
Pasta maker
Machine à pâtes
Nudelmaschine
Pastamachine
Máquina para hacer pasta
Macchina per la pasta
homy90

ENGLISH
Safety attentions
Please follow the rules in case of accidents caused by
false operation.
Attention:
1. Please don’t use your wet hand to take off or insert the
plug in case of electric shock。
2. Don’t put solid thing into the water mouth. Don’t take off
the mould cover and remove the mould, or even touch the
screw in case of accidents.
3. Please don’t put the housing into liquid in case of electric
damage.
Attentions before using
1. Clean the mould before you use the product. Do not put
heavy things above it.
2. Disable people and people lack of operation experience
cannot use the product unless they get company. Keep
children away from the product.
3. This product is only meant for family purpose.
4. Do not disassemble or reforming the product.
5. The product is I kind of electric appliance, make sure the
ground line is well connected.
6. Please check if the power line, plug, measuring cup and
screw is well. If there is damage, please call the service
center. Do not try to fix it by yourself in case of danger.
7. Make sure the disassemble parts are all installed
properly in case of danger.

8. This product is Y type connected, if the power line is
damaged, you must let professional person to take over in
case of danger.
9. This appliance may be used by persons with reduced
physical, sensory or mental capabilities or lack of experience
or knowledge, provided that they are supervised or instructed
in the safe use of the appliance and that they fully understand
the potential hazards.
10. Cleaning and maintenance should not be carried out by
children unless they are at least 8 years of age and are
supervised by an adult.
11. Keep the appliance and its power cord out of reach of
children under 8 years of age.
12. When using electrical equipment, safety precautions
must always be taken to prevent the risk of fire, electric shock
and/or injury in the event of misuse.
13. Make sure that the voltage rating on the typeplate
corresponds to your main voltage of your installation. If this
is not the case, contact the dealer and do not connect the
unit
14. The device must not be used if it has been dropped, it
obvious signs of damage are visible or if it has leaks.
15. Please keep this document at hand and give it to the
future owner in case of transfer of your device
16. Do not operate this appliance if it has a damaged cord or
plug, if it is not working properly or if it has been damaged or
dropped. If the supply cord is damaged, it must be replaced
by the manufacturer or its service agent or a similarly
qualified person in order to avoid a hazard.

17. This device is not intended for use by persons with
reduced capacity on the physical, mental or sensory or lack
of experience and knowledge (including children), unless he
has them was asked to monitor or if they have had
instructions on the use of the appliance by a person
responsible for their safety. Children should be supervised to
ensure they do not play with the device.
18. The device is not intended to be operated by external
timer means or a remote-control system
19. Before cleaning the machine, make sure the machine is
unplugged.
20. The machine is only used for household and indoor.
21. Never immerse the appliance, its power cord or plug in
water or any other liquid
22. The robot should always be unplugged when not in use
and before assembling, disassembling or cleaning, and
before changing an accessory. Avoid contact with moving
parts.
23. Your appliance has been designed for domestic use only.
It is not intended for use in the following situations which are
not covered by the warranty:
- in staff kitchen areas in shops, offices and
other professional environments,
- in farm hostels,
- by guests in hotels, motels and other
residential environments,
- in bed and breakfast type environments.

Attentions during using.
1. Don’t put solid thing into the pasta cup in case the product gets damaged.
2. Don’t put this product near the hot, Strong magnetic, Inflammable and explosive place in case of
accidents.
3. The proportion of flour and water should be accordant to <reference sheet of the amount of pasta
and ingredients> in case of the parts get damaged
4. When you connect the power, make sure that all parts are installed well, and disconnect the power
when there is no one using it.
5. Please operate on flat surface, please don’t operate it on clothing such as carpet, and paper, plastic
as well.
6. When you are discharging, adjusting, cleaning or changing the parts, you must disconnect the
power line.
7. When you disconnect the power, use you hand to hold and pull the plug instead of tearing the
power line out.
8. This product can only be used with specific connector, stirring cup, and other parts. Don’t use the
parts of other products in case of accidents.
9. Wipe out the water before you make pasta so that the taste of pasta won’t be affected.
10. The product cannot work consciously, if you want to constantly make pasta, you should at least
stop the machine for 20 minutes.
11. Place the product on flat surface, don’t let the hold feet off the ground. Don’t touch the product
or moving it in case it may fail to make pasta.
Attentions after using
1. Please wash it in time after washing, the parts that will touch the food should be washed by clean
water. When you are discharging, cleaning parts, you should keep your guard up in case of accidents.
2. Do not heat the product directly, or put all the plastic parts into the disinfection cabinet, washing
machine or hot water above Corrosive liquid 60 degree. And don’t use steel wool and Abrasive cleaner
and Corrosive liquid to wash the product.
3. Please clean the mould after it is dried. Be aware that the clean brush is clean, when there is no
one using it, please turn off the switch. When you want to drop this product, please hand it over to
qualified department. Cut the power line when you want to drop it.

Name and function of parts
1. Lid
2. Control panel
3. Tank
4. Housing
5. Water inlet holes
6. Stir rod
7. Stir cup
8. Squeezing rod
9. Mould bracke
10. Mould cover
11. Pasta mould
12. Storage box
13. Water measuring cup
14. Flour measuring cup
15. Cleaning brush
16. Dough cutter
------ 16

Fine
spaghetti
Normal
spaghetti
Thick
spaghetti
Narrow
ribbon
noodles
Broad
ribbon
noodles
Penne
Lasagna
How to use
Before you use the product, please wash the parts that has directly contact with food.
A
ON/Standby button – to switch the appliance on or off
B
Start/Stop button – to start or stop the appliance
C
Button A – to select one of the 6 automatic programs
D
Button M – to select one of the 6 semiautomatic programs
E
Display
F
KNEADING button – to start dough kneading manually
G
EXTRUSION button – to start dough kneading manually
H
SCALES button – for taring the scales
I
WATER button – for additional water supply

How to use
1) Before first use
Please remove any protective films, advertising and packaging materials from the appliance and from
the accessory parts. Clean the appliances and all removable accessory parts according to the
cleaning instructions in this manual.
2) Install all parts as the picture below
3) Automatic programs
The appliance features 6 automatic programs. Depending on the type of flour and the selection of the
corresponding program, up to 600 g of pasta can be produced fully automatically in one pass. The
table below gives you an overview of the parameters of the individual automatic programs.
You can select the programs by pressing button A for several times.
NOTE : the water supply takes place automatically during the automatic
programs.
Program
Recommended type of
flour
Automatic watering
(ratio of water and
flour)
Recommended
amount of flour
Kneading
time in
minutes
A1
Wheat flour type 00
Ca. 36 ml / 100 g
400 g
(max. 600 g)
04:00
A2
Wheat flour type 00
Ca. 37 ml / 100 g
400 g
(max. 600 g)
04:00

A3
Wheat flour type 405
Durum wheat semolina
Wheat flour/durum wheat
semolina mixed 50:50
Ca. 38 ml / 100 g
400 g
(max. 600 g)
03:30
A4
Italian durum wheat
semolina flour
Ca. 39 ml / 100 g
400 g
(max. 600 g)
04:00
A5
Wholemeal flour
Ca. 36 ml / 100 g
400 g
(max. 600 g)
07:00
A6
Gluten-free
Ca. 58 ml / 100 g
400 g
(max. 600 g)
03:00
TIP : though the refiling hole you can optionally add a little bit olive oil to programs A1-A4
4) Semiautomatic programs
There are two semiautomatic programs to produce up to 600 g of pasta in one pass, from individual
recipes with ingredients of your choice. In contrast to the automatic programs, you have to add the
liquid manually by yourself. The table below gives you and overview of the parameters of both
semiautomatic programs.
You can select the programs by pressing button M for several times.
NOTE: the display shows a suggestion for the required amount of liquid
based on the flour filled in. The liquid has to be poured very slowly and
evenly through the refilling hole.
Program
Recommended
type of flour
Automatic watering
(ratio water and
flour)
Recommended
amount of flour
Kneading time in
minutes
M1
Type 00 or type
550
1 egg yolk (size
M/L) per 200 g
flour
Ca. 37 ml / 100 g
(mix the egg yolk in
the measuring cup,
fill up with water)
400 g
04:00
M2
Type 00 or type
550
1 egg yolk (size
M/L) per 200 g
flour
Ca. 38 ml / 100 g
see program M1
400 g
03:00

5) Filling up the water tank
Remove the water tank and fill it with pure, cold water up to the mark on the upper edge of the tank.
Then push the water tank back into the base untis as far as it will go.
è If the pilot lamp on the water tank lights up in blue, there is enough water in the tank
è If the pilot lamp on the water tank lights up in red, there is not enough water in the tank
6) Switching on the appliance
Press ON/Standby button for about 2 seconds to switch the appliance on.
NOTE: if no further button is pressed within 2 minutes, the appliance switches
back to standby mode.
The integrated scaled determine the total weight of the appliance.
A rotating bar lights up in the display.
NOTE: Do not move the appliance during weighing.
After the check, the appliance turns into operating mode.
è All available programs are shown at the display
è Additionally the display shows a flashing “0”
7) Taring the scales
IMPORTANT: Before you tare the scales to zero position, make sure that:
- The appliance is properly assembled
- The selected pasta form is inserted
- The water tank is filled up completely to the mark
- There is no flour inside of the kneading container yet
Press the SCALES button to tare the scales.
NOTE: if you change the weight of the appliance after taring the scales, a re-taring is necessary.
NOTE: do not move the appliance during weighing!

After taring is completed, the appliance is in operating mode.
è All available programs are shown at the display.
è Additionally the symbol “g” appears.
8) Working with automatic programs
After you have filled in the desired amount of flour and after closing the lid, press
button A to select one of the automatic programs.
You can switch between the programs by pressing this button for several times.
The selected program (e.g. A1) flashes at the display.
To start the selected program press Start/Stop button.

Kneading dough
The automatic program starts with the kneading of the dough.
à The display shows the selected program permanently.
àThe duration of kneading process is shown at the display by a descending
time sequence. Additionally, the and appear.
Automatic water supply
After a short time, the amount of the water determined by the electronics is
automatically pumped into the kneading container via the water outlet.
The display shows symbol
Extruding dough
After the kneading process is finished, the appliance automatically starts
with extrusion of the dough.
è A rotation bar lights up in the display during the extrusion of the dough.
è Additionally, the symbol appears
Ventilation
Shortly after beginning of dough extrusion, the fan starts to work.
è The display shows symbol
Efficient dough yield
The electronics recognizes whether there is still some dough left in the
kneading container and ensures a particularly high dough yield by the
repeating the kneading or extrusion process.
The last 10 seconds of the program are shown at the display in a descending
time sequence.
Automatic stop
After the program has ended, the appliance stops operating automatically.
This is indicated by a 3-time acoustic signal
The display shows ”--:--”
Additionally, the symbol appears
NOTE: if no further button is pressed within 2 minutes, the appliance
switches back to operating mode. If again no further button is pressed within
the next 2 minutes, the appliance switches to standby mode.
Switching off the appliance
Press button ON/Standby, to switch the appliance to standby mode.
The display shows a flashing “b”.
9) Working with semiautomatic programs

NOTE: please carry out steps 1 to 7 first, before you start working with the
semiautomatic programs. Also provide the liquid to be sued in advance.
After you have filled in the desired amount of flour and after closing the lid,
press button M to select one of the programs.
You can switch between the programs by pressing this button for several
times.
The selected program (e.g. M1) flashed at the display.
To start the selected program press Start/Stop button.
Kneading dough
The automatic program starts with kneading of the dough and the
suggested amount of liquid (e.g. 144 ml) is displayed.
The display shows the selected program permanently.
The suggested amount of liquid as well as symbol “ml” lights up.
Additionally, the symbols and appear.
Manual water supply
Pour the suggested amount of liquid slowly and evenly into the kneading
container.
2 minutes before the kneading process has ended, the display changed
and the remaining kneading duration is shown in a descending time
sequence.
Extruding dough
After the kneading process is finished, the appliance automatically starts
with extrusion of the dough.
A rotating bar lights up in the display during extrusion of the dough.
Additionally, the symbol appears.

Ventilation
Shortly after the beginning of dough extrusion, the fan starts to work.
è The display shows symbol
Efficient dough yield
The electronics recognizes whether there is still some dough left in the
kneading container and ensures a particularly high dough yield by the
repeating the kneading or extrusion process.
The last 10 seconds of the program are shown at the display in a descending
time sequence.
Automatic stop
After the program has ended, the appliance stops operating automatically.
This is indicated by a 3-time acoustic signal
The display shows ”--:--”
Additionally, the symbol appears
NOTE: if no further button is pressed within 2 minutes, the appliance
switches back to operating mode. If again no further button is pressed within the next 2 minutes, the
appliance switches to standby mode.
Switching off the appliance
Press button ON/Standby, to switch the appliance to standby mode.
The display shows a flashing “b”.
10) Manual kneading of the dough
You can select the function by pressing the KNEADING button.
NOTE: The process can be stopped at any time. Press the KNEADING
button once again
The appliance starts the kneading process for a duration of max 10 mins.
è The duration of kneading process is shown is a descending time
sequence.
è Additionally, the symbols and appear.

Automatic stop
After the program has ended, the appliance stops operating automatically.
è This is indicated by a 3-time acoustic signal.
è Additionally, symbol appears.
NOTE: if no further button is pressed within 2 minutes, the appliance switches
back to operating mode. If again no further button us pressed within the next 2 minutes, the appliance
switches back to standby mode.
11) Manual extrusion of the dough
You can select the function by pressing the EXTRUSION button.
NOTE: The process can be stopped at any time. Press the EXTRUSION
button once again.
The appliance starts extruding the dough.
è A rotating bar lights up in the display during extrusion of the dough.
è Additionally the symbols and appear.
Ventilation
Shortly after the beginning of dough extrusion, the fan starts to work.
è The display shows symbol
Efficient dough yield
The electronics recognizes whether there is still some dough left in the
kneading container and ensures a particularly high dough yield by the
repeating the kneading or extrusion process.
The last 10 seconds of the program are shown at the display in a descending
time sequence.
Automatic stop
After the program has ended, the appliance stops operating automatically.
è This is indicated by a 3-time acoustic signal.
è Additionally, symbol appears.
NOTE: if no further button is pressed within 2 minutes, the appliance switches back to operating mode.
If again no further button us pressed within the next 2 minutes, the appliance switches back to standby
mode.

12) Additional water supply
You can select the function by pressing the water button.
The pump starts and an additional 5 ml is pumped into the kneading container
for each key press.
è For the duration of the water supply the display shows symbol
NOTE: The additional water supply can be repeated several times up to 30 seconds before the end
of the kneading process. But be careful, if there is too much liquid the dough becomes too sticky and
can only be extruded to a limited extend.
13) Ending the program/function prematurely
To end up a program or function prematurely press Start/Stop or
ON/Standby button
14) Switching off the appliance permanently
For a permanent and safe switch-off, disconnect the power plug after each use.
Tips for good pasta
Pasta making
Please use strong or moderately strong flour.
To ensure good pasta, please use water in right volume according to the value on digital display or
the reference table. In winter, you can increase 5-10mL water. In summer, you can decrease 5-10mL
water.
Adding 3-5g salt inside water can make pasta chewier. Adding 3-5mL oil can make pasta smoother.
Pasta cooking
Please eat pasta in time since fresh pasta have better taste.
Adapt hot-cold method (add cold water when boiling, redo it for a few times) to cook for about 8
minutes(according to width and amount and of pasta to adjust cooking time)

Pasta storage
Use Freshness protection package to keep your pasta
Dough is too dry, we
recommend adding a
little water
Perfect dough
Dough is too moist, we
recommend adding a
little floor
Cleaning and maintenance
①
After finish making pasta, unplug it and disassemble the
parts after using.
②
Disassembled parts(apart from housing) should be
cleaned and dried.
③
1) Dry the moulds or put the moulds into the refrigerator
for half an hour, then hit it heavily so that the flour attached
on the moulds can drop off easily.
2) You can also use the cleaning brush. Soaking the
moulds in water is not suggested, since it may cause the flour
attached on it become sticky and not easy to clean.
④
Keep mould, cleaning brush and measuring cup in dry
places and don’t put it under direct sunshine.
Safety index
Rated voltage
220v
Capacity range
Flour:200-600g
Rated power
180w
Rated frequency
50hz
Electronic scale range
0-5kg
Electronic scale
accuracy
2g
Using environment
Temperature:0-40 degree; wet: ≤90%RH

Trouble shooting
problems
reasons
solutions
the machine doesn’t
work after power on
and press start button
1.power cord not installed
properly
1. install power cord properly
2.self protection for motor long
time working
2. reuse after cooling for 20—
30 minutes
3. stir cup, stir cup lid not properly
installed
3. stir cup, stir cup lid properly
installed
lights on, the
machine doesn’t work
1.not pressing buttons
1. select function and press
button
2.machine self breakdowns
2.repair at local service site
machine stops during
working process
1.material ratio not right, overload
making stuck and stops working
follow strictly as “volume ratio ”
to add material, add water if
too dry, stir to pasta,
select[extrude pasta]; if too wet
add flour to stir, select[extrude
pasta].
2.other objects in the flour,
overload making stuck and
machine stops
2. power off to clean
3.motor temperature control
protection
3.reuse after 20-30 minutes
stop
no response when
pressing buttons
1. power off interval too short,
system not reset
1. reuse after power off 3
minutes
2.the machine is under procedure
2.normal case
3. machine self breakdowns
2. repair at local service site
pasta easily break
1. not using plain, strong protein
flour
1. choosing plain or strong
protein flour
2. water and flour ratio not
proper, less water
2.add flour and water as cup
mark
pasta adhere
water and flour ratio not proper,
more water
add water, flour as cup mark
flour leftovers too
much in the stir cup
1.low voltage
1.using household voltage
stabilizer
2.module hole blocked
2.clean module holes
3.material matching mistake
3. follow strictly “ratio chart” to
add material
Sound and light
alarm
the machine blocked
1.check and clean cups

2. follow strictly “ratio chart” to
add material;add less
water,select【knead
dough】,stir 2 minutes and
select 【knead dough】to
rework
Error code list
Error code
Reason
Trouble shooting
E02
The cover hasn’t been
closed and function has
not been motivated
Close the cover and select
function key
E05
Temperature sensor open
After sale service
E06
Temperature sensor short
circuit
After sale service
E09
Too little water or residue
remained in the cup
Adjusting water amount and get
residue out.
E14
Too much flour
Add 200-600g flour
E15
Residue in the stirring cup
Get residue out.
E17
Weighting sensor broken
After sale service
Note:if the problem above cannot be solved, please do not dissemble products personally, send it
to local after service center.
ENVIRONMENT
CAUTION :
Do not dispose of this product as it has with other household products. There is a
separation of this waste product into communities, you will need to inform your local
authorities about the places where you can return this product. In fact, electrical and
electronic products contain hazardous substances that have harmful effects on the
environment or human health and should be recycled. The symbol here indicates that
electrical and electronic equipment should be chosen carefully, a wheeled waste container is marked
with a cross.
Adeva SAS / H.Koenig Europe - 8 rue Marc Seguin, 77290 Mitry-Mory, France
www.hkoenig.com - https://en.hkoenig.com - Tél: +33 1 64 67 00 05

FRANÇAIS
Avertissements de sécurité
Veuillez suivre les règles en cas d’accident causé par
une mauvaise utilisation.
Attention :
1. Veuillez ne pas utiliser vos mains mouillées pour
brancher ou débrancher la prise afin d’éviter une décharge
électrique.
2. Ne mettez pas de chose solide dans le réservoir d’eau.
3. N’enlevez pas le couvercle du moule, ni le moule, et ne
touchez pas la vis afin d’éviter un accident.
4. Veuillez ne pas plonger le bloc-moteur dans un liquide
afin d’éviter des dommages électriques.
Précautions avant utilisation
1. Nettoyez le moule avant d’utiliser le produit. Ne mettez
pas de choses lourdes dessus.
2. Les personnes handicapées et celles sans expérience
ne peuvent pas utiliser la machine à moins d’être surveillées.
Gardez ce produit hors de portée des enfants !
3. Cette machine est uniquement destinée à un usage
familial.
4. Ne démontez pas la machine et ne la modifiez pas.
5. Le produit est un appareil électrique, assurez-vous que
le cordon d’alimentation soit correctement branché.
6. Veuillez vérifier si le cordon d’alimentation, la prise, la
tasse à mesurer et la vis sont en bon état. S’il y a des
dommages, veuillez appeler le service technique. N’essayez
pas de réparer vous-même pour éviter tout accident.

7. Assurez-vous que toutes les pièces soient correctement
montées.
8. Ce produit est de type Y, si le cordon d’alimentation est
endommagé, vous devez laisser un professionnel le réparer
ou le changer.
9. Cet appareil peut être utilisé par des personnes dont les
capacités physiques, sensorielles ou mentales sont réduites
ou dont l’expérience ou les connaissances ne sont pas
suffisantes, à condition qu’elles bénéficient d’une
surveillance ou qu’elles aient reçu des instructions quant à
l’utilisation de l’appareil en toute sécurité et qu’elles en
comprennent bien les dangers potentiels.
10. Le nettoyage et l’entretien ne doivent pas être effectués
par des enfants, sauf s’ils ont au moins 8 ans et sont
surveillés par un adulte.
11. Gardez l’appareil et son cordon d’alimentation hors de
portée des enfants de moins de 8 ans.
12. Lors de l’utilisation d’appareils électriques, des
précautions doivent toujours être prises pour éviter tout
risque d’incendie, d’électrocution ou de blessure en cas de
mauvaise utilisation.
13. Assurez-vous que la tension nominale indiquée sur la
plaque signalétique corresponde à la tension principale de
votre installation. Si ce n’est pas le cas, contactez le
revendeur et ne branchez pas l’appareil.
14. L’appareil ne doit pas être utilisé s’il est tombé, s’il
présente des signes évidents de dommages ou des fuites.
15. Veuillez conserver ce mode d’emploi en lieu sûr et le
remettre au futur propriétaire en cas de transfert de votre
appareil.

16. N'utilisez pas cet appareil si son cordon ou sa fiche est
endommagée, s'il ne fonctionne pas correctement, s'il a été
abîmé ou est tombé par terre. Si le cordon d'alimentation est
endommagé, il doit être remplacé par le fabricant, son
réparateur ou une personne de même qualification afin
d'éviter tout accident.
17. Cet appareil n’est pas destiné à être utilisé par des
personnes à capacité réduite sur le plan physique, mental ou
sensoriel, ou manquant d’expérience et de connaissances (y
compris les enfants), sauf si elles ont reçu des instructions
sur l’utilisation de l’appareil par une personne responsable
de leur sécurité. Les enfants doivent être surveillés pour
s’assurer qu’ils ne jouent pas avec l’appareil.
18. L’appareil n’est pas conçu pour être utilisé à l’aide d’une
minuterie externe ou d’un système de télécommande
19. Avant de nettoyer l’appareil, assurez-vous qu’il soit
débranché.
20. L’appareil est uniquement destiné à un usage
domestique et en intérieur.
21. Ne plongez jamais l’appareil, son cordon d’alimentation
ou sa fiche dans l’eau ou tout autre liquide
22. L’appareil doit toujours être débranché lorsqu’il n’est pas
utilisé, avant le montage, le démontage ou le nettoyage, et
avant de changer un accessoire. Évitez tout contact avec les
pièces en mouvement.
23. Votre appareil a été conçu pour un usage domestique
seulement. Elle n’a pas été conçue pour être utilisée dans
les cas suivants qui ne sont pas couverts par la garantie :
– dans des coins de cuisines réservés au
personnel dans des magasins, bureaux et
autres environnements professionnels,

– dans des fermes auberges,
– par les clients des hôtels, motels et autres
environnements à caractère résidentiel,
– dans des environnements de type chambres
d’hôtes.
Précautions lors de l’utilisation
1. Ne mettez pas d’objet solide dans le bol pour ne pas abîmer l’appareil.
2. Ne placez pas ce produit à proximité d’un endroit chaud, magnétique, inflammable ou explosif pour
éviter un accident.
3. La proportion de farine et d’eau doit être conforme à la Fiche de référence de la quantité de pâte
et d’ingrédients pour ne pas endommager les pièces de l’appareil.
4. Lorsque vous branchez l’appareil, assurez-vous que toutes les pièces soient bien montées et
débranchez-le lorsque personne ne l’utilise.
5. Veuillez l’utiliser sur une surface plane, non recouverte d’une nappe, de papier ou de plastique.
6. Lorsque vous montez/démontez, nettoyez ou changez les pièces, vous devez débrancher
l’appareil.
7. Lorsque vous débranchez l’appareil, saisissez la fiche et non le cordon.
8. Ce produit ne peut être utilisé qu’avec un cordon d’alimentation, un agitateur et des accessoires
recommandés par le fabricant. N’utilisez pas d’autres pièces pour éviter tout accident.
9. Essuyez l’eau avant de faire la pâte afin que son goût ne soit pas affecté.
10. Le produit ne peut pas fonctionner constamment. Vous devez au moins faire des pauses de 20
minutes.
11. Ne déplacez pas la machine en cours de fonctionnement.
Précautions après utilisation
1. Veuillez nettoyer l’appareil après chaque utilisation. Les pièces en contact avec les aliments
doivent être lavées à l’eau propre. Lorsque vous démontez et nettoyez les pièces, soyez attentif à ne
pas vous blesser.
2. Ne chauffez pas le produit directement, ne placez pas les pièces en plastique dans l’armoire de
désinfection, la machine à laver ou de l’eau chaude à 60 °C. N’utilisez pas d’éponge métallique, de
nettoyant abrasif ou de liquide corrosif pour laver le produit.
3. Lorsque vous souhaitez vous débarrasser de l’appareil, veuillez respecter les normes
environnementales locales.

Description
1. Couvercle
2. Panneau de commande
3. Réservoir
4. Bloc-moteur
5. Trous d’arrivée d’eau
6. Mélangeur
7. Bol de pétrissage
8. Vis d’extrusion
9. Support du moule
10. Couvercle du moule
11. Moule à pâtes
12. Récipient
13. Tasse à mesurer l’eau
14. Tasse à mesurer la farine
15. Brosse de nettoyage
16. Coupe-pâtes
------ 16

Fonctionnement
Avant d’utiliser le produit, veuillez laver les pièces qui sont directement en contact avec les aliments.
A
ON/Standby – pour allumer/mettre en veille l’appareil
B
Start/Stop – pour démarrer ou arrêter l’appareil
C
A – pour choisir un programme automatique
D
M – pour choisir un programme semi-automatique
E
Affichage
F
Pétrissage – pour débuter le pétrissage manuel
G
Fabrication – pour débuter la fabrication manuelle
H
Balance – pour tarer la balance
I
Eau – pour ajouter de l’eau
Spaghettis
fines
Spaghettis
normales
Spaghettis
épaisses
Nouilles
fines
Nouilles
épaisses
Penne
Lasagnes

1 . Utilisation
1) Avant la première utilisation
Veuillez retirer les films de protection, les étiquettes et les matériaux d'emballage de l'appareil et des
accessoires. Nettoyez l'appareil et toutes les pièces accessoires amovibles conformément aux
instructions de nettoyage du mode d'emploi.
2) Montez toutes les pièces comme indiqué ci-dessous :
3) Programmes automatiques
L'appareil dispose de 6 programmes automatiques. En fonction du type de farine et de la sélection
du programme correspondant, il est possible de produire jusqu'à 600 g de pâtes de manière
entièrement automatique en une seule fois. Le tableau ci-dessous vous donne un aperçu des
paramètres des différents programmes automatiques.
Vous pouvez sélectionner les programmes en appuyant sur le bouton A
plusieurs fois.
REMARQUE : l’ajout d’eau se fait automatiquement durant les programmes.
Programme
Type de farine
recommandé
Ajout d’eau
(rapport d’eau et
de farine)
Quantité de
farine
recommandée
Temps de
pétrissage en
minutes
A1
Farine de blé type 00
Ca. 36 ml / 100 g
400 g
(max. 600 g)
04:00
A2
Farine de blé type 00
Ca. 37 ml / 100 g
400 g
(max. 600 g)
04:00

A3
Farine de blé type 405
Farine de semoule de
blé dur
Farine de blé / Farine de
semoule de blé dur
mélangées à 50:50
Ca. 38 ml/100 g
400 g
(max. 600 g)
03:30
A4
Farine de semoule de
blé dur italienne
Ca. 39 ml / 100 g
400 g
(max. 600 g)
04:00
A5
Farine complète
Ca. 36 ml / 100 g
400 g
(max. 600 g)
07:00
A6
Sans gluten
Ca. 58 ml / 100 g
400 g
(max. 600 g)
03:00
CONSEIL : par l’ouverture de remplissage vous pouvez éventuellement ajouter un peu d'huile d'olive
aux programmes A1-A4
4) Programmes semi-automatiques
Il existe deux programmes semi-automatiques pour fabriquer jusqu'à 600 g de pâtes en une seule
fois, à partir de recettes individuelles avec les ingrédients de votre choix. Contrairement aux
programmes automatiques, vous devez ajouter de l'eau manuellement. Le tableau ci-dessous vous
donne un aperçu des paramètres des deux programmes semi-automatiques.
Vous pouvez sélectionner les programmes en appuyant plusieurs fois sur
le bouton M.
REMARQUE : l'écran affiche une suggestion pour la quantité d'eau
requise en fonction de celle de farine. L'eau doit être versée très lentement
et régulièrement par l'orifice de remplissage.
Programme
Type de farine
recommandé
Ajout d’eau
(rapport d’eau et
de farine)
Quantité de
farine
recommandée
Temps de
petrissage en
minutes
M1
Type 00 ou type
550
1 jaune d’oeuf
(grosseur M/L)
pour 200 g de
farine
Ca. 37 ml / 100 g
(mélanger le jaune
d'œuf dans le
gobelet doseur,
remplir d'eau)
400 g
04:00
M2
Type 00 ou type
550
1 jaune d’oeuf
(grosseur M/L)
pour 200 g de
farine
Ca. 38 ml / 100 g
voir programme
M1
400 g
03:00

5) Remplissage du réservoir d'eau
Retirez le réservoir d'eau et remplissez-le d'eau pure et froide jusqu'au repère situé sur le bord
supérieur du réservoir.
Ensuite, remettez le réservoir dans le socle jusqu'à la butée.
è Si le témoin lumineux du réservoir s'allume en bleu, il y a suffisamment d'eau.
è Si le témoin lumineux du réservoir s'allume en rouge, il n'y a pas assez d'eau.
6) Allumage de l’appareil
Appuyez sur le bouton ON/Standby pendant environ 2 secondes pour mettre
l'appareil en marche.
REMARQUE : si vous n'appuyez sur aucune autre touche dans les 2 minutes,
l'appareil repasse en mode veille.
La balance intégrée détermine le poids total de l'appareil.
Une barre rotative s'allume à l'écran.
REMARQUE : ne déplacez pas l'appareil pendant la pesée.
Après le contrôle, l'appareil passe en mode de fonctionnement.
è Tous les programmes disponibles sont affichés sur l'écran
è De plus, un "0" clignote sur l'écran
7) Tarage de la balance
IMPORTANT : avant de tarer la balance à la position zéro, assurez-vous que :
- L'appareil soit correctement monté
- Le coupe-pâtes sélectionné soit inséré
- Le réservoir d'eau soit entièrement rempli jusqu'au repère.
- Il n'y a pas encore de farine dans le bol de pétrissage.
Appuyez sur le bouton correspondant pour tarer la balance.

REMARQUE : si vous modifiez le poids de l'appareil après le tarage de la balance, un nouveau tarage
est nécessaire.
REMARQUE : ne pas déplacer l'appareil pendant la pesée
Une fois le tarage terminé, l'appareil est en mode de fonctionnement.
è Tous les programmes disponibles sont affichés à l'écran.
è En outre, le symbole "g" apparaît.
8) Fonctionnement des programmes automatiques
Après avoir rempli la quantité de farine souhaitée et après avoir fermé le couvercle,
appuyez sur le bouton A pour sélectionner l'un des programmes automatiques.
Vous pouvez passer d'un programme à l'autre en appuyant plusieurs fois sur ce
bouton.
Le programme sélectionné (A1) clignote sur l’écran.
Pour lancer le programme, appuyez sur le bouton Start/Stop.

Pétrissage de la pâte
Le programme automatique commence par le pétrissage de la pâte.
à L'écran affiche en permanence le programme sélectionné.
àLe compte à rebours du processus de pétrissage est indiqué à l'écran. De
plus, les symboles et apparaissent.
Ajout d’eau automatique
Après un court instant, la quantité d'eau déterminée par l’appareil est
automatiquement versée dans le bol de pétrissage par la sortie d'eau.
L’écran affiche le symbole
Fabrication des pâtes
Une fois le processus de pétrissage terminé, l'appareil démarre
automatiquement la fabrication des pâtes.
è De plus, le symbole apparaît.
Ventilation
Juste après le début de la fabrication des pâtes, le ventilateur se met en
marche.
è L’écran affiche le symbole
Rendement élevé de pâtes
L’appareil reconnaît s'il reste encore de la pâte dans le bol de pétrissage et
assure un rendement particulièrement élevé de la pâte en répétant le
processus de pétrissage ou de fabrication.
Les 10 dernières secondes du compte à rebours du programme sont
affichées à l'écran.
Arrêt automatique
Une fois le programme terminé, l'appareil s'arrête automatiquement.
Ceci est indiqué par 3 bips.
L’écran affiche ”--:--”
De plus, le symbole apparaît.
REMARQUE : si vous n'appuyez sur aucun autre bouton dans les 2 minutes
qui suivent, l'appareil repasse en mode de fonctionnement. Si vous
n'appuyez à nouveau sur aucune touche dans les 2 minutes qui suivent,
l'appareil passe en mode veille.
Mise en veille de l’appareil
Appuyez sur ON/Standby pour passer en mode veille.
Le symbole “b” clignote sur l’écran.

9) Fonctionnement des programmes semi-automatiques
REMARQUE : veuillez d'abord effectuer les étapes 1 à 7, avant de
commencer à travailler avec les programmes semi-automatiques. Prévoyez
de remplir le réservoir d'eau à l'avance.
Après avoir mis la quantité de farine souhaitée et après avoir fermé le
couvercle, appuyez sur la touche M pour sélectionner l'un des programmes.
Vous pouvez passer d'un programme à l'autre en appuyant plusieurs fois
sur ce bouton.
Le programme sélectionné (M1) clignote sur l’écran.
Pour lancer le programme, appuyez sur le bouton Start/Stop.
Pétrissage de la pâte
Le programme automatique commence par le pétrissage de la pâte et la
quantité d'eau suggérée (par exemple 144 ml) s'affiche.
L'écran affiche en permanence le programme sélectionné.
La quantité d'eau suggérée ainsi que le symbole "ml" s'allument.
De plus, les symboles et apparaissent.
Ajout d’eau manuel
Verser lentement et uniformément la quantité d'eau suggérée dans le bol de
pétrissage.
2 minutes avant la fin du processus de pétrissage, l'affichage change et le
compte à rebours s'affiche.
Fabrication des pâtes
Une fois le processus de pétrissage terminé, l'appareil démarre
automatiquement la fabrication des pâtes.
Une barre rotative s'allume dans l'écran pendant la fabrication des pâtes.
De plus, le symbole apparaît.

Ventilation
Juste après le début de la fabrication des pâtes, le ventilateur se met en
marche.
è L’écran affiche le symbole
Rendement élevé de pâtes
L’appareil reconnaît s'il reste encore de la pâte dans le bol de pétrissage et
assure un rendement particulièrement élevé de la pâte en répétant le
processus de pétrissage ou de fabrication.
Les 10 dernières secondes du compte à rebours du programme sont
affichées à l'écran.
Arrêt automatique
Une fois le programme terminé, l'appareil s'arrête automatiquement.
Ceci est indiqué par 3 bips.
L’écran affiche ”--:--”
De plus, le symbole apparaît.
REMARQUE : si vous n'appuyez sur aucun autre bouton dans les 2 minutes qui suivent, l'appareil
repasse en mode de fonctionnement. Si vous n'appuyez à nouveau sur aucune touche dans les 2
minutes qui suivent, l'appareil passe en mode veille.
Mise en veille de l’appareil
Appuyez sur ON/Standby pour passer en mode veille.
Le symbole “b” clignote sur l’écran.
10) Pétrissage manuel de la pâte
Vous pouvez sélectionner la fonction en appuyant sur le bouton
correspondant.
REMARQUE : le processus peut être arrêté à tout moment. Pour cela,
appuyez une nouvelle fois sur le bouton.
L'appareil démarre le processus de pétrissage pour une durée maximale de
10 minutes.
è La durée du processus de pétrissage est indiquée sous forme de
compte à rebours.
è De plus, les symboles et apparaissent.

Arrêt automatique
Une fois le programme terminé, l'appareil s'arrête automatiquement.
è Ceci est indiqué par 3 bips.
è De plus, le symbole apparaît.
REMARQUE : si vous n'appuyez sur aucun autre bouton dans les 2 minutes
qui suivent, l'appareil repasse en mode de fonctionnement. Si vous n'appuyez à nouveau sur aucune
touche dans les 2 minutes qui suivent, l'appareil passe en mode veille.
11) Fabrication manuelle des pâtes
Vous pouvez sélectionner la fonction en appuyant sur le bouton
correspondant.
REMARQUE : le processus peut être arrêté à tout moment. Pour cela,
appuyez une nouvelle fois sur le bouton.
L'appareil commence à fabriquer les pâtes.
è Une barre rotative s'allume sur l'écran pendant l'opération.
è De plus, les symboles et apparaissent.
Ventilation
Juste après le début de la fabrication des pâtes, le ventilateur se met en
marche.
è L’écran affiche le symbole
Rendement élevé de pâtes
L’appareil reconnaît s'il reste encore de la pâte dans le bol de pétrissage et
assure un rendement particulièrement élevé de la pâte en répétant le
processus de pétrissage ou de fabrication.
Les 10 dernières secondes du compte à rebours du programme sont
affichées à l'écran.
Arrêt automatique
Une fois le programme terminé, l'appareil s'arrête automatiquement.
è Ceci est indiqué par 3 bips.
è De plus, le symbole apparaît.
REMARQUE : si vous n'appuyez sur aucun autre bouton dans les 2 minutes qui suivent, l'appareil
repasse en mode de fonctionnement. Si vous n'appuyez à nouveau sur aucune touche dans les 2
minutes qui suivent, l'appareil passe en mode veille.

12) Ajout d’eau supplémentaire
Vous pouvez sélectionner la fonction en appuyant sur la touche
correspondante.
La pompe se met en marche et 5 ml supplémentaires sont versés dans le bol
de pétrissage pour chaque pression sur la touche.
è Pendant la durée de l'alimentation en eau, l'écran affiche
REMARQUE : l'apport d'eau supplémentaire peut être répété plusieurs fois jusqu'à 30 secondes
avant la fin du processus de pétrissage. Mais attention, s'il y a trop de liquide, la pâte devient trop
collante et gêne la fabrication des pâtes.
13) Arrêt manuel des programmes
Pour arrêter un programme prématurément, appuyez sur Start/Stop ou
ON/Standby.
14) Débranchement de l’appareil
Pour débrancher l’appareil totalement, retirez la fiche de la prise murale.
Conseils pour de bonnes pâtes
Fabrication de la pâte
Veuillez utiliser une farine de blé tendre ou dur.
Pour avoir de bonnes pâtes, veuillez mettre le volume l’eau indiqué par l’affichage ou le tableau de
référence. En hiver, vous pouvez augmenter de 5 à 10 ml d’eau. En été, vous pouvez diminuer de 5
à 10 ml d’eau.
L’ajout de 3 à 5 g de sel dans l’eau peut rendre les pâtes plus moelleuses. L’ajout de 3 à 5 ml d’huile
peut rendre les pâtes plus lisses.
Cuisson des pâtes
Veuillez manger les pâtes aussitôt, car les pâtes fraîches ont meilleur goût.
Adapter la méthode chaud-froid (ajouter de l’eau froide à l’ébullition, puis refaire plusieurs fois) pour
cuire environ 8 minutes (selon la largeur et la quantité et des pâtes pour ajuster le temps de cuisson)

Conservation des pâtes
Utilisez le sac fraîcheur pour garder vos pâtes
La pâte est trop sèche,
nous vous
recommandons
d’ajouter un peu d’eau.
Pâte parfaite
La pâte est trop humide,
nous vous
recommandons
d’ajouter un peu de
farine.
Nettoyage et entretien
①
Après avoir fini de faire les pâtes , débranchez la machine
et démontez les pièces.
②
Les pièces (à l’exception du bloc-moteur) doivent être
nettoyées et séchées.
③
1) Séchez le moule ou mettez-le au réfrigérateur pendant
une demi-heure, puis frappez-le fortement pour retirer la
farine.
2) Vous pouvez également utiliser la brosse de
nettoyage. Plonger le moule dans l’eau n’est pas
recommandé, car cela peut rendre la farine collante et le
moule difficile à nettoyer.
④
Gardez le moule, la brosse de nettoyage et la tasse à
mesurer dans un endroit sec et à l’abri du soleil direct.

Caractéristiques
Tension
nominale
220 V
Capacité
Farine : 200 - 600
g
Puissance
180 W
Fréquence
50 Hz
Poids
0 - 5 kg
Précision
+ ou - 2 g
Environnement
Température : 0 - 40 °C – HR ≤90%
Guide de dépannage
PROBLÈMES
CAUSES
SOLUTIONS
la machine ne
fonctionne pas
1. cordon d’alimentation mal branché
1. brancher correctement le cordon
d’alimentation
2.coupure de sécurité du moteur
2. attendre 20 à 30 minutes
3. bol ou couvercle mal installé
3. installer correctement le bol et
son couvercle
la machine ne
fonctionne pas et les
témoins sont allumés
1. vous n’avez pas appuyé sur les
boutons
1. sélectionner la fonction et
appuyer sur le bouton
2. la machine est en panne
2. voir le service technique
la machine s’arrête
en cours de
fonctionnement
1. la quantité d’ingrédients est trop
grande et bloque la machine
suivre strictement les quantités
d’ingrédients recommandées :
ajouter de l’eau si la pâte est trop
sèche, pétrir la pâte, sélectionner
extrude pasta ; si trop humide,
ajouter de la farine, pétrir,
sélectionner extrude pasta
2. présence d’objets dans la farine, qui
bloque la machine
2. éteindre pour nettoyer
3. coupure de sécurité du moteur
3. attendre 20 à 30 minutes
aucune réponse en
appuyant sur les
boutons
1. intervalle de mise hors tension trop
court, système non réinitialisé
1. attendre 3 minutes avant
d’allumer
2. la machine est en cours de
procédure
2.cas normal
3. panne de la machine
2. voir le service technique
les pâtes se cassent
facilement
1. vous n’utilisez pas une farine de blé
tendre ou dur
1. utiliser une farine de blé tendre
ou dur
2. le rapport eau et farine n’est pas
correct, mettre moins d’eau
2. ajouter la farine et l’eau avec la
tasse à mesurer

les pâtes collent
le rapport eau et farine n’est pas
correct, mettre plus d’eau
ajouter la farine et l’eau avec la
tasse à mesurer
trop de restes de
farine dans le bol à
pétrin
1. tension trop basse
1. utiliser un stabilisateur de
tension domestique
2. trou du module bloqué
2. nettoyer les trous du module
3. proportions d’ingrédient incorrectes
3. suivre strictement le « tableau
des proportions » des ingrédients
alarme sonore et
visuelle
la machine est bloquée
1. vérifier et nettoyer le bol
2. suivre strictement le « tableau
des proportions » des ingrédients,
ajouter moins d’eau, sélectionner
knead dough, remuer 2 minutes et
sélectionner knead dough pour la
retravailler
Liste des codes d'erreur
Code d’erreur
Cause
Solution
E02
Le couvercle n’a pas été
fermé et la fonction n’a pas
été activée
Fermer le couvercle et appuyer
sur la touche correspondante
E05
Le capteur de température
est ouvert
Voir le service technique
E06
Court-circuit du capteur de
température
Voir le service technique
E09
Trop peu d’eau ou de
résidus sont restés dans le
bol
Ajouter de l’eau et éliminer les
résidus
E14
Trop de farine
Ajouter 200 – 600 g de farine
E15
Présence de résidus dans
le bol
Éliminer les résidus
E17
Le capteur de poids est
cassé
Voir le service technique
Remarque : si le problème ne peut pas être résolu, n’essayer pas de réparer la machine par vous-
même et apportez-la au service technique

ENVIRONNEMENT
ATTENTION :
Vous ne devez pas vous débarrasser de cet appareil avec vos déchets ménagers. Un
système de collecte sélective pour ce type de produit est mis en place par les communes,
vous devez vous renseigner auprès de votre mairie afin d'en connaître les emplacements.
En effet, les produits électriques et électroniques peuvent contenir des substances
dangereuses qui ont des effets néfastes sur l'environnement ou la santé humaine et
doivent être recyclés. Le symbole ci-contre indique que les équipements électriques et électroniques
font l'objet d'une collecte sélective, il représente une poubelle sur roues barrée d'une croix.
Adeva SAS / H.Koenig Europe - 8 rue Marc Seguin, 77290 Mitry-Mory, France
www.hkoenig.com - https://sav.hkoenig.com - Tél: +33 1 64 67 00 05

DEUTSCH
Sicherheitsanweisungen
Bitte folgen Sie den folgenden Anweisungen, um
Unfälle durch eine unsachgemäße Nutzung zu
vermeiden.
Achtung:
1. Entnehmen Sie den Stecker nicht und setzen Sie diesen
nicht ein, wenn Ihre Hände nass sind, um einen
Stromschlag zu vermeiden.
2. Setzen Sie keine festen Gegenstände in den
Wasserauslauf ein. Nehmen Sie weder die Formabdeckung
noch die Form selbst ab, fassen Sie sogar die Schraube
nicht an, um Unfälle zu vermeiden.
3. Legen Sie das Gehäuse nicht in Flüssigkeiten, um
elektrischen Beschädigungen vorzubeugen.
Anweisungen vor der Nutzung
1. Reinigen Sie die Einzelteile, bevor Sie das Gerät
benutzen. Legen Sie keine schweren Gegenstände darauf.
2. Das Gerät darf nicht durch behinderte Menschen und
Personen ohne Operationserfahrung bedient werden, es sei
denn sie werden beaufsichtigt. Halten Sie Kinder fern von
diesem Gerät.
3. Dieses Gerät ist ausschließlich für die
Haushaltsnutzung geeignet.
4. Bauen Sie das Produkt nicht aus und verformen Sie
dieses nicht.

5. Dieses Produkt ist ein elektrisches Gerät der Klasse I,
vergewissern Sie sich, dass die Masseleitung gut
angeschlossen ist.
6. Überprüfen Sie bitte, dass das Stromkabel, der Stecker,
der Messbecher und die Schraube in einem guten Zustand
sind. Wenn diese beschädigt sind, rufen Sie eine
Dienststelle an. Versuchen Sie nicht, den Mangel
selbständig zu beheben, um Gefahren vorzubeugen.
7. Vergewissern Sie sich, dass die ausgebauten Teile
richtig installiert sind, um Gefahren zu vermeiden.
8. Dieses Produkt verfügt über einen Y-Typ Anschluss,
wenn das Stromkabel beschädigt ist, muss eine Fachkraft
die Reparatur übernehmen, um Gefahren zu vermeiden.
9. Dieses Gerät kann von Personen mit eingeschränkten
körperlichen, sensorischen oder geistigen Fähigkeiten oder
mangelnder Erfahrung und Kenntnis benutzt werden,
vorausgesetzt, dass sie beaufsichtigt oder in der sicheren
Benutzung des Gerätes unterwiesen werden und die
möglichen Gefahren vollständig verstehen.
10. Die Reinigung und Wartung dürfen nicht von Kindern
durchgeführt werden, es sei denn sie sind über 8 Jahre alt
und werden von einem Erwachsenen beaufsichtigt.
11. Halten Sie das Gerät und dessen Kabel außer
Reichweite von Kindern unter 8 Jahren.
12. Während der Nutzung von elektrischen Geräten
müssen Sicherheitsanweisungen immer beachtet werden,
um dem Risiko eines Brandes, eines Stromschlages
und/oder einer Verletzung im Falle eines Missbrauchs
vorzubeugen.
13. Vergewissern Sie sich, dass die auf dem Typenschild
angegebene Spannung mit der Hauptspannung Ihrer

Einrichtung übereinstimmt. Wenn dies nicht der Fall ist,
kontaktieren Sie den Händler und schließen Sie das Gerät
nicht an.
14. Das Gerät darf nicht benutzt werden, wenn es fallen
gelassen wurde, wenn es sichtbare Anzeichen einer
Beschädigung aufweist oder eine Leckage hat.
15. Halten Sie bitte dieses Dokument griffbereit und geben
Sie dieses an den künftigen Besitzer im Falle der Übergabe
des Gerätes weiter.
16. Das Gerät darf nicht benutzt werden, wenn das Kabel
oder der Stecker beschädigt sind, wenn es nicht richtig
funktioniert, wenn es beschädigt oder fallen gelassen wurde.
Wenn das Stromkabel beschädigt ist, muss es von dem
Hersteller, seinem Dienstleister oder einer ähnlich
qualifizierten Person ersetzt werden, um Gefahren zu
vermeiden.
17. Dieses Gerät ist nicht dafür geeignet, von Personen mit
eingeschränkten physischen, sensorischen oder geistigen
Fähigkeiten oder mangels Erfahrung und Wissen
(einschließlich Kindern) benutzt zu werden, es sei denn sie
werden beaufsichtigt oder erhielten Anweisungen, von der
für ihre Sicherheit zuständigen Person, wie das Gerät sicher
zu benutzen ist. Kinder müssen beaufsichtigt werden, um
sicherzustellen, dass sie mit dem Gerät nicht spielen.
18. Dieses Gerät ist nicht dafür geeignet, mithilfe einer
externen Schaltuhr oder eines Fernbedienungssystems
bedient zu werden.
19. Vor der Reinigung des Gerätes vergewissern Sie sich,
dass die Maschine vom Netz getrennt ist.
20. Die Maschine darf nur im Haushalt und in Innenräumen
benutzt werden.

21. Tauchen Sie das Gerät, das Stromkabel oder den
Stecker niemals in Wasser oder andere Flüssigkeiten.
22. Das Gerät muss immer beim Nichtgebrauch, vor
Montage, Demontage oder Reinigung, oder vor einem
Zubehöraustausch von der Stromversorgung getrennt
werden. Vermeiden Sie den Kontakt mit beweglichen Teilen.
23. Ihr Gerät ist nur für den Hausgebrauch bestimmt. Es ist
nicht für die Verwendung in den folgenden Situationen
vorgesehen, die nicht von der Garantie abgedeckt sind:
- in Personalküchen in Geschäften, Büros und
anderen professionellen Umgebungen,
- in Landgasthöfen,
- von Gästen in Hotels, Motels und anderen
Wohnumgebungen,
- in Bed-and-Breakfast-Umgebungen.
Anweisungen während der Nutzung.
1. Legen Sie keine festen Gegenstände in die Pasta-Form, das Gerät kann in diesem Fall
beschädigt werden.
2. Platzieren Sie dieses Produkt nicht in der Nähe von heißen, entflammbaren und explosiven
Stellen und in der Nähe von Stellen mit einem starken Magnetfeld, um Unfällen vorzubeugen.
3. Das Verhältnis von Mehl und Wasser muss der Referenztabelle zu der Menge von Pasta und
Zutaten entsprechen, um Beschädigungen der Komponenten zu vermeiden.
4. Wenn Sie das Gerät an die Stromversorgung anschließen, vergewissern Sie sich, dass alle Teile
richtig installiert sind. Trennen Sie das Gerät beim Nichtgebrauch vom Netz.
5. Bedienen Sie das Gerät bitte auf einer flachen Ebene, bedienen Sie es nicht auf Stoffen wie z.B.
Teppichen, oder auf Papier und Plastik.
6. Wenn Sie das Gerät auseinandernehmen, anpassen, reinigen oder die Teile austauschen, muss
es immer von der Stromversorgung getrennt werden.
7. Wenn Sie den Stecker ziehen, halten Sie den Stecker mit Ihrer Hand und ziehen Sie daran,
anstatt am Stromkabel zu ziehen.
8. Das Gerät darf ausschließlich mit geeignetem Stecker, Rührbecher, und anderen Teilen benutzt
werden. Benutzen Sie keine Teile von anderen Produkten, um Gefahren zu vermeiden.
9. Wischen Sie vor der Zubereitung von Pasta Wasser ab, so dass der Geschmack von Pasta nicht
beeinflusst wird.
10. Das Gerät kann nicht kontinuierlich arbeiten; wenn Sie Pasta andauernd zubereiten möchten,

sollten Sie die Maschine für mindestens 20 Minuten stoppen.
11. Platzieren Sie das Gerät auf einer flachen Ebene, lassen Sie die Füße des Gerätes nicht
abheben. Fassen Sie das Gerät nicht an und verstellen Sie dieses nicht, sonst kann der Pasta-
Zubereitungsvorgang gestört werden.

Anweisungen nach der Nutzung.
1. Bitte reinigen Sie das Gerät gleich nach der Nutzung. Die Teile, die in Kontakt mit Lebensmitteln
kommen, müssen mit sauberem Wasser gereinigt werden. Seien Sie besonders vorsichtig, wen Sie
die Teile auseinandernehmen oder reinigen, um Unfällen vorzubeugen.
2. Das Gerät darf nicht direkt erhitzt werden; Setzen Sie keine Plastikteile in den
Desinfektionsschrank, die Spülmaschine oder in heißes Wasser mit ätzenden Flüssigkeiten über 60
Grad ein. Benutzen Sie keine Stahlwolle und keine abrasiven Spülmittel, um das Gerät zu reinigen.
3. Reinigen Sie bitte die Form, nachdem es getrocknet ist. Vergewissern Sie sich, dass die
Reinigungsbürste sauber ist, wenn diese nicht benutzt wird, schalten Sie das Gerät aus. Wenn Sie
das Produkt entsorgen möchten, geben Sie dieses bitte an die Fachabteilung. Schneiden Sie das
Stromkabel ab, bevor Sie das Gerät entsorgen.

Aufbau und Funktion der Einzelteile
1. Deckel
2. Bedienfeld
3. Wasserbehälter
4. Motorblock
5. Öffnung für Wasser
6. Rührstab
7. Rührbecher
8. Auspressstab.
9. Form-Träger
10. Formabdeckung
11. Pasta-Form
12. Aufbewahrungsbox
13. Messbecher für Wasser
14. Messbecher für Mehl
15. Reinigungsbürste
16. Teigschneider
------ 16

Bedienung
Bevor Sie dieses Gerät benutzen, reinigen Sie bitte die Komponenten, die unmittelbar in Kontakt mit
Lebensmitteln kommen.
A
ON-/Standby- Taste – um das Gerät ein und auszuschalten
B
Start-/Stop-Taste – um das Gerät zu starten oder zu stoppen
C
Taste A – um eins aus 6 automatischen Programmen zu wählen
D
Taste M – um eins aus 6 halbautomatischen Programmen zu
wählen
E
Display
F
KNETEN Taste – um das Kneten von Teig manuell zu starten
G
EXTRUDIEREN Taste – um das Extrudieren von Teig manuell zu
starten
H
WAAGE Taste – um die Waage austarieren
I
WASSER Taste – für die zusätzliche Wasserversorgung
Feine
Spaghetti
Normale
Spaghetti
Dicke
Spaghetti
Dünne
Bandnudeln
Breite
Bandnudeln
Penne
Lasagne

1. Anwendung
1) Vor der ersten Nutzung
Entfernen Sie bitte alle Schutzfolien sowie das Werbe- und Verpackungsmaterial von dem Gerät
und dessen Zubehör. Reinigen Sie das Gerät und alle abnehmbaren Teile gemäß der
Reinigungsanweisungen in dieser Bedienungsanleitung.
2) Installieren Sie alle Teile wie unten angezeigt
3) Automatische Programme
Das Gerät verfügt über 6 automatischen Programmen. Je nach der Mehlsorte und der Auswahl
eines entsprechenden Programms, kann bis zu 600 g Pasta auf einmal automatisch produziert
werden. Die untenstehende Tabelle verschafft Ihnen einen Überblick über die Parameter von
individuellen automatischen Programmen.
Sie können ein Programm auswählen, indem Sie auf die Taste A mehrmals
drücken.
HINWEIS: Die Wasserversorgung erfolgt während des automatischen Programms automatisch.
Programm
Empfohlene
Mehlsorte
Automatische
Bewässerung
(Verhältnis von Wasser
und Mehl)
Empfohlene
Mehlmenge
Knetzeit in
Minuten
A1
Weizenmehl Typ 00
Ca. 36 ml / 100 g
400 g
(max. 600 g)
04:00
A2
Weizenmehl Typ 00
Ca. 37 ml / 100 g
400 g
(max. 600 g)
04:00

A3
Weizenmehl Typ 405
Hartweizengrieß
Weizenmehl /
Hartweizengrieß
gemischt 50:50
Ca. 38 ml / 100 g
400 g
(max. 600 g)
03:30
A4
Italienisches
Hartweizengrieß-
Mehl
Ca. 39 ml / 100 g
400 g
(max. 600 g)
04:00
A5
Vollkornmehl
Ca. 36 ml / 100 g
400 g
(max. 600 g)
07:00
A6
Glutenfrei
Ca. 58 ml / 100 g
400 g
(max. 600 g)
03:00
TIPP: Optional können Sie etwas Olivenöl zu Programmen A1-A4 durch die Nachfüllöffnung
hinzufügen.
4) Halbautomatische Programme
Es gibt zwei halbautomatische Programme, um bis zu 600g Pasta auf einmal herzustellen, aus
individuellen Rezepten mit Zutaten Ihrer Wahl. Im Gegensatz zu automatischen Programmen,
müssen Sie die Flüssigkeit selbständig nachfüllen. Die untenstehende Tabelle gibt Ihnen einen
Überblick über die Parameter von beiden automatischen Programmen.
Sie können ein Programm auswählen, indem Sie auf die Taste M
mehrmals drücken.
HINWEIS: Auf dem Display wird die empfohlene Flüssigkeitsmenge
basierend auf die verwendete Mehlmenge angezeigt. Die Flüssigkeit
muss sehr langsam und gleichmäßig durch die Nachfüllöffnung eingefüllt werden.
Programm
Empfohlene Mehlsorte
Automatische
Bewässerung
(Verhältnis von Wasser
und Mehl)
Empfohlene
Mehlmenge
Knetzeit in
Minuten
M1
Typ 00 oder Typ 550
1 Eigelb (Größe M/L) pro
200 g Mehl
Ca. 37 ml / 100 g
(Verrühren Sie das
Eigelb im Messbecher,
befüllt mit Wasser)
400 g
04:00
M2
Typ 00 oder Typ 550
1 Eigelb (Größe M/L) pro
200 g Mehl
Ca. 38 ml / 100 g siehe
das Programm M1
400 g
03:00

5) Den Wasserbehälter befüllen
Nehmen Sie den Wasserbehälter ab und befüllen Sie diesen mit sauberem kaltem Wasser bis zur
Markierung auf der Oberkante des Behälters.
Dann schieben Sie den Wasserbehälter zurück in die Haupteinheit, soweit es geht.
è Wenn die Kontrollleuchte auf dem Wasserbehälter blau leuchtet, gibt es ausreichend Wasser in
dem Behälter.
è Wenn die Kontrollleuchte auf dem Wasserbehälter rot leuchtet, gibt es zu wenig Wasser in dem
Behälter.
6) Das Gerät einschalten
Halten Sie die ON/Standby Taste für ca. 2 Sekunden gedrückt, um das Gerät
einzuschalten.
HINWEIS: Wenn keine weitere Taste innerhalb von 2 Minuten gedrückt wird,
wird das Gerät zurück in den Stand-by-Modus gehen.
Die integrierte Waage bestimmt das gesamte Gewicht des Gerätes.
Ein drehender Balken geht auf dem Display an.
HINWEISE: Verstellen Sie das Gerät nicht während des Abwiegens.
Nach der Kontrolle geht das Gerät in den Betriebsmodus.
è Alle verfügbaren Programme werden auf dem Display angezeigt.
è Zusätzlich wird auf dem Display eine blinkende “0” angezeigt.
7) Die Waage austarieren
WICHTIG: Bevor Sie Ihre Waage in die Null-Position austarieren, vergewissern
Sie sich, dass:
- das Gerät ordnungsgemäß montiert ist.
- die ausgewählte Pastaform eingesetzt ist
- der Wasserbehälter bis zur Markierung befüllt ist.
- noch kein Mehl in den Knetbehälter hinzugefügt wurde.

Drücken Sie auf die WAAGE-Taste, um die Waage auszutarieren.
HINWEIS: Wenn Sie das Gewicht des Gerätes nach dem Austarieren der Waage verändern, ist eine
erneute Tarierung erforderlich.
HINWEIS: Bewegen Sie das Gerät nicht während der Tarierung.
Nachdem das Tarieren abgeschlossen ist, kommt das Gerät in den
Betriebsmodus.
è Alle verfügbaren Programme werden auf dem Display angezeigt.
è Zusätzlich erscheint das Symbol “g”.
8) Mit automatischen Programmen arbeiten
Nachdem Sie die gewünschte Mehlmenge hinzugefügt und den Deckel geschlossen
haben, drücken Sie auf die Taste A, um eins von den automatischen Programmen
auszuwählen.
Sie können zwischen den Programmen umschalten, indem Sie auf diese Taste mehrmals drücken.
Das ausgewählte Programm (z.B. A1) blinkt auf dem Display.
Um das erforderliche Programm zu wählen, drücken Sie auf die Start-
/Stop- Taste.

Teig kneten
Das automatische Programm startet mit dem Kneten von Teig.
à Das ausgewählte Programm wird auf dem Display permanent angezeigt.
à Die Dauer des Knetvorgangs wird auf dem Display als eine absteigende
Zeitfolge angezeigt. Zusätzlich erscheinen und .
Automatische Wasserversorgung
Nach kurzer Zeit wird die Wassermenge, die durch das Gerät bestimmt
wurde, automatisch über den Wasserauslass in den Knetbehälter gepumpt.
Das Display zeigt das Symbol
Teig extrudieren
è Nachdem der Knetvorgang abgeschlossen ist, wird das Gerät
automatisch die Extrusion von Teig starten.
è Ein rotierender Balken wird auf dem Display während der
Teigextrusion angezeigt.
è Zusätzlich erscheint das Symbol .
Belüftung
è Kurz nach dem Beginn des Extrudierens wird der Lüfter starten.
è Das Display zeigt das Symbol
Effiziente Teigabgabe
Das Gerät erkennt, ob noch etwas Teig im Knetbehälter vorhanden ist und
gewährleistet eine besonders hohe Teigabgabe, indem der Knet- und
Extrusionsvorgang wiederholt wird.
Die letzten 10 Minuten des Programms werden auf dem Display als
absteigende Zeitfolge angezeigt.
Automatischer Stopp
Nachdem das Programm abgeschlossen wurde, stellt das Gerät
automatisch den Betrieb ein.
Dies wird durch einen dreimaligen Ton signalisiert.
Das Display zeigt das Symbol”--:--”
Zusätzlich erscheint das Symbol .
HINWEIS: Wenn keine weitere Taste innerhalb von 2 Minuten gedrückt wird, wird das Gerät zurück
in den Betriebsmodus umschalten. Wenn weiterhin keine Taste innerhalb von den nächsten 2
Minuten gedrückt wird, geht das Gerät in den Standby-Modus.

Das Gerät ausschalten
Drücken Sie auf die ON/Standby-Taste, um das Gerät in den Standby-Modus
umzuschalten.
Ein blinkendes “b” wird auf dem Display angezeigt.
9) Mit halbautomatischen Programmen arbeiten
HINWEIS: führen Sie bitte die Schritte 1 bis 7 aus, bevor Sie anfangen mit
halbautomatischen Programmen zu arbeiten. Bereiten Sie auch die
erforderliche Flüssigkeitsmenge im Voraus vor.
Nachdem Sie die erforderliche Mehlmenge hinzugefügt und den Deckel
geschlossen haben, drücken Sie auf Taste M, um eins der Programme zu
wählen.
Sie können zwischen den Programmen umschalten, indem Sie auf diese
Taste mehrmals drücken.
Das gewählte Programm (z.B. M1) wird auf dem Display blinken.
Um das erforderliche Programm zu starten, drücken Sie auf die Start-/Stop-
Taste.
Teig kneten
Das automatische Programm startet mit dem Kneten von Teig und die
empfohlene Flüssigkeitsmenge (z.B. 144 ml) wird angezeigt.
Das ausgewählte Programm wird auf dem Display permanent angezeigt.
Die empfohlene Flüssigkeitsmenge genauso wie das Symbol “ml” werden
aufleuchten.
Zusätzlich erscheinen die Symbole und .
Manuelle Wasserversorgung
Gießen Sie die empfohlene Flüssigkeitsmenge langsam und gleichmäßig in
den Knetbehälter.
2 Minuten vor dem Abschluss des Knetvorgangs wird das Display wechseln
und die gebliebene Knetdauer wird in der absteigenden Zeitfolge auf dem
Display angezeigt.
Teig extrudieren
Nachdem der Knetvorgang abgeschlossen ist, wird das Gerät automatisch
die Extrusion von Teig starten.
Ein rotierender Balken wird auf dem Display während der Teigextrusion
angezeigt.

Zusätzlich erscheint das Symbol .
Belüftung
Kurz nach dem Beginn des Extrudierens wird der Lüfter starten.
è Das Display zeigt das Symbol
Effiziente Teigabgabe
Das Gerät erkennt, ob es noch etwas Teig im Knetbehälter vorhanden ist
und gewährleistet eine besonders hohe Teigabgabe, indem der Knet- und
Extrusionsvorgang wiederholt wird.
Die letzten 10 Minuten des Programms werden auf dem Display als
absteigende Zeitfolge angezeigt.
Automatischer Stopp
Nachdem das Programm abgeschlossen wurde, stellt das Gerät
automatisch den Betrieb ein.
Dies wird durch einen dreimaligen Ton signalisiert.
Das Display zeigt ”--:--”
Zusätzlich erscheint das Symbol .
HINWEIS: Wenn keine weitere Taste innerhalb von 2 Minuten gedrückt wird, wird das Gerät zurück
in den Betriebsmodus umschalten. Wenn weiterhin keine Taste innerhalb von den nächsten 2
Minuten gedrückt wird, geht das Gerät in den Standby-Modus.
Das Gerät ausschalten
Drücken Sie auf die ON/Standby-Taste, um das Gerät in den Standby-Modus
umzuschalten.
Das Display zeigt ein blinkendes “b”.

10) Manuelles Teigkneten.
Sie können diese Funktion auswählen, indem Sie auf die Taste KNETEN
drücken.
HINWEIS: Der Vorgang kann jederzeit abgebrochen werden. Drücken Sie
bitte einfach noch einmal auf die Taste KNETEN.
Das Gerät startet den Knetvorgang für die Dauer von max. 10 Minuten.
è Die Dauer des Knetvorgangs wird als eine absteigende Zeitfolge
angezeigt.
è Zusätzlich erscheinen die Symbole und .
Automatischer Stopp
Nachdem das Programm abgeschlossen wurde, stellt das Gerät
automatisch den Betrieb ein.
è Dies wird durch einen dreimaligen Ton signalisiert.
è Zusätzlich erscheint das Symbol .
HINWEIS: Wenn keine weitere Taste innerhalb von 2 Minuten gedrückt wird, wird das Gerät zurück
in den Betriebsmodus umschalten. Wenn weiterhin keine Taste innerhalb von den nächsten 2
Minuten gedrückt wird, geht das Gerät in den Standby-Modus.

11) Manuelle Teigextrusion
Sie können diese Funktion auswählen, indem Sie auf die Taste EXTRUSION
drücken.
HINWEIS: Der Vorgang kann jederzeit abgebrochen werden. Drücken Sie
dafür noch einmal auf die Taste EXTRUSION.
Das Gerät startet die Extrusion von Teig.
è Ein rotierender Balken wird auf dem Display während der Teigextrusion
angezeigt.
è Zusätzlich erscheinen die Symbole und .
Belüftung
Kurz nach dem Beginn der Teigextrusion wird der Lüfter den Betrieb starten.
è Das Display zeigt
Effiziente Teigabgabe
Das Gerät erkennt, ob noch etwas Teig im Knetbehälter vorhanden ist und
gewährleistet eine besonderes hohe Teigabgabe, indem der Knet- und
Extrusionsvorgang wiederholt wird.
Die letzten 10 Minuten des Programms werden auf dem Display als
absteigende Zeitfolge angezeigt.
Automatischer Stopp
Nachdem das Programm abgeschlossen wurde, stellt das Gerät
automatisch den Betrieb ein.
Dies wird durch einen dreimaligen Ton signalisiert.
è Zusätzlich erscheint das Symbol .
HINWEIS: Wenn keine weitere Taste innerhalb von 2 Minuten gedrückt wird, wird das Gerät zurück
in den Betriebsmodus umschalten. Wenn weiterhin keine Taste innerhalb von den nächsten 2
Minuten gedrückt wird, geht das Gerät in den Standby-Modus.
12) Zusätzliche Wasserversorgung
Sie können diese Funktion wählen, indem Sie auf die Wassertaste drücken.
Die Pumpe startet und zusätzliche 5 ml Wasser werden in den Knetbehälter bei jedem
Drücken der Taste gepumpt.
è Für die Dauer des Wasserpumpens wird auf dem Display das Symbol angezeigt.

HINWEIS: Zusätzliche Wasserversorgung kann mehrmals vor dem Ende des Knetvorgangs für bis
zu 30 Sekunden wiederholt werden. Seien Sie aber vorsichtig, wenn es zu viel Flüssigkeit im Teig
gibt, wird dieser zu klebrig und kann nur eingeschränkt extrudiert werden.
13) Das Programm/die Funktion vorzeitig beenden.
Um ein Programm oder eine Funktion vorzeitig zu beenden, drücken
Sie auf Start/Stop oder auf die ON/Standby-Taste.
14) Das Gerät dauerhaft ausschalten
Für ein permanentes und sicheres Ausschalten trennen Sie den Stecker nach
jeder Nutzung von der Stromversorgung.
Hinweise für gute Pasta
Zubereitung von Pasta
Verwenden Sie bitte backstarkes oder mäßig starkes Mehl.
Um ein gutes Ergebnis zu erzielen, benutzen Sie bitte ausreichend Wasser gemäß der
Mengenangabe auf dem Digitaldisplay oder in der Referenztabelle. Im Winter können Sie die
Wassermenge um 5-10mL erhöhen. Im Sommer kann die Wassermenge um 5-10mL verringert
werden.
Pasta wird zäher, wenn Sie 3-5g Salz in Wasser hinzufügen. Wenn Sie 3-5ml Öl dazugeben, wird
Ihre Pasta weicher.
Pasta kochen
Bitte verzehren Sie Pasta rechtzeitig, da frische Pasta einen besseren Geschmack hat.
Wenden Sie die ”heiß-kalt Methode” an (fügen Sie während des Kochens kaltes Wasser hinzu,
wiederholen Sie den Vorgang mehrmals), kochen Sie diese für ca. 8 Minuten (gemäß der Breite und
Menge von Pasta kann die Kochzeit angepasst werden).

Aufbewahrung von Pasta
Benutzen Sie eine Frischhalteverpackung, damit Ihre Paste frisch bleibt.
Der Teig ist zu trocken,
wir empfehlen Ihnen,
etwas Wasser
hinzuzufügen.
Perfekter Teig
Der Teig ist zu feucht, wir
empfehlen Ihnen, etwas
Mehl hinzuzufügen.
Reinigung und Wartung
①
Nachdem Sie den Zubereitungsvorgang abgeschlossen
haben, ziehen Sie den Stecker und bauen Sie das Gerät
nach der Nutzung auseinander.
②
Die abgebauten Teile (außer das Gehäuse) müssen
gereinigt und getrocknet werden.
③
1) Trocknen Sie die Einzelteile oder legen Sie diese für
eine halbe Stunde in den Kühlschrank, dann klopfen Sie
diese stark ab, so dass das angeklebte Mehl einfach
abfallen kann.
2) Sie können auch eine Reinigungsbürste benutzen. Es
wird nicht empfohlen, die Einzelteile in Wasser einweichen
zu lassen, da es das Zukleben von Mehl an dem Teil und
demzufolge Schwierigkeiten mit der Reinigung verursachen
kann.
④
Halten Sie das Einzelteil, die Reinigungsbürste und den
Messbecher an einer trockenen Stelle und setzen Sie diese
keiner direkten Sonneneinstrahlung aus.

Sicherheitsindex
Nennspannung
220v
Leistungsbereich
Flour:200-600g
Nennleistung
180w
Nennfrequenz
50hz
Elektronischer
Skalabereich
0-5kg
Skalagenauigkeit
2g
Umgebung
Temperatur:0-40 Grad; Feuchtigkeit: ≤90%RH
Fehlerbehebung
Probleme
Ursachen
Lösungen
Das Gerät
funktioniert nicht,
nachdem es
eingeschaltet wurde
und die Powertaste
betätigt wurde.
1.Das Stromkabel ist nicht sachgemäß
angeschlossen
1. Installieren Sie das
Stromkabel richtig.
2.Motor-Selbstschutz wegen der zu
langen Betriebszeit.
2. Machen Sie das Gerät wieder
an, nachdem es für 20—30
Minuten abgekühlt ist.
3. Der Rührbecher oder der
Rührbecherdeckel sind nicht richtig
installiert.
3. Installieren Sie den
Rührbecher oder den
Rührbecherdeckel
ordnungsgemäß.
Die Anzeigen
leuchten, aber das
Gerät funktioniert
nicht.
1. Die Taste wurden nicht gedrückt.
1. Wählen Sie die Funktion aus
und drücken Sie auf die
entsprechende Taste.
2.Das Gerät ist kaputt gegangen.
2. Lassen Sie das Gerät in
einem Servicezentrum
reparieren.
Die Maschine stoppt
während des
Betriebsvorgangs.
1.
Die Zutatenmenge ist nicht richtig, die
Überladung führt zum Feststecken und
einer Betriebsstörung.
Befolgen Sie streng die
Mengenangaben, um die
Zutaten hinzuzufügen, gießen
Sie Wasser, wenn der Teig zu
trocken ist, kneten Sie die
Pasta, wählen Sie [Pasta
extrudieren]; Wenn es zu feucht
ist, fügen Sie Mehl zum Teig
hinzu, danach wählen Sie
[Pasta extrudieren];
2. Andere Zutaten sind im Mehl
vorhanden, die Überladung führt zum
Feststecken und einer Betriebsstörung.
2. Schalten Sie das Gerät zum
Reinigen aus.

3. Der Motortemperatursteuerungsschutz.
3.Benutzen Sie das Gerät
wieder nach einer 20-30-
minütigen Pause.
Keine Rückmeldung
beim Drücken von
Tasten
1. Die Erholungszeit war zu kurz, das
System konnte nicht neugestartet
werden.
1. Starten Sie das Gerät nach 3
Minuten neu.
2.Das Gerät funktioniert.
2. Normalfall
3. Das Gerät ist kaputt gegangen.
2. Lassen Sie das Gerät in
einem Servicezentrum
reparieren.
Paste zerbricht
einfach.
1. Sie benutzen kein backstarkes Mehr
mit hohem Proteingehalt.
1. Benutzen Sie backstarkes
Mehr mit hohem Proteingehalt.
2. Das Wasser-Mehl-Verhältnis ist nicht
richtig, Sie brauchen weniger Wasser.
2. Fügen Sie Wasser und Mehl
hinzu gemäß der Markierung auf
dem Becher.
Paste klebt.
Das Wasser-Mehl-Verhältnis ist nicht
richtig, Sie brauchen mehr Wasser.
Fügen Sie Wasser und Mehl
hinzu gemäß der Markierung auf
dem Becher.
Es gibt zu viele
Mehlreste in dem
Rührbecher.
1. Niedrige Spannung.
1.Benutzen Sie einen
Haushalts-
Spannungsstabilisator.
2. Die Modulöffnung ist blockiert.
2. Reinigen Sie die
Modulöffnungen.
3. Falsche Zutatenmenge.
3. Befolgen Sie streng die
Verhältnistabelle, wenn Sie
Zutaten hinzufügen.
Ton- und Lichtalarm
Das Gerät wurde blockiert.
1.Überprüfen und reinigen Sie
die Becher.
2. Befolgen Sie streng die
Mengenangaben, um die
Zutaten hinzuzufügen, fügen Sie
weniger Wasser hinzu, wählen
Sie 【Pasta kneten】, kneten
Sie den Teig für 2 Minuten und
wählen Sie 【Pasta kneten】
erneut, um den Vorgang zu
wiederholen.;

Fehlercode-Liste
Fehlercode
Gründe
Fehlerbehebung
E02
Die Abdeckung wurde nicht geschlossen
und die Funktion wurde nicht ausgewählt.
Schließen Sie den Deckel und
wählen Sie die Funktionstaste
aus.
E05
Der Temperatursensor ist offen.
Kundendienst
E06
Ein Kurzschluss des Temperatursensors.
Kundendienst
E09
Zu wenig Wasser oder es bleiben
Rückstände in dem Becher.
Passen Sie die Wassermenge
an und entfernen Sie die
Rückstände.
E14
Zu viel Mehl
Fügen Sie 200-600g Mehl hinzu
E15
Rückstände in dem Rührbecher.
Entfernen Sie die Rückstände.
E17
Der Gewichtssensor ist defekt.
Kundendienst
Hinweis: wenn das oben erwähnte Problem nicht gelöst werden kann, bauen Sie das Gerät bitte
nicht selbstständig auseinander, bringen Sie es zu der nächstliegenden Servicestelle.
7. UMWELT
ACHTUNG :
Werfen Sie nicht dieses Produkt, wie es mit anderen Haushaltsprodukten hat. Es gibt
eine Mülltrennungs von diesem Produkt in Gemeinden, Sie müssen Ihre lokalen
Behörden über die Orte, wo man dieses Produkt zurückgeben können zu informieren.
In der Tat enthalten elektrische und elektronische Produkte gefährliche Stoffe, die
schädliche Auswirkungen auf die Umwelt oder die menschliche Gesundheit haben und
sollte recycelt werden. Das Symbol hier darauf hinweisen, dass elektrische oder elektronische Geräte
sollten sorgfältig ausgewählt werden, ist ein fahrbarer Abfallbehälter mit einem Kreuz markiert.
Adeva SAS / H.Koenig Europe - 8 rue Marc Seguin, 77290 Mitry-Mory, France
www.hkoenig.com - https://kundenservice.hkoenig.com - Tél: +33 1 64 67 00 05

NEDERLANDS
Veiligheidsmaatregelen
Volg de regels ter voorkoming van ongelukken door
verkeerd gebruik.
Attentie:
1. Niet met een natte hand de stekker in of uit het
stopcontact nemen wegens gevaar voor een elektrische
schok.
2. Stop geen objecten in de watermond. Haal de vormer er
niet af en haal geen schroeven eruit, dit kan leiden tot
ongelukken.
3. Stop de behuizing niet in een vloeistof, dit kan tot
elektrische schade leiden.
Aanwijzingen voor gebruik
1. Maak de onderdelen schoon voordat u het apparaat
gebruikt. Zet er geen zware dingen op.
2. Het apparaat mag niet worden gebruikt door
gehandicapten personen of door personen die geen
ervaring met het apparaat hebben, tenzij deze onder
toezicht is. Houd kinderen uit de buurt van dit apparaat.
3. Dit apparaat is uitsluitend bestemt voor huishoudelijk
gebruik.
4. Haal het apparaat niet uit elkaar en maak ook geen
aanpassingen.
5. Dit product is een elektrisch apparaat, zorg dat de kabel
goed is aangesloten.

6. Controleer dat de kabel, stekker, maatbeker en as in
goede staat zijn. Neem bij schade contact op met de
klantenservice. Voer zelf geen reparaties uit, dit kan
gevaarlijk zijn.
7. Zorg dat alle onderdelen juist geplaatst worden, dit kan
anders gevaar opleveren.
8. Dit product heeft een Y-verbinding, als de stroomkabel
beschadigd is, dient een gekwalificeerd persoon deze
vervangen.
9. Dit apparaat kan worden gebruikt door personen met
verminderde fysieke, zintuiglijke of mentale vermogens of
met gebrek aan ervaring of kennis, op voorwaarde dat zij
onder toezicht staan of instructies hebben gekregen over
het veilige gebruik van het apparaat en dat zij de mogelijke
gevaren volledig begrijpen.
10. Het schoonmaken en onderhoud mag niet worden
uitgevoerd door kinderen tenzij ze 8 jaar of ouder zijn en er
toezicht is.
11. Houd het apparaat en de stroomkabel uit de buurt van
kinderen jonger dan 8 jaar.
12. Bij het gebruik van elektrische apparaten moeten altijd
de standaard veiligheidsinstructies worden opgevolgd om
de kans op vuur, elektrische schokken en/of verwondingen
te voorkomen.
13. Controleer dat de aangegeven spanning op het
typeplaatje overeenkomt met de spanning van uw
spanningsbron. Als dit niet het geval is, neem dan contact
op met de verkoper en sluit het apparaat niet aan.
14. Het apparaat mag niet gebruikt worden als het gevallen
is, als er duidelijk zichtbare schade is of als het lekt.

15. Bewaar deze handleiding en geef het aan de
toekomstige eigenaar als u het apparaat aan een ander
geeft.
16. Niet het apparaat gebruiken als deze een beschadigde
kabel of stekker heeft, als het niet goed werkt of
beschadigd of gevallen is. Als de stroomkabel beschadigd
is, moet het worden vervangen door de fabrikant, een
servicemonteur of een gelijkwaardig gekwalificeerd
persoon om gevaren te vermijden.
17. Dit apparaat mag niet gebruikt worden door personen
met een beperkt fysiek of mentaal vermogen, of gebrek aan
ervaring en kennis (waaronder kinderen) hebben van het
apparaat, tenzij iemand toezicht houdt of ze instructies
hebben gegeven over het gebruik van het apparaat door de
persoon die verantwoordelijk is voor hun veiligheid.
Kinderen moeten onder toezicht worden gehouden, om te
verzekeren dat ze niet met het apparaat spelen.
18. Het apparaat is niet bedoeld om gebruikt te worden met
een externe timer of apart besturingssysteem.
19. Voor het schoonmaken eerst controleren dat de stekker
uit het stopcontact is.
20. Het apparaat is alleen bedoeld voor huishoudelijk
gebruik in het huis.
21. Nooit het apparaat, stroomkabel of stekker onder water
of andere vloeistof dompelen.
22. De stekker van het apparaat dient altijd uit het
stopcontact gehaald te worden buiten gebruik, voor
assemblage en demontage, het schoonmaken en voor het
verwisselen van een accessoire. Vermijd contact met
bewegende delen.
23. Uw apparaat is uitsluitend ontworpen voor huishoudelijk
gebruik. Het is niet bedoeld voor gebruik in de volgende

situaties, die niet onder de garantie vallen:
- in personeelskeukens in winkels, kantoren en
andere professionele omgevingen,
- in boerderijherbergen,
- door gasten in hotels, motels en andere
residentiële omgevingen,
- in bed & breakfast-omgevingen.
Aanwijzingen tijdens gebruik
1. Stop geen objecten in de pasta-opening, dit kan tot schade leiden.
2. Plaats dit product niet in de buurt van hete, ontvlambare en explosieve plaatsen of in de buurt
van plaatsen met een sterk magnetisch veld om ongelukken te voorkomen.
3. De hoeveelheid bloem en water dient overeen te komen met de lijst van pasta en ingrediënten,
anders kunnen er onderdelen beschadigd raken.
4. Als u de stekker in het stopcontact steekt, controleer dan dat alles juist is geplaatst, en haal
de stekker eruit als het apparaat niet gebruikt wordt.
5. Gebruik het apparaat op een platte oppervlakte, niet op stoffen zoals tapijten, of op papier en
plastic.
6. Als u onderdelen eraf neemt, aanpast, schoonmaakt of vervangt, dient u de stekker uit het
stopcontact te halen.
7. Als u de stekker uit het stopcontact neemt, trek dan aan de stekker en niet aan de kabel.
8. Dit product kan alleen worden gebruikt met de specifieke aansluiting, mengbeker en andere
delen. Gebruik geen andere objecten aangezien dit tot ongelukken kan leiden.
9. Veeg het water weg voor het pasta maken zodat de smaak van de pasta niet beïnvloed wordt.
10. Dit product kan niet langdurig achter elkaar gebruikt worden, laat het soms 20 min afkoelen.
11. Plaats het product op een platte oppervlakte, zorg dat de poten op de oppervlakte staan.
Raak het product niet aan en verplaats deze niet in werking, dit kan de pasta verpesten.
Aanwijzingen na gebruik
1. Maak het apparaat na gebruik op tijd schoon, de onderdelen die in contact komen met
voedsel dienen te worden schoongemaakt met schoon water. Als u onderdelen demonteert of
schoonmaakt, dient u voorzichtig te zijn om ongelukken te voorkomen.
2. Verwarm het product niet op, doe de plastic onderdelen niet in de ontsmettingskast,
vaatwasser, agressieve vloeistof of water dat warmer is dan 60 graden. Gebruik geen staalwol en
bijtend schoonmaakmiddel of vloeistof om het product te wassen.
3. Veeg de stof weg als alles droog is. Controleer dat de borstel schoon is en als het niet gebruikt
wordt, schakel het apparaat dan uit. Als het apparaat is gevallen dient het te worden gerepareerd
door gekwalificeerd personeel. Haal de stekker uit het stopcontact als het apparaat gevallen is.

Namen en functies van de onderdelen
1. Deksel
2. Bedieningspaneel
3. Tank
4. Behuizing
5. Waterinlaatopeningen
6. Roerstaaf
7. Roerkop
8. Perser
9. Vormer
10. Vormklem
11. Pastamond
12. Opvangbak
13. Watermaatbeker
14. Bloemmaatbeker
15. Schoonmaakborstel
16. Deegsnijder
------ 16

Fijne
spaghetti
Normale
spaghetti
Grove
spaghetti
Smalle
lintnoedels
Brede
lintnoedels
Penne
Lasagne
Hoe te gebruiken
Voordat u het product gebruikt, dient u alle onderdelen te wassen die in contact komen met voedsel.
A
ON/Stand-by-knop – om het apparaat in en uit te schakelen
B
Start/Stopknop – om het apparaat te laten starten of stoppen
C
Knop A – om een van de 6 automatische programma's te kiezen
D
Knop M - om een van de 6 semiautomatische programma's te kiezen
E
Display
F
KNEADING-knop – om het kneden handmatig te starten
G
EXTRUSION-knop – om het kneden handmatig te starten
H
SCALES-knop – voor het kalibreren van de weegschaal
I
WATER-knop – om meer water toe te voegen

1. Het gebruik
1) Voor het eerste gebruik
Verwijder eerst beschermende folies, reclame en verpakkingsmateriaal van het apparaat en de
accessoires. Maak het apparaat en alle verwijderbare onderdelen schoon volgens de
schoonmaakinstructies in deze handleiding.
2) Plaats alles zoals getoond in de onderstaande afbeelding
1) Automatische programma's
Het apparaat is voorzien van 6 automatische programma's. Afhankelijk van het soort bloem en de
keuze van het bijbehorende programma kan tot 600 gr pasta in één doorgang automatisch worden
gemaakt. De onderstaande tabel geeft u een overzicht van de gegevens van de aparte
automatische programma's.
U kunt de programma’s kiezen door meermaals op knop A te drukken.
OPMERKING: de toevoer van water vindt automatisch plaats tijdens de
automatische programma's.
Programma
Aanbevolen soort
bloem
Automatische
watertoevoeging
(verhouding water en
bloem)
Aanbevolen
hoeveelheid
bloem
Kneedtijd
in
minuten
A1
Bloemsoort 00
Ca. 36 ml / 100 g
400 g
(max. 600 g)
04:00
A2
Bloemsoort 00
Ca. 37 ml / 100 g
400 g
(max. 600 g)
04:00

A3
Bloemsoort 405
Durumtarwemeel
Bloem/durumtarwemeel
gemengd 50:50
Ca. 38 ml / 100 g
400 g
(max. 600 g)
03:30
A4
Italiaanse
durumtarwemeel
Ca. 39 ml / 100 g
400 g
(max. 600 g)
04:00
A5
Volkorenmeel
Ca. 36 ml / 100 g
400 g
(max. 600 g)
07:00
A6
Glutenvrij
Ca. 58 ml / 100 g
400 g
(max. 600 g)
03:00
TIP: door de vulopening kunt ook optioneel een beetje olijfolie toevoegen bij programma's A1-A4
2) Semiautomatische programma's
Er zijn twee semiautomatische programma's voor het maken van tot wel 600 g pasta in één
doorgang, met individuele recepten met ingrediënten naar uw keuze. In tegenstelling tot de
automatische programma's dient u zelf de vloeistof toe te voegen. De onderstaande tabel geeft u
een overzicht van de gegevens van beide semiautomatische programma's.
U kunt de programma's kiezen door meermaals op knop M te drukken.
OPMERKING: het display toont een suggestie voor de benodigde
hoeveelheid vloeistof op basis van de toegevoegde bloem. De vloeistof
dient langzaam en gelijkmatig te worden toegevoegd door de vulopening.
Programma
Aanbevolen soort
bloem
Automatische
watertoevoeging
(verhouding water
en bloem)
Aanbevolen
hoeveelheid
bloem
Kneedtijd
in minuten
M1
Type 00 of type
550
1 eierdooier
(formaat M/L) per
200 g bloem
Ca. 37 ml / 100 g
(meng de eierdooier
in de maatbeker,
voeg water toe)
400 g
04:00
M2
Type 00 of type
550
1 eierdooier
(formaat M/L) per
200 g bloem
Ca. 38 ml / 100 g zie
programma M1
400 g
03:00

3) Vullen van de watertank
Verwijder de watertank en vul deze met puur, koud water tot de markering aan de bovenrand van
de tank.
Druk de watertank vervolgens weer terug op zijn plek op de basis zover als dit gaat.
è Als het lampje op de watertank blauw wordt, zit er genoeg water in de tank.
è Als het lampje op de watertank rood wordt, zit er te weinig water in de tank.
4) Het apparaat inschakelen
Druk op de ON/Stand-by-knop voor ongeveer 2 seconden om het apparaat in
te schakelen.
OPMERKING: als er verder geen knop wordt ingedrukt in de volgende 2
minuten gaat het apparaat weer in de stand-by-modus.
De ingebouwde weegschaal weegt het complete gewicht van het apparaat.
Een roterend lampje gaat branden op het display.
OPMERKING: Verplaats het apparaat niet tijdens het wegen.
Na de controle gaat het apparaat over in operatie-modus.
è Alle beschikbare programma's worden getoond op het display
è Verder toont het display een blinkende "0”
5) Kalibratie van de weegschaal
BELANGRIJK: Voordat u de weegschaal kalibreert naar nul dient u te zorgen dat:
- Het apparaat juist in elkaar is gezet
- De gekozen pasta is geplaatst
- De watertank gevuld is tot aan de markering
- Er nog geen bloem in het kneedcompartiment zit
Druk op de SCALES-knop om de weegschaal te kalibreren.
OPMERKING: Als u het gewicht van het apparaat verandert na de kalibratie, dient u deze te her
kalibreren.

OPMERKING: Verplaats het apparaat niet tijdens het wegen!
Als de kalibratie is afgerond, gaat het apparaat over in operatie-modus.
è Alle beschikbare programma's worden getoond op het display.
è Verder verschijnt het teken "g”.
6) Automatische programma's gebruiken
Als u de gewenste hoeveelheid bloem heeft toegevoegd en de deksel heeft gesloten,
drukt u op A om een van de automatische programma's te selecteren.
U kunt de programma's selecteren door meermaals op deze knop te drukken.
Het geselecteerde programma (bijv. A1) knippert op het display.
Om het geselecteerde programma te laten beginnen drukt u op Start/Stop.

Deeg kneden
Het automatische programma begint met het kneden van het deeg.
à Het display toont onafgebroken het geselecteerde programma.
àDe duur van het kneedproces wordt getoond op het display met een
aftellende klok. Verder verschijnen en .
Automatische watertoevoer
Na korte tijd wordt de hoeveelheid water die door de elektronica wordt
vastgesteld automatisch in de kneedkamer gepompt via de wateruitlaat.
Het display toont
Deeg persen
Als het kneedproces is afgerond gaat het apparaat automatisch het deeg
persen.
è Een roterend lampje gaat branden op het display tijden het kneden
van het deeg.
è Verder verschijnt het teken
Ventilatie
Kort na het begin van het kneedproces gaat de ventilator draaien.
è Het display toont
Efficiënt deeg maken
De elektronica herkent of er nog wat deeg in de kneedruimte zit en zorgt
voor goed gekneed deeg door het proces te herhalen.
De laatste 10 seconden van het programma worden getoond op het display
met een aftellende klok.
Automatische stop
Als het programma is beëindigd, gaat het apparaat automatisch in werking.
Dit wordt aangegeven met een 3-voudig akoestisch signaal
Het display toont ”--:--”
Verder verschijnt het teken
OPMERKING: als er verder geen knop wordt ingedrukt in de volgende 2
minuten gaat het apparaat weer in de operatie-modus. Als er verder geen
knop wordt ingedrukt in de volgende 2 minuten gaat het apparaat weer in
de stand-by-modus.
Uitschakelen van het apparaat
Druk op ON/Stand-by om het apparaat in stand-by-modus te zetten.
Het display toont een blinkende "b”.
7) Semiautomatische programma's gebruiken

OPMERKING: voer stappen 1 tot 7 eerst uit voordat u met
semiautomatische programma's gaat werken. Voeg ook van tevoren
alvast de vloeistof toe.
Als u de gewenste hoeveelheid bloem heeft toegevoegd en de deksel
heeft gesloten, drukt u op M om een van de programma's te selecteren.
U kunt de programma's selecteren door meermaals op deze knop te
drukken.
Het geselecteerde programma (bijv. M1) knippert op het display.
Om het geselecteerde programma te laten beginnen drukt u op Start/Stop.
Deeg kneden
Het automatische programma begint met kneden van het deeg en de
aanbevolen hoeveelheid vloeistof (bijv. 144 ml) wordt getoond.
Het display toont onafgebroken het geselecteerde programma.
De aanbevolen hoeveelheid vloeistof en ook het teken "ml” gaat branden.
Verder verschijnen en .
Automatische watertoevoer
Giet de aanbevolen hoeveelheid vloeistof langzaam en gelijkmatig in de
kneedruimte.
2 minuten voordat het kneedproces is beëindigd, veranderd het display
en wordt de resterende kneedt tijd aangegeven met een aftellende klok.
Deeg persen
Als het kneedproces is afgerond gaat het apparaat automatisch het deeg
persen.
Een alarmpje gaat branden op het display tijdens het persen van het deeg.
Verder verschijnt het teken .

Ventilatie
Kort na het begin van het persproces gaat de ventilator draaien.
è Het display toont
Efficiënt deeg maken
De elektronica herkent of er nog wat deeg in de kneedruimte zit en zorgt
voor goed gekneed deeg door het proces te herhalen.
De laatste 10 seconden van het programma worden getoond op het
display met een aftellende klok.
Automatische stop
Als het programma is beëindigd, gaat het apparaat automatisch in werking.
Dit wordt aangegeven met een 3-voudig akoestisch signaal
Het display toont ”--:--”
Verder verschijnt het teken
OPMERKING: als er verder geen knop wordt ingedrukt in de volgende 2
minuten gaat het apparaat weer in de operatie-modus. Als er verder geen
knop wordt ingedrukt in de volgende 2 minuten gaat het apparaat weer in de stand-by-modus.
Uitschakelen van het apparaat
Druk op ON/Stand-by om het apparaat in stand-by-modus te zetten.
Het display toont een blinkende "b”.
8) Handmatig kneden van het deeg
U kunt de functie selecteren door op de KNEADING-knop te drukken.
OPMERKING: Het proces kan op elk moment worden gestopt. Druk
nogmaals op KNEADING
Het apparaat begint het kneedproces met een tijdsduur van max 10
minuten.
è De duur van het kneedproces wordt getoond met een aftellende klok.
è Verder verschijnen en .
Automatische stop
Als het programma klaar is, gaat het apparaat automatisch in werking.
è Dit wordt aangegeven met een 3-voudig akoestisch signaal.
è Verder verschijnt het teken .

OPMERKING: als er verder geen knop wordt ingedrukt in de volgende 2 minuten gaat het apparaat
weer in de operatie-modus. Als er verder geen knop wordt ingedrukt in de volgende 2 minuten gaat
het apparaat weer in de stand-by-modus.
9) Handmatig persen van het deeg
U kunt de functie selecteren door op de EXTRUSION-knop te drukken.
OPMERKING: Het proces kan op elk moment worden gestopt. Druk
nogmaals op EXTRUSION.
Het apparaat begint met het persen van het deeg.
è Een roterend lampje gaat branden op het display tijden het persen
van het deeg.
è Verder verschijnen en .
Ventilatie
Kort na het begin van het persproces gaat de ventilator draaien.
è Het display toont
Efficiënt deeg maken
De elektronica herkent of er nog wat deeg in de kneedruimte zit en zorgt
voor goed gekneed deeg door het proces te herhalen.
De laatste 10 seconden van het programma worden getoond op het
display met een aftellende klok.
Automatische stop
Als het programma klaar is, gaat het apparaat automatisch in werking.
è Dit wordt aangegeven met een 3-voudig akoestisch signaal.
è Verder verschijnt het teken .
OPMERKING: als er verder geen knop wordt ingedrukt in de volgende 2
minuten gaat het apparaat weer in de operatie-modus. Als er verder geen knop wordt ingedrukt in
de volgende 2 minuten gaat het apparaat weer in de stand-by-modus.

10) Verdere watertoevoer
U kunt de functie selecteren door op de water-knop te drukken.
De pomp gaat werken en een verdere 5 ml wordt toegevoegd in de
kneedruimte.
è Voor de tijdsduur van de watertoevoer gaat branden
OPMERKING: De verdere watertoevoer kan meermaals worden herhaald tot 30 seconde voor het
einde van het kneedproces. Maar wees voorzichtig, als er te veel vloeistof is, kan het deeg te
kleverig worden en kan het maar beperkt verlengd worden.
11) Vroegtijdig het programma/functie beëindigen
Om een programma of functie eerder te beëindigen drukt u op
Start/Stop of op ON/Stand-by
12) Het apparaat helemaal uitschakelen
Om het apparaat helemaal uit te schakelen, na elk gebruik de stekker uit het
stopcontact halen.
Tips voor goede pasta
Pasta maken
Gebruik bloem van baksterkte of gemiddelde sterkte.
Voor goede pasta dient u de juiste waterhoeveelheid te gebruiken die het display toont of in de
referentietabel staat. In de winter kunt u 5-10 ml water extra gebruiken. In zomer kunt u 5-10 ml
water minder gebruiken.
Pasta wordt taaier als u 3-5 gram zout aan het water toevoegt. Als u 3-5 ml olie toevoegt, zal uw
pasta zachter zijn.
Bereiding pasta
Consumeer de pasta spoedig, want verse pasta smaakt beter.

Gebruik de heet-koudmethode (voeg koud water toe tijdens het koken, herhaal dat een paar keer)
om het ongeveer 8 minuten te laten koken (passend bij de soort en hoeveelheid pasta de
bereidingstijd aanpassen)
Opslag van pasta
Bewaar uw pasta in een verpakking die de versheid houd.
Het deeg is te droog,
we raden aan wat
water toe te voegen
Perfecte deeg
Het deeg is te vochtig,
we raden aan water toe
te voegen
Schoonmaken en onderhoud
①
Na het pasta maken de stekker uit het stopcontact halen
en de onderdelen demonteren.
②
De gedemonteerde onderdelen (op de behuizing na)
moeten worden gewassen en gedroogd.
③
1) Droog de vormen of leg de vormen in de ijskast
gedurende een half uur, ter er vervolgens mee zodat de
bloem die vastzit in de vormen er makkelijk af kan vallen.
2) U kunt ook de schoonmaakborstel gebruiken. De
vormen in water laten weken wordt niet aanbevolen,
hierdoor wordt het vastzittende deeg kleverig en moeilijk
verwijtbaar.
④
Bewaar de vorm, schoonmaakborstel en maatbeker
droog en niet in direct zonlicht.

Veiligheidsindex
Spanning
220v
Capaciteit
Bloem:200-
600gr
Vermogen
180w
Frequentie
50hz
Bereik weegschaal
0-5kg
Precisie
weegschaal
2g
Omgevingstemperatuur
Temperatuur:0-40 graden; vochtigheid: ≤90%RH
Probleemoplossing
Problemen
Oorzaken
Oplossingen
Het apparaat doet
niets na
inschakeling en na
start indrukken.
1.Stroomkabel niet goed
geplaatst.
1. Plaats de stroomkabel correct
2.Zelfbescherming van motor
ingeschakeld door langdurig
gebruik
2.Probeer het opnieuw na een
afkoelingsperiode van 20-30
minuten
3.Roerkop is niet goed
geplaatst
3.Plaats de roerkop correct
De lampen
branden, apparaat
werkt niet
1.Geen knop ingedrukt
1.Kies de functie en druk op de
knop
2.Het apparaat is kapot
2.Laat het repareren bij lokale
servicedienst
Het apparaat stopt
gedurende gebruik
1.Het mengsel is niet goed, het
is te stevig waardoor het
apparaat stopt
Volg strikt het 'volume-ratio’ om
materiaal toe te voegen, voeg
water toe als het te droog is,
meng de pasta, kies [extrude
pasta]; als het te nat is, voeg dan
bloem toe en meng, kies [extrude
pasta].
2.Andere objecten in de bloem
houden blokkeren en zorgen
ervoor dat het apparaat stopt
2.Schakel het apparaat uit en
maak het schoon
3.Bescherming tegen
oververhitting van de motor
3.Gebruik het apparaat weer na
20-30 minuten laten afkoelen
Geen reactie op
ingedrukte
knoppen
1.Te kort uitgeschakeld, het
systeem is niet gereset.
1.Probeer het opnieuw na 3
minuten
2.Het apparaat is in werking
2.Normaal gebruik
3.Het apparaat stopt zelf
2.Laat het repareren bij
servicedienst
De pasta breekt
snel
1.U gebruikt geen pure, sterke
proteïnebloem
1.Gebruik pure, sterke
proteïnebloem
2.de verhouding water en
bloem klopt niet, minder water
2.Voeg bloem en water toe zoals
aangegeven op de markering
De pasta plakt
de verhouding water en bloem
klopt niet, meer water
Voeg water en bloem toe zoals
aangegeven op de markering

Er zitten te veel
resten bloem in de
mengkom
1.Lage spanning
1.Gebruik een stopcontact met
een stabiele spanning
2.Opening module
geblokkeerd
2.Maak openingen van de
module schoon
3.Het materiaal klopt niet
3.Volg strikt de 'ratio-grafiek’ om
materiaal toe te voegen
Geluid- en
lichtalarm
Het apparaat zit vast
1.Controleer en maak de bekers
schoon
2.Volg strikt de 'ratio-grafiek’ om
materiaal toe te voegen; minder
water, kies [knead dough], meng
2 minuten en kies [knead dough]
opnieuw
Lijst met foutmeldingen
Foutmelding
Reden
Probleemoplossing
E02
De deksel is niet gesloten
en er kan geen functie
worden gekozen
Sluit de deksel en selecteer de functie
E05
Temperatuursensor kapot
Neem contact op met de
klantenservice
E06
Kortsluiting
temperatuursensor
Neem contact op met de
klantenservice
E09
Te weinig water of mengsel
over
Voeg water toe en verwijder mengsel
E14
Te weinig bloem
Voeg 200-600gr bloem toe
E15
Resten in de mengbak
Verwijder de resten
E17
Weegsensor kapot
Neem contact op met de
klantenservice
Merk op: Als het probleem niet verholpen kan worden, haal dan niet zelf het apparaat uit elkaar,
stuur het na een reparatiedienst.
MILIEU
ATTENTIE:
Dit apparaat mag niet met uw ander huishoudelijke toestellen worden verwijdert. Dit product
moet op een geselecteerde stortplaats verwijdert worden. U kunt bij de gemeente een
indiceerde plaats aanvragen. Elektrisch en elektronische producten kunnen gevaarlijke
stoffen inhouden die schadelijk zijn voor mensen en het milieu en moet recycled worden.
Het symbool aan de kant geeft aan dat het een elektrisch en elektronisch toestel is en zijn
dus artikelen van een selectieve collectie. Het beeld geeft een afvalbak met een X teken
aan.
Adeva SAS / H.Koenig Europe - 8 rue Marc Seguin, 77290 Mitry-Mory, France
www.hkoenig.com - https://en.hkoenig.com - Tél: +33 1 64 67 00 05

ESPAÑOL
MEDIDAS DE SEGURIDAD
Siga las reglas en caso de accidentes causados por
una operación incorrecta.
Atención:
1. En caso de descargas eléctricas, no desenchufe el
aparato con las manos mojadas.
2. No coloque nada sólido en la salida del agua. No
quite la tapa del molde, no retire el molde y no toque
el tornillo en caso de accidentes.
3. No sumerja la carcasa en agua en caso de daños
eléctricos.
INSTRUCCIONES ANTES DE USAR
1. Limpiar el molde antes de usar el aparato. No coloque
objetos pesados encima.
2. Las personas discapacitadas o con falta de
experiencia operativa no pueden utilizar el aparato a
menos que sean supervisadas. Mantenga el aparato
fuera del alcance de los niños.
3. Este aparato está destinado solo para uso doméstico.
4. No desmonte ni reforme el aparato.
5. Este producto es un tipo de aparato eléctrico,
asegúrese de que el cable de tierra esté bien
conectado.
6. Compruebe que el cable de alimentación, el enchufe,
la taza medidora y el tornillo no estén dañados. Si hay
daños visibles, llame al centro de servicios y no
intente arreglarlo usted mismo.
7. Asegúrese de que todas las piezas desmontables
estén instaladas.

8. Este aparato tiene una conexión tipo Y, si el cable de
alimentación está dañado, deberá ser reemplazado
por el fabricante, su agente de servicios o una
persona calificada para evitar cualquier riesgo.
9. Este aparato puede ser utilizado por personas con
capacidades físicas, sensoriales o mentales
reducidas o con falta de experiencia o conocimientos,
siempre que sean supervisadas o instruidas en el uso
seguro del aparato y que entiendan perfectamente
los peligros potenciales.
10. La limpieza y el mantenimiento no deben ser
realizados por niños, a menos que tengan 8 o más
años de edad y sean supervisados por un adulto.
11. Mantenga el aparato y su cable de alimentación
fuera del alcance de los niños menores de 8 años.
12. Siempre que use un electrodoméstico, debe tomar
las precauciones básicas de seguridad para evitar el
riesgo de incendio, descarga eléctrica y/o lesiones en
caso de mal uso.
13. Asegúrese de que la tensión eléctrica del
tomacorriente se corresponda con la exigida en la
etiqueta de especificaciones técnicas. Si este no es
el caso, no conecte el aparato y comuníquese con el
distribuidor o su agente de servicios.
14. No debe utilizar el aparato luego de haberse caído,
si muestra señales evidentes de daño, o si detecta
cualquier fuga o malfuncionamiento.
15. Mantenga este manual de instrucciones siempre al
alcance y entrégueselo al futuro propietario del
aparato en caso de donarlo o transferirlo

16. No utilice el aparato si el cable de alimentación
está dañado, o si no funciona correctamente, muestra
señales de daño o se ha caído. Si el cable de
alimentación está dañado, deberá ser reemplazado
por el fabricante, su agente de servicios o una
persona calificada para evitar cualquier riesgo.
17. Este aparato no está diseñado para ser utilizado
por personas (incluyendo niños) con discapacidad
física, sensorial o motora, o con falta de experiencia
y conocimiento, a menos que estén siendo
supervisadas y hayan recibido instrucciones para el
uso seguro del dispositivo por parte de una persona
responsable de su seguridad. Los niños deben ser
supervisados para garantizar que no jueguen con el
aparato.
18. Este aparato no debe ser operado por medio de un
temporizador externo ni sistema de control remoto.
19. Asegúrese de desenchufar el aparato antes de
limpiarlo.
20. Solo para uso doméstico y en interior.
21. Nunca sumerja el aparato, su cable de
alimentación o enchufe en agua o cualquier otro
líquido.
22. Asegúrese de desenchufarlo cuando no esté en
uso, antes de montarlo, desmontarlo, limpiarlo o
antes de cambiar un accesorio. Evite el contacto con
partes móviles.
23. Su aparato ha sido diseñado únicamente para uso
doméstico. No ha sido diseñado para ser utilizado en
las siguientes situaciones que no están cubiertas por
la garantía:
- en áreas de cocina para el personal en tiendas,

oficinas y otros entornos profesionales,
- en albergues agrícolas,
- en hoteles, moteles y otros entornos residenciales,
- en entornos de tipo bed and breakfast.
INSTRUCCIONES DURANTE EL USO
1. No ponga nada sólido en la taza de pastas.
2. No coloque el aparato cerca de lugares calientes, campos magnéticos potentes y
artefactos inflamables o explosivos.
3. La proporción de harina y agua debe estar acorde con las medidas colocadas en la hoja
de referencia de la cantidad de pastas e ingredientes.
4. Antes de conectar el cable de alimentación, asegúrese de que todas las piezas estén
bien instaladas y desconecte el cable de alimentación cuando no haya nadie usando el
aparato.
5. Opere el aparato sobre una superficie plana, nunca lo coloque sobre alfombras, papel o
plástico.
6. Cuando esté ajustando, limpiando o cambiando las piezas, debe desconectar el enchufe
del tomacorriente.
7. Para desconectar el aparato, use su mano para sostener y tirar del enchufe en lugar de
tirar del cable de alimentación.
8. No utilice ningún accesorio que no haya sido recomendado por el fabricante.
9. Limpie el aparato y cambie el agua antes de hacer pasta para que el sabor no se vea
afectado.
10. Evite utilizar el aparato de forma continua durante mucho tiempo, si desea hacer pasta
de forma continua, debe al menos detener la máquina durante 20 minutos.
11. Coloque el aparato sobre una superficie plana, no deje que las patas se levanten del
suelo. No toque el producto ni lo mueva en caso de que presente algún problema cuando
esté operando.
INSTRUCCIONES DESPUES DE CADA USO
1. Lave el aparato después de usar. Después de un tiempo sin usar las partes que tocarán
los alimentos deben lavarse de nuevo con agua limpia. Cuando esté descargando o
limpiando las piezas, mantenga la guardia alta para evitar accidentes.
2. No coloque las piezas de plástico en el armario de desinfección, el lavavajillas o en agua
caliente por encima de 60 grados. Y no use esponjas de acero, limpiador abrasivo o
líquido corrosivo para lavar el aparato.
3. Limpie el molde después que se seque para retirar la harina adherida con mayor facilidad.
Asegúrese de que el cepillo de limpieza está limpio. Apague el interruptor cuando no haya
nadie usando el aparato. Para desechar el aparato, entréguelo al departamento calificado.

DESCRIPCIÓN DEL PRODUCTO
1. Tapa
2. Pantalla
3. Tanque
4. Carcasa
5. Orificio para entrada de agua
6. Varilla de agitación
7. Taza mezcladora
8. Varilla exprimidora
9. Soporte del molde
10. Cubierta del molde
11. Molde para pasta
12. Caja de almacenamiento
13. Taza medidora de agua
14. Taza medidora de harina
15. Cepillo de limpieza
16. Cortador de masa
Espaguetis
finos
Espaguet
is
normales
Espaguetis
gruesos
Fideos de
cinta
estrecha
Fideos de
cinta
ancha
Pasta
Lasaña
------ 16

OPERACIÓN
Antes de usar el aparato, lave las partes que estén en contacto directo con los alimentos.
A
Botón encendido/standby – para encender o apagar el aparato
B
Botón de inicio/parada – para iniciar o detener el aparato
C
Botón A – para seleccionar uno de los 6 programas automáticos
D
Botón M – para seleccionar uno de los 6 programas
semiautomáticos
E
Pantalla
F
Botón AMASAR – para comenzar a amasar la masa manualmente
G
Botón EXTRUDIR – para comenzar a amasar la masa
manualmente
H
Botón TARAR - para equilibrar la balanza
I
Botón AGUA - para suministrar agua adicional

1. Como usar
1) Antes del primer uso
Retire las películas protectoras, la publicidad y todos los materiales de embalaje del
aparato y de los accesorios. Limpie el aparato y todos los accesorios extraíbles de
acuerdo con las instrucciones de limpieza descritas en este manual de instrucciones.
2) Instale todas las piezas como se muestra en la imagen de abajo.
3) Programas automáticos
El aparato cuenta con 6 programas automáticos. Dependiendo del tipo de harina y de
la selección del programa correspondiente, se pueden producir hasta 600 g de pasta
de forma totalmente automática en una sola pasada. La siguiente tabla le ofrece una
descripción general de los parámetros de cada programa automático.
Puede seleccionar los programas presionando varias veces el botón (A).
NOTA: el suministro de agua se realiza automáticamente durante la
ejecución de los programas automáticos.
Programas
Tipo de harina
recomendado
Suministro
automático de agua
(proporción de agua
y harina)
Cantidad
recomendada
de harina
Tiempo de
amasado
en
minutos
A1
Harina de trigo tipo 00
36 ml / 100 g
400 g
(máx. 600 g)
04:00
A2
Harina de trigo tipo 00
37 ml / 100 g
400 g
(máx. 600 g)
04:00
A3
Harina de trigo tipo 405
Sémola de trigo duro
Mezcla de harina de
trigo/sémola de trigo
duro 50 y 50
38 ml / 100 g
400 g
(máx. 600 g)
03:30

A4
Sémola de trigo duro
italiana
39 ml / 100 g
400 g
(máx. 600 g)
04:00
A5
Harina integral
36 ml / 100 g
400 g
(máx. 600 g)
07:00
A6
Sin gluten
58 ml / 100 g
400 g
(máx. 600 g)
03:00
SUGERENCIA: opcionalmente, a través del orificio de entrada de agua, puede
agregar un poco de aceite de oliva a los programas A1 – A4.
4) Programas semiautomáticos
El aparato cuenta con 2 programas semiautomáticos para producir hasta 600 g de
pasta en una pasada, a partir de recetas individuales con los ingredientes de su
elección. A diferencia de los programas automáticos, usted debe agregar el líquido
manualmente. La siguiente tabla le ofrece una descripción general de los parámetros
de cada programa semiautomático.
Puede seleccionar los programas presionando varias veces el botón (M).
NOTA: la pantalla muestra una sugerencia de la cantidad requerida de
líquido en función de la harina introducida. Vierta el líquido de manera
lenta y uniforme a través del orificio de entrada de agua.
Programas
Tipo de harina
recomendado
Suministro
automático de agua
(proporción de agua
y harina)
Cantidad
recomendada
de harina
Tiempo
de
amasado
en
minutos
M1
Tipo 00 o tipo
550
1 yema de huevo
(tamaño M/L) por
200 g de harina
37 ml / 100 g
(mezcle la yema de
huevo en el vaso
medidor y complete
con el agua)
400 g
04:00
M2
Tipo 00 o tipo
550
1 yema de huevo
(tamaño M/L) por
200 g de harina
38 ml / 100 g (ver
programa M1)
400 g
03:00

5) Llenar el depósito de agua
Retire el tanque de agua y llénelo con agua fría pura hasta la marca que está en el
borde superior del tanque. Luego coloque el tanque y empújelo hacia el interior de la
base.
è Si el indicador de agua se enciende en azul, hay suficiente agua en el tanque.
è Si el indicador de agua se enciende en rojo, no hay suficiente agua en el tanque.
6) Encender el aparato
Pulse el botón Encendido/Standby durante 2 segundos para encender el
aparato.
NOTA: si no se presiona ningún otro botón en 2 minutos, el aparato vuelve al
modo de espera.
La escala integrada determina el peso total del aparato.
Una barra giratoria se enciende en la pantalla.
NOTA: No mueva el aparato durante el pesaje.
Después de la verificación, el aparato está en modo de funcionamiento.
è Todos los programas disponibles se muestran en la pantalla.
è Además, la pantalla muestra un "0" parpadeante.
7) Tara de la balanza
IMPORTANTE: Antes de tarar la balanza a la posición cero, asegúrese de
que:
- El aparato está correctamente montado.
- Se insertó la forma de pasta seleccionada.
- El depósito de agua está completamente lleno hasta la marca.
- Todavía no hay harina dentro del recipiente de amasado.
Presione el botón TARAR para equilibrar la balanza.
NOTA: si cambia el peso del aparato después de tarar la balanza, vuelva a tarar.
NOTA: ¡no mueva el aparato durante el pesaje!
Una vez finalizada la tara, el aparato está en modo de funcionamiento.
è Todos los programas disponibles se muestran en la pantalla.
è Además, la pantalla muestra el símbolo "g".

8) Trabajar con programas automáticos
Después de colocar la cantidad deseada de harina y cerrar la tapa, presione
el botón A para seleccionar uno de los programas automáticos.
Para navegar entre los programas presione este botón varias veces.
El programa seleccionado (por ejemplo, A1) parpadea en la pantalla.
Para iniciar el programa seleccionado, presione el botón inicio/parada.

Amasar
El programa automático comienza con el amasado de la masa.
à La pantalla muestra el programa seleccionado de forma
permanente.
à La duración del proceso de amasado se muestra en la pantalla
mediante una secuencia de tiempo descendente.
Además, la pantalla muestra y .
Suministro de agua automático
Al poco tiempo, la cantidad de agua determinada por el programa se
bombea automáticamente al recipiente de amasado a través de la
salida de agua.
La pantalla muestra el símbolo .
Extrudir masa
Una vez finalizado el proceso de amasado, el aparato comienza
automáticamente con la extrusión de la masa.
è Una barra de rotación se enciende en la pantalla durante la
extrusión de la masa.
è La pantalla muestra el símbolo .
Ventilación
Poco después de comenzar la extrusión de la masa, el ventilador
comienza a funcionar.
è La pantalla muestra el símbolo .
Rendimiento eficiente de la masa
Automáticamente se reconoce si queda masa en el recipiente de
amasado y se repite el proceso de amasado o extrusión para asegurar
un rendimiento de masa particularmente alto. Los últimos 10 segundos
del programa se muestran en la pantalla en una secuencia de tiempo
descendente.
Parada automática
Una vez finalizado el programa, el aparato deja de funcionar
automáticamente. Esto se indica mediante una señal acústica de 3
pitidos.
La pantalla muestra “--:--”
Además, la pantalla muestra .
NOTA: si no se presiona ningún otro botón en 2 minutos, el aparato vuelve al modo de
funcionamiento. Si de nuevo no se presiona ningún otro botón en los próximos 2 minutos, el
aparato cambia al modo de espera.

Apagar el aparato
Pulse el botón encendido/standby para poner el aparato en modo de espera.
La pantalla muestra una "b" parpadeante
Trabajar con programas semiautomáticos
NOTA: realice los pasos de 1 a 7 antes de empezar a trabajar
con los programas semiautomáticos. También proporcione el
líquido necesario con anticipación.
Después de colocar la cantidad deseada de harina y cerrar la
tapa, Para navegar entre los programas presione este botón
varias veces.
El programa seleccionado (por ejemplo, M1) parpadea en la
pantalla
Para iniciar el programa seleccionado, presione el botón
inicio/parada.
Amasar
El programa comienza con el amasado de la masa y la pantalla
muestra la cantidad de líquido sugerida (ejemplo 144 ml).
à Se muestra el programa seleccionado de forma permanente.
à Se muestra la cantidad de líquido sugerida y el símbolo “ml”.
Además, la pantalla muestra y .
Suministro de agua manualmente
Vierta el líquido de manera lenta y uniforme en el recipiente de
amasado. 2 minutos antes de que finalice el proceso de
amasado, la pantalla cambia y la duración restante del amasado
se muestra en una secuencia de tiempo descendente.
Extrudir masa
Una vez finalizado el proceso de amasado, el aparato
comienza automáticamente con la extrusión de la masa.
La barra de rotación se enciende en la pantalla durante la
extrusión de la masa. Además, la pantalla muestra el
símbolo .
Ventilación
Poco después de comenzar la extrusión de la masa, el ventilador comienza a
funcionar.

è La pantalla muestra el símbolo .
Rendimiento eficiente de la masa
Automáticamente se reconoce si queda masa en el recipiente de
amasado y se repite el proceso de amasado o extrusión para asegurar
un rendimiento de masa particularmente alto. Los últimos 10 segundos
del programa se muestran en la pantalla en una secuencia de tiempo
descendente.
Parada automática
Una vez finalizado el programa, el aparato deja de funcionar
automáticamente. Esto se indica mediante una señal acústica de 3
pitidos. La pantalla muestra “--:--”
Además, la pantalla muestra .
NOTA: si no se presiona ningún otro botón en 2 minutos, el aparato
vuelve al modo de funcionamiento. Si de nuevo no se presiona ningún
otro botón en los próximos 2 minutos, el aparato cambia al modo de
espera.
Apagar el aparato
Pulse el botón encendido/standby para poner el aparato en modo de espera.
La pantalla muestra una "b" parpadeante.
9) Amasado manual de la masa
Puede seleccionar la función presionando el botón AMASAR.
NOTA: El proceso se puede detener en cualquier momento. Presione
el botón AMASAR una vez más.
El aparato inicia el proceso de amasado durante un máximo de
10 minutos.
è La duración del proceso de amasado se muestra en la pantalla
mediante una secuencia de tiempo descendente.
è Además, la pantalla muestra y .
Parada automática
Una vez finalizado el programa, el aparato deja de funcionar
automáticamente. Esto se indica mediante una señal acústica de 3
pitidos. La pantalla muestra “--:--”
Además, la pantalla muestra .
NOTA: si no se presiona ningún otro botón en 2 minutos, el aparato
vuelve al modo de funcionamiento. Si de nuevo no se presiona ningún otro botón en los
próximos 2 minutos, el aparato cambia al modo de espera.

10) Extrusión manual de la masa
Puede seleccionar la función presionando el botón EXTRUDIR.
NOTA: El proceso se puede detener en cualquier momento. Presione
el botón EXTRUDIR una vez más.
El aparato comienza a extrudir la masa.
è La barra de rotación se enciende en la pantalla durante la
extrusión de la masa. Además, la pantalla muestra los símbolos
y .
Ventilación
Poco después de comenzar la extrusión de la masa, el ventilador
comienza a funcionar. La pantalla muestra el símbolo .
Rendimiento eficiente de la masa
Automáticamente se reconoce si queda masa en el recipiente de
amasado y se repite el proceso de amasado o extrusión para
asegurar un rendimiento de masa particularmente alto. Los últimos
10 segundos del programa se muestran en la pantalla en una
secuencia de tiempo descendente.
Parada automática
Una vez finalizado el programa, el aparato deja de funcionar
automáticamente. Esto se indica mediante una señal acústica de 3 pitidos.
La pantalla muestra “--:--”. Además, la pantalla muestra .
NOTA: si no se presiona ningún otro botón en 2 minutos, el aparato vuelve al modo de
funcionamiento. Si de nuevo no se presiona ningún otro botón en los próximos 2 minutos,
el aparato cambia al modo de espera.
11) Suministro de agua adicional
Puede seleccionar la función presionando el botón de agua.
La bomba se pone en marcha y se suministran 5 ml de agua al recipiente
de amasado por cada pulsación del botón.
è Mientras dure el suministro de agua, la pantalla muestra el
símbolo .
NOTA: El suministro de agua adicional se puede repetir varias veces hasta 30 segundos
antes del final del proceso de amasado. Tenga cuidado con la cantidad de líquido para
que la masa no se vuelva demasiado pegajosa.
12) Finalizar el programa/función antes de tiempo
Para finalizar un programa o función de forma prematura, presione el
botón inicio/parada o encendido/standby.

13) Apagar el aparato de forma permanente
Para apagar el aparato permanente y de manera segura, desconecte el
enchufe del tomacorriente después de cada uso.
CONSEJOS ÚTILES PARA UNA BUENA PASTA
Elaboración de pastas
• Utilice harina de fuerza o moderadamente de fuerza.
• Para asegurar una buena pasta, use agua en el volumen correcto de acuerdo con el valor
en la pantalla digital o la tabla de referencia. En invierno, puede aumentar de 5 a 10 ml
de agua. En verano, puede reducir de 5 a 10 ml de agua.
• Agregar 3-5 g de sal dentro del agua puede hacer que la pasta sea más masticable.
Agregar 3-5 ml de aceite puede suavizar la pasta.
Cocción de pastas
• No deje la pasta mucho tiempo antes de consumir, la pasta fresca tiene mejor sabor.
• Adapte el método frío-calor (añadir agua fría al hervir, rehacerlo varias veces durante la
cocción) para cocinar durante unos 8 minutos.
• Ajuste el tiempo de cocción según ancho y cantidad y de pasta.
Almacenamiento de pastas
• Para almacenar la pasta, use un paquete adecuado que proteja la frescura.
La masa está demasiado
seca, recomendamos
añadir un poco de agua.
La masa está bien
La masa está demasiado
húmeda, recomendamos
agregar un poco de harina.

LIMPIEZA Y MANTENIMIENTO
1) Después de usar el aparato, desenchufe el cable de
alimentación del tomacorriente y desmonte las
partes.
2) Las piezas desmontadas (aparte de la carcasa)
deben limpiarse y secarse.
3) 1. Seque los moldes o póngalos en el refrigerador
durante media hora, luego golpéelos con fuerza para
que la harina adherida se caiga fácilmente.
2. También puede utilizar el cepillo de limpieza. No
se recomienda remojar los moldes en agua, ya que
puede hacer que la harina adherida se vuelva
pegajosa y no sea fácil de limpiar.
4) Mantenga el molde, el cepillo de limpieza y la taza
medidora en lugares secos y no los exponga a la luz
solar directa.
ÍNDICES DE SEGURIDAD
Voltaje nominal
220 V
Rango de capacidad
Harina: 200-600g
Potencia nominal
180
W
Frecuencia nominal
50 Hz
Rango de escala
electrónica
0-5
kg
Precisión de la balanza
electrónica
2g
Medio ambiente
Temperatura: 0-40 grados; humedad: ≤ 90%

SOLUCIÓN DE PROBLEMAS
Problema
Posible causa
Posible solución
La máquina no funciona
después de enchufar y
presionar el botón de inicio.
El cable de alimentación
no está instalado
correctamente.
Instale el cable de alimentación
correctamente.
La autoprotección de
control de temperatura
del motor está activada.
Deje enfriar de 20 a 30 minutos
antes de usarla nuevamente.
La tapa de la taza de
agitación no está
instalada
correctamente.
Instale la tapa de la taza de
agitación correctamente.
Luces encendidas y la
máquina no funciona.
No presionó ningún
botón.
Seleccione la función y presione el
botón
Auto averías de la
máquina.
Lleve la máquina a un centro de
servicios local autorizado.
La máquina se detiene durante
el proceso de trabajo.
La cantidad de
ingredientes no es la
correcta, la sobrecarga
produce atascamiento y
la máquina deja de
funcionar.
Siga estrictamente la “tabla de
proporciones” para agregar
ingredientes. Agregue agua si está
demasiado seco y revuelva para
formar la pasta. Si está demasiado
húmedo, agregue harina y
seleccione “extrudir pasta”.
Hay otros componentes
en la harina, la
sobrecarga produce
atascamiento y la
máquina deja de
funcionar.
Apague y limpie la máquina.
La autoprotección de
control de temperatura
del motor está activada.
Deje enfriar de 20 a 30 minutos
antes de usarla nuevamente.
No hay respuesta al presionar
los botones.
Intervalo de descanso
demasiado corto, el
sistema no se reinicia.
Reutilizar después de 3 minutos.
La máquina está en
proceso.
Caso normal.
Auto averías de la
máquina.
Lleve la máquina a un centro de
servicios local autorizado.
La pasta se rompe fácilmente.
No está utilizando
harina de proteína
simple o fuerte.
Elegir harina de proteína simple o
fuerte.
La proporción de agua y
harina no es adecuada.
Añadir harina o agua según
corresponda.

La pasta se pega en el molde.
La proporción de agua y
harina no es adecuada.
Añadir harina o agua según
corresponda.
Exceso de sobras de harina en
la taza para revolver.
Bajo voltaje.
Utilice un estabilizador de voltaje
doméstico.
Orificio bloqueado.
Limpie los orificios del aparato.
La cantidad de
ingredientes no es la
correcta.
Siga estrictamente la “tabla de
proporciones” para agregar
ingredientes.
Alarma de luz o sonido
activada.
La máquina está
bloqueada.
Apague y limpie la máquina.
Siga estrictamente la “tabla de
proporciones” para agregar
ingredientes. Agregue agua si está
demasiado seco y revuelva para
formar la pasta. Si está demasiado
húmedo, agregue harina y
seleccione “extrudir pasta”.

CÓDIGOS DE ERROR
Códigos de error
Posible causa
Posible solución
E02
La función no se activa porque la tapa
está abierta.
Cierre la tapa y seleccione
la función nuevamente.
E05
Sensor de temperatura defectuoso.
Servicio postventa.
E06
Cortocircuito del sensor de temperatura.
Servicio postventa.
E09
Queda muy poca agua o hay residuos
en la taza.
Ajuste la cantidad de agua
y limpie los residuos.
E14
Demasiada harina.
Agregue 200-600g de
harina.
E15
Exceso de residuos en la taza
agitadora.
Elimine los residuos.
E17
Sensor de ponderación roto.
Servicio postventa.
Nota: si los problemas descritos anteriormente no se puede resolver con las
soluciones propuestas, no desmonte el aparato usted mismo, diríjase al centro de
servicio posventa local.
MEDIO AMBIANTE
ATENCIÓN :
No se deshaga de este producto como lo hace con otros productos del hogar. Existe
un sistema selectivo de colecta de este producto puesto en marcha por las
comunidades, debe de informarse en su ayuntamiento acerca de los lugares en los
que puede depositar este producto. De hecho, los productos eléctricos y electrónicos
pueden contener substancias peligrosas que tienen efectos nefastos para el medio ambiente o
para la salud humana y deben ser reciclados. El símbolo aquí presente indica que los equipos
eléctricos o electrónicos deben de ser cuidadosamente seleccionados, representa un recipiente
de basura con ruedas marcado con una X.
Adeva SAS / H.Koenig Europe - 8 rue Marc Seguin, 77290 Mitry-Mory, France
www.hkoenig.com - https://sac.hkoenig.com/ - Tél: +33 1 64 67 00 05

ITALIANO
Istruzioni di sicurezza
Si prega di seguire le regole per evitare incidenti
causati da uso improprio.
Attenzione:
1. Si prega di non togliere o inserire la spina con le mani
bagnate, onde evitare scosse elettriche.
2. Non mettere oggetti solidi nella bocca dell'apparecchio.
Non togliere il coperchio e non toccare le lame, evitare
incidenti.
3. Si prega di non immergere l'apparecchio in liquidi, onde
evitare elettrici.
Istruzioni prima dell'uso
1. Pulisci lo stampo prima di utilizzare il prodotto. Non
mettere cose pesanti sopra di esso.
2. Le persone disabili e le persone prive di esperienza
operativa non possono utilizzare il prodotto a meno che non
siano sorvegliate. Tenere i bambini lontani dal prodotto.
3. Questo prodotto è pensato solo per utilizzo domestico.
4. Non smontare o riparare il prodotto.
5. Il prodotto è un elettrodomestico, installato la messa a
terra dell'impianto elettrico domestico sia ben collegato.
6. Si prega di controllare se l'impianto elettrico, la spina, il
cavo e la presa siano a posto. In caso di danni, chiamare il
centro di assistenza. Non cercare di riparare da soli, onde
evitare pericoli
7. Che le parti smontabili siano tutte installate
correttamente, onde evitare pericoli.

8. Questo prodotto ha un collegamento ad Y, se l'impianto
elettrico è danneggiato, è necessario chiedere l'intervento
di un professionista, onde evitare pericoli.
9. Questo apparecchio può essere usato da persone con
ridotte capacità fisiche, sensoriali o mentali o con
mancanza di esperienza o conoscenza, a condizione che
siano sorvegliate o istruite sull'uso sicuro dell'apparecchio
e che comprendano pienamente i potenziali pericoli.
10. La pulizia e la manutenzione non devono essere
eseguite da bambini a meno che non hanno almeno 8 anni
di età e siano supervisionati da un adulto.
11. Tenere l'apparecchio e il cavo di alimentazione fuori
dalla portata dei bambini di età inferiore a 8 anni.
12. Quando si utilizzano apparecchiature elettriche, devono
essere sempre prese precauzioni di sicurezza per
prevenire il rischio di incendio, scosse elettriche e/o
derivanti da un uso improprio.
13. Rispetta che la tensione nominale sulla targhetta
corrisponda alla tensione principale dell'impianto elettrico
domestico. In caso contrario, contattare il rivenditore e non
collegare l'unità
14. Il dispositivo non deve essere utilizzato se è caduto, se
sono visibili segni evidenti di danneggiamento o se
presenta perdite.
15. Tenere questo documento a portata di mano e
consegnalo al futuro proprietario in caso di trasferimento
dell'apparecchio.

16. Non utilizzare questo apparecchio se ha un cavo o una
spina danneggiata, se non funziona correttamente o se è
stato danneggiato o è caduto. Se il cavo di alimentazione è
danneggiato, deve essere sostituito dal produttore o dal
suo agente di servizio o da una persona altrettanto
qualificata, onde evitare pericoli.
17. Questo dispositivo non è destinato all'uso da parte di
persone con capacità sul piano fisico, mentale o sensoriale
o prive di esperienza e conoscenza (compresi i bambini), a
meno che non siano monitorati o se hanno avuto istruzioni
sull'uso dell' apparecchio da una persona responsabile
della loro sicurezza. I bambini devono essere sorvegliati
per assicurarsi che non giochino con il dispositivo.
18. Il dispositivo non è concepito per essere azionato da un
timer esterno o da un sistema di controllo remoto
19. Prima di pulire l'apparecchio,controllare che sia
scollegato dalla corrente.
20. La macchina è utilizzata solo per uso domestico e per
interni.
21. Non immergere mai l'apparecchio, il cavo di
alimentazione o la spina in acqua o altri liquidi
22. L'apparecchio deve essere sempre scollegato quando
non è in uso e prima di montarlo, smontarlo o pulirlo e prima
di cambiare un accessorio. evitare il contatto con parti in
movimento.
23. Il vostro apparecchio è stato progettato esclusivamente
per un uso domestico. Non è destinato all'uso nelle
seguenti situazioni che non sono coperte dalla garanzia:
- in cucine per il personale in negozi, uffici e altri
ambienti professionali,
- in ostelli agricoli,

- da ospiti in hotel, motel e altri ambienti
residenziali,
- in ambienti tipo bed and breakfast.
Precauzioni durante l'utilizzo.
1. Non mettere oggetti solidi nel robot, onde evitare che il prodotto si danneggi.
2. Non mettere questo prodotto vicino al luogo caldo, magnetico, infiammabile ed esplosivo,
onde evitare incidenti.
3. La proporzione di farina e acqua deve essere conforme al <scheda di riferimento della
quantità di pasta e ingredienti> onde evitare il danneggiamento delle parti
4. Quando si collega l'alimentazione, verificare che tutte le parti siano installate correttamente
e scollegare l'alimentazione se non si utilizza l'apparecchio.
5. Si prega di utilizzare l'apparecchio su una superficie piana, si prega di non utilizzarlo su
indumenti come moquette, carta e plastica.
6. Quando si svuota, si regola, si pulisce o si cambiano le parti, è necessario scollegare la
corrente elettrica.
7. Quando si scollega l'alimentazione, utilizzare la mano per tenere e staccare la spina invece
di tirare il cavo.
8. Questo prodotto può essere utilizzato solo con connettore specifico, contenitore e altre parti.
Non utilizzare parti di altri prodotti, onde evitare incidenti.
9. Asciugare l'acqua prima di impastare in modo che il sapore della pasta non venga alterato.
10. Il prodotto non può funzionare in modo costante per lunghi periodi, durante la preparazione
della pasta, è necessario fermare la macchina per 20 minuti.
11. il prodotto su una superficie piana, non lasciare che i piedini di presa si alzino posare da terra.
Non toccare il prodotto né spostarlo onde evitare di non riuscire a fare la pasta..
Precauzioni dopo l'uso
1. Si prega di lavare l'apparecchio subito dopo l'utilizzo, le parti che sono in contatto con il cibo
devono essere lavate con acqua pulita. Durante la pulizia e lo smontaggio delle parti, è necessario
prestare attenzione onde evitare incidenti.
2. Non riscaldare direttamente il prodotto, non inserirlo in lavastoviglie o in acqua calda al di
sopra di 60 gradi. Non usare lana d'acciaio e detergenti abrasivi e liquidi corrosivi per lavare il
prodotto.
3. Si prega di asciugare completamente lo stampo prima dell'utilizzo. Durante il non utilizzo,
spegnere l'interruttore. Se si desidera smaltire questo apparecchio, si prega di rivolgersi ad un
centro di smaltimento qualificato. Tagliare il cavo elettrico prima di smaltirlo.

Nome e funzione delle parti
1. Coperchio
2. Pannello di controllo
3. contenitore
4. alloggiamento
5. Fori di ingresso dell'acqua
6. Asta di agitazione
7. Vaso contenitore
8. Asta di spremitura
9. Staffa stampo
10. Copertura dello stampo
11. Stampo per pasta
12. contenitore
13. Misurino per acqua
14. Misurino per farina
15. Spazzola per la pulizia
16. Tagliapasta
------ 16

Spaghetti
fini
Spaghetti
normali
Spaghetti
spessi
Tagliatelle
a nastro
stretto
Tagliatelle
a nastro
largo
Penne
Lasagne
Utilizzo
Prima di utilizzare il prodotto, lavare le parti a contatto diretto con gli alimenti.
A
Tasto ON/Standby – per accendere o spegnere l'apparecchio
B
Pulsante Start/Stop – per avviare o arrestare l'apparecchio
C
Pulsante A – per selezionare uno dei 6 programmi automatici
D
Pulsante M – per selezionare uno dei 6 programmi semi automatici
E
Display
F
Pulsante IMPASTO – per iniziare a impastare manualmente
G
Pulsante ESTRUSIONE – per iniziare a impastare manualmente
H
Tasto BILANCIA – per tarare la bilancia
I
Pulsante ACQUA – per un'ulteriore aggiunta di acqua

1. Come usare l'apparecchio
1) Prima del primo utilizzo
Rimuovere eventuali pellicole protettive, materiale pubblicitario e di imballaggio dall'apparecchio e
dagli accessori. Pulire gli apparecchi e tutte le parti accessorie rimovibili secondo le istruzioni di
pulizia contenute in questo manuale.
2) Installa tutte le parti come indicatore nell'immagine qui sotto
3) Programmi automatici
L'apparecchio dispone di 6 programmi automatici. A seconda del tipo di farina e della selezione del
programma corrispondente, è possibile produrre fino a 600 g di pasta in un un unica sessione in
modo completamente automatico. La tabella seguente offre una panoramica dei parametri dei
singoli programmi automatici.
È possibile selezionare i programmi premendo più volte il pulsante A.
NOTA : l'aggiunta dell'acqua avviene automaticamente durante i programmi
automatici.
Programma
Tipo di farina
consigliato
Aggiunta Acqua
automatica
(rapporto acqua e
farina)
Quantità di farina
consigliata
Tempo di
impasto in
minuti
A1
Farina di grano
tenero tipo 00
Circa. 36 ml / 100 g
400 g
(massimo 600 g)
04:00

A2
Farina di grano
tenero tipo 00
Circa. 37 ml / 100 g
400 g
(massimo 600 g)
04:00
A3
Farina di grano
tenero tipo 405
Semola di grano
duro
Farina di grano
tenero/semola di
grano duro misto
50:50
Circa. 38 ml / 100
g
400 g
(massimo 600 g)
03:30
A4
Farina di semola
di grano duro
italiana
Circa. 39 ml / 100 g
400 g
(massimo 600 g)
04:00
A5
Farina integrale
Circa. 36 ml / 100 g
400 g
(massimo 600 g)
07:00
A6
Senza glutine
Circa. 58 ml / 100 g
400 g
(massimo 600 g)
03:00
SUGGERIMENTO: attraverso il foro di riempimento è possible, qualora lo si desideri, aggiungere
un po' di olio d'oliva ai programmi A1-A4
4) Programmi semi automatici
Sono disponibili due programmi semi automatici per produrre fino a 600 g di pasta in una sola
sessione, da singole ricette con ingredienti a scelta. A differenza dei programmi automatici, è
necessario aggiungere l’acqua manualmente. La tabella seguente fornisce una panoramica dei
parametri di entrambi i programmi semi automatici.
È possibile selezionare i programmi premendo più volte il pulsante M.
NOTA: il display mostra un suggerimento per la quantità di liquido
necessaria in base alla farina inserita. Il liquido deve essere versato
molto lentamente ed in modo uniforme attraverso il foro di rabbocco.
Programma
Tipo di farina
consigliato
Aggiunta acqua
automatica (rapporto
acqua e farina)
Quantità di
farina
consigliata
Tempo di impasto
in minuti
M1
Tipo 00 o tipo 550
1 tuorlo d'uovo
(misura M/L) per
200 g di farina
Circa. 37 ml / 100 g
(mescolare il tuorlo
d'uovo nel misurino,
riempire con acqua)
400 g
04:00
M2
Tipo 00 o tipo 550
1 tuorlo d'uovo
(misura M/L) per
200 g di farina
Circa. 38 ml / 100 g
vedi programma M1
400 g
03:00

5) Riempire il serbatoio dell'acqua
Rimuovere il serbatoio dell'acqua e riempirlo con acqua pura e fredda fino al segno sul bordo
superiore del serbatoio.
Quindi spingere il serbatoio dell'acqua nella base fino in fondo.
è Se la spia luminosa sul serbatoio dell'acqua si accende in blu, c'è abbastanza acqua nel
serbatoio
è Se la spia luminosa sul serbatoio dell'acqua si accende in rosso, non c'è abbastanza acqua
nel serbatoio
6) Accensione dell'apparecchio
Premere il pulsante ON/Standby per circa 2 secondi per accendere
l'apparecchio.
NOTA: se entro 2 minuti non viene più premuto alcun tasto, l'apparecchio torna
in modalità standby.
La bilancia integrata è settata sul peso totale dell'apparecchio.
Sul display si accende una barra rotante.
NOTA: Non spostare l'apparecchio durante la pesatura.
Dopo il controllo, l'apparecchio passa in modalità di funzionamento.
è Tutti i programmi disponibili sono visualizzati sul display
è Inoltre il display mostra uno “0” lampeggiante
7) Taratura della bilancia
IMPORTANTE: Prima di tarare la bilancia in posizione zero, assicurarsi che:
- L'apparecchio sia assemblato correttamente
- Sia inserita la forma di pasta selezionata
- Il serbatoio dell'acqua sia completamente pieno fino alla tacca
- Non ci sia ancora farina all'interno del recipiente per impastare

Premere il pulsante BILANCIA per tarare la bilancia.
NOTA: se si modifica il peso dell'apparecchio dopo aver tarato la bilancia, è necessaria una nuova
taratura.
NOTA: non muovere l'apparecchio durante la pesa!
Al termine della taratura, l'apparecchio è in modalità di funzionamento.
è Tutti i programmi disponibili vengono visualizzati sul display.
è Inoltre compare il simbolo “g”.
8) Funzionamento con programmi automatici
Dopo aver immesso la quantità di farina desiderata e dopo aver chiuso il coperchio,
premere il pulsante A per selezionare uno dei programmi automatici.
È possibile passare da un programma all'altro premendo più volte questo pulsante.
Sul display lampeggia il programma selezionato (ad es. A1).
Per avviare il programma selezionato premere il pulsante Start/Stop.

Impastare
Il programma automatico inizia ad impastare la pasta.
à Il display mostra in modo permanente il programma selezionato.
àLa durata del processo di impasto viene visualizzata sul display con una
sequenza temporale decrescente. Inoltre, appaiono le icone e .
Aggiunta automatica dell'acqua
Dopo poco tempo, la quantità di acqua determinata dall'elettronica viene
pompata automaticamente nel recipiente per impastare tramite l'uscita
dell'acqua.
Il display mostra il simbolo
Estrusione di pasta
Al termine del processo di impasto, l'apparecchio inizia automaticamente
con l'estrusione dell'impasto.
è Durante l'estrusione della pasta sul display si accende una barra di
rotazione.
è Inoltre, appare l’icona
Ventilazione
Poco dopo l'inizio dell'estrusione dell'impasto, il ventilatore inizia a
funzionare.
è Il display mostra il simbolo
Efficiente resa dell'impasto
L'elettronica riconosce se c'è ancora dell'impasto nel contenitore
dell'impasto e garantisce una resa di impasto particolarmente elevata
ripetendo il processo di impasto o di estrusione.
Gli ultimi 10 secondi del programma vengono visualizzati sul display in
sequenza temporale decrescente.
Arresto automatico
Al termine del programma, l'apparecchio smette di funzionare
automaticamente.
Ciò è indicato da un triplo segnale acustico
Il display mostra ”--:--”
Inoltre, appare l’icona
NOTA: se entro 2 minuti non viene più premuto alcun tasto, l'apparecchio torna in modalità di
funzionamento. Se non viene più premuto alcun tasto entro i successivi 2 minuti, l'apparecchio
passa in modalità standby.

Spegnimento dell'apparecchio
Premere il pulsante ON/Standby, per portare l'apparecchio in modalità standby.
Il display mostra una “b” lampeggiante.
9) Lavorare con programmi semi automatici
NOTA: eseguire i passaggi da 1 a 7, prima di iniziare a lavorare con i
programmi semiautomatici. Fornire anche il liquido da aggiungere in
anticipo.
Dopo aver immesso la quantità di farina desiderata e dopo aver chiuso il
coperchio, premere il pulsante M per selezionare uno dei programmi.
È possibile passare da un programma all'altro premendo più volte questo
pulsante.
Sul display lampeggia il programma selezionato (ad es. M1).
Per avviare il programma selezionato premere il pulsante Start/Stop.
Impastare
Il programma automatico si avvia con l'impasto dell'impasto e viene
visualizzata la quantità di liquido suggerita (es. 144 ml).
Il display mostra in modo permanente il programma selezionato.
La quantità di liquido suggerita e il simbolo “ml” si accendono.
Inoltre, appaiono le icone e
Aggiunta manuale dell'acqua
Versare la quantità di liquido suggerita lentamente e in modo uniforme nel
recipiente per impastare.
2 minuti prima della fine del processo di impasto, il display cambia e la
durata di impasto rimanente viene visualizzata in una sequenza temporale
decrescente.
Estrusione della pasta
Al termine del processo di impasto, l'apparecchio inizia automaticamente
con l'estrusione dell'impasto.
Una barra rotante si illumina nel display durante l'estrusione dell'impasto.
Inoltre, appare l’icona .

Ventilazione
Poco dopo l'inizio dell'estrusione dell'impasto, la ventola inizia a
funzionare.
è Il display mostra il simbolo
Efficiente resa dell'impasto
L'elettronica riconosce se c'è ancora dell'impasto nel contenitore
dell'impasto e garantisce una resa di impasto particolarmente elevata
ripetendo il processo di impasto o di estrusione.
Gli ultimi 10 secondi del programma vengono visualizzati sul display in
sequenza temporale decrescente.
Arresto automatico
Al termine del programma, l'apparecchio smette di funzionare
automaticamente.
Ciò è indicato da un triplo segnale acustico
Il display mostra ”--:--”
Inoltre, appare l’icona
NOTA: se entro 2 minuti non viene più premuto alcun tasto, l'apparecchio torna in modalità di
funzionamento. Se non viene più premuto alcun tasto entro i successivi 2 minuti, l'apparecchio
passa in modalità standby.
Spegnimento dell'apparecchio
Premere il pulsante ON/Standby, per portare l'apparecchio in modalità standby.
Il display mostra una “b” lampeggiante.
10) Impastamento manuale dell'impasto
È possibile selezionare la funzione premendo il pulsante IMPASTO.
NOTA: Il processo può essere interrotto in qualsiasi momento. Premere di
nuovo il pulsante IMPASTO
L'apparecchio avvia il processo di impasto per una durata di max 10 min.
è La durata del processo di impasto è mostrata in una sequenza
temporale decrescente.
è Inoltre, appaion le icone e

Arresto automatico
Al termine del programma, l'apparecchio smette di funzionare
automaticamente.
è Ciò è indicato da un triplo segnale acustico.
è Inoltre, appare l’icona .
NOTA: se entro 2 minuti non viene più premuto alcun tasto, l'apparecchio torna in modalità di
funzionamento. Se entro 2 minuti non viene più premuto alcun tasto, l'apparecchio torna in modalità
standby.
11) Estrusione manuale della pasta
È possibile selezionare la funzione premendo il pulsante ESTRUSIONE.
NOTA: Il processo può essere interrotto in qualsiasi momento. Premere
di nuovo il pulsante ESTRUSIONE.
L'apparecchio inizia a estrudere l'impasto.
è Una barra rotante si illumina nel display durante l'estrusione
dell'impasto.
è Inoltre appaiono le icone e .
Ventilazione
Poco dopo l'inizio dell'estrusione dell'impasto, la ventola inizia a
funzionare.
è Il display mostra il simbolo
Efficiente resa dell'impasto
L'elettronica riconosce se c'è ancora dell'impasto nel contenitore
dell'impasto e garantisce una resa di impasto particolarmente elevata
ripetendo il processo di impasto o di estrusione.
Gli ultimi 10 secondi del programma vengono visualizzati sul display in
sequenza temporale decrescente.
Arresto automatico
Al termine del programma, l'apparecchio smette di funzionare
automaticamente.
è Ciò è indicato da un segnale acustico 3 volte.
è Inoltre, appare l’icona .

NOTA: se entro 2 minuti non viene più premuto alcun tasto, l'apparecchio torna in modalità di
funzionamento. Se entro 2 minuti non viene più premuto alcun tasto, l'apparecchio torna in modalità
standby.
12) Ulteriore aggiunta d’acqua
È possibile selezionare la funzione premendo il pulsante dell'acqua.
La pompa si avvia e ad ogni pressione del tasto vengono pompati altri 5 ml
nel contenitore dell'impasto.
è Per tutta la durata dell'erogazione dell'acqua il display visualizza il
simbolo
NOTA: l'erogazione di acqua aggiuntiva può essere ripetuta più volte fino a 30 secondi prima della
fine del processo di impasto. Ma attenzione, se c'è troppo liquido l'impasto diventa troppo
appiccicoso e può essere estruso solo in misura limitata.
13) Interruzione anticipata del programma/della funzione
Per terminare prematuramente un programma o una funzione,
premere il pulsante Start/Stop o ON/Standby
14) Spegnimento permanente dell'apparecchio
Per uno spegnimento permanente e sicuro, scollegare la spina di
alimentazione dopo ogni utilizzo.
Consigli per fare una buona pasta
Fare la pasta
Si prega di utilizzare farina dura o moderatamente dura.
Per produrre una buona pasta, utilizzare acqua nella giusta quantità in base al valore sul display
digitale o sulla tabella di riferimento. In inverno, è possibile aumentare di 5-10 ml l'acqua. In tenuta,
è possibile ridurre di 5-10 ml l'acqua
L'aggiunta di 3-5 g di vendita all'interno dell'acqua può rendere la pasta più masticabile. L'aggiunta
di 3-5 ml di olio può rendere la pasta più liscia.

Cottura della pasta
Si prega di mangiare la pasta in tempo poiché la pasta fresca ha un sapore migliore.
del metodo caldo-freddo (aggiungere acqua fredda durante l'ebollizione, utilizzare ripetere per un
paio di volte) per cuocere per circa 8 minuti (in base a larghezza e quantità e della pasta per
regolare il tempo di cottura)
Conservazione della pasta
Usa il contenitore di protezione della freschezza per conservare la tua pasta
L'impasto è troppo
secco, si consiglia di
aggiungere un pò
d'acqua
Impasto perfetto
L'impasto è troppo
umido, si consiglia di
aggiungere un pò di
farina
Pulizia e manutenzione
①
Dopo aver finito di fare la pasta, staccare la spina e
smontare le parti.
②
Le parti smontate (a parte l'alloggiamento) devono
essere pulite e asciugate.
③
1) Asciugare gli stampini o metterli gli stampini in
frigorifero per mezz'ora, quindi sbattere con forza in modo
che la farina attaccata agli stampini possa cadere
facilmente.
2) è possibile anche usare la spazzola per la pulizia. Si
sconsiglia di immergere gli stampini in acqua, poiché la
farina attaccata potrebbe essere difficile da rimuovere.
④
Conservare la spazzola per la pulizia e il misurino in
luoghi asciutti e non esporli alla luce diretta del sole.

Indice di sicurezza
Tensione nominale
220v
Gamma di capacità
Farina: 200-600 g
Potenza nominale
180 w
Frequenza nominale
50 hz
Gamma bilancia
elettronica
0-5kg
Precisione della
bilancia elettronica
2g
Temperatura di Utilizzo
Temperatura: 0-40 gradi; bagnato: 90% UR
Risoluzione dei problemi
problemi
Causa
Soluzioni
la macchina non funziona
dopo l'accensione e
premendo il pulsante di
avvio
1. cavo di alimentazione non
installato correttamente
1. fornire correttamente il
cavo di alimentazione
2.auto protezione per il
funzionamento a lungo termine del
motore
2. Riutilizzare dopo il
raffreddamento per 20-30
minuti
3. Contenitore o coperchio non
installati correttamente
3. presentare correttamente
luci accese, la macchina
non funziona
1.Nessun pulsante premuto
1. Selezionare la funzione e
premere il pulsante
2. Guasti automatici della macchina
2.riparare presso il centro di
assistenza locale
la macchina si ferma
durante il funzionamento
1. rapporto materiale non corretto,
sovraccarico e blocco
dell'apparecchio
seguire rigorosamente il
“rapporto volume” per
aggiungere gli ingredienti,
aggiungere acqua se troppo
asciutto, mescolare,
selezionare [estrusione
pasta]; se è troppo umido
aggiungere la farina,
mescolare, selezionare
[estrusione la pasta].
2.altri oggetti nella farina,
sovraccarico e blocco
dell'apparecchio
2. spegnere per pulire
3. protezione controllo della
temperatura del motore
3.riutilizzare dopo 20-30
minuti di stop
nessuna risposta quando
si premono i pulsanti
1. Intervallo di spegnimento troppo
breve, sistema non resettato
1. riutilizzare dopo uno
spegnimento 3 minuti
2.la macchina è in funzionamento
2.Funzionalità normale

3. Guasto automatico della
macchina
2. Effettuare la riparazione
presso il centro di
assistenza locale
la pasta si spezza
facilmente
1. utilizzo della farina sbagliata
1. scegliere farina proteica
semplice o dura
2. rapporto acqua e farina non
corretto, aggiungere meno acqua
2.aggiungere farina e acqua
come indicatore
pasta appiccicosa
rapporto acqua e farina non
corretto, aggiungere più acqua
aggiungi acqua e farina
come indicatore
avanzi di farina nel
contenitore per
mescolare
1.bassa tensione
1.usare lo stabilizzatore di
tensione domestico
2. Foro modulo bloccato
2.pulire i fori del modulo
3. errore di corrispondenza del
materiale
3. seguire rigorosamente la
"tabella delle porzioni" per
aggiungere gli ingredienti
Allarme sonoro e
luminoso
la macchina si è bloccata
1.controllare e pulire il
contenitore
2. seguire rigorosamente la
"tabella delle opzioni" per
aggiungere gli ingredienti;
ungere meno acqua,
selezionare 【impastare la
pasta】,mescolare 2
minuti e selezionare
【impastare la pasta】per
ricominciare
Elenco dei codici di errore
Codice di
errore
motivo
Risoluzione dei problemi
E02
Il coperchio non è stato
chiuso e la funzione non è
stata attivata
soddisfare il coperchio e
selezionare il tasto funzione
E05
Sensore di temperatura
aperto
Servizio post vendita
E06
Cortocircuito del sensore
di temperatura
Servizio post vendita
E09
Nel contenitore è troppa
poca acqua o residuo
Regolazione della quantità di
acqua e rimozione dei residui.
E14
Troppa farina
Aggiungere 200-600 g di farina
E15
Residui nella tazza
Eliminare i residui.
E17
Sensore di pesatura rotto
Servizio post vendita
Nota: se il problema di cui sopra non può essere risolto, si prega di non disassemblare
l'apparecchio personalmente, inviarlo al centro di assistenza locale.

AMBIANTE
ATTENZIONE :
Non gettare quest’ apparecchio tra i rifiuti domestici. Per questo tipo di prodotti è
fornito dai comuni un sistema di raccolta e ritiro in zona ed è quindi un dovere
informarsi per conoscere il giusto smistamento del rifiuto. Infatti, i prodotti elettrici ed
elettronici possono contenere sostanze pericolose che hanno effetti dannosi
sull’ambiente o sulla nostra salute e quindi devono essere riciclati. Il simbolo al lato indica che le
apparecchiature elettriche ed elettroniche fanno parte di una raccolta selettiva e differenziata
(rappresentata da un bidone su due ruote sbarrato da una croce.
Adeva SAS / H.Koenig Europe - 8 rue Marc Seguin, 77290 Mitry-Mory, France
www.hkoenig.com - https://assistenza.hkoenig.com - Tél: +33 1 64 67 00 05


-
 1
1
-
 2
2
-
 3
3
-
 4
4
-
 5
5
-
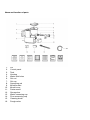 6
6
-
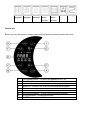 7
7
-
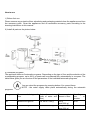 8
8
-
 9
9
-
 10
10
-
 11
11
-
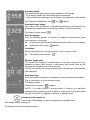 12
12
-
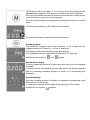 13
13
-
 14
14
-
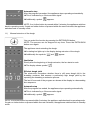 15
15
-
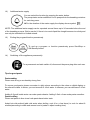 16
16
-
 17
17
-
 18
18
-
 19
19
-
 20
20
-
 21
21
-
 22
22
-
 23
23
-
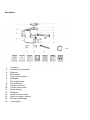 24
24
-
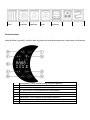 25
25
-
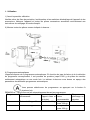 26
26
-
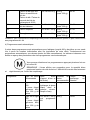 27
27
-
 28
28
-
 29
29
-
 30
30
-
 31
31
-
 32
32
-
 33
33
-
 34
34
-
 35
35
-
 36
36
-
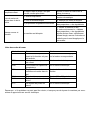 37
37
-
 38
38
-
 39
39
-
 40
40
-
 41
41
-
 42
42
-
 43
43
-
 44
44
-
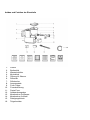 45
45
-
 46
46
-
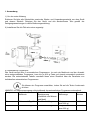 47
47
-
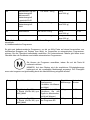 48
48
-
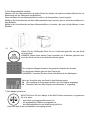 49
49
-
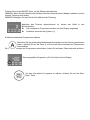 50
50
-
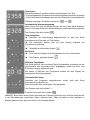 51
51
-
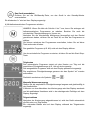 52
52
-
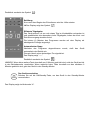 53
53
-
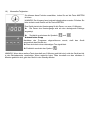 54
54
-
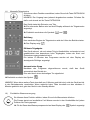 55
55
-
 56
56
-
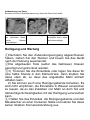 57
57
-
 58
58
-
 59
59
-
 60
60
-
 61
61
-
 62
62
-
 63
63
-
 64
64
-
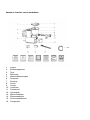 65
65
-
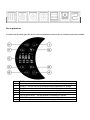 66
66
-
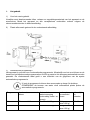 67
67
-
 68
68
-
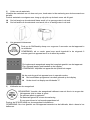 69
69
-
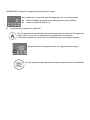 70
70
-
 71
71
-
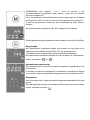 72
72
-
 73
73
-
 74
74
-
 75
75
-
 76
76
-
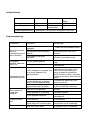 77
77
-
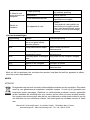 78
78
-
 79
79
-
 80
80
-
 81
81
-
 82
82
-
 83
83
-
 84
84
-
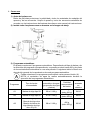 85
85
-
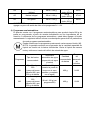 86
86
-
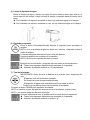 87
87
-
 88
88
-
 89
89
-
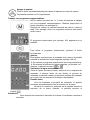 90
90
-
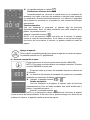 91
91
-
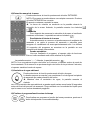 92
92
-
 93
93
-
 94
94
-
 95
95
-
 96
96
-
 97
97
-
 98
98
-
 99
99
-
 100
100
-
 101
101
-
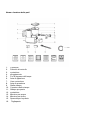 102
102
-
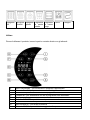 103
103
-
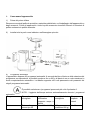 104
104
-
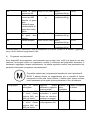 105
105
-
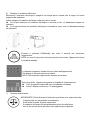 106
106
-
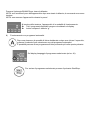 107
107
-
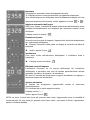 108
108
-
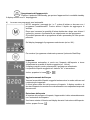 109
109
-
 110
110
-
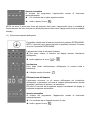 111
111
-
 112
112
-
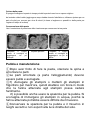 113
113
-
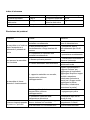 114
114
-
 115
115
-
 116
116
-
 117
117
-
 118
118


in andere talen
- italiano: H Koenig IM HOMY90 Manuale utente
- français: H Koenig IM HOMY90 Manuel utilisateur
- español: H Koenig IM HOMY90 Manual de usuario
- Deutsch: H Koenig IM HOMY90 Benutzerhandbuch
Gerelateerde papieren
Andere documenten
-
Philips HR2358/12 Handleiding
-
Philips HR2353/09R1 Handleiding
-
Unold 68860 de handleiding
-
Philips HR2345/29R1 Handleiding
-
-
Silvercrest SBB 850 EDS A1 Operating Instructions Manual
-
-
Goldstar HB-152CE Instructions & Cooking Manual
-