
GSM-100
USB Microphone
USER MANUAL

USB Microphone

USB Microphone
INDEX
INTRODUCTION ……………………………………….….…….…..……….……….……………………… 4
PRECAUTIONS ……………………………………….….…….…..……….……….…………….…………. 5
FEATURES & SPECIFICATIONS ……………………………………….….…….…..……….………. 6
PRODUCT FUNCTIONS ……………………………………….….…….…..……….……….…………….7
OPERATION INSTRUCTIONS ……………………………………….….…….…..……….……….……7
WARRANTY & REPAIR ……………………………………….….…….…..……….……….……………. 10
LEGALITY & SAFETY ……………………………………….….…….…..……….……….…………….… 11
FCC COMPLIANCE STATEMENT ……………………………………….….…….…..……….……… 12
MANUAL EN ESPAÑOL ……………………………………….….…….…..……….……….…………… 13
MANUEL EN FRANÇAIS ……………………………………….….…….…..……….……….………… 19
HANDBUCH IN DEUTSCH ……………………………………….….…….…..……….……….……… 25
MANUELE IN ITALIANO ……………………………………….….…….…..……….……….………… 31
HANDLEIDING IN HET NEDERLANDS ……………………………………….….…….…..…… 37

USB Microphone
4
Introduction
Thank you for purchasing our GSM-100 USB Microphone. With proper
care & maintenance, your unit will provide years of reliable, uninterrupted
service. The GSM-100 is backed by a 1-year limited warranty*
Preparing for First Use
Please ensure that you find these accessories included with your GSM-
100 USB Microphone:
(1) GSM-100 USB Microphone
(1) User Manual & Warranty
(1) Microphone Stand
(1) USB to Type-C Cable
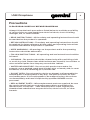
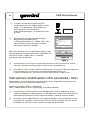
Caution
① All operating instructions should be read before using this
equipment.
② To reduce the risk of electrical shock, do not open the unit. There are
no user replaceable parts inside. Please refer servicing to a qualified
GEMINI service technician. Do not attempt to return the equipment to
your dealer.
③ Do not expose this unit to direct sunlight or to a heat source such as a
radiator or stove.
④ This unit should be cleaned only with a damp cloth. Avoid solvents or
other cleaning detergents.
⑤ When moving this equipment, it should be placed in its original carton
and packaging. This will reduce the risk of damage during transit.
⑥ Do not expose this unit to water or heat.
⑦ Do not use cleaning products or lubricants on the controls or switches.

USB Microphone 5
PLEASE READ CAREFULLY BEFORE PROCEEDING
Always follow the basic precautions listed below to avoid the possibility
of serious injury or even death from electrical shock, short-circuiting,
damages, fire, or other hazards.
• READ INSTRUCTIONS - All the safety and operating instructions should
be read before the product is operated.
• RETAIN INSTRUCTIONS - The safety and operating instructions should
be retained for future reference All the safety and operating instructions
should be read before the product is operated.
• HEED WARNINGS - All warnings on the product and in the operating
instructions should be adhered to.
• FOLLOW INSTRUCTIONS - All operating and use instructions should be
followed.
• CLEANING - The product should be cleaned only with a polishing cloth
or a soft dry cloth. Never clean with furniture wax, benzine, insecticides or
other volatile liquids since they may corrode the cabinet.
• WATER AND MOISTURE - Do not use this product near water, for
example, near a bathtub, wash bowl, kitchen sink, or laundry tub; in a wet
basement; or near a swimming pool; and the like.
• DO NOT OPEN - Do not open the device or attempt to disassemble the
internal parts or modify them in any way. The device contains no user-
serviceable parts. If it should appear to be malfunctioning, discontinue
use immediately and have it inspected by qualified GEMINI service
personnel.
• REPLACEMENT PARTS - When replacement parts are required, be sure
the service technician has used replacement parts specified by the
manufacturer or have the same characteristics as the original part.
Unauthorized substitutions may result in fire, electric shock, or other
hazards.
Precautions

USB Microphone
6
• Specially designed for network teaching, screen recording, video
calls, conference, streaming, game talks, live broadcasting, suitable
for computers, mobile phones and tablets.
• Built-in professional sound card chip, driver-free design for plug
and play, compatible with systems like Windows, iOS, and Android.
• Standard USB 2.0 transmission, high sample rate and ultra-low
delay, make recording and sound playback more clearly.
• With OTG (On-The-Go) function for high-definition recording and
live broadcasting through USB connection with smart phones and
tablets.
• Built-in professional condenser microphone with high sensitivity to
easily capture sound details.
• Microphone gain knob to adjust the volume based on the venue.
• Mute switch to turn on or off the sound signal quickly at any time.
• Real-time monitoring, allows you to adjust microphone volume
according listening situation, to achieve the ideal sound pickup and
recording effect.
• Tap-to-mute sensor with RGB lighting indicator, if the lights is on,
the mic is active, if the light is off, the mic is muted.
• Noise cancelling switch, upward to active noise cancelling system,
downward to close it.
• Standard 5/8 27 threading, can be mounted to most standard
microphone stands.
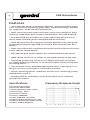
Features
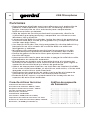
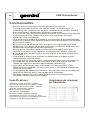
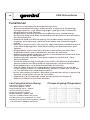
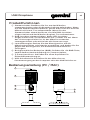
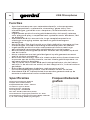
Data Transmission: USB2.0
Sample Rate: 48KHz/16bit
Frequency Response: 20Hz~20KHz
Condenser Type: 14mm
Polar Pattern: Cardioid
Sensitivity: -36dB±3dB
Max SPL: 115dB(THD 1% at 1KHz)
Headphone Output Impedance: 16~60Ω
Headphone Output Power (RMS): 100mW
S/N Ratio: 92dB (A-Weighted)
Specifications Frequency Response Graph

USB Microphone 7
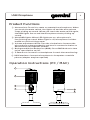
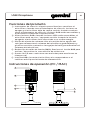
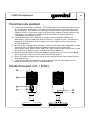
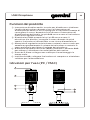
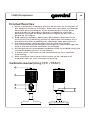
① Mute switch: Touch it to mute or unmute the microphone. When
you touch the mute switch, the lights off and the microphone
stops picking up sound. When you touch the mute switch again,
the RGB lights are on and the microphone starts picking up
sound.
② Mute RGB lights: When LED lights are on, microphone is
live/picking up sound. When light is off, microphone is either
muted or not receiving power.
③ Volume adjustment knob: Turn the clockwise to increase the
microphone volume gradually and turn it counterclockwise to
decrease the microphone volume.
④ Background Noise Reduction (BNR): Press BNR button to turn
noise cancellation on/off.
⑤ 3.5mm Port: Connect to a headphone for real-time monitoring.
⑥ USB interface: Connect microphone to Computer or mobile
phone (adapter may be required)
Product Functions
Operation Instructions (PC / MAC)
4
3
2
5
6
ON OFF
1

USB Microphone
8
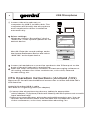
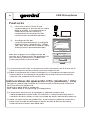
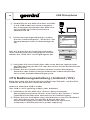
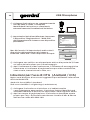
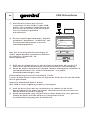
① Connect the microphone to a
computer via USB-C to USB cable. The
computer will identify the microphone
and complete the driver installation
automatically.
Driver settings:
Windows: Set the “Recording” device
“GSM-100” of the system speaker as the
default device.
Mac OS: Enter the sound settings under
the System Preference Device and select
“GSM-100” as the input device.
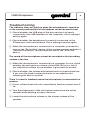
Please note: You will need additional accessories to utilize the GSM-100’s
OTG function.
Android: Standard USB-C cable
iOS: USB-C to Lightning cable (or adapter)
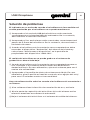
①Connect the microphone to phone or tablet via appropriate
cable/adapter. The phone/tablet will identify the microphone set as audio
input automatically.
②Open your recording app, microphone should be ready to use. You can
monitor Mic & Phone’s audio from the GSM-100’s headphone output.r
video conferences, voice chat, network broadcasting, etc.
2
Connect a headphone or an active speaker to the 3.5mm port on the
back of the microphone for monitoring.
Open the video conference software, instant messaging software or
recording software for video conferences, voice chat, network
broadcasting, etc.
3
4
OTG Operation Instructions (Android /iOS)
Sou nd
Playbck Recording Sounds Communications
Selectarecordingdevicebelowtomodifyitssettings:
Microphone
gemini GSM-100
DefaultDevice
FrontMic
RealtekHighDefinitionAudio
Ready
Configure SetDefault properties
OK Cancel APPLY
Sound Search
SoundEffectsOutput lnput
Sel ect a de vice f or so und in put:
Name
lntema lMicroph one
gemini GSM-100 USB
Built- IN
Type
Sett ings fo r the sel ected d evice :
lnpu t volum e:
lnpu t level :
Outp ut volu me: Mute
Show v olume i n menu ba r
?

USB Microphone 9
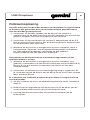
The indicator does not light up when the microphone is turned on
or the sound produced by the microphone cannot be monitored.
① Check whether the USB plug of the microphone is properly
connected to the USB interface of the computer. If not, unplug it
and try again.
② Check whether the headphone is properly connected to the
3.5mm port of the microphone. If not, unplug it and try again.
③ When the microphone is connected to a computer, you need to
turn on the “Recording” device of the system speaker, and select
“Monitor the device” in the properties tab of the “GSM-100”
device.
The sound of the microphone cannot be recorded or the recording
volume is too low.
① When the microphone is connected to a computer for use, check
whether the microphone volume of the GSM-100 is too low. If
yes, adjust the volume to see whether it goes back to normal.
② Check whether the volume adjustment knob is turned down low.
If yes, turn the knob counterclockwise to see whether the
volume goes back to normal.
There is acoustic feedback when the microphone is connected to a
speaker.
① If your software has the echo cancellation function, please turn it
on.
② Turn the pickup part of the microphone away from the active
speaker while keeping a proper distance.
③ Lower the microphone volume or the output volume of the
speaker.
Troubleshooting

USB Microphone
10

USB Microphone 11

USB Microphone
12

USB Microphone 13
Gracias por comprar nuestro micrófono USB GSM-100. Con el cuidado
y mantenimiento adecuados, su unidad proporcionará años de servicio
confiable e ininterrumpido. El GSM-100 está respaldado por una
garantía limitada de 1 año*
Preparación para el primer uso
Asegúrese de encontrar estos accesorios incluidos con su micrófono
USB GSM-100:
(1) Micrófono USB GSM-100
(1) Manual de usuario y garantía
(1) Soporte de micrófono
(1) Cable USB a tipo C
Cautela
① Todas las instrucciones de funcionamiento deben leerse
antes de usar este equipo.
② Para reducir el riesgo de descarga eléctrica, no abra la
unidad. No hay piezas reemplazables por el usuario en el
interior. Consulte el servicio a un técnico de servicio
calificado de GEMINI. No intente devolver el equipo a su
distribuidor.
③ No exponga esta unidad a la luz solar directa o a una fuente
de calor como un radiador o una estufa.
④ Esta unidad debe limpiarse solo con un paño húmedo. Evite
los disolventes u otros detergentes de limpieza.
⑤ Al mover este equipo, debe colocarse en su caja y embalaje
originales. Esto reducirá el riesgo de daños durante el
tránsito.
⑥ No exponga esta unidad al agua o al calor.
⑦ No utilice productos de limpieza ni lubricantes en los mandos
o interruptores.mobile phone for power supplying.
Introducción

USB Microphone
14
• Especialmente diseñado para la enseñanza en red, grabación de
pantalla, videollamadas, conferencias, streaming, charlas de
juegos, transmisión en vivo, adecuado para computadoras,
teléfonos móviles y tabletas.
• Chip de tarjeta de sonido profesional incorporado, diseño sin
controlador para plug and play, compatible con sistemas como
Windows, iOS y Android.
• La transmisión USB 2.0 estándar, la alta frecuencia de muestreo y
el retraso ultra bajo, hacen que la grabación y la reproducción de
sonido sean más claras.
• Con función OTG (On-The-Go) para grabación de alta definición y
transmisión en vivo a través de conexión USB con teléfonos
inteligentes y tabletas.
• Micrófono de condensador profesional incorporado con alta
sensibilidad para capturar fácilmente los detalles del sonido.
• Perilla de ganancia del micrófono para ajustar el volumen en
función del lugar.
• Interruptor de silencio para encender o apagar la señal de sonido
rápidamente en cualquier momento.
• El monitoreo en tiempo real, le permite ajustar el volumen del
micrófono de acuerdo con la situación de escucha, para lograr la
captación de sonido ideal y el efecto de grabación.
• Sensor de toque para silenciar con indicador de iluminación RGB,
si las luces están encendidas, el micrófono está activo, si la luz está
apagada, el micrófono está silenciado.
• Interruptor de cancelación de ruido, hacia arriba al sistema de
cancelación de ruido activo, hacia abajo para cerrarlo.
• Estándar 5/8 27 roscas, se puede montar en la mayoría de los
soportes de micrófono estándar.
Funciones
Gráfico de respuesta
de frecuencia
Características técnicas
Transmisión de datos: USB2.0
Frecuencia de muestreo: 48KHz / 16bit
Respuesta de frecuencia: 20Hz ~ 20KHz
Tipo de condensador: Φ14mm
Patrón polar: Cardioide
Sensibilidad: -36dB±3dB
SPL máximo: 115dB (THD≤1% a 1KHz)
Impedancia de salida de auriculares: 16 ~ 60Ω
Potencia de salida de auriculares (RMS): 100mW
Relación S / N: 92dB (ponderado A)

USB Microphone 15
① Interruptor de silencio: tóquelo para silenciar o reactivar el
micrófono. Cuando toca el interruptor de silencio, las luces se
apagan y el micrófono deja de captar sonido. Cuando vuelve a
tocar el interruptor de silencio, las luces RGB están encendidas y
el micrófono comienza a captar sonido.
② Silenciar luces RGB: Cuando las luces LED están encendidas, el
micrófono está en vivo / captando sonido. Cuando la luz está
apagada, el micrófono está silenciado o no recibe energía.
③ Perilla de ajuste de volumen: Gire el sentido de las agujas del
reloj para aumentar el volumen del micrófono gradualmente y
gírelo en sentido contrario a las agujas del reloj para disminuir el
volumen del micrófono.
④ Reducción de ruido de fondo (BNR): Presione el botón BNR para
activar / desactivar la cancelación de ruido tur n.
⑤ Puerto de 3,5 mm: conéctese a un auricular para monitoreo en
tiempo real.
⑥ Interfaz USB: Conecte el micrófono a la computadora o al
teléfono móvil para la fuente de alimentación.
Funciones del producto
Instrucciones de operación (PC / MAC)
4
3
2
5
6
ON OFF
1

USB Microphone
16
① Conecte el micrófono a una
computadora a través de un cable
USB-C a USB . La computadora
identificará el micrófono y
completará la instalación del
controlador automáticamente.
② Configuración del
controlador:Windows: Configure
el dispositivo "Grabación" "GSM-
100" del altavoz del sistema como
el dispositivo predeterminado.
Mac OS: Ingrese la configuración de
sonido en el Dispositivo de preferencia
del sistema y seleccione "GSM-100"
como dispositivo de entrada.
Features
③ Conecte un auricular o un altavoz activo al puerto de 3,5 mm en la
parte posterior del micrófono para la supervisión.
④ Abra el software de videoconferencia, el software de mensajería
instantánea o el software de grabación para videoconferencias,
chat de voz, transmisión en red, etc.
Tenga en cuenta: Necesitará accesorios adicionales para utilizar la
función OTG del GSM-100.
Android: Cable USB-C estándar
iOS: cable USB-C a Lightning (o adaptador)
① Conecte el micrófono al teléfono o tableta a través del
cable/adaptador adecuado. El teléfono / tableta identificará el
conjunto de micrófonos como entrada de audio automáticamente.
② Abra su aplicación de grabación, el micrófono debería estar listo
para usar. Puede monitorear el audio de Mic & Phone desde la
salida de auriculares del GSM-100.
Instrucciones de operación OTG (Android / iOS)
Sou nd
Playbck Recording Sounds Communications
Selectarecordingdevicebelowtomodifyitssettings:
Microphone
gemini GSM-100
DefaultDevice
FrontMic
RealtekHighDefinitionAudio
Ready
Configure SetDefault properties
OK Cancel APPLY
Sound Search
SoundEffectsOutput lnput
Sel ect a de vice f or so und in put:
Name
lntema lMicroph one
gemini GSM-100 USB
Built- IN
Type
Sett ings fo r the sel ected d evice :
lnpu t volum e:
lnpu t level :
Outp ut volu me: Mute
Show v olume i n menu ba r
?

USB Microphone 17
El indicador no se enciende cuando el micrófono está encendido o el
sonido producido por el micrófono no se puede monitorear.
① Compruebe si el enchufe USB del micrófono está conectado
correctamente a la interfaz USB del ordenador. De lo contrario,
desconéctelo e inténtelo de nuevo.
② Compruebe si los auriculares están conectados correctamente al
puerto de 3,5 mm del micrófono. De lo contrario, desconéctelo e
inténtelo de nuevo.
③ Cuando el micrófono está conectado a una computadora, debe
encender el dispositivo "Grabación" del altavoz del sistema y
seleccionar "Monitorear el dispositivo" en la pestaña de
propiedades del dispositivo "GSM-100".
El sonido del micrófono no se puede grabar o el volumen de
grabación es demasiado bajo.
① Cuando el micrófono esté conectado a una computadora para su
uso, verifique si el volumen del micrófono del GSM-100 es
demasiado bajo. En caso afirmativo, ajuste el volumen para ver si
vuelve a la normalidad.
② Compruebe si la perilla de ajuste de volumen está baja. En caso
afirmativo, gire la perilla en sentido contrario a las agujas del reloj
para ver si el volumen vuelve a la normalidad.
Hay retroalimentación acústica cuando el micrófono está conectado a
un altavoz.
① Si su software tiene la función de cancelación de eco, actívela.
② Gire la parte de captación del micrófono lejos del altavoz activo
mientras mantiene una distancia adecuada.
③ Baje el volumen del micrófono o el volumen de salida del altavoz.
Solución de problemas

USB Microphone
18
Para evitar posibles lesiones personales o daños a la propiedad
causados por descargas eléctricas, altas temperaturas, incendios,
radiación, explosiones, peligros mecánicos y uso inadecuado, lea y
observe los siguientes artículos antes de usar el producto.
① Cuando use el producto, ajuste el volumen del dispositivo a un
nivel adecuado. No lo use durante mucho tiempo cuando el
volumen es alto para evitar fallas en el producto y daños
auditivos.
② Si hay alguna anomalía (como humo, olor, etc.) durante el uso,
apague el interruptor de encendido y desenchufe el enchufe de
alimentación inmediatamente, y luego envíe el producto al
distribuidor para su mantenimiento.
③ El producto y los accesorios deben colocarse en interiores en un
lugar seco y ventilado. No los almacene en un ambiente húmedo y
polvoriento durante mucho tiempo. Mantenga el producto alejado
del fuego, la lluvia, el agua, la colisión excesiva y evite tirar, vibrar
el producto o cubrir sus orificios de ventilación durante el uso,
para no dañar su función.
④ Si el producto necesita fijarse en la pared o el techo, asegúrese de
asegurarlo en su lugar.
⑤ Al utilizar el producto, debe cumplir con las normas de seguridad
pertinentes. Por favor, no utilice el producto en las ocasiones que
están claramente prohibidas por las leyes y reglamentos para
evitar accidentes.
⑥ Por favor, no desmonte, reajuste o repare el producto usted
mismo para evitar lesiones personales. Si tiene alguna pregunta o
necesidad de servicio, póngase en contacto con el SERVICIO DE
ATENCIÓN AL CLIENTE DE GEMINI.
Instrucciones de seguridad

USB Microphone 19
Introduction
Merci d’avoir acheté notre microphone USB GSM-100. Avec des soins et un
entretien appropriés, votre unité fournira des années de service fiable et
ininterrompu. Le GSM-100 est couvert par une garantie limitée de 1 an*
Préparation à la première utilisation
Assurez-vous de trouver ces accessoires inclus avec votre microphone USB
GSM-100 :
(1) GSM-100 USB Microphone
(1) Manuel d’utilisation et garantie
(1) Support de microphone
(1) Câble USB vers Type-C
Prudence
① Toutes les instructions d’utilisation doivent être lues avant d’utiliser
cet équipement.
② Pour réduire le risque de choc électrique, n’ouvrez pas l’appareil. Il
n’y a pas de pièces remplaçables par l’utilisateur à l’intérieur.
Veuillez référer l’entretien à un technicien de service GEMINI
qualifié. N’essayez pas de retourner l’équipement à votre
concessionnaire.
③ N’exposez pas cet appareil à la lumière directe du soleil ou à une
source de chaleur telle qu’un radiateur ou un poêle.
④ Cet appareil ne doit être nettoyé qu’avec un chiffon humide. Évitez
les solvants ou autres détergents de nettoyage.
⑤ Lors du déplacement de cet équipement, il doit être placé dans son
carton et son emballage d’origine. Cela réduira le risque de
dommages pendant le transport.
⑥ N’exposez pas cet appareil à l’eau ou à la chaleur.
⑦ N’utilisez pas de produits de nettoyage ou de lubrifiants sur les
commandes ou les interrupteurs.

USB Microphone
20
• Spécialement conçu pour l’enseignement en réseau,
l’enregistrement d’écran, les appels vidéo, la conférence, le
streaming, les conférences de jeux, la diffusion en direct, adapté
aux ordinateurs, téléphones mobiles et tablettes.
• Puce de carte son professionnelle intégrée, conception sans pilote
pour plug and play, compatible avec des systèmes tels que
Windows, iOS et Android.
• La transmission USB 2.0 standard, la fréquence d’échantillonnage
élevée et le délai ultra-faible rendent l’enregistrement et la lecture
du son plus clairs.
• Avec la fonction OTG (On-The-Go) pour l’enregistrement haute
définition et la diffusion en direct via une connexion USB avec des
téléphones intelligents et des tablettes.
• Microphone à condensateur professionnel intégré avec une
sensibilité élevée pour capturer facilement les détails sonores.
• Bouton de gain du microphone pour régler le volume en fonction
de la salle.
• Interrupteur muet pour activer ou désactiver le signal sonore
rapidement à tout moment.
• La surveillance en temps réel, vous permet de régler le volume du
microphone en fonction de la situation d’écoute, pour obtenir
l’effet de captation et d’enregistrement idéal du son.
• Capteur tap-to-mute avec indicateur d’éclairage RVB, si les
lumières sont allumées, le micro est actif, si la lumière est éteinte,
le micro est coupé.
• Interrupteur de réduction du bruit, vers le haut vers le système de
réduction de bruit actif, vers le bas pour le fermer.
• Filetage standard 5/8 27, peut être monté sur la plupart des
supports de microphone standard.
Fonctionnalités
Graphique de réponse
en fréquence
Transmission de données: USB2.0
Taux d’échantillonnage: 48KHz / 16bit
Réponse en fréquence: 20Hz ~ 20KHz
Type de condenseur: Φ14mm
Motif polaire: cardioïde
Sensibilité: -36dB±3dB
Max SPL: 115dB (THD≤1% à 1KHz)
Impédance de sortie casque: 16 ~ 60Ω
Puissance de sortie casque (RMS): 100mW
Rapport S / N: 92dB (pondéré A)
Spécifications

USB Microphone 21
① Commutateur de sourdine : Touchez-le pour couper ou réactiver
le son du microphone. Lorsque vous appuyez sur l’interrupteur
de sourdine, les lumières s’éteignent et le microphone cesse de
capter le son. Lorsque vous touchez à nouveau l’interrupteur de
sourdine, les lumières RVB sont allumées et le microphone
commence à capter le son.
② Lumières RVB en sourdine: Lorsque les lumières LED sont
allumées, le microphone est en direct / capte le son. Lorsque la
lumière est éteinte, le microphone est coupé ou ne reçoit pas
d’alimentation.
③ Bouton de réglage du volume: Tournez le sens des aiguilles d’une
montre pour augmenter progressivement le volume du
microphone et tournez-le dans le sens inverse des aiguilles d’une
montre pour diminuer le volume du microphone.
④ Réduction du bruit de fond (BNR): Appuyez sur le bouton BNR
pour activer / désactiver l’annulation du bruit.
⑤ Port 3,5 mm: Connectez-vous à un casque pour une surveillance
en temps réel.
⑥ Interface USB: Connectez le microphone à l’ordinateur ou au
téléphone mobile pour l’alimentation.
Fonctions du produit
Mode d’emploi (PC / MAC)
4
3
2
5
6
ON OFF
1

USB Microphone
22
① Connectez le microphone à un
ordinateur via un câble USB-C vers
USB . L’ordinateur identifiera le
microphone et terminera
automatiquement l’installation du
pilote.
② Paramètres du pilote :Windows:
Réglez le périphérique
«Enregistrement» «GSM-100» du
haut-parleur du système comme
périphérique par défaut.
Mac OS: Entrez les paramètres audio sous
le périphérique de préférence système et
sélectionnez «GSM-100» comme
périphérique d’entrée.
③ Connectez un casque ou un haut-parleur actif au port 3,5 mm
situé à l’arrière du microphone pour la surveillance.
④ Ouvrez le logiciel de vidéoconférence, le logiciel de messagerie
instantanée ou le logiciel d’enregistrement pour les
vidéoconférences, le chat vocal, la diffusion réseau, etc.
Remarque: Vous aurez besoin d’accessoires supplémentaires pour
utiliser la fonction OTG du GSM-100.
Android: Câble USB-C standard
iOS : Câble USB-C vers Lightning (ou adaptateur)
① Connectez le microphone au téléphone ou à la tablette via le
câble/adaptateur approprié. Le téléphone / tablette identifiera
automatiquement le microphone défini comme entrée audio.
② Ouvrez votre application d’enregistrement, le microphone doit
être prêt à l’emploi. Vous pouvez surveiller l’audio du mic et du
téléphone à partir de la sortie casque du GSM-100.
Instructions d’utilisation OTG (Android / iOS)
Sou nd
Playbck Recording Sounds Communications
Selectarecordingdevicebelowtomodifyitssettings:
Microphone
gemini GSM-100
DefaultDevice
FrontMic
RealtekHighDefinitionAudio
Ready
Configure SetDefault properties
OK Cancel APPLY
Sound Search
SoundEffectsOutput lnput
Sel ect a de vice f or so und in put:
Name
lntema lMicroph one
gemini GSM-100 USB
Built- IN
Type
Sett ings fo r the sel ected d evice :
lnpu t volum e:
lnpu t level :
Outp ut volu me: Mute
Show v olume i n menu ba r
?

USB Microphone 23
L’indicateur ne s’allume pas lorsque le microphone est allumé ou que
le son produit par le microphone ne peut pas être surveillé.
① Vérifiez si la prise USB du microphone est correctement connectée
à l’interface USB de l’ordinateur. Si ce n’est pas le cas, débranchez-
le et réessayez.
② Vérifiez si le casque est correctement connecté au port 3,5 mm du
microphone. Si ce n’est pas le cas, débranchez-le et réessayez.
③ Lorsque le microphone est connecté à un ordinateur, vous devez
allumer le périphérique «Enregistrement» du haut-parleur
système et sélectionner «Surveiller l’appareil» dans l’onglet des
propriétés du périphérique «GSM-100».
Le son du microphone ne peut pas être enregistré ou le volume
d’enregistrement est trop faible.
① Lorsque le microphone est connecté à un ordinateur pour une
utilisation, vérifiez si le volume du microphone du GSM-100 est
trop faible. Si oui, réglez le volume pour voir s’il revient à la
normale.
② Vérifiez si le bouton de réglage du volume est baissé. Si oui,
tournez le bouton dans le sens inverse des aiguilles d’une montre
pour voir si le volume revient à la normale.
Il y a un retour acoustique lorsque le microphone est connecté à un
haut-parleur.
① Si votre logiciel dispose de la fonction d’annulation d’écho,
veuillez l’activer.
② Éloignez la partie captation du microphone du haut-parleur actif
tout en gardant une distance appropriée.
③ Réduisez le volume du microphone ou le volume de sortie du haut-
parleur.
Dépannage

USB Microphone
24
Pour éviter d’éventuelles blessures corporelles ou des dommages
matériels causés par un choc électrique, une température élevée, un
incendie, un rayonnement, une explosion, des risques mécaniques et
une mauvaise utilisation, veuillez lire et observer les éléments
suivants avant d’utiliser le produit.
① Lors de l’utilisation du produit, veuillez régler le volume de
l’appareil à un niveau approprié. Ne l’utilisez pas pendant une
longue période lorsque le volume est élevé pour éviter une
défaillance du produit et des dommages auditifs.
② S’il y a une anomalie (comme de la fumée, une odeur, etc.)
pendant l’utilisation, veuillez éteindre l’interrupteur
d’alimentation et débrancher immédiatement la prise
d’alimentation, puis envoyer le produit au revendeur pour
entretien.
③ Le produit et les accessoires doivent être placés à l’intérieur dans
un endroit sec et ventilé. Ne les conservez pas longtemps dans un
environnement humide et poussiéreux. Gardez le produit à l’abri
du feu, de la pluie, de l’eau, des collisions excessives et évitez de
jeter, de faire vibrer le produit ou de couvrir ses trous de
ventilation pendant l’utilisation, afin de ne pas endommager sa
fonction.
④ Si le produit doit être fixé au mur ou au plafond, assurez-vous de
le fixer en place.
⑤ Lors de l’utilisation du produit, vous devez respecter les règles de
sécurité applicables. Veuillez ne pas utiliser le produit dans les
occasions qui sont clairement interdites par les lois et règlements
pour éviter les accidents.
⑥ Veuillez ne pas démonter, réajuster ou réparer le produit par vous-
même pour éviter toute blessure personnelle. Si vous avez des
questions ou des besoins en matière de service, veuillez contacter
le SERVICE CLIENT GEMINI.
Consignes de sécurité

USB Microphone 25
Vielen Dank, dass Sie sich für unser GSM-100 USB-Mikrofon
entschieden haben. Bei richtiger Pflege und Wartung bietet Ihr Gerät
jahrelangen zuverlässigen, ununterbrochenen Service. Der GSM-100
wird durch eine 1-jährige eingeschränkte Garantie abgedeckt*
Vorbereiten der ersten Verwendung
Bitte stellen Sie sicher, dass Sie dieses Zubehör im Lieferumfang Ihres
GSM-100 USB-Mikrofons finden:
(1) GSM-100 USB-Mikrofon
(1) Benutzerhandbuch & Garantie
(1) Mikrofonstativ
(1) USB-auf-Typ-C-Kabel
Vorsicht
① Alle Bedienungsanleitungen sollten vor der Verwendung
dieses Geräts gelesen werden.
② Um das Risiko eines elektrischen Schlags zu verringern,
öffnen Sie das Gerät nicht. Es gibt keine vom Benutzer
austauschbaren Teile im Inneren. Bitte wenden Sie sich an
einen qualifizierten GEMINI-Servicetechniker. Versuchen Sie
nicht, das Gerät an Ihren Händler zurückzugeben.
③ Setzen Sie dieses Gerät nicht direktem Sonnenlicht oder
einer Wärmequelle wie einem Heizkörper oder Ofen aus.
④ Dieses Gerät sollte nur mit einem feuchten Tuch gereinigt
werden. Vermeiden Sie Lösungsmittel oder andere
Reinigungsmittel.
⑤ Wenn Sie dieses Gerät bewegen, sollte es in den
Originalkarton und die Originalverpackung gelegt werden.
Dies reduziert das Risiko von Schäden während des
Transports.
⑥ Setzen Sie dieses Gerät weder Wasser noch Hitze aus.
⑦ Verwenden Sie keine Reinigungsmittel oder Schmiermittel
an den Bedienelementen oder Schaltern.
Einleitung

USB Microphone
• Speziell entwickelt für Netzwerkunterricht,
Bildschirmaufzeichnung, Videoanrufe, Konferenz, Streaming,
Spielgespräche, Live-Übertragungen, geeignet für Computer,
Mobiltelefone und Tablets.
• Eingebauter professioneller Soundkartenchip, treiberfreies
Design für Plug-and-Play, kompatibel mit Systemen wie Windows,
iOS und Android.
• Standard-USB 2.0-Übertragung, hohe Abtastrate und extrem
niedrige Verzögerung, machen Aufnahme und Tonwiedergabe
klarer.
• Mit OTG-Funktion (On-The-Go) für High-Definition-Aufnahme und
Live-Übertragung über USB-Verbindung mit Smartphones und
Tablets.
• Eingebautes professionelles Kondensatormikrofon mit hoher
Empfindlichkeit, um Klangdetails einfach zu erfassen.
• Mikrofonverstärkungsknopf, um die Lautstärke basierend auf dem
Veranstaltungsort anzupassen.
• Stummschalter, um das Tonsignal jederzeit schnell ein- oder
auszuschalten.
• Echtzeit-Monitoring, ermöglicht es Ihnen, die Mikrofonlautstärke
entsprechend der Hörsituation anzupassen, um den idealen
Klangaufnahme- und Aufnahmeeffekt zu erzielen.
• Tap-to-Mute-Sensor mit RGB-Beleuchtungsanzeige, wenn das
Licht eingeschaltet ist, das Mikrofon aktiv ist, wenn das Licht aus
ist, ist das Mikrofon stummgeschaltet.
• Noise Cancelling Schalter, Aufwärts zum aktiven Noise Cancelling
System, nach unten, um es zu schließen.
• Standard 5/8 27 Gewinde, kann an den meisten Standard-
Mikrofonständern montiert werden.
26
Funktionen
Leistungsbeschreibung
Datenübertragung: USB2.0
Abtastrate: 48KHz / 16bit
Frequenzgang: 20Hz ~ 20KHz
Kondensatortyp: Φ14mm
Richtcharakteristik: Niere
Empfindlichkeit: -36dB ± 3dB
Max. SPL: 115dB (THD≤1% bei 1KHz)
Kopfhörerausgang Impedanz: 16 ~ 60Ω
Kopfhörer-Ausgangsleistung (RMS): 100mW
S / N-Verhältnis: 92dB (A-bewertet)
Frequenzgang-Diagramm

USB Microphone 27
① Stummschalter: Berühren Sie ihn, um das Mikrofon
stummzuschalten oder die Stummschaltung aufzuheben. Wenn
Sie den Stummschalter berühren, gehen die Lichter aus und das
Mikrofon hört auf, Ton aufzunehmen. Wenn Sie den
Stummschalter erneut berühren, sind die RGB-Leuchten
eingeschaltet und das Mikrofon beginnt, Ton aufzunehmen.
② RGB-Leuchten stummschalten: Wenn LED-Leuchten
eingeschaltet sind, ist das Mikrofon live / nimmt Ton auf. Wenn
das Licht ausgeschaltet ist, ist das Mikrofon entweder
stummgeschaltet oder wird nicht mit Strom versorgt.
③ Lautstärkeregler: Drehen Sie den Uhrzeigersinn, um die
Mikrofonlautstärke schrittweise zu erhöhen, und drehen Sie ihn
gegen den Uhrzeigersinn, um die Mikrofonlautstärke zu
verringern.
④ Background Noise Reduction (BNR): Drücken Sie die BNR-Taste,
umdie Geräuschunterdrückung ein-/auszuschalten.
⑤ 3,5-mm-Anschluss: Schließen Sie einen Kopfhörer für
Echtzeitüberwachung an.
⑥ USB-Schnittstelle: Schließen Sie das Mikrofon zur
Stromversorgung an den Computer oder das Mobiltelefon an.
Produktfunktionen
Bedienungsanleitung (PC / MAC)
4
3
2
5
6
ON OFF
1

USB Microphone
28
① Verbinden Sie das Mikrofon über ein USB-
C-auf-USB-Kabel mit einem Computer .
Der Computer identifiziert das Mikrofon
und schließt die Treiberinstallation
automatisch ab.
② Treibereinstellungen:Windows: Stellen
Sie das "Aufnahmegerät" "GSM-100" des
Systemlautsprechers als Standardgerät
ein.
Mac OS: Geben Sie die Soundeinstellungen
unter dem Systemeinstellungsgerät ein und
wählen Sie "GSM-100" als Eingabegerät aus.
③ Schließen Sie einen Kopfhörer oder einen aktiven Lautsprecher
zur Überwachung an den 3,5-mm-Anschluss auf der Rückseite des
Mikrofons an.
④ Öffnen Sie die Videokonferenzsoftware, Instant Messaging-
Software oder Aufzeichnungssoftware für Videokonferenzen,
Voice-Chat, Netzwerkübertragung usw.
Bitte beachten Sie: Sie benötigen zusätzliches Zubehör, um die OTG-
Funktion des GSM-100 nutzen zu können.
Android: Standard-USB-C-Kabel
iOS: USB-C-auf-Lightning-Kabel (oder Adapter)
① Verbinden Sie das Mikrofon über ein entsprechendes
Kabel/Adapter mit dem Telefon oder Tablet. Das Telefon / Tablet
identifiziert das Mikrofon automatisch als Audioeingang.
② Öffnen Sie Ihre Aufnahme-App, das Mikrofon sollte einsatzbereit
sein. Sie können den Ton von Mic & Phone über den
Kopfhörerausgang des GSM-100 überwachen.ophone to
Computer or mobile phone for power supplying.
OTG Bedienungsanleitung (Android /iOS)
Sou nd
Playbck Recording Sounds Communications
Selectarecordingdevicebelowtomodifyitssettings:
Microphone
gemini GSM-100
DefaultDevice
FrontMic
RealtekHighDefinitionAudio
Ready
Configure SetDefault properties
OK Cancel APPLY
Sound Search
SoundEffectsOutput lnput
Sel ect a de vice f or so und in put:
Name
lntema lMicroph one
gemini GSM-100 USB
Built- IN
Type
Sett ings fo r the sel ected d evice :
lnpu t volum e:
lnpu t level :
Outp ut volu me: Mute
Show v olume i n menu ba r
?

USB Microphone 29
Die Anzeige leuchtet nicht auf, wenn das Mikrofon eingeschaltet ist
oder der vom Mikrofon erzeugte Ton nicht überwacht werden kann.
① Überprüfen Sie, ob der USB-Stecker des Mikrofons
ordnungsgemäß an die USB-Schnittstelle des Computers
angeschlossen ist. Wenn nicht, ziehen Sie den Stecker und
versuchen Sie es erneut.
② Überprüfen Sie, ob der Kopfhörer ordnungsgemäß an den 3,5-mm-
Anschluss des Mikrofons angeschlossen ist. Wenn nicht, ziehen Sie
den Stecker und versuchen Sie es erneut.
③ Wenn das Mikrofon an einen Computer angeschlossen ist, müssen
Sie das Gerät "Aufnahme" des Systemlautsprechers einschalten
und auf der Registerkarte "Eigenschaften" des Geräts "GSM-100"
die Option "Gerät überwachen" auswählen.
Der Ton des Mikrofons kann nicht aufgezeichnet werden oder die
Aufnahmelautstärke ist zu niedrig.
① Wenn das Mikrofon zur Verwendung an einen Computer
angeschlossen ist, überprüfen Sie, ob die Mikrofonlautstärke des
GSM-100 zu niedrig ist. Wenn ja, passen Sie die Lautstärke an, um
zu sehen, ob sie wieder normal wird.
② Überprüfen Sie, ob der Lautstärkeregler niedrig gedreht ist. Wenn
ja, drehen Sie den Regler gegen den Uhrzeigersinn, um zu sehen,
ob die Lautstärke wieder normal wird.
Es gibt akustische Rückmeldungen, wenn das Mikrofon an einen
Lautsprecher angeschlossen ist.
① Wenn Ihre Software über die Echounterdrückungsfunktion
verfügt, schalten Sie sie bitte ein.
② Drehen Sie den Tonabnehmerteil des Mikrofons vom aktiven
Lautsprecher weg, während Sie einen angemessenen Abstand
einhalten.
③ Verringern Sie die Mikrofonlautstärke oder die
Ausgangslautstärke des Lautsprechers.
Fehlerbehebung

USB Microphone
30
Um mögliche Personen- oder Sachschäden durch elektrischen Schlag,
hohe Temperaturen, Feuer, Strahlung, Explosion, mechanische
Gefahren und unsachgemäßen Gebrauch zu vermeiden, lesen und
beachten Sie bitte die folgenden Punkte, bevor Sie das Produkt
verwenden.
① Wenn Sie das Produkt verwenden, stellen Sie bitte die Lautstärke
des Geräts auf ein korrektes Niveau ein. Verwenden Sie es nicht
für eine lange Zeit, wenn die Lautstärke hoch ist, um
Produktversagen und Hörschäden zu vermeiden.
② Wenn während des Gebrauchs Anomalien (wie Rauch, Geruch
usw.) auftreten, schalten Sie bitte den Netzschalter aus, ziehen
Sie den Netzstecker sofort ab und senden Sie das Produkt zur
Wartung an den Händler.
③ Das Produkt und das Zubehör sollten in Innenräumen an einem
trockenen und belüfteten Ort platziert werden. Lagern Sie sie
nicht lange in einer feuchten und staubigen Umgebung. Halten
Sie das Produkt von Feuer, Regen, Wasser und übermäßigen
Kollisionen fern und vermeiden Sie es, das Produkt während des
Gebrauchs zu werfen, zu vibrieren oder seine Belüftungslöcher zu
bedecken, um seine Funktion nicht zu beschädigen.
④ Wenn das Produkt an der Wand oder Decke befestigt werden
muss, stellen Sie bitte sicher, dass es an Ort und Stelle befestigt
wird.
⑤ Bei der Verwendung des Produkts müssen Sie sich an die
einschlägigen Sicherheitsvorschriften halten. Bitte verwenden
Sie das Produkt nicht in den Fällen, in denen Gesetze und
Vorschriften eindeutig verboten sind, um Unfälle zu vermeiden.
⑥ Bitte zerlegen, überarbeiten oder reparieren Sie das Produkt
nicht selbst, um Verletzungen der Person zu vermeiden. Wenn Sie
Fragen oder Serviceanforderungen haben, wenden Sie sich bitte
an den GEMINI KUNDENSERVICE.
Sicherheitshinweise

31
Grazie per aver acquistato il nostro microfono USB GSM-100. Con
un'adeguata cura e manutenzione, la tua unità fornirà anni di servizio
affidabile e ininterrotto. Il GSM-100 è coperto da una garanzia limitata di 1
anno*
Preparazione per il primo utilizzo
Assicurati di trovare questi accessori inclusi nel microfono USB GSM-100:
(1) GSM-100 Microfono USB
(1) Manuale utente e garanzia
(1) Supporto per microfono
(1) Cavo da USB a Tipo C
Cautela
① Tutte le istruzioni per l'uso devono essere lette prima di
utilizzare questa apparecchiatura.
② Per ridurre il rischio di scosse elettriche, non aprire l'unità. Non ci
sono parti sostituibili dall'utente all'interno. Si prega di fare
riferimento alla manutenzione a un tecnico dell'assistenza
GEMINI qualificato. Non tentare di restituire l'attrezzatura al
rivenditore.
③ Non esporre questa unità alla luce solare diretta o a una fonte di
calore come un radiatore o una stufa.
④ Questa unità deve essere pulita solo con un panno umido.
Evitare solventi o altri detergenti per la pulizia.
⑤ Quando si sposta questa apparecchiatura, deve essere collocata
nella sua scatola originale e nella confezione. Ciò ridurrà il
rischio di danni durante il trasporto.
⑥ Non esporre questa unità ad acqua o calore.
⑦ Non utilizzare prodotti per la pulizia o lubrificanti sui comandi o
sugli interruttori.
USB Microphone
Introduzione

USB Microphone
32
• Appositamente progettato per l'insegnamento in rete, la
registrazione dello schermo, le videochiamate, la conferenza, lo
streaming, i discorsi di gioco, la trasmissione in diretta, adatto per
computer, telefoni cellulari e tablet.
• Chip per schede audio professionali integrato, design senza driver
per plug and play, compatibile con sistemi come Windows, iOS e
Android.
• La trasmissione USB 2.0 standard, l'alta frequenza di
campionamento e il ritardo ultra-basso, rendono la registrazione e
la riproduzione del suono più chiare.
• Con funzione OTG (On-The-Go) per la registrazione ad alta
definizione e la trasmissione in diretta tramite connessione USB
con smartphone e tablet.
• Microfono a condensatore professionale incorporato con alta
sensibilità per catturare facilmente i dettagli del suono.
• Manopola di guadagno del microfono per regolare il volume in base
alla sede.
• Disattiva l'interruttore per attivare o disattivare rapidamente il
segnale audio in qualsiasi momento.
• Il monitoraggio in tempo reale, consente di regolare il volume del
microfono in base alla situazione di ascolto, per ottenere l'effetto
di registrazione e ripresa del suono ideale.
• Sensore tap-to-mute con indicatore luminoso RGB, se le luci sono
accese, il microfono è attivo, se la luce è spenta, il microfono è
disattivato.
• Interruttore di cancellazione del rumore, verso l'alto fino al sistema
di cancellazione attiva del rumore, verso il basso per chiuderlo.
• Standard 5/8 27 filettatura, può essere montato sulla maggior parte
dei supporti microfonici standard.
Tratti somatici
Trasmissione dati: USB2.0
Frequenza di campionamento: 48KHz / 16bit
Risposta in frequenza: 20Hz ~ 20KHz
Tipo di condensatore: Φ14mm
Modello polare: cardioide
Sensibilità: -36dB±3dB
SPL massimo: 115dB (THD≤1% a 1KHz)
Impedenza di uscita cuffie: 16 ~ 60Ω
Potenza di uscita cuffie (RMS): 100mW
Rapporto S / N: 92dB (ponderato A)
Indicazioni Grafico della risposta
in frequenza

USB Microphone 33
① Interruttore disattiva audio: toccalo per disattivare o riattivare
l'audio del microfono. Quando si tocca l'interruttore di
disattivazione audio, le luci si spengono e il microfono smette di
raccogliere il suono. Quando tocchi di nuovo l'interruttore di
disattivazione dell'audio, le spie RGB sono accese e il microfono
inizia a raccogliere il suono.
② Disattiva luci RGB: quando le luci a LED sono accese, il
microfono è in diretta / raccoglie il suono. Quando la spia è
spenta, il microfono è disattivato o non riceve alimentazione.
③ Manopola di regolazione del volume: ruotare in senso orario per
aumentare gradualmente il volume del microfono e ruotarlo in
senso antiorario per ridurre il volume del microfono.
④ Riduzione del rumore di fondo (BNR): premere il pulsante BNR
per attivare / disattivare la cancellazione del rumore.
⑤ Porta da 3,5 mm: collega a una cuffia per il monitoraggio in
tempo reale.
⑥ Interfaccia USB: collegare il microfono al computer o al telefono
cellulare per l'alimentazione.
Funzioni del prodotto
Istruzioni per l'uso (PC / MAC)
4
3
2
5
6
ON OFF
1

USB Microphone
34
① Collegare il microfono a un computer tramite
cavo da USB-C a USB . Il computer
identificherà il microfono e completerà
automaticamente l'installazione del driver.
② Impostazioni del driver:Windows: impostare
il dispositivo "Registrazione" "GSM-100"
dell'altoparlante di sistema come dispositivo
predefinito.
Mac OS: inserisci le impostazioni audio sotto il
dispositivo delle preferenze di sistema e
seleziona "GSM-100" come dispositivo di input.
③ Collegare una cuffia o un altoparlante attivo alla porta da 3,5 mm
sul retro del microfono per il monitoraggio.
④ Apri il software di videoconferenza, il software di messaggistica
istantanea o il software di registrazione per videoconferenze,
chat vocale, trasmissione in rete, ecc.
Nota: avrai bisogno di accessori aggiuntivi per utilizzare la funzione
OTG del GSM-100.
Android: Cavo USB-C standard
iOS: cavo da USB-C a Lightning (o adattatore)
① Collegare il microfono al telefono o al tablet tramite
cavo/adattatore appropriato. Il telefono/tablet identificherà
automaticamente il microfono impostato come ingresso audio.
② Apri la tua app di registrazione, il microfono dovrebbe essere
pronto per l'uso. È possibile monitorare l'audio di Mic & Phone
dall'uscita cuffie del GSM-100.
Istruzioni per l'uso di OTG (Android / iOS)
Sou nd
Playbck Recording Sounds Communications
Selectarecordingdevicebelowtomodifyitssettings:
Microphone
gemini GSM-100
DefaultDevice
FrontMic
RealtekHighDefinitionAudio
Ready
Configure SetDefault properties
OK Cancel APPLY
Sound Search
SoundEffectsOutput lnput
Sel ect a de vice f or so und in put:
Name
lntema lMicroph one
gemini GSM-100 USB
Built- IN
Type
Sett ings fo r the sel ected d evice :
lnpu t volum e:
lnpu t level :
Outp ut volu me: Mute
Show v olume i n menu ba r
?

USB Microphone 35
L'indicatore non si accende quando il microfono è acceso o il suono
prodotto dal microfono non può essere monitorato.
① Verificare che la spina USB del microfono sia collegata
correttamente all'interfaccia USB del computer. In caso contrario,
scollegarlo e riprovare.
② Controlla se la cuffia è collegata correttamente alla porta da 3,5
mm del microfono. In caso contrario, scollegarlo e riprovare.
③ Quando il microfono è collegato a un computer, è necessario
accendere il dispositivo "Registrazione" dell'altoparlante di
sistema e selezionare "Monitora il dispositivo" nella scheda delle
proprietà del dispositivo "GSM-100".
Il suono del microfono non può essere registrato o il volume di
registrazione è troppo basso.
① Quando il microfono è collegato a un computer per l'uso,
verificare se il volume del microfono del GSM-100 è troppo basso.
In caso affermativo, regolare il volume per vedere se torna alla
normalità.
② Controllare se la manopola di regolazione del volume è abbassata.
In caso affermativo, ruotare la manopola in senso antiorario per
verificare se il volume torna alla normalità.
C'è un feedback acustico quando il microfono è collegato a un
altoparlante.
① Se il tuo software ha la funzione di cancellazione dell'eco,
attivalo.
② Allontanare la parte di prelievo del microfono dall'altoparlante
attivo mantenendo una distanza adeguata.
③ Abbassare il volume del microfono o il volume di uscita
dell'altoparlante.
Risoluzione dei problemi

USB Microphone
36
Per evitare possibili lesioni personali o danni alla proprietà causati da
scosse elettriche, alte temperature, incendi, radiazioni, esplosioni,
rischi meccanici e uso improprio, si prega di leggere e osservare i
seguenti elementi prima di utilizzare il prodotto.
① Quando si utilizza il prodotto, regolare il volume del dispositivo
a un livello adeguato. Non utilizzarlo a lungo quando il volume è
elevato per evitare guasti al prodotto e danni all'udito.
② Se si verificano anomalie (come fumo, odore, ecc.) durante l'uso,
spegnere l'interruttore di alimentazione e scollegare
immediatamente la spina di alimentazione, quindi inviare il
prodotto al rivenditore per la manutenzione.
③ Il prodotto e gli accessori devono essere collocati all'interno in
un luogo asciutto e ventilato. Non conservarli a lungo in un
ambiente umido e polveroso. Tenere il prodotto lontano da
fuoco, pioggia, acqua, collisione eccessiva ed evitare di
lanciare, far vibrare il prodotto o coprire i suoi fori di
ventilazione durante l'uso, in modo da non danneggiarne la
funzione.
④ Se il prodotto deve essere fissato alla parete o al soffitto,
assicurarsi di fissarlo in posizione.
⑤ Quando si utilizza il prodotto, è necessario rispettare le norme
di sicurezza pertinenti. Si prega di non utilizzare il prodotto in
occasioni che sono chiaramente vietate da leggi e regolamenti
per evitare incidenti.
⑥ Si prega di non smontare, rimontare o riparare il prodotto da soli
per prevenire lesioni personali. In caso di domande o esigenze di
servizio, si prega di contattare il SERVIZIO CLIENTI GEMINI.
Istruzioni di sicurezza

USB Microphone 37
Bedankt voor de aankoop van onze GSM-100 USB microfoon. Met de
juiste zorg en onderhoud biedt uw unit jarenlange betrouwbare,
ononderbroken service. De GSM-100 wordt gedekt door een beperkte
garantie van 1 jaar*
Voorbereiden op eerste gebruik
Zorg ervoor dat u deze accessoires vindt die bij uw GSM-100 USB-
microfoon worden geleverd:
(1) GSM-100 USB Microfoon
(1) Gebruikershandleiding &garantie
(1) Microfoonstandaard
(1) USB-naar-Type-C-kabel
Voorzichtigheid
① Alle gebruiksaanwijzingen moeten worden gelezen voordat u
deze apparatuur gebruikt.
② Om het risico op elektrische schokken te verminderen, moet
u het apparaat niet openen. Er zitten geen door de gebruiker
vervangbare onderdelen in. Raadpleeg het onderhoud naar
een gekwalificeerde GEMINI-servicetechnicus. Probeer de
apparatuur niet terug te sturen naar uw dealer.
③ Stel dit toestel niet bloot aan direct zonlicht of aan een
warmtebron zoals een radiator of kachel.
④ Dit apparaat mag alleen worden gereinigd met een vochtige
doek. Vermijd oplosmiddelen of andere reinigingsmiddelen.
⑤ Bij het verplaatsen van deze apparatuur moet deze in de
originele doos en verpakking worden geplaatst. Dit
vermindert het risico op schade tijdens het transport.
⑥ Stel dit toestel niet bloot aan water of warmte.
⑦ Gebruik geen reinigingsproducten of smeermiddelen op de
bedieningselementen of schakelaars.
Introductie

USB Microphone
38
• Speciaal ontworpen voor netwerkonderwijs, schermopname,
videogesprekken, conferentie, streaming, game talks, live-
uitzendingen, geschikt voor computers, mobiele telefoons en
tablets.
• Ingebouwde professionele geluidskaartchip, drivervrij ontwerp
voor plug-and-play, compatibel met systemen zoals Windows, iOS
en Android.
• Standaard USB 2.0-transmissie, hoge samplefrequentie en
ultralage vertraging maken opname en geluidsweergave
duidelijker.
• Met OTG (On-The-Go) functie voor high-definition opname en live-
uitzendingen via USB-verbinding met smartphones en tablets.
• Ingebouwde professionele condensatormicrofoon met hoge
gevoeligheid om eenvoudig geluidsdetails vast te leggen.
• Microfoonversterkingsknop om het volume aan te passen op basis
van de locatie.
• Mute-schakelaar om het geluidssignaal op elk gewenst moment
snel in of uit te schakelen.
• Real-time monitoring, stelt u in staat om het microfoonvolume aan
te passen aan de luistersituatie, om het ideale geluidsopname- en
opname-effect te bereiken.
• Tap-to-mute sensor met RGB-verlichtingsindicator, als de lichten
aan zijn, is de microfoon actief, als het lampje uit is, is de microfoon
gedempt.
• Ruisonderdrukkingsschakelaar, omhoog naar actief
ruisonderdrukkingssysteem, naar beneden om het te sluiten.
• Standaard 5/8 27 schroefdraad, kan worden gemonteerd op de
meeste standaard microfoonstandaards.
Functies
Gegevensoverdracht: USB2.0
Sample Rate: 48KHz/16bit
Frequentiebereik: 20Hz ~ 20KHz
Condensor Type: Φ14mm
Polair patroon: Cardioïde
Gevoeligheid: -36dB±3dB
Max SPL: 115dB (THD≤1% bij 1KHz)
Hoofdtelefoon uitgangsimpedantie: 16 ~ 60Ω
Hoofdtelefoon uitgangsvermogen (RMS): 100mW
S / N-verhouding: 92dB (A-gewogen)
Specificaties Frequentiebereik
grafiek

USB Microphone 39
① Mute-schakelaar: raak deze aan om de microfoon te dempen of
het dempen ervan op te heffen. Wanneer u de mute-schakelaar
aanraakt, gaan de lampjes uit en neemt de microfoon geen
geluid meer op. Wanneer u de mute-schakelaar opnieuw
aanraakt, branden de RGB-lampjes en begint de microfoon
geluid op te vangen.
② RGB-lampjes dempen: Wanneer LED-lampjes branden, is de
microfoon live/neemt hij geluid op. Wanneer het lampje uit is,
wordt de microfoon gedempt of ontvangt deze geen stroom.
③ Volumeregelaar: draai de knop met de klok mee om het
microfoonvolume geleidelijk te verhogen en draai het tegen de
klok in om het microfoonvolume te verlagen.
④ Achtergrondruisonderdrukking (BNR): Druk op de BNR-knop om
ruisonderdrukking aan / uit te zetten.
⑤ 3,5 mm poort: sluit aan op een hoofdtelefoon voor realtime
monitoring.
⑥ USB-interface: Sluit de microfoon aan op de computer of
mobiele telefoon voor stroomvoorziening.
Productfuncties
Gebruiksaanwijzing (PC / MAC)
4
3
2
5
6
ON OFF
1

USB Microphone
40
① Sluit de microfoon aan op een
computer via een USB-C-naar-USB-
kabel . De computer identificeert de
microfoon en voltooit de installatie
van het stuurprogramma
automatisch.
② Driver instellingen:Windows: Stel het
apparaat "Opnemen" "GSM-100" van
de systeemluidspreker in als het
standaardapparaat.
Mac OS: Voer de geluidsinstellingen in
onder apparaat met systeemvoorkeuren
en selecteer "GSM-100" als
invoerapparaat.
③ Sluit een hoofdtelefoon of een actieve luidspreker aan op de 3,5
mm-poort aan de achterkant van de microfoon voor bewaking.
④ Open de videoconferentiesoftware, instant messaging-software of
opnamesoftware voor videoconferenties, voicechat,
netwerkuitzendingen, enz.
OTG-bedieningsinstructies (Android / iOS)
Let op: U hebt extra accessoires nodig om de OTG-functie van de GSM-
100 te gebruiken.
Android: Standaard USB-C-kabel
iOS: USB-C-naar-Lightning-kabel (of adapter)
① Sluit de microfoon aan op de telefoon of tablet via de juiste
kabel/adapter. De telefoon/tablet identificeert de microfoonset
automatisch als audio-ingang.
② Open uw opname-app, de microfoon moet klaar zijn voor gebruik.
U kunt de audio van Mic &Phone controleren via de
hoofdtelefoonuitgang van de GSM-100.
Sou nd
Playbck Recording Sounds Communications
Selectarecordingdevicebelowtomodifyitssettings:
Microphone
gemini GSM-100
DefaultDevice
FrontMic
RealtekHighDefinitionAudio
Ready
Configure SetDefault properties
OK Cancel APPLY
Sound Search
SoundEffectsOutput lnput
Sel ect a de vice f or so und in put:
Name
lntema lMicroph one
gemini GSM-100 USB
Built- IN
Type
Sett ings fo r the sel ected d evice :
lnpu t volum e:
lnpu t level :
Outp ut volu me: Mute
Show v olume i n menu ba r
?

USB Microphone 41
De indicator gaat niet branden wanneer de microfoon is ingeschakeld
of wanneer het geluid dat door de microfoon wordt geproduceerd,
niet kan worden gecontroleerd.
① Controleer of de USB-stekker van de microfoon correct is
aangesloten op de USB-interface van de computer. Als dit niet het
geval is, koppelt u het los en probeert u het opnieuw.
② Controleer of de hoofdtelefoon correct is aangesloten op de 3,5
mm-poort van de microfoon. Als dit niet het geval is, koppelt u het
los en probeert u het opnieuw.
③ Wanneer de microfoon is aangesloten op een computer, moet u
het apparaat "Opname" van de systeemluidspreker inschakelen
en "Het apparaat bewaken" selecteren op het tabblad
Eigenschappen van het apparaat "GSM-100".
Het geluid van de microfoon kan niet worden opgenomen of het
opnamevolume is te laag.
① Wanneer de microfoon is aangesloten op een computer voor
gebruik, controleert u of het microfoonvolume van de GSM-100 te
laag is. Zo ja, pas dan het volume aan om te zien of het weer
normaal wordt.
② Controleer of de knop voor volumeregeling laag is ingedrukt. Zo
ja, draai dan tegen de klok in aan de knop om te zien of het volume
weer normaal wordt.
Er is akoestische feedback wanneer de microfoon is aangesloten op
een luidspreker.
① Als uw software de echo-onderdrukkingsfunctie heeft, schakelt u
deze in.
② Draai het pick-upgedeelte van de microfoon uit de buurt van de
actieve luidspreker terwijl u de juiste afstand houdt.
③ Verlaag het microfoonvolume of het uitvoervolume van de
luidspreker.
Probleemoplossing

USB Microphone
42
Om mogelijk persoonlijk letsel of materiële schade veroorzaakt door
elektrische schokken, hoge temperaturen, brand, straling, explosie,
mechanische gevaren en onjuist gebruik te voorkomen, moet u de
volgende items lezen en observeren voordat u het product gebruikt.
① Wanneer u het product gebruikt, moet u het volume van het
apparaat aanpassen aan een correct niveau. Gebruik het niet voor
een lange tijd wanneer het volume hoog is om productuitval en
gehoorschade te voorkomen.
② Als er tijdens het gebruik een afwijking is (zoals rook, geur, enz.),
Schakel dan de aan / uit-schakelaar uit en koppel de stekker
onmiddellijk los en stuur het product vervolgens naar de dealer
voor onderhoud.
③ Het product en de accessoires moeten binnenshuis op een droge
en geventileerde plaats worden geplaatst. Bewaar ze niet lang in
een vochtige en stoffige omgeving. Houd het product uit de buurt
van vuur, regen, water, overmatige botsing en vermijd gooien,
trillen van het product of het bedekken van de ventilatiegaten
tijdens gebruik, om de functie ervan niet te beschadigen.
④ Als het product aan de muur of het plafond moet worden
bevestigd, zorg er dan voor dat u het op zijn plaats bevestigt.
⑤ Wanneer u het product gebruikt, moet u zich houden aan de
relevante veiligheidsvoorschriften. Gebruik het product niet in de
gevallen die duidelijk verboden zijn door wet- en regelgeving om
ongelukken te voorkomen.
⑥ Gelieve het product niet zelf te demonteren, opnieuw aan te
passen of te repareren om letsel aan de persoon te voorkomen. Als
u vragen of servicebehoeften heeft, neem dan contact op met de
KLANTENSERVICE VAN GEMINI.
Veiligheidsinstructies
-
 1
1
-
 2
2
-
 3
3
-
 4
4
-
 5
5
-
 6
6
-
 7
7
-
 8
8
-
 9
9
-
 10
10
-
 11
11
-
 12
12
-
 13
13
-
 14
14
-
 15
15
-
 16
16
-
 17
17
-
 18
18
-
 19
19
-
 20
20
-
 21
21
-
 22
22
-
 23
23
-
 24
24
-
 25
25
-
 26
26
-
 27
27
-
 28
28
-
 29
29
-
 30
30
-
 31
31
-
 32
32
-
 33
33
-
 34
34
-
 35
35
-
 36
36
-
 37
37
-
 38
38
-
 39
39
-
 40
40
-
 41
41
-
 42
42


in andere talen
- italiano: Gemini GSM-100 Manuale utente
- français: Gemini GSM-100 Manuel utilisateur
- español: Gemini GSM-100 Manual de usuario
- Deutsch: Gemini GSM-100 Benutzerhandbuch
Gerelateerde artikelen
Andere documenten
-
Boost SPLBOX200 de handleiding
-
 Ibiza SPLBOX200-BK Handleiding
-
Ibiza SPLBOX120-UK de handleiding
-
Ibiza DRAAGBAAR 2.1 AUDIO SYSTEEM MET BLUETOOTH, USB, SD & FM TUNER (SPLBOX150) de handleiding
-
 Ibiza SOUND BOX PORTABLE AUTONOME 300W (FREESOUND300) de handleiding
-
-
Ibiza Sound SPLBOX350-PORT de handleiding

