Aeg-Electrolux 68002KF-N 52O Handleiding
- Categorie
- Kookplaten
- Type
- Handleiding

68002KF-N
Glaskeramische inductie-kookplaat
Ceramic glass induction hob
Montage- en gebruiksaanwijzing
Installation and Operating Instructions

2
Geachte klant,
Lees deze gebruiksaanwijzing zorgvuldig door en bewaar de gebruiks-
aanwijzing zodat deze later kan worden geraadpleegd.
Geef deze gebruiksaanwijzing door aan een eventuele volgende eige-
naar van het apparaat.
De volgende symbolen worden in de tekst gebruikt:
1 Veiligheidsvoorschriften
Waarschuwing! Aanwijzingen ten behoeve van uw persoonlijke veilig-
heid.
Let op! Aanwijzingen om beschadiging van het apparaat te voorkomen.
3 Aanwijzingen en praktische tips
2 Milieu-informatie

3
Inhoud
Gebruiksaanwijzing . . . . . . . . . . . . . . . . . . . . . . . . . . . . . . . . . . . . . . . . 4
Veiligheidsvoorschriften . . . . . . . . . . . . . . . . . . . . . . . . . . . . . . . . . . . . . . . . . 4
Beschrijving van het apparaat. . . . . . . . . . . . . . . . . . . . . . . . . . . . . . . . . . . . 6
Uitrusting kookplaat . . . . . . . . . . . . . . . . . . . . . . . . . . . . . . . . . . . . . . . . . . . . . 6
Uitrusting bedieningsveld . . . . . . . . . . . . . . . . . . . . . . . . . . . . . . . . . . . . . . . . . 6
Touch-control-sensorvelden . . . . . . . . . . . . . . . . . . . . . . . . . . . . . . . . . . . . 7
Indicaties. . . . . . . . . . . . . . . . . . . . . . . . . . . . . . . . . . . . . . . . . . . . . . . . . . . . 7
Restwarmte-indicatie. . . . . . . . . . . . . . . . . . . . . . . . . . . . . . . . . . . . . . . . . . 8
Bediening van het apparaat. . . . . . . . . . . . . . . . . . . . . . . . . . . . . . . . . . . . . . 8
Apparaat in- en uitschakelen . . . . . . . . . . . . . . . . . . . . . . . . . . . . . . . . . . . . . . 8
Kookstand instellen . . . . . . . . . . . . . . . . . . . . . . . . . . . . . . . . . . . . . . . . . . . . . . 8
Bedieningsveld vergrendelen / ontgrendelen . . . . . . . . . . . . . . . . . . . . . . . . . 9
Kinderbeveiliging gebruiken. . . . . . . . . . . . . . . . . . . . . . . . . . . . . . . . . . . . . . . 10
Powerfunctie in-en uitschakelen . . . . . . . . . . . . . . . . . . . . . . . . . . . . . . . . . . . 11
Timer gebruiken . . . . . . . . . . . . . . . . . . . . . . . . . . . . . . . . . . . . . . . . . . . . . . . . . 12
Veiligheidsuitschakeling . . . . . . . . . . . . . . . . . . . . . . . . . . . . . . . . . . . . . . . . . . 15
Tips voor koken en braden. . . . . . . . . . . . . . . . . . . . . . . . . . . . . . . . . . . . . . . 16
Kookgerei voor inductie-kookzones. . . . . . . . . . . . . . . . . . . . . . . . . . . . . . . . . 16
Tips voor energiebesparing . . . . . . . . . . . . . . . . . . . . . . . . . . . . . . . . . . . . . . . . 17
Toepassingsvoorbeelden voor het koken . . . . . . . . . . . . . . . . . . . . . . . . . . . . . 18
Reiniging en onderhoud . . . . . . . . . . . . . . . . . . . . . . . . . . . . . . . . . . . . . . . . . 19
Wat is er aan de hand als … . . . . . . . . . . . . . . . . . . . . . . . . . . . . . . . . . . . . . 20
Afvalverwerking . . . . . . . . . . . . . . . . . . . . . . . . . . . . . . . . . . . . . . . . . . . . . . . . 22
Montageaanwijzing . . . . . . . . . . . . . . . . . . . . . . . . . . . . . . . . . . . . . . . . 23
Garantievoorwaarden. . . . . . . . . . . . . . . . . . . . . . . . . . . . . . . . . . . . . . 25
Adres service-afdeling . . . . . . . . . . . . . . . . . . . . . . . . . . . . . . . . . . . . . 27
Service . . . . . . . . . . . . . . . . . . . . . . . . . . . . . . . . . . . . . . . . . . . . . . . . . . . . . . 29
Montage . . . . . . . . . . . . . . . . . . . . . . . . . . . . . . . . . . . . . . . . . . . . . . . . . . . . 55

4
Gebruiksaanwijzing
1 Veiligheidsvoorschriften
3
Neem deze aanwijzingen in acht, omdat anders bij eventuele schade
het recht op garantie vervalt.
5 Dit apparaat is in overeenstemming met de volgende EG-richtlijnen:
– 73/23/EEG van 19.02.1973 Laagspanningsrichtlijn
– 89/336/EEG van 03.05.1989 EMC-richtlijn inclusief aangepaste richt-
lijn 92/31/EEG
– 93/68/EEG van 22.07.93 CE-markeringsrichtlijn
Gebruik volgens de voorschriften
• Dit apparaat mag alleen in het huishouden worden gebruikt voor het
koken, braden en bakken van levensmiddelen.
• Het apparaat mag niet worden gebruikt als werkblad of aanrecht.
• Het is niet toegestaan het appaat om te bouwen of te veranderen.
• Brandbare vloeistoffen, licht ontvlambare materialen of smeltbare
voorwerpen (bijv. folie, kunststof, aluminium) niet op het apparaat of
in de direct omgeving daarvan plaatsen of opbergen.
Veiligheid voor kinderen
• Houd kleine kinderen altijd uit de buurt van het apparaat.
• Grotere kinderen mogen alleen onder begeleiding en toezicht met het
apparaat werken.
• Om onbedoeld inschakelen door kleine kinderen of huisdieren te
voorkomen, is het aan te bevelen de kinderbeveiliging te activeren.
Algemene veiligheid
• Het apparaat mag alleen worden gemonteerd en aangesloten door
een erkend elektro-installateur.
• Inbouwapparaten mogen alleen worden gebruikt nadat deze zijn in-
gebouwd in voorgeschreven, passende inbouwkasten en werkbladen.
• Bij storingen aan het apparaat of beschadiging van het glaskeramiek
(breuken, sprongen resp. scheuren) moet het apparaat worden uitge-
schakeld en worden losgekoppeld van het elektriciteitsnet, om gevaar
op elektrische schokken te voorkomen.
• Reparaties aan het apparaat mogen alleen worden uitgevoerd door
vakmensen.

5
Veiligheid tijdens het gebruik
• Verwijder stickers en folies van het glaskeramiek.
• Wanneer u onoplettend bent tijdens het werken met het apparaat,
bestaat er risico op verbranding.
• De snoeren van elektrische apparaten mogen niet tegen het hete ap-
paraatoppervlak resp. hete pannen aankomen.
• Oververhit vet en olie is licht ontvlambaar. Laat het apparaat niet
zonder toezicht achter wanneer u kookt met vet of olie (bijv. patat
bakken).
• De kookzones moeten na ieder gebruik worden uitgeschakeld.
• Gebruikers met geïmplanteerde pacemakers dienen met het bovenli-
chaam een afstand van ten minste 30 cm van de ingeschakelde in-
ductie-kookzones aan te houden.
• Gevaar voor verbranding! Materialen van metaal, zoals bijv. messen,
vorken, lepels en pannendeksels niet op de kookzone leggen, omdat
deze heet kunnen worden.
Veiligheid bij het schoonmaken
• Voor het schoonmaken moet het apparaat zijn uitgeschakeld en afge-
koeld.
• Uit veiligheidsoverwegingen is het niet toegestaan het apparaat met
een stoom- of een hogedrukreiniger schoon te maken.
Voorkoming van beschadiging van het apparaat
• Het glaskeramiek kan worden beschadigd door vallende voorwerpen.
• Door stoten met pannen kan de rand van het glaskeramiek bescha-
digd raken.
• Pannen van gietijzer of gietaluminium of pannen met een beschadig-
de bodem kunnen bij het verschuiven het glaskeramiek bekrassen.
• Voorwerpen die kunnen smelten en gerechten die kunnen overkoken,
kunnen inbranden op het glaskeramiek en moeten direct worden ver-
wijderd.
• De kookzones mogen niet worden gebruikt als er geen pan of een
lege pan op staat.
• Het droogkoken van pannen moet worden voorkomen. Hierdoor kan
het kookgerei of glaskeramiek worden beschadigd.
• De luchtopening van 5 mm tussen de werkplaat en het daaronder lig-
gende meubelfront mag niet niet worden afgedekt.

6
Beschrijving van het apparaat
Uitrusting kookplaat
Uitrusting bedieningsveld
Inductie-kookzone 2200W
met Powerfunctie 2800W
Inductie-kookzone
1800 W
Inductie-kookzone
1400 W
Bedieningsveld Inductie-kookzone 1800 W
met Powerfunctie 2800 W
Aan/uit
met controlelampje
Kookstandkeuze
Vergrendeling
Timer-indicatie
Powerfunctie
K
oo
k
zone-
i
n
di
cat
i
es
Timerfunctie
Indicatie
Timer

7
Touch-control-sensorvelden
Het apparaat wordt bediend door middel van touch-control-sensorvel-
den. Functies worden door het aanraken van de sensorvelden gestuurd
en door indicaties en akoestische signalen bevestigd.
De sensorvelden moeten van bovenaf worden aangeraakt, zonder ande-
re sensorvelden te bedekken.
Indicaties
Sensorveld Functie
Aan/uit Apparaat in- en uitschakelen
Instellingen verhogen Kookstand/Tijd verhogen
Instellingen verlagen Kookstand/Tijd verlagen
Timer Timerkeuze
Vergrendeling Bedieningsveld ver-/ ontgrendeld
Power Powerfunctie in-/uitschakelen
Indicatie Beschrijving
Kookzone is uitgeschakeld
- Kookstanden Kookstand is ingesteld
Fout Er is een storing opgetreden
Panherkenning Kookgerei is ongeschikt of te klein
of er is geen kookgerei geplaatst
Restwarmte Kookzone is nog warm
Kinderbeveiliging Vergrendeling/kinderbeveiliging is
ingeschakeld
Power Powerfunctie is ingeschakeld
Veiligheidsuitschakeling Veiligheidsuitschakeling is actief

8
Restwarmte-indicatie
1 Waarschuwing! Verbrandingsgevaar door restwarmte. Na het uitscha-
kelen duurt het nog enige tijd voordat de kookzones zijn afgekoeld. Let
op de
restwarmte-indicatie.
3 Restwarmte kan worden gebruikt voor het smelten en warmhouden
van gerechten.
De inductie-kookzones geven de voor het koken benodigde warmte,
direct aan de onderkant van de pannen af. Het glaskeramiek wordt
slechts door de retourwarmte van het kookgerei verwarmd.
De koelventilator schakelt afhankelijk van de temperatuur van de elek-
tronika automatisch in en uit.
Bediening van het apparaat
3
Inductie-kookzone met daarvoor geschikte pannen gebruiken.
Apparaat in- en uitschakelen
3 Na het inschakelen moet binnen ca. 10 seconden een kookstand of een
functie worden ingesteld, anders schakelt het apparaat automatisch uit.
Kookstand instellen
Bedieningsveld Indicatie Controlelampje
Inschakelen 2 seconden
aanraken
/ brandt
Uitschakelen 1 seconde
aanraken
/ geen gaat uit
Bedieningsveld Indicatie
Verhogen aanraken tot /
Verlagen aanraken tot
Uitschakelen en tegelijk aanraken

9
Bedieningsveld vergrendelen / ontgrendelen
Het bedieningsveld kan met uitzondering van het sensorveld ”Aan/Uit“
op ieder gewenst moment worden vergrendeld, bijv. om het wijzigen
van de instellingen als gevolg van het met een lap afnemen, te voorko-
men.
3 Als u het apparaat uitschakelt, wordt de vergrendeling automatisch uit-
geschakeld.
Bedieningsveld Indicatie
Inschakelen aanraken (na 3 seconden)
Uitschake-
len
aanraken eerder ingestelde kookstand

10
Kinderbeveiliging gebruiken
De kinderbeveiliging voorkomt ongewenst gebruik van het apparaat.
Kinderbeveiliging inschakelen
Kinderbeveiliging tijdelijk uitschakelen
De kinderbeveiliging kan op deze manier eenmalig worden uitgescha-
keld; bij het volgende gebruik is de kinderbeveiliging weer actief.
Kinderbeveiliging uitschakelen
Stap Bedieningsveld Indicatie/signaal
1. apparaat inschakelen
(geen kookstand instellen)
2. aanraken tot het signaal
klinkt
akoestisch signaal
3. aanraken
Apparaat wordt uitgeschakeld. Kinderbeveiliging is ingeschakeld.
Stap Bedieningsveld Indicatie/signaal
1. apparaat inschakelen
2. en tegelijk aanraken / akoestisch signaal
Tot de volgende keer dat het apparaat wordt uitgeschakeld, kan dit
normaal worden gebruikt.
Stap Bedieningsveld Indicatie/signaal
1. apparaat inschakelen
2. aanraken tot het signaal
klinkt
akoestisch signaal
3. aanraken
Apparaat wordt uitgeschakeld. De kinderbeveiliging is uitgeschakeld.

11
Powerfunctie in-en uitschakelen
De Powerfunctie geeft de voorste inductie-kookzones extra vermo-
gen, om bijvoorbeeld een grote hoeveelheid water snel aan de kook te
brengen.
De Powerfunctie wordt bij de kookzone links voor 8 minuten en bij de
kookzone rechts voor 5 minuten geactiveerd. Daarna schakelt de induc-
tie-kookzone automatisch terug naar de kookstand .
3 Als de Powerfunctie wordt uitgeschakeld, wisselen de kookzones auto-
matisch naar de vooraf ingestelde kookstand terug.
Power Management
De kookzones hebben een maximaal
vermogen.
Wordt dit vermogen tijdens het in-
schakelen van de Power-functie
overschreden, vermindert het Power
Management de kookstand van een
andere kookzones.
De aanduiding van deze kookzone
wisselt een minuut lang tussen de
ingestelde kookstand en de maxi-
male kookstand. Daarna wordt de
werkelijke kookstand aangegeven.
Bijvoorbeeld:
Bedieningsveld Indicatie
Inschakelen aanraken
Uitschakelen aanraken
aanraken
Laatste
ingeschakel-
de kookzone
Andere kookzone
ingestelde
kookstand
ingestelde
kookstand
Indicatie werkelijke
kookstand
p 9 6 tijdens het verwisse-
len met
9
6

12
Timer gebruiken
Alle kookzones kunnen tegelijk een van de beide Timerfuncties gebrui-
ken.
3 Als een kookzone wordt uitgeschakeld, dan wordt tevens de ingestelde
Timerfunctie uitgeschakeld.
3 Als additioneel bij een ingestelde kookwekker bij deze kookzone een
kookstand wordt ingesteld, dan wordt de kookzone na afloop van de
ingestelde tijd uitgeschakeld.
Kookzone kiezen
3 De kookstandindicatie van de geselecteerde kookzone dooft zolang de
timertijd kan worden ingesteld.
3 Als het controlelampje langzamer knippert, verschijnt de kookstandin-
dicatie weer en de kookstand kan weer worden ingesteld of gewijzigd.
Functie Vereisten Resultaat na
verloop van de tijd
Automatische uit-
schakeling
bij een ingestelde
kookstand
akoestisch signaal
00 knippert
kookzone wordt uit-
geschakeld
Kookwekker bij niet gebruikte
kookzones
akoestisch signaal
00 knippert
Stap Bedieningsveld Indicatie
1. 1xaanraken Controlelampje van de
eerste kookzone knip-
pert
2. 1xaanraken Controlelampje van de
tweede kookzone knip-
pert
3. 1xaanraken Controlelampje van de
derde kookzone knip-
pert
4. 1xaanraken Controlelampje van de
vierde kookzone knip-
pert

13
3 Als meerdere Timerfuncties zijn ingesteld, dan wordt na een aantal se-
conden de kortste resterende tijd van alle Timerfuncties aangegeven en
knippert het bijbehorende controlelampje.
Tijd instellen
Timerfunctie uitschakelen
Stap Bedieningsveld Indicatie
1. Kookzone se-
lecteren
Het controlelampje van de geselec-
teerde kookzone knippert
2. of van de ge-
selecteerde kookzo-
ne aanraken
00 t/m 99 minuten
3. of van de ge-
selecteerde kookzo-
ne langer dan 4
seconden aanraken
... 05...10...15... 20 of... 95... 90...
85... 80... (in stappen van 5 minuten
voor het gemakkelijker instellen)
Na een paar seconden gaat het controlelampje langzamer knipperen.
De tijd is ingesteld.
De tijd telt terug.
Stap Bedieningsveld Indicatie
1. Kookzone se-
lecteren
Controlelampje van de geselecteerde
kookzone knippert sneller.
Resterende tijd wordt aangegeven
2. van de geselec-
teerde kookzone
aanraken
De resterende tijd telt terug tot 00.
en van de ge-
selecteerde kookzo-
ne tegelijkertijd
aanraken
00 wordt aangegeven.
Het controlelampje dooft.
De timerfunctie voor de geselecteerde kookzone is uitgeschakeld.

14
Tijd wijzigen
Resterende tijd van een kookzone aangeven
Akoestisch signaal uitschakelen
Stap Bedieningsveld Indicatie
1. kookzone se-
lecteren
Controlelampje van de geselecteerde
kookzone knippert sneller
Resterende tijd wordt aangegeven
2. of van de ge-
selecteerde kookzo-
ne aanraken
01 tot 99 minuten
Na een aantal seconden knippert het controlelampje langzamer.
De tijd is ingeschakeld.
De tijd geeft de resterende tijd aan (loopt terug).
Stap Bedieningsveld Indicatie
1. kookzone
selecteren
Controlelampje van de geselecteerde
kookzone knippert sneller
Resterende tijd wordt aangegeven
Na een aantal seconden knippert het controlelampje langzamer.
Stap Bedieningsveld Akoestisch signaal
1. aanraken Akoestische uitschakeling.
Akoestisch signaal gaat uit

15
Veiligheidsuitschakeling
Kookplaat
• Als na het inschakelen van de kookplaat niet binnen ca. 10 seconden
bij een kookzone een kookstand wordt ingesteld, schakelt de kook-
plaat automatisch uit.
• Wanneer alle kookzones worden uitgeschakeld, schakelt de kookplaat
na ca. 10 seconden automatisch uit.
Bedieningsveld
3 Vochtigheid (bijv. een vochtige doek) of overgekookte vloeistoffen op
het bedieningsveld, schakelen alle kookzones direct uit.
Inductie-kookzones
• Bij oververhitting (bijv. als gevolg van een drooggekookte pan) scha-
kelt de kookzone automatisch uit. wordt aangegeven. Voor het
opnieuw gebruiken moet de kookzone op
0 gesteld worden en dient
afgekoeld te zijn.
• Als hiervoor ongeschikte pannen worden gebruikt, knippert in de
indicatie en na 2 minuten schakelt de indicatie van de kookzone uit.
• Als een van de kookzones na een bepaalde tijd niet is uitgeschakeld
of als de kookstand niet wijzigt, schakelt de betreffende kookzone
automatisch uit. wordt aangegeven. Voor het opnieuw gebruiken
moet de kookzone op
0 gesteld worden.
Kookstand Uitschakeling na
V, 1 - 2
6 uur
3 - 4
5 uur
5
4 uur
6 - 9
1,5 uur

16
Tips voor koken en braden
3
Aanwijzing met betrekking tot acrylamide
Volgens de laatste wetenschappelijke inzichten kan een intensieve brui-
ning van levensmiddelen, met name bij zetmeelhoudende producten,
een gevaar voor de gezondheid door acrylamide veroorzaken. Om die
reden adviseren wij levensmiddelen zoveel mogelijk bij lage temperatu-
ren te bereiden en de gerechten niet te veel te bruinen.
Kookgerei voor inductie-kookzones
Materiaal kookgerei
3 Kookgerei voor inductiekookzones wordt door de fabrikant als zodanig
gekenmerkt.
Geschiktheidsproef
Kookgerei is geschikt voor inductie als ...
• ... wat water op een inductiekookzone bij kookstand 9 binnen korte
tijd wordt verhit.
• ... een magneet op de bodem van de pan blijft kleven.
3 Bepaald kookgerei kan tijdens het gebruik op inductiekookzones geluid
produceren. Deze geluiden zijn geen storing van het apparaat en staan
een goede werking op geen enkele wijze in de weg.
Bodem van kookgerei
De bodem van het kookgerei moet zo dik en vlak mogelijk zijn.
Materiaal kookgerei geschikt
Staal, geëmailleerd staal ja
Gietijzer ja
Roestvrij staal indien door fabrikant als zodanig gekenmerkt
Aluminium, koper, messing ---
Glas, keramiek, porselein ---

17
Grootte van de pan
Inductiekookzones passen zich tot op zekere hoogte automatisch aan
de grootte van de bodem van het kookgerei aan. Het magnetische deel
van de panbodem moet echter afhankelijk van de grootte van de kook-
zone een minimale diameter hebben.
3 Het kookgerei moet op het midden van de kookzones staan.
Tips voor energiebesparing
2 Kookgerei vóór het inschakelen van de kookzone plaatsen.
2 Kookgerei, indien mogelijk, altijd met een deksel afsluiten.
Diameter
kookzone [mm]
Minimumdiameter
panbodem [mm]
210 180
180 145
145 120

18
Toepassingsvoorbeelden voor het koken
De gegevens in de volgende tabel dienen slechts als richtlijn.
De Powerfunctie is geschikt voor het koken van grote vloeistofhoeveel-
heden.
Kook-
stand
Kook-
proces
Geschikt voor Duur Aanwijzingen/tips
0 uit-stand
1
Warm
houden
Warm houden van gare
gerechten
Naar be-
hoefte
Afdekken
1-2
Smelten
Hollandaisesaus,
smelten van boter,
chocolade, gelatine
5-25 min. Tussendoor omroeren
Stollen
Schuimomelet, bouillon
met ei
10-40 min. Met deksel bereiden
2-3 Wellen
Wellen van rijst en melk-
gerechten
Verhitten van kant-en-
klaargerechten
25-50 min.
Minimaal dubbele
hoeveelheid vloeistof
aan de rijst toevoegen,
melkgerechten tussen-
door roeren
3-4
Stomen
Stoven
Stoven van groente, vis
Vlees sudderen
20-45 min.
Bij groente weinig
vocht toevoegen (een
paar eetlepels)
4-5 Koken
Koken van aardappels 20-60 min.
Weinig vloeistof
gebruiken, bijvoor-
beeld: max.
¼ l water
per 750 g aardappels
Koken van grotere hoe-
veelheden, eenpansge-
rechten en soep
60-150
min.
Tot 3 l vloeistof plus
ingrediënten
6-7
Zacht
braden
Schnitzel, cordon bleu,
karbonade, gehaktballen,
braadworst, lever, roux,
eieren, omelets, oliebollen
Voortdu-
rend bakken
Tussendoor keren
7-8
Sterk
braden
Aardappel koekjes, lende-
stukken, steaks, pannen-
koeken
5-15 min.
per pan
Tussendoor keren
9
Aan de
kook
brengen
Aanbra
den
Frituren
Aan de kook brengen van grotere hoeveelheden water, pasta ko-
ken, aanbraden van vlees (goulash, stoofvlees), frituren van pata-
tes frites

19
Reiniging en onderhoud
1
Voorzichtig! Verbrandingsgevaar door restwarmte.
1 Let op! Bijtende en schurende schoonmaakmiddelen beschadigen het
apparaat. Schoonmaken met water en handafwasmiddel.
1 Let op! Resten van schoonmaakmiddelen beschadigen het apparaat.
Verwijder resten met water en handafwasmiddel.
Reinig het apparaat na ieder gebruik
1. Maak het apparaat schoon met een vochtige doek en een klein beetje
handafwasmiddel.
2. Wrijf het apparaat droog met een schone doek.
Verwijder verontreinigingen
1. Plaats een glasschraper schuin op het glaskeramische vlak.
2. Verwijder verontreinigingen door de schraper over het oppervlak te la-
ten glijden.
3. Maak het apparaat schoon met een vochtige doek en een klein beetje
handafwasmiddel.
4. Wrijf het apparaat droog met een schone doek.
*Glasschrapers en speciale schoonmaakmiddelen voor glaskeramiek of roestvrij staal zijn ver-
krijgbaar in de vakhandel.
3 Hardnekkige verontreinigingen verwijderen met een speciaal schoon-
maakmiddel voor glaskeramiek of roestvrij staal.
3 Krassen of donkere vlekken in het glaskeramiek kunnen niet meer wor-
den verwijderd, zij hebben echter geen invloed op het functioneren van
het apparaat.
verwijderen
Soort vervuiling direct bij afgekoeld apparaat met
Suiker, suikerhoudende gerech-
ten
ja ---
Glasschraper*
Kunststoffen, aluminiumfolies ja ---
Kalk- en watersporen --- ja
Speciaal schoon-
maakmiddel voor
glaskeramiek of
roestvrij staal*
Vetspatten --- ja
metaalachtig glanzende
verkleuringen
--- ja

20
Wat is er aan de hand als …
Storing Mogelijke oorzaak Oplossing
De kookzones kunnen niet
worden ingeschakeld of
werken niet
Sinds het inschakelen van
het apparaat zijn meer dan
10 seconden verstreken
Apparaat opnieuw inscha-
kelen.
De vergrendeling is inge-
schakeld
Vergrendeling uitschake-
len (zie hoofdstuk ”Bedie-
ningsveld vergrendelen/
ontgrendelen“)
De kinderbeveiliging is in-
geschakeld
Kinderbeveiliging deactive-
ren (zie hoofdstuk ”Kinder-
beveiliging“)
Er zijn meerdere sensorvel-
den tegelijk aangeraakt
Raak slechts één sensorveld
tegelijk aan
Veiligheidsuitschakeling is
geactiveerd
Eventueel op het bedie-
ningsveld liggende voor-
werpen (pan, vaatdoek
o.i.d.) verwijderen. Appa-
raat opnieuw inschakelen
De kookzones verminderen
de kookstand automatisch
tot
De sensorvelden zijn deels
bedekt door een vochtige
doek of met vloeistof
Doek of vloeistof verwijde-
ren.
Gewenste kookstand weer
instellen.
De restwarmte-indicatie
geeft niets aan
De kookzone is slechts kort
gebruikt en is daarom nog
niet heet
Neem contact op met de
klantenservice wanneer de
kookzone toch heet is.
Signaal klinkt, apparaat
wordt uitgeschakeld
Een of meerdere sensorvel-
den zijn langer dan 10 se-
conden afgedekt
Sensorvelden vrijmaken
Een signaal klinkt en het
apparaat wordt ingescha-
keld en na 10 seconden
weer uitgeschakeld
Het aan/uit-sensorveld
werd afgedekt, bijvoor-
beeld door een doekje
Geen voorwerpen op het
bedieningsveld leggen
De indicatie wisselt tussen
twee kookstanden
Power-Management redu-
ceert het vermogen van
deze kookzone
Zie hoofdstuk ”Powerfunc-
tie in-/uitschakelen”

21
Wanneer u de storing niet kunt verhelpen met de hierboven gege-
ven aanwijzingen, neem dan contact op met uw vakhandel of met
onze service-afdeling.
1 Waarschuwing! Reparaties aan het apparaat mogen alleen door vak-
mensen worden uitgevoerd. Onvakkundige reparaties kunnen tot aan-
zienlijke risico's voor de gebruiker leiden.
3 Bij een onjuiste bediening wordt het bezoek van de servicetechnicus
ook tijdens de garantieperiode in rekening gebracht.
knippert Ongeschikt kookgerei Geschikt kookgerei gebrui-
ken
Geen kookgerei op de
kookzone
Kookgerei plaatsen
De diameter van de bodem
van het kookgerei is te
klein voor de kookzone
Op een kleinere kookzone
plaatsen
Geschikt kookgerei gebrui-
ken
brandt Oververhittingbeveiliging
van de kookzone is geacti-
veerd
Kookzone uitschakelen
Kookzone nogmaals in-
schakelen
De beveiligingsuitschake-
ling is geactiveerd.
Kookzone uitschakelen
Kookzone nogmaals in-
schakelen
en nummer wordt aan-
gegeven
Fout in de elektronica Apparaat een aantal minu-
ten van de voeding schei-
den (zekering uit de
huisinstallatie nemen)
Als na het inschakelen de
fout nogmaals wordt
aangegeven, contact opne-
men met de servicedienst
Storing Mogelijke oorzaak Oplossing

22
Afvalverwerking
2
Verpakkingsmateriaal
De verpakkingsmaterialen zijn niet schadelijk voor het milieu en her-
bruikbaar. De kunststoffen hebben de volgende aanduidingen, bijv.
>PE<, >PS<, enz. Verwijder de verpakkingsmaterialen in overeenstem-
ming met de aanduiding bij de gemeentelijke inzamelplaatsen in de
daarvoor bestemde containers.
2 Oud apparaat verwijderen
Het symbool
W op het product of op de verpakking wijst erop dat dit
product niet als huishoudafval mag worden behandeld. Het moet ech-
ter naar een plaats worden gebracht waar elektrische en elektronische
apparatuur wordt gerecycled. Als u ervoor zorgt dat dit product op de
correcte manier wordt verwijderd, voorkomt u mogelijk voor mens en
milieu negatieve gevolgen die zich zouden kunnen voordoen in geval
van verkeerde afvalbehandeling. Voor meer details in verband met het
recyclen van dit product, neemt u het best contact op met de gemeen-
telijke instanties, het bedrijf of de dienst belast met de verwijdering van
huishoudafval of de winkel waar u het product hebt gekocht.

23
Montageaanwijzing
Veiligheidsvoorschriften
De in het land van gebruik geldende wetgeving, verordeningen, richtlij-
nen en normen dienen te worden nageleefd (veiligheidsvoorschriften,
vakkundige recycling volgens de voorschriften, enz.).
De montage mag slechts door een gekwalificeerd technicus worden uit-
gevoerd.
De minimumafstanden tot andere apparaten en meubelen dienen in
acht te worden genomen.
De aanraakbeveiliging dient met de inbouw te zijn gewaarborgd; lades
mogen bijvoorbeeld alleen met beschermplaat direct onder het appa-
raat worden gemonteerd.
De naden op het werkblad dienen met een geschikt afdichtingsmateri-
aal tegen vocht te worden beschermd.
De dichting zorgt voor een naadloze aansluiting tussen apparaat en
werkblad.
De onderkant van het apparaat aan de binnenzijde tegen damp en
vochtigheid beschermen, bijv. tegen een afwasautomaat of een oven.
Voorkom het plaatsen van het apparaat direct naast deuren of onder
ramen. Openklappende deuren en openspringende ramen kunnen an-
ders het kookgerei van de kookplaat stoten.
1 WAARSCHUWING!
Risico op verwonding door elektrische stroom.
• Op de netaansluitklem staat spanning.
• Netaansluitklem spanningvrij maken.
• Houd u aan het aansluitschema.
• Houd u aan de veiligheidsvoorschriften met betrekking tot elektro-
techniek.
• Garandeer de contactbescherming door vakkundige inbouw.
• Laat de elektrische aansluiting uitvoeren door een erkend installateur.
1 LET OP!
Beschadigingen door elektrische stroom.
Loszittende en onvakkundig aangebrachte stekkerverbindingen kunnen
oververhitting van de aansluiting veroorzaken.
• Klemaansluitingen vakkundig uitvoeren.
• Zorg ervoor dat het snoer niet wordt belast door trekken.
• Bij een aansluiting met 1- of met 2-fasen dient steeds de juiste en
passende netaansluitng van het type H05BB-F Tmax 90° (of hoger) te
worden ingezet.

24
• Als de aansluitkabel van dit apparaat beschadigd is, moet deze door
een speciale aansluitkabel (type H05BB-F Tmax 90°; of hoger) worden
vervangen. Deze is verkrijgbaar bij de service-dienst.
• De netkabel van dit apparaat is rechtstreeks op de printplaat gemon-
teerd. Als de netkabel is beschadigd mag deze uitsluitend door een
gekwalificeerd technicus of door onze serviceafdeling worden ver-
vangen.
In de elektrische installatie moet een inrichting worden aangebracht,
die het mogelijk maakt het apparaat met een contactopeningswijdte
van min. 3 mm met alle polen van het net te scheiden.
Geschikte scheidingsinrichtingen zijn bijv. automatische zekeringen
(schroefzekeringen moeten uit de fitting geschroefd worden), aardlek-
schakelaar en veiligheidsschakelaars.
Afdichting vastplakken
• Het werkblad op de plaats van de uitsnijding reinigen.
• Plak het meegeleverde eenzijdig zelfklevende afdichtband rondom de
onderkant van de kookplaat langs de buitenste rand van de glaskera-
mische plaat. Rek het afdichtband daarbij niet uit. De plaats van het
punt waar de tape samenkomt dient in het midden van één van de
zijden te liggen. Na het op maat maken (met enige mm speling) de
beide uiteinden koud tegen elkaar aan drukken.

25
Garantievoorwaarden
Nederland
Onze producten worden met de grootst mogelijke zorgvuldigheid geproduceerd. Desondanks kan
het voorkomen dat er een defect optreedt. Onze servicedienst zal dit op verzoek herstellen, zowel
binnen als buiten de garantietermijn. De levensduur van het product wordt daardoor niet negatief
beïnvloed.
Onderstaande garantievoorwaarden zijn gestoeld op de EU Richtlijn 99/44/EG en het Burgerlijk
Wetboek. De daaruit voortvloeiende rechten blijven onverlet.
Ook de garantieverplichtingen van de verkoper naar de eindgebruiker blijven onaangetast.
Voor dit product verlenen wij garantie volgens onderstaande voorwaarden:
1. Wij verhelpen kosteloos met inachtneming van de voorwaarden 2 tot en met 15 gebreken aan het
product die zich openbaren binnen 24 maanden vanaf de datum van levering aan de eindgebrui-
ker. In geval van professioneel of daarmee gelijk te stellen gebruik is de garantie beperkt tot 12
maanden. Voor tweedehands producten geldt eveneens een termijn van 12 maanden.
2. De garantieprestatie houdt in dat het product kosteloos wordt teruggebracht in de toestand die
het had voor het defect optrad. Gebrekkige onderdelen worden hersteld of vervangen. Kosteloos
vervangen onderdelen worden ons eigendom.
3. Het gebrek moet terstond gemeld worden om mogelijke verdere schade te voorkomen. De garan-
tieaanspraak vervalt indien het gebrek niet binnen twee maanden na vaststelling is gemeld.
4. Voor een beroep op garantie dient het aankoopbewijs met aankoop- en/of leveringsdatum te wor-
den overlegd. Bij ontbreken daarvan dient ander overtuigend bewijs te worden overlegd.
5. De garantie heeft geen betrekking op schade aan kwetsbare onderdelen, zoals (vitrokeramisch)
glas, kunststof, rubber, die ontstaan is door onzorgvuldig gebruik.
6. De garantie heeft geen betrekking op kleine afwijkingen van de gestelde kwaliteit die voor de
waarde en deugdelijkheid van het product onbeduidend zijn.
7. De garantie geldt evenmin voor schade veroorzaakt door:
a. chemische en elektrochemische inwerking van water,
b. abnormale milieuomstandigheden in het algemeen,
c. voor het product oneigenlijke bedrijfsomstandigheden,
d. contact met agressieve stoffen.
8. De garantie heeft geen betrekking op gebreken door transportschade die buiten onze verantwoor-
delijkheid is ontstaan, niet-vakkundige installatie of montage, verkeerd gebruik, gebrekkig onder-
houd, of het niet in acht nemen van de gebruiks- of montageaanwijzingen.
9. Het recht op garantie vervalt wanneer het defect werd veroorzaakt door herstelling of ingrepen
door derden die niet bevoegd of niet deskundig zijn, of wanneer het product voorzien werd van
toebehoren of onderdelen die niet origineel zijn en daardoor een defect veroorzaken.
10. Producten die gemakkelijk kunnen worden vervoerd dienen te worden overhandigd aan of gezon-
den naar onze servicedienst. Herstelling ter plaatse kan slechts worden gevraagd voor grote of in-
gebouwde producten.
11. Indien het product zodanig is ingebouwd, ondergebouwd, opgehangen of geplaatst dat de beno-
digde tijd voor het in- en uitbouwen samen meer dan 30 minuten bedraagt, worden de hierdoor
ontstane extra kosten aan de gebruiker in rekening gebracht. Schade die ontstaat door abnormale
in- of uitbouw komt ten laste van de gebruiker.
12. Indien binnen de garantieperiode de herstelling van hetzelfde defect herhaaldelijk mislukt of de
herstellingkosten disproportioneel zijn wordt in overleg met de gebruiker een gelijkwaardige ver-
vanging geleverd. In geval van vervanging behouden we ons het recht voor om een vergoeding te
rekenen naar rato van de verstreken gebruiksperiode.
13. Herstelling onder garantie heeft geen verlenging van de garantietermijn noch aanvang van een
nieuwe garantietermijn tot gevolg.
14. Op herstellingen geven wij een garantie van 12 maanden, uitsluitend op hetzelfde gebrek.
15. Verdere of andere aanspraken, in het bijzonder vergoeding van schade ontstaan buiten het pro-
duct, zijn uitgesloten voor zover een aansprakelijkheid niet wettelijk is vastgelegd.
16. In geval van aansprakelijkheid zal een vergoeding de aankoopwaarde van het product niet over-
treffen, tenzij wettelijk anders is bepaald.
Deze garantievoorwaarden gelden voor in Nederland gekochte en/of in gebruik zijnde producten.
Indien een product naar het buitenland wordt gebracht dient de gebruiker na te gaan of het pro-
duct voldoet aan de technische voorwaarden ( o.a. spanning, frequentie, installatievoorschriften,
gassoort, klimaatomstandigheden) in het betreffende land. Voor in het buitenland aangeschafte

26
producten dient de gebruiker zich te vergewissen van de bepalingen in Nederland. Noodzakelijke
of gewenste aanpassingen vallen niet onder de garantie, en kunnen niet altijd worden aange-
bracht.
Ook na afloop van de garantietermijn staat onze servicedienst u ter beschikking.
Adres Servicedienst:
Electrolux Service
Vennootsweg 1
2404 CG ALPHEN AAN DEN RIJN
Reparatievoorwaarden
Onze reparatievoorwaarden zijn conform de afspraak tussen de Consumentenbond en Vle-
han*.
Art. 1 Aan de consument zal na een melding van een storing zo mogelijk direct, doch uiterlijk bin-
nen één werkdag worden medegedeeld op welke dag het bezoek van de technicus zal plaatsvin-
den. De reparatie zal als regel binnen zeven werkdagen na de melding zijn uitgevoerd.
Art. 2
a) Alvorens de reparatie wordt verricht zal de technicus een onderzoek uitvoeren naar de vermoe-
delijke oorzaak van de gemelde storing. Aan de hand hiervan zal hij een zo nauwkeurig mogelijke,
gespecificeerde begroting maken van de totale reparatiekosten inclusief voorrijkosten en dia-
gnose-kosten. Desgevraagd zal deze begroting door de technicus schriftelijk worden vastgelegd.
b) Indien de consument met het begrote bedrag niet akkoord gaat, zal op verzoek het te repareren
toestel worden teruggebracht in de staat waarin het aan de technicus werd aangeboden. Nadat dit
is geschied, zullen alleen de kosten van voorrijden en arbeidsloon in rekening worden gebracht op
basis van de werkelijke bestede tijd, danwel van een vooraf vastgesteld tarief.
Art. 3 Indien tijdens het uitvoeren van de reparatie duidelijk wordt dat:
a) de oorspronkelijke reparatie door redelijkerwijs niet te voorziene omstandigheden niet tegen
het begrote bedrag kan worden uitgevoerd, of
b) ook andere dan in de begroting voorziene reparaties noodzakelijk zijn, zal overleg met de con-
sument plaatsvinden en een herziene kostenbegroting worden gemaakt.
In geval de consument daarmee alsnog niet akkoord gaat, geldt eveneens het in artikel 2b bepaal-
de.
Art. 4 De reparatie zal zoveel mogelijk tijdens het eerste bezoek worden uitgevoerd. Indien om het
toestel in werkende staat te brengen een tweede bezoek noodzakelijk is, zal:
a) direct, doch uiterlijk binnen één werkdag door de betreffende service-organisatie of door de
technicus met de consument de datum voor een tweede bezoek worden afgesproken.
b) een herhalingsbezoek zal als regel binnen tien werkdagen na de melding plaatsvinden.
c) voor een tweede of daaropvolgend bezoek zal geen voorrijtarief in rekening worden gebracht,
tenzij de noodzaak voor een herhalingsbezoek aan de consument is toe te schrijven.
Art. 5 De consument ontvangt een gespecificeerde rekening met vermelding van type en serie-
nummer van het apparaat, omschrijving van de diagnose, toegepaste tarieven, gebruikte onderde-
len en materialen en een korte omschrijving van de verrichte werkzaamheden. De betaling van de
rekening dient tegen afgifte van een reparatienota direct contant of door middel van een gega-
randeerd betaalmiddel plaats te vinden.
Art. 6 Op elke uitgevoerde en betaalde reparatie zal bij normaal huishoudelijk gebruik een volledi-
ge garantie van minimaal 3 maanden worden gegeven. Deze garantie omvat het kosteloos uitvoe-
ren van een hernieuwde reparatie. Op de uitgewisselde en betaalde onderdelen geldt een
garantietermijn van 12 maanden. Bij een beroep op garantie op de reparatie dient de consument
op verzoek de gespecificeerde rekening van de voorgaande reparatie aan de technicus te overleg-
gen.
Art. 7 Indien na driemaal uitvoeren van eenzelfde reparatie hetzelfde defect bij normaal huishou-
delijk gebruik opnieuw optreedt binnen de onder art. 6 bedoelde garantietermijn en redelijkerwijs
een afdoend resultaat bij het opnieuw uitvoeren van de reparatie niet verwacht kan worden, zal
aan de consument een nieuw exemplaar of soortgelijk toestel van hetzelfde merk worden aange-
boden tegen bijbetaling op basis van een per product te bepalen jaarlijks afschrijvingspercentage.
Art. 8 Vervangen onderdelen stelt de technicus weer ter beschikking van de consument, met uit-
zondering van de onder garantie of tegen een gereduceerde prijs vervangen onderdelen.
Art. 9 Een reparatie dient op zodanige wijze te worden uitgevoerd, dat een toestel daarna weer
volledig voldoet aan de veiligheidsvoorschriften, die op grond van een van fabriekswege aange-
bracht veiligheidskeurmerk gelden, danwel bij het ontbreken daarvan, aan de wettelijke vereisten
terzake. Dit houdt ondermeer in, dat reparaties moeten worden uitgevoerd met originele en door
de fabrikant ook terzake van veiligheidskeurmerken en -voorschriften gegarandeerde onderdelen.
*) Vereniging Leveranciers van Huishoudelijke Apparaten in Nederland

27
Adres service-afdeling
Nederland
AEG fabrieksservice
Postbus 120
2400 AC Alphen aan den Rijn
Service-informatielijn
(voor bezoek servicetechnicus en onderdelen)
tel. 0172-468 300
Consumentenbelangen
(voor algemene, product- of
gebruiksinformatie)
tel. 0172-468 172
www.aeg.nl

28

29
Service
Controleer bij technische storingen eerst of u met behulp van de ge-
bruiksaanwijzing (hoofdstuk „Wat te moet doen als…“) het probleem
zelf kunt oplossen.
Wanneer u het probleem niet kunt oplossen, neemt u contact op met
onze service-afdeling.
Om u snel te kunnen helpen, hebben
wij de volgende gegevens nodig:
– Modelaanduiding
– Productnummer (PNC)
– Serienummer (S-No.)
(u vindt deze nummers op het
typeplaatje)
– Soort storing
– Eventuele foutmelding die het ap-
paraat aangeeft
– cijfer- of lettercombinatie bestaande uit drie posities, van de glas-
keramische industrie
Om ervoor te zorgen dat u de benodigde nummers van uw apparaat bij
de hand heeft, raden wij u aan deze hier te noteren:
Modelaanduiding: .....................................
PNC: .....................................
S-No: .....................................

30
Dear Customer,
Please read these user instructions carefully and keep them to refer to
later.
Please pass the user instructions on to any future owner of the appli-
ance.
The following symbols are used in the text:
1 Safety instructions
Warning! Notes that concern your personal safety.
Important! Notes that show how to avoid damage to the appliance.
3 Useful tips and hints
2 Environmental information

31
Contents
Operating Instructions. . . . . . . . . . . . . . . . . . . . . . . . . . . . . . . . . . . . . 32
Safety instructions. . . . . . . . . . . . . . . . . . . . . . . . . . . . . . . . . . . . . . . . . . . . . . 32
Description of the Appliance. . . . . . . . . . . . . . . . . . . . . . . . . . . . . . . . . . . . . 34
Cooking surface layout . . . . . . . . . . . . . . . . . . . . . . . . . . . . . . . . . . . . . . . . . . . 34
Control panel layout . . . . . . . . . . . . . . . . . . . . . . . . . . . . . . . . . . . . . . . . . . . . . 34
Touch Control sensor fields . . . . . . . . . . . . . . . . . . . . . . . . . . . . . . . . . . . . . 35
Displays . . . . . . . . . . . . . . . . . . . . . . . . . . . . . . . . . . . . . . . . . . . . . . . . . . . . . 35
Residual heat indicator . . . . . . . . . . . . . . . . . . . . . . . . . . . . . . . . . . . . . . . . 36
Operating the appliance. . . . . . . . . . . . . . . . . . . . . . . . . . . . . . . . . . . . . . . . . 36
Switching the appliance on and off . . . . . . . . . . . . . . . . . . . . . . . . . . . . . . . . 36
Selecting the heat setting. . . . . . . . . . . . . . . . . . . . . . . . . . . . . . . . . . . . . . . . . 36
Locking/unlocking the control panel. . . . . . . . . . . . . . . . . . . . . . . . . . . . . . . . 37
Using the child safety device . . . . . . . . . . . . . . . . . . . . . . . . . . . . . . . . . . . . . . 37
Switching the power function on and off . . . . . . . . . . . . . . . . . . . . . . . . . . . 39
Using the timer . . . . . . . . . . . . . . . . . . . . . . . . . . . . . . . . . . . . . . . . . . . . . . . . . 40
Safety cut-out . . . . . . . . . . . . . . . . . . . . . . . . . . . . . . . . . . . . . . . . . . . . . . . . . . 43
Tips on cooking and frying. . . . . . . . . . . . . . . . . . . . . . . . . . . . . . . . . . . . . . . 44
Cookware for induction cooking zones . . . . . . . . . . . . . . . . . . . . . . . . . . . . . . 44
Tips on energy saving . . . . . . . . . . . . . . . . . . . . . . . . . . . . . . . . . . . . . . . . . . . . 45
Examples of cooking applications . . . . . . . . . . . . . . . . . . . . . . . . . . . . . . . . . . 46
Cleaning and care . . . . . . . . . . . . . . . . . . . . . . . . . . . . . . . . . . . . . . . . . . . . . . 47
What to do if … . . . . . . . . . . . . . . . . . . . . . . . . . . . . . . . . . . . . . . . . . . . . . . . . 48
Disposal . . . . . . . . . . . . . . . . . . . . . . . . . . . . . . . . . . . . . . . . . . . . . . . . . . . . . . . 50
Installation Instructions . . . . . . . . . . . . . . . . . . . . . . . . . . . . . . . . . . . 51
Warranty conditions . . . . . . . . . . . . . . . . . . . . . . . . . . . . . . . . . . . . . . . 53
Service and Spare Parts . . . . . . . . . . . . . . . . . . . . . . . . . . . . . . . . . . . 54
Assembly . . . . . . . . . . . . . . . . . . . . . . . . . . . . . . . . . . . . . . . . . . . . . . . . . . . . 55

32
Operating Instructions
1 Safety instructions
3
Please comply with these instructions. If you do not, any damage re-
sulting is not covered by the warranty.
5 This appliance conforms with the following EU Directives:
– 73/23/EEC dated 19.02.1973 Low Voltage Directive
– 89/336/EEC dated 03.05.1989 EMC Directive inclusive of Amending
Directive 92/31/EEC
– 93/68/EEC dated 22.07.1993 CE Marking Directive
Correct use
• This appliance should be used only for normal domestic cooking and
frying of food.
• The appliance must not be used as a work surface or as a storage sur-
face.
• Additions or modifications to the appliance are not permitted.
• Do not place or store flammable liquids, highly inflammable materials
or fusible objects (e.g. plastic film, plastic, aluminium) on or near the
appliance.
Child safety
• Small children must be kept away from the appliance.
• Only let bigger children work on the appliance under supervision.
• To avoid small children and pets unintentionally switching the appli-
ance on, we recommend activation of the child safety device.
General safety
• The appliance may only be installed and connected by trained, regis-
tered service engineers, or competent persons.
• Built-in appliances may only be used after they have been built in to
suitable built-in units and work surfaces that meet standards.
• In the event of faults with the appliance or damage to the glass ce-
ramic (cracks, scratches or splits), the appliance must be switched off
and disconnected from the electrical supply to prevent the possibility
of an electric shock.
• Repairs to the appliance must only be carried out by trained regis-
tered service engineers.

33
Safety during use
• Remove stickers and film from the glass ceramic.
• There is the risk of burns from the appliance if used carelessly.
• Cables from electrical appliances must not touch the hot surface of
the appliance or hot cookware.
• Overheated fat and oil can ignite quickly. When cooking with fat or
oil (e.g. frying chips) do not leave the appliance unattended.
• Switch the cooking zones off after each use.
• Users with implanted pacemakers should keep their upper body at
least 30 cm from induction cooking zones that are switched on.
• Risk of burns! Do not place objects made of metal, such as knives,
forks, spoons and saucepan lids on the cooking surface, as they can
get hot.
Safety when cleaning
• For cleaning, the appliance must be switched off and cooled down.
• For safety reasons, the cleaning of the appliance with steam jet or
high-pressure cleaning equipment is not permitted.
How to avoid damage to the appliance
• The ceramic glass can be damaged by objects falling onto it.
• The edge of the ceramic glass can be damaged by being knocked by
the cookware.
• Cookware made of cast iron, cast aluminium or with damaged bot-
toms can scratch the ceramic glass if pushed across the surface.
• Objects that melt and things that boil over can burn onto the ceramic
glass and should be removed straightaway.
• Do not use the cooking zones with empty cookware or without cook-
ware.
• To avoid damaging cookware and glass ceramics, do not allow sauce-
pans or frying pans to boil dry.
• The ventilation gap of 5mm between the worktop and front of the
unit underneath it must not be covered.

34
Description of the Appliance
Cooking surface layout
Control panel layout
Induction cooking zone 2200 W
with power function 2800 W
Induction cooking zone 1800 W
Induction cooking zone 1400 W
Control panel Induction cooking zone 1800 W
with power function 2800 W
On/Off
with power indicator
Heat setting selection
Lock
Timer display
Power function
C
oo
ki
ng zone
i
n
di
cators
Timer function
Display
Timer

35
Touch Control sensor fields
The appliance is operated using Touch Control sensor fields. Functions
are controlled by touching sensor fields and confirmed by displays and
acoustic signals.
Touch the sensor fields from above, without covering other sensor
fields.
Displays
Sensor field Function
On / Off Switches appliance on and off
Increase settings Increasing heat setting/time
Decrease settings Decreasing heat setting/time
Timer Timer selection
Lock Locking/unlocking the control
panel
Power Switching the power function on
and off
Display Description
Cooking zone is switched off
- Heat settings Heat setting is set
Fault Malfunction has occurred
Pan detection Cookware is unsuitable or too
small or no cookware has been
placed on the cooking zone
Residual heat Cooking zone is still hot
Child safety device Lock/child safety device is set.
Power Power function is switched on
Safety cut-out Safety cut-out has been activated

36
Residual heat indicator
1 Warning! Risk of burns from residual heat. After being switched off,
the cooking zones need some time to cool down. Look at the residual
heat indicator
.
3 Residual heat can be used for melting and keeping food warm.
The induction cooking zones create the heat required for cooking di-
rectly in the base of the cookware. The glass ceramic is merely heated
by the residual heat of the cookware.
The cooling fan switches itself on and off depending upon the temper-
ature of the electronics.
Operating the appliance
3
Use the induction cooking zones with suitable cookware.
Switching the appliance on and off
3 After switching on, within approx. 10 seconds a heat setting or a func-
tion must be set, otherwise the appliance automatically switches itself
off.
Selecting the heat setting
Control panel Display Pilot light
Switch on Touch for 2 seconds / lights up
Switch off Touch for 1 second / none goes out
Control panel Display
Increase Touch to /
Decrease Touch to
Switch off Touch and at the same time

37
Locking/unlocking the control panel
The control panel, with the exception of the “On/Off” sensor field, can
be locked at any time in order to prevent the settings being changed
e.g. by wiping over the panel with a cloth.
3 When you switch the appliance off, the locking function is automati-
cally switched off.
Using the child safety device
The child safety device prevents unintentional use of the appliance.
Setting the child safety device
Overriding the child safety device
The child safety device can be released in this way for a single cooking
session; it remains activated afterwards.
Control panel Display
Switch on Touch (for 3 seconds)
Switch off Touch previously set heat setting
Step Control panel Display/Signal
1. Switch on the appliance
(Do not set a heat setting)
2. Touch until the signal sounds Acoustic signal
3. Touch
Appliance switches off. The child safety device is set.
Step Control panel Display/Signal
1. Switch on the appliance
2. Touch and at the same time / acoustic signal
Until the appliance is next switched off, it can used as normal.

38
Releasing the child safety device
Step Control panel Display/Signal
1. Switch on the appliance
2. Touch until the signal sounds Acoustic signal
3. Touch
Appliance switches off. The child safety device is released.

39
Switching the power function on and off
The power function makes additional power available to the front
induction cooking zones, e.g. to bring a large volume of water to the
boil.
The power function is activated for 8 minutes for the front left cooking
zone and for 5 minutes for the front right cooking zone. After these
times, the induction cooking zones automatically return to cooking
level .
3 If the power function has ended, the cooking zones automatically
switch back to the heat setting set previously.
Power Management
The cooking zones have a maximum
power available to them.
If this power range is exceeded by
switching on the power function,
Power Management reduces the
heat setting of another cooking
zone.
The indicator for this cooking zone
changes between the heat setting
set and maximum possible heat set-
ting for one minute. Thereafter the
actual heat setting is displayed.
Example:
Control panel Display
Switch on Touch
Switch off Touch
Touch
Last cooking
zone switched
on
Other cooking zone
set heat setting set heat
setting
indicator actual heat
setting
p 9 6 alternating with 9 6

40
Using the timer
All cooking zones can use each use one of the two timer functions at
the same time.
3 If a cooking zone is switched off, the timer function set is also switched
off.
3 If a heat setting is set on this cooking zone in addition to a countdown
timer, the cooking zone is switched off after the time set has elapsed.
Selecting a cooking zone
3 The heat setting indicator of the selected cooking zone goes out, as
long as the timer time can be set.
Function Condition Outcome after the
time has elapsed
Automatic cut-out a heat setting is set acoustic signal
00 flashes
Cooking zone
switches off
Countdown timer cooking zones not in use acoustic signal
00 flashes
Step Control panel Display
1. Touch once Pilot light of the first
cooking zone flashes
2. Touch once Pilot light of the second
cooking zone flashes
3. Touch once Pilot light of the third
cooking zone flashes
4. Touch once Pilot light of the fourth
cooking zone flashes

41
3 If the pilot light is flashing more slowly, the heat setting indicator ap-
pears again and the heat setting can be re-set or modified.
3 If other timer functions are set, after a few seconds the shortest re-
maining time of all the timer functions is displayed and the corre-
sponding pilot light flashes.
Setting time
Switching off the Timer function
Step Control panel Grill setting
1. Selecting cook-
ing zone
Telltale of cooking zone selected
flashes
2. Touch or from
the selected cooking
zone
01 to 99 minutes
3. Touch or from
the selected cooking
zone for more than 4
seconds
... 05...10...15... 20 or... 95... 90...
85... 80... (5-minute steps for easy
setting)
After a few seconds the power indicator flashes more slowly.
The time is set.
The time counts down.
Step Control panel Display
1. Select a cook-
ing zone
Pilot light of the selected cooking
zone flashes more quickly.
Remaining time is displayed
2. Touch for the
cooking zone select-
ed
The remaining time counts down to
00.
Simultaneoulsy
touch
and for
the cooking zone se-
lected
00 is displayed.
The pilot light goes out.
The Timer function for the selected cooking zone is switched off.

42
Changing the time
Displaying the time remaining for a cooking zone
Switching off the acoustic signal
Step Control panel field Display
1. Select cooking
zone
Pilot light of the cooking zone select-
ed flashes faster
The time remaining is displayed
2. Touch or for
the cooking zone se-
lected
01 to 99 minutes
After a few seconds the pilot light flashes more slowly.
The time is set.
The time counts down.
Step Control panel field Display
1. Select cooking
zone
Pilot light of the cooking zone select-
ed flashes faster
The time remaining is displayed
After a few seconds the pilot light flashes more slowly.
Step Control panel field Acoustic signal
1. Touch Acoustic signal to acknowledge.
Acoustic signal stops.

43
Safety cut-out
Cooking surface
• If after switching on the cooking surface, a heat setting is not set for
a cooking zone within approx. 10 seconds, the cooking surface auto-
matically switches itself off.
• If all cooking zones are switched off, the cooking surface automati-
cally switches itself off after approx. 10 seconds.
Control panel
3 Moisture (e.g. a wet cloth) or liquid boiling over onto the control panel
immediately switches all cooking zones off.
Induction cooking zones
• In the event of overheating (e.g. when a pan boils dry) the cooking
zone automatically switches itself off. is displayed. Before being
used again, the cooking zone must be set to 0 and allowed to cool
down.
• If cookware that is not suitable is used, flashes in the display and
after 2 minutes the display for the cooking zone switches itself off.
• If one of the cooking zones is not switched off after a certain time, or
if the heat setting is not modified, the relevant cooking zone switches
off automatically. is displayed. Before being used again, the cook-
ing zone must be set to 0.
Heat setting Switches off after
V, 1 - 2
6 hours
3 - 4
5 hours
5
4 hours
6 - 9
1.5 hours

44
Tips on cooking and frying
3
Information about acrylamides
According to the latest scientific research, intensive browning of food,
especially in products containing starch, may present a health risk due
to acrylamide. Therefore we recommend cooking at low temperatures
and not browning foods too much.
Cookware for induction cooking zones
Cookware material
3 Cookware for induction cooking zones is labelled as suitable by the
manufacturer.
Suitability test
Cookware is suitable for induction cooking, if …
• ... a little water on an induction cooking zone set to heat setting 9 is
heated within a short time.
• ... a magnet sticks to the bottom of the cookware.
3 Certain cookware can make noises when being used on induction cook-
ing zones. These noises are not a fault in the appliance and do not af-
fect operation in any way.
Bottom of the cookware
The bottom of the cookware should be as thick and flat as possible.
Cookware material Suitable
Steel, enamelled steel yes
Cast iron yes
Stainless steel if appropriately labelled by the manufacturer
Aluminium, copper, brass ---
Glass, ceramic, porcelain ---

45
Pan size
Induction cooking zones adapt automatically to the size of the bottom
of the cookware up to a certain limit. However the magnetic part of
the bottom of the cookware must have a minimum diameter depending
upon the size of the cooking zone.
3 The cookware must be placed centrally on the cooking zone.
Tips on energy saving
2 Place cookware on the cooking zone before it is switched on.
2 If possible, always place a lid on the cookware.
Diameter of cooking zone
[mm]
Minimum diameter of dish base
[mm]
210 180
180 145
145 120

46
Examples of cooking applications
The information given in the following table is for guidance only.
The power function is suitable for heating large quantities of liquid.
Heat
set-
ting
Cooking
process
suitable for Cook time Tips/Hints
0 Off position
1
Keeping
food
warm
Keeping cooked foods
warm
as required Cover
1-2
Melting
Hollandaise sauce,
melting butter, chocolate,
gelatine
5-25 mins. Stir occasionally
Solidify-
ing
Fluffy omelettes, baked
eggs
10-40 mins. Cook with lid on
2-3
Simmer-
ing
Simmering rice and milk-
based dishes
Heating up ready-cooked
meals
25-50 mins.
Add at least twice as
much liquid as rice, stir
milk dishes part way
through cooking
3-4
Steaming
Braising
Steaming vegetables, fish
Braising meat
20-45 mins.
With vegetables add
only a little liquid (a
few tablespoons)
4-5 Boiling
Steaming potatoes 20-60 mins.
Use only a little liquid,
e. g.: max.
¼ l water
for 750 g of potatoes
Cooking larger quantities
of food, stews and soups
60-150
mins.
Up to 3 l liquid plus in-
gredients
6-7
Gentle
frying
Frying escalope, veal cor-
don bleu, cutlets, rissoles,
sausages, liver, roux, eggs,
pancakes, doughnuts
as required
Turn halfway through
cooking
7-8
Heavy
frying
Hash browns, loin steaks,
steaks, Flädle (pancakes
for garnishing soup)
5-15 mins.
per pan
Turn halfway through
cooking
9
Boiling
Searing
Deep fry-
ing
Boiling large quantities of water, cooking pasta, searing meat
(goulash, pot roast), deep frying chips

47
Cleaning and care
1
Take care! Risk of burns from residual heat.
1 Important Sharp objects and abrasive cleaning materials will damage
the appliance. Clean with water and washing up liquid.
1 Important Residues from cleaning agents will damage the appliance.
Remove residues with water and washing up liquid.
Cleaning the appliance after each use
1. Wipe the appliance with a damp cloth and a little washing up liquid.
2. Rub the appliance dry using a clean cloth.
Removing deposits
1. Place the scraper on the glass ceramic surface at an angle.
2. Remove residues by sliding the blade over the surface.
3. Wipe the appliance with a damp cloth and a little washing up liquid.
4. Rub the appliance dry using a clean cloth.
*Scrapers and cleaners for glass ceramic and stainless steel can be purchased in specialist shops,
supermarkets, the parts department of your local Service Force Centre or from
www.shop.electrolux.co.uk
3 Remove stubborn residues with a cleaner for glass ceramic or stainless
steel.
3 Scratches or dark stains on the glass ceramic that cannot be removed
do not however affect the functioning of the appliance.
Remove
Type of dirt
imme-
diately
when the appliance has
cooled down
using
sugar, food containing sugar yes ---
a scraper*
plastics, tin foil yes ---
limescale and water rings --- yes
cleaner for glass ce-
ramic or stainless
steel*
fat splashes --- yes
shiny metallic discolorations --- yes

48
What to do if …
Problem Possible cause Remedy
The appliance cannot be
switched on or is not oper-
ating
More than 10 seconds have
passed since the appliance
was switched on
Switch the appliance on
again.
The lock is switched on Switch off the lock (See
the section “Locking/un-
locking the control panel”)
The child safety device is
switched on
Deactivate child safety de-
vice (See the section “Child
safety device”)
Several sensor fields were
touched at the same time
Only touch one sensor field
Safety cut-out has been
triggered
Remove any objects (pan,
cloths, etc.) that are lying
on the control panel.
Switch the appliance on
again
The cooking zones auto-
matically reduce the cook-
ing level to
The sensor fields are partly
covered by a damp cloth or
with liquid
Remove the cloth or the
liquid.
Reset the cooking level re-
quired.
The residual heat indicator
is not displaying anything
The cooking zone was only
on for a short time and is
therefore not hot
If the cooking zone is sup-
posed to be hot, call your
local Service Force Centre.
acoustic signal sounds, ap-
pliance switches off
One or more sensor fields
have been covered for
longer than 10 seconds
Uncover sensor field
Acoustic signal sounds and
appliance switches itself on
and after 10 seconds off
again
The On/Off sensor field has
been covered up, e.g. by a
cloth
Do not place any objects
on the control panel
Display is switching be-
tween two heat settings
Power management is re-
ducing the power of this
cooking zone
See the section “Switching
the power function on and
off”

49
If you are unable to remedy the problem by following the above
suggestions, please contact your local Service Force Centre.
1 Warning! Repairs to the appliance are only to be carried out by quali-
fied service engineers. Considerable danger to the user may result from
improper repairs.
3 If the appliance has been wrongly operated, the visit from the service
technician or dealer may not take place free of charge, even during the
warranty period.
flashes Unsuitable cookware Use suitable cookware
No cookware on the cook-
ing zone
Place cookware on the
cooking zone
The diameter of the bot-
tom of the cookware is too
small for the cooking zone
Move onto a smaller cook-
ing zone
Use suitable cookware
is lit Overheating protection for
the cooking zone has been
triggered
Switch off the cooking
zone. Switch the cooking
zone on again
Safety cut-out has been
triggered
Switch off the cooking
zone. Switch the cooking
zone on again
and number are dis-
played
Electronics fault Disconnect the appliance
from the electrical supply
for a few minutes (Take the
fuse out of the house’s wir-
ing system)
If after switching on again,
is displayed again, call
the customer service de-
partment
Problem Possible cause Remedy

50
Disposal
2
Packaging material
The packaging materials are environmentally friendly and can be recy-
cled. The plastic components are identified by markings, e.g. >PE<,
>PS<, etc. Please dispose of the packaging materials in the appropriate
container at your local waste disposal facilities.
2 Old appliance
The symbol
W on the product or on its packaging indicates that this
product may not be treated as household waste. Instead it shall be
handed over to the applicable collection point for the recycling of elec-
trical and electronic equipment. By ensuring this product is disposed of
correctly, you will help prevent potential negative consequences for the
environment and human health, which could otherwise be caused by
inappropriate waste handling of this product. For more detailed infor-
mation about recycling of this product, please contact your local city
office, your household waste disposal service or the shop where you
purchased the product.

51
Installation Instructions
Safety instructions
The laws, ordinances, directives and standards in force in the country of
use are to be followed (safety regulations, proper recycling in accord-
ance with the regulations, etc.)
Installation may only be carried out by a qualified electrician.
The minimum distances to other appliances and units are to be ob-
served.
Anti-shock protection must be provided by the installation, for example
drawers may only be installed with a protective floor directly under-
neath the appliance.
The cut surfaces of the worktop are to be protected against moisture
using a suitable sealant.
The sealant seals the appliance to the work top with no gap.
When building in, protect the underside of the appliance from steam
and moisture, e.g. from a dishwasher or oven.
Avoid installing the appliance next to doors and under windows. Other-
wise hot cookware may be knocked off the rings when doors and win-
dows are opened.
1 WARNING!
Risk of injury from electrical current.
• The electrical mains terminal is live.
• Observe connection schematic.
• Observe electrical safety rules.
• Ensure anti-shock protection through correct installation by a quali-
fied electrician.
• The appliance must be connected to the electrical supply by a quali-
fied electrician.
1 IMPORTANT!
Risk of injury from electrical current.
Loose and inappropriate plug and socket connections can make the ter-
minal overheat.
• Have the clamping joints correctedly installed by a qualified electri-
cian.
• Use strain relief clamp on cable.
• In the event of single-phase or two-phase connection, the appropri-
ate mains cable of type H05BB-F Tmax 90° (or higher) must be used.

52
• If this appliance’s mains cable is damaged, it must be replaced by a
special cable (type H05BB-F Tmax 90°; or higher). The latter is availa-
ble from the Customer Care Department.
• This appliance’s mains cable is fixed directly to the board. If the mains
cable is damaged, it must only be replaced by a qualified ecletrician
or our Customer Care Department.
A device must be provided in the electrical installation which allows the
appliance to be disconnected from the mains at all poles with a contact
opening width of at least 3 mm
Suitable isolation devices include line protecting cut-outs, fuses (screw
type fuses are to be removed from the holder), earth leakage trips and
contactors.
Sticking on the seal
• Clean the worktop in the area of the cut-out section.
• Stick the one-sided self-adhesive sealing tape supplied all the way
round the lower edge of the cooking surface along the outer edge of
the glass ceramic panel. Do not stretch it. The cut ends should lie in
the middle of one side. When you have cut it to length (add a few
mm), press the two ends flush up against one another.

53
Warranty conditions
Great Britain
Standard guarantee conditions
We, AEG, undertake that if within 12 months of the date of the purchase this AEG appliance or
any part thereof is proved to be defective by reason only of faulty workmanship or materials, we
will, at our discretion repair or replace the same FREE OF CHARGE for labour, materials or carriage
on condition that:
• The appliance has been correctly installed and used only on the electricity or gas supply stated
on the rating plate.
• The appliance has been used for normal domestic purposes only, and in accordance with the
manufacturer's operating and maintenance instructions.
• The appliance has not been serviced, maintained, repaired, taken apart or tampered with by any
person not authorised by us.
• All service work under this guarantee must be undertaken by a Service Force Centre. Any appli-
ance or defective part replaced shall become the Company's property.
• This guarantee is in addition to your statutory and other legal rights.
• Home visits are made between 8.30am and 5.30pm Monday to Friday. Visits may be available
outside these hours in which case a premium will be charged.
Exclusions
This guarantee does not cover:
• Damage or calls resulting from transportation, improper use or neglect, the replacement of any
light bulbs or removable parts of glass or plastic.
• Costs incurred for calls to put right an appliance which is improperly installed or calls to appli-
ances outside the United Kingdom.
• Appliances found to be in use within a commercial environment, plus those which are subject
to rental agreements.
• Products of AEG manufacture which are not marketed by AEG.
European Guarantee
If you should move to another country within Europe then your guarantee moves with you to
your new home subject to the following qualifications:
• The guarantee starts from the date you first purchased your product.
• The guarantee is for the same period and to the same extent for labour and parts as exists in
the new country of use for this brand or range of products.
• This guarantee relates to you and cannot be transferred to another user.
• Your new home is within the European Community (EC) or European Free Trade Area.
• The product is installed and used in accordance with our instructions and is only used domesti-
cally, i.e. a normal household.
• The product is installed taking into account regulations in your new country.
Before you move please contact your nearest Customer Care centre, listed below, to give them de-
tails of your new home. They will then ensure that the local Service Organisation is aware of your
move and able to look after you and your appliances.
France Senlis +33 (0) 3 44 62 29 29
Germany Nürnberg +49 (0) 800 234 7378
Italy Pordenone +39 (0) 800 117511
Sweden Stockholm +46 (0) 8 672 5360
UK Luton +44 (0) 8705 350 350

54
Service and Spare Parts
If the event of your appliance requiring service, or if you wish to pur-
chase spare parts, please contact Service Force by telephoning:
Your telephone call will be automatically routed to the Service Force
Centre covering your post code area.
For the address of your local Service Force Centre and further informa-
tion about Service Force, please visit the website at
www. serviceforce.co.uk
Before calling out an engineer, please ensure you have read the details
under the heading „What to do if...“
When you contact the Service Force Centre you will need to give the
following details:
1. Your name, address and post code.
2. Your telephone number.
3. Clear and concise details of the fault.
4. The model and serial number of the appliance (found on the rating
plate)
5. The purchase date.
Please note that a valid purchase re-
ceipt or guarantee documentation is
required for in-guarantee service
calls.
Customer Care
For general enquiries concerning
your AEG appliance, or for further
information on AEG products please
contact our Customer Care Depart-
ment by letter or telephone at the
address below or visit our website at www.aeg.co.uk.
(*) Calls may be recorded for training purposes
0870 5 929 929
Customer Care Department
Major Appliances
AEG Domestic Appliances
Addington Way
Luton
Bedfordshire, LU4 9QQ
Tel: 08705 350350 (*)
For Customer Service in the Republic
of Ireland please contact us at the ad-
dress below:
AEG/ Electrolux Group (Ire) Ltd
Long Mile Road/ Dublin 12
Republic of Ireland
Tel: +353 (0) 1 4090754
Email: [email protected]

55
Montage / Assembly

56

57

58

59
Typeplaatje / Rating Plate
Induction 7,2 kW
55GADD5AU
68002KF-N
7,2 kW
949 592 559
230 V 50 Hz
AEG - ELECTROLUX

From the Electrolux Group. The world´s No.1 choice.
The Electrolux Group is the world´s largest producer of powered appliances for kitchen, cleaning and outdoor
use. More than 55 million Electrolux Group products (such as refrigerators, cookers, washing machines,
vacuum cleaners, chain saws and lawn mowers) are sold each year to a value of approx. USD 14 billion in more
than 150 countries around the world.
AEG Hausgeräte GmbH
Postfach 1036
D-90327 Nürnberg
http://www.aeg-electrolux.de
© Copyright by AEG
822 930 212-A-010206-01
Subject to change without notice
Wijzigingen voorbehouden
-
 1
1
-
 2
2
-
 3
3
-
 4
4
-
 5
5
-
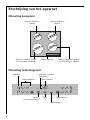 6
6
-
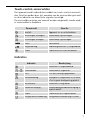 7
7
-
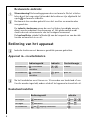 8
8
-
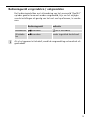 9
9
-
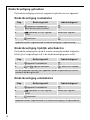 10
10
-
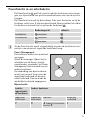 11
11
-
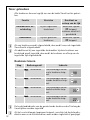 12
12
-
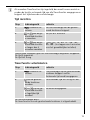 13
13
-
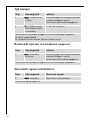 14
14
-
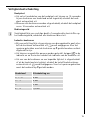 15
15
-
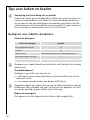 16
16
-
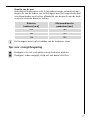 17
17
-
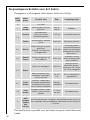 18
18
-
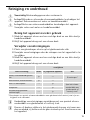 19
19
-
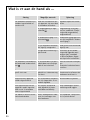 20
20
-
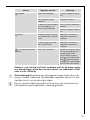 21
21
-
 22
22
-
 23
23
-
 24
24
-
 25
25
-
 26
26
-
 27
27
-
 28
28
-
 29
29
-
 30
30
-
 31
31
-
 32
32
-
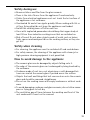 33
33
-
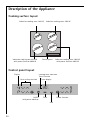 34
34
-
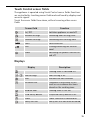 35
35
-
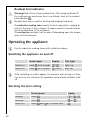 36
36
-
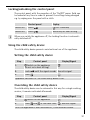 37
37
-
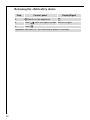 38
38
-
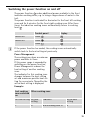 39
39
-
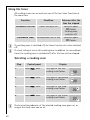 40
40
-
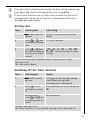 41
41
-
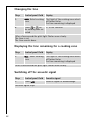 42
42
-
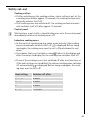 43
43
-
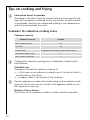 44
44
-
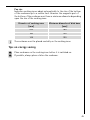 45
45
-
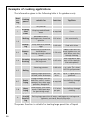 46
46
-
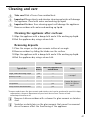 47
47
-
 48
48
-
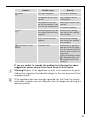 49
49
-
 50
50
-
 51
51
-
 52
52
-
 53
53
-
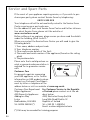 54
54
-
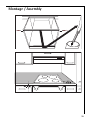 55
55
-
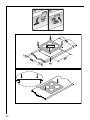 56
56
-
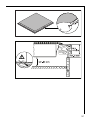 57
57
-
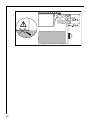 58
58
-
 59
59
-
 60
60


Aeg-Electrolux 68002KF-N 52O Handleiding
- Categorie
- Kookplaten
- Type
- Handleiding