Brother Innov-is XV8550D Gebruikershandleiding
- Type
- Gebruikershandleiding
Pagina wordt geladen...
Pagina wordt geladen...

Note
The designated embroidery time in this guide is an estimated time only.
Hinweis
Die in diesem Stickmuster-Katalog angegebene Stickdauer ist nur ein Schätzwert.
Remarque
La durée de broderie indiquée dans ce guide est uniquement une estimation.
Opmerking
De aangegeven borduurtijd deze handleiding is slechts een schatting.
Nota
Il tempo di ricamo indicato in questa guida è solo una stima.
Примечание
В настоящем руководстве указано приблизительное время вышивания.
註釋
本說明書中的指定刺繡時間僅為預計時間。

1
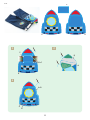
No.1
19 min
1 (124)
2
(085)
239.2 mm
143.9 mm
●
No.2
46 min
1 (085)
2
(124)
3
(085)
308.2 mm
208.9 mm
No.3
13 min
1 (085)
2
(124)
118.3 mm
125.9 mm
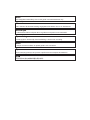
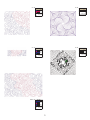
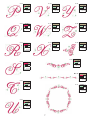
Brother “Exclusives” Additional designs
Zusätzliche Designs in Brother „Exklusiv-Muster“
Motifs « Exclusifs » Brother - Motifs supplémentaires
Brother “Exclusief” Extra ontwerpen
Aggiunti nuovi ricami esclusivi Brother
Дополнительные дизайны из коллекции Brother
The designated embroidery time in this guide is an estimated time only.
(●) Patterns marked with ● have been rotated. Check your design placement prior to
embroidering.
(✝) Refer to the operation manual for the embroidery machine for details on how to
embroider appliqués.
Embroidering on water-soluble sheets without any fabric.
Die in diesem Stickmuster-Katalog angegebene Stickdauer ist nur ein Schätzwert.
(●) Muster, die mit ● gekennzeichnet sind, wurden gedreht. Überprüfen Sie die
Platzierung Ihres Designs, bevor Sie mit Sticken beginnen.
(✝) Weitere Hinweise zum Sticken von Applikationen finden Sie in der
Bedienungsanleitung der Stickmaschine.
Sticken auf wasserlöslicher Folie ohne Sto.
La durée de broderie indiquée dans ce guide est uniquement une estimation.
(●) Les motifs signalés par ● ont été pivotés. Vérifiez l’emplacement de votre motif avant
de commencer à broder.
(✝) Reportez-vous au manuel d’instructions de la machine à broder pour plus
d’informations sur la broderie des appliqués.
Broderie sur des feuilles hydrosolubles sans aucun tissu.
De aangegeven borduurtijd deze handleiding is slechts een schatting.
(●) Patronen die zijn gemarkeerd met ● zijn geroteerd. Controleer de plaats van uw
ontwerp voordat u gaat borduren.
(✝) Raadpleeg de bedieningshandleiding bij de borduurmachine voor gedetailleerde
uitleg over het borduren van applicaties.
Borduren op wateroplosbaar papier zonder textiel.
Il tempo di ricamo indicato in questa guida è solo una stima.
(●)
I ricami contrassegnati dal simbolo
●
appaiono ruotati. Prima di procedere a
ricamare, verificare la posizione del ricamo.
(✝) Consultare il manuale di istruzioni della macchina per ricamare per i dettagli relativi
al ricamo in appliqué.
Ricamo su pellicole solubili in acqua senza alcun tessuto.
В настоящем руководстве указано приблизительное время вышивания.
(●) Дизайны, отмеченные знаком ●, повернуты. Проверьте расположение дизайна
перед началом вышивания.
(✝) Инструкции по вышиванию аппликаций приведены в руководстве пользователя
машины.
Вышивание на водорастворимом стабилизаторе без материала.
本說明書中的指定刺繡時間僅為預計時間。
(●) 以●標記的花樣已旋轉。刺繡前先檢查設計位置。
(
✝) 關於如何進行貼布繡的詳細資訊,請參考刺繡縫紉機的使用說明書。
使用水溶性紙刺繡,而不使用任何布料。
No.4
104 min
1 (804)
2
(607)
3
(804)
4
(607)
5
(804)
6
(810)
7
(804)
8
(810)
9
(620)
10
(399)
280.2 mm
192.6 mm
Pagina wordt geladen...

3
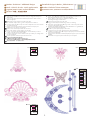
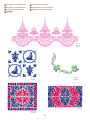
Refer to the operation manual for the sewing machine for details on how to embroider print and stitch patterns.
Weitere Einzelheiten zum Sticken der Druck- und Stickmuster finden Sie in der Bedienungsanleitung der Nähmaschine.
Reportez-vous au mode d’emploi de la machine pour de plus amples détails sur la broderie de motifs avec la fonction Imprimer et Broder.
In de bedieningshandleiding bij de naaimachine vindt u meer bijzonderheden over het borduren met de functie Print en Borduur.
Fare riferimento al manuale d’istruzione della macchina per cucire per i dettagli su come ricamare i ricami stampa & ricama.
Подробные инструкции по вышиванию дизайнов с использованием функции “Печать и вышивка” см. в “Руководстве пользователя” швейной машины.
關於如何印刷刺繡和針趾花樣的詳細資訊,請參考縫紉機的使用說明書。
●
No.11
25 min
1 (019)
2
(086)
3
(513)
4
(202)
5
(399)
6
(007)
7
(399)
266.2 mm
222.9 mm
●
No.12
45 min
1 (019)
2
(406)
3
(001)
4
(869)
5
(209)
6
(205)
7
(406)
8
(869)
268.3 mm
209.9 mm
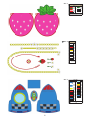
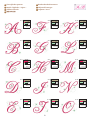
Designs using the Print and Stitch function
Designs, die die Funktion Drucken und Sticken verwenden
Motifs utilisant la fonction Imprimer et Broder
Ontwerpen met de functie Printen en Borduren
Ricami che utilizzano la funzione Stampa & Ricama
Дизайны, созданные при помощи функции “Печать и вышивка”
Embroidery pattern
Stickmuster
Motif de broderie
Borduurpatroon
Ricamo
Дизайн для вышивания
Background image
Hintergrundbild
Image d’arrière-plan
Achtergrondafbeelding
Immagine di sfondo
Изображение фона
Pagina wordt geladen...
Pagina wordt geladen...
Pagina wordt geladen...
Pagina wordt geladen...

8
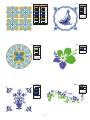
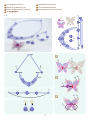
No.1×3
No.2×3
No.3×2
No.9×2
No.10×2
No.7×2
No.8×2
No.18×4
No.16×4
No.17×12
Examples of Combinations Kombinationsbeispiele
Exemples de combinaisons
Voorbeelden van combinaties
Esempi di combinazioni Примеры комбинирования
Pagina wordt geladen...
Pagina wordt geladen...
Pagina wordt geladen...

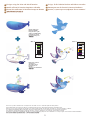
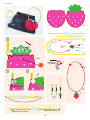
How to make 3D combination motifs
Use the same color of thread in the bobbin and on top for the designs.1.
Embroider individual shapes. When sections are completed they are 2.
joined to make dimensional shapes. Use a thread or narrow ribbon of
a complimentary color to join them.
The following are things you should be aware of when using water-soluble
sheets without any fabric. Remember to check that you have enough upper
thread and lower thread for the design. If the thread breaks during embroidery,
back up at least 10 stitches before starting again. If your embroidery machine
has a speed reduction feature, select the lowest speed. We recommend using
non-woven water-soluble stabilizer. Be sure to use two layers. Make sure that
each layer of the water-soluble stabilizer has a size of 33 cm × 50 cm or more
for pattern no. 4, or 37 cm × 60 cm or more for pattern no. 14. (Since two layers
should be used, the amount of stabilizer required is double the sizes specied.)
When dissolving the water-soluble sheet, cut off the unnecessary portions and
wash the embroidered piece in warm water until it no longer feels slippery. After
the nal rinse, dry the embroidery motif until slightly damp, shape by hand or
with a cool iron, allow to dry completely. Embroider with the thread trimming
function turned off. (For details on changing the setting, refer to the chapter
“Advanced Embroidery” in the Operation Manual.)
Comment réaliser des combinaisons de motifs 3D
Utilisez la même couleur de l dans la canette et sur le dessus pour les motifs.1.
Brodez les formes séparément. Lorsque les différentes parties sont 2.
complètes, elles sont jointes pour créer des formes en volume. Utilisez
un l ou un ruban étroit d’une couleur complémentaire pour les joindre.
Voici ci-dessous les points que vous devez considérer lorsque vous utilisez uniquement
des feuilles solubles dans l’eau pour la broderie sans aucun tissu. Assurez-vous de
bien vérier que vous avez assez de l supérieur et de l inférieur pour le motif. Si le l
casse au cours de la broderie, consolidez au moins 10 points avant de recommencer.
Si votre machine à broder est équipée d’une fonction de réduction de la vitesse,
veuillez choisir la vitesse la plus lente. Nous vous recommandons d’utiliser un renfort
de broderie soluble dans l’eau non tissé. Veillez à en utiliser deux couches. Assurez-
vous que chaque couche de renfort de broderie soluble dans l’eau ait une taille de
33 cm × 50 cm minimum pour le motif No 4, ou de 37 cm × 60 cm minimum pour le
motif No 14. (Comme deux couches doivent être utilisées, la quantité de renfort de
broderie requise est le double des tailles spéciées.) Lors de la dissolution de la feuille
hydrosoluble, coupez les parties inutiles et lavez la pièce brodée à l’eau tiède jusqu’à
ce qu’elle ne soit plus glissante. Après le rinçage nal, séchez le motif de broderie
jusqu’à ce qu’il ne soit plus que légèrement humide, donnez-lui sa forme à la main
ou avec un fer à repasser froid avant de le laisser sécher complètement. Brodez en
désactivant la fonction de coupe-l. (Pour plus de détails sur la modication du réglage,
reportez-vous au chapitre « Broderie avancée » du manuel d’instructions.)
如何製作 3D 組合鏤空圖案
使用水溶性紙,而不使用任何布料時,須注意下列事項。務必確認您有足夠的上
線和底線以供設計刺繡。如果在刺繡時斷線,重新開始前請先倒退 10 針。如果本
機有減速功能,請選擇最低速。 建議使用不織布水溶性襯料。務必使用兩層。確
定花樣編號 4 的每一層水溶性襯料尺寸為 33 cm × 50 cm 或以上,花樣編號 14
為 37 cm × 60 cm 或以上。(由於應使用兩層,所需襯料數量為指定尺寸的兩倍。)
溶解水溶性紙時,修剪不需要的部分,然後以溫水沖洗刺繡件,直到不再感覺滑溜。
最後一次沖洗後,將刺繡鏤空圖案晾乾到微濕,用手或低溫熨斗塑形,使其完全
乾燥。 刺繡時,需關閉剪線功能。(如需變更設定的詳細資訊,請參閱使用說明書
中的「進階刺繡」章節。)
Come creare ricami tridimensionali combinati
Utilizzare sia sopra che nella spolina lo stesso lo da ricamo.1.
Ricamare le forme individualmente. Una volta completate le sezioni le si può 2.
unire per creare forme dimensionali. Per l’unione si suggerisce di usare un lo
o un nastrino stretto del colore desiderato.
In caso d’uso di pellicole solubili in acqua per ricamo senza tessuto occorre
essere consapevoli dei seguenti aspetti: Ricordare di accertarsi di disporre di lo
superiore e inferiore a sufcienza per il ricamo. Se durante il ricamo il lo si spezza,
prima di riprendere a ricamare tornare indietro almeno dieci punti. Se la propria
macchina per cucire dispone della funzione di regolazione della velocità occorre
selezionare la più bassa. Si consiglia di utilizzare stabilizzatore solubile in acqua
non tessuto. Utilizzare due strati. Verificare che le dimensioni di ciascuno strato
dello stabilizzatore solubile in acqua siano di 33 cm × 50 cm o più per il ricamo N° 4,
oppure di 37 cm × 60 cm o più per il ricamo N° 14. (Dato che occorre utilizzare due
strati, la quantità di stabilizzatore necessaria è il doppio delle dimensioni specicate.)
Durante lo scioglimento della pellicola solubile in acqua occorre rimuovere le parti
non necessarie e risciacquare il ricamo in acqua calda sino a quando cessa di
essere viscido. Dopo il risciacquo nale il ricamo andrà lasciato asciugare sino a
quando rimarrà lievemente umido, quindi gli si darà la forma desiderata a mano o
con un ferro da stiro freddo lasciandolo poi asciugare completamente. Ricamare
con la funzione di rifinitura del filo disattivata. (Per i dettagli sulla modifica delle
impostazioni, consultare il capitolo “Ricamo avanzato” nel Manuale di istruzioni.)
Anfertigen von 3D-Kombinationsmotiven
Verwenden Sie für die Muster Faden derselben Farbe in der Spule und oben.1.
Sticken Sie die einzelnen Formen. Die fertigen Teile zusammenfügen, um 2.
plastische Formen zu schaffen. Verwenden Sie zum Zusammenfügen ein
Garn oder schmales Band in einer passenden Farbe.
Die folgenden Punkte sind zu beachten, wenn für eine Stickarbeit nur wasserlösliche
Folie ohne Stoff verwendet wird. Achten Sie darauf, dass ausreichend Ober- und
Unterfaden für das Muster vorhanden ist. Sollte der Faden beim Sticken reißen oder
ausgehen, gehen Sie zum Weitersticken mindestens 10 Stiche zurück. Falls Ihre
Stickmaschine eine Geschwindigkeitsregelung hat, wählen Sie die langsamste Stufe.
Es wird empfohlen, wasserlösliches Stickvlies zu verwenden. Achten Sie darauf,
dass Sie zwei Lagen verwenden. Achten Sie darauf, dass jede Lage wasserlösliches
Stickvlies für Muster Nr. 4 mindestens 33 cm × 50 cm und für Muster Nr. 14
mindestens 37 cm × 60 cm groß ist. (Da zwei Lagen verwendet werden sollten,
wird die doppelte Menge Stickvlies in der angegebenen Größe benötigt.) Zum
Auösen des wasserlöslichen Stickvlieses schneiden nicht benötigte Teile ab und
waschen die Stickarbeit in warmem Wasser aus, bis sie sich nicht mehr schlüpfrig
anfühlt. Nach dem letzten Spülvorgang lassen Sie das Stickmotiv trocknen, bis es
leicht feucht ist, formen es von Hand oder mit einem kalten Bügeleisen aus, und
lassen es dann vollständig trocknen. Sticken Sie mit deaktivierter automatischer
Fadentrimmfunktion. (Ausführliche Informationen zum Ändern der Einstellung nden
Sie im Kapitel „Fortgeschrittene Stickereien“ in der Bedienungsanleitung.)
Hoe maak ik 3D Combinatiemotiefjes
Gebruik dezelfde kleur draad in de spoel en aan de bovenkant voor elk ontwerp.1.
Borduur afzonderlijke vormen. Als alle onderdelen klaar zijn worden ze 2.
bij elkaar gevoegd om dimensionale vormen te maken. Gebruik garen
of lint in een passende kleur om de onderdelen samen te voegen.
Als u alleen wateroplosbaar materiaal gebruikt voor het borduren zonder textiel,
dient u rekening te houden met de hierna genoemde punten. Controleer van te
voren of u voldoende boven- en onderdraad heeft. Indien de draad breekt tijdens
het borduren, ga dan minstens 10 steken terug voordat u weer opnieuw begint. Als
uw borduurmachine een functie voor snelheidsreductie heeft, kies dan de laagst
mogelijke snelheid. We adviseren om niet-geweven, wateroplosbare steunstof te
gebruiken. Gebruik twee lagen. Zorg dat elke laag van de wateroplosbare steunstof
33 cm × 50 cm of groter is voor patroon nr. 4, of 37 cm × 60 cm of groter voor patroon
nr. 14. (Aangezien u beter twee lagen kunt gebruiken, hebt u tweemaal zoveel
steunstof nodig als aangegeven.) Verwijder onnodige delen tijdens het uitspoelen
van het wateroplosbare materiaal. Spoel het borduurwerk uit in warm water tot het
niet meer glad aanvoelt. Laat na de laatste spoelbeurt het borduurmotief drogen
tot het licht vochtig is, vorm het vervolgens met de hand of met een koud strijkijzer,
en laat het volledig drogen. Borduur met de draadknipfunctie uitgeschakeld. (Meer
bijzonderheden over het wijzigen van de instelling vindt u in hoofdstuk “Geavanceerd
borduurwerk” in de Bedieningshandleiding.)
Создание комбинированной 3D вышивки
Используйте нити одного цвета в шпульке и на лицевой стороне вышивки.1.
Вышейте отдельные фигуры. После завершения вышивания 2.
отдельных фигур, соедините их, чтобы получить объемную
вышивку. Для их соединения используйте нить или узкую
ленту подходящего цвета.
При использовании водорастворимого стабилизатора без материала
необходимо учитывать следующее. Убедитесь, что верхней и нижней нити
достаточно для вышивания. Если нить порвется во время вышивания,
перед продолжением вышивания вернитесь как минимум на 10 стежков
назад. Если на вышивальной машине имеется функция снижения скорости,
выберите самую низкую скорость. Рекомендуется использовать нетканый
водорастворимый стабилизатор. Обязательно используйте два слоя
стабилизатора. Размер каждого слоя должен быть не менее 33 × 50 см для
дизайна номер 4 и не менее 37 × 60 см для дизайна номер 14. (Для двух слоев
стабилизатора потребуются в два раза больше указанного количества.) При
растворении водорастворимого стабилизатора обрежьте ненужные его части
и промывайте вышивку теплой водой до тех пор, пока она не перестанет
быть скользкой на ощупь. Затем окончательно промойте вышитое изделие,
высушите его так, чтобы оно было немного влажным, придайте ему форму
рукой или негорячим утюгом и дайте окончательно высохнуть. При вышивании
отключите функцию обрезки нити. (Подробнее об изменении этой настройки
см. в главе “Сложные операции вышивания” в “Руководстве пользователя”.)
Pagina wordt geladen...
Documenttranscriptie
Note The designated embroidery time in this guide is an estimated time only. Hinweis Die in diesem Stickmuster-Katalog angegebene Stickdauer ist nur ein Schätzwert. Remarque La durée de broderie indiquée dans ce guide est uniquement une estimation. Opmerking De aangegeven borduurtijd deze handleiding is slechts een schatting. Nota Il tempo di ricamo indicato in questa guida è solo una stima. Примечание В настоящем руководстве указано приблизительное время вышивания. 註釋 本說明書中的指定刺繡時間僅為預計時間。 Brother “Exclusives” Additional designs Zusätzliche Designs in Brother „Exklusiv-Muster“ Motifs « Exclusifs » Brother - Motifs supplémentaires Brother “Exclusief” Extra ontwerpen Aggiunti nuovi ricami esclusivi Brother Дополнительные дизайны из коллекции Brother Brother「專屬」附加設計圖案 The designated embroidery time in this guide is an estimated time only. (●) Patterns marked with ● have been rotated. Check your design placement prior to embroidering. (✝) Refer to the operation manual for the embroidery machine for details on how to embroider appliqués. Embroidering on water-soluble sheets without any fabric. Die in diesem Stickmuster-Katalog angegebene Stickdauer ist nur ein Schätzwert. (●) Muster, die mit ● gekennzeichnet sind, wurden gedreht. Überprüfen Sie die Platzierung Ihres Designs, bevor Sie mit Sticken beginnen. (✝) Weitere Hinweise zum Sticken von Applikationen finden Sie in der Bedienungsanleitung der Stickmaschine. Sticken auf wasserlöslicher Folie ohne Stoff. La durée de broderie indiquée dans ce guide est uniquement une estimation. (●) Les motifs signalés par ● ont été pivotés. Vérifiez l’emplacement de votre motif avant de commencer à broder. (✝) Reportez-vous au manuel d’instructions de la machine à broder pour plus d’informations sur la broderie des appliqués. Broderie sur des feuilles hydrosolubles sans aucun tissu. De aangegeven borduurtijd deze handleiding is slechts een schatting. (●) Patronen die zijn gemarkeerd met ● zijn geroteerd. Controleer de plaats van uw ontwerp voordat u gaat borduren. (✝) Raadpleeg de bedieningshandleiding bij de borduurmachine voor gedetailleerde uitleg over het borduren van applicaties. Borduren op wateroplosbaar papier zonder textiel. Il tempo di ricamo indicato in questa guida è solo una stima. (●) I ricami contrassegnati dal simbolo ● appaiono ruotati. Prima di procedere a ricamare, verificare la posizione del ricamo. (✝) Consultare il manuale di istruzioni della macchina per ricamare per i dettagli relativi al ricamo in appliqué. Ricamo su pellicole solubili in acqua senza alcun tessuto. В настоящем руководстве указано приблизительное время вышивания. (●) Дизайны, отмеченные знаком ●, повернуты. Проверьте расположение дизайна перед началом вышивания. (✝) Инструкции по вышиванию аппликаций приведены в руководстве пользователя машины. Вышивание на водорастворимом стабилизаторе без материала. 本說明書中的指定刺繡時間僅為預計時間。 (●) 以●標記的花樣已旋轉。刺繡前先檢查設計位置。 (✝) 關於如何進行貼布繡的詳細資訊,請參考刺繡縫紉機的使用說明書。 使用水溶性紙刺繡, 而不使用任何布料。 No.1 No.3 19 min 13 min 1 (124) 1 2 (085) 2 (085) (124) 239.2 mm 118.3 mm 143.9 mm 125.9 mm No.4 104 min 1 (804) 2 (607) 3 (804) 4 (607) 5 (804) 6 (810) 7 (804) 8 (810) 9 (620) 10 (399) 280.2 mm 192.6 mm ● No.2 46 min 1 (085) 2 (124) 3 (085) 308.2 mm 208.9 mm 1 Designs using the Print and Stitch function Designs, die die Funktion Drucken und Sticken verwenden Motifs utilisant la fonction Imprimer et Broder Ontwerpen met de functie Printen en Borduren Ricami che utilizzano la funzione Stampa & Ricama Дизайны, созданные при помощи функции “Печать и вышивка” 使用印刷和針趾功能設計 Background image Hintergrundbild Image d’arrière-plan Achtergrondafbeelding Immagine di sfondo Изображение фона 背景影像 ● No.11 ● No.12 25 min 45 min 1 (019) 1 (019) 2 (086) 2 (406) 3 (513) 3 (001) 4 (202) 4 (869) 5 (399) 5 (209) 6 (007) 6 (205) 7 (399) 7 (406) 266.2 mm 8 (869) 268.3 mm 222.9 mm 209.9 mm Embroidery pattern Stickmuster Motif de broderie Borduurpatroon Ricamo Дизайн для вышивания 刺繡花樣 Refer to the operation manual for the sewing machine for details on how to embroider print and stitch patterns. Weitere Einzelheiten zum Sticken der Druck- und Stickmuster finden Sie in der Bedienungsanleitung der Nähmaschine. Reportez-vous au mode d’emploi de la machine pour de plus amples détails sur la broderie de motifs avec la fonction Imprimer et Broder. In de bedieningshandleiding bij de naaimachine vindt u meer bijzonderheden over het borduren met de functie Print en Borduur. Fare riferimento al manuale d’istruzione della macchina per cucire per i dettagli su come ricamare i ricami stampa & ricama. Подробные инструкции по вышиванию дизайнов с использованием функции “Печать и вышивка” см. в “Руководстве пользователя” швейной машины. 關於如何印刷刺繡和針趾花樣的詳細資訊,請參考縫紉機的使用說明書。 3 Examples of Combinations Kombinationsbeispiele Exemples de combinaisons Voorbeelden van combinaties Esempi di combinazioni Примеры комбинирования 組合範例 No.1×3 No.2×3 No.3×2 No.7×2 No.8×2 No.9×2 No.10×2 No.18×4 No.16×4 No.17×12 8 How to make 3D combination motifs 111 Use the same color of thread in the bobbin and on top for the designs. 222 Embroider individual shapes. When sections are completed they are joined to make dimensional shapes. Use a thread or narrow ribbon of a complimentary color to join them. The following are things you should be aware of when using water-soluble sheets without any fabric. Remember to check that you have enough upper thread and lower thread for the design. If the thread breaks during embroidery, back up at least 10 stitches before starting again. If your embroidery machine has a speed reduction feature, select the lowest speed. We recommend using non-woven water-soluble stabilizer. Be sure to use two layers. Make sure that each layer of the water-soluble stabilizer has a size of 33 cm × 50 cm or more for pattern no. 4, or 37 cm × 60 cm or more for pattern no. 14. (Since two layers should be used, the amount of stabilizer required is double the sizes specified.) When dissolving the water-soluble sheet, cut off the unnecessary portions and wash the embroidered piece in warm water until it no longer feels slippery. After the final rinse, dry the embroidery motif until slightly damp, shape by hand or with a cool iron, allow to dry completely. Embroider with the thread trimming function turned off. (For details on changing the setting, refer to the chapter “Advanced Embroidery” in the Operation Manual.) Comment réaliser des combinaisons de motifs 3D Anfertigen von 3D-Kombinationsmotiven 111 Verwenden Sie für die Muster Faden derselben Farbe in der Spule und oben. 222 Sticken Sie die einzelnen Formen. Die fertigen Teile zusammenfügen, um plastische Formen zu schaffen. Verwenden Sie zum Zusammenfügen ein Garn oder schmales Band in einer passenden Farbe. Die folgenden Punkte sind zu beachten, wenn für eine Stickarbeit nur wasserlösliche Folie ohne Stoff verwendet wird. Achten Sie darauf, dass ausreichend Ober- und Unterfaden für das Muster vorhanden ist. Sollte der Faden beim Sticken reißen oder ausgehen, gehen Sie zum Weitersticken mindestens 10 Stiche zurück. Falls Ihre Stickmaschine eine Geschwindigkeitsregelung hat, wählen Sie die langsamste Stufe. Es wird empfohlen, wasserlösliches Stickvlies zu verwenden. Achten Sie darauf, dass Sie zwei Lagen verwenden. Achten Sie darauf, dass jede Lage wasserlösliches Stickvlies für Muster Nr. 4 mindestens 33 cm × 50 cm und für Muster Nr. 14 mindestens 37 cm × 60 cm groß ist. (Da zwei Lagen verwendet werden sollten, wird die doppelte Menge Stickvlies in der angegebenen Größe benötigt.) Zum Auflösen des wasserlöslichen Stickvlieses schneiden nicht benötigte Teile ab und waschen die Stickarbeit in warmem Wasser aus, bis sie sich nicht mehr schlüpfrig anfühlt. Nach dem letzten Spülvorgang lassen Sie das Stickmotiv trocknen, bis es leicht feucht ist, formen es von Hand oder mit einem kalten Bügeleisen aus, und lassen es dann vollständig trocknen. Sticken Sie mit deaktivierter automatischer Fadentrimmfunktion. (Ausführliche Informationen zum Ändern der Einstellung finden Sie im Kapitel „Fortgeschrittene Stickereien“ in der Bedienungsanleitung.) Hoe maak ik 3D Combinatiemotiefjes 111 Utilisez la même couleur de fil dans la canette et sur le dessus pour les motifs. 222 Brodez les formes séparément. Lorsque les différentes parties sont complètes, elles sont jointes pour créer des formes en volume. Utilisez un fil ou un ruban étroit d’une couleur complémentaire pour les joindre. 111 Gebruik dezelfde kleur draad in de spoel en aan de bovenkant voor elk ontwerp. 222 Borduur afzonderlijke vormen. Als alle onderdelen klaar zijn worden ze bij elkaar gevoegd om dimensionale vormen te maken. Gebruik garen of lint in een passende kleur om de onderdelen samen te voegen. Voici ci-dessous les points que vous devez considérer lorsque vous utilisez uniquement des feuilles solubles dans l’eau pour la broderie sans aucun tissu. Assurez-vous de bien vérifier que vous avez assez de fil supérieur et de fil inférieur pour le motif. Si le fil casse au cours de la broderie, consolidez au moins 10 points avant de recommencer. Si votre machine à broder est équipée d’une fonction de réduction de la vitesse, veuillez choisir la vitesse la plus lente. Nous vous recommandons d’utiliser un renfort de broderie soluble dans l’eau non tissé. Veillez à en utiliser deux couches. Assurezvous que chaque couche de renfort de broderie soluble dans l’eau ait une taille de 33 cm × 50 cm minimum pour le motif No 4, ou de 37 cm × 60 cm minimum pour le motif No 14. (Comme deux couches doivent être utilisées, la quantité de renfort de broderie requise est le double des tailles spécifiées.) Lors de la dissolution de la feuille hydrosoluble, coupez les parties inutiles et lavez la pièce brodée à l’eau tiède jusqu’à ce qu’elle ne soit plus glissante. Après le rinçage final, séchez le motif de broderie jusqu’à ce qu’il ne soit plus que légèrement humide, donnez-lui sa forme à la main ou avec un fer à repasser froid avant de le laisser sécher complètement. Brodez en désactivant la fonction de coupe-fil. (Pour plus de détails sur la modification du réglage, reportez-vous au chapitre « Broderie avancée » du manuel d’instructions.) Als u alleen wateroplosbaar materiaal gebruikt voor het borduren zonder textiel, dient u rekening te houden met de hierna genoemde punten. Controleer van te voren of u voldoende boven- en onderdraad heeft. Indien de draad breekt tijdens het borduren, ga dan minstens 10 steken terug voordat u weer opnieuw begint. Als uw borduurmachine een functie voor snelheidsreductie heeft, kies dan de laagst mogelijke snelheid. We adviseren om niet-geweven, wateroplosbare steunstof te gebruiken. Gebruik twee lagen. Zorg dat elke laag van de wateroplosbare steunstof 33 cm × 50 cm of groter is voor patroon nr. 4, of 37 cm × 60 cm of groter voor patroon nr. 14. (Aangezien u beter twee lagen kunt gebruiken, hebt u tweemaal zoveel steunstof nodig als aangegeven.) Verwijder onnodige delen tijdens het uitspoelen van het wateroplosbare materiaal. Spoel het borduurwerk uit in warm water tot het niet meer glad aanvoelt. Laat na de laatste spoelbeurt het borduurmotief drogen tot het licht vochtig is, vorm het vervolgens met de hand of met een koud strijkijzer, en laat het volledig drogen. Borduur met de draadknipfunctie uitgeschakeld. (Meer bijzonderheden over het wijzigen van de instelling vindt u in hoofdstuk “Geavanceerd borduurwerk” in de Bedieningshandleiding.) Come creare ricami tridimensionali combinati 111 Utilizzare sia sopra che nella spolina lo stesso filo da ricamo. 222 Ricamare le forme individualmente. Una volta completate le sezioni le si può unire per creare forme dimensionali. Per l’unione si suggerisce di usare un filo o un nastrino stretto del colore desiderato. In caso d’uso di pellicole solubili in acqua per ricamo senza tessuto occorre essere consapevoli dei seguenti aspetti: Ricordare di accertarsi di disporre di filo superiore e inferiore a sufficienza per il ricamo. Se durante il ricamo il filo si spezza, prima di riprendere a ricamare tornare indietro almeno dieci punti. Se la propria macchina per cucire dispone della funzione di regolazione della velocità occorre selezionare la più bassa. Si consiglia di utilizzare stabilizzatore solubile in acqua non tessuto. Utilizzare due strati. Verificare che le dimensioni di ciascuno strato dello stabilizzatore solubile in acqua siano di 33 cm × 50 cm o più per il ricamo N° 4, oppure di 37 cm × 60 cm o più per il ricamo N° 14. (Dato che occorre utilizzare due strati, la quantità di stabilizzatore necessaria è il doppio delle dimensioni specificate.) Durante lo scioglimento della pellicola solubile in acqua occorre rimuovere le parti non necessarie e risciacquare il ricamo in acqua calda sino a quando cessa di essere viscido. Dopo il risciacquo finale il ricamo andrà lasciato asciugare sino a quando rimarrà lievemente umido, quindi gli si darà la forma desiderata a mano o con un ferro da stiro freddo lasciandolo poi asciugare completamente. Ricamare con la funzione di rifinitura del filo disattivata. (Per i dettagli sulla modifica delle impostazioni, consultare il capitolo “Ricamo avanzato” nel Manuale di istruzioni.) 如何製作 3D 組合鏤空圖案 111 底線請使用和設計表面相同顏色的繡線。 222 刺繡單個形狀。當所有部分完成時,將其拼接成立體形狀。使用一條互補色的繡線或窄 幅緞帶進行拼接。 使用水溶性紙,而不使用任何布料時,須注意下列事項。務必確認您有足夠的上 線和底線以供設計刺繡。如果在刺繡時斷線,重新開始前請先倒退 10 針。如果本 機有減速功能,請選擇最低速。 建議使用不織布水溶性襯料。務必使用兩層。確 定花樣編號 4 的每一層水溶性襯料尺寸為 33 cm × 50 cm 或以上,花樣編號 14 為 37 cm × 60 cm 或以上。(由於應使用兩層,所需襯料數量為指定尺寸的兩倍。) 溶解水溶性紙時,修剪不需要的部分,然後以溫水沖洗刺繡件,直到不再感覺滑溜。 最後一次沖洗後,將刺繡鏤空圖案晾乾到微濕,用手或低溫熨斗塑形,使其完全 乾燥。 刺繡時,需關閉剪線功能。(如需變更設定的詳細資訊,請參閱使用說明書 中的「進階刺繡」章節。) Создание комбинированной 3D вышивки 111 Используйте нити одного цвета в шпульке и на лицевой стороне вышивки. 222 Вышейте отдельные фигуры. После завершения вышивания отдельных фигур, соедините их, чтобы получить объемную вышивку. Для их соединения используйте нить или узкую ленту подходящего цвета. При использовании водорастворимого стабилизатора без материала необходимо учитывать следующее. Убедитесь, что верхней и нижней нити достаточно для вышивания. Если нить порвется во время вышивания, перед продолжением вышивания вернитесь как минимум на 10 стежков назад. Если на вышивальной машине имеется функция снижения скорости, выберите самую низкую скорость. Рекомендуется использовать нетканый водорастворимый стабилизатор. Обязательно используйте два слоя стабилизатора. Размер каждого слоя должен быть не менее 33 × 50 см для дизайна номер 4 и не менее 37 × 60 см для дизайна номер 14. (Для двух слоев стабилизатора потребуются в два раза больше указанного количества.) При растворении водорастворимого стабилизатора обрежьте ненужные его части и промывайте вышивку теплой водой до тех пор, пока она не перестанет быть скользкой на ощупь. Затем окончательно промойте вышитое изделие, высушите его так, чтобы оно было немного влажным, придайте ему форму рукой или негорячим утюгом и дайте окончательно высохнуть. При вышивании отключите функцию обрезки нити. (Подробнее об изменении этой настройки см. в главе “Сложные операции вышивания” в “Руководстве пользователя”.)-
 1
1
-
 2
2
-
 3
3
-
 4
4
-
 5
5
-
 6
6
-
 7
7
-
 8
8
-
 9
9
-
 10
10
-
 11
11
-
 12
12
-
 13
13
-
 14
14
-
 15
15
-
 16
16


Brother Innov-is XV8550D Gebruikershandleiding
- Type
- Gebruikershandleiding
in andere talen
- English: Brother Innov-is XV8550D User guide
- italiano: Brother Innov-is XV8550D Guida utente
- русский: Brother Innov-is XV8550D Руководство пользователя
- français: Brother Innov-is XV8550D Mode d'emploi
- Deutsch: Brother Innov-is XV8550D Benutzerhandbuch
Gerelateerde papieren
-
Brother Innov-is XV8500D Gebruikershandleiding
-
-
Brother Innov-is XP2 Gebruikershandleiding
-
-
-
-
-
-
-
Brother Innov-is I de handleiding