
00034385
Ultimate Xbox
®
Converter
Hama GmbH & Co KG
Postfach 80
86651 Monheim/Germany
Tel. +49 (0) 9091 /502-0
Fax +49 (0)9091/502-274
www.hama.com
www.hama.com
00034385-07.06
00034385bda 05.07.2006 7:52 Uhr Seite 2

3. Weitere Einstellungsmöglichkeiten:
3.1 Einstellung der Mausgeschwindigkeit:
-Es besteht die Möglichkeit die Mausgeschwindigkeit Ihren Bedürfnissen anzupassen. Dabei
können Sie einen Wert zwischen 1 = langsam und 9 = sehr schnell auswählen.
-Drücken Sie die Taste „ESC“ und die rote Programm LED blinkt langsam.
-Drücken Sie nun die Taste „ALT“ und wahlweise die Taste 1-9.
-Die LED erlischt und der Wert ist abgelegt.
3.2 Ruhezone / Deadzone Einstellung:
Von Spiel zu Spiel ist es unterschiedlich wie weit sie den Analogstick ihres Controllers in eine
Richtung drücken müssen, bevor sich auf dem Bildschirm eine Reaktion ergibt. Dieser minimale
und kurze Bereich, in welchem noch keine Aktion ausgeführt wird, obwohl Sie Ihren
Analogstick bewegen, nennt man Ruhezone. (Deadzone). Diese Anschlagsensitivität können Sie
ebenfalls konfigurieren und in der Gesamtkonfiguration abspeichern.
-Drücken Sie die Taste „ESC“ und die rote Programm LED blinkt langsam.
-Drücken Sie nun die Taste „0-9“ (0 = keine Ruhezone bis 9 = große Ruhezone).
-Die LED erlischt und der Wert ist abgelegt.
Ein Großteil der Spiele funktioniert mit einem Wert zwischen 3-5.
3.3 Invertieren der Maus:
Invertieren der Y-Achse Ihrer Maus (hoch/runter):
Aktivieren:
-Drücken Sie die Taste „ESC“ und die rote Programm LED blinkt langsam.
-Drücken Sie die Taste „END“ und die rote Programm LED erlischt.
Deaktivieren:
-Drücken Sie die Taste „ESC“ und die rote Programm LED blinkt langsam.
-Drücken Sie die Taste „POS1“ und die rote Programm LED erlischt.
3.4 Zuordnung der Mausbewegung zu den Analogsticks:
Der rechte Analogstick am Controller wird im Normalfall zum Umherschauen/Zielen verwendet,
der linke zum Bewegen der Spielfigur. Sogenannte Lightgunshooter wie etwa Silent Scope®
benutzen allerdings den linken Analogstick für das Bewegen des Fadenkreuzes. Die nachfol-
gende Kombination bestimmt daher auf welchen Analogstick die Mausbewegung angewendet
wird.
Mausbewegung (linker Stick):
-Drücken Sie die Taste „ESC“ und die rote Programm LED blinkt.
-Drücken Sie die Taste „Bild Hoch“ und die LED erlischt.
Mausbewegung (rechter Stick):
-Drücken Sie die Taste „ESC“ und die rote Programm LED blinkt.
-Drücken Sie die Taste „Bild runter“ und die LED erlischt.
Mit dem Ultimate Adapter können Sie eine handelsübliche PS/2 Tastatur und PS/2 Maus an Ihre
Xbox
®
anschließen. Dadurch erzielen Sie eine wesentlich verbesserte Steuerung bei First-
Person-Shootern (3D-Shootern, Egoshootern) und auch anderen Spielen welche eine genauere
Steuerung und vor allem Zielen erfordern.
Die Tastenbelegungen lassen sich natürlich Ihren Bedürfnissen entsprechend anpassen, so
dass Sie jeden beliebigen Spieletitel auf Ihre Spielgewohnheiten abstimmen können. Die
Programmierung der Tasten ist dabei kinderleicht. Zusätzlich lassen sich die Einstellungen z.B.
der Deadzone / Ruhezone verfeinern und individuell einstellen. (siehe weitere Beschreibung!)
1. Installation:
1.1Anschluss der PS/2-Tastatur & PS/2-Maus am Ultimate Adapter:
-Verbinden Sie den PS/2-Anschluss der Maus und der Ta statur mit den Anschlüssen an der
Vorderseite des Ultimate Adapters.
-Dabei wird die Maus an den rechten Eingang (grün) und die Tastatur an den linken Eingang
(lila) angeschlossen. Die Eingänge sind farblich gekennzeichnet um Ihnen das Verbinden zu
erleichtern.
1.2 Anschluss des Ultimate Adapters an Ihre Videospielkonsole:
-Schließen Sie den mit der Maus und Tastatur verbundenen Ultimate Adapter an einen
beliebigen Controller-Anschluss Ihrer Konsole an.
-Das Aufleuchten der LEDs Ihrer Tastatur zeigen Ihnen an, dass der Ultimate Adapter
funktioniert und die Tastatur sowie Maus korrekt mit dem Gerät verbunden sind.
2. Programmierung:
2.1 Eigene Belegung für die Tastatur und Maus konfigurieren:
-Drücken Sie die Taste "ESC" auf der angeschlossenen Tastatur, die rote Programm LED auf
dem Ultimate Adapter fängt an langsam zu blinken.
-Jetzt bestätigen Sie die dementsprechende Taste aus der Zuordnungstabelle die neu
programmiert werden soll und dann die Taste auf der Tastatur auf welche die
Controllertaste/-funktion gelegt werden soll.
-Die rote Programm LED fängt an schneller zu blinken und erlischt dann. Jetzt wurde
die Funktionalität auf die von Ihnen ausgewählte Taste neu abgelegt.
-Wiederholen Sie diesen Vorgang für alle anderen Tasten am Controller, die Sie ändern oder
auf die Tastatur legen möchten.
2.2 Konfiguration abspeichern:
-Nachdem Sie alle Tasten wie oben konfiguriert haben, besteht die Möglichkeit diese
Konfiguration unter F1-F8 abzuspeichern. Dabei können Sie acht unterschiedliche
Konfigurationen abspeichern.
-Drücken Sie dafür die Taste „ESC“, die rote Programm LED fängt an langsam zu blinken.
-Jetzt drücken Sie wahlweise die Taste „F1 - F8“ und die rote Programm LED erlischt.
Ihre Konfiguration ist nun gespeichert.
2.3 Konfiguration abrufen:
-Drücken Sie die „ALT“ Taste und die „F1 - F8“ Taste für Ihre jeweilige Konfiguration.
Dies kann auch während dem laufenden Spiel vorgenommen werden.
l
l
Kurzanleitung Ultimate Adapter für Xbox
®
23
00034385bda 05.07.2006 7:52 Uhr Seite 4

With the Ultimate Adapter you can connect a PS/2 keyboard and PS/2 mouse usual in trade to
your Xbox
®
. The result is a considerably improved control as far as First-Person-Shooters (3D-
Shooters, Egoshooters) are concerned. This also applies to other games which require particu-
larly aiming and a more precise control.
Of course, the button occupancies can be adapted to your demands so that you can adjust any
game title to your game habits. The programming of the buttons is really easy. In addition, the
settings of the deadzone / quiet zone e.g. can be refined and adjusted individually. (see further
description!)
1. Installation:
1.1Connecting the PS/2 keyboard & PS/2 mouse to the Ultimate Adapter:
-Connect the PS/2 port of the mouse and of the keyboard to the ports on the front of the
Ultimate Adapter.
-The mouse is connected to the right input (green) and the keyboard to the left input (purple).
The inputs are marked with colours in order to facilitate the connecting process.
1.2Connecting the Ultimate Adapter to your video game console:
-Connect the Ultimate Adapter which is connected to the mouse and to the keyboard to any
controller port of your console.
-The lighting up of the LEDs of your keyboard indicates that the Ultimate Adapter functions
and that the keyboard as well as the mouse are correctly connected to the device.
2. Programming:
2.1 Configure an own occupancy for the keyboard and the mouse:
-Press the button "ESC" on the connected keyboard, the red programme LED on the Ultimate
Adapter begins to flash slowly.
-Confirm now the corresponding button on the keyboard or on the mouse with the desired
controller function which you want to assign anew. (see table)
-The red programme LED begins to flash faster and then goes out. Now the functionality has
been transferred to the button you have chosen.
-Repeat this process for all the other buttons on the controller which you want to change or
occupy.
2.2 Store the configuration:
-When you have configured all buttons as described above, you have the possibility to store
this configuration under F1-F8. You can store eight different configurations.
-Press the button “ESC”, the red programme LED begins to flash slowly.
-Press now alternatively the button "F1-F8" and the red programme LED goes out. Your
configuration is stored now.
2.3 Recall the configuration:
-Press the “ALT” button and the “F1-F8” button for your respective configuration. This
can also be done during the game.
L
L
Quick Guide for Ultimate Adapter for Xbox
®
5
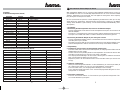
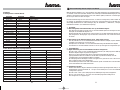
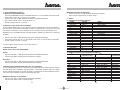
4. Tabellen
4.1 Standard Konfiguration (Xbox
®
)
Controller Tastatur Maus
Left Stick W,A,S,D
Right Stick I,M,J,L Mouse Move
A SPACEBAR
B E
X R
YY
Left Trigger TLeft Button
Right Trigger FRight Button
Left Thumb Z
Right Thumb G
Start ENTER
Back BACKSPACE
Black B
White CAPS LOCK
D-Pad
UP ·
D-Pad Down ‚
D-Pad Left fl
D-Pad Right ‡
4.2 Zuordnungstabelle für Programmierung (Xbox
®
)
Xbox
®
Controller Tastatur Xbox
®
Controller Tastatur
(Controller map keys) (Controller map keys)
AA Left Stick Up Left ALT+·
BB Left Stick Down Left ALT+‚
XX Left Stick Left Left ALT+
fl
YY Left Stick Right Left ALT+
‡
SW TabRight Stick Up Right ALT+·
SB Caps Lock Right Stick Down Right ALT+‚
Left Trigger LRight Stick Left Right ALT+
fl
Right Trigger RRight Stick Right Right ALT+
‡
Start Enter
Back BACK SPACE
Left Thumb Q
Right Thumb P
Up ·
Down ‚
Left
fl
Right
‡
4
00034385bda 05.07.2006 7:52 Uhr Seite 6

7
3. Other setting possibilities:
3.1 Setting of the mouse speed:
-There is the possibility to adapt the mouse speed to your demands. You can select a value
between 1 = slow and 9 = very fast.
-Press the button "ESC" and the red programme LED flashes slowly.
-Now press the button "ALT" and alternatively the button 1-9.
-The LED goes out and the value is stored.
3.2 Quiet zone / deadzone setting:
It depends on the game how far you have to press the analogue stick of your controller in one
direction before you can see a reaction on the screen. This minimal and short period of time
during which an action is not yet carried out although you move your analogue stick is called
quiet zone (deadzone). You can configure this stroke sensitivity as well and store it in the com-
plete configuration.
-Press the button "ESC" and the red programme LED flashes slowly.
-Now press the button "0-9" (0 = no quiet zone to 9 = big quiet zone ).
-The LED goes out and the value is stored.
The majority of the games function with a value between 3-5.
3.3 Inverting of the mouse:
Inverting of the y-axis of your mouse (up/down):
Activate:
-Press the button "ESC" and the red programme LED flashes slowly.
-Press the button "END" and the red programme LED goes out.
Deactivate:
-Press the button "ESC" and the red programme LED flashes slowly.
-Press the button "POS1" and the red programme LED goes out.
3.4 Assignment of the mouse movement to the analogue sticks:
The right analogue stick of the controller is normally used for aiming/looking around, the left
one for moving the game figure. However, so-called Lightgunshooters like Silent Scope® use
the left analogue stick for moving the cross hairs. The following combination determines there-
fore to which analogue stick the mouse movement is applied.
Mouse movement (left stick)
-Press the button “ESC” and the red programme LED flashes.
-Press the button “Picture Up” and the LED goes out.
Mouse movement (right stick)
-Press the button “ESC” and the red programme LED flashes.
-Press the button “Picture Down” and the LED goes out.
6
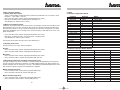
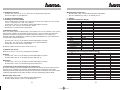
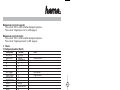
4. Tables
4.1 Standard configuration (Xbox
®
)
Controller Keyboard Mouse
Left Stick W,A,S,D
Right Stick I,M,J,L Mouse Move
A SPACEBAR
B E
X R
YY
Left Trigger TLeft Button
Right Trigger FRight Button
Left Thumb Z
Right Thumb G
Start ENTER
Back BACKSPACE
Black B
White CAPS LOCK
D-Pad
UP ·
D-Pad Down ‚
D-Pad Left fl
D-Pad Right ‡
4.2 Different setting possibilities (Xbox
®
)
Xbox
®
Controller Keyboard Xbox
®
Controller Keyboard
(Controller map keys) (Controller map keys)
AA Left Stick Up Left ALT+·
BB Left Stick Down Left ALT+‚
XX Left Stick Left Left ALT+
fl
YY Left Stick Right Left ALT+
‡
SW TabRight Stick Up Right ALT+·
SB Caps Lock Right Stick Down Right ALT+‚
Left Trigger LRight Stick Left Right ALT+
fl
Right Trigger RRight Stick Right Right ALT+
‡
Start Enter
Back BACK SPACE
Left Thumb Q
Right Thumb P
Up ·
Down ‚
Left
fl
Right
‡
00034385bda 05.07.2006 7:52 Uhr Seite 8

3. D’autres possibilités d’ajustage :
3.1Ajustage de la vitesse de la souris :
-Il existe la possibilité d’adapter la vitesse de la souris à vos besoins. Vous pouvez sélec
tionner une valeur entre 1 = lent et 9 = très rapide.
-Appuyez sur la touche « ESC » et la DEL programme rouge clignote lentement.
-Appuyez maintenant sur la touche « ALT » et sur les touches 1-9 (au choix).
-La DEL s’éteint et la valeur est stockée.
3.2. Ajustage de la zone de repos / de la zone de mort :
Il dépend des jeux jusqu’à quel point vous devez presser le stick analogique de votre contrôleur
dans une certaine direction jusqu’à ce que vous puissiez voir une réaction sur l’écran. Cette
période courte pendant laquelle aucune réaction n’est réalisée bien que vous remuiez le stick
analogique est appelée zone de repos (zone de mort). Vous pouvez également configurer cette
sensitivité à la frappe et stocker celle-ci dans la configuration globale.
-Appuyez sur la touche « ESC » et la DEL programme rouge clignote lentement.
-Appuyez maintenant sur la touche « 0-9 » (0 = pas de zone de repos jusqu’à 9 = grande zone
de repos).
-La DEL s’éteint et la valeur est stockée.
La plupart des jeux fonctionnent avec une valeur entre 3-5.
3.3. Invertir la souris :
Invertir l’axe des y de votre souris (vers le haut/vers le bas) :
Activer :
-Appuyez sur la touche « ESC » et la DEL programme rouge clignote lentement.
-Appuyez sur la touche « END » et la DEL programme rouge s’éteint.
Désactiver :
-Appuyez sur la touche « ESC » et la DEL programme rouge clignote lentement.
-Appuyez sur la touche « POS1 » et la DEL programme rouge s’éteint.
3.4 Assignation du mouvement de la souris aux sticks analogiques :
Normalement, on utilise le stick analogique droit du contrôleur pour s’orienter ou pour viser ; le
stick gauche est utilisé pour mettre la figure en mouvement. Cependant, les « Lightgunshooter »
comme p. ex. Silent Scope® utilisent le stick analogique gauche pour mettre le réticule en
mouvement. La combinaison suivante détermine pour cette raison auquel stick analogique le
mouvement de la souris est appliqué.
Mouvement de la souris (stick gauche) :
-Appuyez sur la touche « ESC » et la DEL programme rouge clignote.
-Appuyez sur la touche « Image vers le haut » et la DEL s’éteint.
Mouvement de la souris (stick droit) :
-Appuyez sur la touche « ESC » et la DEL programme rouge clignote.
-Appuyez sur la touche « Image vers le bas » et la DEL s’éteint.
9
Avec l’adaptateur « Ultimate Adapter » vous pouvez connecter un clavier PS/2 courant et une
souris PS/2 d’usage à votre Xbox
®
. Il en résulte une commande considérablement améliorée
quant aux jeux « First-Person-Shooter » (« 3D-Shooter », « Egoshooter »). Il en est de même
pour d’autres jeux qui demandent une commande plus précise.
Bien sûr, vous pouvez adapter les occupations des touches à vos besoins. Vous pouvez adapter
chaque titre de jeu à vos habitudes de jeu. La programmation des touches est très simple. En
outre, vous pouvez améliorer et ajuster individuellement p. ex. les réglages de la zone de
repos/de la zone de mort (voir description suivante !)
1. Installation :
1.1Connecter le clavier PS/2 et la souris PS/2 à l’adaptateur :
-Connectez la borne PS/2 de la souris et du clavier aux bornes se trouvant sur le devant de
l’adaptateur.
-La souris est connectée à l’entrée droite (verte) et le clavier à l’entrée gauche (lilas). Les
entrées sont marquées avec des couleurs pour que vous puissiez connecter le clavier et la
souris plus facilement à l’adaptateur.
1.2Connecter l’adaptateur à votre coansole de jeux vidéo :
-Connectez l’adaptateur branché à la souris et au clavier à une borne contrôleur quelconque
de votre console.
-L’allumage des DEL de votre clavier indique que l’adaptateur fonctionne et que le clavier
ainsi que la souris sont correctement connectés à l’appareil.
2. Programmation :
2.1Configurer une occupation pour le clavier et la souris :
-Appuyez sur la touche « ESC » sur le clavier branché, la DEL programme rouge sur
l’adaptateur commence à clignoter lentement.
-Confirmez maintenant la touche correspondante sur le clavier ou sur la souris avec la
fonction souhaitée du contrôleur que vous voulez assigner à neuf. (voir tableau).
-La DEL programme rouge commence à clignoter plus rapidement et puis, elle s’éteint.
Maintenant, la touche que vous avez sélectionnée a été occupée à neuf.
-Veuillez répéter ce processus pour toutes les autres touches du contrôleur que vous voulez
changer ou occuper.
2.2Stocker la configuration
-Quand vous avez configuré toutes les touches comme décrit ci-dessus, vous avez la
possibilité de stocker cette configuration sous F1-F8. Vous pouvez stocker huit
configurations différentes.
-Appuyez pour cela sur la touche « ESC », la DEL programme rouge commence à clignoter
lentement.
-Appuyez maintenant sur la touche « F1-F8 » (au choix) et la DEL programme rouge
s’éteint. Votre configuration est maintenant stockée.
2.3Appeler la configuration :
-Appuyez sur la touche « ALT » et sur la touche « F1-F8 »pour votre configuration
respective. Vous pouvez également faire cela pendant le jeu.
8
¬
¬
Notice d’utilisation du Ultimate Adapter du Xbox
®
00034385bda 05.07.2006 7:52 Uhr Seite 10

Met de Ultimate adapter kunt u een gangbaar PS/2-toetsenbord en een gangbare PS/2-muis op
uw Xbox® aansluiten. Daardoor bereikt u een wezenlijk verbeterde bediening bij First-Person-
Shootern (3D-Shootern, Egoshootern) maar ook andere spellen, welke een nauwkeurige
besturing en vooral richten verlangen.
De toetsentoekenning laat zich uiteraard naar uw wensen configureren, zodat u ieder willekeu-
rig spel op uw speeleigenschappen kunt aanpassen. Het programmeren van de toetsen is zeer
eenvoudig. Bovendien kunt u de instellingen, bijv. de “deadzone” / “dode zone”, verfijnen en
individueel instellen. (zie verdere beschrijving!)
1. Installatie:
1.1 Aansluiting PS/2-toetsenbord & PS/2-muis op de Ultimate adapter:
-Sluit de PS/2-aansluiting van de muis en het toetsenbord op de aansluitingen aan de
voorzijde van de Ultimate-adapter aan.
-Hierbij wordt de muis op de rechter ingang (groen) en het toetsenbord op de linker ingang
(lila) aangesloten. De ingangen zijn van een kleur voorzien om u het aansluiten makkelijker
te maken.
1.2 Aansluiting van de Ultimate-adapter op uw video-game-console:
-Sluit de, met de muis en het toetsenbord verbonden Ultimate-adapter, op een willekeurige
controller-aansluiting van uw console aan.
-Het oplichten van de LED´s van uw toetsenbord bevestigt dat de Ultimate-adapter
functioneert en het toetsenbord en de muis correct op het apparaat aangesloten zijn.
2. Programmering:
2.1 Eigen toekenning van het toetsenbord en de muis configureren:
-Druk de “ESC”-toets van het aangesloten toetsenbord in, de rode programma LED op de
Ultimate-adapter begint langzaam te knipperen.
-Bevestig nu de overeenkomstige toets uit de toekenningstabel die opnieuw
geprogrammeerd dient te worden en dan de toets op het toetsenbord, waar de
controllertoets/-functie toegekend dient te worden.
-De rode programma LED begint sneller te knipperen en gaat dan uit. Nu is de functie aan de
door u gekozen toets nieuw toegekend.
-Herhaal deze procedure voor alle andere toetsen op de controller die u wilt veranderen of
op het toestenbord zou willen toekennen.
2.2 Configuratie opslaan:
-Nadat u alle toetsen volgens de bovenstaande procedure geconfigureerd heeft, is het
mogelijk deze configuratie onder F1 – F8 op te slaan. Hierbij kunt u acht verschillende
configuratie´s opslaan.
-Druk de “ESC”-toets in, de rode programma LED begint langzaam te knipperen.
-Druk nu naar keuze de „F1 - F8“-toets in en de rode programma LED gaat uit.
Uw configuratie is nu opgeslagen.
10
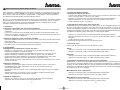
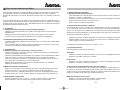
4. Tableaux
4.1 Configuration standard (Xbox
®
)
Controller Keyboard Mouse
Left Stick W,A,S,D
Right Stick I,M,J,L Mouse Move
A SPACEBAR
B E
X R
YY
Left Trigger TLeft Button
Right Trigger FRight Button
Left Thumb Z
Right Thumb G
Start ENTER
Back BACKSPACE
Black B
White CAPS LOCK
D-Pad
UP ·
D-Pad Down ‚
D-Pad Left fl
D-Pad Right ‡
4.2 Possibilités différentes d’ajustage (Xbox
®
)
Xbox
®
Controller Keyboard Xbox
®
Controller Keyboard
(Controller map keys) (Controller map keys)
AA Left Stick Up Left ALT+·
BB Left Stick Down Left ALT+‚
XX Left Stick Left Left ALT+
fl
YY Left Stick Right Left ALT+
‡
SW TabRight Stick Up Right ALT+·
SB Caps Lock Right Stick Down Right ALT+‚
Left Trigger LRight Stick Left Right ALT+
fl
Right Trigger RRight Stick Right Right ALT+
‡
Start Enter
Back BACK SPACE
Left Thumb Q
Right Thumb P
Up ·
Down ‚
Left
fl
Right
‡
:
:
Korte handleiding Ultimate adapter voor Xbox
®
11
00034385bda 05.07.2006 7:52 Uhr Seite 12

Muisbeweging (rechter stick):
-Druk de “ESC”-toets in, en de rode programma LED knippert.
-Druk de “beeld omlaag”-toets in, en de LED gaat uit.
4. Tabellen
4.1 Standaard configuratie (Xbox®)
Controller
Toetsenbord Muis
Linker stick W,A,S,D
Rechter stick I,M,J,L Muisbeweging
A SPATIEBALK
B E
X R
YY
Links-trigger TLinkertoets
Rechts-trigger FRechtertoets
Linker duim Z
Rechter duim G
Start ENTER
Terug BACKSPACE
Zwart B
Wit HOOFDLETTERS
D-pad OMHOOG
·
D-pad omlaag
‚
D-pad links
fl
D-pad rechts
‡
4.2 Toekenningstabel voor het programmeren (Xbox®)
Xbox
®
Controller Toetsenbord
Xbox
®
Controller Toetsenbord
(controller toetsen toekennen) (controller toetsen toekennen)
AA Linker stick omhoog Links ALT+·
BB
Linker stick naar beneden
Links ALT+‚
XX Linker stick links Links ALT+
fl
YY Linker stick rechts Links ALT+
‡
SW Ta bRechter stick omhoog Rechts ALT+·
SB Caps Lock
Rechter stick naar beneden
Rechts ALT+‚
Linker-trigger LRechter stick rechts Rechts ALT+
fl
Rechter-trigger RRight Stick Right Rechts ALT+
‡
Start Enter
Terug BACK SPACE
Links Q
Rechts P
Omhoog ·
Naar beneden ‚
Links
fl
Rechts
‡
2.3 Configuratie activeren:
-Druk de „ALT“-toets en de „F1 - F8“-toets voor uw betreffende configuratie.
Dit kan ook tijdens het spel gebeuren.
3. Overige instelmogelijkheden:
3.1 Instelling van de muissnelheid:
-Het is mogelijk de muissnelheid aan uw wensen aan te passen. Hierbij kunt u een waarde,
tussen 1 = langzaam en 9 = zeer snel, uitkiezen.
-Druk de “ESC”-toets in, en de rode programma LED knippert langzaam.
-Druk nu de „ALT“-toets en naar keuze de 1-9-toets.
-De LED gaat uit en de waarde is opgeslagen.
3.2 Deadzone instelling:
Het is van spel tot spel verschillend hoever u de analoge-stick van uw controller in een richting
moet drukken voordat er op het beeldscherm een reactie is waar te nemen. Dit minimaal en
kort bereik, waarbinnen nog geen actie wordt uitgevoerd, alhoewel u uw analoge-stick
beweegt, noemt men de deadzone. (“dode zone"). Deze gevoeligheid kunt u ook configureren
en in de totale configuratie opslaan.
-Druk de “ESC”-toets in, en de rode programma LED knippert langzaam.
-Druk nu de „0-9“-toets in (0 = geen deadzone tot 9 = grote deadzone).
-De LED gaat uit en de waarde is opgeslagen.
De meeste spellen werken met een waarde tussen 3-5.
3.3 Omkeren van de muis:
Omkeren van de Y-as van uw muis (omhoog/naar beneden):
Activeren:
-Druk de “ESC”-toets in, en de rode programma LED knippert langzaam.
-Druk de “END”-toets in, en de rode programma LED gaat uit.
Deactiveren:
-Druk de “ESC”-toets in, en de rode programma LED knippert langzaam.
-Druk de “POS1”-toets in, en de rode programma LED gaat uit.
3.4 Toekenning van de muisbeweging aan de analoge-sticks:
De rechter analoge-stick op de controller wordt normaliter gebruikt om rond te kijken/richten,
de linker om het speelfiguur te bewegen. Zogenoemde Lightgunshooter zoals bijv. Silent
Scope® gebruiken echter de linker analoge-stick om het vizier te bewegen. De onderstaande
combinatie bepaald daarom op welke analoge-stick de muisbeweging gebruikt wordt.
Muisbeweging (linker stick):
-Druk de “ESC”-toets in, en de rode programma LED knippert.
-Druk de “beeld omhoog”-toets in, en de LED gaat uit.
12 13
00034385bda 05.07.2006 7:52 Uhr Seite 14

3. Altre possibilità di installazione:
3.1 Impostazione della velocità del mouse:
-È possibile adeguare la velocità del mouse alle proprie esigenze. Si può scegliere un
valore tra 1 = lento e 9 = molto veloce.
-Premere il tasto "ESC", il LED del programma rosso comincia a lampeggiare lentamente.
Tenere premuto il tasto "ALT" e a scelta il tasto 1-9.
-Il LED si spegne e il valore è memorizzato.
3.2 Impostazione della zona morta / deadzone:
A seconda del gioco, varia la pressione che si deve effettuare sullo stick analogico del control-
ler in una direzione, prima che si verifichi una reazione sullo schermo. Questo spazio minimo e
breve in cui non è stata ancora eseguita nessuna azione benché si muova lo stick analogico, è
denominata zona morta (deadzone). La sensibilità di pressione può essere configurata e memo-
rizzata nella configurazione generale.
-Premere il tasto "ESC", il LED del programma rosso comincia a lampeggiare lentamente.
-Premere quindi il tasto “0-9” (0 = nessuna zona morta fino a 9 = grande zona morta).
-Il LED si spegne e il valore è memorizzato.
La maggior parte dei giochi funziona con un valore tra 3 e 5.
3.3 Inversione del mouse:
Inversione dell’asse Y del mouse (alto/basso):
Attivazione:
-Premere il tasto "ESC", il LED del programma rosso comincia a lampeggiare lentamente.
-Premere il tasto "END", il LED rosso si spegne.
Disattivazione:
-Premere il tasto "ESC", il LED del programma rosso comincia a lampeggiare lentamente.
-Premere il tasto "POS1", il LED rosso si spegne.
3.4 Assegnazione del movimento del mouse agli stick analogici:
Di regola lo stick analogico destro del controller viene utilizzato per esplorare/mirare, il sinistro
per muovere i personaggi. I cosiddetti lightgunshooter come Silent Scope® utilizzano lo stick
analogico sinistro per il movimento del reticolo. La seguente combinazione determina quindi su
quale stick analogico viene applicato il movimento del mouse.
Movimento del mouse (stick sinistro):
-Premere il tasto "ESC", il LED del programma rosso lampeggia.
-Premere il tasto "Immagine in alto", il LED si spegne.
Con l’adattatore è possibile connettere all’Xbox® una comune tastiera PS/2 e un mouse PS/2.
In questo modo si ottiene un controllo decisamente migliore per il First-Person-Shooter
(Shooter 3D, Egoshootern) e anche per altri giochi che necessitano un controllo e una mira più
precisi.
La configurazione dei tasti si può regolare in base alle proprie esigenze in modo da adattarla
ogni volta alle diverse abitudini di gioco. La programmazione dei tasti è semplicissima. Inoltre è
possibile migliorare le impostazioni, ad es. della deadzone/zona morta e adeguarle alle esigen-
ze individuali (vedi ulteriore descrizione!).
1. Installazione:
1.1 Collegamento della tastiera PS/2 e del mouse PS/2 all’adattatore:
-Collegare il connettore PS/2 del mouse e della tastiera agli attacchi sul lato anteriore
dell’adattatore.
-Collegare il mouse all'entrata destra (verde) e la tastiera all’entrata sinistra (lilla).
Le entrate sono contrassegnate da colori diversi per facilitare il collegamento.
1.2 Collegamento dell’adattatore alla console di gioco:
-Connettere l’adattatore collegato al mouse e alla tastiera a un attacco del controller della
propria console.
-L’accensione dei LED sulla tastiera segnala che l’adattatore è in funzione e che la tastiera
e il mouse sono collegati correttamente all’apparecchio.
2. Programmazione:
2.1 Configurare la propria occupazione per la tastiera e il mouse:
- Premere il tasto "ESC" sulla tastiera collegata, il LED del programma rosso sull’adattatore
comincia a lampeggiare lentamente.
-Confermare dalla tabella di assegnazione il tasto che deve essere riprogrammato, quindi il
tasto sulla tastiera su cui deve essere impostato il tasto / la funzione del controller.
-Il LED rosso del programma comincia a lampeggiare più velocemente, quindi si spegne.
La funzione viene così memorizzata sul tasto selezionato.
-Ripetere questo procedimento per tutti gli altri tasti del controller che si desidera
modificare o impostare sulla tastiera.
2.2 Memorizzazione della configurazione:
-Dopo aver configurato tutti i tasti come descritto sopra, è possibile memorizzare questa
configurazione con F1 - F8. Si possono memorizzare otto configurazioni diverse.
-Premere il tasto "ESC", il LED del programma rosso comincia a lampeggiare lentamente.
-Premere quindi i tasti “F1 - F8“, il LED si spegne. La configurazione è così memorizzata.
2.3 Richiamo della configurazione:
-Premere quindi il tasto “ALT” e i tasti “F1 - F8” per la configurazione corrispondente.
Questa operazione può essere effettuata anche durante la sessione di gioco.
.
.
Brevi istruzioni adattatore per Xbox
®
1514
00034385bda 05.07.2006 7:52 Uhr Seite 16

El adaptador Ultimate permite la conexión de un teclado convencional PS/2 y de un ratón PS/2
a su Xbox®. Ello procura un control notablemente mejor en los First-Person-Shooters (3D-
Shooters, Egoshooters) y en otros juegos en los que se exige un control más exacto y sobre
todo buena puntería.
La ocupación de las teclas se puede adaptar a sus necesidades, de modo que podrá ajustar
cada juego a sus costumbres. La programación de las teclas es muy sencilla. Además, los aju-
stes de, p. ej., Deadzone / Zona de descanso se pueden afinar y realizar individualmente.
(Véase la descripción posterior)
1. Instalación:
1.1 Conexión del teclado PS/2 y del ratón PS/2 al adaptador Ultimate:
-
Enchufe los ratón y teclado PS/2 a las conexiones del lado delantero del adaptador Ultimate.
-El ratón se conecta a la entrada derecha (verde) y el teclado a la izquierda (lila).
Las entradas están identificadas mediante colores para hacerle más fácil la conexión.
1.2 Conexión del adaptador Ultimate a la consola de juegos de vídeo:
-Conecte el adaptador Ultimate con el ratón y el teclado conectados en él a cualquier
conexión del control de su consola.
-Los LEDs de su teclado se iluminan para indicar que el adaptador Ultimate funciona y que
el teclado y el ratón están correctamente conectados al aparato.
2. Programación:
2.1 Configurar la ocupación personal de teclado y ratón:
-Pulse la tecla "ESC" del teclado conectado, el LED rojo de programación del adaptador
Ultimate empieza a parpadear lentamente.
-Confirme ahora la tecla de la tabla de asignación que desee programar de nuevo y,
seguidamente, la tecla del teclado que desee ocupar con la función de la tecla del control.
-El LED rojo de programación empieza a parpadear más deprisa y se apaga a continuación.
La funcionalidad ha sido ahora transferida a la tecla elegida por Usted.
-Repita este proceso con todas las demás teclas del control que desee cambiar o cuya
funcionalidad desee transferir al teclado.
2.2 Guardar la configuración:
-Una vez configuradas todas las teclas como se ha explicado anteriormente, existe la
posibilidad de guardar este configuración como F1 – F8. Podrá guardar ocho
configuraciones diferentes.
-
Para ello, pulse la tecla "ESC", el LED rojo de programación empieza a parpadear lentamente.
-Pulse ahora una de las teclas “F1 - F8“, el LED rojo de programación se apaga.
La configuración se ha guardado.
2.3 Llamar la configuración:
-Pulse la tecla “ALT“ y una de las teclas “F1 - F8“ para la configuración correspondiente.
Estos se puede hacer también durante el juego.
Movimento del mouse (stick destro):
-Premere il tasto "ESC", il LED del programma rosso lampeggia.
-Premere il tasto "Immagine in basso", il LED si spegne.
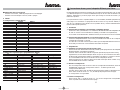
4. Tabelle
4.1 Configurazione standard (Xbox®)
Controller
Tastiera Mouse
Stick sinistro W,A,S,D
Stick destro I,M,J,L Mossa mouse
A SPACEBAR
B E
X R
YY
Trigger sinistro TPulsante sinistro
Trigger destro FPulsante destro
Thumb sinistro Z
Thumb destro G
Start ENTER
Back BACKSPACE
Nero B
Bianco CAPS LOCK
D-Pad SU
·
D-Pad giù
‚
D-Pad sinistra
fl
D-Pad destra
‡
4.2 Tabella di assegnazione per la programmazione (Xbox®)
Xbox
®
Controller Tastiera Xbox
®
Controller Tastiera
(tasti mappa controller)
(tasti mappa controller)
AA Stick sinistro su Sinistra ALT+·
BB Stick sinistro giù Sinistra ALT+‚
XX Stick sinistro a sinistra Sinistra ALT+
fl
YY Stick sinistro a destra Sinistra ALT+
‡
SW TabStick destro su Destra ALT+·
SB Caps Lock Stick destro giù DestraALT+‚
Trigger sinistro LStick destro a sinistra Destra ALT+
fl
Trigger destro RStick destro a destra Destra ALT+
‡
Start Enter
Back BACK SPACE
Sinistra Thumb Q
Destra Thumb P
Su ·
Giù ‚
Sinistra
fl
Destra
‡
fl
fl
Instrucciones breves para el adaptador Ultimate para Xbox
®
16 17
00034385bda 05.07.2006 7:52 Uhr Seite 18

Movimiento del ratón (stick derecho):
-Pulse la tecla "ESC", el LED rojo de programación parpadea.
-Pulse la tecla "Página abajo", el LED se apaga.
4. Tablas:
4.1 Configuración por defecto (Xbox®)
Control Teclado Ratón
Left Stick W,A,S,D
Right Stick I,M,J,L Mouse Move
A SPACEBAR
B E
X R
YY
Left Trigger TLeft Button
Right Trigger FRight Button
Left Thumb Z
Right Thumb G
Start ENTER
Back BACKSPACE
Black B
White CAPS LOCK
D-Pad UP
·
D-Pad Down
‚
D-Pad Left
fl
D-Pad Right
‡
4.2 Tabla de asignación para la programación (Xbox®)
Xbox
®
Controller
Teclado
Xbox
®
Controller
Teclado
(Controller map keys) (Controller map keys)
AA Left Stick Up Left ALT+·
BB Left Stick Down Left ALT+‚
XX Left Stick Left Left ALT+fl
YY Left Stick Right Left ALT+‡
SW TabRight Stick Up Right ALT+·
SB Caps Lock Right Stick Down Right ALT+‚
Left Trigger LRight Stick Left Right ALT+fl
Right Trigger RRight Stick Right Right ALT+‡
Start Enter
Back BACK SPACE
Left Thumb Q
Right Thumb P
Up ·
Down ‚
Left
fl
Right
‡
3. Otras posibilidades de ajuste:
3.1 Ajuste de la velocidad del ratón:
-Existe la posibilidad de ajustar la velocidad del ratón a sus necesidades. Para ello, puede
elegir entre un valor de 1 = lento y 9 = muy rápido.
-Pulse la tecla "ESC", el LED rojo de programación parpadea lentamente.
-Pulse ahora la tecla “ALT“ y una de las teclas 1-9.
-El LED se apaga y el valor se guarda.
3.2 Ajuste de la zona de descanso / Deadzone:
El recorrido que debe realizar en una dirección el stick analógico de su control para obtener
una reacción en la pantalla varía de juego a juego. Esta reducida zona en la que aún no se eje-
cuta ninguna acción pese a estar moviendo el stick analógico se llama zona de descanso.
(Deadzone). Esta sensibilidad al tope se puede configurar también y guardar en la configuraci-
ón global.
-Pulse la tecla "ESC", el LED rojo de programación parpadea lentamente.
-Pulse ahora la tecla “0-9“ (0 = sin zona de descanso hasta 9 = zona de descanso grande).
-El LED se apaga y el valor se guarda.
La mayoría de los juegos funciona con un valor entre 3-5.
3.3 Inversión del ratón:
Invertir el eje Y de su ratón (arriba/abajo):
Activar:
-Pulse la tecla "ESC", el LED rojo de programación parpadea lentamente.
-Pulse la tecla "END", el LED rojo de programación se apaga.
Desactivar:
-Pulse la tecla "ESC", el LED rojo de programación parpadea lentamente.
-Pulse la tecla "POS1", el LED rojo de programación se apaga.
3.4 Asignación del movimiento del ratón a los sticks analógicos:
El stick analógico del control se suele utilizar para explorar/apuntar, el izquierdo para mover la
figura del juego. Los así llamados “Lightgunshooter”, como Silent Scope®, utilizan en cambio
el stick analógico izquierdo para mover la mirilla. La combinación resultante determina enton-
ces en qué stick analógico se aplica el movimiento del ratón.
Movimiento del ratón (stick izquierdo):
-Pulse la tecla "ESC", el LED rojo de programación parpadea.
-Pulse la tecla "Página arriba", el LED se apaga.
1918
00034385bda 05.07.2006 7:52 Uhr Seite 20

2.3 Chamar a configuração:
-Prima a tecla “ALT“ e “F1 - F8“ para a sua respectiva configuração. Isto também pode ser
efectuado durante o decorrer do jogo.
3. Outras possibilidades de ajuste:
3.1 Ajuste da velocidade do rato:
-Existe a possibilidade de adaptar a velocidade do rato às suas necessidades. Aqui pode
seleccionar um valor entre 1 = lento e 9 = muito rápido.
-Prima a tecla “ESC“ e o LED vermelho de programação começa a piscar lentamente.
-Prima agora a tecla “ALT“ e, opcionalmente, as teclas 1-9.
-O LED apaga-se e o valor é registado.
3.2 Ajuste da zona morta/ deadzone:
De jogo para jogo é diferente o quanto deve pressionar o stick analógico do seu controlador
numa determinada direcção, antes de haver uma reacção no ecrã. Esta zona mínima e breve,
na qual ainda não foi efectuada nenhuma acção apesar de movimentar o stick analógico,
chama-se zona morta. (Deadzone). Pode, se necessário, ajustar esta sensibilidade e memorizar
nas configurações totais.
-Prima a tecla “ESC“ e o LED vermelho de programação começa a piscar lentamente.
-Prima agora as teclas de “0-9“ (0 = sem zona morta até 9 = zona morta grande).
-O LED apaga-se e o valor é registado.
Uma grande parte dos jogos funciona com um valor entre 3-5.
3.3 Inversão do rato:
Inversão do eixo Y do seu rato (para cima/para baixo):
Activar:
-Prima a tecla “ESC“ e o LED vermelho de programação começa a piscar lentamente.
-Prima a tecla “END“ e o LED vermelho de programação apaga-se.
Desactivar:
- Prima a tecla “ESC“ e o LED vermelho de programação começa a piscar lentamente.
-Prima o botão “POS1“ e o LED vermelho de programação apaga-se.
3.4 Atribuição do movimento do rato ao stick analógico:
O stick analógico direito no controlador é, normalmente, utilizado para as perspectivas/para
apontar e o esquerdo para movimentar as figuras do jogo. Os chamados jogos Lightgun como
Silent Scope® utilizam sobretudo o sitck analógico esquerdo para movimentar a mira. A
seguinte combinação determina por isso em que stick analógico é aplicado o movimento do
rato.
Com o adaptador Ultimate pode ligar um teclado PS/2 convencional e rato PS/2 à sua Xbox®.
Assim obtém um comando bastante melhor nos jogos tipo First-Person-Shooter (shooter 3D,
Egoshooter) e também outros jogos, que exijam um comando mais preciso para todos os alvos.
A ocupação dos botões pode naturalmente ser adaptada às suas necessidades, para que
possa definir cada um dos seus jogos preferidos de acordo com os seus hábitos de jogo. A
programação dos botões é extremamente fácil. Adicionalmente pode refinar e ajustar indivi-
dualmente as configurações p.ex. da deadzone/ zona morta. (ver outra descrição!)
1. Instalação:
1.1 Ligação do teclado PS/2 & rato PS/2 ao adaptador Ultimate:
-Ligue a entrada PS/2 do rato e o teclado às ligações na parte dianteira do adaptador
Ultimate.
-Assim o rato é ligado na entrada direita (verde) e o teclado na entrada esquerda (lilás).
As entradas são identificadas por cores para lhe facilitar a ligação.
1.2 Ligação do adaptador Ultimate à sua consola de jogos de vídeo:
-Ligue o adaptador Ultimate, ligado com o rato e o teclado, a uma das entradas no
controlador da sua consola.
-Ao acender o LED do seu teclado, tal indica que o adaptador Ultimate funciona e que, tanto
o rato como o teclado foram correctamente ligados ao aparelho.
2. Programação:
2.1 Configurar uma ocupação própria para o teclado e o rato:
-Prima a tecla "ESC" do teclado ligado e o LED vermelho de programação no adaptador
Ultimate começa a piscar lentamente.
-Agora confirme o botão correspondente da tabela de classificação que deve ser
reprogramado e, de seguida, a tecla do teclado à qual deve ser atribuída a função/botão do
controlador.
-O LED vermelho começa a piscar mais rapidamente e, de seguida, fica apaga-se. A
funcionalidade da tecla por si escolhida foi reocupada.
-Repita este processo para todos os outros botões no controlador que pretenda alterar ou
atribuir ao teclado.
2.2 Memorizar a configuração:
-Após ter configurado todos os botões como é descrito acima, existe a possibilidade de
memorizar esta configuração em F1 – F8. Pode memorizar oito configurações diferentes.
-
Para tal prima a tecla “ESC“ e o LED vermelho de programação começa a piscar lentamente.
-Agora pode premir opcionalmente a tecla “F1 - F8“ e l LED vermelho de programação
apaga-se. A sua configuração está memorizada.
–
–
Breve manual do adaptador Ultimate para Xbox
®
2120
00034385bda 05.07.2006 7:52 Uhr Seite 22

Movimento do rato (stick esquerdo):
-Prima a tecla “ESC“ e o LED vermelho de programação pisca.
-Prima a tecla “Imagem para cima“ e o LED apaga-se.
Movimento do rato (stick direito):
-Prima a tecla “ESC“ e o LED vermelho de programação pisca.
-Prima a tecla “Imagem para baixo“ e o LED apaga-se.
4. Tabelas
4.1 Configuração padrão (Xbox®)
Controlador Teclado Rato
Left Stick W,A,S,D
Right Stick I,M,J,L Mouse Move
A SPACEBAR
B E
X R
YY
Left Trigger TLeft Button
Right Trigger FRight Button
Left Thumb Z
Right Thumb G
Iniciar ENTER
Back BACKSPACE
Black B
White CAPS LOCK
D-Pad UP
·
D-Pad Down
‚
D-Pad Left
fl
D-Pad Right
‡
4.2 Tabela de classificação para programação (Xbox®)
Xbox
®
Controller
Teclado
Xbox
®
Controller
Teclado
(Controller map keys) (Controller map keys)
AA Left Stick Up Left ALT+·
BB Left Stick Down Left ALT+‚
XX Left Stick Left Left ALT+fl
YY Left Stick Right Left ALT+‡
SW TabRight Stick Up Right ALT+·
SB Caps Lock Right Stick Down Right ALT+‚
Left Trigger LRight Stick Left Right ALT+fl
Right Trigger RRight Stick Right Right ALT+‡
Start Enter
Back BACK SPACE
Left Thumb Q
Right Thumb P
Up ·
Down ‚
Left
fl
Right
‡
22
00034385bda 05.07.2006 7:52 Uhr Seite 24
-
 1
1
-
 2
2
-
 3
3
-
 4
4
-
 5
5
-
 6
6
-
 7
7
-
 8
8
-
 9
9
-
 10
10
-
 11
11
-
 12
12


in andere talen
- English: Hama 00034385 Owner's manual
- italiano: Hama 00034385 Manuale del proprietario
- français: Hama 00034385 Le manuel du propriétaire
- español: Hama 00034385 El manual del propietario
- Deutsch: Hama 00034385 Bedienungsanleitung
- português: Hama 00034385 Manual do proprietário
Gerelateerde artikelen
Andere documenten
-
Nyko Type Pad™ Handleiding
-
Trust 17337 Handleiding
-
MAXDATA VISION 450T de handleiding
-
-
Fujitsu AMILO DESKTOP SI 3535 de handleiding
-
FUJITSU SIEMENS SCALEO EV de handleiding
-
Belkin F1D104 Handleiding
-
Asus ROG CG8565 de handleiding
-
HP PAVILION ELITE M9400 Handleiding
-