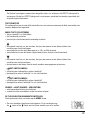
Hama 00104951 de handleiding
- Categorie
- Wekkers
- Type
- de handleiding
Deze handleiding is ook geschikt voor

00104951/02.11
All listed brands are trademarks of the corresponding companies. Errors and omissions excepted,
and subject to technical changes. Our general terms of delivery and payment are applied.
Hama GmbH & Co KG
D-86651 Monheim/Germany
www.hama.com

THE SMART SOLUTION
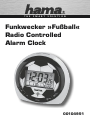
00104951
Funkwecker »Fußball«
Radio Controlled
Alarm Clock

2
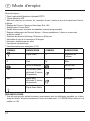
Funktionen:
* Funkgesteuert (über Zeitsignalsender DCF77)
* Großes LCD-Display
* Anzeige von Stunde, Minute, Sekunde; Monat, Datum, Wochentag, Weckzeit
* Zweite Zeitzone (-9 Stunden bis +9 Stunden)
* Automatische Sommer-/ Winterzeitumstellung
* 2 Alarmzeiten mit programmierbarer Weckwiederholung (Schlummerzeit)
* Unabhängige Weckzeiteinstellung – Ansteigendes Wecksignal (Alarm 1) & einfaches
Wecksignal (Alarm 2)
* Zeitanzeige im 12- oder 24-h-Format möglich
* Wochentagsanzeige in 5 Sprachen
* Batteriestandsanzeige
* Hintergrundbeleuchtung
* Betrieb mit 2 x 1,5V-Batterie
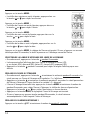
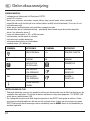
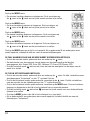
ANZEIGE BEDEUTUNG ANZEIGE BEDEUTUNG
Funksignal Z
z
Wiederholung der
Weckanzeige
DDatum MMonat
Internationale
Zeitanzeige
* Sommer-/ Winter-
zeitumstellung
PM P. M. (Nur bei
12-Stundenanzeige)
ALARM 1
AM A.M. (Nur bei
12-Stundenanzeige)
ALARM 2
schwaches
Funksignal
Uhrzeiteinstellungen
* Nach Einsetzen der Batterie leuchten alle Anzeigeelemente kurz auf. Zeit und Datum werden
vorübergehend auf 1 D 1 M WE 0:00 und die Alarmzeit auf 7:00 eingestellt.
* Der Funkwecker sucht nun automatisch das DCF-Zeitsignal. Dieser Vorgang dauert
üblicherweise 3-5 Minuten. Wenn nach 5 Minuten noch keine automatische Zeiteinstellung
erfolgt ist, stellen Sie die Uhrzeit über die MODE-Taste manuell ein. Der Wecker sucht
automatisch stündlich nach dem Zeitsignal. Nach erfolgreichem Empfang wird die manuell
eingestellte Zeit ersetzt.
d Bedienungsanleitung

3
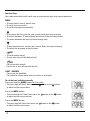
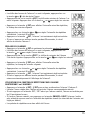
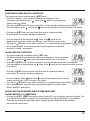
Funktionstasten
Der Funkwecker verfügt über 6 einfache Funktionstasten, über die der Betrieb gesteuert werden
kann.
MODE
• Zum Anzeigen von Alarm 1 und Alarm 2
• Zur manuellen Zeiteinstellung
• Zur Einstellung einer zweiten Zeitzone (internationale Zeit).
• Zum Steigern des Werts für Stunden, Minuten, Jahr, Monat und Datum bei der Einstellung
• Zum Hin- und Herwechseln zwischen der Anzeige im 12- und im 24-Stundenformat
• Zum Hin- und Herwechseln zwischen Ortszeit und internationaler Zeit.
• Zum Verringern des Werts für Stunden, Minuten, Jahr, Monat und Datum bei der Einstellung
• Zum Wählen der Sprache für die Wochentagsanzeige.
SET
• Zum Einstellen der täglichen Weckzeit (Alarm 1)
• Zum Ein- und Ausschalten der täglichen Weckzeit (Alarm 1).
SET
• Zum Einstellen der täglichen Weckzeit (Alarm 2)
• Zum Ein- und Ausschalten der täglichen Weckzeit (Alarm 2).
LIGHT • SNOOZE
• LICHT
• Zum Einschalten des Hintergrundlichts
• Zum Wechseln in den Schlummermodus bei aktivierter Alarmfunktion
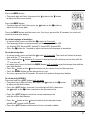
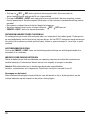
Manuelle Zeiteinstellung
Halten Sie die MODE-Taste drei Sekunden lang gedrückt.
• Drücken Sie Tasten oder , wenn die Stundenanzeige zu blinken anfängt.
So können Sie die gewünschte Stundeneinstellung vornehmen.
Drücken Sie die MODE-Taste:
• Drücken Sie Tasten oder , wenn die Minutenanzeige zu blinken anfängt.
So können Sie die gewünschte Minuteneinstellung vornehmen.

4
Drücken Sie die MODE-Taste:
• Drücken Sie Tasten oder , wenn die Anzeige der Jahreszahl zu blinken
anfängt. So können Sie die gewünschte Jahreseinstellung vornehmen.
Drücken Sie die MODE-Taste:
• Drücken Sie Tasten oder , wenn die Monatsanzeige zu blinken anfängt.
So können Sie die gewünschte Monatseinstellung vornehmen.
Drücken Sie die MODE-Taste:
• Drücken Sie Tasten oder , wenn die Datumsanzeige zu blinken anfängt.
So können Sie die gewünschte Datumseinstellung vornehmen.
Drücken Sie die MODE-Taste erneut, um die Zeiteinstellung zu akzeptieren. Wenn 30 Sekunden
lang keine Taste gedrückt wird, dann springt die Uhr wieder zur normalen Zeitanzeige zurück.
Einstellung der Sprache für Wochentage
• Halten Sie die Taste im Normal-Modus drei Sekunden lang gedrückt.
• Die aktuelle Sprache für die Wochentage wird im LCD-Display angezeigt:
Deutsch (GE), Französisch (FR), Englisch (EN), Spanisch (SP), Italienisch (IT).
• Halten Sie eine Sekunde lang gedrückt, um die Sprachanpassung vorzunehmen.
Einstellung einer zweiten Zeitzone
• Halten Sie im Normalmodus drei Sekunden lang gedrückt. Die Uhr wechselt zur
internationalen Zeit, und auf dem Display erscheint das Symbol „F“.
• Wenn Sie drei Sekunden lang gedrückt halten, wird wieder zum Normalzeitmodus
gewechselt, und das Symbol „F“ erlischt.
• Zum Einstellen der zweiten Zeitzone wechseln Sie wieder zur internationalen Zeit und halten
die MODE-Taste drei Sekunden lang gedrückt. Die Stundenanzeige fängt an zu blinken.
• Drücken Sie die Tasten oder , um für die zweite Zeitzone die Stundeneinstellung
vorzunehmen.
• Drücken Sie die MODE-Taste erneut, um diese Zeiteinstellung zu akzeptieren.
• Wenn 30 Sekunden lang keine Taste gedrückt wird, wechselt der Wecker wieder in den
normalen Zeitanzeigemodus.
Einstellung der täglichen Weckzeit (ALARM 1)
Halten Sie die SET-Taste drei Sekunden lang gedrückt:
• Drücken Sie oder , wenn die Anzeige von Alarm 1 zu blinken anfängt,
um so die gewünschte Stundeneinstellung vorzunehmen.
• Drücken Sie die SET-Taste . Daraufhin beginnt die Minutenanzeige von Alarm 1 zu blinken.
Drücken Sie die Tasten oder , um die Anpassung für die gewünschte
Minutenanzeige vorzunehmen.

5
• Drücken Sie zum Anzeigen des aktuellen Schlummerzeitraums die
SET-Taste , wenn das Minutenfeld blinkt.
• Drücken Sie die Tasten oder , um die Schlummerzeit auf eine
gewünschte Länge zwischen 1 und 59 Minuten einzustellen.
• Drücken Sie die SET-Taste erneut, um die Zeiteinstellung für Alarm 1
zu akzeptieren und die Weckfunktion zu aktivieren.
• Wenn 30 Sekunden lang keine Taste gedrückt wird, dann übernimmt der Wecker die Anzeige
von Alarm 1.
Einstellung der täglichen Weckzeit (ALARM 2)
• Halten Sie die SET-Taste drei Sekunden lang gedrückt.
• Drücken Sie die Tasten oder , wenn die Stundenanzeige von
Alarm 2 zu blinken anfängt, um so die gewünschte Stundeneinstellung vorzunehmen.
• Drücken Sie die SET-Taste . Daraufhin beginnt die Anzeige von Alarm 2 zu blinken.
• Drücken Sie dann die Tasten oder , um die gewünschte Minuteneinstellung
vorzunehmen.
• Drücken Sie zum Anzeigen des aktuellen Schlummerzeitraums die
SET-Taste , wenn das Minutenfeld blinkt.
• Drücken Sie die Tasten oder , um die Schlummerzeit auf die
Auf eine gewünschte Länge zwischen 1 und 59 Minuten einzustellen.
• Drücken Sie die SET-Taste erneut, um die Zeiteinstellung für Alarm 2
zu akzeptieren und die Weckfunktion zu aktivieren.
• Wenn 30 Sekunden lang keine Taste gedrückt wird, dann übernimmt der Wecker die Anzeige
von Alarm 2.
Verwendung der Weck- und Schlummerfunktion für ALARM 1 oder ALARM 2
• Zum Ein- und Ausschalten von Alarm 1 bzw. Alarm 2 drücken Sie die SET-Tasten oder .
• Wenn die aktivierte Weckzeit erreicht ist, ertönt das entsprechende Wecksignal.
• Durch Druck auf die SET-Taste / wird das Wecksignal für die nächsten 24 Stunden
beendet.
• Wenn Sie auf die Taste LIGHT • SNOOZE drücken, wird das Wecksignal unterbrochen, ertönt
aber nach Ablauf der Schlummerzeit erneut (werkseitig sind 4 Minuten voreingestellt).
• Die Alarmanzeige blinkt.
• Nach 4 Minuten endet das Wecksignal, wenn die Tasten oder oder LIGHT • SNOOZE
nicht gedrückt werden.

6
Empfang des Funksignals
Der Funkwecker empfängt automatisch jede Stunde das Funksignal. Der Empfangsvorgang
dauert etwa 3-5 Minuten. Während des Signalempfangs ist das DCF-Funkturmsymbol
im Display zu sehen. Sonst wird es nicht angezeigt.
Hintergrundbeleuchtung
Wenn Sie die Taste LIGHT • SNOOZE drücken, leuchtet das Hintergrundlicht für drei Sekunden.
Batteriestandsanzeige
Wenn die Batterieleistung unter das für den Weckerbetrieb notwendige Niveau fällt, dann
beginnt die Batteriestandanzeige zu leuchten. In diesem Fall sollte die Batterie schnellstmöglich
ausgetauscht werden.
Achtung! Leere Batterien sind umweltgerecht zu entsorgen.
Batteriewechsel:
Bitte verwenden Sie nur den für dieses Gerät zugelassenen Batterietyp und achten Sie beim
einlegen der neuen Batterien auf die korrekte Polung.

7
Features:
* Controlled by Radio Signal (German DCF77)
* Large LCD display
* Displays Hour, Minute, Second; Month, Date, Day of Week, Alarm Time
* Foreign Time Setting (-9 Hour to +9 Hour)
* Summer Time Indicator
* Dual Alarm with programmable snooze period
* Independent Alarm Time Setting - Crescendo Daily Alarm1 & Single Alarm 2
* 12 Hour or 24 Hour Display Format Selectable
* Weekday Indication in 5 Languages
* battery Low Indicator
* Backlight function
* Two Battery (1.5V) Operation
INDICATOR STANDING FOR INDICATOR STANDING FOR
Radio Signal Z
z
Repeat Alarm
Indication
DDate MMonth
Foreign Time
Indication
Summer Time
Indication
PM PM
(12 Hr Display only)
ALARM 1
AM AM
(12 Hr Display only)
ALARM 2
Radio Signal
WeAkly
Setting the time
* Once the battery is installed properly, all the displays on the face of the clock will light up
briey. The time & date will be: 1 D1 M WE 0:00 and the alarm1 time will be 7:00.
* Your radio-controlled clock will begin to seek out the DCF time signal automatically. This takes
typically between 3-5 minutes in good conditions. If after 5 minutes the DCF time has not been
received, use the MODE key to set the time manually. The clock will then automatically attempt
to receive the DCF time each hour every day. When this is successful, the received time will
override the manually set time.
g Operating Instruction

8
Function Keys
Your radio-controlled clock has 6 easy to use function keys that control operation:
MODE
• To view alarm1 time or alarm2 time
• To set the time manually
• To set the foreign time manually.
• To increase the hour, minute, year, month, date during time setting
• To switch between 12 hour display format and 24 hour display format.
• To switch between the local time and foreign time
• To decrease the hour, minute, year, month, date, during time setting
• To select the language of day of week.
SET
• To set the daily alarm1
• To turn on or turn off the daily alarm1
SET
• To set the daily alarm2
• To turn on or turn off the daily alarm2
LIGHT • SNOOZE
• To turn on the backlight
• To switch to snooze mode when the alarm is activated
To set the time and date manually
Press and hold the MODE button for 3 seconds:
• The hour digit will ash, then press the button or the button
to adjust to the correct hour.
Press the MODE button:
• The minute digit will ash, then press the button or the button
to adjust to the correct minute.
Press the MODE button:
• The year digit will ash, then press the button or the button
to adjust to the correct year.

9
Press the MODE button:
• The month digit will ash, then press the button or the button
to adjust to the correct month.
Press the MODE button:
• The date digit will ash, then press the button or the button to
adjust to the correct date.
Press the MODE button and the time is set. If no key is pressed for 30 seconds, the clock will
revert to normal time display.
To set the language of weekdays
• In normal mode, press and hold the button for 3 seconds.
• The language of the current weekdays will be displayed in the LCD :
e.g. English (EN), German(GE), Italian(IT), French(FR), Spanish(SP).
• Press the button for 1 second to adjust to the correct language of weekdays.
To set the foreign time
• In normal mode, press and hold the button for 3 seconds. The clock will switch to foreign
time with the “F” icon turn on.
• Press and hold the button for 3 seconds in foreign time will switch to normal time with the
“F” icon turn off.
• In foreign time, press and hold the MODE button for 3 seconds to set the foreign time with the
hour digit ashes.
• Press the button or the button to adjust to the correct hour for the time zone.
• Press the MODE button and the foreign time is set.
• If no key is pressed for 30 seconds, the clock will revert to foreign time display.
To set the daily ALARM 1
Press and hold the SET button for 3 seconds:
• The alarm1 hour digit will ash, then press the button or the button
to adjust to the desired hour.
• Press the SET button, the alarm1 minute digit will ash, then press
the button or the button to adjust to the desired minute.
• Press the SET button to show the current snooze period
with the minute eld ashes.
• Press the button or the button to adjust to the desired snooze
period from 1 minute to 59 minutes.
• Press the SET button and the alarm1 time is set and enabled.

10
• If no key is pressed for 30 seconds, the clock will resume the alarm l display.
To set the ALARM 2
• Press and hold the SET button for 3 seconds:
• The Alarm 2 hour digit will ash, then press the button or the button
to adjust to the desired hour.
• Press the SET button, the alarm2 minute digit will ash, then press
the button or the button to adjust to the desired minute.
• Press the SET button to show the current snooze
period with the minute eld ashes.
• Press the button or the button to adjust to the desired snooze
period from 1 minute to 59 minutes.
• Press the SET button and the alarm2 time is set and enabled.
• If no key is pressed for 30 seconds, the clock will resume the alarm 2 display.
Using the Alarm and SNOOZE for daily ALARM 1 or ALARM 2
• Press the SET/ SET button to turn the alarm1 on, or the alarm1 off/ the alarm 2 on, or the
alarm2 off.
• When the current time reaches the alarm time that is enabled, the corresponding alarm is
activated.
• Press the SET/ SET button when the alarm is activated will stop the alarm for 24 hours.
• When the alarm is activated, press the SNOOZE • LIGHT button and the alarm stops but sounds
again after the snooze period (4 minutes snooze period is pre-programmed).
• The repeat alarm indicator will ash.
• The alarm will stop after 4 minutes if the SET/ SET button or SNOOZE • LIGHT button is
not pressed.
Receiving the radio control signal
The radio-controlled clock will automatically receive the radio signal every hour. It will take 3-5
minutes to receive the radio signal. If the DCF signal is received, the DCF tower will be visible on
the display, otherwise it will not.
Backlight
Press the SNOOZE • LIGHT button to light up the clock for 3 seconds.
Low battery level detection
Should the battery capacity drop to a level that is not sufcient to operate the clock, the low
battery indicator will light up. The battery should be replaced as soon as possible.

11
Attention! Please dispose of used batteries in an ecologically safe manner.
Replacing the battery:
Please use only the types of battery that are approved for this device and ensure that the polarity
is correct when inserting a new battery.

12
Caractéristiques:
* Réveil radio-piloté (émetteur allemand DCF77)
* Grand afchage LCD
* Afche les heures, les minutes, les secondes, le mois, la date, le jour de la semaine et l‘heure
d‘alarme
* Réglage de l‘heure à l‘étranger (décalage -9h à +9h)
* Symbole pour l‘heure d‘été
* Double alarme avec intervalle de répétition (snooze) programmable
* Réglage indépendant de l‘heure d‘alarme – Alarme quotidienne 1 allant en crescendo
et alarme simple 2
* Sélection du format d‘afchage 12 heures ou 24 heures
* Indication du jour de la semaine en 5 langues
* Indicateur de décharge des piles
* Fonction de rétroéclairage
* Fonctionnement avec deux piles (1,5 V)
SYMBOLE SIGNIFICATION SYMBOLE SIGNIFICATION
Signal Radio Z
z
Répétition de
l‘alarme
DDate MMois
Heure à l‘étranger Heure d‘été
PM APRÈS-MIDI (pour
afchage 12 heures
Uniquement)
ALARME 1
AM Matin (pour
afchage 12 heures
Uniquement)
ALARME 2
Signal Radio Faible
RÉGLAGE DE L‘HEURE
* Une fois que les piles ont été insérées correctement, tous les afchages possibles sur la face
avant du réveil s‘allument brièvement. L‘heure et la date sont : 1 D1 M WE 0:00 et l‘alarme 1 est
réglée sur 7:00.
f Mode d‘emploi

13
* Votre réveil radio-piloté commence alors à rechercher automatiquement le signal horaire DCF.
Cela prend 3 à 5 minutes lorsque les conditions sont bonnes. Si le signal DCF n‘a pas été
reçu au bout de 5 minutes, utilisez la touche MODE pour régler l‘heure manuellement. Le réveil
réessaie automatiquement de capter le signal horaire DCF toutes les heures. Si cette tentative
a été fructueuse, l‘heure reçue remplace alors l‘heure réglée manuellement.
TOUCHES DE FONCTION
Votre réveil radio-piloté possède 6 touches de fonction simples à utiliser. Elles permettent
d‘exécuter les actions suivantes :
MODE
• Afcher l‘heure de l‘alarme 1 ou l‘heure de l‘alarme 2
• Régler l‘heure manuellement
• Régler l‘heure à l‘étranger manuellement
• Régler (avancer) l‘heure, les minutes, l‘année, le mois, la date en mode de réglage
• Passer du format d‘afchage 12 heures au format 24 heures et inversement
• Passer de l‘heure locale à l‘heure à l‘étranger et inversement
• Régler (retarder) l‘heure, les minutes, l‘année, le mois, la date en mode de réglage
• Sélectionner la langue du jour de la semaine
SET
• Régler l‘alarme quotidienne 1
• Activer ou désactiver l‘alarme quotidienne 1
SET
• Régler l‘alarme quotidienne 2
• Activer ou désactiver l‘alarme quotidienne 2
SNOOZE • LIGHT (répétition de l‘alarme/rétroéclairage)
• Allumer le rétroéclairage
• Passer au mode de répétition (snooze) lorsque l‘alarme est activée
RÉGLAGE MANUEL DE L‘HEURE ET DE LA DATE
Appuyez sur la touche MODE et maintenez-la enfoncée pendant 3 secondes :
• Le chiffre des heures se met à clignoter, appuyez alors sur la
touche ou pour régler l‘heure.

14
Appuyez sur la touche MODE :
• Le chiffre des minutes se met à clignoter, appuyez alors sur
la touche ou pour régler les minutes.
Appuyez sur la touche MODE :
• Le chiffre de l‘année se met à clignoter, appuyez alors sur
la touche ou pour régler l‘année.
Appuyez sur la touche MODE :
• Le chiffre du mois se met à clignoter, appuyez alors sur la
touche ou pour régler le mois.
Appuyez sur la touche MODE :
• Le chiffre de la date se met à clignoter, appuyez alors sur la
touche ou pour régler la date.
Appuyez sur la touche MODE, le réglage de l‘heure est terminé. Si vous n‘appuyez sur aucune
touche pendant 30 secondes, le réveil repassera sur l‘afchage normal de l‘heure.
SÉLECTION DE LA LANGUE D‘AFFICHAGE DES JOURS DE LA SEMAINE
• En mode normal, appuyez sur la touche pendant 3 secondes.
• La langue actuelle d‘afchage des jours se met à clignoter à l‘écran LCD :
p. ex. anglais (EN), allemand (GE), italien (IT), français (FR), espagnol (SP).
• Appuyez sur la touche pendant 1 seconde pour régler la langue d‘afchage que vous
désirez.
RÉGLAGE DE L‘HEURE À L‘ÉTRANGER
• En mode normal, appuyez sur la touche et maintenez-la enfoncée pendant 3 secondes. Le
réveil passera sur l‘heure à l‘étranger et le symbole « F » s‘afchera.
• Appuyez sur la touche et maintenez-la enfoncée pendant 3 secondes. Le réveil passe alors
de l‘heure à l‘étranger à l‘heure locale et le symbole « F » disparaît.
• L‘heure à l‘étranger étant afchée, appuyez sur la touche MODE et maintenez-la enfoncée
pendant 3 secondes pour régler l‘heure à l‘étranger, le chiffre des heures clignote alors.
• Appuyez sur la touche ou pour régler l‘heure pour ce fuseau horaire.
• Appuyez sur la touche MODE, le réglage de l‘heure à l‘étranger est terminé.
• Si vous n‘appuyez sur aucune touche pendant 30 secondes, le réveil retourne
automatiquement à l‘afchage de l‘heure à l‘étranger.
RÉGLAGE DE L‘ALARME QUOTIDIENNE 1
Appuyez sur la touche SET et maintenez-la enfoncée pendant 3 secondes :

15
• Le chiffre des heures de l‘alarme 1 se met à clignoter, appuyez alors sur
la touche ou an de régler l‘heure.
• Appuyez ensuite sur la touche SET, le chiffre des minutes de l‘alarme 1 se
met à clignoter. Appuyez alors sur la touche ou pour régler les minutes.
• Appuyez sur la touche SET pour afcher l‘intervalle actuel de répétition,
le champ des minutes clignote.
• Appuyez alors sur la touche ou pour régler l‘intervalle de répétition
souhaité de 1 minute à 59 minutes.
• Appuyez sur la touche SET , l‘alarme 1 est maintenant réglée et activée.
• Si vous n‘appuyez sur aucune touche pendant 30 secondes, le réveil
afche à nouveau l‘alarme 1.
RÉGLAGE DE L‘ALARME 2
• Appuyez sur la touche SET et maintenez-la enfoncée pendant 3 secondes :
• Le chiffre des heures de l‘alarme 2 se met à clignoter, appuyez alors sur
la touche ou pour régler l‘heure désirée.
• Appuyez ensuite sur la touche SET , le chiffre des minutes de l‘alarme
2 se met à clignoter. Appuyez alors sur la touche ou pour régler les minutes.
• Appuyez sur la touche SET pour afcher l‘intervalle actuel de
répétition, le champ des minutes clignote.
• Appuyez alors sur la touche ou pour régler l‘intervalle de répétition
souhaité de 1 minute à 59 minutes.
• Appuyez sur la touche SET , l‘alarme 2 est maintenant réglée et activée.
• Si vous n‘appuyez sur aucune touche pendant 30 secondes, le réveil
retourne automatiquement à l‘afchage de l‘alarme 2.
UTILISATION DE LA FONCTION DE RÉPÉTITION POUR L‘ALARME
QUOTIDIENNE 1 ou L‘ALARME 2
• Appuyez sur la touche SET / SET pour activer ou désactiver l‘alarme 1/l‘alarme 2.
• Lorsque l‘heure réglée pour l‘alarme est arrivée, l‘alarme correspondante retentit.
• Si vous appuyez sur la touche SET / SET alors que l‘alarme retentit, l‘alarme est arrêtée pour
les 24 prochaines heures.
• Si, lorsque l‘alarme retentit, vous appuyez sur la touche SNOOZE • LIGHT, l‘alarme s‘arrête
puis retentit à nouveau une fois l‘intervalle de répétition écoulé (un intervalle de 4 minutes est
réglé par défaut).
• Le symbole de répétition sera alors afché à l‘écran.

16
• L‘alarme s‘arrêtera au bout de 4 minutes si ni la touche SET / SET ni la touche
SNOOZE • LIGHT n‘est actionnée.
RÉCEPTION DU SIGNAL RaDII-PILOTÉ
Le réveil radio-piloté reçoit automatiquement le signal horaire toutes les heures. La procédure
de réception du signal radio dure 3-5 minutes. Si le signal DCF est capté, le symbole représen-
tant un émetteur DCF apparaît à l‘écran ; dans le cas contraire, il n‘apparaît pas.
RETROECLAIRAGE
Appuyez sur la touche SNOOZE • LIGHT an d‘allumer le rétroéclairage du réveil pendant 3
secondes.
INDICATEUR DE DÉCHARGE DES PILES
Si la capacité des piles baisse en dessous d‘un certain seuil ne permettant plus un fonctionne-
ment du réveil, l‘indicateur de décharge des piles s‘afche. Dans ce cas, remplacez les piles
dès que possible.
Attention ! Veuillez recycler les piles usagées conformément aux normes de protection de
l‘environnement.
Remplacement des piles :
Utilisez uniquement des piles appropriées pour cet appareil et insérez les piles neuves en
veillant à respecter la polarité.

17
CARACTERÍSTICAS:
* Controlado por señal de radio (Alemania DCF77)
* Pantalla LCD grande
* Indica horas, minutos, segundos; mes, fecha, día de la semana, hora de alarma
* Ajuste de hora en el extranjero (-9 horas a +9 horas)
* Indicador de horario de verano
* Alarma dual con periodo de repetición o retraso de alarma programable
* Ajuste de la hora de alarma independiente – Alarma diaria 1 & Alarma individual 2
in crescendo
* Formato de visualización de 12 ó 24 horas
* Indicación del día de la semana en 5 idiomas
* Indicador de carga baja de las baterías
* Función de luz de fondo
* Funcionamiento con dos baterías (1,5 V)
INDICADOR CORRESPONDE AINDICADOR CORRESPONDE A
señal de radio Z
z
indicación de repe-
tición de Alarma
Dfecha Mmes
indicación de hora
en el extranjero
indicación de
horario de verano
PM PM (sólo se ve
en formato de 12
horas)
ALARMA 1
AM AM (sólo se ve
en formato de 12
horas)
ALARMA 2
señal de radio
semanal
AJUSTE DE LA HORA
*
Una vez que las baterías se han instalado correctamente, todas las indicaciones que se
encuentran en el frontal del reloj se iluminan brevemente. La hora y la fecha serán: 1 D1 M WE
0:00 y la alarma 1 será 7:00.
* Su reloj controlado por señal de radio empezará a buscar la señal horaria DCF
automáticamente. Esto suele tardar entre 3 y 5 minutos bajo buenas condiciones.
e Instrucciones de uso

18
Si transcurridos 5 minutos no se ha recibido la hora DCF, utilice la tecla MODO para ajustar
la hora manualmente. El reloj intentará recibir la hora DCF automáticamente cada día y a
cada hora completa. Si la recepción tiene éxito, la hora recibida sobrescribirá la hora ajustada
manualmente.
TECLAS DE FUNCIONES
Su reloj controlado por señal de radio dispone de 6 teclas de fácil uso para controlar su
funcionamiento:
MODO
• Para ver la hora de la alarma 1 y de la alarma 2
• Para ajustar la hora manualmente
• Para ajustar la hora en el extranjero manualmente.
• Para incrementar las horas, minutos, año, mes, fecha cuando se ajusta
• Para cambiar entre el formato de visualización de 12 horas y de 24 horas.
• Para cambiar entre la hora local y la hora en el extranjero
• Para reducir las horas, minutos, año, mes, fecha cuando se ajusta
• Para seleccionar el idioma de los días de la semana.
AJUSTAR
• Para ajustar la alarma diaria 1
• Para activar o desactivar la alarma horaria 1
AJUSTAR
• Para ajustar la alarma diaria 2
• Para activar o desactivar la alarma horaria 2
LIGHT • SNOOZE
• Para encender la luz de fondo
• Para cambiar al modo de repetición de alarma cuando la alarma está activada
PARA AJUSTAR LA HORA Y LA FECHA MANUALMENTE
Mantenga pulsada la tecla MODO durante 3 segundos:
• El dígito de las horas parpadea, pulse a continuación la
tecla o la tecla para ajustar las horas correctas.

19
Pulse la tecla MODO:
• El dígito de los minutos parpadea, pulse a continuación la
tecla o la tecla para ajustar los minutos correctos.
Pulse la tecla MODO:
• El dígito del año parpadea, pulse a continuación la
tecla o la tecla para ajustar el año correcto.
Pulse la tecla MODO:
• El dígito del mes parpadea, pulse a continuación la
tecla o la tecla para ajustar el mes correcto.
Pulse la tecla MODO:
• El dígito de la fecha parpadea, pulse a continuación la
tecla o la tecla para ajustar la fecha correcta.
Pulse la tecla MODO y la hora y la fecha quedarán ajustadas. Si no se pulsa ninguna tecla
durante 30 segundos, el reloj vuelve a la indicación normal de la hora.
PARA SELECCIONAR EL IDIOMA DE LOS DÍAS DE LA SEMANA
• En el modo normal, pulse y mantenga pulsada durante 3 segundos la tecla .
• El idioma actual de los días de la semana se visualiza en la pantalla LCD :
p. ej, inglés (EN), alemán (GE), italiano (IT), francés (FR), español (SP).
• Pulse la tecla durante 1 segundo para ajustar el idioma de los días de la semana.
PARA AJUSTAR LA HORA EN EL EXTRANJERO
• En el modo normal, pulse y mantenga pulsada durante 3 segundos la tecla . El reloj conmuta
a la hora en el extranjero y el icono “F” se enciende.
• Pulse y mantenga pulsada durante 3 segundos la tecla si desea cambiar de la hora en el
extranjero a la hora normal, el icono “F” se apaga.
• En el modo de hora en el extranjero, pulse y mantenga pulsada durante 3 segundos la tecla
MODO para ajustar la hora en el extranjero, el dígito de las horas parpadea.
• Pulse la tecla o la tecla para ajustar la hora correcta de la zona horaria.
• Pulse la tecla MODO y la hora en el extranjero quedará ajustada.
• Si no se pulsa ninguna tecla durante 30 segundos, el reloj volverá a la visualización de la hora
en el extranjero.
PARA AJUSTAR LA ALARMA DIARIA 1
Pulse y mantenga pulsada durante 3 segundos la tecla AJUSTAR:
• El dígito de las horas de la alarma 1 parpadea, pulse a continuación
la tecla o la tecla para ajustar las horas que desee.

20
• Pulse la tecla AJUSTAR, el dígito de los minutos de la alarma 1 parpadea,
pulse a continuación la tecla o la tecla para ajustar los minutos que desee.
• Pulse la tecla AJUSTAR para visualizar el periodo actual de repetición
de alarma, el campo de los minutos parpadea.
• Pulse la tecla o la tecla para ajustar el periodo de repetición de
alarma que desee entre 1 y 59 minutos.
• Pulse la tecla AJUSTAR y la hora de la alarma 1 quedará ajustada
y activada.
• Si no se pulsa ninguna tecla durante 30 segundos, el reloj volverá a indicar la alarma 1.
PARA AJUSTAR LA ALARMA 2
Pulse y mantenga pulsada durante 3 segundos la tecla AJUSTAR :
• El dígito de las horas de la alarma 2 parpadea, pulse a continuación la
tecla o la tecla para ajustar las horas que desee.
• Pulse la tecla AJUSTAR , el dígito de los minutos de la alarma 2 parpadea,
pulse a continuación la tecla o la tecla para ajustar los minutos que desee.
• Pulse la tecla AJUSTAR para visualizar el periodo actual de repetición
de alarma, el campo de los minutos parpadea.
• Pulse la tecla o la tecla para ajustar el periodo de repetición de
alarma que desee entre 1 y 59 minutos.
• Pulse la tecla AJUSTAR y la hora de la alarma 2 quedará ajustada y
activada.
• Si no se pulsa ninguna tecla durante 30 segundos, el reloj volverá a la
visualización de la hora de la alarma 2.
UTILIZAR LA ALARMA Y LA REPETICIÓN DE ALARMA PARA LA ALARMA DIARIA 1 ó ALARMA 2
• Pulse la tecla AJUSTAR / AJUSTAR para activar la alarma 1, para desactivar la alarma 1
y activar la alarma 2, o para desactivar la alarma 2.
• Cuando llega la hora de la alarma ajustada, la alarma correspondiente suena.
• Pulse la tecla AJUSTAR / AJUSTAR cuando la alarma esté sonando y ésta se desactivará
durante las próximas 24 horas.
• Cuando la alarma esté activada, pulse la tecla LIGHT • SNOOZE y la alarma dejará de sonar,
pero sonará de nuevo cuando haya transcurrido el tiempo para la repetición de alarma (la
programación por defecto del tiempo de repetición de alarma es de 4 minutos).
• El indicador de repetición de alarma parpadea.
• La alarma dejará de sonar transcurridos 4 minutos si la tecla AJUSTAR / AJUSTAR
o LIGHT • SNOOZE no se pulsa.

21
RECEPCIÓN DE LA SEÑAL DE CONTROL DE RADIO
EL reloj controlado por señal de radio recibe automáticamente la señal de radio cada hora. Se
tarda entre 3 y 5 minutos en recibir la señal de radio. Si la señal DCF se ha recibido, la torre DCF
estará visible en la pantalla, de otro modo, este símbolo no se visualiza.
LUZ DE FONDO
Pulse la tecla LIGHT • SNOOZE para encender el reloj durante 3 segundos.
DETECCIÓN DE NIVEL DE CARGA BAJO DE LAS BATERÍAS
Si la capacidad de las baterías baja a un nivel insuciente para que el reloj funcione, el indica-
dor de carga baja de las baterías se enciende. En este caso, se deben cambiar las baterías lo
antes posible.
Atención: Deseche las baterías gastadas de forma ecológicamente segura.
Cambio de la pila:
Utilice sólo el tipo de pila autorizado para este aparato y observe la correcta polaridad al
cambiar las pilas.

22
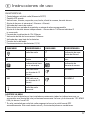
EIGENSCHAPPEN:
* radiogestuurd tijdsignaal (uit Duitsland, DCF77)
* groot LCD-scherm
* toont uren, minuten, seconden, maand, datum, dag van de week, alarm-/wektijd
* mogelijkheid om de locale tijd in te stellen tijdens verblijf in het buitenland (-9 uur tot +9 uur)
* indicatie zomertijd
* duale alarm-/wektijdfunctie met instelbare snooze-periode
* afzonderlijke alarm-/wektijdinstelling – geleidelijk toenemend in geluidssterkte dagelijks
alarm 1 en éénmalig alarm 2
* keuze uit tijdweergave in 12h- of 24h-formaat
* indicatie dag van de week in vijf talen
* indicatie voor zwakke batterijen
* achtergrondverlichting inschakelbaar
* voeding: twee 1,5 V batterijen
SYMBOOL BETEKENIS SYMBOOL BETEKENIS
RADIOSIGNAAL Zz SNOOZE-FUNCTIE
DDATUM MMAAND
LOCALE TIJD
BUITENLAND
ZOMERTIJD
PM NM (ALLEEN
12H-FORMAAT)
ALARM-/
WEKTIJD 1
AM VM (ALLEEN
12H-FORMAAT)
ALARM-/
WEKTIJD 2
ZWAK RADIOSI-
GNAAL
INSTELLEN VAN DE TIJD
* Zodra de batterijen correct zijn geplaatst zullen aan de voorzijde van de klok het display en de
symbolen kort oplichten. De tijd en de datum worden als volgt weergegeven: 1 D1 M WE 0:00
en de alarm-/wektijd toont 7:00.
* De radiograsch gestuurde klok begint automatisch het DCF77-tijdsignaal te zoeken. Onder
gunstige omstandigheden kan dit drie tot vijf minuten duren. Indien na vijf minuten nog geen
DCF77-tijdsignaal wordt ontvangen dient met behulp van de MODE-toets de tijd handmatig te
worden ingesteld.
o Gebruiksaanwijzing

23
De klok zal vervolgens automatisch dagelijks ieder uur proberen het DCF77-tijdsignaal te
ontvangen. Zodra het DCF77-tijdsignaal is ontvangen, wordt de handmatig ingestelde tijd
eventueel geactualiseerd.
TOETSFUNCTIES
De radiograsch gestuurde klok beschikt over zes toetsen waarmee de klok eenvoudig kan
worden bediend en ingesteld.
MODE-TOETS (SELECTEREN)
• alarm-/wektijd 1 en 2 bekijken
• tijd handmatig instellen
• locale tijd in het buitenland handmatig instellen
• de waarde van het uur, de minuten, het jaar, de maand en de datum tijdens het
instellen van de tijd verhogen
• omschakelen tussen de tijdweergave in 12h- en 24h-formaat
• omschakelen tussen de locale (ingestelde) tijd en de tijd in het buitenland
• de waarde van het uur, de minuten, het jaar, de maand en de datum tijdens het
instellen van de tijd verlagen
• de taal waarin de dagen van de week worden weergegeven selecteren
SET (INSTELLINGEN)
• instellen van de dagelijkse alarm-/wektijd 1
• de dagelijkse alarm-/wektijd 1 in- of uitschakelen
SET (INSTELLINGEN)
• instellen van de dagelijkse alarm-/wektijd 2
• de dagelijkse alarm-/wektijd 2 in- of uitschakelen
SNOOZE • LIGHT (SNOOZE • VERLICHTING)
• achtergrondverlichting inschakelen
• snooze-functie inschakelen zodra het alarm afgaat
DE TIJD EN DATUM HANDMATIG INSTELLEN
Druk gedurende drie seconden op de MODE-toets:
• De uren-karakters beginnen te knipperen. Druk vervolgens op
de -toets of de -toets om het juiste aantal uren in te stellen.

24
Druk op de MODE-toets:
• De minuten-karakters beginnen te knipperen. Druk vervolgens op
de -toets of de -toets om het juiste aantal minuten in te stellen.
Druk op de MODE-toets:
• De jaren-karakters beginnen te knipperen. Druk vervolgens op
de -toets of de -toets om het juiste jaartal in te stellen.
Druk op de MODE-toets:
• De maand-karakters beginnen te knipperen. Druk vervolgens op
de -toets of de -toets om de juiste maand in te stellen.
Druk op de MODE-toets:
• De datum-karakters beginnen te knipperen. Druk vervolgens op
de -toets of de -toets om de juiste datum in te stellen.
Druk op de MODE-toets en de tijd is nu ingesteld. Als er gedurende 30 seconden geen toets
wordt ingedrukt, schakelt de klok om naar de normale tijdweergave.
DE TAAL WAARIN DE DAG VAN DE WEEK WORDT WEERGEGEVEN INSTELLEN
• Druk in de normale modus gedurende drie seconden op de -toets.
• De taalselectie voor de weergave van de dagen van de week wordt op het display
weergegeven: bijv. Engels (EN), Duits (GE), Italiaans (IT), Frans (FR), Spaans (SP).
• Druk bij herhaling op de -toets om de juiste taal voor de weergave van de dagen van de
week in te stellen.
DE TIJD IN HET BUITENLAND INSTELLEN
• Druk in de normale modus gedurende drie seconden op de -toets. De klok schakelt om naar
de tijdweergave “buitenland” en het “F”-symbool licht op.
• Druk in de buitenland-modus gedurende drie seconden op de -toets. De klok schakelt om
naar de normale, locale, tijdweergave en het “F”-symbool gaat uit.
• Druk in de buitenland-modus gedurende drie seconden op de MODE-toets. De uren-karakters
beginnen te knipperen en de tijd in het buitenland kan nu ingesteld worden.
• Druk bij herhaling op de -toets of de -toetsom het juiste aantal uren voor de betreffende
tijdzone in te stellen.
• Druk op de MODE-toets en de tijd in het buitenland is nu ingesteld.
• Als er gedurende 30 seconden geen toets wordt ingedrukt, schakelt de klok om naar de
tijdweergave “buitenland”.

25
DAGELIJKSE ALARM-/WEKTIJD 1 INSTELLEN
Druk gedurende drie seconden op de SET-toets:
• De alarm-/wektijd 1 uren-karakters beginnen te knipperen. Druk
vervolgens bij herhaling op de -toets of de -toets om het gewenste
aantal uren in te stellen.
• Druk op de SET-toets. De alarm-/wektijd 1 minuten-karakters beginnen te knipperen.
Druk vervolgens op de -toets of de -toets om het gewenste aantal minuten in te stellen.
• Druk op de SET-toets om de actuele duur van de snooze-periode
te laten tonen. De minuten-karakters knipperen.
• Druk vervolgens bij herhaling op de -toets of de -toets om de
gewenste duur van de snooze- periode van 1 tot 59 minuten in te stellen.
• Druk op de SET-toets en de alarm-/wektijd 1 is nu ingesteld en ingeschakeld.
• Als er gedurende 30 seconden geen toets wordt ingedrukt, zal de klok
de alarm/-wektijd 1 weergeven.
ALARM-/WEKTIJD 2 INSTELLEN
• Druk gedurende drie seconden op de SET-toets:
• De alarm-/wektijd 2 uren-karakters beginnen te knipperen. Druk vervolgens
op de -toets of de -toets om het gewenste aantal uren in te stellen.
• Druk op de SET-toets. De alarm-/wektijd 2 minuten-karakters beginnen te knipperen.
Druk vervolgens bij herhaling op de -toets of de -toets om het gewenste aantal minuten
in te stellen.
• Druk op de SET-toets om de actuele duur van de snooze-periode te
laten tonen. De minuten-karakters knipperen.
• Druk vervolgens op de -toets of de -toets om de gewenste duur van de
snooze-periode van 1 tot 59 minuten in te stellen.
• Druk op de SET-toets en de alarm-/wektijd 2 is nu ingesteld en ingeschakeld.
• Als er gedurende 30 seconden geen toets wordt ingedrukt, zal de klok de
alarm-/wektijd 2 weergeven.
ALARM-/WEKTIJD EN SNOOZE-FUNCTIE VOOR DAGELIJKSE
ALARM-/WEKTIJD 1 of 2 GEBRUIKEN
• Druk op de SET/ SET-toets om de alarm-/wektijd 1 in te schakelen, de alarm-/wektijd 1 uit
te schakelen en de alarm-/wektijd 2 in te schakelen of de alarm-/wektijd 2 uit te schakelen.
• Zodra de actuele tijd de ingestelde alarm-/wektijd bereikt, wordt de desbetreffende
alarmfunctie geactiveerd.

26
• Druk op de SET/ SET-toets zodra het alarmsignaal klinkt. Hiermee wordt de
alarm-/wektijdfunctie gedurende 24 uur uitgeschakeld.
• Druk op de SNOOZE • LIGHT-toets zodra het alarmsignaal klinkt. Hiermee wordt de snooze-
functie geactiveerd. Het alarmsignaal klinkt weer na vier minuten (standaardinstelling snooze-
periode).
• Het snooze-symbool (alarm herhalen) begint te knipperen.
• Het alarmsignaal stopt na vier minuten indien de SET/ SET-toets of
SNOOZE • LIGHT- toets niet ingedrukt worden.
ONTVANGEN RADIOGESTUURD TIJDSIGNAAL
De radiograsch gestuurde klok ontvangt ieder uur automatisch het radiosignaal. Onder gunsti-
ge omstandigheden kan dit drie tot vijf minuten duren. Als het DCF77-tijdsignaal wordt ontvangen
verschijnt het zendmast-symbool op het display. Indien er geen ontvangst is, verschijnt er geen
symbool.
ACHTERGRONDVERLICHTING
Druk op de SNOOZE • LIGHT-toets om de achtergrondverlichting van de klok gedurende drie
seconden in te schakelen.
INDICATIE VOOR ZWAKKE BATTERIJEN
Zodra de batterijen de klok onvoldoende van spanning voorzien verschijnt het symbool voor
zwakke batterijen. De batterijen dienen dan zo snel mogelijk vervangen te worden.
Attentie! Gebruikte batterijen in de daarvoor bestemde inzamelbakken
(winkels, supermarkten enz.) deponeren. Zij behoren niet bij het normale huisvuil!
Vervangen van de batterij:
Gebruik alleen batterijtypes die geschikt zijn voor dit toestel en let er bij het plaatsen van de
nieuwe batterijen op dat de polen in de juiste richting liggen.

27
FUNKCJE:
* Zegar
sterowany sygnałem radiowym (sygnał czasowy DCF77)
* Duży
wyświetlacz LCD
* Wyświetlanie
godziny, minut, sekund, miesiąca, daty, dnia tygodnia, czasu budzenia (alarmu)
* Ustawianie
godziny innej strefy czasowej (od -9 godzin do +9 godzin)
* Czas
letni
* Dwie
funkcje alarmowe z programowanym czasem drzemki
* Niezależne
ustawianie czasu budzenia – wzrastający codzienny alarm 1 i pojedynczy alarm 2
* Wybór
wyświetlania czasu w formacie 12-godzinnym lub 24-godzinnym
* Wskazywanie
dnia tygodnia w 5 językach
* Wskaźnik
słabej baterii
* Funkcja
podświetlenia wyświetlacza
* Zasilanie
dwiema bateriami (1,5 V)
WSKAŹNIK ZNACZENIE WSKAŹNIK ZNACZENIE
radiowy sygnał
czasowy
Zz powtórzenie
alarmu
Ddata Mmiesiąc
inna strefa czasowa czas letni
PM czas
popołudniowy
(tylko w formacie
12-godzinnym)
ALARM 1
AM czas
przedpołudniowy
(tylko w formacie
12-godzinnym)
ALARM 2
słaby radiowy
sygnał czasowy
USTAWIANIE CZASU
*
Po prawidłowym włożeniu baterii zapalają się krótko wszystkie wskaźniki z przodu zegara.
Wyświetlana jest godzina i data: 1 D1 M WE 0:00 oraz czas alarmu 1 (budzenia) 7:00.
*
Zegar sterowany sygnałem radiowym automatycznie rozpoczyna szukanie sygnału
czasowego
DCF. W dobrych warunkach odbioru trwa to zazwyczaj 3-5 minut. Jeżeli po 5
minutach
nie zostanie odebrany sygnał czasowy DCF, przyciskiem MODE ustawić czas ręcznie.
q
I
n
strukcja obsługi

28
Co godzinę każdego dnia zegar będzie automatycznie ponawiał próbę odbioru sygnału
czasowego
DCF. Jeżeli operacja ta zakończy się powodzeniem, odebrany sygnał czasowy
zastąpi czas ustawiony ręcznie.
PRZYCISKI FUNKCYJNE
Zegar
sterowany sygnałem radiowym posiada 6 łatwych w obsłudze przycisków sterujących:
MODE (TRYB)
• Wyświetlanie
czasu alarmu 1 lub 2
• Ręczne
ustawianie czasu
• Ręczne
ustawianie godziny innej strefy czasowej
• Zwiększanie wskaźnika godziny, minut, roku, miesiąca i daty podczas ustawiania czasu
• Przełączanie
między wyświetlaniem czasu w formacie 12-godzinnym i 24-godzinnym
• Przełączaniem
między czasem lokalnym a czasem innej strefy czasowej
• Zmniejszanie wskaźnika godziny, minut, roku, miesiąca i daty podczas ustawiania czasu
• Wybór
języka wskaźnika dnia tygodnia
SET (USTAWIANIE)
• Ustawianie
codziennego alarmu 1 (czasu budzenia)
• Włączanie
lub wyłączanie codziennego alarmu 1
SET (USTAWIANIE)
• Ustawianie
codziennego alarmu 2 (czasu budzenia)
• Włączanie
lub wyłączanie codziennego alarmu 2
SNOOZE • LIGHT (DRZEMKA • PODŚWIETLENIE)
• Włączanie
podświetlenia wyświetlacza
• Przełączanie
na funkcję drzemki, gdy rozlegnie się alarm
RĘCZNE USTAWIANIE GODZINY I DATY
Nacisnąć
i trzymać wciśnięty przycisk MODE przez 3 sekundy:
• Gdy
zacznie migać wskaźnik godziny, przyciskiem
lub ustawić
godzinę.
• Nacisnąć
przycisk MODE:
Gdy zacznie migać wskaźnik minut, przyciskiem lub ustawić
minuty.

29
Nacisnąć przycisk MODE:
• Gdy
zacznie migać wskaźnik roku, przyciskiem lub ustawić
rok.
Nacisnąć
przycisk MODE:
• Gdy
zacznie migać wskaźnik miesiąca, przyciskiem lub ustawić
miesiąc.
Nacisnąć
przycisk MODE:
• Gdy
zacznie migać wskaźnik daty, przyciskiem lub ustawić datę.
Nacisnąć
ponownie przycisk MODE, aby potwierdzić ustawiony czas. Jeżeli w ciągu 30 sekund
nie zostanie naciśnięty żaden przycisk, zegar powróci do wyświetlania lokalnego czasu.
USTAWIANIE JĘZYKA WSKAŹNIKA DNIA TYGODNIA
• Gdy
wyświetlany jest czas lokalny, nacisnąć i trzymać wciśnięty przycisk przez
3 sekundy.
• Na
wyświetlaczu LCD pojawia się kod języka wskaźnika dnia tygodnia:
np. angielski (EN), niemiecki (GE), włoski (IT), francuski (FR), hiszpański (SP).
• Nacisnąć
przez 1 sekundę przycisk ,
aby wybrać żądany język wskaźnika dnia tygodnia.
USTAWIANIE GODZINY INNEJ STREFY CZASOWEJ
• Gdy
wyświetlany jest czas lokalny, nacisnąć i trzymać wciśnięty przycisk przez 3 sekundy.
Zegar przełączy się na godzinę innej strefy czasowej (litera “F” świeci się).
• Nacisnąć
przycisk przez
3 sekundy, gdy wyświetlana jest inna strefa czasowa, aby
przełączyć na czas lokalny (litera “F” jest zgaszona).
• Gdy
wyświetlana jest inna strefa czasowa, nacisnąć przycisk MODE przez 3 sekundy, aby
ustawić godzinę innej strefy czasowej (miga wskaźnik godzin).
• Przyciskiem lub ustawić
godzinę innej strefy czasowej.
• Nacisnąć
ponownie przycisk MODE, aby potwierdzić ustawioną godzinę innej strefy czasowej.
• Jeżeli
w ciągu 30 sekund nie zostanie naciśnięty żaden przycisk, zegar powróci do
wyświetlania
godziny innej strefy czasowej.
USTAWIANIE CODZIENNEGO ALARMU 1 (CZASU BUDZENIA)
Nacisnąć
i trzymać wciśnięty przycisk SET przez 3 sekundy:
• Gdy
zacznie migać wskaźnik godziny alarmu 1,
przyciskiem lub ustawić godzinę.
• Nacisnąć przycisk SET ; gdy zacznie migać wskaźnik minut alarmu 1,
przyciskiem lub ustawić minuty.

30
• Nacisnąć przycisk SET, aby wyświetlić aktualny czas drzemki
z migającym wskaźnikiem minut.
• Przyciskiem lub ustawić
żądany czas drzemki
od 1 minuty do 59 minut.
• Nacisnąć
ponownie przycisk SET, aby potwierdzić i uaktywnić ustawiony
czas
budzenia 1.
• Jeżeli
w ciągu 30 sekund nie zostanie naciśnięty żaden przycisk, zegar powróci do
do
wyświetlania alarmu l.
USTAWIANIE CODZIENNEGO ALARMU 2 (CZASU BUDZENIA)
• Nacisnąć
i trzymać wciśnięty przycisk SET przez 3 sekundy:
• Gdy
zacznie migać wskaźnik godziny alarmu 2, przyciskiem
lub ustawić
żądaną godzinę.
• Nacisnąć
przycisk SET; gdy zacznie migać wskaźnik minut alarmu 2,
przyciskiem lub ustawić minuty.
• Nacisnąć
przycisk SET, aby wyświetlić aktualny czas drzemki
z migającym wskaźnikiem minut.
• Przyciskiem lub ustawić
żądany czas drzemki od 1 minuty do 59 minut.
• Nacisnąć
ponownie przycisk SET, aby potwierdzić i uaktywnić
ustawiony czas budzenia 2.
• Jeżeli
w ciągu 30 sekund nie zostanie naciśnięty żaden przycisk, zegar
powróci do wyświetlania alarmu 2.
CODZIENNE STOSOWANIE FUNKCJI BUDZENIA I DRZEMKI
ALARM 1 lub ALARM 2
• Nacisnąć
przycisk SET/ SET, aby włączyć / wyłączyć alarm 1 lub alarm 2.
• O
ustawionej i uaktywnionej godzinie budzenia włącza się odpowiedni alarm.
• Naciśnięcie
przycisku SET/ SET,, gdy rozlegnie się budzik, wyłącza funkcję budzenia na
24
godziny.
• Gdy
rozlegnie się budzik, nacisnąć przycisk SNOOZE • LIGHT, aby wyłączyć sygnał na czas
drzemki (4-minutowy czas drzemki jest zaprogramowany fabrycznie).
• Miga
wskaźnik powtórzenia alarmu.
• Alarm
wyłączy się po 4 minutach, jeżeli nie zostanie naciśnięty przycisk SET/ SET
lub przycisk SNOOZE • LIGHT.
ODBIÓR RADIOWEGO SYGNAŁU CZASOWEGO
Zegar
sterowany sygnałem radiowym co godzinę odbiera automatycznie sygnał czasowy.
Odbiór radiowego sygnału czasowego trwa około 3-5 minut. Po odbiorze sygnału DCF na
wyświetlaczu pojawia się wieża DCF, w przeciwnym razie nie jest ona widoczna.

31
FUNKCJA PODŚWIETLENIA
Nacisnąć
przycisk SNOOZE • LIGHT, aby podświetlić zegar przez 3 sekundy.
WSKAŹNIK SŁABEJ BATERII
Jeżeli
wydajność baterii spadnie do poziomu uniemożliwiającego zasilanie zegara, świeci się
wskaźnik słabej baterii. Należy wtedy jak najszybciej wymienić baterię.
Uwaga! Prosimy
usuwać zużyte baterie w bezpieczny sposób zgodnie z przepisami ekologii.
Wymiana baterii:
Używać
tylko typu baterii dopuszczonego do tego urządzenia i podczas wkładania nowych
baterii zwrócić uwagę na prawidłową biegunowość.

32
d
Deutsch
[German]
Hiermit erklärt Hama GmbH & Co. KG, dass sich dieses Gerät in Übereinstimmung mit
den grundlegenden Anforderungen und den übrigen einschlägigen Bestimmungen der
Richtlinie 1999/5/EG bendet. Die Konformitätserklärung nach der R&TTE Richtlinie
99/5/EG nden Sie unter www.hama.com
g
English
Hama GmbH & Co. KG hereby declares that this device is in compliance with the basic
requirements and other relevant regulations of the 1999/5/EC guideline. You will nd
the declaration of conformity with R&TTE directive 99/5/EC on the internet at www.
hama.com
f
Français
[French]
La société Hama GmbH & Co. KG certie que cet appareil est conforme aux exigences
de base et aux dispositions de la directive 1999/5/ en vigueur. Vous trouverez la décla-
ration de conformité à la directive R&TTE 99/5/CE sur www.hama.de.
e
Español
[Spanish]
Mediante la presente, Hama GmbH &Co. KG declara que este aparato cumple con los
requisitos básicos y los demás reglamentos relevantes de la directiva 1999/5/CE. La
declaración de conformidad según la directiva R&TTE 99/5/CE la encontrará en www.
hama.com
i
Italiano
[Italian]
Hama GmbH & Co. KG dichiara che questo apparecchio soddisfa i requisiti fonda-
mentali ed è conforme alle norme vigenti della direttiva 1999/5/CE. La dichiarazione di
conformità secondo la direttiva R&TTE 99/5/CE è disponibile sul sito www.hama.com
p
Português
[Portuguese]
A Hama GmbH & Co. KG declara, deste modo, que este aparelho respeita as exigênci-
as básicas e restantes requisitos relevantes da directiva 1999/5/CE. Pode consultar a
declaração de conformidade, segundo a directiva R&TTE 99/5/CE, em www.hama.com
u
Россия
[Russian]
Компания Hama GmbH & Co. KG настоящим подтверждает, что данное изделие
полностью соответствует основным требованиям, а также предписаниям и
положениям нормативов 1999/5/EG. Заявление о соответствии товара нормам
R&TTE 99/5/EG см. на вебузле www.hama.com
o
Nederlands
[Dutch]
Hiermee verklaart Hama GmbH & Co. KG, dat dit apparaat voldoet aan de vereisten
en de overige relevante voorschriften van de richtlijn 1999/5/EG. De verklaring van
overeenstemming conform de R&TTE-richtlijn 99/5/EG vindt u op internet onder
www.hama.com
q
Polski
[Polish]
Hama GmbH & Co. KG oświadcza niniejszym, że urządzenie to spełnia podstawowe
wymagania i pozostałe właściwe postanowienia dyrektywy 1999/5/WE. Deklaracja
zgodności wg dyrektywy 99/5WE dotyczącej urządzeń radiowych i telekomunikacyjny-
ch dostępna jest na stronie www.hama.com
h
Magyar
[Hungarian]
A Hama GmbH & Co. KG ezúton kijelenti, hogy a jelen készülék összhangban van az
1999/5/EK irányelv alapvető követelményeivel és az egyéb vonatkozó rendelkezésekkel.
A 99/5/EK R&TTE irányelv szerinti megfelelőségi nyilatkozatot a www.hama.com
címen találja meg.
k
Ελληνική
[Greek]
Η εταιρία Hama GmbH & Co. KG δηλώνει πως η συσκευή αυτή εκπληρώνει τις βασικές
απαιτήσεις και τις λοιπές σχετικές διατάξεις της οδηγίας 1999/5/EG Τη δήλωση
συμμόρφωσης σύμφωνα με την οδηγία R&TTE 99/5/ΕΚ θα τη βρείτε στη διεύθυνση
www.hama.de.

33
c
Česky
[Czech]
Tímto
rma Hama GmbH & Co. KG potvrzuje, že tento přístroj odpovídá základním
požadavkům a ostatním relevantním předpisům směrnice 1999/5/ES. Prohlášení o
shodě podle směrnice R&TTE 99/5/ES najdete na internetových stránkách
www.hama.com
v
Slovensky
[Slovak]
Spoločnosť
Hama GmbH & Co. KG týmto prehlasuje, že tento prístroj zodpovedá
základným požiadavkám a ostatným relevantným ustanoveniam Smernice 1999/5/
ES. Vyhlásenie o zhode podľa smernice R&TTE 99/5/ES si môžete pozrieť na adrese
www.hama.com.
t
Türkiye
[Turkish]
Hama
GmbH & Co. KG bu cihazın 1999/5/EC Direkti’nin ilgili talimatlarına ve bu
direktif tarafından istenen koşullara uygunluğunu beyan eder. R&TTE Direkti 99/5/
EC’ye göre uygunluk beyanı için www.hama.com adresine bakınız.
s
Svenska
[Swedish]
Hama
GmbH & Co. KG försäkrar härmed att den här apparaten överensstämmer med
de grundläggande kraven och övriga relevanta bestämmelser i direktivet 1999/5/EG.
Försäkran om överensstämmelse enligt R&TTE-direktivet 99/5/EG hittar du på
www.hama.de
m
Suomi
[Finnish]
Hama GmbH & Co. KG vakuuttaa täten, että tämä laite on direktiivin 1999/5/EY perus-
vaatimusten ja muiden oleellisten säännösten mukainen. Radio- ja telepäätelaitteita
koskevan direktiivin 99/5/EY mukainen vaatimustenmukaisuusvakuutus löytyy
osoitteesta www.hama.com
r
România
[Romanian]
Hama GmbH & Co. KG, declară prin prezenta ca acest aparat este în conformitate cu
cerinţele esenţiale şi celelalte hotărâri relevante ale Directivei 1999/5/EC. Declaraţia de
conformitate conform Directivei R&TTE 99/5/EC o găsiţi în Internet la www.hama.com
j
Danmark
[Danish]
Hama GmbH & Co. KG erklærer hermed, at dette apparat er i overensstemmelse med de
grundlæggende krav og de øvrige, relevante bestemmelser i direktiv 1999/5/EF.
Overensstemmelseserklæringen i henhold til direktivet om radio og teleterminaludstyr
99/5/EF kan du nde på www.hama.com
n
Norge
[Norwegian]
Med dette erklærer Hama GmbH & Co. KG at dette apparatet er i overensstemmelse med
grunnleggende krav og relevante bestemmelser i direktiv 1999/5/EF. Du nner
samsvarserklæringen i henhold til R&TTE-direktiv 99/5/EF under www.hama.com
-
 1
1
-
 2
2
-
 3
3
-
 4
4
-
 5
5
-
 6
6
-
 7
7
-
 8
8
-
 9
9
-
 10
10
-
 11
11
-
 12
12
-
 13
13
-
 14
14
-
 15
15
-
 16
16
-
 17
17
-
 18
18
-
 19
19
-
 20
20
-
 21
21
-
 22
22
-
 23
23
-
 24
24
-
 25
25
-
 26
26
-
 27
27
-
 28
28
-
 29
29
-
 30
30
-
 31
31
-
 32
32
-
 33
33
-
 34
34


Hama 00104951 de handleiding
- Categorie
- Wekkers
- Type
- de handleiding
- Deze handleiding is ook geschikt voor
in andere talen
- italiano: Hama 00104951 Manuale del proprietario
- français: Hama 00104951 Le manuel du propriétaire
- español: Hama 00104951 El manual del propietario
- Deutsch: Hama 00104951 Bedienungsanleitung
- polski: Hama 00104951 Instrukcja obsługi