
User Manual /
Gebruikshandleiding
Dash Camera

- 02 -
LEES DIT DOOR.....
ERG BELANGRIJK
1. Laad de dashcam tenminste 2 of 3 uur op vóór gebruik om er zeker van
te zijn dat instellingen worden opgeslagen.
2. We zullen accessoires gratis vervangen indien ze binnen één jaar defect
zijn of missen. Neem in dit geval contact op met onze klantenservice.
3. Er wordt een gratis verlengkabel geleverd als uw voertuig een lange
wielbasis heeft.
4. Als u de camera via een USB-verbinding aansluit op de USB-poort in uw
auto, kan het scherm 'Mass storage' weergeven en moet u de originele
autolader van de camera aansluiten. U kunt ook een speciale lange
USB-kabel aanschaffen voor stroomvoorziening. USB Data De kabel die wij
leveren is alleen voor het lezen van data. De USB-kabel levert geen
constante stroom, wat ertoe kan leiden dat de camera aan de achterkant
niet correct wordt weergegeven.
5. Schakel de functie 'Bewegingsdetectie' uit om ononderbroken
video-opnames tijdens het rijden te garanderen.
6. Stel de gevoeligheid van de G-sensor in op Laag of schakel deze uit;
anders wordt het videobestand gemakkelijk bevroren wanneer uw auto
remt, zelfs als de loop-opnamefunctie van de dashcam is ingeschakeld.
Formatteer de geheugenkaart ten minste eenmaal per maand voor
productstabiliteit.
7. Geheugenkaarten hebben over het algemeen een beperkte
levensduur. Langdurig gebruik kan ertoe leiden dat gegevens niet kunnen
worden opgeslagen. Het is aan te raden in dit geval een nieuwe
geheugenkaart aan te schaffen. Het bedrijf is niet verantwoordelijk voor
gegevensverlies als gevolg van langdurig gebruik. Wanneer ons product
een geheugenkaart bevat, zit hier een garantie op van 6 maanden. We
kunnen de kaart vervangen indien er sprake is van een defect.
8. Vergeet niet de videovergrendelingsfunctie te activeren. Als u een video
heeft die onmiddellijk moet worden opgeslagen, kunt u deze in de
afspeelmodus vinden en vergrendelen om te voorkomen dat deze wordt
overschreven.
9. Als u het scherm wilt uitschakelen maar de dashcam-opname wilt
behouden, selecteert u eenvoudig 'screen save' in de instellingen; de
dashcam blijft normaal filmen.

- 03 -
LEES DIT DOOR.....
ERG BELANGRIJK
10. De omgevingstemperatuur voor de normale werking van dit apparaat
ligt tussen -10°C en 60°C. Als dit temperatuurbereik wordt overschreden,
kan het product defect raken.
11. Als u 24-uurs bewaking nodig heeft, moet u de Hardwire Kit
aanschaffen (NIET INBEGREPEN). Als u de ononderbroken
stroomvoorziening zonder toestemming aansluit, kan dit leiden tot
storingen in het voertuig of het product. Raadpleeg een expert voor
installatieproblemen.
12. Waarom komt de zuignap los na langdurig gebruik? Door langdurig
gebruik is de zuignap verslechterd door de voortdurende blootstelling
aan extreme temperatuurschommelingen, wat resulteert in een afname
van het interne en externe drukverschil.
13. Als u de sigarettenaansteker van uw auto altijd aan laat, blijft hij
aangesloten op de stroombron nadat de auto is uitgeschakeld en moet u
deze handmatig uitschakelen.
14. Zorg ervoor dat de geheugenkaart correct is geïnstalleerd; anders zal
het eruit vallen of de kaartsleuf beschadigen.
15. Als u de video op uw computer wilt bekijken en de speler werkt niet
goed, gebruik dan een andere speler. (VLC-mediaspeler, Pot-speler of
KM-speler zijn allemaal voorbeelden).
16. Zorg ervoor dat de stroom is uitgeschakeld voordat u de
geheugenkaart plaatst of verwijdert.
17. Als dit product rechtstreeks is aangesloten op het
stroomtoevoersysteem van het voertuig, gebruik het dan niet voor een
langere periode zonder dat de motor draait, omdat hierdoor de batterij
vermogen verliest.
18. Stel dit apparaat niet bloot aan overmatige schokken of trillingen om
beschadiging en defecten te voorkomen.
19. Installeer of bedien dit product nooit terwijl u een voertuig bestuurt.
Gebruik alleen voor zover toegestaan door de wet.
Als u geen merk of originele klasse 10 Speed Micro-SD kaart gebruikt,
of als hij groter is dan 32GB capaciteit, zal de camera een bericht weer-
geven met de tekst: 'insert C6 and above the card'

- 04 -
LEES DIT DOOR.....
ERG BELANGRIJK
WAT MOET U DOEN ALS U EEN GEHEUGENKAART-GERELATEERDe
FOUTMELDING KRIJGT?
1. Zorg ervoor dat u de vereiste snelheid van KLASSE 10 en een
geheugenkaart van 32 GB of kleiner gebruikt ( Zo JA, dan ...) Ondersteunt
GEEN microSD-kaarten met een capaciteit van 64 GB, 128 GB of 256 GB.
2. Formatteer de geheugenkaart in de camera door naar de
systeeminstellingen van de camera te gaan.
3. Start de camera opnieuw op en probeer het opnieuw na het
formatteren van de kaart als FAT32 64KB op de pc. U kunt ook proberen de
kaart te plaatsen voordat u de dashcam inschakelt; als de dashcam de
kaart niet detecteert, schakelt u de camera uit en plaatst u de kaart;
schakel vervolgens de dashcam aan.
4. Als de geheugenkaartgerelateerde fout zich blijft voordoen, is de
geheugenkaart defect of NIET origineel. Koop een vervangende
geheugenkaart bij een elektronicawinkel in de buurt, zoals Best Buy,
Stapies of Office Depot. Dit om ervoor te zorgen dat u een geheugenkaart
ontvangt die 100% echt is en wordt aanbevolen."
VALSE GEHEUGENKAART ALERT:
Koop geen geheugenkaarten van eBay of andere externe dealers online;
je zult vrijwel zeker eindigen met een NEP-geheugenkaart. Valse
geheugenkaarten en hun verpakking lijken identiek aan echte; de
snelheid en prestaties van de geheugenkaart zijn echter anders. Het is
gewoon een klasse 4 aansluiting, wat onvoldoende is voor deze 1080P
videocamera.
V: Waarom zegt mijn dashcam 'sd-kaart is vol'?
A: 1. Ondersteunt GEEN microSD-kaarten met 64 GB, 128 GB of 256 GB. Het
is beperkt tot 32 GB aan opslagruimte. Als deze geheugenkaarten worden
gebruikt, wordt de mogelijkheid voor loop-opname uitgeschakeld.
2. Zet de gevoeligheid van de G-sensor op Laag of schakel deze helemaal
uit; het videobestand wordt gemakkelijk bevroren wanneer uw auto remt,
zelfs als de loop-opnamefunctie van de dashcam is ingeschakeld.
3. Als u de G-sensor en parkeermodus inschakelt, zullen te veel
vergrendelde bestanden ertoe leiden dat de kaart vol raakt. Schakel
eenvoudig de G-sensor, bewegingsdetectie en parkeermodus uit.
4. Nadat de benodigde video op de computer is uitgepakt, formatteert u
de geheugenkaart. Wanneer de geheugenkaart na het formatteren weer
in de dashcam wordt geplaatst, zou de melding ""geheugenkaart is vol""
moeten verschijnen. De geheugenkaart zou beschadigd moeten zijn.
5. Als u een gloednieuwe geheugenkaart gebruikt, verschijnt na een korte
opnameperiode een melding dat de geheugenkaart vol is. Aan de
andere kant kan dit type geheugenkaart zijn bijgewerkt, waardoor de
mogelijkheid voor lusopname onbruikbaar is geworden.

- 05 -
LEES DIT DOOR.....
ERG BELANGRIJK
V: Hoe lang kan de dashcam Loop de video opnemen?
A: De camera neemt continu op en overschrijft en bewaart de meest
recente video. Een geheugen van 16 GB met de hoogste resolutie kan
bijvoorbeeld de laatste 1,5-1,75 uur aan enkele camerabeelden aan de
voorkant opslaan. Ter vergelijking: een geheugen van 32 GB met de
hoogste resolutie kan de nieuwste 3,0 ~ 3,5 uur aan video met één camera
aan de voorkant bevatten. Een geheugenkaart van 16 GB van de hoogste
kwaliteit kan bijvoorbeeld de meest recente 1,25 tot 1,5 uur aan voor- en
nacamerabeelden opslaan, terwijl de geheugenkaart van 32 GB de meest
recente 2,5 tot 3,0 uur aan voor- en na-cameravideo kan bevatten.
Opmerking: er worden geen video's van alle reizen opgeslagen."
V: Waarom wordt mijn dashcam willekeurig uitgeschakeld?
A: De eerste verklaring kan zijn dat de stroomaansluiting niet stabiel is; een
goed aangesloten voeding is voldoende.
Een andere verklaring is dat de kaart vol is; wanneer de kaart vol is, heeft
de camera niet genoeg ruimte om nieuwe bestanden op te slaan en
wordt hij uitgeschakeld om u eraan te herinneren de kaart te formatteren.
We raden u aan uw kaart regelmatig te formatteren om de levensduur te
verlengen.
V:Dashcam blijft aan en uit tijdens het rijden, wat is er gebeurd?
A: Het is mogelijk dat de stroomaansluiting niet stabiel is; zorg ervoor dat de
autolader voor de sigarettenaansteker van het netsnoer stevig is
aangesloten op de sigarettenaanstekeraansluiting van de auto en dat er
continu stroom wordt geleverd. Als u correct hebt aangesloten maar u dit
probleem nog steeds heeft, is het netsnoer voor de auto-oplader
waarschijnlijk defect. Neem contact met ons op, dan sturen we je een
vervangende oplader.
V: Waarom kan de camera niet worden ingeschakeld?
A:1) Bepaal om te beginnen of de machine beschadigd is. Verwijder eerst
de geheugenkaart en sluit vervolgens een oplader met een USB-interface
(zoals een oplader voor een mobiele telefoon) via een USB-kabel aan om
te controleren of de camera is ingeschakeld. Als het niet kan worden
ingeschakeld, steek dan een naald langer dan drie seconden in het
reset-gaatje en druk vervolgens op de aan/uit-knop. Als de machine kan
worden ingeschakeld, is deze niet beschadigd. Plaats de geheugenkaart
opnieuw en formatteer deze om te bepalen of deze normaal kan
opnemen. Als de apparatuur niet meer reageert, is deze waarschijnlijk
beschadigd; neem dan contact met ons op voor een vervanging.

- 06 -
LEES DIT DOOR.....
ERG BELANGRIJK
2) Ten tweede: na het voltooien van de eerste fase van de test, als de
machine in goede staat verkeert, gaat u verder met de laadtest voor
auto's. Sluit de autolader aan op de sigarettenaansteker van het voertuig
en zet vervolgens de dashcam aan. Als de autolader kan worden
ingeschakeld en normaal kan worden opgenomen, is hij niet beschadigd.
Als de autolader echter weer wordt aangesloten en tijdens het rijden
automatisch blijft in- en uitschakelen, is de lader kapot; neem dan contact
met ons op voor een vervanging. Als de autolader niet normaal kan worden
ingeschakeld, is deze beschadigd; neem dan contact met ons op voor een
vervanging.
3) Ten derde, als de oplader van het voertuig niet kapot is, kan de
geheugenkaart ervoor zorgen dat het auto systeem crasht. Als de
geheugenkaart is geformatteerd maar onbruikbaar blijft, vervangt u deze
door een andere geheugenkaart."
V: Waarom wordt mijn dashcam altijd automatisch in- en uitgeschakeld?
A: Deze dashcam heeft een parkeermonitorfunctie, als u de
parkeermodus inschakelt, wordt de dashcam automatisch ingeschakeld
en start hij een spoedopname van 30 seconden en deze wordt vervolgens
uitgeschakeld wanneer de interne G-sensor een schok detecteert. Om dit
probleem op te lossen, raden we u aan de parkeermodus tijdens het rijden
uit te schakelen en in te schakelen terwijl u de auto parkeert. Dan helpt de
parkeermonitor u om uw auto te beschermen nadat uw auto is geparkeerd.
V: Waarom kan de dashcam niet normaal opnemen nadat deze is
ingeschakeld?
A:1) Plaats de juiste geheugenkaart en controleer op schade aan de
geheugenkaart.
2) Als u zowel voor- als achtercamera's aanschaft, moet u controleren of uw
achterdisplay correct werkt. Wanneer de camera aan de voorkant
detecteert dat de camera niet normaal kan weergeven, kan de camera
niet normaal opnemen. (Controleer de oplossing voor de
achteruitrijcamera.) Als het probleem niet kan worden opgelost, koppelt u
de achteruitrijcamera los en neemt u contact met ons op om een
vervanging teregelen.

- 07 -
Hoofdfunctie introductie
HDR (High Dynamic Range): uit/aan. Standaard is hij aan.
Wordt gebruikt om de helderheid van de videoclips aan te passen.
Geschikt voor situaties zoals weinig of tegenlicht.
Loop-opname: de camera neemt cyclisch nieuwe video's op binnen het
door u ingestelde tijdsinterval. Kies uit / één minuut / drie minuten / vijf
minuten. Standaardwaarde: drie minuten
Bewegingsdetectie: aan/uit. Standaardwaarde: uit.
Het begint met opnemen zodra het bewegende onderwerpen binnen 3
meter voor de lens detecteert, anders stopt het met opnemen. Het begint
automatisch met het opnemen van video en stopt met opnemen als er
geen dynamische beweging verschijnt.
Parkeerbewaking: in de parkeermodus bevindt de dashcam zich in de
power-0ff-toestand. De dashcam wordt automatisch ingeschakeld en
neemt op wanneer een trilling wordt gedetecteerd.
G-sensor: uit/ Laag/ Medium/ Hoog. Standaardwaarde: Gemiddeld.
De camera kijkt automatisch naar video die wordt opgenomen zodra hij
trillingen of botsingen detecteert. Vliegen die zijn vergrendeld, worden
niet overschreven/bedekt.
Schermbeveiliging: Uit/30 seconden / één minuut / twee minuten.
Standaardwaarde: Uit Opmerking:Als de camera binnen de ingestelde
tijd niet wordt bediend, wordt het scherm zwart om stroom te besparen.
Maar de camera blijft opnemen.
Over 24-uurs bewaking:
we raden aan om de volgende methoden te gebruiken om 24-uurs
bewaking te bereiken
(moet worden gebruikt met een hardwire-kit)
1. 1. Sluit de rode draad van de hardwire-set aan op BAT+ en schakel de
bewegingsdetectiefunctie in nadat u klaar bent. U kunt ook de
parkeerbewakingsfunctie activeren en vervolgens deactiveren. Het zal
automatisch inschakelen en doorgaan met opnemen wanneer het de
trilling detecteert. Nota bene: Dit soort verbinding zal de accu van de
auto leegtrekken en ervoor zorgen dat deze uitvalt.
2. Sluit de rode lijn van de hardwire-set aan op de ACC en schakel
parkeerbewaking en zwaartekrachtsensorfunctionaliteit in. Nadat het
voertuig is uitgeschakeld, wordt de parkeerbewakingsfunctie
automatisch geactiveerd. Het gaat aan en neemt ongeveer 20
seconden op bij trilling..
3. Sluit de rode lijn van de hardwire-set aan op BAT+ en laat deze 24 uur
ononderbroken opnemen totdat de auto-accu de laagste spanning
bereikt, waarna deze automatisch wordt uitgeschakeld.

- 08 -
Over deze handleiding
De informatie in dit document is uitsluitend bedoeld voor informatieve
doeleinden en kan zonder voorafgaande kennisgeving worden
gewijzigd. We doen er alles aan om de nauwkeurigheid en volledigheid
van deze gebruikershandleiding te verzekeren. Voor dergelijke fouten of
weglatingen wordt echter geen verantwoordelijkheid aanvaard. Zonder
voorafgaande waarschuwing behoudt de fabrikant zich het recht voor
om de technische specificaties te wijzigen.
Inleiding
Bedankt voor uw aankoop van deze Dash Cam. Dit apparaat is speciaal
ontworpen voor realtime video- en audio-opnames tijdens het rijden.
Verpakkingsinhoud
Het pakket bevat voornamelijk de volgende items. (Verschillende
soorten accessoires zijn verschillend, raadpleeg de detailpagina)
Tabel 1. Pakket :
Warme tips:
Breng uw ons onmiddellijk op de hoogte als er items ontbreken of
beschadigd zijn: [email protected]
Auto recorder Zuignap
Autolader Mini USB Kabel

- 09 -
Productoverzicht
1. TF Kaartsleuf 2. UP 3. Menu 4. Down
5. HD Interface 6. Stand base 7. USB Interface 8. OK
9. Modus 10. Vergrendeling 11. Aan/uit 12. Lens
13. Weergavescherm 14. Luidspreker 15. Mic 16. Reset

Standby modus Opnamemdus Fotomodus Afspeelmodus
Weergave aan / uitAan/uitknop Weergave aan / uit Weergave aan / uit Weergave aan / uit
Wijzig modusM-Knop Wijzig modus Wijzig modus / Stop
met afspelen video
/
/
/
/
/
/
/
/Vergrendelknop
Start opnameOK-Knop Neem een foto Speel de video afStart opname
Ga naar menuGa naar menu Ga naar menu Ga naar menu
Omhoog-Knop Laatste / Volume
omhoog
// /Omlaag knop Volgende / Volume
omlaag
Vergrendel /
ontgrendel
de huidige
bestanden
- 10 -
Tabel 2. Knoppen

- 11 -
Plaats de geheugenkaart met de gouden contactpunten naar het
scherm gericht en de geheugenkaart met de letters naar de camer-
alens gericht.
De SD-kaart plaatsen
Duw de geheugenkaart totdat deze op zijn plaats klikt (prik de kaart
diep met een dunne naald of creditcard totdat deze in de kaartsleuf
klikt). Zo niet, dan springt het eruit. Schakel vervolgens de camera in en
formatteer de kaart erop."
De geheugenkaart verwijderen
Duw de rand van de geheugenkaart naar binnen totdat u een klik
hoort/voelt en laat hem vervolgens naar buiten duwen totdat u hem uit
de sleuf kunt verwijderen."
Handige tips:
1. Wanneer het apparaat is ingeschakeld, vermijd het verwijderen of
plaatsen van de geheugenkaart. Dit kan leiden tot schade aan de
geheugenkaart en de dashcam.
2. Het ondersteunt alleen microSD-kaarten met een capaciteit van 4 tot
32 GB en een snelheid van klasse 10 of hoger. Voordat de dashcam
voor het eerst wordt gebruikt, is het aan te raden de micro SD-kaarten
te formatteren. Formatteer daarnaast de micro SD-kaart regelmatig om
ruimte te besparen. Maak een back-up van alle kritieke bestanden op
de SD-kaart voordat u gaat formatteren.
3. We raden u aan om de geheugenkaart een keer per maand te
formatteren.
Installeren in voertuigen Bevestig aan voorruit
Bevestig de beugel aan het apparaat. Draai de schroef totdat deze
volledig vastzit. Plaats de zuignap, terwijl de zuignap plat ligt, op de
voorruit. Houd de basis stevig op de voorruit en druk de klem naar
beneden om de autohouder op de voorruit te monteren. Zorg ervoor
dat de basis goed op zijn plaats is vergrendeld.
Aan de slag gaan

Stapies of Office Depot. Dit om ervoor te zorgen dat u een geheugenkaart
- 12 -
Handige tips:
installeer het apparaat in de buurt van de achteruitkijkspiegel voor het
beste zicht op het open veld. Installeer de dashcam NIET op een
locatie die uw vereiste rijzicht belemmert.
Zorg ervoor dat de lens zich binnen het wisbereik van de ruitenwisser
bevindt, zodat u ook bij regen goed zicht hebt.
Raak de lens niet met uw vingers aan. Er kan vingervet op de lens
achterblijven, wat resulteert in onduidelijke video's of snapshots. Maak
de lens regelmatig schoon.
Installeer het apparaat niet op een getinte ruit. Als u dit wel doet, kan
de tint van de film worden aangetast.
Aansluiten op stroom
Gebruik alleen de meegeleverde autolader om het apparaat op te
laden.
Sluit het ene uiteinde van de autolader aan op de USB-poort van de
dashcamera. Sluit de sigarettenaansteker van het voertuig aan op het
andere uiteinde van de autolader. De dashboardcamera wordt
automatisch ingeschakeld en begint met opnemen wanneer de motor
van het voertuig wordt gestart.

-13-
Handige tips:
Het begint met opnemen zodra de motor start. Als u echter wacht op
een rood lampje terwijl de motor draait en de auto vervolgens opnieuw
start, wordt er niet automatisch opgenomen.
De dashcam aan/uit zetten
Auto Power aan/uit
De camera wordt automatisch ingeschakeld wanneer de motor van het
voertuig wordt gestart. Als automatisch uitschakelen is uitgeschakeld,
blijft de dashcam ingeschakeld, zelfs als er niet wordt opgenomen. Als
automatisch uitschakelen is ingeschakeld (1 minuut, 3 minuten), wordt de
dashcam na de opgegeven tijd uitgeschakeld. Dit is alleen effectief als
het apparaat niet opneemt.
Handmatig in-/uitschakelen
Om de stroom handmatig in te schakelen, drukt u op de POWER-knop.
Om uit te schakelen, houdt u de AAN/UIT-knop ten minste 3 seconden
ingedrukt.
Handige Tips:
Als u handmatig inschakelt, duurt het even. En het is normaal.
Tabel 3. lichtindicatoren
Opnemen Blauw lampje knippert
Niet opnemen Continu blauw
Geen ROOD lampje
Volledig opgeladen / Niet opladen
Continu ROOD
Bezig met opladen
Blauw: Aan / uit-lampje
Rood: Oplaadlampje

-14-
Initiële instellingen
Wanneer de Dash Cam voor de eerste keer wordt ingeschakeld, begint
deze direct met opnemen op het videoscherm. Bovendien wordt u
gevraagd om enkele basisconfiguratiegegevens in te voeren.
Wanneer de dashcam voor de eerste keer wordt ingeschakeld, drukt u
op de OK-knop om te stoppen en de opname te starten.
Handige Tips:
De functies van de knoppen zijn afhankelijk van het feit of het apparaat
momenteel aan het opnemen is of niet.
De dashcam moet worden gepauzeerd om het instellingenmenu te
openen.
De Setup-instellingen zijn toegankelijk vanuit de video-, foto- en
afspeelmodus.
De dashcam-instellingen zijn onderverdeeld in 4 categorieën:
Setup-menu, Video-instellingen, Foto-instellingen en Afspeelinstellingen.
Instelmenu
Zet de dashcam aan en deze zal automatisch opnemen.
Druk vervolgens op de OK-knop om het te stoppen.
Druk twee keer op de Menu-knop aan de linkerkant om naar de
setup-instellingen te gaan. Druk op de knop ▲ en ▼ om een menu-optie
te selecteren en druk op de knop OK om het geselecteerde menu te
openen.
Druk op de Menu-knop aan de linkerkant om het menu te verlaten.
Voordat u het apparaat gebruikt, raden we u aan de juiste datum en tijd
in te stellen.
Parkeermodus
Datum / Tijd
Automatische Power uit
Screensaver
Pieptoon
Taal
Frequentie
Knippert
Formaat
Standaardinstellingen
Versie

-15-
Tabel 4. Menu Setup
Pake-modus Uit / Aan 1. Druk op de OK-knop om de instelling
te openen.
2. Druk op ▲ en ▼ om te selecteren.
3. Druk op de OK-knop om op
te slaan en af te sluiten.
Met een parkeermonitor en bewegin
gsdetectiefunctie, zal de dashcam de
toestand van uw auto 24 uur lang
continu bewaken om de toestand
van de stroomvoorziening te observeren.
1. Druk op de OK-knop om de datum / tijd
instelling in te voeren.
2. Gebruik▲en▼om de nummers in te stell
en.
3. Gebruik de OK-knop om de instelling van
het volgende nummer in te voeren.
4. Druk na het instellen van de juiste numm
ers op de Menu-knop om de instelling op
te slaan en af te sluiten.
Uit / Aan
UIT / 1 minuut / 3
minuten"
UIT / 30 seconden / 1
minuut / 2 minuten
English / Français /
Español / Português
/ Deutsch / Italiana /
/ /
русский /
50 Hz / 60 Hz
Uit / Aan
Annuleren / OK 1. Druk op de OK-knop om de formaatin-
stelling te openen.
2. Druk op ▲ en ▼ om Annuleren of OK
te selecteren.
3. Druk op de OK-knop om op te slaan
en af te sluiten.
1. Druk op de OK-knop om de formaatin-
stelling te openen.
2. Druk op ▲ en ▼ om Annuleren of OK te
selecteren.
3. Druk op de OK-knop om op te slaan en
af te sluiten."
Datum / Tijd
Automatische
uitschakeling
Schermbeveiliging
Piepgeluid
Piepgeluid
2021/01/01 00:00:00
JJ/MM/DD

-16-
1. Druk op de OK-knop om naar de standa
ardinstelling te gaan.
2. Druk op ▲ en ▼ om Annuleren of OK te
selecteren.
3. Druk op de OK-knop om op te slaan en
af te sluiten.
Annuleren / OK
Standaardinstelling
Versie / /
Videomodus
Wanneer de motor van het voertuig start en de automatische
opnamefunctie activeert, schakelt de dashcam automatisch in en
begint met opnemen. Wanneer de motor wordt uitgeschakeld, wordt
de opname automatisch beëindigd. Anders drukt u gewoon op de
knop OK om de opname te beëindigen.
Handige Tips:
In sommige auto's blijft de camera opnemen zodra de motor uit is
geschakeld. In dit geval kun je het volgende proberen:
Als het kan, schakel de sigarettenaansteker handmatig uit.
Trek de adapter uit de sigarettenaansteker.

-17-
Aansluiten op een pc
Dit apparaat kan worden aangesloten op een computer via de
USB-poorten aan de bovenzijde van het apparaat.
Wanneer het contact maakt met de pc, hebt u massa opslag. Druk op
OK om te bevestigen. Massaopslag - u kunt de video's en foto's in de
dash cam bekijken
Beschrijving van de
video-opslagmap
DCIMA: video van de camera aan de voorkant
DCIMB: video van de camera aan de achterkant
LOCA: camera aan de voorkant vergrendelde video
MOVA: normale video van de camera aan de voorkant
LOCB: camera aan de achterkant vergrendelde video
MOVB: achter camera normale video
Q:Hoe kan ik afspelen op een laptop?
A: Methode 1: Gebruik een kaartlezer om de afspeelvideo op een
laptop te bekijken. Plaats eerst de geheugenkaart in de kaartlezer en
steek vervolgens de kaartlezer in de USB-poort van de computer.
Methode 2: Verbind de dashcam rechtstreeks met de laptop met de
meegeleverde mini-USB-datakabel. Selecteer 'Massaopslag', klik op
de knop 'OK'. Suggestie: Download VLC-mediaspeler om de
afspeelvideo op pc soepeler te bekijken
Q: Hoe kan ik afspelen op dash cam bekijken?
A:Druk eerst op de knop 'OK' om de opname te stoppen, druk
vervolgens op de modusknop 'M' om naar de afspeelmodus te
schakelen en druk op de knoppen omhoog en omlaag om de video
te selecteren. U kunt de video die u wilt vergrendelen, ontgrendelen of
verwijderen door op de menuknop te drukken.

-18-
Tabel 5. Videomodus-schermweergave
1. Video modus 2. Onder opname 3. G-sensor
4. Noodvergrendeling 5. Opnametijd 6. Resolutie
7. Parkeermonitor 8. Micro SD-kaart 9. Tijd
10. Datum 11.Audio 12. HDR
13. Flits 14. Bewegingsdetectie
15. Loop-opname 16. Kentekenplaat (Alleen weergeven in video)

-19-
Tabel 5. Videomodus-schermweergave
Resolutie
Loop-opname
Blootstelling
Bewegingsdetectie
Audio opname
Datum
G-sensor
HDR
Kenteken
Wissel geluid
Resolutie
Verhoog of verlaag de kwaliteit van de video
1080FHD 1920×1080 /
1080P 1440×1080 /720P
1280×720
Selecteer de duur van de losse video's
Loop-opname
Uit/ 1 minuut/ 2 minuten
/3 minuten/ 5 minuten
HDR
Presenteer een scherpe en heldere beeldkwal
iteit met harmonieus contrast in een omgeving
met hoog contrast en veel discrepantie
Uit/ Aan
Blootstelling
Pas deze aan in verschillende soorten licht
omstandigheden
+2.0 / +5/3 /+4/3 / +1.0 /
+2/3 /+1/3 / +0.0 /-1/3 /
-2/3 /-1.0/ -4/3 /-5/3 /-2.0
Bewegingsdetectie
Het apparaat start automatisch als er
beweging wordt gedetecteert.
Uit / Aan
Opgenomen Audio Zet deze uit of aan gedurende het opnemen Uit / Aan
Datum
Deze datum is te zien in het scherm en kan
worden uitgezet
Uit / Aan
G-sensor
Zet deze uit of pas de gevoeligheid van de
G-sensor aan. De G-sensor detecteert
krachten waarna de opname automatisch
beschermt wordt in geval van een botsing.
Uit/ Hoog/ In/ Laag
Kenteken
Druk de OK knop om het kenteken in te voeren
(Staat niet in beeld tijdens het opnemen,
alleen op de video)
ABC / 123
Wissel geluid Zet het geluid bij starten of eindigen aan of uit. Uit / Aan

-20-
Fotomodus
U kunt deze dashcamera ook gebruiken om foto's te maken van de
huidige scène. Druk vanuit het stand-byscherm op de OK-knop om een
foto te maken.
Warm Tips:
Als het aan het opnemen is, druk dan op de OK-knop om de opname
te stoppen. Druk op de M-knop om naar de fotomodus te gaan.
Druk op de knop ▲ OF ▼ om de instelling te selecteren.
Tabel 7. Foto Modus Interface
1. Fotomodus 2. Belichting
4. Reeks
3. Anti-shake
5. Resolutie
7. Micro SD Card 8. ISO 9. AWB
6. Kwaliteit

-21-
Tabel 8. Foto modus instellingen
Resolutie
Opeenvolging
Kwaliteit
Scherpte
Wit balans
ISO
Blootstelling
Anti trilling
Snelle vertoning
Datum
Resolutie
Bepaal de kwaliteit van de foto
12M 4032 X 3024 /
10M 3648 X 2736 /
8M 3264 X 2448/
5M 2592X1944
/3M 2048 X 1536
/2MHD 1920 X1080 /
1.3M 1280 X 960
Neem meerdere foto's achter elkaar met
maar een druk op de knop
Opeenvolging
Uit / Aan
Kwaliteit
Kies de sterkte van de compressie die op de
afbeelding wordt toegepast"
Hoog / Normaal / Laag
Scherpte
Kies de mate van detail van de foto's
Sterk / Normaal/ Zacht
Wit balans
Hij past automatisch de kleuren aan
Auto/ Daglicht/ Bewolkt/
Tungsten/ Fluoriserend
ISO Kies de sensitiviteit van de foto sensor Auto/ 100/ 200/ 400
Blootstelling
Bepaal hoe licht of donker de afbeelding zal
verschijnen na het nemen van de foto
"+2.0 / +5/3 / +4/3 / +1.0
/ +2/3 / +1/3 / +0.0 / -1/3
/ -2/3 / -1.0 / -4/3 /
-5/3 / -2.0"
Anti trilling
Stelt je in staat om foto's te maken met een
trage sluitertijd, zonder wazige foto's te maken.
Uit/ Aan
Snelle vertoning
Zet snelle vertoning aan of uit
Uit/ 2 seconden/
5 seconden
Datum Zet wel of geen datum op de opname
Uit/ Datum/ Tijd

-22-
Afspeelmodus
Dit apparaat slaat video en foto's op het verwijderbare SD-kaartgeheugen
op. In de afspeelmodus kunt u de opgeslagen video en foto's bekijken en
de video met geluid afspelen.
Om een video of foto te selecteren om af te spelen, drukt u op de knop ▲
OF ▼ en vervolgens op de knop OK.
Als de opname bezig is, drukt u op de OK-knop om de opname te stoppen.
Het stand-byscherm wordt weergegeven.
Druk tweemaal op de M-knop om het afspeelmenu te openen.
Druk op de knop ▲ en ▼ om de optie te selecteren en druk op OK om op
te slaan en af te sluiten. Er zijn twee opties voor u.
Delete
Vergrendel
Tabel 9. Opnames bekijken instellingen
Delete Delete huidige/ delete alles
Ga als volgt te werk om besta
nd(en) te verwijderen:
1. Druk op de toetsen ▲ en ▼
om Verwijderen te selecteren
en druk op de OK-toets.
2. Druk op de ▲-knop en de ▼
-knop omhuidig verwijderen of
alles verwijderen te selecteren.
3. Eenmaal geselecteerd, drukt
u op de OK-knopen Annuleren
of OK wordt weergegeven.
Vergrendel huidige/ Ontgrendel
huidige/ Vergrendel alles/
Ontgrendel alles
Loop-opname
Selecteer de bestanden die u wilt
vergrendelen en deze worden
niet overschreven. Om de bestan
den te beveiligen, doet u het
volgende:
1. Druk op de toetsen ▲ en ▼ om
Beveiligen te selecteren en druk
op de OK-toets.
2. Druk op de knop ▲ en ▼ om
te selecteren. Eenmaal geselect
eerd, drukt u op de OK-knop om
de instelling op te slaan en af te
sluiten.

1. Druk op de toetsen ▲ en ▼
2. Druk op de ▲-knop en de ▼
-23-
Scherm
3 Inch HD scherm
170 graden groothoek
Loop-opname
Loop-opname/ bewegingdetectie
Opname methode
Opname type
AVI
Video resolutie 1920×1080 / 1440×1080 / 1280×720
Foto resolutie
Specificaties
4032X3024 / 3648X2736 / 3264X2448
/ 2592X1944
Video uitgang Nee
Taal
Engels / Français / Español /
Português / Deutsch / Italiana /
Vereenvoudigd Chinees/
Traditioneel Chinees / русский /
Japans
G-sensor Bestanden worden vergrendeld
bij een noodgeval
Handmatige vergrendeling Druk op de vergrendelknop bij
opname
Loop opname Uit/ 1 minuut/ 2 minuten/ 3 minuten
/ 5 minuten
Infrarood nachtvisie Ja
Geheugenkaart Micro SD-kaart (4GB-32GB, Klasse
10 of hoger)
USB USB 2.0
Batterij Lithium-polymeer batterij
Voeding DC-5V/ 1.5A

-24-
Installeer de achteruitrijcamera
Positie 1: Voor een eenvoudige installatie installeert u de achteruitrijcamera
op de achterruit
Positie 2: De achteruitrijcamera moet in de buurt van de kentekenplaat
worden geïnstalleerd. Positie 2 is zeer aan te raden. Zowel de achteruitkijk-
als de achteruitrij-beelden zijn scherp en duidelijk. Om de achteruitrijfunctie
te gebruiken, installeert u de achteruitrijcamera op zijn plaats
3- sluit vervolgens de rode triggerdraad van de verlengkabel van de
achteruitrijcamera aan op de positieve kabel van het achteruitrijlicht van
het voertuig en gebruik tenslotte de koevoet om de kabels te verbergen
Wat betreft de camera aan de achterkant, kunt u door op de knop
Omlaag te drukken kiezen tussen ""Alleen camera aan de voorkant"",
""Alleen camera achter"" of ""Gesplitst scherm"". Als de camera aan de
achterkant niet zichtbaar is, controleer dan of de stekker en het
stopcontact in de buurt van de camera aan de achterkant goed zijn
aangesloten; ze moeten maar op één manier passen, maar kunnen
gemakkelijk verkeerd worden uitgelijnd. Neem bij verdere vragen of
verzoeken contact met ons op.

-25-
Opmerking
1 Let op de positie van de connector bij het aansluiten van de
achteruitrijcamera
met de verlengkabel, raadpleeg de onderstaande details.
Reinig de positie om de kleefkwaliteit te garanderen voordat u de
achteruitrijcamera installeert.
Maak de achterruit regelmatig schoon om de beeldkwaliteit te
garanderen als u positie 1 kiest.
Als u positie 2 kiest, kunt u de achteruitrijcamera installeren met de
meegeleverde zelfklevende stickers of schroeven.
Zorg ervoor dat de achteruitrijcamera normaal wordt weergegeven.
Als het niet normaal werkt, kan dit ertoe leiden dat de dashcam niet
automatisch opneemt nadat deze is ingeschakeld.
Hoe installeer ik de dubbele dash cam achteruitrijcamera?
Situatie 1: Als uw voertuig geen ingebouwde achteruitrijcamera heeft
en u wilt achteruitrijhulp via de dashcam, moet u de RODE draad van
de achterste nokkenaskabel aansluiten op de positieve kabel van het
achteruitrijlicht van het voertuig (12-24V). Wanneer u de auto
achteruitrijdt, geeft de dashcam onmiddellijk een schermvullend
achterbeeld weer met een assistent-lijn.
Situatie 2: Als uw voertuig al een ingebouwde achteruitrijcamera
heeft, hoeft u de RODE draad van de achtercamera nergens op aan
te sluiten; negeer het. Neem contact op met onze
aftersalesmedewerkers als u extra hulp wilt bij het installeren van de
achteruitkijkcamera.
Vraag: Wat moet ik doen als de achteruitrijcamera niet wordt
weergegeven?
A: Er zijn drie mogelijke oorzaken van dit probleem.
1) De achterste nokkendraad is niet goed aangesloten; onderzoek
alle draadverbindingen en zorg ervoor dat ze veilig zijn.
2) Laad het op met een normale autolader. Als u een USB-kabel
gebruikt om verbinding te maken met de USB-poort van de auto voor
stroom, krijgt de camera mogelijk niet genoeg stroom en start hij
mogelijk niet.
3) Als de achterste nok of achterste nokkenas defect is, aarzel dan niet
om contact met ons op te nemen om een vervangende kabel of
achterste nok te verkrijgen.

-26-
Waarom is de video van de achteruitrijcamera gespiegeld?
Dit geldt tegenwoordig voor de meeste camera's aan de achterkant.
Op dit moment hebben dashcams op dit niveau geen automatische
correctiefunctie.
Problemen oplossen
V: Blijft de dashcam werken, zelfs als het contact is uitgeschakeld?
A: Dit wordt bepaald door het DC-stopcontact op uw voertuig. Nadat
het contact is uitgeschakeld, blijven de stopcontacten van sommige
auto's werken, terwijl andere stoppen met werken wanneer de auto
wordt uitgeschakeld. Als de sigarettenaansteker ingeschakeld blijft
nadat het contact is uitgeschakeld, schakel dan de voertuigcamera
handmatig uit.
V: Is er een manier om de microfoon te dempen?
A: Ja, u kunt de microfoon dempen in de menu-instelling.
Vraag: Waarom wordt er gezegd dat het over vijf seconden wordt
uitgeschakeld?
A: Standaard is de automatische uitschakeling van onze machine
uitgeschakeld. Als het geen video kan opnemen of de stroomtoevoer
kan loskoppelen, wordt het automatisch uitgeschakeld en lijkt het
alsof het niet kan worden opgeladen. Deze instelling is omkeerbaar.
De ingebouwde batterijcapaciteit van de machine is slechts 150 MAH,
wat een maximale looptijd van 3 tot 5 minuten mogelijk maakt,
waardoor een continue verbinding met de auto-oplader nodig is.
V: Kan ik de dashcam-bestanden bekijken?
A: Ja, u kunt de bestanden bekijken in de afspeelmodus. Als de
bestanden zijn beveiligd, wordt er een vergrendelingsmarkering op
weergegeven.
Q: Kan ik de dashcam aansluiten op mijn MAC book?
A: Ja, u kunt verbinding maken met uw MAC-computer en uw
beeldmateriaal bekijken. Als Quick Time echter niet goed speelt,
schakel dan over naar een andere speler. (VLC-mediaspeler,
Pot-speler of KM-speler zijn allemaal voorbeelden).
V: Hoe bekijk ik de video's en foto's met de dashcam?
A: Als de dashcam momenteel aan het opnemen is, drukt u op de
OK-knop om deze te pauzeren. Klik vervolgens tweemaal op de knop
Modus (rechts ) om naar de afspeelmodus te gaan. Druk op de knop
▲ en ▼ om de bestanden te selecteren. Als u een video selecteert,
drukt u op de knop OK om het afspelen te starten en te beëindigen.
Druk op de Mode-knop om terug te keren naar de eerder bekeken
bestanden of om een ander bestand te selecteren om te bekijken.

-27-
Problemen oplossen
V: Hoe bekijk ik bestanden op de camera en ontdek ik welke beelden
wazig zijn?
A: De voorruit is zeer reflecterend. Pas de hoek van de nok aan zodat
deze overeenkomt met de installatielocatie van de zuignap.
V: Wat is het meest opvallende verschil tussen video's die overdag en
's nachts zijn opgenomen?
A: De transmissie van veelgebruikte thermische isolatiecoatings voor
het frontglas ligt tussen 68 en 80 procent. Dit beïnvloedt het
opnamevermogen van de camera.
V: Wat moet ik doen als de camera vaak uitvalt of niet kan worden
aangesloten op de voeding?
A: Het interieurontwerp van elk voertuig is uniek. Controleer of de
draaihoek van de voertuigvoedingsadapter correct is ingesteld en of
de verbinding tussen de voeding en de machine stabiel is.
B: De ingebouwde batterij van de machine heeft een beperkte
levensduur van 3-5 minuten. Zorg er bij gebruik van het apparaat voor
dat het is aangesloten op een stroombron.
C: Inspecteer de stroomkabel op schade om te bevestigen dat de
machine stroom krijgt.
D: Als de camera niet in de auto kan worden gebruikt, sluit hem dan
aan op een andere voedingsbron om te zien of de voeding van de
sigarettenaansteker goed werkt."
V: Waarom kan de camera niet worden ingeschakeld?
A: Controleer of het indicatielampje van de voedingsadapter brandt.
Als er geen licht is, koppelt u de autolader los en sluit u deze opnieuw
aan en controleert u de stroombron van de camera. Neem contact
met ons op als de autolader niet werkt.
B: De camera kan niet onbeperkt aan blijven staan. De ingebouwde
batterij heeft een beperkte levensduur van ongeveer 3-5 minuten. Sluit
de camera aan op de sigarettenaansteker met behulp van de
meegeleverde autolader.
C: Omdat al onze artikelen van onze fabrikant naar het magazijn van
Amazon worden verzonden en vervolgens door Amazon worden
afgehandeld, kunnen ze voor een langere periode in het magazijn
blijven. Wanneer u de camera ontvangt, sluit u deze onmiddellijk aan
op een stroombron en laadt u deze volledig op.
D: Probeer eerst de geheugenkaart te verwijderen en vervolgens de
dashcam te resetten (plaats de pin op de knop van de machine met
de RE gedurende 3 seconden). Houd vervolgens de aan / uit-knop
gedurende langere tijd ingedrukt totdat deze wordt ingeschakeld. Het
zal uiteindelijk genezen. Plaats vervolgens de geheugenkaart opnieuw
en zoek de formaatoptie in de instellingen.

-28-
Problemen oplossen
V: Wat moet ik doen als de camera vastloopt, het scherm zwart wordt of de
knoppen niet werken?
A: Controleer of uw kaart klasse 10, 6-32GB, SDHC TF-kaart is
B: Houd de aan/uit-knop ingedrukt om het afsluiten en opnieuw opstarten
te forceren
C: Druk op de Reset-knop om de camera te resetten
Q: Waarom kan ik de menu-instellingen niet openen (Geen reactie door
op menuknop te drukken)?
A: Na het inschakelen blijft de camera in de videomodus en begint
automatisch met opnemen als er een SD-kaart is aangesloten. Druk om te
beginnen op de OK-knop om de opname te pauzeren. Navigeer
vervolgens met de menuknop naar de instellingen.
V: Waarom wordt het scherm blauw en wordt massaopslag gevraagd?
A: Wanneer de camera is aangesloten op een computer of een
laagspanningsvoedingsbron, kan deze massaopslag starten. Om de cam
aan te sluiten op een voeding met standaard voltage, dient u de
meegeleverde autolader te gebruiken.
V: Waarom neemt de camera niet op nadat deze is ingeschakeld?
A: Controleer of er een TF-kaart is geplaatst. Controleer het formaat van de
kaart (Klasse 10, niet groter dan 32 GB)
B: Koppel de camera los, verwijder de kaart en plaats deze opnieuw
C: Formatteer de geheugenkaart van de camera"
V: Wat veroorzaakt een abrubt einde van een video-opname?
A: Het kaartformaat
B: Controleer of het formaat van de geheugenkaart correct is
C: Vervang de kaart door een goed gekwalificeerd exemplaar om te
bepalen of het probleem een kaartstoring is.
D: De markt wordt overspoeld met ondermaatse geheugenkaarten. Deze
kaarten zijn van slechte kwaliteit, waardoor de werking van de camera
nadelig wordt beïnvloed.
V: Waarom wordt het scherm zwart?
A: Het scherm wordt donker als de camera niet binnen het opgegeven
tijdsinterval wordt bediend, zelfs niet tijdens het opnemen. U kunt de
camera wekken door op een willekeurige knop te drukken.
V: Waarom hebben de video's geen geluid?
A: Controleer of de audio-opname is ingeschakeld. U kunt dit controleren
door naar het microfoonlogo te kijken dat op het scherm wordt
weergegeven. De omhoog-knop activeert de microfoon.

-29-
Problemen oplossen
V:Hoe voorkom je wazige video's?
A: Reinig de lens door de beschermende coating te verwijderen.
B: Verwijder de beschermlaag van het scherm.
B:Verwijder de beschermlaag van het scherm.
B: Vanwege het verschil in schermgrootte en het effect van de resolutie,
zullen er visuele variaties zijn tussen een camera en een computer.
Download daarom de bestanden naar uw computer en bekijk ze opnieuw
op uw computer.
C: Controleer de resolutie van de camera. Verhoog de resolutie.
D: De video- en fotomodi zijn afzonderlijk geconfigureerd. Configureer de
video-opname- en foto-opnameresoluties onafhankelijk van elkaar.
E: Controleer of het formaat van de geheugenkaart correct is
Q: Moet de dashcam de hele tijd ingeplugd zijn om op te nemen?
A: Ja, de dashcam moet zijn aangesloten om continu te kunnen opnemen.
De ingebouwde oplaadbare batterij gaat maar een paar minuten mee en
kan niet continu opnemen.
Vraag: Hoe kan ik een videotijdfout oplossen?
A: Update naar het juiste moment volgens de gebruikershandleiding
B: Videomodus en fotomodus hebben hun instellingen. Stel de tijd apart in
tijdens het aansluiten van de camera op de computer" V: Waarom
kan ik de opslag niet lezen en kan ik het aangesloten apparaat niet
vinden?
A: Sluit de USB-kabel opnieuw aan om een stabiele verbinding te
garanderen
B: Wissel naar een andere USB-kabel en controleer of er iets mis is met de
kabel
C: Sluit de camera aan op verschillende computers omdat sommige
computersystemen de externe apparaten verhinderen.
V: Waarom kan ik de ingestelde tijd en datum of andere instellingen niet
opslaan wanneer ik de dashcam voor het eerst krijg?
A: De ingebouwde batterij gaat leeg wanneer de dashcam voor langere
tijd wordt opgeslagen, waardoor de instellingen onbruikbaar worden. Sluit
de dashcam aan op een computer via een USB-kabel, schakel hem uit en
laad hem urenlang op. Stel daarna de tijd en datum in en het wordt
automatisch opgeslagen.

-30-
Deze Dash Cam heeft een garantie van één jaar vanaf de aankoopdatum
tegen defecten in materiaal of kwaliteit. We zullen elk defect onderdeel
repareren of vervangen waarvan niet is vastgesteld dat het het gevolg is
van overmatig gebruik of schade gedurende deze tijd.
We behouden ons het recht voor om camera's die volgens de
voorwaarden van deze garantie in aanmerking komen, te repareren of te
vervangen. Deze garantie dekt geen schade of defecten veroorzaakt
door een ongeluk, misbruik, ongeautoriseerde reparatie of interferentie, of
iets dergelijks.
Als u een camera heeft waarvoor garantieonderhoud nodig is, neem dan
contact met ons op via [email protected]. Stuur een e-mail naar
[email protected] als u algemene of technische vragen heeft over
uw Dash Cam. We zullen er alles aan doen om binnen 24 uur op uw e-mail
te reageren.
Vince.nl is niet verantwoordelijk voor het verlies van persoonlijke gegevens
veroorzaakt door het falen van het opslagapparaat, het verval van de
levensduur en het oneigenlijk gebruik van de apparatuur. Controleer het
opslagapparaat en update de softwareversie tijdig om verlies tijdens het
gebruik te voorkomen! De bestuurder mag tijdens het rijden niet werken.
Alle gevolgen van het onrechtmatig handelen van de bestuurder tijdens
het rijden vallen niet op het bedrijf! Het bedrijf is niet aansprakelijk voor
eventuele gevolgen die worden veroorzaakt door de installatie,
demontage en zelfdemontage van het mainframe door een onbevoegde
en ongekwalificeerde technicus.
Dit product is het voertuig voor het besturen van beeld en geluid en
andere gerelateerde informatie-opnameapparatuur, ongevallen alleen
als extra referentie.
Als verwijzing naar de audio die in dit product is opgenomen, zijn wij niet
verantwoordelijk voor de slechte bestanden, gegevensverlies en andere
redenen die worden veroorzaakt door de abnormale situatie van de
dashcam.
Garantie
Disclaimer:

- 31 -
1.
2.
3.
4.
5.
6.
7.
8.
9.
PLEASE READ.....
MOST IMPORTANT
You should charge the dashcam for at least two to three hours prior to
use, to ensure that it doesn't become unable to save the settings.
We will arrange for a new suction cup and accessories free of charge if
they break or become lost within the one-year guarantee term. Kindly
contact our customer service department at [email protected]
A complimentary extension cable will be provided if your vehicle has a
long wheelbase.
If you connect the camera through a USB connection to the USB port in
your car, the screen may display 'Mass storage' ,and you will need to
connect the camera's original car charger. Alternatively, get a specialized
long USB cable for power delivery. USB Data The cable we supply is just
for data reading. The USB cord does not supply a constant current, which
may result in the back camera not displaying correctly.
To ensure uninterrupted video recording while driving, please disable the
'Motion Detection' function.
Please set the G-sensor sensitivity to Low or turn it off; otherwise, the
video file will be easily frozen when your car brakes, even if the dash cam's
loop recording feature is on. For product stability,format the memory card
atleast once a month.
Memory cards, in general, have a limited lifespan. Long-term usage may
result in the inability to store data. It is advised that you acquire a new
memory card in this instance. The firm will not be accountable for data loss
as a result of prolonged use. When our product includes a memory card, it
comes with a six-month warranty. We can replace it for you if it is
damaged.
Do not forget to activate the video lock feature. If you have a video that
requires immediate saving, you may locate it in playback mode and lock it
to prevent it from being overwritten.
If you wish to turn off the screen but keep the dash cam recording,
simply select 'screen save' in the settings; the dash cam will continue to
film normally.

- 32 -
10.
11.
12.
13.
14.
15.
16.
17.
18.
PLEASE READ.....
MOST IMPORTANT
The ambient temperature range for the typical operation of this
device is between -10°C and 60°C. Exceeding this temperature range
may result in the failure of the product.
If you require 24-hour monitoring, you must purchase the Hardwire
Kit (NOT INCLUDED). Connecting the uninterruptible power supply
without authorization may result in the vehicle or product malfunctioning.
Please consult an expert for installation issues.
Why does the suction mount detach after prolonged use? Due to
prolonged usage, the suction mount deteriorated due to the continual
exposure to extreme temperature fluctuations, resulting in a decrease in
the internal and exterior pressure differential.
If you leave your car's cigarette lighter on all the time, it will remain
connected to the power source after the automobile is turned off, and
you will need to switch it off manually.
Ensure that the memory card is installed correctly; otherwise, it will
fall out or cause harm to the card slot.
If you need to watch the video on your computer and the player is not
working properly, please use another player. (VLC media player, Pot
player, or KM player are all examples).
Ensure that the power is turned off before inserting or removing the
memory card.
If this product is directly linked to the vehicle's power supply
system,avoid using it for an extended period without the engine running
since this will cause the battery to lose power.
Avoid subjecting this device to excessive shocks or vibrations to avoid
damaging it and resulting in failure or unavailability.
Never install or operate this product while driving a vehicle. Please
utilize only to the extent authorized by law
19.

- 33 -
1.
2.
3.
4.
PLEASE READ.....
MOST IMPORTANT
WHAT SHOULD YOU DO IF YOU GET A MEMORY CARD-RELATED
ERROR MESSAGE?
Ensure that you utilize the required CLASS 10 speed and a 32GB or
smaller memory card ( If YES, then ...) Does NOT support microSD cards
with capacities of 64GB, 128GB, or 256GB.
Format the memory card in the camera by going to the system settings
of the camera.
Restart the camera and attempt again after formatting the card as
FAT32 64KB on the PC. Alternatively, please try inserting the card before
powering on the dash cam; if the dash cam does not detect the card, just
switch off the camera and insert the card; then power on the dash cam.
If the Memory Card-related Error continues to occur, the memory card
is either faulty or NOT Genuine. Please obtain a replacement memory card
from a nearby electronics retailer such as Best Buy, Stapies, or Office
Depot. To ensure that you receive a Memory Card that is 100 percent
genuine and recommended.
FAKE MEMORY CARD ALERT:
Avoid purchasing memory cards from eBay or other third-party dealers
online ; you will almost certainly end up with a FAKE memory card. Fake
memory cards and their packaging appear identical to genuine ones;
however, the memory card's speed and performance are different. It is just
a class 4 connection, which is insufficient for this 1080P video camera.
Q: Why my dash cam saying 'sd card is full' ?
A: 1. Does NOT support microSD cards with 64GB, 128GB, or 256GB. It is
limited to 32GB of storage. If these memory cards are used, the loop
recording capability will be disabled.
2. Reduce the sensitivity of the G-sensor to Low or disable it entirely; the
video file will be easily frozen when your car brakes, even if the dash cam's
loop recording function is enabled.
If you do NOT use GENUINE & BRANDED, CLASS 10 Speed MicroSD Card,
or if the card is more than 32GB in capacity, the camera will display a
message reading ‘ insert C6 and above the card’

- 34 -
3.
4.
5.
PLEASE READ.....
MOST IMPORTANT
If you enable G sensor and parking mode, too many locked files will
result in the card becoming full. Simply disable G sensor, motion detection,
and parking mode.
Once the needed video has been extracted to the computer, format
the memory card. When the memory card is reinserted into the dashcam
after formatting, the "memory card is full" message should show. The
memory card should be damaged.
If you are using a brand-new memory card, a notice stating that the
memory card is full shows after a brief recording period. Then again, this
type of memory card may have been updated, rendering the loop
recording capability inoperable.
Q: How long can the dashcam Loop recording the video?
A: All Qumax dashcams record continuously and overwrite and
preserve the most recent video. For example, a 16GB memory with the
highest resolution can save the latest 1.5~1.75 hours of single front
camera footage. In comparison, a 32GB memory with the highest
resolution can keep the latest 3.0~3.5 hours of single front camera
video. For example, the highest quality 16GB memory card can save the
most recent 1.25~1.5 hours of front and after camera footage, while the
32GB memory card can hold the most recent 2.5~3.0 hours of front and
after camera video. Note: It doesn't save videos of all journeys.
Q: Why does my dash cam turns off randomly?
A: The first explanation might be that the power connection is not
steady; a properly connected power supply is sufficient.
Another explanation is that the card is full; when the card is full, the
camera does not have enough room to save fresh files and turns off,
reminding you to format the card. We recommend that you format your
card regularly to extend its life..
Q: Dash cam keeps on and off when I am driving,what's happened?
A: It is possible that the power connection is not steady; please ensure
that the power cord cigar lighter car charger is securely connected to
the car's cigar lighter socket and that power is supplied continuously. If
you are properly connected but still have this issue, the power cord for
the car charger is likely faulty. Contact us, and we will send you a
replacement charger.

- 35 -
PLEASE READ.....
MOST IMPORTANT
Q: Why is the camera unable to be switched on?
A:1) To begin, determine whether the machine is damaged. Remove the
memory card first, and then attach a charger with a USB interface (such as
a mobile phone charger) through a USB cable to verify that the camera is
powered on. If it is unable to be turned on, please put a needle into the
reset hole for more than three seconds and then push the power button. If
the machine can be switched on, it is not harmed. Please re-insert and
format the memory card to determine if it can record normally. If the
equipment continues to be unresponsive, it is likely damaged; please
contact us for a replacement.
2) Second: After completing the first stage of the test, if the machine is in
good condition, proceed to the automobile charging test. Connect the car
charger to the vehicle's cigarette lighter and then power the dashcam. If
the car charger can be switched on and recorded normally, it is not
harmed. If, however, the vehicle charger is reconnected and continues to
switch on and off automatically while driving, the charger is broken; please
contact us for a replacement. If the car charger cannot be switched on
normally, it is damaged; please contact us for a replacement.
3) Thirdly, if the vehicle charger is not broken, the memory card may cause
the car to crash. If the memory card has been formatted but remains
unusable, please replace it with another memory card.
Q:Why my dash cam always auto turn on and off?
A: This dash cam has parking monitor function, if you turn the
parking mode on, the dash cam will auto turn on and starts a
30semergency recording and then turn off when the internal G sensor
detects a shake. To solve this issue, we suggest you turn off the parking
mode when driving and turn it on while you parked car. Then the parking
monitor will help you protect your car after your car parked.
Q:Why can't dashcam record normally after it is turned on?
A:1) Please insert the right memory card and check for damage to the
memory card.
2) If you purchase both front and back cameras, you should verify that your
rear display functions correctly. When the front camera detects that the
camera is unable to show normally, the camera will be unable to record
normally. (Please verify the rear camera solution.) If the issue cannot be
resolved, please detach the rear camera and contact us to arrange for a
replacement

- 36 -
Main function introduction
HDR (High Dynamic Range): off/ on. Default value: on.
Used to adjust the brightness of the video clips. Suitable for situations like
low or back light.
Loop Recording: The cam will cyclically record new videos under the time
interval you set. Off / one minute / three minutes / five minutes. Default
value: three minutes
Motion detection: on/off. Default value: off.
It starts recording once it detects moving subjects within 3 meters in front
of the lens, otherwise it stops recording. It automatically starts recording
video and stops recording after no dynamic motion appears.
Parking Monitoring: Under parking mode, the dash cam is in the power-0ff
condition. The dash cam will automatically turn on and record when detect
a vibration.
G-sensor: off/ Low/ Medium/ High. Default value: Medium.
The cam automatically looks video that is being recorded once it detects
shaking or collision. Flies that are locked won't be overwritten/ covered.
Screen Saver: Off/30 seconds / one minutes / two minutes.
Default value: Off Note:If there is no operation on the cam within
the set time, the screen will go black to save power. But the cam still
keeps recording.
About 24-hour monitoring :
We recommend using the following methods to achieve 24-hour monitoring
( Need to be used with hardwire kit ).
1. 1.Connect the hardwire kit's red wire to BAT+ and then switch on the
motion detection feature after you're finished. Alternatively, activate the
parking monitoring function and then deactivate it. It will automatically
switch on and continue recording when it detects the vibration. Nota bene:
This sort of connection will drain the car's battery and cause it to fail.
2. Connect the hardwire kit's red line to the ACC and enable parking
monitoring and gravity sensor functionality. After the vehicle is switched off,
the parking monitoring function is activated automatically. It will switch on
and record for about 20 seconds when vibrated.
3. Connect the hardwire kit's red line to BAT+ and allow it to record 24 hours
continuously until the car battery reaches its lowest voltage, at which point
it will automatically shut down.

- 37 -
About this Guide
Introduction
The information included in this document is provided for informational
purposes only and is subject to change without notice. We make every
effort to assure the accuracy and completeness of this User Guide.
However, no responsibility is accepted for such mistakes or omissions.
Without previous warning, the manufacturer retains the right to modify the
technical specifications. This handbook applies to the following models: This
manual is applicable to S660 S680 S760 S780 S800 S900 and S900a.
Thank you for purchasing Qumax Dash Cam. This device is specifically
designed for real-time video and audio recording when driving.
Package Contents
The package mainly contains the following items. (Different types of
accessories are different, please refer to the details page)
Table 1. Package
Car Recorder
Car Charger Mini USB Cable
Suction Mount
Warm tips:
Notify your provider immediately if any items are missing or damaged:

- 38 -
Product Overview
1. TF Card Slot 2. UP 3. Menu 4. Down
5. HD Interface 6. Stand Base 7. USB Interface 8. OK
9. Mode 10. Lock 11. Power 12. Lens
13. Display Screen 14. Loudspeaker 15. MIC 16. Reset

- 39 -
Table 2. Buttons
Power Button
Lock button
M button
OK button
Up button
Menu button
Down button
Standby
mode
Recording
mode Photo Mode Playback Mode
Display
on / off
Display
on / off
Display
on / off
Display
on / off
Lock / unlock
the current files
Change mode Change mode
Change mode
/ Stop playing
the video
Start
recording
Stop
recording Take a photo Play the video
Last /
Volume up
Enter
into menu
Enter
into menu
Enter
into menu
Next /
Volume down
/
/
///
/
//
/
/ /

- 40 -
Getting Started
Insert the memory card with the gold contacts toward the screen and the
memory card with the letters toward the camera's lens.
To insert the SD card
Push the memory card until it clicks into place (poke the card with a slim
needle or credit card deeply till it clicked in the card slot). If not, it will pop
out. Then power on camera & format card on it.
Attach the bracket to the device. Turn the screw until it is completely fixed.
With the suction cup lying flat, position the suction cup on the windshield.
Hold the base firmly on the windshield and press down the clamp to
mount the car holder to the windshield. Make sure the base is securely
locked in place.
To remove the memory card
Push the edge of the memory card inward until you hear/feel it click,
and then allow it to push out until you can remove it from the slot.
Warm Tips:
When the device is powered on, avoid removing or inserting the
memory card. This may result in memory card and dash cam
damage.
It only supports microSD cards with a capacity of 4 to 32 GB and a
class 10 or higher speed. Before the dash cam is used for the first time,
it is advisedthat the micro SD cards be formatted. Additionally, please
format the micro SD card on a regular basis to conserve space.
Please make a backup of any critical files on the SD card prior to
formatting.
Once a month, we recommend that you format the memory card.
Installing in Vehicles Mount to Windshield

- 41 -
Connecting to Power
Use only the supplied car charger to power up the device.
Connect the car charger's one end to the dash camera's USB port.
Connect the vehicle's cigarette lighter socket to the other end of the car
charger. The dash camera automatically powers on and begins recording
when the vehicle's engine is started.
Warm Tips:
Install the device near the rear-view mirror to obtain the best
open-field view. Do NOT install the dashcam in a location that will
obstruct your required driving view.
Make sure that the lens is within the wiping range of the windscreen
wiper to ensure a clear view even when it rains.
Do not touch the lens with your fingers. Finger grease may be left on
the lens and will result in unclear videos or snapshots. Clean the lens
on a regular basis.
Do not install the device on a tinted window. Doing so may damage
the tint film.

- 42 -
Auto Power On/Off
The camera automatically turns on when the vehicle's engine is started.
When auto power-off is disabled, the dash cam will remain powered on
even when not recording. When auto power-off is enabled (1 minute, 3
minutes), the dash cam will turn off after the time specified. This is only
effective when the device is not recording.
Manual Power On/Off
To manually turn on the power, press the POWER button.
To turn off, press and hold the POWER button for at least 3 seconds.
Warm Tips:
It will begin recording as soon as the engine begins. However, if you
wait for a red light with the motor running and then restart the car, it will
not record automatically.
Warm Tips:
If you turn on manually, it will take a while. And it is normal.
Table 3. Light Indicators
Blue: Power light
Red: Charging light
Recording
Not Recording
Charging
Fully Charged / Not Charging
Blue light flashes
Solid Blue
Solid RED
No RED light

- 43 -
Initial Settings
When the Dash Cam is turned on for the first time, it will instantly begin
recording on the video screen. Additionally, you will be prompted to submit
some basic configuration information.
When the dash cam is turned on for the first time, Press the OK button to
stop and start recording.
Setup Menu
Turn on the dash cam and it will record automatically.
Then press the OK button to stop it.
Press the Menu button on the left twice to enter into the setup settings.
Press the ▲ and ▼ button to select a menu option and press the OK
button to enter the selected menu.
Press the Menu button on the left to exit the menu.
Table 4. Setup Menu
The dash cam settings are divided into 4 categories: Setup menu, Video
settings, Photo settings and Playback settings.
Before using the device, we recommend you to set up the correct date
and time
Warm Tips:
The button functions are different depending on whether the unit is
currently recording or not.
The dash cam must be paused in order to enter the Settings Menu.
The Setup settings can be accessed from The Video, Photo, and Playback
mode.
Park mode
Date / Time
Auto Power Off
Screensaver
Beep Sound
Language
Frequency
Flash
Format
Default Setting
Version

- 44 -
1. Press the OK button to enter the
setting.
2. Press ▲ and ▼ to select.
3. Press the OK button to save and exit with a parking
monitor and motion
detection function, the dashcam will
continuously monitor your car condition
24hours to observe the power supply
condition.
1. Press the OK button to enter the date /time setting.
2. Use ▲ and ▼ button to set numbers.
3. Use the OK button to enter
the setting of the next number.
4. After setting the right numbers, press
Menu button to save the setting and exit.
Pake mode Off / On
Date / Time
Auto Power Off
Screen Saver
Beep Sound
Language
Frequency
Flash
Format
2021/01/01
00:00:00
YY/MM/DD
OFF / 1 Minutes
/ 3 Minutes
OFF / 30 Seconds
/ 1 Minutes / 2
Minutes
Off / On
English / Français /
Español / Português /
Deutsch / Italiana /
/ /
русский /
50 Hz / 60 Hz
Off / On
Cancel / OK
1. Press the OK button to enter the setting.
2. Press ▲ and ▼ to select.
3. Press the OK button to save and exit.
1. Press the OK button to enter
the format setting.
2. Press ▲ and ▼ to select Cancel or OK.
3. Press the OK button to save and exit.

- 45 -
When the vehicle engine starts and activates the automatic recording
feature,the dashcam automatically switches on and begins recording.
When the engine is turned off, the recording will end automatically.
Otherwise, just hit the OK button to end the recording
Default Setting
Version
Cancel / OK
1. Press the OK button to enter the
defaultsetting.
2. Press ▲ and ▼ to select Cancel or OK.
3. Press the OK button to save and exit.
/ /
Video Mode
Warm Tips:
Some vehicles will keep recording while the engine is turned off.
You may perform one of the following if this happens:
If you are able, switch the cigarette lighter off manually.
Pull the vehicle adapter out of the cigarette lighter.

- 46 -
Connecting to PC
This device can connect to a computer via the USB ports located on
the top of the unit.
When it contacted to the PC, there is Mass storage for you, Press OK to
confirm. Mass storage--you can view the videos and photos in the
dashcam
Video storage folder description
DCIMA: front camera video
DCIMB: rear camera video
LOCA: front camera locked video
MOVA: front camera normal video
LOCB: rear camera locked video
MOVB:rear camera normal video
Q:How to view playback on a laptop?
A:Method 1: Use a card reader to view playback video on laptop. First,
insert the memory card into the card reader, and then insert the card
reader into the computer's USB port.
Method 2: Connect dash cam with laptop directly with the package
included mini USB data cable. Select 'Mass Storage',click 'OK' button.
Suggestion: Download VLC media player to view the playback video on PC
more smoothly
Q: How to view playback on dash cam?
A:First, press the 'OK' button to stop recording, then press the 'M' mode
button to switch to playback mode, and press the up and down buttons to
select the video. You can also select the video to be locked, unlocked, or
deleted by pressing the menu button.

- 47 -
Table 5. Video Mode-Screen Display
1. Video Mode 2. Under Recording 3. G-Sensor
4. Emergency Lock 5. Recording Time 6. Resolution
7. Parking Monitor 8. Micro SD Card 9. Time
10. Date 11. Audio 12. HDR
13. Flash 14. Motion Detention 15. Loop Recording
16. License Plate(Only show in Video)

- 48 -
Table 6. Video Mode-Settings
Resolution
Loop Recording
Exposure
Motion Detection
Record Audio
Date Stamp
G-Sensor
HDR
License plate
Switch sound
Resolution Increase or decrease the quality of the
recorded video
Select the duration of the individual
re-corded video files
Present a crisp and clear picture quality
with harmonious contrast in high
contrast, high discrepancy environment
Adjust exposure level for different
light conditions
Under motion detection mode,the device
will automatically start recording when any
object movement is detected.
Enable or disable sound recording
with the video
Turn On / Off the time and date
stamp shown on recorded files
Turn off or adjust the sensitivity of the
built in G Sensor. The G Sensor
detects forces which will automatically
protect the current re-cording in
event of a collision.
Press the OK button to enter the car
NO. setting.Not displayed on the
screen, only displayed in the video.)
Enable or disable startup or shutdown
sound
1080FHD 1920×1080 /
1080P 1440×1080 /720P
1280×720
Off / 1 Minute / 2
Minutes / 3 Minutes/ 5
Minutes
+2.0 / +5/3 /+4/3 /
+1.0 /+2/3 /+1/3 /
+0.0 /-1/3 /-2/3 /-1.0
/ -4/3 /-5/3 /-2.0
Off / On
Off / On
Off / high / in / low
ABC / 123
Off / On
Off / On
Off / On
Loop Recording
HDR
Exposure
Motion Detection
Record Audio
Date Stamp
G-Sensor
License Plate
Switch Sound

- 49 -
Table 7. Photo Mode Interface
Photo Mode
You can also use this dash camera to take photos of the current
scene. From the standby screen, press the OK button to take a photo.
Warm Tips:
If it is recording, press OK button to stop recording.
Press M button to Photo mode.
Press ▲ OR ▼ button to select the setting.
2. Exposure
5. Resolution
8. ISO
3. Anti - shaking
6. Quality
9. AWB
1. Photo Mode
4. Seqeunce
7. Micro SD card

- 50 -
Table 8. Photo Mode-Settings
Resolution
Sequence
Quality
Sharpness
White Balance
ISO
Exposure
Anti-Shaking
Quick Review
Date Stamp
Resolution Determine the quality of the photo
Enable capturing a sequence of photos
in response to a single photo click of the
camera
Refer to the strength of the compression
being applied to the image
Determine the amount of detail an
imaging system can reproduce
Command automatically adjusts the
colors of the active layer by stretching the
Red, Green and Blue channels separately
Measure the sensitivity of the image
sensor
Determine how light or dark an image
will appear when it's been captured by
your camera
Allow users to shoot images at slow
shutter speeds, without causing blurring
when shooting hand held
Enable / Disable quick review
Enable / Disable date stamp on
recorded events
12M 4032 X 3024 / 10M
3648 X 2736 / 8M 3264 X
2448/ 5M 2592X1944 /3M
2048 X 1536 /2MHD 1920
X1080 / 1.3M 1280 X 960
Off / On
Strong / Normal / Soft
Fine / Normal / Economy
Auto / Daylight / Cloudy /
Tungsten / Fluorescent
Off / On
Off / 2 Seconds / 5
Seconds
Off / Date / Date / Time
Auto / 100 / 200 / 400
+2.0 / +5/3 / +4/3 / +1.0 /
+2/3 / +1/3 / +0.0 / -1/3 /
-2/3 / -1.0 / -4/3 /
-5/3 / -2.0
Sequence
Quality
Sharpness
White Balance
ISO
Exposure
Anti-Shaking
Quick Review
Date Stamp

- 51 -
Table 9. Playback Mode-Settings
Playback Mode
This device stores video and pictures on its removable SD Card Memory.
Playback mode will allow you to review the saved video and photos and
playback the video with sound.
To select a video or photo for playback, press ▲ OR ▼ button and then
press the OK button.
If the recording is in progress, press the OK button to stop recording.
The standby screen is displayed.
Press the M button twice to enter the playback menu.
Press the ▲ and ▼ button to select the option and press the OK to save
and exit. There are two options for you.
To delete file(s) , do the following:
1. Press ▲ and ▼ button to select Delete
and press the OK button.
2. Press ▲ button and ▼ button to select
delete current or delete all.
3. Once selected, press the OK button
and Cancel or OK will display
Delete
Protect
Delete
Protect
Delete Current / Delete All
Lock Current / Unlock
Current / Lock All /
Unlock Al
Select the files you want to lock and it will not
be overwritten.
To protect the file(s), do the following:
1. Press ▲ and ▼ button to select Protect
and press the OK button.
2. Press ▲ and ▼ button to select options.
Once selected, press the OK button to save the
setting and exit

- 52 -
Specification
Display
Angle
Record method
Recording Format
Video Resolution
Photo resolution
Video output
Language
Power Supply
Gravity sensor
Manual Lock
Loop recording
Infrared night vision
Memory card
USB interface
Battery
3’’ HD Screen
170 wide angle
Loop recording / Motion Detection
AVI
1920×1080 / 1440×1080 / 1280×720
4032X3024 / 3648X2736 / 3264X2448 / 2592X1944
No
English / França is / Español /
Português / Deutsch / Italiana /Simplified
Chinese/ Traditional Chinese / русский /
Japanese
The files will be locked when in emergency
Press the Lock button when recording and the dash cam
Off / 1 Minute / 2 Minutes / 3 Minutes / 5 Minutes
Yes
Micro SD card (4GB-32GB, Class 10 or above)
USB 2.0
Lithium polymer battery
DC-5V / 1.5A

- 53 -
Install the Rear Camera
Position 1: For easy installation, install the rear camera on the rear
windshield.
Position 2: Rear camera should be installed near the license plate. Position 2
is very advised. Both the rear viewing and reverse guidance images are
sharp and clear. To use the reversing function- please install the rear
camera in position
3- Then connect the red trigger wire of the rear camera extension cable to
the positive lead of the vehicle reversing lamp and finally use the crowbar
to hide the cables.
Regarding the back camera, by hitting the Down button, you may choose
between "Front Camera Only," "Rear Camera Only," or "Split Screen." If the
rear camera is not visible, verify that the plug and socket near the back
camera are connected properly; they should fit only one way but can
easily be misaligned. Please contact us with any further questions or
requests.

- 54 -
Note
Pay attention to the connector position when connecting the rear
camera with the extension cable, please refer to the below details.
Please clean the position to ensure the adhesive quality before installing
the rear camera.
Please clean the rear windshield regularly to ensure the image quality if
you choose position 1.
If you choose position 2, you can install the rear camera with theincluded
adhesive stickers or screws.
Please make sure that the rear camera displays normally. If it does not
work normally, it may cause the dashcam to fail to record automatically
after it is turned on.
How to install the dual dash cam rear camera ?
Situation 1: If your vehicle does not have a built-in reversing system display
monitor and you want dash cam reverse assistance, you must connect the
rear cam cable's RED wire to the positive lead on the vehicle's reversing
lamp (12-24V). When you reverse the car, the dash cam immediately
displays a full-screen back image with an assistant line.
Situation 2: If your vehicle already includes a built-in reverse camera display
monitor, it is unnecessary to connect the back cam's RED wire to anything;
ignore it. Kindly contact our after-sales staff if you want additional
assistance with rear view camera installation.
Q:What should I do when the rear camera does not display?
A:There are three possible causes of this issue.
1)The rear cam wire is not securely connected; examine all wire
connections and ensure they are secure.
2)Please charge it using a normal vehicle charger. If you use a USB cable to
connect to the car's USB port for power, the camera may not get enough
current and fail to start.
3)If the rear cam or rear cam wire is faulty, don't hesitate to contact us to
obtain a replacement wire or rear cam.
Why is the video ofthe rear camera mirrored?
This is true for the majority of back cameras these days. At the moment,
dash cams at this level do not have an automatic correcting feature.

- 55 -
Trouble Shooting
Q: Does the dash cam keep running even if the ignition is off?
A: It is determined by the DC outlet on your vehicle. After the ignition is
switched off, some automobiles' power outlets continue to operate,
whereas others cease to operate when the car is turned off. If the cigarette
lighter remains powered on after the ignition is turned off, please manually
switch off the vehicle camera.
Q: Is there a way to mute the microphone?
A: Yes, you can mute the microphone in the menu setting.
Q: Why is it said that it will shut off in five seconds?
A: By default, our machine's automated shutdown is disabled. When it is
unable to capture video or disconnect power, it will shut down
automatically and give the impression that it cannot be charged. This
setting is reversible. The machine's built-in battery capacity is just
150MAH, which allows for a maximum run time of 3~5 minutes,
necessitating continual connection to the automobile charger.
Q: Can I view the dash cam files?
A: Yes, you can view the files on playback mode. If the files are protected,
a lock mark will show on them.
Q: Can I connect the dash cam to my MAC book?
A: Yes, you can link to your MAC computer and see your footage.
However, if Quick Time does not play properly, please switch to
another player. (VLC media player, Pot player, or KM player are all
examples).
Q: How to view the videos and photos using the dash cam?
A: If the dash cam is currently recording, hit the OK button to pause it.
Then, twice click the Mode (right ) button to enter playback mode. Press ▲
and ▼ button to select the files. If you select a video, hit the OK button to
begin and end the playback. Press the Mode button to return to the
previously watched files or to select another file to view.
Q: What to do if the suction cup falls off/ unstable?
A: Please remove the suction cup's protective film before installation.
B: Before installation, please wipe the windshield.
C: Verify that the suction cup was placed properly. Assemble the suction
cup of this cam by inserting it into the black handle on the suction cup.

- 56 -
Trouble Shooting
Q: How to view files on the cam and find which images are blurred?
A: The front windshield is very reflective. Please adjust the cam's angle to
match the suction cup's installation location.
Q: What is the most prominent difference between videos recorded in the
daytime and at night?
A: The transmittance of frequently used thermal insulation coatings for the
front glass is between 68 and 80 percent. This influences the camera's
ability to record.
Q: What should I do if the cam often shuts down or cannot be connected to
the power supply?
A: Each vehicle's interior design is unique. Please check that the rotation
angle of the vehicle power adapter is set correctly and that the
connection between the power supply and the machine is steady.
B: The machine's built-in battery has a limited life of 3-5 minutes. When
using It, please ensure that it is connected to a power source.
C: Inspect the power lead for damage to confirm that the machine
receives power.
D: If the cam cannot be used in the car, connect it to another power source
to see if the car cigar lighter's power supply is functioning properly.
Q: Why can't the cam be turned on?
A: Verify that the power adapter's indication light is on. If there is no light,
disconnect and replug the car charger and check the cam's power source.
Please contact us if the car charger does not function.
B: The camera cannot be left on indefinitely. The built-in battery has a
limited life of around 3-5 minutes. Please connect the camera to the
cigarette lighter using the included vehicle charger.
C: Because all of our items are shipped from our manufacturer to
Amazon's warehouse and then fulfilled by Amazon, they may remain in the
warehouse for an extended period of time. When you receive the camera,
immediately connect it to a power source and completely charge it.
D: Please attempt to remove the memory card first, followed by resetting
the dash cam (insert the pin on the machine's button with the RE for 3
seconds). Then, hold down the power button for an extended period of
time until it turns on. It will eventually heal. Then reinsert the memory card
and locate the format option in the settings

- 57 -
Trouble Shooting
Q: What should I do if the cam freezes, the screen goes black or the buttons
do not work?
A: Check whether your card is class 10, 6-32GB, SDHC TF card
B: Press and hold the power button to force shutdown and a restart
C: Press Reset button to reset the cam
Q: Why am I unable to access menu setting (No response by pressing menu
button)?
A: After powering on, the camera will remain in video mode and
automatically begin recording if an SD card is attached. To begin, press
the OK button to pause the recording. Then, using the menu button,
navigate to the settings.
Q: Why does the screen goes blue and prompts mass storage?
A: When the camera is connected to a computer or a low-voltage power
source, it can initiate mass storage. To connect the cam to a power supply
with standard voltage, you should use the included vehicle charger.
Q: Why won’t the cam record after being turned on?
A: Verify that a TF card was inserted. Verify the card's format (Class 10,
no bigger than 32GB)
B: Unplug the camera, remove the card, and reinsert it
C: Format the camera's memory card
Q: What causes abnormal video recording ending?
A: The Card format
B: Verify that the memory card's format is accurate
C: Replace the card with a properly qualified one to determine if the
problem is a card failure.
D: The market is flooded with sub-par memory cards. These cards are of
poor quality, impairing the camera's operation.
Q: Why does the screen goes black?
A: The screen will go dark if the camera is not operated within the
specified time interval, even when recording. You may wake the camera
up by pressing any button.
Q: Why do the videos have no audio?
A: Verify that the audio recording is enabled. You may verify this by looking
at the microphone logo displayed on the screen. The up button activates
the microphone.

- 58 -
Trouble Shooting
Q:How to prevent blurred videos?
A: Clean the lens by removing the protective coating. B: Remove the
screen's protective layer.
B:Remove the screen's protective layer.
B: Due to the difference in screen size and the effect of the resolution,
there will be visual variations between a cam and a computer. Therefore,
please download the files to your computer and re-watch them on your
computer.
C: Verify the camera's resolution. Increase the resolution.
D: The video and photo modes are individually configured. Please
configure the video recording and picture shooting resolutions
independently.
E: Check whether the format of the memory card is correct
Q: Does the dash cam have to be plugged in all the time to record?
A: Yes, the dash cam has to be plugged in for continuous recording. The
built-in rechargeable battery can only last for a couple of minutes time
and cannot record continuously.
Q: How to fix is video time error?
A: Update to the right time according to the user manual
B: Video mode and photo mode have their settings. Please set the time
separately in the process of connecting the cam to the computer
Q: Why am I unable to read storage and can't find the connected device?
A: Reinsert the USB cable to ensure a stable connection
B: Change to another USB cable and check whether there is something
wrong with the cable
C: Connect the cam to different computers because some computer
systems will prevent the external devices.
Q: Why can't I save the setting time and date or other Settings when I first
get the dashcam?
A:The built-in battery dies when the dash cam is stored for an extended
time, rendering the settings unusable. Please attach the dash cam to a
computer through a USB cord, then turn it off and charge it for many hours.
After that, set the time and date, and it will save automatically

- 59 -
Warranty
Warranty
Disclaimer
The Qumax Company is not responsible for the loss of personal data
caused by the failure of the storage device, the decay of service life, and
the improper use of the equipment. Please check the storage device and
update the software version in a timely manner, so as to avoid loss
during use! The driver is not allowed to operate while driving.
All the consequences caused by the driver's illegal operation while
driving does not fall on the company! The Company shall not be liable
for any consequences caused by an unauthorized and unqualified
engineer's installation, disassembly, and self-disassembly of the
mainframe.
This product is the vehicle driving image and sound and other related
information recording equipment, accidents only as an additional
reference.
As a reference to the audio recorded in this product, we shall not be
responsible for the bad files, data loss, and other reasons caused by
the abnormal situation of the dash cam.
This Dash Cam is guaranteed for one year from the date of purchase
against faults in materials or quality. Qumax will repair or replace any
failing part that is not determined to be the result of overuse or damage
during this time.
We reserve the right to repair or replace any cameras considered eligible
under the conditions of this warranty. This guarantee does not cover
damage or failure caused by accident, abuse, unauthorized repair or
interference, or anything similar.
If you have a camera that requires warranty servicing, please contact us at
[email protected]. Please email us at [email protected] if you
have any general or technical queries regarding your Dash Cam. We will
make every effort to respond to your email within 24 hours.

-
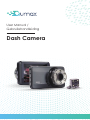 1
1
-
 2
2
-
 3
3
-
 4
4
-
 5
5
-
 6
6
-
 7
7
-
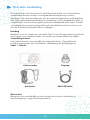 8
8
-
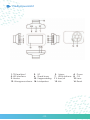 9
9
-
 10
10
-
 11
11
-
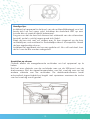 12
12
-
 13
13
-
 14
14
-
 15
15
-
 16
16
-
 17
17
-
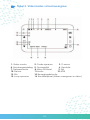 18
18
-
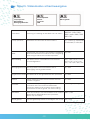 19
19
-
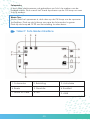 20
20
-
 21
21
-
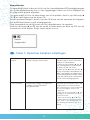 22
22
-
 23
23
-
 24
24
-
 25
25
-
 26
26
-
 27
27
-
 28
28
-
 29
29
-
 30
30
-
 31
31
-
 32
32
-
 33
33
-
 34
34
-
 35
35
-
 36
36
-
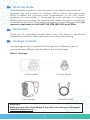 37
37
-
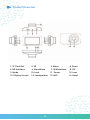 38
38
-
 39
39
-
 40
40
-
 41
41
-
 42
42
-
 43
43
-
 44
44
-
 45
45
-
 46
46
-
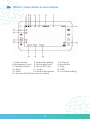 47
47
-
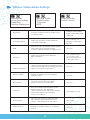 48
48
-
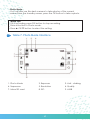 49
49
-
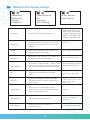 50
50
-
 51
51
-
 52
52
-
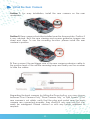 53
53
-
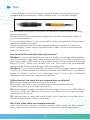 54
54
-
 55
55
-
 56
56
-
 57
57
-
 58
58
-
 59
59
-
 60
60


