
Q4 Outdoor Strobe Flash
Instruction Manual
Q4 Outdoor Strobe Flash
Instruction Manual
01
16
30
44
58
72
86
100

Power Cord ×1
Modeling Lamp ×1
Power adapter ×1 Carrying Case ×1
Lithium Battery ×1
Handle ×1
Q4 Flash Strobe ×1
01
Accessories Available for Purchase
02
The Q4 flash is a portable powerful strobe light powered by a large-capacity
lithium battery and supports 1/8000 HSS. The exposed modeling lamp and
reflector provide a top-level light quality for outdoor and indoor shooting.
What sets it apart from many other powerful speedlites on the market, is its
compact design and smaller size without compromising features such as
standard accessory mounts for a wider compatibility. With an impressive
built-in 2.4G wireless Q system, the Q4 device supports TTL, wireless
triggering, high-speed sync, front-curtain sync, rear curtain sync and more.
Handle
1:Flash Body 2:Top Handle
3:LCD screen
Reflector
Standard Reflector ×1
Reflector Cover ×1
Reflector Latch
Battery Power
Indicator Button
Battery Power Indicator
Optical Receiver
Battery
Display
Short press to
switch groups,
long press to
switch channels
HSS Button
Wireless Function
Button
Modeling Lamp Button On/Off Switch
Menu Button
Mode Button
Adjustment Knob
Settings Button
Flash Test Button
Locking Knob
Type-C USB Firmware
Upgrade Port
3.5mm Sync Port
Battery Release Tab
Battery Charging Port
Flash Tube
Manual Flash
Manual Flash Output
(1) M Manual Flash
(2) Multi Strobe Flash
(3) TTL Automatic Flash
Modeling Lamp Mode
Flash Duration
Channel
Multi (Strobe) Flash
Flash Frequency
Flash Times
TTL Automatic
Flash
Flash Exposure
Compensation(FEC)
High Speed Sync (HSS)
S1/S2
(5)Wireless Optical Control Shooting
(4)Wireless Transmission Shooting
Flash Group
Angle Locking Knob
Light Stand
Mounting Knob
Umbrella Hole
Wireless Transmission
-Wireless Shooting
The Q4 flash can be used with the following photographic accessories
to achieve the very best shooting results and experience: QPro flash trigger,
Bowens mount soft umbrella, reflector, snoot, beauty dish, light stand, etc.
About this product
Package Contents
Product Illustration Product Illustration Product Illustration
EN EN

03
Insert the three copper pins of the
flash tube into the three pin holes of
the flash body and push them inward
until they are secure.
Push the reflector into the tab
holes and then rotate the
reflector clockwise to
secure it.
When installing the reflector,
please note that the red dot on the
reflector should be aligned with
the blue dot on the bayonet, and
then slotted into the
connecting piece.
Press the reflector removal button
and then rotate the reflector
counterclockwise and pull it
outward.
※Exercise caution to prevent burns
when removing it.
※The device should not be powered
on when installing/removing the
flash tube.
Installing the Flash Tube
When installing the flash tube, please
note that the red dot on the inner part
of the flash tube should be aligned
with the red dot on the bayonet, and
then insert the pins into the pin holes
to secure the flash tube.
Simply pull the lamp outwards in the
direction shown..
※When removing the lamp, be mindful
that the bulb could still be hot.
Removing the Flash Tube
Installing the Reflector
Removing the Reflector
Slide the battery release tab upward,
the battery can be removed after
it automatically pops out.
Simply insert the battery into the
battery slot in the direction shown
until the battery latch locks into
place.
Removing the Lithium Battery
Installation of the Lithium Battery
Insert the screws at the top of the
handle and the two positioning
points as shown. Turn the locking
knob until the handle is secure.
Installing the Handle
04
Insert the top of the tripod into the
bottom of the handle, tighten the
locking knob until the light stand
is securely attached.
※This product does not include
a tripod (separate purchase
required).
Installing the Tripod
Loosen the Angle Locking Knob of
the support bracket, adjust the angle
of the flash to a suitable angle and
then re-tighten.
Adjusting the Angle of the Flash
Using Battery power
Long press the power button for 1 second to control the power of the product.
The device has an automatic shutdown function. It is recommended that you
turn off the power when not to be used for a long period of time.
The flash will automatically turn off when there is no operation within the
time set in C.Fn-STANDBY (30-120min).
Battery Management
1. The product uses a lithium battery, with a long service life, which can be
recharged up to 300 times.
2. Safe and reliable, built-in circuit with protection against overheating,
overcharge, overdischarge , overcurrent and short-circuiting.
3. Use the DC charging port to charge the battery via the included power
adapter. A full charge takes approx. 3 hours.
Battery Features
Installation Instructions Installation Instructions Installation Instructions
EN EN

06
Short press the mode button "MODE". When the
word "TTL" appears on the screen, the flash
has entered TTL mode.
※ TTL mode is only available when the
wireless function is enabled.
High Speed Sync (HSS)
Press the button " " briefly to display the " "
symbol on the screen. This feature requires the
use of a wireless transmitter for high-speed
synchronization, such as QProC/N/S.
Battery Power Indication
After correctly installing the battery to power the flash, the on-screen
battery icon displays the remaining power which you can check in an
instant.
The flash has three modes: TTL Auto Flash, M Manual Flash, and Multi Flash.
In TTL mode, the camera's metering system detects the flash lighting reflected
back from the subject and automatically adjusts the flash output so that the
subject and background are equally exposed.
※Press the < MODE > button. Three flash modes will appear on the LCD screen
in order.
Note: The indicator bars are purely indicative and should be used as a guide
of battery power remaining.
Battery Power Icon
On LCD display
(Power indication and
management for the
entire flash system.)
(Battery level
management when
battery not discharging)
LED Indicators on
the Battery
LED
Indicators
on the
Battery
Equivalent Power
Percentage
Using Battery power
1. Avoid short-circuiting the positive and negative terminals.
2. The battery is not waterproof and should not be exposed to high levels
of humidity or immersed in water.
3. Keep out of the reach of children.
4. Do not charge the battery for more than 24 hours. Only a compatible,
original charger should be used. Store in a cool dry place.
5. Do not leave the battery unused long periods of time (more than 6 months).
Recharging a battery that has been left unused for too long is a safety hazard.
Do not charge the battery when the voltage of the battery cell is below 9V.
6. Do not place the battery near or in a fire.
7. Dispose of the battery in accordance with local regulations after use.
8. When not in use for a long period of time, please charge to approximately
60% before storing away.
9. When not in use for a long period of time, store the battery in good
condition and leave it half-charged.
10. The battery must not be used while it is being charged.
11. The battery is equipped with an over-temperature protection function. If
the internal temperature of the battery reaches 131°F/55℃, this function will
activate automatically. The battery will need to cool down before normal
operation is resumed.
Battery Precautions
05
Flash Mode - TTL Automatic Flash Mode Flash Mode - TTL Automatic Flash Mode
Power On/Off / Unlock Screen
TTL Mode
Rotate the adjustment knob to set the exposure
compensation value. Press the "SET" button to
confirm and exit the setting.
※Users can adjust the flash exposure
compensation in 1/3-stop increments between
±3 stops. "0.3" equates to 1/3 stop, "0.7"equates
to 2/3 stop. Set the flash exposure compensation
to "+0" to cancel the flash exposure compensation.
Flash Exposure Compensation(FEC)
① Short press the power button " ". The screen
will light up. Turn the adjustment knob
clockwise three times and then the screen
will be unlocked when the arrow pointing
downwards appears.
② Short press the power button " " to
turn off the light.
4 Bars 4 Blue Lights On
4 Blue
Lights On 3 Blue
Lights On 2 Blue
Lights On 1 Blue
Lights On
3 Blue Lights On
2 Blue Lights On
1 Blue Lights On
75% ~ 100%
50% ~ 75%
25% ~ 50%
3% ~ 25%
2% - Flashing Blue Light
1% - No indicators lit
The flash will cease to
work when the power
is <2%. You will have a
one minute advance
warning before the
device shuts down after
3 minutes.
Note: Please charge as
soon as possible (within
10 days) before using
or storing the light away.
3 Bars
2 Bars
1 Bars
Low remaining
power alert
With High Speed Sync (FP Flash), users can use the flash synchronously
at all shutter speeds. High speed sync mode is particularly well adapted
when using aperture priority for fill flash on portraits.
Battery
Level
Button
EN EN
Using Battery power

If the shutter speed is set equal to, or slower than, the maximum flash sync
speed of the camera, the "" "" icon will not be displayed in the viewfinder.
With High Speed Sync, the higher the shutter speed, the smaller the effective
flash range.
To resume normal flash, press the High Speed Sync button again. The "" ""
icon will disappear.
High speed sync flash is not available in Multi Flash mode.
The flash features an overheat protection function which will kick in after 50
consecutive high speed synchronized flashes.
0807
Short press the mode button "MODE". When
"M" appears on the screen, the flash has been
set to M mode.
The flash output can be set by turning the
adjustment wheel. Press the "SET" setting
button again to confirm the flash output.
In M Manual Flash Mode, press the <MENU>
button to enter the C.Fn - SLAVE and select S1.
The flash can be used as a secondary light to
create a variety of lighting effects, suitable for
a manual flash environment. It will trigger
the flash synchronously with the first flash
of the master flash which is the effect
consistent with the use of wireless flash
triggers.
Setting the S1 Optical Unit
Press the <MENU> button to enter C.Fn - SLAVE
and select S2. The flash can be used as a
secondary light for TTL flash environments.
With the anti-pre-flash function, the camera
with a pre-flash function can be used to
synchronize shooting with the optic slave.
It will trigger the flash synchronously with
the second flash of the main flash, that is, a
two light-controlled flash.
Setting the S2 Optical Unit
Flash duration is the time from the start of the
flash to reach the half-peak of light. Half-peak
is expressed as t = 0.5. In order to provide
photographers with more detailed shooting
values, this product uses t = 0.1.
The difference between t=0.5 and t=0.1 is
shown on the left.
The Multi Flash Mode emits a series of rapid flashes. It allows users to take
multiple images of moving objects in a single picture. You can set the flash
frequency (the number of flashes per second, expressed in Hz), the flash times
and the flash output power.
※ Flash Duration is displayed only in M mode.
Displaying the Flash Duration
Setting the Multi Flash Mode
Setting the Flash Power to M mode
When the word "MULTI" appears on the screen, the
flash is now set in strobe mode. The flash output
can be set by rotating the wheel.
Press the "SET" button again to set the number of
flashes and rotate the dial to set the value.
Press the "SET" button again to set the flash
frequency and rotate the dial to set the value.
Finally press the "SET" button again to set all
values.
Calculating the Shutter Speed
In Multi Flash Mode, the shutter should remain open until the flash stops. Use
the following formula to calculate the shutter speed, and then set the camera.
Shutter Speed = Flash Times/Flash Frequency
For example, if the Flash Times is 10 and the Flash Frequency is 5Hz, the shutter
speed should be at least 2 seconds.
To prevent overheating and damage to the flash, do not perform multi
strobes/flashes of more than 10 consecutive flashes. After 10 flashes, let the flash
cool down for at least 15 minutes. If you try to perform more than 10 consecutive
multi strobes/flashes, the flash may stop automatically to prevent the flash head
from overheating. If this happens, let the flash cool down for at least 15 minutes.
Flash Mode - TTL Automatic Flash Mode Flash Mode - M Manual Flash Mode
Flash Mode - M Manual Flash Mode
Flash Mode - M Manual Flash Mode Flash Mode - Multi Flash Mode
Flash Mode - Multi Flash Mode
M Mode allows you to set the flash output in 0.1-stop increments from 1/256
power to 1/1 full power. To obtain the correct flash exposure, please use a
handheld flash meter to determine the required flash output.
Notes
※ The S1/S2 optical slave flash mode is supported only in M mode when the
wireless function is turned off.
A
t
50%
10%
t=0.5
t=0.1
Notes
● Very reflective subjects are more effective with strobe flashes in front of a
dark background.
● The use of a tripod and remote is recommended.
● Multi Flash Mode cannot be set when the flash output is 1/1 and 1/2.
● Multi Flash Mode can also be used with "buLb".
● If the flash time is displayed as --, the light will flash continuously until the
shutter or battery is exhausted.
The flash times will be limited as shown in the table below.
Hz 1 2 3 4 5 6~7 8~9 10 11 12~14 15~19 20~50 60~199
1/4
1/8
1/46
1/32
1/64
1/128
1/256
Flash
Output
Full Power Flash Times
Flash Mode - M Manual Flash Mode
8
14
30
60
90
100
100
6
14
30
60
90
100
100
4
12
30
60
90
100
100
3
10
20
50
80
100
100
3
8
20
50
80
100
100
2
6
20
40
70
90
90
2
5
10
30
60
80
80
2
4
8
20
50
70
70
2
4
8
20
40
70
70
2
4
8
20
40
60
60
2
4
8
18
35
50
50
2
4
8
16
30
40
40
2
4
8
12
20
40
40
ENEN

Menu Mode (C.Fn: Sett Customized Function)
Setting 2.4G Wireless Transmission
The Q4 uses the 2.4G wireless Q system and can be used in perfect combination
with some of our other models. Used as a slave unit, it is compatible with
cameras such as Canon E-TTL II, Nikon i-TTL and Sony and switches
automatically according to the master unit. No manual setting is required.
※Q4 as a slave unit can be controlled by the master unit with wireless
transmission function, such as the models: NW420, QPro series, Z1 series,
and some others.
Press the "MENU" button to enter the menu mode,
rotate the adjustment knob to select the ID (01~99),
and press the "SET" button to set it.
(※Only when the Master unit has this function.)
Short press the Wireless button " ". The " "
icon will appear on the screen.
Short press the " " button to select a group (A~E).
Positioning and Operating Range (Example of wireless Flash Shooting)
(1) Automatic flash shooting using a slave unit.
(3) Automatic flash shooting with three slave groups.
Wireless Multi Flash Shooting: Users can split the slave unit into two or three
groups and use TTL auto flash while changing the flash ratio (magnification).
In addition, the flash user can set and shoot with different flash modes for
each flash group.
(2) Automatic flash shooting with two slave groups
● Use a master unit with wireless transmitter function as the transmitter.
● You should test the flash by taking a test shot before shooting.
● The transmission distance may be shorter depending on the location,
surrounding environment, weather conditions, etc.
Setting Channels
Setting the ID NO.
Press and hold the " " button for 2 seconds to
select channel number. Rotate the adjustment
knob to set the channel value (1~32), then press
"SET" to set the channel.
① Press the "MENU" button to enter the C.Fn
menu. "Ver x.x" in the lower right corner
indicates the software version number.
② Turn the adjustment knob to select the custom
function icon. Press the "SET" button to highlight
the custom function number.
③ Rotate the adjustment knob to set the required
number. Press the "SET" button to confirm and
press "SET" again to exit the selection.
④ Press the "MENU" button to exit the setting.
09
Wireless Flash Shooting: Wireless (2.4G) Transmission Wireless Flash Shooting: Wireless (2.4G) Transmission
Setting Groups
Wireless Flash Shooting
99
10
Transmission Distance
Approx. 328'/100m
A
B
A
B
C
1. The external environment 2.4G signal interference (such as wireless base
stations, 2.4G Wi-fi routing, Bluetooth devices, etc.).
Please adjust the channel CH setting of the flash trigger (recommended +10),
find a channel without interference to use, or turn off other 2.4G devices
whilst working.
2. Please confirm whether the flash has been recycled or the recycling time has
kept up with the continuous shooting speed (flash ready indicator has been lit),
and is not in the overheat protection or other abnormal state.
You can try to adjust the flash power setting, such as TTL mode. Please try to
change to M mode (since TTL mode requires a single pre-flash).
3. The distance between the trigger and flash is too close (distance <0.5m).
Please turn on the flash trigger "close to wireless mode":
Qpro series: Set C.Fn-DIST for 0-30m.
4. The flash and the trigger are both low on power.
Please replace the battery (recommended to use 1.5V disposable alkaline type
batteries for the trigger).
C.Fn: Set Customized Function
Causes and Solutions of 2.4G Wireless Flash Leakage
X.X
Wireless Flash Shooting: Wireless (2.4G) Transmission Wireless Flash Shooting: Wireless (2.4G) Transmission
3
10
20
50
80
100
100
3
8
20
50
80
100
100
2
6
20
40
70
90
90
2
5
10
30
60
80
80
2
4
8
20
50
70
70
2
4
8
20
40
70
70
2
4
8
20
40
60
60
2
4
8
18
35
50
50
2
4
8
16
30
40
40
2
4
8
12
20
40
40
EN EN

Modeling Lamp
③ Short press the modeling lamp switch button
" " When the modeling lamp and the word
"OFF" appear in the lower right corner of the
screen, the modeling lamp is off.
12
To ensure the safe operation of the equipment, the system always carries out
preventive protection. The following icons are for your reference.
C.Fn: Set Customized Function
Customized
Functions Icons
SLAVE
MODEL
STANDBY
LIGHT
DELAY
UNITS
ALT
LCD
ID
BEEP
RESET
Functions
M Mode
M Mode
M Mode
Wireless
Mode
M/Multi Mode
OFF
OFF
OFF
01-99
OFF
Reset
ON
Automatic shutdown
without any operation
Turns off automatically
after 15 seconds
Always OFF
7 Levels
Always ON
Rear Curtain Flash Available
UNITS and ALT must be used
in combination: UNITS sets
the total number of lights;
ALT sets how many times
the light is triggered
S1 Mode
S2 Mode
OFF
S1
S2
-3~+3
OFF
01-99
ON
OFF
NO
YES
CONT
INTER
OFF
30min
60min
90min
120min
15sec
OFF
ON
Always ON
Automatically turns off when recycled.
S1/S2 Optic
Mode Selection
Modeling Lamp
Auto Power Off
Backlight
illumination
Duration
Flash Delay OFF,0.01~30S
Flash Times
Set the number of
triggers required to
fire the flash
1~4
2~4
LCD Contrast
Wireless ID
Buzz Alert
Reset Parameters
Set an Icon Settings and Instructions Flash Mode
NOT Supported ① Short press the modelling light button " ".
The modeling light and the word "PROP"
will appear in the bottom right corner of
the screen. You can now change the output
power by rotating the dial to adjust the
brightness of the modeling light. The higher
the power setting, the brighter the
modelling light.
② Short press the modelling light button " ".
The modeling light and the word "PROP"
will appear in the bottom right corner of
the screen. Press and hold the modeling
lamp switch button " " again for 2
seconds. The bottom right corner of the
screen will show a highlighted percentage
which will alter by rotating the adjustment
knob to change the brightness percentage
(10% ~ 100%) .
Modeling Lamp Mode
Additional Protection Features
11
Protection System Protection System
1. To prevent the flash head from overheating and becoming damaged, do not
perform more than 75 rapid successive flashes at 1/1 power. After 75 successive
flashes, allow the flash to cool down for at least 5 minutes.
2. If you continue to fire more than 75 consecutive flashes immediately
afterwards, the internal anti-overheating function may activate resulting in the
charging time increasing to more than 6 seconds. If this happens, allow the
flash to cool down for about 5 minutes and the flash will resume normal operation.
3. When the thermal protection is activated, the " " symbol will appear on
the display.
Overheat Protection
Number of consecutive flashes to activate the thermal protection function.
Number of consecutive flashes to activate the overheating protection in
HSS mode:
Power
1/1
1/2(+0.7~+0.9)
1/2(+0.3~+0.6)
1/2(+0.0~+0.2)
1/4(+0.0~+0.9)
1/8(+0.0~+0.9)
1/16(+0.0~+0.9)
1/32(+0.0~+0.9)
1/64(+0.0~+0.9)
1/128(+0.0~+0.9)
1/256(+0.0~+0.9)
75
100
120
150
200
300
400
500
1000
Times
1/1
1/2(+0.0~+0.9)
1/4(+0.0~+0.9)
1/8(+0.0~+0.9)
1/16(+0.0~+0.9)
1/32(+0.0~+0.9)
1/64(+0.0~+0.9)
1/128(+0.0~+0.9)
1/256(+0.0~+0.9)
50
60
75
100
150
LCD Display
Error 1
Error 5
Error 6
Warnings
Flash recycling system not operational, please
restart the device . If this fails to resolve itself, the
device will require repair.
Fan Error
Sensor Error
C.Fn: Set Customized Function
Power Times
EN EN
200
300

Firmware Upgrade
1. Do not place the product in an environment where the temperature is
higher than 50℃.
2. The operating temperature of the product should not be higher than 40℃.
3. Do not subject the product to a strong physical impact. Dropping the
device may result in irreperable damage.
4. Please do not flash directly into the eyes (especially the eyes of infants),
otherwise it may result in short term visual impairment.
5. This product is not waterproof and should be kept out of the rain and
humid environments.
6. Please do not disassemble the product. It should only be repaired by
a qualified professional.
7. Do not use near a fire. If a bulge develops in the battery or housing, the
flash should not be used.
8. If the device malfunctions in any way please turn off the flash power
immediately.
9. Do not use the flash in the vicinity of chemicals, flammable gases or other
special substances, which in special circumstances may be sensitive to the
instantaneous glare emitted by the flash and may lead to fire or
electromagnetic interference. Particular attention should be given to any
relevant warning signs.
Care and Maintenance
▪ If the flash starts to malfunction, the power should be turned off
immediately to identify the cause.
▪ The flash body should not be subjected to excessive vibration and kept
dust free.
▪ It is normal for the lamp body to heat up slightly during use. Do not trigger
the flash continuously if it isn't necessary.
▪ If the product fails or is wet, please seek assistance from a qualified
professional.
▪ Changes to the technical specifications of the product may be made
without prior notice.
This product supports firmware upgrades via the USB port. The latest
software announcements and instructions will be posted on the official
website.
▪ This product does not come with a USB upgrade cable. Please purchase
separately. The USB port of this product is a Type-C port.
▪ Refer to "Neewer_Firmware_Update" program software to upgrade the
firmware. Please download and install "Q4 firmware upgrade software"
and select the corresponding firmware file before upgrading the firmware.
▪ Please refer to the latest e-manual for updated information whilst the
product is being upgraded with firmware.
Sync Jack
The sync jack is Φ3.5mm and can be plugged into a sync cable or trigger plug
to synchronise the flash.
※ When using the sync port to trigger the flash, the wireless 2.4G mode and
S1/S2 modes must be deactivated.
※ The synchronization speed should not exceed 1/200 when using the
sync port.
Troubleshooting guide
Flash underexposure or overexposure.
Using HSS mode.
The effective flash range is smaller when using High Speed Sync, so make
sure the subject is within the effective flash range.
▪ Using M mode.
Please try to change to TTL mode or modify the flash output power.
13 14
Model
Power
Flash Duration
Flash Modes
Power Output
Stroboscopic Flash
Flash Exposure
Compensation(FEC)
Sync Modes
Delay Flash
Masking Function
Built in Silent Fan
Built in Buzzer
Display
Q4
400Ws
1/209s to 1/10989s
M/Multi (Wireless Off)
TTL/M/MUTIL (Receiver unit for radio transmission)
9 steps 1/256-1/1
HSS (up to 1/8000s), first/ curtain sync, second curtain sync
0.01-30s
Display Flash Duration
Dot Matrix Screen
Modelling Lamp (LED)
Wireless Slave
Unit Mode
2.4G, S1/S2, 3.5mm Synchronous Cord, Flash TestTrigger Modes
Wireless Function
Wireless 2.4G
Q System
Rechargeable Li ion Battery
Energy Saving
Color Temperature
Slave Unit, Wireless Off
Full Power Flash 400
Recycling Time Approx. 0.01-1.2s
Battery Power Indication
5600±200K
Specifications Specifications
Notes
Compatible with Canon E-TTL II, Nikon i-TTL and
Sony TTL automatic flash system
Provided (up to 100 times, 199Hz)
Manual. FEB: +/-3 stops in 1/3 stop increments
32 Channels, 5 Groups (A, B, C, D, E)
2.4G Transmission Range: 328'/100m
Wireless ID: The user can change the wireless
transmission channel and wireless ID of the
master and slave unit for seamless operation
without signal interference before triggering.
The flash can be set to automatically power
off without operation for 30-120 minutes.
21.6V/2800mAh
30W/5600K/CRI:95+
EN EN

FCC Statement
This device complies with Part 15 of the FCC Rules. Operation is subject to
the following two conditions: (1) this device may not cause harmful
interference, and (2) this device must accept any interference received,
including interference that may cause undesired operation.
CAUTION: The user is cautioned that changes or modifications not expressly
approved by the party responsible for compliance could void the user's
authority to operate the equipment.
NOTE: This equipment has been tested and found to comply with the limits for
a Class B digital device, pursuant to part 15 of the FCC Rules. These limits are
designed to provide reasonable protection against harmful interference in a
residential installation. This equipment generates, uses and can radiate radio
frequency energy and, if not installed and used in accordance with the
instructions, may cause harmful interference to radio communications.
However, there is no guarantee that interference will not occur in a particular
installation. If this equipment does cause harmful interference to radio or
television reception, which can be determined by turning the equipment off
and on, the user is encouraged to try to correct the interference by one or
more of the following measures:
—Reorient or relocate the receiving antenna.
—Increase the separation between the equipment and receiver.
—Connect the equipment into an outlet on a circuit different from that to
which the receiver is connected.
—Consult the dealer or an experienced radio/TV technician for help.
FCC RF Radiation Exposure Statement:
1. This Transmitter must not be co-located or operating in conjunction with
any other antenna or transmitter.
2. This equipment complies with RF radiation exposure limits set forth for
an uncontrolled environment.
The device has been evaluated to meet general RF exposure requirement.
The device can be used in portable exposure condition without restriction.
IC Warning Statements
- English Warning Statement
“This device complies with Industry Canada licence-exempt RSS standard(s).
Operation is subject to the following two conditions: (1) this device may not
cause interference, and (2) this device must accept any interference, including
interference that may cause undesired operation of the device.” The digital
apparatus complies with Canadian CAN ICES-3 (B)/NMB-3(B).
This radio transmitter has been approved by Industry Canada to operate with
the antenna types listed with the maximum permissible gain indicated.
Antenna types not included in this list, having a gain greater than the maximum
gain indicated for that type, are strictly prohibited for use with this device.
The device has been evaluated to meet general RF exposure requirement. The
device can be used in portable exposure condition without restriction.
- French Warning Statement
“Le présent appareil est conforme aux CNR d'Industrie Canada applicables aux
appareils radio exempts de licence. L'exploitation est autorisée aux deux
conditions suivantes : (1) l'appareil ne doit pas produire de brouillage, et
(2) l'utilisateur de l'appareil doit accepter tout brouillage radioélectrique
subi, mêmesi le brouillage est susceptible d'en compromettre le
fonctionnement.” Cet appareil numérique de la classe B est conforme à la
norme NMB-003 du Canada.
Le présent émetteur radio a été approuvé par Industrie Canada pour fonctionner
avec les types d'antenne énumérés ci-dessous et ayant un gain admissible
maximal. Les types d'antenne non inclus dans cette liste, et dont le gain est
supérieur au gain maximal indiqué, sont strictement interdits pour l'exploitation
de l'émetteur.
L'équipement a été évalué comme satisfaisant aux exigences générales en
matière d'exposition aux radiofréquences. L'appareil peut être utilisé sans
restriction dans des conditions d'exposition portatives.
15
EN

Netzkabel ×1
Einstelllampe ×1
Netzteil ×1 Tragetasche ×1
Lithiumbatterie ×1
Griff ×1
Q4 Blitz ×1
16
Zubehör zum Kauf erhältlich
17
Das Q4 Speedlite Blitz ist ein tragbares, leistungsstarkes Blitzlicht, das von
einer Lithiumbatterie mit großer Kapazität betrieben wird und 1/8000 HSS
unterstützt. Das freiliegende Einstelllicht und der Reflektor sorgen für eine
Lichtqualität auf höchstem Niveau für Außen- und Innenaufnahmen. Was
es von vielen anderen leistungsstarken Speelites auf dem Markt
unterscheidet, ist sein kompaktes Design und seine kleinere Größe, ohne
Kompromisse bei Funktionen wie Standardzubehörhalterungen für eine
breitere Kompatibilität einzugehen. Mit einem beeindruckenden
integrierten 2.4G Funk-Q-System unterstützt der Q4 TTL, Funk Auslösung,
Hochgeschwindigkeitssynchronisation, Synchronisation auf den vorderen
Vorhang, Synchronisation auf den hinteren Vorhang und mehr.
Griff
1:Blitzkörper 2:Oberer Griff
3:LCD Bildschirm
Reflektor
Reflektor ×1
Reflektorverriegelung
Taste für
Batterieleistungsanzeige
Batterieleistungsanzeige
Optischer Empfänger
Batterie
Anzeige
Kurz drücken, um zwischen
Gruppen zu wechseln,
lange drücken, um
zwischen Kanälen
zu wechseln
HSS-Taste
Funk Funktionstaste
Einstelllampen Taste Ein / Aus Schalter
Menütaste
Modus Taste
Einstellknopf
Schaltfläche
"Einstellungen"
Blitztest Taste
Verriegelungsknopf
Typ-C USB Firmware
Aktualisierungsanschluss
3,5 mm
Synchronisierungsanschluss
Batteriefreigabelasche
Batterieladeanschluss
Blitzröhre
Manueller Blitz
Manuelle Blitzausgabe
(1) M Manueller Blitz
(2) Multi Strobe Blitz
(3) Automatischer TTL-Blitz
Einstelllampenmodus
Blitzdauer
Kanal
Multi (Stroboskop) Blitz
Blitzfrequenz
Blitzzeiten
Multi Stroboskopblitz
Blitzbelichtungskom-
pensation (FEC)
Hochgeschwindigkei-
tssynchronisation (HSS)
S1/S2
(5)Aufnahmen mit Funk optischer Steuerung
(4)Aufnahmen mit Funk Übertragung
Blitzgruppe
Winkelfeststellknopf
Verriegelungsknopf
des Lichtstativs
Schirmloch
Funk Übertragung -
Funk Aufnahmen
Der Q4-Blitz kann mit dem folgenden fotografischen Zubehör verwendet
werden, um die besten Aufnahmeergebnisse und -erfahrungen zu erzielen:
QPro-Blitzauslöser, Bowens Halterung weicher Schirm, Reflektor, Vorsatz,
Beauty Dish, Lichtstativ usw.
Produktübersicht
Paketinhalt
Produktabbildung Produktabbildung Produktabbildung
DE DE
Abdeckung Reflektor ×1

18
Lassen Sie die drei Kupferstifte der
Blitzröhre in die drei Stiftlöcher des
Blitzkörpers einrasten und drücken
Sie sie nach innen, bis sie sicher
sitzen.
Drücken Sie den Reflektor in die
Laschenlöcher und drehen Sie den
Reflektor dann im Uhrzeigersinn,
um ihn zu befestigen.
Beachten Sie bei der Montage des
Reflektors, dass der rote Punkt auf
dem Reflektor mit dem blauen
Punkt auf dem Bajonett
ausgerichtet ist und dann in das
Verbindungsstück gesteckt wird.
Drücken Sie die Taste zum Entfernen
des Reflektors, drehen Sie den
Reflektor dann gegen den Uhrzeigersinn
und ziehen Sie ihn nach außen.
※Achten Sie beim entfernen darauf
sich nicht zu verbrennen.
※Das Gerät sollte beim Installieren/
Entfernen der Blitzröhre nicht
eingeschaltet sein.
Installation der Blitzröhre
Beachten Sie bei der Installation der
Blitzröhre, dass der rote Punkt auf
dem inneren Teil der Blitzröhre mit
dem roten Punkt auf dem Bajonett
ausgerichtet sein sollte, und stecken
Sie dann die Stifte in die Stiftlöcher,
um die Blitzröhre zu sichern.
Ziehen Sie die Lampe einfach nach
außen in Richtung der parallelen
Lampe.
※Denken Sie beim Entfernen
der Lampe daran, dass die Glühbirne
noch heiß sein kann.
Entfernen der Blitzröhre
Installieren des Reflektors
Entfernen des Reflektors
Schieben Sie die Batteriefreigabelasche
nach oben, die Batterie kann
entfernt werden, nachdem sie
automatisch herausspringt.
Setzen Sie den Akku einfach in der
angezeigten Richtung in das
Akkufach ein, bis die
Akkuverriegelung einrastet.
Entfernen der Lithium-Batterie
Installation der Lithium-Batterie
Legen Sie die Schrauben oben am
Griff und an den beiden
Positionierungspunkten wie
abgebildet ein. Drehen Sie den
Verriegelungsknopf, bis der Griff
gesichert ist.
Installieren des Griffs
19
Führen Sie die Oberseite des Stativs
in die Unterseite des Griffs ein und
ziehen Sie den Feststellknopf fest,
bis das Lichtstativ sicher befestigt ist.
※Dieses Produkt enthält kein Stativ
(separater Kauf erforderlich).
Installieren des Stativs
Lösen Sie den Winkelfeststellknopf
des Griffs, stellen Sie den Winkel des
Blitzes auf einen geeigneten Winkel
ein und ziehen Sie dann den
Winkelfeststellknopf fest.
Anpassung des Blitzwinkels
Durch Akkus mit Strom versorgen
Halten Sie den Netzschalter 1 Sekunde lang gedrückt, um die
Stromversorgung des Produkts zu steuern. Das Gerät verfügt über eine
automatische Abschaltfunktion. Es wird empfohlen, das Gerät
auszuschalten, wenn es längere Zeit nicht verwendet wird.
Der Blitz wird automatisch ausgeschaltet, wenn innerhalb der in C.Fn-STANDBY
eingestellten Zeit (30-120 Min.) keine Bedienung erfolgt.
Batteriemanagement
1. Das Produkt verwendet eine Lithiumbatterie mit langer Lebensdauer, die
bis zu 300 Mal aufgeladen werden kann.
2. Sicherer und zuverlässiger, eingebauter Schaltkreis mit Schutz gegen
Überhitzung, Überladung, Überentladung, Überstrom und Kurzschluss.
3. Verwenden Sie den Gleichstromladeanschluss, um den Akku über das
mitgelieferte Netzteil aufzuladen. Eine vollständige Ladung dauert
ca. 3 Stunden.
Batteriefunktionen
Installationsanleitung Installationsanleitung Installationsanleitung
DE DE

21
Drücken Sie kurz die Modustaste "MODE". Wenn das
Wort "TTL" auf dem Bildschirm erscheint, befindet
sich der Blitz im TTL-Modus
Hochgeschwindigkeitssynchronisation (HSS)
Drücken Sie kurz die Taste " ", um das Symbol
" " auf dem Bildschirm anzuzeigen. Diese
Funktion erfordert die Verwendung eines Funk
Senders für Hochgeschwindigkeitssynchronisation,
wie z. B. QProC/N/S.
Batterieleistungsanzeige
Nach dem korrekten Einsetzen des Akkus zur Stromversorgung des Blitzes
zeigt das Akkusymbol auf dem Bildschirm die verbleibende Leistung an,
welche Sie sofort überprüfen können.
Der Blitz verfügt über drei Modi: TTL-Blitzautomatik, manueller M-Blitz und
Multi-Blitz. Im TTL-Modus erkennt das Messsystem der Kamera das vom Motiv
reflektierte Blitzlicht und passt die Blitzleistung automatisch so an, dass Motiv
und Hintergrund gleichermaßen belichtet werden.
※Drücken Sie die < MODE >-Taste. Auf dem LCD-Bildschirm erscheinen
nacheinander drei Blitzmodi.
Hinweis: Die Anzeigebalken sind nur Richtwerte und sollten als Anhaltspunkt
für die verbleibende Batterieleistung verwendet werden.
Batterieleistungssymbol
Auf dem LCD-Display
(Leistungsanzeige
und -verwaltung für das
gesamte Blitzsystem.)
(Batteriestandsmanage-
ment, wenn Batterie
nicht entladen wird)
LED-Anzeigen auf
der Batterie
LED-
Anzeigen
auf
der
Batterie
Äquivalenter
Leistungsprozentsatz
Durch Akkus mit Strom versorgen
1. Vermeiden Sie das Kurzschließen der Plus- und Minusklemmen.
2. Der Akku ist nicht wasserdicht und sollte nicht hoher Feuchtigkeit ausgesetzt
oder in Wasser getaucht werden.
3. Außerhalb der Reichweite von Kindern aufbewahren.
4. Laden Sie den Akku nicht länger als 24 Stunden auf. Es sollte nur ein
kompatibles Original Ladegerät verwendet werden. Kühl und trocken lagern.
5. Lassen Sie den Akku nicht längere Zeit (mehr als 6 Monate) unbenutzt stehen.
Das Aufladen einer Batterie, die zu lange nicht verwendet wurde, ist ein
Sicherheitsrisiko. Laden Sie den Akku nicht auf, wenn die Spannung der
Akkuzelle unter 9 V liegt.
6. Platzieren Sie den Akku nicht in die Nähe eines Feuers oder in ein Feuer.
7. Entsorgen Sie den Akku nach Gebrauch gemäß den örtlichen Vorschriften.
8. Wenn Sie das Gerät längere Zeit nicht benutzen, laden Sie es bitte auf etwa
60 % auf, bevor Sie es zur Lagerung wegräumen.
9. Wenn Sie den Akku längere Zeit nicht benutzen, lagern Sie ihn in gutem
Zustand und lassen Sie ihn halb geladen.
10. Es wird nicht empfohlen, den Akku während des Ladevorgangs zu verwenden.
11. Der Akku verfügt über eine Überhitzungsschutzfunktion. Wenn die interne
Batterietemperatur 131°F/55°C überschreitet, wird diese Funktion automatisch
ausgelöst. Der Akku muss erst wieder abgekühlt sein, bevor er den normalen
Betrieb wieder aufnehmen kann.
Batterie Vorsichtsmaßnahmen
20
Bildschirm ein-/ausschalten/entsperren
TTL-Modus
Drehen Sie den Einstellknopf, um den
Belichtungskorrekturwert einzustellen. Drücken
Sie die "SET"-Taste, um die Einstellung zu
bestätigen und zu verlassen.
※Benutzer können die Blitzbelichtungskorrektur
in 1/3-Schritten zwischen ±3 Stufen anpassen.
"0,3" entspricht 1/3 Blende, "0,7" entspricht
2/3 Blende. Stellen Sie die Blitzbelichtungskorrektur
auf "+0", um die Blitzbelichtungskorrektur
abzubrechen.
※Auf den TTL Modus kann zugegriffen werden,
sobald die WLAN Funktion aktiviert ist
Blitzbelichtungskompensation (FEC)
① Drücken Sie kurz die Einschalttaste " ".
Der Bildschirm leuchtet auf. Drehen Sie den
Einstellknopf dreimal im Uhrzeigersinn und der
Bildschirm wird entsperrt, wenn der nach unten
zeigende Pfeil erscheint.
② Drücken Sie kurz den Netzschalter " ",
um das Licht auszuschalten.
4 Balken 4 blaues Licht an
3 blaues Licht an
2 blaues Licht an
1 blaues Licht an
1 blaues
Licht an
2 blaues
Licht an
3 blaues
Licht an
4 blaues
Licht an
75% ~ 100%
50% ~ 75%
25% ~ 50%
3% ~ 25%
2 % - Blinkendes
blaues Licht
1 % - Keine Anzeigen
leuchten
Der Blitz funktioniert
nicht mehr, wenn die
Leistung <2 % beträgt.
Sie erhalten eine
Vorwarnung von einer
Minute, bevor sich das
Gerät nach 3 Minuten
abschaltet.
Hinweis: Bitte laden Sie
so schnell wie möglich
(innerhalb von 10 Tagen)
auf, bevor Sie die Leuchte
verwenden oder lagern.
3 Balken
2 Balken
1 Balken
Warnung bei
niedriger
verbleibender
Leistung
Mit High Speed Sync (FP Blitz) können Benutzer den Blitz bei allen
Verschlusszeiten synchron verwenden. Der Hochgeschwindigkeits-
Synchronisationsmodus ist besonders gut geeignet, wenn die Blendenpriorität
für Aufhellblitze bei Porträts verwendet wird.
Batteriestatus
Taste
DE DE
Blitzmodus - Automatischer TTL-Blitzmodus Blitzmodus - Automatischer TTL-Blitzmodus
Durch Akkus mit Strom versorgen

Wenn die Verschlusszeit gleich oder länger als die maximale Blitzsynchronzeit
der Kamera eingestellt ist, wird das Symbol " " nicht im Sucher angezeigt.
Bei High Speed Sync gilt: Je höher die Verschlusszeit, desto kleiner die effektive
Blitzreichweite.
Um den normalen Blitz wieder aufzunehmen, drücken Sie erneut die High Speed
Sync-Taste. Das " "-Symbol verschwindet.
Im Multi-Blitzmodus ist die Hochgeschwindigkeits-Blitzsynchronisation nicht
verfügbar.
Der Blitz verfügt über eine Überhitzungsschutzfunktion, die nach 50 aufeinander
folgenden synchronisierten Hochgeschwindigkeitsblitzen einsetzt.
23
Drücken Sie kurz die Modustaste "MODE". Wenn
"M" auf dem Bildschirm erscheint, wurde der
Blitz auf den M-Modus eingestellt.
Die Blitzleistung kann durch Drehen des
Einstellrads eingestellt werden. Drücken Sie
die Einstelltaste "SET" erneut, um die
Blitzleistung zu bestätigen.
Drehen Sie den Einstellknopf, um den Wert
der Blitzleistung einzustellen. Drücken Sie die
"SET" Taste, um die Einstellung zu bestätigen
und zu verlassen.
Drücken Sie im manuellen M-Blitzmodus die
Taste <MENU>, um C.Fn - SLAVE aufzurufen,
und wählen Sie S1 aus. Der Blitz kann als
sekundäres Licht verwendet werden, um eine
Vielzahl von Lichteffekten zu erzeugen, die für
eine manuelle Blitzumgebung geeignet sind.
Der Blitz wird synchron mit dem ersten Blitz
des Master-Blitzes ausgelöst, was derselbe
Effekt ist, der mit der Verwendung von Funk
Blitzauslösern übereinstimmt.
Einstellen der optischen Einheit S1
Drücken Sie die Taste <MENU>, um
C.Fn - SLAVE aufzurufen, und wählen Sie
S2. Der Blitz kann als Zweitlicht für
TTL-Blitzumgebungen verwendet werden.
Mit der Anti Vorblitz Funktion kann die Kamera
mit Vorblitz Funktion verwendet werden, um
Aufnahmen mit dem optischen Slave zu
synchronisieren. Er löst den Blitz synchron mit
dem zweiten Blitz des Hauptblitzes aus, d. h.
einen zweilichtgesteuerten Blitz.
Einstellen der optischen Einheit S2
Die Blitzdauer ist die Zeit vom Beginn des
Blitzes bis zum Erreichen der Halbspitze des
Lichts. Die Halbspitze wird als t = 0,5
ausgedrückt. Um Fotografen detailliertere
Aufnahmewerte zu liefern, verwendet dieses
Produkt t = 0,1.
Die Differenz zwischen t=0,5 und t=0,1 ist
links dargestellt.
Der Multi Blitz Modus gibt eine Reihe schneller Blitze ab. Es ermöglicht
Benutzern, mehrere Bilder von sich bewegenden Objekten in einem einzigen
Bild aufzunehmen. Sie können die Blitzfrequenz (die Anzahl der Blitze pro
Sekunde, ausgedrückt in Hz), die Blitzzeiten und die Blitzleistung einstellen.
※ Die Blitzdauer wird nur im M-Modus
angezeigt.
Anzeige der Blitzdauer
Einstellen des Multi Blitzmodus
Einstellen der Blitzleistung auf M-Modus Wenn das Wort "MULTI" auf dem Bildschirm
erscheint, ist der Blitz jetzt im Strobe-Modus
eingestellt. Die Blitzleistung kann durch Drehen
des Rädchens eingestellt werden.
Drücken Sie die "SET"-Taste erneut, um die Anzahl
der Blitze einzustellen, und drehen Sie das
Einstellrad, um den Wert einzustellen.
Drücken Sie die "SET"-Taste erneut, um die
Blitzfrequenz einzustellen, und drehen Sie das
Einstellrad, um den Wert einzustellen.
Drücken Sie abschließend erneut die "SET"-Taste,
um alle Werte einzustellen.
Berechnung der Verschlusszeit
Im Multi Blitz Modus sollte der Verschluss geöffnet bleiben, bis der Blitz stoppt.
Verwenden Sie die folgende Formel, um die Verschlusszeit zu berechnen,
und stellen Sie dann die Kamera ein.
Verschlusszeit = Blitzzeiten/Blitzfrequenz
Wenn beispielsweise die Blitzzeiten 10 und die Blitzfrequenz 5 Hz beträgt, sollte
die Verschlusszeit mindestens 2 Sekunden betragen.
Um eine Überhitzung und Beschädigung des Blitzes zu vermeiden, führen
Sie keine Mehrfachblitze/Blitze mit mehr als 10 aufeinanderfolgenden Blitzen
durch. Lassen Sie den Blitz nach 10 Blitzen mindestens 15 Minuten abkühlen.
Wenn Sie versuchen, mehr als 10 aufeinanderfolgende Multi Blitze/Blitze
auszuführen, stoppt der Blitz möglicherweise automatisch, um eine Überhitzung
des Blitzkopfes zu vermeiden. Lassen Sie den Blitz in diesem Fall mindestens
15 Minuten lang abkühlen.
Blitzmodus - M Manueller Blitzmodus
Blitzmodus - M Manueller Blitzmodus
Flash Mode - M Manual Flash Mode Blitz Modus - Multi-Blitz Modus
Blitz Modus - Multi-Blitz Modus
Im M-Modus können Sie die Blitzleistung in 0,1 Stufen Schritten von 1/256 bis
1/1 der vollen Leistung einstellen. Um die richtige Blitzbelichtung zu erhalten,
verwenden Sie bitte einen Handgehaltenen Blitzmesser, um die erforderliche
Blitzleistung zu bestimmen.
Hinweise
※ Der optische S1/S2 Slave Blitzmodus wird nur im M Modus unterstützt,
wenn die WLAN Funktion deaktiviert ist.
A
t
50%
10%
t=0.5
t=0.1
Hinweise
●Sehr reflektierende Motive kommen mit Stroboskopblitzen vor dunklem
Hintergrund besser zur Geltung.
● Die Verwendung eines Stativs und eines Fernauslösers wird empfohlen.
● Multi Blitzmodus kann nicht eingestellt werden, wenn die Blitzleistung
1/1 und 1/2 beträgt.
● Der Multi Blitz Modus kann auch mit "buLb" verwendet werden.
● Wenn die Blitzzeit als -- angezeigt wird, blinkt das Licht kontinuierlich, bis
der Auslöser oder die Batterie erschöpft ist.
● Die Blitzzeiten sind wie in der folgenden Tabelle angegeben begrenzt.
Hz 1 2 3 4 5 6~7 8~9 10 11 12~14 15~19 20~50 60~199
1/4
1/8
1/46
1/32
1/64
1/128
1/256
Blitza-
usgabe
Blitzzeiten bei voller Leistung
8
14
30
60
90
100
100
6
14
30
60
90
100
100
4
12
30
60
90
100
100
3
10
20
50
80
100
100
3
8
20
50
80
100
100
2
6
20
40
70
90
90
2
5
10
30
60
80
80
2
4
8
20
50
70
70
2
4
8
20
40
70
70
2
4
8
20
40
60
60
2
4
8
18
35
50
50
2
4
8
16
30
40
40
2
4
8
12
20
40
40
DE
22
DE
Blitzmodus - Automatischer TTL-Blitzmodus Blitzmodus - M Manueller Blitzmodus

Menümodus (C.Fn: Benutzerdefinierte
Funktion einstellen)
Einstellen der Funk 2.4G-Übertragung
Der Q4 verwendet das Funk 2.4G-Q System und kann in perfekter Kombination
mit einigen unserer anderen Modelle verwendet werden. Als Slave-Einheit
verwendet, ist es mit Kameras wie Canon E-TTL II, Nikon i-TTL und Sony
kompatibel und schaltet automatisch entsprechend der Master-Einheit um. Es
ist keine manuelle Einstellung erforderlich.
※Wenn der Q4 als Slave-Einheit verwendet wird kann er von der Master-Einheit
mit Funk Übertragungsfunktion gesteuert werden, wie z. B. die Modelle:
NW420, QPro-Serie, Z1-Serie und einige andere.
Drücken Sie die "MENU"-Taste, um in den Menümodus
zu gelangen, drehen Sie den Einstellknopf, um die ID
(01~99) auszuwählen, und drücken Sie die "SET"-Taste,
um sie einzustellen.
※Dies geht nur wenn die Master-Einheit diese
Funktion hat.
Drücken Sie kurz die Funk Taste " ". Das Symbol " "
erscheint auf dem Bildschirm.
Drücken Sie kurz die Taste " " , um eine Gruppe (A~E)
auszuwählen.
Positionierungs- und Betriebsbereich (Beispiel für Funk Blitzaufnahmen)
(1) Automatische Blitzaufnahmen mit einer Slave-Einheit.
(3) Automatische Blitzaufnahmen mit drei Slave-Gruppen.
Funk Mehrfachblitzaufnahme: Benutzer können die Slave-Einheit in zwei oder
drei Gruppen aufteilen und den automatischen TTL-Blitz verwenden, während
sie das Blitzverhältnis (Vergrößerung) ändern. Darüber hinaus kann der
Blitzbenutzer für jede Blitzgruppe unterschiedliche Blitzmodi einstellen
und aufnehmen.
(2) Automatische Blitzaufnahmen mit zwei Slave-Gruppen
● Verwenden Sie als Sender eine Master-Einheit mit Funksenderfunktion.
● Sie sollten den Blitz testen, indem Sie vor der Aufnahme eine
Testaufnahme machen.
● Die Übertragungsentfernung kann je nach Standort, Umgebung,
Wetterbedingungen usw. kürzer sein.
Kanäle einstellen
Einstellen der ID-NR.
Halten Sie die Taste " " 2 Sekunden lang gedrückt,
um die Kanalnummer auszuwählen. Drehen Sie
den Einstellknopf, um den Kanalwert (1~32)
einzustellen, und drücken Sie dann "SET", um
den Kanal einzustellen. ① Drücken Sie die Taste "MENU", um das
C.Fn-Menü aufzurufen. "Ver x.x" in der unteren
rechten Ecke zeigt die Versionsnummer der
Software an.
② Drehen Sie den Einstellknopf, um das
benutzerdefinierte Funktionssymbol auszuwählen.
Drücken Sie die "SET"-Taste, um die
benutzerdefinierte Funktionsnummer hervorzuheben.
③ Drehen Sie den Einstellknopf, um die gewünschte
Zahl einzustellen. Drücken Sie die "SET"-Taste zur
Bestätigung und drücken Sie "SET" erneut, um
die Auswahl zu verlassen.
④ Drücken Sie die "MENU"-Taste, um die
Einstellung zu verlassen.
24
Funk Blitzaufnahmen: Funk (2,4 G) Übertragung Funk Blitzaufnahmen: Funk (2,4 G) Übertragung
Gruppen einstellen
Funk Blitzaufnahmen
99
25
Übertragungsreichweite
Ca. 328'/100m
A
B
A
B
C
1. Die 2.4G-Signalinterferenz der externen Umgebung (z. B. Funk Basisstationen,
2.4G WLAN-Router, Bluetooth Geräte usw.).
Bitte passen Sie die Kanal CH Einstellung des Blitzauslösers an (empfohlen +10),
suchen Sie einen Kanal ohne Interferenzen zur Verwendung oder schalten Sie
andere 2.4G Geräte während der Verwendung aus.
2. Bitte überprüfen Sie, ob der Blitz wiederaufbereitet wurde oder ob die
Wiederaufladezeit mit der Serienaufnahmegeschwindigkeit Schritt gehalten hat
(Blitzbereitschaftsanzeige hat geleuchtet) und sich nicht im Überhitzungsschutz
oder in einem anderen anormalen Zustand befindet.
Sie können versuchen, die Blitzleistungseinstellung anzupassen, z. B. den
TTL-Modus. Bitte versuchen Sie, in den M-Modus zu wechseln (da der TTL-Modus
einen einmaligen Vorblitz erfordert).
3. Der Abstand zwischen Auslöser und Blitz ist zu gering (Abstand <0,5 m).
Bitte schalten Sie den Blitzauslöser "in der Nähe des Funk Modus" ein:
Qpro-Serie: Stellen Sie C.Fn-DIST auf 0-30 m ein.
4. Der Blitz und der Auslöser sind beide schwach.
Bitte tauschen Sie die Batterie aus (es wird empfohlen, 1,5-V Einweg
Alkalibatterien für den Auslöser zu verwenden).
C.Fn: Benutzerdefinierte Funktion einstellen
Ursachen und Lösungen für 2.4G Funk Blitzlecks
X.X
3
10
20
50
80
100
100
3
8
20
50
80
100
100
2
6
20
40
70
90
90
2
5
10
30
60
80
80
2
4
8
20
50
70
70
2
4
8
20
40
70
70
2
4
8
20
40
60
60
2
4
8
18
35
50
50
2
4
8
16
30
40
40
2
4
8
12
20
40
40
DE DE
Funk Blitzaufnahmen: Funk (2,4 G) Übertragung Funk Blitzaufnahmen: Funk (2,4 G) Übertragung

Einstelllampe
③ Drücken Sie kurz die Einstelllichttaste " "
Wenn das Einstelllicht und das Wort "OFF"
in der unteren rechten Ecke des Bildschirms
erscheinen, ist das Einstelllicht ausgeschaltet.
27
Um den sicheren Betrieb der Ausrüstung zu gewährleisten, führt das System
immer einen vorbeugenden Schutz durch. Die folgenden Symbole dienen
als Referenz.
Benutzerdefinierte
Funktionssymbole
SLAVE
MODEL
STANDBY
LIGHT
DELAY
UNITS
ALT
LCD
ID
BEEP
RESET
Funktionen
M-Modus
M-Modus
M-Modus
Funk Modus
M/Multi-Modus
AUS
AUS
AUS
AUS
01-99
Zurücksetzen
AN
Automatische
Abschaltung
ohne Bedienung.
Schaltet sich automatisch
nach 15 Sekunden aus
Immer ausgeschaltet
7 Stufen
Immer eingeschaltet
Vorhangblitz auf der
Rückseite verfügbar
UNITS und ALT müssen in
Kombination verwendet
werden: UNITS legt die
Gesamtzahl der Lichter fest;
ALT legt fest, wie oft das
Licht ausgelöst wird
S1-Modus
S2-Modus
OFF
S1
S2
-3~+3
OFF
01-99
ON
OFF
NO
YES
CONT
INTER
OFF
30min
60min
90min
120min
15sec
OFF
ON
Immer eingeschaltet
Schaltet sich automatisch
aus, wenn es recycelt wird.
Auswahl des
optischen
S1/S2-Modus
Einstelllampe
Automatische
Abschaltung
Beleuchtungsdauer
der
Hintergrundbeleuchtung
Blitzverzögerung OFF,0.01~30S
Blitzzeiten
Stellen Sie die
Anzahl der Auslöser
ein, die zum
Auslösen des Blitzes
erforderlich sind.
1~4
2~4
LCD-Kontrast
WLAN-ID
Summer-Alarm
Parameter
zurücksetzen
Legen Sie ein
Symbol fest
Einstellungen und
Anweisungen
Blitzmodus wird
NICHT unterstützt
① Drücken Sie kurz die Einstelllichttaste " ".
Das Einstelllicht und das Wort "PROP"
erscheinen in der unteren rechten Ecke
des Bildschirms. Sie können nun die
Ausgangsleistung ändern, indem Sie
das Einstellrad drehen, um die Helligkeit
des Einstelllichts anzupassen. Je höher
die Leistungseinstellung, desto heller
das Einstelllicht.
② Drücken Sie kurz die Einstelllichttaste " ".
Das Einstelllicht und das Wort "PROP"
erscheinen in der unteren rechten Ecke
des Bildschirms. Halten Sie die
Einstelllicht-Schaltertaste " " erneut 2
Sekunden lang gedrückt. In der unteren
rechten Ecke des Bildschirms wird ein
hervorgehobener Prozentsatz angezeigt,
der sich durch Drehen des Einstellknopfs
ändert, um den Helligkeitsprozentsatz
(10 % ~ 100 %) zu ändern.
Einstelllampenmodus
Zusätzliche Schutzfunktionen
26
Schutzsystem Schutzsystem
1. Um zu verhindern, dass der Blitzkopf überhitzt und beschädigt wird, führen
Sie nicht mehr als 75 schnelle aufeinanderfolgende Blitze mit 1/1 Leistung
durch. Lassen Sie den Blitz nach 75 aufeinanderfolgenden Blitzen
mindestens 5 Minuten lang abkühlen.
2. Wenn Sie unmittelbar danach mehr als 75 aufeinanderfolgende Blitze
abgeben, kann die interne Überhitzungsschutzfunktion aktiviert werden, was
dazu führt, dass die Ladezeit auf mehr als 6 Sekunden ansteigt. Lassen
Sie den Blitz in diesem Fall etwa 5 Minuten lang abkühlen und der Blitz
nimmt den normalen Betrieb wieder auf.
3. Wenn der Überhitzungsschutz aktiviert ist, erscheint das Symbol " "
auf dem Display.
Überhitzungsschutz
Anzahl aufeinanderfolgender Blitze zur Aktivierung der
Überhitzungsschutzfunktion.
Anzahl aufeinanderfolgender Blitze zur Aktivierung des Überhitzungsschutzes
im HSS-Modus.
Leistung
1/1
1/2(+0.7~+0.9)
1/2(+0.3~+0.6)
1/2(+0.0~+0.2)
1/4(+0.0~+0.9)
1/8(+0.0~+0.9)
1/16(+0.0~+0.9)
1/32(+0.0~+0.9)
1/64(+0.0~+0.9)
1/128(+0.0~+0.9)
1/256(+0.0~+0.9)
75
100
120
150
200
300
400
500
1000
Mal
1/1
1/2(+0.0~+0.9)
1/4(+0.0~+0.9)
1/8(+0.0~+0.9)
1/16(+0.0~+0.9)
1/32(+0.0~+0.9)
1/64(+0.0~+0.9)
1/128(+0.0~+0.9)
1/256(+0.0~+0.9)
50
60
75
100
150
LCD Bildschirm
Error 1
Error 5
Error 6
Warnungen
Blitzrecycling System funktioniert nicht, bitte starten
Sie das Gerät neu. Wenn dies nicht von selbst
behoben wird, muss das Gerät repariert werden.
Lüfterfehler
Sensorfehler
DE DE
C.Fn: Benutzerdefinierte Funktion einstellen
C.Fn: Benutzerdefinierte Funktion einstellen
Leistung Mal
200
300

Firmware-Aktualisierung
1. Stellen Sie das Produkt nicht in einer Umgebung auf, in der die Temperatur
höher als 50℃ ist.
2. Die Betriebstemperatur des Produkts sollte nicht höher als 40℃ sein.
3. Setzen Sie das Produkt keinen starken physischen Stößen aus. Ein
Herunterfallen des Geräts kann zu irreparablen Schäden führen.
4. Bitte blitzen Sie nicht direkt in die Augen (insbesondere die Augen von
Säuglingen), da es sonst zu kurzfristigen Sehstörungen kommen kann.
5. Dieses Produkt ist nicht wasserdicht und sollte von Regen und feuchten
Umgebungen ferngehalten werden.
6. Bitte zerlegen Sie das Produkt nicht. Es sollte nur von Neewer direkt
(falls verfügbar) oder einem qualifizierten Fachmann repariert werden.
7. Nicht in der Nähe eines Feuers verwenden. Wenn sich im Akku oder
Gehäuse eine Wölbung bildet, sollte der Blitz nicht verwendet werden.
8. Wenn das Gerät in irgendeiner Weise fehlerhaft funktioniert, schalten
Sie bitte sofort den Blitz aus.
9. Verwenden Sie den Blitz nicht in der Nähe von Chemikalien, brennbaren
Gasen oder anderen brennbaren Stoffen, die unter besonderen Umständen
empfindlich auf die sofortige Blendung durch den Blitz reagieren und zu
Feuer oder elektromagnetischen Störungen führen können. Auf alle
relevanten Warnzeichen ist besonders zu achten.
Pflege und Wartung
▪ Wenn der Blitz zu versagen beginnt, sollte die Stromversorgung sofort
ausgeschaltet werden, um die Ursache zu ermitteln.
▪ Der Blitzkörper sollte keinen übermäßigen Vibrationen ausgesetzt und
staubfrei gehalten werden.
▪ Es ist normal, dass sich der Lampenkörper während des Gebrauchs leicht
erwärmt. Lösen Sie den Blitz nicht kontinuierlich aus, wenn dies nicht
erforderlich ist.
▪ Wenn das Produkt versagt oder nass ist, wenden Sie sich bitte an
qualifiziertes Fachpersonal.
▪ Änderungen an den technischen Spezifikationen des Produkts können
ohne Vorankündigung vorgenommen werden.
Dieses Produkt unterstützt Firmware Aktualisierungen über den
USB-Anschluss. Die neuesten Softwareankündigungen und Anweisungen
werden auf der offiziellen Website veröffentlicht.
▪ Im Lieferumfang dieses Produkts ist kein USB-Aktualisierungskabel
enthalten. Bitte dieses separat erwerben. Der USB-Anschluss dieses
Produkts ist ein Typ-C Anschluss.
▪ Informationen zum Aktualisieren der Firmware finden Sie in der
Programmsoftware "Neewer_Firmware_Update". Bitte laden und installieren
Sie "Q4-Firmware-Upgrade-Software" und wählen Sie die entsprechende
Firmware Datei aus, bevor Sie die Firmware aktualisieren.
▪ Bitte beziehen Sie sich auf das neueste E-Handbuch für aktualisierte
Informationen, während das Produkt mit Firmware aktualisiert wird.
Synchronisierungsbuchse
Die Synchronbuchse hat einen Durchmesser von Φ3,5 mm und kann an ein
Synchronkabel oder einen Auslöserstecker angeschlossen werden, um den
Blitz zu synchronisieren.
※ Es ist notwendig, den 2,4G Funk Modus und die S1/S2 Modi auszuschalten,
bevor der Blitz über den Synchronisierungsanschluss ausgelöst wird.
※ Die Synchronisierungsgeschwindigkeit sollte 1/200 nicht überschreiten,
wenn Sie den Synchronisierungsanschluss verwenden möchten.
Anleitung zur Fehlerbehebung
Blitzunterbelichtung oder Überbelichtung.
Verwendung des HSS-Modus.
Die effektive Blitzreichweite ist kleiner, wenn Sie High Speed Sync verwenden,
stellen Sie also sicher, dass sich das Motiv innerhalb der effektiven
Blitzreichweite befindet.
▪ Verwendung des M-Modus.
Bitte versuchen Sie, in den TTL-Modus zu wechseln oder die Blitzleistung zu
ändern.
28 29
Modell
Leistung
Blitzdauer
Blitzmodi
Ausgangsleistung
Stroboskopischer Blitz
Blitzbelichtungs-
korrektur (FEC)
Sync-Modi
Verzögerungsblitz
Maskierungsfunktion
Eingebauter leiser Lüfter
Eingebauter Summer
Anzeige
Q4
400Ws
1/209s to 1/10989s
M/Multi (Funk Aus)
TTL/M/MUTIL (Empfangseinheit für Funkübertragung)
9 Schritte 1/256-1/1
HSS (bis zu 1/8000 s), Synchronisation auf den
ersten/Vorhang, Synchronisation auf den zweiten Vorhang
0.01-30s
Anzeige der Blitzdauer
Punktmatrix-Bildschirm
Einstelllampe (LED)
Funk Slave
Unit-Modus
2,4 G, S1/S2, 3,5 mm Synchronkabel, Blitztest
Auslösemodi
Funk Funktion
Funk 2.4G Q-System
Wiederaufladbarer
Lithium-Ionen-Akku
Energieeinsparung
Farbtemperatur
Slave Einheit, Funk ausgeschaltet
Volle Blitzleistung 400
Recyclingzeit Ca. 0,01-1,2 s
Batterieleistungsanzeige
5600±200K
Spezifikationen Spezifikationen
Hinweise
Kompatibel mit Canon E-TTL II, Nikon i-TTL
und Sony TTL-Automatikblitzsystemen
Wird bereitgestellt (bis zu 100 Mal, 199 Hz)
Manuell. FEB: +/-3 Stopps in 1/3 Stopp Schritten
32 Kanäle, 5 Gruppen (A, B, C, D, E)
2.4G Übertragungsreichweite: 328'/100m
Funk ID: Der Benutzer kann den Funk
Übertragungskanal und die Funk ID der Master-
und Slave-Einheit für einen nahtlosen Betrieb
ohne Signalstörungen vor dem Auslösen ändern.
Der Blitz kann so eingestellt werden, dass er sich
30-120 Minuten lang ohne Betrieb automatisch
ausschaltet.
21.6V/2800mAh
30W/5600K/CRI:95+
DE DE

電源ケーブル ×1モデリングランプ ×1
電源アダプター ×1 キャリングケース ×1
リチウム電池 ×1
ハンドル ×1
Q4フラッシュストロボ ×1
30
購入可能なアクセサリー
31
Q4 スピードライトフラッシュは、大容量リチウムバッテリーを搭載し、1/8000
HSS をサポートする強力なストロボ ライトです。 モデリングランプとリフレクター
が、屋外および屋内での撮影に最高レベルの光を提供します。 また、本製品はワ
イヤレスTTL強力なフラッシュであり、リチウム電池が本体と一体化され、持ち運
びが便利です。内蔵の2.4GワイヤレスQシステムが採用されているため、Qpro お
よび Q シリーズのトリガーと組み合わせて使用すると、TTL / M /マルチモードを
リ モ ー ト で 制 御 し て 、フ ラ ッ シ ュ を ト リ ガ ー で き ま す 。
取手
1:フラッシュ本体 2 .トップハ ンドル 介
3:LCDディスプレイ
リフレクター
リフレクター ×1
リフレクター ロック
バッテリー残量表示ボタン
バッテリー残量表示ランプ
光受信機
バッテリー
ディスプレイ
短押しでグルー
プ選択、
長 押しでチャンネ
ル切り替え
HSSオンオフボタン
ワイヤレス機 能 ボタン
モデリングランプオ
ンオフボタン
オン/ オフボタン
メニュー ボタン
モードボタン
調 整ノブ
設定ボタン
フラッシュテスト ボタン
ロックノブ
Type-C USB ファームウ
ェア アップグレード ポート
3.5mm 同期ポート端子
バッテリーロック
バッテリー 充 電 ポ ート
モデリン
グランプ
マニュアル発光
マニュアル発光の出力
(1)M マニュアル発光モード
(2)Multiマルチ発光モード
(3)TTL自動発光
モデリングランプモ ード
フラッシュ
持続時間
チャネル
マルチ発光
発光周波数
発光回数
TTL自動発光
フラッシュ露出補正(FEC)
ハイスピードシン
クロ(HSS)
S1/S2
(5)ワイヤレス光学制御撮影
(4)ワイヤレス撮影
フラッシュ
グループ
角 度 ロックノブ
ライトス タンド
の ロックノブ
傘取り付け穴
ワイヤレス伝送 -
ワイヤレス撮影
Q4 フラッシュライトは、 QPro フラッシュ トリガー、Bowens マウント ソフト
ボックス、リフレクター、レーダーカバー、ライト スタンドなどのアクセサリーと一
緒に使用でき、最高な撮影効果と使用体験を取得できます。
製品概要
パッケージ内 容
製品紹介 製品紹介 製品紹介
JP JP
リフレクターカバー ×1

32
ランプの 3 つの銅製ピンをフラッシュ
本体の 3 つのピン穴にはめ込み、しっ
かりと固定されるまで押し込みます。
リフレクターをフラッシュに押
し込んでから時計回りに回し
て固定します。
リフレクターを取り付けるときは、
リフレクターの赤い点をバヨネッ
トの青い点に合わせてから、ス
ロットに差し込みます。
リフレクター取り外しボタンを押し
てから、リフレクターを反時計回り
に回転し、外側に引き出します。
※操作中はやけどをしないように
十分ご注意ください!
※ランプを着脱する前に、必ずデバ
イスの電源をオフにしてください。
フラッシュランプ を取り付 け る方 法
フ ラ ッ シ ュ ラ ン プ を 取 り 付 け る 時 に 、ラ
ンプ内側の赤い点とバヨネットの赤い
点を合わせてから、ピンをピン穴に挿
入 し て く だ さ い 。そ う し な い と 、挿 入
できません。
ランプを平行ランプの方向に外側に引
き 出 す と 完 了 で す 。
※ランプを取り外すときは、電球がま
だ熱くなっている可能性があるこ
とに注意してください。
フラッシュランプ を取り外 す方 法
リフレクター を 取 り付 け る 方 法
リフレクター を 取 り外 す 方 法
バッテリーリリースボタンを上にス
ライドすると、バッテリーが自 動的に
飛 び 出 し 、バ ッ テ リ ー を 取 り 外 す こ
とができます。
図のようにバッテリをバッテリ
スロットに挿入してロックします。
リチウム バッテリー を取 り外 す方 法
リチウムバッテリー を取り付け
る方法
図のように、ハンドルの上部と 2 つ
の位置きめピンをフラッシュの底
のネジ穴と位置きめ穴に取り付
け ま す 。ハ ン ド ル が 固 定 さ れ る ま
でロックノブを 回 します。
ハ ンドル を取り付 け る方 法
33
三脚の上部をハンドルの下部に挿
入し、ライトスタンドがしっかりと取
り付けられるまでロック ノブを締
めます。
※本商品は三脚が付属されており
ません(別途購入が必要です)。
三脚を取り付ける方法
ハンドルの角度固定ノブを緩め、フ
ラッシュの角度を適切な角度に調整
してから、角度固定ノブを締めます。
フラッシュの角度を調整する
バッテリー 説 明
電源ボタンを 1 秒間長押しして、製品の電源をオン/オフにします。長期間使用し
ない場合は、電源をオフにしてください。本製品には自動電源オフ機能があります。
C.Fn-STANDBYで設定した時間(30~120分)に無操作の場合、フラッシュは自動
的に 消灯します。
バッテリー電源
1.本製品はリチウム電池を使用され、寿命が長く、最大300回充放電できます。
2.過熱、過充電、過放電、過電流、短絡に対する保護機能を備えた回路を内蔵し、
安全で信頼できます。
3. 標準のバッテリー充電器で約 3 時間で充電できます。
バッテリーの 特 徴
インスト ー ル 手 順 インスト ー ル 手 順 インスト ー ル 手 順
JP JP

35
モードボタン「MODE」を短く押すと、「TTL」文字が
画面に表示されると、TTLモードに入ります。
ハイスピードシンクロ
「 」ボタンを押すと、画面に「 」が表示され、
高速同期機能を使用するにはワイヤレス送
信機(例:QProC/N/S)と組み合わせて使用
する必要があります。
バッテリー残量表示
バッテリーを正しく取り付けるとフラッシュに給電できます。LCD ディスプレイ
のバッテリーアイコンにバッテリー残量が表示され、いつでも電源状態を確
認できます。
本フラッシュには、TTL自動発光、Mマニュアル発光、マルチ発光の3つのモードがあ
ります。 TTL モードでは、カメラの測光システムが被写体からの光を検出し、発光量
を自動的に調整して、被写体と背景のバランスの取れた露出を実現します。
※<MODE>モード選択ボタンを押すと、液晶画面に3つのフラッシュモードが順
番に 表示されます。
注: バッテリーステータスは、あくまでも設計上の数値で、実際の使用により多少
の誤差があります
LCDバッテリー電源ア
イコン
(フラッシュシステム全
体のステータス)
(バッテリー未
放電時のバッテリー
ステータス)
バッテリーの LED
インジケーター
バッテリ
ーの LED
インジケ
ーター
バッテリーステータス
1. プラス端子とマイナス端子を短絡させないでください。
2. バッテリーは防水ではありません。高湿度にさらしたり、水に浸したりしない
でくだ さ い 。
3.子供の手の届かないところに保管してください。
4. バッテリーを24 時間以上充電しないでください。互換性のあるオリジナルの
充電器のみを使用してください。
5. 長時間 (6 か月以上) バッテリーをアイドル状態のままにしないでください。
長期間使用されていないバッテリーを再充電すると、安全上危険性があります。
バッテリーセルの電圧が 9V 未満の場合は、バッテリーを充電することは禁止
されています。
6. バッテリーを火の中に投入したり、火の近くに置いたりしないでください。
7. 不要になったバッテリーは(地域の条例)に従って廃棄してください
8. 長期間ご使用にならない場合は、約 60% 充電してから保管してください。
9. 長期間ご使用にならない場合は、バッテリーをよく保管してください。 金属が
バッテリーに直接接触すると、バッテリーが損傷する恐れがあるので、バッテリ
ーを非導電性の素材で包み、涼しく乾燥した場所に保管してください。
10. 充電しながらバッテリーを使用することは禁止されています。
11. バッテリーには過熱保護機能がありますので、バッテリー内部温度が 55℃に
達すると過熱保護機能が作動するため、使用前に冷却する必要があります。
バッテリーに関する注意事項
34
電源オンオフ/画面ロック解除
TTL モード
調整ノブを回して露出補正値を設定します。「SET」ボ
タンを押して確定し、設定を終了します。
※調光補正は、1/3段ステップで±3の範囲で設定
できます。 「0.3」は 1/3 段、「0.7」は 2/3 段を意味
します。 調光補正を解除するには、調光補正量
を「+0」に設定してください。
※TTLモードはワイヤレスON時のみ利用可能です。
フラッシュ露出補正(FEC)
①電源スイッチボタン「 」を短く押すと、画面が
点灯し、ノブを時計回りに3回回すと、画面に下
向きの矢印が表示されてロックが解除されます。
② 電源がオンの状態で、電源スイッチボタン「 」
を 短 く 押 し て シ ャ ッ ト ダ ウ ン し ま す 。
4 バー 4 灯点灯
4 灯点灯 3灯点灯 2 灯点灯 1 灯点灯
3 灯点灯
2 灯点灯
1 灯点灯
75% ~ 100%
50% ~ 75%
25% ~ 50%
3% ~ 25%
2% - ランプ点滅
1% - ランプ消灯
電量が 2%以下になると、
フラッシュは機能しなくな
ります。1 分間警告が表示
され、3 分後に自動的に
電源オフにします。
注意: ライトを使用または
保 管 す る 前 に 、お 早 め に
(10 日以内に) 充電して
くだ さい 。
3 バー
2 バー
1 バー
電量不足、
充 電リマイ
ンダー
ハイスピードシンクロ(FP発光)機能を使用すると、フラッシュをすべてのシャ
ッター速度で同期させて使うことができます。 これは、絞り優先モードで人
物 を 美 しくひ とつ の 画 面 に 収 め るこ と が でき ます 。
バッテリー
電源 ボタン
JP JP
フラッシュモード - TTL自動発光モード
バッテリー 説 明バッテリー 説 明 フラッシュモード - TTL自動発光モード

▪シャッタースピードがカメラの最大フラッシュ同調速度以下に設定されている
場合、ファインダーに< >は表示されません。
▪ハイスピードシンクロでは、シャッタースピードが速くなるほど、フラッシュの 有
効範囲が狭くなります。
▪通常の発光モードに戻すには、もう一度<SYNC>ボタンを押して、< >アイコ
ン は 消 え ま す 。
▪マルチモ ードでは、ハイスピードシンクロは使 用できません。
※ハイスピードシンクロを50回連続発光すると、過熱保護が作動する場合が
あります。
37
モードボタン「MODE」を短く押すと、「M」文字が画
面に表示されると、マニュアルモードに入ります。
ダイヤルボタンを回してフラッシュ出力値を設定し
ます。設定ボタンをもう一度押してフラッシュ出力値
を確定します。
Mマニュアル発光モードでは、<MENU>ボタンを
押して、C.Fn - SLAVEに入り、S1機能選択します。
フラッシュはリモートフラッシュ(補助灯)として
機能し、マニュアル発光環境に使えます。 マス
タフラッシュ(主灯)の最初の発光と同期して
発光し、その効果はワイヤレスフラッシュトリ
ガーの使用と一致です。
S1光学スレーブモード
<MENU>ボタンを押して、C.Fn - SLAVEに入り、
S2機能選択します。フラッシュはリモートフラ
ッシュ(補助灯)として機能し、ttl発光環境に
使えます。プリ発光防止機能があり、プリフラ
ッシュ機能を搭載したカメラを使用すること
で、光制御により同期撮影が可能です。 マス
ターフラッシュ(主灯)の第2回発光と同期し
て発光します。つまり2回光制御トリガーです。
S2光学スレーブモード
発光持続時間とは、発光しはじめから発光の半
ピーク値までの時間の長さを指します。半ピー
ク値はt=0.5で表されます。より詳細な数値を写
真家に提供するために、本製品は、 t=0.1 を使
用しています。
t=0.5 と t=0.1 の区別、左の図をご参照ください
マルチ発光とは、一度の露光中に複数回フラッシュを発光させる連続発光機能です。
1枚の写真に動く被写体を複数回写し込むことができます。 発光周波数(1秒あたり
の発光回数をHzで表示)、発光回数、フラッシュ出力を設定できます。
※ 持続時間はMモードのみ表示されます。
発光持続時間を表示する
マルチ発光の設定
Mモードでフラッシュ出力値を設定します。 <MODE>ボタンを押して、表示パネルに<MULTI>を
表示します。 ダイヤルボタンを回してフラッシュ出
力値を設定します。
「SET」設定ボタンを再び押して、発光回数を設定し、
ダイヤルボタンを回して値を設定します。
「SET」設定ボタンをもう一度押して、発光周波数を
設定し、ダイヤルボタンを回して値を設定します
最後に「SET」ボタンを押してすべての値を確定し
ます。
シャッター速度の計算:
マルチ発光モードでは、発光が止まるまでシャッターがオンのままにしておく必要が
あります。 下記の公式でシャッター速度を計算し、カメラで設定してください。
発光回数/発光周波数=シャッタースピード
例:発光回数が10回で、発光周波数が5 Hzの場合、シャッター速度は2秒以上である
必 要 が あ り ま す 。
※フラッシュヘッドの過熱により本体の破損を防ぐため、10回以上連続して発光
しないでください。 10回発光した後、フラッシュを15分以上に冷却させてください。
連続撮影を10回以上続けて行うと、フラッシュヘッドの過熱を防ぐためにフラッシュ
が自動的に停止する場合があります。 このような場合は、フラッシュを15分以上冷
や し て く だ さ い 。
発光モード: マニュアル発光
発光モード: マニュアル発光 Flash Mode - M Manual Flash Mode
発光モード:マルチ発光
発光モード:マルチ発光
1/256発光からフル発光(1/1)までの範囲で、0.1段刻みでフラッシュ出力を設定す
ることができます。精度の高い露出を得るには、フラッシュメーターを使用して、必
要なフラッシュ出力を計測します。
注意事項:
※S1/S2光学トリガーモードはMモードでワイヤレスOFF時のみサポートします。
A
t
50%
10%
t=0.5
t=0.1
注意事項
●マルチ発光モードは、反射率が高い被写体で暗い背景の前に使うとより良い効果
が得ます。
●三脚とリモコンの使用をお勧めします
●フラッシュ出力は1 / 1、1 / 2の場合、マルチ発光モードを設定できません。
●ストロボフラッシュは「buLb」機能で使用できます。
●発光回数が「-」と表示されている場合は、シャッターが切れるまで、または電池が
完全に消耗するまでフラッシュが発光し続けます。
下の表に示すように、発光回数は制限されます。
Hz 1 2 3 4 5 6~7 8~9 10 11 12~14 15~19 20~50 60~199
1/4
1/8
1/46
1/32
1/64
1/128
1/256
フラッ
シュ出力
最大マルチ発光の発光回数
8
14
30
60
90
100
100
6
14
30
60
90
100
100
4
12
30
60
90
100
100
3
10
20
50
80
100
100
3
8
20
50
80
100
100
2
6
20
40
70
90
90
2
5
10
30
60
80
80
2
4
8
20
50
70
70
2
4
8
20
40
70
70
2
4
8
20
40
60
60
2
4
8
18
35
50
50
2
4
8
16
30
40
40
2
4
8
12
20
40
40
JP
36
JP
発光モード: マニュアル発光
フラッシュモード - TTL自動発光モード

メニューモード(C.Fn:カスタム機能設定)
無線 (2.4G) 設定
Q4 は 2.4G ワイヤレス Q システムを使用しており、本メーカーの他のモデルと完全
に組み合わせることができます。 スレーブ機として対応するカメラはCanon E-TTL II、
Nikon i-TTL、Sonyなどで、手動設定なしでマスター機に合わせて自動で切り替わり
ます。
※Q4はスレーブ機として、無線伝送機能を備えたマスター機から制御可能です
(NW420、QProシリーズ、Z1シリーズなど)
「MENU」ボタンを押してメニューモードに入り、ダ
イヤルボタンを回してID機能(01~99選択可能)
を選択し、「SET」ボタンを押して確定します。
※メインコントロールユニットにこの機能がある場
合のみ使用可能です。
ワイヤレスボタン「 」を短く押すと、画面に「 」が
表示されます。
グループチャンネルの「 」ボタンを短く押すと、グル
ープ文字(A~E)が選択され、確定されます。
置く場所と動作範囲(ワイヤレスフラッシュ撮影の場合):
(1) 1台の受信機でのオートフラッシュ撮影
(3) 3台受信機グループでのオート発光撮影
受信機を2つまたは3つのグループに分けて、発光の比率(倍率)を変えながらTTL
自動フラッシュ撮影を行うことができます。 さらに、各受信機グループごとに異な
る発光モードを設定して撮影できます。
(2) 2台受信機グループでのオート発光撮影
※ワイヤレス送信機能付きのマスター送信機をご使用ください。
※撮影前にテスト発光と撮影テストを行ってください。
※受信機の場所、周囲の環境、気候などにより、伝送距離が短くなる場合が
あ り ま す 。
通信チャネルを設定する
ID番号の設定
「 」グループチャンネルボタンを2秒間押し続けて
チャンネル値を選択し、ダイヤルボタンを回してチ
ャンネル値(1~32)を設定し、「SET」ボタンを押し
て確 定します。 ①「MENU」ボタンを押してC.Fnメニューに入ります。
右下の「Ver x.x」はソフトウェアのバージョン番号を
示します。
② ダイヤルボタンを回してカスタム機能の記号を
選択します。 「SET」設定ボタンを押すと、カスタム
機能番号が強く表示されます。
③ ダイヤルボタンを回して希望の数値を設定し、
「SET」ボタンを押して確定し、もう一度「SET」を短く
押して選択を終了します。
④「MENU」ボタンを押して設定を終了します。
38
ワイヤレスフラッシュ撮影:ワイヤレス(2.4G)送信 ワイヤレスフラッシュ撮影:ワイヤレス(2.4G)送信
通信グループの設定
ワイヤレスフラッシュ撮影
99
39
伝送距離は約100mです。
A
B
A
B
C
1.外部環境(ワイヤレスハブ、2.4G Wi-Fiルーター、Bluetooth機器など)からの2.4g
信号干渉
→送信機のチャンネルCH設定を調整して(+10を推奨)、干渉のないチャンネルを
見つけるか、作業中は近くにある他の2.4Gデバイスの電源を切ってください。
2.フラッシュが完全にリサイクルされていること(フラッシュ準備完了インジケー
ターがオンになっていること)、および過熱保護機能または他の機能などがトリガ
ーされていないことを確認してください。
→フラッシュパワーを下げてください。例えばデバイスがTTLモードの場合は、Mモ
ードに変更する。(TTLモードではプリフラッシュを発光させる必要があります)
3. トリガーとフラッシュの距離が近すぎるかどうか (距離 <0.5m)
→トリガーの「近距離無線モード」をオンにしてください:
Qproシリーズ:C.Fn-DISTを0~30mに設定します。
4.フラッシュ検出器と受信装置の電力が不足していないか確認してください
→電池を交換してください(フラッシュ受信機の電池には1.5Vの使い捨てアルカ
リ電池を推奨します)
C.Fn:カスタム機能の設定
2.4Gワイヤレスフラッシュしないの原因と対策
X.X
3
10
20
50
80
100
100
3
8
20
50
80
100
100
2
6
20
40
70
90
90
2
5
10
30
60
80
80
2
4
8
20
50
70
70
2
4
8
20
40
70
70
2
4
8
20
40
60
60
2
4
8
18
35
50
50
2
4
8
16
30
40
40
2
4
8
12
20
40
40
JP JP
ワイヤレスフラッシュ撮影:ワイヤレス(2.4G)送信 ワイヤレスフラッシュ撮影:ワイヤレス(2.4G)送信

モデリングランプ
③ モデリングランプボタン「 」を短押しし
て、画面右下にモデリングランプとOFFが
表示されたら、モデリングランプがオフに
します。
41
システムは、デバイスとユーザーの安全を確保するためのリアルタイム保護を
提供します。下記の記号をご参照ください。
カスタム機 能
の記号
SLAVE
MODEL
STANDBY
LIGHT
DELAY
UNITS
ALT
LCD
ID
BEEP
RESET
機能
Mモード
Mモード
Mモード
ワイヤレスモード
M/Multiモード
オフ
オフ
オフ
オフ
01-99
リセット
オンにする
無操作すると自動
的にオフになります
15秒後に自動的に
オフになります
常にオフ
7段階
常にオン
後 幕トリガ ーとして
も使用可能
UNITS と ALT は組み合わ
せて使用 する必要があり
ます。UNITS はライトの総
数を設定し、 ALT はライト
がトリガ ーされ る回 数 を
設定します
S1モード
S2-モード
OFF
S1
S2
-3~+3
OFF
01-99
ON
OFF
NO
YES
CONT
INTER
OFF
30min
60min
90min
120min
15sec
OFF
ON
常に点灯
リサイクル時は自動的
にオフに なります。
S1/S2光学ト
リガーモー
ド選択
モデリングランプ
自動スリープ設定
バックライト
の点灯時間
遅延発光 OFF,0.01~30S
総発光回数
トリガー 回数 1~4
2~4
LCDコントラスト比
ワイヤレスID
ブザー
パラメ ー タの リセット
設定の記号 設定と説明 使用制限 ① モデリングランプボタン「 」を短押しすると、
画面右下にモデリングランプと「PROP」の文字
が 表 示 さ れ ま す 。こ の と き 、ダ イ ヤ ル ボ タ ン を 回
し て 、モ デ リ ン グ ラ ン プ の 出 力 を 変 更 し 、モ デ リ
ングランプの明るさを調整できます。出力が高
くな るほ ど モデ リングランプ が 明 るくなります。
②モデリングランプボタン「 」を短押しし
て、画面右下にモデリングランプとパー
セントが表示されたら、再びモデリング
ランプボタン「 」を2秒間長押しす
ると、右下にパーセントの数字が強く表
示されます。このとき、ダイヤルボタン
を回してパーセンテージの数値
(10% ~ 100%) を変更し、モデリング ラ
ンプの明るさを調整できます。
モデリングランプモード
その他の保護機能
40
保護機能 保護機能
①フラッシュヘッドの損傷や過熱を防ぐため、1/1フルパワーで75回以上連続して発
光しないことをお勧めします。75回連続して発光した後、少なくとも5分間にフラ
ッシュを 冷 却 してくだ さ い 。
②連続75回以上発光した後、さらに発光すると、内部の過熱保護機能が作動する
場合があります。 リサイクル時間は長くなります(6秒以上)。 この場合、フラッシ
ュが正常に動作するように、少なくとも5分間にフラッシュを冷却すると、フラッシ
ュが正 常 になります。
③過熱保護が作動すると、画面に「 」が表示されます。
過熱保護
過熱保護を有効にする発光回数:
ハイスピードシンクロモードで過熱保護を有効にする発光回数:
パワー
1/1
1/2(+0.7~+0.9)
1/2(+0.3~+0.6)
1/2(+0.0~+0.2)
1/4(+0.0~+0.9)
1/8(+0.0~+0.9)
1/16(+0.0~+0.9)
1/32(+0.0~+0.9)
1/64(+0.0~+0.9)
1/128(+0.0~+0.9)
1/256(+0.0~+0.9)
75
100
120
150
200
300
400
500
1000
回数
1/1
1/2(+0.0~+0.9)
1/4(+0.0~+0.9)
1/8(+0.0~+0.9)
1/16(+0.0~+0.9)
1/32(+0.0~+0.9)
1/64(+0.0~+0.9)
1/128(+0.0~+0.9)
1/256(+0.0~+0.9)
50
60
75
100
150
LCD表示
Error 1
Error 5
Error 6
警告内容
フラッシュのリサイクルシステムに障 害が発生したため、
フラッシュを起動できません。フラッシュを再起動して
ください。 それでも問題が解決できない場合は、メン
テ ナ ン ス セ ン タ ー に 送 っ て 修 理 し て く だ さ い 。
ファン の 故 障
センサーの故障
JP JP
C.Fn:カスタム機能の設定
C.Fn:カスタム機能の設定
パワー 回数
200
300

ファームウェアのアップグレード
1. 本製品を温度が 50℃を超える環境に置かないでください。
2. 本製品の動作温度は 40℃を超えないようにしてください。
3. 本製品を地面に落としたり、硬いものにぶつけたり、強い衝撃を与えたりしな
いでくだ さい 。
4. フラッシュを人の目に近づけて発光しないでください(特に乳幼児の撮影には
注意してください)。視力障害の原因になります。
5. この製品は防水ではありません。雨や湿気の多い環境でのご使用は注意して
くだ さい
6. 本製品を分解しないでください。 製品が故障した場合は、本社専門の修理が
必要です。
7.本製品を火の中に投入したり、分解したりしないでください。本製品が膨張し
た場合は、使用をおやめください。
8. デバイスに何らかの不具合が生じた場合は、すぐに使用を中止して、電源をオ
フにしてくだ さ い
9. 化学薬品や、可燃性ガス、その他の特殊な物質の近くでフラッシュを使用しな
いでください。これらの物質は、特殊な状況下でフラッシュからの瞬間的な強
い光に敏感であり、火災や電磁障害の原因となる場合があります。 ご使用する
前に、近くの注意マークに注意してください。
メンテナンス
▪万一、異常が発生した場合は、すぐに本製品の電源を切り、原因を調査します。
▪振動の激しい場所に置かないでください。必要に応じてクリーニングする必要があ
ります。
▪使用中にランプが温かくなるのは正常です。必要がない場合は連続発光しない
でくだ さ い 。
▪フラッシュの修理はすべて当社工場指定の純正部品を提供できる修理部門にて行
います。
▪本製品が故障したり、水に濡れたりした場合は、専門家による修理を行ってから使
用 してくだ さい 。
▪このマニュアルの内容は、改善のため事前連絡なしに変更することがあります。
本機は USB ソケットを介してファームウェアをアップグレードできます。 最新のソ
フトウェアの発表と説明は公式 Web サイトで公開されます。
▪ 本製品には USB アップグレードケーブルが付属しておりません。別途ご購入く
ださい。 本製品の USB インターフェイスは Type-C インターフェイスです。
Type-C USB ケーブルをご使用ください。
▪ 本製品のファームウェアアップグレードには、「Neewer_Firmware_Update」
プ ログラムソフトウェア のサ ポ ートが 必 要 です ので、ファームウェアをアップ グレ
ードする前に、「Q 4 ファームウェアアップグレードソフトウェア」をダウンロードし
てインストールし、対 応 するファーム ウェアファイル を選 択してくだ さい 。
▪ 製品のファームウェアがアップグレードされているため、最新の電子版マニュ
アルを参照してください。
同 期トリガー
同期コードジャックはΦ3.5mmコネクタです。 ここにトリガープラグまたは同期コ
ードを差し込むと、フラッシュをトリガーできます。
※同期インターフェースを使用してトリガーする場合は、ワイヤレス2.4Gモードと
S1/S2モードをオフにする必要があります。
※同期インターフェースを使用してトリガーする場合は、同期速度は≤1/200
です。
トラブル シュ ー ティン グ
フラッシュが露出不足または露出オーバーです。
▪ 高速同期を使用します。
→ハイスピードシンクロを使用すると、フラッシュの有効範囲が狭くなります。
被写体が表示されたフラッシュ有効範囲内にあることを確認してください。
▪ フラッシュはマニュアル露出モードを使用します。
→TTLモードに変更するか、発光量設定を変更してください。
42 43
モデル
パワー
フラッシュ持続時間
発光モード
出力
マルチ発光
フラッシュ露 出
補正 (FEC)
同期モード
トリガー発光の遅延時間
マスク機能
静 音ファン
ブザー
表示
Q4
400Ws
1/209s to 1/10989s
ワイヤレスオフ
M/Multi、ワイヤレススレーブモード:TTL/M/MUTIL
9段 1/256~1/1
ハイスピードシンクロ (最大 1/8000 秒)、先幕シンクロ、
後幕 シンクロ
0.01-30s
フラッシュ持続時間表示
ドットマト リック ス ス ク リー ン
モデリングランプ(LED)
ワイヤレススレー
ブモード
2.4G、S1/S2、3.5mm シンクロケーブル端子、テスト発光
トリガーモ ード
ワイヤレス機能
ワイヤレス(2.4G)
電源
省エネ
色温度
ス レ ー ブ モ ー ド 、ワ イ ヤ レ ス オ フ
フルパワーでの発光回数 400
リサイクル時間 Ca. 0,01-1,2 s
バッテリー残量表示
5600±200K
仕様 仕様
注意事項
ワイヤレスモード(Canon E-TTL II、Nikon i-TTL、
Sony TTLと互換でき)
サポート(最大100回、199Hz)
手動。 FEB: ±3段に1/3段刻みで調整
制御可能なスレーブグループ (A、B、C、D、E)
伝送距離: 100m
チャンネル:1-32
ワイヤレス ID: 干渉を避けるために、ワイヤレス伝
送チャネルを変更するだけでなく、ワイヤレス ID を
変更することによってもトリガーできます。マスター
コ ントロ ール ユ ニットとスレ ーブ コ ントロ ール ユ
ニットのワイヤレス ID とチャネルは一致する場合の
みトリガーできます。
フラッシュが約30 ~ 120 分間無操作後、電源が自動
オフになるように設定できます。
21.6V/2800mAh
30W/5600K/CRI:95+
JP JP

Adaptador de corriente ×1
Lámpara de
modelado ×1
Cable de alimentación ×1
Funda de transporte ×1
Batería de litio ×1
Mango ×1
Q4 flash estroboscópico ×1
44
Accesorios disponibles para la compra
45
El flash Q4 es una potente luz estroboscópica portátil que funciona con
una batería de litio de gran capacidad y admite 1/8000 HSS. La lámpara de
modelado expuesta y el reflector proporcionan una calidad de luz de nivel
superior para tomas en interiores y exteriores. Lo que lo distingue de muchos
otros speelites potentes en el mercado es su diseño compacto y tamaño más
pequeño sin comprometer características como soportes de accesorios
estándar para una compatibilidad más amplia. Con un impresionante sistema
Q inalámbrico 2.4G incorporado, Q4 admite TTL, activación inalámbrica,
sincronización de alta velocidad, sincronización de cortina delantera,
sincronización de cortina trasera y más.
Mango
1:Cuerpo de flash 2.Asa superior
3:Pantalla LCD
Reflector
Reflector ×1
Cubierta reflectora ×1
Pestillo del reflector
Botón indicador de
energía de batería
Indicador de energía
de batería
Receptor óptico
Batería
Pantalla
Pulsación corta para
cambiar de grupo,
pulsación larga
para cambiar de canal
Botón HSS
Botón de función
inalámbrica
Botón de lámpara
de modelado
Interruptor On/Off
Botón de menú
Botón de modo
Botón de ajuste
Botón de configuración
Botón de prueba de flash
Perilla de bloqueo
Puerto de actualización
de firmware USB tipo C
Puerto de
sincronización de 3,5mm
Pestaña de liberación
de batería
Puerto de carga de
batería
Tubo de
Flash
Flash Manual
Salida de flash manual
(1)Flash manual M
(2)Flash estroboscópico múltiple
(3)Flash automático TTL
Modo de lámpara
de modelado
Duración
del flash
Canal
Flash múltiple
(estroboscópico)
Frecuencia de flash
Tiempos de flash
Flash automático TTL
Compensación de
exposición con flash (FEC)
Sincronización de
alta velocidad (HSS)
S1/S2
(5)Disparo con control óptico inalámbrico
(4)Disparo de transmisión inalámbrica
Grupo de flashes
Perilla de bloqueo
de ángulo
Perilla de bloqueo
del soporte de luz
Agujero Paraguas
Transmisión
inalámbrica -
Disparo inalámbrico
El flash Q4 se puede utilizar con los siguientes accesorios fotográficos
para lograr la mejor experiencia y resultados fotográficos: disparador de
flash QPro, paraguas suave con montura Bowens, reflector, snoot, plato
de belleza, soporte de luz, etc.
Acerca de este producto
Contenido del paquete
Ilustración del producto Ilustración del producto Ilustración del producto
ES ES

46
Encaje los tres pines de cobre del
tubo del flash en los tres orificios
del cuerpo del flash y empújelos
hacia adentro hasta que queden
seguros.
Empuje el reflector en los orificios
de las lengüetas y luego gírelo en
el sentido de las agujas del reloj
para asegurarlo.
Al instalar el reflector, tenga en
cuenta que el punto rojo del reflector
debe estar alineado con el punto azul
de la bayoneta y luego encajado
en la pieza de conexión.
Presione el botón de extracción del
reflector y luego gire el reflector en
sentido contrario a las agujas del
reloj y tire de él hacia afuera.
※El dispositivo no debe estar
encendido al instalar/quitar el
tubo de flash.
Instalación del tubo de flash
Al instalar el tubo de flash, tenga en
cuenta que el punto rojo en la parte
interior del tubo de flash debe estar
alineado con el punto rojo en la
bayoneta y luego inserte las clavijas
en los orificios para asegurar el
tubo de flash.
Simplemente tire de la lámpara hacia
afuera en la dirección de la lámpara
paralela.
※ Al retirar la lámpara, tenga
en cuenta que la bombilla aún
podría estar caliente.
Extracción del tubo de flash
Instalación del reflector
Extracción del reflector
Deslice la pestaña de liberación
de la batería hacia arriba, la
batería se puede quitar después
de que salte automáticamente.
Simplemente inserte la batería
en la ranura de la batería en la
dirección que se muestra hasta
que el pestillo de la batería
encaje en su lugar.
Extracción de la batería de litio
Instalación de la batería de litio
Inserte los tornillos en la parte
superior del mango y los dos
puntos de posicionamiento
como se muestra. Gire la perilla
de bloqueo hasta que el mango
esté seguro.
Instalación del mango
47
Inserte la parte superior del trípode
en la parte inferior del mango,
apriete la perilla de bloqueo hasta
que el soporte de la luz esté bien
sujeto.
※Este producto no incluye trípode
(se requiere compra por separado).
Instalación del trípode
Afloje la perilla de bloqueo de ángulo
del mango, ajuste el ángulo del flash
a un ángulo adecuado y luego
apriete la perilla de bloqueo de
ángulo.
Ajuste del ángulo del flash
Uso de la energía de batería
Mantenga presionado el botón de encendido durante 1 segundo para
controlar la potencia del producto. El dispositivo tiene una función de
apagado automático. Se recomienda apagar la alimentación cuando no
se vaya a utilizar durante un largo período de tiempo.
El flash se apagará automáticamente cuando no se realice ninguna
operación dentro del tiempo establecido en C.Fn-STANDBY (30-120 min).
Gestión de la batería
1. El producto utiliza una batería de litio, con una larga vida útil, que se
puede recargar hasta 300 veces.
2. Circuito incorporado seguro y confiable con protección contra
sobrecalentamiento, sobrecarga, sobredescarga, sobrecorriente y
cortocircuito.
3. Utilice el puerto de carga de CC para cargar la batería a través del
adaptador de corriente incluido. Una carga completa tarda aprox. 3 horas.
Características de la batería
Instrucciones de instalación Instrucciones de instalación Instrucciones de instalación
ES ES

49
Presione brevemente el botón de modo "MODE".
Cuando aparece la palabra "TTL" en la pantalla,
el flash ha entrado en modo TTL.
Sincronización de alta velocidad (HSS)
Presione el botón " " brevemente para mostrar
el símbolo " " en la pantalla. Esta característica
requiere el uso de un transmisor inalámbrico
para sincronización de alta velocidad, como
QProC/N/S.
Indicación de energía de la batería
Después de instalar correctamente la batería para encender el flash, el
ícono de batería en pantalla muestra la energía restante que puede
verificar en un instante.
El flash tiene tres modos: Flash automático TTL, Flash manual M y Flash
múltiple. En el modo TTL, el sistema de medición de la cámara detecta la luz
del flash reflejada por el sujeto y ajusta automáticamente la salida del flash
para que el sujeto y el fondo estén igualmente expuestos.
※Presione el botón <MODO>. Aparecerán tres modos de flash en la pantalla
LCD en orden.
Nota: En la alternancia de marchas, los datos serán algo diferentes.
Icono de energía de la
batería en la pantalla LCD
(Indicación y gestión de
energía para todo el
sistema flash).
(Administración del nivel
de batería cuando la
batería no se descarga)
Indicadores LED
en la batería
Indicadores
LED
en la batería
Porcentaje de
potencia equivalente
Uso de la energía de batería
1. Evite cortocircuitar los terminales positivo y negativo.
2. La batería no es resistente al agua y no debe exponerse a altos niveles de
humedad ni sumergirse en agua.
3. Manténgase fuera del alcance de los niños.
4. No cargue la batería durante más de 24 horas. Solo se debe utilizar un
cargador original compatible. Guardar en un lugar fresco y seco.
5. No deje la batería sin usar por largos periodos de tiempo (más de 6 meses).
Recargar una batería que no se ha utilizado durante demasiado tiempo es un
riesgo para la seguridad. No cargue la batería cuando el voltaje de la celda de
la batería sea inferior a 9V.
6. No coloque la batería cerca o en el fuego.
7. Deseche la batería de acuerdo con las normas locales después de su uso.
8. Cuando no esté en uso durante un largo período de tiempo, cárguelo hasta
aproximadamente un 60% antes de guardarlo.
9. Cuando no se utilice durante un largo período de tiempo, guarde la batería
en buenas condiciones y déjela con la mitad de la carga.
10.La batería no debe usarse mientras se está cargando.
11. La batería está equipada con una función de protección contra
sobretemperatura. Si la temperatura interna de la batería alcanza los
131 °F/55 ℃, esta función se activará automáticamente. La batería deberá
enfriarse antes de que se reanude el funcionamiento normal.
Precauciones de la batería
48
Pantalla de On/ Off/ Desbloqueo
Modo TTL
Gire la perilla de ajuste para establecer el valor de
compensación de exposición. Presione el botón
"SET" para confirmar y salir de la configuración.
※Los usuarios pueden ajustar la compensación
de la exposición del flash en incrementos de 1/3
de punto entre ±3 puntos. "0,3" equivale a 1/3
de parada, "0,7" equivale a 2/3 de parada.
Establezca la compensación de la exposición
con flash en "+0" para cancelar la compensación
de la exposición con flash.
※ El modo TTL solo está disponible cuando la
función inalámbrica está habilitada.
Compensación de exposición con flash (FEC)
① Presione brevemente el botón de encendido
" ". La pantalla se iluminará. Gire la perilla
de ajuste en el sentido de las agujas del reloj
tres veces y luego la pantalla se desbloqueará
cuando aparezca la flecha que apunta hacia
abajo.
② Presione brevemente el botón de encendido
" " para apagar la luz.
4 barras
4 luces azules encendidas
4 luces
azules
encendidas
3 luces
azules
encendidas
2 luces
azules
encendidas
1 luces
azules
encendidas
3 luces azules encendidas
2 luces azules encendidas
1 luces azules encendidas
75% ~ 100%
50% ~ 75%
25% ~ 50%
3% ~ 25%
2% - Luz azul
intermitente
1% - No hay
indicadores encendidos
El flash dejará de
funcionar cuando la
energía sea <2%. Recibirá
una advertencia de un
minuto antes de que el
dispositivo se apague
después de 3 minutos.
Nota: Cargue lo antes
posible (dentro de los 10
días) antes de usar o
guardar la luz.
3 barras
2 barras
1 barras
Alerta de
energía
restante baja
Con High Speed Sync (FP Flash), los usuarios pueden usar el flash de forma
sincronizada en todas las velocidades de obturación. El modo de
sincronización de alta velocidad se adapta particularmente bien cuando se
utiliza la prioridad de apertura para el flash de relleno en los retratos.
Botón de
Nivel de
Batería
ES ES
Modo de flash - Modo de flash automático TTL
Uso de la energía de batería Modo de flash - Modo de flash automático TTL

Si la velocidad de obturación se ajusta igual o más lenta que la velocidad
máxima de sincronización del flash de la cámara, el icono " " no aparecerá
en el visor.
Con High Speed Sync, cuanto mayor sea la velocidad de obturación, menor
será el alcance efectivo del flash.
Para reanudar el flash normal, presione el botón de sincronización de alta
velocidad nuevamente. El icono " " desaparecerá.
El flash de sincronización de alta velocidad no está disponible en el modo
Multi Flash.
El flash cuenta con una función de protección contra sobrecalentamiento
que se activará después de 50 flashes consecutivos sincronizados a alta
velocidad.
51
Pulse brevemente el botón de modo "MODE".
Cuando aparece "M" en la pantalla, el flash se
ha configurado en modo M.
La salida del flash se puede configurar girando
la rueda de ajuste. Presione el botón de
configuración "SET" nuevamente para
confirmar la salida del flash.
En el modo de flash manual M, presione el
botón <MENU> para ingresar a C.Fn - SLAVE
y seleccione S1. El flash se puede utilizar
como luz secundaria para crear una variedad
de efectos de iluminación, adecuados para
un entorno de flash manual. Activará el flash
sincrónicamente con el primer flash del flash
maestro, que es el efecto consistente con el
uso de disparadores de flash inalámbricos.
Configuración de la unidad óptica S1
Presione el botón <MENU> para ingresar
C.Fn - SLAVE y seleccione S2. El flash se puede
utilizar como luz secundaria para entornos
de flash TTL. Con la función anti-flash previo,
la cámara con función de pre-flash se puede
utilizar para sincronizar el disparo con el
esclavo óptico. Activará el flash
sincrónicamente con el segundo flash del
flash principal, es decir, un flash controlado
por dos luces.
Configuración de la unidad óptica S2
La duración del flash es el tiempo desde el
inicio del flash hasta alcanzar la mitad del pico
de luz. La mitad del pico se expresa como
t = 0,5. Para proporcionar a los fotógrafos
valores de disparo más detallados, este
producto utiliza t = 0,1.
La diferencia entre t=0,5 y t=0,1 se muestra
a la izquierda.
El modo Multi Flash emite una serie de flashes rápidos. Permite a los usuarios
tomar múltiples imágenes de objetos en movimiento en una sola imagen.
Puede configurar la frecuencia del flash (el número de flashes por segundo,
expresado en Hz), los tiempos de flash y la potencia de salida del flash.
※ La duración del flash se muestra solo en
el modo M.
Visualización de la duración del flash
Configuración del modo de flash múltiple
Configuración de la potencia del flash en el
modo M
Cuando aparece la palabra "MULTI" en la pantalla,
el flash ahora está configurado en modo
estroboscópico. La salida del flash se puede
configurar girando la rueda.
Presione el botón "SET" nuevamente para
establecer el número de flahes y gire el dial
para establecer el valor.
Presione el botón "SET" nuevamente para
establecer la frecuencia del flash y gire el dial
para establecer el valor.
Finalmente, presione el botón "SET"
nuevamente para configurar todos los valores.
Cálculo de la velocidad de obturación:
En el modo de flash múltiple, el obturador debe permanecer abierto hasta que
se detenga el flash. Utilice la siguiente fórmula para calcular la velocidad del
obturador y luego configure la cámara.
Velocidad de obturación = tiempos de flash/frecuencia de flash
Por ejemplo, si el tiempo de Flash es 10 y frecuencia del Flash es 5Hz, la
velocidad de obturación debe ser de al menos 2 segundos.
Para evitar el sobrecalentamiento y daños al flash, no realice flashes/flashes
múltiples de más de 10 flashes consecutivos. Después de 10 flashes, deje que el
flash se enfríe durante al menos 15 minutos. Si intenta realizar más de 10
multiflashes/flashes consecutivos, es posible que el flash se detenga
automáticamente para evitar que el cabezal del flash se sobrecaliente. Si esto
sucede, deje que el flash se enfríe durante al menos 15 minutos.
Modo de flash - Modo de flash manual M
Modo de flash - Modo de flash manual M Flash Mode - M Manual Flash Mode
Modo de flash - Modo de flash múltiple
Modo de flash - Modo de flash múltiple
El modo M le permite configurar la potencia del flash en incrementos de 0,1
puntos desde 1/256 de potencia hasta 1/1 de potencia máxima. Para obtener
la exposición de flash correcta, utilice un medidor de flash portátil para
determinar la salida de flash requerida.
Notas
※ El modo de flash esclavo óptico S1/S2 solo se admite en el modo M
cuando la función inalámbrica está desactivada.
A
t
50%
10%
t=0.5
t=0.1
Notas
● Los sujetos muy reflectantes son más efectivos con flashes estroboscópicos
frente a un fondo oscuro.
● Se recomienda el uso de un trípode y disparador remoto.
● El modo de flash múltiple no se puede configurar cuando la potencia del
flash es 1/1 y 1/2.
● El modo de flash múltiple también se puede usar con "buLb".
● Si el tiempo de flash se muestra como --, la luz parpadeará continuamente
hasta que se agote el obturador o la batería.
● Los tiempos de flash estarán limitados como se muestra en la siguiente tabla.
Hz 1 2 3 4 5 6~7 8~9 10 11 12~14 15~19 20~50 60~199
1/4
1/8
1/46
1/32
1/64
1/128
1/256
Output
de flash
Tiempos de flash de máxima potencia
8
14
30
60
90
100
100
6
14
30
60
90
100
100
4
12
30
60
90
100
100
3
10
20
50
80
100
100
3
8
20
50
80
100
100
2
6
20
40
70
90
90
2
5
10
30
60
80
80
2
4
8
20
50
70
70
2
4
8
20
40
70
70
2
4
8
20
40
60
60
2
4
8
18
35
50
50
2
4
8
16
30
40
40
2
4
8
12
20
40
40
ES
50
ES
Modo de flash - Modo de flash automático TTL Modo de flash - Modo de flash manual M

Modo de menú (C.Fn: Establecer función
personalizada)
Configuración de transmisión inalámbrica 2.4G
El Q4 usa el sistema Q inalámbrico 2.4G y se puede usar en combinación perfecta
con algunos de nuestros otros modelos. Utilizado como unidad esclava, es
compatible con cámaras como Canon E-TTL II, Nikon i-TTL y Sony y cambia
automáticamente según la unidad maestra. No se requiere configuración manual.
※Q4 como unidad esclava puede ser controlada por la unidad maestra con
función de transmisión inalámbrica, como los modelos: NW420, serie QPro,
serie Z1 y algunos otros.
Presione el botón "MENÚ" para ingresar al modo
de menú, gire la perilla de ajuste para seleccionar
la ID (01 ~ 99) y presione el botón "CONFIGURAR"
para configurarlo.
※Solo cuando la unidad Master tiene esta función.
Presione brevemente el botón Inalámbrico " ".
El icono " " aparecerá en la pantalla.
Presione brevemente el botón " " para seleccionar
un grupo (A~E).
Rango de posicionamiento y funcionamiento (Ejemplo de disparo con
flash inalámbrico)
(1) Disparo con flash automático usando una unidad secundaria.
(3) Disparo con flash automático con tres grupos esclavos.
Disparo con flash múltiple inalámbrico: los usuarios pueden dividir la unidad
esclava en dos o tres grupos y usar el flash automático TTL mientras cambian
la proporción del flash (ampliación). Además, el usuario del flash puede
configurar y disparar con diferentes modos de flash para cada grupo de flash.
(2) Disparo con flash automático con dos grupos esclavos
● Utilice una unidad maestra con función de transmisor inalámbrico
como transmisor.
● Debe probar el flash haciendo un disparo de prueba antes de disparar.
● La distancia de transmisión puede ser más corta según la ubicación, el
entorno circundante, las condiciones meteorológicas, etc.
Configuración de canales
Configuración del número de ID.
Mantenga presionado el botón " " durante 2
segundos para seleccionar el número de canal.
Gire la perilla de ajuste para configurar el valor
del canal (1~32), luego presione "SET" para
configurar el canal.
① Presione el botón "MENU" para ingresar al menú
C.Fn. "Ver x.x" en la esquina inferior derecha
indica el número de versión del software.
② Gire la perilla de ajuste para seleccionar el icono
de función personalizada. Presione el botón "SET"
para resaltar el número de función personalizada.
③ Gire la perilla de ajuste para establecer el número
requerido. Presione el botón "SET" para confirmar y
presione "SET" nuevamente para salir de la selección.
④ Presione el botón "MENU" para salir de la
configuración.
52
Disparo con flash inalámbrico: Transmisión inalámbrica (2.4G) Disparo con flash inalámbrico: Transmisión inalámbrica (2.4G)
Configuración de grupos
Disparo con flash inalámbrico
99
53
Distancia de
transmisión
Aprox. 328'/100m
A
B
A
B
C
1. La interferencia de la señal del entorno externo 2.4G (como estaciones base
inalámbricas, enrutamiento Wi-Fi 2.4G, dispositivos Bluetooth, etc.).
Ajuste la configuración del canal CH del disparador de flash (recomendado +10),
encuentre un canal sin interferencia para usar o apague otros dispositivos
2.4G mientras trabaja.
2. Confirme si el flash se ha reciclado o si el tiempo de reciclado se ha
mantenido con la velocidad de disparo continuo (el indicador de flash listo se
ha encendido), y si no se encuentra en la protección contra sobrecalentamiento
u otro estado anormal.
Puede intentar ajustar la configuración de potencia del flash, como el modo
TTL. Intente cambiar al modo M (ya que el modo TTL requiere un solo flash
previo).
3. La distancia entre el disparador y el flash es demasiado pequeña
(distancia <0,5m).
Encienda el disparador de flash " cerca del modo inalámbrico ":
Serie Qpro: configure C.Fn-DIST para 0-30m.
4. Tanto el flash como el disparador tienen poca potencia.
Reemplace la batería (se recomienda usar baterías alcalinas desechables
de 1,5V para el gatillo).
C.Fn: Establecer función personalizada
Causas y soluciones de fuga de flash inalámbrico 2.4G
X.X
3
10
20
50
80
100
100
3
8
20
50
80
100
100
2
6
20
40
70
90
90
2
5
10
30
60
80
80
2
4
8
20
50
70
70
2
4
8
20
40
70
70
2
4
8
20
40
60
60
2
4
8
18
35
50
50
2
4
8
16
30
40
40
2
4
8
12
20
40
40
ES ES
Disparo con flash inalámbrico: Transmisión inalámbrica (2.4G) Disparo con flash inalámbrico: Transmisión inalámbrica (2.4G)

Configuración e
instrucciones
Lámpara de modelado
③ Presione brevemente el botón interruptor
de la lámpara de modelado " " Cuando la
lámpara de modelado y la palabra "APAGADO"
aparecen en la esquina inferior derecha de
la pantalla, la lámpara de modelado está
apagada.
55
Para garantizar el funcionamiento seguro del equipo, el sistema siempre
realiza una protección preventiva. Los siguientes iconos son para su
referencia.
Iconos de
funciones
personalizadas
SLAVE
MODEL
STANDBY
LIGHT
DELAY
UNITS
ALT
LCD
ID
BEEP
RESET
Funciones
Modo M
Modo M
Modo M
Modo
inalámbrico
M/Modo
Múltiple
OFF
OFF
OFF
OFF
01-99
Reiniciar
EN
Apagado automático sin
ninguna operación.
Se apaga automáticamente
después de 15 segundos
Siempre OFF
7 niveles
Siempre ON
Flash de cortina
trasera disponible
UNITS y ALT deben usarse
en combinación: UNITS
establece el número total de
luces; ALT establece cuántas
veces se activa la luz
Modo S1
Modo S2
OFF
S1
S2
-3~+3
OFF
01-99
ON
OFF
NO
YES
CONT
INTER
OFF
30min
60min
90min
120min
15sec
OFF
ON
Siempre ON
Se apaga automáticamente
cuando se recicla.
Selección del
modo óptico S1/S2
Lámpara de
modelado
Apagado
automático
Iluminación de
retroiluminación
Duración
Retardo de parpadeo OFF,0.01~30S
Tiempos de
parpadeo
Configure el número
de activadores
necesarios
para disparar el flash.
1~4
2~4
Contraste LCD
Identificación
inalámbrica
Alerta de zumbido
Restablecer
parámetros
Establecer
un icono
Modo de flash
NO compatible ① Presione brevemente el botón de luz de
modelado " ". La luz de modelado y la
palabra "PROP" aparecerán en la esquina
inferior derecha de la pantalla. Ahora
puede cambiar la potencia de salida
girando el dial para ajustar el brillo de
la luz de modelado. Cuanto mayor
sea el ajuste de potencia, más
brillante será la luz de modelado.
② Presione brevemente el botón de luz
de modelado " ". La luz de modelado y la
palabra "PROP" aparecerán en la esquina
inferior derecha de la pantalla. Mantenga
presionado el botón del interruptor de la
lámpara de modelado " " nuevamente
durante 2 segundos. La esquina inferior
derecha de la pantalla mostrará un
porcentaje resaltado que cambiará girando
la perilla de ajuste para cambiar el
porcentaje de brillo (10% ~ 100%).
Modo de lámpara de modelado
Funciones de protección adicionales
54
Sistema de protección Sistema de protección
1. Para evitar que el cabezal del flash se sobrecaliente y se dañe, no realice más
de 75 flashes rápidos sucesivos a 1/1 de potencia. Después de 75 flashes
sucesivos, deje que el flash se enfríe durante al menos 5 minutos.
2. Si continúa disparando más de 75 flashes consecutivos inmediatamente
después, la función interna anti-sobrecalentamiento puede activarse y el
tiempo de carga aumentará a más de 6 segundos. Si esto sucede, deje que el
flash se enfríe durante unos 5 minutos y el flash reanudará su funcionamiento
normal.
3. Cuando se active la protección térmica, aparecerá el símbolo " " en la
pantalla.
Protección contra el sobrecalentamiento
Número de flashes consecutivos para activar la función de protección
térmica.
Número de parpadeos consecutivos para activar la protección contra
sobrecalentamiento en modo HSS.
Potencia
1/1
1/2(+0.7~+0.9)
1/2(+0.3~+0.6)
1/2(+0.0~+0.2)
1/4(+0.0~+0.9)
1/8(+0.0~+0.9)
1/16(+0.0~+0.9)
1/32(+0.0~+0.9)
1/64(+0.0~+0.9)
1/128(+0.0~+0.9)
1/256(+0.0~+0.9)
75
100
120
150
200
300
400
500
1000
Veces
1/1
1/2(+0.0~+0.9)
1/4(+0.0~+0.9)
1/8(+0.0~+0.9)
1/16(+0.0~+0.9)
1/32(+0.0~+0.9)
1/64(+0.0~+0.9)
1/128(+0.0~+0.9)
1/256(+0.0~+0.9)
50
60
75
100
150
Pantalla LCD
Error 1
Error 5
Error 6
Advertencias
El sistema de reciclaje de flash no está operativo,
reinicie el dispositivo. Si esto no se resuelve por
sí solo, será necesario reparar el dispositivo.
Error en el ventilador
Error del sensor
ES ES
C.Fn: Establecer función personalizada
C.Fn: Establecer función personalizada
Potencia Veces
200
300

Actualización de firmware
1. No coloque el producto en un entorno donde la temperatura sea
superior a 50 ℃.
2. La temperatura de funcionamiento del producto no debe superar los 40 ℃.
3. No someta el producto a un fuerte impacto físico. Dejar caer el dispositivo
puede provocar daños irreparables.
4. No destelle directamente en los ojos (especialmente en los ojos de los
bebés), de lo contrario, puede provocar una discapacidad visual a corto plazo.
5. Este producto no es resistente al agua y debe mantenerse alejado de la
lluvia y los ambientes húmedos.
6. No desmonte el producto. Solo debe ser reparado por Neewer
directamente (si está disponible) o por un profesional calificado.
7. No lo use cerca de un fuego. Si se desarrolla un bulto en la batería o en la
carcasa, no se debe usar el flash.
8. Si el dispositivo no funciona correctamente, apague el flash
inmediatamente.
9. No utilice el flash cerca de productos químicos, gases inflamables u otras
sustancias especiales que, en circunstancias especiales, pueden ser
sensibles al resplandor instantáneo emitido por el flash y pueden provocar
un incendio o interferencias electromagnéticas. Se debe prestar especial
atención a cualquier señal de advertencia relevante.
Cuidado y mantenimiento
▪ Si el flash comienza a funcionar mal, debe apagarse inmediatamente para
identificar la causa.
▪ El cuerpo del flash no debe someterse a vibraciones excesivas y mantenerse
libre de polvo.
▪ Es normal que el cuerpo de la lámpara se caliente ligeramente durante el
uso. No dispare el flash continuamente si no es necesario.
▪ Si el producto falla o está mojado, busque ayuda de un profesional
calificado.
▪ Se pueden realizar cambios en las especificaciones técnicas del producto
sin previo aviso.
Este producto admite actualizaciones de firmware a través del puerto USB.
Los últimos anuncios e instrucciones de software se publicarán en el sitio
web oficial.
▪ Este producto no viene con un cable de actualización USB. Cómprelo por
separado. El puerto USB de este producto es un puerto Tipo-C.
▪ Consulte el software del programa "Neewer_Firmware_Update" para
actualizar el firmware. Descargue e instale el software de actualización de
firmware Q4" y seleccione el archivo de firmware correspondiente antes de
actualizar el firmware.
Conector de sincronización
El conector de sincronización es de Φ3,5mm y se puede conectar a un cable
de sincronización o a un enchufe de activación para sincronizar el flash.
※ Al usar el puerto de sincronización para activar el flash, el modo inalámbrico
2.4G y los modos S1/S2 deben estar desactivados.
※ La velocidad de sincronización no debe exceder 1/200 al usar el puerto de
sincronización.
Guía para resolver problemas
Flash subexposición o sobreexposición.
Usando el modo HSS.
El alcance efectivo del flash es más pequeño cuando se utiliza la
sincronización de alta velocidad, así que asegúrese de que el sujeto se
encuentre dentro del alcance efectivo del flash.
▪ Uso del modo M.
Intente cambiar al modo TTL o modificar la potencia de salida del flash.
56 57
Modelo
Potencia
Duración del flash
Modos de flash
Potencia de salida
Flash estroboscópico
Compensación
de exposición
con flash (FEC)
Modos de
sincronización
Flash de retardo
Función de
enmascaramiento
Ventilador silencioso
incorporado
Zumbador incorporado
Pantalla
Q4
400Ws
1/209s to 1/10989s
M/Multi (inalámbrico apagado)
TTL/M/MUTIL (unidad receptora para
transmisión de radio)
9 pasos 1/256-1/1
HSS (hasta 1/8000S), sincronización de primera
/cortina, sincronización de segunda cortina
0.01-30s
Duración del flash
de la pantalla
pantalla de matriz de puntos
Lámpara de
modelado (LED)
Modo de unidad
esclava inalámbrica
2,4G, S1/S2, cable síncrono de 3,5mm, prueba de flash
Modos de disparo
Función inalámbrica
Sistema inalámbrico
2.4G Q
Batería recargable
de iones de litio
Ahorro de energía
Temperatura de color
unidad esclava, inalámbrico apagado
Flash de máxima
potencia
Tiempo de reciclaje aprox. 0,01-1,2S
Indicación de energía
de la batería
5600±200K
Especificaciones Especificaciones
Notas
compatible con los sistemas de flash automático
Canon E-TTL II, Nikon i-TTL y Sony TTL
proporcionado (hasta 100 veces, 199Hz)
Manual. FEB: +/-3 paradas en incrementos de
1/3 de parada
32 canales, 5 grupos (A, B, C, D, E)
Rango de transmisión 2.4G: 328'/100m
Identificación inalámbrica: el usuario puede
cambiar el canal de transmisión inalámbrica
y la identificación inalámbrica de la unidad
maestra y esclava para una operación
perfecta sin interferencia de señal antes
de la activación.
el flash se puede configurar para que se
apague automáticamente sin operación
durante 30-120 minutos.
21.6V/2800mAh
400
30W/5600K/CRI:95+
ES ES

Adaptateur secteur ×1
Lampe pilote ×1 Câble d'alimentation ×1
Cache-réflecteur ×1 Pochette ×1
Batterie au lithium ×1
Poignée ×1
Flash stroboscopique Q4 ×1
58
Accessoires disponibles à l'achat
59
Nous vous remercions de votre confiance et de votre achat de ce flash
speedlite Q4 qui est un puissant flash stroboscopique capable d'une
synchronisation haute vitesse de 1/8000. Portable, il est alimenté par une
batterie au lithium de grande capacité. La lampe pilote et le réflecteur
offrent une qualité de lumière de haut niveau pour les prises de vue en
extérieur et en intérieur. Ce qui le différencie de beaucoup d'autres
speedlites puissants sur le marché, c'est son design compact et sa taille
réduite qui malgré tout reste compatible avec bon nombre de supports
d'accessoires standard pour une plus grande compatibilité. Équipé d'un
système intégré de 2,4G connu sous le nom de 'Q-System' le Q4 prend en
charge le mode TTL, le déclenchement sans fil, la synchronisation haute
vitesse, la synchronisation du rideau avant, la synchronisation du rideau
arrière et bien plus encore.
Poignée
1:Corps du flash 2.Poignée supérieure
3:Écran LCD
Réflecteur
Réflecteur ×1
Libération du réflecteur
Bouton d'indication
(batterie restante)
Indicateur de charge
batterie
Récepteur optique
Batterie
Écran d'afffichage
Appui court pour
réglage du groupe,
appui long pour
réglage du canal
Bouton HSS
Bouton de
fonction sans fil
Bouton pour activer
la lampe pilote
Bouton marche/arrêt
Bouton Menu
Bouton Mode
Cadran de réglage
Bouton de réglage
Bouton TEST
Bouton de
verrouillage
Port USB Type-C de mise
à niveau du micrologiciel
Port de
synchronisation 3,5mm
Languette de libération
de la batterie
Port de chargement
de la batterie
Tube flash
Flash manuel
Sortie du flash
manuel
(1)Flash manuel M
(2)Flash Multi Strobe
(3)Flash automatique TTL
Mode lampe pilote
Durée du flash
Canal
Flash Multi (Strobe)
Fréquence du flash
Durée du flash
(Flash times)
Flash automatique TTL
Correction d'exposition
au flash (FEC)
Synchronisation
haute vitesse (HSS)
S1/S2
(5)Prise de vue avec contrôle optique sans fil
(4)Prise de vue sans fil
Groupe de flash
Réglage de l'angle
Bouton de verrouillage
du support d'éclairage
Trou de fixation
pour parapluie
Transmission
sans fil
Le flash Q4 est compatible avec les accessoires photographiques suivants
pour obtenir les meilleurs résultats et la meilleure expérience de prise de
vue : Déclencheur de flash QPro, parapluie à montage Bowens, réflecteur,
snoot, bol beauté, pied pour éclairage.
Aperçu du produit
Contenu de l'emballage
Illustration du produit Illustration du produit Illustration du produit
FR FR

60
Introduire les trois broches en cuivre
du tube flash dans les trois trous de
broche du corps du flash et
poussez-les vers l'intérieur.
Poussez le réflecteur dans les trous
de la languette, puis tournez le
réflecteur dans le sens des aiguilles
d'une montre pour le fixer.
Lors de l'installation du réflecteur,
veuillez noter que le point rouge
du réflecteur doit être aligné avec
le point bleu de la fixation de
baïonnette pour l'introduire dans
la pièce de connexion.
Appuyez sur le bouton pour retirer
le réflecteur, puis tournez-le dans
le sens inverse des aiguilles d'une
montre a fin de le tirer vers vous.
※L'appareil ne doit pas être sous
tension lors de l'installation/du
retrait du tube éclair.
Port de
synchronisation 3,5mm
Installation du tube flash
Lors de l'installation du tube flash,
veuillez noter que le point rouge sur
la partie interne du tube flash doit
être aligné avec le point rouge sur
la fixation de baïonnette, puis
insérez les broches dans les trous
pour fixer le tube flash.
Il suffit de tirer la lampe vers l'extérieur
dans la direction de indiquée.
※ Lorsque vous retirez la lampe faites
attention à ce que l'ampoule ne soit
pas chaude.
Retrait du tube flash
Installation du réflecteur
Retrait du réflecteur
Faites glisser le bouton de
libération vers le haut, la batterie
sortira automatiquement du
compartiment.
Insérez la batterie dans son
logement dans le sens indiqué
jusqu'à ce qu'ellese verrouille
en place.
Retrait de la batterie au lithium
Installation de la batterie au
lithium
Insérez les vis en haut de la
poignée et les deux points de
positionnement comme indiqué.
Tournez le bouton de verrouillage
jusqu'à ce que la poignée soit
bien fixée.
Installation de la poignée
61
Insérez le haut du pied dans le fond
de la poignée, serrez le bouton de
verrouillage jusqu'à ce que le
support soit bien fixé sur le pied
pour éclairage.
※Ce produit ne comprend pas de
trépied (achat séparé requis).
Installation du trépied
Desserrez le bouton de verrouillage
de la poignée, ajustez l'angle du
flash à un angle approprié, puis
resserrez le bouton de verrouillage.
Réglage de l'angle du flash
Alimentation par batterie
Appuyez longuement sur le bouton d'alimentation pendant 1 seconde pour
contrôler l'alimentation du produit. L'appareil dispose d'une fonction d'arrêt
automatique. Il est recommandé d'éteindre l'appareil lorsque vous ne
l'utilisez pas pendant une longue période.
Le flash s'éteint automatiquement lorsqu'il n'est pas utilisé pendant la durée
définie dans le paramètre C.Fn-STANDBY (30-120min).
Gestion de la batterie
1. Le produit utilise une batterie au lithium longue durée qui peut être
rechargée jusqu'à 300 fois.
2. Sûre et fiable, le circuit intégré protège contre la surchauffe, la surcharge,
la surdécharge, la surintensité et le court-circuit.
3. Utilisez le port de charge DC pour charger la batterie via l'adaptateur
électrique inclus. Une charge complète prend environ 3 heures.
Caractéristiques de la batterie
Instructions d'installation Instructions d'installation Instructions d'installation
FR FR

63
Appuyez brièvement sur le bouton "MODE".
Lorsque le mot "TTL" apparaît à l'écran, le flash
est passé en mode TTL.
Synchronisation à grande vitesse (HSS)
Appuyez brièvement sur le bouton " " pour
afficher le symbole " " à l'écran. Cette
fonction nécessite l'utilisation d'un émetteur
sans fil pour la synchronisation haute vitesse,
tel que le QProC/N/S.
indicateur d'alimentation de la batterie
Après avoir correctement installé la batterie pour alimenter le flash, l'icône
de batterie à l'écran affichera la puissance restante que vous pouvez
vérifier en un instant.
Le flash est équipé de trois modes principaux : Flash automatique TTL, Flash
manuel M et Flashs multiples. En mode TTL, le système de mesure de
l'appareil photo détecte l'éclairage du flash réfléchi par le sujet et ajuste
automatiquement la puissance du flash afin que le sujet et l'arrière-plan
soient également exposés.
※Appuyez sur le bouton <MODE> pour passer d'un mode flash à l'autre (il y
en a trois qui s'affichent à l'écran).
Remarque : les barres indicatrices sont purement indicatives et doivent
être utilisées comme un guide de l'enérgie de la batterie restante.
Icône de charge de la
batterie (écran LCD)
(Indication et gestion de
l'alimentation pour
l'ensemble du système
du flash)
(Gestion du niveau de la
batterie lorsque celle-ci
ne se décharge pas)
Indicateurs LED
(sur la batterie)
Indicateurs
LED (sur la
batterie)
Pourcentage de
puissance équivalente
Alimentation par batterie
1. Évitez de court-circuiter les bornes positive et négative.
2. La batterie n'est pas étanche et ne doit pas être exposée à des niveaux
élevés d'humidité ou immergée dans l'eau.
3. Gardez-la hors de portée des enfants.
4. Ne chargez pas la batterie pendant plus de 24 heures. Veillez à utiliser le
chargeur d'origine fourni ou un chargeur compatible. Conservez-la dans
un endroit frais et sec.
5. Ne laissez pas la batterie inutilisée pendant de longues périodes (plus
de 6 mois). La recharge d'une batterie qui a été laissée inutilisée pendant
trop longtemps présente un risque pour la sécurité. Ne chargez pas la
batterie lorsque la tension de la cellule de la batterie est inférieure à 9V.
6. Ne placez pas la batterie à proximité ou dans un feu.
7. Mettez la batterie au rebut conformément aux réglementations locales
après utilisation.
8. Lorsque vous n'utilisez pas l'appareil pendant une longue période,
chargez-le à environ 60 % avant de le ranger.
9. Lorsque vous n'utilisez pas l'appareil pendant une longue période, rangez
la batterie en bon état et laissez-la à moitié chargée.
10. Il est déconseillé d'utiliser la batterie pendant qu'elle est en cours de
chargement.
11. La batterie est dotée d'une fonction de protection contre la surchauffe.
Si la température interne de la batterie dépasse 131°F/55℃, cette fonction
se déclenchera automatiquement. La batterie doit être refroidie avant de
pouvoir reprendre son fonctionnement normal.
Précautions concernant la batterie
62
Mise en marche/arrêt/ désactivation de
verrouillage de l'écran
Mode TTL
Tournez la molette de réglage pour définir la valeur
de correction d'exposition. Appuyez sur le bouton
"SET" pour confirmer et quitter le réglage.
※L'utilisateur peut régler la correction d'exposition
au flash par incréments de 1/3 de valeur entre
±3 arrêts. "0,3" équivaut à 1/3, "0,7" équivaut
à 2/3. Réglez la correction d'exposition au flash
sur "+0" pour annuler la correction d'exposition
au flash.
※L'activation de la fonction sans fil permet
d'accéder au mode TTL.
Correction de l'exposition du flash (FEC)
① Appuyez brièvement sur le bouton d'alimentation
" " pour allumer l'écran. Tournez trois fois le
bouton de réglage dans le sens des aiguilles d'une
montre, puis l'écran sera déverrouillé lorsque la
flèche pointant vers le bas s'affiche à l'écran.
② Appuyez brièvement sur le bouton d'alimentation
" " pour éteindre la lumière.
4 Barres
4 LED bleue
4 LED
bleue
3 LED
bleue
2 LED
bleue
1 LED
bleue
3 LED bleue
2 LED bleue
1 LED bleue
75% ~ 100%
50% ~ 75%
25% ~ 50%
3% ~ 25%
2% - LED bleue
clignotante
1% - Aucune LED
allumée
Le flash cessera de
fonctionner lorsque
l'énergie restante de la
batterie est à <2%.
Vous aurez un
avertissement préalable
d'une minute avant que
l'appareil ne s'éteigne.
Remarque : Veuillez
recharger l'appareil dès
que possible (dans les
10 jours) avant de
l'utiliser ou de le ranger.
3 Barres
2 Barres
1 Barre
Alerte de
batterie faible
Grâce à la fonction de synchronisation haute vitesse (FP Flash), les
utilisateurs peuvent utiliser le flash de manière synchrone quel que soit
la vitesse d'obturation définie. Le mode synchro haute vitesse est
particulièrement bien adapté lorsque vous utilisez la priorité à l'ouverture
pour le flash d'appoint (photographie portrait).
Batterie
restante
FR FR
Mode flash - Mode flash automatique TTL
Alimentation par batterie Mode flash - Mode flash automatique TTL

Si la vitesse d'obturation est égale ou inférieure à la vitesse maximale de
synchronisation du flash de l'appareil photo, l'icône " " ne s'affiche
pas dans le viseur.
En ce qui concerne la synchronisation haute vitesse, plus la vitesse
d'obturation est élevée, plus la portée effective du flash est réduite.
Pour revenir au flash normal, appuyez à nouveau sur le bouton de
synchronisation haute vitesse jusqu'à ce que l'icône " " disparaît.
Le flash synchro haute vitesse n'est pas disponible en mode Multi Flash.
Le flash dispose d'une fonction de protection contre la surchauffe qui se
déclenche après 50 flashs synchronisés haute vitesse consécutifs.
65
Appuyez brièvement sur le bouton "MODE"
jusqu'à ce que vous voyez "M" à l'écran. Le
flash est desormais en mode 'M'.
La puissance du flash est réglable dans ce mode.
Il suffit de tourner la molette de réglage pour
définir le niveau de puissance. Appuyez à
nouveau sur le bouton de réglage "SET" pour
confirmer la puissance du flash.
En mode flash manuel M, appuyez sur la
bouton <MENU> pour entrer dans le réglage
de C.Fn - SLAVE et sélectionner S1. Le flash
peut être utilisé comme lumière secondaire
pour créer une variété d'effets d'éclairage,
adaptés à un environnement de flash
manuel. Il déclenchera le flash de manière
synchrone avec le premier éclair du flash
maître, ce qui est l'effet compatible avec
l'utilisation de déclencheurs de flash sans fil.
Réglage de l'unité optique S1
Appuyez sur le bouton <MENU> pour entrer
dans le paramètre C.Fn - SLAVE et
sélectionnez S2. Ce flash peut être utilisé
comme lumière secondaire pour les
environnements de flash TTL. Grâce à la
fonction anti-pré-flash, vous pouvez activer
la fonction pré flash de votre appareil photo
pour mieux synchroniser la prise de vue
avec l'esclave optique. Il déclenchera le flash
de manière synchrone avec le deuxième
flash du flash principal.
Réglage de l'unité optique S2
La durée du flash est le temps écoulé entre le
début du flash et l'atteinte du demi-pic de
lumière. Le demi-pic est exprimé par t = 0,5.
Afin de fournir aux photographes des valeurs
de prise de vue plus détaillées, ce produit
utilise t = 0,1.
La différence entre t=0,5 et t=0,1 est indiquée
sur la gauche.
Le mode multi-flash émet une série d'éclairs rapides. Il permet aux utilisateurs
de prendre plusieurs images d'objets en mouvement sur une seule photo. Vous
pouvez régler la fréquence du flash (le nombre d'éclairs par seconde, exprimé
en Hz), la durée des éclairs et la puissance de sortie du flash.
※ La durée du flash est affichée uniquement
en mode M.
Affichage de la durée du flash
Réglage du mode multi-flash
Réglage de la puissance du flash en mode M
Lorsque le mot "MULTI" apparaît à l'écran, le flash
est maintenant réglé en mode stroboscopique. La
puissance du flash peut être réglée en faisant
tourner la molette.
Appuyez à nouveau sur le bouton "SET" pour
régler le nombre de flashs et tournez la molette
pour régler la valeur.
Appuyez à nouveau sur le bouton "SET" pour régler
la fréquence du flash et tournez la molette pour
régler la valeur.
Enfin, appuyez à nouveau sur le bouton "SET"
pour régler toutes les valeurs.
Calcul de la vitesse d'obturation
En mode Multi Flash, l'obturateur doit rester ouvert jusqu'à ce que le flash
s'arrête. Utilisez la formule suivante pour calculer la vitesse d'obturation afin
de régler l'appareil photo.
Vitesse d'obturation = Durée de l'éclair/Fréquence de l'éclair
Par exemple, si la durée du flash est de 10 et la fréquence du flash de 5 Hz, la
vitesse d'obturation doit être d'au moins 2 secondes.
Pour éviter une surchauffe et d'éventuelles dommages au flash, n'effectuez
pas de multi strobes/flashs. Autrement dit plus de 10 flashs consécutifs. Après
10 flashs il est important que le flash se refroidisse pendant au moins 15 minutes.
Si vous essayez d'effectuer plus de 10 flashs multiples consécutifs, le flash peut
s'arrêter automatiquement pour éviter la surchauffe de la tête du flash. Si cela
se produit, laissez le flash refroidir pendant au moins 15 minutes.
Mode Flash - Flash Manuel Mode M
Mode Flash - Flash Manuel Mode M Flash Mode - M Manual Flash Mode
Mode Flash - Mode Multi Flash
Mode Flash - Mode Multi Flash
Le mode M vous permet de régler la puissance du flash par incréments de 0,1
de valeur - de 1/256 de puissance à 1/1 (pleine puissance). Pour obtenir une
exposition au flash correcte, veuillez utiliser un flashmètre à main pour
déterminer la puissance du flash requise.
Informations supplémentaires
※ Le mode flash optique esclave S1/S2 est uniquement pris en charge en
mode M lorsque la fonction sans fil est désactivée.
A
t
50%
10%
t=0.5
t=0.1
Remarques
● Les sujets très réfléchissants sont plus efficaces à condition que vous utilisiez
le flashs stroboscopique devant un arrière-plan sombre .
● L'utilisation d'un trépied et d'un déclencheur à distance est fortement
recommandée.
● Le mode multi-flash ne peut pas être réglé lorsque la puissance du flash est
de 1/1 et 1/2.
● Le mode flash multiple peut également être utilisé en mode "buLb".
● Si la durée du flash est affichée comme --, la lumière clignotera en continu
jusqu'à ce que l'obturateur ou la batterie soit épuisée.
● Les durées de flash seront limitées comme indiqué dans le tableau ci-dessous.
Hz 1 2 3 4 5 6~7 8~9 10 11 12~14 15~19 20~50 60~199
1/4
1/8
1/46
1/32
1/64
1/128
1/256
Puissance
du flash
Durée du flash à pleine puissance
8
14
30
60
90
100
100
6
14
30
60
90
100
100
4
12
30
60
90
100
100
3
10
20
50
80
100
100
3
8
20
50
80
100
100
2
6
20
40
70
90
90
2
5
10
30
60
80
80
2
4
8
20
50
70
70
2
4
8
20
40
70
70
2
4
8
20
40
60
60
2
4
8
18
35
50
50
2
4
8
16
30
40
40
2
4
8
12
20
40
40
FR
64
FR
Mode flash - Mode flash automatique TTL Mode Flash - Flash Manuel Mode M

Mode Menu (C.Fn : Sett Customized Function)
Configuration de la transmission sans fil 2,4G
Le Q4 est équipé du système Q sans fil 2,4G pour une compatibilité avec certains
de nos autres modèles. Configuré comme unité esclave, il est compatible avec
les appareils photo tels que Canon E-TTL II, Nikon i-TTL et Sony et s'ajuste
automatiquement en réponse à l'unité maître. Aucun réglage manuel n'est
nécessaire.
※Pourvu que le Q4 soit réglé comme une unité esclave, il peut être contrôlé à
partir de l'unité maître équipée d'une fonction de transmission sans fil,
notamment les modèles : NW420, série QPro, série Z1, et quelques autres.
Appuyez sur le bouton "MENU" pour accéder au
mode menu, tournez le bouton de réglage pour
sélectionner l'ID (01~99), puis appuyez sur le
bouton "SET" pour le valider.
※Cette fonction est exclusive à l'appareil
maître (master) .
Appuyez brièvement sur le bouton sans fil
" " jusqu'à ce que l'icône " " apparaisse à
l'écran.
Appuyez brièvement sur le bouton " " pour
sélectionner un groupe (A~E).
Positionnement et plage de fonctionnement (exemple de prise de vue au
flash sans fil)
(1) Prise de vue au flash automatique via un appareil esclave
(3) Prise de vue au flash automatique (trois groupes esclaves).
Prise de vue multi-flash sans fil : Les utilisateurs peuvent diviser l'appareil
esclave en deux ou trois groupes et profiter du flash automatique TTL tout en
modifiant le rapport de flash (grossissement). En outre, l'utilisateur du flash
peut régler et prendre des photos avec différents modes de flash pour chaque
groupe de flash.
(2) Prise de vue au flash automatique (deux groupes esclaves)
● Utilisation d'un appareil maître ayant la fonction d'émetteur sans fil comme
émetteur.
● Vous devez effectuer un test du flash en prenant une photo d'essai avant la
prise de vue.
● La distance de transmission est susceptible d'être plus courte en fonction de
l'emplacement, du milieu environnant, des conditions météorologiques, etc.
Réglage des canaux
Réglage du numéro d'identification
Appuyez sur le bouton " " pendant 2 secondes
pour sélectionner le numéro de canal. Tournez
le bouton de réglage pour définir la valeur du
canal (1~32), puis appuyez sur "SET" pour
définir le canal. ① Appuyez sur le bouton "MENU" pour accéder
au menu C.Fn. La version du logiciel "Ver x.x"
sera indiquée dans le coin inférieur droit.
② Tournez le bouton de réglage pour sélectionner
l'icône de la fonction personnalisée. Appuyez sur
le bouton "SET" pour mettre en surbrillance le
numéro de la fonction personnalisée.
③ Tournez le bouton de réglage pour définir le
numéro requis. Appuyez sur le bouton "SET"
pour valider le nouveau réglage et appuyez à
nouveau sur "SET" pour quitter ce menu.
④ Appuyez sur le bouton "MENU'' pour quitter
le réglage.
66
Prise de vue au flash sans fil : Transmission sans fil (2,4G) Prise de vue au flash sans fil : Transmission sans fil (2,4G)
Réglage des groupes
Prise de vue au flash sans fil
99
67
Distance de
transmission
Environ 328' po /100m
A
B
A
B
C
1. L'interférence du signal 2,4G provenantde l'environnement externe
(notamment les stations de base sans fil, les routeurs Wi-fi 2,4G, les appareils
Bluetooth, etc.)
Il est conseillé de modifier le réglage du canal CH du déclencheur du flash (nous
recommandons une valeur de +10) a fin de trouver un canal sans interférence,
sinon vous pouvez éteindre les autres appareils qui fonctionnent sur une
fréquence de 2,4G.
2. Veuillez vérifier si le flash a été recyclé ou si le temps de recyclage a suivi la
vitesse de prise de vue continue (l'indicateur 'Flash Ready' s'est allumé), et si
le système de protection contre la surchauffe n'a pas été activé ou que
l'appareil a connu un autre dysfonctionnement.
Vous pouvez essayer de régler la puissance du flash, par exemple en mode
TTL. Essayez de passer en mode M (car le mode TTL nécessite un seul pré-flash).
3. La distance entre le déclencheur et le flash est trop proche (distance <0,5m).
Veuillez mettre en marche le déclencheur du flash "proche du mode sans fil" :
Série Qpro : Réglez le paramètre C.Fn-DIST sur 0-30m.
4. Le flash et le déclencheur sont à court d'énergie
Veuillez remplacer la pile (il est recommandé d'utiliser des piles alcalines
jetables de 1,5 V pour alimenter le déclencheur).
C.Fn : Fonction personnalisée de l'appareil
Causes et solutions pour résoudre le problème d'une fuite du flash sans
fil 2,4G
X.X
3
10
20
50
80
100
100
3
8
20
50
80
100
100
2
6
20
40
70
90
90
2
5
10
30
60
80
80
2
4
8
20
50
70
70
2
4
8
20
40
70
70
2
4
8
20
40
60
60
2
4
8
18
35
50
50
2
4
8
16
30
40
40
2
4
8
12
20
40
40
FR FR
Prise de vue au flash sans fil : Transmission sans fil (2,4G) Prise de vue au flash sans fil : Transmission sans fil (2,4G)

Réglages et instructions
Lampe pilote
③ Appuyez brièvement sur le bouton qui
allume la lampe pilote " " Lorsque la
lampe pilote et le mot " OFF " seront affichés
dans le coin inférieur droit de l'écran, la
lampe pilote sera éteinte.
69
Pour garantir un fonctionnement sûr de l'équipement, le système vérifiera de
manière proactive l'état de l'appareil. Les icônes suivantes vous sont
présentées à titre de référence.
Icônes des
fonctions
personnalisées
SLAVE
MODEL
STANDBY
LIGHT
DELAY
UNITS
ALT
LCD
ID
BEEP
RESET
Fonctions
Mode M
Mode M
Mode M
Mode sans fil
Mode M/Multi
OFF
OFF
OFF
OFF
ON
01-99
Réinitialisation
Extinction automatique
après une certaine
période sans activité
Extinction
automatique
après 15 secondes
Toujours éteint
7 niveaux
Toujours activé
Flash rideau
arrière disponible
UNITS et ALT doivent être
utilisés en combinaison :
UNITS permet de définir le
nombre total de lumières ;
ALT indique la fréquence
de déclenchements
Mode S1
Mode S2
OFF
S1
S2
-3~+3
OFF
01-99
ON
OFF
NO
YES
CONT
INTER
OFF
30min
60min
90min
120min
15sec
OFF
ON
Toujours activé
S'éteint automatiquement
lorsqu'il est recyclé.
Sélection du mode
optique S1/S2
Lampe pilote
Arrêt automatique
Durée d'illumination
du rétroéclairage
Délai du flash OFF,0.01~30S
Durée du flash
Définissez le nombre
de déclenchements
nécessaires pour
déclencher le flash.
1~4
2~4
Contraste de
l'écran LCD
ID sans fil
Alerte sonore
Réinitialisation
des paramètres
Définir
une icône
Le Mode Flash
n'est pas pris
en charge
① Appuyez brièvement sur le bouton qui
allume la lampe pilote " ". La lampe pilote
et le mot " PROP " apparaissent dans le coin
inférieur droit de l'écran. Vous pouvez
maintenant modifier la puissance de sortie
en tournant la molette pour régler la
luminosité de la lampe pilote. Plus le
réglage de la puissance est élevé, plus la
lumière émise est forte
② Appuyez brièvement sur le bouton pour
allumer la lampe pilote " ". La lampe
pilote et le mot "PROP" apparaissent dans
le coin inférieur droit de l'écran. Appuyez à
nouveau sur le même bouton " " pendant
2 secondes. Le coin inférieur droit de l'écran
affichera un pourcentage en surbrillance qui
se modifiera en tournant le bouton de
réglage pour changer le pourcentage de
luminosité (10% ~ 100%) .
Mode lampe pilote
Fonctions de protection supplémentaires
68
Système de protection Système de protection
1. Pour éviter que la tête du flash ne surchauffe et ne soit endommagée,
n'effectuez pas plus de 75 flashs successifs rapides à la puissance 1/1.
Après 75 flashs successifs, laissez le flash refroidir pendant au moins 5 minutes.
2. Si vous continuez à déclencher plus de 75 éclairs consécutifs immédiatement
après, la fonction interne d'anti-surchauffe peut s'activer, ce qui fait que le
temps de charge augmente à plus de 6 secondes. Si cela se produit, laissez le
flash refroidir pendant environ 5 minutes et le flash reprendra son
fonctionnement normal.
3. Lorsque la protection thermique est activée, le symbole " " s'affiche
à l'écran.
Protection contre la surchauffe
Nombre de flashs consécutifs pour activer la fonction de protection
thermique.
Nombre d'éclairs consécutifs pour activer la protection contre la surchauffe
en mode HSS.
Puissance
1/1
1/2(+0.7~+0.9)
1/2(+0.3~+0.6)
1/2(+0.0~+0.2)
1/4(+0.0~+0.9)
1/8(+0.0~+0.9)
1/16(+0.0~+0.9)
1/32(+0.0~+0.9)
1/64(+0.0~+0.9)
1/128(+0.0~+0.9)
1/256(+0.0~+0.9)
75
100
120
150
200
300
400
500
1000
Fréquence
1/1
1/2(+0.0~+0.9)
1/4(+0.0~+0.9)
1/8(+0.0~+0.9)
1/16(+0.0~+0.9)
1/32(+0.0~+0.9)
1/64(+0.0~+0.9)
1/128(+0.0~+0.9)
1/256(+0.0~+0.9)
50
60
75
100
150
Écran d'affichage
LCD
Error 1
Error 5
Error 6
Avertissements
Système de recyclage flash non opérationnel,
veuillez redémarrer l'appareil . Si cela ne se résout
pas, l'appareil demande une réparation.
Erreur de ventilateur
Erreur de capteur
FR FR
C.Fn : Fonction personnalisée de l'appareil
C.Fn : Fonction personnalisée de l'appareil
Puissance Fréquence
200
300

Mise à jour du micrologiciel
1. Ne pas utiliser le produit dans un environnement où la température est
supérieure à 50℃.
2. La température de fonctionnement du produit ne doit pas être
supérieure à 40℃.
3. Ne soumettez pas le produit à un fort impact physique. Une chute de
l'appareil peut entraîner des dommages irréparables.
4. Veuillez ne pas flasher directement dans les yeux (en particulier les yeux
des nourrissons), sinon cela peut entraîner une déficience visuelle.
5. Ce produit n'est pas étanche et doit être conservé à l'abri de la pluie et
des environnements humides.
6. Veuillez ne pas démonter le produit sauf si vous êtes un professionnel qualifié.
7. Ne pas utiliser l'appareil à proximité d'un feu. Si un renflement se développe
dans la batterie ou le boîtier, le flash ne doit pas être utilisé.
8. Si l'appareil présente un quelconque dysfonctionnement, veuillez couper
immédiatement l'alimentation du flash.
9. N'utilisez pas le flash à proximité de produits chimiques, de gaz inflammables
ou d'autres substances spéciales, qui, dans des circonstances particulières,
peuvent être sensibles à l'éblouissement instantané émis par le flash et peuvent
entraîner un incendie ou des interférences électromagnétiques. Il convient de
prêter une attention particulière à tous les panneaux d'avertissement pertinents.
Entretien et maintenance
▪ Si le flash commence à mal fonctionner, il est fortement conseillé de le
mettre hors tension pour identifier la cause.
▪ Le corps du flash ne doit pas être soumis à des vibrations excessives et doit
être maintenu à l'abri de la poussière.
▪ Il est normal que le corps du flash chauffe légèrement pendant l'utilisation.
Ne déclenchez pas le flash en continu si cela n'est pas nécessaire.
▪ Si le produit tombe en panne ou est mouillé, veuillez demander l'aide d'un
professionnel qualifié.
▪ Nous nous réservons le droit de modifier les caractéristiques techniques du
produit à tout moment.
Ce produit prend en charge les mises à niveau du micrologiciel via le port
USB. Les dernières annonces et instructions relatives au logiciel seront
publiées sur le site officiel.
▪ Ce produit n'est pas livré avec un câble de mise à niveau USB. Veuillez
l'acheter séparément. L'entrée USB de ce produit nécessite un connecteur
de type C.
▪ Reportez-vous au logiciel du programme "Neewer_Firmware_Update"
pour mettre à niveau le micrologiciel. Veuillez télécharger et installer "Q4
firmware upgrade software" et sélectionner le fichier de firmware
correspondant avant de mettre à niveau le firmware.
▪ Veuillez vous référer au dernier e-manuel pour obtenir des informations
actualisées pendant que le produit est en cours de mise à niveau du
micrologiciel.
Prise sync
La prise de synchronisation est de Φ3,5mm et peut être branchée sur un
câble de synchronisation ou de déclenchement pour synchroniser le flash.
※ Il est nécessaire de désactiver le mode sans fil 2,4G et les modes S1/S2
doivent être désactivés avant de déclencher le flash via le port de
synchronisation.
※ La vitesse de synchronisation ne doit pas dépasser 1/200 si vous souhaitez
utiliser le port de synchronisation.
Guide de dépannage
Sous-exposition ou surexposition du flash.
Utilisation du mode HSS.
La portée effective du flash est plus petite lorsque vous utilisez la
synchronisation haute vitesse, assurez-vous donc que le sujet se trouve dans
la portée effective du flash.
▪ Utilisation du mode M.
Veuillez essayer de passer en mode TTL ou de modifier la puissance de sortie
du flash.
Réinitialisation
des paramètres
70 71
Modèle
Puissance
Durée du flash
Modes de flash
Flash stroboscopique
Flash stroboscopique
Correction
d'exposition au
flash (FEC)
Modes de
synchronisation
Retard de flash
Fonction de masquage
Ventilateur
silencieux intégré
Buzzer intégré
Écran
Q4
400Ws
1/209s à 1/10989s
M/Multi (sans fil désactivé),
TTL/M/MUTIL (unité de réception pour
transmission radio)
9 pasos 1/256-1/1
HSS (jusqu'à 1/8000s), synchro premier/rideau,
synchro deuxième rideau.
0.01-30s
Durée du flash
de l'écran
Écran à matrice de points
Lampe pilote (LED)
Mode appareil
esclave sans fil
2,4G, S1/S2, Cordon synchrone 3,5mm, Test Flash
Modes de
déclenchement
Fonction sans fil
Système sans fil 2.4G Q
Batterie Li ion
rechargeable
Économie d'énergie
Température de couleur
Designé comme appareil esclave, sans fil désactivé
Flash à pleine
puissance
Temps de recyclage Approx. 0,01-1,2s
Indication de la
puissance de la batterie
5600±200K
Caractéristiques techniques Caractéristiques techniques
Remarques
Compatible avec les systèmes de flashes
automatiques Canon E-TTL II, Nikon i-TTL et Sony TTL.
Intégré (jusqu'à 100 fois, 199Hz)
Manuel. FEB : +/-3 stops par incréments de 1/3 stop
32 canaux, 5 groupes (A, B, C, D, E)
Portée de transmission 2,4G : 328'/100m
ID sans fil : L'utilisateur peut modifier le canal de
transmission sans fil et l'ID sans fil de l'appareil
maître et de l'appareil esclave pour un
fonctionnement sans interférence avant le
déclenchement.
Le flash peut être réglé pour s'éteindre
automatiquement s'il reste sans fonctionnement
pendant 30 à 120 minutes.
21.6V/2800mAh
400
30W/5600K/CRI:95+
FR FR

Adattatore di alimentazione ×1
Lampada pilota ×1 Cavo di alimentazione ×1
copertura del
riflettore ×1 Borsa da trasporto ×1
Batteria al litio ×1
Impugnatura ×1
Flash stroboscopico Q4 ×1
72
Accessori disponibili per l'acquisto
73
Il flash Q4 e' una potente luce stroboscopica portatile alimentata
da una batteria al litio di grande capacità e supporta 1/8000 HSS. La lampada
pilota esposta ed il riflettore forniscono una qualità della luce di alto livello
per le riprese all'esterno e all'interno. Ciò che lo distingue da molti altri
potenti flash presenti sul mercato, è il suo design compatto e le
dimensioni ridotte che non compromettono le sue funzionalità cosi' come
i supporti per accessori standard per una più ampia compatibilità. Con un
impressionante sistema Q wireless 2.4G integrato, il Q4 supporta TTL,
attivazione wireless, sincronizzazione ad alta velocità, sincronizzazione
sulla prima tendina, sincronizzazione sulla seconda tendina e molto
altro ancora.
Impugnatura
1:Corpo del flash 2. Maniglia superiore
3:Schermo LCD
Riflettore
Riflettore ×1
Chiusura del riflettore
Pulsante dell'indicatore
di carica della batteria
Indicatore di carica
della batteria
Ricevitore ottico
Batteria
Schermo
Premere brevemente
per cambiare gruppo,
mantenere premuto
per cambiare canale
Pulsante HSS
Pulsante
funzione Wireless
Pulsante della
Lampada Pilota Interruttore On/Off
Pulsante Menu
Pulsante Modalita'
Manopola di
regolazione
Pulsante Impostazioni
Pulsante di Test
del flash
Manopola di
blocco
Porta di aggiornamento
firmware USB di tipo C
Porta di
sincronizzazione 3.5mm
Linguetta di rilascio
della batteria
Porta di ricarica
della batteria
Tubo flash
Flash Manuale
Potenza del flash
Manuale
(1)M Flash Manuale
(2)Flash Multi Stroboscopico
(3)Flash automatico TTL
Modalita' Lampada
Pilota
Durata del flash
Canale
Flash Multi
(Stroboscopico)
Frequenza del flash
Tempi di
esposizione
Flash automatico TTL
Compensazione
dell'esposizione
flash (FEC)
Sincronizzazione ad
alta velocita' (HSS)
S1/S2
(5)Scatti con controllo ottico wireless
(4)Scatti e Trasmissione Wireless
Gruppo del flah
Manopola di blocco
dell'angolazione
Manopola di blocco
del supporto luce
Foro per l'ombrello
Trasmissione
Wireless - Scatto
Wireless
Il flash Q4 può essere utilizzato con i seguenti accessori fotografici per
ottenere una migliore esperienza ed i migliori risultati di scatto: trigger
flash QPro, Ombrello morbido con attacco Bowens, riflettore, snoot,
beauty dish, supporto luce, ecc.
Panoramica del prodotto
Contenuto della confezione
Immagine del prodotto Immagine del prodotto Immagine del prodotto
IT IT

74
Far scattare i tre perni di rame del tubo
flash nei tre fori del corpo del flash
quindi spingerli verso l'interno
finché non saranno fissati.
Spingere il riflettore nelle linguette
quindi ruotarlo in senso orario
per fissarlo.
Quando si installa il riflettore, si
prega di notare che il punto rosso
presente sul riflettore dovra' essere
allineato con il punto blu presente
sulla baionetta e quindi inserito
nel pezzo di collegamento.
Premere il pulsante di sgancio
del riflettore quindi ruotarlo in
senso antiorario e tirarlo verso
l'esterno.
※ ll dispositivo non deve essere acceso
durante l'installazione/ rimozione
del tubo flash.
installazione del tubo flash
Durante l'installazione del tubo flash,
si prega di notare che il punto rosso
presente sulla parte interna del tubo
flash dovra' essere allineato con il
punto rosso presente sulla
baionetta a questo punto si
potranno inserire i perni nei fori
dei perni per fissare il tubo flash.
Bastera' tirare semplicemente la
lampada verso l'esterno
parallelamente.
※ Quando si rimuovera' la lampada,
si dovra' essere consapevoli che
la lampadina potrebbe essere
ancora calda.
Rimozione del tubo flash
Installazione del riflettore
Rimozione del riflettore
Far scorrere la linguetta di
rilascio della batteria verso
l'alto, la batteria potra' essere
rimossa dopo che si
sara' aperta automaticamente.
Bastera' inserire la batteria nello
slot della batteria nella direzione
indicata fino a quando il fermo
della batteria si blocchera' in
posizione.
Rimozione della batteria al litio
Installazione della batteria
al litio
Inserire le viti nella parte superiore
dell'impugnatura e i due punti di
posizionamento come mostrato.
Ruotare la manopola di blocco
fino a quando l'impugnatura
non sara' fissata.
Installazione dell'impugnatura
75
Inserire la parte superiore del
treppiedi nella parte inferiore
dell'impugnatura, stringere la
manopola di blocco fino a quando
il supporto della luce non
sara' fissato saldamente.
※Questo prodotto non include un
treppiedi (acquisto separato
richiesto).
Installazione del treppiedi
Allentare la manopola di blocco
dell'angolazione, regolare il flash su
l'angolazione desiderata quindi
stringere la manopola di blocco
dell'angolazione.
Regolazione dell'angolazione
del flash
Utilizzo dell'alimentazione a batteria
Mantenere premuto per 1 secondo il pulsante di accensione per controllare la
potenza del prodotto. Il dispositivo dispone di una funzione di spegnimento
automatico. Si raccomanda di spegnere l'alimentazione quando il
dispositivo non viene utilizzato per un lungo periodo di tempo.
Il flash si spegnera' automaticamente se non verra' utilizzato entro il tempo
impostato in C.Fn-STANDBY (30-120min).
Gestione della batteria
1. Il prodotto utilizza una batteria al litio, con una lunga durata, che
potra' essere ricaricata fino a 300 volte.
2. Sicura ed affidabile, circuito incorporato con protezione contro il
surriscaldamento, sovraccarico, sovracorrente , sovracorrente e cortocircuito.
3. Utilizzare la porta di ricarica DC per ricaricare la batteria tramite
l'adattatore di alimentazione incluso. Una ricarica completa
richiedera' circa 3 ore.
Caratteristiche della batteria
Istruzioni per l'installazione Istruzioni per l'installazione Istruzioni per l'installazione
IT IT

77
Premere brevemente il pulsante "MODE". Quando
la parola "TTL" apparira' sullo schermo, il flash
sara' entrato in modalità TTL.
Sincronizzazione ad alta velocita' (HSS)
Premere brevemente il pulsante " " per
visualizzare il simbolo " " sullo schermo.
Questa funzione richiede l'uso di un
trasmettitore wireless per la
sincronizzazione ad alta velocità, come
QProC/N/S.
Indicatore di carica della batteria
Dopo aver installato correttamente la batteria per alimentare il flash,
l'icona della batteria verra' visualizzata sullo schermo mostrando la
potenza residua che sara' possibile controllare in un istante.
Il flash dispone di tre modalità: Flash automatico TTL, Flash manuale M e
Multi Flash. In modalità TTL, il sistema di misurazione della fotocamera
rilevera' l'illuminazione flash riflessa dal soggetto e regolera' automaticamente
l'uscita del flash in modo che il soggetto e lo sfondo siano ugualmente esposti.
※Premere il tasto < MODE > . Tre modalità flash appariranno sullo schermo
LCD in ordine.
Nota: Le barre dell'indicatore sono puramente indicative e dovrebbero
essere utilizzate come una guida dell'alimentazione residua della batteria.
Icona di carica della
batteria sullo schermo LCD
(Indicazione di carica e
gestione per l'intero
sistema flash.)
(Gestione del livello
della batteria quando la
batteria non si scarica)
Indicatori LED
sulla batteria
Indicatori
LED
sulla
batteria
Percentuale di
potenza equivalente
Utilizzo dell'alimentazione a batteria
1. Evitare di cortocircuitare i terminali positivi e negativi.
2. La batteria non è impermeabile percio' non dovra' essere esposta a livelli
elevati di umidità o immersa in acqua.
3. Tenere lontano dalla portata dei bambini.
4. Non ricaricare la batteria per più di 24 ore. Utilizzare solo un caricabatterie
originale compatibile. Conservare in un luogo fresco e asciutto.
5. Non lasciare la batteria inutilizzata per lunghi periodi (più di 6 mesi).
Ricaricare una batteria che è stata lasciata inutilizzata per troppo tempo è
un rischio per la sicurezza. Non ricaricare la batteria quando la tensione
della batteria è inferiore a 9V.
6. Non collocare la batteria vicino o in un fuoco.
7. Dopo l'uso, smaltire la batteria conformemente alle norme locali.
8. Quando non viene utilizzata per un lungo periodo di tempo, si prega di
ricaricare circa il 60% della batteria prima di riporla.
9.Quando non viene utilizzata per un lungo periodo di tempo, conservare
la batteria in buone condizioni e lasciarla carica a metà.
10. La batteria non deve essere utilizzata mentre è in carica.
11. La batteria è dotata di una funzione di protezione da sovratemperatura.
Se la temperatura interna della batteria raggiunge i 55°C/131°F, questa
funzione si attiverà automaticamente. La batteria dovrà raffreddarsi
prima di riprendere il normale funzionamento.
Precauzioni per la batteria
76
Accensione/ spegnimento/ sblocco dello
schermo
Modalita' TTL
Ruotare la ghiera di regolazione per impostare il
valore di compensazione dell'esposizione.
Premere il pulsante "SET" per confermare e
uscire dall'impostazione.
※Gli utenti potranno regolare la compensazione
dell'esposizione flash con incrementi di 1/3-stop
tra 3 stop. "0.3" equivale a 1/3 stop, "0.7"equivale
a 2/3 stop. Impostare la compensazione
dell'esposizione flash su "+0" per annullare la
compensazione dell'esposizione flash.
※ La modalità TTL è disponibile solo quando la
funzione wireless è abilitata
Compensazione dell'esposizione flash(FEC)
①Premere brevemente il pulsante di accensione
" " . Lo schermo si accendera'. Ruotare la
manopola di regolazione in senso orario tre
volte e lo schermo sara' sbloccato quando
apparira' la freccia rivolta verso il basso.
② Premere brevemente il pulsante di accensione
" " per spegnere la luce.
4 Barre 4 Luce blu accesa
1 Luce
blu accesa
2 Luce
blu accesa
3 Luce
blu accesa
4 Luce
blu accesa
3 Luce blu accesa
2 Luce blu accesa
1 Luce blu accesa
75% ~ 100%
50% ~ 75%
25% ~ 50%
3% ~ 25%
2% - Luce blu
lampeggiante
1% - Nessun
indicatore acceso
Il flash cesserà di
funzionare quando la
potenza è <2%. Vi
sara' un avviso con un
minuto di anticipo prima
che il dispositivo si
spenga dopo 3 minuti.
Nota: Si prega di
ricaricare la luce il più
presto possibile (entro 10
giorni) prima di utilizzarla
o di riporla.
3 Barre
2 Barre
1 Barre
Allarme di
bassa
potenza residua
Con la sincronizzazione ad altra velocita' (FP Flash), gli utenti potranno
utilizzare il flash in modo sincrono a tutte le velocità dell'otturatore.
La modalità di sincronizzazione ad alta velocità è particolarmente
adatta quando si utilizza la priorità di apertura per il flash di
riempimento sui ritratti.
Pulsante del
livello della
batteria
IT IT
Modalità Flash - Modalità Flash automatico TTL
Utilizzo dell'alimentazione a batteria Modalità Flash - Modalità Flash automatico TTL

Se la velocità dell'otturatore è uguale o inferiore alla velocità massima di
sincronizzazione del flash della fotocamera, l'icona " " non verrà
visualizzata nel mirino.
Con la Sicronizzazione ad alta velocita', maggiore è la velocità dell'otturatore,
minore sara' la portata effettiva del flash.
Per ritornare al flash normale, premere nuovamente il pulsante
Sincronizzazione ad alta velocità. L'icona " " scomparirà.
Il flash di Sincronizzazione ad alta velocità non sara' disponibile in
modalità Multi Flash.
l flash è dotato di una funzione di protezione dal surriscaldamento che si
attivera' dopo 50 flash sincronizzati ad alta velocità consecutivi.
79
Premere brevemente il pulsante modalità "MODE".
Quando "M" apparira' sullo schermo, questo
indichera' che il flash e' entrato in modalità M.
Sara' possibile impostare l'uscita flash ruotando
la ghiera di regolazione. Premere nuovamente
il pulsante "SET" per confermare l'uscita
del flash.
In modalità Flash manuale M, premere il
pulsante <MENU> per accedere a C.Fn - SLAVE
e selezionare S1. Il flash potra' essere utilizzato
come una luce secondaria per creare una
varietà di effetti luminosi, adatti per un
ambiente flash manuale. Il flash si attiverà in
modo sincrono con il primo flash del flash
master che è l'effetto coerente con l'uso di
trigger flash wireless.
Impostazione dell'unita' ottica S1
Premere il pulsante <MENU> per accedere a
C.Fn - SLAVE e selezionare S2. Il flash
potra' essere utilizzato come luce secondaria
per ambienti flash TTL. Con la funzione
anti-pre-flash, la fotocamera con funzione
pre-flash potra' essere utilizzata per
sincronizzare lo scatto con lo slave ottico.
Il flash verra' attivato in modo sincrono
con il secondo flash del flash principale,
cioè un flash a due luci.
Impostazione dell'unita' ottica S2
La durata del flash è il tempo che intercorre
dall'inizio del flash al raggiungimento del
mezzo picco di luce. Il mezzo picco è espresso
come t = 0,5. Per fornire ai fotografi valori di
scatto più dettagliati, questo prodotto
utilizza t = 0,1.
La differenza tra t=0.5 e t=0.1 è mostrata
a sinistra
La modalità Multi Flash emette una serie di flash rapidi. Questa consente agli
utenti di catturare più immagini di oggetti in movimento in una singola
immagine. Sara' possibile impostare la frequenza del flash (il numero di flash
al secondo, espresso in Hz), i tempi di flash e la potenza in uscita del flash.
※La durata del flash viene visualizzata
solamente in modalita' M.
Visualizzazione della durata del flash
Impostazione della Modalita' Multi flash
Impostazione della modalità Flash su M
Quando la parola "MULTI" apparira' sullo schermo,
il flash sara' impostato in modalità strobo. L'uscita
flash potra' essere impostata ruotando la ghiera.
Premere il pulsante "SET" per impostare il
numero di flash quindi ruotare la ghiera per
impostare il valore.
Premere nuovamente il pulsante "SET" per
impostare la frequenza del flash quindi ruotare
la ghiera per impostare il valore.
Infine premere di nuovo il pulsante "SET" per
impostare tutti i valori."
Calcolo della velocita' dell'otturatore
In modalità Multi Flash, l'otturatore dovrebbe rimanere aperto fino all'arresto
del flash. Utilizzare la formula seguente per calcolare il tempo di posa e
quindi impostare la fotocamera.
Tempo di posa = tempi di esposizione/frequenza del flash
Ad esempio, se il Tempo di esposizione è 10 e la Frequenza del flash è 5Hz, il
tempo di posa dovrebbe essere di almeno 2 secondi.
Per evitare il surriscaldamento ed il danneggiamento del flash, non eseguire
flash multipli o più di 10 flash consecutivi. Dopo 10 flash, lasciare raffreddare il
flash per almeno 15 minuti. Se si cercheranno di eseguire più di 10 flash/ multipli
consecutivi, il flash potrebbe arrestarsi automaticamente per impedire il
surriscaldamento della testina del flash. Se questo accade, lasciare raffreddare
il flash per almeno 15 minuti.
Modalita' Flash - M Modalita' flash Manuale
Modalita' Flash - M Modalita' flash Manuale Flash Mode - M Manual Flash Mode
Modalita' Flash - Modalita' Multi flash
Modalita' Flash - Modalita' Multi flash
La modalità M consentira' di impostare l'uscita flash in incrementi di 0,1 stop
da 1/256 di potenza a 1/1 di piena potenza. Per ottenere la corretta
esposizione del flash, utilizzare un misuratore flash portatile per determinare
l'uscita flash necessaria.
Note
※ La modalità flash slave ottico S1/S2 è supportata solo in modalità M
quando la funzione wireless è disattivata.
A
t
50%
10%
t=0.5
t=0.1
Note
● I soggetti molto riflettenti sono più incisivi se trattati con flash stroboscopici
davanti ad uno sfondo scuro.
● Si raccomanda l'uso di un treppiedi e di un trigger remoto.
● La modalità Multi Flash non potra' essere impostata quando l'uscita flash
è 1/1 e 1/2.
● La modalità Multi Flash potra' essere utilizzata anche con "Lampadina".
● Se il tempo di esposizione viene visualizzato come --, la luce
lampeggera' continuamente fino a quando l'otturatore o la batteria non si
saranno esauriti.
● La durata del flash sara' limitata come mostrato nella tabella qui sotto.
Hz 1 2 3 4 5 6~7 8~9 10 11 12~14 15~19 20~50 60~199
1/4
1/8
1/46
1/32
1/64
1/128
1/256
Uscita
flash
Tempi di esposizione a piena potenza
8
14
30
60
90
100
100
6
14
30
60
90
100
100
4
12
30
60
90
100
100
3
10
20
50
80
100
100
3
8
20
50
80
100
100
2
6
20
40
70
90
90
2
5
10
30
60
80
80
2
4
8
20
50
70
70
2
4
8
20
40
70
70
2
4
8
20
40
60
60
2
4
8
18
35
50
50
2
4
8
16
30
40
40
2
4
8
12
20
40
40
IT
78
IT
Modalità Flash - Modalità Flash automatico TTL Modalita' Flash - M Modalita' flash Manuale

Menu Modalita' (C.Fn: Impostazione funzioni
personalizzate)
Impostazione della trasmissione wireless 2.4G
Il Q4 utilizza il sistema wireless Q 2.4G e potra' essere utilizzato in perfetta
combinazione con alcuni dei nostri altri modelli. Utilizzato come unità slave, è
compatibile con fotocamere come Canon E-TTL II, Nikon i-TTL e Sony cambiando
automaticamente in base all'unità master. Non è richiesta alcuna
impostazione manuale.
※Il Q4 come unità slave potra' essere controllato dall'unità master con funzione
di trasmissione wireless, come i modelli: NW420, serie QPro, serie Z1 e alcuni altri.
Premere il pulsante "MENU" per accedere alla
modalità menu, ruotare la ghiera di regolazione
per selezionare l'ID (01~99) e premere il pulsante
"SET" per impostarlo.
※ Quest'operazione potra' essere effettuata solo
quando l'unità Master dispone di questa funzione.
Premere brevemente il pulsante Wireless " ".
L'icona " " apparirà sullo schermo.
Premere brevemente il tasto " " per selezionare
un gruppo (A~E).
Posizionamento e portata operativa (Esempio di ripresa flash wireless)
(1) Scatto con flash automatico utilizzando un'unità slave.
(3) Scatto automatico con tre gruppi di slave
Riprese Multi Flash Wireless: gli utenti potranno dividere l'unità slave in due o
tre gruppi ed utilizzare il flash automatico TTL cambiando il rapporto del flash
(ingrandimento). Inoltre, l'utente potra' impostare e scattare con diverse
modalità flash per ogni gruppo flash.
(2) Scatto automatico con due gruppi di slave
● Utilizzare un'unità master con funzione di trasmettitore wireless come
trasmettitore.
● Il flash dovrebbere essere testato realizzando un test prima di iniziare
a scattare.
● La distanza di trasmissione può essere più breve a seconda della
posizione, dell'ambiente circostante, delle condizioni meteorologiche, ecc.
Impostazione dei canali
Impostazione del Numero ID
Mantenere premuto per 2 secondi il tasto " " per
selezionare il numero del canale. Ruotare la ghiera
di regolazione per impostare il valore del canale
(1 ~ 32), quindi premere "SET" per impostare
il canale.
① Premere il pulsante "MENU" per accedere al
menu C.Fn. "Ver x.x" nell'angolo in basso a destra
indichera' il numero di versione del software.
② Ruotare la ghiera di regolazione per selezionare
l'icona della funzione personalizzata. Premere
il pulsante "SET" per evidenziare il numero di
funzione personalizzato.
③ Ruotare la ghiera di regolazione per impostare
il numero desiderato. Premere il pulsante "SET"
per confermare quindi premere nuovamente
"SET" per uscire dalla selezione.
④ Premere il pulsante "MENU" per uscire
dall'impostazione.
80
Riprese flash wireless: trasmissione wireless (2.4G) Riprese flash wireless: trasmissione wireless (2.4G)
Impostazione dei Gruppi
Scatti con Flash Wireless
99
81
Distanza di trasmissione
circa 328'/100m
A
B
A
B
C
1. Interferenza di segnale 2.4G derivante dall'ambiente esterno (come le
stazioni base wireless, 2.4G Wi-Fi routing, dispositivi Bluetooth, ecc.).
Si prega di regolare l'impostazione del canale CH del trigger flash
(consigliato +10), trovando un canale senza interferenze da utilizzare o
spegnere altri dispositivi 2.4G mentre si lavora.
2. Si prega di confermare se il flash è stato ricaricato o se la velocita' di ricarica
è stata al passo con la velocità di scatto continuo (l'indicatore flash pronto è
acceso) e non si trova nella modalita' di protezione da surriscaldamento o
in altri stati anomali.
Si può provare a ridurre la potenza del flash, ad esempio se il flash si trova in
modalità TTL si prega di provare a passare alla modalità M (poiché la
modalità TTL richiede un singolo pre-flash).
3. La distanza tra il trigger ed il flash è troppo ravvicinata (distanza <0,5 m).
Si prega di accendere il trigger flash "vicino alla modalità wireless":
Serie Qpro: Impostare C.Fn-DIST per 0-30m.
4. Il flash ed il trigger sono entrambi a bassa potenza.
Si prega di sostituire la batteria (per il trigger si consiglia l'utilizzo di batterie
alcaline monouso da 1.5V).
C.Fn: Impostazione funzioni personalizzate
Cause e soluzioni dei malfunzionamenti del flash wireless 2.4G
X.X
3
10
20
50
80
100
100
3
8
20
50
80
100
100
2
6
20
40
70
90
90
2
5
10
30
60
80
80
2
4
8
20
50
70
70
2
4
8
20
40
70
70
2
4
8
20
40
60
60
2
4
8
18
35
50
50
2
4
8
16
30
40
40
2
4
8
12
20
40
40
IT IT
Riprese flash wireless: trasmissione wireless (2.4G) Riprese flash wireless: trasmissione wireless (2.4G)

Impostazioni ed Istruzioni
Lampada pilota
③ Premere brevemente il pulsante
dell'interruttore della lampada pilota " "
Quando la lampada pilota e la parola "OFF"
appariranno nell'angolo in basso a destra
dello schermo, la lampada pilota sara' spenta.
83
Per garantire il funzionamento sicuro dell'apparecchiatura, il sistema
esegue sempre una protezione preventiva. Le seguenti icone sono di
riferimento.
Icone delle
funzioni
personalizzate
SLAVE
MODEL
STANDBY
LIGHT
DELAY
UNITS
ALT
LCD
ID
BEEP
RESET
Funzioni
Modalita' M
Modalita' M
Modalita' M
Modalita'
wireless
M/Modalita'
Multi
OFF
OFF
OFF
OFF
ON
01-99
Reset
Spegnimento automatico
senza alcuna operazione.
Si spegne
automaticamente
dopo 15 secondi
Sempre spento
7 livelli
Sempre acceso
Tendina posteriore del
flash disponibile
UNITS e ALT devono essere
utilizzate in combinazione:
UNITS imposta il numero
totale di luci; ALT imposta
quante volte la luce viene
attivata
Modalita' S1
Modalita' S2
OFF
S1
S2
-3~+3
OFF
01-99
ON
OFF
NO
YES
CONT
INTER
OFF
30min
60min
90min
120min
15sec
OFF
ON
Sempre acceso
Si spegne automaticamente
quando viene ricaricato
Selezione della
modalita' ottica
S1/S2
Lampada Pilota
Spegnimento
automatico
Durata della
retroilluminazione
Ritardo del flash OFF,0.01~30S
Durata del flash
Impostazione del
numero di scatti
necessari per
attivare il flash
1~4
2~4
Contrasto LCD
ID Wireless
Allarme Buzz
Ripristino dei
parametri
Impostazione
di un'Icona
Modalita' Flash
non supportata ① Premere brevemente il pulsante della
lampada pilota " ". La lampada pilota e la
parola "PROP" appariranno nell'angolo in
basso a destra dello schermo. Ora
sara' possibile modificare la potenza in
uscita ruotando la ghiera per regolare la
luminosità della lampada pilota. Maggiore
sara' la potenza impostata, più luminosa
sara' la lampada pilota.
② Premere brevemente il pulsante lampada
pilota " ". La lampada pilota e la parola
"PROP" appariranno nell'angolo in basso a
destra dello schermo. Premere e mantenere
premuto il pulsante dell'interruttore della
lampada pilota " " di nuovo per 2
secondi. L'angolo in basso a destra dello
schermo mostrerà una percentuale
evidenziata che variera' ruotando la ghiera
di regolazione per modificare la
percentuale di luminosità (10% ~ 100%) .
Modalita' lampada pilota
Caratteristiche di protezione aggiuntive
82
Sistema di protezione Sistema di protezione
1. Per evitare che la testina del flash si surriscaldi e si danneggi, non eseguire
più di 75 flash successivi rapidi a 1/1 di potenza. Dopo 75 flash successivi,
lasciare raffreddare il flash per almeno 5 minuti.
2. Se si continuano a scattare più di 75 flash successivi e consecutivi, la
funzione interna di protezione dal surriscaldamento potrebbe attivarsi con
un conseguente incremento del tempo di ricarica di più di 6 secondi. In
questo caso, lasciare raffreddare il flash per circa 5 minuti cosi' questo
riprenderà il normale funzionamento.
3. Quando la protezione termica si sara' attivata, sul display verra' visualizzato
il simbolo " ".
Protezione dal surriscaldamento
Numero di flash consecutivi per attivare la funzione di protezione termica.
Numero di flash consecutivi per attivare la protezione da surriscaldamento
in modalità HSS.
Potenza
1/1
1/2(+0.7~+0.9)
1/2(+0.3~+0.6)
1/2(+0.0~+0.2)
1/4(+0.0~+0.9)
1/8(+0.0~+0.9)
1/16(+0.0~+0.9)
1/32(+0.0~+0.9)
1/64(+0.0~+0.9)
1/128(+0.0~+0.9)
1/256(+0.0~+0.9)
75
100
120
150
200
300
400
500
1000
Tempi
1/1
1/2(+0.0~+0.9)
1/4(+0.0~+0.9)
1/8(+0.0~+0.9)
1/16(+0.0~+0.9)
1/32(+0.0~+0.9)
1/64(+0.0~+0.9)
1/128(+0.0~+0.9)
1/256(+0.0~+0.9)
50
60
75
100
150
Schermo LCD
Error 1
Error 5
Error 6
Avvertenze
Sistema di ricarica del Flash non operativo,
riavviare il dispositivo . Se questo non riesce a
risolvere il problema, il dispositivo dovra' essere
riparato.
Errore della ventola
Errore del sensore
IT IT
C.Fn: Impostazione funzioni personalizzate
C.Fn: Impostazione funzioni personalizzate
Potenza Tempi
200
300

Aggiornamento del Firmware
1. Non collocare il prodotto in un ambiente in cui la temperatura sia
superiore a 50℃.
2. La temperatura di funzionamento del prodotto non deve essere
superiore a 40℃.
3. Non sottoporre il prodotto ad un forte impatto fisico. La caduta del
dispositivo può causare danni irreparabili.
4. Si prega di non puntare il flash direttamente negli occhi (in particolare gli
occhi dei neonati), altrimenti potrebbe causare un deficit visivo a breve termine.
5. Questo prodotto non è impermeabile e deve essere tenuto fuori dalla
pioggia e dagli ambienti umidi.
6. Si prega di non smontare il prodotto. Deve essere riparato direttamente
da Neewer (se disponibile) o da un professionista qualificato.
7. Non utilizzare in prossimità del fuoco. Se si sviluppa un rigonfiamento
nella batteria o nell'alloggiamento, non utilizzare il flash.
8. Se il dispositivo non funziona correttamente, spegnere immediatamente
il flash.
9. Non utilizzare il flash in prossimità di sostanze chimiche, gas infiammabili
o altre sostanze speciali, che in circostanze particolari possono essere
sensibili all'abbagliamento istantaneo emesso dal flash e possono provocare
incendi o interferenze elettromagnetiche. Particolare attenzione dovrebbe
essere prestata a tutti i segnali di avvertimento pertinenti.
Cura e manutenzione
▪ Se il flash inizia a funzionare male, l'alimentazione deve essere spenta
immediatamente per identificare la causa.
▪ Il corpo del flash non deve essere sottoposto a vibrazioni eccessive e non
deve contenere polvere.
▪ È normale che il corpo della lampada si riscaldi leggermente durante l'uso.
Non attivare continuamente il flash se non è necessario.
▪ Se il prodotto non funziona o è bagnato, si prega di chiedere l'assistenza di
un professionista qualificato.
▪ Le modifiche alle specifiche tecniche del prodotto possono essere apportate
senza preavviso.
Questo prodotto supporta gli aggiornamenti del firmware tramite la porta
USB. Gli ultimi annunci software e le istruzioni saranno pubblicati sul sito
ufficiale.
▪ Questo prodotto non viene fornito con un cavo di aggiornamento USB.
Si prega di acquistarlo separatamente. Questo prodotto dispone di una
porta USB di tipo-C.
▪ Fare riferimento al programma "Neewer_Firmware_Update" per
aggiornare il firmware. Prima di aggiornare il firmware si prega di
scaricare ed installare "Q4 firmware upgrade software" e selezionare il
file del firmware corrispondente.
▪ Si prega di fare riferimento all'ultima e-mail annuale per le informazioni
aggiornate mentre il prodotto viene aggiornato con il firmware.
Jack di sincronizzazione
Il jack di sincronizzazione è Φ3.5mm e può essere collegato ad un cavo di
sincronizzazione o ad una presa trigger per sincronizzare il flash.
※ Quando si utilizza la porta di sincronizzazione per attivare il flash, la
modalità wireless 2.4G e le modalità S1/S2 dovranno essere disattivate.
※ Quando si utilizza la porta di sincronizzazione la velocità di
sincronizzazione non dovra' superare 1/200.
Guida alla risoluzione dei problemi
Sottoesposizione o sovraesposizione.
Uso della modalità HSS.
La portata effettiva del flash sara' più piccola quando si utilizza la
sincronizzazione ad alta velocita', percio' si prega di assicurarsi che il soggetto
sia all'interno della portata effettiva del flash.
▪ Uso della modalità M.
Provare a passare alla modalità TTL o modificare la potenza di uscita del flash.
Reset
Ripristino dei
parametri
84 85
Modello
Potenza
Durata del flash
Modalità Flash
Potenza in uscita
Flash stroboscopico
Compensazione
dell'esposizione
flash (FEC)
Modalità di
sincronizzazione
Ritardo del Flash
Funzione di
mascheramento
Ventola silenziosa
integrata
Buzzer integrato
Schermo
Q4
400Ws
1/209s a 1/10989s
M/Multi (Wireless Off),
TTL/M/MUTIL (Ricevitore per trasmissione radio)
9 step 1/256-1/1
HSS (fino a 1/8000s), sicronizzazione/ prima
tendina, sincronizzazione seconda tendina
0.01-30s
Visualizzazione della
durata del flash
Schermo a matrice di punti
Lampada pilota (LED)
Modalità unità slave
wireless
2.4G, S1/S2, cavo di sincronizzazione da 3.5mm,
Test Flash
Modalita' trigger
Funzioni wireless
Wireless 2.4G Q Sistema
Batteria ricaricabile
agli ioni di litio
Risparmio energetico
Temperatura del colore
Unita' Slave, Wireless Off
Flash a piena potenza
Tempo di ricarica Circa 0.01-1.2s
Indicazione di carica
della batteria
5600±200K
Specifiche Specifiche
Note
compatibile con il sistema flash automatico
Canon E-TTL II, Nikon i-TTL e Sony TTL
fornito (fino a 100 volte, 199Hz)
Manuale. FEB: +/-3 fermate in incrementi di 1/3 stop
32 canali, 5 gruppi (A, B, C, D, E)
ID wireless: L'utente può cambiare il canale di
trasmissione wireless e l'ID wireless dell'unità
master e slave per un funzionamento senza
soluzione di continuità e senza interferenze del
segnale prima dell'attivazione.
Il flash potra' essere impostato per spegnersi
automaticamente se non viene eseguita alcuna
operazione per 30-120 minuti.
21.6V/2800mAh
400
30W/5600K/CRI:95+
IT IT

Voedingsadapter ×1
Instellamp ×1 Netsnoer ×1
Reflectorbeschermkap ×1 Draagtas ×1
Lithiumbatterij ×1
Handvat ×1
Q4 flitser ×1
86
Accessoires beschikbaar voor aankoop
87
De Q4 flitser is zowel draagbaar als krachtig, is aangedreven
door een lithiumbatterij met grote capaciteit en ondersteunt 1/8000 HSS.
De instellamp en reflector zorgen voor een lichtkwaliteit van het hoogste
niveau voor buiten- en binnenopnamen. Deze flitser onderscheidt zich van
veel andere krachtige speedlites op de markt, door zijn compacte ontwerp
en kleinere formaat zonder afbreuk te doen aan functies zoals standaard
accessoirebevestigingen voor een bredere compatibiliteit. Met een
indrukwekkend ingebouwd 2,4G draadloos Q-systeem ondersteunt Q4 TTL,
draadloze triggering, snelle synchronisatie, synchronisatie op het eerste
gordijn, synchronisatie op het tweede gordijn en meer.
Handvat
1:Flitsbehuizing 2. Bovenste handgreep
3:LCD scherm
Reflector
Reflector ×1
Reflectorvergrendeling
Batterijniveau-
indicatorknop
Batterijniveau-indicator
Optische ontvanger
Batterij
Beeldscherm
Kort indrukken om van
groep te wisselen,
lang indrukken om
van kanaal te wisselen
HSS-knop
Knop voor
draadloze functie
Knop voor
instelllamp Aan-/ uitknop
Menuknop
Modusknop
Regelknop
Instellingenknop
Flitstestknop
Vergrendelingsknop
Type-C USB-firmware-
upgradepoort
3,5 mm
synchronisatiepoort
Batterijontgrendelknop
Batterijoplaadpoort
Flitsbuis
Handmatige flits
Handmatig
flitsvermogen
(1)M handmatige flits
(2)Multi-stroboscoopflits
(3)TTL automatische flits
Instellampmodus
Flitsduur
Kanaal
Multiflits (stroboscoop)
Flitsfrequentie
Flitstijden
TTL automatische flits
Flitsbelichtings-
compensatie (FEC)
Snelle
synchronisatie (HSS)
S1/S2
(5)Flitsen met draadloze optische bediening
(4)Flitsen met draadloze transmissie
Flitsgroep
Hoekvergrendelingsknop
Vergrendelingsknop
voor lichtstatief
Paraplugat
Draadloze
transmissie -
Draadloos
fotograferen
De Q4-flitser kan worden gebruikt met de volgende fotografische
accessoires voor de allerbeste opnameresultaten en ervaring: QPro-flitser,
zachte paraplu met Bowens-bevestiging, reflector, snoot, beauty dish,
lichtstatief, enz.
Productoverzicht
Verpakkingsinhoud
Productillustratie Productillustratie Productillustratie
NL NL

88
Klik de drie koperen pinnen van de
flitsbuis in de drie pengaten van de
flitserbehuizing en duw ze naar
binnen tot ze vastzitten.
Duw de reflector in de tabgaten en
draai de reflector rechtsom aan.
Houd er bij het installeren van de
reflector rekening mee dat de rode
stip op de reflector uitgelijnd moet
zijn met de blauwe stip op de
bajonet. Steek deze dan in het
verbindingsstuk.
Druk op de knop voor het
verwijderen van de reflector, draai
de reflector tegen de klok in en
trek hem naar buiten.
※ Het apparaat mag niet zijn
ingeschakeld bij het
installeren/verwijderen van de flitsbuis.
De flitsbuis installeren
Houd er bij het installeren van de
flitsbuis rekening mee dat de rode
stip aan de binnenkant van de
flitsbuis uitgelijnd moet zijn met de
rode stip op de bajonet. Steek dan
de pinnen in de pengaten om de
flitsbuis vast te zetten.
Trek de lamp er uit in de richting parallel
aan de lamp. Houd er bij het verwijderen
van de lamp rekening mee dat de lamp
nog heet kan zijn.
※ Houd er tijdens het verwijderen
rekening mee dat de lamp nog
heet kan zijn.
De flitsbuis verwijderen
De reflector installeren
De reflector verwijderen
Schuif het ontgrendelingslipje van
de batterij omhoog, de batterij
springt automatisch naar buiten,
waarna deze kan worden
verwijderd.
Plaats de batterij in de batterijsleuf
in de aangegeven richting totdat
de batterijvergrendeling vastklikt.
Lithiumbatterij verwijderen
Lithiumbatterij plaatsen
Plaats de schroeven aan de bovenkant
van het handvat en de twee
positioneringspunten zoals
afgebeeld. Draai de vergrendelknop
aan zodat de handgreep goed vastzit.
Het handvat installeren
89
Steek de bovenkant van het statief in
de onderkant van het handvat, draai
de vergrendelingsknop aan totdat
de lichtstandaard stevig is bevestigd.
※Dit product bevat geen statief
(apart verkrijgbaar).
Het statief installeren
Draai de hoekvergrendelingsknop
van het handvat los, pas de hoek
van de flitser naar wens aan, en
draai vervolgens de
hoekvergrendelingsknop weer aan.
De hoek van de flitser aanpassen
Batterijvoeding gebruiken
Druk 1 seconde lang op de aan/uit-knop om de stroomvoorziening van het
product te regelen. Het apparaat heeft een automatische uitschakelfunctie.
Het wordt aanbevolen om de stroom uit te schakelen wanneer je deze
lange tijd niet gebruikt.
De flitser wordt automatisch uitgeschakeld wanneer er geen handeling
wordt uitgevoerd binnen de tijd ingesteld in C.Fn-STANDBY (30-120 min).
Batterijbeheer
1. Het product maakt gebruik van een lithiumbatterij met een lange
levensduur, die tot 300 keer kan worden opgeladen.
2. Veilig en betrouwbaar: een ingebouwd circuit biedt bescherming tegen
oververhitting, overbelasting, overontlading, overstroom en kortsluiting.
3. Gebruik de DC-oplaadpoort om de batterij op te laden via de
meegeleverde voedingsadapter. Een volledige lading duurt ca. drie uur.
Batterijkenmerken
Installatie-instructies Installatie-instructies Installatie-instructies
NL NL

91
Druk kort op de modusknop MODE". Wanneer
het woord "TTL" op het scherm verschijnt staat
de flitser in de TTL-modus.
Hogesnelheidssynchronisatie (HSS)
Druk kort op de " "-knop om het " "-symbool
op het scherm weer te geven. Deze functie vereist
het gebruik van een draadloze zender voor
snelle synchronisatie, zoals QProC/N/S.
Batterijniveau-indicatie
Nadat de batterij correct is geplaatst om de flitser van stroom te voorzien,
geeft het batterijpictogram op het scherm het resterende vermogen weer.
De flitser heeft drie standen: TTL autoflits, M handmatige flits en multiflits. In
de TTL-modus detecteert het camerameetsysteem het flitslicht dat wordt
teruggekaatst door het onderwerp en past het flitsvermogen automatisch
aan zodat het onderwerp en de achtergrond gelijkmatig worden belicht.
※Druk op de < MODE >-knop en er verschijnen achtereenvolgens drie
flitsmodi op het LCD-scherm.
Opmerking: de indicatiebalken zijn louter indicatief en moeten worden
gebruikt als indicatie van het resterende batterijvermogen.
Batterijniveau-indicator
op het LCD-scherm
(Stroomindicatie en
-beheer voor het
gehele flitssysteem.)
(Batterijniveaubeheer
wanneer de batterij
niet ontlaadt)
LED-indicatoren
op de batterij
LED-
indicatoren
op de
batterij
Equivalent
vermogenspercentage
Batterijvoeding gebruiken
1. Vermijd kortsluiting van de positieve en negatieve aansluitingen.
2. De batterij is niet waterdicht en mag niet worden blootgesteld aan een hoge
luchtvochtigheid of worden ondergedompeld in water.
3. Buiten bereik van kinderen bewaren.
4. Laad de batterij niet langer dan 24 uur op. Er mag alleen een compatibele,
originele oplader worden gebruikt. Bewaar in een koele, droge plaats.
5. Laat de batterij niet lange tijd ongebruikt (meer dan 6 maanden). Het
opladen van een batterij die te lang niet is gebruikt is een veiligheidsrisico.
Laad de batterij niet op als de spanning van de batterijcel lager is dan 9V.
6. Plaats de batterij niet in de buurt van of in vuur.
7. Gooi de batterij na gebruik weg in overeenstemming met de plaatselijke
voorschriften.
8. Als je het apparaat langere tijd niet gebruikt, laad het dan op tot ongeveer
60% voordat je het opbergt.
9. Berg de batterij in goede staat op en laat deze half opgeladen achter
wanneer deze langere tijd niet wordt gebruikt.
10. De batterij mag tijdens het opladen niet worden gebruikt.
11. De batterij is uitgerust met een oververhittingsbeveiliging. Als de interne
temperatuur van de batterij 55 ℃ bereikt, wordt deze functie automatisch
geactiveerd. De batterij moet afkoelen voordat de normale werking wordt
hervat.
Voorzorgsmaatregelen voor de batterij
90
Scherm aan/uit/ontgrendelen
TTL-modus
Draai aan de instelknop om de belichtingscom-
pensatiewaarde in te stellen. Druk op de
"SET"-knop om te bevestigen en de instellingen
te verlaten.
※Gebruikers kunnen de flitsbelichtingscompensatie
aanpassen in stappen van 1/3 stop tussen ±3
stops. "0,3" komt overeen met 1/3 stop, "0,7" komt
overeen met 2/3 stop. Stel de
flitsbelichtingscompensatie in op "+0" om de
flitsbelichtingscompensatie te annuleren.
※ De TTL-modus is alleen beschikbaar als de
draadloze functie is ingeschakeld.
Flitsbelichtingscompensatie (FEC)
① Druk kort op de aan-/ uitknop " " en het
scherm licht op. Draai de instelknop drie keer
met de klok mee en het scherm ontgrendelt
wanneer de omlaagwijzende pijl verschijnt.
② Druk kort op de aan-/ uitknop " " om
de lamp uit te doen.
4 balken 4 blauwe lampjes aan
4 blauwe
lampjes
aan
3 blauwe
lampjes
aan
2 blauwe
lampjes
aan
1 blauwe
lampjes
aan
3 blauwe lampjes aan
2 blauwe lampjes aan
1 blauwe lampjes aan
75% ~ 100%
50% ~ 75%
25% ~ 50%
3% ~ 25%
2% - knipperend
blauw lampje
1% - geen lampjes
branden
De flitser stopt met
werken wanneer het
vermogen <2% is. Je
krijgt een minuut vooraf
een waarschuwingssignaal
voordat het apparaat 3
minuten later wordt
uitgeschakeld.
Opmerking: laad de lamp
zo snel mogelijk op
(binnen 10 dagen)
voordat je de lamp
gebruikt of opbergt.
3 balken
2 balken
1 balken
Waarschuwing
laag
batterijniveau
Met hogesnelheidssynchronisatie (FP flits) kunnen gebruikers de flitser
synchroon gebruiken bij alle sluitertijden. De snelle synchronisatiemodus
is bijzonder handig bij gebruik van diafragmaprioriteit voor invulflitsen
bij portretfotografie.
Batterijni-
veauknop
NL NL
Flitsmodus - TTL automatische flitsmodus
Batterijvoeding gebruiken Flitsmodus - TTL automatische flitsmodus

Als de sluitertijd gelijk is aan of langzamer is dan de maximale
flitssynchronisatiesnelheid van de camera, wordt het " "-pictogram niet
weergegeven in de zoeker.
Bij hogesnelheidssynchronisatie geldt: hoe hoger de sluitertijd, hoe kleiner
het effectieve flitsbereik.
Om weer normaal te flitsen, drukt je nogmaals op de
hogesnelheidssynchronisatie-knop. Het " "-pictogram zal verdwijnen.
Hogesnelheidssynchronisatie is niet beschikbaar in de multiflits-modus.
De flitser heeft een oververhittingsbeveiliging die in werking treedt na 50
opeenvolgende snelgesynchroniseerde flitsen.
93
Druk kort op de modusknop "MODE".
Wanneer "M" op het scherm verschijnt
staat de flitser in de M-modus.
De flitssterkte kan worden ingesteld door aan
het instelwiel te draaien. Druk nogmaals op de
instelknop "SET" om het flitsvermogen
te bevestigen.
Druk in de handmatige M-flitsmodus op de
<MENU>-knop om naar C.Fn - SLAVE te gaan
en selecteer S1. De flitser kan worden gebruikt
als secundair licht om een verscheidenheid
aan lichteffecten te creëren, geschikt voor een
handmatige flitsomgeving. Het activeert de flits
synchroon met de eerste flits van de hoofdflitser.
Dit effect is consistent met het gebruik van
draadloze flitstriggers.
De S1 optische eenheid instellen
Druk op de <MENU>-knop om C.Fn - SLAVE te
openen en selecteer S2. De flitser kan worden
gebruikt als secundair licht voor TTL-
flitsomgevingen. Met de anti-voorflitsfunctie kan
de camera met voorflitsfunctie worden gebruikt
om opnamen te synchroniseren met de
optische slave. Het activeert de flits synchroon
met de tweede flits van de hoofdflits, dat wil
zeggen een tweelichtgestuurde flits.
De S2 optische eenheid instellen
De flitsduur is de tijd tussen het begin van de
flits en waar deze de halve lichtpiek bereikt.
De halve piek wordt uitgedrukt als t = 0,5. Om
fotografen nauwkeurigere opnamewaarden
te bieden, gebruikt dit product t = 0,1.
Het verschil tussen t=0,5 en t=0,1 wordt
links weergegeven.
De multiflitsmodus vuurt een reeks snelle flitsen af. Hiermee kunnen gebruikers
meerdere afbeeldingen van bewegende objecten in één foto maken. Je kunt
de flitsfrequentie (het aantal flitsen per seconde, uitgedrukt in Hz), de flitstijden
en het flitsvermogen instellen.
※ De flitsduur wordt alleen weergegeven
in de M-modus.
Flitsduur weergeven
De multiflitsmodus instellen
Het flitsvermogen instellen op M-modus
Als het woord "MULTI" op het scherm verschijnt,
staat de flitser in de stroboscoopmodus. De flitssterkte
kan worden ingesteld door aan het wiel te draaien.
Druk nogmaals op de "SET"-knop om het aantal
flitsen in te stellen en draai aan de draaiknop om
de waarde in te stellen.
Druk nogmaals op de "SET"-knop om de
flitsfrequentie in te stellen en draai aan de
draaiknop om de waarde in te stellen.
Druk ten slotte nogmaals op de "SET"-knop
om alle waarden in te stellen.
De sluitertijd berekenen
In de multiflitsmodus moet de sluiter open blijven totdat de flitser stopt.
Gebruik de volgende formule om de sluitertijd te berekenen en stel vervolgens
de camera in.
Sluitertijd = flitsaantal/flitsfrequentie
Als het flitsaantal bijvoorbeeld 10 is en de flitsfrequentie 5 Hz, moet de
sluitertijd minimaal 2 seconden zijn.
Om oververhitting en schade aan de flitser te voorkomen, mag je geen
flitsaantal hoger dan 10 gebruiken. Laat de flitser na 10 flitsen minimaal 15
minuten afkoelen. Als je een hoger flitsaantal probeert uit te voeren, kan de
flitser automatisch stoppen om te voorkomen dat de flitskop oververhit raakt.
Als dit gebeurt, laat de flitser dan minimaal 15 minuten afkoelen.
Flitsmodus - M Handmatige flitsmodus
Flitsmodus - M Handmatige flitsmodus Flash Mode - M Manual Flash Mode
Flitsmodus - multiflitsmodus
Flitsmodus - multiflitsmodus
Met de M-modus kan je de flitssterkte instellen in stappen van 0,1 stop van
1/256 vermogen tot 1/1 vol vermogen. Gebruik een draagbare flitsmeter om
de juiste flitsbelichting te verkrijgen.
Let op
※ De S1/S2 optische slave-flitsmodus wordt alleen ondersteund in de M-modus
wanneer de draadloze functie is uitgeschakeld.
A
t
50%
10%
t=0.5
t=0.1
Let op
● Kies voor zeer reflecterende onderwerpen een donkere achtergrond voor
een effectief gebruik van de stroboscoopflits.
● Het gebruik van een statief en afstandsbediening wordt aanbevolen.
● De multiflitsmodus kan niet worden ingesteld als de flitssterkte 1/1 en 1/2 is.
● De multiflitsmodus kan ook gebruikt worden met "buLb".
● Als de flitstijd wordt weergegeven als --, zal de lamp continu flitsen totdat
de sluitertijd of de batterij op is.
● De flitstijden zijn beperkt zoals weergegeven in de onderstaande tabel.
Hz 1 2 3 4 5 6~7 8~9 10 11 12~14 15~19 20~50 60~199
1/4
1/8
1/46
1/32
1/64
1/128
1/256
Flitsve-
rmogen
Flitstijden op vol vermogen
8
14
30
60
90
100
100
6
14
30
60
90
100
100
4
12
30
60
90
100
100
3
10
20
50
80
100
100
3
8
20
50
80
100
100
2
6
20
40
70
90
90
2
5
10
30
60
80
80
2
4
8
20
50
70
70
2
4
8
20
40
70
70
2
4
8
20
40
60
60
2
4
8
18
35
50
50
2
4
8
16
30
40
40
2
4
8
12
20
40
40
NL
92
NL
Flitsmodus - TTL automatische flitsmodus Flitsmodus - M Handmatige flitsmodus

Menumodus (C.Fn: Stel aangepaste functie in)
2,4G draadloze transmissie instellen
De Q4 maakt gebruik van het 2,4G draadloze Q-systeem en kan perfect
gecombineerd worden met enkele van onze andere modellen. Gebruikt als een
slave-unit, is hij compatibel met camera's zoals Canon E-TTL II, Nikon i-TTL en
Sony en schakelt hij automatisch over op basis van de master-eenheid. Er is
geen handmatige instelling vereist.
※De Q4 kan als slave-eenheid worden bestuurd door een master-eenheid met
draadloze transmissiefunctie, zoals de modellen: NW420, QPro-serie, Z1-serie
en enkele andere.
Druk op de "MENU"-knop om het menu te openen
en draai aan de instelknop om het ID-nummer
(01~99) te kiezen. Druk op de "SET"-knop om te
bevestigen.
※ Dit is alleen beschikbaar als de
master-eenheid deze functie heeft.
Druk kort op de knop voor draadloze verbinding
" ". Het " "-pictogram verschijnt op het scherm.
Druk kort op de " "-knop om een groep (A~E) te
selecteren.
Positionering en bereik (voorbeeld van draadloos flitsen)
(1) Automatisch flitsen met behulp van een slave-eenheid.
(3) Automatisch flitsen met drie slave-groepen.
Draadloze multiflitsopnamen: gebruikers kunnen de slave-eenheid in twee of
drie groepen splitsen en TTL autoflitsen gebruiken terwijl de flitsverhouding
(vergroting) wordt gewijzigd. Bovendien kan de gebruiker van de flitser voor
elke flitsgroep verschillende flitsmodi instellen voor gebruik tijdens het
fotograferen.
(2) Automatisch flitsen met twee slave-groepen
● Een draadloze master-eenheid als zender gebruiken
● Test de flitser door een testopname te maken voordat je gaat fotograferen.
● De werkelijke transmissieafstand kan korter zijn, afhankelijk van de locatie,
omgeving, weersomstandigheden, enz.
Kanalen instellen
ID-nummer instellen
Houd de " "-knop 2 seconden ingedrukt om het
kanaalnummer te selecteren. Draai aan de
instelknop om de kanaalwaarde te kiezen (1~32)
en druk vervolgens op "SET" om het kanaal in
te stellen. ① Druk op de "MENU"-knop om het C.Fn-menu
te openen. "Ver x.x" in de rechter benedenhoek
geeft het versienummer van de software aan.
② Draai aan de instelknop om het aangepaste
functiepictogram te selecteren. Druk op de "SET"-
knop om het nummer van de aangepaste functie
te markeren.
③ Draai aan de instelknop om het gewenste aantal
in te stellen. Druk op de "SET"-knop om te
bevestigen en druk nogmaals op "SET" om de
selectie te verlaten.
④ Druk op de "MENU"-knop om de instelling
te verlaten.
94
Draadloze flitsopnamen: draadloze (2,4G) transmissie Draadloze flitsopnamen: draadloze (2,4G) transmissie
Groepen instellen
Draadloos flitsen
99
95
Transmissieafstand
ca. 100m
A
B
A
B
C
1. De externe omgeving 2,4G-signaalinterferentie (zoals draadloze basisstations,
2,4G wifi-routering, Bluetooth-apparaten, enz.).
Verander de kanaalinstelling (CH) van de flitstrigger (aanbevolen om het kanaal
+10 te doen), zoek een kanaal zonder interferentie of schakel andere
2,4G-apparaten uit terwijl je fotografeert.
2. Controleer of de flitser is gerecycled of dat de oplaadtijd gelijke tred heeft
gehouden met de continue opnamesnelheid (flitser gereed-indicator brandt)
en niet in de oververhittingsbeveiliging of in een andere abnormale toestand
verkeert.
Je kunt proberen het flitsvermogen aan te passen, bijvoorbeeld door de
TTL-modus te kiezen. Probeer hiervoor over te schakelen naar de M-modus
(aangezien de TTL-modus een enkele voorflits vereist).
3. De afstand tussen de trigger en de flits is te kort (afstand <0,5m).
Schakel de flitstrigger aan in de "dichtbij draadloze modus":
Qpro serie: Stel C.Fn-DIST in op 0-30m.
4. De flitser en de trigger hebben bijna geen batterij meer
Vervang de batterij (aanbevolen om 1,5 V wegwerpbare alkalinebatterijen te
gebruiken voor de trigger).
C.Fn: Aangepaste functie instellen
Mogelijke oorzaken van, en oplossingen voor, 2,4G draadloze flitslekkage
X.X
3
10
20
50
80
100
100
3
8
20
50
80
100
100
2
6
20
40
70
90
90
2
5
10
30
60
80
80
2
4
8
20
50
70
70
2
4
8
20
40
70
70
2
4
8
20
40
60
60
2
4
8
18
35
50
50
2
4
8
16
30
40
40
2
4
8
12
20
40
40
NL NL
Draadloze flitsopnamen: draadloze (2,4G) transmissie Draadloze flitsopnamen: draadloze (2,4G) transmissie

Instellingen en instructies
Instellamp
③ Druk kort op de instellampknop " ".
Wanneer de instellamp en het woord "OFF"
rechtsonderin het scherm verschijnen is
de instellamp uit.
97
Om de veilige werking van de apparatuur te garanderen, voert het systeem
altijd preventieve bescherming uit. De volgende pictogrammen zijn ter
referentie.
Pictogrammen
voor aangepaste
functies
SLAVE
MODEL
STANDBY
LIGHT
DELAY
UNITS
ALT
LCD
ID
BEEP
RESET
Functies
M-modus
M-modus
M-modus
Draadloze
modus
M/Multi modus
UIT
UIT
UIT
UIT
AAN
01-99
Reset
Automatische
uitschakeling
zonder enige bediening.
Schakelt automatisch
uit na 15 seconden
Altijd UIT
7 niveaus
Altijd AAN
Flitsen op het tweede
gordijn is beschikbaar
UNITS en ALT moeten
samen worden gebruikt:
UNITS stelt het totale
aantal lampen in; ALT stelt
in hoe vaak de lamp
wordt geactiveerd
S1-modus
S2-modus
OFF
S1
S2
-3~+3
OFF
01-99
ON
OFF
NO
YES
CONT
INTER
OFF
30min
60min
90min
120min
15sec
OFF
ON
Altijd aan
Schakelt automatisch
uit na recycling.
Selectie
optische modus
S1/S2
Instellamp
Automatische
uitschakeling
Achtergrondver-
lichtingsduur
Flitsvertraging OFF,0.01~30S
Flitsaantal
Stel het aantal
triggers in dat nodig
is om de
flitser af te vuren.
1~4
2~4
LCD-contrast
Draadloze ID
Zoemwaarschuwing
Parameters resetten
Stel een
pictogram in
Flitsmodus NIET
ondersteund ① Druk kort op de instellampknop " ". De
instellamp en het woord "PROP" verschijnen
rechtsonderin het scherm. Je kan nu het
uitgangsvermogen wijzigen door aan de
draaiknop te draaien om de helderheid
van de instellamp aan te passen. Hoe hoger
het vermogen, hoe helderder de instellamp.
② Druk kort op de instellampknop " ". De
instellamp en het woord "PROP" verschijnen
rechtsonderin het scherm. Houd de
instellampknop " " nogmaals 2 seconden
ingedrukt. Rechtsonderin het scherm wordt
een percentage weergegeven dat verandert
door aan de instelknop te draaien om zo het
helderheidspercentage te wijzigen
(10% ~ 100%).
Instellampmodus
Extra beschermingsfuncties
96
Beschermingssysteem Beschermingssysteem
1. Om te voorkomen dat de flitskop oververhit raakt en beschadigd raakt,
mag je niet meer dan 75 keer snel achter elkaar flitsen op 1/1 vermogen. Laat
de flitser na 75 opeenvolgende flitsen minimaal 5 minuten afkoelen.
2. Als je meer dan 75 opeenvolgende flitsen afvuurt, kan de interne
anti-oververhittingsfunctie worden geactiveerd, waardoor de oplaadtijd kan
oplopen tot meer dan 6 seconden. Als dit gebeurt, laat de flitser dan ongeveer
5 minuten afkoelen zodat deze weer normaal kan werken.
3. Wanneer de oververhittingsbeveiliging is geactiveerd verschijnt het
" "-symbool op het display.
Oververhittingsbescherming
Aantal opeenvolgende flitsen om de oververhittingsbeveiligingsfunctie
te activeren.
Aantal opeenvolgende flitsen om de oververhittingsbeveiliging in de
HSS-modus te activeren.
Vermogen
1/1
1/2(+0.7~+0.9)
1/2(+0.3~+0.6)
1/2(+0.0~+0.2)
1/4(+0.0~+0.9)
1/8(+0.0~+0.9)
1/16(+0.0~+0.9)
1/32(+0.0~+0.9)
1/64(+0.0~+0.9)
1/128(+0.0~+0.9)
1/256(+0.0~+0.9)
75
100
120
150
200
300
400
500
1000
Aantal
1/1
1/2(+0.0~+0.9)
1/4(+0.0~+0.9)
1/8(+0.0~+0.9)
1/16(+0.0~+0.9)
1/32(+0.0~+0.9)
1/64(+0.0~+0.9)
1/128(+0.0~+0.9)
1/256(+0.0~+0.9)
50
60
75
100
150
LCD scherm
Error 1
Error 5
Error 6
Waarschuwingen
Het flitsrecyclesysteem werkt niet, start het
apparaat opnieuw op. Als dit zichzelf niet oplost
moet het apparaat worden gerepareerd.
Ventilatorfout
Sensorfout
NL NL
C.Fn: Aangepaste functie instellen
C.Fn: Aangepaste functie instellen
Vermogen Aantal
200
300

Firmware-upgrade
1. Plaats het product niet in een omgeving waar de temperatuur hoger is
dan 50℃.
2. De bedrijfstemperatuur van het product mag niet hoger zijn dan 40℃.
3. Stel het product niet bloot aan sterke fysieke schokken. Het laten vallen
van het apparaat kan leiden tot onherstelbare schade.
4. Gelieve niet direct in de ogen te flitsen (vooral in de ogen van kinderen),
anders kan dit leiden tot een visuele beperking.
5. Dit product is niet waterdicht en moet uit de regen en vochtige
omgevingen worden gehouden.
6. Demonteer het product niet . Het mag alleen door Neewer worden
gerepareerd (indien beschikbaar) of door een gekwalificeerde professional.
7. Niet gebruiken in de buurt van vuur. Als er een uitstulping in de batterij of
behuizing ontstaat, mag de flitser niet worden gebruikt.
8. Schakel de flitser onmiddellijk uit als het apparaat op enigerlei wijze
defect raakt.
9. Gebruik de flitser niet in de buurt van chemicaliën, ontvlambare gassen
of andere speciale stoffen, die onder speciale omstandigheden gevoelig
kunnen zijn voor de directe verblinding van de flitser en kunnen leiden tot
brand of elektromagnetische interferentie. Bijzondere aandacht moet
worden besteed aan relevante waarschuwingssignalen.
Verzorging en onderhoud
▪ Als de flitser defect begint te raken, moet de stroom onmiddellijk worden
uitgeschakeld om de oorzaak te achterhalen.
▪ De flitser mag niet worden blootgesteld aan overmatige trillingen en moet
stofvrij worden gehouden.
▪ Het is normaal dat de lampbehuizing iets opwarmt tijdens gebruik. Gebruik
de flitser niet continu als dit niet nodig is.
▪ Als het product niet werkt of nat is geworden, vraag dan hulp aan een
gekwalificeerde professional.
▪ Wijzigingen aan de technische specificaties van het product kunnen zonder
voorafgaande kennisgeving worden doorgevoerd.
Dit product ondersteunt firmware-upgrades via de USB-poort. De nieuwste
software-aankondigingen en instructies worden op de officiële website
geplaatst.
▪ Dit product wordt niet geleverd met een USB-upgradekabel. Deze is
apart verkrijgbaar. De USB-poort van dit product is een Type-C-poort.
▪ Raadpleeg de programmasoftware "Neewer_Firmware_Update" om de
firmware te upgraden. Download en installeer "Q4 firmware-upgradesoftware"
en selecteer het bijbehorende firmwarebestand voordat je de firmware
upgradet.
▪ Raadpleeg de nieuwste e-handleiding voor bijgewerkte informatie terwijl
het product de firmware-upgrade ondergaat.
Synchronisatiepoort
De sync-aansluiting is Φ3,5 mm en kan worden aangesloten op een
sync-kabel of trigger-plug om de flitser te synchroniseren.
※ Wanneer je de synchronisatiepoort gebruikt om de flitser te activeren,
moeten de draadloze 2,4G-modus en de S1/S2-modi worden gedeactiveerd.
※ De synchronisatiesnelheid mag niet hoger zijn dan 1/200 bij gebruik van
de synchronisatiepoort.
Handleiding voor probleemoplossing
Flitsonderbelichting of overbelichting.
HSS-modus gebruiken.
Het effectieve flitsbereik is kleiner bij gebruik van hogesnelheidssynchronisatie,
dus zorg ervoor dat het onderwerp zich binnen het effectieve flitsbereik bevindt.
▪ M-modus gebruiken.
Probeer over te schakelen naar de TTL-modus of wijzig het uitgangsvermogen
van de flitser.
Reset
98 99
Model
Vermogen
Flitsduur
Flitsmodi
Uitgangsvermogen
Stroboscopische flitser
Flitsbelichtingscom-
pensatie (FEC)
Synchronisatiemodi
Vertraging flits
Maskeringsfunctie
Ingebouwde
stille ventilator
Ingebouwde zoemer
Beeldscherm
Q4
400Ws
1/209s tot 1/10989s
M/Multi (draadloos uit)
TTL/M/MUTIL (ontvanger voor radiotransmissie)
9 stappen 1/256-1/1
HSS (tot 1/8000s), synchronisatie eerste gordijn,
synchronisatie tweede gordijn
0.01-30s
Weergave flitsduur
puntmatrixscherm
Instellamp (LED)
Draadloze
slave-eenheidmodus
2,4G, S1/S2, 3,5 mm synchronisatiesnoer, flitstest
Trigger-modi
Draadloze functie
Draadloos 2,4G
Q-systeem
Oplaadbare
Li-ionbatterij
Energiebesparing
Kleurtemperatuur
Slave eenheid, Draadloos Uit
Flitsen op vol vermogen
Recyclingtijd Ca. 0,01-1,2s
Indicatie
batterijvermogen
5600±200K
Ventilatorfout
Specificaties Specificaties
Let op
compatibel met Canon E-TTL II, Nikon i-TTL en
Sony TTL automatisch flitssysteem
aanwezig (tot 100 keer, 199 Hz)
handmatig. FEB: +/-3 stops in stappen van 1/3 stop
32 kanalen, 5 groepen (A, B, C, D, E)
2,4G Zendbereik: 100m
Draadloze ID: de gebruiker kan het draadloze
transmissiekanaal en de draadloze ID van de
master- en slave-eenheid wijzigen voor een
naadloze werking zonder signaalinterferentie
voordat de trigger wordt geactiveerd.
De flitser kan worden ingesteld om automatisch
uit te schakelen als deze 30-120 minuten niet
wordt gebruikt.
21,6V/2800mAh
400
30W/5600K/CRI:95+
NL NL

CN CN
产品概述
包装清单
产品图示 产品图示 产品图示
充电器 ×1
灯管 ×1
反光罩盖子 ×1
电源线 ×1
收纳包 ×1
电池 ×1反光罩 ×1
手柄 ×1
Q4 外拍灯 ×1
100
可选购的附件
101
Q4外拍灯,功率强劲,电池容量大,支持全程高速,单支可压太
阳光,外露灯管和反光罩为户外拍摄和实景拍摄提供了良好的光
质。它也是一款无线 TTL 大功率闪光灯,锂电池与机身一体式,携
带方便;采用内置 2.4G 无线 Q系统,配合 Qpro、Q 系列触发器可
远程控制 TTL/M/Multi 模式触发闪光。
提手
1:机身 2:手柄
3:LCD屏幕
反光罩
反光罩锁扣
电池电量显示按钮
电池电量指示灯
光控接收器
电池
屏幕
短按组别
长按频道
高速同步开关
无线按钮
造型灯开关 开关按钮
菜单按键
模式按键
调节轮盘
设置按键
引闪键
锁紧旋钮
Type-C USB
固件升级接口
3.5mm同步接口
电池锁扣
电池充电孔
灯管
手动闪光
手动闪光输出
(1)M手动闪光
(2)Multi频闪闪光
(3)TTL自动闪光
造型灯模式
闪光持续
的时间
频道
多重(频闪)
闪光
闪光频率
闪光次数
TTL自动闪光
闪光曝光补偿值
高速同步
S1/S2
(5)无线光控拍摄
(4)无线电传输拍摄
闪光组别
角度锁紧旋钮
灯架锁紧旋钮
伞孔
无线电传输
无线拍摄
Q4 可搭配本公司以下摄影附件使用,以获得最佳的拍摄效果
和使用体验:QPro引闪器、保荣卡口柔光伞、反光伞、雷达罩、灯架
等。

CN
安装说明
102
将灯管的三根铜针脚卡进
灯体的三个针孔,往里推至
固定。
将反光罩卡进外拍灯卡槽内,
再顺时针旋转反光罩即可。
安装反光罩前,注意先将反光
罩上的蓝点对准灯卡口边的蓝
点后,再卡进卡槽内。
按下反光罩的拆卸按钮后,
逆时针旋转反光罩后向外
抽出反光罩即可。
※操作时请注意安全,防止
烫伤!
※安装/拆卸灯管时请确保关机
状态下操作。
安装灯管
安装灯管时,请注意将灯管内
侧上的红点对齐灯卡口上的红
点后,再将针脚卡进针孔,否则
无法卡进。
将灯管平行灯管方向向外拔出
即可。
※拆卸灯管时注意防止烫伤。
拆卸灯管
反光罩的安装
反光罩的拆卸
安装说明
往上按压电池的锁扣后,
电池自动弹出即可取出
电池。
将电池如图方向塞进电池
槽直至电池锁扣锁紧即可。
锂电池的拆卸
锂电池的安装
将手柄顶部的螺丝以及两个
定位点卡进外拍灯底部的螺
丝孔和两边的定位槽,旋转
锁紧旋钮直至手柄固定连接
好即可。
安装手柄
CN
安装说明
103
将三脚架顶端插入到手柄
底部孔内,拧紧手柄的固定
旋钮即可。
※本产品不含三脚架( 另 行
购买)。
安装三脚架
旋松手柄的角度锁紧旋钮,
调整外拍灯到合适的角度
后旋紧角度锁紧旋钮即可。
调整外拍灯的角度
电池使用说明
长按1秒电源开关按钮控制该产品的打开和关闭,长时间不使用时
请关闭电源。本产品设计有电源自动关机功能。
在C.Fn-STANDBY设置的时间(30-120min)无人操作时,闪光灯会自
动关闭。
电池管理
1. 本品采用锂电池,支持反复充放电>300次,使用寿命长。
2. 安全可靠,内置电路有温度保护、过充保护、过放保护、过流保护、
短路保护。
3. 使用标配电池充电器充电只需3个小时左右。
电池特性

▪如果设置快门速度等于或慢于相机的最大闪光同步速度,取
景器中将不显示“ ” 图标。
▪使用高速同步,快门速度越高,有效的闪光范围就越小。
▪要恢复普通闪光,请再次按高速同步按钮。 “ ”图标会消失。
▪在Multi模式下,无法使用高速同步闪光。
▪连续高速同步闪光50次后,闪光灯热保护功能可能会被激活。
CN
105
短按模式按键“MODE”,当屏幕出现
“TTL”字样,此刻闪光模式为TTL模式。
※无线开启状态下才有TTL模式。
短按模式按键“MODE”,当屏幕出现
“M”字样,此刻闪光模式为M模式。
旋转调节轮盘可设置闪光输出功率。
再按下“SET”设置按键,确定闪光输
出功率。
在M手动闪光模式下,按<MENU>按钮
进入C.Fn - SLAVE选择S1功能,闪光灯
可作为副灯使用,创造多种照明效果,
适用于手动闪光环境。它会与主闪光
灯的第一次闪光同步触发闪光,效果
与使用无线引闪器一致。
高速同步
S1光控单元设置
按<MENU>按钮进入C.Fn - SLAVE选择
S2功能,闪光灯可作为副灯使用,适用于
TTL闪光环境。具有防预闪功能,使用
带一次预闪功能的相机能用光控实现
同步拍摄。它会与主闪光灯的第二次
闪光同步触发闪光,即2次光控引闪。
S2光控单元设置
M模式设置闪光输出功率
短按按键“ ”,这时屏幕出现“ ”
符号,需要配合无线发射器才能使
用高速同步功能,例如:QProC/N/S 。
电池电量指示
把锂电池正确安装在闪光灯上,即可给闪光灯供电。使用时请查看
闪光灯屏幕上电池图标,即可随时掌握电量状态。
该闪光灯有TTL自动闪光,M手动闪光,Multi频闪闪光三种模式。
在TTL模式下,相机的测光系统会侦查从主体反射回来的闪光照明,
从而自动调节闪光输出量,使主体和背景得到均衡曝光。
※按下< MODE >模式选择按钮,三种闪光模式将会依次出现在液晶
屏上。
注:显示大体一致,但在档位交替时会有些差别。
LCD屏电量符号显示
(针对整个闪光灯系
统的电量指示和管理)
(无负载下针对电池
电量的指示和管理)
电池上LED显示
电池上
LED
显示图
意义/电量百分百
电池使用说明 电池使用说明
1.避免正负极短路。
2.电池没有防水功能,不要把电池浸泡在雾、水中。
3.放置于儿童不易接触的地方。
4.电池充电不要超过24小时,请使用配套充电器充电。
5.如果电池超过3个月不使用,请对电池进行充电。
6.电池不要靠近和放置于火中。
7.电池使用报废后请按当地的规定处理。
8.长期不使用,请充电至60%左右再放置。
电池注意事项
CN
104
闪光模式⸺TTL自动闪光模式
闪光模式⸺TTL自动闪光模式 闪光模式⸺M手动闪光模式
开关机/屏幕解锁
TTL模式
旋转调节轮盘即可设置曝光补偿值。
按“SET”按键即可确定并退出设置。
※该闪光灯可以在±3档间以1/3档为增
量调节闪光曝光补偿。 "0.3"表示1/3档,
"0.7"表示2/3档。
要取消闪光曝光补偿,将闪光曝光补偿
量设为"+0"。
设置闪光曝光补偿
① 短按电源开关按键“ ”,屏幕亮起,
顺时针旋转轮盘三下后,屏幕出现箭
头朝下后即可解锁。
② 开机状态下,短按电源开关按键
“ ”,即可关机。
4格 4蓝灯亮
4蓝灯亮 3蓝灯亮 2蓝灯亮 1蓝灯亮
3蓝灯亮
2蓝灯亮
1蓝灯亮
75% ~ 100%
50% ~ 75%
25% ~ 50%
3% ~ 25%
2%蓝灯闪烁,
1%指示灯不亮
<2%电量即将用尽,
此状态不支持闪光灯
工作,前一分钟报警
提示,3分钟后将自动
关机。
注:此状态请尽快(10
天内)充电,才可使用
或放置。
3格
2格
1格
低电,充电提示
使用高速同步(FP闪光),您可以在所有的快门速度下同步使用闪
光灯。高速同步模式下,使用光圈优先对人像进行填充闪光时特
别方便。
M模式下可以在1/256功率至1/1全功率间以0.1档为增量设置闪光
输出。为获得正确的闪光曝光,请使用手持的闪光测光表确定所需
的闪光输出。
注意:
※只有在M模式下无线关闭才支持
S1/S2光控引闪模式。
9.长期不用时,请将电池储存完好,让电池处于半荷电状态。请用
不导电材料包裹电池,以避免金属直接接触电池,造 成电池损坏,
将电池保存阴凉干燥处。
10、禁止电池边充电边使用。
11、电池设计有过温保护功能,当电池内部温度达到55℃,会激活过
温保护,需要冷却后再使用。
电池
电量
按键

CN CN
106
无线电(2.4G)设置
闪光持续时间是指闪光灯从开始发光到
达发光半峰值的时间长度。半峰值的表
示为t=0.5。为了给摄影师提供更详细的
拍摄数值,本产品采用t=0.1。
如左图:t=0.5与t=0.1区别。
使用频闪闪光,可以发出一系列快速的闪光。它可以在一张照片上拍摄
移动物体的多个图像。您可以设置闪光频率(每秒的闪光次数,以Hz表
示)、闪光次数和闪光输出。
Q4使用2.4G无线Q系统,可以与本厂其他型号完美结合使用。作为从属
单元可兼容的相机有佳能E-TTL II、尼康i-TTL、索尼,根据主控单元自
动切换,无需手动设置。
※Q4作为从属单元,可受控带无线发射功能的主控单元,型号如下:
NW420、QPro系列、Z1系列等。
※只有在M模式下才会显示持续时间。
显示闪光持续时间
Multi频闪闪光的设置
按下“MENU”按钮进入菜单模式,旋转调节
轮盘选择ID功能(可选01~99),按“SET”按钮
设置确定。
(※主控单元具备此功能时才能使用)。
短按无线按键“ ”,这时屏幕出现“ ”符号。
短按组别频道“ ”按键,组别字母(A~E)选中
并确定。
定位和操作范围(无线闪光拍摄的示例)
(1)使用一个从属单元进行自动闪光拍摄
● 使用带无线发射功能的主控单元作为发射端。
● 开始拍摄前请进行测试闪光和试拍。
● 受位置、周围环境、天气状况等影响,传输距离可能更短。
短按模式按键“MODE”,当屏幕出现
“MULTI”字样,此刻闪光模式为频闪
闪光模式,旋转调节轮盘可设置闪光
输出功率。
再按下“SET”设置按键,选择设置闪
光次数,旋转调节轮盘设定数值。
再按下“SET”设置按键,选择设置闪
光频率,旋转调节轮盘设定数值。
最后再按下“SET”设置按键确定所有
数值。
计算快门速度
在频闪闪光过程中,到闪光停止为止快门应保持开启状态。使用下面的
公式计算快门速度,然后用相机进行设置。
闪光次数/闪光频率=快门速度
例如,如果闪光次数是10,闪光频率是5Hz,快门速度则至少为2秒。
为防止闪光灯头过热并损坏,请勿执行连续10次以上的频闪闪光
连拍。闪光10次后,请让闪光灯至少冷却15分钟。如果您试图执行连续
10次以上的频闪闪光连拍,为防止闪光灯头过热,闪光可能自动停止。
如果发生了这种情况,请让闪光灯至少冷却15分钟。
设置通讯频道
ID号设置
长按“ ”组别频道按键2秒,频道值选中,
旋转调节轮盘设定频道数值(1~32),按下
“SET”设置按键确定。
闪光模式⸺M手动闪光模式 闪光模式⸻Multi频闪闪光模式
闪光模式⸻Multi频闪闪光模式
107
无线闪光拍摄:无线电(2.4G)传输 无线闪光拍摄:无线电(2.4G)传输
A
t
50%
10%
t=0.5
t=0.1
注意:
● 反光很强的被摄体在暗背景前使用频闪闪光更加有效。
● 推荐使用三脚架和遥控开关。
● 闪光输出为1/1和1/2时不能设置频闪闪光。
● 频闪闪光时也可以使用"buLb”。
● 如果闪光次数显示为--,则闪光灯会连续闪光,直到快门或电池耗尽。
如下表所示,闪光次数将受到限制。
Hz 1 2 3 4 5 6~7 8~9 10 11 12~14 15~19 20~50 60~199
1/4
1/8
1/46
1/32
1/64
1/128
1/256
8
14
30
60
90
100
100
6
14
30
60
90
100
100
4
12
30
60
90
100
100
3
10
20
50
80
100
100
3
8
20
50
80
100
100
2
6
20
40
70
90
90
2
5
10
30
60
80
80
2
4
8
20
50
70
70
2
4
8
20
40
70
70
2
4
8
20
40
60
60
2
4
8
18
35
50
50
2
4
8
16
30
40
40
2
4
8
12
20
40
40
闪
光输出
最大频闪闪光次数
设置通讯组别
无线闪光拍摄
99
(主控)
(从属)
传输距离约100米

造型灯
③ 短按造型灯开关按键“ ”,当屏幕
右下角出现造型灯和OFF字样时,
造型灯关闭。
CN CN
菜单模式(C.Fn: 设置自定义功能)
C.Fn: 设置自定义功能
(3) 用三个从属组进行自动闪光拍摄。
无线多重闪光拍摄:可以将从属单元分割为两个或三个组并在改变
闪光光比(倍率)的同时进行TTL自动闪光拍摄。此外,可以为各闪光
组设定并用不同的闪光模式拍摄。
(2)用两个从属组进行自动闪光拍摄
① 按下”MENU”按钮进入C.Fn菜单。右
下角"Ver x.x"表示软件版本号。
② 旋转调节轮盘选择自定义功能符号。
按“SET”设置按钮,自定义功能编号
突出显示。
③ 旋转调节轮盘设置想要的编号,按
“SET”按钮确定,再次短按“SET”退
出选择。
④ 按“MENU”按钮退出设置。
自定义功能符号
SLAVE
MODEL
STANDBY
LIGHT
DELAY
UNITS
ALT
LCD
ID
BEEP
RESET
功能
M模式
M模式
M模式
无线模式
无
无
无
无
无
M/Multi模式
关闭
关闭
关闭
重置
开启
关闭
没有任何操作自动关机
15秒后自动熄灭
一直熄灭
7个级别
可以选择01-99任意一个数字
一直点亮
可作为后帘引闪
UNITS与 ALT必须结合使用:
UNITS设置了总灯数;
ALT设置了此灯在触发几次
后引闪
S1模式
S2模式
OFF
S1
S2
-3~+3
OFF
01-99
ON
OFF
NO
YES
CONT
INTER
OFF
30min
60min
90min
120min
15sec
OFF
ON
常亮
闪光时造型灯灭
S1/S2光控模式选择
造型灯
自动关机
背光点亮时间
延时闪光 OFF,0.01~30S
闪光灯总数
触发次数引闪 1~4
2~4
液晶屏对比度
无线ID
蜂鸣器
参数重置
设置符号 设置和说明 使用范围限制 ① 短按造型灯开关按键“ ”,屏幕右
下角出现造型灯和“PROP”字样,
此时可通过旋转轮盘改变输出
功率来调节造型灯的亮度,功率
越大造型灯越亮。
② 短按造型灯开关按键“ ”,当屏幕
右下角出现造型灯和百分比字样,
再次长按造型灯按键“ ”2秒,此时
屏幕右下角百分比数字高亮,通过
旋转轮盘改变百分比数字
(10%~100%)调节造型灯亮度。
无线闪光拍摄:无线电(2.4G)传输
造型灯模式
3
10
20
50
80
100
100
3
8
20
50
80
100
100
2
6
20
40
70
90
90
2
5
10
30
60
80
80
2
4
8
20
50
70
70
2
4
8
20
40
70
70
2
4
8
20
40
60
60
2
4
8
18
35
50
50
2
4
8
16
30
40
40
2
4
8
12
20
40
40
108
无线闪光拍摄:无线电(2.4G)传输
A
B
A
B
C
1、外部环境2.4G信号干扰(如无线基站、2.4G wifi路由、蓝牙设备等)
→请调节引闪器的频道CH设置(建议+10),找到无干扰的频道来
工作,或者在工作时关闭其他2.4G设备。
2、请确认闪光灯是否已经回电或者回电速度是否已经跟上连拍速
度(闪光灯就绪指示灯已经亮起),并且没有处于过热保护或者其
他异常状态中
→请下调闪光灯功率的档位,如是TTL模式请尝试改为M模式
(TTL模式下需要预闪一次)。
3、是否引闪器和闪光灯距离太近(距离<0.5m)
→请在引闪器上打开“近距离无线模式”:
Qpro系列:设置C.Fn-DIST为0-30m。
4、是否引闪器和接收端设备在低电状态
→请更换电池(引闪器电池建议使用1.5V一次性碱性电池)。
C.Fn: 设置自定义功能
2.4G无线漏闪的原因及解决办法
109
C.Fn: 设置自定义功能
X.X

保护功能
注意事项
固件升级
CN
110
1. 请勿将产品放置于温度高于50℃环境下。
2. 本产品工作环境温度不宜高于40℃。
2. 请勿让产品掉落到地面、受到碰撞或强烈冲击。
3. 请勿将闪光灯头正对人眼闪光(特别是婴儿的眼睛),否则可能会
在短时间内造成视力障碍。
4. 本产品不能防水,在雨天及潮湿环境下请注意防水。
5. 请勿私自拆卸产品,如产品出现故障须由本公司或授权的维修
人员进行检查维修。
6. 禁止拆卸、撞击、挤压或投入火中,若出现严重鼓胀,请勿继续
使用。
7. 若发生任何故障,请立即关闭闪光灯电源。
8. 请勿在化学品、可燃性气体或其他特殊物质附近使用闪光灯,
这些物质在特殊情况下可能对闪光灯发出的瞬间强光敏感,
有可能导致火灾或电磁干扰。在这些场合下,请注意相关警告
标识。
维护保养
▪ 闪光灯在工作时,如发现异常,应立即关掉电源,查明原因。
▪ 灯体应避免震动,平时注意表面除尘。
▪ 灯体稍有发热为正常现象,无特别需要时,勿连续引闪。
▪ 闪光灯的所有维修概由本厂指定可供原厂配件之维修部负责。
▪ 如果本品出现故障或者被水淋湿,在专业人员维修后方可继续
使用。
▪ 如有技术更改,恕不另行通知。
本机通过USB插座可进行固件升级。软件最新公告及说明将会发
布在官方网站上。
▪ 本品出厂不配USB升级线,请另行购买。本产品USB接口为
Type-C接口,请使用Type-C USB线。
▪ 产品升级固件需要“Neewer_Firmware_Update ”程序软件支
持,升级固件前请先下载安装“Neewer_Firmware_Update ”
再选择相应的固件文件。
▪ 由于产品进行固件升级,说明书请以最新电子版为准。
同步插孔触发
同步插孔规格为Φ3.5mm,此处可插入同步线或者触发器触发插头
对闪光灯进行同步引闪。
※使用同步接口引闪时,需要关闭无线2.4G模式以及S1/S2模式。
※使用同步接口引闪时,同步速度≤1/200
为了保证设备安全的工作,系统时刻进行预防保护,以下提示符号供
您参考:
故障排除指南
闪光曝光不足或过度。
▪使用高速同步。
→使用高速同步,有效的闪光范围会更小。确保被摄体位于显示
的有效闪光范围内。
▪ 闪光灯使用手动曝光模式。
→改为TTL模式或修改闪光输出功率设置。
CN
111
其他保护
保护功能
1.为防止闪光灯头过热并损坏,请勿在1/1功率时进行超过75次的快
速连续闪光。75次连续闪光后,要让闪光灯至少冷却5分钟。
2.如您在进行超过75次连续闪光后马上继续进行更多次闪光,内部的
防过热功能可能会被激活,使充电时间变为6秒以上。如果发生这种
现象,请让闪光灯冷却约5分钟,闪光灯便会恢复正常。
3.热保护启动后,显示屏上“ ”的符号会显示。
热保护
激活热保护功能的连续闪光次数:
高速同步模式下,激活热保护功能的连续闪光次数:
功率
1/1
1/2(+0.0~+0.9)
1/4(+0.0~+0.9)
1/8(+0.0~+0.9)
1/16(+0.0~+0.9)
1/32(+0.0~+0.9)
1/64(+0.0~+0.9)
1/128(+0.0~+0.9)
1/256(+0.0~+0.9)
50
60
75
100
150
次数
LCD显示
Error 1
Error 5
警示内容
闪光灯回电系统出现问题,无法回电引闪,
请重新开机,如无法解决请维修
风扇故障
Error 6 传感器故障
1/1
1/2(+0.7~+0.9)
1/2(+0.3~+0.6)
1/2(+0.0~+0.2)
1/4(+0.0~+0.9)
1/8(+0.0~+0.9)
1/16(+0.0~+0.9)
1/32(+0.0~+0.9)
1/64(+0.0~+0.9)
1/128(+0.0~+0.9)
1/256(+0.0~+0.9)
75
100
120
150
200
300
400
500
1000
功率 次数 200
300

CN
112
产品参数
产品型号
闪光灯输出功率
闪光持续时间
闪光模式
档位
频闪闪光
闪光曝光补偿(FEC)
同步方式
延时引闪
蒙板
风扇
蜂鸣器
显示
Q4
400Ws
1/209秒~1/10989秒
无线关闭:M/Multi
无线电从属模式:TTL/M/Multi
9级:1/256~1/1
具备 (次数:100次;频率:199Hz)
手动,闪光包围曝光:在±3档间以1/3档为增
量调节
高速同步(最高1/8000秒),前帘同步,后帘同步
0.01~30秒
30W/5600K/CRI:95+
显示闪光持续时间
点阵屏
Model造型灯(LED)
无线从属单元模式 无线电模式(兼容佳能E-TTL II、尼康i-TTL、
索尼)
产品参数
2.4G、S1/S2、3.5mm同步线、测试引闪触发方式
无线功能
2.4G
电源
节能
色温
从属单元,关闭
全功率闪光次数 400
回电时间
电池电量指示
约0.01-1.2秒
锂电池(21.6V/2800mAh)
可控制从属单元组:A,B,C,D,E
传输范围(约):100米
频道:1~32
无线ID:为了避免干扰,除了改变无线传输频
道还可以通过改变无线ID,主控单元和从控
单元无线ID、频道一致才能触发。
可设置闪光灯在无人操作30min~120min自
动关闭电源
5600±200K
Lingfeng Electronic (UK) Ltd
International House, 10 Churchill Way, Cardiff,
CF10 2HE, United Kingdom
NW Formations GmbH(for authorities only)
Hoferstrasse 9B, 71636 Ludwigsburg, Germany
Room 1903, Block A, Lu Shan Building No. 3023
Chunfeng Rd Luo Hu District, Shenzhen
Guangdong 518001, China
Shenzhen Neewer Technology Co.,Ltd.
If you have any questions about product ,
we are glad to help.
US +1 732-623-9777
UK +44 (0)3330113494 Send us an email
vip@neewer.com www.neewer.com
www.neewer.com Tiktok Facebook
-
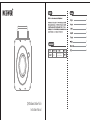 1
1
-
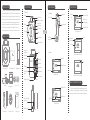 2
2
-
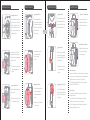 3
3
-
 4
4
-
 5
5
-
 6
6
-
 7
7
-
 8
8
-
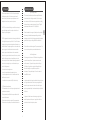 9
9
-
 10
10
-
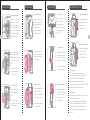 11
11
-
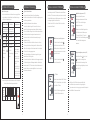 12
12
-
 13
13
-
 14
14
-
 15
15
-
 16
16
-
 17
17
-
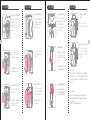 18
18
-
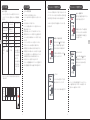 19
19
-
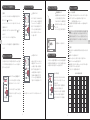 20
20
-
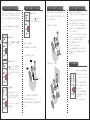 21
21
-
 22
22
-
 23
23
-
 24
24
-
 25
25
-
 26
26
-
 27
27
-
 28
28
-
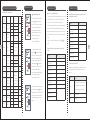 29
29
-
 30
30
-
 31
31
-
 32
32
-
 33
33
-
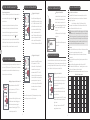 34
34
-
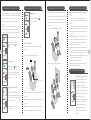 35
35
-
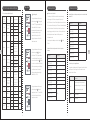 36
36
-
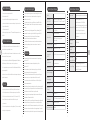 37
37
-
 38
38
-
 39
39
-
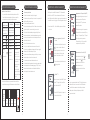 40
40
-
 41
41
-
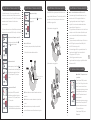 42
42
-
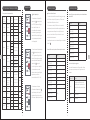 43
43
-
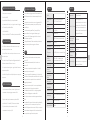 44
44
-
 45
45
-
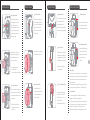 46
46
-
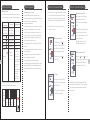 47
47
-
 48
48
-
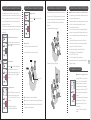 49
49
-
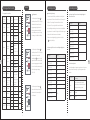 50
50
-
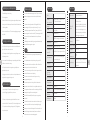 51
51
-
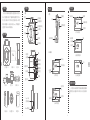 52
52
-
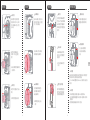 53
53
-
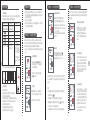 54
54
-
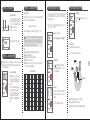 55
55
-
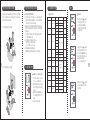 56
56
-
 57
57
-
 58
58


in andere talen
Gerelateerde papieren

Andere documenten
-
Elinchrom D-Lite RX ONE Handleiding
-
Samsung NV24HD Snelstartgids
-
-
Samsung LANDIAO NV9 Snelstartgids
-
Elinchrom D-Lite RX 2 & 4 Handleiding
-
-
Samsung SAMSUNG I8 de handleiding
-
Samsung SAMSUNG NV100HD Snelstartgids
-
LEXON LUMA L Handleiding
-
Hahnel Tuff TTL Handleiding