
5
4
IP Rated if required
W
Document Version EN-ST324RGB_V1_19 (AURORA)
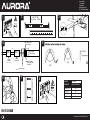
EN-ST324RGB
LED STRIP EN-ST324RGB
LED DRIVERS METRES PER DRIVER
AU-LED2524CV 1m
EN-LED7524 5m
EN-LEDD7524 5m
AU-ENG-150-24 5m
8
76
Enlite
Tel: 01727 836611
Fax: 01727 836622
Website: www.enlitelighting.com
Email: [email protected]
13
EN-ST324RGB
Cut points every 100mm
2
24V DC
LED Driver
+
G
R
B
+
_
V+
G
R
B
+
_
L
N
240V ~
50Hz
24V
DC
Output
24V DC Input
24V DC
24V DC
RGB Controller
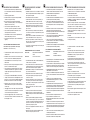
Solder the connection
wires to the strip
EN-ST324RGB
LED Flexible Strip
Remove the plastic
sheath to expose the
copper track
Heat shrink sleeve
Aurora Limited
6 Little Burrow,
Burrowelds,
Welwyn Garden City,
AL7 4SW, United Kingdom

IMPORTANT INSTALLATION INFORMATION
• Installation should be carried out by a qualied electrician
in accordance with the latest edition of the National wiring
regulations.
• The LED Strip operates at 24V DC.
• A 24V DC LED Driver is required (not included). A 24V RGB
Controller is required (not included).
• When connecting to an LED 24 V Driver and 24V RGB
Controller, ensure that the polarity is correct. The strip may be
damaged if connected incorrectly.
• Please note that the strip is IP67 but any user made
connections or joints cannot be guaranteed to be IP rated.
• Before commencing installation or maintenance, ensure
electricity is switched off at the mains.
• Ensure that ALL electrical connections are tight with no loose
strands, including factory connections.
• A soldering iron and heat gun are required for installation (not
supplied).
24V DC LED FLEXIBLE STRIP LIGHT AND ACCESSORIES
EN-ST324RGB High Density RGB Flexible LED strip light
EN-STRGBCK Connector kit accessory
• To install the LED Driver and LED Controller please refer to their
own instructions.
• A maximum of 5m of can be connected in a continuous length.
For runs of over 5m connect individual lengths in parallel.
• The EN-STRGBCK is used to connect the strip to a 24 V DC
RGB Controller
• At the strip connection carefully cut away the plastic sheath to
reveal the +ve and RGB connection points.
• The copper track is lacquered which will need to be removed
so that the solder will take to the copper track. Use a knife to
carefully scrape away the lacquer from the surface of the
copper track.
• ‘Tin’ the copper track and the EN-STRGBCK connection wires.
• Carefully solder the wires onto the LED strip. Match the colours
of the wires, i.e. red, green, blue to the RGB LED strip markings.
The black wire is soldered to the common on the LED strip.
• Apply the glue to the connection and end of the strip. Next
slide the heatshrink sleeves in place over the connection and
end of the strip.
• Gently apply heat to the sleeves with a heat gun until it shrinks
over the connection and end of the strip. As this is a user made
connection an IP rating cannot be guaranteed.
• Ensure when applying strip to surface, it is smooth and clean.
• Connect the wires from the Controller to the LED Driver; ensure
that the polarity is correct.
WICHTIGE INFORMATIONEN ZUR INSTALLATION
• Die Installation muss gemäß der neuesten Ausgabe der
nationalen elektrischen Anschlussvorschriften von einem
qualizierten Elektriker durchgeführt werden.
• Die LED-Leiste arbeitet bei 24V DC.
• Ein 24V DC LED-Treiber und 24V DCRGB LED-Controller ist
erforderlich (nicht im Lieferumfang enthalten)
• Stellen Sie bei der Verbindung mit einem LED-Treiber und
LED-Controller sicher, ass die Polarität korrekt ist. Die Leiste
kann beschädigt werden, wenn sie nicht richtig verbunden
wurde.
• Bitte beachten Sie, dass die Leiste an sich IP67-zertiziert
ist. Nachdem jedoch der Benutzer Anschlüsse und
Verbindungen vorgenommen hat, kann die IP-Zertizierung der
Leiste nicht mehr gewährleistet werden.
• Stellen Sie vor Beginn der Installation oder Wartung sicher,
dass die Stromversorgung unterbrochen ist.
• Stellen Sie sicher, dass ALLE elektrischen Verbindungen
estsitzen und keine losen Litzen aufweisen, einschließlich in
der Fabrik vorgefertigter Verbindungen.
• Ein Lötkolben und eine Heißluftpistole sind für die Installation
erforderlich (nicht im Lieferumfang enthalten).
24V DC FLEXIBLE LED-LICHTLEISTE UND ZUBEHÖR
EN-ST324RGB Flexible RGB LED-Lichtleiste mit hoher
Leuchtdichte
EN-STRGBCK Steckverbinder-Zubehörset
• Bitte berücksichtigen Sie für die Installation des LED-Treibers
die dem LED-Treibers beiliegende Anleitung.
• Die Leiste kann mit einer durchgehenden Länge von maximal
5m angeschlossen werden. Bei Leisten mit einer Länge über
5m müssen die einzelnen Längen parallel geschaltet werden.
• Das EN-STRGBCK wird zum Anschluss der Leiste an einen
24V DC RGB LED Controller verwendet.
• Schieben Sie einen Wärmeschrumpfschlauch über das Ende
der Leiste, das mit dem RGB LED-Controller verbunden werden
soll.
• Schneiden Sie an der Leistenverbindung vorsichtig
die Kunststoffummantelung weg, um die +ve und RGB
Anschlussstellen freizulegen.
• Die Kupferbahn ist mit einer Lackierung beschichtet, die
entfernt werden muss, damit das Lot direkt auf die Kupferbahn
aufgetragen werden kann. Kratzen Sie mit einem Messer
vorsichtig die Lackierung von der Oberäche der Kupferbahn.
• ”Verzinnen“ Sie die Kupferbahn und die Anschlussdrähte des
EN-STRGBCK.
• Verlöten Sie die Drähte vorsichtig mit der LED-Leiste.
• Tragen Sie Klebstoff auf, und chieben Sie einen
Wärmeschrumpfschlauch über das Ende der Leiste und RGB
Anschlussstellen.
• Erwärmen Sie den Schlauch vorsichtig, um den Schlauch zu
schrumpfen und das Ende der Leiste zu versiegeln. Da es sich
hierbei um eine Versiegelung handelt, die der Benutzer selbst
hergestellt hat, kann die IP-Zertizierung nicht gewährleistet
werden.
• Stellen Sie sicher, dass der Streifen beim Auftragen auf die
Oberäche glatt und sauber ist.
• Verbinden Sie die Drähte des RGB LED Controller mit dem LED-
Treiber. Achten Sie dabei auf die richtige Polarität.
INFORMATION IMPORTANTE CONCERNANT
L’INSTALLATION
• L’installation doit être effectuée en conformité avec la dernière
édition de la réglementation nationale de câblage en vigueur
par un professionnel qualié.
• Le bandeau LED fonctionne sur du 24 V DC.
• Un driver LED 24 V DC s’avère nécessaire (non inclus). Un
Gradateur RGB LED 24 V s’avère nécessaire (non inclus).
• Lors de la connexion à un driver LED 24 V et un Gradateur
RGB LED 24 V, assurez-vous que la polarité est correcte. Le
bandeau peut se retrouver endommagé s’il est connecté de
façon incorrecte.
• Merci de prendre note que le bandeau est IP67, mais toutes
les connexions ou joints effectués par l’utilisateur ne peuvent
être garantis IP.
• Avant de commencer l’installation ou la maintenance, assurez-
vous que l’alimentation secteur est coupée (sur « off »).
• Assurez-vous que TOUTES les connexions électriques sont
bien serrées, sans aucun brin débranché, et ce même pour les
connexions effectuées en usine.
• Un fer à souder et un pistolet thermique sont nécessaires pour
l’installation (non fourni).
BANDEAU FLEXIBLE LED 24 V DC ET ACCESSOIRES
EN-ST324RGB Bandeau exible à RGB LEDs haute
densité
EN-STRGBCK Accessoire kit connecteur
• Pour l’installation du driver LED et Contrôleur RGB LED 24 V,
consultez la notice correspondante.
• Il est possible d’effectuer un raccordement d’une longueur
continue maximale de 5m. Pour les distances supérieures à
5m, raccordez les différentes longueurs en parallèle.
• L’EN-STRGBCK e st utilisé pour le raccordement du bandeau
à un Contrôleur de RGB LED 24 V.
• À l’emplacement de la connexion du bandeau, découpez et
retirez la gaine en plastique pour dégager les points de
connexion +ve et RGB.
• La piste de cuivre étant vernie, il est nécessaire de retirer
ce vernis pour pouvoir effectuer la soudure sur la piste de
cuivre. Utilisez un couteau pour gratter doucement le vernis de
la surface de la piste de cuivre.
• “Étamez” la piste de cuivre et les câbles de connexion
EN-STRGBCK.
• Soudez avec précaution les câbles sur le bandeau LED.
• Appliquez la colle sur la connexion et l’extrémité du LED
bandeau, et faites glisser le manchon thermo rétractable sur la
connexion.
• À l’aide d’un pistolet thermique, appliquez doucement la
chaleur sur le manchon jusqu’à ce que celui-ci se rétracte sur
la connexion et l’extrémité du LED bandeau. Étant donné qu’il
s’agit d’une connexion réalisée par l’utilisateur, l’indice de
protection IP ne peut pas être garanti.
• s’assurer lors de l’application de la bande à la surface, il est
lisse et propre
• Branchez les câbles du au Contrôleur de RGB LED au driver
LED; assurez-vous que la polarité est correcte.
IMPORTANTI INFORMAZIONI PER L’INSTALLAZIONE
• L’installazione deve essere eseguita da un elettricista
qualicato e deve essere in conformità con l’ultima edizione
del National Wiring Regulations.
• La striscia LED è esercita a 24V CC.
• Con la striscia va utilizzato un driver LED 24V CC. (NON IN
DOTAZIONE). Con la striscia va utilizzato un controller RGB LED
24V CC. (NON IN DOTAZIONE).
• Quando la si collega a un driver LED e un controller RGB LED
24V CC, assicurarsi che la polarità sia corretta. La striscia può
danneggiarsi se non viene collegata correttamente.
• N.B.: la striscia ha grado di protezione IP67 ma non è possibile
garantire il grado di protezione di collegamenti o raccordi
eseguiti dall’utente.
• Assicurarsi che tutti i contatti siano aderenti e che non vi siano
li allentati.
• Per l’installazione sono necessari saldatore a stilo e pistola
termica (non in dotazione).
• Per installare il driver LED e controller LED consultare le
istruzioni.
• È possibile collegare no a un massimo di 5m in un’unica
lunghezza. Oltre i 5m il collegamento va fatto in parallelo.
• EN-STRGBCK viene usato per collegare la striscia a un
controller RGB LED 24V CC.
• Sul punto di giunzione della striscia spellare la guaina di
plastica per far uscire i punti di collegamento +ve e RGB.
• La treccia di rame è ricoperta di smalto che dovrà essere
rimosso per scoprirla. Usare un coltello per spellare lo smalto
dalla supercie della treccia di rame.
• ‘Fondere’ la treccia di rame e i li di collegamento
EN-STRGBCK.
• Saldare con cura i li alla striscia LED.
• Applicare la colla al collegamento e far scorrere la fascetta
termoretraibile in posizione sul collegamento.
• Far scorrere una fascetta termoretraibile sull’estremità della
striscia, applicare colla all’estremità.
• Scaldare leggermente no a completa aderenza della fascetta
per sigillare l’estremità. Trattandosi di un collegamento
eseguito dall’utente, non è possibile garantire un grado di
protezione IP.
• Assicurare quando si applica la striscia alla supercie, è liscia
e pulita
• Collegare i li del controller RGB LED al driver LED,
assicurandosi che la polarità sia corretta.
GB FR DE IT

NL ES SE UAE
BELANGRIJKE INSTALLATIE-INFORMATIE
• De installatie moet worden uitgevoerd door een
gekwaliceerde elektricien, in overeenstemming met de
toepasselijke nationale veiligheidsvoorschriften voor
elektrische installaties.
• De LED-strip werkt op 24V DC.
• Voor deze strip dient een A 24V DC RGB LED-driver te worden
gebruikt (NIET MEEGELEVERD). Voor deze strip dient een A 24V
DC LED-controller te worden gebruikt (NIET MEEGELEVERD).
• Zorg bij het verbinden met een LED-driver en RGB LED-
controller ervoor dat de polariteit correct is. De strip kan
worden beschadigd als hij onjuist wordt verbonden.
• De strip heeft een IP67-kwalicatie, maar voor verbindingen
of voegen die door de gebruiker zijn gemaakt, kan geen IP-
kwalicatie worden gegarandeerd.
• Zorg er voorafgaand aan installatie of onderhoud voor dat de
elektriciteit bij de netwerkaansluiting is uitgeschakeld.
• Zorg ervoor dat ALLE elektrische verbindingen stevig vast
zitten zonder losse draden.
• Voor installatie dient gebruik gemaakt te worden van een
soldeerbout en warmtepistool (niet meegeleverd).
• Voor de installatie van de LED-driver en RGB LED-controller
dient u de instructies daarvan te raadplegen.
• Er mag een doorlopende lengte van maximaal 5m met elkaar
worden verbonden. Voor lengtes van meer dan 5m dienen
afzonderlijke lengtes parallel te worden verbonden.
• De EN-STRGBCK wordt gebruikt om de strip met een 24V DC
RGB LED-Controller te verbinden.
• Knip bij de stripverbinding voorzichtig het kunststof huls weg
om de +ve en RGB verbindingspunten bloot te leggen.
• De koperen track is gelakt en de lak dient verwijderd te
worden zodat het soldeer zich op de koperen track hecht.
Gebruik een mes om het lak voorzichtig van het oppervlak van
het koperen track af te schrapen.
• ‘Vertin’ de koperen track en de EN-STRGBCK
verbindingsdraden.
• Soldeer de draden voorzichtig aan de LED-strip.
• Breng de lijm op de verbinding en uiteinde van de strip.
Chuif de warmtekrimpkous op zijn plaats over de verbinding
en uiteinde van de strip.
• Schuif een warmtekrimpkous op de verbinding en het uiteinde
van de strip waarop een eindkap is aangebracht, breng lijm op
het eind aan en verwarm voorzichtig om de kous te krimpen
en het de verbinding en eind af te dichten. Aangezien dit een
door de gebruiker gemaakte afdichting is, kan een
IP-kwalicatie niet worden gegarandeerd.
• zorg ervoor dat bij het aanbrengen van strip op het oppervlak,
het glad en schoon is
• Verbind de draden van de RGB LED-Controller met de LED-
driver; zorg ervoor dat de polariteit correct is.
VIKTIG INSTALLATIONSINFORMATION
• Installationen ska utföras av en kvalicerad elektriker i
enlighet med aktuella nationella bestämmelser om
elinstallation.
• Denna LED-Strip drivs med 24V DC.
• En 24V DC LED-driver krävs (ej inkluderad). En RGB 24V LED-
styrenhet krävs (ej inkluderad).
• Se till att polariteten är korrekt vid anslutning till en 24V LED-
drivenhet och RGB 24V LED-styrenhet. Stripen kan skadas om
den kopplas in felaktigt.
• Observera att stripen är IP67, men att alla användartillverkade
anslutningar och fogar inte kan garanteras vara IP67-klassade.
• Stäng alltid av nätströmmen vid reparationer eller montering.
• Se till att ALLA elektriska anslutningar sitter fast ordentligt och
inte har några lösa kopplingar (även fabriksgjorda
anslutningar)
• En lödpenna och värmepistol krävs för installation (ej
inkluderade).
24V DC FLEXIBEL LED-STRIP OCH TILLBEHÖR
EN-ST324RGB Flexibel LED strip med högt ljusöde
EN-STRGBCK Tillbehörssats för anslutning
INSTALLATIONSANVISNIGAR
• En 24V DC LED-driver ska användas med denna strip.
• Se instruktionerna för LED-drivern och RGB LED-styrenhet för
information om hur denna ska installeras.
• Maximalt 5m kan anslutas som en längd. För längder över
5m måste de individuella längderna kopplas parallellt.
• EN-STRGBCK används för att ansluta stripen till en RGB 24V
LED-styrenhet.
• Skär försiktigt bort en bit av plasthöljet vid anslutningspunkten
så att kontaktytorna +Ve och RGB friläggs.
• Kopparbanan är lackerad och denna lack behöver avlägsnas
för att lödtennet ska fästa på kopparbanan. Skrapa försiktigt
bort lacken från kopparbanans yta med en kniv.
• Förtenna kopparbanan och anslutningstrådarna på EN-
STRGBCK
• Löd försiktigt fast trådarna på LED-stripen.
• Applicera lim på anslutningen och änden på stripen, dra
krympslangen på plats över anslutningen och änden på
stripen.
• Värm försiktigt så att krympslangen krymper och förseglar
änden. Då detta är en användartillverkad, kan inte
IP-klassningen garanteras.
• Se till att det är smidigt och rent när du applicerar remsor till
ytan
•
Anslut kablarna från
RGB 24V LED-styrenhet
till LED-drivern
och se till att polariteten är korrekt.
INFORMACIÓN IMPORTANTE PARA LA INSTALACIÓN
• La instalación debe ser realizada por un electricista calicado
de acuerdo con la última edición de las normativas nacionales
de cableado
• La tira LED funciona a 24V CC.
• Requiere un dispositivo controlador de LED de 24V CC (no
incluido). Requiere un y controlador para tira LED de RGB (no
incluido).
• Cuando conecte un controlador de LED y un controlador
para tira LED de RGB, asegúrese de que la polaridad sea
correcta. La tira puede dañarse si se conecta incorrectamente.
• Tenga en cuenta que si bien la tira es IP67, no se puede
asegurar lo mismo de las conexiones o juntas que realice el
usuario.
• Aísle de la red eléctrica antes de la instalación o el
mantenimiento.
• Asegúrese de que TODAS las conexiones eléctricas estén bien
ajustadas, sin hilos sueltos, incluso las conexiones de fábrica.
• Se necesita una soldadora y una pistola de aire caliente para
la instalación (no suministradas).
TIRA FLEXIBLE LED DE 24V CC Y ACCESORIOS
EN-ST324RGB Tira LED exible de alta densidad
EN-STRGBCK Kit de conectores
INSTRUCCIONES DE INSTALACIÓN
• Con esta tira se debe utilizar un controlador de LED de 24V CC
y un controlador para tira LED de RGB.
• Para instalar el controlador de LED y el controlador para tira
LED de RGB, consulte sus instrucciones.
• Se puede conectar un máximo de 5m en una sola pieza. Las
ongitudes de más de 5m se deben conectar en paralelo.
• El EN-STRGBCK se utiliza para conectar la tira a un
controlador para tira LED de RGB.
• En la conexión de la tira, quite con cuidado la cubierta de
plástico para revelar los puntos de conexión +ve y RGB.
• La pista de cobre está laqueada. El laqueado se debe quitar
para que la soldadura tenga efecto. Con un cuchillo, extraiga el
laqueado cuidadosamente de la supercie de la pista de cobre.
• Estañe la pista de cobre y los alambres de conexión del EN-
STRGBCK.
• Suelde los alambres con cuidado sobre la tira LED.
• Aplique pegamento a la conexión y sobre el extremo de la tira.
deslice la funda termocontraíble a su lugar sobre la conexión y
sobre el extremo de la tira.
• Caliente cuidadosamente para contraer la funda y sellar el
extremo. Dado que se trata de un sello realizado por el usuario,
no se puede garantizar la clasicación IP.
• asegúrese de aplicar la tira a la supercie, es suave y limpia
• Conecte los cables del controlador para tira LED RGB a el
driver de LED. Asegúrese de que la polaridad sea correcta.
•
•24LED
•LED
•IP67
IP
•
•24LED
•
LED
• 55
•24
EN-STRGBCK
•LED
•
•
•EN-STRGBCK
•LED
•
•
IP
•LED
•
•LED

GB
Environmental Protection (W.E.E.E.) – Aurora’s WEEE Reg.No. WEE/BG0130YX (UK Only)
Waste Electrical & Electronic Equipment Regulations (WEEE) requires that any of our products showing this marking (left) must not be disposed of
with other household or commercial waste. Aurora does not levy any WEEE disposal charges to its customers for affected WEEE related products.
To prevent possible harm to the environment or human health from uncontrolled waste disposal, please separate any such product from other
waste types and recycle it responsibly at your local facilities. Check with your Local Authority, Recycling Centre or retailer for recycling advice. If,
when you purchased any Aurora product, your supplier included a WEEE disposal fee, you should then contact your supplier for advice on his take
back of the product for the correct disposal.
GUARANTEE
This product is guaranteed for a period of 3 years from the date of purchase. The guarantee is invalid in the case of improper use, installation, tampering,
and removal of the Q.C. date label, installation in an improper working environment or installation not according to the current edition of the National Wiring
Regulations. Should this product fail during the guarantee period it will be replaced free of charge, subject to correct installation and return of the faulty
unit. Aurora does not accept responsibility for any installation costs associated with the replacement of this product. This warranty is in addition to the
statutory rights in your country of purchase. Aurora reserves the right to alter specifications without prior notice.
NL
ilieubescherming (W.E.E.E.) - Aurora WEEE Reg.No. WEE/BG0130YX (alleen in het VK) alleen van toepassing in de UK
De richtlijn voor afvalproducten van elektrische en elektronische apparatuur (WEEE) schrijft voor dat onze producten die van deze markering
(links) zijn voorzien niet met ander huishoudelijk of commercieel afval mogen worden weggeworpen. Aurora brengt klanten geen
WEEE-afvalkosten in rekening voor WEEE-gerelateerde producten waarop dit van toepassing is. Ter voorkoming van mogelijke schade aan het
milieu of de menselijke gezondheid door onbeheerde afvalverwijdering, verzoeken wij u deze producten van andere afvaltypes te scheiden en ze
op verantwoordelijke wijze bij uw plaatselijke milieustraat te recyclen. Raadpleeg uw plaatselijke gemeente, milieustraat of detailhandel voor
recycle-advies. Als uw leverancier u bij de aankoop van een Aurora-product WEEE-afvalkosten in rekening heeft gebracht, dient u contact met uw
leverancier op te nemen over advies betreffende het terugnemen van het product voor correcte afvalverwerking.
GARANTIE
Dit product is gegarandeerd voor een periode van 3 jaar en vanaf de aankoopdatum. De garantie is ongeldig in het geval van onjuist gebruik, onjuiste
installatie, sabotage, en verwijdering van het kwaliteitscontrolelabel, installatie in een ongeschikte werkomgeving of installatie die niet in overeenstemming
is met de huidige editie van de nationale bedradingsvoorschriften. Als dit product tijdens de garantieperiode defecten vertoont, wordt het gratis vervangen,
behoudens juiste installatie, en na retournering van het defecte product. Aurora aanvaardt geen verantwoordelijkheid voor installatiekosten die verbonden
zijn aan de vervanging van dit product. Deze garantie wordt verstrekt naast de wettelijke rechten in uw land van aankoop.
FR
Protection de l’environnement (D.E.E.E.) – N° d’inscription DEEE d’Aurora en Grande-Bretagne WEE/BG0130YX
(Royaume-Uni uniquement)
Les Règlements relatifs aux déchets d’équipements électriques et électroniques (DEEE) exigent que nos produits portant ce marquage (à gauche)
ne soient pas jetés avec d’autres ordures ménagères ou déchets commerciaux. Aurora Limited ne prélève aucune taxe d’éco-contribution à ses
clients pour les produits concernés par la réglementation DEEE. Afin de prévenir tout risque pour l’environnement ou la santé publique, veuillez ne
pas jeter ce type de produits avec les autres déchets et le recycler de manière responsable auprès de vos installations locales. Veuillez vous
rapprocher des autorités compétentes, des centres de recyclage ou de votre distributeur pour des conseils concernant le recyclage de ces
produits. Si, lorsque vous avez acheté un produit Aurora, votre fournisseur a inclus des frais d’élimination des DEEE, veuillez contacter votre fournisseur
pour obtenir des conseils sur sa reprise du produit pour son élimination appropriée.
GARANTIE
Ce produit est garanti pour une période de 3 ans à partir de la date d’achat. La garantie n’est pas valable dans le cas d’une mauvaise utilisation ou
installation, d’une altération et du retrait de l’étiquette de contrôle de qualité, d’une installation dans un environnement mal approprié ou d’une installation
non-conforme à la dernière édition du Règlement national de câblage. Si ce produit tombe en panne pendant la période de garantie, il sera remplacé
gratuitement, sous réserve d’une installation correcte et du renvoi de l’unité défectueuse. Aurora n’accepte aucune responsabilité pour les coûts
d’installation associés au remplacement de ce produit. Cette garantie est en sus des droits légaux dans votre pays d’achat. Aurora se réserve le droit de
modifier les spécifications sans préavis
ES
Protección medioambiental (W.E.E.E.) – Normativa WEEE de Aurora nº WEE/BG0130YX (Solo Reino Unido)
La normativa en materia de residuos de equipos eléctricos y electrónicos (WEEE) exige que cualquiera de nuestros productos que muestre esta
marca (izquierda) no pueda ser eliminado junto con otros residuos comerciales o domésticos. A fin de evitar posibles daños al medioambiente o a
la salud humana como consecuencia de la eliminación de residuos, por favor, separe estos productos de otros productos de desecho y recíclelo
de manera responsable en sus instalaciones locales. Consulte con las autoridades locales, centros de reciclaje o minoristas si precisa de
asesoramiento en materia de reciclado.
GARANTÍA
Este producto tiene garantía por un periodo de 3 años a partir de la fecha de compra. La garantía quedará invalidada en caso de uso, instalación o
manipulación inadecuados, retirada de la etiqueta de fecha Q.C., instalación de un entorno de trabajo inadecuado o instalación no acorde con la Normativa
Nacional de Cableado. En caso de que se produzca un fallo durante el periodo de garantía, será sustituido por otro de modo gratuito siempre que la
instalación haya sido correcta y sujeto a la devolución de la unidad defectuosa. Aurora no acepta responsabilidad alguna por cualesquiera costos de
instalación asociados con la sustitución de este producto. Esta garantía se suma a los derechos legales del país donde adquiriera el producto. Aurora se
reserva el derecho a alterar las especificaciones sin notificación previa.
DE
Umweltschutz (W.E.E.E.) – Auroras WEEE-Registrierungsnummer WEE/BG0130YX (nur GB)
Die WEEE-Richtlinie (Elektro- und Elektronikgeräte-Abfall-Richtlinie) schreibt vor, dass keines unserer Produkte, das diese Kennzeichnung (links)
trägt, mit anderen Haushalts- oder kommerziellen Abfällen zusammen entsorgt werden darf. Aurora erhebt keine WEEE-Entsorgungsgebühren
von ihren Kunden für von der WEEE-Richtlinie betroffene Produkte. Um mögliche Schäden für die Umwelt oder die Gesundheit von Personen
durch unkontrollierte Abfallentsorgung zu vermeiden, trennen Sie bitte all solche Produkte von anderen Abfallarten und lassen Sie es vor Ort
fachgerecht recyclen. Fragen Sie bei den örtlichen Behörden, Recyclingstandorten oder Einzelhändlern hinsichtlich einer Recycling-Beratung
nach. Wenn ein Anbieter bei dem Kauf eines Aurora-Produkts eine WEEE-Entsorgungsgebühr erhoben hat, so sollten Sie diesen fragen, wie das Produkt für
eine fachgerechte Entsorgung zurückgenommen wird.
GARANTIE
Dieses Produkt hat eine Garantiedauer von 3 Jahren ab dem Kaufdatum. Die Garantie entfällt im Falle von unsachgemäßem Gebrauch, Installation,
Fälschung und Entfernung des Datumsetiketts, der Installation in einer ungeeigneten Arbeitsumgebung oder einer Installation, die nicht den nationalen
elektrischen Anschlussvorschriften genügt. Sollte dieses Produkt während der Garantiedauer ausfallen, wird es gebührenfrei ausgetauscht, wenn es
korrekt installiert worden ist und das fehlerhafte Gerät zurückgegeben wird. Aurora haftet nicht für Installationskosten, die mit dem Austausch dieses
Produkts zusammenhängen. Diese Garantie gilt zusätzlich zu den gesetzlichen Rechten des Landes, in dem Sie den Kauf getätigt haben. Aurora behält sich
das Recht vor, ohne vorherige Benachrichtigung die Spezifikationen zu ändern.
SE
Miljöskydd (W.E.E.E.) – Aurora’s WEEE Reg. Nr. WEE/BG0130YX (Enbart Storbritannien)
Enligt WEEE-direktivet (Waste Electrical & Electronic Equipment Regulations) får inga produkter med denna märkning (symbolen till vänster)
kastas i hushållssoporna eller tillsammans med annat kommersiellt avfall. Aurora debiterar inte sina kunder några WEEE-miljöavgifter för berörda
elektriska produkter. Osorterat avfall riskerar att skada miljön och människors hälsa. Särskilj därför allt elavfall från andra typer av avfall och se
till att det deponeras hos kommunens återvinningscentral. Din kommun, lokala återvinningscentral eller lokala återförsäljare kan ge mer
information om återvinning. Om försäljaren har debiterat en avgift för WEEE-bortskaffning vid inköpet av Aurora-produkten är försäljaren skyldig
att ta emot och bortskaffa den uttjänta produkten på ett korrekt sätt.
GARANTI
Denna produkt omfattas av 3 års garanti från och med inköpsdatumet. Garantin upphör att gälla vid felaktig användning eller installation, ingrepp,
borttagande av etiketten med kvalitetskontrolldatum, installation i olämplig miljö eller installation som inte utförs enligt gällande bestämmelser för
elinstallation. Om produkten upphör att fungera under garantiperioden ersätts den kostnadsfritt under förutsättning att installationen utförts korrekt och
att den felaktiga produkten returneras. Aurora ansvarar inte för eventuella installationskostnader i samband med utbyte av produkten. Denna garanti gäller
utöver lagstadgade rättigheter i inköpslandet. Aurora förbehåller sig rätten att ändra specifikationerna utan förvarning.
IT
Protezione ambientale (RAEE) – Reg. RAEE n. WEE/BG0130YX Aurora (Solo UK)
La Direttiva concernente i Rifiuti di apparecchiature elettriche ed elettroniche (RAEE) prevede che tutti i nostri prodotti che presentano questo
simbolo (a sinistra) non debbano essere smaltiti assieme ad altri rifiuti domestici o commerciali. Aurora non addebita alcun onere di smaltimento
RAEE ai propri clienti per prodotti RAEE. Per evitare possibili danni all’ambiente o alla salute umana derivanti da uno smaltimento non controllato
dei rifiuti, separate tali prodotti da altri tipi di rifiuti e riciclateli responsabilmente presso i centri di smaltimento locali. Consultate l’Agenzia
competente, il centro di smaltimento o il rivenditore locali su come smaltire il prodotto. Se, all’acquisto di un prodotto Aurora, il fornitore ha
imposto una sovrattassa per lo smaltimento RAEE, si consiglia di contattarlo per informazioni sulla restituzione del prodotto per il corretto smaltimento.
GARANZIA
Il prodotto è garantito nel paese di acquisto per un periodo di 3 anni dalla data di acquisto. La garanzia non è valida in caso di uso improprio, installazione
scorretta, manomissione, rimozione dell’etichetta della data del Q.C. (controllo qualità), installazione in ambiente di lavoro inadeguato o installazione in
violazione all’ultima edizione delle Normative nazionali di cablaggio. In caso di guasto durante il periodo di validità della garanzia, il prodotto verrà sostituito
a titolo gratuito, previa verifica della corretta installazione e restituzione dell’unità difettosa. Aurora non accetta alcuna responsabilità per eventuali costi
di installazione associati alla sostituzione del prodotto. La presente garanzia rappresenta un supplemento ai diritti legali applicabili nel paese di acquisto.
Aurora si riserva il diritto di modificare le specifiche senza preavviso.
) (WEE/BG0130YX Aurora WEEE ).W.E.E.E(
UAE
WEEE
WEEE WEEEAurora
WEEEAurora
Aurora
Aurora
-
 1
1
-
 2
2
-
 3
3
-
 4
4


in andere talen
- italiano: Aurora ST324RGB Guida utente
- français: Aurora ST324RGB Mode d'emploi
- español: Aurora ST324RGB Guía del usuario
- Deutsch: Aurora ST324RGB Benutzerhandbuch
- svenska: Aurora ST324RGB Användarguide

