Eaton XanuraHome ABX 1 Handleiding
- Categorie
- Afstandsbedieningen
- Type
- Handleiding

XanuraHome™
ABX1
MBO 1991494G01 001
Gebruiksaanwijzing 5
User Guide 19

2 MBO 1991494G01 001 3MBO 1991494G01 001
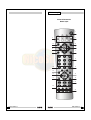
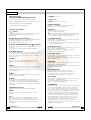
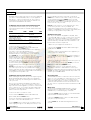
ABX1 Learning RF
Universal Remote 8in1
Button layout
23
1
32
24
4
6
8
5
7
9
11
15
13
17 - 22
25
26
10
16
14
12

4 MBO 1991000G01 001
Attentie:
Lees voor een zorgeloos en veilig gebruik van dit product
deze handleiding en de veiligheidsinformatie zorgvuldig door
en volg deze op. Technische veranderingen of andere
aanpassingen van het product zijn niet toegestaan om
redenen van veiligheid en keuringen. Lees de
gebruiksaanwijzing zorgvuldig voor het correct installeren
van de afstandsbediening. Gebruik van de
afstandsbediening door kinderen alleen bij toezicht van een
volwassene.
Belangrijk: De XanuraHome afstandsbediening moet worden
gebruikt volgens de aanwijzingen in deze handleiding en is niet
geschikt voor andere doeleinden.
Voorkom de volgende situaties:
• overmatige mechanische slijtage en schade
• hoge temperaturen
• sterke vibraties
• hoge luchtvochtigheid
Batterijen installeren en vervangen:
De afstandsbediening werkt alleen op AAA-alkaline
batterijen; probeer het apparaat nooit op een andere
elektriciteitsbron aan te sluiten. Let bij het vervangen van de
batterijen op polariteit (+ en -). Verwijder de batterijen
wanneer de afstandsbediening lange tijd niet wordt gebruikt.
Maak geen kortsluiting tussen de batterijen.
Batterijen zijn geen speelgoed. Laat batterijen niet
rondslingeren; kinderen en huisdieren kunnen ze eenvoudig
doorslikken. Neem in dat geval altijd direct contact op met
een arts. Lekkende of beschadigde batterijen kunnen
brandwonden veroorzaken; verwijder lekkende batterijen
altijd met handschoenen.
Batterijen behandelen als klein chemisch afval. Volg voor
het weggooien van batterijen de aanwijzingen van de
gemeentereiniging. Batterijen nooit in het vuur werpen
(explosiegevaar).
Inhoud
1. Inleiding
2. Batterijen plaatsen
3. Functies van de toetsen
4. Programmeren
4.1 Bediening XanuraHome huisautomatisering
4.2 Handmatig de code ingeven
4.3 Automatisch zoeken op enkele veelvoorkomende
merken
4.4 Automatisch codes zoeken alle merken
4.5 Handmatig codes zoeken
4.6 Codes inleren
4.7 Gevonden codes identificeren
4.8 Standaardvolume instellen voor de satelliet ontvanger
4.9 Home Theater Macro functie
5. Problemen oplossen
5MBO 1991494G01 001
Nederlands

Nederlands
Installatie voor een snelle start
1) Het installeren van de batterijen
1. Verwijder het klepje van het batterijvak aan de achterzijde
van de afstandsbediening
2. Installeer vier volle AAA batterijen. Let daarbij op de + en
- tekens in het batterijvak.
2) Programmeren van de XanuraHome afstandsbediening
1. Zet het apparaat aan wat u wilt gaan bedienen (TV,
Video, CD etc.).
2. Raadpleeg het codeboek wat meegeleverd is met de
afstandsbediening en kies het merk van het apparaat dat u
wilt bedienen. Bijvoorbeeld: al heeft u een Philips Televisie,
kijk dan onder Philips in de TV sectie.
3. Druk op de SETUP toets (4) totdat de LED aanblijft. Laat
de SETUP toets los.
4. Druk op de functietoets (3) welke overeen komt met het
type apparaat wat u wilt gaan bedienen (TV, Video, CD etc.).
5. Geef met de cijfertoetsen (9) de 3 cijferige code uit de
code Bibliotheek in. De LED flikkert bij iedere toets en gaat
uit na het ingeven van het derde cijfer.
6. Wanneer de LED snel begint te knipperen is de
ingegeven code onjuist en dient u opnieuw te beginnen bij 1.
7. Richt de afstandsbediening op het apparaat en druk op
de
X
POWER (1) toets. Uw apparaat zou nu uit moeten
gaan. Zet uw apparaat aan en druk op CHANNEL+. Wanneer
het apparaat reageert, dan is de installatie voltooid.
Wanneer sommige toetsen niet werken, dan dient u de
andere codes uit de code bibliotheek voor uw merk
proberen.
6 MBO 1991494G01 001
1. Inleiding
Met de XanuraHome afstandsbediening kunt u tot 8
apparaten bedienen: TV, VCR (videorecorder), CBL
(decoder, set top box), DVD, CD, SAT (satellietontvanger),
etc. De afstandsbediening bevat een groot aantal
voorgeprogrammeerde codes. Deze codes zijn geschikt voor
bijna alle apparaten die momenteel verkrijgbaar zijn en
moeten eenmalig voor ingebruikname worden
ingeprogrammeerd. Dit kan op verschillende manieren:
a. handmatig één van de codes ingeven welke in het
bijgeleverde codeboekje staan bij het betreffende
merk en type apparaat (zie 4.1)
b. z.g. autosearch voor enkele veelvoorkomende merken
(zie 4.2)
c. autosearch voor alle merken (zie 4.3)
d. handmatig door alle codes heen stappen (zie 4.4)
XanuraHome Huisautomatisering
De XanuraHome afstandsbediening beschikt over twee
zenders: een infrarood (IR) zender en een Radiofrequent
(RF) zender. Daarmee heeft u de mogelijkheid om praktisch
alles te besturen wat elektrisch is. Met de Infrarood (IR)
technologie bedient u uw TV, Video, etc. De XanuraHome
Radiofrequente (RF) technologie maakt het mogelijk
verlichting en apparaten op afstand te bedienen, waar dan
ook in huis. Er zijn talloze toepassingen denkbaar wanneer u
de XanuraHome technologie in uw afstandsbediening
gebruikt.
Enkele voorbeelden van XanuraHome besturingen:
• Verlichting uit- of aanschakelen en dimmen terwijl u TV zit
te kijken.
• Het koffiezetapparaat aanzetten vanuit uw slaapkamer
wanneer u wakker wordt.
• 's Nachts uw verlichting aanschakelen om indringers af te
schrikken wanneer u geluiden hoort.
• Uw elektrische deken inschakelen voordat de film eindigt,
zodat u na de film in een warm bed kunt kruipen.
• Met één druk op de knop alles uitschakelen wanneer u
naar bed gaat.
Om uw verlichting en apparaten te kunnen besturen heeft u
naast de XanuraHome afstandsbediening een RFIX35 RF -
interface (optioneel verkrijgbaar) en XanuraHome dim- en
schakelmodules nodig. De RF-interface zet de RF signalen
van de XanuraHome afstandsbediening om in een
XanuraHome signaal dat via uw bestaande lichtnet wordt
verspreid. Alle andere XanuraHome modules die op uw
lichtnet zijn aangesloten, kunnen ook via de XanuraHome
afstandsbediening worden bediend.
Vraag uw dealer om meer informatie.
7MBO 1991494G01 001

Nederlands
2. Batterijen plaatsen
(gebruik altijd NIEUWE AAA-alkalinebatterijen)
1. Open het klepje achter op de afstandsbediening.
2. Plaats 2 AAA-alkalinebatterijen. Let op de polariteit (+en -)
volgens de aanwijzingen in het batterijvakje.
3. Sluit het batterijvakje zorgvuldig.
3. Functies van de toetsen
[1]
X
(Aan/uit)
Schakelt het laatst geselecteerde apparaat uit. Sommige
apparaten kunnen met deze knop ook worden
ingeschakeld.
[2] LED-lampje achter Functie toetsen
Dit lampje knippert wanneer de afstandsbediening wordt
geactiveerd of brandt continu wanneer u de
afstandsbediening programmeert.
[3] TV, VCR, CBL, DVD, AUDIO, DVR, SAT, XanuraHome
Met deze knoppen kunt u selecteren welk apparaat u wilt
bedienen.
Voor CD zijn een beperkt aantal functies beschikbaar.
[4]
_
MUTE (Geluid uit)
Schakelt het geluid aan of uit. U kunt het volume van uw tv
aan- of uitzetten, ook wanneer u in VCR-, DVDof SAT-
modus bent. Hiervoor hoeft u dan niet over te schakelen
naar de TV-modus.
[5] CHAN +/-
Selecteer het volgende of vorige kanaal op uw tv of
satellietontvanger. In DVD-modus de volgende of vorige
track.
[6] VOL +/-
hiermee regelt u het volume. U kunt het volume van uw tv
harder of zachter zetten, ook wanneer u in VCR-, DVD- of
SAT-modus bent. Hiervoor hoeft u niet over te schakelen
naar de TV-modus.
[7] INFO
Geeft beeldscherm informatie weer van het geselecteerde
apparaat (indien beschikbaar).
[8] SETUP
Hiermee kunt u de afstandsbediening programmeren voor
ingebruikname. U hebt via deze knop ook toegang tot
sommige secundaire functies van bepaalde A/Vapparaten
(Shift). Druk op de SETUP-knop, gevolgd door de gewenste
functieknop.
[9] Numerieke toetsen 0-9
Werken net als op uw normale afstandsbediening.
[10] AV
Selecteert een externe A/V bron (via de A/V of Scart
ingang).
[11] -/--
Met deze knop kunt u op sommige apparaten kanalen
kiezen met een nummer hoger dan 9 (twee cijfers).
Als u in de set-up modus werkt, en automatisch codes zoekt,
kunt u hiermee de code van het te bedienen apparaat
vastleggen.
8 MBO 1991494G01 001
[12] MENU Menu aan.
[13] EXIT Menu uit.
[14] OK Bevestigt de menuselectie.
[15] Navigatieknoppen
Naar boven, naar beneden, naar links, naar rechts.
Navigeren in het menu (TV, DVD etc.).
[16] Teletekst
Æ
Teletext AAN: Start/stopt teletekst.
#
Teletext UIT: Stopt teletekst
Ë
Teletext Hold: Houdt de pagina vast in teletekstmodus.
Ê
Teletext Mix: (TV, CBL & SAT) geeft zowel teletekst als
het beeld van het geselecteerde kanaal weer.
[17] 5 REW (snel terug)
In VCR-, DVD- of CD-modus: deze knop werkt net zoals die
op de orginele afstandsbediening.
In TV-modus: Gekleurde knop (rood), bedienen van teletext
- of andere apparaatfuncties.
[18] 4 FF (snel vooruit)
In VCR-, DVD- of CD-modus: deze knop werkt net zoals die
op de orginele afstandsbediening.
In TV-modus: Gekleurde knop (blauw), bedienen van
teletext - of andere apparaatfuncties.
[19] 1 PLAY (afspelen)
In VCR-, DVD- of CD-modus: deze knop werkt net zoals die
op de orginele afstandsbediening.
In TV-modus: Gekleurde knop (geel), bedienen van teletext of
andere apparaatfuncties.
[20] 2 STOP
In VCR-, DVD- of CD-modus: deze knop werkt net zoals die
op de orginele afstandsbediening.
In TV-modus: Gekleurde knop (groen), bedienen van teletext
- of andere apparaatfuncties.
[21] 8 REC (Opname)
Deze knop werkt net zoals die op de orginele
afstandsbediening van de videorecorder. Om per
ongeluk opnemen te voorkomen moet u deze knop
tweemaal indrukken om de functie te activeren.
[22] 3 PAUSE
In VCR-, DVD- of CD-modus: deze knop werkt net zoals die
op de orginele afstandsbediening.
In TV-modus: Gekleurde knop (magenta), bedienen van
teletext - of andere apparaatfuncties.
[23] SHOWVIEW
Met deze toets kunt u de ShowView of VideoPlus functie van
uw videorecorder gebruiken (mits uw videorecorder deze
functie ondersteunt). Wanneer uw video deze functie niet
heeft, dan kan de toets toegang geven tot de timer functie of
het menu van de videorecorder. Wanneer de Showview / V+
toets wordt gebruikt in andere modes dan de VCR mode
(TV, CBL, SAT, AUDIO), dan wordt de toets vaak gebruikt
voor de Scan functie. Hiermee kunt u b.v. in de TV mode
automatisch zappen tussen de zenders of bij een CD
luisteren naar het intro van de nummers. De toets zorgt
ervoor dat elke 3 seconden een kanaal of nummer
opgeschakeld wordt. U stopt de Scan functie door het
indrukken van een willekeurige toets. De Scan functie stopt
automatisch na 2 minuten.
9MBO 1991494G01 001

Nederlands
[24] LEARN
Programmeertoets voor het leren van functies van uw
originele afstandsbediening. Zie hoofdstuk 4.5 Codes leren
voor het programmeren van de codes.
[25] MACRO, M1, M2, M3
Macro toetsen. Met deze toetsen kunt met een druk op de
toets een serie vooraf gekozen commando's uitvoeren. Druk
eerst op de toets MACRO. Dan op de toets M1, M2 of M3
om de betreffende macro te activeren. Zie voor meer
informatie hoofdstuk 4.7.
[26] L1, l2, L3, L4
Extra toetsen voor het leren van functies van uw originele
afstandsbediening
4. Programmeren
Om uw afstandsbediening geschikt te maken voor uw eigen
apparatuur, dient u deze eenmalig te programmeren. Dit
doet u door een code in te voeren, behorend bij het merk en
type apparaat wat u wilt gaan bedienen met deze
afstandsbediening. U kunt overigens elke gewenst toestel
onder elke toets instellen. Heeft u bijvoorbeeld drie
videorecorders, dan kunt u videorecorder 1 onder VCR
vastleggen, videorecorder 2 onder AUX en videorecorder 3
onder CD.
4.1 Uw huis besturen met XanuraHome Modules
De XanuraHome afstandsbediening geeft u de mogelijkheid
om praktisch alles wat elektrisch is te besturen. Hier zijn
enkele toepassingen wanneer u de XanuraHome technologie
gebruikt:
• Verlichting uit- of aanschakelen en dimmen terwijl u TV zit
te kijken
• 's Nachts uw verlichting aanschakelen om indringers af te
schrikken wanneer u geluiden hoort
• Uw elektrische deken inschakelen voordat de film eindigt,
zodat u na de film in een warm bed kunt kruipen.
Om uw verlichting en apparaten te kunnen besturen heeft u
een RF-interface, RFIX35, en XanuraHome modules nodig.
Vraag uw dealer om meer informatie.
U bedient uw XanuraHome modules op de volgende
wijze:
Zorg ervoor dat de XanuraHome afstandsbediening is ingesteld op
dezelfde lettercode als RFIX35 RF-ontvanger en de modules die in
uw woning geïnstalleerd zijn (zie XanuraHome lettercode
veranderen).
1. Druk op de XanuraHome toets
2. Gebruik de numerieke toetsen om de cijfercode van de
module van uw keuze in te geven (ééncijferige codes
hoeven niet vooraf te worden gegaan door een '0').
3. Gebruik de toets van de functie die u wilt uitvoeren (zie
onderstaand overzicht).
XanuraHome functies:
Aan: CHANNEL +
Uit: CHANNEL
Feller: VOLUME +
Dimmen: VOLUME -
Alle verlichting aan:
X
Power
Alle verlichting en apparaten uit:
_
MUTE 'geluid uit'
10 MBO 1991494G01 001
De XanuraHome lettercode veranderen
De XanuraHome afstandsbediening is standaard ingesteld op
lettercode A. De lettercode van de afstandsbediening moet
overeenkomen met de lettercode van de geïnstalleerde
XanuraHome modulen en de RF-interface (RFIX35). In de
meeste gevallen hoeft u dit niet te wijzigen, tenzij u invloed
ondervindt van een naburig XanuraHome of compatible
systeem. In dat geval adviseren we u de afstands-
bediening en de RFIX35 in de RF-secured mode te zetten
(zie "RF-secured modus").
1. Druk op SETUP toets totdat één van de modus LED-
lampjes continu brandt. Laat de SETUP toets los.
2. Gebruik de numerieke toetsen om de lettercode in te
stellen. Het nummer is gelijk aan de gekozen lettercode.
(1=A, 2=B, ...... 16=P).
3. Druk op de toets -/-- (12) om de lettercode te bevestigen.
De LED gaat uit.
Opmerking: De lettercode die u heeft gekozen moet
overeenstemmen met de lettercode van RF-interface
(RFIX35) die u gebruikt.
RF-secured modus
In de RF-secured modus zal de RFIX35 alleen instructies
ontvangen van afstandsbedieningen die op de RFIX35 zijn
aangemeld. Hiermee voorkomt u dat anderen uw verlichting
en apparaten ongevraagd op afstand kunnen bedienen. Voor
het instellen van de RFIX35 in de RF-secured modus
verwijzen we naar de RFIX35 handleiding.
Om de RF-secured modus te kunnen gebruiken, moet u ook
de afstandsbediening programmeren in de RF-secured
modus. Volg de onderstaande stappen om de RF-secured
modus te programmeren in de ABX1.
ABX1 instellen in RF-secured modus
1. Programmeer onder de Xanura toets de code 822.
• Druk op SETUP totdat de LED continu brandt
• Druk op de XanuraHome toets
• Toets 8-2-2 in, de LED gaat uit na de laatste 2
2. Druk op de XanuraHome toets.
3. Druk op SETUP totdat de LED continu brandt.
4. Laat de SETUP toets los.
5. Druk op de AV toets om een willekeurige beveiligingscode
te genereren.
6. Druk op de -/-- toets.
Terugzetten naar de standaardmodus
(= niet RF-secured modus)
Voor het terugzetten van de ABX1 in de standaardmodus,
programmeer onder de Xanura toets de code 820.
• Druk op SETUP totdat de LED continu brandt
• Druk op de XanuraHome toets
• Toets 8-2-0 in, de LED gaat uit na de 0
11MBO 1991494G01 001

Nederlands
4.2 Handmatig de code ingeven:
Zoek in het codeboekje de lijst op behorende bij het soort
toestel (TV, videorecorder, etc). Zoek vervolgens in deze lijst
het betreffende merk op (b.v. Sony). U vindt nu één of
meerdere 3 cijferige codes. Indien er meerdere codes staan,
hangt het af van het type toestel welke code geschikt is.
Over het algemeen staan de codes in volgorde van de
leeftijd van het toestel. Oudere toestellen eerst, jongere
toestellen achteraan. Het kan soms zijn dat u verschillende
codes moet proberen om de juiste code voor uw toestel te
vinden:
1. Zet het apparaat eerst aan (bijvoorbeeld TV).
2. Druk op SETUP (8) en houd deze knop ingedrukt totdat
het LED-lampje continu brandt. Laat SETUP los.
3. Druk op de modusknop (3) van het apparaat dat u wilt
bedienen (bijvoorbeeld TV) en laat deze weer los.
4. Voer de driecijferige code in uit het codeboek via de
numerieke toetsen (9). Het LED lampje (2) gaat uit
nadat het laatste cijfer is ingevoerd. Als u de verkeerde code
hebt ingevoerd, knippert het LEDlampje 3 seconden. Daarna
gaat het lampje uit. Herhaal dan het instellen vanaf stap 2.
5. Richt de afstandsbediening op de tv en druk op POWER
(1). Het apparaat wordt nu uitgeschakeld.
Controleer de andere functies (voor bijv. een videorecorder:
vooruitspoelen, terugspoelen etc.). Als bepaalde functies
niet werken, betekent dit dat u niet de juiste code hebt
ingevoerd. Herhaal de bovenstaande stappen met de
volgende code uit de lijst.
6. Herhaal de procedure vanaf stap 1 voor andere apparaten
die u wilt bedienen (video, dvd-speler, satelliet, etc). Als uw
apparaat (tv, satelliet, etc.) niet reageert, kunt u een andere
code voor uw merk proberen. Reageert het apparaat nog
steeds niet, probeer dan de methode "4.4 Handmatig codes
zoeken."
4.3 Automatisch zoeken op enkele veelvoorkomende
merken
Als uw merk hierna wordt genoemd, kunt u op merk zoeken
(dit is sneller dan handmatig of automatisch zoeken)
BRAND CODE BRAND CODE
Philips & Sub brands / Radiola 1 Telefunken / Saba /
Normende
4
Sony / Panasonic / JVC / Sharp
/ Akai / Toshiba / Daewoo 2 Grundig / Blaupunkt 5
& Other Japanese brands
Thomson / Brandt / Ferguson 3 Nokia / Finlux / ITT &
Other Scandinavian 6
brands
1. Zet het apparaat dat u wilt bedienen aan.
2. Druk op SETUP (8) en houd deze knop ingedrukt totdat
het LED-lampje (2) continu brandt. Laat SETUP los.
3. Druk op de modusknop (3) die past bij het apparaat dat u
wilt bedienen. Het LED lampje (2) knippert een keer.
4. Voer de code in die bij uw merk hoort, richt de
XanuraHome afstandsbediening op het apparaat en druk één
keer op CHAN+ (5). Blijf de afstandsbediening op het
12 MBO 1991494G01 001
apparaat richten totdat het kanaal verspringt (de
afstandsbediening verstuurt één infraroodsignaal per seconde.
Wacht dus even totdat uw apparaat reageert). Wanneer uw
apparaat reageert, drukt u op -/-- (11) om de code te
bevestigen. Als u per ongeluk de code hebt gemist, kunt u het
zoeken stoppen door op CHAN- (5) te drukken en kunt u door
herhaaldelijk op deze knop te drukken teruggaan naar de juiste
code. Druk op -/-- (11) om de code te bevestigen.
Opmerking: Als bepaalde functies van uw apparatuur niet
werken, moet u een volgende code voor uw merk proberen.
De zoekfunctie begint na de laatst bevestigde code. Als dat
030 was, begint de zoekfunctie bij 031, en gaat door tot de
laatst mogelijke code.
4.4 Automatisch codes zoeken alle merken:
Wanneer u een onbekende code zoekt, kunt u ook
automatisch door alle codes stappen (AutoSearch).
Opmerking: Omdat u elk apparaat (tv, dvd, satelliet) kunt
toewijzen aan de VCR-, CBL-, DVD-, CD-, ASAT-, DSAT- en
AUX-knoppen, moet u eerst een driecijferige code invoeren
van het soort apparaat dat u wilt bedienen (zie het
codeboek), bijvoorbeeld: Als u een satelliet onder de AUX-
knop wilt programmeren, voert u eerst een WILLEKEURIGE
satellietcode in uit het codeboek en volgt u vervolgens de
volgende stappen:
1. Zet het apparaat dat u wilt bedienen aan.
2. Druk op SETUP (8) en houd deze knop ingedrukt totdat
het LED-lampje (2) continu brandt. Laat SETUP los.
3. Druk op de modusknop (3) die past bij het apparaat dat u
wilt bedienen. Het LED lampje (2) knippert een keer.
4. Druk één keer op CHAN+ (5). Na een paar seconden
gaat de afstandsbediening de code zoeken (snel zoeken, 1
code per seconde). Wanneer het apparaat reageert, kunt u
op CHAN+ (5) drukken om het zoeken te vertragen (1 code
per 3 seconden). U kunt teruggaan met CHAN- (5) (of vooruit
met CHAN+ (5) als u te ver terug bent gegaan).
Zodra het apparaat weer reageert, drukt u op -/-- (11) om de
gevonden code op te slaan.
Opmerking: Als bepaalde functies van uw apparatuur niet
werken, moet u een volgende code voor uw merk proberen.
De zoekfunctie begint na de laatst bevestigde code. Als dat
030 was, begint de zoekfunctie bij 031, en gaat door tot de
laatst mogelijke code.
4.5 Handmatig codes zoeken:
Opmerking: Omdat u elk apparaat (tv, dvd, satelliet) kunt
toewijzen aan de VCR-, CBL-, DVD-, CD-, etc. knoppen,
moet u eerst een driecijferige code invoeren van het soort
apparaat dat u wilt bedienen (zie het codeboek),
bijvoorbeeld: als u een satelliet onder de AUX-knop wilt
programmeren, voert u eerst een WILLEKEURIGE
satellietcode in uit het codeboek en volgt u vervolgens de
volgende stappen:
1. Zet het apparaat aan.
2. Druk op SETUP (8) en houd deze knop ingedrukt totdat
het LED-lampje continu brandt. Laat SETUP los.
3. Druk op de modusknop (3) van het apparaat dat u wilt
bedienen (bijvoorbeeld de tv) en laat deze weer los.
13MBO 1991494G01 001

Nederlands
4. Druk telkens op CHAN+ (5) totdat het kanaal verandert.
Als u voorbij de juiste code klikt, gebruik dan CHAN- (5) om
terug te gaan naar de juiste code.
5. Wanneer het apparaat reageert, druk dan op -/-- (11) om
de code te bevestigen.
Opmerking: Als uw apparaat geen CHAN+ heeft, kunt u de
PLAY- (video of dvd) (19) of POWER (1)-knop gebruiken.
Opmerking: Als bepaalde functies van uw apparatuur niet
werken, moet u een volgende code voor uw merk proberen.
De zoekfunctie begint na de laatst bevestigde code. Als dat
030 was, begint de zoekfunctie bij 031, en gaat door tot de
laatst mogelijke code.
4.6 Codes inleren
Uw XanuraHome afstandsbediening heeft de codes van de
meeste TV's, Video's etc. in zijn code bibliotheek. Wanneer
echter een bepaald apparaat niet in deze bibliotheek
voorkomt, dan kunt u de codes leren van uw bestaande
afstandsbediening. Het kan ook zijn dat u een code vindt
welke nagenoeg overeenkomt met de functionaliteit van uw
apparaat, maar waarbij een paar toetsen ontbreken. Deze
toetsen kunt u dan eenvoudig leren (maximaal 150 toetsen).
Master clear
U gebruikt de MASTER CLEAR methode om het
leergeheugen leeg te maken. Het is aan te raden om een
MASTER CLEAR uit te voeren voordat u met leren van
commando's begint.
1. Druk op SETUP (8) toets totdat één van de modus LED
lampjes
continu brandt. Laat de SETUP (8) toets los.
2. Druk twee maal op de toets LEARN (24). De LED knippert
bij iedere toetsdruk.
3. Druk op SETUP (8). De LED gaat na een paar seconden uit.
Opmerkingen bij leren:
• Voer eerst een Master Clear uit voordat u met leren start
(zie methode hierboven)
• Zorg ervoor dat u in beide afstandsbedieningen volle
batterijen gebruikt, voordat u start met inleren.
• Let erop dat u de afstandsbedieningen niet beweegt bij
het indrukken van de toetsen.
• Er kunnen geen commando's geleerd worden onder de
toetsen: Learn, Setup, bron keuze toetsen zoals TV, VCR,
CBL, DVD, SAT, etc., M1, M2, M3, ShowView/V+
XanuraHome toetsen of direct onder de SHIFT toets.
• Experimenteer door in eerste instantie 2 of 3 toetsen in te
leren (om compatibiliteit te testen) alvorens het volledige
toetsenbord van uw originele afstandsbediening in te
leren.
• Wanneer het geheugen vol is, dan zal de één van de
modus LED's gedurende 3 seconden knipperen. Het is nu
niet mogelijk om extra toetsen in te leren. U kunt
eventueel teveel opgeslagen toetsen per mode wissen. U
kunt alleen een volledige modus wissen.
• Door de toetsen van de bestaande afstandsbediening
minder lang in te drukken tijdens het leren blijft er meer
geheugenruimte beschikbaar in de afstandsbediening.
Bovendien is de kans op foutief geleerde codes hierdoor
kleiner.
• Experimenteer met de afstand tussen de
afstandsbedieningen wanneer u problemen heeft bij het
leren.
• Bij sommige afstandsbedieningen zit de Infrarood LED van
14 MBO 1991494G01 001
uw bestaande afstandsbediening niet in het midden.
Probeer dan te experimenteren met het verschuiven
(zijdelings en in hoogte) ten opzichte van elkaar.
• Zorg ervoor dat u niet direct onder een TL buis of in direct
invallend zonlicht zit bij het leren van de commando's in
de afstandsbediening.
• Gebruik de toetsen L1, L2, L3 en L4 om codes in te leren
waarvoor de afstandsbediening geen overeenkomstige
toets heeft. Wanneer u problemen heeft bij het leren van
de commando's van toetsen, wis dan het geheugen en
probeer het leren opnieuw.
• U kunt alleen codes van één originele afstandsbediening
leren in een bepaalde modus. Bijvoorbeeld de codes van
alleen uw DVD afstandsbediening onder de toets [DVD].
Bij sommige combi-apparaten (bijvoorbeeld een TV met
ingebouwde DVD-speler) moet u daarom eerste de TV
functies leren onder de modus TV en daarna de DVD
functies onder de modusknop DVD.
Het leren van commando's:
1. Richt uw bestaande afstandsbediening op de XanuraHome
afstandsbediening (voorkant naar voorkant) met een
afstand van ongeveer 2,5 centimeter tussen de
afstandsbedieningen.
2. Druk op SETUP (8) toets totdat één van de modus LED-
lampjes continu brandt. Laat de SETUP (8) toets los.
3. Druk op de modusknop (TV, AUDIO, SAT, etc.) welke
overeenkomt met het apparaat wat u wilt leren. De LED
knippert eenmalig.
4. Druk op de LEARN (24) toets. De LED knippert eenmalig.
5. Druk op de toets op de XanuraHome afstandsbediening
waaronder u een nieuw commando wilt leren. De LED
knippert eenmalig.
6. Afhankelijk van het type originele afstandsbediening
welke u heeft zijn twee methodes mogelijk:
a. Druk op de toets van uw bestaande
afstandsbediening welke u wilt leren. Houd de
toets van uw originele afstandsbediening ingedrukt
totdat de LED op de XanuraHome
afstandsbediening kort uit gaat. Wanneer de LED
niet kort uitgaat maar knippert dient u bij uw
afstandsbediening methode b toe te passen (n.b. als u
net methode a heeft geprobeerd en u wilt nu methode
b proberen ga dan eerst verder met stap 5).
b. Druk op de toets van uw bestaande
afstandsbediening welke u wilt inleren. Houd de
toets van uw originele afstandbediening net zo
lang ingedrukt als u dit bij de normale bediening
van uw apparatuur zou doen
7. Herhaal stap 5 en 6 voor elke toets die u wilt leren.
8. Wanneer u klaar bent met het leren van de toetsen, drukt
u op SETUP (8)
Wissen van geleerde commando's per modus om
geheugenruimte vrij te maken
U kunt de opgeslagen geleerde commando's voor elke
functie apart wissen (TV, VCR, etc.):
1. Druk op de SETUP (8) toets totdat één van de modus
LED-lampjes continu brandt. Laat de SETUP (8) toets los.
15MBO 1991494G01 001

Nederlands
2. Druk op de modusknop van uw keuze (TV, VCR, etc.). De
LED knippert eenmalig.
3. Druk twee maal op de LEARN (24) toets.
4. Druk op SETUP (8). De LED gaat na een paar seconden uit.
5. Alle opgeslagen geleerde commando's van de door u
gekozen functies zijn nu gewist.
4.7 Gevonden codes identificeren
Indien de batterijen voor langere tijd uit het toestel genomen
worden, kan de ingestelde code uit het geheugen raken. Het
is daarom wellicht verstandig om de codes ergens te
noteren, zodat u ze later eventueel weer snel kunt
inprogrammeren. Indien u de ingestelde code niet weet (b.v.
omdat u via autosearch de code hebt gevonden) dan kunt u
deze op de volgende wijze uitlezen:
1. Druk op SETUP (8) en houd deze knop ingedrukt totdat
het LED-lampje (2) continu brandt. Laat SETUP los.
2. Druk op de modusknop (3) voor het apparaat dat u wilt
identificeren (VCR, CBL, DVD, CD, ASAT, DSAT of AUX).
Het LED-lampje (2) knippert een keer.
3. Druk nogmaals op SETUP (8). Het LED-lampje (2)
knippert een keer.
4. Om het eerste cijfer te identificeren drukt u op de cijfers
van 0 tot 9 (9) totdat het LED-lampje knippert. Het
ingedrukte nummer is het eerste cijfer van de code.
5. Druk weer op alle cijfertoetsen om het tweede cijfer te
vinden.
6. Druk weer op alle cijfertoetsen om het derde cijfer te
vinden. Zodra het derde cijfer is gevonden, gaat
het LED-lampje uit.
4.8 Standaardvolume instellen voor de satelliet ontvanger
Standaard wordt het volume in de Satelliet modus via de TV
geregeld. Sommige satellietdecoders hebben een eigen
volumeregeling. U kunt deze functie dan omprogrammeren
zodat het volume direct via de satellietontvanger wordt
bediend.
1. Druk op de TV-knop (3) en laat deze los. De afstands -
bediening moet voor deze procedure in de TV-modus zijn.
2. Druk op SETUP (8) en houd deze knop ingedrukt totdat
het LED-lampje continu brandt.
3. Laat SETUP (8) los.
4. Druk op Mute (4) en houd deze knop ingedrukt. Het LED
lampje gaat hierbij uit. Houd de knop ongeveer 8 seconden
ingedrukt totdat het LEDje een keer knippert.
5. Het volume is nu ingesteld voor bediening via de
satellietontvanger.
Herhaal deze procedure indien u weer terug wilt naar de
volumeregeling via de TV.
16 MBO 1991494G01 001
4.9 Home Theater Macro functie
Uw afstandsbediening heeft drie Macro toetsen: M1, M2 en
M3. U kunt deze toetsen zo programmeren dat ze een serie
commando's met één druk op de knop uitvoeren. Deze
krachtige functie is ideaal voor b.v. het inschakelen van al
uw audio- en videoapparatuur of het kiezen van bepaalde
voorkeursinstellingen in Home Theatre toepassingen.
Programmeren van de macrotoetsen m1, m2 en m3
1. Druk op de SETUP (8) toets totdat één van de modus
LED-lampjes continu brandt. Laat de SETUP (8) toets los.
2. Druk op de toets MACRO (25). Het LED lampje knippert
één keer.
3. Druk op de Macrotoets die u wilt instellen (M1, M2 of M3)
4. Druk op de toetsen van de afstandsbediening welke u
onder de Macro toets wilt opslaan (maximaal 10
commando's). De volgorde van programmeren wordt exact
overgenomen bij het uitvoeren van het Macro.
5. Om het Macro op te slaan drukt u nogmaals op de toets
MACRO. Wanneer u het maximum van 10 commando's
bereikt, wordt het programmeren automatisch beëindigd en
worden de 10 commando's opgeslagen onder de Macrotoets
welke u aan het instellen bent. Opmerking bij het instellen
van macro's
• Het eerste commando van een Macro dient altijd een
modusknop te zijn (TV, VCR, etc)
• Het kan nodig zijn om extra vertragingen in te bouwen in
de macroreeks (b.v. om uw tv te laten opwarmen). Druk
op PAUSE (17-22) gevolgd door de numeriek toets 1 .. 9
om een vertraging van 1 tot maximaal 9 seconden in te
voeren. Standaard wordt tussen elk Macro commando
een pauze van een halve seconde toegepast.
• De Macrotoetsen kunnen zowel Infrarood (IR) als
Hoogfrequent (RF) commando's uitvoeren. Zo kunt u uw
audio en video apparatuur inschakelen en daarbij
gelijktijdig de verlichting regelen (met behulp een RFIX35
RF-interface). Ideaal voor Home Theatre toepassingen.
Vraag uw dealer voor meer informatie.
Wissen van een macrotoets
1. Druk op de SETUP (8) toets totdat één van de modus
LED-lampjes continu brandt. Laat de SETUP toets los.
2. Druk op de toets MACRO (25). Het LED lampje knippert
één keer.
3. Druk op de Macrotoets die u wilt wissen (M1, M2 of M3)
4. Druk nogmaals op de SETUP (8) toets.
17MBO 1991494G01 001

5. Problemen oplossen
De afstandsbediening werkt niet of de codes worden
niet opgeslagen.
• Controleer met uw oude afstandsbediening of de
apparatuur goed werkt.
• Controleer dat u op de juiste modusknop hebt gedrukt
voor het te bedienen apparaat.
• Als de code niet werkt, kunt u de automatische
zoekfunctie proberen of de volgende code voor uw merk
invoeren.
• Controleer of de batterijen juist zijn geplaatst.
• Voor het programmeren van de afstandsbediening hebt u
twee (nieuwe) AAA alkalinebatterijen nodig. Als de
afstandsbediening de code kwijt is, kan het zijn dat de
batterijen vervangen moeten worden
• Als het LED-lampje continu brandt, moet u de batterijen
vervangen.
• Stel de afstandsbediening in op de fabrieksinstellingen.
De XanuraHome afstandsbediening terug zetten in de
oorspronkelijke fabrieksinstellingen
• Druk op SETUP (8) en houd deze knop ingedrukt totdat
het LED-lampje (2) continu brandt. Laat SETUP los.
• Druk twee keer op STOP (20) en laat deze los.
• Druk op MUTE (4) en laat deze los.
• Het LED-lampje (2) gaat na een paar seconden uit.
18 MBO 1991494G01 001
Nederlands
General Security Note
Attention:
For carefree and safe use of this product, please read this
manual and safety information carefully and follow the
instructions. Technical manipulation of the product or any
changes to the product are forbidden, due to security and
approval issues. Please take care to set up the device
correctly - consult your user guide. Children should use the
device only under adult supervision.
Important: the XanuraHome remote control must be used
according the instructions in this manual and is not suitable for
other purposes.
Avoid the following
• strong mechanical wear and tear
• high temperature
• strong vibrations
• high humidity
Please also respect the additional security notes in the
various user guide chapters. To ensure correct set up please
read the manual and security notes carefully.
Battery install and change
The device may only be used with 2 AAA alkaline batteries -
never try to connect to another power supply. When
inserting batteries be sure the right polarity is used. Remove
the batteries when the device is not used for a longer period.
Make sure that the batteries are not short circuited and are
not disposed in fire (danger of explosion). Batteries do not
belong in children hands. Don't let batteries lay around
openly - they might be swallowed by children or animals. If
this happens see a doctor immediately.
Disposal of batteries:
Batteries are special waste and do not belong in general
household waste disposal. Leaking or damaged batteries
can upon contact with skin cause burning or acid damage -
if necessary use suitable gloves.
Please dispose of batteries in accordance with local bylaws.
Contents
1. Introduction
2. Insert the batteries
3. Function of the remote's buttons
4. Programming
4.1 XanuraHome Automation Control
4.2 Manual code entry
4.3 Automatic code search for some well-known brands
4.4 Automatic code search for all brands
4.5 Manual code search
4.6 Learning codes
4.7 Identifying codes found
4.8 Default Volume Control for satellite
4.9 Home Theatre Macro Feature
5. Troubleshooting
19MBO 1991494G01 001
English

English
Quick start guide
1) Put the batteries in
1. Open the cover on the back of the 8 in 1 Universal
Remote Control
2. Insert 2 batteries (AAA alkaline). Make sure the batteries
are NEW.
2) Program your 8 in 1 Universal Remote Control
1. Turn on the equipment that you wish to control (TV, VCR,
etc).
2. The AUX key allows you to program and control any
equipment such as TV, VCR, Dx
3. Take the code book supplied with the 8 in 1 Universal
Remote Control and find the brand of the equipment you
wish to control. E.g. if you have a Thomson TV look for
Thomson under the TV section.
4. Press and hold on the key marked SETUP (8) until the
LED (2) stays permanently on. This takes about 3 seconds.
Release the SETUP key.
5. Press and release the TV, VCR, CBL, DVD, etc. in
accordance with the appliance you wish to control.
6. From the code book take the first number corresponding
to your equipment and enter the number by pressing the 0-9
key pad (9). Each time you press a key the red LED (2) will
flash.
7. If the number is correctly entered the LED will turn off. If
the number is incorrect then the LED will flash fast. If
incorrect you will need to restart at 4.
Press the
X
POWER key (1) . If your equipment switches off
you have found the right code. If it does not switch off, you
will need to restart from 4.
Sometimes there are several codes that have similar
features. If you find that your 8 in 1 Universal Remote
Control does not work for some functions, you may need to
try another code.
20 MBO 1991494G01 001
1. Introduction
The XanuraHome remote control is designed to control up to
8 devices: TV, VCR, CBL (decoder, set top box), DVD, CD,
SAT (satellite receiver), or any other device. The XanuraHome
remote contains a library of codes that are preprogrammed
into the remote control. This library covers nearly all the audio
video products on the market today. The codes have to be
programmed once before use. This can be done in different
ways:
a. Manual entry of one of the codes displayed under the
related brand and type of equipment in the attached code
book (see 4.1)
b. Automatic code search for some well-known brands (4.2)
c. Automatic code search for all brands (4.3)
d. Manual search through all codes (4.4)
XanuraHome Automation: control all electrical appliances
with one remote control
The XanuraHome Remote has two transmitters: an infrared
(IR) transmitter and a radio frequency (RF) transmitter. This
allows you to operate practically anything. You can operate
your TV, video etc. with the infrared (IR) technology. The
XanuraHome radio frequency (RF) technology makes it
possible to operate lights and appliances from anywhere in
the home.
Here are some examples of the uses of the XanuraHome
Automation feature:
• Dim the lights and switch them on and off while
watching TV.
• Turn the coffee machine on from your bedroom when you
wake up in the morning.
• Turn your lights on at night to scare off intruders when
you hear noises.
• Switch on your electric blanket before the movie ends, so
you can enjoy a warm bed once the movie is finished.
• Switch everything off with a single press of a button
when you go to bed.
2. Insert the batteries (always use new AAA alkaline
batteries).
1. Open the cover on the back of the XanuraHome Remote.
2. Insert 2 AAA alkaline batteries, verify that they are placed
correctly with the + on the battery in the same position as
marked inside the battery compartment.
3. Close the battery compartment carefully.
21MBO 1991494G01 001

English
3. Function of the remote's buttons
[1]
X
POWER (On/Off)
Allows you to switch off the last selected appliance. Some
appliances can also be switched on with this button.
[2] LED indicator
The indicator light flashes when the remote is operating or
lights continuously while you are programming the remote.
[3] TV, VCR, CBL, DVD, AUDIO, DVR, SAT, XanuraHome
These keys allow you to select the appliance you wish to
control.
[4]
_
MUTE
Allows you to turn on/off the sound. You can control the
"Mute" function of your TV even when you are in VCR, DVD
or SAT mode. No need to select the TV mode.
[5] CHAN +/- or PROG +/-
Select the next or the previous channel of your TV or SAT.
In DVD mode: next or previous chapter.
[6] VOLUME +/-
Allows you to control the volume. You can control the
volume of your TV even when you are in VCR, DVD or SAT
mode. No need to select the TV mode.
[7] INFO
Displays on screen information of the selected appliance
(when available).
[8] SETUP
Allows you to program your remote before the first use. It
also allows you to access to secondary functions of certain
A/V appliances (Shift). Press the SETUP key followed by the
function key you desire.
[9] Numeric keys 0 - 9
Work the same way as your original remote.
[10] AV
Selection of an external source (SCART input).
[11] -/--
In connection with the numeric keys, this button allows you
with some equipment to select directly channels higher than
9. If you are in programming mode - automatic code search
you can confirm the code.
[12] Menu Menu On
[13] Exit Menu OFF
[14] OK Confirms menu selection.
[15] Navigation keys
Up, Down, Right, Left. Allows you to navigate into the menu
(TV, DVD, etc).
[16] Teletext
Æ
Teletext ON: Start/stop Teletext / Fasttext.
#
Teletext OFF: Stop Teletext / Fasttext.
Ë
Teletext
Hold: Stop page change in Teletext / Fasttext mode.
Ê
Teletext Mix: Allows you to mix the Teletext / Fasttext and
the picture of the selected channel.
22 MBO 1991494G01 001
[17] 5 REW (rewind)
In VCR, DVD or CD mode: This button works the same way
as in your original remote.
IN TV mode: Coloured key (Red), control of videotext or
special equipment functions.
[18] 4 FF (fast forward)
In VCR, DVD or CD mode: This button works the same way
as in your original remote.
IN TV mode: Coloured key (Blue), control of fasttext or
special equipment functions.
[19] 1 PLAY
In VCR, DVD or CD mode: This button works the same way
as in your original remote.
IN TV mode: Coloured key (Yellow), control of fasttext or
special equipment functions.
[20] 2 STOP
In VCR, DVD or CD mode: This button works the same way
as in your original remote.
IN TV mode: Coloured key (Green), control of fasttext or
special equipment functions.
[21] 8 REC (record)
This key works the same way as the one on your original
remote for your VCR. In order to avoid a mistake you have
to press this key twice to activate this feature.
[22] 3 PAUSE
In VCR, DVD or CD mode: This button works the same way
as in your original remote.
IN TV mode: Coloured key (Magenta), control of fasttext or
special equipment functions.
[23] SHOWVIEW
You can use the ShowView or VideoPlus function of your
video recorder with this button (if your video recorder
supports this function). If your video does not support this
function, the button can give access to the timer function or
the menu of your video recorder. When the ShowView/V+
button is used in other modes than the VCR mode (TV, CBL,
SAT, AUDIO), this button is often used for the Scan function.
For example, in TV mode you can change channels or when
listening to a CD you can only listen to the intros. After 3
seconds, the button selects the following channel or song.
Press any button to stop the Scan function. The Scan
function will automatically stop after 2 minutes.
[24] LEARN
Programming button for learning the functions of your
original remote control. See chapter 4.5, Learning codes, for
information about programming these codes.
[25] MACRO, M1, M2, M3
Macro buttons. With these buttons you can execute a series
of pre-programmed commands with one press of a button.
First press the MACRO button. Then press the M1, M2 or
M3 button to activate the relevant macro. See chapter 4.7 for
more information.
[26] L1, L2, L3, L4
Extra buttons for learning the functions of your original
remote control.
23MBO 1991494G01 001

English
4. Programming
To make your remote suitable for your own equipment, you
have to program it once. You can do this by entering a code,
related to the brand and type of equipment you want to
control. You can program any equipment under any MODE
key. For example, if you have three videorecorders, you can
e.g. assign videorecorder 1 to VCR, videorecorder 2 to DVD
and videorecorder 3 to DVR. The TV button can be used for
TV only.
4.1 Controlling your house with XanuraHome Automation
The XanuraHome remote control allows you to control all
lights and electric appliances you have in your house. Here
are some examples that you can do with your XanuraHome
remote using XanuraHome modules:
• Switch on/off, dim lights while you watch TV.
• Switch on the lights at night to frighten intruders when
you detect something suspicious
• Switch on your electric blanket before the film ends to
have it warm when you go to sleep
To be able to control your lights and appliances you need a
XanuraHome RF-interface (RFIX35) and XanuraHome modules.
Contact your dealer for further information.
You can control the XanuraHome Automation Modules as
follows:
Make sure that the XanuraHome remote control is programmed
on the same Letter Code as the RFIX35 RF-interface and the
modules installed in your house (see changing the XanuraHome
Letter Code).
1. Press the XanuraHome button.
2. Use the numerical keys to select the Unit Code of the
Module of your choice (1-digit codes do not have to
preceded by a '0').
3. Press the button of the function you want to execute (see
overview below).
XanuraHome Automation functions:
On: CHANNEL +
Off: CHANNEL -
Brighter: VOLUME +
Dim: VOLUME -
All lights on:
X
Power
All units off:
_
Mute
Changing the XanuraHome Letter Code
The XanuraHome Remote is set to Letter Code A by default.
In most cases you do not need to change this setting, unless
another XanuraHome or X10 compatible system in your area
causes interference. In case of interference we advice to set
the remote control and the RFIX35 in the RF-secured mode
(see "RF-secured mode").
1. Press the SETUP button until one of the Mode LED's
stays lit. Release the SETUP button.
2. Press the numerical key(s) for the Letter Code selected
(1=A, 2=B, ...... 16=P).
3. Press the -/-- (12) button to confirm the Letter Code. The
LED will extinguish.
24 MBO 1991494G01 001
Note: The Letter Code selected must be the same as the
Letter Code used by your RFIX35 RF-interface.
RF-secured mode
In the RF-secured mode the RF-interface (RFIX35) will only
respond to remote controls that have been linked to the
RFIX35. This prevents others to control your lights and
appliances. To set the RFIX35 in the RF-secured mode please
refer to the RFIX35 manual.
To be able to use the RF-secured mode, the XanuraHome
remote control will have to be set in the RF-secured mode.
To set the XanuraHome remote control into the RF-secured
mode please follow the next steps.
Set the ABX1 to the RF-secured mode
1. Program code 822 under the XanuraHome button.
• Press SETUP button until the LED stays lit
• Press the XanuraHome button
• Enter 8-2-2 , the LED will switch off after the last
2 buttons are pressed
2. Press the XanuraHome button.
3. Press the SETUP button until the LED stays lit.
4. Release the SETUP button.
5. Press the AV button to generate a random security code.
6. Press the -/-- button.
Reset the Remote Control to the standard mode
(= non RF-secured mode)
To reset the ABX1 to the standard mode, program code 820
under the XanuraHome button.
• Press the SETUP until the LED stays lit.
• Press the XanuraHome button.
• Press 8-2-0, the LED will switch off after the 0 button is
pressed.
4.2 Manual code entry
Take your code book and search for the list matching the
equipment you are looking for, e.g. TV or VCR. Next, find
the relevant brand (e.g. Sony). Now you will find one or more
3-digit codes. If there is more than one code, it depends on
your equipment which code is correct.
Generally, the codes are displayed in order of age of the
equipment. Older equipment first, younger equipment at the
end. Sometimes you will have to try several codes before
you find the right code for your equipment.
1. Make sure your equipment is switched on (for example
TV).
2. Press and hold the SETUP (8) key until the LED indicator
lights continuously. Release the SETUP key.
3. Press and release the mode key (3) of the device you
want to control (for example TV).
4. Enter the 3 digit code from the Code Book by using the
key pad (9). The LED (2) turns off after the last digit is
entered. If you entered a wrong code the LED blinks for 3
seconds and then goes off. You have to repeat from step 2.
5. Point the remote in the direction of your TV and press the
POWER button (1). Your device should turn off. Check other
functions (for example for a VCR FF or REW, etc.). If certain
functions are not responding, this indicates that the entered
code is not the correct one. In that case repeat the above
procedure with the next corresponding code of your brand.
25MBO 1991494G01 001

English
6. Repeat this procedure from step 1 for the other equipment
you want to control (VCR, DVD, SAT,...). If your equipment
(TV, SAT, etc....) does not respond, try the other codes for
your brand. If it still doesn't respond, try the manual code
search method (4.4 Manual code search).
4.3 Automatic code search for some well-known brands
If your brand is listed hereafter, you can use the brand
search method (faster than the "manual" and the "automatic
code search").
BRAND CODE BRAND CODE
Philips & Sub brands / Radiola 1 Telefunken / Saba /
Normende
4
Sony / Panasonic / JVC / Sharp
/ Akai / Toshiba / Daewoo 2 Grundig / Blaupunkt 5
& Other Japanese brands
Thomson / Brandt / Ferguson 3 Nokia / Finlux / ITT &
Other Scandinavian 6
brands
1. Turn on the device you want to control.
2. Press and hold SETUP (8) until the LED indicator (2)
lights steadily. Release SETUP button.
3. Press the mode button (3) that matches the equipment
you wish to control. The LED (2) blinks once.
4. Enter the code corresponding to your brand, point the
XanuraHome Remote in the direction of your equipment,
press CHAN+ (5) once only. Continue to point the
XanuraHome Remote at your equipment until the equipment
changes Channel (the remote control sends an IR signal
every second. Please wait until your equipment reacts).
When your equipment does react, press on the key -/-- (11)
to confirm. If you accidentally miss the code, you can stop
the autosearch by pressing CHAN-( 5) and by repeatedly
pressing this key return to the right code. Press -/-- (11) to
confirm.
Remark: if some functions of your equipment don't work,
you need to try another code for your brand. The search
function starts after the last confirmed code. For example, if
it was 030, the search function starts at 031, and it will keep
on trying until the last possible code.
4.4 Automatic code search for all brands
When searching an unknown code, you can step through the
library automatically (AutoSearch). When your equipment
responds, you can stop the searching process and store the
code you found.
Note: as you can dedicate any appliance (TV, DVD, SAT...)
to VCR, CBL, DVD, etc. keys, you need first to enter any 3
digit code for the kind of appliance you wish to control (found
in the code book), i.e.: If you want to program a SAT under
the VCR key, enter ANY SAT code found in the code book
and then follow the steps below:
1. Turn on the device you want to control.
2. Press and hold SETUP (8) until the LED indicator (2)
lights steadily. Release SETUP button.
3. Press the mode button (3) that matches the equipment
you wish to control. The LED (2) blinks once.
4. Press CHAN+ (5) once. After a few seconds the remote
starts stepping through the code library (fast search, 1 code
26 MBO 1991494G01 001
per second). When the device responds, you can press
CHAN+ (5) to switch to slow search (1 code per 3 seconds).
You can step back by pressing CHAN- (5) (you can step
forward by pressing CHAN+ (5) in case you went too far
back). As soon as the device responds again, press the -/-key
(11) to store the code you found.
Remark: if some functions of your equipment don't work,
you need to try another code for your brand. The
search function starts after the last confirmed code. For
example, if it was 030, the search function starts at 031, and
it will keep on trying until the last possible code.
4.5 Manual code search
Note: as you can dedicate any appliance (TV, DVD, SAT...)
to the VCR, CBL, DVD, etc. keys, you first need to enter any
3 digit code for the kind of appliance you wish to control
(found in the code book), i.e.: If you want to program a SAT
under the AUX key, enter ANY SAT code found in the code
book and then follow the steps below:
1. Make sure your equipment is switched on.
2. Press and hold SETUP (8) until the LED indicator lights
steadily. Release SETUP
3. Press the mode key (3) that matches the equipment you
want to control (for example TV).
4. Press CHAN+ (5) repeatedly until the channel changes. If
you step past the correct code use CHAN- (5) to go back to
the right code.
5. When the equipment you want to control reacts, press -/-(
11) to confirm the code.
Note: If your equipment doesn't have CHAN+ you can use
PLAY (VCR or DVD) (19) or POWER (1) key.
Note: if certain functions of your equipment can't be
controlled you will have to find a different code for your
brand. The search starts after the last registered code. If that
was 030, the search starts at 031 until the last possible code
and then goes from 000 to 029.
4.6 Learning codes
Your XanuraHome Remote contains the codes for most TVs,
videos etc. in its code library. If a certain device is not in this
library, you can learn the codes for your existing remote
control. The library may also contain a code that works for
your device, but which misses a few function buttons. You
can then select to only learn those buttons (maximum of 150
buttons).
Master clear
You can use the MASTER CLEAR method to clear the
learning memory. It is advised to execute a MASTER
CLEAR before you start learning any commands.
1. Keep the SETUP (8) pressed until one of the Mode LED's
stays lit. Release the SETUP (8) button.
2. Press the LEARN (24) button twice. The LED will flash
every time you press the button.
3. Press SETUP (8). The LED will extinguish after a few
seconds.
27MBO 1991494G01 001

English
Notes:
• Execute a Master Clear before you start learning (see the
method above).
• Make sure both remote controls have full batteries before
you start learning codes.
• Make sure you do not move the remote controls when
pressing the buttons.
• You cannot learn any commands for the following buttons:
Learn, Setup, Source buttons TV, VCR, CBL, etc, M1, M2,
M3, ShowView, Xanura Home or directly under the SHIFT
button.
• Experiment by learning two or three buttons first (to test
compatibility), before you learn all the buttons of your
original remote control.
• When the memory is full, one of the Mode LED's will
flash for 3 seconds. You cannot learn any codes when the
memory is full. You can, however, erase a mode with
codes you stored. You can only erase a full mode.
• By keeping the buttons for the existing remote control
pressed for a shorter period, there will be more memory
space left for learning codes on the XanuraHome remote
control. This also diminishes the chance that the remote
control learns the wrong codes.
• Experiment with the distance between the remote
controls if you have problems learning the codes.
• Some remote controls do not have the infrared LED in the
centre. Try experimenting by slightly moving the remote
controls (sideways or up/down).
• Tube lighting and bright sunlight can affect the procedure.
• Use the buttons L1, L2, L3 and L4 to learn the codes for
which the XanuraHome remote control does not have a
proper button. If you encounter any problems when
learning the codes of buttons, erase the memory and
start again.
• You can only learn the codes for one original remote
control per mode, e.g. the codes for your DVD remote
control under the DVD button. With some combi devices
(e.g. a TV with built-in DVD player) you first have to learn
the TV functions in TV mode and then the DVD functions
in DVD mode. Learning the commands
1. Point your existing remote control at the XanuraHome
Remote (front to front). Keep a distance of 2,5 cm between
the remote controls.
2. Press the SETUP (8) button until one of the Mode LED's
stays lit. Release the SETUP (8) button.
3. Press the Mode button (TV, AUDIO, SAT, etc.) for the
device you want to learn. The LED will flash once.
4. Press the LEARN (24) button. The LED will flash once.
5. Press the button on the XanuraHome remote you want to
store the new command under. The LED will blink once.
6. Depending on the type of remote control you have, you
can use one of two methods:
a. Press the button on the existing remote control
you want to learn. Keep this button pressed until
the LED on the XanuraHome Remote
extinguishes. If the LED does not extinguish, but
starts flashing, you need to use method B. (If you
have just tried method A and want to try method B,
first repeat step 5).
b. Press the button on the existing remote control
you want to learn. Keep this button pressed as
28 MBO 1991494G01 001
long as you would when using the original remote
control.
7. Repeat steps 5 and 6 for every button you want to learn.
8. When you have finished learning the buttons, press
SETUP (8)
Erasing the commands learned per mode to clear
memory space
You can erase the commands learned and saved for each
separate function (TV, VCR, etc.):
1. Keep the SETUP (8) button pressed until one of the Mode
LED's stays lit. Release the SETUP (8) button.
2. Press the Mode button of your choice (TV, VCR, etc.).
The LED will flash once.
3. Press the LEARN (24) button twice.
4. Press SETUP (8). The LED will extinguish after a few
seconds.
5. All commands learned and saved for the selected function
have now been erased.
4.7 Identifying codes found
If the batteries are taken out of the remote for a longer
period, the programmed codes can be erased from the
memory. Therefore it is wise to write down the codes, so
you will be able to reprogram the remote control quickly If
you don't know the code (for example because you found the
code by autosearch) you can identify it as described below:
1. Press and hold SETUP (8) until the LED indicator (2)
lights steadily. Release SETUP.
2. Press the mode key (3) for the equipment you want to
identify (VCR, CBL, DVD, CD, ASAT, DSAT or AUX). The
LED blinks once.
3. Press again SETUP. The LED blinks once.
4. To identify the first digit press each number button from
0 - 9 (9) until the LED blinks. The number you pressed is the
first digit of the code.
5. Press each number key from 0 - 9 as above to find the
second digit.
6. Press each number key from 0 - 9 as above to find the
third digit. When the third digit has been found the LED will
go off.
29MBO 1991494G01 001

English
4.8 Default Volume Control for satellite
In factory default, in Satellite mode the volume is controlled
by the TV. However, some Satellite tuners have their own
volume control. You can reprogram the remote so the
volume is controlled by the satellite receiver instead of by
the TV.
1. Press and release the TV Mode button (3) - remote must
be in TV mode for this procedure.
2. Press and hold SETUP (8) button until LED remains on.
3. Release SETUP button.
4. Press and hold the Mute (4) key for approximately 8
seconds. LED will stay off for the 8 second period, then blink
once to indicate volume default acceptance and then remain
off.
5. Remote volume default is now set.
6. If the XanuraHome Remote was previously controlling the
television volume in SAT mode, it will now control the
volume of the satellite decoder. If it was previously
controlling the volume of the satellite decoder, it will now
control the volume of the television.
4.9 Home Theatre Macro Feature
Your XanuraHome remote has three Macro buttons: M1, M2
and M3. You can program these buttons to execute a series
of commands with one press of a button. This powerful
feature is ideal for switching on all your audio and video
equipment at once or for selecting certain preferences in
Home Theatre applications.
Programming the Macro buttons M1, M2 and M3
1. Keep the SETUP (8) button pressed until one of the Mode
LED's stays lit. Release the SETUP (8) button.
2. Press MACRO (25). The LED will flash once.
3. Press the Macro button you want to set (M1, M2 or M3).
4. Press the buttons on the remote control you want to enter
under the Macro button (maximum of 10 commands). The
buttons will be executed by the macro in the same order as
they are programmed.
5. To save the macro, you press the MACRO button again. If
you have used up the maximum of 10 commands, the
procedure will stop automatically and the 10 commands will
be saved under the Macro button you are setting.
Notes on programming macros
• The first command of a macro always needs to consist of
a Mode button (TV, VCR, etc)
• You may have to enter a delay in the macro (e.g. to let
your TV warm up). Press PAUSE (17-22) followed by a
numerical key (1-9) to enter a delay of between 1 and 9
seconds. The standard delay between the separate macro
commands is half a second.
• The macro buttons can execute both infrared (IR) and
radio frequency (RF) commands. This means you can
activate audio and video equipment and control the lights
at the same time (using a XanuraHome RFIX35 RF-
interface). This is ideal for Home Theatre applications. Ask
your supplier for more information.
30 MBO 1991494G01 001
Clearing a macro button
1. Press the SETUP (8) button until one of the Mode LED's
stays lit. Release the SETUP button.
2. Press the MACRO (25) button. The LED will flash once.
3. Press the macro button you want to clear (M1, M2 or M3).
4. Press the SETUP (8) button again.
5. Troubleshooting
The remote doesn't work or loses codes entered
• Confirm with your original remote that the equipment
works correctly.
• Make sure that you have pressed the corresponding mode
key of the equipment or device that you want to control.
• If the listed code does not work, try the AUTOSEARCH
method or enter the next code of that brand.
• Check that the batteries have the correct polarity position.
• The programming of the remote requires 2 AAA Alkaline
batteries (new). If the remote looses codes within a few
days/weeks the problem can be solved by using 2 new
batteries.
• If the LED is lit permanently, in general it will be ecessary
to replace the batteries.
• Set the remote back to factory default.
How to set the XanuraHome Remote back to factory default
(Master reset)
• Press and hold SETUP (8) until the LED indicator (2) lights
steadily. Release SETUP.
• Press and release the STOP key (20) twice.
• Press and release the .MUTE key (4).
• The LED (2) turns off after few seconds.
31MBO 1991000G01 001

© 2008 Eaton Electric B.V. Partial or complete reproduction is granted with written permission of Eaton Electric B.V. MBO 1991494G01 001/SWB/SG/March 2008
-
 1
1
-
 2
2
-
 3
3
-
 4
4
-
 5
5
-
 6
6
-
 7
7
-
 8
8
-
 9
9
-
 10
10
-
 11
11
-
 12
12
-
 13
13
-
 14
14
-
 15
15
-
 16
16
-
 17
17


Eaton XanuraHome ABX 1 Handleiding
- Categorie
- Afstandsbedieningen
- Type
- Handleiding
in andere talen
- English: Eaton XanuraHome ABX 1 User manual
Gerelateerde papieren
Andere documenten
-
Thomson 00131898 Operating Instructions Manual
-
-
Thomson 00131867 de handleiding
-
Hama 6 in 1 Universal Remote Control de handleiding
-
Ebode TAKE 6 IR+RF Handleiding
-
Grundig PC CONTROL Handleiding
-
Ebode TAKE 6 IR Handleiding
-
-
-
Universal Remote Control HOME THEATRE MASTER 1000 Handleiding