
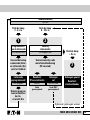
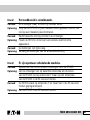
XanuraHome™
Radiofrequentie-interface type RFIX35
MBO 6012349G01 001

2 MBO 6012349G01 001
Technische karakteristieken
• Transponeert radiofrequente (RF-)signalen afkomstig van
afstandsbedieningen naar XanuraHome commando's via het
lichtnet. (Zie pagina 24 voor informatie over RF-signalen).
• Mogelijkheid voor het ontvangen van standaard-RF- of
"RF-secured" codes.
• In de "RF-secured" modus kunnen maximaal 8 beveiligde
afstandsbedieningen of zenders worden aangemeld.
• Ontvangt maximaal 256 adressen(Lettercode A t/m P)
• Mogelijkheid voor het bedienen van slechts één door de
gebruiker te definiëren lettercode (16 adressen).
• Ontworpen als op een wand of plafond te bevestigen
component, met de bijgeleverde voedingskabel ook als los
component in een wandcontactdoos toe te passen.
• Het RF-protocol is compatibel met het RF-protocol van X10.
Dit betekent dat alle standaard X10-compatibele RF afstands-
bedieningen (zenders) kunnen worden gebruikt.
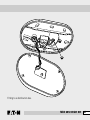
Toepassingsopties
De RFIX35 kan worden gebruikt voor het ontvangen van
RF-commando's, afkomstig van XanuraHome afstandsbedieningen,
en het via het lichtnet doorsturen van deze opdrachten voor het
schakelen of dimmen van actoren (zie figuur 1).
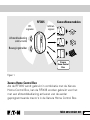
XanuraHome™ Radiofrequentie-interface type RFIX35

3MBO 6012349G01 001
Figuur 1.
XanuraHome modules
RFIX35
lichtnet-
signaal
RF-
signalen
Afstandbediening
(ABX1 of ABX3)
Bewegingsmelder
Xanura
Home Control
Box
Xanura Home Control Box
Als de RFIX35 wordt gebruikt in combinatie met de Xanura
Home Control Box, kan de RFIX35 worden gebruikt voor het
met een afstandsbediening activeren van de eerder
geprogrammeerde macro's in de Xanura Home Control Box.

4 MBO 6012349G01 001
De RFIX35 kan in principe op 2 manieren worden toegepast:
1. Gemonteerd op een centraaldoos
2. Aangesloten op een wandcontactdoos
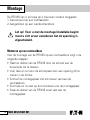
Let op! Voor u met de montage/installatie begint
moet u zich ervan verzekeren dat de spanning is
afgeschakeld.
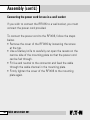
Monteren op een centraaldoos
Voor de montage van de RFIX35 op een centraaldoos volgt u de
volgende stappen.
• Haal het deksel van de RFIX35 door de schroef aan de
bovenzijde los te draaien.
• Voer fase en nul door de achterplaat door een opening (A) te
maken in de sticker.
• Schroef de montageplaat met schroeven vast aan de
centraaldoos.
• Sluit fase en nul aan op de kroonsteen van de montageplaat.
• Draai de deksel van de RFIX35 weer vast aan de
montageplaat.
!
Montage

Monteren op een centraaldoos.
5MBO 6012349G01 001
A

6 MBO 6012349G01 001
Aansluiten van het netsnoer voor toepassing op een
wandcontactdoos
Indien u de RFIX35 wilt aansluiten op een wandcontactdoos
moet het meegeleverde netsnoer worden aangesloten.
Voor het aansluiten van het netsnoer aan de RFIX35 volgt u de
volgende stappen.
• Haal het deksel van de RFIX35 door de schroef aan de
bovenzijde los te draaien.
• Snijdt met een stanleymes voorzichtig de uitsparing aan de
smalle zijde van de montageplaat open zodat het netsnoer
hierdoor gevoerd kan worden.
• Monteer fase en nul aan de kroonsteen en voer de kabel
door het kabelkanaal in de montageplaat.
• Draai de deksel van de RFIX35 weer vast aan de
montageplaat.
Montage (vervolg)

7MBO 6012349G01 001
Aansluiten van het netsnoer.

8 MBO 6012349G01 001
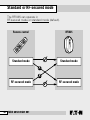
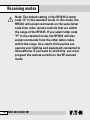
Standaard- of RF-secured modus
De RFIX35 kan werken in de RF-secured modus of in de
standaar
dmodus (standaard).
Afstandsbediening RFIX35
Standaardmodus
RF-secured modus
Standaardmodus
RF-secured modus
✓
✓
✗
✗

9MBO 6012349G01 001
Standaardmodus
In de standaardmodus is de RFIX35 compatibel met alle X10
compatible afstandsbedieningen. In deze modus moet de
gebruiker het adresnummer en de opdracht afzonderlijk
indrukken op de afstandsbediening. De RFIX35 ontvangt
RFsignalen afkomstig van de afstandsbediening (een adres met
een opdracht) en verzendt deze via het lichtnet om actoren te
schakelen of macro's te activeren.
RF-secured modus
In de RF-secured modus worden alleen opdrachten afkomstig
van aangemelde afstandsbedieningen geaccepteerd.
Opdrachten van andere afstandsbedieningen binnen het
ontvangstbereik van de RFIX35 worden genegeerd. Om de
RF-secured modus te kunnen gebruiken, hebt u een afstands-
bediening nodig met een RF-security code. Er kunnen maximaal
8 verschillende afstandsbedieningen worden aangemeld.
Afstandsbedieningen die geschikt zijn voor de RF-secured
modus zijn de XanuraHome ABX1 en ABX3.

10 MBO 6012349G01 001
Ontvangstmodi
Let op: De standaardinstelling van de RFIX35 is
lettercode "A" in de standaardmodus. In deze
modus zal de RFIX35 opdrachten van andere, zich
binnen het bereik van de RFIX35 bevindende
afstandsbedieningen, op dezelfde lettercode
accepteren. Indien u voor lettercode "P" kiest in de
standaardmodus, zal de RFIX35 ook opdrachten
van de overige lettercodes binnen het bereik
accepteren. Hierdoor kunnen derden uw verlichting
en apparaten aangesloten op XanuraHome
ongewenst bedienen. Als u dit wilt voorkomen,
dient u de afstandsbedieningen in de RF-secured
modus te programmeren.
!

11MBO 6012349G01 001
Ontvangstmodus voor één lettercode
Als er een lettercode in de RFIX35 is geprogrammeerd
("
A" t/m "O"), kan de interface alleen de geprogrammeerde
lettercode ontvangen. De afstandsbediening dient te worden
geprogrammeerd op dezelfde lettercode als de RFIX35.
Ontvangstmodus voor alle lettercodes
Als de lettercode van de RFIX35 is geprogrammeerd op
lettercode "
P", stuurt de interface de in de afstandsbediening
geprogrammeerde lettercode door, ongeacht welke lettercode is
geprogrammeerd in de afstandsbediening ("
A" t/m "P"). De
RFIX35 ontvangt alle lettercodes en stuurt de ontvangen
opdrachten van de afstandsbediening via het lichtnet door.

12 MBO 6012349G01 001
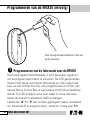
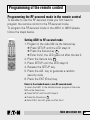
Programmeren van de RFIX35
Programmeermodus
In de programmeermodus kan de RFIX35
worden geprogrammeerd om uitsluitend één door de gebruiker te
definiëren lettercode te ontvangen (= selecteer één lettercode van
A t/m O) of om alle lettercodes (A t/m P) te ontvangen. Als slechts één
lettercode is geprogrammeerd, ontvangt de RFIX35 uitsluitend
instructies afkomstig van afstandsbedieningen binnen het ontvangst-
bereik van de RFIX35 waarin dezelfde lettercode is geprogrammeerd.
Als de RFIX35 bijvoorbeeld is geprogrammeerd op lettercode B, moet
de afstandsbediening ook zijn geprogrammeerd op lettercode B.
Security inleermodus
In de security inleermodus kunnen maximaal
8 RF-secured afstandsbedieningen in de RFIX35 worden aangemeld.
Wanneer de RFIX35 is geprogrammeerd om te werken in de
RF-secured modus, accepteert de RFIX35 uitsluitend RF-instructies
afkomstig van aangemelde afstandsbedieningen. RF-instructies
afkomstig van andere afstandsbedieningen binnen het ontvangstbereik
van de RFIX35 worden genegeerd. In deze modus kunt u ook het
geheugen van de RFIX35 wissen. Alle afstandsbedieningen die in de
RFIX35 zijn aangemeld, worden dan gewist. In deze modus kunt u ook
de standaardontvangstmodus* (niet-beveiligd) programmeren als u de
RF-secured modus eerst hebt geprogrammeerd.
Gebruiksmodus
In de gebruiksmodus ontvangt de RFIX35
RF-instructies afkomstig van afstandsbedieningen, en transponeert
hij deze naar XanuraHome opdrachten over het lichtnet.
*) De standaardmodus is standaard geprogrammeerd op lettercode A.

13MBO 6012349G01 001
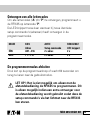
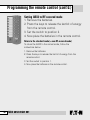
Programmeren
van de lettercode
Verzend het setup
commando (letter-
en cijfercode) (2x)
over het lichtnet
Druk de knop
3 - 6 s in
Druk de knop
6 - 12 s in
Druk de knop
> 9 s in
LED continu AAN
Druk de program-
meerschakelaar
kort in,
of wacht 60 s
Lettercode
geprogrammeerd
LED knippert
Security
inleermodus
Verzend security code
met afstandsbediening
(RF-secured)
Optioneel: geheugen wissen
LED knippert kort
Gebruiksmodus
LED UIT
Resultaat:
RF-secured modus
LED UIT
Geheugen
vol
Code
geaccepteerd
Code NIET
geaccepteerd
LED 2 s AAN
Geheugen gewist
Resultaat:
standaardmodus
1
2
3

14 MBO 6012349G01 001
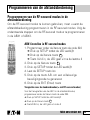
Programmeren van de RFIX35 (vervolg)
Programmeren van de lettercode voor de RFIX35
Houd de programmeerschakelaar 3 tot 6 seconden ingedrukt
om de programmeermodus te activeren. De LED gaat branden.
Verzend het setup commando (lettercode en cijfercode) twee
keer via het lichtnet met bijv. een programmeerunit (PUX), een
Xanura Home Control Box of een andere A10-/X10-compatibele
zender. De LED knippert twee keer nadat hij twee identieke
setup commando's (adressen) heeft ontvangen.
Lettercode "
A" t/m "P" kan worden geprogrammeerd. Voorbeeld:
om lettercode B te programmeren, verzendt u twee keer B01.
1
Druk de programmeerschakelaar in met een
puntig voorwerp.

15MBO 6012349G01 001
Ontvangen van alle lettercodes
Om alle lettercodes ("A" t/m "P") te ontvangen, programmeert u
de RFIX35 op lettercode "
P".
De LED knippert twee keer wanneer hij twee identieke
setup commando's (adressen) heeft ontvangen in de
programmeermodus.
KEUZE KIES ACTIE RESULTAAT
Adres Setup commando LED knippert
ÉÉNA01…016 2 x adres 2 x
ALLE P1…P16 2 x adres 2 x
De programmeermodus afsluiten
Druk kort op de programmeerknop of wacht 60 seconden om
terug te keren naar de gebruiksmodus.
LET OP!: Het is niet mogelijk om alleen met de
afstandsbediening de RFIX35 te programmeren. Dit
is alleen mogelijk indien een extra ontvanger voor
de afstandsbediening wordt gebruikt zodat deze de
setup commando's via het lichtnet naar de RFIX35
kan sturen.
!

16 MBO 6012349G01 001
Programmeren van de RFIX35 (vervolg)
Druk de programmeerschakelaar in met een puntig voorwerp.
Programmeren van de RFIX35 in de RF-secured modus
Houd de programmeerschakelaar 6 seconden ingedrukt om de
RF-secured inleermodes te activeren. De LED knippert nu snel
en kort.
2

17MBO 6012349G01 001
De RFIX35 bevindt zich nu in de
RF-secured ontvangstmodus.
Om een afstandsbediening aan te
melden, verzendt u in de RF-
secured modus (zie pagina 19 en
20) een adres en een opdracht
met de afstandsbediening die u in
de RFIX35 wilt aanmelden.
Als de RFIX35 de afstands-
bediening accepteert, keert
de RFIX35 terug naar de
gebruiksmodus (LED UIT).
Als u meer afstandsbedieningen wilt aanmelden, herhaalt u deze
procedure voor alle andere afstandsbedieningen die u wilt
aanmelden, tot een maximum van 8. Als het geheugen van de
RFIX35 vol is, accepteert hij geen enkele afstandsbediening meer.

18 MBO 6012349G01 001
Programmeren van de RFIX35 (vervolg)
De LED van de RFIX35 licht 2 seconden op, en vervolgens keert
het apparaat terug in de gebruiksmodus zonder de afstands-
bediening op te slaan. Als u per ongeluk een afstandsbediening
aanmeldt die al was aangemeld, wordt deze geaccepteerd
zonder dat dit extra geheugenruimte in beslag neemt.
Let op: als dezelfde afstandbediening is aangemeld
met een nieuwe willekeurig gegenereerde beveiligings-
code, neemt dit wel extra geheugenruimte in beslag.
De RFIX35 keert automatisch terug in de gebruiksmodus als hij
binnen 60 seconden geen opdrachten ontvangt.
Wis alle aangemelde afstandsbedieningen uit het geheugen
Als u al 8 afstandsbedieningen hebt aangemeld en een nieuwe
afstandsbediening in de RFIX35 wilt aanmelden, moet u eerst het
geheugen van de RFIX35 wissen. Dit is mogelijk door de RFIX35
eerst in de RF-secured inleermodus zetten (houd de programmeer-
schakelaar ingedrukt en laat hem na 6 seconden los. De LED
knippert snel en kort). Druk vervolgens opnieuw de programmeer-
schakelaar in, en houd deze ingedrukt. Laat de programmeer-
schakelaar na 9 seconden los. Alle eerder aangemelde afstands-
bedieningen zijn nu gewist, het geheugen is gewist. Nu kunt u de
eerder beschreven procedure beginnen om maximaal 8 afstands-
bedieningen aan te melden.
3
!

19MBO 6012349G01 001
Programmeren van de afstandsbediening
Programmeren van de RF-secured modus in de
afstandsbediening
Om de RF-secured modus te kunnen gebruiken, moet u eerst de
afstandsbediening programmeren in de RF-secured modus. Volg de
onderstaande stappen om de RF-secured modus te programmeren
in de ABX1 of ABX3.
ABX1 instellen in RF-secured modus
1. Programmeer onder de Xanura toets de code 822
➔ Druk op SETUP totdat de LED aanblijft
➔ Druk op de Xanura toets
➔ Toets 8-2-2 in, de LED gaat uit na de laatste 2
2. Druk op de Xanura toets
3. Druk op SETUP totdat de LED aanblijft
4. Laat de SETUP toets los
5. Druk op de toets A.B. om een willekeurige
beveiligingscode te genereren
6. Druk op de ENT (Enter) toets
Terugzetten naar de standaardmodus (= niet RF-secured modus)
Voor het terugzetten van de ABX1 in de standaardmodus,
programmeer onder de Xanura toets de code 820.
➔
Druk op SETUP totdat de LED aanblijft
➔
Druk op de Xanura toets
➔
Toets 8-2-0 in, de LED gaat uit na de 0

20 MBO 6012349G01 001
Programmeren van de afstandsbediening (vervolg)
ABX3 instellen in RF-secured modus
1. Verwijder de batterijen.
2. Druk op toetsen om het laatste restje energie
uit de afstandsbediening te laten lopen.
3. Zet de schakelaar in positie 2.
4. Doe dan pas de batterijen in de
afstandsbediening.
Terugzetten naar de standaardmodus (= niet RF-secured modus)
Voor het terugzetten van de ABX3 in de normale modus volg de
onderstaande instructies:
1. Verwijder de batterijen.
2. Druk op toetsen om het laatste restje energie uit de
afstandsbediening te laten lopen.
3. Zet de schakelaar in positie 1.
4. Doe dan pas de batterijen in de afstandsbediening.

21MBO 6012349G01 001
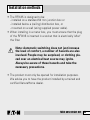
• De RFIX35 is ontworpen voor:
- installatie op een standaard 50-mm inbouwdoos of
- installatie op een centraaldoos of
- bevestiging op een wand (met de meegeleverde
voedingskabel).
• Bij toepassing in meterkast dient u ervoor te zorgen dat de
steker van de RFIX35 in een stopcontact wordt gestoken die
zich elektrisch gezien "achter" het filter bevind.
Let op: automatisch omschakelen verhoogt niet
alleen het comfort, maar kent ook een aantal
gevaren. Mensen kunnen erdoor schrikken, of
kleding die over een elektrische verwarmingsbron
wordt geplaatst, kan vlam vatten. Wees u altijd
bewust van deze gevaren en neem de vereiste
voorzorgsmaatregelen.
• Het product dient slechts te worden geopend voor montage-
doeleinden. Wij adviseren u de montage te laten uitvoeren
door een getrainde en gecertificeerde XanuraHome dealer.
!
Installatiewijzen

22 MBO 6012349G01 001
Installatiewijzen (vervolg)
• Indien het bijgeleverde netsnoer wordt toegepast dienen de
draadeinden tot aan de isolatie in het kroonsteentje te worden
gemonteerd. Er mag geen blank koper zichtbaar zijn.
• Zorg er voor dat de ingebouwde antenne voldoende afstand
heeft tot metalen delen en bekabeling.
• De RFIX35 nooit tegen een metalen achterwand monteren.
• Monteer de RFIX35 op voldoende afstand van andere
RF- zenders zoals WIFI routers, DECT telefoons e.d. Deze
apparaten kunnen de ontvangst van de RFIX35 verstoren.
Monteer de RFIX35 ten minste 1,5 meter van dergelijke
apparaten, elektrisch gezien zo centraal mogelijk in de
woning.
• Om kortsluiting te voorkomen, mag dit product uitsluitend
binnenshuis en uitsluitend op droge plaatsen worden gebruikt.
Stel de componenten niet bloot aan regen of vocht. Gebruik
het product niet in de buurt van een bad, zwembad enz.
• Stel de componenten van uw systemen niet bloot aan
extreem hoge temperaturen of felle lichtbronnen.
• Sluit het product pas aan op de netspanning nadat u hebt
gecontroleerd of de netspanning gelijk is aan de waarden op
de identificatielabels. Sluit een beschadigd netsnoer nooit aan
als het beschadigd is. Neem in dat geval contact op met uw
leverancier.

23MBO 6012349G01 001
• Open het product niet: het apparaat bevat onderdelen die
onder spanning staan. Het product mag uitsluitend worden
gerepareerd en onderhouden door een erkende reparateur.
• Bij onjuist gebruik of als u het product zelf hebt geopend,
gewijzigd of gerepareerd, vervalt elke vorm van garantie.
Eaton aanvaardt geen enkele aansprakelijkheid bij onjuist
gebruik van het product of als het product wordt gebruikt voor
andere dan de gespecificeerde doeleinden. Eaton aanvaardt
geen enkele aansprakelijkheid voor schade die de wettelijke
productaansprakelijkheid te boven gaat.

24 MBO 6012349G01 001
De RF-communicatie vindt plaats via de 433,92 MHz
communicatieband. Deze band is een niet exclusief
beschikbare communicatieband, storingen en beperkingen
in bereik zijn derhalve niet helemaal uit te sluiten.
Het bereik van de RF-signalen is van een aantal (externe)
factoren afhankelijk. Een aantal van deze factoren zijn:
vermogen van de zender, montagewijze en plek, de
luchtvochtigheid en de constructie van de woning. RF-signalen
worden in woningen door de toegepaste materialen minder
goed doorgelaten. Hierdoor zal de maximale communicatie
afstand in woningen minder zijn dan de afstand die in open veld
te bereiken is. In de onderstaande lijst staan de dempende
eigenschappen van een aantal materialen weergeven.
Absorptie van RF- signalen
Hout, gips, gipsplaten ± 10 %
(Bak)steen, spaanplaat ± 30 %
Gewapend beton ± 70 %
Metaal(gaas), aluminium(folie) ± 90 %
RF-signalen

25MBO 6012349G01 001
Technische gegevens
Productkenmerken
Netspanning 230 V AC, 50 Hz
Max. opgenomen vermogen < 2 W
Omgevingstemperatuur 0 tot 40 °C
Frequentie 433,92 MHz; X-10 RF (NEC)-
compatibel protocol
Max. communicatieafstand 100 m (open ruimte)
Beveiligingsklasse Klasse II, Dubbel geïsoleerd
Beveiligingstype IP 40 bij wand- of plafondmontage
IP 20 bij ophangen aan de wand
Normen IEC 60950
Behuizing
Afmetingen (H x B x D) 120 x 80 x 30 mm
Kleur RAL9001
Voedingskabel
Afmeting lengte 1,5 m
Kleur wit

26 MBO 6012343G01 001
Opsporen en verhelpen van storingen
Klacht:
LED op de RFIX35 knippert niet als ik op de
afstandsbediening druk.
Oorzaak:
Batterijen van de afstandsbediening (bijna) leeg.
Oplossing:
Vervang de batterijen van de afstandsbediening.
Oorzaak:
De afstandsbediening (ABX1) staat in IR-modus en niet in de RF-
modus.
Oplossing:
Stel de afstandsbediening als RF-zender in.
Oorzaak:
De RFIX35 staat niet op dezelfde lettercode ingesteld als de
afstandsbediening.
Oplossing:
Programmeer dezelfde lettercode op de afstandsbediening en de
RFIX35 of programmeer de RFIX op lettercode P in.
Oorzaak:
De afstandsbediening staat niet in RF-secured modus
geprogrammeerd en de RFIX35 wel.
Oplossing:
Zet de afstandsbediening in RF-secured modus.
Oorzaak:
De afstandsbediening staat in RF-secured modus
geprogrammeerd en de RFIX35 niet.
Oplossing:
Zet de afstandsbediening in standaard ontvangstmodus.
Oorzaak:
De RFIX35 staat in RF-secured modus en de afstandsbediening is
niet aangemeld.
Oplossing:
Meldt de afstandsbediening aan in RF-secured modus.
Oorzaak:
RF-signalen komen niet over.
Oplossing:
Verklein de afstand tussen afstandsbediening en de RFIX35.

27MBO 6012343G01 001
Klacht:
Het zendbereik is onvoldoende.
Oorzaak:
De ontvanger staat te dicht bij metalen delen.
Oplossing:
Zorg dat de RFIX35 vrij van metalen delen geplaatst wordt, ook
niet op een metalen plaat monteren.
Oorzaak:
Radiofrequente storing verstoort de ontvanger.
Oplossing:
Plaats de RFIX35 uit de buurt van andere elektronische
apparatuur.
Oorzaak:
De batterijen zijn bijna leeg.
Oplossing:
Vervang de batterijen van de afstandsbediening.
Klacht:
Er zijn spontaan schakelende modules.
Oorzaak:
Opdrachten van buren worden ontvangen door de RFIX35.
Oplossing:
Zet de ontvanger niet op dezelfde lettercode als de buren.
Zet de RFIX35 niet op lettercode P maar op één lettercode.
Zet de RFIX35 in de RF-secured modus.
Oorzaak:
De RFIX35 staat op lettercode P en staat niet in de RF-secured
modus geprogrammeerd.
Oplossing:
Zet de RFIX35 in de RF-secured modus.

28 MBO 6012343G01 001
Opsporen en verhelpen van storingen (vervolg)
Klacht:
Nadat de batterijen van de afstandsbediening vervangen
zijn kan ik niets meer bedienen.
Oorzaak:
De batterijen van de afstandsbediening zitten verkeerd om of
maken onvoldoende contact.
Oplossing:
Controleer of de batterijen wel juist geplaatst zijn.
Oorzaak:
De lettercode van de afstandsbediening is gereset naar
lettercode A.
Oplossing:
Programmeer de juiste lettercode in de afstandsbediening.
Oorzaak:
De afstandsbediening genereert een nieuwe RF-secured code die
niet herkend wordt.
Oplossing:
Wis het geheugen van de RFIX35 en meldt de afstandsbediening
opnieuw aan.
Klacht:
Bij het programmeren van de secured code brandt de
LED 2 seconden.
De RFIX35 accepteert geen RF-secured codes meer.
Oorzaak:
Geheugen van de RFIX35 is vol. Er zijn al 8 afstandsbedieningen
in RF-secured modus aangemeld.
Oplossing:
Wis het geheugen van de RFIX35 en meldt de
afstandsbediening(en) opnieuw aan.

29MBO 6012343G01 001
Klacht:
In de programmeermodus accepteert de RFIX35 geen
opdrachten.
Oorzaak:
Er worden geen opdrachten ontvangen.
Oplossing:
Verstuur de instelopdrachten voor het programmeren van de
RFIX35 niet via de afstandsbediening maar door middel van een
ander XanuraHome component (Home Control Box, PUX of
Interface module) via het lichtnet naar de RFIX35.

30 MBO 6012349G01 001
Elektronische apparaten en systemen kunnen gevoelig zijn voor
signalen van andere apparaten, die elektromagnetische storing
veroorzaken. Binnen de Europese Unie zijn afspraken gemaakt over
de immuniteit (gevoeligheid) van de apparatuur voor signalen en
ook de emissie (storing) van deze apparatuur. Als de apparaten/
toepassingen in een omgeving voldoen aan de daarvoor geldende
normen, zullen ze elkaar niet storen (ze zijn dan "Elektro Magnetisch
Compatibel").
Voor residentiële omgevingen, waar het huisautomatiserings-
systeem XanuraHome wordt toegepast, is de Europese norm voor
immuniteit vastgelegd in de EN 61000-6-1. Apparatuur die voldoet
aan deze norm is bestand tegen de elektromagnetische emissie
van overige apparaten die voldoen aan de Europese norm
EN 61000-6-3 (residentiële omgevingen). Ervaring heeft geleerd dat
in woonhuizen apparatuur kan voorkomen dat een EMC-emissie-
niveau heeft boven de in EN 61000-6-3 vastgestelde niveaus. Deze
apparatuur kan de correcte werking van de XanuraHome-modules
verstoren. De immuniteit van de XanuraHome inbouwmodules is
om die reden opgewaardeerd en gelijkwaardig geworden aan de
EN 61000-6-2, de strengere Europese norm voor immuniteit in
industriële omgevingen.
Desalniettemin dient het toepassinggebied van XanuraHome
beperkt te blijven tot residentiële omgevingen.
Ongestoorde werking van het XanuraHome-systeem

31MBO 6012349G01 001
Eaton is niet verantwoordelijk voor het disfunctioneren van
het XanuraHome-systeem als gevolg van in het gebouw
aanwezige apparatuur met emissiewaardes boven de
maximale toegestane niveaus zoals die gelden in
residentiële, commerciële en lichtindustriële omgevingen en
zijn vastgelegd in de EN 61000-6-3.
Toepassing Geldende Europese norm XanuraHome-huis
automatisering*
Immuniteit van Emissie van Immuniteit- en
de apparatuur de apparatuur emissienorm
Residentieel 61000-6-1 61000-6-3 Compatibel/
Commercieel voldoet
Licht-industrieel
* Voorwaarde daarbij is dat het gehele XanuraHome-systeem wordt
geïnstalleerd volgens de geldende instructies door een gecertificeerde
en getrainde XanuraHome-dealer.

© 2007 Eaton Electric B.V. Gedeeltelijke of gehele overname van de inhoud is mogelijk na schriftelijke toestemming van
Eaton Electric B.V. MBO 6012349G01 001/SWB/SG/Juni 2007
Eaton Electric B.V.
Postbus 23
7550 AA Hengelo
Tel.: 074 246 70 00
Fax: 074 246 33 02
www.et-installateur.nl
www.xanura.com

XanuraHome™
Radio Frequency interface type RFIX35
MBO 6012349G01 001

34 MBO 6012349G01 001
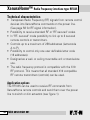
Technical characteristics
• Transposes Radio Frequency (RF) signals from remote control
devices into XanuraHome commands on the power line.
(See page 56 for RF-signal information).
• Possibility to receive standard RF or "RF-secured" codes.
• In "RF- secured" mode possibility to link up to 8 secured
remote controls or transmitters.
• Controls up to a maximum of 256 addresses (Lettercode
A to P).
• Possibility to control only one user definable letter code
(16 addresses).
• Designed as a wall- or ceiling mountable unit or stand-alone
use.
• The radio frequency protocol is compatible with the X10
RF protocol. This means that all standard X10 compatible
RF remote transmitters (controls) can be used.
Application options
The RFIX35 can be used to receive RF-commands from
XanuraHome remote controls and send them over the power
line to switch or dim actuators (see figure 1).
XanuraHome™ Radio Frequency interface type RFIX35

35MBO 6012349G01 001
Figure 1.
XanuraHome modules
RFIX35
Lighting
circuit
signal
RF
signals
Remote control
(ABX1 of ABX3)
Movement sensor
Xanura
Home Control
Box
Xanura Home Control Box
If the RFIX35 is used in combination with the Xanura Home
Control Box the RFIX35 can be used to activate the previously
programmed macros in the Xanura Home Control Box, using a
remote control device.

36 MBO 6012349G01 001
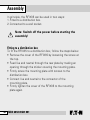
In principle, the RFIX35 can be used in two ways:
1. Fitted to a distribution box.
2. Connected to a wall socket.
Note: Switch off the power before starting the
assembly!
Fitting to a distribution box
To fit the RFIX35 to a distribution box, follow the steps below.
• Remove the cover of the RFIX35 by loosening the screw at
the top.
• Feed live and neutral through the rear plate by making an
opening through the sticker covering the mounting plate.
• Firmly screw the mounting plate with screws to the
distribution box.
• Connect live and neutral to the connector of the
mounting plate.
• Firmly tighten the cover of the RFIX35 to the mounting
plate again.
!
Assembly

37MBO 6012349G01 001
A
Fitting to a distribution box.

38 MBO 6012349G01 001
Connecting the power cord for use in a wall socket
If you wish to connect the RFIX35 to a wall socket, you must
connect the power cord provided.
To connect the power cord to the RFIX35, follow the steps
below.
• Remove the cover of the RFIX35 by loosening the screw
at the top.
• Use a Stanley knife to carefully cut open the recess on the
narrow side of the mounting plate so that the power cord
can be fed through.
• Fit live and neutral to the connector and feed the cable
through the cable channel in the mounting plate.
• Firmly tighten the cover of the RFIX35 to the mounting
plate again.
Assembly
(cont'd.)

39MBO 6012349G01 001
Connecting of the power cord.

40 MBO 6012349G01 001
Standard or RF-secured mode
The RFIX35 can operate in
RF-secur
ed mode or standard mode (default).
Remote control RFIX35
Standard mode
RF-secured mode
Standard mode
RF-secured mode
✓
✓
✗
✗

41MBO 6012349G01 001
Standard mode
In the standard mode the RFIX35 is compatible with existing
remote controls. In this mode the user must press separately
the address number and the command on the remote control.
The RFIX35 will receive the RF signals from the remote control
(an address with a command) and transmit it over the power
line to activate actuators or start macros.
RF-secured mode
In the RF-secured mode only commands from linked remote
controls will be accepted. Commands from other remote
controls within the receiving reach of the RFIX35 will be
ignored. To be able to use the RF-secured mode you will need
a remote control containing RF-security code. Up to 8 different
remote controls can be linked. Remote controls that are suitable
for RF-secured are the XanuraHome ABX1 and the ABX3.

42 MBO 6012349G01 001
Receiving modes
Note: The default setting of the RFIX35 is letter
code "A" in the standard mode. In this mode, the
RFIX35 will accept commands on the same letter
code from other remote controls that are within
the range of the RFIX35. If you select letter code
"P" in the standard mode, the RFIX35 will also
accept commands from the other letter codes
within the range. As a result, third parties can
operate your lighting and equipment connected to
XanuraHome. If you want to avoid this, you must
program the remote controls to the RF-secured
mode.
!

43MBO 6012349G01 001
Single letter code receiving mode
If the letter code of the RFIX35 is programmed to any letter
code ("
A" to "O") the interface will only receive and forward the
programmed letter code. The remote control should be
programmed to the same letter code as the RFIX35.
All letter code receiving mode
If the letter code of the RFIX35 is programmed to letter code "P"
the interface will forward the programmed letter code in the
remote control. Independently which letter code is programmed
into the remote control( "
A" to "P"). The RFIX35 will receive all
letter codes and forward the received commands whenever
programmed into the remote control.

44 MBO 6012349G01 001
Programming of the RFIX35
Programming mode
In the programming mode the RFIX35 can be programmed to
receive only one user defined letter code (= select one lettercode
from A to O) or to receive all letter codes (A to P). When only one
letter code is programmed, the RFIX35 will only receive instructions
from remote controls within the receiving reach of the RFIX35
programmed on the same letter code. If for example the RFIX35 is
programmed on letter code B, the remote control also has to be
programmed on letter code B.
Security learn mode
In the security learn up to 8 RF-secured remote controls can be
linked to the RFIX35. Once the RFIX35 is programmed to function in
RF-secured mode, the RFIX35 will only accept RF-instructions from
linked remote controls. RF-instructions from other remote controls
within the receiving reach of the RFIX35 will be ignored. In this
mode you can also clear the memory of the RFIX35. All remote
controls linked to the RFIX35 will then be deleted. In this mode you
can also program the standard* receiving mode (non-secured)
whenever you have programmed the RF-secured mode previously.
Operation mode
In operation mode the RFIX35 will receive RF instructions from
remote controls and transpose them into XanuraHome commands
on the power line.
*) Default is standard mode programmed to letter code A.

45MBO 6012349G01 001
Programming
the letter code
Send a setup
command (letter
and number code)
(2x)
Press button
3 - 6 s
Press button
6 - 12 s
Press button
> 9 s
LED continuous ON
Shortly press
program switch
or wait 60 s
Letter code
programmed
LED flashes
Security
learn mode
Send security code
with remote control
(RF-secured)
Optional: clear memory
LED short blinks
Operation mode
LED OFF
Result:
secured mode
LED OFF
Memory
full
Code accepted Code NOT accepted
LED 2 s ON
Memory cleared
Result:
standard mode
1
2
3

46 MBO 6012349G01 001
Programming the RFIX35 (cont'd.)
Programming the letter code for the RFIX35
Activate the programming mode by keeping the programming
switch pressed for 3 to 6 seconds. The LED will now lit.
Send the setup command twice (letter code and number code),
through the power line by using e.g. Programming Unit (PUX),
Xanura Home Control Box or other A10 / X10 compatible
transmitters. The LED will blink twice after receipt of two
identical setup commands (Address). Letter code "
A" to "P" may
be programmed. For example, to program letter code B, send
B01 twice.
1
Press the programming switch in with a
pointed object.

47MBO 6012349G01 001
Receive all letter codes
To receive all letter codes ("A" to "P") please program the RFIX35
on letter code "
P".
The LED will blink twice after receiving two identical setup
commands (Address) in the program mode.
CHOICE CHOOSE ACTION RESULT
Address Setup Command LED flashes
SINGLE A01…016 2 x Address 2 x
ALL P1…P16 2 x Address 2 x
Ending the programming mode
Shortly press the programming button mode or just wait
60 seconds to return to the operation mode.
Note: It is not possible to program the RFIX35 with
a remote control only. To program the IRIX35 with
the remote control an additional remote control
receiver is required to send the setup commands
over the power line to the RFIX35.
!

48 MBO 6012349G01 001
Programming the RFIX35 (cont'd.)
Press the programming switch in with a pointed object.
Programming the RFIX35 to the RF-secured mode
Activate the RF-secured programming mode by keeping the
programming switch pressed for 6 seconds. The LED will now
give quick short blinks.
2

49MBO 6012349G01 001
The RFIX35 is now in the
RF-secured receiving mode. To link
a remote control please send an
address and a command with the
remote control in the RF-secured
mode (see page 51 and 52) that you
want to link to the RFIX35.
When the RFIX35 accepts the
remote control the RFIX35 will
return to the operation mode (LED OFF).
If you want to link more remote controls please repeat this
procedure for all other remote controls you want to link up to a
maximum of 8. When the memory of the RFIX35 is full it will not

50 MBO 6012349G01 001
Programming the RFIX35 (cont'd.)
accept any remote control. The LED of the RFIX35 will be lit for
2 sec. and will return to the normal operation mode without
storing the remote control. If you accidentally link a remote
control that was already linked it will be accepted without
"claiming" any extra memory space.
Note: If the same remote control is linked with a
new random generated security code, extra memory
space will be claimed.
The RFIX35 will automatically return to the operation mode when
it does not receive any commands within 60 seconds.
Delete all linked remote controls from memory
If you have already linked 8 remote controls and want to link a new
remote control to the RFIX35, you will first have to clear the
memory of the RFIX35. This is possible by first setting the RFIX35
in the RF-secured programming mode (keep programming switch
pressed and release the switch after 6 seconds. The LED will give
quick short blinks). In the RF-secured mode press the programming
switch and keep it pressed. Release the programming switch after
9 seconds. All previously linked remote controls are now deleted,
the memory is cleared. You can now start the procedure as
previously described to link up to 8 remote controls again.
3
!

51MBO 6012349G01 001
Programming of the remote control
Programming the RF-secured mode in the remote control
To be able to use the RF-secured mode you first have to
program the remote control to the RF-secured mode.
To program the RF-secured mode in the ABX1 or ABX3 please
follow the steps below.
Setting ABX1 to RF-secured mode
1. Program in the code 822 via the Xanura key
➔ Press SETUP until the LED stays lit
➔ Press the Xanura key
➔ Enter 8-2-2, the LED goes out after the last 2
2. Press the Xanura key
3. Press SETUP until the LED stays lit
4. Release the SETUP key.
5. Press the A.B. key to generate a random
security code
6. Press the ENT (Enter) key
Return to the standard mode (= non-RF-secured mode)
To return the ABX1 to the standard mode, program in the code
820 via the Xanura key.
➔
Press SETUP until the LED stays lit
➔
Press the Xanura key
➔
Enter 8-2-0, the LED goes out after the 0

52 MBO 6012349G01 001
Programming the remote control (cont'd.)
Setting ABX3 to RF-secured mode
1. Remove the batteries.
2. Press the keys to release the last bit of energy
from the remote control.
3. Set the switch to position 2.
4. Now place the batteries in the remote control.
Return to the standard mode (= non-RF-secured mode)
To return the ABX3 to the normal mode, follow the
instructions below:
1. Remove the batteries.
2. Press the keys to release the last bit of energy from the
remote control.
3. Set the switch to position 1.
4. Now place the batteries in the remote control.

53MBO 6012349G01 001
• The RFIX35 is designed to be:
- installed on a standard 50 mm junction box or
- installed below a (ceiling) distribution box, or
- mounted on a wall (using supplied power cable).
• When installing in a meter box, you must ensure that the plug
of the RFIX35 is inserted in a socket that is electrically "after"
the filter.
Note: Automatic switching does not just increase
the level of comfort, a number of hazards are also
involved. People may be surprised, or clothing pla-
ced over an electrical heat source may ignite.
Always be aware of these hazards and take the
necessary precautions.
• The product must only be opened for installation purposes.
We advise you to have the product installed by a trained and
certified XanuraHome dealer.
!
Installation methods

54 MBO 6012349G01 001
Installation methods (cont'd.)
• If the mains lead supplied is used, the wire ends must be
installed up to the insulation in the connector. There must not
be any bare copper visible.
• Ensure that the built-in antenna is at a sufficient distance from
metal parts and cabling.
• Never install the RFIX35 against a metal rear wall.
• Install the RFIX35 at a sufficient distance from other
RF transmitters, such as WIFI routers and DECT telephones
etc. This equipment can interfere with the reception of the
RFIX35. Install the RFIX35 at least 1.5 metres from such
equipment, as centrally as possible in the home (in electrical
terms).
• To prevent short circuits, this product should only be used
inside and only in dry spaces. Do not expose the components
to rain or moisture. Do not use the product close to a bath,
swimming pool etc.
• Do not expose the components of your systems to extremely
high temperatures or bright light sources.
• Only connect the product to the mains after checking
whether the mains voltage is the same as the values on the
identification tags. Never connect a power cord when it is
damaged. In that case, please contact your supplier.

55MBO 6012349G01 001
• Do not open the product: the device contains live parts. The
product should only be repaired or serviced by a qualified
repairman.
• In case of improper usage or if you have opened, altered and
repaired the product yourself, all guarantees expire. Eaton
does not accept responsibility in the case of improper usage
of the product or when the product is used for purposes other
than specified. Eaton does not accept responsibility for
additional damage other than covered by the legal product
responsibility.

56 MBO 6012349G01 001
The RF communication uses the 433.92 MHz
communication band. This band is a non-exclusively
available communication band. Therefore, interference
and limitations in range cannot be completely eliminated.
The range of the RF signals depends on a number of (external)
factors. Some of these factors are: transmitter power,
installation method and site, air humidity and construction of the
home. The materials used in homes hinder the transmission of
RF signals to some extent. Consequently, the maximum
communication distance in homes is less than the distance that
can be achieved in the open. The following list gives the
damping effect of several materials.
Absorption of RF signals
Wood, plaster, plasterboard approx. 10 %
Brick and stone, chipboard approx. 30 %
Reinforced concrete approx. 70 %
Metal (gauze), aluminium (foil) approx. 90 %
RF-signals

57MBO 6012349G01 001
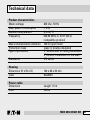
Technical data
Product characteristics
Mains voltage 230 Vac, 50 Hz
Max. power consumption < 2 W
Ambient temperature 0 to 40 °C
Frequency 433,92 MHz; X-10 RF (NEC)
compatible protocol
Max communication distance 100 m (open field)
Protection class Class II, Double insulated
Type of protection
IP 40 with wall or ceiling installation
IP 20 with installation on the wall
Standards IEC 60950
Housing
Dimension (H x W x D) 120 x 80 x 30 mm
Color RAL9001
Power cable
Dimension Length 1.5 m
Color White

58 MBO 6012349G01 001
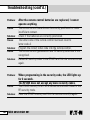
Troubleshooting
Problem:
The LED on the RFIX35 does not flash when I press the
remote control.
Cause:
The remote control batteries are (almost) flat.
Solution:
Replace the batteries.
Cause:
The remote control (ABX1) is in the IR mode and not in the
RF mode.
Solution:
Set the remote control to a RF transmitter.
Cause:
The RFIX35 is not set to the same letter code as the remote
control.
Solution:
Program in the same letter code on the remote control and the
RFIX35 or program the RFIX to letter code P.
Cause:
The remote control is not programmed to the RF-secured mode
but the RFIX35 is.
Solution:
Set the remote control to the RF-secured mode.
Cause:
The remote control is programmed to the RF-secured mode but
the RFIX35 is not.
Solution:
Set the remote control to the standard receive mode.
Cause:
The RFIX35 is in the RF-secured mode and the remote control is
not linked.
Solution:
Link the remote control in the RF-secured mode.
Cause:
RF signals are not received.
Solution:
Reduce the distance between the remote control and the RFIX35.

59MBO 6012349G01 001
Problem:
The transmission range is insufficient.
Cause:
The receiver is too close to metal parts.
Solution:
Ensure that the RFIX35 is placed away of metal parts. Do not
place on a metal plate.
Cause:
Radio frequency signal interferes with the receiver.
Solution:
Place the RFIX35 out of range of other electronic equipment.
Cause:
The batteries are almost flat.
Solution:
Replace the batteries.
Problem:
There are spontaneously switching modules.
Cause:
Commands from neighbours are received by the RFIX35.
Solution:
Do not set the receiver to the same letter code as the neighbours.
Do not set the RFIX35 to letter code P but to a single letter code.
Set the RFIX35 to the RF-secured mode.
Cause:
The RFIX35 is set to letter code P and is not programmed to the
RF-secured mode.
Solution:
Set the RFIX35 to the RF-secured mode.

60 MBO 6012349G01 001
Troubleshooting (cont'd.)
Problem:
After the remote control batteries are replaced, I cannot
operate anything.
Cause:
The remote control batteries are incorrectly positioned or make
insufficient contact.
Solution:
Check if the batteries are correctly positioned.
Cause:
The letter code of the remote control has been reset to
letter code A.
Solution:
Program the correct letter code into the remote control.
Cause:
The remote control generates a new RF-security code that is not
recognised.
Solution:
Delete all security codes in the RFIX35 and link the remote control
again.
Problem:
When programming in the security code, the LED lights up
for 2 seconds.
The RFIX35 does not accept any more security codes.
Cause:
The RFIX35 memory is full. All 8 remote controls are linked in the
RF-security mode.
Solution:
Clear the RFIX35 memory and link the remote control(s) again.

61MBO 6012349G01 001
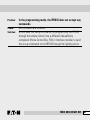
Problem:
In the programming mode, the RFIX35 does not accept any
commands.
Cause:
No commands are received.
Solution:
Do not send the set-up commands for programming the RFIX35
through the remote control. Use a different XanuraHome
component (Home Control Box, PUX or Interface module) to send
the set-up commands to the RFIX35 through the lighting circuit.

62 MBO 6012349G01 001
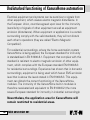
Electrical equipment and systems can be sensitive to signals from
other equipment, which causes electro magnetic disturbance. In
the European Union, countries agreed upon laws for the immunity
(sensitivity) of signals of other equipment as well as equipment
emission (disturbance). When equipment or applications in a certain
surrounding comply with the valid standards, they will not disturb
each other's operations (they are called "Electro Magnetic
Compatible").
For residential surroundings, where the home automation system
XanuraHome is being applied, the European standard for immunity
is standardised in EN 61000-6-1. Equipment that complies with this
standard is resistant to electro magnetic emission of other equip-
ment, which complies with the European standard EN 61000-6-3
for residential surroundings. Experience has shown that in domestic
surroundings, equipment is being used which has an EMC-emission
level that is above the levels stated in EN 61000-6-3. This equip-
ment can disturb the correct functioning of the XanuraHome-
modules. The immunity of the XanuraHome built-in modules is
therefore revaluated and equivalent to EN 61000-6-2 (the more
severe European standard for immunity in industrial surroundings).
Nevertheless, the application area for XanuraHome will
remain restricted to residential areas.
Undisturbed functioning of XanuraHome automation

63MBO 6012349G01 001
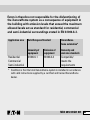
Eaton is therefore not responsible for the disfunctioning of
the XanuraHome system as a consequence of equipment in
the building with emission levels that exceed the maximum
allowed levels set as standard for residential, commercial
and semi-industrial surroundings stated in EN 61000-6-3.
Application area Valid European Standard XanuraHome-
home automation*
Immunity of Emission of Immunity and
equipment equipment
emission standards
Residential 61000-6-1 61000-6-3 Compatible/
Commercial meets the
Semi-industrial requirements
* Condition is that the total XanuraHome-system is installed in accordance
with valid instructions supplied by a certified and trained XanuraHome
dealer.

© 2007 Eaton Electric B.V. Partial or complete reproduction is granted with written permission of Eaton Electric B.V.
MBO 6012349G01 001/SWB/SG/June 2007
Eaton Electric B.V.
P.O. Box 23
7550 AA Hengelo
The Netherlands
Tel.: 074 246 70 00
Fax: 074 246 33 02
www.et-installateur.nl
www.xanura.com
-
 1
1
-
 2
2
-
 3
3
-
 4
4
-
 5
5
-
 6
6
-
 7
7
-
 8
8
-
 9
9
-
 10
10
-
 11
11
-
 12
12
-
 13
13
-
 14
14
-
 15
15
-
 16
16
-
 17
17
-
 18
18
-
 19
19
-
 20
20
-
 21
21
-
 22
22
-
 23
23
-
 24
24
-
 25
25
-
 26
26
-
 27
27
-
 28
28
-
 29
29
-
 30
30
-
 31
31
-
 32
32
-
 33
33
-
 34
34
-
 35
35
-
 36
36
-
 37
37
-
 38
38
-
 39
39
-
 40
40
-
 41
41
-
 42
42
-
 43
43
-
 44
44
-
 45
45
-
 46
46
-
 47
47
-
 48
48
-
 49
49
-
 50
50
-
 51
51
-
 52
52
-
 53
53
-
 54
54
-
 55
55
-
 56
56
-
 57
57
-
 58
58
-
 59
59
-
 60
60
-
 61
61
-
 62
62
-
 63
63
-
 64
64


