
Instruction Manual
DVD-VR350
DVD-VR355
AK68-01375E
Nederlands
English
01375E-VR350,355-XFA-ENG.indb 101375E-VR350,355-XFA-ENG.indb 1 2007-04-27 오후 5:54:382007-04-27 오후 5:54:38

Getting Started
English - 2
Getting Started
CAUTION
• Apparatus shall not be exposed to dripping or splashing
and no objects fi lled with liqulds, such as vases, shall
be placed on the apparatus.
• The Mains plug is used as a disconnect device and
shall stay readily operable at any time.
IMPORTANT NOTE
The mains lead on this equipment is supplied with a
moulded plug incorporating a fuse. The value of the
fuse is indicated on the pin face of the plug. If it requires
replacing, a fuse approved to BS1362 of the same rating
must be used. Never use the plug with the fuse cover
omitted if the cover is detachable.
If a replacement fuse cover is required, it must be of the
same colour as the pin face of the plug. Replacement
covers are available from your dealer. If the fi tted plug
is not suitable for the power points in your house or the
cable is not long enough to reach a power point, you
should obtain a suitable safety approved extension lead
or consult your dealer for assistance.
However, if there is no alternative to cutting off the plug,
remove the fuse and then safely dispose of the plug. Do
not connect the plug to a mains socket, as there is a risk
of shock hazard from the bared fl exible cord.
To disconnect the apparatus from the mains, the plug
must be pulled out from the mains socket, therefore the
mains plug shall be readily operable.
The product unit accompanying this user manual is
licensed under certain intellectual property rights of
certain third parties. This license is limited to private non-
commercial use by end-user consumers for licensed
contents. No rights are granted for commercial use.
The license does not cover any product unit other than
this product unit and the license does not extend to any
unlicensed product unit or process conforming to ISO/IEC
11172-3 or ISO/IEC 13818-3 used or sold in combination
with this product unit. The license only covers the use
of this product unit to encode and/or decode audio fi les
conforming to the ISO/IEC 11172-3 or ISO/IEC 13818-3.
No rights are granted under this license for product
features or functions that do not conform to the ISO/IEC
11172-3 or ISO/IEC 13818-3.
TO REDUCE THE RISK OF ELECTRIC SHOCK, DO
NOT REMOVE THE COVER (OR BACK).
NO USER-SERVICEABLE PARTS ARE INSIDE. REFER
SERVICING TO QUALIFIED SERVICE PERSONNEL.
This symbol indicates “dangerous voltage”
inside the product that presents a risk of
electric shock or personal injury.
This symbol indicates important instructions
accompanying the product.
Do not install this equipment in a confi ned space such
as a bookcase or similar unit.
WARNING : To prevent damage which may result in fi re
or electric shock hazard, do not expose this
appliance to rain or moisture.
CAUTION : DVD RECORDER & VCR USES AN
INVISIBLE LASER BEAM WHICH CAN
CAUSE HAZARDOUS RADIATION
EXPOSURE IF DIRECTED.
BE SURE TO OPERATE RECORDER
CORRECTLY AS INSTRUCTED.
CAUTION
THIS PRODUCT UTILIZES A LASER.
USE OF CONTROLS OR ADJUSTMENTS OR
PERFORMANCE OF PROCEDURES OTHER THAN
THOSE SPECIFIED HEREIN MAY RESULT IN
HAZARDOUS RADIATION EXPOSURE.
DO NOT OPEN COVERS AND DO NOT REPAIR
YOURSELF. REFER SERVICING TO QUALIFIED
PERSONNEL.
Warning
01375E-VR350,355-XFA-ENG.indb 201375E-VR350,355-XFA-ENG.indb 2 2007-04-27 오후 5:54:452007-04-27 오후 5:54:45

Getting Started
English - 3
• Clean the disc by wiping in a straight line from the inside
to the outside of the disc.
For safety reasons, be sure to disconnect the AC power
cord from the AC outlet.
•
Do not use benzene, thinner, or other solvents for cleaning.
• Wipe the cabinet with a soft cloth.
• Use discs with regular shapes.
If an irregular disc (a disc with
a special shape) is used, this
DVD Recorder & VCR may be
damaged.
Holding discs
• Avoid touching the surface of a disc
where recording is performed.
DVD-RAM, DVD±RW and DVD±R
• Clean with an optional DVD-RAM
/PD disc cleaner. Do not use
cleaners or cloths for CDs to clean
DVD-RAM/DVD±RW/DVD±R discs.
DVD-Video, Audio CD
•
Wipe off dirt or contamination on the disc with a soft cloth.
Cautions on handling discs
• Do not write on the printed side with a ball-point pen or
pencil.
• Do not use record cleaning sprays or antistatic. Also, do
not use volatile chemicals, such as benzene or thinner.
• Do not apply labels or stickers to discs. (Do not use
discs fi xed with exposed tape adhesive or leftover
peeled-off stickers.)
• Do not use scratch-proof protectors or covers.
• Do not use discs printed with label printers available on
the market.
• Do not load warped or cracked discs.
Be careful not to harm the disc because the data on
these discs is highly vulnerable to the environment.
• Do not keep under direct sunlight.
• Keep in a cool ventilated area.
• Store vertically.
• Keep in a clean protection jacket.
• If you move your DVD Recorder & VCR suddenly from a
cold place to a warm place, condensation may generate
on the operating parts and lens and cause abnormal
disc playback. In this case, do not connect the plug to
the power outlet and wait for two hours. Then insert the
disc and try to play again.
Important Safety Instructions
▌
Read these operating instructions carefully before using the
unit. Follow all the safety instructions listed below.
Keep these operating instructions handy for future reference.
1) Read these instructions.
2) Keep these instructions.
3) Heed all warnings.
4) Follow all instructions.
5) Do not use this apparatus near water.
6) Clean only with dry cloth.
7) Do not block any ventilation openings, Install in
accordance with the manufacturer’s instructions.
8) Do not install near any heat sources such as radiators,
heat registers, stoves, or other apparatus (including
amplifi ers) that produce heat.
9) Do not defeat the safety purpose of the polarized or
grounding- type plug. A polarized plug has two blades
with one wider than the other. A grounding type plug
has two blades and a third grounding prong. The wide
blade or the third prong are provided for your safety. if
the provided plug does not fi t into your outlet, consult
an electrician for replacement of the obsolete outlet.
10)
Protect the power cord from being walked on or
pinched particularly at plugs, convenience receptacles,
and the point where they exit from the apparatus.
11) Only use attachments/accessories specifi ed by the
manufacturer.
12)
Use only with the cart, stand, tripod, bracket, or table
specifi ed by the manufacturer, or sold with the apparatus.
When a cart is used, use caution when moving the cart/
apparatus combination to avoid injury from tip-over.
13) Unplug this apparatus during lightning storms or
when unused for long periods of time.
14) Refer all servicing to qualifi ed service personnel.
Servicing is required when the apparatus has been
damaged in any way, such as power-supply cord or
plug is damaged, liquid has been spilled or objects
have fallen into the apparatus, the apparatus has
been exposed to rain or moisture, does not operate
normally, or has been dropped.
• Before connecting other components to this recorder,
be sure to turn them all off.
• Do not move the recorder while a disc is being played,
or the disc may be scratched or broken, and the
recorder’s internal parts may be damaged.
• Do not put a fl ower vase fi lled with water or any small
metal objects on the recorder.
• Be careful not to put your hand into the disc tray.
•
Do not place anything other than the disc in the disc tray.
• Exterior interference such as lightning and static
electricity can affect normal operation of this recorder.
If this occurs, turn the DVD Recorder & VCR off and
on again with the /I button, or disconnect and then
reconnect the AC power cord to the AC power outlet.
The recorder will operate normally.
• Be sure to remove the disc and turn off the recorder
after use.
•
Disconnect the AC power cord from the AC outlet when you
don’t intend to use the recorder for long periods of time.
Handling Cautions
▌
Maintenance of Cabinet
▌
Disc Handling
▌
Disc Storage
▌
Precaution
01375E-VR350,355-XFA-ENG.indb 301375E-VR350,355-XFA-ENG.indb 3 2007-04-27 오후 5:54:462007-04-27 오후 5:54:46

Getting Started
English - 4
● DVD-VR350
This unit allows you to record and playback high quality
digital images on a DVD-RAM/DVD-RW/DVD-R disc.
You can record and edit digital video on DVD-RAM/
DVD-RW/DVD-R discs as if they were VCR tapes.
(DVD+RW/DVD+R discs can be played, but cannot be
recorded.)
● DVD-VR355
This unit allows you to record and playback high quality
digital video on DVD-RAM/DVD±RW/DVD±R discs.
You can record and edit digital video on DVD-RAM/
DVD±RW/DVD±R discs as if they were VCR tapes.
DVD-Video
• A digital versatile disc (DVD) can contain up to
135-minutes of images, 8 audio languages and 32
subtitle languages.
It is equipped with MPEG-2 picture compression and
Dolby 3D surround, allowing you to enjoy vivid and clear
theatre quality images in the comfort of your own home.
• When switching from the fi rst layer to the second layer
of a double-layered DVD Video disc, there may be
momentary distortion in the image and sound.
This is not a malfunction of the unit.
•
Once a DVD±R/DVD-RW(V) recorded is fi nalised, it is
playable in a standard DVD player.
Video CD
• Only CD-R disks made in the VCD format (ver 1.1 or 2.0)
can be played back.
• The moving pictures for PCs can be played back only
provided that they are recorded in VCD format in the
CD-Recording program.
• Please contact the CD-R maker for the inquiries related
to discs.
Audio CD
• An audio disc on which 44.1kHz PCM Audio is recorded.
• Plays CD-DA format audio CD-R and CD-RW discs.
This unit may not be able to play some CD-R or CD-RW
discs due to the condition of the recording.
CD-R/-RW
MP3 CD-R/-RW
• Only CD-R discs with MP3 fi les recorded with ISO9660
or JOLIET format can be played back
• Only MP3 fi les with the “mp3” or “MP3” extension can
be used.
• For MP3 fi les recorded with a VBR (Variable Bit Rates),
from 32 Kbps to 320 Kbps, the sound may cut in out.
• Playable bitrate range is from 56Kbps to 320Kbps.
•
The unit can handle a maximum of 1000 fi les and folders.
• DVD-RAM/DVD±RW/DVD±R discs that contain MP3
fi les can be played back.
JPEG CD-R/-RW
•
Only JPEG fi les with the “.jpg”, “.JPG” extension can be used.
•
The unit can handle a maximum of 1000 fi les and folders.
• Maximum size of progressive JPEG is 3M pixels.
• MOTION JPEG is not supported.
Disc Specifi cations
▌
• DVD-RAM/DVD±RW/DVD±R discs that contain JPEG
fi les can be played back.
Using CD-R/-RW
• Use a 700MB (80 minutes) CD-RW/-R disc.
If possible, do not use a 800MB (90 minutes) or above
disc, as the disc may not play back.
• If the CD-RW/-R disc was not recorded as a closed
session, you may experience a delay in the early play-
back time, and all recorded fi les may not play.
• Some CD-RW/-R discs may not be playable with this
unit, depending on the device which was used to burn
them. For contents recorded on CD-RW/-R media
from CDs for your personal use, playability may vary
depending on contents and discs.
Using MPEG4 disc
• Disc : CD-R/-RW, DVD-RAM, DVD±R/DVD±RW
• MPEG4 File with following extensions can be played :
.avi, .divx, .AVI, .DIVX
• MPEG4 Codec Format : DivX 3.11 DivX 4.x DivX 5.x
DivX-Pro Xvid
• Motion Compensation : QPEL, GMC
• four CC : MPG4, mpg4, DIV3, divX3, DIVX, divX, DX50,
MP43, mp43, XVID, xvid
• Available Audio Format : “MP3”, “MPEG1 Audio Layer2”,
“LPCM”, “AC3”, “DTS”, “MS ADPCM”
•
Supported subtitle fi le formats: .smi, .srt, .sub, .psb, .txt, .ass
DVD±R Disc Playback and Recording
• Once a DVD±R recorded is fi nalised, it is playable in a
standard DVD player.
•
You can record onto the available space on the disc and
perform editing functions such as giving titles to discs and
programmes and erasing programmes before fi nalising.
• When programming is erased from a DVD±R, that
space does not become available. Once an area on a
DVD±R is recorded on, that area is no longer available
for recording, whether the recording is erased or not.
•
It takes about 30 seconds for the unit to complete recording
management information after recording fi nishes.
• This product optimizes the DVD±R for each recording.
Optimizing is carried out when you start recording after
inserting the disc or turning on the unit. Recording onto
the disc may become impossible if optimizing is carried
out too many times.
• Playback may be impossible in some cases due to the
condition of recording.
• This unit can play back DVD±R discs recorded and
fi nalised with a Samsung DVD video recorder. It may
not be able to play some DVD±R discs depending on
the disc and the condition of the recording.
DVD-RW Disc Playback and Recording
• Recording and playback can be performed on DVD-RW
discs in both V and VR Modes.
• Once a DVD-RW recorded in VR Mode is fi nalised, you
cannot perform additional recording.
• Once a DVD-RW recorded in V Mode is fi nalised, it
becomes DVD-Video.
• In both modes, playback can be performed before and
after fi nalisation, but additional recording, deleting and
editing can not be performed after fi nalisation.
•
If you want to record the disc in VR Mode and then record
in V Mode, be sure to execute Format. Be careful when
executing Format because all the recorded data may be lost.
01375E-VR350,355-XFA-ENG.indb 401375E-VR350,355-XFA-ENG.indb 4 2007-04-27 오후 5:54:482007-04-27 오후 5:54:48

Getting Started
English - 5
• For an unused disc, a message that asks whether to
initialise a disc or not.
If you select "Yes", disc will be formatted in VR mode.
• DVD-RW(VR mode)
- This is a format that is used for recording data on
a DVD-RW disc. You can repeat recording, editing,
deleting, partial deletion, creation of playlist, and etc.
- A disc that is recorded in this mode may not be played
by existing DVD players.
• DVD-RW(V mode)
- This is a format that is used for recording data on a
DVD- RW or DVD-R disc. The disc can be played by an
existing DVD player once it has been fi nalised.
-
If a disc that has been recorded in V mode by a different
manufacturer’s recorder but has not been fi nalised it cannot
be played or additionally be recorded by this recorder.
DVD+RW Disc Playback and Recording
• With DVD+RW discs, there is no difference between
DVD-Video format(Video mode) and DVD-Video
Recording format (VR mode).
• You can make your own chapters on DVD+RWs and
edit them using the Chapter Edit menu.
• Finalising is generally unnecessary when using a
DVD+RW disc.
DVD-RAM Disc Playback and Recording
• For cartridge type DVD-RAM discs, remove the
cartridge and use the disc only.
• Ensure that the recording mode is set to VR mode.
Otherwise, this product will not be able to play the
recording.
• You cannot play a DVD-RAM in most DVD players due
to compatibility issues.
• Only DVD-RAM standard Version 2.0 discs can be
played in this unit.
•
DVD-RAM recorded on this unit may not work with other
DVD Players. To determine compatibility with these DVD-
RAM discs, refer to the user’s manual for the player.
Protection
• Programme-protected: See page 65 “Locking a Title”
• Disc-protected: See page 74 “Disc Protection”
✻
DVD-RAM/DVD±RW/DVD±R discs that are
incompatible with the DVD-VIDEO format can not be
played with this product.
✻
For more information on DVD recording compatibility,
consult your DVD-RAM/DVD±RW/DVD±R
manufacturer.
✻
Use of poor quality DVD-RAM/DVD±RW/DVD±R discs
may cause following unexpected problems including,
without limitation, recording failure, loss of recorded or
edited materials or damage to the recorder.
Do not use the following discs!
• LD, CD-G, CD-I, CD-ROM, DVD-ROM discs should not
be used in this product.
[Note]
Disc types that can be played : CD/CD-RW/-R/MP3/
JPEG/VCD/DVD-Video/DVD-RAM/DVD±RW/DVD±R.
However, if your DVD-RW/-R disc was recorded with
another device, it can be played only if it was recorded
and fi nalised in V mode.
• Some commercial discs and DVD discs purchased
outside your region may not be playable with this
product. When these discs are played, either “No
Disc.” or “The disc cannot be played. Please check the
regional code of the disc.” will be displayed.
• If your DVD-RAM/DVD±RW/DVD±R disc is an illegal
copy or is not in DVD video format, it may also not be
playable.
Disc compatibility
• A 8X speed DVD+RW or greater disc can be played, but
maximum recording speed is 4x.
• Not all brands of discs will be compatible with this unit.
COPY PROTECTION
• Many DVD discs are encoded with copy protection.
Because of this, you should only connect your DVD
Recorder & VCR directly to your TV, not to a VCR.
Connecting to a VCR results in a distorted picture
from copy-protected DVD discs.
• This product incorporates copyright protection
technology that is protected by methods claims of
certain U.S. patents and other intellectual property
rights owned by Macrovision Corporation and other
rights owners. Use of this copyright protection
technology must be authorized by Macrovision
Corporation, and is intended for home and other
limited viewing uses only unless otherwise authorized
by Macrovision Corporation. Reverse engineering or
disassembly is prohibited.
•
It is permissible to record television programmes, fi lm,
video tapes and other material only in the event that
third party copyrights and other rights are not violated.
01375E-VR350,355-XFA-ENG.indb 501375E-VR350,355-XFA-ENG.indb 5 2007-04-27 오후 5:54:492007-04-27 오후 5:54:49

Getting Started
English - 6
Contents
Getting Started
Warning .................................................................. 2
Precaution .............................................................. 3
Important Safety Instructions..................................3
Handling Cautions .................................................. 3
Maintenance of Cabinet ......................................... 3
Disc Handling ......................................................... 3
Disc Storage ........................................................... 3
Disc Specifi cations ................................................. 4
General Features ................................................... 8
Before Reading the User’s Manual ........................ 9
How to use the DVD Recorder & VCR ................... 9
Unpacking .............................................................. 10
Description ............................................................. 12
Front Panel (DVD-VR350)...................................... 12
Front Panel (DVD-VR355)...................................... 12
Front Panel Display ................................................ 13
Rear Panel (DVD-VR350) ...................................... 13
Rear Panel (DVD-VR355) ...................................... 14
Tour of the Remote Control ....................................15
Connecting & Setting Up
Connecting DVD Recorder & VCR to the TV using
the RF Cable ......................................................... 16
Connecting DVD Recorder & VCR to the TV using
the Audio/Video Cable ........................................... 16
Connecting the S-Video Cable ............................... 17
Connecting the Component Video Cable ............... 17
Connecting HDMI/DVI to a TV (DVD-VR355 only)
.. 18
Case 1 : Connecting to a TV with HDMI Jack ........18
Case 2 : Connecting to a TV with DVI Jack ........... 18
AV Receiver Connections ....................................... 19
Connecting External Devices .................................20
Case1 : Connecting a VCR, Set-Top Box(STB) or DVD
Recorder & VCR to the AUDIO/VIDEO AV 1 IN jacks
.... 20
Case 2 : Connecting a Camcorder to the AV 2 IN
jacks ....................................................................... 20
Case 3 : Connecting a DV Device to the DV IN jack
.. 20
System Setup
On-Screen Menu Navigation .................................. 21
Plug & Auto Setup .................................................. 21
Setting the Date and Time ...................................... 22
■
■
■
■
■
■
■
■
■
■
■
■
■
■
■
■
■
Auto Setup..............................................................22
Manual Setup .........................................................23
Selecting the RF OUT Sound Mode (B/G-D/K, I) ... 23
VIDEO Output CH .................................................. 24
Setting Up the Language Options ..........................24
Setting Up the Audio Options ................................. 25
Setting Up the Display (Video) Options .................. 26
Progressive scan .................................................... 27
Setting Up the Parental Control..............................29
VCR Setting............................................................ 30
DVD EP Mode Time ............................................... 31
Automatic Chapter Creator.....................................31
Quick Recording ..................................................... 32
Anynet+(HDMI-CEC) (DVD-VR355 only) ............... 32
Playback
DVD Playback
Region code (DVD-Video only) ..............................34
Logos of Discs that can be played ......................... 34
Disc types that can be played ................................ 34
Playing a Disc......................................................... 35
Using the Disc Menu and Title Menu...................... 36
Using the Search & Skip Functions ........................ 36
Slow Motion Play/Step Motion Play........................37
Repeat Play ............................................................ 39
Selecting the Subtitle Language.............................39
Selecting the Audio language ................................. 40
Changing the Camera Angle .................................. 40
Zooming-In ............................................................. 40
Using the Bookmarks ............................................. 41
Using the Markers .................................................. 42
Playing back an Audio CD (CD-DA)/MP3............... 43
Buttons on the Remote Control used for Audio
CD(CD-DA)/MP3 playback ..................................... 43
Playing back an Audio CD (CD-DA) ....................... 43
Playing back an MP3 Disc......................................44
Repeat Playback of an Audio/MP3 Disc ................. 44
Play Option Mode ................................................... 45
To Programme Tracks ............................................ 45
Playing back a Picture Disc .................................... 45
Playing back an MPEG4 Disc ................................ 46
VCR Playback
■
■
■
■
■
■
■
■
■
■
■
■
■
■
■
■
■
■
■
■
■
■
■
■
■
■
■
■
■
■
■
01375E-VR350,355-XFA-ENG.indb 601375E-VR350,355-XFA-ENG.indb 6 2007-04-27 오후 5:54:512007-04-27 오후 5:54:51

Getting Started
English - 7
Playing back a VHS Tape (VCR) ............................47
Tracking ..................................................................47
Special VCR Playback Features ............................47
Variable Search System ......................................... 48
Recording
DVD Recording
Recordable discs .................................................... 49
Compatibility between Samsung and Other
Company’s Recorder .............................................. 49
Recording Formats ................................................. 50
Recording Mode ..................................................... 50
Unrecordable video ................................................51
Recording immediately ........................................... 52
Recording through a DV Input jack ........................ 53
Making a One Touch Recording (OTR) .................. 53
Making a Timer Recording .....................................54
Editing the Scheduled Record List .........................56
Deleting the Scheduled Record List ....................... 56
EZ REC MODE ...................................................... 57
VCR Recording
Basic VCR Recording............................................. 58
Check Remaining Time .......................................... 59
Special Recording Features ................................... 59
Copy to DVD or VCR.............................................. 60
To copy from DVD to VCR...................................... 60
To copy from VCR to DVD...................................... 61
Editing
Playing the Title List ...............................................62
Recording on Free space ....................................... 63
Basic Editing (Title List) .......................................... 63
Renaming (Labeling) a Title ...................................63
Locking (Protecting) a Title ..................................... 64
Deleting a Title........................................................ 64
Deleting a Section of a Title.................................... 65
Editing a Chapter....................................................65
Dividing a Title ...................................................... 67
Advanced Editing (Playlist).....................................68
Creating a Playlist .................................................. 68
Playing Titles in the Playlist ................................... 69
Renaming a Playlist Title ........................................ 69
Editing a Scene for the Playlist...............................69
Copying a Playlist to the VCR ................................72
■
■
■
■
■
■
■
■
■
■
■
■
■
■
■
■
■
■
Deleting a Playlist from the Playlist ........................72
Disc Manager ......................................................... 73
Editing the Disc Name ............................................ 73
Disc Protection ....................................................... 73
Formatting a Disc ................................................... 74
Finalising a Disc ..................................................... 74
Unfi nalising a Disc (V/VR mode) ............................75
Delete All Title Lists ................................................ 76
Edit Compatible ...................................................... 76
Reference
Troubleshooting ......................................................77
Specifi cations ......................................................... 80
■
■
■
01375E-VR350,355-XFA-ENG.indb 701375E-VR350,355-XFA-ENG.indb 7 2007-04-27 오후 5:54:532007-04-27 오후 5:54:53

Getting Started
English - 8
A variety of functions with easy-to-use user interface
Integrated menu system and messaging functionality
allow you to perform the desired operations easily and
conveniently. With a DVD-RAM/DVD-RW(VR mode) disc,
you can edit recorded images, create playlist, and edit
images in specifi c sequence according to your needs.
MPEG4 playback
This DVD Recorder & VCR can play MPEG4 formats
within an avi fi le.
DivX Certifi cation
DivX, DivX Certifi ed, and associated logos
are trademarks of DivXNetworks Inc, and
are used under licence.
HDMI (High Defi nition Multimedia Interface)
HDMI reduces picture noise by allowing a pure digital
video/audio signal path from the DVD Recorder & VCR to
your TV. (DVD-VR355 only)
EZ REC MODE
This function allows you Initialise and Finalise a disc
automatically. (See page 58)
● DVD-VR350
This unit allows you to record and playback high quality
digital images on a DVD-RAM/DVD-RW/DVD-R disc.
You can record and edit digital video on DVD-RAM/
DVD-RW/DVD-R discs as if they were VCR tapes.
(DVD+RW/DVD+R discs can be played, but cannot be
recorded.)
● DVD-VR355
This unit allows you to record and playback high quality
digital video on DVD-RAM/DVD±RW/DVD±R discs.
You can record and edit digital video on DVD-RAM/
DVD±RW/DVD±R discs as if they were VCR tapes.
High quality digital audio and video recording and
playback
You can record up to approximately 16-hours of video on
a double side 9.4 GB DVD-RAM disc,up to 15-hours on a
dual-layer 8.5GB DVD±R disc, and up to 8-hours on a 4.7
GB DVD-RAM/DVD±RW/DVD±R disc, depending on the
recording mode.
Creating DVD video titles using DVD±RW/DVD±R discs
With the DVD-VR350,VR355 you can create your own
DVD video titles on 4.7 GB DVD±RW/DVD±R discs.
A Variety of Recording Options
Select an appropriate recording mode between XP, SP,
LP and EP to meet your recording needs. (See page 50)
• XP mode - High quality, about 1 hour
• SP mode - Standard quality, about 2 hours
• LP mode - Low quality, about 4 hours
• EP mode - Lower quality, about 6 or 8 hours
- The dual layer DVD±Rs have approximately double the
capacity of single layer DVD±Rs. (See page 34.)
Copying digital camcorder content using DV input jack
Record DV Device onto DVD-RAM/DVD±RW/DVD±R
discs or video tape using the DV input jack (IEEE1394-
4pin). (See page 53)
High quality progressive scan
Progressive scanning provides high resolution and fl icker
free images. The 10-bit 54-MHz DAC, 2D Y/C Separating
circuitry and Time Base Corrector processor technology
provide you with the highest image playback and
recording quality. (See page 18)
General Features
01375E-VR350,355-XFA-ENG.indb 801375E-VR350,355-XFA-ENG.indb 8 2007-04-27 오후 5:54:552007-04-27 오후 5:54:55

Getting Started
English - 9
Make sure to check the following terms before
reading the user’s manual.
Icons that will be used in manual
Before Reading the User’s Manual
How to use the DVD Recorder & VCR
Please check available disc type before recording.
● DVD-VR350
(DVD+RW/DVD+R discs can be played, but cannot be
recorded.)
● DVD-VR355
If you want to repeatedly record on the same disc or you
want to edit the disc after recording, select a rewritable
DVD±RW or DVD-RAM type disc. If you want to save a
recording without any changes, choose a non-rewritable
DVD±R.
Step 1 : Select the disc type
▌
Unlike a VCR, the recorder automatically starts formatting
when an unused disc is inserted. This is required for the
preparation of recording on a disc.
Using a DVD-RAM
This type of disc can be formatted in DVD-Video
Recording format (VR mode). You can edit recorded
images and create a playlist in a specifi c sequence
according to your requirements.
Using a DVD±RW/+R
• When an unused DVD±RW/+R disc is fi rst inserted,
the message “Uninitialised Disc. Do you want to
initialise this disc?” will be displayed. If you select Yes,
initialising will be start. DVD-RW disc can be formatted
in either DVD-Video format (Video mode) or DVD-Video
Recording format (VR mode)
• With DVD+RW discs, there is no difference between
DVD-Video format (Video mode) and DVD-Video
Recording format (VR mode).
Using a DVD-R
Formatting disc is unnecessary and only V mode Recording
is supported. You can play this type of disc on various DVD
components only when they have been fi nalised.
Step 2 : Format the disc to start recording
▌
You can only use either the VR or V mode on a
DVD-RW, but not both at the same time.
You can format a DVD-RW to V or VR mode using
disc manager. It should be noted that the data of
the disc may be lost when changing formats.
■
■
About the use of this user’s manual
1) Be sure to be familiar with Safety Instructions before
using this product. (See pages 2~5)
2) If a problem occurs, check the Troubleshooting.
(See pages 78~80)
Copyright
©2007 Samsung Electronics Co.
All rights reserved; No part or whole of this user’s
manual may be reproduced or copied without the prior
written permission of Samsung Electronics Co.
Icon Term Defi nition
DVD
This involves a function available
DVD or DVD-RW(V)/DVD±R
discs that have been recorded
and fi nalised.
VCD
This involves a function available
in VCD discs.
RAM
This involves a function available
in DVD-RAM.
-RW
This involves a function available
in DVD-RW.
-R
This involves a function available
in DVD-R.
+RW
This involves a function available
in DVD+RW.
+R
This involves a function available
in DVD+R.
CD
This involves a function
available in a data CD (CD-R or
CD-RW).
JPEG
This involves a function
available in CD-R/-RW or DVD-
RAM/DVD±RW/DVD±R discs.
MP3
This involves a function
available in CD-R/-RW or DVD-
RAM/DVD±RW/DVD±R discs.
MPEG4
This involves a function available
in a data CD-R/-RW or DVD-
RAM/DVD±RW/DVD±R discs.
VHS
This involves a function
available in VIDEO Tape.
Caution
This involves a case where a
function does not operate or
settings may be canceled.
NOTE
This involves tips or instructions
on the page that help each
function operate.
One-Touch
button
A function that can be operated
button by using only one button.
ANYKEY
button
A function that can be operated
by using ANYKEY button.
01375E-VR350,355-XFA-ENG.indb 901375E-VR350,355-XFA-ENG.indb 9 2007-04-27 오후 5:54:572007-04-27 오후 5:54:57

Getting Started
English - 10
Step 4 : Playing
▌
You can select the title you want to play in a displayed
menu and then immediately start playback.
A DVD consists of sections called titles, and sub sections
called chapters.
During recording, a title is created between two points
where you start and stop recording.
Chapters will be created automatically when you fi nalise
recording on DVD-RW/-R discs in V mode.
You can make your own chapters on DVD+RWs and edit
them using the Chapter Edit menu.
The chapter’s length (interval between chapters) varies
according to the recording mode.
Step 5 : Editing a recorded disc
▌
Editing on discs is easier than conventional video tapes.
The recorder supports many different edit functions,
possible only with DVDs. With a simple and easy edit
menu, you can operate various edit functions, such as
delete, copy, rename, lock, etc., on a recorded title.
Creating a playlist (DVD-RAM/-RW in VR mode)
With this recorder, you can create a new playlist on the
same disc and edit it without the change of the original
recording.
Step 6
:
Finalising & Playing on other DVD components
▌
To play your DVD on other DVD components, fi nalising
may be necessary. First, fi nish all editing and recording
operations, then fi nalise the disc.
When using a DVD-RW disc in VR Mode
Although fi nalising is generally unnecessary when playing
the disc on a VR Mode compatible component, a fi nalised
disc should be used for playback.
When using a DVD-RW disc in V mode
The disc should be fi nalised fi rst to enable playback
on anything other than this recorder. No more editing
or recording can be made on the disc once it has been
fi nalised.
When using a DVD±R disc
You should fi nalise the disc to play it on a component
other than this recorder. You cannot edit or record on the
disc once it has been fi nalised.
Install Batteries in the Remote Control
• Open the battery cover on the back of the remote
control.
• Insert two AAA batteries. Make sure that the polarities
(+ and -) are aligned correctly.
• Replace the battery cover.
If the remote control does not operate properly:
• Check the polarity +/- of the batteries (Dry-Cell)
• Check if the batteries are drained.
• Check if the remote sensor is blocked by obstacles.
• Check if there is any fl uorescent lighting nearby.
Dispose of batteries according to local environmental
regulations. Do not put them in the household trash.
• Audio/Video Cable
• RF Cable for TV Control
• HDMI Cable(DVD-VR355 only)
• Remote control.
• Batteries for Remote Control (AAA Size)
• User’s Manual
• Quick Guide
Accessories
▌
Preparing the Remote Control
▌
You can fi nalise discs automatically using EZ
REC MODE. (see page 58)
■
Unpacking
There are two different recording methods: Direct
Recording and Timer Recording. Timer recording is
classifi ed as a Date : Once, Daily or Weekly.
Recording mode : XP (high quality mode), SP (standard
quality mode), LP (long recording mode), and EP
(extended mode).
Step 3 : Recording
▌
01375E-VR350,355-XFA-ENG.indb 1001375E-VR350,355-XFA-ENG.indb 10 2007-04-27 오후 5:55:002007-04-27 오후 5:55:00

Getting Started
English - 11
Result: If your television is compatible with the remote
control, it will switch off. It is now programmed to
operate with the remote control.
To determine whether your television is compatible, follow the instructions below.
1. Switch your television on.
2. Point the remote control towards the television.
3. Press and hold the TV button and enter the two-fi gure code simultaneously corresponding to the brand of your
television, by pressing the appropriate number buttons.
Controllable TV Codes
You can then control the television using the
following buttons.
If several codes are indicated for your television
brand, try each one in turn until you fi nd one that
works.
If you replace the remote control’s batteries, you
must set the brand code again.
■
■
BRAND SELECT NUMBER
SAMSUNG
TV +01, +02, +03, +04, +05, +06, +35
AKAI
TV +12
BANG & OLUFSEN
TV +22
BLAUPUNKT
TV +09
BRANDT
TV +14
BRIONVEGA
TV +22
CGE
TV +21
CONTINENTAL EDISON
TV +24
FERGUSON
TV +14
FINLUX
TV +02, +17, +21
FISHER
TV +12
FORMENTI
TV +22
GRUNDIG
TV +09, +17, +21
HITACHI
TV +11, +13, +14, +24
IMPERIAL
TV +21
JVC
TV +32
LG
TV +02, +30
LOEWE
TV +02
LOEWE OPTA
TV +02, +22
METZ
TV +22
MITSUBISHI
TV +02, +16
MIVAR
TV +21, +29
NOKIA
TV +23
NORDMENDE
TV +13, +14, +22, +24
PANASONIC
TV +08, +23, +24, +25, +26, +27
PHILIPS
TV +02, +20, +22
PHONOLA
TV +02, +20, +22
PIONEER
TV +14, +23
RADIOLA
TV +02, +20
RADIOMARELLI
TV +22
REX
TV +23
SABA
TV +13, +14, +22, +23, +24
SALORA
TV +23
SANYO
TV +12, +16
SCHNEIDER
TV +02
SELECO
TV +23
SHARP
TV +10, +16, +31
SIEMENS
TV +09
SINGER
TV +22
SINUDYNE
TV +22
SONY
TV +15, +16
TELEAVA
TV +14
TELEFUNKEN
TV +14, +24, +28
THOMSON
TV +13, +14, +24
BRAND SELECT NUMBER
THOMSON ASIA
TV +33, +34
TOSHIBA
TV +07, +16, +17, +18, +19, +21
WEGA
TV +22
YOKO
TV +02
Button Function
STANDBY/ON
Used to switch the television on and off.
INPUT SEL. Used to select an external source.
TV VOL (+ or -)
Used to adjust the volume of the television.
PROG (
or
)
Used to select the desired Programme.
TV MUTE Used to toggle the sound on and off.
0~9 Used to input number directly.
01375E-VR350,355-XFA-ENG.indb 1101375E-VR350,355-XFA-ENG.indb 11 2007-04-27 오후 5:55:022007-04-27 오후 5:55:02

Getting Started
English - 12
Front Panel (DVD-VR350)
▌
Front Panel (DVD-VR355)
▌
1. DVD DECK
2. DVD OPEN/CLOSE BUTTON
3. VCR DECK
4. VCR EJECT BUTTON
5. STANDBY/ON BUTTON
6. VIDEO INPUT JACK (AV2 IN)
7. AUDIO INPUT JACK (AV2 IN)
8. DV INPUT JACK
9. P.SCAN BUTTON
10. FRONT PANEL DISPLAY
11. DVD/VCR SELECT BUTTON
12. COPY BUTTONS
13. PROG / BUTTONS
14. RECORD BUTTON
15. STOP BUTTON
16. PLAY/PAUSE BUTTON
Description
1. DVD DECK
2. DVD OPEN/CLOSE BUTTON
3. VCR DECK
4. VCR EJECT BUTTON
5. STANDBY/ON BUTTON
6. VIDEO INPUT JACK (AV2 IN)
7. AUDIO INPUT JACK (AV2 IN)
8. DV INPUT JACK
9. P.SCAN BUTTON
10. FRONT PANEL DISPLAY
11. DVD/VCR SELECT BUTTON
12. COPY BUTTONS
13. PROG / BUTTONS
14. RECORD BUTTON
15. STOP BUTTON
16. PLAY/PAUSE BUTTON
1 2 3 4
161514
13
121110
9876
5
1 2 3 4
161514
13
121110
9876
5
01375E-VR350,355-XFA-ENG.indb 1201375E-VR350,355-XFA-ENG.indb 12 2007-04-27 오후 5:55:042007-04-27 오후 5:55:04

Getting Started
English - 13
1. DVD is activated.
2. DVD-RAM is activated.
3. DVD(±)R or DVD(±)RW is activated.
4. Progressive Scan mode is activated.
5. Record function is activated.
6. VCR is activated.
7. DVD or CD media is loaded.
8. The time, counter position or current deck
status is indicated.
9. When you set a Timer recording, this
indicator is illuminated.
10. VHS Video tape is loaded.
Front Panel Display
▌
12 345 6
10
987
1. S-VIDEO OUT JACK
2. AUDIO L, R OUT JACKS
3. DIGITAL AUDIO OUT JACK
(OPTICAL/COAXIAL)
4. AV 1 IN JACKS (Video/Audio)
5. AV OUT JACKS (Video/Audio)
6. COMPONENT VIDEO OUT JACKS
7. OUT TO TV CONNECTOR
8. AERIAL IN CONNECTOR
Rear Panel (DVD-VR350)
▌
12356 784
01375E-VR350,355-XFA-ENG.indb 1301375E-VR350,355-XFA-ENG.indb 13 2007-04-27 오후 5:55:072007-04-27 오후 5:55:07

Getting Started
English - 14
1. S-VIDEO OUT JACK
2. AUDIO L, R OUT JACKS
3. DIGITAL AUDIO OUT JACK
(OPTICAL/COAXIAL)
4. AV 1 IN JACKS (Video/Audio)
5. AV OUT JACKS (Video/Audio)
6. COMPONENT VIDEO OUT JACKS
7. OUT TO TV CONNECTOR
8. AERIAL IN CONNECTOR
9. HDMI OUTPUT (DVD-VR355 only)
Rear Panel (DVD-VR355)
▌
12356 7849
01375E-VR350,355-XFA-ENG.indb 1401375E-VR350,355-XFA-ENG.indb 14 2007-04-27 오후 5:55:092007-04-27 오후 5:55:09

Getting Started
English - 15
1. DVD Button
Press this when you use a DVD.
2. TV Button
Press this to operate TV.
3. STANDBY/ON Button
4. NUMBER Button
5. IPC Button
6. F.ADV/SKIP Button
7. Playback-related Buttons
Forward/Rewind, Search, Skip, Stop, Play/Still,
REC PAUSE
8. TV VOL (Volume) Button
TV volume adjustment
9. MENU Button
Brings up the DVD Recorder & VCR’s setup menu.
10. OK/DIRECTION Buttons
(▲/▼/◄/► Buttons)
11. INFO Button
This will display current setting or disc status.
12. TITLE LIST/DISC MENU Button
Press this to enter the Title List/Disc menu.
13. SUBTITLE Button
Press this to switch the DVD’s subtitle language.
14. ANYKEY Button
Press this to view the status of the disc that is
being played.
15. REC Button
Press this to make a recording on DVD-RAM/
DVD±RW/±R discs and VHS Video tape.
16. TO DVD copy Button
Press this when you copy from the VCR to the
DVD.
17. REC SPEED Button
Press this to set the desired recording time and
picture quality.
18. VCR Button
Press this when you use a VCR.
19. INPUT SEL. Button
Select input signal in external input mode
(Tuner, AV1, AV2 or DV input).
20. OPEN/CLOSE Button
To open and close the disc tray.
21. TV STANDBY/ON Button
22. TV/VCR Button (Not available)
23. MARKER Button
Press this to bookmark or mark a position while
playing a disc.
24. PROG/TRK Button
Press this to select a TV channel
/Press this to remove the white line.
25. TV MUTE Button
This operates as sound mute (TV mode).
26. RETURN Button
Returns to previous menu.
27. EXIT Button
28. PLAY LIST/TITLE MENU Button
Press this to enter the Edit playlist/Title menu.
29. AUDIO Button
Use this to access various audio functions on a
disc (DVD mode).
30. EZ REC MODE Button
31. TIMER REC Button
Press this when you use Timer Recording.
32. TO VCR copy Button
Press this when you copy from the DVD to the
VCR.
33. CANCEL Button
Your DVD Recorder & VCR remote control will work with Samsung televisions and compatible brands.
Tour of the Remote Control
▌
01375E-VR350,355-XFA-ENG.indb 1501375E-VR350,355-XFA-ENG.indb 15 2007-04-27 오후 5:55:112007-04-27 오후 5:55:11

Connecting & Setting Up
English - 16
Connecting DVD Recorder & VCR
to the TV using the RF Cable
Make sure that both the television and the
DVD Recorder & VCR are switched off before
connecting the cables.
■
1. Remove the aerial or network input cable from the
television.
2. Connect this cable to the 75Ω aerial jack marked
on the rear of your DVD Recorder & VCR.
3. Plug the RF Cable supplied into the jack on your
DVD Recorder & VCR.
4. Plug the other end of the RF Cable into the connector
previously used for the aerial on the television.
Connecting & Setting Up
To RF IN
To RF OUT
RF Cable
To ANT INPUT
TV
ANT
You can connect your DVD Recorder & VCR to
the television using the Audio/Video cable if the
appropriate input is available on the television. You
thus:
• Obtain better quality sound and pictures
• Simplify the setting up procedure of your DVD Recorder
& VCR
1. Connect the RF Cable.
2. Connect one end of the Audio/Video cable to the Video
output and Audio L, R output jack on the rear of the
DVD Recorder & VCR.
3. Plug the other end into the appropriate connector on
the television.
Connecting DVD Recorder & VCR to
the TV using the Audio/Video Cable
Regardless of the type of connection chosen,
you must always connect the RF Cable supplied.
Otherwise, no picture will be visible on the screen
when the DVD Recorder & VCR is switched off.
Make sure that both the television and the
DVD Recorder & VCR are switched off before
connecting the cables.
■
■
ANT IN
RF cable
Aerial
Aerial cable
01375E-VR350,355-XFA-ENG.indb 1601375E-VR350,355-XFA-ENG.indb 16 2007-04-27 오후 5:55:132007-04-27 오후 5:55:13

Connecting & Setting Up
English - 17
You will enjoy high quality images. S-Video seperates
the picture element into black and white(Y) and
colour(C) signals to present clearer images than
composite video output mode.
1. Connect one end of the S-Video cable into the
S-VIDEO output jack on the rear of the DVD Recorder
& VCR.
2. Plug the other end of the S-Video cable into the
appropriate input connector on the television.
3. Connect one end of the audio cable supplied into the
AUDIO output jacks on the rear of the DVD Recorder
& VCR.
• Take care to respect the colour coding of the up and
down channels.
4. Plug the other end of the audio cables into the
appropriate input connectors on the television.
Connecting the S-Video Cable
red
white
white
red
S-Video cable
(not supplied)
You will enjoy high quality accurate colour reproduction
images. Component video seperates the picture
element into black and white(Y), blue(P
B
), red(P
R
)
signals to present most clear and clean images.
1. Connect Component video cables between the
COMPONENT VIDEO OUT jacks on the rear of the
DVD Recorder & VCR and COMPONENT VIDEO IN
jacks on the rear of the TV.
2. Connect audio cables between the audio output jacks
on the rear of the DVD Recorder & VCR and AUDIO
IN jacks on the rear of the TV.
• Take care to respect the colour coding of the up and
down channels.
• Press the input selector on your TV remote control
until the Component signal from the DVD Recorder &
VCR appears on your TV screen.
Connecting the Component
Video Cable
COMPONENT INPUT
red
white
red
white
Component
cable
(not supplied)
01375E-VR350,355-XFA-ENG.indb 1701375E-VR350,355-XFA-ENG.indb 17 2007-04-27 오후 5:55:162007-04-27 오후 5:55:16

Connecting & Setting Up
English - 18
• For more information about Progressive setting, refer to
the page 27.
• Make sure that the colour coded connections match.
That is, the Y, P
B
and P
R
component output jacks of
your DVD Recorder & VCR should be connected to the
exact corresponding component input jacks on your TV.
Otherwise, red or blue images will be displayed on the
TV screen.
• Consumers should note that not all high defi nition
television sets are fully compatible with this product
and may cause artifacts to be displayed in the picture.
In case of progressive scan picture problems, it is
recommended that you switch the connection to the
standard defi nition output.
If there are questions regarding your Samsung TV set’
s compatibility with this DVD Recorder & VCR, please
contact our customer service centre.
Progressive Scan
▌
Your TV must support progressive scan input to
allow to watch progressive scan component video
out. (See page 27)
See your TV User’s Manual to fi nd out if your TV
supports Progressive Scan.
If Progressive Scan is supported, follow the TV
User’s instructions regarding Progressive Scan
settings in the TV’s menu system.
Depending on your TV, the method of connection
may differ from the illustration above.
What is “Progressive Scan”?
Progressive scan has twice as many scanning
lines as the interlace output method has.
Progressive scanning method can provide better
and clearer picture quality.
You must connect the DVD Recorder & VCR to
the component(s) before using the Progressive
Scan feature.
The Component jacks will not output video
resolutions above 576p.
To view 720p and 1080i, connect the DVD
Recorder & VCR to your TV with the HDMI cable.
With HDMI connected, press the P.SCAN button
to alternate between all available resolutions.
(See page 29) (DVD-VR355 only)
■
■
■
■
■
If your TV has a HDMI/DVI input, connect the HDMI/
DVI cable to the TV. You will enjoy the best quality
images and sounds.
Connecting HDMI/DVI to a TV
(DVD-VR355 only)
Case 1 : Connecting to a TV with HDMI
Jack
▌
• Using the HDMI cable, connect the HDMI OUT jack on
the rear of the DVD Recorder & VCR to the HDMI IN
jack of your TV.
• Press the input selector on your TV remote control
until the HDMI signal from the DVD Recorder & VCR
appears on your TV screen.
Case 2 : Connecting to a TV with DVI Jack
▌
• Using the DVI Adapter Cable, connect the HDMI OUT
jack on the rear of the DVD Recorder & VCR to the DVI
IN jack of your TV.
• Using the audio cables, connect the AUDIO (red and
white) OUT jacks on the rear of the DVD Recorder &
VCR to the AUDIO (red and white) IN jacks of your TV.
Turn on the DVD Recorder & VCR and TV.
• Press the input selector on your TV remote control until
the DVI signal from the DVD Recorder & VCR appears
on your TV screen.
HDMI cable
(not supplied)
To watch through the HDMI output, set the
digital audio output to PCM. (See page 26)
Depending on the HDMI device (TV/HDMI Receiver)
you use, audio may not be supported. If TV does
not support Dolby digital/DTS, Audio output is not
available when you set Digital output as Bitstream
or select DTS On in Audio setup menu. In this case,
set the digital audio output to PCM or DTS off.
If you connect the HDMI cable between Samsung
TV, you can operate easily DVD Recorder & VCR
using the TV remote control.(This is only available
with Samsung TVs that support Anynet+(HDMI-
CEC).) (See pages 32~33)
Please check the logo (If your TV has an
logo, then it supports Anynet+ function.)
■
■
■
■
01375E-VR350,355-XFA-ENG.indb 1801375E-VR350,355-XFA-ENG.indb 18 2007-04-27 오후 5:55:192007-04-27 오후 5:55:19

Connecting & Setting Up
English - 19
To change HDMI output resolution, see pages
27~28.
HDMI (High Defi nition Multimedia Interface)
HDMI is an interface to enable the digital
transmission of video and audio data with just a
single connector. Since HDMI is based on DVI,
it is completely compatible with DVI. The only
difference between HDMI and DVI is that HDMI
supports multi-channel audio.
Using HDMI, the DVD Recorder & VCR transmits
a digital video and audio signal and displays a
vivid picture on a TV having an HDMI input jack.
HDMI connection description
HDMI connector - Both uncompressed video data
and digital audio data (LPCM or Bit Stream data).
- Though the DVD Recorder & VCR uses a HDMI
cable, the DVD Recorder & VCR outputs only a
pure digital signal to the TV.
- If TV does not support HDCP (High-bandwidth
Digital Content Protection), snow noise appears
on the screen.
Why does Samsung use HDMI?
Analog TVs require an analog video/audio
signal. However, when playing a DVD, the data
transmitted to a TV is digital. Therefore either a
digital-to-analog converter (in the DVD Recorder
& VCR) or an analog-to-digital converter (in
the TV) is required. During this conversion, the
picture quality is degraded due to noise and
signal loss. HDMI technology is superior because
it requires no D/A conversion and is a pure digital
signal from the DVD Recorder & VCR to your TV.
What is the HDCP?
HDCP (High-bandwidth Digital Content
Protection) is a system for protecting DVD
content outputted via HDMI from being copied.
It provides a secure digital link between a video
source (PC, DVD, etc) and a display device (TV,
projector, etc). Content is encrypted at the source
device to prevent unauthorized copies from being
made.
■
■
■
■
■
red white
DVI adapter cable
(not supplied)
To take full advantage of the movie theatre
experience that DVD offers, you may want to connect
your DVD Recorder & VCR to a complete Surround
Sound system, including an A/V Receiver and six
Surround Sound speakers.
If your A/V receiver is equipped with a Dolby Digital
Decoder, you have the option to bypass the DVD
Recorder & VCR’s built-in Dolby Digital Decoder.
Use the Digital Audio Out connection below.
To enjoy Dolby digital or DTS sound, you must set up
the audio settings. (See page 25)
1. Connect a Digital Audio optical/coaxial cables from the
Digital Audio Out jacks on the rear panel of the DVD
Recorder & VCR to their corresponding Digital Audio
Input jacks on your A/V Receiver:
AV Receiver Connections
Manufactured under licence from Dolby Laboratories.
“Dolby” and the double-D symbol are trademarks of
Dolby Laboratories.
“DTS” and “DTS Digital Out” are trademarks of DTS,
Inc.
To Digital Audio Input of an A/V Receiver
with a Dolby, MPEG2 or DTS Digital
Decoder
or
Rear(L)
Front(L)
Rear(R)
Front(R)
Subwoofer Centre
01375E-VR350,355-XFA-ENG.indb 1901375E-VR350,355-XFA-ENG.indb 19 2007-04-27 오후 5:55:222007-04-27 오후 5:55:22

Connecting & Setting Up
English - 20
Connecting External Devices
This allows you to connect your DVD Recorder &
VCR to other external devices and view or record
their outputs.
• Case 1 : Connecting a VCR, Set-Top Box(STB) or DVD
Recorder & VCR to the AUDIO/VIDEO AV 1 IN
jacks.
• Case 2 :
Connecting a Camcorder to the AV 2 IN in jacks.
• Case 3 : Connecting a DV Device to the DV IN jack
Case1 : Connecting a VCR, Set-Top Box(STB) or DVD
Recorder & VCR to the AUDIO/VIDEO AV 1 IN jacks
▌
If the input is not selected automatically, use
INPUT SEL. button to select proper input.
■
Case 2 : Connecting a Camcorder to
the AV 2 IN jacks
▌
You can use the AV 2 IN jacks on the front panel
of the DVD Recorder & VCR. You can record from
connected equipment.
Connecting a VCR or external device to AUDIO/
VIDEO AV 1 IN jacks of the DVD Recorder & VCR.
You can record from connected equipment (VCR,
STB or DVD).
You can also use the AV 2 IN jacks on the front
panel of the DVD Recorder & VCR.
Copy protected content cannot be recorded.
■
■
Case 3 : Connecting a DV Device to
the DV IN jack
▌
If your DV Device has a DV output jack, connect it to
the DV input jack of your DVD Recorder & VCR.
• If your camcorder has a DV output jack, see page 53 for
more information.
01375E-VR350,355-XFA-ENG.indb 2001375E-VR350,355-XFA-ENG.indb 20 2007-04-27 오후 5:55:252007-04-27 오후 5:55:25

System Setup
English - 21
On-Screen Menu Navigation
The on-screen menus allow you to enable or disable various
functions on your DVD Recorder & VCR.
Press the MENU button to open the on-screen menu and then use
the following buttons to navigate through the on screen menus.
1. ▲▼, ◄► Buttons
Press these buttons on the remote control to move the selection bar
▲▼, ◄► to cycle through the menu options.
2. OK Button
Press this button on the remote control to confi rm any new settings.
3. RETURN Button
Press this button on the remote control to return to the previous menu
screen displayed or to exit the on-screen menu.
4. EXIT Button
Press this button to exit the on-screen menu.
Plug & Auto Setup
The DVD Recorder & VCR will automatically set itself up when it is
plugged into the mains for the fi rst time.
TV stations will be stored in memory. The process takes a few
minutes. The DVD Recorder & VCR will then be ready for use.
1. Connect the RF cable as indicated on page 16.
• Connecting Your DVD Recorder & VCR to the TV using the RF Cable
and Audio/Video cable.
2. Plug the DVD Recorder & VCR into the mains.
• “Auto” in the front panel display fl ickers.
3. Press the ▲▼ buttons select desired language, then press the OK
button.
The message “Auto Setup will be started. Check antenna and TV
cable connection.” is displayed.
4. Start the auto setup.
5. Start the auto scanning.
6. Check the date and time.
Refer to “Setting the Date and Time” to change the date and time. (See
page 22)
System Setup
Auto Channel Memory
Stop
50%
Auto Setup
DVD-Recorder
No Disc
Language Set English
Français
Deutsch
Español
Italiano
Nederlands
Русский
MOVE OK RETURN
Auto Setup
DVD-Recorder
No Disc
Date Time
MON
JAN 01 2007 12 00
MOVE OK RETURN
Setup
DVD-Recorder
No Disc
Programme
Setup
System
►
Clock Set
►
Language
►
Audio
►
Video
►
Parental Control
►
Install
►
MOVE OK RETURN EXIT
01375E-VR350,355-XFA-ENG.indb 2101375E-VR350,355-XFA-ENG.indb 21 2007-04-27 오후 5:55:282007-04-27 오후 5:55:28

System Setup
English - 22
Setting the Date and Time
Your DVD Recorder & VCR contains a 24-hour clock and calendar
used to:
• Automatically stop a programme recording
• Preset your DVD Recorder & VCR to record a programme automatically
• You must set the date and time when you purchase the DVD Recorder
& VCR.
• Do not forget to reset the time when you change clocks from winter to
summer time and vice versa.
1. With the unit in Stop mode/No Disc mode, press the MENU button.
2.
Press the ▲▼ buttons to select Setup, then press the OK or ► button.
3.
Press the ▲▼ buttons to select Clock Set, then press the OK or ► button.
4.
Press the ◄► buttons to select the hour, minutes, day, month and year.
• The selected item is highlighted.
5. Press the ▲▼ buttons to increase or decrease the value.
• The day of the week is displayed automatically.
• You can hold the ▲▼ buttons down to scroll more quickly through
the values.
6. Press the OK button, then the date and time will be saved. If you don’t
press the OK button, it will not be saved.
7. Press the EXIT button to exit the menu.
You do not need to preset the stations if you have already set them
automatically (See Plug & Auto Setup on page 21).
Your DVD Recorder & VCR contains a built-in tuner used to receive
television broadcasts.
You must preset the stations received through the tuner.
This can be done by:
• Plug & Auto Setup (See page 21)
• Auto Setup
• Manual Setup (See page 23)
1. With the unit in Stop mode/No Disc mode, press the MENU button.
2.
Press the ▲▼ buttons to select Setup, then press the OK or ► button.
3.
Press the ▲▼ buttons to select Install, then press the OK or ► button.
4.
Press the ▲▼ buttons to select Auto Setup, then press the OK or ► button.
The System Selection menu is displayed.
Press the ▲▼ buttons to select the system.
5. Press the OK button.
The message “Your data will be lost. Press [OK] to continue, [MENU]
to exit.” is displayed.
6. Press the OK button to start the auto scanning.
•
The fi rst frequency band is scanned and the station found fi rst is
displayed and stored.
The DVD Recorder & VCR then searches for the second station and so on.
• When the automatic scanning procedure has fi nished, the DVD
Recorder & VCR switches automatically to programme 1.
• The number of stations automatically stored by the DVD Recorder &
VCR depends on the number of stations that it has found.
7.
If you wish to cancel the auto scanning before the end, press the OK button.
• Once the auto scanning procedure has fi nished, some stations may
have been stored more than once; select the stations with the best
reception and delete the ones no longer required.
Auto Setup
Clock Set
DVD-Recorder
No Disc
Programme
Setup
Date Time
MON
JAN 01 2007 12 00
MOVE OK RETURN EXIT
Auto Channel Memory
Stop
50%
Install
DVD-Recorder
No Disc
Programme
Setup
Auto Setup
►
Manual Setup
►
TV System : I
►
VIDEO Output CH : CH 36
►
MOVE OK RETURN EXIT
Install
DVD-Recorder
No Disc
Programme
Setup
MOVE OK RETURN EXIT
SYSTEM-B/G
System Selection
SYSTEM-D/K
SYSTEM-I
01375E-VR350,355-XFA-ENG.indb 2201375E-VR350,355-XFA-ENG.indb 22 2007-04-27 오후 5:55:302007-04-27 오후 5:55:30

System Setup
English - 23
If you have already set the stations automatically, you do not need
to preset them manually.
1. With the unit in Stop mode/No Disc mode, press the MENU button.
2.
Press the ▲▼ buttons to select Setup, then press the OK or ► button.
3.
Press the ▲▼ buttons to select Install, then press the OK or ► button.
4. Press the ▲▼ buttons to select Manual Setup, then press the OK or
► button.
5. Press the ▲▼ buttons to select a PR (programme) you wish to edit,
delete, or swap, then press the OK or ► button. Select Edit, Delete or
Swap using the ▲▼ buttons, then press the OK or ► button.
• Edit : You can add or edit PR(programme). After change PR
informations (CH, Name, MFT, System), select Done, then press the
OK button.
- CH : Tune the channel using ◄► buttons.
-
Name : Display station name automatically detected in broadcasting signal.
If not detected, you can edit name by using ▲▼◄► buttons.
- MFT : You can tune up the channel frequency better using ◄►
buttons.
- System : You can select broadcasting system of the receivable
channel (B/G, D/K or I).
• Delete : the channel information of selected PR(programme) will be
removed.
• Swap : You can swap the channel information of two PR(programme).
For example, if you wish to swap PR2 and PR5, select swap at PR2,
then press the OK button at PR5.
Manual Setup
You can choose the sound mode (B/G-D/K, I) according to the TV
set connected to your DVD Recorder & VCR.
1. With the unit in Stop mode/No Disc mode, press the MENU button.
2.
Press the ▲▼ buttons to select Setup, then press the OK or ► button.
3.
Press the ▲▼ buttons to select Install, then press the OK or ► button.
4. Press the ▲▼ button to select TV System, then press the OK or ►
button.
5. Press the ▲▼ button to select G, I or K then press the OK or ►
button.
6. Press the MENU button to exit the menu.
Selecting the RF OUT Sound Mode (B/G-D/K, I)
Install
DVD-Recorder
No Disc
Programme
Setup
Auto Setup
►
Manual Setup
►
TV System : I
►
VIDEO Output CH : CH 36
►
MOVE OK RETURN EXIT
Install
DVD-Recorder
No Disc
Programme
Setup
Auto Setup
►
Manual Setup
►
TV System : I
►
VIDEO Output CH : CH 36
►
MOVE OK RETURN EXIT
Manual Setup
Done
MOVE OK
PR 01
CH
◄
---
►
Name
----
MFT
---
I
---
System I
01375E-VR350,355-XFA-ENG.indb 2301375E-VR350,355-XFA-ENG.indb 23 2007-04-27 오후 5:55:332007-04-27 오후 5:55:33

System Setup
English - 24
Your DVD Recorder & VCR output channel may need to be changed
if the pictures suffer from interference or if your TV cannot fi nd the
pictures.
1. With the unit in Stop mode/No Disc mode, press the MENU button.
2.
Press the ▲▼ buttons to select Setup, then press the OK or ► button.
3.
Press the ▲▼ buttons to select Install, then press the OK or ► button.
4. Press the ▲▼ buttons to select VIDEO Output CH, then press the OK
or ► button.
5. Press the ▲▼ buttons to select the desired VIDEO output channel,
then press the OK or ► button.
VIDEO Output CH
If you set audio, subtitle, disc menu, on-screen menu and DivX
subtitle language in advance, they will come up automatically every
time you watch a movie.
1. With the unit in Stop mode/No Disc mode, press the MENU button.
2.
Press the ▲▼ buttons to select Setup, then press the OK or ► button.
3.
Press the ▲▼ buttons to select Language, then press the OK or ► button.
Language setup menu will be displayed.
4. Press the ▲▼ buttons to select the desired language option, then
press the OK or ► button.
• Audio : For the disc audio language.
• Subtitle : For the disc subtitles.
• Disc Menu : For the disc menu contained on the disc.
• On-Screen Menu :
For the on-screen menu of your DVD Recorder & VCR.
• DivX Subtitle :
Selecting a supported DivX subtitle language by region.
Setting Up the Language Options
If the selected language is not recorded on the disc, the original
pre-recorded language is selected.
The selected language will only appear if it is supported on the disc.
If the subtitle language is displayed in broken fonts, change DivX
Subtitle to the appropriate region. If it still does not work, the
format is not supported.
■
■
■
5. Press the ▲▼ buttons to select the desired language, then press the
OK or ► button.
Western
Afrikaans, Basque, Catalan, Danish, Dutch, English, Faeroese,
Finnish, French, German, Icelandic, Indonesian, Italian, Malay,
Norwegian, Portuguese, Spanish, Swahili, Swedish
Central
English, Albanian, Croatian, Czech, Hungarian, Polish,
Romanian, Serbian (Latin), Slovak, Slovenian
Greek
English, Greek
Cyrillic
English, Azeri, Belarusian, Bulgarian, Kazakh,
Macedonian, Russian, Serbian, Tatar, Ukrainian, Uzbek
Language
DVD-Recorder
No Disc
Programme
Setup
Audio
Subtitle
Disc Menu
On-Screen Menu
DivX Subtitle : Western
Original
▲
English
Français
Deutsch
Español
Italiano
Nederlands
Korean
▼
MOVE OK RETURN EXIT
CH 35
π
CH 36
CH 37
CH 38
CH 39
CH 40
CH 41
†
Install
DVD-Recorder
No Disc
Programme
Setup
Auto Setup
►
Manual Setup
►
TV System : K
►
VIDEO Output CH : CH 36
►
CH 35
▲
CH 36
CH 37
CH 38
CH 39
CH 40
CH 41
▼
MOVE OK RETURN EXIT
01375E-VR350,355-XFA-ENG.indb 2401375E-VR350,355-XFA-ENG.indb 24 2007-04-27 오후 5:55:352007-04-27 오후 5:55:35

System Setup
English - 25
Allows you to setup the audio device and sound status settings
depending on the audio system in use.
You can also adjust the NICAM mode.
1. With the unit in Stop mode/No Disc mode, press the MENU button.
2.
Press the ▲▼ buttons to select Setup, then press the OK or ► button.
3.
Press the ▲▼ buttons to select Audio, then press the OK or ► button.
Audio setup menu will be displayed.
4. Press the ▲▼ buttons to select the desired audio option, then press
the OK or ► button.
5. Press the ▲▼ buttons to select the desired item, then press the OK or
► button.
Setting Up the Audio Options
Digital Output
▌
• PCM : Converts to PCM (2CH) 48kHz audio. Select PCM when using
the Analog Audio Outputs.
• Bitstream : Converts to Dolby Digital Bitstream. Select Bitstream when
using the Digital Audio Output.
Be sure to select the correct Digital Output or no audio will be heard.
■
DTS
▌
• Off : Doesn’t output digital signal.
• On : Outputs DTS Bitstream via digital output only. Select DTS when
connecting to a DTS Decoder.
When DTS soundtrack is played, sound is not output from Analog
Audio Output.
■
Dynamic Compression
▌
This is only active when a Dolby Digital signal is detected.
• On : When Movie soundtracks are played at low volume or from smaller
speakers, the system can apply appropriate compression to make
low-level content more intelligible and prevent dramatic passages
from getting too loud.
• Off : You can enjoy the movie with the standard Dynamic Range.
NICAM
▌
NICAM programmes are divided into 3 types.
NICAM Stereo, NICAM Mono and Bilingual (transmission in another
language).
NICAM programmes are always accompanied by astandard mono
sound broadcast and you can select the desired sound.
• On : NICAM mode
• Off : Only set at this position to record the standard mono sound during
a NICAM broadcast if the stereo sound is distorted due to inferior
reception conditions.
Audio
DVD-Recorder
No Disc
Programme
Setup
Digital Output : PCM
►
DTS : Off
►
Dynamic Compression
: On
►
NICAM
: On
►
MOVE OK RETURN EXIT
Audio
DVD-Recorder
No Disc
Programme
Setup
Digital Output : PCM
►
DTS : Off
►
Dynamic Compression
: On
►
NICAM
: On
►
MOVE OK RETURN EXIT
Audio
DVD-Recorder
No Disc
Programme
Setup
Digital Output : PCM
►
DTS : Off
►
Dynamic Compression
: On
►
NICAM
: On
►
MOVE OK RETURN EXIT
Audio
DVD-Recorder
No Disc
Programme
Setup
Digital Output : PCM
►
DTS : Off
►
Dynamic Compression
: On
►
NICAM
: On
►
MOVE OK RETURN EXIT
01375E-VR350,355-XFA-ENG.indb 2501375E-VR350,355-XFA-ENG.indb 25 2007-04-27 오후 5:55:382007-04-27 오후 5:55:38

System Setup
English - 26
3D Noise Reduction (motion adaptive noise reduction)
▌
• Off : Normal
• On : Provides a clear picture through noise reduction (for recording).
This function depends on disc type. It may not work for some disc
types.
■
TV Aspect
▌
Depending on the type of television you have, you may want to
adjust the screen setting. (aspect ratio)
• 4:3 Letter Box : Select this when you want to see all the 16:9 ratio
picture from the DVD, even though you have a TV with
a 4:3 ratio screen. Black bars will appear at the top
and bottom of the screen.
• 4:3 Pan - Scan : Select this for conventional size TV when you want to
see the central portion of the 16:9 screen. (Extreme
left and right side of movie picture will be cut off.)
• 16:9 Wide : You can view the full 16:9 picture on your wide-screen TV.
This function allows you to setup the TV screen settings.
1. With the unit in Stop mode/No Disc mode, press the MENU button.
2.
Press the ▲▼ buttons to select Setup, then press the OK or ► button.
3.
Press the ▲▼ buttons to select Video, then press the OK or ► button.
Video option menu will be displayed.
4. Press the ▲▼ buttons to select the desired video option, then press
the OK or ► button.
5. Press the ▲▼ buttons to select the desired item, then press the OK or
► button.
Setting Up the Display (Video) Options
Press the RETURN or ◄ button to return to the previous menu.
Press the EXIT button to exit the menu.
■
Video
DVD-Recorder
No Disc
Programme
Setup
TV Aspect : 16:9 Wide
►
3D Noise Reduction
: Off
►
DivX(R) Registration
►
MOVE OK RETURN EXIT
Video
DVD-Recorder
No Disc
Programme
Setup
TV Aspect : 16:9 Wide
►
3D Noise Reduction
: Off
►
DivX(R) Registration
►
MOVE OK RETURN EXIT
01375E-VR350,355-XFA-ENG.indb 2601375E-VR350,355-XFA-ENG.indb 26 2007-04-27 오후 5:55:422007-04-27 오후 5:55:42

System Setup
English - 27
HDMI/DVI Resolution (DVD-VR355 only)
▌
This setting is used when the unit is connected by HDMI or DVI with
Display devices (TV, projector, etc).
• 576P : 720 x 576
• 720P : 1280 x 720
• 1080i : 1920 x 1080
If the TV supports Progressive Scan, press the P.SCAN button on
the front of the DVD Recorder & VCR to enjoy.
Canceling the Progressive scan
1. In Stop mode, press the P.SCAN button on the front of the DVD
Recorder & VCR.
The message “Press [Yes] to confi rm Interlace scan mode. Otherwise,
press [No].” will appear.
2. Press the ◄► buttons to select Yes, and then press the OK button.
3. Set your TV to Interlace input (using the TV remote control.)
Setting up the Progressive scan
1. In Stop mode, press the P.SCAN button on the front of the DVD
Recorder & VCR.
The message “Press [Yes] to confi rm Progressive scan mode.
Otherwise, press [No].” will appear.
2. Press the ◄► buttons to select Yes, and then press the OK button.
3. Set your TV to Progressive input (using the TV remote control.)
Progressive scan
Progressive setting is only available when the DVD recorder is in
stop mode.
■
• Connect the DVD Recorder & VCR to your TV via HDMI or DVI. Set
your TV's input to HDMI or DVI.
• Press the P.SCAN button while the unit is in Stop mode to select the
output resolution.
- If your TV is connected the HDMI or DVI cable, the output resolution
mode changes in the following sequence each time you press the
P.SCAN button:
→ 576p → 720p → 1080i
- If your TV is connected the AV or component cables(without HDMI/
DVI cable), the output resolution mode toggles 576p/576i in turn.
•
HDMI/DVI cable does not support 576i. Video with 576i resolution can only
be viewed through the analog outputs (Composite/S-Video/Component).
Output selection (DVD-VR355 only)
Video
DVD-Recorder
No Disc
Programme
Setup
TV Aspect : 16:9 Wide
►
3D Noise Reduction
: Off
►
HDMI/DVI Resolution
:
DivX(R) Registration
√
576P
720P
1080i
MOVE OK RETURN EXIT
01375E-VR350,355-XFA-ENG.indb 2701375E-VR350,355-XFA-ENG.indb 27 2007-04-27 오후 5:55:452007-04-27 오후 5:55:45

System Setup
English - 28
Even if HDMI/DVI cable is connected to your TV, the AV
connection outputs only 576i and the component connection
outputs only 576p irrespective of the on-screen display.
Progressive scan automatically activates when HDMI is
connected. (Please make sure PS is indicated on the front
panel of the DVD Recorder & VCR.)
There will be no HDMI video and audio outputs unless
progressive scan function is activated.
Consult your TV User’s Manual to fi nd out if your TV supports
Progressive Scan.
If Progressive Scan is supported, follow the TV User’s Manual
regarding Progressive Scan settings in the TV’s menu system.
If Video Output is set incorrectly, the screen may be blocked.
The resolutions available for HDMI/DVI output depend on the
connected TV or projector. For details, see the user’s manual of
your TV or projector.
When the resolution is changed it may take a few seconds for a
normal image to appear.
If you set the HDMI output resolution 720p or 1080i, HDMI output
provides better picture quality.
■
■
■
■
■
■
■
■
DivX(R) Registration
▌
Please use the Registration code to register this DVD Recorder with
the DivX(R) Video On Demand format.
To learn more, visit www.divx.com/vod
Video
DVD-Recorder
No Disc
Programme
Setup
TV Aspect : 16:9 Wide
►
3D Noise Reduction
: Off
►
Video Output
: Component
►
Your registration code is :
XXXXXXXX
To learn more, visit www.divx.com/vod
Done
DivX(R) Video On Demand
MOVE OK RETURN EXIT
01375E-VR350,355-XFA-ENG.indb 2801375E-VR350,355-XFA-ENG.indb 28 2007-04-27 오후 5:55:472007-04-27 오후 5:55:47

System Setup
English - 29
About the Rating Level
▌
1. Press the ▲▼ buttons to select Rating Level, then press the OK or
► button.
2. Press the ▲▼ buttons to select the rating level you want, then press
the OK or ► button.
For example, if you select up to Level 6, discs that contain Level 7, 8
will not play. A larger number indicates that the programme is intended
for adult use only.
Press the RETURN or ◄ button to return to the previous menu.
Press the EXIT button to exit the menu.
■
About the Change Password
▌
1. Press the ▲▼ buttons to select Change Password, then press the
OK or ► button.
• The ‘Enter the password.’ message will be displayed.
2. Enter the 4-digit password using the number buttons on the remote
control.
• The ‘Confi rm the password.’ message will be displayed.
3. Enter your password again using the 0 to 9 buttons on the remote
control.
The Parental Control function works in conjunction with DVDs that have
been assigned a rating - which helps you control the types of DVDs that
your family watches. There are up to 8 rating levels on a disc.
1. With the unit in Stop mode/No Disc mode, press the MENU button on
the remote control.
2.
Press the ▲▼ buttons to select Setup, then press the OK or ► button.
3. Press the ▲▼ buttons to select Parental Control, then press the OK
or ► button.
• The ‘Create the password’ message will be displayed.
4. Enter the 4-digit password using the 0 to 9 buttons on the remote
control.
• The ‘Confi rm the password’ message will be displayed.
5. Enter your password again, and then press the OK or ► button.
6. Press the ▲▼ buttons to select On, then press the OK or ► button.
The Parental Control screen appears.
Setting Up the Parental Control
Refer to Troubleshooting if you forgot your password. (See page 78)
■
Parental Control
DVD-Recorder
No Disc
Programme
Setup
Password :Off
√
Off
On
MOVE OK RETURN EXIT
Parental Control
DVD-Recorder
No Disc
Programme
Setup
Password :On
√
Rating Level : Level 1 Kids
√
Change Password
√
Level 8 Adults
Level 7
Level 6
Level 5
Level 4
Level 3
Level 2
Level 1 Kids
MOVE OK RETURN EXIT
Parental Control
DVD-Recorder
No Disc
Programme
Setup
Password : On
►
Rating Level : Level 1 Kids
►
Change Password
►
MOVE OK RETURN EXIT
01375E-VR350,355-XFA-ENG.indb 2901375E-VR350,355-XFA-ENG.indb 29 2007-04-27 오후 5:55:492007-04-27 오후 5:55:49

System Setup
English - 30
This function allows you to setup the VCR setting.
1. With the unit in Stop mode/No Disc mode, press the MENU button.
2.
Press the ▲▼ buttons to select Setup, then press the OK or ► button.
3.
Press the ▲▼ buttons to select System, then press the OK or ► button.
4. Press the ▲▼ buttons to select VCR, then press the OK or ► button.
5. Press the ▲▼ buttons to select the desired VCR option, then press
the OK or ► button.
6. Press the ▲▼ buttons to select the desired item, then press the OK or
► button.
VCR Setting
Auto Play
▌
If you want your videotapes to play automatically when you insert
them, turn on Auto Play.
• On - The VCR will automatically begin playing a video tape when it
is inserted, as long as the safety tab of the cassette has been
removed.
• Off - Auto play is disabled.
IPC (Intelligent Picture Control)
▌
The intelligent Picture Control Feature allows you to adjust the sharpness
of the image automatically, according to your own preferences.
• On - the sharpness of the image is adjusted automatically.
• Off - To adjust the sharpness manually
Auto Repeat
▌
It sets the VCR to play a tape repeatedly (unless a tape control is
activated : Stop, Fast Forward or Rewind).
Tape Length
▌
This information is usually printed on the tape box. The menu cycles
through: E180, E240, E280, E300. Once the type of cassette is set,
the VCR can display the amount of time remaining on the tape when
you press the INFO button.
System
DVD-Recorder
No Disc
Programme
Setup
Tape Length : E180
√
Auto Play : On
√
Auto Repeat : Off
√
IPC : On
►
Colour System : Automatic
►
E180
E240
E280
E300
MOVE OK RETURN EXIT
DVD-Recorder
No Disc
Programme
Setup
Tape Length : E180
►
Auto Play : On
√
Auto Repeat : Off
√
IPC : On
►
Colour System : Automatic
►
Off
On
System
MOVE OK RETURN EXIT
DVD-Recorder
No Disc
Programme
Setup
Tape Length : E180
►
Auto Play : On
►
Auto Repeat : Off
√
IPC : On
√
Colour System : Automatic
►
Off
On
System
MOVE OK RETURN EXIT
DVD-Recorder
No Disc
Programme
Setup
Tape Length : E180
►
Auto Play : On
►
Auto Repeat : Off
►
IPC On
√
Colour System Automatic
√
Off
On
System
MOVE OK RETURN EXIT
01375E-VR350,355-XFA-ENG.indb 3001375E-VR350,355-XFA-ENG.indb 30 2007-04-27 오후 5:55:522007-04-27 오후 5:55:52

System Setup
English - 31
Colour System
▌
Before recording or playing back a tape, you can select the required
system standard.
• Automatic : When playing back a tape, the system standard is
automatically selected by the DVD Recorder & VCR.
• PAL : PAL video system
• MESECAM
• B/W : Black and White.
You can set the EP (Extended Play) mode’s time setting to 6 or 8
hours.
1. With the unit in Stop mode/No Disc mode, press the MENU button.
2.
Press the ▲▼ buttons to select Setup, then press the OK or ► button.
3.
Press the ▲▼ buttons to select System, then press the OK or ► button.
4. Press the ▲▼ buttons to select DVD EP Mode Time, then press the
OK or ► button.
5. Press the ▲▼ buttons to select 6 Hours or 8 Hours, then press the
OK or ► button.
DVD EP Mode Time
A DVD-Video consists of ‘Titles’ and ‘Chapters’.
When you record one programme, it makes one Title.
If you use this function, the Title will be divided into Chapters.
1.
With a disc inserted and the unit in Stop mode, press the MENU button.
2.
Press the ▲▼ buttons to select Setup, then press the OK or ► button
.
3.
Press the ▲▼ buttons to select System, then press the OK or ► button.
4. Press the ▲▼ buttons to select Chapter Creator, then press the OK
or ► button.
5. Press the ▲▼ buttons to select On, then press the OK or ► button.
Press the EXIT button to exit the menu.
6.
Set the recording speed by pressing the REC SPEED button on the
remote control (See page 50 for more information on recording speeds).
7. Press the REC button to start recording. The message “Do you want to
create the chapter menu after this recording?” is displayed.
8. Press the ◄► buttons to select Yes and press the OK button and
recording begins. In XP and SP mode, you must record at least 5
minutes to create a chapter. In LP and EP mode, 15 minutes.
Automatic Chapter Creator
(V mode)
No
Yes
Do you want to create the chapter menu
after this recording?
System
DVD-Recorder
No Disc
Programme
Setup
Tape Length : E180
►
Auto Play : On
►
Auto Repeat : Off
►
IPC : On
√
Colour System : Automatic
√
Automatic
PAL
MESECAM
B/W
MOVE OK RETURN EXIT
System
DVD-Recorder
No Disc
Programme
Setup
VCR
►
DVD EP Mode Time
: AV1
√
Chapter Creator : Off
√
Quick Recording : Off
►
6 Hours
8 Hours
MOVE OK RETURN EXIT
01375E-VR350,355-XFA-ENG.indb 3101375E-VR350,355-XFA-ENG.indb 31 2007-04-27 오후 5:55:542007-04-27 오후 5:55:54

System Setup
English - 32
On DVD-RW discs, additional chapters and titles can be added
to a fi nalised disc by unfi nalising and recording again. On DVD-R
discs, once fi nalised, no additional chapters or titles can be
recorded.
■
The Automatic Chapter Creator function does not work during
Timer Recording or when you turn the power off.
The DVD-R disc cannot be unfi nalised.
■
■
9. Press the STOP button to stop recording.
10. To display the created titles, fi nalise the disc (See page 75) and then
press the TITLE MENU button. The title menu will be displayed.
11. To display the created chapters, select the desired Title and then
press the DISC MENU button. The chapter menu for the selected
Title will be displayed.
Quick Recording
If this function is set to on, the DVD Recorder & VCR will power on
quickly, which enables you to immediatedly record a desired channel.
1. With the unit in Stop mode/No Disc mode, press the MENU button.
2.
Press the ▲▼ buttons to select Setup, then press the OK or ► button.
3.
Press the ▲▼ buttons to select System, then press the OK or ► button.
4. Press the ▲▼ buttons to select Quick Recording, then press the OK
or ► button.
5. Press the ▲▼ buttons to select On, then press the OK or ► button.
The Quick Recording is set to Off as default.
If this function is set to on, power consumption will be increased
when the unit is powered off.
■
■
Anynet+(HDMI-CEC) (DVD-VR355 only)
Anynet+ is a function that can be used to operate the recorder using a
Samsung TV remote control, by connecting the DVD Recorder & VCR to a
SAMSUNG TV using an HDMI Cable. (see page 20) (This is only available
with SAMSUNG TVs that support Anynet+.)
1. With the unit in Stop mode/No Disc mode, press the MENU button on
the remote control.
2.
Press the ▲▼ buttons to select Setup, then press the OK or ► button.
3.
Press the ▲▼ buttons to select System, then press the OK or ► button.
The system menu will be displayed.
4. Press the ▲▼ buttons to select Anynet+(HDMI-CEC), then press the
OK or ► button.
Anynet+(HDMI-CEC) items will be displayed.
5. Press the ▲▼ buttons to select On, then press the OK or ► button.
1/1
JAN/01/2007
09:41 PR1
JAN/01/2007
09:45 PR1
JAN/01/2007
09:50 PR1
Previous Top Next
JAN/01/2007
12:30 PR1
JAN/01/2007
12:00 PR1
JAN/01/2007
12:40 PR1
1/1
Previous Top Next
CHAPTER
123
System
DVD-Recorder
No Disc
Programme
Setup
VCR
►
DVD EP Mode Time : 6 Hours
►
Chapter Creator : Off
►
Quick Recording : On
√
Off
On
MOVE OK RETURN EXIT
System
DVD-Recorder
No Disc
Programme
Setup
VCR
►
DVD EP Mode Time : 6 Hours
►
Chapter Creator : Off
►
Quick Recording : Off
►
Anynet+(HDMI-CEC)Off
►
Off
On
MOVE OK RETURN EXIT
01375E-VR350,355-XFA-ENG.indb 3201375E-VR350,355-XFA-ENG.indb 32 2007-04-27 오후 5:55:572007-04-27 오후 5:55:57

System Setup
English - 33
For using Anynet+(HDMI-CEC)
1. Connect DVD Recorder & VCR to the TV by using HDMI cable. (See
page 20)
2.
Set the Anynet+(HDMI-CEC) to “On” on your DVD Recorder & VCR.
(see above)
3.
Set the Anynet+ function on your TV.
(See the TV instruction manual for more information.)
• You can operate the DVD Recorder & VCR by using TV remote control.
(TV buttons that can be used to control the DVD Recorder & VCR :
, ,
, , , , and , buttons,
~
button)
• When you press Anynet+ button on the TV remote control, the OSD to the
left will appear.
- Select Device : Use this option to select device.
- Record : Use this option to start recording or stop recording.
- Menu on Device : Same as MENU button (
) on the DVD Recorder &
VCR remote control.
- Device Operation : Same as ANYKEY button (
) on the DVD Recorder
& VCR remote control.
By pressing the PLAY button of the recorder while watching TV,
the TV screen will change to the play screen.
If you play a DVD when the TV power is off, the TV will power On.
If you turn the TV off, the DVD Recorder & VCR will power off
automatically.(When the DVD recorder & VCR is recording, it
can't be powered off.)
If you change the HDMI to other sources(Composite, Component,
RF... etc) in TV while playing the DVD disc, the DVD Recorder
& VCR will stop playing. The DVD Recorder & VCR may keep
playing certain discs based on their content.
■
■
■
■
TV Menu
View TV
Z
Select Device
Z
Record
Z
Menu on Device
Z
Device Operation
Z
Receiver : Off
Z
Setup
Z
DVDR
Move
Ok
Exit
01375E-VR350,355-XFA-ENG.indb 3301375E-VR350,355-XFA-ENG.indb 33 2007-04-27 오후 5:56:082007-04-27 오후 5:56:08

English - 34
Playback
Playback
This section introduces basic functions of playback
by disc type.
Read the following information before playing a disc.
Region code (DVD-Video only)
Logos of Discs that can be played
Both the DVD Recorder & VCR and the discs
are coded by region. These regional codes
must match in order for the disc to play. If the
codes do not match, the disc will not play. The
Region Number for this DVD Recorder & VCR
is described on the rear panel of the DVD
Recorder & VCR.
Dolby Digital DTS Digital Audio
Stereo PAL broadcast system
in U.K, France,
Germany, etc.
MP3DivX
Disc types that can be played
Disc
Types
Disc Logo
content
Recorded
content
Disc Shape
Max. Playing Time
MP3
MP3 Audio
Single sided(5”)
-
Single sided(3.5”)
-
MPEG4
MPEG4 Movie
Single sided(5”)
-
Single sided(3.5”)
-
DVD-RAM
VIDEO
AUDIO
Single sided(5”)
(4.7GB)
1hr (XP: Excellent Quality)
2 hrs (SP: Standard Quality)
4 hrs (LP: Long Playback)
6 or 8 hrs (EP:Extended)
Double sided(5”)
(9.4GB)
2 hrs (XP: Excellent Quality)
4 hrs (SP: Standard Quality)
8 hrs (LP: Long Playback)
12 or 16 hrs (EP:Extended)
DVD-RW
VIDEO
AUDIO
5” (4.7GB)
1hr (XP: Excellent Quality)
2 hrs (SP: Standard Quality)
4 hrs (LP: Long Playback)
6 or 8 hrs (EP:Extended)
DVD-R
VIDEO
AUDIO
Single
Layer(5”)
(4.7GB)
1hr (XP: Excellent Quality)
2 hrs (SP: Standard Quality)
4 hrs (LP: Long Playback)
6 or 8 hrs (EP:Extended)
Dual Layer(5”)
(8.5GB)
2 hrs (XP: Excellent Quality)
4 hrs (SP: Standard Quality)
8 hrs (LP: Long Playback)
11 or 15 hrs (EP:Extended)
DVD+RW
VIDEO
AUDIO
5” (4.7GB)
1hr (XP: Excellent Quality)
2 hrs (SP: Standard Quality)
4 hrs (LP: Long Playback)
6 or 8 hrs (EP:Extended)
DVD+R
VIDEO
AUDIO
Single Layer(5”)
(4.7GB)
1hr (XP: Excellent Quality)
2 hrs (SP: Standard Quality)
4 hrs (LP: Long Playback)
6 or 8 hrs (EP:Extended)
Dual Layer(5”)
(8.5GB)
2 hrs (XP: Excellent Quality)
4 hrs (SP: Standard Quality)
8 hrs (LP: Long Playback)
11 or 15 hrs (EP:Extended)
Disc
Types
Disc Logo
content
Recorded
content
Disc Shape
Max. Playing Time
DVD-
VIDEO
VIDEO
AUDIO
Single sided(5”) 240 min.
Double sided(5”)
480 min.
Single sided(3.5”)
80 min.
Double sided(3.5”)
160 min.
VCD
VIDEO
AUDIO
Single sided(5”)
74 min.
Single sided(3.5”)
20 min.
AUDIO-CD
AUDIO
Single sided(5”)
74 min.
Single sided(3.5”)
20 min.
JPEG
JPEG Image
Single sided(5”)
-
Single sided(3.5”)
-
01375E-VR350,355-XFA-ENG.indb 3401375E-VR350,355-XFA-ENG.indb 34 2007-04-27 오후 5:56:142007-04-27 오후 5:56:14

English - 35
Playback
1. Press the OPEN/CLOSE button.
2. Place a disc gently into the tray with the disc’s label facing up.
3. Press OPEN/CLOSE button to close the disc tray.
• Your DVD Recorder & VCR closes the disc tray and plays the disc
automatically.
• The recorder does not play discs automatically after being powered
on initially.
• When the recorder is powered on and a disc is in the tray, the unit will
be activated and wait in stop status. Press the PLAY button to start
playback.
4. Press the STOP button to stop playback.
Playing a Disc
When you stop playing a disc, the DVD Recorder & VCR
remembers where you stopped, When you press the PLAY
button again, it will pick up where you left off. (unless the disc
is removed or the DVD Recorder & VCR is unplugged, or if you
press the STOP button twice.)
■
Do not move your DVD Recorder & VCR while playing, as this
may cause damage to the disc.
Make sure to press the OPEN/CLOSE button to open or close
the disc tray.
Do not push the disc tray while it is being opened or closed, as
this may cause a product malfunction.
Do not place foreign materials on or in the disc tray.
Some functions may perform differently or be disabled depending
on the disc type. If this occurs, refer to the instructions written on
the disc case.
Be especially careful that children’s fi ngers are not caught
between the disc tray and the tray chassis when it closes.
After turning power on, it will take a few seconds until the DVD
Recorder & VCR operates.
■
■
■
■
■
■
■
This DVD Recorder & VCR can only operate with discs that are
compatible with DVD-RAM Standard Version 2.0.
Playback and/or recording may not work for some types of discs,
or when specifi c operations, such as angle change and aspect
ratio adjustment, are being performed. Information about the discs
is written in detail on the box. Please refer to this if necessary.
Do not allow the disc to become dirty or scratched, fi ngerprints,
dirt, dust, scratches or deposits of cigarette smoke on the
recording surface may make it impossible to use the disc for
recording.
DVD-RAM/±RW/±R discs may not be able to play on some DVD
players, depending on the player, disc and the condition of the
recording.
Discs with NTSC programmes recorded on them can be played
but cannot be recorded using this product.
■
■
■
■
■
Discs that cannot be played
▌
● DVD-Video with a region number other than “2” or “ALL”
● 3.9 GB DVD-R Disc for Authoring.
● A DVD±R/DVD-RW(V) disc which has been recorded and not fi nalised
in a different manufacturer’s recorder.
● DVD-ROM/PD/MV-Disc, etc
● CVD/CD-ROM/CDV/CD-G/CD-I
01375E-VR350,355-XFA-ENG.indb 3501375E-VR350,355-XFA-ENG.indb 35 2007-04-27 오후 5:56:172007-04-27 오후 5:56:17

English - 36
Playback
Some discs contain a dedicated menu system that allows you to
select special functions for title, chapters, audio track, subtitles,
fi lm previews, information on characters, etc.
Using the Disc Menu and Title Menu
For DVD-VIDEO disc
▌
Disc Menu :
Press the DISC MENU button to enter the disc menu of the disc.
• Move to the setup menu related to playback operation.
• You can select audio language and subtitle etc. provided
by the disc.
• When playing a VCD2.0, you can choose Menu On or
Menu Off by using the DISC MENU button.
Title Menu :
Press the TITLE MENU button to move to the title menu of the disc.
• Use this button if the disc contains more than one title.
Some discs may not support the title menu.
Title List
Press the TITLE LIST button to display title list.
The Title List is simply a list of titles on a disc. If a title cannot be played again.
Playlist (DVD-RAM/-RW(VR))
Press the PLAY LIST button to display playlist.
A playlist is a custom-made list of titles.
When one playlist is played, only the titles withn the playlist will play and then
stop. Even if that playlist is deleted, the original recording will not be deleted.
For DVD-RAM/DVD±RW/DVD±R disc
▌
Using the Search & Skip Functions
Searching through a Chapter or Track
▌
During playback, press the SEARCH ◄◄ or ►► button on the remote
control. Each time you press the SEARCH button, the playback speed
will change as follows.
• You can scan the programme in reverse order. To return to normal
speed playback, press the ►ll button.
DVD-VIDEO/DVD-RAM/
DVD±RW/DVD±R
►► Fast 1/◄◄ Fast 1
►► Fast 2/◄◄ Fast 2
►► Fast 3/◄◄ Fast 3
►► Fast 4/◄◄ Fast 4
►► Fast 5/◄◄ Fast 5
►► Fast 6/◄◄ Fast 6
MPEG4 Fast 1
Fast 2
Fast 3
AUDIO CD (CD-DA)
X2
X4
X8
VCD
Fast 1
Fast 2
Fast 3
01375E-VR350,355-XFA-ENG.indb 3601375E-VR350,355-XFA-ENG.indb 36 2007-04-27 오후 5:56:182007-04-27 오후 5:56:18

English - 37
Playback
No sound is heard during Scan (Search) mode, except CDs (CD-
DA). (You can hear the sound during forward search (Fast 1) in
disc.)
No sound is heard during scanning in all MPEG4 and VCD
modes. Depending on the disc type, the sound quality may lower
during Fast 1 mode.
■
Skipping ahead 30 seconds
▌
In play mode, press F.ADV/SKIP button to skip ahead exactly 30
seconds.
Skipping Chapters or Tracks
▌
During playback, press the l◄◄ or ►►l button on the remote control.
• If you press the l◄◄ button
If you press the l◄◄ button, it moves to the beginning of the chapter,
track or marker (DVD-RAM/-RW(VR mode)).
Pressing the button once again within 3 seconds returns to the
beginning of the previous chapter, track or marker (DVD-RAM/-RW(VR
mode)).
• If you press the ►►l button
If you press the ►►l button, it moves to the next chapter, track or
marker (DVD-RAM/-RW(VR mode)).
Slow Motion Play/Step Motion Play
Slow Motion Play
▌
During Still mode, press the SEARCH ◄◄ or ►► button on the remote
control for more than 1 second.
• Each time you press the ►► button :
l► Slow 1
l► Slow 2
l► Slow 3
• Each time you press the ◄◄ button :
◄ l Slow 1
◄ l Slow 2
◄ l Slow 3
To return to normal speed playback, press the ►ll button.
Slow motion can play only in the forward direction on MPEG4
and VCD discs.
■
01375E-VR350,355-XFA-ENG.indb 3701375E-VR350,355-XFA-ENG.indb 37 2007-04-27 오후 5:56:212007-04-27 오후 5:56:21

English - 38
Playback
Step Motion Play
▌
During Still mode, press the F.ADV/SKIP button on the remote control.
• Each time the button is pressed, a new frame will appear.
To return to normal speed playback, press the ►ll button.
No sound is heard during STEP or SLOW mode.
■
The ANYKEY functions allows you to easily search for a desired
scene by accessing title, chapter, track and time. You can also
change the subtitle and audio settings and set some features
including Repeat, Angle and Zoom.
Using the ANYKEY button
Moving to a desired scene directly
▌
1. Press the ANYKEY button during playback.
2. Press the ▲▼ buttons to select a Title, a Chapter or a Time.
3.
Press the ◄► buttons or number (0~9) buttons to select the desired scene.
(In case of searching a time, enter the time in the sequence of hours,
minutes, seconds using the number buttons.)
Then, press the OK button.
• If you want to move to a certain title, chapter or time, use this function.
This may not work for some discs. When an audio CD (CD-
DA) or an MP3 disc is inserted, according to the disc type, the
information display may not be appear.
The Time Search function does not operate on some discs.
To make the sub-menu disappear, press the ANYKEY or
RETURN button again.
When VCD2.0 is in Menu Off mode only, this function works.
(see page 36)
■
■
■
■
DVD-VIDEO
Title
Chapter
Time
Subtitle
Audio
Repeat
Angle
Zoom
1/2
1/28
00:00:11
ENG
ENG D 5.1CH
Off
1/1
Off
MOVE CHANGE
01375E-VR350,355-XFA-ENG.indb 3801375E-VR350,355-XFA-ENG.indb 38 2007-04-27 오후 5:56:232007-04-27 오후 5:56:23

English - 39
Playback
DVD-RAM/-RW(VR mode), unfi nalised DVD-RW(V mode) and
unfi nalised DVD±R do not repeat a chapter.
To make the sub-menu disappear, press the ANYKEY or
RETURN button again.
When VCD2.0 is in Menu Off mode only, this function works.
(see page 36)
■
■
■
Repeat Play
Playing Repeatedly
▌
1. Press the ANYKEY button during playback.
2. Press the ▲▼ buttons to select Repeat.
3. Select repeat mode using ◄► button, then press the OK button.
Playing a Certain section Repeatedly
▌
1. Press the ANYKEY button during playback.
2. Press the ▲▼ buttons to select Repeat.
3. Press the ◄► button to select the A-B, then press the OK button.
4. Press the OK button at the point where you want the repeat play to
start (A) and press it again at the point where you want the repeat play
to stop (B). Repeat playback of the A-B section starts.
- To return to normal playback -
Press the CANCEL button to return to normal playback.
If you set point (B) before fi ve seconds has lapsed, the prohibition
mark ( ) will appear.
Audio CDs (CD-DA), MP3 and MPEG4 discs do not support the
Repeat A-B function.
When VCD2.0 is in Menu Off mode only, this function works.
(see page 36)
■
■
■
Selecting the Subtitle Language
Subtitle languages may not work depending on the disc type. This
is only available during playback.
You can also operate this function by pressing the SUBTITLE button
on the remote control.
1. Press the ANYKEY button during playback.
2. Press the ▲▼ buttons to select Subtitle, then press the ◄► buttons
to select the desired subtitle language.
The subtitle display may be different depending on the disc type.
Some discs allow you to select the language for the disc menu only.
To make the sub--menu disappear,press the ANYKEY or
RETURN button again.
■
■
■
Repeat A-B A-B
DVD-VIDEO
Title
Chapter
Time
Subtitle
Audio
Repeat
Angle
Zoom
1/2
1/28
00:00:57
ENG
ENG D 5.1CH
Off
1/1
Off
MOVE CHANGE
DVD-VIDEO
Title
Chapter
Time
Subtitle
Audio
Repeat
Angle
Zoom
1/2
1/28
00:00:27
ENG
ENG D 5.1CH
Off
1/1
Off
MOVE CHANGE
DVD-VIDEO
Title
Chapter
Time
Subtitle
Audio
Repeat
Angle
Zoom
1/2
1/28
00:00:52
ENG
ENG D 5.1CH
Off
1/1
Off
MOVE CHANGE
01375E-VR350,355-XFA-ENG.indb 3901375E-VR350,355-XFA-ENG.indb 39 2007-04-27 오후 5:56:252007-04-27 오후 5:56:25

English - 40
Playback
Changing the Camera Angle
This function is disc-dependent, and may not work all DVDs.
This function does not work when a DVD has not been recorded
with a multi-camera angle system.
To make the sub-menu disappear, press the ANYKEY or
RETURN button again.
■
■
■
If a DVD-VIDEO contains multiple angles of a particular scene, you can
use the Angle function.
If the disc contains multiple angles, the ANGLE appears on the screen.
1. Press the ANYKEY button during playback.
2. Press the ▲▼ buttons to select Angle, then press the ◄► buttons or
number (0~9) buttons to select the desired angle scene.
Audio languages may not work depending on the disc type. This is
only available during playback.
You can also operate this function by pressing the AUDIO button on
the remote control.
1. Press the ANYKEY button during playback.
2. Press the ▲▼ buttons to select Audio, then press the ◄► buttons to
select the desired audio language.
Selecting the Audio language
Audio languages may be different because they are disc-specifi c.
Some discs allow you to select the audio language for the disc
menu only.
To make the sub-menu disappear, press the ANYKEY or
RETURN button again.
■
■
■
1. Press the ANYKEY button during playback.
2. Press the ▲▼ buttons to select Zoom, then press the OK button.
(
) will be displayed.
3. Press ▲▼, ◄► buttons to move to the area you want to enlarge.
4. Press the OK button.
• Each time the OK button is pressed, the picture is enlarged up to 4X
(four times the normal size). :
Zooming-In
DVD-VIDEO/DVD-RAM/DVD±RW/DVD±R
normal size → X2 → X4 → X2 → normal size
VCD
normal size → X2 → normal size
When VCD2.0 is in Menu Off mode only, this function works.
(see page 36)
■
DVD-VIDEO
Title
Chapter
Time
Subtitle
Audio
Repeat
Angle
Zoom
1/2
1/28
00:01:01
ENG
ENG D 5.1CH
Off
1/3
Off
MOVE CHANGE
DVD-VIDEO
Title
Chapter
Time
Subtitle
Audio
Repeat
Angle
Zoom
1/2
1/28
00:01:03
ENG
ENG D 5.1CH
Off
1/1
Off
MOVE CHANGE
01375E-VR350,355-XFA-ENG.indb 4001375E-VR350,355-XFA-ENG.indb 40 2007-04-27 오후 5:56:292007-04-27 오후 5:56:29

English - 41
Playback
Playing back a Bookmark
▌
1. Press the MARKER button.
2. Press the ◄► buttons to select a bookmarked scene.
3. Press the OK or ►ll button to start playing from the selected scene.
Clearing a Bookmark
▌
1. Press the MARKER button.
2. Press the ◄► buttons to select a bookmarked scene.
3. Press the CANCEL button to delete the selected bookmark.
When the disc tray is opened and then closed, bookmarks will
disappear.
When VCD2.0 is in Menu Off mode only, this function works.
(see page 36)
■
■
Using the Bookmarks
Set marks at scenes you want to see again so that you can start
playback from the marked position.
Setting Bookmarks
▌
1. Press the MARKER button during playback.
2. Press the OK button when the desired scene appears.
• The number 1 is displayed and the scene is memorized.
3. Press the ◄► button to move to the next position.
4. Press the OK button again when the desired scene appears.
• The number 2 is displayed and the scene is memorized. Repeat
above to bookmark other positions. You can bookmark up to 10
scenes.
(V mode)
Bookmark
1
2
-
-
-
-
-
-
-
--
MOVE PLAY
CLEAR
RETURN
Bookmark
1
2
-
-
-
-
-
-
-
--
MOVE PLAY
CLEAR
RETURN
Bookmark
1
2
-
4
5
-
-
-
--
RETURNOKMOVE
01375E-VR350,355-XFA-ENG.indb 4101375E-VR350,355-XFA-ENG.indb 41 2007-04-27 오후 5:56:322007-04-27 오후 5:56:32

English - 42
Playback
Clearing a Marker
▌
1. Press the MARKER button during playback.
2. Press the ◄► buttons to select a marked scene.
Press the CANCEL button to delete the selected mark.
• When a marker is cleared while DVD-RAM/DVD-RW(VR mode) is
playing, marker numbers will change. For example, if the 7th marker
is cleared after ten markers are registered, the marker numbers after
the eighth will automatically move ahead by one and the 8th marker
becomes the 7th.
Playing back a Marker
▌
1. Press the MARKER button during playback.
2. Press the ◄► buttons to select a marked scene.
3. Press the OK or ►ll button to start playing from the selected scene.
• If you press the NEXT SKIP (►►l) button or the PREVIOUS SKIP
(l◄◄ ) button in marker mode, When the next or current marked
point plays for shorter than three seconds, playback starts from the
previous marked point.
Using the Markers
(VR mode)
Setting Markers
▌
1. Press the MARKER button during playback.
2. Press the OK button when the desired scene appears.
• The number 01 is displayed and the scene is memorized.
3. Press the ◄► button to move to the next position.
4. Press the OK button again when the desired scene appears.
• The number 02 is displayed and the scene is memorized.
• DVD-RAM or DVD-RW(VR Mode) discs have the Marker function
instead of the Bookmark function. The Marker function allows you to
mark up to 99 scenes. Since the scenes may be displayed as many
different pages, numbering is necessary. If a disc in use is encoded
with disc Protect, Markers cannot be set or delete.
Only playback is available.
When VCD2.0 is in Menu Off mode only, this function works.
(see page 36)
■
Marker
01
02
-
-
-
-
-
-
-
--
N : 2
MOVE PLAY
CLEAR
RETURN
Marker
01
02
-
-
-
-
-
-
-
--
N : 2
MOVE PLAY
CLEAR
RETURN
Marker
01
02
03
04
05
06
07
08
09
N : 9
Marker
01
02
03
04
05
06
07
08
09
10
N : 10
MOVE PLAY
CLEAR
RETURN
01375E-VR350,355-XFA-ENG.indb 4201375E-VR350,355-XFA-ENG.indb 42 2007-04-27 오후 5:56:352007-04-27 오후 5:56:35

English - 43
Playback
Playing back an Audio CD (CD-DA)
▌
1. Insert an audio CD (CD-DA) into the disc tray.
• The audio CD menu appears and the tracks (songs) are played
automatically.
2. Press the ▲▼ buttons to select the track (song) to start playback from,
and then press the OK button.
1
3 3
5
6
4
7
7
9
2
8
Audio CD (CD-DA) Screen Elements
1. Play mode icon.
2. Current track (song) : Displays the number of the track currently
being played.
3. Displays the current play index and total track number.
4. This shows the operating state of a disc and a playback time
corresponding to a portion that is currently played.
5. Displays the track list (song list) and the playing time of each track.
6. Button display
Playing back an Audio CD (CD-DA)/MP3
Buttons on the Remote Control used for Audio
CD(CD-DA)/MP3 playback
▌
1. l◄◄ button : Returns to the beginning of the current track when
pressed during playback.
If pressed again, your DVD recorder moves to and plays the previous
track.
If you press this button within three seconds after playback starts, the
previous track will be played.
If you press this button after three seconds, the current track will be
replayed from the beginning.
2. ►►l button : Plays the next track.
3.
Press the (◄◄ /►► ) buttons : Fast Play (X2, X4, X8) (Audio CD only)
4.
button : Stops a track (song).
5. RETURN button : Moves to the folder to which the current song
belongs.
6. ►ll button : Plays a track (song) or Still playback.
7. ▲▼ button : Selects a track (song).
8. ►, OK button : Plays the selected track (song).
9. ANYKEY button :
To display the play mode window. (Repeat or Play Option).
Music List
CD
TRACK 1
►
0:00:15
TRACK 1 0:03:50
002 TRACK 2 0:04:00
003 TRACK 3 0:03:49
004 TRACK 4 0:03:47
005 TRACK 5 0:04:29
006 TRACK 6 0:03:44
007 TRACK 7 0:03:44
No. Title Length
TRACK 1 01/15
CDDA
MOVEPLAY MODE
OK
RETURN EXIT
Music List
CD
TRACK 1
►
0:00:15
TRACK 1 0:03:50
002 TRACK 2 0:04:00
003 TRACK 3 0:03:49
004 TRACK 4 0:03:47
005 TRACK 5 0:04:29
006 TRACK 6 0:03:44
007 TRACK 7 0:03:44
No. Title Length
TRACK 1 01/15
CDDA
h
g
e
d f
c
MOVEPLAY MODE
OK
RETURN EXIT
01375E-VR350,355-XFA-ENG.indb 4301375E-VR350,355-XFA-ENG.indb 43 2007-04-27 오후 5:56:382007-04-27 오후 5:56:38

English - 44
Playback
Playing back an MP3 Disc
▌
1. Insert an MP3 Disc into the disc tray.
2. Press the ▲▼ buttons to select the Disc Navigation, and then press
the OK or ► button.
3. Press the ▲▼ buttons to select the Music, and then press the OK or
► button.
4. Press the ▲▼ buttons to select the track (song) you want to hear, and
then press the OK button.
MP3 Screen Elements
1. Play mode icon.
2. Current track (song) : Displays the name of the track being played.
3. Displays the current play index and total fi le number.
4. This shows the operating state of a disc and a playback time
corresponding to a portion that is currently played.
5. Displays the mp3 fi le and folder list (song list).
6. Button display.
7. MP3 fi le information
Repeat Playback of an Audio/MP3 Disc
▌
1. During playback, press the ANYKEY button.
The Repeat mode will be highlighted.
2. Press the ◄► buttons to select the desired repeat mode you want to
play repeatedly, then press the OK button.
• Repeat Track (CD (CD-DA)/MP3)
• Repeat Folder (MP3)
• Repeat Disc (CD (CD-DA)/MP3)
- To return to normal playback -
Press the CANCEL button to return to normal playback.
Music List
MP3
SONG01
3.5MB
01/26/2007
►
0:00:06
ROOT
SONG01
002 SONG02
003 SONG03
004 SONG04
005 SONG05
006
SONG06
No. Title
SONG01
01/11
MP3
MOVEPLAY MODE
OK
RETURN EXIT
Music List
MP3
SONG01
3.5MB
01/26/2007
►
0:00:06
ROOT
SONG01
002 SONG02
003 SONG03
004 SONG04
005 SONG05
006
SONG06
No. Title
SONG01
01/11
MP3
fi
h
g
e
c
d
MOVEPLAY MODE
OK
RETURN EXIT
Music List
CD
TRACK 1
►
0:00:01
001 TRACK 1 0:03:50
002 TRACK 2 0:04:00
003 TRACK 3 0:03:49
004 TRACK 4 0:03:47
005 TRACK 5 0:04:29
006 TRACK 6 0:03:44
007 TRACK 7 0:03:44
No. Title Length
TRACK 1 01/15
PLAY MODE
Repeat : Off
Play Option : Normal
CDDA
MOVEPLAY MODE
OK
RETURN EXIT
01375E-VR350,355-XFA-ENG.indb 4401375E-VR350,355-XFA-ENG.indb 44 2007-04-27 오후 5:56:412007-04-27 오후 5:56:41

English - 45
Playback
Play Option Mode
▌
1. In the still mode, press the ANYKEY button.
The Play option will be highlighted.
2. Press the ◄► buttons to select a desired Play option, then press the
OK button.
• Normal : Tracks on a disc are played in the order in which they were
recorded on the disc.
• Playlist : The Playlist playback option allows you to select the order
in which you want tracks to play.
• Intro [ I ] : The fi rst 10 seconds of each track will be played.If you
want to listen to the music that you have selected, press
the OK button or ►ll button. The play option will be
changed to Normal Play. When Intro Play is completed,
Normal Play is performed.
• Random [ R ] : The Random option plays a disc’s tracks in random
order. After a random list is generated and played
completely, another random list is generated and
played. Random Play continues until the play option
is changed.
To Programme Tracks
▌
You can register a maximum 30 tracks in the playlist.
1. In the still mode, press the ANYKEY button.
The Play option will be highlighted.
2. Press the ◄► buttons to select Playlist, then press the OK button.
Playlist screen is displayed.
3. Press the ▲▼ buttons to select tracks in the order in which you want
them to play, then press the OK button.
If you playlisted a wrong track, press the ► buttons, then press the ▲
▼ buttons to select the wrong track, then press the CANCEL button.
4. Press the PLAY button to play the playlist.
1. Insert a JPEG Disc into the disc tray.
2. Press the ▲▼ buttons to select the Disc Navigation, and then press
the OK or ► button.
3. Press the ▲▼ buttons to select the Photo, and then press the OK or
► button.
4. Press the ▲▼◄► buttons to select a picture.
• To see the next 8 pictures, press the ►►l button.
• To see the previous 8 pictures, press the l◄◄ button.
Playing back a Picture Disc
Music List
CD
TRACK 1
II
0:00:01
001 TRACK 1 0:03:50
002 TRACK 2 0:04:00
003 TRACK 3 0:03:49
004 TRACK 4 0:03:47
005 TRACK 5 0:04:29
006 TRACK 6 0:03:44
007 TRACK 7 0:03:44
No. Title Length
TRACK 1
01/15
PLAY MODE
Repeat : Off
Play Option : Normal
CDDA
MOVEPLAY MODE
OK
RETURN EXIT
Music List
CD
TRACK 1
II
0:00:01
001 TRACK 1 0:03:50
002 TRACK 2 0:04:00
003 TRACK 3 0:03:49
004 TRACK 4 0:03:47
005 TRACK 5 0:04:29
006 TRACK 6 0:03:44
007 TRACK 7 0:03:44
No. Title Length
TRACK 1 01/15
PLAY MODE
Repeat : Off
Play Option : Normal
CDDA
MOVEPLAY MODE
OK
RETURN EXIT
Playlist
CD
001 TRACK 1
002 TRACK 2
003 TRACK 3
004 TRACK 4
TRACK 1
TRACK 2
TRACK 3
TRACK 4
TRACK 5
TRACK 6
TRACK 7
TRACK 8
04/15
CDDA
CDDA
CDDA
CDDA
CDDA
CDDA
CDDA
CDDA
MOVEPLAY MODE
OK
EXIT
Photo ListJPEG
JPEG01
MOVESlide Show OK RETURN EXIT
ROOT JPEG01 JPEG02 JPEG03
JPEG04 JPEG05 JPEG06 JPEG07
01/10
01375E-VR350,355-XFA-ENG.indb 4501375E-VR350,355-XFA-ENG.indb 45 2007-04-27 오후 5:56:442007-04-27 오후 5:56:44

English - 46
Playback
5-1. If you press the ►ll button, the Slide Show Speed screen will appear.
Press the ◄► buttons to set the slide show speed, then press the
OK button.
5-2. Press the OK button with a picture selected in the Album screen and
select a display mode (Album screen (
), Slide show ( ),
Rotation (
) or Zoom ( )) using the ◄► buttons, then press
the OK button.
: Returns to the Album screen.
: The unit enters slide show mode.
Before the slide show begins the picture interval (Slide show
speed) must be set.
: Each time the OK button is pressed, the picture rotates 90
degrees clockwise.
: Each time the OK button is pressed, the picture is enlarged
up to 4X(four times the normal size).
→ normal size → 2X → 4X → 2X
• Press the ANYKEY button to display the menu bar.
• Press the RETURN button to clear the menu bar.
MPEG4 fi les contain the audio and video data.
MPEG4 fi les with the following extensions can be played.
- .avi, .divx, .AVI, .DIVX
1. Insert an MPEG4 Disc into the disc tray.
2. Press the ▲▼ buttons to select the Disc Navigation, and then press
the OK or ► button.
3. Press the ▲▼ buttons to select the DivX, and then press the OK or ►
button.
4.
Press the ▲▼ buttons to select the avi fi le, then press the OK or ► button.
MPEG4 Function Description
Playing back an MPEG4 Disc
Function Description
Skip Scene
During play, press the I◄◄ or ►►I button, it moves
forward or backward 5 minutes.
Search Scene
During play, press the SEARCH (◄◄ or ►► ) button
and press again to search at a faster speed.
→ Fast 1 → Fast 2 → Fast 3
Slow Motion
In still or step mode, press the SEARCH (►► )
button on the remote control.
→ Slow 1 → Slow 2 → Slow 3
Step Motion
In the still or play mode, press the F.ADV/SKIP
button on the remote control.
DVD-RW(VR)
JPEG01
MOVE PHOTO OK RETURN
Slide Show Speed
Slow Normal Fast
DVD-RW(VR)
JPEG01
MOVE PHOTO OK RETURN
MOVE OK RETURN EXIT
DivX List
CD
ROOT
ROOT
001 movie_1
No. Title Size
DIVX01
00/01
MPEG4
MOVE OK RETURN EXIT
01375E-VR350,355-XFA-ENG.indb 4601375E-VR350,355-XFA-ENG.indb 46 2007-04-27 오후 5:56:472007-04-27 오후 5:56:47

English - 47
Playback
This unit can play the following video compression formats
MPEG4 Codec format : DivX 3.11 DivX 4.x DivX 5.x DivX-Pro
Xvid
Motion Compensation : QPEL, GMC
Audio format : “MP3”, “MPEG1 Audio Layer2”, “LPCM”, “AC3”,
“DTS”, “MS ADPCM”
Some MPEG4 fi les created on a personal computer may not be
play back.
That is why Codec Type, Version and Higher resolution over
specifi cation is not supported.
Supported subtitle fi le formats: .smi, .srt, .sub, .psb, .txt, .ass
(The subtitle fi le should have exactly the same name as the
corresponding MPEG4 fi le name)
■
■
■
1. Insert a standard VHS tape into the VCR deck.
• When a videotape is inserted, power will turn on automatically.
2. Press the ►II (PLAY/STILL) button on the remote control or on the
front panel of the unit. The videotape will begin to play automatically if
the Record Safety Tab is removed and Auto Play is turned on.
3. Press the
(STOP) button on the remote control or on the front panel
of the unit.
Playing back a VHS Tape (VCR)
Tracking
▌
The Tracking adjustment removes the white lines that sometimes
appear during playback because of slight differences in recording
decks.
During playback, press the PROG/TRK (
/ ) buttons to remove white
lines from the picture.
In Play mode, press ►II (PLAY/STILL) button to still a single frame.
Still
In the Still mode, press F.ADV/SKIP button to advance to the next frame.
Frame Advance
Special VCR Playback Features
▌
While a videotape is playing, you can enjoy a variety of special
playback features.
In Play mode, press Forward (►► ) button or Rewind (◄◄ ) button to
Fps/Rps at two speeds:
• Picture Search - Press and release repeatedly to advance the tape
forward or backword at 2,3,5,7 times normal speed.
• Jet Search - Press and hold to advance the tape forward or backward
at 7 times normal speed.
Fps/Rps
01375E-VR350,355-XFA-ENG.indb 4701375E-VR350,355-XFA-ENG.indb 47 2007-04-27 오후 5:56:512007-04-27 오후 5:56:51

English - 48
Playback
In Play mode, press F.ADV/SKIP button to cue ahead exactly 30
seconds. Press F.ADV/SKIP button repeatedly up to 4 times to cue
ahead 2 minutes.
Skip
In Still mode, press ►► button for slow motion. Press the ►► button
repeatedly to play slow motion speed at 1/10, 1/7, 1/5 times. Press the
PLAY button twice to resume normal viewing.
Slow motion
Variable Search System
▌
Each time you record a cassette on this DVD Recorder & VCR,
an index is automatically marked on the tape when recording is
started.The Search function allows you to fast-forward or rewind to
a specifi c index and start playback from that point.
• This DVD Recorder & VCR uses a standard indexing system (VISS). As
a result, it will recognize any indexes marked by other VCRs using the
same system and vice versa.
Use this feature when you want to search for the 0:00:00 counter
position on a cassette.
1. Press the CANCEL button at the point on the tape where you want to
set the counter to 0:00:00.
2. While a cassette is stopped, press the ANYKEY button.
3. Press the ▲▼ buttons to select Go To [0:00:00], then press the OK
button. The VCR will rewind or fast forward, searching for the 0:00:00
counter position, and then automatically stop at that position.
Go To [0:00:00] Stop
Use this feature when you want to search for a blank position to
record a programme on a cassette.
1. While a cassette is stopped, press the ANYKEY button.
2. Press the ▲▼ buttons to select End Search, then press the OK
button. The VCR will fast forward, searching for a blank position, and
then automatically stop at that position. If the VCR reaches the end of
the tape during end search, the tape will be ejected.
End Search
Use scan and play when you don’t know exactly where a programme
is located on a cassette tape.
1. While a cassette is stopped, press the ANYKEY button.
2. Press the ▲▼ buttons to select Forward Intro Scan or Reverse Intro
Scan, then press the OK button. When an Index mark is found the
DVD Recorder & VCR will playback the tape for 5 seconds, after which
it will continue searching for the next Index mark.
Forward/Reverse Intro Scan
Go To [0:00:00]
◄◄
00:00:49
End Search
►►
00:00:13
Scan and Play
►►
00:01:49
01375E-VR350,355-XFA-ENG.indb 4801375E-VR350,355-XFA-ENG.indb 48 2007-04-27 오후 5:56:522007-04-27 오후 5:56:52

English - 49
Recording
This section shows various DVD recording methods.
This unit can record on various types of discs.
Before recording, read the following instructions and
select the disc type according to your preference.
This recorder can record on the following discs.
● DVD-VR350
● DVD-VR355
• DVD±RWs and DVD-RAMs are rewritable.
• DVD±Rs are non-rewritable.
Recordable discs
Recording
Disc Types
Recording
format
Recording
Device
Finalising
Additional Recording
in Samsung Recorder
DVD-RAM VR Mode
Samsung X Recordable
Other Company
X Recordable
DVD-RW
VR Mode
Samsung
fi nalised Not recordable
not fi nalised Recordable
Other Company
fi nalised Not recordable
not fi nalised Recordable
V Mode
Samsung
fi nalised Not recordable
not fi nalised Recordable
Other Company
fi nalised Not recordable
not fi nalised Not recordable
DVD-R V Mode
Samsung
fi nalised Not recordable
not fi nalised Recordable
Other Company
fi nalised Not recordable
not fi nalised Not recordable
DVD+RW
(DVD-VR355 only)
-
Samsung X
Not recordable in
some cases
Other Company
X
Not recordable in
some cases
DVD+R
(DVD-VR355 only)
-
Samsung
fi nalised Not recordable
not fi nalised
Not recordable in
some cases
Other Company
fi nalised Not recordable
not fi nalised
Not recordable in
some cases
Compatibility between Samsung and
Other Company’s Recorder
▌
DVD-RAM DVD-RW DVD-R DVD+RW DVD+R
DVD-RAM DVD-RW DVD-R
Finalise
- This closes the DVD-RW/±R so no additional
recording can be done.
Unfi nalise
- This allows additional recording on a DVD-RW
disc originally recorded on the DVD Recorder &
VCR
- A DVD-RW disc that has been recorded by DAO
(Disc At Once) in a PC cannot be unfi nalised.
- A DVD-RW disc that has been recorded in V
mode on a different make of recorder cannot be
unfi nalised.
- A DVD±R disc cannot be unfi nalised.
■
■
01375E-VR350,355-XFA-ENG.indb 4901375E-VR350,355-XFA-ENG.indb 49 2007-04-27 오후 5:56:542007-04-27 오후 5:56:54

English - 50
Recording
Since available functions differ depending on the disc type, select a disc
that best fi ts your preferences.
When you insert an unused disc, the following message appears.
DVD-RAM : Use after formatting the disc.
DVD±RW/+R : Use after initialising the disc.
When using a DVD-RW disc, you can change the mode.
Refer to Formatting a Disc on page 75.
DVD-R : Formatting a disc is unnecessary and only V mode Recording is
supported.
Recording Formats
▌
• Chapters will be created automatically when you fi nalise recording on
DVD-RW/-R discs in V mode.
• Simple editing (erasing titles/changing title name).
DVD-RW(V mode)/-R
• This mode involves multiple editing functions (such as deletion of the
whole title, partial deletion of a title, etc.).
• Various editing options using a created Playlist.
DVD-RAM/-RW(VR mode)
Select one of four recording modes by pressing the REC SPEED button
repeatedly while the unit is in Stop mode for the desired recording time
and picture quality.
In general, picture quality improves as the recording time decreases.
In AUTO Mode, the most suitable record mode is adjusted automatically,
according to remaining time on the disc and length of the timer recording.
This function selects one mode from XP, SP, LP and EP mode and is used
in timer recording mode only.
Recording Mode
• The dual layer DVD±Rs have approximately double the capacity of
single layer DVD±Rs. (See page 34.)
Mode Characteristic
Recording Times Data Rates
XP
(high quality mode)
Select when the video
quality is important.
Approx. 1 hour
about 8 Mbps
SP
(standard quality mode)
Select to record in
standard quality.
Approx. 2 hours
about 4 Mbps
LP
(long recording mode)
Select when a long
recording time is
required.
Approx. 4 hours
about 2 Mbps
EP
(extended mode)
Select when a long
recording time is
required.
Approx. 6 hours/
about 1,2 Mbps
Approx. 8 hours/
about 0,8 Mbps
AUTO
for timer recording only
see page 55.
Approx 1 to 8 hours
Approx 0,8 to 8 Mbps
• You can also make your own chapters on DVD+RWs and edit them
using the Chapter Edit menu. (see pages 66 to 68)
DVD+RW
You can initialise discs automatically using EZ REC MODE
(see page 58).
■
No
Yes
Uninitialised Disc
Do you want to initialise this disc?
DVD-RAM
DVD±RW/+R
No
Yes
Unformatted Disc
Do you want to format this disc?
01375E-VR350,355-XFA-ENG.indb 5001375E-VR350,355-XFA-ENG.indb 50 2007-04-27 오후 5:56:562007-04-27 오후 5:56:56

English - 51
Recording
Pictures with copy protection cannot be recorded on this DVD
Recorder & VCR.
When the DVD Recorder & VCR receives a copy guard signal while
recording, recording stops and the following message appears on
the screen.
Unrecordable video
TV broadcasts that contain copy control signals may have one of the
following three signal types, Copy-Free, Copy-Once and Copy-Never.
If you want to record a copy-once type programme, use DVD-RW with
CPRM in VR Mode and DVD-RAM discs.
Once Copy Once has been recorded, additional recording cannot be
performed.
* Compatible with CPRM.
Content Protection for Recordable Media (CPRM)
CPRM is a mechanism that ties a recording to the media on which it
is recorded. It is supported by some DVD recorders, but not by many
DVD players.
Each blank recordable DVD has a unique 64-bit media ID etched in
the BCA. When protected content is recorded onto the disc, it can
be encrypted with a 56-bit C2 (Cryptomeria) cipher derived from the
media ID.
During playback, the ID is read from the BCA and used to generate a
key to decrypt the contents of the disc.
If the contents of the disc are copied to other media, the ID will be
absent or wrong and the data will not be decryptable.
Concerning Copy Control Signals
Media
Signal type
Copy-Free Copy-Once Copy-Never
DVD-RAM (Ver.2.0)
OO* -
DVD+RW
O- -
DVD+R
O- -
DVD-RW (Ver.1.1)
O- -
DVD-RW (Ver.1.1)
with CPRM
VR mode
OO* -
DVD-R
O- -
You cannot record copy protected movie.
01375E-VR350,355-XFA-ENG.indb 5101375E-VR350,355-XFA-ENG.indb 51 2007-04-27 오후 5:56:582007-04-27 오후 5:56:58

English - 52
Recording
1. Press the PROG/TRK ( / ) buttons or number buttons to select the
station you want to record.
2. Press the REC SPEED button repeatedly, to select the recording
speed (quality).
→ SP → LP → EP → XP
3. Press the REC button.
Recording the current programme you are watching
▌
1. Power on your DVD Recorder & VCR and switch to AV mode by
pressing the INPUT SEL. button on the remote control. The front panel
display changes in the following sequence.
→ PR → AV1 → AV2 → DV
2. Press the REC SPEED button repeatedly to select the recording speed
(quality).
→ SP → LP → EP → XP
3. When your DVD Recorder & VCR is in the Stop mode, set the
operation mode of your external devices to play mode.
4. Press the REC button on your DVD Recorder & VCR when the image
from which you want to start recording is displayed.
Recording from external equipment you are watching
▌
To pause recording
Press the PLAY/PAUSE (
) button to pause a recording in progress.
● Press the PLAY/PAUSE (
) button again to resume recording.
● You can switch channels by pressing the PROG/TRK (
/ ) buttons
while recording pauses.
To stop recording
Press the STOP button to stop a recording in progress.
● When using DVD-RAM/DVD±RW/DVD±R discs, the message
“Updating the disc information. Please wait for a moment.” is
displayed.
Recording immediately
1. Check the antenna cable is connected.
2. Press the OPEN/CLOSE button and place a recordeble disc on the
disc tray.
3. Check the remaining time on the disc.
DVD-RAM/DVD±RW/+R discs should be formatted or initialised in advance
before beginning recording. Most new discs are sold unformatted. Make
sure to format your unformatted discs before recording.
4. Press the OPEN/CLOSE button to close the disc tray.
Wait until LOAD disappears from the front panel display.
Before you start
DVD-VR355 only
RAM
VR XP PR 7
Available Time 00:28
01375E-VR350,355-XFA-ENG.indb 5201375E-VR350,355-XFA-ENG.indb 52 2007-04-27 오후 5:57:002007-04-27 오후 5:57:00

English - 53
Recording
You can not change the recording mode and the programme
while recording.
Recording will stop automatically if there is no free space left for
recording.
Up to 99 titles can be recorded onto a DVD-RAM/-RW/-R disc,
and up to 48 titles onto a DVD+RW/+R disc.
If the power interrupted due to power failure or other reasons, the
title being recorded will not be saved onto the disc.
Recording will stop automatically if a copy protected image is
selected.
Do not use DVD-R authoring discs with this unit.
Also refer to the user manual for your External Devices when
recording from external equipment using the Audio/Video cable.
■
■
■
■
■
■
■
Some camcorders may not work with your DVD Recorder & VCR
even if they have a DV output jack.
Also refer to the user manual for your camcorder when recording
through a DV jack.
To display playback related icons on the screen, press any
direction button on the remote control.
■
■
■
You may control the Camcorder using the IEEE1394 (DV) interface.
Follow these directions to record onto a disc or tape from a
camcorder that has a DV output jack.
1. Connect the DV output jack of your camcorder to the DV input jack on
the front of your DVD Recorder & VCR using a DV cable.
2. Power on your DVD Recorder & VCR and switch to DV mode by
pressing the INPUT SEL. button on the remote control.
3. Press the REC SPEED button repeatedly to select the recording speed
(quality).
→ SP → LP → EP → XP
4. If the input is set to DV, a playback/record menu that enables
camcorder control appears on the top of the screen.
5. Select the Play icon on the upper part of the screen to playback the
camcorder and fi nd the starting position to copy.
6. To start recording, Press the ◄► buttons to select REC (
z
) icon in the
top side of the screen, then press the OK button.
You can press the REC button on the remote control to start recording.
7. Press the STOP button on your DVD Recorder & VCR when the
recording is fi nished.
Recording through a DV Input jack
Making a One Touch Recording (OTR)
One-Touch Recording (OTR) allows you to add recording time in preset
minute increments up to 9 hours by pressing the REC button repeatedly.
1. Press the PROG/TRK ( / ) buttons or number buttons to select the
station to record.
If you want to record through a connected external component, press
the INPUT SEL. button to select an appropriate external input (AV1,
AV2 or DV input).
DVD-VR355 only
DV
MOVE OK RETURN
The DV device is connected.
01375E-VR350,355-XFA-ENG.indb 5301375E-VR350,355-XFA-ENG.indb 53 2007-04-27 오후 5:57:022007-04-27 오후 5:57:02

English - 54
Recording
Press the STOP (■) button.
The message “Press STOP button once more to cancel Timer Record” is
displayed.
Press the STOP (■) button again.
The message “Updating the disc Information. Please wait for a moment”
is displayed.
To stop recording
▌
The timer counter decreases by the minute from 9:00 to 0:00,
then the DVD Recorder & VCR stops recording.
■
2. Press the REC button.
3. While in Record mode, press the REC button again to activate One-
Touch Recording (OTR).
• Record length 0:30 appears on the On-Screen Display and the DVD
Recorder & VCR will record for exactly 30 minutes.
4. Continue pressing REC to add recording time in preset minute
increments up to 9 hours.
• The DVD Recorder & VCR stops recording automatically when the
time has elapsed.
1. Check the antenna cable is connected.
2. Check the remaining time of the disc.
3. Check the date and time are correct.
Make sure the Clock (Setup-Clock Set) must be set before you
proceed with a timer recording.
(See page 22 )
1. Press the OPEN/CLOSE button, and place a recordable disc on the
disc tray.
2. Press the OPEN/CLOSE button to close the disc tray.
Wait until LOAD disappears from the front panel display.
3. With the unit in Stop mode, press the MENU button.
4.
Press the ▲▼ buttons to select Programme, then press the OK or ► button.
You can go to this step directly by pressing the TIMER REC button.
5. Press the OK or ► button twice.
• The Timer Recording screen is displayed.
6. Fill in the items using the ▲▼◄► buttons.
◄►: Moves to the previous/next item,
▲▼: Sets a value.
• To : Select the media to record DVD or VCR.
• Source :
The video input source (AV1 or AV2), or the broadcasting
channel you want to make a timer recording from.
• Day : Set the recording day.
Daily, MO-SA, MO-FR, W-SA, ...W-SU,
01MON, ...31WED
• Start/End Time : Start and end time of the timer recording.
Making a Timer Recording
DVD-VR355 only
Programme
DVD-Recorder
Title List
Playlist
Disc Manager
Programme
Setup
Copy
DVD-RAM(VR)
Scheduled Record List
►
MOVE OK RETURN EXIT
Scheduled Record List
DVD-Recorder
DVD-RAM(VR) Current Time 12:00
No. To Source Day Start End Speed Edit
No. 01
Available Time 00:48 SP
DVD PR 01 01 SUN 12:00 14:00 SP
To Source Day Start End Speed
MOVE OK RETURN EXIT
01375E-VR350,355-XFA-ENG.indb 5401375E-VR350,355-XFA-ENG.indb 54 2007-04-27 오후 5:57:042007-04-27 오후 5:57:04

English - 55
Recording
The timer recording time may differ from the set time depending
on disc status and overall timer recording status (for example,
recording times overlapping, or when the previous recording ends
within 3 minutes before the start time of the next recording.)
■
Recording Speed (DVD)
AUTO : Select when you want to set video quality automatically. In
AUTO Mode, the most suitable record mode is adjusted automatically,
according to remaining time on the disc and length of the timer
recording. This function selects one mode from XP, SP, LP and EP
mode and is used in timer recording mode only.
XP (high quality) :
Select when audio and video qualities are important.
(Approx. 1 hour)
SP
(standard quality) : Select to record in standard quality. (Approx. 2 hours)
LP (low quality) : Select when a long recording time is required.
(Approx. 4 hours)
EP (extended mode) : Select when a longer recording time is required.
(Approx.6 hours at 1.2Mbps or Approx. 8 hours at 0.8 Mbps.)
- The dual layer DVD±Rs have approximately double the capacity of
single layer DVD±Rs. (See page 34.)
Recording Speed (VCR)
AUTO : Select when you want to set video quality automatically. It
depends on remaining time on the VCR tape.
SP : Standard Play, for best picture quality.
LP : Long Play, for maximum recording time (3 times SP).
7. Press the OK button.
If the timer settings overlap
The fi rst programme has priority. After recording of the fi rst programme
is complete, the second programme starts being recorded.
To exit without saving the current setting
Press the EXIT or RETURN button.
To return to the previous menu
Press the RETURN button if you don't want to set a timer recording.
8. Turn the power off to fi nish the timer recording.
• will blink if disc or tape is not inserted.
• will appear on the front panel. It means that a timer recording is
registered.
When you are recording in EP mode on a DVD-RW(V mode)/-R
disc, it may not record for the full 6 or 8 hours because the unit
uses the VBR (Variable Bit Rate) ENCODING system.
For example, if you record a programme with a lot of action, it
uses a higher bit rate which in turn consumes more disc memory.
■
01375E-VR350,355-XFA-ENG.indb 5501375E-VR350,355-XFA-ENG.indb 55 2007-04-27 오후 5:57:072007-04-27 오후 5:57:07

English - 56
Recording
Follow these directions to edit the timer record list.
1. With the unit in Stop mode, press the MENU button.
2. Press the ▲▼ buttons to select Programme, then press the OK or ►
button.
3. Press the OK button.
4. Press the ▲▼ buttons to select the number of the scheduled record
list you want to edit, then press the OK or ► button.
• The Edit and Delete items are displayed.
5. Press the ▲▼ buttons to select Edit, then press the OK or ► button.
• The Timer Recording screen is displayed. Edit the items you want
to modify. See the Timer Recording section for more information on
Timer Recording Input items.(See pages 54~55)
6. Press the OK button to confi rm the edited setting.
7. Press the EXIT button after fi nishing the operation.
The menu screen will disappear.
Editing the Scheduled Record List
DVD-VR355 only
Follow these directions to delete a title from the timer record list.
1. With the unit in Stop mode, press the MENU button.
2. Press the ▲▼ buttons to select Programme, then press the OK or ►
button.
3. Press the OK button.
4. Press the ▲▼ buttons to select the number of the scheduled record
list you want to delete, and then press the OK button.
• The Edit and Delete items are displayed.
5.
Press the ▲▼ buttons to select Delete, then press the OK or ► button.
• You will be prompted with the delete confi rm message such as (“Do
you want to delete No.01?”).
6. Press the ◄ ► buttons to select Yes, then press the OK button.
• The selected title will be deleted from the list.
7. Press the EXIT button after fi nishing the operation.
The menu screen will disappear.
Deleting the Scheduled Record List
You can not delete programmes that are currently being
recorded.
■
DVD-VR355 only
Scheduled Record List
DVD-Recorder
DVD-RAM(VR)
Current Time 12:00
No. To Source Day Start End Speed Edit
01 DVD PR 01 Daily 12:00 14:00 SP Off
►
02 DVD PR 02 Daily 15:00 16:00 SP Off
►
03 : :
√ ►
Do you want to delete ‘No.01’?
Yes No
No.01
MOVE OK RETURN EXIT
Scheduled Record List
DVD-Recorder
DVD-RAM(VR) Current Time 12:00
No. To Source Day Start End Speed Edit
No. 01
Available Time 00:48 SP
DVD PR 01 01 SUN 12:00 14:00 SP
To Source Day Start End Speed
MOVE OK RETURN EXIT
01375E-VR350,355-XFA-ENG.indb 5601375E-VR350,355-XFA-ENG.indb 56 2007-04-27 오후 5:57:092007-04-27 오후 5:57:09

English - 57
Recording
This function allows you Initialise and Finalise a disc automatically.
1.
With the unit in Stop mode/No Disc mode, press the EZ REC MODE
button on the remote control.
2. Press the ◄ ► buttons to select On, and then press the OK button.
The EZ REC MODE is set up.
3. Insert a disc.
If the disc is new, it will initialise automatically.
4. Press the REC button.
5. EZ REC MODE will Automatically Finalise the disc under the following
conditions.
- When you press the OPEN/CLOSE button on your DVD Recorder &
VCR after recording on at least 30% of the disc. The tray will open after
the disc has been fi nalised.
- When the disc is full, it will fi nalise automatically and the DVD Recorder
& VCR will remain in stop mode.
- When you make a timer recording and it occupies at least 30% of the
disc, the disc will fi nalise automatically and the DVD Recorder & VCR
will power off. Please note that auto fi nalisation will not work if the
DVD Recorder & VCR has more than one Timer Recording set in the
Scheduled Record List.
EZ REC MODE
DVD-VR355 only
If you insert a new DVD-RW disc, it will be formatted in V mode
after auto initialising.
If you select off, you must initialise (see page 50) and fi nalise the
disc manually in the Disc Manager menu.(see page 75)
The length of Recording is different according to recording mode.
(see page 50)
■
■
■
50%
Disc Initialise (DVD-V)
Now, initialising..
No
Yes
Press “On” to confirm EZ REC mode.
Otherwise press “Off”
50%
Disc Finalise
Processing..
01375E-VR350,355-XFA-ENG.indb 5701375E-VR350,355-XFA-ENG.indb 57 2007-04-27 오후 5:57:112007-04-27 오후 5:57:11

English - 58
Recording
Before starting
1. Check TV channel and Antenna connections.
2. Check the remaining time on the tape.
You can record a TV show in progress by inserting a blank tape
and pressing the
z
(REC) button. You can even add time in preset
increments up to 9 hours by pressing the
z
(REC) button repeatedly.
1. Insert a blank VHS tape into the VCR deck.
• Make sure the tape is long enough to record the entire programme.
2. Press the Number buttons or the PROG/TRK ( / ) buttons to select
the desired channel.
Press the INPUT SEL. button to select AV1, AV2 or DV input if
recording from an external device connected to the input jacks of the
recorder.
3. Press the REC SPEED button on the remote control to set the Record
Speed to one of the following options:
• SP – Standard Play, for best picture quality.
• LP – Long Play, for maximum recording time (3 times SP).
Be sure your videotape has a Record Safety Tab. If the tab is
missing, you can cover the opening with a small piece of tape.
■
The selected Record Speed will appear on the front panel display
and on-screen display.
■
Basic VCR Recording
Warning: Do not cover this opening unless you are sure you want
to record over the tape.
■
4. Press the
z
(REC) button on the remote control or front panel.
For options while recording is in progress, see “Special Recording
Features”.
When you watch or record on the VCR during DVD Recording,
some function buttons may not operate.
The message “This function is not available.” will be displayed.
■
Maximum Recording Time - SP vs. LP
Tape Length SP (Standard Play) LP (Long Play)
E180 Approx. 3 hrs Approx. 6 hrs
E240 Approx. 4 hrs Approx. 8 hrs
E280
Approx. 4 hrs 40 mins Approx. 9 hrs 20 mins
E300 Approx. 5 hrs Approx. 10 hrs
To pause recording
Press the PLAY/PAUSE (
) button to pause a recording in progress.
● Press the PLAY/PAUSE (
) button again to resume recording.
● You can switch channels by pressing the PROG/TRK (
/ ) buttons
while recording pauses.
To stop recording
Press the STOP button to stop a recording in progress.
01375E-VR350,355-XFA-ENG.indb 5801375E-VR350,355-XFA-ENG.indb 58 2007-04-27 오후 5:57:132007-04-27 오후 5:57:13

English - 59
Recording
1. Press INFO button on the remote control.
The following information will be displayed.
(Current deck status, recording speed, remaining time, input channel,
current time.)
Check Remaining Time
While a recording is in progress, you can watch a different media,
or add recording time in preset increments.
1. Watch a different media during recording
You can watch a DVD during VCR recording or watch a Video tape
during DVD recording.
• During VCR recording, insert a DVD in the DVD deck. The output will
automatically change to the DVD and start playback.
• During DVD recording, insert a Video tape in the VCR deck. The
output will automatically change to the VCR and start playback. (Only
if tape is missing the safety tab)
2. Add Recording Time
Refer to the One-Touch Recording (OTR).
(See page 53)
3. Recording DVD and VCR at the same time
You can record DVD and VCR at the same time, but both modes must
be set up to record separately.
• Press the DVD/VCR button to set the unit to DVD or VCR mode.
• Choose input mode PR, AV1, AV2 or DV for DVD or VCR.
• Choose REC SPEED mode for DVD or VCR.
• Press REC button for DVD or VCR.
Special Recording Features
When the DVD Recorder & VCR is connected to your TV using
the S-Video or component video cable, the playback screen on
the video tape will not display during DVD recording.
You cannot record different channels at the same time.
The DVD and VCR cannot start recording at the exact same time.
You must set one to start recording, then the other.
■
■
■
STOP
00:00:00
SP
Rem 01:21
PR 1
VCR
JAN 01 2007 MON 12 : 00
STOP
00:00:00
SP
Rem 00:48
PR 1
RAM
01375E-VR350,355-XFA-ENG.indb 5901375E-VR350,355-XFA-ENG.indb 59 2007-04-27 오후 5:57:152007-04-27 오후 5:57:15

English - 60
Recording
• Insert a DVD disc you want to copy.
• Insert a VHS tape.
• Press the VCR copy button on front panel or remote control. (TO VCR)
• To stop recording, press the STOP button.
• You can also copy from DivX to VCR when the desired DivX is played
back. If the DivX disc has various fi les, only the selected fi le will be
played back.
Direct copy DVD to VCR
Copy function is not allowed in progressive scan mode.
■
You can copy from the DVD to VCR or VCR to DVD.
Check the remaining time on the tape and disc.
Copy to DVD or VCR
1. With the unit in Stop mode, press the MENU button.
2. Press the ▲▼ buttons to select Copy, then press the OK or ► button.
3. Press the ▲▼ buttons to select DVD
--
> VCR, then press the OK or
► button.
4. Press the ▲▼ buttons to select Edit Copylist, then press the OK or
► button.
• To copy from “Edit Copylist”, you need to make a copylist in advance.
• Select “New Copylist” and create the new playlist. (See page 68)
• On DVD-RW(V)/DVD+RW/±R disc, you can only use Direct copy
function.
5. Press the ▲▼ buttons to select desired copylist, then press the OK or
► button.
6. Press the ▲▼ buttons to select Copy, then press the OK or ► button.
To copy from DVD to VCR
▌
(VR mode)
DVD-VR355 only
Edit CopylistDVD-RAM(VR)
No.
Title Length
Edit
JAN/01/2007
1/1
JAN/01/2007 12:00
1 Scene
JAN/01/2007 12:00
01 JAN/01/2007 12:0 00:00:11
√
Play
Rename
Edit Scene
Copy
Delete
MOVE OK RETURN EXIT
01375E-VR350,355-XFA-ENG.indb 6001375E-VR350,355-XFA-ENG.indb 60 2007-04-27 오후 5:57:172007-04-27 오후 5:57:17

English - 61
Recording
• Insert the VHS tape you want to copy.
• Insert Recordable DVD disc.
• Press DVD copy button on front panel or remote control. (TO DVD)
• To stop recording press the STOP button.
Direct copy VCR to DVD
1. With the unit in Stop mode, press the MENU button in stop mode.
2. Press the ▲▼ buttons to select Copy, then press the OK or ► button.
3. Press the ▲▼ buttons to select VCR
--
> DVD, then press the OK or
► button.
4. You can use the ►II, I◄◄ or ►► I, ◄◄ or ►► buttons to search for the
Start position.
Press the OK button at the start point.
5. You can use the ►II, I◄◄ or ►► I, ◄◄ or ►► buttons to search for the
end position.
Press the OK button at the end point.
• A copylist will be generated.
Repeat the above steps to create the copylist.
• In VCR mode, the copylist cannot be saved.
6. Press the ▲▼ buttons to select desired copylist, then press the OK or
► button.
7. Press the ▲▼ buttons to select Copy, then press the OK or ► button.
• The VCR will fast forward, searching for a start position and then
automatically start a copy.
• It may not be match up with Start and End point exactly.
• If you want to copy all copylists, select Copy All.
To copy from VCR to DVD
▌
VCR
- -
> DVD
DVD-Recorder
No.
Start End
Edit
DVD-RAM(VR)
00:03:42
STOP
01 00:02:20 00:03:22
√
02
--
:
--
:
--
--
:
--
:
--
√
Copy All
Play
Copy
Delete
MOVE OK RETURN EXIT
01375E-VR350,355-XFA-ENG.indb 6101375E-VR350,355-XFA-ENG.indb 61 2007-04-27 오후 5:57:192007-04-27 오후 5:57:19

Editing
English - 62
This section introduces basic functions of DVD editing and explains both edit functions for the recording on a
disc and edit functions for the entire disc.
c
Playback screen for recorded titles
d
Information window for the selected title: Title name, recording date,
lock status, recording mode
e
Recorded title No.
f
Recorded title name
g
Recording Length (i.e., the playing time)
h
Edit menu
Play: Plays the selected title.
Rename: Changes the name of a selected title.
Delete: Deletes the selected title from the list.
Edit: Deletes a section of title.
Protection: Locks or unlocks the selected title.
i
Button display
Title List Screen Elements
By pressing the ANYKEY button, you can play desired title.
(see page 38)
This may depend on the type of disc.
DVD-RW(V)/DVD+RW/±R has limited editing function.
■
■
■
Editing
Playing the Title List
Follow these instructions to play back a title from the Title List.
1. Press the TITLE LIST button.
The Title List screen is displayed.
2. Press the ▲▼ buttons to select a title you want to play from Title List,
and then press the PLAY button.
3. Press the STOP button to stop playing.
To return to the title list screen, press the TITLE LIST button.
DVD-VR355 only
RAM
VR
► XP
Title List
01 JAN/01/2007 12:00 00:00:11
►
02 JAN/01/2007 12:30 00:00:09
►
03 JAN/01/2007 01:30 00:01:36
√
04 JAN/01/2007 01:3000:00:11
√
No. Title Length
Edit
DVD-RAM(VR)
JAN/01/2007
3/4
JAN/01/2007
01:00 PR1
JAN/01/2007
XP
Play
Rename
Delete
Edit
Protection
MOVE OK RETURN EXIT
Title List
01 JAN/01/2007 12:00 00:00:11
►
02 JAN/01/2007 12:30 00:00:09
►
03 JAN/01/2007 01:00 00:01:36
►
04 JAN/01/2007 01:30 00:00:11
►
No. Title Length
Edit
DVD-RAM(VR)
JAN/01/2007 3/4
JAN/01/2007 01:00 PR1
JAN/01/2007
XP
ed
c
f
g
i
MOVE OK RETURN EXIT
Title List
01 JAN/01/2007 12:00 00:00:11
►
02 JAN/01/2007 12:30 00:00:09
►
03 JAN/01/2007 01:00 00:01:36
√
04 JAN/01/2007 01:30 00:00:11
√
No. Title Length
Edit
DVD-RAM(VR)
JAN/01/2007
3/4
JAN/01/2007 01:00 PR1
JAN/01/2007
XP
h
Play
Rename
Delete
Edit
Protection
MOVE OK RETURN EXIT
01375E-VR350,355-XFA-ENG.indb 6201375E-VR350,355-XFA-ENG.indb 62 2007-04-27 오후 5:57:212007-04-27 오후 5:57:21

Editing
English - 63
Basic Editing (Title List)
Follow these instructions to rename a title list, i.e., to edit the title of
a recorded programme.
1. Press the TITLE LIST button.
The Title List screen is displayed.
2. Press the ▲▼ buttons to select a title you want to rename from the
Title List, then press the OK or ► button.
3. Press the ▲▼ buttons to select Rename, then press the OK or ►
button.
The Rename screen is displayed.
4. Select the desired characters using the ▲▼◄ ► buttons, press the
OK button.
• Back Space: Deletes the character before the cursor.
• Space: Enters a blank and moves the cursor one forward (to the
right).
• Delete: Deletes the character at the cursor position.
• Clear: Deletes all the character inputs.
• Save: Registers the character inputs.
5. Press the ▲▼◄ ► buttons to select Save, and then press the OK
button.
The changed title name is displayed in the title fi eld of the selected
title.
Renaming (Labeling) a Title
▌
DVD-VR355 only
This function is only available with DVD+RW discs. If existing titles are
deleted, new free space will be created. When you operate free space
function, on-air TV images will appear on the left side of the title list.
1. Press the TITLE LIST button. The Title List screen is displayed.
2. Press the ▲▼ button to select Free Space, then press the OK or ►
button. On-air TV images will appear on the left side of the title list.
3. Press the OK button.
Recording on Free space
▌
DVD-VR355 only
Title List
DVD+RW
No. Title Length
Edit
Free Space 5/7
Free Space
PR 10
SP
01 APR/19/2007 12:00 00:00:21
►
02 APR/19/2007 12:30 00:00:03
►
03 APR/20/2007 12:00 00:00:15
►
04 APR/20/2007 12:30 00:00:16
►
05 Free Space 00:00:15 √
06 APR/21/2007 12:30 00:08:16
►
07 Free Space 03:40:27
►
Recording
MOVE OK RETURN EXIT
Rename
DVD-Recorder
DVD-RAM(VR)
Sports(A1)
Back Space Space Delete Clear
Save
MOVE OK RETURN EXIT
Title List
01 JAN/01/2007 12:00 00:00:11
►
02 JAN/01/2007 12:30 00:00:09
►
03 Sports(A1) 00:01:36
►
04 JAN/01/2007 01:30 00:00:11
►
No. Title Length
Edit
DVD-RAM(VR)
Sports(A1)
3/4
Sports(A1)
JAN/01/2007
XP
MOVE OK RETURN EXIT
01375E-VR350,355-XFA-ENG.indb 6301375E-VR350,355-XFA-ENG.indb 63 2007-04-27 오후 5:57:252007-04-27 오후 5:57:25

Editing
English - 64
Follow these instructions to lock a title to protect it from accidental
deletion.
1. Press the TITLE LIST button.
The Title List screen is displayed.
2. Press the ▲▼ buttons to select a title you want to rename from the
Title List, then press the OK or ► button.
3. Press the ▲▼ buttons to select Protection, then press the OK or ►
button.
4. Press the ◄ ► buttons to select On, then press the OK button. The
key icon on the information window for the selected title changes to the
locked status. (
→ )
Locking (Protecting) a Title
▌
DVD-VR355 only
Follow these instructions to delete a title from the Title List.
1. Press the TITLE LIST button.
The Title List screen is displayed.
2. Press the ▲▼ buttons to select a title you want to rename from the
Title List, then press the OK or ► button.
3.
Press the ▲▼ buttons to select Delete, then press the OK or ► button.
You will be prompted with a confi rmation message.
DVD-RAM(VR), DVD-RW(VR mode): Since Playlist is present, the
message ‘Do you want to delete? (Related playlists may be deleted.)’
is displayed.
DVD-RW(Video mode),DVD+RW, DVD±R: Since Playlist is not
present, the message ‘Do you want to delete?’ is displayed.
• The message depends on the type of disc.
4. Press the ◄ ► buttons to select Yes, then press the OK button.
Deleting a Title
▌
You cannot delete a protected title.
If you want to delete a protected title, select Off in the Title
Protection menu.
Once a title is deleted from the Title List, it cannot be recovered.
Once DVD-RW/±R is fi nalised, it cannot be deleted.
With DVD±R, titles are only deleted from the menu, however, the
Title remains physically on the disc.
■
■
■
■
DVD-VR355 only
Title Protection :
DVD-RAM(VR)
JAN/01/2007
3/4
JAN/01/2007
01:00 PR1
JAN/01/2007
XP
Off
On
Title List
MOVE OK RETURN EXIT
Title List
01 JAN/01/2007 12:00 00:00:11
►
02 JAN/01/2007 12:30 00:00:09
►
03 JAN/01/2007 01:00 00:01:36
►
04 JAN/01/2007 01:30 00:00:11
►
No. Title Length
Edit
DVD-RAM(VR)
3/4
JAN/01/2007 01:00 PR1
JAN/01/2007
XP
JAN/01/2007
MOVE OK RETURN EXIT
Title List
Do you want to delete?
(Related playlists
may be deleted.)
DVD-RAM(VR)
JAN/01/2007 3/4
JAN/01/2007 01:00 PR1
JAN/01/2007
XP
No
Yes
MOVE OK RETURN EXIT
01375E-VR350,355-XFA-ENG.indb 6401375E-VR350,355-XFA-ENG.indb 64 2007-04-27 오후 5:57:282007-04-27 오후 5:57:28

Editing
English - 65
Edit Title List Screen Elements
c
Playback bar
d
Playtime
e
Section deletion starting point window and time
f
Section deletion end point window and time
• Select the start and end points of the section you want to delete
using the playback related buttons.
• Playback related buttons:
( , , , , )
The length of the section to be deleted must be at least 5
seconds long.
End point cannot be marked earlier than start point.
The section cannot be deleted when it includes a still picture.
■
■
■
Editing a Chapter
▌
You can make your own chapters on DVD+RWs and edit them using
the Chapter Edit menu.
1. Press the TITLE LIST button.
The Title List screen is displayed.
2. Press the ▲▼ buttons to select a title containing a chapter you want
to edit, then press the OK or ► button.
3. Press the ▲▼ buttons to select Chapter Edit, then press the OK or ►
button. The Chapter Edit screen is displayed.
DVD-VR355 only
Follow these instructions to delete a section of a title from the Title
List.
1. Press the TITLE LIST button.
The Title List screen is displayed.
2. Press the ▲▼ buttons to select a title you want to rename from the
Title List, then press the OK or ► button.
3. Press the ▲▼ buttons to select Edit, then press the OK or ► button.
The Edit Title List screen is displayed.
4. Press the OK button at the starting point.
The image and starting point time are displayed in the section deletion
starting point window.
5. Press the OK button at the end point.
The image and end point time is displayed in the Section deletion
ending point window.
6. Press the ◄ ► buttons to select Delete, then press the OK button.
7. Press the ◄ ► buttons to select Yes, then press the OK button.
The selected section has been deleted.
To return to the Title List, press the ◄ ► buttons to select Return.
Deleting a Section of a Title
▌
(VR mode)
MOVE OK RETURN EXIT
Edit Title List
DVD-RAM(VR)
Title List No. 03
00:00:02 00:00:00
00:00:02
Start End Delete Return
►
Start End
MOVE OK RETURN EXIT
MOVE OK RETURN EXIT
Edit Title List
DVD-RAM(VR)
Title List No. 03
00:00:02 00:00:15
00:00:15
Start End Delete Return
Start End
MOVE OK RETURN EXIT
Edit Title List
DVD-RAM(VR)
Title List No. 03
Start End
00:00:05
00:00:10
Start End Delete Return
00:00:15
Do you want to delete?
(Deleted part will not be restored.)
Yes
No
MOVE OK RETURN EXIT
MOVE OK RETURN EXIT
Edit Title List
DVD-RAM(VR)
Title List No. 03
00:00:02 00:00:00
00:00:02
Start End Delete Return
►
Start End
e
f
d
c
MOVE OK RETURN EXIT
Chapter Edit
Add Return
Delete All
HiddenDelete
00:00:00
►
Chapter : 1/1 Show
DVD+RW
MOVE OK RETURN EXIT
01375E-VR350,355-XFA-ENG.indb 6501375E-VR350,355-XFA-ENG.indb 65 2007-04-27 오후 5:57:312007-04-27 오후 5:57:31

Editing
English - 66
Chapter Edit Screen Elements
1. Current chapter number and status
2. Playback bar
3. Playtime
4. Chapter Edit menu
4. Select a chapter you want to hide using the playback related buttons.
• Playback related buttons: (
, , , , ).
5.
Press the ◄ ► buttons to select Hidden, and then press the OK button.
The selected chapter is hidden.
• To fi nish the operation, select Return using the ◄ ► buttons then
press the OK button.
If there is only one chapter, it can’t be hidden.
Hidden/Show menu is not avaiable if there is no chapter in the
selected title.
The hidden chapters are not shown on the existing DVD players.
Hidden chapters will be played when playing back the entire title.
You can make the hidden chapter shown by pressing the OK
button at Show menu.
■
■
■
■
Hiding a chapter
Follow steps 1 to 3 in page
66
4. Select the point where you want to add a chpater using the playback
related buttons, then press the OK button at that point.
Each time you press the OK button, a new chapter will be added.
• Playback related buttons: (
, , , , ).
5. Press the ◄ ► buttons to select Return, and then press the OK button.
The edited title will now have the chapter you added.
You can make up to 99 chapters in a title and 254 chapters in a disc.
The edited chapters are shown on existing DVD players only
after performing the Edit Compatible function. (See page 77)
If you add a chapter, the title is divided at that point; If you add a chapter
onto a title that has only one chapter, it creates another chapter.
■
■
■
Adding a chapter
Follow steps 1 to 3 in page 66
4. Select a chapter you want to delete using the playback related buttons.
• Playback related buttons: (
, , , , ).
5. Press the ◄ ► buttons to select Delete, and then press the OK button.
The edited title has chapters as you deleted.
• To fi nish the operation, select Return using the ◄ ► buttons then
press the OK button.
First chapter can't be deleted.
Delete menu is not available if there is one chapter in the selected
tilte.
When deleting a chapter, only the chapter marker is actually
deleted, not the recorded video.
Deleting a chapter can't be canceled.
■
■
■
■
Deleting a chapter
Follow steps 1 to 3 in page
66
Chapter Edit
Add Return
Delete All
HiddenDelete
00:00:00
►
Chapter : 1/1 Show
DVD+RW
c
e
f
d
MOVE OK RETURN EXIT
Chapter Edit
Add Return
Delete All
HiddenDelete
00:10:10
►
Chapter : 1/2 Show
DVD+RW
MOVE OK RETURN EXIT
Chapter Edit
00:15:00
Add Return
Delete All
HiddenDelete
►
Chapter : 2/3 Show
DVD+RW
MOVE OK RETURN EXIT
Chapter Edit
00:15:00
Add Return
Delete All
HiddenDelete
►
Chapter : 2/4 Hidden
DVD+RW
MOVE OK RETURN EXIT
01375E-VR350,355-XFA-ENG.indb 6601375E-VR350,355-XFA-ENG.indb 66 2007-04-27 오후 5:57:382007-04-27 오후 5:57:38

Editing
English - 67
4.
Press the ◄ ► buttons to select Delete All, and then press the OK button.
5. Press the ◄ ► buttons to select Yes, and then press the OK button.
When deleting a chapter, only the chapter marker is actually
deleted, not the recorded video.
Delete All menu is not avaiable if there is one chapter in the
selected title.
■
■
Deleting all chapters
Follow steps 1 to 3 in page
66
The length of the section to be deleted must be at least 5 seconds
long.
■
DVD-VR355 only
Follow these instructions to divide a long title into several titles.
1. Press the TITLE LIST button.
The Title List screen is displayed.
2. Press the ▲▼ buttons to select a title you want to divide from the Title
List, then press the OK or ► button.
3. Press the ▲▼ buttons to select Divide Title, then press the OK or ►
button. The Divide Title screen is displayed.
4. Select the point you want to divide using the playback related buttons,
then press the OK button.
• Playback related buttons: (
, , , , ).
5. Press the ◄ ► buttons to select Divide, then press the OK button.
6. Press the ◄ ► buttons to select Yes, then press the OK button.
The selected title has been divided into two titles.
Dividing a Title
▌
Chapter Edit
Add Return
Delete All
HiddenDelete
00:00:00
►
DVD+RW
Do you want to delete all chapter marks?
Yes
No
MOVE OK RETURN EXIT
Divide Title
Title List No. 03
Start
00:00:00 00:00:00
00:00:00
Point Divide Return
►
DVD+RW
End
MOVE OK RETURN EXIT
Divide Title
Title List No. 03
00:00:00 00:19:25
00:19:25
Point Divide Return
►
DVD+RW
Start End
MOVE OK RETURN EXIT
Divide Title
Title List No. 03
Start End
00:00:00
00:019:25
Point Divide Return
√
DVD+RW
Do you want to divide the title?
(Once divided, titles cannot be merged back.)
Yes
No
MOVE OK RETURN EXIT
01375E-VR350,355-XFA-ENG.indb 6701375E-VR350,355-XFA-ENG.indb 67 2007-04-27 오후 5:57:452007-04-27 오후 5:57:45

Editing
English - 68
Advanced Editing (Playlist)
Follow these instructions to create a new playlist title from a recorded
title.
1. With the unit in Stop mode, press the MENU button.
2. Press the ▲▼ buttons to select Playlist, then press the OK or ►
button.
3. Press the ▲▼ buttons to select New Playlist, then press the OK or ►
button.
The Make Scene screen is displayed.
4. Press the OK button at the start point.
•
The image and time at the start point are displayed on the Start
window.
• The yellow-coloured selection bar moves to the End item.
•
Select the starting point of the section from which you want to create a
new scene using the playback related buttons.
• Playback related buttons: ( , , , , )
5. Press the OK button at the end point.
• The image and end point time are displayed in the End window.
• The yellow-coloured selection bar moves to the Make icon.
- To make a new playlist -
6. Press the ◄ ► buttons to select Make, then press the OK button.
A new Make Scene screen is displayed.
A new Scene will be added to the current Playlist.
- To return to Edit Playlist menu -
7. Press the ◄ ► buttons to select Return, then press the OK button.
The Edit Playlist screen is displayed.
Creating a Playlist
▌
You can check and see all the scenes on Edit Playlist screen.
(See page 70)
Repeat steps 1~6 if you want to make a new playlist.
Repeat steps 4~6 if you want to make scenes of the playlist.
■
■
■
You can create up to 99 playlist titles.
Depending on the kind of disc, the displayed screen may be
slightly different.
A disc that is recorded on this unit cannot be displayed playlist
menu if EZ REC MODE set to "On".
■
■
■
(VR mode)
MOVE OK RETURN EXIT
Make Scene
DVD-Recorder
DVD-RAM(VR)
Scene No. 001
00:00:02 00:00:00
00:00:02
Start End Make Return
►
Title List : 1/7
Start End
MOVE OK RETURN EXIT
MOVE OK RETURN EXIT
Make Scene
DVD-Recorder
DVD-RAM(VR)
Scene No. 001
00:00:02 00:00:08
00:00:08
Start End Make Return
ІІ
Title List : 1/7
Start End
MOVE OK RETURN EXIT
Edit Playlist
JAN/01/2007
JAN/01/2007 12:00
1 Scene
JAN/01/2007 12:00
01 JAN/01/2007 12:00 00:00:06
►
No. Title Length Edit
DVD-RAM(VR)
1/1
MOVE OK RETURN EXIT
01375E-VR350,355-XFA-ENG.indb 6801375E-VR350,355-XFA-ENG.indb 68 2007-04-27 오후 5:57:512007-04-27 오후 5:57:51

Editing
English - 69
Follow these instructions to play the playlist titles.
1. Press the PLAY LIST button with the disc stopped.
The Edit Playlist screen is displayed.
2. Press the ▲▼ buttons to select the title you want to play from the
Playlist, then press the OK or ► button.
3. Press the ▲▼ buttons to select Play, then press the OK or ► button.
The playlist titles will be played back.
4. Press the STOP button to stop playing.
The screen returns to the Edit Playlist screen.
Playing Titles in the Playlist
▌
(VR mode)
Follow these instructions to rename a playlist Title, i.e. to edit the
title of a playlist title.
1. Press the PLAY LIST button with the disc stopped.
The Edit Playlist screen is displayed.
2. Press the ▲▼ buttons to select the title you want to rename from the
Playlist, then press the OK or ► button.
3. Press the ▲▼ buttons to select Rename, then press the OK button.
The Rename screen is displayed.
4. Enter the desired characters using the ▲▼◄ ► buttons.
• Back Space : Deletes the character before the cursor.
• Space :
Enters a blank and moves the cursor one forward (to the right).
• Delete : Deletes the character at the cursor position.
• Clear : Deletes all the character inputs.
• Save : Registers the character inputs.
5.
Press the ▲▼◄ ► buttons to select Save, then press the OK button.
The changed title is displayed in the title fi eld of the selected playlist title.
Renaming a Playlist Title
▌
(VR mode)
Follow these instructions to edit scenes for a playlist.
1. Press the PLAY LIST button with the disc stopped.
The Edit Playlist screen is displayed.
2. Press the ▲▼ buttons to select the title you want to edit from the
Playlist, and then press the OK or ► button.
3. Press the ▲▼ buttons to select Edit Scene, then press the OK or ►
button.
The Edit Scene screen is displayed.
Editing a Scene for the Playlist
▌
(VR mode)
Edit Playlist
JAN/01/2007
JAN/01/2007 12:00
1 Scene
JAN/01/2007 12:00
01 JAN/01/2007 12:00 00:00:03
►
02 JAN/01/2007 12:30 00:00:25
►
03 JAN/01/2007 12:0 00:00:05
√
No. Title Length Edit
Play
Rename
Edit Scene
Copy
Delete
DVD-RAM(VR)
3/3
MOVE OK RETURN EXIT
Rename
DVD-Recorder
DVD-RAM(VR)
Dolphin
Back Space Space Delete Clear
Save
MOVE OK RETURN EXIT
Edit Playlist
Dolphin
Dolphin
1 Scene
JAN/01/2007 12:00
No. Title Length Edit
DVD-RAM(VR)
01 JAN/01/2007 12:00 00:00:03
►
02 JAN/01/2007 12:30 00:00:25
►
03 Dolphin 00:00:05
►
3/3
MOVE OK RETURN EXIT
Edit Scene
DVD-Recorder
Scene No. 1 / 7 Playlist No. 3
DVD-RAM(VR)
01 00:00:03 02 00:00:42 03 00:00:04
04 00:00:03 05 00:00:11 06 00:00:04
Play
Modify
Move
Add
Delete
MOVE OK RETURN EXIT
01375E-VR350,355-XFA-ENG.indb 6901375E-VR350,355-XFA-ENG.indb 69 2007-04-27 오후 5:57:562007-04-27 오후 5:57:56

Editing
English - 70
4. Press the ▲▼◄ ► buttons to select the scene you want to modify,
then press the OK button.
5. Press the ▲▼ buttons to select Modify, then press the OK button.
The Modify Scene screen is displayed.
6. Press the OK button at the start point of the scene.
• The image and starting point time are displayed on the Start window.
• Select the starting or ending point of the section you want to modify
using the playback related buttons.
• Playback related buttons: (
, , , , )
7. Press the OK button at the end point of the scene.
• The image and ending point time are displayed in the End window.
8. Press the ◄► buttons to select Change, then press the OK button.
• The scene you want to modify is changed with the selected section.
Modifying a Scene (Replacing a Scene)
Follow steps 1 to 3 on page 70.
4. Press the ▲▼◄ ► buttons to select the scene you want to play, then
press the OK button.
The playlist title to be played is selected.
5. Press the OK button again.
The selected scene will be played back.
• To stop scene play, press the STOP button.
Playing a Selected Scene
Follow steps 1 to 3 on page 70.
Edit Scene
DVD-Recorder
Scene No. 2 / 7 Playlist No. 3
DVD-RAM(VR)
01 00:00:03 02 00:00:42
Play
Modify
Move
Add
Delete
04 00:00:03 05 00:00:11 06 00:00:04
03 00:00:04
MOVE OK RETURN EXIT
Edit Scene
DVD-Recorder
Scene No. 2 / 7 Playlist No. 3
DVD-RAM(VR)
01 00:00:03 02 00:00:42
Play
Modify
Move
Add
Delete
04 00:00:03 05 00:00:11 06 00:00:04
03 00:00:04
MOVE OK RETURN EXIT
MOVE OK RETURN EXIT
Modify Scene
DVD-Recorder
DVD-RAM(VR)
Scene No. 002
00:00:04 00:00:00
00:00:04
Start End Change Cancel
Title List : 1/7
►
Start End
MOVE OK RETURN EXIT
Modify Scene
DVD-Recorder
DVD-RAM(VR)
Scene No. 002
00:00:04 00:00:07
Start End Change Cancel
Title List : 1/7
ІІ
00:00:07
Start End
MOVE OK RETURN EXIT
Edit Scene
DVD-Recorder
Scene No. 2 / 7 Playlist No. 3
DVD-RAM(VR)
02 00:00:03
Play
Modify
Move
Add
Delete
04 00:00:03 05 00:00:11 06 00:00:04
03 00:00:04
01 00:00:03
MOVE OK RETURN EXIT
01375E-VR350,355-XFA-ENG.indb 7001375E-VR350,355-XFA-ENG.indb 70 2007-04-27 오후 5:58:022007-04-27 오후 5:58:02

Editing
English - 71
4. Press the ▲▼◄ ► buttons to select the scene that will have a new
scene inserted before it, then press the OK button.
A yellow selection window is displayed on the scene to be added as
the new scene.
5. Press the ▲▼ buttons to select Add, then press the OK button.
The Add Scene screen is displayed.
6. Press the OK button at the starting point of the scene.
• The image and starting point time are displayed in the Start window.
• Select the end point of the section where you want to add the new
scene using the playback related buttons.
• Playback related buttons: (
, , , , )
7. Press the OK button at the end point of the scene.
• The image and time of the end point are displayed in the End window
• To cancel, press the ◄ ► buttons to select Cancel and then press
the OK button.
8. Press the ◄ ► buttons to select Add, then press the OK button.
• The section you want to add is inserted prior to the scene selected in
step 4.
Adding a Scene
Follow steps 1 to 3 on page 70.
4. Press the ▲▼◄ ► buttons to select the scene you want to move
(change the position), then press the OK button.
5. Press the ▲▼ buttons to select Move, then press the OK button.
• A yellow selection window is displayed on the scene to be moved.
6. Press the ▲▼◄ ► buttons to select the position to which you want to
move the selected scene, then select the OK button.
• The selected scene is moved to the selected position.
Moving a Scene (Changing the Position of a Scene)
Follow steps 1 to 3 on page 70.
You cannot move the selected scene to the position of the next
scene, because the selected scene should be inserted before
that position, which requires no action.
Depending on the kind of disc, the displayed screen may be
slightly different.
■
■
00:00:07
Edit Scene
DVD-Recorder
Scene No. 2 / 7 Playlist No. 3
DVD-RAM(VR)
01 00:00:03 02 00:00:42
Play
Modify
Move
Add
Delete
04 00:00:03 05 00:00:11 06 00:00:04
03 00:00:04
MOVE OK RETURN EXIT
Edit Scene
DVD-Recorder
Scene No. 2 / 7 Playlist No. 3
DVD-RAM(VR)
01 00:00:03 02 00:00:42
Play
Modify
Move
Add
Delete
05 00:00:11
06 00:00:04
04 00:00:04
03 00:00:04
MOVE OK RETURN EXIT
MOVE OK RETURN EXIT
Add Scene
DVD-Recorder
DVD-RAM(VR)
Scene No. 002
00:00:04 00:00:00
00:00:04
Start End Add Cancel
Title List : 1/7
►
Start End
MOVE OK RETURN EXIT
MOVE OK RETURN
00:00:07
Add Scene
DVD-Recorder
DVD-RAM(VR)
Scene No. 002
00:00:04 00:00:07
Start End Add Cancel
Title List : 1/7
ІІ
Start End
MOVE OK RETURN EXIT
Edit Scene
DVD-Recorder
Scene No. 2 / 8 Playlist No. 3
DVD-RAM(VR)
01 00:00:03 02 00:00:03
Play
Modify
Move
Add
Delete
05 00:00:03
06 00:00:11
04 00:00:04
03 00:00:42
MOVE OK RETURN EXIT
01375E-VR350,355-XFA-ENG.indb 7101375E-VR350,355-XFA-ENG.indb 71 2007-04-27 오후 5:58:112007-04-27 오후 5:58:11

Editing
English - 72
4. Press the ▲▼◄ ► buttons to select the scene you want to delete,
and then press the OK button.
5. Press the ▲▼ buttons to select Delete, then press the OK button.
Deleting a Scene
Follow steps 1 to 3 on page 70.
1. Press the PLAY LIST button with the disc stopped.
The Edit Playlist screen is displayed.
2. Press the ▲▼ buttons to select the title you want to edit from the
Playlist, then press the OK or ► button.
3. Press the ▲▼ buttons to select Delete, then press the OK button.
4. Press the ◄ ► buttons to select Yes, then press the OK button.
You automatically return to the Edit Playlist screen after the delete
operation has fi nished.
Deleting a Playlist from the Playlist
▌
1. Press the PLAY LIST button with the disc stopped.
The Edit Playlist screen is displayed.
2. Press the ▲▼ buttons to select the title you want to edit from the
Playlist, and then press the OK or ► button.
3. Press the ▲▼ buttons to select Copy, then press the OK button.
• The title you choose is played and copied to VCR tape.
4. Press the EXIT button after the operation has fi nished. The menu
screen will disappear.
Copying a Playlist to the VCR
▌
Copy function is not allowed in progressive scan mode.
■
Edit Scene
DVD-Recorder
Scene No. 2 / 8 Playlist No. 3
DVD-RAM(VR)
01 00:00:03 02 00:00:03
Play
Modify
Move
Add
Delete
06 00:00:11
05 00:00:0304 00:00:04
03 00:00:42
MOVE OK RETURN EXIT
Edit Scene
DVD-Recorder
Scene No. 2 / 7 Playlist No. 3
DVD-RAM(VR)
01 00:00:03 02 00:00:03
Play
Modify
Move
Add
Delete
06 00:00:11
05 00:00:0304 00:00:04
03 00:00:42
MOVE OK RETURN EXIT
Edit Playlist
DVD-RAM(VR)
Dolphin
2 Scene
JAN/01/2007 01:00
Do you want to delete?
No
Yes
Dolphin
MOVE OK RETURN EXIT
01375E-VR350,355-XFA-ENG.indb 7201375E-VR350,355-XFA-ENG.indb 72 2007-04-27 오후 5:58:192007-04-27 오후 5:58:19

Editing
English - 73
Disc Manager
Follow these instructions to give a name to a disc.
Editing the Disc Name
▌
1. With the unit in Stop mode, press the MENU button.
2. Press the ▲▼ buttons to select Disc Manager, then press the OK or
► button.
3. Press the ▲▼ buttons to select Disc Name, then press the OK or ►
button.
The Edit Name screen is displayed.
4. Enter the desired characters using the ▲▼◄ ► buttons.
• Back Space : Deletes the character before the cursor.
• Space :
Enters a blank and moves the cursor one forward (to the right).
• Delete : Deletes the character at the cursor position.
• Clear : Deletes all the character inputs.
• Save : Registers the character inputs.
5. Press the ▲▼◄ ► buttons to select Save, then press the OK button.
A disc name is given to the disc.
To edit the disc name, you need to clear disc protection in
advance.
Depending on the kind of disc, the displayed screen may be
different.
■
■
DVD-VR355 only
Disc Protect allows you to protect your discs from being formatted
or deleted due to unintended operations.
1. With the unit in Stop mode, press the MENU button.
2. Press the ▲▼ buttons to select Disc Manager, then press the OK or
► button.
3. Press the ▲▼ buttons to select Disc Protection, then press the OK
or ► button.
4. Press the ▲▼ button to select Protected, then press the OK or ►
button.
Disc Protection
▌
Rename
DVD-Recorder
DVD-RAM(VR)
Back Space Space Delete Clear
Save
Disc
MOVE OK RETURN EXIT
Disc Manager
DVD-Recorder
Title List
Playlist
Disc Manager
Programme
Setup
Copy
DVD-RAM(VR)
Disc Name : Disc
►
Disc Protection : Not Protected
►
Disc Format
►
Delete All Title Lists
►
MOVE OK RETURN EXIT
Disc Manager
DVD-Recorder
Title List
Playlist
Disc Manager
Programme
Setup
Copy
DVD-RAM(VR)
Disc Name :
►
Disc Protection : Protected
►
Disc Format
►
Delete All Title Lists
►
MOVE OK RETURN EXIT
01375E-VR350,355-XFA-ENG.indb 7301375E-VR350,355-XFA-ENG.indb 73 2007-04-27 오후 5:58:242007-04-27 오후 5:58:24

Editing
English - 74
After you record titles onto a DVD-RW/±R disc with your DVD recorder, it
needs to be fi nalised before it can be played back on external devices.
Finalising a Disc
▌
1. With the unit in Stop mode, press the MENU button.
2. Press the ▲▼ buttons to select Disc Manager, then press the OK or
► button.
3. Press the ▲▼ button to select Disc Finalise, then press the OK or ►
button.
You will be prompted with the message ‘Do you want to fi nalise disc?’
4. Press the ◄ ► buttons to select Yes, then press the OK button. You
will be prompted again with the message “Disc will be fi nalised. Do you
want to continue?”
5. Press the ◄ ► buttons to select Yes, then press the OK button. The
disc is fi nalised.
DVD-VR355 only
Use these instructions to format a disc.
The Disc Protection should be cleared.
Formatting a Disc
▌
1. With the unit in Stop mode, press the MENU button.
2. Press the ▲▼ buttons to select Disc Manager, then press the OK or
► button.
3. Press the ▲▼ buttons to select Disc Format, then press the OK or ►
button.
DVD-RAM/+RW
• You will be prompted with the confi rmation message ‘Do you want to
format disc?’
• You will be prompted with the confi rmation message ‘All data will be
deleted. Do you want to continue.’
DVD-RW
• You will be prompted with the confi rmation message ‘Choose the
recording format for DVD-RW.’
• You will be prompted with the confi rmation message ‘All data will be
deleted. Do you want to continue?’
4. Press the ◄ ► buttons to select Yes, then press the OK button.
The disc is formatted.
DVD-VR and DVD-V mode are defi ned according to their recording
format.
DVD-VR mode DVD-V mode
DISC
DVD-RAM
DVD-RW
DVD-RW
DVD-R
DVD-VR355 only
•
DVD-RAM/+RW
•
DVD-RW
Disc Manager
DVD-Recorder
Title List
Playlist
Disc Manager
Programme
Setup
Copy
DVD-RAM(VR)
Disc Name :
►
Disc Protection : Not Protected
►
Disc Format : DVD-VR
►
Disc Finalise
►
Do you want to format disc?
Yes No
MOVE OK RETURN EXIT
Disc Manager
DVD-Recorder
Title List
Playlist
Disc Manager
Programme
Setup
Copy
DVD-RW(VR)
Disc Name :
►
Disc Protection : Not Protected
►
Disc Format : DVD-VR
►
Disc Finalise
►
Delete All Title Lists
►
Choose the recording format for DVD-RW.
DVD-VR DVD-V
MOVE OK RETURN EXIT
Disc Manager
DVD-Recorder
Title List
Playlist
Disc Manager
Programme
Setup
Copy
DVD-RW(VR)
Disc Name :
►
Disc Protection : Not Protected
►
Disc Format : DVD-VR
►
Disc Finalise
►
Delete All Title Lists
►
Do you want to finalise disc?
Yes No
MOVE OK RETURN EXIT
01375E-VR350,355-XFA-ENG.indb 7401375E-VR350,355-XFA-ENG.indb 74 2007-04-27 오후 5:58:262007-04-27 오후 5:58:26

Editing
English - 75
Once a disc is fi nalised, you cannot delete titles from the record
list.
After being fi nalised, the DVD-RW(V mode)/±R operates in the
same manner as a DVD-Video.
Depending on the disc type, the displayed screen may be
different.
Finalising time may be different depending on the amount of data
recorded on the disc.
Data on the disc will be damaged if the recorder is powered off
during fi nalise process.
You can fi nalise the disc automatically using EZ REC MODE
(see page 58).
■
■
■
■
■
■
1. With the unit in Stop mode, press the MENU button.
2. Press the ▲▼ buttons to select Disc Manager, then press the OK or
► button.
3. Press the ▲▼ button to select Disc Unfi nalise, then press the OK or
► button.
You will be prompted with the message ‘Do you want to unfi nalise
disc?’.
4. Press the ◄ ► buttons to select Yes, then press the OK button. You
will be prompted again with the message “Disc will be unfi nalised. Do
you want to continue?”
5. Press the ◄ ► buttons to select Yes, then press the OK button.
The disc is unfi nalised.
Unfi nalising a Disc (V/VR mode)
▌
A DVD-RW can be fi nalised or unfi nalised in V mode.
A DVD-RW can be fi nalised or unfi nalised in VR mode.
■
■
Finalise Unfi nalise
Mark DVD-Video(RW) DVD-RW(V)
Operation Same as DVD-Video
Additional recording, protection
and deletion are possible.
Finalise Unfi nalise
Mark DVD-RW(VR:F) DVD-RW(VR mode)
Operation
Additional recording,
deletion, editing, and
protection are impossible.
Additional recording,
deletion, editing, and
protection are possible.
Disc Manager
DVD-Recorder
Title List
Playlist
Disc Manager
Programme
Setup
Copy
DVD-RW(VR:F)
Disc Name :
►
Disc Format : DVD-VR
►
Disc Unfinalise
►
Do you want to unfinalise disc?
Yes No
MOVE OK RETURN EXIT
01375E-VR350,355-XFA-ENG.indb 7501375E-VR350,355-XFA-ENG.indb 75 2007-04-27 오후 5:58:282007-04-27 오후 5:58:28

Editing
English - 76
1. With the unit in Stop mode, press the MENU button.
2. Press the ▲▼ buttons to select Disc Manager, then press the OK or
► button.
3. Press the ▲▼ buttons to select Delete All Title Lists, then press the
OK or ► button.
• You will be prompted with the confi rmation message ‘Do you want to
delete all title lists?’.
• When Protected Title exists : The Delete All Title List function will
not operate. If there is a title containing a still picture, however,
that function will not operate. If you want to delete a protected title,
disable Protect for it on the Lock item.
4. Press the ◄ ► buttons to select Yes, then press the OK button.
All title lists are deleted.
Delete All Title Lists
▌
DVD-VR355 only
If you don’t performing Chapter Edit, you will be prompted with
the confi rmation message “You do not need to execute Edit
Compatible.”
■
For DVD+RW discs, this function needs to be performed in order to
view edited chapters or titles on a standard DVD player.
Edit Compatible
▌
1. With the unit in Stop mode, press the MENU button on the remote
control.
2. Press the ▲▼ buttons to select Disc Manager, and then press the
OK or ► button.
3. Press the ▲▼ buttons to select Edit Compatible, and then press the
OK or ► button.
4. Press the ◄ ► buttons to select Yes, and then press the OK button.
The Edit Compatible process will start.
After performing Edit Compatible, you can move to the title menu of
the disc by pressing the TITLE MENU button.
DVD-VR355 only
Disc Manager
DVD-Recorder
Title List
Playlist
Disc Manager
Programme
Setup
Copy
DVD-RAM(VR)
Disc Name :
►
Disc Protection : Not Protected
►
Disc Format : DVD-VR
►
Disc Finalise
►
Delete All Title Lists
Do you want to delete all title lists?
Yes No
MOVE OK RETURN EXIT
Disc Manager
DVD-Recorder
Title List
Disc Manager
Programme
Setup
Copy
DVD+RW
Disc Name :
►
Disc Format
►
Edit Compatible
►
Do you want to execute Edit Compatible?
This may take more than an hour
depending on the configuration.
Yes No
MOVE OK RETURN EXIT
01375E-VR350,355-XFA-ENG.indb 7601375E-VR350,355-XFA-ENG.indb 76 2007-04-27 오후 5:58:302007-04-27 오후 5:58:30

Reference
English - 77
Reference
Troubleshooting (DVD)
If your product malfunctions, go through the check points below before contacting a Samsung authorized
service centre.
Problem Explanation/Solution
No power.
• Check whether the power cord is securely plugged into the power outlet.
• Did you press the /I button of your DVD Recorder & VCR.
The input is displayed
for a while when the
power turns on.
The DVD Recorder & VCR requires some time to initialise after it is turned on.
If 'Quick Recording' function is set to on, the DVD Recorder & VCR will power on quickly,
which enables you to immediately record a desired channel. (see page 33)
Cannot record TV
programmes.
• Check whether the power cord is securely plugged into the power outlet.
• Did you set the DVD Recorder & VCR programme settings correctly?
• Check the free space on your disc.
• Check the antenna cable is connected.
Timer recording does
not work properly.
• Check the recording time, end time and current time settings again.
• Recording will be canceled if the power is interrupted due to a power failure or other
reason during recording.
Cannot record.
• Check whether the disc is formatted. This product can record on formatted discs only.
• Check whether your disc has a suffi cient free space.
I pressed the REC
button but there is no
response.
If a programme is copy protected, you cannot record it.
I forgot the password
for parental lock.
Press the PROG ( / ) buttons of your DVD Recorder & VCR at the same time when
the power is on, and then press the STANDBY/ON button.
All settings including password will revert to factory settings.
Do not use it if not absolutely required.
(Note that this function is available only when there is no disc inserted.)
Cannot play the disc.
• Check whether the disc is inserted correctly with the label facing up.
• Check the regional code of your DVD disc.
• This DVD Recorder & VCR cannot playback some types of disc.
No sound.
• Are you watching a programme in slow or skip mode?
If you are playing a programme at a speed other than normal speed, sound is not
output. (except for forward search Playback (Fast 1) and you cannot also hear during
scanning MPEG4 and VCD in all mode.)
• Check the connections and initial settings.
• Check whether the disc is damaged.
Clean up the disc, if necessary.
• Check whether the disc is inserted correctly with the label facing up.
01375E-VR350,355-XFA-ENG.indb 7701375E-VR350,355-XFA-ENG.indb 77 2007-04-27 오후 5:58:322007-04-27 오후 5:58:32

Reference
English - 78
Troubleshooting (DVD)
Problem Explanation/Solution
icon appears on
the screen.
You cannot use the operation or function due to one of the following reasons:
(1) Your DVD disc does not support the feature (for example, angles)
(2) You’ve requested a title, chapter, or scan time that is out of the correct range.
Play mode settings
are different from the
settings confi gured
with the Setting menu.
The disc does not support all the selected functions.
In this case, some settings you confi gure on the Setting menu may not work properly.
Cannot change the
aspect ratio.
Aspect ratio is fi xed for DVD disc.
No audio output.
Check whether you selected correct digital output options in the Audio Output Options
menu.
No video or audio output.
The disc tray is ejected
after 2 to 5 seconds.
Did you move your DVD Recorder & VCR suddenly from a cold place to a warm place?
In this case, do not connect the plug to the power outlet and wait for two hours.
Then insert the disc and try to play again.It will work properly when condensation has
evaporated.
Angle operation
does not work during
playback of a DVD disc.
Angle operation is available only when the disc contains images captured at different
angles.
The disc revolves, but
no image or bad quality
images are output.
• Check whether there is damage or foreign materials on your disc.
• Some discs with bad manufacturing quality may not be played back.
• If the scene changes from dark to bright suddenly, the screen may jitter temporarily, but
it is not a defect.
Desired audio
language and subtitle
language are not
played.
Audio languages and subtitle languages are disc-specifi c.
Only the sound and subtitle languages contained on a DVD disc are available and
displayed on the disc menu.
No progressive
output.
• Check whether PS is displayed on front panel.
• Make sure to change the component video output using the Progressive button when
the disc is stopped.
The remote control
doesn’t work.
• Point the remote control at the remote control sensor on your DVD Recorder & VCR.
Operate within distance. (15ft)
Remove obstacles between your DVD Recorder & VCR and remote control.
• Check whether the batteries are depleted.
Other problems
• Read the table of contents and then fi nd and read the sections describing your
problem, and follow the directions given.
• Turn the unit off and on.
• If your problem still persists, contact your nearest Samsung service centre.
No HDMI output.
(DVD-VR355 only)
• Check the Video output is HDMI enabled.
• Check the connection between the TV and the HDMI jack of the DVD Recorder & VCR.
• See if your TV supports this 576p/720p/1080i DVD Recorder & VCR.
Abnormal HDMI
output screen.
(DVD-VR355 only)
• If snow noise appears on the screen, it means that TV does not support HDCP
(High-bandwidth Digital Content Protection).
HDMI output Jitter
(DVD-VR355 only)
• Check your TV system setup correctly.
• Screen Jitter may occur when the frame rate is converted from 50Hz to 60Hz for
720p/1080i HDMI (High Defi nition Multimedia Interface) Output.
• Please refer to the user’s manual of your TV.
01375E-VR350,355-XFA-ENG.indb 7801375E-VR350,355-XFA-ENG.indb 78 2007-04-27 오후 5:58:332007-04-27 오후 5:58:33

Reference
English - 79
Troubleshooting (VCR)
Before contacting a Samsung authorized service centre, perform the following simple checks.
Problem Explanation/Solution
No power
• Check that the power plug is connected to a wall outlet.
• Have you pressed the /I button?
You cannot insert a video cassette
• A video cassette can only be inserted with the window side up and the
safety tab facing you.
The television programme was not
recorded
• Check the DVD Recorder & VCR antenna connections.
• Is the DVD Recorder & VCR tuner properly set?
• Check if the safety tab is intact on the cassette.
Timer recording was unsuccessful
• Re-check the recording start/stop time settings and the current time
• Check whether you inserted a tape which has enough time to record
No playback picture or the picture is
distorted
• Check to see if you are using a prerecorded tape.
You cannot see normal broadcasts
Noise bars or streaks on playback
• Check the tuner/external setting. It should be on tuner.
• Check the TV antenna connections.
• Press the PROG/TRK ( / ) buttons to minimize this effect.
When the ►II button is pressed during
playback, the still picture has severe
“noise bar” streaks
• A still picture may have “noise bars”, depending on the condition of
the tape. Press the PROG/TRK ( / ) buttons during slow motion to
minimize this effect.
Video Head Cleaning
• If poor pictures appear on a variety of cassettes, the video heads may
need cleaning. This is not a common problem and unless it appears,
the heads should not be cleaned.
When cleaning the video heads, read all instructions provided with
the head cleaning cassette. Incorrect head cleaning can permanently
damage the video heads.
If you are unable to solve the problem after reading the above instructions, note:
• The model and serial number on the rear of your DVD Recorder & VCR
• The warranty information
• A clear description of the problem
Then contact your nearest SAMSUNG authorized service centre.
01375E-VR350,355-XFA-ENG.indb 7901375E-VR350,355-XFA-ENG.indb 79 2007-04-27 오후 5:58:352007-04-27 오후 5:58:35

Reference
English - 80
Specifi cations
General
Power requirements AC110 - 240V, 50/60Hz
Power consumption 30 Watts
Weight 4.8 Kg
Dimensions 430(W) x 321(D) x 79(H)
Operating temp. +5°C to +35°C
Other conditions Keep level when operating. Less than 75% operating humidity
Input
Video input (Rear) RCA jack : 1.0Vp-p(unbalanced) 75Ω
Audio input (Rear) RCA jack : -8dBm, 47Kohm unbalanced
Front input RCA jack, DV
Output
RF out UHF 21-69 (Initial CH36)
Audio (DVD, VCR) RCA jack, Audio L/R
Audio (DVD only) Digital audio out OPTICAL COAXIAL
Video (DVD, VCR)
RCA jack, S-Video Out, Component out, HDMI (576p, 720p,
1080i) (DVD-VR355 only)
VCR
Tape format VHS type video tape
Colour system PAL
Tuning system B/G, D/K, I
Video S/N Above 43dB (standard recording)
Resolution Above 240 lines (standard recording)
Audio S/N Above 68dB (Hi-Fi), 39dB (Mono)
DVD
Audio frequency characteristics 20Hz-20KHz (Hi-Fi)
Picture Compression format MPEG-II
Audio Compression format Dolby AC-3 256kbps
Recording Quality XP (8 Mbps), SP (4 Mbps), LP (2 Mbps), EP (1.2/0.8 Mbps)
Video S/N Ratio Min. 50dB at standard recording
Audio S/N Ratio Min. 75dB
Audio frequency characteristics 20 Hz ~ 20 KHz
Audio Output
For DVD discs, audio signals recorded at 96kHz sampling frequency are converted into and output at 48kHz.
Disc Type DVD VCD AUDIO CD (CD-DA)
Analog Audio Output 48 / 96KHz 44.1KHz 44.1KHz
Digital Audio Output 48KHz 44.1KHz 44.1KHz
01375E-VR350,355-XFA-ENG.indb 8001375E-VR350,355-XFA-ENG.indb 80 2007-04-27 오후 5:58:362007-04-27 오후 5:58:36

Region Country Customer Care Center Web Site
North America
CANADA 1-800-SAMSUNG (7267864) www.samsung.com/ca
MEXICO 01-800-SAMSUNG (7267864) www.samsung.com/mx
U.S.A 1-800-SAMSUNG (7267864) www.samsung.com
Latin America
ARGENTINE 0800-333-3733 www.samsung.com/ar
BRAZIL
0800-124-421
4004-0000
www.samsung.com/br
CHILE 800-726-7864 (SAMSUNG) www.samsung.com/cl
COSTA RICA 0-800-507-7267 www.samsung.com/latin
ECUADOR 1-800-10-7267 www.samsung.com/latin
EL SALVADOR 800-6225 www.samsung.com/latin
GUATEMALA 1-800-299-0013 www.samsung.com/latin
JAMAICA 1-800-234-7267 www.samsung.com/latin
PANAMA 800-7267 www.samsung.com/latin
PUERTO RICO 1-800-682-3180 www.samsung.com/latin
REP. DOMINICA 1-800-751-2676 www.samsung.com/latin
TRINIDAD & TOBAGO 1-800-7267-864 www.samsung.com/latin
VENEZUELA 0-800-100-5303 www.samsung.com/latin
COLOMBIA 01-8000112112 www.samsung.com.co
Europe
BELGIUM 02 201 2418 www.samsung.com/be
CZECH REPUBLIC
844 000 844
Distributor pro Českou republiku :Samsung
Zrt., česka organizační složka Vyskočilova 4,
14000 Praha 4
www.samsung.com/cz
DENMARK 70 70 19 70 www.samsung.com/dk
FINLAND 030-6227 515 www.samsung.com/fi
FRANCE
3260 SAMSUNG or
08 25 08 65 65 (€ 0,15/Min)
www.samsung.com/fr
GERMANY 01805 - 121213 (€ 0,14/Min) www.samsung.de
HUNGARY 06-80-SAMSUNG (7267864) www.samsung.com/hu
ITALIA 800-SAMSUNG (7267864) www.samsung.com/it
LUXEMBURG 0032 (0)2 201 24 18 www.samsung.lu
NETHERLANDS 0900 20 200 88 (€ 0,10/Min) www.samsung.com/nl
NORWAY 815-56 480 www.samsung.com/no
POLAND 0 801 801 881 www.samsung.com/pl
PORTUGAL 80 8 200 128 www.samsung.com/pt
SLOVAKIA 0800-SAMSUNG (726786) www.samsung.com/sk
SPAIN 902 10 11 30 www.samsung.com/es
SWEDEN 0771-400 200 www.samsung.com/se
U.K 0870 SAMSUNG (7267864) www.samsung.com/uk
Republic of Ireland 0818 717 100 www.samsung.com/uk
Switzerland 0800-7267864 www.samsung.com/ch
CIS
RUSSIA 8-800-200-0400 www.samsung.ru
KAZAHSTAN 8-800-080-1188 www.samsung.kz
UZBEKISTAN 8-800-120-0400 www.samsung.uz
UKRAINE 8-800-502-0000 www.samsung.com/ur
LITHUANIA 8-800-77777 www.samsung.lt
LATVIA 800-7267 www.samsung.com/lv/index.htm
ESTONIA 800-7267 www.samsung.ee
Asia Pacifi c
AUSTRALIA 1300 362 603 www.samsung.com/au
CHINA 800-810-5858, 010-6475 1880 www.samsung.com.cn
HONG KONG 3698 - 4698 www.samsung.com/hk
INDIA
3030 8282
1800 110011
www.samsung.com/in
INDONESIA 0800-112-8888 www.samsung.com/id
JAPAN 0120-327-527 www.samsung.com/jp
MALAYSIA 1800-88-9999 www.samsung.com/my
PHILIPPINES 1800-10-SAMSUNG (7267864) www.samsung.com/ph
SINGAPORE 1800-SAMSUNG (7267864) www.samsung.com/sg
THAILAND
1800-29-3232
02-689-3232
www.samsung.com/th
TAIWAN 0800-329-999 www.samsung.com/tw
VIETNAM 1 800 588 889 www.samsung.com/vn
Middle East & Africa
SOUTH AFRICA 0860 7267864 (SAMSUNG) www.samsung.com/za
U.A.E
800SAMSUNG (7267864)
8000-4726
www.samsung.com/mea
Contact SAMSUNG WORLD WIDE
If you have any questions or comments relating to Samsung products, please contact the SAMSUNG
customer care centre.
Contact Samsung wereldwijd
Wanneer u suggesties of vragen heeft met betrekking tot Samsung producten, gelieve contact op te
nemen met de consumenten dienst van Samsung.
01375E-VR350,355-XFA-ENG.indb 8101375E-VR350,355-XFA-ENG.indb 81 2007-04-27 오후 5:58:372007-04-27 오후 5:58:37

AK68-01375E
Nederlands
English
01375E-VR350,355-XFA-ENG.indb 8201375E-VR350,355-XFA-ENG.indb 82 2007-04-27 오후 5:58:392007-04-27 오후 5:58:39

Gebruiksaanwijzing
DVD-VR350
DVD-VR355
AK68-01375E
English Nederlands
01375E-VR350,355-XFA-NL.indb 101375E-VR350,355-XFA-NL.indb 1 2007-04-27 오후 6:39:542007-04-27 오후 6:39:54

Aan de slag
Nederlands - 2
Aan de slag
Als afgeschermde kabels en stekkers worden gebruikt
om het apparaat op andere apparaten aan te sluiten,
voldoet dit product aan de CE-voorschriften. Gebruik
afgeschermde kabels en stekkers voor aansluiting op
andere elektrische apparaten, zoals radio’s en televisies,
om elektromagnetische storingen te voorkomen.
LET OP
• Het apparaat moet niet worden blootgesteld aan
druppels of spatten, en er moeten geen objecten
gevuld met vloeistoff en, zoals vazen, op het apparaat
geplaatst worden.
• De hoofdstekker wordt gebruikt als een
ontkoppelapparaat, en dient op ieder moment in gebruik
te kunnen worden genomen.
BELANGRIJKE OPMERKING
De voedingskabel van deze apparatuur wordt geleverd
met een gegoten stekker die een zekering bevat.
De waarde van de zekering vindt u aan de kant van de
polen van de stekker. Als u de zekering van de stekker
moet vervangen, gebruik dan een zekering met dezelfde
waarde die voldoet aan de vereisten van BS1362.
Gebruik de stekker nooit zonder het klepje van de
zekering als dit klepje afneembaar is.
Als het klepje van de zekering moet worden vervangen,
moet dit klepje dezelfde kleur als de kant van de polen
van de stekker hebben.
Vervangingsklepjes zijn beschikbaar bij de leverancier.
Als de standaardstekker niet geschikt is voor de
stopcontacten in uw woning of de kabel niet lang
genoeg is om een stopcontact te bereiken, moet u een
geschikt goedgekeurd verlengsnoer gebruiken of contact
opnemen met de leverancier voor hulp.
Als er echter geen andere mogelijkheid is dan het
afsnijden van de stekker, verwijdert u de zekering en
gooit u de stekker op de juiste wijze weg. Sluit de stekker
niet aan op de contrastekker van een stroomsnoer
omdat de blanke fl exibele draad tot elektrische
schokken kan leiden. De producteenheid die bij deze
gebruikershandleiding hoort, valt onder licentie van
bepaalde intellectuele eigendomsrechten van bepaalde
derde partijen.
Deze licentie is beperkt tot niet-commercieel gebruik in
de privé-sfeer door eindconsumenten voor de inhoud van
de licentie.
De licentie dekt geen andere producteenheid dan deze
producteenheid. De licentie geldt niet voor andere
producteenheden of -processen zonder licentie conform
ISO/IEC 11172-3 of ISO/IEC 13818-3, die gebruikt of
verkocht worden in combinatie met deze producteenheid.
De licentie dekt alleen het gebruik van deze
producteenheid voor het coderen en/of decoderen van
geluidsbestanden conform ISO/IEC 11172-3 of ISO/IEC
13818-3. Er worden onder deze licentie geen rechten
verleend voor productkenmerken of -functies die niet
conform ISO/IEC 11172-3 of ISO/IEC 13818-3 zijn.
OM DE KANS OP ELEKTRISCHE SCHOKKEN
TE BEPERKEN, DIENT U DE BEHUIZING (OF DE
ACHTERZIJDE) NIET TE WISSEN.
DIT APPARAAT BEVAT GEEN ONDERDELEN
DIE DOOR DE GEBRUIKER KUNNEN WORDEN
ONDERHOUDEN OF GEREPAREERD. LAAT
ONDERHOUD EN REPARATIES OVER AAN EEN
GEKWALIFICEERDE MONTEUR.
Dit symbool duidt op gevaarlijke spanning
binnen het product. Deze spanning brengt
het risico van elektrische schokken of
persoonlijke verwonding met zich mee.
Dit symbool duidt op belangrijke instructies
in de documentatie van het product.
Plaats deze apparatuur niet in een besloten ruimte zoals
een boekenkast of een vergelijkbare plaats.
WAARSCHUWING : om schade te voorkomen die tot
brand of elektrische schokken
kan leiden, mag dit apparaat niet
worden blootgesteld aan regen of
vocht.
LET OP : VOOR DE DVD- EN VIDEORECORDER
WORDT EEN ONZICHTBARE LASERBUNDEL
GEBRUIKT DIE TOT EEN GEVAARLIJKE
BLOOTSTELLING AAN STRALING KAN
LEIDEN WANNEER DEZE OP IETS OF
IEMAND WORDT GERICHT. ZORG ERVOOR
DAT DE RECORDER OP DE JUISTE MANIER
EN IN OVEREENSTEMMING MET DEZE
AANWIJZINGEN WORDT GEBRUIKT.
LET OP
IN DIT PRODUCT WORDT GEBRUIK GEMAAKT VAN
EEN LASERSTRAAL.
GEBRUIK VAN MECHANISMEN, AANPASSINGEN
OF UITVOEREN VAN PROCEDURES ANDERS DAN
ZOALS IN DEZE GEBRUIKSAANWIJZING VERMELD,
KUNNEN BLOOTSTELLING AAN SCHADELIJKE
STRALING TOT GEVOLG HEBBEN.
MAAK DE DVD-RECORDER NOOIT OPEN EN VOER
ZELF GEEN REPARATIES UIT. LAAT ONDERHOUD EN
REPARATIES OVER AAN EEN GEKWALIFICEERDE
MONTEUR.
Waarschuwing
LET OP
GEVAAR VOOR
ELEKTRISCHE SCHOKKEN
NIET OPENEN
01375E-VR350,355-XFA-NL.indb 201375E-VR350,355-XFA-NL.indb 2 2007-04-27 오후 6:40:232007-04-27 오후 6:40:23

Aan de slag
Nederlands - 3
• Steek uw hand niet in de schijfl ade.
• Plaats geen andere voorwerpen dan de schijf in de
schijfl ade.
• Externe storingen, zoals bliksem of statische elektriciteit,
kunnen de normale werking van de recorder beïnvloeden.
Schakel in dat geval de DVD- en videorecorder uit
en weer in met de toets
/I of haal de stekker uit het
stopcontact en steek hem er vervolgens weer in. De
recorder werkt daarna weer normaal.
• Verwijder de schijf en schakel de recorder uit na gebruik.
• Haal de stekker uit het stopcontact wanneer u de recorder
langere tijd niet zult gebruiken.
• Reinig de schijf door recht vanaf het midden naar de
buitenzijde van de schijf te vegen.
Zorg er om veiligheidsredenen voor dat u de stekker uit
het stopcontact haalt.
• Gebruik geen benzine, thinner of andere oplosmiddelen.
• Veeg de behuizing met een zachte doek schoon.
• Gebruik alleen schijven met een
normale vorm. Als een schijf met
een speciale vorm wordt gebruikt,
kan deze DVD- en videorecorder
beschadigd raken.
Schijven vasthouden
• Raak het oppervlak van de schijf niet
aan op de plaats waar de opname is
uitgevoerd.
DVD-RAM, DVD±RW en DVD±R
• Reinig deze schijven met een optioneel
DVD-RAM/PD-reinigingsmiddel.
Gebruik geen reinigingsmiddelen of
doeken voor CD’s om DVD-RAM/DVD
±RW/DVD±R-schijven te reinigen.
DVD-video, audio-CD
•
Gebruik een zachte doek om vuil van de schijf te vegen.
Waarschuwingen voor het gebruik van
schijvena
• Gebruik geen ballpoint of potlood om op de bedrukte
zijde te schrijven
• Gebruik geen reinigingssprays voor langspeelplaten of
antistatische middelen. Gebruik geen vluchtige middelen
zoals benzine of thinner.
• Plak geen etiketten of stickers op schijven. (Gebruik geen
gerepareerde schijven met een blootliggende kleefstof
van plakband of verwijderde stickers.)
• Gebruik geen krasbestendige beschermhoezen of
doosjes.
• Gebruik geen schijven die met de verkrijgbare
etiketprinters zijn bedrukt.
• Gebruik geen kromgetrokken of gebarsten schijven.
Belangrijke veiligheidsinstructies
▌
Lees deze bedieningsinstructies zorgvuldig door voordat
u het apparaat gebruikt. Volg elk van onderstaande
veiligheidsinstructies. Houd deze instructies bij de hand voor
toekomstig gebruik
1) Lees deze instructies.
2) Bewaar deze instructies.
3) Let op alle waarschuwingen.
4) Volg alle instructies.
5) Gebruik dit apparaat niet in de buurt van water.
6) Reinig het apparaat alleen met een droge doek.
7) Blokkeer geen ventilatieopeningen. Installeer het
apparaat in overeenstemming met de instructies van de
fabrikant.
8) Plaats het apparaat niet in de buurt van warmtebronnen
zoals radiatoren, verwarmingsroosters of andere
apparaten die warmte afgeven (met inbegrip van
versterkers).
9) Vergeet het veiligheidsdoel van de gepolariseerde
stekker of aardlekstekker niet. Een gepolariseerde
stekker bevat twee pennen waarbij de ene pen iets
breder is dan de andere. Een aardlekstekker bevat
twee pennen en een aardklem. De brede pen van
de gepolariseerde stekker en de aardklem van de
aardlekstekker zijn bedoeld voor uw veiligheid. Als een
stekker niet in het stopcontact past, kunt u het beste
een elektricien raadplegen voor vervanging van het
verouderde stopcontact.
10) Zorg ervoor dat niemand op het stroomsnoer kan
staan of dat stroomsnoer beklemd kan raken, in het
bijzonder bij stekkers, adapters en op het punt waar
het snoer het apparaat verlaat.
11) Gebruik alleen accessoires die door de fabrikant zijn
opgegeven.
12) Gebruik het apparaat alleen op een karretje,
standaard, driepoot, steun of tafel die door de fabrikant
is opgegeven of die bij het apparaat wordt verkocht.
Wees voorzichtig wanneer u een karretje gebruikt
om het apparaat te verplaatsen om te voorkomen
dat het toestel of het karretje kantelt en eventueel tot
verwondingen leidt.
13) Neem de stekker van het apparaat uit het stopcontact
tijdens onweer met bliksem of wanneer het apparaat
langere tijd niet worden gebruikt.
14) Laat onderhoud en reparaties over aan een
gekwalifi ceerde monteur. Reparaties zijn nodig als
het apparaat is beschadigd, bijvoorbeeld als het
stroomsnoer of de stekker is beschadigd, vloeistof op
het apparaat is gemorst of voorwerpen in het apparaat
zijn gevallen, het apparaat is blootgesteld aan regen of
vocht, het apparaat niet normaal werkt of het apparaat
is gevallen.
• Schakel andere installatiecomponenten eerst uit voordat
u deze op de recorder aansluit.
• Verplaats de recorder niet terwijl een schijf wordt
afgespeeld, omdat de schijf kan worden bekrast of kan
breken en de interne onderdelen van de recorder kunnen
worden beschadigd.
• Plaats geen bloemenvaas gevuld met water, of kleine
metalen voorwerpen op de recorder.
Waarschuwingen voor gebruik
▌
Onderhoud van behuizing
▌
Gebruik van schijven
▌
Voorzorgsmaatregelen
01375E-VR350,355-XFA-NL.indb 301375E-VR350,355-XFA-NL.indb 3 2007-04-27 오후 6:40:242007-04-27 오후 6:40:24

Aan de slag
Nederlands - 4
Zorg ervoor dat u de schijf niet beschadigt omdat de
gegevens op deze schijven zeer kwetsbaar zijn.
• Bewaar de schijf niet in direct zonlicht.
• Bewaar de schijf in een koele, geventileerde omgeving.
• Bewaar de schijf verticaal.
• Bewaar de schijf in een schone beschermhoes.
•
Als u de DVD- en videorecorder plotseling van een koude
naar een warme plek verplaatst, kan condensatie op de
werkende onderdelen en lens ontstaan en kan de schijf op
een abnormale manier worden afgespeeld. Stop in dat geval
de stekker niet in het stopcontact en wacht twee uur. Plaats
vervolgens de schijf en probeer opnieuw af te spelen.
● DVD-VR350
Met dit apparaat kunt u hoogwaardige digitale
afbeeldingen afspelen of opnemen op een DVD-RAM/
DVD-RW/DVD-R-schijf. U kunt, net als op videobanden,
digitale video op een DVD-RAM/DVD-RW/DVD-R-schijf
opnemen en bewerken. (DVD+RW/DVD+R-schijven
kunnen wel worden afgespeeld maar er kan niet mee
worden opgenomen.)
● DVD-VR355
Met dit apparaat kunt u hoogwaardige digitale video afspelen
of opnemen op een DVD-RAM/DVD±RW/DVD±R-schijf. U
kunt, net als op videobanden, digitale video op een DVD-
RAM/DVD±RW/DVD±R-schijf opnemen en bewerken.
DVD-Video
•
Een DVD (Digital Versatile Disc) kan maximaal 135 minuten
aan beelden, 8 geluidstalen en 32 ondertitelingstalen bevatten.
Een DVD is voorzien van MPEG-2-beeldcompressie en
Dolby 3D-surround waarmee u in uw eigen huis van levendige
en heldere beelden van bioscoopkwaliteit kunt genieten.
• Wanneer van de eerste laag wordt overgeschakeld naar
de tweede laag van een DVD-videoschijf met twee lagen,
kan een korte storing van het beeld en geluid optreden.
Dit is geen storing van het apparaat zelf.
•
Nadat een opname op DVD±R/DVD-RW(V) is voltooid, kan
deze worden afgespeeld op een standaard DVD-speler.
Video-CD
• Alleen cd-r-schijven die zijn gemaakt in vcd-indeling
(versie 1.1 of 2.0) kunnen worden afgespeeld.
• Bewegende beelden voor de pc kunnen alleen worden
afgespeeld als ze zijn opgenomen in vcd-indeling in het
opnameprogramma voor cd's.
• Neem contact op met de fabrikant van de cd-r als u
vragen hebt over schijven.
Audio-CD
• Een geluidsschijf waarop 44,1 kHz PCM-geluid is
opgenomen.
• Hiermee worden audio-CD-R’s en -CD-RW’s met de
indeling CD-DA afgespeeld. Het apparaat kan bepaalde
CD-R’s en CD-RW’s mogelijk niet afspelen vanwege de
opnamecondities.
CD-RW/-R
MP3 CD-RW/-R
• Alleen CD-R’s met MP3-bestanden die in de indeling
ISO9660 of JOLIET zijn opgenomen, kunnen worden
afgespeeld.
Specifi caties van schijven
▌
• U kunt alleen MP3-bestanden met de extensie “mp3” of
“MP3” gebruiken.
• Bij MP3-bestanden die met een VBR (Variable Bit Rates)
van 32 Kbps tot 320 Kbps zijn opgenomen, kan het
geluid worden onderbroken.
• Het afspeelbare bitrate-bereik is van 56 Kbps tot 320 Kbps.
• Het apparaat kan maximaal 1000 bestanden en mappen
verwerken.
• DVD-RAM/DVD±RW/DVD±R-schijven waarop MP3-
bestanden zijn opgenomen, kunnen worden afgespeeld.
JPEG CD-RW/-R
•
U kunt alleen bestanden met de extensie “.jpg” of “.JPG” gebruiken.
•
Het apparaat kan maximaal 1000 bestanden en mappen verwerken.
•
De maximale grootte van progressieve JPEG is 3 megapixels.
• MOTION JPEG wordt niet ondersteund.
• DVD-RAM/DVD±RW/DVD±R-schijven waarop JPEG-
bestanden zijn opgenomen, kunnen worden afgespeeld.
CD-RW/-R gebruiken
• Gebruik een CD-RW/-R van 700 MB (80 minuten).
Probeer geen schijf van 800 MB (90 minuten) of meer
te gebruiken, omdat deze schijf mogelijk niet wordt
afgespeeld.
• Als de CD-RW/-R niet in een afgesloten sessie is
opgenomen, kan een vertraging optreden tijdens
de eerste afspeeltijd en worden mogelijk niet alle
opgenomen bestanden afgespeeld.
•
Sommige CD-RW/-R’s kunnen mogelijk niet met dit
apparaat worden afgespeeld. Dit hangt af van het
apparaat dat is gebruikt om deze CD-RW/-R’s te branden.
Voor de inhoud van CD’s die voor persoonlijk gebruik op
CD-RW/-R’s zijn opgenomen, kan de afspeelbaarheid
afhankelijk zijn van de inhoud en de schijf.
MPEG4-levyn käyttö
• Schijf : CD-R/-RW, DVD-RAM, DVD±R/DVD±RW
• U kunt MPEG4-bestanden met de volgende extensies
afspelen: .avi, .divx, .AVI, .DIVX
• MPEG4 Codec-indeling: DivX 3.11 DivX 4.x DivX 5.x
DivX-Pro Xvid
• Bewegingscompensatie: QPEL, GMC
• four CC: MPG4, mpg4, DIV3, divX3, DIVX, divX, DX50,
MP43, mp43, XVID, xvid
• Beschikbare audio-indelingen: “MP3”, “MPEG1 Audio
laag 2”, “LPCM”, “AC3”, “DTS”, “MS ADPCM”
• Ondersteunde bestandsindelingen voor ondertiteling:
.smi, .srt, .sub, .psb, .txt, .ass
DVD±R’s afspelen en opnemen
• Nadat een opname op DVD±R is voltooid, kan deze
worden afgespeeld op een standaard DVD-speler.
• U kunt op de beschikbare ruimte van de schijf opnemen
en u kunt bewerkingsfuncties uitvoeren, zoals schijven
en programma’s namen geven en programma’s wissen
voordat u de schijf sluit.
• Wanneer programmering van een DVD±R wordt
verwijderd, komt deze ruimte niet beschikbaar. Wanneer
eenmaal op een deel van een DVD±R is opgenomen, is
deze ruimte niet langer beschikbaar voor opnamen, of de
opname nu gewist is of niet.
•
Nadat de opname is beëindigd, duurt het ongeveer 30 seconden
voordat de beheergegevens van de opname zijn voltooid.
• Dit apparaat optimaliseert de DVD±R voor elke opname.
De optimalisatie wordt uitgevoerd wanneer u met
opnemen begint nadat u de schijf hebt geplaatst of het
apparaat hebt ingeschakeld. Als de optimalisatie te vaak
wordt uitgevoerd, kan mogelijk niet langer op de schijf
worden opgenomen.
Schijven bewaren
▌
01375E-VR350,355-XFA-NL.indb 401375E-VR350,355-XFA-NL.indb 4 2007-04-27 오후 6:40:252007-04-27 오후 6:40:25

Aan de slag
Nederlands - 5
• Vanwege de opnamecondities kan afspelen in bepaalde
gevallen niet mogelijk zijn.
• Met dit apparaat kunt u DVD±R’s afspelen die zijn
opgenomen en gesloten met een Samsung DVD-
en videorecorder. Mogelijk kunt u bepaalde DVD±R’
s niet afspelen. Dit is afhankelijk van de schijf en de
opnamecondities.
DVD-RW’s afspelen en opnemen
• U kunt op DVD-RW-schijven opnemen en deze zowel in
V- als in VR modus afspelen.
• Als een DVD-RW die in VR modus is opgenomen, is
afgesloten, kunt u geen extra opnamen meer opslaan.
• Wanneer een DVD-RW die in V modus is opgenomen, is
voltooid, wordt dit een DVD-video.
• In beide modi kunt u afspelen voordat en nadat de DVD
is afgesloten, maar nadat de DVD is afgesloten, kunt u
niet meer opnemen, wissen of bewerken.
• Als u in VR modus en vervolgens in V modus op de schijf
wilt opnemen, moet u de schijf eerst formatteren. Wees
voorzichtig bij het formatteren, omdat alle opgenomen
gegevens verloren gaan.
• Wanneer u een lege schijf plaatst, wordt u gevraagd of u
deze wilt initialiseren of niet. Als u Ja selecteert, wordt de
schijf in VR-modus geformatteerd.
• DVD-RW (VR modus)
- Deze indeling wordt gebruikt om gegevens op een
DVD-RW op te nemen. U kunt onder andere opnieuw
opnemen, bewerken, wissen, gedeeltelijk wissen en een
playlist maken.
- Een schijf die in deze modus is opgenomen, kan mogelijk
niet op bestaande DVD-spelers worden afgespeeld.
• DVD-RW (V modus)
- Deze indeling wordt gebruikt om gegevens op een DVD-
RW/-R op te nemen. Wanneer deze schijf is afgesloten,
kan de schijf op een bestaande DVD-speler worden
afgespeeld.
- Als een schijf met een recorder van een andere fabrikant
in V modus is opgenomen maar niet is afgesloten, kan
de schijf niet worden afgespeeld en kunnen geen extra
opnamen worden toegevoegd met deze recorder.
DVD+RW-schijf afspelen en opnemen
• Bij DVD+RW-schijven is er geen verschil tussen de DVD-
video-indeling (videomodus) en DVD-video-opname-
indeling (VR-modus).
• U kunt op DVD+RW's uw eigen hoofdstukken maken en
deze bewerken via het menu Chapter Edit (Hoofdstuk
bewerken).
• Wanneer u een DVD+RW-schijf gebruikt, hoeft de schijf
doorgaans niet te worden afgesloten.
DVD-RAM-schijf afspelen en opnemen
• Verwijder bij DVD-RAM-schijven in cartridges de
cartridge en gebruik alleen de schijf.
• Zorg ervoor dat de opnamemodus is ingesteld op VR-
modus. Anders kan de opname mogelijk niet op dit
apparaat worden afgespeeld.
• Op de meeste DVD-spelers kunt u wegens compatibiliteit
sproblemen geen DVD-RAM’s afspelen.
• Op dit apparaat kunt u alleen DVD-RAM’s van
standaardversie 2.0 afspelen.
•
Een DVD-RAM die op deze recorder werd opgenomen,
kan mogelijk niet op andere DVD-spelers worden
afgespeeld. Zie de gebruikershandleiding voor de speler
om de compatibiliteit met deze DVD-RAM-schijven te
achterhalen.
Beveiliging
• Programmabeveiliging: zie pagina 65, “Een titel
vergrendelen (beveiligen)”.
• Schijfbeveiliging: zie pagina 74 “Schijfbeveiliging”.
✻
DVD-RAM/DVD±RW/DVD±R-schijven die niet
compatibel zijn met de DVD-VIDEO-indeling, kunt u niet
afspelen met dit apparaat.
✻
Raadpleeg uw DVD-RAM/DVD±RW/DVD±R-fabrikant
voor meer informatie over de compatibiliteit van DVD-
opnames.
✻
Bij het gebruik van DVD-RAM/DVD±RW/DVD±R-schijven
van lechte kwaliteit kunnen onverwachte problemen
ontstaan, met inbegrip van opnamefouten, het verlies van
opgenomen of bewerkt materiaal of beschadiging van de
recorder.
Gebruik de volgende schijven niet!
• Gebruik in dit apparaat geen schijven van het type LD,
CD-G, CD-I, CD-ROM, DVD-ROM.
[Opmerking]
U kunt de volgende typen schijven afspelen : CD/
CD-RW/-R/MP3/JPEG/VCD/DVD-Video/DVD-RAM/
DVD±RW/DVD±R.
Als een DVD-RW/-R schijf echter met een ander apparaat
is opgenomen, kan deze alleen worden afgespeeld als de
schijf in V modus is opgenomen en gesloten.
• Mogelijk kunt u bepaalde commerciële schijven en
DVDschijven die u buiten uw regio hebt aangeschaft, niet
afspelen op dit apparaat. Wanneer deze schijven worden
afgespeeld, wordt “Geen schijf” of “Schijf kan niet worden
afgespeeld. Controleer de regiocode van deze schijf.”
weergegeven.
• Als de DVD-RAM/DVD±RW/DVD±R een illegale kopie is
of een andere indeling dan DVD-videoindeling heeft, kunt
u deze schijf mogelijk ook niet afspelen.
Compatibiliteit schijf
• Een DVD+RW-schijf waarop met een snelheid van 8X of
sneller kan worden opgenomen, kan worden afgespeeld,
maar de maximum opnamesnelheid is 4x.
•
Niet alle merken schijven kunnen in dit apparaat gebruikt worden.
KOPIEERBEVEILIGING
• Veel DVD’s bevatten een kopieerbeveiliging. Sluit uw
DVD- en videorecorder daarom rechtstreeks aan op
uw tv en niet op een videorecorder. Aansluiting via een
videorecorder kan leiden tot vervormde weergave van
DVD’s met kopieerbeveiliging.
• Dit product bevat copyrightbeschermingstechnol
gie die beschermd wordt door methodeclaims van
bepaalde patenten in de Verenigde Staten en andere
intellectuele eigendomsrechten die in het bezit zijn
van Macrovision Corporation en andere rechtmatige
eigenaren. Het gebruik van deze copyrightbescerming
stechnologie moet zijn goedgekeurd door Macrovision
Corporation en is uitsluitend bedoeld voor privé-
gebruik en weergave voor een beperkt publiek, tenzij
Macrovision Corporation een andere goedkeuring
heeft verleend. Reverse engineering of demonteren is
niet toegestaan.
• Het is alleen toegestaan televisieprogramma’s, fi lms,
videobanden en ander materiaal op te nemen als
daarmee geen auteursrechten of andere rechten van
derden worden geschonden.
01375E-VR350,355-XFA-NL.indb 501375E-VR350,355-XFA-NL.indb 5 2007-04-27 오후 6:40:272007-04-27 오후 6:40:27

Aan de slag
Nederlands - 6
Inhoud
Aan de slag
Waarschuwing ........................................................ 2
Voorzorgsmaatregelen ........................................... 3
Belangrijke veiligheidsinstructies............................3
Waarschuwingen voor gebruik ............................... 3
Onderhoud van behuizing ......................................3
Gebruik van schijven .............................................. 3
Schijven bewaren ................................................... 4
Specifi caties van schijven ...................................... 4
Algemene informatie .............................................. 8
Voordat u de gebruiksaanwijzing leest ................... 9
De DVD- en videorecorder gebruiken ....................9
Uitpakken ............................................................... 10
Beschrijving ............................................................ 12
Voorpaneel (DVD-VR350) ...................................... 12
Voorpaneel (DVD-VR355) ...................................... 12
Display voorpaneel ................................................. 13
Achterpaneel (DVD-VR350) ................................... 13
Achterpaneel (DVD-VR355) ................................... 14
De toetsen van de afstandsbediening .................... 15
Aansluiten en instellen
De DVD- en videorecorder op de tv aansluiten met
de RF-kabel ........................................................... 16
De DVD - en videorecorder op de tv aansluiten met
de audio- en videokabel ........................................16
De S-videokabel aansluiten....................................17
De componentvideokabel aansluiten ..................... 17
HDMI/DVI aansluiten op een tv (alleen DVD-VR355)
..... 18
Situatie 1 : Aansluiten op een tv met een HDMI
aansluiting ..............................................................18
Situatie 2 : Aansluiten op een tv met een DVI-
aansluiting ..............................................................18
Aansluiten op de AV-ontvanger .............................. 19
Externe apparaten aansluiten ................................ 20
Situatie 1 : Een videorecorder, set-top box (STB) of
DVD- en videorecorder aansluiten op de AUDIO-
VIDEO AV 1 IN - aansluitingen ................................20
Situatie 2 : Een camcorder aansluiten op de AV 2 IN-
aansluitingen. .........................................................20
Situatie 3 : Een DV-apparaat aansluiten ................ 20
■
■
■
■
■
■
■
■
■
■
■
■
■
■
Systeem-installatie
Menunavigatie op het tv-scherm ............................ 21
Inschakelen en automatisch instellen.....................21
De datum en tijd instellen ....................................... 22
Automatisch instellen ............................................. 22
Handmatig instellen ................................................ 23
RF OUT geluidsstand instellen (B/G-D/K, I) ........... 23
VIDEO-uitvoerkanaal.............................................. 24
De taalopties instellen ............................................ 24
De geluidsopties instellen.......................................25
De beeldopties (video) instellen ............................. 26
Progressief scannen...............................................27
Parental Control (Kinderslot) instellen .................... 29
Video-instelling ....................................................... 30
Duur van EP-modus op DVD ................................. 31
Automatisch hoofdstukken maken ......................... 31
Snel opnemen ........................................................ 32
Anynet+(HDMI-CEC) (alleen DVD-VR355) ............ 32
Afspelen
DVD afspelen
Regiocode (alleen DVD-video) ...............................34
Logo's van schijven die kunnen worden afgespeeld
.... 34
Schijven die kunnen worden afgespeeld ................ 34
Een schijf afspelen ................................................. 35
Het schijfmenu en het titelmenu gebruiken ............ 36
De functies Zoeken en Overslaan gebruiken ......... 36
Vertraagd afspelen en stap voor stap afspelen ...... 37
De toets ANYKEY gebruiken .................................. 38
Afspelen herhalen .................................................. 39
De taal van de ondertiteling selecteren .................. 39
Taalkeuze voor Geluid ............................................40
De camerahoek wijzigen ........................................ 40
Inzoomen................................................................ 40
De bladwijzers gebruiken ....................................... 41
De markeringen gebruiken ..................................... 42
Een audio-CD (CD-DA) / MP3 afspelen ................. 43
Toetsen op de afstandsbediening voor het afspelen
van muziek-cd's (cd-da)/MP3 .................................43
Een audio-CD (CD-DA) afspelen ........................... 43
■
■
■
■
■
■
■
■
■
■
■
■
■
■
■
■
■
■
■
■
■
■
■
■
■
■
■
■
■
■
■
■
■
01375E-VR350,355-XFA-NL.indb 601375E-VR350,355-XFA-NL.indb 6 2007-04-27 오후 6:40:282007-04-27 오후 6:40:28

Aan de slag
Nederlands - 7
Een MP3-schijf afspelen.........................................44
Herhaald afspelen van een audio/MP3-schijf ......... 44
De modus Afspeeloptie ..........................................45
Tracks programmeren ............................................ 45
Een beeldschijf afspelen ........................................ 45
Een MPEG4-schijf afspelen ................................... 46
Video’s afspelen
Een videoband afspelen(recorder) ......................... 47
Tracking ..................................................................47
Speciale functies voorhet afspelen van video’s ...... 47
Variabel zoeksysteem ............................................48
Opnemen
Opnemen op DVD
Opneembare DVD’s ............................................... 49
Compatibiliteit van Samsung-recorders en recorders
van andere bedrijven ..............................................49
Opname-indelingen ................................................ 50
Opnamemodus ....................................................... 50
Kopieerbeveiliging .................................................. 51
Direct opnemen ...................................................... 52
Opnemen via een DV-ingang ................................. 53
Een OTR (One Touch Recording) maken .............. 53
Een timer-opnamemaken ....................................... 54
Een timer-opnamewijzigen ..................................... 56
Een timer-opname verwijderen(wissen) ................. 56
OPNAMESTAND EZ .............................................. 57
Video-opnamen
Standaard video-opnamen ..................................... 58
De resterende tijd controleren ................................ 59
Speciale opnamefuncties ....................................... 59
Kopiëren naar DVD of video...................................60
Van de DVD-recorder naar de videorecorder
kopiëren.................................................................. 60
Van video naar DVD kopiëren ................................ 61
■
■
■
■
■
■
■
■
■
■
■
■
■
■
■
■
■
Bewerken
De titellijst afspelen ................................................ 62
Opnemen op Vrije Ruimte ...................................... 63
Basisbewerking (titellijst) ........................................ 63
De naam van een titel wijzigen...............................63
Een titel vergrendelen (beveiligen) ......................... 64
Een titel wissen ...................................................... 64
Een deel van een titel wissen ................................. 65
Een hoofdstuk bewerken ........................................ 65
Een titel splitsen ..................................................... 67
Geavanceerd bewerken (Playlist) .......................... 68
Een playlist maken ................................................. 68
Titels in de playlist afspelen ................................... 69
De naam van een playlisttitel wijzige......................69
Een scène uit de playlist bewerken ........................ 69
Een playlist naar de videorecorder kopiëren .......... 72
Een titel uit de playlist verwijderen(wissen) ............72
Schijfbeheer ........................................................... 73
De naam van de schijf bewerken ........................... 73
Schijfbeveiliging......................................................73
Een schijf formatteren ............................................ 74
Een schijf sluiten .................................................... 74
Sluiten van een schijf ongedaan-maken (V/VR
modus) ...................................................................75
Alle Titellijsten Verwijderen ..................................... 76
Compatibel bewerken.............................................76
Naslag
Problemen oplossen...............................................77
Specifi caties ........................................................... 80
■
■
■
■
■
■
01375E-VR350,355-XFA-NL.indb 701375E-VR350,355-XFA-NL.indb 7 2007-04-27 오후 6:40:292007-04-27 오후 6:40:29

Aan de slag
Nederlands - 8
Groot aantal verschillende functies met eenvoudige
gebruikersinterface
Dankzij de geïntegreerde menusysteem- en
berichtfuncties kunt u de gewenste handelingen
gemakkelijk uitvoeren. Met een DVD-RAM/DVD-RW (VR
modus) kunt u opgenomen beelden bewerken, playlists
maken en beelden in de gewenste volgorde bewerken.
MPEG4 afspelen
Met deze DVD- en videorecorder kunt u mpeg4-formaten
binnen een avi-bestand afspelen.
DivX-certifi catie
DivX, DivX Certifi ed en de bijbehorende
logo’s zijn handelsmerken van
DivXNetworks, Inc en worden gebruikt
onder licentie.
HDMI (High Defi nition Multimedia Interface)
HDMI vermindert beeldruis door een digitaal video/
audiosignaalpad van de DVD- en videorecorder naar uw
tv. (alleen DVD-VR355)
OPNAMESTAND EZ
Met behulp van deze functie kunt u een schijf
automatisch initialiseren en voltooien. (Zie pagina 58.)
● DVD-VR350
Met dit apparaat kunt u hoogwaardige digitale
afbeeldingen afspelen of opnemen op een DVD-RAM/
DVD-RW/DVD-R-schijf. U kunt, net als op videobanden,
digitale video op een DVD-RAM/DVD-RW/DVD-R-schijf
opnemen en bewerken. (DVD+RW/DVD+R-schijven
kunnen wel worden afgespeeld maar er kan niet mee
worden opgenomen.)
● DVD-VR355
Met dit apparaat kunt u hoogwaardige digitale video
afspelen of opnemen op een DVD-RAM/DVD±RW/DVD
±R-schijf. U kunt, net als op videobanden, digitale video
op een DVD-RAM/DVD±RW/DVD±R-schijf opnemen
en bewerken.
Digitale audio en video van hoge kwaliteit opnemen
en afspelen
Afhankelijk van de opnamemodus kunt u tot ongeveer
16 uur aan video opnemen op een dubbelzijdige 9,4 GB
DVD-RAM-schijf, tot 15 uur op een dubbellaagse 8,5 GB
DVD±R-schijf en tot 8 uur op een 4,7 GB DVD-RAM/DVD
±RW/DVD±R-schijf.
DVD-videotitels maken met DVD±RW/DVD±R-schijven
Met de DVD-VR350,VR355 kunt u uw eigen DVD-videotitels
maken op DVD±RW/DVD±R-schijven van 4,7 GB.
Verschillende opnamemogelijkheden
Maak een keuze uit de opnamemodi XP, SP, LP en EP
om aan uw opnamebehoeften te voldoen (zie pagina 50).
• XP-modus: hoge kwaliteit, ongeveer 1 uur
• SP-modus: standaardkwaliteit, ongeveer 2 uur
• LP-modus: lagere kwaliteit, ongeveer 4 uur
• EP-modus: laagste kwaliteit, ongeveer 6 tot 8 uur
- - De DVD±R's met dubbele laag hebben ongeveer de
dubbele capaciteit van DVD±R's met één laag.
(Zie pagina 34).
De inhoud van een digitale camcorder kopiëren via
de DV-ingang
U kunt beelden van een DV-apparaat via de DV-ingang
(IEEE 1394-4pin) opnemen op DVD-RAM/DVD±RW/DVD
±R-schijven of videobanden. (Zie pagina 53).
Progressief scannen met hoge kwaliteit
Met progressief scannen krijgt u trillingsvrije beelden
van hoge resolutie. Het 10 bits 54-MHz DAC en 2D Y/C
scheidingscircuit en de processortechnologie Time Base
Corrector bieden de hoogste kwaliteit beeldweergave en
-opname (zie pagina 18).
Algemene informatie
01375E-VR350,355-XFA-NL.indb 801375E-VR350,355-XFA-NL.indb 8 2007-04-27 오후 6:40:302007-04-27 오후 6:40:30

Aan de slag
Nederlands - 9
Raadpleeg de volgende begrippen voordat u de
gebruiksaanwijzing leest.
Voordat u de gebruiksaanwijzing leest
De DVD- en videorecorder gebruiken
Controleer voordat u gaat opnemen de schijftypen die
beschikbaar zijn.
● DVD-VR350
(DVD+RW/DVD+R-schijven kunnen wel worden
afgespeeld maar er kan niet mee worden opgenomen.)
● DVD-VR355
Als u herhaaldelijk op dezelfde schijf wilt opnemen of
als u de schijf na de opname wilt bewerken, kiest u een
herschrijfbare DVD±RW of DVD-RAM schijf. Als u een
opname zonder wijzigingen wilt opslaan, kiest u een niet-
herschrijfbare DVD±R.
Stap 1 : Het schijftype kiezen
▌
In tegenstelling tot bij een videorecorder, wordt een
ongebruikte schijf die in de recorder wordt geplaatst,
automatisch geformatteerd. Dit is nodig om de opname
op een schijf voor te bereiden
Een DVD-RAM gebruiken
Dit schijftype kan in de DVD-video-opname-indeling
(VR-modus) worden geformatteerd. U kunt opgenomen
beelden bewerken en een afspeellijst in een gewenste
volgorde maken.
Een DVD±RW/+R gebruiken
• Wanneer een niet-gebruikte DVD±RW/+R-schijf
voor het eerst wordt geplaatst, wordt het bericht
“Ongeïnitialiseerde schijf Wilt u deze schijf initialiseren?
weergegeven. Als u 'Ja' selecteert, wordt de initialisatie
gestart. De DVD-RW-schijf kan in de DVD-video-
indeling (videomodus) of de DVD-video-opname-
indeling (VR-modus) worden geformatteerd.
• Bij DVD+RW-schijven is er geen verschil tussen de
DVD-video-indeling (videomodus) en DVD-video-
opname-indeling (VR-modus).
Een DVD-R gebruiken
Frmatteren is niet nodig en alleen opnemen in videomodus
wordt ondersteund. Op verschillende DVD-onderdelen kunt
u dit schijftype pas afspelen nadat de schijf is afgesloten.
U kunt zowel de VR- als de V modus gebruiken
op een DVD-RW, alleen niet tegelijk.
U kunt met behulp van schijfbeheer een DVD-RW
in V- of VR-modus indelen. Het is echter mogelijk
dat de gegevens op de schijf verloren gaan als u
de indeling wijzigt.
■
■
Pictogram
Woord Defi nitie
DVD
Een beschikbare functie voor DVD
of DVD-RW(V)/DVD±R -schijven
die zijn opgenomen en afgesloten.
VCD
Een beschikbare functie voor
VCD schijven.
RAM
Een beschikbare functie voor
DVD-RAM’s
-RW
Een beschikbare functie voor
DVD-RW’s.
-R
Een beschikbare functie voor
DVD-R’s.
+RW
Een beschikbare functie voor
DVD-RW.
+R
Een beschikbare functie voor
DVD+R.
CD
Een beschikbare functie voor
gegevens-CD’s (CD-R of CD-
RW).
JPEG
Een beschikbare functie voor
CD-R/-RW’s,
DVD-RAM/DVD±
RW/DVD±R
.
MP3
Een beschikbare functie voor
CD-R/-RW’s,
DVD-RAM/DVD±
RW/DVD±R
.
MPEG4
Een beschikbare functie voor
een gegevens-CD-RW/-R, DVD-
RAM/DVD±RW/DVD±R.
VHS
Een situatie waarin een functie
niet werkt of instellingen
mogelijk worden geannuleerd.
Let op
Een situatie waarin een functie
niet werkt of instellingen
mogelijk worden geannuleerd.
OPMER KING
Tips of aanwijzingen die de
werking van elke functie
bevorderen.
De toets eenmaal
indrukken
Een functie die kan worden
gebruikt via één toets.
De toets
ANYKEY
Een functie die kan worden
gebruikt via de toets ANYKEY.
Deze handleiding gebruiken
1) Zorg ervoor dat u de veiligheidsinstructies leest
voordat u dit apparaat gebruikt (zie pagina 2-5).
2) Lees Problemen oplossen als sprake is van een
probleem (zie pagina 78-80).
Tekijänoikeudet
©2007 Samsung Electronics Co.
Alle rechten voorbehouden. Niets van deze
gebruiksaanwijzing mag worden
Stap 2 : De schijf formatteren om de
opname te starten
▌
Oppaassa käytetyt kuvakkeet
01375E-VR350,355-XFA-NL.indb 901375E-VR350,355-XFA-NL.indb 9 2007-04-27 오후 6:40:322007-04-27 오후 6:40:32

Aan de slag
Nederlands - 10
Stap 4 : Afspelen
▌
U kunt de titel die u wilt afspelen, selecteren in een
weergegeven menu en vervolgens direct afspelen.
Een DVD bestaat uit secties die titels genoemd worden,
en subsecties die hoofdstukken genoemd worden.
Tijdens het opnemen wordt er een titel gemaakt tussen
twee punten: daar waar u begint met opnemen en daar
waar u eindigt.
Hoofdstukken worden automatisch gemaakt wanneer u de
opname op DVD-RW/-R -schijven in V modus voltooit.
U kunt uw eigen hoofdstukken maken op DVD+RW's
en ze bewerken via het menu Chapter Edit (Hoofdstuk
bewerken).
De lengte van het hoofdstuk (interval tussen hoofdstukken)
hangt af van de opnamemodus.
Stap 5 : Een opgenomen schijf bewerken
▌
Het is eenvoudiger om beeldmateriaal op schijven te
bewerken dan op conventionele videobanden.
De recorder ondersteunt veel verschillende
bewerkingsfuncties, die alleen mogelijk zijn met DVD’s.
Met een eenvoudig bewerkingsmenu kunt u diverse
bewerkingsfuncties op een opgenomen titel uitvoeren,
zoals wissen, kopiëren, hernoemen, vergrendelen.
Een playlist maken (DVD-RAM/-RW in VR modus)
Met deze recorder kunt u een nieuwe playlist op dezelfde
schijf maken en bewerken zonder dat de originele opname
wordt gewijzigd.
Batterijen plaatsen in de afstandsbediening
• Open het batterijklepje aan de achterkant van de
afstandsbediening.
• Plaats twee AAA batterijen. Let bij het plaatsen op de
correcte polariteit (+ en -).
• Schuif het batterijklepje weer op de afstandsbediening.
Als de afstandsbediening niet correct werkt:
• Controleer de polariteit (+/-) van de batterijen (Dry-Cell)
• Controleer of de batterijen leeg zijn.
• Controleer of de sensor van de afstandsbediening niet
door voorwerpen wordt geblokkeerd.
• Controleer of er tl-verlichting in de directe omgeving is.
Gooi de batterijen weg volgens de richtlijnen die in uw
gemeente gelden. Gooi ze niet bij het huishoudelijk afval.
• Audio- en videokabel
• RF-kabel voor tv-bediening
• HDMI-kabel (alleen DVD-VR355)
• Afstandsbediening.
• Batterijen voor de afstandsbediening (AAA-formaat)
• Gebruiksaanwijzing
• Snelgids
Accessoires
▌
De afstandsbediening gebruiksklaar maken
▌
U kunt de schijf automatisch met de EZ REC
MODE (OPNAMESTAND EZ) afsluiten.
(Zie pagina 58)
■
Uitpakken
Er zijn twee verschillende opnamemethoden: directe
opname en timer-opname.
Een timer-opname is geclassifi ceerd als een datum:
eenmaal, dagelijks of wekelijks Opnamemodus: XP (hoge-
kwaliteitsmodus), SP (standaard kwaliteitsmodus), LP
(langeopnamemodus) en EP (uitgebreide modus).
Stap 3 : Opnemen
▌
Stap 6 : Schijf afsluiten en afspelen
▌
Wanneer u de DVD wilt afspelen, is het soms nodig deze
te sluiten. Zorg dat u klaar bent met alle bewerkingen en
opnamen en sluit de schijf af.
Een DVD-RW-schijf in de VR modus gebruiken
Hoewel het over het algemeen niet nodig is de schijf te
sluiten om deze in de VR-modus af te spelen, dient u
voor het afspelen een afgesloten schijf te gebruiken.
Een DVD-RW-schijf in de V modus gebruiken
De schijf moet eerst worden gesloten om op andere
apparatuur dan deze recorder te kunnen worden
afgespeeld. Als u de schijf hebt gesloten, kunt u deze niet
meer bewerken of iets erop opnemen.
Een DVD±R-schijf gebruiken
De schijf moet eerst worden gesloten om deze op een
ander apparaat dan deze recorder te kunnen afspelen.
Als de schijf is afgesloten, kan deze niet meer worden
bewerkt of iets erop worden opgenomen.
01375E-VR350,355-XFA-NL.indb 1001375E-VR350,355-XFA-NL.indb 10 2007-04-27 오후 6:40:342007-04-27 오후 6:40:34

Aan de slag
Nederlands - 11
Resultaat: als de televisie compatibel is met de
afstandsbediening, wordt deze uitgeschakeld.
De tv is nu geprogrammeerd om met de
afstandsbediening bediend te worden.
U bepaalt of uw televisie compatibel is door de onderstaande instructies te volgen.
1. Zet de televisie aan.
2. Richt de afstandsbediening op de televisie.
3. Druk op de toets TV en houdt deze ingedrukt en voer tegelijkertijd de tweecijferige code in voor het merk van de televisie
door op de juiste cijferknoppen te indrukken.
Controllable TV Codes
Daarna kunt u de televisie met de volgende
toetsen regelen.
Als er meerdere codes staan voor het merk van
uw tv, probeer dan elke code uit totdat u de code
vindt die werkt.
Als u de batterijen van de afstandsbediening
vervangt, moet u opnieuw de merkcode instellen.
■
■
BRAND SELECT NUMBER
SAMSUNG
TV +01, +02, +03, +04, +05, +06, +35
AKAI
TV +12
BANG & OLUFSEN
TV +22
BLAUPUNKT
TV +09
BRANDT
TV +14
BRIONVEGA
TV +22
CGE
TV +21
CONTINENTAL EDISON
TV +24
FERGUSON
TV +14
FINLUX
TV +02, +17, +21
FISHER
TV +12
FORMENTI
TV +22
GRUNDIG
TV +09, +17, +21
HITACHI
TV +11, +13, +14, +24
IMPERIAL
TV +21
JVC
TV +32
LG
TV +02, +30
LOEWE
TV +02
LOEWE OPTA
TV +02, +22
METZ
TV +22
MITSUBISHI
TV +02, +16
MIVAR
TV +21, +29
NOKIA
TV +23
NORDMENDE
TV +13, +14, +22, +24
PANASONIC
TV +08, +23, +24, +25, +26, +27
PHILIPS
TV +02, +20, +22
PHONOLA
TV +02, +20, +22
PIONEER
TV +14, +23
RADIOLA
TV +02, +20
RADIOMARELLI
TV +22
REX
TV +23
SABA
TV +13, +14, +22, +23, +24
SALORA
TV +23
SANYO
TV +12, +16
SCHNEIDER
TV +02
SELECO
TV +23
SHARP
TV +10, +16, +31
SIEMENS
TV +09
SINGER
TV +22
SINUDYNE
TV +22
SONY
TV +15, +16
TELEAVA
TV +14
TELEFUNKEN
TV +14, +24, +28
THOMSON
TV +13, +14, +24
BRAND SELECT NUMBER
THOMSON ASIA
TV +33, +34
TOSHIBA
TV +07, +16, +17, +18, +19, +21
WEGA
TV +22
YOKO
TV +02
Toets Functie
STANDBY/ON Hiermee zet u de televisie aan en uit.
INPUT SEL.
Hiermee selecteert u een externe bron.
TV VOL (+ of -)
Hiermee past u het volume van de
televisie aan.
PROG (
of
)
Hiermee selecteert u het gewenste
programma.
TV MUTE Hiermee zet u het geluid aan en uit.
0~9
Hiermee voert u cijfers rechtstreeks in.
01375E-VR350,355-XFA-NL.indb 1101375E-VR350,355-XFA-NL.indb 11 2007-04-27 오후 6:40:352007-04-27 오후 6:40:35

Aan de slag
Nederlands - 12
Voorpaneel (DVD-VR350)
▌
Voorpaneel (DVD-VR355)
▌
1. DVD-RECORDER
2. TOETS OPEN/CLOSE VAN DE DVD-
RECORDER
3. VIDEORECORDER
4. TOETS EJECT VAN DE VIDEORECORDER
5. TOETS STANDBY/ON
6. VIDEO-INGANG (AV2 IN)
7. AUDIO-INGANG (AV2 IN)
8. DV-INGANG
9. DE KNOP P.SCAN
10. DISPLAY VOORPANEEL
11. KEUZEKNOP DVD/VCR
12. KOPIEERKNOPPEN
13. PROG
/ -KNOPPEN
14. OPNAMEKNOP
15. DE KNOP STOP
16. DE KNOP PLAY/PAUSE
Beschrijving
1 2 3 4
161514
13
121110
9876
5
1 2 3 4
161514
13
121110
9876
5
01375E-VR350,355-XFA-NL.indb 1201375E-VR350,355-XFA-NL.indb 12 2007-04-27 오후 6:40:372007-04-27 오후 6:40:37

Aan de slag
Nederlands - 13
1. DVD is ingeschakeld.
2. DVD-RAM is ingeschakeld.
3. DVD(±)R of DVD(±)RW is ingeschakeld.
4. Progressieve-scanmodus is ingeschakeld.
5. Opnamefunctie is ingeschakeld.
6. Videorecorder is ingeschakeld.
7. DVD of CD is geplaatst.
8. Tijd, positie van de teller of huidige
recorderstatus wordt weergegeven.
9. Wanneer u een timer-opname instelt, brandt
dit lampje.
10. Videocassette is geplaatst.
Display voorpaneel
▌
12 345 6
10
987
Achterpaneel (DVD-VR350)
▌
1. S-VIDEO-UITGANG
2. AUDIO-UITGANGEN L EN R
3. DIGITAL AUDIO OUT-AANSLUITING
(OPTISCH/COAXIAAL)
4. AV1 (TV) SCART-INGANG EN -UITGANG
5. AV2 (EXT) SCART
6. COMPONENTVIDEO-OUT
AANSLUITINGEN
7. UITGANG VOOR TV-AANSLUITING
8. INGANG VOOR ANTENNESTEKKER
12356 784
01375E-VR350,355-XFA-NL.indb 1301375E-VR350,355-XFA-NL.indb 13 2007-04-27 오후 6:40:392007-04-27 오후 6:40:39

Aan de slag
Nederlands - 14
1. S-VIDEO-UITGANG
2. AUDIO-UITGANGEN L EN R
3. DIGITAL AUDIO OUT-AANSLUITING
(OPTISCH/COAXIAAL)
4. AV1 (TV) SCART-INGANG EN -UITGANG
5. AV2 (EXT) SCART
6. COMPONENTVIDEO-OUT
AANSLUITINGEN
7. UITGANG VOOR TV-AANSLUITING
8. INGANG VOOR ANTENNESTEKKER
9. HDMI-UITGANG (alleen DVD-VR355)
Achterpaneel (DVD-VR355)
▌
12356 7849
01375E-VR350,355-XFA-NL.indb 1401375E-VR350,355-XFA-NL.indb 14 2007-04-27 오후 6:40:412007-04-27 오후 6:40:41

Aan de slag
Nederlands - 15
1. De toets DVD
Druk hierop wanneer u een DVD gebruikt.
2. De toets TV
Druk hierop om de tv te bedienen.
3. De toets STANDBY/ON
4. De CIJFERTOETSEN
5. De toets IPC
6. De toets F.ADV/SKIP
7. Afspeeltoetsen
Voorwaarts/Achterwaarts, Zoeken, Overslaan,
Stop, Afspelen/Pauze, REC PAUSE
8. De toets TV VOL (Volume)
Hiermee past u het volume aan
9. De toets MENU
Hiermee opent u het instellingenmenu van de
DVD- en videorecorder.
10. De toets OK/richtingstoetsen
(De toetsen ▲/▼/◄/►)
11. De toets INFO
Hiermee geeft u de huidige instellingen of
schijfstatus weer
12. De toets TITLE LIST/DISC MENU
Hiermee geeft u de titellijst/het schijfmenu weer
13. De toets SUBTITLE
Druk hierop om een andere DVD-ondertiteltaal
weer te geven.
14. De toets ANYKEY
Druk hierop om de status van de schijf weer te
geven die wordt afgespeeld
15. De toets REC
Druk hierop om opnamen op DVD-RAM/DVD±
RW/±R-schijvenen videobanden te maken.
16. Kopieertoets TO DVD
Druk hierop wanneer u van de videorecorder
naar de DVD kopieert.
17. De toets REC SPEED
Druk hierop om de gewenste opnametijd en
beeldkwaliteit in te stellen.
18. De toets VCR
Druk hierop wanneer u een videoband gebruikt.
19. De toets INPUT SEL.
Hiermee selecteert u het invoersignaal in de
externe ingangsmodus (Tuner, AV1, AV2 of
DV-ingang)
20. De toets OPEN/CLOSE
Hiermee opent en sluit u de schijfl ade.
21. De toets TV STANDBY/ON
22. De toets TV/VCR
23. De toets MARKER
Hiermee kunt u bladwijzer aanbrengen of een
positie markeren tijdens het afspelen van een
schijf.
24. De toets PROG/TRK
Druk hierop om een tv-kanaal te kiezen./
Druk hierop om de witte streep te wissen.
25. De toets TV MUTE
Hiermee schakelt u het geluid uit (tv-modus).
26. De toets RETURN
Hiermee gaat u terug naar het vorige menu.
27. De toets EXIT
28. De toets PLAY LIST/TITLE MENU
Druk hierop om het menu Edit playlist/Titel
(Playlist bewerken/Titel) te openen.
29. De toets AUDIO
Hiermee heeft u toegang tot verschillende
geluidsfuncties op een schijf (DVD-modus).
30. De toets EZ REC MODE
31. De toets TIMER REC
Druk hierop wanneer u een timer-opname
gebruikt.
32. Kopieertoets TO VCR
Druk deze toets in wanneer u van de DVD naar
de videorecorder kopieert.
33. De toets CANCEL
De afstandsbediening van uw DVD- en videorecorder kunt u ook voor Samsung-televisies en
compatibele merken gebruiken.
De toetsen van de afstandsbediening
▌
01375E-VR350,355-XFA-NL.indb 1501375E-VR350,355-XFA-NL.indb 15 2007-04-27 오후 6:40:422007-04-27 오후 6:40:42

Aansluiten en instellen
Nederlands - 16
ANT IN
De DVD - en videorecorder op de tv
aansluiten met de audio- en videokabel
De DVD- en videorecorder op de
tv aansluiten met de RF-kabel
Zorg ervoor dat de televisie en de DVD- en
videorecorder zijn uitgeschakeld voordat u de
kabels aansluit.
■
1. Verwijder de antenne- of netwerkinvoerkabel uit de
televisie.
2. Sluit deze kabel achterop de DVD- en videorecorder
aan op de 75Ω antenne-ingang die is gemarkeerd met
.
3. Sluit de meegeleverde RF-kabel aan op de
-
ingang op de DVD- en videorecorder.
4. Sluit het andere uiteinde van de RF-kabel aan op de
aansluiting die eerder voor de antenne van de televisie
werd gebruikt.
Als de televisie de juiste ingang bevat, kunt u de
DVD- en videorecorder op de televisie aansluiten met
de SCART-kabel. Dit heeft de volgende voordelen:
• Betere kwaliteit van geluid en beeld
• Vereenvoudigde instellingsprocedure voor de DVDen
videorecorder
1. Sluit de antennekabel aan.
2. Sluit één uiteinde van de audio- en videokabel aan
op de video-uitgang en de Audio L, R-uitgang aan de
achterkant van de DVD- en videorecorder.
3. Sluit het andere uiteinde op de juiste aansluiting van
de televisie aan.
Ongeacht het type verbinding, moet u de RF-
kabel altijd aansluiten. Als de RF-kabel niet is
aangesloten, is geen beeld zichtbaar op het
scherm wanneer de DVD- en videorecorder is
uitgeschakeld.
Zorg ervoor dat de televisie en de DVD- en
videorecorder zijn uitgeschakeld voordat u de
kabels aansluit.
■
■
Aansluiten en instellen
Naar RF IN
Naar RF OUT
RF-kabel
Naar ANT INPUT
RF-kabel
Antenne
Antenne-kabel
01375E-VR350,355-XFA-NL.indb 1601375E-VR350,355-XFA-NL.indb 16 2007-04-27 오후 6:40:442007-04-27 오후 6:40:44

Aansluiten en instellen
Nederlands - 17
COMPONENT INPUT
Hiermee krijgt u een hogere weergavekwaliteit.
S-Video verdeelt het beeldelement in zwart/wit (Y) en
kleur (C) signalen voor een hogere weergavekwaliteit
dan via de videouitgangsmodus composiet.
1. Sluit een uiteinde van de S-Video-kabel aan op de
S-VIDEO-uitgang op de achterkant van de DVD-en
videorecorder.
2. Sluit het andere uiteinde van de S-Video-kabel aan op
de juiste ingang op de televisie.
3. Sluit een uiteinde van de meegeleverde geluidskabel
aan op de AUDIO-uitgangen op de achterkant van de
DVD- en videorecorder.
• Let op de kleurcode voor het bovenste en onderste
kanaal.
4. Sluit het andere uiteinde van de audiokabels aan op
de juiste ingangen op de televisie.
De S-videokabel aansluiten
rood
wit
wit
rood
S-Video-kabel
(niet meegeleverd)
Hiermee verkrijgt u een hoge beeldkwaliteit en
optimale kleurweergave Component video verdeelt
het beeldelement in zwart/wit (Y), blauw (P
B
), rood (P
R
)
signalen voor heldere en scherpe beelden.
1. Sluit component-videokabels aan Op de COMPONENT
VIDEO OUT uitgang op de achterkant van de DVD- en
videorecorder en de COMPONENT VIDEO IN-ingangen
op de achterzijde van de TV.
2. Sluit audiokabels aan op de audio-uitgangen op de
achterzijde van de DVD- en videorecorder en de AUDIO
IN-ingangen op de achterzijde van de tv.
• Let op de kleurcode voor het bovenste en onderste
kanaal.
• Druk net zo lang op de knop op uw afstandsbediening
waarmee u de ingang kunt selecteren totdat op het
scherm van uw tv het component-signaal van de DVD-
en video recorder wordt weergegeven.
De componentvideokabel
aansluiten
rood
wit
rood
wit
Componentkabel
(niet meegeleverd)
01375E-VR350,355-XFA-NL.indb 1701375E-VR350,355-XFA-NL.indb 17 2007-04-27 오후 6:40:462007-04-27 오후 6:40:46

Aansluiten en instellen
Nederlands - 18
• Voor meer informatie over Progressieve instellingen, zie
pagina 27.
• Zorg ervoor dat de kleurgecodeerde aansluitingen
overeenkomen. De Y,
P
B
,
P
R
-componentuitgangen van
de DVD- en videorecorder moeten worden aangesloten
op de exact overeenkomende componentingangen van
de tv. Als de aansluitingen niet juist zijn, verschijnen
rode of blauwe beelden op het tv-scherm.
• U moet er rekening mee houden dat niet iedere hoge-
defi nitie tv-set volledig compatibel is met dit product.
Dit kan ervoor zorgen dat niet alle beelden juist worden
weergegeven. Als u problemen ondervindt bij het
progressief scannen van beelden, ordt u aangeraden
over te schakelen naar de standaarddefi nitie-uitvoer. Als
u vragen hebt over de compatibiliteit van uw Samsung
tv-set met deze DVD- en videorecorder, kunt u contact
opnemen met onze klantenservice.
Progressieve scan
▌
Uw TV moet een progressieve scaningang
ondersteunen voor het bekijken van een progressieve
scanvideo-uitgang. (zie pagina 27).
Raadpleeg de televisiehandleiding als u wilt weten
of uw televisie progressief scannen ondersteunt.
Als dat het geval is, bevat de televisiehandleiding
instructies over de instellingen voor progressief
scannen. Voer deze instructies uit in het
menusysteem van de tv.
Afhankelijk van uw televisie, kan de gebruikte
methode afwijken van bovenstaande afbeelding.
Wat is progressief scannen? Bij progressief
scannen is het aantal scanlijnen twee keer zo
groot als bij de interlace-methode. De progressieve
scanmethode kan voor een beter en scherper
beeld zorgen.
De componentaansluiting geeft geen
videoresoluties door van boven de 576p. Sluit de
DVD- en videorecorder met de HDMI-kabel aan
op uw tv om 720p en 1080i te kunnen bekijken.
Wanneer de HDMI aangesloten is, drukt u op
de knop P.SCAN om te schakelen tussen alle
beschikbare resoluties. (Zie pagina 29)
(alleen DVD-VR355)
■
■
■
■
Als uw tv een HDMI/DVI-ingang heeft, sluit u de HDMI/
DVI-kabel aan op een tv. U zult genieten van beelden
en geluiden met de beste kwaliteit.
HDMI/DVI aansluiten op een tv
(alleen DVD-VR355)
Als u de HDMI-uitvoer wilt bekijken, moet u de digitale
audio-uitvoer op PCM instellen. (zie pagina 26)
Afhankelijk van het HDMI-apparaat (TV/HDMI-
ontvanger) dat u gebruikt, kan het zijn dat audio
niet wordt ondersteund. Als uw tv Dolby Digital/
DTS niet ondersteunt, is audio-uitvoer niet
beschikbaar als u digitale uitvoer als Bitstream
instelt of DTS On (DTS aan) selecteert in het
menu Audio setup (geluidsinstelling).
Zet in dat geval de digitale uitvoer op PCM of zet
DTS op Uit.
■
■
Situatie 1: Aansluiten op een tv met
een HDMI aansluiting
▌
• Sluit met een HDMI-kabel de HDMI OUT-uitgang aan
de achterzijde van de DVD- en videorecorder aan op de
HDMI IN-ingang van uw tv.
• Druk net zo lang op de knop op uw afstandsbediening
waarmee u de ingang kunt selecteren totdat op het
scherm van uw tv het HDMI-signaal van de DVD- en
videorecorder wordt weergegeven.
Situatie 2: Aansluiten op een tv met
een DVI-aansluiting
▌
• Verbind met een DVI-adapterkabel het HDMI OUT-
uitgang aan de achterzijde van de DVD- en videorecorder
met de DVI IN-ingang van uw tv.
• Verbind met behulp van audiokabels de AUDIO (rood en
wit) OUT uitgangen aan de achterzijde van de DVD- en
videorecorder met de AUDIO (rood en wit) IN ingangen
van uw tv. Schakel de DVD- en videorecorder en de tv in.
• Druk net zo lang op de knop op uw afstandsbediening
waarmee u de ingang kunt selecteren totdat op het
scherm van uw tv het DVI-signaal van de DVD- en
videorecorder wordt weergegeven.
HDMI-kabel
(niet meegeleverd)
01375E-VR350,355-XFA-NL.indb 1801375E-VR350,355-XFA-NL.indb 18 2007-04-27 오후 6:40:492007-04-27 오후 6:40:49

Aansluiten en instellen
Nederlands - 19
Voor het wijzigen van de HDMI-uitvoerresolutie,
zie pagina 27~28.
HDMI (High Defi nition Multimedia Interface)
HDMI is een interface waarmee video- en
audiogegevens met slechts één aansluiting digitaal
kunnen worden verzonden. Aangezien HDMI
gebaseerd is op DVI, is het volledig compatibel
met DVI. Het enige verschil tussen HDMI en DVI is
dat HDMI meerdere geluidskanalen ondersteunt.
Door middel van HDMI verzendt de DVD-en
videorecorder een digitaal video- en audiosignaal
en wordt een helder beeld verkregen op een tv
met een HDMI-ingang.
Beschrijving HDMI-aansluiting
HDMI-aansluiting – Zowel niet-gecomprimeerde
videogegevens en digitale audiogegevens (LPCM-
of Bit Stream-gegevens).
- Hoewel de DVD- en videorecorder een HDMI-
kabel gebruikt, wordt alleen een puur digitaal
signaal naar de tv verzonden.
- Als de tv geen HDCP (High-bandwidth Digital
content protection) ondersteunt, is er alleen
sneeuw te zien op het scherm.
Waarom gebruikt Samsung wel HDMI?
Analoge tv’s vereisen een analoog video/
audiosignaal. Wanneer echter een DVD wordt
afgespeeld, zijn de gegevens die naar een tv
worden verzonden digitaal. Daarom is een digitaal-
naar-analoog omzetter (in de DVD-recorder
en videorecorder) of een analoog-naar-digitaal
omzetter (in de tv) vereist. Tijdens de omzetting
vertoont het beeld ruis en wordt het signaal
verloren. HDMI-technologie is superieur, omdat
er geen D/A-omzetting nodig is en het een puur
digitaal signaal is van de DVD- en videorecorder
naar de tv.
■
■
■
■
rood wit
DVI-adapterkabel
(niet meegeleverd)
Als u een Samsung TV via een HDMI-kabel
op de DVD-recorder & VCR aansluit, kunt u
de DVD-recorder & VCR gemakkelijk via de
afstandsbediening van de TV bedienen. (Dit is alleen
mogelijk met Samsung TV's die Anynet+(HDMI-
CEC) ondersteunen) (Zie pagina 32~33)
Controleer het logo (als uw tv het logo
heeft, wordt de functie Anynet+ ondersteund).
■
■
Om volledig gebruik te kunnen maken van de
bioscoopervaring die DVD biedt, wilt u uw DVD- en
videorecorder misschien aansluiten op een volledig
Surround Sound-systeem, inclusief een AV-ontvanger
en zes Surround Sound-luidsprekers.
Geproduceerd onder licentie van Dolby Laboratories.
Als uw AV-ontvanger een Dolby Digital-decoder bevat,
kunt u ervoor kiezen de ingebouwde Dolby Digital-
decoder van de DVD- en videorecorder niet te gebruiken.
Gebruik onderstaande Digital Audio Out-verbinding.
Als u Dolby Digital- of DTS-geluid wilt gebruiken, moet u
de geluidsinstellingen aanpassen (zie pagina 25).
1. Sluit een optische Digital Audio-kabel of een
Digital Audio-coaxkabel van de Digital Audio Out-
aansluitingen op de achterkant van de DVD en
videorecorder aan op de overeenkomstige Digital
Audio In-aansluitingen op de AV-ontvanger:
Aansluiten op de AV-ontvanger
Geproduceerd onder licentie van Dolby Laboratories.
“Dolby” en het symbool met de dubbele-D, zijn
handelsmerken van Dolby Laboratories.
“DTS” and “DTS Digital Out” zijn handelsmerken van
DTS, Inc.
Naar digitale audio-ingang van een AV-
ontvanger met een Dolby-, MPEG2- of
DTS Digital-decoder
of
Achter (L)
Voor (L)
Achter (R)
Voor (R)
Subwoofer Midden
Wat is de HDCP?
HDCP (High-bandwidth Digital Content Protection)
is een systeem voor het beschermen tegen
kopiëren van DVD-inhoud die wordt uitgevoerd
via HDMI. Het biedt een veilige digitale koppeling
tussen een videobron (PC, DVD, etc.) en een
weergave-apparaat (tv, projector, etc.). Inhoud
wordt gecodeerd in het bronapparaat om niet-
geautoriseerd kopiëren te voorkomen.
■
01375E-VR350,355-XFA-NL.indb 1901375E-VR350,355-XFA-NL.indb 19 2007-04-27 오후 6:40:512007-04-27 오후 6:40:51

Aansluiten en instellen
Nederlands - 20
Externe apparaten aansluiten
Hiermee kunt u de DVD- en videorecorder op
andere externe apparaten aansluiten en hun uitvoer
weergeven of opnemen.
• Situatie 1 : Een videorecorder, set-top box (STB) of
DVD- en videorecorder aansluiten op de
AUDIO-VIDEO AV 1 IN-aansluitingen.
• Situatie 2 :
Een camcorder aansluiten op de AV 2
INaansluitingen.
• Situatie 3 : Een dv-apparaat aansluiten op de DV
INaansluiting.
Situatie 1 : Een videorecorder, set-top box
(STB) of DVD- en videorecorder aansluiten
op de AUDIO-VIDEO AV 1 IN - aansluitingen
▌
Als de ingang niet automatisch wordt
geselecteerd, gebruikt u de toets INPUT SEL. om
de juiste ingang te selecteren.
■
Situatie 2 : Een camcorder aansluiten
op de AV 2 IN-aansluitingen.
▌
U kunt de AV 2 IN-aansluitingen op het voorpaneel
van de DVD- en videorecorder gebruiken. Het is
mogelijk om van aangesloten apparatuur op te
nemen.
Een videorecorder of extern apparaat aansluiten op
de AUDIO/VIDEO AV 1 IN-aansluitingen van de DVD-
en videorecorder.
Het is mogelijk om van aangesloten apparatuur op te
nemen (videorecorder, STB of DVD-speler).
U kunt ook de AV 2 IN-aansluitingen op het
voorpaneel van de DVD- en videorecorder
gebruiken.
Tegen kopiëren beveiligde inhoud kan niet
worden opgenomen.
■
■
Situatie 3 : Een DV-apparaat
aansluiten
▌
Als uw DV-apparaat een DV-uitgang heeft, sluit
deze dan aan op de DV-ingang van de DVD- en
videorecorder.
• Als de camcorder een DV-uitgang heeft, zie pagina 53
voor meer informatie.
01375E-VR350,355-XFA-NL.indb 2001375E-VR350,355-XFA-NL.indb 20 2007-04-27 오후 6:40:542007-04-27 오후 6:40:54

Systeem-installatie
Nederlands - 21
Inschakelen en automatisch instellen
Menunavigatie op het tv-scherm
Met de menu’s op het scherm kunt u diverse functies op de DVD- en
videorecorder in- of uitschakelen.
Druk op de toets MENU om het schermmenu te openen en gebruik
vervolgens de volgende toetsen om door de schermmenu's te navigeren.
1. De toetsen ▲▼, ◄►
Druk op deze toetsen op de afstandsbediening om de selectiebalk te
verplaatsen ▲▼,◄► om door de menuopties te schuiven.
2. De toets OK
Druk op deze toets op de afstandsbediening om alle nieuwe
instellingen te bevestigen.
3. De toets RETURN
Druk op deze toets op de afstandsbediening om terug te keren naar
het eerder weergegeven schermmenu of om het menu op het scherm
af te sluiten.
4. De toets EXIT
Druk op deze knop om het schermmenu af te sluiten.
De DVD- en videorecorder wordt automatisch ingesteld wanneer de
stekker voor het eerst in het stopcontact wordt gestoken.
Tv-stations worden in het geheugen opgeslagen. Dit proces duurt
enkele minuten. De DVD- en videorecorder is dan klaar voor gebruik.
1. Sluit de RF-kabel aan zoals op pagina 16 is aangegeven.
• Uw DVD- en videorecorder aan te sluiten op de tv met de RF- en
scartkabel (of audio/videokabel).
2. Sluit de DVD- en videorecorder aan op het stroomnet.
• Op het display van het voorpaneel knippert “Auto”.
3. Gebruik de toetsen ▲▼ om de keuzebalk te verplaatsen en de
gewenste taal te kiezen. Druk vervolgens op de toets OK.
Het bericht “Automatisch instellen wordt gestart. Controleer de antenne
en tv-kabelverbinding.” wordt weergegeven.
4. Het automatisch instellen wordt gestart.
5. Het automatisch scannen wordt gestart.
6. Controleer de datum en de tijd.
• Als deze niet correct is: Raadpleeg “De datum en tijd instellen”
(zie pagina 22) als u de datum en tijd wilt wijzigen.
Systeem-installatie
Automatisch zendergeheugen
Stop
50%
Instellen
DVD-Recorder
Geen schijf
Programma
Instellen
Systeem ►
Klok instellen ►
Taal ►
Geluid ►
Beeld ►
Kinderslot ►
Installeren ►
VERPL. OK TERUG
EINDE
Autom. instellen
DVD-Recorder
Geen schijf
Datum Tijd
MA
JAN 01 2007 12 00
VERPL. OK TERUG
01375E-VR350,355-XFA-NL.indb 2101375E-VR350,355-XFA-NL.indb 21 2007-04-27 오후 6:40:572007-04-27 오후 6:40:57

Systeem-installatie
Nederlands - 22
De datum en tijd instellen
De DVD- en videorecorder bevat een 24-uurs klok en een kalender die
voor het volgende worden gebruikt:
• Het opnemen van programma’s automatisch stoppen.
• De DVD- en videorecorder vooraf instellen voor automatische opname
van een programma.
•
Nadat u de DVD- en videorecorder hebt gekocht, moet u de datum en tijd instellen.
• Vergeet de tijd niet opnieuw in te stellen om over te schakelen van
wintertijd naar zomertijd en andersom.
1.
Druk met het apparaat in de modus Stop/Geen cd/dvd op de toets MENU.
2.
Druk op de toetsen ▲▼ om Instellen te selecteren en druk op OK of op de toets ►.
3. Druk op de toetsen ▲▼ om Klok instellen te selecteren en druk op OK
of op de toets ►.
4. Druk op de toetsen ◄ ► om het uur, de minuten, de dag, de maand en
het jaar te kiezen.
• Het geselecteerde item wordt gemarkeerd.
5. Druk op de toetsen ▲▼ om de waarden te verhogen of te verlagen.
• De dag van de week wordt automatisch weergegeven.
• U kunt de toetsen ▲▼ ingedrukt houden om sneller door de waarden
te schuiven.
6. Druk op de toets OK om de datum en tijd op te slaan. Indien u niet op
OK drukt, wordt deze gegevens niet opgeslagen.
7. Druk op de toets EXIT om het menu af te sluiten.
U hoeft de stations niet vooraf in te stellen als u deze al automatisch
hebt ingesteld (zie Inschakelen en automatisch instellen op pagina 21).
De DVD- en videorecorder bevat een ingebouwde tuner voor de
ontvangst van televisie-uitzendingen.
U moet de stations die via de tuner worden ontvangen, vooraf instellen.
Dit kunt u op de volgende manieren doen:
• Inschakelen en automatisch instellen (zie pagina 21)
• Automatisch instellen
• Handmatig instellen (zie pagina 23)
1.
Druk met het apparaat in de modus Stop/Geen cd/dvd op de toets MENU.
2.
Druk op de toetsen ▲▼ om Instellen te selecteren en druk op OK of op de toets ►.
3. Druk op de toetsen ▲▼ om Installeren te selecteren en druk op OK of
op de toets ►.
4. Druk op de toetsen ▲▼ om Autom. instellen te selecteren en druk op
OK of op de toets ►.
Het menu Sys. Select wordt weergegeven. Druk op de knoppen ▲▼ op
de systeem te selecteren.
5. Drukt u op de toets OK.
Het bericht ‘Uw gegevens gaan verloren. Druk op [OK] om door te gaan,
op [MENU] om af te sluiten.’
wordt weergegeven.
6. Druk op OK om het automatische scannen te starten.
•
De eerste frequentieband wordt gescand en het eerste gevonden station
wordt weergegeven en opgeslagen. De DVD- en videorecorder zoekt
vervolgens naar het tweede station, enzovoort.
• Wanneer de automatische scanprocedure is voltooid, wordt de DVD-
en videorecorder automatisch overgeschakeld naar programma 1.
• Het aantal stations dat automatisch door de DVD- en videorecorder
wordt opgeslagen, hangt af van het aantal gevonden stations.
7.
Als u het automatisch scannen voortijdig wilt annuleren, drukt u op de toets OK.
• Wanneer de automatische scanprocedure is voltooid, kunnen sommige
stations meerdere malen zijn opgeslagen. Kies de stations met de
beste ontvangst en verwijder de stations die niet langer nodig zijn.
Automatisch instellen
Datum Tijd
MA
Klok instellen
DVD-Recorder
Geen schijf
Programma
Instellen
JAN 01 2007 12 00
VERPL. OK TERUG
EINDE
Automatisch zendergeheugen
Stop
50%
Installeren
DVD-Recorder
Geen schijf
Programma
Instellen
Autom. instellen
►
Handmatig instellen
►
TV-systeem : I
►
VIDEO-uitvoerkanaal : CH 36
►
VERPL. OK TERUG EINDE
Installeren
DVD-Recorder
Geen schijf
Programma
Instellen
SYSTEM-B/G
Systeemselectie
SYSTEM-D/K
SYSTEM-I
VERPL. OK TERUG EINDE
01375E-VR350,355-XFA-NL.indb 2201375E-VR350,355-XFA-NL.indb 22 2007-04-27 오후 6:40:592007-04-27 오후 6:40:59

Systeem-installatie
Nederlands - 23
Als u de stations al automatisch hebt ingesteld, hoeft u ze niet
handmatig in te stellen.
1.
Con l’unità in modalità Arresto/Nessun disco, premere il tasto MENU.
2. Druk op de toetsen ▲▼ om Instellen te selecteren en druk op OK of op
de toets ►.
3. Druk op de toetsen ▲▼ om Installeren te selecteren en druk op OK of
op de toets ►.
4. Druk op de toetsen ▲▼ om Handmatig instellen te selecteren en druk
op OK of op de toets ►.
5. Druk op de knoppen ▲▼ om een PR (programma) te selecteren dat u
wilt bewerken, verwijderen of wisselen, en druk op OK of op de knop ►.
Druk op de knoppen ▲▼ om Bewerken, Verwijderen of Wisselen te
selecteren, en druk op OK of op de knop ►.
•
Bewerken : U kunt een PR (programma) toevoegen of bewerken. Na
de programma-informatie te hebben gewijzigd (CH, Naam, Decoder,
MFT, Systeem), selecteert u Gereed en drukt u vervolgens op OK.
- CH : Stel het kanaal af met de knoppen ◄►.
- Naam : Geeft de zendernaam automatisch weer die in het
zendsignaal is gevonden. Als deze niet wordt gevonden, kunt u de
naam bewerken met de knoppen ▲▼◄►.
- Decoder : Als u deze inschakelt, kunt u gecodeerde kanalen
opnemen met de externe decoderbox.
Zie de instructies voor het aansluiten van de externe decoderbox op
pagina 16 voordat u deze inschakelt.
- MFT : Met de knoppen ◄► kunt u de kanaalfrequentie beter
afstellen.
- Systeem : U kunt het uitzendsysteem selecteren van het te
ontvangen kanaal (B/G, D/K of I).
• Verwijderen : De kanaalgegevens van het geselecteerde PR
(programma) worden verwijderd.
• Wisselen : Het is mogelijk de kanaalgegevens van twee PR's
(programma's) te wisselen.
Als u bijvoorbeeld PR2 en PR5 wilt wisselen, selecteert u Wisselen bij
PR2 en drukt u bij PR5 op OK.
Handmatig instellen
U kunt de geluidsmodus kiezen (B/G-D/K, I) afhankelijk van de
televisie die op de DVD- en videorecorder is aangesloten.
1.
Druk met het apparaat in de modus Stop/Geen cd/dvd op de toets MENU.
2. Druk op de toetsen ▲▼ om Instellen te selecteren en druk op OK of op
de toets ►.
3. Druk op de toetsen ▲▼ om Installeren te selecteren en druk op OK of
op de toets ►.
4. Druk op de toetsen ▲▼ TV-systeem te selecteren en druk op OK of op
de toets ►.
5. Druk op de toetsen ▲▼ G, I of K te selecteren en druk op de toets OK
of op de toets ►.
6. Druk op de toets EXIT om het menu af te sluiten.
RF OUT geluidsstand instellen (B/G-D/K, I)
Installeren
DVD-Recorder
Geen schijf
Programma
Instellen
Autom. instellen ►
Handmatig instellen ►
TV-systeem : I ►
VIDEO-uitvoerkanaal : CH 36 ►
VERPL. OK TERUG
EINDE
MOVE OK
Handmatig instellen
Gereed
PR 01
CH
◄ ►
Naam
Decoder Uit
MFT
Systeem I
VERPL. OK
01375E-VR350,355-XFA-NL.indb 2301375E-VR350,355-XFA-NL.indb 23 2007-04-27 오후 6:41:002007-04-27 오후 6:41:00

Systeem-installatie
Nederlands - 24
Als het beeld wordt gestoord of niet kan worden gevonden, moet
het uitgangskanaal van de DVD- en videorecorder mogelijk worden
gewijzigd.
1.
Druk met het apparaat in de modus Stop/Geen cd/dvd op de toets MENU.
2. Druk op de toetsen ▲▼ om Instellen te selecteren en druk op OK of op
de toets ►.
3. Druk op de toetsen ▲▼ om Installeren te selecteren en druk op OK of
op de toets ►.
4. Druk op de toetsen ▲▼ om VIDEO-uitvoerkanaal te selecteren en
druk op OK of op de toets ►.
5. Druk op de toetsen ▲▼ om het gewenste VIDEO uitgangskanaal te
selecteren en druk op OK of op de toets ►.
VIDEO-uitvoerkanaal
Indien u het geluid, de ondertiteling, het menu van de schijf en de
taal van de DivX-ondertiteling vooraf instelt, worden de instellingen
automatisch ingeschakeld wanneer u een fi lm kijkt.
1.
Druk met het apparaat in de modus Stop/Geen cd/dvd op de toets MENU.
2. Druk op de toetsen ▲▼ om Instellen te selecteren en druk op OK of op
de toets ►.
3. Druk op de toetsen ▲▼ om Taal te selecteren en druk op OK of op de
toets ►.
Het menu met taalinstellingen verschijnt.
4. Druk op de toetsen ▲▼ om de gewenste taaloptie te selecteren en druk
op OK of op de toets ►.
• Geluid : voor de taal van het geluidsspoor van de schijf.
• Ondertiteling : voor de ondertitels van de schijf.
• Schijftaal : voor het schijfmenu op de schijf.
•
Schermmenu : voor het tv-schermmenu van de DVD- en video recorder.
• DivX-ondertitel : voor het selecteren van een ondersteunde taal voor
DivX-ondertiteling per regio.
De taalopties instellen
Indien de geselecteerde taal niet op de schijf is opgenomen, wordt
de taal waarin de schijf werd opgenomen, geselecteerd.
De geselecteerde taal verschijnt alleen als deze op de schijf wordt
ondersteund.
Als de taal van de ondertiteling in verkeerde letters wordt
weergegeven, wijzigt u de DivX-ondertiteling in de juiste regio. Als
het dan nog niet werkt, wordt het formaat niet ondersteund.
■
■
■
5. Druk op de toetsen ▲▼ om de gewenste taal te selecteren en druk op
OK of op de toets ►.
Western
Afrikaans, Baskisch, Catalaans, Deens, Nederlands, Engels,
Faerøers, Fins, Frans, Duits, IJslands, Indonesisch, Italiaans,
Maleisisch, Noors, Portugees, Spaans, Swahili, Zweeds
Central
Engels, Albaans, Kroaats, Tsjechisch, Hongaars, Pools,
Roemeens, Servisch(Latin), Slowaaks, Sloveens
Greek
Engels, Grieks
Cyrillic
Engels, Azerbeidzjaans, Wit-Russisch, Bulgaars, Kazaks,
Macedonisch, Russisch, Servisch, Tataars, Oekraïens, Oezbeeks
Installeren
DVD-Recorder
Geen schijf
Programma
Instellen
Autom. instellen ►
Handmatig instellen ►
TV-systeem : G ►
VIDEO-uitvoerkanaal : CH 36 ►
CH 35
▲
CH 36
CH 37
CH 38
CH 39
CH 40
CH 41
▼
VERPL. OK TERUG
EINDE
Taal
DVD-Recorder
Geen schijf
Programma
Instellen
Geluid : Origineel
Ondertiteling : Automatisch
Schijftaal : English
Schermmenu
: Nederlands
DivX-ondertitel : Western
Origineel
▲
English
Français
Deutsch
Español
Italiano
Nederlands
Korean
▼
VERPL. OK TERUG
EINDE
01375E-VR350,355-XFA-NL.indb 2401375E-VR350,355-XFA-NL.indb 24 2007-04-27 오후 6:41:022007-04-27 오후 6:41:02

Systeem-installatie
Nederlands - 25
Met de geluidsopties kunt u het geluid en de geluidsstatus instellen,
afhankelijk van het gebruikte audiosysteem.
U kunt ook de modus NICAM aanpassen.
1.
Druk met het apparaat in de modus Stop/Geen cd/dvd op de toets MENU.
2. Druk op de toetsen ▲▼ om Instellen te selecteren en druk op OK of op
de toets ►.
3. Druk op de toetsen ▲▼ om Geluid te selecteren en druk op OK of op
de toets ►.
Het menu met geluidsinstellingen verschijnt.
4. Druk op de toetsen ▲▼ om de gewenste geluidsoptie te selecteren en
druk op OK of op de toets ►.
5. Druk op de toetsen ▲▼ om het gewenste item te selecteren en druk op
OK of op de toets ►.
De geluidsopties instellen
Digitale uitgang
▌
• PCM : Converteert naar PCM (2CH) 48kHz audio. Selecteer PCM als u
gebruik maakt van analoge audio-uitvoer.
• Bitstream : Converteert naar Dolby Digital Bitstream. Selecteer Bitstream
als u gebruik maakt van digitale audiouitvoer.
Zorg ervoor dat u de juiste digitale uitvoer selecteert, anders kunt
u geen geluid horen.
■
Dynamische compressie
▌
Deze is alleen actief wanneer er een Dolby Digitalsignaal is
gedetecteerd.
• Aan : Wanneer u fi lmmuziek zachtjes afspeelt of met kleinere speakers,
kan het systeem de juiste compressie toepassen om de zachte
inhoud verstaanbaarder te maken en om te voorkomen dat
dramatische passages te hard klinken.
• Uit : U kunt de fi lm bekijken met het standaard dynamisch bereik.
NICAM
▌
NICAM-programma’s worden verdeeld in 3 typen.
NICAM stereo, NICAM mono en tweetalig (transmissie in andere taal).
NICAM-programma’s hebben altijd een standaard monogeluid en u
kunt het gewenste geluid selecteren.
• Aan : NICAM-modus
• Uit : Schakel deze optie alleen in bij het opnemen van het standaard
monogeluid tijdens een NICAM-uitzending, als het stereogeluid
wordt verstoord door slechte ontvangstomstandigheden.
DTS
▌
• Uit : er wordt geen digitaal signaal verzonden.
• Aan : er wordt alleen DTS-bitstream via digitale uitvoer verzonden.
Selecteer DTS als u het apparaat aansluit op een DTS-decoder.
Bij het afspelen van de DTS-audiotrack wordt het geluid niet via
de analoge audiouitgang verzonden.
■
Geluid
DVD-Recorder
Geen schijf
Programma
Instellen
Digitale uitgang : PCM ►
DTS : Uit ►
Dynamische compressie
: Aan ►
NICAM
: Aan ►
VERPL. OK TERUG
EINDE
Geluid
DVD-Recorder
Geen schijf
Programma
Instellen
Digitale uitgang : PCM ►
DTS : Uit ►
Dynamische compressie
: Aan ►
NICAM
: Aan ►
VERPL. OK TERUG
EINDE
Geluid
DVD-Recorder
Geen schijf
Programma
Instellen
Digitale uitgang : PCM ►
DTS : Uit ►
Dynamische compressie
: Aan ►
NICAM
: Aan ►
VERPL. OK TERUG
EINDE
Geluid
DVD-Recorder
Geen schijf
Programma
Instellen
Digitale uitgang : PCM ►
DTS : Uit ►
Dynamische compressie
: Aan ►
NICAM
: Aan ►
VERPL. OK TERUG
EINDE
01375E-VR350,355-XFA-NL.indb 2501375E-VR350,355-XFA-NL.indb 25 2007-04-27 오후 6:41:042007-04-27 오후 6:41:04

Systeem-installatie
Nederlands - 26
3D-ruisonderdrukking
▌
• Uit : Normaal
• Aan : Biedt een helder beeld via ruisonderdrukking (voor opnames).
Deze functie hangt af van het schijftype. Bij sommige schijven
werkt deze namelijk niet.
■
Breedte/hoogte TV
▌
Afhankelijk van het type televisie kunt u de instellingen voor het
beeldformaat.
• 4:3 LetterBox : Selecteer deze optie als u hetgehele 16:9-scherm wilt
zien dat dvd biedt, ook al heeft uw tv een beeldformaat
van 4:3.
• 4:3 Pan - Scan : Selecteer deze optie voor con ventionele tv’s als u
het centrale deel van het 16:9-scherm wilt zien. (De
uiterste rechter- en linkerkant van het beeld worden
afgesneden).
• 16:9 Breed : U ziet het volledige 16:9-beeld op uw breedbeeldtelevisie.
Met deze functie kunt u de tv-scherminstellingen invoeren.
1.
Druk met het apparaat in de modus Stop/Geen cd/dvd op de toets MENU.
2. Druk op de toetsen ▲▼ om Instellen te selecteren en druk op OK of op
de toets ►.
3. Druk op de toetsen ▲▼ om Beeld te selecteren en druk op OK of op de
toets ►.
Het menu met video-opties verschijnt.
4. Druk op de toetsen ▲▼ om de gewenste videooptie te selecteren en
druk op OK of op de toets ►.
5. Druk op de toetsen ▲▼ om het gewenste item te selecteren en druk op
OK of op de toets ►.
De beeldopties (video) instellen
Druk op de toets RETURN of op de toets ◄ om naar het vorige
menu terug te keren. Druk op de toets EXIT om het menu af te
sluiten.
■
Beeld
DVD-Recorder
Geen schijf
Programma
Instellen
Breedte/hoogte TV : 16:9 Breed ►
3D-ruisonderdrukking
: Uit ►
DivX(R)-registratie ►
VERPL. OK TERUG
EINDE
Beeld
DVD-Recorder
Geen schijf
Programma
Instellen
Breedte/hoogte TV : 16:9 Breed ►
3D-ruisonderdrukking
: Uit ►
DivX(R)-registratie ►
VERPL. OK TERUG
EINDE
01375E-VR350,355-XFA-NL.indb 2601375E-VR350,355-XFA-NL.indb 26 2007-04-27 오후 6:41:062007-04-27 오후 6:41:06

Systeem-installatie
Nederlands - 27
Als uw tv Progressieve scan ondersteunt, drukt u op de toets P.SCAN
op de voorkant van de DVD- en videorecorder om hogere kwaliteit
videobeelden te krijgen.
Progressieve scan annuleren
1. Druk in de stopmodus op de knop P.SCAN button op de voorkant van
de DVD- en videorecorder.
Het bericht “[Ja] om Interlaced scanmodus te bevestigen. Kies anders
[Nee].” wordt weergegeven.
2. Druk op de knoppen ◄ ► om Ja te selecteren en druk vervolgens op
OK.
3. Stel uw tv in op de Interlace-ingang (met behulp van de
afstandsbediening van de tv).
Progressieve scan instellen
1. Druk in de stopmodus op de knop P.SCAN button op de voorkant van
de DVD- en videorecorder.
Het bericht “[Ja] om Progressieve scanmodus te bevestigen. Kies
anders [Nee].” wordt weergegeven.
2. Druk op de knoppen ◄ ► om Ja te selecteren en druk vervolgens op
OK.
3. Stel uw tv in op de Progressieve ingang (met behulp van de
afstandsbediening van de TV).
Progressief scannen
De instelling voor progressief scannen is alleen beschikbaar
wanneer de DVD- en videorecorder in de stopstand staat.
■
HDMI/DVI-resolutie (alleen DVD-VR355)
▌
Deze instelling wordt gebruikt wanneer de eenheid wordt
aangesloten door middel van HDMI of DVI op weergave-apparaten
(tv, projector, etc.).
• 576P : 720 x 576
• 720P : 1280 x 720
• 1080i : 1920 x 1080
• Sluit de DVD- en videorecorder aan op uw tv via HDMI of DVI. Stel de tv-
ingang in op HDMI of DVI.
• Druk op de knop P.SCAN terwijl de eenheid in de stand Stop staat om de
uitvoerresolutie te selecteren.
- Als de tv is aangesloten met de HDMI- of DVI-kabel, verandert de
uitvoerresolutiemodus iedere keer dat u op de knop P.SCAN drukt in de
volgende volgorde:
→ 576p → 720p → 1080i
- Als uw tv is aangesloten met AV- of componentkabels (zonder HDMI/
DVI-kabel), schakelt de uitvoerresolutiemodus tussen 576p en 576i.
• HDMI/DVI-kabel ondersteunt geen 576i. Video met 576i-resolutie kan
alleen worden weergegeven via de analoge uitgangen (Composite/
S-Video/Component)
Uitgangsselectie (alleen DVD-VR355)
Beeld
DVD-Recorder
Geen schijf
Programma
Instellen
Breedte/hoogte TV : 16:9 Breed ►
3D-ruisonderdrukking
: Uit ►
HDMI/DVI-resolutie
DivX(R)-registratie
►
576P
720P
1080i
VERPL. OK TERUG
EINDE
01375E-VR350,355-XFA-NL.indb 2701375E-VR350,355-XFA-NL.indb 27 2007-04-27 오후 6:41:072007-04-27 오후 6:41:07

Systeem-installatie
Nederlands - 28
DivX(R)-registratie
Voor het aanmelden van deze DVD-recorder voor het Div(R) Video
On Demand-formaat hebt u uw registratiecode nodig.
Voor meer informatie kunt u terecht op www.divx.com/vod
▌
Zelfs als de HDMI/DVI-kabel is aangesloten op uw tv, heeft de AV-
aansluiting alleen 576i als uitvoer en de componentaansluiting alleen
576p als uitvoer, onafhankelijk van het display op het scherm.
Progressief scannen wordt automatisch geactiveerd wanneer HDMI
aangesloten is. (Controleer of PS
op het voorpaneel van de DVD-
recorder wordt aangegeven.)
Er zal geen HDMI-video- of geluidsuitvoer zijn als de progressieve
scanfunctie niet ingeschakeld is.
Raadpleeg de televisiehandleiding als u wilt weten of uw televisie
progressief scannen ondersteunt.
Als dat het geval is, bevat de televisiehandleiding instructies over de
instellingen voor progressief scannen.
Voer deze instructies uit in het menusysteem van de tv.
Als de verkeerde video-uitgang is ingesteld, wordt het scherm
mogelijk geblokkeerd.
De beschikbare resoluties voor HDMI/DVI-uitvoer zijn afhankelijk van
de aangesloten tv of projector. Raadpleeg de gebruiksaanwijzing van
uw TV of projector voor meer informatie.
Als de resolutie wordt gewijzigd, kan het enkele seconden duren
voordat het beeld weer normaal wordt weergegeven.
Als u de HDMI-uitgangsresolutie instelt op 720p of 1080i, zal de
HDMI-uitgang beter beeldkwaliteit leveren.
■
■
■
■
■
■
■
■
Beeld
DVD-Recorder
Geen schijf
Programma
Instellen
VERPL. OK TERUG
EINDE
Breedte/hoogte TV : 16:9 Breed ►
3D-ruisonderdrukking
: Uit ►
DivX(R)-registratie ►
Uw registratiecode is :
XXXXXXXX
Voor meer informatie ga naar www.divx.com/vod
Gereed
DivX(R) video op aanvraag
01375E-VR350,355-XFA-NL.indb 2801375E-VR350,355-XFA-NL.indb 28 2007-04-27 오후 6:41:092007-04-27 오후 6:41:09

Systeem-installatie
Nederlands - 29
De functie Kinderslot werkt bij DVD’s die voorzien zijn van een
classifi catie. Zo kunt u controle houden over het type fi lms waarnaar
uw gezin kijkt.
Een schijf bevat maximaal acht classifi catieniveaus.
1. Druk vanuit de stopstand/modus Geen schijf op de toets MENU van de
afstandsbediening.
2. Druk op de toetsen ▲▼ om Instellen te selecteren en druk op OK of
op de toets ►.
3. Druk op de toetsen ▲▼ om Kinderslot te selecteren en druk op OK
of op de toets ►.
• Het bericht ‘Torgangscode Instellen’ verschijnt.
4. Voer de viercijferige toegangscode in met de toetsen 0 t/m 9 op de
afstandsbediening.
• Het bericht ‘Toegangscode bevestigen’ verschijnt.
5. Voer de toegangscode nogmaals in en druk op OK of op de toets ►.
6. Druk op de toetsen ▲▼ om Aan te selecteren en druk op OK of op de
toets ►.
Parental Control (Kinderslot) instellen
Raadpleeg Problemen oplossen als u de toegangscode vergeet
(zie pagina 78).
■
Het classifi catieniveau
▌
1. Druk op de toetsen ▲▼ om Niveau te selecteren en druk op OK of op
de toets ►.
2. Druk op de toetsen ▲▼ om het gewenste classifi catieniveau te
selecteren en druk op OK of op de toets ►.
Als u bijvoorbeeld niveau 6 kiest, worden schijven van niveau 7 of 8
niet afgespeeld. Een hoger cijfer geeft aan dat het programma alleen
door volwassenen mag worden gebruikt.
Druk op de toets RETURN of op de toets ◄ om naar het vorige
menu terug te keren. Druk op de toets EXIT om het menu af te
sluiten.
■
1. Druk op de toetsen ▲▼ om Toegangscode wijzigen te selecteren en
druk op OK of op de toets ►.
• Het bericht ‘Geef de toegangscode in’ verschijnt.
2. Voer de viercijferige toegangscode in met de cijferknoppen op de
afstandsbediening.
• Het bericht ‘Toegangscode bevestigen’ verschijnt.
3. Voer de toegangscode nogmaals in met de toetsen 0 t/m 9 op de
afstandsbediening.
De Toegangscode wijzigen
▌
Kinderslot
DVD-Recorder
Geen schijf
Programma
Instellen
Toegangscode :Off
►
Uit
Aan
VERPL. OK TERUG
EINDE
Kinderslot
DVD-Recorder
Geen schijf
Programma
Instellen
Toegangscode :On
►
Niveau : Level 1 Kids
►
Toegangscode wijzigen
►
Niveau 8 Volw.
Niveau 7
Niveau 6
Niveau 5
Niveau 4
Niveau 3
Niveau 2
Niveau 1 kind
VERPL. OK TERUG
EINDE
Kinderslot
DVD-Recorder
Geen schijf
Programma
Instellen
Toegangscode : Aan ►
Niveau : Niveau 1 kind ►
Toegangscode wijzigen ►
VERPL. OK TERUG
EINDE
01375E-VR350,355-XFA-NL.indb 2901375E-VR350,355-XFA-NL.indb 29 2007-04-27 오후 6:41:112007-04-27 오후 6:41:11

Systeem-installatie
Nederlands - 30
Met deze functie kunt u de instellingen voor de videorecorder invoeren.
1.
Druk met het apparaat in de modus Stop/Geen cd/dvd op de toets MENU.
2. Druk op de toetsen ▲▼ om Instellen te selecteren en druk op OK of
op de toets ►.
3. Druk op de toetsen ▲▼ om Systeem te selecteren en druk op OK of
op de toets ►.
4. Druk op de toetsen ▲▼ om VCR te selecteren en druk op OK of op
de toets ►.
5. Druk op de toetsen ▲▼ om de gewenste videooptie te selecteren en
druk op OK of op de toets ►.
6. Druk op de toetsen ▲▼ om het gewenste item te selecteren en druk
op OK of op de toets ►.
Video-instelling
Automatisch afspelen
▌
Als u wilt dat videobanden automatisch worden afgespeeld wanneer
u ze in de videorecorder plaatst, schakelt u Automatisch afspelen in.
• Aan - wanneer de wisbeveiliging is verwijderd, wordt een videoband
automatisch afgespeeld wanneer de band in de videorecorder is
geplaatst.
• Uit - automatisch afspelen is uitgeschakeld.
IPC (Intelligent Picture Control)
▌
Met de functie IPC kunt u de beeldscherpte automatisch aanpassen
volgens uw eigen voorkeur.
• Aan - de beeldscherpte wordt automatisch aangepast.
• Uit - de beeldscherpte handmatig aanpassen.
Automatisch herhalen
▌
Met deze functie wordt de videorecorder zo ingesteld dat een
videoband steeds opnieuw wordt afgespeeld (tenzij de bandfunctie
Stoppen, Vooruitspoelen of Terugspoelen wordt ingeschakeld).
Lengte cassette
▌
Deze informatie is meestal afgedrukt op de videocassette. In het
menu bladert u door E180, E240, E280 en E300.
Wanneer het type cassette is ingesteld, wordt de overgebleven tijd
op de band weergegeven als u op de toets INFO drukt.
Systeem
DVD-Recorder
Geen schijf
Programma
Instellen
Lengte cassette : E180 ►
Automatisch afspelen : Aan ►
Automatisch herhalen : Uit ►
IPC : Aan ►
Kleursysteem : Automatisch ►
E180
E240
E280
E300
VERPL. OK TERUG
EINDE
DVD-Recorder
Geen schijf
Programma
Instellen
Lengte cassette : E180 ►
Automatisch afspelen : Aan ►
Automatisch herhalen : Uit ►
IPC : Aan ►
Kleursysteem : Automatisch ►
Uit
Aan
Systeem
VERPL. OK TERUG
EINDE
DVD-Recorder
Geen schijf
Programma
Instellen
Lengte cassette : E180 ►
Automatisch afspelen : Aan ►
Automatisch herhalen : Uit ►
IPC : Aan ►
Kleursysteem : Automatisch ►
Uit
Aan
Systeem
VERPL. OK TERUG
EINDE
DVD-Recorder
Geen schijf
Programma
Instellen
Lengte cassette : E180 ►
Automatisch afspelen : Aan ►
Automatisch herhalen : Uit ►
IPC : Aan ►
Kleursysteem : Automatisch ►
Uit
Aan
Systeem
VERPL. OK TERUG
EINDE
01375E-VR350,355-XFA-NL.indb 3001375E-VR350,355-XFA-NL.indb 30 2007-04-27 오후 6:41:132007-04-27 오후 6:41:13

Systeem-installatie
Nederlands - 31
Kleurensysteem
▌
Voordat u een videoband opneemt of afspeelt, kunt u de gewenste
systeemstandaard kiezen.
• Automatisch : wanneer een videoband wordt afgespeeld, wordt de
systeemstandaard automatisch door de DVD- en
videorecorder gekozen.
• PAL : PAL videosysteem
• MESECAM
• B/W : zwart-wit.
U kunt de tijdsinstelling van de EP-modus (Extended Play) op 6 of 8
uur instellen.
1.
Druk met het apparaat in de modus Stop/Geen cd/dvd op de toets MENU.
2. Druk op de toetsen ▲▼ om Instellen te selecteren en druk op OK of
op de toets ►.
3. Druk op de toetsen ▲▼ om Systeem te selecteren en druk op OK of
op de toets ►.
4. Druk op de toetsen ▲▼ om DVD EP modustijd te selecteren en druk
op OK of op de toets ►.
5. Druk op de toetsen ▲▼ om 6 uur of 8 uur te selecteren en druk op
OK of op de toets ►.
Duur van EP-modus op DVD
Een DVD-video bestaat uit ‘titels’ en ‘hoofdstukken’.
Als u één programma opneemt, wordt één titel gemaakt.
Als u deze functie gebruikt, wordt de titel verdeeld in hoofdstukken.
1. Druk in de stopmodus en terwijl er een schijf is geplaatst, op de knop
MENU.
2. Druk op de toetsen ▲▼ om Instellen te selecteren en druk op OK of
op de toets ►.
3. Druk op de toetsen ▲▼ om Systeem te selecteren en druk op OK of
op de toets ►.
4. Druk op de toetsen ▲▼ om Hoofdstuk maken te selecteren en druk
op OK of op de toets ►.
5. Druk op de toetsen ▲▼ om Aan te selecteren en druk op OK of op de
toets ►. Druk op de toets EXIT om het menu af te sluiten.
6. Stel de opnamesnelheid in door op de knop REC SPEED op de
afstandsbediening te drukken (zie pagina 50 voor meer informatie over
opnamesnelheden).
7. Druk op de toets REC om het opnemen te starten. Het bericht ‘Wilt u
het hoofdstukmenu maken na deze opname?’ verschijnt.
8. Druk op de toetsen ◄ ► om Ja te selecteren en druk op OK.
De opname wordt gestart. In de XP- en de SP-modus moet u ten
minste 5 minuten opnemen om een hoofdstuk te maken. In de LP- en
de EPmodus is dit 15 minuten.
Automatisch hoofdstukken maken
(V-modus)
Nee
Ja
Wilt u het hoofdstukmenu maken
na deze opname?
Systeem
DVD-Recorder
Geen schijf
Programma
Instellen
VCR ►
DVD EP modustijd
: 6 uur ►
Hoofdstuk maken : Uit ►
Snel opnemen : Uit ►
6 uur
8 uur
VERPL. OK TERUG
EINDE
Systeem
DVD-Recorder
Geen schijf
Programma
Instellen
Lengte cassette : E180 ►
Automatisch afspelen : Aan ►
Automatisch herhalen : Uit ►
IPC : Aan ►
Kleursysteem : Automatisch ►
VERPL. OK TERUG
EINDE
Automatisch
PAL
MESECAM
B/W
01375E-VR350,355-XFA-NL.indb 3101375E-VR350,355-XFA-NL.indb 31 2007-04-27 오후 6:41:142007-04-27 오후 6:41:14

Systeem-installatie
Nederlands - 32
Op DVD-RW-schijven kunt u extra hoofdstukken en titels aan
een gesloten schijf toevoegen door het sluiten van de schijf
ongedaan te maken en opnieuw op te nemen.
Op DVD-R-schijven die zijn gesloten, kunnen geen extra
hoofdstukken of titels worden toegevoegd.
■
De functie Automatisch hoofdstuk maken werkt niet tijdens Timer-
opname of wanneer u het apparaat uitschakelt.
Het sluiten van de DVD-R-schijf kan niet ongedaan worden
gemaakt.
■
■
9. Druk op de toets STOP om het opnemen te stoppen.
10. U geeft de gemaakte titels weer door de schijf te sluiten (zie pagina
75) en op de toets TITLE MENU te indrukken. Het titelmenu
verschijnt.
11. U geeft de gemaakte hoofdstukken weer door op de gewenste titel te
klikken en op de toets DISC MENU te indrukken. Het hoofdstukmenu
voor de geselecteerde titel verschijnt.
Snel opnemen
Als deze functie is ingeschakeld, wordt de DVD- en videorecorder
snel ingeschakeld zodat u onmiddellijk het gewenste kanaal kunt
opnemen.
1. Druk op de knop MENU met het apparaat in de modus Stop/modus
Geen schijf.
2. Druk op de knoppen ▲▼ om Instellen te selecteren en druk
vervolgens op OK of op de knop ►.
3. Druk op de knoppen ▲▼ om Systeem te selecteren en druk
vervolgens op OK of op de knop ►.
4. Druk op de knoppen ▲▼ om Snel opnemen te selecteren en druk
vervolgens op OK of op de knop ►.
5. Druk op de knoppen ▲▼ om Aan te selecteren en druk op OK of op
de knop ►.
De functie Snel opnemen is standaard ingesteld op Uit.
Als deze functie is ingeschakeld, zal het energieverbruik verhogen
wanneer het toestel wordt uitgeschakeld
■
■
Anynet+(HDMI-CEC) (alleen DVD-VR355)
Anynet+ is een functie die kan worden gebruikt om met de
afstandsbediening van een Samsung-TV de recorder te bedienen.
Sluit hiervoor de DVD-recorder & VCR met een HDMI-kabel aan op een
Samsung-TV. (zie pagina 20) (Dit is alleen mogelijk bij SAMSUNG-TV's
die Anynet+ ondersteunen.)
1. Druk vanuit de stand Stop (Stop)/No Disc (Geen schijf) op de knop
MENU van de afstandsbediening.
2. Druk op de knoppen ▲▼ om Instellen te selecteren, en druk
vervolgens op OK of op de knop ►.
3.
Druk op de knoppen ▲▼ om Systeem te selecteren, en druk vervolgens
op OK of op de knop ►.
Het systeemmenu wordt weergegeven.
4. Druk op de knoppen ▲▼ om Anynet+(HDMI-CEC) te selecteren en
druk vervolgens op OK of op de knop ►.
De Anynet+(HDMI-CEC)-items worden weergegeven.
5. Druk op de knoppen ▲▼ om Aan te selecteren, en druk vervolgens
op OK of op de knop ►.
Systeem
DVD-Recorder
Geen schijf
Programma
Instellen
VCR ►
DVD EP modustijd : 6 uur ►
Hoofdstuk maken : Uit ►
Snel opnemen : Uit ►
Anynet+(HDMI-CEC) : Aan ►
Uit
Aan
VERPL. OK TERUG
EINDE
1/1
JAN/01/2007
09:41 PR1
JAN/01/2007
09:45 PR1
JAN/01/2007
09:50 PR1
Vorige Boven Volgende
JAN/01/2007
12:30 PR1
JAN/01/2007
12:00 PR1
JAN/01/2007
12:40 PR1
1/1
Vorige Boven Volgende
123
HOOFDSTUK
Systeem
DVD-Recorder
Geen schijf
Programma
Instellen
VCR ►
DVD EP modustijd
: 6 uur ►
Hoofdstuk maken : Uit ►
Snel opnemen : Uit ►
Uit
Aan
VERPL. OK TERUG
EINDE
01375E-VR350,355-XFA-NL.indb 3201375E-VR350,355-XFA-NL.indb 32 2007-04-27 오후 6:41:162007-04-27 오후 6:41:16

Systeem-installatie
Nederlands - 33
Voor het gebruik van Anynet+(HDMI-CEC)
1. Sluit de DVD-recorder & VCR met de HDMI-kabel op de TV aan.
(Zie pagina 20)
2. Stel de optie Anynet+ (HDMI CEC) op uw DVD-recorder & VCR in op
“Aan”. (zie hierboven)
3.
Stel de functie Anynet+ op uw TV in.
(Raadpleeg de handleiding van de TV voor meer informatie hierover.)
• U kunt nu de DVD-recorder & VCR met de afstandsbediening van de TV
bedienen. (De TV-knoppen kunnen worden gebruikt voor het bedienen
van de DVD- en videorecorder:
, , , , ,
en
,
,
~
)
• Als u op de knop Anynet+ drukt op de afstandsbediening van de TV,
wordt links de OSD weergegeven.
- Apparaat selecteren : gebruik deze optie om een apparaat te kiezen.
- Opnemen : gebruik deze optie om het opnemen te starten of stoppen.
- Apparaatmenu : identiek aan de knop MENU (
) op de afstandsbedi-
ening van de DVD-recorder & VCR.
- Apparaatbediening : identiek aan de knop ANYKEY (
) op de
afstandsbediening van de DVD-recorder. & VCR.
Als u tijdens het tv-kijken op de knop PLAY van de recorder
drukt, verandert het TV-scherm in het afspeelscherm.
Als u een DVD afspeelt terwijl de TV uit staat, wordt de TV
ingeschakeld.
Als u de TV uitschakelt, wordt de DVD-recorder & VCR
automatisch uitgeschakeld. (Als de DVD-recorder & VCR aan het
opnemen is, kan deze niet worden uitgeschakeld.)
Wanneer u de HDMI instelt op andere bronnen (Composite,
Component, RF... etc.) in de TV terwijl de DVD- en videorecorder
een dvd afspeelt, wordt het afspelen gestopt. Afhankelijk van
hun inhoud blijft de DVD- en videorecorder mogelijk bepaalde
schijven afspelen.
■
■
■
■
TV weergeven
Z
Apparaat selecteren
Z
Opnemen
Z
Apparaatmenu
Z
Apparaatbediening
Z
Receiver : Uit
Z
Instellingen
Z
DVDR
Verpl.
Ok
Einde
TV-menu
01375E-VR350,355-XFA-NL.indb 3301375E-VR350,355-XFA-NL.indb 33 2007-04-27 오후 6:41:232007-04-27 오후 6:41:23

Nederlands - 34
Αfspelen
Afspelen
In deze sectie worden de basisfuncties voor het
afspelen per schijftype beschreven.
Lees de volgende informatie voordat u een schijf
afspeelt.
Regiocode (alleen DVD-video)
Logo's van schijven die kunnen
worden afgespeeld
Schijven die kunnen worden afgespeeld
Zowel de DVD- en videorecorder als de DVD’s
zijn per regio gecodeerd. De regiocodes
moeten overeenkomen om de DVD te kunnen
afspelen. Als de codes niet overeenkomen,
kunt u de DVD niet afspelen. De regiocode
voor deze DVD- en videorecorder staat op de
achterzijde van de recorder.
Dolby Digital DTS Digitaal geluid
Stereo PAL tv-systeem in
Engeland, Frankrijk,
Duitsland etc.
MP3DivX
Typen
schijven
Schijfl ogo
Opgenomen
inhoud
Vorm van schijf
Max. afspeeltijd in
minuten
DVD-
VIDEO
VIDEO
AUDIO
Enkelzijdig (12,7 cm)
240 min.
Dubbelzijdig (12,7 cm)
480 min.
Enkelzijdig (8,89 cm)
80 min.
Dubbelzijdig (8,89 cm)
160 min.
VCD
AUDIO+
VIDEO
Enkelzijdig (12,7 cm)
74 min.
Enkelzijdig (8,89 cm)
20 min.
AUDIO-CD
AUDIO
Enkelzijdig (12,7 cm)
74 min.
Enkelzijdig (8,89 cm)
20 min.
JPEG
JPEG-
afbeelding
Enkelzijdig (12,7 cm)
-
Enkelzijdig (8,89 cm)
-
MP3 MP3 Audio
Enkelzijdig (12,7 cm)
-
Enkelzijdig (8,89 cm)
-
MPEG4
MPEG4
Film
Enkelzijdig (12,7 cm)
-
Enkelzijdig (8,89 cm)
-
DVD-RAM
VIDEO
AUDIO
Enkelzijdig (12,7 cm)
(4.7GB)
1uur (XP: uitstekende kwaliteit)
2uur (SP: standaardkwaliteit)
4uur (LP: langdurig afspelen)
6 of 8uur (EP:Verlengd)
Dubbelzijdig (12,7 cm)
(9.4GB)
2uur (XP: uitstekende kwaliteit)
4uur (SP: standaardkwaliteit)
8uur (LP: langdurig afspelen)
12 of 16uur (EP:Verlengd)
DVD-RW
VIDEO
AUDIO
12.7cm (4.7GB)
1uur (XP: uitstekende kwaliteit)
2uur (SP: standaardkwaliteit)
4uur (LP: langdurig afspelen)
6 of 8uur (EP:Verlengd)
DVD-R
VIDEO
AUDIO
Enkele laag(12,7 cm)
(4.7GB)
1uur (XP: uitstekende kwaliteit)
2uur (SP: standaardkwaliteit)
4uur (LP: langdurig afspelen)
6 of 8uur (EP:Verlengd)
Dubbele laag(12,7 cm)
(8.5GB)
2uur (XP: uitstekende kwaliteit)
4uur (SP: standaardkwaliteit)
8uur (LP: langdurig afspelen)
11 of 15uur (EP:Verlengd)
DVD+RW
VIDEO
AUDIO
12.7cm (4.7GB)
1uur (XP: uitstekende kwaliteit)
2uur (SP: standaardkwaliteit)
4uur (LP: langdurig afspelen)
6 of 8uur (EP:Verlengd)
01375E-VR350,355-XFA-NL.indb 3401375E-VR350,355-XFA-NL.indb 34 2007-04-27 오후 6:41:262007-04-27 오후 6:41:26

Nederlands - 35
Αfspelen
1. Druk op de toets OPEN/CLOSE.
2. Plaats voorzichtig een schijf in de lade, met het etiket naar boven.
3. Druk op de toets OPEN/CLOSE om de schijfl ade te sluiten.
• De schijfl ade wordt gesloten en de schijf wordt automatisch
afgespeeld.
• De recorder speelt de schijven niet automatisch af nadat het apparaat
wordt ingeschakeld.
• Wanneer de recorder is ingeschakeld en de lade een schijf bevat,
wordt het onderdeel gestart en ingesteld op de stopstatus. Druk op
de knop PLAY om het afspelen te starten.
4. Druk op de toets STOP om het afspelen te stoppen.
Een schijf afspelen
Deze DVD- en videorecorder kan alleen worden gebruikt met
schijven die compatibel zijn met de DVD-RAM-standaard versie 2.0.
Mogelijk werkt het opnemen en/of afspelen niet bij bepaalde typen
schijven of wanneer bepaalde bewerkingen, zoals een wijziging
van het camerastandpunt en het beeldformaat, worden uitgevoerd.
De verpakking bevat uitgebreide informatie over de schijf.
Raadpleeg indien nodig deze informatie.
Zorg ervoor dat de schijf geen vuil of krassen bevat. Als het
opnameoppervlak vingerafdrukken, vuil, stof, krassen of restanten
van sigarettenrook bevat, kan de schijf mogelijk niet meer voor
opname worden gebruikt.
Mogelijk kunt u op bepaalde DVD-spelers geen DVD-RAM/±RW/
±R’s afspelen. Dit is afhankelijk van de speler, de schijf en de
opnamecondities.
Schijven waarop NTSC-programma’s zijn opgenomen, kunnen met
deze recorder worden afgespeeld, maar niet worden opgenomen.
■
■
■
■
■
Wanneer het afspelen wordt gestopt, onthoudt de DVD- en
videorecorder de plaats waar op STOP is gedrukt. Wanneer u
weer op PLAY drukt, wordt het afspelen voortgezet vanaf de
plaats waar u bent gestopt (behalve wanneer de schijf intussen
is verwijderd, de stekker van de DVD- en videorecorder uit het
stopcontact is gehaald of twee keer op STOP is gedrukt).
■
Verplaats de DVD- en videorecorder niet tijdens het afspelen.
Hierdoor kan de schijf beschadigd raken.
Gebruik de toets OPEN/CLOSE om de schijfl ade te openen of te
sluiten.
Druk niet op de schijfl ade terwijl de lade wordt geopend of
gesloten. Dit kan een defect van het product veroorzaken.
Plaats geen vreemde materialen op of in de schijfl ade.
Afhankelijk van het schijftype, kunnen sommige functies anders
worden uitgevoerd of zijn uitgeschakeld. Raadpleeg de instructies
op het DVD-doosje als dit het geval is.
Let goed op dat de vingers van kinderen niet beklemd raken
tussen de schijfl ade en het frame van de lade wanneer de lade
wordt gesloten.
Wanneer u de DVD- en videorecorder inschakelt, duurt het enkele
seconden voordat de recorder werkt.
■
■
■
■
■
■
■
Schijven die niet kunnen worden afgespeeld
▌
● DVD-video met andere regiocode dan "2" of "ALLE".
● 3,9 GB DVD-R-schijf voor authoring.
● Een DVD±R/DVD-RW(V)-schijf die is opgenomen en niet is afgesloten
op een recorder van een andere fabrikant.
● DVD-ROM/PD/MV-Disc enzovoort.
● Video CD/CVD/CD-ROM/CDV/CD-G/CD-I
01375E-VR350,355-XFA-NL.indb 3501375E-VR350,355-XFA-NL.indb 35 2007-04-27 오후 6:41:282007-04-27 오후 6:41:28

Nederlands - 36
Αfspelen
Sommige schijven bevatten een specifi ek menusysteem waarmee
u speciale functies kunt selecteren voor de titel, hoofdstukken,
ondertiteling, voorvertoningen van fi lms, informatie over
personages, enzovoort.
Het schijfmenu en het titelmenu gebruiken
Voor DVD-VIDEO
▌
Disc Menu (Schijfmenu) : Druk op de knop DISC MENU om het
schijfmenu van de schijf te openen.
• Ga naar het instellingenmenu voor het afspelen.
• U kunt de taal van het geluidsspoor, de ondertiteling, enzovoort, die op
de schijf staan, selecteren.
• Tijdens het spelen van een VCD2.0 kunt u met de knop DISC MENU
Menu On (Menu aan) of Menu Off (Menu uit) kiezen.
Title Menu (Titelmenu) : Druk op de knop TITEL MENU om het titelmenu
van de schijf te openen.
• Gebruik deze knop als de schijf meerdere titels bevat. Niet alle schijven
ondersteunen het titelmenu.
Titellijst
Druk op de toets TITLE LIST (TITELLIJST) om de titellijst weer te geven.
De titellijst is gewoon een lijst met titels op een schijf. Als een titel is
verwijderd kan deze niet meer worden afgespeeld.
Afspeellijst (DVD-RAM/-RW(VR))
Druk op de knop PLAY LIST (AFSPEELLIJST) om de afspeellijst af te
spelen.Een afspeellijst is een zelfgemaakte lijst met titels.
Wanneer een afspeellijst wordt afgespeeld, worden alle titels in de
afspeellijst afgespeeld, waarna het afspelen wordt gestopt. Als de afspeellijst
wordt verwijderd, wordt de oorspronkelijke opname niet verwijderd.
Voor DVD-RAM/DVD±RW/DVD±R
▌
De functies Zoeken en Overslaan gebruiken
Zoeken in een hoofdstuk of track
▌
Druk tijdens het afspelen op de toets SEARCH ◄◄ of ►► op de
afstandsbediening. Telkens wanneer u de toets SEARCH indrukt, wordt de
afspeelsnelheid als volgt gewijzigd:
• U kunt het programma in omgekeerde volgorde scannen. Als u de
normale afspeelsnelheid wilt hervatten, drukt u op de toets ►ll .
DVD-VIDEO/DVD-RAM/
DVD±RW/DVD±R
►► Snel 1/◄◄ Snel 1
►► Snel 2/◄◄ Snel 2
►► Snel 3/◄◄ Snel 3
►► Snel 4/◄◄ Snel 4
►► Snel 5/◄◄ Snel 5
►► Snel 6/◄◄ Snel 6
MPEG4 Snel 1
Snel 2
Snel 3
AUDIO CD (CD-DA)
X2
X4
X8
VCD
Snel 1
Snel 2
Snel 3
01375E-VR350,355-XFA-NL.indb 3601375E-VR350,355-XFA-NL.indb 36 2007-04-27 오후 6:41:302007-04-27 오후 6:41:30

Nederlands - 37
Αfspelen
Tijdens het zoeken hoort u geen geluid, behalve bij CD’s (CD-DA).
(U kunt het geluid horen tijdens het vooruit zoeken (Snel 1) op
de schijf.) Als u MPEG4-bestanden scant, hoort u in geen enkele
modus geluid.
Afhankelijk van het schijftype kan de geluidskwaliteit lager zijn
tijdens de modus Snel 1.
■
Hoofdstukken of tracks overslaan
▌
Paina toiston aikana kaukosäätimen painiketta l◄◄ of ►►l.
• De toets l◄◄
u op de toets l◄◄ drukt, gaat u naar het begin van het hoofdstuk, de
track of de markering (DVD-RAM/-RW (VR modus)). Als u binnen 3
seconden nogmaals op de toets drukt, keert u terug naar het begin
van het vorige hoofdstuk, de vorige track of de vorige markering (DVD-
RAM/-RW (VR modus)).
• De toets ►►l
Als u op de toets ►►l drukt, gaat u naar het volgende hoofdstuk, de
volgende track of de volgende markering (DVD-RAM/-RW (VR modus)).
30 seconden overslaan
▌
Druk in de afspeelmodus op de toets F.ADV/SKIP om precies 30
seconden over te slaan.
Vertraagd afspelen en stap voor stap
afspelen
Vertraagd afspelen
▌
Druk in de stopstand minimaal 1 seconde op de knop SEARCH (◄◄ of
►► ) op de afstandsbediening.
• Telkens wanneer u op de toets ►► drukt:
l► Langz. 1
l► Langz. 2
l► Langz. 3
• Telkens wanneer u op de toets ◄◄ drukt:
◄ l Langz. 1
◄ l Langz. 2
◄ l Langz. 3
Als u de normale afspeelsnelheid wilt hervatten, drukt u op de toets
►ll.
Vertraagd afspelen werkt op MPEG4-schijven alleen in
voorwaartse richting.
■
01375E-VR350,355-XFA-NL.indb 3701375E-VR350,355-XFA-NL.indb 37 2007-04-27 오후 6:41:312007-04-27 오후 6:41:31

Nederlands - 38
Αfspelen
Stap voor stap afspelen
▌
Druk in de stopstand op de knop F.ADV/SKIP van de afstandsbediening.
• Iedere keer dat de toets wordt ingedrukt, verschijnt er een nieuw beeld.
Als u de normale afspeelsnelheid wilt hervatten, drukt u op de toets
►ll.
U hoort geen geluid tijdens stapsgewijs of vertraagd afspelen.
■
Met de ANYKEY-functies kunt u gemakkelijk naar een gewenste
scène zoeken via de titel, het hoofdstuk, de track en het tijdstip.
Bovendien kunt u de ondertitelings- en geluidsinstellingen wijzigen
en bepaalde functies instellen, waaronder Herhalen, Hoek en
Zoomen.
De toets ANYKEY gebruiken
Direct naar een gewenste scène gaan
▌
1. Druk tijdens het afspelen op de toets ANYKEY.
2. Druk op de toetsen ▲▼ om een Titel, een Hoofdstuk of een Tijd te
selecteren.
3. Druk op de toetsen ◄ ► of de cijfertoetsen (0-9) om de gewenste
scène te kiezen.
Druk vervolgens op OK.
(Als u naar een bepaalde tijd wilt gaan, voert u met de cijfertoetsen de
gewenste tijd in volgorde van uren, minuten en seconden in.)
◄► are not available.
• Gebruik deze functie als u naar een bepaalde titel, hoofdstuk of tijd
wilt gaan.
Bij sommige schijven werkt dit niet. Wanneer een audio-CD
(CD-DA) of een MP3-schijf in de recorder is geplaatst wordt de
informatie-display afhankelijk van het schijftype mogelijk niet
weergegeven.
Op sommige disks werkt de tijdzoekfunctie niet.
Het scherm verdwijnt als u opnieuw op de knop ANYKEY of
RETURN drukt.
■
■
■
DVD-VIDEO
Titel
Hoofdstuk
Tijd
Ondertitels
Geluid
Herhalen
Beeldhoek
Zoom
1/2
1/28
00:00:11
ENG
ENG D 5.1CH
Uit
1/1
Uit
VERPL. WIJZIGEN
01375E-VR350,355-XFA-NL.indb 3801375E-VR350,355-XFA-NL.indb 38 2007-04-27 오후 6:41:332007-04-27 오후 6:41:33

Nederlands - 39
Αfspelen
DVD-RAM/-RW (VR tila), viimeistelemätön DVD-RW (V tila) ja
viimeistelemätön DVD±R eivät toista jaksoa.
Het scherm verdwijnt als u opnieuw op de knop ANYKEY of
RETURN drukt.
Deze functie werkt alleen wanneer VCD2.0 zich in de modus
Menu Off (Menu uit) bevindt (zie pagina 36)
■
■
■
Afspelen herhalen
Herhaald afspelen
▌
1. Druk tijdens het afspelen op de toets ANYKEY.
2. Druk op de toetsen ▲▼ om Herhalen te selecteren.
3.
Selecteer de herhaalstand met de knop ◄ ► en druk vervolgens op OK.
1. Druk tijdens het afspelen op de toets ANYKEY.
2. Druk op de toetsen ▲▼ om Herhalen te selecteren.
3. Druk op de toets ◄ ► om A-B te selecteren en druk op OK.
4. Druk op OK. waar u het herhaaldelijk afspelen wilt laten beginnen
(A) en druk nogmaals op OK. waar u het herhaaldelijk afspelen wilt
stoppen (B). Het herhaaldelijk afspelen van het gedeelte A-B begint.
- De normale weergave hervatten -
Druk op de knop CANCEL om verder te gaan met normaal
afspelen.
Als u punt (B) instelt voordat vijf seconden voorbij zijn, wordt het
verbodsteken ( ) weergegeven.
Muziek-cd’s (CD-DA), MP3- en MPEG4-schijven ondersteunen
de functie Herhalen A-B niet.
Deze functie werkt alleen wanneer VCD2.0 zich in de modus
Menu Off (Menu uit) bevindt (zie pagina 36)
■
■
■
De taal van de ondertiteling selecteren
Afhankelijk van het schijftype kunnen sommige talen niet werken.
Deze functie is alleen beschikbaar tijdens het afspelen.
U kunt ook met de toets SUBTITLE op de afstandsbediening de taal
van de ondertiteling instellen.
1. Druk tijdens het afspelen op de toets ANYKEY.
2. Druk op de toetsen ▲▼ om Ondertitles te selecteren en druk
vervolgens op de toetsen ◄ ► om de gewenste taal te selecteren.
Talen voor het geluidsspoor kunnen verschillen omdat ze
afhankelijk zijn van de schijf.
Bij sommige schijven kunt u alleen de taal voor het geluidsspoor
van het schijfmenu iezen.
Het scherm verdwijnt als u opnieuw op de knop ANYKEY of
RETURN drukt.
■
■
■
Een bepaald gedeelte herhaaldelijk afspelen
▌
DVD-VIDEO
Titel
Hoofdstuk
Tijd
Ondertitels
Geluid
Herhalen
Beeldhoek
Zoom
1/2
1/28
00:00:27
ENG
ENG D 5.1CH
Uit
1/1
Uit
VERPL. WIJZIGEN
DVD-VIDEO
Titel
Hoofdstuk
Tijd
Ondertitels
Geluid
Herhalen
Beeldhoek
Zoom
1/2
1/28
00:00:52
ENG
ENG D 5.1CH
Uit
1/1
Uit
VERPL. TERUG
Herhalen A-B
A-B
DVD-VIDEO
Titel
Hoofdstuk
Tijd
Ondertitels
Geluid
Herhalen
Beeldhoek
Zoom
1/2
1/28
00:00:57
ENG
ENG D 5.1CH
Uit
1/1
Uit
VERPL. WIJZIGEN
01375E-VR350,355-XFA-NL.indb 3901375E-VR350,355-XFA-NL.indb 39 2007-04-27 오후 6:41:352007-04-27 오후 6:41:35

Nederlands - 40
Αfspelen
1. Druk tijdens het afspelen op de toets ANYKEY.
2. Druk op de toetsen ▲▼ om Zoom selecteren endruk op OK.
(
) wordt weergegeven.
3. Druk op de toetsen ▲▼, ◄► om naar hetgedeelte te gaan dat u wilt
vergroten.
4. Druk op de toets OK.
• Telkens wanneer u op de knop OK drukt, wordt de foto tot 4x
uitvergroot (vier keer de normale grootte). :
Inzoomen
DVD-VIDEO/DVD-RAM/
DVD±RW/DVD±R
normale grootte → X2 → X4 → X2 →
normale grootte
VCD
normale grootte
→
X2
→
normale
grootte
De camerahoek wijzigen
Deze functie hangt af van de schijf en werktmogelijk niet bij alle
DVD’s.
Deze functie werkt niet als een DVD niet meteen hoeksysteem
met meerdere camera’s isopgenomen.
Het scherm verdwijnt als u opnieuw op de knop ANYKEY of
RETURN drukt.
■
■
■
Wanneer een DVD-video meerdere camerastandpunten van een
bepaalde scène bevat, kunt u de functie Beeldhoek gebruiken.
Als de schijf meerdere camerastandpunten bevat, wordt de
BEELDHOEK op het scherm weergegeven.
1. Druk tijdens het afspelen op de toets ANYKEY.
2. Druk op de toetsen ▲▼ om Beeldhoek te selecteren en druk
vervolgens op de toetsen ◄ ► of op de cijfertoetsen (0-9) om de
gewenste hoekscène te selecteren.
Afhankelijk van het schijftype kunnen talen voor hetgeluidsspoor
niet werken. Deze functie is alleenbeschikbaar tijdens het afspelen.
U kunt deze functie ook uitvoeren via de toets AUDIO op de
afstandsbediening.
1. Druk tijdens het afspelen op de toets ANYKEY.
2. Druk op de toetsen ▲▼ om Geluid selecterenen druk vervolgens op
de toetsen ◄► om degewenste taal te selecteren.
Taalkeuze voor Geluid
Talen voor het geluidsspoor kunnen verschillenomdat ze
afhankelijk zijn van de schijf.
Bij sommige schijven kunt u alleen de taal voorhet geluidsspoor
van het schijfmenu kiezen.
Het scherm verdwijnt als u opnieuw op de knop ANYKEY of
RETURN drukt.
■
■
■
DVD-VIDEO
Titel
Hoofdstuk
Tijd
Ondertitels
Geluid
Herhalen
Beeldhoek
Zoom
1/2
1/28
00:01:03
ENG
ENG D 5.1CH
Uit
1/1
Uit
VERPL. WIJZIGEN
DVD-VIDEO
Titel
Hoofdstuk
Tijd
Ondertitels
Geluid
Herhalen
Beeldhoek
Zoom
1/2
1/28
00:01:01
ENG
ENG D 5.1CH
Uit
1/3
Uit
VERPL. WIJZIGEN
01375E-VR350,355-XFA-NL.indb 4001375E-VR350,355-XFA-NL.indb 40 2007-04-27 오후 6:41:372007-04-27 오후 6:41:37

Nederlands - 41
Αfspelen
De bladwijzers gebruiken
Plaats markeringen bij scènes die u nogmaals wilt zienzodat u vanaf
de gemarkeerde positie kunt afspelen.
Een bladwijzer afspelen
▌
1. Druk op de toets MARKER.
2. Druk op de toetsen ◄► om een gemarkeerde scène te selecteren.
3. Druk op OK of op de toets ►ll om af te spelen vanafde geselecteerde
scène.
Een bladwijzer wissen
▌
1. Druk op de toets MARKER.
2. Druk op de toetsen ◄ ► om een gemarkeerdescène te selecteren.
3. Druk op de knop CANCEL om de geselecteerde bladwijzer te
verwijderen.
Als de schijfl ade wordt geopend en vervolgens gesloten,
verdwijnen de bladwijzers.
Deze functie werkt alleen wanneer VCD2.0 zich in de modus
Menu Off (Menu uit) bevindt (zie pagina 36)
■
■
Favorieten instellen
▌
1. Druk tijdens het afspelen op de toets MARKER.
2. Druk op OK wanneer de gewenste scène wordtweergegeven.
• Het getal 1 wordt weergegeven en de scènewordt in het geheugen
opgeslagen.
3. Druk op de toets ◄► om naar de volgende positie te gaan.
4. Druk weer op OK wanneer de gewenste scènewordt weergegeven.
• Het getal 2 wordt weergegeven en de scène wordtin het geheugen
opgeslagen. Herhaal bovenstaandeprocedure om andere posities te
markeren. U kuntmaximaal 10 scènes markeren.
(V modus)
Favoriet
1
2
-
-
-
-
-
-
-
--
VERPL. AFSP. WISSEN TERUG
Favoriet
1
2
-
-
-
-
-
-
-
--
VERPL. AFSP. WISSEN TERUG
Favoriet
1
2
-
4
5
-
-
-
-
--
VERPL. OK TERUG
01375E-VR350,355-XFA-NL.indb 4101375E-VR350,355-XFA-NL.indb 41 2007-04-27 오후 6:41:392007-04-27 오후 6:41:39

Nederlands - 42
Αfspelen
De markeringen gebruiken
(VR modus)
Een markering wissen
▌
1. Druk tijdens het afspelen op de toets MARKER.
2. Druk op de toetsen ◄ ► om een gemarkeerde scène te selecteren.
Druk op de knop CANCEL om de geselecteerde markering te
verwijderen.
• Als een markering wordt gewist terwijl de DVD-RAM of DVD-RW (VR
modus) wordt afgespeeld, worden de markeringsnummers gewijzigd.
Als u bijvoorbeeld de7e markering wist nadat er 10 markeringen
zijngeregistreerd, worden de markeringen na de achtsteautomatisch
één vooruit geschoven en wordt de 8emarkering de 7e.
Een markering afspelen
▌
1. Druk tijdens het afspelen op de toets MARKER.
2. Druk op de toetsen ◄► om een gemarkeerde scène te selecteren.
3. Druk op OK of op de toets ►ll om af te spelenvanaf de geselecteerde
scène.
• Als u in de markeringsmodus op de toets NEXT SKIP (►►l) of
de toets PREVIOUS SKIP (l◄◄ ) druk en het volgende of huidige
gemarkeerde puntminder dan drie seconden wordt afgespeeld,
beginthet afspelen bij het vorige gemarkeerde punt.
Markeringen instellen
▌
1. Druk tijdens het afspelen op de toets MARKER.
2. Druk op OK wanneer de gewenste scène wordtweergegeven.
• Het getal 01 wordt weergegeven en de scènewordt in het geheugen
opgeslagen.
3. Druk op de knop ◄► om naar de volgende positie te gaan.
4. Druk weer op OK wanneer de gewenste scènewordt weergegeven.
• Het getal 02 wordt weergegeven en de scène wordt inhet geheugen
opgeslagen.
• Voor DVD-RAM of DVD-RW’s (VR modus) gelden demarkeringsfunctie
in plaats van de bladwijzerfunctie.Met de markeringsfunctie kunt
u maximaal 99 scènesmarkeren. Omdat de scènes als een groot
aantal pagina’s kunnen worden weergegeven, is het nodigdat de
scènes worden genummerd. Als een schijf ingebruik is gecodeerd met
Schijfbeveiliging, kunnen ergeen markeringen worden ingesteld of
worden verwijderd. Het is alleen mogelijk om af te spelen.
Markeren
01
02
03
04
05
06
07
08
09
10
N : 10
Markeren
01
02
03
04
05
06
07
08
09
--
N : 9
VERPL. AFSP. WISSEN TERUG
Deze functie werkt alleen wanneer VCD2.0 zich in de modus
Menu Off (Menu uit) bevindt (zie pagina 36)
■
Markeren
01
02
-- -- -- -- -- -- -- --
N : 2
VERPL. AFSP. WISSEN TERUG
Markeren
01
02
-- -- -- -- -- -- -- --
N : 2
VERPL. AFSP. WISSEN TERUG
01375E-VR350,355-XFA-NL.indb 4201375E-VR350,355-XFA-NL.indb 42 2007-04-27 오후 6:41:412007-04-27 오후 6:41:41

Nederlands - 43
Αfspelen
Een audio-CD (CD-DA) / MP3 afspelen
1. De toets l ◄◄ : terugkeren naar het begin van detrack als deze
toetstijdens het afspelen wordt ingedrukt.
Als u nogmaals op de toetsdrukt, gaat de recordernaar de vorige track
en wordt deze track afgespeeld.
Als u drie seconden nadat het afspelen is begonnen,op deze
toetsdrukt, wordt de vorige track afgespeeld.
Als u na drie seconden op deze toetsdrukt, wordt dehuidige track
opnieuw vanaf het begin afgespeeld.
2. De toets ►►l : de volgende track afspelen.
3. Druk op de toets (◄◄ /►► ) : snel afspelen (X2, X4, X8)
(Alleen muziek-cd's)
4. De toets
: het afspelen van een track stoppen.
5. De toets RETURN : naar de map gaan die de huidige track bevat.
6. De toets ►ll :
Speelt een track af of stopt het afspelen.
7. De toets ▲▼ : een track selecteren.
8. ►, de knop OK : speelt de geselecteerde track (nummer) af.
9. De toets ANYKEY : hiermee geeft u het venster voor de afspeelstand
weer. (optie Herhalen of Afspeeloptie).
Een audio-CD (CD-DA) afspelen
▌
1. Plaats een audio-CD (CD-DA) in de schijfl ade.
• Het audio-CD-menu wordt weergegeven en detracks (nummers)
worden automatisch afgespeeld.
2. Druk op de toetsen ▲▼ om de track te selecterenwaar u het afspelen
wilt starten en druk op OK.
Onderdelen van het AUDIO-CD-scherm (CD-DA)
1. Pictogram Afspeelstand.
2. Huidige track (nummer) : Toont het nummer van de track die op het
moment wordt afgespeeld.
3. Toont de huidige afgespeelde track en het totale aantal tracks.
4. Toont de werkingsstatus van een schijf en de afspeeltijd op basis van
een gedeelte dat op dat moment wordt afgespeeld.
5. Toont de lijst met tracks en de duur van elke track.
6. Knopweergave
1
3 3
5
6
4
7
7
9
2
8
Toetsen op de afstandsbediening voor het
afspelen van muziek-cd's (cd-da)/MP3
▌
Muzieklijst
CD
TRACK 1 0:03:50
002 TRACK 2 0:04:00
003 TRACK 3 0:03:49
004 TRACK 4 0:03:47
005 TRACK 5 0:04:29
006 TRACK 6 0:03:44
007 TRACK 7 0:03:44
Nr. Titel Lengte
TRACK 1
01/15
TRACK 1
► 0:00:15
CDDA
VERPL. OK TERUG
EINDE
PLAY MODE
Muzieklijst
CD
TRACK 1 0:03:50
002 TRACK 2 0:04:00
003 TRACK 3 0:03:49
004 TRACK 4 0:03:47
005 TRACK 5 0:04:29
006 TRACK 6 0:03:44
007 TRACK 7 0:03:44
Nr. Titel Lengte
TRACK 1
01/15
TRACK 1
► 0:00:15
CDDA
h
g
e
d f
c
VERPL. OK TERUG
EINDE
PLAY MODE
01375E-VR350,355-XFA-NL.indb 4301375E-VR350,355-XFA-NL.indb 43 2007-04-27 오후 6:41:442007-04-27 오후 6:41:44

Nederlands - 44
Αfspelen
Een MP3-schijf afspelen
▌
1. Plaats een MP3-schijf in de schijfl ade.
2. Druk op de toetsen ▲▼ om Schijfnavigatie te selecteren en druk op
OK of op de knop ►.
3. Druk op de toetsen ▲▼ om Muziek te selecteren en druk op OK of op
de knop ►.
4. Druk op de toetsen ▲▼ om de gewenste trackte selecteren en druk
vervolgens op OK.
Onderdelen van het MP3-scherm
1. Pictogram Afspeelstand.
2. Huidige track (nummer) : toont de naam van de track die op het
moment wordt afgespeeld.
3. Toont de huidige trackindex en het totale aantal bestanden.
4. Toont de werkingsstatus van een schijf en de afspeeltijd op basis van
een gedeelte dat op dat moment wordt afgespeeld.
5. Toont de lijst van MP3-bestanden en -mappen (nummerlijst).
6. Knopweergave.
7. MP3-bestandsinformatie
Herhaald afspelen van een audio/MP3-schijf
▌
1. Druk tijdens het afspelen op de knop ANYKEY.
De modus Herhalen wordt gemarkeerd.
2. Druk op de knoppen ◄► om de gewenste herhaalstand te selecteren
en druk op OK.
•
Track herhalen (CD (CD-DA)/MP3)
• Map herhalen (MP3)
• Schijf herhalen (CD (CD-DA)/MP3)
- De normale weergave hervatten -
Druk op de knop CANCEL om verder te gaan met normaal afspelen.
Muzieklijst
MP3
ROOT
Song 1
002 Song 2
003 Song 3
004 Song 4
005 Song 5
006
Song 6
Nr. Titel
Song 1
01/11
MP3
► 0:00:06
Song 1
3.5MB
01/26/2007
VERPL. OK TERUG
EINDE
PLAY MODE
Muzieklijst
MP3
ROOT
Song 1
002 Song 2
003 Song 3
004 Song 4
005 Song 5
006
Song 6
Nr. Titel
Song 1
01/11
MP3
► 0:00:06
Song 1
3.5MB
01/26/2007
VERPL. OK TERUG
EINDE
PLAY MODE
fi
h
g
e
c
d
Muzieklijst
CD
001 TRACK 1 0:03:50
002 TRACK 2 0:04:00
003 TRACK 3 0:03:49
004 TRACK 4 0:03:47
005 TRACK 5 0:04:29
006 TRACK 6 0:03:44
007 TRACK 7 0:03:44
Nr. Titel Lengte
TRACK 1
01/15
► 0:00:01
TRACK 1
AFSPEELMODUS
Herhalen : Uit
Afspeeloptie
:
Normaal
CDDA
VERPL. OK TERUG
EINDE
PLAY MODE
01375E-VR350,355-XFA-NL.indb 4401375E-VR350,355-XFA-NL.indb 44 2007-04-27 오후 6:41:462007-04-27 오후 6:41:46

Nederlands - 45
Αfspelen
1. Plaats een JPEG-schijf in de schijfl ade.
2. Druk op de knoppen ▲▼ om Schijfnavigatie te selecteren en druk op
OK of op de knop ►.
3. Druk op de knoppen ▲▼ om Foto te selecteren en druk op OK of op
de knop ►.
4. Druk op de knoppen ▲▼◄► om een foto te selecteren.
• Druk op de knop ►►l om de volgende 8 foto’s te bekijken.
• Druk op de knop l◄◄ om de vorige 8 foto’s te bekijken.
Een beeldschijf afspelen
De modus Afspeeloptie
▌
1. Druk op ANYKEY in de stopstand.
De optie Afspeeloptie. wordt gemarkeerd.
2. Druk op de toetsen ◄ ► om de gewenste afspeeloptie te selecteren en
druk op OK.
• Normaal : de tracks op de schijf worden afgespeeld in de volgorde
waarin ze op de schijf zijnopgenomen.
• Afspeellijst : met deze optie kunt u de volgorde kiezen waarin u de
tracks wilt afspelen.
• Intro[ I ] : de eerste 10 seconden van elke track worden afgespeeld.
Als u naar de muziek die u hebt geselecteerd, wilt luisteren,
drukt u op OK of op de knop ►ll. De afspeeloptie wordt
gewijzigd in Normaal. Wanneer Intro is voltooid, wordt de
optie Normaal hervat.
• Willekeurig[ R ] : met de optie Willekeurig kunt u de tracks op een
schijf in willekeurige volgorde afspelen. Nadat een
lijst in willekeurige volgorde is gegenereerd en
volledig is afgespeeld, wordt een nieuwe lijst in
willekeurige volgorde gegenereerd en afgespeeld.
De functie Willekeurig blijft actief tot u de
afspeeloptie wijzigt.
Tracks programmeren
▌
U kunt maximaal 30 tracks in de playlist plaatsen.
1. Druk op ANYKEY in de stopstand.
De optie Afspeeloptie. wordt gemarkeerd.
2. Druk op de toetsen ◄► om Afspeellijst selecteren en druk op OK.
Het scherm Playlist wordt weergegeven.
3. Druk op de toetsen ▲▼ om tracks te selecteren inde volgorde waarin
u ze wilt afspelen en druk op OK.
Als u een verkeerde track in de afspeellijst heeft gezet, drukt u op de
knop ► en vervolgens op de knoppen ▲▼ om de verkeerde track te
selecteren. Druk vervolgens op de knop CANCEL.
4. Druk op de toets PLAY om de playlist af te spelen.
Muzieklijst
CD
001 TRACK 1 0:03:50
002 TRACK 2 0:04:00
003 TRACK 3 0:03:49
004 TRACK 4 0:03:47
005 TRACK 5 0:04:29
006 TRACK 6 0:03:44
007 TRACK 7 0:03:44
Nr. Titel Lengte
TRACK 1
01/15
II 0:00:01
TRACK 1
AFSPEELMODUS
Herhalen : Uit
Afspeeloptie
:
Normaal
CDDA
VERPL. OK TERUG
EINDE
PLAY MODE
Muzieklijst
CD
001 TRACK 1 0:03:50
002 TRACK 2 0:04:00
003 TRACK 3 0:03:49
004 TRACK 4 0:03:47
005 TRACK 5 0:04:29
006 TRACK 6 0:03:44
007 TRACK 7 0:03:44
Nr. Titel Lengte
TRACK 1
01/15
II 0:00:01
TRACK 1
AFSPEELMODUS
Herhalen : Uit
Afspeeloptie
:
Normaal
CDDA
VERPL. OK TERUG
EINDE
PLAY MODE
Afspeellijst
CD
001 TRACK 1
002 TRACK 2
003 TRACK 3
004 TRACK 4
TRACK 1
TRACK 2
TRACK 3
TRACK 4
TRACK 5
TRACK 6
TRACK 7
TRACK 8
04/15
CDDA
CDDA
CDDA
CDDA
CDDA
CDDA
CDDA
CDDA
VERPL. OK
EINDE
PLAY MODE
FotolijstJPEG
JPEG01 01/10
ROOT JPEG01 JPEG02 JPEG03
JPEG04 JPEG05 JPEG06 JPEG07
Diavoorstelling
VERPL. OK TERUG
EINDE
01375E-VR350,355-XFA-NL.indb 4501375E-VR350,355-XFA-NL.indb 45 2007-04-27 오후 6:41:482007-04-27 오후 6:41:48

Nederlands - 46
Αfspelen
5-1. Als u op de knop ►ll drukt, verschijnt het scherm Snelheid
diavoorstelling.
Druk op de knoppen ◄► om de snelheid van de diavoorstelling in te
stellen en druk op OK.
5-2. Druk op de knop OK terwijl een afbeelding is geselecteerd op het
scherm Album. Selecteer een afspeelstand (Albumscherm (
),
Diavoorste lling (
), Draaien ( ) of Zoomen ( )) met de
knoppen ◄► en druk vervolgens op OK.
: Keert terug naar het Albumscherm.
: Het apparaat gaat naar de stand Diavoorstelling.
Voordat de diavoorstelling begint, moet u de foto-interval
(Snelheid diavoorstelling) instellen.
: Telkens wanneer u op OK drukt, wordt de foto 90 graden
rechtsom gedraaid.
: Telkens wanneer u op de knop OK drukt, wordt de foto tot 4x
uitvergroot (vier keer de normale grootte).
→ normale grootte → 2X → 4X → 2X
• Druk op de knop ANYKEY om de menubalk weer te geven.
• Druk op de knop RETURN om de menubalk te verbergen.
MPEG4-bestanden bevatten geluids- en videogegevens.
U kunt MPEG4-bestanden met de volgende extensies afspelen:
- .avi, .divx, .AVI, .DIVX
1. Plaats een MPEG4-schijf in de schijfl ade.
2. Druk op de knoppen ▲▼ om Schijfnavigatie te selecteren en druk op
OK of op de knop ►.
3. Druk op de knoppen ▲▼ om DivX te selecteren en druk vervolgens
op OK of op de knop ►.
4. Druk op de knoppen ▲▼ om het avi-bestand te selecteren en druk
vervolgens op OK of op de knop ►.
Functiebeschrijving MPEG4
Een MPEG4-schijf afspelen
Functie Beschrijving
Scène overslaan
Druk tijdens het afspelen op I◄◄ of ►►I om 5
minuten vooruit of terug te springen.
Scène zoeken
Druk tijdens het afspelen op de knop SEARCH
(ZOEKEN) (◄◄ of ►► ) en druk nogmaals voor een
hogere zoeksnelheid.
→ Snel 1 → Snel 2 → Snel 3
Vertraagd
afspelen
Druk in de pauzestand of tijdens stapsgewijs
afspelen op de knop SEARCH (ZOEKEN) (►► )
op de afstandsbediening.
→ Langz. 1 → Langz. 2 → Langz. 3
Stap voor stap
afspelen
Druk in de stopstand of afspeelstand op de knop
F.ADV/SKIP van de afstandsbediening.
DVD-RW(VR)
JPEG01
Snelheid diavoorstelling
Langz. Normaal
Snel
VERPL.
FOTO OK TERUG
DVD-RW(VR)
JPEG01
VERPL. FOTO OK TERUG
Nr. Titel Grootte
00/01
MPEG4
CD
DivX-lijst
ROOT
001 movie_1
ROOT
DIVX01
VERPL. OK TERUG
EINDE
01375E-VR350,355-XFA-NL.indb 4601375E-VR350,355-XFA-NL.indb 46 2007-04-27 오후 6:41:522007-04-27 오후 6:41:52

Nederlands - 47
Αfspelen
Met dit apparaat kunt u de volgende videocompressie-indelingen
van MPEG4-codecs afspelen: DivX 3.11 DivX 4.x DivX 5.x
DivXPro Xvid
Bewegingscompensatie : QPEL, GMC
Audio-indeling: “MP3”, “MPEG1 Audio laag2”, “LPCM”, “AC3”,
“DTS”, “MS ADPCM”
Sommige MPEG4-bestanden die op een pc werden gemaakt,
worden mogelijk niet afgespeeld.
Daarom worden de Codectypes, versies en hogere resoluties
dan de vermelde, niet ondersteund.
Ondersteunde bestandsindelingen voor ondertiteling: .smi, .srt,
.sub, .psb, .txt, .ass (de namen van het ondertitelingsbestand en
het bijbehorende mpeg4-bestand moeten precies dezelfde zijn).
■
■
■
1. Plaats een standaardvideoband in de videorecorder.
• Wanneer u een videoband in de videorecorder plaatst,wordt de
videorecorder automatisch ingeschakeld.
2. Druk op de toets ►II (PLAY/STILL) op de afstandsbediening of op het
voorpaneel van hetapparaat.
De videoband wordt automatisch afgespeeld als de wisbeveiliging is
verwijderd enAuto Play (Automatisch afspelen) is ingeschakeld.
3. Druk op de toets
(STOP) op de afstandsbedieningof op het
voorpaneel van het apparaat.
Een videoband afspelen(recorder)
Druk in de afspeelmodus op de toets ►II (PLAY/STILL) om één frame in
de pauzestandteplaatsen.
Stoppen
Druk in de stopstand op de knop F.ADV/SKIP om naar het volgende
frame te gaan.
Volgende frame
Tracking
▌
Met de optie Tracking worden witte strepen verwijderddie soms
tijdens het afspelen verschijnen wegens kleineverschillen in
recorders.
Druk tijdens het afspelen op de toetsen PROG/TRK (
/ ) om witte
strepen uit het beeldte wissen.
Speciale functies voorhet afspelen van video’s
▌
Terwijl een videoband wordt afgespeeld, kunt u eengroot aantal
verschillende afspeelfuncties gebruiken.
Druk in de afspeelmodus op de toetsVooruitspoelen (►► ) of Terugspoelen
(◄◄ ) om met twee snelhedenvooruit-of terug te spoelen:
• Beeld zoeken - Beeld zoeken - druk herhaaldelijkde toetsin en laat de
toetslos om de band 2,3,5,7 keer sneller dan normaal vooruit of terug te
spoelen.
• Snel zoeken - druk de toetsin en laat de toetslosom de band 7 keer
sneller dan normaal vooruit ofterug te spoelen.
Fps/Rps
Wisbeveiliging
01375E-VR350,355-XFA-NL.indb 4701375E-VR350,355-XFA-NL.indb 47 2007-04-27 오후 6:41:552007-04-27 오후 6:41:55

Nederlands - 48
Αfspelen
Druk in de afspeelmodus op de toets F.ADV/SKIP om precies 30
seconden over te slaan. Druk maximaal 4 maal op de toets F.ADV/SKIP
om 2 minuten over te slaan.
Overslaan
Druk in de stopstand op de knop ►► om vertraagd af te spelen. Druk
herhaaldelijk op de knop ►► voor vertraagd afspelen op respectievelijk
1/10, 1/7 of 1/5 van de normale afspeelsnelheid. Druk tweemaal op de
knop PLAY voor normale weergave.
Vertraagd afspelen
Gebruik deze functie als u op een videocassettenaar de tellerpositie
0:00:00 wilt gaan.
1. Druk op het punt op de band waar u de teller op 0:00:00 wilt instellen
op de knop CANCEL.
2. Wanneer de videocassette is gestopt, drukt u op de toets ANYKEY.
3. Druk op de knoppen ▲▼ om Ga naar [0:00:00] te selecteren en druk
op OK.
De videoband wordt vooruitgespoeld of teruggespoeld tot de
tellerpositie 0:00:00 en stopautomatisch op deze positie.
Ga naar [0:00:00]
Gebruik deze functie als u een lege positie wilt zoekenom een
programma op een videocassette op te nemen.
1. Wanneer de videocassette is gestopt, drukt u op de toets ANYKEY.
2. Druk op de toetsen ▲▼ om Einde zoekopdracht selecteren en druk
op OK. De videoband wordt vooruitgespoeld of teruggespoeldtot een
lege positie en stop automatisch op deze positie.Als het einde van de
videoband tijdens deze zoekopdracht wordt bereikt, wordt de band
uitgeworpen.
Einde zoekopdracht
Gebruik Scannen en afspelen als u niet precies weetwaar een
programma zich op een videoband bevindt.
1. While a cassette is stopped, press the ANYKEY button.
2. Druk op de toetsen ▲▼ om Voorwaartse introscan of Achterwaartse
introscan en druk op de toets OK. Wanneer een indexmarkering
wordt gevonden, wordt de band 5 seconden afgespeeld, waarna
naarde volgende indexmarkering wordt gezocht
Intro Vooruit/Achteruit scannen
Ga naar [0:00:00]
◄◄
00:00:49
Einde zoekopdracht
►►
00:00:13
Scannen en afspelen
►►
00:01:49
Variabel zoeksysteem
▌
Telkens wanneer u een videocassette op deze DVD- en videorecorder
opneemt, wordt automatisch een index op deband gemarkeerd
wanneer de opname begint. Met de zoekfunctie kunt u naar een
bepaalde index doorspoelen ofterugspoelen en vanaf dat punt
afspelen. Afhankelijk van degekozen richting, worden de indexen als
volgt genummerd:
• Voor deze DVD- en videorecorder wordt een standaar dindexerings
systeem(VISS) gebruikt. Hierdoor worden alleindexen die in andere
videorecorders zijn gemarkeerd, indeze videorecorder herkend en vice
versa.
01375E-VR350,355-XFA-NL.indb 4801375E-VR350,355-XFA-NL.indb 48 2007-04-27 오후 6:41:562007-04-27 오후 6:41:56

Nederlands - 49
Opnemen
In dit gedeelte vindt u beschrijvingen van
verschillende opnamemethoden voor DVD’s.
Met dit apparaat kunt u op verschillende
schijftypenopnemen.
Lees voordat u begint de volgende instructiesen kies
het schijftype op basis van uw voorkeur.
Met deze recorder kunt u op de volgende schijven
opnemen.
● DVD-VR350
● DVD-VR355
• DVD±RWs en DVD-RAMs zijn herschrijfbaar.
• DVD±Rs zijn niet herschrijfbaar.
Opneembare DVD’s
Opnemen
Typen
schijven
Opname-
indeling
Recorder Sluiten
Extra opnamen in
Samsung-recorder
DVD-RAM
VR Mode
Samsung
X
Opneembaar
Ander bedrijf
X
Opneembaar
DVD-RW
VR Mode
Samsung
gesloten Niet opneembaar
niet gesloten
Opneembaar
Ander bedrijf
gesloten Niet opneembaar
niet gesloten
Opneembaar
V Mode
Samsung
gesloten Niet opneembaar
niet gesloten
Opneembaar
Ander bedrijf
gesloten Niet opneembaar
niet gesloten Niet opneembaar
DVD-R
V Mode
Samsung
gesloten Niet opneembaar
niet gesloten
Opneembaar
Ander bedrijf
gesloten Niet opneembaar
niet gesloten Niet opneembaar
DVD+RW
(alleen DVD-
VR355)
-
Samsung
X
In sommige gevallen
niet opneembaar
Ander bedrijf
X
In sommige gevallen
niet opneembaar
DVD+R
(alleen DVD-
VR355)
-
Samsung
gesloten Niet opneembaar
niet gesloten
In sommige gevallen
niet opneembaar
Ander bedrijf
gesloten Niet opneembaar
niet gesloten
In sommige gevallen
niet opneembaar
Compatibiliteit van Samsung-recorders
en recorders van andere bedrijven
▌
DVD-RAM DVD-RW DVD-R DVD+RW DVD+R
DVD-RAM DVD-RW DVD-R
Sluiten
- Hiermee wordt de DVD-RW/±R gesloten
zodat geenextra opnamen kunnen worden
toegevoegd.
Sluiten ongedaan maken
- Hiermee kunt u extra opnamen opslaan op
eenDVD-RW-schijf die oorspronkelijk op de
DVD- envideorecorder zijn opgenomen.
- Het sluiten van een DVD-RW die met DAO (Disc
At Once) is opgenomen op een pc, kan niet
ongedaanworden gemaakt.
- Het sluiten van een DVD-RW die in de V
modus vaneen recorder van een ander merk
is opgenomen,kan niet ongedaan worden
gemaakt.
- Het sluiten van een DVD±R kan niet ongedaan
worden gemaakt.
■
■
01375E-VR350,355-XFA-NL.indb 4901375E-VR350,355-XFA-NL.indb 49 2007-04-27 오후 6:41:582007-04-27 오후 6:41:58

Nederlands - 50
Opnemen
Omdat de beschikbare functies afhankelijk zijn van het schijftype,kunt u
de schijf kiezen die het beste aan uw voorwaarden voldoet.Wanneer u
een ongebruikte schijf in de recorder plaatst,wordt het volgende bericht
weergegeven.
DVD-RAM : Gebruiken nadat de schijf is geformatteerd.
DVD±RW/+R : Gebruiken nadat de schijf is geïnitialiseerd.
Bij en DVD-RW-schijf kunt u de modus wijzigen.
Zie Een schijf formatteren op pagina 75.
DVD-R : Frmatteren is niet nodig en alleen opnemen in videomodus
wordt ondersteund.
Opname-indelingen
▌
• Hoofdstukken worden automatisch gemaakt wanneeru de opname op
DVD-RW/-R-schijven in V modusvoltooit.
• titels wissen/naam van titels wijzigen.
DVD-RW (V modus)/-R
Kies een van de vier opnamemodi voor de gewensteopnametijd
en beeldkwaliteit door de toets REC SPEED meerdere malen in te
drukken vanuit destopstand.
Over het algemeen neemt de beeldkwaliteit toe naarmate de duur van
de opname afneemt.
In de modus AUTO wordt de meest geschikte opna memodus
automatisch aangepast op basis van de overgebleven tijd op de
schijf en de lengte van de tijdgestuurde opname. Met deze functie
wordt slechts één modus geselecteerd in de modi XP, SP, LP en EP.
U kunt deze modus voor tijdgestuurde opnamen gebruiken.
Opnamemodus
• De DVD±Rs met dubbele laag hebben ongeveer de dubbele capaciteit
van DVD±Rs met één laag. (Zie pagina 34).
Modus Kenmerk
Duur van opname Gegevenssnelheid
XP
(hoge-kwaliteitsmodus)
Selecteer deze optie
wanneer de videokwaliteit
belangrijk is.
Ong. 1 uur
Ong. 8 Mbps
SP
SP(modus stan-
daardkwaliteit)
Selecteer deze optie om
met standaardkwaliteit op
te nemen
Ong. 2 uur
Ong. 4 Mbps
LP
(verlengde modus)
Selecteer deze optie
wanneer er een lange
opnametijd nodig is.
Ong. 4 uur
Ong. 2 Mbps
EP
(extended mode)
Selecteer deze optie
wanneer er een langere
opnametijd nodig is.
Ong. 6 uur/
ong. 1,2 Mbps
Ong. 8 uur/
ong. 0,8 Mbps
AUTO
Alleen voor timeropnamen
(zie pagina 55).
Ong. 1 tot 8 uur Ong.
0,8 tot 8 Mbps
• U kunt op DVD+RW's ook uw eigen hoofdstukken maken en deze bewerken
via het menu Chapter Edit (Hoofdstuk bewerken). (zie pagina’s 68)
DVD+RW
U kunt de schijf automatisch met de EZ REC MODE afsluiten.
(Zie pagina 58.)
■
• Deze modus biedt verschillende bewerkingsfuncties(zoals het wissenvan
de volledige titel, het gedeeltelijke wissenvan een titel, enzovoort.)
• Verschillende bewerkingsopties met behulp van eengemaakte playlist.
DVD-RAM/-RW (VR modus)
Nee
Ja
Ongeïnitialiseerde schijf
Wilt u deze schijf initialiseren?
DVD-RAM
DVD±RW/+R
Nee
Ja
Ongeformatteerde schijf.
Wilt u deze schijf formatteren?
01375E-VR350,355-XFA-NL.indb 5001375E-VR350,355-XFA-NL.indb 50 2007-04-27 오후 6:41:592007-04-27 오후 6:41:59

Nederlands - 51
Opnemen
Met deze DVD- en videorecorder kunt u geen beeldenmet
kopieerbeveiliging opnemen. Als de DVD- en videorecorder een
kopieerbeveiligingssignaal ontvangt tijdens de opname,wordt de
opname gestopt en verschijnt het volgendebericht op het scherm.
Kopieerbeveiliging
Tv-uitzendingen met kopieerbeveiligingssignalen kunnen een van
devolgende drie typen signalen bevatten: vrij kopiëren, éénmaal
kopiërenen nooit kopiëren.
Als u een programma van het type vrij kopiëren wilt opnemen, gebruikt u
een DVD-RW met CPRM (inhoudbeveiliging voor opneembare media) in
VR-modus en DVD-RAM-schijven.
Wanneer een programma van het type éénmaal kopiëren is opgenomen,
kunnen geen opnamen meer worden uitgevoerd.
* Compatibel met CPRM.
Inhoudbeveiligingvoor opneembare media (CPRM)
CPRM is een mechanisme dat een opname aan de media koppelt
waarop deze is opgenomen. Het wordt ondersteund doorsommige
DVD-recorders, maar door weinig DVD-spelers.
Elke lege opneembare DVD heeft een uniek 64-bits medium-idgeëtst
in de BCA. Wanneer de beveiligde inhoud op de schijf isopgenomen,
kan deze worden gecodeerd met een 56 bits C2(cryptomeria) cipher
afgeleid van de medium-id.
Tijdens het afspelen wordt de id gelezen vanaf de BCAengebruikt om
een sleutel te genereren om de inhoud van de schijfte ontcijferen.
Als de inhoud van de schijf naar andere media wordtgekopieerd,
ontbreekt de id of is deze verkeerd en kunnen de.
Kopieerbeveiligingssignalen
Media
Signaal
Vrij kopiëren Eenmaal kopiëren Nooit kopiëren
DVD-RAM (Ver. 2.0)
OO* -
DVD+RW
O- -
DVD+R
O- -
DVD-RW (Ver. 1.1)
O- -
DVD-RW (Ver.1.1)
met CPRM
VR modus
OO* -
DVD-R
O- -
U kunt tegen kopiëren beveiligde films
niet opnemen.
01375E-VR350,355-XFA-NL.indb 5101375E-VR350,355-XFA-NL.indb 51 2007-04-27 오후 6:42:012007-04-27 오후 6:42:01

Nederlands - 52
Opnemen
Direct opnemen
1. Controleer of de antennekabel is aangesloten.
2. Druk op de toets OPEN/CLOSE en plaats een schijf die opnames bevat
in de schijfl ade.
3. Controleer de resterende tijd op de schijf.
DVD-RAM/DVD±RW/+R-schijven moeten worden geformatteerd
voordat de opname wordt gestart. De meeste nieuwe schijvenworden
niet-geformatteerd verkocht. Zorg ervoor dat u de niet-geformatteerde
schijven voor de opname formatteert.
4. Druk op de toets OPEN/CLOSE om de schijfl ade tesluiten. Wacht tot
LOAD niet meer op het display van hetvoorpaneel wordt weergegeven.
Voordat u begint
Het programma opnemenwaarnaar u kijkt
▌
1. Druk op de toetsen PROG/TRK ( / ) om het station te selecteren
dat u wilt opnemen.
2. Druk meerdere malen op de toets REC SPEED om de opnamesnelheid
(kwaliteit) te kiezen.
→ SP → LP → EP → XP
3. Druk op de toets REC.
Opnemen van externe apparaten waarnaar u kijkt
▌
1. Schakel de DVD- en videorecorder in en schakel overnaar AV-modus
door op de afstandsbediening op detoets INPUT SEL. te drukken. Het
display van het voorpaneel wordt in de volgende volgorde gewijzigd:
→ PR → AV1 → AV2 → DV
2. Druk meerdere malen op de toets REC SPEED om de opnamesnelheid
(kwaliteit) te kiezen.
→ SP → LP → EP → XP
3. Terwijl de DVD- en videorecorder in de stopstandstaat, stelt u het
externe apparaat in op deafspeelmodus.
4. Wanneer het beeld dat u wilt opnemen, verschijnt, drukt u op de toets
REC van de DVD- en videorecorder.
De opname tijdelijk onderbreken
Druk op de toets PLAY/PAUSE (
) om een opname te onderbreken.
● Druk op PLAY/PAUSE (
) om terug te keren naar normale weergave.
● U kunt tijdens de onderbreking van een opname tussen kanalen
schakelen door op PROG/TRK (
/ ) te drukken.
De opname beëindigen
Druk op de knop STOP om een opname te stoppen of te beëindigen.
● Wanneer u DVD-RAM/DVD±RW/DVD±R-schijven gebruikt, verschijnt
het bericht “Schijfi nformatie wordt bijgewerkt. Een ogenblik geduld”.
RAM
VR XP PR 7
Beschikbare tijd 00:28
alleen DVD-VR355
01375E-VR350,355-XFA-NL.indb 5201375E-VR350,355-XFA-NL.indb 52 2007-04-27 오후 6:42:022007-04-27 오후 6:42:02

Nederlands - 53
Opnemen
Niet alle camcorders werken in combinatie met uwDVD- en
videorecorder, zelfs niet als deze camcorders een DV-uitgang
bevatten.
Raadpleeg ook de handleiding van de camcorderals u via een
DV-uitgang opneemt.
U geeft pictogrammen voor het afspelen op het scherm weer
door op een richtingspijl op de afstandsbediening te drukken.
■
■
■
Opnemen via een DV-ingang
U kunt de camcorder regelen met de interface IEEE1394 (DV).
Volg onderstaande aanwijzingen als u de inhoud vaneen camcorder
met een DV-uitgang op een schijf ofvideoband wilt opnemen.
1. Verbind de DV-uitgang van de camcorder metbehulp van een DV-kabel
met de DV-ingang op devoorzijde van de DVD- en videorecorder.
2. Schakel de DVD- en videorecorder in en schakelover naar DV-modus
door op de afstandsbedieningop de toets INPUT SEL. te drukken.
3. Druk meerdere malen op de toets REC SPEED om de opnamesnelheid
(kwaliteit) te kiezen.
→ SP → LP → EP → XP
4. Als de invoer op DV is ingesteld, verschijnt er bovenaan het scherm een
afspeel/opnamemenu waarmeeu de camcorder kunt regelen.
5. Selecteer het pictogram (Play) (Afspelen) bovenaan het scherm om de
camcorder te laten afspelen en zoek de startpositie om te kopiëren.
6. U start het opnemen met de toets ◄ ► om hetopnamepictogram (
z
)
boven aan het scherm teselecteren en vervolgens met de toets OK.
U kunt ook opnemen met de toets REC op de afstandsbediening.
7. Druk op de toets STOP van de DVD- en videorecorder wanneer de
opname is voltooid.
DV
VERPL. OK TERUG
Het DV-apparaat is aangesloten.
Een OTR (One Touch Recording) maken
Met OTR (One-Touch Recording, opnemen met één druk op de
knop) kunt u opnametijd in stappen van een vooraf ingesteld
aantal minuten en met een maximale duur van 9 uur instellen door
herhaaldelijk op de knop REC te drukken.
1. Druk op de toetsen PROG/TRK (
/ ) of op decijfertoetsen om het
station te selecteren dat u wiltopnemen.Als u via een aangesloten
extern apparaat wilt opnemen, drukt u op de toets INPUT SEL. om de
juiste externe ingang te selecteren (AV1, AV2 of DV-ingang).
alleen DVD-VR355
Tijdens een opname kunt u de opnamemodusen het programma
niet wijzigen.
Als er onvoldoende ruimte over is, wordt eenopname automatisch
beëindigd.
U kunt maximaal 99 titels opslaan op een DVD-RAM/-RW/-R-schijf
en maximaal 48 titels op een DVD+RW/+R-schijf.
Als de stroomtoevoer wegens een stroomstoring of een andere
oorzaak wordtonderbroken, wordt de titel die wordtopgenomen,
niet op de schijf opgeslagen.
De opname wordt automatisch beëindigd alstegen kopiëren
beveiligde beelden zijn geselecteerd.
Gebruik geen DVD-R-authoringschijven voordit apparaat.
Raadpleeg ook de gebruikershandleiding van het externe apparaat
als u opneemt met een audio/videokabel of een scart-kabel.
■
■
■
■
■
■
■
01375E-VR350,355-XFA-NL.indb 5301375E-VR350,355-XFA-NL.indb 53 2007-04-27 오후 6:42:042007-04-27 오후 6:42:04

Nederlands - 54
Opnemen
Druk op de toets STOP (■).
Het bericht “Druk nogmaals op de knop STOP-toets om de timer-opname
te annuleren”.
Druk nogmaals op de toets STOP (■)
Het bericht ‘Schijfi nformatie wordt bijgewerkt. Een ogenblik geduld.’ wordt
weergegeven.
De opname beëindigen
▌
De teller van de timer loopt minuutsgewijs terug van 09:00 naar
0:00. Op dat moment stopt de DVD- en videorecorder de opname.
■
1. Controleer of de antennekabel is aangesloten.
2. Controleer de resterende tijd van de schijf.
3. Controleer of de datum en de tijd correct zijn.
De klok (Setup-Klok instellen) moet worden ingesteldvoordat u
verdergaat met het opnemen via een timer. (zie pagina 22)
1. Druk op de toets OPEN/CLOSE en plaats eenop neembare schijf in de
schijfl ade.
2. Druk op de toets OPEN/CLOSE m de schijfl ade tesluiten.
Wacht tot LOAD niet meer op het display vanhet voorpaneel wordt
weergegeven.
3. Druk in de stopstand op de toets MENU.
4. Druk op de toetsen ▲▼ om Programma eselecteren en druk op OK or
► of op de toets.
U kunt rechtstreeks naar deze stap gaan door op de knop TIMER REC
te drukken.
5. Druk tweemaal op OK of op de knop ►.
• Het timer-opnamescherm wordt weergegeven.
6. Vul de items in met de toetsen ▲▼◄►.
◄►: hiermee gaat u naar het vorige/volgende item.
▲▼
: hiermee stelt u een waarde in.
• Op : kies of u op DVD of op videoband wilt opnemen.
• Bron : de video-ingangsbron (AV1, AV2 of AV3) of het uitzendkanaal
waarvan u een tijdgestuurde opname wilt maken.
• Dag : stel de opnamedag in.
Dagelijks MA-ZA, MA-VR, W-ZA, …W-ZO, 01MA, ...31WO
• Begin/Einde : begin- en eindtijd van de timer-opname.
Een timer-opnamemaken
2. Druk op de toets REC.
3. Druk in de opnamemodus nogmaals op de toets REC om OTR in te
schakelen.
• De opnameduur 0:30 verschijnt op het schermen er wordt exact 30
minuten opgenomen.
4. Druk nogmaals op REC om opnametijd in stappenvan 30 minuten en
met een maximale duur van 9uur toe te voegen.
• Wanneer de tijd is verstreken, wordt de opname wordt automatisch
beëindigd.
alleen DVD-VR355
Programma
DVD-Recorder
Titellijst
Afspeellijst
Schijfbeheer
Programma
Instellen
Kopiëren
DVD-RAM(VR)
Lijst van geplande opnamen
►
VERPL. OK TERUG
EINDE
Lijst van geplande opnamen
DVD-Recorder
DVD-RAM(VR)
Huidige tijd 12:00
Nr.
Op
Bron
Dag
Begin
Einde
Snelheid
Bewerk
Nr. 01
Beschikbare tijd 00:48 SP
DVD PR 01 01 SUN 12:00 14:00 SP
Op
Bron
Dag
Begin
Einde
Snelheid
VERPL. OK TERUG
EINDE
01375E-VR350,355-XFA-NL.indb 5401375E-VR350,355-XFA-NL.indb 54 2007-04-27 오후 6:42:062007-04-27 오후 6:42:06

Nederlands - 55
Opnemen
De timer-opname kan afwijken van de ingestelde tijd, afhankelijk
van de schijf en de algemene timer-opname status (bijv.
overlappende opnametijden of opname start minder dan 3
minuten na afl oop van de voorgaande opname).
■
Opnamesnelheid (DVD)
AUTO (AUTOMATISCH) : selecteer deze optie wanneer u de
videokwaliteit automatisch wilt instellen. In de modus AUTO wordt de
meest geschikte opnamemodus automatisch aangepast op basis van
de overgebleven tijd op de schijf en de lengte van de tijdgestuurde
opname. Met deze functie wordt slechts éénmodus geselecteerd in
de modi XP, SP, LPen EPen ukunt deze modus voor timer-opnamen
gebruiken.
XP (hoge kwaliteit) : selecteer deze optie als de geluids- en
videokwaliteit belangrijk zijn (ong. 1 uur).
SP (standaardkwaliteit) : selecteer deze optie ommet standaardkwaliteit
op te nemen (ong. 2 uur).
LP (lage kwaliteit) : selecteer deze optie wanneerer een lange
opnametijd nodig is (ong. 4 uur).
EP (verlengde modus) : selecteer deze optie wanneer er een langere
opnametijd nodig is (ong. 6 uur bij 1,2 Mbps of ong. 8 uur bij 0,8 Mbps).
- De DVD±R's met dubbele laag hebben ongeveer de dubbele
capaciteit van DVD±R's met één laag. (Zie pagina 34).
Opnamesnelheid (VCR)
AUTO (AUTOMATISCH) : selecteer deze optie wanneer u
devideokwaliteit automatisch wilt instellen. Dit hangt afvan de
resterende tijd op de videoband.
SP: standaard afspelen, voor de beste beeldkwaliteit.
LP: langdurig afspelen, voor de maximaleopna metijd (3 maal SP).
7. Druk op OK.
Als de timer-instellingen elkaar overlappen
Het eerste programma heeft prioriteit. Nadat de opname van het eerste
programma is voltooid, wordt het tweede programma opgenomen.
Afsluiten zonder de huidige instelling op te slaan
Druk op de toets EXIT of RETURN.
Terugkeren naar het vorige menu
Druk op de toets RETURN als u geen timer-opna mewilt instellen.
8. Schakel het apparaat uit om de timer-opname te voltooien.
•
knippert als er geen schijf of videoband in dere corder is geplaatst.
• wordt op het voorpaneel weergegeven. Ditbe tek ent dat een timer-
opname is geregistreerd
Wanneer u in de EP-modus op een DVD-RW(Vmodus)/R-schijf
opneemt, wordt er mogelijk geen 6 of 8 uur opgenomen omdat de
eenheid het codeersysteem VBR (Variable Bit Rate) gebruikt. Als
u bijvoorbeeld een programma opneemt metveel actie, gebruikt
deze een hogere bitsnelheidwat meer geheugen in beslag neemt.
■
01375E-VR350,355-XFA-NL.indb 5501375E-VR350,355-XFA-NL.indb 55 2007-04-27 오후 6:42:072007-04-27 오후 6:42:07

Nederlands - 56
Opnemen
Volg de volgende aanwijzingen om de lijst met timeropnamen te
bewerken.
1. Druk in de stopstand op de toets MENU.
2. Druk op de toets ▲▼ om Programma te selecteren en druk op OK of
op de toets ►.
3. Druk op de knop OK.
4. Druk op de toets ▲▼ om het nummer te selecterendat u in de lijst met
geplande opnamen wilt bewerkenen druk op OK of op de toets ►.
• De items die u kunt Bewerken en Verwijder, wordenweergegeven.
5. Druk op de toetsen ▲▼ om Bewerken selecteren endruk op OK of op
de toets ►.
• Het timer-opnamescherm wordt weergegeven.
Bewerk de items die u wilt aanpassen.
Raadpleeg de sectie over timer-opnamen voormeer informatie over
invoeritems voor timeropnamen. (zie pagina 54-55)
6. Druk op OK om de bewerkte instelling te bevestigen.
7. Druk op de toets EXIT nadat de bewerking is voltooid.
Het menuscherm verdwijnt.
Een timer-opnamewijzigen
Volg de volgende aanwijzingen om een titel uit de lijst mettimer-
opnamen te wissen.
1. Druk in de stopstand op de toets MENU.
2. Druk op de toets ▲▼ om Programma te selecterenen druk op OK of
op de toets ►.
3. Druk op de knop OK.
4. Druk op de toets ▲▼ om het nummer teselecteren dat u uit de lijst
met geplande opnamenwilt wissenen druk op OK of op de toets.
• De items die u kunt Bewerken en Verwijder, wordenweergegeven.
5.
Druk op de toetsen ▲▼ om Verwijder te selecterenen druk op OK of
op de toets ►.
• Er verschijnt een bericht als ‘Wilt u ‘Nr. 01’ verwijderen?’ waarmee u
wordt gevraagd hetwissente bevestigen.
6. Druk op de toetsen ◄ ► om Ja te selecteren endruk op OK.
• De geselecteerde titel wordt uit de lijst verwijderd.
7. Druk op de toets EXIT nadat de bewerking is voltooid.
Het menuscherm verdwijnt.
Een timer-opname verwijderen(wissen)
U kunt geen programma’s verwijderen die op dat moment worden
opgenomen.
■
alleen DVD-VR355
alleen DVD-VR355
Lijst van geplande opnamen
DVD-Recorder
DVD-RAM(VR)
Huidige tijd 12:00
Nr. 01
Beschikbare tijd 00:48 SP
DVD PR 01 Daily 12:00 14:00 SP
Op
Bron
Dag
Begin
Einde
Snelheid
Nr.
Op
Bron
Dag
Begin
Einde
Snelheid
Bewerk
VERPL. OK TERUG
EINDE
DVD-Recorder
DVD-RAM(VR)
Nr.
Op
Bron
Dag
Begin
Einde
Snelheid
Bewerk
Lijst van geplande opnamen
Huidige tijd 12:00
01 DVD PR 01 Daily 12:00 14:00 SP Off
►
02 DVD PR 02 Daily 15:00 16:00 SP Off
►
03 : :
►
Wilt u ‘Nr. 01’ verwijderen?
Ja Nee
Nr.01
VERPL. OK TERUG
EINDE
01375E-VR350,355-XFA-NL.indb 5601375E-VR350,355-XFA-NL.indb 56 2007-04-27 오후 6:42:092007-04-27 오후 6:42:09

Nederlands - 57
Opnemen
Met behulp van deze functie kunt u een schijf automatisch
initialiseren en voltooien.
1.
Druk vanuit de stand Stop (Stop)/No Disc (Geen schijf) op de knop
OPNAMESTAND EZ van de afstandsbediening.
2. Druk op de knoppen ◄ ► om Aan te selecteren en druk vervolgens op
OK.
De opnamestand EZ wordt ingesteld.
3. Plaats een schijf.
Als de schijf nieuw is, wordt deze automatisch geïnitialiseerd.
4. Druk op de knop REC.
5. In de opnamestand EZ wordt de schijf automatisch afgesloten onder de
volgende voorwaarden.
- Als u op de knop OPEN/CLOSE van uw DVD-recorder & VCR drukt
nadat de opname voor 30% is voltooid, wordt de lade geopend nadat de
schijf volledig is afgesloten.
- Als de schijf vol is, wordt deze automatisch afgesloten en de DVD-
recorder & VCR blijft in de stopstand.
- Als u een timeropname doet en deze opname bezet ten minste 30%
van de schijf, wordt de schijf automatisch voltooid en de DVD- en
videorecorder wordt uitgeschakeld. Het automatisch voltooien van de
schijf werkt niet als er meer dan één opname in de Scheduled Record
List (Lijst van geplande opnamen) staat.
OPNAMESTAND EZ
alleen DVD-VR355
Als u een nieuwe DVD-RW-schijf plaatst, wordt deze na
automatische initialisatie in V-modus geformatteerd.
Als u off (uit) selecteert, moet u een schijf handmatig initialiseren
(zie pagina 50) en met Disc Manager (Schijfbeheer) afsluiten
(zie pagina 75).
Opnamelengte kan variëren, afhankelijk van de opnamestand.
(Zie pagina 50)
■
■
■
Uit
Aan
Druk op "Aan" om EZ REC mode te bevestigen
Voor annuleren druk op "Uit"
50%
Schijf afsluiten
Bezig met verwerken.
50%
Schijf initialiseren (DVD-V)
Bezig met initialiseren.
01375E-VR350,355-XFA-NL.indb 5701375E-VR350,355-XFA-NL.indb 57 2007-04-27 오후 6:42:112007-04-27 오후 6:42:11

Nederlands - 58
Opnemen
Voordat u begint
1. Controleer het tv-kanaal en de antenneaansluitingen.
2. Controleer de resterende tijd op de videoband.
U kunt een uitgezonden tv-programma opnemen door eenlege
videoband in de recorder te plaatsen en op de toets
z
(REC) te
drukken. U kunt opnametijd in vooraf ingestelde stappen met een
maximale duur van 9 uur toevoegen door meerdere malen op de
knop
z
(REC) te drukken.
1. Plaats een lege videoband in de videorecorder.
• Zorg ervoor dat de videoband lang genoeg is omhet hele programma
op te nemen.
2. Druk op cijferknoppen of de knoppen PROG/TRK (
/ ) om het
gewenste kanaal te selecteren.
Als u vanaf een extern apparaat wilt opnemen, drukt u op de toets
INPUT SEL. om AV1, AV2 (of DV-ingang) te selecteren. aangesloten
op de ingangen van de recorder.
3. Druk op de toets REC SPEED van de afstandsbediening om de
opnamesnelheid op eenvan de volgende manieren in te stellen:
• SP – standaard opname, voor de beste beeldkwaliteit.
• LP – verlengde opname, voor een maximaleopnametijd maar een
lagere beeldkwaliteit (3 maal SP).
4. Druk op de toets
z
(REC) op de afstandsbediening.
Zie “Speciale opnamefuncties” voor meer informatie over de opties
tijdens opnamen.
Wanneer u een videoband bekijkt of een programmaopneemt
tijdens het opnemen met de DVD-recorder, werken sommige
functieknoppen mogelijk niet.Het bericht “Dezefunctie is niet
beschikbaar.” zal worden weergegeven.
■
Controleer of de videoband een wisbeveiligingbevat. Als het
lipje van de wisbeveiliging ontbreekt,kunt u de opening met een
stukjeplakband bedekken.
■
De gekozen opnamesnelheid wordt op de display van het
voorpaneel en op het schermweergegeven.
■
Standaard video-opnamen
Waarschuwing: Bedek de opening niet als u nietzeker weet dat u
op de videoband wilt opnemen.
■
Maximale opnametijd - SPen LP
Lengte van band SP (standaardkwaliteit) LP (Lange opname)
E180
Ong. 3 uur Ong. 6 uur
E240
Ong. 4 uur Ong. 8 uur
E280
Ong. 4 uur en 40 minuten Ong. 9 uur en 20 minuten
E300
Ong. 5 uur Ong. 10 uur
De opname tijdelijk onderbreken
Druk op de toets PLAY/PAUSE (
) om een opname te onderbreken.
● Druk op PLAY/PAUSE ( ) om terug te keren naar normale weergave.
● U kunt tijdens de onderbreking van een opname tussen kanalen
schakelen door op PROG/TRK (
/ ) te drukken.
De opname beëindigen
Druk op de knop STOP om een opname te stoppen of te beëindigen.
01375E-VR350,355-XFA-NL.indb 5801375E-VR350,355-XFA-NL.indb 58 2007-04-27 오후 6:42:122007-04-27 오후 6:42:12

Nederlands - 59
Opnemen
1. Druk op de toets INFO op de afstandsbediening.
De volgende informatie wordt weergegeven: (Huidige recorderstatus,
opnamesnelheid,resteren de tijd, invoerkanaal, huidige tijd.)
De resterende tijd controleren
Terwijl er wordt opgenomen, kunt u naar een ander kanaal of een
ander medium kijken of opnametijd in vooraf ingestelde stappen
toevoegen.
1. Naar een ander medium kijken tijdens de opname
Tijdens een video-opname kunt u naar een DVD kijken entijdens een
DVD-opname kunt u naar een videoband kijken.
• Plaats tijdens de video-opname een DVD in de DVD-recorder.
De uitvoer wordt automatisch in de DVD-recorder gewijzigd en deze
wordt afgespeeld.
• Plaats tijdens de DVD-opname een videoband in devideorecorder.
De uitvoer wordt automatisch in devideorecorder gewijzigd en deze
wordt afgespeeld.(Dit geldt alleen als de wisbeveiliging is verwijderd.)
2. Opnametijd toevoegen
Raadpleeg One-Touch Recording (OTR)(zie pagina 53)
3. Tegelijkertijd een DVD en een video opnemen
U kunt tegelijkertijd een DVD en een video opnemen, maar beidemodi
moeten worden ingesteld om afzonderlijk op te nemen.
• Druk op de toets DVD/VCR om de eenheid in testellen op DVD- of
VCR-modus (DVD- of videomodus).
• Kies de ingangsmodus PR, AV1, AV2 of DV-ingang.
voor DVD of video.
• Kies de opnamemodus voor DVD of video.
• Druk op de toets REC voor DVD of video.
Speciale opnamefuncties
Als de DVD- en videorecorder op uw tv isaangesloten met de
S-Video- of de component-videokabel, wordt het afspeelscherm
op devideoband niet weergegeven tijdens de DVD-opname.
U kunt verschillende kanalen niet tegelijkertijdopnemen.
De DVD-recorder en videorecorder kunnen niettegelijkertijd met
opnemen beginnen. U moetinstellen met welke modus wordt
begonnen enwelke modus daarop volgt.
■
■
■
STOP
00:00:00
SP
Rem 01:21
PR 1
VCR
JAN 01 2007 ZO 12 : 00
STOP
00:00:00
SP
Rem 00:48
PR 1
RAM
01375E-VR350,355-XFA-NL.indb 5901375E-VR350,355-XFA-NL.indb 59 2007-04-27 오후 6:42:142007-04-27 오후 6:42:14

Nederlands - 60
Opnemen
U kunt van de DVD-recorder naar de videorecorderkopiëren en van
de videorecorder naar de DVD-recorderkopiëren.
Controleer de resterende tijd op de videoband.
Kopiëren naar DVD of video
1. Druk in de stopstand op de toets MENU.
2. Druk op de toetsen ▲▼ om Kopiëren te selecteren en druk op OK of
op de toets ►.
3. Druk op de toetsen ▲▼ om DVD
--
> VCR teselecteren en druk op OK
of op de toets ►.
4. Druk op de toetsen ▲▼ om Kopieerlijst bewerken teselecteren en
druk op OK of op de toets ►.
• Om te kunnen kopi‘ren uit de "Kopieerlijst bewerken", dient u van
tevoren een kopieerlijst te maken.
• Selecteer "Nieuwe kopieerlijst" en maak de nieuwe playlist.
(zie pagina 68)
• Op een DVD-RW(V)/DVD+RW/±R-schijf kunt u uitsluitend de functie
Direct copy (Direct kopiëren) gebruiken.
5. Druk op de toetsen ▲▼ om de gewenste kopieerlijst te selecteren en
druk op OK of op detoets ►.
6. Druk op de toetsen ▲▼ om Kopiëren te selecteren en druk op OK of
op de toetsr ►.
Van de DVD-recorder naar de videorecorder kopiëren
▌
• Plaats een DVD-schijf die u wilt kopiëren in derecorder.
• Plaats een videoband in de recorder.
• Druk op de videokopieerknop op het voorpaneel ofde afstandsbediening
(TO VCR).
• Druk op de toets STOP om de opname te beëindigen.
• U kunt ook van DivX naar VCR kopiëren wanneer de gewenste DivX
wordt afgespeeld.
Als de DivX-schijf meerdere bestanden bevat, wordt alleen het
geselecteerde bestand afgespeeld.
Rechtstreeks van de DVD- naar de video-recorder kopiëren
De kopieerfunctie is niet toegestaan tijdens de progressieve-
scanmodus.
■
alleen DVD-VR355
VR modus
Kopieerlijst bewerken
Nr.
Titel
Lengte
Bewerken
DVD-RAM(VR)
JAN/01/2007 12:00
1 Scène
JAN/01/2007 12:00
01 JAN/01/2007 12:0 00:00:11
►
Afspelen
Hernoemen
Scène bew.
Kopiëren
Verwijderen
JAN/01/2007 1/1
VERPL. OK TERUG
EINDE
01375E-VR350,355-XFA-NL.indb 6001375E-VR350,355-XFA-NL.indb 60 2007-04-27 오후 6:42:152007-04-27 오후 6:42:15

Nederlands - 61
Opnemen
• Plaats de VHS-band die u wilt kopiëren.
• Plaats de opneembare DVD-schijf.
• Druk op de kopieerknop voor DVD’s op het voorpaneel of op de
afstandsbediening. (TO DVD)
• Druk op de toets STOP om het opnemen te stoppen.
Direct van video naar DVD kopiëren
1. Druk in de stopstand op de toets MENU.
2. Druk op de toetsen ▲▼ om Kopiëren te selecteren en druk op OK of
op de toets ►.
3. Druk op de toetsen ▲▼ om VCR
--
> DVD teselecteren en druk op OK
of op de toets ►.
4. U kunt de toetsen ►II, I◄◄ of ►►I , ◄◄ of ►► gebruiken om de
startpositie te zoeken.
Druk bij het startpunt op OK.
5. U kunt de toetsen ►II, I◄◄ of ►►I , ◄◄ of ►► gebruiken om de
eindpositie te zoeken.
Druk bij het eindpunt op OK.
• Er wordt een kopieerlijst gemaakt. Herhaal de boven staande
stappen om de kopieerlijst te maken.
• De kopieerlijst kan in de videomodus niet worden opgeslagen.
6. Druk op de toetsen ▲▼ om de gewenste kopieerlijstte selecteren en
druk op OK of op de toets ►.
7. Druk op de toetsen ▲▼ om Kopiëren te selecteren en druk op OK of
op de toets ►.
• De video wordt vooruitgespoeld, op zoek naareen startpositie waarna
deze automatisch eenkopie maakt.
• Deze houdt zich niet altijd exact aan het starteneindpunt.
• Als u alle kopieerlijsten wilt kopiëren, selecteert u Alles kopiëren.
Van video naar DVD kopiëren
▌
VCR - -> DVD
DVD-Recorder
Nr.
Begin
Einde
Bewerken
DVD-RAM(VR)
00:03:42
STOP
01 00:02:20 --:--:--
►
02 --:--:-- --:--:--
►
Alles kopiëren
Afspelen
Kopiëren
Wissen
VERPL. OK TERUG
EINDE
01375E-VR350,355-XFA-NL.indb 6101375E-VR350,355-XFA-NL.indb 61 2007-04-27 오후 6:42:172007-04-27 오후 6:42:17

Bewerken
Nederlands - 62
De titellijst afspelen
In deze paragraaf komen de basisfuncties vanDVD-bewerking aan de orde en worden zowelbewerkingsfuncties
uitgelegd voor het opnemen op een schijf als bewerkingsfunctiesvoor de hele schijf.
Volg deze instructies om een titel uit de titellijst af te spelen.
1. Druk op de toets TITLE LIST.
Het scherm Titellijst verschijnt.
2. Druk op de knoppen ▲▼ om uit de titellijst een titel te selecteren die u
wilt afspelen en druk vervolgens op de knop PLAY.
3. Druk op de toets STOP om het afspelen te stoppen.
U keert terug naar het titellijstscherm door op detoets TITLE LIST te
drukken.
c
Het afspeelscherm voor opgenomen titels.
d
Informatievenster voor de geselecteerde titel: titelnaam,
opnamedatum, vergrendelstatus, opnamemodus.
e
Nummer opgenomen titel.
f
Naam opgenomen titel.
g
Lengte opname (de afspeeltijd).
h
Menu Bewerken
Afspelen : speelt de geselecteerde titel af.
Hernoemen : wijzigt de naam van een geselecteerde titel.
Wissen : verwijdert een sectie van de titel.
Bewerken : verwijdert een sectie van de titel.
Beveiliging : vergrendelt of ontgrendelt de geselecteerde titel.
i
Knopweergave
Elementen van het titellijstscherm
Door op de knop ANYKEY te drukken, kunt u de gewenste titel
afspelen. (Zie pagina 38)
Dit hangt af van het schijftype.
DVD-RW(V)/DVD+RW/±R heeft een beperktebewerkingsfunctie.
■
■
■
Bewerken
RAM
VR
► XP
alleen DVD-VR355
Titellijst
01 JAN/01/2007 12:00 00:00:11
►
02 JAN/01/2007 12:30 00:00:09
►
03 JAN/01/2007 01:00 00:01:36
►
04 JAN/01/2007 01:00 00:00:11
►
Nr. Titel
Lengte Bewerken
DVD-RAM(VR)
JAN/01/2007
3/4
JAN/01/2007
01:00 PR1
JAN/01/2007
XP
Afspelen
Hernoemen
Wissen
Bewerken
Beveiliging
VERPL. OK TERUG
EINDE
Titellijst
01 JAN/01/2007 12:00 00:00:11
►
02 JAN/01/2007 12:30 00:00:09
►
03 JAN/01/2007 01:00 00:01:36
►
04 JAN/01/2007 01:00 00:00:11
►
Nr. Titel
Lengte Bewerken
DVD-RAM(VR)
JAN/01/2007
3/4
JAN/01/2007
01:00 PR1
JAN/01/2007
XP
ed
c
f
g
i
VERPL. OK TERUG
EINDE
Titellijst
01 JAN/01/2007 12:00 00:00:11
►
02 JAN/01/2007 12:30 00:00:09
►
03 JAN/01/2007 01:00 00:01:36
►
04 JAN/01/2007 01:00 00:00:11
►
Nr. Titel
Lengte Bewerken
DVD-RAM(VR)
JAN/01/2007
3/4
JAN/01/2007
01:00 PR1
JAN/01/2007
XP
Afspelen
Hernoemen
Wissen
Bewerken
Beveiliging
h
VERPL. OK TERUG
EINDE
01375E-VR350,355-XFA-NL.indb 6201375E-VR350,355-XFA-NL.indb 62 2007-04-27 오후 6:42:192007-04-27 오후 6:42:19

Bewerken
Nederlands - 63
Deze functie is alleen beschikbaar bij DVD+RW-schijven. Als er
bestaande titels worden verwijderd, wordt nieuwe vrije ruimte
gemaakt. Wanneer u de functie voor de vrije ruimte gebruikt,
verschijnen uitgezonden tv-beelden aan de linkerzijde van de
titellijst.
1. Druk op de knop TITLE LIST. Het scherm. Title List (Titellijst) verschijnt.
2. Druk op de knoppen ▲▼ om Vrije Ruimte te selecteren en druk
vervolgens op OK of op de knop ►. Uitgezonden tv-beelden
verschijnen aan de linkerzijde van de titellijst.
3. Druk op de knop OK.
Opnemen op Vrije Ruimte
▌
Basisbewerking (titellijst)
Volg de onderstaande instructies om de naam van eentitellijst te
wijzigen, d.w.z. de titel van een opgenomenprogramma te bewerken.
1. Druk op de TITLE LIST toets.
Het scherm Titellijst verschijnt.
2. Druk op de toetsen ▲▼ om uit de titellijst een titelte selecteren die u
wilt hernoemen, en druk vervolgens op OK of op de toets ►.
3. Druk op de toetsen ▲▼ om Hernoemen teselecteren en druk op OK
of op de toets ►.
Het scherm Hernoemen verschijnt.
4. Selecteer de gewenste tekens met de toetsen ▲▼ ◄ ►en druk op de
toets OK.
• Backspace: zet de cursor een positie terug doet hetzelfde als de
toets WISSEN.
• Spatie : voert een spatie in en zet de cursor eennaar rechts.
• Verwijderen : verwijdert het teken op de cursorpositie.
• Wissen : verwijdert alle ingevoerde tekens.
• Opslaan : registreert de ingevoerde tekens.
5. Druk op de toetsen ▲▼ ◄ ► om Opslaan teselecteren en druk op de
toets OK.
De gewijzigde titelnaam wordt weergegeven in hettitelveld van de
geselecteerde titel.
De naam van een titel wijzigen
▌
alleen DVD-VR355
alleen DVD-VR355
Titellijst
DVD+RW
Nr. Titel
Lengte Bewerken
Vrije Ruimt 5/7
Vrije Ruimt
PR 10
SP
01 APR/19/2007 12:00 00:00:21
►
02 APR/19/2007 12:30 00:00:03
►
03 APR/20/2007 12:00 00:00:15
►
04 APR/20/2007 12:30 00:00:16
►
05 Vrije Ruimt 00:00:15 √
06 APR/21/2007 12:30 00:08:16
►
07 Vrije Ruimt 03:40:27
►
Openmen
VERPL. OK TERUG
EINDE
Titellijst
01 JAN/01/2007 12:00 00:00:11
►
02 JAN/01/2007 12:30 00:00:09
►
03 Sports(A1) 00:01:36
►
04 JAN/01/2007 01:30 00:00:11
►
Nr. Titel
Lengte Bewerken
DVD-RAM(VR)
Sports(A1)
3/4
Sports(A1)
JAN/01/2007
XP
VERPL. OK TERUG
EINDE
Hernoemen
DVD-Recorder
DVD-RAM(VR)
Sports(A1)
Backspace Spatie
Verwijderen
Wissen
Opslaan
VERPL. OK TERUG
EINDE
01375E-VR350,355-XFA-NL.indb 6301375E-VR350,355-XFA-NL.indb 63 2007-04-27 오후 6:42:222007-04-27 오후 6:42:22

Bewerken
Nederlands - 64
Volg onderstaande instructies om een titel te vergrendelen enzo te
voorkomen dat deze per ongeluk wordt verwijderd.
1. Druk op de TITLE LIST toets.
Het scherm Titellijst verschijnt.
2. Druk op de toetsen ▲▼ om uit de titellijst een titelte selecteren die u
wilt beveiligen, en druk vervolgens op OK of op de toets ►.
3. Druk op de toetsen ▲▼ om Beveiliging te selecteren en druk op OK
of op de toets ►.
4. Druk op ◄ ► om Aan te selecteren en druk vervolgens op OK.
Het sleutelpictogram op het informatievenster voor de geselecteerde
titel, verandert in de vergrendelde status. (
→ )
Een titel vergrendelen (beveiligen)
▌
Volg onderstaande instructies om een titel uit de titel-lijstte wissen.
1. Druk op de TITLE LIST toets.
Het scherm Titellijst verschijnt.
2. Druk op de toetsen ▲▼ om uit de titellijst een titelte selecteren die u
wilt wissen, en druk vervolgensop OK of op de toets ►.
3.
Druk op de toetsen ▲▼ om Wissen te selecterenen druk op OK of op
de toets ►.
Er verschijnt een bericht waarin u wordt gevraagdde bewerking te
bevestigen.
DVD-RAM(VR)/DVD-RW (VR modus): Aangezien de playlistaanwezig
is, 'Wilt u dit echt verwijderen? (Gerelateerde afspeellijsten worden
mogelijk verwijderd.)'
DVD-RW (videomodus), DVD+RW, DVD±R: Aangezien de playlist
nietaanwezig is, verschijnt het bericht 'Wilt u dit echt verwijderen?'.
• Het bericht hangt af van het schijftype.
4. Druk op ◄ ► om Ja te selecteren en druk vervolgens op OK.
Een titel wissen
▌
Het is niet mogelijk een beveiligde titel tewissen. Als u
een beveiligde titel wilt wissen, selecteert u Nee het menu
Titelbeveiliging.
Wanneer een titel eenmaal uit de titellijst is verwijderd, kan
deze niet meer worden hersteld.
Wanneer een DVD±R, DVD-RW is afgesloten,kan deze niet
worden verwijderd.
Bij DVD±R worden titels alleen uit het menu verwijderd, hoewel
de titel fysiek op de schijf blijft staan.
■
■
■
■
alleen DVD-VR355
alleen DVD-VR355
Titelbeveiliging :
DVD-RAM(VR)
JAN/01/2007
3/4
JAN/01/2007
01:00 PR1
JAN/01/2007
XP
Uit
Aan
Titellijst
VERPL. OK TERUG
EINDE
Titellijst
Wilt u dit echt verwijderen?
(Gerelateerde afspeellijsten
worden mogelijk verwijderd.)
DVD-RAM(VR)
JAN/01/2007
3/4
JAN/01/2007 01:00 PR1
JAN/01/2007
XP
Nee
Ja
VERPL. OK TERUG
EINDE
01 JAN/01/2007 12:00 00:00:11
►
02 JAN/01/2007 12:30 00:00:09
►
03 JAN/01/2007 01:00 00:01:36
►
04 JAN/01/2007 01:30 00:00:11
►
DVD-RAM(VR)
3/4
JAN/01/2007 01:00 PR1
JAN/01/2007
XP
JAN/01/2007
Nr. Titel
Lengte Bewerken
Titellijst
VERPL. OK TERUG
EINDE
01375E-VR350,355-XFA-NL.indb 6401375E-VR350,355-XFA-NL.indb 64 2007-04-27 오후 6:42:242007-04-27 오후 6:42:24

Bewerken
Nederlands - 65
Volg onderstaande instructies om een sectie uit een titel uit de
titellijst te verwijderen.
1. Druk op de TITLE LIST toets.
Het scherm Titellijst verschijnt.
2. Druk op de toetsen ▲▼ om uit de titellijst een titelte selecteren die u
wilt wissen, en druk vervolgensop OK of op de toets ►.
3. Druk op de toetsen ▲▼ om Bewerken te selecteren en druk op OK of
op de toets ►.
Het scherm Titellijst bewerken verschijnt.
4. Druk bij het startpunt op OK.
Het beeld en de tijdvan het startpunt worden weergegeven in
hetstartpuntvenster voor sectieverwijdering.
5. Druk bij het eindpunt op OK.
Het beeld en de tijd van het eindpunt wordenweergegeven in het
eindpuntvenster voor sectieverwijdering.
6. Druk op ◄ ► om Wissen te selecteren en druk vervolgens op OK.
7. Druk op ◄ ► om Ja te selecteren en druk vervolgens op OK.
De geselecteerde sectie is verwijderd.
U keert terug naar de titellijst door op de toetsen ◄► te drukken om
Terug te selecteren.
Een deel van een titel wissen
▌
Elementen van het scherm Titellijst bewerken
c
Afspeelbalk
d
Afspeeltijd
e
Startpuntvenster sectieverwijdering en tijd
f
Eindpuntvenster sectieverwijdering en tijd
• Selecteer de start- en eindpunten van de sectiedie u wilt wissen met
de afspeelknoppen.
• Afspeelknoppen:
( , , , , )
De te wissensectie moet langer duren dan 5 seconden.
Eindpunt kan niet eerder vallen dan startpunt.
De sectie kan niet worden verwijderd alsdeze een stilstaand
beeld bevat.
■
■
■
Een hoofdstuk bewerken
▌
U kunt uw eigen hoofdstukken maken op DVD+RW's en ze bewerken
via het menu Chapter Edit (Hoofdstuk bewerken).
1. Druk op de knop TITLE LIST.
Het scherm Titellijst verschijnt.
2. Druk op de knoppen ▲▼ om een titel te selecteren die een hoofdstuk
bevat dat u wilt bewerken en druk vervolgens op OK of op de knop ►.
3. Druk op de knoppen ▲▼ om Hfd. bewrk. te selecteren en druk
vervolgens op OK of op de knop ►.
Het scherm Hoofdstuk bewerken wordt weergegeven.
alleen DVD-VR355
(VR modus)
DVD-RW(VR)
Titellijstnr. 03
00:00:02 00:00:00
00:00:02
Begin Einde Wissen Terug
►
Titellijst bewerken
Begin
Einde
VERPL. OK TERUG
EINDE
DVD-RAM(VR)
Titellijstnr. 03
00:00:02 00:00:15
00:00:15
Begin
Einde
Wissen Terug
Titellijst bewerken
Begin
Einde
VERPL. OK TERUG
EINDE
DVD-RAM(VR)
Titellijstnr. 03
Start
End
00:00:05
00:00:10
Begin
Einde
Wissen Terug
00:00:15
Wilt u dit echt verwijderen?
(Verwijderd deel kan niet worden hersteld.)
Ja
Nee
Titellijst bewerken
VERPL. OK TERUG
EINDE
DVD-RAM(VR)
Titellijstnr. 03
00:00:02 00:00:00
00:00:02
Begin
Einde
Wissen Terug
►
Titellijst bewerken
Begin
Einde
c
e
f
d
VERPL. OK TERUG
EINDE
Hoofdstuk bewerken
Toev. Terug
All.wiss.
Verborgen
Verw.
00:00:00
►
Hoofdstuk : 1/1 Bekijken
DVD+RW
VERPL. OK TERUG
EINDE
01375E-VR350,355-XFA-NL.indb 6501375E-VR350,355-XFA-NL.indb 65 2007-04-27 오후 6:42:272007-04-27 오후 6:42:27

Bewerken
Nederlands - 66
Schermelementen Hoofdstuk bewerken
1. Huidig hoofdstuknummer en status
2. Afspeelbalk
3. Afspeeltijd
4. Het menu Hoofdstuk bewerken
Als er slechts één hoofdstuk is, kan het niet worden verborgen.
Het menu Verborgen/Bekijken is niet beschikbaar als er geen
hoofdstuk in de geselecteerde titel is.
De verborgen hoofdstukken worden niet weergegeven op
bestaande dvd-spelers.
Het menu Verborgen wordt gewijzigd naar Bekijken terwijl een
hoofdstuk wordt afgespeeld. U kunt het verborgen hoofdstuk
weergeven door in het menu Bekijken op de knop OK te drukken.
■
■
■
■
4. Selecteer een hoofdstuk dat u wilt verbergen met behulp van de
afspeelknoppen.
• Afspeelknoppen:
( , , , , )
.
5. Druk op de knoppen ◄ ► om Verborgen te selecteren en druk
vervolgens op OK. Het geselecteerde hoofdstuk wordt verborgen.
• Om de bewerking te voltooien, selecteert u Terug met de knoppen
◄► en drukt u vervolgens op OK.
Een hoofdstuk verbergen
Volg stappen 1 tot 3 op pagina 66
In een titel kunt u maximaal 99 hoofdstukken maken en op een
schijf maximaal 254 hoofdstukken.
De bewerkte hoofdstukken worden alleen op bestaande dvd-
spelers weergegeven nadat u de functie Edit Compatible
(Compatibel bewerken) hebt uitgevoerd. (zie pagina 77)
Als u een hoofdstuk toevoegt, wordt de titel op dat punt gesplitst.
Als u een hoofdstuk toevoegt aan een titel die slechts één
hoofdstuk bevat, wordt een nieuw hoofdstuk gemaakt.
■
■
■
4. Selecteer het punt waar u een hoofdstuk wilt toevoegen met de
afspeelknoppen en druk vervolgens op dit punt op OK.
Telkens wanneer u op de knop OK drukt, wordt een nieuw hoofdstuk
toegevoegd.
• Afspeelknoppen:
( , , , , )
.
5. Druk op de knoppen ◄► om Terug te selecteren en druk vervolgens
op de knop OK.
De bewerkte titel zal nu het hoofdstuk bevatten dat u hebt toegevoegd.
Een hoofdstuk toevoegen
Volg stappen 1 tot 3 op pagina 66
Het eerste hoofdstuk kan niet worden verwijderd
Het menu Delete (Verwijderen) is niet beschikbaar als de
geselecteerde titel slechts één hoofdstuk bevat.
Wanneer u een hoofdstuk verwijdert, wordt alleen de
hoofdstukmarkering verwijderd, maar niet de opgenomen video.
Het verwijderen van een hoofdstuk kan niet ongedaan worden
gemaakt.
■
■
■
■
4. Selecteer een hoofdstuk dat u wilt verwijderen met behulp van de
afspeelknoppen.
• Afspeelknoppen:
( , , , , )
.
5. Druk op de knoppen ◄ ► om Verw. te selecteren en druk vervolgens
op OK. De hoofdstukken die u hebt verwijderd, zijn verdwenen uit de
bewerkte titel.
• Om de bewerking te voltooien, selecteert u Terug met de knoppen
◄ ► en drukt u vervolgens op OK.
Een hoofdstuk verwijderen
Volg stappen 1 tot 3 op pagina 66
Hoofdstuk bewerken
Toev. Terug
All.wiss.
Verborgen
Verw.
00:00:00
►
Hoofdstuk : 1/1 Bekijken
DVD+RW
c
e
f
d
VERPL. OK TERUG
EINDE
Hoofdstuk bewerken
Toev. Terug
All.wiss.
Verborgen
Verw.
Hoofdstuk : 1/2 Bekijken
DVD+RW
00:10:10
►
VERPL. OK TERUG
EINDE
Hoofdstuk bewerken
00:15:00
Toev. Terug
All.wiss.
Verborgen
Verw.
►
Hoofdstuk : 2/3 Bekijken
DVD+RW
VERPL. OK TERUG
EINDE
Hoofdstuk bewerken
00:15:00
Toev. Terug
All.wiss.
Verborgen
Verw.
►
Hoofdstuk : 2/4 Verborgen
DVD+RW
VERPL. OK TERUG
EINDE
01375E-VR350,355-XFA-NL.indb 6601375E-VR350,355-XFA-NL.indb 66 2007-04-27 오후 6:42:322007-04-27 오후 6:42:32

Bewerken
Nederlands - 67
Een titel splitsen
▌
Volg deze richtlijnen om een lange titel op te splitsen in meerdere
titels.
1. Druk op de knop TITLE LIST.
Het scherm Titellijst verschijnt.
2. Druk op de knoppen ▲▼ om een titel die u wilt splitsen te selecteren
in de titellijst en druk vervolgens op OK of op de knop ►.
3. Druk op de knoppen ▲▼ om Titel splitsen te selecteren en druk
vervolgens op OK of op de knop ►.
Het scherm Titel splitsen wordt weergegeven.
4. Selecteer het punt waar u het hoofdstuk wilt splitsen met de hulp van
de afspeelknoppen en druk vervolgens op OK.
• Afspeelknoppen:
( , , , , )
.
5. Druk op de knoppen ◄ ► om Splitsen te selecteren en druk
vervolgens op de knop OK.
6. Druk op de knoppen ◄ ► om Ja te selecteren en druk vervolgens op
de knop OK.
De geselecteerde titel is in twee titels opgesplitst.
De te verwijderen sectie moet langer duren dan vijf seconden.
■
4. Druk op de knoppen ◄ ► om All. wiss. te selecteren en druk
vervolgens op OK.
5. Druk op de knoppen ◄ ► om Ja te selecteren en druk vervolgens op
de knop OK.
Wanneer u een hoofdstuk verwijdert, wordt alleen de
hoofdstukmarkering verwijderd, maar niet de opgenomen video.
Het menu All. wiss. is niet beschikbaar als de geselecteerde titel
slechts één hoofdstuk bevat.
■
■
Alle hoofdstukken verwijderen
Volg stappen 1 tot 3 op pagina 66
alleen DVD-VR355
Hoofdstuk bewerken
Toev. Terug
All.wiss.
Verborgen
Verw.
00:00:00
►
DVD+RW
Wilt u alle hoofdstukmerktekens wissen?
Ja
Nee
VERPL. OK TERUG
EINDE
Titel splitsen
Titellijstnr. 03
Begin
00:00:00 00:00:00
00:00:00
Punt
Splitsen
Terug
►
DVD+RW
Einde
VERPL. OK TERUG
EINDE
Titel splitsen
Titellijstnr. 03
00:00:00 00:19:25
00:19:25
Punt
Splitsen
Terug
►
DVD+RW
Begin Einde
VERPL. OK TERUG
EINDE
Titel splitsen
Titellijstnr. 03
00:19:25
00:19:25
Punt
Splitsen
Terug
DVD+RW
Begin Einde
Wilt u de titel splitsen?
(Titels kunnen als ze zijn gesplitst niet
meer samengevoegd worden.)
Ja
Nee
VERPL. OK TERUG
EINDE
01375E-VR350,355-XFA-NL.indb 6701375E-VR350,355-XFA-NL.indb 67 2007-04-27 오후 6:42:402007-04-27 오후 6:42:40

Bewerken
Nederlands - 68
Geavanceerd bewerken (Playlist)
Volg onderstaande instructies om een nieuwe playlist-titel van een
opgenomen titel te maken.
1. Druk in de stopstand op de toets MENU.
2. Druk op de toetsen ▲▼ om Afspeellijst selecteren endruk op OK of
op de toets ►.
3. Druk op de toetsen ▲▼ om Nieuwe playlist te selecteren en druk op
OK of op de toets ► button.
Het scherm Scène maken verschijnt.
4. Druk bij het startpunt op OK.
•
Het beeld en de tijd van het startpunt worden weergegeven in het
startvenster.
• De geelgekleurde selectiebalk gaat naar het einditem.
• Selecteer het startpunt van de sectie waarvan u eennieuwe scène
wilt maken met de afspeelknoppen.
• Afspeelknoppen:
( , , , , )
.
5. Druk bij het eindpunt op OK.
• Het beeld en de tijd van het eindpunt worden-weergegeven in het
eindvenster.
• De geelgekleurde selectiebalk gaat naar hetmaakpictogram.
- Een nieuwe playlist maken -
6. Druk op ◄ ► om Maken te selecteren en druk vervolgens op OK.
Er verschijnt een nieuw Scène maken.
Er wordt een nu een nieuwe scène aan de huidigeplaylist toegevoegd.
- Naar het menu Playlist bewerken terugkeren -
7. Druk op ◄ ► om Terug te selecteren en druk vervolgens op OK.
Het scherm Playlist bewerken wordt weergegeven.
Een playlist maken
▌
U kunt de playlist controleren door alle scènes op het scherm
Playlist bewerken weer te geven. (zie pagina 70).
Herhaal stap 1 /tm 6 als u een nieuweplaylist wilt maken.
Herhaal stap 4 /tm 6 als u scènes van deplaylist wilt maken.
■
■
■
U kunt maximaal 99 playlisttitels maken.
Afhankelijk van het type schijf kan het weergegeven scherm iets
verschillen.
Een schijf die is opgenomen op dit apparaat met de EZ REC
MODE ingesteld op “Aan”, geeft de afspeellijst niet weer.
■
■
■
(VR modus)
Scène maken
DVD-Recorder
DVD-RAM(VR)
Scènenr. 001
00:00:02 00:00:00
00:00:02
Begin
Einde
Maken Terug
►
Titellijst : 1/7
Begin
Einde
VERPL. OK TERUG
EINDE
Scène maken
DVD-Recorder
DVD-RAM(VR)
Scènenr. 001
00:00:02 00:00:08
00:00:08
Begin
Einde Maken
Terug
ІІ
Titellijst : 1/7
Begin
Einde
VERPL. OK TERUG
EINDE
Afspeellijst bewerken
DVD-RAM(VR)
JAN/01/2007 12:00
1 Scène
JAN/01/2007 12:00
01 JAN/01/2007 12:00 00:00:06
►
Nr. Titel
Lengte
Bewerken
JAN/01/2007
1/1
VERPL. OK TERUG
EINDE
01375E-VR350,355-XFA-NL.indb 6801375E-VR350,355-XFA-NL.indb 68 2007-04-27 오후 6:42:452007-04-27 오후 6:42:45

Bewerken
Nederlands - 69
Volg onderstaande instructies om de playlisttitels afte spelen.
1. Druk op de toets PLAYLIST terwijl de schijf isgestopt.
Het scherm Playlist bewerken wordtweergegeven.
2. Druk op de toetsen ▲▼ om uit de playlist de titel teselecteren die u
wilt afspelen en druk op OK of opde toets ►.
3. Druk op de toetsen ▲▼ om Afspelen te selecterenen druk op OK of
op de toets ►.
De playlisttitels worden afgespeeld.
4. Druk op de toets STOP om het afspelen te stoppen.
Het scherm keert terug naar het scherm Playlist bewerken.
Titels in de playlist afspelen
▌
Volg de onderstaande instructies om de naam van eenplaylisttitel te
wijzigen, d.w.z. de titel van een playlisttitelte bewerken.
1. Druk op de toets PLAYLIST terwijl de schijf isgestopt.
Het scherm Playlist bewerken wordtweergegeven.
2. Druk op de toetsen ▲▼ om uit de playlist de titelte selecteren die u
wilt hernoemen en druk op OK of op de toets ►.
3. Druk op ▲▼ om Hernoemen te selecteren en druk vervolgens op OK.
Het scherm Hernoemen verschijnt.
4. Selecteer de gewenste tekens met de toetsen ▲▼ ◄ ►.
• Backspace: zet de cursor een positie terug doet hetzelfde als de
toets WISSEN.
• Spatie : voert een spatie in en zet de cursor eennaar rechts.
• Verwijderen : verwijdert het teken op de cursorpositie.
• Wissen : verwijdert alle ingevoerde tekens.
• Opslaan : registreert de ingevoerde tekens.
5.
Druk op ▲▼◄► om Opslaan te selecteren en drukvervolgens op OK.
De gewijzigde titel wordt weergegeven in het titelveldvan de
geselecteerde playlisttitel.
De naam van een playlisttitel wijzige
▌
Volg onderstaande instructies om scènes voor een playlist te
bewerken.
1. Druk op de toets PLAYLIST terwijl de schijf isgestopt.
Het scherm Playlist bewerken wordtweergegeven.
2. Druk op de toetsen ▲▼ om uit de playlist de titel teselecteren die u
wilt bewerken en druk op OK of opde toets ►.
3. Druk op de toetsen ▲▼ om Scène bew. te selecterenen druk op OK
of op de toets ►.
Het scherm Wijzig Scènewordt weergegeven.
Een scène uit de playlist bewerken
▌
(VR modus)
(VR modus)
(VR modus)
Afspeellijst bewerken
DVD-RAM(VR)
JAN/01/2007 12:00
1 Scène
JAN/01/2007 12:00
01 JAN/01/2007 12:00 00:00:03
►
02 JAN/01/2007 12:30 00:00:25
►
03 JAN/01/2007 12:0 00:00:05
►
Afspelen
Hernoemen
Scène bew.
Kopiëren
Verwijderen
Nr. Titel
Lengte
Bewerken
JAN/01/2007 3/3
VERPL. OK TERUG
EINDE
Hernoemen
DVD-Recorder
DVD-RAM(VR)
Dolphin
Opslaan
Backspace Spatie
Verwijderen
Wissen
VERPL. OK TERUG
EINDE
Afspeellijst bewerken
DVD-RAM(VR)
Dolphin
1 Scène
JAN/01/2007 12:00
Nr
.
Titel
Lengte
Bewerken
01 JAN/01/2007 12:00 00:00:03
►
02 JAN/01/2007 12:30 00:00:25
►
03 Dolphin 00:00:05
►
Dolphin
3/3
VERPL. OK TERUG
EINDE
Scène bewerkenDVD-Recorder
Scènenr. 1 / 7 Afspeellijstnr. 3
DVD-RAM(VR)
01 00:00:03
04 00:00:03
Verw.
Toev.
Verpl.
Wijzigen
Afspelen
05 00:00:11 06 00:00:04
02 00:00:42 03 00:00:04
VERPL. OK TERUG
EINDE
01375E-VR350,355-XFA-NL.indb 6901375E-VR350,355-XFA-NL.indb 69 2007-04-27 오후 6:42:502007-04-27 오후 6:42:50

Bewerken
Nederlands - 70
4. Druk op de toetsen ▲▼◄► om de scène te selecterendie u wilt
wijzigen en druk op OK.
5. Druk op ▲▼ om Wijzigen te selecteren en druk vervolgens op OK.
Het scherm Scène wijzigenwordt weergegeven.
6. Druk bij het startpunt van de scène op OK.
• Het beeld en de tijd van het startpunt worden-weergegeven in het
startvenster.
• Selecteer de start- of het eindpunt van de sectie die uwilt wijzigen
met de afspeelknoppen.
• Afspeelknoppen:
( , , , , )
.
7. Druk bij het eindpunt van de scène op OK.
• Het bee ld en de tijd van het eindpunt worden-weergegeven in het
eindvenster.
8. Druk op de toetsen ◄ ► om Wijzigen te selecteren en druk
vervolgens op OK.
• De scène die u wilt wijzigen, is gewijzigd met de geselecteerde
sectie.
Een scène wijzigen (een scène vervangen)
Follow steps 1 to 3 on page 70.
4. Druk op de toetsen ▲▼◄ ► om de scène te selecteren die u wilt
afspelen en druk op OK.
De af te spelen playlisttitel wordt geselecteerd.
5. Druk nogmaals op OK.
De geselecteerde scène wordt afgespeeld.
• U stopt het afspelen door op de toets STOP tedrukken.
Een geselecteerde scène afspelen
Follow steps 1 to 3 on page 70.
DVD-Recorder
Scènenr. 2 / 7 Afspeellijstnr. 3
DVD-RAM(VR)
01 00:00:03 02 00:00:42
Afspelen
Wijzigen
Toev.
Verw.
04 00:00:03 005 00:00:11 06 00:00:04
03 00:00:04
Scène bewerken
Verpl.
VERPL. OK TERUG
EINDE
DVD-Recorder
Scènenr. 2 / 7 Afspeellijstnr. 3
DVD-RAM(VR)
Afspelen
Wijzigen
Toev.
Verw.
Scène bewerken
04 00:00:03
01 00:00:03 02 00:00:42
05 00:00:11 06 00:00:04
03 00:00:04
Verpl.
VERPL. OK TERUG
EINDE
Scène wijzigen
DVD-Recorder
DVD-RAM(VR)
Scènenr. 002
Begin Einde
00:00:04 00:00:00
00:00:04
Begin
Einde
Wijzigen
Titellijst : 1/7
►
Annuleren
VERPL. OK TERUG
EINDE
Scène wijzigen
DVD-Recorder
DVD-RAM(VR)
Scènenr. 002
00:00:04 00:00:07
Begin
Einde
Wijzigen
Titellijst : 1/7
00:00:07
II
Annuleren
Begin
Einde
VERPL. OK TERUG
EINDE
Scène bewerken
DVD-Recorder
Scènenr. 2 / 7 Afspeellijstnr. 3
DVD-RAM(VR)
02 00:00:03
Afspelen
Wijzigen
Toev.
Verw.
04 00:00:03 05 00:00:11 06 00:00:04
03 00:00:04
Verpl.
01 00:00:03
VERPL. OK TERUG
EINDE
01375E-VR350,355-XFA-NL.indb 7001375E-VR350,355-XFA-NL.indb 70 2007-04-27 오후 6:42:532007-04-27 오후 6:42:53

Bewerken
Nederlands - 71
4. Druk op de toetsen ▲▼◄ ► om de scène te selecteren die u van
positie veranderen en druk op OK.
5. Druk op ▲▼ om Verpl. te selecteren en druk vervolgens op OK.
• Er verschijnt een geel selectievenster op de te verplaatsen scène.
6. Druk op de toetsen ▲▼ ◄ ► om de positie te selecteren waarnaar u
de geselecteerde scène wilt verplaatsen en druk op OK.
• De geselecteerde scène wordt verplaatst naar de geselecteerde
positie.
Een scène verplaatsen (de positie van een scène wijzigen)
Follow steps 1 to 3 on page 70.
4. Druk op de toetsen ▲▼◄ ► om de scène te selecteren waar u een
nieuwe scène voor wilt plaatsen en druk op OK.
Er verschijnt een geel selectievenster op de scène die uwilt toevoegen.
5. Druk op de toetsen ▲▼ om Toev. te selecteren en druk vervolgens op
OK.
Het scherm Scène toevoegenwordt weergegeven.
6. Druk bij het startpunt van de scène op OK.
• Het beeld en de tijd van het startpunt worden-weergegeven in het
startvenster.
• Selecteer het eindpunt van de sectie waar u eennieuwe scène wilt
toevoegen met de afspeelknoppen.
• Afspeelknoppen:
( , , , , )
.
7. Druk bij het eindpunt van de scène op OK.
• Het beeld en de tijd van het eindpunt worden-weergegeven in het
eindvenster.
• Druk op ◄ ► om Annuleren te selecteren en druk vervolgens op OK.
8. Druk op de toetsen ◄ ► om Toev. te selecterenen druk vervolgens op
OK.
• De sectie die u wilt toevoegen, wordt ingevoegdvoor de scène die bij
stap is geselecteerd.
Een scène toevoegen
Follow steps 1 to 3 on page 70.
Het is niet mogelijk de geselecteerde scènenaar de positie van
de volgende scène te verplaatsen, omdat de geselecteerde
scène danervoor wordt geplaatst en er niets verandert.
Afhankelijk van het type schijf kan het weergegeven scherm iets
verschillen.
■
■
Scène bewerken
DVD-Recorder
Scènenr. 2 / 7 Afspeellijstnr. 3
DVD-RAM(VR)
001 00:00:03 002 00:00:42
004 00:00:03 005 00:00:11 006 00:00:04
003 00:00:04
Afspelen
Wijzigen
Toev.
Verw.
Verpl.
VERPL. OK TERUG
EINDE
Scène bewerken
DVD-Recorder
Scènenr. 2 / 7 Afspeellijstnr. 3
DVD-RAM(VR)
01 00:00:03 02 00:00:42
06 00:00:04
05 00:00:11
04 00:00:04
03 00:00:04
Afspelen
Wijzigen
Toev.
Verw.
Verpl.
VERPL. OK TERUG
EINDE
Scène toevoegen
DVD-Recorder
DVD-RAM(VR)
Scènenr. 002
00:00:04 00:00:00
00:00:04
Titellijst : 1/7
►
Begin
Einde
Begin
Einde Toev.
Annuleren
VERPL. OK TERUG
EINDE
Scène toevoegen
DVD-Recorder
DVD-RAM(VR)
Scènenr. 002
00:00:04 00:00:07
Titellijst: 1/7
00:00:07
II
Begin
Einde
Begin
Einde
Toev.
Annuleren
VERPL. OK TERUG
EINDE
Scène bewerken
DVD-Recorder
Scènenr. 2 / 8 Afspeellijstnr. 3
DVD-RAM(VR)
01 00:00:03 02 00:00:03
05 00:00:03
06 00:00:11
04 00:00:04
03 00:00:42
Afspelen
Wijzigen
Toev.
Verw.
Verpl.
VERPL. OK TERUG
EINDE
01375E-VR350,355-XFA-NL.indb 7101375E-VR350,355-XFA-NL.indb 71 2007-04-27 오후 6:43:002007-04-27 오후 6:43:00

Bewerken
Nederlands - 72
4. Druk op de toetsen ▲▼◄ ► om de scène teselecteren die u wilt
wissenen druk op OK.
5. Druk op ▲▼ om Verw. te selecteren en druk vervolgens op OK.
Een scène wissen
Follow steps 1 to 3 on page 70.
1. Druk op de toets PLAYLIST terwijl de schijf is gestopt.
Het scherm Playlist bewerken wordt weergegeven.
2. Druk op de toetsen ▲▼ om uit de playlist de titel te selecteren die u
wilt bewerken en druk op OK of op de toets ►.
3. Druk op ▲▼ om Kopiëren te selecteren en druk vervolgens op OK.
• De titel die u kiest, wordt afgespeeld engekopieerd naar de
videoband.
4. Druk op de toets EXIT nadat de bewerking is voltooid.
Het menuscherm verdwijnt.
Een playlist naar de videorecorder kopiëren
▌
1. Druk op de toets PLAYLIST terwijl de schijfi s gestopt.
Het scherm Playlist bewerkenwordt weergegeven.
2. Druk op de toetsen ▲▼ om uit de playlist de titelte selecteren die u
wilt bewerken en druk op OK of op de toets ►.
3. Druk op ▲▼ om Verwijderen te selecteren en drukvervolgens op OK.
4. Druk op ◄ ► om Ja te selecteren en druk vervolgens op OK.
U gaat automatisch terug naar het scherm Playlistbewerken als het
verwijderen is voltooid.
De kopieerfunctie is niet toegestaan tijdens de progressieve-
scanmodus.
■
Een titel uit de playlist verwijderen(wissen)
▌
Scène bewerken
DVD-Recorder
Scènenr. 2 / 8 Afspeellijstnr. 3
DVD-RAM(VR)
01 00:00:03 02 00:00:03
06 00:00:11
05 00:00:0304 00:00:04
03 00:00:42
Afspelen
Wijzigen
Toev.
Verw.
Verpl.
VERPL. OK TERUG
EINDE
Scène bewerken
DVD-Recorder
Scènenr. 2 / 7 Afspeellijstnr. 3
DVD-RAM(VR)
01 00:00:03 02 00:00:03
06 00:00:11
05 00:00:0304 00:00:04
03 00:00:42
Afspelen
Wijzigen
Toev.
Verw.
Verpl.
VERPL. OK TERUG
EINDE
Afspeellijst bewerken
Dolphin
Dolphin
2 Scène
JAN/01/2007 01:00
Wilt u dit echt verwijderen?
Nee
Ja
DVD-RAM(VR)
VERPL. OK TERUG
EINDE
01375E-VR350,355-XFA-NL.indb 7201375E-VR350,355-XFA-NL.indb 72 2007-04-27 오후 6:43:072007-04-27 오후 6:43:07

Bewerken
Nederlands - 73
Schijfbeheer
Gebruik onderstaande instructies om een schijf eennaam te geven.
De naam van de schijf bewerken
▌
1. Druk in de stopstand op de toets MENU.
2. Druk op de toetsen ▲▼ om Schijfbeheer te selecteren en druk op
OK of op de toets ►.
3. Druk op de toetsen ▲▼ om Schijfnaam te selecterenen druk op OK
of op de toets ►.
Het scherm Naam bewerken wordt weergegeven.
4. Voer de gewenste tekens in met de toetsen ▲▼◄►.
• Backspace: zet de cursor een positie terug doet hetzelfde als de
toets WISSEN.
• Spatie : voert een spatie in en zet de cursor eennaar rechts.
• Verwijderen : verwijdert het teken op de cursorpositie.
• Wissen : verwijdert alle ingevoerde tekens.
• Opslaan : registreert de ingevoerde tekens.
5. Druk op de toetsen ▲▼ ◄ ► om Opslaan te selecteren en druk
vervolgens op OK of op de toets.
De schijf krijgt een schijfnaam.
Om de schijfnaam te bewerken, moet u de schijfbeveiliging
vooraf opheffen.
Afhankelijk van het type schijf kan hetweergegeven scherm
verschillen.
■
■
Schijfbeveiliging zorgt ervoor dat de schijven niet perongeluk
kunnen worden geformatteerd of verwijderd.
1. Druk in de stopstand op de toets MENU.
2. Druk op de toetsen ▲▼ om Schijfbeheer te selecteren en druk op
OK of op de toets ►.
3. Druk op de toetsen ▲▼ om Schijfbeveiliging te selecteren en druk
op OK of op de toets ►.
4. Druk op de toets ▲▼ om Beveiligd selecteren endruk op OK of op de
toets ►.
Schijfbeveiliging
▌
alleen DVD-VR355
Hernoemen
DVD-Recorder
DVD-RAM(VR)
Schijf
Backspace Spatie
Verwijderen
Wissen
Opslaan
VERPL. OK TERUG
EINDE
Schijfbeheer
DVD-Recorder
DVD-RAM(VR)
Titellijst
Afspeellijst
Schijfbeheer
Programma
Instellen
Kopiëren
Schijfnaam : Disc
►
Schijfbeveiliging : Niet beveiligd
►
Schijfindeling
►
Alle titellijsten verwijderen
►
VERPL. OK TERUG
EINDE
Schijfbeheer
DVD-Recorder
DVD-RAM(VR)
Titellijst
Afspeellijst
Schijfbeheer
Programma
Instellen
Kopiëren
Schijfnaam : Disc
►
Schijfbeveiliging : Beveiligd
►
Schijfindeling
►
Alle titellijsten verwijderen
►
VERPL. OK TERUG
EINDE
01375E-VR350,355-XFA-NL.indb 7301375E-VR350,355-XFA-NL.indb 73 2007-04-27 오후 6:43:102007-04-27 오후 6:43:10

Bewerken
Nederlands - 74
Gebruik deze instructies om een schijf te sluiten.
Hef eventueel eerst de schijfbeveiliging op.
Een schijf formatteren
▌
•
DVD-RAM/+RW
•
DVD-RW
1. Druk in de stopstand op de toets MENU.
2. Druk op de toetsen ▲▼ om Schijfbeheer te selecteren en druk op
OK of op de toets ►.
3. Druk op de toetsen ▲▼ om Schijfi ndeling te selecteren en druk op
OK of op de toets ►.
DVD-RAM/+RW
• Het bevestigingsbericht ‘Wilt u de schijf formatteren?’ wordt
weergegeven.
• Het bevestigingsbericht ‘Alle gegevens worden verwijderd. Wilt u
doorgaan?’ wordt weergegeven.
DVD-RW
• Het bevestigingsbericht ‘Kies opname-indeling voor DVD-RW.’ wordt
weergegeven.
• Het bevestigingsbericht ‘Alle gegevens worden verwijderd. Wilt u
doorgaan?’ wordt weergegeven.
4. Druk op de knoppen ◄ ► om Ja te selecteren en druk vervolgens op
OK.
De schijf wordt geformatteerd.
DVD-VR en DVD-V modus worden gedefi nieerd opbasis van hun
opname-indeling.
DVD-VR modus DVD-V modus
SCHIJF
DVD-RAM
DVD-RW
DVD-RW
DVD-R
alleen DVD-VR355
Nadat u met uw DVD-recorder titels op een DVD-RW/
±R
schijf hebt
opgenomen, moet de schijf nog wordenafgesloten voordat hij in andere
DVD-spelers kan worden weergegeven.
Een schijf sluiten
▌
1. Druk in de stopstand op de toets MENU.
2. Druk op de toetsen ▲▼ om Schijfbeheer te selecteren en druk op
OK of op de toets ►.
3. Druk op de toets ▲▼ om Schijf afsluiten te selecteren en druk op
OK of op de toets ►.
‘Wilt u deze schijf afsluiten?’ verschijnt.
4. Druk op de knoppen ◄ ► om Ja te selecteren en druk vervolgens
op OK. Het bevestigingsbericht “Schijf wordt afgesloten. Wilt u
doorgaan?” wordt weergegeven.
5. Druk op ◄ ► om Ja te selecteren en druk vervolgens op OK.
De schijf wordt afgesloten.
alleen DVD-VR355
Schijfbeheer
DVD-Recorder
DVD-RAM(VR)
Titellijst
Afspeellijst
Schijfbeheer
Programma
Instellen
Kopiëren
Schijfnaam : Disc
►
Schijfbeveiliging : Niet beveiligd
►
Schijfindeling
►
Alle titellijsten verwijderen
►
'Wilt u deze schijf formatteren?
Ja Nee
VERPL. OK TERUG
EINDE
Schijfbeheer
DVD-Recorder
DVD-RW(VR)
Schijfnaam :
►
Schijfbeveiliging : Niet beveiligd
►
Schijfindeling : DVD-VR
►
Schijf afsluiten
►
Alle titellijsten verwijderen
►
Titellijst
Afspeellijst
Schijfbeheer
Programma
Instellen
Kopiëren
Kies opname-indeling voor DVD-RW.
DVD-VR DVD-V
VERPL. OK TERUG
EINDE
Schijfbeheer
DVD-Recorder
DVD-RW(VR)
Schijfnaam :
►
Schijfbeveiliging : Niet beveiligd
►
Schijfindeling : DVD-VR
►
Schijf afsluiten
►
Alle titellijsten verwijderen
►
Titellijst
Afspeellijst
Schijfbeheer
Programma
Instellen
Kopiëren
Wilt u deze schijf afsluiten?
Ja Nee
VERPL. OK TERUG
EINDE
01375E-VR350,355-XFA-NL.indb 7401375E-VR350,355-XFA-NL.indb 74 2007-04-27 오후 6:43:122007-04-27 오후 6:43:12

Bewerken
Nederlands - 75
Wanneer een schijf eenmaal is afgesloten, kunt ugeen titels uit
de lijst van opnamen wissen.
Nadat de schijf is afgesloten, werkt de DVD-RW(V modus)/±R op
dezelfde manier als een DVD-video-speler.
Afhankelijk van het type schijf kan het weergegevenscherm
verschillen.
De sluitingstijd kan verschillen, afhankelijk van dehoeveelheid
gegevens die op de schijf zijnopgenomen.
De gegevens op een schijf raken beschadigd, als derecorder
wordt uitgeschakeld tijdens het sluiten.
U kunt de schijf automatisch met de EZ REC MODE afsluiten.
(Zie pagina 58.)
■
■
■
■
■
■
1. Druk in de stopstand op de toets MENU.
2. Druk op de toetsen ▲▼ om Schijfbeheer te selecteren en druk op
OK of op de toets ►.
3. Druk op de toets ▲▼ om Afsluiten schijf ongedaan maken te
selecteren en druk op OK of op de toets ►.
Het bericht ‘Afsluiten schijf ongedaan maken?’ verschijnt.
4. Druk op de knoppen ◄ ► om Ja te selecteren en druk vervolgens
op OK. Het bevestigingsbericht “Afsluiten van schijf wordt ongedaan
gemaakt. Wilt u doorgaan?” wordt weergegeven.
5. Druk op ◄ ► om Ja te selecteren en druk vervolgens op de toets OK.
Het sluiten van de schijf wordt ongedaan gemaakt.
Een DVD-RW kan worden afgesloten of hetsluiten kan ongedaan
worden gemaakt in deV modus.
Een DVD-RW kan worden gesloten of hetsluiten kan ongedaan
worden gemaakt in de VR modus.
■
■
Sluiten Ongedaan maken
Markeren DVD-Video(RW) DVD-RW(V modus)
Bewerking Dezelfde als DVD-video
Extra opname, beveiliging en
verwijdering is mogelijk.
Sluiten Ongedaan maken
Markeren DVD-RW(VR:A) DVD-RW(VR mode)
Bewerking
Extra opname,
verwijdering, bewerking en
beveiligingis niet mogelijk.
Extra opname,
verwijdering, bewerking en
beveiligingis mogelijk.
Sluiten van een schijf ongedaan-maken
(V/VR modus)
▌
Schijfbeheer
DVD-Recorder
DVD-RW(VR:F)
Schijfnaam :
►
Schijfindeling : DVD-VR
►
Afsluiten schijf ongedaan maken
►
Titellijst
Afspeellijst
Schijfbeheer
Programma
Instellen
Kopiëren
VERPL. OK TERUG
EINDE
Afsluiten schijf ongedaan maken?
Ja Nee
01375E-VR350,355-XFA-NL.indb 7501375E-VR350,355-XFA-NL.indb 75 2007-04-27 오후 6:43:142007-04-27 오후 6:43:14

Bewerken
Nederlands - 76
Als u Chapter Edit (Hoofdstuk bewerken) niet uitvoert, wordt het
bevestigingsbericht "U hoeft Compatibel bewerken niet uit te
voeren" weergegeven.
■
1. Druk in de stopstand op de toets MENU.
2. Druk op de toetsen ▲▼ om Schijfbeheer te selecterenen druk op OK
of op de toets ►.
3. Druk op de toets ▲▼ om Alle titellijsten verwijderen te selecteren
en druk op OK of op de toets ►.
• Het bevestigingsbericht ‘Wilt u alle titellijsten verwijderen?’ verschijnt.
• Bij een beveiligde titel werkt de functie Alletitellijsten wissenniet.
Ook als de lijst een titelbevat met een stilstaand beeld, zal die
functieniet werken.
Als u een beveiligde titel wilt wissen, schakeltu de beveiliging ervoor uit
om het item te ontgrendelen.
4. Druk op ◄ ► om Ja te selecteren en druk vervolgens op OK.
Alle titellijsten worden verwijderd.
Alle Titellijsten Verwijderen
▌
alleen DVD-VR355
Bij DVD+RW-schijven moet deze functie worden uitgevoerd om
bewerkte hoofdstukken of titels op een standaard dvd-speler te
bekijken
Compatibel bewerken
▌
1. Druk vanuit de stopstand op de knop MENU van de afstandsbediening.
2. Druk op de knoppen ▲▼ om Schijfbeheer te selecteren en druk
vervolgens op OK of op de knop ►.
3. Druk op de knoppen ▲▼ om Compatibiliteit bewerken te selecteren
en druk vervolgens op OK of op de knop ►.
4. Druk op de knoppen ◄► om Ja te selecteren en druk vervolgens op
de knop OK.
Het proces voor Compatibel bewerken wordt gestart.
Nadat u Compatibel bewerken hebt uitgevoerd, kunt u naar het
titelmenu van de schijf gaan door op de knop TITLE MENU te drukken.
alleen DVD-VR355
Schijfbeheer
DVD-Recorder
DVD-RAM(VR)
Titellijst
Afspeellijst
Schijfbeheer
Programma
Instellen
Kopiëren
Schijfnaam : Disc
►
Schijfbeveiliging : Niet beveiligd
►
Schijfindeling
►
Alle titellijsten verwijderen
►
Wilt u alle titellijsten verwijderen?
Ja Nee
VERPL. OK TERUG
EINDE
Schijfbeheer
DVD-Recorder
Titellijst
Schijfbeheer
Programma
Instellen
DVD+RW
Schijfnaam :
►
Schijfindeling
►
Compatibiliteit bewerken
►
Wilt u de compatibiliteit bewerken?
Dit kan langer dan een uur duren
afhankelijk van de configuratie.
Nee
Ja
VERPL. OK TERUG
EINDE
01375E-VR350,355-XFA-NL.indb 7601375E-VR350,355-XFA-NL.indb 76 2007-04-27 오후 6:43:162007-04-27 오후 6:43:16

Naslag
Nederlands - 77
Naslag
Problemen oplossen (DVD)
Als het product niet goed werkt, gaat u de onderstaande controlepunten na voordat u contact opneemt
meteen erkend servicecentrum van Samsung.
Probleem Verklaring/oplossing
Geen stroom.
• Controleer of de netstekker stevig in het stopcontact zit.
• Ga na of de toets
/I de DVD- en videorecorder is ingedrukt.
De invoer wordt
even- weergegeven
wanneerhet apparaat
wordting-eschakeld.
Nadat de DVD- en videorecorder is ingeschakeld, duurt het even voordat
dezegeïnitialiseerd is.
Als de functie 'Quick recording' (snel opnemen) is ingeschakeld, wordt de DVD-
en videorecorder snel ingeschakeld zodat u onmiddellijk het gewenste kanaal kunt
opnemen. (zie pagina 33)
Ik kan geen tv-
programma’s
opnemen.
• Controleer of de netstekker stevig in het stopcontact zit.
• Hebt u de programma-instellingen van de DVD- en videorecorder correct ingesteld?
• Ga na hoeveel vrije ruimte de schijf bevat.
• Controleer of de antennekabel is aangesloten.
De timer-opname
werkt niet goed.
• Controleer nogmaals de instellingen voor de opnametijd, de eindtijd en de huidige tijd.
• Het opnemen wordt geannuleerd als de stroomvoorziening wordt onderbroken
vanwege een stroomstoring of een andere vergelijkbare reden.
Ik kan niets opnemen.
• Controleer of de schijf is geformatteerd. Dit product kan alleen op geformatteerde
schijvenopnemen.
• Ga na of de schijf voldoende vrije-schijfruimte bevat.
Er gebeurt niets als
ikop de toets REC
druk.
Als een programma tegen kopiëren is beveiligd, kunt u dit niet kopiëren.
Ik ben de toegan-
gscode voorhet
kinder-slotvergeten.
Druk tegelijkertijd op de toetsen PROG (
/ ) van de DVD-recorder en de video als
deze zijn ingeschakeld, en druk vervolgens op de toets STANDBY/ON.
Alle instellingen, inclusief de toegangscode, worden teruggezet in de fabrieksinstellingen.
Gebruik deze alleen, als dit echt vereist is.
(deze functie is alleen beschikbaar als er geen schijf is geplaatst).
Ik kan de schijf
nietafspelen.
• Controleer of de schijf is geplaatst met het etiket aan de bovenzijde.
• Controleer de regiocode van de DVD-schijf.
• Deze DVD- en videorecorder kan sommige schijftypen niet afspelen.
Geen geluid.
• Speelt u een programma vertraagd af of slaat u scènes over?
Als u een programma met een andere snelheid dan de normale snelheid afspeelt,
hoort u geen geluid. (Behalve voor het afspelen met vooruit zoeken (Snel 1) en als u
MPEG4-bestanden scant, hoort u in geen enkele modus geluid.)
• Controleer de aansluitingen en de oorspronkelijke instellingen.
• Controleer of de schijf is beschadigd.
Maak de schijf schoon indien nodig.
• Controleer of de schijf is geplaatst met het etiket aan de bovenzijde.
01375E-VR350,355-XFA-NL.indb 7701375E-VR350,355-XFA-NL.indb 77 2007-04-27 오후 6:43:172007-04-27 오후 6:43:17

Naslag
Nederlands - 78
Problemen oplossen (DVD)
Probleem Verklaring/oplossing
Het pictogram
wordt op het scherm-
weergegeven.
De bewerking of functie is niet mogelijk door een van de onderstaande redenen:
(1) De DVD-schijf ondersteunt de functie niet (bijvoorbeeld beeldhoeken).
(2) U hebt een titel, hoofdstuk of zoektijd gevraagd buiten het toegestane bereik.
De instellingen vandea
fspeelmodus zijn anders
dan de instellingen die
met het menu Instelling
zijn geconfi gureerd.
De schijf ondersteunt niet alle geselecteerde functies.
In dit geval werken sommige functies niet goed die u met het menu Instelling
hebtgeconfi gureerd.
Ik kan de beeldver-
houding nietwijzigen.
De beeldverhouding voor DVD-schijven staat vast.
Er is geen audiouitvoer.
Controleer of u de juiste opties voor digitale uitvoer heeft geselecteerd in het menu
Optiesvoor audio-uitvoer.
Er is geen video- ofaudio-
uitvoer. De schijfl ade
wordt na2 tot 5 seconden-
geopend.
Hebt u de DVD- en videorecorder plotseling van een koude locatie naar een warme
plaatsverplaatst? Stop in dat geval de stekker niet in het stopcontact en wacht twee uur.
Plaats vervolgens de schijf en probeer deze opnieuw af te spelen. Alles zal correct
werken wanneer de condensatie is verdampt.
De beeldhoekbewerkin-
gwerkt niet tijdens het
afspelen van een DVD-
schijf.
Beeldhoekbewerking is alleen beschikbaar wanneer de schijf beelden bevat die met
verschillende beeldhoeken zijn vastgelegd.
De schijf draait, maar er
worden alleen beelden
vanslechte kwaliteit of
helemaalgeen beelden
weergegeven.
• Controleer of de schijf beschadigd is of dat er vreemde stoffen op zitten.
• Sommige schijven van slechte kwaliteit kunnen niet worden afgespeeld.
• Als een donkere scène plotseling helder wordt, kan het scherm tijdelijk trillen.
Dit is echtergeen mankement.
De gewenste audio-
taalen ondertitel-
ingstaalworden niet
afgespeeld.
Audio- en ondertitelingstalen zijn niet schijfspecifi ek.
Alleen het geluid en de ondertitelingstalen op een DVD-schijf zijn beschikbaar en
wordenop het schijfmenu afgespeeld.
Er is geen
progressieveuitvoer.
• Controleer of PS op het voorpaneel wordt weergegeven.
• Zorg ervoor dat u de componentvideo-uitvoer wijzigt met de toetsProgressive (Progre
ssief) wanneer de schijf is gestopt.
De afstandsbedienin-
gwerkt niet.
• Wijs de afstandsbediening naar de sensor van de afstandsbediening op de DVD-
envideorecorder. Bedien deze binnen een bepaalde afstand (5m).
Verwijder obstakels tussen de DVD- en videorecorder en de afstandsbediening.
• Controleer of de batterijen leeg zijn.
Overige problemen
• Lees de inhoudsopgave en zoek en lees de paragrafen die het probleem omschrijven
envolg de gegeven richtlijnen.
• Zet het apparaat uit en weer aan.
• Neem contact op met het plaatselijke Samsung-servicecentrum als het probleem aanhoudt.
Er is geen HDM-Iuitvoer.
(alleen DVD-VR355)
• Controleer of HDMI voor de video-uitgang is ingeschakeld.
• Controleer de aansluiting tussen de tv en de HDMI-aansluiting van de DVD- en
videorecorder.
• Controleer of uw tv deze 576p/720p/1080i -DVD- en videorecorder ondersteunt.
Abnormaal HDMI-
uitvoerscherm.
(alleen DVD-VR355)
• Als er sneeuw te zien is op het scherm, betekent dit dat de tv geen HDCP (High-band-
width Digital Content Protection) ondersteunt.
HDMI-uitvoertrillingen
(alleen DVD-VR355)
• Controleer of uw tv goed is ingesteld.
• Trillingen van het beeld kunnen optreden wanneer de beeldsnelheid wordt omgezet van
50Hz naar 60Hz voor 720P/1080i HDMI-uitvoer (High Defi nition Multimedia Interface).
• Zie de gebruiksaanwijzing van uw tv voor meer informatie.
01375E-VR350,355-XFA-NL.indb 7801375E-VR350,355-XFA-NL.indb 78 2007-04-27 오후 6:43:192007-04-27 오후 6:43:19

Naslag
Nederlands - 79
Problemen oplossen (VIDEO)
Voer de volgende eenvoudige controles uit voordat u contact opneemt met een erkend Samsung-
servicecentrum.
Probleem Verklaring/oplossing
Geen stroom.
• Controleer of de stekker in het stopcontact zit.
• Hebt u op de toets
/I gedrukt?
U kunt geen videocassette plaatsen.
• Een videocassette moet met het label aan de bovenzijde en het
wispreventielipje naar u toe worden geplaatst.
Het televisieprogramma is
nietopgenomen.
• Controleer de antenneaansluitingen van de DVD- en videorecorder.
• Is de DVD- en videorecorder-tuner correct ingesteld?
• Controleer of het wispreventielipje op de cassette intact is.
Timer-opname is mislukt.
• Controleer nogmaals de instellingen voor de start-/stoptijd van de
opname en de huidige tijd.
• Controleer of u een band hebt geplaatst met voldoende opnametijd.
Er is geen afspeelbeeld of het beeld is
vervormd.
• Controleer of u een vooraf opgenomen band gebruikt.
U kunt geen normale uitzendingen
bekijken.
Ruisstrepen bij het afspelen.
• Controleer de externe instelling en die van de tuner. Deze moet op
tunerstaan.
• Controleer de antenneaansluitingen van de tv.
• Druk op de toetsen PROG/TRK (
/ ) om dit effect te minimaliseren.
Wanneer tijdens het afspelen de toets
►II wordt ingedrukt, heeft het stilstaande
beeld zeer veel ruisstrepen.
• Bij een stilstaand beeld kunnen er “ruisstrepen” ontstaan, afhankelijk
van de conditie van de band. Druk tijdens het vertraagd afspelen op de
toetsen PROG/TRK (
/ ) om dit effect te minimaliseren.
Reinigen van de videokop
• Als meerdere cassettes slechte beelden geven, moeten de videokoppen-
worden gereinigd. Doe dit alleen als dit probleem zich voordoet. Lees bij
het reinigen van de videokoppen alle instructies die bij debijbehorende
video zijn bijgeleverd. Als u de koppen op een onjuistemanier reinigt,
kunt u deze permanent beschadigen.
Als u het probleem na het lezen van bovenstaande instructies niet hebt kunnen oplossen, noteer dan:
• Het model en het serienummer op de achterkant van de DVD- en videorecorder
• De garantiebepalingen
• Een duidelijke omschrijving van het probleem
Neem daarna contact op met het dichtstbijzijnde erkende SAMSUNG-servicecentrum.
01375E-VR350,355-XFA-NL.indb 7901375E-VR350,355-XFA-NL.indb 79 2007-04-27 오후 6:43:202007-04-27 오후 6:43:20

Naslag
Nederlands - 80
Specifi caties
Algemeen
Stroomvereisten AC 110 - 240V, 50/60Hz
Energieverbruik 30 Watts
Gewicht 4.8 Kg
Afmetingen 430 mm (B) X 321 mm (D) X 79(H)
Bedrijfstemperatuur. +5°C tot +35°C
Overige condities
Houd het apparaat horizontaal als dit is ingeschakeld. Zorgtijd ens
gebruik voor een luchtvochtigheid van minder dan 75%.
Ingang
Video-ingang (achterkant) Europese scartaansluiting: 1,0Vp-p (ongebalanceerd) 75Ω
Audio-ingang (achterkant) Europese scartaansluiting: -8dBm, 47Kohm ongebalanceerd
Ingang aan voorkant RCA-aansluiting, DV
Uitgang
RF-uitgang UHF 21-69 (Beginkanall 36)
Audio (DVD, video) RCA-ingang, Europese scartaansluiting, audio L/R
Audio (alleen DVD) Digitale audio-uitgang OPTICALCOAXIAL
Video (DVD, video)
RCA-aansluiting, Euro Scart-aansluiting (Composite,RGB),
S-Video-uitgang, Component-uitgang HDMI (576p, 720p, 1080i)
(alleen DVD-VR355)
Videorecorder
Tape-indeling VHS-videoband
Kleursysteem PAL
Tuningsysteem B/G, D/K, I
Video S/N Boven de 43dB (standaardopname)
Resolutie Meer dan 240 lijnen (standaardopname)
Audio S/N Boven de 68dB (Hi-Fi), 39dB(Mono)
DVD
Eigenschappen audiofrequentie
20Hz-20KHz (Hi-Fi)
Indeling beeldcompressie MPEG-II
Indeling audiocompressie Dolby AC-3 256kbps
Opnamekwaliteit XP (8 Mbps), SP (4 Mbps), LP (2 Mbps), EP (1.2/0.8 Mbps)
Video S/N Verhouding min. 50dB bij standaardopname
Audio S/N Verhouding min. 75dB
Eigenschappen audiofrequentie
20 Hz ~ 20 KHz
Audio-uitgang
Bij DVD-schijven worden audiosignalen die met een samplingfrequentie van 96kHz zijn opgenomen, geconverteerd
naar en uitgevoerd met 48kHz.
Schijftype DVD VCD AUDIO-CD (CD-DA)
Analoge audio-uitgang 48 / 96KHz 44.1KHz 44.1KHz
Digitale audio-uitgang 48KHz 44.1KHz 44.1KHz
01375E-VR350,355-XFA-NL.indb 8001375E-VR350,355-XFA-NL.indb 80 2007-04-27 오후 6:43:212007-04-27 오후 6:43:21

Contact SAMSUNG WORLD WIDE
If you have any questions or comments relating to Samsung products, please contact the SAMSUNG
customer care centre.
Contact Samsung wereldwijd
Wanneer u suggesties of vragen heeft met betrekking tot Samsung producten, gelieve contact op te nemen
met de consumenten dienst van Samsung.
Region Country Customer Care Center Web Site
North America
CANADA 1-800-SAMSUNG (7267864) www.samsung.com/ca
MEXICO 01-800-SAMSUNG (7267864) www.samsung.com/mx
U.S.A 1-800-SAMSUNG (7267864) www.samsung.com
Latin America
ARGENTINE 0800-333-3733 www.samsung.com/ar
BRAZIL
0800-124-421
4004-0000
www.samsung.com/br
CHILE 800-726-7864 (SAMSUNG) www.samsung.com/cl
COSTA RICA 0-800-507-7267 www.samsung.com/latin
ECUADOR 1-800-10-7267 www.samsung.com/latin
EL SALVADOR 800-6225 www.samsung.com/latin
GUATEMALA 1-800-299-0013 www.samsung.com/latin
JAMAICA 1-800-234-7267 www.samsung.com/latin
PANAMA 800-7267 www.samsung.com/latin
PUERTO RICO 1-800-682-3180 www.samsung.com/latin
REP. DOMINICA 1-800-751-2676 www.samsung.com/latin
TRINIDAD & TOBAGO 1-800-7267-864 www.samsung.com/latin
VENEZUELA 0-800-100-5303 www.samsung.com/latin
COLOMBIA 01-8000112112 www.samsung.com.co
Europe
BELGIUM 02 201 2418 www.samsung.com/be
CZECH REPUBLIC
844 000 844
Distributor pro Českou republiku :
Samsung Zrt., česka organizační složka
Vyskočilova 4, 14000 Praha 4
www.samsung.com/cz
DENMARK 70 70 19 70 www.samsung.com/dk
FINLAND 030-6227 515 www.samsung.com/fi
FRANCE
3260 SAMSUNG or
08 25 08 65 65 (€ 0,15/Min)
www.samsung.com/fr
GERMANY 01805 - 121213 (€ 0,14/Min) www.samsung.de
HUNGARY 06-80-SAMSUNG (7267864) www.samsung.com/hu
ITALIA 800-SAMSUNG (7267864) www.samsung.com/it
LUXEMBURG 0032 (0)2 201 24 18 www.samsung.lu
NETHERLANDS 0900 20 200 88 (€ 0,10/Min) www.samsung.com/nl
NORWAY 815-56 480 www.samsung.com/no
POLAND 0 801 801 881 www.samsung.com/pl
PORTUGAL 80 8 200 128 www.samsung.com/pt
SLOVAKIA 0800-SAMSUNG (726786) www.samsung.com/sk
SPAIN 902 10 11 30 www.samsung.com/es
SWEDEN 0771-400 200 www.samsung.com/se
U.K 0870 SAMSUNG (7267864) www.samsung.com/uk
Republic of Ireland 0818 717 100 www.samsung.com/uk
Switzerland 0800-7267864 www.samsung.com/ch
CIS
RUSSIA 8-800-200-0400 www.samsung.ru
KAZAHSTAN 8-800-080-1188 www.samsung.kz
UZBEKISTAN 8-800-120-0400 www.samsung.uz
UKRAINE 8-800-502-0000 www.samsung.com/ur
LITHUANIA 8-800-77777 www.samsung.lt
LATVIA 800-7267 www.samsung.com/lv/index.htm
ESTONIA 800-7267 www.samsung.ee
Asia Pacifi c
AUSTRALIA 1300 362 603 www.samsung.com/au
CHINA 800-810-5858, 010-6475 1880 www.samsung.com.cn
HONG KONG 3698 - 4698 www.samsung.com/hk
INDIA
3030 8282
1800 110011
www.samsung.com/in
INDONESIA 0800-112-8888 www.samsung.com/id
JAPAN 0120-327-527 www.samsung.com/jp
MALAYSIA 1800-88-9999 www.samsung.com/my
PHILIPPINES 1800-10-SAMSUNG (7267864) www.samsung.com/ph
SINGAPORE 1800-SAMSUNG (7267864) www.samsung.com/sg
THAILAND
1800-29-3232
02-689-3232
www.samsung.com/th
TAIWAN 0800-329-999 www.samsung.com/tw
VIETNAM 1 800 588 889 www.samsung.com/vn
Middle East & Africa
SOUTH AFRICA 0860 7267864 (SAMSUNG) www.samsung.com/za
U.A.E
800SAMSUNG (7267864)
8000-4726
www.samsung.com/mea
01375E-VR350,355-XFA-NL.indb 8101375E-VR350,355-XFA-NL.indb 81 2007-04-27 오후 6:43:222007-04-27 오후 6:43:22

AK68-01375E
Correcte verwijdering van dit product
(elektrische & elektronische afvalapparatuur)
Dit merkteken op het product of het bijbehorende informatiemateriaal duidt erop dat het niet met
anderhuis-houdelijk afval verwijderd moet worden aan het einde van zijn gebruiksduur. Om mogelijke
schadeaan het milieu of de menselijke gezondheid door ongecontroleerde afvalverwijdering te voorkomen,
moetu dit product van andere soorten afval scheiden en op een verantwoorde manier recyclen, zodat
hetduurzame hergebruik van materiaalbronnen wordt bevorderd.
Huishoudelijke gebruikers moeten contact opnemen met de winkel waar ze dit product hebben gekocht
ofmet de gemeente waar ze wonen om te vernemen waar en hoe ze dit product milieuvriendelijk
kunnenlaten recyclen.
Zakelijke gebruikers moeten contact opnemen met hun leverancier en de algemene voorwaarden van
dekoopovereenkomsten nalezen. Dit product moet niet worden gemengd met ander bedrijfsafval voor
verwijdering.
English Nederlands
01375E-VR350,355-XFA-NL.indb 8201375E-VR350,355-XFA-NL.indb 82 2007-04-27 오후 6:43:242007-04-27 오후 6:43:24
-
 1
1
-
 2
2
-
 3
3
-
 4
4
-
 5
5
-
 6
6
-
 7
7
-
 8
8
-
 9
9
-
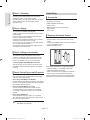 10
10
-
 11
11
-
 12
12
-
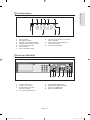 13
13
-
 14
14
-
 15
15
-
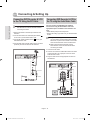 16
16
-
 17
17
-
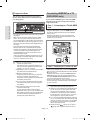 18
18
-
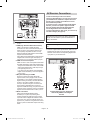 19
19
-
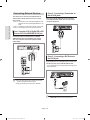 20
20
-
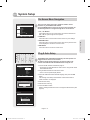 21
21
-
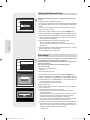 22
22
-
 23
23
-
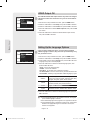 24
24
-
 25
25
-
 26
26
-
 27
27
-
 28
28
-
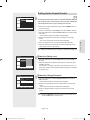 29
29
-
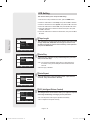 30
30
-
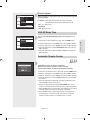 31
31
-
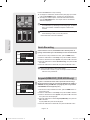 32
32
-
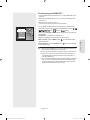 33
33
-
 34
34
-
 35
35
-
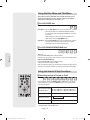 36
36
-
 37
37
-
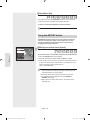 38
38
-
 39
39
-
 40
40
-
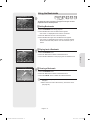 41
41
-
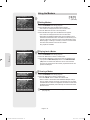 42
42
-
 43
43
-
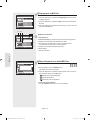 44
44
-
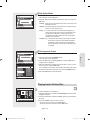 45
45
-
 46
46
-
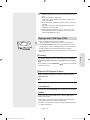 47
47
-
 48
48
-
 49
49
-
 50
50
-
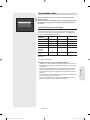 51
51
-
 52
52
-
 53
53
-
 54
54
-
 55
55
-
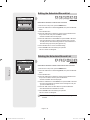 56
56
-
 57
57
-
 58
58
-
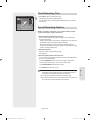 59
59
-
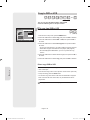 60
60
-
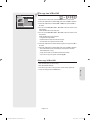 61
61
-
 62
62
-
 63
63
-
 64
64
-
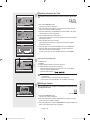 65
65
-
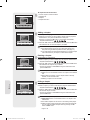 66
66
-
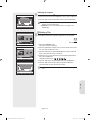 67
67
-
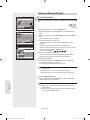 68
68
-
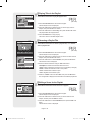 69
69
-
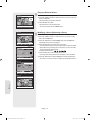 70
70
-
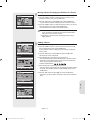 71
71
-
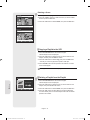 72
72
-
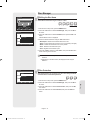 73
73
-
 74
74
-
 75
75
-
 76
76
-
 77
77
-
 78
78
-
 79
79
-
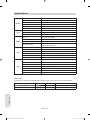 80
80
-
 81
81
-
 82
82
-
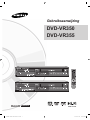 83
83
-
 84
84
-
 85
85
-
 86
86
-
 87
87
-
 88
88
-
 89
89
-
 90
90
-
 91
91
-
 92
92
-
 93
93
-
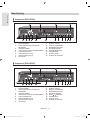 94
94
-
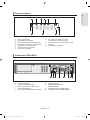 95
95
-
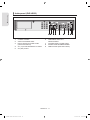 96
96
-
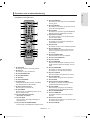 97
97
-
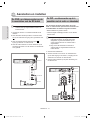 98
98
-
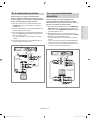 99
99
-
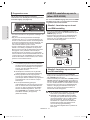 100
100
-
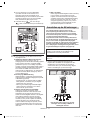 101
101
-
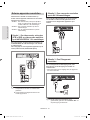 102
102
-
 103
103
-
 104
104
-
 105
105
-
 106
106
-
 107
107
-
 108
108
-
 109
109
-
 110
110
-
 111
111
-
 112
112
-
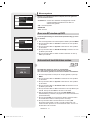 113
113
-
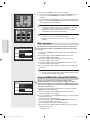 114
114
-
 115
115
-
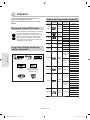 116
116
-
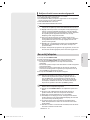 117
117
-
 118
118
-
 119
119
-
 120
120
-
 121
121
-
 122
122
-
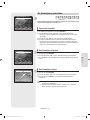 123
123
-
 124
124
-
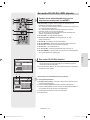 125
125
-
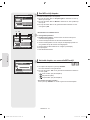 126
126
-
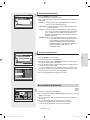 127
127
-
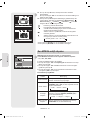 128
128
-
 129
129
-
 130
130
-
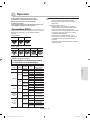 131
131
-
 132
132
-
 133
133
-
 134
134
-
 135
135
-
 136
136
-
 137
137
-
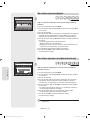 138
138
-
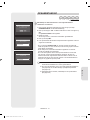 139
139
-
 140
140
-
 141
141
-
 142
142
-
 143
143
-
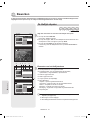 144
144
-
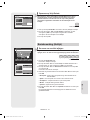 145
145
-
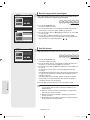 146
146
-
 147
147
-
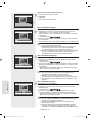 148
148
-
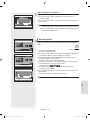 149
149
-
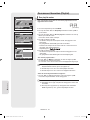 150
150
-
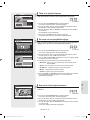 151
151
-
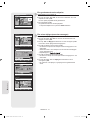 152
152
-
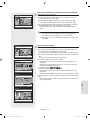 153
153
-
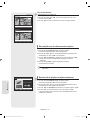 154
154
-
 155
155
-
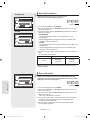 156
156
-
 157
157
-
 158
158
-
 159
159
-
 160
160
-
 161
161
-
 162
162
-
 163
163
-
 164
164


