probst FXAH-120-GRABO-GREENLINE Handleiding
- Type
- Handleiding

FLIEGUAN-AKKU-HANDY
FXAH-120-GRABO-GREENLINE
DE | Betriebsanleitung
GB | Operating Instructions
FR | Instructionsd‘emploi
IT | Istruzioni d’uso
PL | Instrukcja Obsługi
ES | Instrucciones de uso
NL | Bedrijfshandleiding
58500016 V5


58500016
V5
Original Betriebsanleitung
FXAH-120-GRABO-GREENLINE
DE
I
Betriebsanleitung

Inhalt
58500016
2 / 17
DE
Inhalt
1 EG-Konformitätserklärung .................................................................................................................... 3
2 Sicherheit ................................................................................................................................................ 4
2.1 Sicherheitshinweise .......................................................................................................................... 4
2.2 Sicherheitskennzeichnung ............................................................................................................... 4
2.3 Persönliche Sicherheitsmaßnahmen ............................................................................................... 4
2.4 Schutzausrüstung ............................................................................................................................. 4
2.5 Unfallschutz ...................................................................................................................................... 5
2.6 Sicherheit im Betrieb ........................................................................................................................ 5
2.6.1 Eigenmächtige Umbauten ............................................................................................................ 5
2.7 Akku Sicherheit ................................................................................................................................ 6
3 Allgemeines ............................................................................................................................................ 7
3.1 Bestimmungsgemäßer Einsatz ........................................................................................................ 7
3.2 Technische Daten ............................................................................................................................ 9
3.2.1 Allgemein ..................................................................................................................................... 9
3.2.2 Ladegerät ..................................................................................................................................... 9
3.2.3 Lieferumfang ................................................................................................................................ 9
4 Bedienung ............................................................................................................................................. 10
4.1 Allgemein ........................................................................................................................................ 10
4.1.1 Lasten heben ............................................................................................................................. 10
4.1.2 Lasten ablegen .......................................................................................................................... 10
4.2 Gerätebedienung ............................................................................................................................ 11
4.2.1 Verbinden eines Tragegurtes mit dem Gerät ............................................................................. 11
4.2.2 Ersetzen der Gummischaumdichtung ........................................................................................ 11
4.2.3 Filter wechseln ........................................................................................................................... 11
4.2.4 Akku wechseln ........................................................................................................................... 12
4.2.5 Akku aufladen ............................................................................................................................ 12
4.2.6 Inbetriebnahme .......................................................................................................................... 13
5 Wartung und Pflege.............................................................................................................................. 14
5.1 Saugplatte ...................................................................................................................................... 14
5.2 Dichtheitsprüfung ........................................................................................................................... 14
5.3 Jährliche Prüfung ........................................................................................................................... 14
5.4 Hinweis zum Typenschild ............................................................................................................... 14
5.5 Hinweis zur Vermietung/Verleihung von PROBST-Geräten .......................................................... 14
6 Entsorgung / Recycling von Geräten und Maschinen ...................................................................... 14
7 Über den Entwickler ............................................................................................................................. 15
8 Anwendungsbeispiele für FXAH-120-GRABO-GREENLINE ............................................................ 16
Änderungen gegenüber den Angaben und Abbildungen in der Betriebsanleitung sind vorbehalten.

EG-Konformitätserklärung
58500016
3 / 17
DE
1 EG-Konformitätserklärung
Bezeichnung:
Typ:
Artikel-Nr.:
FLIEGUAN-AKKU-HANDY FXAH-120-GRABO-GREENLINE
FXAH-120-GRABO-GREENLINE
58500016
Hersteller:
Probst GmbH
Gottlieb-Daimler-Straße 6
71729 Erdmannhausen, Germany
info@probst-handling.de
www.probst-handling.com
Die vorstehend bezeichnete Maschine entspricht den einschlägigen Vorgaben nachfolgender EU-Richtlinien:
2006/42/EG (Maschinenrichtlinie)
2014/30/EU (Elektromagnetische Verträglichkeit)
DIN EN 1012-1 / DIN EN 1012-2
Kompressoren und Vakuumpumpen; Sicherheitsanforderungen Teil 1 und 2.
Dokumentationsbevollmächtigter:
Name: Jean Holderied
Anschrift: Probst GmbH; Gottlieb-Daimler-Straße 6; 71729 Erdmannhausen, Germany
Unterschrift, Angaben zum Unterzeichner:
Erdmannhausen, 21.11.2023..........................................................................
(Eric Wilhelm, Geschäftsführer)

Sicherheit
58500016
4 / 17
DE
2 Sicherheit
2.1 Sicherheitshinweise
Lebensgefahr!
Bezeichnet eine Gefahr. Wenn sie nicht gemieden wird, sind Tod und schwerste Verletzungen die
Folge.
Gefährliche Situation!
Bezeichnet eine gefährliche Situation. Wenn sie nicht gemieden wird, können Verletzungen oder
Sachschäden die Folge sein.
Verbot!
Bezeichnet ein Verbot. Wenn es nicht eingehalten wird, sind Tod und schwerste Verletzungen, oder
Sachschäden die Folge.
Wichtige Informationen oder nützliche Tipps zum Gebrauch.
2.2 Sicherheitskennzeichnung
GEBOTSZEICHEN
Symbol
Bedeutung
Bestell-Nr.
Größe
Jeder Bediener muss die Bedienungsanleitung für das Gerät mit
den Sicherheitsvorschriften gelesen und verstanden haben.
29040665
29040666
29041049
Ø 30 mm
Ø 50 mm
Ø 80 mm
2.3 Persönliche Sicherheitsmaßnahmen
• Jeder Bediener muss die Bedienungsanleitung für das Gerät mit den Sicherheitsvorschriften
gelesen und verstanden haben.
• Das Gerät und alle übergeordneten Geräte in/an die das Gerät eingebaut ist, dürfen nur von dafür
beauftragten und qualifizierten Personen betrieben werden.
• Es dürfen nur Geräte mit Handgriffen manuell geführt werden.
Ansonsten besteht Verletzungsgefahr der Hände!
2.4 Schutzausrüstung
Die Schutzausrüstung besteht gemäß den
sicherheitstechnischen Anforderungen aus:
• Schutzkleidung
• Schutzhandschuhe
• Sicherheitsschuhe

Sicherheit
58500016
5 / 17
DE
2.5 Unfallschutz
• Arbeitsbereich für unbefugte Personen, insbesondere Kinder, weiträumig absichern.
• Vorsicht bei Gewitter – Gefahr durch Blitzschlag!
Je nach Intensität des Gewitters gegebenenfalls die Arbeit mit dem Geräte einstellen.
• Arbeitsbereich ausreichend beleuchten.
• Vorsicht bei nassen, angefrorenen, vereisten und verschmutzten Baustoffen!
Es besteht die Gefahr des Herausrutschens des Greifgutes. → UNFALLGEFAHR!
2.6 Sicherheit im Betrieb
2.6.1 Eigenmächtige Umbauten
Eigenmächtige Umbauten am Gerät oder der Einsatz von eventuell selbstgebauten
Zusatzvorrichtungen gefährden Leib und Leben und sind deshalb grundsätzlich verboten!

Sicherheit
58500016
6 / 17
DE
2.7 Akku Sicherheit
• Es darf nur der Akku verwendet werden, welcher mit dem Gerät geliefert wurde.
• Der Akku sollte in einem Temperaturbereich von 0° C - 45°C gelagert werden.
• Wenn der Akku nicht in Gebrauch ist, von anderen metallischen Gegenständen wie
Papierklammern, Münzen, Schlüssel, Nägeln und Schrauben fernhalten, um einen Kurzschluss
zu vermeiden.
• Der Akku darf nicht geöffnet werden!
• Akku vor Hitze schützen und direkte Sonneneinstrahlung und Feuer vermeiden!
• Wenn ein Akku defekt ist, kann Flüssigkeit entweichen und mit angrenzenden Komponenten in
Kontakt kommen.
• Das Gerät „FLIEGUAN-AKKU-HANDY“ und das Batterie-Ladegerät sind NICHT
wasserdicht!!!
• Vor dem Gebrauch, Ladegerät, Kabel und Stecker überprüfen.
Wenn Beschädigungen erkennbar sind, das Ladegerät nicht verwenden!
• Niemals das Ladegerät öffnen.
Es darf nur von qualifiziertem Fachpersonal geöffnet und repariert werden!
• Akku und Ladegerät während des Ladevorgangs von brennbaren Gegenständen fernhalten!

Allgemeines
58500016
7 / 17
DE
3 Allgemeines
3.1 Bestimmungsgemäßer Einsatz
• Das Gerät darf nur für den in der Bedienungsanleitung beschriebenen bestimmungsgemäßen
Einsatz, unter Einhaltung der gültigen Sicherheitsvorschriften und unter Einhaltung der
dementsprechenden gesetzlichen Bestimmungen und den der Konformitätserklärung verwendet
werden.
• Jeder anderweitige Einsatz gilt als nicht bestimmungsgemäß und ist verboten!
• Die am Einsatzort gültigen gesetzlichen Sicherheits- und Unfallvorschriften müssen zusätzlich
eingehalten werden.
Der Anwender muss sich vor jedem Einsatz vergewissern, dass:
• das Gerät für den vorgesehenen Einsatz geeignet ist
• sich im ordnungsgemäßen Zustand befindet
• die zu hebenden Lasten für das Heben geeignet sind
In Zweifelsfällen setzen Sie sich vor der Inbetriebnahme mit dem Hersteller in Verbindung.
Das Gerät „FLIEGUAN-AKKU-HANDY“ ist ein elektrischer Vakuum-Handsauger, der eine Tragfähigkeit
(WLL) von bis zu 120 kg (265 lbs) hat und sich auf fast jeder Oberfläche ansaugen kann.
Somit ist das Gerät geeignet zum Ansaugen und anschließendem Anheben, Versetzen und Verlegen
von Materialien mit glatten und saugdichten Oberflächen, wie zum Beispiel:
Fliesen, Naturstein-, Beton- und Marmorplatten, Glas.
Die hier angegebenen Materialien dienen lediglich als Orientierung. Gegebenenfalls müssen vor
dem Ansaugen/Anheben Vorversuche gemacht werden, damit das Transportgut keinen
Schaden nimmt!
Bei dünnen Materialien kann Bruchgefahr bestehen, bedingt durch das sich aufbauende
Vakuum während des Ansaugvorgangs. Daher wird eine ausreichende Eigenstabilität des
Materials vorausgesetzt!
• Die maximale Tragfähigkeit (WLL) beträgt 120 kg (265 lbs), wenn das Gerät horizontal
gehalten wird.
• Wird das Gerät schräg oder vertikal gehalten, beträgt die maximale Tragfähigkeit
(WLL) 60 kg (132 lbs).
• Die maximale Tragfähigkeit (WLL) darf keinesfalls überschritten werden!
Die Last könnte sich loslösen und herabfallen. Verletzungsgefahr!
Das Gerät „FLIEGUAN-AKKU-HANDY“ ist nicht zum Klettern oder zum Tragen des Gewichts
einer Person geeignet oder vorgesehen. Die Verwendung des Gerätes zum Klettern oder zu
einem anderen nicht vorgesehenen Zweck kann zu Verletzungen oder zum Tod führen.

Allgemeines
58500016
8 / 17
DE
• Die Last (Steinplatte, Fliese usw.) welche angesaugt
und transportiert werden soll, muss genügend
Eigenstabilität aufweisen, da ansonsten Bruchgefahr
beim Anheben besteht!
• Lasten dürfen sich beim Anheben keinesfalls
durchbiegen – darauf ist besonders bei dünnen und
großformatigen Lasten zu achten!
• Generell dürfen Lasten nur mittig angesaugt werden,
da sonst die Last schief am Gerät hängt, was zum
Bruch der Last führen kann - speziell beim Anheben
von großformatigen Lasten mit einer kleinen
Saugplatte.
NICHT ERLAUBTE TÄTIGKEITEN:
Eigenmächtige Umbauten am Gerät oder der Einsatz von eventuell selbstgebauten
Zusatzvorrichtungen gefährden Leib und Leben und sind deshalb grundsätzlich verboten!!
Die Tragfähigkeit (WLL) des Gerätes darf nicht überschritten werden.
Alle nicht bestimmungsgemäßen Transporte mit dem Gerät sind strengstens untersagt:
• Transport von Produkten, Gegenständen und Materialien, die nicht in dieser Anleitung beschrieben
sind.
• das Aufhängen des Gerätes mit Seilen, Ketten, einem Tragegurt oder ähnlichem an einem
Trägergerät.
Das Gerät darf NUR als Handgerät verwendet werden!

Allgemeines
58500016
9 / 17
DE
3.2 Technische Daten
3.2.1 Allgemein
Akkuspannung
Akku-Laufzeit (vollgeladen)
Akkukapazität
Saugleistung
14,8V Li-Ion
ca. 1,5 Stunden
2.2 AH
16W
Tragfähigkeit (WLL)
Erforderlicher Unterdruck
Nettogewicht (mit Akku)
Abmessungen
120 kg (265 lbs)
- 0,6 bar (- 8,7 psi)
1,5 kg (3,3 lbs)
297 x 181 x 115 mm
3.2.2 Ladegerät
Modell
Aufladespannung
Eingangsspannung
XV-2008290006
DC 16,8 v/ 1,4 A
100V-240VAC; 50/60Hz; 0.5 A max
3.2.3 Lieferumfang
①
Ersatzfilter (1x)
②
Li-Ionen Akku (1x)
③
Ladegerät (1x) inklusive Wechselstecker (3)
④
Ersatz-Gummischaumdichtung (1x)

Bedienung
58500016
10 / 17
DE
4 Bedienung
4.1 Allgemein
• Festsitzende Lasten nicht losreißen.
• Bei Energieausfall die Last, wenn möglich sofort absetzen.
• Nur geeignete Lasten ansaugen und heben (Eigenstabilität und Oberflächendichte prüfen).
• Last nur auf freier, ebener Fläche absetzen. Sie können sonst beim Lösen verrutschen.
• Last erst lösen, wenn sie vollständig und sicher aufliegt oder steht.
• Hände von der Last beim Lösen weghalten.
• Saugflächen stets gleichmäßig belasten.
4.1.1 Lasten heben
• Gerät direkt über der Last positionieren.
• Gerät auf die Last aufsetzen. Auf gleichmäßige Lastverteilung achten.
• Die Last ist nun angesaugt.
• Beim Anheben darauf achten, dass nur jeweils ein Stück des zu hebenden Gutes angehoben
wird. Anhaftende andere Teile vorsichtig mit einem Schraubendreher ablösen, bevor Sie das Teil
weiter anheben. Nicht mit den Händen lösen, Quetschgefahr!
4.1.2 Lasten ablegen
• Last absenken und sicher auf freie, ebene Fläche ablegen, damit die Last nicht abrutschen oder
kippen kann.
• Zum Ablösen der angesaugten Last, roten Ablöseknopf drücken.
• Last ist nun abgelöst.

Bedienung
58500016
11 / 17
DE
4.2 Gerätebedienung
4.2.1 Verbinden eines Tragegurtes mit dem Gerät
• Die vier Metallösen rund um den Griff dienen
zur Befestigung des Tragegurtes.
• Jeweils eine der Schnallen (an den Enden
des Bandes) in eine hierfür vorgesehene Öse
sichern.
• Tragegurt kann zur Lastunterstützung um die
Schulter des Bedieners gelegt werden.
4.2.2 Ersetzen der Gummischaumdichtung
• Die beschädigte oder verbrauchte
Gummischaumdichtung durch Herausziehen
entfernen.
• Die neue Gummischaumdichtung vorsichtig
in Position drücken.
4.2.3 Filter wechseln
• Mit der Spitze eines Schraubendrehers den
Kunststoffstopfen (Ring) und Filter auf der
Geräteunterseite entfernen.
• Neuen Filter (oder gereinigter Filter)
einsetzen und Kunststoffstopfen (Ring)
wieder hineindrücken, um den Filter zu
sichern.

Bedienung
58500016
12 / 17
DE
4.2.4 Akku wechseln
• Um den Akku aus dem Gerät (FXAH-120-
GRABO-GREENLINE) zu entnehmen, Akku-
Clip nach vorne schieben (weg vom
Haltegriff).
• Der Akku kann jetzt nach oben aus dem
Akku-Fach entfernt werden.
• Um einen Akku in das Gerät (FXAH-120-
GRABO-GREENLINE) wieder einzusetzen,
Akku ins Akku-Fach stecken und Akku-Clip
nach hinten schieben (in Richtung des
Haltegriffs) um den Akku zu sichern.
4.2.5 Akku aufladen
• Der Akku wird in einem teilgeladenen Zustand mit dem Gerät geliefert und muss vor dem
ersten Gebrauch vollkommen aufgeladen werden.
• Die Ladedauer beträgt ca. 2 Stunden. Wenn der Akku vollgeladen ist, beträgt die Betriebszeit der
Vakuumpumpe ca. 1,5 Stunden.
• Die Akkus können jederzeit aufgeladen werden, ohne dass ihre Lebensdauer reduziert wird. Ein
Unterbrechen des Ladevorgangs schadet den Akkus nicht.
Es darf nur das mitgelieferte Akku-Ladegerät verwendet werden!
• Es ist darauf zuachten, dass die
Netzspannung mit den Daten auf dem
Typenschild des Ladegerätes übereinstimmt.
• Das Ladegerät darf nur in trockener
Umgebung verwendet werden.
Das Ladegerät ist nicht wasserdicht!
• Akku beim Ladevorgang von brennbaren
Objekten fernhalten!
• Zum Wechseln der Wechselstecker die
jeweilige Drehrichtung am Netzstecker
beachten
(OPEN / LOCK).
• Netzstecker des Ladegerätes an eine Steck-
dose anschließen.
• Ladegerät an den Akku anschließen.
• Der Akku wird aufgeladen, sobald er mit dem
Ladegerät verbunden ist.
• Der Ladevorgang wird automatisch beendet,
sobald der Akku vollgeladen ist.

Bedienung
58500016
13 / 17
DE
4.2.6 Inbetriebnahme
• ON-OFF Schalter ① in die ON-Position schieben, um das Gerät (FXAH-120-GRABO-
GREENLINE) anzuschalten.
• Die Akkuzustandsanzeige ② unterhalb des Stromschalters leuchtet auf, um den Ladezustand
des Akkus anzuzeigen.
• Sollte die Akkuzustandsanzeige ② blinken, ist der Akku ⑥ nicht ausreichend aufgeladen und
sollte vor Gebrauch des Gerätes aufgeladen werden.
• Der Akku ⑥ sollte immer vor jedem Gebrauch vollständig geladen sein. Die Verwendung des
Geräts mit einem zu niedrigem Akku-Ladezustand, kann zu schwerwiegenden Verletzungen
und Beschädigungen durch plötzliches Herabfallen der angehobenen Last führen!!!
• Der Akku kann jederzeit geladen werden, ohne die Lebensdauer des Akkus dadurch zu verringern
• Wenn die Haltekraft merklich nachzulassen beginnt, obwohl der Akku vollständig geladen ist,
Gummischaumdichtung auf Verschleiß oder Beschädigung überprüfen. Es darf nicht versucht
werden, mit dem Gerät eine Last anzuheben, bevor die Gummischaumdichtung ersetzt wurde.
• Gerät (FXAH-120-GRABO-GREENLINE) auf der Oberfläche positionieren, welche angehoben
werden soll.
• Um die Vakuumpumpe einzuschalten und ein Ansaugen der Last auszulösen, muss der grüne
Knopf ③ gedrückt werden. Dabei das Gerät am Handgriff einige Sekunden mit leichtem
Kraftaufwand gegen die zu hebende Last drücken und der Ansaugvorgang beginnt.
• Wenn die angesaugte Last wieder gelöst werden soll, muss der rote Knopf ④ gedrückt werden.
• Anschließend beginnt sofort erneut wieder der Ansaugvorgang. Dieser kann durch Drücken des
grünen Knopfes ③ unterbrochen werden.
• Das Manometer ⑤ muss vor allem bei leicht porösen Werkstoffen ständig im Blickfeld
des Bedieners sein. Sollte die Anzeige weniger als - 0,6 bar (- 8,7 psi) anzeigen, Werkstoff
unverzüglich ablegen!

Wartung und Pflege
58500016
14 / 17
DE
5 Wartung und Pflege
5.1 Saugplatte
• Saugplatte mindestens einmal täglich von anhaftenden Gegenständen, Schmutz und Staub reinigen.
Schwammgummi mit Druckluft und/oder Wasserstrahl reinigen→ hierzu Gummischaumdichtung
entfernen.
• Beschädigte Sauglatte (Risse, Löcher, Wellenbildung) sofort austauschen.
• Verwenden Sie zur Reinigung des Gerätes Kaltreiniger (kein Waschbenzin oder ätzende
Flüssigkeiten verwenden).
5.2 Dichtheitsprüfung
• Vor jeder Nutzung das Gerät auf Dichtheit prüfen.
5.3 Jährliche Prüfung
• Kontrolle aller Bauteile, insbesondere der Dichtung. Prüfung auf Risse, Verschleiß, Korrosion und
Funktionssicherheit durch einen Sachkundigen.
5.4 Hinweis zum Typenschild
• Gerätetyp, Gerätenummer und Baujahr sind wichtige Angaben zur Identifikation des Gerätes. Sie
sind bei Ersatzteilbestellungen, Gewährleistungsansprüchen und sonstigen Anfragen zum Gerät
stets mit anzugeben.
• Die maximale Tragfähigkeit (WLL) gibt an, für welche maximale Belastung das Gerät ausgelegt ist.
Die maximale Tragfähigkeit (WLL) darf nicht überschritten werden.
• Das im Typenschild bezeichnete Eigengewicht ist bei der Verwendung am Hebezeug/Trägergerät
(z.B. Kran, Kettenzug, Gabelstapler, Bagger...) mit zu berücksichtigen.
Beispiel:
5.5 Hinweis zur Vermietung/Verleihung von PROBST-Geräten
Bei jeder Verleihung/Vermietung von PROBST-Geräten muss unbedingt die dazu gehörige Original-
Betriebsanleitung mitgeliefert werden (bei Abweichung der Sprache des jeweiligen Benutzerlandes,
ist zusätzlich die jeweilige Übersetzung der Original-Betriebsanleitung mit zuliefern)!
6 Entsorgung / Recycling von Geräten und Maschinen
Das Produkt darf nur von qualifiziertem Fachpersonal außer Betrieb genommen und zur Entsorgung/
zum Recyclen vorbereitet werden. Entsprechend vorhandene Einzelkomponenten (wie Metalle,
Kunststoffe, Flüssigkeiten, Batterien/Akkus etc.) müssen gemäß den national/ länderspezifisch
geltenden Gesetzen und Entsorgungsvorschriften entsorgt/recycelt werden!
Das Produkt darf nicht im Hausmüll entsorgt werden!

Über den Entwickler
58500016
15 / 17
DE
7 Über den Entwickler
Der "Moderne GRABO" wurde vom
Maschinenbauingenieur Nimo Rotem erfunden. Obwohl
es "handgeführte elektrische Vakuumgeräte" schon seit
einiger Zeit gibt, ermöglichte ein großer technischer
Durchbruch in der Dichtungstechnologie, der von Nemo
vorangetrieben wurde, den modernen GRABO-Geräten
eine unglaubliche Hebeleistung in ein kleines und
tragbares Paket zu packen.

Anwendungsbeispiele für FXAH-120-GRABO-GREENLINE
58500016
16 / 17
DE
8 Anwendungsbeispiele für FXAH-120-GRABO-GREENLINE
FXAH-120-GRABO-
GREENLINE
FXAH-120-SOLO-Set
(48500055)
FXAH-120-SOLO-Set 4(8500055)
ALX-120-HG (42600206)
FXAH-120-DUO-SET (48500054)
FXAH-120-DUO-SET (48500039)
VPH-RS (42710072)

Anwendungsbeispiele für FXAH-120-GRABO-GREENLINE
58500016
17 / 17
DE
FXAH-DUO-CB (48500072)
FXAH-RS-CB (48500065)
FXAH-EL-CB (48500071)


58500016
V5
Translation of original operating instructions
FXAH-120-GRABO-GREENLINE
GB
I
Operating Instructions

Contents
58500016
2 / 17
GB
Contents
1 EC-Declaration of Conformity / UKCA-Declaration of Conformity .................................................... 3
2 Safety ....................................................................................................................................................... 4
2.1 Safety symbols ................................................................................................................................. 4
2.2 Safety Marking ................................................................................................................................. 4
2.3 Personal safety requirements .......................................................................................................... 4
2.4 Protective equipment ........................................................................................................................ 4
2.5 Accident prevention .......................................................................................................................... 5
2.6 Safety procedures ............................................................................................................................ 5
2.6.1 Unauthorized alterations .............................................................................................................. 5
2.7 Battery safety ................................................................................................................................... 6
3 General .................................................................................................................................................... 7
3.1 Authorized use ................................................................................................................................. 7
3.2 Technical data .................................................................................................................................. 9
3.2.1 General ........................................................................................................................................ 9
3.2.2 Battery charger ............................................................................................................................ 9
3.2.3 Cope of delivery ........................................................................................................................... 9
4 Operation ............................................................................................................................................... 10
4.1 General ........................................................................................................................................... 10
4.1.1 Lifting loads ................................................................................................................................ 10
4.1.2 Releasing loads ......................................................................................................................... 10
4.2 Device operation ............................................................................................................................ 11
4.2.1 Connecting
a
carrying strap
to the device
.............................................................................. 11
4.2.2
Replacing
the
rubber foam seal
.......................................................................................... 11
4.2.3 Change
filter
.............................................................................................................................. 11
4.2.4 Replace
battery
........................................................................................................................ 12
4.2.5 Charging
the battery
................................................................................................................ 12
4.2.6 Starting
up
................................................................................................................................. 13
5 Maintenance and care .......................................................................................................................... 14
5.1 Suction plate ................................................................................................................................... 14
5.2 Leak test ......................................................................................................................................... 14
5.3 Annual audit ................................................................................................................................... 14
5.4 Hints to the type plate ..................................................................................................................... 14
5.5 Hints to the renting/leasing of PROBST devices ........................................................................... 14
6 Disposal / recycling of devices and machines .................................................................................. 14
7 About the developer ............................................................................................................................. 15
8 Examples of use for FXAH-120-GRABO-GREENLINE ...................................................................... 16
We hereby reserve the right to make changes to the information and illustrations in the operating instructions.

EC-Declaration of Conformity / UKCA-Declaration of Conformity
58500016
3 / 17
GB
1 EC-Declaration of Conformity / UKCA-Declaration of Conformity
Description:
Type:
Order number:
FLIEGUAN-AKKU-HANDY FXAH-120-GRABO-GREENLINE
FXAH-120-GRABO-GREENLINE
58500016
Manufacturer:
Probst GmbH
Gottlieb-Daimler-Straße 6
71729 Erdmannhausen, Germany
info@probst-handling.de
www.probst-handling.com
Importer:
Probst Ltd
Unit 2 Fletcher House
Stafford Park 17
Telford Shropshire TF3 3DG, United Kingdom
www.probst-handling.co.uk
sales@probst-handling.co.uk
The machine described above complies with the relevant requirements of the following EU directives:
The object of the declaration described above is in conformity with the relevant UK-Regulations and UK-Guidelines:
EC-machinery directive 2006/42/EC (Reference: OJ L 157, 09.06.2006)
UK-Regulation: Supply of Machinery (Safety) Regulations 2008 (SI 2008 No. 1597)
2014/30/EU (Electromagnetic compatibility) / (Reference: OJ L 96, 29.03.2014)
UK-Regulation: Electromagnetic Compatibility Regulations 2016 (SI 2016 No. 1091)
DIN EN 1012-1 / DIN EN 1012-2
Compressors and vacuum pumps; Safety requirements part 1 and 2.
UK-Regulation: BS EN 1012-1:2010
Authorized person for EC-documentation:
Name: Jean Holderied
Address: Probst GmbH; Gottlieb-Daimler-Straße 6; 71729 Erdmannhausen, Germany
Authorized person for UK-documentation:
Name: Nigel Hughes
Address: Probst Ltd ; Unit 2 Fletcher House; Stafford Park 17; Telford Shropshire TF3 3DG, United Kingdom
Signature, information to the subscriber:
Erdmannhausen, 21.11.2023..........................................................................
(Eric Wilhelm, Managing Director)

Safety
58500016
4 / 17
GB
2 Safety
2.1 Safety symbols
Danger to life!
Identifies imminent hazard. If you do not avoid the hazard, death or severe injury will result.
Hazardous situation!
Identifies a potentially hazardous situation. If you do not avoid the situation, injury or damage to
property can result.
Prohibition!
Identifies imminent a prohibition. If you do not avoid the prohibition, death and severe injury, or damage
to property will result.
Important informations or useful tips for use.
2.2 Safety Marking
REGULATORY SIGN
Symbol
Meaning
Order-No.
Size
Each operator must have read and understood the operating
instructions (and all safety instructions).
29040665
29040666
29041049
Ø 30 mm
Ø 50 mm
Ø 80 mm
2.3 Personal safety requirements
Each operator must have read and understood the operating instructions (and all safety instructions).
Only qualified, authorized personal is allowed to operate the device and all devices which are
connected (lifting device/carrier).
The manual guiding is only allowed for devices with handles.
Otherwise there is a risk of injury to the hands!
2.4 Protective equipment
The protective equipment must consist, according to the safety
regulations of the following parts:
• Protective clothing
• Safety gloves
• Safety shoes

Safety
58500016
5 / 17
GB
2.5 Accident prevention
• The workplace has to be covered for unauthorized persons, especially children.
• Caution at thunderstorm - danger of lightning!
Depending on the intensity of the thunderstorm, stop working with the device if necessary.
• The workplace must be sufficiently illuminated.
• Be careful with wet, frozen, iced and dirty building materials! There is a danger of the
gripping material slipping out. → DANGER OF ACCIDENT!
2.6 Safety procedures
2.6.1 Unauthorized alterations
All unauthorized alterations of the device and the use of any self-made additional equipment could
cause danger and are therefore forbidden!

Safety
58500016
6 / 17
GB
2.7 Battery safety
• Only the battery pack supplied with the device may be used.
• The battery should be stored in a temperature range of 0°C-45°C (32°F – 113°F).
• When the battery is not in use, keep it away from other metal objects such as paper clips, coins,
keys, nails and screws to prevent short circuits.
• The battery must not be opened!
• Protect the battery from heat and avoid direct sunlight and fire!
• If a battery is defective, liquid may leak and come into contact with adjacent components.
• The device "FLIEGUAN-AKKU-HANDY" and the battery charger are NOT waterproof!!!
• Check the charger, cable and plug before use.
If damage is visible, do not use the charger!
• Never open the charger. It may only be opened and repaired by qualified personnel!
• Keep the battery and charger away from flammable objects during the charging process!

General
58500016
7 / 17
GB
3 General
3.1 Authorized use
• The device is only designed for the use specified in this documentation.
• Every other use is not authorized and is forbidden!
• All relevant safety regulations, corresponding legal regulations, especially regulations of the
declaration of conformity, and additional local health and safety regulations must be observed.
Prior to every operation the user must ensure that:
• The equipment is suited to the intended operation
• the functioning and the working condition of the equipment is examined
• the load is suitable to be handled.
Any doubts about instructions should be raised with the manufacturer prior to use.
The device „FLIEGUAN-AKKU-HANDY“ is an electric handheld vacuum cleaner, which has a working
load limit (WLL) of up to 120 kg (265 lbs) and can suck on almost any surface.
The device is therefore suitable for suctioning and then lifting, moving and laying materials with flat and
absorbent surfaces, for example:
Tiles, natural stone, concrete and marble slabs, glass.
The materials specified here are for guidance only. If necessary, pre-tests must be made before
suction/lifting to ensure that the transported goods are not damaged!
There is a risk of breakage with thin materials due to the vacuum that builds up during the
suction process. Therefore, the material must have sufficient inherent stability!
• The maximum working load limit (WLL) is 120 kg (265 lbs), when the unit is held
horizontally.
• If the unit is held at an angle or vertically, the maximum working load limit (WLL) is 60 kg
(132 lbs).
• The maximum working load limit (WLL) must never be exceeded!
The load could become loose and fall down. Danger of injury!
The device "FLIEGUAN-AKKU-HANDY" is not suitable or intended for climbing or carrying the
weight of a person. Using the device for climbing or for any other purpose not intended may
result in injury or death.

General
58500016
8 / 17
GB
● The load (stone slab, tile etc.) which is to be sucked and
transported, must have sufficient inherent stability,
otherwise there is risk of breakage when lifting!
● Loads must not be bend when lifting - especially take
care with thin and large-sized stone slabs!
● Generally, the loads are only to be sucked in the middle,
otherwise the load hangs diagonally under the device
which may cause a breaking of the load - especially when
lifting large stone slabs with a small suction plate.
PROHIBITED ACTIVITIES:
Unauthorised modifications to the unit or the use of any additional devices that you may have built
yourself endanger life and limb and are therefore strictly prohibited!
The working load limit (WLL) of the device must not be exceeded.
Any transport with the device that is not in accordance with the regulations is strictly prohibited:
• transport of products, objects and materials not described in these instructions.
• hanging the device on a carrier device using ropes, chains, or the lifting strap or similar.
The device must ONLY be used as a handheld device!

General
58500016
9 / 17
GB
3.2 Technical data
3.2.1 General
Battery voltage
Battery life (fully charged)
Battery capacity
Suction capacity
14,8V Li-Ion
approx. 1,5 hours
2.2 AH
16W
Load capacity (WLL)
Required negative pressure
Net weight (with battery)
Dimensions
120 kg (265 lbs)
- 0,6 bar (- 8,7 psi)
1,5 kg (3,3 lbs)
297 x 181 x 115 mm
3.2.2 Battery charger
Model
Charging voltage
Input voltage
XV-2008290006
DC 16,8 v / 1,4 A
100V-240VAC; 50/60Hz; 0.5 A max
3.2.3 Cope of delivery
①
Spare
filter (1x)
②
Li-Ion batteries (1x)
③
Battery charger (1x) including interchangeable plug (3)
④
Spare rubber foam seal
(1x)

Operation
58500016
10 / 17
GB
4 Operation
4.1 General
• Do not tear off stuck loads.
• In case of a power failure, immediately lower the load if possible.
• Only suck in and lift suitable loads (check inherent stability and surface density).
• Only place the load on a free, level surface. Otherwise they can slip when released.
• Do not release the load until it is completely and securely supported or standing.
• Keep hands away from the load when releasing.
• Always load the suction surfaces evenly.
4.1.1 Lifting loads
• Position the device directly above the load.
• Place the device on the load. Ensure even load distribution.
• The load is now sucked in.
• When lifting, make sure that only one piece of the material to be lifted is lifted at a time. Carefully
remove any other adhering parts with a screwdriver before you lift the part further. Do not loosen
with your hands, danger of crushing!
4.1.2 Releasing loads
• Lower the load and lay it down safely on a free, flat surface so that the load cannot slip or tip over.
• Press the red release button to release the sucked load.
• Load is now released.

Operation
58500016
11 / 17
GB
4.2 Device operation
4.2.1 Connecting
a
carrying strap
to the device
• The four metal eyelets around the handle are
used to attach the lifting carrying strap.
•
Secure one of the buckles (at each end of
the strap) in an eyelet provided for this
purpose.
• Carrying strap can be placed around the
operator's shoulder for load support.
4.2.2
Replacing
the
rubber foam seal
• Remove the damaged or used rubber foam
seal by pulling it out.
• Carefully press the new rubber foam seal into
position.
4.2.3 Change
filter
• Use the tip of a screwdriver to remove the
plastic plug (ring) and filter on the bottom of
the device.
• Insert a new filter (or cleaned filter) and push
the plastic plug (ring) back in to secure the
filter.

Operation
58500016
12 / 17
GB
4.2.4 Replace
battery
• To remove the battery from the unit (FXAH-
120-GRABO-GREENLINE), slide the battery
clip forward (away from the handle).
• The battery can now be removed from the
top of the battery compartment.
• To reinsert a battery into the unit (FXAH-120-
GRABO-GREENLINE), insert the battery into
the battery compartment and slide the battery
clip backward (toward the handle) to secure
the battery.
4.2.5 Charging
the battery
• The battery is supplied with the device in a partially charged state and must be fully
charged before first use.
• The charging time is approx. 2 hours. When the battery is fully charged, the operating time of the
vacuum pump is approx. 1,5 hours.
• The batteries can be charged at any time without reducing their service life. Interrupting the
charging process will not damage the batteries.
Only the supplied battery charger may be used!
• Make sure that the mains voltage
corresponds to the data on the charger's type
plate.
• The charger may only be used in a dry
environment.
The charger is not waterproof!
• Keep the battery away from flammable
objects during charging!
• To change the interchangeable plugs,
observe the respective direction of rotation
on the mains plug (OPEN / LOCK).
• Connect the mains plug of the charger to a
socket.
• Connect the charger to the battery.
• The battery is charged as soon as it is
connected to the charger.
• The charging process is automatically
terminated when the battery is fully charged.

Operation
58500016
13 / 17
GB
4.2.6 Starting
up
• Slide the ON-OFF switch ① to the ON position to turn on the unit (FXAH-120-GRABO-
GREENLINE).
• The battery status indicator ② below the power switch lights up to indicate the battery charge
level.
• If the battery status indicator ② flashes, the battery ⑥ is not sufficiently charged and should be
recharged before using the device:
• The battery ⑥ should always be fully charged before each use. Wounding the unit with a battery
charge level that is too low can result in serious injury and damage due to sudden dropping
of the lifted load!!!
• The battery can be charged at any time without reducing the battery life.
• If the holding force begins to decrease noticeably even though the battery is fully charged, check
the rubber foam seal for wear or damage. Do not attempt to lift a load with the unit until the rubber
foam seal has been replaced.
• Position the device (FXAH-120-GRABO-GREENLINE) on the surface to be lifted.
• To switch on the vacuum pump and trigger suction of the load, press the green button ③. Press
the device at the handle for a few seconds with light force against the load to be lifted and the
suction process begins.
• If the sucked material is to be released again, the red button ④ must be pressed to release it.
• The suction process then immediately starts again. This can be interrupted by pressing the green
button ③.
• The manometer ⑤ must be constantly in the operator's field of vision, especially with
slightly porous materials. If the display shows less than - 0.6 bar (- 8,7 psi), discard
material immediately!

Maintenance and care
58500016
14 / 17
GB
5 Maintenance and care
5.1 Suction plate
• Clean the suction plate from adhering objects, dirt and dust at least once a day. Clean sponge
rubber with compressed air and/or water jet. → For this remove the rubber foam seal.
• Replace damaged suction plate (cracks, holes, ripples) immediately.
• Use cold cleaner to clean the device (do not use petroleum ether or corrosive liquids).
5.2 Leak test
• Check the unit for leaks before each use.
5.3 Annual audit
• Check all components, especially the seal. Inspection for cracks, wear, corrosion and functional
reliability by an expert.
5.4 Hints to the type plate
• Type, serial-number and production year are very important for the identification of your device. If
you need information to spare-parts, warranty or other specific details please refer to this
information´s.
• The maximum carrying capacity/working load limit (WLL) is the maximum load which can be
handled with the device. Do not exceed this carrying capacity/working load limit (WLL).
• If you use the device in combination with other lifting equipment (Crane, chain hoist, forklift truck,
excavator) consider the deadweight of the device.
Example:
5.5 Hints to the renting/leasing of PROBST devices
With every renting/leasing of PROBST devices the original operating instructions must be
included unconditionally (in deviation of the user´s country's language, the respective translations of
the original operating instructions must be delivered additionally)!
6 Disposal / recycling of devices and machines
The product may only be taken out of service and prepared for disposal / recycling by qualified
personnel. Correspondingly existing single components (such as metals, plastics, liquids,
batteries/rechargeable batteries etc.) must be disposed of/recycled in accordance with the
nationally/country-specific applicable laws and disposal regulations!
The product must not be disposed of in household waste!

About the developer
58500016
15 / 17
GB
7 About the developer
The “Modern GRABO” was invented by Mechanical
Engineer Mr. Nimo Rotem. Although “hand-held electric
vacuum units” have been around for some time, a major
engineering breakthrough in sealing technologies,
pioneered by Nemo, allowed modern GRABO units to
pack an incredible amount of lifting capacity in a small
and portable package, and do so on a wide variety of
rough surfaces and objects.

Examples of use for FXAH-120-GRABO-GREENLINE
58500016
16 / 17
GB
8 Examples of use for FXAH-120-GRABO-GREENLINE
FXAH-120-GRABO-
GREENLINE
FXAH-120-SOLO-Set
(48500055)
FXAH-120-SOLO-Set 4(8500055)
ALX-120-HG (42600206)
FXAH-120-DUO-SET (48500054)
FXAH-120-DUO-SET (48500039)
VPH-RS (42710072)

Examples of use for FXAH-120-GRABO-GREENLINE
58500016
17 / 17
GB
FXAH-DUO-CB (48500072)
FXAH-RS-CB (48500065)
FXAH-EL-CB (48500071)


58500016
V5
Traduction des instructions d'emploi originales
FXAH-120-GRABO-GREENLINE
FR
I
Instructions d'emploi

Description:
58500016
2 / 17
FR
Sommaire
1 CE-Déclaration de Conformité .............................................................................................................. 3
2 Sécurité ................................................................................................................................................... 4
2.1 Instructions de sécurité .................................................................................................................... 4
2.2 Signalisation de sécurité .................................................................................................................. 4
2.3 Mesures de sécurité personnelle ..................................................................................................... 4
2.4 Equipment de protection .................................................................................................................. 4
2.5 Protection contre les accidents ........................................................................................................ 5
2.6 Sécurité en cours de fonctionnement ............................................................................................... 5
2.6.1 Transformations effectuées sur l’initiative de l’utilisateur ............................................................ 5
2.7 Sécurité des batteries ....................................................................................................................... 6
3 Généralités .............................................................................................................................................. 7
3.1 Utilisation conforme .......................................................................................................................... 7
3.2 Caractéristiques techniques ............................................................................................................. 9
3.2.1 Généralités ................................................................................................................................... 9
3.2.2 Chargeur de batterie .................................................................................................................... 9
3.2.3 Champ d'application..................................................................................................................... 9
4 Maniement ............................................................................................................................................. 10
4.1 Généralités ..................................................................................................................................... 10
4.1.1 Soulever des charges ................................................................................................................ 10
4.1.2 Charges de dépôt ...................................................................................................................... 10
4.2 Fonctionnement de l'appareil ......................................................................................................... 11
4.2.1 Connexion d'une courroie de transport à l'appareil ................................................................... 11
4.2.2 Remplacement du joint en mousse de caoutchouc ................................................................... 11
4.2.3 Changer de filtre ........................................................................................................................ 11
4.2.4 Remplacer la pile ....................................................................................................................... 12
4.2.5 Recharger la batterie ................................................................................................................. 12
4.2.6 Mise en service .......................................................................................................................... 13
5 Maintenance et entretien ..................................................................................................................... 14
5.1 Plaque d'aspiration ......................................................................................................................... 14
5.2 Test d'étanchéité ............................................................................................................................ 14
5.3 Audit annuel ................................................................................................................................... 14
5.4 Informations concernant la plaque signalétique ............................................................................. 14
5.5 Remarque concernant la location/le prêt des engins PROBST ..................................................... 14
6 Elimination / recyclage des appareils et des machines ................................................................... 14
7 À propos du développeur .................................................................................................................... 15
8 Exemples d'utilisation pour FXAH-120-GRABO-GREENLINE ......................................................... 16
Nous nous réservons le droit de modifier les informations et les illustrations du mode d'emploi.

CE-Déclaration de Conformité
58500016
3 / 17
FR
1 CE-Déclaration de Conformité
Description:
Type:
N° de commande:
FLIEGUAN-AKKU-HANDY FXAH-120-GRABO-GREENLINE
FXAH-120-GRABO-GREENLINE
58500016
Fabricant:
Probst GmbH
Gottlieb-Daimler-Straße 6
71729 Erdmannhausen, Germany
info@probst-handling.de
www.probst-handling.com
La machine décrite ci-dessus est conforme aux exigences applicables des directives UE suivantes :
Idée directrice EC 2006/42/CE
2014/30/EU (Electromagnétique Compatibilité)
DIN EN 1012-1 / DIN EN 1012-2
Compresseurs et pompes a vide; Exigences en matière de sécurité. Partie 1 et 2.
Personne autorise pour EC-documentation:
Nom: Jean Holderied
Adresse: Probst GmbH; Gottlieb-Daimler-Straße 6; 71729 Erdmannhausen, Germany
Signature, informations ou signataire:
Erdmannhausen, 21.11.2023..........................................................................
(Eric Wilhelm, Directeur général)

Sécurité
58500016
4 / 17
FR
2 Sécurité
2.1 Instructions de sécurité
Danger de mort !
Désigne un danger. Provoque des blessures graves ou la mort s’il n’est pas évité.
Situation dangereuse !
Désigne une situation dangereuse. Risque de blessures légères ou mineures, ou de dommages
matériels si elle n’est pas évitée.
Interdiction !
Désigne une interdiction. Son non-respect entraîne des blessures graves, la mort ou des dommages
matériels.
Informations importantes ou des conseils utiles sur l'usage.
2.2 Signalisation de sécurité
PANNEAUX OBLIGATION
Symbole
Signification
Réf.
Taille
Chaque opérateur doit avoir lu et assimilé la notice d’instructions
de l’appareil, ainsi que les règles de sécurité.
29040665
29040666
29041049
Ø 30 mm
Ø 50 mm
Ø 80 mm
2.3 Mesures de sécurité personnelle
• Chaque opérateur doit avoir lu et assimilé la notice d’instructions de l’appareil, ainsi que les règles
de sécurité.
• L'appareil et tous les appareils sur et dans lesquels l'appareil est monté ne peuvent être utilisés que
par des personnes dûment mandatées, qualifiées et habilitées.
• Seules les appareils équipées de poignées peuvent être dirigées à la main.
Sinon, il y a un risque de blessure aux mains !
2.4 Equipment de protection
Conformément aux exigences techniques de sécurité,
l’équipement de protection comprend:
• des vêtements de protection
• des gants de protection
• des chaussures de sécurité

Sécurité
58500016
5 / 17
FR
2.5 Protection contre les accidents
• Protéger largement la zone de travail pour empêcher l’accès des personnes non autorisées, en
particulier des enfants.
• Attention en cas d’orage - danger de foudre!
En fonction de l'intensité de l'orage, arrêtez de travailler avec l'appareil si nécessaire.
• Eclairer suffisamment la zone de travail !
• Attention aux matériaux de construction mouillés, gelés, glacés et sales !
Il y a un risque que le matériel de préhension glisse. → DANGER D'ACCIDENT !
2.6 Sécurité en cours de fonctionnement
2.6.1 Transformations effectuées sur l’initiative de l’utilisateur
Toute modification effectuée sur l’appareil de la propre autorité de l’utilisateur ainsi que
l‘emploi par ce dernier de dispositifs auxiliaires éventuellement réalisés par lui-même,
représentent un risque de danger corporel ou mortel et sont, en conséquence, fondamentalement
interdits !

Sécurité
58500016
6 / 17
FR
2.7 Sécurité des batteries
• Seul le bloc-piles fourni avec l'appareil peut être utilisé.
• La pile doit être stockée dans une plage de température comprise entre 0°C - 45 °C.
• Lorsque la batterie n'est pas utilisée, tenez-la éloignée des autres objets métalliques tels que les
trombones, les pièces de monnaie, les clés, les clous et les vis pour éviter les courts-circuits.
• La batterie ne doit pas être ouverte!
• Protégez la batterie de la chaleur et évitez la lumière directe du soleil et le feu !
• Si une batterie est défectueuse, le liquide peut fuir et entrer en contact avec les composants
adjacents.
• L'appareil "FLIEGUAN-AKKU-HANDY" et le chargeur de batterie ne sont PAS étanches ! !!
• Vérifiez le chargeur, le câble et la prise avant l'utilisation.
Si des dommages sont visibles, n'utilisez pas le chargeur !
• N'ouvrez jamais le chargeur. Il ne peut être ouvert et réparé que par du personnel qualifié !
• Gardez la batterie et le chargeur à l'écart des objets inflammables pendant le processus de
chargement !

Généralités
58500016
7 / 17
FR
3 Généralités
3.1 Utilisation conforme
• L’appareil ne peut être utilisé que pour l’usage prévu dans la notice d’instructions, en respectant les
règles de sécurité en vigueur, ainsi que les dispositions correspondantes de la déclaration de
conformité.
• Tout autre usage est considéré comme non conforme à l’usage prévu et est interdit !
• Les règles légales de sécurité et de prévention des accidents applicables sur le lieu d’utilisation
doivent également être respectées.
Avant chaque utilisation, l’utilisateur doit s’assurer que :
• L’appareil est adapté à l’usage prévu
• L’appareil est en bon état
• Les charges peuvent être soulevées
En cas de doute il convient de contacter le fabricant.
L'appareil „FLIEGUAN-AKKU-HANDY“ est un aspirateur à main électrique qui a une force de maintien
allant jusqu'à (WLL) 120 kg et peut aspirer sur presque toutes les surfaces.
Ainsi, l'appareil convient à l'aspiration puis au levage, au déplacement et à la pose de matériaux à
surfaces lisses et étanches à l'aspiration, comme par exemple :
carreaux, dalles de pierre naturelle, de béton et de marbre, verre.
Les matériaux indiqués ici ne sont donnés qu'à titre indicatif. Le cas échéant, des essais
préalables doivent être effectués avant l'aspiration/le levage afin que le produit transporté ne
soit pas endommagé !
Les matériaux fins peuvent présenter un risque de rupture en raison du vide qui se crée
pendant le processus d'aspiration. C'est pourquoi une stabilité propre suffisante du matériau
est supposée !
• La capacité de charge maximale (WLL) est de 120 kg (265 lbs), lorsque l'appareil est tenu
horizontalement.
• Si l'unité est tenue en angle ou verticalement, la capacité de charge maximale (WLL) est de
60 kg
(132 lbs).
• La capacité de charge maximale (WLL) ne doit jamais être dépassée !
La charge pourrait se détacher et tomber. Risque de blessure !
L’appareil „FLIEGUAN-AKKU-HANDY" n'est pas adapté ou destiné à l'escalade ou au port du
poids d'une personne. L'utilisation de l'appareil pour l'escalade ou pour tout autre usage non
prévu peut entraîner des blessures ou la mort.

Généralités
58500016
8 / 17
FR
● La charge (dalle en pierre, carreau etc.) qui doit être
aspirée et transportée doit avoir une stabilité suffisante,
dans le cas contraire la charge risque de se briser au
moment où elle sera soulevée!
● Les dalles de pierre ne doivent en aucun cas fléchir
pendant l’opération de levage – il faut faire
particulièrement attention avec les dalles en pierre peu
épaisses ou de grand format!
● En général, les charges (dalles de pierre) ne peuvent être
aspirées qu'en position centrale, sinon la charge sera
suspendue de travers sur l'appareil, ce qui peut entraîner
la rupture de la charge en particulier lors du levage de
dalles de pierre de grand format avec une petite platine
d’aspiration.
LES ACTIVITÉS INTERDITES :
Les modifications non autorisées de l'appareil ou l'utilisation de tout dispositif supplémentaire que
vous avez vous-même construit mettent en danger la vie et l'intégrité corporelle et sont donc strictement
interdites !
La capacité de charge de l'appareil ne doit pas être dépassés.
Tout transport avec l'appareil qui n'est pas conforme à la réglementation est strictement interdit:
• Transport de produits, d'objets et de matériaux non décrits dans ces instructions.
• l'accrochage de l'appareil sur un dispositif porteur à l'aide de cordes, de chaînes, ou de la sangle de
levage ou d'un dispositif similaire.
L'appareil doit être utilisé UNIQUEMENT comme un appareil de poche !

Généralités
58500016
9 / 17
FR
3.2 Caractéristiques techniques
3.2.1 Généralités
Tension de la batterie
Autonomie de la batterie
(entièrement chargé)
Capacité de la batterie
Capacité d'aspiration
14,8V Li-Ion
environ 1,5 heures
2.2 AH
16W
Capacité de charge
(WLL)
Pression négative requise
Poids net (avec batterie)
Dimensions
120 kg (265 lbs)
- 0,6 bar (- 8,7 psi)
1,5 kg (3,3 lbs)
297 x 181 x 115 mm
3.2.2 Chargeur de batterie
Modèle
Tension de charge
Tension d'entrée
XV-2008290006
DC 16,8 v / 1,4 A
100V-240VAC; 50/60Hz; 0.5 A max
3.2.3 Champ d'application
①
Filtre de rechange (1x)
②
Piles Li-Ion
(1x)
③
Chargeur de batterie (1x) y compris le bouchon interchangeable (3)
④
Joint de rechange en mousse de caoutchouc
(1x)

Maniement
58500016
10 / 17
FR
4 Maniement
4.1 Généralités
• N'arrachez pas les charges coincées.
• En cas de panne de courant, débranchez immédiatement la charge si possible.
• N'aspirez et ne soulevez que les charges appropriées (vérifiez la stabilité inhérente et la densité
de surface).
• Ne placez la charge que sur une surface libre et plane. Sinon, ils peuvent glisser lorsqu'ils sont
relâchés.
• Ne relâchez pas la charge avant qu'elle ne soit complètement et solidement soutenue ou debout.
• Gardez les mains loin de la charge lorsque vous la relâchez.
• Chargez toujours les surfaces d'aspiration de manière uniforme.
4.1.1 Soulever des charges
• Positionnez l'appareil directement au-dessus de la charge.
• Placez l'appareil sur la charge. Veiller à une répartition uniforme de la charge.
• La charge est maintenant aspirée.
• Lors du levage, assurez-vous qu'une seule pièce de la matière à soulever est soulevée à la fois.
Retirez soigneusement toute autre pièce adhérente à l'aide d'un tournevis avant de la soulever
davantage. Ne pas relâcher avec les mains, risque d'écrasement !
4.1.2 Charges de dépôt
• Abaissez la charge et déposez-la en toute sécurité sur une surface libre et plane afin qu'elle ne
puisse ni glisser ni se renverser.
• Appuyez sur le bouton rouge de libération pour libérer la charge aspirée.
• La charge est maintenant détachée.

Maniement
58500016
11 / 17
FR
4.2 Fonctionnement de l'appareil
4.2.1 Connexion d'une courroie de transport à l'appareil
• Les quatre oeillets métalliques autour de la
poignée servent à fixer la sangle de levage.
•
Fixez l'une des boucles (à chaque
extrémité de la sangle) dans un oeillet
prévu à cet effet.
• La sangle de transport peut être placée
autour de l'épaule de l'opérateur pour
soutenir la charge.
4.2.2 Remplacement du joint en mousse de caoutchouc
• Retirez le joint en mousse de caoutchouc
endommagé ou usagé en le tirant.
• Appuyez avec précaution sur le nouveau joint
en mousse de caoutchouc pour le mettre en
place.
4.2.3 Changer de filtre
• Utilisez la pointe d'un tournevis pour retirer le
bouchon en plastique (bague) et le filtre sur
le fond de l'appareil.
• Insérez un nouveau filtre (ou un filtre nettoyé)
et repoussez le bouchon en plastique
(anneau) pour fixer le filtre.

Maniement
58500016
12 / 17
FR
4.2.4 Remplacer la pile
• Pour retirer la batterie de l'appareil (FXAH-
120-GRABO-GREENLINE), faites glisser le
clip de la batterie vers l'avant (en l'éloignant
de la poignée).
• La pile peut maintenant être retirée du haut
du compartiment de la pile.
• Pour réinstaller une pile dans l'appareil
(FXAH-120-GRABO-GREENLINE), insérez la
pile dans le compartiment et faites glisser le
clip de la pile vers l'arrière (vers la poignée)
pour la fixer.
4.2.5 Recharger la batterie
• La batterie est fournie avec l'appareil dans un état partiellement chargé et doit être
complètement chargée avant la première utilisation.
• Le temps de chargement est d'environ 2 heures. Lorsque la batterie est complètement chargée,
la durée de fonctionnement de la pompe à vide est d'environ 1,5 heure.
• Les batteries peuvent être rechargées à tout moment sans réduire leur durée de vie. L'interruption
du processus de charge n'endommagera pas les batteries.
Seul le chargeur de batterie fourni peut être utilisé !
• Assurez-vous que la tension secteur
correspond aux données figurant sur la
plaque signalétique du chargeur.
• Le chargeur ne doit être utilisé que dans un
environnement sec.
Le chargeur n'est pas étanche !
• Gardez la batterie loin des objets
inflammables pendant la charge !
• Pour changer les fiches interchangeables,
respectez le sens de rotation de la fiche
secteur. (OPEN / LOCK).
• Branchez la fiche secteur du chargeur à une
prise de courant.
• Branchez le chargeur à la batterie.
• La batterie est chargée dès qu'elle est
connectée au chargeur.
• Le processus de chargement est
automatiquement interrompu lorsque la
batterie est complètement chargée.

Maniement
58500016
13 / 17
FR
4.2.6 Mise en service
• Faites glisser l'interrupteur ON-OFF ① sur la position ON pour mettre l'appareil en marche
(FXAH-120-GRABO-GREENLINE).
• L'indicateur d'état de la batterie ② sous l'interrupteur s'allume pour indiquer le niveau de charge
de la batterie.
• Si l'indicateur d'état de la batterie ② clignote, la batterie ⑥ 'est pas suffisamment chargée et
doit être rechargée avant d'utiliser l'appareil.
• La batterie ⑥ doit toujours être entièrement chargée avant chaque utilisation. L'utilisation d'un
appareil dont le niveau de charge de la batterie est trop faible peut entraîner des blessures
graves et des dommages dus à la chute soudaine de la charge soulevée !!!
• La batterie peut être rechargée à tout moment sans que son autonomie ne soit réduite.
• Si la force de maintien commence à diminuer sensiblement alors que la batterie est entièrement
chargée, vérifiez si le joint en mousse de caoutchouc est usé ou endommagé. N'essayez pas de
soulever une charge avec l'appareil tant que le joint en mousse de caoutchouc n'a pas été
remplacé.
• Positionnez l'appareil (FXAH-120-GRABO-GREENLINE) sur la surface à soulever.
• Pour mettre en marche la pompe à vide et déclencher l'aspiration de la charge, appuyez sur le
bouton vert ③. Pressez l'appareil à la poignée pendant quelques secondes avec une force
légère contre la charge à soulever et le processus d'aspiration commence.
• Si la charge aspirée doit être à nouveau libérée, il faut appuyer sur le bouton rouge ④.
• Le processus d'aspiration recommence alors immédiatement. On peut l'interrompre en appuyant
sur le bouton vert ③.
• Le manomètre ⑤ doit être constamment dans le champ de vision de l'opérateur, surtout
avec des matériaux légèrement poreux. Si l'écran affiche moins de - 0,6 bar (- 8,7 psi), jetez
le matériel immédiatement !

Maintenance et entretien
58500016
14 / 17
FR
5 Maintenance et entretien
5.1 Plaque d'aspiration
• Nettoyez la plaque d'aspiration des objets adhérents, de la saleté et de la poussière au moins une
fois par jour. Nettoyez le caoutchouc mousse avec de l'air comprimé et/ou un jet d'eau. → Pour ce
faire, retirez le joint en mousse de caoutchouc.
• Remplacez immédiatement la plaque d'aspiration endommagée (fissures, trous, ondulations).
• Utilisez un nettoyant à froid pour nettoyer l'appareil (n'utilisez pas d'éther de pétrole ou de liquides
corrosifs).
5.2 Test d'étanchéité
• Vérifiez l'étanchéité de l'appareil avant chaque utilisation.
5.3 Audit annuel
• Vérifiez tous les composants, en particulier le sceau. Inspection des fissures, de l'usure, de la
corrosion et de la fiabilité fonctionnelle par un expert.
5.4 Informations concernant la plaque signalétique
• Le type et le numéro de l’appareil ainsi que l’année de construction sont des informations
importantes pour identifier l’appareil. Elles doivent toujours être indiquées pour des commandes de
pièces de rechange, des demandes de garantie et d’autres questions en liaison avec l’appareil.
• La charge maximale indique la capacité de charge maximale (WLL) pour laquelle l’appareil est
conçu. La charge maximale (WLL) ne doit pas être dépassée.
• Le poids propre défini sur la plaque signalétique doit être pris en compte lors de l’utilisation avec un
engin de levage / engin porteur (par ex. grue, palan, chariot élévateur, excavateur …).
Exemple:
5.5 Remarque concernant la location/le prêt des engins PROBST
Lors de chaque location/prêt d’un engin PROBST, les instructions d’emploi originales
correspondantes doivent impérativement être jointes (si la langue n’est pas celle de l’utilisateur, une
traduction des instructions d’emploi originales dans la langue adéquate doit être fournie) !
6 Elimination / recyclage des appareils et des machines
Le produit ne doit être mis hors service et préparé pour l'élimination / le recyclage que par un
personnel qualifié. Les composants individuels présents (tels que les métaux, les plastiques, les
liquides, les piles/accumulateurs, etc.) doivent être éliminés/recyclés conformément aux lois et aux
réglementations nationales/locales en vigueur en matière d'élimination des déchets!
Le produit ne doit pas être éliminé avec les ordures ménagères!

À propos du développeur
58500016
15 / 17
FR
7 À propos du développeur
Le "GRABO moderne" a été inventé par l'ingénieur en
mécanique Nimo Rotem. Bien que les "aspirateurs
électriques portatifs" existent depuis un certain temps,
une percée technique majeure dans la technologie de
l'étanchéité, réalisée par Nemo, a permis aux appareils
GRABO modernes d'offrir une puissance de levage
incroyable dans un emballage petit et portable.

Exemples d'utilisation pour FXAH-120-GRABO-GREENLINE
58500016
16 / 17
FR
8 Exemples d'utilisation pour FXAH-120-GRABO-GREENLINE
FXAH-120-GRABO-
GREENLINE
FXAH-120-SOLO-Set
(48500055)
FXAH-120-SOLO-Set 4(8500055)
ALX-120-HG (42600206)
FXAH-120-DUO-SET (48500054)
FXAH-120-DUO-SET (48500039)
VPH-RS (42710072)

Exemples d'utilisation pour FXAH-120-GRABO-GREENLINE
58500016
17 / 17
FR
FXAH-DUO-CB (48500072)
FXAH-RS-CB (48500065)
FXAH-EL-CB (48500071)


58500016
V5
Traduzione delle istruzioni d'uso originali
FXAH-120-GRABO-GREENLINE
IT
I
Istruzioni d’uso

58500016
2 / 17
IT
Indice
1 Certificato di conformita´norme CE...................................................................................................... 3
2 Sicurezza ................................................................................................................................................. 4
2.1 Simboli di sicurezza .......................................................................................................................... 4
2.2 Segni di sicurezza ............................................................................................................................ 4
2.3 Misure di sicurezza personali ........................................................................................................... 4
2.4 Equipaggiamento antinfortunistico ................................................................................................... 5
2.5 Protezione contro gli infortuni ........................................................................................................... 5
2.6 Sicurezza durante l'esercizio ............................................................................................................ 5
2.6.1 Modifiche eseguite in proprio ....................................................................................................... 5
2.7 Sicurezza della batteria .................................................................................................................... 6
3 Aspetti generali ....................................................................................................................................... 7
3.1 Uso autorizzato ................................................................................................................................ 7
3.2 Dati tecnici ........................................................................................................................................ 9
3.2.1 Generale ...................................................................................................................................... 9
3.2.2 Caricabatterie ............................................................................................................................... 9
3.2.3 Ambito di fornitura ........................................................................................................................ 9
4 Funzionamento ..................................................................................................................................... 10
4.1 Generale ......................................................................................................................................... 10
4.1.1 Sollevare carichi ......................................................................................................................... 10
4.1.2 Carichi di deposito ..................................................................................................................... 10
4.2 Funzionamento del dispositivo ....................................................................................................... 11
4.2.1 Collegamento di una tracolla per il trasporto all'apparecchio .................................................... 11
4.2.2 Sostituzione della guarnizione in gommapiuma ........................................................................ 11
4.2.3 Sostituzione del filtro .................................................................................................................. 11
4.2.4 Sostituire la batteria ................................................................................................................... 12
4.2.5 Caricare la batteria ..................................................................................................................... 12
4.2.6 Messa in servizio ....................................................................................................................... 13
5 Cura e manutenzione ........................................................................................................................... 14
5.1 Piastra di aspirazione ..................................................................................................................... 14
5.2 Prova di tenuta ............................................................................................................................... 14
5.3 Audit annuale ................................................................................................................................. 14
5.4 Indicazioni per l’etichetta identificativa ........................................................................................... 14
5.5 Indicazioni per il noleggio/leasing di attrezzature PROBST........................................................... 14
6 Smaltimento / riciclaggio di apparecchi e macchinari ..................................................................... 14
7 Informazioni sullo sviluppatore .......................................................................................................... 15
8 Esempi d'uso per FXAH-120-GRABO-GREENLINE........................................................................... 16
Ci riserviamo il diritto di apportare modifiche alle informazioni e alle illustrazioni delle istruzioni per l'uso.

Certificato di conformita´norme CE
58500016
3 / 17
IT
1 Certificato di conformita´norme CE
Descrizione:
Modello:
Articolo n.:
FLIEGUAN-AKKU-HANDY FXAH-120-GRABO-GREENLINE
FXAH-120-GRABO-GREENLINE
58500016
Produttore:
Probst GmbH
Gottlieb-Daimler-Straße 6
71729 Erdmannhausen, Germany
info@probst-handling.de
www.probst-handling.com
La macchina sopra descritta rispetta I requisiti principali delle seguenti normative della EU:
2006/42/CE (linea di guida CE)
2014/30/EU (Compatibilità elettromagnetica)
DIN EN 1012-1 / DIN EN 1012-2
Compressori e pompe vacuum .Requisiti di sicurezza parte 1 e 2.
Persona autorizzata per CE-documentazione:
Nome: Jean Holderied
Indirizzo: Probst GmbH; Gottlieb-Daimler-Straße 6; 71729 Erdmannhausen, Germany
Firma, dati del sottoscrivente:
Erdmannhausen, 21.11.2023..........................................................................
(Eric Wilhelm, Direttore generale)

Sicurezza
58500016
4 / 17
IT
2 Sicurezza
2.1 Simboli di sicurezza
Pericolo di vita!
Indica un pericolo. Se non viene osservato le conseguenze possono essere la morte o gravi infortuni.
Situazione pericolosa!
Indica una situazione pericolosa. Le conseguenze possono essere infortuni e ferite.
Vietato!
Indica un divieto. Se non osservato le conseguenze possono essere la morte o gravi ferite.
Informazioni importanti o suggerimenti utili per l'uso.
2.2 Segni di sicurezza
SEGNI OBBLIGATORI
Simbolo
Significato
Articolo-N.
Misura
Ogni persona coinvolta nelle operazioni di installazione,
avviamento, utilizzo, manutenzione e riparazione del dispositivo
deve aver letto e compreso le istruzioni d’uso e, in particolare, il
capitolo “Sicurezza” qui contenuto.
29040665
29040666
29041049
Ø30 mm
Ø50 mm
Ø 80 mm
2.3 Misure di sicurezza personali
• Tutti gli operatori devono aver letto e compreso le istruzioni d’uso.
• Solo apersonale qualificato ed autorizzato è concesso l’utilizzo del dispositivo e delle component
collegate (dispositivo di sollevamento).
• La guida manual è consentita solo su dispositive con maniglie.
Altrimenti c'è il rischio di lesioni alle mani!

Sicurezza
58500016
5 / 17
IT
2.4 Equipaggiamento antinfortunistico
In conformità con i requisiti tecnici relativi alla sicurezza,
l'equipaggiamento protettivo è costituito da:
• Indumenti antinfortunistici
• Guanti antinfortunistici
• Scarpe antinfortunistiche
2.5 Protezione contro gli infortuni
• Mettere in sicurezza l'area di lavoro per le persone non autorizzate, soprattutto i bambini, su una
vasta area.
• Attenzione durante i temporali - pericolo di fulmini!
A seconda dell'intensità del temporale, interrompere il lavoro con l'attrezzatura se necessario.
• Illuminate sufficientemente l'area di lavoro.
• Attenzione ai materiali da costruzione bagnati, congelati, ghiacciati e sporchi!
C'è il pericolo che il materiale di presa scivoli via. → PERICOLO DI INCIDENTE!
2.6 Sicurezza durante l'esercizio
2.6.1 Modifiche eseguite in proprio
Le modifiche eseguite in proprio sull'apparecchio o l'impiego di dispositivi ausiliari realizzati in proprio
possono costituire un pericolo per l'incolumità fisica ed essere causa di lesioni mortali; per questa
ragione è fatto assoluto divieto di effettuare modifiche del genere!!

Sicurezza
58500016
6 / 17
IT
2.7 Sicurezza della batteria
• Si può usare solo il pacco batteria fornito con l'unità.
• La batteria deve essere conservata in un intervallo di temperatura di 0°C - 45°C.
• Quando la batteria non viene utilizzata, tenerla lontana da altri oggetti metallici come graffette,
monete, chiavi, chiodi e viti per evitare cortocircuiti.
• La batteria non deve essere aperta!
• Proteggere la batteria dal calore ed evitare la luce diretta del sole e il fuoco!
• Se una batteria è difettosa, il liquido può fuoriuscire ed entrare in contatto con i componenti
adiacenti.
• L'unità "FLIEGUAN-AKKU-HANDY" e il caricabatterie NON sono impermeabili!!!
• Prima dell'uso, controllare il caricabatterie, il cavo e la spina.
In caso di danni visibili, non utilizzare il caricabatterie!
• Non aprire mai il caricabatterie. Può essere aperto e riparato solo da personale qualificato!
• Tenere la batteria e il caricabatterie lontano da oggetti infiammabili durante il processo di carica!

Aspetti generali
58500016
7 / 17
IT
3 Aspetti generali
3.1 Uso autorizzato
• L'apparecchio deve essere utilizzato in modo regolare ed esclusivamente per le finalità descritte
nelle istruzioni d'uso rispettando le norme sulla sicurezza vigenti e le disposizioni previste dalle
norme CE relativamente al certificato di conformità.
• È vietato ogni utilizzo diverso da quello previsto dalle norme!
• Occorre inoltre rispettare le norme sulla sicurezza e sulla prevenzione degli infortuni localmente
vigenti.
Prima di ogni utilizzo assicurarsi che:
• L’apparecchio sia adatto all’utilizzo preposto
• le condizioni funzionale e di lavoro dell’apparecchio vengano esaminate
• che i carichi da movimentare siano adatti per questo apparecchio.
In caso di dubbi in merito alle istruzioni rivolgersi al produttore prima dell’uilizzo.
Il dispositivo „FLIEGUAN-AKKU-HANDY“ è un aspirapolvere elettrico portatile, che ha una forza di
tenuta fino a (WLL) 120 kg e può aspirare su quasi tutte le superfici.
Il dispositivo è quindi adatto per aspirare e poi sollevare, spostare e posare materiali con superfici lisce
e assorbenti, come ad esempio :
Piastrelle, pietra naturale, cemento e lastre di marmo, vetro.
I materiali indicati sono solo indicativi. Se necessario, prima dell'aspirazione/sollevamento è
necessario effettuare dei test preliminari per garantire che la merce trasportata non venga
danneggiata!
I materiali sottili rischiano di rompersi a causa del vuoto che si crea durante il processo di
aspirazione. Una sufficiente stabilità intrinseca del materiale è quindi un prerequisito!
• La capacità di carico massima (WLL) è di 120 kg (265 lbs), quando l'unità viene tenuta
orizzontale.
• Se l'unità viene tenuta ad angolo o in verticale, la capacità di carico massima (WLL) è di 60
kg (132 lbs).
• La capacità di carico massima (WLL) non deve mai essere superata!
Il carico potrebbe allentarsi e cadere. Pericolo di lesioni!
Il dispositivo "FLIEGUAN-AKKU-HANDY" non è adatto o destinato ad arrampicarsi o a portare il
peso di una persona. L'utilizzo del dispositivo per l'arrampicata o per qualsiasi altro scopo non
previsto può provocare lesioni o morte.

Aspetti generali
58500016
8 / 17
IT
• Il carico (lastra in pietra, marmetta ecc.) che deve essere
aspirato e sollevato, deve avere una stabilità inerente
sufficiente, in caso contrario sussiste il rischio di rottura
durante il sollevamento!
• Le lastre in pietra non devono piegarsi durante il
sollevamento – fate particolare attenzione a lastre in
pietra larghe e sottili!
• In generale, i carichi (lastre di pietra) possono essere
risucchiati solo centralmente, altrimenti il carico viene
appeso obliquamente sull'apparecchio, il che può portare
alla rottura del carico - specialmente quando si sollevano
lastre di pietra di grande formato con una piccola piastra
di aspirazione.
ATTIVITÀ PROIBITE:
Modifiche non autorizzate all'apparecchio o l'uso di altri apparecchi supplementari da voi stessi
costruiti mettono in pericolo la vita e l'incolumità fisica e sono quindi severamente proibiti!
La capacità di carico dell'apparecchio non deve essere superati.
È severamente vietato qualsiasi trasporto con l'apparecchio che non sia conforme alle norme:
● Trasporto di prodotti, oggetti e materiali non descritti in queste istruzioni.
● Sospendere l'unità da un supporto utilizzando corde, catene, imbracature o simili.
L'apparecchio deve essere utilizzato SOLO come dispositivo portatile!

Aspetti generali
58500016
9 / 17
IT
3.2 Dati tecnici
3.2.1 Generale
Tensione della batteria
Durata della batteria
(a piena carica)
Capacità della batteria
Capacità di
aspirazione
14,8V Li-Ion
ca. 1,5 ore
2,2 AH
16W
Capacità di carico (WLL)
Pressione negativa richiesta
Peso netto (con
batteria)
Dimensioni
120 kg (265 lbs)
-0,6 bar (- 8,7 psi)
1,5 kg (3,3 lbs)
297 x 181 x 115 mm
3.2.2 Caricabatterie
Modello
Tensione di carica
Tensione d'ingresso
XV-2008290006
DC 16,8 v / 1,4 A
100V-240VAC; 50/60Hz; 0.5 A max
3.2.3 Ambito di fornitura
①
Filtro di ricambio (1x)
②
Batterie agli ioni di litio
(1x)
③
Caricabatteria (1x) compresa la spina intercambiabile (3)
④
Guarnizione in gommapiuma di ricambio
(1x)

Funzionamento
58500016
10 / 17
IT
4 Funzionamento
4.1 Generale
• Non strappare i carichi bloccati.
• In caso di mancanza di corrente, se possibile, scollegare immediatamente il carico.
• Aspirare e sollevare solo carichi idonei (verificare la stabilità intrinseca e la densità superficiale).
• Posizionare il carico solo su una superficie libera e piana. Altrimenti possono scivolare quando
vengono rilasciati.
• Non rilasciare il carico finché non è completamente e saldamente sostenuto o in piedi.
• Tenere le mani lontano dal carico quando si rilascia.
• Caricare sempre le superfici di aspirazione in modo uniforme.
4.1.1 Sollevare carichi
• Posizionare il dispositivo direttamente sopra il carico.
• Posizionare il dispositivo sul carico. Assicurare una distribuzione uniforme del carico.
• Il carico viene ora risucchiato.
• Durante il sollevamento, assicurarsi che venga sollevato un solo pezzo del materiale da sollevare
alla volta. Rimuovere con cautela qualsiasi altra parte aderente con un cacciavite prima di
sollevare ulteriormente la parte. Non allentare con le mani, pericolo di schiacciamento!
4.1.2 Carichi di deposito
• Abbassare il carico e appoggiarlo in modo sicuro su una superficie libera e piana, in modo che il
carico non possa scivolare o ribaltarsi.
• Premere il pulsante rosso di rilascio per rilasciare il carico aspirato.
• Il carico è ora staccato.

Funzionamento
58500016
11 / 17
IT
4.2 Funzionamento del dispositivo
4.2.1 Collegamento di una tracolla per il trasporto all'apparecchio
• I quattro occhielli metallici intorno alla
maniglia sono utilizzati per fissare la cinghia
di sollevamento per il trasporto.
•
Fissare una delle fibbie (ad ogni estremità
della cinghia) in un apposito occhiello.
• La tracolla può essere messa intorno alla
spalla dell'operatore per sostenere il carico.
4.2.2 Sostituzione della guarnizione in gommapiuma
• Rimuovere la guarnizione in gommapiuma
danneggiata o usata estraendola.
• Premere con cautela la nuova guarnizione in
gommapiuma in posizione.
4.2.3 Sostituzione del filtro
• Utilizzare la punta di un cacciavite per
rimuovere il tappo di plastica (anello) e il filtro
sul fondo dell'apparecchio.
• Inserire un nuovo filtro (o un filtro pulito) e
spingere il tappo di plastica (anello) per
fissare il filtro.

Funzionamento
58500016
12 / 17
IT
4.2.4 Sostituire la batteria
• Per rimuovere la batteria dall'unità (FXAH-
120-GRABO-GREENLINE), far scorrere la
clip della batteria in avanti (lontano
dall'impugnatura).
• La batteria può ora essere rimossa dalla
parte superiore del vano batterie.
• Per reinserire una batteria nell'unità (FXAH-
120-GRABO-GREENLINE), inserire la
batteria nel vano batteria e far scorrere la clip
della batteria all'indietro (verso l'impugnatura)
per fissare la batteria.
4.2.5 Caricare la batteria
• La batteria viene fornita con il dispositivo in condizione di carica parziale e deve essere
completamente carica prima del primo utilizzo.
• Il tempo di ricarica è di circa 2 ore. Quando la batteria è completamente carica, il tempo di
funzionamento della pompa per vuoto è di circa 2 ore.
• Le batterie possono essere caricate in qualsiasi momento senza ridurre la loro durata.
L'interruzione del processo di carica non danneggia le batterie.
Si può utilizzare solo il caricabatterie in dotazione!
• Assicurarsi che la tensione di rete
corrisponda ai dati riportati sulla targhetta del
caricabatterie.
• Il caricabatterie può essere utilizzato solo in
un ambiente asciutto.
Il caricabatterie non è impermeabile!
• Tenere la batteria lontano da oggetti
infiammabili durante la carica!
• Per cambiare le spine intercambiabili,
osservare il rispettivo senso di rotazione sulla
spina di rete (OPEN / LOCK).
• Collegare la spina di rete del caricabatterie
ad una presa.
• Collegare il caricabatterie alla batteria.
• La batteria viene caricata non appena viene
collegata al caricabatterie.
• Il processo di carica viene automaticamente
interrotto quando la batteria è completamente
carica.

Funzionamento
58500016
13 / 17
IT
4.2.6 Messa in servizio
• Far scorrere l'interruttore ON-OFF ① in posizione ON per accendere l'unità (FXAH-120-GRABO-
GREENLINE).
• L'indicatore di stato della batteria ② sotto l'interruttore di alimentazione si illumina per indicare il
livello di carica della batteria.
• Se l'indicatore di stato della batteria ② lampeggia, la batteria ⑥ non è sufficientemente carica e
deve essere ricaricata prima di utilizzare il dispositivo.
• La batteria ⑥ dovrebbe essere sempre completamente carica prima di ogni utilizzo. L'uso
dell'unità con un livello di carica della batteria troppo basso può provocare gravi lesioni e
danni dovuti alla caduta improvvisa del carico sollevato!!!
• La batteria può essere caricata in qualsiasi momento senza ridurre l'autonomia.
• Se la forza di tenuta comincia a diminuire sensibilmente anche se la batteria è completamente
carica, controllare che la guarnizione di gommapiuma non sia usurata o danneggiata. Non tentare
di sollevare un carico con l'unità finché la guarnizione di gommapiuma non sia stata sostituita.
• Posizionare il dispositivo (FXAH-120-GRABO-GREENLINE) sulla superficie da sollevare.
• Per accendere la pompa a vuoto e attivare l'aspirazione del carico, è necessario premere il
pulsante verde ③. Premete il dispositivo sulla maniglia per alcuni secondi con una forza leggera
contro il carico da sollevare e il processo di aspirazione inizia.
• Se il carico aspirato deve essere rilasciato di nuovo, il pulsante rosso ④ deve essere premuto.
• Il processo di aspirazione ricomincia immediatamente. Questo può essere interrotto premendo il
pulsante verde ③.
• Il manometro ⑤ deve essere costantemente nel campo visivo dell'operatore,
specialmente quando si lavora con materiali leggermente porosi. Se il display mostra
meno di - 0,6 bar (- 8,7 psi), scartare immediatamente il materiale!

Cura e manutenzione
58500016
14 / 17
IT
5 Cura e manutenzione
5.1 Piastra di aspirazione
• Pulire la piastra di aspirazione da oggetti aderenti, sporco e polvere almeno una volta al giorno.
Pulire la gomma spugna con aria compressa e/o getto d'acqua. → Per fare questo, rimuovete la
guarnizione di gommapiuma.
• Sostituire immediatamente la piastra di aspirazione danneggiata (crepe, fori, ondulazioni).
• Usare un detergente a freddo per pulire l'apparecchio (non usare etere di petrolio o liquidi corrosivi).
5.2 Prova di tenuta
• Controllare che non vi siano perdite prima di ogni utilizzo.
5.3 Audit annuale
• Controllare tutti i componenti, in particolare la tenuta. Ispezione di cricche, usura, corrosione e
affidabilità funzionale da parte di un esperto.
5.4 Indicazioni per l’etichetta identificativa
• Modello, numero di matricola e anno di produzione sono molto importanti per l’identificazione del
vostro apparecchio. Se avete bisogno di informazioni in merito alle parti di ricambio, garanzia o
altri dettagli specifici fate riferimento a queste informazioni.
• La capacità di portata massima (WLL) indica il carico Massimo che può essere sollevato con
l’apparecchio. Non superare la capacità di portata (WLL) indicata.
• Se utilizzate l’apparecchio unitamente ad un’altra macchina operatrice (gru, argano, carrello
elevatore, escavatore) tenete in considerazione anche il peso netto dell’apparecchio.
Esempio:
5.5 Indicazioni per il noleggio/leasing di attrezzature PROBST
Ad ogni noleggio/leasing delle attrezzature PROBST è obbligatorio includere le istruzioni d’uso
originali (a seconda della lingua del paese dell’utilizzatore, verrà fornita in aggiunta la traduzione delle
istruzioni d’uso originali)!
6 Smaltimento / riciclaggio di apparecchi e macchinari
Il prodotto può essere messo fuori servizio e preparato per lo smaltimento / riciclaggio solo da
personale qualificato. I singoli componenti esistenti (come metalli, plastiche, liquidi,
batterie/accumulatori ecc.) devono essere smaltiti/riciclati in conformità alle leggi e alle norme di
smaltimento specifiche del paese!
Il prodotto non deve essere smaltito nei rifiuti domestici!

Informazioni sullo sviluppatore
58500016
15 / 17
IT
7 Informazioni sullo sviluppatore
Il "GRABO moderno" è stato inventato dall'ingegnere
meccanico Nimo Rotem. Anche se gli "aspirapolvere
elettrici portatili" esistono da tempo, un importante
progresso tecnico nella tecnologia delle guarnizioni,
guidato da Nemo, ha permesso ai moderni dispositivi
GRABO di racchiudere un'incredibile potenza di
sollevamento in un pacchetto piccolo e portatile.

Esempi d'uso per FXAH-120-GRABO-GREENLINE
58500016
16 / 17
IT
8 Esempi d'uso per FXAH-120-GRABO-GREENLINE
FXAH-120-GRABO-
GREENLINE
FXAH-120-SOLO-Set
(48500055)
FXAH-120-SOLO-Set 4(8500055)
ALX-120-HG (42600206)
FXAH-120-DUO-SET (48500054)
FXAH-120-DUO-SET (48500039)
VPH-RS (42710072)

Esempi d'uso per FXAH-120-GRABO-GREENLINE
58500016
17 / 17
IT
FXAH-DUO-CB (48500072)
FXAH-RS-CB (48500065)
FXAH-EL-CB (48500071)


58500016
V5
Tłumaczenie oryginalnej instrukcji
FXAH-120-GRABO-GREENLINE
PL
I
Instrukcja Obsługi

Nazwa:
58500016
2 / 17
PL
Spis treści
1 CE - Deklaracja zgodności .................................................................................................................... 3
2 Bezpieczeństwo ...................................................................................................................................... 4
2.2 Znaki bezpieczeństwa ...................................................................................................................... 4
2.3 Środki bezpieczeństwa osobistego .................................................................................................. 4
2.4 Wyposażenie ochronne .................................................................................................................... 5
2.5 Ochrona przed nieszczęśliwym wypadkiem ..................................................................................... 5
2.6 Bezpieczeństwo podczas pracy ....................................................................................................... 5
2.6.1 Samowolne przeróbki .................................................................................................................. 5
2.7 Bezpieczeństwo baterii ..................................................................................................................... 6
3 Informacje ogólne................................................................................................................................... 7
3.1 Stosowanie zgodnie z przeznaczeniem ........................................................................................... 7
3.2 Dane techniczne ............................................................................................................................... 9
3.2.1 Ogólne .......................................................................................................................................... 9
3.2.2 Ładowarka akumulatorów ............................................................................................................ 9
3.2.3 Zakres dostawy ............................................................................................................................ 9
4 Manipulowanie ...................................................................................................................................... 10
4.1 Ogólne ............................................................................................................................................ 10
4.1.1 Podnośniki.................................................................................................................................. 10
4.1.2 Obciążenia depozytowe ............................................................................................................. 10
4.2 Obsługa urządzenia ....................................................................................................................... 11
4.2.1 Podłączanie paska nośnego do urządzenia .............................................................................. 11
4.2.2 Wymiana uszczelki z pianki gumowej ........................................................................................ 11
4.2.3 Wymień filtr ................................................................................................................................ 11
4.2.4 Wymiana baterii ......................................................................................................................... 12
4.2.5 Ładowanie akumulatora ............................................................................................................. 12
4.2.6 Uruchomienie ............................................................................................................................. 13
5 Konserwacja i utrzymanie ................................................................................................................... 14
5.1 Płyta ssąca ..................................................................................................................................... 14
5.2 Test szczelności ............................................................................................................................. 14
5.3 Audyt roczny ................................................................................................................................... 14
5.4 Wskazówki dotyczące tabliczki znamionowej ................................................................................ 14
5.5 Wskazówka dotycząca wynajmowania/wypożyczania urządzeń marki PROBST ......................... 14
6 Utylizacja / recykling sprzętu i maszyn .............................................................................................. 14
7 O deweloperze ...................................................................................................................................... 15
8 Przykłady zastosowania dla FXAH-120-GRABO-GREENLINE ......................................................... 16
Zastrzegamy sobie prawo do wprowadzania zmian w informacjach i ilustracjach zawartych w instrukcji obsługi.

CE - Deklaracja zgodności
58500016
3 / 17
PL
1 CE - Deklaracja zgodności
Nazwa:
Typ:
Nr zamówienia:
FLIEGUAN-AKKU-HANDY FXAH-120-GRABO-GREENLINE
FXAH-120-GRABO-GREENLINE
58500016
Producent:
Probst GmbH
Gottlieb-Daimler-Straße 6
71729 Erdmannhausen, Germany
info@probst-handling.de
www.probst-handling.com
Wyżej wymieniona maszyna jest zgodna z odnośnymi wytycznymi następujących dyrektyw UE:
2006/42/CE (dyrektywa maszynowa)
2014/30 / UE (kompatybilność elektromagnetyczna)
DIN EN 1012-1 / DIN EN 1012-2
Kompresory i pompy próżniowe; wymogi dotyczące bezpieczeństwa część 1 i 2.
Autoryzować osoba dla EC- Dokumentacja :
Nazwisko: Jean Holderied
Adres: Probst GmbH; Gottlieb-Daimler-Straße 6; 71729 Erdmannhausen, Germany
Podpis, informacje na temat osoby podpisującej:
Erdmannhausen, 21.11.2023..........................................................................
(Eric Wilhelm, Prezes Zarządu)

Bezpieczeństwo
58500016
4 / 17
PL
2 Bezpieczeństwo
2.1 Wskazówki bezpieczeństwa
Niebezpieczeństwo dla życia!
Oznacza niebezpieczeństwo. W przypadku, gdy nie będzie unikane, następstwem może być śmierć lub
ciężkie zranienie.
Sytuacja niebezpieczna!
Oznacza sytuację niebezpieczną. W przypadku, gdy nie będzie unikana, następstwem mogą być
ciężkie zranienia lub szkody materialne.
Zakaz!
Oznacza zakaz. W przypadku nieprzestrzegania następstwem mogą być śmierć, ciężkie zranienie lub
szkody materialne.
Ważne informacje lub przydatne porady użytkowania
2.2 Znaki bezpieczeństwa
ZNAKI NAKAZU
Symbol
Znaczenie
Nr zam.
Wielkość
Każdy operator musi przeczytać i zrozumieć instrukcję obsługi dla
urządzenia i zawarte w niej przepisy bezpieczeństwa.
29040665
29040666
29041049
Ø30 mm
Ø50 mm
Ø 80 mm
2.3 Środki bezpieczeństwa osobistego
• Każdy operator musi przeczytać i zrozumieć instrukcję obsługi dla urządzenia i zawarte w niej
przepisy bezpieczeństwa.
• Urządzenie i wszystkie urządzenia nadrzędne, w/do których urządzenie jest zamontowane, mogą
być użytkowane wyłącznie przez osoby wykwalifikowane i posiadające odpowiednie pozwolenie.
• Tylko maszyny posiadające uchwyty mogą być obsługiwane ręcznie.
W przeciwnym razie istnieje niebezpieczeństwo zranienia rąk!

Bezpieczeństwo
58500016
5 / 17
PL
2.4 Wyposażenie ochronne
Zgodnie z wymaganiami w zakresie bezpieczeństwa
wyposażenie ochronne składa się z:
• odzieży ochronnej
• rękawic ochronnych
• butów ochronnych
2.5 Ochrona przed nieszczęśliwym wypadkiem
• Zabezpieczyć miejsce pracy dla osób nieupoważnionych, zwłaszcza dzieci, na dużej powierzchni.
• Uwaga podczas burzy z piorunami - zagrożenie piorunem!
W zależności od intensywności burzy, w razie potrzeby należy przerwać pracę z urządzeniem.
• Odpowiednio oświetlić obszar roboczy.
• Należy uważać na mokre, zamarznięte, oblodzone i brudne materiały budowlane!
Istnieje niebezpieczeństwo wysunięcia się materiału chwytającego. →
NIEBEZPIECZEŃSTWO WYPADKU!!
2.6 Bezpieczeństwo podczas pracy
2.6.1 Samowolne przeróbki
Samowolne przeróbki urządzenia lub stosowanie samodzielnie wykonanych urządzeń dodatkowych
stanowi zagrożenie dla zdrowia oraz życia i z tego powodu jest zasadniczo zabronione!!

Bezpieczeństwo
58500016
6 / 17
PL
2.7 Bezpieczeństwo baterii
• Można używać tylko dołączonego do urządzenia akumulatora.
• Bateria powinna być przechowywana w zakresie temperatur od 0°C - 45°C.
• Gdy bateria nie jest używana, trzymaj ją z dala od innych metalowych przedmiotów, takich jak
spinacze, monety, klucze, gwoździe i śruby, aby zapobiec zwarciom.
• Baterii nie wolno otwierać!
• Chronić akumulator przed gorącem i unikać bezpośredniego światła słonecznego i ognia!
• Jeśli akumulator jest uszkodzony, może dojść do wycieku cieczy i kontaktu z sąsiednimi
elementami.
• Urządzenie "FLIEGUAN-AKKU-HANDY" oraz ładowarka do akumulatorów NIE SĄ
wodoodporne!!!
• Przed użyciem należy sprawdzić ładowarkę, kabel i wtyczkę.
Jeżeli widoczne są jakiekolwiek uszkodzenia, nie należy używać ładowarki!
• Nigdy nie otwieraj ładowarki. Może on być otwierany i naprawiany tylko przez wykwalifikowany
personel!
• Podczas procesu ładowania akumulator i ładowarkę należy przechowywać z dala od
łatwopalnych przedmiotów!

Informacje ogólne
58500016
7 / 17
PL
3 Informacje ogólne
3.1 Stosowanie zgodnie z przeznaczeniem
• Urządzenie może być wykorzystywane wyłącznie do zgodnych z przeznaczeniem zastosowań
opisanych w niniejszej instrukcji obsługi zgodnie z obowiązującymi przepisami bezpieczeństwa
oraz odpowiednimi postanowieniami deklaracji zgodności.
• Każde inne zastosowanie traktowane jest jako niezgodne z przeznaczeniem i jest zabronione!
• Należy dodatkowo przestrzegać obowiązujących w miejscu zastosowania ustawowych przepisów
bezpieczeństwa i higieny pracy.
Przed każdym użyciem urządzenia użytkownik musi upewnić się, że:
• urządzenie nadaje się do danego zastosowania, jest sprawne oraz że dany ładunek można
podnosić za pomocą tego urządzenia.
W razie wątpliwości skontaktować się przed zastosowaniem z producentem.
Urządzenie „FLIEGUAN-AKKU-HANDY“ jest elektrycznym odkurzaczem ręcznym o sile nacisku do
(WLL) 120 kg, który może zasysać prawie każdą powierzchnię.
Urządzenie jest zatem odpowiednie do zasysania, a następnie podnoszenia, przenoszenia i układania
materiałów o gładkich i chłonnych powierzchniach, takich jak:
Płytki, kamień naturalny, płyty betonowe i marmurowe, szkło.
Podane tu materiały mają jedynie charakter orientacyjny. W razie potrzeby przed
zasysaniem/podnoszeniem należy przeprowadzić wstępne testy, aby upewnić się, że
transportowany materiał nie zostanie uszkodzony!
W przypadku cienkich materiałów istnieje ryzyko pęknięcia z powodu podciśnienia
wytwarzanego podczas procesu zasysania. Warunkiem wstępnym jest zatem wystarczająca
stabilność materiału!
• Maksymalna nośność (WLL) wynosi 120 kg (265 lbs), gdy urządzenie jest trzymane
poziomo.
• Jeśli urządzenie jest trzymane pod kątem lub pionowo, maksymalna nośność (WLL)
wynosi 60 kg
(132 lbs).
• Maksymalna nośność (WLL) nie może być nigdy przekroczona!
Ładunek może się poluzować i spaść. Niebezpieczeństwo obrażeń!
Urządzenie "FLIEGUAN-AKKU-HANDY" nie nadaje się ani nie jest przeznaczone do wspinaczki
lub przenoszenia ciężaru ciała. Używanie urządzenia do wspinaczki lub do innych celów
niezgodnych z przeznaczeniem może spowodować obrażenia ciała lub śmierć.

Informacje ogólne
58500016
8 / 17
PL
• Ładunek (płyta kamienna, dachówka itp.), który ma
zostać wessany i przetransportowany, musi mieć
wystarczającą wewnętrzną stabilność, w przeciwnym
razie istnieje ryzyko złamania podczas podnoszenia!
• Ładunki nie mogą zginać się podczas podnoszenia -
jest to szczególnie ważne w przypadku cienkich i
dużych ładunków!
• Ogólnie rzecz biorąc, ładunki (płyty kamienne) mogą
być zasysane tylko centralnie, ponieważ w przeciwnym
razie ładunek zawiesi się ukośnie na urządzeniu, co
może prowadzić do zerwania ładunku - szczególnie
przy podnoszeniu wielkogabarytowych płyt
kamiennych z małą płytą ssącą.
ZABRONIONE DZIAŁANIA:
Nieautoryzowane modyfikacje urządzenia lub użycie dodatkowych urządzeń, które zostały przez
Państwa zbudowane, zagrażają życiu i kończynom i dlatego są surowo zabronione!
Nie wolno przekraczać dopuszczalnego obciążenia roboczego (WLL) urządzenia.
Jakikolwiek transport z urządzeniem niezgodny z przepisami jest surowo wzbroniony:
● Transport produktów, przedmiotów i materiałów nieopisanych w niniejszej instrukcji.
● Zawieszanie urządzenia na urządzeniu nośnym za pomocą lin, łańcuchów lub pasa nośnego do
podnoszenia lub podobnego urządzenia.
Urządzenie musi być używane wyłącznie jako urządzenie ręczne!

Informacje ogólne
58500016
9 / 17
PL
3.2 Dane techniczne
3.2.1 Ogólne
Napięcie akumulatora
Żywotność baterii (w pełni
naładowany)
Pojemność baterii
Wydajność odsysania
14,8V Li-Ion
ok. 1,5 godziny
2.2 AH
16W
Nośność (WLL)
Wymagane podciśnienie
Waga netto
(z akumulatorem)
Wymiary
120 kg (265 lbs)
- 0,6 bar (- 8,7 psi)
1,5 kg (3,3 lbs)
297 x 181 x 115 mm
3.2.2 Ładowarka akumulatorów
Model
Napięcie ładowania
Napięcie wejściowe
XV-2008290006
DC 16,8 v / 1,4 A
100V-240VAC; 50/60Hz; 0.5 A max
3.2.3 Zakres dostawy
①
Wymienny filtr (1x)
②
Akumulatory litowo-jonowe
(1x)
③
Ładowarka do baterii (1x) wraz z wymienną wtyczką (3)
④
Zapasowa uszczelka z pianki gumowej
(1x)

Manipulowanie
58500016
10 / 17
PL
4 Manipulowanie
4.1 Ogólne
• Nie odrywaj zaklinowanych ładunków.
• W przypadku awarii zasilania należy w miarę możliwości natychmiast odłączyć obciążenie.
• Wsysać i podnosić tylko odpowiednie ładunki (sprawdzić wewnętrzną stabilność i gęstość
powierzchni).
• Ładunek należy umieszczać tylko na wolnej, równej powierzchni. W przeciwnym razie mogą się
ześlizgnąć po zwolnieniu.
• Nie wolno zwalniać ładunku, dopóki nie będzie on całkowicie i bezpiecznie podparty lub stojący.
• Podczas zwalniania należy trzymać ręce z dala od ładunku.
• Powierzchnie ssące należy zawsze równomiernie obciążać.
4.1.1 Podnośniki
• Ustawić urządzenie bezpośrednio nad obciążeniem.
• Umieścić urządzenie na ładunku. Zapewnić równomierne rozłożenie obciążenia.
• Ładunek jest teraz wessany.
• Podczas podnoszenia należy upewnić się, że w danym momencie podnoszony jest tylko jeden
kawałek materiału, który ma być podniesiony. Przed dalszym podniesieniem części należy
ostrożnie usunąć śrubokrętem inne przylegające elementy. Nie luzować się rękami,
niebezpieczeństwo zmiażdżenia!
4.1.2 Obciążenia depozytowe
• Opuść ładunek i połóż go bezpiecznie na wolnej, płaskiej powierzchni, tak aby nie mógł się
ześlizgnąć ani przewrócić.
• Nacisnąć czerwony przycisk zwalniający, aby zwolnić zasysany ładunek.
• Ładunek jest teraz odłączony.

Manipulowanie
58500016
11 / 17
PL
4.2 Obsługa urządzenia
4.2.1 Podłączanie paska nośnego do urządzenia
• Cztery metalowe oczka wokół uchwytu służą
do mocowania pasa nośnego do
podnoszenia.
• Zamocuj jedną z klamer (na każdym końcu
taśmy) w przewidzianym do tego celu
oczku.
• Pasek nośny może być umieszczony wokół
ramienia operatora, aby podtrzymać ładunek.
4.2.2 Wymiana uszczelki z pianki gumowej
• Uszkodzoną lub zużytą uszczelkę z pianki
gumowej należy usunąć poprzez jej
wyciągnięcie.
• Ostrożnie wcisnąć nową uszczelkę z pianki
gumowej na miejsce.
4.2.3 Wymień filtr
• Za pomocą końcówki wkrętaka wyjmij
plastikową wtyczkę (pierścień) i filtr na
spodzie urządzenia.
• Włóż nowy filtr (lub wyczyszczony filtr) i
wciśnij z powrotem plastikową wtyczkę
(pierścień), aby zabezpieczyć filtr.

Manipulowanie
58500016
12 / 17
PL
4.2.4 Wymiana baterii
• Aby wyjąć baterię z urządzenia (FXAH-120-
GRABO-GREENLINE), przesuń zaczep
baterii do przodu (z dala od uchwytu).
• Baterię można teraz wyjąć z górnej części
komory baterii.
• Aby ponownie włożyć baterię do urządzenia
(FXAH-120-GRABO-GREENLINE), włóż ją
do komory baterii i przesuń zaczep baterii do
tyłu (w kierunku uchwytu) w celu
zabezpieczenia baterii.
4.2.5 Ładowanie akumulatora
• Bateria jest dostarczana z urządzeniem w stanie częściowo naładowanym i musi być w pełni
naładowana przed pierwszym użyciem.
• Czas ładowania wynosi ok. 2 godzin. Przy pełnym naładowaniu akumulatora czas pracy pompy
próżniowej wynosi ok. 1,5 godziny.
• Akumulatory można w każdej chwili naładować bez zmniejszania ich żywotności. Przerwanie
procesu ładowania nie spowoduje uszkodzenia baterii.
Można używać tylko dołączonej do zestawu ładowarki akumulatorów!
• Upewnić się, że napięcie sieciowe jest
zgodne z danymi na tabliczce znamionowej
prostownika.
• Ładowarka może być używana tylko w
suchym środowisku.
Ładowarka nie jest wodoodporna!
• Podczas ładowania akumulator należy
trzymać z dala od łatwopalnych przedmiotów!
• Aby wymienić wymienne wtyczki, należy
przestrzegać odpowiedniego kierunku
obrotów na wtyczce sieciowej (OPEN /
LOCK).
• Podłączyć wtyczkę sieciową ładowarki do
gniazda.
• Podłączyć ładowarkę do akumulatora.
• Bateria jest ładowana zaraz po podłączeniu
do ładowarki.
• Proces ładowania kończy się automatycznie
po całkowitym naładowaniu akumulatora.

Manipulowanie
58500016
13 / 17
PL
4.2.6 Uruchomienie
• Przesuń przełącznik ON-OFF ① do pozycji ON, aby włączyć urządzenie (FXAH-120-GRABO-
GREENLINE).
• Wskaźnik stanu akumulatora ② poniżej wyłącznika zasilania świeci się, wskazując poziom
naładowania akumulatora.
• Jeśli wskaźnik stanu akumulatora ② miga, oznacza to, że akumulator ⑥ nie jest wystarczająco
naładowany i należy go naładować przed użyciem urządzenia.
• Akumulator ⑥ powinien być zawsze w pełni naładowany przed każdym użyciem. Praca z
urządzeniem przy zbyt niskim poziomie naładowania akumulatora może prowadzić do poważnych
obrażeń i uszkodzeń ciała w wyniku nagłego upuszczenia podniesionego ładunku!!!
• Akumulator może być ładowany w dowolnym momencie bez zmniejszania jego żywotności.
• Jeśli siła trzymania zaczyna się zauważalnie zmniejszać, mimo że akumulator jest w pełni
naładowany, sprawdź, czy uszczelka z pianki gumowej nie jest zużyta lub uszkodzona. Nie
należy próbować podnosić ładunku z urządzeniem, dopóki nie zostanie wymieniona uszczelka z
pianki gumowej.
• Ustawić urządzenie (FXAH-120-GRABO-GREENLINE) na powierzchni, która ma zostać
podniesiona.
• Aby włączyć pompę próżniową i uruchomić odsysanie ładunku, należy nacisnąć zielony przycisk
③. Naciśnij urządzenie na uchwycie przez kilka sekund z lekką siłą na podnoszony ładunek i
rozpocznie się proces zasysania.
• Jeżeli odessany ładunek ma zostać ponownie odessany, należy nacisnąć czerwony przycisk ④.
• Następnie proces odsysania natychmiast rozpoczyna się od nowa. Można go przerwać,
naciskając zielony przycisk ③.
• Ciśnieniomierz ⑤ musi znajdować się stale w polu widzenia operatora, szczególnie przy
pracy z lekko porowatymi materiałami. Jeśli wyświetlacz pokazuje mniej niż - 0,76 bara (-
8,7 psi), należy natychmiast wyrzucić materiał!

Konserwacja i utrzymanie
58500016
14 / 17
PL
5 Konserwacja i utrzymanie
5.1 Płyta ssąca
• Płytę ssącą należy czyścić z przylegających przedmiotów, brudu i kurzu przynajmniej raz dziennie.
Gąbkę gumową czyścić sprężonym powietrzem i/lub strumieniem wody. → W tym celu należy
usunąć gumową uszczelkę piankową.
• Uszkodzoną płytę ssącą (pęknięcia, otwory, fałdy) należy natychmiast wymienić.
• Do czyszczenia urządzenia należy używać środka czyszczącego na zimno (nie używać benzyny
lakierniczej ani płynów powodujących korozję).
5.2 Test szczelności
• Przed każdym użyciem należy sprawdzić urządzenie pod kątem szczelności.
5.3 Audyt roczny
• Sprawdzić wszystkie elementy, zwłaszcza uszczelkę. Kontrola pod kątem pęknięć, zużycia, korozji i
niezawodności działania przez eksperta.
5.4 Wskazówki dotyczące tabliczki znamionowej
• Typ urządzenia, numer urządzenia oraz rok produkcji mają istotne znaczenie w procesie
identyfikacji urządzenia. Dane te należy podawać w przypadku zamawiania części zamiennych,
usług gwarancyjnych oraz pozostałych pytań związanych z danym urządzeniem.
• Maksymalny udźwig informuje o wartości maksymalnego obciążenia (WLL) urządzenia. Nie wolno
przekraczać maksymalnego (WLL) udźwigu.
• Podany na tabliczce znamionowej ciężar własny należy uwzględnić w przypadku zastosowania
podnośnika/urządzenia nośnego (np. dźwig, wyciąg łańcuchowy, wózek widłowy, koparka...).
Przykład:
5.5 Wskazówka dotycząca wynajmowania/wypożyczania urządzeń marki PROBST
Każde wypożyczenie/wynajęcie urządzeń marki PROBST wymaga dołączenia oryginalnej instrukcji
obsługi! Jeśli w kraju użytkownika obowiązuje inny język, należy ponadto dostarczyć tłumaczenie
oryginalnej instrukcji obsługi.
6 Utylizacja / recykling sprzętu i maszyn
Produkt może być wycofany z eksploatacji i przygotowany do utylizacji / recyklingu wyłącznie przez
wykwalifikowany personel. Odpowiednio istniejące pojedyncze komponenty (jak np. metale, tworzywa
sztuczne, ciecze, baterie / akumulatory itp.) należy utylizować / poddawać recyklingowi zgodnie z
obowiązującymi w danym kraju przepisami i zasadami utylizacji!
Produkt nie może być wyrzucany do odpadów domowych!

O deweloperze
58500016
15 / 17
PL
7 O deweloperze
„Nowoczesne GRABO" zostało wynalezione przez
inżyniera mechanika Nimo Rotem. Chociaż "ręczne
odkurzacze elektryczne" istnieją już od jakiegoś czasu, to
dzięki przełomowi technicznemu w technologii
uszczelnień, dokonanemu przez firmę Nemo,
nowoczesne urządzenia GRABO posiadają niesamowitą
moc podnoszenia w małym i przenośnym opakowaniu.

Przykłady zastosowania dla FXAH-120-GRABO-GREENLINE
58500016
16 / 17
PL
8 Przykłady zastosowania dla FXAH-120-GRABO-GREENLINE
FXAH-120-GRABO-
GREENLINE
FXAH-120-SOLO-Set
(48500055)
FXAH-120-SOLO-Set 4(8500055)
ALX-120-HG (42600206)
FXAH-120-DUO-SET (48500054)
FXAH-120-DUO-SET (48500039)
VPH-RS (42710072)

Przykłady zastosowania dla FXAH-120-GRABO-GREENLINE
58500016
17 / 17
PL
FXAH-DUO-CB (48500072)
FXAH-RS-CB (48500065)
FXAH-EL-CB (48500071)


58500016
V5
Traducción de las instrucciones de uso originales
FXAH-120-GRABO-GREENLINE
ES
I
Instrucciones de uso

Indicación:
58500016
2 / 17
ES
Índice
1 Declaración de conformidad CE ........................................................................................................... 3
2 Seguridad ................................................................................................................................................ 4
2.1 Indicaciones de seguridad................................................................................................................ 4
2.2 Señalización de seguridad ............................................................................................................... 4
2.3 Medidas de seguridad personales ................................................................................................... 4
2.4 Equipamiento de protección ............................................................................................................. 4
2.5 Protección contra accidentes ........................................................................................................... 5
2.6 Seguridad durante el funcionamiento .............................................................................................. 5
2.6.1 Conversiones no autorizadas ...................................................................................................... 5
2.7 Seguridad de la batería .................................................................................................................... 6
3 Generalidades ......................................................................................................................................... 7
3.1 Empleo conforme al uso previsto ..................................................................................................... 7
3.2 Datos Técnicos ................................................................................................................................. 9
3.2.1 Generalidades .............................................................................................................................. 9
3.2.2 Cargador ...................................................................................................................................... 9
3.2.3 Alcance de la entrega .................................................................................................................. 9
4 Manejo ................................................................................................................................................... 10
4.1 Generalidades ................................................................................................................................ 10
4.1.1 Elevación de cargas ................................................................................................................... 10
4.1.2 Bajar la carga ............................................................................................................................. 10
4.2 Funcionamiento de la unidad ......................................................................................................... 11
4.2.1 Conexión de la correa de transporte a la unidad ....................................................................... 11
4.2.2 Sustitución de la junta de gomaespuma .................................................................................... 11
4.2.3 Cambiar el filtro .......................................................................................................................... 11
4.2.4 Cambiar la batería ..................................................................................................................... 12
4.2.5 Carga de la batería .................................................................................................................... 12
4.2.6 Puesta en marcha ...................................................................................................................... 13
5 Mantenimiento y conservación ........................................................................................................... 14
5.1 Placa de succión ............................................................................................................................ 14
5.2 Prueba de fugas ............................................................................................................................. 14
5.3 Inspección anual ............................................................................................................................ 14
5.4 Nota sobre la placa de características ........................................................................................... 14
5.5 Nota sobre el alquiler/préstamo de equipos PROBST ................................................................... 14
6 Eliminación/reciclaje de equipos y máquinas ................................................................................... 14
7 Sobre el productor ............................................................................................................................... 15
8 Ejemplos de aplicación de FXAH-120-GRABO-GREENLINE ........................................................... 16
Nos reservamos el derecho a modificar la información y las ilustraciones de las instrucciones de uso.

Declaración de conformidad CE
58500016
3 / 17
ES
1 Declaración de conformidad CE
Indicación:
Referencia:
Número de orden:
FLIEGUAN-AKKU-HANDY FXAH-120-GRABO-GREENLINE
FXAH-120-GRABO-GREENLINE
58500016
Fabricante:
Probst GmbH
Gottlieb-Daimler-Straße 6
71729 Erdmannhausen, Germany
info@probst-handling.de
www.probst-handling.com
La máquina indicada con anterioridad cumple las especificaciones pertinentes de las siguientes directivas de la UE:
2006/42/CE (Directiva sobre máquinas)
2014/30/EU (Compatibilidad electromagnética)
DIN EN 1012-1 / DIN EN 1012-2
Compresores y bombas de vacío; requisitos de seguridad parte 1 y 2.
Persona autoriza por documentación:
Nombre: Jean Holderied
Dirección: Probst GmbH; Gottlieb-Daimler-Straße 6; 71729 Erdmannhausen, Germany
Firma, datos del firmante:
Erdmannhausen, 21.11.2023..........................................................................
(Eric Wilhelm, Director General)

Seguridad
58500016
4 / 17
ES
2 Seguridad
2.1 Indicaciones de seguridad
¡Peligro de muerte!
Identifica un peligro. Si no se evita, la consecuencia pueden ser la muerte y lesiones muy graves.
¡Situación peligrosa!
Identifica una situación peligrosa. Si no se evita, la consecuencia pueden ser lesiones o daños
materiales.
¡Prohibición!
Identifica una prohibición. Si no se evita, la consecuencia pueden ser la muerte, lesiones muy graves o
daños materiales.
Informaciones importantes o consejos útiles para el uso.
2.2 Señalización de seguridad
SEÑALES DE OBLIGACIÓN
Símbolo
Significado
Nº de pedido
Tamaño
Cada usuario deberá haber leído y comprendido las instrucciones
de funcionamiento para el aparato junto a las indicaciones de
seguridad.
29040665
29040666
29041049
Ø 30 mm
Ø 50 mm
Ø 80 mm
2.3 Medidas de seguridad personales
• Todo operador debe haber leído y comprendido las instrucciones de uso del aparato con las
normas de seguridad.
• El dispositivo y todos los dispositivos de nivel superior en/sobre los que está instalado el
dispositivo sólo pueden ser manejados por personas autorizadas y cualificadas.
• Sólo los dispositivos con asas pueden ser guiados manualmente.
De lo contrario, existe el riesgo de lesiones en las manos.
2.4 Equipamiento de protección
<
De acuerdo con los requisitos técnicos de seguridad, el equipamiento
de protección se compone de:
• Ropa protectora
• Guantes de protección
• Calzado de seguridad

Seguridad
58500016
5 / 17
ES
2.5 Protección contra accidentes
• Asegure la zona de trabajo para las personas no autorizadas, especialmente los niños, en una
zona amplia.
• ¡Precaución durante las tormentas eléctricas: ¡peligro de rayos!
Dependiendo de la intensidad de la tormenta eléctrica, deje de trabajar con el equipo si es
necesario.
• Ilumine el área de trabajo lo suficiente.
• Tenga cuidado con los materiales de construcción húmedos, congelados, helados y
sucios. Existe el peligro de que el material de agarre se salga.
¡PELIGRO DE ACCIDENTE!
2.6 Seguridad durante el funcionamiento
2.6.1 Conversiones no autorizadas
Las modificaciones no autorizadas de la unidad o el uso de cualquier dispositivo adicional que usted
mismo haya construido ponen en peligro la vida y la integridad física y, por lo tanto, están estrictamente
prohibidas.

Seguridad
58500016
6 / 17
ES
2.7 Seguridad de la batería
• Sólo puede utilizarse la batería suministrada con el aparato.
• La batería debe almacenarse en un rango de temperatura de 0°C - 45°C.
• Cuando la batería no esté en uso, manténgala alejada de otros objetos metálicos como clips,
monedas, llaves, clavos y tornillos para evitar un cortocircuito.
• No abra la batería!
• Proteja la batería del calor y evite la luz solar directa y el fuego.
• Si una batería está defectuosa, el líquido puede escapar y entrar en contacto con los
componentes adyacentes.
• ¡¡¡El dispositivo "FLIEGUAN-AKKU-HANDY" y el cargador de baterías NO son resistente al
agua !!!
• Antes de utilizarlo, comprueba el cargador, el cable y el enchufe.
Si hay daños visibles, no utilice el cargador!
• No abra nunca el cargador.
Sólo puede ser abierto y reparado por personal cualificado!
• Mantenga la batería y el cargador alejados de objetos inflamables durante la carga!

Generalidades
58500016
7 / 17
ES
3 Generalidades
3.1 Empleo conforme al uso previsto
• Únicamente debe emplearse el aparato conforme al uso previsto descrito en las instrucciones de
manejo, cumpliendo la normativa de seguridad vigente y cumpliendo las correspondientes
disposiciones de la declaración de conformidad.
• ¡Cualquier empleo distinto se considera no conforme al uso previsto y está prohibido!
• Además, deben cumplirse las normas legales de seguridad y de prevención de accidentes
vigentes en el lugar de empleo.
l usuario se debe asegurar antes de cada uso que:
• el aparato es apropiado para el uso previsto
• el aparato se encuentra en buen estado
• la carga a levantar es apropiada para su elevación
En caso de dudas, rogamos contacte con el fabricante antes de su puesta en marcha.
La unidad "FLIEGUAN-AKKU-HANDY" es un dispositivo de aspiración manual eléctrico que tiene una
fuerza de sujeción de hasta (WLL) 120 kg y puede aspirar por sí mismo casi cualquier superficie.
Por lo que el aparato es adecuado para aspirar y luego levantar, mover y colocar materiales con
superficies lisas y absorbentes, como por ejemplo :
Azulejos, piedra natural, losas de hormigón y mármol, vidrio.
Los materiales aquí indicados son orientativos. En caso necesario, deben realizarse pruebas
previas antes de la aspiración/elevación para garantizar que el material transportado no resulte
dañado.
Existe riesgo de rotura con materiales delgados debido al vacío que se forma durante el
proceso de succión. Por lo tanto, es imprescindible que el material tenga suficiente estabilidad.
• El límite máximo de carga de trabajo (WLL) es de 120 kg (265 lbs) cuando la unidad se
mantiene en posición horizontal.
• Si la unidad se mantiene en ángulo o en vertical, la capacidad de carga máxima (WLL) es de
60 kg
(132 libras).
• La capacidad de carga máxima (WLL) no debe superarse en ningún caso.
La carga podría soltarse y caer. Riesgo de lesiones.
El dispositivo "FLIEGUAN-AKKU-HANDY" no es adecuado ni está destinado a la escalada o a
soportar el peso de una persona. El uso del aparato para escalar o para cualquier otro fin no
previsto puede provocar lesiones o la muerte.

Generalidades
58500016
8 / 17
ES
• La carga (baldosa) a transportar y a aspirar, debe tener
la suficiente estabilidad propia, ya que de lo contrario
hay peligro de rotura al elevarla.
• La carga no se deben flexionar en ningún caso al
elevarla – prestar especial atención en baldosas finas o
de gran formato!
• Normalmente las cargas (losas de piedra) solamente se
pueden elevar en el centro, ya que sino la carga está
suspendida de forma oblicua que puede llevar a la rotura
de la pieza. Prestar especial atención al elevar losas de
piedra de gran formato con una placa de aspiración
pequeña.
TRABAJOS NO PERMITIDOS:
Modificaciones propias en el aparato o el uso de dispositivos adicionales fabricados eventualmente
por uno mismo ponen en peligro a la vida de las personas y por lo tanto están totalmente prohibidas !!
No se debe sobrepasar la capacidad portante de apertura del aparato.
Están totalmente prohibidos todos los transporte no debidos con el aparato:
• Transporte de paquete de materiales, objetos y materiales que no estén descritos en este manual.
• Suspender la unidad de un soporte mediante cuerdas, cadenas o la correa de elevación o similar.
La unidad sólo puede utilizarse como unidad de mano.

Generalidades
58500016
9 / 17
ES
3.2 Datos Técnicos
3.2.1 Generalidades
Tensión de la batería
Duración de la batería
(con carga completa)
Capacidad de la batería
Energía de aspiración
14,8V Li-Ion
Aprox. 1,5 horas
2.2 AH
16W
Capacidad de carga
(WLL)
Presión negativa requerida
Peso neto (con batería)
Dimensiones
120 kg (265 lbs)
- 0,6 bar (- 8,7 psi)
1,5 kg (3,3 lbs)
297 x 181 x 115 mm
3.2.2 Cargador
Modelo
Tensión de carga
Tensión de entrada
XV-2008290006
DC 16,8 v / 1,4 A
100V-240VAC; 50/60Hz; 0.5 A max
3.2.3 Alcance de la entrega
①
Filtro de repuesto (1x)
②
Li-Ionen Batería (1x)
③
Cargador (1x) Incluye enchufe intercambiable (3)
④
Junta de gomaespuma de recambio (1x)

Manejo
58500016
10 / 17
ES
4 Manejo
4.1 Generalidades
• No arrancar las cargas sueltas que estén atascadas.
• En caso de fallo de la red eléctrica, baje la carga inmediatamente si es posible.
• Aspirar y elevar sólo cargas adecuadas (comprobar la estabilidad inherente y la densidad de la
superficie).
• Coloque la carga sólo en una superficie libre y nivelada. De lo contrario, pueden resbalar al
soltarse.
• No suelte la carga hasta que esté completa y firmemente apoyada o estacionada.
• Mantenga las manos alejadas de la carga cuando la suelte.
• Aplique siempre una carga uniforme a las superficies de succión.
4.1.1 Elevación de cargas
• Coloque la unidad directamente sobre la carga.
• Coloque la unidad sobre la carga. Asegúrese de que la carga esté distribuida uniformemente.
• La carga está ahora succionada.
• Al levantar, asegúrese de que sólo se levanta una pieza de la carga a la vez. Afloje con cuidado
cualquier otra pieza que esté pegada con un destornillador antes de seguir levantando el artículo.
No aflojar con las manos, peligro de aplastamiento.
4.1.2 Bajar la carga
• Baje la carga y colóquela de forma segura en una superficie libre y nivelada para que la carga no
pueda resbalar o volcar.
• Pulse el botón rojo de liberación para soltar la carga aspirada.
• La carga está ahora desprendida.

Manejo
58500016
11 / 17
ES
4.2 Funcionamiento de la unidad
4.2.1 Conexión de la correa de transporte a la unidad
• Los cuatro ojales metálicos que rodean el
asa sirven para fijar la correa de elevación.
• Fije una de las hebillas (en cada extremo de
la correa) en un ojal previsto para ello.
• La correa de transporte puede colocarse
alrededor del hombro del operador para
soportar la carga.
4.2.2 Sustitución de la junta de gomaespuma
• Retire la junta de gomaespuma dañada o
usada tirando de ella.
• Presione con cuidado la nueva junta de
gomaespuma en su posición.
4.2.3 Cambiar el filtro
• Utilice la punta de un destornillador para
retirar el tapón de plástico (anillo) y el filtro de
la parte inferior de la unidad.
• Inserte el nuevo filtro (o el filtro limpio) y
presione el tapón de plástico (anillo) para
asegurar el filtro.

Manejo
58500016
12 / 17
ES
4.2.4 Cambiar la batería
• Para extraer la batería de la unidad (FXAH-
120-GRABO-GREENLINE) , empuje el clip
de la batería hacia adelante (lejos del
mango).
• Ahora se puede extraer la batería hacia
arriba del compartimento de la batería.
• Para volver a insertar una pila en la unidad
(FXAH-120-GRABO-GREENLINE) , inserte
la pila en el compartimento de la pila y
empuje el clip de la pila hacia atrás (hacia el
mango) para asegurar la pila.
4.2.5 Carga de la batería
• La batería se suministra con la unidad en un estado parcialmente cargado y debe cargarse
completamente antes de su primer uso.
• El tiempo de carga es de aproximadamente 2 horas. Cuando la batería está completamente
cargada, el tiempo de funcionamiento de la bomba de vacío es de aproximadamente 1,5 horas.
• Las baterías pueden cargarse en cualquier momento sin reducir su vida útil. La interrupción del
proceso de carga no dañará las baterías.
Sólo se puede utilizar el cargador de baterías suministrado!
• Asegúrese de que la tensión de red se
corresponde con los datos de la placa de
características del cargador.
• El cargador sólo puede utilizarse en un
entorno seco.
• El cargador no es resistente al agua!
• Mantenga la batería alejada de objetos
inflamables durante la carga.
• Para cambiar las clavijas intercambiables,
observe el sentido de giro respectivo en la
clavija de red (OPEN / LOCK).
• Conecta el enchufe del cargador a una toma
de corriente.
• Conecta el cargador a la batería.
• La batería se carga en cuanto se conecta al
cargador.
• El proceso de carga finaliza
automáticamente en cuanto la batería está
completamente cargada.

Manejo
58500016
13 / 17
ES
4.2.6 Puesta en marcha
• Deslice el interruptor ON-OFF ① a la posición ON para encender la unidad (FXAH-120-GRABO-
GREENLINE)
• El indicador de estado de la batería ② debajo del interruptor de encendido se ilumina para
indicar el estado de carga de la batería.
• Si el indicador de estado de la batería ② parpadea, la batería ⑥ no está suficientemente
cargada y debe cargarse antes de utilizar la unidad. La batería ⑥ debe estar siempre
completamente cargada antes de cada uso. ¡¡¡Si el nivel de carga de la batería es demasiado
bajo, pueden producirse graves lesiones y daños debido a la caída repentina de la carga
levantada !!!
• La batería puede cargarse en cualquier momento sin reducir su duración.
• Si la fuerza de retención empieza a disminuir notablemente aunque la batería esté
completamente cargada, compruebe que la junta de gomaespuma no esté desgastada o dañada.
No intente levantar una carga con la unidad hasta que la junta de gomaespuma haya sido
sustituida.
• Coloque la unidad (FXAH-120-GRABO-GREENLINE) en la superficie a elevar.
• Para encender la bomba de vacío y activar la aspiración de la carga, hay que pulsar el botón
verde ③. Presione el dispositivo en la empuñadura durante unos segundos con una ligera
fuerza contra la carga a elevar y se iniciará el proceso de succión.
• Si se quiere volver a liberar la carga aspirada, hay que pulsar el botón rojo ④.
• A continuación, el proceso de aspiración se reanuda inmediatamente. Se puede interrumpir
pulsando el botón verde ③.
• El manómetro digital ⑤ debe estar en todo momento en el campo de visión del operario,
especialmente con materiales ligeramente porosos. Si la pantalla muestra menos de - 0,6
bar (- 8,7 psi), ¡deje la carga inmediatamente!

Mantenimiento y conservación
58500016
14 / 17
ES
5 Mantenimiento y conservación
5.1 Placa de succión
• Limpie la placa de aspiración al menos una vez al día para eliminar los objetos adheridos, la
suciedad y el polvo. Limpiar el caucho de la esponja con aire comprimido y/o chorro de agua. →
Para ello, retire la junta de gomaespuma.
• Sustituya inmediatamente la placa de succión dañada (grietas, agujeros, ondulaciones).
• Utilice un limpiador en frío para limpiar la unidad (no utilice éter de petróleo ni líquidos corrosivos).
5.2 Prueba de fugas
• Compruebe la estanqueidad del aparato antes de cada uso.
5.3 Inspección anual
• Compruebe todos los componentes, especialmente la junta. Un experto debe comprobar si hay
grietas, desgaste, corrosión y seguridad de funcionamiento.
5.4 Nota sobre la placa de características
• El tipo de unidad, el número de unidad y el año de fabricación son datos importantes para
identificar la unidad. Deben indicarse siempre cuando se pidan piezas de recambio, se reclame la
garantía o se realicen otras consultas sobre el aparato.
• La capacidad de carga máxima (WLL) indica la carga máxima para la que está diseñada la
unidad. La capacidad de carga máxima (WLL) no debe ser superada.
• El peso muerto indicado en la placa de características debe tenerse en cuenta al utilizar el equipo
de elevación/transporte (por ejemplo, grúa, polipasto de cadena, carretilla elevadora, excavadora).
Ejemplo:
5.5 Nota sobre el alquiler/préstamo de equipos PROBST
Siempre que se alquilen unidades PROBST, se deben suministrar las correspondientes
instrucciones de uso originales (si el idioma del país del usuario es diferente, también se debe
suministrar la respectiva traducción de las instrucciones de uso originales).
6 Eliminación/reciclaje de equipos y máquinas
El producto sólo puede ser desmontado y preparado para su eliminación/reciclaje por personal
cualificado. Los componentes individuales existentes (como metales, plásticos, líquidos,
pilas/baterías recargables, etc.) deben eliminarse/reciclarse de acuerdo con las leyes y normas de
eliminación vigentes en cada país.
El producto no debe eliminarse en la basura de casa !

Sobre el productor
58500016
15 / 17
ES
7 Sobre el productor
El "GRABO moderno" fue inventado por el ingeniero
mecánico Nimo Rotem. Aunque las "aspiradoras
eléctricas de mano" existen desde hace tiempo, un
importante avance técnico en la tecnología de sellado,
impulsado por Nemo, permitió que los modernos
dispositivos GRABO reunieran una increíble potencia de
elevación en un paquete pequeño y portátil.

Ejemplos de aplicación de FXAH-120-GRABO-GREENLINE
58500016
16 / 17
ES
8 Ejemplos de aplicación de FXAH-120-GRABO-GREENLINE
FXAH-120-GRABO-
GREENLINE
FXAH-120-SOLO-Set
(48500055)
FXAH-120-SOLO-Set 4(8500055)
ALX-120-HG (42600206)
FXAH-120-DUO-SET (48500054)
FXAH-120-DUO-SET (48500039)
VPH-RS (42710072)

Ejemplos de aplicación de FXAH-120-GRABO-GREENLINE
58500016
17 / 17
ES
FXAH-DUO-CB (48500072)
FXAH-RS-CB (48500065)
FXAH-EL-CB (48500071)


58500016
V5
Vertaling van de originele bedieningshandleiding
FXAH-120-GRABO-GREENLINE
NL
I
Bedrijfshandleiding

Inhoud
58500016
2 / 18
NL
Inhoud
1 CE - Conformiteitsverklaring ................................................................................................................. 3
2 Veiligheid ................................................................................................................................................. 4
2.1 Veiligheidsinstructies ........................................................................................................................ 4
2.2 Veiligheidsaanduidingen .................................................................................................................. 4
2.3 Persoonlijke veiligheidsmaatregelen ................................................................................................ 4
2.4 Beschermende uitrusting.................................................................................................................. 5
2.5 Ongevallenpreventie ........................................................................................................................ 5
2.6 Veiligheid tijdens bedrijf.................................................................................................................... 5
2.6.1 Eigenmachtige ombouw ............................................................................................................... 5
2.7 Veiligheid van de batterij .................................................................................................................. 6
3 Algemeen ................................................................................................................................................ 7
3.1 Gebruik volgens de voorschriften ..................................................................................................... 7
3.2 Technische gegevens ...................................................................................................................... 9
3.2.1 Algemeen ..................................................................................................................................... 9
3.2.2 Acculader ..................................................................................................................................... 9
3.2.3 Leveringsomvang ......................................................................................................................... 9
4 Bediening .............................................................................................................................................. 10
4.1 Algemeen ....................................................................................................................................... 10
4.1.1 Hefbelastingen ........................................................................................................................... 10
4.1.2 Stortingsladingen ....................................................................................................................... 10
4.2 Bediening van het apparaat ........................................................................................................... 11
4.2.1 Het aansluiten van een draagriem op het apparaat .................................................................. 11
4.2.2 Vervangen van de rubberen schuimrubber afdichting ............................................................... 11
4.2.3 Vervang het filter ........................................................................................................................ 11
4.2.4 Vervang de batterij ..................................................................................................................... 12
4.2.5 Opladen van de batterij .............................................................................................................. 12
4.2.6 Inbedrijfstelling ........................................................................................................................... 13
5 Onderhoud en verzorging ................................................................................................................... 14
5.1 Zuigplaat ......................................................................................................................................... 14
5.2 Lekkagetest .................................................................................................................................... 14
5.3 Jaarlijkse controle ........................................................................................................................... 14
5.4 Instructie m.b.t. het typeplaatje ...................................................................................................... 14
5.5 Instructie m.b.t. verhuur/uitlenen van PROBST apparaten ............................................................ 15
6 Verwijdering / recycling van apparatuur en machines ..................................................................... 15
7 Over de ontwikkelaar ........................................................................................................................... 16
8 Gebruiksvoorbeelden van FXAH-120-GRABO-GREENLINE ............................................................ 17
Wijzigingen van de informatie en afbeeldingen in de gebruiksaanwijzing voorbehouden.

CE - Conformiteitsverklaring
58500016
3 / 18
NL
1 CE - Conformiteitsverklaring
Benaming:
Typ:
Bestel-Nr.:
FLIEGUAN-AKKU-HANDY FXAH-120-GRABO-GREENLINE
FXAH-120-GRABO-GREENLINE
58500016
Fabrikant:
Probst GmbH
Gottlieb-Daimler-Straße 6
71729 Erdmannhausen, Germany
info@probst-handling.de
www.probst-handling.com
De hierboven beschreven machine voldoet aan de betreffende bepalingen van de volgende Europese richtlijnen:
2006/42/EG (machinerichtlijn)
2014/30/EU (Elektromagnetische compatibiliteit)
DIN EN 1012-1 / DIN EN 1012-2
Compressoren en vacuümpompen; veiligheidseisen deel 1 en 2
Autoriseerde persoon voor EC-dokumentatie:
Naam: Jean Holderied
Adres: Probst GmbH; Gottlieb-Daimler-Straße 6; 71729 Erdmannhausen, Germany
Handtekening, gegevens over ondertekenaar:
Erdmannhausen, 21.11.2023..........................................................................
(Eric Wilhelm, Managing Director)

Veiligheid
58500016
4 / 18
NL
2 Veiligheid
2.1 Veiligheidsinstructies
Levensgevaar!
Geeft een gevaar aan. Als dit niet voorkomen wordt, zijn de dood en zwaar letsel het gevolg.
Gevaarlijke situatie!
Geeft een gevaarlijke situatie aan. Als deze niet voorkomen wordt, kunnen letsel of schade het gevolg
zijn
Verbod!
Geeft een verbod aan. Als men zich hier niet aan houdt, zijn de dood en zwaar letsel of schade het
gevolg.
Belangrijke informatie of nuttige tips voor gebruik.
2.2 Veiligheidsaanduidingen
GEBODSTEKENS
Symbool
Betekenis
Bestel-Nr.
Formaat
Elke bediener moet de handleiding met de veiligheidsvoorschriften
van het toestel gelezen en begrepen hebben.
29040665
29040666
29041049
Ø 30 mm
Ø 50 mm
Ø 80 mm
2.3 Persoonlijke veiligheidsmaatregelen
• Elk persoon die het apaparaat bedient moet van tevoren de bedieningshandleiding voor de
Easy Clean met de veiligheidsvoorschriften hebben gelezen en begrepen.
• Het apparaat en alle daarmee verbonden apparaten die in het appraat in/aangebouwd zijn,
mogen enkel door door personeel worden bediend die hiervoor gekwalificeerd en
gecertificeerd zijn.
• Er mogen enkel machines met handgrepen handmatig bedient worden.
Anders bestaat er gevaar voor verwonding van de handen!

Veiligheid
58500016
5 / 18
NL
2.4 Beschermende uitrusting
De beschermende uitrusting bestaat volgens de
veiligheidstechnische eisen uit:
• Beschermende kleding
• Veiligheidshandschoenen
• Veiligheidsschoenen
2.5 Ongevallenpreventie
• Beveilig het werkgebied voor onbevoegden, vooral kinderen, over een groot gebied.
• Voorzichtig bij onweer - gevaar door blikseminslag!
Stop, afhankelijk van de intensiteit van het onweer, zo nodig met het werken met de apparatuur.
• Verlicht het werkgebied voldoende.
• Wees voorzichtig met natte, bevroren, ijzige en vuile bouwmaterialen!
Het gevaar bestaat dat het grijpmateriaal eruit glijdt. GEVAAR VOOR ONGELUK!
2.6 Veiligheid tijdens bedrijf
2.6.1 Eigenmachtige ombouw
Eigenmachtige ombouw van het toestel of het gebruik van eventueel zelfgebouwde extra inrichtingen
zijn een gevaar voor leven en goed en daarom in principe verboden!!

Veiligheid
58500016
6 / 18
NL
2.7 Veiligheid van de batterij
• Alleen de bij het apparaat geleverde accu mag worden gebruikt.
• De batterij moet worden opgeslagen in een temperatuurbereik van 0°C - 45°C.
• Als de batterij niet wordt gebruikt, houd deze dan uit de buurt van andere metalen voorwerpen
zoals paperclips, munten, sleutels, spijkers en schroeven om kortsluiting te voorkomen.
• De batterij mag niet worden geopend!
• Bescherm de batterij tegen hitte en vermijd direct zonlicht en vuur!
• Als een batterij defect is, kan er vloeistof lekken en in contact komen met aangrenzende
componenten.
• Het apparaat "FLIEGUAN-AKKU-HANDY" en de batterijlader zijn NIET waterdicht!!!
• Controleer de lader, de kabel en de stekker voor gebruik.
Als er schade zichtbaar is, gebruik dan de lader niet!
• Open nooit de lader. Het mag alleen worden geopend en gerepareerd door gekwalificeerd
personeel!
• Houd de batterij en de lader uit de buurt van ontvlambare voorwerpen tijdens het opladen!

Algemeen
58500016
7 / 18
NL
3 Algemeen
3.1 Gebruik volgens de voorschriften
• Het apparaat mag uitsluitend voor het in de handleiding omschreven voorgeschreven gebruik met
inachtneming van de geldige veiligheidsvoorschriften en de desbetreffende wettelijke bepalingen
en de bepalingen van de conformiteitsverklaring worden gebruikt.
• Elk ander gebruik geldt als niet conform de voorschriften en is verboden!
• De op de plaats van gebruik geldende wettelijke veiligheids- en ongevalpreventievoorschriften
moeten bovendien worden aangehouden.
De gebruiker moet voor elk gebruik zeker zijn dat:
• het toestel geschikt is voor de voorziene toepassing
• dat het zich in de juiste stand bevindt
• dat de te heffen lasten mogen gehoffen worden
In geval van twijfel contacteert u best de fabrikant voor in gebruikname van het toestel.
Het apparaat „FLIEGUAN-AKKU-HANDY“ is een elektrische handstofzuiger, die een houdkracht heeft
tot (WLL) 120 kg en op bijna elk oppervlak kan zuigen.
Het apparaat is daarom geschikt voor het opzuigen en vervolgens optillen, verplaatsen en leggen van
materialen met gladde en absorberende oppervlakken, zoals:
Tegels, natuursteen, beton- en marmerplaten, glas.
De hier vermelde materialen zijn alleen bedoeld als richtlijn. Indien nodig moeten voor het
zuigen/hijsen voorafgaande tests worden uitgevoerd om te controleren of het getransporteerde
materiaal niet beschadigd is!
Bij dunne materialen bestaat het risico op breuk door het vacuüm dat wordt opgebouwd tijdens
het zuigen. Voldoende inherente stabiliteit van het materiaal is daarom een eerste vereiste!
• Het maximale draagvermogen (WLL) is 120 kg (265 lbs) wanneer het apparaat horizontaal
wordt gehouden.
• Als het apparaat onder een hoek of verticaal wordt gehouden, bedraagt het maximale
draagvermogen (WLL) 60 kg (132 lbs).
• Het maximale draagvermogen (WLL) mag nooit worden overschreden!
De lading kan losraken en naar beneden vallen. Gevaar voor letsel!
Het apparaat "FLIEGUAN-AKKU-HANDY" is niet geschikt of bedoeld om te klimmen of het
gewicht van een persoon te dragen. Het gebruik van het toestel om te klimmen of voor andere
doeleinden dan waarvoor het bestemd is, kan leiden tot letsel of de dood.

Algemeen
58500016
8 / 18
NL
● De last (steenplaat, tegels enz.) die moet worden
aangezogen en getransporteerd, moet voldoende eigen
stabiliteit bezitten, omdat anders tijdens het optillen
gevaar voor breuk bestaat!
● Steenplaten mogen bij het optillen in geen geval
doorbuigen – met name bij dunne en grote steenplaten
moet daarop worden gelet!
• Over het algemeen mogen lasten (steenplaten)
uitsluitend in het midden worden aangezogen, omdat
de last anders scheef aan het apparaat hangt; wat kan
leiden tot breuk van de last - vooral bij het heffen van
stenen platen van groot formaat met een kleine zuigplaat
VERBODEN ACTIVITEITEN:
Ongeoorloofde wijzigingen aan het apparaat of het gebruik van extra apparaten die u zelf hebt
gebouwd brengen het leven en de ledematen in gevaar en zijn daarom ten strengste verboden!
Het draagvermogen (WLL) van het apparaat mag niet worden overschreden.
Elk transport met het apparaat dat niet in overeenstemming is met de voorschriften is ten
strengste verboden:
● Vervoer van producten, voorwerpen en materialen die niet in deze handleiding zijn beschreven.
● het toestel aan een drager te hangen met behulp van touwen, kettingen of en hijsband of iets
dergelijks.
Het apparaat mag ALLEEN als handapparaat worden gebruikt!

Algemeen
58500016
9 / 18
NL
3.2 Technische gegevens
3.2.1 Algemeen
Batterijspanning
Accuduur (volledig
opgeladen)
Batterijcapaciteit
Zuigcapaciteit
14,8V Li-Ion
ongeveer 1,5 uur
2.2 AH
16W
Belastingscapaciteit
(WLL)
Vereiste negatieve druk
Nettogewicht
(met batterij)
Afmetingen
120 kg (265 lbs)
- 0,6 bar (- 8,7 psi)
1,5 kg (3,3 lbs)
297 x 181 x 115 mm
3.2.2 Acculader
Model
Laadspanning
Ingangsspanning
XV-2008290006
DC 16,8 v / 1,4 A
100V-240VAC; 50/60Hz; 0.5 A max
3.2.3 Leveringsomvang
①
Vervangingsfilter (1x)
②
Li-Ion batterijen
(1x)
③
Batterijlader (1x) inclusief verwisselbare stekker (3)
④
Reserve rubberen schuimrubber afdichting (1x)

Bediening
58500016
10 / 18
NL
4 Bediening
4.1 Algemeen
• Scheur geen vastzittende lading af.
• In het geval van een stroomstoring moet de belasting, indien mogelijk, onmiddellijk worden
losgekoppeld.
• Zuig alleen geschikte ladingen op en hef ze op (controleer de inherente stabiliteit en de
oppervlaktedichtheid).
• Plaats de lading alleen op een vrije, vlakke ondergrond. Anders kunnen ze uitglijden als ze
worden losgelaten.
• Laat de lading pas los als deze volledig en stevig is ondersteund of staat.
• Houd uw handen uit de buurt van de lading bij het loslaten.
• Belast de aanzuigoppervlakken altijd gelijkmatig.
4.1.1 Hefbelastingen
• Plaats het apparaat direct boven de lading.
• Plaats het apparaat op de lading. Zorg voor een gelijkmatige verdeling van de belasting.
• De lading wordt nu opgezogen.
• Zorg er bij het tillen voor dat er slechts één stuk van het te tillen materiaal tegelijk wordt getild.
Verwijder voorzichtig alle andere vastzittende onderdelen met een schroevendraaier voordat u
het onderdeel verder optilt. Maak niet los met je handen, gevaar voor verplettering!
4.1.2 Stortingsladingen
• Laat de lading zakken en leg deze veilig neer op een vrije, vlakke ondergrond, zodat de lading
niet kan wegglijden of kantelen.
• Druk op de rode ontgrendelingsknop om de aangezogen lading te ontgrendelen.
• De lading is nu losgekoppeld.

Bediening
58500016
11 / 18
NL
4.2 Bediening van het apparaat
4.2.1 Het aansluiten van een draagriem op het apparaat
• De vier metalen oogjes rond het handvat
worden gebruikt om de draagriem te
bevestigen.
•
Zet een van de gespen (aan elk uiteinde
van de band) vast in een daarvoor
bestemd oogje.
• De draagriem kan rond de schouder van de
operator worden geplaatst om de lading te
ondersteunen.
4.2.2 Vervangen van de rubberen schuimrubber afdichting
• Verwijder de beschadigde of gebruikte
rubberen schuimrubber afdichting door deze
eruit te trekken.
• Druk de nieuwe rubberen schuimrubber
afdichting voorzichtig op zijn plaats.
4.2.3 Vervang het filter
• Gebruik de punt van een schroevendraaier
om de plastic plug (ring) en het filter aan de
onderkant van het apparaat te verwijderen.
• Plaats een nieuw filter (of schoongemaakt
filter) en duw de plastic plug (ring) terug om
het filter vast te zetten.

Bediening
58500016
12 / 18
NL
4.2.4 Vervang de batterij
• Om de batterij uit het apparaat (FXAH-120-
GRABO-GREENLINE) te verwijderen, schuift
u de batterijclip naar voren (weg van de
handgreep).
• De batterij kan nu uit de bovenkant van het
batterijcompartiment worden verwijderd.
• Om een batterij opnieuw in het toestel
(FXAH-120-GRABO-GREENLINE) te
plaatsen, plaatst u de batterij in het
batterijvak en schuift u de batterijclip naar
achteren (in de richting van het handvat) om
de batterij vast te zetten.
4.2.5 Opladen van de batterij
• De batterij wordt in gedeeltelijk geladen toestand bij het apparaat geleverd en moet voor het
eerste gebruik volledig worden opgeladen.
• De oplaadtijd is ongeveer 2 uur. Wanneer de accu volledig is opgeladen, bedraagt de bedrijfstijd
van de vacuümpomp ca. 1,5 uur.
• De accu's kunnen op elk moment worden opgeladen zonder dat de levensduur wordt verkort. Het
onderbreken van het laadproces zal de accu's niet beschadigen.
Alleen de meegeleverde acculader mag worden gebruikt!
• Controleer of de netspanning overeenkomt
met de gegevens op het typeplaatje van de
lader.
• De lader mag alleen in een droge omgeving
worden gebruikt.
De lader is niet waterdicht!
• Houd de batterij uit de buurt van ontvlambare
voorwerpen tijdens het opladen!
• Voor het verwisselen van de verwisselbare
stekkers, de respectieve draairichting op de
netstekker in acht nemen
(OPEN / LOCK).
• Sluit de netstekker van de lader aan op een
stopcontact.
• Sluit de lader aan op de batterij.
• De batterij wordt opgeladen zodra deze is
aangesloten op de lader.
• Het laadproces wordt automatisch beëindigd
wanneer de accu volledig is opgeladen.

Bediening
58500016
13 / 18
NL
4.2.6 Inbedrijfstelling
• Schuif de ON-OFF ① schakelaar in de stand ON om het apparaat in te schakelen (FXAH-120-
GRABO-GREENLINE).
• De indicator voor de batterijstatus ② onder de stroomschakelaar licht op om het laadniveau van
de batterij aan te geven.
• Als de batterijstatusindicator ② knippert, is de batterij ⑥ niet voldoende opgeladen en moet
deze worden opgeladen voordat het apparaat wordt gebruikt.
• De batterij ⑥ moet altijd volledig worden opgeladen voor elk gebruik. Het verwonden van het
toestel met een te laag laadniveau van de batterij kan leiden tot ernstige verwondingen en
schade door het plotseling laten vallen van de geheven last!!!
• De batterij kan op elk moment worden opgeladen zonder dat dit ten koste gaat van de levensduur
van de batterij.
• Als de houdkracht merkbaar begint af te nemen, ook al is de batterij volledig opgeladen,
controleer dan de rubberen schuimafdichting op slijtage of beschadiging. Probeer geen lading
met het toestel te tillen totdat de rubberen schuimafdichting is vervangen.
• Plaats het apparaat (FXAH-120-GRABO-GREENLINE) op het op te tillen oppervlak.
• Om de vacuümpomp in te schakelen en het zuigen van de lading te starten, moet de groene knop
③ worden ingedrukt. Druk het toestel aan de handgreep enkele seconden met lichte kracht
tegen de op te heffen last en het opzuigen begint.
• Als de afgezogen lading weer moet worden vrijgegeven, moet de rode knop ④ worden
ingedrukt.
• Het afzuigen begint dan onmiddellijk opnieuw. Dit kan worden onderbroken door op de groene
knop ③ te drukken.
• De manometer moet zich constant in het gezichtsveld van de operator bevinden, vooral bij
licht poreus materiaal. Als het display minder dan - 0,6 bar (- 8,7 psi) toont, gooi het
materiaal dan onmiddellijk weg!

Onderhoud en verzorging
58500016
14 / 18
NL
5 Onderhoud en verzorging
5.1 Zuigplaat
• Maak de zuigplaat minstens één keer per dag schoon van vastzittende voorwerpen, vuil en stof.
Reinig het sponsrubber met perslucht en/of waterstraal. → Om dit te doen, verwijdert u de rubberen
schuimafdichting.
• Vervang beschadigde zuigplaat (scheuren, gaten, rimpelingen) onmiddellijk.
• Gebruik een koud reinigingsmiddel om het apparaat te reinigen (gebruik geen petroleum spiritus of
bijtende vloeistoffen).
5.2 Lekkagetest
• Controleer het apparaat voor elk gebruik op lekkage.
5.3 Jaarlijkse controle
• Controleer alle onderdelen, vooral de afdichting. Inspectie op scheuren, slijtage, corrosie en
functionele betrouwbaarheid door een deskundige.
5.4 Instructie m.b.t. het typeplaatje
• Het apparaattype, apparaatnummer en bouwjaar zijn belangrijke opgaven voor de identificatie van
het apparaat. Zij dienen bij bestellingen van onderdelen, aanspraken op fabrieksgarantie en
overige aanvragen m.b.t. het apparaat altijd mee worden aangegeven.
• Het maximale draagvermogen (WLL) geeft aan voor welke maximale belasting het apparaat
ontworpen is. Het maximale draagvermogen (WLL) mag niet worden overschreden.
• Bij het gebruik bij het hefgereedschap/draagapparaat (bv. kraan, kettingtakel, vormheftruck,
bagger) moet ook rekening worden gehouden met het op het typeplaatje aangeduide eigen
gewicht.
Voorbeeld:

Verwijdering / recycling van apparatuur en machines
58500016
15 / 18
NL
5.5 Instructie m.b.t. verhuur/uitlenen van PROBST apparaten
Bij iedere uitlening/verhuur van PROBST apparaten moet absoluut de daarbij horende originele
handleiding worden meegeleverd (indien de taal van het land van de betreffende gebruiker afwijkt,
dient bovendien de desbetreffende vertaling van de originele handleiding te worden meegeleverd)!
6 Verwijdering / recycling van apparatuur en machines
Het product mag alleen door gekwalificeerd personeel buiten gebruik worden gesteld en worden
voorbereid voor verwijdering / recycling. Dienovereenkomstig aanwezige afzonderlijke componenten
(zoals metalen, kunststoffen, vloeistoffen, batterijen/accu's enz.) moeten worden verwijderd/gerecycled
in overeenstemming met de nationaal/landspecifiek geldende wetten en verordeningen inzake
afvalverwerking!
Het product mag niet met het huisvuil worden meegegeven!

Over de ontwikkelaar
58500016
16 / 18
NL
7 Over de ontwikkelaar
De "Moderne GRABO" is uitgevonden door
werktuigbouwkundig ingenieur Nimo Rotem. Hoewel
"elektrische handstofzuigers" al enige tijd bestaan, heeft
een belangrijke technische doorbraak in de
afdichtingstechnologie, aangedreven door Nemo, de
moderne GRABO-apparaten in staat gesteld een
ongelooflijke hefkracht in een klein en draagbaar pakket
te stoppen.

Gebruiksvoorbeelden van FXAH-120-GRABO-GREENLINE
58500016
17 / 18
NL
8 Gebruiksvoorbeelden van FXAH-120-GRABO-GREENLINE
FXAH-120-GRABO-
GREENLINE
FXAH-120-SOLO-Set
(48500055)
FXAH-120-SOLO-Set 4(8500055)
ALX-120-HG (42600206)
FXAH-120-DUO-SET (48500054)
FXAH-120-DUO-SET (48500039)
VPH-RS (42710072)

Gebruiksvoorbeelden van FXAH-120-GRABO-GREENLINE
58500016
18 / 18
NL
FXAH-DUO-CB (48500072)
FXAH-RS-CB (48500065)
FXAH-EL-CB (48500071)
-
 1
1
-
 2
2
-
 3
3
-
 4
4
-
 5
5
-
 6
6
-
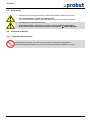 7
7
-
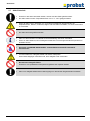 8
8
-
 9
9
-
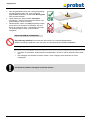 10
10
-
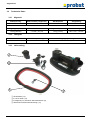 11
11
-
 12
12
-
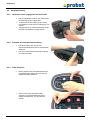 13
13
-
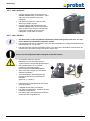 14
14
-
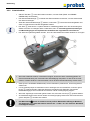 15
15
-
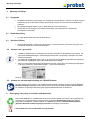 16
16
-
 17
17
-
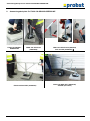 18
18
-
 19
19
-
 20
20
-
 21
21
-
 22
22
-
 23
23
-
 24
24
-
 25
25
-
 26
26
-
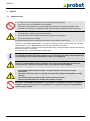 27
27
-
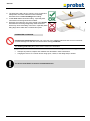 28
28
-
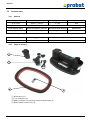 29
29
-
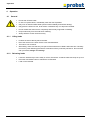 30
30
-
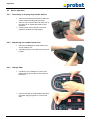 31
31
-
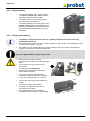 32
32
-
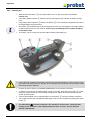 33
33
-
 34
34
-
 35
35
-
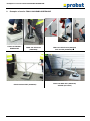 36
36
-
 37
37
-
 38
38
-
 39
39
-
 40
40
-
 41
41
-
 42
42
-
 43
43
-
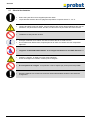 44
44
-
 45
45
-
 46
46
-
 47
47
-
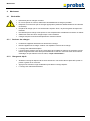 48
48
-
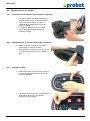 49
49
-
 50
50
-
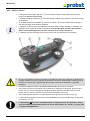 51
51
-
 52
52
-
 53
53
-
 54
54
-
 55
55
-
 56
56
-
 57
57
-
 58
58
-
 59
59
-
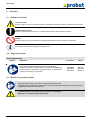 60
60
-
 61
61
-
 62
62
-
 63
63
-
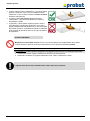 64
64
-
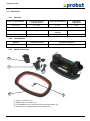 65
65
-
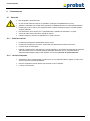 66
66
-
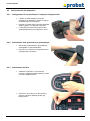 67
67
-
 68
68
-
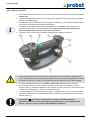 69
69
-
 70
70
-
 71
71
-
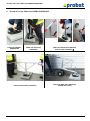 72
72
-
 73
73
-
 74
74
-
 75
75
-
 76
76
-
 77
77
-
 78
78
-
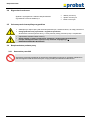 79
79
-
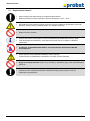 80
80
-
 81
81
-
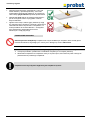 82
82
-
 83
83
-
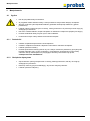 84
84
-
 85
85
-
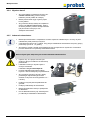 86
86
-
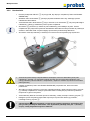 87
87
-
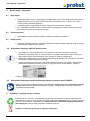 88
88
-
 89
89
-
 90
90
-
 91
91
-
 92
92
-
 93
93
-
 94
94
-
 95
95
-
 96
96
-
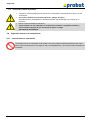 97
97
-
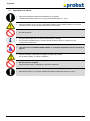 98
98
-
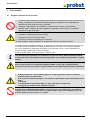 99
99
-
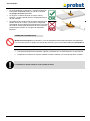 100
100
-
 101
101
-
 102
102
-
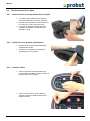 103
103
-
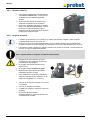 104
104
-
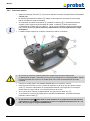 105
105
-
 106
106
-
 107
107
-
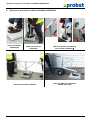 108
108
-
 109
109
-
 110
110
-
 111
111
-
 112
112
-
 113
113
-
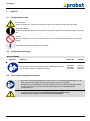 114
114
-
 115
115
-
 116
116
-
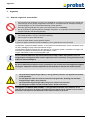 117
117
-
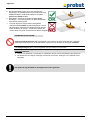 118
118
-
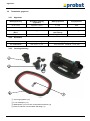 119
119
-
 120
120
-
 121
121
-
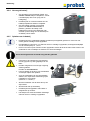 122
122
-
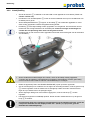 123
123
-
 124
124
-
 125
125
-
 126
126
-
 127
127
-
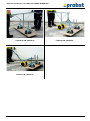 128
128


probst FXAH-120-GRABO-GREENLINE Handleiding
- Type
- Handleiding
in andere talen
Gerelateerde papieren
-
 probst FXAH-120-GRABO-PRO-LIFTER-GREENLINE Handleiding
-
 probst FXAH-120-GRABO-PRO-LIFTER-GREENLINE Handleiding
-
 probst VPH-150-GREENLINE Handleiding
-
 probst VPH-150-GREENLINE Handleiding
-
 probst VH-1/25 Handleiding
-
 probst ALX-120 Handleiding
-
 probst RG-20/85-SAFELOCK Handleiding
-
probst RGV-9/9 Handleiding
-
 probst WEZ-06 Handleiding
-
 probst FTZ-MULTI-15 Basic Device Handleiding


