
FAVORIT 78020 VI
NL AFWASAUTOMAAT GEBRUIKSAANWIJZING 2
EN DISHWASHER USER MANUAL 22

INHOUD
4 VEILIGHEIDSVOORSCHRIFTEN
6 BESCHRIJVING VAN HET PRODUCT
7 BEDIENINGSPANEEL
8PROGRAMMA’S
10 OPTIES
11 VOOR HET EERSTE GEBRUIK
14 DAGELIJKS GEBRUIK
17 ONDERHOUD EN REINIGING
18 PROBLEEMOPLOSSING
20 TECHNISCHE INFORMATIE
MILIEUBESCHERMING
Recycle de materialen met het symbool . Gooi de verpakking in een geschikte
verzamelcontainer om het te recyclen.
Help om het milieu en de volksgezondheid te beschermen en recycle het afval van
elektrische en elektronische apparaten. Gooi apparaten gemarkeerd met het symbool
niet weg met het huishoudelijk afval. Breng het product naar het milieustation bij u in de
buurt of neem contact op met de gemeente.
GA NAAR ONZE WEBSITE VOOR:
- Producten
- Brochures
- Gebruikershandleidingen
- Oplossen van problemen
- Service-informatie
www.aeg.com
LEGENDA
Waarschuwing - Belangrijke veiligheidsinformatie.
Algemene informatie en tips
Milieu-informatie
Wijzigingen voorbehouden.
2
www.aeg.com

VOOR PERFECTE RESULTATEN
Bedankt dat u voor dit AEG product heeft gekozen. Dit apparaat is ontworpen om
vele jaren uitstekend te presteren, met innovatieve technologieën die het leven
gemakkelijker helpen maken – functies die gewone apparaten wellicht niet hebben.
Neem een paar minuten de tijd om het door te lezen zodat u er optimaal van kunt
profiteren.
ACCESSOIRES EN VERBRUIKSARTIKELEN
In de AEG webshop vindt u alles wat u nodig heeft om al uw apparaten van AEG
mooi te houden en perfect te laten functioneren. Ook vindt u hier een groot aantal
accessoires die zijn ontworpen en gebouwd volgens de hoge kwaliteitsnormen die u
verwacht, van speciaal kookgerei tot bestekmandjes en van flessenhouders tot
waszakken…
Bezoek onze webshop op
www.aeg.com/shop
KLANTENSERVICE
Wij raden altijd het gebruik van originele onderdelen aan.
Wanneer u contact opneemt met de klantenservice dient u de volgende
gegevens bij de hand te hebben. Deze informatie treft u aan op het typeplaatje.
Model
Productnummer
Serienummer
NEDERLANDS
3

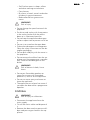
VEILIGHEIDSVOORSCHRIFTEN
Lees zorgvuldig de meegeleverde instruc-
ties voor installatie en gebruik van het ap-
paraat. De fabrikant is niet verantwoorde-
lijk voor letsel en schade veroorzaakt door
een foutieve installatie. Bewaar de instruc-
ties van het apparaat voor toekomstig ge-
bruik.
VEILIGHEID VAN KINDEREN
EN KWETSBARE MENSEN
WAARSCHUWING!
Gevaar voor verstikking, letsel of
permanente invaliditeit.
• Mensen, met inbegrip van kinderen,
met beperkte lichamelijke, zintuiglijke
of verstandelijke vermogens of gebrek
aan ervaring en kennis, mogen dit ap-
paraat niet bedienen. Zij moeten onder
toezicht staan of instructies krijgen over
het gebruik van dit apparaat van ie-
mand die verantwoordelijk is voor hun
veiligheid. Laat kinderen niet met het
apparaat spelen.
• Houd alle verpakkingsmaterialen uit de
buurt van kinderen.
• Houd alle reinigingsmiddelen uit de
buurt van kinderen.
• Houd kinderen en huisdieren uit de
buurt van het apparaat als de deur
open is.
MONTAGE
• Verwijder alle verpakkingsmaterialen.
• Installeer en gebruik geen beschadigd
apparaat.
• Installeer of gebruik het apparaat niet
op een plek waar de temperatuur on-
der de 0 °C komt.
• Volg de installatie-instructies op die zijn
meegeleverd met het apparaat.
• Zorg ervoor dat het apparaat onder en
naast veilige installaties wordt geïnstal-
leerd.
Aansluiting aan de waterleiding
• Zorg dat u de waterslangen niet be-
schadigt.
• Laat het water stromen tot het schoon
is voordat u het apparaat aansluit op
nieuwe leidingen of leidingen die lang
niet zijn gebruikt.
• Zorg dat er geen lekkages zijn als u het
apparaat de eerste keer gebruikt.
• De watertoevoerslang heeft een veilig-
heidsventiel en een omhulsel met een
hoofdkabel aan de binnenkant.
WAARSCHUWING!
Gevaarlijke spanning.
• Als de watertoevoerslang beschadigd
is, haal dan onmiddellijk de stekker uit
het stopcontact. Neem contact op met
de service-afdeling om de watertoe-
voerslang te vervangen.
Aansluiting aan het
elektriciteitsnet
WAARSCHUWING!
Gevaar voor brand en elektrische
schokken.
• Dit apparaat moet worden aangesloten
op een geaard stopcontact.
• Controleer of de elektrische informatie
op het typeplaatje overeenkomt met
de stroomvoorziening. Zo niet, neem
dan contact op met een elektromon-
teur.
• Gebruik altijd een correct geïnstalleerd,
schokbestendig stopcontact.
• Gebruik geen meerwegstekkers en ver-
lengsnoeren.
• Zorg dat u de hoofdstekker en kabel
niet beschadigt. Neem contact op met
de service-afdeling of een elektromon-
teur om een beschadigde hoofdkabel
te vervangen.
4
www.aeg.com

• Steek de stekker pas in het stopcontact
als de installatie is voltooid. Zorg ervoor
dat het netsnoer na installatie bereik-
baar is.
• Trek niet aan het aansluitnoer om het
apparaat los te koppelen. Trek altijd
aan de stekker.
GEBRUIK
• Dit apparaat is bedoeld voor huishou-
delijk gebruik of gelijksoortige toepas-
singen zoals:
– Personeelskeukens in winkels, kanto-
ren of andere werkomgevingen
– Boerderijen
– Door gasten in hotels, motels en an-
dere residentiële omgevingen
– Bed-and-breakfast accomodaties.
WAARSCHUWING!
Gevaar voor letsel.
• De specificatie van het apparaat mag
niet worden veranderd.
• Doe messen en bestek met scherpe
punten in het bestekmandje met de
punten omlaag in horizontale positie.
• Laat de deur van het apparaat niet
open staan zonder toezicht om te voor-
komen dat er iemand over struikelt.
• Ga niet op de open deur zitten of
staan.
• Vaatwasmiddel is gevaarlijk. Volg de
veiligheidsinstructies op de verpakking
van het vaatwasmiddel op.
• Speel niet met het water van het appa-
raat en drink het niet op.
• Verwijder de borden pas uit het appa-
raat als het programma is voltooid. Er
kan vaatwasmiddel op de borden zit-
ten.
WAARSCHUWING!
Gevaar voor elektrische schokken,
brand of brandwonden.
• Plaats geen ontvlambare producten of
items die vochtig zijn door ontvlambare
producten in, bij of op het apparaat.
• Gebruik geen waterstralen of stoom om
het apparaat te reinigen.
• Het apparaat kan hete stoom laten ont-
snappen als u de deur opent terwijl er
een programma wordt uitgevoerd.
VERWIJDERING
WAARSCHUWING!
Gevaar voor letsel of verstikking.
• Haal de stekker uit het stopcontact.
• Snijd het netsnoer van het apparaat af
en gooi dit weg.
• Verwijder de deurgreep om te voorko-
men dat kinderen en huisdieren opge-
sloten raken in het apparaat.
NEDERLANDS
5

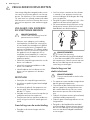
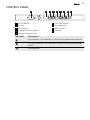
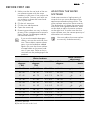
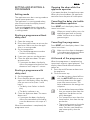
BESCHRIJVING VAN HET PRODUCT
1
2
3
4
5
8
10
6
7
12
9
11
1
Top sproeiarm
2
Bovenste sproeiarm
3
Onderste sproeiarm
4
Filters
5
Typeplaatje
6
Zoutreservoir
7
Waterhardheidsknop
8
Glansmiddeldoseerbakje
9
Wasmiddeldoseerlade
10
Bestekmand
11
Onderrek
12
Bovenrek
LICHTSTRAAL
• Als een programma in werking is, ver-
schijnt er een rode lichtstraal op de
vloer onder de deur van het apparaat.
Als het programma klaar is, verandert
het rode licht in een groen licht.
• Als het apparaat een storing heeft, gaat
het rode licht knipperen.
6
www.aeg.com

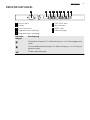
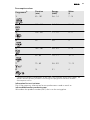
BEDIENINGSPANEEL
1
2
3
4
5
6
7
8
9
1
Aan/uit-toets
2
Display
3
Toets startuitstel
4
Programmatoets (omlaag)
5
Programmatoets (omhoog)
6
ÖKO PLUS-toets
7
Multitab-toets
8
RESET-toets
9
Indicatielampjes
Indicatie-
lampjes
Beschrijving
Zoutindicatielampje. Dit indicatielampje is uit als het programma
werkt.
Glansmiddelindicatielampje. Dit indicatielampje is uit als het pro-
gramma werkt.
Einde-indicatielampje.
NEDERLANDS
7

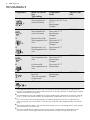
PROGRAMMA’S
Programma Mate van vervui-
ling
Type lading
Programma
fasen
Options (Op-
ties)
1
1)
Alles
Serviesgoed, be-
stek en pannen
Voorwas
Wassen van 45 °C tot
70 °C
Spoelingen
Drogen
ÖKO PLUS
2
2)
Sterk bevuild
Serviesgoed, be-
stek en pannen
Voorwas
Afwassen 70 °C
Spoelingen
Drogen
ÖKO PLUS
3
3)
Normaal bevuild
Serviesgoed en be-
stek
Voorwas
Afwassen 50 °C
Spoelingen
Drogen
4
4)
Net gemaakt vuil
Serviesgoed en be-
stek
Afwassen 60 °C
Spoelen
5
5)
Normaal bevuild
Serviesgoed en be-
stek
Voorwas
Afwassen 50 °C
Spoelingen
Drogen
ÖKO PLUS
6 Licht bevuild
Serviesgoed en be-
stek
Afwassen 55 °C
Spoelingen
7 Normaal of licht
bevuild
Teer serviesgoed
en glaswerk
Afwassen 45 °C
Spoelingen
Drogen
ÖKO PLUS
8
6)
Alles Voorwas
1)
Het apparaat detecteert de mate van vervuiling en de hoeveelheid serviesgoed in de
korven. De temperatuur en hoeveelheid water, het energieverbruik en de programmaduur
worden automatisch aangepast.
2)
Dit programma heeft een spoelfase bij hoge temperatuur voor betere resultaten voor de
hygi?e. Tijdens de spoelfase blijft de temperatuur gedurende 10 tot 14 minuten op 70 °C.
3)
Dit is het meest stille afwasprogramma. De pomp werkt op zeer lage snelheid om zo
weinig mogelijk geluid te maken. Door de lage snelheid is de programmaduur uiteraard
lang.
4)
Met dit programma kunt u een pas bevuilde lading wassen. Het programma geeft goede
wasresultaten in een korte tijd.
5)
Dit is het standaard programma voor testinstituten. Dit programma biedt het meest
efficiënte water- en energieverbruik voor normaal bevuild serviesgoed en bestek.
8
www.aeg.com

6)
Gebruik dit programma om het serviesgoed snel te spoelen. Hierdoor kunnen
voedselresten niet aan het serviesgoed vastkoeken en ontstaan er geen vieze geurtjes in
het apparaat.
U hoeft voor dit programma geen afwasmiddel te gebruiken.
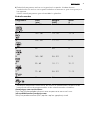
Verbruikswaarden
Programma
1)
Duur
(min)
Energie-
(kWh)
Water
(l)
1 40 - 150 0.6 - 1.4 7 - 14
2 140 - 160 1.4 - 1.6 13 - 14
3 200 - 220 1.1 - 1.2 9 - 11
4 30 0.8 9
5 160 - 180 0.8 - 0.9 9 - 10
6 50 - 60 1.0 - 1.1 10 - 11
7 70 - 80 0.8 - 0.9 11 - 12
8 14 0.1 4
1)
De druk en temperatuur van het water, de variaties in stroomtoevoer, de opties en de
hoeveelheid vaat kan de programmaduur en de verbruikswaarden veranderen.
Aanwijzingen voor testinstituten
Stuur voor alle benodigde informatie over testprestaties een e-mail naar:
Schrijf het productnummer (PNC) op dat u op het typeplaatje vindt.
NEDERLANDS
9

OPTIES
Schakel de opties in of uit, voor-
dat u een programma start. U kunt
de opties niet inschakelen of uit-
schakelen als er een programma
bezig is.
Zorg er als één of meerdere op-
ties worden ingesteld voor dat de
bijbehorende lampjes branden
voordat het programma start.
ÖKO PLUS
Met deze optie wordt de temperatuur in
de droogfase verlaagd. Het energiever-
bruik daalt met 25%.
De borden kunnen nog nat zijn aan het
einde van het programma.
Druk op de ÖKO PLUS-toets:
• Als de optie van toepassing is op het
programma, gaat het bijbehorende
lampje branden.
• Als de optie niet van toepassing is op
het programma, knippert het bijbeho-
rende lampje enkele seconden en gaat
vervolgens uit.
MULTITAB
Activeer deze optie alleen als u gecombi-
neerde afwastabletten gebruikt.
Deze optie stopt de stroom van glansmid-
del en zout. De bijbehorende indicatie-
lampjes gaan uit.
De programmaduur kan toenemen.
• Druk op de multitabtoets. Het bijbeho-
rende lampje gaat branden.
• De optie blijft aan tot u het uitschakelt.
Druk op de multitabtoets. Het bijbeho-
rende lampje gaat uit.
Voer deze stappen uit als u stopt met
het gebruik van gecombineerde
afwastabletten en voordat u begint
met het gebruik van afzonderlijk
afwasmiddel, glansmiddel en
regenereerzout:
1. Schakel de multitaboptie uit.
2. Stel de waterontharder in op het
hoogste niveau.
3. Zorg ervoor dat het zoutreservoir en
het glansmiddeldoseerbakje gevuld
zijn.
4. Start het kortste programma met een
spoelfase, zonder afwasmiddel en
zonder vaat.
5. Stel de waterontharder af op de wa-
terhardheid in uw omgeving.
6. Stel de hoeveelheid glansmiddel in.
GELUIDSSIGNALEN
De geluidssignalen klinken onder de vol-
gende omstandigheden:
• Het programma is voltooid.
• Het niveau van de waterontharder is
elektronisch gewijzigd.
• Er een storing in het apparaat optreedt
Fabrieksinstelling: aan. U kunt de
geluidssignalen uitschakelen.
De geluidssignalen uitschakelen
1. Druk op de aan-/uittoets om het ap-
paraat te activeren. Zorg dat het appa-
raat in de instelmodus staat. Zie ‘HET
PROGRAMMA INSTELLEN EN STAR-
TEN'.
2. Druk tegelijkertijd op toets (4) en (5)
en houd de toetsen ingedrukt totdat
de indicatielampjes van toets (3), (4)
en (5) knipperen.
3. Druk op toets (5),
• De indicatielampjes van toets (3) en
(4) gaan uit.
• Het indicatielampje van toets (5)
blijft knipperen.
• Wordt de instelling van de geluids-
signalen op de display weergege-
ven.
Aan
Uit
4. Druk op toets (5) om de instelling te
wijzigen.
5. Schakel het apparaat uit om te beves-
tigen.
10
www.aeg.com

VOOR HET EERSTE GEBRUIK
1. Controleer of het ingestelde niveau
van de waterontharder juist is voor de
waterhardheid in uw omgeving. Als
dat niet het geval is, dan stelt u de wa-
terontharder in. Neem contact op met
uw plaatselijke waterinstantie voor in-
formatie over de hardheid van het wa-
ter in uw omgeving.
2. Het zoutreservoir vullen.
3. Vul het glansmiddeldoseerbakje.
4. Draai de waterkraan open.
5. Er kunnen wasmiddelen in het appa-
raat achtergebleven zijn. Start een
programma om ze te verwijderen. Ge-
bruik geen wasmiddel en gebruik de
mandjes niet.
Activeer de multitabfunctie als u
gecombineerde vaatwastabletten
gebruikt. Deze tabletten bevatten
vaatwasmiddel, glansspoelmiddel
en andere middelen. Zorg ervoor
dat deze tabletten geschikt zijn
voor de waterhardheid in uw om-
geving. Zie de instructies op de
verpakking van de producten.
DE WATERONTHARDER
INSTELLEN
Hard water bevat een grote hoeveelheid
mineralen die schade aan het apparaat en
slechte schoonmaakresultaten kan veroor-
zaken. De waterontharder neutraliseert
deze mineralen.
Het vaatwaszout houdt de waterontharder
schoon en in goede staat. Zie de tabel om
de waterontharder af te stellen op het
juiste niveau. Dit zorgt ervoor dat de wa-
terontharder de juiste hoeveelheid rege-
nereerzout en water gebruikt.
U moet de waterontharder hand-
matig en elektronisch instellen.
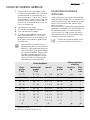
Waterhardheid
Waterontharder
afstelling
Duits
graden
(°dH)
Nederlands
graden
(°fH)
mmol/l Clarke
graden
Handma-
tig
Elek-
troni-
sche
51 - 70 91 - 125 9.1 - 12.5 64 - 88
2
1)
10
43 - 50 76 - 90 7.6 - 9.0 53 - 63
2
1)
9
37 - 42 65 - 75 6.5 - 7.5 46 - 52
2
1)
8
29 - 36 51 - 64 5.1 - 6.4 36 - 45
2
1)
7
23 - 28 40 - 50 4.0 - 5.0 28 - 35
2
1)
6
19 - 22 33 - 39 3.3 - 3.9 23 - 27
2
1)
5
1)
15 - 18 26 - 32 2.6 - 3.2 18 - 22 1 4
11 - 14 19 - 25 1.9 - 2.5 13 - 17 1 3
4 - 10 7 - 18 0.7 - 1.8 5 - 12 1 2
< 4 < 7 < 0.7 < 5
1
2)
1
2)
1)
Fabrieksinstelling.
2)
Gebruik geen zout op dit niveau.
NEDERLANDS
11

Handmatig instellen
Zet de waterhardheidsknop in stand 1 of
2.
Elektronische instelling
1. Druk op de aan-/uittoets om het ap-
paraat te activeren. Zorg ervoor dat
het apparaat in de instelmodus staat,
zie 'HET PROGRAMMA INSTELLEN
EN STARTEN'.
2. Druk tegelijkertijd op toets (4) en (5)
en houd de toetsen ingedrukt totdat
de indicatielampjes van toets (3), (4)
en (5) knipperen.
3. Druk op toets (3).
• De indicatielampjes van toets (4) en
(5) gaan uit.
• Het indicatielampje van toets (3)
blijft knipperen.
• De geluidssignalen klinken, bijv. vijf
onderbroken geluidssignalen = ni-
veau 5.
• Het display toont de instelling van
de waterontharder, bijv.
= ni-
veau 5.
4. Druk herhaaldelijk op functietoets (3)
om de instelling te wijzigen.
5. Schakel het apparaat uit om de instel-
ling te bevestigen.
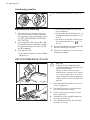
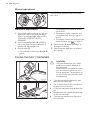
HET ZOUTRESERVOIR VULLEN
LET OP!
Gebruik alleen regenereerzout.
Andere producten kunnen het ap-
paraat beschadigen.
Water en zout kunnen uit het
zoutreservoir stromen als u het bij-
vult. Gevaar voor roest. Start om
dit te voorkomen een programma
nadat u het zoutreservoir heeft bij-
gevuld.
1.
Draai de dop linksom om het zoutre-
servoir te openen.
2.
Doe een liter water in het zoutreser-
voir (alleen de eerste keer).
3.
Vul het zoutreservoir met zout voor
afwasautomaten.
4.
Verwijder het zout rond de opening
van het zoutreservoir.
5.
Draai de dop rechtsom om het zout-
reservoir te sluiten.
12
www.aeg.com

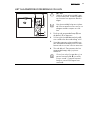
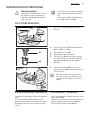
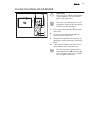
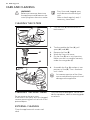
HET GLANSMIDDELDOSEERBAKJE VULLEN
M
A
X
1
2
3
4
+
-
A
B
D
C
LET OP!
Gebruik alleen glansmiddel voor
afwasautomaten. Andere produc-
ten kunnen het apparaat bescha-
digen.
Het glansmiddel helpt om tijdens
de laatste spoelfase het servies te
drogen zonder strepen en vlek-
ken.
1.
Druk op de ontgrendelknop (D) om
de deksel (C) te openen.
2.
Vul het glansmiddeldoseerbakje (A)
niet verder dan de aanduiding 'max'.
3.
Verwijder gemorst glansmiddel met
een absorberend doekje om te voor-
komen dat er te veel schuim ontstaat.
4.
Sluit de deksel. Zorg ervoor dat het
ontgrendelknopje op zijn plaats
dichtklikt.
U kunt het schuifje voor de vrij te
geven hoeveelheid (B) instellen
tussen stand 1 (laagste hoeveel-
heid) en stand 4 (hoogste hoe-
veelheid).
NEDERLANDS
13

DAGELIJKS GEBRUIK
1. Draai de waterkraan open.
2. Druk op de aan-/uittoets om het ap-
paraat te activeren. Zorg dat het appa-
raat in de instelmodus staat. Zie ‘EEN
PROGRAMMA INSTELLEN EN STAR-
TEN'.
• Vul het zoutreservoir als het zoutin-
dicatielampje brandt.
• Vul het glansmiddeldoseerbakje als
het indicatielampje van het glans-
middel brandt.
3. Ruim de rekken in.
4. Voeg vaatwasmiddel toe.
5. U dient het juiste programma in te
stellen en te starten voor het type la-
ding en de mate van vervuiling.
DE REKKEN INRUIMEN
Zie de meegeleverde folder voor
voorbeelden voor het inruimen
van de rekken.
• Gebruik het apparaat alleen om voor-
werpen af te wassen die vaatwasbe-
stendig zijn.
• Doe geen voorwerpen in het apparaat
die gemaakt zijn van hout, hoorn, alu-
minium, tin en koper.
• Plaats geen voorwerpen in het apparaat
die water kunnen absorberen (sponzen,
keukenhanddoeken).
• Verwijder alle voedselresten van de
voorwerpen.
• Maak aangebrande voedselresten op
de voorwerpen zachter.
• Plaats holle voorwerpen (bijv. kopjes,
glazen en pannen) met de opening
naar beneden.
• Zorg ervoor dat serviesgoed en bestek
niet in elkaar liggen. Meng lepels met
ander bestek.
• Zorg er voor dat glazen andere glazen
niet aanraken
• Leg kleine voorwerpen in de bestek-
mand.
• Leg lichte voorwerpen in het bovenrek.
Zorg ervoor dat de voorwerpen niet
verschuiven.
• Zorg er voor dat de sproeiarmen vrij
kunnen ronddraaien voordat u een pro-
gramma start.
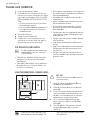
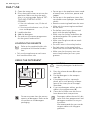
VAATWASMIDDEL GEBRUIKEN
20
30
M
A
X
1
2
3
4
+
-
A
B
C
LET OP!
Gebruik alleen wasmiddel voor af-
wasautomaten.
1.
Druk op de ontgrendelknop (B) om
de deksel (C) te openen.
2.
Doe de vaatwastablet in het doseer-
bakje (A) .
3.
Plaats een kleine hoeveelheid van het
vaatwasmiddel in de binnenkant van
de deur van het apparaat als het pro-
gramma een voorwasfase heeft.
4.
Als u vaatwasmiddeltabletten ge-
bruikt, plaatst u deze in het doseer-
bakje (A).
5.
Sluit de deksel. Zorg ervoor dat het
ontgrendelknopje op zijn plaats
dichtklikt.
Gebruik niet meer dan de juiste
hoeveelheid vaatwasmiddel. Zie
de instructies van de vaatwasmid-
delfabrikant.
14
www.aeg.com

Vaatwastabletten lossen niet hele-
maal op bij korte programma's en
er blijven resten van het vaatwas-
middel achter op het servies.
Wij raden aan dat u vaatwasta-
bletten gebruikt bij lange pro-
gramma's.
EEN PROGRAMMA INSTELLEN
EN STARTEN
Instelmodus
Het apparaat moet in de instelmodus
staan om bepaalde acties te accepteren.
Het apparaat staat in de instelmodus als
het display na de activering 2 horizontale
statusbalkjes weergeeft.
Druk op RESET, als het bedieningspaneel
andere omstandigheden weergeeft, tot
het apparaat in de instelmodus staat.
Een programma starten zonder
startuitstel
1. Draai de waterkraan open.
2. Druk op de aan-/uittoets om het ap-
paraat in te schakelen. Zorg dat het
apparaat in de instelmodus staat.
3. Stel het programma in.
• Het bijbehorende nummer knippert
op het display.
4. Indien gewenst kunt u de opties instel-
len.
5. Sluit de deur van het apparaat. Het
programma wordt gestart.
• Als u de deur opent, dan toont het
display de programmaduur die af-
loopt in stappen van 1 minuut.
Een programma starten met
een uitgestelde start
1. Stel het programma in.
2. Blijf op de toets uitgestelde start druk-
ken tot het display de uitgestelde tijd
toont die u wilt instellen (van 1 tot 24
uur).
• De uitgestelde tijd knippert op de
display.
• Het indicatielampje van de uitge-
stelde start staat aan.
3. Sluit de deur van het apparaat. Het af-
tellen start.
• Als u de deur opent, toont het dis-
play het aftellen van de uitgestelde
start die afloopt in stappen van 1
uur.
Als het aftelproces voltooid is, wordt het
programma gestart.
De deur openen als het
apparaat in werking is
Als u de deur opent, stopt het apparaat.
Als u de deur weer sluit, gaat het appa-
raat verder vanaf het punt van onderbre-
king.
De uitgestelde start annuleren
tijdens het aftellen
Druk op RESET tot het display twee hori-
zontale statusstreepjes weergeeft.
Als u een uitgestelde start annu-
leert, gaat het apparaat terug naar
de instelmodus. U moet het pro-
gramma opnieuw instellen.
Het programma annuleren
Druk op RESET tot het display twee hori-
zontale statusstreepjes weergeeft.
Controleer of er afwasmiddel in
het afwasmiddeldoseerbakje aan-
wezig is voordat u een nieuw pro-
gramma start.
Aan het einde van het
programma
Wanneer het programma is voltooid,
hoort u met tussenpozen een geluidssig-
naal. Het display toont 0 en het indicatie-
lampje voor het einde gaat branden.
1. Druk op de aan-/uittoets om het ap-
paraat te deactiveren.
2. Draai de waterkraan dicht.
Als u niet op de aan-/uittoets
drukt, schakelt AUTO OFF het ap-
paraat na een paar minuten auto-
matisch uit. Dit helpt het energie-
verbruik te verminderen.
NEDERLANDS
15

• Laat de borden afkoelen voor-
dat u deze uit het apparaat
neemt. Hete borden zijn gevoe-
lig voor beschadigingen.
• Ruim eerst de onderkorf en dan
de bovenkorf uit.
• Er kan water liggen aan de zij-
kanten en op de deur van het
apparaat. Roestvrij staal koelt
sneller af dan borden.
16
www.aeg.com

ONDERHOUD EN REINIGING
WAARSCHUWING!
Schakel het apparaat uit en trek
de stekker uit het stopcontact
voordat u onderhoudshandelin-
gen verricht.
Vuile filters en verstopte sproeiar-
men verminderen de wasresulta-
ten.
Controleer regelmatig de filters
en reinig deze zo nodig.
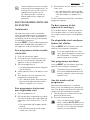
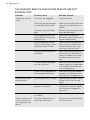
DE FILTERS REINIGEN
A
B
C
C
1.
Draai het filter (A) linksom en verwij-
der het.
A1
A2
2.
Haal om het filter (A) te demonteren,
(A1) en (A2) uit elkaar.
3.
Verwijder het filter (B).
4.
Reinig de filters met water.
5.
Zet het filter (B) terug in de startposi-
tie. Zorg ervoor dat ze goed worden
gemonteerd onder de twee gelei-
ders (C).
6.
Monteer het filter (A) en zet het in
positie in filter (B). Rechtsom draaien
tot het vastzit.
Een onjuiste plaatsing van de fil-
ters kan leiden tot slechte wasre-
sultaten en het apparaat bescha-
digen.
DE SPROEIARMEN REINIGEN
Probeer niet de sproeiarmen te verwijde-
ren.
Als etensresten de openingen in de
sproeiarmen hebben verstopt, verwijder
deze dan met een smal en puntig voor-
werp.
BUITENKANT REINIGEN
Maak het apparaat schoon met een voch-
tige, zachte doek.
Gebruik alleen neutrale schoonmaakmid-
delen. Gebruik geen schuurmiddelen,
schuursponsjes of oplosmiddelen.
NEDERLANDS
17

PROBLEEMOPLOSSING
Het apparaat start of stopt niet tijdens de
werking.
Raadpleeg voordat u contact opneemt
met de klantenservice de informatie over
het oplossen van problemen.
Bij sommige problemen wordt er op de
display een alarmcode weergegeven:
•
- Het apparaat wordt niet gevuld
met water.
•
- Het apparaat pompt geen water
weg.
•
- Het bescherminssysteem tegen
waterlekkage is in werking getreden.
WAARSCHUWING!
Schakel het apparaat uit voordat u
controles uitvoert.
Probleem Mogelijke oorzaak Mogelijke oplossing
Het programma
start niet.
De stekker zit niet in het
stopcontact.
Sluit de stekker aan.
De deur van het apparaat is
open.
Sluit de deur van het appa-
raat.
De zekering in de zekering-
kast is doorgebrand.
Vervang de zekering.
Startuitstel is ingesteld. Annuleer de uitgestelde
start of wacht tot het einde
van het aftellen.
Het apparaat wordt
niet met water ge-
vuld.
De waterkraan is gesloten. Draai de waterkraan open.
De waterdruk is te laag. Neem contact op met het
waterleidingbedrijf.
De waterkraan is verstopt of
aangezet met kalkaanslag.
Maak de waterkraan schoon.
Het filter in de watertoe-
voerslang is verstopt.
Maak de filter schoon.
De watertoevoerslang is ge-
knikt of gebogen.
Zorg ervoor dat de positie
van de slang correct is.
Het beschermingssysteem
tegen lekkage is aan. Er zijn
waterlekkages in het appa-
raat.
Draai de waterkraan dicht
en neem contact op met de
service-afdeling.
Het apparaat pompt
geen water weg.
De gootsteenafvoer is ge-
blokkeerd.
Ontstop de gootsteenaf-
voer.
De waterafvoerslang is ge-
knikt of gebogen.
Zorg ervoor dat de positie
van de slang correct is.
Schakel het apparaat na de controles in.
Het programma gaat verder vanaf het
punt waar het werd onderbroken.
Als het probleem opnieuw optreedt,
neemt u contact op met onze service-af-
deling.
Als de display andere alarmcodes aan-
geeft, neemt u contact op met onze servi-
ce-afdeling.
18
www.aeg.com

DE WAS- EN DROOGRESULTATEN ZIJN NIET NAAR
TEVREDENHEID
Storing Mogelijke oorzaak Mogelijke oplossing
De borden zijn niet
schoon.
De filters zijn verstopt. Reinig de filters.
De filters zijn niet juist ge-
monteerd en geplaatst.
Zorg ervoor dat de filters
juist zijn gemonteerd en ge-
installeerd.
De sproeiarmen zijn ver-
stopt.
Verder het vuil met een dun,
puntig voorwerp.
Het programma is niet ge-
schikt voor het type lading
en de mate van vervuiling.
Zorg ervoor dat het pro-
gramma geschikt is voor het
type lading en mate van ver-
vuiling.
Onjuiste positie van de
items in de mandjes. Water
kan niet alle items afwas-
sen.
Zorg ervoor dat de positie
van de items in de rekken
juist is en dat het water een-
voudig alle items kan afwas-
sen.
De sproeiarmen konden
niet vrij draaien.
Zorg ervoor dat de positie
van de items in de rekken
juist is en dat de sproeiar-
men niet worden geblok-
keerd.
Er is te weinig of geen af-
wasmiddel gebruikt.
Zorg ervoor dat u de juiste
hoeveelheid vaatwasmiddel
gebruikt in het doseerbakje
voordat u een programma
start.
Er zit geen vaatwasmiddel
in het doseerbakje.
Zorg ervoor dat er vaatwas-
middel in het doseerbakje zit
voordat u een programma
start.
Er zitten kalkresten
op de borden.
Het zoutreservoir is leeg. Zorg ervoor dat er vaatwas-
zout in het zoutreservoir zit.
Het ingestelde niveau van
de waterontharder is on-
juist.
Controleer of het ingestelde
niveau van de wateronthar-
der juist is voor de water-
hardheid in uw omgeving.
De dop van het zoutreser-
voir zit los.
Draai de dop vast.
Witte strepen of
vlekken of een blau-
we waas op glazen
en serviesgoed.
De vrijgegeven hoeveel-
heid glansmiddel is te
hoog.
Stel de hoeveelheid glans-
middel lager in.
.
NEDERLANDS
19

Storing Mogelijke oorzaak Mogelijke oplossing
Er is te veel vaatwasmiddel
gebruikt.
Zorg ervoor dat u de juiste
hoeveelheid vaatwasmiddel
gebruikt in het doseerbakje
voordat u een programma
start.
Opgedroogde wa-
terdruppels op de
glazen en de bor-
den.
De vrijgegeven hoeveel-
heid glansmiddel is te laag.
Stel de hoeveelheid glans-
middel hoger in.
De kwaliteit van het vaat-
wasmiddel kan de oorzaak
zijn.
Probeer een ander merk
vaatwasmiddel.
Het serviesgoed is
nat.
Het programma had geen
droogfase.
Een programma instellen
met droogfase.
Het serviesgoed is
nat en mat.
Het glansmiddeldoseerbak-
je is leeg.
Zorg ervoor dat er glans-
spoelmiddel in het glansmid-
deldoseerbakje zit.
De kwaliteit van het glans-
middel kan de oorzaak zijn.
Probeer een ander merk
glansmiddel.
De kwaliteit van de gecom-
bineerde vaatwastabletten
kan de oorzaak zijn.
• Probeer een ander merk
gecombineerde vaatwas-
tabletten.
• Activeer de glansmiddel-
dosering en gebruik het
glansmiddel samen met
de gecombineerde vaat-
wastabletten.
Activeer het
glansmiddeldoseerbakje als de
multitabfunctie geactiveerd is
1. Druk op de aan-/uittoets om het ap-
paraat te activeren. Zorg ervoor dat
het apparaat in de instelmodus staat,
zie ‘HET PROGRAMMA INSTELLEN
EN STARTEN'.
2. Druk tegelijkertijd op toets (4) en (5)
en houd de toetsen ingedrukt totdat
de indicatielampjes van toets (3), (4)
en (5) knipperen.
3. Druk op toets (4).
• De indicatielampjes van toets (3) en
(5) gaan uit.
• Het indicatielampje van toets (4)
blijft knipperen.
• Wordt op de display de instelling
van het glansmiddeldoseerbakje
weergegeven
Uit
Aan
4. Druk op toets (4) om de instelling te
wijzigen.
5. Schakel het apparaat uit om de instel-
ling te bevestigen.
6. Stel de hoeveelheid glansmiddel in.
7. Vul het glansmiddeldoseerbakje.
TECHNISCHE INFORMATIE
Afmeting Breedte / hoogte / diepte
(mm)
596 / 818 - 898 / 550
20
www.aeg.com

Aansluiting op het elek-
triciteitsnet
Zie het typeplaatje.
Voltage 220-240 V
Tijd 50 Hz
Waterdruk Min. / max. (bar / MPa) (0.5 / 0.05 ) / (8 / 0.8 )
Watertoevoer
1)
Koud water of warm water
2)
max. 60 °C
Vermogen Couverts 12
Energieverbruik Modus aan 0.10 W
Modus uit 0.10 W
1)
Sluit de slang aan op een kraan met 3/4”-schroefdraad.
2)
Als het hete water door alternatieve, milieuvriendelijkere energiebronnen geproduceerd
wordt (bijv. zonnepanelen en windenergie), gebruik dan een heetwatervoorziening om het
energieverbruik te verminderen.
NEDERLANDS
21

CONTENTS
24 SAFETY INSTRUCTIONS
26 PRODUCT DESCRIPTION
27 CONTROL PANEL
28 PROGRAMMES
30 OPTIONS
31 BEFORE FIRST USE
34 DAILY USE
36 CARE AND CLEANING
37 TROUBLESHOOTING
39 TECHNICAL INFORMATION
ENVIRONMENT CONCERNS
Recycle the materials with the symbol . Put the packaging in applicable containers to
recycle it.
Help protect the environment and human health and to recycle waste of electrical and
electronic appliances. Do not dispose appliances marked with the symbol
with the
household waste. Return the product to your local recycling facility or contact your
municipal office.
VISIT OUR WEBSITE FOR:
- Products
- Brochures
- User manuals
- Trouble shooter
- Service information
www.aeg.com
LEGEND
Warning - Important Safety information.
General information and tips
Environmental information
Subject to change without notice.
22
www.aeg.com

FOR PERFECT RESULTS
Thank you for choosing this AEG product. We have created it to give you
impeccable performance for many years, with innovative technologies that help
make life simpler – features you might not find on ordinary appliances. Please spend
a few minutes reading to get the very best from it.
ACCESSORIES AND CONSUMABLES
In the AEG webshop, you’ll find everything you need to keep all your AEG
appliances looking spotless and working perfectly. Along with a wide range of
accessories designed and built to the high quality standards you would expect, from
specialist cookware to cutlery baskets, from bottle holders to delicate laundry bags…
Visit the webshop at:
www.aeg.com/shop
CUSTOMER CARE AND SERVICE
We recommend the use of original spare parts.
When contacting Service, ensure that you have the following data available. The
information can be found on the rating plate.
Model
PNC
Serial Number
ENGLISH
23

SAFETY INSTRUCTIONS
Before the installation and use of the ap-
pliance, carefully read the supplied in-
structions. The manufacturer is not re-
sponsible if an incorrect installation and
use causes injuries and damages. Always
keep the instructions with the appliance
for future reference.
CHILDREN AND VULNERABLE
PEOPLE SAFETY
WARNING!
Risk of suffocation, injury or per-
manent disability.
• Do not let persons, children included,
with reduced physical sensory, reduced
mental functions or lack of experience
and knowledge use the appliance. They
must have supervision or instruction for
the operation of the appliance by a per-
son who is responsible for their safety.
Do not let children play with the appli-
ance.
• Keep all packaging away from children.
• Keep all detergents away from children.
• Keep children and pets away from the
appliance door when it is open.
INSTALLATION
• Remove all the packaging.
• Do not install or use a damaged appli-
ance.
• Do not install or use the appliance
where the temperature is less than 0 °C.
• Obey the installation instruction sup-
plied with the appliance.
• Make sure that the appliance is instal-
led below and adjacent to safe struc-
tures.
Water connection
• Make sure not to cause damage to the
water hoses.
• Before you connect the appliance to
new pipes or pipes not used for a long
time, let the water flow until it is clean.
• The first time you use the appliance,
make sure that there is no leakage.
• The water inlet hose has a safety valve
and a sheath with an inner mains cable.
WARNING!
Dangerous voltage.
• If the water inlet hose is damaged, im-
mediately disconnect the mains plug
from the mains socket. Contact the
service to replace the water inlet hose.
Electrical connection
WARNING!
Risk of fire and electrical shock.
• The appliance must be earthed.
• Make sure that the electrical informa-
tion on the rating plate agrees with the
power supply. If not, contact an electri-
cian.
• Always use a correctly installed shock-
proof socket.
• Do not use multi-plug adapters and ex-
tension cables.
• Make sure not to cause damage to the
mains plug and to the mains cable.
Contact the Service or an electrician to
change a damaged mains cable.
• Connect the mains plug to the mains
socket only at the end of the installa-
tion. Make sure that there is access to
the mains plug after the installation.
• Do not pull the mains cable to discon-
nect the appliance. Always pull the
mains plug.
USE
• This appliance is intended to be used in
household and similar applications such
as:
24
www.aeg.com

– Staff kitchen areas in shops, offices
and other working environments
– Farm houses
– By clients in hotels, motels and other
residential type environments
– Bed and breakfast type environ-
ments.
WARNING!
Risk of injury.
• Do not change the specification of this
appliance.
• Put knives and cutlery with sharp points
in the cutlery basket with the points
down or in a horizontal position.
• Do not keep the appliance door open
without supervision to prevent to fall on
it.
• Do not sit or stand on the open door.
• Dishwasher detergents are dangerous.
Obey the safety instructions on the de-
tergent packaging.
• Do not drink and play with the water in
the appliance.
• Do not remove the dishes from the ap-
pliance until the programme is comple-
ted. There can be detergent on the
dishes.
WARNING!
Risk of electrical shock, fire or
burns.
• Do not put flammable products or
items that are wet with flammable
products in, near or on the appliance.
• Do not use water spray and steam to
clean the appliance.
• The appliance can release hot steam if
you open the door while a programme
operates.
DISPOSAL
WARNING!
Risk of injury or suffocation.
• Disconnect the appliance from the
mains supply.
• Cut off the mains cable and dispose of
it.
• Remove the door catch to prevent chil-
dren and pets to get closed in the ap-
pliance.
ENGLISH
25

PRODUCT DESCRIPTION
1
2
3
4
5
8
10
6
7
12
9
11
1
Top spray arm
2
Upper spray arm
3
Lower spray arm
4
Filters
5
Rating plate
6
Salt container
7
Water hardness dial
8
Rinse aid dispenser
9
Detergent dispenser
10
Cutlery basket
11
Lower basket
12
Upper basket
LIGHT BEAM
• When a programme operates, a red
light beam shows on the floor below
the appliance door. When the pro-
gramme is completed, the red light
changes to a green light.
• When the appliance has a malfunction,
the red light beam flashes.
26
www.aeg.com

CONTROL PANEL
1
2
3
4
5
6
7
8
9
1
On/off button
2
Display
3
Delay button
4
Programme button (down)
5
Programme button (up)
6
ÖKO PLUS button
7
Multitab button
8
RESET button
9
Indicators
Indicators Description
Salt indicator. This indicator is off while the programme operates.
Rinse aid indicator. This indicator is off while the programme op-
erates.
End indicator.
ENGLISH
27

PROGRAMMES
Programme Degree of soil
Type of load
Programme
phases
Options
1
1)
All
Crockery, cutlery,
pots and pans
Prewash
Wash from 45 °C to 70
°C
Rinses
Dry
ÖKO PLUS
2
2)
Heavy soil
Crockery, cutlery,
pots and pans
Prewash
Wash 70 °C
Rinses
Dry
ÖKO PLUS
3
3)
Normal soil
Crockery and cut-
lery
Prewash
Wash 50 °C
Rinses
Dry
4
4)
Fresh soil
Crockery and cut-
lery
Wash 60 °C
Rinse
5
5)
Normal soil
Crockery and cut-
lery
Prewash
Wash 50 °C
Rinses
Dry
ÖKO PLUS
6 Light soil
Crockery and cut-
lery
Wash 55 °C
Rinses
7 Normal or light soil
Delicate crockery
and glassware
Wash 45 °C
Rinses
Dry
ÖKO PLUS
8
6)
All Prewash
1)
The appliance senses the degree of soil and the quantity of items in the baskets. It
automatically adjusts the temperature and quantity of the water, the energy consumption
and the programme duration.
2)
This programme has a high temperature rinsing phase for better hygiene results. During
the rinsing phase, the temperature stays at 70 °C for 10 to 14 minutes.
3)
This is the most silent washing programme. The pump works at a very low speed to
decrease the level of noise. Because of the low speed, the programme duration is long.
4)
With this programme you can wash a load with fresh soil. It gives good washing results in a
short time.
5)
This is the standard programme for test institutes. With this programme you have the most
efficient use of water and energy consumption for crockery and cutlery with normal soil.
6)
Use this programme to quickly rinse the dishes. This prevents the remaining food to bond
on the dishes and bad odours to come out from the appliance.
Do not use detergent with this programme.
28
www.aeg.com

Consumption values
Programme
1)
Duration
(min)
Energy
(kWh)
Water
(l)
1 40 - 150 0.6 - 1.4 7 - 14
2 140 - 160 1.4 - 1.6 13 - 14
3 200 - 220 1.1 - 1.2 9 - 11
4 30 0.8 9
5 160 - 180 0.8 - 0.9 9 - 10
6 50 - 60 1.0 - 1.1 10 - 11
7 70 - 80 0.8 - 0.9 11 - 12
8 14 0.1 4
1)
The pressure and the temperature of the water, the variations of the mains supply, the
options and the quantity of dishes can change the programme duration and the
consumption values.
Information for test institutes
For all the necessary information for test performance. send an email to:
Write down the product number (PNC) that is on the rating plate.
ENGLISH
29

OPTIONS
Activate or deactivate the options
before the start of a programme.
You cannot activate or deactivate
the options while a programme
operates.
If one or more options are set,
make sure that the related indica-
tors are on before the programme
starts.
ÖKO PLUS
This option decreases the temperature in
the drying phase. The energy consump-
tion decreases by 25%.
The dishes can be wet at the end of the
programme.
Press the ÖKO PLUS button:
• If the option is applicable to the pro-
gramme, the related indicator comes
on.
• If the option is not applicable to the
programme, the related indicator flash-
es for some seconds and then stays off.
MULTITAB
Activate this option only when you use the
combi detergent tablets.
This option deactivates the flow of rinse
aid and salt. The related indicators are off.
The programme duration can increase.
• Press the multitab button, the related
indicator comes on.
• The option stays on until you deactivate
it. Press the multitab button, the related
indicator goes off.
If you stop to use the combi detergent
tablets, before you start to use
separately detergent, rinse aid and
dishwasher salt, do these steps:
1. Deactivate the multitab option.
2. Set the water softener to the highest
level.
3. Make sure that the salt container and
the rinse aid dispenser are full.
4. Start the shortest programme with a
rinsing phase, without detergent and
without dishes.
5. Adjust the water softener to the water
hardness in your area.
6. Adjust the released quantity of rinse
aid.
ACOUSTIC SIGNALS
The acoustic signals operate in these con-
ditions:
• The programme is completed.
• The level of the water softener is adjus-
ted electronically.
• The appliance has a malfunction.
Factory setting: on. You can deac-
tivate the acoustic signals.
Deactivating the acoustic signals
1. Press the on/off button to activate the
appliance. Make sure that the appli-
ance is in setting mode. Refer to ‘SET-
TING AND STARTING A PRO-
GRAMME’.
2. Press and hold buttons (4) and (5) at
the same time until the indicators of
buttons (3), (4) and (5) flash.
3. Press button (5),
• The indicators of buttons (3) and (4)
go off.
• The indicator of button (5) contin-
ues to flash.
• The display shows the setting of the
acoustic signals.
On
Off
4. Press button (5) to change the setting.
5. Deactivate the appliance to confirm.
30
www.aeg.com

BEFORE FIRST USE
1. Make sure that the set level of the wa-
ter softener agrees with the water
hardness in your area. If not, adjust the
water softener. Contact your local wa-
ter authority to know the water hard-
ness in your area.
2. Fill the salt container.
3. Fill the rinse aid dispenser.
4. Open the water tap.
5. Processing residues can stay in the ap-
pliance. Start a programme to remove
them. Do not use detergent and do
not load the baskets.
If you use the combi detergent
tablets, activate the multitab func-
tion. These tablets contain deter-
gent, rinse aid and other added
agents. Be sure that these tablets
are applicable to the water hard-
ness in your area. Refer to the in-
structions on the packaging of the
products.
ADJUSTING THE WATER
SOFTENER
Hard water contains a high quantity of
minerals that can cause damage to the
appliance and bad washing results. The
water softener neutralises these minerals.
The dishwasher salt keeps the water soft-
ener clean and in good conditions. Refer
to the table to adjust the water softener
to the right level. It makes sure that the
water softener uses the correct quantity of
dishwasher salt and water.
You must adjust the water soften-
er manually and electronically.
Water hardness
Water softener
adjustment
German
degrees
(°dH)
French
degrees
(°fH)
mmol/l Clarke
degrees
Manual Elec-
tronic
51 - 70 91 - 125 9.1 - 12.5 64 - 88
2
1)
10
43 - 50 76 - 90 7.6 - 9.0 53 - 63
2
1)
9
37 - 42 65 - 75 6.5 - 7.5 46 - 52
2
1)
8
29 - 36 51 - 64 5.1 - 6.4 36 - 45
2
1)
7
23 - 28 40 - 50 4.0 - 5.0 28 - 35
2
1)
6
19 - 22 33 - 39 3.3 - 3.9 23 - 27
2
1)
5
1)
15 - 18 26 - 32 2.6 - 3.2 18 - 22 1 4
11 - 14 19 - 25 1.9 - 2.5 13 - 17 1 3
4 - 10 7 - 18 0.7 - 1.8 5 - 12 1 2
< 4 < 7 < 0.7 < 5
1
2)
1
2)
1)
Factory position.
2)
Do not use salt at this level.
ENGLISH
31

Manual adjustment
Turn the water hardness dial to the posi-
tion 1 or 2.
Electronic adjustment
1. Press the on/off button to activate the
appliance. Make sure that the appli-
ance is in setting mode, refer to ‘SET-
TING AND STARTING A PRO-
GRAMME’.
2. Press and hold buttons (4) and (5) at
the same time until the indicators of
buttons (3), (4) and (5) flash.
3. Press button (3).
• The indicators of buttons (4) and (5)
go off.
• The indicator of button (3) contin-
ues to flash.
• The acoustic signals operate, e.g.
five intermittent acoustic signals =
level 5.
• The display shows the setting of the
water softener, e.g.
= level 5.
4. Press button (3) again and again to
change the setting.
5. Deactivate the appliance to confirm
the setting.
FILLING THE SALT CONTAINER
CAUTION!
Only use dishwasher salt. Other
products can cause damage to
the appliance.
Water and salt can come out from
the salt container when you fill it.
Risk of corrosion. To prevent it, af-
ter you fill the salt container, start
a programme.
1.
Turn the cap counterclockwise and
open the salt container.
2.
Put 1 litre of water in the salt contain-
er (only for the first time).
3.
Fill the salt container with dishwasher
salt.
4.
Remove the salt around the opening
of the salt container.
5.
Turn the cap clockwise to close the
salt container.
32
www.aeg.com

FILLING THE RINSE AID DISPENSER
M
A
X
1
2
3
4
+
-
A
B
D
C
CAUTION!
Only use rinse aid for dishwashers.
Other products can cause dam-
age to the appliance.
The rinse aid, during the last rins-
ing phase, helps to dry the dishes
without streaks and stains.
1.
Press the release button (D) to open
the lid (C).
2.
Fill the rinse aid dispenser (A), no
more than the mark 'max'.
3.
Remove the spilled rinse aid with an
absorbent cloth to prevent too much
foam.
4.
Close the lid. Make sure that the re-
lease button locks into position.
You can turn the selector of the
released quantity (B) between po-
sition 1 (lowest quantity) and posi-
tion 4 (highest quantity).
ENGLISH
33

DAILY USE
1. Open the water tap.
2. Press the on/off button to activate the
appliance. Make sure that the appli-
ance is in setting mode. Refer to ’SET-
TING AND STARTING A PRO-
GRAMME’.
• If the salt indicator is on, fill the salt
container.
• If the rinse aid indicator is on, fill the
rinse aid dispenser.
3. Load the baskets.
4. Add the detergent.
5. Set and start the correct programme
for the type of load and soil.
LOADING THE BASKETS
Refer to the supplied leaflet with
examples of the load of the bas-
kets.
• Only use the appliance to wash items
that are dishwasher-safe.
• Do not put in the appliance items made
of wood, horn, aluminium, pewter and
copper.
• Do not put in the appliance items that
can absorb water (sponges, household
cloths).
• Remove remaining food from the items.
• Make soft the remaining burned food
on the items.
• Put hollow items (cups, glasses and
pans) with the opening down.
• Make sure that cutlery and dishes do
not bond together. Mix spoons with
other cutlery.
• Make sure that glasses do not touch
other glasses.
• Put small items in the cutlery basket.
• Put light items in the upper basket.
Make sure that the items do not move.
• Make sure that the spray arms can
move freely before you start a pro-
gramme.
USING THE DETERGENT
20
30
M
A
X
1
2
3
4
+
-
A
B
C
CAUTION!
Use only detergents for dishwash-
ers.
1.
Press the release button (B) to open
the lid (C).
2.
Put the detergent in the compart-
ment (A) .
3.
If the programme has a prewash
phase, put a small quantity of deter-
gent on the inner part of the appli-
ance door.
4.
If you use detergent tablets, put the
tablet in the compartment (A).
5.
Close the lid. Make sure that the re-
lease button locks into position.
Do not use more than the correct
quantity of detergent. Refer to the
instructions on the detergent
packaging.
Detergent tablets do not fully dis-
solve with short programmes and
detergent residues can stay on
the dishes.
We recommend that you use de-
tergent tablets with long pro-
grammes.
34
www.aeg.com

SETTING AND STARTING A
PROGRAMME
Setting mode
The appliance must be in setting mode to
accept some operations.
The appliance is in setting mode when,
after the activation the display shows 2
horizontal status bars.
If the control panel shows other condi-
tions, press RESET until the appliance is
in setting mode.
Starting a programme without
delay start
1. Open the water tap.
2. Press the on/off button to activate the
appliance. Make sure that the appli-
ance is in setting mode.
3. Set the programme.
• The related programme number
flashes in the display.
4. If you want, you can set the options.
5. Close the appliance door. The pro-
gramme starts.
• If you open the door, the display
shows the programme duration that
decreases with steps of 1 minute.
Starting a programme with
delay start
1. Set the programme.
2. Press the delay button again and
again until the display shows the delay
time you want to set (from 1 to 24
hours).
• The delay time flashes in the dis-
play.
• The delay indicator is on.
3. Close the appliance door. The count-
down starts.
• If you open the door, the display
shows the countdown of the delay
start that decreases with steps of 1
hour.
When the countdown is completed, the
programme starts.
Opening the door while the
appliance operates
If you open the door, the appliance stops.
When you close the door, the appliance
continues from the point of interruption.
Cancelling the delay start while
the countdown operates
Press RESET until the display shows 2 hor-
izontal status bars.
When you cancel a delay start, the
appliance goes back to setting
mode. You have to set the pro-
gramme again.
Cancelling the programme
Press RESET until the display shows 2 hor-
izontal status bars.
Make sure that there is detergent
in the detergent dispenser before
you start a new programme.
At the end of the programme
When the programme is completed, an
intermittent acoustic signal operates. The
display shows 0 and the end indicator
comes on.
1. Press the on/off button to deactivate
the appliance.
2. Close the water tap.
If you do not press the on/off but-
ton, the AUTO OFF device auto-
matically deactivates the appli-
ance after some minutes. This
helps to decrease the energy con-
sumption.
• Let the dishes become cold be-
fore you remove them from the
appliance. Hot dishes can be
easily damaged.
• First remove the items from the
lower basket, then from the up-
per basket.
• There can be water on the sides
and on the door of the appli-
ance. Stainless steel becomes
cool more quickly than the
dishes.
ENGLISH
35

CARE AND CLEANING
WARNING!
Before maintenance, deactivate
the appliance and disconnect the
mains plug from the mains socket.
Dirty filters and clogged spray
arms decrease the washing re-
sults.
Make a check regularly and, if
necessary, clean them.
CLEANING THE FILTERS
A
B
C
C
1.
Turn the filter (A) counterclockwise
and remove it.
A1
A2
2.
To disassemble the filter (A), pull
apart (A1) and (A2).
3.
Remove the filter (B).
4.
Wash the filters with water.
5.
Put the filter (B) to its initial position.
Make sure that it assembles correctly
under the two guides (C).
6.
Assemble the filter (A) and put it into
position in filter (B). Turn it clockwise
until it locks.
An incorrect position of the filters
can cause bad washing results and
damage to the appliance.
CLEANING THE SPRAY ARMS
Do not remove the spray arms.
If the holes in the spray arms are clogged,
remove remaining parts of soil with a thin
pointed object.
EXTERNAL CLEANING
Clean the appliance with a moist soft
cloth.
Only use neutral detergents. Do not use
abrasive products, abrasive cleaning pads
or solvents.
36
www.aeg.com

TROUBLESHOOTING
The appliance does not start or it stops
during operation.
Before you contact the Service, refer to
the information that follows for a solution
to the problem.
With some problems, the display shows
an alarm code:
•
- The appliance does not fill with
water.
•
- The appliance does not drain the
water.
•
- The anti-flood device is on.
WARNING!
Deactivate the appliance before
you do the checks.
Problem Possible cause Possible solution
The programme
does not start.
The mains plug is not con-
nected in the mains socket.
Connect the mains plug.
The appliance door is open. Close the appliance door.
The fuse in the fuse box is
damaged.
Replace the fuse.
The delay start is set. Cancel the delay start or
wait for the end of the
countdown.
The appliance does
not fill with water.
The water tap is closed. Open the water tap.
The water pressure is too
low.
Contact your local water au-
thority.
The water tap is clogged or
there is limescale on it.
Clean the water tap.
The filter in the water inlet
hose is clogged.
Clean the filter.
The water inlet hose has a
kink or a bend.
Make sure that the position
of the hose is correct.
The anti-flood device is on.
There are water leakages in
the appliance.
Close the water tap and
contact the Service.
The appliance does
not drain the water.
The sink spigot is clogged. Clean the sink spigot.
The water drain hose has a
kink or a bend.
Make sure that the position
of the hose is correct.
After the checks are completed, activate
the appliance. The programme continues
from the point of interruption.
If the problem occurs again, contact the
Service.
If the display shows other alarm codes,
contact the Service.
ENGLISH
37

THE WASHING RESULTS AND DRYING RESULTS ARE NOT
SATISFACTORY
Problem Possible cause Possible solution
The dishes are not
clean.
The filters are clogged. Clean the filters.
The filters are not correctly
assembled and installed.
Make sure that the filters are
correctly assembled and in-
stalled.
The spray arms are clog-
ged.
Remove remaining soil with a
thin pointed object.
The programme was not
applicable for the type of
load and soil.
Make sure that the pro-
gramme is applicable for the
type of load and soil.
Incorrect position of the
items in the baskets. Water
could not wash all items.
Make sure that the position
of the items in the baskets is
correct and that the water
can easily wash all items.
The spray arms could not
turn freely.
Make sure that the position
of the items in the baskets is
correct and does not cause
the blockage of the spray
arms.
The quantity of detergent
was not sufficient.
Make sure that you add the
correct quantity of detergent
in the dispenser before you
start a programme.
There was no detergent in
the detergent dispenser.
Make sure that you add de-
tergent in the dispenser be-
fore you start a programme.
Limescale particles
on the dishes.
The salt container is empty. Make sure that there is dish-
washer salt in the salt con-
tainer.
The set level of the water
softener is incorrect.
Make sure that the set level
of the water softener agrees
with the water hardness in
your area.
The cap of the salt contain-
er is loose.
Tighten the cap.
Whitish streaks and
stains or bluish lay-
ers on glasses and
dishes.
The released quantity of
rinse aid is too much.
Decrease the released quan-
tity of rinse aid
.
38
www.aeg.com

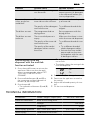
Problem Possible cause Possible solution
The quantity of detergent
was too much.
Make sure that you add the
correct quantity of detergent
in the dispenser before you
start a programme.
Dry water drop
stains on glasses
and dishes.
The released quantity of
rinse aid was not sufficient .
Increase the released quanti-
ty of rinse aid.
The quality of the detergent
can be the cause.
Try a different brand of de-
tergent.
The dishes are wet. The programme had no
drying phase.
Set a programme with the
drying phase.
The dishes are wet
and matt.
The rinse aid dispenser is
empty.
Make sure that there is rinse
aid in the rinse aid dispenser.
The quality of the rinse aid
can be the cause.
Try a different brand of rinse
aid.
The quality of the combi
detergent tablets can be
the cause.
• Try a different brand of
combi detergent tablets.
• Activate the rinse aid dis-
penser and use the rinse
aid together with the com-
bi detergent tablets.
Activating the rinse aid
dispenser with the multitab
function activated
1. Press the on/off button to activate the
appliance. Make sure that the appli-
ance is in setting mode, refer to ‘SET-
TING AND STARTING A PRO-
GRAMME’.
2. Press and hold buttons (4) and (5) at
the same time until the indicators of
buttons (3), (4) and (5) flash.
3. Press button (4).
• The indicators of buttons (3) and (5)
go off.
• The indicator of button (4) contin-
ues to flash.
• The display shows the setting of the
rinse aid dispenser.
Off
On
4. Press button (4) to change the setting.
5. Deactivate the appliance to confirm
the setting.
6. Adjust the released quantity of rinse
aid.
7. Fill the rinse aid dispenser.
TECHNICAL INFORMATION
Dimensions Width / Height / Depth (mm) 596 / 818 - 898 / 550
Electrical connection Refer to the rating plate.
Voltage 220-240 V
Frequency 50 Hz
Water supply pressure Min. / max. (bar / MPa) (0.5 / 0.05 ) / (8 / 0.8 )
Water supply
1)
Cold water or hot water
2)
max. 60 °C
ENGLISH
39

Capacity Place settings 12
Power consumption Left-on mode 0.10 W
Off-mode 0.10 W
1)
Connect the water inlet hose to a water tap with a 3/4'' thread.
2)
If the hot water comes from alternative sources of energy, (e.g. solar panels, aeolian
energy), use the hot water supply to decrease energy consumption.
40
www.aeg.com

ENGLISH
41

42
www.aeg.com

ENGLISH
43

www.aeg.com/shop 117913260-A-352012
-
 1
1
-
 2
2
-
 3
3
-
 4
4
-
 5
5
-
 6
6
-
 7
7
-
 8
8
-
 9
9
-
 10
10
-
 11
11
-
 12
12
-
 13
13
-
 14
14
-
 15
15
-
 16
16
-
 17
17
-
 18
18
-
 19
19
-
 20
20
-
 21
21
-
 22
22
-
 23
23
-
 24
24
-
 25
25
-
 26
26
-
 27
27
-
 28
28
-
 29
29
-
 30
30
-
 31
31
-
 32
32
-
 33
33
-
 34
34
-
 35
35
-
 36
36
-
 37
37
-
 38
38
-
 39
39
-
 40
40
-
 41
41
-
 42
42
-
 43
43
-
 44
44


in andere talen
- English: AEG F78020VI1P User manual
Gerelateerde papieren
-
AEG F50502VI0 Handleiding
-
AEG F78400IM0P Handleiding
-
Aeg-Electrolux F55002UM0P Handleiding
-
-
AEG F78000VI0P Handleiding
-
AEG F78400VI0P Handleiding
-
-
-
-