Electrolux ERW33900X Handleiding
- Categorie
- Drinkkoelers
- Type
- Handleiding

gebruiksaanwijzing
user manual
istruzioni per l’uso
manual de instrucciones
Wijnkelder
Wine Cellar
Vano cantina
Bodega
ERW33900X
ERW33910X

Electrolux. Thinking of you.
Ga voor meer van onze ideeën naar www.electrolux.com
INHOUD
Veiligheidsinformatie 2
Bedieningspaneel 4
Het eerste gebruik 5
Dagelijks gebruik 5
Onderhoud en reiniging 7
Problemen oplossen 8
Technische gegevens 10
Montage 10
Het milieu 12
Wijzigingen voorbehouden
VEILIGHEIDSINFORMATIE
In het belang van uw veiligheid en om een
correct gebruik te kunnen waarborgen is
het van belang dat u, alvorens het apparaat
te installeren en in gebruik te nemen, deze
gebruiksaanwijzing, inclusief de tips en waar-
schuwingen, grondig doorleest. Om onnodi-
ge vergissingen en ongevallen te voorko-
men is het belangrijk ervoor te zorgen dat al-
le mensen die het apparaat gebruiken, volle-
dig bekend zijn met de werking ervan en de
veiligheidsvoorzieningen. Bewaar deze in-
structies en zorg ervoor dat zij bij het appa-
raat blijven als het wordt verplaatst of ver-
kocht, zodat iedereen die het apparaat ge-
durende zijn hele levensduur gebruikt, naar
behoren is geïnformeerd over het gebruik
en de veiligheid van het apparaat.
Voor de veiligheid van mensen en eigendom-
men dient u zich aan de voorzorgsmaatre-
gelen uit dit instructieboekje te houden, de
fabrikant is niet verantwoordelijk voor scha-
de die door het niet opvolgen van de aanwij-
zingen veroorzaakt is.
Veiligheid van kinderen en kwetsbare
mensen
• Dit apparaat is niet bedoeld voor gebruik
door personen (waaronder begrepen kin-
deren) met verminderde fysieke, zintuiglij-
ke vermogens of een gebrek aan ervaring
en kennis, tenzij dit onder toezicht ge-
beurt van een voor hun veiligheid verant-
woordelijke persoon of tenzij zij van een
dergelijke persoon instructie hebben ont-
vangen over het gebruik van het apparaat.
Houd kinderen uit de buurt om te voorko-
men dat ze met het apparaat gaan spelen.
• Houd alle verpakkingsmateriaal buiten
het bereik van kinderen. Gevaar voor ver-
stikking.
• Als u het apparaat afdankt trek dan de
stekker uit het stopcontact, snij de voe-
dingskabel door (zo dicht mogelijk bij het
apparaat) en verwijder de deur om te voor-
komen dat kinderen een elektrische
schok krijgen of zichzelf in het apparaat
opsluiten.
• Als dit apparaat, dat voorzien is van een
magnetische deursluiting, een ouder ap-
paraat vervangt, dat voorzien is van een
veerslot (slot) op de deur of het deksel,
zorg er dan voor dat u het slot onbruik-
baar maakt voordat u het oude apparaat
weggooit. Dit voorkomt dat kinderen er in
opgesloten kunnen raken.
Algemene veiligheid
Let op! Houd de ventilatie-openingen
altijd vrij van obstructies.
• Dit apparaat is uitsluitend bedoeld voor
het bewaren van wijn.
• Gebruik geen mechanische hulpmiddelen
of kunstgrepen om het ontdooiproces te
versnellen.
• Gebruik geen andere elektrische appara-
ten (bijvoorbeeld roomijsmachines) in koel-
kasten, tenzij ze voor dit doel goedge-
keurd zijn door de fabrikant.
• Let op dat u het koelcircuit niet beschadigt.
• Het koelmiddel isobutaan (R600a) be-
vindt zich in het koelcircuit van het appa-
raat. Dit is een natuurlijk gas dat welis-
waar milieuvriendelijk is, maar ook uiterst
ontvlambaar.
Controleer of de onderdelen van het koel-
circuit tijdens transport en installatie van
het apparaat niet beschadigd zijn geraakt.
Indien het koelcircuit beschadigd is:
2 electrolux

– open vuur en ontstekingsbronnen ver-
mijden,
– de ruimte waar het apparaat zich be-
vindt, grondig ventileren
• Het is gevaarlijk om wijzigingen aan te
brengen in de specificaties of dit product
op enigerlei wijze te modificeren. Een be-
schadigd netsnoer kan kortsluiting, brand
en/of een elektrische schok veroorzaken.
Waarschuwing! Alle elektrische onder-
delen (netsnoer, stekker, compressor)
mogen uitsluitend worden vervangen
door een erkende onderhoudsdienst of
gekwalificeerd onderhoudspersoneel.
1. Het netsnoer mag niet worden ver-
lengd.
2. Verzeker u ervan dat de stekker niet
wordt platgedrukt of beschadigd door
de achterkant van het apparaat. Een
platgedrukte of beschadigde stekker
kan oververhit raken en brand veroor-
zaken.
3. Verzeker u ervan dat u de stekker van
het apparaat kunt bereiken.
4. Trek niet aan het snoer.
5. Als de stekker loszit, steek hem dan
niet in het stopcontact. Dan bestaat
er een risico op een elektrische schok
of brand.
6. U mag het apparaat niet gebruiken
zonder de afdekking van het lampje
1)
voor de binnenverlichting.
• Dit apparaat is zwaar. Wees voorzichtig
wanneer u het apparaat verplaatst.
• Haal geen artikelen uit het vriesvak of
raak ze niet aan wanneer uw handen voch-
tig/nat zijn, dit kan uw huid beschadigen
of vrieswonden veroorzaken.
• Stel het apparaat niet langdurig bloot aan
direct zonlicht.
•
Gloeilampjes
2)
dat in dit apparaat wordt
gebruikt, is een speciaal lampje voor huis-
houdelijke apparaten. De lampjes zijn niet
geschikt voor de verlichting van ruimtes.
Dagelijks gebruik
• Zet geen hete potten op de kunststof on-
derdelen in het apparaat.
• Bewaar geen brandbare gassen of vloei-
stoffen in het apparaat, deze kunnen ont-
ploffen.
• U dient zich strikt te houden aan de aan-
bevelingen van de fabrikant van het appa-
raat met betrekking tot het bewaren van
voedsel. Raadpleeg de betreffende aan-
wijzingen.
Onderhoud en reiniging
• Schakel het apparaat uit en trek de stek-
ker uit het stopcontact voordat u onder-
houdshandelingen verricht.
• Maak het apparaat niet schoon met me-
talen voorwerpen.
• Gebruik geen scherpe voorwerpen om ijs
van het apparaat te krabben. Gebruik
een kunststof schraper.
• Controleer de afvoer in de koelkast regel-
matig op dooiwater. Maak de afvoer, in-
dien nodig, schoon. Als de afvoer ver-
stopt is, zal er water op de bodem van
het apparaat liggen.
Installatie
Belangrijk! Voor de aansluiting van
elektriciteit dienen de instructies in de
desbetreffende paragrafen nauwgezet te
worden opgevolgd.
• Pak het apparaat uit en controleer of er
beschadigingen zijn. Sluit het apparaat
niet aan als het beschadigd is. Meld mo-
gelijke beschadigingen onmiddellijk bij de
winkel waar u het apparaat gekocht
heeft. Gooi in dat geval de verpakking
niet weg.
• Wij adviseren u om 4 uur te wachten voor-
dat u het apparaat aansluit, dan kan de
olie terugvloeien in de compressor.
• Rond het apparaat dient adequate lucht-
circulatie te zijn, anders kan dit tot over-
verhitting leiden. Om voldoende ventilatie
te verkrijgen de instructies met betrekking
tot de installatie opvolgen.
• De achterkant dient zo mogelijk tegen
een muur geplaatst te worden, teneinde
te voorkomen dat hete onderdelen (com-
pressor, condensator) aangeraakt kun-
nen worden en brandwonden veroorza-
ken.
1) Als er een afdekking voor het lampje is voorzien
2) Het lampje
electrolux 3

• Het apparaat mag niet vlakbij radiatoren
of kooktoestellen geplaatst worden.
• Verzeker u ervan dat de stekker bereik-
baar is nadat het apparaat geïnstalleerd is.
• Sluit het apparaat alleen aan op een drink-
waterleiding.
3)
Onderhoud
• Alle elektrotechnische werkzaamheden
die noodzakelijk zijn voor het uitvoeren
van onderhoud aan het apparaat, dienen
uitgevoerd te worden door een gekwalifi-
ceerd elektricien of competent persoon.
• Dit product mag alleen worden onderhou-
den door een erkend onderhoudscen-
trum en er dient alleen gebruik te worden
gemaakt van originele reserveonderdelen.
Bescherming van het milieu
Dit apparaat bevat geen gassen die de
ozonlaag kunnen beschadigen, niet in
het koelcircuit en evenmin in de isolatie-
materialen. Het apparaat mag niet wor-
den weggegooid bij het normale huis-
houdelijke afval. Het isolatieschuim be-
vat ontvlambare gassen: het apparaat
moet weggegooid worden conform de
van toepassing zijnde regels die u bij
de lokale overheidsinstanties kunt ver-
krijgen. Voorkom beschadiging aan de
koeleenheid, vooral aan de achterkant
bij de warmtewisselaar. De materialen
die gebruikt zijn voor dit apparaat en
die voorzien zijn van het symbool
zijn recyclebaar.
BEDIENINGSPANEEL
1 2 3 4 5 6
1. AAN/UIT-schakelaar
2. Thermostaatknop van de onderste ruim-
te
3. Keuzetoets voor een ruimte
4. Display
5. Resetschakelaar van het alarm
Lichtknop
6. Thermostaatknop van de bovenste ruim-
te
Display
1 2 3
1. Controlelampje gekozen ruimte
2. Controlelampje van de positieve tempe-
ratuur
3. Weergave temperatuur
Inschakelen
Nadat u de stekker in het stopcontact heeft
gestoken drukt u, als het display niet ver-
licht is, op de AAN/UIT-schakelaar.
3) Indien er een wateraansluiting voorzien is
4 electrolux

Uitschakelen
Het apparaat wordt uitgeschakeld door de
toets ON/OFF langer dan 1 seconde inge-
drukt te houden.
Hierna wordt het aftellen van de tempera-
tuur van -3 -2 -1 weergegeven.
Wanneer het apparaat wordt uitgeschakeld,
gaat het display ook uit.
Temperatuurregeling
Selecteer de ruimte door te drukken op de
keuzeknop voor een ruimte.
Stel de temperatuur in door aan de knop
(thermostaatknop van de bovenste of onder-
ste ruimte, afhankelijk van de ruimte die
moet worden afgesteld) te draaien.
De exacte instelling moet echter gekozen
worden rekening houdend met het feit dat
de temperatuur in het apparaat afhankelijk
is van:
• de omgevingstemperatuur
• De frequentie van het openen van de deur-
en
• Het aantal bewaarde flessen
• de plaats van het apparaat.
Alarm bij open deur
Als de deur ongeveer 5 minuten heeft open-
gestaan, klinkt er een geluidsalarm. De
alarmtoestand bij geopende deur wordt aan-
gegeven door:
• knipperend controlelampje gekozen ruim-
te
• rood branden van display
• het geluid van de zoemer.
Druk op de resettoets alarm om het geluids-
ignaal te annuleren.
Als de normale omstandigheden hersteld
zijn (deur gesloten), wordt het geluidsalarm
uitgeschakeld.
Lichtknop
Indien u het licht wilt laten branden terwijl
de deur gesloten is, hoeft u alleen maar de
deur open en weer dicht te doen. De verlich-
ting blijft dan automatisch gedurende 10 mi-
nuten AAN.
Als u de verlichting wilt uitschakelen voor-
dat deze automatisch uitgaat, opent u de
deur en drukt u op de lichtknop.
De verlichting heeft geen negatieve invloed
op de kwaliteit van de wijn.
HET EERSTE GEBRUIK
De binnenkant schoonmaken
Voordat u het apparaat voor de eerste keer
gebruikt, wast u de binnenkant en de inter-
ne accessoires met lauwwarm water en een
beetje neutrale zeep om de typische geur
van een nieuw product weg te nemen.
Droog daarna grondig af.
Belangrijk! Gebruik geen oplosmiddelen of
schuurpoeders. Deze beschadigen de lak.
DAGELIJKS GEBRUIK
Rangschikking van de wijn
Bovenste compartiment:
De temperatuur kan worden ingesteld tus-
sen de +6 °C en +11°C. Deze ruimte is ide-
aal voor wijnen, vooral nieuwe rode en witte
wijnen, die onmiddellijk gedronken worden.
De ruimten werken elk met een ander tem-
peratuurbereik.
Onderste compartiment:
De temperatuur kan worden ingesteld tus-
sen de +12 °C en +18 °C. Deze ruimte is
ideaal voor het bewaren en verfijnen van ro-
de of witte wijnen gedurende langere perio-
den.
De temperaturen in dit vak zijn geschikt
voor het bewaren van gerijpte en volle wijnen.
Leg de flessen zo neer dat de kurken niet uit-
drogen.
Bewaar de wijn in het donker. De deur van
de koelkast is vervaardigd van dubbelver-
duisterings- en anti-UV-glas om de wijn te
beschermen tegen licht, in het geval dat de
koelkast in een goed verlichte ruimte staat.
Voorkomt dat u het licht van het apparaat
te vaak of te lang aan zet. Wijn blijft beter be-
houden in het donker.
Ga zorgvuldig om met de flessen, zodat de
wijn niet wordt geschud.
electrolux 5

Let op de aanbevelingen en de adviezen die
u bij aanschaf hebt gekregen of die zijn ver-
meld in de documentatie over de kwaliteit,
de duurzaamheid en de optimale bewaar-
temperatuur van de wijn.
Suggesties voor de conservering
De conserveringsduur van de wijn is afhan-
kelijk van de rijping, van de druivensoort,
het alcoholgehalte en van het percentage
fructose en tannine van de wijn. Controleer
bij aankoop of de wijn al gerijpt is of dat dit
na verloop van tijd beter wordt.
Aanbevolen bewaartemperaturen:
• Voor champagne en mousserende wij-
nen, bij 6 tot 8°C
• Voor witte wijnen, bij 10 tot 12°C
• Voor rosé en lichtrode wijnen, bij 12 tot
16°C
• Gerijpte rode wijnen, bij 14 tot 16°C
Als u verschillende flessen boven op elkaar
stapelt, zorg er dan voor dat deze het koel-
element van de koelkast niet raken.
Legplateaus van de wijnkelder
De legplateaus kunnen worden verwijderd
om ze te reinigen.
Flessenrek van de wijnkelder
Verwijder het legplateau en schuif het rek in
de twee geleiders.
Op de legplanken met flessenrekken is het
maximale gewicht 30 kg.
Het is mogelijk om het legplateau tussen ge-
leiders met een afstand van 100 mm te plaat-
sen om de uitstalling van de flessen te be-
vorderen.
Het onderste vak is voorzien van een schuif-
lade die gebruikt kan worden om de flessen
verticaal te plaatsen.
De lade is voorzien van twee scheidingswan-
den die aangepast kunnen worden aan fles-
sen met verschillende doorsneden.
6 electrolux

Luchtbevochtiger
De juiste luchtvochtigheid is cruciaal voor
het correct bewaren van wijn.
Uw wijnkelder beschikt over een speciale
luchtbevochtiger, die de luchtvochtigheid in
het apparaat verhoogt.
Verspreid de lavastenen die zijn meegele-
verd langs de smalle lade, zoals in de afbeel-
ding te zien is. Vul de lade dan met water
tot de helft van de capaciteit.
Bij normale werking worden de lavastenen
regelmatig door het water bevochtigd. Con-
troleer regelmatig of er zich nog water in de
lade bevindt en vul zo nodig water bij.
Merk op dat als de luchtvochtigheid in de
ruimte waarin uw apparaat is geïnstalleerd,
bijzonder hoog is, dan heeft de binnenkant
van uw wijnkelder ook een relatief hogere
luchtvochtigheid.
Dit kan leiden tot flessen die damp bevatten
wanneer de deur wordt geopend of etiket-
ten die loskomen. Verlaag in een dergelijk
geval de hoeveelheid water in de lade dien-
overeenkomstig.
Luchtcirculatie
Het koelvak is voorzien van een speciale AIR-
LIGHT-ventilator die automatisch gaat wer-
ken naar aanleiding van de thermostaatin-
stellingen of de omgevingstemperatuur.
ONDERHOUD EN REINIGING
Let op! Voordat u welke
onderhoudshandeling dan ook verricht,
de stekker uit het stopcontact trekken.
Het koelcircuit van dit apparaat bevat
koolwaterstoffen; onderhoud en herla-
den mag alleen uitgevoerd worden
door bevoegde technici.
Periodieke reiniging
Het apparaat moet regelmatig worden
schoongemaakt:
• maak de binnenkant en de accessoires
schoon met lauw water en wat neutrale
zeep.
• controleer de afdichtingen regelmatig en
wrijf ze schoon om u ervan te verzekeren
dat ze schoon zijn en vrij van restjes zijn.
• spoel ze af en maak ze grondig droog.
electrolux 7

Belangrijk! Trek niet aan leidingen en/of
kabels aan de binnenkant van de kast en
verplaats of beschadig ze niet.
Gebruik nooit schoonmaakmiddelen,
schuurpoeders, erg geparfumeerde reini-
gingsproducten en waspolijstmiddelen om
de binnenkant schoon te maken, aangezien
deze het oppervlak beschadigen en een ster-
ke geur achterlaten.
Maak de condensor (zwart rooster) en de
compressor op de achterkant van het appa-
raat schoon met een borstel of stofzuiger.
Deze handeling zal de prestatie van het ap-
paraat verbeteren en het elektriciteitsver-
bruik besparen.
Belangrijk! Zorg ervoor dat u het
koelsysteem niet beschadigt.
Veel normaal verkrijgbare keukenreinigers
bevatten chemicaliën die de kunststoffen
die in dit apparaat gebruikt zijn kunnen aan-
tasten/beschadigen. Daarom wordt het aan-
bevolen de buitenkant van dit apparaat al-
leen schoon te maken met warm water met
een beetje afwasmiddel.
Steek, na het schoonmaken van het appa-
raat, de stekker weer in het stopcontact.
Ontdooien
Rijp wordt elke keer als de compressormo-
tor tijdens normale werking stopt, automa-
tisch van de verdamper verwijderd. Het dooi-
water loopt via een gootje in een speciale
opvangbak aan de achterkant van het appa-
raat, boven de compressormotor, waar het
verdampt.
Het is belangrijk om het afvoergaatje van
het dooiwater in het midden van het afvoer-
kanaal van het apparaat regelmatig schoon
te maken om te voorkomen dat het water
overloopt en in de koelkast gaat druppelen.
Gebruik daarvoor de speciale reiniger, die al
in het afvoergaatje zit.
Periodes dat het apparaat niet gebruikt
wordt
Neem de volgende voorzorgsmaatregelen
als het apparaat gedurende lange tijd niet
gebruikt wordt:
• trek de stekker uit het stopcontact
•
ontdooi de koelkast
4)
en maak het appa-
raat en alle accessoires schoon
• laat de deur/deuren op een kier staan om
de vorming van onaangename luchtjes te
voorkomen.
Als uw apparaat aan blijft staan, vraag dan
iemand om het zo nu en dan te controleren,
om te voorkomen dat het bewaarde voed-
sel bederft als de stroom uitvalt.
PROBLEMEN OPLOSSEN
Waarschuwing! Haal de stekker uit
het stopcontact voordat u problemen
gaat oplossen.
Alleen een gekwalificeerd elektricien of
een bevoegde persoon mag proble-
men oplossen die niet in deze handlei-
ding beschreven zijn.
Belangrijk! Tijdens het normale gebruik
hoort u geluiden (compressor,
koelmiddelcirculatie).
4) Indien dat nodig is.
8 electrolux

Probleem Mogelijke oorzaak Oplossing
Het apparaat maakt la-
waai.
Het apparaat wordt niet goed on-
dersteund.
Controleer of het apparaat stabiel
staat (alle vier de voetjes moeten
op de vloer staan).
De zoemer klinkt. Het dis-
play brandt rood.
De deur is niet goed gesloten. Zie 'Alarm deur open'.
Het apparaat werkt niet.
Het lampje brandt niet.
Het apparaat is uitgeschakeld. Schakel het apparaat in.
De stekker zit niet goed in het
stopcontact.
Steek de stekker goed in het stop-
contact.
Het apparaat krijgt geen stroom.
Er staat geen spanning op het
stopcontact.
Sluit een ander elektrisch appa-
raat aan op het stopcontact.
Neem contact op met een gekwa-
lificeerd elektricien.
Het lampje werkt niet.
Het lampje staat in stand-by. Sluit en open de deur.
Het lampje is stuk. Zie 'Het lampje vervangen'.
De compressor werkt
continu.
De temperatuur is niet goed inge-
steld.
Stel een hogere temperatuur in.
De deur is niet goed gesloten. Zie 'De deur sluiten'.
De deur is te vaak geopend. Laat de deur niet langer dan no-
dig openstaan.
De kamertemperatuur is te hoog. Verlaag de temperatuur in de ka-
mer.
Er loopt water over de
achterkant van de koel-
kast.
Tijdens het automatische ont-
dooiproces ontdooit de rijp te-
gen de achterwand.
Dit is normaal.
Er loopt water in de koel-
kast.
De waterafvoer is verstopt. Reinig de waterafvoer.
Producten verhinderen dat water
in de wateropvangbak kan stro-
men.
Zorg ervoor dat de producten de
achterwand niet raken.
De temperatuur in het ap-
paraat is te laag/hoog.
De thermostaatknop is niet goed
ingesteld.
Stel een hogere/lagere tempera-
tuur in.
De deur is niet goed gesloten. Zie 'De deur sluiten'.
Er zijn veel producten tegelijk op-
geborgen.
Berg minder producten tegelijk op.
De temperatuur in het ap-
paraat is te hoog.
Er is geen koude luchtcirculatie
in het apparaat aanwezig.
Zorg ervoor dat er koude luchtcir-
culatie in het apparaat aanwezig is.
De lamp vervangen van de wijnkelder
1. Trek de stekker uit het stopcontact.
2. Verwijder het lampenkapje door het naar
binnen te drukken met bijvoorbeeld een
schroevendraaier om de achterste ha-
ken vrij te geven. Maak tegelijkertijd de
middelste haak los en schuif het kapje in
de richting van de pijl.
3. Vervang het kapotte lampje voor een
nieuwe van hetzelfde type en dezelfde ei-
genschappen speciaal ontwikkeld voor
huishoudelijke apparaten.
4. Plaats het lampenkapje terug.
5. Steek de stekker in het stopcontact.
6. Open de deur. Controleer of het lampje
gaat branden.
electrolux 9

De deur sluiten
1. Maak de afdichtingen van de deur
schoon.
2. Stel de deur, indien nodig, af. Raad-
pleeg "Montage".
3. Vervang, indien nodig, de defecte deur-
afdichtingen. Neem contact met de ser-
vice-afdeling.
TECHNISCHE GEGEVENS
Afmetingen van de uitsparing
Hoogte 1780 mm
Breedte 560 mm
Diepte 550 mm
De technische gegevens staan op het type-
plaatje aan de linker binnenkant in het appa-
raat en op het energielabel.
MONTAGE
Opstelling
Installeer dit apparaat op een plaats waar
de omgevingstemperatuur overeenkomt
met de klimaatklasse die vermeld is op het
typeplaatje van het apparaat:
10 electrolux

Klimaat-
klasse
Omgevingstemperatuur
SN +10°C tot + 32°C
N +16°C tot + 32°C
ST +16°C tot + 38°C
T +16°C tot + 43°C
Elektrische aansluiting
Zorg er vóór het aansluiten voor dat het vol-
tage en de frequentie op het typeplaatje
overeenkomen met de stroomtoevoer in uw
huis.
Het apparaat moet geaard zijn. De netsnoer-
stekker is voorzien van een contact voor dit
doel. Als het stopcontact niet geaard is,
sluit het apparaat dan aan op een afzonder-
lijk aardepunt, in overeenstemming met de
geldende regels, raadpleeg hiervoor een ge-
kwalificeerd elektricien.
De fabrikant neemt geen verantwoordelijk-
heid op zich als de bovenstaande veiligheids-
maatregelen niet worden nageleefd.
Dit apparaat voldoet aan de EU. richtlijnen.
Ventilatievereisten
De luchtstroom achter het apparaat moet
voldoende zijn.
min.
200 cm
2
min.
200 cm
2
Het apparaat installeren
Let op! Zorg ervoor dat het
aansluitsnoer vrij kan bewegen.
Ga als volgt te werk:
1. Bevestig de zelfklevende afdichtstrip op
het apparaat zoals aangegeven op de af-
beelding.
2. Installeer het apparaat in de nis.
3. Bevestig het apparaat met 4 schroeven
in de nis.
electrolux 11

4. Bevestig de afdekking op de schroeven.
Voer een eindcontrole uit en verzeker u er-
van dat:
• Alle schroeven zijn aangedraaid.
• de afdichtingsstrip goed bevestigd is aan
de kast.
• De deur goed open en dicht gaat.
Montage-instructies voor het onderste
gedeelte van de compensator van de
deur
1. Maak de twee schroeven in het onder-
ste gedeelte los zonder deze geheel los
te schroeven, als de deur open staat.
2. Plaats de stalen compensator zoals aan-
gegeven in de afbeelding en plaats het
bovenste gedeelte onder de kop van de
schroeven.
3. Lijn de compensator uit met de stalen
doorpaneel en draai de schroeven vast.
4. Plaats de stalen carter binnenin de com-
pensator zoals aangegeven door de af-
beelding.
HET MILIEU
Het symbool op het product of op de
verpakking wijst erop dat dit product niet
als huishoudafval mag worden behandeld,
maar moet worden afgegeven bij een
12 electrolux

verzamelpunt waar elektrische en
elektronische apparatuur wordt gerecycled.
Als u ervoor zorgt dat dit product op de
juiste manier wordt verwijderd, voorkomt u
mogelijke negatieve gevolgen voor mens en
milieu die zich zouden kunnen voordoen in
geval van verkeerde afvalverwerking. Voor
gedetailleerdere informatie over het
recyclen van dit product, kunt u contact
opnemen met de gemeente, de
gemeentereiniging of de winkel waar u het
product hebt gekocht.
electrolux 13

Electrolux. Thinking of you.
Share more of our thinking at www.electrolux.com
CONTENTS
Safety information 14
Control panel 16
First use 17
Daily use 17
Care and Cleaning 19
What to do if… 20
Technical data 22
Installation 22
Environmental concerns 24
Subject to change without notice
SAFETY INFORMATION
In the interest of your safety and to ensure
the correct use, before installing and first us-
ing the appliance, read this user manual
carefully, including its hints and warnings.
To avoid unnecessary mistakes and acci-
dents, it is important to ensure that all peo-
ple using the appliance are thoroughly famil-
iar with its operation and safety features.
Save these instructions and make sure that
they remain with the appliance if it is moved
or sold, so that everyone using it through its
life will be properly informed on appliance
use and safety.
For the safety of life and property keep the
precautions of these user's instructions as
the manufacturer is not responsible for dam-
ages caused by omission.
Children and vulnerable people safety
• This appliance is not intended for use by
persons (including children) with reduced
physical, sensory or mental capabilities,
or lack of experience and knowledge, un-
less they have been given supervision or
instruction concerning use of the appli-
ance by a person responsible for their
safety.
Children should be supervised to ensure
that they do not play with the appliance.
• Keep all packaging well away from chil-
dren. There is risk of suffocation.
• If you are discarding the appliance pull
the plug out of the socket, cut the con-
nection cable (as close to the appliance
as you can) and remove the door to pre-
vent playing children to suffer electric
shock or to close themselves into it.
• If this appliance featuring magnetic door
seals is to replace an older appliance hav-
ing a spring lock (latch) on the door or lid,
be sure to make that spring lock unusa-
ble before you discard the old appliance.
This will prevent it from becoming a
death trap for a child.
General safety
Caution! Keep ventilation openings
clear of obstruction.
• This appliance is intended to be used ex-
clusively for the storage of wine.
• Do not use a mechanical device or any ar-
tificial means to speed up the thawing
process.
• Do not use other electrical appliances
(such as ice cream makers) inside of re-
frigerating appliances, unless they are ap-
proved for this purpose by the manufac-
turer.
• Do not damage the refrigerant circuit.
• The refrigerant isobutane (R600a) is con-
tained within the refrigerant circuit of the
appliance, a natural gas with a high level
of environmental compatibility, which is
nevertheless flammable.
During transportation and installation of
the appliance, be certain that none of the
components of the refrigerant circuit be-
come damaged.
If the refrigerant circuit should become
damaged:
– avoid open flames and sources of igni-
tion
– thoroughly ventilate the room in which
the appliance is situated
• It is dangerous to alter the specifications
or modify this product in any way. Any
damage to the cord may cause a short-
circuit, fire and/or electric shock.
14 electrolux

Warning! Any electrical component
(power cord, plug, compressor) must
be replaced by a certified service agent
or qualified service personnel.
1. Power cord must not be lengthened.
2. Make sure that the power plug is not
squashed or damaged by the back of
the appliance. A squashed or dam-
aged power plug may overheat and
cause a fire.
3. Make sure that you can come to the
mains plug of the appliance.
4. Do not pull the mains cable.
5. If the power plug socket is loose, do
not insert the power plug. There is a
risk of electric shock or fire.
6. You must not operate the appliance
without the lamp cover
5)
of interior
lighting.
• This appliance is heavy. Care should be
taken when moving it.
• Do not remove nor touch items from the
freezer compartment if your hands are
damp/wet, as this could cause skin abra-
sions or frost/freezer burns.
• Avoid prolonged exposure of the appli-
ance to direct sunlight.
•
Bulb lamps
6)
used in this appliance are
special purpose lamps selected for house-
hold appliances use only. They are not
suitable for household room illumination.
Daily use
• Do not put hot pot on the plastic parts in
the appliance.
• Do not store flammable gas and liquid in
the appliance, because they may explode.
• Appliance's manufacturers storage rec-
ommendations should be strictly adhered
to. Refer to relevant instructions.
Care and cleaning
• Before maintenance, switch off the appli-
ance and disconnect the mains plug from
the mains socket.
• Do not clean the appliance with metal ob-
jects.
• Do not use sharp objects to remove frost
from the appliance. Use a plastic scraper.
• Regularly examine the drain in the refriger-
ator for defrosted water. If necessary,
clean the drain. If the drain is blocked, wa-
ter will collect in the bottom of the appli-
ance.
Installation
Important! For electrical connection
carefully follow the instructions given in
specific paragraphs.
• Unpack the appliance and check if there
are damages on it. Do not connect the ap-
pliance if it is damaged. Report possible
damages immediately to the place you
bought it. In that case retain packing.
• It is advisable to wait at least four hours
before connecting the appliance to allow
the oil to flow back in the compressor.
• Adequate air circulation should be
around the appliance, lacking this leads
to overheating. To achieve sufficient ven-
tilation follow the instructions relevant to
installation.
• Wherever possible the back of the prod-
uct should be against a wall to avoid
touching or catching warm parts (com-
pressor, condenser) to prevent possible
burn.
• The appliance must not be located close
to radiators or cookers.
• Make sure that the mains plug is accessi-
ble after the installation of the appliance.
•
Connect to potable water supply only.
7)
Service
• Any electrical work required to do the serv-
icing of the appliance should be carried
out by a qualified electrician or compe-
tent person.
• This product must be serviced by an au-
thorized Service Centre, and only genu-
ine spare parts must be used.
5) If the lamp cover is foreseen
6) If the lamp is foreseen
7) If a water connection is foreseen
electrolux 15

Environment Protection
This appliance does not contain gasses
which could damage the ozone layer,
in either its refrigerant circuit or insula-
tion materials. The appliance shall not
be discarded together with the urban re-
fuse and rubbish. The insulation foam
contains flammable gases: the appli-
ance shall be disposed according to
the applicable regulations to obtain
from your local authorities. Avoid dam-
aging the cooling unit, especially at the
rear near the heat exchanger. The ma-
terials used on this appliance marked
by the symbol
are recyclable.
CONTROL PANEL
1 2 3 4 5 6
1. ON/OFF switch
2. Bottom compartment temperature regu-
lator
3. Compartment selection button
4. Display
5. Alarm reset switch
Light button
6. Top compartment temperature regulator
Display
1 2 3
1. Selected compartment indicator
2. Positive temperature indicator
3. Temperature indicator
Switching on
After plugging the plug into the power out-
let, if the display is not illuminated, press ON/
OFF switch.
Switching off
The appliance is shut off by pressing ON/
OFF switch for more than 1 second.
After this, a countdown of the temperature
from -3 -2 -1 will be shown.
When the appliance is switched off, Display
also goes off.
Temperature regulation
Select the compartment by pressing the
Compartment selection button.
Set the temperature by turning the knob
(Top or Bottom compartment temperature
setting regulator depending on the compart-
ment to be adjusted).
However, the exact setting should be chos-
en keeping in mind that the temperature in-
side the appliance depends on:
• room temperature
• how often the doors are opened
• the quantity of bottles stored
• the location of the appliance.
Door open alarm
An acoustic alarm will sound when the door
is left open for around 5 minutes. The door
open alarm conditions are indicated by:
• flashing Selected compartment indicator
• red display illumination
• beeping sound.
Press the Alarm reset switch to deactivate
the acoustic alarm.
16 electrolux

When normal conditions are restored (door
closed), the acoustic alarm will stop.
Light button
If you would like the light to remain on, with
the door closed, it is sufficient to open and
close the door and the light will remain ON
automatically for 10 minutes.
If you want to switch off the light before the
automatic turn off time, open the door and
push the Light button.
The light has no negative effect on the qual-
ity on the wine.
FIRST USE
Cleaning the interior
Before using the appliance for the first time,
wash the interior and all internal accesso-
ries with lukewarm water and some neutral
soap so as to remove the typical smell of a
brand-new product, then dry thoroughly.
Important! Do not use detergents or abra-
sive powders, as these will damage the fin-
ish.
DAILY USE
Wine arrangement
Top Compartment:
The temperature can be adjusted between
+6 and + 11°C.This compartment is ideal
for wines, especially new reds and whites,
to be consumed immediately. Operation
compartments with differentiated tempera-
tures.
Bottom Compartment:
The temperature can be adjusted between
+ 12 and + 18°C.This compartment is ideal
for storing and refining red or white wines
for long periods.
The temperatures of this compartment are
suitable for storing aged and full-bodied
wines.
Lay the bottles down in such a way that the
corks do not dry.
Keep the wine in the dark. The door is in anti-
UV darkened double glass to protect the
wine from the light in case the refrigerator is
located in a well-lit place.
Avoid switching the appliance light on too of-
ten or for too long. Wine keeps better in the
dark.
Handle the bottles with care, to avoid agitat-
ing the wine.
Follow the recommendations and advice re-
ceived at the time of purchase or given in
the technical documentation regarding the
quality, duration and optimum storage tem-
perature of the wine.
Storage advice
The storage time for wine depends on age-
ing, the type of grapes, alcoholic content
and level of fructose and tannin contained
in it.At the time of purchase, check if the
wine is already aged or if it will improve over
time.
Recommended storage temperatures:
• For champagne and sparkling wines, be-
tween 6 and 8°C
• For white wines, between 10 and 12°C
• For rose’ and light red wines, between 12
and 16°C
• Aged red wines, 14 -16°C
When placing various bottles on top of
each other, make sure they do not touch
the refrigerator cooling plate.
electrolux 17

Wine Cellar shelves
The shelves can be removed for cleaning.
Wine Cellar Bottle Holder
Remove the shelf and insert it between the
two guides.
The maximum possible weight on the bottle
shelves is 30 kg.
The shelf can be arranged between guides
100 mm apart to favour display of the bottles.
The bottom compartment is arranged with
a sliding drawer to be used for placing the
bottles upright.
The drawer has two dividers that adapt to
bottles of different diameters.
Humidifier
The right humidity is vitally important for the
proper storage of wine.
Your Wine Cellar is fitted with a special hu-
midifying device that increases the humidity
inside the appliance.
Spread out the lava stones provided along
the small tray as show in the picture. Then
fill the tray with water up to the half of its ca-
pacity.
In normal operation, the lava stones are reg-
ularly humidified by the water, periodically
check at water present inside the tray and
refill it when needed.
Note that if the humidity in the area in which
your appliance is installed is particularly
high, the interior of your Wine Cellar will also
be relatively more humid.
This may result in bottles misting up when
the door is opened or labels peeling off. In
this case reduce the quantity of water in the
tray accordingly.
18 electrolux

Air circulation
The refrigerator compartment has a special
AIRLIGHT fan which is automatically activa-
ted in function of the appliance thermostat
setting and ambient conditions.
CARE AND CLEANING
Caution! Unplug the appliance before
carrying out any maintenance operation.
This appliance contains hydrocarbons
in its cooling unit; maintenance and re-
charging must therefore only be carried
out by authorized technicians.
Periodic cleaning
The equipment has to be cleaned regularly:
• clean the inside and accessories with luke-
warm water and some neutral soap.
• regularly check the door seals and wipe
clean to ensure they are clean and free
from debris.
• rinse and dry thoroughly.
Important! Do not pull, move or damage
any pipes and/or cables inside the cabinet.
Never use detergents, abrasive powders,
highly perfumed cleaning products or wax
polishes to clean the interior as this will dam-
age the surface and leave a strong odour.
Clean the condenser (black grill) and the
compressor at the back of the appliance
with a brush or a vacuum cleaner. This op-
eration will improve the performance of the
appliance and save electricity consumption.
Important! Take care of not to damage the
cooling system.
Many proprietary kitchen surface cleaners
contain chemicals that can attack/damage
the plastics used in this appliance. For this
reason it is recommended that the outer cas-
ing of this appliance is only cleaned with
warm water with a little washing-up liquid
added.
After cleaning, reconnect the equipment to
the mains supply.
Defrosting
Frost is automatically eliminated from the
evaporator every time the motor compres-
sor stops, during normal use. The defrost
water drains out through a trough into a spe-
cial container at the back of the appliance,
over the motor compressor, where it evapo-
rates.
It is important to periodically clean the de-
frost water drain hole in the middle of the ap-
pliance channel to prevent the water over-
flowing and dripping inside. Use the special
cleaner provided, which you will find already
inserted into the drain hole.
electrolux 19

Periods of non-operation
When the appliance is not in use for long pe-
riods, take the following precautions:
• disconnect the appliance from elec-
tricity supply
•
defrost
8)
and clean the appliance and all
accessories
• leave the door/doors ajar to prevent un-
pleasant smells.
If the cabinet will be kept on, ask some-
body to check it once in a while to prevent
the food inside from spoiling in case of a
power failure.
WHAT TO DO IF…
Warning! Before troubleshooting,
disconnect the mains plug from the
mains socket.
Only a qualified electrician or compe-
tent person must do the troubleshoot-
ing that is not in this manual.
Important! There are some sounds during
normal use (compressor, refrigerant
circulation).
Problem Possible cause Solution
The appliance is noisy The appliance is not supported
properly
Check if the appliance stands sta-
ble (all the four feet should be on
the floor)
The buzzer sounds. The
Display is red.
The door is not closed correctly. Refer to "Door open alarm".
The appliance does not
operate. The lamp does
not operate.
The appliance is switched off. Switch on the appliance.
The mains plug is not connected
to the mains socket correctly.
Connect the mains plug to the
mains socket correctly.
The appliance has no power.
There is no voltage in the mains
socket.
Connect a different electrical appli-
ance to the mains socket.
Contact a qualified electrician.
The lamp does not work. The lamp is in stand-by. Close and open the door.
The lamp is defective. Refer to "Replacing the lamp".
The compressor oper-
ates continually.
The temperature is not set cor-
rectly.
Set a higher temperature.
The door is not closed correctly. Refer to "Closing the door".
The door has been opened too
frequently.
Do not keep the door open longer
than necessary.
The room temperature is too
high.
Decrease the room temperature.
8) If foreseen.
20 electrolux

Problem Possible cause Solution
Water flows on the rear
plate of the refrigerator.
During the automatic defrosting
process, frost defrosts on the
rear plate.
This is correct.
Water flows into the re-
frigerator.
The water outlet is clogged. Clean the water outlet.
Products prevent that water
flows into the water collector.
Make sure that products do not
touch the rear plate.
The temperature in the
appliance is too low/high.
The temperature regulator is not
set correctly.
Set a higher/lower temperature.
The door is not closed correctly. Refer to "Closing the door".
Many products are stored at the
same time.
Store less products at the same
time.
The temperature in the
appliance is too high.
There is no cold air circulation in
the appliance.
Make sure that there is cold air cir-
culation in the appliance.
Replacing the lamp Wine Cellar
1. Disconnect the mains plug from the
mains socket.
2. Remove the lamp cover by pressing it in-
wards with a tool (e.g. screwdriver) to
free the rear side hookings. At the same
time, free the middle hook and slide off
the cover in the direction of the arrows.
3. Replace the used lamp with a new lamp
of the same type and specifically de-
signed for household appliances and
having the same characteristics.
4. Install the lamp cover.
5. Connect the mains plug to the mains
socket.
6. Open the door. Make sure that the lamp
comes on.
Closing the door
1. Clean the door gaskets.
2. If necessary, adjust the door. Refer to "In-
stallation".
electrolux 21

3. If necessary, replace the defective door
gaskets. Contact the Service Center.
TECHNICAL DATA
Dimension of the recess
Height 1780 mm
Width 560 mm
Depth 550 mm
The technical information are situated in the
rating plate on the internal left side of the ap-
pliance and in the energy label.
INSTALLATION
Positioning
Install this appliance at a location where the
ambient temperature corresponds to the cli-
mate class indicated on the rating plate of
the appliance:
Climate
class
Ambient temperature
SN +10°C to + 32°C
N +16°C to + 32°C
ST +16°C to + 38°C
T +16°C to + 43°C
Electrical connection
Before plugging in, ensure that the voltage
and frequency shown on the rating plate cor-
respond to your domestic power supply.
The appliance must be earthed. The power
supply cable plug is provided with a contact
for this purpose. If the domestic power sup-
ply socket is not earthed, connect the appli-
ance to a separate earth in compliance with
current regulations, consulting a qualified
electrician.
The manufacturer declines all responsibility
if the above safety precautions are not ob-
served.
This appliance complies with the E.E.C. Di-
rectives.
Ventilation requirements
The airflow behind the appliance must be
sufficient.
min.
200 cm
2
min.
200 cm
2
Installing the appliance
Caution! Make sure that the mains
cable can move freely.
Do the following steps:
1. Apply the adhesive sealing strip to the
appliance as shown in figure.
22 electrolux

2. Install the appliance in the niche.
3. Attach the appliance to the niche with 4
screws.
4. Fix the covers on the screws.
Do a final check to make sure that:
• All screws are tightened.
• The sealing strip is attached tightly to the
cabinet.
• The door opens and closes correctly.
Assembly instructions for the
compensator lower part of the door
1. With the door open, loosen the two
screws situated in the lower part without
unscrewing them completely.
electrolux 23

2. Position the steel compensator as indi-
cated in the figure and insert the upper
part under the head of the screws.
3. Align the compensator with the steel
door panel and tighten the screws.
4. Insert the steel carter inside the compen-
sator as indicated in the figure.
ENVIRONMENTAL CONCERNS
The symbol on the product or on its
packaging indicates that this product may
not be treated as household waste. Instead
it should be taken to the appropriate
collection point for the recycling of electrical
and electronic equipment. By ensuring this
product is disposed of correctly, you will
help prevent potential negative
consequences for the environment and
human health, which could otherwise be
caused by inappropriate waste handling of
this product. For more detailed information
about recycling of this product, please
contact your local council, your household
waste disposal service or the shop where
you purchased the product.
24 electrolux

Electrolux. Thinking of you.
Per conoscere meglio il nostro modo di pensare, visitate il
sito www.electrolux.com
INDICE
Informazioni per la sicurezza 25
Pannello dei comandi 27
Primo utilizzo 28
Utilizzo quotidiano 28
Pulizia e cura 30
Cosa fare se… 31
Dati tecnici 33
Installazione 33
Considerazioni ambientali 36
Con riserva di modifiche
INFORMAZIONI PER LA SICUREZZA
Per garantire un impiego corretto e sicuro
dell'apparecchio, prima dell'installazione e
del primo utilizzo leggere con attenzione il li-
bretto istruzioni, inclusi i suggerimenti e le
avvertenze. Per evitare errori e incidenti, è
importante garantire che tutte le persone
che utilizzano l'apparecchio ne conoscano il
funzionamento e le caratteristiche di sicurez-
za. Conservare queste istruzioni e accertar-
si che rimangano unite all'apparecchio in ca-
so di vendita o trasloco, in modo che chiun-
que lo utilizzi sia correttamente informato sul-
l'uso e sulle norme di sicurezza.
Per la sicurezza delle persone e delle cose
osservare le precauzioni indicate nelle pre-
senti istruzioni per l'utente, il produttore non
è responsabile dei danni provocati da even-
tuali omissioni.
Sicurezza dei bambini e delle persone
fragili
• Questo apparecchio non deve essere usa-
to da persone, bambini inclusi, con ridot-
te capacità fisiche, sensoriali o psichiche,
oppure prive di conoscenza e esperien-
za, a meno che non siano state istruite al-
l'uso dell'apparecchio da parte dei re-
sponsabili della loro sicurezza, oppure sot-
to vigilanza di questi.
I bambini devono essere sorvegliati per as-
sicurarsi che non giochino con l'apparec-
chio.
• Tenere i materiali di imballaggio al di fuori
della portata dei bambini. Alcuni materiali
possono creare rischi di soffocamento.
• Qualora l'apparecchio venga demolito,
estrarre la spina dalla presa, tagliare il ca-
vo di collegamento (il più vicino possibile
all'apparecchio) e smontare lo sportello
per evitare che i bambini giocando possa-
no subire scosse elettriche o chiudersi
dentro l'apparecchio.
• Se questo nuovo apparecchio, che è do-
tato di guarnizioni magnetiche nello spor-
tello, va a sostituirne uno più vecchio aven-
te sportello o coperchio con chiusure a
molla, si deve rendere inutilizzabili tali chiu-
sure prima di eliminare l'apparecchio so-
stituito, per evitare che diventi una trappo-
la mortale per i bambini.
Norme di sicurezza generali
Attenzione Accertarsi che le aperture
di ventilazione non siano ostruite.
• Questo apparecchiatura è destinato
esclusivamente alla conservazione del vi-
no.
• Non utilizzare dispositivi meccanici o altri
mezzi artificiali per accelerare lo sbrina-
mento.
• Non utilizzare altri apparecchi elettrici (per
esempio gelatiere) all'interno del frigorife-
ro, salvo quelli approvati per tale scopo
dal produttore.
• Non danneggiare il circuito refrigerante.
• Il circuito refrigerante dell'apparecchiatu-
ra contiene isobutano (R600a), un gas na-
turale con un elevato livello di compatibili-
tà ambientale che, tuttavia, è infiammabile.
Durante il trasporto e l'installazione del-
l'apparecchiatura, assicurarsi che nessu-
no dei componenti del circuito refrigeran-
te venga danneggiato.
electrolux 25

In caso di danneggiamento del circuito re-
frigerante:
– evitare fiamme libere e scintille
– aerare bene il locale in cui si trova l'ap-
parecchiatura
• È pericoloso cambiare le specifiche o mo-
dificare il prodotto in qualunque modo.
Un danneggiamento del cavo potrebbe
provocare cortocircuiti, incendi e/o scos-
se elettriche.
Avvertenza Tutti i componenti elettrici
(cavo di alimentazione, spina, compres-
sore) devono essere sostituiti da un tec-
nico certificato o da personale d'assi-
stenza qualificato.
1. Non collegare prolunghe al cavo di ali-
mentazione.
2. Evitare che il lato posteriore dell'appa-
recchiatura possa schiacciare o dan-
neggiare la spina causandone il surri-
scaldamento con un conseguente ri-
schio di incendio.
3. La spina dell'apparecchiatura deve tro-
varsi in una posizione accessibile.
4. Evitare di tirare il cavo di alimentazione.
5. Se la presa elettrica non è perfetta-
mente stabile, non inserire la spina. Il
collegamento potrebbe provocare
scosse elettriche o creare un rischio
di incendio.
6. Non accendere l’apparecchiatura se
non è installato il coprilampada
9)
della
luce interna.
• Questo apparecchio è pesante. Prestare
attenzione quando occorre spostarlo.
• Evitare di estrarre o di toccare gli alimenti
riposti nel vano congelatore con le mani
bagnate o umide; il contatto potrebbe pro-
vocare abrasioni o ustioni da freddo.
• Evitare un'esposizione prolungata dell'ap-
parecchiatura alla luce solare diretta.
•
Lampadine
10)
utilizzate in questo appa-
recchio sono lampadine speciali, selezio-
nate per essere usate unicamente negli
elettrodomestici. Non sono adatte per l'il-
luminazione degli ambienti.
Uso normale
• Non appoggiare pentole calde sulle parti
in plastica dell'apparecchiatura.
• Non riporre gas o liquidi infiammabili nel-
l'apparecchio: i contenitori potrebbero
esplodere.
• Osservare rigorosamente le raccomanda-
zioni del produttore riguardo alla conser-
vazione degli alimenti. Leggere attenta-
mente le relative istruzioni.
Pulizia e cura
• Prima della manutenzione, spegnere l'ap-
parecchio e staccare la spina dalla presa.
• Non pulire l'apparecchio con oggetti me-
tallici.
• Non usare oggetti appuntiti per rimuovere
la brina dall'apparecchio. Usare un ra-
schietto di plastica.
• Esaminare regolarmente il foro di scarico
dell'acqua di sbrinamento nel frigorifero.
Se necessario, pulirlo. Se il foro è ottura-
to, l'acqua si raccoglie sul fondo dell'ap-
parecchio.
Installazione
Importante Per il collegamento elettrico,
seguire attentamente le istruzioni dei
paragrafi corrispondenti.
• Disimballare l'apparecchio e assicurarsi
che non presenti danni. Non collegare
l'apparecchio se è danneggiato. Segnala-
re immediatamente gli eventuali danni al
negozio in cui è stato acquistato. In que-
sto caso conservare l'imballaggio.
• Si consiglia di attendere almeno due ore
prima di collegare l'apparecchio per con-
sentire all'olio di arrivare nel compressore.
• Attorno all'apparecchio vi deve essere
un'adeguata circolazione dell'aria, altri-
menti si può surriscaldare. Per ottenere
una ventilazione sufficiente seguire le istru-
zioni di installazione.
• Se possibile il retro dell'apparecchio do-
vrebbe essere posizionato contro una pa-
rete per evitare di toccare le parti calde o
di rimanervi impigliati (compressore, con-
densatore), evitando così possibili scotta-
ture.
• L'apparecchio non deve essere posto vi-
cino a radiatori o piani di cottura a gas.
• Installare l'apparecchio in modo che la
presa rimanga accessibile.
9) Per le apparecchiature che prevedono il coprilampada
10) Le lampadine
26 electrolux

• Per il collegamento idrico, usare solo sor-
genti d'acqua potabile.
11)
Assistenza tecnica
• Gli interventi elettrici sull'apparecchiatura
devono essere eseguiti esclusivamente
da elettricisti qualificati o da personale
competente.
• Gli interventi di assistenza devono essere
eseguiti esclusivamente da tecnici autoriz-
zati e utilizzando solo ricambi originali.
Tutela ambientale
Questo apparecchio non contiene gas
che potrebbero danneggiare lo strato
di ozono nel circuito refrigerante o nei
materiali isolanti. L'apparecchio non de-
ve essere smaltito assieme ai rifiuti ur-
bani e alla spazzatura. La schiuma del-
l'isolamento contiene gas infiammabili:
lo smaltimento dell'apparecchio va ese-
guito secondo le prescrizioni vigenti da
richiedere alle autorità locali. Evitare di
danneggiare il gruppo refrigerante, spe-
cialmente nella parte posteriore vicino
allo scambiatore di calore. I materiali
usati su questo apparecchio contrasse-
gnati dal simbolo
sono riciclabili.
PANNELLO DEI COMANDI
1 2 3 4 5 6
1. Tasto ON/OFF
2. Regolatore temperatura del vano inferiore
3. Tasto Selezione vano
4. Display
5. Tasto di reset allarme
Tasto accensione luce
6. Regolatore temperatura del vano supe-
riore
Display
1 2 3
1. Indicatore del vano selezionato
2. Indicatore della temperatura positiva
3. Indicatore della temperatura
Accensione
Se, dopo aver inserito la spina nella presa, il
display non si illumina, premere il tasto ON/
OFF.
Spegnimento
L'apparecchiatura si spegne se si preme il
tasto ON/OFF per più di 1 secondo.
Viene, quindi, visualizzato un conto alla ro-
vescia (-3 -2 -1) della temperatura.
Quando si spegne l'apparecchiatura, si spe-
gne anche il display.
Regolazione della temperatura
Selezionare il vano premendo il relativo pul-
sante di selezione.
Impostare la temperatura ruotando la mano-
pola (il regolatore dell'impostazione della
temperatura relativa al vano superiore o infe-
riore a seconda del vano da regolare).
11) Per gli apparecchi che prevedono un collegamento alla rete idrica
electrolux 27

Tuttavia, è importante ricordare che la tem-
peratura all'interno dell'apparecchiatura di-
pende dai seguenti fattori:
• temperatura ambiente;
• frequenza di apertura delle porte;
• quantità di bottiglie conservate;
• ubicazione dell'apparecchiatura.
Allarme porta aperta
Se la porta è lasciata aperta per circa 5 mi-
nuti, viene emesso un segnale acustico. Le
condizioni di allarme della porta aperta so-
no indicate da:
• indicatore del vano selezionato lampeg-
giante;
• illuminazione rossa del display;
• segnale acustico.
Premere l'interruttore di disattivazione del-
l'allarme per disattivare l'allarme acustico.
Quando vengono ripristinate le condizioni
normali (sportello chiuso), l'allarme acustico
si interrompe.
Tasto spia
Se si desidera che la spia rimanga accesa
quando la porta è chiusa, è sufficiente apri-
re e chiudere lo sportello: la spia rimane au-
tomaticamente accesa per 10 minuti.
Se si desidera spegnere la spia prima dello
spegnimento automatico, aprire la porta e
premere il tasto spia.
La luce della spia non ha effetti negativi sul-
la qualità del vino.
PRIMO UTILIZZO
Pulizia dell'interno
Prima di utilizzare l'apparecchio per la pri-
ma volta, lavare l'interno e gli accessori in-
terni con acqua tiepida e un po' di sapone
neutro in modo a togliere il tipico odore dei
prodotti nuovi, quindi asciugare accurata-
mente.
Importante Non usare detergenti corrosivi
o polveri abrasive che danneggiano le finitu-
re.
UTILIZZO QUOTIDIANO
Disposizione del vino
Vano Superiore:
La temperatura è regolabile tra +6 e +11°C.
Questo vano è ideale per i vini da bere subi-
to, soprattutto bianchi o rossi giovani. Il va-
no è diviso in due comparti a temperature
differenziate.
Vano Inferiore:
La temperatura è regolabile tra +12 e
+18°C. Questo vano è ideale per la conser-
vazione e l’affinamento dei vini rossi o bian-
chi per periodi lunghi.
Le temperature di questo comparto sono
idonee per la conservazione di vini invecchia-
ti e corposi
Coricare le bottiglie in modo che i tappi non
si secchino.
Conservare il vino al buio. La porta è in dop-
pio vetro offuscato e anti UV per proteggere
il vino dalla luce nel caso in cui il frigorifero
si trovi in un luogo molto illuminato.
Evitare di accendere troppo spesso o per
troppo tempo la luce dell’apparecchitura. Il
vino si conserva meglio al buio.
Maneggiare le bottiglie con cura per evitare
di agitare il vino.
Fare attenzione alle raccomandazioni e ai
consigli ricevuti al momento dell'acquisto o
riportati nella documentazione tecnica relati-
va alla qualità, alla durata e alla temperatura
ottimale di conservazione del vino.
Suggerimenti di conservazione
Il tempo di conservazione del vino dipende
dall'invecchiamento, dal tipo d'uva, dal con-
28 electrolux

tenuto alcolico e dal livello di fruttosio e tan-
nino in esso contenuti. Al momento dell'ac-
quisto, controllare se il vino è già invecchia-
to o se migliorerà col passare del tempo.
Temperature di conservazione consi-
gliate:
• per champagne e vini frizzanti dai 6 agli
8°C
• per vini bianchi dai 10 ai 12°C
• per vini rosé e rossi leggeri dai 12 ai 16°C
• vini rossi stagionati 14 -16°C
Se si impilano diverse bottiglie una sull'altra,
assicurarsi che queste non tocchino la pia-
stra di raffreddamento del frigorifero.
Ripiani della cantinetta frigo
I ripiani possono essere rimossi per la pulizia.
Portabottiglie per cantinetta frigo
Estrarre il ripiano ed inserirlo tra le due guide.
Sulle mensole portabottiglie il peso massi-
mo possibile è di 30 Kg
E’ possibile disporre il ripiano tra guide di-
stanti 100 mm per favorire l’esposizione del-
le bottiglie
Il comparto inferiore e’ predisposto con un
cassetto scorrevole da utilizzare per dispor-
re le bottiglie in verticale.
Il cassetto e’ provvisto di due separatori
che si adattano a bottiglie con diametri di-
versi
Umidificatore
Per una corretta conservazione del vino è
fondamentale rispettare il giusto livello di umi-
dità.
La cantinetta frigo è corredata di uno spe-
ciale dispositivo umidificatore che fa aumen-
tare l'umidità all'interno dell'apparecchiatura.
Distribuire le pietre laviche fornite insieme al
piccolo vassoio come illustrato nella figura.
Quindi riempire il vassoio di acqua fino a me-
tà della sua capacità.
In condizioni di funzionamento normali, le
pietre laviche vengono regolarmente umidifi-
cate dall'acqua, accertarsi periodicamente
della presenza di acqua nel vassoi e rabboc-
care quando necessario.
Nota bene: qualora l'umidità nella zona di in-
stallazione dell'apparecchiatura fosse parti-
colarmente elevata, l'interno della cantinetta
frigo potrebbe risultare relativamente più
umido.
electrolux 29

Questa condizione potrebbe provocare un
appannamento delle bottiglie quando si
apre lo sportello oppure il distacco delle eti-
chette. In tal caso, ridurre di conseguenza
la quantità di acqua nel vassoio.
Ricircolo dell'aria
Il vano frigorifero è dotato di una speciale
ventola AIRLIGHT che si attiva automatica-
mente in base alla regolazione del termosta-
to e alle condizioni ambientali.
PULIZIA E CURA
Attenzione Staccare la spina
dell'apparecchio prima di eseguire
lavori di manutenzione.
Questo apparecchio contiene idrocar-
buri nell'unità di raffreddamento; la ma-
nutenzione e la ricarica devono pertan-
to essere effettuate esclusivamente da
tecnici autorizzati.
Pulizia periodica
L'apparecchio deve essere pulito regolar-
mente:
• pulire l'interno e gli accessori con acqua
tiepida e un po' di sapone neutro.
• controllare regolarmente le guarnizioni del-
la porta e verificare che siano pulite e pri-
ve di residui.
• risciacquare e asciugare accuratamente.
Importante Non tirare, spostare o
danneggiare tubi e/o cavi all'interno
dell'apparecchio.
Non usare mai detergenti, polveri abrasive,
prodotti per la pulizia con una forte profuma-
zione o cere lucidanti per pulire l'interno, in
quanto danneggiano la superficie e lasciano
un odore forte.
Pulire il condensatore (griglia nera) e il com-
pressore sul retro con una spazzola o un
aspirapolvere. Questa operazione migliorerà
le prestazioni dell'apparecchio riducendo i
consumi elettrici.
Importante Non danneggiare il sistema di
raffreddamento.
Molti detergenti per cucine di marca conten-
gono sostanze chimiche in grado di attacca-
re/danneggiare la plastica impiegata in que-
sto apparecchio. Per questo motivo si rac-
comanda di pulire l'involucro esterno dell'ap-
parecchio solo con acqua calda con un po'
di liquido detergente.
Dopo la pulizia, ricollegare l'apparecchio al-
la rete di alimentazione.
Sbrinamento
Durante il normale utilizzo, la brina viene eli-
minata automaticamente dall'evaporatore
ogni volta che il motocompressore si arre-
sta L'acqua di sbrinamento giunge attraver-
so un condotto in un apposito recipiente po-
sto sul retro dell'apparecchiatura, sopra il
motocompressore, dove evapora.
È importante pulire periodicamente il foro di
scarico dell'acqua di sbrinamento, situato al
30 electrolux

centro dell'apparecchiatura, per evitare fuo-
riuscite e gocciolamenti di acqua. Usare l'ap-
posito utensile già inserito nel foro di scarico
Periodi di inutilizzo
Se l'apparecchiatura non viene utilizzata per
un lungo periodo, adottare le seguenti pre-
cauzioni:
• scollegare l'apparecchiatura dalla re-
te elettrica;
•
sbrinare
12)
e pulire l'apparecchiatura e tut-
ti gli accessori;
• lasciare la porta o le porte socchiuse per
evitare la formazione di odori sgradevoli.
Se l'apparecchiatura rimane accesa, farla
controllare periodicamente per evitare che
gli alimenti si deteriorino in caso di interruzio-
ne della corrente elettrica.
COSA FARE SE…
Avvertenza Prima di eseguire la
ricerca guasti, estrarre la spina dalla
presa di alimentazione.
Le operazioni di ricerca guasti non de-
scritte nel presente manuale devono es-
sere eseguite esclusivamente da elettri-
cisti qualificati o da personale compe-
tente.
Importante Durante l'uso alcuni rumori di
funzionamento (come quelli del
compressore o del circuito refrigerante)
sono da considerarsi normali.
Problema Possibile causa Soluzione
L'apparecchiatura è ru-
morosa.
L'apparecchiatura non è appog-
giata in modo corretto.
Controllare che l'apparecchiatura
sia appoggiata in modo stabile (tut-
ti i quattro piedini devono essere
a contatto con il pavimento).
Viene emesso un segnale
acustico. L'illuminazione
del display diventa rossa.
La porta non è chiusa corretta-
mente.
Fare riferimento alla sezione "Allar-
me porta aperta".
L'apparecchiatura non
funziona. La lampadina
non si accende.
L'apparecchiatura è spenta. Accendere l’apparecchiatura.
La spina non è inserita corretta-
mente nella presa di alimentazio-
ne.
Inserire correttamente la spina nel-
la presa di alimentazione.
L'apparecchiatura non riceve
corrente. Assenza di tensione
nella presa di alimentazione.
Collegare alla presa di alimentazio-
ne un'altra apparecchiatura elettri-
ca.
Rivolgersi a un elettricista qualifica-
to.
12) Nei modelli in cui la funzione è prevista.
electrolux 31

Problema Possibile causa Soluzione
La lampadina non si ac-
cende.
La lampadina è in modalità stand-
by.
Chiudere e riaprire lo sportello.
La lampadina è difettosa. Fare riferimento alla sezione "So-
stituzione della lampadina".
Il compressore rimane
sempre in funzione.
La temperatura non è impostata
correttamente.
Impostare una temperatura supe-
riore.
La porta non è chiusa corretta-
mente.
Fare riferimento alla sezione "Chiu-
sura della porta".
La porta viene aperta troppo fre-
quentemente.
Limitare il più possibile il tempo di
apertura della porta.
La temperatura ambiente è trop-
po alta
Abbassare la temperatura ambien-
te
Sul pannello posteriore
del frigorifero scorre ac-
qua.
Durante lo sbrinamento automa-
tico, la brina che si forma sul pan-
nello posteriore si scioglie.
Non si tratta di un'anomalia.
All'interno del frigorifero
scorre acqua.
Lo scarico dell'acqua è ostruito. Pulire lo scarico dell'acqua.
Gli alimenti impediscono all'ac-
qua di fluire nell'apposito collet-
tore.
Evitare di disporre gli alimenti a di-
retto contatto con il pannello po-
steriore.
La temperatura all'inter-
no dell'apparecchiatura è
troppo bassa/alta.
Il regolatore della temperatura
non è impostato correttamente.
Impostare una temperatura supe-
riore/inferiore.
La porta non è chiusa corretta-
mente.
Fare riferimento alla sezione "Chiu-
sura della porta".
Sono stati introdotti molti alimen-
ti contemporaneamente.
Introdurre gli alimenti poco alla vol-
ta.
La temperatura all'inter-
no dell'apparecchiatura è
troppo alta.
L'aria fredda non circola corretta-
mente all'interno dell'apparec-
chiatura.
Adottare le misure necessarie per
garantire una corretta circolazione
dell'aria fredda.
Sostituzione della lampadina nel vano
cantina
1. Estrarre la spina dalla presa di corrente.
2. Togliere il coprilampada premendolo ver-
so l'interno con un attrezzo (per esem-
pio un cacciavite) in modo da liberare i
ganci posteriori e contemporaneamente
liberare il gancio centrale e sfilare il co-
perchio nella direzione delle frecce.
3. Sostituire la lampadina con una nuova
dello stesso tipo, specificatamente pro-
gettata per gli elettrodomestici e avente
le stesse caratteristiche.
4. Installare il coprilampada.
5. Inserire la spina nella presa.
6. Aprire la porta. Controllare che la lampa-
dina si accenda.
32 electrolux

Chiusura della porta
1. Pulire le guarnizioni della porta.
2. Se necessario, regolare la porta. Vedere
"Installazione".
3. Se necessario, sostituire le guarnizioni
della porta difettose. Contattare il Cen-
tro di assistenza locale.
DATI TECNICI
Nicchia di incasso
Altezza 1780 mm
Larghezza 560 mm
Profondità 550 mm
Le informazioni tecniche sono riportate sulla
targhetta sul lato sinistro interno dell'appa-
recchio e sull'etichetta dei valori energetici.
INSTALLAZIONE
Posizionamento
Installare questo apparecchio in un punto in
cui la temperatura ambiente corrisponda al-
la classe climatica indicata sulla sua targhet-
ta:
electrolux 33

Classe
climati-
ca
Temperatura ambiente
SN da + 10°C a + 32°C
N da + 16°C a + 32°C
ST da + 16°C a + 38°C
T da + 16°C a + 43°C
Collegamento elettrico
Prima di inserire la spina, verificare che la
tensione e la frequenza riportate sulla tar-
ghetta corrispondano ai valori della rete elet-
trica domestica.
L'apparecchio deve essere collegato a mas-
sa. La spina del cavo di alimentazione è do-
tata di un contatto a tale scopo. Se la presa
della rete elettrica domestica non è collega-
ta a massa, collegare l'apparecchio ad una
massa separata in conformità alle norme re-
lative alla corrente, consultando un elettrici-
sta qualificato.
Il fabbricante declina qualsiasi responsabili-
tà se le precauzioni suddette non sono ri-
spettate.
Il presente apparecchio è conforme alle di-
rettive CEE.
Requisiti di ventilazione
Il flusso d'aria dietro l'apparecchio deve es-
sere sufficiente.
min.
200 cm
2
min.
200 cm
2
Installazione dell'apparecchiatura
Attenzione Accertarsi che il cavo di
rete sia libero da ostacoli.
Eseguire le seguenti operazioni:
1. Applicare la striscia sigillante adesiva al-
l'apparecchiatura come mostrato nella fi-
gura.
2. Installare l'apparecchiatura nella nicchia.
3. Fissare l'apparecchiatura nella nicchia
con 4 viti.
34 electrolux

4. Fissare i coprivite.
Effettuare un controllo finale per verificare
che:
• tutte le viti siano serrate;
• la striscia sigillante sia fissata saldamente
all'unità;
• la porta si apra e si chiuda correttamente.
Istruzioni per l'assemblaggio della
parte inferiore della porta del
compensatore
1. Con la porta aperta, allentare le due viti
situate nella parte inferiore senza svitarle
completamente.
2. Posizionare il compensatore in acciaio
come indicato nella figura e inserire la
parte superiore sotto la testa delle viti.
3. Allineare il compensatore al pannello in
acciaio dello sportello e serrare le viti.
4. Inserire il carter in acciaio all'interno del
compensatore come indicato nella figura.
electrolux 35

CONSIDERAZIONI AMBIENTALI
Il simbolo sul prodotto o sulla
confezione indica che il prodotto non deve
essere considerato come un normale rifiuto
domestico, ma deve essere portato nel
punto di raccolta appropriato per il
riciclaggio di apparecchiature elettriche ed
elettroniche. Provvedendo a smaltire questo
prodotto in modo appropriato, si
contribuisce a evitare potenziali
conseguenze negative per l’ambiente e per
la salute, che potrebbero derivare da uno
smaltimento inadeguato del prodotto. Per
informazioni più dettagliate sul riciclaggio di
questo prodotto, contattare l’ufficio
comunale, il servizio locale di smaltimento
rifiuti o il negozio in cui è stato acquistato il
prodotto.
36 electrolux

Electrolux. Thinking of you.
Conozca mejor nuestros conceptos en www.electrolux.com
ÍNDICE DE MATERIAS
Información sobre seguridad 37
Panel de mandos 39
Primer uso 40
Uso diario 40
Mantenimiento y limpieza 42
Qué hacer si… 43
Datos técnicos 45
Instalación 46
Aspectos medioambientales 48
Salvo modificaciones
INFORMACIÓN SOBRE SEGURIDAD
Por su seguridad y para garantizar el funcio-
namiento correcto del aparato, antes de ins-
talarlo y utilizarlo por primera vez lea atenta-
mente este manual del usuario, incluidos
los consejos y advertencias. Para evitar erro-
res y accidentes, es importante que todas
las personas que utilicen el aparato estén
perfectamente al tanto de su funcionamien-
to y de las características de seguridad. Con-
serve estas instrucciones y no olvide mante-
nerlas junto al aparato en caso de su des-
plazamiento o venta para que quienes lo uti-
licen a lo largo de su vida útil dispongan
siempre de la información adecuada sobre
el uso y la seguridad.
Por la seguridad de personas y bienes, siga
las normas de seguridad indicadas en estas
instrucciones, ya que el fabricante no se ha-
ce responsable de daños provocados por
omisiones.
Seguridad de niños y personas
vulnerables
• Este electrodoméstico no está diseñado
para que lo usen personas (incluidos ni-
ños) con discapacidad física, sensorial o
mental, o con experiencia y conocimiento
insuficientes, a menos que una persona
responsable de su seguridad les supervi-
se o instruya en el uso del electrodomés-
tico.
No permita que los niños jueguen con el
electrodoméstico.
• Mantenga los materiales de embalaje ale-
jados de los niños. Existe riesgo de asfixia.
• Si va a desechar el aparato, extraiga el en-
chufe de la toma, corte el cable de cone-
xión (tan cerca del aparato como pueda)
y retire la puerta para impedir que los ni-
ños al jugar puedan sufrir descargas eléc-
tricas o quedar atrapados en su interior.
• Si este aparato, que cuenta con juntas
de puerta magnéticas, sustituirá a un apa-
rato más antiguo con cierre de muelle
(pestillo) en la puerta, cerciórese de inutili-
zar el cierre de muelle antes de desechar
el aparato antiguo. Evitará así que se con-
vierta en una trampa mortal para niños.
Instrucciones generales de seguridad
Precaución Mantenga las aberturas
de ventilación sin obstrucciones.
• Este aparato se debe utilizar exclusiva-
mente para almacenar vino.
• No utilice dispositivos mecánicos ni me-
dios artificiales para acelerar el proceso
de descongelación.
• No utilice otros aparatos eléctricos (como
máquinas para hacer helados) dentro de
aparatos de refrigeración, a menos que el
fabricante haya autorizado su utilización
para estos fines.
• No dañe el circuito de refrigeración.
• El circuito de refrigeración del aparato
contiene isobutano (R600a). Se trata de
un gas natural con un alto nivel de com-
patibilidad medioambiental, aunque es in-
flamable.
Durante el transporte y la instalación del
aparato, cerciórese de que ninguno de
los componentes del circuito de refrigera-
ción sufra daños.
Si el circuito de refrigeración resulta daña-
do:
electrolux 37

– mantenga el aparato alejado de las lla-
mas y de cualquier fuente de combus-
tión
– ventile bien la habitación en la que se
encuentra el aparato
• Es peligroso alterar las especificaciones o
modificar este producto en modo alguno.
Cualquier daño en el cable de alimenta-
ción puede provocar un cortocircuito, un
incendio o una descarga eléctrica.
Advertencia Los componentes eléctri-
cos (cable de alimentación, enchufe,
compresor) debe sustituirlos un técnico
autorizado o un profesional cualificado.
1. El cable de alimentación no se debe
prolongar.
2. Compruebe que la parte posterior del
aparato no aplaste ni dañe el enchu-
fe. Un enchufe aplastado o dañado
puede recalentarse y provocar un in-
cendio.
3. Cerciórese de que tiene acceso al en-
chufe del aparato.
4. No tire del cable de alimentación.
5. Si la toma de red está floja, no intro-
duzca el enchufe. Existe riesgo de des-
carga eléctrica o incendio.
6. No debe utilizar el aparato sin la tapa
de la bombilla
13)
para la iluminación in-
terior.
• Este aparato es pesado. Tome las debi-
das precauciones durante su desplaza-
miento.
• No retire ni toque elementos del compar-
timento congelador con las manos húme-
das o mojadas, ya que podría sufrir abra-
sión de la piel o quemaduras por conge-
lación.
• Evite la exposición prolongada del apara-
to a la luz solar directa.
•
Las bombillas
14)
que se utilizan en este
aparato son especiales, y se han seleccio-
nado exclusivamente para uso en apara-
tos domésticos. No pueden utilizarse pa-
ra la iluminación de la vivienda.
Uso diario
• No coloque recipientes calientes sobre
las piezas plásticas del aparato.
• No almacene gas ni líquido inflamable en
el aparato, ya que podrían estallar.
• Se deben seguir estrictamente las reco-
mendaciones sobre almacenamiento del
fabricante del aparato. Consulte las ins-
trucciones correspondientes.
Cuidado y limpieza
• Antes de realizar tareas de mantenimien-
to, apague el aparato y desconecte el en-
chufe de la toma de red.
• No limpie el aparato con objetos metáli-
cos.
• No utilice objetos afilados para eliminar el
hielo del aparato. Utilice un raspador plás-
tico.
• Inspeccione habitualmente el desagüe
del agua descongelada del frigorífico. Si
es necesario, limpie el desagüe. Si el de-
sagüe se bloquea, el agua se acumulará
en la base del aparato.
Instalación
Importante Para realizar la conexión
eléctrica, siga atentamente las
instrucciones de los párrafos
correspondientes.
• Desembale el aparato y compruebe que
no tiene daños. No conecte el aparato si
está dañado. Informe de los posibles da-
ños de inmediato a la tienda donde lo ad-
quirió. En ese caso, conserve el material
de embalaje.
• Es recomendable esperar al menos dos
horas antes de conectar el aparato, para
permitir que el aceite regrese al compre-
sor.
• El aparato debe contar con circulación
de aire adecuada alrededor, ya que de lo
contrario se produce recalentamiento. Pa-
ra conseguir una ventilación suficiente, si-
ga las instrucciones correspondientes a
la instalación.
• Siempre que sea posible, la parte poste-
rior del producto debe estar contra una
pared, para evitar que se toquen las par-
tes calientes (compresor, condensador) y
se produzcan quemaduras.
• El aparato no debe colocarse cerca de ra-
diadores ni de hornillas de cocina.
• Asegúrese de que es posible acceder al
enchufe después de instalar el electrodo-
méstico.
13) Si está previsto el uso de la tapa de la bombilla
14) Si está previsto el uso de bombilla
38 electrolux

• Realice la conexión sólo con el suministro
de agua potable.
15)
Servicio técnico
• Un electricista homologado deberá reali-
zar las tareas que se requieran para eje-
cutar el servicio o mantenimiento de este
electrodoméstico.
• Las reparaciones de este aparato debe
realizarlas un centro de servicio técnico
autorizado y sólo se deben utilizar recam-
bios originales.
Protección del medio ambiente
Este aparato no contiene gases perjudi-
ciales para la capa de ozono, ni en el
circuito de refrigerante ni en los materia-
les aislantes. El aparato no se debe de-
sechar junto con los residuos urbanos.
La espuma aislante contiene gases in-
flamables: el aparato se debe desechar
de acuerdo con la normativa vigente,
que puede solicitar a las autoridades lo-
cales. No dañe la unidad de refrigera-
ción, en especial la parte trasera, cerca
del intercambiador de calor. Los mate-
riales de este aparato marcados con el
símbolo
son reciclables.
PANEL DE MANDOS
1 2 3 4 5 6
1. Interruptor de encendido/apagado
2. Regulador de temperatura del comparti-
mento inferior
3. Tecla de selección de compartimento
4. Pantalla
5. Interruptor de restablecimiento de la alar-
ma
Tecla de luz
6. Regulador de temperatura del comparti-
mento superior
Visor digital
1 2 3
1. Indicador del compartimento selecciona-
do
2. Indicador de temperatura positiva
3. Indicador de temperatura
Encendido
Si la pantalla no se enciende una vez enchu-
fado el aparato, pulse la tecla de encendido/
apagado.
Apagado
Si desea apagar el aparato pulse la tecla de
encendido/apagado durante más de 1 se-
gundo.
Posteriormente, el indicador de temperatu-
ra mostrará la cuenta atrás -3 -2 -1.
Al apagarse el aparato, se apaga también la
pantalla.
15) Si está prevista una conexión de agua
electrolux 39

Regulación de la temperatura
Seleccione el compartimento pulsando la
tecla de selección de compartimento.
Programar la temperatura girando el mando
(regulador de temperatura del compartimen-
to superior o inferior en función del que se
deba ajustar).
Sin embargo, el ajuste exacto debe elegirse
teniendo en cuenta que la temperatura inte-
rior del aparato depende de:
• temperatura ambiente
• frecuencia de apertura de las puertas
• cantidad de botellas guardadas
• ubicación del aparato.
Alarma de puerta abierta
Sonará una alarma acústica si la puerta se
queda abierta durante 5 minutos aproxima-
damente. Los indicadores de puerta abierta
son los siguientes:
• indicador del compartimento selecciona-
do intermitente
• iluminación del indicador en color rojo
• señal acústica
Pulse el interruptor de desconexión de alar-
ma para desactivar la señal acústica.
Al restablecerse las condiciones normales
(puerta cerrada, la alarma acústica se deten-
drá.
Botón de luz
Si quiere que la luz siga encendida con la
puerta cerrada, basta con que abra y cierre
la puerta. La luz permanece encendida au-
tomáticamente durante 10 minutos.
Para apagar la luz antes de que se apague
automáticamente, abra la puerta y pulse el
botón Luz.
La luz no afecta a la calidad del vino.
PRIMER USO
Limpieza de las partes internas
Antes del empleo limpiar todas las partes in-
ternas con agua tibia y jabón neutro, a fin
de eliminar el característico olor de nuevo y
secarlas luego cuidadosamente.
Importante No utilice detergentes ni pol-
vos abrasivos, ya que podrían dañar el aca-
bado
USO DIARIO
Disposición del vino
Compartimiento superior:
La temperatura se puede regular entre +6 y
+ 11°C. Este compartimento es ideal para
los vinos que se beben al poco tiempo, es-
pecialmente blancos o tintos jóvenes. Las
secciones del compartimento tienen tempe-
raturas diferentes.
Compartimiento inferior:
La temperatura se puede regular entre + 12
y + 18°C. Este compartimento es ideal para
conservar y mejorar los vinos tintos o blan-
cos durante largos periodos.
Las temperaturas de este compartimento
son adecuadas para conservar vinos añejos
y con cuerpo.
Coloque las botellas acostadas de modo
que los tapones no se sequen.
Conserve el vino en la oscuridad. La puerta
es de doble vidrio oscuro y anti UV para pro-
teger el vino de la luz si el frigorífico está en
un lugar iluminado.
Evite encender la luz del aparato con dema-
siada frecuencia y no la deje encendida du-
rante demasiado tiempo. El vino se conser-
va mejor en la oscuridad.
Manipule las botellas con cuidado para que
el vino no se agite.
Preste atención a las recomendaciones y
los consejos recibidos en el momento de la
compra o incluidos en la documentación téc-
nica con relación a la calidad, la duración y
la temperatura de conservación óptima del
vino.
40 electrolux

Sugerencias para la conservación
El tiempo de conservación del vino depen-
de del añejamiento, del tipo de uva, del gra-
do alcohólico y del porcentaje de fructosa y
tanino que contenga. Cuando compre el vi-
no, averigüe si es añejo o si mejora con el
tiempo.
Temperaturas de almacenamiento reco-
mendadas:
• Para champaña y vinos espumosos, de 6
a 8°C
• Para vinos blancos, de 10 a 12°C
• Para vinos rosados y tintos ligeros, de 12
a 16°C
• Para vinos tintos añejos, de 14 a 16°C
Si apila varias botellas, asegurarse de que
no toquen la placa de enfriamiento del frigo-
rífico.
Estantes de la bodega
Los estantes se pueden quitar para la lim-
pieza.
Portabotellas de la vinoteca
Saque el estante y póngalo entre las dos
guías.
Las ménsulas portabotellas admiten un pe-
so máximo de 30 kg.
Es posible poner el estante entre guías a
100 mm de distancia para favorecer la ex-
posición de las botellas.
El compartimento inferior viene con un ca-
jón corredero que sirve para colocar las bo-
tellas en posición vertical.
El cajón está dotado de dos separadores
que se adaptan a botellas de diámetros di-
ferentes.
electrolux 41

Humidificador
La humedad adecuada es fundamental pa-
ra una buena conservación del vino.
Su bodega está equipada con un dispositi-
vo humidificador especial que aumenta la
humedad dentro del aparato.
Esparza por la bandeja las piedras de lava
suministradas tal y como se indica en la ima-
gen. Después llene de agua la bandeja has-
ta la mitad de su capacidad.
En el funcionamiento normal, las piedras de
lava se humedecen regularmente con el
agua. Verifique periódicamente que hay
agua en la bandeja y rellénela cuando sea
preciso.
Tenga en cuenta que si la humedad del
área donde se instala el aparato es particu-
larmente elevada, el interior de la bodega
también será relativamente más húmedo.
Esto puede hacer que las botellas se empa-
ñen al abrir la puerta o se despeguen las eti-
quetas. En tal caso, reduzca la cantidad de
agua de la bandeja según corresponda.
Recirculación del aire
El compartimiento frigorífico dispone de un
ventilador AIRLIGHT especial que se activa
automáticamente en función de la progra-
mación del termostato y las condiciones am-
bientales.
MANTENIMIENTO Y LIMPIEZA
Precaución Antes de realizar tareas
de mantenimiento, desenchufe el
aparato.
Este equipo contiene hidrocarburos en
la unidad de refrigeración; por tanto, el
mantenimiento y la recarga deben es-
tar a cargo exclusivamente de técnicos
autorizados.
Limpieza periódica
El equipo debe limpiarse de manera habitual:
• limpie el interior y los accesorios con
agua templada y un jabón neutro.
• revise y limpie periódicamente las juntas
de la puerta para mantenerlas limpias y
sin restos;
• Aclare y seque a fondo.
42 electrolux

Importante No mueva, dañe ni tire de los
conductos o cables del interior del armario.
No utilice detergentes, polvos abrasivos,
productos de limpieza perfumados ni cera
para limpiar el interior, ya que dañarán la su-
perficie y dejarán un fuerte olor.
Limpie el condensador (rejilla negra) y el
compresor de la parte posterior del aparato
con un cepillo o un aspirador. Esa opera-
ción mejorará el rendimiento del aparato y
reducirá el consumo eléctrico.
Importante Tenga cuidado para no dañar
el sistema de refrigeración.
Muchas marcas de limpiadores de superfi-
cies de cocina contienen químicos que pue-
den atacar o dañar los plásticos del apara-
to. Por tal razón, se recomienda que el exte-
rior del aparato se limpie sólo con agua tem-
plada a la que se añadirá un poco de líqui-
do lavavajillas.
Después de la limpieza, vuelva a conectar
el aparato a la toma de red.
Descongelación
La escarcha se elimina automáticamente
del evaporador cada vez que se detiene el
compresor, durante el funcionamiento nor-
mal. El agua de la descongelación se des-
carga por un canal hacia un recipiente espe-
cial situado en la parte posterior del apara-
to, sobre el motor compresor, desde donde
se evapora.
Es importante limpiar periódicamente el ori-
ficio de salida del agua de descongelación
situado en la mitad del canal del electrodo-
méstico para evitar que el agua desborde y
caiga en el interior. Utilice el limpiador espe-
cial suministrado, que hallará ya colocado
en el orificio de desagüe.
Periodos de inactividad
Si el aparato no se utiliza durante un tiempo
prolongado, tome las siguientes precaucio-
nes:
• desconecte el aparato de la red eléc-
trica
•
descongele
16)
y limpie el aparato y todos
los accesorios
• deje la o las puertas entreabiertas para
evitar olores desagradables.
Si el armario va a mantenerse abierto, pro-
cure que alguien lo vigile de vez en cuando
para que los alimentos de su interior no se
estropeen si se interrumpe el suministro
eléctrico.
QUÉ HACER SI…
Advertencia Antes de solucionar
problemas, desenchufe el aparato.
Las medidas de resolución de proble-
mas que no se indican en este manual
deben dejarse en manos de un electri-
cista o profesional cualificado y compe-
tente.
Importante Se oyen sonidos durante el
funcionamiento normal (compresor,
circulación de refrigerante).
16) Si está previsto.
electrolux 43

Problema Causa probable Solución
El aparato hace ruido.
El aparato no está bien apoyado
en el suelo.
Compruebe que los soportes del
aparato descansan sobre una su-
perficie estable (las cuatro patas
deben estar bien apoyadas en el
suelo).
El aparato emite una se-
ñal acústica. La pantalla
está roja.
La puerta no está bien cerrada. Consulte la sección "Alarma de
puerta abierta".
El aparato no funciona.
La bombilla no funciona.
El aparato está apagado. Encienda el aparato
El aparato no está correctamen-
te enchufado a la toma de co-
rriente.
Enchufe el aparato correctamente
a la toma de corriente.
El aparato no recibe suministro
eléctrico. No hay tensión en la to-
ma de corriente.
Enchufe un aparato eléctrico dife-
rente a la toma de corriente.
Llame a un electricista cualificado.
La bombilla no funciona. La bombilla está en espera. Cierre y abra la puerta.
La bombilla es defectuosa. Consulte la sección "Sustitución
de la bombilla".
El compresor funciona
continuamente.
La temperatura no se ha ajusta-
do correctamente.
Seleccione una temperatura más
alta.
La puerta no está bien cerrada. Consulte la sección "Cierre de la
puerta".
La puerta se ha abierto con ex-
cesiva frecuencia.
No mantenga abierta la puerta
más tiempo del necesario.
La temperatura ambiente es de-
masiado alta.
Reduzca la temperatura ambiente.
El agua fluye por la placa
posterior del frigorífico.
Durante el proceso de descon-
gelación automática, el hielo se
descongela en la placa posterior.
Esto es normal.
El agua fluye al interior
del frigorífico.
La salida de agua está obstruida. Limpie la salida de agua.
Los productos impiden que el
agua fluya al colector.
Asegúrese de que los alimentos
no entran en contacto con la pla-
ca posterior.
La temperatura del apa-
rato es demasiado baja/
alta.
El regulador de temperatura no
se ha ajustado correctamente.
Seleccione una temperatura más
alta o baja.
La puerta no está bien cerrada. Consulte la sección "Cierre de la
puerta".
Se han guardado muchos ali-
mentos al mismo tiempo.
Guarde menos productos al mis-
mo tiempo.
La temperatura del apa-
rato es demasiado alta.
No hay circulación de aire frío en
el aparato.
Compruebe que el aire frío circula
libremente en el aparato.
Cambio de la bombilla de la bodega
1. Desconecte el enchufe de la toma de co-
rriente.
2. Presione la cubierta de la bombilla hacia
dentro con una herramienta (como un
destornillador) para soltar el gancho tra-
sero. Suelte el gancho intermedio al mis-
mo tiempo y deslice la cubierta en la di-
rección de las flechas.
3. Cambie la bombilla por una nueva del
mismo tipo específicamente diseñada
44 electrolux

para electrodomésticos y que tenga las
mismas características.
4. Instale la cubierta de la bombilla.
5. Conecte el enchufe a la toma de red.
6. Abra la puerta. Compruebe que la bom-
billa se enciende.
Cierre de la puerta
1. Limpie las juntas de la puerta.
2. Si es necesario, ajuste la puerta. Consul-
te "Instalación".
3. Si es necesario, cambie las juntas de
puerta defectuosas. Contacte al Centro
de servicio técnico.
DATOS TÉCNICOS
Medidas de la cavidad
Altura 1780 mm
Anchura 560 mm
Fondo 550 mm
La información técnica se encuentra en la
placa de datos técnicos en el lado interior iz-
quierdo del aparato y en la etiqueta de ener-
gía.
electrolux 45

INSTALACIÓN
Colocación
Instale el aparato en un punto en el que la
temperatura ambiente se corresponda con
la clase climática indicada en la placa de da-
tos técnicos del aparato:
Clase
climáti-
ca
Temperatura ambiente
SN +10°C a + 32°C
N +16°C a + 32°C
ST +16°C a + 38°C
T +16°C a + 43°C
Conexión eléctrica
Antes de conectar el aparato, compruebe
que el voltaje y la frecuencia que aparecen
en la placa de datos técnicos se correspon-
den con el suministro de la vivienda.
El aparato debe tener conexión a tierra. El
enchufe del cable de alimentación se sumi-
nistra con un contacto para tal fin. Si la to-
ma de red de la vivienda carece de cone-
xión a tierra, conecte el aparato a una toma
de tierra conforme con la normativa, des-
pués de consultar a un electricista profesio-
nal.
El fabricante rechaza toda responsabilidad
si no se toman las precauciones antes indi-
cadas.
Este aparato es conforme con las directivas
de la CEE.
Requisitos de ventilación
El flujo de aire de la parte posterior del apa-
rato debería ser suficiente.
min.
200 cm
2
min.
200 cm
2
Instalación del aparato
Precaución Compruebe que el cable
de alimentación puede moverse con
facilidad.
Ejecute los pasos siguientes:
1. Aplique la cinta selladora adhesiva al apa-
rato como se muestra en la figura.
2. Instale el aparato en el hueco.
3. Fije el aparato al hueco con 4 tornillos.
46 electrolux

4. Fije las tapas a los tornillos.
Finalmente, compruebe que:
• Todos los tornillos están apretados.
• La cinta selladora está fijada con firmeza
al armario.
• La puerta abre y cierra correctamente.
Instrucciones de montaje de la parte
inferior del compensador de la puerta
1. Con la puerta abierta, afloje los dos tor-
nillos situados en la parte inferior sin de-
satornillarlos completamente.
2. Coloque el compensador de acero co-
mo se indica en la figura e introduzca la
parte superior bajo la cabeza de los tor-
nillos.
3. Alinee el compensador con el panel de
la puerta de acero y apriete los tornillos.
4. Inserte el cárter de acero en el interior
del compensador como se indica en la
figura.
electrolux 47

ASPECTOS MEDIOAMBIENTALES
El símbolo que aparece en el aparato o
en su embalaje, indica que este producto
no se puede tratar como un residuo normal
del hogar. Se deberá entregar, sin coste
para el poseedor, bien al distribuidor, en el
acto de la compra de un nuevo producto
similar al que se deshecha, bien a un punto
municipal de recolección selectiva de
equipos eléctricos y electrónicos para su
reciclaje. Al asegurarse de que este
producto se desecha correctamente, usted
ayudará a evitar posibles consecuencias
negativas para el medio ambiente y la salud
pública, lo cual podría ocurrir si este
producto no se gestionara de forma
adecuada. Para obtener información más
detallada sobre el reciclaje de este
producto, póngase en contacto con el
Ayuntamiento de su Municipio, ó con la
tienda donde lo compró.
48 electrolux

electrolux 49

50 electrolux

electrolux 51

222343425-00-062010
www.electrolux.com/shop
-
 1
1
-
 2
2
-
 3
3
-
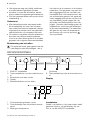 4
4
-
 5
5
-
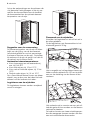 6
6
-
 7
7
-
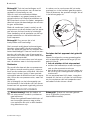 8
8
-
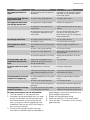 9
9
-
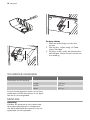 10
10
-
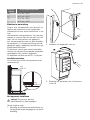 11
11
-
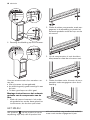 12
12
-
 13
13
-
 14
14
-
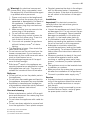 15
15
-
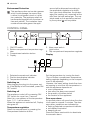 16
16
-
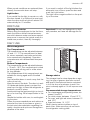 17
17
-
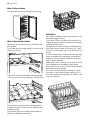 18
18
-
 19
19
-
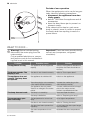 20
20
-
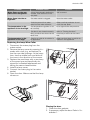 21
21
-
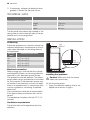 22
22
-
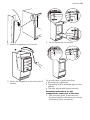 23
23
-
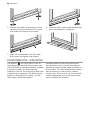 24
24
-
 25
25
-
 26
26
-
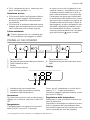 27
27
-
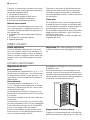 28
28
-
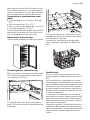 29
29
-
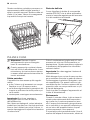 30
30
-
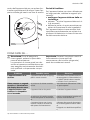 31
31
-
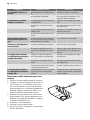 32
32
-
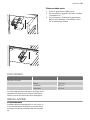 33
33
-
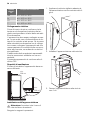 34
34
-
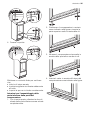 35
35
-
 36
36
-
 37
37
-
 38
38
-
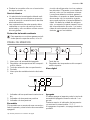 39
39
-
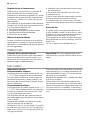 40
40
-
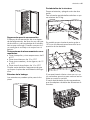 41
41
-
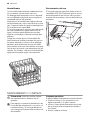 42
42
-
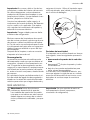 43
43
-
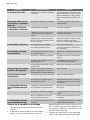 44
44
-
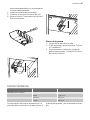 45
45
-
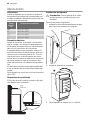 46
46
-
 47
47
-
 48
48
-
 49
49
-
 50
50
-
 51
51
-
 52
52


Electrolux ERW33900X Handleiding
- Categorie
- Drinkkoelers
- Type
- Handleiding
in andere talen
- English: Electrolux ERW33900X User manual
- italiano: Electrolux ERW33900X Manuale utente
- español: Electrolux ERW33900X Manual de usuario
Andere documenten
-
Atag KF8178WDL Handleiding
-
-
-
 Küppersbusch EWK178002Z Handleiding
-
Smeg WI360LX Handleiding
-
Aeg-Electrolux SWD81800G0 Handleiding
-
Aeg-Electrolux SWD81800G1 Handleiding
-
-
-
Aeg-Electrolux SWD81800L1 Handleiding
