Overmax OV-X-RALLY 2.0 Handleiding
- Categorie
- Speelgoed
- Type
- Handleiding

PL
Instrukcja obsługi / User Manual /
Bedienungsanleitung / Manuale d’uso /
Manuel de l’Utilisateur / Manual de usuario /
Handleiding / Посібник користувача /
Vartotojo vadovas / Korisnički priručnik
Rally 2.0
IT
LT
FR
HR
PL
ES
EN
NL
DE
UK

PL
www.overmax.eu

PL
Wprowadzenie
Drogi Kliencie!
Dziękujemy za obdarzenie nas zaufaniem i wybranie marki Overmax.
Dzięki wykorzystaniu wysokiej jakości materiałów i nowoczesnych
rozwiązań technologicznych oddajemy w Twoje ręce produkt idealny
do codziennego użytkowania. Jesteśmy pewni, że dzięki ogromnej
staranności wykonania spełni on Twoje wymagania. Przed użyciem produktu
zapoznaj się dokładnie z poniższą instrukcją obsługi.
Jeśli masz jakiekolwiek uwagi lub pytania do zakupionego produktu,
skontaktuj się z nami:
Ważne informacje:
Prosimy o przeczytanie tej instrukcji przed przystąpieniem do obsługi
produktu, aby zapoznać się z jego funkcjami i wykorzystać je zgodnie
z przeznaczeniem.
1.
Nie należy naprawiać oraz dokonywać modyfikacji urządzenia. Czynności
te może dokonać tylko autoryzowany serwis.
2.
Nie uruchamiaj urządzenia, jeżeli zauważyłeś jakiekolwiek uszkodzenia.
3.
Nie używaj urządzenia, gdy zaczyna wadliwie działać, zostało upuszczone
lub zanurzone w wodzie, nadmiernie nagrzewa się, pojawią się
odbarwienia, wybrzuszenia oraz gdy wystąpią inne nietypowe zjawiska.
Skontaktuj się z autoryzowanym serwisem producenta.
4. Nigdy nie zostawiaj baterii podłączonej do ładowania bez nadzoru.
5.
Urządzenie jest przeznaczone dla dzieci powyżej 8 roku życia.
Nie pozwalaj, aby młodsze dzieci nim się bawiły.
6.
Używaj urządzenia z dala od źródeł ciepła, wysokich temperatur, gorących
powierzchni, bezpośredniego światła słonecznego, źródeł iskrzenia,
otwartego ognia, olei oraz ostrych krawędzi.

PL
7.
Nie używaj urządzenia w otoczeniu zawierającego łatwopalne,
wybuchowe lub toksyczne substancje.
8. Nie używaj substancji chemicznych do czyszczenia urządzenia.
9. Po każdym użyciu wyłącz urządzenie i odłącz baterię.
10.
Nie zanurzaj całego urządzenia w wodzie lub w innych cieczach.
Nie używaj w pobliżu wody.
11. Przed czyszczeniem lub przenoszeniem urządzenia, wyłącz je.
12.
Nie używaj urządzenia do innych celów, niż do których zostało ono
zaprojektowane.
13. Trzymaj urządzenie z dala od ostrych przedmiotów.
14. Nie kładź innych przedmiotów na urządzeniu, kiedy z niego korzystasz.
15.
Korzystaj z urządzenia tylko na płaskich i twardych powierzchniach.
Unikaj jazdy po piasku, trawie lub innych powierzchniach, które mogą
spowodować uszkodzenie urządzenia.
16. Do ładowania baterii używaj tylko przewodu ładującego załączonego
do zestawu.
17. Po każdym ładowaniu odłącz przewód USB od gniazda USB.
18.
Zwracaj uwagę na polaryzację baterii w urządzeniu oraz w kontrolerze.
19.
W urządzeniu używaj tylko baterii załączonej w zestawie,
w kontrolerze używane są dwie baterie AA 1,5 V (nie znajdują się one
w zestawie). W kontrolerze nie należy używać akumulatorków.
20.
Po użyciu nie dotykaj silnika samochodu, ponieważ może mieć wysoką
temperaturę.
21.
Źródło zasilania stosowane przy tej zabawce elektrycznej powinno być
regularnie kontrolowane pod kątem uszkodzeń przewodu zasilania,
wtyczki, obudowy lub innych części, a w razie uszkodzeń nie powinno
być wykorzystywane do momentu jego naprawienia.
22.
Zabawki nie można przyłączać do więcej niż zalecana liczby źródeł
zasilania.
23. Akumulatory należy ładować tylko pod nadzorem osób dorosłych.
24. Akumulatory należy przed ładowaniem wyciągnąć z zabawki.
25. Nie należy wkładać różnych typów baterii lub nowych i używanych baterii.
26. Wyczerpane baterie należy wyjąć z zabawki.
27. Zacisków zasilania nie należy zwierać.
28. Baterii jednorazowego użytku nie należy ładować.

PL
SCHEMAT URZĄDZENIA
Nadwozie
Pokrywa baterii
Bateria
Włącznik
Regulator
skrętu kół
SCHEMAT KONTROLERA
Dioda zasilania
Włącznik
Przepustnica
Pokrętło do sterowania w lewo i prawo

PL
MONTAŻ BATERII W KONTROLERZE
1. Zdejmij pokrywę baterii.
2. Włóż dwie baterie AA 1,5 V. Zwróć szczególną uwagę na polaryzację
baterii.
3. Załóż pokrywę z powrotem.

PL
ŁADOWANIE BATERII SAMOCHODU
1. Podłącz ładowarkę do gniazda USB w komputerze lub do zasilacza USB.
Następnie podłącz baterię do ładowarki. Podczas ładowania dioda świeci
się. Gdy bateria będzie naładowana dioda zgaśnie.
2. Odkręć śrubkę mocującą na pokrywie baterii w samochodzie i zdejmij ją.
3. Podłącz baterię, zamknij pokrywę i przykręć z powrotem.

PL
SPOSÓB UŻYTKOWANIA
1. Przesuń włącznik na samochodzie do pozycji ON.
2. Przesuń włącznik kontrolera do pozycji ON. Dioda zasilania zacznie
migać. Odczekaj ok. 15 sekund, aż kontroler połączy się z samochodem.
Dioda zacznie świecić ciągłym światłem.
3. Aby jechać wprzód, przesuń przepustnicę do tyłu. Im mocniej
przepustnica jest przesunięta, tym samochód szybciej będzie się
poruszał.
Przesuń przepustnicę do przodu, aby zahamować i jechać do tyłu.
4. Kręć pokrętłem w lewo lub w prawo, aby samochód skręcał.

PL
REGULACJA SKRĘTU
Jeśli zauważysz, że samochód zamiast jechać prosto lekko zbacza na lewo lub
prawo, możesz wyregulować skręt regulatorem.
CZYSZCZENIE I KONSERWACJA
1. Przed czyszczeniem wyłącz urządzenie i odłącz baterię.
2. Czyść samochód i kontroler wilgotną szmatką.
3. Nie używaj substancji chemicznych do czyszczenia urządzenia.
4. Po każdym użyciu oczyść samochód z piasku i pyłu.
Zdjęcia mają charakter poglądowy, rzeczywisty wygląd produktów może
różnić się od prezentowanego na zdjęciach.

EN
www.overmax.eu

EN
INTRODUCTION
Dear customer!
Thank you for placing trust in us and choosing Overmax.
Thanks to the use of high-quality materials and modern solutions, we
provide you with a product perfect for everyday use. We are convinced that
the product will satisfy your requirements as it has been designed with
utmost care. Before you start using the product, please read this manual
carefully.
Should you have any remarks or questions concerning the product, please do
not hesitate to contact us:
Important:
Please read this manual before you start using the product to see all its
functions and use them in accordance with intended use.
1.
Do not repair or modify the device. Only an authorized service technician
is allowed to perform these operations.
2. Do not switch the device on if you have noticed any damage.
3.
Do not use the device when it acts up, has been dropped or immersed in
water, overheats extensively, is discolored or deformed, and when other
atypical circumstances occur. Contact the manufacturer’s authorized
service center.
4. Never leave the charging battery unattended.
5.
The device is intended for children aged above 8. Do not let younger
children play with it.
6.
Use the device away from sources of heat, high temperatures, hot
surfaces, direct sunlight, source of ignition, naked flame, oils and sharp
edges.

EN
7. Do not use the device in inflammable, explosive or toxic atmosphere.
8. Do not use chemicals to clean the device.
9. After every use, switch the device o and disconnect the battery.
10. Do not immerse the entire device in water or other liquids. Do not use
the device near water.
11. Before you start cleaning or moving the device, switch it o.
12. Do not use the device for other purposes than designed.
13. Keep the device away from sharp items.
14. Do not place other items on the device when you use it.
15.
Use the device on flat and hard surfaces only. Avoid going on sand,
grass or other surfaces which may lead to damage.
16. To charge a battery, use a supplied charging cord only.
17. After every charging, disconnect the USB cable from the USB port.
18. Pay attention to battery polarization in the device and controller.
19.
In the device use the supplied battery only, in the controller two batteries
AA 1,5V are used (they are not supplied). In the controller do not use
storage batteries.
20.
After the use, do not touch a car engine because it may be extremely hot.
21.
Transformer, power supply, or battery charger used with the electric
toy shall be regularly examined for damage to the supply cord, plug,
enclosure or other parts, and in the event of such damage, it shall not
be used until the damage has been repaired.
22.
The toy must not be connected to more power sources than
recommended.
23. Recharge the batteries only under adult supervision.
24. Batteries must be removed from the toy before charging.
25. Do not use dierent types of batteries or new and used batteries.
26. Remove exhausted batteries from the toy.
27. Power terminals should not be short-circuited.
28. Non-rechargeable batteries should not be recharged.

EN
DEVICE OUTLINE
Body
Battery cover
Battery
On/o switch
Wheel turn
adjustment
CONTROLLER OUTLINE
Power LED
On/off
switch
Choke valve
Left and right control knob

EN
HOW TO ASSEMBLE BATTERY IN
THE CONTROLLER
1. Remove battery cover.
2. Insert two batteries AA 1,5 V. Pay special attention to battery terminals.
3. Put the cover back on.

EN
HOW TO CHARGE CAR BATTERY
1. Connect the charger to a USB port on your computer or to a USB power
adapter. Then connect the battery to the charger. During charging the LED
lights up. When the battery is charged, the LED will turn o.
2. Unscrew the camping screw from the car battery cover and remove it.
3. Connect the battery, close the cover and screw it back on.

EN
HOW TO USE
1. Set the car switch into ON.
2. Slide the controller switch into ON. Power LED will start flashing. Wait
about 15 seconds until the controller has connected with the car. LED
will go on continuously.
3. To go forward, move the choke valve to the back. The stronger
the movement, the higher the speed of the car. Move the choke valve to
the front, to stop and reverse.
4. Turn the knob left or right to make the car turn.

EN
TURN ADJUSTMENT
If you have noticed that the car turns aside instead of going straight, you can
adapt the turn with adjustment.
CLEANING AND MAINTENANCE
1. Before you start cleaning, switch the device o and disconnect the battery.
2. Clean the car and controller with wet cloth.
3. Do not use chemicals to clean the device.
4. After every use, remove sand and dust from the car.
The pictures are for reference only. The real design of the products may
dier from the pictures presented.

DE
www.overmax.eu

DE
EINLEITUNG
Sehr geehrte Kunden!
Wir bedanken uns für Ihr Vertrauen und Auswahl der Marke Overmax.
Wir geben zu Ihren Händen ein Produkt über, das dank hochwertigen
Materialien und innovativen technologischen Lösungen perfekt für den
täglichen Gebrauch ist. Wir sind sicher, dass dank einer sehr sorgfältigen
Ausführung unser Produkt Ihre Anforderungen erfüllt.
Vor dem Gebrauch lesen Sie genau die vorliegende Bedienungsanleitung
durch. Falls Bemerkungen oder Fragen zum gekauften Produkt, nehmen Sie
mit uns Kontakt auf:
WICHTIGE INFORMATIONEN
Bitte, die vorliegende Bedienungsanleitung vor dem Gebrauch des
Gerätes durchzulesen, um seine Funktionen kennen zu lernen und es
bestimmungsgemäß zu verwenden.
1.
Das Gerät darf nicht repariert oder modifiziert werden. Diese Tätigkeiten dürfen
nur durch ein autorisiertes Service durchgeführt werden.
2. Betätigen Sie das Gerät nicht, wenn Sie die Beschädigungen bemerkten.
3.
Das Gerät soll nicht verwendet werden, wenn es mangelhaft funktioniert,
fallen gelassen oder eingeweicht wurde oder, wenn andere ungewöhnlichen
Erscheinungen vorkommen. Nehmen Sie Kontakt mit dem autorisierten Service
des Herstellers auf.
4. Lassen Sie die Batterie während des Ladevorgangs nie unbeaufsichtigt.
5.
Dieses Gerät ist kein Spielzeug. Das Gerät ist für die Kinder über 8 Jahre alt
bestimmt.
6.
Das Gerät soll weit von den Wärmequellen, hohen Temperaturen, heißen Flächen,
direkter Sonnenstrahlung, Funkenquellen, oenem Feuer, Ölen und scharfen
Kanten verwendet werden.

DE
7.
Benutzen Sie das Gerät nicht in der Nähe von brennbaren, explosiven oder
toxischen Stoen.
8. Verwenden Sie keine Chemikalien zur Reinigung des Gerätes.
9.
Nach jedem Gebrauch schalten Sie das Gerät aus und schalten Sie die Batterie ab.
10.
Tauchen Sie das Gerät niemals in Wasser oder andere Flüssigkeiten. Verwenden
Sie es nicht in der Nähe vom Wasser.
11. Vor der Reinigung oder Tragen des Gerätes, schalten Sie es aus.
12.
Das Gerät darf nicht für die anderen Zwecke als die bestimmungsgemäße
Verwendung benutzt werden.
13. Bewahren Sie das Gerät weit von den scharfen Gegenständen auf.
14. Bei der Verwendung stellen Sie keine Gegenstände auf das Gerät.
15. Benutzen Sie das Gerät nur auf ebenen und harten Oberflächen. Vermeiden
Sie die Sandflächen, Gras oder andere Fläche, die eine Beschädigung des
Gerätes verursachen können.
16. Verwenden Sie zum Laden des Akkus nur das mitgelieferte Ladekabel.
17. Trennen Sie das USB-Kabel nach jedem Ladevorgang von der USB-Buchse.
18. Beachten Sie die richtige Polarisation der Batterien im Gerät oder Controller.
19.
Im Gerät benutzen Sie nur die im Set beinhaltete Batterie. Im Controller werden
zwei Batterien AA 1,5V benutzt (nicht im Set beinhaltet). Im Controller dürfen
keine Akkus verwendet werden.
20. Nach dem Gebrauch fassen Sie den Motor des Autos nicht an, weil er
sehr heiß sein kann.
21.
Der mit dem elektrischen Spielzeug verwendete Transformator,
das Netzteil oder das Batterieladegerät müssen regelmäßig auf
Beschädigungen des Versorgungskabels, des Steckers, des Gehäuses
oder anderer Teile überprüft werden. Im Falle einer solchen Beschädigung
darf es erst verwendet werden, wenn der Schaden behoben wurde .
22.
Das Spielzeug darf nicht an mehr Stromquellen als empfohlen
angeschlossen werden.
23. Laden Sie die Batterien nur unter Aufsicht von Erwachsenen auf.
24.
Vor dem Laden müssen die Batterien aus dem Spielzeug entfernt
werden.
25.
Verwenden Sie keine anderen Batterietypen oder neue und gebrauchte
Batterien.
26. Entfernen Sie die verbrauchten Batterien aus dem Spielzeug.
27. Stromanschlüsse dürfen nicht kurzgeschlossen werden.
28. Nicht wiederaufladbare Batterien sollten nicht aufgeladen werden.

DE
SCHEMA DES GERÄTES
Karosserie
Batterieabdeckung
Batterie
Einschalter
Regler der
Lenkvor
-
richtung
SCHEMA DES CONTROLLERS
Power-Diode
Einschalter
Drosselklapppe
Drehknopf zur Steuerung nach links
und rechts

DE
BATTERIEMONTAGE IM CONTROLLER
1. Nehmen Sie die Batterieabdeckung ab.
2. Legen Sie zwei Batterien AA 1,5 V ein. Beachten Sie die richtige
Polarisation der Batterien.
3. Setzen Sie wieder die Batterieabdeckung.

DE
LADUNG DER BATTERIEN VOM AUTO
1. Schließen Sie das Ladegerät an einen USB-Anschluss Ihres Computers
oder an ein USB-Netzteil an. Schließen Sie dann den Akku an das
Ladegerät an. Während des Ladevorgangs leuchtet die LED. Wenn der Akku
aufgeladen ist, erlischt die LED.
2. Schrauben Sie die Schraube an der Batterieabdeckung ab und nehmen
Sie sie ab.
3. Schließen Sie die Batterie an, schließen Sie die Abdeckung und ziehen Sie
die Schraube wieder an.

DE
GEBRAUCHSWEISE
1. Schieben Sie den Einschalter des Autos auf die ON-Position.
2. Schieben Sie den Einschalter des Controllers auf die ON-Position. Die
Power-Diode wird blinken. Warten Sie ca. 15 Sekunden, bis der Controller
sich mit dem Auto verbindet. Die Diode wird ständig leuchten.
3. Um vorwärts zu fahren, schieben Sie die Drosselklappe nach hinten. Je
stärker die Drosselklappe geschoben wurde, desto schneller wird das
Auto fahren. Schieben Sie die Drosselklappe nach vorne, um das Auto
zu stoppen und rückwärts zu fahren.
4. Drehen Sie mit dem Drehknopf nach rechts oder links, damit das Auto lenkt.

DE
Die Fotos sind anschaulich, das tatsächliche Aussehen der Produkte kann
von der gezeigten Abbildung abweichen.
VERSTELLUNG DES LENKWINKELS
Wenn Sie bemerken, dass das Auto, statt geradeaus zu fahren, nach links
oder rechts abbiegt, können Sie die Drehung mit dem Drehknopf regulieren.
WARTUNG UND REINIGUNG
1. Vor der Reinigung schließen Sie das Gerät aus und klemmen Sie
die Batterie ab.
2. Reinigen Sie das Auto und den Controller mit einem feuchten Tuch.
3. Benutzen Sie keine chemische Mittel zur Reinigung des Autos.
4. Nach jedem Gebrauch reinigen Sie das Auto von Sand und Staub.

IT
www.overmax.eu

IT
Introduzione
Gentile Cliente!
Ringraziamo per aver riposto in noi la Vostra fiducia e aver scelto prodotto
di un marchio Overmax. Grazie all’uso di materiali di alta qualità e soluzioni
tecnologiche moderne, vi diamo un prodotto ideale per l’uso quotidiano. Siamo
sicuri che, grazie alla grande cura posta nella sua fabbricazione, soddisferà
le vostre esigenze. Prima di utilizzare il prodotto, leggere attentamente le
seguenti istruzioni.
Se avete commenti o domande sul prodotto acquistato, contattateci:
Informazioni importanti:
Si prega di leggere questo manuale prima di utilizzare il prodotto per scoprire
le sue caratteristiche e usarlo come previsto.
1.
Non riparare o modificare il dispositivo. Questo può essere fatto solo da
un centro di assistenza autorizzato.
2. Non mettere in funzione il dispositivo se si notano danni.
3.
Non usare il dispositivo se comincia a funzionare male, se è stata lasciata
cadere o immersa in acqua, se diventa eccessivamente calda o se mostra
scolorimento, rigonfiamenti o altre condizioni anomale. Contattare il
centro di assistenza autorizzato dal produttore.
4. Non lasciare mai incustodita la batteria collegata a un caricatore.
5.
Questo dispositivo è destinato all’uso da parte di bambini di età superiore
agli 8 anni. Non permettere ai bambini più piccoli di giocarci.
6.
Usare il dispositivo lontano da fonti di calore e temperature elevate,
fonti di scintille, fiamme aperte, superfici calde, luce solare diretta, oli
e bordi taglienti IT.

IT
7.
Non utilizzare il dispositivo in un ambiente contenente sostanze
infiammabili, sostanze esplosive o tossiche.
8. Non usare sostanze chimiche per pulire il dispositivo.
9. Dopo ogni utilizzo, spegnere il dispositivo e scollegare la batteria.
10. Non immergere l’intero dispositivo in acqua o altri liquidi.
11.
Non usare vicino all’acqua. Prima di pulire o spostare il dispositivo,
spegnerlo.
12.
Non utilizzare il dispositivo per scopi diversi da quelli per cui è stato
progettato.
13. Tenere il dispositivo lontano da oggetti appuntiti.
14. Non mettere altri oggetti sopra il dispositivo quando lo state usando.
15.
Utilizzare il dispositivo solo su superfici piane e dure. Evitare di guidare
su sabbia, erba o altre superfici che può causare danni al dispositivo.
16. Usare solo il cavo di ricarica incluso per caricare la batteria.
17. Dopo ogni ricarica scollegare il cavo USB dalla porta USB.
18.
Fare attenzione alla polarità della batteria nel dispositivo e nel controller.
19.
Utilizzare solo la batteria inclusa nel dispositivo, nel controller vengono
usate le due batterie AA 1,5 V (non incluse
20. Non utilizzare batterie ricaricabili nel controller. Non toccare il motore
dell’auto dopo l’uso, perché potrebbe avere la temperatura elevata.
21.
La fonte di alimentazione utilizzata per questo giocattolo elettrico
dovrebbe essere regolarmente controllato per eventuali danni al cavo
di alimentazione, spina, involucro oppure altre parti, e se danneggiato
non devono essere utilizzati fino a quanto non sarà riparato.
22.
I giocattoli non devono essere collegati a più di un numero raccomandato
delle fonti di alimentazione.
23. Caricare le batterie ricaricabili solo sotto la supervisione di un adulto.
24.
Le batterie ricaricabili devono essere rimosse dal giocattolo prima della
ricarica.
25. Non inserire diverse tipi di batterie o batterie nuove e usate.
26. Rimuovere le batterie esaurite dal giocattolo.
27. Non cortocircuitare i terminali di alimentazione.
28. Non ricaricare le batterie usa e getta.

IT
SCHEMA DEL DISPOSITIVO
Carrozzeria
Coperchio della
batteria
Batteria
Interruttore
Regoltore
dello sterzo
delle ruote
SCHEMA DEL CONTROLLER
Diodo di
alimentazione
Interruttore
Acceleratore
Manopola per girare a destra e a sinistra

IT
INSTALLAZIONE DELLA BATTERIA NEL
CONTROLLER
1. Rimuovere il coperchio della batteria.
2.
Inserire due batterie AA 1,5 V. Prestare particolare attenzione alla
polarità della batteria.
3. Rimettere il coperchio.

IT
RICARICA DELLA BATTERIA DELL’AUTO
1. Collegare il caricatore a una porta USB del computer o a un adattatore
di alimentazione USB. Poi collegare la batteria al caricatore. Durante la
ricarica il diodo LED sarà acceso. Quando la batteria è completamente
carica, Il LED si spegne.
2.
Allentare la vite di fissaggio del coperchio della batteria dell’auto e
rimuoverlo.
3. Collegare la batteria, chiudere il coperchio e riavvitarlo.

IT
MODALITÁ D’USO
1. Portare l’interruttore dell’auto in posizione ON. Portare
l’interruttore del controllore in posizione ON. Il diodo LED di
alimentazione comincia a pulsare.
2. Attendere ca. 15 secondi, finché il controller si colleghi con l’auto.
Il diodo LED si illuminerà continuamente.
3. Per andare avanti, spostare l’acceleratore indietro. Più
l’acceleratore è spostato, più velocemente andrà la macchina.
Spostare l’acceleratore in avanti per frenare e guidare all’indietro.
4. Girare la manopola a sinistra o a destra per far girare la macchina.

IT
REGOLAZIONE DELLO STERZO
Se notate che l’auto devia leggermente a sinistra o a destra invece di andare
dritta, potete regolare lo sterzo con il regolatore degli indicatori di direzione.
PULIZIA E CONSERVAZIONE
1. Spegnere il dispositivo e scollegare la batteria prima della pulizia.
2. Pulire la macchina e il controller con un panno umido.
3. Non usare sostanze chimiche per pulire il dispositivo.
4. Pulire la macchina dalla sabbia e dalla polvere dopo ogni uso.
Le foto sono solo a scopo illustrativo, l’aspetto reale dei prodotti può
dierire dalle immagini.

FR
www.overmax.eu

FR
Introduction
Cher client !
Merci de nous avoir fait confiance et d’avoir choisi la marque Overmax.
Grâce à l’utilisation des matériaux de la meilleure qualité et des solutions
technologiques innovantes, nous vous donnons un produit parfait à l’usage
quotidien. Nous sommes sûrs que grâce à un grand soin que nous avons pris
pour fabriquer ce produit, il répondra à toutes vos exigences. Avant d’utiliser
le produit pour la première fois, lisez attentivement ce mode d’emploi.
Si vous avez des questions ou remarques relatives au produit acheté, n’hésitez
pas à nous contacter à l’adresse :
Renseignements importants :
Veuillez lire cette notice d’utilisation avant de commencer à manipuler le produit
afin de connaître ses fonctions et l’utiliser conformément à son usage prévu.
1.
Ne réalisez pas des dépannages du dispositif et ne le modifiez pas. Seulement
un service agréé peut procéder au dépannage du produit.
2.
Ne mettez le dispositif en marche si vous avez remarqué des dégâts de
quelque nature que ce soit.
3.
N’utilisez pas le dispositif quand il commence à fonctionner mal, il a été
tombé au sol ou immergé dans l’eau, il se chaue de façon excessive, il
y a des décolorations, renflements ou d’autres phénomènes atypiques.
Consultez un service agréé du fabricant.
4. Ne laissez jamais la pile branchée à un chargeur sans surveillance.
5.
Le dispositif est destiné aux enfants de plus de 8 ans. Ne laissez pas les
enfants plus jeunes jouer avec le produit.
6.
Utilisez le dispositif à l’écart des sources de chaleur, des températures
élevées, des surfaces chaudes, de la lumière directe du soleil, des sources
d’étincellement, des flammes nues, des huiles et des arêtes vives.

FR
7.
N’utilisez pas le dispositif dans un environnement comprenant des
substances inflammables, explosives ou toxiques.
8. N’utilisez pas de substances chimiques pour nettoyer le dispositif.
9. Désactivez le dispositif et débranchez la pile après chaque utilisation.
10.
Ne plongez pas tout le dispositif dans l’eau ou dans un autre liquide.
N’utilisez pas à proximité de l’eau.
11. Avant de nettoyer ou de porter le dispositif, désactivez-le.
12.
N’utilisez pas le produit à d’autres fins que celles auxquelles il a été conçu.
13. Tenez le dispositif à l’écart des objets aigus.
14. Ne mettez pas d’autres objets sur le dispositif quand vous l’utilisez.
15.
N’utilisez le dispositif que sur des surfaces planes et dures. Évitez de
l’utiliser sur le sable, la pelouse ou sur d’autres surfaces qui peuvent causer
l’endommagement du dispositif.
16.
Pour recharger la pile, n’utilisez que le câble de recharge fourni avec le
produit.
17. Après chaque recharge, débranchez le câble USB de la prise USB.
18.
Prêtez attention à la polarité de la pile dans le dispositif et dans la manette.
19.
Dans le dispositif, n’utilisez que la pile fournie avec le produit, dans la
manette, on utilise deux piles AA 1,5 V (elles ne sont pas incluses). Dans
la manette, il convient de ne pas utiliser des accumulateurs.
20. Après avoir utilisé, ne touchez pas le moteur du véhicule, parce qu’il peut
avoir une température élevée.
21.
La source d’alimentation électrique utilisée dans ce jouet électrique devrait
être contrôlée régulièrement en vue de détecter des endommagements
du câble de recharge, de la fiche, du boîtier ou d’autres pièces, et en cas
de dégâts, elle ne devrait pas être utilisée jusqu’au moment de réparation
de celle-ci.
22. Le jouet ne peut pas être branché à un nombre de sources d’alimentation
électrique supérieur à celui recommandé.
23.
Les accumulateurs devraient être rechargés uniquement sous la surveillance
d’adultes.
24. Il est nécessaire de retirer les accumulateurs du jouet avant de procéder
à leur recharge.
25.
Il convient de ne pas mettre de diérentes types de piles ou des piles
neuves et usées.
26. Il est nécessaire de retirer les piles usées du jouet.
27.
Il est interdit de mettre en contact les contacteurs d’alimentation électrique.
28. Il est interdit de recharger les piles à usage unique.

FR
SCHÉMA DU DISPOSITIF
Carrosserie
Couvercle du
compartiment à piles
Pile
Interrupteur
marche/arrêt
Régulateur
du braquage
des roues
SCHÉMA DE LA MANETTE
Diode d’
alimentation
électrique
Interrupteur
marche/arrêt
Papillon
des gaz
Joystick de braquage vers la gauche/vers la droite

FR
INSTALLATION DES PILES DANS LA
MANETTE
1. Enlevez le couvercle du compartiment à piles
2.
Mettez les deux piles AA 1,5 V. Prêtez une attention particulière à la
polarité des piles.
3. Installez le couvercle de nouveau. Rimettere il coperchio.

FR
RECHARGE DE LA PILE DU VÉHICULE
1.
Branchez le chargeur à la prise USB à l’ordinateur ou à l’adaptateur
USB. Puis, branchez la pile au recharger. La diode est allumée pendant
la recharge. Quand la pile sera chargée, la diode s’éteindra.
2.
Dévissez le vis de fixation sur le couvercle du compartiment à piles
dans la voiture et enlevez-le.
3. Branchez la pile, fermez le couvercle et vissez de nouveau.

FR
MODE D’UTILISATION
1. Bougez l’interrupteur marche/arrêt sur la voiture jusqu’à la
position ON Bougez l’interrupteur marche/arrêt de la manette
jusqu’à la position ON. La diode d’alimentation électrique
commencera à clignoter.
2. Attendez environ 15 secondes jusqu’à ce que la manette se
connecte avec la voiture.
3. La diode sera allumée en continu. Pour aller tout droit, bougez le
papillon des gaz vers l’arrière. Plus le papillon des gaz est bougé,
plus rapide sera la voiture. Bougez le papillon des gaz vers l’avant
pour freiner et pour aller vers l’arrière.
4. Tournez le joystick à gauche ou à droite pour faire tourner la voiture.

FR
RÉGLAGE DU BRAQUAGE
Si vous remarquez que la voiture tire à gauche ou à droite au lieu d’aller tout
droit vous pouvez régler le braquage à l’aide du régulateur.
NETTOYAGE ET ENTRETIEN
1. Avant de nettoyer, désactivez le dispositif et débranchez la pile.
2. Nettoyez la voiture et la manette à l’aide d’un chion humide.
3. N’utilisez pas de substances chimiques pour nettoyer le dispositif.
4. Après chaque utilisation, nettoyez la voiture du sable et de la poussière.
Les photos sont à caractère informatif, l’apparence réelle
des produits peut varier de celle présentée sur les photos.

ES
www.overmax.eu

ES
Introducción
¡Estimado Cliente!
Gracias por confiar en nosotros y elegir la marca Overmax. Gracias a la utilización de
materiales de alta calidad y soluciones tecnológicas modernas te proporcionamos
un producto ideal para el uso diario. Estamos seguros de que cumplirá tus
expectativas gracias al gran cuidado puesto en su fabricación. Antes de utilizar
el producto, lee atentamente las siguientes instrucciones de uso.
Si tienes algún comentario o pregunta sobre algún producto que hayas comprado,
por favor contacta con nosotros:
Información importante:
Por favor, lee este manual de instrucciones antes de utilizar el producto para
familiarizarte con sus funciones y utilizarlo de acuerdo con su uso previsto.
1. No se debe reparar ni realizar ninguna modificación en el dispositivo. Esta
actividad puede ser realizada exclusivamente por un proveedor de servicios
autorizado.
2. No conectes el dispositivo si has percibido algún defecto.
3. No utilices el dispositivo si comienza a funcionar de manera inapropiada, si
se ha caído o se ha sumergido en agua, si se calienta excesivamente, está
descolorido o deformado, o se producen otros fenómenos inusuales. Ponte
en contacto con el servicio autorizado del fabricante.
4. Nunca dejes las pilas conectadas al cargador sin supervisión.
5. El dispositivo está destinado a niños mayores de 8 años. No dejes que los
niños más pequeños jueguen con él.
6. Utiliza el aparato lejos de fuentes de calor, altas temperaturas, superficies
calientes, luz solar directa, fuentes de chispas, llamas abiertas, aceites y
bordes afilados.

ES
7.
No utilices el dispositivo en un entorno que presente sustancias inflamables,
explosivas o tóxicas.
8. No utilices productos químicos para limpiar el dispositivo.
9. Después de cada uso, apaga el dispositivo y desconecta las pilas.
10. No sumerjas todo el dispositivo en agua u otros líquidos. No utilizar cerca
del agua.
11. Antes de limpiar o mover el dispositivo, apágalo.
12. No utilices el dispositivo para fines distintos de aquellos para los que ha
sido diseñado.
13. Mantén el dispositivo alejado de objetos afilados.
14.
No coloques otros objetos encima del dispositivo cuando lo estés utilizando.
15.
Utiliza el dispositivo solo en superficies planas y duras. Evita la conducción
sobre arena, hierba u otras superficies que puedan causar daños en el
dispositivo.
16.
Utiliza exclusivamente el cable de carga suministrado para cargar las pilas.
17. Desconecta el cable USB de la toma USB después de cada carga.
18.
Presta atención a la polaridad de las pilas en el dispositivo y en el controlador.
19. En el dispositivo utiliza exclusivamente las pilas suministradas en el kit,
en el controlador se utilizan dos pilas AA 1,5 V (no incluídas en el kit). No
utilices pilas recargables en el controlador.
20. No toques el motor del coche después de usarlo ya que puede estar a una
temperatura muy alta.
21.
La fuente de alimentación utilizada con este juguete eléctrico debe
ser inspeccionada regularmente para detectar daños en el cable de
alimentación, conectores, carcasa u otras partes, si hay algún daño no
debe utilizarse hasta su reparación.
22.
El juguete no puede ser conectado a un número superior de fuentes de
alimentación al recomendado.
23.
Las pilas recargables deben recargarse solo bajo la supervisión de personas
adultas.
24. Las pilas deben ser extraídas del juguete antes de cargarlas.
25. No se deben mezclar diferentes tipos de pilas, o pilas nuevas y usadas.
26. Las pilas agotadas deber ser retiradas del juguete.
27.
Los terminales de la fuente de alimentación no deben estar en cortocircuito.
28. No recargues las pilas de un solo uso.

ES
ESQUEMA DEL DISPOSITIVO
Carrocería
Tapa de las pilas
Pilas
Conector
Regulador
de las ruedas
de dirección
DIAGRAMA DEL CONTROLADOR
Diodo de
alimentación
Conector
Acelerador
Mando de control para girar a la izquierda y a la derecha

ES
INSTALACIÓN DE LAS PILAS EN
EL CONTROLADOR
1. Retira la tapa de las pilas.
2.
Introduce dos pilas AA 1,5 V. Presta especial atención a la polaridad
de las pilas.
3. Vuelve a poner la tapa.

ES
CARGA DE LAS PILAS DEL COCHE
1.
Conecta el cargador a un puerto USB de tu ordenador o a un adaptador
USB. A continuación, conecta las pilas al cargador. Durante la carga, el
diodo se iluminará. Cuando las pilas estén cargadas, el diodo se apagará.
2. Afloja el tornillo de sujeción de la tapa de las pilas del coche y retírala.
3. Coloca las pilas, cierra la tapa y vuelve a atornillarla.

ES
UTILIZACIÓN
1. Coloca el interruptor del coche en la posición ON. Coloca el interruptor del
del controlador en la posición ON. El diodo de energía empieza a parpadear.
2. Espera unos 15 segundos hasta que el controlador se conecte al coche.
3. El diodo permanecerá encendido continuamente. Para que el
coche se mueva hacia adelante, desplaza el acelerador hacia
atrás. Contra más fuerte de desplace el acelerador, más rápido
se moverá el coche. Desplaza el acelerador hacia adelante para
frenar y para que el coche se mueva hacia atrás.
4. Gira el mando a la izquierda o a la derecha para hacer girar el coche.

ES
REGULACIÓN DE LA DIRECCIÓN
Si observas que el coche se desvía ligeramente hacia la izquierda o hacia la
derecha en lugar de ir recto, puedes ajustar la dirección con el regulador.
LIMPIEZA Y MANTENIMIENTO
1. Apaga el dispositivo y desconecta las pilas antes de limpiarlo.
2. Limpia el coche y el controlador con un paño húmedo.
3. No utilices productos químicos para limpiar el dispositivo.
4. Limpia el coche de arena y polvo después de cada uso.
Las fotos solo tienen carácter ilustrativo, el aspecto real de los productos
puede diferir de los presentados en las fotos.

NL
www.overmax.eu

NL
Inleiding
Beste klant!
Bedankt voor het vertrouwen dat u in ons stelt en voor het merk Overmax
heeft gekozen.
Dankzij het gebruik van hoogwaardige materialen en moderne technologische
oplossingen bieden wij u een product dat ideaal is voor dagelijks gebruik. Wij
zijn er zeker van dat het dankzij veel vakmanschap aan uw eisen voldoet.
Lees voor het gebruik van het product de volgende gebruiksaanwijzing
zorgvuldig door.
Als u opmerkingen of vragen heeft over een gekocht product, neem dan contact
met ons op:
Belangrijke informatie:
Lees deze handleiding door voordat u het product gebruikt om kennis te
maken met de functies ervan en deze te gebruiken voor het doel waarvoor
ze bedoeld zijn.
1. Probeer het apparaat niet te repareren of aan te passen. Dit kan alleen
worden gedaan door een erkend servicecentrum.
2. Gebruik het apparaat niet als u schade opmerkt.
3.
Gebruik het apparaat niet als het defect is, is gevallen of ondergedompeld
in water, overmatig heet is geworden, verkleurd is, of als er andere
ongebruikelijke verschijnselen zijn opgetreden. Neem contact op met
een erkend servicecentrum van de fabrikant.
4. Laat de batterij nooit onbeheerd achter in de lader.
5.
Het apparaat is ontworpen voor mensen ouder dan 14 jaar. Laat jongere
kinderen er niet mee spelen. Houd het apparaat buiten het bereik van kinderen.

NL
6.
Gebruik het apparaat niet in de buurt van warmtebronnen, hoge
temperaturen, hete oppervlakken, direct zonlicht, vonken, open vuur,
olie en scherpe randen.
7.
Gebruik het apparaat niet in een omgeving die ontvlambare, explosieve
of giftige stoen bevat.
8. Gebruik geen chemicaliën om het apparaat te reinigen.
9. Schakel het apparaat uit en ontkoppel de batterij na elk gebruik.
10.
Dompel het apparaat niet in zijn geheel onder in water of andere
vloeistoen. Niet gebruiken in de buurt van water.
11. Schakel het apparaat uit voordat u het reinigt of verplaatst.
12.
Gebruik het apparaat niet voor andere doeleinden dan waarvoor het
is ontworpen.
13. Houd het apparaat uit de buurt van scherpe voorwerpen.
14. Plaats geen andere voorwerpen op het apparaat terwijl u het gebruikt.
15. Gebruik het apparaat alleen op vlakke of harde oppervlakken. Vermijd
rijden op zand, gras of andere oppervlakken die het apparaat kunnen
beschadigen.
16. Gebruik alleen de meegeleverde lader om de batterij op te laden.
17. Koppel de lader na elke lading los van de USB-poort.
18. Let op de polariteit van de batterij in het apparaat en de controller.
19.
De controller gebruikt twee 1,5 V AA-batterijen (niet meegeleverd).
Gebruik geen oplaadbare batterijen in de controller.
20. Raak de motor van de auto na gebruik niet aan, omdat deze heet kan
zijn.
21.
Transformator, voeding of batterijlader die met het elektrische speelgoed
wordt gebruikt, meet regelmatig warden gecontroleerd op schade aan
het netsnoer, de stekker, de behuizing of andere onderdelen, en in het
geval van dergelijke schade, mag deze niet warden gebruikt totdat de
schade is hersteld.
22. Het speelgoed mag niet op meer stroombronnen warden aangesloten
dan aanbevolen.
23. Laad de batterijen a Ileen ender toezicht van een volwassene op.
24.
Batterijen moeten uit het speelgoed warden verwijderd voordat ze
warden opgeladen.
25. Gebruik geen verschillende soorten batterijen of nieuwe en gebruikte
batterijen.
26. Verwijder lege batterijen uit het speelgoed.
27. Vermogensklemmen mogen niet warden kortgesloten.

NL
SCHEMA VAN HET APPARAAT
lichaam
Batterij deksel
Batterij
Schakelaar
Stuurwiel
versteller
SCHEMA VAN DE CONTROLLER
Power LED
Schakelaar
Smoorklep
Bedieningsknop links en rechts

NL
INSTALLATIE VAN DE BATTERIJ IN DE
CONTROLLER
1. Verwijder het batterijdeksel.
2.
Plaats twee 1,5 V AA-batterijen. Let in het bijzonder op de polariteit
van de batterij.
3. Doe de deksel er weer op.

NL
HET OPLADEN VAN DE AUTOACCU
1. Sluit de lader aan op een USB-poort van uw computer of op een USB-
adapter. Sluit vervolgens de batterij aan op de lader. Wanneer de batterij
volledig is opgeladen, gaat de LED branden. De LED brandt niet tijdens
het laden.
2. Schroef de bevestigingsschroef van het batterijdeksel van de auto los
en verwijder deze.
3. Sluit de batterij aan, sluit het deksel en schroef het weer vast.

NL
HET GEBRUIK
1. Schuif de schakelaar op de autoschakelaar in de stand ON.
2. Schuif de regelaarschakelaar in de stand ON (aan). De aan/uit-
led zal knipperen. Wacht ongeveer 15 seconden tot de controller
verbinding maakt met de auto. De LED zal continu oplichten.
3. Om vooruit te gaan, schuif de gashendel naar achteren. Hoe harder
de gashendel wordt bewogen, hoe sneller de auto zal bewegen.
Schuif de gashendel naar voren om te remmen en rij achteruit.
4. Draai de knop naar links of rechts om de auto te laten draaien.

NL
STUURCONTROLE
Als u merkt dat uw auto niet rechtdoor gaat, maar iets naar links of rechts
afbuigt, kunt u de bocht aanpassen door middel van een afsteller.
REINIGING EN ONDERHOUD
1. Schakel het apparaat uit en koppel de batterij los voordat u het
apparaat schoonmaakt.
2. Reinig de auto en de controller met een vochtige doek.
3. Gebruik geen chemicaliën om de machine te reinigen.
4. Reinig de auto na elk gebruik van zand en stof.
De foto’s zijn slechts ter illustratie, het werkelijke uiterlijk van
de producten kan afwijken van de foto’s die worden getoond.

UK
www.overmax.eu

UK
Дорогий клієнт!
Дорогий клієнт!
Дякуємо за довіру до нас i вибір марки Overmax. Завдяки використанню
високоякісних матеріалів та сучасних технологічних рішень, ми
надаємо Вам продукт, який ідеально підходить для щоденного
використання. Ми впевнені, що він буде відповідати Вашим вимогам
завдяки великій ретельності його виготовлення. Перед використанням
продукту уважно прочитайте наступну інструкцію з експлуатації.
Якщо у вас є будь-які зауваження або запитання щодо придбаного
вами продукту, будь ласка, зв’яжіться з нами:
Важлива інформація:
Будь ласка, прочитайте цю інструкцію перед використанням продукту,
щоб ознайомитися з його функціями та використовувати їх за
призначенням.
1.
Не ремонтуйте та не модифікуйте пристрій. Ці дії може виконувати
лише уповноважений сервісний центр.
2. Не запускайте пристрій, якщо Ви помітите будь-яке пошкодження.
3. Не використовуйте пристрій, коли він починає виходити з ладу, впав
або занурився у воду, надмірно нагрівається, відбулась зміна кольору,
з’являються нерівності або та при виникненні інших незвичних явищ.
Зверніться до уповноваженого сервісного центру виробника.
4.
Ніколи не залишайте батарею підключеною до зарядного пристрою
без нагляду.
5.
Пристрій призначений для осіб старше 8 років. Не дозволяйте дітям
молодшого віку самостійно гратися з пристроєм.

UK
6.
Використовуйте пристрій подалі від джерел тепла, високих
температур, гарячих поверхонь, прямих сонячних променів,
іскроутворюючих джерел, відкритого вогню, масла та гострих країв.
7.
Не використовуйте пристрій у середовищі, що містить
легкозаймисті, вибухонебезпечні та токсичні речовини.
8. Не застосовуйте для очищення пристрою хімічні засоби.
9.
Вимикайте пристрій та виймайте батарею після кожного використання.
10. Не занурюйте весь пристрій у воду або інші рідини.
11.
Не використовуйте поблизу води. Перед чищенням або
переміщенням пристрою вимкніть його.
12.
Не використовуйте пристрій для інших цілей, крім тих, для яких він
був розроблений.Тримайте пристрій подалі від гострих предметів.
13.
Не кладіть інші предмети на пристрою під час його використання.
14. Використовуйте пристрій лише на рівних і твердих поверхнях.
15.
Уникайте їзди по піску, траві або інших поверхнях, які можуть
пошкодити пристрій.
16. Для заряджання батареї використовуйте лише зарядний кабель,
що входить у комплект.
17.
Після кожного заряджання від’єднуйте зарядний кабель від USB-роз’єму.
18. Зверніть увагу на полярність батареї у пристрої а контролері.
19.
Використовуйте лише батарею, що входить у комплект пристрою,
контролер використовує дві батареї типу АА 1,5 В (не входять в
комплект). Не використовуйте акумулятори в контролері.
20. Після використання не торкайтесь двигуна автомобіля, оскільки
він може мати високу температуру.
21.
Джерело живлення, що використовується з цією електричною
іграшкою, слід регулярно перевіряти на предмет пошкодження
шнура живлення, штекера, корпусу чи інших елементів та у
випадку пошкодження його не слід використовувати, поки не
буде відремонтоване.
22.
Не під’єднуйте іграшку до більшої кількості джерел живлення,
ніж рекомендовано.
23. Заряджайте акумулятори лише під наглядом дорослих.
24. Перед зарядкою акумулятори потрібно вийняти з іграшки.
25.
Не використовуйте різні типи батарей або нові та вживані батареї.
26. Вийміть з іграшки розряджені батареї.
27. Не замикайте клеми живлення.
28. Не заряджайте одноразових батерей.

UK
СХЕМА ПРИСТРОЮ
Кузов
Кришка на
батарею
Батарея
Перемикач
Регулятор
повороту
коліс
СХЕМА КОНТРОЛЕРА
Світлодіод
живлення
Світлодіод
живлення
Дросельна
заслінка
Ручка для управління ліво та право

UK
ВСТАНОВЛЕННЯ БАТАРЕЇ В
КОНТРОЛЕРІ
1. Зніміть кришку батареї.
2. Вставте дві батареї типу АА 1,5 В. Зверніть особливу увагу на
полярність батарей.
3. Покладіть кришку назад.

UK
ЗАРЯДЖАННЯ БАТАРЕЇ АВТОМОБІЛЯ
1.
Підключіть зарядний пристрій до USB-порту на комп’ютері або до
USB-адаптера живлення. Потім підключіть батарею до зарядного
пристрою. Світлодіод світиться під час заряджання. Світлодіод
вимикається, коли акумулятор заряджена.
2.
Відкрутіть фіксуючий гвинт на кришці батареї в автомобілі та
зніміть її.
3. Підключіть батарею, закрийте кришку та прикрутіть її назад.

UK
СПОСІБ ВИКОРИСТАННЯ
1. Переведіть перемикач на автомобілі в положення ON.
Переведіть перемикач контролера в положення ON.
2. Світлодіод живлення буде блимати. Зачекайте приблизно
15 секунд, поки контролер підключиться до автомобіля.
3. Світлодіод буде світитися постійно. Щоб їхати вперед, поверніть
дросельну заслінку назад. Чим більше вона повернена, тим
швидше автомобіль рухатиметься. Перемістіть дросельну
заслінку вперед, щоб загальмувати та їздити назад.
4. Щоб автомобіль повернув, поверніть ручку вліво або вправо.

UK
РЕГУЛЮВАННЯ ПОВОРОТУ
Якщо Ви помітили, що автомобіль трохи відхиляється вліво або
вправо від прямолінійного руху, ви можете регулювати поворот за
допомогою регулятора.
ЧИЩЕННЯ ТА ОБСЛУГОВУВАННЯ
1. Перед очищенням вимкніть пристрій та вийміть батарею.
2. Очищайте автомобіль та контролер вологою ганчіркою.
3. Не застосовуйте для очищення пристрою хімічні засоби.
4. Очищайте автомобіль від піску та пилу після кожного використання.
Фотографії служать лише для ілюстрації, фактичний зовнішній
вигляд продуку може відрізнятися від представленого на фото.

LT
www.overmax.eu

LT
Įvadas
Gerbiamas Kliente!
Dėkojame, kad pasitikėjote mumis ir pasirinkote prekės ženklą „Overmax“. Dėl
aukštos kokybės medžiagų panaudojimo ir modernių technologinių sprendimų
mes siūlome Jums produktą, kuris idealiai tinka kasdieniam naudojimui. Esame
tikri, kad dėl kruopštaus pagaminimo, jis puikiai atitiks Jūsų reikalavimus. Prieš
naudodami gaminį, atidžiai perskaitykite šias instrukcijas. Jei turite komentarų
ar klausimų apie įsigytą produktą, susisiekite su mumis:
Svarbios informacijos:
Prieš pradėdami naudoti gaminį, perskaitykite šį vadovą, kad galėtumėte
susipažinti su jo funkcijomis ir naudoti pagal paskirtį.
1.
Neremontuokite ir nemodifikuokite prietaiso. Šias veiklas gali atlikti tik
įgaliotasis techninės priežiūros centras.
2. Neįjunkite prietaiso, jei pastebėjote kokių nors pažeidimų.
3.
Nenaudokite prietaiso, kai jis pradeda blogai veikti, buvo nukritęs ar
panardintas į vandenį, pernelyg įkaista, atsiranda spalvos pakitimų,
išsipūtimų ar kitų neįprastų reiškinių. Kreipkitės į įgaliotą gamintojo tarnybą.
4.
Niekada nepalikite prie įkrovimo prijungto akumuliatoriaus be priežiūros.
5.
Prietaisas skirtas vyresniems nei 8 metų žmonėms. Neleiskite
jaunesniems vaikams su juo žaisti.
6.
Prietaisą naudokite atokiau nuo šilumos šaltinių, aukštos temperatūros,
karštų paviršių, tiesioginių saulės spindulių, kibirkščių, atviros liepsnos,
alyvų ir aštrių kraštų.
7.
Nenaudokite prietaiso aplinkoje, kurioje yra degių, sprogstamų ar toksiškų
medžiagų.

LT
8. Prietaisui valyti nenaudokite chemikalų.
9. Po kiekvieno naudojimo išjunkite prietaisą ir atjunkite akumuliatorių.
10. Nemerkite viso prietaiso į vandenį ar kitus skysčius.
11.
Nenaudokite šalia vandens. Prieš valydami ar perkeldami prietaisą,
išjunkite jį.
12. Nenaudokite prietaiso kitiems tikslams, nei jis buvo suprojektuotas.
13. Laikykite prietaisą atokiau nuo aštrių daiktų.
14. Nestatykite kitų daiktų ant prietaiso, kai jį naudojate.
15. Prietaisą naudokite tik ant plokščių ir kietų paviršių.
16.
Venkite važiuoti smėliu, žole ar kitu paviršiumi, kurisgali sugadinti
prietaisą.
17.
Akumuliatoriui įkrauti naudokite tik pridedamą rinkinyje įkrovimo laidą.
Po kiekvieno įkrovimo atjunkite įkrovimo laidą iš USB lizdo.
18. Atkreipkite dėmesį į prietaiso ir valdiklio baterijų poliškumą.
19. Įrenginyje naudokite tik komplekte esančią bateriją, valdiklis naudoja
tris 1,5 V AA baterijas (nepridedamos). Valdiklyje nenaudokite įkraunamų
baterijų.
20. Po naudojimo nelieskite automobilio variklio, nes jis gali būti aukštos
temperatūros.
21.
Su šiuo elektriniu žaislu naudojamas maitinimo šaltinis turėtų būti
reguliariai tikrinamas, ar nėra pažeistas maitinimo laidas, kištukas,
korpusas ar kitos dalys, o jei yra sugadintas, neturėtų būti naudojamas,
kol jis bus suremontuotas.
22.
Žaislas neturi būti prijungtas prie daugiau nei rekomenduojamų
maitinimo šaltinių vienetų.
23. Kraunamas baterijas galima įkrauti tik prižiūrint suaugusiems.
24. Prieš įkraunant, iš žaislo reikia išimti baterijas.
25. Nenaudokite skirtingų tipų baterijų ar naujų ir naudotų baterijų kartu.
26. Išimkite iš žaislo išsekusias baterijas.
27. Su maitinimo gnybtais nedarykite trumpojo jungimo.
28. Neįkraunamų baterijų negalima įkrauti.

LT
PRIETAISO SCHEMA
Kėbulas
Baterijos dangtis
Baterija
Jungiklis
Ratų
pasukimo
reguliatorius
VALDIKLIO SCHEMA
Matinimo
šviesos diodas
Jungiklis
Droselis
Valdymo rankenėlė į kairę ir į dešinę

LT
BATERIJŲ MONTAVIMAS VALDIKLYJE
1. Nuimkite akumuliatoriaus dangtį.
2.
Įdėkite tris AA 1,5 V baterijas. Ypatingą dėmesį atkreipkite į baterijų
poliškumą.
3. Vėl uždėkite dangtį.

LT
AUTOMOBILIO BATERIJOS ĮKROVIMAS
1. Prijunkite įkrovimo laidą prie kompiuterio USB prievado arba prie USB
maitinimo adapterio. Tada prijunkite akumuliatorių prie įkrovimo
kabelio. Įkrovimo metu LED diodas šviečia.
2.
Atsukite automobilyje akumuliatoriaus dangtelio tvirtinimo varžtą
ir nuimkite jį.
3. Prijunkite akumuliatorių, uždarykite dangtelį ir vėl prisukite.

LT
NAUDOJIMO BŪDAS
1. Automobilio jungiklį nustatykite į padėtį ON. Perkelkite valdiklio
jungiklį į ON padėtį. Maitinimo šviesos diodas pradės mirksėti.
2. Palaukite maždaug 15 sekundžių, kol valdiklis prisijungs prie
automobilio. Šviesos diodas nuolat degs.
3. Norėdami važiuoti į priekį, pastumkite droselį atgal. Kuo stipriau
droselis stumiamas, tuo greičiau automobilis judės. Paslinkite
droselį į priekį, kad stabdytumėte ir važiuotumėte atgal.
4. Pasukite rankenėlę kairėn arba dešinėn, kad automobilis pasisuktų.

LT
POSŪKIO REGULIAVIMAS
Jei pastebėsite, kad automobilis, užuot važiavęs tiesiai, šiek tiek nukrypsta į
kairę arba į dešinę, posūkį galite reguliuoti valdiklio reguliatoriumi
VALYMAS IR PRIEŽIŪRA
1. Prieš valydami atjunkite įrenginį ir išimkite baterijas.
2. Valykite automobilį ir valdiklį drėgnu skudurėliu.
3. Nenaudokite chemikalų prietaisui valyti.
4. Po kiekvieno naudojimo nuvalykite automobilį nuo smėlio ir dulkių.
Nuotraukos yra tik iliustracinės, tikroji gaminių išvaizda
gali skirtis nuo pavaizduotų nuotraukose.

HR
www.overmax.eu

HR
Uvod
Poštovani!
Zahvaljujemo na Vašem povjerenju i što ste odabrali brend Overmax.
Zahvaljujući korištenju materijala visoke kvalitete i modernih tehnoloških
rješenja dajemo u Tvoje ruke proizvod savršen za svakodnevno korištenje.
Sigurni smo da zahvaljujući visokoj kvaliteti izrade ispunit će on Tvoja
očekivanja. Prije korištenja proizvoda pročitaj pažljivo niža uputstva.
Ukoliko imaš bilo kakve primjedbe ili pitanja u vezi kupljenog proizvoda,
kontaktiraj nas:
Važne informacije:
Molimo da pročitaš ova uputstva prije prvog korištenja proizvoda, kako bi
upoznao njegove funkcionalnosti i kako bi ih namjenski koristio.
1.
Ne smije se popravljati ili modificirati uređaj. Ove radnje smije izvršiti
jedino ovlašteni serviser.
2. Ne uključuj uređaj ukoliko si primijetio bilo koja oštećenja.
3.
Ne koristi uređaj ukoliko je počeo neispravno raditi, pao je ili je bio
potopljen u vodi, pregrijava se, pojavile su se promjene boje, izbočine ili
druge neobične pojave. Kontaktiraj ovlašteni servis proizvođača.
4. Nikad ne ostavljaj bateriju spojenu na punjenje bez nadzora.
5. Uređaj je namijenjen djeci starijoj od 8 godina. Ne dozvoli mlađoj djeci
da se njim igraju.
6.
Koristi uređaj daleko od izvora topline, visokih temperatura, vrućih
površina, direktne sunčeve svjetlosti, izvora
7.
Iskra, otvorenog plamena, ulja ili oštrih rubova. Ne koristi uređaj u blizini
lako zapaljivih, eksplozivnih ili toksičnih supstanci.
8. Ne koristi kemijska sredstva za čišćenje uređaja.

HR
9. Nakon svakog korištenja isključi uređaj i odspoji bateriju.
10. Ne potapaj cijeli uređaj u vodi ili drugim tekućinama.
11.
Ne koristi u blizini vode. Prije čišćenja ili premještanja uređaja, isključi ga.
12. Ne koristi uređaj u druge svrhe nego one za koje je dizajniran.
13. Drži uređaj daleko od oštrih predmeta.
14. Ne stavljaj druge predmete na uređaj, kada ga ne koristiš.
15. Koristi uređaj samo na ravnim i tvrdim površinama.
16.
Izbjegavaj vožnju po pijesku, travi i drugim površinama, koje mogu
uzrokovati oštećenje uređaja.
17.
Za punjenje baterija koristi samo priložen uz set kabel za napajanje.
Nakon svakog punjenja odspoji kabel USB iz USB porta.
18.
Obrati pozornost na polarizaciju baterije u uređaju i u daljinskom upravljaču.
19. U uređaju koristi isključivo baterije priložene uz set.
20.
U daljinskom upravljaču koriste se baterije AA 1,5 V (nisu uključene
uz set). U daljinskom upravljaču se ne smije koristiti punjive baterije.
21.
Nakon korištenja ne diraj motor vozila, jer može imati visoku temperaturu.
22.
Izvor napajanja, koji se koristi kod ove igračke, bi se trebao redovito
provjeravati s obzirom na oštećenja kabela za napajanje, utikača, oklopa
ili drugih dijelova, a u slučaju oštećenja ne bi se smio koristiti dok se
ne popravi.
23.
Igračku se ne smije spajati na više od preporučene količine izvora napajanja.
Akumulator je potrebno punjiti samo pod nadzorom odraslih osoba.
24. Akumulator je potrebno prije punjenja izvaditi iz igračke.
25.
Ne smije se stavljati različite tipove baterija ili nove i korištene baterije.
26. Potrošene baterije je potrebno ukloniti iz igračke.
27. Stege napajanja se ne smije stiskati.
28. Jednokratne baterije se ne smiju puniti.

HR
NACRT UREĐAJA
Karoserija
Poklopac baterija
Baterija
Prekidač
Regulator
okretanja
kotača
NACRT DALJINSKOG UPRAVLJAČA
Dioda
napajanja
Prekidač
Ručica za
ubrzavanje
Okrugli volan za upravljanje lijevo i desno

HR
MONTIRANJE BATERIJA U DALJINSKOM
UPRAVLJAČU
1. Ukloni poklopac baterija.
2.
Stavi tri baterije AA 1,5V, obrati posebnu pažnju na polarizaciju baterija.
3. Vrati poklopac baterija.

HR
PUNJENJE BATERIJA VOZILA
1.
Spoji punjač na USB port na računalu ili na USB uređaj za napajanje.
Onda spoji bateriju na punjač. Tijekom punjenja dioda svijetli. Kada se
baterija napuni dioda će se ugasiti.
2. Odvijaj vijak na poklopcu baterija na vozilu i ukloni ga.
3. Spoji bateriju, poklopi poklopac i ponovo zavijaj.

HR
NAČIN KORIŠTENJA
1. Pomakni prekidač na vozilu u poziciju ON. Pomakni prekidač
daljinskog upravljača u poziciju ON. Dioda napajanja će početi
treperiti.
2. Pričekaj 15 sekundi dok se daljinski upravljač spoji s vozilom.
3. Dioda će početi svijetliti neprestano. Za ići ravno, pomakni ručicu
put natrag. Što jače Pomičeš dršku, to se vozilo brže kreće. Pomakni
ručicu naprijed, kako bi zakočio i vozio unatrag.
4. Pomakni krug lijevo ili desno, kako bi vozilo skrenulo.

HR
PODEŠAVANJE SKRETANJA
Ukoliko primijetiš da vozilo umjesto ići ravno lagano ide put lijevo ili desno,
možeš podesiti skretanje regulatorom.
ČIŠĆENJE I ODRŽAVANJE
1. Prije čišćenja isključi uređaj i odspoji bateriju.
2. Čisti vozilo i daljinski upravljač vlažnom krpicom.
3. Ne koristi kemijska sredstva za čišćenje uređaja.
4. Nakon svakog korištenja očisti vozilo od pijeska i prašine.
Slike imaju ilustrativni karakter, stvarni izgled proizvoda
može se razlikovati od prikazanog na slikama.

Poznań, 10.10.2019
DEKLARACJA ZGODNOŚCI UE
H03/OV/20
1. Nr. 5902581653789
2. Nazwa i adres producenta lub jego upoważnionego
przedstawiciela:
BrandLine Group Sp. z o. o. ul. A. Kręglewskiego 1,
61-248 Poznań, POLSKA
3. Niniejsza deklaracja zgodności wydana zostaje na wyłączną
odpowiedzialność producenta: BrandLine Group Sp. z o. o.
4. Przedmiot deklaracji:
auto RC X-RALLY 2.0
5. Opisany w pkt 4 przedmiot niniejszej deklaracji jest zgodny z odnośnymi wymaganiami przepisów
wspólnotowych dotyczących harmonizacji.
6. Odwołania do odnośnych norm zharmonizowanych, które zastosowano, lub do specyfi kacji,
w odniesieniu do których deklarowana jest zgodność:
2014/53/UE – Dyrektywa Radiowa / Dyrektywa RED
2011/65/UE – Dyrektywa RoHS 2
2009/48/WE – Dyrektywa Zabawkowa TD
2014/30/UE – Dyrektywa Kompatybilności
Elektromagnetycznej EMC
EN 71-1:2014+A1:2018
PN-EN 71-1+A1:2018-08
EN 71-2:2011+A1:2014
PN-EN 71-2+A1:2014-06
EN 71-3:2019
PN-EN 71-3:2019-07
EN IEC 62115:2020+A11:2020
PN-EN IEC 62115:2020-04+A11:2020-07
ETSI EN 301 489-1 V2.2.3:2019
PN-ETSI EN 301 489-1 V2.2.3:2020-07
ETSI EN 301 489-3 V2.1.1:2019
PN-ETSI EN 301 489-3 V2.1.1:2019-10
ETSI EN 300 440 V2.2.1:2018
PN-ETSI EN 300 440 V2.2.1:2018-12
EN 62479:2010
PN-EN 62479:2011
EN 50663:2017
PN-EN 50663:2017-12
IEC 62321-3-1:2013
PN-EN 62321-3-1:2014-08
IEC 62321-4:2013+A1:2017
PN-EN 62321-4:2014-08+A1:2017-12
IEC 62321-5:2013
PN-EN 62321-5:2014-08
IEC 62321-6:2015
PN-EN 62321-6:2015-10
IEC 62321-7-1:2015
PN-EN 62321-7-1:2016-02
IEC 62321-7-2:2017
PN-EN 62321-7-2:2017-07
IEC 62321-8:2017
PN-EN 62321-8:2017-07
7. Informacje dodatkowe:
Numer niniejszej deklaracji H03/OV/20
Poznań, 10.10.2019
(miejsce idata wystawienia)
Członek zarządu
(podpis)

Poznań, 10.10.2019
DECLARATION OF CONFORMITY
H03/OV/20
1. Nr. 5902581653789
2. Name and address of the manufacturer or his authorized
representative:
BrandLine Group Sp. z o. o. ul. A. Kręglewskiego 1,
61-248 Poznań, POLAND
3. This declaration of conformity is issued under the sole
responsibility of the manufacturer: BrandLine Group Sp. z o. o.
4. Object Declaration
auto RC X-RALLY 2.0
5. Described in Section 4, the object of this declaration is in conformity with the relevant Community
harmonization legislation.
6. References to the relevant harmonized standards used, or specifi cations, for which compliance is declared:
2014/53 / EU - Radio Directive / RED Directive
2011/65 / EU - RoHS Directive 2
2009/48 / EC - TD Toy Directive
2014/30 / EU - EMC Electromagnetic Compatibility
Directive
EN 71-1:2014+A1:2018
EN 71-2:2011+A1:2014
EN 71-3:2019
EN IEC 62115:2020+A11:2020
ETSI EN 301 489-1 V2.2.3:2019
ETSI EN 301 489-3 V2.1.1:2019
ETSI EN 300 440 V2.2.1:2018
EN 62479:2010
EN 50663:2017
IEC 62321-3-1:2013
IEC 62321-4:2013+A1:2017
IEC 62321-5:2013
IEC 62321-6:2015
IEC 62321-7-1:2015
IEC 62321-7-2:2017
IEC 62321-8:2017
7. Additional information:
Number of this Declaration H03/OV/20
Poznań, 10.10.2019
(place and date of issue)
Member of the Board
(signature)

Poznań, 10.10.2019
KONFORMITÄTSERKLÄRUNG
H03/OV/20
1. Nr. 5902581653789
2. Name und Anschrift des Herstellers oder seines Bevoll-
mächtigten:
BrandLine Group Sp. z o. o. ul. A. Kręglewskiego 1,
61-248 Poznań, POLEN
3. Diese Konformitätserklärung wird unter der alleinigen
Verantwortung des Herstellers ausgestellt:
BrandLine Group Sp. z o. o.
4. Objekterklärung
RC-Auto X-RALLY 2.0
5. Der in Abschnitt 4 beschriebene Gegenstand dieser Erklärung entspricht den einschlägigen Rechtsvorschriften
zur Harmonisierung der Gemeinschaft.
6. Verweise auf die relevanten verwendeten harmonisierten Normen oder Spezifi kationen, für die die
Konformität erklärt wird:
2014/53 / EU - Radio Directive / RED Directive
2011/65 / EU - RoHS Directive 2
2009/48 / EC - TD Toy Directive
2014/30 / EU - EMC Electromagnetic Compatibility
Directive
EN 71-1:2014+A1:2018
EN 71-2:2011+A1:2014
EN 71-3:2019
EN IEC 62115:2020+A11:2020
ETSI EN 301 489-1 V2.2.3:2019
ETSI EN 301 489-3 V2.1.1:2019
ETSI EN 300 440 V2.2.1:2018
EN 62479:2010
EN 50663:2017
IEC 62321-3-1:2013
IEC 62321-4:2013+A1:2017
IEC 62321-5:2013
IEC 62321-6:2015
IEC 62321-7-1:2015
IEC 62321-7-2:2017
IEC 62321-8:2017
7. Zusätzliche Informationen:
Nummer dieser Erklärung H03/OV/20
Poznań, 10.10.2019
(Ort und Datum der Ausstellung)
Vorstandsmitglied
(Unterschrift)

Poznań, 10.10.2019
DICHIARAZIONE DI CONFORMITÀ
H03/OV/20
1. Nr. 5902581653789
2. Nome e indirizzo del fabbricante o del suo rappresentante
autorizzato:
BrandLine Group Sp. z o. o. ul. A. Kręglewskiego 1,
61-248 Poznań, POLONIA
3. La presente dichiarazione di conformità viene rilasciata sotto
la responsabilità esclusiva del produttore:
BrandLine Group Sp. z o. o.
4. Dichiarazione dell’oggetto
Auto radiocomandata X-RALLY 2.0
5. Descritto nella sezione 4, l’oggetto della presente dichiarazione è conforme alla pertinente normativa
comunitaria di armonizzazione.
6. Riferimenti alle pertinenti norme armonizzate utilizzate, o specifi che, per le quali è dichiarata la conformità:
2014/53 / EU - Radio Directive / RED Directive
2011/65 / EU - RoHS Directive 2
2009/48 / EC - TD Toy Directive
2014/30 / EU - EMC Electromagnetic Compatibility
Directive
EN 71-1:2014+A1:2018
EN 71-2:2011+A1:2014
EN 71-3:2019
EN IEC 62115:2020+A11:2020
ETSI EN 301 489-1 V2.2.3:2019
ETSI EN 301 489-3 V2.1.1:2019
ETSI EN 300 440 V2.2.1:2018
EN 62479:2010
EN 50663:2017
IEC 62321-3-1:2013
IEC 62321-4:2013+A1:2017
IEC 62321-5:2013
IEC 62321-6:2015
IEC 62321-7-1:2015
IEC 62321-7-2:2017
IEC 62321-8:2017
7. Informazioni aggiuntive:
Numero di questa dichiarazione H03/OV/20
Poznań, 10.10.2019
(luogo e data di rilascio)
Membro del Consiglio
(fi rma)

Poznań, 10.10.2019
DÉCLARATION DE CONFORMITÉ
H03/OV/20
1. Nr. 5902581653789
2. Nom et adresse du fabricant ou de son mandataire:
BrandLine Group Sp. z o. o. ul. A. Kręglewskiego 1,
61-248 Poznań, POLOGNE
3. Cette déclaration de conformité est émise sous la seule
responsabilité du fabricant: BrandLine Group Sp. z o. o.
4. Przedmiot deklaracji:
Voiture RC X-RALLY 2.0
5. Décrit dans la section 4, l’objet de cette déclaration est conforme à la législation communautaire
d’harmonisation pertinente.
6. Références aux normes harmonisées pertinentes utilisées ou aux spécifi cations pour lesquelles la conformité
est déclarée:
2014/53 / EU - Radio Directive / RED Directive
2011/65 / EU - RoHS Directive 2
2009/48 / EC - TD Toy Directive
2014/30 / EU - EMC Electromagnetic Compatibility
Directive
EN 71-1:2014+A1:2018
EN 71-2:2011+A1:2014
EN 71-3:2019
EN IEC 62115:2020+A11:2020
ETSI EN 301 489-1 V2.2.3:2019
ETSI EN 301 489-3 V2.1.1:2019
ETSI EN 300 440 V2.2.1:2018
EN 62479:2010
EN 50663:2017
IEC 62321-3-1:2013
IEC 62321-4:2013+A1:2017
IEC 62321-5:2013
IEC 62321-6:2015
IEC 62321-7-1:2015
IEC 62321-7-2:2017
IEC 62321-8:2017
7. Informations complémentaires:
Numéro de cette déclaration H03/OV/20
Poznań, 10.10.2019
(lieu et date de délivrance)
Membre du Conseil
(Signature)

Poznań, 10.10.2019
DECLARACIÓN DE CONFORMIDAD
H03/OV/20
1. Nr. 5902581653789
2. Nombre y dirección del fabricante o su representante
autorizado:
BrandLine Group Sp. z o. o. ul. A. Kręglewskiego 1,
61-248 Poznań, POLONIA
3. Esta declaración de conformidad se emite bajo la exclusiva
responsabilidad del fabricante: BrandLine Group Sp. z o. o.
4. Declaración de objeto
Coche RC X-RALLY 2.0
5. Descrito en la Sección 4, el objeto de esta declaración es conforme con la legislación comunitaria de
armonización pertinente.
6. Referencias a las normas armonizadas pertinentes utilizadas, o especifi caciones, cuyo cumplimiento se
declara:
2014/53 / EU - Radio Directive / RED Directive
2011/65 / EU - RoHS Directive 2
2009/48 / EC - TD Toy Directive
2014/30 / EU - EMC Electromagnetic Compatibility
Directive
EN 71-1:2014+A1:2018
EN 71-2:2011+A1:2014
EN 71-3:2019
EN IEC 62115:2020+A11:2020
ETSI EN 301 489-1 V2.2.3:2019
ETSI EN 301 489-3 V2.1.1:2019
ETSI EN 300 440 V2.2.1:2018
EN 62479:2010
EN 50663:2017
IEC 62321-3-1:2013
IEC 62321-4:2013+A1:2017
IEC 62321-5:2013
IEC 62321-6:2015
IEC 62321-7-1:2015
IEC 62321-7-2:2017
IEC 62321-8:2017
7. Información adicional:
Número de esta declaración H03/OV/20
Poznań, 10.10.2019
(Lugar y fecha de emisión)
Miembro del Consejo
(fi rma)

Poznań, 10.10.2019
CONFORMITEITSVERKLARING
H03/OV/20
1. Nr. 5902581653789
2. Naam en adres van de fabrikant of zijn gemachtigde:
BrandLine Group Sp. z o. o. ul. A. Kręglewskiego 1,
61-248 Poznań, POLEN
3. Deze conformiteitsverklaring wordt verstrekt onder de
exclusieve verantwoordelijkheid van de fabrikant: BrandLine
Group Sp. z o. o.
4. Objectverklaring:
RC auto X-RALLY 2.0
5. Beschreven in deel 4, is het onderwerp van deze verklaring in overeenstemming met de relevante
communautaire harmonisatiewetgeving.
6. Verwijzingen naar de relevante geharmoniseerde normen die worden gebruikt, of specifi caties, waarvoor
conformiteit wordt verklaard:
2014/53 / EU - Radio Directive / RED Directive
2011/65 / EU - RoHS Directive 2
2009/48 / EC - TD Toy Directive
2014/30 / EU - EMC Electromagnetic Compatibility
Directive
EN 71-1:2014+A1:2018
EN 71-2:2011+A1:2014
EN 71-3:2019
EN IEC 62115:2020+A11:2020
ETSI EN 301 489-1 V2.2.3:2019
ETSI EN 301 489-3 V2.1.1:2019
ETSI EN 300 440 V2.2.1:2018
EN 62479:2010
EN 50663:2017
IEC 62321-3-1:2013
IEC 62321-4:2013+A1:2017
IEC 62321-5:2013
IEC 62321-6:2015
IEC 62321-7-1:2015
IEC 62321-7-2:2017
IEC 62321-8:2017
7. Aanvullende informatie:
Nummer van deze verklaring H03/OV/20
Poznań, 10.10.2019
(plaats en datum van het probleem)
Bestuurslid
(handtekening)

Poznań, 10.10.2019
ДЕКЛАРАЦІЯ ПРО ВІДПОВІДНІСТЬ
H03/OV/20
1. Nr. 5902581653789
2. Назва та адреса виробника або його
уповноваженого представника:
BrandLine Group Sp. z o. o. ul. A. Kręglewskiego 1,
61-248 Познань, ПОЛЬЩА
3. Ця декларація про відповідність видається на
виключну відповідальність виробника: BrandLine
Group Sp. z o. o.
4. Декларація об’єкта
RC автомобіль X-RALLY 2.0
5. Описано в Розділі 4, об’єкт цієї декларації відповідає відповідному законодавству
Співтовариства про гармонізацію.
6. Посилання на відповідні гармонізовані стандарти, що використовуються, або специфікації,
щодо яких заявлено про відповідність:
2014/53 / EU - Radio Directive / RED Directive
2011/65 / EU - RoHS Directive 2
2009/48 / EC - TD Toy Directive
2014/30 / EU - EMC Electromagnetic Compatibility
Directive
EN 71-1:2014+A1:2018
EN 71-2:2011+A1:2014
EN 71-3:2019
EN IEC 62115:2020+A11:2020
ETSI EN 301 489-1 V2.2.3:2019
ETSI EN 301 489-3 V2.1.1:2019
ETSI EN 300 440 V2.2.1:2018
EN 62479:2010
EN 50663:2017
IEC 62321-3-1:2013
IEC 62321-4:2013+A1:2017
IEC 62321-5:2013
IEC 62321-6:2015
IEC 62321-7-1:2015
IEC 62321-7-2:2017
IEC 62321-8:2017
7. Додаткова інформація:
Номер цієї Декларації H03/OV/20
Poznań, 10.10.2019
(місце та дата випуску)
Член правління
(підпис)

Poznań, 10.10.2019
ATITIKTIES DEKLARACIJA
H03/OV/20
1. Nr. 5902581653789
2. Gamintojo arba jo įgalioto atstovo pavadinimas ir
adresas:
BrandLine Group Sp. z o. o. ul. A. Kręglewskiego 1,
61-248 Poznań, LENKIJA
3. Ši atitikties deklaracija yra išduodama tik gamintojo
atsakomybe: BrandLine Group Sp. z o. o.
4. Objekto deklaracija
RC automobili X-RALLY 2.0
5. Aprašytas 4 skirsnyje, šios deklaracijos objektas atitinka susijusius derinamuosius Bendrijos teisės aktus.
6. Nuorodos į atitinkamus darniuosius standartus arba specifi kacijas, kurių atitikimas deklaruojamas:
2014/53 / EU - Radio Directive / RED Directive
2011/65 / EU - RoHS Directive 2
2009/48 / EC - TD Toy Directive
2014/30 / EU - EMC Electromagnetic Compatibility
Directive
EN 71-1:2014+A1:2018
EN 71-2:2011+A1:2014
EN 71-3:2019
EN IEC 62115:2020+A11:2020
ETSI EN 301 489-1 V2.2.3:2019
ETSI EN 301 489-3 V2.1.1:2019
ETSI EN 300 440 V2.2.1:2018
EN 62479:2010
EN 50663:2017
IEC 62321-3-1:2013
IEC 62321-4:2013+A1:2017
IEC 62321-5:2013
IEC 62321-6:2015
IEC 62321-7-1:2015
IEC 62321-7-2:2017
IEC 62321-8:2017
7. Papildoma informacija:
Šios deklaracijos numeris H03/OV/20
Poznań, 10.10.2019
(išdavimo vieta ir data)
Tarybos narys
(parašas)

Poznań, 10.10.2019
IZJAVA O SUKLADNOSTI
H03/OV/20
1. Nr. 5902581653789
2. Ime i adresa proizvođača ili njegovog ovlaštenog pred-
stavnika:
BrandLine Group Sp. z o. o. ul. A. Kręglewskiego 1,
61-248 Poznań, POLJSKA
3. Ova izjava o sukladnosti izdana je na isključivu odgovornost
proizvođača: BrandLine Group Sp. z o. o.
4. Izjava o objektu
RC automobil X-RALLY 2.0
5. Opisan u odjeljku 4., cilj ove izjave je u skladu s relevantnim zakonodavstvom Zajednice za usklađivanje.
6. Reference na relevantne usklađene standarde koji se koriste ili specifi kacije za koje je deklarirana sukladnost:
2014/53 / EU - Radio Directive / RED Directive
2011/65 / EU - RoHS Directive 2
2009/48 / EC - TD Toy Directive
2014/30 / EU - EMC Electromagnetic Compatibility
Directive
EN 71-1:2014+A1:2018
EN 71-2:2011+A1:2014
EN 71-3:2019
EN IEC 62115:2020+A11:2020
ETSI EN 301 489-1 V2.2.3:2019
ETSI EN 301 489-3 V2.1.1:2019
ETSI EN 300 440 V2.2.1:2018
EN 62479:2010
EN 50663:2017
IEC 62321-3-1:2013
IEC 62321-4:2013+A1:2017
IEC 62321-5:2013
IEC 62321-6:2015
IEC 62321-7-1:2015
IEC 62321-7-2:2017
IEC 62321-8:2017
7. Dodatne informacije:
Broj ove izjave H03/OV/20
Poznań, 10.10.2019
(mjesto i datum izdavanja)
Član Odbora
(potpis)

www.overmax.eu
Documenttranscriptie
Rally 2.0 Instrukcja obsługi / User Manual / Bedienungsanleitung / Manuale d’uso / Manuel de l’Utilisateur / Manual de usuario / Handleiding / Посібник користувача / Vartotojo vadovas / Korisnički priručnik PL EN DE IT FR ES NL UK LT HR PL www.overmax.eu Wprowadzenie Drogi Kliencie! Dziękujemy za obdarzenie nas zaufaniem i wybranie marki Overmax. Dzięki wykorzystaniu wysokiej jakości materiałów i nowoczesnych rozwiązań technologicznych oddajemy w Twoje ręce produkt idealny do codziennego użytkowania. Jesteśmy pewni, że dzięki ogromnej staranności wykonania spełni on Twoje wymagania. Przed użyciem produktu zapoznaj się dokładnie z poniższą instrukcją obsługi. Jeśli masz jakiekolwiek uwagi lub pytania do zakupionego produktu, skontaktuj się z nami: [email protected] Ważne informacje: Prosimy o przeczytanie tej instrukcji przed przystąpieniem do obsługi produktu, aby zapoznać się z jego funkcjami i wykorzystać je zgodnie z przeznaczeniem. 1. 2. 3. 4. 5. 6. Nie należy naprawiać oraz dokonywać modyfikacji urządzenia. Czynności te może dokonać tylko autoryzowany serwis. Nie uruchamiaj urządzenia, jeżeli zauważyłeś jakiekolwiek uszkodzenia. Nie używaj urządzenia, gdy zaczyna wadliwie działać, zostało upuszczone lub zanurzone w wodzie, nadmiernie nagrzewa się, pojawią się odbarwienia, wybrzuszenia oraz gdy wystąpią inne nietypowe zjawiska. Skontaktuj się z autoryzowanym serwisem producenta. Nigdy nie zostawiaj baterii podłączonej do ładowania bez nadzoru. Urządzenie jest przeznaczone dla dzieci powyżej 8 roku życia. Nie pozwalaj, aby młodsze dzieci nim się bawiły. Używaj urządzenia z dala od źródeł ciepła, wysokich temperatur, gorących powierzchni, bezpośredniego światła słonecznego, źródeł iskrzenia, otwartego ognia, olei oraz ostrych krawędzi. PL PL 7. 8. 9. 10. 11. 12. 13. 14. 15. 16. 17. 18. 19. 20. 21. 22. 23. 24. 25. 26. 27. 28. Nie używaj urządzenia w otoczeniu zawierającego łatwopalne, wybuchowe lub toksyczne substancje. Nie używaj substancji chemicznych do czyszczenia urządzenia. Po każdym użyciu wyłącz urządzenie i odłącz baterię. Nie zanurzaj całego urządzenia w wodzie lub w innych cieczach. Nie używaj w pobliżu wody. Przed czyszczeniem lub przenoszeniem urządzenia, wyłącz je. Nie używaj urządzenia do innych celów, niż do których zostało ono zaprojektowane. Trzymaj urządzenie z dala od ostrych przedmiotów. Nie kładź innych przedmiotów na urządzeniu, kiedy z niego korzystasz. Korzystaj z urządzenia tylko na płaskich i twardych powierzchniach. Unikaj jazdy po piasku, trawie lub innych powierzchniach, które mogą spowodować uszkodzenie urządzenia. Do ładowania baterii używaj tylko przewodu ładującego załączonego do zestawu. Po każdym ładowaniu odłącz przewód USB od gniazda USB. Zwracaj uwagę na polaryzację baterii w urządzeniu oraz w kontrolerze. W urządzeniu używaj tylko baterii załączonej w zestawie, w kontrolerze używane są dwie baterie AA 1,5 V (nie znajdują się one w zestawie). W kontrolerze nie należy używać akumulatorków. Po użyciu nie dotykaj silnika samochodu, ponieważ może mieć wysoką temperaturę. Źródło zasilania stosowane przy tej zabawce elektrycznej powinno być regularnie kontrolowane pod kątem uszkodzeń przewodu zasilania, wtyczki, obudowy lub innych części, a w razie uszkodzeń nie powinno być wykorzystywane do momentu jego naprawienia. Zabawki nie można przyłączać do więcej niż zalecana liczby źródeł zasilania. Akumulatory należy ładować tylko pod nadzorem osób dorosłych. Akumulatory należy przed ładowaniem wyciągnąć z zabawki. Nie należy wkładać różnych typów baterii lub nowych i używanych baterii. Wyczerpane baterie należy wyjąć z zabawki. Zacisków zasilania nie należy zwierać. Baterii jednorazowego użytku nie należy ładować. SCHEMAT URZĄDZENIA PL Nadwozie Bateria Regulator skrętu kół Włącznik Pokrywa baterii SCHEMAT KONTROLERA Dioda zasilania Pokrętło do sterowania w lewo i prawo Włącznik Przepustnica PL MONTAŻ BATERII W KONTROLERZE 1. Zdejmij pokrywę baterii. 2. Włóż dwie baterie AA 1,5 V. Zwróć szczególną uwagę na polaryzację baterii. 3. Załóż pokrywę z powrotem. ŁADOWANIE BATERII SAMOCHODU 1. Podłącz ładowarkę do gniazda USB w komputerze lub do zasilacza USB. Następnie podłącz baterię do ładowarki. Podczas ładowania dioda świeci się. Gdy bateria będzie naładowana dioda zgaśnie. 2. Odkręć śrubkę mocującą na pokrywie baterii w samochodzie i zdejmij ją. 3. Podłącz baterię, zamknij pokrywę i przykręć z powrotem. PL PL SPOSÓB UŻYTKOWANIA 1. Przesuń włącznik na samochodzie do pozycji ON. 2. Przesuń włącznik kontrolera do pozycji ON. Dioda zasilania zacznie migać. Odczekaj ok. 15 sekund, aż kontroler połączy się z samochodem. Dioda zacznie świecić ciągłym światłem. 3. Aby jechać wprzód, przesuń przepustnicę do tyłu. Im mocniej przepustnica jest przesunięta, tym samochód szybciej będzie się poruszał. Przesuń przepustnicę do przodu, aby zahamować i jechać do tyłu. 4. Kręć pokrętłem w lewo lub w prawo, aby samochód skręcał. REGULACJA SKRĘTU Jeśli zauważysz, że samochód zamiast jechać prosto lekko zbacza na lewo lub prawo, możesz wyregulować skręt regulatorem. CZYSZCZENIE I KONSERWACJA 1. Przed czyszczeniem wyłącz urządzenie i odłącz baterię. 2. Czyść samochód i kontroler wilgotną szmatką. 3. Nie używaj substancji chemicznych do czyszczenia urządzenia. 4. Po każdym użyciu oczyść samochód z piasku i pyłu. Zdjęcia mają charakter poglądowy, rzeczywisty wygląd produktów może różnić się od prezentowanego na zdjęciach. PL EN www.overmax.eu INTRODUCTION Dear customer! Thank you for placing trust in us and choosing Overmax. Thanks to the use of high-quality materials and modern solutions, we provide you with a product perfect for everyday use. We are convinced that the product will satisfy your requirements as it has been designed with utmost care. Before you start using the product, please read this manual carefully. Should you have any remarks or questions concerning the product, please do not hesitate to contact us: [email protected] Important: Please read this manual before you start using the product to see all its functions and use them in accordance with intended use. 1. 2. 3. 4. 5. 6. Do not repair or modify the device. Only an authorized service technician is allowed to perform these operations. Do not switch the device on if you have noticed any damage. Do not use the device when it acts up, has been dropped or immersed in water, overheats extensively, is discolored or deformed, and when other atypical circumstances occur. Contact the manufacturer’s authorized service center. Never leave the charging battery unattended. The device is intended for children aged above 8. Do not let younger children play with it. Use the device away from sources of heat, high temperatures, hot surfaces, direct sunlight, source of ignition, naked flame, oils and sharp edges. EN EN 7. 8. 9. 10. 11. 12. 13. 14. 15. 16. 17. 18. 19. 20. 21. 22. 23. 24. 25. 26. 27. 28. Do not use the device in inflammable, explosive or toxic atmosphere. Do not use chemicals to clean the device. After every use, switch the device off and disconnect the battery. Do not immerse the entire device in water or other liquids. Do not use the device near water. Before you start cleaning or moving the device, switch it off. Do not use the device for other purposes than designed. Keep the device away from sharp items. Do not place other items on the device when you use it. Use the device on flat and hard surfaces only. Avoid going on sand, grass or other surfaces which may lead to damage. To charge a battery, use a supplied charging cord only. After every charging, disconnect the USB cable from the USB port. Pay attention to battery polarization in the device and controller. In the device use the supplied battery only, in the controller two batteries AA 1,5V are used (they are not supplied). In the controller do not use storage batteries. After the use, do not touch a car engine because it may be extremely hot. Transformer, power supply, or battery charger used with the electric toy shall be regularly examined for damage to the supply cord, plug, enclosure or other parts, and in the event of such damage, it shall not be used until the damage has been repaired. The toy must not be connected to more power sources than recommended. Recharge the batteries only under adult supervision. Batteries must be removed from the toy before charging. Do not use different types of batteries or new and used batteries. Remove exhausted batteries from the toy. Power terminals should not be short-circuited. Non-rechargeable batteries should not be recharged. DEVICE OUTLINE EN Body Battery Wheel turn adjustment On/off switch Battery cover CONTROLLER OUTLINE Left and right control knob Power LED On/off switch Choke valve EN HOW TO ASSEMBLE BATTERY IN THE CONTROLLER 1. Remove battery cover. 2. Insert two batteries AA 1,5 V. Pay special attention to battery terminals. 3. Put the cover back on. HOW TO CHARGE CAR BATTERY 1. Connect the charger to a USB port on your computer or to a USB power adapter. Then connect the battery to the charger. During charging the LED lights up. When the battery is charged, the LED will turn off. 2. Unscrew the camping screw from the car battery cover and remove it. 3. Connect the battery, close the cover and screw it back on. EN HOW TO USE EN 1. Set the car switch into ON. 2. Slide the controller switch into ON. Power LED will start flashing. Wait about 15 seconds until the controller has connected with the car. LED will go on continuously. 3. To go forward, move the choke valve to the back. The stronger the movement, the higher the speed of the car. Move the choke valve to the front, to stop and reverse. 4. Turn the knob left or right to make the car turn. TURN ADJUSTMENT If you have noticed that the car turns aside instead of going straight, you can adapt the turn with adjustment. CLEANING AND MAINTENANCE 1. Before you start cleaning, switch the device off and disconnect the battery. 2. Clean the car and controller with wet cloth. 3. Do not use chemicals to clean the device. 4. After every use, remove sand and dust from the car. The pictures are for reference only. The real design of the products may differ from the pictures presented. EN DE www.overmax.eu EINLEITUNG Sehr geehrte Kunden! Wir bedanken uns für Ihr Vertrauen und Auswahl der Marke Overmax. Wir geben zu Ihren Händen ein Produkt über, das dank hochwertigen Materialien und innovativen technologischen Lösungen perfekt für den täglichen Gebrauch ist. Wir sind sicher, dass dank einer sehr sorgfältigen Ausführung unser Produkt Ihre Anforderungen erfüllt. Vor dem Gebrauch lesen Sie genau die vorliegende Bedienungsanleitung durch. Falls Bemerkungen oder Fragen zum gekauften Produkt, nehmen Sie mit uns Kontakt auf: [email protected] WICHTIGE INFORMATIONEN Bitte, die vorliegende Bedienungsanleitung vor dem Gebrauch des Gerätes durchzulesen, um seine Funktionen kennen zu lernen und es bestimmungsgemäß zu verwenden. 1. 2. 3. 4. 5. 6. Das Gerät darf nicht repariert oder modifiziert werden. Diese Tätigkeiten dürfen nur durch ein autorisiertes Service durchgeführt werden. Betätigen Sie das Gerät nicht, wenn Sie die Beschädigungen bemerkten. Das Gerät soll nicht verwendet werden, wenn es mangelhaft funktioniert, fallen gelassen oder eingeweicht wurde oder, wenn andere ungewöhnlichen Erscheinungen vorkommen. Nehmen Sie Kontakt mit dem autorisierten Service des Herstellers auf. Lassen Sie die Batterie während des Ladevorgangs nie unbeaufsichtigt. Dieses Gerät ist kein Spielzeug. Das Gerät ist für die Kinder über 8 Jahre alt bestimmt. Das Gerät soll weit von den Wärmequellen, hohen Temperaturen, heißen Flächen, direkter Sonnenstrahlung, Funkenquellen, offenem Feuer, Ölen und scharfen Kanten verwendet werden. DE 7. 8. 9. 10. DE 11. 12. 13. 14. 15. 16. 17. 18. 19. 20. 21. 22. 23. 24. 25. 26. 27. 28. Benutzen Sie das Gerät nicht in der Nähe von brennbaren, explosiven oder toxischen Stoffen. Verwenden Sie keine Chemikalien zur Reinigung des Gerätes. Nach jedem Gebrauch schalten Sie das Gerät aus und schalten Sie die Batterie ab. Tauchen Sie das Gerät niemals in Wasser oder andere Flüssigkeiten. Verwenden Sie es nicht in der Nähe vom Wasser. Vor der Reinigung oder Tragen des Gerätes, schalten Sie es aus. Das Gerät darf nicht für die anderen Zwecke als die bestimmungsgemäße Verwendung benutzt werden. Bewahren Sie das Gerät weit von den scharfen Gegenständen auf. Bei der Verwendung stellen Sie keine Gegenstände auf das Gerät. Benutzen Sie das Gerät nur auf ebenen und harten Oberflächen. Vermeiden Sie die Sandflächen, Gras oder andere Fläche, die eine Beschädigung des Gerätes verursachen können. Verwenden Sie zum Laden des Akkus nur das mitgelieferte Ladekabel. Trennen Sie das USB-Kabel nach jedem Ladevorgang von der USB-Buchse. Beachten Sie die richtige Polarisation der Batterien im Gerät oder Controller. Im Gerät benutzen Sie nur die im Set beinhaltete Batterie. Im Controller werden zwei Batterien AA 1,5V benutzt (nicht im Set beinhaltet). Im Controller dürfen keine Akkus verwendet werden. Nach dem Gebrauch fassen Sie den Motor des Autos nicht an, weil er sehr heiß sein kann. Der mit dem elektrischen Spielzeug verwendete Transformator, das Netzteil oder das Batterieladegerät müssen regelmäßig auf Beschädigungen des Versorgungskabels, des Steckers, des Gehäuses oder anderer Teile überprüft werden. Im Falle einer solchen Beschädigung darf es erst verwendet werden, wenn der Schaden behoben wurde . Das Spielzeug darf nicht an mehr Stromquellen als empfohlen angeschlossen werden. Laden Sie die Batterien nur unter Aufsicht von Erwachsenen auf. Vor dem Laden müssen die Batterien aus dem Spielzeug entfernt werden. Verwenden Sie keine anderen Batterietypen oder neue und gebrauchte Batterien. Entfernen Sie die verbrauchten Batterien aus dem Spielzeug. Stromanschlüsse dürfen nicht kurzgeschlossen werden. Nicht wiederaufladbare Batterien sollten nicht aufgeladen werden. SCHEMA DES GERÄTES Karosserie Batterie DE Regler der Lenkvorrichtung Einschalter Batterieabdeckung SCHEMA DES CONTROLLERS Drehknopf zur Steuerung nach links und rechts Power-Diode Einschalter Drosselklapppe BATTERIEMONTAGE IM CONTROLLER 1. Nehmen Sie die Batterieabdeckung ab. DE 2. Legen Sie zwei Batterien AA 1,5 V ein. Beachten Sie die richtige Polarisation der Batterien. 3. Setzen Sie wieder die Batterieabdeckung. LADUNG DER BATTERIEN VOM AUTO 1. Schließen Sie das Ladegerät an einen USB-Anschluss Ihres Computers oder an ein USB-Netzteil an. Schließen Sie dann den Akku an das Ladegerät an. Während des Ladevorgangs leuchtet die LED. Wenn der Akku aufgeladen ist, erlischt die LED. 2. Schrauben Sie die Schraube an der Batterieabdeckung ab und nehmen Sie sie ab. 3. Schließen Sie die Batterie an, schließen Sie die Abdeckung und ziehen Sie die Schraube wieder an. DE GEBRAUCHSWEISE 1. Schieben Sie den Einschalter des Autos auf die ON-Position. 2. Schieben Sie den Einschalter des Controllers auf die ON-Position. Die Power-Diode wird blinken. Warten Sie ca. 15 Sekunden, bis der Controller DE sich mit dem Auto verbindet. Die Diode wird ständig leuchten. 3. Um vorwärts zu fahren, schieben Sie die Drosselklappe nach hinten. Je stärker die Drosselklappe geschoben wurde, desto schneller wird das Auto fahren. Schieben Sie die Drosselklappe nach vorne, um das Auto zu stoppen und rückwärts zu fahren. 4. Drehen Sie mit dem Drehknopf nach rechts oder links, damit das Auto lenkt. VERSTELLUNG DES LENKWINKELS Wenn Sie bemerken, dass das Auto, statt geradeaus zu fahren, nach links oder rechts abbiegt, können Sie die Drehung mit dem Drehknopf regulieren. DE WARTUNG UND REINIGUNG 1. Vor der Reinigung schließen Sie das Gerät aus und klemmen Sie die Batterie ab. 2. Reinigen Sie das Auto und den Controller mit einem feuchten Tuch. 3. Benutzen Sie keine chemische Mittel zur Reinigung des Autos. 4. Nach jedem Gebrauch reinigen Sie das Auto von Sand und Staub. Die Fotos sind anschaulich, das tatsächliche Aussehen der Produkte kann von der gezeigten Abbildung abweichen. IT www.overmax.eu Introduzione Gentile Cliente! Ringraziamo per aver riposto in noi la Vostra fiducia e aver scelto prodotto di un marchio Overmax. Grazie all’uso di materiali di alta qualità e soluzioni tecnologiche moderne, vi diamo un prodotto ideale per l’uso quotidiano. Siamo sicuri che, grazie alla grande cura posta nella sua fabbricazione, soddisferà le vostre esigenze. Prima di utilizzare il prodotto, leggere attentamente le seguenti istruzioni. Se avete commenti o domande sul prodotto acquistato, contattateci: [email protected] Informazioni importanti: Si prega di leggere questo manuale prima di utilizzare il prodotto per scoprire le sue caratteristiche e usarlo come previsto. 1. 2. 3. 4. 5. 6. Non riparare o modificare il dispositivo. Questo può essere fatto solo da un centro di assistenza autorizzato. Non mettere in funzione il dispositivo se si notano danni. Non usare il dispositivo se comincia a funzionare male, se è stata lasciata cadere o immersa in acqua, se diventa eccessivamente calda o se mostra scolorimento, rigonfiamenti o altre condizioni anomale. Contattare il centro di assistenza autorizzato dal produttore. Non lasciare mai incustodita la batteria collegata a un caricatore. Questo dispositivo è destinato all’uso da parte di bambini di età superiore agli 8 anni. Non permettere ai bambini più piccoli di giocarci. Usare il dispositivo lontano da fonti di calore e temperature elevate, fonti di scintille, fiamme aperte, superfici calde, luce solare diretta, oli e bordi taglienti IT. IT 7. 8. 9. 10. 11. 12. IT 13. 14. 15. 16. 17. 18. 19. 20. 21. 22. 23. 24. 25. 26. 27. 28. Non utilizzare il dispositivo in un ambiente contenente sostanze infiammabili, sostanze esplosive o tossiche. Non usare sostanze chimiche per pulire il dispositivo. Dopo ogni utilizzo, spegnere il dispositivo e scollegare la batteria. Non immergere l’intero dispositivo in acqua o altri liquidi. Non usare vicino all’acqua. Prima di pulire o spostare il dispositivo, spegnerlo. Non utilizzare il dispositivo per scopi diversi da quelli per cui è stato progettato. Tenere il dispositivo lontano da oggetti appuntiti. Non mettere altri oggetti sopra il dispositivo quando lo state usando. Utilizzare il dispositivo solo su superfici piane e dure. Evitare di guidare su sabbia, erba o altre superfici che può causare danni al dispositivo. Usare solo il cavo di ricarica incluso per caricare la batteria. Dopo ogni ricarica scollegare il cavo USB dalla porta USB. Fare attenzione alla polarità della batteria nel dispositivo e nel controller. Utilizzare solo la batteria inclusa nel dispositivo, nel controller vengono usate le due batterie AA 1,5 V (non incluse Non utilizzare batterie ricaricabili nel controller. Non toccare il motore dell’auto dopo l’uso, perché potrebbe avere la temperatura elevata. La fonte di alimentazione utilizzata per questo giocattolo elettrico dovrebbe essere regolarmente controllato per eventuali danni al cavo di alimentazione, spina, involucro oppure altre parti, e se danneggiato non devono essere utilizzati fino a quanto non sarà riparato. I giocattoli non devono essere collegati a più di un numero raccomandato delle fonti di alimentazione. Caricare le batterie ricaricabili solo sotto la supervisione di un adulto. Le batterie ricaricabili devono essere rimosse dal giocattolo prima della ricarica. Non inserire diverse tipi di batterie o batterie nuove e usate. Rimuovere le batterie esaurite dal giocattolo. Non cortocircuitare i terminali di alimentazione. Non ricaricare le batterie usa e getta. SCHEMA DEL DISPOSITIVO Carrozzeria Regoltore dello sterzo delle ruote Batteria IT Interruttore Coperchio della batteria SCHEMA DEL CONTROLLER Diodo di alimentazione Manopola per girare a destra e a sinistra Interruttore Acceleratore INSTALLAZIONE DELLA BATTERIA NEL CONTROLLER 1. Rimuovere il coperchio della batteria. 2. Inserire due batterie AA 1,5 V. Prestare particolare attenzione alla polarità della batteria. 3. Rimettere il coperchio. IT RICARICA DELLA BATTERIA DELL’AUTO 1. 2. Collegare il caricatore a una porta USB del computer o a un adattatore di alimentazione USB. Poi collegare la batteria al caricatore. Durante la ricarica il diodo LED sarà acceso. Quando la batteria è completamente carica, Il LED si spegne. Allentare la vite di fissaggio del coperchio della batteria dell’auto e rimuoverlo. IT 3. Collegare la batteria, chiudere il coperchio e riavvitarlo. MODALITÁ D’USO 1. Portare l’interruttore dell’auto in posizione ON. Portare l’interruttore del controllore in posizione ON. Il diodo LED di alimentazione comincia a pulsare. 2. Attendere ca. 15 secondi, finché il controller si colleghi con l’auto. Il diodo LED si illuminerà continuamente. IT 3. Per andare avanti, spostare l’acceleratore indietro. Più l’acceleratore è spostato, più velocemente andrà la macchina. Spostare l’acceleratore in avanti per frenare e guidare all’indietro. 4. Girare la manopola a sinistra o a destra per far girare la macchina. REGOLAZIONE DELLO STERZO Se notate che l’auto devia leggermente a sinistra o a destra invece di andare dritta, potete regolare lo sterzo con il regolatore degli indicatori di direzione. IT PULIZIA E CONSERVAZIONE 1. Spegnere il dispositivo e scollegare la batteria prima della pulizia. 2. Pulire la macchina e il controller con un panno umido. 3. Non usare sostanze chimiche per pulire il dispositivo. 4. Pulire la macchina dalla sabbia e dalla polvere dopo ogni uso. Le foto sono solo a scopo illustrativo, l’aspetto reale dei prodotti può differire dalle immagini. FR www.overmax.eu Introduction Cher client ! Merci de nous avoir fait confiance et d’avoir choisi la marque Overmax. Grâce à l’utilisation des matériaux de la meilleure qualité et des solutions technologiques innovantes, nous vous donnons un produit parfait à l’usage quotidien. Nous sommes sûrs que grâce à un grand soin que nous avons pris pour fabriquer ce produit, il répondra à toutes vos exigences. Avant d’utiliser le produit pour la première fois, lisez attentivement ce mode d’emploi. Si vous avez des questions ou remarques relatives au produit acheté, n’hésitez pas à nous contacter à l’adresse : [email protected] Renseignements importants : Veuillez lire cette notice d’utilisation avant de commencer à manipuler le produit afin de connaître ses fonctions et l’utiliser conformément à son usage prévu. 1. 2. 3. 4. 5. 6. Ne réalisez pas des dépannages du dispositif et ne le modifiez pas. Seulement un service agréé peut procéder au dépannage du produit. Ne mettez le dispositif en marche si vous avez remarqué des dégâts de quelque nature que ce soit. N’utilisez pas le dispositif quand il commence à fonctionner mal, il a été tombé au sol ou immergé dans l’eau, il se chauffe de façon excessive, il y a des décolorations, renflements ou d’autres phénomènes atypiques. Consultez un service agréé du fabricant. Ne laissez jamais la pile branchée à un chargeur sans surveillance. Le dispositif est destiné aux enfants de plus de 8 ans. Ne laissez pas les enfants plus jeunes jouer avec le produit. Utilisez le dispositif à l’écart des sources de chaleur, des températures élevées, des surfaces chaudes, de la lumière directe du soleil, des sources d’étincellement, des flammes nues, des huiles et des arêtes vives. FR 7. 8. 9. 10. FR 11. 12. 13. 14. 15. 16. 17. 18. 19. 20. 21. 22. 23. 24. 25. 26. 27. 28. N’utilisez pas le dispositif dans un environnement comprenant des substances inflammables, explosives ou toxiques. N’utilisez pas de substances chimiques pour nettoyer le dispositif. Désactivez le dispositif et débranchez la pile après chaque utilisation. Ne plongez pas tout le dispositif dans l’eau ou dans un autre liquide. N’utilisez pas à proximité de l’eau. Avant de nettoyer ou de porter le dispositif, désactivez-le. N’utilisez pas le produit à d’autres fins que celles auxquelles il a été conçu. Tenez le dispositif à l’écart des objets aigus. Ne mettez pas d’autres objets sur le dispositif quand vous l’utilisez. N’utilisez le dispositif que sur des surfaces planes et dures. Évitez de l’utiliser sur le sable, la pelouse ou sur d’autres surfaces qui peuvent causer l’endommagement du dispositif. Pour recharger la pile, n’utilisez que le câble de recharge fourni avec le produit. Après chaque recharge, débranchez le câble USB de la prise USB. Prêtez attention à la polarité de la pile dans le dispositif et dans la manette. Dans le dispositif, n’utilisez que la pile fournie avec le produit, dans la manette, on utilise deux piles AA 1,5 V (elles ne sont pas incluses). Dans la manette, il convient de ne pas utiliser des accumulateurs. Après avoir utilisé, ne touchez pas le moteur du véhicule, parce qu’il peut avoir une température élevée. La source d’alimentation électrique utilisée dans ce jouet électrique devrait être contrôlée régulièrement en vue de détecter des endommagements du câble de recharge, de la fiche, du boîtier ou d’autres pièces, et en cas de dégâts, elle ne devrait pas être utilisée jusqu’au moment de réparation de celle-ci. Le jouet ne peut pas être branché à un nombre de sources d’alimentation électrique supérieur à celui recommandé. Les accumulateurs devraient être rechargés uniquement sous la surveillance d’adultes. Il est nécessaire de retirer les accumulateurs du jouet avant de procéder à leur recharge. Il convient de ne pas mettre de différentes types de piles ou des piles neuves et usées. Il est nécessaire de retirer les piles usées du jouet. Il est interdit de mettre en contact les contacteurs d’alimentation électrique. Il est interdit de recharger les piles à usage unique. SCHÉMA DU DISPOSITIF Carrosserie Pile Régulateur du braquage des roues Couvercle du compartiment à piles FR Interrupteur marche/arrêt SCHÉMA DE LA MANETTE Diode d’ alimentation électrique Joystick de braquage vers la gauche/vers la droite Interrupteur marche/arrêt Papillon des gaz INSTALLATION DES PILES DANS LA MANETTE 1. Enlevez le couvercle du compartiment à piles 2. Mettez les deux piles AA 1,5 V. Prêtez une attention particulière à la polarité des piles. 3. Installez le couvercle de nouveau. Rimettere il coperchio. FR RECHARGE DE LA PILE DU VÉHICULE 1. 2. Branchez le chargeur à la prise USB à l’ordinateur ou à l’adaptateur USB. Puis, branchez la pile au recharger. La diode est allumée pendant la recharge. Quand la pile sera chargée, la diode s’éteindra. Dévissez le vis de fixation sur le couvercle du compartiment à piles dans la voiture et enlevez-le. FR 3. Branchez la pile, fermez le couvercle et vissez de nouveau. MODE D’UTILISATION 1. 2. 3. FR 4. Bougez l’interrupteur marche/arrêt sur la voiture jusqu’à la position ON Bougez l’interrupteur marche/arrêt de la manette jusqu’à la position ON. La diode d’alimentation électrique commencera à clignoter. Attendez environ 15 secondes jusqu’à ce que la manette se connecte avec la voiture. La diode sera allumée en continu. Pour aller tout droit, bougez le papillon des gaz vers l’arrière. Plus le papillon des gaz est bougé, plus rapide sera la voiture. Bougez le papillon des gaz vers l’avant pour freiner et pour aller vers l’arrière. Tournez le joystick à gauche ou à droite pour faire tourner la voiture. RÉGLAGE DU BRAQUAGE Si vous remarquez que la voiture tire à gauche ou à droite au lieu d’aller tout droit vous pouvez régler le braquage à l’aide du régulateur. FR NETTOYAGE ET ENTRETIEN 1. Avant de nettoyer, désactivez le dispositif et débranchez la pile. 2. Nettoyez la voiture et la manette à l’aide d’un chiffon humide. 3. N’utilisez pas de substances chimiques pour nettoyer le dispositif. 4. Après chaque utilisation, nettoyez la voiture du sable et de la poussière. Les photos sont à caractère informatif, l’apparence réelle des produits peut varier de celle présentée sur les photos. ES www.overmax.eu Introducción ¡Estimado Cliente! Gracias por confiar en nosotros y elegir la marca Overmax. Gracias a la utilización de materiales de alta calidad y soluciones tecnológicas modernas te proporcionamos un producto ideal para el uso diario. Estamos seguros de que cumplirá tus expectativas gracias al gran cuidado puesto en su fabricación. Antes de utilizar el producto, lee atentamente las siguientes instrucciones de uso. Si tienes algún comentario o pregunta sobre algún producto que hayas comprado, por favor contacta con nosotros: [email protected] Información importante: Por favor, lee este manual de instrucciones antes de utilizar el producto para familiarizarte con sus funciones y utilizarlo de acuerdo con su uso previsto. 1. 2. 3. 4. 5. 6. No se debe reparar ni realizar ninguna modificación en el dispositivo. Esta actividad puede ser realizada exclusivamente por un proveedor de servicios autorizado. No conectes el dispositivo si has percibido algún defecto. No utilices el dispositivo si comienza a funcionar de manera inapropiada, si se ha caído o se ha sumergido en agua, si se calienta excesivamente, está descolorido o deformado, o se producen otros fenómenos inusuales. Ponte en contacto con el servicio autorizado del fabricante. Nunca dejes las pilas conectadas al cargador sin supervisión. El dispositivo está destinado a niños mayores de 8 años. No dejes que los niños más pequeños jueguen con él. Utiliza el aparato lejos de fuentes de calor, altas temperaturas, superficies calientes, luz solar directa, fuentes de chispas, llamas abiertas, aceites y bordes afilados. ES 7. 8. 9. 10. 11. 12. 13. 14. 15. ES 16. 17. 18. 19. 20. 21. 22. 23. 24. 25. 26. 27. 28. No utilices el dispositivo en un entorno que presente sustancias inflamables, explosivas o tóxicas. No utilices productos químicos para limpiar el dispositivo. Después de cada uso, apaga el dispositivo y desconecta las pilas. No sumerjas todo el dispositivo en agua u otros líquidos. No utilizar cerca del agua. Antes de limpiar o mover el dispositivo, apágalo. No utilices el dispositivo para fines distintos de aquellos para los que ha sido diseñado. Mantén el dispositivo alejado de objetos afilados. No coloques otros objetos encima del dispositivo cuando lo estés utilizando. Utiliza el dispositivo solo en superficies planas y duras. Evita la conducción sobre arena, hierba u otras superficies que puedan causar daños en el dispositivo. Utiliza exclusivamente el cable de carga suministrado para cargar las pilas. Desconecta el cable USB de la toma USB después de cada carga. Presta atención a la polaridad de las pilas en el dispositivo y en el controlador. En el dispositivo utiliza exclusivamente las pilas suministradas en el kit, en el controlador se utilizan dos pilas AA 1,5 V (no incluídas en el kit). No utilices pilas recargables en el controlador. No toques el motor del coche después de usarlo ya que puede estar a una temperatura muy alta. La fuente de alimentación utilizada con este juguete eléctrico debe ser inspeccionada regularmente para detectar daños en el cable de alimentación, conectores, carcasa u otras partes, si hay algún daño no debe utilizarse hasta su reparación. El juguete no puede ser conectado a un número superior de fuentes de alimentación al recomendado. Las pilas recargables deben recargarse solo bajo la supervisión de personas adultas. Las pilas deben ser extraídas del juguete antes de cargarlas. No se deben mezclar diferentes tipos de pilas, o pilas nuevas y usadas. Las pilas agotadas deber ser retiradas del juguete. Los terminales de la fuente de alimentación no deben estar en cortocircuito. No recargues las pilas de un solo uso. ESQUEMA DEL DISPOSITIVO Carrocería Pilas Regulador de las ruedas de dirección Conector ES Tapa de las pilas DIAGRAMA DEL CONTROLADOR Diodo de alimentación Mando de control para girar a la izquierda y a la derecha Conector Acelerador INSTALACIÓN DE LAS PILAS EN EL CONTROLADOR ES 1. Retira la tapa de las pilas. 2. Introduce dos pilas AA 1,5 V. Presta especial atención a la polaridad de las pilas. 3. Vuelve a poner la tapa. CARGA DE LAS PILAS DEL COCHE 1. 2. Conecta el cargador a un puerto USB de tu ordenador o a un adaptador USB. A continuación, conecta las pilas al cargador. Durante la carga, el diodo se iluminará. Cuando las pilas estén cargadas, el diodo se apagará. Afloja el tornillo de sujeción de la tapa de las pilas del coche y retírala. ES 3. Coloca las pilas, cierra la tapa y vuelve a atornillarla. UTILIZACIÓN 1. Coloca el interruptor del coche en la posición ON. Coloca el interruptor del del controlador en la posición ON. El diodo de energía empieza a parpadear. 2. Espera unos 15 segundos hasta que el controlador se conecte al coche. 3. El diodo permanecerá encendido continuamente. Para que el coche se mueva hacia adelante, desplaza el acelerador hacia atrás. Contra más fuerte de desplace el acelerador, más rápido se moverá el coche. Desplaza el acelerador hacia adelante para frenar y para que el coche se mueva hacia atrás. ES 4. Gira el mando a la izquierda o a la derecha para hacer girar el coche. REGULACIÓN DE LA DIRECCIÓN Si observas que el coche se desvía ligeramente hacia la izquierda o hacia la derecha en lugar de ir recto, puedes ajustar la dirección con el regulador. ES LIMPIEZA Y MANTENIMIENTO 1. Apaga el dispositivo y desconecta las pilas antes de limpiarlo. 2. Limpia el coche y el controlador con un paño húmedo. 3. No utilices productos químicos para limpiar el dispositivo. 4. Limpia el coche de arena y polvo después de cada uso. Las fotos solo tienen carácter ilustrativo, el aspecto real de los productos puede diferir de los presentados en las fotos. NL www.overmax.eu Inleiding Beste klant! Bedankt voor het vertrouwen dat u in ons stelt en voor het merk Overmax heeft gekozen. Dankzij het gebruik van hoogwaardige materialen en moderne technologische oplossingen bieden wij u een product dat ideaal is voor dagelijks gebruik. Wij zijn er zeker van dat het dankzij veel vakmanschap aan uw eisen voldoet. Lees voor het gebruik van het product de volgende gebruiksaanwijzing zorgvuldig door. Als u opmerkingen of vragen heeft over een gekocht product, neem dan contact met ons op: [email protected] Belangrijke informatie: Lees deze handleiding door voordat u het product gebruikt om kennis te maken met de functies ervan en deze te gebruiken voor het doel waarvoor ze bedoeld zijn. 1. 2. 3. 4. 5. Probeer het apparaat niet te repareren of aan te passen. Dit kan alleen worden gedaan door een erkend servicecentrum. Gebruik het apparaat niet als u schade opmerkt. Gebruik het apparaat niet als het defect is, is gevallen of ondergedompeld in water, overmatig heet is geworden, verkleurd is, of als er andere ongebruikelijke verschijnselen zijn opgetreden. Neem contact op met een erkend servicecentrum van de fabrikant. Laat de batterij nooit onbeheerd achter in de lader. Het apparaat is ontworpen voor mensen ouder dan 14 jaar. Laat jongere kinderen er niet mee spelen. Houd het apparaat buiten het bereik van kinderen. NL 6. 7. 8. 9. 10. 11. 12. 13. 14. 15. NL 16. 17. 18. 19. 20. 21. 22. 23. 24. 25. 26. 27. Gebruik het apparaat niet in de buurt van warmtebronnen, hoge temperaturen, hete oppervlakken, direct zonlicht, vonken, open vuur, olie en scherpe randen. Gebruik het apparaat niet in een omgeving die ontvlambare, explosieve of giftige stoffen bevat. Gebruik geen chemicaliën om het apparaat te reinigen. Schakel het apparaat uit en ontkoppel de batterij na elk gebruik. Dompel het apparaat niet in zijn geheel onder in water of andere vloeistoffen. Niet gebruiken in de buurt van water. Schakel het apparaat uit voordat u het reinigt of verplaatst. Gebruik het apparaat niet voor andere doeleinden dan waarvoor het is ontworpen. Houd het apparaat uit de buurt van scherpe voorwerpen. Plaats geen andere voorwerpen op het apparaat terwijl u het gebruikt. Gebruik het apparaat alleen op vlakke of harde oppervlakken. Vermijd rijden op zand, gras of andere oppervlakken die het apparaat kunnen beschadigen. Gebruik alleen de meegeleverde lader om de batterij op te laden. Koppel de lader na elke lading los van de USB-poort. Let op de polariteit van de batterij in het apparaat en de controller. De controller gebruikt twee 1,5 V AA-batterijen (niet meegeleverd). Gebruik geen oplaadbare batterijen in de controller. Raak de motor van de auto na gebruik niet aan, omdat deze heet kan zijn. Transformator, voeding of batterijlader die met het elektrische speelgoed wordt gebruikt, meet regelmatig warden gecontroleerd op schade aan het netsnoer, de stekker, de behuizing of andere onderdelen, en in het geval van dergelijke schade, mag deze niet warden gebruikt totdat de schade is hersteld. Het speelgoed mag niet op meer stroombronnen warden aangesloten dan aanbevolen. Laad de batterijen a Ileen ender toezicht van een volwassene op. Batterijen moeten uit het speelgoed warden verwijderd voordat ze warden opgeladen. Gebruik geen verschillende soorten batterijen of nieuwe en gebruikte batterijen. Verwijder lege batterijen uit het speelgoed. Vermogensklemmen mogen niet warden kortgesloten. SCHEMA VAN HET APPARAAT lichaam Batterij Stuurwiel versteller Schakelaar Batterij deksel NL SCHEMA VAN DE CONTROLLER Power LED Bedieningsknop links en rechts Schakelaar Smoorklep INSTALLATIE VAN DE BATTERIJ IN DE CONTROLLER 1. Verwijder het batterijdeksel. 2. Plaats twee 1,5 V AA-batterijen. Let in het bijzonder op de polariteit van de batterij. 3. Doe de deksel er weer op. NL HET OPLADEN VAN DE AUTOACCU 1. 2. Sluit de lader aan op een USB-poort van uw computer of op een USBadapter. Sluit vervolgens de batterij aan op de lader. Wanneer de batterij volledig is opgeladen, gaat de LED branden. De LED brandt niet tijdens het laden. Schroef de bevestigingsschroef van het batterijdeksel van de auto los en verwijder deze. NL 3. Sluit de batterij aan, sluit het deksel en schroef het weer vast. HET GEBRUIK 1. Schuif de schakelaar op de autoschakelaar in de stand ON. 2. Schuif de regelaarschakelaar in de stand ON (aan). De aan/uitled zal knipperen. Wacht ongeveer 15 seconden tot de controller verbinding maakt met de auto. De LED zal continu oplichten. 3. Om vooruit te gaan, schuif de gashendel naar achteren. Hoe harder de gashendel wordt bewogen, hoe sneller de auto zal bewegen. Schuif de gashendel naar voren om te remmen en rij achteruit. NL 4. Draai de knop naar links of rechts om de auto te laten draaien. STUURCONTROLE Als u merkt dat uw auto niet rechtdoor gaat, maar iets naar links of rechts afbuigt, kunt u de bocht aanpassen door middel van een afsteller. REINIGING EN ONDERHOUD 1. Schakel het apparaat uit en koppel de batterij los voordat u het apparaat schoonmaakt. 2. Reinig de auto en de controller met een vochtige doek. 3. Gebruik geen chemicaliën om de machine te reinigen. 4. Reinig de auto na elk gebruik van zand en stof. De foto’s zijn slechts ter illustratie, het werkelijke uiterlijk van de producten kan afwijken van de foto’s die worden getoond. NL UK www.overmax.eu Дорогий клієнт! Дорогий клієнт! Дякуємо за довіру до нас i вибір марки Overmax. Завдяки використанню високоякісних матеріалів та сучасних технологічних рішень, ми надаємо Вам продукт, який ідеально підходить для щоденного використання. Ми впевнені, що він буде відповідати Вашим вимогам завдяки великій ретельності його виготовлення. Перед використанням продукту уважно прочитайте наступну інструкцію з експлуатації. Якщо у вас є будь-які зауваження або запитання щодо придбаного вами продукту, будь ласка, зв’яжіться з нами: [email protected] Важлива інформація: Будь ласка, прочитайте цю інструкцію перед використанням продукту, щоб ознайомитися з його функціями та використовувати їх за призначенням. 1. 2. 3. 4. 5. Не ремонтуйте та не модифікуйте пристрій. Ці дії може виконувати лише уповноважений сервісний центр. Не запускайте пристрій, якщо Ви помітите будь-яке пошкодження. Не використовуйте пристрій, коли він починає виходити з ладу, впав або занурився у воду, надмірно нагрівається, відбулась зміна кольору, з’являються нерівності або та при виникненні інших незвичних явищ. Зверніться до уповноваженого сервісного центру виробника. Ніколи не залишайте батарею підключеною до зарядного пристрою без нагляду. Пристрій призначений для осіб старше 8 років. Не дозволяйте дітям молодшого віку самостійно гратися з пристроєм. UK Використовуйте пристрій подалі від джерел тепла, високих температур, гарячих поверхонь, прямих сонячних променів, іскроутворюючих джерел, відкритого вогню, масла та гострих країв. 7. Не використовуйте пристрій у середовищі, що містить легкозаймисті, вибухонебезпечні та токсичні речовини. 8. Не застосовуйте для очищення пристрою хімічні засоби. 9. Вимикайте пристрій та виймайте батарею після кожного використання. 10. Не занурюйте весь пристрій у воду або інші рідини. 11. Не використовуйте поблизу води. Перед чищенням або переміщенням пристрою вимкніть його. 12. Не використовуйте пристрій для інших цілей, крім тих, для яких він був розроблений.Тримайте пристрій подалі від гострих предметів. 13. Не кладіть інші предмети на пристрою під час його використання. 14. Використовуйте пристрій лише на рівних і твердих поверхнях. 15. Уникайте їзди по піску, траві або інших поверхнях, які можуть пошкодити пристрій. 16. Для заряджання батареї використовуйте лише зарядний кабель, що входить у комплект. 17. Після кожного заряджання від’єднуйте зарядний кабель від USB-роз’єму. 18. Зверніть увагу на полярність батареї у пристрої а контролері. 19. Використовуйте лише батарею, що входить у комплект пристрою, контролер використовує дві батареї типу АА 1,5 В (не входять в комплект). Не використовуйте акумулятори в контролері. 20. Після використання не торкайтесь двигуна автомобіля, оскільки він може мати високу температуру. 21. Джерело живлення, що використовується з цією електричною іграшкою, слід регулярно перевіряти на предмет пошкодження шнура живлення, штекера, корпусу чи інших елементів та у випадку пошкодження його не слід використовувати, поки не буде відремонтоване. 22. Не під’єднуйте іграшку до більшої кількості джерел живлення, ніж рекомендовано. 23. Заряджайте акумулятори лише під наглядом дорослих. 24. Перед зарядкою акумулятори потрібно вийняти з іграшки. 25. Не використовуйте різні типи батарей або нові та вживані батареї. 26. Вийміть з іграшки розряджені батареї. 27. Не замикайте клеми живлення. 28. Не заряджайте одноразових батерей. 6. UK СХЕМА ПРИСТРОЮ Кузов Регулятор повороту коліс Батарея Перемикач Кришка на батарею СХЕМА КОНТРОЛЕРА Світлодіод живлення UK Ручка для управління ліво та право Світлодіод живлення Дросельна заслінка ВСТАНОВЛЕННЯ БАТАРЕЇ В КОНТРОЛЕРІ 1. Зніміть кришку батареї. 2. Вставте дві батареї типу АА 1,5 В. Зверніть особливу увагу на полярність батарей. 3. Покладіть кришку назад. UK ЗАРЯДЖАННЯ БАТАРЕЇ АВТОМОБІЛЯ 1. 2. Підключіть зарядний пристрій до USB-порту на комп’ютері або до USB-адаптера живлення. Потім підключіть батарею до зарядного пристрою. Світлодіод світиться під час заряджання. Світлодіод вимикається, коли акумулятор заряджена. Відкрутіть фіксуючий гвинт на кришці батареї в автомобілі та зніміть її. UK 3. Підключіть батарею, закрийте кришку та прикрутіть її назад. СПОСІБ ВИКОРИСТАННЯ 1. Переведіть перемикач на автомобілі в положення ON. Переведіть перемикач контролера в положення ON. 2. Світлодіод живлення буде блимати. Зачекайте приблизно 15 секунд, поки контролер підключиться до автомобіля. 3. Світлодіод буде світитися постійно. Щоб їхати вперед, поверніть дросельну заслінку назад. Чим більше вона повернена, тим швидше автомобіль рухатиметься. Перемістіть дросельну заслінку вперед, щоб загальмувати та їздити назад. UK 4. Щоб автомобіль повернув, поверніть ручку вліво або вправо. РЕГУЛЮВАННЯ ПОВОРОТУ Якщо Ви помітили, що автомобіль трохи відхиляється вліво або вправо від прямолінійного руху, ви можете регулювати поворот за допомогою регулятора. ЧИЩЕННЯ ТА ОБСЛУГОВУВАННЯ 1. Перед очищенням вимкніть пристрій та вийміть батарею. 2. Очищайте автомобіль та контролер вологою ганчіркою. 3. Не застосовуйте для очищення пристрою хімічні засоби. 4. Очищайте автомобіль від піску та пилу після кожного використання. Фотографії служать лише для ілюстрації, фактичний зовнішній вигляд продуку може відрізнятися від представленого на фото. UK LT www.overmax.eu Įvadas Gerbiamas Kliente! Dėkojame, kad pasitikėjote mumis ir pasirinkote prekės ženklą „Overmax“. Dėl aukštos kokybės medžiagų panaudojimo ir modernių technologinių sprendimų mes siūlome Jums produktą, kuris idealiai tinka kasdieniam naudojimui. Esame tikri, kad dėl kruopštaus pagaminimo, jis puikiai atitiks Jūsų reikalavimus. Prieš naudodami gaminį, atidžiai perskaitykite šias instrukcijas. Jei turite komentarų ar klausimų apie įsigytą produktą, susisiekite su mumis: [email protected] Svarbios informacijos: Prieš pradėdami naudoti gaminį, perskaitykite šį vadovą, kad galėtumėte susipažinti su jo funkcijomis ir naudoti pagal paskirtį. 1. 2. 3. 4. 5. 6. 7. Neremontuokite ir nemodifikuokite prietaiso. Šias veiklas gali atlikti tik įgaliotasis techninės priežiūros centras. Neįjunkite prietaiso, jei pastebėjote kokių nors pažeidimų. Nenaudokite prietaiso, kai jis pradeda blogai veikti, buvo nukritęs ar panardintas į vandenį, pernelyg įkaista, atsiranda spalvos pakitimų, išsipūtimų ar kitų neįprastų reiškinių. Kreipkitės į įgaliotą gamintojo tarnybą. Niekada nepalikite prie įkrovimo prijungto akumuliatoriaus be priežiūros. Prietaisas skirtas vyresniems nei 8 metų žmonėms. Neleiskite jaunesniems vaikams su juo žaisti. Prietaisą naudokite atokiau nuo šilumos šaltinių, aukštos temperatūros, karštų paviršių, tiesioginių saulės spindulių, kibirkščių, atviros liepsnos, alyvų ir aštrių kraštų. Nenaudokite prietaiso aplinkoje, kurioje yra degių, sprogstamų ar toksiškų medžiagų. LT 8. 9. 10. 11. 12. 13. 14. 15. 16. 17. 18. 19. 20. 21. LT 22. 23. 24. 25. 26. 27. 28. Prietaisui valyti nenaudokite chemikalų. Po kiekvieno naudojimo išjunkite prietaisą ir atjunkite akumuliatorių. Nemerkite viso prietaiso į vandenį ar kitus skysčius. Nenaudokite šalia vandens. Prieš valydami ar perkeldami prietaisą, išjunkite jį. Nenaudokite prietaiso kitiems tikslams, nei jis buvo suprojektuotas. Laikykite prietaisą atokiau nuo aštrių daiktų. Nestatykite kitų daiktų ant prietaiso, kai jį naudojate. Prietaisą naudokite tik ant plokščių ir kietų paviršių. Venkite važiuoti smėliu, žole ar kitu paviršiumi, kurisgali sugadinti prietaisą. Akumuliatoriui įkrauti naudokite tik pridedamą rinkinyje įkrovimo laidą. Po kiekvieno įkrovimo atjunkite įkrovimo laidą iš USB lizdo. Atkreipkite dėmesį į prietaiso ir valdiklio baterijų poliškumą. Įrenginyje naudokite tik komplekte esančią bateriją, valdiklis naudoja tris 1,5 V AA baterijas (nepridedamos). Valdiklyje nenaudokite įkraunamų baterijų. Po naudojimo nelieskite automobilio variklio, nes jis gali būti aukštos temperatūros. Su šiuo elektriniu žaislu naudojamas maitinimo šaltinis turėtų būti reguliariai tikrinamas, ar nėra pažeistas maitinimo laidas, kištukas, korpusas ar kitos dalys, o jei yra sugadintas, neturėtų būti naudojamas, kol jis bus suremontuotas. Žaislas neturi būti prijungtas prie daugiau nei rekomenduojamų maitinimo šaltinių vienetų. Kraunamas baterijas galima įkrauti tik prižiūrint suaugusiems. Prieš įkraunant, iš žaislo reikia išimti baterijas. Nenaudokite skirtingų tipų baterijų ar naujų ir naudotų baterijų kartu. Išimkite iš žaislo išsekusias baterijas. Su maitinimo gnybtais nedarykite trumpojo jungimo. Neįkraunamų baterijų negalima įkrauti. PRIETAISO SCHEMA Kėbulas Baterija Ratų pasukimo reguliatorius Jungiklis Baterijos dangtis VALDIKLIO SCHEMA Matinimo šviesos diodas Valdymo rankenėlė į kairę ir į dešinę Jungiklis Droselis LT BATERIJŲ MONTAVIMAS VALDIKLYJE 1. Nuimkite akumuliatoriaus dangtį. 2. Įdėkite tris AA 1,5 V baterijas. Ypatingą dėmesį atkreipkite į baterijų poliškumą. 3. Vėl uždėkite dangtį. LT AUTOMOBILIO BATERIJOS ĮKROVIMAS 1. 2. 3. Prijunkite įkrovimo laidą prie kompiuterio USB prievado arba prie USB maitinimo adapterio. Tada prijunkite akumuliatorių prie įkrovimo kabelio. Įkrovimo metu LED diodas šviečia. Atsukite automobilyje akumuliatoriaus dangtelio tvirtinimo varžtą ir nuimkite jį. Prijunkite akumuliatorių, uždarykite dangtelį ir vėl prisukite. LT NAUDOJIMO BŪDAS 1. Automobilio jungiklį nustatykite į padėtį ON. Perkelkite valdiklio jungiklį į ON padėtį. Maitinimo šviesos diodas pradės mirksėti. 2. Palaukite maždaug 15 sekundžių, kol valdiklis prisijungs prie automobilio. Šviesos diodas nuolat degs. 3. Norėdami važiuoti į priekį, pastumkite droselį atgal. Kuo stipriau droselis stumiamas, tuo greičiau automobilis judės. Paslinkite droselį į priekį, kad stabdytumėte ir važiuotumėte atgal. LT 4. Pasukite rankenėlę kairėn arba dešinėn, kad automobilis pasisuktų. POSŪKIO REGULIAVIMAS Jei pastebėsite, kad automobilis, užuot važiavęs tiesiai, šiek tiek nukrypsta į kairę arba į dešinę, posūkį galite reguliuoti valdiklio reguliatoriumi VALYMAS IR PRIEŽIŪRA 1. Prieš valydami atjunkite įrenginį ir išimkite baterijas. 2. Valykite automobilį ir valdiklį drėgnu skudurėliu. 3. Nenaudokite chemikalų prietaisui valyti. 4. Po kiekvieno naudojimo nuvalykite automobilį nuo smėlio ir dulkių. Nuotraukos yra tik iliustracinės, tikroji gaminių išvaizda gali skirtis nuo pavaizduotų nuotraukose. LT HR www.overmax.eu Uvod Poštovani! Zahvaljujemo na Vašem povjerenju i što ste odabrali brend Overmax. Zahvaljujući korištenju materijala visoke kvalitete i modernih tehnoloških rješenja dajemo u Tvoje ruke proizvod savršen za svakodnevno korištenje. Sigurni smo da zahvaljujući visokoj kvaliteti izrade ispunit će on Tvoja očekivanja. Prije korištenja proizvoda pročitaj pažljivo niža uputstva. Ukoliko imaš bilo kakve primjedbe ili pitanja u vezi kupljenog proizvoda, kontaktiraj nas: [email protected] Važne informacije: Molimo da pročitaš ova uputstva prije prvog korištenja proizvoda, kako bi upoznao njegove funkcionalnosti i kako bi ih namjenski koristio. 1. 2. 3. 4. 5. 6. 7. 8. Ne smije se popravljati ili modificirati uređaj. Ove radnje smije izvršiti jedino ovlašteni serviser. Ne uključuj uređaj ukoliko si primijetio bilo koja oštećenja. Ne koristi uređaj ukoliko je počeo neispravno raditi, pao je ili je bio potopljen u vodi, pregrijava se, pojavile su se promjene boje, izbočine ili druge neobične pojave. Kontaktiraj ovlašteni servis proizvođača. Nikad ne ostavljaj bateriju spojenu na punjenje bez nadzora. Uređaj je namijenjen djeci starijoj od 8 godina. Ne dozvoli mlađoj djeci da se njim igraju. Koristi uređaj daleko od izvora topline, visokih temperatura, vrućih površina, direktne sunčeve svjetlosti, izvora Iskra, otvorenog plamena, ulja ili oštrih rubova. Ne koristi uređaj u blizini lako zapaljivih, eksplozivnih ili toksičnih supstanci. Ne koristi kemijska sredstva za čišćenje uređaja. HR 9. 10. 11. 12. 13. 14. 15. 16. 17. 18. 19. 20. 21. 22. 23. HR 24. 25. 26. 27. 28. Nakon svakog korištenja isključi uređaj i odspoji bateriju. Ne potapaj cijeli uređaj u vodi ili drugim tekućinama. Ne koristi u blizini vode. Prije čišćenja ili premještanja uređaja, isključi ga. Ne koristi uređaj u druge svrhe nego one za koje je dizajniran. Drži uređaj daleko od oštrih predmeta. Ne stavljaj druge predmete na uređaj, kada ga ne koristiš. Koristi uređaj samo na ravnim i tvrdim površinama. Izbjegavaj vožnju po pijesku, travi i drugim površinama, koje mogu uzrokovati oštećenje uređaja. Za punjenje baterija koristi samo priložen uz set kabel za napajanje. Nakon svakog punjenja odspoji kabel USB iz USB porta. Obrati pozornost na polarizaciju baterije u uređaju i u daljinskom upravljaču. U uređaju koristi isključivo baterije priložene uz set. U daljinskom upravljaču koriste se baterije AA 1,5 V (nisu uključene uz set). U daljinskom upravljaču se ne smije koristiti punjive baterije. Nakon korištenja ne diraj motor vozila, jer može imati visoku temperaturu. Izvor napajanja, koji se koristi kod ove igračke, bi se trebao redovito provjeravati s obzirom na oštećenja kabela za napajanje, utikača, oklopa ili drugih dijelova, a u slučaju oštećenja ne bi se smio koristiti dok se ne popravi. Igračku se ne smije spajati na više od preporučene količine izvora napajanja. Akumulator je potrebno punjiti samo pod nadzorom odraslih osoba. Akumulator je potrebno prije punjenja izvaditi iz igračke. Ne smije se stavljati različite tipove baterija ili nove i korištene baterije. Potrošene baterije je potrebno ukloniti iz igračke. Stege napajanja se ne smije stiskati. Jednokratne baterije se ne smiju puniti. NACRT UREĐAJA Karoserija Baterija Regulator okretanja kotača Prekidač Poklopac baterija NACRT DALJINSKOG UPRAVLJAČA Dioda napajanja Okrugli volan za upravljanje lijevo i desno HR Prekidač Ručica za ubrzavanje MONTIRANJE BATERIJA U DALJINSKOM UPRAVLJAČU 1. Ukloni poklopac baterija. 2. Stavi tri baterije AA 1,5V, obrati posebnu pažnju na polarizaciju baterija. 3. Vrati poklopac baterija. HR PUNJENJE BATERIJA VOZILA 1. 2. Spoji punjač na USB port na računalu ili na USB uređaj za napajanje. Onda spoji bateriju na punjač. Tijekom punjenja dioda svijetli. Kada se baterija napuni dioda će se ugasiti. Odvijaj vijak na poklopcu baterija na vozilu i ukloni ga. 3. Spoji bateriju, poklopi poklopac i ponovo zavijaj. HR NAČIN KORIŠTENJA 1. Pomakni prekidač na vozilu u poziciju ON. Pomakni prekidač daljinskog upravljača u poziciju ON. Dioda napajanja će početi treperiti. 2. Pričekaj 15 sekundi dok se daljinski upravljač spoji s vozilom. 3. Dioda će početi svijetliti neprestano. Za ići ravno, pomakni ručicu put natrag. Što jače Pomičeš dršku, to se vozilo brže kreće. Pomakni ručicu naprijed, kako bi zakočio i vozio unatrag. HR 4. Pomakni krug lijevo ili desno, kako bi vozilo skrenulo. PODEŠAVANJE SKRETANJA Ukoliko primijetiš da vozilo umjesto ići ravno lagano ide put lijevo ili desno, možeš podesiti skretanje regulatorom. ČIŠĆENJE I ODRŽAVANJE 1. Prije čišćenja isključi uređaj i odspoji bateriju. 2. Čisti vozilo i daljinski upravljač vlažnom krpicom. 3. Ne koristi kemijska sredstva za čišćenje uređaja. 4. Nakon svakog korištenja očisti vozilo od pijeska i prašine. HR Slike imaju ilustrativni karakter, stvarni izgled proizvoda može se razlikovati od prikazanog na slikama. Poznań, 10.10.2019 DEKLARACJA ZGODNOŚCI UE H03/OV/20 1. Nr. 5902581653789 2. Nazwa i adres producenta lub jego upoważnionego przedstawiciela: BrandLine Group Sp. z o. o. ul. A. Kręglewskiego 1, 61-248 Poznań, POLSKA 3. Niniejsza deklaracja zgodności wydana zostaje na wyłączną odpowiedzialność producenta: BrandLine Group Sp. z o. o. 4. Przedmiot deklaracji: auto RC X-RALLY 2.0 5. Opisany w pkt 4 przedmiot niniejszej deklaracji jest zgodny z odnośnymi wymaganiami przepisów wspólnotowych dotyczących harmonizacji. 6. Odwołania do odnośnych norm zharmonizowanych, które zastosowano, lub do specyfikacji, w odniesieniu do których deklarowana jest zgodność: 2014/53/UE – Dyrektywa Radiowa / Dyrektywa RED 2011/65/UE – Dyrektywa RoHS 2 2009/48/WE – Dyrektywa Zabawkowa TD 2014/30/UE – Dyrektywa Kompatybilności Elektromagnetycznej EMC EN 71-1:2014+A1:2018 PN-EN 71-1+A1:2018-08 EN 71-2:2011+A1:2014 PN-EN 71-2+A1:2014-06 EN 71-3:2019 PN-EN 71-3:2019-07 EN IEC 62115:2020+A11:2020 PN-EN IEC 62115:2020-04+A11:2020-07 ETSI EN 301 489-1 V2.2.3:2019 PN-ETSI EN 301 489-1 V2.2.3:2020-07 ETSI EN 301 489-3 V2.1.1:2019 PN-ETSI EN 301 489-3 V2.1.1:2019-10 ETSI EN 300 440 V2.2.1:2018 PN-ETSI EN 300 440 V2.2.1:2018-12 EN 62479:2010 PN-EN 62479:2011 EN 50663:2017 PN-EN 50663:2017-12 IEC 62321-3-1:2013 PN-EN 62321-3-1:2014-08 IEC 62321-4:2013+A1:2017 PN-EN 62321-4:2014-08+A1:2017-12 IEC 62321-5:2013 PN-EN 62321-5:2014-08 IEC 62321-6:2015 PN-EN 62321-6:2015-10 IEC 62321-7-1:2015 PN-EN 62321-7-1:2016-02 IEC 62321-7-2:2017 PN-EN 62321-7-2:2017-07 IEC 62321-8:2017 PN-EN 62321-8:2017-07 7. Informacje dodatkowe: Numer niniejszej deklaracji H03/OV/20 Poznań, 10.10.2019 (miejsce i data wystawienia) Członek zarządu (podpis) Poznań, 10.10.2019 DECLARATION OF CONFORMITY H03/OV/20 1. Nr. 5902581653789 2. Name and address of the manufacturer or his authorized representative: BrandLine Group Sp. z o. o. ul. A. Kręglewskiego 1, 61-248 Poznań, POLAND 3. This declaration of conformity is issued under the sole responsibility of the manufacturer: BrandLine Group Sp. z o. o. 4. Object Declaration auto RC X-RALLY 2.0 5. Described in Section 4, the object of this declaration is in conformity with the relevant Community harmonization legislation. 6. References to the relevant harmonized standards used, or specifications, for which compliance is declared: 2014/53 / EU - Radio Directive / RED Directive 2011/65 / EU - RoHS Directive 2 2009/48 / EC - TD Toy Directive 2014/30 / EU - EMC Electromagnetic Compatibility Directive EN 71-1:2014+A1:2018 EN 71-2:2011+A1:2014 EN 71-3:2019 EN IEC 62115:2020+A11:2020 ETSI EN 301 489-1 V2.2.3:2019 ETSI EN 301 489-3 V2.1.1:2019 ETSI EN 300 440 V2.2.1:2018 EN 62479:2010 EN 50663:2017 IEC 62321-3-1:2013 IEC 62321-4:2013+A1:2017 IEC 62321-5:2013 IEC 62321-6:2015 IEC 62321-7-1:2015 IEC 62321-7-2:2017 IEC 62321-8:2017 7. Additional information: Number of this Declaration H03/OV/20 Poznań, 10.10.2019 (place and date of issue) Member of the Board (signature) Poznań, 10.10.2019 KONFORMITÄTSERKLÄRUNG H03/OV/20 1. Nr. 5902581653789 2. Name und Anschrift des Herstellers oder seines Bevollmächtigten: BrandLine Group Sp. z o. o. ul. A. Kręglewskiego 1, 61-248 Poznań, POLEN 3. Diese Konformitätserklärung wird unter der alleinigen Verantwortung des Herstellers ausgestellt: BrandLine Group Sp. z o. o. 4. Objekterklärung RC-Auto X-RALLY 2.0 5. Der in Abschnitt 4 beschriebene Gegenstand dieser Erklärung entspricht den einschlägigen Rechtsvorschriften zur Harmonisierung der Gemeinschaft. 6. Verweise auf die relevanten verwendeten harmonisierten Normen oder Spezifikationen, für die die Konformität erklärt wird: 2014/53 / EU - Radio Directive / RED Directive 2011/65 / EU - RoHS Directive 2 2009/48 / EC - TD Toy Directive 2014/30 / EU - EMC Electromagnetic Compatibility Directive EN 71-1:2014+A1:2018 EN 71-2:2011+A1:2014 EN 71-3:2019 EN IEC 62115:2020+A11:2020 ETSI EN 301 489-1 V2.2.3:2019 ETSI EN 301 489-3 V2.1.1:2019 ETSI EN 300 440 V2.2.1:2018 EN 62479:2010 EN 50663:2017 IEC 62321-3-1:2013 IEC 62321-4:2013+A1:2017 IEC 62321-5:2013 IEC 62321-6:2015 IEC 62321-7-1:2015 IEC 62321-7-2:2017 IEC 62321-8:2017 7. Zusätzliche Informationen: Nummer dieser Erklärung H03/OV/20 Poznań, 10.10.2019 (Ort und Datum der Ausstellung) Vorstandsmitglied (Unterschrift) Poznań, 10.10.2019 DICHIARAZIONE DI CONFORMITÀ H03/OV/20 1. Nr. 5902581653789 2. Nome e indirizzo del fabbricante o del suo rappresentante autorizzato: BrandLine Group Sp. z o. o. ul. A. Kręglewskiego 1, 61-248 Poznań, POLONIA 3. La presente dichiarazione di conformità viene rilasciata sotto la responsabilità esclusiva del produttore: BrandLine Group Sp. z o. o. 4. Dichiarazione dell’oggetto Auto radiocomandata X-RALLY 2.0 5. Descritto nella sezione 4, l’oggetto della presente dichiarazione è conforme alla pertinente normativa comunitaria di armonizzazione. 6. Riferimenti alle pertinenti norme armonizzate utilizzate, o specifiche, per le quali è dichiarata la conformità: 2014/53 / EU - Radio Directive / RED Directive 2011/65 / EU - RoHS Directive 2 2009/48 / EC - TD Toy Directive 2014/30 / EU - EMC Electromagnetic Compatibility Directive EN 71-1:2014+A1:2018 EN 71-2:2011+A1:2014 EN 71-3:2019 EN IEC 62115:2020+A11:2020 ETSI EN 301 489-1 V2.2.3:2019 ETSI EN 301 489-3 V2.1.1:2019 ETSI EN 300 440 V2.2.1:2018 EN 62479:2010 EN 50663:2017 IEC 62321-3-1:2013 IEC 62321-4:2013+A1:2017 IEC 62321-5:2013 IEC 62321-6:2015 IEC 62321-7-1:2015 IEC 62321-7-2:2017 IEC 62321-8:2017 7. Informazioni aggiuntive: Numero di questa dichiarazione H03/OV/20 Poznań, 10.10.2019 (luogo e data di rilascio) Membro del Consiglio (firma) Poznań, 10.10.2019 DÉCLARATION DE CONFORMITÉ H03/OV/20 1. Nr. 5902581653789 2. Nom et adresse du fabricant ou de son mandataire: BrandLine Group Sp. z o. o. ul. A. Kręglewskiego 1, 61-248 Poznań, POLOGNE 3. Cette déclaration de conformité est émise sous la seule responsabilité du fabricant: BrandLine Group Sp. z o. o. 4. Przedmiot deklaracji: Voiture RC X-RALLY 2.0 5. Décrit dans la section 4, l’objet de cette déclaration est conforme à la législation communautaire d’harmonisation pertinente. 6. Références aux normes harmonisées pertinentes utilisées ou aux spécifications pour lesquelles la conformité est déclarée: 2014/53 / EU - Radio Directive / RED Directive 2011/65 / EU - RoHS Directive 2 2009/48 / EC - TD Toy Directive 2014/30 / EU - EMC Electromagnetic Compatibility Directive EN 71-1:2014+A1:2018 EN 71-2:2011+A1:2014 EN 71-3:2019 EN IEC 62115:2020+A11:2020 ETSI EN 301 489-1 V2.2.3:2019 ETSI EN 301 489-3 V2.1.1:2019 ETSI EN 300 440 V2.2.1:2018 EN 62479:2010 EN 50663:2017 IEC 62321-3-1:2013 IEC 62321-4:2013+A1:2017 IEC 62321-5:2013 IEC 62321-6:2015 IEC 62321-7-1:2015 IEC 62321-7-2:2017 IEC 62321-8:2017 7. Informations complémentaires: Numéro de cette déclaration H03/OV/20 Poznań, 10.10.2019 (lieu et date de délivrance) Membre du Conseil (Signature) Poznań, 10.10.2019 DECLARACIÓN DE CONFORMIDAD H03/OV/20 1. Nr. 5902581653789 2. Nombre y dirección del fabricante o su representante autorizado: BrandLine Group Sp. z o. o. ul. A. Kręglewskiego 1, 61-248 Poznań, POLONIA 3. Esta declaración de conformidad se emite bajo la exclusiva responsabilidad del fabricante: BrandLine Group Sp. z o. o. 4. Declaración de objeto Coche RC X-RALLY 2.0 5. Descrito en la Sección 4, el objeto de esta declaración es conforme con la legislación comunitaria de armonización pertinente. 6. Referencias a las normas armonizadas pertinentes utilizadas, o especificaciones, cuyo cumplimiento se declara: 2014/53 / EU - Radio Directive / RED Directive 2011/65 / EU - RoHS Directive 2 2009/48 / EC - TD Toy Directive 2014/30 / EU - EMC Electromagnetic Compatibility Directive EN 71-1:2014+A1:2018 EN 71-2:2011+A1:2014 EN 71-3:2019 EN IEC 62115:2020+A11:2020 ETSI EN 301 489-1 V2.2.3:2019 ETSI EN 301 489-3 V2.1.1:2019 ETSI EN 300 440 V2.2.1:2018 EN 62479:2010 EN 50663:2017 IEC 62321-3-1:2013 IEC 62321-4:2013+A1:2017 IEC 62321-5:2013 IEC 62321-6:2015 IEC 62321-7-1:2015 IEC 62321-7-2:2017 IEC 62321-8:2017 7. Información adicional: Número de esta declaración H03/OV/20 Poznań, 10.10.2019 (Lugar y fecha de emisión) Miembro del Consejo (firma) Poznań, 10.10.2019 CONFORMITEITSVERKLARING H03/OV/20 1. Nr. 5902581653789 2. Naam en adres van de fabrikant of zijn gemachtigde: BrandLine Group Sp. z o. o. ul. A. Kręglewskiego 1, 61-248 Poznań, POLEN 3. Deze conformiteitsverklaring wordt verstrekt onder de exclusieve verantwoordelijkheid van de fabrikant: BrandLine Group Sp. z o. o. 4. Objectverklaring: RC auto X-RALLY 2.0 5. Beschreven in deel 4, is het onderwerp van deze verklaring in overeenstemming met de relevante communautaire harmonisatiewetgeving. 6. Verwijzingen naar de relevante geharmoniseerde normen die worden gebruikt, of specificaties, waarvoor conformiteit wordt verklaard: 2014/53 / EU - Radio Directive / RED Directive 2011/65 / EU - RoHS Directive 2 2009/48 / EC - TD Toy Directive 2014/30 / EU - EMC Electromagnetic Compatibility Directive EN 71-1:2014+A1:2018 EN 71-2:2011+A1:2014 EN 71-3:2019 EN IEC 62115:2020+A11:2020 ETSI EN 301 489-1 V2.2.3:2019 ETSI EN 301 489-3 V2.1.1:2019 ETSI EN 300 440 V2.2.1:2018 EN 62479:2010 EN 50663:2017 IEC 62321-3-1:2013 IEC 62321-4:2013+A1:2017 IEC 62321-5:2013 IEC 62321-6:2015 IEC 62321-7-1:2015 IEC 62321-7-2:2017 IEC 62321-8:2017 7. Aanvullende informatie: Nummer van deze verklaring H03/OV/20 Poznań, 10.10.2019 (plaats en datum van het probleem) Bestuurslid (handtekening) Poznań, 10.10.2019 ДЕКЛАРАЦІЯ ПРО ВІДПОВІДНІСТЬ H03/OV/20 1. Nr. 5902581653789 2. Назва та адреса виробника або його уповноваженого представника: BrandLine Group Sp. z o. o. ul. A. Kręglewskiego 1, 61-248 Познань, ПОЛЬЩА 3. Ця декларація про відповідність видається на виключну відповідальність виробника: BrandLine Group Sp. z o. o. 4. Декларація об’єкта RC автомобіль X-RALLY 2.0 5. Описано в Розділі 4, об’єкт цієї декларації відповідає відповідному законодавству Співтовариства про гармонізацію. 6. Посилання на відповідні гармонізовані стандарти, що використовуються, або специфікації, щодо яких заявлено про відповідність: 2014/53 / EU - Radio Directive / RED Directive 2011/65 / EU - RoHS Directive 2 2009/48 / EC - TD Toy Directive 2014/30 / EU - EMC Electromagnetic Compatibility Directive EN 71-1:2014+A1:2018 EN 71-2:2011+A1:2014 EN 71-3:2019 EN IEC 62115:2020+A11:2020 ETSI EN 301 489-1 V2.2.3:2019 ETSI EN 301 489-3 V2.1.1:2019 ETSI EN 300 440 V2.2.1:2018 EN 62479:2010 EN 50663:2017 IEC 62321-3-1:2013 IEC 62321-4:2013+A1:2017 IEC 62321-5:2013 IEC 62321-6:2015 IEC 62321-7-1:2015 IEC 62321-7-2:2017 IEC 62321-8:2017 7. Додаткова інформація: Номер цієї Декларації H03/OV/20 Poznań, 10.10.2019 (місце та дата випуску) Член правління (підпис) Poznań, 10.10.2019 ATITIKTIES DEKLARACIJA H03/OV/20 1. Nr. 5902581653789 2. Gamintojo arba jo įgalioto atstovo pavadinimas ir adresas: BrandLine Group Sp. z o. o. ul. A. Kręglewskiego 1, 61-248 Poznań, LENKIJA 3. Ši atitikties deklaracija yra išduodama tik gamintojo atsakomybe: BrandLine Group Sp. z o. o. 4. Objekto deklaracija RC automobili X-RALLY 2.0 5. Aprašytas 4 skirsnyje, šios deklaracijos objektas atitinka susijusius derinamuosius Bendrijos teisės aktus. 6. Nuorodos į atitinkamus darniuosius standartus arba specifikacijas, kurių atitikimas deklaruojamas: 2014/53 / EU - Radio Directive / RED Directive 2011/65 / EU - RoHS Directive 2 2009/48 / EC - TD Toy Directive 2014/30 / EU - EMC Electromagnetic Compatibility Directive EN 71-1:2014+A1:2018 EN 71-2:2011+A1:2014 EN 71-3:2019 EN IEC 62115:2020+A11:2020 ETSI EN 301 489-1 V2.2.3:2019 ETSI EN 301 489-3 V2.1.1:2019 ETSI EN 300 440 V2.2.1:2018 EN 62479:2010 EN 50663:2017 IEC 62321-3-1:2013 IEC 62321-4:2013+A1:2017 IEC 62321-5:2013 IEC 62321-6:2015 IEC 62321-7-1:2015 IEC 62321-7-2:2017 IEC 62321-8:2017 7. Papildoma informacija: Šios deklaracijos numeris H03/OV/20 Poznań, 10.10.2019 (išdavimo vieta ir data) Tarybos narys (parašas) Poznań, 10.10.2019 IZJAVA O SUKLADNOSTI H03/OV/20 1. Nr. 5902581653789 2. Ime i adresa proizvođača ili njegovog ovlaštenog predstavnika: BrandLine Group Sp. z o. o. ul. A. Kręglewskiego 1, 61-248 Poznań, POLJSKA 3. Ova izjava o sukladnosti izdana je na isključivu odgovornost proizvođača: BrandLine Group Sp. z o. o. 4. Izjava o objektu RC automobil X-RALLY 2.0 5. Opisan u odjeljku 4., cilj ove izjave je u skladu s relevantnim zakonodavstvom Zajednice za usklađivanje. 6. Reference na relevantne usklađene standarde koji se koriste ili specifikacije za koje je deklarirana sukladnost: 2014/53 / EU - Radio Directive / RED Directive 2011/65 / EU - RoHS Directive 2 2009/48 / EC - TD Toy Directive 2014/30 / EU - EMC Electromagnetic Compatibility Directive EN 71-1:2014+A1:2018 EN 71-2:2011+A1:2014 EN 71-3:2019 EN IEC 62115:2020+A11:2020 ETSI EN 301 489-1 V2.2.3:2019 ETSI EN 301 489-3 V2.1.1:2019 ETSI EN 300 440 V2.2.1:2018 EN 62479:2010 EN 50663:2017 IEC 62321-3-1:2013 IEC 62321-4:2013+A1:2017 IEC 62321-5:2013 IEC 62321-6:2015 IEC 62321-7-1:2015 IEC 62321-7-2:2017 IEC 62321-8:2017 7. Dodatne informacije: Broj ove izjave H03/OV/20 Poznań, 10.10.2019 (mjesto i datum izdavanja) Član Odbora (potpis) www.overmax.eu-
 1
1
-
 2
2
-
 3
3
-
 4
4
-
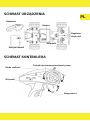 5
5
-
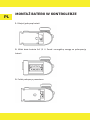 6
6
-
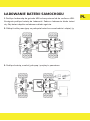 7
7
-
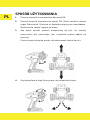 8
8
-
 9
9
-
 10
10
-
 11
11
-
 12
12
-
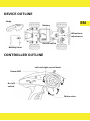 13
13
-
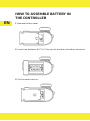 14
14
-
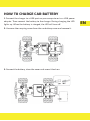 15
15
-
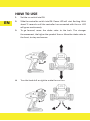 16
16
-
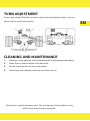 17
17
-
 18
18
-
 19
19
-
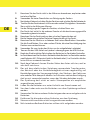 20
20
-
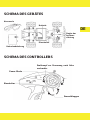 21
21
-
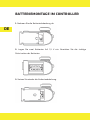 22
22
-
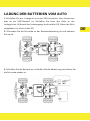 23
23
-
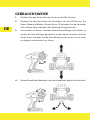 24
24
-
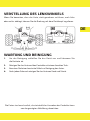 25
25
-
 26
26
-
 27
27
-
 28
28
-
 29
29
-
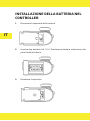 30
30
-
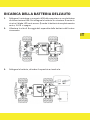 31
31
-
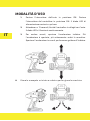 32
32
-
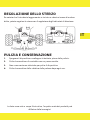 33
33
-
 34
34
-
 35
35
-
 36
36
-
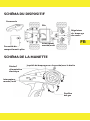 37
37
-
 38
38
-
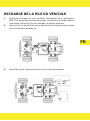 39
39
-
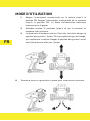 40
40
-
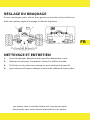 41
41
-
 42
42
-
 43
43
-
 44
44
-
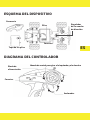 45
45
-
 46
46
-
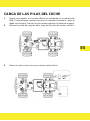 47
47
-
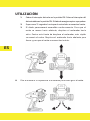 48
48
-
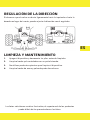 49
49
-
 50
50
-
 51
51
-
 52
52
-
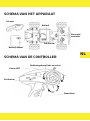 53
53
-
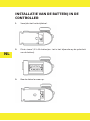 54
54
-
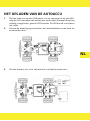 55
55
-
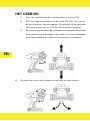 56
56
-
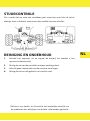 57
57
-
 58
58
-
 59
59
-
 60
60
-
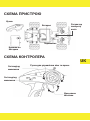 61
61
-
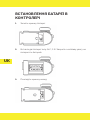 62
62
-
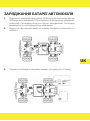 63
63
-
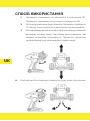 64
64
-
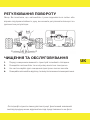 65
65
-
 66
66
-
 67
67
-
 68
68
-
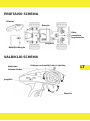 69
69
-
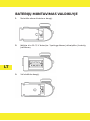 70
70
-
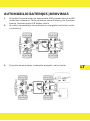 71
71
-
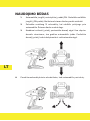 72
72
-
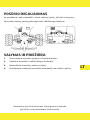 73
73
-
 74
74
-
 75
75
-
 76
76
-
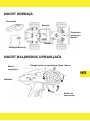 77
77
-
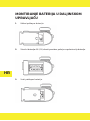 78
78
-
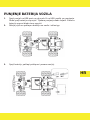 79
79
-
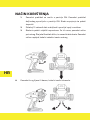 80
80
-
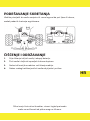 81
81
-
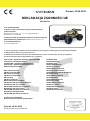 82
82
-
 83
83
-
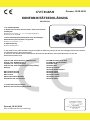 84
84
-
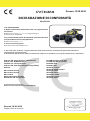 85
85
-
 86
86
-
 87
87
-
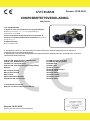 88
88
-
 89
89
-
 90
90
-
 91
91
-
 92
92


Overmax OV-X-RALLY 2.0 Handleiding
- Categorie
- Speelgoed
- Type
- Handleiding
in andere talen
- English: Overmax OV-X-RALLY 2.0 User manual
- italiano: Overmax OV-X-RALLY 2.0 Manuale utente
- français: Overmax OV-X-RALLY 2.0 Manuel utilisateur
- español: Overmax OV-X-RALLY 2.0 Manual de usuario
- Deutsch: Overmax OV-X-RALLY 2.0 Benutzerhandbuch
- polski: Overmax OV-X-RALLY 2.0 Instrukcja obsługi