
WLAN 11g USB Adapter
User Guide
ver 1.0

This product is in compliance with the essential requirements and other relevant
provisions of the R&TTE directive 1999/5/EC.
Product Name: X-Micro WLAN 11g USB Adapter
Model Name : XWL-11GUAR

1
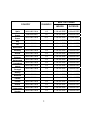
MAX. OUT POWER
COUNTRY CHANNELS
INDOOR OUTDOOR
Spain
2400-2483.5 MHz 1-13 < 100 mW EIRP < 100 mW EIRP
France
2400-2454 MHz 1-8 < 100 mW EIRP < 100 mW EIRP
France
2454-2483.5 MHz 9-13 < 100 mW EIRP < 10 mW EIRP
Ital
y
2400-2483.5 MHz 1-13 < 100 mW EIRP < 100 mW EIRP
U
K
2400-2483.5 MHz 1-13 < 100 mW EIRP < 100 mW EIRP
Netherlands
2400-2483.5 MHz 1-13 < 100 mW EIRP < 100 mW EIRP
German
y
2400-2483.5 MHz 1-13 < 100 mW EIRP < 100 mW EIRP
Austria
2400-2483.5 MHz 1-13 < 100 mW EIRP < 100 mW EIRP
Bel
g
ium
2400-2483.5 MHz 1-13 < 100 mW EIRP < 100 mW EIRP
Switzerland
2400-2483.5 MHz 1-13 < 100 mW EIRP < 100 mW EIRP
Luxembur
g
2400-2483.5 MHz 1-13 < 100 mW EIRP < 100 mW EIRP
Ireland
2400-2483.5 MHz 1-13 < 100 mW EIRP < 100 mW EIRP
Portu
g
al
2400-2483.5 MHz 1-13 < 100 mW EIRP < 100 mW EIRP
Norwa
y
2400-2483.5 MHz 1-13 < 100 mW EIRP < 100 mW EIRP
Denmark
2400-2483.5 MHz 1-13 < 100 mW EIRP < 100 mW EIRP
Finland
2400-2483.5 MHz 1-13 < 100 mW EIRP < 100 mW EIRP
Iceland
2400-2483.5 MHz 1-13 < 100 mW EIRP < 100 mW EIRP
Greece
2400-2483.5 MHz 1-13 < 100 mW EIRP < 100 mW EIRP
Lichtenstein
2400-2483.5 MHz 1-13 < 100 mW EIRP < 100 mW EIRP
Sweden
2400-2483.5 MHz 1-13 < 100 mW EIRP < 100 mW EIRP

2
FCC INFORMATION
FCC Radiation Exposure Statement
This equipment complies with FCC radiation exposure limits set forth for an uncontrolled environment.
This equipment should be installed and operated with minimum distance 20cm between the
radiator & your body.
This transmitter must not be co-located or operating in conjunction with any other antenna or
transmitter.
The equipment has been tested and found to comply with the limits for a Class B Digital
Device, pursuant to part 15 of the FCC Rules. These limits are designed to provide reasonable
protection against harmful interference in a residential installation.
This equipment generates, uses and can radiate radio frequency energy and, if not installed
and used in accordance with the instruction, may cause harmful interference to radio communication.
However, there is no grantee that interference will not occur in a particular installation. If this equipment
dose cause harmful interference to radio or television reception, which can be determined by turning
the equipment off and on, the user is encouraged to try to correct the interference by one or more of the
following measures:
--Reorient or relocate the receiving antenna.
--Increase the separation between the equipment and receiver.
--Connect the equipment into an outlet on a circuit different from that to which the receiver is connected
--Consult the dealer or an experienced radio/TV technician for help.
Notice: The Part 15 radio device operates on a non-interference basis with other devices operating at
this frequency. Any changes or modification not expressly approved by the party responsible could void
the user’s authority to operate the device.
REGULATORY INFORMATION
X-Micro WLAN 11g USB Adapter must be installed and used in strict accordance with the instructions.
This device complies with the following radio frequency and safety standards.
USA - Federal Communications Commission (FCC)
This device complies with Part 15 of FCC Rules. Operation is subject to the following two conditions:
1. This device may not cause harmful interference.
2. This device must accept any interference that may cause undesired operation.

3
Copyright
Copyright 2006 by X-Micro Technology Corp., All rights reserved. No part of
this publication may be reproduced, transmitted, transcribed, stored in a
retrieval system, or translated into any language or computer language, in any
form or by any means, electronic, mechanical, magnetic, optical, chemical,
manual or otherwise, without the prior written permission of X-Micro
Technology Corp.
Disclaimer
X-Micro Technology Corp. makes no representations or warranties, either
expressed or implied, with respect to the contents hereof and specifically
disclaims any warranties, merchantability or fitness for any particular purpose.
Any software described in this manual is sold or licensed "as is". Should the
programs prove defective following their purchase, the buyer (and not this
company, its distributor, or its dealer) assumes the entire cost of all necessary
servicing, repair, and any incidental or consequential damages resulting from
any defect in the software. Further, X-Micro Technology Corp., reserves the
right to revise this publication and to make changes from time to time in the
contents hereof without obligation to notify any person of such revision or
change.
All brand and product names mentioned in this manual are trademarks and/or
registered trademarks of their respective holders.

4
Index
English……………………………………………….…...………………………..P.5
German…………………….……………………………......……………………P.12
French………………………………………………………..……………………P.19
Dutch……………………………………………………………..………………P.26
Italian…………………………………………………………………............….P.33
Spanish……………………………………………………………….....……….P.40
Portuguese…………......................................………………………….…..P.47
Russian…………….......................................………………………….……P.54
Traditional Chinese……………………………………………………….……P.61

5
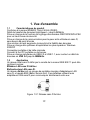
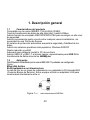
1. Overview
1.1 Product Feature
Complies with the IEEE802.11b/g 2.4GHz (DSSS) standard
High-speed data transfer rate – up to 54Mbps
Support WEP/WPA/WPA-PSK Data Encryption function for high level of
security
Supports peer-to-peer communication among any wireless users, no Access
Point required
Automatic fallback increases data security and reliability
Supports the most popular operating system: Windows 2000/XP
Portable and mini-size design
Suitable for Any Notebook or Desktop PC
Support USB 2.0 and USB 1.1 at the same time, especially for
USB 2.0 the
data rate reaches
480MBytes.
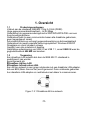
1.2 Application
Wireless LAN network defined by IEEE 802.11 standard committee could be
Configure as:
#Ad Hoc wireless LAN
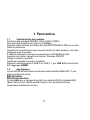
#Infrastructure wireless LAN. Ad Hoc network is a group of notebooks with
wireless LAN adapter, called a BSS (Basic Service Set). These notebooks use
their wireless LAN adapter to communicate with each other directly.

6
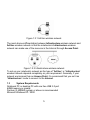
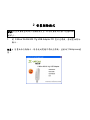
Figure 1.2.1 Ad Hoc wireless network
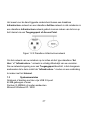
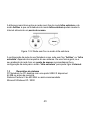
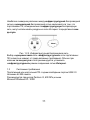
The most obvious differentiation between Infrastructure wireless network and
Ad Hoc wireless network is that the notebooks in Infrastructure wireless
network can make use of the resource in the Internet through Access Point.
Figure 1.2.2 Infrastructure wireless network
To set up your notebook’s network as the type of “Ad Hoc” or “Infrastructure”
wireless network depends completely on your requirement. Generally, if your
network environment has an Access Point, it’s recommend that you set it as
“Infrastructure” mode to connect to the Internet.
1.3 System Requirements
Notebook PC or desktop PC with one free USB 2.0 port
64MB memory or greater
Pentium III 600MHz system or above is recommended
Microsoft Windows XP / 2000

7
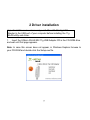
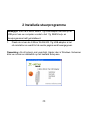
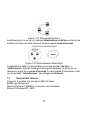
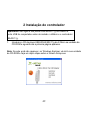
2 Driver installation
Important: Please do not connect your X-Micro WLAN 11g USB
Adapter to the USB port of your computer before installing the 11g
WLAN utility and driver.
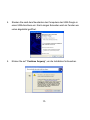
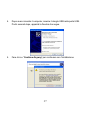
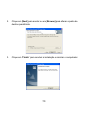
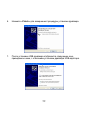
1. Insert the X-Micro WLAN 802.11g USB Adapter CD in the CD-ROM drive
and wait until first page appears.
Note: In case this screen does not appear, in Windows Explorer browse to
your CD-ROM and double-click the Setup.exe file.

8
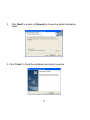
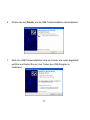
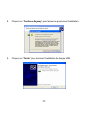
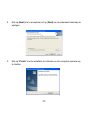
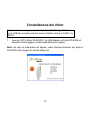
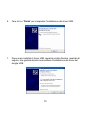
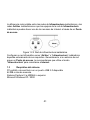
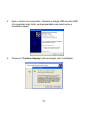
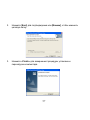
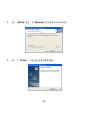
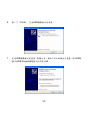
2. Click [Next] to accept, or [Browse] to change the default destination
folder.
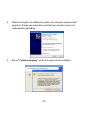
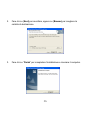
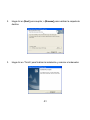
3. Click “Finish” to finish the installation and restart computer.

9
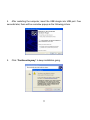
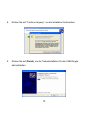
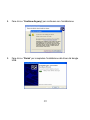
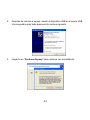
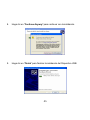
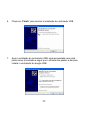
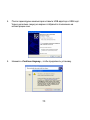
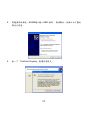
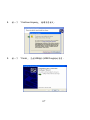
4. After restarting the computer, insert the USB dongle into USB port. Few
seconds later, there will be a window popup as the following picture.
5. Click “Continue Anyway” to keep installation going.

10
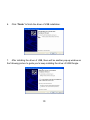
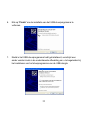
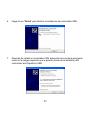
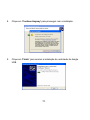
6. Click “Finish” to finish the driver of USB installation.
7. After installing the driver of USB, there will be another pop-up window as
the following picture to guide you to keep installing the driver of USB Dongle.

11
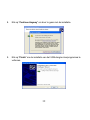
8. Click “Continue Anyway” to keep installation going.
9. Click “Finish” to finish the driver of USB Dongle installation.

12
1. Überblick
1.1 Produktleistungsmerkmale
Konform mit dem IEEE802.11b/g 2.4GHz (DSSS)-Standard
High-Speed Datentransferrate – bis zu 54Mbps
Unterstützt die WEP/WPA/WPA-PSK Datenverschlüsselungsfunktion für ein
hohes Sicherheitsniveau
Unterstützt Peer-to-Peer-Kommunikation zwischen drahtlosen Benutzern ohne
Zugriffspunkte
Automatischer Fallback zur Erhöhung der Datensicherheit und Zuverlässigkeit
Unterstützt das populärste Betriebssystem: Windows 2000/XP
Tragbar und Mini-Größe
Geeignet für Notebook- sowie Desktop-PCs
Unterstützt USB 2.0 und USB 1.1. Mit
USB 2.0 kann die Datentransferrate bis
zu
480MBytes sein.
1.2 Anwendung
Ein dem Standard IEEE 802.11 entsprechendes drahtloses LAN-Netzwerk
kann als:
#drahtloses Ad-hoc-LAN
#drahtloses Infrastruktur-LAN
konfiguriert werden.
Ein Ad-hoc-Netzwerk ist eine Gruppe von Notebooks mit drahtlosem
LAN-Adapter, der als BSS (Basic Service Set) bezeichnet wird. Diese
Notebooks verwenden ihren drahtlosen LAN-Adapter, um direkt miteinander
zu kommunizieren.
Abb. 1.2.1 drahtloses Ad-hoc-Netzwerk

13
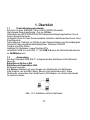
Der deutlichste Unterschied zwischen einem drahtlosen
Infrastruktur-Netzwerk und einem drahtlosen Ad-hoc-Netzwerk ist, dass die
Notebooks in einem drahtlosen Infrastruktur-Netzwerk über einen
Zugriffspunkt die Ressourcen im Internet benutzen können.
Abb. 1.2.2 drahtloses Infrastruktur-Netzwerk
Es hängt völlig von Ihrem Bedarf ab, ob Sie Ihr Notebook-Netzwerk als
"Ad-hoc"- oder "Infrastructure"-Netzwerk einrichten sollten. Im Allgemeinen
ist es ratsam den "Infrastructure"-Modus zur Verbindung mit dem Internet zu
verwenden, wenn Ihre Netzwerkumgebung einen Zugriffspunkt hat.
1.3 Systemanforderungen
Notebook-PC oder Desktop-PC mit einem freien USB 2.0-Anschluss
64MB oder noch mehr Speicher
Pentium III 600MHz System oder noch höhere Klasse
Microsoft Windows XP / 2000

14
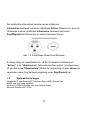
2. Treiberinstallation
Wichtig: Bitte verbinden Sie Ihren X-Micro WLAN 11g USB Adapter
mit dem USB-Anschluss Ihres Computers nicht, bevor Sie das 11g
WLAN-Dienstprogramm und den 11g WLAN-Treiber installiert haben.
1. Legen Sie die X-Micro WLAN 802.11g USB Adapter CD in Ihr optisches
Laufwerk ein und warten, bis die Startseite geöffnet wird.
Hinweis: Wenn die Startseite nicht geöffnet wurde, dann öffnen Sie bitte im
Windows-Explorer die Datei "Setup.exe" auf der CD-ROM.

15
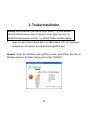
2. Klicken Sie auf [Next], wenn Sie den Standardzielordner annehmen
möchten. Oder Klicken Sie auf [Browse], um den Zielordner zu ändern.
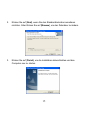
3. Klicken Sie auf [Finish], um die Installation abzuschließen und den
Computer neu zu starten.

16
4. Stecken Sie nach dem Neustarten des Computers den USB-Dongle in
einen USB-Anschluss ein. Nach einigen Sekunden wird ein Fenster wie
unten abgebildet geöffnet.
5. Klicken Sie auf "Continue Anyway", um die Installation fortzusetzen.

17
6. Klicken Sie auf [Finish], um die USB-Treiberinstallation abzuschließen.
7. Nach der USB-Treiberinstallation wird ein Fenster wie unten abgebildet
geöffnet und fordert Sie auf, den Treiber des USB-Dongles zu
installieren.

18
8. Klicken Sie auf "Continue Anyway", um die Installation fortzusetzen.
9. Klicken Sie auf [Finish], um die Treiberinstallation für den USB-Dongle
abzuschließen.

19
1. Vue d'ensemble
1.1 Caractéristiques du produit
Conforme à la norme IEEE802.11b/g 2.4GHz (DSSS)
Débit de transfert de données High-speed – jusqu'à 54Mbit/s
Prise en charge de la fonction de cryptage des données WEP/WPA/WPA-PSK
pour un haut niveau de sécurité
Prise en charge de la communication peer-to-peer entre utilisateurs sans fil,
sans besoin de point d'accès
Une solution de repli augmente la sécurité et la fiabilité des données
Prise en charge des systèmes d'exploitation les plus répandus: Windows
2000/XP
Conception portable et de taille minimale
Convient à tout PC portable ou de bureau
Prise en charge simultanée de USB 2.0 et USB 1.1, avec surtout un débit de
données en
USB 2.0 jusqu'à 480Mbit/s.
1.2 Application
Un réseau local sans fil défini par le comité de la norme IEEE 802.11 peut être
configuré comme:
#Réseau LAN sans fil Ad Hoc
#Infrastructure LAN sans fil.
Un réseau Ad Hoc est un groupe de portables équipés d'adaptateurs LAN
sans fil, et appelé BSS (Basic Service Set). Ces portables utilisent leurs
adaptateurs LAN sans fil pour communiquer directement entre eux.
Figure 1.2.1 Réseau sans fil Ad Hoc

20
La différence la plus évidente entre un réseau d'Infrastructure sans fil et un
réseau sans fil Ad Hoc est que les portables dans une réseau
d'Infrastructure sans fil peuvent utiliser la ressource Internet via un Point
d'accès.
Figure 1.2.2 Réseau d'infrastructure sans fil
Le choix de configurer votre réseau de portables en type de réseau sans fil
“Ad Hoc” ou “Infrastructure” dépend complètement de votre besoin. En
général, si votre environnement réseau comporte un Point d'accès, il est
recommandé que vous le configuriez en mode “Infrastructure” pour vous
connecter à Internet.
1.3 Configuration système requise
PC portable ou de bureau avec un port USB 2.0 disponible
64MB de mémoire ou davantage
Un système Pentium III 600MHz ou supérieur est recommandé
Microsoft Windows XP / 2000

21
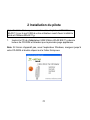
2 Installation du pilote
Important: Veuillez ne pas connecter votre adaptateur USB X-Micro
WLAN 11g sur le port USB de votre ordinateur avant d'avoir installé le
pilote et l'utilitaire WLAN 11g.
1. Insérez le CD de d'adaptateur USB X-Micro WLAN 802.11g dans le
lecteur de CD-ROM et attendez que la première page apparaisse.
Note: Si l'écran n'apparaît pas, sous l'explorateur Windows, naviguez jusqu'à
votre CD-ROM et double cliquez sur le fichier Setup.exe.

22
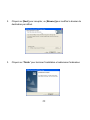
2. Cliquez sur [Next] pour accepter, ou [Browse] pour modifier le dossier de
destination par défaut.
3. Cliquez sur “Finish” pour terminer l'installation et redémarrer l'ordinateur.

23
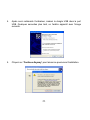
4. Après avoir redémarré l'ordinateur, insérez le dongle USB dans le port
USB. Quelques secondes plus tard, un fenêtre apparaît avec l'image
suivante.
5. Cliquez sur “Continue Anyway” pour laisser se poursuivre l'installation.

24
6. Cliquez sur “Finish” pour terminer l'installation du pilote USB.
7. Après avoir installé le pilote USB, une autre fenêtre apparaît avec l'image
suivante, pour vous guider dans la poursuite de l'installation du pilote du
dongle USB.

25
8. Cliquez sur “Continue Anyway” pour laisser se poursuivre l'installation.
9. Cliquez sur “Finish” pour terminer l'installation du dongle USB.

26
1. Overzicht
1.1 Producteigenschappen
Voldoet aan de standaard IEEE802.11b/g 2.4 GHz (DSSS)
Hoge gegevensoverdrachtsnelheid – tot 54 Mbps
Ondersteunt de gegevenscoderingsfunctie WEP/WPA/WPA-PSK voor een
hoog beveiligingsniveau
Ondersteunt peer-to-peer communicatie tussen alle draadloze gebruikers,
geen toegangspunt vereist
Automatische back-up verhoogt gegevensbeveiliging en betrouwbaarheid
Ondersteunt de meest populaire besturingssystemen: Windows 2000/XP
Draagbaar en uiterst compact ontwerp
Geschikt voor elke notebook of desktop
Gelijktijdige ondersteuning van USB 2.0 en USB 1.1, vooral
USB 2.0 waar de
gegevenssnelheid
480 MB kan bereiken.
1.2 Toepassing
Een draadloos LAN-netwerk dat door de IEEE 802.11 standaard is
gedefinieerd, kan worden
geconfigureerd als:
#Draadloos Ad Hoc-LAN
#Draadloos Infrastructuur-LAN.
Een Ad Hoc-netwerk is een groep notebooks met een draadloze LAN-adapter,
dat een BSS (Basic Service Set) wordt genoemd. Deze notebooks gebruiken
hun draadloze LAN-adapter om rechtstreeks met elkaar te communiceren.
Figuur 1.2.1 Draadloos Ad Hoc-netwerk

27
Het meest voor de hand liggende onderscheid tussen een draadloos
Infrastructure -netwerk en een draadloos Ad Hoc-netwerk is dat notebooks in
een draadloos Infrastructuur-netwerk gebruik kunnen maken van de bron op
het Internet via een Toegangspunt of Access Point.
Figuur 1.2.2 Draadloos Infrastructuurnetwerk
Om het netwerk van uw notebook op te zetten als het type draadloos “Ad
Hoc-” of “Infrastructure -” netwerk is volledig afhankelijk van uw vereisten.
Als uw netwerkomgeving over een Toegangspunt beschikt, is het doorgaans
aanbevolen dat u deze instelt als “Infrastructure -” modus om een verbinding
te maken met het Internet.
1.3 Systeemvereisten
Notebook of desktop met één vrije USB 2.0-poort
64 MB geheugen of meer
Pentium III 600MHz of sneller aanbevolen
Microsoft Windows XP / 2000

28
2 Installatie stuurprogramma
Belangrijk: Sluit uw X-Micro WLAN 11g USB-adapter niet aan op de
USB-poort van uw computer voordat u het 11g WLAN hulp- en
stuurprogramma hebt geïnstalleerd.
1. Plaats de cd van de X-Micro WLAN 802.11g USB-adapter in het
cd-romstation en wacht tot de eerste pagina wordt weergegeven.
Opmerking: Als dit scherm niet verschijnt, blader dan in Windows Verkenner
door uw cd-rom en dubbelklik op het bestand Setup.exe.

29
2. Klik op [Next] om te accepteren of op [Next] om de standaard doelmap te
wijzigen.
3. Klik op "Finish" om de installatie te voltooien en de computer opnieuw op
te starten.

30
4. Plaats de dongle in de USB-poort nadat u de computer opnieuw hebt
opgestart. Enkele seconden later verschijnt een venster zoals in de
onderstaande afbeelding.
5. Klik op “Continue Anyway” om door te gaan met de installatie.

31
6. Klik op "Finish" om de installatie van het USB-stuurprogramma te
voltooien.
7. Nadat u het USB-stuurprogramma hebt geïnstalleerd, verschijnt een
ander venster zoals in de onderstaande afbeelding om u te begeleiden bij
het installeren van het stuurprogramma van de USB-dongle.

32
8. Klik op "Continue Anyway" om door te gaan met de installatie.
9. Klik op "Finish" om de installatie van het USB-dongle-stuurprogramma te
voltooien.

33
1. Panoramica
1.1 Caratteristiche del prodotto
Conforme allo standard IEEE802.11b/g 2.4GHz (DSSS)
Alta velocità di trasferimento dati fino a 54Mbps
Supporto della funzione di codifica dei dati WEP/WPA/WPA-PSK per un alto
livello di protezione
Supporta la comunicazione peer-to-peer tra tutti gli utenti wireless, non sono
necessari punti d’accesso
Il Fallback automatico aumenta la protezione e l’affidabilità dei dati
Supporto dei sistemi operativi più comuni: Windows 2000/XP
Design compatto e portatile
Adatto per qualsiasi computer o portatile
Supporto contemporaneo di USB 2.0 e USB 1.1, per
USB 2.0 la velocità dei
dati raggiunge
480MB.
1.2 Applicazione
La rete WLAN definita dalla commissione dello standard IEEE 802.11 può
essere configurata come:
#WLAN Ad Hoc
#WLAN Infrastruttura.
La rete Ad Hoc è un gruppo di portatili con scheda WLAN, chiamata BSS
(Basic Service Set). Questi portatili usano la loro scheda WLAN per
comunicare direttamente tra loro.

34
Figura 1.2.1 Rete wireless Ad hoc
La differenza più ovvia tra reti wireless Infrastruttura ed Ad Hoc è che la rete
wireless può fare uso delle risorse di Internet usando punti d’accesso.
Figura 1.2.2 Rete wireless Infrastruttura
L’impostazione della rete del portatile come rete wireless “Ad Hoc” o
“Infrastructure” dipende totalmente dai requisiti personali. In generale, se
l'ambiente di rete ha un punto d'accesso, si raccomanda di impostare la rete
con la modalità " Infrastructure " per collegarsi ad Internet.
1.3 Requisiti del sistema
Computer o portatile con una porta USB 2.0 libera
64MB o più di memoria
Sistema Pentium III 600MHz o superiore, raccomandato
Microsoft Windows XP / 2000

35
2 Installazione del driver
Importante: non collegare la scheda X-Micro WLAN 11g USB alla
porta USB del computer prima di avere installato il driver e l'utilità 11g
WLAN.
1. Inserire il CD X-Micro WLAN 802.11g USB Adapter nell’unità CD-ROM ed
attendere finché appare la schermata della prima pagina.
Nota: nel caso la schermata non appaia, usare Windows Explorer per aprire il
CD-ROM e fare doppio clic sul file Setup.exe.

36
2. Fare clic su [Next] per accettare, oppure su [Browse] per scegliere la
cartella di destinazione.
3. Fare clic su “Finish” per completare l’installazione e riavviare il computer.

37
4. Dopo avere riavviato il computer, inserire il dongle USB nella porta USB.
Pochi secondi dopo, apparirà la finestra che segue.
5. Fare clic su “Continue Anyway” per continuare con l’installazione.

38
6. Fare clic su “Finish” per completare l'installazione del driver USB.
7. Dopo avere installato il driver USB, apparirà un’altra finestra, mostrata di
seguito, che guiderà durante le procedure d’installazione del driver del
dongle USB.

39
8. Fare clic su “Continue Anyway” per continuare con l’installazione.
9. Fare clic su “Finish” per completare l'installazione del driver del dongle
USB.

40
1. Descripción general
1.1 Características del producto
Compatible con la norma IEEE801.11b/g2.4GHz (DSSS)
Tasa de transferencia de datos de alta velocidad - hasta 54 Mbps
Admite función de encriptado WEP/WPA/WPA-PSK para conseguir un alto nivel
de seguridad
Admite comunicación punto a punto entre cualquier usuario inalámbrico, sin
necesidad de usar Puntos de Acceso
El sistema de protección automática aumenta la seguridad y fiabilidad de los
datos
Admite los sistemas operativos más populares: Windows 2000/XP
Diseño reducido y portátil
Adecuado para cualquier portátil o PC de escritorio
Admite USB 2.0 y USB 1.1 al mismo tiempo, especialmente para
USB 2.0 la
transferencia de datos alcanza los
480MBytes.
1.2 Aplicación
Red Wireless LAN definida por la norma IEEE 802.11 pudiendo ser configurada
Como:
#Red LAN Ad Hoc
#LAN inalámbrica en infraestructura.
La red Ad Hoc es un grupo de ordenadores con adaptador LAN, llamado BSS
(Conjunto Básico de Servicio). Estos equipos utilizan su adaptador LAN para
comunicarse directamente entre sí.
Figura 1.2.1 Red inalámbrica Ad Hoc

41
La diferencia más notable entre las redes de Infraestructura inalámbricas y las
redes Ad Hoc inalámbricas es que los equipos de la red de Infraestructura
inalámbrica pueden hacer uso de los recursos de Internet a través de un Punto
de acceso.
Figura 1.2.2 Red de infraestructura inalámbrica
Configurar su red informática como “Ad Hoc” o “Infraestructura” inalámbrica
depende enteramente de sus requisitos. Generalmente, si su entorno de red
posee un Punto de acceso, le recomendamos que utilice el modo
“Infraestructura” para conectarse a Internet.
1.3 Requisitos del sistema
PC portátil o de escritorio con un puerto USB 2.0 disponible
64 MB o más de memoria
Sistema Pentium III a 600MHz o superior
Microsoft Windows XP / 2000

42
2 Instalación de controladores
Importante: Por favor, no conecte su Adaptador USB X-Micro WLAN
11g al puerto USB de su equipo antes de instalar el controlador y la
utilidad 11g WLAN.
1. Inserte el CD del Adaptador USB X-Micro WLAN 802.11g USB en la unidad
de CD-ROM y espere a que aparezca la primera página.
NOTE: En caso de que no aparezca la pantalla, navegue en el Explorador de
Windows hasta su unidad de CD-ROM y haga doble clic en el archivo Setup.exe.

43
2. Haga clic en [Next] para aceptar, o [Browse] para cambiar la carpeta de
destino.
3. Haga clic en “Finish” para finalizar la instalación y reiniciar el ordenador.

44
4. Después de reiniciar el equipo, inserte el dispositivo USB en el puerto USB.
Unos segundos más tarde aparecerá la ventana siguiente.
5. Haga clic en "Continue Anyway" para continuar con la instalación.

45
6. Haga clic en “Finish” para finalizar la instalación del controlador USB.
7. Después de instalar el controlador USB, aparecerá otra ventana emergente
como en la imagen siguiente que le guiará a través de la instalación del
controlador del Dispositivo USB.

46
8. Haga clic en "Continue Anyway" para continuar con la instalación.
9. Haga clic en “Finish” para finalizar la instalación del Dispositivo USB.

47
1. Resumo
1.1 Características do produto
Compatível com a especificação IEEE802.11b/g de 2,4 GHz (DSSS)
Alta velocidade de transmissão dos dados até 54 Mbps
Suporta a encriptação de dados WEP/WPA/WPA-PSK para um alto nível de
segurança
Suporta a comunicação através de uma rede não hierárquica e entre quaisquer
utilizadores sem fios não sendo necessário um ponto de acesso
A recuperação automática aumenta a segurança e fiabilidade dos dados
Suporta os mais populares sistemas operativos: Windows 2000/XP
Design portátil e de pequenas dimensões
Adequado para qualquer Notebook ou PC Desktop
Suporte em simultâneo para as especificações USB 2.0 e USB 1.1, sobretudo ao
nível da especificação
USB 2.0 a velocidade de transmissão de dados pode
chegar aos
480 MBytes.
1.2 Aplicação
Tal como definido pela norma IEEE 802.11, a rede LAN sem fios pode ser
configurada para funcionar como:
# LAN sem fios Ad Hoc ou
# LAN sem fios Infra estrutura.
No modo
Ad Hoc
, a rede é composta por um grupo de Notebooks com uma placa
LAN
sem fios e recebe a designação BSS (Basic Service Set). Estes Notebooks utilizam
as respectivas placas LAN sem fios para comunicarem directamente uns com os
outros.
Figura 1.2.1 Rede sem fios Ad Hoc

48
A diferença mais óbvia entre as redes sem fios do modo Infra estrutura e do
modo Ad Hoc é que os Notebooks do modo Infra estrutura podem aceder à
Internet através de um ponto de acesso.
Figura 1.2.2 Rede sem fios no modo Infra estrutura
A configuração da rede do seu Notebook como rede sem fios “Ad Hoc” ou “Infra
estrutura” depende dos requisitos do seu sistema. De uma forma geral, se o
seu ambiente de rede tiver um ponto de acesso recomendamos-lhe a
configuração da rede para o modo “Infra estrutura” para poder ligar à Internet.
1.3 Requisitos do sistema
PC Notebook ou PC desktop com uma porta USB 2.0 disponível
64 MB ou acima de memória
Sistema Pentium III de 600 MHz ou acima recomendado
Microsoft Windows XP / 2000

49
2 Instalação do controlador
Importante: Não ligue a sua placa USB WLAN 11g da X-Micro à
porta USB do computador antes de instalar o utilitário e o controlador
WLAN 11g.
1. Introduza o CD da placa USB WLAN 802.11g da X-Micro na unidade de
CD-ROM e aguarde até a primeira página aparecer.
Nota: Se este ecrã não aparecer, no Windows Explorer vá até à sua unidade
de CD-ROM e faça um duplo clique sobre o ficheiro Setup.exe.

50
2. Clique em [Next] para aceitar ou em [Browse] para alterar a pasta de
destino predefinida.
3. Clique em “Finish” para concluir a instalação e reiniciar o computador.

51
4. Após o reinício do computador, introduza o dongle USB na porta USB.
Uns segundos mais tarde, será apresentada uma janela como a
mostrada a seguir.
5. Clique em “Continue Anyway” para prosseguir com a instalação.

52
6. Clique em “Finish” para concluir a instalação do controlador USB.
7. Após a instalação do controlador USB, será apresentada uma outra
janela como a mostrada a seguir que o informa dos passos a dar para
instalar o controlador do dongle USB.

53
8. Clique em “Continue Anyway” para prosseguir com a instalação.
9. Clique em “Finish” para concluir a instalação do controlador do dongle
USB.

54
1. Обзор
1.1 Особенности устройства
Соответствие стандарту IEEE802.11b/g 2,4 ГГц (DSSS)
Высокая скорость передачи данных – до 54 Мбит/с.
Поддержка функции шифрования данных WEP, WPA, WPA-PSK для
обеспечения безопасности высокого уровня.
Поддержка одноранговой передачи данных между всеми пользователями
беспроводной сети, не требуется точка доступа.
Автоматическая нейтрализация неисправностей повышает сохранность и
надежность данных.
Поддержка наиболее распространенных операционных систем: Windows
2000/XP
Портативная и компактная конструкция
Подходит для любого портативного или настольного ПК
Одновременная поддержка USB 2.0 и USB 1.1, скорость передачи данных
посредством
USB 2.0 достигает 480 Мбит/с.
1.2 Приложение
В соответствии со стандартом IEEE 802.11 беспроводная локальная сеть
может быть настроена следующим образом:
#одноранговая беспроводная сеть
#инфраструктурная беспроводная сеть.
Одноранговая беспроводная сеть – это группа портативных ПК с
адаптерами беспроводной сети, которая называется BSS (Basic Service
Set). Эти портативные ПК используют адаптеры беспроводной сети для
непосредственного обмена информацией друг с другом.
Рис. 1.2.1. Беспроводная одноранговая сеть

55
Наиболее очевидное различие между инфраструктурной беспроводной
сетью и одноранговой беспроводной сетью заключается в том, что
портативные ПК, объединенные в инфраструктурную беспроводную
сеть, могут использовать ресурсы из сети Интернет посредством точки
доступа.
Рис. 1.2.2. Инфраструктурная беспроводная сеть
Выбор «однораноговой» или «инфраструктурной» сети портативных
ПК полностью зависит от предъявляемых требований. Обычно при
наличии точки доступа в сети рекомендуется установить
«инфраструктурный» режим соединения сетью Интернет.
1.3 Системные требования
Портативный или настольный ПК с одним свободным портом USB 2.0
Не менее 64 Мб памяти
Рекомендуется процессор Pentium III, 600 МГц и выше
Microsoft Windows XP / 2000

56
2. Установка драйвера
Важное примечание. Подключайте адаптер X-Micro WLAN 11g
USB к USB-порту ПК только после установки служебной
программы и драйвера 11g WLAN.
1. Вставьте компакт-диск, прилагающийся к адаптеру X-Micro WLAN
802.11g USB, в привод для компакт-дисков и дождитесь, пока
отобразится первая страница.
Примечание. Если окно не отобразилось, в окне Проводника Windows
перейдите к приводу компакт-дисков и дважды щелкните файл
«Setup.exe».

57
2. Нажмите [Next] для подтверждения или [Browse], чтобы изменить
целевую папку.
3. Нажмите «Finish» для завершения процедуры установки и
перезагрузки компьютера.

58
4. После перезагрузки компьютера вставьте USB-адаптер в USB-порт.
Через несколько секунд на экране отобразится показанное на
иллюстрации окно.
5. Нажмите «Continue Anyway», чтобы продолжить установку.

59
6. Нажмите «Finish» для завершения процедуры установки драйвера.
7. После установки USB-драйвера отобразится следующее окно,
приведенное ниже, с описанием установки драйвера USB-адаптера.

60
8. Нажмите «Continue Anyway», чтобы продолжить установку.
9. Нажмите «Finish» для завершения процедуры установки
USB-адаптера.

61
1. 總覽
1.1 產品功能
與 IEEE802.11b/g 2.4GHz (DSSS) 標準相容。
高速資料傳輸率-最高可達 54Mbps。
支援高安全性 WEP/WPA/WPA-PSK 資料加密功能
不需任何無線網路基地台,可支援所有無線網路使用者間的點對點通訊。
自動錯誤回復功能,增加資料的安全性和穩定性。
支援大部分的作業系統: Windows 2000/XP
設計小巧,攜帶方便
適用於所有筆記型或桌上型電腦
可支援 USB 2.0 及 USB 1.1,USB 2.0 間的傳輸率可達 480M
位元
1.2
應用
由IEEE 802.11標準協會所定義的無線區域網卡可設定為
#
點對點模式(Ad Hoc wireless LAN)
#
主控/基地台模式(Infrastructure wireless LAN)無線區域網路。
點對點模式網路(Ad Hoc)是由一群內附無線區域網卡的筆記型電腦所組成,稱為
BSS基本服務(Basic Service Set) 這些筆記型電腦使用各自的無線區域網卡,可
直接相互進行通訊。
Figure 1.2.1
點對點模式無線網路(Ad Hoc wireless network)

62
主控/基地台模式無線區域網路(Infrastructure)與點對點模式無線網路(Ad Hoc)
最大的不同在於,使用固定式無線網路的筆記型電腦可透過無線網路基地台
(Access Point)使用網際網路資源。
Figure 1.2.
主控/基地台模式無線網路(Infrastructure wireless network)
只需要依據個人需求,將筆記型電腦的無線網路設定為「點對點」或「基地台」。
一般情況下,若所處環境具無線基地台網路,建議設定為連接網際網路的固定式
模式
(Infrastructure)。
1.3
系統需求
具有一個以上 USB 2.0 接埠的筆記型或桌上型電腦
64MB
以上的記憶體
建議使用 Pentium III 600MHz 以上的處理器
Microsoft Windows XP / 2000
作業系統

2 安裝驅動程式
重要:安裝本無線區域網卡及驅動程式前,切勿將無線網卡插入電腦
USB
接埠上。
1. 將 X-Micro WLAN 802.11g USB Adapter CD 置於光碟機,靜候畫面開始
顯示。
注意: 若畫面未自動顯示,請在我的電腦中尋找光碟機,並按兩下Setup.exe檔
案。

64
2. 按一下[Next] 接受,或 [Browse] 變更預設資料夾的位置。
3.
按一下「Finish」 完成安裝並重新啟動電腦。

65
4. 電腦重新啟動後,將USB插卡插入USB 接埠。 靜候數秒,會顯示如下圖的
彈出式視窗。
5.
按一下「Continue Anyway」繼續安裝程式。

66
6. 按一下「Finish」 完成USB驅動程式的安裝。
7.
完成USB驅動程式安裝後,會顯示另一個如下所示的彈出式視窗,說明USB
插卡(USB Dongle)驅動程式的安裝步驟。

67
8. 按一下 「Continue Anyway」 繼續安裝程式。
9.
按一下 「Finish」 完成USB插卡(USB Dongle)的安裝。

www.x-micro.com
Documenttranscriptie
WLAN 11g USB Adapter User Guide ver 1.0 This product is in compliance with the essential requirements and other relevant provisions of the R&TTE directive 1999/5/EC. Product Name: X-Micro WLAN 11g USB Adapter Model Name : XWL-11GUAR MAX. OUT POWER COUNTRY Spain France France Italy UK Netherlands Germany Austria Belgium Switzerland Luxemburg Ireland Portugal Norway Denmark Finland Iceland Greece Lichtenstein Sweden CHANNELS INDOOR OUTDOOR 2400-2483.5 MHz 1-13 < 100 mW EIRP < 100 mW EIRP 2400-2454 MHz 1-8 < 100 mW EIRP < 100 mW EIRP 2454-2483.5 MHz 9-13 < 100 mW EIRP < 10 mW EIRP 2400-2483.5 MHz 1-13 < 100 mW EIRP < 100 mW EIRP 2400-2483.5 MHz 1-13 < 100 mW EIRP < 100 mW EIRP 2400-2483.5 MHz 1-13 < 100 mW EIRP < 100 mW EIRP 2400-2483.5 MHz 1-13 < 100 mW EIRP < 100 mW EIRP 2400-2483.5 MHz 1-13 < 100 mW EIRP < 100 mW EIRP 2400-2483.5 MHz 1-13 < 100 mW EIRP < 100 mW EIRP 2400-2483.5 MHz 1-13 < 100 mW EIRP < 100 mW EIRP 2400-2483.5 MHz 1-13 < 100 mW EIRP < 100 mW EIRP 2400-2483.5 MHz 1-13 < 100 mW EIRP < 100 mW EIRP 2400-2483.5 MHz 1-13 < 100 mW EIRP < 100 mW EIRP 2400-2483.5 MHz 1-13 < 100 mW EIRP < 100 mW EIRP 2400-2483.5 MHz 1-13 < 100 mW EIRP < 100 mW EIRP 2400-2483.5 MHz 1-13 < 100 mW EIRP < 100 mW EIRP 2400-2483.5 MHz 1-13 < 100 mW EIRP < 100 mW EIRP 2400-2483.5 MHz 1-13 < 100 mW EIRP < 100 mW EIRP 2400-2483.5 MHz 1-13 < 100 mW EIRP < 100 mW EIRP 2400-2483.5 MHz 1-13 < 100 mW EIRP < 100 mW EIRP 1 FCC INFORMATION FCC Radiation Exposure Statement This equipment complies with FCC radiation exposure limits set forth for an uncontrolled environment. This equipment should be installed and operated with minimum distance 20cm between the radiator & your body. This transmitter must not be co-located or operating in conjunction with any other antenna or transmitter. The equipment has been tested and found to comply with the limits for a Class B Digital Device, pursuant to part 15 of the FCC Rules. These limits are designed to provide reasonable protection against harmful interference in a residential installation. This equipment generates, uses and can radiate radio frequency energy and, if not installed and used in accordance with the instruction, may cause harmful interference to radio communication. However, there is no grantee that interference will not occur in a particular installation. If this equipment dose cause harmful interference to radio or television reception, which can be determined by turning the equipment off and on, the user is encouraged to try to correct the interference by one or more of the following measures: --Reorient or relocate the receiving antenna. --Increase the separation between the equipment and receiver. --Connect the equipment into an outlet on a circuit different from that to which the receiver is connected --Consult the dealer or an experienced radio/TV technician for help. Notice: The Part 15 radio device operates on a non-interference basis with other devices operating at this frequency. Any changes or modification not expressly approved by the party responsible could void the user’s authority to operate the device. REGULATORY INFORMATION X-Micro WLAN 11g USB Adapter must be installed and used in strict accordance with the instructions. This device complies with the following radio frequency and safety standards. USA - Federal Communications Commission (FCC) This device complies with Part 15 of FCC Rules. Operation is subject to the following two conditions: 1. This device may not cause harmful interference. 2. This device must accept any interference that may cause undesired operation. 2 Copyright Copyright 2006 by X-Micro Technology Corp., All rights reserved. No part of this publication may be reproduced, transmitted, transcribed, stored in a retrieval system, or translated into any language or computer language, in any form or by any means, electronic, mechanical, magnetic, optical, chemical, manual or otherwise, without the prior written permission of X-Micro Technology Corp. Disclaimer X-Micro Technology Corp. makes no representations or warranties, either expressed or implied, with respect to the contents hereof and specifically disclaims any warranties, merchantability or fitness for any particular purpose. Any software described in this manual is sold or licensed "as is". Should the programs prove defective following their purchase, the buyer (and not this company, its distributor, or its dealer) assumes the entire cost of all necessary servicing, repair, and any incidental or consequential damages resulting from any defect in the software. Further, X-Micro Technology Corp., reserves the right to revise this publication and to make changes from time to time in the contents hereof without obligation to notify any person of such revision or change. All brand and product names mentioned in this manual are trademarks and/or registered trademarks of their respective holders. 3 Index English……………………………………………….…...………………………..P.5 German…………………….……………………………......……………………P.12 French………………………………………………………..……………………P.19 Dutch……………………………………………………………..………………P.26 Italian…………………………………………………………………............….P.33 Spanish……………………………………………………………….....……….P.40 Portuguese…………......................................………………………….…..P.47 Russian…………….......................................………………………….……P.54 Traditional Chinese……………………………………………………….……P.61 4 1. Overview 1.1 Product Feature Complies with the IEEE802.11b/g 2.4GHz (DSSS) standard High-speed data transfer rate – up to 54Mbps Support WEP/WPA/WPA-PSK Data Encryption function for high level of security Supports peer-to-peer communication among any wireless users, no Access Point required Automatic fallback increases data security and reliability Supports the most popular operating system: Windows 2000/XP Portable and mini-size design Suitable for Any Notebook or Desktop PC Support USB 2.0 and USB 1.1 at the same time, especially for USB 2.0 the data rate reaches 480MBytes. 1.2 Application Wireless LAN network defined by IEEE 802.11 standard committee could be Configure as: #Ad Hoc wireless LAN #Infrastructure wireless LAN. Ad Hoc network is a group of notebooks with wireless LAN adapter, called a BSS (Basic Service Set). These notebooks use their wireless LAN adapter to communicate with each other directly. 5 Figure 1.2.1 Ad Hoc wireless network The most obvious differentiation between Infrastructure wireless network and Ad Hoc wireless network is that the notebooks in Infrastructure wireless network can make use of the resource in the Internet through Access Point. Figure 1.2.2 Infrastructure wireless network To set up your notebook’s network as the type of “Ad Hoc” or “Infrastructure” wireless network depends completely on your requirement. Generally, if your network environment has an Access Point, it’s recommend that you set it as “Infrastructure” mode to connect to the Internet. 1.3 System Requirements Notebook PC or desktop PC with one free USB 2.0 port 64MB memory or greater Pentium III 600MHz system or above is recommended Microsoft Windows XP / 2000 6 2 Driver installation Important: Please do not connect your X-Micro WLAN 11g USB Adapter to the USB port of your computer before installing the 11g WLAN utility and driver. 1. Insert the X-Micro WLAN 802.11g USB Adapter CD in the CD-ROM drive and wait until first page appears. Note: In case this screen does not appear, in Windows Explorer browse to your CD-ROM and double-click the Setup.exe file. 7 2. Click [Next] to accept, or [Browse] to change the default destination folder. 3. Click “Finish” to finish the installation and restart computer. 8 4. After restarting the computer, insert the USB dongle into USB port. Few seconds later, there will be a window popup as the following picture. 5. Click “Continue Anyway” to keep installation going. 9 6. Click “Finish” to finish the driver of USB installation. 7. After installing the driver of USB, there will be another pop-up window as the following picture to guide you to keep installing the driver of USB Dongle. 10 8. Click “Continue Anyway” to keep installation going. 9. Click “Finish” to finish the driver of USB Dongle installation. 11 1. Überblick 1.1 Produktleistungsmerkmale Konform mit dem IEEE802.11b/g 2.4GHz (DSSS)-Standard High-Speed Datentransferrate – bis zu 54Mbps Unterstützt die WEP/WPA/WPA-PSK Datenverschlüsselungsfunktion für ein hohes Sicherheitsniveau Unterstützt Peer-to-Peer-Kommunikation zwischen drahtlosen Benutzern ohne Zugriffspunkte Automatischer Fallback zur Erhöhung der Datensicherheit und Zuverlässigkeit Unterstützt das populärste Betriebssystem: Windows 2000/XP Tragbar und Mini-Größe Geeignet für Notebook- sowie Desktop-PCs Unterstützt USB 2.0 und USB 1.1. Mit USB 2.0 kann die Datentransferrate bis zu 480MBytes sein. 1.2 Anwendung Ein dem Standard IEEE 802.11 entsprechendes drahtloses LAN-Netzwerk kann als: #drahtloses Ad-hoc-LAN #drahtloses Infrastruktur-LAN konfiguriert werden. Ein Ad-hoc-Netzwerk ist eine Gruppe von Notebooks mit drahtlosem LAN-Adapter, der als BSS (Basic Service Set) bezeichnet wird. Diese Notebooks verwenden ihren drahtlosen LAN-Adapter, um direkt miteinander zu kommunizieren. Abb. 1.2.1 drahtloses Ad-hoc-Netzwerk 12 Der deutlichste Unterschied zwischen einem drahtlosen Infrastruktur-Netzwerk und einem drahtlosen Ad-hoc-Netzwerk ist, dass die Notebooks in einem drahtlosen Infrastruktur-Netzwerk über einen Zugriffspunkt die Ressourcen im Internet benutzen können. Abb. 1.2.2 drahtloses Infrastruktur-Netzwerk Es hängt völlig von Ihrem Bedarf ab, ob Sie Ihr Notebook-Netzwerk als "Ad-hoc"- oder "Infrastructure"-Netzwerk einrichten sollten. Im Allgemeinen ist es ratsam den "Infrastructure"-Modus zur Verbindung mit dem Internet zu verwenden, wenn Ihre Netzwerkumgebung einen Zugriffspunkt hat. 1.3 Systemanforderungen Notebook-PC oder Desktop-PC mit einem freien USB 2.0-Anschluss 64MB oder noch mehr Speicher Pentium III 600MHz System oder noch höhere Klasse Microsoft Windows XP / 2000 13 2. Treiberinstallation Wichtig: Bitte verbinden Sie Ihren X-Micro WLAN 11g USB Adapter mit dem USB-Anschluss Ihres Computers nicht, bevor Sie das 11g WLAN-Dienstprogramm und den 11g WLAN-Treiber installiert haben. 1. Legen Sie die X-Micro WLAN 802.11g USB Adapter CD in Ihr optisches Laufwerk ein und warten, bis die Startseite geöffnet wird. Hinweis: Wenn die Startseite nicht geöffnet wurde, dann öffnen Sie bitte im Windows-Explorer die Datei "Setup.exe" auf der CD-ROM. 14 2. Klicken Sie auf [Next], wenn Sie den Standardzielordner annehmen möchten. Oder Klicken Sie auf [Browse], um den Zielordner zu ändern. 3. Klicken Sie auf [Finish], um die Installation abzuschließen und den Computer neu zu starten. 15 4. Stecken Sie nach dem Neustarten des Computers den USB-Dongle in einen USB-Anschluss ein. Nach einigen Sekunden wird ein Fenster wie unten abgebildet geöffnet. 5. Klicken Sie auf "Continue Anyway", um die Installation fortzusetzen. 16 6. Klicken Sie auf [Finish], um die USB-Treiberinstallation abzuschließen. 7. Nach der USB-Treiberinstallation wird ein Fenster wie unten abgebildet geöffnet und fordert Sie auf, den Treiber des USB-Dongles zu installieren. 17 8. Klicken Sie auf "Continue Anyway", um die Installation fortzusetzen. 9. Klicken Sie auf [Finish], um die Treiberinstallation für den USB-Dongle abzuschließen. 18 1. Vue d'ensemble 1.1 Caractéristiques du produit Conforme à la norme IEEE802.11b/g 2.4GHz (DSSS) Débit de transfert de données High-speed – jusqu'à 54Mbit/s Prise en charge de la fonction de cryptage des données WEP/WPA/WPA-PSK pour un haut niveau de sécurité Prise en charge de la communication peer-to-peer entre utilisateurs sans fil, sans besoin de point d'accès Une solution de repli augmente la sécurité et la fiabilité des données Prise en charge des systèmes d'exploitation les plus répandus: Windows 2000/XP Conception portable et de taille minimale Convient à tout PC portable ou de bureau Prise en charge simultanée de USB 2.0 et USB 1.1, avec surtout un débit de données en USB 2.0 jusqu'à 480Mbit/s. 1.2 Application Un réseau local sans fil défini par le comité de la norme IEEE 802.11 peut être configuré comme: #Réseau LAN sans fil Ad Hoc #Infrastructure LAN sans fil. Un réseau Ad Hoc est un groupe de portables équipés d'adaptateurs LAN sans fil, et appelé BSS (Basic Service Set). Ces portables utilisent leurs adaptateurs LAN sans fil pour communiquer directement entre eux. Figure 1.2.1 Réseau sans fil Ad Hoc 19 La différence la plus évidente entre un réseau d'Infrastructure sans fil et un réseau sans fil Ad Hoc est que les portables dans une réseau d'Infrastructure sans fil peuvent utiliser la ressource Internet via un Point d'accès. Figure 1.2.2 Réseau d'infrastructure sans fil Le choix de configurer votre réseau de portables en type de réseau sans fil “Ad Hoc” ou “Infrastructure” dépend complètement de votre besoin. En général, si votre environnement réseau comporte un Point d'accès, il est recommandé que vous le configuriez en mode “Infrastructure” pour vous connecter à Internet. 1.3 Configuration système requise PC portable ou de bureau avec un port USB 2.0 disponible 64MB de mémoire ou davantage Un système Pentium III 600MHz ou supérieur est recommandé Microsoft Windows XP / 2000 20 2 Installation du pilote Important: Veuillez ne pas connecter votre adaptateur USB X-Micro WLAN 11g sur le port USB de votre ordinateur avant d'avoir installé le pilote et l'utilitaire WLAN 11g. 1. Insérez le CD de d'adaptateur USB X-Micro WLAN 802.11g dans le lecteur de CD-ROM et attendez que la première page apparaisse. Note: Si l'écran n'apparaît pas, sous l'explorateur Windows, naviguez jusqu'à votre CD-ROM et double cliquez sur le fichier Setup.exe. 21 2. Cliquez sur [Next] pour accepter, ou [Browse] pour modifier le dossier de destination par défaut. 3. Cliquez sur “Finish” pour terminer l'installation et redémarrer l'ordinateur. 22 4. Après avoir redémarré l'ordinateur, insérez le dongle USB dans le port USB. Quelques secondes plus tard, un fenêtre apparaît avec l'image suivante. 5. Cliquez sur “Continue Anyway” pour laisser se poursuivre l'installation. 23 6. Cliquez sur “Finish” pour terminer l'installation du pilote USB. 7. Après avoir installé le pilote USB, une autre fenêtre apparaît avec l'image suivante, pour vous guider dans la poursuite de l'installation du pilote du dongle USB. 24 8. Cliquez sur “Continue Anyway” pour laisser se poursuivre l'installation. 9. Cliquez sur “Finish” pour terminer l'installation du dongle USB. 25 1. Overzicht 1.1 Producteigenschappen Voldoet aan de standaard IEEE802.11b/g 2.4 GHz (DSSS) Hoge gegevensoverdrachtsnelheid – tot 54 Mbps Ondersteunt de gegevenscoderingsfunctie WEP/WPA/WPA-PSK voor een hoog beveiligingsniveau Ondersteunt peer-to-peer communicatie tussen alle draadloze gebruikers, geen toegangspunt vereist Automatische back-up verhoogt gegevensbeveiliging en betrouwbaarheid Ondersteunt de meest populaire besturingssystemen: Windows 2000/XP Draagbaar en uiterst compact ontwerp Geschikt voor elke notebook of desktop Gelijktijdige ondersteuning van USB 2.0 en USB 1.1, vooral USB 2.0 waar de gegevenssnelheid 480 MB kan bereiken. 1.2 Toepassing Een draadloos LAN-netwerk dat door de IEEE 802.11 standaard is gedefinieerd, kan worden geconfigureerd als: #Draadloos Ad Hoc-LAN #Draadloos Infrastructuur-LAN. Een Ad Hoc-netwerk is een groep notebooks met een draadloze LAN-adapter, dat een BSS (Basic Service Set) wordt genoemd. Deze notebooks gebruiken hun draadloze LAN-adapter om rechtstreeks met elkaar te communiceren. Figuur 1.2.1 Draadloos Ad Hoc-netwerk 26 Het meest voor de hand liggende onderscheid tussen een draadloos Infrastructure -netwerk en een draadloos Ad Hoc-netwerk is dat notebooks in een draadloos Infrastructuur-netwerk gebruik kunnen maken van de bron op het Internet via een Toegangspunt of Access Point. Figuur 1.2.2 Draadloos Infrastructuurnetwerk Om het netwerk van uw notebook op te zetten als het type draadloos “Ad Hoc-” of “Infrastructure -” netwerk is volledig afhankelijk van uw vereisten. Als uw netwerkomgeving over een Toegangspunt beschikt, is het doorgaans aanbevolen dat u deze instelt als “Infrastructure -” modus om een verbinding te maken met het Internet. 1.3 Systeemvereisten Notebook of desktop met één vrije USB 2.0-poort 64 MB geheugen of meer Pentium III 600MHz of sneller aanbevolen Microsoft Windows XP / 2000 27 2 Installatie stuurprogramma Belangrijk: Sluit uw X-Micro WLAN 11g USB-adapter niet aan op de USB-poort van uw computer voordat u het 11g WLAN hulp- en stuurprogramma hebt geïnstalleerd. 1. Plaats de cd van de X-Micro WLAN 802.11g USB-adapter in het cd-romstation en wacht tot de eerste pagina wordt weergegeven. Opmerking: Als dit scherm niet verschijnt, blader dan in Windows Verkenner door uw cd-rom en dubbelklik op het bestand Setup.exe. 28 2. Klik op [Next] om te accepteren of op [Next] om de standaard doelmap te wijzigen. 3. Klik op "Finish" om de installatie te voltooien en de computer opnieuw op te starten. 29 4. Plaats de dongle in de USB-poort nadat u de computer opnieuw hebt opgestart. Enkele seconden later verschijnt een venster zoals in de onderstaande afbeelding. 5. Klik op “Continue Anyway” om door te gaan met de installatie. 30 6. Klik op "Finish" om de installatie van het USB-stuurprogramma te voltooien. 7. Nadat u het USB-stuurprogramma hebt geïnstalleerd, verschijnt een ander venster zoals in de onderstaande afbeelding om u te begeleiden bij het installeren van het stuurprogramma van de USB-dongle. 31 8. Klik op "Continue Anyway" om door te gaan met de installatie. 9. Klik op "Finish" om de installatie van het USB-dongle-stuurprogramma te voltooien. 32 1. Panoramica 1.1 Caratteristiche del prodotto Conforme allo standard IEEE802.11b/g 2.4GHz (DSSS) Alta velocità di trasferimento dati fino a 54Mbps Supporto della funzione di codifica dei dati WEP/WPA/WPA-PSK per un alto livello di protezione Supporta la comunicazione peer-to-peer tra tutti gli utenti wireless, non sono necessari punti d’accesso Il Fallback automatico aumenta la protezione e l’affidabilità dei dati Supporto dei sistemi operativi più comuni: Windows 2000/XP Design compatto e portatile Adatto per qualsiasi computer o portatile Supporto contemporaneo di USB 2.0 e USB 1.1, per USB 2.0 la velocità dei dati raggiunge 480MB. 1.2 Applicazione La rete WLAN definita dalla commissione dello standard IEEE 802.11 può essere configurata come: #WLAN Ad Hoc #WLAN Infrastruttura. La rete Ad Hoc è un gruppo di portatili con scheda WLAN, chiamata BSS (Basic Service Set). Questi portatili usano la loro scheda WLAN per comunicare direttamente tra loro. 33 Figura 1.2.1 Rete wireless Ad hoc La differenza più ovvia tra reti wireless Infrastruttura ed Ad Hoc è che la rete wireless può fare uso delle risorse di Internet usando punti d’accesso. Figura 1.2.2 Rete wireless Infrastruttura L’impostazione della rete del portatile come rete wireless “Ad Hoc” o “Infrastructure” dipende totalmente dai requisiti personali. In generale, se l'ambiente di rete ha un punto d'accesso, si raccomanda di impostare la rete con la modalità " Infrastructure " per collegarsi ad Internet. 1.3 Requisiti del sistema Computer o portatile con una porta USB 2.0 libera 64MB o più di memoria Sistema Pentium III 600MHz o superiore, raccomandato Microsoft Windows XP / 2000 34 2 Installazione del driver Importante: non collegare la scheda X-Micro WLAN 11g USB alla porta USB del computer prima di avere installato il driver e l'utilità 11g WLAN. 1. Inserire il CD X-Micro WLAN 802.11g USB Adapter nell’unità CD-ROM ed attendere finché appare la schermata della prima pagina. Nota: nel caso la schermata non appaia, usare Windows Explorer per aprire il CD-ROM e fare doppio clic sul file Setup.exe. 35 2. Fare clic su [Next] per accettare, oppure su [Browse] per scegliere la cartella di destinazione. 3. Fare clic su “Finish” per completare l’installazione e riavviare il computer. 36 4. Dopo avere riavviato il computer, inserire il dongle USB nella porta USB. Pochi secondi dopo, apparirà la finestra che segue. 5. Fare clic su “Continue Anyway” per continuare con l’installazione. 37 6. Fare clic su “Finish” per completare l'installazione del driver USB. 7. Dopo avere installato il driver USB, apparirà un’altra finestra, mostrata di seguito, che guiderà durante le procedure d’installazione del driver del dongle USB. 38 8. Fare clic su “Continue Anyway” per continuare con l’installazione. 9. Fare clic su “Finish” per completare l'installazione del driver del dongle USB. 39 1. Descripción general 1.1 Características del producto Compatible con la norma IEEE801.11b/g2.4GHz (DSSS) Tasa de transferencia de datos de alta velocidad - hasta 54 Mbps Admite función de encriptado WEP/WPA/WPA-PSK para conseguir un alto nivel de seguridad Admite comunicación punto a punto entre cualquier usuario inalámbrico, sin necesidad de usar Puntos de Acceso El sistema de protección automática aumenta la seguridad y fiabilidad de los datos Admite los sistemas operativos más populares: Windows 2000/XP Diseño reducido y portátil Adecuado para cualquier portátil o PC de escritorio Admite USB 2.0 y USB 1.1 al mismo tiempo, especialmente para USB 2.0 la transferencia de datos alcanza los 480MBytes. 1.2 Aplicación Red Wireless LAN definida por la norma IEEE 802.11 pudiendo ser configurada Como: #Red LAN Ad Hoc #LAN inalámbrica en infraestructura. La red Ad Hoc es un grupo de ordenadores con adaptador LAN, llamado BSS (Conjunto Básico de Servicio). Estos equipos utilizan su adaptador LAN para comunicarse directamente entre sí. Figura 1.2.1 Red inalámbrica Ad Hoc 40 La diferencia más notable entre las redes de Infraestructura inalámbricas y las redes Ad Hoc inalámbricas es que los equipos de la red de Infraestructura inalámbrica pueden hacer uso de los recursos de Internet a través de un Punto de acceso. Figura 1.2.2 Red de infraestructura inalámbrica Configurar su red informática como “Ad Hoc” o “Infraestructura” inalámbrica depende enteramente de sus requisitos. Generalmente, si su entorno de red posee un Punto de acceso, le recomendamos que utilice el modo “Infraestructura” para conectarse a Internet. 1.3 Requisitos del sistema PC portátil o de escritorio con un puerto USB 2.0 disponible 64 MB o más de memoria Sistema Pentium III a 600MHz o superior Microsoft Windows XP / 2000 41 2 Instalación de controladores Importante: Por favor, no conecte su Adaptador USB X-Micro WLAN 11g al puerto USB de su equipo antes de instalar el controlador y la utilidad 11g WLAN. 1. Inserte el CD del Adaptador USB X-Micro WLAN 802.11g USB en la unidad de CD-ROM y espere a que aparezca la primera página. NOTE: En caso de que no aparezca la pantalla, navegue en el Explorador de Windows hasta su unidad de CD-ROM y haga doble clic en el archivo Setup.exe. 42 2. Haga clic en [Next] para aceptar, o [Browse] para cambiar la carpeta de destino. 3. Haga clic en “Finish” para finalizar la instalación y reiniciar el ordenador. 43 4. Después de reiniciar el equipo, inserte el dispositivo USB en el puerto USB. Unos segundos más tarde aparecerá la ventana siguiente. 5. Haga clic en "Continue Anyway" para continuar con la instalación. 44 6. Haga clic en “Finish” para finalizar la instalación del controlador USB. 7. Después de instalar el controlador USB, aparecerá otra ventana emergente como en la imagen siguiente que le guiará a través de la instalación del controlador del Dispositivo USB. 45 8. Haga clic en "Continue Anyway" para continuar con la instalación. 9. Haga clic en “Finish” para finalizar la instalación del Dispositivo USB. 46 1. Resumo 1.1 Características do produto Compatível com a especificação IEEE802.11b/g de 2,4 GHz (DSSS) Alta velocidade de transmissão dos dados até 54 Mbps Suporta a encriptação de dados WEP/WPA/WPA-PSK para um alto nível de segurança Suporta a comunicação através de uma rede não hierárquica e entre quaisquer utilizadores sem fios não sendo necessário um ponto de acesso A recuperação automática aumenta a segurança e fiabilidade dos dados Suporta os mais populares sistemas operativos: Windows 2000/XP Design portátil e de pequenas dimensões Adequado para qualquer Notebook ou PC Desktop Suporte em simultâneo para as especificações USB 2.0 e USB 1.1, sobretudo ao nível da especificação USB 2.0 a velocidade de transmissão de dados pode chegar aos 480 MBytes. 1.2 Aplicação Tal como definido pela norma IEEE 802.11, a rede LAN sem fios pode ser configurada para funcionar como: # LAN sem fios Ad Hoc ou # LAN sem fios Infra estrutura. No modo Ad Hoc, a rede é composta por um grupo de Notebooks com uma placa LAN sem fios e recebe a designação BSS (Basic Service Set). Estes Notebooks utilizam as respectivas placas LAN sem fios para comunicarem directamente uns com os outros. Figura 1.2.1 Rede sem fios Ad Hoc 47 A diferença mais óbvia entre as redes sem fios do modo Infra estrutura e do modo Ad Hoc é que os Notebooks do modo Infra estrutura podem aceder à Internet através de um ponto de acesso. Figura 1.2.2 Rede sem fios no modo Infra estrutura A configuração da rede do seu Notebook como rede sem fios “Ad Hoc” ou “Infra estrutura” depende dos requisitos do seu sistema. De uma forma geral, se o seu ambiente de rede tiver um ponto de acesso recomendamos-lhe a configuração da rede para o modo “Infra estrutura” para poder ligar à Internet. 1.3 Requisitos do sistema PC Notebook ou PC desktop com uma porta USB 2.0 disponível 64 MB ou acima de memória Sistema Pentium III de 600 MHz ou acima recomendado Microsoft Windows XP / 2000 48 2 Instalação do controlador Importante: Não ligue a sua placa USB WLAN 11g da X-Micro à porta USB do computador antes de instalar o utilitário e o controlador WLAN 11g. 1. Introduza o CD da placa USB WLAN 802.11g da X-Micro na unidade de CD-ROM e aguarde até a primeira página aparecer. Nota: Se este ecrã não aparecer, no Windows Explorer vá até à sua unidade de CD-ROM e faça um duplo clique sobre o ficheiro Setup.exe. 49 2. Clique em [Next] para aceitar ou em [Browse] para alterar a pasta de destino predefinida. 3. Clique em “Finish” para concluir a instalação e reiniciar o computador. 50 4. Após o reinício do computador, introduza o dongle USB na porta USB. Uns segundos mais tarde, será apresentada uma janela como a mostrada a seguir. 5. Clique em “Continue Anyway” para prosseguir com a instalação. 51 6. Clique em “Finish” para concluir a instalação do controlador USB. 7. Após a instalação do controlador USB, será apresentada uma outra janela como a mostrada a seguir que o informa dos passos a dar para instalar o controlador do dongle USB. 52 8. Clique em “Continue Anyway” para prosseguir com a instalação. 9. Clique em “Finish” para concluir a instalação do controlador do dongle USB. 53 1. Обзор 1.1 Особенности устройства Соответствие стандарту IEEE802.11b/g 2,4 ГГц (DSSS) Высокая скорость передачи данных – до 54 Мбит/с. Поддержка функции шифрования данных WEP, WPA, WPA-PSK для обеспечения безопасности высокого уровня. Поддержка одноранговой передачи данных между всеми пользователями беспроводной сети, не требуется точка доступа. Автоматическая нейтрализация неисправностей повышает сохранность и надежность данных. Поддержка наиболее распространенных операционных систем: Windows 2000/XP Портативная и компактная конструкция Подходит для любого портативного или настольного ПК Одновременная поддержка USB 2.0 и USB 1.1, скорость передачи данных посредством USB 2.0 достигает 480 Мбит/с. 1.2 Приложение В соответствии со стандартом IEEE 802.11 беспроводная локальная сеть может быть настроена следующим образом: #одноранговая беспроводная сеть #инфраструктурная беспроводная сеть. Одноранговая беспроводная сеть – это группа портативных ПК с адаптерами беспроводной сети, которая называется BSS (Basic Service Set). Эти портативные ПК используют адаптеры беспроводной сети для непосредственного обмена информацией друг с другом. Рис. 1.2.1. Беспроводная одноранговая сеть 54 Наиболее очевидное различие между инфраструктурной беспроводной сетью и одноранговой беспроводной сетью заключается в том, что портативные ПК, объединенные в инфраструктурную беспроводную сеть, могут использовать ресурсы из сети Интернет посредством точки доступа. Рис. 1.2.2. Инфраструктурная беспроводная сеть Выбор «однораноговой» или «инфраструктурной» сети портативных ПК полностью зависит от предъявляемых требований. Обычно при наличии точки доступа в сети рекомендуется установить «инфраструктурный» режим соединения сетью Интернет. 1.3 Системные требования Портативный или настольный ПК с одним свободным портом USB 2.0 Не менее 64 Мб памяти Рекомендуется процессор Pentium III, 600 МГц и выше Microsoft Windows XP / 2000 55 2. Установка драйвера Важное примечание. Подключайте адаптер X-Micro WLAN 11g USB к USB-порту ПК только после установки служебной программы и драйвера 11g WLAN. 1. Вставьте компакт-диск, прилагающийся к адаптеру X-Micro WLAN 802.11g USB, в привод для компакт-дисков и дождитесь, пока отобразится первая страница. Примечание. Если окно не отобразилось, в окне Проводника Windows перейдите к приводу компакт-дисков и дважды щелкните файл «Setup.exe». 56 2. Нажмите [Next] для подтверждения или [Browse], чтобы изменить целевую папку. 3. Нажмите «Finish» для завершения процедуры установки и перезагрузки компьютера. 57 4. После перезагрузки компьютера вставьте USB-адаптер в USB-порт. Через несколько секунд на экране отобразится показанное на иллюстрации окно. 5. Нажмите «Continue Anyway», чтобы продолжить установку. 58 6. Нажмите «Finish» для завершения процедуры установки драйвера. 7. После установки USB-драйвера отобразится следующее окно, приведенное ниже, с описанием установки драйвера USB-адаптера. 59 8. Нажмите «Continue Anyway», чтобы продолжить установку. 9. Нажмите «Finish» для завершения процедуры установки USB-адаптера. 60 1. 總覽 1.1 產品功能 與 IEEE802.11b/g 2.4GHz (DSSS) 標準相容。 高速資料傳輸率-最高可達 54Mbps。 支援高安全性 WEP/WPA/WPA-PSK 資料加密功能 不需任何無線網路基地台,可支援所有無線網路使用者間的點對點通訊。 自動錯誤回復功能,增加資料的安全性和穩定性。 支援大部分的作業系統: Windows 2000/XP 設計小巧,攜帶方便 適用於所有筆記型或桌上型電腦 可支援 USB 2.0 及 USB 1.1,USB 2.0 間的傳輸率可達 480M 位元 1.2 應用 由IEEE 802.11標準協會所定義的無線區域網卡可設定為 #點對點模式(Ad Hoc wireless LAN) #主控/基地台模式(Infrastructure wireless LAN)無線區域網路。 點對點模式網路(Ad Hoc)是由一群內附無線區域網卡的筆記型電腦所組成,稱為 BSS基本服務(Basic Service Set) 這些筆記型電腦使用各自的無線區域網卡,可 直接相互進行通訊。 Figure 1.2.1 點對點模式無線網路(Ad Hoc wireless network) 61 主控/基地台模式無線區域網路(Infrastructure)與點對點模式無線網路(Ad Hoc) 最大的不同在於,使用固定式無線網路的筆記型電腦可透過無線網路基地台 (Access Point)使用網際網路資源。 Figure 1.2.主控/基地台模式無線網路(Infrastructure wireless network) 只需要依據個人需求,將筆記型電腦的無線網路設定為「點對點」或「基地台」。 一般情況下,若所處環境具無線基地台網路,建議設定為連接網際網路的固定式 模式(Infrastructure)。 系統需求 1.3 具有一個以上 USB 2.0 接埠的筆記型或桌上型電腦 64MB 以上的記憶體 建議使用 Pentium III 600MHz 以上的處理器 Microsoft Windows XP / 2000 作業系統 62 2 安裝驅動程式 重要:安裝本無線區域網卡及驅動程式前,切勿將無線網卡插入電腦USB 接埠上。 1. 將 X-Micro WLAN 802.11g USB Adapter CD 置於光碟機,靜候畫面開始 顯示。 注意: 若畫面未自動顯示,請在我的電腦中尋找光碟機,並按兩下Setup.exe檔 案。 2. 按一下[Next] 接受,或 [Browse] 變更預設資料夾的位置。 3. 按一下「Finish」 完成安裝並重新啟動電腦。 64 4. 電腦重新啟動後,將USB插卡插入USB 接埠。 靜候數秒,會顯示如下圖的 彈出式視窗。 5. 按一下「Continue Anyway」繼續安裝程式。 65 6. 按一下「Finish」 完成USB驅動程式的安裝。 7. 完成USB驅動程式安裝後,會顯示另一個如下所示的彈出式視窗,說明USB 插卡(USB Dongle)驅動程式的安裝步驟。 66 8. 按一下 「Continue Anyway」 繼續安裝程式。 9. 按一下 「Finish」 完成USB插卡(USB Dongle)的安裝。 67 www.x-micro.com-
 1
1
-
 2
2
-
 3
3
-
 4
4
-
 5
5
-
 6
6
-
 7
7
-
 8
8
-
 9
9
-
 10
10
-
 11
11
-
 12
12
-
 13
13
-
 14
14
-
 15
15
-
 16
16
-
 17
17
-
 18
18
-
 19
19
-
 20
20
-
 21
21
-
 22
22
-
 23
23
-
 24
24
-
 25
25
-
 26
26
-
 27
27
-
 28
28
-
 29
29
-
 30
30
-
 31
31
-
 32
32
-
 33
33
-
 34
34
-
 35
35
-
 36
36
-
 37
37
-
 38
38
-
 39
39
-
 40
40
-
 41
41
-
 42
42
-
 43
43
-
 44
44
-
 45
45
-
 46
46
-
 47
47
-
 48
48
-
 49
49
-
 50
50
-
 51
51
-
 52
52
-
 53
53
-
 54
54
-
 55
55
-
 56
56
-
 57
57
-
 58
58
-
 59
59
-
 60
60
-
 61
61
-
 62
62
-
 63
63
-
 64
64
-
 65
65
-
 66
66
-
 67
67
-
 68
68
-
 69
69
-
 70
70


in andere talen
- English: X-Micro XWL-11GUAR User manual
- italiano: X-Micro XWL-11GUAR Manuale utente
- русский: X-Micro XWL-11GUAR Руководство пользователя
- français: X-Micro XWL-11GUAR Manuel utilisateur
- español: X-Micro XWL-11GUAR Manual de usuario
- Deutsch: X-Micro XWL-11GUAR Benutzerhandbuch
- português: X-Micro XWL-11GUAR Manual do usuário
Gerelateerde artikelen
Andere documenten
-
Compaq Pavilion zd7000 - Notebook PC Function Manual
-
Philips CPWUA054 de handleiding
-
HP PAVILION ZT3120EA de handleiding
-
Linksys WRT54GS de handleiding
-
Dell Wireless 1515 Wireless-N WLAN Card Users Guide de handleiding
-
Linksys WRT54G(EU/LA) Handleiding
-
Hama 00053302 de handleiding
-
 Symbol APs - Other Installatie gids
-
Hama 00053305 de handleiding
-
 X-Micro Tech. Slim Portable HDD Handleiding

