Classic Phono TCD-2550 Handleiding
- Categorie
- CD spelers
- Type
- Handleiding

Model: TCD-2550
USER MANUAL- Wooden Turntable with USB Encoding,
AM/FM radio, CD and cassette player
GEBRUIKERSHANDLEIDING - Houten platenspeler met USB-codering,
AM/FM-radio, CD en cassettespeler
BEDIENUNGSANLEITUNG – Holzplattenspieler mit USB-Kodierung,
AM/FM-Radio, CD- und Kassetten-Spieler
MODE D’EMPLOI- Tourne-disque en bois avec encodage USB,
radio AM/FM, lecteur de CD et de cassette
MANUAL DE USUARIO: tocadiscos de madera con codificación USB,
radio AM/FM, reproductor de CD y casete

1
Index:
English
.........................................................................................................................................
2
Nederlands
...............................................................................................................................
14
Deutsch
.....................................................................................................................................
27
Français
.....................................................................................................................................
40
Español
.....................................................................................................................................
53

2
CAUTION:
Do Usage of controls or adjustments or performance of procedures other than those specified
herein may result in hazardous radiation exposure.
PRECAUTIONS BEFORE USE
KEEP THESE INSTRUCTIONS IN MIND:
1. Do not cover or block any ventilation openings. When placing the device on a shelf, leave 5 cm (2”)
free space around the whole device.
2. Install in accordance with the supplied user manual.
3. Keep the device away from heat sources such as radiators, heaters, stoves, candles and other
heat-generating products or naked flame. The device can only be used in moderate climates.
Extremely cold or warm environments should be avoided. Working temperature between 0° and 35°C.
4. Avoid using the device near strong magnetic fields.
5. Electrostatic discharge can disturb normal usage of this device. If so, simply reset and restart the
device following the instruction manual. During file transmission, please handle with care and operate
in a static-free environment.
6. Warning! Never insert an object into the product through the vents or openings. High voltage flows
through the product and inserting an object can cause electric shock and/or short circuit internal parts.
For the same reason, do not spill water or liquid on the product.
7. Do not use in wet or moist areas such as bathrooms, steamy kitchens or near swimming pools.
8. The device shall not be exposed to dripping or splashing and make sure that no objects filled with
liquids, such as vases, are placed on or near the apparatus.
9. Do not use this device when condensation may occur. When the unit is used in a warm wet room with
damp, water droplets or condensation may occur inside the unit and the unit may not function properly;
let the unit stand in power OFF for 1 or 2 hours before turning on the power: the unit should be dry
before getting any power.
10. Although this device is manufactured with the utmost care and checked several times before leaving
the factory, it is still possible that problems may occur, as with all electrical appliances. If you notice
smoke, an excessive build-up of heat or any other unexpected phenomena, you should disconnect the
plug from the main power socket immediately.
11. This device must operate on a power source as specified on the specification label. If you are not sure
of the type of power supply used in your home, consult your dealer or local power company.
12. Keep away from animals. Some animals enjoy biting on power cords.
13. To clean the device, use a soft dry cloth. Do not use solvents or petrol based fluids.
To remove severe stains, you may use a damp cloth with dilute detergent.
14. The supplier is not responsible for damage or lost data caused by malfunction, misuse, modification
of the device or battery replacement.
15. Do not interrupt the connection when the device is formatting or transferring files. Otherwise, data
may be corrupted or lost.
16. If the unit has USB playback function, the USB memory stick should be plugged into the unit directly.
Don’t use an USB extension cable because it can cause interference resulting in failing of data.
17. The rating label has been marked on the bottom or back panel of the device.
18. This device is not intended for use by people (including children) with physical, sensory or mental
disabilities, or a lack of experience and knowledge, unless they’re under supervision or have received
instructions about the correct use of the device by the person who is responsible for their safety.
19. This product is intended for non professional use only and not for commercial or industrial use.
20. Make sure the unit is adjusted to a stable position. Damage caused by using this product in an
unstable position vibrations or shocks or by failure to follow any other warning or precaution
contained within this user manual will not be covered by warranty.
21. Never remove the casing of this device.
22. Never place this device on other electrical equipment.
23. Do not allow children access to plastic bags.
24. Only use attachments/accessories specified by the manufacturer.

3
25. Refer all servicing to qualified service personnel. Servicing is required when the device has been damaged in
any way, such as the power supply cord or the plug, when liquid has been spilled or objects have fallen into the
d
evice, when the device has been exposed to rain or moisture, does not operate normally, or has been dropped.
26. Long exposure to loud sounds from personal music players may lead to temporary or permanent hearing loss.
27. If the product is delivered with power cable or AC power adaptor:
● If any trouble occur, disconnect the AC power cord and refer servicing to qualified personnel.
●
Don’t step on or pinch the power adaptor. Be very careful, particularly near the plugs and the cable’s exit point.
Do not place heavy items on the power adaptor, which may damage it. Keep the entire device out of
children’s reach! When playing with the power cable, they can seriously injure themselves.
● Unplug this device during lightning storms or when unused for a long period.
● The socket outlet must be installed near the equipment and must be easily accessible.
● Do not overload ac outlets or extension cords. Overloading can cause fire or electric shock.
●
Devices with class 1 construction should be connected to a main socket outlet with a protective earthed connection.
● Devices with class 2 construction do not require a earthed connection.
● Always hold the plug when pulling it out of the main supply socket. Do not pull the power cord. This can
cause a short circuit.
● Do not use a damaged power cord or plug or a loose outlet. Doing so may result in fire or electric shock.
28. If the product contains or is delivered with a remote control containing coin/cell batteries:
Warning:
● “Do not ingest battery, Chemical Burn Hazard” or equivalent working.
●
[The remote control supplied with] This product contains a coin/button cell battery. If the battery is swallowed
it can cause severe internal burns in just 2 hours and can lead to death.
● Keep new and used batteries away from children.
● If the battery compartment does not close securely, stop using the product and keep it away from children.
●
If you think batteries might have been swallowed or placed inside any part of the body, seek immediate medical attention.
29. Caution about the use of Batteries:
● Danger of explosion if battery is incorrectly replaced. Replace only with the same or equivalent type.
● Battery cannot be subjected to high or low extreme temperatures, low air pressure at high altitude during use
storage or transportation.
●
Replacement of a battery with an incorrect type that can result in an explosion or the leakage of flammable liquid or gas.
● Disposal of a battery into fire or a hot oven, or mechanically crushing or cutting of a battery , that can result
in an explosion.
● Leaving a battery in an extremely high temperature surrounding environment that can result in an explosion
or that leakage of flammable liquid or gas.
● A battery subjected to extremely low air pressure that may result in an explosion or the leakage of flammable
liquid or gas.
● Attention should be drawn to the environmental aspects of battery disposal.
INSTALLATION
● Unpack all parts and remove protective material.
● Do not connect the unit to the mains before checking the mains voltage and before all other connections
have been made.

4
UNPACKING AND SET UP
• Carefullyremove the unit f rom the display carton and removeall p a cking
materialfrom the u nit.
• Unwind the AC power cord a nd extend it to its fu l l l ength.
• Unwind the FM Antennawire and extend it to its full length.
• Place the unit on a stable,level surface, convenientto an AC outlet awayfrom a
strong magnetic field.
• Connect the plug to your AC outlet.
• Raise the lid to expose the phonograph.The phonographhas b een securedfor
shipment with a transit s
crew.Use a coin or screwdriverto turn th e
transportation locking screw clockwise. This will all ow the turntableto "float".
Transportation locking screw
• Remove the opaque white plastic stylus cover from the phonograph stylus by
sliding it in the directionof the arrow(refer to the pictureon th e right side).
• During this operati on pay attention to the stylus, because damage to the stylus is
not covered by the guarantee.
• Remove t he t wist-tie that was used to secure the tone ar m during shipment.
• Releasethe tone arm lock lever (see Fig.1 below).
• Connect the plug to your AC 230V,50Hz outlet.
WARNING
Class 1 Laser Product
WARNING: When participating in the traffic listening to a personal mu sic
player can make the listener less aware of potential dangers such as
approaching cars.
WARNING: To prevent possible hearing damage, do not listen at high volume
levels for long periods.

5
LITHIUM BATTERY INSTALLATION OF REMOTE CONTROL
• The remote control requires one CR2025 (3V) lithium battery.
• Hold and lever pressing the clasp with the thumb in the right direction of the
arrow in the illustration, and take out the battery compartment by sliding with
forefinger in the direction towards you. Take out the battery compartment from
the remote control. Install a lithium battery (CR-2025) in the compartment with
the positive polarity upturned Level hold and push the battery compartment into
the remote control lightly. It’s okay once you hear a click.
FRONT
LEFT SIDE
21 22
20

6
REAR
23
24
TOP

7
REMOTE CONTROL
LOCATION OF CONTROLS
1.
USB PORT
2.
POWER ON/OFF BUTTON
3.
VOLUME KNOB
4.
FUNCTION BUTTON
5.
RECORD BUTTON
6.
LCD DISPLAY
7.
AM RADIO SOURCE BUTTON
8.
FM RADIO SOURCE BUTTON
9.
CD/USB SOURCE BUTTON
10.
TAPE SOURCE BUTTON
11.
PHONO SOURCE BUTTON
12.
CD DOOR
13.
PLAY/PAUSE: Press to play. When it plays, press to stop playback temporarily and
press again to resume playback.
14.
STOP: Press when you want to finish playback.

8
15.
SKIP -/REWIND: Press to go to the previous track, press & hold to go back fast.
16.
SKIP +/FAST FORWARD: press to go to the next track, press & hold to fast forward.
17.
PLAY-MODE: press repeatedly to choose the play-mode (REPEAT, RANDOM)
18.
CD DOOR OPEN/CLOSE BUTTON
19.
TUNING KNOB
20.
SPEAKERS
21.
CASSETTE FFD/EJECT
22.
CASSETTE MECHANISM
23.
ANTENNA WIRE
24.
POWER CORD
25.
TURNTABLE PLATE
26.
TRANSPORTATION LOCK SCREW
27.
TONE ARM
28.
TONE ARM LOCK
29.
LIFT LEVER
30.
33/45/78 RPM SPEEDSELECTOR
REMOTE CONTROL
31.
-/+ 10 TRACK
32.
PROGRAM BUTTON
33.
DELETE BUTTON
34.
RANDOM BUTTON
35.
REPEAT BUTTON
36.
CD DOOR OPEN/CLOSE BUTTON
37.
RECORD BUTTON
38.
PLAY/PAUSE
39.
SKIP+/FAST FORWARD
40.
SKIP-/REWIND
41.
STOP
POWER SOURCES
AC POWER: You can power your stereo system by plugging the AC power cord (24)
into a wall power outlet. Check that the rated voltage of your appliance matches your
local voltage.

9
TO USE THE RADIO
1. Press the [POWER] button (2) to turn ON the unit;
2. Select the desired audio source by pressing the [SOURCE] button (7 to 11);
3. (Please see detailed instructions for each Source in the following chapters);
4. Adjust the volume with the [VOLUME KNOB] (3) to the desired level;
5. Press and hold the [POWER] button (2) to turn OFF the unit.
Note: When no sound is produced, the unit will switch OFF automat. after 10 minutes.
RADIO OPERATION
1. Press the [AM] or [FM] button (7 or 8);
2. Adjust radio frequency to your desired station by turning the [TUNING KNOB]
(19).
Note: For a better reception FM move the wired antenna (23) around.
For MW reception the signals are picked up through a built-in ferrite antenna. You may
have to orient the unit to obtain the best reception.
TURNTABLE OPERATION
Note: When using the turntable for the first time, turn the [TRANSPORTATION LOCK SCREW]
(26) clockwise until fully screwed in.
1. Press the [PHONO] button (11);
2. Place a record on the turntable. Place the EP adapter over the central spindle
when playing 45 rpm records;
3. Set the [SPEED SELECTOR] (30) to 33, 45 or 78 rpm according to the record;
4. Release the [TONEARM CLAMP] (28), and remove the stylus protector;
5. Lift up the [TONEARM] (27) with the [LIFT LEVER] (30);
6. Move the [TONEARM] (27) to the beginning of the record;
7. Lift down the [TONEARM] (27) with the [LIFT LEVER] (29);
8. When the record is finished the [TONEARM] (27) will automatically return to the
rest support and the [PLATE] (25) will stop turning. To stop manually, lift up the
tonearm from the record and return it to the rest support.
NOTE: Do not turn or stop the turntable manually. Moving or jarring the turntable without
securing the tone arm clamp could result in damage to the tone arm.

10
Making the TCS-2550 ready for transportation.
• Lock the [TONEARM] (27) with the [TONEARM CLAMP] (28);
• Place the protective cap on the stylus (even when not in use);
• Turn the [TRANSPORTATION LOCK SCREW] (26) counterclockwise until you feel
more resistance (don’t remove the screw completely!)
CD-MP3 OPERATION
1. Press the [CD/USB] button (9);
2. Press [OPEN/CLOSE] (18) to open the [CD DOOR] (12) and place a CD with the
label side facing up in the CD compartment.
3. Close the [CD DOOR] (12). CD music search is performed and playback will start
automatically from the first track.
PROGRAMMING
Up to 99 tacks (MP3, 20 in CD) can be programmed and play in any order.
1. Stop the playback by pressing [STOP] (14 or 41);
2. Press [PLAY MODE] (17) or [PROGRAM](32), the display (6) will show “P01” and
flash;
3. Select desired track by using [SKIP -/+] buttons (15/16 or 39/40);
4. Press [PLAY MODE] (17) or [PROGRAM](32)gain to Program the track into the
program memory;
5. Repeat step 3 and 4 to enter additional tracks into the program memory.
6. When all the desired tracks have been programmed, press [PLAY] (13 or 38) to
play the disc in the order you have programmed.
Note: Press [STOP] (14 or 41) twice to terminate the programmed play.
USB OPERATION
1. Press the [CD/USB] button (9);
2. Plug an USB stick into the [USB PORT] (1);

11
3. Press the [FUNCTION] button (4) to select USB mode;
4. Playback will start automatically from the first track.
PROGRAMMING
The PROGRAMMING operation is the same as that of CD-MP3.
Notes:
• Some mp3 player may not be able to play via the usb socket. this is not a
malfunctioning of the system.
• The USB port is not designed for charging smartphones or other devices.
TAPE OPERATION
1. Press the [TAPE] source button (10);
2. Insert a cassette TAPE into the [CASSETTE MECHANISM] (22);
3. The system will start playback automatically;
• Press [TAPE FORWARD/EJECT] button (21) half way during playback to start quick
tape winding in forward direction.
• Slightly press the [TAPE FORWARD/EJECT] button (21) again to resume playback.
• Press the [TAPE FORWARD/EJECT] button (21) completely inwards and the
cassette tape will be ejected.
DIRECT USB ENCODING Remark:
• Recording speed is 1:1.
• No song title will be recorded during encoding mode.
• To avoid damage to USB memory, remove it only when the radio is turned off.
ENCODE FROM PHONO AND CASSETTE:
1. Plug the USB stick into the [USB PORT] (1);
2. Perform normal playback of the source you want to encode & record;
3. Press the [RECORD] button (5 or 37) twice to start encoding. On the display will
flash “REC”;
4. Once the record is finished, press the [STOP] button (14 or 41) to stop recording.
ENCODE FORM CD:
Encode 1 track:
1. Plug the USB stick into the [USB PORT] (1);
2. Perform normal playback of the track you want to encode & record;
3. Press the [RECORD] button (5 or 37) twice during the playback of the desired
track.
The playback will stop and restart automatically. The “USB” text on the top of the display

12
will flash, indicating the encoding is started.
4. At the end of the track press the [STOP] button (14 or 41) to finish recording the
track.
1. Plug the USB stick into the [USB PORT] (1);
2. Perform normal playback of the CD you want to encode & record;
3. Press the [RECORD] button (5 or 37) twice after the initial music search has been
completed;
4. The playback will start. The “USB” text on the top of the display will flash,
indicating the encoding is started.
Note: When the conversion is completed, the unit will stop playback and recording
automatically.
DELETE TRACKS FROM USB
1. Perform normal playback of the track you want to delete;
2. During playback of the track you want to delete, press the [DELETE] button (33)
on the remote control twice.
SPECIFICATIONS
Power requirement : AC 230V ~ 50Hz
Power consumption : 40 Watt (max)
Music Power : 2 x 4.5W
Radio Frequency : AM: 525-1640 KHz
FM: 88-108 MHz
Turntable speed: : 33/45/78 RPM
CD player compatibility : CD/CD-R/CD-RW/MP3
USB connection for Memorystick (no charging) : MP3 files
USB recording from CD, Tape and Record : Bitrate 128 KBPS

13
1. Guarantee
Lenco offers service and warranty in accordance to European law, which means that in case of repairs (both
during and after the warranty period) you should contact your local dealer.
Importantnote: It is not possible to send products that ne ed repairsto Lenco directly.
Important note: If this unit is opened or accessed by a non-official service center in any way, the warranty
expires.
This device is not suitable forprofessional use. In case of professional us
e, all warranty obligations of the
manufacturer will be voided.
2. Disclaimer
Updates to Firmware and/or hardware components a re made regularly. Therefore some of the instruction,
specifications and pictures in this documentation may differ slightly from your particular situation. All items
described in this guide for illustration purposes only and may not apply to particular situation. No legal right or
entitlements maybe obtained from the description made in t hi
s manual.
3. Disposal of the Old Device
This symbol indicatesthatthe relevantelectricalproductor batteryshould n ot be disposed of
as general household wastein Europe.Toensurethe correctwaste t reatment of the product
and battery,please dispose them in accordanceto any applicable local laws of requirementfor
disposal of electrical equipment or batteries. In so doing, you will help to conserve natural
resources and improvestandardsof environmental protectio
n in treatmentand disposal of
electrical waste(Waste Electrical and Electronic EquipmentDirective).
4. CE Marking
Hereby, Lenco Benelux B.V., Thermiekstraat 1a, 6361 HB Nuth, The Netherlands, d eclares that this
productis in compliance wit h the essential E U d i rective requirements.
5. Service
For moreinformation and helpdesksupport, please visitww w.lenco.com
Lenco BeneluxBV,Thermiekstraat 1a, 6361 HB, The Netherlands.

14
Nederlands
LET OP:
Het gebruik van afstandsbedieningen of aanpassingen of de uitvoering van procedures die niet in dit document
zijn gespecificeerd, kan leiden tot gevaarlijke blootstelling aan straling.
VOORZORGSMAATREGELEN VOOR GEBRUIK
ONTHOUD DE VOLGENDE INSTRUCTIES:
1. Bedek of blokkeer de ventilatieopeningen niet. Wanneer u het apparaat op een schap plaatst, dient u 5 cm (2”)
vrije ruimte rondom het gehele apparaat te behouden.
2. Installeer het product volgens de meegeleverde gebruikershandleiding.
3. Houd het apparaat uit de buurt van hittebronnen, zoals radiatoren, verwarmingen, kachels, kaarsen en andere
hittegenererende producten of open vuur. Het apparaat kan alleen worden gebruikt in een gematigd klimaat.
Extreem koude of warme omgevingen dienen te worden vermeden. Het bedrijfstemperatuurbereik ligt
tussen 0 °C en 35 °C.
4. Gebruik dit apparaat niet in de buurt van krachtige magnetische velden.
5. Elektrostatische ontlading kan normaal gebruik van dit apparaat verstoren. U hoeft het apparaat in dit geval
slechts te resetten en opnieuw op te starten volgens de gebruikershandleiding. Wees voorzichtig tijdens
bestandsoverdracht en gebruik het product in een omgeving zonder statische interferentie.
6. Waarschuwing! Steek nooit een voorwerp via de ventilatie- of andere openingen in het product. Er is
hoogspanning in het product aanwezig en als u er een object insteekt, kan dat een elektrische schok
veroorzaken en/of kortsluiting in de interne onderdelen. Mors om dezelfde reden geen water of vloeistof op
het product.
7.
Gebruik het toestel niet in vochtige ruimtes, zoals badkamers, stomende keukens of in de buurt van zwembaden.
8. Het apparaat mag niet worden blootgesteld aan druppels en spetters en zorg ervoor dat er geen met vloeistof
gevulde voorwerpen, zoals vazen, op of in de buurt van het apparaat worden geplaatst.
9. Gebruik dit apparaat niet wanneer condensatie kan optreden. Wanneer het apparaat in een warme, natte ruimte
wordt gebruikt, kunnen zich waterdruppels of condens vormen in het apparaat en kan het apparaat niet goed
functioneren. Laat het apparaat 1 of 2 uur uit staan voordat u het inschakelt: het apparaat dient droog te zijn
voordat deze stroom ontvangt.
10. Alhoewel dit apparaat met grote zorg gefabriceerd en verschillende keren geïnspecteerd is voordat het de
fabriek verlaat, is het nog steeds mogelijk dat er problemen optreden, zoals met alle elektrische apparaten.
Als u rook, een overmatige hitteontwikkeling of enig ander onverwacht verschijnsel opmerkt, moet u
onmiddellijk de stekker van het netsnoer uit het stopcontact halen.
11. Dit apparaat moet worden gebruikt met een voedingsbron zoals gespecificeerd op het specificatielabel.
Als u twijfelt over het type voeding dat gebruikt wordt in uw huis, raadpleeg dan uw dealer of plaatselijk
energiebedrijf.
12. Buiten bereik van dieren houden. Sommige dieren kauwen graag op voedingskabels.
13. Gebruik een zacht, droog doekje om het apparaat te reinigen. Gebruik geen oplosmiddelen of op benzine
gebaseerde vloeistoffen. U kunt een vochtig doekje met verdund schoonmaakmiddel gebruiken om
hardnekkige vlekken te verwijderen.
14. De leverancier is niet verantwoordelijk voor schade of verloren gegevens veroorzaakt door storing, misbruik
modificatie van het apparaat of batterijvervanging.
15. Onderbreek nooit de verbinding wanneer het apparaat formatteert of bestanden overdraagt. De gegevens
kunnen anders corrupt of verloren raken.
16. Indien het apparaat een USB-afspeelfunctie heeft, moet de USB-geheugenstick rechtstreeks op het apparaat
worden aangesloten. Gebruik geen USB-verlengkabel, omdat die kan leiden tot storingen met foutieve
gegevens als gevolg.
17. Het classificatielabel bevindt zich op de onderkant of het achterpaneel van het apparaat.
18. Dit hulpmiddel is niet bedoeld voor gebruik door mensen (inclusief kinderen) met een fysieke, zintuiglijke of
mentale handicap, of een gebrek aan ervaring en kennis, tenzij zij toezicht of instructies hebben gekregen
over het juiste gebruik van het hulpmiddel door een persoon die verantwoordelijk is voor hun veiligheid.
19. Dit product is alleen voor niet-professioneel gebruik bedoeld en niet voor commercieel of industrieel gebruik.
20. Verzeker u ervan dat het apparaat in een stabiele positie staat opgesteld. Schade die wordt veroorzaakt door
het gebruik van dit product in een onstabiele positie, trillingen of schokken of het niet opvolgen van de
waarschuwingen of voorzorgsmaatregelen in deze gebruikershandleiding wordt niet gedekt door de garantie.
21. Verwijder nooit de behuizing van dit apparaat.
22. Plaats dit apparaat nooit op andere elektrische apparatuur.

15
23. Geef kinderen geen gelegenheid in aanraking met plastic zakken te komen.
24. Gebruik uitsluitend uitbreidingen/accessoires gespecificeerd door de fabrikant.
25. Laat alle reparaties over aan gekwalificeerd onderhoudspersoneel. Onderhoud is nodig als het apparaat is
beschadigd, bijvoorbeeld als de voedingskabel of de stekker is beschadigd, als er vloeistof op het apparaat
is gemorst, als er voorwerpen in het apparaat zijn gevallen, als het apparaat is blootgesteld aan regen of vocht
als het apparaat niet normaal werkt of als het is gevallen.
26. Langdurige blootstelling aan harde geluiden van persoonlijke muziekspelers kan leiden tot tijdelijk of
permanent gehoorverlies.
27. Als het product wordt geleverd met voedingskabel of wisselstroomvoedingsadapter:
● Als er zich problemen voordoen, moet u de voedingskabel loskoppelen en het ter onderhoud aanbieden
aan gekwalificeerd personeel.
● Nooit op de voedingsadapter stappen of deze indrukken. Wees zeer voorzichtig, vooral in het gebied rond
de stekkers en de kabelaansluitingen. Plaats geen zware voorwerpen op de voedingsadapter
om beschadiging ervan te voorkomen. Houd het gehele apparaat buiten bereik van kinderen! Wanneer
kinderen met de voedingskabel spelen, kunnen zij ernstig letsel oplopen.
● Haal de stekker uit het stopcontact tijdens onweer of wanneer u deze langere tijd niet gebruikt.
● Het stopcontact moet in de buurt van de apparatuur zijn geïnstalleerd en eenvoudig te bereiken zijn.
● Laat AC-stopcontacten of verlengsnoeren nooit overbelast raken. Overbelasting kan brand of een
elektrische schok veroorzaken.
● Apparaten met een Klasse 1 structuur dienen te worden aangesloten op een stopcontact met een
beschermende aardverbinding.
● Apparaten met een Klasse 2 structuur vereisen geen aardverbinding.
● Houd altijd de stekker vast wanneer u deze uit het stopcontact trekt. Trek nooit aan de voedingskabel.
Dit kan tot een kortsluiting leiden.
● Gebruik nooit een beschadigde voedingskabel of stekker of een los stopcontact. Dit vormt namelijk een
risico op brand of elektrische schokken.
28.
Indien het product knoopcelbatterijen bevat of wordt geleverd met een afstandsbediening die knoopcelbatterijen bevat:
Waarschuwing:
● “Batterij niet inslikken, chemisch brandgevaar” of gelijkwaardige werking.
● De meegeleverde afstandsbediening bevat een knoopcelbatterij. Als de batterij wordt ingeslikt, kan deze in
slechts 2 uur ernstige interne brandwonden veroorzaken en tot de dood leiden.
● Houd nieuwe en gebruikte batterijen buiten bereik van kinderen.
● Als de batterijhouder niet goed kan worden gesloten, dient u het product niet meer te gebruiken en buiten
bereik van kinderen te houden.
● Als u denkt dat batterijen zijn ingeslikt of binnenin een willekeurig lichaamsdeel terecht zijn gekomen, dient
u onmiddellijk medische hulp te zoeken.
29. Waarschuwing m.b.t. het gebruik van batterijen:
● Als de batterij onjuist wordt geplaatst, bestaat er explosiegevaar. Vervang de batterij alleen door een zelfde
of vergelijkbare soort batterij.
● Stel de batterij niet bloot aan extreem hoge of lage temperaturen of een lage luchtdruk op grote hoogte
tijdens gebruik, opslag of transport.
● Vervanging van een batterij door een incorrect type kan leiden tot een ontploffing of de lekkage van
ontvlambare vloeistoffen of gas.
● Het weggooien van een batterij in het vuur of een hete oven, of het mechanisch verpletteren of insnijden
van een batterij, kan leiden tot een explosie.
● Het achterlaten van een batterij in een omgeving met extreem hoge temperaturen kan leiden tot een
explosie of het lekken van brandbare vloeistof of gas.
● Een batterij die aan een extreem lage luchtdruk wordt blootgesteld, kan leiden tot een explosie of het lekken
van brandbare vloeistof of gas.
● Aandacht voor het milieu is nodig bij het verwijderen van de batterijen.
INSTALLATIE
● Pak alle onderdelen uit en verwijder de beschermende materialen.
● Sluit het apparaat niet aan op het stopcontact, voordat u de netspanning hebt gecontroleerd en voordat alle
andere aansluitingen zijn gemaakt.

16
* Deze instructies zijn enkel van toepassing op producten met een voedingskabel of
een AC voedingsadapter.
UITPAKKEN EN INSTELLEN
• Haal het apparaat voorzichtiguit de verpakking en verwijder a l l e
verpakkingsmaterialen van het apparaat.
• Wikkel de voedingskabel volledi g uit.
• Wikkel de FM-antennevolledig uit.
• Plaats hetapparaat op een stabielen vlak oppervlak, in de buurt van een
stopcontact e n uit de buurt van krachtige magnetische velden.
• Steek d e stekker
in een stopcontact.
• Til het deksel op voor toegang tot het draaiplateau.Het draaiplateau zit voor
transportveil i gheid nog vastmet e en transportschroef.Gebruik een munt of
schroeve ndraaier o m de transportveiligheidsschroefrechtsom te draaien. Het
draaiplateau kan vervolgens “zweven”.
Transportveiligheidsschroef
• Verwijder de ondoorzichtige witte kunststof naa l dcover van de naald door dezein
de richting van het pi jltje te schu i ven.
• Let hi erbij goed op de naald, omdat een beschadigde naald niet door de garantie
wordtgedekt.
• Verwijder de binder waar de toonarm mee vast is gezetvoor t ransportveiligheid.
• Ontgrendelde toonarmvergrendeling (zie Afb. 1 hieronder).
• Sluit de stekker aan op een AC 230V,50Hz stopcontact.
WAARSCHUWING
Klasse 1 Laserp roduct
WAARSCHUWING: Wanneer u zich op de straat bevindt, kan het gebruik van
een persoonlijke muziekspeler de luisteraar afleiden van de potentiële
gevaren,zoalsnaderende auto's.
WAARSCHUWING: Luister nooit voor lan ge tijd op hoge volumeniveaus, om
mogelijke gehoorbeschadiging te voorkomen.

17
EN NL
TONE ARM LOCK LEVER VERGRENDELHENDEL VAN TOONARM
STYLUS COVER NAALDCOVER
Fig.1 Afb. 1
LITHIUMBATTERIJ VAN DE AFSTANDSBEDIENING INSTALLEREN
• De afstandsbediening vereist één CR2025 (3V) lithiumbatterij.
• Druk het palletje met de duim in de richting van het pijltje in de afbeelding en
verwijder de batterijhouder door deze met uw wijsvinger richting uw lichaam uit
te schuiven. Haal de batterijhouder uit de afstandsbediening. Plaats een
lithiumbatterij (CR-2025) in de houdder met de positieve polariteit omhoog en
druk de batterijhouder lichtjes terug in de afstandsbediening. Alles is in orde
zodra u een klikje hoort.
VOORKANT

18
LINKERKANT
21 22
20
ACHTERKANT
23
24

19
BOVENKANT
AFSTANDSBEDIENING

20
PLAATS VAN DE BEDIENINGSORGANEN
1.
USB-POORT
2.
AAN/UITTOETS
3.
VOLUME-KNOP
4.
FUNCTIEKNOP
5.
OPNAMEKNOP
6.
LCD-SCHERM
7.
BRONKNOP AM-RADIO
8.
BRONKNOP FM-RADIO
9.
BRONKNOP CD/USB
10.
BRONKNOP CASSETTE
11.
BRONKNOP PLATENSPELER
12.
KLEPJE VOOR CD
13.
AFSPELEN/PAUZE: Indrukken om af te spelen. Druk tijdens het afspelen in om het
afspelen tijdelijk te stoppen en druk nogmaals om het afspelen te hervatten.
14.
STOP: Indrukken wanneer u het afspelen wilt beëindigen.
15.
VORIGE -/TERUGSPOELEN: Indrukken om naar het vorige nummer te gaan,
ingedrukt houden om terug te spoelen.
16.
VOLGENDE +/VOORUITPOELEN: Indrukken om naar het volgende nummer te
gaan, ingedrukt houden om vooruit te spoelen.
17.
AFSPELEN-MODUS: Herhaaldelijk indrukken om de afspeelmodus te kiezen
(HERHALEN, WILLEKEURIG)
18.
TOETS CD-KLEPJE OPENEN/SLUITEN
19.
AFSTEMKNOP
20.
LUIDSPREKERS
21.
CASSETTE VOORUITSPOELEN/UITWERPEN
22.
CASSETTEMECHANISME
23.
ANTENNEDRAAD
24.
NETSNOER
25.
DRAAIPLATEAU
26.
TRANSPORTVEILIGHEIDSSCHROEF
27.
TOONARM
28.
TOONARMVERGRENDELING
29.
LIFTMECHANISME
30.
SNELHEIDSKNOP 33/45/78 TPM
AFSTANDSBEDIENING
31.
NUMMER -/+ 10

21
32.
PROGRAMMATOEST
33.
VERWIJDERTOETS
34.
TOETS WILLEKEURIG
35.
HERHAALTOETS
36.
TOETS CD-KLEPJE OPENEN/SLUITEN
37.
OPNAMEKNOP
38.
AFSPELEN/PAUZE
39.
VOLGENDE +/VOORUITSPOELEN
40.
VOLGENDE -/TERUGSPOELEN
41.
STOP
VOEDINGSBRONNEN
LICHTNETSTROOM: U kunt uw stereosysteem inschakelen door de stekker van het
netsnoer (24) in een stopcontact te steken. Controleer of de nominale spanning van
uw apparaat overeenkomt met uw plaatselijke netspanning.
DE RADIO GEBRUIKEN
1. Druk op de knop [POWER] (2) om het apparaat AAN te zetten;
2. Selecteer de gewenste audiobron door op de knop [SOURCE] te drukken
(7 to 11);
3. (Raadpleeg de gedetailleerde instructies voor elke bron in de volgende
hoofdstukken);
4. Pas het volume aan met de [VOLUME-KNOP] (3) tot het gewenste niveau;
5. Houd de knop [POWER] (2) ingedrukt om het apparaat UIT te zetten.
Opmerking: Als er geen geluid wordt geproduceerd, schakelt het apparaat na 10 minuten
automatisch UIT.
RADIOBEDIENING
1. Druk op de knop [AM] of de knop [FM] (7 of 8);
2. Stel de radiofrequentie in op de gewenste zender door aan de [TUNING-KNOP]
(19) te draaien.
Opmerking: Beweeg de draadantenne (23) voor een betere FM-ontvangst.
Voor MG-ontvangst worden de signalen opgepikt door een ingebouwde ferrietantenne.
Mogelijk moet u het apparaat richten om de beste ontvangst te krijgen.

22
BEDIENING PLATENSPELER
Opmerking: Wanneer u de platenspeler voor de eerste keer gebruikt, draait u de
[TRANSPORTVEILIGHEIDSSCHROEF] (26) rechtsom totdat deze volledig is ingeschroefd.
1. Druk op de knop [PHONO] (11);
2. Plaats een plaat op het draaiplateau. Plaats de EP-adapter op de middenas voor
het afspelen van 45-toerenplaten;
3. Zet de [SNELHEIDSKNOP] (30) op 33, 45 of 78 tpm overeenkomstig de plaat;
4. Maak de [TOONARM-KLEM] (28) los, en verwijder de naaldbeschermer;
5. Til de [TOONARM] (27) op met het [LIFTMECHANISME] (30);
6. Beweeg de [TOONARM] (27) naar het begin van de plaat;
7. Laat de [TOONARM] (27) zakken met het [LIFTMECHANISME] (29);
8. Wanneer de plaat klaar is, zal de [TOONARM] (27) automatisch terugkeren naar
de armsteun en stopt het [PLATEAU] (25) met draaien. Om handmatig te stoppen,
tilt u de toonarm van de plaat en brengt u deze terug naar de armsteun.
OPMERKING: Probeer de platenspeler niet handmatig te draaien of stoppen. De
platenspeler bewegen of schudden zonder de toonarmvergrendeling vast te zetten zal tot
beschadiging van de toonarm leiden.
De TCS-2550 gereedmaken voor transport.
• Vergrendel de [TOONARM] (27) met de [TOONARM-KLEM] (28);
• Plaats het beschermkapje op de naald (zelfs wanneer niet in gebruik);
• Draai de [TRANSPORTVEILIGHEIDSSCHROEF] (26) linksom totdat u meer
weerstand voelt (verwijder de schroef niet volledig!)

23
BEDIENING CD-MP3
1. Druk op de knop [CD/USB] (9);
2. Druk op [OPEN/CLOSE] (18) om het [CD-KLEPJE] (12) te openen en plaats een CD
met de bedrukte zijde naar boven gericht in de CD-houder.
3. Sluit het [CD-KLEPJE] (12). Het zoeken naar muziek op de CD wordt uitgevoerd en
het afspelen zal automatisch starten vanaf het eerste nummer.
PROGRAMMEREN
Maximaal 99 nummers (MP3, 20 in CD) kunnen worden geprogrammeerd en in willekeurige
volgorde worden afgespeeld.
1. Stop het afspelen door [STOP] (14 of 41) in te drukken;
2. Druk op [PLAY MODE] (17) of [PROGRAM] (32), en het display (6) zal "P01" tonen
en knipperen;
3. Selecteer het gewenste nummer met de knoppen [SKIP -/+] (15/16 of 39/40);
4. Druk nogmaals op [PLAY MODE] (17) of [PROGRAM] (32) om het nummer in het
programmageheugen te programmeren;
5. Herhaal stap 3 en 4 om extra nummers in het programmageheugen in te voeren.
6. Wanneer alle gewenste nummers zijn geprogrammeerd, drukt u op [PLAY]
(13 of 38) om de schijf in de geprogrammeerde volgorde af te spelen.
Opmerking: Druk tweemaal op [STOP] (14 of 41) om het geprogrammeerd afspelen
te beëindigen.
BEDIENING USB
1. Druk op de knop [CD/USB] (9);
2. Steek een USB-stick in de [USB-POORT] (1);
3. Druk op de knop [FUNCTION] (4) om de USB-modus te selecteren;
4. Het afspelen wordt automatisch gestart vanaf het eerste nummer.
PROGRAMMEREN
De bediening PROGRAMMERING is hetzelfde als die van CD-MP3.
Opmerkingen:
• Sommige mp3-spelers kunnen mogelijk niet via de USB-aansluiting afspelen. Dit
is geen storing van het systeem.

24
• De USB-poort is niet ontworpen voor het opladen van smartphones of andere
apparaten.
BEDIENING CASSETTE
1. Druk op de bronknop [TAPE] (10);
2. Plaats een CASSETTE in het [CASSETTEMECHANISME] (22);
3. Het systeem zal automatisch beginnen met afspelen;
• Druk tijdens het afspelen de knop [CASSETTE VOORUITSPOELEN/UITWERPEN] (21)
half in om de cassette vooruit te spoelen.
• Druk nogmaals lichtjes op de knop [CASSETTE VOORUITSPOELEN/UITWERPEN]
(21) om het afspelen te hervatten.
• Druk de knop [CASSETTE VOORUITSPOELEN/UITWERPEN] (21) volledig in en de
cassette zal worden uitgeworpen.
Opmerking DIRECTE USB-CODERING:
• De opnamesnelheid is 1:1.
• Er wordt geen songtitel opgenomen tijdens de coderingsmodus.
• Verwijder de USB alleen wanneer de radio is uitgeschakeld om schade aan het
USB-geheugen te voorkomen.
CODEREN VAN PLATENSPELER EN CASSETTE:
1. Steek de USB-stick in de [USB-POORT] (1);
2. Voer normaal afspelen uit van de bron die u wilt coderen en opnemen;
3. Druk tweemaal op de knop [RECORD] (5 of 37) om het coderen te starten. Op het
scherm zal “REC” knipperen;
4. Als het opnemen klaar is, drukt u op de knop [STOP] (14 of 41) om het opnemen
te stoppen.
CODEREN VAN CD:
1 nummer coderen:
1. Steek de USB-stick in de [USB-POORT] (1);
2. Voer normaal afspelen uit van het nummer dat u wilt coderen en opnemen;
3. Druk tweemaal op de knop [RECORD] (5 of 37) tijdens het afspelen van het
gewenste nummer.
Het afspelen zal stoppen en automatisch opnieuw starten. Aan de bovenkant van het
display zal de tekst “USB” knipperen, waarmee wordt aangegeven dat het coderen is
gestart.
4. Druk aan het einde van het nummer op de knop [STOP] (14 of 41) om het
opnemen van het nummer te beëindigen.

25
1. Steek de USB-stick in de [USB-POORT] (1);
2. Voer normaal afspelen uit van de CD die u wilt coderen en opnemen;
3. Druk tweemaal op de knop [RECORD] (5 of 37) nadat het zoeken naar muziek is
voltooid;
4. Het afspelen zal beginnen. Aan de bovenkant van het display zal de tekst “USB”
knipperen, waarmee wordt aangegeven dat het coderen is gestart.
Opmerking: Het apparaat zal automatisch stoppen met afspelen en opnemen
wanneer het omzetten is voltooid.
NUMMERS VAN USB WISSEN
1. Voer normaal afspelen uit van het nummer dat u wilt wissen;
2. Druk tijdens het afspelen van het nummer dat u wilt wissen tweemaal op de
knop [DELETE] (33) op de afstandsbediening.
SPECIFICATIES
Vermogensbehoefte : AC 230 V~, 50 Hz
Energieverbruik : 40 watt (max)
Muziekvermogen : 2 X 4,5W
Radiofrequentie : AM: 525-1640 KHz
FM: 88-108 MHz
Snelheid van platenspeler: : 33/45/78 TPM
Compatibiliteit CD-speler : CD/CD-R/CD-RW/MP3
USB-aansluiting voor USB-stick (niet opladen) : MP3-bestanden
USB-opname vanaf CD, cassette en plaat : Bitsnelheid 128 kbps

26
1. Garan�e
Lenco biedt service en garantie aan overeenkomstig met de Europese wetgeving. Dit houdt in dat u, in het geval van
reparaties (zoweltijdens alsnade garantieperiode), uwlokale handelaar moetcontacteren.
Belangrijke opmerking: Hetisniet mogelijkom producten die gerepareerdmoetenworden direct naar Lencote sturen.
Belangrijke opmerking: De garantie verloopt als een onofficieel servicecenter het apparaat op wat voor manier dan ook
heeftgeopend, of ertoegang
toe heeft gekregen.
Het apparaat is nietgeschiktvoor professioneelgebruik. Inhetgevalvan professioneel gebruikwordenalle
garantieverplichtingenvandefabrikant nietigverklaard.
2. Disclaimer
Er worden regelmatig updates in de firmware en/of hardwarecomponenten gemaakt. Daardoor kunnen gedeelten van
de instructie, de specificaties en afbeeldingen in deze documentatie enigszins verschillen van uw eigen situatie. Alle
onderwerpen die staan beschreve
n in deze handleiding zijn bedoeld als illustratie en zijn niet van toepassing op
specifieke situaties.Aan de beschrijvingin dit documentkunnen geen rechtenwordenontleend.
3. Afvoer vanhet oude apparaat
Dit symbool geeft aan dathet betreffendeelektrische productof de batterij nietmoet worden
verwijderd als algemeenhuishoudelijk afvalin Europa.Zorg vooreen juisteafvalverwerking door het
product endebatterijin overeenstemmingmetalle vantoepassing zi
jndelokale wetten voor het
verwijderen van elektrische apparatuur of batterijente verwijderen. Als u dit doet,helpt u de
natuurlijkehulpbronnente behoudenen de standaardvan milieubeschermingte verbeteren bijde
behandelingen verwijdering van elektrischafval (Afgedankte Elektrischeen Elektronische Apparatuur).
4. CE-markering
Lenco Benelux B.V., Thermiekstraat 1a, 6361 HB Nuth, Nederland, verklaart hierbij dat dit product voldoet
aan de vereisten van
de essentiële EU-richtlijnen. De conformiteitsverklaring kanwordenopgevraagd via
5. Service
Bezoekvoormeer informatie enhelpdeskondersteuningwww.lenco.com
Lenco BeneluxBV, Thermiekstraat1a, 6361 HB,Nederland.

27
Deutsch
ACHTUNG:
Eine andere als die hier beschriebene Bedienung, Einstellung oder Verwendung der Funktionen kann zu
gefährlicher Strahlenbelastung führen.
VORSICHTSMASSNAHMEN VOR DER BENUTZUNG
BEFOLGEN SIE IMMER FOLGENDE ANWEISUNGEN:
1. Blockieren oder bedecken Sie keine Lüftungsöffnungen. Wenn Sie das Gerät auf ein Regal stellen
lassen Sie um das gesamte Gerät 5 cm (2”) freien Platz.
2. Stellen Sie das Gerät entsprechend den Anweisungen der mitgelieferten Bedienungsanleitung auf.
3. Halten Sie das Gerät von Hitzequellen wie Radiatoren, Heizern, Öfen, Kerzen oder anderen hitzeerzeugenden
Produkten oder offenen Flammen fern. Das Gerät darf nur bei gemäßigtem Klima verwendet werden.
Sehr kalte oder heiße Umgebungen sind zu vermeiden. Der Betriebstemperaturbereich liegt zwischen 0 °C und 35 °C.
4. Meiden Sie bei der Nutzung des Produkts die Nähe starker Magnetfelder.
5.
Elektrostatische Entladungen können die normale Verwendung von diesem Gerät stören. Sollte dies geschehen
führen Sie einfach einen Reset aus und starten Sie dann das Gerät entsprechend den Anweisungen dieser
Bedienungsanleitung neu. Gehen Sie besonders bei Datenübertragungen mit dem Gerät vorsichtig um und
führen Sie diese nur in einer antielektrostatischen Umgebung aus.
6. Warnung! Niemals Gegenstände durch die Lüftungsschlitze oder Öffnungen in das Gerät stecken.
In diesem Gerät fließt Hochspannung und das Hineinstecken von Gegenständen kann zu elektrischem
Schock und/oder Kurzschluss interner elektrischer Bauteile führen. Aus dem gleichen Grund kein Wasser
oder Flüssigkeiten in das Gerät geben.
7. Benutzen Sie das Gerät nicht in nasser oder feuchter Umgebung wie Bad, Dampfküche oder in der Nähe
von Schwimmbecken.
8. Das Gerät darf weder Tropf- noch Spritzwasser ausgesetzt werden und es dürfen keine mit Flüssigkeit
gefüllten Behälter wie z.B. Vasen auf das Gerät oder in der Nähe des Gerätes gestellt werden.
9. Benutzen Sie das Gerät nicht bei Kondensationsgefahr. Wenn Sie das Gerät in einem warmen feuchten
Raum benutzen, dann können sich im Inneren des Geräts Wassertropfen oder Kondensationen bilden und zu
Fehlfunktionen des Geräts führen. Schalten Sie in diesem Fall das Gerät für 1 – 2 Stunden aus, bevor Sie es
erneut einschalten: Das Gerät sollte vollständig getrocknet sein, wenn Sie es wieder einschalten.
10.
Obwohl dieses Gerät unter größter Sorgfalt und vor Auslieferung mehrmals überprüft wurde, können trotzdem
wie bei jedem anderen elektrischen Gerät auch Probleme auftauchen. Trennen Sie das Gerät im Falle einer
Rauchentwicklung, starker Hitzeentwicklung oder jeden anderen unnatürlichen Erscheinung sofort vom Netz.
11. Dieses Gerät ist durch eine Stromquelle wie auf dem Typenschild angegeben zu betreiben. Halten Sie bei
Unsicherheiten über die Art Ihrer Stromversorgung in Ihrer Wohnung Rücksprache mit Ihrem Händler oder
Ihrer Stromzuliefererfirma.
12. Halten Sie es von Haustieren fern. Einige Nagetiere lieben es, an Netzkabeln zu nagen.
13. Benutzen Sie für die Reinigung ein weiches und trockenes Tuch. Benutzen Sie niemals Lösungsmittel oder
Flüssigkeiten auf Ölbasis. Benutzen Sie zum Entfernen hartnäckiger Flecken ein feuchtes Tuch mit mildem
Reinigungsmittel.
14. Der Hersteller haftet nicht für Schäden oder Verluste durch Fehlfunktion, Zweckentfremdung oder
Modifikation des Geräts oder durch Wechseln der Batterien.
15. Unterbrechen Sie die Verbindung nicht während einer Formatierung oder einer Datenübertragung.
Bei Unterbrechung drohen Datenverlust und Datenbeschädigung.
16. Wenn das Gerät eine USB-Wiedergabefunktion besitzt, dann stecken Sie den USB-Stick direkt in das Gerät.
Verwenden Sie kein USB-Verlängerungskabel, weil die erhöhte Störungsanfälligkeit zu Datenverlust führen könnte.
17. Das Typenschild befindet sich an der Unter- oder Rückseite des Geräts.
18. Dieses Gerät ist nicht zur Benutzung durch Personen (einschließlich Kinder) mit physischen, sensorischen
oder mentalen Beeinträchtigungen oder ohne ausreichender Erfahrung vorgesehen, es sei denn,
sie werden durch eine verantwortliche Person beaufsichtigt oder wurden in die ordnungsgemäße Bedienung
des Gerätes durch eine für ihre Sicherheit verantwortliche Person eingewiesen.
19. Dieses Produkt ist nur für den nicht-professionellen Gebrauch und nicht für gewerbliche oder industrielle
Zwecke bestimmt.
20. Stellen Sie sicher, dass das Gerät in einer stabilen Position aufgestellt ist. Schäden aufgrund Verwendung
dieses Produkts in einer instabilen Position, Vibrationen, Stöße oder Nichtbeachtung der anderen in dieser
Bedienungsanleitung enthaltenen Warnungen und Sicherheitshinweise werden nicht durch die Garantie abgedeckt.
21. Entfernen Sie niemals das Gehäuse dieses Produkts.

28
22. Stellen Sie das Produkt niemals auf andere elektrische Geräte.
23. Halten Sie Kinder von den Plastiktüten fern.
24. Benutzen Sie nur vom Hersteller spezifizierte Erweiterungen/Zubehörteile.
25. Lassen Sie alle Eingriffe von qualifiziertem Servicepersonal ausführen. Eingriffe werden notwendig
wenn das Gerät auf irgendeine Weise wie beispielsweise am Netzkabel oder am Netzstecker beschädigt wurde
Flüssigkeit in das Gerät eingedrungen ist, Gegenstände in das Gerät gefallen sind, das Gerät Regen oder
Feuchtigkeit ausgesetzt war, es heruntergefallen ist oder nicht ordnungsgemäß funktioniert.
26. Langes Hören lauter Töne aus einem Musikgerät kann zum zeitweiligen oder permanenten Hörverlust führen.
27. Wenn zum Lieferumfang des Produkts ein Netzkabel oder ein Netzadapter gehört:
● Wenn irgendwelche Probleme auftreten, dann ziehen Sie den Netzstecker aus der Netzsteckdose und
setzen Sie sich anschließend mit einer qualifizierten Fachkraft in Verbindung.
● Treten Sie nicht auf das Netzteil und klemmen Sie es auch nicht ein. Geben Sie besonders im näheren
Bereich des Steckers und der Stelle acht, wo das Kabel aus dem Gerät herausgeführt wird. Stellen Sie
keine schweren Gegenstände auf das Netzteil, weil es dadurch beschädigt werden könnte. Halten Sie das
gesamte Gerät außerhalb der Reichweite von Kindern! Durch Spielen mit dem Netzkabel können sie sich
ernsthafte Verletzungen zuziehen.
● Trennen Sie das Gerät während eines Gewitters oder bei längerer Nichtbenutzung vom Netz.
● Die Wandsteckdose muss sich in der Nähe des Geräts befinden und einfach zu erreichen sein.
● Steckdosen und Verlängerungsleitungen nicht überlasten. Eine Überlastung kann zu Brandgefahr bzw.
Stromschlag führen.
● Geräte der Schutzklasse 1 sind an eine Netzsteckdose mit Schutzleiter anzuschließen.
● Geräte der Schutzklasse 2 benötigen keinen Schutzleiteranschluss.
● Halten Sie den Netzstecker in der Hand, wenn Sie ihn aus der Netzsteckdose ziehen. Ziehen Sie ihn nicht
durch Zerren am Kabel heraus. Das kann zu einem Kurzschluss führen.
●
Verwenden Sie weder ein beschädigtes Netzkabel noch einen beschädigten Stecker oder eine lockere Steckdose.
Es besteht Brand- und Stromschlaggefahr.
28.Wenn das Produkt mit einer Fernbedienung mit Batterien/Knopfzellen geliefert wird oder das Produkt eine
derartige Fernbedienung umfasst:
Warnung:
● „Die Batterie nicht einnehmen, er besteht Verätzungsgefahr”.
● [Die mit diesem Produkt mitgelieferte Fernbedienung] enthält eine Knopfbatterie. Das Verschlucken der
Batterie kann innerhalb von nur 2 Stunden zu schwersten inneren Verbrennungen mit Todesfolge führen.
● Halten Sie neue und gebrauchte Batterien von Kindern fern.
● Verwenden Sie dieses Produkt nicht weiter und halten Sie es von Kindern fern, wenn das Batteriefach
nicht sicher schließt.
● Suchen Sie umgehend ärztliche Hilfe auf, wenn Sie vermuten, dass Batterien verschluckt oder in
Körperöffnungen eingeführt wurden.
29.Warnhinweise bzgl. der Verwendung von Batterien:
● Es besteht Explosionsgefahr, wenn die Batterien nicht korrekt eingelegt werden. Nur mit Batterien des
gleichen oder entsprechenden Typs ersetzen.
● Die Batterie darf während der Benutzung, Aufbewahrung oder des Transports weder sehr hohen oder
sehr niedrigen Temperaturen noch niedrigem Luftdruck in großen Höhenlagen ausgesetzt werden.
● Die Ersetzung der Batterie mit einem falschen Batterietyp kann zum Explodieren der Batterie oder dem
Auslaufen von entflammbarem Gas oder entflammbarer Flüssigkeit aus der Batterie führen.
● Die Entsorgung der Batterie in Feuer oder einem heißen Ofen oder das mechanische Zerkleinern oder
Zerteilen der Batterie kann zu Explosionen führen.
● Das Verbleiben der Batterie in einer Umgebung mit sehr hohen Temperaturen kann zum Explodieren der
Batterie oder dem Auslaufen von entflammbarem Gas oder entflammbarer Flüssigkeit führen.
● Eine einem sehr niedrigen Luftdruck ausgesetzte Batterie kann explodieren oder es kann aus einer einem
sehr niedrigen Luftdruck ausgesetzten Batterie entflammbares Gas oder entflammbare Flüssigkeit auslaufen.
● Augenmerk ist auf den ökologischen Aspekt der Batterieentsorgung zu legen.
ANSCHLUSS
● Packen Sie alle Teile aus und entfernen Sie danach die Schutzmaterialien.
● Schließen Sie das Gerät nicht eher an das Netz an, bevor Sie die Netzspannung überprüft haben und alle
anderen notwendigen Verbindungen hergestellt sind.

29
*
Diese Anleitungen gelten nur für Produkte, die ein Netzkabel oder ein AC-Netzteil
verwenden.
AUSPACKEN UND AUFSTELLEN
• Nehmen S i e das Gerät vorsichtig aus der Verpackung und entfernen Si e
anschließend jegliches Verpackungsmater i a l vom Gerät.
• Wickeln Sie das Netzkabel auf seine volle Länge ab.
• Wickeln Sie das Kabel der FM-Antenne auf seine volle Länge ab.
• Stellen Sie das Gerät auf eine geeignete,ebene Oberfläche ; am bestenin Nähe
einer Netzsteckdosefernvon starken Magnetfeldern .
• Stecken Sie den Netzstecker in eine Netzsteckdose.
• ÖffnenSiedenDeckeldes Plattenspielers.Der Plattenspielerwurdefür den
TransportmiteinerTransportsicherunggesichert.DrehenSiediese
TransportsicherungsschraubemitHilfeeinerMünzeodereinesSchraubendrehers
inUhrzeigersinn
. Danachkann sichderPlattentellerdrehen.
Transportsicherungsschraube
• Nehmen Sie den undurchsichtigen, weißen Plastikschutz der Tonnadel ab, indem
Sie diesen Schutz in Richtung des Pfeilesschieben (siehe Abbildung rechts).
• Achten Sie dabei besonders auf die Tonnadel, weil Beschädigunge n der Tonnadel
nicht durchdie Garantieabgedeckt werden.
• Entfernen Sie alle Plastikbänder, die zur Siche r ung des Tonarms während des
Transportsbefestigt wurden.
• EntriegelnSie den Tonarmsicherungshebel (siehe nachstehende Ab b. 1).
• Steck
enSie den Stecker in eine Netzsteckdose m i t 230 V AC/50 Hz.
WARNUNG
Laserprodukt der Klasse 1
WARNUNG: Bei der Teilnahme am Straßenverkehr kann das Hören von Musik
über ein Musikgerät von mö gli chen Gefahren, wie sich annähernden
Fahrzeugen, ablenken.
WARNUNG: Hören Sie nicht für längere Zeit mit einem hohen
Lautstär kepegel,um dauerh aften Hörschäden vorzubeugen.

30
EN DE
TONE ARM LOCK LEVER TONARMSICHERUNGSHEBEL
STYLUS COVER TONNADELABDECKUNG
Fig.1 Abb. 1
EINLEGEN DER LITHIUM-BATTERIE DER FERNBEDIENUNG
• Die Fernbedienung wird über eine Lithium-Batterie vom Typ CR2025 (3 V)
betrieben.
• Halten Sie die Zunge und drücken Sie sie mit dem Daumen in die Richtung wie auf
der Abbildung gezeigt. Schieben Sie anschließend das Batteriefach mit dem
Zeigefinger in Ihre Richtung. Nehmen Sie nun das Batteriefach aus der
Fernbedienung heraus. Legen Sie eine Lithium-Batterie (CR-2025) mit dem
positiven Pol nach oben zeigend im Batteriefach ein und schieben Sie das
Batteriefach mit leichtem Druck wieder in die Fernbedienung. Es ertönt ein Klick,
wenn es ordnungsgemäß einrastet.

31
VORDERSEITE
LINKE SEITE
21 22
20
RÜCKSEITE
23
24

32
OBERSEITE
FERNBEDIENUNG

33
BEDIENELEMENTE
1.
USB-PORT
2.
TASTE EIN/AUS
3.
LAUTSTÄRKEREGLER
4.
FUNKTIONSTASTE
5.
AUFZEICHNUNGSTASTE
6.
LCD-ANZEIGE
7.
WAHLTASTE KLANGQUELLE AM-RADIO
8.
WAHLTASTE KLANGQUELLE FM-RADIO
9.
WAHLTASTE KLANGQUELLE CD/USB
10.
WAHLTASTE KLANGQUELLE KASSETTE
11.
WAHLTASTE KLANGQUELLE PHONO
12.
CD-FACH
13.
WIEDERGABE/PAUSE: Für die Wiedergabe drücken. Während der Wiedergabe für
eine zeitweilige Wiedergabeunterbrechung drücken. Erneutes Drücken setzt die
Wiedergabe fort.
14.
STOPP: Drücken, wenn Sie die Wiedergabe beenden möchten.
15.
ZURÜCKSPRINGEN/SCHNELLES ZURÜCKSPULEN: Drücken, um zum vorherigen
Titel zu springen und gedrückt halten, um schnell zurückzuspulen.
16.
VORSPRINGEN/SCHNELLES VORSPULEN: Drücken, um zum nächsten Titel zu
springen und gedrückt halten, um schnell vorzuspulen.
17.
WIEDERGABEMODUS: Für die Auswahl des Wiedergabemodus (WIEDERHOLUNG,
ZUFALL) mehrmals drücken.
18.
TASTE CD-FACH ÖFFNEN/SCHLIESSEN
19.
ABSTIMMREGLER
20.
LAUTSPRECHER
21.
KASSETTE SCHNELL VORSPULEN/AUSWERFEN
22.
KASSETTENFACH
23.
ANTENNENDRAHT
24.
NETZKABEL
25.
PLATTENTELLER
26.
TRANSPORTSICHERUNGSSCHRAUBE
27.
TONARM
28.
TONARMARRETIERUNG
29.
TONARMLIFTHEBEL
30.
GESCHWINDIGKEITSWÄHLER 33/45/78 U/MIN

34
FERNBEDIENUNG
31.
±10 TITEL
32.
PROGRAMM-TASTE
33.
LÖSCHTASTE
34.
ZUFALLSWIEDERGABETASTE
35.
WIEDERHOLTASTE
36.
TASTE CD-FACH ÖFFNEN/SCHLIESSEN
37.
AUFZEICHNUNGSTASTE
38.
WIEDERGABE/PAUSE
39.
VORSPRINGEN/SCHNELLES VORSPULEN
40.
ZURÜCKSPRINGEN/SCHNELLES ZURÜCKSPULEN
41.
STOPP
STROMQUELLEN
AC-STROMVERSORGUNG: Sie können Ihr Stereosystem mit Strom versorgen, indem Sie den
Netzstecker (24) in eine Netzsteckdose stecken. Überprüfen Sie, ob die Nennspannung Ihres
Stereosystems mit der Spannung bei Ihnen vor Ort übereinstimmt.
UM DAS RADIO ZU VERWENDEN
1. Drücken Sie die Taste [POWER] (2), um das Gerät einzuschalten;
2. Wählen Sie die gewünschte Audioquelle aus, indem Sie die entsprechende
Wahltaste für die [SOURCE] (7 – 11) drücken;
3. (schlagen Sie bitte für detaillierte Informationen zu den einzelnen Klangquellen
unter dem nachfolgendem Kapitel nach);
4. Stellen Sie den gewünschten Lautstärkepegel mit Hilfe des Drehreglers [VOLUME] (3)
ein;
5. Halten Sie die Taste [POWER] (2) gedrückt, um das Gerät auszuschalten.
Hinweis: Wenn keine Wiedergabe erfolgt, dann schaltet sich das Gerät nach 10 Minuten
automatisch aus.
BEDIENUNG DES RADIOS
1. Drücken Sie die Taste [AM] oder [FM] (7 oder 8);
2. Stellen Sie die Radiofrequenz Ihres gewünschten Radiosenders ein, indem Sie den
Drehregler [TUNING] (19) drehen.
Hinweis: Richten Sie die Drahtantenne (23) für einen besseren FM-Empfang aus.
Für den MW-Empfang werden die Signale über eine eingebaute Ferrit-Antenne empfangen.
In diesem Fall können Sie u.U. durch Ausrichtung des Geräts den Empfang verbessern.

35
PLATTENSPIELERBEDIENUNG
Hinweis: Wenn Sie den Plattenspieler das erste Mal verwenden, dann drehen Sie die
[TRANSPORTSICHERUNGSSCHRAUBE] (26) solange in Uhrzeigersinn, bis sie vollständig
hineingedreht ist.
1. Drücken Sie die Taste [PHONO] (11);
2. Legen Sie eine Schallplatte auf den Plattenteller. Wenn Sie eine Single
wiedergeben möchten, dann stecken Sie den Single-Adapter auf die
Plattentellerspindel;
3. Stellen Sie den [GESCHWINDIGKEITSWÄHLER] (30) je nach Schallplattentyp auf 33,
45 oder 78 U/min.
4. Entriegeln Sie die [TONARMARRETIERUNG] (28) und nehmen Sie die
Tonabnehmernadelschutzkappe ab;
5. Heben Sie den [TONARM] (27) mit Hilfe des [TONARMLIFTHEBELS] (30) an;
6. Bewegen Sie den [TONARM] (27) zum Anfang der Schallplatte;
7. Setzen Sie den [TONARM] (27) mit Hilfe des [TONARMLIFTHEBELS] (29) auf der
Schallplatte ab;
8. Wenn das Ende der Schallplatte erreicht ist, dann kehrt der [TONARM] (27)
automatisch zur Tonarmauflage zurück und die [PLATTE] (25) stoppt ihre Drehung.
Heben Sie den Tonarm von der Schallplatte und bewegen Sie ihn anschließend
zurück zur Tonarmauflage, um die Wiedergabe manuell zu beenden.
HINWEIS: Drehen oder stoppen Sie den Plattenteller nicht mit der Hand. Wenn der
Plattenspieler bewegt oder geschüttelt wird, ohne dass der Tonarm in der
Tonarmaufnahme durch die Tonarmarretierung gesichert wurde, dann kann dies zur
Beschädigung des Tonarms führen.
Den TCS-2550 transportbereit machen.
• Sichern Sie den [TONARM] (27) mit der [TONARMARRETIERUNG] (28);
• Setzen Sie die Schutzkappe auf die Tonabnehmernadel (selbst dann, wenn nicht
in Benutzung);
• Drehen Sie die [TRANSPORTSICHERUNGSSCHRAUBE] (26) solange gegen
Uhrzeigersinn, bis Sie mehr Widerstand verspüren (Die Schraube nicht vollständig
herausschrauben!)

36
CD-/MP3-BEDIENUNG
1. Drücken Sie die Taste [CD/USBS] (9);
2. Drücken Sie die Taste [OPEN/CLOSE] (18), um das [CD-FACH] (12) zu öffnen. Legen
Sie eine CD mit der beschrifteten Seite nach oben in das CD-Fach.
3. Schließen Sie das [CD-FACH] (12) wieder. Die Suche nach auf der CD befindlicher
Musik wird gestartet. Anschließend wird automatisch mit dem ersten Titel
beginnend die Wiedergabe gestartet.
PROGRAMMIERUNG
Es können bis zu 99 Titel (MP3, bei CD 20) programmiert und in beliebiger Reihenfolge
wiedergegeben werden.
1. Sie können die Wiedergabe durch Drücken der Taste [STOP] (14 oder 41)
beenden;
2. Wenn Sie [PLAY MODE] (17) oder [PROGRAM](32) drücken, dann wird auf der
Anzeige (6) „P01“ blinkend angezeigt;
3. Wählen Sie den gewünschten Titel mit Hilfe der Tasten [SKIP -/+] (15/16 oder
39/40) aus;
4. Durch erneutes Drücken von [PLAY MODE] (17) oder [PROGRAM](32) wird der
Titel in den Programmspeicher geschrieben;
5. Wiederholen Sie die Schritte 3 und 4, um weitere Titel im Programmspeicher
abzulegen.
6. Wenn Sie alle gewünschten Titel programmiert haben, dann drücken Sie [PLAY]
(13 oder 38), um die CD in der von Ihnen programmierten Reihenfolge
wiederzugeben.
Hinweis: Drücken Sie zweimal [STOP] (14 oder 41), um die programmierte
Wiedergabe zu beenden.

37
USB-BEDIENUNG
1. Drücken Sie die Taste [CD/USB] (9);
2. Stecken Sie einen USB-Stick in den USB-Port [USB] (1);
3. Drücken Sie die Taste [FUNCTION] (4), um den USB-Modus auszuwählen;
4. Die Wiedergabe beginnt automatisch mit dem ersten Titel.
PROGRAMMIERUNG
Die Schritte der PROGRAMMIERUNG sind dieselben wie bei der CD-/MP3-Programmierung.
Hinweis:
• Einige MP3-Player können nicht über die USB-Schnittstelle wiedergeben. Das ist
keine Fehlfunktion des Systems.
• Der USB-Port ist nicht zum Laden von Smartphones oder anderen Geräten bestimmt.
KASSETTENBEDIENUNG
1. Drücken Sie die Klangquellenwahltaste [TAPE] (10);
2. Legen Sie im [KASSETTENFACH] (22) eine Kassette ein;
3. Das System startet die Wiedergabe automatisch;
• Drücken Sie während der Wiedergabe die Taste [KASSETTE VORSPULEN/
AUSWERFEN] (21) zur Hälfte herunter, um das schnelle Vorspulen der Kassette zu
starten.
• Drücken Sie die Taste [KASSETTE VORSPULEN/AUSWERFEN] (21) erneut leicht,
um die Wiedergabe fortzusetzen.
• Drücken Sie die Taste [KASSETTE VORSPULEN/AUSWERFEN] (21) ganz nach unten,
um die Kassette auszuwerfen.
ANMERKUNG DIREKTE USB-KODIERUNG:
• Die Aufzeichnungsgeschwindigkeit ist 1:1.
• Im Kodierungsmodus werden keine Liedtitel aufgezeichnet.
• Entfernen Sie den USB-Speicher nur dann, wenn das Radio ausgeschaltet ist, um
einer Beschädigung des USB-Speichers vorzubeugen.
KODIERUNG VON PHONO UND KASSETTE:
1. Stecken Sie den USB-Stick in den USB-Port [USB] (1);
2. Geben Sie die Quelle normal wieder, die Sie aufzeichnen und kodieren möchten;
3. Drücken Sie die Taste [RECORD] (5 oder 37) zweimal, um die Aufzeichnung zu
starten. Auf der Anzeige erscheint blinkend „REC“;
4. Wenn die Schallplatte/Kassette wiedergegeben wurde, dann drücken Sie die
Taste [STOP] (14 oder 41), um die Aufzeichnung zu beenden.

38
KODIERUNG VON CD:
Kodierung eines Titels:
1. Stecken Sie den USB-Stick in den USB-Port [USB] (1);
2. Geben Sie den Titel normal wieder, den Sie aufzeichnen und kodieren möchten;
3. Drücken Sie während der Wiedergabe des gewünschten Titels die Taste [RECORD]
(5 oder 37) zweimal.
Die Wiedergabe wird beendet und automatisch neu gestartet. Der Schriftzug „USB“ auf
der Anzeige oben blinkt, wodurch angezeigt wird, dass die Kodierung begonnen wurde.
4. Drücken Sie am Ende des Titels die Taste [STOP] (14 oder 41), um die
Aufzeichnung des Titels zu beenden.
1. Stecken Sie den USB-Stick in den USB-Port [USB] (1);
2. Geben Sie die CD normal wieder, die Sie aufzeichnen und kodieren möchten;
3. Drücken Sie nach Beendigung der erstmaligen Suche nach vorhandener Musik die
Taste [RECORD] (5 oder 37) zweimal;
4. Die Wiedergabe beginnt. Der Schriftzug „USB“ auf der Anzeige oben blinkt,
wodurch angezeigt wird, dass die Kodierung begonnen wurde.
Hinweis: Wenn die Umwandlung beendet ist, dann stoppt das Gerät die Wiedergabe
und die Aufzeichnung automatisch.
TITEL VON USB LÖSCHEN
1. Geben Sie den Titel normal wieder, den Sie löschen möchten;
2. Drücken Sie während der Wiedergabe des Titels, den Sie löschen möchten
zweimal die Taste [DELETE] (33) auf der Fernbedienung.
TECHNISCHE DATEN
Spannungsversorgung : AC 230 V, 50 Hz
Leistungsaufnahme : 40 Watt (max.)
Musikleistung : 2 x 4,5 W
Frequenz des Radiosenders : AM: 525-1640 KHz
FM: 88-108 MHz
Geschwindigkeit Plattenteller: : 33/45/78 U/min
Kompatibilität CD-Player : CD/CD-R/CD-RW/MP3
USB-Verbindung für Memorysticks (kein Laden) : MP3-Dateien
USB-Aufzeichnung von CD, Kassette und Schallplatte : Bitrate 128 kbps

39
1. Garantie
Lenco bietet Leistungen und Garantien im Einklang mit Europäischem Recht. Im Falle von Reparaturen (sowohl während
als auchnach Ablauf der Garantiezeit)solltenSie deshalb Ihren Einzelhändler kontaktieren.
Wichtiger Hinweis:Es ist nichtmöglich, Gerätefür Reparaturendirekt anLenco zu schicken.
Wichtiger Hinweis: Falls dieses Gerät von einem nicht autorisierten Kundendienst geöffnet oder darauf zugegriffen wird,
erlischtdie Garantie.
Dieses
Gerät ist nicht für professionelle Zwecke geeignet. Falls das Gerät für professionelle Zwecke eingesetzt wird,
erlöschenalle Garantieverpflicht ungen seitensdes Herstellers.
2. Haftungsauss chluss
Aktualisierungen der Firmware und/oder Hardware-Komponenten werden regelmäßig durchgeführt. Daher können
einige der Anweisungen, Spezifikationen und Abbildungen in dieser Dokumentation von Ihrer individuellen Situation
abweichen. Alle in diesem Handbuch
beschriebenen Elemente dienen nur zur Illustration und treffen auf Ihre
individuelle Situation möglicherweise nicht zu. Aus der in diesem Handbuch getätigten Beschreibung können keine
Rechtsansprüche oderAnsprüche geltendgemachtwerden.
3. Entsorgung des Altgeräts
Dieses Symbol zeigt an, dass das entsprechende Produkt oder dessen Batterie in
Europa nicht mit dem normalen Hausmüll entsorgt werden darf. Um die
ordnungsgemäße Abfallbehandlung des Produkts und dessen Batterie zu
gewährleisten, müssen diese im Einklang mit allen anwendbaren örtlichen
Vorschriften zur Entsorgung von Elektrogeräten und Batterien entsorgt werden.
Dabei helfen Sie, natürliche Ressourcen zu schonen und Umweltschutzstandards
zur Verwertung und
Entsorgung von Altgeräten aufrecht zu halten (Waste Electrical
and Electronic Equipment Directive).
4. CE-Kennzeichen
Hiermit er klärt Lenco Benelux B.V., Thermiekstraat 1a, 6361 HB Nuth, The Netherlands, dass dieses P rodukt
den grundsätzlichen Anforderungender EU-Richtlinie entspricht. Die Konformitätserklärung ist e r hältlich unter
5. Service
WeitereInformationenund Unterstützungerhalten Sie unterwww.lenco.com
Lenco BeneluxBV, Thermiekstraat1a, 6361 HB,DieNiederlande.

Français
ATTENTION :
L’utilisation de commandes ou d’ajustements ou l’exécution de procédures autres que celles spécifiées dans le
présent document peuvent entraîner une exposition dangereuse aux radiations.
PRÉCAUTIONS AVANT UTILISATION
GARDEZ CES INSTRUCTIONS À L’ESPRIT :
1. Ne couvrez pas et n’obturez pas les ouvertures de ventilation. Lorsque vous placez l’appareil sur une étagère
laissez 5 cm (2”) d’espace libre tout autour de l’appareil.
2. Installez-le conformément au mode d’emploi fourni.
3. Gardez l’appareil à l’écart des sources de chaleur telles que des radiateurs, appareils de chauffage, fours
bougies et autres produits générant de la chaleur ou une flamme nue. L’appareil ne peut être utilisé que dans
des climats modérés. Les environnements extrêmement froids ou chauds doivent être évités. La plage de
température de fonctionnement se situe entre 0° et 35° C.
4. Évitez d’utiliser l’appareil à proximité de champs magnétiques puissants.
5. Des décharges électrostatiques peuvent perturber le fonctionnement de cet appareil. Dans ce cas, il suffit de
réinitialiser et de redémarrer l’appareil en suivant le mode d’emploi. Pendant le transfert de fichiers, manipulez
l’appareil avec précaution et faites-le fonctionner dans un environnement sans électricité statique.
6. Mise en garde ! N’introduisez jamais un objet dans l’appareil par les ouvertures et les fentes de ventilation.
Étant donné que des tensions élevées sont présentes à l’intérieur du produit, l’insertion d’un objet peut
entraîner une électrocution et/ou court-circuiter les composants internes. Pour les mêmes raisons, ne versez
pas de l’eau ou un liquide sur le produit.
7. Ne l’utilisez pas dans des endroits humides tels qu’une salle de bain, une cuisine pleine de vapeur ou à
proximité d’une piscine.
8. L’appareil ne doit pas être exposé à des écoulements ou des éclaboussures et aucun objet contenant un
liquide, tel qu’un vase, ne doit être posé sur ou près de l’appareil.
9. N’utilisez pas cet appareil lorsque de la condensation est possible. Lorsque l’appareil est utilisé dans une
pièce humide et chaude, des gouttelettes d’eau ou de la condensation peuvent se former à l’intérieur de
l’appareil et affecter son fonctionnement. Laissez l’appareil hors tension pendant 1 ou 2 heures avant de le
mettre en marche : l’appareil doit être sec avant sa mise sous tension.
10. Bien que ce dispositif soit fabriqué avec le plus grand soin et contrôlé à plusieurs reprises avant de quitter
l’usine, des problèmes peuvent néanmoins survenir, comme avec tous les appareils électriques. Si l’appareil
émet de la fumée ou en cas d’accumulation excessive de la chaleur ou d’un phénomène inattendu
débranchez immédiatement la fiche d’alimentation du secteur.
11. Cet appareil doit fonctionner avec la source d’alimentation indiquée sur la plaque signalétique. Si vous n’êtes
pas sûr du type d’alimentation utilisé chez vous, contactez votre revendeur ou le fournisseur local d’électricité.
12. Tenez l’appareil à l’abri des animaux. Certains animaux aiment ronger les cordons électriques.
13. Pour nettoyer l’appareil, servez-vous d’un chiffon doux et sec. N’utilisez pas de solvant ni d’autre liquide à
base de pétrole. Pour enlever les taches importantes, vous pouvez vous servir d’un chiffon humide imbibé
d’une solution de détergent diluée.
14. Le fournisseur n’est pas responsable des dommages ou pertes de données causés par un dysfonctionnement
une utilisation abusive, une modification de l’appareil ou un remplacement de la batterie.
15. N’interrompez pas la connexion lorsque l’appareil formate ou transfère des fichiers. Dans le cas contraire
les données pourraient être endommagées ou perdues.
16. Si l’appareil a une fonction de lecture USB, il faut brancher la clé USB directement sur l’appareil. N’utilisez
pas un câble d’extension USB, car cela peut causer des interférences entraînant des pertes de données.
17. L’étiquette de classification se trouve sur le panneau inférieur ou arrière de l’appareil.
18. Cet appareil ne doit pas être utilisé par des personnes (y compris les enfants) souffrant de déficiences
physiques, sensorielles ou mentales, ou d’un manque d’expérience et de connaissances, à moins qu’elles
n’aient été supervisées ou qu’une personne responsable de leur sécurité ne leur ait donné des instructions
sur l’utilisation correcte de l’appareil.
19. Ce produit est réservé à un usage non professionnel, et non pas à un usage commercial ni industriel.
20. Vérifiez que l’appareil est en position stable. La garantie ne couvre pas les dégâts occasionnés par l’utilisation
de cet appareil en position instable, par les vibrations, les chocs ou par la non-observation de tout autre
avertissement ou précaution contenus dans ce mode d’emploi.

41
21. N’ouvrez jamais cet appareil.
22. Ne placez jamais cet appareil sur un autre appareil électrique.
23. Ne laissez pas les sacs en plastique à la portée des enfants.
24. Utilisez uniquement les accessoires recommandés par le fabricant.
25. Confiez l’entretien et les réparations à un personnel qualifié. Une réparation est nécessaire lorsque l’appareil
a été endommagé de quelque façon que ce soit, par exemple lorsque le cordon d’alimentation ou la prise
sont endommagés, lorsqu’un liquide s’est déversé ou des objets sont tombés sur l’appareil, lorsque l’appareil
a été exposé à la pluie ou à l’humidité lorsqu’il ne fonctionne pas correctement ou est tombé.
26. Une exposition prolongée à la musique avec un volume élevé peut entraîner une perte auditive temporaire
ou permanente.
27. Si l’appareil est livré avec un câble d’alimentation ou un adaptateur secteur :
● En cas de problème, débranchez le cordon d’alimentation CA et confiez l’entretien à un personnel qualifié.
● Ne marchez pas sur l’adaptateur secteur ou ne le coincez pas. Faites très attention en particulier à proximité
des fiches et du point de sortie du câble. Ne placez pas d’objets lourds sur l’adaptateur secteur, car ils
pourraient l’endommager. Gardez l’appareil hors de portée des enfants ! Ils pourraient se blesser gravement
s’ils jouent avec le câble d’alimentation.
● Débranchez cet appareil pendant les orages ou lorsqu’il n’est pas utilisé pendant une longue durée.
● La prise secteur doit être installée près de l’appareil et doit être facilement accessible.
● Ne surchargez pas les prises de courant ou les rallonges. Une surcharge peut entraîner un incendie ou
une électrocution.
● Les appareils de classe 1 doivent être branchés à une prise de courant disposant d’une connexion
protectrice à la terre.
● Les appareils à la norme de construction de classe 2 ne nécessitent pas de connexion à la terre.
● Tirez toujours sur la fiche pour débrancher le cordon de la prise secteur. Ne tirez pas sur le cordon
d’alimentation. Cela pourrait provoquer un court-circuit.
● N’utilisez pas un cordon ou une fiche d’alimentation endommagé ni une prise desserrée. Vous courez un
risque d’incendie ou de décharge électrique.
28. Si le produit contient ou est livré avec une télécommande contenant des piles boutons :
Avertissement :
● « N’ingérez pas la pile, car vous risquez une brûlure chimique » ou une formule équivalente.
● La télécommande fournie contient une pile bouton/pièce de monnaie. Si la pile est avalée, elle peut causer
de graves brûlures internes en seulement 2 heures et peut entraîner la mort.
● Tenez les piles neuves et usagées hors de portée des enfants.
● Si le compartiment à piles ne se ferme pas correctement, cessez d’utiliser l’appareil et tenez-le hors de
portée des enfants.
● Si vous pensez que les piles ont été avalées ou placées à l’intérieur d’une partie du corps, consultez un
médecin immédiatement.
29. Mise en garde relative à l’utilisation des piles :
● Risque d’explosion si la pile est mal remplacée. Remplacez les piles par des piles d’un type identique ou
équivalent.
● Pendant l’utilisation, le stockage ou le transport, la pile ne doit pas être soumise à des températures
extrêmement élevées ou basses, à une faible pression d’air à haute altitude.
● Le remplacement d’une pile par une autre de type incorrect peut entraîner une explosion ou une fuite de
liquide ou de gaz inflammable.
● L’introduction d’une pile dans le feu ou dans un four chaud, l’écrasement ou le découpage mécanique peut
entraîner une explosion.
● L’exposition d’une pile dans un environnement à température extrêmement élevée peut entraîner une
explosion ou une fuite de liquide ou de gaz inflammable.
● L’exposition d’une pile à une pression d’air extrêmement basse peut entraîner une explosion ou une fuite
de liquide ou de gaz inflammable.
● Veuillez considérer les questions environnementales lors de la mise au rebut des piles.
INSTALLATION
● Déballez toutes les pièces et enlevez le matériau de protection.
● Ne connectez pas l’unité au secteur avant d’avoir vérifié la tension du secteur et avant que toutes les
autres connexions n’aient été effectuées.

42
* Ces instructions s’appliquent uniquement aux produits utilisant un câble
d’alimentation ou un adaptateur secteur.
DÉBALLAGEET INSTALLATION
• Sortezsoigneusement l’appareildu carton et enlevez tous les emballages.
• Déroulez le cordond’alimentation secteur et dé ployez-leentièrement.
• Déroulez le fil d’antenneFM et déployez-la e ntièrement.
• Posez l’appareil sur une surface plane et stable,avecune pr i se se cteur facilement
accessible et éloignée de ch
amps magnétiques forts.
• Branchez le cordon d’alimentation à une prise secteur.
• Levezle couvercle pour exposer l e phonographe.Le phonographe a étésécurisé
pour le transportavecune vis de transport. Util i sez une p i èce de monnaie ou un
tournevispour faire tourner la vis servant à bloquer pe nda nt le transportdans le
sens horaire. Ceci fera « flotter » le tourne-disque.
Vis de blocage pendant le t ransport
• Retirez la protection de la pointe de lecture en plastique blanc opaque de la
pointe de lecture du phonographe en la faisant glisser dans le se ns de la flèche
(reportez-vous à l’illustration à droite).
• Pendant cette opération, faites particulièrement attention à la pointe de lect ure
car l es dégâts ne sont pas couverts par l a garantie.
• Enlevez le lien torsadé qui servait à im m obiliser le bras de lecture lors du
transport.
• Libérezle levier de verrouillagedu bras de lect
ure(voir l a figure 1 ci-dessous).
• Branchez le cordon à une prise él ectrique 230 V CA, 50 Hz.
AVERTISSEMENT
Produit laser de classe 1
AVERTISSEMENT : L’utilisation d’un lecteur de musique personnel dans la
circulation peut détourner l ’attention de l’auditeur de dangers potentiels tels
que l’approche des voitures.
AVERTISSEMENT : Pour éviter une éventuelle détérioration de l’ouïe,
n’écoutez pas la musique à un niveau de volume élevé pendant des périodes
prolongées.

43
EN FR
TONE ARM LOCK LEVER LEVIER DE BLOCAGE DU BRAS DE LECTURE
STYLUS COVER PROTECTION DE LA POINTE DE LECTURE
Fig.1 Figure 1
INSTALLATION DE LA PILE AU LITHIUM DE LA TÉLÉCOMMANDE
• La télécommande nécessite une pile au lithium CR2025 (3 V).
• Tenez la télécommande et levez en appuyant sur le fermoir avec le pouce dans la
bonne direction indiquée par la flèche dans l’illustration, puis retirez le
compartiment de la pile en le faisant glisser avec l’index vers vous. Faites sortir le
compartiment de la pile de la télécommande. Installez une pile au lithium
(CR-2025) dans le compartiment avec la polarité positive vers le haut, puis insérez
doucement le compartiment de la pile dans la télécommande. Le compartiment
est en place lorsque vous entendez un clic.
AVANT

44
CÔTÉ GAUCHE
21 22
20
ARRIÈRE
23
24

45
DESSUS
TÉLÉCOMMANDE

46
EMPLACEMENT DES BOUTONS
1.
PORT USB
2.
BOUTON MARCHE/ARRÊT
3.
MOLETTE DE VOLUME
4.
SÉLECTEUR DE FONCTION
5.
BOUTON D’ENREGISTREMENT
6.
ÉCRAN LCD
7.
BOUTON SOURCE RADIO AM
8.
BOUTON SOURCE RADIO FM
9.
BOUTON SOURCE CD/USB
10.
BOUTON SOURCE CASSETTE
11.
BOUTON SOURCE PHONO
12.
PORTE CD
13.
DÉMARRE/MET EN PAUSE LA LECTURE : Appuyez dessus pour lancer la lecture.
Pendant la lecture, appuyez dessus pour l’arrêter temporairement et une fois de
plus pour reprendre la lecture.
14.
ARRÊT : Appuyez dessus lorsque vous souhaitez terminer la lecture.
15.
SAUT ARRIÈRE/RETOUR : Appuyez dessus pour passer à la piste précédente,
maintenez enfoncé pour effectuer un retour rapide.
16.
SAUT AVANT/AVANCE RAPIDE : appuyez dessus pour passer à la piste suivante,
maintenez enfoncé pour effectuer une avance rapide.
17.
LECTURE-MODE : appuyez dessus à plusieurs reprises pour choisir le mode de
lecture (RÉPÉTITION, ALÉATOIRE)
18.
BOUTON OUVERTURE/FERMETURE CD
19.
BOUTON DE SYNTONISATION
20.
ENCEINTES
21.
AVANCE RAPIDE/ÉJECTION DE CASSETTE
22.
MÉCANISME DU LECTEUR DE CASSETTE
23.
ANTENNE FILAIRE
24.
CORDON D’ALIMENTATION
25.
PLATINE DU TOURNE-DISQUE
26.
VIS DE BLOCAGE PENDANT LE TRANSPORT
27.
BRAS DE LECTURE
28.
BLOCAGE DU BRAS DE LECTURE
29.
RELÈVE-BRAS
30.
SÉLECTEUR DE VITESSE 33 45/78 tr/min

47
TÉLÉCOMMANDE
31.
PISTE -/+ 10
32.
BOUTON PROGRAMME
33.
BOUTON SUPPRIMER
34.
BOUTON ALÉATOIRE
35.
BOUTON RÉPÉTITION
36.
BOUTON OUVERTURE/FERMETURE CD
37.
BOUTON D’ENREGISTREMENT
38.
DÉMARRE/MET EN PAUSE LA LECTURE
39.
SAUT AVANT/AVANCE RAPIDE
40.
SAUT ARRIÈRE/RETOUR
41.
ARRÊT
SOURCES D’ALIMENTATION
ALIMENTATION CA : Vous pouvez alimenter votre système stéréo en branchant le
cordon secteur (24) sur une prise de courant murale. Vérifiez que la tension nominale
de votre appareil correspond à la tension du secteur.
UTILISER LA RADIO
1. Appuyez sur le bouton [POWER] (2) pour allumer l’appareil.
2. Sélectionnez la piste souhaitée en appuyant sur le bouton [SOURCE] (7 à 11).
3. (Reportez-vous aux instructions détaillées correspondant à chaque source dans
les chapitres suivants).
4. Réglez le volume au niveau souhaité avec la [MOLETTE DE VOLUME] (3).
5. Appuyez sur le bouton [POWER] (2) pour éteindre l’appareil.
Remarque : Quand aucun son n'est produit, l'appareil s'éteint automatiquement au bout de
10 minutes.
UTILISATION DE LA RADIO
1. Puis, appuyez sur le bouton [AM] ou [FM] (7 ou 8).
2. Réglez la fréquence radio sur la station souhaitée en tournant le [BOUTON DE
SYNTONISATION] (19).
Remarque : Pour une meilleure réception, déplacez l'antenne filaire (23).
Les signaux de la réception MW sont captés par une antenne ferrite intégrée. Il se peut que
vous ayez à orienter l'appareil pour obtenir la meilleure réception.

48
UTILISATION DE LA PLATINE
Remarque : Lorsque vous utilisez la platine pour la première fois, tournez la [VIS SERVANT À
BLOQUER PENDANT LE TRANSPORT] (26) dans le sens horaire jusqu'à ce qu’elle soit
complètement vissée.
1. Appuyez sur le bouton [PHONO] (11).
2. Placez un disque sur le tourne-disque. Placez l'adaptateur EP sur l’axe central lors
de la lecture de 45 tours.
3. Réglez le [SÉLECTEUR DE VITESSE] (30) sur 33, 45 ou 78 tr/min en fonction du disque.
4. Relâchez la [BRIDE DU BRAS DE LECTURE] (28) et retirez la protection de la pointe
de lecture.
5. Soulevez le [BRAS DE LECTURE] (27) avec le [RELÈVE-BRAS] (30).
6. Placez le [BAS DE LECTURE] (27) au début du disque.
7. Baissez le [BRAS DE LECTURE] (27) avec le [RELÈVE-BRAS] (29).
8. Lorsque le disque est terminé, le [BRAS DE LECTURE] (27) revient
automatiquement sur l’appui et la [PLATINE] s’ (25) arrête de tourner. Pour
arrêter manuellement, soulevez le bras de lecture du disque et remettez-le à sa
position de repos.
REMARQUE : Ne tournez pas ou n’arrêtez pas le tourne-disque à la main. Déplacer ou
secouer le tourne-disque sans immobiliser le levier de blocage du bras de lecture peut
endommager celui-ci.
Préparer le TCS-2550 pour le transport.
• Verrouillez le [BRAS DE LECTURE] (27) avec la [BRIDE DU BRAS DE LECTURE] (28).
• Placez le capuchon de protection sur la pointe de lecture (même si celle-ci n’est
pas utilisée).
• Tourner la [VIS SERVANT À BLOQUER PENDANT LE TRANSPORT] (26) dans le sens
antihoraire jusqu'à ce que vous sentiez plus de résistance (ne retirez pas la vis
complètement !)

49
FONCTIONNEMENT DU LECTEUR CD/MP3
1. Appuyez sur le bouton [CD/USB] (9).
2. Appuyez sur [OUVRIR/FERMER] (18) pour ouvrir la [PORTE DU COMPARTIMENT À
CD] (12) et placez un CD avec l'étiquette tournée vers le haut dans le
compartiment à CD.
3. Fermez la porte du [COMPARTIMENT À CD] (12). La recherche de musique sur le
CD est effectuée et la lecture démarre automatiquement à partir de la première
piste.
PROGRAMMATION
Jusqu'à 99 pistes (MP3, 20 sur un CD) peuvent être programmées et écoutez-les dans
n'importe quel ordre.
1. Arrêtez la lecture en appuyant sur [STOP] (14 ou 41).
2. Appuyez sur [PLAY MODE] (17) ou [PROGRAM](32), l'affichage (6) indique « P01 »
et clignote.
3. Sélectionnez la piste désirée en utilisant les boutons [SAUT ARRIÈRE/AVANT]
(15/16 ou 39/40).
4. Appuyez sur [PLAY MODE] (17) ou [PROGRAMME](32) pour programmer la piste
en mémoire.
5. Répétez les étapes 3 et 4 pour ajouter d’autres pistes dans la mémoire du
programme.
6. Lorsque toutes les pistes souhaitées ont été programmées, appuyez sur [PLAY]
(13 ou 38) pour lire le disque dans l’ordre que vous avez programmé.
Remarque : Appuyez sur [STOP] (14 ou 41) pour terminer la lecture du programme.
FONCTIONNEMENT PAR USB
1. Appuyez sur le bouton [CD/USB] (9).
2. Branchez une clé USB dans le [PORT USB] (1).
3. Appuyez sur le bouton [FUNCTION] (4) pour sélectionner le mode USB.
4. La lecture démarre automatiquement à partir de la première piste.
PROGRAMMATION
La procédure de PROGRAMMATION est la même que celle du CD-MP3.

50
Remarque :
• Certains lecteurs MP3 peuvent ne pas être en mesure d’être lus via le port USB. Il
ne s’agit pas d’un dysfonctionnement du système.
• Le port USB n'est pas conçu pour la charge de smartphones ou d'autres appareils.
FONCTIONNEMENT DU LECTEUR DE CASSETTE
1. Appuyez sur le bouton source [TAPE] (10).
2. Insérez une cassette dans le [MÉCANISME D U LECTEUR DE CASSETTE] (22).
3. Le système démarrera la lecture automatiquement.
• Appuyez sur le bouton [AVANCE/ÉJECTION DE LA CASSETTE] (21) à moitié pendant
la lecture pour commencer l'enroulement rapide de la bande vers l’avant.
• Appuyez légèrement sur le bouton [AVANCE/ÉJECTION DE LA CASSETTE] (21) de
nouveau pour reprendre la lecture.
• Enfoncez complètement le bouton [AVANCE/ÉJECTION DE LA CASSETTE] (21) et la
cassette sera éjectée.
ENCODAGE USB DIRECT. Remarque :
• La vitesse d'enregistrement est de 1:1.
• Aucun titre de chanson ne sera enregistré pendant l'encodage.
• Pour éviter d’endommager la clé USB, enlevez-la uniquement lorsque la radio est
éteinte.
ENCODER À PARTIR DE LA PHONO ET DES CASSETTES :
1. Branchez la clé USB dans le [PORT USB] (1).
2. Effectuez une lecture normale de la source que vous souhaitez encoder et
enregistrer.
3. Appuyez sur le bouton [RECORD] (5 ou 37) pour lancer l’encodage. « REC
(ENREG.) » clignote sur l’affichage.
4. Une fois que le disque est terminé, appuyez sur le bouton [STOP] (14 ou 41) pour
arrêter l'enregistrement.
ENCODER À PARTIR D’UN CD :
Encoder 1 piste :
1. Branchez la clé USB dans le [PORT USB] (1).
2. Effectuez une lecture normale de la piste que vous souhaitez encoder et enregistrer.
3. Appuyez sur le bouton [RECORD] (5 ou 37) à deux reprises pendant la lecture de
la piste souhaitée.
La lecture s'arrête et redémarre automatiquement. Le texte « USB » clignote en haut de
l’affichage, indiquant que l'encodage a commencé.

51
4. À la fin de la piste, appuyez sur le bouton [STOP] (14 ou 41) pour terminer son
enregistrement.
1. Branchez la clé USB dans le [PORT USB] (1).
2. Effectuez une lecture normale du CD que vous souhaitez encoder et enregistrer.
3. Appuyez sur le bouton [RECORD] (5 ou 37) à deux reprises après que la recherche
de musique initiale a été réalisée.
4. La lecture commence. Le texte « USB » clignote en haut de l’affichage, indiquant
que l'encodage a commencé.
Remarque : Lorsque la conversion est terminée, l'appareil arrête automatiquement
l'enregistrement et la lecture.
SUPPRIMER LES MORCEAUX SUR UNE CLÉ USB
1. Effectuez une lecture normale du morceau que vous souhaitez supprimer.
2. Pendant la lecture du morceau que vous voulez supprimer, appuyez sur le bouton
[DELETE] (33) de la télécommande à deux reprises.
CARACTÉRISTIQUES TECHNIQUES
Alimentation électrique : 230 Vca ~, 50 Hz
Puissance absorbée : 40 Watts (max.)
Puissance musicale : 2 X 4,5 W
Fréquence radio : AM : 525-1640 kHz
FM : 88-108 MHz
Vitesse du tourne-disque : 33/45/78 tr/min
Compatibilité du lecteur CD : CD/CD-R/CD-RW/MP3
Connexion USB pour clé USB (pas de charge) : Fichiers MP3
Enregistrement USB à partir d’un CD, d’une
cassette et d’un disque
: Débit binaire 128 KB/S

52
1. Garantie
Lenco propose un entretien et une garantie conformément à la législation européenne, ce qui signifie qu’en cas de
besoin de réparation (aussi bien pendant et après la période de garantie), vous pouvez contacter votre revendeur le plus
proche.
Remarqueimportante : Il n’estpas possible de renvoyerl’appareil pourréparationdirectement à Lenco.
Remarque importante : Si l’unité est ouverte ou modifiée de quelque manière que ce soit par un réparateur no n agréé
,
la garantieserait caduque.
Cet appareil ne convient pasàuneutilisation professionnelle. En casd’utilisation professionnelle, les obligations de
garantie dufabricantserontannulées.
2. Clause de non responsabilité
Des mises à jour du lo giciel et/ou des composants informatiques sont régulièrement effectuées. Il se peut donc que
certaines instructions, caractéristiques et images présentes dans ce document diffèrent légèrement de votre
configuration spéc
ifique. Tous les articles décrits dans ce guide le sont fournis uniquement à des fins d'illustration et
peuvent ne pas s'appliquer à une configuration spécifique. Aucun droit légal ne peut être obtenu depuis les informations
contenues dans cemanuel.
3. Mise au rebut de l'appareil usagé
Ce symbole indique que l'équipe mentélectriqueconcerné ou la batterie ne doivent pas être jetés
parmi les autresdéchets ménagerse n Europe.Afinde garantir un traiteme nt approprié de l
a batterie
ou de l’appareil usagés, veuillezles mettreau rebutconformément à la règlementationlocaleen
vigueurrelative auxéquipementsélectriqueset autresbatteries.En agissant de lasorte, vous
contribuerez à lapréservation desressourcesnaturelleset à l’amélioration des niveaux de protection
environnementale concernant le traitementet la destructiondes déchetsé lectriques (Directive sur les
déchetsdes équipementsé lectriques et électroniques)
.
4. Marquage CE
Parla prése nte, Lenco Benelux B.V., Thermiekstraat1a, 6361 HB Nuth, Pays-Bas, déclare que ce produitest
conforme aux exigences principales d es directiveseuropéennes.La déclaration de conformité peut être
5. Service
Pourensavoirplus et obtenirdel'assistance, visitezwww.lenco.com
LencoBenelux BV,Thermiekstraat 1a,6361 HB, TheNetherlands.

53
Español
PRECAUCIÓN:
El uso de controles o ajustes o rendimiento de procedimientos excepto aquellos que los aquí especificados
puede provocar una exposición peligrosa a la radiación.
PRECAUCIONES PREVIAS AL USO
TENGA ESTAS INSTRUCCIONES EN MENTE:
1. No cubra o bloquee ninguna apertura de ventilación. Cuando coloque el dispositivo en una estantería
deje 5 cm (2”) de espacio libre alrededor de todo el dispositivo.
2. Instálelo conforme al manual de usuario que se adjunta.
3. Mantenga el aparato alejado de fuentes de calor, como radiadores, calentadores, estufas, velas u otros
productos que generen calor o llama viva. El aparato solo puede usarse en climas moderados. Se deben
evitar los ambientes extremadamente fríos o cálidos. La gama de temperatura de funcionamiento es de
entre 0° y 35°C.
4. Evite usar el dispositivo cerca de campos magnéticos fuertes.
5. Una descarga electrostática puede entorpecer el uso normal de este dispositivo. En tal caso, simplemente
reinícielo siguiendo el manual de instrucciones. Durante la transmisión de archivos, por favor manéjelo con
cuidado opérelo en un entorno libre de electricidad estática.
6. ¡Advertencia! Nunca inserte un objeto en el producto a través de las ventilaciones o aperturas. Alto voltaje
fluye a través del producto e insertar un objeto puede provocar una descarga eléctrica y/o un cortocircuito
de sus componentes internos. Por el mismo motivo, no derrame agua o líquidos en el producto.
7.
No lo utilice en zonas húmedas, como cuartos de baño, cocinas en las que se forme vapor ni cerca de piscinas.
8. El aparato no debe exponerse a goteos o salpicaduras y asegúrese de que se colocan sobre o cerca del
aparato objetos llenos de líquidos, como jarrones.
9. No use este dispositivo cuando se pueda producir condensación. Cuando la unidad se usa en una sala
húmeda cálida, se pueden formar gotitas de agua o condensación en el interior de la unidad y esta puede no
funcionar adecuadamente; deje que la unidad se apague durante 1 o 2 horas antes de volver a encender la
unidad: el aparato debe estar seco antes de conectarse a una fuente de alimentación.
10. Aunque este dispositivo está fabricado con el máximo cuidado y comprobado varias veces antes de salir de
fábrica, todavía es posible que se puedan producir problemas, al igual que con todos los aparatos eléctricos.
Si observa la aparición de humo, una acumulación excesiva de calor o cualquier otro fenómeno inesperado
deberá desconectar inmediatamente el enchufe de la toma de corriente.
11.
Este dispositivo debe funcionar con una fuente de alimentación que se especifica en la etiqueta de especificaciones.
Si no está seguro del tipo de alimentación que se usa en su hogar, consulte con el distribuidor o una
compañía eléctrica local.
12. Manténgalo alejado de los animales. A algunos animales les encanta morder los cables de alimentación.
13. Para limpiar el dispositivo use un paño seco y suave. No utilice líquidos disolventes ni con base de petróleo.
Para eliminar manchas difíciles, puede usar un paño húmedo con detergente diluido.
14.
El proveedor no asume ninguna responsabilidad por daños o datos perdidos provocados por un funcionamiento
incorrecto, uso incorrecto, modificación del dispositivo o sustitución de la batería.
15. No interrumpa la conexión cuando el dispositivo esté formateando o transfiriendo archivos. En caso contrario
los datos se pueden estropear o perder.
16. Si la unidad dispone de función de reproducción USB, se debe conectar la memoria USB directamente en la
unidad. No utilice un cable de extensión USB ya que pueden crear interferencias que causen una pérdida de datos.
17. La etiqueta calificativa se encuentra en la parte inferior o en el panel posterior del aparato.
18.
Este dispositivo no está diseñado para su uso por parte de personas (incluyendo niños) con discapacidad física
sensorial o mental o con falta de experiencia o conocimientos, salvo que se les haya dado supervisión o
instrucciones acerca del uso correcto del dispositivo por parte de una persona responsable de su seguridad.
19. Este producto está diseñado para un uso no profesional únicamente y no para un uso comercial o industrial.
20. Asegúrese de que la unidad esté fijada en una posición estable. La garantía no cubrirá los daños derivados
de usar este producto en una posición inestable, vibraciones o golpes o por no seguir otras advertencias o
precauciones que aparecen en este manual de usuario.
21. Nunca retire la carcasa del dispositivo.
22. Nunca coloque este dispositivo sobre otro equipo eléctrico.
23. Mantenga las bolsas de plástico fuera del alcance de los niños.
24. Use únicamente los dispositivos/accesorios especificados por el fabricante.

54
25. Remita todas las reparaciones al personal cualificado. Es necesario el mantenimiento cuando el aparato
presenta cualquier tipo de daño, por ejemplo, el cable de alimentación o el enchufe presentan daños; se ha
vertido líquido sobre el aparato; se han caído objetos en el aparato; el aparato se ha expuesto a la lluvia o
humedad; el aparato no funciona normalmente o se ha caído.
26. Una larga exposición a sonidos elevados de reproductores de música personales puede provocar una
pérdida de audición temporal o permanente.
27. Si el producto viene con un cable de alimentación o un adaptador de corriente de CA:
● Si se produce cualquier problema, desconecte el cable de alimentación CA y remítalo a mantenimiento por
parte de personal cualificado.
● No pise o pince el adaptador de alimentación. Tenga mucho cuidado, en especial en las zonas alrededor
de las tomas y el punto de salida del cable. No coloque objetos pesados en el adaptador de alimentación
ya que pueden dañarlo. ¡Mantenga el dispositivo fuera del alcance de los niños! Si juegan con el cable de
alimentación, puede sufrir lesiones graves.
● Desconecte el dispositivo durante tormentas eléctricas o cuando no vaya a usarse durante periodos
prolongados de tiempo.
● La salida de la toma debe instalarse cerca del equipo y debe ser fácilmente accesible.
● No sobrecargue las tomas CA o los cables de extensión. La sobrecarga puede provocar un incendio o una
descarga eléctrica.
● Los dispositivos con construcción de Clase 1 deben estar conectados a una toma de corriente con una
conexión a tierra protegida.
● Los dispositivos con construcción de Clase 2 no requieren una conexión a tierra.
● Sujete siempre el enchufe cuando los extraiga de la toma de corriente. No tire del cable de alimentación.
Esto puede provocar un cortocircuito.
● No utilice un cable de alimentación o enchufe deteriorado o una toma suelta. Si lo hace podría provocar
un incendio o una descarga eléctrica.
28. Si el producto contiene o se entrega con un mando a distancia que contiene pilas de botón / celdas:
Advertencia:
● “Ni ingiera la pila, riesgo de quemadura química” o frase equivalente.
● [El mando a distancia que se suministra] Este producto contiene una pila de tipo botón/moneda.
Si la pila se traga, puede provocar graves quemaduras internas en sólo 2 horas y podría ocasionar la muerte.
● Mantenga las pilas nuevas o usadas fuera del alcance de los niños.
● Si el compartimiento de las pilas no se cierra correctamente, deje de usar el producto y no lo deje al alcance
los niños.
● Si tiene la sospecha de que una pila ha sido ingerida o se encuentra en algún lugar del cuerpo, busque
inmediatamente atención médica.
29. Precaución sobre el uso de las pilas:
● Existe riesgo de explosión si la pila no se sustituye correctamente. Sustitúyala únicamente con otra del
mismo tipo u otro equivalente.
● No se pueden exponer las pilas a temperaturas extremadamente altas o bajas, baja presión de aire a gran
altitud durante el uso, almacenamiento o transporte.
● Si cambia la pila por otra que no sea la correcta, se puede producir una explosión o la fuga de líquidos o
gases inflamables.
● Si arroja la pila al fuego o a un horno caliente, o aplasta o cortar mecánicamente una pila podría provocar
una explosión.
● Si deja una pila en un lugar con temperaturas extremadamente altas, se puede producir una explosión o
una fuga de líquido o gas inflamable.
● Si se expone la pila a una presión de aire extremadamente baja, se puede producir una explosión o la fuga
de líquidos o gases inflamables.
● Se debe prestar atención a los aspectos medioambientales sobre la eliminación de baterías.
INSTALACIÓN
● Desembale todas las piezas y retire el material protector.
● No conecte la unidad a la corriente eléctrica antes de comprobar la tensión de la corriente y antes de que
se hayan hecho todas las demás conexiones.

55
DESEMBALAJE Y CONFIGURACIÓN
• Retirecon cuidado la unidad del cartón de muestray retire todo el material de
embalaje de la uni dad .
• Desenrolleel cable de corriente y extiéndalo al máximo.
• Desenrolleel cable de la antena FM y extiéndalo al máximo.
• Coloque la unidad sobreuna superficie establey nivelada, cercade una tomade
corrienteque esté alejada de u n campo m a gnét i co intenso.
• Conecteel en chufea la toma CA.
• Suba la tapa paramostrarel fonógrafo. El fonógrafo h
a sido asegurado para su
transporte mediante un tornillo parael transporte. Use una moneda o un
destornilladorpara girar el tornillo de bloqueo d e transportehacia la derecha
.
Estopermitiráque el tocadiscos “flote”.
Tornillo de bloqueo de transporte
• Quite la cu bierta de plástico blanco opaco d e l a aguja del gramófono deslizándola
en la dirección de la fl echa (consulte la figuraa la derecha).
• Preste atención a la aguja durante esta operación, ya que los daños a la aguja no
está n cubiertos por l a garantía.
• Retire la atadura de alambre que se ha empleado para asegurar el brazo del
tocadiscos duranteel envío.
• Libere la palanca de bloqueo del brazode lectura (consulte la Fig. 1 que aparece a
continuación).
• Conecteel en c
hufea la toma eléctrica CA de 230 V, 50 Hz.
ADVERTENCIA
Producto Láser Clase 1
ADVERTENCIA: Utili zar un reproductor de música personal mientras participa
en el tráfico puede h a cer que el usuario esté menos atento a los peligros
potenciales, como vehículos que se acercan.
ADVERTENCIA: Para evitar posibles daños en la audición, no la escuche a
volúmenes elevados durante largos periodos de tiempo.

56
EN ES
TONE ARM LOCK LEVER PALANCA DE BLOQUEO DEL BRAZO DEL
TOCADISCOS
STYLUS COVER CUBIERTA DE AL AGUJA
Fig.1 Fig.1
INSTALACIÓN DE LA PILA DE LITIO DEL MANDO A DISTANCIA
• El mando a distancia funciona con una pila de litio CR2025 (3 V).
• Sostenga y haga palanca presionando el cierre con el pulgar en la dirección de la
flecha como aparece en la ilustración, y saque el compartimento de la pila
deslizándolo con el dedo índice hacia usted. Saque el compartimento de la pila
del mando a distancia. Instale una pila de litio (CR-2025) con la polaridad positiva
hacia arriba. Sostenga y empuje suavemente el compartimento de la pila dentro
del mando a distancia. Habrá terminado cuando escuche un chasquido.
DELANTERAS

57
LADO IZQUIEDO
21 22
20
PARTE TRASERA
23
24

58
PARTE SUPERIOR
MANDO A DISTANCIA

59
SITUACIÓN DE LOS CONTROLES
1.
PUERTO USB
2.
BOTÓN DE ENCENDIDO/APAGADO
3.
MANDO DE VOLUMEN
4.
BOTÓN FUNCIÓN
5.
BOTÓN GRABAR
6.
PANTALLA LCD
7.
BOTÓN DE FUENTE DE RADIO AM
8.
BOTÓN DE FUENTE DE RADIO FM
9.
BOTÓN DE FUENTE DE CD/USB
10.
BOTÓN DE FUENTE DE CINTA
11.
BOTÓN DE FUENTE DE TELÉFONO
12.
TAPA DEL CD
13.
REPRODUCIR/PAUSA: Pulse para reproducir. Cuando se reproduce, pulse para
detener la reproducción temporalmente y pulse otra vez para reanudar la
reproducción.
14.
DETENER: Pulse cuando quiera terminar la reproducción.
15.
SALTAR -/REBOBINAR: Pulse para ir a la pista anterior, mantenga pulsado para
retroceder rápidamente.
16.
SALTAR +/AVANCE RÁPIDO: Pulse para ir a la siguiente pista, mantenga pulsado
para avanzar rápidamente.
17.
REPRODUCIR/MODO: Pulse varias veces para elegir el modo de reproducción
(REPETIR, ALEATORIO)
18.
BOTÓN ABRIR / CERRAR PUERTA DEL CD
19.
DIAL DE SINTONIZACIÓN
20.
ALTAVOCES
21.
EXPULSAR/AVANCE RÁPIDO DEL CASETE
22.
MECANISMO DEL CASETE
23.
ANTENA DE CABLE
24.
CABLE DE ALIMENTACIÓN
25.
PLATO DEL TOCADISCOS
26.
TORNILLO DE BLOQUEO DE TRANSPORTE
27.
BRAZO
28.
BLOQUEO DEL BRAZO DE LECTURA
29.
PALANCA DE LEVANTAMIENTO
30.
SELECTOR DE VELOCIDAD DE 33/45/78 RPM

60
MANDO A DISTANCIA
31.
-/+ 10 PISTA
32.
BOTÓN PROGRAMA
33.
BOTÓN ELIMINAR
34.
BOTÓN ALEATORIO
35.
Botón REPETIR
36.
BOTÓN ABRIR / CERRAR PUERTA DEL CD
37.
BOTÓN GRABAR
38.
REPRODUCIR/PAUSA
39.
SALTAR +/AVANCE RÁPIDO
40.
SALTAR -/REBOBINAR
41.
DETENER
FUENTES DE ALIMENTACIÓN
INTERRUPTOR DE CA: Puede suministrar energía a su sistema estéreo al conectar el
cable de alimentación de CA (24) a una toma de corriente de pared. Compruebe que el
voltaje nominal de su aparato coincide con el voltaje local.
PARA USAR LA RADIO
1. Pulse el botón de [POWER] (2) para encender la unidad;
2. Seleccione la fuente de audio deseada al pulsar el botón [SOURCE] (7 a 11);
3. (Consulte las instrucciones específicas para cada Fuente en los siguientes
capítulos);
4. Ajuste el volumen con la [PERILLA DE VOLUME] (3) al nivel deseado;
5. Mantenga pulsado el botón de [POWER] (2) para apagar la unidad.
Nota: Cuando no se produce ningún sonido, la unidad se apagará automáticamente
transcurridos 10 minutos.
FUNCIONAMIENTO DE LA RADIO
1. Pulse el botón [AM] o [FM] (7 u 8);
2. Ajuste la frecuencia de radio a su emisora deseada al girar la [PERILLA DE
TUNING] (19).
Nota: Para obtener una mejor recepción, mueva la antena de cable (23).
Para la recepción de MW, las señales se recogen a través de una antena de ferrita integrada.
Es posible que tenga que orientar la unidad para obtener la mejor recepción.
FUNCIONAMIENTO DEL TOCADISCOS
Nota: Cuando use el tocadiscos por primera vez, gire el [TORNILLO DE BLOQUEO DE
TRANSPORTE] (26) hacia la derecha hasta que esté completamente atornillado.

61
1. Pulse el botón [PHONO] (11);
2. Ponga un disco en el tocadiscos. Coloque el adaptador EP sobre el cabezal central
cuando reproduzca discos de 45 rpm;
3. Ajuste el [SELECTOR DE VELOCIDAD] (30) a 33, 45 o 78 rpm según el disco;
4. Suelte la [PINZA DEL BRAZO DE LECTURA] (28) y retire el protector de la aguja;
5. Levante el [BRAZO DE LECTURA] (27) con la [PALANCA DE ELEVACIÓN] (30);
6. Mueva el [BRAZO DE LECTURA] (27) al principio del disco;
7. Baje el [BRAZO DE LECTURA] (27) con la [PALANCA DE ELEVACIÓN] (29);
8. Cuando termine el disco, el [BRAZO DE LECTURA] (27) volverá automáticamente
al soporte y el [PLATO] (25) dejará de girar. Para detenerlo de forma manual,
levante el brazo de lectura y colóquele en el soporte.
NOTA: No gire ni detenga manualmente el tocadiscos. Mover o sacudir el tocadiscos sin
fijar la abrazadera del brazo podría provocar daños en el mismo.
Preparar el TCS-2550 para el transporte.
• Bloquee el [BRAZO DE LECTURA] (27) con el [PINZA DEL BRAZO DE LECTURA] (28);
• Coloque la funda protectora en la aguja (incluso cuando no la utilice);
• Gire el [TORNILLO DE BLOQUEO DE TRANSPORTE] (26) hacia la izquierda hasta
que sienta más resistencia (¡no quite el tornillo del todo!)
FUNCIONAMIENTO DE CD-MP3
1. Pulse el botón [CD/USB] (9);
2. Pulse [OPEN/CLOSE] (18) para abrir la [COMPUERTA DEL CD] (12) y coloque un CD
con la etiqueta hacia arriba en el compartimiento del CD.
3. Cierre la [COMPUERTA DEL CD] (12). Se realiza una búsqueda de música de CD y
empezará la reproducción de forma automática desde la primera pista.

62
PROGRAMACIÓN
Se pueden programar hasta 99 pistas (MP3, 20 en CD) y reproducir en cualquier orden.
1. Detenga la reproducción al pulsar [STOP] (14 o 41);
2. Pulse [PLAY MODE] (17) o [PROGRAM] (32), aparecerá “P01” en la pantalla (6) y
parpadeará;
3. Seleccione la pista deseada con los botones [SKIP-/+] (15/16 o 39/40);
4. Pulse [PLAY MODE] (17) o [PROGRAM] (32) para programar la pista en la memoria
del programa;
5. Repita los pasos 3 y 4 para introducir pistas adicionales en la memoria del
programa.
6. Cuando se hayan programado todas las pistas deseadas, pulse [PLAY] (13 o 38)
para reproducir el disco en el orden que ha programado.
Nota: Pulse [STOP] (14 o 41) dos veces para terminar la reproducción programada.
FUNCIONAMIENTO USB
1. Pulse el botón [CD/USB] (9);
2. Conecte una memoria USB en el [PUERTO USB] (1);
3. Pulse el botón [FUNCTION] (4) para seleccionar el modo USB;
4. La reproducción comenzará automáticamente desde la primera pista.
PROGRAMACIÓN
La operación de PROGRAMACIÓN es la misma que la de un CD-MP3.
Nota:
• Es posible que algunos reproductores de mp3 no puedan reproducirse a través de
la toma USB. Esto no significa que el sistema funcione de forma incorrecta.
• El puerto USB no está diseñado para cargar smartphones u otros dispositivos.
FUNCIONAMIENTO DE LA CINTA
1. Pulse el botón de fuente [TAPE] (10);
2. Introduzca una CINTA de casete en el [MECANISMO DEL CASETE] (22);
3. El sistema iniciará la reproducción de forma automática;

63
• Pulse el botón [AVANZAR/EXPULSAR CINTA] (21) hasta la mitad durante la
reproducción para iniciar el bobinado rápido de la cinta hacia adelante.
• Pulse levemente el botón [AVANZAR/EXPULSAR CINTA] (21) otra vez para
reanudar la reproducción.
• Pulse el botón [AVANZAR/EXPULSAR CINTA] (21) hasta el fondo completamente y
la cinta de casete saldrá expulsada.
CODIFICACIÓN USB DIRECTA Observación:
• La velocidad de grabación es 1:1.
• No se grabará ningún título de canción durante el modo de codificación.
• Para evitar dañar la memoria USB, sáquela solo cuando se apague la radio.
CODIFICAR A PARTIR DE PHONO Y CASETE:
1. Conecte la memoria USB en el [PUERTO USB] (1);
2. Realice la reproducción normal de la fuente que quiere codificar y grabar;
3. Pulse el botón [RECORD] (5 o 37) dos veces para iniciar la codificación.
Parpadeará “REC” en la pantalla;
4. Cuando termine el disco, pulse el botón [STOP] (14 o 41) para detener la
grabación.
FORMATO PARA CODIFICAR CD:
Codificar 1 pista:
1. Conecte la memoria USB en el [PUERTO USB] (1);
2. Realice la reproducción normal de la pista que quiere codificar y grabar;
3. Pulse el botón [RECORD] (5 o 37) dos veces durante la reproducción de la pista
deseada.
La reproducción se detendrá y se reiniciará de forma automática. El texto "USB" en la
parte superior de la pantalla parpadeará, lo que indica que ha empezado la codificación.
4. Al final de la pista, pulse el botón [STOP] (14 o 41) para terminar de grabar la
pista.
1. Conecte la memoria USB en el [PUERTO USB] (1);
2. Realice la reproducción normal del CD que quiere codificar y grabar;
3. Pulse el botón [RECORD] (5 o 37) dos veces cuando se haya completado la
búsqueda de música inicial;
4. Comenzará la reproducción. El texto "USB" en la parte superior de la pantalla
parpadeará, lo que indica que ha empezado la codificación.
Nota: Cuando se complete la conversión, la unidad detendrá la reproducción y la
grabación de forma automática.

64
ELIMINAR PISTAS DEL USB
1. Realice la reproducción normal de la pista que quiere eliminar;
2. Durante la reproducción de la pista que quiere eliminar, pulse dos veces el botón
[DELETE] (33) en el mando a distancia.
ESPECIFICACIONES
Requisitos de alimentación : CA 230 V~, 50 Hz
Consumo de energía : 40 vatios (máx)
Potencia musical : 2 X 4,5 W
Frecuencia de radio : AM: 525-1640 KHz
FM: 88-108 MHz
Velocidad del tocadiscos: : 33/45/78 RPM
Compatibilidad de reproductor de CD : CD/CD-R/CD-RW/MP3
Conexión USB para la memoria (sin cargar) : Archivos MP3
Grabación USB desde CD, cinta y disco. : Bitrate 128 KBPS

65
1. Garantía
Lencoofrece servicio y garantía en cumplimiento conlas leyesdela Unión Europea,lo cual implicaque, en casode que
su productoprecise serreparado (tanto durante comodespués del periododegarantía), deberá contactar directamente
consudistribuidor.
Notaimportante: Noe s posible enviarsus reparaciones directamente a Lenco.
Notaimportante: Si launidad es abiertapor un centrode servicio no oficial,la garantía quedará anulada.
Esteaparatono es ad
ecuado para el uso profesional.En caso de darleun uso profesional, todaslas obligaciones de
garantía delfabricantequedarán anuladas.
2. Exención de responsabilidad
Regularmentese llevan a cabo actualizaciones en el Firmware yen los componentesdel hardware. Poresta razón,
algunas delas instrucciones,especificacionese imágenes incluidas enestedo cumentopueden diferirligeramente
respecto asu situación particular.Todoslos elementosdescritosen esta
guía tienenun objetivodemera ilustración, y
pueden noser de aplicaciónensu situación particular.No se puede obtener ningún derecho ni derecholegal apartir de
la descripciónhecha en este manual.
3. Eliminación del antiguo dispositivo
Estesímbolo indicaqueno deberá deshacerse del producto eléctricoobateríaencuestión junto con
los residuos domésticos, en elámbitode la UE. Para garantizar un tratamientoresidual correcto del
productoysu batería,por favor,
elimíneloscumpliendo conlasleyes locales aplicables sobrerequisitos
parael desechado deequipos eléctricosy baterías.De hacerlo,ayudaráa conservarrecursosnaturales
y mejorar los estándares de protección medioambiental en el tratamiento y eliminación de residuos
eléctricos(Directivasobre laEliminación de EquiposEléctricos yElectrónicos).
4. Marca CE
Porla presente,Lenco Benelux B.V., Thermiekstraat 1a, 6361 HB Nuth, Países Bajos, declaraque esteproducto
cumple con las exigencias esenciale s de la directiva de la UE. La declaración de conformidad puede consultarse
mediante
5. Service (Servicio)
Para obtenermás informacióny soportedel departamentotécnico, porfavor,visite la páginaweb www.lenco.com
Lenco BeneluxBV, Thermiekstraat1a, 6361 HB,Países Bajos.
Documenttranscriptie
Model: TCD-2550 USER MANUAL- Wooden Turntable with USB Encoding, AM/FM radio, CD and cassette player GEBRUIKERSHANDLEIDING - Houten platenspeler met USB-codering, AM/FM-radio, CD en cassettespeler BEDIENUNGSANLEITUNG – Holzplattenspieler mit USB-Kodierung, AM/FM-Radio, CD- und Kassetten-Spieler MODE D’EMPLOI- Tourne-disque en bois avec encodage USB, radio AM/FM, lecteur de CD et de cassette MANUAL DE USUARIO: tocadiscos de madera con codificación USB, radio AM/FM, reproductor de CD y casete Index: English.........................................................................................................................................2 Nederlands............................................................................................................................... 14 Deutsch.....................................................................................................................................27 Français.....................................................................................................................................40 Español..................................................................................................................................... 53 1 CAUTION: Do Usage of controls or adjustments or performance of procedures other than those specified herein may result in hazardous radiation exposure. PRECAUTIONS BEFORE USE KEEP THESE INSTRUCTIONS IN MIND: 1. Do not cover or block any ventilation openings. When placing the device on a shelf, leave 5 cm (2”) free space around the whole device. 2. Install in accordance with the supplied user manual. 3. Keep the device away from heat sources such as radiators, heaters, stoves, candles and other heat-generating products or naked flame. The device can only be used in moderate climates. Extremely cold or warm environments should be avoided. Working temperature between 0° and 35°C. 4. Avoid using the device near strong magnetic fields. 5. Electrostatic discharge can disturb normal usage of this device. If so, simply reset and restart the device following the instruction manual. During file transmission, please handle with care and operate in a static-free environment. 6. Warning! Never insert an object into the product through the vents or openings. High voltage flows through the product and inserting an object can cause electric shock and/or short circuit internal parts. For the same reason, do not spill water or liquid on the product. 7. Do not use in wet or moist areas such as bathrooms, steamy kitchens or near swimming pools. 8. The device shall not be exposed to dripping or splashing and make sure that no objects filled with liquids, such as vases, are placed on or near the apparatus. 9. Do not use this device when condensation may occur. When the unit is used in a warm wet room with damp, water droplets or condensation may occur inside the unit and the unit may not function properly; let the unit stand in power OFF for 1 or 2 hours before turning on the power: the unit should be dry before getting any power. 10. Although this device is manufactured with the utmost care and checked several times before leaving the factory, it is still possible that problems may occur, as with all electrical appliances. If you notice smoke, an excessive build-up of heat or any other unexpected phenomena, you should disconnect the plug from the main power socket immediately. 11. This device must operate on a power source as specified on the specification label. If you are not sure of the type of power supply used in your home, consult your dealer or local power company. 12. Keep away from animals. Some animals enjoy biting on power cords. 13. To clean the device, use a soft dry cloth. Do not use solvents or petrol based fluids. To remove severe stains, you may use a damp cloth with dilute detergent. 14. The supplier is not responsible for damage or lost data caused by malfunction, misuse, modification of the device or battery replacement. 15. Do not interrupt the connection when the device is formatting or transferring files. Otherwise, data may be corrupted or lost. 16. If the unit has USB playback function, the USB memory stick should be plugged into the unit directly. Don’t use an USB extension cable because it can cause interference resulting in failing of data. 17. The rating label has been marked on the bottom or back panel of the device. 18. This device is not intended for use by people (including children) with physical, sensory or mental disabilities, or a lack of experience and knowledge, unless they’re under supervision or have received instructions about the correct use of the device by the person who is responsible for their safety. 19. This product is intended for non professional use only and not for commercial or industrial use. 20. Make sure the unit is adjusted to a stable position. Damage caused by using this product in an unstable position vibrations or shocks or by failure to follow any other warning or precaution contained within this user manual will not be covered by warranty. 21. Never remove the casing of this device. 22. Never place this device on other electrical equipment. 23. Do not allow children access to plastic bags. 24. Only use attachments/accessories specified by the manufacturer. 2 25. Refer all servicing to qualified service personnel. Servicing is required when the device has been damaged in any way, such as the power supply cord or the plug, when liquid has been spilled or objects have fallen into the device, when the device has been exposed to rain or moisture, does not operate normally, or has been dropped. 26. Long exposure to loud sounds from personal music players may lead to temporary or permanent hearing loss. 27. If the product is delivered with power cable or AC power adaptor: ● If any trouble occur, disconnect the AC power cord and refer servicing to qualified personnel. ● Don’t step on or pinch the power adaptor. Be very careful, particularly near the plugs and the cable’s exit point. Do not place heavy items on the power adaptor, which may damage it. Keep the entire device out of children’s reach! When playing with the power cable, they can seriously injure themselves. ● Unplug this device during lightning storms or when unused for a long period. ● The socket outlet must be installed near the equipment and must be easily accessible. ● Do not overload ac outlets or extension cords. Overloading can cause fire or electric shock. ● Devices with class 1 construction should be connected to a main socket outlet with a protective earthed connection. ● Devices with class 2 construction do not require a earthed connection. ● Always hold the plug when pulling it out of the main supply socket. Do not pull the power cord. This can cause a short circuit. ● Do not use a damaged power cord or plug or a loose outlet. Doing so may result in fire or electric shock. 28. If the product contains or is delivered with a remote control containing coin/cell batteries: Warning: ● “Do not ingest battery, Chemical Burn Hazard” or equivalent working. ● [The remote control supplied with] This product contains a coin/button cell battery. If the battery is swallowed it can cause severe internal burns in just 2 hours and can lead to death. ● Keep new and used batteries away from children. ● If the battery compartment does not close securely, stop using the product and keep it away from children. ● If you think batteries might have been swallowed or placed inside any part of the body, seek immediate medical attention. 29. Caution about the use of Batteries: ● Danger of explosion if battery is incorrectly replaced. Replace only with the same or equivalent type. ● Battery cannot be subjected to high or low extreme temperatures, low air pressure at high altitude during use storage or transportation. ● Replacement of a battery with an incorrect type that can result in an explosion or the leakage of flammable liquid or gas. ● Disposal of a battery into fire or a hot oven, or mechanically crushing or cutting of a battery, that can result in an explosion. ● Leaving a battery in an extremely high temperature surrounding environment that can result in an explosion or that leakage of flammable liquid or gas. ● A battery subjected to extremely low air pressure that may result in an explosion or the leakage of flammable liquid or gas. ● Attention should be drawn to the environmental aspects of battery disposal. INSTALLATION ● Unpack all parts and remove protective material. ● Do not connect the unit to the mains before checking the mains voltage and before all other connections have been made. 3 WARNING Class 1 Laser Product WARNING: When participating in the traffic listening to a personal music player can make the listener less aware of potential dangers such as approaching cars. WARNING: To prevent possible hearing damage, do not listen at high volume levels for long periods. UNPACKING AND SET UP • Carefully remove the unit from the display carton and remove all packing material from the unit. • Unwind the AC power cord and extend it to its full length. • Unwind the FM Antenna wire and extend it to its full length. • Place the unit on a stable, level surface, convenient to an AC outlet away from a strong magnetic field. • Connect the plug to your AC outlet. • Raise the lid to expose the phonograph. The phonograph has been secured for shipment with a transit screw. Use a coin or screwdriver to turn the transportation locking screw clockwise. This will allow the turntable to "float". Transportation locking screw • • • • • Remove the opaque white plastic stylus cover from the phonograph stylus by sliding it in the direction of the arrow (refer to the picture on the right side). During this operation pay attention to the stylus, because damage to the stylus is not covered by the guarantee. Remove the twist-tie that was used to secure the tone arm during shipment. Release the tone arm lock lever (see Fig.1 below). Connect the plug to your AC 230V, 50Hz outlet. 4 LITHIUM BATTERY INSTALLATION OF REMOTE CONTROL • The remote control requires one CR2025 (3V) lithium battery. • Hold and lever pressing the clasp with the thumb in the right direction of the arrow in the illustration, and take out the battery compartment by sliding with forefinger in the direction towards you. Take out the battery compartment from the remote control. Install a lithium battery (CR-2025) in the compartment with the positive polarity upturned Level hold and push the battery compartment into the remote control lightly. It’s okay once you hear a click. FRONT LEFT SIDE 21 22 20 5 REAR 23 24 TOP 6 REMOTE CONTROL LOCATION OF CONTROLS 1. USB PORT 2. POWER ON/OFF BUTTON 3. VOLUME KNOB 4. FUNCTION BUTTON 5. RECORD BUTTON 6. LCD DISPLAY 7. AM RADIO SOURCE BUTTON 8. FM RADIO SOURCE BUTTON 9. CD/USB SOURCE BUTTON 10. TAPE SOURCE BUTTON 11. PHONO SOURCE BUTTON 12. CD DOOR 13. PLAY/PAUSE: Press to play. When it plays, press to stop playback temporarily and press again to resume playback. 14. STOP: Press when you want to finish playback. 7 15. SKIP -/REWIND: Press to go to the previous track, press & hold to go back fast. 16. SKIP +/FAST FORWARD: press to go to the next track, press & hold to fast forward. 17. PLAY-MODE: press repeatedly to choose the play-mode (REPEAT, RANDOM) 18. CD DOOR OPEN/CLOSE BUTTON 19. TUNING KNOB 20. SPEAKERS 21. CASSETTE FFD/EJECT 22. CASSETTE MECHANISM 23. ANTENNA WIRE 24. POWER CORD 25. TURNTABLE PLATE 26. TRANSPORTATION LOCK SCREW 27. TONE ARM 28. TONE ARM LOCK 29. LIFT LEVER 30. 33/45/78 RPM SPEEDSELECTOR REMOTE CONTROL 31. -/+ 10 TRACK 32. PROGRAM BUTTON 33. DELETE BUTTON 34. RANDOM BUTTON 35. REPEAT BUTTON 36. CD DOOR OPEN/CLOSE BUTTON 37. RECORD BUTTON 38. PLAY/PAUSE 39. SKIP+/FAST FORWARD 40. SKIP-/REWIND 41. STOP POWER SOURCES AC POWER: You can power your stereo system by plugging the AC power cord (24) into a wall power outlet. Check that the rated voltage of your appliance matches your local voltage. 8 TO USE THE RADIO 1. Press the [POWER] button (2) to turn ON the unit; 2. Select the desired audio source by pressing the [SOURCE] button (7 to 11); 3. (Please see detailed instructions for each Source in the following chapters); 4. Adjust the volume with the [VOLUME KNOB] (3) to the desired level; 5. Press and hold the [POWER] button (2) to turn OFF the unit. Note: When no sound is produced, the unit will switch OFF automat. after 10 minutes. RADIO OPERATION 1. Press the [AM] or [FM] button (7 or 8); 2. Adjust radio frequency to your desired station by turning the [TUNING KNOB] (19). Note: For a better reception FM move the wired antenna (23) around. For MW reception the signals are picked up through a built-in ferrite antenna. You may have to orient the unit to obtain the best reception. TURNTABLE OPERATION Note: When using the turntable for the first time, turn the [TRANSPORTATION LOCK SCREW] (26) clockwise until fully screwed in. 1. Press the [PHONO] button (11); 2. Place a record on the turntable. Place the EP adapter over the central spindle when playing 45 rpm records; 3. Set the [SPEED SELECTOR] (30) to 33, 45 or 78 rpm according to the record; 4. Release the [TONEARM CLAMP] (28), and remove the stylus protector; 5. Lift up the [TONEARM] (27) with the [LIFT LEVER] (30); 6. Move the [TONEARM] (27) to the beginning of the record; 7. Lift down the [TONEARM] (27) with the [LIFT LEVER] (29); 8. When the record is finished the [TONEARM] (27) will automatically return to the rest support and the [PLATE] (25) will stop turning. To stop manually, lift up the tonearm from the record and return it to the rest support. NOTE: Do not turn or stop the turntable manually. Moving or jarring the turntable without securing the tone arm clamp could result in damage to the tone arm. 9 Making the TCS-2550 ready for transportation. • • • Lock the [TONEARM] (27) with the [TONEARM CLAMP] (28); Place the protective cap on the stylus (even when not in use); Turn the [TRANSPORTATION LOCK SCREW] (26) counterclockwise until you feel more resistance (don’t remove the screw completely!) CD-MP3 OPERATION 1. Press the [CD/USB] button (9); 2. Press [OPEN/CLOSE] (18) to open the [CD DOOR] (12) and place a CD with the label side facing up in the CD compartment. 3. Close the [CD DOOR] (12). CD music search is performed and playback will start automatically from the first track. PROGRAMMING Up to 99 tacks (MP3, 20 in CD) can be programmed and play in any order. 1. Stop the playback by pressing [STOP] (14 or 41); 2. Press [PLAY MODE] (17) or [PROGRAM](32), the display (6) will show “P01” and flash; 3. Select desired track by using [SKIP -/+] buttons (15/16 or 39/40); 4. Press [PLAY MODE] (17) or [PROGRAM](32)gain to Program the track into the program memory; 5. Repeat step 3 and 4 to enter additional tracks into the program memory. 6. When all the desired tracks have been programmed, press [PLAY] (13 or 38) to play the disc in the order you have programmed. Note: Press [STOP] (14 or 41) twice to terminate the programmed play. USB OPERATION 1. Press the [CD/USB] button (9); 2. Plug an USB stick into the [USB PORT] (1); 10 3. Press the [FUNCTION] button (4) to select USB mode; 4. Playback will start automatically from the first track. PROGRAMMING The PROGRAMMING operation is the same as that of CD-MP3. Notes: • • Some mp3 player may not be able to play via the usb socket. this is not a malfunctioning of the system. The USB port is not designed for charging smartphones or other devices. TAPE OPERATION 1. Press the [TAPE] source button (10); 2. Insert a cassette TAPE into the [CASSETTE MECHANISM] (22); 3. The system will start playback automatically; • • • Press [TAPE FORWARD/EJECT] button (21) half way during playback to start quick tape winding in forward direction. Slightly press the [TAPE FORWARD/EJECT] button (21) again to resume playback. Press the [TAPE FORWARD/EJECT] button (21) completely inwards and the cassette tape will be ejected. DIRECT USB ENCODING Remark: • • • Recording speed is 1:1. No song title will be recorded during encoding mode. To avoid damage to USB memory, remove it only when the radio is turned off. ENCODE FROM PHONO AND CASSETTE: 1. Plug the USB stick into the [USB PORT] (1); 2. Perform normal playback of the source you want to encode & record; 3. Press the [RECORD] button (5 or 37) twice to start encoding. On the display will flash “REC”; 4. Once the record is finished, press the [STOP] button (14 or 41) to stop recording. ENCODE FORM CD: Encode 1 track: 1. Plug the USB stick into the [USB PORT] (1); 2. Perform normal playback of the track you want to encode & record; 3. Press the [RECORD] button (5 or 37) twice during the playback of the desired track. The playback will stop and restart automatically. The “USB” text on the top of the display 11 will flash, indicating the encoding is started. 4. At the end of the track press the [STOP] button (14 or 41) to finish recording the track. 1. Plug the USB stick into the [USB PORT] (1); 2. Perform normal playback of the CD you want to encode & record; 3. Press the [RECORD] button (5 or 37) twice after the initial music search has been completed; 4. The playback will start. The “USB” text on the top of the display will flash, indicating the encoding is started. Note: When the conversion is completed, the unit will stop playback and recording automatically. DELETE TRACKS FROM USB 1. Perform normal playback of the track you want to delete; 2. During playback of the track you want to delete, press the [DELETE] button (33) on the remote control twice. SPECIFICATIONS Power requirement Power consumption Music Power Radio Frequency : : : : Turntable speed: CD player compatibility USB connection for Memorystick (no charging) USB recording from CD, Tape and Record : : : : 12 AC 230V ~ 50Hz 40 Watt (max) 2 x 4.5W AM: 525-1640 KHz FM: 88-108 MHz 33/45/78 RPM CD/CD-R/CD-RW/MP3 MP3 files Bitrate 128 KBPS 1. Guarantee Lenco offers service and warranty in accordance to European law, which means that in case of repairs (both during and after the warranty period) you should contact your local dealer. Important note: It is not possible to send products that need repairs to Lenco directly. Important note: If this unit is opened or accessed by a non-official service center in any way, the warranty expires. This device is not suitable for professional use. In case of professional use, all warranty obligations of the manufacturer will be voided. 2. Disclaimer Updates to Firmware and/or hardware components are made regularly. Therefore some of the instruction, specifications and pictures in this documentation may differ slightly from your particular situation. All items described in this guide for illustration purposes only and may not apply to particular situation. No legal right or entitlements may be obtained from the description made in this manual. 3. Disposal of the Old Device This symbol indicates that the relevant electrical product or battery should not be disposed of as general household waste in Europe. To ensure the correct waste treatment of the product and battery, please dispose them in accordance to any applicable local laws of requirement for disposal of electrical equipment or batteries. In so doing, you will help to conserve natural resources and improve standards of environmental protection in treatment and disposal of electrical waste (Waste Electrical and Electronic Equipment Directive). 4. CE Marking Hereby, Lenco Benelux B.V., Thermiekstraat 1a, 6361 HB Nuth, The Netherlands, declares that this product is in compliance with the essential EU directive requirements. The declaration of conformity may be consulted via [email protected] 5. Service For more information and helpdesk support, please visit www.lenco.com Lenco Benelux BV, Thermiekstraat 1a, 6361 HB, The Netherlands. 13 Nederlands LET OP: Het gebruik van afstandsbedieningen of aanpassingen of de uitvoering van procedures die niet in dit document zijn gespecificeerd, kan leiden tot gevaarlijke blootstelling aan straling. VOORZORGSMAATREGELEN VOOR GEBRUIK ONTHOUD DE VOLGENDE INSTRUCTIES: 1. Bedek of blokkeer de ventilatieopeningen niet. Wanneer u het apparaat op een schap plaatst, dient u 5 cm (2”) vrije ruimte rondom het gehele apparaat te behouden. 2. Installeer het product volgens de meegeleverde gebruikershandleiding. 3. Houd het apparaat uit de buurt van hittebronnen, zoals radiatoren, verwarmingen, kachels, kaarsen en andere hittegenererende producten of open vuur. Het apparaat kan alleen worden gebruikt in een gematigd klimaat. Extreem koude of warme omgevingen dienen te worden vermeden. Het bedrijfstemperatuurbereik ligt tussen 0 °C en 35 °C. 4. Gebruik dit apparaat niet in de buurt van krachtige magnetische velden. 5. Elektrostatische ontlading kan normaal gebruik van dit apparaat verstoren. U hoeft het apparaat in dit geval slechts te resetten en opnieuw op te starten volgens de gebruikershandleiding. Wees voorzichtig tijdens bestandsoverdracht en gebruik het product in een omgeving zonder statische interferentie. 6. Waarschuwing! Steek nooit een voorwerp via de ventilatie- of andere openingen in het product. Er is hoogspanning in het product aanwezig en als u er een object insteekt, kan dat een elektrische schok veroorzaken en/of kortsluiting in de interne onderdelen. Mors om dezelfde reden geen water of vloeistof op het product. 7. Gebruik het toestel niet in vochtige ruimtes, zoals badkamers, stomende keukens of in de buurt van zwembaden. 8. Het apparaat mag niet worden blootgesteld aan druppels en spetters en zorg ervoor dat er geen met vloeistof gevulde voorwerpen, zoals vazen, op of in de buurt van het apparaat worden geplaatst. 9. Gebruik dit apparaat niet wanneer condensatie kan optreden. Wanneer het apparaat in een warme, natte ruimte wordt gebruikt, kunnen zich waterdruppels of condens vormen in het apparaat en kan het apparaat niet goed functioneren. Laat het apparaat 1 of 2 uur uit staan voordat u het inschakelt: het apparaat dient droog te zijn voordat deze stroom ontvangt. 10. Alhoewel dit apparaat met grote zorg gefabriceerd en verschillende keren geïnspecteerd is voordat het de fabriek verlaat, is het nog steeds mogelijk dat er problemen optreden, zoals met alle elektrische apparaten. Als u rook, een overmatige hitteontwikkeling of enig ander onverwacht verschijnsel opmerkt, moet u onmiddellijk de stekker van het netsnoer uit het stopcontact halen. 11. Dit apparaat moet worden gebruikt met een voedingsbron zoals gespecificeerd op het specificatielabel. Als u twijfelt over het type voeding dat gebruikt wordt in uw huis, raadpleeg dan uw dealer of plaatselijk energiebedrijf. 12. Buiten bereik van dieren houden. Sommige dieren kauwen graag op voedingskabels. 13. Gebruik een zacht, droog doekje om het apparaat te reinigen. Gebruik geen oplosmiddelen of op benzine gebaseerde vloeistoffen. U kunt een vochtig doekje met verdund schoonmaakmiddel gebruiken om hardnekkige vlekken te verwijderen. 14. De leverancier is niet verantwoordelijk voor schade of verloren gegevens veroorzaakt door storing, misbruik modificatie van het apparaat of batterijvervanging. 15. Onderbreek nooit de verbinding wanneer het apparaat formatteert of bestanden overdraagt. De gegevens kunnen anders corrupt of verloren raken. 16. Indien het apparaat een USB-afspeelfunctie heeft, moet de USB-geheugenstick rechtstreeks op het apparaat worden aangesloten. Gebruik geen USB-verlengkabel, omdat die kan leiden tot storingen met foutieve gegevens als gevolg. 17. Het classificatielabel bevindt zich op de onderkant of het achterpaneel van het apparaat. 18. Dit hulpmiddel is niet bedoeld voor gebruik door mensen (inclusief kinderen) met een fysieke, zintuiglijke of mentale handicap, of een gebrek aan ervaring en kennis, tenzij zij toezicht of instructies hebben gekregen over het juiste gebruik van het hulpmiddel door een persoon die verantwoordelijk is voor hun veiligheid. 19. Dit product is alleen voor niet-professioneel gebruik bedoeld en niet voor commercieel of industrieel gebruik. 20. Verzeker u ervan dat het apparaat in een stabiele positie staat opgesteld. Schade die wordt veroorzaakt door het gebruik van dit product in een onstabiele positie, trillingen of schokken of het niet opvolgen van de waarschuwingen of voorzorgsmaatregelen in deze gebruikershandleiding wordt niet gedekt door de garantie. 21. Verwijder nooit de behuizing van dit apparaat. 22. Plaats dit apparaat nooit op andere elektrische apparatuur. 14 23. Geef kinderen geen gelegenheid in aanraking met plastic zakken te komen. 24. Gebruik uitsluitend uitbreidingen/accessoires gespecificeerd door de fabrikant. 25. Laat alle reparaties over aan gekwalificeerd onderhoudspersoneel. Onderhoud is nodig als het apparaat is beschadigd, bijvoorbeeld als de voedingskabel of de stekker is beschadigd, als er vloeistof op het apparaat is gemorst, als er voorwerpen in het apparaat zijn gevallen, als het apparaat is blootgesteld aan regen of vocht als het apparaat niet normaal werkt of als het is gevallen. 26. Langdurige blootstelling aan harde geluiden van persoonlijke muziekspelers kan leiden tot tijdelijk of permanent gehoorverlies. 27. Als het product wordt geleverd met voedingskabel of wisselstroomvoedingsadapter: ● Als er zich problemen voordoen, moet u de voedingskabel loskoppelen en het ter onderhoud aanbieden aan gekwalificeerd personeel. ● Nooit op de voedingsadapter stappen of deze indrukken. Wees zeer voorzichtig, vooral in het gebied rond de stekkers en de kabelaansluitingen. Plaats geen zware voorwerpen op de voedingsadapter om beschadiging ervan te voorkomen. Houd het gehele apparaat buiten bereik van kinderen! Wanneer kinderen met de voedingskabel spelen, kunnen zij ernstig letsel oplopen. ● Haal de stekker uit het stopcontact tijdens onweer of wanneer u deze langere tijd niet gebruikt. ● Het stopcontact moet in de buurt van de apparatuur zijn geïnstalleerd en eenvoudig te bereiken zijn. ● Laat AC-stopcontacten of verlengsnoeren nooit overbelast raken. Overbelasting kan brand of een elektrische schok veroorzaken. ● Apparaten met een Klasse 1 structuur dienen te worden aangesloten op een stopcontact met een beschermende aardverbinding. ● Apparaten met een Klasse 2 structuur vereisen geen aardverbinding. ● Houd altijd de stekker vast wanneer u deze uit het stopcontact trekt. Trek nooit aan de voedingskabel. Dit kan tot een kortsluiting leiden. ● Gebruik nooit een beschadigde voedingskabel of stekker of een los stopcontact. Dit vormt namelijk een risico op brand of elektrische schokken. 28. Indien het product knoopcelbatterijen bevat of wordt geleverd met een afstandsbediening die knoopcelbatterijen bevat: Waarschuwing: ● “Batterij niet inslikken, chemisch brandgevaar” of gelijkwaardige werking. ● De meegeleverde afstandsbediening bevat een knoopcelbatterij. Als de batterij wordt ingeslikt, kan deze in slechts 2 uur ernstige interne brandwonden veroorzaken en tot de dood leiden. ● Houd nieuwe en gebruikte batterijen buiten bereik van kinderen. ● Als de batterijhouder niet goed kan worden gesloten, dient u het product niet meer te gebruiken en buiten bereik van kinderen te houden. ● Als u denkt dat batterijen zijn ingeslikt of binnenin een willekeurig lichaamsdeel terecht zijn gekomen, dient u onmiddellijk medische hulp te zoeken. 29. Waarschuwing m.b.t. het gebruik van batterijen: ● Als de batterij onjuist wordt geplaatst, bestaat er explosiegevaar. Vervang de batterij alleen door een zelfde of vergelijkbare soort batterij. ● Stel de batterij niet bloot aan extreem hoge of lage temperaturen of een lage luchtdruk op grote hoogte tijdens gebruik, opslag of transport. ● Vervanging van een batterij door een incorrect type kan leiden tot een ontploffing of de lekkage van ontvlambare vloeistoffen of gas. ● Het weggooien van een batterij in het vuur of een hete oven, of het mechanisch verpletteren of insnijden van een batterij, kan leiden tot een explosie. ● Het achterlaten van een batterij in een omgeving met extreem hoge temperaturen kan leiden tot een explosie of het lekken van brandbare vloeistof of gas. ● Een batterij die aan een extreem lage luchtdruk wordt blootgesteld, kan leiden tot een explosie of het lekken van brandbare vloeistof of gas. ● Aandacht voor het milieu is nodig bij het verwijderen van de batterijen. INSTALLATIE ● Pak alle onderdelen uit en verwijder de beschermende materialen. ● Sluit het apparaat niet aan op het stopcontact, voordat u de netspanning hebt gecontroleerd en voordat alle andere aansluitingen zijn gemaakt. 15 WAARSCHUWING Klasse 1 Laserproduct WAARSCHUWING: Wanneer u zich op de straat bevindt, kan het gebruik van een persoonlijke muziekspeler de luisteraar afleiden van de potentiële gevaren, zoals naderende auto's. WAARSCHUWING: Luister nooit voor lange tijd op hoge volumeniveaus, om mogelijke gehoorbeschadiging te voorkomen. * Deze instructies zijn enkel van toepassing op producten met een voedingskabel of een AC voedingsadapter. UITPAKKEN EN INSTELLEN • Haal het apparaat voorzichtig uit de verpakking en verwijder alle verpakkingsmaterialen van het apparaat. • Wikkel de voedingskabel volledig uit. • Wikkel de FM-antenne volledig uit. • Plaats het apparaat op een stabiel en vlak oppervlak, in de buurt van een stopcontact en uit de buurt van krachtige magnetische velden. • Steek de stekker in een stopcontact. • Til het deksel op voor toegang tot het draaiplateau. Het draaiplateau zit voor transportveiligheid nog vast met een transportschroef. Gebruik een munt of schroevendraaier om de transportveiligheidsschroef rechtsom te draaien. Het draaiplateau kan vervolgens “zweven”. Transportveiligheidsschroef • Verwijder de ondoorzichtige witte kunststof naaldcover van de naald door deze in de richting van het pijltje te schuiven. • Let hierbij goed op de naald, omdat een beschadigde naald niet door de garantie wordt gedekt. • Verwijder de binder waar de toonarm mee vast is gezet voor transportveiligheid. • Ontgrendel de toonarmvergrendeling (zie Afb. 1 hieronder). • Sluit de stekker aan op een AC 230V, 50Hz stopcontact. 16 EN NL TONE ARM LOCK LEVER VERGRENDELHENDEL VAN TOONARM STYLUS COVER NAALDCOVER Fig.1 Afb. 1 LITHIUMBATTERIJ VAN DE AFSTANDSBEDIENING INSTALLEREN • De afstandsbediening vereist één CR2025 (3V) lithiumbatterij. • Druk het palletje met de duim in de richting van het pijltje in de afbeelding en verwijder de batterijhouder door deze met uw wijsvinger richting uw lichaam uit te schuiven. Haal de batterijhouder uit de afstandsbediening. Plaats een lithiumbatterij (CR-2025) in de houdder met de positieve polariteit omhoog en druk de batterijhouder lichtjes terug in de afstandsbediening. Alles is in orde zodra u een klikje hoort. VOORKANT 17 LINKERKANT 21 22 20 ACHTERKANT 23 24 18 BOVENKANT AFSTANDSBEDIENING 19 PLAATS VAN DE BEDIENINGSORGANEN 1. USB-POORT 2. AAN/UITTOETS 3. VOLUME-KNOP 4. FUNCTIEKNOP 5. OPNAMEKNOP 6. LCD-SCHERM 7. BRONKNOP AM-RADIO 8. BRONKNOP FM-RADIO 9. BRONKNOP CD/USB 10. BRONKNOP CASSETTE 11. BRONKNOP PLATENSPELER 12. KLEPJE VOOR CD 13. AFSPELEN/PAUZE: Indrukken om af te spelen. Druk tijdens het afspelen in om het afspelen tijdelijk te stoppen en druk nogmaals om het afspelen te hervatten. 14. STOP: Indrukken wanneer u het afspelen wilt beëindigen. 15. VORIGE -/TERUGSPOELEN: Indrukken om naar het vorige nummer te gaan, ingedrukt houden om terug te spoelen. 16. VOLGENDE +/VOORUITPOELEN: Indrukken om naar het volgende nummer te gaan, ingedrukt houden om vooruit te spoelen. 17. AFSPELEN-MODUS: Herhaaldelijk indrukken om de afspeelmodus te kiezen (HERHALEN, WILLEKEURIG) 18. TOETS CD-KLEPJE OPENEN/SLUITEN 19. AFSTEMKNOP 20. LUIDSPREKERS 21. CASSETTE VOORUITSPOELEN/UITWERPEN 22. CASSETTEMECHANISME 23. ANTENNEDRAAD 24. NETSNOER 25. DRAAIPLATEAU 26. TRANSPORTVEILIGHEIDSSCHROEF 27. TOONARM 28. TOONARMVERGRENDELING 29. LIFTMECHANISME 30. SNELHEIDSKNOP 33/45/78 TPM AFSTANDSBEDIENING 31. NUMMER -/+ 10 20 32. PROGRAMMATOEST 33. VERWIJDERTOETS 34. TOETS WILLEKEURIG 35. HERHAALTOETS 36. TOETS CD-KLEPJE OPENEN/SLUITEN 37. OPNAMEKNOP 38. AFSPELEN/PAUZE 39. VOLGENDE +/VOORUITSPOELEN 40. VOLGENDE -/TERUGSPOELEN 41. STOP VOEDINGSBRONNEN LICHTNETSTROOM: U kunt uw stereosysteem inschakelen door de stekker van het netsnoer (24) in een stopcontact te steken. Controleer of de nominale spanning van uw apparaat overeenkomt met uw plaatselijke netspanning. DE RADIO GEBRUIKEN 1. Druk op de knop [POWER] (2) om het apparaat AAN te zetten; 2. Selecteer de gewenste audiobron door op de knop [SOURCE] te drukken (7 to 11); 3. (Raadpleeg de gedetailleerde instructies voor elke bron in de volgende hoofdstukken); 4. Pas het volume aan met de [VOLUME-KNOP] (3) tot het gewenste niveau; 5. Houd de knop [POWER] (2) ingedrukt om het apparaat UIT te zetten. Opmerking: Als er geen geluid wordt geproduceerd, schakelt het apparaat na 10 minuten automatisch UIT. RADIOBEDIENING 1. Druk op de knop [AM] of de knop [FM] (7 of 8); 2. Stel de radiofrequentie in op de gewenste zender door aan de [TUNING-KNOP] (19) te draaien. Opmerking: Beweeg de draadantenne (23) voor een betere FM-ontvangst. Voor MG-ontvangst worden de signalen opgepikt door een ingebouwde ferrietantenne. Mogelijk moet u het apparaat richten om de beste ontvangst te krijgen. 21 BEDIENING PLATENSPELER Opmerking: Wanneer u de platenspeler voor de eerste keer gebruikt, draait u de [TRANSPORTVEILIGHEIDSSCHROEF] (26) rechtsom totdat deze volledig is ingeschroefd. 1. Druk op de knop [PHONO] (11); 2. Plaats een plaat op het draaiplateau. Plaats de EP-adapter op de middenas voor het afspelen van 45-toerenplaten; 3. Zet de [SNELHEIDSKNOP] (30) op 33, 45 of 78 tpm overeenkomstig de plaat; 4. Maak de [TOONARM-KLEM] (28) los, en verwijder de naaldbeschermer; 5. Til de [TOONARM] (27) op met het [LIFTMECHANISME] (30); 6. Beweeg de [TOONARM] (27) naar het begin van de plaat; 7. Laat de [TOONARM] (27) zakken met het [LIFTMECHANISME] (29); 8. Wanneer de plaat klaar is, zal de [TOONARM] (27) automatisch terugkeren naar de armsteun en stopt het [PLATEAU] (25) met draaien. Om handmatig te stoppen, tilt u de toonarm van de plaat en brengt u deze terug naar de armsteun. OPMERKING: Probeer de platenspeler niet handmatig te draaien of stoppen. De platenspeler bewegen of schudden zonder de toonarmvergrendeling vast te zetten zal tot beschadiging van de toonarm leiden. De TCS-2550 gereedmaken voor transport. • • • Vergrendel de [TOONARM] (27) met de [TOONARM-KLEM] (28); Plaats het beschermkapje op de naald (zelfs wanneer niet in gebruik); Draai de [TRANSPORTVEILIGHEIDSSCHROEF] (26) linksom totdat u meer weerstand voelt (verwijder de schroef niet volledig!) 22 BEDIENING CD-MP3 1. Druk op de knop [CD/USB] (9); 2. Druk op [OPEN/CLOSE] (18) om het [CD-KLEPJE] (12) te openen en plaats een CD met de bedrukte zijde naar boven gericht in de CD-houder. 3. Sluit het [CD-KLEPJE] (12). Het zoeken naar muziek op de CD wordt uitgevoerd en het afspelen zal automatisch starten vanaf het eerste nummer. PROGRAMMEREN Maximaal 99 nummers (MP3, 20 in CD) kunnen worden geprogrammeerd en in willekeurige volgorde worden afgespeeld. 1. Stop het afspelen door [STOP] (14 of 41) in te drukken; 2. Druk op [PLAY MODE] (17) of [PROGRAM] (32), en het display (6) zal "P01" tonen en knipperen; 3. Selecteer het gewenste nummer met de knoppen [SKIP -/+] (15/16 of 39/40); 4. Druk nogmaals op [PLAY MODE] (17) of [PROGRAM] (32) om het nummer in het programmageheugen te programmeren; 5. Herhaal stap 3 en 4 om extra nummers in het programmageheugen in te voeren. 6. Wanneer alle gewenste nummers zijn geprogrammeerd, drukt u op [PLAY] (13 of 38) om de schijf in de geprogrammeerde volgorde af te spelen. Opmerking: Druk tweemaal op [STOP] (14 of 41) om het geprogrammeerd afspelen te beëindigen. BEDIENING USB 1. Druk op de knop [CD/USB] (9); 2. Steek een USB-stick in de [USB-POORT] (1); 3. Druk op de knop [FUNCTION] (4) om de USB-modus te selecteren; 4. Het afspelen wordt automatisch gestart vanaf het eerste nummer. PROGRAMMEREN De bediening PROGRAMMERING is hetzelfde als die van CD-MP3. Opmerkingen: • Sommige mp3-spelers kunnen mogelijk niet via de USB-aansluiting afspelen. Dit is geen storing van het systeem. 23 • De USB-poort is niet ontworpen voor het opladen van smartphones of andere apparaten. BEDIENING CASSETTE 1. Druk op de bronknop [TAPE] (10); 2. Plaats een CASSETTE in het [CASSETTEMECHANISME] (22); 3. Het systeem zal automatisch beginnen met afspelen; • • • Druk tijdens het afspelen de knop [CASSETTE VOORUITSPOELEN/UITWERPEN] (21) half in om de cassette vooruit te spoelen. Druk nogmaals lichtjes op de knop [CASSETTE VOORUITSPOELEN/UITWERPEN] (21) om het afspelen te hervatten. Druk de knop [CASSETTE VOORUITSPOELEN/UITWERPEN] (21) volledig in en de cassette zal worden uitgeworpen. Opmerking DIRECTE USB-CODERING: • • • De opnamesnelheid is 1:1. Er wordt geen songtitel opgenomen tijdens de coderingsmodus. Verwijder de USB alleen wanneer de radio is uitgeschakeld om schade aan het USB-geheugen te voorkomen. CODEREN VAN PLATENSPELER EN CASSETTE: 1. Steek de USB-stick in de [USB-POORT] (1); 2. Voer normaal afspelen uit van de bron die u wilt coderen en opnemen; 3. Druk tweemaal op de knop [RECORD] (5 of 37) om het coderen te starten. Op het scherm zal “REC” knipperen; 4. Als het opnemen klaar is, drukt u op de knop [STOP] (14 of 41) om het opnemen te stoppen. CODEREN VAN CD: 1 nummer coderen: 1. Steek de USB-stick in de [USB-POORT] (1); 2. Voer normaal afspelen uit van het nummer dat u wilt coderen en opnemen; 3. Druk tweemaal op de knop [RECORD] (5 of 37) tijdens het afspelen van het gewenste nummer. Het afspelen zal stoppen en automatisch opnieuw starten. Aan de bovenkant van het display zal de tekst “USB” knipperen, waarmee wordt aangegeven dat het coderen is gestart. 4. Druk aan het einde van het nummer op de knop [STOP] (14 of 41) om het opnemen van het nummer te beëindigen. 24 1. Steek de USB-stick in de [USB-POORT] (1); 2. Voer normaal afspelen uit van de CD die u wilt coderen en opnemen; 3. Druk tweemaal op de knop [RECORD] (5 of 37) nadat het zoeken naar muziek is voltooid; 4. Het afspelen zal beginnen. Aan de bovenkant van het display zal de tekst “USB” knipperen, waarmee wordt aangegeven dat het coderen is gestart. Opmerking: Het apparaat zal automatisch stoppen met afspelen en opnemen wanneer het omzetten is voltooid. NUMMERS VAN USB WISSEN 1. Voer normaal afspelen uit van het nummer dat u wilt wissen; 2. Druk tijdens het afspelen van het nummer dat u wilt wissen tweemaal op de knop [DELETE] (33) op de afstandsbediening. SPECIFICATIES Vermogensbehoefte Energieverbruik Muziekvermogen Radiofrequentie : : : : Snelheid van platenspeler: Compatibiliteit CD-speler USB-aansluiting voor USB-stick (niet opladen) USB-opname vanaf CD, cassette en plaat : : : : 25 AC 230 V~, 50 Hz 40 watt (max) 2 X 4,5W AM: 525-1640 KHz FM: 88-108 MHz 33/45/78 TPM CD/CD-R/CD-RW/MP3 MP3-bestanden Bitsnelheid 128 kbps 1. Garan�e Lenco biedt service en garantie aan overeenkomstig met de Europese wetgeving. Dit houdt in dat u, in het geval van reparaties (zowel tijdens als na de garantieperiode), uw lokale handelaar moet contacteren. Belangrijke opmerking: Het is niet mogelijk om producten die gerepareerd moeten worden direct naar Lenco te sturen. Belangrijke opmerking: De garantie verloopt als een onofficieel servicecenter het apparaat op wat voor manier dan ook heeft geopend, of er toegang toe heeft gekregen. Het apparaat is niet geschikt voor professioneel gebruik. In het geval van professioneel gebruik worden alle garantieverplichtingen van de fabrikant nietig verklaard. 2. Disclaimer Er worden regelmatig updates in de firmware en/of hardwarecomponenten gemaakt. Daardoor kunnen gedeelten van de instructie, de specificaties en afbeeldingen in deze documentatie enigszins verschillen van uw eigen situatie. Alle onderwerpen die staan beschreven in deze handleiding zijn bedoeld als illustratie en zijn niet van toepassing op specifieke situaties. Aan de beschrijving in dit document kunnen geen rechten worden ontleend. 3. Afvoer van het oude apparaat Dit symbool geeft aan dat het betreffende elektrische product of de batterij niet moet worden verwijderd als algemeen huishoudelijk afval in Europa. Zorg voor een juiste afvalverwerking door het product en de batterij in overeenstemming met alle van toepassing zijnde lokale wetten voor het verwijderen van elektrische apparatuur of batterijen te verwijderen. Als u dit doet, helpt u de natuurlijke hulpbronnen te behouden en de standaard van milieubescherming te verbeteren bij de behandeling en verwijdering van elektrisch afval (Afgedankte Elektrische en Elektronische Apparatuur). 4. CE-markering Lenco Benelux B.V., Thermiekstraat 1a, 6361 HB Nuth, Nederland, verklaart hierbij dat dit product voldoet aan de vereisten van de essentiële EU-richtlijnen. De conformiteitsverklaring kan worden opgevraagd via [email protected] 5. Service Bezoek voor meer informatie en helpdeskondersteuning www.lenco.com Lenco Benelux BV, Thermiekstraat 1a, 6361 HB, Nederland. 26 Deutsch ACHTUNG: Eine andere als die hier beschriebene Bedienung, Einstellung oder Verwendung der Funktionen kann zu gefährlicher Strahlenbelastung führen. VORSICHTSMASSNAHMEN VOR DER BENUTZUNG BEFOLGEN SIE IMMER FOLGENDE ANWEISUNGEN: 1. Blockieren oder bedecken Sie keine Lüftungsöffnungen. Wenn Sie das Gerät auf ein Regal stellen lassen Sie um das gesamte Gerät 5 cm (2”) freien Platz. 2. Stellen Sie das Gerät entsprechend den Anweisungen der mitgelieferten Bedienungsanleitung auf. 3. Halten Sie das Gerät von Hitzequellen wie Radiatoren, Heizern, Öfen, Kerzen oder anderen hitzeerzeugenden Produkten oder offenen Flammen fern. Das Gerät darf nur bei gemäßigtem Klima verwendet werden. Sehr kalte oder heiße Umgebungen sind zu vermeiden. Der Betriebstemperaturbereich liegt zwischen 0 °C und 35 °C. 4. Meiden Sie bei der Nutzung des Produkts die Nähe starker Magnetfelder. 5. Elektrostatische Entladungen können die normale Verwendung von diesem Gerät stören. Sollte dies geschehen führen Sie einfach einen Reset aus und starten Sie dann das Gerät entsprechend den Anweisungen dieser Bedienungsanleitung neu. Gehen Sie besonders bei Datenübertragungen mit dem Gerät vorsichtig um und führen Sie diese nur in einer antielektrostatischen Umgebung aus. 6. Warnung! Niemals Gegenstände durch die Lüftungsschlitze oder Öffnungen in das Gerät stecken. In diesem Gerät fließt Hochspannung und das Hineinstecken von Gegenständen kann zu elektrischem Schock und/oder Kurzschluss interner elektrischer Bauteile führen. Aus dem gleichen Grund kein Wasser oder Flüssigkeiten in das Gerät geben. 7. Benutzen Sie das Gerät nicht in nasser oder feuchter Umgebung wie Bad, Dampfküche oder in der Nähe von Schwimmbecken. 8. Das Gerät darf weder Tropf- noch Spritzwasser ausgesetzt werden und es dürfen keine mit Flüssigkeit gefüllten Behälter wie z.B. Vasen auf das Gerät oder in der Nähe des Gerätes gestellt werden. 9. Benutzen Sie das Gerät nicht bei Kondensationsgefahr. Wenn Sie das Gerät in einem warmen feuchten Raum benutzen, dann können sich im Inneren des Geräts Wassertropfen oder Kondensationen bilden und zu Fehlfunktionen des Geräts führen. Schalten Sie in diesem Fall das Gerät für 1 – 2 Stunden aus, bevor Sie es erneut einschalten: Das Gerät sollte vollständig getrocknet sein, wenn Sie es wieder einschalten. 10. Obwohl dieses Gerät unter größter Sorgfalt und vor Auslieferung mehrmals überprüft wurde, können trotzdem wie bei jedem anderen elektrischen Gerät auch Probleme auftauchen. Trennen Sie das Gerät im Falle einer Rauchentwicklung, starker Hitzeentwicklung oder jeden anderen unnatürlichen Erscheinung sofort vom Netz. 11. Dieses Gerät ist durch eine Stromquelle wie auf dem Typenschild angegeben zu betreiben. Halten Sie bei Unsicherheiten über die Art Ihrer Stromversorgung in Ihrer Wohnung Rücksprache mit Ihrem Händler oder Ihrer Stromzuliefererfirma. 12. Halten Sie es von Haustieren fern. Einige Nagetiere lieben es, an Netzkabeln zu nagen. 13. Benutzen Sie für die Reinigung ein weiches und trockenes Tuch. Benutzen Sie niemals Lösungsmittel oder Flüssigkeiten auf Ölbasis. Benutzen Sie zum Entfernen hartnäckiger Flecken ein feuchtes Tuch mit mildem Reinigungsmittel. 14. Der Hersteller haftet nicht für Schäden oder Verluste durch Fehlfunktion, Zweckentfremdung oder Modifikation des Geräts oder durch Wechseln der Batterien. 15. Unterbrechen Sie die Verbindung nicht während einer Formatierung oder einer Datenübertragung. Bei Unterbrechung drohen Datenverlust und Datenbeschädigung. 16. Wenn das Gerät eine USB-Wiedergabefunktion besitzt, dann stecken Sie den USB-Stick direkt in das Gerät. Verwenden Sie kein USB-Verlängerungskabel, weil die erhöhte Störungsanfälligkeit zu Datenverlust führen könnte. 17. Das Typenschild befindet sich an der Unter- oder Rückseite des Geräts. 18. Dieses Gerät ist nicht zur Benutzung durch Personen (einschließlich Kinder) mit physischen, sensorischen oder mentalen Beeinträchtigungen oder ohne ausreichender Erfahrung vorgesehen, es sei denn, sie werden durch eine verantwortliche Person beaufsichtigt oder wurden in die ordnungsgemäße Bedienung des Gerätes durch eine für ihre Sicherheit verantwortliche Person eingewiesen. 19. Dieses Produkt ist nur für den nicht-professionellen Gebrauch und nicht für gewerbliche oder industrielle Zwecke bestimmt. 20. Stellen Sie sicher, dass das Gerät in einer stabilen Position aufgestellt ist. Schäden aufgrund Verwendung dieses Produkts in einer instabilen Position, Vibrationen, Stöße oder Nichtbeachtung der anderen in dieser Bedienungsanleitung enthaltenen Warnungen und Sicherheitshinweise werden nicht durch die Garantie abgedeckt. 21. Entfernen Sie niemals das Gehäuse dieses Produkts. 27 22. Stellen Sie das Produkt niemals auf andere elektrische Geräte. 23. Halten Sie Kinder von den Plastiktüten fern. 24. Benutzen Sie nur vom Hersteller spezifizierte Erweiterungen/Zubehörteile. 25. Lassen Sie alle Eingriffe von qualifiziertem Servicepersonal ausführen. Eingriffe werden notwendig wenn das Gerät auf irgendeine Weise wie beispielsweise am Netzkabel oder am Netzstecker beschädigt wurde Flüssigkeit in das Gerät eingedrungen ist, Gegenstände in das Gerät gefallen sind, das Gerät Regen oder Feuchtigkeit ausgesetzt war, es heruntergefallen ist oder nicht ordnungsgemäß funktioniert. 26. Langes Hören lauter Töne aus einem Musikgerät kann zum zeitweiligen oder permanenten Hörverlust führen. 27. Wenn zum Lieferumfang des Produkts ein Netzkabel oder ein Netzadapter gehört: ● Wenn irgendwelche Probleme auftreten, dann ziehen Sie den Netzstecker aus der Netzsteckdose und setzen Sie sich anschließend mit einer qualifizierten Fachkraft in Verbindung. ● Treten Sie nicht auf das Netzteil und klemmen Sie es auch nicht ein. Geben Sie besonders im näheren Bereich des Steckers und der Stelle acht, wo das Kabel aus dem Gerät herausgeführt wird. Stellen Sie keine schweren Gegenstände auf das Netzteil, weil es dadurch beschädigt werden könnte. Halten Sie das gesamte Gerät außerhalb der Reichweite von Kindern! Durch Spielen mit dem Netzkabel können sie sich ernsthafte Verletzungen zuziehen. ● Trennen Sie das Gerät während eines Gewitters oder bei längerer Nichtbenutzung vom Netz. ● Die Wandsteckdose muss sich in der Nähe des Geräts befinden und einfach zu erreichen sein. ● Steckdosen und Verlängerungsleitungen nicht überlasten. Eine Überlastung kann zu Brandgefahr bzw. Stromschlag führen. ● Geräte der Schutzklasse 1 sind an eine Netzsteckdose mit Schutzleiter anzuschließen. ● Geräte der Schutzklasse 2 benötigen keinen Schutzleiteranschluss. ● Halten Sie den Netzstecker in der Hand, wenn Sie ihn aus der Netzsteckdose ziehen. Ziehen Sie ihn nicht durch Zerren am Kabel heraus. Das kann zu einem Kurzschluss führen. ● Verwenden Sie weder ein beschädigtes Netzkabel noch einen beschädigten Stecker oder eine lockere Steckdose. Es besteht Brand- und Stromschlaggefahr. 28.Wenn das Produkt mit einer Fernbedienung mit Batterien/Knopfzellen geliefert wird oder das Produkt eine derartige Fernbedienung umfasst: Warnung: ● „Die Batterie nicht einnehmen, er besteht Verätzungsgefahr”. ● [Die mit diesem Produkt mitgelieferte Fernbedienung] enthält eine Knopfbatterie. Das Verschlucken der Batterie kann innerhalb von nur 2 Stunden zu schwersten inneren Verbrennungen mit Todesfolge führen. ● Halten Sie neue und gebrauchte Batterien von Kindern fern. ● Verwenden Sie dieses Produkt nicht weiter und halten Sie es von Kindern fern, wenn das Batteriefach nicht sicher schließt. ● Suchen Sie umgehend ärztliche Hilfe auf, wenn Sie vermuten, dass Batterien verschluckt oder in Körperöffnungen eingeführt wurden. 29.Warnhinweise bzgl. der Verwendung von Batterien: ● Es besteht Explosionsgefahr, wenn die Batterien nicht korrekt eingelegt werden. Nur mit Batterien des gleichen oder entsprechenden Typs ersetzen. ● Die Batterie darf während der Benutzung, Aufbewahrung oder des Transports weder sehr hohen oder sehr niedrigen Temperaturen noch niedrigem Luftdruck in großen Höhenlagen ausgesetzt werden. ● Die Ersetzung der Batterie mit einem falschen Batterietyp kann zum Explodieren der Batterie oder dem Auslaufen von entflammbarem Gas oder entflammbarer Flüssigkeit aus der Batterie führen. ● Die Entsorgung der Batterie in Feuer oder einem heißen Ofen oder das mechanische Zerkleinern oder Zerteilen der Batterie kann zu Explosionen führen. ● Das Verbleiben der Batterie in einer Umgebung mit sehr hohen Temperaturen kann zum Explodieren der Batterie oder dem Auslaufen von entflammbarem Gas oder entflammbarer Flüssigkeit führen. ● Eine einem sehr niedrigen Luftdruck ausgesetzte Batterie kann explodieren oder es kann aus einer einem sehr niedrigen Luftdruck ausgesetzten Batterie entflammbares Gas oder entflammbare Flüssigkeit auslaufen. ● Augenmerk ist auf den ökologischen Aspekt der Batterieentsorgung zu legen. ANSCHLUSS ● Packen Sie alle Teile aus und entfernen Sie danach die Schutzmaterialien. ● Schließen Sie das Gerät nicht eher an das Netz an, bevor Sie die Netzspannung überprüft haben und alle anderen notwendigen Verbindungen hergestellt sind. 28 WARNUNG Laserprodukt der Klasse 1 WARNUNG: Bei der Teilnahme am Straßenverkehr kann das Hören von Musik über ein Musikgerät von möglichen Gefahren, wie sich annähernden Fahrzeugen, ablenken. WARNUNG: Hören Sie nicht für längere Zeit mit einem hohen Lautstärkepegel, um dauerhaften Hörschäden vorzubeugen. * Diese Anleitungen gelten nur für Produkte, die ein Netzkabel oder ein AC-Netzteil verwenden. AUSPACKEN UND AUFSTELLEN • Nehmen Sie das Gerät vorsichtig aus der Verpackung und entfernen Sie anschließend jegliches Verpackungsmaterial vom Gerät. • Wickeln Sie das Netzkabel auf seine volle Länge ab. • Wickeln Sie das Kabel der FM-Antenne auf seine volle Länge ab. • Stellen Sie das Gerät auf eine geeignete, ebene Oberfläche; am besten in Nähe einer Netzsteckdose fern von starken Magnetfeldern. • Stecken Sie den Netzstecker in eine Netzsteckdose. • Öffnen Sie den Deckel des Plattenspielers. Der Plattenspieler wurde für den Transport mit einer Transportsicherung gesichert. Drehen Sie diese Transportsicherungsschraube mit Hilfe einer Münze oder eines Schraubendrehers in Uhrzeigersinn. Danach kann sich der Plattenteller drehen. Transportsicherungsschraube • • • • • Nehmen Sie den undurchsichtigen, weißen Plastikschutz der Tonnadel ab, indem Sie diesen Schutz in Richtung des Pfeiles schieben (siehe Abbildung rechts). Achten Sie dabei besonders auf die Tonnadel, weil Beschädigungen der Tonnadel nicht durch die Garantie abgedeckt werden. Entfernen Sie alle Plastikbänder, die zur Sicherung des Tonarms während des Transports befestigt wurden. Entriegeln Sie den Tonarmsicherungshebel (siehe nachstehende Abb. 1). Stecken Sie den Stecker in eine Netzsteckdose mit 230 V AC/50 Hz. 29 EN DE TONE ARM LOCK LEVER TONARMSICHERUNGSHEBEL STYLUS COVER TONNADELABDECKUNG Fig.1 Abb. 1 EINLEGEN DER LITHIUM-BATTERIE DER FERNBEDIENUNG • Die Fernbedienung wird über eine Lithium-Batterie vom Typ CR2025 (3 V) betrieben. • Halten Sie die Zunge und drücken Sie sie mit dem Daumen in die Richtung wie auf der Abbildung gezeigt. Schieben Sie anschließend das Batteriefach mit dem Zeigefinger in Ihre Richtung. Nehmen Sie nun das Batteriefach aus der Fernbedienung heraus. Legen Sie eine Lithium-Batterie (CR-2025) mit dem positiven Pol nach oben zeigend im Batteriefach ein und schieben Sie das Batteriefach mit leichtem Druck wieder in die Fernbedienung. Es ertönt ein Klick, wenn es ordnungsgemäß einrastet. 30 VORDERSEITE LINKE SEITE 21 22 20 RÜCKSEITE 23 24 31 OBERSEITE FERNBEDIENUNG 32 BEDIENELEMENTE 1. USB-PORT 2. TASTE EIN/AUS 3. LAUTSTÄRKEREGLER 4. FUNKTIONSTASTE 5. AUFZEICHNUNGSTASTE 6. LCD-ANZEIGE 7. WAHLTASTE KLANGQUELLE AM-RADIO 8. WAHLTASTE KLANGQUELLE FM-RADIO 9. WAHLTASTE KLANGQUELLE CD/USB 10. WAHLTASTE KLANGQUELLE KASSETTE 11. WAHLTASTE KLANGQUELLE PHONO 12. CD-FACH 13. WIEDERGABE/PAUSE: Für die Wiedergabe drücken. Während der Wiedergabe für eine zeitweilige Wiedergabeunterbrechung drücken. Erneutes Drücken setzt die Wiedergabe fort. 14. STOPP: Drücken, wenn Sie die Wiedergabe beenden möchten. 15. ZURÜCKSPRINGEN/SCHNELLES ZURÜCKSPULEN: Drücken, um zum vorherigen Titel zu springen und gedrückt halten, um schnell zurückzuspulen. 16. VORSPRINGEN/SCHNELLES VORSPULEN: Drücken, um zum nächsten Titel zu springen und gedrückt halten, um schnell vorzuspulen. 17. WIEDERGABEMODUS: Für die Auswahl des Wiedergabemodus (WIEDERHOLUNG, ZUFALL) mehrmals drücken. 18. TASTE CD-FACH ÖFFNEN/SCHLIESSEN 19. ABSTIMMREGLER 20. LAUTSPRECHER 21. KASSETTE SCHNELL VORSPULEN/AUSWERFEN 22. KASSETTENFACH 23. ANTENNENDRAHT 24. NETZKABEL 25. PLATTENTELLER 26. TRANSPORTSICHERUNGSSCHRAUBE 27. TONARM 28. TONARMARRETIERUNG 29. TONARMLIFTHEBEL 30. GESCHWINDIGKEITSWÄHLER 33/45/78 U/MIN 33 FERNBEDIENUNG 31. ±10 TITEL 32. PROGRAMM-TASTE 33. LÖSCHTASTE 34. ZUFALLSWIEDERGABETASTE 35. WIEDERHOLTASTE 36. TASTE CD-FACH ÖFFNEN/SCHLIESSEN 37. AUFZEICHNUNGSTASTE 38. WIEDERGABE/PAUSE 39. VORSPRINGEN/SCHNELLES VORSPULEN 40. ZURÜCKSPRINGEN/SCHNELLES ZURÜCKSPULEN 41. STOPP STROMQUELLEN AC-STROMVERSORGUNG: Sie können Ihr Stereosystem mit Strom versorgen, indem Sie den Netzstecker (24) in eine Netzsteckdose stecken. Überprüfen Sie, ob die Nennspannung Ihres Stereosystems mit der Spannung bei Ihnen vor Ort übereinstimmt. UM DAS RADIO ZU VERWENDEN 1. Drücken Sie die Taste [POWER] (2), um das Gerät einzuschalten; 2. Wählen Sie die gewünschte Audioquelle aus, indem Sie die entsprechende Wahltaste für die [SOURCE] (7 – 11) drücken; 3. (schlagen Sie bitte für detaillierte Informationen zu den einzelnen Klangquellen unter dem nachfolgendem Kapitel nach); 4. Stellen Sie den gewünschten Lautstärkepegel mit Hilfe des Drehreglers [VOLUME] (3) ein; 5. Halten Sie die Taste [POWER] (2) gedrückt, um das Gerät auszuschalten. Hinweis: Wenn keine Wiedergabe erfolgt, dann schaltet sich das Gerät nach 10 Minuten automatisch aus. BEDIENUNG DES RADIOS 1. Drücken Sie die Taste [AM] oder [FM] (7 oder 8); 2. Stellen Sie die Radiofrequenz Ihres gewünschten Radiosenders ein, indem Sie den Drehregler [TUNING] (19) drehen. Hinweis: Richten Sie die Drahtantenne (23) für einen besseren FM-Empfang aus. Für den MW-Empfang werden die Signale über eine eingebaute Ferrit-Antenne empfangen. In diesem Fall können Sie u.U. durch Ausrichtung des Geräts den Empfang verbessern. 34 PLATTENSPIELERBEDIENUNG Hinweis: Wenn Sie den Plattenspieler das erste Mal verwenden, dann drehen Sie die [TRANSPORTSICHERUNGSSCHRAUBE] (26) solange in Uhrzeigersinn, bis sie vollständig hineingedreht ist. 1. Drücken Sie die Taste [PHONO] (11); 2. Legen Sie eine Schallplatte auf den Plattenteller. Wenn Sie eine Single wiedergeben möchten, dann stecken Sie den Single-Adapter auf die Plattentellerspindel; 3. Stellen Sie den [GESCHWINDIGKEITSWÄHLER] (30) je nach Schallplattentyp auf 33, 45 oder 78 U/min. 4. Entriegeln Sie die [TONARMARRETIERUNG] (28) und nehmen Sie die Tonabnehmernadelschutzkappe ab; 5. Heben Sie den [TONARM] (27) mit Hilfe des [TONARMLIFTHEBELS] (30) an; 6. Bewegen Sie den [TONARM] (27) zum Anfang der Schallplatte; 7. Setzen Sie den [TONARM] (27) mit Hilfe des [TONARMLIFTHEBELS] (29) auf der Schallplatte ab; 8. Wenn das Ende der Schallplatte erreicht ist, dann kehrt der [TONARM] (27) automatisch zur Tonarmauflage zurück und die [PLATTE] (25) stoppt ihre Drehung. Heben Sie den Tonarm von der Schallplatte und bewegen Sie ihn anschließend zurück zur Tonarmauflage, um die Wiedergabe manuell zu beenden. HINWEIS: Drehen oder stoppen Sie den Plattenteller nicht mit der Hand. Wenn der Plattenspieler bewegt oder geschüttelt wird, ohne dass der Tonarm in der Tonarmaufnahme durch die Tonarmarretierung gesichert wurde, dann kann dies zur Beschädigung des Tonarms führen. Den TCS-2550 transportbereit machen. • • • Sichern Sie den [TONARM] (27) mit der [TONARMARRETIERUNG] (28); Setzen Sie die Schutzkappe auf die Tonabnehmernadel (selbst dann, wenn nicht in Benutzung); Drehen Sie die [TRANSPORTSICHERUNGSSCHRAUBE] (26) solange gegen Uhrzeigersinn, bis Sie mehr Widerstand verspüren (Die Schraube nicht vollständig herausschrauben!) 35 CD-/MP3-BEDIENUNG 1. Drücken Sie die Taste [CD/USBS] (9); 2. Drücken Sie die Taste [OPEN/CLOSE] (18), um das [CD-FACH] (12) zu öffnen. Legen Sie eine CD mit der beschrifteten Seite nach oben in das CD-Fach. 3. Schließen Sie das [CD-FACH] (12) wieder. Die Suche nach auf der CD befindlicher Musik wird gestartet. Anschließend wird automatisch mit dem ersten Titel beginnend die Wiedergabe gestartet. PROGRAMMIERUNG Es können bis zu 99 Titel (MP3, bei CD 20) programmiert und in beliebiger Reihenfolge wiedergegeben werden. 1. Sie können die Wiedergabe durch Drücken der Taste [STOP] (14 oder 41) beenden; 2. Wenn Sie [PLAY MODE] (17) oder [PROGRAM](32) drücken, dann wird auf der Anzeige (6) „P01“ blinkend angezeigt; 3. Wählen Sie den gewünschten Titel mit Hilfe der Tasten [SKIP -/+] (15/16 oder 39/40) aus; 4. Durch erneutes Drücken von [PLAY MODE] (17) oder [PROGRAM](32) wird der Titel in den Programmspeicher geschrieben; 5. Wiederholen Sie die Schritte 3 und 4, um weitere Titel im Programmspeicher abzulegen. 6. Wenn Sie alle gewünschten Titel programmiert haben, dann drücken Sie [PLAY] (13 oder 38), um die CD in der von Ihnen programmierten Reihenfolge wiederzugeben. Hinweis: Drücken Sie zweimal [STOP] (14 oder 41), um die programmierte Wiedergabe zu beenden. 36 USB-BEDIENUNG 1. Drücken Sie die Taste [CD/USB] (9); 2. Stecken Sie einen USB-Stick in den USB-Port [USB] (1); 3. Drücken Sie die Taste [FUNCTION] (4), um den USB-Modus auszuwählen; 4. Die Wiedergabe beginnt automatisch mit dem ersten Titel. PROGRAMMIERUNG Die Schritte der PROGRAMMIERUNG sind dieselben wie bei der CD-/MP3-Programmierung. Hinweis: • • Einige MP3-Player können nicht über die USB-Schnittstelle wiedergeben. Das ist keine Fehlfunktion des Systems. Der USB-Port ist nicht zum Laden von Smartphones oder anderen Geräten bestimmt. KASSETTENBEDIENUNG 1. Drücken Sie die Klangquellenwahltaste [TAPE] (10); 2. Legen Sie im [KASSETTENFACH] (22) eine Kassette ein; 3. Das System startet die Wiedergabe automatisch; • • • Drücken Sie während der Wiedergabe die Taste [KASSETTE VORSPULEN/ AUSWERFEN] (21) zur Hälfte herunter, um das schnelle Vorspulen der Kassette zu starten. Drücken Sie die Taste [KASSETTE VORSPULEN/AUSWERFEN] (21) erneut leicht, um die Wiedergabe fortzusetzen. Drücken Sie die Taste [KASSETTE VORSPULEN/AUSWERFEN] (21) ganz nach unten, um die Kassette auszuwerfen. ANMERKUNG DIREKTE USB-KODIERUNG: • • • Die Aufzeichnungsgeschwindigkeit ist 1:1. Im Kodierungsmodus werden keine Liedtitel aufgezeichnet. Entfernen Sie den USB-Speicher nur dann, wenn das Radio ausgeschaltet ist, um einer Beschädigung des USB-Speichers vorzubeugen. KODIERUNG VON PHONO UND KASSETTE: 1. Stecken Sie den USB-Stick in den USB-Port [USB] (1); 2. Geben Sie die Quelle normal wieder, die Sie aufzeichnen und kodieren möchten; 3. Drücken Sie die Taste [RECORD] (5 oder 37) zweimal, um die Aufzeichnung zu starten. Auf der Anzeige erscheint blinkend „REC“; 4. Wenn die Schallplatte/Kassette wiedergegeben wurde, dann drücken Sie die Taste [STOP] (14 oder 41), um die Aufzeichnung zu beenden. 37 KODIERUNG VON CD: Kodierung eines Titels: 1. Stecken Sie den USB-Stick in den USB-Port [USB] (1); 2. Geben Sie den Titel normal wieder, den Sie aufzeichnen und kodieren möchten; 3. Drücken Sie während der Wiedergabe des gewünschten Titels die Taste [RECORD] (5 oder 37) zweimal. Die Wiedergabe wird beendet und automatisch neu gestartet. Der Schriftzug „USB“ auf der Anzeige oben blinkt, wodurch angezeigt wird, dass die Kodierung begonnen wurde. 4. Drücken Sie am Ende des Titels die Taste [STOP] (14 oder 41), um die Aufzeichnung des Titels zu beenden. 1. Stecken Sie den USB-Stick in den USB-Port [USB] (1); 2. Geben Sie die CD normal wieder, die Sie aufzeichnen und kodieren möchten; 3. Drücken Sie nach Beendigung der erstmaligen Suche nach vorhandener Musik die Taste [RECORD] (5 oder 37) zweimal; 4. Die Wiedergabe beginnt. Der Schriftzug „USB“ auf der Anzeige oben blinkt, wodurch angezeigt wird, dass die Kodierung begonnen wurde. Hinweis: Wenn die Umwandlung beendet ist, dann stoppt das Gerät die Wiedergabe und die Aufzeichnung automatisch. TITEL VON USB LÖSCHEN 1. Geben Sie den Titel normal wieder, den Sie löschen möchten; 2. Drücken Sie während der Wiedergabe des Titels, den Sie löschen möchten zweimal die Taste [DELETE] (33) auf der Fernbedienung. TECHNISCHE DATEN Spannungsversorgung Leistungsaufnahme Musikleistung Frequenz des Radiosenders : : : : Geschwindigkeit Plattenteller: Kompatibilität CD-Player USB-Verbindung für Memorysticks (kein Laden) USB-Aufzeichnung von CD, Kassette und Schallplatte : : : : 38 AC 230 V, 50 Hz 40 Watt (max.) 2 x 4,5 W AM: 525-1640 KHz FM: 88-108 MHz 33/45/78 U/min CD/CD-R/CD-RW/MP3 MP3-Dateien Bitrate 128 kbps 1. Garantie Lenco bietet Leistungen und Garantien im Einklang mit Europäischem Recht. Im Falle von Reparaturen (sowohl während als auch nach Ablauf der Garantiezeit) sollten Sie deshalb Ihren Einzelhändler kontaktieren. Wichtiger Hinweis: Es ist nicht möglich, Geräte für Reparaturen direkt an Lenco zu schicken. Wichtiger Hinweis: Falls dieses Gerät von einem nicht autorisierten Kundendienst geöffnet oder darauf zugegriffen wird, erlischt die Garantie. Dieses Gerät ist nicht für professionelle Zwecke geeignet. Falls das Gerät für professionelle Zwecke eingesetzt wird, erlöschen alle Garantieverpflichtungen seitens des Herstellers. 2. Haftungsausschluss Aktualisierungen der Firmware und/oder Hardware-Komponenten werden regelmäßig durchgeführt. Daher können einige der Anweisungen, Spezifikationen und Abbildungen in dieser Dokumentation von Ihrer individuellen Situation abweichen. Alle in diesem Handbuch beschriebenen Elemente dienen nur zur Illustration und treffen auf Ihre individuelle Situation möglicherweise nicht zu. Aus der in diesem Handbuch getätigten Beschreibung können keine Rechtsansprüche oder Ansprüche geltend gemacht werden. 3. Entsorgung des Altgeräts Dieses Symbol zeigt an, dass das entsprechende Produkt oder dessen Batterie in Europa nicht mit dem normalen Hausmüll entsorgt werden darf. Um die ordnungsgemäße Abfallbehandlung des Produkts und dessen Batterie zu gewährleisten, müssen diese im Einklang mit allen anwendbaren örtlichen Vorschriften zur Entsorgung von Elektrogeräten und Batterien entsorgt werden. Dabei helfen Sie, natürliche Ressourcen zu schonen und Umweltschutzstandards zur Verwertung und Entsorgung von Altgeräten aufrecht zu halten (Waste Electrical and Electronic Equipment Directive). 4. CE-Kennzeichen Hiermit erklärt Lenco Benelux B.V., Thermiekstraat 1a, 6361 HB Nuth, The Netherlands, dass dieses Produkt den grundsätzlichen Anforderungen der EU-Richtlinie entspricht. Die Konformitätserklärung ist erhältlich unter [email protected] 5. Service Weitere Informationen und Unterstützung erhalten Sie unter www.lenco.com Lenco Benelux BV, Thermiekstraat 1a, 6361 HB, Die Niederlande. 39 Français ATTENTION : L’utilisation de commandes ou d’ajustements ou l’exécution de procédures autres que celles spécifiées dans le présent document peuvent entraîner une exposition dangereuse aux radiations. PRÉCAUTIONS AVANT UTILISATION GARDEZ CES INSTRUCTIONS À L’ESPRIT : 1. Ne couvrez pas et n’obturez pas les ouvertures de ventilation. Lorsque vous placez l’appareil sur une étagère laissez 5 cm (2”) d’espace libre tout autour de l’appareil. 2. Installez-le conformément au mode d’emploi fourni. 3. Gardez l’appareil à l’écart des sources de chaleur telles que des radiateurs, appareils de chauffage, fours bougies et autres produits générant de la chaleur ou une flamme nue. L’appareil ne peut être utilisé que dans des climats modérés. Les environnements extrêmement froids ou chauds doivent être évités. La plage de température de fonctionnement se situe entre 0° et 35° C. 4. Évitez d’utiliser l’appareil à proximité de champs magnétiques puissants. 5. Des décharges électrostatiques peuvent perturber le fonctionnement de cet appareil. Dans ce cas, il suffit de réinitialiser et de redémarrer l’appareil en suivant le mode d’emploi. Pendant le transfert de fichiers, manipulez l’appareil avec précaution et faites-le fonctionner dans un environnement sans électricité statique. 6. Mise en garde ! N’introduisez jamais un objet dans l’appareil par les ouvertures et les fentes de ventilation. Étant donné que des tensions élevées sont présentes à l’intérieur du produit, l’insertion d’un objet peut entraîner une électrocution et/ou court-circuiter les composants internes. Pour les mêmes raisons, ne versez pas de l’eau ou un liquide sur le produit. 7. Ne l’utilisez pas dans des endroits humides tels qu’une salle de bain, une cuisine pleine de vapeur ou à proximité d’une piscine. 8. L’appareil ne doit pas être exposé à des écoulements ou des éclaboussures et aucun objet contenant un liquide, tel qu’un vase, ne doit être posé sur ou près de l’appareil. 9. N’utilisez pas cet appareil lorsque de la condensation est possible. Lorsque l’appareil est utilisé dans une pièce humide et chaude, des gouttelettes d’eau ou de la condensation peuvent se former à l’intérieur de l’appareil et affecter son fonctionnement. Laissez l’appareil hors tension pendant 1 ou 2 heures avant de le mettre en marche : l’appareil doit être sec avant sa mise sous tension. 10. Bien que ce dispositif soit fabriqué avec le plus grand soin et contrôlé à plusieurs reprises avant de quitter l’usine, des problèmes peuvent néanmoins survenir, comme avec tous les appareils électriques. Si l’appareil émet de la fumée ou en cas d’accumulation excessive de la chaleur ou d’un phénomène inattendu débranchez immédiatement la fiche d’alimentation du secteur. 11. Cet appareil doit fonctionner avec la source d’alimentation indiquée sur la plaque signalétique. Si vous n’êtes pas sûr du type d’alimentation utilisé chez vous, contactez votre revendeur ou le fournisseur local d’électricité. 12. Tenez l’appareil à l’abri des animaux. Certains animaux aiment ronger les cordons électriques. 13. Pour nettoyer l’appareil, servez-vous d’un chiffon doux et sec. N’utilisez pas de solvant ni d’autre liquide à base de pétrole. Pour enlever les taches importantes, vous pouvez vous servir d’un chiffon humide imbibé d’une solution de détergent diluée. 14. Le fournisseur n’est pas responsable des dommages ou pertes de données causés par un dysfonctionnement une utilisation abusive, une modification de l’appareil ou un remplacement de la batterie. 15. N’interrompez pas la connexion lorsque l’appareil formate ou transfère des fichiers. Dans le cas contraire les données pourraient être endommagées ou perdues. 16. Si l’appareil a une fonction de lecture USB, il faut brancher la clé USB directement sur l’appareil. N’utilisez pas un câble d’extension USB, car cela peut causer des interférences entraînant des pertes de données. 17. L’étiquette de classification se trouve sur le panneau inférieur ou arrière de l’appareil. 18. Cet appareil ne doit pas être utilisé par des personnes (y compris les enfants) souffrant de déficiences physiques, sensorielles ou mentales, ou d’un manque d’expérience et de connaissances, à moins qu’elles n’aient été supervisées ou qu’une personne responsable de leur sécurité ne leur ait donné des instructions sur l’utilisation correcte de l’appareil. 19. Ce produit est réservé à un usage non professionnel, et non pas à un usage commercial ni industriel. 20. Vérifiez que l’appareil est en position stable. La garantie ne couvre pas les dégâts occasionnés par l’utilisation de cet appareil en position instable, par les vibrations, les chocs ou par la non-observation de tout autre avertissement ou précaution contenus dans ce mode d’emploi. 21. N’ouvrez jamais cet appareil. 22. Ne placez jamais cet appareil sur un autre appareil électrique. 23. Ne laissez pas les sacs en plastique à la portée des enfants. 24. Utilisez uniquement les accessoires recommandés par le fabricant. 25. Confiez l’entretien et les réparations à un personnel qualifié. Une réparation est nécessaire lorsque l’appareil a été endommagé de quelque façon que ce soit, par exemple lorsque le cordon d’alimentation ou la prise sont endommagés, lorsqu’un liquide s’est déversé ou des objets sont tombés sur l’appareil, lorsque l’appareil a été exposé à la pluie ou à l’humidité lorsqu’il ne fonctionne pas correctement ou est tombé. 26. Une exposition prolongée à la musique avec un volume élevé peut entraîner une perte auditive temporaire ou permanente. 27. Si l’appareil est livré avec un câble d’alimentation ou un adaptateur secteur : ● En cas de problème, débranchez le cordon d’alimentation CA et confiez l’entretien à un personnel qualifié. ● Ne marchez pas sur l’adaptateur secteur ou ne le coincez pas. Faites très attention en particulier à proximité des fiches et du point de sortie du câble. Ne placez pas d’objets lourds sur l’adaptateur secteur, car ils pourraient l’endommager. Gardez l’appareil hors de portée des enfants ! Ils pourraient se blesser gravement s’ils jouent avec le câble d’alimentation. ● Débranchez cet appareil pendant les orages ou lorsqu’il n’est pas utilisé pendant une longue durée. ● La prise secteur doit être installée près de l’appareil et doit être facilement accessible. ● Ne surchargez pas les prises de courant ou les rallonges. Une surcharge peut entraîner un incendie ou une électrocution. ● Les appareils de classe 1 doivent être branchés à une prise de courant disposant d’une connexion protectrice à la terre. ● Les appareils à la norme de construction de classe 2 ne nécessitent pas de connexion à la terre. ● Tirez toujours sur la fiche pour débrancher le cordon de la prise secteur. Ne tirez pas sur le cordon d’alimentation. Cela pourrait provoquer un court-circuit. ● N’utilisez pas un cordon ou une fiche d’alimentation endommagé ni une prise desserrée. Vous courez un risque d’incendie ou de décharge électrique. 28. Si le produit contient ou est livré avec une télécommande contenant des piles boutons : Avertissement : ● « N’ingérez pas la pile, car vous risquez une brûlure chimique » ou une formule équivalente. ● La télécommande fournie contient une pile bouton/pièce de monnaie. Si la pile est avalée, elle peut causer de graves brûlures internes en seulement 2 heures et peut entraîner la mort. ● Tenez les piles neuves et usagées hors de portée des enfants. ● Si le compartiment à piles ne se ferme pas correctement, cessez d’utiliser l’appareil et tenez-le hors de portée des enfants. ● Si vous pensez que les piles ont été avalées ou placées à l’intérieur d’une partie du corps, consultez un médecin immédiatement. 29. Mise en garde relative à l’utilisation des piles : ● Risque d’explosion si la pile est mal remplacée. Remplacez les piles par des piles d’un type identique ou équivalent. ● Pendant l’utilisation, le stockage ou le transport, la pile ne doit pas être soumise à des températures extrêmement élevées ou basses, à une faible pression d’air à haute altitude. ● Le remplacement d’une pile par une autre de type incorrect peut entraîner une explosion ou une fuite de liquide ou de gaz inflammable. ● L’introduction d’une pile dans le feu ou dans un four chaud, l’écrasement ou le découpage mécanique peut entraîner une explosion. ● L’exposition d’une pile dans un environnement à température extrêmement élevée peut entraîner une explosion ou une fuite de liquide ou de gaz inflammable. ● L’exposition d’une pile à une pression d’air extrêmement basse peut entraîner une explosion ou une fuite de liquide ou de gaz inflammable. ● Veuillez considérer les questions environnementales lors de la mise au rebut des piles. INSTALLATION ● Déballez toutes les pièces et enlevez le matériau de protection. ● Ne connectez pas l’unité au secteur avant d’avoir vérifié la tension du secteur et avant que toutes les autres connexions n’aient été effectuées. 41 AVERTISSEMENT Produit laser de classe 1 AVERTISSEMENT : L’utilisation d’un lecteur de musique personnel dans la circulation peut détourner l’attention de l’auditeur de dangers potentiels tels que l’approche des voitures. AVERTISSEMENT : Pour éviter une éventuelle détérioration de l’ouïe, n’écoutez pas la musique à un niveau de volume élevé pendant des périodes prolongées. * Ces instructions s’appliquent uniquement aux produits utilisant un câble d’alimentation ou un adaptateur secteur. DÉBALLAGE ET INSTALLATION • Sortez soigneusement l’appareil du carton et enlevez tous les emballages. • Déroulez le cordon d’alimentation secteur et déployez-le entièrement. • Déroulez le fil d’antenne FM et déployez-la entièrement. • Posez l’appareil sur une surface plane et stable, avec une prise secteur facilement accessible et éloignée de champs magnétiques forts. • Branchez le cordon d’alimentation à une prise secteur. • Levez le couvercle pour exposer le phonographe. Le phonographe a été sécurisé pour le transport avec une vis de transport. Utilisez une pièce de monnaie ou un tournevis pour faire tourner la vis servant à bloquer pendant le transport dans le sens horaire. Ceci fera « flotter » le tourne-disque. Vis de blocage pendant le transport • • • • • Retirez la protection de la pointe de lecture en plastique blanc opaque de la pointe de lecture du phonographe en la faisant glisser dans le sens de la flèche (reportez-vous à l’illustration à droite). Pendant cette opération, faites particulièrement attention à la pointe de lecture car les dégâts ne sont pas couverts par la garantie. Enlevez le lien torsadé qui servait à immobiliser le bras de lecture lors du transport. Libérez le levier de verrouillage du bras de lecture (voir la figure 1 ci-dessous). Branchez le cordon à une prise électrique 230 V CA, 50 Hz. 42 EN FR TONE ARM LOCK LEVER LEVIER DE BLOCAGE DU BRAS DE LECTURE STYLUS COVER PROTECTION DE LA POINTE DE LECTURE Fig.1 Figure 1 INSTALLATION DE LA PILE AU LITHIUM DE LA TÉLÉCOMMANDE • La télécommande nécessite une pile au lithium CR2025 (3 V). • Tenez la télécommande et levez en appuyant sur le fermoir avec le pouce dans la bonne direction indiquée par la flèche dans l’illustration, puis retirez le compartiment de la pile en le faisant glisser avec l’index vers vous. Faites sortir le compartiment de la pile de la télécommande. Installez une pile au lithium (CR-2025) dans le compartiment avec la polarité positive vers le haut, puis insérez doucement le compartiment de la pile dans la télécommande. Le compartiment est en place lorsque vous entendez un clic. AVANT 43 CÔTÉ GAUCHE 21 22 20 ARRIÈRE 23 24 44 DESSUS TÉLÉCOMMANDE 45 EMPLACEMENT DES BOUTONS 1. PORT USB 2. BOUTON MARCHE/ARRÊT 3. MOLETTE DE VOLUME 4. SÉLECTEUR DE FONCTION 5. BOUTON D’ENREGISTREMENT 6. ÉCRAN LCD 7. BOUTON SOURCE RADIO AM 8. BOUTON SOURCE RADIO FM 9. BOUTON SOURCE CD/USB 10. BOUTON SOURCE CASSETTE 11. BOUTON SOURCE PHONO 12. PORTE CD 13. DÉMARRE/MET EN PAUSE LA LECTURE : Appuyez dessus pour lancer la lecture. Pendant la lecture, appuyez dessus pour l’arrêter temporairement et une fois de plus pour reprendre la lecture. 14. ARRÊT : Appuyez dessus lorsque vous souhaitez terminer la lecture. 15. SAUT ARRIÈRE/RETOUR : Appuyez dessus pour passer à la piste précédente, maintenez enfoncé pour effectuer un retour rapide. 16. SAUT AVANT/AVANCE RAPIDE : appuyez dessus pour passer à la piste suivante, maintenez enfoncé pour effectuer une avance rapide. 17. LECTURE-MODE : appuyez dessus à plusieurs reprises pour choisir le mode de lecture (RÉPÉTITION, ALÉATOIRE) 18. BOUTON OUVERTURE/FERMETURE CD 19. BOUTON DE SYNTONISATION 20. ENCEINTES 21. AVANCE RAPIDE/ÉJECTION DE CASSETTE 22. MÉCANISME DU LECTEUR DE CASSETTE 23. ANTENNE FILAIRE 24. CORDON D’ALIMENTATION 25. PLATINE DU TOURNE-DISQUE 26. VIS DE BLOCAGE PENDANT LE TRANSPORT 27. BRAS DE LECTURE 28. BLOCAGE DU BRAS DE LECTURE 29. RELÈVE-BRAS 30. SÉLECTEUR DE VITESSE 33 45/78 tr/min 46 TÉLÉCOMMANDE 31. PISTE -/+ 10 32. BOUTON PROGRAMME 33. BOUTON SUPPRIMER 34. BOUTON ALÉATOIRE 35. BOUTON RÉPÉTITION 36. BOUTON OUVERTURE/FERMETURE CD 37. BOUTON D’ENREGISTREMENT 38. DÉMARRE/MET EN PAUSE LA LECTURE 39. SAUT AVANT/AVANCE RAPIDE 40. SAUT ARRIÈRE/RETOUR 41. ARRÊT SOURCES D’ALIMENTATION ALIMENTATION CA : Vous pouvez alimenter votre système stéréo en branchant le cordon secteur (24) sur une prise de courant murale. Vérifiez que la tension nominale de votre appareil correspond à la tension du secteur. UTILISER LA RADIO 1. Appuyez sur le bouton [POWER] (2) pour allumer l’appareil. 2. Sélectionnez la piste souhaitée en appuyant sur le bouton [SOURCE] (7 à 11). 3. (Reportez-vous aux instructions détaillées correspondant à chaque source dans les chapitres suivants). 4. Réglez le volume au niveau souhaité avec la [MOLETTE DE VOLUME] (3). 5. Appuyez sur le bouton [POWER] (2) pour éteindre l’appareil. Remarque : Quand aucun son n'est produit, l'appareil s'éteint automatiquement au bout de 10 minutes. UTILISATION DE LA RADIO 1. Puis, appuyez sur le bouton [AM] ou [FM] (7 ou 8). 2. Réglez la fréquence radio sur la station souhaitée en tournant le [BOUTON DE SYNTONISATION] (19). Remarque : Pour une meilleure réception, déplacez l'antenne filaire (23). Les signaux de la réception MW sont captés par une antenne ferrite intégrée. Il se peut que vous ayez à orienter l'appareil pour obtenir la meilleure réception. 47 UTILISATION DE LA PLATINE Remarque : Lorsque vous utilisez la platine pour la première fois, tournez la [VIS SERVANT À BLOQUER PENDANT LE TRANSPORT] (26) dans le sens horaire jusqu'à ce qu’elle soit complètement vissée. 1. Appuyez sur le bouton [PHONO] (11). 2. Placez un disque sur le tourne-disque. Placez l'adaptateur EP sur l’axe central lors de la lecture de 45 tours. 3. Réglez le [SÉLECTEUR DE VITESSE] (30) sur 33, 45 ou 78 tr/min en fonction du disque. 4. Relâchez la [BRIDE DU BRAS DE LECTURE] (28) et retirez la protection de la pointe 5. 6. 7. 8. de lecture. Soulevez le [BRAS DE LECTURE] (27) avec le [RELÈVE-BRAS] (30). Placez le [BAS DE LECTURE] (27) au début du disque. Baissez le [BRAS DE LECTURE] (27) avec le [RELÈVE-BRAS] (29). Lorsque le disque est terminé, le [BRAS DE LECTURE] (27) revient automatiquement sur l’appui et la [PLATINE] s’ (25) arrête de tourner. Pour arrêter manuellement, soulevez le bras de lecture du disque et remettez-le à sa position de repos. REMARQUE : Ne tournez pas ou n’arrêtez pas le tourne-disque à la main. Déplacer ou secouer le tourne-disque sans immobiliser le levier de blocage du bras de lecture peut endommager celui-ci. Préparer le TCS-2550 pour le transport. • Verrouillez le [BRAS DE LECTURE] (27) avec la [BRIDE DU BRAS DE LECTURE] (28). • • Placez le capuchon de protection sur la pointe de lecture (même si celle-ci n’est pas utilisée). Tourner la [VIS SERVANT À BLOQUER PENDANT LE TRANSPORT] (26) dans le sens antihoraire jusqu'à ce que vous sentiez plus de résistance (ne retirez pas la vis complètement !) 48 FONCTIONNEMENT DU LECTEUR CD/MP3 1. Appuyez sur le bouton [CD/USB] (9). 2. Appuyez sur [OUVRIR/FERMER] (18) pour ouvrir la [PORTE DU COMPARTIMENT À CD] (12) et placez un CD avec l'étiquette tournée vers le haut dans le compartiment à CD. 3. Fermez la porte du [COMPARTIMENT À CD] (12). La recherche de musique sur le CD est effectuée et la lecture démarre automatiquement à partir de la première piste. PROGRAMMATION Jusqu'à 99 pistes (MP3, 20 sur un CD) peuvent être programmées et écoutez-les dans n'importe quel ordre. 1. Arrêtez la lecture en appuyant sur [STOP] (14 ou 41). 2. Appuyez sur [PLAY MODE] (17) ou [PROGRAM](32), l'affichage (6) indique « P01 » et clignote. 3. Sélectionnez la piste désirée en utilisant les boutons [SAUT ARRIÈRE/AVANT] (15/16 ou 39/40). 4. Appuyez sur [PLAY MODE] (17) ou [PROGRAMME](32) pour programmer la piste en mémoire. 5. Répétez les étapes 3 et 4 pour ajouter d’autres pistes dans la mémoire du programme. 6. Lorsque toutes les pistes souhaitées ont été programmées, appuyez sur [PLAY] (13 ou 38) pour lire le disque dans l’ordre que vous avez programmé. Remarque : Appuyez sur [STOP] (14 ou 41) pour terminer la lecture du programme. FONCTIONNEMENT PAR USB 1. Appuyez sur le bouton [CD/USB] (9). 2. Branchez une clé USB dans le [PORT USB] (1). 3. Appuyez sur le bouton [FUNCTION] (4) pour sélectionner le mode USB. 4. La lecture démarre automatiquement à partir de la première piste. PROGRAMMATION La procédure de PROGRAMMATION est la même que celle du CD-MP3. 49 Remarque : • • Certains lecteurs MP3 peuvent ne pas être en mesure d’être lus via le port USB. Il ne s’agit pas d’un dysfonctionnement du système. Le port USB n'est pas conçu pour la charge de smartphones ou d'autres appareils. FONCTIONNEMENT DU LECTEUR DE CASSETTE 1. Appuyez sur le bouton source [TAPE] (10). 2. Insérez une cassette dans le [MÉCANISME D U LECTEUR DE CASSETTE] (22). 3. Le système démarrera la lecture automatiquement. • • • Appuyez sur le bouton [AVANCE/ÉJECTION DE LA CASSETTE] (21) à moitié pendant la lecture pour commencer l'enroulement rapide de la bande vers l’avant. Appuyez légèrement sur le bouton [AVANCE/ÉJECTION DE LA CASSETTE] (21) de nouveau pour reprendre la lecture. Enfoncez complètement le bouton [AVANCE/ÉJECTION DE LA CASSETTE] (21) et la cassette sera éjectée. ENCODAGE USB DIRECT. Remarque : • • • La vitesse d'enregistrement est de 1:1. Aucun titre de chanson ne sera enregistré pendant l'encodage. Pour éviter d’endommager la clé USB, enlevez-la uniquement lorsque la radio est éteinte. ENCODER À PARTIR DE LA PHONO ET DES CASSETTES : 1. Branchez la clé USB dans le [PORT USB] (1). 2. Effectuez une lecture normale de la source que vous souhaitez encoder et enregistrer. 3. Appuyez sur le bouton [RECORD] (5 ou 37) pour lancer l’encodage. « REC (ENREG.) » clignote sur l’affichage. 4. Une fois que le disque est terminé, appuyez sur le bouton [STOP] (14 ou 41) pour arrêter l'enregistrement. ENCODER À PARTIR D’UN CD : Encoder 1 piste : 1. Branchez la clé USB dans le [PORT USB] (1). 2. Effectuez une lecture normale de la piste que vous souhaitez encoder et enregistrer. 3. Appuyez sur le bouton [RECORD] (5 ou 37) à deux reprises pendant la lecture de la piste souhaitée. La lecture s'arrête et redémarre automatiquement. Le texte « USB » clignote en haut de l’affichage, indiquant que l'encodage a commencé. 50 4. À la fin de la piste, appuyez sur le bouton [STOP] (14 ou 41) pour terminer son enregistrement. 1. Branchez la clé USB dans le [PORT USB] (1). 2. Effectuez une lecture normale du CD que vous souhaitez encoder et enregistrer. 3. Appuyez sur le bouton [RECORD] (5 ou 37) à deux reprises après que la recherche de musique initiale a été réalisée. 4. La lecture commence. Le texte « USB » clignote en haut de l’affichage, indiquant que l'encodage a commencé. Remarque : Lorsque la conversion est terminée, l'appareil arrête automatiquement l'enregistrement et la lecture. SUPPRIMER LES MORCEAUX SUR UNE CLÉ USB 1. Effectuez une lecture normale du morceau que vous souhaitez supprimer. 2. Pendant la lecture du morceau que vous voulez supprimer, appuyez sur le bouton [DELETE] (33) de la télécommande à deux reprises. CARACTÉRISTIQUES TECHNIQUES Alimentation électrique Puissance absorbée Puissance musicale Fréquence radio : : : : Vitesse du tourne-disque Compatibilité du lecteur CD Connexion USB pour clé USB (pas de charge) Enregistrement USB à partir d’un CD, d’une cassette et d’un disque : : : : 51 230 Vca ~, 50 Hz 40 Watts (max.) 2 X 4,5 W AM : 525-1640 kHz FM : 88-108 MHz 33/45/78 tr/min CD/CD-R/CD-RW/MP3 Fichiers MP3 Débit binaire 128 KB/S 1. Garantie Lenco propose un entretien et une garantie conformément à la législation européenne, ce qui signifie qu’en cas de besoin de réparation (aussi bien pendant et après la période de garantie), vous pouvez contacter votre revendeur le plus proche. Remarque importante : Il n’est pas possible de renvoyer l’appareil pour réparation directement à Lenco. Remarque importante : Si l’unité est ouverte ou modifiée de quelque manière que ce soit par un réparateur non agréé, la garantie serait caduque. Cet appareil ne convient pas à une utilisation professionnelle. En cas d’utilisation professionnelle, les obligations de garantie du fabricant seront annulées. 2. Clause de non responsabilité Des mises à jour du logiciel et/ou des composants informatiques sont régulièrement effectuées. Il se peut donc que certaines instructions, caractéristiques et images présentes dans ce document diffèrent légèrement de votre configuration spécifique. Tous les articles décrits dans ce guide le sont fournis uniquement à des fins d'illustration et peuvent ne pas s'appliquer à une configuration spécifique. Aucun droit légal ne peut être obtenu depuis les informations contenues dans ce manuel. 3. Mise au rebut de l'appareil usagé Ce symbole indique que l'équipement électrique concerné ou la batterie ne doivent pas être jetés parmi les autres déchets ménagers en Europe. Afin de garantir un traitement approprié de la batterie ou de l’appareil usagés, veuillez les mettre au rebut conformément à la règlementation locale en vigueur relative aux équipements électriques et autres batteries. En agissant de la sorte, vous contribuerez à la préservation des ressources naturelles et à l’amélioration des niveaux de protection environnementale concernant le traitement et la destruction des déchets électriques (Directive sur les déchets des équipements électriques et électroniques). 4. Marquage CE Par la présente, Lenco Benelux B.V., Thermiekstraat 1a, 6361 HB Nuth, Pays-Bas, déclare que ce produit est conforme aux exigences principales des directives européennes. La déclaration de conformité peut être consultée au lien : [email protected] 5. Service Pour en savoir plus et obtenir de l'assistance, visitez www.lenco.com Lenco Benelux BV, Thermiekstraat 1a, 6361 HB, The Netherlands. 52 Español PRECAUCIÓN: El uso de controles o ajustes o rendimiento de procedimientos excepto aquellos que los aquí especificados puede provocar una exposición peligrosa a la radiación. PRECAUCIONES PREVIAS AL USO TENGA ESTAS INSTRUCCIONES EN MENTE: 1. No cubra o bloquee ninguna apertura de ventilación. Cuando coloque el dispositivo en una estantería deje 5 cm (2”) de espacio libre alrededor de todo el dispositivo. 2. Instálelo conforme al manual de usuario que se adjunta. 3. Mantenga el aparato alejado de fuentes de calor, como radiadores, calentadores, estufas, velas u otros productos que generen calor o llama viva. El aparato solo puede usarse en climas moderados. Se deben evitar los ambientes extremadamente fríos o cálidos. La gama de temperatura de funcionamiento es de entre 0° y 35°C. 4. Evite usar el dispositivo cerca de campos magnéticos fuertes. 5. Una descarga electrostática puede entorpecer el uso normal de este dispositivo. En tal caso, simplemente reinícielo siguiendo el manual de instrucciones. Durante la transmisión de archivos, por favor manéjelo con cuidado opérelo en un entorno libre de electricidad estática. 6. ¡Advertencia! Nunca inserte un objeto en el producto a través de las ventilaciones o aperturas. Alto voltaje fluye a través del producto e insertar un objeto puede provocar una descarga eléctrica y/o un cortocircuito de sus componentes internos. Por el mismo motivo, no derrame agua o líquidos en el producto. 7. No lo utilice en zonas húmedas, como cuartos de baño, cocinas en las que se forme vapor ni cerca de piscinas. 8. El aparato no debe exponerse a goteos o salpicaduras y asegúrese de que se colocan sobre o cerca del aparato objetos llenos de líquidos, como jarrones. 9. No use este dispositivo cuando se pueda producir condensación. Cuando la unidad se usa en una sala húmeda cálida, se pueden formar gotitas de agua o condensación en el interior de la unidad y esta puede no funcionar adecuadamente; deje que la unidad se apague durante 1 o 2 horas antes de volver a encender la unidad: el aparato debe estar seco antes de conectarse a una fuente de alimentación. 10. Aunque este dispositivo está fabricado con el máximo cuidado y comprobado varias veces antes de salir de fábrica, todavía es posible que se puedan producir problemas, al igual que con todos los aparatos eléctricos. Si observa la aparición de humo, una acumulación excesiva de calor o cualquier otro fenómeno inesperado deberá desconectar inmediatamente el enchufe de la toma de corriente. 11. Este dispositivo debe funcionar con una fuente de alimentación que se especifica en la etiqueta de especificaciones. Si no está seguro del tipo de alimentación que se usa en su hogar, consulte con el distribuidor o una compañía eléctrica local. 12. Manténgalo alejado de los animales. A algunos animales les encanta morder los cables de alimentación. 13. Para limpiar el dispositivo use un paño seco y suave. No utilice líquidos disolventes ni con base de petróleo. Para eliminar manchas difíciles, puede usar un paño húmedo con detergente diluido. 14. El proveedor no asume ninguna responsabilidad por daños o datos perdidos provocados por un funcionamiento incorrecto, uso incorrecto, modificación del dispositivo o sustitución de la batería. 15. No interrumpa la conexión cuando el dispositivo esté formateando o transfiriendo archivos. En caso contrario los datos se pueden estropear o perder. 16. Si la unidad dispone de función de reproducción USB, se debe conectar la memoria USB directamente en la unidad. No utilice un cable de extensión USB ya que pueden crear interferencias que causen una pérdida de datos. 17. La etiqueta calificativa se encuentra en la parte inferior o en el panel posterior del aparato. 18. Este dispositivo no está diseñado para su uso por parte de personas (incluyendo niños) con discapacidad física sensorial o mental o con falta de experiencia o conocimientos, salvo que se les haya dado supervisión o instrucciones acerca del uso correcto del dispositivo por parte de una persona responsable de su seguridad. 19. Este producto está diseñado para un uso no profesional únicamente y no para un uso comercial o industrial. 20. Asegúrese de que la unidad esté fijada en una posición estable. La garantía no cubrirá los daños derivados de usar este producto en una posición inestable, vibraciones o golpes o por no seguir otras advertencias o precauciones que aparecen en este manual de usuario. 21. Nunca retire la carcasa del dispositivo. 22. Nunca coloque este dispositivo sobre otro equipo eléctrico. 23. Mantenga las bolsas de plástico fuera del alcance de los niños. 24. Use únicamente los dispositivos/accesorios especificados por el fabricante. 53 25. Remita todas las reparaciones al personal cualificado. Es necesario el mantenimiento cuando el aparato presenta cualquier tipo de daño, por ejemplo, el cable de alimentación o el enchufe presentan daños; se ha vertido líquido sobre el aparato; se han caído objetos en el aparato; el aparato se ha expuesto a la lluvia o humedad; el aparato no funciona normalmente o se ha caído. 26. Una larga exposición a sonidos elevados de reproductores de música personales puede provocar una pérdida de audición temporal o permanente. 27. Si el producto viene con un cable de alimentación o un adaptador de corriente de CA: ● Si se produce cualquier problema, desconecte el cable de alimentación CA y remítalo a mantenimiento por parte de personal cualificado. ● No pise o pince el adaptador de alimentación. Tenga mucho cuidado, en especial en las zonas alrededor de las tomas y el punto de salida del cable. No coloque objetos pesados en el adaptador de alimentación ya que pueden dañarlo. ¡Mantenga el dispositivo fuera del alcance de los niños! Si juegan con el cable de alimentación, puede sufrir lesiones graves. ● Desconecte el dispositivo durante tormentas eléctricas o cuando no vaya a usarse durante periodos prolongados de tiempo. ● La salida de la toma debe instalarse cerca del equipo y debe ser fácilmente accesible. ● No sobrecargue las tomas CA o los cables de extensión. La sobrecarga puede provocar un incendio o una descarga eléctrica. ● Los dispositivos con construcción de Clase 1 deben estar conectados a una toma de corriente con una conexión a tierra protegida. ● Los dispositivos con construcción de Clase 2 no requieren una conexión a tierra. ● Sujete siempre el enchufe cuando los extraiga de la toma de corriente. No tire del cable de alimentación. Esto puede provocar un cortocircuito. ● No utilice un cable de alimentación o enchufe deteriorado o una toma suelta. Si lo hace podría provocar un incendio o una descarga eléctrica. 28. Si el producto contiene o se entrega con un mando a distancia que contiene pilas de botón / celdas: Advertencia: ● “Ni ingiera la pila, riesgo de quemadura química” o frase equivalente. ● [El mando a distancia que se suministra] Este producto contiene una pila de tipo botón/moneda. Si la pila se traga, puede provocar graves quemaduras internas en sólo 2 horas y podría ocasionar la muerte. ● Mantenga las pilas nuevas o usadas fuera del alcance de los niños. ● Si el compartimiento de las pilas no se cierra correctamente, deje de usar el producto y no lo deje al alcance los niños. ● Si tiene la sospecha de que una pila ha sido ingerida o se encuentra en algún lugar del cuerpo, busque inmediatamente atención médica. 29. Precaución sobre el uso de las pilas: ● Existe riesgo de explosión si la pila no se sustituye correctamente. Sustitúyala únicamente con otra del mismo tipo u otro equivalente. ● No se pueden exponer las pilas a temperaturas extremadamente altas o bajas, baja presión de aire a gran altitud durante el uso, almacenamiento o transporte. ● Si cambia la pila por otra que no sea la correcta, se puede producir una explosión o la fuga de líquidos o gases inflamables. ● Si arroja la pila al fuego o a un horno caliente, o aplasta o cortar mecánicamente una pila podría provocar una explosión. ● Si deja una pila en un lugar con temperaturas extremadamente altas, se puede producir una explosión o una fuga de líquido o gas inflamable. ● Si se expone la pila a una presión de aire extremadamente baja, se puede producir una explosión o la fuga de líquidos o gases inflamables. ● Se debe prestar atención a los aspectos medioambientales sobre la eliminación de baterías. INSTALACIÓN ● Desembale todas las piezas y retire el material protector. ● No conecte la unidad a la corriente eléctrica antes de comprobar la tensión de la corriente y antes de que se hayan hecho todas las demás conexiones. 54 ADVERTENCIA Producto Láser Clase 1 ADVERTENCIA: Utilizar un reproductor de música personal mientras participa en el tráfico puede hacer que el usuario esté menos atento a los peligros potenciales, como vehículos que se acercan. ADVERTENCIA: Para evitar posibles daños en la audición, no la escuche a volúmenes elevados durante largos periodos de tiempo. DESEMBALAJE Y CONFIGURACIÓN • Retire con cuidado la unidad del cartón de muestra y retire todo el material de embalaje de la unidad. • Desenrolle el cable de corriente y extiéndalo al máximo. • Desenrolle el cable de la antena FM y extiéndalo al máximo. • Coloque la unidad sobre una superficie estable y nivelada, cerca de una toma de corriente que esté alejada de un campo magnético intenso. • Conecte el enchufe a la toma CA. • Suba la tapa para mostrar el fonógrafo. El fonógrafo ha sido asegurado para su transporte mediante un tornillo para el transporte. Use una moneda o un destornillador para girar el tornillo de bloqueo de transporte hacia la derecha. Esto permitirá que el tocadiscos “flote”. Tornillo de bloqueo de transporte • • • • • Quite la cubierta de plástico blanco opaco de la aguja del gramófono deslizándola en la dirección de la flecha (consulte la figura a la derecha). Preste atención a la aguja durante esta operación, ya que los daños a la aguja no están cubiertos por la garantía. Retire la atadura de alambre que se ha empleado para asegurar el brazo del tocadiscos durante el envío. Libere la palanca de bloqueo del brazo de lectura (consulte la Fig. 1 que aparece a continuación). Conecte el enchufe a la toma eléctrica CA de 230 V, 50 Hz. 55 EN ES TONE ARM LOCK LEVER PALANCA DE BLOQUEO DEL BRAZO DEL TOCADISCOS STYLUS COVER CUBIERTA DE AL AGUJA Fig.1 Fig.1 INSTALACIÓN DE LA PILA DE LITIO DEL MANDO A DISTANCIA • El mando a distancia funciona con una pila de litio CR2025 (3 V). • Sostenga y haga palanca presionando el cierre con el pulgar en la dirección de la flecha como aparece en la ilustración, y saque el compartimento de la pila deslizándolo con el dedo índice hacia usted. Saque el compartimento de la pila del mando a distancia. Instale una pila de litio (CR-2025) con la polaridad positiva hacia arriba. Sostenga y empuje suavemente el compartimento de la pila dentro del mando a distancia. Habrá terminado cuando escuche un chasquido. DELANTERAS 56 LADO IZQUIEDO 21 22 20 PARTE TRASERA 23 24 57 PARTE SUPERIOR MANDO A DISTANCIA 58 SITUACIÓN DE LOS CONTROLES 1. PUERTO USB 2. BOTÓN DE ENCENDIDO/APAGADO 3. MANDO DE VOLUMEN 4. BOTÓN FUNCIÓN 5. BOTÓN GRABAR 6. PANTALLA LCD 7. BOTÓN DE FUENTE DE RADIO AM 8. BOTÓN DE FUENTE DE RADIO FM 9. BOTÓN DE FUENTE DE CD/USB 10. BOTÓN DE FUENTE DE CINTA 11. BOTÓN DE FUENTE DE TELÉFONO 12. TAPA DEL CD 13. REPRODUCIR/PAUSA: Pulse para reproducir. Cuando se reproduce, pulse para detener la reproducción temporalmente y pulse otra vez para reanudar la reproducción. 14. DETENER: Pulse cuando quiera terminar la reproducción. 15. SALTAR -/REBOBINAR: Pulse para ir a la pista anterior, mantenga pulsado para retroceder rápidamente. 16. SALTAR +/AVANCE RÁPIDO: Pulse para ir a la siguiente pista, mantenga pulsado para avanzar rápidamente. 17. REPRODUCIR/MODO: Pulse varias veces para elegir el modo de reproducción (REPETIR, ALEATORIO) 18. BOTÓN ABRIR / CERRAR PUERTA DEL CD 19. DIAL DE SINTONIZACIÓN 20. ALTAVOCES 21. EXPULSAR/AVANCE RÁPIDO DEL CASETE 22. MECANISMO DEL CASETE 23. ANTENA DE CABLE 24. CABLE DE ALIMENTACIÓN 25. PLATO DEL TOCADISCOS 26. TORNILLO DE BLOQUEO DE TRANSPORTE 27. BRAZO 28. BLOQUEO DEL BRAZO DE LECTURA 29. PALANCA DE LEVANTAMIENTO 30. SELECTOR DE VELOCIDAD DE 33/45/78 RPM 59 MANDO A DISTANCIA 31. -/+ 10 PISTA 32. BOTÓN PROGRAMA 33. BOTÓN ELIMINAR 34. BOTÓN ALEATORIO 35. Botón REPETIR 36. BOTÓN ABRIR / CERRAR PUERTA DEL CD 37. BOTÓN GRABAR 38. REPRODUCIR/PAUSA 39. SALTAR +/AVANCE RÁPIDO 40. SALTAR -/REBOBINAR 41. DETENER FUENTES DE ALIMENTACIÓN INTERRUPTOR DE CA: Puede suministrar energía a su sistema estéreo al conectar el cable de alimentación de CA (24) a una toma de corriente de pared. Compruebe que el voltaje nominal de su aparato coincide con el voltaje local. PARA USAR LA RADIO 1. Pulse el botón de [POWER] (2) para encender la unidad; 2. Seleccione la fuente de audio deseada al pulsar el botón [SOURCE] (7 a 11); 3. (Consulte las instrucciones específicas para cada Fuente en los siguientes capítulos); 4. Ajuste el volumen con la [PERILLA DE VOLUME] (3) al nivel deseado; 5. Mantenga pulsado el botón de [POWER] (2) para apagar la unidad. Nota: Cuando no se produce ningún sonido, la unidad se apagará automáticamente transcurridos 10 minutos. FUNCIONAMIENTO DE LA RADIO 1. Pulse el botón [AM] o [FM] (7 u 8); 2. Ajuste la frecuencia de radio a su emisora deseada al girar la [PERILLA DE TUNING] (19). Nota: Para obtener una mejor recepción, mueva la antena de cable (23). Para la recepción de MW, las señales se recogen a través de una antena de ferrita integrada. Es posible que tenga que orientar la unidad para obtener la mejor recepción. FUNCIONAMIENTO DEL TOCADISCOS Nota: Cuando use el tocadiscos por primera vez, gire el [TORNILLO DE BLOQUEO DE TRANSPORTE] (26) hacia la derecha hasta que esté completamente atornillado. 60 1. Pulse el botón [PHONO] (11); 2. Ponga un disco en el tocadiscos. Coloque el adaptador EP sobre el cabezal central cuando reproduzca discos de 45 rpm; 3. Ajuste el [SELECTOR DE VELOCIDAD] (30) a 33, 45 o 78 rpm según el disco; 4. Suelte la [PINZA DEL BRAZO DE LECTURA] (28) y retire el protector de la aguja; 5. Levante el [BRAZO DE LECTURA] (27) con la [PALANCA DE ELEVACIÓN] (30); 6. Mueva el [BRAZO DE LECTURA] (27) al principio del disco; 7. Baje el [BRAZO DE LECTURA] (27) con la [PALANCA DE ELEVACIÓN] (29); 8. Cuando termine el disco, el [BRAZO DE LECTURA] (27) volverá automáticamente al soporte y el [PLATO] (25) dejará de girar. Para detenerlo de forma manual, levante el brazo de lectura y colóquele en el soporte. NOTA: No gire ni detenga manualmente el tocadiscos. Mover o sacudir el tocadiscos sin fijar la abrazadera del brazo podría provocar daños en el mismo. Preparar el TCS-2550 para el transporte. • • • Bloquee el [BRAZO DE LECTURA] (27) con el [PINZA DEL BRAZO DE LECTURA] (28); Coloque la funda protectora en la aguja (incluso cuando no la utilice); Gire el [TORNILLO DE BLOQUEO DE TRANSPORTE] (26) hacia la izquierda hasta que sienta más resistencia (¡no quite el tornillo del todo!) FUNCIONAMIENTO DE CD-MP3 1. Pulse el botón [CD/USB] (9); 2. Pulse [OPEN/CLOSE] (18) para abrir la [COMPUERTA DEL CD] (12) y coloque un CD con la etiqueta hacia arriba en el compartimiento del CD. 3. Cierre la [COMPUERTA DEL CD] (12). Se realiza una búsqueda de música de CD y empezará la reproducción de forma automática desde la primera pista. 61 PROGRAMACIÓN Se pueden programar hasta 99 pistas (MP3, 20 en CD) y reproducir en cualquier orden. 1. Detenga la reproducción al pulsar [STOP] (14 o 41); 2. Pulse [PLAY MODE] (17) o [PROGRAM] (32), aparecerá “P01” en la pantalla (6) y parpadeará; 3. Seleccione la pista deseada con los botones [SKIP-/+] (15/16 o 39/40); 4. Pulse [PLAY MODE] (17) o [PROGRAM] (32) para programar la pista en la memoria del programa; 5. Repita los pasos 3 y 4 para introducir pistas adicionales en la memoria del programa. 6. Cuando se hayan programado todas las pistas deseadas, pulse [PLAY] (13 o 38) para reproducir el disco en el orden que ha programado. Nota: Pulse [STOP] (14 o 41) dos veces para terminar la reproducción programada. FUNCIONAMIENTO USB 1. Pulse el botón [CD/USB] (9); 2. Conecte una memoria USB en el [PUERTO USB] (1); 3. Pulse el botón [FUNCTION] (4) para seleccionar el modo USB; 4. La reproducción comenzará automáticamente desde la primera pista. PROGRAMACIÓN La operación de PROGRAMACIÓN es la misma que la de un CD-MP3. Nota: • • Es posible que algunos reproductores de mp3 no puedan reproducirse a través de la toma USB. Esto no significa que el sistema funcione de forma incorrecta. El puerto USB no está diseñado para cargar smartphones u otros dispositivos. FUNCIONAMIENTO DE LA CINTA 1. Pulse el botón de fuente [TAPE] (10); 2. Introduzca una CINTA de casete en el [MECANISMO DEL CASETE] (22); 3. El sistema iniciará la reproducción de forma automática; 62 • • • Pulse el botón [AVANZAR/EXPULSAR CINTA] (21) hasta la mitad durante la reproducción para iniciar el bobinado rápido de la cinta hacia adelante. Pulse levemente el botón [AVANZAR/EXPULSAR CINTA] (21) otra vez para reanudar la reproducción. Pulse el botón [AVANZAR/EXPULSAR CINTA] (21) hasta el fondo completamente y la cinta de casete saldrá expulsada. CODIFICACIÓN USB DIRECTA Observación: • • • La velocidad de grabación es 1:1. No se grabará ningún título de canción durante el modo de codificación. Para evitar dañar la memoria USB, sáquela solo cuando se apague la radio. CODIFICAR A PARTIR DE PHONO Y CASETE: 1. Conecte la memoria USB en el [PUERTO USB] (1); 2. Realice la reproducción normal de la fuente que quiere codificar y grabar; 3. Pulse el botón [RECORD] (5 o 37) dos veces para iniciar la codificación. Parpadeará “REC” en la pantalla; 4. Cuando termine el disco, pulse el botón [STOP] (14 o 41) para detener la grabación. FORMATO PARA CODIFICAR CD: Codificar 1 pista: 1. Conecte la memoria USB en el [PUERTO USB] (1); 2. Realice la reproducción normal de la pista que quiere codificar y grabar; 3. Pulse el botón [RECORD] (5 o 37) dos veces durante la reproducción de la pista deseada. La reproducción se detendrá y se reiniciará de forma automática. El texto "USB" en la parte superior de la pantalla parpadeará, lo que indica que ha empezado la codificación. 4. Al final de la pista, pulse el botón [STOP] (14 o 41) para terminar de grabar la pista. 1. Conecte la memoria USB en el [PUERTO USB] (1); 2. Realice la reproducción normal del CD que quiere codificar y grabar; 3. Pulse el botón [RECORD] (5 o 37) dos veces cuando se haya completado la búsqueda de música inicial; 4. Comenzará la reproducción. El texto "USB" en la parte superior de la pantalla parpadeará, lo que indica que ha empezado la codificación. Nota: Cuando se complete la conversión, la unidad detendrá la reproducción y la grabación de forma automática. 63 ELIMINAR PISTAS DEL USB 1. Realice la reproducción normal de la pista que quiere eliminar; 2. Durante la reproducción de la pista que quiere eliminar, pulse dos veces el botón [DELETE] (33) en el mando a distancia. ESPECIFICACIONES Requisitos de alimentación Consumo de energía Potencia musical Frecuencia de radio : : : : Velocidad del tocadiscos: Compatibilidad de reproductor de CD Conexión USB para la memoria (sin cargar) Grabación USB desde CD, cinta y disco. : : : : 64 CA 230 V~, 50 Hz 40 vatios (máx) 2 X 4,5 W AM: 525-1640 KHz FM: 88-108 MHz 33/45/78 RPM CD/CD-R/CD-RW/MP3 Archivos MP3 Bitrate 128 KBPS 1. Garantía Lenco ofrece servicio y garantía en cumplimiento con las leyes de la Unión Europea, lo cual implica que, en caso de que su producto precise ser reparado (tanto durante como después del periodo de garantía), deberá contactar directamente con su distribuidor. Nota importante: No es posible enviar sus reparaciones directamente a Lenco. Nota importante: Si la unidad es abierta por un centro de servicio no oficial, la garantía quedará anulada. Este aparato no es adecuado para el uso profesional. En caso de darle un uso profesional, todas las obligaciones de garantía del fabricante quedarán anuladas. 2. Exención de responsabilidad Regularmente se llevan a cabo actualizaciones en el Firmware y en los componentes del hardware. Por esta razón, algunas de las instrucciones, especificaciones e imágenes incluidas en este documento pueden diferir ligeramente respecto a su situación particular. Todos los elementos descritos en esta guía tienen un objetivo de mera ilustración, y pueden no ser de aplicación en su situación particular. No se puede obtener ningún derecho ni derecho legal a partir de la descripción hecha en este manual. 3. Eliminación del antiguo dispositivo Este símbolo indica que no deberá deshacerse del producto eléctrico o batería en cuestión junto con los residuos domésticos, en el ámbito de la UE. Para garantizar un tratamiento residual correcto del producto y su batería, por favor, elimínelos cumpliendo con las leyes locales aplicables sobre requisitos para el desechado de equipos eléctricos y baterías. De hacerlo, ayudará a conservar recursos naturales y mejorar los estándares de protección medioambiental en el tratamiento y eliminación de residuos eléctricos (Directiva sobre la Eliminación de Equipos Eléctricos y Electrónicos). 4. Marca CE Por la presente, Lenco Benelux B.V., Thermiekstraat 1a, 6361 HB Nuth, Países Bajos, declara que este producto cumple con las exigencias esenciales de la directiva de la UE. La declaración de conformidad puede consultarse mediante [email protected] 5. Service (Servicio) Para obtener más información y soporte del departamento técnico, por favor, visite la página web www.lenco.com Lenco Benelux BV, Thermiekstraat 1a, 6361 HB, Países Bajos. 65-
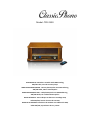 1
1
-
 2
2
-
 3
3
-
 4
4
-
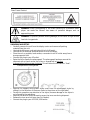 5
5
-
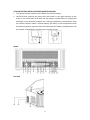 6
6
-
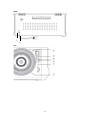 7
7
-
 8
8
-
 9
9
-
 10
10
-
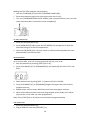 11
11
-
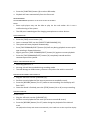 12
12
-
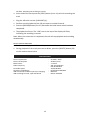 13
13
-
 14
14
-
 15
15
-
 16
16
-
 17
17
-
 18
18
-
 19
19
-
 20
20
-
 21
21
-
 22
22
-
 23
23
-
 24
24
-
 25
25
-
 26
26
-
 27
27
-
 28
28
-
 29
29
-
 30
30
-
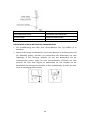 31
31
-
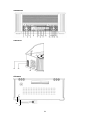 32
32
-
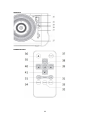 33
33
-
 34
34
-
 35
35
-
 36
36
-
 37
37
-
 38
38
-
 39
39
-
 40
40
-
 41
41
-
 42
42
-
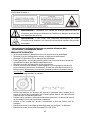 43
43
-
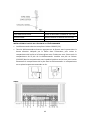 44
44
-
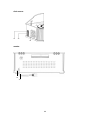 45
45
-
 46
46
-
 47
47
-
 48
48
-
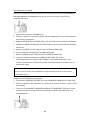 49
49
-
 50
50
-
 51
51
-
 52
52
-
 53
53
-
 54
54
-
 55
55
-
 56
56
-
 57
57
-
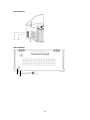 58
58
-
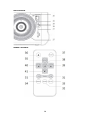 59
59
-
 60
60
-
 61
61
-
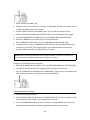 62
62
-
 63
63
-
 64
64
-
 65
65
-
 66
66


Classic Phono TCD-2550 Handleiding
- Categorie
- CD spelers
- Type
- Handleiding
in andere talen
- English: Classic Phono TCD-2550 User manual
- français: Classic Phono TCD-2550 Manuel utilisateur
- español: Classic Phono TCD-2550 Manual de usuario
- Deutsch: Classic Phono TCD-2550 Benutzerhandbuch
Gerelateerde papieren

Andere documenten
-
Roadstar HIF-1902HP Handleiding
-
Roadstar HIF-1937TUMPK Handleiding
-
Lenco Classic Phono TCD-2570WD de handleiding
-
Roadstar HIF-1993BT de handleiding
-
Roadstar HIF-1893TUMPK Handleiding
-
Lenco TCD-2550 Handleiding
-
Lenco LS-55 Handleiding
-
-
Roadstar HIF-1899TUMPK Handleiding
-
Roadstar HIF-1993D+BT Handleiding