
TC-139
TC-139
Lire attentivement la notice avant d’utiliser l’appareil
Before operating this product, please read user manual completely
Lees de handleiding door voordat u deze eenheid gebruikt
Lea atentamente el manual del usuario antes de utilizar el aparato
Lesen Sie die Bedienungsanleitung bevor Sie das Gerät gebrauchen
Français - English - Dutch
Español - Deutsch
2
MANUEL D’UTILISATION
13
USER MANUAL
24
HANDLEIDING
35
MANUAL DE INSTRUCCIONES
47
BEDIENUNGSANLEITUNG

AVANT DE COMMENCER
Merci d’avoir acheté le TOKAI TC-139: un radioréveil Bluetooth® doté d’une
double alarme avec RADIO FM numérique.
Ce produit est votre garantie de qualité, de performance et de valeur. Nos
ingénieurs ont inclus de nombreuses fonctionnalités utiles et pratiques dans
ce produit. Veuillez lire ce manuel d’instructions entièrement an d’assurer la
meilleure performance de chaque fonction.
Ce produit a été fabriqué en utilisant des composants de qualité et dans les
normes de fabrication.
Le TOKAI TC-139 a été testé par les inspecteurs et trouvé en parfait état de
fonctionnement avant de quitter notre usine.
Pour référence ultérieure, noter le numéro de série dans l’espace prévu.
Model No: TOKAI TC-139
N° de série
AVERTISSEMENTS
REMARQUE:
Nous nous réservons le droit d’apporter des changements techniques sans
préavis dans un but d’amélioration.
IMPORTANT!
Il est recommander de ne pas laisser un téléphone portable à proximité de
l’appareil, an d’éviter des interférences électromagnétiques dans les haut-
parleurs
2
Ce symbole indique qu’une tension dangereuse représentant un risque
d’électrocution est présente dans cet appareil, ne pas toucher les pièces à
l’intérieur an d’éviter tout risque de choc électrique pour les personnes.
ATTENTION: POUR RÉDURE LE RISQUE D’ÉLECTROCUTION,
NE PAS RETIRER LE COUVERCLE L’INTÉRIEUR DE L’APPAREIL
NE COMPORTE AUCUNE PIÉCE UTILE À L’UTILISATEUR
CONFIEZ-EN L’ENTRETIEN A DU PERSONNEL QUALIFIE
Ce symbole indique que la documentation fournie avec cet appareil
contient des instructions importantes relatives au fonctionnement et à
l’entretien.
ATTENTION
RISQUE D’ÉLECTROCUTION
NE PAS COUVRIR

3
ATTENTION
Danger d’explosion si la pile n’est pas correctement installée. Lorsqu’elle est
usée remplacez-la uniquement avec le même type de pile.
Cet appareil est appareil de classe II. Ce symbole signie que cet
appareil est doublement isolé. Une prise de terre n’est pas nécessaire.
PRECAUTIONS D’UTILISATION
1. Ne placez aucune amme, telle qu’une bougie, sur l’appareil.
2. Ne placez pas l’appareil dans un endroit clos, tel qu’une bibliothèque fermée
ou étagère sans une ventilation adéquate.
3. Lorsque le dispositif de mise hors tension est la che secteur, celle-ci doit
rester accessible et opérationnelle.
4. N’obstruez pas les grilles de ventilation avec des objets tels que journaux,
nappes de table, rideaux, etc.
5. N’exposez pas l’appareil à des projections de liquides et assurez-vous
qu’aucun objet contenant de l’eau, tel qu’un vase, ne soit placé sur
l’appareil.
6. Ne branchez pas l’antenne FM sur une antenne extérieure.
7. N’exposez pas l’appareil au rayonnement direct du soleil, aux extrêmes de
températures, à l’humidité, aux vibrations ou à un environnement
poussiéreux.
8. Ne nettoyez pas la surface de l’appareil à l’aide de produits abrasifs, de
benzène, de diluants ou d’autres solvants. Nettoyez-la avec une solution de
détergent doux et non-abrasif et un chiffon propre et doux.
9. Ne tentez jamais d’insérer des ls de fer, aiguilles ou autres objets similaires
dans les grilles de ventilation ou autres orices de l’appareil.
10. Avertissement concernant la mise hors tension de l’appareil : la mise hors
tension s’effectue en débranchant la che secteur. De ce fait, celle-ci doit
toujours rester accessible et opérationnelle.
11. N’exposez pas les piles à une chaleur extrême, telle que le rayonnement
direct du soleil, le feu etc.
12. Produit LED Classe 1.

4
ALIMENTATION SECTEUR & SYSTEME DE SAUVEGARDE
Branchement de l’adaptateur AC-DC
Le radioréveil est alimenté par un adaptateur AC-DC externe (inclus) avec une
tension de sortie de 5V DC 1.5A.
Connexion de l’alimentation
Branchez l’adaptateur AC-DC sur une prise de courant AC domestique, puis
branchez la che DC de l’adaptateur sur la prise d’entrée DC du radioréveil.
Pile de sauvegarde
• Le radioréveil dispose d’un système d’alimentation de secours nécessitant
une pile plate au lithium 3V de type CR2032 (non fournie).
• Ouvrez le compartiment de la pile en dévissant le couvercle avec un petit
tournevis.
• Insérez la pile dans le compartiment à pile en respectant la polarité (+/-)
indiquée à l’intérieur du compartiment.
• Revissez le couvercle du compartiment de la pile pour le refermer.
Note : En cas de coupure de courant, le radioréveil bascule automatiquement
sur l’alimentation par pile, ainsi l’horloge et la mémoire du réveil sont
conservées et continuent de fonctionner normalement. Lorsque le courant est
rétabli, le radioréveil bascule de nouveau sur l’alimentation secteur.
Précautions d’emploi des Piles
1. Utilisez uniquement la taille et le type de pile spéciés dans ce mode
d’emploi.
2. Si l’appareil ne doit pas être utilisé pendant une longue période, retirez la
pile. Une vieille pile ou une pile qui fuie peut causer des dommages à
l’appareil.
3. Ne pas essayer de recharger une pile qui n’est pas destinée à être
rechargée; elle peut surchauffer et exploser (Suivez les instructions du
fabricant de la pile).
4. Ne pas jeter les piles au feu, elles pourraient fuir ou exploser.
Mise en garde !
Il existe un risque d’explosion en cas de remplacement non-conforme de la pile.
Remplacez-la uniquement par une pile du même type ou d’un type équivalent
Protection de l’Environnement !
Les piles contiennent des substances chimiques. Par souci de protection de
l’environnement, il est recommandé de se débarrasser des piles usagées en les
déposant dans des contenants spécialement conçus à cet effet.

5
DESCRIPTION DE L’APPAREIL ET EMPLACEMENT DES COMMANDES
COMMANDES ET FONCTIONS
1. SNOOZE / SLEEP / DIMMER : Alarme à répétition / Fonction Sommeil /
Variateur de luminosité
2. Touche SOURCE
3. Touche M+ / : Mémoire + / Lecture – Pause / Coupler
4. Touche : Précédent / Recherche des stations précédentes
5. Touche : Suivant / Recherche des stations suivantes
6. VOLUME - /AL.1 : Diminuer le volume / Activer-Désactiver/ Réglage
ALARME 1
7. VOLUME+/AL 2 : Augmenter le volume/ Activer-Désactiver /Réglage
ALARME 2
8. Touche SET/MEM : Réglage / Mémorisation
9. Touche / LIGHT : Marche-Arrêt / Activer-Désactiver Lumière d’ambiance /
Arrêt Alarme
10. AFFICHEUR LED
11. LUMIERE D’AMBIANCE
12. Prise Chargeur USB
13. Fil d’antenne FM
14. Compartiment à pile
15. Plaque signalétique
16. Prise d’entrée DC (5V DC IN)
17. Prise d’entrée AUXILIAIRE (AUX IN)
18. Haut parleur

6
DESCRIPTION DE L’AFFICHEUR & DES INDICATEURS
REGLAGES DE L’HORLOGE ET DU REVEIL
Réglage manuel de l’heure
En mode appareil éteint, maintenez enfoncé la touche SET/MEM (8) Réglage /
Mémorisation; l’indication “24 Hr” clignote à l’écran. Appuyez sur la touche
(4) ou (5) pour sélectionner le format d’afchage de l’heure 24H ou 12H.
Appuyez sur la touche SET/MEM (8) pour conrmer, et les chiffres de l’heure
clignotent.
Appuyez sur la touche (4) ou (5) pour régler l’heure actuelle. Appuyez
de nouveau sur la touche SET/MEM (8) pour conrmer, puis les chiffres des
minutes clignotent.
Appuyez sur la touche (4) ou (5) pour régler les minutes.
Lorsque les réglages sont terminés, appuyez encore une fois sur la touche SET/
MEM (8): pour conrmer le réglage de l’heure actuelle qui s’afche.
Réglage du réveil
Pour afcher l’heure du réveil, appuyez une fois sur la touche AL.1 ou AL.2
(6/7).
Lorsque l’heure de réveil s’afche, appuyez sur la touche Alarme - AL1 / AL2 -
pendant 3 secondes: les chiffres de l’heure clignotent.
Appuyez sur la touche (4) ou (5) pour régler les heures.
Appuyez de nouveau sur la touche Alarme - AL1 / AL2 : les chiffres des
minutes clignotent.
Appuyez sur la touche (4) ou (5) pour régler les minutes.
Appuyez sur la touche Alarme (AL1 / AL2) pour changer le mode de réveil (pour
la sonnerie BEP s’afche ; pour la RADIO la fréquence s’afche).
Activer / Désactiver / Arrêt de l’alarme
Appuyez et maintenez enfoncé le bouton “AL.1” (6) / “AL. 2 “(7) pour activer
l’alarme.
Une fois l’alarme activée, le voyant s’allume sur l’afcheur à côté de l’indicateur
AL1 ou AL2.
Pour désactiver l’alarme, maintenez enfoncé le bouton “AL.1” (6) / “AL. 2 “(7)
Indicateur de l’HEURE
Indicateur PM
Indicateur AUXILIAIRE
Indicateur ALARME 1
Indicateur Bluetooth®
Indicateur FM
Indicateur ALARME 2

7
jusqu’à ce que l’indicateur de l’alarme disparaisse de l’afcheur.
Pour arrêter l’alarme, appuyez sur la touche Arrêt Alarme “ / LIGHT” (9).
Fonction “Lumière d’ambiance”
Pour rendre votre réveil plus agréable, le TC 139 vous aidera à bien commencer
la journée grâce à sa fonction « lumière d’ambiance » que vous pourrez régler
avec votre alarme. Lorsque votre alarme retentit en mode sonnerie ou radio le
TC-139 s’illuminera en couleurs.
Appuyez longuement sur la touche LIGHT (9) pour activer ou désactiver la
fonction Lumière d’ambiance.
Fonction SNOOZE: Alarme à répétition
La fonction alarme à répétition : SNOOZE vous permet de dormir 9 minutes de
plus.
Lorsque l’alarme sonne, appuyez sur la touche ‘SNOOZE’ (1) pour activer
la fonction « Alarme à répétition », le réveil (réglé sur sonnerie ou sur radio)
s’arrête et sonnera de nouveau 9 minutes plus tard. Pour désactiver la fonction
Snooze, appuyez sur la touche ‘Arrêt Alarme’ (9).
FONCTION RADIO
REMARQUE: Assurez-vous que l’antenne FM est complètement déroulée pour
assurer une meilleure réception FM.
Écouter la Radio
1) Appuyez sur la touche ‘Marche/Arrêt’ (9) pour allumer la radio.
2) Réglez la station FM à l’aide des boutons de recherche des stations (4)
ou (5). Appuyez et maintenir la pression pendant 1 seconde sur l’un des
boutons de recherche (4) ou (5), puis relâcher, l’appareil recherchera
automatiquement la prochaine station de radio disponible.
3) Pour éteindre la radio appuyez sur la touche Marche/Arrêt (9).
Mémoriser et rappeler des stations de radio présélectionnées
1. Appuyez sur la touche Marche/Arrêt (9) pour allumer l’appareil.
2. Réglez la station FM désirée à l’aide des boutons de recherche (4) ou
(5).
3. Appuyez sur la touche SET/MEM (8) & l’indication “P01” clignote à l’écran.
4. Appuyez une nouvelle fois sur la touche ‘SET/MEM’ pour mémoriser la
station radio.
5. Répéter les étapes 2 à 4 an de mémoriser d’autres stations de radio.
6. Votre radio réveil peut stocker jusque 10 stations de radio FM.
7. Lorsque “P01-P10” clignote, sélectionnez le numéro de préréglage à l’aide
des boutons (4) ou (5).

8
8. Pour rappeler une station préréglée, appuyez sur ‘M +’ (3) pour sélectionner
le numéro de préréglage dans l’ordre.
Fonction Sommeil (Arrêt différé)
Lorsque vous écoutez la radio, appuyez sur le bouton SLEEP (1) pour entrer
en mode « Arrêt différé ». Appuyez plusieurs fois sur la touche SLEEP pour
programmer l’arrêt différé de 120 minutes à 10 minutes (par palier de 10
minutes). L’appareil s’éteint automatiquement une fois le temps écoulé.
FONCTION BLUETOOTH®
Conguration Bluetooth®
Les performances de connexion Bluetooth® peuvent varier selon la marque et
le modèle de l’appareil connecté. Pour de meilleures performances, veuillez
connecter des périphériques Bluetooth® les plus récents intégrant la version
Bluetooth® 2.1 et utilisant la dernière mise à jour du micro logiciel disponible
auprès du constructeur de l’appareil. La compatibilité avec tous les appareils et
les types de médias n’est pas garantie.
An de considérer les performances Bluetooth®, s’assurer que tout autre
appareil Bluetooth® dans un rayon de 9 mètres ont leur fonction Bluetooth®
désactivée, car la présence d’autres périphériques Bluetooth® en mode activé
pourraient compliquer les opérations de connexion. Le Bluetooth® est une
technique de communication radio à courte portée.
L’émetteur Bluetooth® et du matériel de réception de cet appareil a une plage
de fonctionnement d’environ 9 mètres dans un espace ouvert.
Généralement, les dispositifs Bluetooth® peuvent communiquer, les uns avec
les autres, facilement dans une pièce de taille normale. Le fonctionnement entre
les différentes pièces dépend de la construction de la pièce. Il est important
de noter que la portée Bluetooth® est sensiblement réduite si des objets
solides obstruent la communication. Le corps humain, des murs en béton, ou
bibliothèques réduisent la portée Bluetooth®. Le verre, les murs lambrissés ou
les cloisons de bureau peuvent avoir un effet moins grave mais perceptible.
Vous devez placer vos périphériques Bluetooth® à proximité les uns des autres
si vous observez des difcultés de communication.
Connexion de votre téléphone mobile, tablette, etc…
Veuillez lire attentivement, au préalable, les instructions liées aux opérations
de couplage Bluetooth® de votre périphérique Bluetooth® tel que Smartphone
(Android®, iPhone®, Windows phone® etc…), tablette, lecteur multimédia ou
autres périphérique possédant la fonction Bluetooth®. Veuillez vous familiariser
avec les fonctionnalités Bluetooth® de votre appareil avant de le connecter au
TC-139.

9
Coupler votre périphérique Bluetooth®
1. Assurez-vous que la fonction Bluetooth® de votre périphérique Bluetooth®
est activée. Référez vous au manuel d’utilisation de votre appareil externe
pour plus de détails.
2. Placez le TOKAI TC-139 et votre périphérique Bluetooth® externe dans un
rayon de 90 cm.
3. Mettez le TOKAI TC-139 sous tension en appuyant sur la touche Marche/
Arrêt (9).
4. Appuyez sur la touche SOURCE de votre appareil pour passer en mode
BLUETOOTH®. Le voyant s’allume à côté de l’indicateur “BT” sur l’afcheur.
L’indicateur clignote rapidement.
5. Utilisez les touches de contrôles de votre appareil Bluetooth® externe
pour lancer la recherche de votre appareil Bluetooth® celui-ci apparait sous
l’identiant «TC-139 » puis sélectionnez-le. Si votre appareil externe requiert
un mot de passe, entrez le mot de passe par défaut “0 0 0 0”. Se référer
au mode d’emploi de votre appareil Bluetooth® externe pour les opérations
de couplage et de connexion avec des appareils Bluetooth®.
6. Sélectionnez et conrmez le couplage sur votre périphérique Bluetooth®.
La connexion est établie en quelques secondes et le TOKAI TC-139 produit
un signal sonore de conrmation. Une fois le couplage réussi, l’indicateur
de couplage Bluetooth®, à côté de BT sur l’afcheur, clignote lentement.
Votre radioréveil restera couplé à l’appareil externe à moins que vous ne
le déconnectiez manuellement ou bien que vous effectuiez une
réinitialisation, vous pouvez maintenant commencer à écouter votre musique
en streaming via le procédé Bluetooth®.
Lecture de vos chiers audio via Bluetooth®
1. Suivez les instructions liées aux opérations de couplage pour connecter
votre périphérique Bluetooth®.
2. Utilisez les touches de contrôles de votre appareil Bluetooth® connecté pour
sélectionner une piste musicale.
3. Pour lire ou pour mettre en pause la piste sélectionnée, utilisez les touches
de contrôles de votre périphérique Bluetooth®, ou appuyez sur la touche
Lecture/Pause (3) de votre radioréveil.
4. Votre musique mise en lecture sur votre appareil Bluetooth® externe est
maintenant entendue à travers le haut-parleur de votre radio réveil.
Coupler un nouveau périphérique BLUETOOTH®
Vous pouvez coupler seulement un appareil Bluetooth® externe à la fois sur
votre radioréveil.
Si vous voulez changer le périphérique externe Bluetooth® connecté avec votre
radioréveil, veuillez procéder comme suit:
• Activez la fonction Bluetooth® sur votre appareil Bluetooth® externe.

• Appuyez et maintenez la touche « COUPLER » M+/ (3) pendant 3
secondes. L’indicateur de couplage à côté de « BT » sur l’afcheur, clignote
rapidement et le radioréveil émettra un signal de conrmation.
• Sélectionnez et conrmez le couplage sur votre nouvel appareil Bluetooth®
externe.
Note:
Certains téléphones mobiles peuvent se connecter et se déconnecter lorsque
vous effectuez un appel téléphonique et mettez n aux appels. Ce n’est pas une
indication d’un problème avec votre appareil.
AUTRES FONCTIONS
Fonction « Variateur de luminosité »
En mode veille, appuyez sur le bouton DIMMER (variateur de luminosité) (1)
pour augmenter ou réduire la luminosité de l’écran LED.
Fonction « Entrée Auxiliaire »
Cette fonction requiert l’utilisation d’un câble audio de 3,5 mm (non inclus).
La prise AUXILIAIRE vous permettra de connecter un lecteur de musique
externe ou une source sonore externe à votre TC-139.
1. Branchez un câble audio de 3,5 mm (non inclus) dans votre appareil externe
et branchez l’autre extrémité (3,5 mm jack) à la prise AUX-IN situé à l’arrière
de l’unité.
2. Appuyez sur le bouton SOURCE pour basculer en mode Entrée Auxiliaire
(AUX IN).
3. Utilisez les touches de contrôles de l’appareil externe connecté pour
contrôler la lecture jouée via le haut-parleur du radioréveil.
Fonction « Recharge via le port USB »
La prise chargeur USB DC 5 V. (12) située à l’arrière de l’appareil vous permet
de recharger un appareil externe au moyen d’un cordon USB (non fourni).
Vous pouvez recharger un appareil de maximum DC 5V.
Par exemple, cette prise USB vous permet de recharger votre Smartphone,
iPhone® ou tablette (de DC 5 V. max).
ATTENTION ! Ce port USB a uniquement une fonction de recharge et ne vous permet
PAS de brancher une clé USB et de lire son contenu.
Fonction « Réinitialisation »
Si le système ne répond pas ou fonctionne avec des erreurs ou par
intermittence, ceci est peut-être dû une décharge électrostatique (ESD) ou
une surtension qui a déclenché une extinction automatique du microcontrôleur
10

interne.
Si cela se produit, débranchez simplement le cordon d’alimentation et retirez
la pile de sauvegarde, puis attendre au moins 3 minutes, puis congurer de
nouveau l’appareil en suivant le mode d’emploi.
SPECIFICATIONS TECHNIQUES
Référence Modèle • TC-139
Alimentation • Entrée AC 100-240V - 50/60 Hz
• Sortie DC 5V 1500mA
Consommation en mode marche • 5W
Consommation en mode veille • < 1 W
Pile de secours •1 pile de 3V (CR2032 Lithium) non fournie
Couverture de Fréquence Radio • FM: 87.5MHz - 108 MHz
Puissance de sortie AUDIO • 2 W RMS
Prise chargeur USB • 1000 mA / DC 5V MAX
Entrée AUXILIAIRE • Prise Jack 3.5 mm
Bluetooth® • Version 2.1
Plage température intérieure • 0 to + 50°C or 32 to 122 °F
Poids de l’appareil • 300 g
Dimensions • 106×125×116 mm
IMPORTANT :
Les spécications et le design de l’appareil peuvent être soumis à
modications sans préavis.
IMPORTATEUR EXCLUSIF
Ce produit a été importé par la Société LEMA S.A.S.
Pour toute question relative à la conformité du produit, merci d’envoyer votre
demande à :
LEMA S.A.S.
28, Boulevard Zéphirin Camélinat
92230 GENNEVILLIERS
FRANCE
11

MISE AU REBUT EN FIN DE VIE
Attention ! Ce logo apposé sur le produit indique qu’il s’agit d’un
appareil dont le traitement en tant que déchet rentre dans le cadre de
la directive 2002/96/CE du 27 janvier 2003, relative aux déchets
d’équipements électriques et électroniques (DEEE).
Ce symbole signie que les produits électriques et électroniques
usagées ne doivent pas être mélangés avec les déchets ménagers
généraux. Un système de collecte séparé est prévu pour ces produits.
Si vous souhaitez mettre cet appareil au rebut, ne le jetez pas
dans une poubelle ordinaire !
- La présence de substances dangereuses dans les équipements électriques
et électroniques peut avoir des effets potentiels sur l’environnement et la
santé humaine dans le cycle de retraitement de ce produit.
- Ainsi, lors de la n de vie de cet appareil, celui-ci ne doit pas être jeté avec
les déchets municipaux non triés. Les appareils électriques et électroniques
doivent être traités séparément et conformément aux lois en vigueur en
matière de traitement, de récupération et de recyclage adéquats de ces
appareils.
- Des systèmes de reprise et de collecte sont mis à votre disposition par les
collectivités locales (déchetteries) et les distributeurs. Veuillez contacter
votre administration locale pour plus de renseignements. Vous avez
l’obligation d’utiliser les systèmes de collecte sélective mise à votre
disposition.
- Si votre appareil électrique et électronique usagé comporte des piles ou
des accumulateurs, veuillez les mettre séparément et préalablement au rebut
conformément à la législation locale en vigueur.
- En veillant à la mise au rebut correcte de ce produit, vous contribuerez
à assurer le traitement, la récupération et le recyclage nécessaires de ces
déchets, et préviendrez ainsi les effets néfastes potentiels de leur mauvaise
gestion sur l’environnement et la santé humaine.
Cet appareil est conforme aux exigences imposées par la
Directive Européenne 2006 / 95 CE (Directives sur la
Compatibilité Electromagnétique et Basse Tension)
12

BEFORE WE BEGIN
Thank you for purchasing the TOKAI brand model TC-139, Bluetooth Clock
Radio with PLL FM Digital radio & preset stations.
This is your assurance of quality, performance and value. Our engineers have
included many useful and convenient features in this product. Please be sure
to read this instruction Manual completely to make sure you are getting the
maximum benet from each feature.
This product was manufactured using the highest quality components and
standards of workmanship. It was tested by inspectors and found to be in perfect
working order before it left our factory.
For future reference, record the serial number in the space provided.
Model No: TOKAI TC-139 :
Serial Number:
WARNING
NOTE:
We reserve the right to make technical changes without notice in the interest of
improvement.
CAUTION
Danger of explosion if battery is incorrectly replaced. Replace only with the
same or equivalent type of battery.
IMPORTANT!
It is recommended not to leave a mobile phone near the unit in order to avoid
electromagnetic interference in the speakers
This equipment is a Class II or double insulated electrical
appliance. It has been designed in such a way that it does not
require a safety connection to electrical earth.
13
The lightning ash is intended to alert the user to the presence of
dangerous voltage within the product’s enclosure, and touching the inner
parts may result in a risk of electric shock to persons.
The exclamatory mark is intended to alert the user to the presence of
important operating instructions.
To reduce the risk of electric shock or re, do not open the cover. Refer
servicing to qualied service personnel.
Warning

14
PRECAUTIONS FOR USE
1. No naked ame sources, such as lighted candles, should be placed on the
apparatus.
2. Do not place the product in closed bookcases or racks without proper
ventilation.
3. Where the mains plug is used as the disconnect device, the disconnect
device shall remain readily operable.
4. The ventilation should not be impeded by covering the ventilation openings
with items, such as newspapers, table-cloths, curtains, etc.
5. It shall not be exposed to dripping or splashing and that no objects lled with
liquids, such as vases, shall be placed on the apparatus.
6. Do not connect FM antenna to outside antenna.
7. The unit should not be exposed to direct sunlight, very high or low
temperature, moisture, vibrations or placed in dusty environment.
8. Do not use abrasive, benzene, thinner or other solvents to clean the surface
of the unit. To clean, wipe it with mild non-abrasive detergent solution and
clean soft cloth.
9. Never attempt to insert wires, pins or other such objects into the vents or
opening of the unit.
10. Disconnect device warning : Mains plug is used as the connection, so it
should always remain ready operate.
11. Batteries shall not be exposed to excessive heat such as sunshine, re or
the like.
12. Class 1 LED product.
POWER SUPPLY & BATTERY BACK-UP SYSTEM
PREPARATION FOR USE
AC-DC adaptor connection: The clock radio unit can be powered by an external
AC-DC adaptor, required the output DC 5V 1.5A (included).
POWER CONNECTION
Plug the AC-DC adaptor to a household outlet AC source, connect the adaptor’s
DC output plug to the DC IN Jack of the clock unit.
BATTERY BACK-UP
• This unit is equipped with a battery back-up system, it requires a 3V at
lithium battery CR2032 (not included).
• Open the battery compartment by unscrewing the lid with a small
screwdriver.
• Insert the battery in the battery compartment, making certain that

15
the positive and negative (+ and -) battery terminals are attached to the
corresponding terminals on the plate in the battery compartment.
• Screw the lid of the battery compartment to close.
Note : If an AC power failure occurs, the clock automatically switches to the
battery power supply, the clock and timer memory continue running. When the
AC power resumes, the clock switches back to AC again.
BATTERY CARE
1. Use only the size and type of batteries specied.
2. If the unit is not to be used for an extended period of time, remove the
battery. Old or leaking batteries can cause damage to the unit.
3. Do not try to recharge batteries not intended to be recharged; they can
overheat and rupture (Follow battery manufacturer’s directions).
4. Do not dispose of batteries in re, batteries may leak or explode.

16
DESCRIPTION OF THE PRODUCT & LOCATION OF CONTROLS
FUNCTION & CONTROLS
1. SNOOZE / SLEEP / DIMMER BUTTON
2. SOURCE BUTTON
3. MEMORY UP / PLAY / PAUSE BUTTON/PAIR BUTTON
4. SKIP BACK / TUNING DOWN BUTTON
5. SKIP FORWARD / TUNING UP BUTTON
6. VOLUME DOWN/ ALARM 1 ON-OFF SET BUTTON
7. VOLUME UP/ ALARM 2 ON-OFF SET BUTTON
8. SET / MEMORY BUTTON
9. POWER ON – OFF / MOOD LIGHT ON-OFF / ALARM OFF BUTTON
10. DISPLAY
11. MOOD LIGHT
12. USB CHARGING SOCKET
13. FM ANTENNA
14. BATTERY COMPARTMENT
15. RATING LABEL
16. DC IN JACK
17. AUX IN JACK
18. SPEAKER

17
LED DISPLAY & INDICATORS
TIME AND ALARM SETTINGS
Time manual setting
With the radio OFF mode, press and hold the SET / MEMORY button (8); “24
Hr” will blink. Press the SKIP FORWARD (5) or SKIP BACK (4) button to set
the unit to the 12 hour (12 Hr) mode or 24 Hour (24 Hr) mode. Press the SET /
MEMORY button (8) to conrm and the hours will blink.
Press the SKIP FORWARD (5) or SKIP BACK (4) button to set the current hour,
then press the SET / MEMORY (8) button again to conrm the hour; then the
minute digits will blink. Press the SKIP FORWARD (5) or SKIP BACK (4) button
to set the current minutes.
When done, press SET / MEMORY (8) button once again to indicate the current
time is set.
Setting Alarm Time
To preview the alarm time : press the ALARM button (6/7) once.
While the display is showing the alarm time and you hold the ALARM button
(AL.1 / AL.2) for 3 seconds and the hours will blink.
Press the SKIP FORWARD (5) or SKIP BACK (4) button to set the alarm hour.
Press the ALARM button (AL.1 / AL.2) again; the minute digits will blink. Press
the SKIP FORWARD (5) or SKIP BACK (4) button to set the alarm minutes.
Press the ALARM button (AL.1 / AL.2) and you can change the sound mode
(Buzzer or Radio) for the alarm.
Enable / Disable / Stop the alarm
Press and hold the ALARM button “AL.1” (6) / “AL. 2” (7) to enable (or disable)
the alarm. Once the alarm is activated, the small dot on the display will light on
next to the bell symbol of AL1 and AL2.
To stop the alarm from coming on the following day, hold the ALARM button
(AL.1 / AL.2) to turn it OFF. The alarm icon will disappear to indicate the alarm
is disarmed.
To stop the alarm, press ALARM OFF (9) button.
TIME Indicator
PM Indicator
AUX Indicator
ALARM 1 Indicator
BLUETOOTH Indicator
FM Indicator
ALARM 2 Indicator

18
Wake up to radio or buzzer with mood-lights
Have a great start to each day with your choice of wake up call. Have a buzzer
or radio station to rouse you from slumber. Mood-lights will also come on when
your alarm sounds, making mornings ever so pleasant.
Mood-lights
Press and hold the MOOD LIGHT ON-OFF button (9) for 3 seconds to turn the
mood- lights ON-OFF.
Even though Mood-lights is OFF in standby mode, the Mood Light will light ON
when Alarm sounds (together with Buzzer or Radio).
Snooze function
When Alarm rings, press Snooze button (1) to suspend the alarm & to activate
the snooze function, the alarm will stop. It will come on again 9 minutes later
and the alarm will ring again. You may repeat this cycle several times during the
alarm cycle and until the next alarm rings.
Note: The interval time of the Snooze function is 9 minutes.
- If you want to disable the SNOOZE function and stop alarm completely,
press ALARM OFF button (9).
RADIO OPERATIONS
Listening to Radio
Note : Ensure that the FM antenna is completely unrolled and extended for best
FM reception.
1. Press the POWER ON-OFF button (9) to turn the unit ON.
2. Use the TUNING UP (5) or TUNING DOWN (4) button to select the desired
radio station. If you press and hold the TUNING UP (5) or TUNING DOWN
(4) button for one second, then release, the unit will automatically scan to the
next broadcasting station.
3. Press the POWER ON-OFF button (9) to turn the radio OFF.
To set / recall the radio presets
1. Press the POWER ON-OFF button (9) to turn the unit ON.
2. Use the TUNING UP (5) or TUNING DOWN (4) button to select the desired
radio station.
3. Press the SET/MEM. button; “P01” will blink in the display.
4. Press the SET / MEM. button again to set the preset.

19
5. Repeat steps 2 through 4 to set more presets.
6. The unit can preset 10 stations totally for FM.
7. When “P01-P10” is blinking, press the Tune+ or Tune- button to select the
preset number.
8. When recalling preset stations, press the Memory + (M+) button (3) to select
the preset number in cycle.
Sleep operation
When listening to radio, press Sleep button (1) to enter sleep mode. You can just
adjust the sleep timer from 120 mins to 10 mins by pressing the Sleep button
(1). The unit will automatically turn off after the selected time.
BLUETOOTH SETUP
Bluetooth connectivity performance may vary with brand and model of the
connected device. For best performance, please connect newer Bluetooth
devices incorporating Bluetooth 2.1 and using the latest rmware update
available from the device vendor. Compatibility with all devices and media types
is not guaranteed.
Bluetooth performance considerations ensure all Bluetooth devices within 30
feet have Bluetooth transmission disabled. The presence of other functioning
Bluetooth devices during connection may lead to operational difculties.
Bluetooth is a short-range radio communication standard. The Bluetooth
transmitter and receiver hardware in this unit has an approximate operational
range of 30 feet in open space. Generally Bluetooth devices can communicate
with each other clearly within a regular sized room or ofce. Operation between
different rooms will depend on the construction of the room.
It is important to recognize the fact that Bluetooth communication range may be
substantially reduced if the signal passes through a solid object. Human bodies,
brick and concrete walls, and heavy furniture or bookcases will reduce the
operational range of your Bluetooth devices. Glass, dry-wall or wood paneled
walls and ofce partitions may have a less severe but noticeable effect. You
should position your Bluetooth devices closer to each other if you observe
communication difculties.
Stereo music connection to your smart phones (such as Android® smarphones,
Iphone®, Windowsphone® etc…) connection or PC tablet, multi-media player
etc… all devices having Bluetooth function, you will need some familiarity with
the Bluetooth functions of your Bluetooth device. As each device operates
slightly differently, please familiarize yourself with the Bluetooth capabilities of
your device before connecting.

Pairing your Bluetooth device
1. Ensure that the Bluetooth on your Bluetooth device is powered ON. You
might need to refer to the external device user manual for details.
2. Place the clock-radio and the external device where they are no more than 3
feet apart.
3. Power ON the unit by pressing the POWER button (9).
4. Press the Source (2) button to switch to Bluetooth mode.
Bluetooth mode is indicated by “BT” on the display. The pair indicator will
ash quickly.
5. Using the native controls on your Bluetooth device, select the “TC-139” in
your Bluetooth settings to pair. If your device requests a password, enter the
default password “ 0 0 0 0 ”. Refer to the user’s manual for your specic
device for instructions on pairing and connecting Bluetooth devices.
6. Select and conrm the pairing on your external device, the connection will
be completed in a few seconds and the radio will produce a conrmation
tone, when successfully paired and connected, the pair indicator will ash
slowly on the clock radio. After initial pairing, the unit will stay paired unless
unpaired manually by the user or erased due to a reset of the device and
you can now start your Bluetooth music streaming operation.
Playing Audio Wirelessly
1. Follow the instructions for Pairing a Bluetooth Device.
2. Use the native controls on the connected Bluetooth Device to select a track.
3. To play or pause the selected track, use the native controls on the connected
Bluetooth Device or press the Play/Pause button (3).
4. Audio played through the connected Bluetooth device will now be heard
through the speakers of the clock radio.
Changing the Bluetooth connection to a new mobile phone (or other
Bluetooth device)
• You can pair the unit with only 1 external Bluetooth device.
If you want to change the Bluetooth external device already connected with your
clock-radio, please proceed as follows :
Power ON the Bluetooth function of yr external device.
Press and hold the Pair button (3) for 3 seconds. The pair indicator will ash
quickly and the clock-radio will produce a conrmation tone.
Select and conrm the pairing on your new mobile phone or Bluetooth external
device.
20

Note:
Some mobile phones may connect and disconnect as you make and end calls.
This is not an indication of a problem with your unit.
OTHER FUNCTIONS
DIMMER control
In standby mode, press the DIMMER (1) button allows you to set the brightness
of the LED display to high or low levels.
AUX IN
Requires a 3.5mm audio cable (no included).
1. Connect the 3.5mm audio cable to the Line In on the unit and an audio
output on an MP3 player or other audio source.
2. Press the Source button to switch to Aux In mode.
3. Use the native controls on the connected MP3 player or other audio source
to play and control audio played through the clock radio speaker.
USB CHARGING SOCKET
The USB charging socket (12) of DC 5 V. at the back of the unit allows you to
charge an external device via USB cable (not supplied).
You can charge with a DC 5 V. device max.
For example : your mobile phone (Android ® or Iphone ® are in 5 V. max) and
external device with USB socket of max.
The connector or the USB charging cable are not supplied.
RESETTING
If the system does not respond or exhibits erratic or intermittent operation, you
may have experienced an electrostatic discharge (ESD) or a power surge that
triggered the internal microcontroller to shut down automatically. If this occurs,
simply disconnect the ac power cord and remove the system backup battery,
wait for at least 3 minutes and then setup the unit again as if it is a brand new
unit.
21

TECHNICAL SPECIFICATIONS
Power Adaptor: • Input AC 100-240V / 50- 60 Hz
• Output DC 5V 1500mA
Power consumption • 5W
Standby power consumption • <1W
Battery backup • 3V (CR2032 Flat Lithium battery x 1)
not included
Radio Frequency Coverage • FM: 87.5MHz - 108 MHz
USB Charging Socket • 1000 mA / DC 5V MAX
Aux. In • 3.5 mm Jack
Audio output power • 2W RMS
Temperature range for Indoor • 0 to + 50°C or 32 to 122 °F
Net Weight • 0.31kgs
Dimensions • 106 x 125 x 116 mm
IMPORTANT:
Due to continual revision and improvement on our products design,
specications are subject to change without further notice.
EXCLUSIVE IMPORTER
This product was imported by the Company : LEMA S.A.S.
For any questions concerning the conformity of the product, thank you to send
your request to :
LEMA S.A.S.
28, Boulevard Zéphirin Camélinat
92230 GENNEVILLIERS
FRANCE
22

23
END OF LIFE DISPOSAL
Warning ! This logo set on the product means that the recycling
of this apparatus comes within the framework of the Directive
2002/96/CE of January 27, 2003 concerning the Waste of Electrical
and Electronic Equipment (WEEE).
This symbol means that used electrical and electronic products should
not be mixed with general household waste. There is a separate
collection system for these products.
If you want to dispose of this equipment, please do not use the
ordinary dust bin!
- The presence of dangerous substances in the electrical and electronic
equipments can have potential consequences on the environment and
human health in the cycle of reprocessing this product.
- Therefore, at the end of its lifetime, this product shall not be disposed with
other non-recycled waste. Used electrical and electronic equipment must
be treated separately and in accordance with legislation that requires proper
treatment, recovery and recycling of used electrical and electronic
equipment.
- Local authorities and resellers have set special procedures for the purpose
of collecting and recycling this product (please contact your local authority
for further details). You have the obligation to use the selective waste
collection systems put in place by your local authority.
- If you’re used electrical or electronic equipment has batteries or
accumulators, please dispose of these separately beforehand according to
local requirements.
- By disposing of this product correctly you will help ensure that the waste
undergoes the necessary treatment, recovery and recycling and thus prevent
potential negative effects on the environment and human health which could
otherwise arise due to inappropriate waste handling.
This unit complies with European Council Directive 2006 / 95 CE
(Electromagnetic Compatibility & Low Voltage Directives)

VOOR WE VAN START GAAN
Dank u voor uw aankoop van deze Bluetooth wekkerradio met PLL FM
digitale radio & voorkeuzezenders, het model TC-139 van het merk TOKAI.
Dit is uw garantie voor kwaliteit, performance en waarde naar geld. Onze
ingenieurs hebben talrijke nuttige en handige functies in dit product ingebouwd.
Lees deze handleiding volledig om er zeker van te zijn dat u elk kenmerk van
uw apparaat maximaal zult benutten.
Dit product is met de hoogste standaard van vakmanschap vervaardigd uit
onderdelen van de beste kwaliteit. Het is door inspecteurs getest en in perfecte
staat bevonden voordat het onze fabriek verliet.
Noteer in de daarvoor bestemde ruimte het serienummer voor eventueel
toekomstig gebruik.
Model nr.: TOKAI TC-139 :
Serienummer: ___________________________________________________
______
WAARSCHUWING
WAARSCHUWING
OPMERKING:
In het belang van verbetering behouden wij ons het recht voor om zonder
voorafgaande kennisgeving technische aanpassingen te doen.
BELANGRIJK!
Het wordt aanbevolen om geen mobiele telefoon in de buurt van het apparaat
verlaten om elektromagnetische interferentie in de luidsprekers te voorkomen.
Dit apparaat is een klasse II of dubbelgeïsoleerd elektrisch apparaat.
Het is zo ontworpen dat een veiligheidsaansluiting op de elektrische
aarding niet nodig is.
24
De bliksemschicht is bedoeld om de gebruiker te waarschuwen voor
de aanwezigheid van gevaarlijke spanning binnenin de behuizing van
dit product; het aanraken van de onderdelen binnenin kan leiden tot
elektrische schokken bij mensen.
Het uitroepteken is bedoeld om de gebruiker erop te wijzen dat belangrijke
bedieningsinstructies bij dit apparaat zijn meegeleverd.
Om een risico op elektrische schokken of brand te voorkomen mag
de behuizing niet worden geopend. Laat alle onderhoud over aan een
gekwaliceerde elektricien.
Warning

25
GEBRUIKSVOORZORGEN
1. Zet geen naakte vlam zoals van brandende kaarsen bovenop het apparaat.
2. Zet dit apparaat niet in een gesloten boekenkast of rek waardoor de
ventilatie belemmerd wordt.
3. De netstekker doet dienst als hoofdmiddel om dit apparaat van de
netvoeding los te koppelen en dient te allen tijde bereikbaar te zijn.
4. De ventilatie mag niet belemmerd worden door de ventilatieopeningen van
het apparaat af te dekken met bijvoorbeeld kranten, tafelkleden, gordijnen
enz.
5. Dit apparaat mag niet worden blootgesteld aan druppelende of spattende
vloeistof en voorwerpen die met water gevuld zijn, zoals vazen, mogen niet
op dit apparaat worden neergezet.
6. Sluit de FM-antenne niet aan op een buitenantenne.
7. Dit apparaat mag niet worden blootgesteld aan rechtstreeks zonlicht,
extreem hoge of lage temperaturen, vochtigheid, trilling of omgevingen met
veel stof.
8. Gebruik geen schuurmiddelen, benzeen, thinner of andere chemische
producten om de behuizing van dit apparaat te reinigen. Veeg de behuizing
schoon met een mild sopje en een zachte, schone doek.
9. Probeer in geen geval kabels, pinnen of andere voorwerpen in de openingen
of ventilatiesleuven van dit apparaat te stoppen.
10. Waarschuwing betreffende het ontkoppelen van dit apparaat: de stekker
doet dienst als hoofdmiddel om het apparaat van de netvoeding los te
koppelen en dient daarom te allen tijde bereikbaar te zijn.
11. De batterijen mogen niet worden blootgesteld aan overmatige hitte zoals
van zonneschijn of vuur.
12. LED-apparaat van de Categorie 1.
VOEDING & BACK-UPSYSTEEM MET BATTERIJ
VOORBEREIDING VOOR GEBRUIK
De wissel-naar-gelijkstroomadapter aansluiten: de wekkerradio krijgt
stroomvoeding via een externe wissel-naar-gelijkstroomadapter met een uitgang
van 5V 1,5A gelijkstroom (meegeleverd).
AANSLUITEN OP DE VOEDING
Sluit de wissel-naar-gelijkstroomadapter aan op een huishoudelijk stopcontact
en stop de gelijkstroom uitgangstekker van de adapter in het contact DC IN van
de wekkerradio.

26
BATTERIJ BACK-UP
• Dit apparaat is uitgerust met een batterij back-up-systeem dat werkt op een
platte lithiumbatterij van 3V en van het type CR2032 (niet meegeleverd).
• Open het batterijvak door het deksel met een kleine schroevendraaier los te
schroeven.
• Zet de batterij met de positieve en negatieve batterijcontacten (+ en -) in de
juiste richting in het batterijvak. De polariteit is aangeduid op het plaatje in
het batterijvak.
• Schroef het deksel van het batterijvak weer vast.
Opmerking: in geval van stroomstoring schakelt het apparaat automatisch over
naar de batterijvoeding, zodat de klok en het timergeheugen kunnen blijven
werken. Het apparaat schakelt terug naar de wisselstroomvoeding zodra de
stroomvoeding is hersteld.
BATTERIJEN MET ZORG HANTEREN
1. Gebruik uitsluitend batterijen van de grootte en het type dat is opgegeven in
de technische gegevens.
2. Verwijder de batterij als het apparaat lange tijd niet zal worden gebruikt.
Oude of lekkende batterijen kunnen het apparaat beschadigen.
3. Probeer nooit batterijen die niet-herlaadbaar zijn op te laden, omdat deze
kunnen oververhitten en barsten (volg steeds de richtlijnen van de fabrikant
van de batterij).
4. Werp batterijen niet in vuur omdat zij kunnen lekken of ontploffen.

27
BESCHRIJVING VAN HET APPARAAT & LOCATIE VAN DE
BEDIENINGSTOETSEN
FUNCTIE & BEDIENINGSTOETSEN
1. TOETS SLUIMER/SLAAP/DIMMER
2. BRONTOETS
3. TOETS GEHEUGEN OP / WEERGAVE / PAUZE /KOPPELTOETS
4. TOETS ACHTERUIT / AFSTEMMEN NEER
5. TOETS VOORUIT / AFSTEMMEN OP
6. TOETS VOLUME NEER/ WEKKER 1 AAN/UIT INSTELLEN
7. TOETS VOLUME OP/ WEKKER 2 AAN/UIT INSTELLEN
8. TOETS INSTELLEN / GEHEUGEN
9. TOETS AAN/UITSCHAKELEN / SFEERLICHT AAN/UIT / WEKKER UIT
10. DISPLAY
11. SFEERLICHT
12. USB-LAADCONTACT
13. FM-ANTENNE
14. BATTERIJVAK
15. TYPEPLAATJE
16. CONTACT GELIJKSTROOM-IN
17. CONTACT AUX-IN
18. LUIDSPREKER

TIJD-indicator
PM-indicator
AUX-indicator
WEKKER 1-indicator
BLUETOOTH-indicator
FM-indicator
WEKKER 2-indicator
28
LED-DISPLAY & INDICATOREN
DE TIJD EN WEKKER INSTELLEN
De tijd handmatig instellen
Houd in de modus radio UIT de toets INSTELLEN / GEHEUGEN ingedrukt (8),
“24u” gaat dan knipperen. Druk op de toets VOORUIT (5) of ACHTERUIT (4)
om het apparaat in de modus 12 uur (12u) of 24 uur (24u) te schakelen. Druk op
de toets INSTELLEN / GEHEUGEN (8) om te bevestigen. De uurcijfers gaan nu
knipperen.
Druk op de toets VOORUIT (5) of ACHTERUIT (4) om het huidige uur in te
stellen en druk dan opnieuw op de toets INSTELLEN / GEHEUGEN (8) om
het uur te bevestigen. Nu gaan de minutencijfers knipperen. Druk op de toets
VOORUIT (5) of ACHTERUIT (4) om de minuten van de huidige tijd in te stellen.
Druk wanneer u klaar bent nogmaals op de toets INSTELLEN / GEHEUGEN (8)
om de instelling van de huidige tijd te bevestigen.
De wekkertijd instellen
Om de wekkertijd na te kijken: druk eenmaal op de toets WEKKER (6/7).
Houd terwijl de wekkertijd op de display is aangegeven de toets WEKKER
(WEK1 / WEK2) 3 seconden lang ingedrukt zodat de uurcijfers gaan knipperen.
Druk op de toets VOORUIT (5) of ACHTERUIT (4) om het uur van de wektijd in
te stellen.
Druk nogmaals op de toets WEKKER (WEK1 / WEK2), zodat de minutencijfers
gaan knipperen. Druk op de toets VOORUIT (5) of ACHTERUIT (4) om de
minuten van de wektijd in te stellen.
Druk op de toets WEKKER (WEK1 / WEK2) om de geluidsmodus (zoemer of
radio) voor de wekker in te stellen.
De wekker inschakelen/uitschakelen/stoppen
Houd de toets WEKKER “WEK1” (6) / “WEK 2” (7) ingedrukt om de wekker in (of
uit) te schakelen. Als de wekker is ingeschakeld licht naast het belsymbool van
WEK1 en WEK2 op de display een kleine stip op.
Om te voorkomen dat de wekker de volgende dag luidt, houdt u de toets
WEKKER button (WEK1 / WEK2) ingedrukt om de wekker UIT te schakelen. Het

29
wekkericoon dooft, aangevend dat de wekker is uitgeschakeld. Druk op de toets
WEKKER UIT (9) om de wekker volledig uit te schakelen.
Wakker worden met de radio of zoemer en met sfeerlicht
Start uw dag op een aangename manier met de wekker van uw keuze. Wordt uit
uw slaap gewekt door de zoemer of radiozender met het sfeerlicht dat ook zal
branden terwijl de wekker luidt, waardoor uw ontwaken prettiger wordt dan ooit.
Sfeerlicht
Houd de toets SFEERLICHT AAN/UIT (9) 3 seconden lang ingedrukt om het
sfeerlicht AAN/UIT te schakelen.
Hoewel het sfeerlicht in de modus stand-by UIT is geschakeld, gaat dit
INSCHAKELEN terwijl de wekker luidt (samen met de zoemer of radio).
Sluimerfunctie
Druk terwijl de wekker luidt op de Sluimertoets (1) om de wekker tijdelijk te
stoppen & de sluimerfunctie te activeren. De wekker stopt en luidt 9 minuten
later opnieuw. U kunt deze cyclus verschillende keren herhalen tot de volgende
wekker luidt.
Opmerking: de tussentijd van de sluimerfunctie is 9 minuten.
- Druk op de toets WEKKER uit (9) om de SLUIMER-functie uit te schakelen
en de wekker volledig te stoppen.
DE RADIO BEDIENEN
Naar de radio luisteren
Opmerking: zorg ervoor dat de FM-antenne volledig is uitgerold en gestrekt
voor een optimale FM-ontvangst.
1. Druk op de toets STROOM AAN/UIT (9) om het apparaat IN te schakelen.
2. Gebruik de toets AFSTEMMEN OP (5) of AFSTEMMEN NEER (4) om af te
stemmen op de gewenste radiozender. Houd de toets AFSTEMMEN OP (5)
of AFSTEMMEN NEER (4) één seconde lang ingedrukt om automatisch
naar de eerstvolgende radiozender te scannen.
3. Druk op de toets STROOM AAN/UIT (9) om de radio UIT te schakelen.
Voorkeuzezenders op de radio in te stellen/op te roepen
1. Druk op de toets STROOM AAN/UIT (9) om het apparaat IN te schakelen.
2. Gebruik de toets AFSTEMMEN OP (5) of AFSTEMMEN NEER (4) om af te
stemmen op de gewenste radiozender.
3. Druk op de toets INST/GEH.. “P01” knippert dan op de display.

30
4. Druk nogmaals op de toets INST/GEH. om de zender in te stellen als
voorkeuzezender.
5. Herhaal de stappen 2 tot en met 4 om andere voorkeuzezenders in te
stellen.
6. U kunt tot 10 radiozenders op FM in de radio instellen.
7. Druk terwijl “P01-P10” knippert op de toets Afstemmen+ of Afstemmen- om
een cijfer voor de voorkeuzezender te kiezen.
8. Druk voor het oproepen van voorkeuzezenders op de toets Geheugen
+ (M+) (3) om de cijfers van de achtereenvolgende voorkeuzezenders te
selecteren.
De slaapfunctie
Druk terwijl u naar de radio luistert op de Slaaptoets (1) om de slaapmodus
binnen te gaan. U kunt de slaaptimer instellen tussen 120 min. en 10 min. door
te drukken op de Slaaptoets (1). Het apparaat schakelt automatisch uit nadat de
ingestelde tijd is verstreken.
BLUETOOTH INSTELLEN
De performance van de Bluetooth-connectiviteit kan variëren naargelang het
merk en model van het verbonden apparaat. Voor een optimale performance
is het raadzaam dit apparaat alleen te verbinden met de nieuwste Bluetooth-
apparatuur met Bluetooth 2.1 en de meest recente rmware-updates van de
leverancier van het apparaat te gebruiken. Compatibiliteit met alle apparaten en
mediatypes is niet gegarandeerd.
Een correcte Bluetooth-performance vereist dat de Bluetooth-transmissie van
alle Bluetooth-apparaten binnen een straal van 9 meter is uitgeschakeld. De
aanwezigheid van andere Bluetooth-apparaten tijdens de verbinding kan leiden
tot operationele storingen. Bluetooth is een standaard voor radiocommunicatie
op korte afstand. De hardware van de Bluetooth-zender en -ontvanger in
dit apparaat heeft een operationeel bereik van ongeveer 9 meter in een
open ruimte. Over het algemeen kunnen Bluetooth-apparaten alleen binnen
een ruimte van de grootte van een gangbaar kantoor helder met elkaar
communiceren. Communicatie tussen verschillende afgezonderde ruimtes is
afhankelijk van de constructie van het gebouw.
Het is belangrijk te weten dat het bereik van de Bluetooth-communicatie
aanzienlijk kan worden belemmerd als het signaal doorheen een vast voorwerp
moet gaan. Menselijke lichamen, bakstenen en betonnen muren en zwaar
meubilair of boekenkasten zullen het operationele bereik van uw Bluetooth-
apparaten belemmeren. Glas, gipsplaat of wanden met houten lambrisering
en kantoorpartities hebben een minder ernstige, maar toch merkbare
invloed. U kunt uw Bluetooth-apparaten dichter bij elkaar brengen als u

31
communicatieproblemen ondervindt.
Stereomuziekverbinding met uw smartphone (zoals Android® smartphone,
Iphone®, Windowsphone® enz.), verbinding van een pc-tablet, multimediaspeler
enz. gebeuren allemaal via de Bluetooth-functie van apparaten en vergen enige
vertrouwdheid met de Bluetooth-functies van al deze Bluetooth-apparaten.
Omdat elk apparaat iets anders werkt, is het raadzaam zich vertrouwd te maken
met de Bluetooth-mogelijkheden van het apparaat in kwestie voordat u een
verbinding maakt.
Een Bluetooth-apparaat koppelen
1. Zorg ervoor dat de Bluetooth op uw Bluetooth-apparaat is INGESCHAKELD.
Mogelijks moet u de handleiding van het externe apparaat raadplegen voor
meer informatie.
2. Zet de wekkerradio en het externe apparaat op niet meer dan 1 meter
afstand van elkaar.
3. Schakel de radiowekker IN door te drukken op de STROOMTOETS (9).
4. Druk op de Brontoets (2) om de Bluetooth-modus binnen te gaan.
De Bluetooth-modus wordt aangegeven met “BT” op de display. De
koppelindicator gaat snel knipperen.
5. Gebruik de eigen knoppen van het Bluetooth-apparaat en selecteer
“TC-139” in uw Bluetooth-instellingen om te koppelen. Voer het standaard
wachtwoord “0 0 0 0” in als uw apparaat een wachtwoord vraagt. Verwijs
naar de handleiding van uw specieke apparaat voor instructies over het
koppelen en verbinden met Bluetooth-apparaten.
6. Selecteer en bevestig de koppeling op uw externe apparaat. De verbinding
komt na enkele seconden tot stand en de wekkerradio laat een
bevestigingstoon horen, aangevend dat met succes is gekoppeld en
verbonden. De koppelindicator op de wekkerradio knippert dan langzaam.
U kunt nu van start gaan met het streamen van uw Bluetooth-muziek.
Eenmaal gekoppeld, blijft het apparaat gekoppeld tot de gebruiker het
handmatig ontkoppelt of de koppeling door een reset van het apparaat wordt
gewist.
Draadloze audio afspelen
1. Volg de instructies voor het koppelen van een Bluetooth-apparaat.
2. Gebruik de eigen toetsen van het verbonden Bluetooth-apparaat om een
muzieknummer te selecteren.
3. Gebruik de eigen toetsen van het verbonden Bluetooth-apparaat om
het geselecteerde muzieknummer weer te geven of de weergave tijdelijk te
onderbreken, of druk op de toets Weergave/Pauze (3).
4. U hoort dan de audio van het verbonden Bluetooth-apparaat weergegeven
via de luidsprekers van de wekkerradio.

De Bluetooth-verbinding wijzigen naar een nieuwe mobiele telefoon (of
ander Bluetooth-apparaat)
• U kunt dit apparaat met slechts 1 extern Bluetooth-apparaat koppelen.
Ga als volgt te werk als uw wekkerradio reeds met een apparaat is verbonden
en u met een ander extern Bluetooth-apparaat wilt verbinden:
Schakel de Bluetooth-functie van uw externe apparaat IN.
Houd de Koppeltoets (3) 3 seconden lang ingedrukt. De koppelindicator zal snel
knipperen en de wekkerradio laat een bevestigingstoon horen.
Selecteer en bevestig de koppeling op uw nieuwe mobiele telefoon of extern
Bluetooth-apparaat.
Opmerking:
Het is mogelijk dat sommige mobiele telefoons bij het starten en beëindigen van
een telefoongesprek telkens verbinding maken en weer loskoppelen. Dit wijst
niet op een probleem met dit apparaat.
OVERIGE FUNCTIES
GEBRUIK VAN DE DIMMER
Druk in de modus stand-by op de toets DIMMER (1) om de helderheid van de
LED-DISPLAY hoger of lager in te stellen.
AUX-IN
Deze ingang vergt een geluidskabel met stekker van 3,5mm (niet meegeleverd).
1. Sluit de geluidskabel met stekker van 3,5mm aan op het Lijn-in contact van
het apparaat en op de geluiduitgang van een MP3-speler of andere geluidsbron.
2. Druk op de Brontoets om over te schakelen naar de modus Aux-in.
3. Gebruik de eigen toetsen van de aangesloten MP3-speler of andere
geluidsbron om weer te geven via de luidspreker van de wekkerradio en de
weergave via de wekkerradio te bedienen.
USB-LAADCONTACT
U kunt een USB-kabel (niet meegeleverd) aansluiten op het USB-laadcontact
(12) van 5V gelijkstroom op de achterzijde van het apparaat om een extern
apparaat op te laden.
U kunt een apparaat met maximaal 5V gelijkstroom opladen.
Voorbeeld: uw mobiele telefoon (Android® of Iphone® bevinden zich in de max.
5 V.) en extern apparaat met USB-poort van max.
Het aansluitstuk voor de USB-laadkabel is niet meegeleverd.
RESETTEN
Als het systeem niet reageert of wisselvallig lijkt te functioneren, kan er sprake
32

zijn van een elektrostatische ontlading (ESO) of heeft stroomstoot de interne
microcontroller automatisch stilgelegd. Als dit gebeurt haalt u eenvoudig de
stekker uit het stopcontact en verwijdert u de batterij van het back-up-systeem,
wacht u ten minste 3 minuten en stelt dan het apparaat opnieuw in alsof het
splinternieuw was.
TECHNISCHE GEGEVENS
Stroomadapter: • Ingang 100-240V / 50- 60 Hz wisselstroom
• Uitgang 5V 1500mA gelijkstroom
Stroomverbruik • 5W
Stroomverbruik in stand-by • <1W
Batterij back-up • 3V (CR2032 platte lithiumbatterij x 1) niet
meegeleverd
Bereik radiofrequentie • FM: 87.5MHz - 108 MHz
USB-laadcontact • 1000 mA / 5V gelijkstroom MAX
Aux. ingang • 3,5 mm contact
Geluiduitgang vermogen • 2W RMS
Temperatuurbereik voor • 0 tot + 50°C of 32 tot 122 °F
binnengebruik
Netto gewicht • 0,31kg
Afmetingen • 106 x 125 x 116 mm
BELANGRIJK:
Als gevolg van voortdurende herziening en verbetering van het ontwerp
van onze producten kunnen de uiteindelijke technische gegevens zonder
voorafgaande kennisgeving gewijzigd zijn.
EXCLUSIEF IMPORTEUR
Dit product werd ingevoerd door het bedrijf : LEMA S.A.S.
Voor eventuele vragen betreffende de conformiteit van het product, kunt u uw
verzoek sturen naar :
LEMA S.A.S.
28, Boulevard Zéphirin Camélinat
92230 GENNEVILLIERS
FRANCE
33

34
WEGDOEN NA HET EINDE VAN DE LEVENSDUUR
Let op : Dit symbool geeft aan dat elektrische en elektronische
apparatuur, aan het eind van hun levensduur, niet mag worden
gedeponeerd bij het normale huishoudelijk afval Uw product is van dit
merkteken voorzien. Dit betekent dat en elektronische apparatuur
niet samen met afgedankte elektrische het normale huisafval mogen
worden weggegooid.
Er bestaat een afzonderlijk inzamelingssysteem voor deze producten.
(Afgedankte Electrische & Electronische Apparatuur (WEEE).
- Uw product is ontworpen en vervaardigd met hoge kwaliteit materialen en
componenten welke kunnen worden gerecycled en opnieuw gebruikt.
(WEEE aanwijzing).
- Afgedankte elektrische en elektronische apparatuur moet gescheiden
worden ingezameld conform de wetgeving inzake de verantwoorde
verwerking, terugwinning en recycling van afgedankte elektrische en
elektronische apparatuur.
- In de Europese Unie zijn er afzonderlijke verzamelsystemen voor gebruikte
elektrische en elektronische producten. Help ons om het milieu waar we in
leven te behouden! Deponeer het product bij het afvalinzamelingbedrijf van
uw gemeente.
- Als uw elektrische of elektronische apparatuur batterijen of accumulatoren
bevat dan moet u deze afzonderlijk conform de plaatselijke voorschriften
weggooien.
- Door dit product op een verantwoorde manier weg te gooien, zorgt u ervoor
dat het afval de juiste verwerking, terugwinning en recycling ondergaat en
potentiële negatieve effecten op het milieu en de menselijke gezondheid
worden voorkomen die anders zouden ontstaan door het verkeerd
verwerken van het afval.
Dit apparaat voldoet aan de Europese veiligheid en EMC & LVD
richtlijnen 2006 / 95 CE

ANTES DE COMENZAR
Gracias por adquirir el Radio Despertador con Bluetooth, FM Digital PLL y
memorias para estaciones TOKAI modelo TC-139.
Esta es su garantía de calidad, rendimiento y valor. Nuestros ingenieros
han incluido muchas funciones de utilidad y conveniencia en este producto.
Asegúrese de leer este Manual de Instrucciones de manera completa a n de
obtener los mayores benecios de cada función.
Este producto fue fabricado usando los componentes de mayor calidad y
estándares de mano de obra. Fue probado por inspectores y encontrado de en
perfecto funcionamiento antes de salir nuestra fábrica.
Para referencia futura, registre el número de serie en el espacio provisto.
Modelo No: TOKAI TC-139 :
Número de Serie :
NOTA:
Nos reservamos el derecho de efectuar cambios técnicos sin aviso, en el interés
de la mejora.
PRECAUCION
Peligro de explosión si la pila es colocada de manera incorrecta. Reemplace
solamente con pilas de la misma calidad o del tipo equivalente.
IMPORTANTE!
Se recomienda no dejar un teléfono móvil cerca de la unidad con el n de evitar
la interferencia electromagnética en altavoces.
Este equipo es un aparato eléctrico de Clase II o de doble aislamiento.
Ha sido diseñado de manera que no requiera conexión eléctrica de
cable a tierra.
35
La imagen del rayo tiene por objetivo alertar al usuario de la presencia de
voltaje peligroso dentro del producto y tomar contacto con partes internas
podría resultar en riesgo de shock eléctrico a las personas.
El símbolo de exclamación tiene por objetivo alertar al usuario de la
presencia de importantes instrucciones de manejo.
Para reducir el riesgo de shock eléctrico o incendio, no abra la cubierta.
Reera el servicio del producto a personal calicado.
Warning

36
PRECAUCIONES PARA EL USO
1. No debe colocarse sobre el aparato ninguna fuente inamable o encendida,
tales como velas.
2. No coloque el producto en una biblioteca cerrada o estanterías sin
ventilación apropiada.
3. A pesar de desconectar el aparato de la corriente, el mismo quedará
activado para su funcionamiento.
4. La ventilación no debe ser impedida bloqueando las aberturas especícas
de ventilación, con elementos tales como periódicos, manteles, cortinas,
etc.
5. No deberá ser expuesto a goteos o salpicaduras y no deberán colocarse
sobre el aparato elementos llenos de líquidos, tales como oreros.
6. No conecte la antena FM a una antena de exterior.
7. La unidad no debe ser expuesta a luz solar directa, muy altas o bajas
temperaturas, humedad, vibraciones o colocada en ambientes con polvo.
8. No utilizar solventes abrasivos, benzina, thinner u otros para limpiar la
supercie de la unidad. Para limpiarla, pase un paño con detergente suave
no abrasivo y seque con otro paño suave.
9. Jamás intente insertar cables, alleres u objetos similares en las
ventilaciones u otras aberturas de la unidad.
10. Advertencia sobre la desconexión de la unidad: El enchufe principal es
usado para la conexión, de manera que debe permanecer siempre listo para
funcionar.
11. Las pilas no deberán se expuestas a calor excesivo tales como luz solar,
fuego o similares.
12. producto de LED Clase 1
ALIMENTACION Y SISTEMA DE RESGUARDO A PILA
PREPARACION PARA SU USO
Conexión al adaptador de corriente: El radio despertador puede ser alimentado
mediante un adaptador de corriente externo, cuya salida requerida debe ser 5V
1.5A (incluido).
CONEXION A LA CORRIENTE
Enchufe el adaptador de corriente a un enchufe de la casa, conectando la cha
de salida del adaptador al toma DC IN de la unidad.
PILA DE RESGUARDO
• Esta unidad está equipada con un sistema de resguardo, el cual requiere
una pila plana de litio de 3V CR2032 (no incluida).
• Abra el compartimiento para pilas, destornillando la tapa con destornillador

37
pequeño.
• Inserte la pila en el compartimiento, asegurándose que tanto el polo positivo
como el negativo (+ y -) sean conectadas a las terminales correspondientes
en la platina del compartimiento de las pilas.
• Vuelva a atornillar la tapa para cerrar el compartimiento.
Nota : Si se produjera una falla en la corriente eléctrica, el reloj
automáticamente cambiará a la alimentación a pilas; tanto el reloj como la
memoria del temporizador continuarán funcionando. Cuando se restablezca la
corriente eléctrica, el reloj volverá a cambiar a la misma nuevamente.
CUIDSADO DE LA PILA
1. Use solamente el tamaño y tipo de pila especicado.
2. Si la unidad no es utilizada por un prolongado período, retire la pila. Pilas
viejas o que pierden pueden dañar la unidad.
3. No trate de recargar pilas que no sean recargables; se pueden
sobrecalentar y romper (siga las indicaciones del fabricante de la pila).
4. No arroje la pila al fuego ya que podría perder o explotar.

38
DESCRIPCION DEL PRODUCTO Y UBICACION DE CONTROLES
FUNCIONES Y CONTROLES
1. BOTON DE SNOOZE / DORMIR / DIMMER
2. BOTON DE DE FUENTE
3. BOTON DE MEMORIA ADELANTE / REPRODUCIR / PAUSA /BOTON PAR
4. BOTON DE SALTEAR HACIA ATRAS / SINTONIA INFERIOR
5. BOTON DE SALTEAR HACIA ADELANTE / SINTONIA SUPERIOR
6. BOTON DE BAJAR VOLUMEN / ALARMA 1 ENCENDIDA - APAGADA Y
AJUSTE
7. BOTON DE SUBIR VOLUMEN / ALARMA 2 ENCENDIDA - APAGADA Y
AJUSTE
8. BOTON DE AJUSTE / MEMORIA
9. BOTON DE ENCENDIDO – APAGADO / LUZ AMBIENTAL ENCENDIDA -
APAGADA / ALARMA APAGADA
10. PANTALLA
11. LUZ AMBIENTAL
12. ENTRADA DE CARGA USB
13. ANTENA FM
14. COMPARTIMIENTO DE LA PILA
15. ETIQUETA DE CASIFICACION
16. TOMA DE ENTRADA DE CORRIENTE
17. TOMA DE ENTRADA AUX
18. PARLANTE

39
PANTALLA LED E INDICADORES
CONFIGURACION DE HORA Y ALARMA
Conguración manual de la hora
Con la radio en modo APAGADO, presione y sostenga el botón de AJUSTE /
MEMORIA (8); “24 Hz” titilará. Presione el botón SALTEAR HACIA ADELANTE
(5) o SALTEAR HACIA ATRAS (4) para congurar la unidad al modo de
12 horas (12 Hz) o al de 24 Horas (24 Hz). Presione el botón de AJUSTE /
MEMORIA (8) para conrmar y titilarán las horas.
Presione el botón SALTEAR HACIA ADELANTE (5) o SALTEAR HACIA ATRAS
(4) para congurar la hora actual, luego presione nuevamente el botón AJUSTE
/ MEMORIA (8) para conrmar la hora; luego titilarán los dígitos de los minutos.
Presione el botón SALTEAR HACIA ADELANTE (5) o SALTEAR HACIA ATRAS
(4) para congurar los minutos actuales.
Cuando termine, presione nuevamente el botón AJUSTE / MEMORIA (8) para
indicar que ha congurado la hora actual.
Congurar la Hora de Alarma
Para previsualizar la hora de alarma : presione una vez el botón de ALARMA
(6/7).
Mientras la pantalla le muestra la hora de alarma y sostiene el botón de
ALARMA (AL.1 / AL.2) por 3 segundos, las horas titilarán.
Presione el botón SALTEAR HACIA ADELANTE (5) o SALTEAR HACIA ATRAS
(4) para congurar la hora de la alarma.
Presione nuevamente el botón ALARMA (AL.1 / AL.2); titilarán los dígitos de
los minutos. Presione el botón SALTEAR HACIA ADELANTE (5) o SALTEAR
HACIA ATRAS (4) para congurar los minutos de la alarma.
Presione el botón ALARMA (AL.1 / AL.2) y podrá cambiar el modo de sonido
para la alarma (Campana o Radio).
Activar / Desactivar / Detener la alarma
Presione y sostenga el botón ALARMA “AL.1” (6) / “AL. 2” (7) para activar (o
desactivar) la alarma. Una vez que haya sido activada la alarma, el pequeño
Indicador de HORA
Indicador PM
Indicador AUX
Indicador ALARMA 1
Indicador BLUETOOH
Indicador FM
Indicador ALARMA 2

40
punto en la pantalla se iluminará junto al símbolo de campana de AL1 y AL2.
Para impedir que la alarma vuelva a sonar al día siguiente, sostenga el botón
ALARMA (AL.1 / AL.2) para APAGARLA. El ícono de la alarma desaparecerá
indicando que la misma ha sido desactivada. Para detener la alarma, presione
el botón ALARMA APAGADA (9).
Despertar con la radio o campana con luces ambientales
Tenga un espléndido comienza cada día con su elección de llamada para
despertar. Haga que una campana o una estación de radio lo despierte. Las
luces ambientales también se encenderán cuando suene su alarma, lo cual
hará sus mañanas más placenteras.
Luces ambientales
Presione y sostenga el botón de LUZ AMBIENTAL ENCENDIDA - APAGADA (9)
por 3 segundos para encender o apagar las luces ambientales.
A pesar que las luces ambientales están apagadas en el modo standby, las
mismas se encenderán cuando suene la Alarma (junto a la Campana o la
Radio).
Función de snooze
Cuando suene la alarma, presione el botón Snooze (1) para suspender
la alarma y activar la función de snooze, la alarma se detendrá. Volverá a
activarse a los 9 minutos y comenzará nuevamente a sonar. Puede repetir este
ciclo varias veces durante el ciclo de la alarma hasta que suene la siguiente
alarma.
Nota: El tiempo de intervalo de la función de Snooze es de 9 minutos.
- Si desea desactivar la función de SNOOZE y detener completamente la
alarma, presione el botón ALARMA APAGADA (9).
FUNCIONAMIENTO DE LA RADIO
Escuchando la Radio
Nota : Asegúrese que la antena de FM esté completamente desenrollada y
extendida para lograr la mejor recepción de FM.
1. Presione el botón de ENCENDIDO – APAGADO (9) para encender la
unidad.
2. Use el botón de SINTONIA SUPERIOR (5) o SINTONIA INFERIOR (4) para
seleccionar la estación de radio deseada. Si presiona y sostiene el botón de
SINTONIA SUPERIOR (5) o SINTONIA INFERIOR (4) por un segundo y

41
luego lo suelta, la unidad automáticamente escaneará a la siguiente
estación emisora.
3. Presione el botón de ENCENDIDO – APAGADO (9) para apagar la radio.
Congurar / llamar radios memorizadas
1. Presione el botón de de ENCENDIDO – APAGADO (9) para encender la
unidad.
2. Use el botón de SINTONIA SUPERIOR (5) o SINTONIA INFERIOR (4) para
seleccionar la estación de radio deseada.
3. Presione el botón de CONF/MEM.; “P01” titilará en la pantalla.
4. Presione nuevamente el botón de CONF/MEM para congurar la memoria.
5. repita los pasos 2 al 4 para memorizar otras estaciones.
6. la unidad puede memorizar un total de 10 estaciones para FM.
7. Cuando titile “P01-P10”, presione el botón Sintonía+ o Sintonía- para
seleccionar el número de memoria.
8. Cuando llame una estación memorizada, presione el botón Memoria + (M+)
(3) para seleccionar el número de memoria en ciclo.
Función dormir
Cuando escuche la radio, presione el botón Dormir (1) para entrar a ese
modo. Puede congurar el temporizador para dormirse desde los 120 mins
a los 10 minutos presionando el botón Dormir (1). La unidad se apagará
automáticamente tras la hora seleccionada.
CONFIGURACION DEL BLUETOOTH
El rendimiento de la conectividad Bluetooth puede variar con la marca y modelo
del dispositivo conectado. Para el mejor rendimiento, conecte dispositivos
Bluetooth de nuevas generaciones que incorporen Bluetooth 2.1, usando la
actualización más reciente del rmware tomada del vendedor del dispositivo. No
se garantiza la compatibilidad con todos los dispositivos y tipos de soporte.
Las consideraciones del rendimiento de Bluetooth aseguran que todos los
dispositivos Bluetooth dentro de un radio de 30 pies, tendrán su transmisión
desactivada. La presencia de otros dispositivos con Bluetooth funcionando
durante la conexión pueden llevar a dicultades en el funcionamiento. Bluetooth
es un estándar de comunicación vía radio de corto rango. El transmisor y
receptor de Bluetooth en esta unidad posee un rango de funcionamiento de
aproximadamente 30 pies en espacio abierto. Generalmente, los dispositivos
de Bluetooth pueden comunicarse entre sí claramente dentro de una habitación

u ocina de tamaño normal. El funcionamiento entre diferentes habitaciones
dependerá de la construcción de las mismas.
Es importante reconocer el hecho que el rango de comunicación por Bluetooth
puede verse sustancialmente reducido si la señal pasa a través de un objeto
sólido. Cuerpos humanos, ladrillos y paredes de concreto, y muebles pesados o
bibliotecas reducirán el rango de funcionamiento de sus dispositivos Bluetooth.
Vidrio, paredes o paredes con paneles de madera y particiones de ocina,
pueden tener un menos severo pero igualmente notable efecto. Debe posicionar
sus dispositivos Bluetooth cerca entre sí en caso que observe dicultades en la
comunicación.
Conexión de música en estéreo a su smart phone (tales como los smarphones
Android®, Iphone®, Windowsphone® etc.…) o tableta PC, reproductor
multimedia, etc.… todos dispositivos que tienen función de Bluetooth,
necesitará familiarizarse con las funciones Bluetooth de su dispositivo en
cuestión. Como cada dispositivo funciona de manera ligeramente diferente,
familiarícese con la capacidad Bluetooth de sus dispositivo antes de conectarlo.
Conectando su dispositivo Bluetooth
1. Asegúrese que su dispsitivo Bluetooth esté encendido. Posiblemente deba
referirse al manual del usuario del dispositivo externo para mayores detalles.
2. Coloque a una separación de no más de 3 pies su radio despertador y el
dispositivo externo.
3. Encienda la unidad presionando el botón de ENCENDIDO (9).
4. Presione el botón de Fuente (2) para cambiar la modo Bluetooth.
El modo Bluetooth es indicado mediante “BT” en la pantalla. El indicador de
conexión titilará rápidamente.
5. Usando los controles nativos de su dispositivo Bluetooth, seleccione “TC-
139” en su conguración de Bluetooth para conectar. Si su dispositivo
requiere una clave, entre “ 0 0 0 0 ” por defecto. Reérase al manual del
usuario de su dispositivo para instrucciones de conexión con dispositivos
Bluetooth.
6. Seleccione y conrme la conexión a su dispositivo externo, y la misma
se completará en unos pocos segundos y la radio producirá un tono de
conrmación, cuando se haya conectado exitosamente; el indicador de par
titilará lentamente en el radio despertador. Tras la conexión inicial, la unidad
se mantendrá conectada a menos que sea desconectada manualmente por
el usuario o haya sido borrada debido a un reinicio de la unidad del
dispositivo. Ahora podrá iniciar el ujo de música vía Bluetooth.
42

Reproducción de audio de modo inalámbrico
1. Siga las instrucciones para Conectar un Dispositivo Bluetooth.
2. Use los controles nativos de su dispositivo Bluetooth conectado para
seleccionar una pista.
3. Para reproducir o pausar la pista seleccionada, use los controles nativos
en el dispositivo Bluetooth conectado o presione el botón de REPRODUCIR
/ PAUSA (3).
4. El audio reproducido a través del dispositivo Bluetooth conectado se
escuchará ahora a través de los parlantes del radio despertador.
Cambio de la conexión Bluetooth a un nuevo teléfono celular (u otro
dispositivo Bluetooth)
• Puede conectar la unidad a solamente 1 dispositivo externo Bluetooth.
Si desea cambiar el dispositivo externo Bluetooth conectado con su radio
despertador, proceda del siguiente modo :
Encienda la función de Bluetooth de sus dispositivo externo.
Presione y sostenga el botón PAR (3) por 3 segundos. El indicador de conexión
titilará rápidamente en el radio despertador, el cual producirá un tono de
conrmación.
Seleccione y conrme la conexión en su teléfono móvil o dispositivo externo
Bluetooth.
Nota:
Algunos teléfonos móviles pueden conectar o desconectar del modo en que
efectúa o corta una llamada. Esto no es indicativo de un problema con su
unidad.
OTRAS FUNCIONES
Control de DIMMER
En el modo standby, presione el botón DIMMER (1) para poder ajustar el brillo
de la pantalla LED, a niveles altos o bajos.
AUX IN
Requiere un cable de audio de 3.5mm (no incluido).
1. Conecte el cable de audio de 3.5mm al toma Line In de la unidad y a una
salida de audio de un reproductor MP3 u otra fuente de audio.
2. Presione el botón Fuente para cambiar al modo Aux In.
3. Use los controles nativos de su reproductor MP3 conectado u otra fuente de
audio para reproducir y controlar el audio reproducido a través del parlante
43

44
del radio despertador.
TOMA DE CARGA USB
El toma de carga USB (12) de DC 5 V. en la parte trasera de la unidad le
permite cargar un dispositivo externo mediante el cable USB (no provisto).
Puede cargar con un dispositivo de un máximo de 5 V.
Por ejemplo: su teléfono móvil (Android® o Iphone® tienen un máx. de 5 V) y
dispositivo externo con toma de USB de max.
El conector o cable de carga USB no son provistos.
REAJUSTE
Si el sistema no responde o muestra funcionamiento errático o intermitente,
puede haber experimentado una descarga electrostática (ESD) o subida de
tensión eléctrica, la cual activo el apagado automático del microcontrolador
interno. Si ésto ocurriera, simplemente desconecte el cable de la corriente
y retire la pila de resguardo, espere al menos 3 minutos y luego vuelva a
congurar la unidad como si fuera nueva.
ESPECIFICACIONES TECNICAS
Adaptador de corriente: • Entrada AC 100-240V / 50- 60 Hz
• Salida DC 5V 1500mA
Consumo de corriente • 5W
Consumo en modo Standby • <1W
Pila de resguardo • 3V (1 pila plana CR2032 de litio) no
incluida
Cobertura de la Radio Frecuencia • FM: 87.5MHz - 108 MHz
Toma de carga USB • 1000 mA / DC 5V MAX
Aux. In • Toma 3.5 mm
Potencia de salida de Audio • 2W RMS
Rango de Temperatura para interior • 0 a + 50°C ó 32 a 122°F
Peso neto • 0.31kgs
Dimensiones • 106 x 125 x 116 mm
IMPORTANTE: Debido a la continua revisión y mejoras en el diseño de
nuestros productos, las especicaciones quedan sujetas a cambio sin
aviso previo.

IMPORTADOR EXCLUSIVO
Este producto fue importado por la empresa LEMA S.A.S.
Para cualquier duda respecto a la conformidad de este producto, por favor,
envíe su solicitud a:
LEMA S.A.S.
28, Boulevard Zéphirin Camélinat
92230 GENNEVILLIERS
FRANCE
45

46
Desecho del producto
Atencion ! Este juego de logo sobre el producto quiere decir que el
reciclaje de este aparato viene dentro del marco de la Directiva
2002/96/CE del 27 de enero de 2003 concernir la Basura(el Gasto) de
Equipo Eléctrico y Electrónico (WEEE).
Su producto esta marcado con este simbolo. Signica que los
productos electricos y electronicos usados no deberian mezclarse con
los residuos domesticos generales.
Existe un sistema de recogida independiente para estos productos.
Si quiere desechar este equipo, ¡por favor no utilice el cubo de la
basura habitual !
- Los equipos electricos y electronicos usados deberian tratarse por separado
de acuerdo con la legislacion que requiere un tratamiento, una recuperacion
y un reciclaje adecuados de los equipos electricos y electronicos usados.
Tras la puesta en practica por parte de los estados equipos electricos y
electronicos usados.
- Tras la puesta en practica por parte de los estados miembros, los hogares
de pariculares dentro de los estados de la Union Europea pueden devolver
sus equipos electricos y electronicos a los centros de recogida designados
sin coste alguno. (Por favor, pongase en contacto con su autoridad local
para obtener mas detalles).
- Si sus equipos electricos o electronicos usados tienen pilas o
acumuladores, por favor desechelos por separado con antelacion segun los
requisitos locales.
- Al desechar este producto correctamente, ayudara a asegurar que los
residuos reciban el tratamiento, la recuperacion y el reciclaje necesarios,
previniendo de esta forma posibles efectos negativos en el medio ambiente
y la salud humana que de otra forma podrian producirse debido a una
manipulacion de residuos inapropiada.
Esta unidad cumple con el Consejo europeo la Directiva 2006 / 95 CE
(la Compatibilidad Electromagnética y Directivas de Voltaje Bajas)

BEVOR WIR BEGINNEN
Vielen Dank für den Kauf dieses TOKAI Uhrenradios TC-139 mit Bluetooth,
PLL UKW Digital-Radio & Senderprogrammierung.
Unser Name ist Ihre Garantie für die Qualität, hervorragende Leistung und den
Wert Ihres neuen Gerätes. Unsere Ingenieure haben dieses Produkt mit vielen
nützlichen und benutzerfreundlichen Funktionen ausgestattet. Bitte lesen Sie
diese Bedienungsanleitung vor dem Einsatz des Gerätes vollständig durch, so
dass Sie dessen Funktionen optimal nutzen können.
In diesem Produkt wurden hochqualitativer Komponenten und unter Einhaltung
höchster Verarbeitungs- und Qualitätsstandards verwendet. Unsere Inspektoren
haben das Gerät im Werk sorgfältig geprüft und dieses war vor der Auslieferung
in vollständig funktionsfähigem Zustand.
Für die Bezugnahme in der Zukunft sollten Sie die Seriennummer des Gerätes
auf der nachfolgenden Zeile notieren.
Modell: TOKAI TC-139 :
Seriennummer:
WARNUNG
HINWEIS:
Im Interesse der Produktverbesserung behalten wir uns Änderungen
technischer Daten und anderer Leistungsmerkmale ohne Vorankündigung vor.
VORSICHT
Es besteht Explosionsgefahr wenn die Batterie nicht korrekt eingelegt wird. Bitte
ersetzen Sie die Batterie nur durch eine Batterie des vorgeschriebenen Typs
oder eines äquivalenten Typs.
47
Das Blitzsymbol soll den Benutzer auf die Gegenwart gefährlicher
Spannung im Inneren des Gerätes hinweisen, und dass sich der
Benutzer durch Berühren der inneren Teile der Gefahr lebensbedrohlicher
Stromschläge und Personenverletzungen aussetzt.
Das Ausrufezeichen weist den Benutzer auf wichtige Betriebshinweise in
dieser Bedienungsanleitung hin.
Um der Gefahr von elektrischen Stromschlägen und Feuer vorzubeugen,
sollten Sie niemals die Gehäuseabdeckung entfernen. Übergeben Sie das
Gerät zur Wartung stets nur einem qualizierten Service-Fachmann.
Warning

48
WICHTIG!
Es wird empfohlen, ein Mobiltelefon in der Nähe der Einheit zu verlassen, um
elektromagnetische Störungen in den Lautsprechern zu vermeiden.
Dieses Gerät ist ein Elektrogerät der Sicherheitsklasse II, d.h. dieses
Elektrogerät ist mit doppelter Isolierung ausgestattet. Es wurde so
geschaffen, dass das Gerät keinen Schutzleiter und keine Erdung
benötigt.
WICHTIGE SICHERHEITSHINWEISE
Das Blitzsymbol soll den Benutzer auf die Gegenwart gefährlicher Spannung
im Inneren des Gerätes hinweisen, und dass sich der Benutzer durch
Berühren der inneren Teile der Gefahr lebensbedrohlicher Stromschläge und
Personenverletzungen aussetzt. Das Ausrufezeichen weist den Benutzer auf
wichtige Betriebshinweise in dieser Bedienungsanleitung hin.
1. Halten Sie offenes Feuer, wie z.B. Kerzen von dem Gerät fern, und stellen
Sie diese niemals auf das Gerät.
2. Platzieren Sie das Gerät niemals in geschlossenen Bücherregalen oder
anderen Regalen wo keine ausreichende Belüftung des Gerätes
gewährleistet ist.
3. Das Netzkabel dient zum Abtrennen des Gerätes von der
Netzstromversorgung, und das von der Stromversorgung abgetrennte Gerät
kann auch in abgetrenntem Zustand betrieben werden.
4. Die Belüftungsöffnungen im Gehäuse des Geräte sollten nicht durch
Gegenstände, wie z.B. Zeitungen, Tischdecken, Vorhänge, etc. abgedeckt
oder verschlossen werden.
5. Setzen Sie das Gerät niemals Tropf- oder Spritzwasser aus, und achten Sie
darauf, dass niemals mit Wasser gefüllte Gegenstände, wie z.B.
Blumenvasen auf dem Gerät abgestellt werden.
6. Schließen Sie niemals eine externe UKW-Antenne an der Antenne des
Gerätes an.
7. Das Gerät sollte möglichst nicht direkter Sonneneinstrahlung, extrem hohen
oder niedrigen Temperaturen, Feuchtigkeit, Vibrationen oder Staub
ausgesetzt werden. Vermeiden Sie die Aufstellung an solchen Orten.
8. Verwenden Sie niemals scharfe Reiniger wie z.B. Benzin, Verdünner oder
andere Lösungsmittel zur Reinigung der Oberächen des Gerätes. Reinigen
Sie die Oberächen des Gerätes nur mit einem milden, nicht scheuernden
Reinigungsmittel und einem sauberen, leicht feuchten Tuch.
9. Versuchen Sie niemals Kabel, Stifte oder andere Gegenstände in die
Belüftungsschlitze des Gerätes einzuführen.
10. Warnhinweis zum Abtrennen von der Stromversorgung: Der Netzstecker

trennt das Gerät von der Netzstromversorgung, und Sie sollten stets darauf
achten, dass der Netzstecker leicht erreichbar ist.
11. Batterien sollten niemals heiß werden, und vermeiden Sie es diese direkter
Sonneneinstrahlung, Feuer oder der Wärme von anderen Wärmequellen
auszusetzen.
12. LED-Produkt der Klasse 1.
STROMVERSORGUNG & STÜTZBATTERIESYSTEM
VORBEREITUNG ZUM EINSATZ
AC-DC Netzadapter-Anschluss: Dieses Uhrenradio kann mittels eines externen
AC-DC Netzadapters mit den folgenden Leistungswerten betrieben werden: DC
5V 1.5A (mitgeliefert).
NETZANSCHLUSS
Schließen Sie den AC-DC Netzadapter an einer Haushaltssteckdose an, und
verbinden Sie den DC-Stecker des Adapters mit der DC IN Anschlussbuchse
des Uhrenradios.
STÜTZBATTERIE-SYSTEM
• Dieses Gerät ist mit einem Stützbatteriesystem ausgerüstet, und benötigt
eine 3V Lithiumknopfzelle des Typs CR2032 (nicht mitgeliefert).
• Öffnen Sie das Batteriefach, indem Sie die Schrauben der Abdeckung
mittels eines kleinen Schraubenziehers lösen.
• Legen Sie eine passende Batterie in das Batteriefach ein, und stellen Sie
sicher, dass die Kontakte der Batterie für Plus und Minus (+ und -) korrekt
auf die Kontaktplatinen im Batteriefach ausgerichtet sind.
• Anschließend die Batteriefachabdeckung wieder aufsetzen und die
Schrauben festziehen.
Hinweis: Wenn ein Ausfall der AC-Netzstromversorgung auftritt, dann
schaltet die Uhr automatisch auf die Batteriestromversorgung um, und die
Einstellungen für die Uhrzeit und den Alarm bleiben erhalten. Sobald die AC-
Netzstromversorgung wieder hergestellt ist, schaltet die Uhr wieder auf die
Stromversorgung mit AC-Netzstrom um.
HINWEISE ZUR BATTERIE
1. Verwenden Sie nur Batterien des vorgeschriebenen Typs und der
angegebenen Größe.
2. Wenn das Gerät voraussichtlich längere Zeit nicht in Gebrauch sein wird,
sollten die Batterie herausnehmen. Alte Batterien können auslaufen und das
Gerät schwer beschädigen.
3. Versuchen Sie niemals nicht auadbare Batterien wieder aufzuladen; diese
49

könnten sich dabei überhitzen und aufbrechen (Befolgen Sie stets die
Hinweise des Batterieherstellers).
4. Werfen Sie Batterien niemals ins Feuer, da diese aufbrechen oder
explodieren könnten.
50

51
BESCHREIBUNG DES PRODUKTES & LAGE DER REGLER UND
BEDIENUNGSELEMENTE
FUNKTIONEN & REGLER
1. SCHLUMMERN / EINSCHLAFEN / DIMMER-TASTE
2. SIGNALQUELLE-TASTE
3. SPEICHER AUFWÄRTS / WIEDERGABE / PAUSE-TASTE/
KOPPLUNGSTASTE
4. SKIP RÜCKWÄRTS / SENBDERSUCHE ABWÄRTS TASTE
5. SKIP VORWÄRTS / SENDERSOCHE AUFWÄRTS TASTE
6. LAUTSTÄRKE ABWÄRTS / ALARM 1 EIN-AUS SET TASTE
7. LAUTSTÄRKE AUFWÄRTS / ALARM 2 EIN-AUS SET TASTE
8. SET / SPEICHER-TASTE
9. HAUPTSCHALTER EIN – AUS / STIMMUNGSLICHT EIN - AUS / ALARM
AUS TASTE
10. ANZEIGE
11. STIMMUNGSLICHT
12. USB-BUCHSE FÜR LADEFUNKTION
13. UKW-ANTENNE
14. BATTERIEFACH
15. TYPSCHILD
16. DC IN BUCHSE
17. AUX IN BUCHSE
18. LAUTSPRECHER

LED ANZEIGE & INDIKATOREN
ZEIT UND ALARM - EINSTELLUNG
Manuelle Einstellung der Uhrzeit
Halten Sie die SET/SPEICHER-Taste (8) gedrückt, während das Gerät
“AUS”-geschaltet ist; In der Anzeige blinkt nun “24 Hr”. Betätigen Sie die
Taste SKIP VORWÄRTS (5) oder SKIP RÜCKWÄRTS (4), um die Zeitanzeige
zwischen dem 12-Stunden-Modus (12 Hr) oder dem 24-Stunden-Modus (24 Hr)
umzuschalten. Betätigen Sie die SET / SPEICHER-Taste (8) nochmals, um die
Einstellung zu bestätigen, und die Stundenanzeige blinkt nun.
Betätigen Sie die SKIP VORWÄRTS-Taste (5) oder SKIP RÜCKWÄRTS-
Taste (4), um die aktuelle Stunde einzustellen, und betätigen Sie die SET /
SPEICHER-Taste (8) nochmals, um die Stundeneinstellung zu bestätigen;
anschließend blinkt die Minutenanzeige. Betätigen Sie die SKIP VORWÄRTS-
Taste (5) oder SKIP RÜCKWÄRTS-Taste (4), um die aktuelle Minute
einzustellen.
Betätigen Sie die SET / SPEICHER-Taste (8) einmal, um die Einstellung der
Uhrzeit zu bestätigen und abzuschließen.
Einstellung der Alarmzeit
Voranzeige der eingestellten Alarmzeit: Betätigen Sie die ALARM-Tasten (6/7)
einmal.
Die Stundenanzeige beginnt zu blinken wenn Sie während der Anzeige der
eingestellten Alarmzeit die Taste ALARM (AL.1 / AL.2) ca. 3 Sekunden lang
gedrückt halten.
Betätigen Sie die Tasten SKIP VORWÄRTS (5) oder SKIP RÜCKWÄRTS (4),
um die gewünschte Stunde für den Alarm einzustellen.
Betätigen Sie die ALARM-Taste (AL.1 / AL.2) nochmals; die Minutenstellen der
Anzeige blinken nun. Betätigen Sie die TASTEN SKIP VORWÄRTS (5) oder
SKIP RÜCNWÄRTS (4), um die Minutenanzeige wie gewünscht einzustellen.
Betätigen Sie die Taste ALARM (AL.1 / AL.2) nochmals, und Sie können den
Alarmton-Modus (Summer oder Radio) für die Alarmfunktion einstellen.
ZEIT-Indikator
PM-Indikator
AUX-Indikator
ALARM 1-Indikator
BLUETOOTH-Indikator
UKW-Indikator
ALARM 2-Indikator
52

53
Alarmfunktion Aktivieren / Deaktivieren / Alarmfunktion abschalten
Halten Sie die Tasten ALARM “AL.1” (6) / “AL. 2” (7) gedrückt, um die
Alarmfunktion zu aktivieren (oder zu deaktivieren). Sobald die Alarmfunktion
aktiviert wurde, erscheint ein kleiner Punkt in der Anzeige neben dem
Glockensymbol für AL 1 und AL 2.
Halten Sie die ALARM-Taste (AL. 1 / AL. 2) gedrückt, um zu die Alarmfunktion
für den folgenden Tag auszuschalten, und die Alarmfunktion ist nun “AUS”. Das
Alarmsymbol erlischt, wodurch angezeigt wird dass die Alarmfunktion deaktiviert
wurde.
Betätigen Sie die Taste ALARM AUS (9), um den Alarm abzuschalten sobald
dieser ertönt.
Aufwachen mit Radiomusik oder Summer und Stimmungslicht-Funktion
Der Tag fängt immer gut an mit Ihrer Auswahl der Weckart. Sie können sich
wahlweise mit Summer oder Radiomusik wecken lassen. Das Stimmungslicht
schaltet sich zudem ein, sobald der Alarm ausgelöst wird, wodurch das
morgendliche Aufwachen um so angenehmer wird.
Stimmungslicht
Halten Sie die Taste STIMMUNGSLICHT (MOOD LIGHT) EIN - AUS (9) ca. 3
Sekunden lang gedrückt, um das Stimmungslicht EIN – AUS zu schalten.
Das Stimmungslicht ist “AUS” während das Gerät im Bereitschaft-Modus
funktioniert, und wird “EIN” geschaltet sobald der Alarm (entweder Summer oder
Radio) ausgelöst wird.
Schlummern-Funktion
Betätigen Sie die Schlummern-Taste (1), um den Alarm kurzzeitig auszuschalten
& um die Schlummern-Funktion zu aktivieren. Der Alarm wird nach 9 Minuten
wieder ausgelöst der Alarm ertönt erneut. Sie können den Vorgang mehrmals
wiederholen und nach dem Abschalten ertönt der Alarm am folgenden Tag
erneut.
Hinweis: Das Schlummern-Intervall beträgt 9 Minuten.
- Betätigen Sie die ALARM AUS Taste (9), falls Sie die SCHLUMMERN-
FUNKTION (SNOOZE) beenden, und die Alarmfunktion vollständig abschalten
möchten.
RADIO-BETRIEB
Radio hören
Hinweis: Stellen Sie sicher, dass die UKW-Antenne vollständig abgewickelt
und in voller Länge ausgelegt wurde, um einen optimalen UKW-Empfang zu
gewährleisten.

54
1. Betätigen Sie die Taste HAUTSCHALTER EIN-AUS (9), um das Gerät “EIN”
zu schalten.
2. Verwenden Sie die Tasten SENDERSUCHE AUFWÄRTS (5) oder
SENDERSUCHE ABWÄRTS (4), um eine gewünschte Sendestation
einzustellen. Wenn Sie die Tasten für die SENDERSUCHE AUFWÄRTS
(5) oder SENDERSUCHE ABWÄRTS (4) ca. 1 Sekunde lang gedrückt
halten, dann stellt das Gerät automatisch die nächste Sendestation aufwärts
in der Senderskala ein.
3. Betätigen Sie die Taste HAUPTSCHALTER EIN-AUS (9), um das Radio
wieder “AUS” zu schalten.
Programmieren / Abrufen vorprogrammierter Radiosender
1. Betätigen Sie die Taste HAUPTSCHALTER EIN-AUS (9), um das Gerät
“EIN” zu schalten.
2. Verwenden Sie die Tasten SENDERSUCHE AUFWÄRTS (5) oder
SENDERSUCHE ABWÄRTS (4), um einen gewünschten Radiosender
einzustellen.
3. Betätigen Sie die Taste SET/MEM.; “P01” blinkt nun in der Anzeige.
4. Betätigen Sie die Taste SET/MEM. Nochmals, um den Radiosender im
Speicher zu programmieren.
5. Wiederholen Sie die Schritte 2 bis 4, um weitere Radiosender zu speichern.
6. Das Gerät kann insgesamt bis zu 10 Sendestationen für das UKW-
Frequenzband fest speichern.
7. Betätigen Sie die Tasten “Sendersuche +” (Tune +) oder “Sendersuche
–” (Tune -) während “P01-P10” in der Anzeige blinken, um eine gewünschte
Programmposition für die Sendestation auszuwählen.
8. Betätigen Sie die Taste “Speicher +” (M+) (3), um eine Programmposition
aufwärts auszuwählen.
Einschlaftimer-Funktion
Betätigen Sie die Einschlaftimer-Taste (1) während Sie Radio hören, um den
Einschlaftimer-Modus zu aktivieren. Sie können nun ein Zeitintervall von
120 Minuten bis 10 Minuten abwärts einstellen, indem Sie wiederholt die
Einschlaftimer-Taste (1) betätigen. Das Gerät schaltet sich nun automatisch
nach Ablauf des eingestellten Zeitintervalls aus.
BLUETOOTH - EINSTELLUNGEN
Die Funktion der Bluetooth-Verbindung kann von Marke zu Marke und Modell
zu Model des jeweils angeschlossenen Gerätes unterschiedlich sein. Für eine
optimale Funktion sollten Sie möglichst neuere Bluetooth-Geräte der Version

2.1 mit neuester Firmware-Version des Vertreibers verwenden. Wir übernehmen
keine Garantie, dass dieses Gerät mit allen Geräten anderer Hersteller
kompatibel ist.
Um eine zuverlässige Bluetooth-Funktion zu gewährleisten, sollten Sie
sicherstellen, dass alle Bluetooth-fähigen Geräte in einem Umkreis von 10
Metern deaktiviert sind. Durch die Gegenwart anderer Geräte mit aktivierter
Bluetooth-Funktion kann die Übertragung zwischen Ihrem Uhrenradio und der
Musikquelle gestört werden. Bluetooth ist ein Funkübertragungsstandard für
kurze Distanzen. Der Bluetooth-Sender und Empfänger dieses Gerätes haben
eine Reichweite von ca.10 Metern bei unbehinderter Übertragungsdistanz.
Normalerweise können Bluetooth-Geräte in einem Zimmer regulärer Größe
problemlos miteinander Verbindung aufnehmen. Die Übertragungsqualität des
Signals von einem Raum in einen anderen Raum hängt von der Konstruktion
und Beschaffenheit der Wände ab.
Es muss unbedingt beachtet werden, dass die Bluetooth-Reichweite durch
feste Gegenstände im Übertragungsweg erheblich verringert wird. Menschliche
Körper, Wände aus Ziegelsteinen und Beton, sowie schwere Möbel oder
Bücherregale können die effektive Reichweite von Bluetooth-Geräten erheblich
reduzieren. Glas, trockene Wände oder Paneelen sowie Büropartitionen haben
einen geringeren Einuss auf die Übertragungsreichweite. Sie sollten Bluetooth-
Geräte näher beieinander positionieren, falls Übertragungsstörungen auftreten.
Für die Stereo-Verbindung zur Musikwiedergabe über Ihr Smartphone (z.B.
Smartphones mit Android®-,iPhone®- , oder Windowsphone®-Betriebssystem,
usw. …) oder die für die Verbindung mit PC-Tabletts, Multimedia-Playern, usw.
mit Bluetooth-Funktion sollten Sie sich über die Bluetooth-Funktion Ihrer Geräte
informieren. Da jedes Gerät etwas anders funktioniert, müssen Sie sich mit der
Einrichtung der Bluetooth-fähigen Geräte vor dem Gebrauch vertraut machen.
Die Kopplung von Bluetooth-fähigen Geräten
1. Stellen Sie sicher, dass die Bluetooth-Funktion an beiden Geräten “EIN”
geschaltet wurde. Beachten Sie die Gebrauchsanleitungen der externen
Geräte für ausführliche Einzelheiten hierzu.
2. Platzieren Sie das Uhrenradio und das externe Gerät zur Herstellung der
Verbindung nicht weiter als 1 Meter voneinander entfernt.
3. Schalten Sie das Uhrenradio “EIN”, indem Sie den HAUPTSCHALTER (9)
betätigen.
4. Betätigen Sie die Signalquelle-Taste (2) (SOURCE), um den Bluetooth-
Modus zu aktivieren.
Der Bluetooth-Modus wird durch den “BT”-Indikator in der Anzeige
55

angezeigt. Der Kopplungs-Indikator blinkt in schneller Folge.
5. Verwenden Sie die Bedientasten Ihres externen Bluetooth-Gerätes und
wählen Sie die Verbindung mit “TC-139” in den Bluetooth-Einstellungen
aus, um die Kopplung zu bestätigen. Falls Ihr Gerät ein Passwort verlangt,
dann geben Sie hierfür “0 0 0 0” ein. Beachten Sie die Bedienungsanleitung
zur Bluetooth-Kopplung für das jeweilige Gerät, um die Verbindung
herzustellen.
6. Wählen Sie das Uhrenradio auf Ihrem externen Gerät aus und die
Verbindung wird automatisch nach ein paar Sekunden hergestellt, worauf hin
Sie vom Radio einen Bestätigungston hören und der Kopplungsindikator
blinkt nun langsam am Uhrenradio. Nach der erstmaligen Kopplung der
Geräte bleibt die Verbindung zwischen den Geräten bestehen bis Sie
diese entweder manuell wieder trennen, oder die gespeicherten
Einstellungen durch eine Rücksetzung gelöscht werden und Sie können nun
Musik über die Bluetooth-Verbindung mit dem Uhrenradio abspielen.
Musikwiedergabe über die Bluetooth-Verbindung
1. Befolgen Sie die Gebrauchshinweise zur Kopplung zwischen den
betreffenden Bluetooth-Geräten.
2. Verwenden Sie die entsprechenden Bedientasten des sendenden Gerätes,
um einen gewünschten Musiktitel auszuwählen.
3. Verwenden Sie die entsprechenden Bedientasten Ihres sendenden Gerätes,
um die Wiedergabe eines Musiktitels auszuwählen oder zu pausieren, oder
betätigen Sie die Wiedergabe/Pause-Taste (3) des Uhrenradios.
4. Sie hören nun die Audio-Wiedergabe des gekoppelten Bluetooth-Gerätes
über den Lautsprecher des Uhrenradios.
Wechseln der Bluetooth-Verbindung zu einem neuen Mobiltelefon (oder
anderen Bluetooth-Geräten)
• Sie können jeweils nur 1 externes Bluetooth-Gerät mit dem Uhrenradio
koppeln.
Falls Sie die Verbindung zu einem bereits verbundenen, externen Bluetooth-
Gerät trennen, und ein anderes Bluetooth-Gerät koppeln möchten, dann gehen
Sie dazu wie folgt vor:
Schalten Sie die Bluetooth-Funktion des externen Gerätes ein. Halten Sie
die Kopplungstaste (3) ca. 3 Sekunden lang gedrückt. Der Kopplungs-
Indikator blinkt nun wieder in schneller Abfolge, und das Uhrenradio erzeugt
einen Bestätigungston. Wählen Sie das Uhrenradio nun im Bluetooth-Menü
des externen Gerätes aus, und bestätigen Sie die Kopplung mit den neuen
Mobiltelefon oder einem anderen externen Bluetooth-Gerät.
56

Hinweis:
Einige Mobiltelefone unterbrechen die Verbindung während Sie
Anrufe machen oder empfangen, und stellen die Verbindung anschließend
wieder her. Dies weist jedoch nicht auf eine Beschädigung oder
Funktionsstörung Ihres Gerätes hin.
WEITERE FUNKTIONEN
DIMMER Regler
Betätigen Sie die DIMMER-Taste (1), um die Helligkeit der LED-Anzeige auf
eine höhere oder niedrigere Stufe einzustellen.
AUX IN
Benötigt ein Audiokabel mit 3.5mm Klinkenstecker (nicht mitgeliefert).
1. Verbinden Sie das Audiokabel mit 3.5mm Klinkenstecker mit der “LINE
IN”-Buchse am Gerät, und einen MP3-Player oder eine andere Signalquelle
am gegenüber liegenden Ende des Kabels.
2. Betätigen Sie die Taste für die Umschaltung der Audio-Signalquelle, um den
“AUX IN”-Modus zu aktivieren.
3. Verwenden Sie die Bedientasten am angeschlossenen MP3-Player oder an
der alternativen Signalquelle, um die Musikwiedergabe über den
Lautsprecher des Uhrenradios zu steuern.
USB-BUCHSE FÜR BATTERIELADE-FUNKTIONEN
Die USB-Buchse (12) mit einer Ausgangsspannung von DC 5 V an der
Rückseite des Gerätes ermöglicht das Auaden der Batterien externer Geräte
über ein passendes USB-Kabel (nicht mitgeliefert).
Sie können nur Geräte auaden, die maximal einen Ladestrom von DC 5 V
benötigen.
Zum Beispiel: Ihr Mobiltelefon (Android® oder iPhone® benötigen max. DC 5V.)
und viele andere externe oder mobile Geräte mit USB-Buchse.
Der Ladebuchsenadapter oder das USB-Kabel sind nicht im Lieferumfang
enthalten.
RÜCKSETZUNG
Falls das System nicht mehr auf Benutzereingaben reagiert, nur fehlerhaft auf
solche Eingaben reagiert oder zwischenzeitlich nicht funktioniert, dann kann
es sein, dass das Gerät einer elektro-statischen Entladung (ESD) oder einer
Netzspannungsspitze ausgesetzt war, wodurch sich der Mikroprozessor im
Gerät automatisch ausgeschaltet hat. Falls dieser Fall eintritt, dann trennen
Sie das Gerät einfach von der AC-Netzstromversorgung, entfernen Sie die
57

Stützbatterie aus dem Gerät, und warten Sie mindestens 3 Minuten bis Sie die
Batterie wieder einlegen oder das Gerät erneut mit der Netzstromversorgung
verbinden; führen Sie anschließend nochmals alle Einstellungen wie bei einem
Neugerät aus.
TECHNISCHE DATEN
Netzadapter: • Primärseite AC 100-240V / 50- 60 Hz
• Sekundärseite DC 5V 1500mA
Leistungsaufnahme • 5W
Leistungsaufnahme in Bereitschaft • <1W
Stützbatterie • 3V (CR2032 Lithium-Knopfzelle x 1) nicht
enthalten
Radio-Frequenzbereich • FM: 87.5MHz - 108 MHz
USB-Ladebuchse • 1000 mA / DC 5V MAX
Aux. In • 3.5 mm Buchse
Audio Ausgangsleistung • 2W RMS
Innentemperatur-Betriebsbereich • 0 bis +50°C (32 bis 122°F)
Nettogewicht • 0.31kg
Abmessungen • 106 x 125 x 116 mm
EXKLUSIVER IMPORTEUR
Dieses Gerät wird importiert durch : LEMA S.A.S.
Für Fragen zur Konformität des Geräts, wenden Sie sich bitten an :
LEMA S.A.S.
28, Boulevard Zéphirin Camélinat
92230 GENNEVILLIERS
FRANCE
58

Entsorgung am Ende der Lebensdauer
Achtung ! Ihr Produkt trägt dieses Symbol. Es besagt, dass Elektro-
und Elektronikgeräte nicht mit dem Haushaltsmüll entsorgt, sondern
einem getrennten Rücknahmesystem zugeführt werden sollten.
Dieses Symbol auf dem Produkt bedeutet, dass die
Wiederverwendung dieses Apparates innerhalb des Gerüstes der
Direktive 2002/96/CE vom 27. Januar 2003 bezüglich der Vergeudung
der Elektrischen und Elektronischen Ausrüstung (WEEE) kommt.
Werfen Sie dieses Gerät zur Entsorgung bitte nicht in den normalen
Hausmüll!
- Gemäß einer neuen EU-Richtlinie, die die ordnungsgemäße Rücknahme,
Behandlung und Verwertung von gebrauchten Elektro-und Elektronikgeräten
vorschreibt, müssen elektrische und elektronische Altgeräte getrennt entsorgt
werden.
- Nach der Einführung der Richtlinie in den Eu-Mitgliedstaaten können
Privathaushalte ihre gebrauchten Elektro- und Elektronikgeräte nun
kostenlos an ausgewiesenen Rücknahmestellen abgeben. (Weitere
Einzelheiten erhalten Sie von Ihrer Gemeindeverwaltung.).
- Wenn Ihre gebrauchten Elektro- und Elektronikgeräte Batterien oder Akkus
enthalten, sollten diese vorher entnommen und gemäß örtlich geltenden
Regelungen getrennt entsorgt werden.
- Durch die ordnungsgemäße Entsorgung tragen Sie dazu bei, dass Altgeräte
angemessen gesammelt, behandelt und verwendet werden. Dies verhindert
mögliche schädliche Auswirkungen auf Umwelt und Gesundheit durch eine
unsachgemäße Entsorgung.
Dieses Gerät erfüllt Europäische Rat-Direktive 2006 / 95 CE
(Elektromagnetische Vereinbarkeit und Niedrige Spannungsdirektiven)
59

TC-139
www.tokai.fr
Documenttranscriptie
TC-139 2 MANUEL D’UTILISATION 13 USER MANUAL 24 HANDLEIDING 35 MANUAL DE INSTRUCCIONES 47 BEDIENUNGSANLEITUNG Lire attentivement la notice avant d’utiliser l’appareil Before operating this product, please read user manual completely Lees de handleiding door voordat u deze eenheid gebruikt Lea atentamente el manual del usuario antes de utilizar el aparato Lesen Sie die Bedienungsanleitung bevor Sie das Gerät gebrauchen Français - English - Dutch Español - Deutsch TC-139 AVANT DE COMMENCER Merci d’avoir acheté le TOKAI TC-139: un radioréveil Bluetooth® doté d’une double alarme avec RADIO FM numérique. Ce produit est votre garantie de qualité, de performance et de valeur. Nos ingénieurs ont inclus de nombreuses fonctionnalités utiles et pratiques dans ce produit. Veuillez lire ce manuel d’instructions entièrement afin d’assurer la meilleure performance de chaque fonction. Ce produit a été fabriqué en utilisant des composants de qualité et dans les normes de fabrication. Le TOKAI TC-139 a été testé par les inspecteurs et trouvé en parfait état de fonctionnement avant de quitter notre usine. Pour référence ultérieure, noter le numéro de série dans l’espace prévu. Model No: TOKAI TC-139 N° de série AVERTISSEMENTS ATTENTION RISQUE D’ÉLECTROCUTION NE PAS COUVRIR ATTENTION: POUR RÉDURE LE RISQUE D’ÉLECTROCUTION, NE PAS RETIRER LE COUVERCLE L’INTÉRIEUR DE L’APPAREIL NE COMPORTE AUCUNE PIÉCE UTILE À L’UTILISATEUR CONFIEZ-EN L’ENTRETIEN A DU PERSONNEL QUALIFIE Ce symbole indique qu’une tension dangereuse représentant un risque d’électrocution est présente dans cet appareil, ne pas toucher les pièces à l’intérieur afin d’éviter tout risque de choc électrique pour les personnes. Ce symbole indique que la documentation fournie avec cet appareil contient des instructions importantes relatives au fonctionnement et à l’entretien. REMARQUE: Nous nous réservons le droit d’apporter des changements techniques sans préavis dans un but d’amélioration. IMPORTANT! Il est recommander de ne pas laisser un téléphone portable à proximité de l’appareil, afin d’éviter des interférences électromagnétiques dans les hautparleurs 2 ATTENTION Danger d’explosion si la pile n’est pas correctement installée. Lorsqu’elle est usée remplacez-la uniquement avec le même type de pile. Cet appareil est appareil de classe II. Ce symbole signifie que cet appareil est doublement isolé. Une prise de terre n’est pas nécessaire. PRECAUTIONS D’UTILISATION 1. Ne placez aucune flamme, telle qu’une bougie, sur l’appareil. 2. Ne placez pas l’appareil dans un endroit clos, tel qu’une bibliothèque fermée ou étagère sans une ventilation adéquate. 3. Lorsque le dispositif de mise hors tension est la fiche secteur, celle-ci doit rester accessible et opérationnelle. 4. N’obstruez pas les grilles de ventilation avec des objets tels que journaux, nappes de table, rideaux, etc. 5. N’exposez pas l’appareil à des projections de liquides et assurez-vous qu’aucun objet contenant de l’eau, tel qu’un vase, ne soit placé sur l’appareil. 6. Ne branchez pas l’antenne FM sur une antenne extérieure. 7. N’exposez pas l’appareil au rayonnement direct du soleil, aux extrêmes de températures, à l’humidité, aux vibrations ou à un environnement poussiéreux. 8. Ne nettoyez pas la surface de l’appareil à l’aide de produits abrasifs, de benzène, de diluants ou d’autres solvants. Nettoyez-la avec une solution de détergent doux et non-abrasif et un chiffon propre et doux. 9. Ne tentez jamais d’insérer des fils de fer, aiguilles ou autres objets similaires dans les grilles de ventilation ou autres orifices de l’appareil. 10. Avertissement concernant la mise hors tension de l’appareil : la mise hors tension s’effectue en débranchant la fiche secteur. De ce fait, celle-ci doit toujours rester accessible et opérationnelle. 11. N’exposez pas les piles à une chaleur extrême, telle que le rayonnement direct du soleil, le feu etc. 12. Produit LED Classe 1. 3 ALIMENTATION SECTEUR & SYSTEME DE SAUVEGARDE Branchement de l’adaptateur AC-DC Le radioréveil est alimenté par un adaptateur AC-DC externe (inclus) avec une tension de sortie de 5V DC 1.5A. Connexion de l’alimentation Branchez l’adaptateur AC-DC sur une prise de courant AC domestique, puis branchez la fiche DC de l’adaptateur sur la prise d’entrée DC du radioréveil. Pile de sauvegarde • Le radioréveil dispose d’un système d’alimentation de secours nécessitant une pile plate au lithium 3V de type CR2032 (non fournie). • Ouvrez le compartiment de la pile en dévissant le couvercle avec un petit tournevis. • Insérez la pile dans le compartiment à pile en respectant la polarité (+/-) indiquée à l’intérieur du compartiment. • Revissez le couvercle du compartiment de la pile pour le refermer. Note : En cas de coupure de courant, le radioréveil bascule automatiquement sur l’alimentation par pile, ainsi l’horloge et la mémoire du réveil sont conservées et continuent de fonctionner normalement. Lorsque le courant est rétabli, le radioréveil bascule de nouveau sur l’alimentation secteur. Précautions d’emploi des Piles 1. Utilisez uniquement la taille et le type de pile spécifiés dans ce mode d’emploi. 2. Si l’appareil ne doit pas être utilisé pendant une longue période, retirez la pile. Une vieille pile ou une pile qui fuie peut causer des dommages à l’appareil. 3. Ne pas essayer de recharger une pile qui n’est pas destinée à être rechargée; elle peut surchauffer et exploser (Suivez les instructions du fabricant de la pile). 4. Ne pas jeter les piles au feu, elles pourraient fuir ou exploser. Mise en garde ! Il existe un risque d’explosion en cas de remplacement non-conforme de la pile. Remplacez-la uniquement par une pile du même type ou d’un type équivalent Protection de l’Environnement ! Les piles contiennent des substances chimiques. Par souci de protection de l’environnement, il est recommandé de se débarrasser des piles usagées en les déposant dans des contenants spécialement conçus à cet effet. 4 DESCRIPTION DE L’APPAREIL ET EMPLACEMENT DES COMMANDES COMMANDES ET FONCTIONS 1. SNOOZE / SLEEP / DIMMER : Alarme à répétition / Fonction Sommeil / Variateur de luminosité 2. Touche SOURCE 3. Touche M+ / : Mémoire + / Lecture – Pause / Coupler 4. Touche : Précédent / Recherche des stations précédentes 5. Touche : Suivant / Recherche des stations suivantes 6. VOLUME - /AL.1 : Diminuer le volume / Activer-Désactiver/ Réglage ALARME 1 7. VOLUME+/AL 2 : Augmenter le volume/ Activer-Désactiver /Réglage ALARME 2 8. Touche SET/MEM : Réglage / Mémorisation 9. Touche / LIGHT : Marche-Arrêt / Activer-Désactiver Lumière d’ambiance / Arrêt Alarme 10. AFFICHEUR LED 11. LUMIERE D’AMBIANCE 12. Prise Chargeur USB 13. Fil d’antenne FM 14. Compartiment à pile 15. Plaque signalétique 16. Prise d’entrée DC (5V DC IN) 17. Prise d’entrée AUXILIAIRE (AUX IN) 18. Haut parleur 5 DESCRIPTION DE L’AFFICHEUR & DES INDICATEURS Indicateur de l’HEURE Indicateur PM Indicateur Bluetooth® Indicateur AUXILIAIRE Indicateur FM Indicateur ALARME 1 Indicateur ALARME 2 REGLAGES DE L’HORLOGE ET DU REVEIL Réglage manuel de l’heure En mode appareil éteint, maintenez enfoncé la touche SET/MEM (8) Réglage / Mémorisation; l’indication “24 Hr” clignote à l’écran. Appuyez sur la touche (4) ou (5) pour sélectionner le format d’affichage de l’heure 24H ou 12H. Appuyez sur la touche SET/MEM (8) pour confirmer, et les chiffres de l’heure clignotent. Appuyez sur la touche (4) ou (5) pour régler l’heure actuelle. Appuyez de nouveau sur la touche SET/MEM (8) pour confirmer, puis les chiffres des minutes clignotent. Appuyez sur la touche (4) ou (5) pour régler les minutes. Lorsque les réglages sont terminés, appuyez encore une fois sur la touche SET/ MEM (8): pour confirmer le réglage de l’heure actuelle qui s’affiche. Réglage du réveil Pour afficher l’heure du réveil, appuyez une fois sur la touche AL.1 ou AL.2 (6/7). Lorsque l’heure de réveil s’affiche, appuyez sur la touche Alarme - AL1 / AL2 pendant 3 secondes: les chiffres de l’heure clignotent. Appuyez sur la touche (4) ou (5) pour régler les heures. Appuyez de nouveau sur la touche Alarme - AL1 / AL2 : les chiffres des minutes clignotent. Appuyez sur la touche (4) ou (5) pour régler les minutes. Appuyez sur la touche Alarme (AL1 / AL2) pour changer le mode de réveil (pour la sonnerie BEP s’affiche ; pour la RADIO la fréquence s’affiche). Activer / Désactiver / Arrêt de l’alarme Appuyez et maintenez enfoncé le bouton “AL.1” (6) / “AL. 2 “(7) pour activer l’alarme. Une fois l’alarme activée, le voyant s’allume sur l’afficheur à côté de l’indicateur AL1 ou AL2. Pour désactiver l’alarme, maintenez enfoncé le bouton “AL.1” (6) / “AL. 2 “(7) 6 jusqu’à ce que l’indicateur de l’alarme disparaisse de l’afficheur. Pour arrêter l’alarme, appuyez sur la touche Arrêt Alarme “ / LIGHT” (9). Fonction “Lumière d’ambiance” Pour rendre votre réveil plus agréable, le TC 139 vous aidera à bien commencer la journée grâce à sa fonction « lumière d’ambiance » que vous pourrez régler avec votre alarme. Lorsque votre alarme retentit en mode sonnerie ou radio le TC-139 s’illuminera en couleurs. Appuyez longuement sur la touche LIGHT (9) pour activer ou désactiver la fonction Lumière d’ambiance. Fonction SNOOZE: Alarme à répétition La fonction alarme à répétition : SNOOZE vous permet de dormir 9 minutes de plus. Lorsque l’alarme sonne, appuyez sur la touche ‘SNOOZE’ (1) pour activer la fonction « Alarme à répétition », le réveil (réglé sur sonnerie ou sur radio) s’arrête et sonnera de nouveau 9 minutes plus tard. Pour désactiver la fonction Snooze, appuyez sur la touche ‘Arrêt Alarme’ (9). FONCTION RADIO REMARQUE: Assurez-vous que l’antenne FM est complètement déroulée pour assurer une meilleure réception FM. Écouter la Radio 1) Appuyez sur la touche ‘Marche/Arrêt’ (9) pour allumer la radio. 2) Réglez la station FM à l’aide des boutons de recherche des stations (4) ou (5). Appuyez et maintenir la pression pendant 1 seconde sur l’un des boutons de recherche (4) ou (5), puis relâcher, l’appareil recherchera automatiquement la prochaine station de radio disponible. 3) Pour éteindre la radio appuyez sur la touche Marche/Arrêt (9). Mémoriser et rappeler des stations de radio présélectionnées 1. Appuyez sur la touche Marche/Arrêt (9) pour allumer l’appareil. 2. Réglez la station FM désirée à l’aide des boutons de recherche (4) ou (5). 3. Appuyez sur la touche SET/MEM (8) & l’indication “P01” clignote à l’écran. 4. Appuyez une nouvelle fois sur la touche ‘SET/MEM’ pour mémoriser la station radio. 5. Répéter les étapes 2 à 4 afin de mémoriser d’autres stations de radio. 6. Votre radio réveil peut stocker jusque 10 stations de radio FM. 7. Lorsque “P01-P10” clignote, sélectionnez le numéro de préréglage à l’aide des boutons (4) ou (5). 7 8. Pour rappeler une station préréglée, appuyez sur ‘M +’ (3) pour sélectionner le numéro de préréglage dans l’ordre. Fonction Sommeil (Arrêt différé) Lorsque vous écoutez la radio, appuyez sur le bouton SLEEP (1) pour entrer en mode « Arrêt différé ». Appuyez plusieurs fois sur la touche SLEEP pour programmer l’arrêt différé de 120 minutes à 10 minutes (par palier de 10 minutes). L’appareil s’éteint automatiquement une fois le temps écoulé. FONCTION BLUETOOTH® Configuration Bluetooth® Les performances de connexion Bluetooth® peuvent varier selon la marque et le modèle de l’appareil connecté. Pour de meilleures performances, veuillez connecter des périphériques Bluetooth® les plus récents intégrant la version Bluetooth® 2.1 et utilisant la dernière mise à jour du micro logiciel disponible auprès du constructeur de l’appareil. La compatibilité avec tous les appareils et les types de médias n’est pas garantie. Afin de considérer les performances Bluetooth®, s’assurer que tout autre appareil Bluetooth® dans un rayon de 9 mètres ont leur fonction Bluetooth® désactivée, car la présence d’autres périphériques Bluetooth® en mode activé pourraient compliquer les opérations de connexion. Le Bluetooth® est une technique de communication radio à courte portée. L’émetteur Bluetooth® et du matériel de réception de cet appareil a une plage de fonctionnement d’environ 9 mètres dans un espace ouvert. Généralement, les dispositifs Bluetooth® peuvent communiquer, les uns avec les autres, facilement dans une pièce de taille normale. Le fonctionnement entre les différentes pièces dépend de la construction de la pièce. Il est important de noter que la portée Bluetooth® est sensiblement réduite si des objets solides obstruent la communication. Le corps humain, des murs en béton, ou bibliothèques réduisent la portée Bluetooth®. Le verre, les murs lambrissés ou les cloisons de bureau peuvent avoir un effet moins grave mais perceptible. Vous devez placer vos périphériques Bluetooth® à proximité les uns des autres si vous observez des difficultés de communication. Connexion de votre téléphone mobile, tablette, etc… Veuillez lire attentivement, au préalable, les instructions liées aux opérations de couplage Bluetooth® de votre périphérique Bluetooth® tel que Smartphone (Android®, iPhone®, Windows phone® etc…), tablette, lecteur multimédia ou autres périphérique possédant la fonction Bluetooth®. Veuillez vous familiariser avec les fonctionnalités Bluetooth® de votre appareil avant de le connecter au TC-139. 8 Coupler votre périphérique Bluetooth® 1. Assurez-vous que la fonction Bluetooth® de votre périphérique Bluetooth® est activée. Référez vous au manuel d’utilisation de votre appareil externe pour plus de détails. 2. Placez le TOKAI TC-139 et votre périphérique Bluetooth® externe dans un rayon de 90 cm. 3. Mettez le TOKAI TC-139 sous tension en appuyant sur la touche Marche/ Arrêt (9). 4. Appuyez sur la touche SOURCE de votre appareil pour passer en mode BLUETOOTH®. Le voyant s’allume à côté de l’indicateur “BT” sur l’afficheur. L’indicateur clignote rapidement. 5. Utilisez les touches de contrôles de votre appareil Bluetooth® externe pour lancer la recherche de votre appareil Bluetooth® celui-ci apparait sous l’identifiant «TC-139 » puis sélectionnez-le. Si votre appareil externe requiert un mot de passe, entrez le mot de passe par défaut “0 0 0 0”. Se référer au mode d’emploi de votre appareil Bluetooth® externe pour les opérations de couplage et de connexion avec des appareils Bluetooth®. 6. Sélectionnez et confirmez le couplage sur votre périphérique Bluetooth®. La connexion est établie en quelques secondes et le TOKAI TC-139 produit un signal sonore de confirmation. Une fois le couplage réussi, l’indicateur de couplage Bluetooth®, à côté de BT sur l’afficheur, clignote lentement. Votre radioréveil restera couplé à l’appareil externe à moins que vous ne le déconnectiez manuellement ou bien que vous effectuiez une réinitialisation, vous pouvez maintenant commencer à écouter votre musique en streaming via le procédé Bluetooth®. Lecture de vos fichiers audio via Bluetooth® 1. Suivez les instructions liées aux opérations de couplage pour connecter votre périphérique Bluetooth®. 2. Utilisez les touches de contrôles de votre appareil Bluetooth® connecté pour sélectionner une piste musicale. 3. Pour lire ou pour mettre en pause la piste sélectionnée, utilisez les touches de contrôles de votre périphérique Bluetooth®, ou appuyez sur la touche Lecture/Pause (3) de votre radioréveil. 4. Votre musique mise en lecture sur votre appareil Bluetooth® externe est maintenant entendue à travers le haut-parleur de votre radio réveil. Coupler un nouveau périphérique BLUETOOTH® Vous pouvez coupler seulement un appareil Bluetooth® externe à la fois sur votre radioréveil. Si vous voulez changer le périphérique externe Bluetooth® connecté avec votre radioréveil, veuillez procéder comme suit: • Activez la fonction Bluetooth® sur votre appareil Bluetooth® externe. 9 • • Appuyez et maintenez la touche « COUPLER » M+/ (3) pendant 3 secondes. L’indicateur de couplage à côté de « BT » sur l’afficheur, clignote rapidement et le radioréveil émettra un signal de confirmation. Sélectionnez et confirmez le couplage sur votre nouvel appareil Bluetooth® externe. Note: Certains téléphones mobiles peuvent se connecter et se déconnecter lorsque vous effectuez un appel téléphonique et mettez fin aux appels. Ce n’est pas une indication d’un problème avec votre appareil. AUTRES FONCTIONS Fonction « Variateur de luminosité » En mode veille, appuyez sur le bouton DIMMER (variateur de luminosité) (1) pour augmenter ou réduire la luminosité de l’écran LED. Fonction « Entrée Auxiliaire » Cette fonction requiert l’utilisation d’un câble audio de 3,5 mm (non inclus). La prise AUXILIAIRE vous permettra de connecter un lecteur de musique externe ou une source sonore externe à votre TC-139. 1. Branchez un câble audio de 3,5 mm (non inclus) dans votre appareil externe et branchez l’autre extrémité (3,5 mm jack) à la prise AUX-IN situé à l’arrière de l’unité. 2. Appuyez sur le bouton SOURCE pour basculer en mode Entrée Auxiliaire (AUX IN). 3. Utilisez les touches de contrôles de l’appareil externe connecté pour contrôler la lecture jouée via le haut-parleur du radioréveil. Fonction « Recharge via le port USB » La prise chargeur USB DC 5 V. (12) située à l’arrière de l’appareil vous permet de recharger un appareil externe au moyen d’un cordon USB (non fourni). Vous pouvez recharger un appareil de maximum DC 5V. Par exemple, cette prise USB vous permet de recharger votre Smartphone, iPhone® ou tablette (de DC 5 V. max). ATTENTION ! Ce port USB a uniquement une fonction de recharge et ne vous permet PAS de brancher une clé USB et de lire son contenu. Fonction « Réinitialisation » Si le système ne répond pas ou fonctionne avec des erreurs ou par intermittence, ceci est peut-être dû une décharge électrostatique (ESD) ou une surtension qui a déclenché une extinction automatique du microcontrôleur 10 interne. Si cela se produit, débranchez simplement le cordon d’alimentation et retirez la pile de sauvegarde, puis attendre au moins 3 minutes, puis configurer de nouveau l’appareil en suivant le mode d’emploi. SPECIFICATIONS TECHNIQUES Référence Modèle Alimentation Consommation en mode marche Consommation en mode veille Pile de secours Couverture de Fréquence Radio Puissance de sortie AUDIO Prise chargeur USB Entrée AUXILIAIRE Bluetooth® Plage température intérieure Poids de l’appareil Dimensions • TC-139 • Entrée AC 100-240V - 50/60 Hz • Sortie DC 5V 1500mA • 5W •<1W •1 pile de 3V (CR2032 Lithium) non fournie • FM: 87.5MHz - 108 MHz • 2 W RMS • 1000 mA / DC 5V MAX • Prise Jack 3.5 mm • Version 2.1 • 0 to + 50°C or 32 to 122 °F • 300 g • 106×125×116 mm IMPORTANT : Les spécifications et le design de l’appareil peuvent être soumis à modifications sans préavis. IMPORTATEUR EXCLUSIF Ce produit a été importé par la Société LEMA S.A.S. Pour toute question relative à la conformité du produit, merci d’envoyer votre demande à : LEMA S.A.S. 28, Boulevard Zéphirin Camélinat 92230 GENNEVILLIERS FRANCE 11 MISE AU REBUT EN FIN DE VIE Attention ! Ce logo apposé sur le produit indique qu’il s’agit d’un appareil dont le traitement en tant que déchet rentre dans le cadre de la directive 2002/96/CE du 27 janvier 2003, relative aux déchets d’équipements électriques et électroniques (DEEE). Ce symbole signifie que les produits électriques et électroniques usagées ne doivent pas être mélangés avec les déchets ménagers généraux. Un système de collecte séparé est prévu pour ces produits. Si vous souhaitez mettre cet appareil au rebut, ne le jetez pas dans une poubelle ordinaire ! - La présence de substances dangereuses dans les équipements électriques et électroniques peut avoir des effets potentiels sur l’environnement et la santé humaine dans le cycle de retraitement de ce produit. - Ainsi, lors de la fin de vie de cet appareil, celui-ci ne doit pas être jeté avec les déchets municipaux non triés. Les appareils électriques et électroniques doivent être traités séparément et conformément aux lois en vigueur en matière de traitement, de récupération et de recyclage adéquats de ces appareils. - Des systèmes de reprise et de collecte sont mis à votre disposition par les collectivités locales (déchetteries) et les distributeurs. Veuillez contacter votre administration locale pour plus de renseignements. Vous avez l’obligation d’utiliser les systèmes de collecte sélective mise à votre disposition. - Si votre appareil électrique et électronique usagé comporte des piles ou des accumulateurs, veuillez les mettre séparément et préalablement au rebut conformément à la législation locale en vigueur. - En veillant à la mise au rebut correcte de ce produit, vous contribuerez à assurer le traitement, la récupération et le recyclage nécessaires de ces déchets, et préviendrez ainsi les effets néfastes potentiels de leur mauvaise gestion sur l’environnement et la santé humaine. Cet appareil est conforme aux exigences imposées par la Directive Européenne 2006 / 95 CE (Directives sur la Compatibilité Electromagnétique et Basse Tension) 12 BEFORE WE BEGIN Thank you for purchasing the TOKAI brand model TC-139, Bluetooth Clock Radio with PLL FM Digital radio & preset stations. This is your assurance of quality, performance and value. Our engineers have included many useful and convenient features in this product. Please be sure to read this instruction Manual completely to make sure you are getting the maximum benefit from each feature. This product was manufactured using the highest quality components and standards of workmanship. It was tested by inspectors and found to be in perfect working order before it left our factory. For future reference, record the serial number in the space provided. Model No: TOKAI TC-139 : Serial Number: WARNING The lightning flash is intended to alert the user to the presence of dangerous voltage within the product’s enclosure, and touching the inner parts may result in a risk of electric shock to persons. The exclamatory mark is intended to alert the user to the presence of important operating instructions. Warning To reduce the risk of electric shock or fire, do not open the cover. Refer servicing to qualified service personnel. NOTE: We reserve the right to make technical changes without notice in the interest of improvement. CAUTION Danger of explosion if battery is incorrectly replaced. Replace only with the same or equivalent type of battery. IMPORTANT! It is recommended not to leave a mobile phone near the unit in order to avoid electromagnetic interference in the speakers This equipment is a Class II or double insulated electrical appliance. It has been designed in such a way that it does not require a safety connection to electrical earth. 13 PRECAUTIONS FOR USE 1. No naked flame sources, such as lighted candles, should be placed on the apparatus. 2. Do not place the product in closed bookcases or racks without proper ventilation. 3. Where the mains plug is used as the disconnect device, the disconnect device shall remain readily operable. 4. The ventilation should not be impeded by covering the ventilation openings with items, such as newspapers, table-cloths, curtains, etc. 5. It shall not be exposed to dripping or splashing and that no objects filled with liquids, such as vases, shall be placed on the apparatus. 6. Do not connect FM antenna to outside antenna. 7. The unit should not be exposed to direct sunlight, very high or low temperature, moisture, vibrations or placed in dusty environment. 8. Do not use abrasive, benzene, thinner or other solvents to clean the surface of the unit. To clean, wipe it with mild non-abrasive detergent solution and clean soft cloth. 9. Never attempt to insert wires, pins or other such objects into the vents or opening of the unit. 10. Disconnect device warning : Mains plug is used as the connection, so it should always remain ready operate. 11. Batteries shall not be exposed to excessive heat such as sunshine, fire or the like. 12. Class 1 LED product. POWER SUPPLY & BATTERY BACK-UP SYSTEM PREPARATION FOR USE AC-DC adaptor connection: The clock radio unit can be powered by an external AC-DC adaptor, required the output DC 5V 1.5A (included). POWER CONNECTION Plug the AC-DC adaptor to a household outlet AC source, connect the adaptor’s DC output plug to the DC IN Jack of the clock unit. BATTERY BACK-UP • This unit is equipped with a battery back-up system, it requires a 3V flat lithium battery CR2032 (not included). • Open the battery compartment by unscrewing the lid with a small screwdriver. • Insert the battery in the battery compartment, making certain that 14 • the positive and negative (+ and -) battery terminals are attached to the corresponding terminals on the plate in the battery compartment. Screw the lid of the battery compartment to close. Note : If an AC power failure occurs, the clock automatically switches to the battery power supply, the clock and timer memory continue running. When the AC power resumes, the clock switches back to AC again. BATTERY CARE 1. Use only the size and type of batteries specified. 2. If the unit is not to be used for an extended period of time, remove the battery. Old or leaking batteries can cause damage to the unit. 3. Do not try to recharge batteries not intended to be recharged; they can overheat and rupture (Follow battery manufacturer’s directions). 4. Do not dispose of batteries in fire, batteries may leak or explode. 15 DESCRIPTION OF THE PRODUCT & LOCATION OF CONTROLS FUNCTION & CONTROLS 1. SNOOZE / SLEEP / DIMMER BUTTON 2. SOURCE BUTTON 3. MEMORY UP / PLAY / PAUSE BUTTON/PAIR BUTTON 4. SKIP BACK / TUNING DOWN BUTTON 5. SKIP FORWARD / TUNING UP BUTTON 6. VOLUME DOWN/ ALARM 1 ON-OFF SET BUTTON 7. VOLUME UP/ ALARM 2 ON-OFF SET BUTTON 8. SET / MEMORY BUTTON 9. POWER ON – OFF / MOOD LIGHT ON-OFF / ALARM OFF BUTTON 10. DISPLAY 11. MOOD LIGHT 12. USB CHARGING SOCKET 13. FM ANTENNA 14. BATTERY COMPARTMENT 15. RATING LABEL 16. DC IN JACK 17. AUX IN JACK 18. SPEAKER 16 LED DISPLAY & INDICATORS TIME Indicator PM Indicator BLUETOOTH Indicator AUX Indicator FM Indicator ALARM 1 Indicator ALARM 2 Indicator TIME AND ALARM SETTINGS Time manual setting With the radio OFF mode, press and hold the SET / MEMORY button (8); “24 Hr” will blink. Press the SKIP FORWARD (5) or SKIP BACK (4) button to set the unit to the 12 hour (12 Hr) mode or 24 Hour (24 Hr) mode. Press the SET / MEMORY button (8) to confirm and the hours will blink. Press the SKIP FORWARD (5) or SKIP BACK (4) button to set the current hour, then press the SET / MEMORY (8) button again to confirm the hour; then the minute digits will blink. Press the SKIP FORWARD (5) or SKIP BACK (4) button to set the current minutes. When done, press SET / MEMORY (8) button once again to indicate the current time is set. Setting Alarm Time To preview the alarm time : press the ALARM button (6/7) once. While the display is showing the alarm time and you hold the ALARM button (AL.1 / AL.2) for 3 seconds and the hours will blink. Press the SKIP FORWARD (5) or SKIP BACK (4) button to set the alarm hour. Press the ALARM button (AL.1 / AL.2) again; the minute digits will blink. Press the SKIP FORWARD (5) or SKIP BACK (4) button to set the alarm minutes. Press the ALARM button (AL.1 / AL.2) and you can change the sound mode (Buzzer or Radio) for the alarm. Enable / Disable / Stop the alarm Press and hold the ALARM button “AL.1” (6) / “AL. 2” (7) to enable (or disable) the alarm. Once the alarm is activated, the small dot on the display will light on next to the bell symbol of AL1 and AL2. To stop the alarm from coming on the following day, hold the ALARM button (AL.1 / AL.2) to turn it OFF. The alarm icon will disappear to indicate the alarm is disarmed. To stop the alarm, press ALARM OFF (9) button. 17 Wake up to radio or buzzer with mood-lights Have a great start to each day with your choice of wake up call. Have a buzzer or radio station to rouse you from slumber. Mood-lights will also come on when your alarm sounds, making mornings ever so pleasant. Mood-lights Press and hold the MOOD LIGHT ON-OFF button (9) for 3 seconds to turn the mood- lights ON-OFF. Even though Mood-lights is OFF in standby mode, the Mood Light will light ON when Alarm sounds (together with Buzzer or Radio). Snooze function When Alarm rings, press Snooze button (1) to suspend the alarm & to activate the snooze function, the alarm will stop. It will come on again 9 minutes later and the alarm will ring again. You may repeat this cycle several times during the alarm cycle and until the next alarm rings. Note: The interval time of the Snooze function is 9 minutes. - If you want to disable the SNOOZE function and stop alarm completely, press ALARM OFF button (9). RADIO OPERATIONS Listening to Radio Note : Ensure that the FM antenna is completely unrolled and extended for best FM reception. 1. Press the POWER ON-OFF button (9) to turn the unit ON. 2. Use the TUNING UP (5) or TUNING DOWN (4) button to select the desired radio station. If you press and hold the TUNING UP (5) or TUNING DOWN (4) button for one second, then release, the unit will automatically scan to the next broadcasting station. 3. Press the POWER ON-OFF button (9) to turn the radio OFF. To set / recall the radio presets 1. Press the POWER ON-OFF button (9) to turn the unit ON. 2. Use the TUNING UP (5) or TUNING DOWN (4) button to select the desired radio station. 3. Press the SET/MEM. button; “P01” will blink in the display. 4. Press the SET / MEM. button again to set the preset. 18 5. Repeat steps 2 through 4 to set more presets. 6. The unit can preset 10 stations totally for FM. 7. When “P01-P10” is blinking, press the Tune+ or Tune- button to select the preset number. 8. When recalling preset stations, press the Memory + (M+) button (3) to select the preset number in cycle. Sleep operation When listening to radio, press Sleep button (1) to enter sleep mode. You can just adjust the sleep timer from 120 mins to 10 mins by pressing the Sleep button (1). The unit will automatically turn off after the selected time. BLUETOOTH SETUP Bluetooth connectivity performance may vary with brand and model of the connected device. For best performance, please connect newer Bluetooth devices incorporating Bluetooth 2.1 and using the latest firmware update available from the device vendor. Compatibility with all devices and media types is not guaranteed. Bluetooth performance considerations ensure all Bluetooth devices within 30 feet have Bluetooth transmission disabled. The presence of other functioning Bluetooth devices during connection may lead to operational difficulties. Bluetooth is a short-range radio communication standard. The Bluetooth transmitter and receiver hardware in this unit has an approximate operational range of 30 feet in open space. Generally Bluetooth devices can communicate with each other clearly within a regular sized room or office. Operation between different rooms will depend on the construction of the room. It is important to recognize the fact that Bluetooth communication range may be substantially reduced if the signal passes through a solid object. Human bodies, brick and concrete walls, and heavy furniture or bookcases will reduce the operational range of your Bluetooth devices. Glass, dry-wall or wood paneled walls and office partitions may have a less severe but noticeable effect. You should position your Bluetooth devices closer to each other if you observe communication difficulties. Stereo music connection to your smart phones (such as Android® smarphones, Iphone®, Windowsphone® etc…) connection or PC tablet, multi-media player etc… all devices having Bluetooth function, you will need some familiarity with the Bluetooth functions of your Bluetooth device. As each device operates slightly differently, please familiarize yourself with the Bluetooth capabilities of your device before connecting. 19 Pairing your Bluetooth device 1. Ensure that the Bluetooth on your Bluetooth device is powered ON. You might need to refer to the external device user manual for details. 2. Place the clock-radio and the external device where they are no more than 3 feet apart. 3. Power ON the unit by pressing the POWER button (9). 4. Press the Source (2) button to switch to Bluetooth mode. Bluetooth mode is indicated by “BT” on the display. The pair indicator will flash quickly. 5. Using the native controls on your Bluetooth device, select the “TC-139” in your Bluetooth settings to pair. If your device requests a password, enter the default password “ 0 0 0 0 ”. Refer to the user’s manual for your specific device for instructions on pairing and connecting Bluetooth devices. 6. Select and confirm the pairing on your external device, the connection will be completed in a few seconds and the radio will produce a confirmation tone, when successfully paired and connected, the pair indicator will flash slowly on the clock radio. After initial pairing, the unit will stay paired unless unpaired manually by the user or erased due to a reset of the device and you can now start your Bluetooth music streaming operation. Playing Audio Wirelessly 1. Follow the instructions for Pairing a Bluetooth Device. 2. Use the native controls on the connected Bluetooth Device to select a track. 3. To play or pause the selected track, use the native controls on the connected Bluetooth Device or press the Play/Pause button (3). 4. Audio played through the connected Bluetooth device will now be heard through the speakers of the clock radio. Changing the Bluetooth connection to a new mobile phone (or other Bluetooth device) • You can pair the unit with only 1 external Bluetooth device. If you want to change the Bluetooth external device already connected with your clock-radio, please proceed as follows : Power ON the Bluetooth function of yr external device. Press and hold the Pair button (3) for 3 seconds. The pair indicator will flash quickly and the clock-radio will produce a confirmation tone. Select and confirm the pairing on your new mobile phone or Bluetooth external device. 20 Note: Some mobile phones may connect and disconnect as you make and end calls. This is not an indication of a problem with your unit. OTHER FUNCTIONS DIMMER control In standby mode, press the DIMMER (1) button allows you to set the brightness of the LED display to high or low levels. AUX IN Requires a 3.5mm audio cable (no included). 1. Connect the 3.5mm audio cable to the Line In on the unit and an audio output on an MP3 player or other audio source. 2. Press the Source button to switch to Aux In mode. 3. Use the native controls on the connected MP3 player or other audio source to play and control audio played through the clock radio speaker. USB CHARGING SOCKET The USB charging socket (12) of DC 5 V. at the back of the unit allows you to charge an external device via USB cable (not supplied). You can charge with a DC 5 V. device max. For example : your mobile phone (Android ® or Iphone ® are in 5 V. max) and external device with USB socket of max. The connector or the USB charging cable are not supplied. RESETTING If the system does not respond or exhibits erratic or intermittent operation, you may have experienced an electrostatic discharge (ESD) or a power surge that triggered the internal microcontroller to shut down automatically. If this occurs, simply disconnect the ac power cord and remove the system backup battery, wait for at least 3 minutes and then setup the unit again as if it is a brand new unit. 21 TECHNICAL SPECIFICATIONS Power Adaptor: • Input AC 100-240V / 50- 60 Hz • Output DC 5V 1500mA Power consumption • 5W Standby power consumption • <1W Battery backup • 3V (CR2032 Flat Lithium battery x 1) not included Radio Frequency Coverage • FM: 87.5MHz - 108 MHz USB Charging Socket • 1000 mA / DC 5V MAX Aux. In • 3.5 mm Jack Audio output power • 2W RMS Temperature range for Indoor • 0 to + 50°C or 32 to 122 °F Net Weight • 0.31kgs Dimensions • 106 x 125 x 116 mm IMPORTANT: Due to continual revision and improvement on our products design, specifications are subject to change without further notice. EXCLUSIVE IMPORTER This product was imported by the Company : LEMA S.A.S. For any questions concerning the conformity of the product, thank you to send your request to : LEMA S.A.S. 28, Boulevard Zéphirin Camélinat 92230 GENNEVILLIERS FRANCE 22 END OF LIFE DISPOSAL Warning ! This logo set on the product means that the recycling of this apparatus comes within the framework of the Directive 2002/96/CE of January 27, 2003 concerning the Waste of Electrical and Electronic Equipment (WEEE). This symbol means that used electrical and electronic products should not be mixed with general household waste. There is a separate collection system for these products. If you want to dispose of this equipment, please do not use the ordinary dust bin! - - - The presence of dangerous substances in the electrical and electronic equipments can have potential consequences on the environment and human health in the cycle of reprocessing this product. Therefore, at the end of its lifetime, this product shall not be disposed with other non-recycled waste. Used electrical and electronic equipment must be treated separately and in accordance with legislation that requires proper treatment, recovery and recycling of used electrical and electronic equipment. Local authorities and resellers have set special procedures for the purpose of collecting and recycling this product (please contact your local authority for further details). You have the obligation to use the selective waste collection systems put in place by your local authority. If you’re used electrical or electronic equipment has batteries or accumulators, please dispose of these separately beforehand according to local requirements. By disposing of this product correctly you will help ensure that the waste undergoes the necessary treatment, recovery and recycling and thus prevent potential negative effects on the environment and human health which could otherwise arise due to inappropriate waste handling. This unit complies with European Council Directive 2006 / 95 CE (Electromagnetic Compatibility & Low Voltage Directives) 23 VOOR WE VAN START GAAN Dank u voor uw aankoop van deze Bluetooth wekkerradio met PLL FM digitale radio & voorkeuzezenders, het model TC-139 van het merk TOKAI. Dit is uw garantie voor kwaliteit, performance en waarde naar geld. Onze ingenieurs hebben talrijke nuttige en handige functies in dit product ingebouwd. Lees deze handleiding volledig om er zeker van te zijn dat u elk kenmerk van uw apparaat maximaal zult benutten. Dit product is met de hoogste standaard van vakmanschap vervaardigd uit onderdelen van de beste kwaliteit. Het is door inspecteurs getest en in perfecte staat bevonden voordat het onze fabriek verliet. Noteer in de daarvoor bestemde ruimte het serienummer voor eventueel toekomstig gebruik. Model nr.: TOKAI TC-139 : Serienummer: ___________________________________________________ ______ WAARSCHUWING De bliksemschicht is bedoeld om de gebruiker te waarschuwen voor de aanwezigheid van gevaarlijke spanning binnenin de behuizing van WAARSCHUWING dit product; het aanraken van de onderdelen binnenin kan leiden tot elektrische schokken bij mensen. Het uitroepteken is bedoeld om de gebruiker erop te wijzen dat belangrijke bedieningsinstructies bij dit apparaat zijn meegeleverd. Warning Om een risico op elektrische schokken of brand te voorkomen mag de behuizing niet worden geopend. Laat alle onderhoud over aan een gekwalificeerde elektricien. OPMERKING: In het belang van verbetering behouden wij ons het recht voor om zonder voorafgaande kennisgeving technische aanpassingen te doen. BELANGRIJK! Het wordt aanbevolen om geen mobiele telefoon in de buurt van het apparaat verlaten om elektromagnetische interferentie in de luidsprekers te voorkomen. Dit apparaat is een klasse II of dubbelgeïsoleerd elektrisch apparaat. Het is zo ontworpen dat een veiligheidsaansluiting op de elektrische aarding niet nodig is. 24 GEBRUIKSVOORZORGEN 1. Zet geen naakte vlam zoals van brandende kaarsen bovenop het apparaat. 2. Zet dit apparaat niet in een gesloten boekenkast of rek waardoor de ventilatie belemmerd wordt. 3. De netstekker doet dienst als hoofdmiddel om dit apparaat van de netvoeding los te koppelen en dient te allen tijde bereikbaar te zijn. 4. De ventilatie mag niet belemmerd worden door de ventilatieopeningen van het apparaat af te dekken met bijvoorbeeld kranten, tafelkleden, gordijnen enz. 5. Dit apparaat mag niet worden blootgesteld aan druppelende of spattende vloeistof en voorwerpen die met water gevuld zijn, zoals vazen, mogen niet op dit apparaat worden neergezet. 6. Sluit de FM-antenne niet aan op een buitenantenne. 7. Dit apparaat mag niet worden blootgesteld aan rechtstreeks zonlicht, extreem hoge of lage temperaturen, vochtigheid, trilling of omgevingen met veel stof. 8. Gebruik geen schuurmiddelen, benzeen, thinner of andere chemische producten om de behuizing van dit apparaat te reinigen. Veeg de behuizing schoon met een mild sopje en een zachte, schone doek. 9. Probeer in geen geval kabels, pinnen of andere voorwerpen in de openingen of ventilatiesleuven van dit apparaat te stoppen. 10. Waarschuwing betreffende het ontkoppelen van dit apparaat: de stekker doet dienst als hoofdmiddel om het apparaat van de netvoeding los te koppelen en dient daarom te allen tijde bereikbaar te zijn. 11. De batterijen mogen niet worden blootgesteld aan overmatige hitte zoals van zonneschijn of vuur. 12. LED-apparaat van de Categorie 1. VOEDING & BACK-UPSYSTEEM MET BATTERIJ VOORBEREIDING VOOR GEBRUIK De wissel-naar-gelijkstroomadapter aansluiten: de wekkerradio krijgt stroomvoeding via een externe wissel-naar-gelijkstroomadapter met een uitgang van 5V 1,5A gelijkstroom (meegeleverd). AANSLUITEN OP DE VOEDING Sluit de wissel-naar-gelijkstroomadapter aan op een huishoudelijk stopcontact en stop de gelijkstroom uitgangstekker van de adapter in het contact DC IN van de wekkerradio. 25 BATTERIJ BACK-UP • Dit apparaat is uitgerust met een batterij back-up-systeem dat werkt op een platte lithiumbatterij van 3V en van het type CR2032 (niet meegeleverd). • Open het batterijvak door het deksel met een kleine schroevendraaier los te schroeven. • Zet de batterij met de positieve en negatieve batterijcontacten (+ en -) in de juiste richting in het batterijvak. De polariteit is aangeduid op het plaatje in het batterijvak. • Schroef het deksel van het batterijvak weer vast. Opmerking: in geval van stroomstoring schakelt het apparaat automatisch over naar de batterijvoeding, zodat de klok en het timergeheugen kunnen blijven werken. Het apparaat schakelt terug naar de wisselstroomvoeding zodra de stroomvoeding is hersteld. BATTERIJEN MET ZORG HANTEREN 1. Gebruik uitsluitend batterijen van de grootte en het type dat is opgegeven in de technische gegevens. 2. Verwijder de batterij als het apparaat lange tijd niet zal worden gebruikt. Oude of lekkende batterijen kunnen het apparaat beschadigen. 3. Probeer nooit batterijen die niet-herlaadbaar zijn op te laden, omdat deze kunnen oververhitten en barsten (volg steeds de richtlijnen van de fabrikant van de batterij). 4. Werp batterijen niet in vuur omdat zij kunnen lekken of ontploffen. 26 BESCHRIJVING VAN HET APPARAAT & LOCATIE VAN DE BEDIENINGSTOETSEN FUNCTIE & BEDIENINGSTOETSEN 1. 2. 3. 4. 5. 6. 7. 8. 9. 10. 11. 12. 13. 14. 15. 16. 17. 18. TOETS SLUIMER/SLAAP/DIMMER BRONTOETS TOETS GEHEUGEN OP / WEERGAVE / PAUZE /KOPPELTOETS TOETS ACHTERUIT / AFSTEMMEN NEER TOETS VOORUIT / AFSTEMMEN OP TOETS VOLUME NEER/ WEKKER 1 AAN/UIT INSTELLEN TOETS VOLUME OP/ WEKKER 2 AAN/UIT INSTELLEN TOETS INSTELLEN / GEHEUGEN TOETS AAN/UITSCHAKELEN / SFEERLICHT AAN/UIT / WEKKER UIT DISPLAY SFEERLICHT USB-LAADCONTACT FM-ANTENNE BATTERIJVAK TYPEPLAATJE CONTACT GELIJKSTROOM-IN CONTACT AUX-IN LUIDSPREKER 27 LED-DISPLAY & INDICATOREN TIJD-indicator PM-indicator BLUETOOTH-indicator AUX-indicator FM-indicator WEKKER 1-indicator WEKKER 2-indicator DE TIJD EN WEKKER INSTELLEN De tijd handmatig instellen Houd in de modus radio UIT de toets INSTELLEN / GEHEUGEN ingedrukt (8), “24u” gaat dan knipperen. Druk op de toets VOORUIT (5) of ACHTERUIT (4) om het apparaat in de modus 12 uur (12u) of 24 uur (24u) te schakelen. Druk op de toets INSTELLEN / GEHEUGEN (8) om te bevestigen. De uurcijfers gaan nu knipperen. Druk op de toets VOORUIT (5) of ACHTERUIT (4) om het huidige uur in te stellen en druk dan opnieuw op de toets INSTELLEN / GEHEUGEN (8) om het uur te bevestigen. Nu gaan de minutencijfers knipperen. Druk op de toets VOORUIT (5) of ACHTERUIT (4) om de minuten van de huidige tijd in te stellen. Druk wanneer u klaar bent nogmaals op de toets INSTELLEN / GEHEUGEN (8) om de instelling van de huidige tijd te bevestigen. De wekkertijd instellen Om de wekkertijd na te kijken: druk eenmaal op de toets WEKKER (6/7). Houd terwijl de wekkertijd op de display is aangegeven de toets WEKKER (WEK1 / WEK2) 3 seconden lang ingedrukt zodat de uurcijfers gaan knipperen. Druk op de toets VOORUIT (5) of ACHTERUIT (4) om het uur van de wektijd in te stellen. Druk nogmaals op de toets WEKKER (WEK1 / WEK2), zodat de minutencijfers gaan knipperen. Druk op de toets VOORUIT (5) of ACHTERUIT (4) om de minuten van de wektijd in te stellen. Druk op de toets WEKKER (WEK1 / WEK2) om de geluidsmodus (zoemer of radio) voor de wekker in te stellen. De wekker inschakelen/uitschakelen/stoppen Houd de toets WEKKER “WEK1” (6) / “WEK 2” (7) ingedrukt om de wekker in (of uit) te schakelen. Als de wekker is ingeschakeld licht naast het belsymbool van WEK1 en WEK2 op de display een kleine stip op. Om te voorkomen dat de wekker de volgende dag luidt, houdt u de toets WEKKER button (WEK1 / WEK2) ingedrukt om de wekker UIT te schakelen. Het 28 wekkericoon dooft, aangevend dat de wekker is uitgeschakeld. Druk op de toets WEKKER UIT (9) om de wekker volledig uit te schakelen. Wakker worden met de radio of zoemer en met sfeerlicht Start uw dag op een aangename manier met de wekker van uw keuze. Wordt uit uw slaap gewekt door de zoemer of radiozender met het sfeerlicht dat ook zal branden terwijl de wekker luidt, waardoor uw ontwaken prettiger wordt dan ooit. Sfeerlicht Houd de toets SFEERLICHT AAN/UIT (9) 3 seconden lang ingedrukt om het sfeerlicht AAN/UIT te schakelen. Hoewel het sfeerlicht in de modus stand-by UIT is geschakeld, gaat dit INSCHAKELEN terwijl de wekker luidt (samen met de zoemer of radio). Sluimerfunctie Druk terwijl de wekker luidt op de Sluimertoets (1) om de wekker tijdelijk te stoppen & de sluimerfunctie te activeren. De wekker stopt en luidt 9 minuten later opnieuw. U kunt deze cyclus verschillende keren herhalen tot de volgende wekker luidt. Opmerking: de tussentijd van de sluimerfunctie is 9 minuten. - Druk op de toets WEKKER uit (9) om de SLUIMER-functie uit te schakelen en de wekker volledig te stoppen. DE RADIO BEDIENEN Naar de radio luisteren Opmerking: zorg ervoor dat de FM-antenne volledig is uitgerold en gestrekt voor een optimale FM-ontvangst. 1. Druk op de toets STROOM AAN/UIT (9) om het apparaat IN te schakelen. 2. Gebruik de toets AFSTEMMEN OP (5) of AFSTEMMEN NEER (4) om af te stemmen op de gewenste radiozender. Houd de toets AFSTEMMEN OP (5) of AFSTEMMEN NEER (4) één seconde lang ingedrukt om automatisch naar de eerstvolgende radiozender te scannen. 3. Druk op de toets STROOM AAN/UIT (9) om de radio UIT te schakelen. Voorkeuzezenders op de radio in te stellen/op te roepen 1. Druk op de toets STROOM AAN/UIT (9) om het apparaat IN te schakelen. 2. Gebruik de toets AFSTEMMEN OP (5) of AFSTEMMEN NEER (4) om af te stemmen op de gewenste radiozender. 3. Druk op de toets INST/GEH.. “P01” knippert dan op de display. 29 4. Druk nogmaals op de toets INST/GEH. om de zender in te stellen als voorkeuzezender. 5. Herhaal de stappen 2 tot en met 4 om andere voorkeuzezenders in te stellen. 6. U kunt tot 10 radiozenders op FM in de radio instellen. 7. Druk terwijl “P01-P10” knippert op de toets Afstemmen+ of Afstemmen- om een cijfer voor de voorkeuzezender te kiezen. 8. Druk voor het oproepen van voorkeuzezenders op de toets Geheugen + (M+) (3) om de cijfers van de achtereenvolgende voorkeuzezenders te selecteren. De slaapfunctie Druk terwijl u naar de radio luistert op de Slaaptoets (1) om de slaapmodus binnen te gaan. U kunt de slaaptimer instellen tussen 120 min. en 10 min. door te drukken op de Slaaptoets (1). Het apparaat schakelt automatisch uit nadat de ingestelde tijd is verstreken. BLUETOOTH INSTELLEN De performance van de Bluetooth-connectiviteit kan variëren naargelang het merk en model van het verbonden apparaat. Voor een optimale performance is het raadzaam dit apparaat alleen te verbinden met de nieuwste Bluetoothapparatuur met Bluetooth 2.1 en de meest recente firmware-updates van de leverancier van het apparaat te gebruiken. Compatibiliteit met alle apparaten en mediatypes is niet gegarandeerd. Een correcte Bluetooth-performance vereist dat de Bluetooth-transmissie van alle Bluetooth-apparaten binnen een straal van 9 meter is uitgeschakeld. De aanwezigheid van andere Bluetooth-apparaten tijdens de verbinding kan leiden tot operationele storingen. Bluetooth is een standaard voor radiocommunicatie op korte afstand. De hardware van de Bluetooth-zender en -ontvanger in dit apparaat heeft een operationeel bereik van ongeveer 9 meter in een open ruimte. Over het algemeen kunnen Bluetooth-apparaten alleen binnen een ruimte van de grootte van een gangbaar kantoor helder met elkaar communiceren. Communicatie tussen verschillende afgezonderde ruimtes is afhankelijk van de constructie van het gebouw. Het is belangrijk te weten dat het bereik van de Bluetooth-communicatie aanzienlijk kan worden belemmerd als het signaal doorheen een vast voorwerp moet gaan. Menselijke lichamen, bakstenen en betonnen muren en zwaar meubilair of boekenkasten zullen het operationele bereik van uw Bluetoothapparaten belemmeren. Glas, gipsplaat of wanden met houten lambrisering en kantoorpartities hebben een minder ernstige, maar toch merkbare invloed. U kunt uw Bluetooth-apparaten dichter bij elkaar brengen als u 30 communicatieproblemen ondervindt. Stereomuziekverbinding met uw smartphone (zoals Android® smartphone, Iphone®, Windowsphone® enz.), verbinding van een pc-tablet, multimediaspeler enz. gebeuren allemaal via de Bluetooth-functie van apparaten en vergen enige vertrouwdheid met de Bluetooth-functies van al deze Bluetooth-apparaten. Omdat elk apparaat iets anders werkt, is het raadzaam zich vertrouwd te maken met de Bluetooth-mogelijkheden van het apparaat in kwestie voordat u een verbinding maakt. Een Bluetooth-apparaat koppelen 1. Zorg ervoor dat de Bluetooth op uw Bluetooth-apparaat is INGESCHAKELD. Mogelijks moet u de handleiding van het externe apparaat raadplegen voor meer informatie. 2. Zet de wekkerradio en het externe apparaat op niet meer dan 1 meter afstand van elkaar. 3. Schakel de radiowekker IN door te drukken op de STROOMTOETS (9). 4. Druk op de Brontoets (2) om de Bluetooth-modus binnen te gaan. De Bluetooth-modus wordt aangegeven met “BT” op de display. De koppelindicator gaat snel knipperen. 5. Gebruik de eigen knoppen van het Bluetooth-apparaat en selecteer “TC-139” in uw Bluetooth-instellingen om te koppelen. Voer het standaard wachtwoord “0 0 0 0” in als uw apparaat een wachtwoord vraagt. Verwijs naar de handleiding van uw specifieke apparaat voor instructies over het koppelen en verbinden met Bluetooth-apparaten. 6. Selecteer en bevestig de koppeling op uw externe apparaat. De verbinding komt na enkele seconden tot stand en de wekkerradio laat een bevestigingstoon horen, aangevend dat met succes is gekoppeld en verbonden. De koppelindicator op de wekkerradio knippert dan langzaam. U kunt nu van start gaan met het streamen van uw Bluetooth-muziek. Eenmaal gekoppeld, blijft het apparaat gekoppeld tot de gebruiker het handmatig ontkoppelt of de koppeling door een reset van het apparaat wordt gewist. Draadloze audio afspelen 1. Volg de instructies voor het koppelen van een Bluetooth-apparaat. 2. Gebruik de eigen toetsen van het verbonden Bluetooth-apparaat om een muzieknummer te selecteren. 3. Gebruik de eigen toetsen van het verbonden Bluetooth-apparaat om het geselecteerde muzieknummer weer te geven of de weergave tijdelijk te onderbreken, of druk op de toets Weergave/Pauze (3). 4. U hoort dan de audio van het verbonden Bluetooth-apparaat weergegeven via de luidsprekers van de wekkerradio. 31 De Bluetooth-verbinding wijzigen naar een nieuwe mobiele telefoon (of ander Bluetooth-apparaat) • U kunt dit apparaat met slechts 1 extern Bluetooth-apparaat koppelen. Ga als volgt te werk als uw wekkerradio reeds met een apparaat is verbonden en u met een ander extern Bluetooth-apparaat wilt verbinden: Schakel de Bluetooth-functie van uw externe apparaat IN. Houd de Koppeltoets (3) 3 seconden lang ingedrukt. De koppelindicator zal snel knipperen en de wekkerradio laat een bevestigingstoon horen. Selecteer en bevestig de koppeling op uw nieuwe mobiele telefoon of extern Bluetooth-apparaat. Opmerking: Het is mogelijk dat sommige mobiele telefoons bij het starten en beëindigen van een telefoongesprek telkens verbinding maken en weer loskoppelen. Dit wijst niet op een probleem met dit apparaat. OVERIGE FUNCTIES GEBRUIK VAN DE DIMMER Druk in de modus stand-by op de toets DIMMER (1) om de helderheid van de LED-DISPLAY hoger of lager in te stellen. AUX-IN Deze ingang vergt een geluidskabel met stekker van 3,5mm (niet meegeleverd). 1. Sluit de geluidskabel met stekker van 3,5mm aan op het Lijn-in contact van het apparaat en op de geluiduitgang van een MP3-speler of andere geluidsbron. 2. Druk op de Brontoets om over te schakelen naar de modus Aux-in. 3. Gebruik de eigen toetsen van de aangesloten MP3-speler of andere geluidsbron om weer te geven via de luidspreker van de wekkerradio en de weergave via de wekkerradio te bedienen. USB-LAADCONTACT U kunt een USB-kabel (niet meegeleverd) aansluiten op het USB-laadcontact (12) van 5V gelijkstroom op de achterzijde van het apparaat om een extern apparaat op te laden. U kunt een apparaat met maximaal 5V gelijkstroom opladen. Voorbeeld: uw mobiele telefoon (Android® of Iphone® bevinden zich in de max. 5 V.) en extern apparaat met USB-poort van max. Het aansluitstuk voor de USB-laadkabel is niet meegeleverd. RESETTEN Als het systeem niet reageert of wisselvallig lijkt te functioneren, kan er sprake 32 zijn van een elektrostatische ontlading (ESO) of heeft stroomstoot de interne microcontroller automatisch stilgelegd. Als dit gebeurt haalt u eenvoudig de stekker uit het stopcontact en verwijdert u de batterij van het back-up-systeem, wacht u ten minste 3 minuten en stelt dan het apparaat opnieuw in alsof het splinternieuw was. TECHNISCHE GEGEVENS Stroomadapter: • Ingang 100-240V / 50- 60 Hz wisselstroom • Uitgang 5V 1500mA gelijkstroom Stroomverbruik • 5W Stroomverbruik in stand-by • <1W Batterij back-up • 3V (CR2032 platte lithiumbatterij x 1) niet meegeleverd Bereik radiofrequentie • FM: 87.5MHz - 108 MHz USB-laadcontact • 1000 mA / 5V gelijkstroom MAX Aux. ingang • 3,5 mm contact Geluiduitgang vermogen • 2W RMS Temperatuurbereik voor • 0 tot + 50°C of 32 tot 122 °F binnengebruik Netto gewicht • 0,31kg Afmetingen • 106 x 125 x 116 mm BELANGRIJK: Als gevolg van voortdurende herziening en verbetering van het ontwerp van onze producten kunnen de uiteindelijke technische gegevens zonder voorafgaande kennisgeving gewijzigd zijn. EXCLUSIEF IMPORTEUR Dit product werd ingevoerd door het bedrijf : LEMA S.A.S. Voor eventuele vragen betreffende de conformiteit van het product, kunt u uw verzoek sturen naar : LEMA S.A.S. 28, Boulevard Zéphirin Camélinat 92230 GENNEVILLIERS FRANCE 33 WEGDOEN NA HET EINDE VAN DE LEVENSDUUR - - - Let op : Dit symbool geeft aan dat elektrische en elektronische apparatuur, aan het eind van hun levensduur, niet mag worden gedeponeerd bij het normale huishoudelijk afval Uw product is van dit merkteken voorzien. Dit betekent dat en elektronische apparatuur niet samen met afgedankte elektrische het normale huisafval mogen worden weggegooid. Er bestaat een afzonderlijk inzamelingssysteem voor deze producten. (Afgedankte Electrische & Electronische Apparatuur (WEEE). Uw product is ontworpen en vervaardigd met hoge kwaliteit materialen en componenten welke kunnen worden gerecycled en opnieuw gebruikt. (WEEE aanwijzing). Afgedankte elektrische en elektronische apparatuur moet gescheiden worden ingezameld conform de wetgeving inzake de verantwoorde verwerking, terugwinning en recycling van afgedankte elektrische en elektronische apparatuur. In de Europese Unie zijn er afzonderlijke verzamelsystemen voor gebruikte elektrische en elektronische producten. Help ons om het milieu waar we in leven te behouden! Deponeer het product bij het afvalinzamelingbedrijf van uw gemeente. Als uw elektrische of elektronische apparatuur batterijen of accumulatoren bevat dan moet u deze afzonderlijk conform de plaatselijke voorschriften weggooien. Door dit product op een verantwoorde manier weg te gooien, zorgt u ervoor dat het afval de juiste verwerking, terugwinning en recycling ondergaat en potentiële negatieve effecten op het milieu en de menselijke gezondheid worden voorkomen die anders zouden ontstaan door het verkeerd verwerken van het afval. Dit apparaat voldoet aan de Europese veiligheid en EMC & LVD richtlijnen 2006 / 95 CE 34 ANTES DE COMENZAR Gracias por adquirir el Radio Despertador con Bluetooth, FM Digital PLL y memorias para estaciones TOKAI modelo TC-139. Esta es su garantía de calidad, rendimiento y valor. Nuestros ingenieros han incluido muchas funciones de utilidad y conveniencia en este producto. Asegúrese de leer este Manual de Instrucciones de manera completa a fin de obtener los mayores beneficios de cada función. Este producto fue fabricado usando los componentes de mayor calidad y estándares de mano de obra. Fue probado por inspectores y encontrado de en perfecto funcionamiento antes de salir nuestra fábrica. Para referencia futura, registre el número de serie en el espacio provisto. Modelo No: TOKAI TC-139 : Número de Serie : La imagen del rayo tiene por objetivo alertar al usuario de la presencia de voltaje peligroso dentro del producto y tomar contacto con partes internas podría resultar en riesgo de shock eléctrico a las personas. El símbolo de exclamación tiene por objetivo alertar al usuario de la presencia de importantes instrucciones de manejo. Warning Para reducir el riesgo de shock eléctrico o incendio, no abra la cubierta. Refiera el servicio del producto a personal calificado. NOTA: Nos reservamos el derecho de efectuar cambios técnicos sin aviso, en el interés de la mejora. PRECAUCION Peligro de explosión si la pila es colocada de manera incorrecta. Reemplace solamente con pilas de la misma calidad o del tipo equivalente. IMPORTANTE! Se recomienda no dejar un teléfono móvil cerca de la unidad con el fin de evitar la interferencia electromagnética en altavoces. Este equipo es un aparato eléctrico de Clase II o de doble aislamiento. Ha sido diseñado de manera que no requiera conexión eléctrica de cable a tierra. 35 PRECAUCIONES PARA EL USO 1. No debe colocarse sobre el aparato ninguna fuente inflamable o encendida, tales como velas. 2. No coloque el producto en una biblioteca cerrada o estanterías sin ventilación apropiada. 3. A pesar de desconectar el aparato de la corriente, el mismo quedará activado para su funcionamiento. 4. La ventilación no debe ser impedida bloqueando las aberturas específicas de ventilación, con elementos tales como periódicos, manteles, cortinas, etc. 5. No deberá ser expuesto a goteos o salpicaduras y no deberán colocarse sobre el aparato elementos llenos de líquidos, tales como floreros. 6. No conecte la antena FM a una antena de exterior. 7. La unidad no debe ser expuesta a luz solar directa, muy altas o bajas temperaturas, humedad, vibraciones o colocada en ambientes con polvo. 8. No utilizar solventes abrasivos, benzina, thinner u otros para limpiar la superficie de la unidad. Para limpiarla, pase un paño con detergente suave no abrasivo y seque con otro paño suave. 9. Jamás intente insertar cables, alfileres u objetos similares en las ventilaciones u otras aberturas de la unidad. 10. Advertencia sobre la desconexión de la unidad: El enchufe principal es usado para la conexión, de manera que debe permanecer siempre listo para funcionar. 11. Las pilas no deberán se expuestas a calor excesivo tales como luz solar, fuego o similares. 12. producto de LED Clase 1 ALIMENTACION Y SISTEMA DE RESGUARDO A PILA PREPARACION PARA SU USO Conexión al adaptador de corriente: El radio despertador puede ser alimentado mediante un adaptador de corriente externo, cuya salida requerida debe ser 5V 1.5A (incluido). CONEXION A LA CORRIENTE Enchufe el adaptador de corriente a un enchufe de la casa, conectando la ficha de salida del adaptador al toma DC IN de la unidad. PILA DE RESGUARDO • Esta unidad está equipada con un sistema de resguardo, el cual requiere una pila plana de litio de 3V CR2032 (no incluida). • Abra el compartimiento para pilas, destornillando la tapa con destornillador 36 • • pequeño. Inserte la pila en el compartimiento, asegurándose que tanto el polo positivo como el negativo (+ y -) sean conectadas a las terminales correspondientes en la platina del compartimiento de las pilas. Vuelva a atornillar la tapa para cerrar el compartimiento. Nota : Si se produjera una falla en la corriente eléctrica, el reloj automáticamente cambiará a la alimentación a pilas; tanto el reloj como la memoria del temporizador continuarán funcionando. Cuando se restablezca la corriente eléctrica, el reloj volverá a cambiar a la misma nuevamente. CUIDSADO DE LA PILA 1. Use solamente el tamaño y tipo de pila especificado. 2. Si la unidad no es utilizada por un prolongado período, retire la pila. Pilas viejas o que pierden pueden dañar la unidad. 3. No trate de recargar pilas que no sean recargables; se pueden sobrecalentar y romper (siga las indicaciones del fabricante de la pila). 4. No arroje la pila al fuego ya que podría perder o explotar. 37 DESCRIPCION DEL PRODUCTO Y UBICACION DE CONTROLES FUNCIONES Y CONTROLES 1. 2. 3. 4. 5. 6. BOTON DE SNOOZE / DORMIR / DIMMER BOTON DE DE FUENTE BOTON DE MEMORIA ADELANTE / REPRODUCIR / PAUSA /BOTON PAR BOTON DE SALTEAR HACIA ATRAS / SINTONIA INFERIOR BOTON DE SALTEAR HACIA ADELANTE / SINTONIA SUPERIOR BOTON DE BAJAR VOLUMEN / ALARMA 1 ENCENDIDA - APAGADA Y AJUSTE 7. BOTON DE SUBIR VOLUMEN / ALARMA 2 ENCENDIDA - APAGADA Y AJUSTE 8. BOTON DE AJUSTE / MEMORIA 9. BOTON DE ENCENDIDO – APAGADO / LUZ AMBIENTAL ENCENDIDA APAGADA / ALARMA APAGADA 10. PANTALLA 11. LUZ AMBIENTAL 12. ENTRADA DE CARGA USB 13. ANTENA FM 14. COMPARTIMIENTO DE LA PILA 15. ETIQUETA DE CASIFICACION 16. TOMA DE ENTRADA DE CORRIENTE 17. TOMA DE ENTRADA AUX 18. PARLANTE 38 PANTALLA LED E INDICADORES Indicador de HORA Indicador PM Indicador BLUETOOH Indicador AUX Indicador FM Indicador ALARMA 1 Indicador ALARMA 2 CONFIGURACION DE HORA Y ALARMA Configuración manual de la hora Con la radio en modo APAGADO, presione y sostenga el botón de AJUSTE / MEMORIA (8); “24 Hz” titilará. Presione el botón SALTEAR HACIA ADELANTE (5) o SALTEAR HACIA ATRAS (4) para configurar la unidad al modo de 12 horas (12 Hz) o al de 24 Horas (24 Hz). Presione el botón de AJUSTE / MEMORIA (8) para confirmar y titilarán las horas. Presione el botón SALTEAR HACIA ADELANTE (5) o SALTEAR HACIA ATRAS (4) para configurar la hora actual, luego presione nuevamente el botón AJUSTE / MEMORIA (8) para confirmar la hora; luego titilarán los dígitos de los minutos. Presione el botón SALTEAR HACIA ADELANTE (5) o SALTEAR HACIA ATRAS (4) para configurar los minutos actuales. Cuando termine, presione nuevamente el botón AJUSTE / MEMORIA (8) para indicar que ha configurado la hora actual. Configurar la Hora de Alarma Para previsualizar la hora de alarma : presione una vez el botón de ALARMA (6/7). Mientras la pantalla le muestra la hora de alarma y sostiene el botón de ALARMA (AL.1 / AL.2) por 3 segundos, las horas titilarán. Presione el botón SALTEAR HACIA ADELANTE (5) o SALTEAR HACIA ATRAS (4) para configurar la hora de la alarma. Presione nuevamente el botón ALARMA (AL.1 / AL.2); titilarán los dígitos de los minutos. Presione el botón SALTEAR HACIA ADELANTE (5) o SALTEAR HACIA ATRAS (4) para configurar los minutos de la alarma. Presione el botón ALARMA (AL.1 / AL.2) y podrá cambiar el modo de sonido para la alarma (Campana o Radio). Activar / Desactivar / Detener la alarma Presione y sostenga el botón ALARMA “AL.1” (6) / “AL. 2” (7) para activar (o desactivar) la alarma. Una vez que haya sido activada la alarma, el pequeño 39 punto en la pantalla se iluminará junto al símbolo de campana de AL1 y AL2. Para impedir que la alarma vuelva a sonar al día siguiente, sostenga el botón ALARMA (AL.1 / AL.2) para APAGARLA. El ícono de la alarma desaparecerá indicando que la misma ha sido desactivada. Para detener la alarma, presione el botón ALARMA APAGADA (9). Despertar con la radio o campana con luces ambientales Tenga un espléndido comienza cada día con su elección de llamada para despertar. Haga que una campana o una estación de radio lo despierte. Las luces ambientales también se encenderán cuando suene su alarma, lo cual hará sus mañanas más placenteras. Luces ambientales Presione y sostenga el botón de LUZ AMBIENTAL ENCENDIDA - APAGADA (9) por 3 segundos para encender o apagar las luces ambientales. A pesar que las luces ambientales están apagadas en el modo standby, las mismas se encenderán cuando suene la Alarma (junto a la Campana o la Radio). Función de snooze Cuando suene la alarma, presione el botón Snooze (1) para suspender la alarma y activar la función de snooze, la alarma se detendrá. Volverá a activarse a los 9 minutos y comenzará nuevamente a sonar. Puede repetir este ciclo varias veces durante el ciclo de la alarma hasta que suene la siguiente alarma. Nota: El tiempo de intervalo de la función de Snooze es de 9 minutos. - Si desea desactivar la función de SNOOZE y detener completamente la alarma, presione el botón ALARMA APAGADA (9). FUNCIONAMIENTO DE LA RADIO Escuchando la Radio Nota : Asegúrese que la antena de FM esté completamente desenrollada y extendida para lograr la mejor recepción de FM. 1. Presione el botón de ENCENDIDO – APAGADO (9) para encender la unidad. 2. Use el botón de SINTONIA SUPERIOR (5) o SINTONIA INFERIOR (4) para seleccionar la estación de radio deseada. Si presiona y sostiene el botón de SINTONIA SUPERIOR (5) o SINTONIA INFERIOR (4) por un segundo y 40 luego lo suelta, la unidad automáticamente escaneará a la siguiente estación emisora. 3. Presione el botón de ENCENDIDO – APAGADO (9) para apagar la radio. Configurar / llamar radios memorizadas 1. Presione el botón de de ENCENDIDO – APAGADO (9) para encender la unidad. 2. Use el botón de SINTONIA SUPERIOR (5) o SINTONIA INFERIOR (4) para seleccionar la estación de radio deseada. 3. Presione el botón de CONF/MEM.; “P01” titilará en la pantalla. 4. Presione nuevamente el botón de CONF/MEM para configurar la memoria. 5. repita los pasos 2 al 4 para memorizar otras estaciones. 6. la unidad puede memorizar un total de 10 estaciones para FM. 7. Cuando titile “P01-P10”, presione el botón Sintonía+ o Sintonía- para seleccionar el número de memoria. 8. Cuando llame una estación memorizada, presione el botón Memoria + (M+) (3) para seleccionar el número de memoria en ciclo. Función dormir Cuando escuche la radio, presione el botón Dormir (1) para entrar a ese modo. Puede configurar el temporizador para dormirse desde los 120 mins a los 10 minutos presionando el botón Dormir (1). La unidad se apagará automáticamente tras la hora seleccionada. CONFIGURACION DEL BLUETOOTH El rendimiento de la conectividad Bluetooth puede variar con la marca y modelo del dispositivo conectado. Para el mejor rendimiento, conecte dispositivos Bluetooth de nuevas generaciones que incorporen Bluetooth 2.1, usando la actualización más reciente del firmware tomada del vendedor del dispositivo. No se garantiza la compatibilidad con todos los dispositivos y tipos de soporte. Las consideraciones del rendimiento de Bluetooth aseguran que todos los dispositivos Bluetooth dentro de un radio de 30 pies, tendrán su transmisión desactivada. La presencia de otros dispositivos con Bluetooth funcionando durante la conexión pueden llevar a dificultades en el funcionamiento. Bluetooth es un estándar de comunicación vía radio de corto rango. El transmisor y receptor de Bluetooth en esta unidad posee un rango de funcionamiento de aproximadamente 30 pies en espacio abierto. Generalmente, los dispositivos de Bluetooth pueden comunicarse entre sí claramente dentro de una habitación 41 u oficina de tamaño normal. El funcionamiento entre diferentes habitaciones dependerá de la construcción de las mismas. Es importante reconocer el hecho que el rango de comunicación por Bluetooth puede verse sustancialmente reducido si la señal pasa a través de un objeto sólido. Cuerpos humanos, ladrillos y paredes de concreto, y muebles pesados o bibliotecas reducirán el rango de funcionamiento de sus dispositivos Bluetooth. Vidrio, paredes o paredes con paneles de madera y particiones de oficina, pueden tener un menos severo pero igualmente notable efecto. Debe posicionar sus dispositivos Bluetooth cerca entre sí en caso que observe dificultades en la comunicación. Conexión de música en estéreo a su smart phone (tales como los smarphones Android®, Iphone®, Windowsphone® etc.…) o tableta PC, reproductor multimedia, etc.… todos dispositivos que tienen función de Bluetooth, necesitará familiarizarse con las funciones Bluetooth de su dispositivo en cuestión. Como cada dispositivo funciona de manera ligeramente diferente, familiarícese con la capacidad Bluetooth de sus dispositivo antes de conectarlo. Conectando su dispositivo Bluetooth 1. Asegúrese que su dispsitivo Bluetooth esté encendido. Posiblemente deba referirse al manual del usuario del dispositivo externo para mayores detalles. 2. Coloque a una separación de no más de 3 pies su radio despertador y el dispositivo externo. 3. Encienda la unidad presionando el botón de ENCENDIDO (9). 4. Presione el botón de Fuente (2) para cambiar la modo Bluetooth. El modo Bluetooth es indicado mediante “BT” en la pantalla. El indicador de conexión titilará rápidamente. 5. Usando los controles nativos de su dispositivo Bluetooth, seleccione “TC139” en su configuración de Bluetooth para conectar. Si su dispositivo requiere una clave, entre “ 0 0 0 0 ” por defecto. Refiérase al manual del usuario de su dispositivo para instrucciones de conexión con dispositivos Bluetooth. 6. Seleccione y confirme la conexión a su dispositivo externo, y la misma se completará en unos pocos segundos y la radio producirá un tono de confirmación, cuando se haya conectado exitosamente; el indicador de par titilará lentamente en el radio despertador. Tras la conexión inicial, la unidad se mantendrá conectada a menos que sea desconectada manualmente por el usuario o haya sido borrada debido a un reinicio de la unidad del dispositivo. Ahora podrá iniciar el flujo de música vía Bluetooth. 42 Reproducción de audio de modo inalámbrico 1. Siga las instrucciones para Conectar un Dispositivo Bluetooth. 2. Use los controles nativos de su dispositivo Bluetooth conectado para seleccionar una pista. 3. Para reproducir o pausar la pista seleccionada, use los controles nativos en el dispositivo Bluetooth conectado o presione el botón de REPRODUCIR / PAUSA (3). 4. El audio reproducido a través del dispositivo Bluetooth conectado se escuchará ahora a través de los parlantes del radio despertador. Cambio de la conexión Bluetooth a un nuevo teléfono celular (u otro dispositivo Bluetooth) • Puede conectar la unidad a solamente 1 dispositivo externo Bluetooth. Si desea cambiar el dispositivo externo Bluetooth conectado con su radio despertador, proceda del siguiente modo : Encienda la función de Bluetooth de sus dispositivo externo. Presione y sostenga el botón PAR (3) por 3 segundos. El indicador de conexión titilará rápidamente en el radio despertador, el cual producirá un tono de confirmación. Seleccione y confirme la conexión en su teléfono móvil o dispositivo externo Bluetooth. Nota: Algunos teléfonos móviles pueden conectar o desconectar del modo en que efectúa o corta una llamada. Esto no es indicativo de un problema con su unidad. OTRAS FUNCIONES Control de DIMMER En el modo standby, presione el botón DIMMER (1) para poder ajustar el brillo de la pantalla LED, a niveles altos o bajos. AUX IN Requiere un cable de audio de 3.5mm (no incluido). 1. Conecte el cable de audio de 3.5mm al toma Line In de la unidad y a una salida de audio de un reproductor MP3 u otra fuente de audio. 2. Presione el botón Fuente para cambiar al modo Aux In. 3. Use los controles nativos de su reproductor MP3 conectado u otra fuente de audio para reproducir y controlar el audio reproducido a través del parlante 43 del radio despertador. TOMA DE CARGA USB El toma de carga USB (12) de DC 5 V. en la parte trasera de la unidad le permite cargar un dispositivo externo mediante el cable USB (no provisto). Puede cargar con un dispositivo de un máximo de 5 V. Por ejemplo: su teléfono móvil (Android® o Iphone® tienen un máx. de 5 V) y dispositivo externo con toma de USB de max. El conector o cable de carga USB no son provistos. REAJUSTE Si el sistema no responde o muestra funcionamiento errático o intermitente, puede haber experimentado una descarga electrostática (ESD) o subida de tensión eléctrica, la cual activo el apagado automático del microcontrolador interno. Si ésto ocurriera, simplemente desconecte el cable de la corriente y retire la pila de resguardo, espere al menos 3 minutos y luego vuelva a configurar la unidad como si fuera nueva. ESPECIFICACIONES TECNICAS Adaptador de corriente: Consumo de corriente Consumo en modo Standby Pila de resguardo Cobertura de la Radio Frecuencia Toma de carga USB Aux. In Potencia de salida de Audio Rango de Temperatura para interior Peso neto Dimensiones • Entrada AC 100-240V / 50- 60 Hz • Salida DC 5V 1500mA • 5W • <1W • 3V (1 pila plana CR2032 de litio) no incluida • FM: 87.5MHz - 108 MHz • 1000 mA / DC 5V MAX • Toma 3.5 mm • 2W RMS • 0 a + 50°C ó 32 a 122°F • 0.31kgs • 106 x 125 x 116 mm IMPORTANTE: Debido a la continua revisión y mejoras en el diseño de nuestros productos, las especificaciones quedan sujetas a cambio sin aviso previo. 44 IMPORTADOR EXCLUSIVO Este producto fue importado por la empresa LEMA S.A.S. Para cualquier duda respecto a la conformidad de este producto, por favor, envíe su solicitud a: LEMA S.A.S. 28, Boulevard Zéphirin Camélinat 92230 GENNEVILLIERS FRANCE 45 Desecho del producto Atencion ! Este juego de logo sobre el producto quiere decir que el reciclaje de este aparato viene dentro del marco de la Directiva 2002/96/CE del 27 de enero de 2003 concernir la Basura(el Gasto) de Equipo Eléctrico y Electrónico (WEEE). Su producto esta marcado con este simbolo. Significa que los productos electricos y electronicos usados no deberian mezclarse con los residuos domesticos generales. Existe un sistema de recogida independiente para estos productos. Si quiere desechar este equipo, ¡por favor no utilice el cubo de la basura habitual ! - - - - Los equipos electricos y electronicos usados deberian tratarse por separado de acuerdo con la legislacion que requiere un tratamiento, una recuperacion y un reciclaje adecuados de los equipos electricos y electronicos usados. Tras la puesta en practica por parte de los estados equipos electricos y electronicos usados. Tras la puesta en practica por parte de los estados miembros, los hogares de pariculares dentro de los estados de la Union Europea pueden devolver sus equipos electricos y electronicos a los centros de recogida designados sin coste alguno. (Por favor, pongase en contacto con su autoridad local para obtener mas detalles). Si sus equipos electricos o electronicos usados tienen pilas o acumuladores, por favor desechelos por separado con antelacion segun los requisitos locales. Al desechar este producto correctamente, ayudara a asegurar que los residuos reciban el tratamiento, la recuperacion y el reciclaje necesarios, previniendo de esta forma posibles efectos negativos en el medio ambiente y la salud humana que de otra forma podrian producirse debido a una manipulacion de residuos inapropiada. Esta unidad cumple con el Consejo europeo la Directiva 2006 / 95 CE (la Compatibilidad Electromagnética y Directivas de Voltaje Bajas) 46 BEVOR WIR BEGINNEN Vielen Dank für den Kauf dieses TOKAI Uhrenradios TC-139 mit Bluetooth, PLL UKW Digital-Radio & Senderprogrammierung. Unser Name ist Ihre Garantie für die Qualität, hervorragende Leistung und den Wert Ihres neuen Gerätes. Unsere Ingenieure haben dieses Produkt mit vielen nützlichen und benutzerfreundlichen Funktionen ausgestattet. Bitte lesen Sie diese Bedienungsanleitung vor dem Einsatz des Gerätes vollständig durch, so dass Sie dessen Funktionen optimal nutzen können. In diesem Produkt wurden hochqualitativer Komponenten und unter Einhaltung höchster Verarbeitungs- und Qualitätsstandards verwendet. Unsere Inspektoren haben das Gerät im Werk sorgfältig geprüft und dieses war vor der Auslieferung in vollständig funktionsfähigem Zustand. Für die Bezugnahme in der Zukunft sollten Sie die Seriennummer des Gerätes auf der nachfolgenden Zeile notieren. Modell: TOKAI TC-139 : Seriennummer: WARNUNG Das Blitzsymbol soll den Benutzer auf die Gegenwart gefährlicher Spannung im Inneren des Gerätes hinweisen, und dass sich der Benutzer durch Berühren der inneren Teile der Gefahr lebensbedrohlicher Stromschläge und Personenverletzungen aussetzt. Das Ausrufezeichen weist den Benutzer auf wichtige Betriebshinweise in dieser Bedienungsanleitung hin. Warning Um der Gefahr von elektrischen Stromschlägen und Feuer vorzubeugen, sollten Sie niemals die Gehäuseabdeckung entfernen. Übergeben Sie das Gerät zur Wartung stets nur einem qualifizierten Service-Fachmann. HINWEIS: Im Interesse der Produktverbesserung behalten wir uns Änderungen technischer Daten und anderer Leistungsmerkmale ohne Vorankündigung vor. VORSICHT Es besteht Explosionsgefahr wenn die Batterie nicht korrekt eingelegt wird. Bitte ersetzen Sie die Batterie nur durch eine Batterie des vorgeschriebenen Typs oder eines äquivalenten Typs. 47 WICHTIG! Es wird empfohlen, ein Mobiltelefon in der Nähe der Einheit zu verlassen, um elektromagnetische Störungen in den Lautsprechern zu vermeiden. Dieses Gerät ist ein Elektrogerät der Sicherheitsklasse II, d.h. dieses Elektrogerät ist mit doppelter Isolierung ausgestattet. Es wurde so geschaffen, dass das Gerät keinen Schutzleiter und keine Erdung benötigt. WICHTIGE SICHERHEITSHINWEISE Das Blitzsymbol soll den Benutzer auf die Gegenwart gefährlicher Spannung im Inneren des Gerätes hinweisen, und dass sich der Benutzer durch Berühren der inneren Teile der Gefahr lebensbedrohlicher Stromschläge und Personenverletzungen aussetzt. Das Ausrufezeichen weist den Benutzer auf wichtige Betriebshinweise in dieser Bedienungsanleitung hin. 1. Halten Sie offenes Feuer, wie z.B. Kerzen von dem Gerät fern, und stellen Sie diese niemals auf das Gerät. 2. Platzieren Sie das Gerät niemals in geschlossenen Bücherregalen oder anderen Regalen wo keine ausreichende Belüftung des Gerätes gewährleistet ist. 3. Das Netzkabel dient zum Abtrennen des Gerätes von der Netzstromversorgung, und das von der Stromversorgung abgetrennte Gerät kann auch in abgetrenntem Zustand betrieben werden. 4. Die Belüftungsöffnungen im Gehäuse des Geräte sollten nicht durch Gegenstände, wie z.B. Zeitungen, Tischdecken, Vorhänge, etc. abgedeckt oder verschlossen werden. 5. Setzen Sie das Gerät niemals Tropf- oder Spritzwasser aus, und achten Sie darauf, dass niemals mit Wasser gefüllte Gegenstände, wie z.B. Blumenvasen auf dem Gerät abgestellt werden. 6. Schließen Sie niemals eine externe UKW-Antenne an der Antenne des Gerätes an. 7. Das Gerät sollte möglichst nicht direkter Sonneneinstrahlung, extrem hohen oder niedrigen Temperaturen, Feuchtigkeit, Vibrationen oder Staub ausgesetzt werden. Vermeiden Sie die Aufstellung an solchen Orten. 8. Verwenden Sie niemals scharfe Reiniger wie z.B. Benzin, Verdünner oder andere Lösungsmittel zur Reinigung der Oberflächen des Gerätes. Reinigen Sie die Oberflächen des Gerätes nur mit einem milden, nicht scheuernden Reinigungsmittel und einem sauberen, leicht feuchten Tuch. 9. Versuchen Sie niemals Kabel, Stifte oder andere Gegenstände in die Belüftungsschlitze des Gerätes einzuführen. 10. Warnhinweis zum Abtrennen von der Stromversorgung: Der Netzstecker 48 trennt das Gerät von der Netzstromversorgung, und Sie sollten stets darauf achten, dass der Netzstecker leicht erreichbar ist. 11. Batterien sollten niemals heiß werden, und vermeiden Sie es diese direkter Sonneneinstrahlung, Feuer oder der Wärme von anderen Wärmequellen auszusetzen. 12. LED-Produkt der Klasse 1. STROMVERSORGUNG & STÜTZBATTERIESYSTEM VORBEREITUNG ZUM EINSATZ AC-DC Netzadapter-Anschluss: Dieses Uhrenradio kann mittels eines externen AC-DC Netzadapters mit den folgenden Leistungswerten betrieben werden: DC 5V 1.5A (mitgeliefert). NETZANSCHLUSS Schließen Sie den AC-DC Netzadapter an einer Haushaltssteckdose an, und verbinden Sie den DC-Stecker des Adapters mit der DC IN Anschlussbuchse des Uhrenradios. STÜTZBATTERIE-SYSTEM • Dieses Gerät ist mit einem Stützbatteriesystem ausgerüstet, und benötigt eine 3V Lithiumknopfzelle des Typs CR2032 (nicht mitgeliefert). • Öffnen Sie das Batteriefach, indem Sie die Schrauben der Abdeckung mittels eines kleinen Schraubenziehers lösen. • Legen Sie eine passende Batterie in das Batteriefach ein, und stellen Sie sicher, dass die Kontakte der Batterie für Plus und Minus (+ und -) korrekt auf die Kontaktplatinen im Batteriefach ausgerichtet sind. • Anschließend die Batteriefachabdeckung wieder aufsetzen und die Schrauben festziehen. Hinweis: Wenn ein Ausfall der AC-Netzstromversorgung auftritt, dann schaltet die Uhr automatisch auf die Batteriestromversorgung um, und die Einstellungen für die Uhrzeit und den Alarm bleiben erhalten. Sobald die ACNetzstromversorgung wieder hergestellt ist, schaltet die Uhr wieder auf die Stromversorgung mit AC-Netzstrom um. HINWEISE ZUR BATTERIE 1. Verwenden Sie nur Batterien des vorgeschriebenen Typs und der angegebenen Größe. 2. Wenn das Gerät voraussichtlich längere Zeit nicht in Gebrauch sein wird, sollten die Batterie herausnehmen. Alte Batterien können auslaufen und das Gerät schwer beschädigen. 3. Versuchen Sie niemals nicht aufladbare Batterien wieder aufzuladen; diese 49 könnten sich dabei überhitzen und aufbrechen (Befolgen Sie stets die Hinweise des Batterieherstellers). 4. Werfen Sie Batterien niemals ins Feuer, da diese aufbrechen oder explodieren könnten. 50 BESCHREIBUNG DES PRODUKTES & LAGE DER REGLER UND BEDIENUNGSELEMENTE FUNKTIONEN & REGLER 1. SCHLUMMERN / EINSCHLAFEN / DIMMER-TASTE 2. SIGNALQUELLE-TASTE 3. SPEICHER AUFWÄRTS / WIEDERGABE / PAUSE-TASTE/ KOPPLUNGSTASTE 4. SKIP RÜCKWÄRTS / SENBDERSUCHE ABWÄRTS TASTE 5. SKIP VORWÄRTS / SENDERSOCHE AUFWÄRTS TASTE 6. LAUTSTÄRKE ABWÄRTS / ALARM 1 EIN-AUS SET TASTE 7. LAUTSTÄRKE AUFWÄRTS / ALARM 2 EIN-AUS SET TASTE 8. SET / SPEICHER-TASTE 9. HAUPTSCHALTER EIN – AUS / STIMMUNGSLICHT EIN - AUS / ALARM AUS TASTE 10. ANZEIGE 11. STIMMUNGSLICHT 12. USB-BUCHSE FÜR LADEFUNKTION 13. UKW-ANTENNE 14. BATTERIEFACH 15. TYPSCHILD 16. DC IN BUCHSE 17. AUX IN BUCHSE 18. LAUTSPRECHER 51 LED ANZEIGE & INDIKATOREN ZEIT-Indikator PM-Indikator BLUETOOTH-Indikator AUX-Indikator UKW-Indikator ALARM 1-Indikator ALARM 2-Indikator ZEIT UND ALARM - EINSTELLUNG Manuelle Einstellung der Uhrzeit Halten Sie die SET/SPEICHER-Taste (8) gedrückt, während das Gerät “AUS”-geschaltet ist; In der Anzeige blinkt nun “24 Hr”. Betätigen Sie die Taste SKIP VORWÄRTS (5) oder SKIP RÜCKWÄRTS (4), um die Zeitanzeige zwischen dem 12-Stunden-Modus (12 Hr) oder dem 24-Stunden-Modus (24 Hr) umzuschalten. Betätigen Sie die SET / SPEICHER-Taste (8) nochmals, um die Einstellung zu bestätigen, und die Stundenanzeige blinkt nun. Betätigen Sie die SKIP VORWÄRTS-Taste (5) oder SKIP RÜCKWÄRTSTaste (4), um die aktuelle Stunde einzustellen, und betätigen Sie die SET / SPEICHER-Taste (8) nochmals, um die Stundeneinstellung zu bestätigen; anschließend blinkt die Minutenanzeige. Betätigen Sie die SKIP VORWÄRTSTaste (5) oder SKIP RÜCKWÄRTS-Taste (4), um die aktuelle Minute einzustellen. Betätigen Sie die SET / SPEICHER-Taste (8) einmal, um die Einstellung der Uhrzeit zu bestätigen und abzuschließen. Einstellung der Alarmzeit Voranzeige der eingestellten Alarmzeit: Betätigen Sie die ALARM-Tasten (6/7) einmal. Die Stundenanzeige beginnt zu blinken wenn Sie während der Anzeige der eingestellten Alarmzeit die Taste ALARM (AL.1 / AL.2) ca. 3 Sekunden lang gedrückt halten. Betätigen Sie die Tasten SKIP VORWÄRTS (5) oder SKIP RÜCKWÄRTS (4), um die gewünschte Stunde für den Alarm einzustellen. Betätigen Sie die ALARM-Taste (AL.1 / AL.2) nochmals; die Minutenstellen der Anzeige blinken nun. Betätigen Sie die TASTEN SKIP VORWÄRTS (5) oder SKIP RÜCNWÄRTS (4), um die Minutenanzeige wie gewünscht einzustellen. Betätigen Sie die Taste ALARM (AL.1 / AL.2) nochmals, und Sie können den Alarmton-Modus (Summer oder Radio) für die Alarmfunktion einstellen. 52 Alarmfunktion Aktivieren / Deaktivieren / Alarmfunktion abschalten Halten Sie die Tasten ALARM “AL.1” (6) / “AL. 2” (7) gedrückt, um die Alarmfunktion zu aktivieren (oder zu deaktivieren). Sobald die Alarmfunktion aktiviert wurde, erscheint ein kleiner Punkt in der Anzeige neben dem Glockensymbol für AL 1 und AL 2. Halten Sie die ALARM-Taste (AL. 1 / AL. 2) gedrückt, um zu die Alarmfunktion für den folgenden Tag auszuschalten, und die Alarmfunktion ist nun “AUS”. Das Alarmsymbol erlischt, wodurch angezeigt wird dass die Alarmfunktion deaktiviert wurde. Betätigen Sie die Taste ALARM AUS (9), um den Alarm abzuschalten sobald dieser ertönt. Aufwachen mit Radiomusik oder Summer und Stimmungslicht-Funktion Der Tag fängt immer gut an mit Ihrer Auswahl der Weckart. Sie können sich wahlweise mit Summer oder Radiomusik wecken lassen. Das Stimmungslicht schaltet sich zudem ein, sobald der Alarm ausgelöst wird, wodurch das morgendliche Aufwachen um so angenehmer wird. Stimmungslicht Halten Sie die Taste STIMMUNGSLICHT (MOOD LIGHT) EIN - AUS (9) ca. 3 Sekunden lang gedrückt, um das Stimmungslicht EIN – AUS zu schalten. Das Stimmungslicht ist “AUS” während das Gerät im Bereitschaft-Modus funktioniert, und wird “EIN” geschaltet sobald der Alarm (entweder Summer oder Radio) ausgelöst wird. Schlummern-Funktion Betätigen Sie die Schlummern-Taste (1), um den Alarm kurzzeitig auszuschalten & um die Schlummern-Funktion zu aktivieren. Der Alarm wird nach 9 Minuten wieder ausgelöst der Alarm ertönt erneut. Sie können den Vorgang mehrmals wiederholen und nach dem Abschalten ertönt der Alarm am folgenden Tag erneut. Hinweis: Das Schlummern-Intervall beträgt 9 Minuten. - Betätigen Sie die ALARM AUS Taste (9), falls Sie die SCHLUMMERNFUNKTION (SNOOZE) beenden, und die Alarmfunktion vollständig abschalten möchten. RADIO-BETRIEB Radio hören Hinweis: Stellen Sie sicher, dass die UKW-Antenne vollständig abgewickelt und in voller Länge ausgelegt wurde, um einen optimalen UKW-Empfang zu gewährleisten. 53 1. Betätigen Sie die Taste HAUTSCHALTER EIN-AUS (9), um das Gerät “EIN” zu schalten. 2. Verwenden Sie die Tasten SENDERSUCHE AUFWÄRTS (5) oder SENDERSUCHE ABWÄRTS (4), um eine gewünschte Sendestation einzustellen. Wenn Sie die Tasten für die SENDERSUCHE AUFWÄRTS (5) oder SENDERSUCHE ABWÄRTS (4) ca. 1 Sekunde lang gedrückt halten, dann stellt das Gerät automatisch die nächste Sendestation aufwärts in der Senderskala ein. 3. Betätigen Sie die Taste HAUPTSCHALTER EIN-AUS (9), um das Radio wieder “AUS” zu schalten. Programmieren / Abrufen vorprogrammierter Radiosender 1. Betätigen Sie die Taste HAUPTSCHALTER EIN-AUS (9), um das Gerät “EIN” zu schalten. 2. Verwenden Sie die Tasten SENDERSUCHE AUFWÄRTS (5) oder SENDERSUCHE ABWÄRTS (4), um einen gewünschten Radiosender einzustellen. 3. Betätigen Sie die Taste SET/MEM.; “P01” blinkt nun in der Anzeige. 4. Betätigen Sie die Taste SET/MEM. Nochmals, um den Radiosender im Speicher zu programmieren. 5. Wiederholen Sie die Schritte 2 bis 4, um weitere Radiosender zu speichern. 6. Das Gerät kann insgesamt bis zu 10 Sendestationen für das UKWFrequenzband fest speichern. 7. Betätigen Sie die Tasten “Sendersuche +” (Tune +) oder “Sendersuche –” (Tune -) während “P01-P10” in der Anzeige blinken, um eine gewünschte Programmposition für die Sendestation auszuwählen. 8. Betätigen Sie die Taste “Speicher +” (M+) (3), um eine Programmposition aufwärts auszuwählen. Einschlaftimer-Funktion Betätigen Sie die Einschlaftimer-Taste (1) während Sie Radio hören, um den Einschlaftimer-Modus zu aktivieren. Sie können nun ein Zeitintervall von 120 Minuten bis 10 Minuten abwärts einstellen, indem Sie wiederholt die Einschlaftimer-Taste (1) betätigen. Das Gerät schaltet sich nun automatisch nach Ablauf des eingestellten Zeitintervalls aus. BLUETOOTH - EINSTELLUNGEN Die Funktion der Bluetooth-Verbindung kann von Marke zu Marke und Modell zu Model des jeweils angeschlossenen Gerätes unterschiedlich sein. Für eine optimale Funktion sollten Sie möglichst neuere Bluetooth-Geräte der Version 54 2.1 mit neuester Firmware-Version des Vertreibers verwenden. Wir übernehmen keine Garantie, dass dieses Gerät mit allen Geräten anderer Hersteller kompatibel ist. Um eine zuverlässige Bluetooth-Funktion zu gewährleisten, sollten Sie sicherstellen, dass alle Bluetooth-fähigen Geräte in einem Umkreis von 10 Metern deaktiviert sind. Durch die Gegenwart anderer Geräte mit aktivierter Bluetooth-Funktion kann die Übertragung zwischen Ihrem Uhrenradio und der Musikquelle gestört werden. Bluetooth ist ein Funkübertragungsstandard für kurze Distanzen. Der Bluetooth-Sender und Empfänger dieses Gerätes haben eine Reichweite von ca.10 Metern bei unbehinderter Übertragungsdistanz. Normalerweise können Bluetooth-Geräte in einem Zimmer regulärer Größe problemlos miteinander Verbindung aufnehmen. Die Übertragungsqualität des Signals von einem Raum in einen anderen Raum hängt von der Konstruktion und Beschaffenheit der Wände ab. Es muss unbedingt beachtet werden, dass die Bluetooth-Reichweite durch feste Gegenstände im Übertragungsweg erheblich verringert wird. Menschliche Körper, Wände aus Ziegelsteinen und Beton, sowie schwere Möbel oder Bücherregale können die effektive Reichweite von Bluetooth-Geräten erheblich reduzieren. Glas, trockene Wände oder Paneelen sowie Büropartitionen haben einen geringeren Einfluss auf die Übertragungsreichweite. Sie sollten BluetoothGeräte näher beieinander positionieren, falls Übertragungsstörungen auftreten. Für die Stereo-Verbindung zur Musikwiedergabe über Ihr Smartphone (z.B. Smartphones mit Android®-,iPhone®- , oder Windowsphone®-Betriebssystem, usw. …) oder die für die Verbindung mit PC-Tabletts, Multimedia-Playern, usw. mit Bluetooth-Funktion sollten Sie sich über die Bluetooth-Funktion Ihrer Geräte informieren. Da jedes Gerät etwas anders funktioniert, müssen Sie sich mit der Einrichtung der Bluetooth-fähigen Geräte vor dem Gebrauch vertraut machen. Die Kopplung von Bluetooth-fähigen Geräten 1. Stellen Sie sicher, dass die Bluetooth-Funktion an beiden Geräten “EIN” geschaltet wurde. Beachten Sie die Gebrauchsanleitungen der externen Geräte für ausführliche Einzelheiten hierzu. 2. Platzieren Sie das Uhrenradio und das externe Gerät zur Herstellung der Verbindung nicht weiter als 1 Meter voneinander entfernt. 3. Schalten Sie das Uhrenradio “EIN”, indem Sie den HAUPTSCHALTER (9) betätigen. 4. Betätigen Sie die Signalquelle-Taste (2) (SOURCE), um den BluetoothModus zu aktivieren. Der Bluetooth-Modus wird durch den “BT”-Indikator in der Anzeige 55 angezeigt. Der Kopplungs-Indikator blinkt in schneller Folge. 5. Verwenden Sie die Bedientasten Ihres externen Bluetooth-Gerätes und wählen Sie die Verbindung mit “TC-139” in den Bluetooth-Einstellungen aus, um die Kopplung zu bestätigen. Falls Ihr Gerät ein Passwort verlangt, dann geben Sie hierfür “0 0 0 0” ein. Beachten Sie die Bedienungsanleitung zur Bluetooth-Kopplung für das jeweilige Gerät, um die Verbindung herzustellen. 6. Wählen Sie das Uhrenradio auf Ihrem externen Gerät aus und die Verbindung wird automatisch nach ein paar Sekunden hergestellt, worauf hin Sie vom Radio einen Bestätigungston hören und der Kopplungsindikator blinkt nun langsam am Uhrenradio. Nach der erstmaligen Kopplung der Geräte bleibt die Verbindung zwischen den Geräten bestehen bis Sie diese entweder manuell wieder trennen, oder die gespeicherten Einstellungen durch eine Rücksetzung gelöscht werden und Sie können nun Musik über die Bluetooth-Verbindung mit dem Uhrenradio abspielen. Musikwiedergabe über die Bluetooth-Verbindung 1. Befolgen Sie die Gebrauchshinweise zur Kopplung zwischen den betreffenden Bluetooth-Geräten. 2. Verwenden Sie die entsprechenden Bedientasten des sendenden Gerätes, um einen gewünschten Musiktitel auszuwählen. 3. Verwenden Sie die entsprechenden Bedientasten Ihres sendenden Gerätes, um die Wiedergabe eines Musiktitels auszuwählen oder zu pausieren, oder betätigen Sie die Wiedergabe/Pause-Taste (3) des Uhrenradios. 4. Sie hören nun die Audio-Wiedergabe des gekoppelten Bluetooth-Gerätes über den Lautsprecher des Uhrenradios. Wechseln der Bluetooth-Verbindung zu einem neuen Mobiltelefon (oder anderen Bluetooth-Geräten) • Sie können jeweils nur 1 externes Bluetooth-Gerät mit dem Uhrenradio koppeln. Falls Sie die Verbindung zu einem bereits verbundenen, externen BluetoothGerät trennen, und ein anderes Bluetooth-Gerät koppeln möchten, dann gehen Sie dazu wie folgt vor: Schalten Sie die Bluetooth-Funktion des externen Gerätes ein. Halten Sie die Kopplungstaste (3) ca. 3 Sekunden lang gedrückt. Der KopplungsIndikator blinkt nun wieder in schneller Abfolge, und das Uhrenradio erzeugt einen Bestätigungston. Wählen Sie das Uhrenradio nun im Bluetooth-Menü des externen Gerätes aus, und bestätigen Sie die Kopplung mit den neuen Mobiltelefon oder einem anderen externen Bluetooth-Gerät. 56 Hinweis: Einige Mobiltelefone unterbrechen die Verbindung während Sie Anrufe machen oder empfangen, und stellen die Verbindung anschließend wieder her. Dies weist jedoch nicht auf eine Beschädigung oder Funktionsstörung Ihres Gerätes hin. WEITERE FUNKTIONEN DIMMER Regler Betätigen Sie die DIMMER-Taste (1), um die Helligkeit der LED-Anzeige auf eine höhere oder niedrigere Stufe einzustellen. AUX IN Benötigt ein Audiokabel mit 3.5mm Klinkenstecker (nicht mitgeliefert). 1. Verbinden Sie das Audiokabel mit 3.5mm Klinkenstecker mit der “LINE IN”-Buchse am Gerät, und einen MP3-Player oder eine andere Signalquelle am gegenüber liegenden Ende des Kabels. 2. Betätigen Sie die Taste für die Umschaltung der Audio-Signalquelle, um den “AUX IN”-Modus zu aktivieren. 3. Verwenden Sie die Bedientasten am angeschlossenen MP3-Player oder an der alternativen Signalquelle, um die Musikwiedergabe über den Lautsprecher des Uhrenradios zu steuern. USB-BUCHSE FÜR BATTERIELADE-FUNKTIONEN Die USB-Buchse (12) mit einer Ausgangsspannung von DC 5 V an der Rückseite des Gerätes ermöglicht das Aufladen der Batterien externer Geräte über ein passendes USB-Kabel (nicht mitgeliefert). Sie können nur Geräte aufladen, die maximal einen Ladestrom von DC 5 V benötigen. Zum Beispiel: Ihr Mobiltelefon (Android® oder iPhone® benötigen max. DC 5V.) und viele andere externe oder mobile Geräte mit USB-Buchse. Der Ladebuchsenadapter oder das USB-Kabel sind nicht im Lieferumfang enthalten. RÜCKSETZUNG Falls das System nicht mehr auf Benutzereingaben reagiert, nur fehlerhaft auf solche Eingaben reagiert oder zwischenzeitlich nicht funktioniert, dann kann es sein, dass das Gerät einer elektro-statischen Entladung (ESD) oder einer Netzspannungsspitze ausgesetzt war, wodurch sich der Mikroprozessor im Gerät automatisch ausgeschaltet hat. Falls dieser Fall eintritt, dann trennen Sie das Gerät einfach von der AC-Netzstromversorgung, entfernen Sie die 57 Stützbatterie aus dem Gerät, und warten Sie mindestens 3 Minuten bis Sie die Batterie wieder einlegen oder das Gerät erneut mit der Netzstromversorgung verbinden; führen Sie anschließend nochmals alle Einstellungen wie bei einem Neugerät aus. TECHNISCHE DATEN Netzadapter: • Primärseite AC 100-240V / 50- 60 Hz • Sekundärseite DC 5V 1500mA Leistungsaufnahme • 5W Leistungsaufnahme in Bereitschaft • <1W Stützbatterie • 3V (CR2032 Lithium-Knopfzelle x 1) nicht enthalten Radio-Frequenzbereich • FM: 87.5MHz - 108 MHz USB-Ladebuchse • 1000 mA / DC 5V MAX Aux. In • 3.5 mm Buchse Audio Ausgangsleistung • 2W RMS Innentemperatur-Betriebsbereich • 0 bis +50°C (32 bis 122°F) Nettogewicht • 0.31kg Abmessungen • 106 x 125 x 116 mm EXKLUSIVER IMPORTEUR Dieses Gerät wird importiert durch : LEMA S.A.S. Für Fragen zur Konformität des Geräts, wenden Sie sich bitten an : LEMA S.A.S. 28, Boulevard Zéphirin Camélinat 92230 GENNEVILLIERS FRANCE 58 Entsorgung am Ende der Lebensdauer Achtung ! Ihr Produkt trägt dieses Symbol. Es besagt, dass Elektround Elektronikgeräte nicht mit dem Haushaltsmüll entsorgt, sondern einem getrennten Rücknahmesystem zugeführt werden sollten. Dieses Symbol auf dem Produkt bedeutet, dass die Wiederverwendung dieses Apparates innerhalb des Gerüstes der Direktive 2002/96/CE vom 27. Januar 2003 bezüglich der Vergeudung der Elektrischen und Elektronischen Ausrüstung (WEEE) kommt. Werfen Sie dieses Gerät zur Entsorgung bitte nicht in den normalen Hausmüll! - - - Gemäß einer neuen EU-Richtlinie, die die ordnungsgemäße Rücknahme, Behandlung und Verwertung von gebrauchten Elektro-und Elektronikgeräten vorschreibt, müssen elektrische und elektronische Altgeräte getrennt entsorgt werden. Nach der Einführung der Richtlinie in den Eu-Mitgliedstaaten können Privathaushalte ihre gebrauchten Elektro- und Elektronikgeräte nun kostenlos an ausgewiesenen Rücknahmestellen abgeben. (Weitere Einzelheiten erhalten Sie von Ihrer Gemeindeverwaltung.). Wenn Ihre gebrauchten Elektro- und Elektronikgeräte Batterien oder Akkus enthalten, sollten diese vorher entnommen und gemäß örtlich geltenden Regelungen getrennt entsorgt werden. Durch die ordnungsgemäße Entsorgung tragen Sie dazu bei, dass Altgeräte angemessen gesammelt, behandelt und verwendet werden. Dies verhindert mögliche schädliche Auswirkungen auf Umwelt und Gesundheit durch eine unsachgemäße Entsorgung. Dieses Gerät erfüllt Europäische Rat-Direktive 2006 / 95 CE (Elektromagnetische Vereinbarkeit und Niedrige Spannungsdirektiven) 59 TC-139 www.tokai.fr-
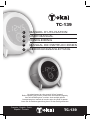 1
1
-
 2
2
-
 3
3
-
 4
4
-
 5
5
-
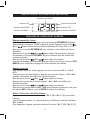 6
6
-
 7
7
-
 8
8
-
 9
9
-
 10
10
-
 11
11
-
 12
12
-
 13
13
-
 14
14
-
 15
15
-
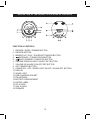 16
16
-
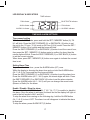 17
17
-
 18
18
-
 19
19
-
 20
20
-
 21
21
-
 22
22
-
 23
23
-
 24
24
-
 25
25
-
 26
26
-
 27
27
-
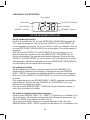 28
28
-
 29
29
-
 30
30
-
 31
31
-
 32
32
-
 33
33
-
 34
34
-
 35
35
-
 36
36
-
 37
37
-
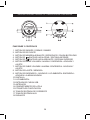 38
38
-
 39
39
-
 40
40
-
 41
41
-
 42
42
-
 43
43
-
 44
44
-
 45
45
-
 46
46
-
 47
47
-
 48
48
-
 49
49
-
 50
50
-
 51
51
-
 52
52
-
 53
53
-
 54
54
-
 55
55
-
 56
56
-
 57
57
-
 58
58
-
 59
59
-
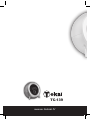 60
60


in andere talen
- English: Tokai TC-139 User manual
- français: Tokai TC-139 Manuel utilisateur
- español: Tokai TC-139 Manual de usuario
- Deutsch: Tokai TC-139 Benutzerhandbuch