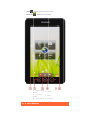
Lenovo 22282EU Handleiding
- Categorie
- Tabletten
- Type
- Handleiding
Deze handleiding is ook geschikt voor

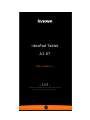
IdeaPad Tablet
A1-07
User Guide V1.1
Please read the
safety precautions and important notes
in the supplied manual before use.

C
Ch
O
v
1
1
1
1
1
1
1
1
1
1
1
1
1
Ch
C
o
2
2
Ch
A
p
3
3
3
C
ontents
apter 01
v
erview
o
1
-1 A
p
1
-2 B
u
1
-3 Po
1
-4 Tu
1
-5 Sc
1
-6 N
a
1
-7 4-
1
-8 H
o
1
-9 S
w
1
-10 St
a
1
-11 R
e
1
-12 A
p
1
-13 E
n
apter 02
o
nnectin
g
2
-1 Br
o
2
-2 Le
apter 03
p
plicatio
n
3
-1 C
a
3
-2 C
a
3
-3 C
a
o
f IdeaP
a
p
pearance
D
u
ttons Des
c
wering Ide
rning Scre
e
reen Lock/
a
vigation Ti
Pane Desk
t
o
me Scree
n
w
itching Ho
a
tus Bar
e
cent Apps
p
plications
M
n
tering Tex
t
g
to the
o
wser
novo App
S
n
s
a
lculator
a
lendar
a
mera
a
d Table
D
escription
c
ription
aPad Tabl
e
e
n Backlig
h
Unlock
ps
t
op
n
me Screen
M
anageme
t
Internet
S
hop
t A1-07
e
t A1-07 O
n
h
t On/Of
f
n
t
n
/Of
f

3-4 Clock
3-5 Contacts
3-6 Email
3-7 ES File Explore
3-8 Gallery
3-9 Music
Chapter 04
Settings
4-1 Wireless & Networks
4-2 Sound Settings
4-3 Display Settings
4-4 Location & Security
4-5 Applications
4-6 Accounts & Sync
4-7 Privacy
4-8 Storage
4-9 Language & Keyboard
4-10 Backup
4-11 Date & Time
4-12 About Tablet

C
O
1
-
1
-
1
-
1
-
1
-
1
-
1
-
1
-
1
-
1
-
1
-
1
-
1
-
1-1
A
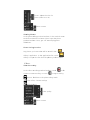
The pi
c
actual
1-2
B
Pow
e
•
C
hapter 01
O
vervie
w
-
1 App
-
2 But
t
-
3 Po
w
-
4 Tur
n
-
5 Scr
e
-
6 Na
v
-
7 4-P
a
-
8 Ho
m
-
9 Swi
t
-
10 Sta
t
-
11 Rec
e
-
12 App
-
13 Ent
e
A
ppearan
c
ture is for
item, whic
h
B
uttons
D
e
r Butto
n
While in t
h
w
of Idea
P
earance D
e
t
ons Descri
w
ering Idea
P
n
ing Scree
n
e
en Lock/U
v
igation Tip
s
a
ne Deskt
o
m
e Screen
t
ching Ho
m
t
us Bar
e
nt Apps
lications M
a
e
ring Text
ce Desc
r
reference
h
is the st
a
D
escripti
o
n
h
e shutdo
w
P
ad Tabl
e
scription
ption
P
ad Tablet
n
Backlight
nlock
s
o
p
m
e Screen
a
nagemen
t
r
iption
purposes o
a
ndard.
o
n
w
n mode, p
r
et A1-0
7
*Speci
f
A1-07 On
/
On/Of
f
t
nly, and m
r
ess and h
o
7
f
ic models o
n
/
Of
f
ay differ fr
o
ld this bu
t
n
ly
om the
t
ton

(for about 2-3 sec) to power on your IdeaPad Tablet A1-07.
• After your IdeaPad Tablet A1-07 is powered on, press this
button to turn off the illuminated screen display. While the
screen display is off, press this button again to re-
illuminate the screen.
• After your IdeaPad Tablet A1-07 is powered on, press and
hold this button (for about 2-3 sec) to bring up IdeaPad
Tablet A1-07 "Tablet options" pop-up box; select "Power
off" and press "OK" to shut down IdeaPad Tablet A1-07.
• After your IdeaPad Tablet A1-07 is powered on, press and
hold this button (for about 6 sec) to forced shutdown.
Volume Button
• Adjusts the volume.
Screen Rotation Lock Button
• Toggle the button DOWN to lock the screen orientation, not
allowing screen rotation.
• Toggle the button UP to unlock the screen orientation,
allowing screen rotation.
*SIM card socket
• The SIM card slot is located on the lower left of the device
frame. In the Power off mode, insert the end of a sharp-
pointed object into the small hole above the socket until the
stopper pin pops out, and then insert the SIM card. To
remove the SIM card, in the Power off mode, push the SIM
card into the slot until it clicks, then pull it out.
1-3 Powering IdeaPad Tablet A1-07 On/Off
Powering IdeaPad Tablet A1-07 On
Press and hold the "Power" button on the upper right of IdeaPad
Tablet A1-07, and the Lenovo and startup screens display in
sequence, indicating that IdeaPad Tablet A1-07 has been powered
on.
Powering IdeaPad Tablet A1-07 Off
Press and hold the "Power" button on the upper right of IdeaPad
Tablet A1-07 until "Tablet options" displays on the screen, select

"Power off " and touch "OK" to power off your IdeaPad Tablet A1-
07.
*For the 3G-enabled version, be sure to insert or remove the SIM
card in the Power off mode. Doing so when the device is on may
damage the SIM card.
1-4 Turning Screen Backlight On/Off
Turning Screen Backlight On
In the standby mode, you can tap the "Power" button on the upper
right of the IdeaPad Tablet A1-07 to "wake" the screen up. The
device's screen will then light up, indicating that the backlight has
been turned on.
Turning Screen Backlight Off
If your IdeaPad Tablet A1-07 is powered on and you do not use it
temporarily, you can tap the "Power" button on its upper right to
turn off the screen backlight. Your IdeaPad Tablet A1-07 will enter
the standby mode to save power.
1-5 Screen Lock/Unlock
Lock Screen
Auto Lock
You can set Screen timeout in <Display> under " Settings". If
there is no operation within the preset standby time, then the
screen backlight will automatically turn off, and the device will be
locked.

Manual Lock
If your IdeaPad Tablet A1-07 is powered on and you do not use it
temporarily, you can tap the "Power" button on its upper right to
dim the screen display down. The device will then enter the
standby mode and become locked.
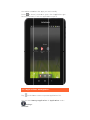
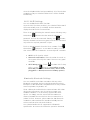
How to Unlock
Once in the standby mode, tap the "Power" button on the upper
right of IdeaPad Tablet A1-07 to brighten the screen display back
up to normal level. You can also touch and slide the lock icon to
the right, following the on-screen instructions to unlock the
screen, as shown in the figure below:

Scre
You ca
"Setti
n
been
e
unlock
1-6
N
•
•
•
•
en Lock
n touch "S
e
n
gs" to set
t
e
nabled, yo
the scree
n
N
avigatio
Lenovo
A
Function
Applicati
o
Home
for 2 sec t
Pattern
S
e
t up scre
e
t
he screen
u need to
d
n
before yo
u
n Tips
A
pp Shop
menu
o
ns :
D
: Back to
t
o display r
e
S
ettings
e
n lock" in
<
lock patte
r
d
raw your
u
u
can use
y
: Enter
t
: Display a
p
D
isplay all
t
t
he home
s
e
cent apps
<
Location
&
r
n. After th
u
nlock patt
y
our devic
e
t
he Lenovo
p
ps functio
t
ablet’s ap
p
s
creen or p
r
.
&
security
>
is function
ern in ord
e
e
.
App Shop.
n menu.
p
s.
r
ess the b
u
>
under
has
e
r to
u
tton

•
•
1-7
4
Back :
Browser
1
S
2
m
3
4
-Pane D
e
Back to th
: Brow
s
1
- Lenovo
S
hop
2
- Functio
n
m
enu
3
- Applica
t
e
sktop
e previous
s
e the Inte
r
App
4 - H
n
5 - B
t
ions
6 - B
screen.
r
net.
ome
ack
rowser

1-8 Home Screen
This desktop enables you to quickly view and open your most
frequently used applications.
In the home screen, you can add widgets or shortcuts, and change
your wallpaper as well.
• Touch a blank space for about 2 seconds. "Add to Home
screen" pops out, and you can add widgets and shortcuts,
and change wallpaper as well. Your desired widgets,
shortcuts and other items can be added to the home
screen.

•
1-9
S
Your
I
You ca
move i
1-10
To delete
s
the desire
d
bottom of
onto the
S
witchin
g
I
deaPad T
n slide the
cons amo
n
Status
B
s
omething
d
gadget u
the screen
Trash Bi
n
g
Home
S
ablet A1-
0
screen wit
n
g home sc
B
ar
on the ho
m
ntil a Tras
h
, then dra
g
n
icon.
S
creen
0
7 has m
u
h your fing
reens.
m
e screen,
h
Bin icon
d
g
and drop
u
ltiple des
er to switc
touch and
d
isplays at
t
the gadge
t
ktops.
h the displ
a
hold
t
he
t
icon
a
y and

The sy
Tablet
You ca
level,
P
about
y
Touch
the No
settin
g
securi
t
1-11
stem mes
s
A1-07.
n get the i
n
P
ower level
y
our tablet
the Status
tification P
a
g
s for Wirel
e
t
y, Applicat
Recent
A
s
age(s), if
a
n
formation
, Charging
.
bar at the
a
nel is dis
p
e
ss & netw
ions, etc.
A
pps
a
ny, will be
about Wi-
F
status an
d
top of the
p
layed. Pre
s
orks, Soun
displayed
F
i connecti
o
d
other det
a
screen an
d
s
s butto
d, Display,
on the Ide
a
o
n status,
S
a
iled notifi
c
d
drag it do
n to open
d
Location
&
a
Pad
S
ignal
c
ations
wn,
d
etailed
&

Your t
a
Touch
have u
1-12
Tap
You ca
S
Unins
t
a
blet reme
m
for abo
sed recent
Applicat
on the h
o
n enter M
a
S
ettings".
t
all
m
bers the
a
ut 2 secon
d
ly. Touch
a
ions Ma
n
o
me screen
a
nage app
a
pps you u
d
s to open
a
n applicati
o
n
ageme
n
to open t
h
lications i
sed recent
l
a list of a
p
o
n to open
t
h
e applicati
n Applica
t
l
y.
p
plications
y
it.
ons list.
t
ions unde
y
ou
r "

Tap "Downloaded", the app you desired, then press the Uninstall
button on the top to uninstall the app.
Stop/change setting
Tap "All" or "Running", the app you desired, then the option you
want.
Install
Tap "Lenovo App Shop" in applications list. For details, please refer
to "Lenovo App Shop" on "Chapter 2".
Select the appropriate applications to download.
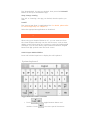
1-13 Entering Text
When using your IdeaPad Tablet A1-07, you can enter text from
the virtual keyboard directly onto the touch screen, such as when
adding contact information into Contacts or typing and editing SMS
messages. You can also directly input Chinese characters, English
letters and digit symbols onto the touch screen.
Switch Input Method Editor
Press and hold the input box to display the soft keyboard.
System keyboard
Toggle between letters/numbers
• Touch / to toggle between letters and
numbers. Touch to see more special characters.

• Touch , the indicator displays, and you can enter
capital letters.
Input options
• Touch on the keyboard to open Input
languages menu. You can select Input languages or
Switch Layouts on this menu.
Voice input
• Touch on the keyboard to open voice input.
*Specific models only

C
C
2-
1
Net
wit
h
you
op
e
Th
e
the
per
s
Tou
bro
w
Th
e
I
n
Tou
the
key
E
x
Tou
B
o
You
C
hapter 02
C
onnecti
2-1
B
2-2
L
1
Brows
e
work supp
h
the web
r network
e
rator or s
e
e
web bro
w
Internet
v
s
onal use.
ch " Br
o
w
ser.
e
browser
s
n
put we
b
ch the inp
popup so
f
board to
o
x
it
ch " "
o
o
okmar
k
can save
n
g
to th
e
B
rowser
L
enovo Ap
p
e
r
ort is req
u
browser. I
support,
p
e
rvice pro
v
w
ser in you
v
ia the Wi-
o
wser" in
t
s
upports t
h
b
addres
s
ut text bo
x
f
t keyboar
d
o
pen the w
o
n the bott
o
k
s
bookmark
e
Intern
p
Shop
u
ired for a
c
f there ar
e
p
lease con
s
v
ider direc
t
r IdeaPad
Fi networ
k
t
he applica
h
e followin
s
x
, and inp
u
d
. Then to
u
eb pa
g
e.
o
m bar to
s to your
f
et
*Specifi
c
cessin
g
th
e
any prob
l
s
ult your n
t
ly.
Tablet A1
-
k
for busin
e
tions list t
o
g
function
s
u
t the web
u
ch
quit the b
r
f
avorite w
e
c models o
n
e Internet
l
ems with
etwork
-
07 can ac
c
e
ss and
o
open th
e
s
:
address
w
on the so
f
r
owser.
e
b pa
g
es a
n
ly
c
ess
e
w
ith
f
t
nd

na
v
Bo
o
Dis
p
You
to
o
edi
t
sho
Mo
s
Dis
p
mo
s
His
Dis
p
bro
w
N
e
Thi
s
win
win
A
d
Tou
Re
f
Fo
r
Bo
o
Tou
Mo
r
incl
inf
o
Zo
o
to t
enl
a
whi
Ba
c
2-
2
v
i
g
ate to t
h
o
kmarks:
p
lays a lis
t
can also
a
o
pen the p
o
t
, copy, sh
a
rtcuts, set
s
t visited
:
p
lays a lis
t
s
t recently
tory:
p
lays a lis
t
w
sed rece
n
e
w Win
d
s
function
i
dow, or to
dows.
d
ditiona
l
ch to di
s
f
resh: Tou
r
ward: To
u
o
kmarks:
ch to
r
e:
T
ouch
ude Add b
o
o
, Share p
a
o
m Pa
g
es
he screen
a
r
g
in
g
/red
u
le touchin
g
c
k: Touch
2
Lenov
o
h
em in sec
o
t
of the we
a
dd a boo
k
o
pup wind
o
a
re, delet
e
as home
p
:
t
of web a
d
.
t
of the we
n
tly.
d
ow/Wi
n
i
s mainly
u
to
gg
le a
m
l
Functi
o
s
play mor
e
ch to
u
ch to
Touch
bookmark
to dis
p
o
okmark,
ag
e, Down
l
In/Out:
Y
size, and
z
u
cin
g
the
d
g
the scre
e
to prev
o
App Sh
o
nds. It c
o
b address
e
k
mark. Pre
o
w for edi
t
e
the selec
t
p
a
g
e and
d
d
dresses t
h
b address
e
n
dow
u
sed to op
e
m
on
g
seve
r
o
ns
e
function
s
manually
r
g
o to the
to mana
g
a current
p
lay an op
t
Find on pa
l
oads and
S
Y
ou can a
u
z
oom the
p
d
istance b
e
e
n.
ious pa
g
e.
op
o
ntains 3 t
a
e
s that yo
u
ss and hol
t
in
g
links.
Y
t
ed websit
d
o other o
p
h
at you ha
v
e
s that yo
u
e
n a new
w
r
al previou
s
s
.
r
efresh th
e
next pa
g
e
g
e your bo
o
pa
g
e.
t
ion list. T
h
g
e, Select
S
ettin
g
s.
u
tomatical
l
p
a
g
e in/ou
e
tween yo
u
a
bs:
u
have ad
d
d web ico
n
Y
ou can o
p
e, create
p
erations.
v
e browse
d
u
have
w
eb pa
g
e
s
ly opene
d
e
web pa
ge
.
o
kmarks.
h
ese optio
text, Pa
ge
l
y fit the p
a
t by
u
r two fin
g
d
ed.
n
s
p
en,
d
d
e
.
ns
e
ag
e
g
ers

Within the applications list, touch " Lenovo App Shop"
to open the Lenovo App Shop interface. NOTE: Network
support is required before you can use this application. If
there is any problem with your network support, please
consult your network operator or service provider.
After entering the <New> page, you can toggle among
the upper tabs <All Categories>, <New>, <Bestsellers>,
<Recommended> and <All>, <Free>for various content.
If you want to download applications for your IdeaPad
Tablet A1-07, you must first register for a Lenovo
account. Once you have registered for a Lenovo account,
you can use it to lo
g
in and download the free applications
of your choice onto your IdeaPad Tablet A1-07.
All Categories
Click "All Categories" tab on top of the <Lenovo App
Shop> page to enter <Lenovo App Shop> category list.
New
Click to display the latest software applications.
Bestsellers
Click to display the most popular applications.
Recommended
Click to display the recommended applications.
All
Click to display all applications.
Free
Click to display the free applications.
*Specific models only

C
A
3-
1
Tou
cal
c
3-
2
Tou
cal
e
N
e
You
M
a
C
hapter 03
A
pplicati
o
3-1
C
3-2
C
3-3
C
3-4
C
3-5
C
3-6 E
3-7 E
3-8
G
3-9
M
1
Calcula
ch " C
a
c
ulator appl
2
Calend
a
ch " C
a
e
ndar page
.
e
w Calen
can creat
e
a
nage C
a
o
ns
C
alculator
C
alendar
C
amera
C
lock
C
ontacts
mail
S File Expl
o
G
allery
M
usic
tor
a
lculator" i
n
ication.
a
r
a
lendar" in
.
dar Ite
m
e
a new ev
e
a
lendar
E
o
re
n
the appli
c
the applic
a
m
e
nt by tou
c
E
vents
*Speci
f
c
ations list
a
tions list t
c
hing and h
f
ic models o
n
to enter t
h
o open the
olding a ti
m
n
ly
h
e
m
e.

You
Vie
w
Da
y
cre
a
We
e
cre
a
Mo
n
Da
y
NO
T
the
tap
p
fun
c
3-
3
Tou
pho
fou
n
can
S
w
You
inte
swi
t
P
h
Ta
k
In t
scr
e
Ca
m
can switc
h
w
by tappi
n
y
view: To
u
a
te, view,
e
e
k view:
T
a
te, view,
e
n
th view:
y
view, the
n
T
E: Within
current da
y
p
ing the
c
tion menu
3
Camer
a
ch "
C
to taking a
n
d view wil
perform t
h
w
itch Ca
m
r pad prov
i
rface, tap
t
ch camera
h
otos
k
ing Phot
o
he photo t
a
e
en to take
Video Re
Exposure
,
m
era settin
g
Store loc
a
White bal
a
h
among th
n
g funct
u
ch and h
o
e
dit or dele
t
T
ouch and
h
e
dit or dele
t
Touch any
n
you can
m
any "Cale
n
y
or the cu
, and sele
c
from any
o
a
C
amera" in
nd video r
e
l display o
n
h
e followin
g
m
eras
i
des you w
i
, functio
n
between f
o
s
a
king previ
snapshots
corder: S
w
,
Picture si
z
g
s.
a
tion
a
nce
e Day vie
w
ion menu.
o
ld an even
t
t
e that ev
e
h
old an ev
e
t
e that ev
e
date in th
e
m
anage ev
e
n
dar" view,
rrent wee
k
c
t "
T
o
d
o
ther day,
the applic
a
e
cording p
r
n
the scree
g
operation
i
th two ca
m
n
menu ap
ront and b
a
ew interfa
c
.
w
itches to t
h
z
e, Picture
w
, Week vi
e
t
in the da
y
e
nt.
e
nt in the
w
e
nt.
e
month vi
e
e
nts in day
you can q
u
k
and mont
h
d
ay" butto
n
week or m
a
tions list t
o
r
eview inte
r
n. From th
i
s:
m
eras. On
c
pears, and
a
ck.
c
e, touch
h
e video r
e
quality, Co
e
w and Mo
n
y
view to
w
eek view
t
e
w to ente
r
view.
u
ickly retu
r
h
simply b
y
n
on the
onth view.
o
open the
r
face. The
i
s display,
y
c
ameras
select
on the
e
cording m
o
lor effect a
n
th
t
o
r
r
n to
y
y
ou
o
de.
nd

Vie
w
In t
tou
c
pre
v
slid
e
Ph
o
An
y
Gall
Gall
Vi
d
Vid
e
In t
scr
e
w
ing Pho
t
he photo t
a
c
h Photo P
r
v
iew interf
a
e
shows.
o
to Savin
g
y
photos yo
ery" applic
ery" to op
e
d
eos
e
o Recor
d
he video r
e
e
en to star
t
Camera:
S
Color effe
White bal
a
Zoom: A
d
photo (fr
o
Select
t
os
a
king previ
r
eview on l
o
a
ce. Here,
y
g
Location
u have tak
e
ation. In t
h
e
n the list
o
d
ing
e
cording pr
e
t
recording
,
S
witches to
ct, Camer
a
a
nce
Select
d
just the si
o
m 1x to 4
camera
ew interfa
c
o
wer right
y
ou can se
t
e
n will be
s
h
e applicati
o
f all the p
h
e
view inte
r
,
or touch
the photo
a
settings
Video qu
camera
ze of a
x).
c
e, in the v
e
t
o open th
e
t
and play
p
s
aved in th
e
ons list, to
h
otos you
h
r
face, touc
h
to sto
p
taking mo
d
ality
e
rtical mo
d
e
photo
p
hoto
e
"
uch "
h
ave taken
.
h
on t
h
p
recording
d
e.
d
e,
.
h
e
.

Vie
w
In t
pre
v
cor
n
thu
m
Vid
e
An
y
the
app
rec
o
3-
4
Tou
vie
w
To
a
Wh
e
Sn
o
3-
5
Tou
Ad
d
Wit
h
con
t
info
you
Edi
t
Wit
h
on
t
you
3-
6
Net
w
w
ing Vid
e
he vertical
v
iously rec
o
n
er of the
v
m
bnail to
o
e
o Saving
y
videos yo
u
" Gall
lications li
s
o
rded vide
o
4
Clock
ch "
C
w
.
a
dd an ala
r
e
n an alar
m
o
oze to del
5
Contac
t
ch "
C
d
contact
h
in the "C
o
t
act> on t
h
rmation fo
r
have finis
h
t
contact
h
in the "C
o
t
he functio
n
r contacts.
6
Email
w
ork supp
o
e
os
mode, a t
h
o
rded vide
o
v
ideo recor
d
o
pen the vi
d
Location
u
have rec
o
ery" applic
s
t to start t
o
s in <Gall
e
C
lock" in th
e
r
m, touch
m
sounds,
t
ay for ten
m
t
s
C
ontacts" i
n
o
ntacts" m
a
h
e function
r
that cont
a
h
ed.
o
ntacts" de
t
n
menu to
e
o
rt is requi
r
h
umbnail i
m
o
will be di
s
d
ing previ
e
d
eo play in
t
o
rded will
a
ation. Tou
c
he applica
t
e
ry>.
e
applicati
o
then to
u
t
ouch Dis
m
m
inutes.
n
the appli
c
a
in page, t
o
menu, an
d
a
ct. Tap th
e
t
ails page,
e
nter the
e
r
ed for usi
n
m
age of th
e
s
played in
t
e
w interfac
e
t
erface.
a
utomatical
c
h " G
a
t
ion. You c
a
o
ns list to o
u
ch "Add a
l
m
iss to tur
n
c
ations list.
o
uch , s
e
d
then inpu
t
e
<Done>
t
ouch ,
s
e
diting mod
n
g your Id
e
e
last
t
he lower r
e
. Touch th
ly be save
d
a
llery" in t
h
a
n view th
e
pen the Cl
o
l
arm".
n
it off or
e
lect the <
N
t
the relev
a
button wh
e
s
elect the
e, then ed
i
e
aPad Tabl
e
ight
e
d
in
h
e
e
o
ck
N
ew
a
nt
e
n
i
t
e
t

A1-
0
net
w
ser
v
Tou
3-
7
Tou
up
t
bro
w
you
Ro
o
Tap
qui
c
Ne
w
Tap
sea
r
Aft
e
file
Op
e
Tap
del
e
•
•
•
For
hel
p
0
7's mailb
o
w
ork supp
o
v
ice provid
e
ch "
E
7
ES File
ch "
E
t
he file ma
n
w
se and m
a
r Pad.
o
t
the
c
kly return
w
, select
r
ch engine
.
e
r you touc
has been
c
e
rations
, selec
t
e
te etc,.
•
Copy/P
a
or mor
e
Select
t
touch "
•
Delete:
more fi
delete
t
•
Renam
e
file, th
e
renam
e
more deta
i
p
instructio
o
x. If there
o
rt, please
c
e
r directly.
E
mail" in t
h
Explore
E
S File Exp
n
agement
a
a
nage any
button in
t
to the roo
t
"New"
.
You can a
h "OK", th
e
c
reated suc
c
t
" Op
e
a
ste: Withi
e
files, the
n
t
he locatio
n
Paste".
Within th
e
les, then t
o
t
he file(s).
e
: Within t
h
e
n touch "
R
e
the file.
i
ls, tap
n.
are any p
r
c
onsult yo
u
h
e applicati
o
lore " in th
a
pplication
,
and all of
t
t
he upper l
t
directory
f
to create
a
lso edit th
e
e
system s
h
c
essfully.
e
ration" to
p
n the file li
n
touch "C
o
n
where yo
u
e
file list, t
a
o
uch "Dele
t
h
e file list,
R
ename" u
n
, and re
r
oblems wi
t
u
r network
o
n list.
e applicati
o
,
which en
a
t
he files st
o
eft corner
o
f
or local st
o
a
new file
o
e
name of
a
h
ould infor
m
p
aste, cut,
st, tap
o
py" under
u
want to
p
a
p ,
t
e" under "
O
tap
n
der "Oper
a
fer to ES F
t
h your
operator o
o
ns list to
b
a
bles you t
o
o
red locally
o
f the pag
e
o
rage.
o
r folder a
n
a
folder or
f
m
you that
copy, ren
a
, select
"Operatio
n
p
aste, then
select one
O
peration"
, select on
a
tion" to
ile Explore
r
b
ring
o
on
e
to
n
d
f
ile.
the
a
me,
one
n
".
or
to
e

3-
8
Tou
the
upp
sel
e
On
Gal
the
n
file.
On
Sel
e
mo
d
3-
9
Tou
app
mu
s
Tou
mu
s
Mu
s
You
vol
u
8
Gallery
ch "
G
picture ap
p
er right co
r
e
ct display
m
Gallery P
a
lery and
C
Gallery: S
w
Camera:
S
Details: T
o
n
touch
Picture Li
e
ct a photo
d
e.
9
Music
ch "
M
lication, th
e
s
ic from yo
ch the but
t
s
ic files by
A
s
ic Player
can press
u
me.
/: Pl
a
/: Pr
e
: Playlists
: Shuffle
: Repeat
G
allery" to
s
p
lication h
o
r
ner of the
m
odes:
a
ge
C
amera: Y
o
w
itch to G
a
S
witch to C
a
o
uch to
to show
d
st Page
, then tou
c
M
usic" in th
e
e
n select
w
ur comput
e
t
on on the
t
A
rtists, Al
b
Controls
the side v
o
a
y/Pause
e
vious/Ne
x
s
tart the <
o
mepage,
y
screen aft
e
album or
o
u can sel
e
a
llery.
a
mera.
select
o
d
etailed inf
o
c
h the
b
e
applicati
o
w
hat you w
a
e
r using th
e
t
op of the
m
b
ums, Son
g
o
lume butt
o
x
t
G
allery> a
p
y
ou can sli
d
e
r touchin
g
pho
t
e
ct Gallery
o
o
n the fun
c
o
rmation a
b
b
utton to e
n
o
n list to st
a
a
nt to play
.
e
USB cabl
e
m
usic pag
e
g
s or Playli
s
o
n of your
p
plication.
d
e in
g
the albu
m
t
o.
o
r Camera
.
c
tion menu
,
b
out a sele
n
ter slides
h
a
rt the mu
s
.
You can
c
e
supplied.
e
to sort yo
s
ts.
Pad to adj
u
In
the
m
to
.
,
cted
h
ow
s
ic
c
opy
ur
u
st

On
the
n
pla
y
top
music play
e
n
enter oth
y
. To turn
o
of the scr
e
e
r page, t
o
er applicat
i
o
ff/change
e
en, drag it
o
uch ca
n
i
ons, but y
o
music, tou
c
down, the
n
back to h
o
ur music
c
c
h the stat
u
n select
*Specif
ome page,
c
ontinues t
u
s bar at t
h
.
ic models on
o
h
e
ly

C
S
Wit
h
the
4-
1
Thi
s
set
t
hot
s
mo
d
Ai
C
hapter 04
S
ettings
4-1
W
4-2
S
4-3
D
4-4 L
4-5
A
4-6
A
4-7 P
4-8
S
4-9 L
4-10
B
4-11
D
4-12
A
h
in the ap
p
Settings i
n
1
Wirele
s
s
setting m
o
t
ings, Blue
t
s
pot, VPN
s
d
els only).
rplane
M
W
ireless &
N
S
ound Setti
D
isplay Set
t
ocation &
S
A
pplication
s
A
ccounts &
rivacy
S
torage
anguage
&
B
ackup
D
ate & Tim
e
A
bout Table
p
lications li
s
n
terface.
s
s & Net
w
o
dule inclu
t
ooth, Blue
t
s
ettings an
d
M
ode
N
etworks
ngs
t
ings
S
ecurity
s
Sync
&
Keyboard
e
t
s
t, touch "
w
orks
des: Airpla
t
ooth setti
n
d
3G Mobil
e
*Speci
f
Setti
n
ne mode,
W
n
gs, Tether
e
Network
s
f
ic models o
n
n
gs" to ent
e
W
i-Fi, Wi-F
ing & port
a
s
(Specific
n
ly
e
r
i
a
ble

On
c
con
n
im
m
W
You
On
c
will
dis
p
The
LA
N
pas
s
tha
t
onl
y
Tou
the
n
als
o
•
•
•
Bl
u
You
Blu
e
Exa
ste
r
Sin
c
dev
Ide
a
dev
dist
(ab
o
con
n
suc
h
You
spe
c
c
e the Airpl
a
n
ections o
n
m
ediately.
i-Fi/Wi-
F
can enabl
e
c
e the Wi-F
automatic
a
p
lay them i
n
re is an ic
o
N
, where
s
word, and
t
the netw
o
y
after the
ch a desir
e
n
select "
o
select <A
d
•
Wi-Fi:
•
Netwo
the sys
networ
k
•
Wi-Fi
s
policy"
turns
o
plugg
e
u
etooth
/
can establ
e
tooth com
mples of s
u
r
eo earpho
n
c
e a Blueto
ices by rad
a
Pad Table
t
ice. You si
m
ance betw
e
o
ut 32 feet
n
ection ca
n
h
as walls
o
r IdeaPad
T
c
ification.
T
a
ne Mode
h
n
your Ide
a
F
i Settin
g
e
/disable
W
i has been
a
lly scan f
o
n
the Wi-Fi
o
n indicatin
indicate
s
can be co
n
o
rk has be
e
required p
a
e
d network
Advanc
e
d
d Wi-Fi N
e
Wi-Fi func
t
rk notific
a
tem will n
o
k
s.
s
leep poli
c
on the "
o
ff (uses
m
e
d in or N
e
/
Bluetoo
t
ish a wirel
e
patible de
v
u
ch Blueto
o
n
es, keybo
a
oth-enable
io waves,
y
t
A1-07 to
m
ply need
t
e
en the tw
o
). Howeve
r
n
sometim
e
o
r other el
e
T
ablet A1-
0
T
o ensure t
h
as been e
n
a
Pad Table
t
g
s
W
i-Fi functi
o
enabled, y
o
r available
network li
s
g the netw
s
that the
n
n
nected di
r
e
n encrypt
e
a
ssword is
from the li
e
" to set s
t
e
twork> to
t
ion switch
.
a
tion: Afte
o
tify the us
e
c
y: Touch
Advance"
m
ore mob
e
ver(uses
t
h Setti
n
e
ss connec
t
v
ices using
o
th compa
t
a
rds, etc.
d device c
o
y
ou do not
be directly
t
o ensure
t
o
devices d
r
, please n
o
e
s be interf
e
e
ctronic de
v
0
7 support
s
he interac
t
n
abled, all
t
A1-07 will
o
n.
o
ur IdeaPa
wireless n
e
s
t.
ork status
n
etwork re
q
r
ectly, and
e
d, and can
input.
st to conn
e
t
atic IP set
t
manually
a
.
r the switc
h
e
rs if there
and sel
e
: sleep w
h
ile data),
more bat
t
n
gs
t
ion with a
n
Bluetooth
t
t
ible device
o
mmunicat
e
have to p
o
opposite t
h
t
hat the m
a
oes not ex
c
o
te that th
e
e
red with
b
v
ices.
s
V2.0 Blu
e
t
ive operati
of the wir
e
be disabl
e
d Tablet A
1
e
tworks,
following e
q
uires no
indica
t
be conne
c
e
ct. Touch
t
ing. You c
a
a
dd a net
w
h
is turned
are any o
p
e
ct "Wi-Fi s
h
en scree
n
Never wh
t
ery powe
n
y other
t
echnolog
y
s may incl
u
e
s with ot
h
o
se your
h
e other
a
ximum
c
eed 10 m
e
Bluetooth
b
y barriers
e
tooth
on betwee
n
e
less
e
d
1
-07
very
t
es
c
ted
,
a
n
w
ork.
on,
p
en
leep
n
en
r).
y
.
u
de
h
er
n

your IdeaPad Tablet A1-07 and another Bluetooth-enabled
device, please use only Lenovo-approved accessories
applicable to your IdeaPad Tablet A1-07 model. Or, check
with the manufacturer of the other device to determine
whether the device is compatible with your IdeaPad Tablet
A1-07.
In some cases, the use of Bluetooth may be restricted. For
the related information, please consult with your local
authorities or service provider.
Using functions requiring Bluetooth technology or running
these functions in the background will consume the battery
power of your IdeaPad Tablet A1-07 at a faster than average
rate, also reduce the service life of your battery. You can
perform the following operations in the Bluetooth Settings:
• Bluetooth devices: After Bluetooth has been turned
on, your IdeaPad Tablet A1-07 will automatically
display a list of any Bluetooth-enabled devices which
can be found in the nearby area (i.e. scan devices).
Tethering & Portable Hotspot
You can share your tablet's mobile data connection via USB
or as a portable Wi-Fi hotspot.
VPN Settings
These settings allow you to add and set up various types of
VPN (Virtual Private Network).
3G Mobile Networks (Specific models only)
You can enable/disable 3G Mobile Networks function. If there
are any problems with your network support, please consult
your network operator or service provider.
4-2 Sound Settings
Touch this option to enter the "Sound Settings" interface.
The setting includes General (Silent mode, Vibrate,
Volume), Notifications (Notifications ringtone) and
Feedback (Audible touch tones, Audible selection,
Screen lock sounds and Haptic feedback ).
4-3 Display Settings

The display setting options include: Brightness, Auto-rotate
screen, Animation and Screen timeout.
Brightness
You can manually adjust the brightness, or select "Automatic
brightness", which allows your IdeaPad Tablet A1-07 to
adjust the screen brightness automatically according to the
current ambient light.
Auto-rotate screen
You can select whether to allow screen horizontal or vertical
auto-rotation.
Animation
Once the animation switch has been turned on, your IdeaPad
Tablet A1-07 will display animations whenever application
windows are opened or closed, thereby enhancing the
attractiveness of your experience.
Screen timeout
This option allows you to select how long your IdeaPad
Tablet A1-07's screen will remain lit without any activity
before it automatically locks the screen to save power. You
can set the time period to 15 seconds, 30 seconds, 1 minute,
2 minutes, 10 minutes, 30 minutes and never.
4-4 Location & Security
Within the settings, you will gain access to the following
functions:
My Location, Screen Unlock, SIM card lock (Specific
models only), Passwords, Device administration and
Credential storage.
My Location
You can select whether to use wireless networks or GPS
satellites.
Notice on using the GPS feature
• Many factors can interfere with GPS satellite
reception. In places with strong interference (such as
indoors, in a car, or between buildings) or during bad

weather it is possible that you may either fail to get a
signal or find that a longer positioning time will be
necessary.
• For your safety, please do not watch or operate the
monitor while driving.
• Navdroyd is free navigation software that will enable
you to better experience this product’s GPS
functionality. Please esnure you connect to Wi-Fi
download the map by Navdroy before using the GPS.
Be aware that this version is function-limited to maps
of only one country or region. Before downloading the
maps of another country or region it will be necessary
to manually delete the previous set of maps.
• Using a Wi-Fi connection, check for updates online at
least once a week to enhance your GPS experience.
Screen Unlock
Using the option, you will be able to unlock the screen in the
three ways: Pattern Unlock, PIN Unlock and Password
Unlock. You can cancel the screen lock here as well.
Touch <Pattern> and then draw the unlock pattern of your
choice (as demonstrated) on the screen with your finger.
Once you have set the unlock pattern, you will then be able
to turn <Use Visible Pattern> on/off.

Once you have set and activated the Pattern Unlock function,
then the Unlock keyboard will be displayed on the screen
whenever the screen is unlocked by the slide. Draw your
pre-selected pattern on the screen with your finger using the
Unlock keyboard. After the preset pattern has been correctly
drawn, the screen will become unlocked.
Touch <PIN>. You will need to input at least 4 numbers as
the PIN code to unlock the screen.
Touch <Password>. You will need to input at least 4
characters as the password to unlock the screen.
SIM Card Lock Setting (Specific models only)

Passwords
With the <Visible passwords> option, you can decide
whether or not your chosen password will be visible as you
input it. If the checkbox is checked, then the password will
be visible. If it is unchecked, then your password will only be
displayed as **** as you input it, thereby making your
password more secure.
Device administration
These functions are not available to ordinary users. Only
TsingMail users who have previously set up the appropriate
security policies within their companies can use these
functions.
These features work in conjunction with the Enterprise Policy
Center, (Lenovo Enterprise Policy Manager). The Enterprise
Policy Center is the executor of the security policy of the
Lenovo enterprise platform. Whenever the user enables the
Lenovo enterprise mail and service function, the Enterprise
policy center will then be enabled automatically. This will
allow your IdeaPad Tablet A1-07 to accept the security policy
as set forth by the IT department of your company, for
example, mandatory screen-savers with increased password
strength. Enabling these functions also allows your IdeaPad
Tablet A1-07 to accept management instructions from your
company’s IT department, for example, allowing them to
erase data remotely and reset your device.
Credential Storage
This function allows your IdeaPad Tablet A1-07 to access
web pages and LANs for which a specific security certificate
or other certificate is required. After having set the
credential storage password, you can access the web pages
or LANs with the appropriate security certificates and other
certificates you have stored.
• Use secure credentials: This option will be
unavailable until the credential storage password has
been set.
• Install from SD card : You can install certificates
from SD card.
• Set password: Touch this option to set the
credential storage password. After it has been set
successfully, the "Use secure credentials " checkbox
will be checked, indicating that this option is now
available.
• Clear storage: Select this option to delete all your
currently saved certificates and reset the credential
storage password.

4-5 Applications
With these settings include: Unknown sources, Manage
applications, Running services, Storage use, Battery use,
Development (NOTE: This last function is available for
developers only.)
Manage Applications
With this option, you can easily manage and delete
applications of your choice.
With the <All> menu, you can filter any running applications
or applications provided by the third-party software
developer in the applications list.
After selecting an application, you will then be able to see its
related information details, and also be able to perform
operations such as Uninstall , Clear cache and Clear defaults.
Running Services
With this option, you can end and set some running
applications.
Storage Use
With this option, you can view storage used by applications.
Battery Use
With this option, you can see how much the battery has
been used.
Unknown Sources
This option allows installation of non-Market applications.
Development
This option is only available for developers. With it, you can
set some of the development options available for that
application.
• USB debugging: Uses the debugging mode after
connecting to USB. You can toggle between on and
off.
• Stay awake: The screen will not sleep when the
battery is charged. You can toggle between on and

off.
• Allow mock locations: You can toggle between on and
off.
4-6 Accounts & Sync
With the option, you will be able to do general sync settings
and manage accounts.
General sync settings enables you to select Background data
and Auto-sync.
Via account management settings, you can add accounts, or
use existing account. You can log in by using an existing
account to view relevant information under your account,
and to use some advanced functions and applications of this
device.
4-7 Privacy
This option enables you to reset to the factory data.
4-8 Storage
This option enables you to see SD card and internal storage.
4-9 Language & Keyboard
Language Settings
You can select the language you wish to use to operate your
IdeaPad Tablet A1-07.
Keyboard Settings
You can select input method and set Keyboard in this
setting.
4-10 Backup
This option enables you to back up and restore some data.

4-11 Date & Time
With these settings, you can set a series of time-related
options such as the system time.
Date & Time Settings
You can enable the auto time update via network, select the
time zone, set the specific date and time, and set the display
format of date and time.
4-12 About Tablet
Within this option, you can view System updates, Status,
Battery use, Legal information, Model number, Android
version, Kernel version and Build number.
*Specific models only
-
 1
1
-
 2
2
-
 3
3
-
 4
4
-
 5
5
-
 6
6
-
 7
7
-
 8
8
-
 9
9
-
 10
10
-
 11
11
-
 12
12
-
 13
13
-
 14
14
-
 15
15
-
 16
16
-
 17
17
-
 18
18
-
 19
19
-
 20
20
-
 21
21
-
 22
22
-
 23
23
-
 24
24
-
 25
25
-
 26
26
-
 27
27
-
 28
28
-
 29
29
-
 30
30
-
 31
31
-
 32
32
-
 33
33
-
 34
34
-
 35
35


Lenovo 22282EU Handleiding
- Categorie
- Tabletten
- Type
- Handleiding
- Deze handleiding is ook geschikt voor
in andere talen
- English: Lenovo 22282EU User manual
Gerelateerde artikelen
-
Lenovo TAB 4 Handleiding
-
-
-
-
-
-