
Downloaded from www.vandenborre.be
A61900GSW0
AGS1921
NL
VRIEZER GEBRUIKSAANWIJZING 2
EN
FREEZER USER MANUAL 20
FR
CONGÉLATEUR NOTICE D'UTILISATION 38

Downloaded from www.vandenborre.be
VOOR PERFECTE RESULTATEN
Bedankt dat u voor dit AEG product heeft gekozen. Dit
apparaat is ontworpen om vele jaren uitstekend te
presteren, met innovatieve technologieën die het leven
gemakkelijker helpen maken – functies die gewone
apparaten wellicht niet hebben. Neem een paar
minuten de tijd om het door te lezen zodat u er
optimaal van kunt profiteren.
ACCESSOIRES EN VERBRUIKSARTIKELEN
In de AEG webshop vindt u alles wat u nodig heeft om
al uw apparaten van AEG mooi te houden en perfect te
laten functioneren. Ook vindt u hier een groot aantal
accessoires die zijn ontworpen en gebouwd volgens de
hoge kwaliteitsnormen die u verwacht, van speciaal
kookgerei tot bestekmandjes en van flessenhouders tot
waszakken…
Bezoek onze webshop op
www.aeg-electrolux.com/shop
2

Downloaded from www.vandenborre.be
INHOUD
4 Veiligheidsinformatie
7 Bedieningspaneel
10 Het eerste gebruik
10 Dagelijks gebruik
11 Handige aanwijzingen en tips
12 Onderhoud en reiniging
14 Problemen oplossen
15 Technische gegevens
16 Montage
19 Het milieu
In deze gebruiksaanwijzing worden de
volgende symbolen gebruikt:
Belangrijke informatie over uw
persoonlijke veiligheid en informatie
over het voorkomen van schade aan
het apparaat.
Algemene informatie en tips
Milieu-informatie
Wijzigingen voorbehouden
Inhoud
3

Downloaded from www.vandenborre.be
VEILIGHEIDSINFORMATIE
In het belang van uw veiligheid en om een correct gebruik te kunnen waarborgen is het
van belang dat u, alvorens het apparaat te installeren en in gebruik te nemen, deze ge-
bruiksaanwijzing, inclusief de tips en waarschuwingen, grondig doorleest. Om onnodige
vergissingen en ongevallen te voorkomen is het belangrijk ervoor te zorgen dat alle men-
sen die het apparaat gebruiken, volledig bekend zijn met de werking ervan en de veilig-
heidsvoorzieningen. Bewaar deze instructies en zorg ervoor dat zij bij het apparaat blij-
ven als het wordt verplaatst of verkocht, zodat iedereen die het apparaat gedurende zijn
hele levensduur gebruikt, naar behoren is geïnformeerd over het gebruik en de veiligheid
van het apparaat.
Voor de veiligheid van mensen en eigendommen dient u zich aan de voorzorgsmaatrege-
len uit dit instructieboekje te houden, de fabrikant is niet verantwoordelijk voor schade
die door het niet opvolgen van de aanwijzingen veroorzaakt is.
Veiligheid van kinderen en kwetsbare mensen
• Dit apparaat is niet bedoeld voor gebruik door personen (waaronder begrepen kinde-
ren) met verminderde fysieke, zintuiglijke vermogens of een gebrek aan ervaring en
kennis, tenzij dit onder toezicht gebeurt van een voor hun veiligheid verantwoordelijke
persoon of tenzij zij van een dergelijke persoon instructie hebben ontvangen over het
gebruik van het apparaat.
Houd kinderen uit de buurt om te voorkomen dat ze met het apparaat gaan spelen.
• Houd alle verpakkingsmateriaal buiten het bereik van kinderen. Gevaar voor verstikking.
• Als u het apparaat afdankt trek dan de stekker uit het stopcontact, snij de voedingska-
bel door (zo dicht mogelijk bij het apparaat) en verwijder de deur om te voorkomen
dat kinderen een elektrische schok krijgen of zichzelf in het apparaat opsluiten.
• Als dit apparaat, dat voorzien is van een magnetische deursluiting, een ouder apparaat
vervangt, dat voorzien is van een veerslot (slot) op de deur of het deksel, zorg er dan
voor dat u het slot onbruikbaar maakt voordat u het oude apparaat weggooit. Dit voor-
komt dat kinderen er in opgesloten kunnen raken.
Algemene veiligheid
LET OP!
Houd de ventilatie-openingen altijd vrij van obstructies.
• Dit apparaat is bedoeld voor het bewaren van levensmiddelen en/of dranken in een
gewoon huishouden, zoals uitgelegd in dit instructieboekje.
• Gebruik geen mechanische hulpmiddelen of kunstgrepen om het ontdooiproces te ver-
snellen.
• Gebruik geen andere elektrische apparaten (bijvoorbeeld ijsmachines) in koelkasten, ten-
zij ze voor dit doel goedgekeurd zijn door de fabrikant.
• Let op dat u het koelcircuit niet beschadigt.
• Het koelmiddel isobutaan (R600a) bevindt zich in het koelcircuit van het apparaat, dit
is een natuurlijk gas dat weliswaar milieuvriendelijk is, maar ook uiterst ontvlambaar.
4
Veiligheidsinformatie

Downloaded from www.vandenborre.be
Controleer of de onderdelen van het koelcircuit tijdens transport en installatie van het
apparaat niet beschadigd zijn geraakt.
Indien het koelcircuit beschadigd is:
– open vuur en ontstekingsbronnen vermijden
– de ruimte waar het apparaat zich bevindt grondig ventileren
• Het is gevaarlijk om wijzigingen aan te brengen in de specificaties of dit product op
enigerlei wijze te modificeren. Een beschadigd netsnoer kan kortsluiting, brand en/of
een elektrische schok veroorzaken.
WAARSCHUWING!
Alle elektrische onderdelen (netsnoer, stekker, compressor) mogen uitsluitend vervangen
worden door een erkende onderhoudsdienst of gekwalificeerd onderhoudspersoneel.
1. Het netsnoer mag niet verlengd worden.
2. Verzeker u ervan dat de stekker niet platgedrukt of beschadigd wordt door de ach-
terkant van het apparaat. Een platgedrukte of beschadigde stekker kan oververhit
raken en brand veroorzaken.
3. Verzeker u ervan dat u de stekker van het apparaat kunt bereiken.
4. Trek niet aan het snoer.
5. Als de stekker los zit, steek hem dan niet in het stopcontact. Dan bestaat er een
risico op een elektrische schok of brand.
6.
U mag het apparaat niet gebruiken zonder de afdekking van het lampje
1)
voor de
binnenverlichting.
• Dit apparaat is zwaar. Wees voorzichtig als u het apparaat verplaatst.
• Haal geen artikelen uit het vriesvak en raak ze niet aan als uw handen vochtig/nat zijn,
dit kan uw huid beschadigen of vrieswonden veroorzaken.
• Stel het apparaat niet langdurig bloot aan direct zonlicht.
•
Gloeilampjes
2)
gebruikt voor dit apparaat is een speciaal lampje voor huishoudelijke
apparaten. De lampjes zijn niet geschikt voor de verlichting van ruimtes.
Dagelijks gebruik
• Zet geen hete potten op de kunststof onderdelen in het apparaat.
• Bewaar geen brandbare gassen of vloeistoffen in het apparaat, deze kunnen ontploffen.
•
Zet geen levensmiddelen direct tegen de luchtopening in de achterwand.
3)
• Diepgevroren voedsel mag niet opnieuw worden ingevroren als het eenmaal ontdooid
is.
• Bewaar voorverpakte diepvriesproducten volgens de aanwijzingen van de fabrikant.
• U dient zich strikt te houden aan de aanbevelingen van de fabrikant van het apparaat
met betrekking tot het bewaren van voedsel. Raadpleeg de betreffende aanwijzingen.
• Leg geen koolzuurhoudende of mousserende dranken in de vriezer, deze veroorzaken
druk op de fles die daardoor kan ontploffen, dit kan schade toebrengen aan het apparaat.
1) Als er een afdekking voor het lampje is voorzien.
2) Als er is voorzien in een lamp.
3) Als het apparaat vorstvrij is.
Veiligheidsinformatie
5

Downloaded from www.vandenborre.be
• IJslollies kunnen vrieswonden veroorzaken als ze rechtstreeks vanuit het apparaat ge-
consumeerd worden.
Onderhoud en reiniging
• Schakel het apparaat uit en trek de stekker uit het stopcontact voordat u onderhouds-
werkzaamheden verricht.
• Maak het apparaat niet schoon met metalen voorwerpen.
• Gebruik geen scherpe voorwerpen om ijs van het apparaat te krabben. Gebruik een
kunststof schraper.
Installatie
Voor de aansluiting van elektriciteit dienen de instructies in de desbetreffende paragra-
fen nauwgezet te worden opgevolgd.
• Pak het apparaat uit en controleer of er beschadigingen zijn. Sluit het apparaat niet
aan als het beschadigd is. Meld mogelijke beschadigingen onmiddellijk bij de winkel
waar u het apparaat gekocht heeft. Gooi in dat geval de verpakking niet weg.
• Wij adviseren u om 4 uur te wachten voordat u het apparaat aansluit, dan kan de olie
terugvloeien in de compressor.
• Rond het apparaat dient adequate luchtcirculatie te zijn, anders kan dit tot oververhit-
ting leiden. Om voldoende ventilatie te verkrijgen de instructies met betrekking tot de
installatie opvolgen.
• De achterkant dient zo mogelijk tegen een muur geplaatst te worden, teneinde te voor-
komen dat hete onderdelen (compressor, condensator) aangeraakt kunnen worden en
brandwonden veroorzaken.
• Het apparaat mag niet vlakbij radiatoren of kooktoestellen geplaatst worden.
• Verzeker u ervan dat de stekker bereikbaar is nadat het apparaat geïnstalleerd is.
•
Sluit het apparaat alleen aan op een drinkwaterleiding.
4)
Onderhoud
• Alle elektrotechnische werkzaamheden die noodzakelijk zijn voor het uitvoeren van on-
derhoud aan het apparaat, dienen uitgevoerd te worden door een gekwalificeerd elek-
tricien of competent persoon.
• Dit product mag alleen worden onderhouden door een erkend onderhoudscentrum en
er dient alleen gebruik te worden gemaakt van originele reserveonderdelen.
Bescherming van het milieu
Dit apparaat bevat geen gassen die de ozonlaag kunnen beschadigen, niet in het koelcir-
cuit en evenmin in de isolatiematerialen. Het apparaat mag niet worden weggegooid bij
het normale huishoudelijke afval. Het isolatieschuim bevat ontvlambare gassen: het appa-
raat moet weggegooid worden conform de van toepassing zijnde regels die u bij de loka-
le overheidsinstanties kunt verkrijgen. Voorkom beschadiging aan de koeleenheid, vooral
aan de achterkant bij de warmtewisselaar. De materialen die gebruikt zijn voor dit appa-
raat en die voorzien zijn van het symbool
zijn recyclebaar.
4) Indien er een wateraansluiting voorzien is.
6
Veiligheidsinformatie

Downloaded from www.vandenborre.be
BEDIENINGSPANEEL
1 2 3 4 5 6
1 ON/OFF-toets
2 Mode-toets
3 OK-toets
4 Toets temperatuur lager
5 Toets temperatuur hoger
6 Display
Het ingestelde geluid van de toetsen kan harder worden gezet door een paar seconden
gelijktijdig te drukken op de toets Mode en de toets Temperatuur lager. De wijziging kan
weer ongedaan worden gemaakt.
Display
3 4 5 621
1 Timer-functie
2 FROSTMATIC-functie
3 Minute Minder-functie
4 Functie Kinderslot
5 Indicatielampje alarm
6 Temperatuurlampje
Inschakelen
Ga als volgt te werk om het apparaat in te schakelen:
1. Steek de stekker in het stopcontact.
2. Druk op de ON/OFF -knop als het display uit is.
3. Het alarm kan na een paar seconden werken.
Zie om het alarm te resetten 'Alarm hoge temperatuur'.
4. Het temperatuurindicatielampje toont de ingestelde standaardtemperatuur.
Zie 'Temperatuuregeling' om een andere temperatuur in te stellen.
Uitschakelen
Ga als volgt te werk om het apparaat uit te schakelen:
1. Druk op de ON/OFF-knop voor 5 seconden.
2. Het display wordt uitgeschakeld.
Bedieningspaneel
7

Downloaded from www.vandenborre.be
3. Trek de stekker uit het stopcontact om de stroomtoevoer naar het apparaat af te sluiten.
Temperatuurregeling
De ingestelde temperatuur van de vriezer kan worden aangepast door op de temperatuur-
knop te drukken.
Standaard ingestelde temperatuur:
• -18 °C voor de vriezer
De temperatuurweergave toont de ingestelde temperatuur.
De ingestelde temperatuur zal binnen 24 uur worden bereikt.
Na een stroomonderbreking blijft de ingestelde temperatuur opgeslagen.
FROSTMATIC-functie
Voor inschakeling van de functie:
1. Druk op de Mode-knop tot het bijbehorende pictogram verschijnt.
Het indicatielampje FROSTMATIC knippert.
Het indicatielampje van de vriezertemperatuur toont het symbool
.
2. Druk op de toets OK om te bevestigen.
Het FROSTMATIC-indicatielampje wordt weergegeven.
Er start een animatie.
Deze functie stopt automatisch na 52 uur.
Om de functie uit te schakelen voor deze automatisch afloopt:
1. Druk op de knop Mode tot het indicatielampje FROSTMATIC knippert.
2. Druk op de toets OK om te bevestigen.
3. Het FROSTMATIC-indicatielampje gaat uit.
De functie gaat uit door een andere ingestelde vriezertemperatuur te selecteren.
Minute Minder-functie
De Minute Minder -functie moet worden gebruikt om een akoestisch alarm op de gewen-
ste tijd in te stellen. Dit is bijvoorbeeld handig als in een recept staat dat een mengsel
een bepaalde tijd moet afkoelen, of als u een herinnering nodig hebt om niet te vergeten
flessen, die u snel in de vriezer wil afkoelen, weer uit de vriezer te halen.
Om de functie aan te zetten:
1. Druk op de Mode-toets tot het bijbehorende pictogram verschijnt.
Het Minute Minder -lampje knippert.
De timer toont gedurende enkele seconden de ingestelde waarde (30 minuten).
2. Druk op de timerknop om de waarde van de timer te wijzigen van 1 tot 90 minuten.
3. Druk op de OK-toets om te bevestigen.
Het Minute Minder -lampje wordt getoond.
De timer begint te knipperen (min).
Op het einde van de aftelling knippert het Minute Minder -lampje en klinkt een alarm:
1. Verwijder alle drankjes uit het vriesvak.
8
Bedieningspaneel

Downloaded from www.vandenborre.be
2. Schakel de functie uit.
Om de functie uit te zetten:
1. Druk op de Mode-knop tot het Minute Minder -lampje knippert.
2. Druk op de OK-toets om te bevestigen.
3. Het Minute Minder -lampje gaat uit.
De functie kan op elk moment worden uitgeschakeld.
Het is mogelijk om te allen tijde en voor het einde van de ingestelde tijd, de tijd te veran-
deren door op de toets voor het omlaag zetten van de temperatuur en op de toets voor
het omhoog zetten van de temperatuur te drukken.
Kinderslot-functie
Selecteer de kinderslotfunctie om de bediening van de knoppen te vergrendelen tegen
onbedoelde bediening.
Voor inschakeling van de functie:
1. Druk op de Mode-knop tot het bijbehorende pictogram verschijnt.
2. Het indicatielampje Kinderslot knippert.
3. Druk op de OK-knop om te bevestigen.
Het indicatielampje Kinderslot wordt getoond.
Voor uitschakeling van de functie:
1. Druk op de Mode-knop tot het indicatielampje Kinderslot knippert.
2. Druk op de OK-knop om te bevestigen.
3. Het indicatielampje Kinderslot gaat uit.
Alarm hoge temperatuur
Een toename van de temperatuur in de vriesruimte (bijvoorbeeld door een eerdere stroom-
uitval) wordt aangegeven door:
• knipperende indicatielampjes van het alarm en de vriezertemperatuur
• het geluid van de zoemer.
Om het alarm te resetten:
1. Druk op een willekeurige toets.
2. De zoemer gaat uit.
3. De temperatuurweergave van de vriezer toont de hoogste temperatuur gedurende
een aantal seconden. En toont dan weer de ingestelde temperatuur.
4. Het indicatielampje alarm blijft knipperen totdat de normale omstandigheden zijn her-
steld.
Als het alarm is teruggekeerd, gaat het indicatielampje alarm uit.
Alarm deur open
Er klinkt een geluidsalarm als de deur ongeveer 80 seconden open blijft staan.
Als de normale omstandigheden hersteld zijn (deur sluiten), wordt het geluidsalarm uit-
geschakeld.
Bedieningspaneel
9

Downloaded from www.vandenborre.be
HET EERSTE GEBRUIK
De binnenkant schoonmaken
Voordat u het apparaat voor de eerste keer gebruikt, wast u de binnenkant en de interne
accessoires met lauwwarm water en een beetje neutrale zeep om de typische geur van
een nieuw product weg te nemen. Droog daarna grondig af.
Gebruik geen oplosmiddelen of schuurpoeders. Deze beschadigen de lak.
DAGELIJKS GEBRUIK
Invriezen van vers voedsel
Het vriesvak is ideaal om vers voedsel in te vriezen en diepvries voedsel op te slaan.
Activeer om vers voedsel in te vriezen de FROSTMATIC functie ten minste 24 uur voordat
u het in te vriezen voedsel in het vriesvak legt.
Zet het verse voedsel dat u in wilt vriezen in de twee bovenste vakken.
De maximale hoeveelheid voedsel die in 24 uur ingevroren kan worden is vermeld op het
typeplaatje , een etiket dat aan de binnenkant van het apparaat zit.
Het invriesproces duurt 24 uur. Vries tijdens deze periode geen ander voedsel in.
Om de maximale hoeveelheid te benutten zoals aangegeven op het typeplaatje, moet u
alle lades uit het vriesvak verwijderen.
Om de beste werking en het beste prestatiever-
mogen van het apparaat te garanderen, mag het
voedsel geen contact maken met de achterkant
van de vriezer in het deel getoond in de afbeelding.
Het bewaren van ingevroren voedsel
Als u het apparaat voor het eerst of na een periode dat het niet gebruikt is inschakelt,
het apparaat minstens 2 uur op een hoge instelling laten werken voordat u er producten
in plaatst.
In het geval van onbedoelde ontdooiing, bijvoorbeeld als de stroom langer is uitgevallen
dan de duur die op de kaart met technische kenmerken onder "tijdsduur" is vermeld,
moet het ontdooide voedsel snel geconsumeerd worden of onmiddellijk bereid worden
en dan weer worden ingevroren (nadat het afgekoeld is).
10
Het eerste gebruik

Downloaded from www.vandenborre.be
Kalender ingevroren voedsel
De symbolen geven verschillende soorten ingevroren levensmiddelen aan
De cijfers geven de bewaartijd in maanden aan voor de bijbehorende ingevroren levens-
middelen Of de hoogste of laagste waarde van de aangegeven bewaartijd van toepassing
is, hangt af van de kwaliteit van het voedsel en eventuele bereiding voordat het werd
ingevroren.
Ontdooien
Diepgevroren of ingevroren voedsel kunt, voordat het gebruikt wordt, in het koelvak of
op kamertemperatuur laten ontdooien, afhankelijk van de hoeveelheid tijd die hiervoor
nodig is.
Kleine stukken kunnen zelfs rechtstreeks vanuit de vriezer gekookt worden als ze nog be-
vroren zijn: in dat geval zal de bereiding iets langer duren.
Koude accumulators
De vriezer is voorzien van een of meer koudeaccumulators; hierdoor blijft het voedsel lan-
ger koud als de stroom uitvalt of als er een storing is.
HANDIGE AANWIJZINGEN EN TIPS
Tips voor het invriezen
Om u te helpen om het beste van het invriesproces te maken, volgen hier een paar be-
langrijke tips:
• de maximale hoeveelheid voedsel die in 24 uur ingevroren kan worden. is vermeld op
het typeplaatje;
• het invriesproces duurt 24 uur. Voeg gedurende deze periode niet meer in te vriezen
voedsel toe;
• vries alleen vers en grondig schoongemaakte levensmiddelen van uitstekende kwaliteit
in;
• bereid het voedsel in kleine porties voor, zo kan het snel en volledig worden ingevro-
ren en zo kunt u later alleen die hoeveelheid laten ontdooien die u nodig heeft;
• wikkel het voedsel in aluminiumfolie of plastic en zorg ervoor dat de pakjes luchtdicht
zijn;
• leg vers, nog niet ingevroren voedsel niet tegen het al ingevroren voedsel, om te voor-
komen dat dit laatste warm wordt;
• smalle pakjes zijn makkelijker op te bergen dan dikke; zout maakt voedsel minder lang
houdbaar;
• water bevriest, als dit rechtstreeks uit het vriesvak geconsumeerd wordt, kan het aan
de huid vastvriezen;
• het is aan te bevelen de invriesdatum op elk pakje te vermelden, dan kunt u zien hoe
lang het al bewaard is;
Handige aanwijzingen en tips
11

Downloaded from www.vandenborre.be
Tips voor het bewaren van ingevroren voedsel
Om de beste resultaten van dit apparaat te verkrijgen, dient u:
• er zich van te verzekeren dat de commercieel ingevroren levensmiddelen op geschikte
wijze door de detailhandelaar werden opgeslagen;
• ervoor te zorgen dat de ingevroren levensmiddelen zo snel mogelijk van de winkel
naar uw vriezer gebracht worden;
• de deur niet vaker te openen of open te laten staan dan strikt noodzakelijk.
• Als voedsel eenmaal ontdooid is, bederft het snel en kan het niet opnieuw worden in-
gevroren.
• Bewaar het voedsel niet langer dan de door de fabrikant aangegeven bewaarperiode.
ONDERHOUD EN REINIGING
LET OP!
Voordat u welke onderhoudshandeling dan ook verricht, de stekker uit het stopcontact
trekken.
Het koelcircuit van dit apparaat bevat koolwaterstoffen; onderhoud en herladen mag al-
leen uitgevoerd worden door bevoegde technici.
Periodieke reiniging
Het apparaat moet regelmatig worden schoongemaakt:
• maak de binnenkant en de accessoires schoon met lauw water en wat neutrale zeep.
• controleer de afdichtingen regelmatig en wrijf ze schoon om u ervan te verzekeren
dat ze schoon zijn en vrij van restjes zijn.
• spoel ze af en maak ze grondig droog.
Trek niet aan leidingen en/of kabels aan de binnenkant van de kast en verplaats of bescha-
dig ze niet.
Gebruik nooit schoonmaakmiddelen, schuurpoeders, erg geparfumeerde reinigingsproduc-
ten en waspolijstmiddelen om de binnenkant schoon te maken, aangezien deze het op-
pervlak beschadigen en een sterke geur achterlaten.
Maak de condensor (zwart rooster) en de compressor op de achterkant van het apparaat
schoon met een borstel of stofzuiger. Deze handeling zal de prestatie van het apparaat
verbeteren en het elektriciteitsverbruik besparen.
Zorg ervoor dat u het koelsysteem niet beschadigt.
Veel normaal verkrijgbare keukenreinigers bevatten chemicaliën die de kunststoffen die
in dit apparaat gebruikt zijn kunnen aantasten/beschadigen. Daarom wordt het aanbevo-
len de buitenkant van dit apparaat alleen schoon te maken met warm water met een
beetje afwasmiddel.
Steek, na het schoonmaken van het apparaat, de stekker weer in het stopcontact.
12
Onderhoud en reiniging

Downloaded from www.vandenborre.be
De vriezer ontdooien
Een zekere hoeveelheid rijp zal zich altijd vormen op de schappen van de vriezer en rond
het bovenste vak.
Ontdooi de vriezer wanneer de rijplaag een dikte van ongeveer 3-5 mm bereikt heeft.
Zet, ongeveer 12 uur voordat u gaat ontdooien, de thermostaatknop op een hogere
stand, om voldoende koudereserve op te bouwen voor de onderbreking tijdens de werking.
Volg onderstaande aanwijzingen om de rijp te verwijderen:
1. Schakel het apparaat uit.
2. Verwijder al het ingevroren voedsel, wikkel het in een paar lagen krantenpapier en
leg het op een koele plaats.
LET OP!
Raak ingevroren voedsel niet met natte handen aan. Uw handen kunnen dan aan de pro-
ducten vastvriezen.
3. Laat de deur open staan en steek de kunst-
stof schraper in de daarvoor bedoelde
opening in het midden van de bodem,
plaats er een opvangbak onder om het
dooiwater op te vangen
Om het ontdooiproces te versnellen kunt u
een bak warm water in het vriesvak zetten.
Verwijder bovendien stukken ijs die afbreken
voordat het ontdooien voltooid is.
4. Na afloop van het ontdooien de binnen-
kant grondig droog maken en de schra-
per bewaren voor toekomstig gebruik.
5. Schakel het apparaat in.
6. Zet het eerder verwijderde voedsel na twee tot drie uur terug in het vriesvak.
Gebruik nooit scherpe metalen om de rijp van de verdamper te krabben, deze zou bescha-
digd kunnen raken.
Gebruik geen mechanische of kunstmatige middelen om het ontdooiproces te versnellen,
behalve die middelen die door de fabrikant zijn aanbevolen.
Een temperatuurstijging tijdens het ontdooien van de ingevroren levensmiddelen, kan de
veilige bewaartijd verkorten.
Periodes dat het apparaat niet gebruikt wordt
Als het apparaat gedurende lange tijd niet gebruikt wordt, neem dan de volgende voor-
zorgsmaatregelen:
•
trek de stekker uit het stopcontact
• verwijder al het voedsel,
•
ontdooi de koelkast
5)
, en maak het apparaat en alle accessoires schoon,
5) Indien nodig,
Onderhoud en reiniging
13

Downloaded from www.vandenborre.be
• laat de deur/deuren op een kier staan om de vorming van onaangename luchtjes te
voorkomen.
Als uw apparaat aan blijft staan, vraag dan iemand om het zo nu en dan te controleren,
om te voorkomen dat het bewaarde voedsel bederft, als de stroom uitvalt.
PROBLEMEN OPLOSSEN
WAARSCHUWING!
Voordat u storingen opspoort, de stekker uit het stopcontact trekken.
Het opsporen van storingen die niet in deze handleiding vermeld zijn, dient te worden
verricht door een gekwalificeerd technicus of deskundig persoon.
Er zijn tijdens de normale werking geluiden te horen (compressor, koelcircuit).
Probleem Mogelijke oorzaak Oplossing
Het apparaat werkt niet.
Het controlelampje knip-
pert niet.
Het apparaat is uitgeschakeld. Schakel het apparaat in.
De stekker zit niet goed in het
stopcontact.
Steek de stekker goed in het stop-
contact.
Het apparaat krijgt geen
stroom. Er staat geen spanning
op het stopcontact.
Sluit een ander elektrisch appa-
raat aan op het stopcontact.
Neem contact op met een gekwa-
lificeerde elektricien.
Het controlelampje gaat
branden.
Het apparaat werkt niet goed. Neem contact op met een gekwa-
lificeerde elektricien.
Het alarmlampje knippert.
De temperatuur in het vriesvak
is te hoog.
Raadpleeg "Alarm hoge tempera-
tuur"
De compressor werkt con-
tinu.
De temperatuur is niet goed in-
gesteld.
Stel een hogere temperatuur in.
De deur is niet goed gesloten. Raadpleeg "De deur sluiten".
De deur is te vaak open gedaan. Laat de deur niet langer open
staan dan noodzakelijk.
De temperatuur van het pro-
duct is te hoog.
Laat het product afkoelen tot ka-
mertemperatuur voordat u het
conserveert.
De kamertemperatuur is te
hoog.
Verlaag de kamertemperatuur.
De functie FROSTMATIC is inge-
schakeld.
Raadpleeg " FROSTMATIC func-
tie".
De temperatuur in de vrie-
zer is te laag.
De temperatuur is niet goed in-
gesteld.
Stel een hogere temperatuur in.
14
Problemen oplossen

Downloaded from www.vandenborre.be
Probleem Mogelijke oorzaak Oplossing
De functie FROSTMATIC is inge-
schakeld.
Raadpleeg " FROSTMATIC func-
tie".
De temperatuur in het
vriesvak is te hoog.
De temperatuur is niet goed in-
gesteld.
Stel een lagere temperatuur in.
De deur is niet goed gesloten. Raadpleeg "De deur sluiten".
De temperatuur van het pro-
duct is te hoog.
Laat het product afkoelen tot ka-
mertemperatuur voordat u het
conserveert.
Er zijn veel producten tegelijk
geconserveerd.
Conserveer minder producten te-
gelijk.
Producten liggen te dicht op elk-
aar.
Berg de producten zodanig op
dat er koude lucht kan circuleren.
Er is te veel rijp.
Het voedsel is niet goed verpakt. Verpak het voedsel op de juiste
manier.
De deur is niet goed gesloten. Raadpleeg "De deur sluiten".
De temperatuur is niet goed in-
gesteld.
Stel een hogere temperatuur in.
De deur sluiten
1. Maak de afdichtingen van de deur schoon.
2. Stel de deur, indien nodig, af. Raadpleeg "Montage".
3. Vervang, indien nodig, de defecte deurafdichtingen. Neem contact met de service-
afdeling.
TECHNISCHE GEGEVENS
Afmetingen van de uitsparing
Hoogte 1600 mm
Breedte 600 mm
Diepte 630 mm
Tijdsduur 35 h
De technische gegevens staan op het typeplaatje aan de linker binnenkant in het appa-
raat en op het energielabel.
Technische gegevens
15

Downloaded from www.vandenborre.be
MONTAGE
WAARSCHUWING!
Lees voor uw eigen veiligheid en correcte werking van het apparaat eerst de "veiligheids-
informatie" aandachtig door, alvorens het apparaat te installeren.
Location
Het apparaat moet ver van hittebronnen, zoals radiatoren, boilers, direct zonlicht enz.,
vandaan worden geïnstalleerd. Zorg er voor dat lucht vrij kan circuleren aan de achter-
kant van het keukenkastje. Als het apparaat onder een muur met een afdakje wordt ge-
plaatst, moet de minimale afstand tussen de bovenkant van het keukenkastje en de muur
ten minste 100 mm bedragen om de beste prestatie te garanderen. Voor de beste presta-
tie dient u het apparaat echter niet onder een afdakje te zetten. De afstelbare voetjes
aan de onderkant van het apparaat garanderen een nauwkeurig horizontale uitlijning.
Als het keukenkastje in een hoek is geplaatst en de zijkant bevat scharnieren die naar de
muur wijzen, moet de afstand tussen de muur en het keukenkastje ten minste 10 mm
zijn om de deur ver genoeg open te krijgen zodat de planken verwijderd kunnen worden.
WAARSCHUWING!
Het moet mogelijk zijn het apparaat van de hoofdstroomtoevoer af te halen; de stekker
moet daarom na installatie gemakkelijk toegankelijk zijn.
Opstelling
WAARSCHUWING!
Als u een oud apparaat weggooit dat voorzien is van een deurslot of vergrendeling, zorg
er dan voor dat dit onbruikbaar gemaakt wordt, zodat kinderen er niet in opgesloten kun-
nen raken.
De stekker van het apparaat moet na installatie toegankelijk zijn.
Installeer dit apparaat op een plaats waar de omgevingstemperatuur overeenkomt met
de klimaatklasse die vermeld is op het typeplaatje van het apparaat:
10mm
10mm 100mm
16
Montage

Downloaded from www.vandenborre.be
Klimaatklasse Omgevingstemperatuur
SN +10°C tot + 32°C
N +16°C tot + 32°C
ST +16°C tot + 38°C
T +16°C tot + 43°C
Elektrische aansluiting
Zorg er vóór het aansluiten voor dat het voltage en de frequentie op het typeplaatje over-
eenkomen met de stroomtoevoer in uw huis.
Het apparaat moet geaard zijn. De netsnoerstekker is voorzien van een contact voor dit
doel. Als het stopcontact niet geaard is, sluit het apparaat dan aan op een afzonderlijk
aardepunt, in overeenstemming met de geldende regels, raadpleeg hiervoor een gekwali-
ficeerd elektricien.
De fabrikant neemt geen verantwoordelijkheid op zich als de bovenstaande veiligheids-
maatregelen niet worden nageleefd.
Dit apparaat voldoet aan de EU. richtlijnen.
Afstandsstukken achterkant
In het apparaat vindt u twee afstandsstukken
die geplaatst moeten worden zoals aangege-
ven op de afbeelding.
Draai de schroeven los en plaats het afstands-
stuk onder de kop van de schroef, draai daarna
de schroeven weer vast
Omkeerbaarheid van de deur
WAARSCHUWING!
Voordat werkzaamheden worden uitgevoerd, moet u zich ervan verzekeren dat de stek-
ker uit het stopcontact is getrokken.
Om de draairichting van de deur te veranderen, gaat u als volgt te werk:
Montage
17

Downloaded from www.vandenborre.be
1. Verwijder het klik-in ventilatierooster
(D). Verwijder het onderste scharnier
(E) door de drie bevestigingsschroeven
los te draaien, laat de pakking van het
scharnier (X) zitten.
2. Schuif de deur van de pen (G). Schroef
de pen (G) los en monteer deze op de
andere kant.
3. Draai de scharnierpen (Z) van het schar-
nier (E) en de achterste schroef (Y) los
met een sleutel van 10 mm en verwij-
der het sluitmechanisme (M). Haal, uit
het zakje met de accessoires, het onder-
ste sluitmechanisme en monteer dit op
de andere kant van hetzelfde scharnier
door de achterste schroef weer vast te
draaien.
4. Schroef het bovenste sluitmechanisme
(N) los van de onderkant van de deur.
Haal, uit het zakje met de accessoires, het bovenste sluitmechanisme en monteer dit
op de andere kant van de deur door de schroef weer vast te draaien.
5. Monteer de deur.
6. Installeer het onderste scharnier (E) op de andere kant, met behulp van de drie eer-
der verwijderde schroeven en plaats de pakking van het scharnier (X).
7. Verwijder de afdekking (F) van het ventilatierooster (D) door het in de richting van
de pijl te drukken en monteer het op de andere kant.
8. Installeer het ventilatierooster (D), door het op zijn plaats vast te klikken.
N
F
F
X
E
D
Y
M
Z
G
18
Montage

Downloaded from www.vandenborre.be
9. Schroef het handvat los. Verwijder de
dop met een drevel. Installeer het hand-
vat op de dop op de andere kant. Haal
de twee doppen uit het zakje met de ac-
cessoires en maak de na de verwijde-
ring van het handvat overgebleven ga-
ten hiermee dicht.
10. Verzeker u ervan dat de voorste plaat
van de deur evenwijdig is aan de voor-
ste plaat van de bovenkant.
11. Zet het apparaat op zijn plaats, zet het
waterpas, wacht minstens vier uur en steek dan de stekker in het stopcontact.
Voer een eindcontrole uit en verzeker u ervan dat:
• Alle schroeven zijn aangedraaid.
• De magnetische afdichtstrip vast zit aan de kast.
• De deur goed open en dicht gaat.
Als de omgevingstemperatuur laag is (bijv. in de winter), kan het zijn dat de pakking niet
precies op de kast past. Wacht in dat geval tot de pakking zich op een natuurlijke wijze zet.
HET MILIEU
Het symbool op het product of op de verpakking wijst erop dat dit product niet als
huishoudafval mag worden behandeld, maar moet worden afgegeven bij een
verzamelpunt waar elektrische en elektronische apparatuur wordt gerecycled. Als u
ervoor zorgt dat dit product op de juiste manier wordt verwijderd, voorkomt u mogelijke
negatieve gevolgen voor mens en milieu die zich zouden kunnen voordoen in geval van
verkeerde afvalverwerking. Voor gedetailleerdere informatie over het recyclen van dit
product, kunt u contact opnemen met de gemeente, de gemeentereiniging of de winkel
waar u het product hebt gekocht.
180°
Het milieu
19

Downloaded from www.vandenborre.be
FOR PERFECT RESULTS
Thank you for choosing this AEG product. We have
created it to give you impeccable performance for many
years, with innovative technologies that help make life
simpler – features you might not find on ordinary
appliances. Please spend a few minutes reading to get
the very best from it.
ACCESSORIES AND CONSUMABLES
In the AEG webshop, you’ll find everything you need to
keep all your AEG appliances looking spotless and
working perfectly. Along with a wide range of
accessories designed and built to the high quality
standards you would expect, from specialist cookware
to cutlery baskets, from bottle holders to delicate
laundry bags…
Visit the webshop at:
www.aeg-electrolux.com/shop
20

Downloaded from www.vandenborre.be
CONTENTS
22 Safety information
24 Control panel
27 First use
27 Daily use
29 Helpful Hints and Tips
29 Care and cleaning
31 What to do if…
33 Technical data
33 Installation
36 Environmental concerns
The following symbols are used in this
user manual:
Important information concerning
your personal safety and information
on how to avoid damaging the
appliance.
General information and tips
Environmental information
Subject to change without notice
Contents
21

Downloaded from www.vandenborre.be
SAFETY INFORMATION
In the interest of your safety and to ensure the correct use, before installing and first
using the appliance, read this user manual carefully, including its hints and warnings. To
avoid unnecessary mistakes and accidents, it is important to ensure that all people using
the appliance are thoroughly familiar with its operation and safety features. Save these
instructions and make sure that they remain with the appliance if it is moved or sold, so
that everyone using it through its life will be properly informed on appliance use and safety.
For the safety of life and property keep the precautions of these user's instructions as the
manufacturer is not responsible for damages caused by omission.
Children and vulnerable people safety
• This appliance is not intended for use by persons (including children) with reduced
physical, sensory or mental capabilities, or lack of experience and knowledge, unless
they have been given supervision or instruction concerning use of the appliance by a
person responsible for their safety.
Children should be supervised to ensure that they do not play with the appliance.
• Keep all packaging well away from children. There is risk of suffocation.
• If you are discarding the appliance pull the plug out of the socket, cut the connection
cable (as close to the appliance as you can) and remove the door to prevent playing
children to suffer electric shock or to close themselves into it.
• If this appliance featuring magnetic door seals is to replace an older appliance having
a spring lock (latch) on the door or lid, be sure to make that spring lock unusable be-
fore you discard the old appliance. This will prevent it from becoming a death trap for
a child.
General safety
CAUTION!
Keep ventilation openings clear of obstruction.
• The appliance is intended for keeping foodstuff and/or beverages in a normal house-
hold as explained in this instruction booklet.
• Do not use a mechanical device or any artificial means to speed up the thawing process.
• Do not use other electrical appliances (such as ice cream makers) inside of refrigerat-
ing appliances, unless they are approved for this purpose by the manufacturer.
• Do not damage the refrigerant circuit.
• The refrigerant isobutane (R600a) is contained within the refrigerant circuit of the ap-
pliance, a natural gas with a high level of environmental compatibility, which is never-
theless flammable.
During transportation and installation of the appliance, be certain that none of the
components of the refrigerant circuit become damaged.
If the refrigerant circuit should become damaged:
– avoid open flames and sources of ignition
– thoroughly ventilate the room in which the appliance is situated
22
Safety information

Downloaded from www.vandenborre.be
• It is dangerous to alter the specifications or modify this product in any way. Any dam-
age to the cord may cause a short-circuit, fire and/or electric shock.
WARNING!
Any electrical component (power cord, plug, compressor) must be replaced by a certified
service agent or qualified service personnel.
1. Power cord must not be lengthened.
2. Make sure that the power plug is not squashed or damaged by the back of the
appliance. A squashed or damaged power plug may overheat and cause a fire.
3. Make sure that you can come to the mains plug of the appliance.
4. Do not pull the mains cable.
5. If the power plug socket is loose, do not insert the power plug. There is a risk of
electric shock or fire.
6.
You must not operate the appliance without the lamp cover
6)
of interior lighting.
• This appliance is heavy. Care should be taken when moving it.
• Do not remove nor touch items from the freezer compartment if your hands are damp/
wet, as this could cause skin abrasions or frost/freezer burns.
• Avoid prolonged exposure of the appliance to direct sunlight.
•
Bulb lamps
7)
used in this appliance are special purpose lamps selected for household
appliances use only. They are not suitable for household room illumination.
Daily Use
• Do not put hot pot on the plastic parts in the appliance.
• Do not store flammable gas and liquid in the appliance, because they may explode.
•
Do not place food products directly against the air outlet on the rear wall.
8)
• Frozen food must not be re-frozen once it has been thawed out.
• Store pre-packed frozen food in accordance with the frozen food manufacturer's in-
structions.
• Appliance's manufacturers storage recommendations should be strictly adhered to. Re-
fer to relevant instructions.
• Do not place carbonated or fizzy drinks in the freezer compartment as it creates pres-
sure on the container, which may cause it to explode, resulting in damage to the appli-
ance.
• Ice lollies can cause frost burns if consumed straight from the appliance.
Care and cleaning
• Before maintenance, switch off the appliance and disconnect the mains plug from the
mains socket.
• Do not clean the appliance with metal objects.
• Do not use sharp objects to remove frost from the appliance. Use a plastic scraper.
6) If the lamp cover is foreseen.
7) If the lamp is foreseen.
8) If the appliance is Frost Free.
Safety information
23

Downloaded from www.vandenborre.be
Installation
For electrical connection carefully follow the instructions given in specific paragraphs.
• Unpack the appliance and check if there are damages on it. Do not connect the appli-
ance if it is damaged. Report possible damages immediately to the place you bought
it. In that case retain packing.
• It is advisable to wait at least four hours before connecting the appliance to allow the
oil to flow back in the compressor.
• Adequate air circulation should be around the appliance, lacking this leads to overheat-
ing. To achieve sufficient ventilation follow the instructions relevant to installation.
• Wherever possible the back of the product should be against a wall to avoid touching
or catching warm parts (compressor, condenser) to prevent possible burn.
• The appliance must not be located close to radiators or cookers.
• Make sure that the mains plug is accessible after the installation of the appliance.
•
Connect to potable water supply only.
9)
Service
• Any electrical work required to do the servicing of the appliance should be carried out
by a qualified electrician or competent person.
• This product must be serviced by an authorized Service Centre, and only genuine spare
parts must be used.
Environment Protection
This appliance does not contain gasses which could damage the ozone layer, in either its
refrigerant circuit or insulation materials. The appliance shall not be discarded together
with the urban refuse and rubbish. The insulation foam contains flammable gases: the
appliance shall be disposed according to the applicable regulations to obtain from your
local authorities. Avoid damaging the cooling unit, especially at the rear near the heat
exchanger. The materials used on this appliance marked by the symbol
are recyclable.
CONTROL PANEL
1 2 3 4 5 6
1 ON/OFF button
2 Mode button
3 OK button
4 Temperature colder button
5 Temperature warmer button
9) If a water connection is foreseen.
24
Control panel

Downloaded from www.vandenborre.be
6 Display
It is possible to change predefined sound of buttons to a loudly one by pressing together
Mode button and Temperature colder button for some seconds. Change is reversible.
Display
3 4 5 621
1 Timer function
2 FROSTMATIC function
3 Minute Minder function
4 Child Lock function
5 Alarm indicator
6 Temperature indicator
Switching on
To switch on the appliance do these steps:
1. Connect the mains plug to the power socket.
2. Press the ON/OFF button if the display is off.
3. The alarm buzzer could operate after few seconds.
To reset the alarm refer to "High temperature alarm".
4. The temperature indicators show the set default temperature.
To select a different set temperature refer to "Temperature regulation".
Switching off
To switch off the appliance do these steps:
1. Press the ON/OFF button for 5 seconds.
2. The display switches off.
3. To disconnect the appliance from the power disconnect the mains plug from the pow-
er socket.
Temperature regulation
The set temperature of the freezer may be adjusted by pressing the temperature button.
Set default temperature:
• -18°C for the freezer
The temperature indicator shows the set temperature.
The set temperature will be reached within 24 hours.
After a power failure the set temperature remains stored.
FROSTMATIC function
To switch on the function:
1. Press the Mode button until the corresponding icon appears.
Control panel
25

Downloaded from www.vandenborre.be
The FROSTMATIC indicator flashes.
The freezer temperature indicator shows
symbol.
2. Press the OK button to confirm.
The FROSTMATIC indicator is shown.
An animation starts.
This function stops automatically after 52 hours.
To switch off the function before its automatic end:
1. Press the Mode button until the FROSTMATIC indicator flashes.
2. Press the OK button to confirm.
3. The FROSTMATIC indicator goes off.
The function switches off by selecting a different freezer set temperature.
Minute Minder function
The Minute Minder function is to be used to set an acoustic alarm at the preferred time,
useful for example when a recipe requires to cool down a mixture for a certain lenght of
time, or when a reminder is needed in order not to forget the bottles pleaced in the freez-
er for fast cooling.
To switch on the function:
1. Press the Mode button until the corresponding icon appears.
The Minute Minder indicator flashes.
The Timer shows the set value (30 minutes) for a few seconds.
2. Press the Timer regulator button to change the Timer set value from 1 to 90 minutes.
3. Press the OK button to confirm.
The Minute Minder indicator is shown.
The Timer start to flash (min).
At the end of the countdown the Minute Minder indicator flashes and an audible alarm
sounds:
1. Remove any drinks contained in the freezer compartment.
2. Switch off the function.
To switch off the function:
1. Press the Mode button until the Minute Minder indicator flashes.
2. Press the OK button to confirm.
3. The Minute Minder indicator goes off.
It is possible to deactivate the function at any time.
It is possible to change the time at any time and before the end by pressing the Tempera-
ture colder button and the Temperature warmer button.
Child Lock function
To lock the buttons from unintentional operation select the Child Lock function.
To switch on the function:
1. Press the Mode button until the corresponding icon appears.
2. The Child Lock indicator flashes.
26
Control panel

Downloaded from www.vandenborre.be
3. Press the OK button to confirm.
The Child Lock indicator is shown.
To switch off the function:
1. Press the Mode button until the Child Lock indicator flashes.
2. Press the OK button to confirm.
3. The Child Lock indicator goes off.
High temperature alarm
An increase in the temperature in the freezer compartment (for example due to an earli-
er power failure) is indicated by:
• flashing the alarm and freezer temperature indicators
• sounding of buzzer.
To reset the alarm:
1. Press any button.
2. The buzzer switches off.
3. The freezer temperature indicator shows the highest temperature reached for a few
seconds. Then show again the set temperature.
4. The alarm indicator continue to flash until the normal conditions are restored.
When the alarm has returned the alarm indicator goes off.
Door open alarm
An acoustic alarm will sound when the door is left open for around 80 seconds.
When normal conditions are restored (door closed), the acoustic alarm will stop.
FIRST USE
Cleaning the interior
Before using the appliance for the first time, wash the interior and all internal accesso-
ries with lukewarm water and some neutral soap so as to remove the typical smell of a
brand-new product, then dry thoroughly.
Do not use detergents or abrasive powders, as these will damage the finish.
DAILY USE
Freezing fresh food
The freezer compartment is suitable for freezing fresh food and storing frozen and deep-
frozen food for a long time.
To freeze fresh food activate the FROSTMATIC function at least 24 hours before placing
the food to be frozen in the freezer compartment.
Place the fresh food to be frozen in the two top compartments.
The maximum amount of food that can be frozen in 24 hours is specified on the rating
plate , a label located on the inside of the appliance.
First use
27

Downloaded from www.vandenborre.be
The freezing process lasts 24 hours: during this period do not add other food to be frozen.
To utilize the maximum quantity indicated on the rating plate, remove all the drawers
from the freezer compartment.
To guarantee the best functionality and perform-
ance of the appliance, the food must be not
placed in contact with the back wall of the freez-
er in the area as shown in the figure.
Storage of frozen food
When first starting-up or after a period out of use, before putting the products in the
compartment let the appliance run at least 2 hours on the higher settings.
In the event of accidental defrosting, for example due to a power failure, if the power
has been off for longer than the value shown in the technical characteristics chart under
"rising time", the defrosted food must be consumed quickly or cooked immediately and
then re-frozen (after cooling).
Frozen Food Calendar
The symbols show different types of frozen goods.
The numbers indicate storage times in months for the appropriate types of frozen goods.
Whether the upper or lower value of the indicated storage time is valid depends on the
quality of the foods and treating before freezing.
Thawing
Deep-frozen or frozen food, prior to being used, can be thawed in the refrigerator com-
partment or at room temperature, depending on the time available for this operation.
Small pieces may even be cooked still frozen, directly from the freezer: in this case, cook-
ing will take longer.
Cold accumulators
One or more cold accumulators are supplied in the freezer; these increase the length of
time for which food will keep in the event of a power failure or breakdown.
28
Daily use

Downloaded from www.vandenborre.be
HELPFUL HINTS AND TIPS
Hints for freezing
To help you make the most of the freezing process, here are some important hints:
• the maximum quantity of food which can be frozen in 24 hrs. is shown on the rating
plate;
• the freezing process takes 24 hours. No further food to be frozen should be added dur-
ing this period;
• only freeze top quality, fresh and thoroughly cleaned, foodstuffs;
• prepare food in small portions to enable it to be rapidly and completely frozen and to
make it possible subsequently to thaw only the quantity required;
• wrap up the food in aluminium foil or polythene and make sure that the packages are
airtight;
• do not allow fresh, unfrozen food to touch food which is already frozen, thus avoiding
a rise in temperature of the latter;
• lean foods store better and longer than fatty ones; salt reduces the storage life of food;
• water ices, if consumed immediately after removal from the freezer compartment, can
possibly cause the skin to be freeze burnt;
• it is advisable to show the freezing in date on each individual pack to enable you to
keep tab of the storage time.
Hints for storage of frozen food
To obtain the best performance from this appliance, you should:
• make sure that the commercially frozen foodstuffs were adequately stored by the re-
tailer;
• be sure that frozen foodstuffs are transferred from the foodstore to the freezer in the
shortest possible time;
• not open the door frequently or leave it open longer than absolutely necessary.
• Once defrosted, food deteriorates rapidly and cannot be refrozen.
• Do not exceed the storage period indicated by the food manufacturer.
CARE AND CLEANING
CAUTION!
Unplug the appliance before carrying out any maintenance operation.
This appliance contains hydrocarbons in its cooling unit; maintenance and recharging
must therefore only be carried out by authorized technicians.
Periodic cleaning
The equipment has to be cleaned regularly:
• clean the inside and accessories with lukewarm water and some neutral soap.
Helpful Hints and Tips
29

Downloaded from www.vandenborre.be
• regularly check the door seals and wipe clean to ensure they are clean and free from
debris.
• rinse and dry thoroughly.
Do not pull, move or damage any pipes and/or cables inside the cabinet.
Never use detergents, abrasive powders, highly perfumed cleaning products or wax pol-
ishes to clean the interior as this will damage the surface and leave a strong odour.
Clean the condenser (black grill) and the compressor at the back of the appliance with a
brush or a vacuum cleaner. This operation will improve the performance of the appliance
and save electricity consumption.
Take care of not to damage the cooling system.
Many proprietary kitchen surface cleaners contain chemicals that can attack/damage the
plastics used in this appliance. For this reason it is recommended that the outer casing of
this appliance is only cleaned with warm water with a little washing-up liquid added.
After cleaning, reconnect the equipment to the mains supply.
Defrosting the freezer
A certain amount of frost will always form on the freezer shelves and around the top
compartment.
Defrost the freezer when the frost layer reaches a thickness of about 3-5 mm.
About 12 hours prior to defrosting, set the Temperature regulator toward higher set-
tings , in order to build up sufficient chill reserve for the interruption in operation.
To remove the frost, follow the instructions below:
1. Switch off the appliance.
2. Remove any stored food, wrap it in several layers of newspaper and put it in a cool
place.
CAUTION!
Do not touch frozen goods with wet hands. Hands can freeze to the goods.
3. Leave the door open and insert the plas-
tic scraper in the appropriate seating at
the bottom centre, placing a basin under-
neath to collect the defrost water
In order to speed up the defrosting process,
place a pot of warm water in the freezer com-
partment. In addition, remove pieces of ice
that break away before defrosting is complete.
4. When defrosting is completed, dry the in-
terior thoroughly and keep the scraper
for future use.
5. Switch on the appliance.
6. After two or three hours, reload the previously removed food into the compartment.
30
Care and cleaning

Downloaded from www.vandenborre.be
Never use sharp metal tools to scrape off frost from the evaporator as you could damage
it.
Do not use a mechanical device or any artificial means to speed up the thawing process
other than those recommended by the manufacturer.
A temperature rise of the frozen food packs, during defrosting, may shorten their safe
storage life.
Periods of non-operation
When the appliance is not in use for long periods, take the following precautions:
•
disconnect the appliance from electricity supply
• remove all food
•
defrost
10)
and clean the appliance and all accessories
• leave the door/doors ajar to prevent unpleasant smells.
If the cabinet will be kept on, ask somebody to check it once in a while to prevent the
food inside from spoiling in case of a power failure.
WHAT TO DO IF…
WARNING!
Before troubleshooting, disconnect the mains plug from the mains socket.
Only a qualified electrician or competent person must do the troubleshooting that is not
in this manual.
There are some sounds during normal use (compressor, refrigerant circulation).
Problem Possible cause Solution
The appliance does not op-
erate. The Pilot light does
not flash.
The appliance is switched off. Switch on the appliance.
The mains plug is not connec-
ted to the mains socket correct-
ly.
Connect the mains plug to the
mains socket correctly.
The appliance has no power.
There is no voltage in the mains
socket.
Connect a different electrical ap-
pliance to the mains socket.
Contact a qualified electrician.
The Pilot light flashes.
The appliance is not working
properly.
Contact a qualified electrician.
The Alarm light flashes.
The temperature in the freezer
is too high.
Refer to "High temperature
alarm"
The compressor operates
continually.
The temperature is not set cor-
rectly.
Set a higher temperature.
The door is not closed correctly. Refer to "Closing the door".
10) If foreseen.
What to do if…
31

Downloaded from www.vandenborre.be
Problem Possible cause Solution
The door has been opened too
frequently.
Do not keep the door open lon-
ger than necessary.
The product temperature is too
high.
Let the product temperature de-
crease to room temperature be-
fore storage.
The room temperature is too
high.
Decrease the room temperature.
The FROSTMATIC function is
switched on.
Refer to "FROSTMATIC function".
The temperature in the
freezer is too low.
The temperature regulator is
not set correctly.
Set a higher temperature.
The FROSTMATIC function is
switched on.
Refer to "FROSTMATIC function".
The temperature in the
freezer is too high.
The temperature regulator is
not set correctly.
Set a lower temperature.
The door is not closed correctly. Refer to "Closing the door".
The product temperature is too
high.
Let the product temperature de-
crease to room temperature be-
fore storage.
Many products are stored at
the same time.
Store less products at the same
time.
Products are too near to each
other.
Store products so that there is
cold air circulation.
There is too much frost.
Food is not wrapped correctly. Wrap the food correctly.
The door is not closed correctly. Refer to "Closing the door".
The temperature regulator is
not set correctly.
Set a higher temperature.
Closing the door
1. Clean the door gaskets.
2. If necessary, adjust the door. Refer to "Installation".
3. If necessary, replace the defective door gaskets. Contact the Service Center.
32
What to do if…

Downloaded from www.vandenborre.be
TECHNICAL DATA
Dimension of the recess
Height 1600 mm
Width 600 mm
Depth 630 mm
Rising Time 35 h
The technical information are situated in the rating plate on the internal left side of the
appliance and in the energy label.
INSTALLATION
WARNING!
Read the "Safety Information" carefully for your safety and correct operation of the ap-
pliance before installing the appliance.
Location
The appliance should be installed well away from sources of heat such as radiators, boil-
ers, direct sunlight etc. Ensure that air can circulate freely around the back of the cabi-
net. To ensure best performance, if the appliance is positioned below an overhanging
wall unit, the minimum distance between the top of the cabinet and the wall unit must
be at least 100 mm . Ideally, however, the appliance should not be positioned below over-
hanging wall units. Accurate levelling is ensured by one or more adjustable feet at the
base of the cabinet.
If the cabinet is placed in a corner and the side with the hinges facing the wall, the dis-
tance between the wall and the cabinet must be at least 10 mm to allow the door to
open enough so that the shelves can be removed.
WARNING!
It must be possible to disconnect the appliance from the mains power supply; the plug
must therefore be easily accessible after installation.
Technical data
33

Downloaded from www.vandenborre.be
Positioning
WARNING!
If you are discarding an old appliance that has a lock or catch on the door, you must
ensure that it is made unusable to prevent young children being trapped inside.
The appliance shall have the plug accessible after installation.
Install this appliance at a location where the ambient temperature corresponds to the
climate class indicated on the rating plate of the appliance:
Climate class Ambient temperature
SN +10°C to + 32°C
N +16°C to + 32°C
ST +16°C to + 38°C
T +16°C to + 43°C
Electrical connection
Before plugging in, ensure that the voltage and frequency shown on the rating plate cor-
respond to your domestic power supply.
The appliance must be earthed. The power supply cable plug is provided with a contact
for this purpose. If the domestic power supply socket is not earthed, connect the appli-
ance to a separate earth in compliance with current regulations, consulting a qualified
electrician.
The manufacturer declines all responsibility if the above safety precautions are not ob-
served.
This appliance complies with the E.E.C. Directives.
10mm
10mm 100mm
34
Installation

Downloaded from www.vandenborre.be
Rear spacers
Inside the appliance you find two spacers
which must be fitted as shown in the figure.
Slacken the screws and insert the spacer under
the screw head, then retighten the screws.
Door reversibility
WARNING!
Before carrying out any operations, remove the plug from the power socket.
To change the opening direction of the door, do these steps:
1. Remove the clip-in ventilation grille
(D). Remove the bottom hinge (E) by un-
screwing the three fixing screws and
keep the hinge gasket (X).
N
F
F
X
E
D
Y
M
Z
Installation
35

Downloaded from www.vandenborre.be
2. Slide the door off the pin (G). Unscrew
the pin (G) and install it on the oppo-
site side.
3. Unscrew the pivot pin (Z) of the hinge
(E) and the rear screw (Y) with a span-
ner of 10 mm and remove the closing
device (M). Take from the accessory
bag the lower closing device left and in-
stall it on the opposite side of the same
hinge by screwing again the rear screw.
4. Unscrew the upper closing device (N)
from the bottom of the door. Take
from the accessory bag the upper clos-
ing device left and install it on the op-
posite side of the bottom of the door by screwing again the screw.
5. Install the door.
6. Install the bottom hinge (E) on the opposite side, using the three screws previously
removed inserting the hinge gasket (X).
7. Remove the blanking cover (F) from the ventilation grille (D) by pushing it in the
direction of the arrow and install it on the opposite side.
8. Install the ventilation grille (D), clipping it into place.
9. Unscrew the handle. Remove the plug
with a punch. Install the handle and
the plug on opposite side. Take from
the accessory bag the two plugs and
cover the holes left open after having
removed the handle.
10. Make sure that the front board of the
door is parallel to the front board of
the top.
11. Reposition, level the appliance, wait for
at least four hours and then connect it
to the power socket.
Do a final check to make sure that:
• All screws are tightened.
• The magnetic seal adheres to the cabinet.
• The door opens and closes correctly.
If the ambient temperature is cold (i.e. in Winter), the gasket may not fit perfectly to the
cabinet. In that case, wait for the natural fitting of the gasket.
ENVIRONMENTAL CONCERNS
The symbol on the product or on its packaging indicates that this product may not
be treated as household waste. Instead it should be taken to the appropriate collection
G
180°
36
Environmental concerns

Downloaded from www.vandenborre.be
point for the recycling of electrical and electronic equipment. By ensuring this product is
disposed of correctly, you will help prevent potential negative consequences for the
environment and human health, which could otherwise be caused by inappropriate
waste handling of this product. For more detailed information about recycling of this
product, please contact your local council, your household waste disposal service or the
shop where you purchased the product.
Environmental concerns
37

Downloaded from www.vandenborre.be
POUR DES RÉSULTATS PARFAITS
Merci d'avoir choisi ce produit AEG. Nous l'avons créé
pour vous offrir la meilleure performance pour une
longue durée, avec des technologies innovantes qui
vous simplifient la vie - autant de caractéristiques que
vous ne trouverez pas sûrement pas sur d'autres
appareils. Veuillez prendre quelques instants pour lire
cette notice afin d'utiliser au mieux votre appareil.
ACCESSOIRES ET CONSOMMABLES
Dans la boutique en ligne d'AEG, vous trouverez tout ce
qu'il vous faut pour que vos appareils AEG fonctionnent
parfaitement. Sans oublier une vaste gamme
d'accessoires conçus et fabriqués selon les critères de
qualité les plus élevés qui soient, des articles de cuisine
spécialisés aux range-couverts, des porte-bouteilles aux
sacs à linge délicats...
Visitez la boutique en ligne sur
www.aeg-electrolux.com/shop
38

Downloaded from www.vandenborre.be
SOMMAIRE
40 Consignes de sécurité
43 Bandeau de commande
46 Première utilisation
46 Utilisation quotidienne
48 Conseils
48 Entretien et nettoyage
50 En cas d'anomalie de
fonctionnement
52 Caractéristiques techniques
52 Installation
56 En matière de sauvegarde de
l'environnement
Les symboles suivants sont utilisés
dans ce manuel:
Informations importantes pour votre
sécurité et pour éviter d’abîmer
l’appareil.
Informations générales et conseils
Informations écologiques
Sous réserve de modifications
Sommaire
39

Downloaded from www.vandenborre.be
CONSIGNES DE SÉCURITÉ
Pour votre sécurité et garantir une utilisation correcte de l'appareil, lisez attentivement
cette notice, y compris les conseils et avertissements, avant d'installer et d'utiliser l'appa-
reil pour la première fois. Pour éviter toute erreur ou accident, veillez à ce que toute per-
sonne qui utilise l'appareil connaisse bien son fonctionnement et ses fonctions de sécu-
rité. Conservez cette notice avec l'appareil. Si l'appareil doit être vendu ou cédé à une
autre personne, veillez à remettre cette notice au nouveau propriétaire, afin qu'il puisse
se familiariser avec son fonctionnement et sa sécurité.
Pour la sécurité des personnes et des biens, conservez et respectez les consignes de sécu-
rité figurant dans cette notice. Le fabricant décline toute responsabilité en cas de dom-
mages dus au non-respect de ces instructions.
Sécurité des enfants et des personnes vulnérables
• Cet appareil n'est pas destiné à être utilisé par des enfants ou des personnes dont les
capacités physiques, sensorielles ou mentales, ou le manque d'expérience et de con-
naissance les empêchent d'utiliser l'appareil sans risque lorsqu'ils sont sans surveillan-
ce ou en l'absence d'instruction d'une personne responsable qui puisse leur assurer
une utilisation de l'appareil sans danger.
Empêchez les enfants de jouer avec l'appareil.
• Ne laissez pas les différents emballages à portée des enfants. Ils pourraient s'asphyxier.
• Si l'appareil doit être mis au rebut, veillez à couper le câble d'alimentation électrique
au ras de l'appareil pour éviter les risques d'électrocution. Démontez la porte pour évi-
ter que des enfants ne restent enfermés à l'intérieur.
• Cet appareil est muni de fermetures magnétiques. S'il remplace un appareil équipé
d'une fermeture à ressort, nous vous conseillons de rendre celle-ci inutilisable avant
de vous en débarrasser. Ceci afin d'éviter aux enfants de s'enfermer dans l'appareil et
de mettre ainsi leur vie en danger.
Mesures générales de sécurité
ATTENTION
Veillez à ce que les orifices de ventilation ne soient pas obstrués.
• Cet appareil est destiné uniquement à la conservation d’aliments et/ou de boissons
dans le cadre d’un usage domestique normal, tel que celui décrit dans la présente notice.
• N'utilisez pas d'appareils électriques, d'agents chimiques ou tout autre système artifi-
ciel pour accélérer le processus de dégivrage.
• N’utilisez pas d'autres appareils électriques (par exemple, sorbetières) à l'intérieur d’ap-
pareils réfrigérants sauf s’ils sont homologués pour cet usage par leur fabricant.
• Faites très attention lorsque vous déplacez l'appareil afin de ne pas endommager des
parties du circuit de refroidissement et ainsi d'éviter des risques de fuite.
• Le circuit de refroidissement de l’appareil contient de l’isobutane (R600a), un gaz natu-
rel offrant un haut niveau de compatibilité avec l’environnement mais qui est néan-
moins inflammable.
40
Consignes de sécurité

Downloaded from www.vandenborre.be
Pendant le transport et l'installation de l’appareil, assurez-vous qu'aucune pièce du cir-
cuit de refroidissement n'est endommagée.
Si tel est le cas :
– Évitez les flammes vives (briquet) et tout autre allumage (étincelles).
– Aérez soigneusement la pièce où se trouve l'appareil.
• Ne modifiez pas les spécifications de l'appareil. Un cordon d'alimentation endommagé
peut être la cause de courts-circuits, d'incendies et/ou de décharges électriques.
AVERTISSEMENT
Les composants électriques (cordon d'alimentation, prise, compresseur) doivent être rem-
placés par un technicien d’entretien agréé ou par un électricien spécialisé.
1. L'appareil ne doit pas être raccordé à l'aide d'un prolongateur, d'une prise multiple
ou d'un raccordement multiple (risque d'incendie).
2. Assurez-vous que la prise n'est pas écrasée ou endommagée par l'arrière de l'appa-
reil. Une prise de courant endommagée peut surchauffer et provoquer un incendie.
3. Vérifiez que la prise murale reste accessible une fois que l'installation est terminée.
4. Ne débranchez pas l'appareil en tirant sur le câble, particulièrement lorsque l'appa-
reil est tiré de son logement.
5. Si la fiche du cordon d'alimentation est desserrée, ne la branchez pas dans la prise
murale. Risque d'électrocution ou d'incendie !
6.
N'utilisez pas l'appareil si le diffuseur de l'ampoule d'éclairage n'est pas présent
11)
pour l'éclairage intérieur.
• Cet appareil est lourd. Faites attention en le déplaçant.
• Ne touchez pas avec les mains humides les surfaces givrées et les produits congelés
(risque de brûlure et d'arrachement de la peau).
• Évitez une exposition prolongée de l'appareil aux rayons solaires.
•
Ampoules
12)
utilisées dans cet appareil sont des ampoules spéciales dédiées unique-
ment à un usage avec des appareils ménagers. Elles ne conviennent pas à l'éclairage
des pièces d'une habitation.
Utilisation quotidienne
• Ne posez pas d'éléments chauds sur les parties en plastique de l'appareil.
• Ne stockez pas de gaz ou de liquides inflammables dans l'appareil (risque d'explosion).
• Ne placez pas d'aliments directement contre la sortie d'air sur la paroi arrière de l'ap-
pareil.
13)
• Un produit décongelé ne doit jamais être recongelé.
• Conservez les aliments emballés conformément aux instructions de leur fabricant.
• Respectez scrupuleusement les conseils de conservation donnés par le fabricant de l'ap-
pareil. Consultez les instructions respectives.
11) Si le diffuseur est prévu.
12) Si l'ampoule est prévue.
13) Si l'appareil est sans givre.
Consignes de sécurité
41

Downloaded from www.vandenborre.be
• Ne mettez pas de bouteilles ni de boîtes de boissons gazeuses dans le compartiment
congélateur, car la pression se formant à l'intérieur du contenant pourrait le faire écla-
ter et endommager ainsi l'appareil.
• Ne consommez pas certains produits tels que les bâtonnets glacés dès leur sortie de
l'appareil, car ils peuvent provoquer des brûlures.
Entretien et nettoyage
• Avant tout entretien, mettez l'appareil à l'arrêt et débranchez-le. Si vous n'avez pas
accès à la prise, coupez le courant.
• N'utilisez pas d'objets métalliques pour nettoyer l'appareil.
• N'utilisez pas d'objet tranchant pour gratter la couche de givre. N'employez pour cela
qu'une spatule en plastique.
Installation
Avant de procéder au branchement électrique, respectez scrupuleusement les instruc-
tions fournies dans cette notice.
• Déballez l'appareil et vérifiez qu'il n'est pas endommagé. Ne branchez pas l'appareil s'il
est endommagé. Signalez immédiatement au revendeur de l'appareil les dommages
constatés. Dans ce cas, gardez l'emballage.
• Il est conseillé d'attendre au moins quatre heures avant de brancher l'appareil pour
que le circuit frigorifique soit stabilisé.
• Veillez à ce que l'air circule librement autour de l'appareil pour éviter qu'il ne surchauf-
fe. Pour assurer une ventilation suffisante, respectez les instructions de la notice (cha-
pitre Installation).
• Placez l'appareil dos au mur pour éviter tout contact avec le compresseur et le conden-
seur (risque de brûlure).
• Placez de préférence votre appareil loin d'une source de chaleur (chauffage, cuisson
ou rayons solaires trop intenses).
• Assurez-vous que la prise murale reste accessible après l'installation de l'appareil.
•
Branchez à l'alimentation en eau potable uniquement.
14)
Maintenance
• Les branchements électriques nécessaires à l'entretien de l'appareil doivent être réali-
sés par un électricien qualifié ou une personne compétente.
• Cet appareil ne doit être entretenu et réparé que par un Service après-vente autorisé,
exclusivement avec des pièces d'origine.
14) Si un branchement sur le réseau d'eau est prévu.
42
Consignes de sécurité

Downloaded from www.vandenborre.be
Protection de l'environnement
Le système frigorifique et l'isolation de votre appareil ne contiennent pas de C.F.C. contri-
buant ainsi à préserver l'environnement. L'appareil ne doit pas être mis au rebut avec les
ordures ménagères et les déchets urbains. La mousse d'isolation contient des gaz inflam-
mables : l'appareil sera mis au rebut conformément aux règlements applicables disponi-
bles auprès des autorités locales. Veillez à ne pas détériorer les circuits frigorifiques, no-
tamment au niveau du condenseur. Les matériaux utilisés dans cet appareil identifiés par
le symbole
sont recyclables.
BANDEAU DE COMMANDE
1 2 3 4 5 6
1 Touche ON/OFF
2 Touche Mode
3 Touche OK
4 Touche Température plus froide
5 Touche Température plus chaude
6 Indicateur
Pour augmenter le volume défini lors de l'activation ou désactivation des touches, ap-
puyez simultanément sur les touches Mode et Température plus froide pendant plusieurs
secondes. Ce changement est réversible.
Afficheur
3 4 5 621
1 Fonction minuteur
2 Fonction FROSTMATIC
3 Fonction Minute Minder
4 Fonction Sécurité enfants
5 Voyant alarme
6 Indicateur de température
Mise en fonctionnement
Pour mettre en fonctionnement l'appareil, procédez comme suit :
1. Branchez l'appareil électriquement.
2. Appuyez sur la touche ON/OFF si l'écran est éteint.
Bandeau de commande
43

Downloaded from www.vandenborre.be
3. L'alarme sonore peut se déclencher au bout de quelques secondes.
Pour réinitialiser l'alarme, reportez-vous au paragraphe « Alarme de température ».
4. Les voyants du thermostat indiquent la température programmée par défaut.
Pour sélectionner une température de consigne différente, reportez-vous au paragraphe
« Réglage de la température ».
Mise à l'arrêt
Pour mettre à l'arrêt l'appareil, procédez comme suit :
1. Appuyez sur la touche ON/OFF pendant 5 secondes.
2. L'affichage est désactivé.
3. Pour mettre l'appareil hors tension, débranchez-le électriquement.
Réglage de la température
La température de consigne du congélateur peut être réglée en appuyant sur la touche
de température.
Réglage de la température par défaut :
• -18 °C dans le compartiment congélateur
L'indicateur de température indique la température programmée.
La température programmée sera atteinte en 24 heures.
Après une coupure de courant, la température programmée reste activée.
Fonction FROSTMATIC
Pour activer la fonction :
1. Appuyez sur la touche Mode jusqu'à ce que le voyant correspondant apparaisse.
L'indicateur FROSTMATIC clignote.
Le voyant de température du congélateur affiche le symbole
.
2. Appuyez sur la touche OK pour confirmer.
L'indicateur FROSTMATIC s'affiche.
Une animation est lancée.
Cette fonction se désactive automatiquement au bout de 52 heures.
Pour désactiver la fonction avant sa désactivation automatique :
1. Appuyez sur la touche Mode jusqu'à ce que l'indicateur FROSTMATIC clignote.
2. Appuyez sur la touche OK pour confirmer.
3. L'indicateur FROSTMATIC s'éteint.
La fonction se désactive en sélectionnant une température de consigne différente.
Fonction Minute Minder
La fonction Minute Minder sert à régler une alarme sonore à une heure désirée, ce qui
est utile, par exemple, lorsque l'on souhaite refroidir une préparation pendant un certain
temps dans le cadre d'une recette de cuisine, ou lorsque l'on refroidit des bouteilles rapi-
dement dans le congélateur.
Pour activer la fonction :
44
Bandeau de commande

Downloaded from www.vandenborre.be
1. Appuyez sur le bouton Mode jusqu'à ce que le voyant correspondant apparaisse.
L'indicateur Minute Minder clignote.
La minuterie affiche pendant quelques secondes la valeur de consigne (30 minutes).
2. Appuyez sur le bouton de réglage de la minuterie pour modifier la valeur de consigne
(1 à 90 minutes).
3. Appuyez sur le bouton OK pour confirmer.
L'indicateur Minute Minder s'affiche.
La minuterie se met à clignoter (min).
À la fin du décompte, l'indicateur Minute Minder clignote et un signal sonore retentit :
1. Retirez les boissons placées dans le compartiment de congélation.
2. Désactivez la fonction.
Pour désactiver la fonction :
1. Appuyez sur le bouton Mode jusqu'à ce que l'indicateur Minute Minder clignote.
2. Appuyez sur le bouton OK pour confirmer.
3. L'indicateur Minute Minder s'éteint.
Il est possible de désactiver cette fonction à tout moment.
Il est possible de modifier l'heure à tout moment et avant la fin du décompte en appuy-
ant sur le bouton de réglage plus de froid et sur sur le bouton de réglage moins de froid.
Fonction Sécurité enfants
Pour verrouiller les touches afin de prévenir les erreurs de manipulation, sélectionnez la
fonction Sécurité enfants.
Pour activer la fonction :
1. Appuyez sur la touche Mode jusqu'à ce que le symbole correspondant apparaisse.
2. Le voyant Sécurité enfants clignote.
3. Appuyez sur la touche OK pour confirmation.
Le voyant Sécurité enfants apparaît.
Pour désactiver la fonction :
1. Appuyez sur la touche Mode jusqu'à ce que le voyant Sécurité enfants clignote.
2. Appuyez sur la touche OK pour confirmation.
3. Le voyant Sécurité enfants s'éteint.
Alarme haute température
Une augmentation de la température dans le compartiment congélateur (par exemple à
cause d'une coupure de courant) est indiquée par :
• Le clignotement de l'alarme et des voyants de température du congélateur
• Le déclenchement d'une alarme sonore.
Pour réinitier l'alarme :
1. Appuyez sur une touche quelconque.
2. L’alarme sonore s’éteint.
3. Le voyant de température du congélateur affiche la température maximum régnant
dans le compartiment durant quelques secondes. Puis il affiche à nouveau la tempé-
rature programmée.
Bandeau de commande
45

Downloaded from www.vandenborre.be
4. Le voyant alarme continue de clignoter jusqu'à ce que les conditions normales de
fonctionnement soient rétablies.
Une fois l'alarme rétablie, le voyant alarme s'éteint.
Alarme porte ouverte
Une alarme sonore se déclenche si la porte est restée ouverte pendant 80 secondes environ.
Au rétablissement des conditions normales (porte fermée), l'alarme sonore s'arrête.
PREMIÈRE UTILISATION
Nettoyage intérieur
Avant d'utiliser l'appareil pour la première fois, nettoyez l'intérieur et tous les accessoires
internes avec de l'eau tiède savonneuse pour supprimer l'odeur caractéristique du "neuf"
puis séchez soigneusement.
N'utilisez pas de produits abrasifs, poudre à récurer, éponge métallique pour ne pas abî-
mer la finition.
UTILISATION QUOTIDIENNE
Congélation de denrées fraîches
Votre appareil porte le sigle normalisé 4 étoiles c'est à dire qu'il vous permet de congeler
vous même des denrées fraîches et des plats cuisinés, et de conserver des aliments surge-
lés ou congelés.
Activez la fonction FROSTMATIC 24 heures avant d'introduire les denrées fraîches à con-
geler dans le compartiment congélateur et si vous utilisez la capacité maximale de congé-
lation.
Placez les denrées fraîches à congeler dans les deux compartiments supérieurs.
Respectez le pouvoir de congélation de votre appareil (c'est à dire la quantité maximale
de denrées fraîches que vous pouvez congeler par 24 heures) qui figure sur la plaque
signalétique située à l'intérieur de l'appareil.
Le temps de congélation est de 24 heures : vous ne devez ajouter aucune autre denrée à
congeler au cours de cette période.
Pour utiliser la quantité maximale indiquée sur la plaque signalétique, sortez tous les ti-
roirs du compartiment congélateur.
46
Première utilisation

Downloaded from www.vandenborre.be
Pour garantir un bon fonctionnement et une per-
formance optimale de l'appareil, les aliments ne
doivent pas entrer en contact avec la paroi arriè-
re du compartiment congélateur, comme indi-
qué sur la figure.
Conservation des aliments congelés
À la mise en service ou après un arrêt prolongé, placez le thermostat sur la position Max
pendant 2 heures environ, avant d'introduire les produits dans le compartiment.
En cas de dégivrage accidentel, dû par exemple à une panne de courant, si la panne doit
se prolonger plus longtemps qu'il n'est indiqué à la rubrique "temps d'augmentation"
dans la section Caractéristiques techniques, consommez les aliments décongelés le plus
rapidement possible ou recongelez-les après les avoir cuits (une fois refroidis).
Calendrier des aliments congelés
Les symboles indiquent différents types d'aliments congelés
Les numéros indiquent les temps de conservation en mois correspondant aux différents
types d'aliments congelés. La validité du temps de stockage maximum ou minimum indi-
qué dépend de la qualité des aliments et de leur traitement avant la congélation.
La décongélation
Les aliments surgelés ou congelés peuvent être décongelés dans le compartiment réfrigé-
rateur ou à température ambiante, avant d'être utilisés, en fonction du temps disponible
pour cette opération.
Les petites pièces peuvent même être cuites sans décongélation préalable : dans ce cas,
la cuisson est plus longue.
Accumulateurs de froid
Le compartiment congélateur est équipé d'un ou plusieurs accumulateurs ; il(s) vous per-
mette(nt) d'augmenter l'autonomie de fonctionnement de l'appareil en cas de coupure
de courant, de transporter des produits congelés ou surgelés, de maintenir le froid dans
les produits surgelés ou congelés durant la période de dégivrage.
Utilisation quotidienne
47

Downloaded from www.vandenborre.be
CONSEILS
Conseils pour la congélation
Pour obtenir les meilleurs résultats, voici quelques conseils importants :
• la quantité maximale de denrées que vous pouvez congeler par 24 heures est indiquée
sur la plaque signalétique.
• le temps de congélation est de 24 heures. Aucune autre denrée à congeler ne doit être
ajoutée pendant cette période.
• congelez seulement les denrées alimentaires fraîches, de qualité supérieure (une fois
nettoyées).
• préparez la nourriture en petits paquets pour une congélation rapide et uniforme, adap-
tés à l'importance de la consommation.
• enveloppez les aliments dans des feuilles d'aluminium ou de polyéthylène et assurez-
vous que les emballages sont étanches ;
• ne laissez pas des aliments frais, non congelés, toucher des aliments déjà congelés
pour éviter une remontée en température de ces derniers.
• les aliments maigres se conservent mieux et plus longtemps que les aliments gras ; le
sel réduit la durée de conservation des aliments
• la température très basse à laquelle se trouvent les bâtonnets glacés, s'ils sont consom-
més dès leur sortie du compartiment congélateur, peut provoquer des brûlures.
• L'identification des emballages est importante : indiquez la date de congélation du pro-
duit, et respectez la durée de conservation indiquée par le fabricant.
Conseils pour la conservation des produits surgelés et congelés du commerce
Pour une bonne conservation des produits surgelés et congelés, vous devez :
• vous assurer qu'ils ont bien été conservés au magasin ;
• prévoir un temps réduit au minimum pour leur transport du magasin d'alimentation à
votre domicile ;
• éviter d'ouvrir trop souvent la porte du congélateur et ne la laisser ouverte que le
temps nécessaire.
• une fois décongelés, les aliments se détériorent rapidement et ne peuvent pas être re-
congelés.
• respecter la durée de conservation indiquée par le fabricant.
ENTRETIEN ET NETTOYAGE
ATTENTION
débrancher l'appareil avant toute opération d'entretien.
Cet appareil contient des hydrocarbures dans son circuit réfrigérant : l'entretien et la re-
charge ne doivent donc être effectués que par du personnel autorisé.
48
Conseils

Downloaded from www.vandenborre.be
Nettoyage périodique
Cet appareil doit être nettoyé régulièrement :
• nettoyez l'intérieur et tous les accessoires avec de l'eau tiède savonneuse.
• vérifiez régulièrement les joints de porte et nettoyez-les en les essuyant pour éviter
toute accumulation de déchets.
• rincez et séchez soigneusement.
Ne pas tirer, déplacer ou endommager les tuyaux et/ou câbles qui se trouvent à l'inté-
rieur de l'appareil.
Ne JAMAIS utiliser de produits abrasifs ou caustiques ni d'éponges avec grattoir pour net-
toyer l'intérieur de façon à ne pas l'abîmer et laisser de fortes odeurs.
Nettoyer le condenseur (grille noire) et le compresseur situés à l'arrière de l'appareil avec
une brosse ou un aspirateur. Cette opération améliore les performances de l'appareil et
permet des économies d'énergie.
Attention à ne pas endommager le système de réfrigération.
De nombreux détergents pour la cuisine recommandés par les fabricants contiennent des
produits chimiques qui peuvent attaquer/endommager les pièces en plastique utilisées
dans cet appareil. Il est par conséquent recommandé d'utiliser seulement de l'eau chaude
additionnée d'un peu de savon liquide pour nettoyer la carrosserie de l'appareil.
Après le nettoyage, rebranchez l'appareil.
Dégivrage du congélateur
Une certaine quantité de givre se forme toujours sur les clayettes du congélateur et au-
tour du compartiment supérieur.
Dégivrez le congélateur lorsque l'épaisseur de la couche de givre est d'environ 3-5 mm.
Environ 12 heures avant d'effectuer le dégivrage, réglez le bouton du thermostat vers le
haut, de manière à assurer une réserve de froid pendant l'interruption du fonctionnement.
Pour enlever le givre, suivez les instructions ci-dessous :
1. Mettez l'appareil à l'arrêt.
2. Sortez les denrées congelées, enveloppez celles-ci dans plusieurs feuilles de papier
journal et conservez-les dans un endroit frais.
ATTENTION
Ne touchez pas d'aliments surgelés avec des mains mouillées. Vos mains risqueraient de
rester collées.
Entretien et nettoyage
49

Downloaded from www.vandenborre.be
3. Laissez la porte entrouverte et glissez la
spatule en plastique dans le logement pré-
vu, en bas de l'appareil ; placez dessous
un récipient pour recevoir l'eau de dégi-
vrage.
Pour accélérer le dégivrage, placez un réci-
pient d'eau chaude dans le compartiment
congélateur. De plus, retirez les morceaux de
givre qui se détachent en se cassant avant la
fin du dégivrage.
4. Le dégivrage terminé, épongez et séchez
bien l'intérieur du congélateur et conser-
vez la spatule pour une prochaine utilisa-
tion.
5. Mettez l'appareil en marche.
6. Deux ou trois heures plus tard, replacez les produits surgelés ou congelés dans le com-
partiment.
N'utilisez jamais de couteau ou d'objet métallique pour gratter la couche de givre, vous
risquez de détériorer irrémédiablement l'évaporateur.
N'utilisez aucun autre dispositif mécanique ou moyen artificiel que ceux qui sont recom-
mandés par le fabricant pour accélérer le dégivrage de votre appareil.
Une élévation de la température des denrées congelées, pendant la décongélation, peut
réduire leur durée de conservation.
En cas d'absence prolongée ou de non-utilisation
Prenez les précautions suivantes :
•
débranchez l'appareil
• retirez tous les aliments
•
dégivrez
15)
et nettoyez l'appareil et tous les accessoires
• laissez la porte/les portes entrouverte(s) pour prévenir la formation d'odeurs désagréa-
bles.
Si, toutefois, vous n'avez pas la possibilité de débrancher et vider l'appareiI, faites vérifier
régulièrement son bon fonctionnement pour éviter la détérioration des aliments en cas
de panne de courant.
EN CAS D'ANOMALIE DE FONCTIONNEMENT
AVERTISSEMENT
Avant d'intervenir sur l'appareil, débranchez-le.
La résolution des problèmes, non mentionnés dans la présente notice, doit être exclusive-
ment confiée à un électricien qualifié ou à une personne compétente.
15) Si cela est prévu.
50
En cas d'anomalie de fonctionnement

Downloaded from www.vandenborre.be
Certains bruits pendant le fonctionnement (compresseur, circuit de réfrigérant) sont nor-
maux.
Anomalie Cause possible Remède
L'appareil ne fonctionne
pas. Le voyant ne clignote
pas.
L'appareil est éteint. Mettez l'appareil en fonctionne-
ment.
La fiche n'est pas correctement
branchée sur la prise de courant.
Branchez correctement la fiche
sur la prise.
Le courant n'arrive pas à l'appa-
reil. La prise de courant n'est
pas alimentée.
Branchez un autre appareil élec-
trique à la prise de courant.
Faites appel à un électricien qua-
lifié.
Le voyant s'allume.
L'appareil ne fonctionne pas
correctement.
Faites appel à un électricien qua-
lifié.
Le voyant Alarme clignote.
La température du congélateur
est trop élevée.
Consultez le paragraphe "Alarme
haute température"
Le compresseur fonction-
ne en permanence.
La température n'est pas bien
réglée.
Sélectionnez une température
plus élevée.
La porte n'est pas bien fermée. Consultez le paragraphe "Ferme-
ture de la porte".
La porte a été ouverte trop sou-
vent.
Ne laissez pas la porte ouverte
plus longtemps que nécessaire.
La température du produit est
trop élevée.
Laissez le produit revenir à tem-
pérature ambiante avant de le
ranger dans le congélateur.
La température ambiante est
trop élevée.
Réduisez la température ambian-
te.
La fonction FROSTMATIC est ac-
tivée.
Consultez le paragraphe "Fonc-
tion FROSTMATIC".
La température du congé-
lateur est trop basse.
La température n'est pas bien
réglée.
Sélectionnez une température
plus élevée.
La fonction FROSTMATIC est ac-
tivée.
Consultez le paragraphe "Fonc-
tion FROSTMATIC".
La température du congé-
lateur est trop élevée.
La température n'est pas bien
réglée.
Sélectionnez une température
plus basse.
La porte n'est pas bien fermée. Consultez le paragraphe "Ferme-
ture de la porte".
La température du produit est
trop élevée.
Laissez le produit revenir à tem-
pérature ambiante avant de le
ranger dans le congélateur.
Trop de produits ont été intro-
duits simultanément.
Introduisez moins de produits en
même temps.
En cas d'anomalie de fonctionnement
51

Downloaded from www.vandenborre.be
Anomalie Cause possible Remède
Les produits sont trop près les
uns des autres.
Stockez les produits de façon à
permettre la circulation de l'air
froid.
Il y a trop de givre.
Les aliments ne sont pas correc-
tement emballés.
Enveloppez les aliments correcte-
ment.
La porte n'est pas bien fermée. Consultez le paragraphe "Ferme-
ture de la porte".
La température n'est pas bien
réglée.
Sélectionnez une température
plus élevée.
Fermeture de la porte
1. Nettoyez les joints de la porte.
2. Si nécessaire, ajustez la porte. Consultez le paragraphe "Installation".
3. Si nécessaire, remplacez les joints défectueux. Contactez le Service Après-vente.
CARACTÉRISTIQUES TECHNIQUES
Dimensions de la niche d'en-
castrement
Hauteur 1600 mm
Largeur 600 mm
Profondeur 630 mm
Temps de remontée en tempé-
rature
35 h
Les caractéristiques techniques figurent sur la plaque signalétique située sur le côté gau-
che à l'intérieur de l'appareil et sur l'étiquette d'énergie.
INSTALLATION
AVERTISSEMENT
Pour votre sécurité et le bon fonctionnement de l'appareil, veuillez lire attentivement les
"Consignes de sécurité" avant d'installer l'appareil.
Emplacement
L'appareil doit être installé à bonne distance de toute source de chaleur telle que les ra-
diateurs, chauffe-eau, lumière directe du soleil etc. Assurez-vous que l'air circule libre-
ment à l'arrière de l'appareil. Pour garantir un rendement optimum si l'appareil est instal-
lé sous un élément suspendu, la distance entre le haut de l'armoire et l'élément suspendu
doit être de 100 mm minimum. Si possible, évitez de placer l'appareil sous des éléments
52
Caractéristiques techniques

Downloaded from www.vandenborre.be
suspendus. La mise à niveau se fait à l'aide d'un ou de plusieurs pieds réglables à la base
de l'armoire.
Si l'armoire est placée dans un angle et le côté avec les charnières est face au mur, la
distance entre le mur et l'armoire doit être de 10 mm minimum afin de permettre à la
porte de s'ouvrir suffisamment pour pouvoir sortir les clayettes.
AVERTISSEMENT
L'appareil doit pouvoir être débranché à tout moment ; Il est donc nécessaire que la prise
murale reste accessible après l'installation.
Emplacement
AVERTISSEMENT
Si l'appareil qui doit être mis au rebut est équipé d'un dispositif de fermeture, rendez celui-
ci inutilisable de manière à ce que les enfants ne puissent pas rester enfermés à l'inté-
rieur de l'appareil.
La prise de l'appareil doit être facilement accessible après son installation.
Installez cet appareil à un endroit où la température ambiante correspond à la classe cli-
matique indiquée sur la plaque signalétique de l'appareil :
Classe climatique Température ambiante
SN +10°C à + 32°C
N +16°C à + 32°C
ST +16°C à +38°C
T +16°C à +43°C
Branchement électrique
Contrôlez, avant de brancher l'appareil, si la tension et la fréquence indiquées sur la pla-
que signalétique correspondent à celles de votre réseau.
L'appareil doit être relié à la terre. La fiche du câble d'alimentation comporte un loge-
ment pour mise à la terre. Si la prise de courant murale n'est pas mise à la terre, bran-
10mm
10mm 100mm
Installation
53

Downloaded from www.vandenborre.be
chez l'appareil sur une prise de terre conformément aux normes en vigueur, en deman-
dant conseil à un électricien qualifié.
Le fabricant décline toute responsabilité en cas d'incident suite au non-respect des consi-
gnes de sécurité sus-mentionnées.
Cet appareil est conforme aux directives communautaires.
Entretoises arrière
Vous trouverez deux entretoises jointes à l'ap-
pareil qui doivent être installées comme indi-
qué sur la figure.
Desserrez les vis et introduisez l'entretoise sous
la tête de vis, puis resserrez les vis.
Réversibilité de la porte
AVERTISSEMENT
Avant toute opération, débranchez la fiche de la prise de courant.
Pour changer le sens d'ouverture de la porte, procédez comme suit :
1. Enlevez la grille de ventilation enclique-
table (D). Démontez la charnière infé-
rieure (E) en dévissant les trois vis et
gardez le joint de la charnière (X).
N
F
F
X
E
D
Y
M
Z
54
Installation

Downloaded from www.vandenborre.be
2. Glissez la porte pour la faire sortir de la
goupille (G). Dévissez la goupille (G) et
montez-la sur le côté opposé.
3. Dévissez l'axe d'articulation (Z) de la
charnière (E) et la vis arrière (Y) avec
une clé de 10 mm et enlevez le disposi-
tif de fermeture (M). Prenez le disposi-
tif de fermeture inférieur restant du sa-
chet d’accessoires et installez-le sur le
côté opposé de la même charnière en
revissant la vis arrière.
4. Dévissez le dispositif de fermeture su-
périeur (N) situé dans le bas de la por-
te. Prenez le dispositif de fermeture su-
périeur restant du sachet d’accessoires et installez-le sur le côté opposé du bas de la
porte en revissant la vis.
5. Installez la porte.
6. Installez la charnière inférieure (E) sur le côté opposé, en utilisant les trois vis préala-
blement enlevées en introduisant le joint de la charnière (X).
7. Enlevez le cache (F) de la grille de ventilation (D) en le poussant dans le sens de la
flèche et installez-le sur le côté opposé.
8. Installez la grille de ventilation (D) en l'enclenchant en position.
9. Dévissez la poignée. Retirez le cache
avec une pointe. Installez la poignée et
le cache sur le côté opposé. Prenez les
deux caches fournis du sac d'accessoi-
res et couvrez les orifices restés libres
après avoir enlevé la poignée.
10. Assurez-vous que le panneau avant de
la porte est parallèle au panneau avant
de l'élément supérieur.
11. Remettez l'appareil en place, mettez-le
d'aplomb, attendez quatre heures au
moins puis branchez-le à la prise de courant.
Procédez à un dernier contrôle pour vous assurer que :
• Toutes les vis sont serrées.
• Le joint magnétique adhère bien à l'appareil.
• La porte s'ouvre et se ferme correctement.
Si la température ambiante est basse (en hiver, par exemple), il se peut que le joint n'ad-
hère pas parfaitement. Dans ce cas, attendez que le joint reprenne sa taille naturelle.
G
180°
Installation
55

Downloaded from www.vandenborre.be
EN MATIÈRE DE SAUVEGARDE DE L'ENVIRONNEMENT
Le symbole sur le produit ou son emballage indique que ce produit ne peut être traité
comme déchet ménager. Il doit être remis au point de collecte dédié à cet effet (collecte
et recyclage du matériel électrique et électronique).
En procédant à la mise au rebut de l'appareil dans les règles de l’art, nous préservons
l'environnement et notre sécurité, s’assurant ainsi que les déchets seront traités dans des
conditions optimum.
Pour obtenir plus de détails sur le recyclage de ce produit, veuillez prendre contact avec
les services de votre commune ou le magasin où vous avez effectué l'achat.
56
En matière de sauvegarde de l'environnement

Downloaded from www.vandenborre.be
57

Downloaded from www.vandenborre.be
58

Downloaded from www.vandenborre.be
59

Downloaded from www.vandenborre.be
www.aeg-electrolux.com/shop 222356611-A-302010
-
 1
1
-
 2
2
-
 3
3
-
 4
4
-
 5
5
-
 6
6
-
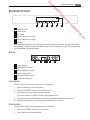 7
7
-
 8
8
-
 9
9
-
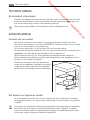 10
10
-
 11
11
-
 12
12
-
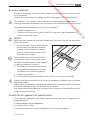 13
13
-
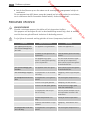 14
14
-
 15
15
-
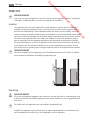 16
16
-
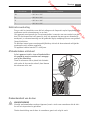 17
17
-
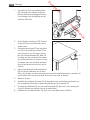 18
18
-
 19
19
-
 20
20
-
 21
21
-
 22
22
-
 23
23
-
 24
24
-
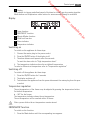 25
25
-
 26
26
-
 27
27
-
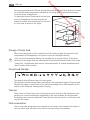 28
28
-
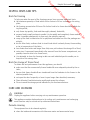 29
29
-
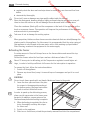 30
30
-
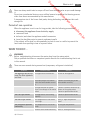 31
31
-
 32
32
-
 33
33
-
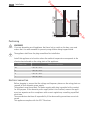 34
34
-
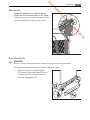 35
35
-
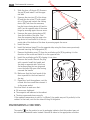 36
36
-
 37
37
-
 38
38
-
 39
39
-
 40
40
-
 41
41
-
 42
42
-
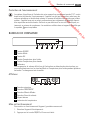 43
43
-
 44
44
-
 45
45
-
 46
46
-
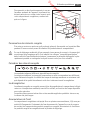 47
47
-
 48
48
-
 49
49
-
 50
50
-
 51
51
-
 52
52
-
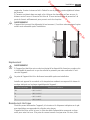 53
53
-
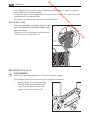 54
54
-
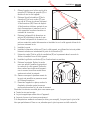 55
55
-
 56
56
-
 57
57
-
 58
58
-
 59
59
-
 60
60


AEG Electrolux AGS1921 Handleiding
- Type
- Handleiding
- Deze handleiding is ook geschikt voor
in andere talen
- English: AEG Electrolux AGS1921 User manual
- français: AEG Electrolux AGS1921 Manuel utilisateur
Andere documenten
-
Aeg-Electrolux AGS88800F0 Handleiding
-
-
-
-
-
-
AEG SCS41800S0 Handleiding
-
AEG A61900GSW0 Handleiding
-
Proline PLC102 Handleiding
-