
EN
FR
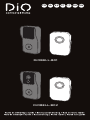
DiOBELL-B01
DiOBELL-B02
IT
PTESNL DE

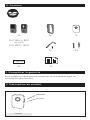
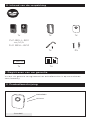
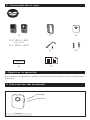
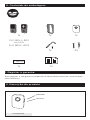
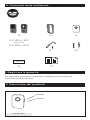
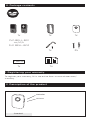
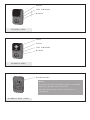
1x
DiO BELL-B01
ou/of/o
DiO BELL-B02
2x1x
1x
1x 1x
1x
name
1x
DiO BELL-B01
ou/of/o
DiO BELL-B02
2x1x
1x
1x 1x
1x
name
1. Enregistrer la garantie
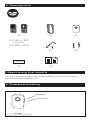
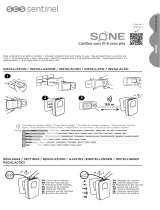
0. Contenu
2. Description du produit
Pour enregistrer votre garantie, remplissez le formulaire en ligne sur
www.chacon.com/warranty
Mélodies
Volume
Carillon

1x
DiO BELL-B01
ou/of/o
DiO BELL-B02
2x1x
1x
1x 1x
1x
name
1x
DiO BELL-B01
ou/of/o
DiO BELL-B02
2x1x
1x
1x 1x
1x
name
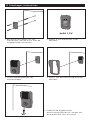
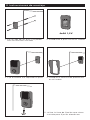
Micro
Indicateur LED
Bouton
Lentille
Micro
Indicateur LED
Bouton
Bouton de réinitialisation
DiOBELL-B01
DiOBELL-B02
DiOBELL-B01 + B02
Remarque
Pour réinitialiser l’appareil, maintenez le
bouton de réinitialisation enfoncé durant 5
secondes.
La sonnette émet un son lorsque l’opération
est terminée.

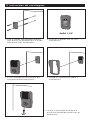
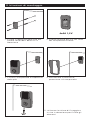
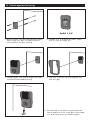
3. Instructions de montage
1. Fixez le couvercle des piles sur
votre mur à l’aide des vis fournies
3. Fixez la sonnette au couvercle
des piles
2. Insérez 4 piles AA dans votre
sonnette
4. Placez la casquette de protection
sur la sonnette
5. Utilisez la clé de fixation et la vis
fournie pour fixer les éléments
+
+
+
-
-+
-
-
4xAA 1,5V
+
+
+
-
-+
-
-
4xAA 1,5V
+
+
+
-
-+
-
-
4xAA 1,5V
+
+
+
-
-+
-
-
4xAA 1,5V
+
+
+
-
-+
-
-
4xAA 1,5V

4. Configuration de la sonnette
Remarque
Pour réinitialiser l’appareil, maintenez le bouton de réinitialisation enfoncé
durant 5 secondes.
La sonnette émet un son lorsque l’opération est terminée.
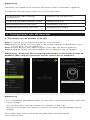
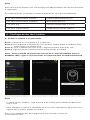
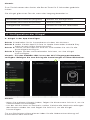
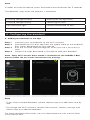
A. Ajout de la sonnette dans l’application
Etape 1 Connectez votre smartphone au réseau Wi-Fi
Etape 2 Téléchargez l’application DiO one sur l’Apple Store ou Android Play
Store suivant votre appareil.
Étape 3 Exécutez l’application DiO one et inscrivez-vous pour la toute
première utilisation.
Étape 4 Suivez les étapes ci-dessous pour ajouter votre sonnette
Remarque : Seul le mode point d’accès Wi-Fi est disponible pour le DIO-
BELL-B01, veuillez suivre les instructions à l’écran pour l’appairage.
Remarque
- Si vous avez plusieurs sonnettes, veuillez suivre à nouveau l’étape 4 pour
les ajouter une par une.
- Pour modifier le signal Wi-Fi, veuillez restaurer les paramètres d’usine de
la caméra et suivre l’étape 4 pour ajouter la sonnette.
Pour de plus amples informations, veuillez télécharger le manuel
d’utilisateur sur www.chacon.com
Voyant rouge clignotant (lent) En attente de configuration
Voyant rouge clignotant (rapide) Recherche du WiFi
Voyant bleu fixe Caméra connectée au WiFi
Voyant bleu clignotant Mode point d’accès

B. Appairage du carillon
Etape 1 Insérez deux piles AA dans le carillon
Etape 2 Appuyez sur le bouton du votre sonnette endéans les 120 secondes
5. Mentions légales
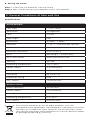
Spécifications
Sonnette connectée
Type de lentille 1/2.9’’ CMOS
Résolution 2 Mega pixels
Objectif 2.4mm
Angle de vision 140°
Bande passante 16Kbps~2Mbps
Ouverture 1/25~1/100,000 par seconde
Audio Bidirectionnel
Luminosité minimum 0.0[email protected]
Wi-Fi 802.11b/g/n - 2,4GHz only
Encryptage Wi-Fi WPA-PSK/WPA2-PSK
Sécurité AES128
Température de fonctionnement -20°C~50°C
Alimentation 4 piles AA
Protocoles TCP/IP,HTTP,DHCP,DNS,RTSP
Taille(mm) 65 x 125 x 35
Indice de protection IP54
Puissance Max 73,62mW ERP
Carillon sans fil
Radio fréquence 433.92MHz
Alimentation 2 piles AA
Consommation en veille ≤ 600uA
Température de fonctionnement 0°C~35°C
Puissance Max. 0,05mW ERP
Ce produit doit être traité conformément à la directive
Européenne 2002/96/EC dans le but d’être recyclé ou démonté
pour minimiser son impact sur l’environnement. Pour davantage
d’informations, veuillez contacter les autorités locales ou
régionales.

6. Support
www.chacon.com/support
Le soussigné, Chacon, déclare que l’équipement radioélectrique
du type ‘DiOBELL-B01 / DiOBELL-B02’ sont conformes à la
Directive 2014/53/UE.
Le texte complet de la déclaration UE de conformité est
disponible à l’adresse internet suivante : http://chacon.com/
conformity
FR - FRANCE: SUIVANT LA REGLEMENTATION CNIL concernant les
dispositif de vidéosurveillance ou visiophone
Ce dispositif a pour fonction d’identifier un visiteur, en aucun cas il ne doit
être utilisé pour surveiller la rue ou l’espace public. Ce dispositif doit être
utilisé conformément à la loi informatique et libertés. Toute utilisation de
ce produit en dehors d’un cadre strictement personnel est soumise à des
obligations légales d’utilisation, notamment en application de la loi n°78-17
du 6 janvier 1978, sur lesquelles il appartient à l’acquéreur de se renseigner
auprès de la CNIL, et est soumis à l’obtention d’autorisations administratives
préalables.
L’acquéreur est susceptible d’engager sa responsabilité civile et pénale
en cas d’utilisation détournée du dispositif dans le but de porter atteinte
à l’intimité de la vie privée ou à l’image de tiers ; Le fabricant ne pourra
en aucun cas être tenu responsable d’une utilisation du visiophone en
contravention avec les dispositions législatives et réglementaires en vigueur.
www.chacon.com
Chacon S.A. - Avenue mercator 2 - 1300 Wavre
v 1.1 200710

1x
DiO BELL-B01
ou/of/o
DiO BELL-B02
2x1x
1x
1x 1x
1x
name
1x
DiO BELL-B01
ou/of/o
DiO BELL-B02
2x1x
1x
1x 1x
1x
name
1. Registreren van uw garantie
0. Inhoud van de verpakking
2. Productbeschrijving
Vul om uw garantie te registreren het onlineformulier in op www.chacon.
com/warranty.
Melodieën
Volume
Deurbell

1x
DiO BELL-B01
ou/of/o
DiO BELL-B02
2x1x
1x
1x 1x
1x
name
1x
DiO BELL-B01
ou/of/o
DiO BELL-B02
2x1x
1x
1x 1x
1x
name
Microfoon
Led-indicator
Belknop
Lens
Microfoon
Led-indicator
Belknop
Reset-knop
DiOBELL-B01
DiOBELL-B02
DiOBELL-B01 + B02
Opmerking
Houd om het apparaat te resetten de Reset-
knop 5 seconden ingedrukt.
De deurbel laat een toon horen als hij
hiermee klaar is.

3. Montage-instructies
1. Bevestig het klepje van het
batterijvak aan de muur met de
bijgeleverde schroeven.
3. Plaats de deurbel op het
batterijklepje.
2. Plaats 4 AA-batterijen in de
deurbel.
4. Plaats het beschermkapje op de
deurbel.
5. Gebruik de bijgeleverde
bevestigingssleutel en schroef om
de elementen vast te zetten.
+
+
+
-
-+
-
-
4xAA 1,5V
+
+
+
-
-+
-
-
4xAA 1,5V
+
+
+
-
-+
-
-
4xAA 1,5V
+
+
+
-
-+
-
-
4xAA 1,5V
+
+
+
-
-+
-
-
4xAA 1,5V

4. Configureren van de deurbel
Opmerking
Houd om het apparaat te resetten de Reset-knop 5 seconden ingedrukt.
De deurbel laat een toon horen als hij hiermee klaar is.
A. Toevoegen van de deurbel in de app
Stap 1 Verbind uw smartphone met het wifi-netwerk.
Stap 2 Download de DiO one-app in de Apple Store of Android Play Store
afhankelijk van uw apparaat.
Stap 3 Open de DiO one-app en meld u aan voor het eerste gebruik.
Stap 4 Volg de onderstaande stappen om uw deurbel toe te voegen.
Opmerking : Alleen de Wi-Fi-toegangspuntmodus is beschikbaar voor de
DIOBELL-B01, volg de instructies op het scherm om te koppelen.
Opmerking
- Als u meerdere deurbellen heeft, herhaal dan stap 4 om deze één voor één
toe te voegen.
- Om te verbinden met een ander wifi-netwerk, moet u de
fabrieksinstellingen herstellen en stap 4 uitvoeren om de deurbel toe te
voegen.
Download voor meer informatie de gebruikershandleiding op
www.chacon.com.
Knipperende rode indicator
(langzaam)
Wachten op configuratie
Knipperende rode indicator (snel) Zoeken naar wifi
Brandende blauwe indicator Verbonden met wifi
Knipperende blauwe indicator Toegangspuntmodus

B. Koppelen van de bel
Stap 1 Plaats twee AA-batterijen in de bel.
Stap 2 Druk binnen 120 seconden op de belknop van uw deurbel.
5. Wettelijke kennisgevingen
Technische gegevens
Smartdeurbel
Lenstype 1/2,9” CMOS
Resolutie 2 megapixel
Lens 2,4 mm
Kijkhoek 140°
Bandbreedte 16 Kbps tot 2 Mbps
Sluitertijd 1/25 tot 1/100.000 per seconde
Audio Tweerichtingsaudio
Min. lichtgevoeligheid 0,01 lux bij f/1,2
Wi-Fi 802.11b/g/n - 2,4GHz only
Wi-Fi-versleuteling WPA-PSK/WPA2-PSK
Beveiliging AES128
Bedrijfstemperatuur -20 °C tot 50 °C
Voeding 4 AA-batterijen
Protocols TCP/IP, HTTP, DHCP, DNS, RTSP
Afmetingen (mm) 65 x 125 x 35
Beschermingsgraad IP54
Maximum Vermogen 73,62mW ERP
Draadloze bel
Frequentie 433,92 MHz
Voeding 2 AA-batterijen
Verbruik in stand-by ≤ 600 uA
Bedrijfstemperatuur 0°C tot 35°C
Maximum Vermogen 0,05mW ERP
Dit product moet zijn verwerkt volgens de Richtlijn nr.
2002/96/EG met het doel van de recycling ervan of moet zijn
gedemonteerd op die wijze, dat zijn invloed op de omgeving
de kleinst mogelijk was. Meer details wordt aan u door locale of
regionale overheid verstrekt.

6. Support
www.chacon.com/support
Hierbij verklaar ik, Chacon, dat het type radioapparatuur
‘DiOBELL-B01 / DiOBELL-B02’ conform is met Richtlijn 2014/53/
EU.
De volledige tekst van de EU-conformiteitsverklaring kan worden
geraadpleegd op het volgende internetadres: http://chacon.com/
conformity
www.chacon.com
Chacon S.A. - Avenue mercator 2 - 1300 Wavre
v 1.1 200710

1x
DiO BELL-B01
ou/of/o
DiO BELL-B02
2x1x
1x
1x 1x
1x
name
1x
DiO BELL-B01
ou/of/o
DiO BELL-B02
2x1x
1x
1x 1x
1x
name
1. Registrar la garantía
0. Contenido de la caja
2. Descripción del producto
Para registrar la garantía, rellene el formulario en línea en www.chacon.com/
warranty
Melodías
Volumen
Timbre

1x
DiO BELL-B01
ou/of/o
DiO BELL-B02
2x1x
1x
1x 1x
1x
name
1x
DiO BELL-B01
ou/of/o
DiO BELL-B02
2x1x
1x
1x 1x
1x
name
Lente
Micro
Indicador LED
Lente
Micro
Indicador LED
Botón
Botón de reinicio
DiOBELL-B01
DiOBELL-B02
DiOBELL-B01 + B02
Nota
Para reiniciar el dispositivo, mantenga
pulsado el botón de reinicio durante 5
segundos.
El timbre emitirá un pitido cuando la
operación se haya completado.

3. Instrucciones de montaje
1. Fije la tapa de las pilas a la pared
con los tornillos incluido
3. Fije el timbre a la tapa de las pilas
2. Introduzca 4 pilas AA en el timbre
4. Coloque la carcasa de protección
en el timbre
5. Utilice la llave de fijación que viene
incluida para fijar los elementos
+
+
+
-
-+
-
-
4xAA 1,5V
+
+
+
-
-+
-
-
4xAA 1,5V
+
+
+
-
-+
-
-
4xAA 1,5V
+
+
+
-
-+
-
-
4xAA 1,5V
+
+
+
-
-+
-
-
4xAA 1,5V

4. Configuración del timbre
Nota
Para reiniciar el dispositivo, mantenga pulsado el botón de reinicio durante
5 segundos.
El timbre emitirá un pitido cuando la operación se haya completado.
A. Añadir el timbre a la aplicación
Paso 1 Conecte su smartphone a la red wifi.
Paso 2 Descárguese la aplicación DiO one en Apple Store o Android Play
Store según su dispositivo.
Paso 3 Inicie la aplicación DiO one y regístrese para el primer uso.
Paso 4 Siga los pasos a continuación para añadir el timbre.
Nota : Solo el modo de punto de acceso Wi-Fi está disponible para el
DIOBELL-B01, siga las instrucciones en pantalla para el emparejamiento
Nota
- Si tiene varios timbres, siga el paso 4 de nuevo para añadir dispositivos
uno a uno.
- Para cambiar la red wifi, restablezca los ajustes de fábrica de la cámara y
siga el paso 4 para añadir el timbre.
Para más información, descárguese el manual de usuario en
www.chacon.com
Luz roja intermitente (lenta) Esperando configuración
Luz roja intermitente (rápida) Buscando red wifi
Luz azul fija Cámara conectada a la wifi
Luz azul intermitente Modo de punto de acceso

B. Asociar el timbre con cables
Paso 1 Introduzca dos pilas AA en el timbre con cables.
Paso 2 Pulse el botón del timbre conectado en los 120 segundos
posteriores.
5. Avisos legales
Especificaciones
Timbre conectado
Tipo de lente CMOS de 1/2,9»
Resolución 2 megapíxeles
Objetivo 2,4 mm
Ángulo de visión 140°
Ancho de banda 16 Kbps~2 Mbps
Obturador 1/25~1/100.000 por segundo
Audio Bidireccional
Brillo mínimo 0,01 [email protected]
Wi-Fi 802.11b/g/n - 2,4GHz only
Cifrado Wi-Fi WPA-PSK/WPA2-PSK
Seguridad AES128
Temperatura de funcionamiento -20 °C~50 °C
Alimentación 4 pilas AA
Protocolos TCP/IP, HTTP, DHCP, DNS, RTSP
Tamaño (mm) 65 x 125 x 35
Índice de protección IP54
Potencia máxima 73,62mW ERP
Timbre sin cables
Radiofrecuencia 433,92 MHz
Alimentación 2 pilas AA
Consumo en modo de espera ≤ 600 uA
Temperatura de funcionamiento 0°C~35°C
Potencia máxima 0,05mW ERP
Este producto debe estar procesado acorde la directiva
2002/96/ES con el propósito de su reciclación o desmantelado
de manera que se minimice su efecto al medio ambiente.
Consulte las autoridades locales o regionales para obtener más
detalles.

6. Support
www.chacon.com/support
Por la presente, Chacon, declara que el tipo de equipo
radioeléctrico ‘DiOBELL-B01 / DiOBELL-B02’ es conforme con le
Directiva 2014/53/UE.
El texto completo de la declaración UE de conformidad está
disponible en la dirección internet siguiente:
http://chacon.com/conformity
www.chacon.com
Chacon S.A. - Avenue mercator 2 - 1300 Wavre
v 1.1 200710

1x
DiO BELL-B01
ou/of/o
DiO BELL-B02
2x1x
1x
1x 1x
1x
name
1x
DiO BELL-B01
ou/of/o
DiO BELL-B02
2x1x
1x
1x 1x
1x
name
1. Registar a garantia
0. Conteúdo da embalagem
2. Descrição do produto
Para registar a sua garantia, preencha o formulário online em www.chacon.
com/warranty
Melodias
Volume
Campainha

1x
DiO BELL-B01
ou/of/o
DiO BELL-B02
2x1x
1x
1x 1x
1x
name
1x
DiO BELL-B01
ou/of/o
DiO BELL-B02
2x1x
1x
1x 1x
1x
name
Microfone
Indicador LED
Botão
Lente
Microfone
Indicador LED
Botão
Botão de reinicialização
DiOBELL-B01
DiOBELL-B02
DiOBELL-B01 + B02
Observação
Para reinicializar o aparelho, mantenha o
botão de reinicialização premido durante 5
segundos.
A campainha emite um som quando a
operação está concluída.

3. Instruções de montagem
1. Fixe a tampa do compartimento
das pilhas na parede com a ajuda
dos parafusos fornecidos
3. Fixe a campainha na tampa do
compartimento das pilhas
2. Insira as 4 pilhas AA na sua
campainha
4. Coloque a proteção sobre a
campainha
5. Utilize a chave de fixação e o
parafuso fornecido para fixar os
elementos
+
+
+
-
-+
-
-
4xAA 1,5V
+
+
+
-
-+
-
-
4xAA 1,5V
+
+
+
-
-+
-
-
4xAA 1,5V
+
+
+
-
-+
-
-
4xAA 1,5V
+
+
+
-
-+
-
-
4xAA 1,5V

4. Configuração da campainha
Observação
Para reinicializar o aparelho, mantenha o botão de reinicialização premido
durante 5 segundos.
A campainha emite um som quando a operação está concluída.
A. Adição da campainha na aplicação
Etapa 1 Ligue o seu smartphone à rede Wi-Fi
Etapa 2 Transfira a aplicação DiO one em Apple Store ou Android Play
Store consoante o seu aparelho.
Etapa 3 Execute a aplicação DiO one e registe-se para a primeira utilização.
Etapa 4 Siga as etapas abaixo para adicionar a sua campainha
Observação : Somente o modo de ponto de acesso Wi-Fi está disponível
para o DIOBELL-B01; siga as instruções na tela para emparelhar.
Observação
- Se tiver várias campainhas, efetue novamente a etapa 4 para as adicionar
uma a uma.
- Para modificar o sinal Wi-Fi, reponha as predefinições da câmara e siga a
etapa 4 para adicionar a campainha.
Para mais informações, transfira o manual do utilizador em
www.chacon.com
Luz avisadora vermelha
intermitente (lenta)
À espera de configuração
Luz avisadora vermelha
intermitente (rápida)
Deteção de Wi-Fi
Luz avisadora fixa Câmara ligada ao Wi-Fi
Luz avisadora azul intermitente Modo ponto de acesso

B. Emparelhamento da campainha interior
Etapa 1 Insira duas pilhas AA na campainha interior
Etapa 2 Prima o botão da sua campainha no espaço de 120 segundos
5. Menções legais
Especificações
Campainha com conectividade
Tipo de lente CMOS 1/2,9”
Resolução 2 megapixels
Objetivo 2,4 mm
Ângulo de visão 140°
Largura de banda 16 Kbps~2 Mbps
Abertura 1/25~1/100.000 por segundo
Áudio Bidirecional
Luminosidade mínima 0,01 Lux@F1,2
Wi-Fi 802.11b/g/n - 2,4GHz only
Encriptação Wi-Fi WPA-PSK/WPA2-PSK
Segurança AES128
Temperatura de funcionamento -20°C~50°C
Alimentação 4 pilhas AA
Protocolos TCP/IP, HTTP, DHCP, DNS, RTSP
Dimensões (mm) 65 x 125 x 35
Índice de proteção IP54
Potência máxima 73,62mW ERP
Campainha interior sem fios
Frequência de rádio 433.92 MHz
Alimentação 2 pilhas AA
Consumo em espera ≤ 600 uA
Temperatura de funcionamento 0°C~35°C
Potência máxima 0,05mW ERP
Este produto deve ser passado pelo tratamento conforme
à norma 2002/96/ES para ser reciclado ou desmontado de
maneira que a sua inuência no meio ambiente seja mínima.
As autoridades locais ou regionais prestam mais informações
detalhadas.

6. Support
www.chacon.com/support
O abaixo assinado, Chacon, declara que o presente tipo de
equipamento de rádio ‘DiOBELL-B01 / DiOBELL-B02’ está em
conformidade com a Diretiva 2014/53/UE.
O texto integral da declaração de conformidade está disponível
no seguinte endereço de Internet:
http://chacon.com/conformity
www.chacon.com
Chacon S.A. - Avenue mercator 2 - 1300 Wavre
v 1.1 200710

1x
DiO BELL-B01
ou/of/o
DiO BELL-B02
2x1x
1x
1x 1x
1x
name
1x
DiO BELL-B01
ou/of/o
DiO BELL-B02
2x1x
1x
1x 1x
1x
name
1. Registrare la garanzia
0. Contenuto della confezione
2. Descrizione del prodotto
Per registrare la garanzia, compilare il modulo online all’indirizzo
www.chacon.com/warranty
Melodie
Volume
Campanello

1x
DiO BELL-B01
ou/of/o
DiO BELL-B02
2x1x
1x
1x 1x
1x
name
1x
DiO BELL-B01
ou/of/o
DiO BELL-B02
2x1x
1x
1x 1x
1x
name
Microfono
Spia led
Pulsante
Lente
Microfono
Spia led
Pulsante
Pulsante reset
DiOBELL-B01
DiOBELL-B02
DiOBELL-B01 + B02
N.B.
Per resettare il dispositivo, tenere premuto il
pulsante reset per 5 secondi.
Il campanello emetterà un suono a
operazione completata.

3. Istruzioni di montaggio
1. Fissare il coperchio delle pile alla
parete servendosi delle viti in
dotazione
3. Fissare il campanello al coperchio
delle pile
2. Inserire quattro pile AA nel vano
del campanello esterno
4. Posizionare la cornice di
protezione sul campanello
5. Utilizzare la chiave di fissaggio e
la vite in dotazione per fissare gli
elementi
+
+
+
-
-+
-
-
4xAA 1,5V
+
+
+
-
-+
-
-
4xAA 1,5V
+
+
+
-
-+
-
-
4xAA 1,5V
+
+
+
-
-+
-
-
4xAA 1,5V
+
+
+
-
-+
-
-
4xAA 1,5V

4. Configurazione del campanello
N.B.
Per resettare il dispositivo, tenere premuto il pulsante reset per 5 secondi.
Il campanello emetterà un suono a operazione completata.
A. Aggiungere il campanello tramite l’applicazione
Step 1 Collegare lo smartphone alla rete WiFi
Step 2 Scaricare l’applicazione DiO one dall’Apple Store o dal Play Store
Android, a seconda del proprio dispositivo.
Step 3 Avviare l’applicazione DiO one ed eettuare la registrazione al primo
utilizzo.
Step 4 Seguire i passaggi illustrati di seguito per aggiungere il campanello
N.B. : Per il DIOBELL-B01 è disponibile solo la modalità punto di accesso
Wi-Fi, seguire le istruzioni sullo schermo per l’associazione.
N.B.
- In caso di più campanelli, eseguire nuovamente lo step 4 per aggiungere
uno per volta tutti i dispositivi.
- Per cambiare la rete WiFi, ripristinare le impostazioni di fabbrica della
videocamera e seguire il punto 4 per aggiungere il campanello.
Per maggiori informazioni, si prega di scaricare il manuale utente su
www.chacon.com
Spia rossa lampeggiante (lenta) Configurazione in corso
Spia rosse lampeggiante (veloce) Ricerca rete WiFi
Spia blu fissa Videocamera connessa al WiFi
Spia blu lampeggiante Modalità punto di accesso

B. Abbinamento del campanello interno
Step 1 Inserire due pile AA nel campanello interno
Step 2 Premere il pulsante del campanello esterno entro 120 secondi
5. Note legali
Specifiche
Campanello esterno
Tipo di lente 1/2.9’’ CMOS
Risoluzione 2 Mega pixels
Obiettivo 2.4 mm
Angolo di vista 140°
Larghezza di banda 16 Kbps~2 Mbps
Framerate 1/25~1/100.000 al secondo
Audio Bidirezionale
Luminosità minima 0,01 [email protected]
Wi-Fi 802.11b/g/n - 2,4GHz only
Crittografia Wi-Fi WPA-PSK/WPA2-PSK
Sicurezza AES128
Temperatura di esercizio Da -20°C a 50°C
Alimentazione 4 pile AA
Protocolli TCP/IP,HTTP,DHCP,DNS,RTSP
Dimensioni (mm) 65 x 125 x 35
Grado di protezione IP54
Potenza massima 73,62 mW ERP
Campanello wireless interno
Frequenza radio 433.92 MHz
Alimentazione 2 pile AA
Consumi in standby ≤ 600 uA
Temperatura di esercizio Da 0°C a 35°C
Potenza massima 0,05 mW ERP
Non gettare le batterie o prodotti esausti con i rifiuti domestici
(immondizia). Potrebbero contenere sostanze pericolose
dannose per la salute o l’ambiente. Restituire questi prodotti al
commerciante o utilizzare i servizi di raccolta dierenziata della
propria città.

6. Support
www.chacon.com/support
Con la presente, Chacon, dichiara che l’apparecchiatura radio tipo
‘DiOBELL-B01 / DiOBELL-B02’ è conforme alla direttiva
2014/53/UE.
Il testo completo della dichiarazione di conformità UE è
disponibile al seguente sito: http://chacon.com/conformity
www.chacon.com
Chacon S.A. - Avenue mercator 2 - 1300 Wavre
v 1.1 200710

1x
DiO BELL-B01
ou/of/o
DiO BELL-B02
2x1x
1x
1x 1x
1x
name
1x
DiO BELL-B01
ou/of/o
DiO BELL-B02
2x1x
1x
1x 1x
1x
name
1. Registrierung Ihrer Garantie
0. Packungsinhalt
2. Produktbeschreibung
Um Ihre Garantie zu registrieren, füllen Sie das Online-Formular unter
www.chacon.com/warranty aus
Melodien
Lautstärke
Klingel

1x
DiO BELL-B01
ou/of/o
DiO BELL-B02
2x1x
1x
1x 1x
1x
name
1x
DiO BELL-B01
ou/of/o
DiO BELL-B02
2x1x
1x
1x 1x
1x
name
Mikro
LED-Anzeige
Taste
Linse
Mikro
LED-Anzeige
Taste
Reset-Taste
DiOBELL-B01
DiOBELL-B02
DiOBELL-B01 + B02
Hinweis
Zum Zurücksetzen des Geräts die Reset-
Taste für 5 Sekunden gedrückt halten.
Die Klingel gibt einen Ton ab, wenn der
Vorgang beendet ist.

3. Montageanleitung
1. Befestigen Sie die Batteriefachab-
deckung mit den mitgelieferten
Schrauben an der Wand.
3. Befestigen Sie die Klingel auf der
Batteriefachabdeckung.
2. Legen Sie 4 Batterien des Typs
AA in Ihre Klingel ein.
4. Setzen Sie die Schutzkappe auf
die Klingel.
5. Verwenden Sie den mitgelieferten
Montageschlüssel und die Schraube,
um die Elemente zu befestigen.
+
+
+
-
-+
-
-
4xAA 1,5V
+
+
+
-
-+
-
-
4xAA 1,5V
+
+
+
-
-+
-
-
4xAA 1,5V
+
+
+
-
-+
-
-
4xAA 1,5V
+
+
+
-
-+
-
-
4xAA 1,5V

4. Konfiguration der Klingel
Hinweis
Zum Zurücksetzen des Geräts die Reset-Taste für 5 Sekunden gedrückt
halten.
Die Klingel gibt einen Ton ab, wenn der Vorgang beendet ist.
A. Klingel in der App hinzufügen
Schritt 1 Verbinden Sie Ihr Smartphone mit dem WLAN-Netz.
Schritt 2 Laden Sie die App DiO one im Apple Store oder Android Play
Store je nach Ihrem Gerät herunter.
Schritt 3 Führen Sie die App DiO one aus und melden Sie sich für die
erstmalige Nutzung an.
Schritt 4 Folgen Sie den nachstehenden Schritten, um Ihre Klingel
hinzuzufügen.
Hinweis : Für den DIOBELL-B01 ist nur der Wi-Fi-Zugangspunktmodus
verfügbar. Befolgen Sie zum Pairing die Anweisungen auf dem Bildschirm.
Hinweis
- Wenn Sie mehrere Klingeln haben, folgen Sie bitte erneut Schritt 4, um sie
nacheinander hinzuzufügen.
- Um das WLAN-Netz zu wechseln, stellen Sie bitte die Werkseinstellungen
der Kamera wieder her und folgen Sie Schritt 4, um die Klingel
hinzuzufügen.
Für ausführlichere Informationen laden Sie die Gebrauchsanleitung auf
www.chacon.com herunter
Blinkende rote Leuchte (langsam) Warten auf Konfiguration
Blinkende rote Leuchte (schnell) WLAN-Suche
Stetige blaue Leuchte Kamera mit WLAN verbunden
Blinkende blaue Leuchte Zugangspunkt-Modus

B. Kopplung des Türglockenspiels
Schritt 1 Legen Sie 2 Batterien des Typs AA in das Glockenspiel ein.
Schritt 2 Drücken Sie innerhalb von 120 Sekunden auf die Taste Ihrer Klingel.
5. Gesetzliche Angaben
Technische Daten
Vernetzte Klingel
Linsentyp 1/2,9’’ CMOS
Auflösung 2 Megapixel
Objektiv 2,4 mm
Blickwinkel 140°
Bandbreite 16 Kbps~2 Mbps
Önung 1/25~1/100.000 pro Sekunde
Audio bidirektional
Minimale Lichtstärke 0,01 [email protected]
WLAN 802.11b/g/n - 2,4GHz only
WLAN-Verschlüsselung WPA-PSK/WPA2-PSK
Sicherheit AES128
Betriebstemperatur -20 °C~50 °C
Stromversorgung 4 Batterien Typ AA
Protokolle TCP/IP, HTTP, DHCP, DNS, RTSP
Größe (mm) 65 x 125 x 35
Schutzart IP54
Max. Leistung 73,62mW ERP
Funk-Türglockenspiel
Funkfrequenz 433,92 MHz
Stromversorgung 2 Batterien Typ AA
Stromverbrauch im Standby-Mo-
dus
≤ 600 uA
Betriebstemperatur 0°C~35°C
Max. Leistung 0,05mW ERP
Batterien/Akkus oder defekte Produkte nicht im Hausmüll
entsorgen. Die möglicherweise enthaltenen gefährlichen
Substanzen können für die Gesundheit oder die Umwelt schädlich
sein. Geben Sie die Produkte beim Händler zurück oder geben Sie
sie an einer Sammelstelle oder bei einem Recyclinghof ab.

6. Support
www.chacon.com/support
Chacon erklärt hiermit, dass der Funkgerätetyp „DiOBELL-B01 /
DiOBELL-B02“ mit der Richtlinie 2014/53/EG konform ist.
Der vollständige Test der EU-Konformitätserklärung steht unter
der folgenden Internetadresse zur Verfügung: http://chacon.
com/conformity
www.chacon.com
Chacon S.A. - Avenue mercator 2 - 1300 Wavre
v 1.1 200710

1x
DiO BELL-B01
ou/of/o
DiO BELL-B02
2x1x
1x
1x 1x
1x
name
1x
DiO BELL-B01
ou/of/o
DiO BELL-B02
2x1x
1x
1x 1x
1x
name
1. Registering your warranty
0. Package contents
2. Description of the product
To register your warranty, fill in the online form at www.chacon.com/
warranty
Melodies
Volume
Doorbell

1x
DiO BELL-B01
ou/of/o
DiO BELL-B02
2x1x
1x
1x 1x
1x
name
1x
DiO BELL-B01
ou/of/o
DiO BELL-B02
2x1x
1x
1x 1x
1x
name
Micro
LED indicator
Button
Lens
Micro
LED indicator
Button
Reset button
DiOBELL-B01
DiOBELL-B02
DiOBELL-B01 + B02
Note
In order to reset the device, press and hold
the reset button for 5 seconds.
The doorbell rings when the process is
complete.

3. Installation instructions
1. Fix the battery cover to your wall
using the screws provided
3. Fix the doorbell to the battery
cover
2. Insert 4 AA batteries into your
doorbell
4. Place the protection cover over
the doorbell
5. Use the fixing key and the screw
provided to fix the elements into
place.
+
+
+
-
-+
-
-
4xAA 1,5V
+
+
+
-
-+
-
-
4xAA 1,5V
+
+
+
-
-+
-
-
4xAA 1,5V
+
+
+
-
-+
-
-
4xAA 1,5V
+
+
+
-
-+
-
-
4xAA 1,5V

4. Configuring the doorbell
Note
In order to reset the device, press and hold the reset button for 5 seconds.
The doorbell rings when the process is complete.
A. Adding the doorbell in the app
Step 1 Connect your smartphone to the WiFi network
Step 2 Download the DiO one app from the Apple Store or the Android
Play Store, depending on your device.
Step 3 Run the DiO one app and register when you use it for the first
time.
Step 4 Follow the steps described in the app to add your doorbell.
Note : Only Wi-Fi access point mode is available for the DIOBELL-B01,
please follow the on-screen instructions for pairing.
Note
- If you have multiple doorbells, please repeat step 4 to add them one by
one.
- To change the WiFi network, restore the camera’s factory settings and
follow step 4 to add the doorbell.
For more detailed information, you can download the user manual from
www.chacon.com
Flashing red light (slow) Waiting for configuration
Flashing red light (fast) Searching for WiFi
Constant blue light Camera connected to WiFi
Flashing blue light Access point mode

B. Pairing the chime
Step 1 Insert two AA batteries into the chime
Step 2 Press the button on your doorbell within 120 seconds
5. General Conditions of Sale and Use
Specifications
Wired doorbell
Lens type 1 / 2.9’’ CMOS
Resolution 2 megapixels
Lens: 2.4 mm
View angle 140°
Bandwidth 16 Kbps ~ 2 Mbps
Aperture 1 / 25 ~ 1 / 100,000 per second
Audio Two-way
Minimum luminosity 0.01 [email protected]
Wi-Fi 802.11b/g/n - 2,4GHz only
Wi-Fi encryption WPA-PSK/WPA2-PSK
Security AES128
Operating temperature -20°C~50°C
Power supply 4 AA batteries
Protocols TCP/IP, HTTP, DHCP, DNS, RTSP
Size (mm) 65 x 125 x 35
Protection rating IP54
Max. Power 73,62mW ERP
Wireless chime
Radio frequency 433.92 MHz
Power supply 2 AA batteries
Consumption in standby mode ≤ 600 uA
Operating temperature 0°C~35°C
Max. Power 0,05mW ERP
Don’t throw batteries or out of order products with the
household waste (garbage). The dangerous substances that they
are likely to include may harm health or the environment. Make
your retailer take back these products or use the selective collect
of garbage proposed by your city.

6. Support
www.chacon.com/support
Hereby, Chacon, declares that the radio equipment type
‘DiOBELL-B01 / DiOBELL-B02’ is in compliance with the Directive
2014/53/EU.
The full test of the EU declaration of conformity is available at the
following Internet address:
http://chacon.com/conformity
www.chacon.com
Chacon S.A. - Avenue mercator 2 - 1300 Wavre
v 1.2 220506
-
 1
1
-
 2
2
-
 3
3
-
 4
4
-
 5
5
-
 6
6
-
 7
7
-
 8
8
-
 9
9
-
 10
10
-
 11
11
-
 12
12
-
 13
13
-
 14
14
-
 15
15
-
 16
16
-
 17
17
-
 18
18
-
 19
19
-
 20
20
-
 21
21
-
 22
22
-
 23
23
-
 24
24
-
 25
25
-
 26
26
-
 27
27
-
 28
28
-
 29
29
-
 30
30
-
 31
31
-
 32
32
-
 33
33
-
 34
34
-
 35
35
-
 36
36
-
 37
37
-
 38
38
-
 39
39
-
 40
40
-
 41
41
-
 42
42
-
 43
43


in andere talen
- italiano: Chacon DIOBELL-B01 Guida utente
- français: Chacon DIOBELL-B01 Mode d'emploi
- español: Chacon DIOBELL-B01 Guía del usuario
- Deutsch: Chacon DIOBELL-B01 Benutzerhandbuch
- português: Chacon DIOBELL-B01 Guia de usuario
Gerelateerde papieren
Andere documenten
-
woox R9061 Gebruikershandleiding
-
DIO DIOBELL-B11 Handleiding
-
-
DIO DIOCAM-RE01 Handleiding
-
Yamaha VL Version2 de handleiding
-
-
Victron energy BlueSolar PWM DUO-LCD-USB de handleiding
-
Victron energy BlueSolar PWM Charge Controller - LCD - USB 12V 24V 30A 48V 10A 20A 30A de handleiding
-
 SCS Sentinel CSF0105 de handleiding
-
 SCS Sentinel CAC0053X de handleiding

