DIO BELL-B11 Doorbell Gebruikershandleiding
- Type
- Gebruikershandleiding

EN
FR
DiOBELL-B11
IT
PTESNL DE

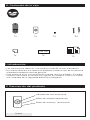
1x 2x1x
1x
1x
1x1x
name
1x 2x1x
1x
1x
1x1x
name
1. Introduction
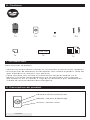
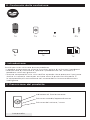
0. Contenu
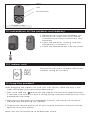
2. Description du produit
Merci d’utiliser ce produit.
• Veuillez lire attentivement toutes les instructions avant d’utiliser l’appareil.
• N’essayez pas de démonter ou de réparer vous-même le produit, faute de
quoi le produit ne sera plus sous garantie.
• Cette sonnette vous envoie une notification lorsqu’on appuie sur le
bouton. Le carillon émet également une sonnerie pour vous informer
que quelqu’un est à la porte. Il s’agit de la sonnette la plus abordable en
matière de sécurité domestique intelligente.
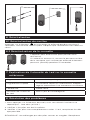
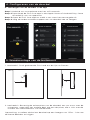
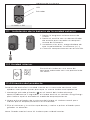
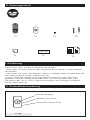
Indicateur de fonctionnement
Mélodie / bouton d’appairage
Volume / bouton reset
Carillon

1x 2x1x
1x
1x
1x1x
name
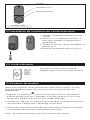
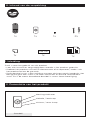
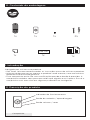
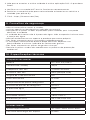
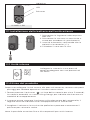
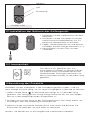
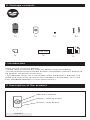
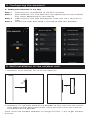
2.1 Installation de la batterie de l’unité extérieure
2.2 Unité intérieure
3 Utilisation du produit
1. Retirez la languette isolante avant de
l’utiliser.
2. Retirez la vis à l’aide d’un tournevis à
croix pour accéder au compartiment
des batteries.
3. Insérez les piles en veillant à respecter la
polarité (+/-)
4. Refermez le compartiment avec la vis.
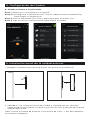
Branchez le carillon dans une prise
adaptée, avec une puissance de 110~240V
Après avoir branché l’unité intérieure dans votre prise murale, il ne vous
reste que quelques étapes afin que votre tout nouveau carillon soit
opérationnel.
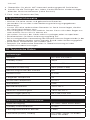
1. Appuyez sur le bouton situé sur le côté du carillon et maintenez-le
enfoncé pendant environ 3 secondes, le carillon émettra un son «Ding-
Dong» pour indiquer qu’il est entré en mode appairage.
2. Maintenant, appuyez sur le bouton de la sonnette, le carillon émettra une
sonnerie pour indiquer que l’ appairage a fonctionné.
3. Choisissez le volume et la musique de votre choix et appuyez à nouveau
sur le bouton poussoir pour sauvegarder votre choix.
Note : Vous pouvez associer jusqu’à 10 sonnettes par carillon
Lentille
Indicateur LED
Bouton poussoir
DiOBELL-B11

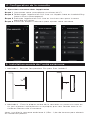
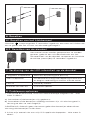
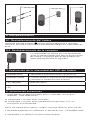
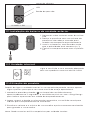
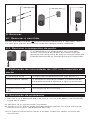
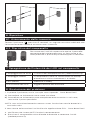
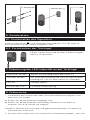
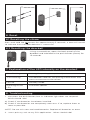
5. Installation murale de l’unité extérieure
1. Méthode 1 : Poussez fort pendant 30s pour fixer l’adhésif
2. Méthode 2 : Fixez la plaque arrière de la sonnette sur votre mur avec les
vis, puis ajoutez l’autre partie sur la plaque, que vous fermez avec la vis
située en dessous de la sonnette.
Note : Installer la sonnette extérieure à 1,15m - 1,4m de hauteur pour obtenir
les meilleures photos.
1
2
3
1
2
3
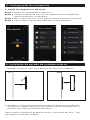
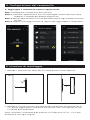
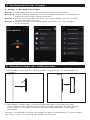
4. Configuration de la sonnette
A. Ajout de la sonnette dans l’application
Etape 1 Connectez votre smartphone au réseau Wi-Fi.
Etape 2 Téléchargez l’application DiO One sur l’Apple Store ou Android Play
Store suivant votre appareil.
Étape 3 Exécutez l’application DiO One et inscrivez-vous pour la toute
première utilisation.
Étape 4 Suivez les étapes ci-dessous pour ajouter votre sonnette.

6. Réinitialisation
6.1 Réinitialisation du carillon
6.2 Réinitialisation de la sonnette
8. Résolution des problèmes
7. Explication de l’intensité du Led sur la sonnette
extérieure
3xAA 1,5V
3xAA 1,5V
3xAA 1,5V
Appuyez sur le bouton et maintenez-le enfoncé pendant environ 5
secondes, une tonalité retentit pour indiquer que l’eacement du code est
réussi.
L’appareil doit être ouvert pour pouvoir être
réinitialisé.
À l’aide d’un tourne-vis, ouvrez le panneau arrière
de la sonnette, puis maintenez enfoncé le bouton-
poussoir (frontal) pendant 15 secondes.
1. Vous appuyez sur le bouton poussoir, mais son témoin lumineux ne
répond pas… Que dois-je faire ?
a. Vérifiez si les piles ont été installées.
b. Vérifiez si les piles sont complètement usées. Si oui, remplacez-les dès
que possible.
REMARQUE : Ne mélangez pas des piles neuves et usagées. Remplacez
Clignotement lent Attente de l’appairage (voir point 4.).
Clignotement rapide La sonnette reçoit les informations d’appai-
rage et commence à se connecter au routeur
Led éteinte mode veille.
Variation de l’intensité
du Led
Mise à jour du micrologiciel.

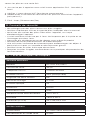
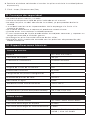
10. Caractéristiques techniques
Sonnette extérieure
Batterie DC 4.5V AA/LR6*3
Courant de veille 45 µA
Fréquence sans fil 2.4GHz+433MHz
Distance sans fil 80m (champ libre)
Angle de vue de la caméra 60°
Définition d’image 0.3 MP
Distance optique 2S
Autofocus 10 PCS
Étanchéité à l’eau IP44
Température de fonctionnement -10°C~50°C
Humidité <90% à 40°C
Dimension (L*H*P) 50,7*126,1*19,5 mm
Carillon intérieur
Alimentation AC 100V~240V 50Hz~60Hz
Consommation en mode veille 0.5Wh
9. Conseils de sécurité
• Ne mélangez pas des piles neuves aux piles usagées.
• Veuillez uniquement utilisez le type de piles indiquées dans le manuel.
• Ne laissez pas traîner des piles usées dans l’appareil, au risque
d’endommager l’appareil.
• L’unité intérieure ne résiste pas à l’eau. Ne l’exposez pas à la pluie et ne
l’immergez pas dans l’eau.
• N’essayez pas de démonter ou de réparer vous-même le produit
• Veuillez conserver précieusement ce mode d’emploi.
• Une utilisation incorrecte de la batterie peut endommager vos objets à
proximité et risquer un incendie ou des blessures graves.
• Veuillez laisser les piles à distance des enfants.
• Recyclez les piles usagées conformément aux pratiques de protection de
l’environnement
toutes les piles en une seule fois.
2. Je n’arrive pas à appairer mon unité à mon application DiO... Que dois-je
faire?
a. Vérifiez si votre réseau WiFi fonctionne correctement.
b. Redémarrez la sonnette en réinstallant les piles ou réinitialisez l’appareil
(voir point 6.)
3. FAQ : https://chacon.com/faq

11. Support
www.chacon.com/support
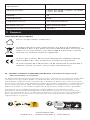
Ce produit doit être traité conformément à la directive Européenne
2002/96/EC dans le but d’être recyclé ou démonté pour minimiser son
impact sur l’environnement. Pour davantage d’informations, veuillez
contacter les autorités locales ou régionales.
Le soussigné, Chacon, déclare que l’équipement radioélectrique du
type ‘DiOBELL-B11’ sont conformes à la Directive 2014/53/UE.
Le texte complet de la déclaration UE de conformité est disponible à
l’adresse internet suivante : http://chacon.com/conformity
FR - FRANCE: SUIVANT LA REGLEMENTATION CNIL concernant les dispositif de
vidéosurveillance ou visiophone
Ce dispositif a pour fonction d’identifier un visiteur, en aucun cas il ne doit être utilisé pour
surveiller la rue ou l’espace public. Ce dispositif doit être utilisé conformément à la loi
informatique et libertés. Toute utilisation de ce produit en dehors d’un cadre strictement
personnel est soumise à des obligations légales d’utilisation, notamment en application de
la loi n°78-17 du 6 janvier 1978, sur lesquelles il appartient à l’acquéreur de se renseigner
auprès de la CNIL, et est soumis à l’obtention d’autorisations administratives préalables.
L’acquéreur est susceptible d’engager sa responsabilité civile et pénale en cas
d’utilisation détournée du dispositif dans le but de porter atteinte à l’intimité de la vie
privée ou à l’image de tiers ; Le fabricant ne pourra en aucun cas être tenu responsable
d’une utilisation de la sonnette en contravention avec les dispositions législatives et
réglementaires en vigueur.
www.chacon.com
Chacon S.A. - Avenue mercator 2 - 1300 Wavre
Consommation d’énergie en fonc-
tionnement
1.5Wh
Volume (30cm) Faible: 60-70dB / Moyen: 70-80dB
/ Fort: 80-90dB
Mélodie 38
Démodulation OOK
Fréquence sans fil 433.92MHz±250KHz
Distance sans fil 80m (champ libre)
Température de fonctionnement -10~50°C
À DÉPOSER
EN MAGASIN À DÉPOSER
EN DÉCHÈTERIE
OU
FR
Cet appareil
et ses piles
se recyclent
Pour un usage intérieur uniquement

1x 2x1x
1x
1x
1x1x
name
1x 2x1x
1x
1x
1x1x
name
1. Inleiding
0. Inhoud van de verpakking
2. Presentatie van het produkt
Dank u voor het gebruik van dit product.
• Lees alle instructies zorgvuldig door voordat u het product gebruikt.
• Probeer het product niet zelf te demonteren of te repareren, anders valt
het product buiten de garantie.
• Deze deurbel stuurt u een melding wanneer de knop wordt ingedrukt. Het
belsignaal gaat ook af om u te laten weten dat er iemand voor de deur
staat. Dit is de meest betaalbare deurbel in smart home beveiliging.
Deurbell
Werkingsindicator
Melodie / leerknop
Volume / reset knop

1x 2x1x
1x
1x
1x1x
name
Cameralens
LED
Drukknop
DiOBELL-B11
2.1 Installatie van de batterij van de buitenunit
2.2 Binnenunit
3 Gebruik van het product
1. Verwijder het isolatielipje voor gebruik.
2. Verwijder de schroef met een kruis-
kopschroevendraaier om toegang te
krijgen tot het batterijcompartiment.
3. Plaats de batterijen en let daarbij op de
juiste polariteit (+/-)
4. 4. Sluit het compartiment met de
schroef.
Steek de stekker van de bel in een
geschikt stopcontact met een spanning
van 110~240V
Nadat u de stekker van de binnenunit in het stopcontact hebt gestoken, zijn
er nog maar een paar stappen nodig om uw nieuwe gong operationeel te
maken.
1. Druk op de knop aan de zijkant van de chime en houd deze ongeveer
3 seconden ingedrukt, de chime zal een «Ding-Dong» geluid laten horen
om aan te geven dat hij in de koppelingsmodus is gekomen.
2. Druk nu op de knop op de deurbel camera, de bel zal klinken om aan te
geven dat het koppelen is gelukt.
3. Kies het volume en de muziek van uw keuze en druk nogmaals op de
drukknop om uw keuze op te slaan.
Opmerking: U kunt maximaal 10 bellen per bel koppelen.

5. Wandmontage van de buitenunit
1. Methode 1: Druk gedurende 30s hard om de lijm te fixeren
2. Methode 2: Bevestig de achterplaat van de deurbel aan uw muur met de
schroeven, voeg dan het andere deel toe aan de plaat, die u sluit met de
schroef aan de onderkant van de deurbel.
Opmerking: Installeer de buiten deurbel op een hoogte van 1.15m - 1.4m om
de beste beelden te krijgen.
1
2
3
1
2
3
4. Configureren van de deurbel
A. Toevoegen van de deurbel in de app
Stap 1 Verbind uw smartphone met het wifi-netwerk.
Stap 2 Download de DiO One-app in de Apple Store of Android Play Store
afhankelijk van uw apparaat.
Stap 3 Open de DiO One-app en meld u aan voor het eerste gebruik.
Stap 4 Volg de onderstaande stappen om uw deurbel toe te voegen.

3xAA 1,5V
3xAA 1,5V
3xAA 1,5V
6. Resetten
6.1 Resetten van het klokkenspel
6.2. Resetten van de deurbel.
8. Problemen oplossen
7. Verklaring van de LED intensiteit op de deurbel
Houd de knop ongeveer 5 seconden ingedrukt, een toon zal klinken om
aan te geven dat het wissen van de code geslaagd is.
Het toestel moet worden geopend om te worden
gereset, gebruik een schroevendraaier om het
achterpaneel van de deurbel te openen en houd de
drukknop (voorzijde) 15 seconden ingedrukt.
1. U drukt op de drukknop, maar het indicatielampje reageert niet... Wat
moet ik doen?
a) Controleer of de batterijen zijn geplaatst.
b) Controleer of de batterijen volledig versleten zijn. Als dat het geval is,
vervang ze dan zo snel mogelijk.
OPMERKING: Gebruik geen nieuwe en gebruikte batterijen door elkaar.
Vervang alle batterijen in één keer.
2. Ik kan mijn toestel niet aan mijn DiO applicatie koppelen... Wat moet ik
doen?
Langzaam knipperend Wachten op pairing (zie punt 4.).
Snel knipperend De deurbel ontvangt de koppelingsinformatie
en begint verbinding te maken met de router
LED uit Stand-by modus.
Dimmen van de LED Firmware update.

10. Technische specificaties
Buitenbel
Batterij DC 4.5V AA/LR6*3
Stand-by stroom µA
Draadloze frequentie 2.4GHz+433MHz
Draadloze afstand 80m (vrij veld)
Kijkhoek van de camera 60
Camera pixels 0.3 MP
Lengte fotopunten 2S
Aantal fotopunten 10 PCS
Waterdicht IP44
Werkende temperatuur -10°C~50°C
Relatieve vochtigheid <90% bij 40°C
Afmetingen (W*H*D) 50,7*126,1*19,5 mm
Binnenklokje
Stroomvoorziening AC 100V~240V 50Hz~60Hz
Stand-by stroomverbruik 0.5Wh
Stroomverbruik in bedrijf 1.5Wh
Volume (30 cm) Laag:60-70dB / Gemid-
deld:70-80dB / Hoog:80-90dB
9. Veiligheidsadvies
• Gebruik geen nieuwe en gebruikte batterijen door elkaar.
• Gebruik alleen het type batterijen dat in de handleiding staat aangegeven.
• Laat geen gebruikte batterijen in het apparaat rondslingeren, aangezien
dit het apparaat kan beschadigen.
• De binnenunit is niet waterdicht. Stel het niet bloot aan regen en dompel
het niet onder in water.
• Probeer het product niet zelf te demonteren of te repareren.
• Bewaar deze instructies zorgvuldig.
• Onjuist gebruik van de batterij kan schade toebrengen aan voorwerpen in
de buurt en kan brand of ernstig letsel veroorzaken.
• Houd batterijen uit de buurt van kinderen.
• Recycle gebruikte batterijen in overeenstemming met de
milieubeschermingspraktijken
a. Controleer of uw WiFi-netwerk goed werkt.
b. Start de deurbel opnieuw op door de batterijen opnieuw te plaatsen of
reset het toestel (zie punt 6.)
3. FAQ : https://chacon.com/faq

11. Support
www.chacon.com/support
Dit product moet zijn verwerkt volgens de Richtlijn nr.
2002/96/EG met het doel van de recycling ervan of moet zijn
gedemonteerd op die wijze, dat zijn invloed op de omgeving
de kleinst mogelijk was. Meer details wordt aan u door locale of
regionale overheid verstrekt.
Hierbij verklaar ik, Chacon, dat het type radioapparatuur
‘DiOBELL-B11’ conform is met Richtlijn 2014/53/EU.
De volledige tekst van de EU-conformiteitsverklaring kan worden
geraadpleegd op het volgende internetadres: http://chacon.com/
conformity
www.chacon.com
Chacon S.A. - Avenue mercator 2 - 1300 Wavre
Melodie 38
Demodulatie OOK
Draadloze frequentie 433.92MHz±250KHz
Draadloze afstand 80m (vrij veld)
Werkende temperatuur -10~50°C
Enkel voor gebruik binnenshuis

1x 2x1x
1x
1x
1x1x
name
1. Introducción
0. Contenido de la caja
2. Descripción del producto
• Lea atentamente todas las instrucciones antes de utilizar el producto.
• No intente desmontar o reparar el producto usted mismo, de lo contrario
el producto quedará fuera de garantía.
• Este timbre le envía una notificación cuando se pulsa el botón. El timbre
también suena para avisar que hay alguien en la puerta. Este es el timbre
más asequible de la seguridad doméstica inteligente.
Timbre
1x 2x1x
1x
1x
1x1x
name
Indicador de funcionamiento
Botón de melodía/aprendizaje
Botón de volumen/ restauración

1x 2x1x
1x
1x
1x1x
name
Objetivo de la cámara
LED
Pulsador
DiOBELL-B11
2.1 Instalación de la batería de la unidad exterior
2.2 Unidad interior
3 Utilización del producto
1. Retire la lengüeta aislante antes de
usarla.
2. Retire el tornillo con un destornillador
de estrella para acceder al comparti-
mento de la batería.
3. Introduzca las pilas, asegurándose de
que la polaridad es la correcta (+/-)
4. Cierre el compartimento con el tornillo.
Enchufe el timbre en una toma de
corriente adecuada con una potencia de
110~240V
Después de enchufar la unidad interior en su toma de corriente, sólo
quedan unos pocos pasos para que su nuevo timbre esté operativo.
1. Mantenga pulsado el botón en el lateral del timbre durante
aproximadamente 3 segundos, el timbre emitirá un sonido «Ding-Dong»
para indicar que ha entrado en modo de emparejamiento.
2. Ahora pulse el botón de la cámara del timbre, el timbre sonará para
indicar que el emparejamiento ha funcionado.
3. Elija el volumen y la música que desee y vuelva a pulsar el botón para
guardar su elección.
Nota: Puede asociar hasta 10 timbres por unidad interior.

5. Instalación mural de la unidad exterior
1. Método 1: Presione con fuerza durante 30s para fijar el adhesivo
2. Método 2: Fije la placa trasera del timbre a la pared con los tornillos,
luego añada la otra parte a la placa, que cerrará con el tornillo de la parte
inferior del timbre.
Nota: Instale el timbre de exterior a una altura de 1,15m - 1,4m para obtener
las mejores imágenes.
1
2
3
1
2
3
4. Configuración del timbre
A. Añadir el timbre a la aplicación
Paso 1 Conecte su smartphone a la red wifi.
Paso 2 Descárguese la aplicación DiO One en Apple Store o Android Play
Store según su dispositivo.
Paso 3 Abrir la aplicación DiO One y regístrese para el primer uso.
Paso 4 Siga los pasos a continuación para añadir el timbre.

3xAA 1,5V
3xAA 1,5V
3xAA 1,5V
6. Restablecimiento
6.1. Restablecimiento del timbre
6.2. Restablecimiento de la campana
8. Solución de problemas
7. Explicación de la intensidad del LED del timbre
Mantenga pulsado el botón durante aproximadamente 5 segundos,
sonará un tono para indicar que el borrado del código se ha realizado con
éxito.
La unidad debe ser abierta para ser restablecida,
utilice un destornillador para abrir el panel trasero
del timbre y mantenga presionado el botón pul-
sador (frontal) durante 15 segundos.
1. Usted presiona el botón pulsador, pero su indicador luminoso no
responde... ¿Qué debo hacer?
a) Compruebe si las pilas están instaladas.
b) Compruebe si las pilas están completamente gastadas. Si es así,
sustitúyalas lo antes posible.
NOTA: No mezcle pilas nuevas y usadas. Sustituya todas las pilas a la vez.
2. No puedo emparejar mi unidad con mi aplicación DiO... ¿Qué debo hacer?
a. Comprueba si tu red WiFi funciona correctamente.
Parpadeo lento Esperando el emparejamiento (ver punto 4.).
Parpadeo rápido El timbre recibe la información de emparejamiento
y comienza a conectarse con el router
LED apagado Modo de espera.
Atenuación del
LED
Actualización del firmware.

10. Especificaciones técnicas
Timbre de exterior
Batería DC 4.5V AA/LR6*3
Corriente de espera 45 µA
Frecuencia inalámbrica 2.4GHz+433MHz
Distancia inalámbrica 80m (campo libre)
Ángulo de visión de la cámara 60
Píxeles de la cámara 0,3 MP
Longitud de los puntos fotográficos 2S
Número de puntos de foto 10 PCS
Resistente al agua IP44
Temperatura de funcionamiento -10°C~50°C
Humedad relativa <90% a 40°C
Dimensiones (ancho*alto*profundidad) 50,7*126,1*19,5 mm
Timbre interior
Fuente de alimentación AC 100V~240V 50Hz~60Hz
Consumo de energía en espera 0.5Wh
Consumo de energía en funcionamiento 1.5Wh
Volumen (30cm) Bajo: 60-70dB / Medio: 70-
80dB / Alto: 80-90dB
9. Consejos de seguridad
- No mezcle pilas nuevas y usadas.
- Utilice únicamente el tipo de pilas indicado en el manual.
- No deje las pilas usadas dentro de la unidad, ya que pueden dañar la
unidad.
- La unidad interior no es impermeable. No la exponga a la lluvia ni la
sumerja en agua.
- No intente desmontar o reparar el producto usted mismo.
- Guarde estas instrucciones cuidadosamente.
- El uso incorrecto de la pila puede dañar los objetos cercanos y suponer un
riesgo de incendio o lesiones graves.
- Mantenga las pilas fuera del alcance de los niños.
- Recicle las pilas usadas de acuerdo con las prácticas de protección del
medio ambiente
b. Reinicie el timbre volviendo a instalar las pilas o reinicie la unidad (véase
el punto 6.)
3. FAQ : https://chacon.com/faq

Este producto debe estar procesado acorde la directiva
2002/96/ES con el propósito de su reciclación o desmantelado
de manera que se minimice su efecto al medio ambiente.
Consulte las autoridades locales o regionales para obtener más
detalles.
Por la presente, Chacon, declara que el tipo de equipo
radioeléctrico ‘DiOBELL-B11’ es conforme con le Directiva
2014/53/UE.
El texto completo de la declaración UE de conformidad está
disponible en la dirección internet siguiente:
http://chacon.com/conformity
www.chacon.com
Chacon S.A. - Avenue mercator 2 - 1300 Wavre
11. Support
www.chacon.com/support
Melodía 38
Demodulación OOK
Frecuencia inalámbrica 433.92MHz±250KHz
Distancia inalámbrica 80m (campo libre)
Temperatura de funcionamiento -10~50°C
Solo para uso en interiores

1x 2x1x
1x
1x
1x1x
name
1. Introdução
0. Conteúdo da embalagem
2. Descrição do produto
Obrigado por utilizar este produto.
• Por favor, leia atentamente todas as instruções antes de utilizar o produto.
• Não tente desmontar ou reparar o produto você mesmo, caso contrário o
produto estará fora de garantia.
• Esta campainha envia-lhe uma notificação quando o botão é premido. A
campainha também toca para que saiba que alguém está à porta. Esta é a
campainha mais acessível em segurança doméstica inteligente.
Campainha
1x 2x1x
1x
1x
1x1x
name
Indicador de funcionamento
Botão de melodia / aprendizagem
Botão volume / reset

1x 2x1x
1x
1x
1x1x
name
Lente da câmara
LED
Botão de pressão
DiOBELL-B11
2.1 Instalação da bateria da unidade exterior
2.2 Unidade interiort
3 Utilização do produto
1. Remover a aba isolante antes da utiliza-
ção.
2. Retirar o parafuso com uma chave de
parafusos de cabeça cruzada para
aceder ao compartimento da bateria.
3. Inserir as baterias, certificando-se de
que a polaridade está correcta (+/-).
4. Fechar o compartimento com o parafu-
so.
Ligar o carrilhão a uma tomada adequada
com uma potência nominal de 110~240V
Depois de ligar a unidade interior à sua tomada de parede, restam apenas
alguns passos para que o seu novo carrilhão esteja operacional.
1. Mantenha premido o botão na lateral do carrilhão durante
aproximadamente 3 segundos, o carrilhão emitirá um som «Ding-Dong»
para indicar que entrou em modo de emparelhamento.
2. Agora, premir o botão na câmara da campainha, o carrilhão soará para
indicar que o emparelhamento funcionou.
3. Escolha o volume e a música da sua escolha e prima novamente o botão
para guardar a sua escolha.
Nota: Pode associar até 10 campainhas por unidade interior.

5. Instalação de parede da unidade exterior
1. Método 1: Empurrar com força durante 30s para fixar o adesivo
2. Método 2: Fixe a placa traseira da campainha da porta à parede com
os parafusos, depois adicione a outra parte à placa, que fecha com o
parafuso no fundo da campainha da porta.
Nota: Instale a campainha da porta exterior a uma altura de 1,15m - 1,4m
para obter as melhores imagens.
1
2
3
1
2
3
4. Configuração da campainha
A. Adição da campainha na aplicação
Etapa 1 Ligue o seu smartphone à rede Wi-Fi
Etapa 2 Transfira a aplicação DiO One em Apple Store ou Android Play
Store consoante o seu aparelho.
Etapa 3 Abrir a aplicação DiO One e registe-se para a primeira utilização.
Etapa 4 Siga as etapas abaixo para adicionar a sua campainha

3xAA 1,5V
3xAA 1,5V
3xAA 1,5V
6. Reiniciar
6.1. Reiniciar o carrilhão
6.2. Reiniciar a campainha da porta.
8. Resolução de problemas
7. Explicação da intensidade do LED na campainha da
porta
Manter premido o botão durante aproximadamente 5 segundos, soará
um tom para indicar que a eliminação do código é bem sucedida.
A unidade deve ser aberta para ser reiniciada,
utilizar uma chave de fendas para abrir o painel
posterior da campainha da porta e manter premido
o botão de pressão (à frente) durante 15 segundos.
1. Pressiona-se o botão de pressão, mas a sua luz indicadora não responde.
O que devo fazer?
a) Verificar se as pilhas foram instaladas.
b) Verificar se as pilhas estão completamente gastas. Em caso afirmativo,
substitua-as o mais rapidamente possível.
NOTA: Não misturar pilhas novas e usadas. Substituir todas as pilhas de
uma só vez.
Flamejante lento à espera de emparelhamento (ver ponto 4.).
Intermitência rápida A campainha da porta recebe a informação de
emparelhamento e começa a ligar-se ao router
LED desligado Modo standby.
Escurecimento do
LED
Actualização do Firmware.

10. Especificações técnicas
Campainha de exterior
Bateria DC 4.5V AA/LR6*3
Corrente de standby 45µA
Frequência sem fios 2.4GHz+433MHz
Distância sem fios 80m (campo livre)
Ângulo de visão da câmara 60
Pixéis da câmara 0,3 MP
Comprimento do ponto fotográfico 2S
Número de pontos de fotografia 10 PCS
À prova de água IP44
Temperatura de funcionamento -10°C~50°C
Humidade relativa <90% a 40°C
Dimensão (W*H*D) 50,7*126,1*19,5 mm
Unidade interior
Alimentação eléctrica AC 100V~240V 50Hz~60Hz
Consumo de energia em espera 0.5Wh
9. Conselhos de segurança
- Não misturar pilhas novas e usadas.
- Utilizar apenas o tipo de pilhas indicado no manual.
- Não deixar as pilhas usadas espalhadas pela unidade, pois isso pode
danificar a unidade.
- A unidade de interior não é à prova de água. Não a exponha à chuva nem
a imerja em água.
- Não tente desmontar ou reparar o produto por conta própria.
- Por favor, mantenha estas instruções cuidadosamente.
- A utilização incorrecta da bateria pode danificar objectos nas
proximidades e arriscar incêndio ou ferimentos graves.
- Por favor, mantenha as pilhas longe das crianças.
- Recicle as pilhas usadas de acordo com as práticas de protecção
ambiental.
2. Não posso associar a minha unidade à minha aplicação DiO. O que devo
fazer?
a. Verificar se a sua rede WiFi está a funcionar correctamente.
b. Reiniciar a campainha da porta reinstalando as baterias ou reiniciar a
unidade (ver ponto 6.)
3. FAQ : https://chacon.com/faq

Este produto deve ser passado pelo tratamento conforme
à norma 2002/96/ES para ser reciclado ou desmontado de
maneira que a sua inuência no meio ambiente seja mínima.
As autoridades locais ou regionais prestam mais informações
detalhadas.
O abaixo assinado, Chacon, declara que o presente tipo de
equipamento de rádio ‘DiOBELL-B11’ está em conformidade com
a Diretiva 2014/53/UE.
O texto integral da declaração de conformidade está disponível
no seguinte endereço de Internet:
http://chacon.com/conformity
www.chacon.com
Chacon S.A. - Avenue mercator 2 - 1300 Wavre
11. Support
www.chacon.com/support
Consumo de energia em funcionamento 1.5Wh
Volume (30cm) Low: 60-70dB / Medium: 70-
80dB / High: 80-90dB
Melodia 38
Desmodulação OOK
Frequência sem fios 433.92MHz±250KHz
Distância sem fios 80m (campo livre)
Temperatura de funcionamento -10~50°C
Apenas para uso interior

1x 2x1x
1x
1x
1x1x
name
1. Introduzione
0. Contenuto della confezione
2. Descrizione del prodotto
Grazie per aver utilizzato questo prodotto.
• Leggere attentamente tutte le istruzioni prima di utilizzare il prodotto.
• Non tentare di smontare o riparare il prodotto da soli, altrimenti il
prodotto sarà fuori garanzia.
• Questo campanello invia una notifica quando viene premuto il pulsante.
Anche la suoneria suona per avvisare che c’è qualcuno alla porta. È
la campanello più conveniente nel settore della sicurezza domestica
intelligente.
Campanello
1x 2x1x
1x
1x
1x1x
name
Indicatore di funzionamento
Pulsante melodia/apprendimento
Pulsante del volume / reset

1x 2x1x
1x
1x
1x1x
name
Obiettivo
LED
Pulsante
DiOBELL-B11
2.1 Installazione della batteria dell’unità esterna
2.2 Unità interna
3 Utilizzo del prodotto
1. Rimuovere la linguetta isolante prima
dell’uso.
2. Rimuovere la vite con un cacciavite a
croce per accedere al vano batteria.
3. Inserire le batterie, verificando che la
polarità sia corretta (+/-).
4. Chiudere il vano con la vite.
Collegare la suoneria a una presa di
corrente adeguata con una potenza di
110~240V
Dopo aver collegato l’unità interna alla presa di corrente, restano solo pochi
passaggi per rendere operativo il vostro nuovo chime.
1. Tenete premuto il pulsante sul lato della suoneria per circa 3 secondi;
la suoneria emetterà un suono «Ding-Dong» per indicare che è entrata in
modalità di accoppiamento.
2. A questo punto, premere il pulsante sulla telecamera del campanello; il
segnale acustico indicherà che l’accoppiamento ha funzionato.
3. Scegliete il volume e la musica che preferite e premete nuovamente il
pulsante per salvare la scelta.
Nota: è possibile associare fino a 20 campanelli per unità interna.

5. Istruzioni di montaggio
1. Metodo 1: premere con forza per 30 secondi per fissare l’adesivo
2. Metodo 2: fissare la piastra posteriore del campanello alla parete con le
viti, quindi aggiungere l’altra parte alla piastra, che si chiude con la vite
sul fondo del campanello.
Nota: installare il campanello da esterno a un’altezza di 1,15 m - 1,4 m per
ottenere le immagini migliori.
1
2
3
1
2
3
4. Configurazione del campanello
A. Aggiungere il campanello tramite l’applicazione
Step 1 Collegare lo smartphone alla rete WiFi
Step 2 Scaricare l’applicazione DiO One dall’Apple Store o dal Play Store
Android, a seconda del proprio dispositivo.
Step 3 Aprire l’applicazione DiO One ed eettuare la registrazione al primo
utilizzo.
Step 4 Seguire i passaggi illustrati di seguito per aggiungere il campanello

3xAA 1,5V
3xAA 1,5V
3xAA 1,5V
6. Ripristino
6.1. Azzeramento della suoneria
6.2. Ripristino del campanello
8. Risoluzione dei problemi
7. Spiegazione dell’intensità dei LED sul campanello
Tenere il pulsante per circa 5 secondi; un segnale acustico indicherà che
l’eliminazione del codice è avvenuta con successo.
Per resettare l’unità è necessario aprire il pannello
posteriore del campanello con un cacciavite e te-
nere premuto il pulsante (anteriore) per 15 secondi.
1. Si preme il pulsante, ma la sua spia non risponde... Cosa devo fare?
a) Controllare se le batterie sono state installate.
b) Controllare se le batterie sono completamente esaurite. In tal caso,
sostituirle il prima possibile.
NOTA: non mischiare batterie nuove e usate. Sostituire tutte le batterie in
una volta sola.
2. Non riesco ad associare l’unità alla mia applicazione DiO... Cosa devo fare?
a. Verificare che la rete WiFi funzioni correttamente.
b. Riavviare il campanello reinstallando le batterie o resettare l’unità
(vedere punto 5)
Lampeggiamento lento in attesa dell’accoppiamento (vedere punto 4).
Lampeggio veloce il campanello riceve le informazioni di accop-
piamento e inizia a connettersi al router.
LED spento Modalità standby.
Diminuzione del LED Aggiornamento del firmware.

10. Specifiche tecniche
Campana da esterno
Batteria DC 4,5V AA/LR6*3
Corrente di standby 45 µA
Frequenza wireless 2.4GHz+433MHz
Distanza wireless 80m (campo libero)
Angolo di visione della telecamera 60
Pixel della telecamera 0,3 MP
Lunghezza punto foto 2S
Numero di punti foto 10 PCS
Impermeabile IP44
Temperatura di funzionamento -10°C~50°C
Umidità relativa <90% a 40°C
Dimensioni (L*H*P) 50,7*126,1*19,5 mm
Unità interna
Alimentazione AC 100V~240V 50Hz~60Hz
Consumo di energia in standby 0.5Wh
Consumo di energia in funzione 1.5Wh
Volume (30cm) Basso: 60-70dB / Medio: 70-
80dB / Alto: 80-90dB
Melodia 38
Demodulazione OOK
Frequenza wireless 433.92MHz±250KHz
9. Consigli di sicurezza
• Non mischiare batterie nuove e usate.
• Utilizzare solo il tipo di batterie indicato nel manuale.
• Non lasciare le batterie usate in giro per l’unità, perché potrebbero
danneggiarla.
• L’unità interna non è impermeabile. Non esporla alla pioggia e non
immergerla in acqua.
• Non tentare di smontare o riparare il prodotto da soli.
• Conservare con cura queste istruzioni.
• L’uso improprio della batteria può danneggiare gli oggetti vicini e
comportare il rischio di incendi o lesioni gravi.
• Tenere le batterie lontano dalla portata dei bambini.
• Riciclare le batterie usate secondo le pratiche di protezione ambientale
3. FAQ : https://chacon.com/faq

Non gettare le batterie o prodotti esausti con i rifiuti domestici
(immondizia). Potrebbero contenere sostanze pericolose
dannose per la salute o l’ambiente. Restituire questi prodotti al
commerciante o utilizzare i servizi di raccolta dierenziata della
propria città.
Con la presente, Chacon, dichiara che l’apparecchiatura radio tipo
‘DiOBELL-B11’ è conforme alla direttiva 2014/53/UE.
Il testo completo della dichiarazione di conformità UE è
disponibile al seguente sito: http://chacon.com/conformity
www.chacon.com
Chacon S.A. - Avenue mercator 2 - 1300 Wavre
11. Support
www.chacon.com/support
Distanza wireless 80m (campo libero)
Temperatura di funzionamento -10~50°C
Solo per uso interno

1x 2x1x
1x
1x
1x1x
name
1. Einleitung
0. Packungsinhalt
2. Produktbeschreibung
Vielen Dank, dass Sie dieses Produkt verwenden.
• Bitte lesen Sie alle Anweisungen sorgfältig durch, bevor Sie das Produkt
verwenden.
• Versuchen Sie nicht, das Produkt selbst zu zerlegen oder zu reparieren, da
sonst die Garantie für das Produkt erlischt.
• Diese Türklingel sendet Ihnen eine Benachrichtigung wenn die Taste
gedrückt wird. Der Gong ertönt ebenfalls, um Sie zu informieren, dass
jemand an der Tür ist. Dies ist die erschwinglichste Türklingel im Bereich
Smart Home Security.
Klingel
1x 2x1x
1x
1x
1x1x
name
Betriebsanzeige
Melodie-/Lerntaste
Lautstärke-/Reset-Taste

1x 2x1x
1x
1x
1x1x
name
Objektiv
LED
Drucktaste
DiOBELL-B11
2.1 Installation der Batterie des Außengeräts
2.2 Inneneinheit
3 Benutzung des Produkts
1. Entfernen Sie die Isolierlasche vor dem
Gebrauch.
2. Entfernen Sie die Schraube mit einem
Kreuzschlitzschraubendreher, um Zu-
gang zum Batteriefach zu erhalten.
3. Legen Sie die Batterien ein und achten
Sie dabei auf die richtige Polarität (+/-).
4. Verschließen Sie das Fach mit der
Schraube.
Das Gerät muss geönet sein, um
zurückgesetzt werden zu können.Önen
Sie mithilfe eines Schraubenziehers die
Rückwand der Türklingel und halten Sie
den Druckknopf (vorne) 15 Sekunden lang
gedrückt.
Nachdem Sie das Innengerät in die Steckdose gesteckt haben, sind nur
noch wenige Schritte nötig, um Ihr neues Klingelgerät in Betrieb zu nehmen.
1. Halten Sie die Taste an der Seite des Gongs ca. 3 Sekunden lang
gedrückt. Der Gong gibt ein «Ding-Dong»-Geräusch ab, um anzuzeigen,
dass er in den Kopplungsmodus eingetreten ist.
2. Drücken Sie nun die Taste an der Türklingelkamera. Der Gong ertönt, um
anzuzeigen, dass die Kopplung funktioniert hat.
3. Wählen Sie die Lautstärke und die Musik Ihrer Wahl und drücken Sie
erneut den Druckknopf, um Ihre Wahl zu speichern
Hinweis: Sie können bis zu 20 Klingeln pro Inneneinheit zuordnen.

5. Wandmontage der Außeneinheit
1. Methode 1: Drücken Sie 30 Sekunden lang kräftig, um den Kleber zu
fixieren.
2. Methode 2: Befestigen Sie die Rückplatte der Türklingel mit den
Schrauben an der Wand, dann fügen Sie den anderen Teil der Platte
hinzu, den Sie mit der Schraube an der Unterseite der Türklingel
schließen.
Hinweis: Installieren Sie die Türklingel für den Außenbereich in einer Höhe
von 1,15m - 1,4m, um die besten Bilder zu erhalten.
1
2
3
1
2
3
A. Klingel in der App hinzufügen
Schritt 1 Verbinden Sie Ihr Smartphone mit dem WLAN-Netz.
Schritt 2 Laden Sie die App DiO One im Apple Store oder Android Play
Store je nach Ihrem Gerät herunter.
Schritt 3 Önen Sie die App DiO One aus und melden Sie sich für die
erstmalige Nutzung an.
Schritt 4 Folgen Sie den nachstehenden Schritten, um Ihre Klingel
hinzuzufügen.
4. Konfiguration der Klingel

3xAA 1,5V
3xAA 1,5V
3xAA 1,5V
6. Zurücksetzen
6.1. Zurücksetzen des Signaltons
6.2. Zurücksetzen der Türklingel.
8. Fehlersuche
7. Erläuterung der LED-Intensität an der Türklingel
Halten Sie die Taste ca. 5 Sekunden lang gedrückt. Ein Ton zeigt an,
dass die Löschung des Codes erfolgreich war.
Önen Sie das Gerät und drücken Sie den Klingelk-
nopf für 15 Sekunden.
1. Sie drücken den Druckknopf, aber seine Kontrollleuchte reagiert nicht...
Was muss ich tundo?
a) Prüfen Sie, ob die Batterien eingelegt sind.
b) Prüfen Sie, ob die Batterien vollständig verbraucht sind. Wenn ja,
ersetzen Sie sie so schnell wie möglich.
HINWEIS: Mischen Sie nicht neue und gebrauchte Batterien. Ersetzen Sie
alle Batterien auf einmal.
2. Ich kann mein Gerät nicht mit meiner DiO-Anwendung koppeln... Was soll
Langsames Blinken Warten auf die Kopplung (siehe Punkt 4.).
Schnelles Blinken Die Türklingel empfängt die Pairing-Informationen
und beginnt, sich mit dem Router zu verbinden.
LED aus Standby-Modus.
Dimmen der LED Firmware-Aktualisierung

10. Technische Daten
Außenklingel
Batterie DC 4.5V AA/LR6*3
Standby-Strom 45µA
Drahtlose Frequenz 2.4GHz+433MHz
Drahtlose Entfernung 80m (freies Feld)
Betrachtungswinkel der Kamera 60
Kamera-Pixel 0,3 MP
Länge der Fotopunkte 2S
Anzahl der Fotopunkte 10 PCS
Wasserdicht IP44
Betriebstemperatur -10°C~50°C
Relative Luftfeuchtigkeit <90% bei 40°C
Abmessungen (B*H*T) 50,7*126,1*19,5 mm
Glockenspiel für den Innenbereich
Stromversorgung AC 100V~240V 50Hz~60Hz
Standby-Stromverbrauch 0.5Wh
Leistungsaufnahme im Betrieb 1.5Wh
Lautstärke (30cm): Niedrig 60-70dB / Mittel: 70-80dB /
Hoch: 80-90dB
9. Sicherheitshinweise
• Mischen Sie keine neuen und gebrauchten Batterien.
• Verwenden Sie nur den in der Bedienungsanleitung angegebenen
Batterietyp.
• Lassen Sie keine verbrauchten Batterien im Gerät herumliegen, da dies
das Gerät beschädigen kann.
• Das Innengerät ist nicht wasserdicht. Setzen Sie es nicht dem Regen aus
und tauchen Sie es nicht in Wasser ein.
• Versuchen Sie nicht, das Gerät selbst zu zerlegen oder zu reparieren.
• Bitte bewahren Sie diese Anleitung sorgfältig auf.
• Bei unsachgemäßer Verwendung der Batterie können Gegenstände in der
Nähe beschädigt werden und es besteht Brand- oder Verletzungsgefahr.
• Bitte halten Sie Batterien von Kindern fern.
• Recyceln Sie verbrauchte Batterien in Übereinstimmung mit den
Umweltschutzbestimmungen.
ich tun?
a. Überprüfen Sie, ob Ihr WiFi-Netzwerk ordnungsgemäß funktioniert.
b. Starten Sie die Türklingel neu, indem Sie die Batterien wieder einlegen
oder das Gerät zurücksetzen (siehe Punkt 6.)
3. FAQ : https://chacon.com/faq

Batterien/Akkus oder defekte Produkte nicht im Hausmüll
entsorgen. Die möglicherweise enthaltenen gefährlichen
Substanzen können für die Gesundheit oder die Umwelt schädlich
sein. Geben Sie die Produkte beim Händler zurück oder geben Sie
sie an einer Sammelstelle oder bei einem Recyclinghof ab.
Chacon erklärt hiermit, dass der Funkgerätetyp „DiOBELL-B11“
mit der Richtlinie 2014/53/EG konform ist.
Der vollständige Test der EU-Konformitätserklärung steht unter
der folgenden Internetadresse zur Verfügung: http://chacon.
com/conformity
www.chacon.com
Chacon S.A. - Avenue mercator 2 - 1300 Wavre
11. Support
www.chacon.com/support
Melodie 38
Demodulation OOK
Drahtlose Frequenz 433.92MHz±250KHz
Drahtlose Entfernung 80m (freies Feld)
Betriebstemperatur -10~50°C
Nur für den Innenbereich

1x 2x1x
1x
1x
1x1x
name
1. Introduction
0. Package contents
2. Description of the product
Thank you for using this product.
• Please read all instructions carefully before using the product.
• Do not attempt to disassemble or repair the product yourself, otherwise
the product will be out of warranty.
• This doorbell sends you a notification when the button is pressed. The
chime also rings to let you know that someone is at the door. This is the
most aordable doorbell in smart home security.
Doorbell
1x 2x1x
1x
1x
1x1x
name
Operation indicator
Melody / learning button
Volume / reset button

1x 2x1x
1x
1x
1x1x
name
Lens
LED
Push button
DiOBELL-B11
2.1 Installation of the outdoor unit battery
2.2 Indoor unit
3 Using the product
1. Remove the insulating tab before use.
2. Remove the screw with a crosshead
screwdriver to access the battery com-
partment.
3. Insert the batteries, making sure that
the polarity is correct (+/-)
4. Close the compartment with the screw.
Plug the chime into a suitable socket with
a power rating of 110~240V
After plugging the indoor unit into your wall socket, there are only a few
steps left to get your new chime operational.
1. Press and hold the button on the side of the chime for approximately
3 seconds, the chime will emit a «Ding-Dong» sound to indicate that it has
entered pairing mode.
2. Now press the button on the doorbell camera, the chime will sound to
indicate that the pairing has worked.
3. Choose the volume and music of your choice and press the push button
again to save your choice.
Note: You can associate up to 20 bells per chime.

5. Wall installation of the outdoor unit
1. Method 1: Push hard for 30s to fix the adhesive
2. Method 2: Fix the back plate of the doorbell to your wall with the screws,
then add the other part to the plate, which you close with the screw on
the bottom of the doorbell.
Note: Install the outdoor doorbell at a height of 1.15m - 1.4m to get the best
pictures.
1
2
3
1
2
3
4. Configuring the doorbell
A. Adding the doorbell in the app
Step 1 Connect your smartphone to the WiFi network
Step 2 Download the DiO One app from the Apple Store or the Android
Play Store, depending on your device.
Step 3 Open the DiO One app and register when you use it for the first
time.
Step 4 Follow the steps described in the app to add your doorbell.

3xAA 1,5V
3xAA 1,5V
3xAA 1,5V
6. Reset
6.1 Resetting the chime
6.2 Resetting the doorbell
8. Troubleshooting
7. Explanation of the LED intensity on the doorbell
Press and hold the button for approximately 5 seconds, a tone will sound
to indicate that the code deletion is successful.
Using a screwdriver, open the back panel of the
doorbell and hold down the push button (front) for
15 seconds.
1. You press the push button, but its indicator light does not respond...
What should I do?
a) Check if the batteries have been installed.
b) Check if the batteries are completely worn out. If so, replace them as
soon as possible.
NOTE: Do not mix new and used batteries. Replace all batteries at once.
2. I can’t pair my unit to my DiO application... What should I do?
Slow flashing Waiting for pairing (see point 4.).
Fast flashing The doorbell receives the pairing information and
starts to connect to the router
LED o Standby mode.
Dimming of the
LED
Firmware update.

10. Technical specifications
Outdoor bell
Battery DC 4.5V AA/LR6*3
Standby current 45µA
Wireless frequency 2.4GHz+433MHz
Wireless distance 80m (free field)
Viewing angle of camera 60
Pixels 0.3 MP
Optical distance 2S
Autofocus 10 PCS
Waterproof IP44
Operating temperature -10°C~50°C
Relative humidity <90% at 40°C
Dimension (W*H*D) 50.7*126.1*19.5 mm
Indoor chime
Power supply AC 100V~240V 50Hz~60Hz
Standby power consumption 0.5Wh
Power consumption in operation 1.5Wh
9. Safety advice
- Do not mix new and used batteries.
- Please use only the type of batteries indicated in the manual.
- Do not leave used batteries lying around in the unit, as this may damage
the unit.
- The indoor unit is not waterproof. Do not expose it to rain or immerse it
in water.
- Do not attempt to disassemble or repair the product yourself.
- Please keep these instructions carefully.
- Incorrect use of the battery may damage nearby objects and risk fire or
serious injury.
- Please keep batteries away from children.
- Recycle used batteries in accordance with environmental protection
practices
a. Check if your WiFi network is working properly.
b. Restart the doorbell by reinstalling the batteries or reset the unit (see
point 6.)
3. FAQ : https://chacon.com/faq

Don’t throw batteries or out of order products with the
household waste (garbage). The dangerous substances that they
are likely to include may harm health or the environment. Make
your retailer take back these products or use the selective collect
of garbage proposed by your city.
Hereby, Chacon, declares that the radio equipment type
‘DiOBELL-B11’ is in compliance with the Directive 2014/53/EU.
The full test of the EU declaration of conformity is available at the
following Internet address:
http://chacon.com/conformity
For indoor use only
www.chacon.com
Chacon S.A. - Avenue mercator 2 - 1300 Wavre
11. Support
www.chacon.com/support
Volume (30cm): Low 60-70dB / Medium: 70-80dB
/ High: 80-90dB
Melody 38
Demodulation OOK
Wireless frequency 433.92MHz±250KHz
Wireless distance 80m (free field)
Operating temperature -10~50°C
v1.5 221123
-
 1
1
-
 2
2
-
 3
3
-
 4
4
-
 5
5
-
 6
6
-
 7
7
-
 8
8
-
 9
9
-
 10
10
-
 11
11
-
 12
12
-
 13
13
-
 14
14
-
 15
15
-
 16
16
-
 17
17
-
 18
18
-
 19
19
-
 20
20
-
 21
21
-
 22
22
-
 23
23
-
 24
24
-
 25
25
-
 26
26
-
 27
27
-
 28
28
-
 29
29
-
 30
30
-
 31
31
-
 32
32
-
 33
33
-
 34
34
-
 35
35
-
 36
36
-
 37
37
-
 38
38
-
 39
39
-
 40
40
-
 41
41
-
 42
42
-
 43
43


DIO BELL-B11 Doorbell Gebruikershandleiding
- Type
- Gebruikershandleiding
in andere talen
- English: DIO BELL-B11 Doorbell User guide
- italiano: DIO BELL-B11 Doorbell Guida utente
- français: DIO BELL-B11 Doorbell Mode d'emploi
- español: DIO BELL-B11 Doorbell Guía del usuario
- Deutsch: DIO BELL-B11 Doorbell Benutzerhandbuch
- português: DIO BELL-B11 Doorbell Guia de usuario
Gerelateerde papieren
Andere documenten
-
Chacon 84198 Handleiding
-
-
-
Trust 71273 Handleiding
-
woox R9061 Gebruikershandleiding
-
-
-
Chacon 53023 Handleiding
-
Netatmo In-Wall Transformer for Smart Video Doorbell Gebruikershandleiding
-