ELECTRONICS FOR SPECIALISTS ELECTRONICS FOR SPECIALISTS ELECTRONICS FOR SPECIALISTS ELECTRONICS FOR SPECIALISTS
BEDIENUNGSANLEITUNG
INSTRUCTION MANUAL
MODE D’EMPLOI
ISTRUZIONI PER L’USO
GEBRUIKSAANWIJZING
MANUAL DE INSTRUCCIONES
INSTRUKCJA OBSŁUGI
SIKKERHEDSOPLYSNINGER
SÄKERHETSFÖRESKRIFTER
TURVALLISUUDESTA
PARL-30SPOT
Bestell-Nr. • Order No. 38.3100
DMX-LED-Scheinwerfer
DMX LED Spotlight


3
ELECTRONICS FOR SPECIALISTS ELECTRONICS FOR SPECIALISTS ELECTRONICS FOR SPECIALISTS ELECTRONICS FOR SPECIALISTS
Deutsch ..........Seite 4
English ...........Page 8
Français ..........Page 12
Italiano...........Pagina 16
Nederlands .......Pagina 20
Español ..........Página 24
Polski ............Strona 28
Dansk ............Sida 32
Svenska ..........Sidan 33
Suomi............Sivulta 34

4
Deutsch
English
English Page
Français
Français Page
Italiano
Italiano Pagina
Español
Español Página
Nederlands
Nederlands Pagina
Polski
Polski Strona
Deutsch
Deutsch Seite
DMX-LED-Scheinwerfer
Diese Anleitung richtet sich an den Installateur des
Geräts und an den Bediener mit Grundkenntnissen in
der DMX-Steuerung. Bitte lesen Sie die Anleitung vor
dem Betrieb gründlich durch und heben Sie sie für ein
späteres Nachlesen auf.
Auf der Seite 2 finden Sie alle beschriebenen
Bedienelemente und Anschlüsse.
1 Übersicht der Bedienelemente
und Anschlüsse
1.1 Scheinwerfer
1 Feststellschrauben für den Montagebügel (9)
2 Anschlussbuchse für die Fernbedienung LC-3
3
DMX-Signal-Ausgang (3-pol. XLR) zum Anschluss
an den DMX-Eingang eines weiteren DMX-
Lichteffektgeräts;
1 = Masse, 2 = DMX−, 3 = DMX+
4 DMX-Signal-Eingang (3-pol. XLR);
1 = Masse, 2 = DMX−, 3 = DMX+
5 Taste für die DMX-Adresseneinstellung
(siehe Kapitel 7.2)
6 Netzkabel zum Anschluss an eine Steckdose
(230 V/ 50 Hz)
7
Montageplatte zur Befestigung an einer Wand
oder Decke
8 Schraube für die Montageplatte
9 Montagebügel
10 Gehäusedeckel mit Kunststoffscheibe
11 Feststellschraube für die Verriegelung (12)
12 Verriegelung für den Gehäusedeckel
1.2 Fernbedienung LC-3
Die Fernbedienung ist als Zubehör erhältlich und
gehört nicht zum Lieferumfang des Scheinwerfers.
13 Taste STAND BY für die Funktion Blackout
(Licht aus)
14
Taste FUNCTION zur Auswahl verschiedener Licht-
wechselfunktionen in Abhängigkeit von dem mit
der Taste MODE gewählten Betriebsmodus
15 Taste MODE zum Umschalten zwischen
Sound-Modus 1 (LED leuchtet nicht)
Manual-Modus (LED leuchtet)
Sound-Modus 2 (LED blinkt langsam)
Auto-Modus (LED blinkt schnell)
Hinweis: Zur Steuerung über die Fernbedienung darf am
Eingang DMX IN (4) kein DMX-Signal anliegen.
2 Hinweise für
densicherenGebrauch
Der Scheinwerfer entspricht allen relevanten Richt-
linien der EU und trägt deshalb das -Zeichen.
WARNUNG Das Gerät wird mit lebensgefährlicher
Netzspannung versorgt. Nehmen Sie
deshalb niemals selbst Eingriffe am
Gerät vor und stecken Sie nichts in die
Lüftungsöffnungen. Es besteht die Ge-
fahr eines elektrischen Schlags.
•
Verwenden Sie den Scheinwerfer nur im Innenbe-
reich und schützen Sie ihn vor Tropf- und Spritzwas-
ser sowie vor hoher Luftfeuchtigkeit. Der zulässige
Einsatztemperaturbereich beträgt 0 – 40 °C.
•
Zie hen Sie sofort den Netzstecker aus der Steckdose,
1. wenn sichtbare Schäden am Gerät oder an der
Netzanschlussleitung vorhanden sind,
2.
wenn nach einem Sturz oder Ähnlichem der Ver-
dacht auf einen Defekt besteht,
3. wenn Funktionsstörungen auftreten.
Geben Sie das Gerät in jedem Fall zur Reparatur in
eine Fachwerkstatt.
•
Ein beschädigtes Netzkabel darf nur durch eine
Fachwerkstatt ersetzt werden.
•
Ziehen Sie den Netzstecker nie am Kabel aus der
Steckdose, fassen Sie immer am Stecker an.
•
Verwenden Sie für die Reinigung nur ein trockenes,
weiches Tuch, niemals Wasser oder Chemikalien.
•
Wird der Scheinwerfer zweckentfremdet, nicht
sicher montiert, falsch be dient oder nicht fach-
gerecht repariert, kann keine Haftung für daraus
resultierende Sach- oder Personenschäden und
keine Garantie für den Scheinwerfer übernommen
werden.
Soll der Scheinwerfer endgültig aus dem
Betrieb genommen werden, übergeben Sie
ihn zur umweltgerechten Entsorgung einem
örtlichen Recyclingbetrieb.
3 Einsatzmöglichkeiten
Der Scheinwerfer ist für den Einsatz auf Bühnen, in
Diskotheken und Partyräumen oder zu Dekorations-
zwecken geeignet. Er erzeugt far bi ges Licht über
superhelle 5-mm-LEDs, die in Blau, Rot und Grün
leuchten. Es sind auch musikgesteuerte Farbwech-
sel, langsame Farbüberblendungen und Stroboskop-
Effekte möglich.
Der Scheinwerfer ist für die Steuerung über ein
DMX-Lichtsteuergerät ausgelegt (4 DMX-Steuer-
kanäle), kann aber auch ohne Steuergerät oder mit
der als Zubehör erhältlichen Fernbedienung LC-3
betrieben werden.

5
Deutsch
4 Montage
•
Platzieren Sie das Gerät immer so, dass im Betrieb
eine ausreichende Luftzirkulation gewährleistet ist.
Die Lüftungsöffnungen am Gehäuse dürfen auf kei
-
nen Fall abgedeckt werden (z. B. durch Vorhänge).
•
Der Abstand zum angestrahlten Objekt sollte min-
destens 10 cm betragen.
1)
Den Montagebügel (9) mit den beiden Knebelschrau-
ben (1) am Scheinwerfergehäuse festschrauben.
2)
Den Scheinwerfer über den Montagebügel (9)
befestigen, z. B. mit einer stabilen Montage-
schraube oder einer Lichtstrahler-Halterung
(C- Haken) an einer Traverse.
Soll der Scheinwerfer an einer Decke oder
Wand befestigt werden, die Montageplatte (7)
an den Montagebügel nach der Abbildung 1 fest-
schrauben. Die Montageplatte mit dem Schein-
werfer an geeignerter Stelle der Decke bzw. Wand
festschrauben.
WARNUNG
Der Scheinwerfer muss fachgerecht
und sicher montiert werden. Wird er
an einer Stelle installiert, unter der sich
Personen aufhalten können, muss er
zusätzlich gesichert werden (z. B. durch ein Fang
-
seil am Montagebügel; das Fangseil so befestigen,
dass der Fallweg des Gerätes nicht mehr als 20 cm
betragen kann).
3) Zum Ausrichten des Scheinwerfers die zwei Fest-
stellschrauben (1) am Montagebügel lösen. Die
ge wünschte Neigung des Scheinwerfers einstellen
und die Schrauben wieder fest anziehen.
Ist der Scheinwerfer an der Montageplatte (7)
festgeschraubt, ggf. die Schraube (8) etwas lösen,
den Montagebügel (9) wie gewünscht drehen und
die Schraube wieder festziehen.
5 Inbetriebnahme
WARNUNG
Blicken Sie nicht direkt in die LEDs, das
kann zu Augenschäden führen.
Beachten Sie, dass sehr schnelle Licht-
wechsel bei fotosensiblen Menschen
und Epilep tikern epileptische Anfälle
aus lösen können!
Zum Einschalten des Scheinwerfers den Ste cker des
Netzkabels (6) in eine Steckdose (230 V/ 50 Hz) ste cken,
zum Ausschalten ihn wieder herausziehen.
Um einen besseren Bedienkomfort zu erhalten, ist
es empfehlenswert, den Scheinwerfer an eine Steck-
dose an zu schließen, die sich über einen Lichtschalter
ein- und ausschalten lässt.
Vorsicht: Der Scheinwerfer darf nicht über einen
Dimmer an die Netzspannung angeschlossen werden!
6 Betrieb ohne Steuergerät
Empfängt der Scheinwerfer kein DMX-Steuersignal,
wechselt er selbstständig mit langsamen Überblen-
dungen die Farben.
Läuft Musik mit deutlichem Rhythmus im Bass-
bereich in ausreichender Lautstärke, wechselt der
Scheinwerfer, gesteuert über ein internes Mikrofon,
die Farbe im Takt der Musik. Sollte die Musiksteuerung
nicht optimal funktionieren, die Lautstärke erhöhen
oder den Abstand zwischen Schallquelle und Schein-
werfer verringern.
6.1 Zusammenschalten mehrerer Scheinwerfer
Es lassen sich mehrere PARL-30SPOT zusammenschal-
ten, um so synchron die Farben zu wechseln oder über
das interne Mikrofon des Hauptgerätes alle weiteren
Nebengeräte im gleichen Rhythmus zu steuern.
Dazu den Anschluss DMX OUT (3) des Haupt-
gerätes über ein 3-poliges XLR-Kabel (z. B. Serie
CDMXN-... aus dem Sortiment von IMG STAGELINE)
mit dem Anschluss DMX IN (4) des ersten Nebenge-
rätes verbinden. Den Anschluss DMX OUT des ersten
Nebengerätes mit dem Anschluss DMX IN des zweiten
Nebengerätes verbinden usw.
6.2 Fernbedienung über LC-3
Über die als Zubehör erhältliche Fernbedienung LC-3
können zusätzlich zu der Musiksteuerung verschie-
dene Funktionen gesteuert werden.
1) Die Fernbedienung an die Buchse REMOTE CONT-
ROL (2) anschließen.
2)
Am Eingang DMX IN (4) darf kein DMX-Signal
anliegen.
3) Über den Ausgang DMX OUT (3) können weitere
PARL-30SPOT angeschlossen werden (☞Kapi-
tel6.1), um diese über die Fernbedienung gemein-
sam mit dem Hauptgerät zu steuern.
4) Mit der Taste STAND BY (13) lässt sich die Funktion
Blackout ein- und ausschalten. Bei eingeschalteter
Funktion wird das Licht abgeblendet und die LED
neben der Taste leuchtet.
5)
Mit der Taste MODE (15) den Betriebsmodus
wählen:
a) Nach dem Einschalten des Scheinwerfers ist der
Modus SOUND 1 aktiviert. Die LED neben der
Taste MODE leuchtet nicht. Bei gedrückt ge-
haltener Taste FUNCTION (14) wird ein musik-
abhängiger Stroboskop-Effekt erzeugt. Bei
jedem neuen Drücken der Taste wechselt dieser
zwischen weißem Licht, wechselndem farbigem
Licht (bei mehreren Scheinwerfern als kurze
Sequenz mit nur einem Blitz pro Scheinwerfer;
die Farbe ist bei allen Scheinwerfern gleich) und
wechselndem farbigem Licht mit unterschied-
lichen Farben bei mehreren Scheinwerfern.

6
Deutsch
b) Zum Umschalten auf den Modus MANUAL die
Taste MODE einmal drücken. Die LED neben der
Taste leuchtet. Mit der Taste FUNCTION kann
jetzt eine der folgenden Farben ausgewählt
werden:
Weiß, Rot, Blau, Violett, Orange, Grün, Gelb,
Magenta, Cyan
c) Zum Umschalten auf den Modus SOUND 2 die
Taste MODE ein weiteres Mal drücken. Die LED
neben der Taste blinkt langsam. Mit der Taste
FUNCTION kann durch wiederholtes Drücken
zwischen fünf verschiedenen musikgesteuerten
Farbwechseloptionen und Sequenzen gewählt
werden. Diese Optionen sind nur mit mehreren
zusammengeschalteten Scheinwerfern sinnvoll.
d)
Zum Umschalten auf den Modus AUTO die Taste
MODE ein weiteres Mal drücken. Die LED neben
der Taste blinkt schnell. In dieser Betriebsart wer-
den die Farben automatisch durch Überblenden
gewechselt. Laufende Musik hat hierauf keinen
Einfluss. Mit der Taste FUNCTION kann durch
wiederholtes Drücken zwischen drei verschie-
denen Überblendgeschwindigkeiten gewählt
werden.
Zum Zurückschalten auf den Modus SOUND 1 die
Taste MODE erneut drücken.
7 Bedienung über ein
Lichtsteuergerät
Zur Bedienung über ein Lichtsteuergerät mit DMX512-
Protokoll (z. B. DMX-1440 oder DMX-510USB von
IMG STAGELINE) verfügt der Scheinwerfer über vier
Steuer ka näle. Die Funktionen der Kanäle und die
DMX-Werte finden Sie im Kapitel 9.1.
7.1 Anschluss
Für die DMX-Signalübertragung sollten spezielle Kabel
verwendet werden (z. B. Kabel der CDMXN-Serie von
IMG STAGELINE). Bei Leitungslängen ab 150 m oder
bei der Steuerung von mehr als 32 Geräten über einen
DMX-Ausgang wird grundsätzlich das Zwischen-
schalten eines DMX-Aufholverstärkers empfohlen
(z. B. SR-103DMX).
1) Den DMX-Eingang (4) mit dem DMX-Ausgang des
Lichtsteuergerätes verbinden.
2) Den DMX-Ausgang (3) mit dem DMX-Eingang des
nächsten Lichteffektgerätes verbinden. Dessen Aus-
gang wieder mit dem Eingang des nachfolgenden
Gerätes verbinden usw., bis alle Licht effektgeräte
in einer Kette angeschlossen sind.
3)
Den DMX-Ausgang des letzten DMX-Geräts der
Kette mit einem 120-Ω-Widerstand (> 0,3 W) ab-
schließen: An die Pins 2 und 3 eines XLR-Steckers
den Widerstand anlöten und den Ste cker in den
DMX-Ausgang stecken oder einen entsprechenden
Abschlussstecker (z. B. DLT-123 von IMG STAGE-
LINE) verwenden.
7.2 Startadresse einstellen
Um den Scheinwerfer mit einem Lichtsteuergerät be-
dienen zu können, muss die DMX-Startadres se für
den 1. DMX-Kanal eingestellt werden. Ist z. B. am
Steuergerät die Adresse 17 zum Steuern der Farbe
Rot vorge sehen, am Scheinwerfer die Start adresse
17 einstellen. Die anderen Funktionen des Schein-
werfers (Grün, Blau, Dimmer) sind dann automatisch
den drei folgenden Kanälen (in diesem Beispiel 18 –
20) zugeordnet. Als nächstmögliche Startadresse für
das folgende DMX-gesteuerte Gerät könnte dann bei
diesem Beispiel die Adresse 21 verwendet werden.
Zum Einstellen der Adresse stehen die folgenden zwei
Methoden zur Verfügung:
7.2.1 Automatische Adresseneinstellung
Diese Methode ist sinnvoll, wenn mehrere PARL-
30SPOT verwendet werden und deren Adressen im
unteren Bereich liegen sollen:
1)
Den DMX-Eingang (4) des ersten Scheinwerfers
vom Steuergerät trennen oder das Steuergerät aus-
schalten, sodass kein DMX-Signal am Eingang des
Scheinwerfers anliegt.
2)
Die Taste DMX ADDRESS SETTING (5) am ersten
Scheinwerfer fünf Sekunden lang drücken. Der
Scheinwerfer und die an ihm angeschlossenen
Scheinwerfer werden dann dunkel.
3) Die Verbindung zum Steuergerät wiederherstellen
bzw. das Steuergerät wiedereinschalten.
Die Startadresse des ersten Scheinwerfers ist nun auf
1 eingestellt, die Startadressen der folgenden Schein-
werfer auf 5, 9, 13 usw.

7
Deutsch
7.2.2 Adresseneinstellung über das Steuergerät
Mit dieser Methode kann einem Scheinwerfer auf
einfache Weise eine beliebige Startadresse zugewie-
sen werden:
1)
Am Steuergerät den DMX-Wert des Kanals, der
der einzustellenden Startadresse entspricht, auf das
Maximum (255) stellen. Die Werte aller anderen
DMX-Kanäle auf Null stellen. Soll z. B. die Start-
adresse 17 eingestellt werden, den Kanal 17 am
Steuerpult voll aufziehen und alle anderen Kanäle
auf Null stellen.
2) Bei allen Scheinwerfern, die diese Startadresse er-
halten sollen, kurz die Taste DMX ADDRESS SET-
TING (5) drücken.
Diese Bedienschritte wiederholen, bis jeder Schein-
werfer seine Adresse erhalten hat.
7.3 Steuerung mit dem LED-4C
Das Gerät LED-4C von IMG STAGELINE ist ein ein-
fach zu bedienendes Steuerpult speziell für diese
LED-Scheinwerfer. Es verfügt über 4 Kanäle, sodass
alle daran angeschlossenen Scheinwerfer nur synchron
gesteuert werden können.
Die Startadresse der Scheinwerfer auf 1 oder auf
ein Vielfaches von 4 + 1 (5, 9, 13, … max. 61) ein-
stellen, ☞Kapitel 7.2.1. Genaueres zur Bedienung
entnehmen Sie bitte der Anleitung zum LED-4C.
8 Scheinwerfer säubern
Die Kunststoffscheibe des Scheinwerferdeckels (10)
sollte in regelmäßigen Abständen, je nach Verschmut-
zung durch Staub, Rauch oder andere Schmutzpar-
tikel, von außen und ggf. auch von innen gereinigt
werden. Nur dann kann das Licht in maximaler Hel-
ligkeit abgestrahlt werden.
1) Zum Säubern ein weiches, sauberes Tuch und ein
mildes Reinigungsmittel verwenden. Anschließend
die Kunststoffscheibe trocken wischen.
2)
Um die Scheibe von innen reinigen zu können, muss
der Scheinwerferdeckel (10) abgenommen werden.
VORSICHT! Vor dem Öffnen des Scheinwerfers un-
bedingt den Netzstecker aus der Steckdose ziehen.
a) Die Feststellschraube (11) lösen und den Riegel
(12) nach hinten schieben.
b)
Den Scheinwerferdeckel ein Stück gegen den
Uhrzeigersinn drehen, sodass er ausrastet und
abgenommen werden kann.
c) Die Scheibe von innen reinigen und den Schein-
werfer in umgekehrter Reihenfolge wieder zu-
sammensetzen.
9 Technische Daten
Stromversorgung: . . . . . .230 V/ 50 Hz
Leistungsaufnahme: . . . .10 VA
Leuchtmittel: . . . . . . . . . .superhelle 5-mm-LEDs
Anzahl: . . . . . . . . . . . .90
24 rote
33 grüne
33 blaue
Abstrahlwinkel: . . . . . .20°
Einsatztemperatur: . . . . .0 – 40 °C
Abmessungen: . . . . . . . .⌀ 120 mm × 120 mm
Gewicht: . . . . . . . . . . . . .1 kg
Kabellänge: . . . . . . . . . . .1,2 m
9.1 DMX-Kanäle
DMX Wert Funktion
Kanal 1: Rot-Anteil
0 – 255 Helligkeit Rot
Kanal 2: Grün-Anteil
0 – 255 Helligkeit Grün
Kanal 3: Blau-Anteil
0 – 255 Helligkeit Blau
Kanal 4: Dimmer / Stroboskop/ Musik
0 – 7 LEDs aus
8 – 190 Dimmer
191 – 200 musikgesteuerter Farbwechsel
über das integrierte Mikrofon
201 – 247 Stroboskop-Effekt:
langsam schnell
248 – 255 volle Helligkeit
Änderungen vorbehalten.
Diese Bedienungsanleitung ist urheberrechtlich für MONACOR ® INTERNATIONAL GmbH & Co. KG geschützt. Eine
Reproduktion für eigene kommerzielle Zwecke – auch auszugsweise – ist untersagt.

8
English
Deutsch
Deutsch Seite
Français
Français Page
Italiano
Italiano Pagina
Español
Español Página
Nederlands
Nederlands Pagina
Polski
Polski Strona
DMX LED Spotlight
These instructions are intended for installers of the unit
and for users with basic knowledge in DMX control.
Please read the instructions carefully prior to operation
and keep them for later reference.
All operating elements and connections described
can be found on page 2.
1 Operating Elements
andConnections
1.1 Spotlight
1 Locking screws for the mounting bracket (9)
2 Connection jack for the remote control LC-3
3 DMX signal output (3-pole, XLR) for connection
to the DMX input of another DMX light effect
unit;
1 = ground, 2 = DMX−, 3 = DMX+
4 DMX signal input (3-pole, XLR);
1 = ground, 2 = DMX−, 3 = DMX+
5 Button for adjusting the DMX address
(see chapter 7.2)
6 Mains cable for connection to a socket
(230 V/ 50 Hz)
7 Mounting plate for fixing the spotlight to a wall
or ceiling
8 Screw for the mounting plate
9 Mounting bracket
10 Housing cover with plastic pane
11 Locking screw for the latch (12)
12 Latch for the housing cover
1.2 Remote control LC-3
The remote control is available as an accessory and
not supplied with the LED spotlight.
13 Button STAND BY for the function Blackout
(light off)
14
Button FUNCTION for selecting various light
changing functions depending on the operating
mode selected with the button MODE
15 Button MODE for switching over between
Sound mode 1 (LED off)
Manual mode (LED on)
Sound mode 2 (LED flashing slowly)
Auto mode (LED flashing rapidly)
Note: For control via the remote control, there must be
no DMX signal at the input DMX IN (4).
2 Safety Notes
The spotlight corresponds to all relevant directives of
the EU and is therefore marked with .
WARNING
The spotlight is supplied with hazar-
dous mains voltage. Leave servic ing to
skilled personnel only and do not insert
anything into the air vents, otherwise
you will risk an electric shock!
•
The spotlight is suitable for indoor use only. Protect
it against dripping water, splash water and high
humidity. The admissible ambient temperature
range is 0 – 40 °C.
•
Immediately disconnect the mains plug from the
mains socket
1. in case of visible damage to the unit or to the
mains cable,
2.
if a defect might have occurred after the unit was
dropped or suffered a similar accident,
3. if malfunctions occur.
In any case the unit must be repaired by skilled
personnel.
•
A damaged mains cable must be replaced by skilled
personnel only.
•
Never pull the mains cable for disconnecting the mains
plug from the mains socket, always seize the plug.
•
For cleaning only use a dry, soft cloth, never use
chemicals or water.
•
No guarantee claims for the spotlight and no lia-
bility for any resulting personal damage or material
damage will be accepted if the spotlight is used for
other purposes than originally intended, if it is not
safely mounted or correctly operated, or if it is not
repaired in an expert way.
•
Important for U. K. Customers!
The wires in this mains lead are coloured in accord-
ance with the following code:
green / yellow = earth
blue = neutral
brown = live
As the colours of the wires in the mains lead of this
appliance may not correspond with the coloured
markings identifying the terminals in your plug,
proceed as follows:
1. The wire which is coloured green and yellow must
be connected to the terminal in the plug which is
marked with the letter E or by the earth symbol
, or coloured green or green and yellow.
2. The wire which is coloured blue must be con
-
nected to the terminal which is marked with the
letter N or coloured black.
3. The wire which is coloured brown must be con-
nected to the terminal which is marked with the
letter L or coloured red.
Warning – This appliance must be earthed.
English
English Page

9
English
If the spotlight is to be put out of operation
definitively, take it to a local recycling plant
for a disposal which is not harmful to the
environment.
3 Applications
This spotlight is suited for applications on stage, in
discothèques and party rooms or for decoration pur-
poses. It creates coloured light via extra bright 5 mm
LEDs in blue, red, and green. Music-controlled colour
changes, gradual transitions from one colour to an-
other, and stroboscopic effects will be possible.
The spotlight is designed for control via a DMX
light controller (4 DMX control channels), however, it
can also be operated without a controller or with the
remote control LC-3 available as an accessory.
4 Mounting
•
Always place the spotlight in such a way that a
sufficient air circulation will be ensured during op-
eration. Never cover the air vents of the housing
(e. g. by curtains).
•
The minimum distance to the illuminated object
should be 10 cm.
1) Fasten the mounting bracket (9) to the housing of
the spotlight by means of the two knob screws (1).
2) Fasten the spotlight via the mounting bracket (9),
e. g. with a stable mounting screw or a support for
lighting units (C-hook) on a cross bar.
For mounting the spotlight on a ceiling or a
wall, screw the mounting plate (7) to the mounting
brack et according to figure 1. Find a suitable place
on the ceiling or wall and screw on the mounting
plate with the spotlight.
WARNING
Mount the spotlight safely and ex-
pertly. If the spotlight is installed at
a place where people may walk or sit
under it, additionally secure it (e. g. by
a safety rope fixed to the mount ing bracket; fasten
the safety rope in such a way that, even in the event
of a fall, the maximum falling distance of the spot-
light will not exceed 20 cm).
3)
To adjust the spotlight, release the two locking
screws (1) at the mounting bracket. Adjust the de-
sired inclination of the spotlight, then retighten
the screws.
If the spotlight is screwed to the mounting
plate (7), slightly release the screw (8), if neces-
sary, turn the mounting bracket (9) as desired, then
retighten the screw.
5 Setting the Spotlight into
Operation
WARNING Never look directly into the LEDs; this
may cause eye damage.
Please note that fast changes in light-
ing, e. g. flashing light, may trigger
epileptic seizures with photosensitive
persons or persons with epilepsy!
To switch on the spotlight, connect the plug of the
mains cable (6) to a socket (230 V/ 50 Hz); to switch it
off, disconnect it.
For a more convenient operation, it is recom-
mended to connect the spotlight to a mains socket
which is switched on and off via a light switch.
Caution: Do not connect the spotlight to the mains
voltage via a dimmer!
6 Operation without Controller
If the spotlight does not receive any DMX control sig-
nal, it will automatically change colours by gradual
transition from one colour to another.
If music is played at sufficient volume with a clear
rhythm in the bass range, the spotlight will change
colours to the beat of the music, controlled via an
internal microphone. If the music control should fail to
operate optimally, increase the volume or reduce the
distance between the sound source and the spotlight.
6.1 Interconnecting several spotlights
Several PARL-30SPOT may be interconnected in order
to change colours in sync or to control all slave units
to the same rhythm via the internal microphone of
the master unit.
For this purpose, connect the output DMX OUT
(3) of the master unit via a 3-pole XLR cable (e. g.
series CDMXN-… from the product range of IMG
STAGE LINE) to the input DMX IN (4) of the first slave
unit. Connect the output DMX OUT of the first slave
unit to the input DMX IN of the second slave unit, etc.
6.2 Remote control via LC-3
The remote control LC-3 available as an accessory
allows to control various functions in addition to the
music control.
1) Connect the remote control to the jack REMOTE
CONTROL (2).
2) There must be no DMX signal at the input DMX
IN (4).
3)
Via the output DMX OUT (3), further PARL-30SPOT
units may be connected (☞chap ter 6.1) in order
to control them together with the master unit via
the remote control.

10
English
4)
The button STAND BY (13) allows to activate /
deactivate the function Blackout. With the function
activated, the light will be off and the LED next to
the button will light up.
5) Select the operating mode with the button MODE
(15).
a)
After switching on the spotlight, the mode
SOUND 1 will be activated. The LED next to
the button MODE will not light up. When the
button FUNCTION (14) is kept pressed, a music-
dependent stroboscopic effect will be created.
Each time the button is pressed again, this effect
will change between white light, changing
coloured light (in case of several spotlights as a
short sequence of only one flash per spotlight;
with the same colour for all spotlights), and
changing coloured light with different colours
in case of several spotlights.
b)
To switch to the mode MANUAL, press the but
-
ton MODE once. The LED next to the button will
light up. Use the button FUNCTION to select one
of the following colours:
white, red, blue, purple, orange, green, yellow,
magenta, cyan
c)
To switch to the mode SOUND 2, press the
button MODE once again. The LED next to
the button will flash slowly. A selection of five
music-controlled colour change options and se-
quences is available when the button FUNCTION
is pressed repeatedly. These options, however,
only make sense when several spotlights have
been interconnected.
d) To switch to the mode AUTO, press the button
MODE once again. The LED next to the button
will flash rapidly. In this operating mode, the
colours will change automatically by transition
from one colour to another. Any music played at
this stage will not affect this mode. A selection
of three transition speeds is available when the
button FUNCTION is pressed repeatedly.
To return to the mode SOUND 1, press the button
MODE once again.
7 Operation via a Light Controller
For operation via a light controller with DMX512
protocol (e. g. DMX-1440 or DMX-510USB by IMG
STAGELINE), the spotlight is equipped with four con-
trol channels. The functions of the channels and the
DMX values can be found in chapter 9.1.
7.1 Connection
For DMX signal transmission, special cables should
be used (e. g. cables of the CDMXN series from IMG
STAGELINE). For cable lengths exceeding 150 m or
when controlling more than 32 units via a single DMX
output, it is generally recommended to insert a DMX
level matching amplifier (e. g. SR-103DMX).
1) Connect the DMX input (4) to the DMX output of
the light controller.
2) Connect the DMX output (3) to the DMX input of
the following light effect unit; connect its output
again to the input of the following unit, etc. until
all light effect units have been connected in a chain.
3) Terminate the DMX output of the last DMX unit in
the chain with a 120 Ω resistor (> 0.3 W): Solder
the resistor to the pins 2 and 3 of an XLR plug
and connect the plug to the DMX output or use a
corre sponding terminating plug (e. g. DLT-123 by
IMG STAGELINE).
7.2 Adjusting the start address
For operation of the spotlight with a light controller,
adjust the DMX start address for the first DMX chan-
nel. If e. g. address 17 on the controller is provided for
controlling the colour red, adjust the start address17
on the spotlight. The other functions of the spotlight
(green, blue, dimmer) will then automatically be as-
signed to the three following channels (in this example
18 to 20). As the next possible start address for the
following DMX-controlled unit, address 21 could be
used in this example.
There are two methods for adjusting the address:
7.2.1 Automatic address adjustment
This method makes sense when several PARL-30SPOT
units are used for which addresses of low range are
desired:
1)
Disconnect the input DMX input (4) of the first
spotlight from the controller or switch off the con-
troller so that there is no DMX signal at the input
of the spotlight.
2)
Press the button DMX ADDRESS SETTING (5) on
the first spotlight for five seconds. The spotlight
and the spotlights connected to it will then be dark.
3)
Reconnect the controller or switch on the controller
again.
The start address of the first spotlight is now set to1;
the start addresses of the following spotlights to5,
9, 13, etc.

11
English
7.2.2 Address adjustment via the controller
With this method, any start address desired can easily
be assigned to a spotlight:
1)
At the controller, set the DMX value of the channel
corresponding to the start address to be adjusted to
the maximum (255). Set the values of all other DMX
channels to zero. For adjusting, e. g. start address
17, fully advance channel 17 on the controller and
set all other channels to zero.
2) On all spotlights to which this start address is to be
assigned, shortly press the button DMX ADDRESS
SETTING (5).
Repeat these operating steps until an address has been
assigned to each spotlight.
7.3 Control with LED-4C
The unit LED-4C by IMG STAGELINE is an easy-to-use
controller specially designed for these LED spotlights.
It is equipped with 4 channels so that all spotlights
connected to it can only be controlled in sync.
Set the start address of the spotlights to 1 or to
a multiple of 4 + 1 (5, 9, 13, … 61 max.), ☞chap-
ter7.2.1. Detailed information for operation can be
found in the manual of LED-4C.
8 Cleaning the Spotlight
The plastic pane of the spotlight cover (10) should be
cleaned at regular intervals from the outside, and if
necessary, also from the inside, depending on impuri-
ties caused by dust, smoke, or other dirt particles. Only
this will ensure that the light is emitted at maximum
brightness.
1)
For cleaning use a soft, clean cloth and a mild
detergent. Then wipe the plastic plane dry.
2) For cleaning the pane from the inside, remove the
spotlight cover (10).
CAUTION! Always disconnect the mains plug from
the socket before opening the spotlight.
a)
Release the locking screw (11) and slide the latch
(12) to the rear.
b) Slightly turn the spotlight cover counter-clock-
wise so that it will unlock and can be removed.
c) Clean the pane from the inside and reassemble
the spotlight in reverse order.
9 Specifications
Power supply: . . . . . . . . .230 V/ 50 Hz
Power consumption: . . . .10 VA
Light source: . . . . . . . . . .extra bright 5 mm LEDs
Number: . . . . . . . . . . .90
red: 24
green: 33
blue: 33
Beam angle: . . . . . . . . . .20°
Ambient temperature: . . .0 – 40 °C
Dimensions. . . . . . . . . . .⌀ 120 mm × 120 mm
Weight: . . . . . . . . . . . . .1 kg
Cable length: . . . . . . . . .1.2 m
9.1 DMX channels
DMX value Function
Channel 1: proportion of red
0 – 255 brightness of red
Channel 2: proportion of green
0 – 255 brightness of green
Channel 3: proportion of blue
0 – 255 brightness of blue
Channel 4: dimmer / stroboscope/ music
0 – 7 LEDs off
8 – 190 dimmer
191 – 200
music-controlled change of
colour via integrated micro-
phone
201 – 247 stroboscopic effect:
slow fast
248 – 255 full brightness
Subject to technical modification.
All rights reserved by MONACOR
® INTERNATIONAL GmbH & Co. KG. No part of this instruction manual may be
reproduced in any form or by any means for any commercial use.

12
Français
Deutsch
Deutsch Seite
English
English Page
Italiano
Italiano Pagina
Español
Español Página
Nederlands
Nederlands Pagina
Polski
Polski Strona
Projecteur DMX à LEDs
Cette notice s’adresse à l’installateur de l‘appareil et
à l‘utilisateur avec des connaissances de base dans
la gestion DMX. Veuillez lire la présente notice avec
attention avant le fonctionnement et conservez-la
pour pouvoir, si besoin, vous y reporter ultérieurement.
Vous trouverez sur la page 2, l’ensemble des élé-
ments et branchements.
1 Eléments et branchements
1.1 Projecteur
1 Vis de blocage pour l’étrier de montage (9)
2
Prise de branchement pour la télécommande
LC-3
3 Sortie signal DMX (XLR 3 pôles) pour brancher à
l’entrée DMX d’un autre jeu de lumière DMX :
1 = masse, 2 = DMX−, 3 = DMX+
4 Entrée signal DMX (XLR, 3 pôles) :
1 = masse, 2 = DMX−, 3 = DMX+
5 Touche pour le réglage des adresses DMX
(voir chapitre 7.2)
6 Cordon secteur à relier à une prise secteur
230 V/ 50 Hz
7 Plaque de montage pour fixer le projecteur sur
un mur ou au plafond
8 Vis pour la plaque de montage
9 Etrier de montage
10 Couvercle du boîtier avec vitre en plastique
11 Vis de réglage pour le verrouillage (12)
12 Verrouillage pour le couvercle du boîtier
1.2 Télécommande LC-3
La télécommande est disponible en option mais n’est
pas livrée avec le projecteur à LEDs.
13 Touche STAND BY pour la fonction Blackout
(lumière éteinte)
14 Touche FUNCTION pour sélectionner différentes
fonctions de changement de lumière selon le
mode de fonctionnement sélectionné avec la
touche MODE
15 Touche MODE pour commuter entre
Mode Sound 1 (la LED ne brille pas)
Mode Manuel (la LED brille)
Mode Sound 2 (la LED clignote lentement)
Mode Auto (la LED clignote vite)
Conseil: Pour une gestion via la télécommande, aucun
signal DMX ne doit pas être présent à l’entrée DMX IN (4).
2 Conseils d’utilisation
etdesécurité
Le projecteur répond à toutes les directives nécessaires
de l’Union européenne et porte donc le symbole .
AVERTISSEMENT Le projecteur est alimenté par une
tension dangereuse. Ne touchez
jamais l’intérieur de l’appareil et
ne faites rien tomber dans les ouïes
de ventilation ! Risque de décharge
électrique.
•
Le projecteur n'est conçu que pour une utilisation
en intérieur. Protégez-le de tout type de projections
d'eau, des éclaboussures et d’une humidité de l’air
élevée. La plage de température de fonctionnement
autorisée est de 0 – 40 °C.
•
Ne faites pas fonctionner le projecteur ou débran-
chez-le immédiatement du secteur lorsque :
1.
des dommages visibles apparaissent sur l’appareil
ou sur le cordon secteur,
2. après une chute ou un cas similaire, vous avez
un doute sur l’état de l’appareil,
3. des dysfonctionnements apparaissent.
Dans tous les cas, les dommages doivent être répa-
rés par un technicien spécialisé.
•
Tout cordon secteur endommagé ne doit être rem-
placé que par un technicien habilité.
•
Ne débranchez jamais l’appareil en tirant sur le cor-
don secteur ; retirez toujours le cordon secteur en
tirant la fiche.
•
Pour le nettoyage, utilisez seulement un chiffon
sec et doux, en aucun cas, de produits chimiques
ou d’eau.
•
Nous déclinons toute responsabilité en cas de
dommages matériels ou corporels résultants si le
projecteur est utilisé dans un but autre que celui
pour lequel il a été conçu, s’il n’est pas monté de
manière sûre, n’est pas correctement utilisé ou n’est
pas réparé par une personne habilitée, en outre, la
garantie deviendrait caduque.
Lorsque le projecteur est définitivement retiré
du service, vous devez le déposer dans une
usine de recyclage adaptée pour contribuer
à son élimination non polluante.
CARTONS ET EMBALLAGE
PAPIER À TRIER
Français
Français Page

13
Français
3 Possibilités d’utilisation
Le projecteur est conçu pour une utilisation sur scène,
en discothèque et dans des salles des fêtes ou pour
décorer. Il crée une lumière de couleur via des LEDs
5 mm extrêmement claires, brillant en bleu, rouge et
vert. Ainsi, des changements de couleur gérés par
la musique, des transitions lentes de couleurs et des
effets stroboscopiques sont possibles.
Le projecteur est configuré pour être géré via un
contrôleur DMX (4 canaux de commande DMX) ; il
peut également fonctionner sans contrôleur ou avec
la télécommande LC-3, disponible en option.
4 Montage
•
Placez toujours l’appareil de telle sorte qu’une circu-
lation d’air suffisante soit assurée pendant le fonc-
tionnement. En aucun cas les ouïes de ventilation
sur le boîtier ne doivent être obturées (par exemple
par des rideaux).
•
La distance minimale avec l’objet à éclairer doit être
de 10 cm.
1) Vissez l’étrier de montage (9) sur le boîtier du pro-
jecteur avec les deux vis papillon (1).
2) Fixez le projecteur via l’étrier de montage (9), sur
une traverse avec par exemple une vis de montage
solide ou un support pour projecteur (crochet C).
Si le projecteur doit être fixé sur un mur ou
au plafond, vissez la plaque de montage (7) sur
l’étrier selon le schéma 1. Fixez la plaque de mon-
tage avec le projecteur à l’endroit voulu sur le mur
ou le plafond.
AVERTISSEMENT
Le projecteur doit être monté de
manière professionnelle et sûre. Si
l’appareil doit être installé au-des-
sus de personnes, il doit être en plus
assuré (par exemple avec une corde de sécurité sur
l’étrier de montage. Fixez la corde de telle sorte que
la distance de chute de l’appareil ne puisse pas être
supérieure à 20 cm).
3) Pour orienter le projecteur, desserrez les deux vis
de blocage (1) sur l’étrier de montage. Réglez l’in-
clinaison voulue puis revissez les vis.
Si le projecteur est vissé sur la plaque de mon-
tage (7), desserrez un peu la vis (8), si nécessaire,
tournez l’étrier de montage (9) comme souhaité
puis revissez la vis.
5 Mise en service
AVERTISSEMENT
Ne regardez jamais directement
les LEDs, cela pourrait générer des
troubles de la vision.
Faites attention : des changements
très rapides de lumière peuvent
déclencher chez les personnes
photo sensibles et les épileptiques
des crises d’épilepsie !
Pour allumer le projecteur, mettez la fiche du cordon
secteur (6) dans une prise secteur 230 V/ 50 Hz. Pour
l’éteindre, débranchez le cordon secteur.
Pour un meilleur confort d’utilisation, il est re-
commandé de relier le projecteur à une prise secteur
pouvant être allumée et éteinte via un interrupteur.
Attention ! Le projecteur ne doit pas être relié à l’ali-
mentation via un dimmer.
6 Fonctionnement sans contrôleur
Si le récepteur ne reçoit aucun signal de commande
DMX, il change tout seul la couleur avec des transi-
tions lentes.
Si la musique va à un rythme marqué dans la
plage des graves, à un volume suffisant, le projecteur
change la couleur au rythme de la musique, géré par
un microphone interne. Si la gestion par la musique
ne fonctionne pas de manière optimale, augmentez
le volume ou diminuez la distance entre la source
sonore et le projecteur.
6.1 Fonctionnement combiné de plusieurs
projecteurs
Il est possible de faire fonctionner ensemble plusieurs
PARL-30SPOT pour changer les couleurs de manière
synchrone ou pour contrôler les appareils auxiliaires
au même rythme via le microphone interne de l’ap-
pareil principal.
Reliez la connexion DMX OUT (3) de l’appa-
reil principal via un cordon XLR 3 pôles (p. ex. série
CDMXN-... de la gamme IMG STAGELINE) à l’entrée
DMX IN (4) du premier appareil auxiliaire. Reliez la
connexion DMX OUT du premier appareil auxiliaire à
la connexion DMX IN du deuxième appareil auxiliaire
et ainsi de suite.
6.2 Télécommande LC-3
Via la télécommande LC-3 disponible en option,
diverses fonctions peuvent être gérées en plus de la
gestion par la musique.
1)
Reliez la télécommande à la prise REMOTE
CONTROL (2).
2) Aucun signal DMX ne doit être présent à l’entrée
DMX IN (4).

14
Français
3)
Via la sortie DMX OUT (3), on peut brancher
d’autres PARL-30SPOT (☞chapitre 6.1) pour les
gérer de manière synchrone à l’appareil principal
avec la télécommande.
4) Avec la touche STAND BY (13), la fonction Black-
out peut être activée ou éteinte. Si la fonction est
activée, la lumière est coupée et la LED à côté de
la touche brille.
5) Avec la touche MODE (15), sélectionnez le mode
de fonctionnement:
a)
Après l’allumage du projecteur, le mode
SOUND1 est activé. La LED à côté de la touche
MODE ne brille pas. Si la touche FUNCTION
(14) est maintenue enfoncée, un effet strobo-
scopique dépendant de la musique est créé. A
chaque nouvelle pression sur la touche, il passe
de lumière blanche, lumière de couleur chan-
geante (pour plusieurs projecteurs comme courte
séquence avec uniquement un éclair par projec
-
teur ; la couleur est identique sur tous les pro-
jecteurs) à lumière de couleur changeante avec
différentes couleurs sur plusieurs projecteurs.
b)
Pour commuter sur le mode MANUAL, appuyez
une fois sur la touche MODE. La LED à côté de
la touche brille. Avec la touche FUNCTION, on
peut sélectionner une des couleurs suivantes :
blanc, rouge, bleu, violet, orange, vert, jaune,
magenta, cyan.
c)
Pour commuter sur le mode SOUND 2, appuyez
une nouvelle fois sur la touche MODE. La LED
à côté de la touche clignote lentement. Avec la
touche FUNCTION, on peut sélectionner entre
cinq options de changement de couleurs et sé-
quences gérées par la musique, par des pres-
sions répétées. Ces options n’ont d’intérêt que
si plusieurs projecteurs sont branchés ensemble.
d)
Pour commuter sur le mode AUTO, appuyez
une nouvelle fois sur la touche MODE. La LED à
côté de la touche clignote rapidement. Avec ce
mode de fonctionnement, les couleurs changent
automatiquement par transition. La musique en
cours n’a pas d’influence. Avec la touche FUNC-
TION, on peut sélectionner entre trois vitesses de
transition par des pressions répétées.
Pour revenir au mode SOUND 1, appuyez une nou-
velle fois sur la touche MODE.
7 Utilisation via un contrôleur
Pour une utilisation via un contrôleur avec protocole
DMX512 (par exemple DMX-1440 ou DMX-510USB
de IMG STAGELINE), le projecteur dispose de quatre
canaux de commande. Les fonctions des canaux et
les valeurs DMX sont décrites dans le chapitre 9.1.
7.1 Branchement
Pour la transmission de signaux DMX, il est recom-
mandé d’utiliser des câbles spécifiques (par exemple
câbles de la série CDMXN de IMG STAGELINE). Pour
des longueurs de liaison à partir de 150 m ou pour la
gestion de plus de 32 appareils via une seule sortie
DMX, il est recommandé d’insérer un amplificateur
répétiteur DMX (p. ex. SR-103DMX).
1) Reliez l’entrée DMX (4) à la sortie DMX du jeu de
lumière.
2) Reliez la sortie DMX (3) à l’entrée DMX du jeu de
lumière suivant. Reliez sa sortie à l’entrée du pro-
chain appareil et ainsi de suite jusqu’à ce que tous
les jeux de lumière soient reliés dans une chaîne.
3) Terminez la sortie DMX du dernier appareil DMX
de la chaîne avec une résistance 120 Ω (> 0,3 W):
soudez aux pins 2 et 3 d’une fiche XLR la résistance
et branchez la fiche dans la sortie DMX ou utilisez
un bouchon correspondant (p. ex. DLT-123 de IMG
STAGELINE).
7.2 Réglage de l’adresse de démarrage
Pour pouvoir utiliser le projecteur avec un contrôleur,
il faut régler l’adresse de démarrage DMX pour le
premier canal DMX. Si par exemple sur le contrôleur,
l’adresse 17 est prévue pour le contrôle de la couleur
Rouge, réglez sur le projecteur l’adresse de démar-
rage 17. Les autres fonctions du projecteur (vert, bleu,
dimmer), sont automatiquement attribuées aux trois
canaux suivants (dans cet exemple 18 à 20). Comme
adresse de démarrage pour l’appareil suivant à gestion
DMX immédiatement suivante on peut utiliser, dans
cet exemple, l’adresse 21.
Pour régler l’adresse, deux méthodes existent :
7.2.1 Réglage automatique des adresses
Cette méthode est utile si plusieurs PARL-30SPOT
doivent être utilisés et dont les adresses sont dans la
plage inférieure :
1) Séparez l’entrée DMX (4) du premier projecteur du
contrôleur ou éteignez le contrôleur de telle sorte
qu’aucun signal DMX ne soit présent à l’entrée
du projecteur.
2)
Appuyez pendant cinq secondes sur la touche DMX
ADDRESS SETTING (5) sur le premier projecteur. Le
projecteur et ceux reliés sont alors sombres.
3)
Rétablissez la liaison avec le contrôleur ou rallumez
le contrôleur.
L’adresse de démarrage du premier projecteur est
réglée sur 1, les adresses de démarrage des appareils
suivants sur 5, 9, 13 etc.

15
Français
7.2.2 Réglage des adresses via le contrôleur
Avec cette méthode, on peut attribuer à un projecteur
une adresse quelconque de démarrage de manière
simple :
1)
Sur le contrôleur, réglez la valeur DMX du canal
qui correspond à l’adresse de démarrage à régler,
sur le maximum (255). Mettez les valeurs de tous
les autres canaux DMX sur zéro. Si par exemple
l’adresse de démarrage 17 doit être réglée, ouvrez
complètement le canal 17 sur le contrôleur et met-
tez sur zéro tous les autres canaux.
2)
Pour tous les projecteurs devant recevoir cette
adresse de démarrage, appuyez brièvement sur la
touche DMX ADDRESS SETTING (5).
Répétez ces points jusqu’à ce que chaque projecteur
aie son adresse.
7.3 Gestion avec le LED-4C
Le LED-4C de IMG STAGELINE est un contrôleur simple
d’utilisation spécialement conçu pour ces projecteurs
à LEDs. Il dispose de 4 canaux, tous les projecteurs
reliés ne peuvent être gérés que de manière synchrone.
Réglez l’adresse de démarrage pour les projec-
teurs sur 1 ou sur un multiple de 4 + 1 (5, 9, 13, …
61 max.), ☞chapitre 7.2.1. Reportez-vous à la notice
du LED-4C pour plus de détails.
8 Nettoyage du projecteur
La vitre plastique du couvercle du projecteur (10) doit
être nettoyée à intervalles réguliers de toute poussière,
fumée ou autres particules salissantes, de l’intérieur
et de l’extérieur. C’est à cette seule condition que la
lumière sera diffusée avec une luminosité maximale.
1) Pour le nettoyage, utilisez un chiffon doux, propre
et un produit nettoyant doux. Ensuite essuyez la
vitre de plastique.
2) Pour pouvoir nettoyer la vitre de l’intérieur, il faut
retirer le couvercle du projecteur (10).
ATTENTION ! Avant d’ouvrir le projecteur, débran-
chez impérativement la fiche secteur de la prise
secteur.
a) Desserrez la vis de blocage (11), poussez le ver-
rouillage (12) vers l’arrière.
b) Tournez le couvercle du projecteur un peu dans
le sens inverse des aiguilles d’une montre pour
qu’il se désenclenche et puisse être retiré.
c) Nettoyez la vitre de l’intérieur, puis remontez le
projecteur dans l’ordre inverse.
9 Caractéristiques techniques
Alimentation : . . . . . . . . .230 V/ 50 Hz
Consommation : . . . . . . .10 VA
Lampes : . . . . . . . . . . . . .LEDs 5 mm
extrêmement claires
Nombre : . . . . . . . . . . .90
24 rouges
33 vertes
33 bleues
Angle de diffusion : . . .20°
Température de fonc. : . .0 – 40 °C
Dimensions : . . . . . . . . . .⌀ 120 mm × 120 mm
Poids : . . . . . . . . . . . . . . .1 kg
Longueur de câble : . . . .1,2 m
9.1 Canaux DMX
Valeur DMX Fonction
Canal 1 : Part de rouge
0 – 255 luminosité du rouge
Canal 2 : Part de vert
0 – 255 luminosité du vert
Canal 3 : Part de bleu
0 – 255 luminosité du bleu
Canal 4 : Dimmer / Stroboscope / Musique
0 – 7 LEDs éteintes
8 – 190 dimmer
191 – 200
changement de couleur
géré par la musique
via le microphone intégré
201 – 247 effet stroboscope :
lent rapide
248 – 255 luminosité maximale
Tout droit de modification réservé.
Notice d’utilisation protégée par le copyright de MONACOR
®
INTERNATIONAL GmbH & Co. KG. Toute reproduction
même partielle à des fins commerciales est interdite.

16
Italiano
Deutsch
Deutsch Seite
English
English Page
Français
Français Page
Español
Español Página
Nederlands
Nederlands Pagina
Polski
Polski Strona
Proiettore DMX a LED
Queste istruzioni sono rivolte all‘installatore dell‘appa-
recchio nonché all‘utente con conoscenze di base dei
comandi DMX. Vi preghiamo di leggerle attentamente
prima della messa in funzione dell‘apparecchio e di
conservarle per un uso futuro.
A pagina 2 trovate tutti gli elementi di comando
e collegamenti descritti.
1 Elementi di comando
ecollegamenti
1.1 Faretto
1 Viti di bloccaggio per la staffa di montaggio (9)
2 Presa di collegamento per il telecomando LC-3
3 Uscita segnale DMX (XLR a 3 poli) per il collega-
mento con l’ingresso DMX di un’ulteriore unità
per effetti luce;
1 = massa, 2 = DMX−, 3 = DMX+
4 Ingresso segnale DMX (XLR a 3 poli);
1 = massa, 2 = DMX−, 3 = DMX+
5 Tasto per l’impostazione dell’inidirizzo DMX,
(vedi Capitolo 7.2)
6 Cavo rete per il collegamento con una presa
(230 V/50 Hz)
7 Piastra di montaggio per il fissaggio alla parete
o al soffitto
8 Vite per la piastra di montaggio
9 Staffa di montaggio
10 Coperchio con disco di plastica
11 Vite di fissaggio per il bloccaggio (12)
12 Bloccaggio del coperchio
1.2 Telecomando LC-3
Il telecomando è disponibile come accessorio e non è
in dotazione con il faretto a LED.
13 Tasto STAND BY per la funzione Blackout
(luce spenta)
14
Tasto FUNCTION per scegliere diverse funzioni
di cambio luce a seconda del modo di funziona-
mento determinato con il tasto MODE
15 Tasto MODE per cambiare fra
Modo Sound 1 (LED spento)
Modo manuale (LED acceso)
Modo Sound 2 (LED lampeggia lentamente)
Modo auto (LED lampeggia velocemente)
N. B.: Per usare il telecomando, all’ingresso DMX IN (4)
non deve essere presente nessun segnale DMX.
2 Avvertenze di sicurezza
Il faretto è conforme a tutte le direttive rilevanti dell’UE
e pertanto porta la sigla .
AVVERTIMENTO
L’apparecchio funziona con perico-
losa tensione di rete. Non interve-
nire mai al suo interno e non inserire
niente nelle fessure di aerazione! Esi-
ste il pericolo di una scarica elettrica.
•
Usare il proiettore solo all’interno di locali e proteg-
gerlo dall'acqua gocciolante e dagli spruzzi d'acqua
nonché da alta umidità dell'aria. La temperatura
d'esercizio ammessa è 0 – 40 °C.
•
Non mettere in funzione il faretto e staccare subito
la spina rete se:
1.
l’apparecchio o il cavo rete presentano dei danni
visibili;
2. dopo una caduta o dopo eventi simili sussiste il
sospetto di un difetto;
3. l’apparecchio non funziona correttamente.
Per la riparazione rivolgersi sempre ad un’officina
competente.
•
Il cavo rete, se danneggiato, deve essere sostituito
solo da un laboratorio specializzato.
•
Staccare il cavo rete afferrando la spina, senza tirare
il cavo.
•
Per la pulizia usare solo un panno morbido, asciutto;
non impiegare in nessun caso prodotti chimici o acqua.
•
Nel caso d’uso improprio, di montaggio non sicuro,
d’impiego scorretto o di riparazione non a regola
d’arte del faretto, non si assume nessuna responsa-
bilità per eventuali danni consequenziali a persone
o a cose e non si assume nessuna garanzia per il
faretto.
Se si desidera eliminare il faretto definitiva-
mente, consegnarlo per lo smaltimento ad
un’istituzione locale per il riciclaggio.
3 Possibilità d’impiego
Il faretto è indicato per l’impiego sul palcoscenico,
in discoteche o per party oppure per decorazione.
Produce una luce colorata per mezzo dei LED super-
luminosi di 5 mm nei colori blu, rosso e verde. Sono
possibili dei cambi di colori comandati dalla musica,
delle dissolvenze lente fra i colori nonché degli effetti
stroboscopici.
Il faretto è previsto per il comando attraverso
un’unità di comando luce DMX (4canali di controllo
DMX), ma può essere usato anche senza unità di
comando oppure tramite il telecomando LC-3 dispo-
nibile come accessorio.
Italiano
Italiano Pagina

17
Italiano
4 Montaggio
•
Posizionare l’apparecchio in modo tale che durante
il funzionamento sia garantita una circolazione suf-
ficiente dell’aria. Le aperture d’aerazione sul con-
tenitore non devono essere coperte in nessun caso
(p. es. da tende).
•
La distanza da un oggetto irradiato deve essere non
inferiore a 10 cm.
1) Avvitare la staffa di montaggio (9) sul contenitore
del faretto per mezzo delle due viti ad alette (1).
2) Fissare il faretto per mezzo della sua staffa di mon-
taggio (9), p. es. con una robusta vite di montaggio
oppure con un supporto per fari (gancio a C) ad
una traversa.
Se il faretto deve essere fissato al soffitto o
alla parete, avvitare la piastra di montaggio (7) alla
staffa come da figura 1. Avvitare la piastra con il
faretto in un posto adatto del soffitto o della parete.
AVVERTIMENTO Il faretto deve essere montato a re-
gola d’arte e in modo sicuro. Se viene
installato in modo sospeso sopra
delle persone è richiesto un siste ma
di sicurezza supplementare (p. es. per mezzo di una
fune di trattenuta fissata alla staffa di montaggio;
fissare la fune in modo tale che la caduta dell’unità
non possa superare i 20 cm).
3) Per orientare il faretto allentare le due viti di bloc-
caggio (1) sulla staffa di montaggio. Impostare
l’inclinazione desiderata del faretto e stringere
nuovamente le viti.
Se il faretto è avvitato alla piastra di montaggio
(7), allentare eventualmente la vite (8), girare la
staffa di montaggio (9) come desiderato e stringere
di nuovo la vite
5 Messa in funzione
AVVERTIMENTO Non guardare direttamente nei LED
per escludere possibili danni agli
occhi.
Tenete presente che i veloci cambi
di luce possono provocare attacchi
d’epilessia presso persone fotosen-
sibili o epilettici!
Per accendere il faretto inserire la spina del cavo rete
(6) in una presa (230 V/ 50 Hz), per lo spegnimento
staccare la spina.
Per maggiore comodità è consigliabile collegare
il faretto con una presa comandata da un interruttore
di luce.
Attenzione: Il faretto non deve essere collegato con
la tensione di rete per mezzo di un dimmer!
6 Funzionamento senza
unitàdicomando
Se il faretto non riceve nessun segnale DMX di
comando, cambia automaticamente i colori con dis-
solvenze lente.
Se c’è della musica con chiaro ritmo nei bassi, il
faretto, comandato da un microfono integrato, cam-
bia il colore nel ritmo della musica. Se il comando
musica non dovesse funzionare in modo ottimale,
aumentare il volume oppure ridurre la distanza fra
sorgente sonora e faretto.
6.1 Assemblaggio di più faretti
Si possono unire più PARL-30SPOT, per ottenere un
cambio sincronizzato dei colori oppure per comandare,
tramite il microfono interno dell’apparecchio princi-
pale, tutti gli apparecchi secondari nello stesso ritmo.
Per fare ciò collegare il contatto DMX OUT (3)
dell’apparecchio principale con il contatto DMX IN
(4) del primo apparecchio secondario servendosi di
una cavo XLR a 3 poli (p. es. serie CDMXN-... del pro-
gramma di IMG STAGELINE). Collegare il contatto
DMX OUT del primo apparecchio secondario con il
contatto DMX IN del secondo apparecchio seconda-
rio ecc.
6.2 Telecomando tramite LC-3
Per mezzo del telecomando LC-3 disponibile come
accessorio è possibile comandare diverse funzioni oltre
al comando tramite la musica.
1)
Collegare il telecomando con la presa REMOTE
CONTROL (2).
2) All’ingresso DMX IN (4) non deve essere presente
nessun segnale DMX.
3) Attraverso l’uscita DMX OUT (3) è possibile colle-
gare ulteriori PARL-30SPOT (☞Capitolo 6.1), per
comandarli insieme con l’apparecchio principale
per mezzo del telecomando.
4) Con il tasto STAND BY (13) si può attivare e disatti-
vare la funzione Blackout. Con la funzione attivata,
la luce viene mascherata e il LED vicino al tasto si
accende.
5) Con il tasto MODE (15) selezionare il modo di fun-
zionamento:
a) Dopo l’accensione del faretto è attivato il modo
SOUND 1. Il LED vicino al tasto MODE è spento.
Se si tiene premuto il tasto FUNCTION (14), si
produce un effetto stroboscopico dipendente
dalla musica. Con ogni nuova pressione del
tasto, l’effetto cambia fra luce bianca, luce di
vari colori (nel caso di più faretti come sequenza
breve con un solo lampo per faretto; il colore è
lo stesso in tutti i faretti) e luce di vari colori con
colori differenti nel caso di più faretti.

18
Italiano
b)
Per passare al modo MANUAL premere una
volta il tasto MODE. Il LED vicino al tasto si
accende. Con il tasto FUNCTION si può ora sce-
gliere uno dei seguenti colori:
bianco, rosso, blu, viola, arancio, verde, giallo,
magenta, cyan
c) Per passare al modo SOUND 2 premere un’al-
tra volta il tasto MODE. Il LED vicino al tasto
lampeggia lentamente. Con il tasto FUNCTION
si possono scegliere, premendo ripetutamente,
cinque differenti opzioni e sequenze di cambio
colori comandato dalla musica. Queste opzioni
hanno senso solo alla presenza di più faretti col-
legati fra loro.
d)
Per passare al modo AUTO premere un’altra
volta il tasto MODE. Il LED vicino al tasto lam-
peggia velocemente. In questo modo i colori
cambiano automaticamente con dissolvenze.
La musica non influisce sul cambio. Con il tasto
FUNCTION si possono scegliere, premendo ri-
petutamente, tre differenti velocità per le dis-
solvenze.
Per ritornare nel modo SOUND 1 premere ancora
il tasto MODE.
7 Funzionamento attraverso
un’unità di comando luce
Per il funzionamento attraverso un’unità di comando
luce con protocollo DMX512 (p. es. DMX-1440 o
DMX-510USB di IMG STAGELINE), il faretto dispone
di quattro canali di comando. Le funzioni dei canali e
i valori DMX si trovano nel capitolo 9.1.
7.1 Collegamento
Per la trasmissione di segnali DMX si dovrebbero usare
cavi speciali (p. es. CDMXN-… di IMG STAGELINE).
Nel caso di lunghezze oltre i 150 m o con più di 32
apparecchi tramite una sola uscita DMX si consiglia
per principio l’impiego di un amplificatore DMX (p. es.
SR-103DMX).
1)
Collegare l’ingresso DMX (4) con l’uscita DMX
dell’unità di comando.
2)
Collegare l’uscita DMX (3) con l’ingresso DMX della
successiva unità per effetti luce. Quindi collegare
l’uscita di quest’ultima con l’ingresso dell’appa-
recchio a valle ecc. fino al collegamento di tutte le
unità in una catena.
3)
Terminare l’uscita DMX dell’ultima unità DMX della
catena con un resistenza 120 Ω (> 0,3 W): saldare
la resistenza ai pin 2 e 3 di un connettore XLR ed
inserire il connettore nell’uscita DMX, oppure usare
un relativo connettore terminatore (p. es. DLT-123
di IMG STAGELINE).
7.2 Impostare l’indirizzo di start
Per poter usare il faretto con un’unità di comando
luce, occorre impostare l’indirizzo di start DMX per
il primo canale DMX. Se, per esempio, sull’unità di
comando è previsto l’indirizzo 17 per il comando del
colore rosso, si deve impostare sul faretto l’indirizzo
di start 17. Le altre funzioni del faretto (verde, blu,
dimmer) saranno assegnati automaticamente ai tre
canali successivi (nel nostro esempio 18 – 20). Un altro
possibile indirizzo di start per l’apparecchio succes-
sivo comandato da DMX, potrebbe essere nel nostro
esempio l’indirizzo 21.
Per impostare l’indirizzo sono disponibili i seguenti
due metodi:
7.2.1 Impostazione automatica dell’indirizzo
Questo metodo ha senso se si impiegano più PARL-
30SPOT e se i loro indirizzi devono essere bassi:
1) Staccare dall’unità di comando l’ingresso DMX (4)
del primo faretto oppure spegnere l’unità di co-
mando in modo che all’ingresso del faretto non
sia presente nessun segnale DMX.
2)
Premere per cinque secondi il tasto DMX ADDRESS
SETTING (5) sul primo faretto. Il faretto e i faretti
collegati con lo stesso diventano bui.
3)
Ripristinare il collegamento con l’unità di comando
oppure riaccendere detta unità.
L’indirizzo di start del primo faretto è ora messo su1,
gli indirizzi di start dei faretti seguenti sono 5, 9, 13
ecc.
7.2.2 Impostazione dell’indirizzo attraverso
l’unità di comando
Con questo metodo è semplice assegnare ad un
faretto un qualsiasi indirizzo di start:
1)
Sull’unità di comando mettere il valore DMX del
canale che corrisponde all’indirizzo da impostare
sul massimo (255). Mettere sullo zero i valori di tutti
gli altri canali DMX. Se si deve impostare per esem-
pio l’indirizzo di start 17, aprire completamente il
canale 17 sull’unità di comando e mettere tutti gli
altri canali sullo zero.
2) Per tutti i faretti che devono avere questo indirizzo
di start premere brevemente il tasto DMX ADDRESS
SETTING (5).
Ripetere questi passi finché ogni faretto ha avuto il
suo indirizzo.

19
Italiano
7.3 Comando tramite il LED-4C
L’apparecchio LED-4C di IMG STAGELINE è un’unità
di comando facile da usare, specialmente per que-
sti faretti a LED. Dispone di 4 canali così che tutti i
faretti collegati possono essere comandati in modo
sincronizzato.
Impostare l’indirizzo di start dei faretti su 1 o su
un multiplo di 4 + 1 (5, 9, 13, … max. 61), ☞Capi-
tolo7.2.1. Delle indicazioni più particolari sul funzio-
namento si trovano nelle istruzioni del LED-4C.
8 Pulizia del faretto
Il disco di plastica del coperchio del faretto (10)
do vrebbe essere pulito ad intervalli regolari, a secondo
della presenza di sporco per polvere, fumo o altre
particelle. La pulizia dovrebbe riguardare il lato esterno
ed eventualmente anche quello interno. Solo in questo
modo è garantito che la luce venga irradiata con la
massima luminosità.
1)
Per la pulizia usare un panno morbido, pulito,
insieme ad un detergente delicato. Quindi asciugare
il disco di plastica.
2) Per poter pulire l’interno del disco occorre staccare
il coperchio (10).
ATTENZIONE! Prima di aprire il coperchio staccare
assolutamente la spina dalla presa di rete.
a)
Allentare la vite di fissaggio (11) e spostare all’in
-
dietro il blocco (12).
b) Girare il coperchio un po’ in senso antiorario in
modo che si sganci per poter essere tolto.
c)
Pulire il disco dall’interno e riassemblare il faretto
in ordine inverso.
9 Dati tecnici
Alimentazione: . . . . . . . .230 V/ 50 Hz
Potenza assorbita: . . . . . .10 VA
Lampadine: . . . . . . . . . . .LED superluminosi
di5 mm
Numero: . . . . . . . . . . .90
rosso
verde
blu
Angolo d’irradiazione: .20°
Temperatura d’esercizio: .0 – 40 °C
Dimensioni: . . . . . . . . . . .⌀ 120 mm × 120 mm
Peso: . . . . . . . . . . . . . . . .1 kg
Lunghezza cavo: . . . . . . .1,2 m
9.1 Canali DMX
Valore DMX Funzione
Canale 1: Parte rosso
0 – 255 Luminosità rosso
Canale 2: Parte verde
0 – 255 Luminosità verde
Canale 3: Parte blu
0 – 255 Luminosità blu
Canale 4: Dimmer / Stroboscopio / Musica
0 – 7 LED spenti
8 – 190 Dimmer
191 – 200
Cambio colori comandato
dalla musica tramite il micro-
fono integrato
201 – 247 Effetto stroboscopico:
lento veloce
248 – 255 Luminosità totale
Con riserva di modifiche tecniche.
La MONACOR
® INTERNATIONAL GmbH & Co. KG si riserva ogni diritto di elaborazione in qualsiasi forma delle
presenti istruzioni per l’uso. La riproduzione – anche parziale – per propri scopi commerciali è vietata.

20
Nederlands
Deutsch
Deutsch Seite
English
English Page
Français
Français Page
Italiano
Italiano Pagina
Español
Español Página
Polski
Polski Strona
DMX-ledschijnwerper
Deze handleiding is bedoeld voor de installateur van
de schijnwerper en voor de gebruiker met basiskennis
van de DMX-besturing. Lees de handleiding grondig
door, alvorens het apparaat in gebruik te nemen, en
bewaar ze voor latere raadpleging.
Op de pagina 2 vindt u een overzicht van alle
bedieningselementen en de aansluitingen.
1 Overzicht van de bedienings-
elementen en aansluitingen
1.1 Schijnwerper
1 Vastzetschroeven voor de montagebeugel (9)
2 Aansluitjack voor de afstandsbediening LC-3
3
DMX-signaaluitgang (3-polig XLR) voor de
aansluit ing op de DMX-ingang van een ander
DMX-licht effectapparaat;
1 = massa, 2 = DMX−, 3 = DMX+
4 DMX-signaalingang (3-pol. XLR);
1 = massa, 2 = DMX−, 3 = DMX+
5 Toets voor de DMX-adresinstelling,
(zie hoofdstuk 7.2)
6 Netsnoer voor aansluiting op een stopcontact
(230 V/ 50 Hz)
7 Montageplaat voor de bevestiging aan muur of
plafond
8 Schroef voor de montageplaat
9 Montagebeugel
10 Deksel met kunststofschijf
11 Stelschroef voor de vergrendeling (12)
12 Vergrendeling voor het behuizingsdeksel
1.2 Afstandsbediening LC-3
De afstandsbediening is als toebehoren verkrijgbaar en
is niet in de levering van de schijnwerper inbegrepen.
13 Toets STAND BY voor de functie Blackout
(licht uit)
14
Toets FUNCTION voor het selecteren van ver-
schillende lichtwisselfuncties afhankelijk van
de be drijfsmodus die met de toets MODE werd
gesel ecteerd
15 Toets MODUS voor het wisselen tussen
Sound-modus 1 (De LED licht niet op)
Manual-modus (De LED licht op)
Sound-modus 2 (LED knippert traag)
Auto-modus (LED knippert snel)
Opmerking: Voor de besturing via de afstandsbediening
mag er geen DMX-signaal naar de ingang DMX IN (4)
worden gestuurd.
2 Veiligheidsvoorschriften
De schijnwerper is in overeenstemming met alle rele-
vante EU-richtlijnen en is daarom met gekenmerkt.
WAARSCHUWING De netspanning van de schijnwer-
per is levensgevaarlijk. Open het
apparaat niet, en zorg dat u niets
in de ventilatieope ningen steekt! U
loopt het risico van een elektrische
schok.
•
De schijnwerper is enkel geschikt voor gebruik bin-
nenshuis; vermijd druip- en spatwater en plaatsen
met een hoge vochtigheid. De toegestane gebruiks-
temperatuur bedraagt 0 – 40 °C.
•
Schakel de schijnwerper niet in of trek onmiddellijk
de stekker uit het stopcontact,
1. wanneer het apparaat of het netsnoer zichtbaar
beschadigd is,
2.
wanneer er een defect zou kunnen optreden
nadat het apparaat bijvoorbeeld is gevallen,
3. wanneer het apparaat slecht functioneert.
Het apparaat moet in elk geval worden hersteld
door een gekwalificeerd vakman.
•
Een beschadigd netsnoer mag alleen in een erkende
werkplaats worden vervangen.
•
Trek de stekker nooit met het snoer uit het stopcon-
tact, maar steeds met de stekker zelf.
•
Verwijder het stof met een droge, zachte doek.
Gebruik zeker geen water of chemicaliën.
•
In geval van ongeoorloofd of verkeerd gebruik,
onveilige montage, foutieve bediening of van her-
stelling door een niet-gekwalificeerd persoon vervalt
de garantie en de aansprakelijkheid voor hieruit
resulterende materiële of lichamelijke schade.
Wanneer de schijnwerper definitief uit be-
drijf genomen wordt, bezorg hem dan voor
milieuvriendelijke verwerking aan een plaat-
selijk recyclagebedrijf.
3 Toepassingen
De schijnwerper is geschikt voor gebruik op podia,
in discotheken en feestzalen of voor decoratiedoel-
einden. Hij genereert gekleurd licht via superheldere
5 mm-LED’s, die blauw, rood en groen licht afgeven. Er
zijn ook muziekgestuurde kleurwisselingen, langzame
kleurovergang en stroboscoopeffecten mogelijk.
De schijnwerper is geschikt om via een DMX-licht-
regelaar te worden bestuurd (4 DMX-besturings-
kanalen), maar kan ook zonder regelaar of met de
als toebehoren beschikbare afstandsbediening LC-3
worden gebruikt.
Nederlands
Nederlands Pagina

21
Nederlands
4 Montage
•
Plaats het apparaat steeds zo, dat bij het gebruik
voldoende ventilatie is gegarandeerd. De ventilatie-
openingen van de behuizing mogen in geen geval
worden afgedekt (b.v. door gordijnen).
•
De afstand tot het bestraalde voorwerp moet ten
minste 10 cm bedragen.
1) Zet de montagebeugel (9) met de beide vleugel-
schroeven (1) op de schijnwerperbehuizing vast.
2)
Bevestig de schijnwerper via de montagebeugel
(9), b.v. met een stabiele montageschroef of een
spotlichthouder (C-haak) aan een traverse.
Als de schijnwerper aan een plafond of wand
moet worden bevestigd, schroeft u de montage-
plaat (7) vast op de montagebeugel zoals getoond
in figuur 1. Schroef de montageplaat met de schijn-
werper vast op een geschikte plaats aan het plafond
of de muur.
WAARSCHUWING
De schijnwerper moet deskundig
en veilig worden gemonteerd. Als
hij op een plek wordt geïnstalleerd,
waar personen onder kunnen
komen staan, moet hij extra worden beveiligd (b.v.
door een hijskabel aan de montagebeugel; bevestig
de hijskabel zo dat het apparaat niet meer dan 20 cm
kan vallen).
3) Voor het uitlijnen van de schijnwerper draait u de
twee bevestigingsschroeven (1) van de montage-
beugel los. Stel de gewenste hellingshoek van de
schijnwerper in en draai de schroeven weer vast.
Als de schijnwerper op de montageplaat (7)
is vastgeschroefd, draait u de schroef (8) ietwat
los, draait u de montagebeugel (9) in de gewenste
positie en draait u de schroef opnieuw vast.
5 Ingebruikneming
WAARSCHUWING
Kijk niet rechtstreeks in de LED’s,
omdat dit de ogen kan beschadigen.
Weet dat stroboscoopeffecten en
zeer snelle lichtwisselingen bij foto-
sensibele mensen en epileptici epileptische aanvallen
kunnen veroorzaken!
Voor het inschakelen van de schijnwerper steekt u
de stekker van het netsnoer (6) in een stopcontact
(230 V/ 50 Hz); om hem uit te schakelen, trekt u de
stekker er terug uit.
Voor een makkelijker bediening is het aangeraden
de schijnwerper in een stopcontact te pluggen dat u
via een lichtschakelaar kan in- en uitschakelen.
Opgelet: De schijnwerper mag niet via een dimmer
op de netspanning zijn aangesloten!
6 Gebruik zonder
besturingsapparaat
Als de schijnwerper geen DMX-besturingssignaal ont-
vangt, wisselt hij automatisch met langzame overgan-
gen van kleur.
Als er muziek wordt gespeeld met een duidelijk
ritme in het basbereik en met een voldoende ge-
luidsvolume, dan wisselt de schijnwerper, gestuurd
via een interne microfoon, de kleur op het ritme van
de muziek. Als de muzieksturing niet optimaal zou
functioneren, verhoogt u het geluidsvolume of verkort
u de afstand tussen geluidsbron en schijnwerper.
6.1 Aaneenschakelen van meerdere
schijnwerpers
U kunt meerdere PARL-30SPOT-schijnwerpers aaneen-
schakelen, om zo de kleuren synchroon te wisselen of
via de interne microfoon van het centrale apparaat alle
overige randapparaten op hetzelfde ritme te besturen.
Verbind de aansluiting DMX OUT (3) van het cen-
trale apparaat via een 3-polige XLR-kabel (b.v. serie
CDMXN-... uit het gamma van IMG STAGELINE) met
de aansluiting DMX IN (4) van het eerste randapparaat.
Verbind de aansluiting DMX OUT van het eerste
randapparaat met de aansluiting DMX IN van het
tweede randapparaat etc.
6.2 Afstandsbediening via LC-3
Via de als toebehoren verkrijgbare afstandsbediening
LC-3 kunnen bovenop de muzieksturing verschillende
functies worden gestuurd.
1)
Sluit de afstandsbediening aan op de jack REMOTE
CONTROL (2).
2) Op de ingang DMX IN (4) mag geen DMX-signaal
beschikbaar zijn.
3)
Via de uitgang DMXOUT (3) kunnen andere
PARL-30SPOT-schijnwerpers worden aangesloten
(☞hoofdstuk 6.1), om deze via de afstandsbedie-
ning samen met het centrale apparaat te besturen.
4)
Met de toets STAND BY (13) kunt u de functie
Blackout in- en uitschakelen. Bij geactiveerde
functie wordt het licht gedimd, en de LED naast
de toets licht op.
5)
Selecteer met de toets MODE (15) de bedrijfs-
modus:
a)
Na het inschakelen van de schijnwerper is de
modus SOUND 1 actief. De LED naast de toets
MODE licht niet op. Als u de toets FUNCTION
(14) ingedrukt houdt, wordt een muziekafhan-
kelijk stroboscoopeffect gegenereerd. Telkens u
op de toets drukt, wisselt deze tussen wit licht,
afwisselend gekleurd licht (bij meerdere schijn-
werpers als korte sequentie met slechts één flits
per schijnwerper; de kleur is bij alle schijnwerpers
gelijk) en wisselend gekleurd licht met verschil-
lende kleuren bij meerdere schijn werpers.

22
Nederlands
b)
Om naar de modus MANUAL te wisselen, drukt
u eenmaal op de toets MODE. De LED naast de
toets licht op. Met de toets FUNCTION kan nu een
van de volgende kleuren worden geselecteerd:
wit, rood, blauw, violet, oranje, groen, geel,
magenta, cyaan
c) Om naar de modus SOUND 2 om te schakelen,
drukt u nogmaals op de toets MODE. De LED
naast de toets knippert langzaam. Door de toets
FUNCTION herhaald in te drukken, kunt u tussen
vijf verschillende muziekgestuurde kleurwisse
-
lingsopties en sequenties selecteren. Deze opties
hebben alleen zin als er meerdere schijnwerper
aaneengeschakeld zijn.
d)
Om naar de modus AUTO te wisselen, drukt
u nogmaals op de toets MODE. De LED naast
de toets knippert snel. In deze bedrijfsmodus
gaan de kleuren automatisch in elkaar over. De
momenteel gespeelde muziek heeft hierop geen
invloed. Door herhaald op de toets FUNCTION
te drukken, kunt u kiezen uit drie verschillende
overgangssnelheden.
Om terug te schakelen naar de modus SOUND 1,
drukt u opnieuw op de toets MODE.
7 Bediening via een lichtregelaar
Voor de bediening via een lichtregelaar met
DMX512-protocol (b.v. DMX-1440 of DMX-510USB
van IMG STAGELINE) beschikt de schijnwerper over
vier besturingskanalen. De functies van de kanalen en
de DMX-waarden vindt u terug in het hoofdstuk 9.1.
7.1 Aansluiting
Voor de DMX-signaaloverdracht moeten speciale
kabels worden gebruikt (bv. kabels van de CDMXN-
serie van IMG STAGELINE). Bij kabellengten vanaf
150 m of bij het sturen van meer dan 32 apparaten
via een DMX-uitgang wordt in principe aanbevolen om
een DMX-ophaalversterker (bv. SR-103DMX) tussen
te schakelen.
1) Verbind de DMX-ingang (4) met de DMX-uitgang
van de lichtregelaar.
2) Verbind de DMX-uitgang (3) met de DMX-ingang
van de volgende lichtregelaar. Verbind de uitgang
hiervan opnieuw met de ingang van het nagescha-
kelde apparaat etc., tot alle lichteffectapparaten in
een kring zijn aangesloten.
3) Sluit de DMX-uitgang van het laatste DMX-appa-
raat van de ketting met een weerstand van 120 Ω
(>0,3 W) af: Soldeer de weerstand vast aan de
pinnen 2 en 3 van een XLR-stekker en plug de
stekker in de DMX-uitgang, of gebruik een over-
eenkomstige afsluitstekker (b.v. DLT-123 van IMG
STAGELINE).
7.2 Het startadres instellen
Om de schijnwerper met een lichtregelaar te kunnen
bedienen, moet het DMX-startadres voor het 1ste
DMX-kanaal worden ingesteld. Als bijvoorbeeld op
de regeleenheid het adres 17 voorzien is voor het
besturen van de rode kleur, stelt u het startadres 17 in
op de schijnwerper. De andere functies van de schijn-
werper (groen, blauw, dimmer) zijn dan automatisch
aan de drie volgende kanalen (in dit voorbeeld 18 – 20)
toegewezen. Als volgend mogelijk startadres voor het
volgende DMX-gestuurde apparaat zou in dit voor-
beeld het adres 21 kunnen worden gebruikt.
Voor het instellen van het adres staan de volgende
twee methoden ter beschikking:
7.2.1 Automatische adresinstelling
Deze methode is nuttig als er meerdere PARL-30SPOT-
schijnwerpers worden gebruikt en de adressen ervan
in het onderste bereik moeten liggen:
1)
Koppel de DMX-ingang (4) van de eerste schijnwer-
per los van het besturingsapparaat of schakel het
besturingsapparaat uit, zodat er geen DMX-signaal
op de ingang van de schijnwerper is.
2) Houd de toets DMX ADDRESS SETTING (5) op de
eerste schijnwerper vijf seconden ingedrukt. De
schijnwerper en de schijnwerper die erop is aan-
gesloten worden dan donker.
3) Maak opnieuw de verbinding met het besturings-
apparaat resp. schakel het besturingsapparaat op-
nieuw in.
Het startadres van de eerste schijnwerper is nu op 1
ingesteld, de startadressen van de volgende schijn-
werpers op 5, 9, 13 etc.
7.2.2 Het adres via het besturingsapparaat instellen
Met deze methode kunt u op zeer eenvoudige wijze
een willekeurig startadres aan een schijnwerper
toewijzen:
1)
Op het besturingsapparaat stelt u de DMX-waarde
van het kanaal, dat overeenstemt met het in te stel-
len startadres, in op de maximumwaarde (255). Stel
de waarden van alle andere DMX-kanalen in op nul.
Als b.v. startadres 17 moet worden ingesteld, schuif
dan kanaal 17 op het besturingspaneel volledig
open en plaats alle andere kanalen in de nulstand.
2)
Bij alle schijnwerpers die dit startadres moeten ont
-
vangen, drukt u even op de toets DMX ADDRESS
SETTING (5).
Herhaal deze bedieningsstappen tot elke schijnwerper
zjin adres heeft gekregen.

23
Nederlands
7.3 Besturing met de LED-4C
Het apparaat LED-4C van IMG STAGELINE is een een-
voudig te bedienen besturingspaneel dat speciaal voor
deze LED-schijnwerper is bedoeld. Het beschikt over 4
kanalen, zodat alle hierop aangesloten schijnwerpers
alleen synchroon kunnen worden bestuurd.
Stel het startadres van de schijnwerpers op 1 of
op een veelvoud van 4 + 1 (5, 9, 13, … max. 61) in,
☞hoofdstuk 7.2.1. Meer gedetailleerde informatie
vindt u terug in de handleiding LED-4C.
8 Schijnwerper reinigen
Het kunststofschijfje van het schijnwerperdeksel (10)
moet regelmatig, afhankelijk van de verontreiniging
door stof, rook of andere vuildeeltjes, aan de buiten-
kant en evt. ook aan de binnenkant worden gereinigd.
Alleen dan kan het licht met maximale helderheid
worden uitgestraald.
1)
Voor de reiniging gebruikt u een zachte, schone
doek en een zacht detergent. Veeg de kunststof-
schijf vervolgens droog.
2)
Om de schijf aan de binnenkant te kunnen rei-
nigen, moet het schijnwerperdeksel (10) worden
afge-nomen.
OPGELET! Trek de netstekker zeker uit het stop-
contact, alvorens de schijnwerper te openen.
a)
Draai de stelschroef (11) los en schuif de grendel
(12) naar achter.
b)
Draai het schijnwerperdeksel een beetje naar
rechts, zodat het ontgrendelt en kan worden
weggenomen.
c) Reinig de schijf aan de binnenkant en volg bo-
venstaande procedure in omgekeerde volgorde
om de schijnwerper opnieuw te monteren.
9 Technische gegevens
Voedingsspanning: . . . . .230 V/ 50 Hz
Vermogensverbruik: . . . .10 VA
Verlichting: . . . . . . . . . . .superheldere 5 mm-LED’s
Aantal: . . . . . . . . . . . .90
24 rode
33 groene
33 blauwe
Uitstralingshoek: . . . . .20°
Omgevings-
temperatuurbereik: . . . . .0 – 40 °C
Afmetingen: . . . . . . . . . .⌀ 120 mm × 120 mm
Gewicht: . . . . . . . . . . . . .1 kg
Kabellengte: . . . . . . . . . .1,2 m
9.1 DMX-kanalen
DMX-waarde Functie
Kanaal 1: Roodaandeel
0 – 255 Helderheid rood
Kanaal 2: Groenaandeel
0 – 255 Helderheid groen
Kanaal 3: Blauwaandeel
0 – 255 Helderheid blauw
Kanaal 4: Dimmer / stroboscoop / muziek
0 – 7 LED’s uit
8 – 190 Dimmer
191 – 200 Muziekgestuurde kleurwisse-
ling via de interne microfoon
201 – 247 Stroboscoopeffect:
langzaam snel
248 – 255 Volle helderheid
Wijzigingen voorbehouden.
Deze gebruiksaanwijzing is door de auteurswet be schermd eigendom van MONACOR
®
INTERNATIONAL GmbH&
Co.KG. Een reproductie – ook gedeeltelijk – voor eigen commerciële doeleinden is verboden.

24
Español
Deutsch
Deutsch Seite
English
English Page
Français
Français Page
Italiano
Italiano Pagina
Nederlands
Nederlands Pagina
Polski
Polski Strona
Proyector LED DMX
Estas instrucciones van dirigidas al instalador del apa-
rato y a usuarios con conocimientos básicos en control
DMX. Lea atentamente estas instrucciones antes de
funcionamiento y guárdelas para usos posteriores.
Todos los elementos de funcionamiento y las
conexiones que se describen pueden encontrarse en
la página 2.
1 Elementos de Funcionamiento
yConexiones
1.1 Proyector
1 Tornillos de cierre para el soporte de montaje (9)
2 Jack de conexión para el control remoto LC-3
3 Salida de señal DMX (3 polos XLR) para conectar
a la entrada DMX de otro efecto de luces DMX;
1 = masa, 2 = DMX−, 3 = DMX+
4 Entrada de señal DMX (3 polos XLR);
1 = masa, 2 = DMX−, 3 = DMX+
5 Botón para ajustar la dirección DMX
(ver apartado 7.2)
6 Cable de corriente para la conexión a una toma
(230 V/ 50 Hz)
7 Placa de montaje para fijar el proyector en una
pared o en el techo
8 Tornillo para la placa de montaje
9 Soporte de montaje
10 Tapa de la carcasa con placa plástica
11 Tornillo de cierre para el seguro (12)
12 Seguro para la tapa de la carcasa
1.2 Control remoto LC-3
El control remoto está disponible como accesorio y no
se incluye con el proyector de LEDs.
13
Botón STAND BY para la función Blackout (luz
apagada)
14 Botón FUNCTION para seleccionar varias funcio-
nes de cambio de luces dependiendo del modo
de funcionamiento seleccionado con el botón
MODE
15 Botón MODE para cambiar entre:
Modo Sound 1 (LED apagado)
Modo Manual (LED encendido)
Modo Sound 2 (LED parpadea lentamente)
Modo Auto (LED parpadea rápidamente)
Nota: Para el control remoto, no puede haber ninguna
señal DMX en la entrada DMX IN (4).
2 Notas de Seguridad
El proyector cumple con todas las directivas relevan-
tes por la UE, y por lo tanto está marcado con el
símbolo .
ADVERTENCIA El proyector está alimentado con un
voltaje peligroso. Deje el manteni-
miento para el personal cualificado y
no introduzca nada en las rejillas de
ventilación, esto podría provocarle
una descarga eléctrica.
•
El proyector está adecuado sólo para utilizarlo en
interiores. Protéjalo contra goteos, salpicaduras y
humedad elevada. Rango de temperatura ambiente
admisible: 0 – 40 °C.
•
Inmediatamente desconecte el enchufe de la toma
de corriente:
1.
En caso de daño visible en el aparato o en el
cable de corriente.
2.
Si se produce algún defecto tras una caída o
accidente similar.
3. Si no funciona correctamente.
En cualquier caso el aparato debe ser reparado por
expertos.
•
Sólo el personal cualificado puede reemplazar un
cable de corriente dañado.
•
No tire nunca del cable para desconectarlo de la
toma de corriente, tire siempre del enchufe.
•
Para la limpieza utilice sólo un paño seco y suave, no
utilice nunca ni agua ni productos químicos.
•
No podrá reclamarse garantía ni responsabilidad
alguna por cualquier daño personal o material
producido si se utiliza el proyector para otros fines
diferentes a los originalmente concebidos, si no se
instala de un modo seguro, si no se utiliza correc-
tamente o si no lo repara el personal cualificado.
Si va a poner el proyector fuera de servicio
definitivamente, llévelo a la planta de reci-
claje más cercana para que su eliminación
no perjudique al medioambiente.
3 Aplicaciones
Este proyector está adecuado para aplicaciones en
escenario, discotecas o salas de fiesta y para decora-
ción. Crea luz coloreada mediante LEDs de 5 mm de
gran brillo en azul, rojo y verde. Es posible hacer cam-
bios de color controlados por música, transiciones gra-
duales de un color al otro y efectos estroboscópicos.
El proyector está diseñado para utilizarse me-
diante un controlador de luces DMX (4 canales de
control DMX), sin embargo, también puede funcionar
sin controlador o con el control remoto LC-3, dispo-
nible como accesorio.
Español
Español Página

25
Español
4 Montaje
•
Coloque siempre el proyector de modo que tenga
suficiente circulación de aire durante su funciona-
miento. No cubra nunca las rejillas de ventilación
(por ejemplo con las cortinas).
•
La distancia mínima hasta el objeto iluminado
debería ser de 10 cm.
1)
Sujete el soporte de montaje (9) a la carcasa del
proyector mediante los dos tornillos de cierre (1).
2) Sujete el proyector con el soporte de montaje (9),
por ejemplo con tornillo de montaje estable o un
soporte para efectos luminosos (gancho C) en una
barra transversal.
Para montar el proyector en un techo o en una
pared, atornille la placa de montaje (7) al soporte de
montaje como se muestra en la figura 1. Encuentre
un lugar adecuado en el techo o en la pared y ator-
nille la placa de montaje con el proyector.
ADVERTENCIA Monte el proyector de modo experto
y seguro. Si se va a instalar el proyec-
tor en un lugar donde la gente puede
sentarse o pasear por debajo de él,
asegúrelo adicionalmente (p. ej. con una cuerda de
seguridad fijada al soporte de montaje; asegure la
cuerda de modo que en caso de caída, la distancia
máxima de caída no supere los 20 cm).
3)
Para ajustar el proyector, afloje los dos tornillos
de cierre (1) en el soporte de montaje. Ajuste la
inclinación del proyector como desee y vuelva a
apretar los tornillos.
Si el proyector está atornillado a la placa de
montaje (7), afloje levemente el tornillo (8), si es ne-
cesario; gire el soporte de montaje (9) como desee
y apriete de nuevo los tornillos.
5 Puesta en marcha del Proyector
ADVERTENCIA
No mire nunca los LEDs directamente;
podría provocarle daños oculares.
Sepa que los cambios rápidos de ilu-
minación, como una luz parpadeante,
pueden provocar ataques de epilepsia
en personas que sean fotosensibles o
epilépticas.
Para conectar el proyector, conecte el enchufe del
cable de corriente (6) a una toma (230 V/ 50 Hz); para
apagarlo, desconéctelo.
Para un funcionamiento más adecuado, se re-
comienda que conecte el proyector a una toma con
interruptor de apagado y encendido de luz.
Precaución: No conecte el proyector a la corriente
con un dimmer.
6 Funcionamiento sin
ControladorDMX
Si el proyector no recibe ninguna señal de un contro-
lador DMX, cambia automáticamente de color con
una transición gradual de un color al otro.
Si la música se reproduce con un volumen sufi-
ciente y con un ritmo claro en los graves, el proyector
cambia los colores al ritmo de la música mediante el
micrófono interno. Si el control por música no fun-
ciona de un modo óptimo, aumente el volumen o
reduzca la distancia entre el proyector y la fuente de
sonido.
6.1 Interconexión de varios proyectores
Pueden combinarse varios PARL-30SPOT para cambiar
de color de modo sincronizado o para controlar todas
las unidades secundarias al mismo ritmo mediante el
micrófono interno de la unidad master.
Para ello, conecte la salida DMX OUT (3) del
master con un cable de 3 polos XLR (p. ej. los modelos
CDMXN-... de la gama de productos de IMG STAGE-
LINE) a la entrada DMX IN (4) de la primera unidad
secundaria. Conecte la salida DMX OUT de la primera
unidad secundaria a la entrada DMX IN de la segunda,
y así sucesivamente.
6.2 Control remoto por LC-3
El control remoto LC-3, disponible como accesorio,
permite controlar varias funciones además del control
por música.
1) Conecte el control remoto al jack REMOTE CON-
TROL (2).
2) No puede haber ninguna señal DMX en la entrada
DMX IN (4).
3) Mediante la salida DMX OUT (3), puede conectar
más unidades PARL-30SPOT (☞apartado 6.1) para
controlarlos todos a la vez con la unidad master
mediante el control remoto.
4) El botón STAND BY (13) permite activar / desactivar
la función Blackout. Con la función activada, la luz
se apaga y el LED junto al botón se ilumina.
5)
Elija el modo de funcionamiento con el botón
MODE (15).
a)
Después de conectar el proyector, se activa el
modo SOUND 1. El LED junto al botón MODE
no se ilumina. Si se mantiene el botón FUNCTION
(14) pulsado, se crea un efecto estroboscópico
al ritmo de la música. Cada vez que se pulsa el
botón, este efecto cambia entre luz blanca, luz
de colores cambiante (en caso de varios proyec-
tores como una breve secuencia de sólo 1 flash
por proyector; con el mismo color para todos
los proyectores) y luz de colores cambiante con
varios colores en caso de varios proyectores.

26
Español
b)
Para cambiar al modo MANUAL, pulse el botón
MODE una vez. El LED junto al botón se ilumina.
Utilice el botón FUNCTION para elegir uno de los
siguientes colores:
Blanco, rojo, azul, morado, naranja, verde, ama-
rillo, magenta o cian.
c) Para pasar al modo SOUND 2, pulse el botón
MODE una vez más. El LED junto al botón par-
padea lentamente. Ahora tiene disponibles 5 op-
ciones de cambio de color y secuencias mediante
la música cuando pulse el botón FUNCTION
repetidamente. Sin embargo, estas opciones sólo
tienen sentido cuando se han interconectado
varios proyectores.
d)
Para pasar al modo AUTO, pulse el botón MODE
una vez más. El LED junto al botón parpadea rá-
pidamente. En este modo de funcionamiento, los
colores cambian automáticamente por transición
de un color al otro. La música no afectará este
modo. Puede elegir 3 velocidades de transición
pulsando el botón FUNCTION repetidamente.
Para volver al modo SOUND 1, pulse 1 vez más el
botón MODE.
7 Funcionamiento mediante un
Controlador de Luces
Para el funcionamiento mediante un controlador de
luces con protocolo DMX512 (como el DMX-1440 o
el DMX-510USB de IMG STAGELINE), el proyector está
equipado con cuatro canales de control. Las funciones
de los canales y los valores DMX puede encontrarlos
en el apartado 9.1.
7.1 Conexión
Para la transmisión de señales DMX, deberían utilizarse
cables especiales (p. ej. cables de la gama CDMXN de
IMG STAGELINE). Para cableados de más de 150 m o
para el control de más de 32 aparatos mediante una
única salida DMX, se recomienda insertar un ampli-
ficador de nivel DMX adecuado (p. ej. SR-103DMX).
1) Conecte la entrada DMX (4) a la salida DMX del
controlador.
2)
Conecte la salida DMX (3) a la entrada DMX de
la siguiente unidad de efectos de luces; conecte
su salida a la entrada de siguiente unidad, y así
hasta que se hayan conectado todos los aparatos
en cadena.
3)
Termine la salida DMX del último aparato DMX
de la cadena con un resistor de 120 Ω (> 0,3 W):
Suelde el resistor a los pines 2 y 3 de una toma XLR
macho y conecte la toma a la salida DMX o utilice
el tapón correspondiente (p. ej. el DLT-123 de IMG
STAGELINE).
7.2 Ajuste la dirección de inicio
Para el funcionamiento del proyector con un con-
trolador de luces, ajuste la dirección DMX de inicio
para el primer canal DMX. Si p.ej. la dirección 17 del
controlador es para controlar el color rojo, ajuste la
dirección de inicio 17 en el proyector. Las otras funcio-
nes del proyector (verde, azul, dimmer) se asignarán
automáticamente a los tres canales siguientes (en este
ejemplo 18 a 20). Como siguiente dirección de inicio
posible para el siguiente aparato controlado por DMX
tendríamos la dirección 21 en este ejemplo.
Existen dos métodos para ajustar las direcciones:
7.2.1 Ajuste automático de direcciones
Este método sólo tiene sentido cuando se utilizan
varios PARL-30SPOT para los que se desea direcciones
de rango bajo:
1)
Desconecte la entrada DMX (4) del primer proyector
desde el controlador o desconecte el controlador
para que no exista ninguna señal DMX en la en-
trada del proyector.
2)
Pulse el botón DMX ADDRESS SETTING (5) en el
primer proyector durante 5 segundos. El proyector
y los proyectores conectados a él ennegrecerán.
3)
Reconecte el controlador o encienda el controlador
de nuevo.
Ahora, la dirección de inicio del primer proyector es1;
las direcciones de inicio de los demás proyectores serán
5, 9, 13, etc.
7.2.2 Ajuste de las direcciones mediante el
controlador
Con este método, puede asignar fácilmente la direc-
ción de inicio que quiera a un proyector:
1)
En el controlador, ajuste el valor DMX del canal
co-rrespondiente para la dirección de inicio que hay
que ajustar al máximo (255). Ajuste los valores de
todos los otros canales DMX en cero. Para ajustar
p. ej. la dirección de inicio 17, avance el canal 17
del controlador completamente y coloque todos
los demás canales en cero.
2)
Pulse brevemente el botón DMX ADDRESS SETTING
(5) en todos los proyectores que deben recibir esta
dirección de inicio.
Repita estos pasos hasta que se asigne una dirección
a cada proyector.

27
Español
7.3 Control con el LED-4C
El LED-4C de IMG STAGELINE es un controlador
de fácil manejo diseñado especialmente para estos
pro-yectores de LEDs. Está equipado con 4 canales de
modo que todos los proyectores conectados a él sólo
pueden controlarse de modo sincronizado.
Coloque las direcciones de inicio de los proyecto-
res en 1 o en múltiple de 4 + 1 (5, 9, 13, … 61 máx.),
☞apartado 7.2.1. Puede encontrar información deta-
llada para el funcionamiento en el manual del LED-4C.
8 Limpieza del Proyector
La placa plástica de la tapa del proyector (10) tiene
que limpiarse regularmente por la parte exterior, y,
si es necesario, también por la parte interior, depen-
diendo de las impurezas provocadas por el polvo, el
humo u otras partículas de suciedad. Sólo de este
modo se puede asegurar que la luz se emita con su
máximo brillo.
1)
Para la limpieza utilice un paño limpio y suave y
un detergente poco agresivo. Para acabar pase un
trapo seco por la placa plástica.
2)
Para la limpieza de la tapa plástica por la parte
interior, quite la tapa del proyector (10).
¡PRECAUCIÓN! Desconecte siempre el enchufe de
corriente de la toma antes de abrir el proyector.
a)
Afloje el tornillo de cierre (11) y deslice el seguro
(12) hacia atrás.
b) Gire levemente la tapa del proyector en sentido
contrario a las agujas del reloj para que se des-
encaje y pueda extraerse.
c) Limpie el cristal por la parte interior y monte de
nuevo el proyector en orden inverso.
9 Especificaciones
Alimentación: . . . . . . . . .230 V/ 50 Hz
Consumo: . . . . . . . . . . . .10 VA
Fuente da luz: . . . . . . . . .LEDs de 5 mm
de gran brillo
Número: . . . . . . . . . . .90
rojo: 24
verde: 33
azul: 33
Angulo de brillo: . . . . .20°
Temperatura ambiente: . .0 – 40 °C
Dimensiones. . . . . . . . . .⌀ 120 × 120 mm
Peso: . . . . . . . . . . . . . . . .1 kg
Longitud del cable: . . . . .1,2 m
9.1 Canales DMX
Valor DMX Función
Canal 1: proporción de rojo
0 – 255 brillo de los LEDS rojos
Canal 2: proporción de verde
0 – 255 brillo de los LEDs verdes
Canal 3: proporción de azul
0 – 255 brillo de los LEDs azules
Canal 4: dimmer / estroboscopio / música
0 – 7 LEDs apagados
8 – 190 dimmer
191 – 200
control por la música del
cambio de color mediante
el micro integrado
201 – 247 efecto estroboscópico:
lento rápido
248 – 255 brillo total
Sujeto a modificaciones técnicas.
Manual de instrucciones protegido por el copyright de MONACOR
®
INTERNATIONAL GmbH & Co. KG. Toda
reproducción mismo parcial para fines comerciales está prohibida.

28
Polski
Deutsch
Deutsch Seite
English
English Page
Français
Français Page
Italiano
Italiano Pagina
Español
Español Página
Nederlands
Nederlands Pagina
Reflektor diodowy DMX
Niniejsza instrukcja przeznaczona jest dla instalatorów
i użytkowników posiadających co najmniej podsta-
wową wiedzę na temat sterowania DMX. Przed rozpo-
częciem pracy z urządzeniem, prosimy zapoznać się z
instrukcją obsługi, a następnie zachować ją do wglądu.
Opisane elementy sterujące i gniazda połącze-
niowe zostały przedstawione na stronie 2.
1 Elementy operacyjne oraz złącza
1.1 Reflektor
1 Regulatory uchwytu montażowego (9)
2 Gniazdo połączeniowe do pilota LC-3
3 Wyjście sygnału DMX (3-pinowy, XLR) do podłą-
czania wejścia DMX kolejnego urządzenia;
1 = masa, 2 = DMX−, 3 = DMX+
4 Wejście sygnału DMX (3-pinowy, XLR);
1 = masa, 2 = DMX−, 3 = DMX+
5 Przycisk do ustawiania adresu DMX
(patrz rozdz. 7.2)
6
Kabel zasilający do połączenia z gniazdkiem
sieciowym (230 V/ 50 Hz)
7
Płyta montażowa do mocowania reflektora na
ścianie lub suficie
8 Śruba mocująca płytę montażową
9 Uchwyt montażowy
10 Osłona z plastikową szybką
11 Śruby mocujące zatrzask (12)
12 Zatrzask osłony
1.2 Pilot zdalnego sterowania LC-3
Pilot zdalnego sterowania jest osobnym urządzeniem
i nie jest dołączany do reflektora diodowego.
13 Przycisk STAND BY dla funkcji Blackout
(wygaszenie)
14
Przycisk FUNCTION do wyboru różnych funkcji
zmiany światła, w zależności od trybu pracy,
ustawionego przyciskiem MODE
15
Przycisk MODE do przełączania pomiędzy try-
bami:
Tryb Sound 1 (dioda zgaszona)
Tryb Manual (dioda zapalona)
Tryb Sound 2 (dioda miga wolno)
Tryb Auto (dioda miga szybko)
Uwaga: Przy sterowaniu pilotem nie można równo cześnie
podawać sygnału DMX na wejście DMX (4).
2 Środki bezpieczeństwa
Reflektor spełnia wszystkie wymagania norm UE i
dlatego posiada oznaczony symbolem .
OSTRZEŻENIE
Urządzenie jest zasilane wysokim
napięciem sieciowym. Wszelkie na-
prawy należy zlecić przeszkolonemu
personelowi. Nie należy przeprowa-
dzać żadnych modyfikacji nie opisanych w instruk-
cji obsługi, oraz nie wolno umiesz-czać niczego w
otworach wenty lacyjnych! Może to spowodować
porażenie prądem elektrycznym.
•
Urządzenie przeznaczony jest tylko do użytku we-
wnątrz pomieszczeń; należy chronić go przed dzia-
łaniem wody oraz dużą wilgotnością. Dopuszczalny
zakres temperatury pracy wynosi 0 – 40 °C.
•
Nie należy włączać lub natychmiast odłączyć urzą-
dzenie od sieci w przypadku:
1.
gdy stwierdzono widoczne uszkodzenie urządze-
nia lub kabla zasilającego,
2. jeśli urządzenie mogło ulec uszkodzeniu na sku-
tek upadku lub podobnego zdarzenia,
3. jeśli stwierdzono nieprawidłowe działanie.
Naprawy urządzenia może dokonywać tylko prze-
szkolony personel.
•
Uszkodzony kabel zasilający musi zostać wymie-
niony wyłącznie przez przeszkolony personel.
•
Nie wolno odłączać zasilania ciągnąc za kabel, na-
leży zawsze chwytać za wtyczkę.
•
Do czyszczenia należy używać suchej miękkiej
ściereczki, nie używać wody ani silnych środków
chemicznych.
•
Producent i dostawca nie ponoszą odpowiedzial-
ności za wynikłe uszkodzenia sprzętu lub obraże-
nia użytkownika w przypadku gdy urządzenie jest
wyko rzystywane w innych celach niż to się przewi-
duje lub jeśli jest nieodpowiednio zainstalowane,
użytkowane lub naprawiane.
Aby nie zaśmiecać środowiska po całkowitym
zakończeniu eksploatacji urządzenia należy
je oddać do punktu recyklingu.
3 Zastosowanie
Reflektor może być wykorzystywany do zastosowań sce-
nicznych, w dyskotekach lub jako element dekoracyjny.
Wyposażony jest w super jasne diody 5 mm w kolorach
niebieskim, czerwonym i zielonym. Możliwe jest stero-
wanie zmianą kolorów w rytm muzyki, płynne prze-
chodzenie pomiędzy kolorami oraz efekt stroboskopu.
Reflektor przystosowany jest do sterowania
sygna łem DMX z kontrolera (4 kanały DMX), ale może
również pracować bez niego lub być sterowany za
pomocą pilota zdalnego sterowania LC-3.
Polski
Polski Strona

29
Polski
4 Montaż
•
Reflektor należy zamontować w takim miejscu, aby
zapewnić dostateczną cyrkulację powietrza wokół
niego. Nie wolno zasłaniać otworów wentylacyjnych
na obudowie (np. zasłoną).
•
Minimalny dystans od oświetlanego obiektu powi-
nien wynosić 10 cm.
1) Przykręcić uchwyt montażowy (9) do obudowy za
pomocą dwóch śrub regulujących (1).
2)
Przymocować reflektor poprzez uchwyt montażowy
(9), np. za pomocą śrub na stałe lub specjalnych
zaczepów do świateł (w kształcie C) na poprzeczce
statywu.
W celu zamontowania reflektora na ścianie
lub suficie, należy przykręcić płytę montażową (7)
do uchwytu montażowego jak pokazano na rys.1.
Następnie przymocować płytę z reflektorem w
odpowiednim miejscu na ścianie lub suficie.
OSTRZEŻENIE Urządzenie musi być zamontowane
w sposób bezpieczny i fachowy. Jeśli
ma pracować ponad ludźmi, należy
je dodatkowo zabezpieczyć przed
upadkiem (np. wykorzystując linki zabezpieczające.
Długość takich linek należy tak dobrać aby w przy-
padku ich wykorzystania urządzenie maksymalnie
spadło o 20 cm).
3)
Dla uzyskania żądanej pozycji, poluzować regu-
-latory (1) przy uchwycie montażowym. Ustawić
żądaną pozycję i dokręcić je.
Jeżeli reflektor został zamontowany z wy-
korzystaniem płyty montażowej (7), poluzować
śrubę(8), jeśli trzeba, obrócić uchwyt montażowy
(9) do żądanej pozycji, a następnie dokręcić śrubę.
5 Przygotowanie urządzenia
dopracy
OSTRZEŻENIE Nie należy patrzeć bezpośrednio na
diody, silne światło może uszkodzić
wzrok.
Efekt stroboskopu i szybkie zmiany
światła mogą być groźne dla osób
wrażliwych na światło oraz chorych
na epilepsję!
Aby włączyć reflektor należy podłączyć wtyczkę kabla
zasilającego (6) do gniazdka sieciowego (230 V/ 50 Hz);
aby wyłączyć – odłączyć wtyczkę od gniazdka.
Aby ułatwić obsługę zaleca się podłączenie urzą-
dzenia do gniazdka, które będzie włączane i wyłą-
czane razem z oświetleniem.
Uwaga: Nie wolno podłączać reflektora do zasilania
poprzez dimer (ściemniacz)!
6 Praca bez kontrolera
Jeżeli do reflektora nie jest podawany sygnał sterujący
DMX, przechodzenie z jednego koloru w inny odbywa
się płynnie.
Jeżeli grająca w pomieszczeniu muzyka posiada
odpowiedni poziom głośności oraz wyraźny rytm ni-
skich częstotliwości, zmiana kolorów będzie z nim
synchronizowana poprzez wbudowany mikrofon.
W przypadku słabej synchronizacji z muzyką, należy
zwiększyć poziom głośności lub zmniejszyć dystans
między reflektorem a głośnikiem.
6.1 Łączenie kilku reflektorów
Pojedyncze reflektory PARL-30SPOT (również oba typy
na raz) mogą zostać połączone aby umożliwić jedno-
czesne sterowanie wszystkich podrzędnych zgodnie
z rytmem nadrzędnego.
W tym celu, należy połączyć wyjście DMX OUT-
PUT (3) reflektora nadrzędnego, 3-pinowym kablem
XLR (np. serii CDMXN-... marki IMG STAGELINE), do
wejścia DMX INPUT (4) podrzędnego. Kolejne reflek-
tory podłączać analogicznie, łącząc wyjścia DMX z
wejściami DMX kolejnych urządzeń.
6.2 Zdalne sterowanie pilotem LC-3
Pilot zdalnego sterowania LC-3, dostępny w opcji,
pozwala na wywoływanie różnych funkcji.
1) Podłączyć pilot do gniazda REMOTE CONTROL (2).
2)
Na wejście DMX INPUT (4) urządzenia nie może być
podawany w tym czasie żaden sygnał.
3) Po podłączeniu na wyjście DMX OUT (3), kolejne
reflektory PARL-30SPOT mogą być sterowane
(☞rozdz. 6.1) równocześnie z pierwszym.
4)
Przycisk STAND BY (13) pozwala na włączanie /
wyłączanie funkcji wygaszania Blackout. Gdy funk-
cja ta zostanie wywołana, zostaje wyłączone światło
i zapala się dioda obok przycisku.
5) Wybrać tryb pracy przyciskiem MODE (15).
a)
Po włączeniu, reflektor ustawia się w tryb
SOUND 1. Dioda obok przycisku MODE nie
świeci się. Po wciśnięciu i przytrzymaniu przy-
cisku FUNCTION (14), uruchomiony zostanie
efekt stroboskopu, pracujący w rytm muzyki.
Po każdym kolejnym wciśnięciu, nastąpi zmiana
z białego na inny kolor (jeżeli podłączono więcej
reflektorów, jeden błysk każdego reflektora; w
tym samym kolorze), i zmiana kolorów z różnymi
kolorami na poszczególnych reflektorach, jeśli
połączono ich kilka.
b) Aby przejść do trybu MANUAL, należy wcisnąć
przycisk MODE jeden raz. Zapali się dioda obok
przycisku. Wykorzystać przycisk FUNCTION aby
wybrać jeden z kolorów:
biały, czerwony, niebieski, purpurowy,

30
Polski
pomarańczowy, zielony, żółty, karmazynowy,
turkusowy.
c) Aby włączyć tryb SOUND 2, wcisnąć jeszcze raz
przycisk MODE. Dioda obok przycisku będzie
wolno migać. Wybór jednej z pięciu, sterowa-
nych muzycznie, sekwencji zmian kolorów nastę-
puje poprzez sekwencyjne naciskanie przycisku
FUNCTION. Funkcja ta ma zastosowanie tylko
po połączeniu kilku reflektorów.
d)
Kolejne wciśnięcie przycisku MODE przełączy
reflektor w tryb AUTO. Dioda obok przycisku
będzie migać szybko. W tym trybie, przecho-
dzenie między kolorami będzie następowało
automatycznie, niezależnie od grającej muzyki.
Możliwa jest jedynie zmiana prędkości, prze-
łączania przez kilkukrotne wciśnięcie przycisku
FUNCTION.
Aby powrócić do trybu SOUND 1, należy ponownie
wcisnąć przycisk MODE.
7 Sterowanie przez
kontrolerświatła
Urządzenie może być sterowane poprzez sterownik
światła z protokółem DMX512 (np. DMX-1440 lub
DMX-510USB marki IMG STAGELINE), do tego celu
można wykorzystać cztery kanały sterujące. Funkcje
poszczególnych kanałów opisano w rozdz. 9.1.
7.1 Podłączanie
Do podłączania zaleca się wykorzystać specjalny kabel
do transmisji sygnałów DMX (np. serii CDMXN marki
IMG STAGELINE). Jeżeli długość przewodu przekracza
150 m lub podłączane jest więcej niż 32 urządzenia,
zalecane jest podłączenie wzmacniacza sygnału DMX
(np. SR-103DMX marki IMG STAGELINE).
1)
Połączyć wejście DMX INPUT (4) do wyjścia kon-
trolera DMX.
2)
Połączyć wyjście DMX OUTPUT (3) do wejścia DMX
kolejnego efektu świetlnego; kolejne urządzenia
podłączać analogicznie, aż wszystkie urządzenia
zostaną połączone.
3) Na wyjście DMX ostatniego z podłączonych efek-
tów podłączyć opornik 120 Ω (> 0,3 W): Opornik
należy wlutować pomiędzy 2 i 3 pin we wtyku XLR
i następnie wpiąć go do wyjścia; można również
użyć gotowy wtyk terminujący (np. DLT-123 marki
IMG STAGELINE).
7.2 Ustawianie adresu startowego
Podczas pracy z kontrolerem, należy ustawić adres
startowy DMX pierwszego kanału. Jeżeli np. adres 17
kontrolera jest przewidziany dla koloru czerwonego,
należy ustawić adres 17 na reflektorze. Pozostałym
funkcjom reflektora (zielony, niebieski, ściemniacz)
zostaną przypisane automatycznie kolejne trzy adresy
(w tym przypadku 18 do 20). Jako adres startowy
kolejnego urządzenia można wówczas ustawić 21.
Istnieją dwie metody ustawiania adresu:
7.2.1 Automatyczne ustawianie adresu
Metoda ta ma zastosowanie w przypadku gdy połą-
czono kilka reflektorów PARL-30SPOT i przewidziano
dla nich niskie adresy startowe:
1)
Odłączyć wejście DMX (4) pierwszego reflektora od
kontrolera lub wyłączyć kontroler, aby na wejściu
reflektora nie było sygnału DMX.
2)
Wcisnąć przycisk DMX ADDRESS SETTING (5) na
pierwszym reflektorze na 5 sekund. Wszystkie po-
łączone reflektory będą zgaszone.
3) Podłączyć ponownie lub włączyć kontroler.
Adres startowy pierwszego reflektora zostanie usta-
wiony na 1; adresy kolejnych na 5, 9, 13, itd.
7.2.2 Ustawianie adresów poprzez kontroler
Dzięki tej metodzie, każdy adres startowy może być
łatwo przypisany do reflektora:
1)
Na kontrolerze, ustawić wartość DMX odpowie-
dniego kanału zgodnie z adresem startowym (max
255). Ustawić wartość pozostałych kanałów DMX
na zero. Przykładowo w celu ustawienia adresu
17, otworzyć kanał 17 na kontrolerze a pozostałe
ustawić na zero.
2)
Na pozostałych reflektorach nacisnąć na krótko
przycisk DMX ADDRESS SETTING (5).
Powtórzyć całą operację aż wszystkim reflektorom
zostaną przypisane adresy.
7.3 Sterowanie poprzez LED-4C
Urządzenie LED-4C marki IMG STAGELINE jest łatwym
w obsłudze sterownikiem dedykowanym do reflekto-
rów diodowych. Wyposażone jest w 4 kanały, więc
wszystkie podłączone reflektory mogą być jedynie
synchronizowane.
Ustawić adres startowy reflektora na 1 lub wielo-
krotność 4 + 1 (5, 9, 13, … 61 max), ☞rozdz. 7.2.1.
Szczegółowe informacje można znaleźć w instrukcji
obsługi LED-4C.

31
Polski
8 Czyszczenie reflektora
Plastikowa szybka na osłonie (10) powinna być regu-
larnie czyszczona z zewnątrz, jeśli potrzeba również
wewnątrz, zależnie od warunków pracy. Zapewni to
maksymalną jasność światła.
1)
Do czyszczenia używać miękkiej ściereczki i słabego
środka chemicznego. Po wyczyszczeniu wytrzeć
szybkę do sucha.
2)
Aby wyczyścić szybkę od wewnątrz należy zdjąć
osłonę (10).
UWAGA! Przed otwarciem obudowy należy zawsze
odłączyć zasilanie.
a) Odkręcić śruby mocujące (11) i zsunąć zaczepy
osłony (12) do tyłu.
b)
Delikatnie przekręcić osłonę przeciwnie do ruchu
wskazówek zegara aż zostanie odblokowana.
c)
Wyczyścić szybkę od wewnątrz i ponownie przy-
kręcić osłonę.
9 Specyfikacja
Zasilanie: . . . . . . . . . . . . .230 V/ 50 Hz
Pobór mocy: . . . . . . . . . .10 VA
Oświetlenie: . . . . . . . . . .super jasnych 5 mmdiod
Liczba:. . . . . . . . . . . . .90
czerwone: 24
zielone: 33
niebieskie: 33
Kąt świecenia: . . . . . . .20°
Zakres temperatur: . . . . .0 – 40 °C
Wymiary . . . . . . . . . . . . .⌀ 120 mm × 120 mm
Waga: . . . . . . . . . . . . . . .1 kg
Długość kabla: . . . . . . . .1,2 m
9.1 Kanały DMX
Wartość DMX Funkcja
Kanał 1: proporcja czerwonego
0 – 255 jasność czerwonych diod
Kanał 2: proporcja zielonego
0 – 255 jasność zielonych diod
Kanał 3: proporcja niebieskiego
0 – 255 jasność niebieskich diod
Kanał 4: ściemniacz / stroboskop / muzyka
0 – 7 wyłącznie diod
8 – 190 ściemniacz
191 – 200
zmiana kolorów sterowana
muzyką poprzez wbudowany
mikrofon
201 – 247 efekt stroboskopu:
wolny szybki
248 – 255 pełna jasność
Z zastrzeżeniem możliwości zmian.
Instrukcje obsługi są chronione prawem copyright for MONACOR
®
INTERNATIONAL GmbH & Co. KG. Przetwarzanie
całości lub części instrukcji dla osobistych korzyści finansowych jest zabronione.

32
Dansk
Nederlands
Nederlands Pagina
Svenska
Svenska Sidan
Suomi
Suomi Sivulta
Dansk
Dansk Sida
Læs nedenstående sikkerhedsoplys ninger opmærk-
somt igennem før ibrugtagning af enheden. Bortset
fra sikkerhedsoplysningerne henvises til den eng elske
tekst.
Vigtige sikkerhedsoplysninger
Denne enhed overholder alle relevante EU-direktiver
og er som følge deraf mærket .
ADVARSEL
Dette produkt benytter livsfarlig net-
spænding. Udfør aldrig nogen form for
modifikationer på produktet og indfør
aldrig genstande i ventilationshullerne,
da du dermed risikere at få elektrisk
stød.
ADVARSEL
Se ikke direkte mod lyskilden under
brug; dette kan medføre skader på
øjnene.
Vær venligst opmærksom på at stro-
boskob-effekter og hurtige lysskift kan
udløse epileptiske anfald hos personer,
der enten er fotosensitive eller lider af
epilepsi!
•
Enheden er kun beregnet til indendørs brug. Beskyt
den mod vanddråber og -stænk, høj luftfugtighed
og varme (tilladt omgivelsestemperatur 0 – 40 °C).
•
Tag ikke enheden i brug og tag straks stikket ud af
stikkontakten i følgende tilfælde:
1.
hvis der er synlig skade på enheden eller net-
kablet,
2.
hvis der kan være opstået skade, efter at enheden
er tabt eller lignende,
3. hvis der forekommer fejlfunktion.
Enheden skal altid repareres af autoriseret personel.
•
Et beskadiget netkabel må kun repareres af auto-
riseret personel.
•
Tag aldrig netstikket ud af stikkontakten ved at
trække i kablet, tag fat i selve stikket.
•
Rengør kabinettet med en tør, blød klud; der må
under ingen omstændigheder benyttes kemikalier
eller vand.
•
Hvis enheden benyttes til andre formål, end den
oprindeligt er beregnet til, hvis den monteres eller
betjenes forkert, eller hvis den ikke repareres af
uautoriseret personel, omfattes eventuelle skader
ikke af garantien.
Hvis enheden skal tages ud af drift for be-
standigt, skal den bringes til en lokal gen-
brugsstation for bortskaffelse.
Montering
•
Placér altid enheden så der er rigeligt med ventila-
tion omkring denne. Kabinettets ventilationshuller
må ikke tildækkes.
•
Hold en afstand på mindst 10 cm til belyste objekter.
ADVARSEL
Fastgør enheden på en sikker måde.
Hvis enheden skal monteres hængende
over personer, skal der yderligere mon-
teres en sikker hedswire. Spænd wiren
så enheden maximalt kan falde 20 cm.
Alle rettigheder til denne brugsvejledning tilhører MONACOR
® INTERNATIONAL GmbH & Co. KG. Ingen dele af
denne vejledning må reproduceres under ingen omstændigheder til kommerciel anvendelse.

33
Svenska
Suomi
Suomi Sivulta
Innan enheten tas i bruk, läs noga igenom säkerhets-
föreskrifterna. För ytterligare information, läs den
Engelska delen av bruksanvisningen.
Säkerhetsföreskrifter
Enheten uppfyller relevanta Eu-direktiv och har därför
försett med symbolen .
VARNING
Enheten använder hög spänning in-
ternt. Överlåt därför all service till
auktoriserad verkstad. Stoppa aldrig in
föremål i ventilationshålen på enheten
då detta kan ge upphov till elektriska
överslag med risk för skada på person
och materiel.
VARNING
Titta aldrig direkt in i ljuskällan. Risk
för permanent ögonskada föreligger.
Tänk på att strobolampan och snabba
ljusskiften kan framkalla epeleptiska
anfall hos känsliga personer!
•
Enheten är endast avsedd för inomhusbruk. Enhe-
ten skall skyddas mot vätskor, hög värme och hög
luftfuktighet. Arbetstemperatur 0 – 40 grader C.
•
Tag omedelbart ur elsladden ur elurtaget om något
av följande fel uppstår.
1. Om enheten eller elsladden har synliga skador.
2. Om enheten skadats av fall eller dylikt.
3. Om andra felfunktioner uppstår.
Enheten skall alltid lagas av kunnig personal.
•
En skadad elsladd skall bytas på verkstad.
•
Drag aldrig ur kontakten genom att dra i sladden,
utan ta tag i kontaktkroppen.
•
Rengör endast med en ren och torr trasa, använd
aldrig vätskor i någon form då dessa kan rinna in
och orsaka kortslutning.
•
Om enheten används på annat sätt än som avses
upphör alla garantier att gälla. I dessa fall tas heller
inget ansvar för skada på person eller materiel. Det
samma gäller om enheten servas på icke auktori-
serad verksta.
Om enheterna ska skrotas, ta dem då till en
lokal återvinningsanläggning för omhänder-
tagande på ett sätt som inte är skadligt för
miljön.
Montering
•
Placera enheten så att luften kan cirkulera fritt runt
den och täpp inte till kylhålen i chassiet.
•
Minimiavstånd till brännbara föremål är 10 cm.
VARNING
Enheten skall monteras stadigt och sä-
kert. Om enheten monteras över plat-
ser där människor passerar skall den
säkras med en säkerhetslina. Linan skall
fästas så att max frifall är 20 cm.
Svenska
Svenska Sidan
Alla rättigheter är reserverade av MONACOR
®
INTER NATIONAL GmbH & Co. KG. Ingen del av denna instruktions-
manual får eftertryckas i någon form eller på något sätt användas i kommersiellt syfte.

34
Suomi
Nederlands
Nederlands Pagina
Dansk
Dansk Sida
Svenska
Svenska Sidan
Suomi
Suomi Sivulta
Ole hyvä ja huomioi aina seuraavat turvallisuutta kos-
kevat ohjeet ennen laitteen käyttöön ottoa. Katso
käyttöön liittyviä ohjeita myös Englanninkielisistä oh-
jeista, jos tarvitset lisää tietoa laitteen käytöstä.
Turvallisuudesta
Laite vastaa kaikkia vaadittuja EU direktiivejä, joten se
on varustettu merkinnällä.
VAROITUS
Laite toimii hengenvaarallisella jän-
nitteellä (230 V~). Jätä huoltotoimet
valtuu tetun huoltoliikkeen tehtäväksi.
Älä peitä tuuletusaukkoja. Asiantun-
tematon käsittely saattaa aiheuttaa
sähköiskun vaaran.
VAROITUS Älä katso suoraan valonlähteeseen, se
voi vaurioittaa silmää.
Stroboefektit ja erittäin nopeat valon
muutokset saattavat laukaista epilep-
tisen kohtauksen henkilöillä, jotka ovat
valoherkkiä tai epileptisiä!
•
Laitteet soveltuvat vain sisätilakäyttöön. Suojele
niitä kosteudelta, vedeltä ja kuumuudelta (sallittu
ympäröivä lämpötila 0 – 40 °C).
•
Irrota virtajohto pistorasiasta, äläkä käynnistä lai-
tetta, jos
1. laitteessa tai virtajohdossa on havaittava vaurio,
2. putoaminen tai muu vastaava vahinko on saat-
tanut aiheuttaa vaurion,
3. laitteessa esiintyy toimintahäiriöitä
Kaikissa näissä tapauksissa laite tulee huollattaa
valtuutetussa huollossa.
•
Vioittuneen virtakaapelin saa vaihtaa vain valtuu-
tettu huoltoliike.
•
Älä koskaan irrota virtajohtoa pistorasiasta johdosta
vetämällä.
•
Käytä puhdistamiseen pelkästään kuivaa, pehmeää
kangasta. Älä käytä kemikaaleja tai vettä.
•
Laitteen takuu raukeaa, eikä valmistaja, maahan-
tuoja tai myyjä ota vastuuta mahdollisista välit-
tömistä tai välillisistä vahingoista, jos laitetta on
käytetty muuhun kuin alkuperäiseen käyttötarkoi-
tuk- seen, laitetta on taitamattomasti käytetty tai
kytketty tai jos laitetta on huollettu muussa kuin
valtuutetussa huollossa.
Kun laite poistetaan lopullisesti käytösta, vie
se paikalliseen kierrätyskeskukseen jälkikä-
sittelyä varten.
Asennus
•
Asenna laite aina siten, että riittävä ilmankierto on
varmistettu käytön aikana. Älä koskaan peitä tuu-
letusaukkoja (esim. verhoilla).
•
Minimi välimatkan valaistavaan kohteeseen pitäisi
olla 10 cm.
VAROITUS Laite on asennettava asiantuntevasti
ja turvallisesti. Jos laite asennetaan
paikkaan minkä alla on ihmisiä, on
hyvä tehdä lisävar mistus (esim. kiin-
nittää turvavaijeri asennuskiinnikkee-
seen siten, että vaikka laite irtoaisi, se
ei putoaisi 20 cm alemmas).
Kaikki oikeudet pidätetään MONACOR
® INTERNATIONAL GmbH & Co. KG. Mitään tämän käyttöohjeen osaa ei
saa jäljentää miltään osin käytettäväksi mihinkään kaupallisiin tarkoituksiin.


-
 1
1
-
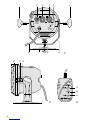 2
2
-
 3
3
-
 4
4
-
 5
5
-
 6
6
-
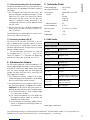 7
7
-
 8
8
-
 9
9
-
 10
10
-
 11
11
-
 12
12
-
 13
13
-
 14
14
-
 15
15
-
 16
16
-
 17
17
-
 18
18
-
 19
19
-
 20
20
-
 21
21
-
 22
22
-
 23
23
-
 24
24
-
 25
25
-
 26
26
-
 27
27
-
 28
28
-
 29
29
-
 30
30
-
 31
31
-
 32
32
-
 33
33
-
 34
34
-
 35
35
-
 36
36