EcoFlow 50'' Tilt Mount Bracket Handleiding
- Type
- Handleiding

50'' Tilt Mount Bracket
V1.0
User Manual

Please read this User Manual and ensure you understand it fully before using the product. Please keep this User
Manual properly for future reference. Any incorrect usage may result in severe injury to the user or others, damage to
the product, or loss of property. By using this product, the user will be deemed as having understood, recognized, and
accepted all the terms and contents of the User Manual, and will be responsible for any incorrect usage and all
consequences arising therefrom. EcoFlow hereby disclaims any liability for any losses due to the user’s failure to use
the product in accordance with the User Manual.
In compliance with laws and regulations, EcoFlow shall have the final right to interpret this document and all related
documents for this product. Any update, revision, or termination of the contents thereof, if necessary, shall be made
without prior notice, and users may visit the official website of EcoFlow for the latest information on the product.
EN
Lesen Sie diese Bedienungsanleitung sorgfältig durch, bevor Sie das Produkt verwenden, um sicherzustellen, dass Sie
das Produkt vollständig verstehen und es richtig verwenden können. Bewahren Sie dieses Benutzerhandbuch nach
dem Lesen zum späteren Nachschlagen gut auf. Die unsachgemäße Verwendung dieses Produkts kann zu schweren
Verletzungen bei Ihnen oder anderen Personen sowie zu Produkt- und Sachschäden führen. Sobald Sie dieses Produkt
verwenden, wird davon ausgegangen, dass Sie alle Bedingungen und Inhalte dieses Dokuments verstehen,
genehmigen und akzeptieren. Die einzelnen Benutzer sind für ihre Handlungen und deren Folgen verantwortlich.
EcoFlow haftet nicht für Schäden, die dadurch entstehen, dass der Benutzer das Produkt nicht in Übereinstimmung mit
dieser Bedienungsanleitung verwendet.
In Übereinstimmung mit den Gesetzen und Vorschriften behält sich EcoFlow das Recht auf die endgültige Auslegung
dieses Dokuments und aller Dokumente, die zu dem Produkt gehören, vor. Dieses Dokument kann ohne vorherige
Ankündigung geändert (aktualisiert, überarbeitet oder beendigt) werden. Bitte besuchen Sie die offizielle Website von
EcoFlow, um die neuesten Produktinformationen zu erhalten.
DE
Lisez attentivement ce manuel d’utilisation avant d’utiliser le produit pour vous assurer que vous comprenez
parfaitement le produit et que vous pouvez l’utiliser correctement. Après avoir lu ce manuel d’utilisation, conservez-le
soigneusement pour toute référence ultérieure. Si vous n’utilisez pas ce produit correctement, vous risquez de vous
blesser gravement ou de blesser d’autres personnes, ou d’endommager le produit et de provoquer des dégâts
matériels. Dès que vous utilisez ce produit, vous êtes réputé avoir compris, approuvé et accepté tous les termes et
contenus de ce document. Les utilisateurs individuels sont responsables de leurs actions et des conséquences de ces
actions. EcoFlow n’est pas responsable de toute perte causée par le fait que l’utilisateur n’utilise pas le produit
conformément au présent manuel d’utilisation.
Conformément aux lois et règlements, EcoFlow se réserve le droit d’interprétation finale du document final et de tous
les documents relatifs au produit. Ce document est susceptible d’être modifié (mises à jour, révisions ou résiliation) sans
avis préalable. Veuillez visiter le site Web officiel d’EcoFlow pour obtenir les dernières informations sur le produit.
FR
Prima di utilizzare il prodotto, gli utenti devono leggere attentamente il presente manuale utente e assicurarsi di averne
compreso appieno il contenuto. Conservare il presente manuale utente per riferimento futuro. Qualsiasi uso non
corretto può causare gravi lesioni all'utente o ad altri, danni al prodotto o perdita di proprietà. Utilizzando questo
prodotto, si riterrà che l'utente abbia compreso, riconosciuto e
accettato tutti i termini e i contenuti del Manuale utente, e sarà responsabile di qualsiasi uso non corretto e di tutte le
conseguenze da esso derivanti. Con il presente documento, EcoFlow declina ogni responsabilità per eventuali perdite
dovute all'utilizzo del prodotto da parte dell'utente in maniera non conforme a quanto indicato nel Manuale utente.
In conformità alle leggi e alle normative, la nostra azienda ha il diritto finale di interpretare questo documento e tutti i
documenti relativi a questo prodotto. Qualsiasi aggiornamento, revisione o risoluzione del contenuto, se necessario,
sarà effettuato senza preavviso. Gli utenti sono tenuti a visitare il sito ufficiale di EcoFlow per consultare le informazioni
più aggiornate sul prodotto.
IT
Disclaimer/Haftungsausschluss/Avisdenon-responsabilité/
Esclusione di responsabilità/Aviso legal/Aansprakelijkheid/
Отказ от ответственности/免責事項/면책 조항/

JP
Перед использованием изделия внимательно прочитайте это руководство пользователя и убедитесь, что вы
полностью поняли все инструкции. После прочтения сохраните руководство для дальнейшего использования.
Любое неправильное использование этого изделия может привести к получению серьезных травм
пользователем или другими людьми, к повреждению изделия и материальному ущербу. Использование этого
изделия будет означать, что пользователь понимает, признает и принимает все условия и положения данного
руководства, а также несет ответственность за любое неправильное применение и вытекающие из этого
последствия. Настоящим компания EcoFlow отказывается от ответственности за любые убытки, вызванные
несоблюдением пользователем инструкций по эксплуатации изделия, которые указаны в этом руководстве.
В соответствии с законами и нормативными требованиями компания EcoFlow оставляет за собой право
окончательного толкования этого документа и всех иных документов, связанных с данным изделием. Все
обновления и изменения содержимого руководства, а также прекращение его действия, если это необходимо,
производятся без предварительного уведомления. Актуальную информацию об изделии можно найти на
официальном веб-сайте EcoFlow.
RU
KR
Zorg dat u deze gebruikershandleiding voor gebruik volledig leest en begrijpt. Bewaar deze gebruikershandleiding voor
toekomstig gebruik. Elk onjuist gebruik kan leiden tot ernstig letsel voor de gebruiker of anderen, schade aan het
product en het verlies van eigendommen. De gebruiker van dit product wordt geacht alle voorwaarden en informatie in
de gebruikershandleiding
te hebben begrepen, erkend en geaccepteerd, en zal verantwoordelijk zijn voor elk onjuist gebruik en alle gevolgen
daarvan. Bij deze verwerpt EcoFlow alle verantwoordelijkheid voor verliezen als gevolg van het niet volgens de
gebruikershandleiding gebruiken van het product door de gebruiker.
In overeenstemming met wet- en regelgeving heeft EcoFlow het laatste woord over de interpretatie van dit document
en alle aan dit product gerelateerde documenten. Elke wijziging, herziening of beëindiging van de inhoud hiervan,
indien nodig, zal zonder kennisgeving vooraf worden gedaan. Voor de nieuwste informatie over dit product kunnen
gebruikers de officiële website van EcoFlow bezoeken.
NL
Lea este manual de usuario detenidamente antes de usar el producto para asegurarse de que comprende
completamente el producto y puede usarlo correctamente. Después de leer este manual de usuario, guárdelo
debidamente para consultarlo más adelante. El uso inadecuado de este producto puede causar lesiones graves a usted
mismo o a otros, así como causar daños al producto y a la propiedad. Una vez que utilice este producto, se considerará
que comprende, aprueba y acepta todas las condiciones y el contenido de este documento. Cada usuario es
responsable de sus acciones y de las consecuencias de dichas acciones. EcoFlow no es responsable de ninguna
pérdida causada por la incapacidad del usuario para utilizar el producto según lo dispuesto en este manual de usuario.
De conformidad con la ley y la normativa, EcoFlow se reserva el derecho de interpretación final de este documento y
de todos los documentos relacionados con el producto. Este documento es susceptible de cambios (actualizaciones,
revisiones o retirada) sin previo aviso. Visite el sitio web oficial de EcoFlow para obtener la información más reciente
sobre el producto.
ES

CHT
CHS
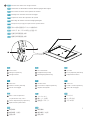
1. This product is applicable to EcoFlow rigid solar panel series with the following models
400 W Rigid Solar Panel(EF-SG-M400-04).
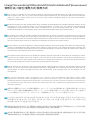
2. Place the solar panel on a soft material to avoid friction with the ground during installation.
3. Be sure to wear protective gloves and safety goggles during installation to avoid being scratched.
4. When installing the bracket, be sure to use the mounting holes reserved for the solar panel, and do not drill or modify
the module frame without authorization, which will void the warranty.
5. Check the connections of parts every three months to ensure that they are intact.
6. Do not use non-official accessories. If you need to replace components or accessories, purchase them from EcoFlow’s
official sales channels.
EN
1. Dieses Produkt ist für die Solarpanele EF-SG-M400-04 geeignet. Wenn Sie andere Modelle von Solarpanelen
installieren möchten, wenden Sie sich an unseren Kundendienst.
2. Tragen Sie bei der Montage unbedingt Schutzhandschuhe und eine Schutzbrille, um Kratzer zu vermeiden.
3. Legen Sie das Solarpanel auf ein weiches Material, um Reibung mit dem Boden während der Montage zu vermeiden.
4. Achten Sie bei der Montage der Halterung darauf, dass Sie die für das Solarpanel vorgesehenen Befestigungslöcher verwenden
und den Panelrahmen nicht ohne Genehmigung anbohren oder modifizieren, da dies zum Erlöschen der Garantie führt.
5. Überprüfen Sie alle drei Monate die Anschlüsse der Teile, um sicherzustellen, dass sie intakt sind.
6. Verwenden Sie keine nicht werksgeprüften Zubehörteile. Wenn Sie Komponenten oder Zubehörteile ersetzen
müssen, kaufen Sie diese über die offiziellen EcoFlow-Vertriebskanäle.
DE
Safety Instructions/Sicherheitshinweise/Consignes de sécurité/
Istruzioni di sicurezza/Instrucciones de seguridad/
Veiligheidsinstructies/Правила техники безопасности/
안전 지침/使用上の注意//
1. Ce produit est applicable aux panneaux solaires EF-SG-M100. Si vous devez installer d’autres modèles de panneaux
solaires, consultez notre service après-vente.
2. Veillez à porter des gants de protection et des lunettes de sécurité pendant l’installation pour éviter les rayures.
3. Placez le panneau solaire sur un matériau souple pour éviter toute friction avec le sol pendant l’installation.
4. Lors de l’installation du support, veillez à utiliser les trous de montage réservés au panneau solaire, et ne percez pas
ou ne modifiez pas le cadre du module sans autorisation, ce qui annulerait la garantie.
5. Vérifiez tous les trois mois les connexions des pièces pour s’assurer qu’elles sont intactes.
6. N’utilisez pas d’accessoires non officiels. Si vous devez remplacer des composants ou des accessoires, achetez-les
auprès des canaux de vente officiels d’EcoFlow.
FR
1. Questo prodotto è applicabile ai seguenti modelli della serie di pannelli solari rigidi EcoFlow:
Pannello solare rigido da 400 W (EF-SG-M400-04).
2. Posizionare il pannello solare su un materiale morbido per evitare frizioni durante l'installazione.
3. Durante l'installazione, indossare guanti da lavoro e occhiali protettivi per evitare di graffiarsi.
4. Durante l'installazione della staffa, utilizzare i fori di montaggio predisposti per il pannello solare. Non forare né
modificare il telaio del modulo senza autorizzazione, poiché ciò renderebbe nulla la garanzia.
5. Verificare i collegamenti dei componenti ogni tre mesi per garantirne l'integrità.
6. Non utilizzare accessori non ufficiali. Se è necessario sostituire componenti o accessori, acquistarli dai canali di
vendita ufficiali di EcoFlow.
IT

1. Dit product is geschikt voor stijve EcoFlow-zonnepanelen van het model
stijf 400W-zonnepaneel (EF-SG-M400-04).
2. Plaats het zonnepaneel op een zacht materiaal, zodat het tijdens de montage niet over de grond schuurt.
3. Draag tijdens de montage veiligheidshandschoenen en een veiligheidsbril om schrammen en oogschade te voor-
komen.
4. Gebruik bij de montage van de beugel de montagegaten voor het zonnepaneel. Zonder toestemming mag u geen
gaten in het montageframe boren en het montageframe niet aanpassen; anders vervalt de garantie.
5. Controleer elke drie maanden de verbindingen van de onderdelen om te zorgen dat ze intact zijn.
6. Gebruik geen niet-officiële accessoires. Als u onderdelen of accessoires moet vervangen, moet u die aanschaffen bij
de officiële verkoopkanalen van EcoFlow.
NL
1. Это изделие подходит для серии солнечных панелей EcoFlow с одинарным стеклом, в которую входят
следующие модели:
солнечная панель с одинарным стеклом мощностью 400 Вт (EF-SG-M400-04).
2. Разместите солнечную панель на мягком материале во избежание трения с землей во время установки.
3. Во время установки обязательно наденьте защитные перчатки и очки, чтобы не поцарапаться.
4. При установке кронштейна используйте монтажные отверстия, предназначенные для солнечной панели, и
не сверлите и не модифицируйте раму модуля без разрешения, что приведет к аннулированию гарантии.
5. Проверяйте соединения деталей каждые три месяца, чтобы убедиться, что они не повреждены.
6. Не используйте неофициальные аксессуары. Если компоненты или аксессуары необходимо заменить,
приобретите их через официальный канал продаж EcoFlow.
RU
EF-SG-M400-04
JP
KR
EF-SG-M400-04
CHS
EF-SG-M400-04
CHT
1. Este producto se corresponde con los paneles solares EF-SG-M400-04. Si necesita instalar otros modelos de placas
solares, consúltelo con nuestro servicio de posventa.
2. Asegúrese de usar guantes protectores y gafas de seguridad durante la instalación para evitar que se raye.
3. Coloque el panel solar sobre un material blando para evitar la fricción con el suelo durante la instalación.
4. Al instalar el soporte, asegúrese de hacer uso de los orificios de montaje reservados para el panel solar y NO perfore
ni modifique el marco del módulo sin autorización, ya que esto anularía la garantía.
5. Verifique las conexiones de las piezas cada tres meses para garantizar que estén intactas.
6. No utilice accesorios que no sean oficiales. Si necesita reemplazar componentes o accesorios, cómprelos en los cana-
les de venta oficiales de EcoFlow.
ES

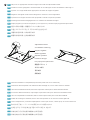
1 2 3 4
5 6 7 8
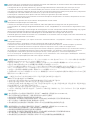
×6 ×6
×6
×6
×6 ×6 ×6
×6
EN
1
2
3
4
5
6
7
8
Flat washer
Self-drilling screw
Large washer
Spring washer
Flange nut
Torx screw
Wing nut
Hex bolt
JP
1
2
3
4
5
6
7
8
CHS
1
2
3
4
5
6
7
8
DE
1
2
3
4
5
6
7
8
Federscheibe
Große Unterlegscheibe
Sechskantschraube
Flanschmutter
Unterlegscheibe
Torx-Schraube
Flügelmutter
Selbstschneidende Schraube
FR
1
2
3
4
5
6
7
8
Écrou à embase
Rondelle plate
Grande rondelle
Rondelle élastique
Vis Torx
Écrou papillon
Vis autoperceuse
Boulon à tête hexagonale
ES
1
2
3
4
5
6
7
8
Tuerca de brida
Arandela plana
Arandela elástica
arandela grande
Tornillo Torx
Tuerca de mariposa
Tornillo autoperforante
Tornillo de cabeza
hexagonal
Packing List/Packliste/Liste de colisage/Contenuto della confezione/
Listado de contenidos del embalaje/ Paklijst/В комплекте/
포장 목록
KR
1
2
3
4
5
6
7
8
IT
1
2
3
4
5
6
7
8
Bullone a testa esagonale
Rondella
Rondella grande
Rondella piatta
Dado flangiato
Vite Torx
Dado a farfalla
Vite autofilettante
NL
1
2
3
4
5
6
7
8
Zeskantbout
Veerring
Grote carrosseriering
Platte ring
Flensmoer
Torx-schroef
Vleugelmoer
Zelf-tappende bout
RU
1
2
3
4
5
6
7
8
Болт с шестигранной
головкой
Пружинная шайба
Большая шайба
Плоская шайба
Фланцевая гайка
Винт с шестигранным
углублением под ключ
Гайка-барашек
Самонарезающий винт
CHT
1
2
3
4
5
6
7
8

9 10
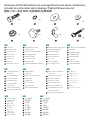
×4
×2
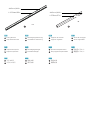
L1270mm/50in
L575mm/27in
EN
9
10 Adjustable bracket
Fixing bracket 9
10 Support réglable
Support de fixation
FR
9
10 Verstellbare Halterung
Befestigungshalterung
DE
9
10
JP
9
10
KR
9
10
Staffa di fissaggio
Staffa regolabile
IT
9
10
CN
9
10
CN
9
10
Bevestigingsbeugel
Instelbare beugel
NL
9
10
Крепежный кронштейн
Регулируемый кронштейн
RU
9
10 Soporte ajustable
Soporte de fijación
ES

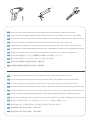
EN Be sure to wear protective gloves and safety goggles during installation to avoid being scratched.
DE Tragen Sie bei der Montage unbedingt Schutzhandschuhe und eine Schutzbrille, um Kratzer zu vermeiden.
FR Veillez à porter des gants de protection et des lunettes de sécurité pendant l’installation pour éviter les rayures.
IT Durante l'installazione, indossare guanti da lavoro e occhiali protettivi per evitare di graffiarsi.
ES Asegúrese de usar guantes protectores y gafas de seguridad durante la instalación para evitar que se raye.
NL Draag tijdens de montage veiligheidshandschoenen en een veiligheidsbril om schrammen en oogschade te voorkomen.
RU Во время установки обязательно наденьте защитные перчатки и очки, чтобы не поцарапаться.
KR
IT Gli attrezzi richiesti per l'installazione non sono forniti in dotazione e dovranno essere acquistati separatamente.
NL Voor de montage benodigde gereedschappen staan niet in de lijst vermeld en moeten zelf worden aangeschaft.
RU Инструменты, необходимые для установки, не включены в комплект, их следует приобретать самостоятельно.
KR
JP
CHS
CHT
EN The tools required for installation are not included in the list, please purchase them yourself.
DE Die für die Montage erforderlichen Werkzeuge sind nicht in der Liste enthalten, kaufen Sie diese selbst.
FR Les outils nécessaires à l’installation ne sont pas inclus dans la liste, veuillez les acheter vous-même.
ES Las herramientas necesarias para la instalación no figuran en la lista, por lo que debe adquirirlas usted mismo.
JP
CHS
CHT

Usage/Verwendung/Utilisation/Utilizzo/Uso/Gebruik/Применение/
使用方法/사용법/
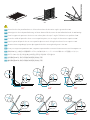
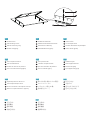
This system can flexibly tune the elevation angle by adjusting the installation buckle to keep the solar panel at a
vertical angle to the sun's rays, which ensures optimal power production. For information about the best elevation
angle for a solar system, please refer to your local solar system installation guide or the solar manufacturer’s
installation requirements.
EN
Bei diesem System kann der Aufstellwinkel durch Verstellen der Montageklammer flexibel eingestellt werden, um das
Solarpanel in einem vertikalen Winkel zur Sonneneinstrahlung zu halten, was eine optimale Stromerzeugung
gewährleistet. Informationen über den besten Aufstellwinkel für eine Solaranlage finden Sie in Ihrem örtlichen
Installationshandbuch für Solaranlagen oder in den Installationsanforderungen des Solarherstellers.
DE
Ce système peut régler de manière flexible l’angle d’élévation en ajustant la boucle d’installation pour maintenir le
panneau solaire à un angle vertical par rapport aux rayons du soleil, ce qui garantit une production d’énergie optimale.
Pour plus d’informations sur le meilleur angle d’élévation d’un système solaire, veuillez consulter le guide d’installation
de votre système solaire local ou les exigences d’installation du fabricant du système solaire.
FR
Questo sistema consente di regolare in modo flessibile l'angolo di elevazione agendo sulla fibbia di installazione per
garantire la perpendicolarità del pannello solare rispetto ai raggi del sole e una produzione ottimale di energia. Per
informazioni sul migliore angolo di elevazione di un sistema fotovoltaico, consultare la guida all'installazione o i requisiti
di installazione del produttore del sistema fotovoltaico.
IT
Este sistema puede regular de forma flexible el ángulo de elevación ajustando la abrazadera de montaje para sujetar
el panel solar en ángulo vertical con respecto a los rayos del sol, lo que garantiza que se genere energía de forma
óptima. Para conocer el mejor ángulo de elevación para un equipo de energía solar, consulte la guía de instalación de
su sistema de energía solar local o los requisitos de instalación del fabricante.
ES
Met dit systeem kan de hoek van het zonnepaneel flexibel worden ingesteld, zodat het zonnepaneel loodrecht op de
stralen van de zon staat en de stroomproductie optimaal is. Raadpleeg voor informatie over de beste hoek voor het
zonnesysteem uw lokale montage-instructies voor zonnepanelen of de montage-eisen van de fabrikant van het
zonnepaneel.
NL
Эта система позволяет гибко настраивать угол подъема путем регулировки монтажной скобы, чтобы
удерживать солнечную панель под вертикальным углом к солнечным лучам, что обеспечивает оптимальную
выработку энергии. Сведения об оптимальном угле наклона для системы солнечных панелей см. в руководстве
по установке системы солнечных панелей для вашего региона или в требованиях производителя солнечных
панелей к монтажу.
RU
JP
KR
CHS
CHT

EN
DE
FR
IT
ES
NL
RU
JP
KR
CHT
CHS
0° 90°

Installation Steps/Montageschritte/Étapes d’installation/
Fasi dell'installazione/Procedimiento de instalación/Montage/
Этапы установки/取り付け手順/설치 단계//
1EN
DE
FR
IT
JP
KR
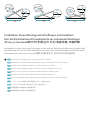
Installation on the short side/Montage an der kurzen Seite/Installation sur le petit côté/
Installazione sul lato corto/Instalación en el lado más corto/Montage op de korte kant/
Установка на короткой стороне/横置き設置/짧은 쪽 설치/短边安装/短邊安裝
ES
NL
RU
CHS
CHT

EN
Fixing bracket
Flange nut
Flat washer
Large washer
Spring washer
Hex bolt
A
B
C
D
F
E
JP
フランジ ナット
平ワッシャー
大型ワッシャ
ばねワッシャー
六角ボルト
A
B
C
D
E
固定用ブラケット
F
CHS
固定支架
法兰螺母
平垫圈
大垫圈
弹簧垫圈
外六角螺栓
A
B
C
D
E
F
DE
Befestigungshalterung
Flanschmutter
Unterlegscheibe
Federscheibe
Sechskantschraube
A
B
C
D
E
F
Große Unterlegscheibe
FR
Support de fixation
Écrou à embase
Rondelle plate
Rondelle élastique
Boulon à tête hexagonale
A
B
C
D
E
F
Grande rondelle
ES
Soporte de fijación
Tuerca de brida
Arandela plana
Arandela elástica
Tornillo de cabeza hexagonal
A
B
C
D
E
F
Arandela grande
1
A
B
C
E
D
F
KR
A
B
C
D
E
F
CHT
A
B
C
D
E
F
IT
Dado flangiato
Rondella piatta
Rondella grande
Rondella
Bullone a testa esagonale
Staffa di fissaggio
A
B
C
D
E
F
NL
Flensmoer
Platte ring
Grote carrosseriering
Veerring
Zeskantbout
Bevestigingsbeugel
A
B
C
D
E
F
RU
Фланцевая гайка
Плоская шайба
Большая шайба
Пружинная шайба
Болт с шестигранной головкой
Крепежный кронштейн
F
A
B
C
D
E

A
B
C
CHT
A
B
C
KR
A
B
C
EN
Torx screw
Wing nut (interior)
Fixing bracket
A
B
C
DE
Torx-Schraube
Flügelmutter (innen)
Befestigungshalterung
A
B
C
FR
Vis Torx
Écrou papillon (intérieur)
Support de fixation
A
B
C
JP
A
B
C
CHS
A
B
C
ES
Tornillo Torx
Tuerca de mariposa (interior)
Soporte de fijación
A
B
C
IT
Vite Torx
Dado a farfalla (interno)
Staffa di fissaggio
A
B
C
NL
Vite Torx
Dado a farfalla (interno)
Staffa di fissaggio
A
B
C
RU
Винт с шестигранным
углублением под ключ
Гайка-барашек (внутренняя)
Крепежный кронштейн
A
B
C
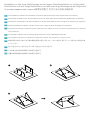
2Connect the other two fixing brackets
Verbinden Sie die beiden anderen Befestigungshalterungen
Raccordez les deux autres pattes de fixation
Collegare le altre due staffe di fissaggio
Acople los otros dos soportes de fijación
Bevestig de andere twee bevestigingsbeugels
Соедините два других крепежных кронштейна
EN
DE
FR
IT
ES
NL
RU
JP
KR
CHT
CHS

3Adjust to an appropriate elevation angle and install the adjustable bracket
Stellen Sie einen geeigneten Aufstellwinkel ein und bringen Sie die verstellbare Halterung an
Ajustez à un angle d’élévation approprié et installez le support réglable
Regolare all'angolo di elevazione adeguato e montare la staffa regolabile
Ajústelo en el ángulo de elevación apropiado e instale el soporte ajustable
Stel de gewenste bevestigingshoek in en monteer de instelbare beugel
Отрегулируйте до соответствующего угла подъема и установите регулируемый кронштейн
EN
DE
FR
IT
ES
NL
RU
JP
KR
CHT
CHS
After the installation is completed, flip the solar panel over to use it instantly.
Drehen Sie das Solarpanel nach Abschluss der Montage um, um es sofort nutzen zu können.
Une fois l’installation terminée, retournez le panneau solaire pour l’utiliser instantanément.
Al termine dell'installazione, capovolgere il pannello solare per utilizzarlo immediatamente.
Una vez completada la instalación, dele la vuelta al panel solar para usarlo de inmediato.
Nadat de montage is voltooid, draait u het zonnepaneel om en kan het worden gebruikt.
После завершения установки переверните солнечную панель, чтобы сразу же использовать ее.
EN
DE
FR
IT
ES
NL
RU
JP
KR
CHT
CHS
調整用ブラケット
调节支架
調節支架
Soporte ajustable
Verstellbare Halterung
Adjustable bracket
Support réglable
Staffa regolabile
Регулируемый кронштейн
Instelbare beugel

12
3
Installation on the long side/Montage an der langen Seite/Installation sur le long côté/
/Installazione sul lato lungo/Instalación en el lado más largo/Montage op de lange kant/
Установка на длинной стороне/縦置き設置//长边安装/長邊安裝
The installation is identical to Installation on the short side, please refer to the figures below for reference.
Die Montage ist identisch mit der Montage an der kurzen Seite, siehe die nachstehenden Abbildungen als Referenz.
L’installation est identique à l’étape Installation sur le petit côté. Reportez-vous aux figures ci-dessous pour référence.
Questa installazione è identica a quella sul lato corto. Vedere le figure di seguito per riferimento.
El proceso de montaje es idéntico al paso Instalación en el lado más corto. Consulte las ilustraciones para tenerlas
como referencia.
De montage is identiek aan de montage op de korte kant, zie de afbeeldingen hieronder.
Эта установка идентична установке на короткой стороне. Для справки см. рисунки ниже.
EN
DE
FR
IT
ES
NL
RU
JP
KR
CHT
CHS

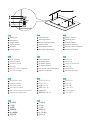
Fixed installation/Ortsfeste Montage/Installation fixe/Installazione fissa/Instalación fija/
Vaste montage/Стационарная установка/固定式設置//固定式安装/固定式安裝
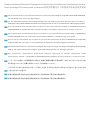
For permanent fixed use,please fix the bracket on a flat surface before Step 3 -Long Side / Short Side Installation.
For installation steps, refer to the figure below.
Für die dauerhafte ortsfeste Verwendung befestigen Sie die Halterung auf einer ebenen Fläche vor Schritt 3 -
Montage an der langen Seite/kurzen Seite. Die Montageschritte sind in der nachstehenden Abbildung dargestellt.
Pour une utilisation fixe permanente, fixez le support sur une surface plane avant l’Étape3 - Installation sur le long
côté/Installation sur le petit côté. Pour connaître les étapes d’installation, reportez-vous à la figure ci-dessous.
Per un utilizzo fisso in modo permanente, fissare la staffa su una superficie piana prima della Fase 3 - Installazione
sul lato lungo/lato corto. Per informazioni sulle fasi dell'installazione, consultare la figura di seguito.
Para su uso fijo y permanente, fije el soporte en una superficie plana antes del Paso 3: Instalación en el lado más
largo o el lado más corto. Para ver el procedimiento de instalación, consulte la siguiente ilustración.
Als het zonnepaneel op een vaste locatie wordt gebruikt, moet u de beugel vóór Stap 3: montage op de korte/lange
kant op een vlakke ondergrond bevestigen. Zie de afbeelding hieronder voor montage-instructies.
Для постоянного стационарного применения закрепите кронштейн на плоской поверхности перед
выполнением этапа 3— «Установка на длинной/короткой стороне». Этапы установки см. на рисунке ниже.
ソーラーパネルを固定して長期間使用する場合は、縦置き/横置き設置の手順を参照し、あらかじめブラケットを水平な場
所に取り付けてください。設置の手順については、下図を参照してください。
如需长期固定使用,请在长边/短边安装步骤➂前,将支架安装在平面。安装步骤如图所示:
如需長期固定使用,請在長邊/短邊安裝步驟➂前,將支架安裝在平面。安裝步驟如圖所示:
EN
DE
FR
IT
ES
NL
RU
JP
KR
CHT
CHS

A
B
C
D
CHS
A
B
C
D
KR
A
B
C
D
CHT
A
B
C
D
RU
Просверленная область*
Самонарезающий винт
Пластмассовое стопорное кольцо
Область приклеивания (серая)
A
B
C
D
EN
Drilled area*
Self-drilling screw
Plastic retaining ring
Glued area(grey)
A
B
C
D
DE
Gebohrter Bereich*
Selbstschneidende Schraube
Kunststoff-Haltering
Verklebebereich (grau)
A
B
C
D
FR
Zone forée*
Vis autoperceuse
Anneau de retenue en plastique
A
B
C
Zone collée (grise)
D
ES
Área perforada*
Tornillo autoperforante
Aro de retención de plástico
Área encolada (gris)
A
B
C
D
IT
Area di perforazione*
Vite autofilettante
Anello di ritenuta in plastica
Area di incollamento (grigia)
A
B
C
D
NL
Geboord gat *
Zelf-tappende bout
Plastic borgring
Lijmoppervlak (grijs)
A
B
C
D
JP
A
B
C
D

*After drilling holes in the pre-installation position, first glue waterproof silicone around the holes, and then secure
them with self-drilling screws.
EN
*Nach dem Bohren von Löchern an der vorbereiteten Position kleben Sie zunächst wasserdichtes Silikon um die
Löcher und befestigen s ie dann mit selbstschneidenden Schrauben.
DE
*Après avoir percé des trous dans la position de pré-installation, collez d’abord du silicone étanche autour des trous,
puis fixez-les avec des vis autoperceuses.
FR
*Dopo avere praticato i fori nella posizione di pre-installazione, applicare del silicone impermeabile intorno ai fori,
quindi fissarli con le viti autofilettanti.
IT
*Después de perforar los orificios en la posición de preinstalación, aplique la silicona impermeable alrededor de los
orificios y luego use los tornillos autoperforantes para fijarlos.
ES
*Nadat u op de juiste plaatsen gaten hebt geboord, moet u eerst waterdichte siliconenlijm rond de gaten
aanbrengen en daarna de beugel met de zelf-tappende schroeven bevestigen.
NL
*После сверления отверстий в предустановочном положении сначала нанесите вокруг них водостойкий
силиконовый герметик, а затем заверните самонарезающие винты.
RU
*設置予定の場所で取り付け用の穴を開けた後、穴の周囲に防水シリコンコーキング材を塗布してから、セルフドリル ネジ
で架台に固定します。
JP
*在預安裝位置打孔後,先往孔洞四周塗抹防水矽膠,再用鑽尾螺絲進行固定。
CHT
*在预安装位置打孔后,先往孔洞四周涂抹防水硅胶,再用钻尾螺丝进行固定。
CHS
KR
-
 1
1
-
 2
2
-
 3
3
-
 4
4
-
 5
5
-
 6
6
-
 7
7
-
 8
8
-
 9
9
-
 10
10
-
 11
11
-
 12
12
-
 13
13
-
 14
14
-
 15
15
-
 16
16
-
 17
17
-
 18
18


EcoFlow 50'' Tilt Mount Bracket Handleiding
- Type
- Handleiding
in andere talen
Gerelateerde artikelen
-
EcoFlow ZPTSP300-2-AKIT-4 de handleiding
-
-
EcoFlow 100 W Flexible Solar Panel Handleiding
-
-
-
EcoFlow Pro Smart Extra Battery Handleiding
-
-
EcoFlow 400W Handleiding
-
EcoFlow EFWN511 Handleiding
-
