
OptiPlex 3050 All-in-One
Quick Start Guide
Snelstartgids
Guide d'information rapide
Schnellstart-Handbuch
Guida introduttiva rapida
Product support and manuals
Productondersteuning en handleidingen | Support produits et manuels
Produktsupport und Handbücher | Supporto prodotto e manuali
Dell.com/support
Dell.com/support/manuals
Dell.com/support/windows
Contact Dell
Contact opnemen met Dell | Contacter Dell
Kontaktaufnahme mit Dell | Contattare Dell
Dell.com/contactdell
Regulatory and safety
Regelgeving en veiligheid | Réglementations et sécurité
Sicherheitshinweise und Zulassungsinformationen | Normative e sicurezza
Dell.com/regulatory_compliance
Regulatory model
Beschreven model | Modèle réglementaire
Muster-Modellnummer | Modello normativo
W18B
Regulatory type
Beschreven type | Type réglementaire
Muster-Typnummer | Tipo di conformità
W18B001
Computer model
Computermodel | Modèle de l'ordinateur
Computermodell | Modello computer
OptiPlex 3050 All-in-One
Printed in China.
2016-11
© 2016 Dell Inc.
© 2016 Microsoft Corporation
4 5
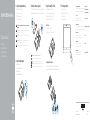
Easel stand
Ezelstandaard | Socle inclinable
Staffeleistandrahmen | Piedistallo a cavalletto
3 Install the cable cover (optional)
Plaats het kabelafdekplaatje (optioneel) | Installez le cache-câbles (en option)
Kabelabdeckung installieren (optional) | Installare il coperchio del cavo (opzionale)
Press the power button
Druk op de aan-uitknop
Appuyer sur le bouton d'alimentation
Betriebsschalter drücken
Premere il pulsante Accensione
Set up the stand (HAS or Easel)
Zet de standaard (HAS of ezel) in elkaar
Régler le socle (inclinable ou à hauteur réglable)
Standrahmen einrichten (HAS oder Staffelei)
Impostare il piedistallo (HAS o a cavalletto)
1 Connect the keyboard and mouse
Sluit het toetsenbord en de muis aan
Connecter le clavier et la souris
Tastatur und Maus anschließen
Collegare la tastiera e il mouse
NOTE: If you are connecting a wireless keyboard or mouse, see the documentation that
shipped with it.
N.B.: Als u een draadloos toetsenbord of draadloze muis aansluit, raadpleeg dan de meegeleverde
documentatie.
REMARQUE: Si vous connectez un clavier ou une souris sans fil, consultez la documentation
fournie.
ANMERKUNG: Wenn Sie eine Wireless-Tastatur oder eine Maus anschließen, finden Sie weiter
Informationen in der Dokumentation, dieser beilagen.
N.B.: se si utilizza una tastiera o un mouse senza fili, visualizzare la documentazione fornita.
2 Connect the power adapter
Sluit de netadapter aan
Brancher l'adaptateur d'alimentation
Netzadapter anschließen
Collegare l'adattatore di alimentazione
Height adjustable stand (HAS)
In hoogte verstelbare standaard (HAS) | Socle à hauteur réglable (HAS)
Höhenverstellbarer Standrahmen (HAS) | Piedistallo ad altezza regolabile (HAS)
NOTE: Securing the cable cover by using the Torx screw is optional.
N.B.: Het vastzetten van het afdekplaatje met de Torx-schroef is optioneel.
REMARQUE: la fixation du cache des câbles au moyen de la vis Torx est facultative.
ANMERKUNG: Das Befestigen der Kabelabdeckung mithilfe der Torx-Schraube ist optional.
N.B.: il fissaggio del coperchio del cavo mediante l'uso della vite Torx è opzionale.

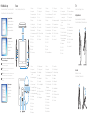
Features
Kenmerken | Caractéristiques | Funktionen | Funzioni
1. Microfoon
2. Camera (optioneel)
3. Camera-privacyvergrendeling
(optioneel)
4. Camera-statuslampje (optioneel)
5. Microfoon
6. Optisch station (optioneel)
7. On-screen display (OSD)-knoppen
8. Activiteitenlampje vaste schijf
9. Aan/uit-knop en voedingsstatuslampje
10. Stereoluidsprekers
11. USB 2.0-poorten
12. USB 3.0-poorten
13. Netwerkpoort
14. DisplayPort
15. Netadapterpoort
16. HDMI-ingang (optioneel)
17. Seriële poort (optioneel)
18. Kabelafdekplaatje
19. Standaard
20. Kabelgeleidingssleuf
21. Servicetaglabel
22. Sleuf voor beveiligingskabel
23. Headsetpoort
24. USB 3.0-poort met PowerShare
25. USB 3.0-poort
26. SD-kaartleesapparaat
1. Microphone
2. Webcam (en option)
3. Loquet du volet de la webcam (en option)
4. Voyant d'état de la webcam (en option)
5. Microphone
6. Lecteur optique (en option)
7. Boutons de menu à l'écran (OSD)
8. Voyant d'activité du disque dur
9. Bouton et voyant d'alimentation
10. Haut-parleurs stéréo
11. Ports USB2.0
12. Ports USB3.0
13. Port réseau
14. DisplayPort
15. Port du connecteur d'alimentation
16. Port VGA (en option)
17. Port de série (en option)
18. Cache-câbles
19. Socle
20. Emplacement pour routage de câbles
21. Étiquette du numéro de service
22. Passage du câble de sécurité
23. Port pour casque
24. Port USB3.0 avec PowerShare
25. Port USB3.0
26. Lecteur de carte SD
1. Mikrofon
2. Kamera (optional)
3. Kamera-Privatsphäreriegel (optional)
4. Kamerastatusanzeige (optional)
5. Mikrofon
6. Optisches Laufwerk (optional)
7. OSD-Tasten (On-Screen-Display,
Bildschirmanzeige)
8. Festplatten-Aktivitätsanzeige
9. Betriebsschalter- und
Stromversorgungsanzeige
10. Stereolautsprecher
11. USB2.0-Anschlüsse
12. USB3.0-Anschlüsse
13. Netzwerkanschluss
14. DisplayPort-Anschluss
15. Netzanschluss-Port
16. VGA-Anschluss (optional)
17. Serielle Schnittstelle (optional)
18. Kabelabdeckung
19. Standrahmen
20. Kabelführungsschlitz
21. Service-Tag-Etikett
22. Sicherheitskabeleinschub
23. Kopfhöreranschluss
24. USB3.0-Anschluss mit PowerShare
25. USB3.0-Anschluss
26. SD-Kartenleser
1. Microfono
2. Fotocamera (opzionale)
3. Dispositivo di chiusura privacy della
fotocamera (opzionale)
4. Indicatore di stato della fotocamera
(opzionale)
5. Microfono
6. Unità ottica (opzionale)
7. Pulsanti OSD (On Screen Display)
8. Indicatore di attività del disco rigido
9. Indicatore stato alimentazione e
pulsante di alimentazione
10. Altoparlanti stereo
11. Porte USB 2.0
12. Porte USB 3.0
13. Porta di rete
14. DisplayPort
15. Porta connettore di alimentazione
16. Porta VGA (opzionale)
17. Porta seriale (opzionale)
18. Coperchio del cavo
19. Piedistallo
20. Slot di instradamento del cavo
21. Etichetta Numero di servizio
22. Slot per cavo di sicurezza
23. Porta auricolare
24. Porta USB 3.0 con PowerShare
25. Porta USB 3.0
26. Lettore di schede SD
Tilt
Kantelen | Inclinaison | Neigung | Inclinazione
Height adjustable stand
In hoogte verstelbare standaard | Socle à hauteur réglable
Höhenverstellbarer Standrahmen | Piedistallo ad altezza regolabile
Easel stand
Ezelstandaard | Socle inclinable
Staffeleistandrahmen | Piedistallo a cavalletto
6 Finish Windows 7 setup
Voltooi de installatie van Windows 7 | Terminer l'installation de Windows 7
Windows 7-Setup abschließen | Terminare l'installazione di Windows 7
Set a password for Windows
Stel een wachtwoord voor Windows in
Définir un mot de passe pour Windows
Kennwort für Windows einrichten
Impostare una password per Windows
Connect to your network
Maak verbinding met uw netwerk
Se connecter au réseau
Mit dem Netzwerk verbinden
Connettere alla rete
NOTE: If you are connecting to a secured wireless network, enter the password for the
wireless network access when prompted.
N.B.: als u verbinding maakt met een beveiligd draadloos netwerk, vul dan het wachtwoord voor
het netwerk in wanneer daar om gevraagd wordt.
REMARQUE: si vous vous connectez à un réseau sans fil sécurisé, saisissez le mot de passe
d'accès au réseau sans fil lorsque vous y êtes invité.
ANMERKUNG: Wenn Sie sich mit einem geschützten Wireless-Netzwerk verbinden, geben Sie
das Kennwort für das Wireless-Netzwerk ein, wenn Sie dazu aufgefordert werden.
N.B.: per collegarsi a una rete senza fili protetta, inserire la password di accesso alla rete senza fili
quando richiesto.
Protect your computer
Beveilig de computer
Protéger votre ordinateur
Computer schützen
Proteggere il computer
1. Microphone
2. Camera (optional)
3. Camera privacy latch (optional)
4. Camera status light (optional)
5. Microphone
6. Optical drive (optional)
7. On screen display (OSD) buttons
8. Hard drive activity light
9. Power button and power status light
10. Stereo speakers
11. USB 2.0 ports
12. USB 3.0 ports
13. Network port
14. DisplayPort
15. Power connector port
16. VGA port (optional)
17. Serial port (optional)
18. Cable cover
19. Stand
20. Cable routing slot
21. Service tag label
22. Security cable slot
23. Headset port
24. USB 3.0 port with PowerShare
25. USB 3.0 port
26. SD Card reader
Documenttranscriptie
1 Connect the keyboard and mouse OptiPlex 3050 All-in-One Sluit het toetsenbord en de muis aan Connecter le clavier et la souris Tastatur und Maus anschließen Collegare la tastiera e il mouse 3 Install the cable cover (optional) Plaats het kabelafdekplaatje (optioneel) | Installez le cache-câbles (en option) Kabelabdeckung installieren (optional) | Installare il coperchio del cavo (opzionale) Ezelstandaard | Socle inclinable Staffeleistandrahmen | Piedistallo a cavalletto N.B.: Als u een draadloos toetsenbord of draadloze muis aansluit, raadpleeg dan de meegeleverde documentatie. Snelstartgids Guide d'information rapide Schnellstart-Handbuch Guida introduttiva rapida Zet de standaard (HAS of ezel) in elkaar Régler le socle (inclinable ou à hauteur réglable) Standrahmen einrichten (HAS oder Staffelei) Impostare il piedistallo (HAS o a cavalletto) Easel stand NOTE: If you are connecting a wireless keyboard or mouse, see the documentation that shipped with it. Quick Start Guide 4 Set up the stand (HAS or Easel) REMARQUE : Si vous connectez un clavier ou une souris sans fil, consultez la documentation fournie. ANMERKUNG: Wenn Sie eine Wireless-Tastatur oder eine Maus anschließen, finden Sie weiter Informationen in der Dokumentation, dieser beilagen. N.B.: se si utilizza una tastiera o un mouse senza fili, visualizzare la documentazione fornita. NOTE: Securing the cable cover by using the Torx screw is optional. 2 Connect the power adapter Sluit de netadapter aan Brancher l'adaptateur d'alimentation Netzadapter anschließen Collegare l'adattatore di alimentazione 5 Press the power button Druk op de aan-uitknop Appuyer sur le bouton d'alimentation Betriebsschalter drücken Premere il pulsante Accensione Dell.com/support Product support and manuals Productondersteuning en handleidingen | Support produits et manuels Dell.com/support/manuals Produktsupport und Handbücher | Supporto prodotto e manuali Dell.com/support/windows Contact Dell Contact opnemen met Dell | Contacter Dell Kontaktaufnahme mit Dell | Contattare Dell Dell.com/contactdell Regulatory and safety Regelgeving en veiligheid | Réglementations et sécurité Dell.com/regulatory_compliance Sicherheitshinweise und Zulassungsinformationen | Normative e sicurezza Regulatory model Beschreven model | Modèle réglementaire Muster-Modellnummer | Modello normativo W18B Regulatory type Beschreven type | Type réglementaire Muster-Typnummer | Tipo di conformità W18B001 Computer model Computermodel | Modèle de l'ordinateur Computermodell | Modello computer OptiPlex 3050 All-in-One N.B.: Het vastzetten van het afdekplaatje met de Torx-schroef is optioneel. REMARQUE : la fixation du cache des câbles au moyen de la vis Torx est facultative. ANMERKUNG: Das Befestigen der Kabelabdeckung mithilfe der Torx-Schraube ist optional. N.B.: il fissaggio del coperchio del cavo mediante l'uso della vite Torx è opzionale. Height adjustable stand (HAS) In hoogte verstelbare standaard (HAS) | Socle à hauteur réglable (HAS) Höhenverstellbarer Standrahmen (HAS) | Piedistallo ad altezza regolabile (HAS) © 2016 Dell Inc. © 2016 Microsoft Corporation Printed in China. 2016-11 6 Finish Windows 7 setup Voltooi de installatie van Windows 7 | Terminer l'installation de Windows 7 Windows 7-Setup abschließen | Terminare l'installazione di Windows 7 Set a password for Windows Stel een wachtwoord voor Windows in Définir un mot de passe pour Windows Kennwort für Windows einrichten Impostare una password per Windows Connect to your network Maak verbinding met uw netwerk Se connecter au réseau Mit dem Netzwerk verbinden Connettere alla rete Features Kenmerken | Caractéristiques | Funktionen | Funzioni 1. Microphone 16. VGA port (optional) 1. Microphone 16. Port VGA (en option) 1. Microfono 14. DisplayPort 2. Camera (optional) 17. Serial port (optional) 2. Webcam (en option) 17. Port de série (en option) 2. Fotocamera (opzionale) 15. Porta connettore di alimentazione 3. Dispositivo di chiusura privacy della fotocamera (opzionale) 16. Porta VGA (opzionale) 17. Porta seriale (opzionale) 4. Indicatore di stato della fotocamera (opzionale) 18. Coperchio del cavo 5. Microfono 19. Piedistallo 6. Unità ottica (opzionale) 7. Pulsanti OSD (On Screen Display) 8. Indicatore di attività del disco rigido 9. Indicatore stato alimentazione e pulsante di alimentazione 3. Camera privacy latch (optional) 18. Cable cover 3. Loquet du volet de la webcam (en option) 18. Cache-câbles 4. Camera status light (optional) 19. Stand 4. Voyant d'état de la webcam (en option) 19. Socle 5. Microphone 20. Cable routing slot 5. Microphone 20. Emplacement pour routage de câbles 6. Optical drive (optional) 21. 6. Lecteur optique (en option) 21. 7. On screen display (OSD) buttons 22. Security cable slot 7. Boutons de menu à l'écran (OSD) 22. Passage du câble de sécurité 8. Hard drive activity light 23. 8. Voyant d'activité du disque dur 23. 9. Power button and power status light 24. USB 3.0 port with PowerShare 9. Bouton et voyant d'alimentation 24. Port USB 3.0 avec PowerShare 10. Stereo speakers 25. USB 3.0 port 10. Haut-parleurs stéréo 25. Port USB 3.0 11. USB 2.0 ports 26. SD Card reader 11. Ports USB 2.0 26. Lecteur de carte SD 12. USB 3.0 ports 12. Ports USB 3.0 13. Network port 13. Port réseau 14. DisplayPort 14. DisplayPort 15. Power connector port 15. Port du connecteur d'alimentation Service tag label Headset port Étiquette du numéro de service Port pour casque 10. Altoparlanti stereo 11. Porte USB 2.0 12. Porte USB 3.0 13. Porta di rete Tilt Kantelen | Inclinaison | Neigung | Inclinazione Height adjustable stand In hoogte verstelbare standaard | Socle à hauteur réglable Höhenverstellbarer Standrahmen | Piedistallo ad altezza regolabile 20. Slot di instradamento del cavo 21. Etichetta Numero di servizio 22. Slot per cavo di sicurezza 23. Porta auricolare 24. Porta USB 3.0 con PowerShare 25. Porta USB 3.0 26. Lettore di schede SD NOTE: If you are connecting to a secured wireless network, enter the password for the wireless network access when prompted. N.B.: als u verbinding maakt met een beveiligd draadloos netwerk, vul dan het wachtwoord voor het netwerk in wanneer daar om gevraagd wordt. REMARQUE : si vous vous connectez à un réseau sans fil sécurisé, saisissez le mot de passe d'accès au réseau sans fil lorsque vous y êtes invité. ANMERKUNG: Wenn Sie sich mit einem geschützten Wireless-Netzwerk verbinden, geben Sie das Kennwort für das Wireless-Netzwerk ein, wenn Sie dazu aufgefordert werden. N.B.: per collegarsi a una rete senza fili protetta, inserire la password di accesso alla rete senza fili quando richiesto. Protect your computer Beveilig de computer Protéger votre ordinateur Computer schützen Proteggere il computer 1. Microfoon 16. HDMI-ingang (optioneel) 1. Mikrofon 15. Netzanschluss-Port 2. Camera (optioneel) 17. Seriële poort (optioneel) 2. Kamera (optional) 16. VGA-Anschluss (optional) 3. Camera-privacyvergrendeling (optioneel) 18. Kabelafdekplaatje 3. Kamera-Privatsphäreriegel (optional) 17. Serielle Schnittstelle (optional) 19. Standaard 4. Kamerastatusanzeige (optional) 18. Kabelabdeckung 4. Camera-statuslampje (optioneel) 20. Kabelgeleidingssleuf 5. Mikrofon 19. Standrahmen 5. Microfoon 21. 6. Optisches Laufwerk (optional) 20. Kabelführungsschlitz 6. Optisch station (optioneel) 22. Sleuf voor beveiligingskabel 7. On-screen display (OSD)-knoppen 23. OSD-Tasten (On-Screen-Display, Bildschirmanzeige) 21. 7. 8. Activiteitenlampje vaste schijf 24. USB 3.0-poort met PowerShare 8. Festplatten-Aktivitätsanzeige 23. 9. Aan/uit-knop en voedingsstatuslampje 25. USB 3.0-poort 9. 24. USB 3.0-Anschluss mit PowerShare 10. Stereoluidsprekers 26. SD-kaartleesapparaat Betriebsschalter- und Stromversorgungsanzeige 11. USB 2.0-poorten 10. Stereolautsprecher 12. USB 3.0-poorten 11. USB 2.0-Anschlüsse 13. Netwerkpoort 12. USB 3.0-Anschlüsse 14. DisplayPort 13. Netzwerkanschluss Netadapterpoort 14. DisplayPort-Anschluss 15. Servicetaglabel Headsetpoort Service-Tag-Etikett 22. Sicherheitskabeleinschub Kopfhöreranschluss 25. USB 3.0-Anschluss 26. SD-Kartenleser Easel stand Ezelstandaard | Socle inclinable Staffeleistandrahmen | Piedistallo a cavalletto-
 1
1
-
 2
2

