Yamaha CD-S303RK Handleiding
- Categorie
- CD spelers
- Type
- Handleiding
Deze handleiding is ook geschikt voor

Owner’s Manual
Mode d’emploi
Benutzerhandbuch
Bruksanvisning
Manuale di istruzioni
Manual de instrucciones
Gebruikershandleiding
Руководство пользователя
Compact Disc Player
Lecteur Compact Disc
Проигрыватель компакт дисков
CD-S303
EN
FR
DE
SV
IT
ES
NL
RU
English
Français
Deutsch
Svenska
Italiano
Español
Nederlands
Русский

2En
Please read these precautions carefully before
proceeding.
Be sure to follow the instructions
Please carefully read and observe the following
precautions to avoid harm to people or damage
to your personal property.
After reading this document thoroughly, please
retain it in a location that anyone using the
product can access at any time.
WARNING
These precautions alert you to the possibility
of death or serious injury to yourself or others.
If you notice any abnormality
• If any of the following abnormalities occur,
immediately shut down the power.
- The power cord or plug becomes damaged.
- Unusual smells, noise or smoke are emitted
from the product.
- An object or some water has been dropped
into the product.
- Cracks or other damage appear on the
product.
- There is a sudden loss of sound during use of
the product.
Follow the steps below to shut down the power.
- Turn off the power to this product.
- Disconnect the power cord plug from the AC
outlet.
Continuing to use the product as-is may result
in fire, electrical shock or damage to the
product. Request inspection or repair
immediately.
Power supply
• Do not damage the power cord.
- Do not place the power cord near heat
sources such as heaters.
- Do not forcefully bend or modify the power
cord.
- Do not damage the power cord.
- Do not place heavy objects on the power
cord.
- Do not staple the power cord.
Using a frayed power cord with the core wire
exposed may result in fire, electrical shock or
damage to the product.
• During lightning or electrical storms, do not
touch this product, power plug or power cord.
Otherwise, electrical shock may be caused.
• Use the voltage specified for this product.
Using an incorrect voltage may result in fire,
electrical shock or damage to the product.
• Be sure to use only the item listed below to
supply power:
- Included power cord
Otherwise, fire, burns or damage to the product
may be caused.
• Do not use the following Included accessory
with other devices.
- Power cord
Otherwise, fire, burns or damage to the product
may be caused.
• Check the power cord plug periodically and
remove any dirt or dust that may have
accumulated.
Otherwise, fire or electrical shock may be
caused.
• Be sure to fully insert the power cord plug into
an AC outlet.
Otherwise, electrical shock, or fire or damage to
the product due to short circuit may be caused.
• Insert the power cord plug into the AC outlet
that is visible and easily accessible.
If some trouble or malfunction occurs, you
should be able to immediately disconnect the
plug from the AC outlet easily. Even when the
PRECAUTIONS
• Contact the following customer center for
inspection or repair.
- The store you purchased the product
- Yamaha dealer
• This product is intended for use as a general
household device. Do not use it in any field or
activity requiring a high degree of reliability in
relation to human lives or valuable assets.
• Please note that Yamaha cannot accept any
liability for any losses resulting from improper
use or unauthorized modification of the
product.

En 3
power switch is turned off, as long as the power
cord is not unplugged from the wall AC outlet,
the product is not disconnected from the power
source completely.
• If you plan not to use the product for a long
period of time, remove the power cord plug
from the AC outlets.
Otherwise, fire or damage to the product may
be caused.
Do not disassemble
• Do not modify or disassemble this product.
Otherwise, fire, electrical shock, injury or
damage to the product may be caused.
Water warning
• Do not use this product in damp or wet
conditions, such as a bathroom or rainy outdoor
location.
• Do not place on this product any containers
(such as vases or medicine bottles) that contain
liquids.
If liquid spills into the product, fire, electrical
shock or damage to the product may be caused.
• Do not insert the power cord plug into or
remove it from the AC outlet with wet hands. Do
not handle this product with wet hands.
Otherwise, electrical shock or damage to the
product may be caused.
Fire warning
• Do not handle open flames near this product.
Otherwise, fire may be caused.
Vision loss
• Do not look into the laser beam.
If the laser beam hits your eyes, vision loss may
be caused.
Handling
• Do not drop this product or apply any strong
impact to the product.
Otherwise, fire, electrical shock or damage to
the product may be caused.
Batteries
• Do not swallow batteries.
• Keep batteries away from children.
Otherwise, they may swallow the batteries by
accident. Leaking battery liquid may cause loss
of vision or inflammation. If the battery case on
this product is not completely sealed, stop using
the product and keep it away from children. If
someone has swallowed a battery by accident,
consult a physician immediately. If a battery is
swallowed, it can cause serious chemical burns
or melting of body tissue within two hours, leading
to possible death.
• Do not throw batteries into an open fire.
• Do not expose batteries to high temperatures,
such as direct sunlight or an open fire.
Otherwise, they may explode, resulting in fire or
injury.
• If battery liquid is leaking, do not touch the
liquid.
Otherwise, loss of vision or chemical burns may
be caused. If you touch the battery liquid, wash
it away with water immediately, and consult a
physician.
• Do not use batteries other than the specified
type.
• Do not use old and new batteries together.
• Do not use different types of batteries together.
• Do not insert batteries in an orientation opposite
from the polarity indication.
• Do not break down the battery.
• Do not charge non-rechargeable dry cell
batteries.
Otherwise, they may explode or battery liquid
may leak, resulting in fires, burns, loss of vision,
inflammation, or damage to the product. If you
touch the battery liquid, wash it away with water
immediately, and consult a physician.
• Do not carry the batteries in a pocket or bag or
store them along with a piece of metal.
Otherwise, the batteries may short-circuit,
leading to an explosion or leaking liquid, which
could result in fires, loss of vision, or injuries.
• If you plan not to use the product for a long
period of time, or if the batteries are completely
discharged, remove them from the remote
control.
Otherwise, battery liquid may leak, possibly
resulting in loss of vision, inflammatory injury, or
damage to the product.
• Before you store or discard the batteries, apply
a piece of tape to the connectors to insulate
them.
If the battery connectors come into contact with
other batteries or metallic objects, they may
explode or battery liquid may leak, possibly
resulting in fire, burns, loss of vision, or
inflammatory injury.

4En
CAUTION
These precautions alert you to the possibility
of physical injury to yourself or others.
Power supply
• If the power cord plug inserted into the AC
outlet is wiggly or loose, do not use that outlet.
Otherwise, fire, electrical shock or burns may
be caused.
• When removing the power cord plug from the
product or an outlet, always hold the plug itself
and not the cord.
Otherwise, the power cord may be damaged,
resulting in fire or electrical shock.
Installation
• Do not place this product in an unstable
position or a location subject to vibration.
Otherwise, the product may fall or tip over,
resulting in injuries or damage to the product.
• Do not block the heat dissipation of this product
when installing it.
- Do not cover the product with a cloth or table
cloth.
- Do not install the product on a carpet or rug.
- Make sure that the top surface faces up. Do
not install the product on its sides or upside
down.
- Do not use the product in a confined, poorly-
ventilated location.
Inadequate ventilation may result in
overheating inside the product, possibly
causing damage and fire or malfunction.
Make sure that there is adequate space around
the product at least 2.5 cm above, 2.5 cm at the
sides and 2.5 cm behind.
• During earthquakes, stay away from this
product.
Otherwise, the product may fall or tip over,
resulting in injuries.
• Before moving this product, be sure to turn off
the power switch and remove all connected
cables.
Otherwise, the cables might be caught by a
foot or hand, and the product may fall or tip
over, resulting in injuries or damage to the
product.
Connections
• If you plan to connect external devices, first
read the owner’s manual for each device, and
connect them in accordance with the
instructions.
If you do not follow the instructions correctly,
injury or damage to the product may be
caused.
Hearing loss
• Do not expose yourself to high volume sound
for an extended period of time.Otherwise,
hearing loss may be caused. If you experience
any hearing abnormality, consult a physician.
• If you plan to connect this product to any other
devices, first turn off the power to all devices.
Otherwise, hearing loss, electrical shock or
damage to the product may be caused.
• When turning on the power to the audio system,
always turn on the power to the power amplifier
LAST. When turning off the power to the audio
system, turn off the power to the power
amplifier FIRST.
Otherwise, hearing loss or damage to the
product may be caused.
Maintenance
• Before cleaning the product, be sure to remove
the power cord plug from the AC outlet.
Otherwise, electrical shock may be caused.
Handling
• Do not insert your hands or fingers in any gaps
or openings on this product.
Otherwise, injury may be caused.
• Do not drop a foreign object, such as a piece of
metal or paper, into any gap on this product.
Otherwise, fire, electrical shock or damage to
the product may be caused.
• Do not apply the following excessive force to
this product.
- Resting your weight on this product
- Placing heavy objects on this product
- Stacking up this product
- Applying excessive force to the buttons,
switches, or I/O connectors
Otherwise, injury or damage to the product may
be caused.
• Do not pull connected cables.
Otherwise, the product may fall or tip over,
resulting in injuries or damage to the product.

En 5
NOTICE
Follow the precautions below to avoid malfunction
and damage to this product and to prevent the
loss of data.
Power supply
• If you plan not to use this product for a long
period of time, remove the power cord plug
from the AC outlet. Even when [A] (Power) on
the front panel is turned off, a small amount of
current still flows through this product.
Installation
• Depending on the environment in which you
use the product, a phone, radio or TV may
generate noise. In that case, change the
product location or orientation, or the
surrounding environment.
• Do not install this product in a place subject to:
- Direct sunlight
- Extremely high or low temperatures
- Excessive dust
Otherwise, malfunction or damage to the
product may be caused.
• Do not install this product in a place where
condensation can form due to rapid, drastic
changes in ambient temperature. Using the
product while condensation is present may
cause damage to the product. If there is a
reason to believe that condensation might have
occurred on or in this product, leave it for
several hours without turning on the power.
You can start using the product when the
condensation has completely dried.
Handling
• Do not place any vinyl, plastic or rubber
products on this product. Otherwise, the panel
may be discolored or deteriorate.
Maintenance
• Use a dry, soft cloth to clean this product. Do
not use benzine, thinner, detergent or chemical
rag to clean the surface of the product.
Otherwise, the surface may be discolored or
deteriorate.
NOTE
This section describes precautions to be
observed during use, functional restrictions, and
supplemental information that may be helpful for
you.
Disposal or transfer
• If you plan to transfer ownership of this product,
include this document and the supplied
accessories along with the product.
• Follow the rules of your local authority to
dispose of this product and its accessories.
• Follow the rules of your local authority to
dispose of used batteries.
Precautions for use
Important information
WARNING
Use of controls or adjustments or performance of
procedures other than those specified herein may
result in hazardous radiation exposure.

6En
(weee_battery_eu_en_02)
Information for users on collection and disposal of old equipment and used batteries:
These symbols on the products, packaging, and/or accompanying documents mean that used
electrical and electronic products and batteries should not be mixed with general household waste.
For proper treatment, recovery and recycling of old products and used batteries, please take them to
applicable collection points, in accordance with your national legislation.
By disposing of these products and batteries correctly, you will help to save valuable resources and
prevent any potential negative effects on human health and the environment which could otherwise
arise from inappropriate waste handling.
For more information about collection and recycling of old products and batteries, please contact
your local municipality, your waste disposal service or the point of sale where you purchased the
items.
For business users in the European Union:
If you wish to discard electrical and electronic equipment, please contact your dealer or supplier for
further information.
Information on Disposal in other Countries outside the European Union:
These symbols are only valid in the European Union. If you wish to discard these items, please
contact your local authorities or dealer and ask for the correct method of disposal.
Note for the battery symbol (bottom two symbol examples):
This symbol might be used in combination with a chemical symbol. In this case it complies with the
requirement set by the EU Battery Directive for the chemical involved.

En 7
CONTENTS
BEFORE USING THE UNIT 8
Features . . . . . . . . . . . . . . . . . . . . . . . . . . . . . . . . . . . . . . . . . . . . . . . . . . . . . . . . . 8
About this manual. . . . . . . . . . . . . . . . . . . . . . . . . . . . . . . . . . . . . . . . . . . . . . . . 8
Accessories . . . . . . . . . . . . . . . . . . . . . . . . . . . . . . . . . . . . . . . . . . . . . . . . . . . . . . 9
PREPARATION 10
Connecting to an amplifier. . . . . . . . . . . . . . . . . . . . . . . . . . . . . . . . . . . . . . .10
Connecting the power cord . . . . . . . . . . . . . . . . . . . . . . . . . . . . . . . . . . . . . .10
Turning on the power . . . . . . . . . . . . . . . . . . . . . . . . . . . . . . . . . . . . . . . . . . .11
PLAYING AUDIO 12
Playing an audio CD . . . . . . . . . . . . . . . . . . . . . . . . . . . . . . . . . . . . . . . . . . . . .12
Playing music files stored on your USB flash drive . . . . . . . . . . . . . . . . .13
Advanced functions . . . . . . . . . . . . . . . . . . . . . . . . . . . . . . . . . . . . . . . . . . . . .14
Random-sequence playback . . . . . . . . . . . . . . . . . . . . . . . . . . . . . . . . . . . . . . . . . . . . . . . . . . . . . . . . . 14
Repeat playback . . . . . . . . . . . . . . . . . . . . . . . . . . . . . . . . . . . . . . . . . . . . . . . . . . . . . . . . . . . . . . . . . . . . . 14
Playing tracks in the specified order (Program playback) . . . . . . . . . . . . . . . . . . . . . . . . . . . . . . 14
Playing a specified part repeatedly (A-B Repeat playback) . . . . . . . . . . . . . . . . . . . . . . . . . . . . . 15
Enjoying high-quality sound playback (PURE DIRECT) . . . . . . . . . . . . . . . . . . . . . . . . . . . . . . . . . 15
Switching information on the display. . . . . . . . . . . . . . . . . . . . . . . . . . . . . . . . . . . . . . . . . . . . . . . . . 15
Changing the display brightness . . . . . . . . . . . . . . . . . . . . . . . . . . . . . . . . . . . . . . . . . . . . . . . . . . . . . 15
APPENDIX 16
Part names . . . . . . . . . . . . . . . . . . . . . . . . . . . . . . . . . . . . . . . . . . . . . . . . . . . . .16
Front panel. . . . . . . . . . . . . . . . . . . . . . . . . . . . . . . . . . . . . . . . . . . . . . . . . . . . . . . . . . . . . . . . . . . . . . . . . . . 16
Display. . . . . . . . . . . . . . . . . . . . . . . . . . . . . . . . . . . . . . . . . . . . . . . . . . . . . . . . . . . . . . . . . . . . . . . . . . . . . . . 17
Rear panel . . . . . . . . . . . . . . . . . . . . . . . . . . . . . . . . . . . . . . . . . . . . . . . . . . . . . . . . . . . . . . . . . . . . . . . . . . . 17
Remote control. . . . . . . . . . . . . . . . . . . . . . . . . . . . . . . . . . . . . . . . . . . . . . . . . . . . . . . . . . . . . . . . . . . . . . . 18
Advanced settings . . . . . . . . . . . . . . . . . . . . . . . . . . . . . . . . . . . . . . . . . . . . . .19
Playback Mode Memory (PLAY MEM). . . . . . . . . . . . . . . . . . . . . . . . . . . . . . . . . . . . . . . . . . . . . . . . . . 19
Ready Mode (RDY MODE). . . . . . . . . . . . . . . . . . . . . . . . . . . . . . . . . . . . . . . . . . . . . . . . . . . . . . . . . . . . . 19
Automatic Playback (AUTO PLAY) . . . . . . . . . . . . . . . . . . . . . . . . . . . . . . . . . . . . . . . . . . . . . . . . . . . . . 19
Auto Power Standby (AUTO STBY) . . . . . . . . . . . . . . . . . . . . . . . . . . . . . . . . . . . . . . . . . . . . . . . . . . . . 19
Supported file formats/discs/USB flash drives. . . . . . . . . . . . . . . . . . . . .20
Specifications. . . . . . . . . . . . . . . . . . . . . . . . . . . . . . . . . . . . . . . . . . . . . . . . . . .21
Troubleshooting . . . . . . . . . . . . . . . . . . . . . . . . . . . . . . . . . . . . . . . . . . . . . . . .22

8En
BEFORE USING THE UNIT
• Optical digital output
• Coaxial digital output
• Supports playback of CD-R and CD-RW discs
• Supports playback of files stored on USB flash drives or data CDs (MP3/WMA/AAC/
WAV/FLAC)
• Random-sequence playback (page 14)
• Repeat playback (page 14)
• Program playback (audio CDs only) (page 14)
• A-B Repeat playback (audio CDs only) (page 15)
• PURE DIRECT function (page 15)
• Configurable display settings (items to be displayed/brightness) (page 15)
• Remote-controlled Standby On/Off
• Playback Mode Memory (page 19)
• Ready mode (page 19)
• Automatic Playback function (page 19)
• Auto Power Standby function (page 19)
• This manual explains operations performed primarily on the supplied remote control.
• All illustrations in this manual are provided for the purpose of operational instruction.
• In this manual, a music CD is referred to as an audio CD, and a CD that contains
MP3/WMA/AAC/WAV/FLAC data is referred to as a data CD.
• Specifications and appearance are subject to change without notice.
•
WARNING
is intended to alert you to the risk of death or serious injury.
• CAUTION is intended to alert you to the risk of personal injury.
• should be observed to avoid malfunction and damage to this product.
• provide supplemental information that might be handy.
Features About this manual
Notice
Note

En 9
• Remote control
• Power cord
• RCA stereo cable
• Batteries (AA, R6, UM-3) (x2)
• Owner’s Manual (this manual)
Accessories
Inserting batteries into the
remote control
Insert the batteries in the proper
orientation.
Remote control operating
range
Point the remote control toward
the remote control sensor on
the unit from within the range
shown in the figure on the right.
Batteries (AA, R6, UM-3)
30° 30°
Within
6m

10 En
PREPARATION
CAUTION
• Do not plug the power cord of this unit and other connected devices into AC outlets until all non-
power connections are complete.
After all the connections are complete, connect the supplied power cord to the AC IN
connector on this unit, and then plug the other end into an AC outlet.
Connecting to an amplifier Connecting the power cord
AmplifierAmplifier
RCA stereo cable
(supplied)
Coaxial digital audio cable
(commercially available)
Optical digital cable
(commercially available) To an AC wall
outlet
This unit (rear)
Power cord
(supplied)

En 11
To turn on the power to the unit, press A (Power) on the front panel.
Note
• If you press A (Power) on the remote control while the power to the unit is on, the unit will enter
Standby mode.
• The power indicator on the unit operates as follows:
Brightly lit: Power is on
Dimly lit: Standby mode
Off: Power is off
• This unit features an Auto Power Standby function that saves power consumption (page 19).
(Default: Auto Power Standby On)
Turning on the power
A (Power)
Power indicator

12 En
CD/USB
OPEN/CLOSE
PLAYING AUDIO
This unit enables you to play data CDs as well as audio CDs. For
information on the type of CDs that can be played on this unit, please
refer to “Supported file formats/discs/USB flash drives” (page 20).
1If the USB indicator on the front panel is lit, press
CD/USB to switch to Disc mode.
2Place a CD on the disc tray.
Press OPEN/CLOSE repeatedly to open and close the disc tray.
Note
• You can also press (Open/Close) on the front panel repeatedly to
open and close the disc tray.
• When the unit is ready to play an audio CD, the playback media
indicator (CD) on the display lights up.
3Press (Play).
The (Play) indicator on the display lights up and playback
starts.
Note
• During audio file playback, the playback media indicator reflecting the
file format lights up.
Notice
• Do not insert your hand or finger into the disc tray slot. Doing so might
cause injury.
Note
• After you place a CD on the disc tray, the disc tray will close and playback
will start if you perform one of the following operations:
– Press (Play).
– Press a numeric key that corresponds to a track number.
• You can configure the unit so that playback automatically starts when
power to the unit is turned on or when you switch to Disc or USB mode
(page 19).
(Default: Automatic Playback On)
Use the following remote control keys to navigate the operation.
* The control buttons on the front panel function as follows:
(Skip backward/Search backward):
Skips back to the previous track. Skips back to the top of the
current track if pressed during playback. It also searches
tracks backward if you press and hold the button.
(Skip forward/Search forward):
Skips to the next track. It also searches tracks forward if you
press and hold the button.
Playing an audio CD
Available keys Function
(Play) The (Play) indicator on the display lights
up and playback starts.
(Pause)
The (Pause) indicator on the display lights
up and playback pauses. alternatively,
press to resume playback.
(Stop) Stops playback.
(Search backward)* Searches tracks backward.
(Search forward)* Searches tracks forward.
(Skip backward)*
Skips back to the previous track. Skips back to
the top of the current track if pressed during
playback.
(Skip forward)* Skips to the next track.
Numeric keys Enter a track number to directly select the
corresponding track.
FOLDER ,
(Data CDs only) Enable you to select a folder.
Numeric keys

En 13
CD/USB
You can play music files (stored on your USB flash drive) on this
unit. For information on the supported USB flash drives, please
refer to “Supported file formats/discs/USB flash drives” (page 20).
1If the USB indicator on the front panel is off, press
CD/USB to switch to USB mode.
The USB indicator on the front panel lights up orange.
2Connect the USB flash drive to the USB jack.
When the unit is ready for playback, the playback media
indicator (USB) on the display lights up, and the USB indicator
on the front panel lights up green.
Notice
• Do not use USB extension cables.
3Press (Play).
The (Play) indicator on the display lights up and playback
starts.
Note
• During audio file playback, the playback media indicator reflecting the
file format lights up.
• If compatible music files are stored on your USB flash drive, the unit
will play them in chronological order based on date of creation.
Notice
• Do not remove the USB flash drive during playback, or while the information
display on the front panel is indicating “USB READING”. In this case, first
press CD/USB to switch to Disc mode, make sure that the USB indicator
turns off, and then remove the flash drive.
Use the following remote control keys to navigate the operation.
* The control buttons on the front panel function as follows:
(Skip backward/Search backward):
Skips back to the previous track. Skips back to the top of the
current track if pressed during playback. It also searches
tracks backward if you press and hold the button.
(Skip forward/Search forward):
Skips to the next track. It also searches tracks forward if you
press and hold the button.
Playing music files stored on your USB flash drive
This unit (front panel)
USB flash drive
Available keys Function
(Play) The (Play) indicator on the display lights
up and playback starts.
(Pause)
The (Pause) indicator on the display lights
up and playback pauses. alternatively,
press to resume playback.
(Stop) Stops playback.
(Search backward)* Searches tracks backward.
(Search forward)* Searches tracks forward.
(Skip backward)*
Skips back to the previous track. Skips back to
the top of the current track if pressed during
playback.
(Skip forward)* Skips to the next track.
FOLDER , Enable you to select a folder.

14 En
RANDOM
CLEAR
ENTER
REPEAT
PROGRAM
You can configure playback mode and display settings using
advanced functions.
Random-sequence playback
Press RANDOM to play tracks in random order. Pressing RANDOM
repeatedly will change the Random-sequence playback setting as
follows:
Note
• To cancel Random-sequence playback, open the disc tray.
Repeat playback
Press REPEAT to play tracks repeatedly. Pressing REPEAT
repeatedly will change the Repeat playback setting as follows:
Note
• To cancel Repeat playback, open the disc tray.
Playing tracks in the specified order
(Program playback)
You can play audio CD tracks in the specified order.
1Press PROGRAM while playback is stopped.
2Use the numeric keys to enter the track number of a
song you want to program.
3Press ENTER.
Repeat steps 2 and 3 to program each track.
Press CLEAR to cancel each programmed track starting with
the last track you programmed.
4Press (Play).
The unit starts to play the tracks in the programmed order.
Note
• Program playback does not work with data CDs or USB flash drives.
• You can program up to 24 tracks.
• Do one of the following to clear all programmed tracks:
– Press CLEAR while Program playback is stopped.
– Turn off the power to the unit or set the unit in Standby mode.
– Open the disc tray.
Advanced functions
Indicator Setting
RNDM Plays all tracks in random order.
Off Turns off Random-sequence playback.
Indicator Setting
REP Plays one track repeatedly.
REP FOLDER
(Data CDs and USB
flash drives only)
Plays tracks in the current folder repeatedly.
REP ALL Plays all tracks repeatedly.
Off Turns off Repeat playback.
TRACKTEXT AAC WAV FLAC RESUM RDY TOTAL REMAIN RNDM REP FOLDER ALL A - BCD PROG
TRACKTEXT AAC WAV FLAC RESUM RDY TOTAL REMAIN RNDM REP FOLDER ALL A - BCD PROG
Numeric keys

En 15
A/B
PURE
DIRECT
DISPLAY
DIMMER
Playing a specified part repeatedly
(A-B Repeat playback)
You can specify the start and end points of a track during audio CD
playback to play the specified part repeatedly.
1Play an audio CD.
2Press A/B at the point you want to start Repeat
playback.
3Press A/B again at the point you want to end Repeat
playback.
The unit starts Repeat playback.
Note
• Repeat playback does not work with data CDs or USB flash drives.
• You cannot specify the A-B Repeat setting when the PURE DIRECT
function is turned on.
• Do one of the following to cancel A-B Repeat playback:
– Press A/B again.
– Press (Stop).
– Open the disc tray.
Enjoying high-quality sound playback
(PURE DIRECT)
If the PURE DIRECT function is turned on, digital audio will not be
output. In this way, the PURE DIRECT function reduces noise that
would affect sound quality, enabling you to enjoy playback of high-
quality sound.
Pressing PURE DIRECT repeatedly will toggle between PURE
DIRECT on and off.
Note
• To use the PURE DIRECT function, connect the ANALOG OUT jacks on
the rear panel to the amplifier. The DIGITAL OUT jacks will not output any
signals.
• When the PURE DIRECT function is turned on:
– The PURE DIRECT indicator lights up.
– The front panel display will be turned off while content is playing.
– Only a minimum number of indicators and messages will appear while
you are operating the unit.
– This setting will be maintained after you turn off the power to the unit.
Switching information on the display
Pressing DISPLAY repeatedly during playback will switch the
information on the display as follows:
Note
• The information display indicates up to 64 characters (1-byte alphanumeric
characters and several symbols).
Changing the display brightness
Press DIMMER repeatedly to switch between four stages of display
brightness.
TEXT AAC WAV FLAC RESUM RDY TOTAL REMAIN RNDM FOLDER ALLPROG CD TRACK REP
TEXT AAC WAV FLAC RESUM RDY TOTAL REMAIN RNDM FOLDER ALLPROG CD TRACK REP
Playback media Information on the display
Audio CD
Elapsed time Remaining time of the current
track (TRACK REMAIN) Total remaining time on
the CD (TOTAL REMAIN) Tra ck n a me*
Artist name* Album title*
* If CD-text has been embedded
Data CD,
USB flash drive
Elapsed time Track name* Artist name*
Album title*
* If tags have been embedded

16 En
APPENDIX
Front panel
1A (Power) (page 11)
2Power indicator (page 11)
3USB jack (page 13)
4USB indicator (page 13)
5CD/USB (pages 12, 13)
6PURE DIRECT (page 15)
7PURE DIRECT indicator (page 15)
8Disc tray (page 12)
9 (Open/Close) (page 12)
0Remote control sensor (page 9)
A (Skip backward/Search backward) (pages 12, 13)
B (Skip forward/Search forward) (pages 12, 13)
C (Play) (pages 12, 13, 14)
D (Pause) (pages 12, 13)
E (Stop) (pages 12, 13, 14, 15)
Part names
1 2 3 4 7 0
8 9
5 6 A B C D E

En 17
Display
1 / (Play/Pause) indicator (pages 12, 13)
2Playback media indicator (pages 12, 13)
3Advanced setting indicator (page 19)
4Time indicator (page 15)
5Playback mode indicator (pages 14, 15)
6Information display (pages 14, 15, 19)
Rear panel
1ANALOG OUT jacks (page 10)
2DIGITAL OUT jack (COAXIAL) (page 10)
3DIGITAL OUT jack (OPTICAL) (page 10)
4AC IN connector (page 10)
TRACKCD TEXT AAC WAV FLAC RESUM RDY TOTAL REMAIN PROG RNDM REP FOLDER ALL A - B
1 62 3 54
2 3 41

18 En
Remote control
1A (Power) (page 11)
2Remote control signal transmitter (page 9)
3OPEN/CLOSE (page 12)
4PROGRAM (page 14)
5REPEAT (page 14)
6DIMMER (page 15)
7RANDOM (page 14)
8A/B (page 15)
9DISPLAY (page 15)
0Numeric keys (pages 12, 14)
ACLEAR (page 14)
BENTER (page 14)
C (Search backward), (Search forward) (pages 12, 13)
(Pause) (pages 12, 13)
(Skip backward) (pages 12, 13)
(Skip forward) (pages 12, 13)
(Play) (pages 12, 13, 14)
(Stop) (pages 12, 13, 14, 15)
FOLDER , (pages 12, 13)
DCD/USB (pages 12, 13)
EPURE DIRECT (page 15)
3
4
9
0
C
7
8
A
B
D
E
6
5
21

En 19
This section explains how to configure various advanced functions. You can configure
most of these settings from the front panel. (Some settings require remote control
operation.)
1Place the unit in Standby mode (page 11).
2Press and hold PURE DIRECT, (Open/Close), and (Play),
simultaneously for three seconds or longer.
The following indicator appears on the information display of the front panel, and
the unit enters setting mode. You can set the Playback Mode Memory, Ready
Mode, Automatic Playback, and Auto Power Standby functions in this order.
3Press or to turn the function on or off.
4Press (Stop).
The setting is confirmed, and the next parameter is automatically selected. Repeat
steps 3 and 4. When all settings are complete, the following indicator appears on
the information display of the front panel, and the unit enters Standby mode.
Note
• If you press (Play) during this process, the setting at that point will be confirmed, and the
unit will enter Standby mode.
Playback Mode Memory (PLAY MEM)
With this function enabled, the unit retains the Repeat playback and Random-sequence
playback settings even after the power to the unit is turned off. When the Playback
Mode Memory function is turned on, the Advanced setting indicator (RESUM) on the
display lights up.
Default: Off
Note
• If you turn on the power to the unit after enabling the Playback Mode Memory function, the unit will
play the most recently-played track or file from the beginning.
Ready Mode (RDY MODE)
With this function enabled, the unit pauses each time the playback of a track has
completed. You can start playback of the next track when you choose. When the Ready
Mode function is enabled, the Advanced setting indicator (RDY) on the display lights
up.
Default: Off
Automatic Playback (AUTO PLAY)
With this function enabled, the unit automatically starts playback when power to the unit
is turned on or when you switch to Disc or USB mode.
Default: On
Auto Power Standby (AUTO STBY)
With this function enabled, the unit automatically enters Standby mode if you do not
interact with it for 20 minutes after the playback has stopped.
Default: On
Advanced settings
PURE DIRECT
TRACKTEXT AAC WAV FLAC RESUM RDY TOTAL REMAIN RNDM REP FOLDER ALLPROG CD TRACKTEXT AAC WAV FLAC RESUM RDY TOTAL REMAIN RNDM REP FOLDER ALLPROG CD
CD TRACK REP TEXT AAC WAV FLAC RESUM RDY TOTAL REMAIN RNDM FOLDER ALLPROG

20 En
❑Supported file formats
* Linear PCM format only.
Note
• Files on a data CD or USB flash drive will be played in chronological order based on date of
creation.
• This unit supports ISO9660 format discs.
• If the unit is playing a VBR (variable bitrate) file, an accurate elapsed time might not be displayed.
• Digital Rights Management (DRM) encoded content cannot be played back.
❑Supported discs
Please use discs with the following logos.
Notice
• Do not use odd-shaped discs or discs with tape or a decal attached. Otherwise, malfunction of the
unit may occur.
• This unit might not play some CD-RW discs or discs that were improperly recorded.
• To play back an 8-cm CD, place it in the inner recessed area of the disc tray. Do not put a normal
(12-cm) CD on top of an 8-cm CD.
Supported file formats/discs/USB flash drives
File Sampling frequency (kHz) Bit depth
(bit)
Bitrate
(kbps)
Number of
channels
MP3 32/44.1/48 — 32-320 2
WMA 32/44.1/48 — 48-192 2
AAC 32/44.1/48 — 8-320 2
WAV * 32/44.1/48/64/88.2/96 16/24 — 2
FLAC 32/44.1/48/64/88.2/96 16/24 — 2
Data CD USB flash drive
Number of folder hierarchies
(including the root folder) 99
Number of folders 999 999
Number of files 1100 65535
Compact discs (audio CDs)
CD-R and CD-RW discs
• Discs with one of the following descriptions:
FOR CONSUMER
FOR CONSUMER USE
FOR MUSIC USE ONLY
• For CD-R or CD-RW discs, the unit plays only the finalized discs.
Note
• This unit might not play some CD-R/CD-RW discs or discs that were
improperly recorded.
CD-TEXT discs
These discs contain embedded text information, such as album
titles, song names, and artist names. This information (alphanumeric
characters and some symbols only) along with the elapsed time will
be displayed.

En 21
❑Handling a disc
• Handle a disc carefully so as not to scratch the recorded
surface. Do not bend a disc.
• If there are any fingerprints or dust on the recorded surface,
use a soft cloth to wipe the surface straight from the center
toward the perimeter.
• Never use a vinyl record cleaner, anti-static agent, or other chemical to wipe a disc.
• Use a soft-tip pen to write only on the label side.
• Do not leave a disc under the direct sunlight or in a location that is exposed to high
temperature or humidity for a long period of time.
• Do not use a commercially-available lens cleaner. Otherwise, a malfunction may
occur.
❑Supported USB flash drives
Before you use this unit to play music files stored on a USB flash drive, make sure that
the following requirements are satisfied:
• The USB flash drive complies with mass storage class requirements.
• Data has been recorded using the FAT16 or FAT32 file system.
Notice
• Some USB flash drives may not operate properly.
• USB flash drives with encryption cannot be used.
• Yamaha and its dealers are not responsible for the loss of any data stored on a USB flash drive that
is connected to this unit. We recommend that you keep backup data in case of loss of data.
• Yamaha will not guarantee the operation or power supply to any USB flash drives.
The specifications of this unit are as follows.
Audio section
• Output Level (1 kHz, 0 dB, Fs 44.1 kHz) ..................................................... 2.0 ± 0.3 V
• S/N Ratio (IHF-A Network) (1 kHz, 0 dB, Fs 44.1 kHz) .......................105 dB or higher
• Dynamic Range (1 kHz, 0 dB, Fs 44.1 kHz) .........................................96 dB or higher
• Harmonic Distortion (1 kHz, 0 dB, Fs 44.1 kHz) ..................................0.003% or lower
• Frequency Response
Audio CD ................................................................................................ 2 Hz – 20 kHz
Data CD/USB Fs 48 kHz ................................................................. 2 Hz – 22 kHz
Fs 96 kHz ......................................................2 Hz – 44 kHz, –3 dB
Laser section
• Laser Type ........................................................................................................ AIGaAs
• Wavelength ........................................................................................................790 nm
• Laser Output ...........................................................................................Max. 1.04 mW
General
• Power Supply
U.S.A. and Canada models................................................................ AC 120 V, 60 Hz
Australia model............................................................................ AC 230-240 V, 50 Hz
Europe and U.K. models .................................................................... AC 230 V, 50 Hz
Asia and General models ....................................................... AC 110-240 V, 50/60 Hz
China model........................................................................................ AC 220 V, 50 Hz
• Power Consumption...............................................................................................11 W
• Standby Power Consumption
Power Standby (Standby mode)...........................................................................0.2 W
Power Off ..............................................................................................................0.2 W
• Dimensions (W × H × D)................................................................. 435 x 87 x 260 mm
• Weight..................................................................................................................3.5 kg
* The contents of this manual apply to the latest specifications as of the publishing date.
To obtain the latest manual, access the Yamaha website then download the manual file.
Specifications
Output jacks
• Analog audio x 1 (RCA Unbalanced)
• Digital audio
COAXIAL x 1, OPTICAL x 1
Other jacks
• USB × 1 (USB2.0)

22 En
Refer to the table below if the unit fails to function properly. If your problem is not listed below, or if the symptoms persist after you follow the instructions below, turn off the power to
the unit by pressing A (Power) on the front panel, disconnect the power cord, and contact your nearest authorized Yamaha dealer or service center.
Troubleshooting
Problem Cause Solution Page
Pressing the power switch does not
turn the power on. The power cord may not be properly plugged in. Connect the power cord firmly to the AC outlet. 10
The disc tray does not close
completely. A foreign object is inside the disc tray enclosure. Check the disc tray and remove any foreign object. —
Unable to play the inserted disc.
The disc is scratched. Change the disc. —
The lens inside the unit has condensation. Turn on the power to the unit, wait 20 – 30 minutes, and then try to play
the disc again. —
The disc is set upside down. Be sure to place the disc with its label side up. —
The disc is dirty or scratched. Wipe off the dirt from the disc surface, or use an unscratched disc. 21
You tried to play files in a format that is not supported by the unit. Be sure to use a disc that contains files in a format that is supported by
the unit. 20
You tried to play a disc that is not supported by the unit. Be sure to use a disc that is supported by the unit. 20, 21
The unit is in USB mode. Press CD/USB to switch to Disc mode. 12, 16, 18
Playback does not start immediately or
from the correct point. The disc is dirty or scratched. Wipe off the dirt from the disc surface, or use an unscratched disc. 21
Unable to play a music file stored on the
USB flash drive.
The USB flash drive may not be properly connected to the unit. Connect the USB flash drive properly. 13
You tried to play files in a format that is not supported by the unit. Be sure to use a USB flash drive that contains files in a format that is
supported by the unit. 20
The unit is in Disc mode. Press CD/USB to switch to USB mode. 13, 16, 18
No sound The unit is not connected to the amplifier properly. Check the connection to the amplifier. 10
Audio is not output from the device
connected to the DIGITAL OUT jacks. The PURE DIRECT function is turned on. Turn the PURE DIRECT function off. 15
The sound skips.
The unit is affected by vibration or impact. Change the location of the unit. —
The disc is dirty or scratched. Wipe off the dirt from the disc surface, or use an unscratched disc. 21

En 23
Buzzing or hum noise is heard. The RCA stereo cable is not connected firmly. Connect the RCA stereo cable firmly. If the symptom does not improve,
check to see whether the cable itself is defective. 10
Noise in the tuner The unit is located close to the tuner. Relocate the unit farther away from the tuner, or turn off the power to
the unit. —
The disc tray is making noise. The disc is deformed. Use a non-deformed disc. —
No indication on the display The PURE DIRECT function is turned on Turn the PURE DIRECT function off. 15
No folder name or file name appears on
the information display.
Characters other than one-byte alphanumeric are used for the folder or
file name. Use one-byte alphanumeric characters for the folder and file names. 15
The remote control does not work or
function properly.
The batteries are weak. Replace all batteries. 9
Wrong distance or angle. Use the remote control within the operative range. 9
Direct sunlight or lighting (from an inverter type of fluorescent lamp,
etc.) is striking the remote control sensor of this unit. Reposition the orientation of the lighting or the unit. —
Problem Cause Solution Page

24 Fr
Lisez attentivement ces consignes avant
l’utilisation du produit.
Assurez-vous de suivre les
instructions
Lisez attentivement et observez les précautions
suivantes pour éviter les blessures corporelles et
les dommages de biens personnels.
Après avoir lu ce document dans son intégralité,
rangez-le dans un lieu accessible en
permanence à tout utilisateur du produit.
AVERTISSEMENT
Ces consignes de sécurité attirent votre
attention sur des risques de décès ou de
blessures graves pour l’utilisateur ou des tiers.
En cas d’anomalie
• Si vous remarquez une des anomalies
suivantes, coupez immédiatement
l’alimentation.
- Le cordon d’alimentation ou sa fiche est
endommagé.
- Le produit émet une odeur ou un bruit
anormal, ou de la fumée.
- Un objet ou de l’eau a pénétré à l’intérieur du
produit.
- Des fissures ou d’autres dommages sont
visibles sur le produit.
- Une brusque perte de son est survenue
durant l’utilisation du produit.
Suivez les étapes ci-dessous pour couper
l’alimentation.
- Mettez le produit hors tension.
- Débranchez la fiche du cordon d’alimentation
de la prise secteur.
Continuer à utiliser le produit avec de telles
anomalies peut causer un incendie, un choc
électrique ou un endommagement du produit.
Faites immédiatement inspecter ou réparer le
produit.
Alimentation
• N’endommagez pas le cordon d’alimentation.
- Ne placez pas le cordon d’alimentation à
proximité de sources de chaleur telles que
des appareils de chauffage.
- Ne pliez pas le cordon d’alimentation avec
une force excessive et ne le modifiez pas.
- N’endommagez pas le cordon d’alimentation.
- Ne posez pas d’objets lourds sur le cordon
d’alimentation.
- N’agrafez pas le cordon d’alimentation.
L’utilisation d’un cordon d’alimentation effiloché
dont les fils sont à nus peut causer un incendie,
un choc électrique ou un endommagement du
produit.
• Pendant un orage et en présence d’éclairs, ne
touchez pas ce produit, ni son cordon et sa
fiche d’alimentation.
Sinon, vous risquez un choc électrique.
• Utilisez la tension spécifiée pour ce produit.
L’utilisation d’une tension incorrecte peut
provoquer un incendie, une électrocution ou
endommager le produit.
• Utilisez exclusivement l’accessoire ci-dessous
pour alimenter l’appareil :
- Le cordon d’alimentation fourni
Sinon, vous risquez un incendie, des brûlures
ou un endommagement du produit.
• N’utilisez pas l’accessoire fourni suivant avec
tout autre dispositif.
- le cordon d’alimentation
Sinon, vous risquez un incendie, des brûlures
ou un endommagement du produit.
PRÉCAUTIONS D’USAGE
• Pour tout travail d’inspection ou de réparation,
adressez-vous à un des centres de service
clientèle suivants.
- Le point de vente où vous avez acheté le
produit
- Un revendeur Yamaha
• Ce produit est conçu pour une utilisation dans
un cadre domestique conventionnel. Ne
l’utilisez pas dans tout cadre ou pour toute
activité requérant une haute fiabilité pour la
gestion des gestes essentiels à la vie ou des
biens de grande valeur.
• Notez que Yamaha décline toute
responsabilité pour toute perte résultant d’une
utilisation incorrecte ou d’une modification
non agrée du produit.

Fr 25
• Vérifiez régulièrement l’état de la fiche du
cordon d’alimentation et dépoussiérez-la en
prenant soin de retirer toutes les impuretés qui
pourraient s’y accumuler.
Sinon, vous risquez un incendie ou un choc
électrique.
• Veillez à insérer à fond la fiche du cordon
d’alimentation dans la prise secteur.
Sinon, cela pourrait causer un court-circuit
provoquant un choc électrique, un incendie ou
un endommagement du produit.
• Insérez la fiche du cordon d’alimentation dans
une prise secteur visible et facilement
accessible.
En cas de problème ou de dysfonctionnement,
vous devez être en mesure de débrancher
immédiatement la fiche d’alimentation de la
prise secteur. Même lorsque l’interrupteur
d’alimentation est en position désactivée,
l’appareil demeure connecté à la source
d’électricité tant que le cordon d’alimentation
reste branché à la prise secteur.
• Si vous ne comptez pas utiliser le produit
pendant une période prolongée, débranchez la
fiche de son cordon d’alimentation de la prise
secteur.
Sinon, vous risquez un incendie ou un
endommagement du produit.
Démontage interdit
• Ne modifiez et ne démontez pas ce produit.
Sinon, cela pourrait causer un incendie, un
choc électrique, des blessures ou un
endommagement du produit.
Avertissement relatif aux liquides
• N’utilisez pas ce produit dans un
environnement humide, comme dans une salle
de bain ou un endroit exposé à la pluie en
extérieur.
• Ne posez pas de récipients (tels que des vases
ou des flacons de médicaments) contenant des
liquides sur ce produit.
La pénétration de tout liquide dans le produit
pourrait causer un incendie, un choc électrique
ou un endommagement du produit.
• Ne branchez jamais la fiche du cordon
d’alimentation à la prise secteur et ne l’en
débranchez jamais avec les mains mouillées.
Ne manipulez pas ce produit avec les mains
mouillées.
Sinon, cela pourrait causer un choc électrique
ou un endommagement du produit.
Avertissement sur les risques d’incendie
• Ne manipulez pas de source de flammes nues
à proximité de ce produit.
Sinon, cela pourrait causer un incendie.
Perte de vision
• Ne regardez jamais directement le faisceau
laser.
Si le faisceau laser entre en contact avec vos
yeux, vous risquez une perte de vision.
Manipulation
• Veillez à ne pas faire tomber le produit ni à le
soumettre à des chocs importants.
Sinon, cela pourrait causer un incendie, un
choc électrique ou un endommagement du
produit.
Piles
• N’avalez jamais des piles.
• Gardez les piles hors de portée des enfants.
Sinon, ils risquent de les avaler accidentellement.
Le liquide fuyant des piles peut causer une perte
de la vue ou une inflammation des yeux. Si le
compartiment des piles de ce produit n’est pas
parfaitement hermétique, cessez d’utiliser le
produit et gardez-le hors de portée des enfants.
En cas d’ingestion accidentelle d’une pile,
consultez immédiatement un médecin.
L’ingestion d’une pile peut causer de graves
brûlures chimiques ou la fonte des tissus
organiques dans les deux heures suivant
l’ingestion, et peut provoquer le décès.
• Ne jetez pas des piles dans un feu ouvert.
• N’exposez pas les piles à une source de
chaleur excessive, comme les rayons directs
du soleil ou un feu ouvert.
Sinon, elles pourraient exploser et causer un
incendie ou des blessures.
• Ne touchez pas le liquide fuyant d’une pile.
Sinon, cela pourrait causer une perte de la vue
ou des brûlures chimiques. Si vous touchez du
liquide fuyant d’une pile, rincez-le
immédiatement à l’eau et consultez un
médecin.
• N’utilisez pas de piles autres que celles du type
spécifié.
• N’utilisez pas à la fois des piles neuves avec
des piles usagées.
• N’utilisez pas simultanément des piles de types
différents.
• N’insérez pas les piles dans le sens contraire
aux indications de polarité.
• Ne percez ni démolissez jamais les piles.
• Ne chargez pas des piles sèches non
rechargeables.

26 Fr
Sinon, les piles pourraient exploser ou du liquide
pourrait en fuir, causant un incendie, des
brûlures, une perte de la vue ou un
endommagement du produit. Si vous touchez du
liquide fuyant d’une pile, rincez-le immédiatement
à l’eau et consultez un médecin.
• Ne transportez pas les piles dans une poche ni
un sac et ne les rangez pas avec tout objet
métallique.
Sinon, cela risquerait de causer un court-circuit
dans les piles susceptible d’entraîner une
explosion ou une fuite de liquide, provoquant
un incendie, une perte de la vue ou des
blessures.
• Si vous ne comptez pas utiliser le produit
pendant une période prolongée, ou si les piles
sont complètement déchargées, retirez-les de
la télécommande.
Sinon, du liquide risque de fuir des piles,
posant un risque de perte de la vue, de lésions
inflammatoires ou d’endommagement du
produit.
• Avant de ranger ou de mettre au rebut des
piles, isolez leurs bornes en les couvrant de
bande adhésive.
Si les bornes d’une pile entrent en contact avec
d’autres piles ou des objets métalliques, cela
pourrait causer une explosion ou une fuite de
liquide des piles pouvant entraîner un incendie,
des brûlures, une perte de la vue ou des
lésions inflammatoires.
ATTENTION
Ces consignes de sécurité attirent votre
attention sur des risques de blessures pour
l’utilisateur ou des tiers.
Alimentation
• Si la fiche du cordon d’alimentation insérée
dans une prise de courant a du jeu, n’utilisez
pas cette prise.
Sinon, cela pourrait causer un incendie, un
choc électrique ou des brûlures.
• Veillez à toujours saisir la fiche du cordon
d’alimentation même, et non le cordon, pour la
retirer du produit ou de la prise secteur.
Sinon, cela pourrait endommager le cordon
d’alimentation, causant un incendie ou un choc
électrique.
Installation
• Ne placez pas ce produit sur une surface
instable ou soumise à des vibrations.
Sinon, le produit risquerait de tomber et d’être
endommagé ou de causer des blessures.
• Veillez à ne pas bloquer la dissipation
thermique du produit lors de son installation.
- Ne couvrez pas le produit d’un morceau de
tissu ni d’une nappe.
- N’installez pas le produit sur une moquette ou
un tapis.
- Veillez à ce que la surface supérieure du
produit soit orientée vers le haut. Ne posez
pas le produit sur son flanc ni à l’envers.
- N’utilisez pas le produit dans un lieu clos et
mal aéré.
Une ventilation insuffisante peut causer une
surchauffe à l’intérieur du produit susceptible
d’entraîner un endommagement et un incendie
ou un dysfonctionnement.
Veillez à conserver un espace libre suffisant
autour du produit : au moins 2,5 cm à la
surface, 2,5 cm sur les côtés et 2,5 cm à
l’arrière.
• Durant un tremblement de terre, tenez-vous à
l’écart du produit.
Sinon, le produit risquerait de tomber et d’être
endommagé, causant des blessures.
• Avant de déplacer ce produit, veillez à
désactiver l’interrupteur d’alimentation et à
débrancher tous les câbles connectés.
Sinon, quelqu’un risque de se prendre le pied
ou la main dans les câbles, causant la chute et
l’endommagement du produit ou des
blessures.
Raccordements
• Si vous comptez brancher des appareils
externes, lisez d’abord le mode d’emploi de
chaque appareil concerné et branchez chaque
appareil en suivant les instructions fournies.
Si vous ne suivez pas ces instructions à la
lettre, cela pourrait causer des blessures ou un
endommagement du produit.
Perte auditives
• Ne vous exposez pas de façon prolongée à un
niveau sonore élevé. Si vous constatez tout
problème auditif, consultez un médecin.
• Avant de brancher ce produit à tout autre
appareil, mettez tous les autres appareils hors
tension.

Fr 27
Sinon, cela pourrait causer une perte auditive,
un choc électrique ou un endommagement du
produit.
• Quand vous mettez votre système audio sous
tension, veillez à toujours mettre l’amplificateur
de puissance sous tension EN DERNIER.
Quand vous mettez votre système audio hors
tension, veillez à toujours mettre l’amplificateur
de puissance hors tension EN PREMIER.
Sinon, cela pourrait causer une perte auditive
ou un endommagement du produit.
Entretien
• Avant de nettoyer le produit, veillez à
débrancher la fiche de son cordon
d’alimentation de la prise secteur.
Sinon, vous risquez un choc électrique.
Manipulation
• N’insérez jamais les mains ni les doigts dans
tout interstice ou ouverture de ce produit.
Sinon, cela pourrait causer des blessures.
• Ne laissez jamais des corps étrangers tels que
des petites pièces métalliques ou du papier
pénétrer à l’intérieur du produit par ses
ouvertures.
Sinon, cela pourrait causer un incendie, un
choc électrique ou un endommagement du
produit.
• N’appliquez pas de force excessive sur le
produit comme décrit ci-dessous.
- Reposer le poids de votre corps sur ce
produit
- Poser des objets lourds sur ce produit
- Placer ce produit en empilement
- Appliquer une force démesurée aux boutons,
commutateurs ou connecteurs d’E/S
Sinon, cela pourrait causer des blessures ou un
endommagement du produit.
• Ne tirez jamais sur des câbles connectés.
Sinon, le produit risquerait de tomber et d’être
endommagé ou de causer des blessures.
AVIS
Suivez les consignes ci-dessous pour éviter un
dysfonctionnement et un endommagement du
produit ainsi que la perte de données.
Alimentation
• Si vous ne comptez pas utiliser ce produit
pendant une période prolongée, débranchez la
fiche de son cordon d’alimentation de la prise
secteur. Même quand le produit a été mis hors
tension avec son commutateur [A]
(alimentation) en face avant, une faible quantité
de courant continue de l’alimenter.
Installation
• Selon l’environnement d’utilisation du produit, il
se pourrait qu’un téléphone, une radio ou un
téléviseur génère du bruit. Dans ce cas,
changez l’emplacement ou l’orientation du
produit, ou modifiez son environnement
d’utilisation.
• N’installez pas ce produit dans des endroits
exposés à :
- La lumière directe du soleil
- Des températures extrêmement basses ou
élevées
- Une quantité excessive de poussière
Sinon, cela pourrait causer un
dysfonctionnement ou un endommagement du
produit.
• N’installez pas ce produit dans un lieu où des
changements abrupts et marqués de la
température ambiante peuvent entrainer la
formation de condensation. L’utilisation de ce
produit en présence de condensation peut
endommager le produit. Si vous suspectez la
présence de condensation sur ou à l’intérieur
de ce produit, laissez-le reposer plusieurs
heures sans le mettre sous tension.
Une fois que la condensation a complètement
disparu, vous pouvez à nouveau utiliser le
produit.
Manipulation
• Ne placez aucun produit en vinyle, en plastique
ou en caoutchouc sur ce produit. Sinon, cela
risquerait de décolorer ou détériorer son
panneau.
Entretien
• Nettoyez ce produit à l’aide d’un chiffon doux et
sec. N’utilisez pas de la benzène, du diluant,
du détergent ni des chiffons de lavage
chimique pour nettoyer la surface du produit.
Sinon, cela risquerait de décolorer ou détériorer
sa surface.
Précautions d’emploi

28 Fr
NOTE
Cette section décrit des précautions à observer
durant l’utilisation, des restrictions de
fonctionnalité et des informations
complémentaires utiles.
Mise au rebut ou transfert
• Avant de transférer la propriété de ce produit,
veillez à inclure ce document et les accessoires
fournis avec le produit.
• Suivez les règlements en vigueur dans votre
région pour mettre au rebut ce produit et ses
accessoires.
• Suivez les règlements en vigueur dans votre
région pour la mise au rebut des piles usagées.
Informations importantes
AVERTISSEMENT
L’utilisation de commandes et l’emploi de réglages ou
de méthodes autres que ceux décrits ci-dessous,
peuvent entraîner une exposition à un rayonnement
dangereux.
(weee_battery_eu_fr_02)
Informations concernant la collecte et le traitement des piles usagées et des
déchets d’équipements électriques et électroniques
Les symboles sur les produits, l’emballage et/ou les documents joints signifient que les
produits électriques ou électroniques usagés ainsi que les piles usagées ne doivent pas
être mélangés avec les déchets domestiques habituels.
Pour un traitement, une récupération et un recyclage appropriés des déchets
d’équipements électriques et électroniques et des piles usagées, veuillez les déposer
aux points de collecte prévus à cet effet, conformément à la réglementation nationale.
En vous débarrassant correctement des déchets d’équipements électriques et
électroniques et des piles usagées, vous contribuerez à la sauvegarde de précieuses
ressources et à la prévention de potentiels effets négatifs sur la santé humaine qui
pourraient advenir lors d’un traitement inapproprié des déchets.
Pour plus d’informations à propos de la collecte et du recyclage des déchets
d’équipements électriques et électroniques et des piles usagées, veuillez contacter
votre municipalité, votre service de traitement des déchets ou le point de vente où vous
avez acheté les produits.
Pour les professionnels dans l’Union européenne :
Si vous souhaitez vous débarrasser des déchets d’équipements électriques et
électroniques, veuillez contacter votre vendeur ou fournisseur pour plus d’informations.
Informations sur la mise au rebut dans d’autres pays en dehors de l’Union
européenne :
Ces symboles sont seulement valables dans l’Union européenne. Si vous souhaitez vous
débarrasser de déchets d’équipements électriques et électroniques ou de piles
usagées, veuillez contacter les autorités locales ou votre fournisseur et demander la
méthode de traitement appropriée.
Note pour le symbole « pile » (deux exemples de symbole ci-dessous) :
Ce symbole peut être utilisé en combinaison avec un symbole chimique. Dans ce cas, il
respecte les exigences établies par la directive européenne relative aux piles pour le
produit chimique en question.

Fr 29
Sommaire
AVANT D’UTILISER L’APPAREIL 30
Fonctionnalités . . . . . . . . . . . . . . . . . . . . . . . . . . . . . . . . . . . . . . . . . . . . . . . . .30
À propos de ce manuel . . . . . . . . . . . . . . . . . . . . . . . . . . . . . . . . . . . . . . . . . .30
Accessoires . . . . . . . . . . . . . . . . . . . . . . . . . . . . . . . . . . . . . . . . . . . . . . . . . . . . .31
PRÉPARATION 32
Connexion à un amplificateur . . . . . . . . . . . . . . . . . . . . . . . . . . . . . . . . . . . .32
Raccordement du cordon d’alimentation . . . . . . . . . . . . . . . . . . . . . . . . .32
Mise sous tension . . . . . . . . . . . . . . . . . . . . . . . . . . . . . . . . . . . . . . . . . . . . . . .33
LECTURE AUDIO 34
Lecture de CD audio . . . . . . . . . . . . . . . . . . . . . . . . . . . . . . . . . . . . . . . . . . . . .34
Lecture de fichiers musicaux stockés sur une clé USB . . . . . . . . . . . . . .35
Fonctions avancées . . . . . . . . . . . . . . . . . . . . . . . . . . . . . . . . . . . . . . . . . . . . .36
Lecture en ordre aléatoire. . . . . . . . . . . . . . . . . . . . . . . . . . . . . . . . . . . . . . . . . . . . . . . . . . . . . . . . . . . . 36
Lecture répétée. . . . . . . . . . . . . . . . . . . . . . . . . . . . . . . . . . . . . . . . . . . . . . . . . . . . . . . . . . . . . . . . . . . . . . 36
Lecture des plages selon un ordre défini (lecture programmée) . . . . . . . . . . . . . . . . . . . . . . . 36
Lecture répétée d’un passage spécifique (lecture répétée A-B) . . . . . . . . . . . . . . . . . . . . . . . . 37
Lecture en son de haute qualité (PURE DIRECT) . . . . . . . . . . . . . . . . . . . . . . . . . . . . . . . . . . . . . . . 37
Changement des informations affichées sur l’écran . . . . . . . . . . . . . . . . . . . . . . . . . . . . . . . . . . . 37
Réglage de luminosité de l’écran . . . . . . . . . . . . . . . . . . . . . . . . . . . . . . . . . . . . . . . . . . . . . . . . . . . . . 37
ANNEXE 38
Noms des éléments . . . . . . . . . . . . . . . . . . . . . . . . . . . . . . . . . . . . . . . . . . . . . 38
Panneau avant . . . . . . . . . . . . . . . . . . . . . . . . . . . . . . . . . . . . . . . . . . . . . . . . . . . . . . . . . . . . . . . . . . . . . . . 38
Écran. . . . . . . . . . . . . . . . . . . . . . . . . . . . . . . . . . . . . . . . . . . . . . . . . . . . . . . . . . . . . . . . . . . . . . . . . . . . . . . . . 39
Panneau arrière . . . . . . . . . . . . . . . . . . . . . . . . . . . . . . . . . . . . . . . . . . . . . . . . . . . . . . . . . . . . . . . . . . . . . . 39
Télécommande . . . . . . . . . . . . . . . . . . . . . . . . . . . . . . . . . . . . . . . . . . . . . . . . . . . . . . . . . . . . . . . . . . . . . . 40
Réglages avancés . . . . . . . . . . . . . . . . . . . . . . . . . . . . . . . . . . . . . . . . . . . . . . .41
Mémorisation du mode de lecture (PLAY MEM). . . . . . . . . . . . . . . . . . . . . . . . . . . . . . . . . . . . . . . . 41
Mode paré à lire (RDY MODE) . . . . . . . . . . . . . . . . . . . . . . . . . . . . . . . . . . . . . . . . . . . . . . . . . . . . . . . . . 41
Lecture automatique (AUTO PLAY). . . . . . . . . . . . . . . . . . . . . . . . . . . . . . . . . . . . . . . . . . . . . . . . . . . . 41
Mise en veille automatique (AUTO STBY) . . . . . . . . . . . . . . . . . . . . . . . . . . . . . . . . . . . . . . . . . . . . . . 41
Formats de fichiers/disques/clés USB compatibles. . . . . . . . . . . . . . . . . 42
Caractéristiques techniques . . . . . . . . . . . . . . . . . . . . . . . . . . . . . . . . . . . . . 43
Résolution des problèmes . . . . . . . . . . . . . . . . . . . . . . . . . . . . . . . . . . . . . . .44

30 Fr
AVANT D’UTILISER L’APPAREIL
• Sortie numérique optique
• Sortie numérique coaxiale
• Lecture de disques CD-R et CD-RW prise en charge
• Lecture de fichiers sauvegardés sur clé USB ou CD de données (MP3/WMA/AAC/
WAV/FLAC)
• Lecture en ordre aléatoire (page 36)
• Lecture répétée (page 36)
• Lecture programmée (uniquement pour CD audio) (page 36)
• Lecture répétée A-B (uniquement pour CD audio) (page 37)
• Fonction PURE DIRECT (page 37)
• Paramètres d’écran configurables (éléments affichés/luminosité) (page 37)
• Alimentation/veille commandées à distance
• Mémorisation du mode de lecture (page 41)
• Mode paré à lire (page 41)
• Lecture automatique (page 41)
• Mise en veille automatique (page 41)
• Ce manuel décrit les opérations exécutées principalement avec la télécommande
fournie.
• Toutes les illustrations figurant dans ce mode d’emploi servent à clarifier les
instructions d’utilisation.
• Dans ce mode d’emploi, un « CD audio » désigne un CD de musique et un « CD de
données » un CD contenant des données MP3/WMA/AAC/WAV/FLAC.
• Les spécifications techniques et l’aspect du produit peuvent être modifiés sans
préavis.
•
AVERTISSEMENT alerte sur un risque de décès ou de blessures
graves.
•
ATTENTION alerte sur un risque de blessures corporelles.
• fournit des consignes à respecter pour éviter un dysfonctionnement et un
endommagement du produit.
• fournit des informations utiles supplémentaires.
Fonctionnalités À propos de ce manuel
Avis
Note

Fr 31
• Télécommande
• Cordon d’alimentation
• Câble stéréo RCA/Cinch
• Piles (AA, R6, UM-3) (x2)
• Mode d’emploi (ce manuel)
Accessoires
Mise en place des piles dans
la télécommande
Insérez les piles dans le sens
correct.
Portée de la télécommande
Pointez la télécommande vers
le capteur de télécommande
de l’appareil, en l’utilisant dans
sa zone de portée décrite sur
l’illustration de droite.
Piles (AA, R6, UM-3)
30° 30°
Dans un
rayon de
6 m

32 Fr
PRÉPARATION
ATTENTION
• Ne branchez le cordon d’alimentation ni de cet appareil ni d’aucun autre dispositif au secteur avant
que toutes les connexions audio ne soient terminées.
Quand toutes les connexions sont effectuées, branchez le cordon d’alimentation fourni
à la prise AC IN de l’appareil et l’autre extrémité du cordon à une prise de courant de
tension appropriée.
Connexion à un amplificateur Raccordement du cordon d’alimentation
AmplificateurAmplificateur
Câble stéréo RCA/Cinch
(fourni)
Câble audio numérique coaxial
(disponible dans le commerce)
Câble numérique optique
(disponible dans le commerce) Branchement
sur une prise
secteur
Cet appareil (arrière)
Cordon
d’alimentation
(fourni)

Fr 33
Pour mettre l’appareil sous tension, appuyez sur le bouton A (alimentation) du
panneau avant.
Note
• Si vous appuyez sur la touche A (alimentation) de la télécommande quand l’appareil est sous
tension, il passe en veille.
• Le témoin d’alimentation de l’appareil fournit les indications suivantes :
Fortement éclairé : alimentation activée
Faiblement éclairé : mode veille
Éteint : hors tension
• La fonction de mise en veille automatique de cet appareil permet de réduire sa consommation
électrique (page 41).
(Réglage par défaut: mise en veille automatique activée)
Mise sous tension
A (alimentation)
Témoin d’alimentation

34 Fr
CD/USB
OPEN/CLOSE
LECTURE AUDIO
Cet appareil permet de lire des CD de données et des CD audio.
Pour des informations sur les types de CD pouvant être lus avec
cet appareil, voyez la section «Formats de fichiers/disques/clés
USB compatibles» (page 42).
1
Si le témoin USB du panneau avant est allumé, appuyez
sur la touche CD/USB pour activer le mode de disque.
2Insérez un CD dans le tiroir de disque.
La touche OPEN/CLOSE permet d’ouvrir et de fermer
alternativement le tiroir de disque.
Note
• Le bouton (ouverture/fermeture) du panneau avant permet aussi
d’ouvrir et de fermer alternativement le tiroir de disque.
• Quand l’appareil est paré pour la lecture d’un CD audio, le témoin du
support de lecture (CD) s’allume sur l’écran.
3Appuyez sur la touche (lecture).
Le témoin de lecture ( ) s’allume sur l’écran et la lecture
démarre.
Note
• Durant la lecture d’un fichier audio, le témoin du support de lecture
correspondant au format de ce fichier s’allume sur l’écran.
Avis
• N’insérez pas la main ni les doigts dans la fente du tiroir de disque. Sinon,
cela pourrait causer des blessures.
Note
• Après le chargement d’un CD dans le tiroir de disque, le tiroir se referme et
la lecture démarre si vous effectuez une des opérations suivantes :
– Vous appuyez sur la touche (lecture).
– Vous appuyez sur une touche numérique correspondant au numéro
d’une plage.
• Vous pouvez configurer l’appareil de sorte que la lecture démarre
automatiquement quand vous le mettez sous tension ou quand vous
passez en mode de disque ou en mode USB (page 41).
(Réglage par défaut: lecture automatique activée)
Utilisez les touches suivantes de la télécommande pour contrôler
les fonctions.
* Les boutons de commande du panneau avant opèrent les
fonctions suivantes :
(saut arrière/recherche arrière) :
Retourne au début du morceau précédent. Retourne au début
du morceau courant quand cette touche est enfoncée pendant
la lecture. Permet aussi d’effectuer une recherche arrière
quand la touche est maintenue enfoncée pendant la lecture.
(saut avant/recherche avant) :
Saute au début du morceau suivant. Permet aussi d’effectuer
une recherche avant quand la touche est maintenue enfoncée
pendant la lecture.
Lecture de CD audio
Touches disponibles Fonction
(lecture) Le témoin de lecture ( ) s’allume sur l’écran
et la lecture démarre.
(pause)
Le témoin de pause ( ) s’allume sur l’écran
et la lecture s’interrompt. Appuyez sur
(ou à nouveau sur ) pour relancer la
lecture.
(arrêt) Arrête la lecture.
(recherche arrière)* Effectue une recherche arrière dans le
morceau.
(recherche avant)* Effectue une recherche avant dans le morceau.
(saut arrière)*
Retourne au début du morceau précédent.
Retourne au début du morceau courant quand
cette touche est enfoncée pendant la lecture.
(saut avant)* Saute au début du morceau suivant.
Touches numériques
Pour sélectionner une plage, appuyez
simplement sur la touche numérique
correspondante.
FOLDER ,
(uniquement pour les CD
de données)
Permettent de sélectionner un dossier.
Touches
numériques

Fr 35
CD/USB
Cet appareil permet de lire des fichiers musicaux (stockés sur une
clé USB). Pour des informations sur les clés USB prises en charge,
voyez la section «Formats de fichiers/disques/clés USB
compatibles» (page 42).
1
Si le témoin USB du panneau avant est éteint, appuyez
sur la touche CD/USB pour activer le mode USB.
Le témoin USB en face avant s’allume en orange.
2Branchez la clé USB à la prise USB.
Quand l’appareil est paré pour la lecture, le témoin du support
de lecture (USB) s’allume sur l’écran et le témoin USB en face
avant s’allume en vert.
Avis
• N’utilisez pas de rallonge USB.
3Appuyez sur la touche (lecture).
Le témoin de lecture ( ) s’allume sur l’écran et la lecture
démarre.
Note
• Durant la lecture d’un fichier audio, le témoin du support de lecture
correspondant au format de ce fichier s’allume sur l’écran.
• L’appareil permet de lire des fichiers musicaux compatibles contenus
sur une clé USB dans l’ordre chronologique, sur base de leur date de
création.
Avis
• Ne retirez jamais la clé USB pendant la lecture ou quand
« USB READING » est affiché sur l’écran. Dans ce cas, appuyez d’abord
sur la touche CD/USB pour activer le mode de disque et vérifiez que le
témoin USB est éteint avant de retirer la clé USB.
Utilisez les touches suivantes de la télécommande pour contrôler
les fonctions.
* Les boutons de commande du panneau avant opèrent les
fonctions suivantes :
(saut arrière/recherche arrière) :
Retourne au début du morceau précédent. Retourne au début
du morceau courant quand cette touche est enfoncée
pendant la lecture. Permet aussi d’effectuer une recherche
arrière quand la touche est maintenue enfoncée pendant la
lecture.
(saut avant/recherche avant) :
Saute au début du morceau suivant. Permet aussi d’effectuer
une recherche avant quand la touche est maintenue enfoncée
pendant la lecture.
Lecture de fichiers musicaux stockés sur une clé USB
Cet appareil (panneau avant)
Clé USB
Touches disponibles Fonction
(lecture) Le témoin de lecture ( ) s’allume sur l’écran
et la lecture démarre.
(pause)
Le témoin de pause ( ) s’allume sur l’écran
et la lecture s’interrompt. Appuyez sur
(ou à nouveau sur ) pour relancer la
lecture.
(arrêt) Arrête la lecture.
(recherche arrière)* Effectue une recherche arrière dans le
morceau.
(recherche avant)* Effectue une recherche avant dans le morceau.
(saut arrière)*
Retourne au début du morceau précédent.
Retourne au début du morceau courant quand
cette touche est enfoncée pendant la lecture.
(saut avant)* Saute au début du morceau suivant.
FOLDER , Permettent de sélectionner un dossier.

36 Fr
RANDOM
CLEAR
ENTER
REPEAT
PROGRAM
Vous pouvez configurer le mode de lecture et les paramètres
d’affichage à l’aide des fonctions avancées.
Lecture en ordre aléatoire
Appuyez sur la touche RANDOM pour lire les plages dans un ordre
aléatoire. Chaque pression sur la touche RANDOM change le
réglage de lecture aléatoire comme suit :
Note
• Pour annuler la lecture en ordre aléatoire, ouvrez le tiroir de disque.
Lecture répétée
Appuyez sur la touche REPEAT pour lire les plages de manière
répétée. Chaque pression sur la touche REPEAT change le réglage
de lecture répétée comme suit :
Note
• Pour annuler la lecture répétée, ouvrez le tiroir de disque.
Lecture des plages selon un ordre défini
(lecture programmée)
Vous pouvez lire les plages d’un CD selon un ordre défini.
1Appuyez sur la touche PROGRAM quand la lecture
est arrêtée.
2Saisissez le numéro d’une plage à programmer avec
les touches numériques.
3Appuyez sur ENTER.
Répétez les étapes 2 et 3 pour programmer toutes les plages
voulues.
La touche CLEAR supprime chaque plage programmée, en
commençant par la dernière plage programmée.
4Appuyez sur la touche (lecture).
L’appareil démarre la lecture des plages selon l’ordre
programmé.
Note
• La lecture programmée n’est pas disponible pour les CD de données ni les
clés USB.
• Vous pouvez programmer jusqu’à 24 plages.
• Suivez une des méthodes ci-dessous pour supprimer toutes les plages
programmées :
– Appuyez sur la touche CLEAR quand la lecture est arrêtée.
– Mettez l’appareil hors tension ou mettez-le en mode veille.
– Ouvrez le tiroir de disque.
Fonctions avancées
Témoin Réglage
RNDM Lit toutes les plages dans un ordre aléatoire.
Off La lecture en ordre aléatoire est désactivée.
Témoin Réglage
REP Lit une plage de manière répétée.
REP FOLDER (uniquement
pour les CD de données et
les clés USB)
Lit les plages du dossier actuel de manière
répétée.
REP ALL Lit toutes les plages de manière répétée.
Off La lecture répétée est désactivée.
TRACKTEXT AAC WAV FLAC RESUM RDY TOTAL REMAIN RNDM REP FOLDER ALL A - BCD PROG
TRACKTEXT AAC WAV FLAC RESUM RDY TOTAL REMAIN RNDM REP FOLDER ALL A - BCD PROG
Touches
numériques

Fr 37
A/B
PURE
DIRECT
DISPLAY
DIMMER
Lecture répétée d’un passage spécifique
(lecture répétée A-B)
Vous pouvez définir le point de départ et de fin d’un passage sur
une plage de CD audio de sorte à lire ce passage de manière
répétée.
1Lisez un CD audio.
2Appuyez sur la touche A/B au point de départ voulu
pour le passage répété.
3Appuyez à nouveau sur la touche A/B au point de fin
voulu pour le passage répété.
L’appareil démarre la lecture répétée.
Note
• La lecture répétée n’est pas disponible pour les CD de données ni les clés
USB.
• La lecture répétée A-B n’est pas disponible quand la fonction PURE DIRECT
est activée.
• Suivez une des méthodes ci-dessous pour annuler la lecture répétée A-B :
– Appuyez à nouveau sur la touche A/B.
– Appuyez sur la touche (arrêt).
– Ouvrez le tiroir de disque.
Lecture en son de haute qualité
(PURE DIRECT)
Quand la fonction PURE DIRECT est active, le signal numérique est
désactivé. La fonction PURE DIRECT réduit ainsi le bruit affectant
la qualité sonore et rehausse votre plaisir d’écoute avec un son de
haute qualité.
Chaque pression sur la touche PURE DIRECT active et désactive
alternativement la fonction PURE DIRECT.
Note
• Pour exploiter la fonction PURE DIRECT, branchez les prises de sortie
ANALOG OUT du panneau arrière à l’amplificateur. Les prises DIGITAL
OUT ne produisent aucun signal.
• Quand la fonction PURE DIRECT est active :
– Le témoin PURE DIRECT s’allume.
– L’écran est éteint pendant la lecture de contenu.
– Il affiche un nombre minimum de témoins et messages durant l’utilisation
de l’appareil.
– Le réglage de cette fonction est mémorisé à la mise hors tension de
l’appareil.
Changement des informations affichées
sur l’écran
Chaque pression sur la touche DISPLAY durant la lecture permet
de changer comme suit les informations affichées sur l’écran :
Note
• L’écran peut afficher jusqu’à 64 caractères (caractères alphanumériques
d’un octet et divers symboles).
Réglage de luminosité de l’écran
La touche DIMMER permet de régler la luminosité de l’écran sur
quatre niveaux différents.
TEXT AAC WAV FLAC RESUM RDY TOTAL REMAIN RNDM FOLDER ALLPROG CD TRACK REP
TEXT AAC WAV FLAC RESUM RDY TOTAL REMAIN RNDM FOLDER ALLPROG CD TRACK REP
Support de lecture Informations affichées sur l’écran
CD audio
Durée écoulée Durée résiduelle du morceau
courant (TRACK REMAIN) Durée résiduelle du
CD (TOTAL REMAIN) Nom du morceau*
Nom de l’artiste* Titre de l’album*
* Si le disque contient des données CD-texte
CD de données, clé
USB
Durée écoulée Nom du morceau* Nom de
l’artiste* Titre de l’album*
* À condition que le support intègre ces marqueurs

38 Fr
ANNEXE
Panneau avant
1A (alimentation) (page 33)
2Témoin d’alimentation (page 33)
3Prise USB (page 35)
4Témoin USB (page 35)
5CD/USB (pages 34, 35)
6PURE DIRECT (page 37)
7Témoin PURE DIRECT (page 37)
8Tiroir de disque (page 34)
9 (ouverture/fermeture) (page 34)
0Capteur de télécommande (page 31)
A (saut arrière/recherche arrière) (pages 34, 35)
B (saut avant/recherche avant) (pages 34, 35)
C (lecture) (pages 34, 35, 36)
D (pause) (pages 34, 35)
E (arrêt) (pages 34, 35, 36, 37)
Noms des éléments
1 2 3 4 7 0
8 9
5 6 A B C D E

Fr 39
Écran
1Témoin / (lecture/pause) (pages 34, 35)
2Témoin de support de lecture (pages 34, 35)
3Témoin des réglages avancés (page 41)
4Affichage de durée (Page 37)
5Témoin du mode de lecture (pages 36, 37)
6Affichage d’informations (pages 36, 37, 41)
Panneau arrière
1Prises ANALOG OUT (page 32)
2Prise DIGITAL OUT (COAXIAL) (page 32)
3Prise DIGITAL OUT (OPTICAL) (page 32)
4Prise AC IN (page 32)
TRACKCD TEXT AAC WAV FLAC RESUM RDY TOTAL REMAIN PROG RNDM REP FOLDER ALL A - B
1 62 3 54
2 3 41

40 Fr
Télécommande
1A (alimentation) (page 33)
2Émetteur de signal de télécommande (page 31)
3OPEN/CLOSE (page 34)
4PROGRAM (page 36)
5REPEAT (page 36)
6DIMMER (page 37)
7RANDOM (page 36)
8A/B (page 37)
9DISPLAY (page 37)
0Touches numériques (pages 34, 36)
ACLEAR (page 36)
BENTER (page 36)
C (recherche arrière), (recherche avant) (pages 34, 35)
(pause) (pages 34, 35)
(saut arrière) (pages 34, 35)
(saut avant) (pages 34, 35)
(lecture) (pages 34, 35, 36)
(arrêt) (pages 34, 35, 36, 37)
FOLDER , (pages 34, 35)
DCD/USB (pages 34, 35)
EPURE DIRECT (page 37)
3
4
9
0
C
7
8
A
B
D
E
6
5
21

Fr 41
Cette section décrit la configuration des diverses fonctions avancées. Vous pouvez
changer la majorité de ces paramètres depuis la face avant. (Certains paramètres ne
sont accessibles que via la télécommande.)
1Activez le mode veille de l’appareil (page 33).
2
Maintenez simultanément les touches PURE DIRECT, (ouverture/
fermeture) et (lecture), enfoncées pendant au moins trois secondes.
Le témoin suivant apparaît sur l’affichage d’informations en face avant, puis
l’appareil passe en mode de réglage. Ce mode permet de régler dans cet ordre
les fonctions suivantes : mémorisation du mode de lecture, mode paré à lire,
lecture automatique et mise en veille automatique.
3Appuyez sur la touche ou pour activer ou
couper la fonction.
4Appuyez sur la touche (arrêt).
Le réglage est confirmé et le paramètre suivant est automatiquement sélectionné.
Répétez les étapes 3 et 4. Quand tous les réglages sont terminés, le témoin suivant
apparaît sur l’affichage d’informations en face avant, puis l’appareil passe en veille.
Note
• Si vous appuyez sur la touche (lecture) au cours de cette procédure, le réglage est
confirmé et l’appareil passe en veille.
Mémorisation du mode de lecture (PLAY MEM)
Quand cette fonction est active, l’appareil mémorise et conserve les réglages de
lecture répétée et de lecture aléatoire après sa mise hors tension. Quand la
mémorisation du mode de lecture est activée, le témoin des réglages avancés
(RESUM) s’allume sur l’écran.
Réglage par défaut : Désactivé
Note
• Quand la fonction de mémorisation du mode de lecture est activée et que vous mettez l’appareil
sous tension, il lit la dernière plage ou le dernier fichier lu depuis le début.
Mode paré à lire (RDY MODE)
Quand cette fonction est active, l’appareil interrompt momentanément la lecture à la fin
de chaque plage. La lecture de la plage suivante démarre lorsque vous la choisissez.
Quand le mode paré à lire est activé, le témoin des réglages avancés (RDY) s’allume
sur l’écran.
Réglage par défaut : Désactivé
Lecture automatique (AUTO PLAY)
Quand cette fonction est active, la lecture démarre automatiquement quand vous
mettez l’appareil sous tension ou quand vous passez en mode de disque ou mode
USB.
Réglage par défaut : Activé
Mise en veille automatique (AUTO STBY)
Quand cette fonction est active, l’appareil passe automatiquement en veille lorsque 20
minutes s’écoulent sans aucune activité après l’arrêt de la lecture.
Réglage par défaut : Activé
Réglages avancés
PURE DIRECT
TRACKTEXT AAC WAV FLAC RESUM RDY TOTAL REMAIN RNDM REP FOLDER ALLPROG CD TRACKTEXT AAC WAV FLAC RESUM RDY TOTAL REMAIN RNDM REP FOLDER ALLPROG CD
CD TRACK REP TEXT AAC WAV FLAC RESUM RDY TOTAL REMAIN RNDM FOLDER ALLPROG

42 Fr
❑Formats de fichiers compatibles
* Format PCM linéaire uniquement.
Note
• Les fichiers contenus sur un CD de données ou une clé USB sont lus dans l’ordre chronologique,
selon leur date de création.
• Cet appareil prend en charge les disques au format ISO9660.
• Lorsque l’appareil lit un fichier VBR (Variable Bit Rate), la durée écoulée pourrait ne pas être
affichée avec précision.
• Les contenus Digital Rights Management (DRM) encodés ne peuvent pas être lus.
❑Disques pris en charge
Utilisez des disques affichant un des logos suivants.
Avis
• N’utilisez pas des disques de forme irrégulière ni de disques sur lesquels de la bande adhésive ou
des vignettes sont collées. Sinon cela pourrait entraîner un dysfonctionnement de l’appareil.
• Il se pourrait que l’appareil ne puisse pas lire certains disques CD-RW ou des disques
incorrectement enregistrés.
• Pour lire un CD de 8 cm, posez-le dans le creux au centre du tiroir de disque. Ne posez jamais un
CD conventionnel (de 12 cm) sur un CD de 8 cm.
Formats de fichiers/disques/clés USB compatibles
Fichier Fréquence d’échantillonnage (kHz) Résolution
de bit (bit)
Débit binaire
(kbps)
Nombre de
canaux
MP3 32/44.1/48 — 32-320 2
WMA 32/44.1/48 — 48-192 2
AAC 32/44.1/48 — 8-320 2
WAV * 32/44.1/48/64/88.2/96 16/24 — 2
FLAC 32/44.1/48/64/88.2/96 16/24 — 2
CD de données Clé USB
Nombre de hiérarchies de
dossiers
(y compris le répertoire racine)
99
Nombre de dossiers 999 999
Nombre de fichiers 1100 65535
Disques compacts (CD audio)
Disques CD-R et CD-RW
• Utilisez des disques comportant une des mentions suivantes :
FOR CONSUMER
FOR CONSUMER USE
FOR MUSIC USE ONLY
• L’appareil lit uniquement des disques CD-R et CD-RW finalisés.
Note
• Il se pourrait que l’appareil ne puisse pas lire certains disques CD-R/CD-RW
ou des disques incorrectement enregistrés.
Disques contenant des données CD-texte
Ces disques contiennent des données de texte, comme par
exemple les titres d’albums, noms de morceaux et noms d’artistes.
Ces informations (uniquement des caractères alphanumériques
ainsi que certains symboles) s’affichent en même temps que la
durée écoulée.

Fr 43
❑Manipulation des disques
• Manipulez les disques avec soin, de sorte à ne pas rayer leur
surface enregistrée. Ne pliez jamais les disques.
• En présence de traces de doigts ou de poussière sur la
surface enregistrée, frottez le disque depuis son centre vers
son bord extérieur avec un chiffon doux.
• N’utilisez jamais de produit nettoyant pour disques vinyles, d’agent antistatique ni
d’autres produits chimiques pour nettoyer un disque.
• Écrivez exclusivement sur le côté étiquette du disque, avec un feutre à pointe douce.
• Ne laissez jamais un disque à la lumière directe du soleil ni dans un endroit soumis à
des températures ou une humidité élevées de manière prolongée.
• N’utilisez pas de nettoyant pour lentille disponible dans le commerce. Sinon cela
pourrait causer un dysfonctionnement.
❑Clés USB prises en charge
Avant d’utiliser cet appareil pour lire des fichiers musicaux stockés sur une clé USB,
vérifiez que les conditions suivantes sont respectées :
• La clé USB est conforme aux normes des périphériques de stockage de masse.
• Les données ont été enregistrées via le système de fichiers FAT16 ou FAT32.
Avis
• Il se pourrait que certaines clés USB ne fonctionnent pas correctement.
• Les clés USB avec cryptage ne peuvent pas être utilisés.
• Yamaha et ses revendeurs déclinent toute responsabilité pour toute perte de données
sauvegardées sur une clé USB raccordée à cet appareil. Nous vous recommandons de faire
régulièrement des copies de sauvegarde pour vous protéger contre la perte de données.
• Yamaha ne garantit ni le fonctionnement ni l’alimentation de toute clé USB.
Voici les caractéristiques techniques de cet appareil.
Section audio
• Niveau de sortie (1 kHz, 0 dB, Fs 44,1 kHz)................................................. 2,0 ±0,3 V
• Rapport S/B (réseau IHF-A) (1 kHz, 0 dB, Fs 44,1 kHz)....................... 105 dB ou plus
• Plage dynamique (1 kHz, 0 dB, Fs 44,1 kHz)......................................... 96 dB ou plus
• Distorsion harmonique (1 kHz, 0 dB, Fs 44,1 kHz)............................ 0,003% ou moins
• Réponse en fréquence
CD audio................................................................................................. 2 Hz – 20 kHz
CD de données/USB Fs 48 kHz ....................................................... 2 Hz – 22 kHz
Fs 96 kHz ............................................2 Hz – 44 kHz, –3 dB
Section laser
• Type de laser .................................................................................................... AIGaAs
• Longueur d’onde ...............................................................................................790 nm
• Puissance du laser .................................................................................1,04 mW max.
Généralités
• Tension d’alimentation
Modèles pour les États-Unis et le Canada ......................................... CA 120 V, 60 Hz
Modèle pour l’Australie ............................................................... CA 230–240 V, 50 Hz
Modèles pour l’Europe et le Royaume-Uni ......................................... CA 230 V, 50 Hz
Modèle pour l’Asie et modèle général................................... CA 110–240 V, 50/60 Hz
Modèle pour la Chine ......................................................................... CA 220 V, 50 Hz
• Consommation.......................................................................................................11 W
• Consommation en veille
Standby (mode veille)...........................................................................................0,2 W
Hors tension..........................................................................................................0,2 W
• Dimensions (L × H × P) ................................................................. 435 × 87 × 260 mm
• Poids ....................................................................................................................3,5 kg
* Le contenu de ce mode d’emploi s’applique aux dernières caractéristiques techniques connues
à la date de publication du manuel. Pour obtenir la version la plus récente du manuel, accédez au
site Web de Yamaha puis téléchargez le fichier du manuel concerné.
Caractéristiques techniques
Prises de sortie
• Audio analogique x 1 (RCA/Cinch asymétrique)
• Audio numérique
COAXIAL × 1, OPTICAL × 1
Autres prises
• USB × 1 (USB2.0)

44 Fr
Reportez-vous au tableau suivant si l’appareil ne fonctionne pas correctement. Si l’anomalie constatée ne figure pas ci-dessous, ou si la correction suggérée reste sans effet, mettez
l’appareil hors tension en appuyant sur A (alimentation) en face avant, débranchez le cordon d’alimentation et prenez contact avec un revendeur ou un centre SAV Yamaha agréé.
Résolution des problèmes
Anomalies Causes possibles Solution Page
Impossible de mettre l’appareil sous
tension en appuyant sur son
interrupteur d’alimentation.
Le cordon d’alimentation est peut-être mal raccordé. Branchez fermement le cordon d’alimentation à une prise secteur. 32
Le tiroir de disque ne se referme pas
complètement. Un corps étranger se trouve à l’intérieur du tiroir de disque. Vérifiez le tiroir de disque et retirez-en tout corps étranger. —
Impossible de lire le disque chargé.
Le disque est rayé. Utilisez un autre disque. —
De la condensation s’est formée sur la lentille à l’intérieur de l’appareil. Mettez l’appareil sous tension et attendez 20 à 30 minutes avant
d’essayer à nouveau de lire le disque. —
Le disque a été inséré à l’envers. Insérez le disque avec son étiquette orientée vers le haut. —
Le disque est sale ou rayé. Éliminez la saleté de la surface du disque ou choisissez un disque
intact. 43
Vous tentez de lire un fichier dont le format n’est pas pris en charge par
l’appareil.
Veillez à utiliser un disque contenant des fichiers de format compatible
avec l’appareil. 42
Vous tentez de lire un disque dont le format n’est pas pris en charge
par l’appareil. Veillez à utiliser un disque de format compatible avec l’appareil. 42, 43
L’appareil se trouve en mode USB. Appuyez sur la touche CD/USB pour activer le mode de disque. 34, 38, 40
La lecture ne commence pas
directement ou ne commence pas à
l’emplacement correct.
Le disque est sale ou rayé. Éliminez la saleté de la surface du disque ou choisissez un disque
intact. 43
Impossible de lire un fichier musical
stocké sur votre clé USB.
La clé USB n’est peut-être pas correctement raccordée à l’appareil. Raccordez correctement la clé USB. 35
Vous tentez de lire un fichier dont le format n’est pas pris en charge par
l’appareil.
Veillez à utiliser une clé USB contenant des fichiers de format
compatible avec l’appareil. 42
L’appareil se trouve en mode de disque. Appuyez sur la touche CD/USB pour activer le mode USB. 35, 38, 40
Aucun son La connexion de l’appareil à l’amplificateur est incorrecte. Vérifiez la connexion à l’amplificateur. 32
L’appareil branché aux prises DIGITAL
OUT ne produit aucun son. La fonction PURE DIRECT est active. Désactivez la fonction PURE DIRECT. 37

Fr 45
La lecture est saccadée.
Des vibrations ou des coups affectent la lecture. Changez l’emplacement de l’appareil. —
Le disque est sale ou rayé. Éliminez la saleté de la surface du disque ou choisissez un disque
intact. 43
L’appareil produit un ronflement ou un
bourdonnement. Le câble RCA/Cinch stéréo est mal raccordé.
Raccordez fermement le câble RCA/Cinch stéréo. Si cela ne résout
pas le problème, assurez-vous que le câble n’est pas lui-même
endommagé.
32
Votre syntoniseur génère du bruit. L’appareil est proche du syntoniseur. Mettez l’appareil hors tension ou éloignez-le du syntoniseur. —
Le fonctionnement du tiroir de disque
est bruyant. Le disque est déformé. Utilisez un disque sans la moindre déformation. —
L’écran n’affiche aucune information. La fonction PURE DIRECT est active. Désactivez la fonction PURE DIRECT. 37
Aucun nom de dossier ni nom de fichier
n’apparaît sur l’affichage d’information.
Le nom du dossier ou du fichier contient des caractères autres que le
format alphanumérique d’un octet.
Utilisez exclusivement des caractères alphanumériques d’un octet
pour les noms de dossier et de fichier. 37
La télécommande ne fonctionne pas
correctement.
Les piles sont déchargées. Remplacez toutes les piles. 31
Distance ou angle incorrect. Utilisez la télécommande dans sa zone de portée. 31
Les rayons directs du soleil ou un éclairage direct (provenant d’une
lampe fluorescente à changement de fréquence, etc.) frappent le
capteur de télécommande de l’appareil.
Changez la position de l’éclairage ou de l’appareil. —
Anomalies Causes possibles Solution Page

46 De
Lesen Sie zunächst vorliegende
Vorsichtsmaßnahmen sorgfältig durch.
Befolgen Sie unbedingt die
Anweisungen!
Lesen und beachten Sie die folgenden
Vorsichtsmaßnahmen sorgfältig, um Verletzungen
und Sachschäden zu vermeiden.
Bewahren Sie vorliegendes Dokument nach
gründlicher Lektüre an einem Ort auf, an dem
sämtliche Benutzer des Geräts jederzeit darauf
zugreifen können.
WARNUNG
Diese Vorsichtsmaßnahmen warnen vor
tödlichen oder schweren Verletzungen des
Benutzers oder anderer Personen.
Bei Auffälligkeiten
• Tritt eine der folgenden Unregelmäßigkeiten
auf, schalten Sie das Gerät sofort aus.
- Das Netzkabel bzw. der Netzstecker ist
beschädigt.
- Das Gerät erzeugt ungewöhnliche Gerüche,
Geräusche oder Rauch.
- Ein Gegenstand oder Wasser ist in das Gerät
eingedrungen.
- Das Gerät weist Risse oder andere Schäden
auf.
- Beim Einsatz des Geräts fällt der Ton aus.
Schalten Sie das Gerät wie folgt aus:
- Schalten Sie das Gerät aus.
- Ziehen Sie den Netzkabelstecker aus der
Steckdose.
Wird das Gerät in diesem Zustand weiter
eingesetzt, könnte ein Brand, elektrischer
Schlag oder Beschädigung des Geräts
erfolgen. Fordern Sie unverzüglich eine Prüfung
oder Reparatur an.
Stromversorgung
• Beschädigen Sie das Netzkabel nicht.
- Halten Sie das Netzkabel fern von
Wärmequellen wie Heizgeräten.
- Verbiegen oder modifizieren Sie das
Netzkabel nicht.
- Beschädigen Sie das Netzkabel nicht.
- Stellen Sie keine schweren Gegenstände auf
das Netzkabel.
- Heften Sie das Netzkabel nicht an.
Wird das Netzkabel mit frei liegenden Drähten
eingesetzt, kann ein Brand, elektrischer Schlag
oder Beschädigung des Geräts erfolgen.
• Berühren Sie dieses Gerät, den Netzstecker
oder das Netzkabel bei Blitzschlag oder
Gewitter nicht.
Andernfalls könnte ein elektrischer Schlag
erfolgen.
• Verwenden Sie die für dieses Produkt
spezifizierte Netzspannung.
Verwendung einer falschen Netzspannung
kann einen Brand, einen elektrischen Schlag
oder eine Beschädigung des Produkts zur
Folge haben.
• Verwenden Sie für die Stromversorgung
ausschließlich folgendes Zubehör:
- zugehöriges Netzkabel
Andernfalls könnte ein Brand, Verbrennungen
oder eine Beschädigung des Geräts verursacht
werden.
VORSICHTSMAẞNAHMEN
• Wenden Sie sich zwecks Prüfung oder
Reparatur an folgende Kundendienststelle:
- Geschäft, in dem Sie das Gerät erworben
haben
- Yamaha-Händler
• Dieses Gerät ist für allgemeinen
Hausgebrauch bestimmt. Verwenden Sie es
nicht in Bereichen oder Tätigkeiten, die im
Zusammenhang mit Menschenleben oder
wertvollen Vermögenswerten ein hohes Maß
an Zuverlässigkeit erfordern.
• Yamaha kann keine Haftung für Verluste
übernehmen, die durch unsachgemäße
Verwendung oder unbefugte Umrüstung des
Geräts entstehen.

De 47
• Setzen Sie folgendes zugehörige Zubehör nicht
mit anderen Geräten ein.
- Netzkabel
Andernfalls könnte ein Brand, Verbrennungen
oder eine Beschädigung des Geräts verursacht
werden.
• Prüfen Sie regelmäßig den Zustand des
Netzsteckers und entfernen Sie jeglichen
Schmutz oder Staub, der sich darauf
angesammelt hat.
Andernfalls könnte ein Brand oder ein
elektrischer Schlag erfolgen.
• Der Netzstecker muss vollständig in die
Steckdose gesteckt werden.
Andernfalls kann ein elektrischer Schlag, ein
Brand oder eine Beschädigung des Geräts
aufgrund eines Kurzschlusses erfolgen.
• Stecken Sie den Netzstecker in eine sichtbare
und leicht zugängliche Steckdose.
Sollten Probleme oder eine Störung auftreten,
sollten Sie den Netzstecker bequem und
umgehend von der Netzsteckdose abziehen
können. Auch ausgeschaltet, ist das Gerät
nicht komplett von der Stromversorgung
getrennt, solange das Netzkabel noch in der
Steckdose steckt.
• Wird das Gerät voraussichtlich längere Zeit
nicht benutzt, sollten Sie den Netzstecker von
der Netzsteckdose abziehen.
Andernfalls könnte eine Brand oder eine
Beschädigung des Geräts erfolgen.
Nicht zerlegen
• Dieses Gerät nicht umrüsten oder zerlegen.
Andernfalls könnte eine Brand, ein elektrischer
Schlag, eine Verletzung oder eine
Beschädigung des Geräts erfolgen.
Gefahr durch Wasser
• Benutzen Sie dieses Gerät nicht unter feuchten
oder nassen Bedingungen, z.B. in einem
Badezimmer oder draußen im Regen.
• Stellen Sie keine Behälter (wie Vasen oder
Medizinflaschen), die Flüssigkeiten enthalten,
auf dieses Gerät ab.
Falls Flüssigkeit in das Gerät gelangt, kann ein
Brand, ein elektrischer Schlag oder eine
Beschädigung des Geräts erfolgen.
• Den Netzstecker mit nassen Händen weder in
die Steckdose stecken noch von der Steckdose
abziehen. Berühren Sie dieses Gerät niemals
mit feuchten Händen.
Andernfalls könnte eine ein elektrischer Schlag
oder eine Beschädigung des Geräts erfolgen.
Brandschutz
• Halten sie offene Flammen von diesem Gerät
fern.
Andernfalls kann eine Brand verursacht
werden.
Sehverlust
• Blicken Sie nicht in den Laserstrahl.
Fällt der Laserstrahl auf Ihre Augen ein, kann
Sehverlust verursacht werden.
Handhabung
• Schützen Sie dieses Gerät vor Stürzen und
starken Stößen.
Andernfalls könnte ein elektrischer Schlag oder
eine Beschädigung des Geräts erfolgen.
Batterien
• Batterien nicht verschlucken.
• Halten Sie Batterien außerhalb der Reichweite
von Kindern.
Andernfalls könnten diese eine Batterie
versehentlich verschlucken. Auslaufende
Batterieflüssigkeit kann zu Sehverlust oder
Entzündungen führen. Falls das Batteriefach
dieses Geräts sich nicht mehr vollständig
schließt, den Einsatz des Geräts einstellen und
das Gerät von Kindern fernhalten. Wurde eine
Batterie versehentlich verschluckt, sofort einen
Arzt aufsuchen. Wurde eine Batterie verschluckt,
kann dies innerhalb von zwei Stunden zu
schweren und sogar tödlichen Verätzungen oder
Verlust von Körpergewebe führen.
• Werfen Sie Batterien nicht in offenes Feuer.
• Setzen Sie Batterien keinen übermäßig hohen
Temperaturen von z.B. direkter
Sonneneinstrahlung oder Feuer aus.
Andernfalls können sie explodieren und Brand
oder Verletzungen verursachen.
• Berühren Sie auslaufende Batterieflüssigkeit
nicht.
Andernfalls könnten Blindheit oder Verätzungen
erfolgen. Bei Kontakt mit Batterieflüssigkeit
waschen Sie diese sofort mit Wasser ab und
suchen Sie einen Arzt auf.
• Verwenden Sie niemals andere als die
vorgegebenen Batterien.
• Verwenden Sie alte und neue Batterien nicht
gemeinsam.
• Verwenden Sie nicht verschiedene
Batteriearten gemeinsam.
• Setzen Sie die Batterien immer nur in der
vorgegebenen Ausrichtung ein.
• Zerlegen Sie die Batterien nicht.

48 De
• Laden Sie keine nicht wiederaufladbaren
Trockenbatterien.
Andernfalls könnten sie explodieren oder
Batterieflüssigkeit austreten, was zu Bränden,
Verbrennungen, Sehverlust, Entzündungen oder
Schäden am Gerät führen kann. Bei Kontakt mit
Batterieflüssigkeit waschen Sie diese sofort mit
Wasser ab und suchen Sie einen Arzt auf.
• Tragen Sie die Batterien nicht in einer Tasche
und bewahren Sie sie nicht zusammen mit
Metallgegenständen auf.
Andernfalls könnten die Batterien
kurzgeschlossen werden und explodieren oder
die Flüssigkeit austreten, was zu Bränden,
Sehverlust oder Verletzungen führen kann.
• Wird das Gerät voraussichtlich längere Zeit
nicht benutzt oder sind die Batterien vollständig
entladen, nehmen Sie die Batterien aus dem
Gerät heraus.
Andernfalls kann Batterieflüssigkeit auslaufen
und möglicherweise zu Sehverlust,
entzündlichen Verletzungen oder Schäden am
Gerät führen.
• Bringen Sie vor dem Lagern oder Entsorgen
der Batterien ein Stück Klebeband an den
Polen an, um sie zu isolieren.
Falls die Batteriepole mit anderen Batterien
oder Metallgegenständen in Kontakt kommen,
könnten die Batterien explodieren oder
Flüssigkeit austreten, was zu Brand,
Verbrennungen, Sehverlust oder entzündlichen
Verletzungen führen kann.
VORSICHT
Diese Vorsichtsmaßnahmen warnen vor
Verletzungen des Benutzers oder anderer
Personen.
Stromversorgung
• Verwenden Sie keine Steckdose, in welcher der
eingesteckte Netzstecker nicht fest sitzt.
Andernfalls könnte ein elektrischer Schlag oder
Verbrennungen erfolgen.
• Ziehen Sie Netzstecker stets am Stecker vom
Gerät oder aus der Netzsteckdose ab, niemals
am Kabel.
Andernfalls kann das Netzkabel beschädigt
werden und einen Brand oder Stromschlag
verursachen.
Einsatzort
• Stellen Sie dieses Gerät nicht in eine labile
Position oder an einen Ort, der Vibrationen
ausgesetzt ist.
Andernfalls kann das Gerät abstürzen oder
umkippen, was zu Verletzungen oder Schäden
am Gerät führen kann.
• Verdecken Sie beim Aufstellen des Geräts nicht
dessen Belüftungsöffnungen.
- Decken Sie das Gerät nicht mit einem Tuch
oder Tischtuch ab.
- Stellen Sie das Gerät nicht auf einen Teppich
oder Läufer ab.
- Die Oberseite muss nach oben gerichtet
werden. Stellen Sie das Gerät nicht auf die
Seite oder auf den Kopf.
- Verwenden Sie das Gerät nicht an einer
beengten und schlecht belüfteten Stelle.
Eine unzureichende Belüftung kann zu einer
Überhitzung im Gerät und zu Schäden, Brand
oder Störung führen.
Stellen Sie sicher, dass ein Mindestfreiraum von
2,5 cm an der Oberseite, 2,5 cm an beiden
Seiten und 2,5 cm an der Rückseite des Geräts
vorhanden ist.
• Halten Sie sich bei Erdbeben nicht in der Nähe
dieses Geräts auf.
Andernfalls kann das Gerät abstürzen oder
umkippen, was zu Verletzungen führen kann.
• Bevor Sie dieses Gerät versetzen, muss es
ausgeschaltet und alle Verbindungskabel
gelöst werden.
Andernfalls könnten die Kabel versehentlich
mitgerissen werden und das Gerät abstürzen
oder umkippen, was zu Verletzungen oder
Schäden am Gerät führen kann.
Anschlüsse
• Wenn Sie externe Geräte anschließen möchten,
lesen Sie zunächst die zugehörigen
Anleitungen und verbinden Sie die Geräte
entsprechend den Anweisungen.
Werden die Anweisungen nicht korrekt befolgt,
kann eine Verletzung oder eine Beschädigung
des Geräts erfolgen.
Gehörverlust
• Setzen Sie sich nicht über längere Zeit hohen
Lautstärken aus.Andernfalls könnte
Gehörverlust erfolgen. Suchen Sie bei
Gehörstörungen einen Arzt auf.
• Bevor Sie dieses Gerät mit anderen Geräten
verbinden, schalten Sie alle Geräte aus.
Andernfalls könnte Gehörverlust, ein
elektrischer Schlag oder eine Beschädigung
des Geräts erfolgen.

De 49
• Schalten Sie beim Einschalten Ihrer
Audioanlage den Leistungsverstärker stets
ZULETZT ein. Schalten Sie beim Ausschalten
Ihrer Audioanlage den Leistungsverstärker
stets ZUERST ein.
Andernfalls könnte Gehörverlust oder eine
Beschädigung des Geräts erfolgen.
Wartung
• Ziehen Sie vor dem Reinigen des Geräts den
Netzstecker aus der Steckdose.
Andernfalls könnte ein elektrischer Schlag
erfolgen.
Handhabung
• Keine Hände oder Finger in die Spalte oder
Öffnungen des Geräts stecken.
Andernfalls kann eine Verletzung verursacht
werden.
• Lassen Sie keine Fremdkörper wie
Metallgegenstände oder Papier in
Geräteöffnungen fallen.
Andernfalls könnte ein elektrischer Schlag oder
eine Beschädigung des Geräts erfolgen.
• Wenden Sie auf folgende Weisen keine
übermäßige Kraft auf dieses Gerät an:
- Abstützen gegen das Gerät
- Abstellen schwerer Gegenstände auf das
Gerät
- Stapeln des Geräts
- Kraftvolle Bedienung der Tasten, Schalter
oder Anschlüsse
Andernfalls könnte eine Verletzung oder eine
Beschädigung des Geräts erfolgen.
• Ziehen Sie nicht an verbundenen Kabeln.
Andernfalls kann das Gerät abstürzen oder
umkippen, was zu Verletzungen oder Schäden
am Gerät führen kann.
ACHTUNG
Befolgen Sie die nachstehenden
Vorsichtsmaßnahmen, um Störung und
Beschädigung des Geräts und Datenverlust zu
vermeiden.
Stromversorgung
• Wird das Gerät voraussichtlich längere Zeit
nicht benutzt, sollten Sie den Netzstecker von
der Netzsteckdose abziehen. Auch wenn Sie
das Gerät mit [A] (Ein/Aus) an der Frontblende
ausschalten, nimmt das Gerät noch eine
minimale Strommenge auf.
Einsatzort
• Je nach der Einsatzumgebung dieses Geräts
kann ein Telefon, Radio oder Fernseher
Störungen erzeugen. Ändern Sie in solchem
Fall den Einsatzort, die Ausrichtung oder die
Umgebung des Geräts.
• Vermeiden Sie den Einsatz dieses Geräts unter
folgenden Bedingungen:
- direkte Sonneneinstrahlung
- extrem hohe oder niedrige Temperaturen
- übermäßiger Staub
Andernfalls könnte eine Störung oder
Beschädigung des Geräts erfolgen.
• Setzen Sie dieses Gerät nicht an einem Ort auf,
an dem sich aufgrund schneller, drastischer
Änderungen der Umgebungstemperatur
Kondenswasser bilden kann. Die Einsatz des
Geräts bei vorhandener Kondensation kann zu
Schäden am Gerät führen. Besteht Grund zur
Annahme, dass sich an oder in diesem Gerät
Kondensation gebildet haben könnte, lassen
Sie es mehrere Stunden lang im
ausgeschalteten Zustand stehen.
Sobald die Kondensation vollständig
getrocknet ist, kann das Gerät wieder
eingesetzt werden.
Handhabung
• Stellen Sie keine Gegenstände aus Vinyl,
Kunststoff oder Gummi auf dieses Gerät ab.
Andernfalls kann das Gehäuse verfärbt oder
beschädigt werden.
Wartung
• Reinigen Sie dieses Gerät mit einem trockenen,
weichen Tuch. Verwenden Sie zum Reinigen
der Oberfläche dieses Geräts niemals Benzin,
Verdünner, Reinigungsmittel oder
Feuchtwischtücher. Andernfalls kann die
Oberfläche verfärbt oder beschädigt werden.
Vorsichtsmaßnahmen für den
Einsatz

50 De
HINWEIS
In diesem Abschnitt werden
Vorsichtsmaßnahmen beschrieben, die während
der Benutzung zu beachten sind,
Einschränkungen von Funktionen und hilfreiche
Zusatzinformationen.
Entsorgung oder Weitergabe
• Falls Sie dieses Gerät an eine andere Person
weitergeben, legen Sie vorliegende Unterlagen
und das zugehörige Zubehör bei.
• Befolgen Sie bei der Entsorgung dieses Geräts
und seines Zubehörs die geltenden örtlichen
Vorschriften.
• Befolgen Sie bei der Entsorgung von
Altbatterien die geltenden örtlichen
Vorschriften.
Wichtige Informationen
WARNUNG
Die Verwendung von Bedienelementen oder die
Einstellung bzw. die Ausführung von anderen als in
dieser Anleitung beschriebenen Vorgängen kann zu
Gefährdung durch gefährliche Strahlung führen.
(weee_battery_eu_de_02)
Verbraucherinformation zur Sammlung und Entsorgung alter Elektrogeräte
und benutzter Batterien
Befinden sich diese Symbole auf den Produkten, der Verpackung und/oder beiliegenden
Unterlagen, so sollten benutzte elektrische Geräte und Batterien nicht mit dem normalen
Haushaltsabfall entsorgt werden.
In Übereinstimmung mit Ihren nationalen Bestimmungen bringen Sie alte Geräte und
benutzte Batterien bitte zur fachgerechten Entsorgung, Wiederaufbereitung und
Wiederverwendung zu den entsprechenden Sammelstellen.
Durch die fachgerechte Entsorgung der Elektrogeräte und Batterien helfen Sie, wertvolle
Ressourcen zu schützen, und verhindern mögliche negative Auswirkungen auf die
menschliche Gesundheit und die Umwelt, die andernfalls durch unsachgerechte
Müllentsorgung auftreten könnten.
Für weitere Informationen zum Sammeln und Wiederaufbereiten alter Elektrogeräte und
Batterien kontaktieren Sie bitte Ihre örtliche Stadt- oder Gemeindeverwaltung, Ihren
Abfallentsorgungsdienst oder die Verkaufsstelle der Artikel.
Information für geschäftliche Anwender in der Europäischen Union:
Wenn Sie Elektrogeräte ausrangieren möchten, kontaktieren Sie bitte Ihren Händler oder
Zulieferer für weitere Informationen.
Entsorgungsinformation für Länder außerhalb der Europäischen Union:
Diese Symbole gelten nur innerhalb der Europäischen Union. Wenn Sie solche Artikel
ausrangieren möchten, kontaktieren Sie bitte Ihre örtlichen Behörden oder Ihren Händler
und fragen Sie nach der sachgerechten Entsorgungsmethode.
Anmerkung zum Batteriesymbol (untere zwei Symbolbeispiele):
Dieses Symbol kann auch in Kombination mit einem chemischen Symbol verwendet
werden. In diesem Fall entspricht dies den Anforderungen der EU-Batterierichtlinie zur
Verwendung chemischer Stoffe.

De 51
INHALT
VOR DER BENUTZUNG DES GERÄTS 52
Merkmale. . . . . . . . . . . . . . . . . . . . . . . . . . . . . . . . . . . . . . . . . . . . . . . . . . . . . . .52
Über diese Anleitung . . . . . . . . . . . . . . . . . . . . . . . . . . . . . . . . . . . . . . . . . . . .52
Zubehör . . . . . . . . . . . . . . . . . . . . . . . . . . . . . . . . . . . . . . . . . . . . . . . . . . . . . . . .53
VORBEREITUNG 54
Verbindung mit einem Verstärker . . . . . . . . . . . . . . . . . . . . . . . . . . . . . . . .54
Netzkabel anschließen . . . . . . . . . . . . . . . . . . . . . . . . . . . . . . . . . . . . . . . . . .54
Gerät einschalten . . . . . . . . . . . . . . . . . . . . . . . . . . . . . . . . . . . . . . . . . . . . . . .55
AUDIOWIEDERGABE 56
Audio-CD wiedergeben . . . . . . . . . . . . . . . . . . . . . . . . . . . . . . . . . . . . . . . . . .56
Musikdateien von USB-Speicher wiedergeben . . . . . . . . . . . . . . . . . . . .57
Erweiterte Funktionen. . . . . . . . . . . . . . . . . . . . . . . . . . . . . . . . . . . . . . . . . . .58
Zufällige Wiedergabe . . . . . . . . . . . . . . . . . . . . . . . . . . . . . . . . . . . . . . . . . . . . . . . . . . . . . . . . . . . . . . . . 58
Wiederholte Wiedergabe. . . . . . . . . . . . . . . . . . . . . . . . . . . . . . . . . . . . . . . . . . . . . . . . . . . . . . . . . . . . . 58
Titel in der angegebenen Reihenfolge abspielen (Programmwiedergabe) . . . . . . . . . . . . . 58
Einen festgelegten Abschnitt wiederholt abspielen (wiederholte A-B-Wiedergabe) . . . . 59
Hochwertigen Klang genießen (PURE DIRECT) . . . . . . . . . . . . . . . . . . . . . . . . . . . . . . . . . . . . . . . . 59
Informationen auf dem Display umschalten . . . . . . . . . . . . . . . . . . . . . . . . . . . . . . . . . . . . . . . . . . 59
Anzeigehelligkeit ändern. . . . . . . . . . . . . . . . . . . . . . . . . . . . . . . . . . . . . . . . . . . . . . . . . . . . . . . . . . . . . 59
ANHANG 60
Teilebezeichnungen. . . . . . . . . . . . . . . . . . . . . . . . . . . . . . . . . . . . . . . . . . . . .60
Frontblende. . . . . . . . . . . . . . . . . . . . . . . . . . . . . . . . . . . . . . . . . . . . . . . . . . . . . . . . . . . . . . . . . . . . . . . . . . 60
Display. . . . . . . . . . . . . . . . . . . . . . . . . . . . . . . . . . . . . . . . . . . . . . . . . . . . . . . . . . . . . . . . . . . . . . . . . . . . . . . 61
Rückseite. . . . . . . . . . . . . . . . . . . . . . . . . . . . . . . . . . . . . . . . . . . . . . . . . . . . . . . . . . . . . . . . . . . . . . . . . . . . . 61
Fernbedienung. . . . . . . . . . . . . . . . . . . . . . . . . . . . . . . . . . . . . . . . . . . . . . . . . . . . . . . . . . . . . . . . . . . . . . . 62
Weiterführende Einstellungen . . . . . . . . . . . . . . . . . . . . . . . . . . . . . . . . . . .63
Wiedergabemodus-Speicher (PLAY MEM) . . . . . . . . . . . . . . . . . . . . . . . . . . . . . . . . . . . . . . . . . . . . . 63
Bereitschaftsmodus (RDY MODE). . . . . . . . . . . . . . . . . . . . . . . . . . . . . . . . . . . . . . . . . . . . . . . . . . . . . . 63
Automatische Wiedergabe (AUTO PLAY) . . . . . . . . . . . . . . . . . . . . . . . . . . . . . . . . . . . . . . . . . . . . . . 63
Automatisches Standby (AUTO STBY) . . . . . . . . . . . . . . . . . . . . . . . . . . . . . . . . . . . . . . . . . . . . . . . . . 63
Unterstützte Dateiformate/Disks/USB-Speicher . . . . . . . . . . . . . . . . . . .64
Technische Daten . . . . . . . . . . . . . . . . . . . . . . . . . . . . . . . . . . . . . . . . . . . . . . .65
Störungsbeseitigung . . . . . . . . . . . . . . . . . . . . . . . . . . . . . . . . . . . . . . . . . . . .66

52 De
VOR DER BENUTZUNG DES GERÄTS
• Optischer Digitalausgang
• Koaxialer Digitalausgang
• Unterstützt die Wiedergabe von CD-R- und CD-RW-Disks
• Unterstützt die Wiedergabe von Dateien auf USB-Speichern oder Daten-CDs (MP3/
WMA/AAC/WAV/FLAC)
• Zufällige Wiedergabe (Seite 58)
• Wiederholte Wiedergabe (Seite 58)
• Programmwiedergabe (nur Audio-CDs) (Seite 58)
• Wiederholte A-B-Wiedergabe (nur Audio-CDs) (Seite 59)
• PURE DIRECT-Funktion (Seite 59)
• Konfigurierbare Bildschirmeinstellungen (anzuzeigende Information/Helligkeit)
(Seite 59)
• Ferngesteuertes Standby-Ein/Aus
• Wiedergabemodus-Speicher (Seite 63)
• Bereitschaftsmodus (Seite 63)
• Automatische Wiedergabe (Seite 63)
• Automatisches Standby (Seite 63)
• Vorliegende Anleitung beschreibt die Bedienvorgänge vornehmlich unter
Verwendung der Fernbedienung.
• Die Abbildungen in vorliegender Anleitung dienen ausschließlich zur
Veranschaulichung der Bedienungsvorgänge.
• In vorliegender Anleitung wird eine Musik-CD als Audio-CD und eine CD mit MP3/
WMA/AAC/WAV/FLAC-Daten als Daten-CD bezeichnet.
• Änderungen der technischen Daten und des Designs jederzeit ohne
Vorankündigung vorbehalten.
•
WARNUNG weist auf die Gefahr einer schweren oder tödlichen
Verletzung hin.
•
VORSICHT weist auf die Gefahr einer Körperverletzung hin.
• hilft Störungen und Beschädigungen dieses Geräts zu vermeiden.
• weist auf ergänzende Informationen hin, die nützlich sein könnten.
Merkmale Über diese Anleitung
Achtung
Hinweis

De 53
• Fernbedienung
• Netzkabel
• Stereo-Cinchkabel
• Batterien (AA, R6, UM-3) (x 2)
• Vorliegendes Benutzerhandbuch
Zubehör
Batterien in Fernbedienung
einsetzen
Legen Sie die Batterien mit der
richtigen Ausrichtung ein.
Reichweite der
Fernbedienung
Richten Sie die Fernbedienung
im rechts abgebildeten Bereich
auf den Fernbedienungssensor
des Geräts aus.
Batterien (AA, R6, UM-3)
30° 30°
Max. 6 m

54 De
VORBEREITUNG
VORSICHT
• Stecken Sie die Netzkabel aller Geräte erst dann in die Steckdose, wenn alle anderen
Verbindungen abgeschlossen sind.
Schließen Sie nach dem Herstellen aller Verbindungen das zugehörige Netzkabel an
der Buchse AC IN des vorliegenden Geräts und dann an einer Netzsteckdose an.
Verbindung mit einem Verstärker Netzkabel anschließen
VerstärkerVerstärker
Stereo-Cinchkabel
(zugehörig)
Koaxiales Digitalkabel
(handelsüblich)
Optisches Digitalkabel
(handelsüblich) Zur Wand-/
Netzsteckdose
Vorliegendes Gerät (Rückseite)
Netzkabel
(zugehörig)

De 55
Drücken Sie zum Einschalten des Geräts A (Ein/Aus) an der Frontblende.
Hinweis
• Wird bei eingeschaltetem Gerät A (Ein/Aus) auf der Fernbedienung gedrückt, schaltet das Gerät
in den Standby-Modus.
• Die Betriebsanzeige am Gerät funktioniert wie folgt:
Leuchtet hell: Gerät eingeschaltet
Leuchtet schwach: Standby-Modus
Aus: Gerät ausgeschaltet
• Vorliegendes Gerät verfügt über eine automatische Standby-Funktion, welche Strom einspart
(Seite 63).
(Vorgabe: Automatisches Standby ein)
Gerät einschalten
A (Ein/Aus)
Betriebsanzeige

56 De
CD/USB
OPEN/CLOSE
AUDIOWIEDERGABE
Mit diesem Gerät können Sie sowohl Daten-CDs als auch Audio-
CDs abspielen. Näheres über die von diesem Gerät abspielbaren
Dateiformate findet sich unter „Unterstützte Dateiformate/Disks/
USB-Speicher“ (Seite 64).
1
Wenn die USB-Anzeige an der Frontblende leuchtet,
drücken Sie CD/USB, um den Disc-Modus aufzurufen.
2Legen Sie eine CD in die Disklade ein.
Drücken Sie OPEN/CLOSE zum Öffnen bzw. Schließen der
Disklade.
Hinweis
• Die Disklade kann alternativ mit (Öffnen/Schließen) an der
Frontblende geöffnet bzw. geschlossen werden.
• Wenn das Gerät für die Wiedergabe einer Audio-CD bereit ist,
leuchtet die Wiedergabemedienanzeige (CD) auf dem Display.
3Drücken Sie (Wiedergabe).
Die Anzeige (Wiedergabe) auf dem Display leuchtet, und
die Wiedergabe beginnt.
Hinweis
• Während der Wiedergabe von Audiodateien leuchtet die
Wiedergabemedienanzeige für das entsprechende Dateiformat.
Achtung
• Stecken Sie die Finger nicht in das Disklade-Fach. Andernfalls kann
Verletzung verursacht werden.
Hinweis
• Nach dem Einlegen einer CD in die Disklade wird die Disklade geschlossen und
die Wiedergabe gestartet, sobald Sie einen der folgenden Vorgänge ausführen:
– Drücken Sie (Wiedergabe).
– Drücken Sie eine einer Titelnummer entsprechenden Zifferntaste.
• Das Gerät kann so konfiguriert werden, dass die Wiedergabe automatisch
startet, wenn das Gerät eingeschaltet oder auf den Disc- oder USB-Modus
umgeschaltet wird (Seite 63).
(Vorgabe: Automatische Wiedergabe ein)
Bedienen Sie das Gerät mit folgenden Tasten auf der
Fernbedienung.
* Die Steuertasten auf der Frontblende funktionieren wie folgt:
(Rücklauf/Rückwärtssuchlauf):
Springt zum vorigen Titel zurück. Springt zum Anfang des
aktuell wiedergegebenen Titels zurück. Bei gedrückt
gehaltener Taste werden Titel rückwärts abgesucht.
(Vorlauf/Vorwärtssuchlauf):
Springt zum nächsten Titel. Bei gedrückt gehaltener Taste
werden Titel vorwärts abgesucht.
Audio-CD wiedergeben
Verfügbare Tasten Funktion
(Wiedergabe) Die Anzeige (Wiedergabe) auf dem
Display leuchtet, und die Wiedergabe beginnt.
(Pause)
Die Anzeige (Pause) auf dem Display
leuchtet, und die Wiedergabe wird
unterbrochen. , alternativ drücken,
um die Wiedergabe fortzusetzen.
(Stopp) Stoppt die Wiedergabe.
(Rückwärtssuchlauf)* Sucht Titel rückwärts ab.
(Vorwärtssuchlauf)* Sucht Titel vorwärts ab.
(Rücklauf)*
Springt zum vorigen Titel zurück. Springt zum
Anfang des aktuell wiedergegebenen Titels
zurück.
(Vorlauf)* Springt zum nächsten Titel.
Zifferntasten Geben Sie eine Titelnummer ein, um den
entsprechenden Titel direkt auszuwählen.
FOLDER ,
(nur Daten-CDs) Zum Auswählen eines Ordners.
Zifferntasten

De 57
CD/USB
Sie können auf diesem Gerät Musikdateien wiedergeben, die sich
auf einem USB-Speicher befinden. Einzelheiten zu den
unterstützten USB-Speichern finden sich unter „Unterstützte
Dateiformate/Disks/USB-Speicher“ (Seite 64).
1Wenn die USB-Anzeige an der Frontblende nicht
leuchtet, drücken Sie CD/USB, um den USB-Modus
aufzurufen.
Die USB-Anzeige an der Frontblende leuchtet orange.
2
Stecken Sie den USB-Speicher an der Buchse USB ein.
Wenn das Gerät wiedergabebereit ist, leuchtet die
Wiedergabemedienanzeige (USB) auf dem Display auf, und
die USB-Anzeige an der Frontblende leuchtet grün.
Achtung
• Setzen Sie kein USB Verlängerungskabel ein.
3Drücken Sie (Wiedergabe).
Die Anzeige (Wiedergabe) auf dem Display leuchtet, und
die Wiedergabe beginnt.
Hinweis
• Während der Wiedergabe von Audiodateien leuchtet die
Wiedergabemedienanzeige für das entsprechende Dateiformat.
• Das Gerät spielt unterstützte Musikdateien vom USB-Speicher in der
Reihenfolge der Erstellungsdaten ab.
Achtung
• Entfernen Sie den USB-Speicher nicht während der Wiedergabe oder
während auf der Frontblende „USB READING“ in der Informationsanzeige
erscheint. Drücken Sie in diesem Fall zuerst CD/USB, um in den Disc-
Modus zu wechseln, und stellen Sie sicher, dass die USB-Anzeige erlischt,
bevor Sie den USB-Speicher entfernen.
Bedienen Sie das Gerät mit folgenden Tasten auf der
Fernbedienung.
* Die Steuertasten auf der Frontblende funktionieren wie folgt:
(Rücklauf/Rückwärtssuchlauf):
Springt zum vorigen Titel zurück. Springt zum Anfang des
aktuell wiedergegebenen Titels zurück. Bei gedrückt
gehaltener Taste werden Titel rückwärts abgesucht.
(Vorlauf/Vorwärtssuchlauf):
Springt zum nächsten Titel. Bei gedrückt gehaltener Taste
werden Titel vorwärts abgesucht.
Musikdateien von USB-Speicher wiedergeben
Vorliegendes Gerät (Frontblende)
USB-Speicher
Verfügbare Tasten Funktion
(Wiedergabe) Die Anzeige (Wiedergabe) auf dem
Display leuchtet, und die Wiedergabe beginnt.
(Pause)
Die Anzeige (Pause) auf dem Display
leuchtet, und die Wiedergabe wird
unterbrochen. , alternativ drücken,
um die Wiedergabe fortzusetzen.
(Stopp) Stoppt die Wiedergabe.
(Rückwärtssuchlauf)* Sucht Titel rückwärts ab.
(Vorwärtssuchlauf)* Sucht Titel vorwärts ab.
(Rücklauf)*
Springt zum vorigen Titel zurück. Springt zum
Anfang des aktuell wiedergegebenen Titels
zurück.
(Vorlauf)* Springt zum nächsten Titel.
FOLDER , Zum Auswählen eines Ordners.

58 De
RANDOM
CLEAR
ENTER
REPEAT
PROGRAM
Der Wiedergabemodus und die Anzeigeeinstellungen mithilfe
erweiterter Funktionen konfiguriert werden.
Zufällige Wiedergabe
Drücken Sie RANDOM, um Titel in zufälliger Reihenfolge
abzuspielen. Mit jedem Druck auf RANDOM ändert die Einstellung
für die zufällige Wiedergabe wie folgt:
Hinweis
• Um die zufällige Wiedergabe abzubrechen, öffnen Sie die Disklade.
Wiederholte Wiedergabe
Drücken Sie REPEAT, um Titel wiederholt abzuspielen. Mit jedem
Druck auf REPEAT ändert die Einstellung für die wiederholte
Wiedergabe wie folgt:
Hinweis
• Um die wiederholte Wiedergabe abzubrechen, öffnen Sie die Disklade.
Titel in der angegebenen Reihenfolge
abspielen (Programmwiedergabe)
Sie können Audio-CD-Titel in der angegebenen Reihenfolge
abspielen.
1Drücken Sie PROGRAM bei gestoppter Wiedergabe.
2Geben Sie mit den Zifferntasten die Titelnummer
eines zu programmierenden Titels ein.
3Drücken Sie ENTER.
Wiederholen Sie die Schritte 2 und 3, um weitere Titel zu
programmieren.
Drücken Sie CLEAR, um Titel am Ende beginnend vom
Programm zu löschen.
4Drücken Sie (Wiedergabe).
Das Gerät beginnt mit der Wiedergabe der Titel in der
programmierten Reihenfolge.
Hinweis
• Die Programmwiedergabe funktioniert nicht mit Daten-CDs oder USB-
Speichern.
• Sie können bis zu 24 Titel programmieren.
• Das gesamte Titelprogramm kann auf folgende Weisen gelöscht werden:
– Drücken Sie CLEAR bei gestoppter Programmwiedergabe.
– Schalten Sie das Gerät aus oder in den Standby-Modus.
– Öffnen Sie die Disklade.
Erweiterte Funktionen
Anzeige Einstellung
RNDM Spielt alle Titel in zufälliger Reihenfolge ab.
Aus Deaktiviert die zufällige Wiedergabe.
Anzeige Einstellung
REP Spielt einen Titel wiederholt ab.
REP FOLDER
(nur Daten-CDs und
USB-Speicher)
Spielt die Titel im aktuellen Ordner wiederholt ab.
REP ALL Spielt alle Titel wiederholt ab.
Aus Deaktiviert die wiederholte Wiedergabe.
TRACKTEXT AAC WAV FLAC RESUM RDY TOTAL REMAIN RNDM REP FOLDER ALL A - BCD PROG
TRACKTEXT AAC WAV FLAC RESUM RDY TOTAL REMAIN RNDM REP FOLDER ALL A - BCD PROG
Zifferntasten

De 59
A/B
PURE
DIRECT
DISPLAY
DIMMER
Einen festgelegten Abschnitt wiederholt
abspielen (wiederholte A-B-Wiedergabe)
Sie können während der Audio-CD-Wiedergabe den Start- und
Endpunkt eines Titelabschnitts festlegen, der wiederholt
abzuspielen ist.
1Eine Audio-CD abspielen.
2Drücken Sie A/B an der Stelle, ab welcher die
Wiedergabe zu wiederholen ist.
3Drücken Sie erneut A/B an der Stelle, bis zu welcher
die Wiedergabe zu wiederholen ist.
Das Gerät beginnt die wiederholte Wiedergabe.
Hinweis
• Die wiederholte Wiedergabe funktioniert nicht mit Daten-CDs oder USB-
Speichern.
• Die wiederholte A-B-Wiedergabe kann nicht eingestellt werden, wenn
PURE DIRECT aktiviert ist.
• Die wiederholte A-B-Wiedergabe kann auf folgende Weisen aufgehoben
werden:
– Drücken Sie erneut A/B.
– Drücken Sie (Stopp).
– Öffnen Sie die Disklade.
Hochwertigen Klang genießen
(PURE DIRECT)
Bei aktiviertem PURE DIRECT wird kein Digitalaudio ausgegeben.
Auf diese Weise reduziert PURE DIRECT Störgeräusche, welche
die Klangqualität beeinträchtigen würden, und ermöglicht die
Wiedergabe von qualitativ hochwertigem Klang.
Mit jedem Druck auf PURE DIRECT wird PURE DIRECT ein- bzw.
ausgeschaltet.
Hinweis
• Soll PURE DIRECT eingesetzt werden, verbinden Sie die Buchsen
ANALOG OUT auf der Rückseite mit dem Verstärker. Die Buchsen
DIGITAL OUT geben keine Signale aus.
• Bei aktiviertem PURE DIRECT geschieht Folgendes:
– Die Anzeige PURE DIRECT leuchtet.
– Das Frontblende-Display bleibt während der Wiedergabe von Inhalten
ausgeschaltet.
– Eine minimale Anzahl von Anzeigen und Meldungen wird während der
Bedienung des Geräts angezeigt.
– Diese Einstellung bleibt nach dem Ausschalten des Gerät erhalten.
Informationen auf dem Display
umschalten
Mit jedem Druck auf DISPLAY während der Wiedergabe werden
die Informationen auf dem Display wie folgt umgeschaltet:
Hinweis
• Die Informationsanzeige zeigt bis zu 64 Zeichen (alphanumerische 1-Byte-
Zeichen und mehrere Symbole) an.
Anzeigehelligkeit ändern
Mit jedem Druck auf DIMMER wird zwischen vier Stufen der
Anzeigehelligkeit umgeschaltet.
TEXT AAC WAV FLAC RESUM RDY TOTAL REMAIN RNDM FOLDER ALLPROG CD TRACK REP
TEXT AAC WAV FLAC RESUM RDY TOTAL REMAIN RNDM FOLDER ALLPROG CD TRACK REP Wiedergegebene
Medien Informationen auf dem Display
Audio-CD
Ablaufzeit Restzeit des aktuellen Titels (TRACK
REMAIN) Gesamte Restzeit der CD (TOTAL
REMAIN) Titelname* Interpretenname*
Albumtitel*
* Bei eingebettetem CD-Text
Daten-CD,
USB-Speicher
Ablaufzeit Titelname* Interpretenname*
Albumtitel*
* Bei eingebetteten Tags

60 De
ANHANG
Frontblende
1A (Ein/Aus) (Seite 55)
2Betriebsanzeige (Seite 55)
3Buchse USB (Seite 57)
4Anzeige USB (Seite 57)
5CD/USB (Seiten 56, 57)
6PURE DIRECT (Seite 59)
7Anzeige PURE DIRECT (Seite 59)
8Disklade (Seite 56)
9 (Öffnen/Schließen) (Seite 56)
0Fernbedienungssensor (Seite 53)
A (Rücklauf/Rückwärtssuchlauf) (Seiten 56, 57)
B (Vorlauf/Vorwärtssuchlauf) (Seiten 56, 57)
C (Wiedergabe) (Seiten 56, 57, 58)
D (Pause) (Seiten 56, 57)
E (Stopp) (Seiten 56, 57, 58, 59)
Teilebezeichnungen
1 2 3 4 7 0
8 9
5 6 A B C D E

De 61
Display
1Anzeige / (Wiedergabe/Pause) (Seiten 56, 57)
2Wiedergabemedienanzeige (Seiten 56, 57)
3Anzeige für erweiterte Einstellungen (Seite 63)
4Zeitanzeige (Seite 59)
5Wiedergabemodusanzeige (Seiten 58, 59)
6Informationsanzeige (Seiten 58, 59, 63)
Rückseite
1Buchsen ANALOG OUT (Seite 54)
2Buchse DIGITAL OUT (COAXIAL) (Seite 54)
3Buchse DIGITAL OUT (OPTICAL) (Seite 54)
4Buchse AC IN (Seite 54)
TRACKCD TEXT AAC WAV FLAC RESUM RDY TOTAL REMAIN PROG RNDM REP FOLDER ALL A - B
1 62 3 54
2 3 41

62 De
Fernbedienung
1A (Ein/Aus) (Seite 55)
2Fernbedienungssignal-Sender (Seite 53)
3OPEN/CLOSE (Seite 56)
4PROGRAM (Seite 58)
5REPEAT (Seite 58)
6DIMMER (Seite 59)
7RANDOM (Seite 58)
8A/B (Seite 59)
9DISPLAY (Seite 59)
0Zifferntasten (Seiten 56, 58)
ACLEAR (Seite 58)
BENTER (Seite 58)
C (Rückwärtssuchlauf), (Vorwärtssuchlauf) (Seiten 56, 57)
(Pause) (Seiten 56, 57)
(Rücklauf) (Seiten 56, 57)
(Vorlauf) (Seiten 56, 57)
(Wiedergabe) (Seiten 56, 57, 58)
(Stopp) (Seiten 56, 57, 58, 59)
FOLDER , (Seiten 56, 57)
DCD/USB (Seiten 56, 57)
EPURE DIRECT (Seite 59)
3
4
9
0
C
7
8
A
B
D
E
6
5
21

De 63
In diesem Abschnitt wird beschrieben, wie Sie verschiedene fortgeschrittene
Funktionen konfigurieren. Sie können die meisten dieser Einstellungen an der
Frontblende konfigurieren. (Gewisse Einstellungen erfordern die Fernbedienung.)
1Schalten Sie das Gerät in den Standby-Modus (Seite 55).
2Halten Sie gleichzeitig PURE DIRECT, (Öffnen/Schließen) und
(Wiedergabe) mindestens drei Sekunden lang gedrückt.
Die folgende Anzeige erscheint auf dem Informationsdisplay an der Frontblende,
und das Gerät wechselt in den Einstellmodus. Sie können den Wiedergabemodus-
Speicher, den Bereitschaftsmodus, die automatische Wiedergabe und das
automatische Standby der Reihe nach einstellen.
3Drücken Sie oder , um die Funktion ein-
oder auszuschalten.
4Drücken Sie (Stopp).
Die Einstellung wird bestätigt und der nächste Parameter automatisch ausgewählt.
Wiederholen Sie die Schritte 3 und 4. Nach Abschluss aller Einstellungen
erscheint die folgende Anzeige im Informationsdisplay an der Frontblende, und
das Gerät wechselt in den Standby-Modus.
Hinweis
• Wird während dieses Vorgangs (Wiedergabe) gedrückt, wird die gegenwärtige
Einstellung bestätigt und das Gerät in den Standby-Modus versetzt.
Wiedergabemodus-Speicher (PLAY MEM)
Wenn diese Funktion aktiviert ist, behält das Gerät die Einstellungen für wiederholte
und zufällige Wiedergabe auch nach dem Ausschalten des Geräts bei. Bei aktiviertem
Wiedergabemodus-Speicher leuchtet die Anzeige für erweiterte Einstellungen
(RESUM) auf dem Display.
Vorgabe: Aus
Hinweis
• Wenn Sie das Gerät einschalten, nachdem Sie den Wiedergabemodus-Speicher aktiviert haben,
spielt das Gerät den zuletzt wiedergegebenen Titel oder die zuletzt abgespielte Datei von Anfang
an ab.
Bereitschaftsmodus (RDY MODE)
Wenn diese Funktion aktiviert ist, unterbricht das Gerät nach jedem Titel die
Wiedergabe. Sie können die Wiedergabe des nächsten Titels nach Belieben starten.
Bei aktiviertem Bereitschaftsmodus leuchtet die Anzeige für erweiterte Einstellungen
(RDY) auf dem Display.
Vorgabe: Aus
Automatische Wiedergabe (AUTO PLAY)
Wenn diese Funktion aktiviert ist, startet das Gerät automatisch die Wiedergabe, wenn
es eingeschaltet oder auf den Disc- oder USB-Modus umgeschaltet wird.
Vorgabe: Ein
Automatisches Standby (AUTO STBY)
Wenn diese Funktion aktiviert ist, schaltet das Gerät automatisch in den Standby-
Modus, wenn bei gestoppter Wiedergabe 20 Minuten lang nicht bedient wird.
Vorgabe: Ein
Weiterführende Einstellungen
PURE DIRECT
TRACKTEXT AAC WAV FLAC RESUM RDY TOTAL REMAIN RNDM REP FOLDER ALLPROG CD TRACKTEXT AAC WAV FLAC RESUM RDY TOTAL REMAIN RNDM REP FOLDER ALLPROG CD
CD TRACK REP TEXT AAC WAV FLAC RESUM RDY TOTAL REMAIN RNDM FOLDER ALLPROG

64 De
❑Unterstützte Dateiformate
* Nur Format Linear PCM.
Hinweis
• Dateien von einer Daten-CD oder einem USB-Speicher werden in der Reihenfolge der
Erstellungsdaten abgespielt.
• Dieses Gerät unterstützt Disks im Format ISO9660.
• Bei der Wiedergabe eine VBR-Datei (mit variabler Bitrate) kann die Ablaufzeit womöglich nicht
korrekt angezeigt werden.
• DRM (Digital Rights Management)-verschlüsselte Inhalte lassen sich nicht abspielen.
❑Unterstützte Disks
Bitte verwenden Sie Disks mit den folgenden Logos:
Achtung
• Verwenden Sie keine Disks mit ungewöhnlichen Formen, Klebeband oder Aufklebern. Andernfalls
kann eine Störung des Geräts verursacht werden.
• Gewisse oder unsachgemäß aufgenommene CD-RW-Disks können möglicherweise nicht
abgespielt werden.
• Um eine 8-cm-CD abzuspielen, legen Sie sie in den inneren vertieften Bereich der Disklade.
Legen Sie keine gewöhnliche (12-cm-) CD auf eine 8-cm-CD.
Unterstützte Dateiformate/Disks/USB-Speicher
Datei Sampling-Frequenz (kHz) Bit-Tiefe
(Bit)
Bitrate
(kbps)
Anzahl
Kanäle
MP3 32/44,1/48 — 32-320 2
WMA 32/44.1/48 — 48-192 2
AAC 32/44.1/48 — 8-320 2
WAV * 32/44.1/48/64/88.2/96 16/24 — 2
FLAC 32/44.1/48/64/88.2/96 16/24 — 2
Daten-CD USB-Speicher
Anzahl der Ordnerhierarchien
(einschließlich des
Stammordners)
99
Anzahl Ordner 999 999
Anzahl Dateien 1100 65535
Compact Discs (Audio-CDs)
CD-R- und CD-RW-Disks
• Disks mit einer der folgenden Angaben:
FOR CONSUMER
FOR CONSUMER USE
FOR MUSIC USE ONLY
• CD-R- oder CD-RW-Disks können nur finalisiert abgespielt
werden.
Hinweis
• Gewisse oder unsachgemäß aufgenommene CD-R- oder CD-RW-Disks
können möglicherweise nicht abgespielt werden.
CD-TEXT-Disks
Solche Disks enthalten eingebettete Textinformationen wie
Albumtitel, Titelnamen und Interpretennamen. Diese Informationen
(alphanumerische Zeichen und mehrere Symbole) sowie die
Abspielzeit werden angezeigt.

De 65
❑Umgang mit Disks
• Gehen Sie vorsichtig mit Disks um, sodass die
Aufnahmefläche nicht zerkratzt wird. Biegen Sie die Disks
nicht.
• Wischen Sie Fingerabdrücke oder Staub mit einem weichen
Tuch von der Mitte zum Umfang hin von der Aufnahmefläche
ab.
• Verwenden Sie zum Abwischen einer Disk niemals Schallplattenreiniger,
Antistatikmittel oder andere Chemikalien.
• Beschriften Sie nur die Labelseite mit einem weichen Filzstift.
• Lassen Sie keine Disks an Stellen, wo sie direkter Sonneneinstrahlung oder über
einen längeren Zeitraum hohen Temperaturen oder Feuchtigkeit ausgesetzt sind.
• Verwenden Sie keine handelsüblichen Linsenreiniger. Andernfalls kann eine Störung
verursacht werden.
❑Unterstützte USB-Speicher
Stellen Sie sicher, dass die folgenden Anforderungen erfüllt sind, bevor Sie mit diesem
Gerät Musikdateien von einem USB-Speicher abspielen:
• Der USB-Speicher erfüllt die Anforderungen der Massenspeicherklasse.
• Die Daten wurden mit dem Dateisystem FAT16 oder FAT32 aufgezeichnet.
Achtung
• Gewisse USB-Speicher mögen nicht richtig funktionieren.
• Verschlüsselte USB-Speicher sind nicht einsetzbar.
• Yamaha und ihre Händler sind nicht für den Verlust von Daten auf einem mit diesem Gerät
verbundenen USB-Speicher verantwortlich. Wir empfehlen, dass Sie zur Vermeidung von
Datenverlust Sicherungsdaten aufbewahren.
• Yamaha garantiert nicht die Funktion oder die Stromversorgung von USB-Speichern.
Das Gerät entspricht folgenden technischen Daten.
Audio-Abschnitt
• Ausgangspegel (1 kHz, 0 dB, Fs 44,1 kHz) ............................................... 2,0 ± 0,3 V.
• Signal-Rausch-Verhältnis (IHF-A-Netzwerk) (1 kHz, 0 dB, Fs 44,1 kHz)... min. 105 dB
• Dynamikbereich (1 kHz, 0 dB, Fs 44,1 kHz)................................................ min. 96 dB
• Harmonische Verzerrung (1 kHz, 0 dB, Fs 44,1 kHz)..............................max. 0,003 %
• Frequenzgang
Audio-CD .................................................................................................. 2 Hz–20 kHz
Daten-CD/USB Fs 48 kHz ................................................................... 2 Hz–22 kHz
Fs 96 kHz ........................................................2 Hz–44 kHz, –3 dB
Laser-Abschnitt
• Lasertyp ............................................................................................................ AIGaAs
• Wellenlänge .......................................................................................................790 nm
• Laserleistung ..........................................................................................max. 1,04 mW
Allgemeines
• Stromversorgung
USA- und Kanada-Modelle.................................................................. 120 VAC, 60 Hz
Australien-Modell......................................................................... 230–240 VAC, 50 Hz
Europa- und Großbritannien-Modelle .................................................. 230 VAC, 50 Hz
Asien- und Universalmodelle.................................................. 110–240 VAC, 50/60 Hz
China-Modell........................................................................................ 220 VAC, 50 Hz
• Leistungsaufnahme ...............................................................................................11 W
• Standby-Leistungsaufnahme
Standby-Modus ....................................................................................................0,2 W
Gerät ausgeschaltet .............................................................................................0,2 W
• Abmessungen (B× H× T) ............................................................... 435 x 87 x 260 mm
• Gewicht................................................................................................................3,5 kg
* Der Inhalt dieser Bedienungsanleitung gilt für die neuesten technischen Daten zum Zeitpunkt der
Veröffentlichung. Um die neueste Version der Anleitung zu erhalten, rufen Sie die Website von
Yamaha auf und laden Sie dann die Datei mit der Bedienungsanleitung herunter.
Technische Daten
Ausgangsbuchsen
• Analogaudio x 1 (Cinch, unsymmetrisch)
• Digitalaudio
COAXIAL x 1, OPTICAL x 1
Andere Buchsen
• USB x 1 (USB 2.0)

66 De
Beziehen Sie sich auf die untere Tabelle, wenn dieses Gerät nicht richtig funktioniert. Ist das aufgetretene Problem nachfolgend nicht aufgeführt oder hilft die vorgeschlagene Lösung
nicht ab, drücken Sie A (Ein/Aus) an der Frontblende, um das Gerät auszuschalten, ziehen Sie das Netzkabel von der Netzsteckdose ab und wenden Sie sich an den nächsten
autorisierten Yamaha Händler oder Kundendienst.
Störungsbeseitigung
Problem Ursache Lösung Seite
Der Ein/Aus-Schalter schaltet das Gerät
nicht ein. Das Netzkabel ist möglicherweise nicht richtig eingesteckt. Das Netzkabel fest mit der Netzsteckdose verbinden. 54
Die Disklade schließt nicht vollständig. Es befindet sich ein Fremdkörper im Disklade-Fach. Prüfen Sie die Disklade und entfernen Sie jegliche Fremdkörper. —
Eingelegte Disk wird nicht
wiedergegeben.
Die Disk ist zerkratzt. Wechseln Sie die Disk. —
Es hat sich Kondenswasser auf der Linse im Gerät gebildet. Schalten Sie das Gerät ein, warten Sie 20 bis 30 Minuten und
versuchen Sie dann erneut, die Disk abzuspielen. —
Die Disk wurde verkehrt herum eingelegt. Stellen Sie sicher, dass die Labelseite der Disk nach oben weist. —
Die Disk ist verschmutzt oder zerkratzt. Wischen Sie den Schmutz von der Disk-Oberfläche ab bzw.
verwenden Sie eine nicht verkratzte Disk. 65
Sie versuchen Dateien abzuspielen, deren Format das Gerät nicht
unterstützt.
Stellen Sie sicher, dass das Format der Dateien auf der Disk vom
Gerät unterstützt sind. 64
Sie versuchen eine Disk abzuspielen, die das Gerät nicht unterstützt. Stellen Sie sicher, dass die Disk vom Gerät unterstützt ist. 64, 65
Das Gerät ist im USB-Modus. Drücken Sie CD/USB, um den Disc-Modus aufzurufen. 56, 60, 62
Die Wiedergabe beginnt nicht sofort
oder am richtigen Punkt. Die Disk ist verschmutzt oder zerkratzt. Wischen Sie den Schmutz von der Disk-Oberfläche ab bzw.
verwenden Sie eine nicht verkratzte Disk. 65
Musikdatei auf einem USB-Speicher
wird nicht wiedergegeben.
Der USB-Speicher ist nicht sachgemäß mit dem Gerät verbunden. Schließen Sie den USB-Speicher richtig an. 57
Sie versuchen Dateien abzuspielen, deren Format das Gerät nicht
unterstützt.
Stellen Sie sicher, dass das Format der Dateien auf dem USB-
Speicher vom Gerät unterstützt sind. 64
Das Gerät ist im Disc-Modus. Drücken Sie CD/USB, um den USB-Modus aufzurufen. 57, 60, 62
Kein Ton Dieses Gerät ist nicht richtig mit dem Verstärker verbunden. Prüfen Sie die Verbindung zum Verstärker. 54
Vom mit den Buchsen DIGITAL OUT
verbundenen Gerät wird kein Audio
ausgegeben.
PURE DIRECT ist aktiviert. Deaktivieren Sie PURE DIRECT. 59

De 67
Der Ton wird unterbrochen.
Das Gerät ist Vibrationen oder Stößen ausgesetzt. Ändern Sie den Standort des Geräts. —
Die Disk ist verschmutzt oder zerkratzt. Wischen Sie den Schmutz von der Disk-Oberfläche ab bzw.
verwenden Sie eine nicht verkratzte Disk. 65
Hörbares Summen oder Brummen wird
erzeugt. Das Stereo-Cinch-Kabel ist nicht fest verbunden. Schließen Sie das Stereo-Cinch-Kabel fest an. Tritt keine Besserung
ein, das Kabel selbst auf Defekte untersuchen. 54
Der Tuner wird gestört. Das Gerät befindet sich zu nah am Tuner. Stellen Sie das Gerät weiter vom Tuner entfernt auf, oder schalten Sie
das Gerät aus. —
Die Disklade erzeugt Geräusche. Die Disk ist verformt. Verwenden Sie eine nicht verformte Disk. —
Keine Anzeige auf dem Display PURE DIRECT ist aktiviert. Deaktivieren Sie PURE DIRECT. 59
In der Informationsanzeige wird kein
Ordner- oder Dateiname angezeigt.
Der Ordner- oder Dateiname enthält andere als alphanumerische 1-
Byte-Zeichen.
Verwenden Sie alphanumerische 1-Byte-Zeichen für die Ordner- und
Dateinamen. 59
Die Fernbedienung funktioniert nicht
oder nicht ordnungsgemäß.
Die Batterien sind entladen. Tauschen Sie alle Batterien aus. 53
Falscher Abstand oder Winkel. Betätigen Sie die Fernbedienung innerhalb des Betriebsbereichs. 53
Der Fernbedienungssensor am Gerät ist direktem Sonnenlicht oder
starkem Licht (z.B. einer Leuchtstoffröhre) ausgesetzt. Ändern Sie die Ausrichtung der Beleuchtung oder des Geräts. —
Problem Ursache Lösung Seite

68 Sv
Läs dessa försiktighetsåtgärder noggrant
innan du fortsätter.
Se till att följa instruktionerna
Läs noggrant och följ följande
försiktighetsåtgärder för att undvika personskador
eller skador på personlig egendom.
Efter att ha noggrant läst igenom detta dokument,
ska det förvaras på en plats som alla kan komma
åt när som helst som använder produkten.
VARNING
Dessa försiktighetsåtgärder varnar dig för
risken för dödsfall eller allvarlig personskada
för dig eller andra.
Om du noterar något avvikande
• Om någon av följande avvikelser sker, ska
strömmen stängas av omedelbart.
- Strömsladden eller stickkontakten har
skadats.
- Ovanliga luktar, ljud eller rök avges från
produkten.
- Ett föremål eller vatten har tappats på
produkten.
- Sprickor eller andra skador uppträder på
produkten.
- Plötslig förlust av ljud uppstår vid användning
av produkten.
Följ stegen nedan för att stänga av strömmen.
- Stäng av strömmen till produkten.
- Koppla bort strömsladden från vägguttaget.
Fortsatt användning av produkten som den är
kan den leda till brand, elchock eller skada på
produkten. Begär inspektion eller reparation
omedelbart.
Strömförsörjning
• Skada inte strömsladden.
- Placera inte strömsladden nära värmekällor
som värmare.
- Böj eller modifiera inte strömsladden med
tvång.
- Skada inte strömsladden.
- Placera inte tunga föremål på strömsladden.
- Stapla inte något på strömsladden.
Användning av en sliten strömsladd med
kärntråden exponerad kan leda till brand,
elchock eller skada på produkten.
• Vid åskväder eller elektriska ska man undvika
att röra vid produkten, strömkontakten eller
strömsladden.
Annars kan elektriska stötar inträffa.
• Angiven spänning ska användas för denna
produkt.
Användande av felaktig spänning kan leda till
brand, elchock eller skada på produkten.
• Säkerställ att endast använda den upptagna
artikeln nedan för att leverera ström:
- Inkluderad strömsladd
Annars kan brand, brännskador eller skada på
produkten inträffa.
• Följande medföljande tillbehör ska inte
användas med andra apparater.
- Strömsladd
Annars kan brand, brännskador eller skada på
produkten inträffa.
• Kontrollera strömsladdens stickkontakt med
jämna mellanrum och ta bort smuts eller damm
som kan ha ansamlats.
Annars kan brand eller elektriska stötar inträffa.
• Var noga med att sätta in strömsladdens
stickkontakt i ett vägguttag.
Annars kan elektriska stötar eller brand eller
skada på produkten uppstå på grund av
kortslutning.
FÖRSIKTIGHETSÅTGÄRDER
• Kontakta följande kundcenter för inspektion
eller reparation.
- Butiken du köpte produkten
- Återförsäljare åt Yamaha
• Denna produkt är avsedd att användas som
hushållsapparat. Ska inte användas inom
något område eller verksamhet som kräver
hög tillförlitlighet i förhållande till människors
liv eller värdefulla tillgångar.
• Notera att Yamaha inte kan påläggas något
ansvar för förluster till följd av inkorrekt
användning eller obehörig modifiering av
produkten.

Sv 69
• Sätt i strömsladdens stickkontakt i vägguttaget
som är synligt och lättillgängligt.
Skulle problem eller funktionsstörning uppstå,
ska du enkelt kunna koppla ur stickkontakten
direkt från vägguttaget. Även om strömbrytaren
är avstängd, och så länge som strömsladden
inte kopplats bort från vägguttaget, är
produkten inte helt fri från strömkällan.
• Om du inte planerar på att använda produkten
under en längre tid, ska du ta ut strömsladden
ur vägguttaget.
Annars kan brand eller skada på produkten
inträffa.
Får inte demonteras
• Produkten får varken modifieras eller plockas
isär.
Annars kan det leda till brand, elchock eller
personskada eller skada på produkten.
Vattenvarning
• Denna produkt ska inte användas i fuktiga eller
våta förhållanden, t.ex. i badrum eller i regn på
platser utomhus.
• Placera inte behållare (som vaser eller
medicinflaskor) som innehåller vätska på denna
produkt.
Om vätska läcker in i produkten, kan brand,
elchock eller skada på produkten inträffa.
• Strömsladdens stickkontakt ska inte tas bort
eller koppla in den från vägguttaget med blöta
händer. Hantera inte produkten med blöta
händer.
Annars kan det leda till elektriska stötar eller
skador på produkten.
Brandvarning
• Några öppna lågor får inte hanteras nära denna
produkt.
Annars kan det orsaka brand.
Nedsatt syn
• Stirra aldrig rakt in i laserstrålen.
Om laserstrålen träffar dina ögon kan nedsatt
syn orsakas.
Hantering
• Tappa inte denna produkt och lägg inte någon
kraftig påverkan på produkten.
Annars kan det leda till brand, elektriska stötar
eller skador på produkten.
Batterier
• Svälj inte batterierna.
• Håll batterier borta från barn.
Annars kan de svälja batterierna av misstag.
Läckande syra från batteriet kan orsaka nedsatt
syn eller inflammation. Om batteriets fodral på
denna produkt inte är helt förseglat, ska
produkten inte användas och hållas borta från
barn. Om någon har svalt ett batteri av misstag,
ska läkare kontaktas omedelbart. Om ett batteri
sväljs kan det orsaka allvarliga kemiska
brännskador eller smälta kroppsvävnad inom
några timmar, vilket kan leda till dödsfall.
• Kasta inte batterier i en öppen eld.
• Batterierna ska inte utsättas för höga
temperaturer som exempelvis direkt solljus och
öppen eld.
Annars kan de explodera, vilket kan leda till brand
eller personskada.
• Om syra läcker ut från batteriet ska du undvika
att komma i kontakt med den.
Annars kan nedsatt syn eller kemiska
brännskador inträffa. Om du kommer i kontakt
med batterisyran ska du genast skölja bort den
med vatten och kontakta läkare.
• Använd inte andra batterier än den angivna
typen.
• Använd inte gamla och nya batterier
tillsammans.
• Använd inte olika typer av batterier tillsammans.
• Sätt inte i batterierna i en riktning som är motsatt
till riktningen för polariteten.
• Plocka inte isär batteriet.
• Icke-uppladdningsbara torrcellsbatterier får inte
laddas.
De kan explodera eller batterisyra kan läcka,
vilket kan leda till bränder, brännskador, nedsatt
syn, inflammation eller skada på produkten. Om
du kommer i kontakt med batterisyran ska du
genast skölja bort den med vatten och kontakta
läkare.
• Bär inte batterierna i en ficka eller väska eller
förvara dem tillsammans med en metallbit.
Risk för att batterierna kortsluts, vilket kan leda
till en explosion eller läckande syra, vilket i sin
tur kan leda till bränder, nedsatt syn eller
personskador.
• Planerar du att inte använda produkten under
en längre tid eller batterierna har blivit
urladdade ska du ta plocka dem från
fjärrkontrollen.
I annat fall kan batterisyra läcka, vilket kan leda
till nedsatt syn, inflammatorisk skada eller
skada på produkten.

70 Sv
• Innan du förvarar eller kasserar batterierna, ska
du fästa en bit tejp på kontakterna för att isolera
dem.
Om batteriets kontakter kommer i kontakt med
andra batterier eller metallföremål kan de
explodera eller batterisyra börja läcka ut, vilket
kan leda till brand, brännskador, nedsatt syn
eller inflammatorisk skada.
FÖRSIKTIGHET
Dessa försiktighetsåtgärder varnar dig för
risken för fysisk skada på dig eller andra.
Strömförsörjning
• Om strömsladdens kontakt som sitter i
vägguttaget har vridit sig eller är lös, ska
vägguttaget inte användas.
Annars kan det leda till brand, elchock eller
brännskador.
• När strömsladden kopplas bort från produkten
eller vägguttaget ska alltid stickkontakten och
inte själva sladden greppas.
Annars kan strömsladden skadas vilket kan
resultera i brand eller elchock.
Installation
• Placera inte denna produkt i ett instabilt läge
eller på en plats utsatt för vibrationer.
Annars kan produkten rasa eller välta, vilket kan
leda till skador på produkten.
• Blockera inte värmeavledningen för denna
produkt när du installerar den.
- Täck inte produkten med en trasa eller duk.
- Produkten ska inte installeras på en matta eller
pläd.
- Säkerställ att ovansidan är vänd uppåt.
Produkten ska inte installeras på dess sidor
eller upp och ner vänd.
- Produkten ska inte användas på ett trångt,
undermåligt ventilerat utrymme.
Bristande ventilation kan leda till överhettning i
produkten, vilket kan orsaka skador och brand
eller funktionsstörningar.
Se till att det finns tillräckligt med utrymme runt
produkten på minst 2,5 cm ovanför, 2,5 cm på
sidorna och 2,5 cm på baksidan.
• Håll dig borta från denna produkt i händelse av
jordbävningar.
Annars kan produkten rasa eller välta, med
resultat för personskador.
• Säkerställ att strömbrytaren är avstängd och att
alla anslutna kablar är borttagna innan du flyttar
produkten.
I annat fall kan kablarna fångas upp av en fot
eller hand och produkten rasar eller välter, vilket
kan leda till personskador eller skador på
produkten.
Anslutningar
• Planerar du att ansluta externa enheter ska du
först läsa ägarmanualen för varje enhet och
anslut dem i enlighet med instruktionerna.
Om du underlåter att följa instruktionerna kan
det orsaka personskador eller skador på
produkten.
Hörselnedsättning
• Utsätt dig inte för höga volymljud under en
längre tid.Kan leda till nedsättning av hörsel.
Om du upplever någon form av nedsatt hörsel,
ska du kontakta en läkare.
• Om du funderar på att ansluta produkten till
andra enheter, ska du först slå av strömmen till
alla enheter.
Annars kan det leda till nedsättning av hörsel,
elektrisk stöt eller att produkten skadas.
• När du slår på strömmen till ljudsystemet ska du
alltid slå på strömmen till förstärkaren SIST. När
du stänger av strömmen till ljudsystemet, ska
du stänga av strömmen till förstärkaren FÖRST.
Annars kan det leda till hörselnedsättning eller
att produkten skadas.
Underhåll
• Innan du rengör produkten, se till att dra ut
strömsladden ur vägguttaget.
Annars kan elektriska stötar inträffa.
Hantering
• För inte in händer eller fingrar i några luckor
eller öppningar på denna produkt.
Kan orsaka personskada.
• Tappa inte ett främmande föremål, som en bit
metall eller papper i något mellanrum på denna
produkt.
Annars kan det leda till brand, elektriska stötar
eller skador på produkten.
• Använd inte överdriven kraft på denna produkt.
- Vila din vikt på denna produkt
- Placering av tunga föremål på denna produkt
- Staplande på produkten
- Tillämpa överdriven kraft på knapparna,
omkopplarna eller I/O-kontakterna
Det kan leda till personskada eller att produkten
skadas.
• Dra inte i anslutna kablar.
Annars kan produkten rasa eller välta, vilket kan
leda till skador på produkten.

Sv 71
MEDDELANDE
Följ försiktighetsåtgärderna nedan för att undvika
funktionsstörningar och skada på denna produkt
och för att förhindra förlust av data.
Strömförsörjning
• Om du inte planerar på att använda produkten
under en längre tid, ska du ta ut strömsladden
ur vägguttaget. Trots att [A] (Ström) är
avstängd på frontpanelen, flödar fortfarande en
liten mängd ström igenom denna produkt.
Installation
• Beroende på omgivningen som du använder
produkten kan en telefon, radio eller TV
generera brus. I så fall ska produktens
placering eller orientering eller den omgivande
miljön ändras.
• Installera inte produkten på en plats som
omfattas av:
- Direkt solljus
- Extremt höga eller låga temperaturer
- För mycket damm
Det kan leda till funktionsstörning eller att
produkten skadas.
• Installera inte produkten på en plats där
kondens kan bildas på grund av snabba,
drastiska förändringar i den omgivande
temperaturen. Användning av produkten
medan kondens råder kan skada produkten.
Om det finns en anledning att tro att kondens
kan ha inträffat på eller i denna produkt, ska
den lämnas i flera timmar utan att slå på
strömmen.
Du kan börja använda produkten när den är
helt torr från kondens.
Hantering
• Placera inga vinyl-, plast- eller gummiprodukter
på denna produkt. I annat fall kan panelen
missfärgas eller försämras.
Underhåll
• Använd en torr, mjuk trasa för att rengöra
produkten. Använd inte bensin, thinner,
tvättmedel eller kemisk trasa för att rengöra
produktens yta. Annars kan ytan missfärgas
eller försämras.
OBS!
Detta avsnitt beskriver försiktighetsåtgärder som
ska följas vid användning,
funktionsbegränsningar och kompletterande
information som kan vara till hjälp för dig.
Bortskaffande eller överföring
• Om du planerar att överföra äganderätten till
denna produkt ska du skicka med detta
dokument och medföljande tillbehör
tillsammans med produkten.
• Följ din lokala myndighets bestämmelser för
kassering av denna produkt och dess tillbehör.
• Följ din lokala myndighets bestämmelser för
kassering av batterier.
Försiktighetsåtgärder vid
användning
Viktig information
VARNING
Användning av reglage eller justeringar eller
utförande av åtgärder på annat sätt än så som
beskrivs häri kan resultera i farlig strålning.

72 Sv
(weee_battery_eu_sv_02)
Användarinformation, beträffande insamling och dumpning av gammal
utrustning och använda batterier
De symboler, som finns på produkterna, emballaget och/eller bifogade dokument talar
om att de använda elektriska och elektroniska produkterna, samt batterierna, inte ska
blandas med allmänt hushållsavfall.
För rätt handhavande, återställande och återvinning av gamla produkter och gamla
batterier, vänligen medtag dessa till lämpliga insamlingsplatser, i enlighet med din
nationella lagstiftning.
Genom att slänga dessa produkter och batterier på rätt sätt, kommer du att hjälpa till att
rädda värdefulla resurser och förhindra möjliga negativa effekter på mänsklig hälsa och
miljö, vilka i annat fall skulle kunna uppstå, p.g.a. felaktig sophantering.
För mer information om insamling och återvinning av gamla produkter och batterier,
vänligen kontakta din lokala kommun, ditt sophanteringsföretag eller inköpsstället för
dina varor.
För företagare inom EU:
Om du vill göra dig av med elektrisk och elektronisk utrustning, vänligen kontakta din
försäljare eller leverantör för mer information.
Information om sophantering i andra länder utanför EU:
Dessa symboler gäller endast inom EU. Om du vill slänga dessa föremål, vänligen
kontakta dina lokala myndigheter eller försäljare och fråga efter det korrekta sättet att
slänga dem.
Kommentar ang. batterisymbolen (de två nedersta symbolexemplen):
Denna symbol kan komma att användas i kombination med en kemisk symbol. I detta fall
överensstämmer den med de krav, som har ställts genom direktiven för den aktuella
kemikalien.

Sv 73
INNEHÅLL
INNAN RECEIVERN ANVÄNDS 74
Funktioner. . . . . . . . . . . . . . . . . . . . . . . . . . . . . . . . . . . . . . . . . . . . . . . . . . . . . .74
Om denna manual. . . . . . . . . . . . . . . . . . . . . . . . . . . . . . . . . . . . . . . . . . . . . . .74
Tillbehör. . . . . . . . . . . . . . . . . . . . . . . . . . . . . . . . . . . . . . . . . . . . . . . . . . . . . . . .75
FÖRBEREDELSE 76
Anslutning till en förstärkare. . . . . . . . . . . . . . . . . . . . . . . . . . . . . . . . . . . . .76
Anslutning av strömsladden . . . . . . . . . . . . . . . . . . . . . . . . . . . . . . . . . . . . .76
Slå på strömmen . . . . . . . . . . . . . . . . . . . . . . . . . . . . . . . . . . . . . . . . . . . . . . . .77
SPELA UPP LJUD 78
Spela upp en ljud-CD . . . . . . . . . . . . . . . . . . . . . . . . . . . . . . . . . . . . . . . . . . . .78
Spelar upp musikfiler lagrade på ditt USB-flashminne . . . . . . . . . . . . .79
Avancerade funktioner . . . . . . . . . . . . . . . . . . . . . . . . . . . . . . . . . . . . . . . . . .80
Slumpvis uppspelningssekvens . . . . . . . . . . . . . . . . . . . . . . . . . . . . . . . . . . . . . . . . . . . . . . . . . . . . . . 80
Upprepa uppspelning. . . . . . . . . . . . . . . . . . . . . . . . . . . . . . . . . . . . . . . . . . . . . . . . . . . . . . . . . . . . . . . . 80
Spela upp spår i angiven ordning (Programuppspelning). . . . . . . . . . . . . . . . . . . . . . . . . . . . . . 80
Spela upp en viss del upprepade gånger (A-B Upprepa uppspelning). . . . . . . . . . . . . . . . . . 81
Njuter av högkvalitativ ljuduppspelning (PURE DIRECT) . . . . . . . . . . . . . . . . . . . . . . . . . . . . . . . 81
Växlar information på skärmen . . . . . . . . . . . . . . . . . . . . . . . . . . . . . . . . . . . . . . . . . . . . . . . . . . . . . . . 81
Ändra skärmens ljusstyrka. . . . . . . . . . . . . . . . . . . . . . . . . . . . . . . . . . . . . . . . . . . . . . . . . . . . . . . . . . . . 81
APPENDIX 82
Namn på delarna. . . . . . . . . . . . . . . . . . . . . . . . . . . . . . . . . . . . . . . . . . . . . . . .82
Frontpanel . . . . . . . . . . . . . . . . . . . . . . . . . . . . . . . . . . . . . . . . . . . . . . . . . . . . . . . . . . . . . . . . . . . . . . . . . . . 82
Display. . . . . . . . . . . . . . . . . . . . . . . . . . . . . . . . . . . . . . . . . . . . . . . . . . . . . . . . . . . . . . . . . . . . . . . . . . . . . . . 83
Bakpanel . . . . . . . . . . . . . . . . . . . . . . . . . . . . . . . . . . . . . . . . . . . . . . . . . . . . . . . . . . . . . . . . . . . . . . . . . . . . . 83
Fjärrkontroll. . . . . . . . . . . . . . . . . . . . . . . . . . . . . . . . . . . . . . . . . . . . . . . . . . . . . . . . . . . . . . . . . . . . . . . . . . 84
Avancerade inställningar . . . . . . . . . . . . . . . . . . . . . . . . . . . . . . . . . . . . . . . .85
Minne för uppspelningsläge (PLAY MEM). . . . . . . . . . . . . . . . . . . . . . . . . . . . . . . . . . . . . . . . . . . . . .85
Ready-läge (RDY MODE) . . . . . . . . . . . . . . . . . . . . . . . . . . . . . . . . . . . . . . . . . . . . . . . . . . . . . . . . . . . . . . 85
Automatisk uppspelning (AUTO PLAY) . . . . . . . . . . . . . . . . . . . . . . . . . . . . . . . . . . . . . . . . . . . . . . . . 85
Automatiskt standby-läge (AUTO STBY) . . . . . . . . . . . . . . . . . . . . . . . . . . . . . . . . . . . . . . . . . . . . . . . 85
Filformat/skivor/USB-flashminnen stöds . . . . . . . . . . . . . . . . . . . . . . . . .86
Specifikationer . . . . . . . . . . . . . . . . . . . . . . . . . . . . . . . . . . . . . . . . . . . . . . . . .87
Felsökning. . . . . . . . . . . . . . . . . . . . . . . . . . . . . . . . . . . . . . . . . . . . . . . . . . . . . .88

74 Sv
INNAN RECEIVERN ANVÄNDS
• Optisk digital utgång
• Koaxial digital utgång
• Stöder uppspelning av CD-R- och CD-RW-skivor
• Stöder uppspelning av lagrade filer på USB-flashminnen eller data-CD-skivor (MP3/
WMA/AAC/WAV/FLAC)
• Slumpvis uppspelningssekvens (sidan 80)
• Upprepa uppspelning (sidan 80)
• Programuppspelning (endast ljud-CD-skivor) (sidan 80)
• A-B Upprepa uppspelning (endast ljud-CD-skivor) (sidan 81)
• Funktionen PURE DIRECT (sidan 81)
• Konfigurerbara bildskärmsinställningar (objekt som ska visas/ljusstyrka) (sidan 81)
• Fjärrstyrt standby-läge På/Av
• Minne för uppspelningsläge (sidan 85)
• Ready-läge (sidan 85)
• Funktionen automatisk uppspelning (sidan 85)
• Funktionen automatiskt standby-läge (sidan 85)
• I den här manualen beskrivs hur receivern primärt används med hjälp av den
medföljande fjärrkontrollen.
• Alla bilder i denna bruksanvisning tillhandahålls som ändamål för driftsanvisningar.
• I den här bruksanvisningen kallas en musik-CD-skiva för en ljud-CD-skiva och en
CD-skiva som innehåller MP3/WMA/AAC/WAV/FLAC-data kallas för en data-CD-
skiva.
• Specifikationer och utseende kan ändras utan föregående meddelande.
•
VARNING är avsedd att varna dig om risken för dödsfall eller allvarliga
personskador.
•
FÖRSIKTIGHET är avsedd att uppmärksamma dig på risken för
personskador.
• ska följas för att undvika funktionsstörning och skada på produkten.
• ger kompletterande information som kan vara till till nytta.
Funktioner Om denna manual
Meddelande
Obs!

Sv 75
•Fjärrkontroll
• Strömsladd
• RCA stereokabel
• Batterier (AA, R6, UM-3) (x2)
• Bruksanvisning (denna manual)
Tillbehör
Sätta i batterier i
fjärrkontrollen
Sätt i batterierna i korrekt
riktning.
Fjärrkontrollens räckvidd
Rikta fjärrkontrollen mot
fjärrkontrollsensorn på
receivern inifrån det område
som visas i figuren nedan till
höger.
Batterier (AA, R6, UM-3)
30° 30°
Inom 6 m

76 Sv
FÖRBEREDELSE
FÖRSIKTIGHET
• Anslut inte strömsladden för denna receiver och andra anslutna apparater i vägguttag förrän alla
icke strömförande anslutningar är slutförda.
När alla anslutningar är klara, ansluter du den medföljande strömsladden till AC IN-
kontakt på den här receivern, och sedan den andra ändkontakten i ett vägguttag.
Anslutning till en förstärkare Anslutning av strömsladden
FörstärkareFörstärkare
RCA stereokabel
(medföljer)
Koaxial digital ljudkabel
(kommersiellt tillgängliga)
Optisk digital kabel
((kommersiellt tillgängliga)) Till ett
vägguttag
Receivern (baksidan)
Strömsladd
(medföljer)

Sv 77
För att slå på strömmen till receivern, tryck på A (Ström) på frontpanelen.
Obs!
• Om du trycker på A (Ström) på fjärrkontrollen medan strömmen till receivern är på, går den in i
standby-läge.
• Strömindikatorn på receivern fungerar enligt följande:
Starkt ljus: Strömmen är på
Svagt ljus: Standby-läge
Av: Strömmen är av
• Receivern har en automatisk standby-funktion som sparar strömförbrukning (sidan 85).
(Standard: Automatiskt standby-läge På)
Slå på strömmen
A (Ström)
Strömindikator

78 Sv
CD/USB
OPEN/CLOSE
SPELA UPP LJUD
Receivern gör att du kan spela både data-CD-skivor och ljud-CD.
För information om typ av CD-skivor som kan spelas upp på denna
receiver, se “Filformat/skivor/USB-flashminnen stöds” (sidan 86).
1Om USB-indikatorn på frontpanelen är tänd, ska du
trycka på CD/USB för att växla till skivläge.
2Sätt i en CD-skiva i CD-facket.
Tryck på OPEN/CLOSE upprepade gånger för att öppna och
stänga CD-facket.
Obs!
• Du kan också trycka på (Öppna/Stäng) på frontpanelen
upprepade gånger för att öppna och stänga CD-facket.
• När enheten är klar att spela upp en ljud-CD, tänds indikatorn för
mediauppspelning (CD) på skärmen.
3Tryck på (Spela).
Indikatorn (Spela) på displayen tänds och uppspelningen
startar.
Obs!
• Under uppspelning av ljudfiler, tänds indikatorn för uppspelning av
media som avspeglar filformatet.
Meddelande
• För inte in handen eller fingret i öppningen till CD-facket. Sådan handling
kan leda till personskador.
Obs!
• När du har satt i en CD i CD-facket, stängs den och uppspelningen startar
om du utför någon av följande åtgärder:
– Tryck på (Spela).
– Tryck på en siffertangent som motsvarar ett spårnummer.
• Du kan konfigurera receivern så att uppspelningen startar automatiskt när
strömmen till receivern är påslagen eller när du växlar till läget CD-skiva
eller USB (sidan 85). (Standard: Automatisk uppspelning På)
Använd följande knappar på fjärrkontrollen när du vill navigera.
* Så här fungerar kontrollknapparna på frontpanelen:
(Hoppa bakåt/Sök bakåt):
Hoppar tillbaka till föregående spår. Hoppar tillbaka överst till
det aktuella spåret om det trycks ned under uppspelning. Den
söker också spår bakåt om du håller knappen intryckt under
uppspelning.
(Hoppa framåt/Sök framåt):
Hoppar till nästa spår. Den söker också spår framåt om du
håller knappen intryckt under uppspelning.
Spela upp en ljud-CD
Tillgängliga knappar Funktion
(Spela) Indikatorn (Spela) på displayen tänds och
uppspelningen startar.
(Pausa)
Indikatorn (Pausa) på displayen tänds och
uppspelningen pausar. Alternativt, tryck
på för att återuppta uppspelningen.
(Stoppa) Stoppar uppspelningen.
(Sök bakåt)* Söker spår bakåt.
(Sök framåt)* Söker spår framåt.
(Hoppa bakåt)*
Hoppar tillbaka till föregående spår. Hoppar
tillbaka överst till det aktuella spåret om det
trycks ned under uppspelning.
(Hoppa framåt)* Hoppar till nästa spår.
Siffertangenter Ange ett spårnummer för att välja motsvarande
spår direkt.
FOLDER ,
(endast data-CD-skivor) Gör att du kan välja en mapp.
Siffertangenter

Sv 79
CD/USB
Du kan spela musikfiler (som lagrats på ditt USB-flashminne) på
denna receiver. För mer information om USB-flashminnen som
stöds, se “Filformat/skivor/USB-flashminnen stöds” (sidan 86).
1Om indikatorn för USB på frontpanelen är släckt,
ska du trycka på CD/USB för att växla till läget USB.
Indikatorn för USB-minnet på frontpanelen lyser orange.
2Anslut USB-flashminnet till USB-uttaget.
När enheten är klar för uppspelning, tänds indikatorn för
mediauppspelning (USB) på skärmen, och USB-indikatorn på
frontpanelen lyser grönt.
Meddelande
• Använd inte USB förlängningskablar.
3Tryck på (Spela).
Indikatorn (Spela) på displayen tänds och uppspelningen
startar.
Obs!
• Under uppspelning av ljudfiler, tänds indikatorn för uppspelning av
media som avspeglar filformatet.
• Om kompatibla musikfiler lagras på ditt USB-flashminne, spelar receivern
upp dem i kronologisk ordning baserat på datumet för skapande.
Meddelande
• Ta inte bort USB-flashminnet under uppspelning eller när
informationsdisplayen på frontpanelen anger “USB READING”. I sådant fall
ska du först trycka på CD/USB för att växla till CD-läge. Säkerställ att
indikatorn för USB-minnet släcks och ta sedan bort flashminnet.
Använd följande knappar på fjärrkontrollen när du vill navigera.
* Så här fungerar kontrollknapparna på frontpanelen:
(Hoppa bakåt/Sök bakåt):
Hoppar tillbaka till föregående spår. Hoppar tillbaka överst till
det aktuella spåret om det trycks ned under uppspelning. Den
söker också spår bakåt om du håller knappen intryckt under
uppspelning.
(Hoppa framåt/Sök framåt):
Hoppar till nästa spår. Den söker också spår framåt om du
håller knappen intryckt under uppspelning.
Spelar upp musikfiler lagrade på ditt USB-flashminne
Den här receivern (frontpanelen)
USB-flashminne
Tillgängliga knappar Funktion
(Spela) Indikatorn (Spela) på displayen tänds och
uppspelningen startar.
(Pausa)
Indikatorn (Pausa) på displayen tänds och
uppspelningen pausar. alternativt, tryck
på för att återuppta uppspelningen.
(Stoppa) Stoppar uppspelningen.
(Sök bakåt)* Söker spår bakåt.
(Sök framåt)* Söker spår framåt.
(Hoppa bakåt)*
Hoppar tillbaka till föregående spår. Hoppar
tillbaka överst till det aktuella spåret om det
trycks ned under uppspelning.
(Hoppa framåt)* Hoppar till nästa spår.
FOLDER , Gör att du kan välja en mapp.

80 Sv
RANDOM
CLEAR
ENTER
REPEAT
PROGRAM
Du kan konfigurera uppspelningsläget och visa inställningar med
hjälp av avancerade funktioner.
Slumpvis uppspelningssekvens
Tryck på RANDOM för att spela spår i slumpmässig ordning.
Genom att trycka på RANDOM upprepade gånger ändrar
inställningen för uppspelning av slumpmässig sekvens enligt
följande:
Obs!
• Du kan öppna skivfacket för att avbryta slumpmässig
uppspelningssekvens.
Upprepa uppspelning
Tryck på REPEAT för att spela spår upprepade gånger. Genom att
trycka på REPEAT upprepade gånger, ändrar inställningen för
upprepad uppspelning enligt följande:
Obs!
• Du kan öppna skivfacket för att avbryta upprepad uppspelning.
Spela upp spår i angiven ordning
(Programuppspelning)
Du kan spela upp spår med ljud-CD i angiven ordning.
1Tryck på PROGRAM medan uppspelningen stoppas.
2Använd siffertangenterna för att ange spårnumret
för en låt som du vill programmera.
3Tryck på ENTER.
Upprepa steg 2 och 3 för att programmera varje spår.
Tryck på CLEAR för att avbryta varje programmerat spår med
början av det senaste spåret som du programmerade.
4Tryck på (Spela).
Receivern börjar spela spåren i programmerad ordning.
Obs!
• Programuppspelning fungerar inte med data-CD-skivor eller USB-
flashminnen.
• Du kan programmera upp till 24 spår.
• Gör ett av följande för att rensa alla programmerade spår:
– Tryck på CLEAR medan uppspelningen stoppas.
– Stäng av strömmen till receivern eller ställ in den i standby-läge.
– Öppna CD-facket.
Avancerade funktioner
Indikator Inställning
RNDM Spelar alla spår i slumpmässig ordning.
Av Slår av slumpmässig uppspelningssekvens.
Indikator Inställning
REP Spelar upp ett spår upprepade gånger.
REP FOLDER
(endast data-CD-skivor och
USB-flashminnen)
Spelar upp spår i den aktuella mappen
upprepade gånger.
REP ALL Spelar upp alla spår upprepade gånger.
Av Stänger av upprepa uppspelning.
TRACKTEXT AAC WAV FLAC RESUM RDY TOTAL REMAIN RNDM REP FOLDER ALL A - BCD PROG
TRACKTEXT AAC WAV FLAC RESUM RDY TOTAL REMAIN RNDM REP FOLDER ALL A - BCD PROG
Siffertangenter

Sv 81
A/B
PURE
DIRECT
DISPLAY
DIMMER
Spela upp en viss del upprepade gånger
(A-B Upprepa uppspelning)
Du kan ange start- och slutpunkter för ett spår under uppspelning
med ljud-CD för att spela den angivna delen upprepade gånger.
1Spela upp en ljud-CD.
2Tryck på A/B vid den punkt som du vill börja
upprepa uppspelning.
3Tryck på A/B igen vid den punkt som du vill avsluta
upprepa uppspelning.
Receivern startar upprepad uppspelning.
Obs!
• Upprepad uppspelning fungerar inte med data-CD-skivor eller USB-
flashminnen.
• Du kan inte ange inställningen för A-B upprepa när funktionen PURE DIRECT
är påslagen.
• Gör ett av följande för att avbryta A-B upprepad spelning:
– Tryck på A/B igen.
– Tryck på (Stoppa).
– Öppna CD-facket.
Njuter av högkvalitativ ljuduppspelning
(PURE DIRECT)
Om funktionen PURE DIRECT är påslagen, kommer inte digitalt ljud
produceras. På detta sätt minskar funktionen PURE DIRECT brus
som påverkar ljudkvaliteten. Detta gör att du kan njuta av
uppspelning med högkvalitativt ljud.
Genom att trycka på PURE DIRECT upprepade gånger, kan du
växla mellan på/av för PURE DIRECT.
Obs!
• När funktionen PURE DIRECT används, ska ANALOG OUT-uttagen på
bakpanelen till receivern användas. DIGITAL OUT-uttagen matar inte ut
några signaler.
• När funktionen PURE DIRECT är påslagen:
– Indikator för PURE DIRECT tänds.
– Frontpanelens skärm släcks medan innehållet spelas upp.
– Endast ett litet antal indikatorer och meddelanden visas när du använder
receivern.
– Denna inställning behålls när du stänger av receivern.
Växlar information på skärmen
Genom att trycka på DISPLAY upprepade gånger under
uppspelningen, växlar informationen på skärmen enligt följande:
Obs!
• Informationsdisplayen indikerar upp till 64 tecken (1-byte av alfanumeriska
tecken och flera symboler).
Ändra skärmens ljusstyrka
Tryck på DIMMER upprepade gånger för att växla mellan fyra steg
av visad ljusstyrka.
TEXT AAC WAV FLAC RESUM RDY TOTAL REMAIN RNDM FOLDER ALLPROG CD TRACK REP
TEXT AAC WAV FLAC RESUM RDY TOTAL REMAIN RNDM FOLDER ALLPROG CD TRACK REP
Uppspelning av media Information på skärmen
Ljud-CD
Spelad tid Återstående tid för aktuellt spår
(TRACK REMAIN) Total återstående tid på CD:n
(TOTAL REMAIN) Namn på spåret*
Artistnamn* Albumets titel*
* Om CD-text har bäddats in
Data-CD-skiva,
USB-flashminne
Spelad tid Namn på spåret* Artistnamn*
Albumets titel*
* Om taggar har bäddats in

82 Sv
APPENDIX
Frontpanel
1A (Ström) (sidan 77)
2Strömindikator (sidan 77)
3USB-uttag (sidan 79)
4USB-indikator (sidan 79)
5CD/USB (sidor 78, 79)
6PURE DIRECT (sidan 81)
7PURE DIRECT-indikator (sidan 81)
8CD-fack (sidan 78)
9 (Öppna/Stäng) (sidan 78)
0Fjärrkontrollsensor (sidan 75)
A (Hoppa bakåt/Sök bakåt) (sidor 78, 79)
B (Hoppa framåt/Sök framåt) (sidor 78, 79)
C (Spela) (sidor 78, 79, 80)
D (Pausa) (sidor 78, 79)
E (Stoppa) (sidor 78, 79, 80, 81)
Namn på delarna
1 2 3 4 7 0
8 9
5 6 A B C D E

Sv 83
Display
1 / (Spela/Pausa) indikator (sidor 78, 79)
2Indikator för uppspelning av media (sidor 78, 79)
3Indikator för avancerad inställning (sidan 85)
4Tidsindikator (Sidan 81)
5Lägesindikator för uppspelning (sidor 80, 81)
6Visning av information (sidor 80, 81, 85)
Bakpanel
1Uttagen för ANALOG OUT (sidan 76)
2DIGITAL OUT-uttag (KOAXIAL) (sidan 76)
3DIGITAL OUT-uttag (OPTISK) (sidan 76)
4AC IN-kontakt (sidan 76)
TRACKCD TEXT AAC WAV FLAC RESUM RDY TOTAL REMAIN PROG RNDM REP FOLDER ALL A - B
1 62 3 54
2 3 41

84 Sv
Fjärrkontroll
1A (Ström) (sidan 77)
2Fjärrkontrollens signalöverförare (sidan 75)
3OPEN/CLOSE (sidan 78)
4PROGRAM (sidan 80)
5REPEAT (sidan 80)
6DIMMER (sidan 81)
7RANDOM (sidan 80)
8A/B (sidan 81)
9DISPLAY (sidan 81)
0Siffertangenter (sidor 78, 80)
ACLEAR (sidan 80)
BENTER (sidan 80)
C (Sök bakåt), (Sök framåt) (sidor 78, 79)
(Pausa) (sidor 78, 79)
(Hoppa bakåt) (sidor 78, 79)
(Hoppa framåt) (sidor 78, 79)
(Spela) (sidor 78, 79, 80)
(Stoppa) (sidor 78, 79, 80, 81)
FOLDER , (sidor 78, 79)
DCD/USB (sidor 78, 79)
EPURE DIRECT (sidan 81)
3
4
9
0
C
7
8
A
B
D
E
6
5
21

Sv 85
Detta avsnitt förklarar hur man konfigurerar olika avancerade funktioner. Du kan
konfigurera de flesta inställningarna på frontpanelen. (Vissa inställningar kräver
användande av fjärrkontrollen.)
1Sätt receivern i standby-läge (sidan 77).
2Håll PURE DIRECT intryckt, (Öppna/Stäng),och (Spela),
samtidigt i tre sekunder eller längre.
Följande indikator visas på informationsdisplayen på frontpanelen och enheten
går in i inställningsläge. Du kan ställa in funktionerna Minne för uppspelningsläge,
Ready-läget, Automatisk uppspelning och Automatiskt standby-läge i denna
ordningsföljd.
3Tryck på eller för att slå på eller av
funktionen.
4Tryck på (Stoppa).
Inställningen bekräftas och nästa parameter väljs automatiskt. Upprepa steg 3 och
4. När alla inställningar är klara, visas följande indikator på informationsdisplayen
på frontpanelen och receivern går in i Standby-läge.
Obs!
• Trycker du på (Spela) under denna process, kommer inställningen vid den punkten att
bekräftas och enheten går in i standby-läge.
Minne för uppspelningsläge (PLAY MEM)
Med funktionen aktiverad, behåller receivern inställningarna för upprepad uppspelning
och slumpmässig uppspelningssekvens även efter att strömmen till receivern har
stängts av. När minnesfunktionen för uppspelningsläge är påslagen, tänds indikatorn
för avancerade inställningar (RESUM) på displayen.
Standard: Av
Obs!
• Slår du på strömmen till receivern efter att ha aktiverat minnesfunktionen för uppspelningsläge,
spelar receivern upp det senaste spåret eller filen från början.
Ready-läge (RDY MODE)
När denna funktion är aktiverad pausar receivern uppspelningen varje gång ett spår
har slutförts. Du kan börja uppspelning av nästa spår när du väljer. När funktionen
Ready-läget är aktiverat, tänds indikatorn avancerad inställning (RDY) på displayen.
Standard: Av
Automatisk uppspelning (AUTO PLAY)
Med denna funktion aktiverad startar receivern automatiskt uppspelning när strömmen
till receivern påslagen eller när du växlar till läget CD-skiva eller USB.
Standard: På
Automatiskt standby-läge (AUTO STBY)
Med denna funktion aktiverad går receivern automatiskt i standby-läge om du inte
interagerar med den inom 20 minuter efter att uppspelningen har stoppats.
Standard: På
Avancerade inställningar
PURE DIRECT
TRACKTEXT AAC WAV FLAC RESUM RDY TOTAL REMAIN RNDM REP FOLDER ALLPROG CD TRACKTEXT AAC WAV FLAC RESUM RDY TOTAL REMAIN RNDM REP FOLDER ALLPROG CD
CD TRACK REP TEXT AAC WAV FLAC RESUM RDY TOTAL REMAIN RNDM FOLDER ALLPROG

86 Sv
❑Filformat som stöds
* Endast linjärt PCM-format.
Obs!
• Filer på en data-CD-skiva eller USB-flashminne spelas upp i kronologisk ordning baserat på
datumet för skapandet.
• Receivern stöder skivor i ISO9660-format.
• Om receivern spelar en VBR-fil (variabel bithastighet), kan det hända att en exakt förfluten tid inte
visas.
• Kodat Digital Rights Management (DRM) kan inte spelas upp.
❑Skivor som stöds
Använd skivor med följande logotyper.
Meddelande
• Använd inte skivor med annan form eller skivor med tejp eller en dekal påklistrad. I annat fall kan
funktionsstörning på receivern inträffa.
• Receivern kanske inte spelar upp vissa CD-RW-skivor eller skivor som spelats in inkorrekt.
• För att spela upp en 8 cm CD-skiva, ska den placeras i CD-fackets inre innandöme. Stapla inte på
en vanlig CD-skiva (12 cm) ovanpå en 8 cm CD-skiva.
Filformat/skivor/USB-flashminnen stöds
Fil Samplingsfrekvens (kHz) Bitdjup
(bitars)
Bithastighet
(kbps)
Antal
kanaler
MP3 32/44.1/48 — 32-320 2
WMA 32/44.1/48 — 48-192 2
AAC 32/44.1/48 — 8-320 2
WAV * 32/44.1/48/64/88.2/96 16/24 — 2
FLAC 32/44.1/48/64/88.2/96 16/24 — 2
Data-CD-skiva USB-flashminne
Antal mapphierarkier
(inklusive rotmappen) 99
Antal mappar 999 999
Antal filer 1100 65535
Kompaktskivor (ljud-CD-skivor)
CD-R- och CD-RW-skivor
• Skivor med en av följande beskrivningar:
FOR CONSUMER
FOR CONSUMER USE
FOR MUSIC USE ONLY
• För CD-R- eller CD-RW-skivor, spelar receivern endast upp de
slutförda skivorna.
Obs!
• Receivern kanske inte spelar upp vissa CD-R/CD-RW-skivor eller skivor som
spelats in inkorrekt.
CD-TEXT-skivor
Skivorna innehåller inbäddad textinformation, till exempel albumets
titel, namn på låten och artistnamn. Denna information (endast
alfanumeriska tecken och vissa symboler) tillsammans med förfluten
tid visas.

Sv 87
❑Hantera en CD-skiva
• En CD-skiva ska hanteras försiktigt så att den inspelade ytan
inte repas. Böj inte en CD-skiva.
• Om det finns fingeravtryck eller damm på den inspelade ytan,
ska en mjuk trasa användas för att torka av ytan rakt från mitten
mot omkretsen.
• Använd aldrig rengöringsmedel för vinylskivor, antistatiska medel eller andra
kemikalier för att torka av en CD-skiva.
• Använd en filtpenna för att bara skriva på etikettsidan.
• Låt aldrig en CD-skiva ligga i direkt solljus eller på en plats som utsätts för hög
temperatur eller fuktighet under en längre tid.
• Använd inte ett kommersiellt tillgängligt linsrengöringsmedel. I annat fall kan en
funktionsstörning inträffa.
❑USB-flashminnen som stöds
Innan du använder receivern för att spela upp musikfiler lagrade på ett USB-
flashminne, ska du se till att följande krav är uppfyllda:
• USB-flashminnet uppfyller kraven för klassad masslagring.
• Data har spelats in med filsystemet FAT16 eller FAT32.
Meddelande
• Vissa USB-flashminnen kanske inte fungerar korrekt.
• USB-flashminnen med kryptering kan inte användas.
• Yamaha och dess återförsäljare ska inte hållas ansvariga för dataförlust som lagras på ett USB-
flashminne som är anslutet till receivern. Vi rekommenderar att du sparar säkerhetskopierad data
vid eventuell förlust av data.
• Yamaha garanterar inte drift eller strömförsörjning till några USB-flashminnen.
Specifikationer för den här receivern är enligt följande.
Ljudavsnitt
• Utgångsnivå (1 kHz, 0 dB, Fs 44,1 kHz) ..................................................... 2,0 ± 0,3 V
• S/N förhållande (IHF-A Nätverk) (1 kHz, 0 dB, Fs 44,1 kHz) ...........105 dB eller högre
• Dynamiskt område (1 kHz, 0 dB, Fs 44,1 kHz).................................. 96 dB eller högre
• Harmonisk distorsion (1 kHz, 0 dB, Fs 44,1 kHz) ............................0,003 % eller lägre
• Frekvensåtergivning
Ljud-CD................................................................................................... 2 Hz – 20 kHz
Data CD/USB Fs 48 kHz ................................................................. 2 Hz – 22 kHz
Fs 96 kHz ......................................................2 Hz – 44 kHz, –3 dB
Laseravsnitt
• Lasertyp ............................................................................................................ AIGaAs
• Våglängd ...........................................................................................................790 nm
• Laserutgång Max.............................................................................................1,04 mW
Allmänt
• Strömförsörjning
Modeller för USA och Kanada ............................................................ AC 120 V, 60 Hz
Modell för Australien ....................................................................AC 230-240 V, 50 Hz
Modeller för Europa och Storbritannien.............................................. AC 230 V, 50 Hz
Modell för Asien och allmänna modeller ................................AC 110-240 V, 50/60 Hz
Modell för Kina.................................................................................... AC 220 V, 50 Hz
• Effektförbrukning....................................................................................................11 W
• Energiförbrukning i standby-läge
Power Standby (Standby-läge)............................................................................ 0,2 W
Slå av strömmen .................................................................................................. 0,2 W
• Mått (B × H × D) ............................................................................. 435 x 87 x 260 mm
• Vikt .......................................................................................................................3,5 kg
* Innehållet i denna bruksanvisning gäller de senaste specifikationerna vid publiceringsdatumet.
Om du vill ha den senaste bruksanvisningen går du till Yamahas webbplats och laddar ned
bruksanvisningsfilen.
Specifikationer
Uttag för ljudutgång
• Analogt ljud x 1 (RCA obalanserat)
• Digitalt ljud
KOAXIAL x 1, OPTISKT x 1
Andra uttag
• USB × 1 (USB2.0)

88 Sv
Se tabellen nedan om receivern inte fungerar korrekt. Om problemet inte finns med på listan nedan, eller om symptomen kvarstår efter att du följt instruktionerna nedan, stäng av
strömmen till receivern genom att trycka på A (Ström) på frontpanelen, dra ut strömsladden och kontakta närmaste auktoriserade Yamaha-återförsäljare eller servicecenter.
Felsökning
Problem Orsak Lösning Sidan
När strömbrytaren trycks in, slås inte
strömmen på. Strömsladden kanske inte är ordentligt ansluten. Anslut strömsladden ordentligt till vägguttaget. 76
CD-facket stängs inte helt. Ett främmande föremål finns i CD-fackets innandöme. Kontrollera CD-facket och plocka bort eventuella främmande föremål. —
Det går inte att spela den isatta CD-
skivan.
CD-skivan är repad. Byt CD-skiva. —
Receiverns lins har kondens. Slå på strömmen till receivern. Vänta i 20 – 30 minuter och försök
sedan spela upp CD-skivan igen. —
CD-skivan är felvänd. Se till att CD-skivan är placerad med etikettsidan uppåt. —
CD-skivan är smutsig eller repad. Torka av smutsen från CD-skivans yta eller använd en som inte är
repad. 87
Du försökte spela upp filer i ett format som inte receivern inte stöder. Använd en CD-skiva som innehåller filer i ett format som receivern inte
stöder. 86
Du försökte spela en CD-skiva som inte receivern inte stöder. Använd en CD-skiva som receivern stöder. 86, 87
Receivern är i USB-läge. Tryck på CD/USB för att växla till CD-läge. 78, 82, 84
Uppspelningen startar inte omedelbart
eller från korrekt punkt. CD-skivan är smutsig eller repad. Torka av smutsen från CD-skivans yta eller använd en som inte är
repad. 87
Det går inte att spela upp musikfiler
lagrade på USB-flashminnet.
USB-flashminne kanske inte är ordentligt ansluten till receivern. Anslut USB-flashminnet korrekt. 79
Du försökte spela upp filer i ett format som inte receivern inte stöder. Använd ett USB-minne som innehåller filer i ett format som receivern
stöder. 86
Receivern är i CD-läge. Tryck på CD/USB för att växla till USB-läge. 79, 82, 84
Inget ljud Receivern är inte korrekt ansluten till förstärkaren. Kontrollera anslutningen till förstärkaren. 76
Ljud matas inte ut från receivern som är
ansluten till DIGITAL OUT-uttagen. Funktionen PURE DIRECT är påslagen. Slå av funktionen PURE DIRECT. 81
Ljudet hoppar.
Receivern är påverkad av vibrationer eller stötar. Ändra receiverns plats. —
CD-skivan är smutsig eller repad. Torka av smutsen från CD-skivans yta eller använd en som inte är
repad. 87

Sv 89
Surrande eller brummande ljud hörs. RCA-stereokabeln är inte korrekt ansluten. Anslut RCA-stereokabeln korrekt. Om symptomet inte har förbättrats,
ska du kontrollera att själva kabeln inte är defekt. 76
Oljud i radiomottagare Receivern är placerad för nära radiomottagaren. Flytta receivern längre bort från radiomottagaren, eller stäng av
strömmen till receivern. —
CD-facket ger ifrån sig ljud. CD-skivan är deformerad. Använd en icke-deformerad CD-skiva. —
Ingen indikering på displayen Funktionen PURE DIRECT är påslagen Slå av funktionen PURE DIRECT. 81
Inget namn för mapp eller fil visas på
informationsdisplayen.
Andra tecken än alfanumeriska med en byte används för namnet på
mappen eller filen.
Använd alfanumeriska tecken med en byte för namnet på mappen och
filen. 81
Fjärrkontrollen fungerar inte alls eller
fungerar dåligt.
Batterierna är svaga. Byt ut alla batterier. 75
Fel avstånd eller vinkel. Använda fjärrkontrollen inom angiven räckvidd. 75
Fjärrkontrollsensorn på denna receiver utsätts för direkt solljus eller
stark belysning (från ett lysrör med typ av växelriktare el. dyl.). Positionera om orienteringen av belysningen eller receivern. —
Problem Orsak Lösning Sidan

90 It
Leggere attentamente queste precauzioni
prima di procedere.
Accertarsi di seguire le istruzioni
Leggere e osservare attentamente le seguenti
precauzioni per evitare lesioni personali o danni
alla cose.
Terminata la lettura per intero del presente
documento, conservarlo in un luogo di facile
accesso per chiunque utilizzi il prodotto.
AVVERTENZA
Queste precauzioni avvertono l’utente del
rischio di morte o lesioni gravi a sé o agli altri.
In caso di anomalie
• Se si verifica una delle anomalie indicate di
seguito, spegnere immediatamente il prodotto.
- Il cavo/la spina di alimentazione è
danneggiato/a.
- L’unità sprigiona del fumo o un odore o rumore
insolito
- Nel prodotto è penetrata acqua o qualche
oggetto.
- Appaiono crepe o altri danni visibili sul
prodotto.
- Si verifica una scomparsa improvvisa del
suono durante l’utilizzo.
Per spegnere l’alimentazione, procedere come
segue.
- Spegnere il prodotto.
- Scollegare il cavo di alimentazione dalla presa
di corrente CA.
Continuare a utilizzare il prodotto può causare
incendi, scosse elettriche o danni al prodotto.
Richiedere immediatamente un’ispezione o una
riparazione.
Alimentazione
• Non danneggiare il cavo di alimentazione.
- Non posizionare il cavo di alimentazione
accanto a fonti di calore come per esempio
termosifoni.
- Non piegare con forza o modificare il cavo di
alimentazione.
- Non danneggiare il cavo di alimentazione.
- Non appoggiare oggetti pesanti sul cavo di
alimentazione.
- Non fissare con graffette il cavo di
alimentazione.
Utilizzare un cavo sfilacciato con il filo esposto
può causare incendi, scosse elettriche o danni
al prodotto.
• In caso di fulmini o tempeste elettriche, non
toccare il prodotto, la spina o il cavo di
alimentazione.
In caso contrario, si possono verificare scosse
elettriche.
• Utilizzare la tensione specificata per il prodotto.
L’uso di una tensione scorretta può causare
incendi, scosse elettriche o danni al prodotto.
• Assicurarsi di utilizzare solo l’articolo elencato
sotto per fornire alimentazione:
- Cavo di alimentazione incluso
In caso contrario, si possono verificare incendi,
ustioni o danni al prodotto.
• Non utilizzare con altri dispositivi il seguente
accessorio incluso.
- Cavo di alimentazione
In caso contrario, si possono verificare incendi,
ustioni o danni al prodotto.
• Controllare periodicamente la spina elettrica ed
eventualmente rimuovere la sporcizia o la
polvere accumulata.
In caso contrario, si possono verificare scosse
elettriche.
PRECAUZIONI
• Per ispezioni e riparazioni, rivolgersi a uno dei
seguenti centri assistenza clienti.
- Il negozio di acquisto del prodotto
Rivenditore Yamaha
• Questo prodotto è concepito per l’uso come
elettrodomestico generico. Non utilizzare in
campi o attività che richiedano un elevato
grado di affidabilità in termini di vite umane o
beni preziosi.
• Yamaha non si assume alcuna responsabilità
per eventuali perdite derivanti dall’utilizzo
improprio o da modifiche non autorizzate al
prodotto.

It 91
• Assicurarsi di inserire fino in fondo la spina
nella presa di corrente.
In caso contrario, si possono verificare
cortocircuiti con conseguenti scosse elettriche,
incendi o danni al prodotto.
• Inserire la spina di alimentazione in una presa
di corrente visibile e facilmente accessibile.
In caso di problemi o malfunzionamenti, è
necessario poter facilmente scollegare la spina
dalla presa di corrente CA. Anche quando
l’interruttore di alimentazione è spento, a
condizione che il cavo di alimentazione non sia
staccato dalla presa CA, il prodotto non è
completamente scollegato dalla sorgente di
alimentazione.
• Se si prevede di non utilizzare il prodotto per un
periodo di tempo prolungato, scollegare il cavo
dalla presa di alimentazione.
In caso contrario, si possono verificare danni al
prodotto.
Non disassemblare
• Non modificare o disassemblare il prodotto.
In caso contrario, si possono causare incendi,
scosse elettriche, lesioni o danni al prodotto.
Esposizione all’acqua
• Non utilizzare il prodotto in ambienti umidi o
bagnati, come per esempio in bagno o
all’aperto in caso di pioggia.
• Non posizionare il prodotto su contenitori (p.es.
vasi o bottiglie di medicinali) che contengono
liquidi.
In caso di versamenti nel prodotto, si possono
verificare incendi, scosse elettriche o danni al
prodotto.
• Non collegare o scollegare il cavo di
alimentazione dalla presa di corrente con le
mani bagnate. Non maneggiare il prodotto con
le mani bagnate.
In caso contrario, si possono causare scosse
elettriche o danni al prodotto.
Esposizione al fuoco
• Non utilizzare fiamme libere accanto al
prodotto.
In caso contrario, si possono verificare incendi.
Perdita della vista
• Non guardare direttamente il raggio laser.
Se il raggio laser colpisce gli occhi, può
causare perdita della vista.
Manipolazione
• Non lasciar cadere o a far subire un impatto
violento al prodotto.
In caso contrario, si possono causare incendi,
scosse elettriche o danni al prodotto.
Batterie
• Non ingoiare le batterie.
• Tenere le batterie lontano dalla portata dei
bambini.
In caso contrario, potrebbero ingoiare
accidentalmente le batterie. Il liquido fuoriuscito
dalle batterie può causare infiammazioni o perdita
della vista. Se l’alloggiamento della batteria non è
completamente sigillato, smettere di utilizzare il
prodotto e tenerlo lontano dalla portata dei
bambini. Se per caso di dovessero ingoiare le
batterie, rivolgersi immediatamente a un medico.
In quanto le batterie possono causare ustioni
chimiche gravi o lo scioglimento dei tessuti
organici in un paio d’ore e condurre alla morte.
• Non gettare le batterie nel fuoco.
• Non esporre le batterie a temperature elevate,
quale luce diretta del sole o fuoco.
In caso contrario, potrebbero esplodere o
provocare incendi o lesioni.
• In caso di fuoriuscite, non toccare il liquido.
In caso contrario, si possono verificare perdita
della vista o ustioni chimiche. Se si viene a
contatto con il liquido della batteria, lavarlo via
immediatamente con acqua e consultare un
medico.
• Non utilizzare batterie diverse da quelle
specificate.
• Non mescolare batterie vecchie e batterie
nuove.
• Non mescolare batterie di tipo diverso.
• Non inserire batterie in senso opposto alla
polarità indicata.
• Non rompere la batteria.
• Non caricare batterie a cella secca non
ricaricabili.
In caso contrario, le batterie potrebbero
esplodere o potrebbero verificarsi perdite di
liquido con relativi incendi, ustioni, perdita della
vista, infiammazioni o danni al prodotto. Se si
viene a contatto con il liquido della batteria,
lavarlo via immediatamente con acqua e
consultare un medico.
• Non mettere le batterie in tasca o in una borsa,
né lasciarle a contatto con altri oggetti in
metallo.
In caso contrario, le batterie potrebbero entrare
in cortocircuito con conseguenti esplosioni o
fuoriuscite di liquido, che potrebbero a loro
volta causare incendi, perdita della vista o
lesioni.

92 It
• Se si prevede di non utilizzare il prodotto per un
periodo di tempo prolungato o se le batterie
sono completamente scariche, rimuovere le
batterie dal telecomando.
In caso contrario, potrebbero verificarsi perdite
di liquido e conseguentemente perdita della
vista, infiammazioni o danni al prodotto.
• Prima di conservare o smaltire le batterie,
applicare un pezzo di nastro adesivo ai
connettori per isolarli.
Se i connettori entrano in contatto con altre
batterie od oggetti metallici, potrebbero
esplodere o potrebbero verificarsi perdite di
liquido con relativi incendi, ustioni, perdita della
vista o infiammazioni.
ATTENZIONE
Queste precauzioni avvertono l’utente del
rischio di lesioni a sé o agli altri.
Alimentazione
• Se il cavo di alimentazione collegato alla presa
elettrica è instabile o allentato, non utilizzare
quella presa.
In caso contrario, si possono causare incendi,
scosse elettriche o ustioni.
• Quando si estrae la spina elettrica dal prodotto
o da una presa, afferrare sempre direttamente
la spina e non il cavo.
In caso contrario, il cavo potrebbe
danneggiarsi con conseguenti incendi o
scosse elettriche.
Installazione
• Non collocare il prodotto in una posizione
instabile o in luoghi soggetti a vibrazioni.
In caso contrario, il prodotto potrebbe cadere e
danneggiarsi o provocare lesioni.
• Non bloccare la dissipazione del calore del
prodotto durante l’installazione.
- Non coprire il prodotto con panni o tovaglie.
- Non installare il prodotto su un tappeto o sulla
moquette.
- Accertarsi che la superficie superiore sia
rivolta verso l’alto. Non installare il prodotto sul
lato o sottosopra.
- Non utilizzare il prodotto in locali angusti e
scarsamente ventilati.
Una ventilazione inadeguata può causare
surriscaldamento con conseguenti possibili
danni al prodotto, malfunzionamenti e perfino
incendi.
Accertarsi che vi sia lo spazio libero adeguato
intorno al prodotto: almeno 2,5 cm in alto, 2,5
cm ai lati e 2,5 cm sul lato posteriore.
• Allontanarsi dal prodotto durante i terremoti.
In caso contrario, il prodotto potrebbe cadere e
provocare lesioni.
• Prima di spostare il prodotto, accertarsi di
spegnere l’alimentazione e scollegare tutti i
cavi di collegamento.
In caso contrario, i cavi potrebbero incastrarsi
con i piedi o le mani e il prodotto potrebbe
cadere e danneggiarsi o provocare lesioni.
Collegamenti
• Se si prevede di collegare unità esterne,
accertarsi di leggere a fondo il manuale di
ciascun dispositivo e di collegarle seguendo le
istruzioni.
Se non si seguono correttamente le istruzioni, si
possono verificare lesioni o danni al prodotto.
Danni all’udito
• Non esporsi ad audio ad alto volume per
periodi prolungati.In caso contrario, si può
verificare la perdita dell’udito. Se si accusano
disturbi uditivi rivolgersi a un medico.
• Se si intende connettere il prodotto ad altri
dispositivi, prima spegnerli tutti.
In caso contrario, si possono causare perdita
dell’udito, incendi, scosse elettriche o danni al
prodotto.
• Quando si accende il sistema audio,
accendere sempre l’amplificatore di potenza
PER ULTIMO. Quando si spegne il sistema
audio, spegnere sempre l’amplificatore di
potenza PER PRIMO.
In caso contrario, si possono causare perdita
dell’udito o danni al prodotto.
Manutenzione
• Prima di pulire il prodotto, assicurarsi di
scollegare il cavo di alimentazione dalla presa
di corrente.
In caso contrario, si possono verificare scosse
elettriche.

It 93
Manipolazione
• Non inserire le mani o le dita nelle fessure o
aperture del prodotto.
In caso contrario, si possono provocare lesioni.
• Evitare di far penetrare oggetti estranei come
pezzi di carta o metallo nelle aperture del
prodotto.
In caso contrario, si possono causare incendi,
scosse elettriche o danni al prodotto.
• Non applicare forza eccessiva al prodotto
come nei seguenti casi.
- Appoggiarsi con tutto il proprio peso sul
prodotto
- Posizionare oggetti pesanti sul prodotto
- Impilare il prodotto
- Applicare forza eccessiva ai pulsanti, agli
interruttori o ai connettori di ingresso/uscita
In caso contrario, si possono verificare lesioni o
danni al prodotto.
• Non tirare i cavi collegati.
In caso contrario, il prodotto potrebbe cadere e
danneggiarsi o provocare lesioni.
AVVISO
Seguire le precauzioni seguenti per evitare
malfunzionamenti e danni al prodotto e prevenire
la perdita di dati.
Alimentazione
• Se si prevede di non utilizzare il prodotto per un
periodo di tempo prolungato, scollegare il cavo
dalla presa di alimentazione. Anche quando
l’interruttore [A] (Alimentazione) sul pannello
anteriore è spento, una quantità minima di
corrente continua a fluire nel prodotto.
Installazione
• A seconda dell’ambiente di utilizzo del
prodotto, telefoni, radio e televisori possono
produrre rumore. In tal caso, spostare il
prodotto in un altro luogo oppure modificarne
l’orientamento o l’ambiente in cui è collocato.
• Non installare il prodotto in luoghi soggetti a:
- Luce solare diretta
- Temperature estreme
- Polvere eccessiva
In caso contrario, si possono verificare
malfunzionamenti o danni al prodotto.
• Non installare il prodotto in luoghi in cui si
possa formare condensa a causa dei rapidi e
drastici cambi di temperatura. L’utilizzo del
prodotto in presenza di condensa può
danneggiarlo, Se si ritiene vi sia condensa
sopra o all’interno del prodotto, lasciarlo spento
per diverse ore.
Una volta che la condensa si è completamente
asciugata, sarà possibile tornare a utilizzare il
prodotto.
Manipolazione
• Non collocare oggetti in vinile, plastica o
gomma sul prodotto. In caso contrario, il
pannello potrebbe scolorarsi o deteriorarsi.
Manutenzione
• Per pulire il prodotto, utilizzare un panno morbido
e asciutto. Non utilizzare benzina, diluenti,
detergenti o altre sostanze chimiche per pulire la
superficie del prodotto. In caso contrario, la
superficie potrebbe scolorarsi o deteriorarsi.
NOTA
Questa sezione descrive le precauzioni da
osservare durante l’utilizzo, restrizioni funzionali e
ulteriori informazioni che possono risultare utili.
Smaltimento o trasferimento
• Se si intende trasferire la proprietà del prodotto,
includere questo documento e gli accessori
forniti in dotazione al prodotto.
• Osservare le norme locali in materia di
smaltimento per il prodotto e i relativi accessori.
• Osservare le norme locali in materia di
smaltimento di batterie usate.
Precauzioni per l’uso
Informazioni importanti
AVVERTENZA
L’uso di controlli, regolazioni, operazioni o procedure
non specificati in questo manuale possono risultare in
esposizione a radiazioni pericolose.

94 It
(weee_battery_eu_it_02)
Informazioni per gli utenti sulla raccolta e lo smaltimento di vecchia
attrezzatura e batterie usate
Questi simboli sui prodotti, sull’imballaggio e/o sui documenti che li accompagnano,
indicano che i prodotti elettrici ed elettronici e le batterie non devono essere mischiati
con i rifiuti generici.
Per il trattamento, il recupero e il riciclaggio appropriato di vecchi prodotti e batterie
usate, si prega di portarli ai punti di raccolta designati, in accordo con la legislazione
locale.
Smaltendo correttamente questi prodotti e batterie si potranno recuperare risorse
preziose, oltre a prevenire potenziali effetti negativi sulla salute e l’ambiente che
potrebbero sorgere a causa del trattamento improprio dei rifiuti.
Per ulteriori informazioni sulla raccolta e il riciclaggio di vecchi prodotti e batterie, si
prega di contattare l’amministrazione comunale locale, il servizio di smaltimento dei rifiuti
o il punto vendita dove sono stati acquistati gli articoli.
Per utenti imprenditori dell’Unione europea:
Se si desidera scartare attrezzatura elettrica ed elettronica, si prega di contattare il
proprio rivenditore o il proprio fornitore per ulteriori informazioni.
Informazioni sullo smaltimento negli altri Paesi al di fuori dell’Unione europea:
Questi simboli sono validi solamente nell’Unione Europea; se si desidera scartare questi
articoli, si prega di contattare le autorità locali o il rivenditore e richiedere informazioni
sulla corretta modalità di smaltimento.
Note per il simbolo della batteria (in basso due esempi del simbolo):
È possibile che questo simbolo sia usato in combinazione con un simbolo chimico.
Questo caso è conforme al requisito stabilito dalle Direttive UE sulle batterie relative agli
elementi chimici contenuti.

It 95
INDICE
PRIMA DI UTILIZZARE L’UNITÀ 96
Caratteristiche . . . . . . . . . . . . . . . . . . . . . . . . . . . . . . . . . . . . . . . . . . . . . . . . . .96
Informazioni sul presente manuale . . . . . . . . . . . . . . . . . . . . . . . . . . . . . . .96
Accessori . . . . . . . . . . . . . . . . . . . . . . . . . . . . . . . . . . . . . . . . . . . . . . . . . . . . . . .97
PREPARAZIONE 98
Collegamento a un amplificatore. . . . . . . . . . . . . . . . . . . . . . . . . . . . . . . . .98
Collegamento del cavo di alimentazione. . . . . . . . . . . . . . . . . . . . . . . . . .98
Accensione . . . . . . . . . . . . . . . . . . . . . . . . . . . . . . . . . . . . . . . . . . . . . . . . . . . . .99
RIPRODUZIONE DI AUDIO 100
Riproduzione di un CD audio. . . . . . . . . . . . . . . . . . . . . . . . . . . . . . . . . . . 100
Riproduzione di file musicali archiviati sull’unità flash USB. . . . . . . 101
Funzioni avanzate. . . . . . . . . . . . . . . . . . . . . . . . . . . . . . . . . . . . . . . . . . . . . 102
Riproduzione in sequenza casuale. . . . . . . . . . . . . . . . . . . . . . . . . . . . . . . . . . . . . . . . . . . . . . . . . . . 102
Ripetizione ripetuta. . . . . . . . . . . . . . . . . . . . . . . . . . . . . . . . . . . . . . . . . . . . . . . . . . . . . . . . . . . . . . . . . 102
Riproduzione di tracce nell’ordine specificato (Riproduzione programmata) . . . . . . . . . . 102
Riproduzione ripetuta di una parte specifica (Riproduzione ripetuta A-B) . . . . . . . . . . . . . 103
Ascolto di riproduzioni sonore di alta qualità (PURE DIRECT). . . . . . . . . . . . . . . . . . . . . . . . . . 103
Scelta delle informazioni visualizzate sul display . . . . . . . . . . . . . . . . . . . . . . . . . . . . . . . . . . . . . 103
Regolazione della luminosità del display. . . . . . . . . . . . . . . . . . . . . . . . . . . . . . . . . . . . . . . . . . . . . 103
APPENDICE 104
Nomi delle parti. . . . . . . . . . . . . . . . . . . . . . . . . . . . . . . . . . . . . . . . . . . . . . . .104
Pannello anteriore. . . . . . . . . . . . . . . . . . . . . . . . . . . . . . . . . . . . . . . . . . . . . . . . . . . . . . . . . . . . . . . . . . .104
Display. . . . . . . . . . . . . . . . . . . . . . . . . . . . . . . . . . . . . . . . . . . . . . . . . . . . . . . . . . . . . . . . . . . . . . . . . . . . . .105
Pannello posteriore. . . . . . . . . . . . . . . . . . . . . . . . . . . . . . . . . . . . . . . . . . . . . . . . . . . . . . . . . . . . . . . . . .105
Telecomando . . . . . . . . . . . . . . . . . . . . . . . . . . . . . . . . . . . . . . . . . . . . . . . . . . . . . . . . . . . . . . . . . . . . . . .106
Impostazioni avanzate . . . . . . . . . . . . . . . . . . . . . . . . . . . . . . . . . . . . . . . . .107
Memoria modalità di riproduzione (PLAY MEM) . . . . . . . . . . . . . . . . . . . . . . . . . . . . . . . . . . . . . .107
Modalità pronta (RDY MODE) . . . . . . . . . . . . . . . . . . . . . . . . . . . . . . . . . . . . . . . . . . . . . . . . . . . . . . . .107
Riproduzione automatica (AUTO PLAY). . . . . . . . . . . . . . . . . . . . . . . . . . . . . . . . . . . . . . . . . . . . . . .107
Spegnimento automatico (AUTO STBY) . . . . . . . . . . . . . . . . . . . . . . . . . . . . . . . . . . . . . . . . . . . . . .107
Formati di file/dischi/unità flash USB supportati . . . . . . . . . . . . . . . . .108
Dati tecnici . . . . . . . . . . . . . . . . . . . . . . . . . . . . . . . . . . . . . . . . . . . . . . . . . . . .109
Risoluzione dei problemi . . . . . . . . . . . . . . . . . . . . . . . . . . . . . . . . . . . . . . .110

96 It
PRIMA DI UTILIZZARE L’UNITÀ
• Uscita digitale ottica
• Uscita digitale coassiale
• Supporta la riproduzione di dischi CD-R e CD-RW
• Supporta la riproduzione di file memorizzati su unità flash USB o CD dati (MP3/WMA/
AAC/WAV/FLAC)
• Riproduzione in sequenza casuale (pagina 102)
• Ripetizione ripetuta (pagina 102)
• Riproduzione programmata (solo CD audio) (pagina 102)
• Riproduzione ripetuta A-B (solo CD audio) (pagina 103)
• Funzione PURE DIRECT (pagina 103)
• Impostazioni display configurabili (voci da visualizzare/luminosità) (pagina 103)
• Attivazione/disattivazione standby telecomandata
• Memoria modalità di riproduzione (pagina 107)
• Modalità pronta (pagina 107)
• Funzione di riproduzione automatica (pagina 107)
• Funzione di spegnimento automatico (pagina 107)
• Questo manuale spiega le operazioni che è possibile effettuare principalmente
mediante il telecomando in dotazione.
• Tutte le illustrazioni nel presente manuale sono fornite come istruzioni di
funzionamento.
• In questo manuale, con CD audio si intende un CD musicale e un CD che contiene
dati MP3/WMA/AAC/WAV/FLAC viene indicato come CD dati.
• Le specifiche e l’aspetto sono soggetti a modifica senza preavviso.
•
AVVERTENZA indica rischio di lesioni gravi o di morte.
•
ATTENZIONE indica rischio di lesioni.
• Seguire per evitare malfunzionamenti e danni al prodotto.
• forniscono ulteriori informazioni utili.
Caratteristiche Informazioni sul presente manuale
Avviso
Nota

It 97
• Telecomando
• Cavo di alimentazione
• Cavo stereo RCA
• Batterie (AA, R6, UM-3) (x2)
• Manuale di istruzioni (questo manuale)
Accessori
Inserimento delle batterie nel
telecomando
Inserire le batterie rispettando
l’orientamento.
Raggio d’azione del
telecomando
Puntare il telecomando verso il
relativo sensore sull’unità entro
il raggio illustrato nella figura
sulla destra.
Batterie (AA, R6, UM-3)
30° 30°
Entro 6 m

98 It
PREPARAZIONE
ATTENZIONE
• Non collegare il cavo di alimentazione dell’unità e di altri dispositivi collegati alle prese di corrente
prima di aver completato tutti i collegamenti non di alimentazione.
Una volta completati tutti i collegamenti, collegare il cavo di alimentazione fornito nella
connettore AC IN dell’unità, quindi collegare l’altra estremità a una presa di corrente.
Collegamento a un amplificatore Collegamento del cavo di alimentazione
AmplificatoreAmplificatore
Cavo stereo RCA
(fornito in dotazione)
Cavo audio digitale coassiale
(disponibile in commercio)
Cavo digitale ottico
(disponibile in commercio) A una presa di
corrente
Questa unità (retro)
Cavo di alimentazione
(fornito in dotazione)

It 99
Per accendere l’unità, premere A (Alimentazione) sul pannello anteriore.
Nota
• Premere A (Alimentazione) sul telecomando mentre l’unità è alimentata, per entrare in modalità
standby.
• L’indicatore di alimentazione dell’unità funziona come segue:
Luce brillante: unità accesa
Luce tenue: modalità standby
Spento: l’alimentazione è spenta
• L’unità dispone di una funzione di spegnimento automatico che consente di risparmiare energia
(pagina 107).
(Predefinita: Funzione di spegnimento automatico attiva)
Accensione
A (Alimentazione)
Indicatore di accensione

100 It
CD/USB
OPEN/CLOSE
RIPRODUZIONE DI AUDIO
L’unità consente di riprodurre CD dati oltre a CD audio. Per
informazioni sui tipi di CD che è possibile riprodurre con l’unità,
consultare “Formati di file/dischi/unità flash USB supportati”
(pagina 108).
1Se l’indicatore USB sul pannello anteriore è acceso,
premere CD/USB per passare in modalità Disco.
2Posizionare un CD sul vassoio del disco.
Premere ripetutamente OPEN/CLOSE per aprire e chiudere il
vassoio del disco.
Nota
• Per aprire e chiudere il vassoio del disco, è inoltre possibile premere
ripetutamente (Apri/Chiudi) sul pannello anteriore.
• Quando l’unità è pronta a riprodurre un CD audio, l’indicatore di media
in riproduzione (CD) si illumina sul display.
3Premere (Riproduci).
Si illuminerà sul display l’indicatore (Riproduci) e inizierà la
riproduzione.
Nota
• Durante la riproduzione di file audio, l’indicatore di media in
riproduzione corrisponde al formato di file si illumina.
Avviso
• Non inserire le mani o le dita nella fessura del vassoio del disco per evitare
lesioni.
Nota
• Una volta posizionato un CD sul vassoio del disco, il vassoio si chiuderà e
partirà la riproduzione se si esegue una delle seguenti operazioni:
– Premere (Riproduci).
– Premere un tasto numerico corrispondente al numero di una traccia.
• È possibile configurare l’unità in modo che la riproduzione inizi
automaticamente all’accensione dell’unità o quando si passa in modalità
Disco o USB (pagina 107). (Predefinita: riproduzione automatica attivata)
Utilizzare i seguenti tasti del telecomando per controllare il
funzionamento.
* I pulsanti di controllo sul pannello anteriore funzionano come
segue:
(Salta indietro/Cerca indietro):
Salta indietro alla traccia precedente. Salta indietro all’inizio
della traccia precedente se premuto durante la riproduzione.
Tenendo premuto il pulsante inoltre, cerca le tracce indietro.
(Salta in avanti/Cerca in avanti)
Salta alla traccia successiva. Tenendo premuto il pulsante
inoltre, cerca le tracce in avanti.
Riproduzione di un CD audio
Tasti disponibili Funzione
(Riproduci) Si illuminerà sul display l’indicatore
(Riproduci) e inizierà la riproduzione.
(Pausa)
Si illuminerà sul display l’indicatore (Pausa)
e si sospenderà la riproduzione. In
alternativa, premere per riprendere la
riproduzione.
(Interrompi) Interrompe la riproduzione.
(Cerca indietro)* Cerca le tracce precedenti.
(Cerca in avanti)* Cerca le tracce successive.
(Salta indietro)*
Salta indietro alla traccia precedente. Salta
indietro all’inizio della traccia precedente se
premuto durante la riproduzione.
(Salta in avanti)* Salta alla traccia successiva.
Tasti numerici Immettere il numero di una traccia per
selezionarla direttamente.
FOLDER ,
(Solo CD dati) Consente di selezionare una cartella.
Tasti numerici

It 101
CD/USB
Sull’unità è possibile riprodurre brani musicali (presenti sull’unità flash
USB). Per informazioni sulle unità flash USB supportati, consultare
“Formati di file/dischi/unità flash USB supportati” (pagina 108).
1Se l’indicatore USB sul pannello anteriore è spento,
premere CD/USB per passare in modalità USB.
L’indicatore USB sul pannello anteriore si illumina in arancione.
2Collegare l’unità flash USB alla presa USB.
Quando l’unità è pronta alla riproduzione, l’indicatore di media
in riproduzione (USB) si illumina sul display, e l’indicatore USB
sul pannello anteriore si illumina in verde.
Avviso
• Non utilizzare prolunghe USB.
3Premere (Riproduci).
Si illuminerà sul display l’indicatore (Riproduci) e inizierà la
riproduzione.
Nota
• Durante la riproduzione di file audio, l’indicatore di media in
riproduzione corrisponde al formato di file si illumina.
• Se sull’unità flash USB sono presenti file musicali, l’unità li riprodurrà
in ordine cronologico secondo la data di creazione.
Avviso
• Non rimuovere l’unità flash USB durante la riproduzione o quando il display
sul pannello anteriore indica “USB READING”. In questo caso, prima
premere CD/USB per passare in modalità disco, assicurarsi che l’indicatore
USB si spenga, quindi rimuovere l’unità flash.
Utilizzare i seguenti tasti del telecomando per controllare il
funzionamento.
* I pulsanti di controllo sul pannello anteriore funzionano come
segue:
(Salta indietro/Cerca indietro):
Salta indietro alla traccia precedente. Salta indietro all’inizio
della traccia precedente se premuto durante la riproduzione.
Tenendo premuto il pulsante inoltre, cerca le tracce indietro.
(Salta in avanti/Cerca in avanti)
Salta alla traccia successiva. Tenendo premuto il pulsante
inoltre, cerca le tracce in avanti.
Riproduzione di file musicali archiviati sull’unità flash USB
Questa unità (pannello anteriore)
Unità flash USB
Tasti disponibili Funzione
(Riproduci) Si illuminerà sul display l’indicatore
(Riproduci) e inizierà la riproduzione.
(Pausa)
Si illuminerà sul display l’indicatore (Pausa)
e si sospenderà la riproduzione. In
alternativa, premere per riprendere la
riproduzione.
(Interrompi) Interrompe la riproduzione.
(Cerca indietro)* Cerca le tracce precedenti.
(Cerca in avanti)* Cerca le tracce successive.
(Salta indietro)*
Salta indietro alla traccia precedente. Salta
indietro all’inizio della traccia precedente se
premuto durante la riproduzione.
(Salta in avanti)* Salta alla traccia successiva.
FOLDER , Consente di selezionare una cartella.

102 It
RANDOM
CLEAR
ENTER
REPEAT
PROGRAM
È possibile configurare la modalità di riproduzione e le impostazioni
del display tramite le funzioni avanzate.
Riproduzione in sequenza casuale
Premere RANDOM per riprodurre in ordine casuale. Premendo
ripetutamente RANDOM, le impostazioni di riproduzione in
sequenza casuale cambieranno come segue:
Nota
• Per annullare la riproduzione in sequenza casuale, aprire il vassoio del
disco.
Ripetizione ripetuta
Premere REPEAT per riprodurre le tracce ripetutamente. Premendo
ripetutamente REPEAT, le impostazioni della riproduzione ripetuta
cambieranno come segue:
Nota
• Per annullare la riproduzione ripetuta, aprire il vassoio del disco.
Riproduzione di tracce nell’ordine
specificato (Riproduzione programmata)
È possibile riprodurre tracce di CD audio nell’ordine specificato.
1Premere PROGRAM a riproduzione interrotta.
2Usare i tasti numerici per immettere il numero di
traccia di un brano da programmare.
3Premere ENTER.
Ripetere i punti 2 e 3 per programmare ciascuna traccia.
Premere CLEAR per annullare ciascuna traccia programmata
a partire dall’ultima.
4Premere (Riproduci).
L’unità inizia a riprodurre le tracce nell’ordine programmato.
Nota
• La riproduzione programmata non funziona con CD dati o unità flash USB.
• È possibile programmare fino a 24 tracce.
• Eseguire una delle seguenti operazioni per cancellare tutte le tracce
programmate:
– Premere CLEAR a riproduzione programmata interrotta.
– Spegnere l’unità o metterla in modalità standby.
– Aprire il vassoio del disco.
Funzioni avanzate
Indicatore Impostazione
RNDM Riproduce tutte le tracce in ordine casuale.
Off Disattiva la riproduzione in sequenza casuale.
Indicatore Impostazione
REP Riproduce una traccia ripetutamente.
REP FOLDER (solo CD
dati e unità flash USB)
Riproduce ripetutamente tutte le tracce della
cartella corrente.
REP ALL Riproduce tutte le tracce ripetutamente.
Off Disattiva la riproduzione ripetuta.
TRACKTEXT AAC WAV FLAC RESUM RDY TOTAL REMAIN RNDM REP FOLDER ALL A - BCD PROG
TRACKTEXT AAC WAV FLAC RESUM RDY TOTAL REMAIN RNDM REP FOLDER ALL A - BCD PROG
Tasti numerici

It 103
A/B
PURE
DIRECT
DISPLAY
DIMMER
Riproduzione ripetuta di una parte
specifica (Riproduzione ripetuta A-B)
È possibile specificare i punti iniziali e finali di una traccia durante
la riproduzione di CD audio per riprodurre ripetutamente la parte
specificata.
1Riprodurre un CD audio.
2Premere A/B nel punto in cui si desidera avviare la
riproduzione ripetuta.
3Premere nuovamente A/B nel punto in cui si
desidera terminare la riproduzione ripetuta.
L’unità avvia la riproduzione ripetuta.
Nota
• La riproduzione ripetuta non funziona con CD dati o unità flash USB.
• Non è possibile specificare l’impostazione Ripeti A-B quando è attivata la
funzione PURE DIRECT.
• Eseguire una delle seguenti operazioni per annullare la riproduzione
ripetuta A-B:
– Premere nuovamente A/B.
– Premere (Interrompi).
– Aprire il vassoio del disco.
Ascolto di riproduzioni sonore di alta
qualità (PURE DIRECT)
Se la funzione PURE DIRECT è attivata, non verrà emesso audio
digitale. In questo modo, la funzione PURE DIRECT riduce il rumore
che influirebbe sulla qualità sonora, permettendo di godersi la
riproduzione di audio di alta qualità.
Premere ripetutamente PURE DIRECT per attivare/disattivare
PURE DIRECT.
Nota
• Per utilizzare la funzione PURE DIRECT, collegare all’amplificatore le prese
ANALOG OUT sul pannello posteriore. Le prese DIGITAL OUT non
emetteranno alcun segnale.
• Quando la funzione PURE DIRECT è attivata:
– L’indicatore PURE DIRECT si illumina.
– Il display sul pannello anteriore rimarrà spento durante la riproduzione
dei contenuti.
– Apparirà solo un numero minimo di indicatori e messaggi mentre si
utilizza l’unità.
– Questa impostazione verrà mantenuta dopo lo spegnimento dell’unità.
Scelta delle informazioni visualizzate sul
display
Premere ripetutamente DISPLAY durante la riproduzione per
cambiare le informazioni visualizzate come segue:
Nota
• Il display informativo indica fino a 64 caratteri (caratteri alfanumerici a 1 byte
e diversi simboli).
Regolazione della luminosità del display
Premere ripetutamente DIMMER per alternare tra i quattro livelli di
luminosità del display.
TEXT AAC WAV FLAC RESUM RDY TOTAL REMAIN RNDM FOLDER ALLPROG CD TRACK REP
TEXT AAC WAV FLAC RESUM RDY TOTAL REMAIN RNDM FOLDER ALLPROG CD TRACK REP
Media in riproduzione Informazioni visualizzate sul display
CD audio
Tempo trascorso Tempo residuo della traccia
corrente (TRACK REMAIN) Tempo totale
residuo sul CD (TOTAL REMAIN) Nome della
traccia* Nome dell’artista* Titolo dell’album*
* Se il CD contiene CD-text
CD dati, unità flash
USB
Tempo trascorso Nome della traccia*
Nome dell’artista* Titolo dell’album*
* Se sono incorporate tag.

104 It
APPENDICE
Pannello anteriore
1A (Alimentazione) (pagina 99)
2Indicatore di alimentazione (pagina 99)
3Presa USB (pagina 101)
4Indicatore USB (pagina 101)
5CD/USB (pagine 100, 101)
6PURE DIRECT (pagina 103)
7Indicatore PURE DIRECT (pagina 103)
8Vassoio del disco (pagina 100)
9 (Apri/Chiudi) (pagina 100)
0Sensore del telecomando (pagina 97)
A(Salta indietro/Cerca indietro) (pagine 100, 101)
B (Salta in avanti/Cerca in avanti) (pagine 100, 101)
C (Riproduci) (pagine 100, 101, 102)
D (Pausa) (pagine 100, 101)
E (Interrompi) (pagine 100, 101, 102, 103)
Nomi delle parti
1 2 3 4 7 0
8 9
5 6 A B C D E

It 105
Display
1 / Indicatore (Riproduci/Pausa) (pagine 100, 101)
2Indicatore riproduzione media (pagine 100, 101)
3Indicatore impostazioni avanzate (pagina 107)
4Indicatore del tempo (pagina 103)
5Indicatore modalità di riproduzione (pagine 102, 103)
6Display informazioni (pagine 102, 103, 107)
Pannello posteriore
1Connettori ANALOG OUT (pagina 98)
2Connettore DIGITAL OUT (COAXIAL) (pagina 98)
3Connettore DIGITAL OUT (OPTICAL) (pagina 98)
4Connettore AC IN (pagina 98)
TRACKCD TEXT AAC WAV FLAC RESUM RDY TOTAL REMAIN PROG RNDM REP FOLDER ALL A - B
1 62 3 54
2 3 41

106 It
Telecomando
1A (Alimentazione) (pagina 99)
2Trasmettere il segnale del telecomando (pagina 97)
3OPEN/CLOSE (pagina 100)
4PROGRAM (pagina 102)
5REPEAT (pagina 102)
6DIMMER (pagina 103)
7RANDOM (pagina 102)
8A/B (pagina 103)
9DISPLAY (pagina 103)
0Tasti numerici (pagine 100, 102)
ACLEAR (pagina 102)
BENTER (pagina 102)
C (Cerca indietro), (Cerca in avanti) (pagine 100, 101)
(Pausa) (pagine 100, 101)
(Salta indietro) (pagine 100, 101)
(Salta in avanti) (pagine 100, 101)
(Riproduci) (pagine 100, 101, 102)
(Interrompi) (pagine 100, 101, 102, 103)
FOLDER , (pagine 100, 101)
DCD/USB (pagine 100, 101)
EPURE DIRECT (pagina 103)
3
4
9
0
C
7
8
A
B
D
E
6
5
21

It 107
Questa sezione spiega come configurare varie funzioni. avanzate È possibile
modificare la maggior parte di queste impostazioni dal pannello anteriore. (alcune
impostazioni richiedono l’uso del telecomando.)
1Mettere l’unità in modalità standby (pagina 99).
2Tenere premuti contemporaneamente PURE DICRECT, (Apri/
Chiudi) e (Riproduci) per almeno tre secondi.
Il seguente indicatore appare sul display informativo del pannello anteriore e
l’unità entra in modalità d’impostazione. È possibile impostare le funzioni Memoria
modalità di riproduzione, Modalità pronta, Riproduzione automatica e
Spegnimento automatico in quest’ordine.
3Premere o per attivare o disattivare la
funzione.
4Premere (Interrompi).
L’impostazione è confermata e viene automaticamente selezionato il parametro
successivo. Ripetere i punti 3 e 4. Completate tutte le impostazioni, il seguente
indicatore appare sul display informativo del pannello anteriore e l’unità entra in
modalità standby.
Nota
• Premendo (Riproduci) in questa fase, l'impostazione verrà confermata e l'unità entrerà
in modalità standby.
Memoria modalità di riproduzione (PLAY MEM)
Con la funzione abilitata, l’unità mantiene le impostazioni per Riproduzione ripetuta e
Riproduzione in sequenza casuale dopo lo spegnimento dell’unità. Quando è attivata la
funzione Memoria modalità di riproduzione, l’indicatore della impostazioni avanzate
(RESUM) si illumina sul display.
Predefinita: Disattivata
Nota
• Se si attiva l’alimentazione dell’unità dopo aver abilitato la funzione Memoria modalità di
riproduzione, l’unità riprodurrà dall’inizio la traccia o file riprodotti più di recente.
Modalità pronta (RDY MODE)
Con la funzione abilitata, l’unità si ferma ogni volta che viene completata la
riproduzione di una traccia. È possibile avviare la riproduzione della traccia successiva
quando si desidera. Quando è attivata la funzione modalità Pronta, l’indicatore delle
impostazioni avanzate (RDY) si illumina sul display.
Predefinita: Disattivata
Riproduzione automatica (AUTO PLAY)
Con la funzione abilitata, l’unità avvia automaticamente la riproduzione all’accensione
dell’unità o quando si passa in modalità Disco o USB.
Predefinita: Attivata
Spegnimento automatico (AUTO STBY)
Con la funzione abilitata, l’unità entra automaticamente in modalità standby se non si
interagisce con essa per 20 minuti da quando la riproduzione è stata interrotta.
Predefinita: Attivata
Impostazioni avanzate
PURE DIRECT
TRACKTEXT AAC WAV FLAC RESUM RDY TOTAL REMAIN RNDM REP FOLDER ALLPROG CD TRACKTEXT AAC WAV FLAC RESUM RDY TOTAL REMAIN RNDM REP FOLDER ALLPROG CD
CD TRACK REP TEXT AAC WAV FLAC RESUM RDY TOTAL REMAIN RNDM FOLDER ALLPROG

108 It
❑Formati di file supportati
* Solo formato PCM lineare.
Nota
• I file su un CD dati o un’unità flash USB verranno riprodotti in ordine cronologico in base alla data
di creazione.
• L’unità supporta i dischi in formato ISO9660.
• Per la riproduzione di file VBR (variable bitrate), potrebbe non essere visualizzato correttamente il
tempo trascorso.
• Non è possibile riprodurre contenuti Digital Rights Management (DRM).
❑Dischi supportati
Utilizzare i dischi con i seguenti loghi.
Avviso
• Per evitare malfunzionamenti dell’unità, non utilizzare dischi con forme strane o dischi con sopra
nastri o adesivi.
• L’unità potrebbe non riprodurre alcuni dischi CD-RW o dischi non registrati in modo corretto.
• Per riprodurre CD da 8 cm, posizionarli nell’area incava del vassoio. Non posizionare normali CD
da 12 cm sopra a CD da 8 cm.
Formati di file/dischi/unità flash USB supportati
File Frequenza di campionamento (kHz) Profondità in
bit (bit)
Bitrate
(kbps)
Numero di
canali
MP3 32/44,1/48 — 32-320 2
WMA 32/44.1/48 — 48-192 2
AAC 32/44.1/48 — 8-320 2
WAV * 32/44.1/48/64/88.2/96 16/24 — 2
FLAC 32/44.1/48/64/88.2/96 16/24 — 2
CD dati Unità flash USB
Numero di livelli di cartelle
(inclusa la cartella radice) 99
Numero di cartelle 999 999
Numero di file 1100 65535
Compact disc (CD audio)
Dischi CD-R e CD-RW
• Dischi con una delle seguenti descrizioni:
FOR CONSUMER
FOR CONSUMER USE
FOR MUSIC USE ONLY
• Per i dischi CD-R o CD-RW, l’unità riproduce solo i dischi
finalizzati.
Nota
• L’unità potrebbe non riprodurre alcuni dischi CD-R/CD-RW o dischi non
registrati in modo corretto.
Dischi CD-TEXT
Questi dischi contengono informazioni testuali incorporate, come
per esempio titoli degli album, nomi dei brani e degli artisti. Saranno
visualizzate queste informazioni (solo caratteri alfanumerici e alcuni
simboli) oltre al tempo trascorso.

It 109
❑Manipolazione del disco
• Maneggiare con cura il disco per evitare di graffiare la
superficie registrata. Non piegare il disco.
• In caso di impronte digitali o polvere sulla superficie registrata,
pulirla con un panno morbido partendo dal centro e
spostandosi verso il bordo.
• Per pulire il disco, non utilizzare mai prodotti di pulizia per dischi in vinile, prodotti
antistatici o altre sostanze chimiche.
• Utilizzare una penna a punta morbida per scrivere solo sul lato dell’etichetta.
• Non lasciare il disco sotto la luce solare diretta o in luoghi esposti ad alta
temperatura o umidità per lunghi periodi di tempo.
• Per evitare malfunzionamenti, non utilizzare prodotti in commercio per la pulizia delle
lente.
❑Unità flash USB supportate
Prima di utilizzare l’unità per riprodurre file musicali memorizzati su unità flash USB,
assicurarsi che vengano soddisfatti i seguenti requisiti:
• L’unità flash USB è conforme ai requisiti di classe di archiviazione di massa.
• I dati sono stati registrati con file system FAT16 o FAT32.
Avviso
• Alcune unità flash USB potrebbero non funzionare correttamente.
• Le unità flash USB con crittografia non possono essere utilizzate.
• Yamaha e i suoi rivenditori non si assumo alcuna responsabilità per l’eventuale perdita di dati su
unità flash USB connesse all’unità. Consigliamo di conservare delle copie dei dati in caso di
perdita.
• Yamaha non garantisce il funzionamento o l’alimentazione delle unità flash USB.
Le specifiche dell’unità sono le seguenti.
Sezione audio
• Livello di uscita (1 kHz, 0 dB, Fs 44,1 kHz) .................................................. 2,0 ±0,3 V
• Rapporto segnale/rumore (rete IHF-A) (1 kHz, 0 dB, Fs 44,1 kHz).......... 105 dB o più
• Gamma dinamica (1 kHz, 0 dB, Fs 44,1 kHz) ............................................ 96 dB o più
• Distorsione armonica (1 kHz, 0 dB, Fs 44,1 kHz).................................0,003% o meno
• Risposta in frequenza
CD audio................................................................................................. 2 Hz – 20 kHz
CD dati/Unità USB Fs 48 kHz ....................................................... 2 Hz – 22 kHz
Fs 96 kHz ............................................2 Hz – 44 kHz, –3 dB
Sezione laser
• Tipo di laser ...................................................................................................... AIGaAs
• Lunghezza d’onda .............................................................................................790 nm
• Potenza laser ..........................................................................................Max. 1,04 mW
Problemi di carattere generale
• Alimentazione
Modelli per USA e Canada................................................................. 120 V CA, 60 Hz
Modello per l’Australia .................................................................230-240 V CA, 50 Hz
Modelli per l’Europa e il Regno Unito ................................................. 230 V CA, 50 Hz
Modello generale e per l’Asia.................................................110-240 V CA, 50/60 Hz
Modello per la Cina............................................................................. 220 V CA, 50 Hz
• Assorbimento di corrente ......................................................................................11 W
• Consumo in standby
Standby alimentazione (modalità standby) ..........................................................0,2 W
Spegnimento.........................................................................................................0,2 W
• Dimensioni (L x A x P)..................................................................... 435 x 87 x 260 mm
• Peso .....................................................................................................................3,5 kg
* Il contenuto del presente manuale si applica alle ultime specifiche tecniche a partire dalla data di
pubblicazione. Per ottenere la versione più recente del manuale, accedere al sito Web Yamaha e
scaricare il file corrispondente.
Dati tecnici
Prese di uscita
• Audio analogico x 1 (RCA non bilanciato)
• Audio digitale
COASSIALE x 1, OTTICA x 1
Altre prese
• USB × 1 (USB2.0)

110 It
Se l’unità non funzionasse correttamente, consultare la tabella seguente. Se il problema riscontrato non fosse presente nell’elenco seguente o se i sintomi persistono dopo aver
seguito le istruzioni proposte qui sotto, spegnere l’unità premendo A (Alimentazione) sul pannello anteriore, scollegare il cavo di alimentazione e mettersi in contatto con il rivenditore
autorizzato o centro di assistenza Yamaha più vicino.
Risoluzione dei problemi
Problema Causa Soluzione Pagina
Premendo l’interruttore
dell’alimentazione l’unità non si
accende.
Il cavo di alimentazione potrebbe non essere collegato correttamente. Collegare il cavo di alimentazione saldamente alla presa di corrente
CA. 98
Il vassoio del disco non si chiude
completamente. Un oggetto estraneo è presente nell’alloggiamento del vassoio. Ispezionare il vassoio e rimuovere eventuali oggetti esterni. —
Impossibile riprodurre il disco inserito.
Il disco è graffiato. Cambiare disco. —
Si è formata della condensa sulla lente. Accendere l’unità, attendere 20–30 minuti, quindi provare nuovamente
a riprodurre il disco. —
Il disco è inserito sottosopra. Assicurarsi che il lato con l’etichetta del disco sia rivolto verso l’alto. —
Il disco è sporco o graffiato. Rimuovere lo sporco dalla superficie del disco o utilizzare un disco non
graffiato. 109
Non è possibile riprodurre file in un formato non supportato dall’unità. Assicurarsi di utilizzare un disco che contenga file in un formato
supportato dall’unità. 108
Non è possibile riprodurre dischi non supportati dall’unità. Assicurarsi di utilizzare un disco supportato dall’unità. 108, 109
L’unità è in modalità USB. Premere CD/USB per passare in modalità disco. 100, 104,
106
La riproduzione non inizia
immediatamente o dal punto corretto. Il disco è sporco o graffiato. Rimuovere lo sporco dalla superficie del disco o utilizzare un disco non
graffiato. 109
Impossibile riprodurre file musicali
archiviati sull’unità flash USB.
L’unità flash USB non è collegata correttamente all’unità. Collegare correttamente l’unità flash USB. 101
Non è possibile riprodurre file in un formato non supportato dall’unità. Assicurarsi di utilizzare un’unità flash USB che contenga file in un
formato supportato dall’unità. 108
L’unità è in modalità disco. Premere CD/USB per passare in modalità USB. 101, 104,
106
Audio assente L’unità non è collegata correttamente all’amplificatore. Verificare il collegamento all’amplificatore. 98
L’audio non viene emesso dal
dispositivo collegato alle prese DIGITAL
OUT.
La funzione PURE DIRECT è attivata. Disattivare la funzione PURE DIRECT. 103

It 111
L’audio si sente a scatti.
L’unità è soggetta a urti o vibrazioni. Spostare l’unità. —
Il disco è sporco o graffiato. Rimuovere lo sporco dalla superficie del disco o utilizzare un disco non
graffiato. 109
Si sente fruscio o ronzio. Il cavo stereo RCA non è collegato saldamente. Collegare saldamente il cavo stereo RCA. Se il sintomo non migliora,
verificare che il cavo stesso non sia difettoso. 98
Rumore nel sintonizzatore L’unità è sita vicino a un sintonizzatore. Allontanare l’unità dal sintonizzatore o spegnere l’unità. —
Il vassoio del disco è rumoroso. Il disco è deformato. Utilizzare un disco non deformato. —
Sul display non appare alcuna
indicazione La funzione PURE DIRECT è attivata Disattivare la funzione PURE DIRECT. 103
Non appare il nome della cartella o del
file nel display.
Il nome della cartella o del file utilizza caratteri diversi da caratteri
alfanumerici da un byte.
Utilizzare caratteri alfanumerici da un byte per i nomi dei file e delle
cartelle. 103
Il telecomando non funziona
correttamente.
Le batterie sono quasi esaurite. Sostituire le batterie. 97
Distanza eccessiva o angolo errato. Utilizzare il telecomando entro il raggio d’azione. 97
La luce solare o l’illuminazione diretta (da una lampada a fluorescenza
di tipo inverter o altro) colpisce il sensore a infrarossi dell’unità. Cambiare l’orientamento dell’illuminazione o dell’unità. —
Problema Causa Soluzione Pagina

112 Es
Lea atentamente estas precauciones antes de
continuar.
Asegúrese de seguir estas
instrucciones
Lea atentamente y cumpla las siguientes
precauciones para evitar lesiones personales o
daños materiales.
Una vez que haya leído detenidamente este
documento, consérvelo en un lugar al que todas
las personas que utilicen el producto puedan
acceder en cualquier momento.
ADVERTENCIA
Estas precauciones le alertan de la posibilidad
de muerte o lesiones graves para usted u otras
personas.
Si observa cualquier anomalía
• Si se produce alguna de las siguientes
anomalías, apague la alimentación de
inmediato.
- El cable o el enchufe de alimentación resultan
dañados.
- El producto emite olores, ruidos o humo
inusuales.
- Un objeto o agua han caído al interior del
producto.
- Aparecen grietas u otros daños en el
producto.
- Se produce una pérdida repentina de sonido
durante el uso del producto.
Siga los pasos que se muestran a continuación
para desactivar la alimentación.
- Desactive la alimentación de este producto.
- Desconecte el enchufe del cable de
alimentación de la toma de CA.
Si continúa utilizando el producto en este
estado, puede producirse un incendio, una
descarga eléctrica o daños en el producto.
Solicite su inspección o reparación de
inmediato.
Alimentación
• Evite dañar el cable de alimentación.
- No coloque el cable de alimentación cerca de
fuentes de calor como calentadores.
- No doble ni modifique a la fuerza el cable de
alimentación.
- Evite dañar el cable de alimentación.
- No coloque objetos pesados sobre el cable
de alimentación.
- No utilice grapas en el cable de alimentación.
Si utiliza un cable de alimentación pelado con
los hilos del núcleo expuestos puede
producirse un incendio, una descarga eléctrica
o daños en el producto.
• Si se producen relámpagos o tormentas
eléctricas, no toque este producto, el enchufe
ni el cable de alimentación.
De lo contrario, se puede provocar descarga
eléctrica.
• Utilice el voltaje especificado para este
producto.
El uso de un voltaje incorrecto puede provocar
incendios, descargas eléctricas o daños en el
producto.
• Asegúrese de utilizar únicamente el
componente que figura continuación para
suministrar energía:
- Cable de alimentación incluido
De lo contrario, se puede provocar un incendio,
quemaduras o daños en el producto.
• No utilice el siguiente accesorio incluido con
otros dispositivos.
- Cable de alimentación
De lo contrario, se puede provocar un incendio,
quemaduras o daños en el producto.
PRECAUCIONES
• Póngase en contacto con el siguiente centro
de atención al cliente si necesita realizar una
inspección o reparación.
- La tienda en la que adquirió el producto
- Un distribuidor Yamaha
• Este producto está destinado para su uso
como un aparato doméstico general. No lo
utilice en campos o actividades que requieran
un alto grado de fiabilidad que pueda afectar
a vidas humanas o recursos valiosos.
• Tenga en cuenta que Yamaha no puede
aceptar responsabilidad alguna por las
pérdidas resultantes del uso indebido o la
modificación no autorizada del producto.

Es 113
• Compruebe periódicamente el enchufe del
cable de alimentación y quite la suciedad o el
polvo que pudieran haberse acumulado.
De lo contrario, se puede provocar un incendio
o una descarga eléctrica.
• Asegúrese de insertar por completo el enchufe
del cable de alimentación en una toma de CA.
De lo contrario, se puede producir una
descarga eléctrica, un incendio o daños en el
producto debido a un cortocircuito.
• Inserte el enchufe del cable de alimentación en
una toma de CA que esté visible y a la que se
pueda acceder con facilidad.
Si se produce algún problema o
funcionamiento defectuoso, debería poder
desconectar de inmediato el enchufe de la
toma de CA fácilmente. Aunque el interruptor
de alimentación esté apagado, si el cable de
alimentación no está desenchufado de la toma
de CA de la pared, el producto no se
desconecta de la alimentación completamente.
• Si no tiene previsto utilizar el producto durante
un periodo prolongado, extraiga el enchufe del
cable de alimentación de las tomas de CA.
De lo contrario, se puede provocar un incendio
o daños en el producto.
No desmonte el producto
• No modifique ni desmonte este producto.
De lo contrario, se puede provocar un incendio,
una descarga eléctrica, lesiones o daños en el
producto.
Advertencia sobre el agua
• No utilice este producto en lugares donde haya
mucha humedad o donde pueda gotear agua,
como un baño o una ubicación exterior lluviosa.
• No coloque sobre este producto recipientes
(como jarrones o frascos de medicamentos)
que contenga líquidos.
Si se derrama un líquido en el interior del
producto, se puede provocar un incendio, una
descarga eléctrica o daños en el producto.
• No inserte el enchufe del cable de alimentación
ni lo extraiga de la toma de CA con las manos
húmedas. No manipule este producto con las
manos húmedas.
De lo contrario, se puede provocar una
descarga eléctrica o daños en el producto.
Advertencia sobre el contacto con fuego
• No manipule llamas abiertas cerca de este
producto.
De lo contrario, se puede provocar un incendio.
Pérdida de visión
• No mire directamente al haz del láser.
Si el haz del láser le alcanza en los ojos, podría
sufrir pérdida de visión.
Manipulación
• No deje caer este producto ni lo someta a
impactos fuertes.
De lo contrario, se puede provocar un incendio,
una descarga eléctrica o daños en el producto.
Pilas
• No ingiera las pilas.
• Mantenga las pilas fuera del alcance de los
niños.
De lo contrario, podrían ingerir las pilas por
accidente. La fuga de líquido de las pilas puede
provocar pérdida de visión o inflamación. Si la
carcasa de las pilas de este producto no queda
completamente sellada, deje de usar el producto
y manténgalo alejado de los niños. Si alguien
ingiere una pila accidentalmente, acuda a un
médico de inmediato. Si se ingiere una pila,
puede provocar quemaduras químicas graves o
que se derritan los tejidos del cuerpo en un plazo
de dos horas, lo que puede causar la muerte.
• No arroje las pilas al fuego.
• No exponga las pilas a temperaturas altas,
como la luz del sol directa o el fuego.
De lo contrario, pueden explotar y provocar un
incendio o lesiones.
• Si el líquido de las pilas tiene fugas, evite
tocarlo.
De lo contrario, se puede producir pérdida de
visión o quemaduras químicas. Si toca el
líquido de las pilas, enjuáguelo con agua de
inmediato y acuda a un médico.
• No utilice pilas diferentes del tipo especificado.
• No combine pilas usadas y nuevas.
• No combine distintos tipos de pilas.
• No inserte las pilas con una orientación
opuesta a la indicación de la polaridad.
• No rompa las pilas.
• No cargue pilas secas no recargables.
De lo contrario, pueden explotar o el líquido de
las pilas puede filtrarse, lo que provocaría
incendios, quemaduras, pérdida de visión,
inflamación o daños en el producto. Si toca el
líquido de las pilas, enjuáguelo con agua de
inmediato y acuda a un médico.
• No transporte las pilas en un bolsillo o en una
bolsa, ni las guarde junto con un fragmento de
metal.
De lo contrario, las pilas pueden sufrir un
cortocircuito, lo que provocaría una explosión o
una fuga de líquido, que a su vez produciría
incendios, pérdida de visión o lesiones.

114 Es
• Si no tiene previsto utilizar el producto durante
un periodo prolongado, o si las pilas se
descargan por completo, extráigalas del
mando a distancia.
De lo contrario, el líquido de las pilas puede
filtrarse, lo que probablemente provoque
pérdida de visión, lesiones inflamatorias o
daños en el producto.
• Antes de almacenar o desechar las pilas, fije
un trozo de cinta a los conectores para
aislarlos.
Si los conectores de las pilas entran en
contacto con otras pilas u objetos metálicos,
pueden explotar o el líquido de las pilas puede
filtrarse, lo que probablemente provoque un
incendio, quemaduras, pérdida de visión o
lesiones inflamatorias.
ATENCIÓN
Estas precauciones le alertan de la posibilidad
de lesiones físicas para usted u otras
personas.
Alimentación
• Si el enchufe del cable de alimentación
insertado en la toma de CA presenta
ondulaciones o está suelto, no utilice esa toma.
De lo contrario, se puede provocar un incendio,
una descarga eléctrica o quemaduras.
• Al extraer el enchufe del cable de alimentación
del producto o de una toma, tire siempre del
enchufe y no del cable.
De lo contrario, el cable de alimentación puede
resultar dañado, lo que provocará un incendio
o una descarga eléctrica.
Instalación
• No coloque este producto en una posición
inestable o en una ubicación sometida a
vibraciones.
De lo contrario, el producto podría caerse o
volcar, lo que provocará lesiones o daños en el
producto.
• No bloquee la disipación de calor de este
producto cuando lo instale.
- No cubra el producto con un paño o mantel.
- No instale el producto sobre una moqueta o
alfombra.
- Asegúrese de que la superficie superior está
orientada hacia arriba. No instale el producto
sobre sus laterales o boca abajo.
- No utilice el producto en un lugar demasiado
pequeño o mal ventilado.
Una ventilación inadecuada puede provocar el
sobrecalentamiento del interior del producto, lo
que posiblemente cause daños y un incendio o
un funcionamiento defectuoso.
Asegúrese de que haya un espacio adecuado
alrededor del producto, de al menos 2,5 cm
encima, 2,5 cm en los lados y 2,5 cm detrás.
• En caso de un terremoto, manténgase alejado
de este producto.
De lo contrario, el producto podría caerse o
volcar, lo que provocará lesiones.
• Antes de mover este producto, asegúrese de
desconectar el interruptor de alimentación y de
retirar todos los cables conectados.
De lo contrario, los cables podrían enredarse
en los pies o las manos, y el producto podría
caerse o volcar, lo que provocará lesiones o
daños en el producto.
Conexiones
• Si tiene previsto conectar dispositivos externos,
lea primero el manual de instrucciones de cada
dispositivo y conéctelos de acuerdo con las
instrucciones.
Si no se siguen las instrucciones
correctamente, pueden producirse lesiones o
daños en el producto.
Pérdida auditiva
• No se exponga a sonidos con volumen alto
durante un periodo prolongado.De lo contrario,
se puede producir pérdida auditiva. Si
experimenta alguna anomalía auditiva, acuda a
un médico.

Es 115
• Si tiene previsto conectar este producto a otros
dispositivos, desactive primero la alimentación
de todos los dispositivos.
De lo contrario, se puede provocar pérdida
auditiva, una descarga eléctrica o daños en el
producto.
• Al activar la alimentación del sistema de audio,
active siempre EN ÚLTIMO LUGAR la
alimentación del amplificador de potencia. Al
desactivar la alimentación del sistema de
audio, desactive PRIMERO la alimentación del
amplificador de potencia.
De lo contrario, se puede provocar pérdida
auditiva o daños en el producto.
Mantenimiento
• Antes de limpiar el producto, asegúrese de
extraer el enchufe del cable de alimentación de
la toma de CA.
De lo contrario, se puede provocar descarga
eléctrica.
Manipulación
• No introduzca las manos ni los dedos en los
huecos o las aberturas de este producto.
De lo contrario, se pueden producir lesiones.
• No deje caer objetos extraños, como un
fragmento de metal o de papel, por las rendijas
de este producto.
De lo contrario, se puede provocar un incendio,
una descarga eléctrica o daños en el producto.
• No ejerza las siguientes fuerzas excesivas
sobre este producto.
- Apoyar su peso sobre este producto
- Colocar objetos pesados sobre este producto
- Apilar este producto
- Ejercer una fuerza excesiva sobre los
botones, interruptores o conectores de E/S
De lo contrario, se pueden producir lesiones o
daños en el producto.
• No tire de los cables conectados.
De lo contrario, el producto podría caerse o
volcar, lo que provocará lesiones o daños en el
producto.
AVISO
Siga las precauciones que se indican a
continuación para evitar un funcionamiento
defectuoso y daños en este producto, así como
para evitar la pérdida de datos.
Alimentación
• Si no tiene previsto utilizar este producto
durante un periodo prolongado, extraiga el
enchufe del cable de alimentación de la toma
de CA. Aunque el indicador [A] (alimentación)
del panel delantero esté apagado, todavía
seguirá fluyendo una pequeña cantidad de
corriente por este producto.
Instalación
• En función del entorno en el que utilice el
producto, un teléfono, una radio o un televisor
pueden generar ruido. En ese caso, cambie la
ubicación o la orientación del producto, o bien
las condiciones del entorno circundante.
• No instale este producto en una zona expuesta
a:
- Luz del sol directa
- Temperaturas extremadamente altas o bajas
- Exceso de polvo
De lo contrario, se puede producir un
funcionamiento defectuoso o daños en el
producto.
• No instale este producto en un lugar en el que
se pueda formar condensación debido a
cambios rápidos y drásticos de la temperatura
ambiente. El uso del producto cuando existe
condensación puede provocarle daños. Si hay
motivos para creer que se puede haber
producido condensación sobre este producto o
en su interior, déjelo durante varias horas sin
activar la alimentación.
Puede empezar a utilizar el producto cuando la
condensación se haya secado por completo.
Manipulación
• No coloque productos de vinilo, plástico o
caucho sobre este producto De lo contrario, el
panel puede descolorarse o deteriorarse.
Mantenimiento
• Utilice un paño seco y suave para limpiar este
producto. No utilice un trapo con bencina,
disolvente, detergente o productos químicos
para limpiar la superficie del producto. De lo
contrario, la superficie puede descolorarse o
deteriorarse.
Precauciones de uso

116 Es
NOTA
En esta sección se describen las precauciones
que se deben cumplir durante el uso, las
restricciones funcionales y la información
complementaria que puede resultarle de utilidad.
Eliminación o transferencia
• Si tiene previsto transferir la propiedad de este
producto, incluya este documento y los
accesorios incluidos junto con el producto.
• Siga las normas de las autoridades locales
para eliminar este producto y sus accesorios.
• Siga las normas de las autoridades locales
para eliminar las pilas usadas.
Información importante
ADVERTENCIA
El uso de los controles, los ajustes o los
procedimientos que no se especifican enste manual
pueden causar una exposición peligrosa a la
radiación.
(weee_battery_eu_es_02)
Información para usuarios sobre la recogida y eliminación de los equipos
antiguos y las pilas usadas
Estos símbolos en los productos, embalajes y documentos anexos significan que los
productos eléctricos y electrónicos y sus pilas no deben mezclarse con los desperdicios
domésticos normales.
Para el tratamiento, recuperación y reciclaje apropiados de los productos antiguos y las
pilas usadas, llévelos a puntos de reciclaje correspondientes, de acuerdo con la
legislación nacional.
Al deshacerse de estos productos y pilas de forma correcta, ayudará a ahorrar recursos
valiosos y a impedir los posibles efectos desfavorables en la salud humana y en el
entorno que de otro modo se producirían si se trataran los desperdicios de modo
inapropiado.
Para obtener más información acerca de la recogida y el reciclaje de los productos
antiguos y las pilas, póngase en contacto con las autoridades locales, con el servicio de
eliminación de basuras o con el punto de venta donde adquirió los artículos.
Para los usuarios empresariales de la Unión Europea:
Si desea desechar equipos eléctricos y electrónicos, póngase en contacto con su
vendedor o proveedor para obtener más información.
Información sobre la eliminación en otros países fuera de la Unión Europea:
Estos símbolos solamente son válidos en la Unión Europea. Si desea desechar estos
artículos, póngase en contacto con las autoridades locales o con el vendedor y
pregúnteles el método correcto.
Nota sobre el símbolo de pila (dos ejemplos de símbolos en la parte inferior):
Este símbolo se puede utilizar en combinación con un símbolo químico. En este caso,
cumple el requisito establecido por la Directiva de la UE sobre pilas correspondiente a
la sustancia química utilizada.

Es 117
CONTENIDO
ANTES DE UTILIZAR LA UNIDAD 118
Funciones . . . . . . . . . . . . . . . . . . . . . . . . . . . . . . . . . . . . . . . . . . . . . . . . . . . . 118
Acerca de este manual. . . . . . . . . . . . . . . . . . . . . . . . . . . . . . . . . . . . . . . . . 118
Accesorios . . . . . . . . . . . . . . . . . . . . . . . . . . . . . . . . . . . . . . . . . . . . . . . . . . . . 119
PREPARACIÓN 120
Conexión a un amplificador . . . . . . . . . . . . . . . . . . . . . . . . . . . . . . . . . . . . 120
Conexión del cable de alimentación . . . . . . . . . . . . . . . . . . . . . . . . . . . . 120
Activación del equipo . . . . . . . . . . . . . . . . . . . . . . . . . . . . . . . . . . . . . . . . . 121
REPRODUCCIÓN DE AUDIO 122
Reproducción de un CD de audio . . . . . . . . . . . . . . . . . . . . . . . . . . . . . . . 122
Reproducción de archivos de música guardados en una unidad
flash USB . . . . . . . . . . . . . . . . . . . . . . . . . . . . . . . . . . . . . . . . . . . . . . . . . . . . . 123
Funciones avanzadas . . . . . . . . . . . . . . . . . . . . . . . . . . . . . . . . . . . . . . . . . . 124
Reproducción en secuencia aleatoria . . . . . . . . . . . . . . . . . . . . . . . . . . . . . . . . . . . . . . . . . . . . . . . . 124
Reproducción repetida. . . . . . . . . . . . . . . . . . . . . . . . . . . . . . . . . . . . . . . . . . . . . . . . . . . . . . . . . . . . . . 124
Reproducción de pistas en el orden especificado (reproducción programada) . . . . . . . . 124
Reproducción de una parte especificada varias veces (reproducción repetida A-B) . . . . 125
Reproducción de sonido de calidad alta (PURE DIRECT) . . . . . . . . . . . . . . . . . . . . . . . . . . . . . . 125
Cambio de la información del visor . . . . . . . . . . . . . . . . . . . . . . . . . . . . . . . . . . . . . . . . . . . . . . . . . . 125
Cambio del brillo del visor. . . . . . . . . . . . . . . . . . . . . . . . . . . . . . . . . . . . . . . . . . . . . . . . . . . . . . . . . . . 125
APÉNDICE 126
Nombres de las partes . . . . . . . . . . . . . . . . . . . . . . . . . . . . . . . . . . . . . . . . . .126
Panel delantero . . . . . . . . . . . . . . . . . . . . . . . . . . . . . . . . . . . . . . . . . . . . . . . . . . . . . . . . . . . . . . . . . . . . .126
Visor . . . . . . . . . . . . . . . . . . . . . . . . . . . . . . . . . . . . . . . . . . . . . . . . . . . . . . . . . . . . . . . . . . . . . . . . . . . . . . . .127
Panel trasero . . . . . . . . . . . . . . . . . . . . . . . . . . . . . . . . . . . . . . . . . . . . . . . . . . . . . . . . . . . . . . . . . . . . . . . .127
Mando a distancia . . . . . . . . . . . . . . . . . . . . . . . . . . . . . . . . . . . . . . . . . . . . . . . . . . . . . . . . . . . . . . . . . . .128
Ajustes avanzados . . . . . . . . . . . . . . . . . . . . . . . . . . . . . . . . . . . . . . . . . . . . .129
Memoria de modo de reproducción (PLAY MEM) . . . . . . . . . . . . . . . . . . . . . . . . . . . . . . . . . . . . .129
Modo preparado (RDY MODE) . . . . . . . . . . . . . . . . . . . . . . . . . . . . . . . . . . . . . . . . . . . . . . . . . . . . . . .129
Reproducción automática (AUTO PLAY) . . . . . . . . . . . . . . . . . . . . . . . . . . . . . . . . . . . . . . . . . . . . . .129
Espera automática (AUTO STBY) . . . . . . . . . . . . . . . . . . . . . . . . . . . . . . . . . . . . . . . . . . . . . . . . . . . . .129
Formatos de archivo/discos/unidades flash USB compatibles . . . . .130
Especificaciones . . . . . . . . . . . . . . . . . . . . . . . . . . . . . . . . . . . . . . . . . . . . . . .131
Resolución de problemas . . . . . . . . . . . . . . . . . . . . . . . . . . . . . . . . . . . . . . .132

118 Es
ANTES DE UTILIZAR LA UNIDAD
• Salida digital óptica
• Salida digital coaxial
• Admite la reproducción de discos CD-R y CD-RW
• Admite la reproducción de archivos guardados en unidades flash USB o CD de
datos (MP3/WMA/AAC/WAV/FLAC)
• Reproducción en secuencia aleatoria (página 124)
• Reproducción repetida (página 124)
• Reproducción programada (solo CD de audio) (página 124)
• Reproducción repetida A-B (solo CD de audio) (página 125)
• Función PURE DIRECT (página 125)
• Ajustes del visor configurables (elementos que se muestran/brillo) (página 125)
• Encendido/apagado y modo de espera controlados por el mando a distancia
• Memoria de modo de reproducción (página 129)
• Modo preparado (página 129)
• Función de reproducción automática (página 129)
• Función de espera automática (página 129)
• En este manual se explican las principales operaciones que se realizan con el
mando a distancia incluido.
• Todas las ilustraciones de este manual se proporcionan como parte de las
instrucciones de funcionamiento.
• En este manual, los CD de música se denominan CD audio, y los CD que contienen
datos MP3/WMA/AAC/WAV/FLAC se denominan CD de datos.
• Las especificaciones y el diseño están sujetos a cambio sin previo aviso.
•
ADVERTENCIA alerta del riesgo de muerte o lesiones graves.
•
ATENCIÓN alerta del riesgo de lesiones personales.
• se debe cumplir para evitar fallos de funcionamiento y daños en el
producto.
• proporciona información complementaria que puede resultar práctica.
Funciones Acerca de este manual
Aviso
Nota

Es 119
• Mando a distancia
• Cable de alimentación
• Cable estéreo RCA
• Pilas (AA, R6, UM-3) (x2)
• Manual de instrucciones (este manual)
Accesorios
Colocación de las pilas en el
mando a distancia
Coloque las pilas con la
orientación adecuada.
Rango de funcionamiento del
mando a distancia
Señale con el mando a
distancia hacia el sensor del
mando a distancia de la
unidad dentro del rango
mostrado en la figura de la
derecha.
Pilas (AA, R6, UM-3)
30° 30°
Menos
de 6 m

120 Es
PREPARACIÓN
ATENCIÓN
• No enchufe el cable de alimentación de esta unidad ni otros dispositivos conectados a las tomas
de CA hasta que haya terminado de realizar todas las conexiones sin alimentación.
Cuando termine de realizar todas las conexiones, conecte el cable de alimentación
suministrado a la conector AC IN de esta unidad y, a continuación, enchufe el otro
extremo a una toma de CA.
Conexión a un amplificador Conexión del cable de alimentación
AmplificadorAmplificador
Cable estéreo RCA
(suministrado)
Cable de audio digital coaxial
(de venta en comercios)
Cable digital óptico
(de venta en comercios) A una toma de
CA
Esta unidad (parte trasera)
Cable de
alimentación
(suministrado)

Es 121
Para encender la alimentación de la unidad, pulse A (alimentación) en el panel
delantero.
Nota
• Si pulsa A (alimentación) en el mando a distancia con la unidad encendida, esta pasará al modo
de espera.
• El indicador de alimentación de la unidad funciona de la siguiente manera:
Iluminación intensa: alimentación encendida
Iluminación suave: modo de espera
Apagado: alimentación apagada
• Esta unidad cuenta con una función de espera automática que permite reducir el consumo de
energía (página 129).
(Valor predeterminado: espera automática activada)
Activación del equipo
A (alimentación)
Indicador de alimentación

122 Es
CD/USB
OPEN/CLOSE
REPRODUCCIÓN DE AUDIO
Esta unidad le permite reproducir tanto CD de datos como CD de
audio. Para obtener información sobre los tipos de CD que se
pueden reproducir en esta unidad, consulte “Formatos de archivo/
discos/unidades flash USB compatibles” (página 130).
1Si el indicador USB situado en el panel delantero
está iluminado, pulse CD/USB para cambiar al modo
de disco.
2Coloque un CD en la bandeja de disco.
Pulse OPEN/CLOSE varias veces para abrir y cerrar la
bandeja de disco.
Nota
• También puede pulsar (abrir/cerrar) varias veces en el panel
delantero para abrir y cerrar la bandeja de disco.
• Cuando la unidad está lista para reproducir un CD de audio, se
ilumina el indicador de medios de reproducción (CD) en el visor.
3Pulse (reproducción).
Se ilumina el indicador (reproducción) en el visor y se
inicia la reproducción.
Nota
• Durante la reproducción de archivos de audio, se ilumina el indicador de
medios de reproducción que se corresponde con el formato de archivo.
Aviso
• No introduzca la mano o los dedos en la ranura de la bandeja de disco. En
caso contrario, puede sufrir lesiones.
Nota
• Una vez colocado el CD en la bandeja de disco, esta se cerrará y se
iniciará la reproducción si realiza una de las siguientes operaciones:
– Pulse (reproducción).
– Pulse una tecla numérica que se corresponda con un número de pista.
• Puede configurar la unidad para que la reproducción comience
automáticamente al encender la alimentación o bien al cambiar al modo de
disco o USB (página 129).
(Valor predeterminado: reproducción automática activada)
Utilice las siguientes teclas del mando a distancia para
desplazarse por los menús de funcionamiento.
* Los botones de control del panel delantero funcionan de la
siguiente manera:
(salto hacia atrás/búsqueda hacia atrás):
Salta a la pista anterior. Si se pulsa durante la reproducción,
salta al principio de la pista actual. También busca pistas
hacia atrás si se mantiene pulsado el botón.
(salto hacia delante/búsqueda hacia delante):
Salta a la pista siguiente. También busca pistas hacia delante
si se mantiene pulsado el botón.
Reproducción de un CD de audio
Teclas disponibles Función
(reproducción) Se ilumina el indicador (reproducción) en el
visor y se inicia la reproducción.
(pausa)
Se ilumina el indicador (pausa) en el visor y la
reproducción se pone en pausa. También
puede pulsar para reanudar la reproducción.
(parada) Detiene la reproducción.
(búsqueda
hacia atrás)* Realiza una búsqueda de pistas hacia atrás.
(búsqueda
hacia delante)* Realiza una búsqueda de pistas hacia delante.
(salto hacia
atrás)*
Salta a la pista anterior. Si se pulsa durante la
reproducción, salta al principio de la pista actual.
(salto hacia
delante)* Salta a la pista siguiente.
Teclas numéricas Introduzca un número de pista para seleccionar
directamente la pista correspondiente.
FOLDER ,
(solo CD de datos) Le permite seleccionar una carpeta.
Teclas
numéricas

Es 123
CD/USB
En esta unidad puede reproducir archivos de música (guardados
en una unidad flash USB). Para obtener información sobre las
unidades flash USB compatibles, consulte “Formatos de archivo/
discos/unidades flash USB compatibles” (página 130).
1
Si el indicador USB situado en el panel delantero está
apagado, pulse CD/USB para cambiar al modo USB.
El indicador USB del panel delantero se ilumina en naranja.
2Conecte la unidad flash USB a la toma USB.
Cuando la unidad está lista para reproducir, se ilumina el
indicador de medios de reproducción (USB) en el visor, y el
indicador USB del panel delantero se ilumina en verde.
Aviso
• No utilice cables alargadores USB.
3Pulse (reproducción).
Se ilumina el indicador (reproducción) en el visor y se
inicia la reproducción.
Nota
• Durante la reproducción de archivos de audio, se ilumina el indicador de
medios de reproducción que se corresponde con el formato de archivo.
• Si se guardan archivos de música compatibles en la unidad flash USB, la
unidad los reproducirá en orden cronológico según la fecha de creación.
Aviso
• No extraiga la unidad flash USB durante la reproducción o si en el visor de
información del panel delantero se muestra “USB READING”. En tal caso,
pulse primero CD/USB para cambiar al modo de disco, asegúrese de que
el indicador USB se desactiva y luego extraiga la unidad flash.
Utilice las siguientes teclas del mando a distancia para
desplazarse por los menús de funcionamiento.
* Los botones de control del panel delantero funcionan de la
siguiente manera:
(salto hacia atrás/búsqueda hacia atrás):
Salta a la pista anterior. Si se pulsa durante la reproducción,
salta al principio de la pista actual. También busca pistas
hacia atrás si se mantiene pulsado el botón.
(salto hacia delante/búsqueda hacia delante):
Salta a la pista siguiente. También busca pistas hacia delante
si se mantiene pulsado el botón.
Reproducción de archivos de música guardados en una unidad flash USB
Esta unidad (panel delantero)
Unidad flash USB
Teclas disponibles Función
(reproducción) Se ilumina el indicador (reproducción) en el
visor y se inicia la reproducción.
(pausa)
Se ilumina el indicador (pausa) en el visor y la
reproducción se pone en pausa. También
puede pulsar para reanudar la reproducción.
(parada) Detiene la reproducción.
(búsqueda
hacia atrás)* Realiza una búsqueda de pistas hacia atrás.
(búsqueda
hacia delante)* Realiza una búsqueda de pistas hacia delante.
(salto hacia
atrás)*
Salta a la pista anterior. Si se pulsa durante la
reproducción, salta al principio de la pista actual.
(salto hacia
delante)* Salta a la pista siguiente.
FOLDER , Le permite seleccionar una carpeta.

124 Es
RANDOM
CLEAR
ENTER
REPEAT
PROGRAM
Puede configurar el modo de reproducción y los ajustes del visor
con las funciones avanzadas.
Reproducción en secuencia aleatoria
Pulse RANDOM para reproducir pistas en orden aleatorio. Si pulsa
RANDOM varias veces, cambiará el ajuste de reproducción en
secuencia aleatoria de la siguiente manera:
Nota
• Para cancelar la reproducción en secuencia aleatoria, abra la bandeja de
disco.
Reproducción repetida
Pulse REPEAT para reproducir las pistas varias veces. Si pulsa
REPEAT varias veces, cambiará el ajuste de reproducción repetida
de la siguiente manera:
Nota
• Para cancelar la reproducción repetida, abra la bandeja de disco.
Reproducción de pistas en el orden
especificado (reproducción programada)
Puede reproducir las pistas del CD de audio en el orden
especificado.
1Pulse PROGRAM con la reproducción parada.
2Utilice las teclas numéricas para introducir el
número de pista de la canción que desee programar.
3Pulse ENTER.
Repita los pasos 2 y 3 programar para cada pista.
Pulse CLEAR para cancelar cada pista programada desde la
última pista que haya programado.
4Pulse (reproducción).
La unidad comienza a reproducir las pistas en el orden
programado.
Nota
• La reproducción programada no funciona con los CD de datos o las
unidades flash USB.
• Puede programar un máximo de 24 pistas.
• Realice una de las siguientes acciones para borrar todas las pistas
programadas:
– Pulse CLEAR con la reproducción programada detenida.
– Apague la alimentación de la unidad o cambie al modo de espera.
– Abra la bandeja de disco.
Funciones avanzadas
Indicador Ajuste
RNDM Reproduce todas las pistas en orden aleatorio.
Off Desactiva la reproducción en secuencia aleatoria.
Indicador Ajuste
REP Reproduce una pista varias veces.
REP FOLDER
(solo CD de datos y
unidades flash USB)
Reproduce las pistas de la carpeta actual varias
veces.
REP ALL Reproduce todas las pistas varias veces.
Off Desactiva la reproducción repetida.
TRACKTEXT AAC WAV FLAC RESUM RDY TOTAL REMAIN RNDM REP FOLDER ALL A - BCD PROG
TRACKTEXT AAC WAV FLAC RESUM RDY TOTAL REMAIN RNDM REP FOLDER ALL A - BCD PROG
Teclas
numéricas

Es 125
A/B
PURE
DIRECT
DISPLAY
DIMMER
Reproducción de una parte especificada
varias veces (reproducción repetida A-B)
Puede especificar los puntos de inicio y finalización de una pista
durante la reproducción de un CD de audio para reproducir la
parte especificada varias veces.
1Reproduzca un CD de audio.
2Pulse A/B en el punto en el que desee comenzar la
reproducción repetida.
3Pulse A/B de nuevo en el punto en el que desee
terminar la reproducción repetida.
La unidad inicia la reproducción repetida.
Nota
• La reproducción repetida no funciona con los CD de datos o las unidades
flash USB.
• No puede especificar el ajuste de repetición A-B si la función PURE DIRECT
está activada.
• Realice una de las siguientes acciones para cancelar la reproducción
repetida A-B:
– Pulse A/B de nuevo.
– Pulse (parada).
– Abra la bandeja de disco.
Reproducción de sonido de calidad alta
(PURE DIRECT)
Si la función PURE DIRECT está activada, no se emitirá audio
digital. De esta forma, la función PURE DIRECT reduce el ruido que
afectaría a la calidad del sonido, lo que le permite disfrutar de una
reproducción con sonido de calidad alta.
Pulse PURE DIRECT varias veces para activar o desactivar esta
función.
Nota
• Para utilizar la función PURE DIRECT, conecte las tomas ANALOG OUT
del panel trasero al amplificador. Las tomas DIGITAL OUT no emitirán
señales.
• Cuando la función PURE DIRECT está activada:
– El indicador PURE DIRECT se ilumina.
– El visor del panel delantero se apagará mientras se reproduce el
contenido.
– Durante el funcionamiento de la unidad, prácticamente no aparecerán
indicadores o mensajes.
– Este ajuste se conservará aunque apague la alimentación de la unidad.
Cambio de la información del visor
Si pulsa DISPLAY varias veces durante la reproducción, la
información del visor cambiará de la siguiente manera:
Nota
• En el visor de información se muestra un máximo de 64 caracteres
(caracteres alfanuméricos de 1 byte y varios símbolos).
Cambio del brillo del visor
Pulse DIMMER varias veces para alternar entre los cuatro niveles
de brillo del visor.
TEXT AAC WAV FLAC RESUM RDY TOTAL REMAIN RNDM FOLDER ALLPROG CD TRACK REP
TEXT AAC WAV FLAC RESUM RDY TOTAL REMAIN RNDM FOLDER ALLPROG CD TRACK REP
Medio de
reproducción Información en el visor
CD de audio
Tiempo transcurrido Tiempo restante de la pista
actual (TRACK REMAIN) Tiempo total restante
en el CD (TOTAL REMAIN) Nombre de la pista*
Nombre del artista* Título del álbum*
* Si se ha integrado texto en el CD
CD de datos, unidad
flash USB
Tiempo transcurrido Nombre de la pista*
Nombre del artista* Título del álbum*
* Si se han integrado etiquetas

126 Es
APÉNDICE
Panel delantero
1A (alimentación) (página 121)
2Indicador de alimentación (página 121)
3Toma USB (página 123)
4Indicador USB (página 123)
5CD/USB (páginas 122, 123)
6PURE DIRECT (página 125)
7Indicador PURE DIRECT (página 125)
8Bandeja de disco (página 122)
9 (abrir/cerrar) (página 122)
0Sensor del mando a distancia (página 119)
A (salto hacia atrás/búsqueda hacia atrás) (páginas 122, 123)
B (salto hacia delante/búsqueda hacia delante) (páginas 122, 123)
C (reproducción) (páginas 122, 123, 124)
D (pausa) (páginas 122, 123)
E (parada) (páginas 122, 123, 124, 125)
Nombres de las partes
1 2 3 4 7 0
8 9
5 6 A B C D E

Es 127
Visor
1Indicador / (reproducción/pausa) (páginas 122, 123)
2Indicador de medios de reproducción (páginas 122, 123)
3Indicador de ajustes avanzados (página 129)
4Indicador de tiempo (Página 125)
5Indicador de modo de reproducción (páginas 124, 125)
6Visor de información (páginas 124, 125, 129)
Panel trasero
1Tomas ANALOG OUT (página 120)
2Toma DIGITAL OUT (COAXIAL) (página 120)
3Toma DIGITAL OUT (OPTICAL) (página 120)
4Conector AC IN (página 120)
TRACKCD TEXT AAC WAV FLAC RESUM RDY TOTAL REMAIN PROG RNDM REP FOLDER ALL A - B
1 62 3 54
2 3 41

128 Es
Mando a distancia
1A (alimentación) (página 121)
2Transmisor de señales del mando a distancia (página 119)
3OPEN/CLOSE (página 122)
4PROGRAM (página 124)
5REPEAT (página 124)
6DIMMER (página 125)
7RANDOM (página 124)
8A/B (página 125)
9DISPLAY (página 125)
0Teclas numéricas (páginas 122, 124)
ACLEAR (página 124)
BENTER (página 124)
C (búsqueda hacia atrás), (búsqueda hacia delante)
(páginas 122, 123)
(pausa) (páginas 122, 123)
(salto hacia atrás) (páginas 122, 123)
(salto hacia delante) (páginas 122, 123)
(reproducción) (páginas 122, 123, 124)
(parada) (páginas 122, 123, 124, 125)
FOLDER , (páginas 122, 123)
DCD/USB (páginas 122, 123)
EPURE DIRECT (página 125)
3
4
9
0
C
7
8
A
B
D
E
6
5
21

Es 129
En esta sección se explica cómo configurar varias funciones avanzadas. Puede
configurar la mayoría de estos ajustes desde el panel delantero. (Para algunos ajustes
es necesario utilizar el mando a distancia).
1Ponga la unidad en modo de espera (página 121).
2Mantenga pulsado PURE DIRECT, (abrir/cerrar) y
(reproducción) simultáneamente durante tres segundos o más.
Aparece el siguiente indicador en el visor de información del panel delantero y la
unidad pasa al modo de ajustes. Puede definir las funciones de memoria de modo
de reproducción, modo preparado, reproducción automática y espera automática
en este orden.
3
Pulse o para activar o desactivar la función.
4Pulse (parada).
El ajuste queda confirmado y se selecciona automáticamente el siguiente
parámetro. Repita los pasos 3 y 4. Una vez finalizada la configuración, aparece el
siguiente indicador en el visor de información del panel delantero y la unidad pasa
al modo de espera.
Nota
• Si pulsa (Reproducir) durante este proceso, se confirmará el ajuste en ese punto y la
unidad pasará al modo de espera.
Memoria de modo de reproducción (PLAY MEM)
Con esta función activada, la unidad conserva los ajustes de reproducción repetida y
reproducción en secuencia aleatoria aunque la alimentación de la unidad está
apagada. Cuando la función de memoria de modo de reproducción está activada, se
ilumina el indicador de ajustes avanzados (RESUM) en el visor.
Valor predeterminado: Desactivado
Nota
• Si enciende la alimentación de la unidad después de activar la función de memoria de modo de
reproducción, la unidad reproducirá la pista o el archivo reproducidos más recientemente desde el
principio.
Modo preparado (RDY MODE)
Con esta función activada, la unidad se pone en pausa cada vez que finaliza la
reproducción de una pista. Puede iniciar la reproducción de la siguiente pista cuando
lo desee. Cuando la función de modo preparado está activada, se ilumina el indicador
de ajustes avanzados (RDY) en el visor.
Valor predeterminado: Desactivado
Reproducción automática (AUTO PLAY)
Con esta función activada, la unidad inicia automáticamente la reproducción cuando la
alimentación está encendida o al cambiar al modo de disco o USB.
Valor predeterminado: Activado
Espera automática (AUTO STBY)
Con esta función activada, el unidad pasa automáticamente al modo de espera si no
se realizan operaciones durante 20 minutos una vez detenida la reproducción.
Valor predeterminado: Activado
Ajustes avanzados
PURE DIRECT
TRACKTEXT AAC WAV FLAC RESUM RDY TOTAL REMAIN RNDM REP FOLDER ALLPROG CD TRACKTEXT AAC WAV FLAC RESUM RDY TOTAL REMAIN RNDM REP FOLDER ALLPROG CD
CD TRACK REP TEXT AAC WAV FLAC RESUM RDY TOTAL REMAIN RNDM FOLDER ALLPROG

130 Es
❑Formatos de archivo compatibles
* Solo formato PCM lineal.
Nota
• Los archivos de un CD de datos o de una unidad flash USB se reproducirán en orden cronológico
según la fecha de creación.
• Esta unidad es compatible con discos con formato ISO9660.
• Si la unidad está reproduciendo un archivo VBR (velocidad de bits variable), es posible que el
tiempo transcurrido no se muestre de manera precisa.
• No se puede reproducir contenido codificado con gestión de derechos digitales (DRM).
❑Discos compatibles
Utilice discos con los siguientes logotipos.
Aviso
• Evite utilizar discos con formas extrañas o bien discos con cintas o calcomanías pegadas. De lo
contrario, se puede producir un fallo de funcionamiento de la unidad.
• Es posible que esta unidad no reproduzca algunos discos CD-RW o bien discos que no se hayan
grabado correctamente.
• Para reproducir un CD de 8 cm, colóquelo en la zona encastrada interior de la bandeja de disco.
No coloque un CD de tamaño normal (12 cm) sobre un CD de 8 cm.
Formatos de archivo/discos/unidades flash USB compatibles
Archivo Frecuencia de muestreo (kHz) Profundidad
de bits (bit)
Velocidad de
bits (kbps)
Número de
canales
MP3 32/44,1/48 — 32-320 2
WMA 32/44.1/48 — 48-192 2
AAC 32/44.1/48 — 8-320 2
WAV * 32/44.1/48/64/88.2/96 16/24 — 2
FLAC 32/44.1/48/64/88.2/96 16/24 — 2
CD de datos Unidad flash USB
Número de jerarquías de
carpetas
(incluida la carpeta raíz)
99
Número de carpetas 999 999
Número de archivos 1100 65535
Discos compactos (CD de audio)
Discos CD-R y CD-RW
• Discos con una de las siguientes descripciones:
FOR CONSUMER
FOR CONSUMER USE
FOR MUSIC USE ONLY
• En el caso de discos CD-R o CD-RW, la unidad solo reproduce los
discos finalizados.
Nota
• Es posible que esta unidad no reproduzca algunos discos CD-R/CD-RW o
bien discos que no se hayan grabado correctamente.
Discos CD-TEXT
Estos discos contienen datos de texto integrados, como títulos de
álbumes, nombres de canciones y nombres de artistas. Se mostrará
esta información (caracteres alfanuméricos y solo algunos
símbolos) junto con el tiempo transcurrido.

Es 131
❑Cómo manipular un disco
• Manipule el disco con cuidado para evitar rayar la superficie
grabada. No doble el disco.
• Si hay huellas o polvo en la superficie grabada, utilice un paño
suave para limpiar la superficie directamente desde el centro
hacia el perímetro.
• No utilice nunca un limpiador de discos de vinilo, un agente antiestático u otros
productos químicos para limpiar el disco.
• Utilice un rotulador de punta suave para escribir únicamente en la cara de la
etiqueta.
• No coloque el disco bajo la luz solar directa o en un lugar que esté expuesto a
temperaturas o humedad altas durante un periodo prolongado.
• No utilice un limpiador de lentes de venta en comercios. De lo contrario, se puede
producir un fallo de funcionamiento.
❑Unidades flash USB compatibles
Antes de utilizar esta unidad para reproducir archivos de música guardados en una
unidad flash USB, asegúrese de que se cumplen los siguientes requisitos:
• La unidad flash USB cumple los requisitos de almacenamiento masivo.
• Los datos se han grabado utilizando el sistema de archivos FAT16 o FAT32.
Aviso
• Es posible que algunas unidades flash USB no funcionen correctamente.
• No es posible utilizar unidades flash USB con cifrado.
• Yamaha y sus distribuidores no asumen la responsabilidad por la pérdida de datos guardados en
una unidad flash USB que esté conectada a esta unidad. Se recomienda que guarde una copia de
seguridad en caso de pérdida de los datos.
• Yamaha no garantizará el funcionamiento ni la alimentación de las unidades flash USB.
A continuación se describen las especificaciones de esta unidad.
Sección de audio
• Nivel de salida (1 kHz, 0 dB, Fs 44,1 kHz) .................................................. 2,0 ± 0,3 V
• Relación señal a ruido (red IHF-A) (1 kHz, 0 dB, Fs 44,1 kHz) ........105 dB o superior
• Rango dinámico (1 kHz, 0 dB, Fs 44,1 kHz) ...................................... 96 dB o superior
• Distorsión armónica (1 kHz, 0 dB, Fs 44,1 kHz).................................0.003% o inferior
• Respuesta de frecuencia
CD de audio............................................................................................ 2 Hz – 20 kHz
CD de datos/USB Fs 48 kHz .......................................................... 2 Hz – 22 kHz
Fs 96 kHz ............................................... 2 Hz – 44 kHz, –3 dB
Sección de láser
• Tipo de láser ..................................................................................................... AIGaAs
• Longitud de onda ..............................................................................................790 nm
• Salida de láser ........................................................................................Máx. 1,04 mW
General
• Alimentación
Modelos para EE. UU. y Canadá........................................................120 V CA, 60 Hz
Modelo para Australia..................................................................230-240 V CA, 50 Hz
Modelos para Europa y Reino Unido.................................................. 230 V CA, 50 Hz
Modelos para Asia y general..................................................110-240 V CA, 50/60 Hz
Modelo para China ............................................................................. 220 V CA, 50 Hz
• Consumo eléctrico.................................................................................................11 W
• Consumo en espera
Alimentación en espera (modo de espera) ......................................................... 0,2 W
Alimentación desactivada ................................................................................... 0,2 W
• Dimensiones (An × Al × Pr) ............................................................ 435 x 87 x 260 mm
• Peso .....................................................................................................................3,5 kg
* El contenido de este manual se aplica a las últimas especificaciones según la fecha de
publicación. Para obtener el último manual, acceda al sitio web de Yamaha y descargue el
archivo del manual.
Especificaciones
Tomas de salida
• Audio analógico x 1 (RCA sin balancear)
• Audio digital
COAXIAL x 1, OPTICAL x 1
Otras tomas
• USB × 1 (USB 2.0)

132 Es
Consulte la tabla siguiente si la unidad no funciona correctamente. Si el problema no figura en la información siguiente, o si los síntomas persisten después de seguir las
instrucciones siguientes, apague la alimentación de la unidad pulsando A (alimentación) en el panel delantero, desconecte el cable de alimentación y póngase en contacto con el
centro de atención al cliente o distribuidor autorizado Yamaha más cercano.
Resolución de problemas
Problema Causa Solución Página
Al pulsar el conmutador de
alimentación no se enciende la
alimentación.
Es posible que el cable de alimentación no esté enchufado
correctamente. Conecte el cable de alimentación con firmeza a la toma de CA. 120
La bandeja de disco no se cierra
completamente. Hay un objeto extraño dentro de la carcasa de la bandeja de disco. Revise la bandeja de disco y retire cualquier objeto extraño. —
No se puede reproducir el disco
insertado.
El disco está rayado. Cambie el disco. —
Se ha formado condensación en la lente del interior de la unidad. Active la alimentación de la unidad, espere 20-30 minutos y luego
intente reproducir el disco de nuevo. —
El disco se ha colocado boca abajo. Asegúrese de colocar el disco con la etiqueta orientada hacia arriba. —
El disco está sucio o rayado. Limpie la suciedad de la superficie del disco o utilice un disco que no
esté rayado. 131
Ha intentado reproducir archivos con un formato no compatible con la
unidad.
Asegúrese de utilizar un disco que contenga archivos con un formato
compatible con la unidad. 130
Ha intentado reproducir un disco no compatible con la unidad. Asegúrese de utilizar un disco compatible con la unidad. 130, 131
La unidad está en modo USB. Pulse CD/USB para cambiar al modo de disco. 122, 126,
128
La reproducción no se inicia de
inmediato o desde el punto correcto. El disco está sucio o rayado. Limpie la suciedad de la superficie del disco o utilice un disco que no
esté rayado. 131
No se puede reproducir un archivo de
música guardado en la unidad flash
USB.
Es posible que la unidad flash USB no esté conectada correctamente
a la unidad. Conecte la unidad flash USB correctamente. 123
Ha intentado reproducir archivos con un formato no compatible con la
unidad.
Asegúrese de utilizar una unidad flash USB que contenga archivos
con un formato compatible con la unidad. 130
La unidad está en modo de disco. Pulse CD/USB para cambiar al modo USB. 123, 126,
128
No se escucha sonido. La unidad no está conectada adecuadamente al amplificador. Compruebe la conexión al amplificador. 120

Es 133
No se escucha el audio desde el
dispositivo conectado a las tomas
DIGITAL OUT.
La función PURE DIRECT está activada. Desactive la función PURE DIRECT. 125
Se producen interrupciones del sonido.
La unidad se ve afectada por vibraciones o golpes. Cambie la ubicación de la unidad. —
El disco está sucio o rayado. Limpie la suciedad de la superficie del disco o utilice un disco que no
esté rayado. 131
Se oye un zumbido o un ruido. El cable estéreo RCA no se ha conectado con firmeza. Conecte el cable estéreo RCA con firmeza. Si el problema no se
corrige, compruebe si el cable está defectuoso. 120
Ruido en el sintonizador. La unidad está ubicada cerca del sintonizador. Aleje la unidad del sintonizador o apague la alimentación de la unidad. —
La bandeja de disco hace ruido. El disco está deformado. Utilice un disco que no esté deformado. —
No aparece ninguna indicación en el
visor. La función PURE DIRECT está activada. Desactive la función PURE DIRECT. 125
No aparecen los nombres de carpetas o
archivos en el visor de información.
El nombre de carpeta o archivo utiliza caracteres no alfanuméricos de
un solo byte.
Utilice caracteres alfanuméricos de un solo byte para los nombres de
carpetas y archivos. 125
El mando a distancia no funciona o no
funciona correctamente.
Las pilas se están agotando. Sustituya todas las pilas. 119
La distancia o el ángulo son incorrectos. Utilice el mando a distancia dentro de su rango operativo. 119
El sensor del mando a distancia de esta unidad está sometido a la luz
solar directa o a iluminación intensa (lámpara fluorescente de tipo
inverso, por ejemplo).
Cambie la orientación de la iluminación o de la unidad. —
Problema Causa Solución Página

134 Nl
Lees deze voorzorgsmaatregelen zorgvuldig
door alvorens verder te gaan.
Volg de instructies
Lees de volgende voorzorgsmaatregelen
zorgvuldig door en leef ze na om persoonlijk
letsel of schade aan uw persoonlijke
eigendommen te voorkomen.
Nadat u dit document grondig heeft gelezen,
bewaart u het op een locatie waar alle gebruikers
van het product altijd toegang tot hebben.
WAARSCHUWING
Deze voorzorgsmaatregelen maken u attent op
de mogelijkheid van fataal of serieus letsel van
uzelf of anderen.
Als u onregelmatigheden opmerkt
• Als een van de volgende abnormale storingen
optreedt, schakel de apparatuur dan
onmiddellijk uit.
- Het netsnoer of de stekker wordt beschadigd.
- Als er ongebruikelijke geuren, geluiden of
rook door het product worden uitgestoten.
- Er is een voorwerp of water in het product
gekomen.
- Op het product verschijnen barsten of andere
schade.
- Tijdens het gebruik van het product is er
plotseling geluidsverlies.
Volg de stappen hieronder om uit te schakelen.
- Schakel dit product uit.
- Trek de stekker van het netsnoer uit het
stopcontact.
Gebruik van het product in de huidige staat kan
leiden tot brand, elektrische schokken of
schade aan het product. Vraag onmiddellijk om
inspectie of reparatie.
Netadapter
• Beschadig het netsnoer niet.
- Plaats het netsnoer niet in de buurt van
warmtebronnen, zoals verwarmingen.
- Buig of modificeer het netsnoer niet met
kracht.
- Beschadig het netsnoer niet.
- Plaats geen zware voorwerpen op het
netsnoer.
- Niet het netsnoer niet vast.
Het gebruik van een geschaafd netsnoer met
een blootgelegde kerndraad kan leiden tot
brand, elektrische schokken of schade aan het
product.
• Raak dit product, de netstekker of het netsnoer
niet aan tijdens bliksem of onweer.
Anders kunnen er elektrische schokken
ontstaan.
• Gebruik voor dit product het opgegeven
voltage.
Gebruik van een onjuist voltage kan leiden tot
brand, elektrische schokken of schade aan het
product.
• Gebruik alleen het onderstaande item om
voeding te leveren:
-Meegeleverd netsnoer
Anders kunnen er brand, brandwonden of
schade aan het product ontstaan.
• Gebruik de volgende accessoires niet bij
andere apparaten.
- Netsnoer
Anders kunnen er brand, brandwonden of
schade aan het product ontstaan.
VOORZICHTIG
• Neem contact op met het volgende
klantencentrum voor inspectie of reparatie.
- De winkel waar u het product heeft gekocht
- Yamaha dealer
• Dit product is bedoeld om te gebruiken als
een algemeen huishoudelijk apparaat.
Gebruik het niet buiten of bij activiteiten die
een hoge mate van betrouwbaarheid vereisen
met betrekking tot mensenlevens of waardevol
materiaal.
• Merk op dat Yamaha geen aansprakelijkheid
kan accepteren voor verliezen voortvloeiende
uit onjuist gebruik of ongeoorloofde
wijzigingen in het product.

Nl 135
• Controleer de stekker van het netsnoer
regelmatig en verwijder eventueel vuil of stof.
Anders kan brand of kunnen elektrische
schokken ontstaan.
• Steek de stekker van het netsnoer volledig in
het stopcontact.
Anders kunnen elektrische schokken, brand of
schade aan het product ontstaan door
kortsluiting.
• Steek het netsnoer in het stopcontact dat
zichtbaar en eenvoudig toegankelijk is.
Bij problemen of storingen moet u de stekker
makkelijk uit het stopcontact kunnen trekken.
Zelfs als het product wordt uitgeschakeld met
de aan/uit-schakelaar, maar het netsnoer niet
uit het stopcontact wordt gehaald, wordt het
product niet volledig van de voedingsbron
losgekoppeld.
• Als u van plan bent het product lange tijd niet te
gebruiken, haal de stekker dan uit het
stopcontact.
Anders kan brand of schade aan het product
worden veroorzaakt.
Niet demonteren
• Wijzig of demonteer dit product niet.
Anders kan er brand, elektrische schokken,
letsel of schade aan het product ontstaan.
Waarschuwing voor water
• Gebruik dit product niet in vochtige of natte
omgevingen, zoals een badkamer of een
regenachtige buitenlocatie.
• Plaats dit product niet op containers (zoals
vazen of medicijnflessen) met vloeistof.
Als er vloeistof in het product komt, kunnen er
elektrische schokken, of kan er brand of schade
aan het product ontstaan.
• Steek de stekker van het netsnoer niet met
natte handen in het stopcontact en verwijder
deze niet met natte handen. Gebruik dit
product niet met natte handen.
Anders kunnen er elektrische schokken of kan
er schade aan het product ontstaan.
Waarschuwing voor brand
• Gebruik geen open vlammen in de buurt van dit
product.
Anders kan er brand worden veroorzaakt.
Gezichtsverlies
• Kijk niet in de laserstraal.
Als de laserstraal uw ogen raakt, kan er
gezichtsverlies optreden.
Behandeling
• Laat het product niet vallen en stel het niet bloot
aan sterke schokken.
Anders kunnen er elektrische schokken of kan
er brand of schade aan het product ontstaan.
Batterijen
• Batterijen niet inslikken.
• Houd batterijen uit de buurt van kinderen.
Anders kunnen de batterijen per ongeluk worden
ingeslikt. Lekkende batterijvloeistof kan leiden tot
verlies van gezichtsvermogen of een ontsteking.
Als de batterijbehuizing van dit product niet
volledig is verzegeld, stop dan met gebruik van
het product en houd het uit de buurt van
kinderen. Als iemand per ongeluk een batterij
heeft ingeslikt, raadpleeg dan onmiddellijk een
arts. Als een batterij wordt ingeslikt, kan deze
binnen twee uur ernstige chemische
brandwonden of smelten van lichaamsweefsel
veroorzaken, wat mogelijk tot de dood leidt.
• Gooi batterijen niet in open vuur.
• Stel batterijen niet bloot aan hoge
temperaturen, zoals direct zonlicht of open
vuur.
Anders kunnen ze exploderen, waardoor er brand
of letsel ontstaat.
• Raak de vloeistof van lekkende batterijen niet
aan.
Anders kan er sprake zijn van verlies van
gezichtsvermogen of chemische
brandwonden. Als u de batterijvloeistof
aanraakt, was het dan onmiddellijk af met water
en raadpleeg een arts.
• Gebruik geen andere batterijen dan het
opgegeven type.
• Gebruik geen oude en nieuwe batterijen door
elkaar.
• Gebruik geen verschillende typen batterijen
door elkaar.
• Plaats de batterijen niet omgekeerd aan de
aangegeven polariteitsrichting.
• Breek de batterij niet open.
• Laad geen niet-oplaadbare batterijen op.
Anders kunnen ze exploderen of kan de
batterijvloeistof lekken, hetgeen resulteert in
brand, brandwonden, verlies van het
gezichtsvermogen, ontsteking of schade aan het
product. Als u de batterijvloeistof aanraakt, was
het dan onmiddellijk af met water en raadpleeg
een arts.

136 Nl
• Draag de batterijen niet in een zak of tas en
bewaar ze niet samen met metalen
voorwerpen.
Anders kunnen de batterijen kortsluiten. Dit kan
leiden tot explosies of lekkende vloeistof, wat
kan leiden tot brand, verlies van
gezichtsvermogen of letsel.
• Als u van plan bent het product lange tijd niet te
gebruiken, of als de batterijen volledig leeg zijn,
verwijder ze dan van uit de afstandsbediening.
Anders kan er batterijvloeistof gaan lekken, wat
kan leiden tot verlies van gezichtsvermogen,
een ontsteking of schade aan het product.
• Breng voordat u de batterijen opslaat of
weggooit een stuk tape op de aansluitingen
aan om ze te isoleren.
Als de batterijcontacten in contact komen met
andere batterijen of metalen voorwerpen,
kunnen ze exploderen of kan er batterijvloeistof
lekken, wat kan leiden tot brand, brandwonden,
verlies van gezichtsvermogen of ontsteking.
VOORZICHTIG
Deze voorzorgsmaatregelen maken u attent op
de mogelijkheid van lichamelijk letsel van uzelf
of anderen.
Netadapter
• Gebruik het stopcontact niet als het netsnoer
niet goed in het stopcontact is gestoken of los
zit.
Anders kunnen er elektrische schokken,
brandwonden of kan er brand ontstaan.
• Houd bij het verwijderen van de plug uit het
product of de stekker uit een stopcontact altijd
de plug of stekker zelf vast en niet het snoer.
Anders kan het netsnoer worden beschadigd,
wat kan leiden tot brand of elektrische
schokken.
Opstelling
• Plaats dit product niet op een onstabiele plaats
of een locatie die onderhevig is aan trillingen.
Anders kan het product vallen of kantelen,
waardoor persoonlijk letsel of schade aan het
product kan ontstaan.
• Blokkeer de warmteafvoer van dit product niet
als u het plaatst.
- Bedek het product niet met een doek of
tafelkleed.
- Installeer het product niet op een tapijt of
kleed.
- Controleer of het bovenoppervlak naar boven
is gericht. Installeer het product niet op de
zijkanten of ondersteboven.
- Gebruik het product niet op een krappe,
slecht geventileerde locatie.
Een ontoereikende ventilatie kan leiden tot
oververhitting in het product en mogelijk zelfs
tot schade en brand of storingen.
Controleer of er rond het product voldoende
ruimte is, minstens 2,5 cm boven, 2,5 cm aan
de zijkanten en 2,5 cm aan de achterkant.
• Blijf tijdens aardbevingen uit de buurt van dit
product.
Anders kan het product vallen of kantelen,
hetgeen tot verwondingen kan leiden.
• Schakel vóór verplaatsen van het product uit en
verwijder alle aangesloten kabels.
Anders kunnen de kabels blijven haken aan
een voet of hand. Het product kan vallen of
kantelen, wat verwondingen of schade aan het
product kan veroorzaken.
Aansluitingen
• Als u van plan bent om externe apparatuur aan
te sluiten, lees dan eerst de
gebruikershandleiding van elk apparaat en sluit
deze aan volgens de instructies.
Als u de instructies niet juist opvolgt, kan het
product persoonlijk letsel of schade
veroorzaken.
Gehoorverlies
• Stel uzelf niet gedurende lange tijd bloot aan
een hoog geluidsvolume.Anders kan er
gehoorverlies ontstaan. Als u problemen met
uw gehoor ervaart, neem dan contact op met
een arts.
• Als u van plan bent dit product op andere
apparaten aan te sluiten, schakel dan eerst het
apparaat uit.
Anders kan dit leiden tot gehoorverlies,
elektrische schokken of schade aan het
product.

Nl 137
• Schakel bij het inschakelen van het apparaat
altijd de voeding van de eindversterker HET
LAATST in. Schakel bij het uitschakelen van het
apparaat altijd de voeding van de
eindversterker HET EERST in.
Anders kan er gehoorverlies optreden of
schade aan het product worden veroorzaakt.
Onderhoud
• Haal vóór het reinigen van het product de
stekker uit het stopcontact.
Anders kunnen er elektrische schokken
ontstaan.
Behandeling
• Steek uw handen of vingers niet in gaten of
openingen van dit product.
Anders kan er letsel ontstaan.
• Laat geen vreemd object, zoals een stuk
metaal of papier, in een opening van dit product
vallen.
Anders kunnen er elektrische schokken of kan
er brand of schade aan het product ontstaan.
• Gebruik dit product niet met buitensporig veel
kracht.
- Uw gewicht op dit product laten rusten
- Zware objecten op dit product plaatsen
- Dit product stapelen
- Buitensporige kracht toepassen op de
knoppen, schakelaars of I/O-aansluitingen
Anders kan er persoonlijk letsel of schade aan
het product ontstaan.
• Trek niet aan de aangesloten kabels.
Anders kan het product vallen of kantelen,
waardoor persoonlijk letsel of schade aan het
product kan ontstaan.
LET OP
Volg de onderstaande voorzorgsmaatregelen om
storingen en schade aan dit product te vermijden
en Dataverlies te voorkomen.
Netadapter
• Als u van plan bent dit product lange tijd niet te
gebruiken, haal de stekker dan uit het
stopcontact. Zelfs als [A] (Aan/Uit) op het
voorpaneel is uitgeschakeld, stroomt er nog
steeds een klein deel stroom door dit product.
Opstelling
• Afhankelijk van de omgeving waarin u het
product gebruikt, kunnen een telefoon, radio of
tv ruis genereren. Verander in dat geval de
plaats van het product, de oriëntatie of de
omgeving.
• Installeer dit product niet op een plek die
blootstaat aan:
- Direct zonlicht
- Extreem hoge of lage temperaturen
- Overmatig veel stof
Anders kunnen er storingen of schade aan het
product ontstaan.
• Installeer dit product niet op een plek waar
condensatie kan ontstaan door snelle,
drastische veranderingen in de
omgevingstemperatuur. Als u het product
gebruikt terwijl zich condensatie voordoet, kan
het product worden beschadigd. Als u denkt
dat er condensatie is opgetreden op of in dit
product, laat het dan een paar uur staan zonder
de apparatuur in te schakelen.
U kunt het product weer gebruiken als de
condensatie volledig is opgedroogd.
Behandeling
• Plaats geen vinyl, plastic of rubberen
producten op dit product. Anders kan het
paneel verkleuren of achteruitgaan.
Onderhoud
• Reinig dit product met een droge zachte doek.
Reinig het oppervlak van het product niet met
benzine, verdunner, reinigingsmiddel of een
chemische doek. Anders kan het oppervlak
verkleuren of achteruitgaan.
OPMERKING
Dit gedeelte beschrijft voorzorgsmaatregelen die
moeten worden nageleefd tijdens gebruik,
functionele beperkingen en aanvullende
informatie die nuttig voor u kan zijn.
Verwijdering of overdracht
• Als u van plan bent dit product over te dragen,
dient u dit document en de meegeleverde
accessoires samen met het product over te
dragen.
• Volg de regels van uw lokale autoriteit om dit
product en de bijbehorende accessoires te
verwijderen.
• Volg de regels van uw lokale autoriteit om
gebruikte batterijen te verwijderen.
Voorzorgsmaatregelen vóór
gebruik
Belangrijke informatie

138 Nl
WAARSCHUWING
Gebruik van bedieningsorganen, instellingen of
procedures anders dan beschreven in dit document
kan leiden tot blootstelling aan gevaarlijke stralen.
(weee_battery_eu_nl_02)
Informatie over ophalen en weggooien van oude apparatuur en lege batterijen
Deze symbolen op de apparaten, verpakking en/of meegeleverde documenten
betekenen dat gebruikte elektrische en elektronische apparaten en batterijen niet met
het gewone huishoudelijke afval mogen worden gemengd.
Voor juist behandelen, hergebruik of recyclen van oude apparatuur en lege batterijen
brengt u deze naar de desbetreffende ophaalpunten in overeenstemming met de
nationale wetgeving.
Door deze apparatuur en batterijen op de juiste manier weg te gooien, helpt u
waardevolle bronnen te sparen en mogelijk negatieve effecten op de gezondheid van de
mens en op het milieu te voorkomen, die het gevolg kunnen zijn van niet-aangepaste
afvalverwerking.
Voor meer informatie over ophalen en recyclen van oude apparatuur en batterijen neemt
u contact op met de lokale overheid, uw afvalophaalmaatschappij of het verkooppunt
waar u de items hebt gekocht.
Voor zakelijke gebruikers in de Europese Unie:
Als u elektrische en elektronische apparatuur wilt weggooien, neemt u voor meer
informatie contact op met uw dealer of leverancier.
Informatie over weggooien in landen buiten de Europese Unie:
Deze symbolen zijn alleen geldig in de Europese Unie. Als u deze items wilt weggooien,
neemt u contact op met de lokale overheid of een lokale dealer en vraagt u om
instructies voor het correct weggooien.
Opmerking bij het batterijsymbool (de twee onderste voorbeeldsymbolen):
Dit symbool kan in combinatie met een chemisch symbool worden gebruikt. In dat geval
wordt voldaan aan de eis uit de batterijrichtlijn van de EU voor de desbetreffende
chemische stof.

Nl 139
INHOUD
ALVORENS HET TOESTEL TE GEBRUIKEN 140
Eigenschappen. . . . . . . . . . . . . . . . . . . . . . . . . . . . . . . . . . . . . . . . . . . . . . . . 140
Over deze handleiding . . . . . . . . . . . . . . . . . . . . . . . . . . . . . . . . . . . . . . . . 140
Accessoires . . . . . . . . . . . . . . . . . . . . . . . . . . . . . . . . . . . . . . . . . . . . . . . . . . . 141
VOORBEREIDINGEN 142
Aansluiten op een versterker. . . . . . . . . . . . . . . . . . . . . . . . . . . . . . . . . . . 142
Het netsnoer aansluiten . . . . . . . . . . . . . . . . . . . . . . . . . . . . . . . . . . . . . . . 142
Het apparaat inschakelen. . . . . . . . . . . . . . . . . . . . . . . . . . . . . . . . . . . . . . 143
AUDIO AFSPELEN 144
Een audio-cd afspelen . . . . . . . . . . . . . . . . . . . . . . . . . . . . . . . . . . . . . . . . . 144
Muziekbestanden afspelen die op het USB-flashgeheugen zijn
opgeslagen . . . . . . . . . . . . . . . . . . . . . . . . . . . . . . . . . . . . . . . . . . . . . . . . . . . 145
Geavanceerde functies . . . . . . . . . . . . . . . . . . . . . . . . . . . . . . . . . . . . . . . . 146
Willekeurig afspelen . . . . . . . . . . . . . . . . . . . . . . . . . . . . . . . . . . . . . . . . . . . . . . . . . . . . . . . . . . . . . . . . 146
herhaald afspelen. . . . . . . . . . . . . . . . . . . . . . . . . . . . . . . . . . . . . . . . . . . . . . . . . . . . . . . . . . . . . . . . . . . 146
Tracks in de opgegeven volgorde afspelen (geprogrammeerd afspelen) . . . . . . . . . . . . . . 146
Een gespecificeerd deel herhalen (A-B herhaald afspelen) . . . . . . . . . . . . . . . . . . . . . . . . . . . . 147
Geniet van hoogwaardige geluidsweergave (PURE DIRECT) . . . . . . . . . . . . . . . . . . . . . . . . . . 147
Informatie op de display omschakelen. . . . . . . . . . . . . . . . . . . . . . . . . . . . . . . . . . . . . . . . . . . . . . . 147
De helderheid van de display wijzigen. . . . . . . . . . . . . . . . . . . . . . . . . . . . . . . . . . . . . . . . . . . . . . . 147
APPENDIX 148
Onderdeelnamen . . . . . . . . . . . . . . . . . . . . . . . . . . . . . . . . . . . . . . . . . . . . . .148
Voorpaneel . . . . . . . . . . . . . . . . . . . . . . . . . . . . . . . . . . . . . . . . . . . . . . . . . . . . . . . . . . . . . . . . . . . . . . . . .148
Display. . . . . . . . . . . . . . . . . . . . . . . . . . . . . . . . . . . . . . . . . . . . . . . . . . . . . . . . . . . . . . . . . . . . . . . . . . . . . .149
Achterpaneel. . . . . . . . . . . . . . . . . . . . . . . . . . . . . . . . . . . . . . . . . . . . . . . . . . . . . . . . . . . . . . . . . . . . . . . .149
Afstandsbediening . . . . . . . . . . . . . . . . . . . . . . . . . . . . . . . . . . . . . . . . . . . . . . . . . . . . . . . . . . . . . . . . . .150
Geavanceerde instellingen . . . . . . . . . . . . . . . . . . . . . . . . . . . . . . . . . . . . .151
Geheugen afspeelmodus (PLAY MEM). . . . . . . . . . . . . . . . . . . . . . . . . . . . . . . . . . . . . . . . . . . . . . . .151
Ready Mode (RDY MODE). . . . . . . . . . . . . . . . . . . . . . . . . . . . . . . . . . . . . . . . . . . . . . . . . . . . . . . . . . . .151
Automatisch afspelen (AUTO PLAY) . . . . . . . . . . . . . . . . . . . . . . . . . . . . . . . . . . . . . . . . . . . . . . . . . .151
Automatische standby (AUTO STBY) . . . . . . . . . . . . . . . . . . . . . . . . . . . . . . . . . . . . . . . . . . . . . . . . .151
Ondersteunde bestandsindelingen/discs/USB-flashgeheugens . . .152
Technische gegevens. . . . . . . . . . . . . . . . . . . . . . . . . . . . . . . . . . . . . . . . . . .153
Foutopsporing. . . . . . . . . . . . . . . . . . . . . . . . . . . . . . . . . . . . . . . . . . . . . . . . .154

140 Nl
ALVORENS HET TOESTEL TE GEBRUIKEN
• Optische digitale uitgang
• Coaxiale digitale uitgang
• Biedt ondersteuning voor het afspelen van CD-R- en CD-RW-discs
• Biedt ondersteuning voor het afspelen van bestanden die zijn opgeslagen op USB-
flashgeheugens of data-cd’s (MP3/WMA/AAC/WAV/FLAC)
• Willekeurig afspelen (pagina 146)
• Herhaald afspelen (pagina 146)
• Geprogrammeerd afspelen (alleen audio-cd’s) (pagina 146)
• A-B Herhaald afspelen (alleen audio-cd’s) (pagina 147)
• PURE DIRECT-functie (pagina 147)
• Configureerbare weergave-instellingen (weergegeven items/helderheid)
(pagina 147)
• Extern bestuurde standby aan/uit
• Geheugen afspeelmodus (pagina 151)
• Ready Mode (modus gereed) (pagina 151)
• Automatische afspeelfunctie (pagina 151)
• Automatische standby-functie (pagina 151)
• In deze handleiding wordt de bediening primair met de meegeleverde
afstandsbediening uitgelegd.
• Alle illustraties in deze handleiding zijn bedoeld voor bedieningsinstructies.
• In deze handleiding wordt een muziek-cd ook wel audio-cd genoemd. Een cd met
MP3/WMA/AAC/WAV/FLAC-gegevens wordt ook wel data-cd genoemd.
• Technische gegevens en uiterlijk kunnen zonder kennisgeving worden gewijzigd.
•
WAARSCHUWING waarschuwt u voor de kans op overlijden of
ernstig letsel.
•
VOORZICHTIG waarschuwt u voor de kans op persoonlijk letsel.
• dient te worden nageleefd om storingen en schade aan dit product te
voorkomen.
• is bedoeld om aanvullende informatie te geven die handig kan zijn.
Eigenschappen Over deze handleiding
Let op
Opmerking

Nl 141
• Afstandsbediening
• Netsnoer
• RCA-stereokabel
• Batterijen (AA, R6, UM-3) (X2)
• Gebruikershandleiding (deze handleiding)
Accessoires
Batterijen in de
afstandsbediening plaatsen
Plaats de batterijen in de juiste
richting.
Bedieningsbereik
afstandsbediening
Richt de afstandsbediening op
de sensor van de
afstandsbediening op het
apparaat vanuit het bereik dat
in de afbeelding rechts wordt
weergegeven.
Batterijen (AA, R6, UM-3)
30° 30°
Binnen
6m

142 Nl
VOORBEREIDINGEN
VOORZICHTIG
• Steek het netsnoer van dit apparaat en andere aangesloten apparaten pas in stopcontacten als
alle niet-stroomaansluitingen zijn voltooid.
Steek nadat alle aansluitingen zijn voltooid het meegeleverde netsnoer in de AC IN-
aansluiting van dit apparaat en steek vervolgens het andere uiteinde in een
stopcontact.
Aansluiten op een versterker Het netsnoer aansluiten
VersterkerVersterker
RCA-stereokabel
(meegeleverd)
Coaxiale digitale audiokabel
(in de handel verkrijgbaar)
Optische digitale kabel
(in de handel verkrijgbaar) Op een
wandstopcontact
Dit toestel (achterzijde)
Netsnoer
(meegeleverd)

Nl 143
Om het apparaat in te schakelen, drukt u op A (Aan/Uit) op het voorpaneel.
Opmerking
• Als u op A (Aan/Uit) op de afstandsbediening drukt terwijl het apparaat is ingeschakeld, gaat het
apparaat in standby-modus.
• De aan/uit-indicator van de eenheid werkt als volgt:
Helder brandend: Toestel staat aan
Gedimd brandend: Stand-by-modus
Off: Toestel is uitgeschakeld
• Dit apparaat is voorzien van een Automatische standby-functie die energie bespaart (pagina 151).
(Standaard: Automatische Standby aan)
Het apparaat inschakelen
A (Aan/Uit)
Voedingsindicator

144 Nl
CD/USB
OPEN/CLOSE
AUDIO AFSPELEN
Met dit apparaat kunt u data-cd’s en audio-cd’s afspelen. Zie
“Ondersteunde bestandsindelingen/discs/USB-flashgeheugens”
(pagina152) voor informatie over het type cd’s dat op dit apparaat
kan worden afgespeeld.
1
Als de USB-indicator op het voorpaneel oplicht, druk
dan op CD/USB om naar discmodus om te schakelen.
2Plaats een cd in de disclade.
Druk herhaaldelijk op OPEN/CLOSE om de disclade te
openen en te sluiten.
Opmerking
• U kunt ook herhaaldelijk op (Openen/sluiten) op het voorpaneel
drukken om de disclade te openen en te sluiten.
• Als de unit klaar is om aan audio-cd af te spelen, dan licht de
afspeelmedia-indicator (CD) op het display op.
3Druk op (afspelen).
De -indicator (afspelen) in de display licht op en het
afspelen start.
Opmerking
• Tijdens het afspelen van audiobestanden licht de indicator op voor de
afspeelmedia die de bestandsindeling weergeeft.
Let op
• Plaats uw hand of vinger niet in de disclade. Hierdoor kan letsel ontstaan.
Opmerking
• Nadat u een cd in de disclade heeft geplaatst, wordt de disclade gesloten
en start het afspelen als u een van de volgende handelingen uitvoert:
– Druk op (afspelen).
– Druk op een numerieke toets die overeenkomt met een tracknummer.
• U kunt het apparaat zodanig configureren dat het afspelen automatisch
start als het apparaat wordt ingeschakeld of als u naar de Disc- of USB-
modus schakelt (pagina 151).
(Standaard: Automatisch afspelen aan)
Gebruik de volgende toetsen op de afstandsbediening om door de
bediening te navigeren.
*De bedieningsknoppen op het voorpaneel werken als volgt:
(Achteruit overslaan/achteruit zoeken):
Gaat terug naar de vorige track. Gaat bij indrukken tijdens het
afspelen terug naar het begin van de huidige track. Als u de
toets ingedrukt houdt, worden tracks ook achteruit gezocht.
(Vooruit overslaan/vooruit zoeken):
Gaat naar de volgende track. Als u de knop ingedrukt houdt,
worden ook tracks vooruit gezocht.
Een audio-cd afspelen
Beschikbare toetsen Functie
(Afspelen) De (Afspelen)-indicator in de display
licht op en het afspelen start.
(Pauze)
De (Pauze)-indicator in de display licht
op en het afspelen wordt gepauzeerd.
druk als alternatief op om het afspelen
te hervatten.
(Stop) Stopt het afspelen.
(Achteruit zoeken)* Zoekt tracks achteruit.
(Vooruit zoeken)* Zoekt tracks vooruit.
(Achteruit overslaan)*
Gaat terug naar de vorige track. Gaat bij
indrukken tijdens het afspelen terug naar
het begin van de huidige track.
(Vooruit overslaan)* Gaat naar de volgende track.
Numerieke toetsen Voer een tracknummer in om direct de
corresponderende track te selecteren.
FOLDER ,
(alleen data-cd’s) Hiermee kan een map worden geselecteerd.
Numerieke
toetsen

Nl 145
CD/USB
U kunt muziekbestanden (opgeslagen op uw USB-flashgeheugen)
op dit apparaat afspelen. Zie “Ondersteunde bestandsindelingen/
discs/USB-flashgeheugens” (pagina152) voor meer informatie over
ondersteunde USB-flashgeheugens.
1
Als de USB-indicator op het voorpaneel uit is, druk
dan op CD/USB om naar USB-modus om te schakelen.
De USB-indicator op het voorpaneel licht oranje op.
2
Sluit het USB-flashgeheugen aan op de USB-aansluiting.
Als het apparaat klaar is om af te spelen, licht de
afspeelmedia-indicator (USB) in de display op en de USB-
indicator op het voorpaneel licht groen op.
Let op
• Gebruik geen USB-verlengkabels.
3Druk op (afspelen).
De -indicator (afspelen) in de display licht op en het
afspelen start.
Opmerking
• Tijdens het afspelen van audiobestanden licht de indicator op voor de
afspeelmedia die de bestandsindeling weergeeft.
• Als er compatibel muziekbestanden op het USB-flashgeheugen zijn
opgeslagen, speelt het apparaat deze af in chronologische volgorde
op basis van de aanmaakdatum.
Let op
• Verwijder het USB-flashgeheugen niet tijdens afspelen of als het
informatiescherm op het voorpaneel de melding “USB READING”
aangeeft. In dit geval drukt u eerst op CD/USB om naar de discmodus te
schakelen. Controleer of de USB-indicator wordt uitgeschakeld en
verwijder vervolgens het flashgeheugen.
Gebruik de volgende toetsen op de afstandsbediening om door de
bediening te navigeren.
* De bedieningsknoppen op het voorpaneel werken als volgt:
(Achteruit overslaan/achteruit zoeken):
Gaat terug naar de vorige track. Gaat bij indrukken tijdens het
afspelen terug naar het begin van de huidige track. Als u de
toets ingedrukt houdt, worden tracks ook achteruit gezocht.
(Vooruit overslaan/vooruit zoeken):
Gaat naar de volgende track. Als u de knop ingedrukt houdt,
worden ook tracks vooruit gezocht.
Muziekbestanden afspelen die op het USB-flashgeheugen zijn opgeslagen
Dit toestel (voorpaneel)
USB-flashgeheugen
Beschikbare toetsen Functie
(Afspelen) De -indicator (afspelen) in de display
licht op en het afspelen start.
(Pauze)
De -indicator (pauze) in de display licht
op en het afspelen wordt gepauzeerd.
druk als alternatief op om het afspelen
te hervatten.
(Stop) Stopt het afspelen.
(Achteruit zoeken)* Zoekt tracks achteruit.
(Vooruit zoeken)* Zoekt tracks vooruit.
(Achteruit overslaan)*
Gaat terug naar de vorige track. Gaat bij
indrukken tijdens het afspelen terug naar
het begin van de huidige track.
(Vooruit overslaan)* Gaat naar de volgende track.
FOLDER , Hiermee kan een map worden geselecteerd.

146 Nl
RANDOM
CLEAR
ENTER
REPEAT
PROGRAM
U kunt de afspeelmodus configureren en instellingen met
geavanceerde functies weergeven.
Willekeurig afspelen
Druk op RANDOM om tracks in willekeurige volgorde af te spelen.
Als u herhaaldelijk op RANDOM drukt, wordt de instelling
willekeurig afspelen als volgt gewijzigd:
Opmerking
• Om Willekeurig afspelen te annuleren opent u de disclade.
herhaald afspelen
Druk op REPEAT om meerdere tracks herhaald af te spelen. Als u
herhaaldelijk op REPEAT drukt, wordt de instelling voor herhaald
afspelen als volgt gewijzigd:
Opmerking
• Om Herhaald afspelen te annuleren opent u de disclade.
Tracks in de opgegeven volgorde
afspelen (geprogrammeerd afspelen)
U kunt audio-cd-tracks in de opgegeven volgorde afspelen.
1Druk op PROGRAM als afspelen is gestopt.
2Voer met de numerieke toetsen het tracknummer
van de song in die u wilt programmeren.
3Druk op ENTER.
Herhaal stap 2 en 3 om elke track te programmeren.
Druk op CLEAR om alle geprogrammeerde tracks te
annuleren, beginnend met de laatst geprogrammeerde track.
4Druk op (afspelen).
Het apparaat gaat de tracks in de geprogrammeerde volgorde
afspelen.
Opmerking
• Geprogrammeerd afspelen werkt niet met data-cd’s of USB-
flashgeheugens.
• U kunt maximaal 24 tracks programmeren.
• Voer een van de volgende handelingen uit om alle geprogrammeerde
tracks te wissen:
– Druk op CLEAR als geprogrammeerd afspelen is gestopt.
– Schakel het apparaat uit of zet het in standby-modus.
– Open de disclade.
Geavanceerde functies
Indicator Instelling
RNDM Speelt alle tracks in willekeurige volgorde af.
Uit Schakelt willekeurig afspelen uit.
Indicator Instelling
REP Eén track herhalen.
REP FOLDER
(Alleen data-cd’s en
USB-flashgeheugens)
Speelt tracks in de huidige map herhaald af.
REP ALL Alle tracks herhalen.
Uit Schakelt herhaald afspelen uit.
TRACKTEXT AAC WAV FLAC RESUM RDY TOTAL REMAIN RNDM REP FOLDER ALL A - BCD PROG
TRACKTEXT AAC WAV FLAC RESUM RDY TOTAL REMAIN RNDM REP FOLDER ALL A - BCD PROG
Numerieke
toetsen

Nl 147
A/B
PURE
DIRECT
DISPLAY
DIMMER
Een gespecificeerd deel herhalen
(A-B herhaald afspelen)
U kunt tijdens het afspelen van audio-cd’s de start- en eindpunten
van een track opgeven om het opgegeven deel herhaaldelijk af te
spelen.
1Een audio-cd afspelen.
2Druk op A/B op het punt waar u de weergave van
herhaald afspelen wilt starten.
3Druk nogmaals op A/B op het punt waarop u
herhaald afspelen wilt beëindigen.
Het apparaat begint met herhaald afspelen.
Opmerking
• Herhaald afspelen werkt niet met data-cd’s of USB-flashgeheugens.
• U kunt de instelling A-B herhaald afspelen niet opgeven als de functie
PURE DIRECT is ingeschakeld.
• Om A-B herhaald afspelen te annuleren, gaat u als volgt te werk:
– Druk nogmaals op A/B.
– Druk op (Stop).
– Open de disclade.
Geniet van hoogwaardige
geluidsweergave (PURE DIRECT)
Als de functie PURE DIRECT is ingeschakeld, wordt er geen
digitale audio verzonden. Op deze manier reduceert de functie
PURE DIRECT ruis die de geluidskwaliteit zou beïnvloeden, zodat u
kunt genieten van het afspelen van hoogwaardig geluid.
Als u herhaaldelijk op PURE DIRECT drukt, schakelt u tussen PURE
DIRECT aan en uit.
Opmerking
• Om de PURE DIRECT-functie te gebruiken, sluit u de ANALOG OUT-
aansluitingen op het achterpaneel aan op de versterker. De DIGITAL OUT-
aansluitingen verzenden geen signaal.
• Als de functie PURE DIRECT is ingeschakeld:
– Licht de PURE DIRECT-indicator op.
– Tijdens het afspelen wordt het scherm op het voorpaneel uitgeschakeld.
– Tijdens het bedienen van het apparaat verschijnen er slechts een
minimumaantal indicators en berichten.
– Deze instelling blijft behouden nadat u het apparaat heeft uitgeschakeld.
Informatie op de display omschakelen
Als u tijdens het afspelen herhaaldelijk op DISPLAY drukt, wordt de
informatie in de display als volgt gewijzigd:
Opmerking
• Het informatiedisplay geeft maximaal 64 tekens weer (1-byte alfanumerieke
tekens en verscheidene symbolen).
De helderheid van de display wijzigen
Druk herhaaldelijk op DIMMER om tussen vier helderheidsniveaus
van de display om te schakelen.
TEXT AAC WAV FLAC RESUM RDY TOTAL REMAIN RNDM FOLDER ALLPROG CD TRACK REP
TEXT AAC WAV FLAC RESUM RDY TOTAL REMAIN RNDM FOLDER ALLPROG CD TRACK REP
Afspeelmedia Informatie in de display
Audio-cd
Verstreken tijd resterende tijd van de huidige
track (TRACK REMAIN) Totale resterende tijd
op de cd (TOTAL REMAIN) Tracknaam*
Naam artiest* Albumtitel*
* Als cd-tekst is geïntegreerd
Data-cd, USB-
flashgeheugen
Verstreken tijd Tracknaam* Naam artiest*
Albumtitel*
* Als er tags zijn geïntegreerd

148 Nl
APPENDIX
Voorpaneel
1A (Aan/Uit) (pagina 143)
2Aan/Uit-indicator (pagina 143)
3USB-aansluiting (pagina 145)
4USB-indicator (pagina 145)
5CD/USB (pagina’s 144, 145)
6PURE DIRECT (pagina 147)
7PURE DIRECT-indicator (pagina 147)
8Disclade (pagina 144)
9 (Openen/sluiten) (pagina 144)
0Sensor afstandsbediening (pagina 141)
A (Achteruit overslaan/achteruit zoeken) (pagina’s 144, 145)
B (Vooruit overslaan/vooruit zoeken) (pagina’s 144, 145)
C (Afspelen) (pagina’s 144, 145, 146)
D (Pauze) (pagina’s 144, 145)
E (Stop) (pagina’s 144, 145, 146, 147)
Onderdeelnamen
1 2 3 4 7 0
8 9
5 6 A B C D E

Nl 149
Display
1 / (Afspelen/Pauze)-indicator (pagina’s 144, 145)
2Indicator afspeelmedia (pagina’s 144, 145)
3Indicator geavanceerde instelling (pagina 151)
4Tijdindicator (pagina 147)
5Indicator afspeelmodus (pagina’s 146, 147)
6Informatiedisplay (pagina’s 146, 147, 151)
Achterpaneel
1ANALOG OUT-aansluitingen (pagina 142)
2DIGITAL OUT-aansluiting (COAXIAL) (pagina 142)
3DIGITAL OUT-aansluiting (OPTICAL) (pagina 142)
4AC IN-aansluiting (pagina 142)
TRACKCD TEXT AAC WAV FLAC RESUM RDY TOTAL REMAIN PROG RNDM REP FOLDER ALL A - B
1 62 3 54
2 3 41

150 Nl
Afstandsbediening
1A (Aan/Uit) (pagina 143)
2Signaalzender afstandsbediening (pagina 141)
3OPEN/CLOSE (pagina 144)
4PROGRAM (pagina 146)
5REPEAT (pagina 146)
6DIMMER (pagina 147)
7RANDOM (pagina 146)
8A/B (pagina 147)
9DISPLAY (pagina 147)
0Numerieke toetsen (pagina’s 144, 146)
ACLEAR (pagina 146)
BENTER (pagina 146)
C (Achteruit zoeken), (Vooruit zoeken) (pagina’s 144, 145)
(Pauze) (pagina’s 144, 145)
(Achteruit overslaan) (pagina’s 144, 145)
(Vooruit overslaan) (pagina’s 144, 145)
(Afspelen) (pagina’s 144, 145, 146)
(Stop) (pagina’s 144, 145, 146, 147)
FOLDER , (pagina’s 144, 145)
DCD/USB (pagina’s 144, 145)
EPURE DIRECT (pagina 147)
3
4
9
0
C
7
8
A
B
D
E
6
5
21

Nl 151
Deze sectie geeft uitleg over het configureren van diverse geavanceerde functies. U
kunt de meeste van deze instellingen configureren vanaf het voorpaneel. (Voor
sommige instellingen is een afstandsbediening vereist.)
1Plaats het apparaat in standby-modus (pagina 143).
2Houd PURE DIRECT, (Openen/sluiten) en (Afspelen) drie
seconden of langer tegelijkertijd ingedrukt.
De volgende indicator verschijnt in het informatiedisplay van het voorpaneel en het
apparaat gaat naar instelmodus. In deze volgorde kunt u de functies Playback
Mode Memory, Ready Mode, Automatic Playback en Auto Power standby instellen.
3Druk op of om de functie in of uit te
schakelen.
4Druk op (Stop).
De instelling wordt bevestigd en de volgende parameter wordt automatisch
geselecteerd. Herhaal stap 3 en 4. Als alle instellingen zijn voltooid, verschijnt de
volgende indicator op het informatiescherm van het voorpaneel en gaat het
apparaat naar standby-modus.
Opmerking
• Als tijdens het proces op (Afspelen) wordt gedrukt, wordt de instelling op dat punt
bevestigd, en schakelt de unit over op stand-by-modus.
Geheugen afspeelmodus (PLAY MEM)
Als deze functie is ingeschakeld, blijft het apparaat de instellingen voor herhaald
afspelen en willekeurig afspelen onthouden, zelfs nadat het apparaat is uitgeschakeld.
Als de geheugenfunctie voor afspeelmodus is ingeschakeld, licht de indicator voor
geavanceerde instellingen (RESUM) op het scherm op.
Standaard: Uit
Opmerking
• Als u het apparaat inschakelt nadat u de functie geheugen afspeelmodus heeft ingeschakeld,
wordt de meest recentelijk afgespeelde track of het bestand vanaf het begin afgespeeld.
Ready Mode (RDY MODE)
Als deze functie is ingeschakeld wordt het apparaat gepauzeerd als de weergave van
een track is voltooid. U kunt de volgende track afspelen als u deze kiest. Als de functie
Ready Mode is ingeschakeld, licht de indicator geavanceerde instellingen (RDY) op
het scherm op.
Standaard: Uit
Automatisch afspelen (AUTO PLAY)
Als deze functie is ingeschakeld begint het apparaat automatisch met afspelen als het
wordt ingeschakeld of als u naar de Disc- of USB-modus omschakelt.
Standaard: Aan
Automatische standby (AUTO STBY)
Als deze functie is ingeschakeld, gaat het apparaat automatisch naar standby-modus
als het gedurende 20 minuten na het afspelen niet wordt bediend.
Standaard: Aan
Geavanceerde instellingen
PURE DIRECT
TRACKTEXT AAC WAV FLAC RESUM RDY TOTAL REMAIN RNDM REP FOLDER ALLPROG CD TRACKTEXT AAC WAV FLAC RESUM RDY TOTAL REMAIN RNDM REP FOLDER ALLPROG CD
CD TRACK REP TEXT AAC WAV FLAC RESUM RDY TOTAL REMAIN RNDM FOLDER ALLPROG

152 Nl
❑Ondersteunde bestandsindelingen
* Alleen lineaire PCM-indeling.
Opmerking
• Bestanden op een data-cd of USB-flashgeheugen worden in chronologische volgorde afgespeeld
op basis van de aanmaakdatum.
• Dit apparaat ondersteunt ISO9660-indelingsdiscs.
• Als het apparaat een VBR-bestand (variabele bitrate) afspeelt, wordt er mogelijk geen
nauwkeurige verstreken tijd weergegeven.
• Digital Rights Management-inhoud (DRM) kan niet worden afgespeeld.
❑Ondersteunde discs
Gebruik discs met de volgende logo’s.
Let op
• Gebruik geen vreemd gevormde discs of discs met tape of een sticker. Anders kunnen er storingen
in het apparaat optreden.
• Dit apparaat kan sommige CD-RW-discs of discs die onjuist zijn opgenomen niet afspelen.
• Om een 8 cm-cd af te spelen, plaats u deze in het verzonken deel van de disclade. Plaats geen
normale cd (12 cm) op een 8-cm-cd.
Ondersteunde bestandsindelingen/discs/USB-flashgeheugens
Bestand Samplingfrequentie (kHz) Bitdiepte
(bit)
Bitrate
(kbps)
Aantal
kanalen
MP3 32/44.1/48 — 32-320 2
WMA 32/44.1/48 — 48-192 2
AAC 32/44.1/48 — 8-320 2
WAV * 32/44.1/48/64/88.2/96 16/24 — 2
FLAC 32/44.1/48/64/88.2/96 16/24 — 2
Data-cd USB-flashgeheugen
Aantal maphiërarchieën
(inclusief de hoofdmap) 99
Aantal mappen 999 999
Aantal bestanden 1100 65535
Compact discs (audio-cd’s)
CD-R- en CD-RW-discs
• Discs met een van de volgende beschrijvingen:
FOR CONSUMER
FOR CONSUMER USE
FOR MUSIC USE ONLY
• Bij CD-R- of CD-RW-discs speelt het apparaat alleen
gefinaliseerde discs af.
Opmerking
• Dit apparaat kan sommige CD-R/CD-RW-discs of discs die onjuist zijn
opgenomen niet afspelen.
CD-TEXT-discs
Deze schijven bevatten ingebedde tekstinformatie, zoals
albumtitels, songnamen en artiestennamen. Deze informatie (alleen
alfanumerieke tekens en sommige symbolen) wordt samen met de
verstreken tijd weergegeven.

Nl 153
❑Werken met een disc
• Hanteer een disc voorzichtig, zodat er geen krassen op het
opgenomen oppervlak komen. Buig een disc niet.
• Als er vingerafdrukken of stof op het opgenomen oppervlak
komen, veeg het oppervlak dan met een zacht doekje vanaf
het midden naar de rand af.
• Gebruik nooit reinigingsmiddelen voor vinylplaten, antistatische oplossingen of
andere chemicaliën om een disc te reinigen.
• Gebruik een soft-tip pen om alleen op het etiket te schrijven.
• Laat een disc niet achter in direct zonlicht of op een locatie die lange tijd wordt
blootgesteld aan hoge temperaturen of vochtigheid.
• Gebruik geen in de handel verkrijgbare lensreiniger. Anders kunnen er storingen
optreden.
❑Ondersteunde USB-flashgeheugens
Voordat u dit apparaat gebruikt om muziekbestanden af te spelen die op een USB-
flashgeheugen zijn opgeslagen, moet u controleren of aan de volgende eisen is
voldaan:
• Het USB-flashgeheugen voldoet aan de eisen van de massa-opslagklasse.
• De gegevens zijn opgenomen met het FAT16- of FAT32-bestandssysteem.
Let op
• Sommige USB-flashgeheugens werken mogelijk niet juist.
• USB-flashgeheugens met encryptie kunnen niet worden gebruikt.
• Yamaha en de dealers zijn niet verantwoordelijk voor het verlies van gegevens die zijn opgeslagen
op een USB-flashgeheugen dat op dit apparaat is aangesloten. Wij raden u aan om back-
upgegevens te bewaren bij mogelijk verlies van gegevens.
• Yamaha garandeert de werking van of voeding naar USB-flashgeheugens niet.
De specificaties van dit toestel zijn als volgt.
Audiogedeelte
• Uitgangsniveau (1 kHz, 0 dB, Fs 44,1 kHz)........................................................ 2,0 ± 0,3 V
• Signaal/ruisverhouding (IHF-A netwerk) (1 kHz, 0 dB, Fs 44,1 kHz)..........105 dB of hoger
• Dynamisch bereik (1 kHz, 0 dB, Fs 44,1 kHz).............................................. 96 dB of hoger
• Harmonische vervorming (1 kHz, 0 dB, Fs 44,1 kHz) .................................0,003% of lager
• Frequentierespons
Audio-cd .........................................................................................................2 Hz – 20 kHz
Data-cd/USB Fs 48 kHz .........................................................................2 Hz – 22 kHz
Fs 96 kHz ............................................................. 2 Hz – 44 kHz, –3 dB
Lasersectie
• Lasertype ..................................................................................................................AIGaAs
• Golflengte ................................................................................................................. 790 nm
• Laseruitgang.................................................................................................. Max. 1,04 mW
Algemeen
• Netadapter
Model V.S. en Canada............................................................................... AC 120 V, 60 Hz
Model Australië................................................................................... AC 230-240 V, 50 Hz
Europa en het Verenigd Koninkrijk ............................................................ AC 230 V, 50 Hz
Azië- en universele modellen......................................................... AC 110-240 V, 50/60 Hz
Model voor China....................................................................................... AC 220 V, 50 Hz
• Stroomverbruik..............................................................................................................11 W
• Opgenomen vermogen in stand-by
Power Standby (standby-modus) ................................................................................0,2 W
Uitschakelen ................................................................................................................0,2 W
• Afmetingen (B × H × D)......................................................................... 435 x 87 x 260 mm
• Gewicht....................................................................................................................... 3,5 kg
* De inhoud van deze handleiding geldt voor de meest recente specificaties op de datum dat de
handleiding werd gepubliceerd. Voor de meest recente handleiding gaat u naar de website van
Yamaha, waar u het bestand met de handleiding kunt downloaden.
Technische gegevens
Uitgangen
• Analoge audio x 1 (RCA ongebalanceerd)
• Digitale audio
COAXIAL x 1, OPTICAL x 1
Andere aansluitingen
• USB × 1 (USB2.0)

154 Nl
Raadpleeg de onderstaande tabel als het toestel niet goed functioneert. Als het probleem hieronder niet wordt weergegeven, of als de symptomen na het volgen van de
onderstaande instructies aanhouden, schakel dan de voeding van het apparaat uit door op A (Aan/Uit) op het voorpaneel te drukken, het netsnoer los te koppelen en contact op te
nemen met de dichtstbijzijnde geautoriseerde Yamaha-dealer of het dichtstbijzijnde onderhoudscentrum.
Foutopsporing
Probleem Oorzaak Oplossing Pagina
Als u op de aan/uit-schakelaar drukt,
wordt het apparaat niet ingeschakeld. Het netsnoer is mogelijk niet juist aangesloten. Sluit het netsnoer stevig aan op het stopcontact. 142
De disclade sluit niet volledig. In de disclade bevindt zich een vreemd object. Controleer de disclade en verwijder vreemde voorwerpen. —
Kan de geplaatste disc niet afspelen.
De disc is bekrast. Vervang de disc. —
De lens in het apparaat heeft condensatie. Schakel het apparaat in, wacht 20 – 30 minuten en probeer de disc
vervolgens opnieuw af te spelen. —
De disc is ondersteboven geplaatst. Plaats de disc met het etiket omhoog. —
De disc is vuil of bekrast. Veeg het vuil van het discoppervlak, of gebruik een niet bekraste disc. 153
U heeft geprobeerd bestanden af te spelen in een indeling die niet
door het apparaat wordt ondersteund.
Gebruik een disc met bestanden in een indeling die door het apparaat
wordt ondersteund. 152
U heeft geprobeerd een disc af te spelen die niet door het apparaat
wordt ondersteund. Gebruik een disc die wordt ondersteund door het apparaat. 152, 153
Het apparaat staat in USB-modus. Druk op CD/USB om naar de discmodus om te schakelen. 144, 148,
150
Afspelen start niet direct of vanaf het
juiste punt. De disc is vuil of bekrast. Veeg het vuil van het discoppervlak, of gebruik een niet bekraste disc. 153
Kan muziekbestand dat op het USB-
flashgeheugen is opgeslagen niet
afspelen.
Het USB-flashgeheugen is mogelijk niet juist aangesloten op het
apparaat. Sluit het USB-flashgeheugen op de juiste wijze aan. 145
U heeft geprobeerd bestanden af te spelen in een indeling die niet
door het apparaat wordt ondersteund.
Gebruik een USB-flashgeheugen met bestanden in een indeling die
door het apparaat wordt ondersteund. 152
Het apparaat staat in discmodus. Druk op CD/USB om naar USB-modus om te schakelen. 145, 148,
150
Geen geluid Het apparaat is niet juist op de versterker aangesloten. Controleer de aansluiting op de versterker. 142
De audio wordt niet verzonden via het
apparaat dat is aangesloten op de
DIGITAL OUT-aansluitingen.
De functie PURE DIRECT is ingeschakeld. Schakel de functie PURE DIRECT uit. 147

Nl 155
Het geluid slaat over.
Het apparaat wordt beïnvloed door trillingen of schokken. Wijzig de locatie van het apparaat. —
De disc is vuil of bekrast. Veeg het vuil van het discoppervlak, of gebruik een niet bekraste disc. 153
Er wordt een zoem- of bromgeluid
waargenomen. De RCA-stereokabel is niet goed aangesloten. Sluit de RCA-stereokabel stevig aan. Als het symptoom niet verbetert,
controleer dan of de kabel zelf defect is. 142
Ruis in de tuner Het apparaat bevindt zich dicht bij de tuner. Verplaats het apparaat verder van de tuner, of schakel het apparaat
uit. —
De disclade maakt bijgeluiden. De disc is vervormd. Gebruik een niet vervormde disc. —
Geen indicatie in de display De functie PURE DIRECT is ingeschakeld Schakel de functie PURE DIRECT uit. 147
In de informatieweergave verschijnt
geen mapnaam of bestandsnaam.
Andere tekens dan 1-byte alfanumeriek worden gebruikt voor de map-
of bestandsnaam.
Gebruik 1-byte alfanumerieke tekens voor de map- en
bestandsnamen. 147
De afstandsbediening werkt niet of niet
goed.
De batterijen zijn bijna leeg. Vervang alle batterijen. 141
Verkeerde afstand of hoek. Gebruik de afstandsbediening binnen het werkingsbereik. 141
Direct zonlicht of sterke verlichting (van fluorescentielampen met een
voorschakelapparaat, enz.) valt op de afstandsbedieningssensor van
dit toestel.
Verplaats de richting van de verlichting of het toestel. —
Probleem Oorzaak Oplossing Pagina

156 Ru
Перед началом работы внимательно
ознакомьтесь с данными мерами
безопасности.
Обязательно следуйте
инструкциям
Внимательно прочтите данные меры
безопасности и соблюдайте их, чтобы
избежать причинения вреда людям или
повреждения личной собственности.
После внимательного прочтения настоящего
документа храните его в месте, доступном
для каждого пользователя продукта.
ПРЕДУПРЕЖДЕНИЕ
Данные меры предосторожности
предупреждают о риске причинения
смерти или серьезной травмы себе или
другим людям.
Возникновение нарушений
• При возникновении любых указанных ниже
нарушений немедленно выключите питание.
- Кабель питания или штепсель
повреждены.
- Необычный запах, шум или дым исходят от
продукта.
- Посторонний предмет или вода попади
внутрь продукта.
- Трещины или другие повреждения
появились на продукте.
- Во время работы продукта неожиданно
пропадает звук.
Выполните следующие шаги, чтобы
отключить питание.
- Выключите питание данного продукта.
- Отсоедините штепсель кабеля питания от
розетки переменного тока.
Дальнейшее использование продукта в
состоянии «как есть» может привести к
пожару, поражению электрическим током
или повреждению продукта. Следует
немедленно провести проверку или ремонт
продукта.
Источник питания
• Не повреждайте кабель питания.
- Не располагайте кабель питания рядом с
источниками тепла, например, возле
обогревателей.
- Не сгибайте кабель питания с усилием и не
модифицируйте его.
- Не повреждайте кабель питания.
- Не ставьте тяжелые предметы на кабель
питания.
- Не скрепляйте кабель питания скобами.
Использование поврежденного кабеля
питания с открытыми жилами проводов
может вызвать пожар, поражение
электрическим током или повреждение
продукта.
• Во время разрядов молнии или грозы не
прикасайтесь к продукту, штепселю или
кабелю питания.
В противном случае возможно поражение
электрическим током.
• Используйте напряжение, указанное для
данного изделия.
Использование несоответствующего
напряжения может привести к возгоранию,
поражению электрическим током или
повреждению изделия.
• Для подачи питания используйте только
указанное ниже изделие.
- Прилагаемый кабель питания
В противном случае это может привести к
пожару, ожогам или повреждению
продукта.
• Не используйте следующий прилагаемый
аксессуар с другими устройствами.
- Кабель питания
В противном случае это может привести к
пожару, ожогам или повреждению
продукта.
ПРАВИЛА ТЕХНИКИ БЕЗОПАСНОСТИ
• Обращайтесь в следующие центры
обслуживания клиентов для проведения
проверки или ремонта.
- Магазин, в котором вы приобрели
продукт
- Дилер Yamaha
• Данный продукт предназначен для
использования в качестве обычного
бытового устройства. Не используйте его в
сферах деятельности, требующих высокой
надежности в отношении человеческих
жизней или ценных активов.
• Обратите внимание, что компания Yamaha
не несет ответственности за любые
потери, возникшие в результате
неправильного использования или
несанкционированной модификации
данного продукта.

Ru 157
• Периодически проверяйте штепсель кабеля
питания и удаляйте с него грязь и пыль,
которые могут на нем скапливаться.
В противном случае может возникнуть
пожар или произойти поражение
электрическим током.
• Обязательно полностью вставьте штепсель
кабеля питания в розетку переменного тока.
В противном случае это может вызвать
поражение электрическим током, пожар или
повреждение продукта в результате
короткого замыкания.
• Вставьте штепсель кабеля питания в
розетку переменного тока, которая хорошо
видна и легко доступна.
При возникновении сбоя или неисправности
вы должны иметь возможность немедленно
и беспрепятственно отсоединить штепсель
от розетки переменного тока. Даже если
выключатель питания находится в
выключенном положении, до тех пор пока
штепсель не отсоединен от настенной
розетки, продукт остается подключенным к
источнику питания.
• Если вы планируете длительное время не
использовать данный продукт, отсоедините
штепсель кабеля питания от розетки
переменного тока.
В противном случае может возникнуть
пожар или повреждение продукта.
Не разбирать
• Не модифицируйте и не разбирайте данный
продукт.
В противном случае может возникнуть
пожар, поражение электрическим током,
травма или повреждение продукта.
Меры безопасности при контакте с
водой
• Не используйте данный продукт во влажных
или мокрых условиях, например, в ванной
комнате или в дождливую погоду на
открытом воздухе.
• Не ставьте на данный продукт любые
контейнеры с жидкостями (например, вазы
или лекарственные флаконы).
Если жидкость прольется внутрь продукта,
это может вызвать пожар, поражение
электрическим током или повреждение
продукта.
• Не вставляйте штепсель кабеля питания в
розетку переменного тока и не вынимайте
его из нее мокрыми руками. Не беритесь за
данный продукт мокрыми руками.
В противном случае это может вызвать
поражение электрическим током или
повреждение продукта.
Меры пожарной безопасности
• Не используйте данный продукт рядом с
открытым пламенем.
В противном случае это может вызвать
пожар.
Риск потери зрения
• Не смотрите на лазерный луч.
Если луч попадет в глаза, это может
привести к потере зрения.
Эксплуатация
• Не роняйте данный продукт и не
применяйте к нему чрезмерные усилия.
В противном случае это может вызвать
пожар, поражение электрическим током или
повреждение продукта.
Батарейки
• Не глотайте батарейки
• Храните батарейки в местах, недоступных
для детей.
В противном случае они могут случайно
проглотить их. Утечка электролита может
вызвать потерю зрения или раздражение.
Если отсек для батареек на данном продукте
не полностью закрыт, прекратите
использование продукта и храните его в
недоступном для детей месте. Если кто-то
случайно проглотил батарейку, немедленно
обратитесь к врачу. В случае проглатывания
батарейка может вызвать серьезные
химические ожоги или растворение тканей
организма в течение двух часов, что может
привести к смерти.
• Не бросайте батарейки в открытый огонь.
• Не подвергайте батарейки воздействию
высоких температур, например,
воздействию прямых солнечных лучей или
открытого огня.
В противном случае они могут взорваться, что
приведет к пожару или травме.
• В случае утечки электролита не
прикасайтесь к нему.
В противном случае это может привести к
потере зрения или химическим ожогам. В
случае касания электролита немедленно
смойте его водой и обратитесь к врачу.
• Не используйте батарейки другого типа
кроме указанного.
• Не используйте старые и новые батарейки
вместе.
• Не используйте разные типы батареек
вместе.
• Не вставляйте батарейки с нарушением
указанной полярности.
• Не ломайте батарейки.
• Не заряжайте неперезаряжаемые сухие
батарейки.

158 Ru
В противном случае они могут взорваться или
может произойти утечка электролита, что
вызовет пожар, ожоги, потерю зрения,
раздражение или повреждение продукта. В
случае касания электролита немедленно
смойте его водой и обратитесь к врачу.
• Не носите батарейки в кармане или сумке и
не храните их вместе с металлическими
предметами.
В противном случае может произойти
короткое замыкание батареек, что
приведет к взрыву или утечке электролита,
в результате чего может возникнуть пожар,
потеря зрения или травмы.
• Если вы планируете длительное время не
использовать данный продукт, или если
батарейки полностью разряжены, выньте их
из пульта ДУ.
В противном случае может произойти
утечка электролита, что, возможно,
вызовет потерю зрения, травму с
воспалением или повреждение продукта.
• Перед хранением или утилизацией батареек
прикрепите кусочек клейкой ленты к
контактам, чтобы изолировать их.
Если контактные участки батареек будут
соприкасаться друг с другом или с
металлическими объектами, они могут
взорваться или может произойти утечка
электролита, что, возможно, станет
причиной пожара, ожогов, потери зрения
или травмы с раздражением.
ВНИМАНИЕ
Данные меры предосторожности
предупреждают о риске физической
травмы для себя или других людей.
Источник питания
• Если штепсель кабеля питания вставляется
в розетку переменного тока неплотно, не
используйте данную розетку.
В противном случае это может привести к
пожару, поражению электрическим током
или ожогам.
• При извлечении штепселя кабеля питания
из продукта или розетки всегда держитесь
за сам штепсель, а не за кабель.
В противном случае кабель питания может
быть поврежден, что станет причиной
пожара или поражения электрическим
током.
Установка
• Не располагайте данный продукт в
неустойчивом положении или в местах,
подверженных вибрации.
В противном случае продукт может упасть
или опрокинуться, что приведет к травмам
или повреждению продукта.
• Не блокируйте отвод тепла от данного
продукта при его установке.
- Не накрывайте продукт тканью или
скатертью.
- Не устанавливайте продукт на ковер или
коврик.
- Убедитесь, что верхняя сторона
направлена вверх. Не устанавливайте
продукт на его боковые стороны или вверх
ногами.
- Не пользуйтесь аппаратом в тесных, плохо
проветриваемых помещениях.
Ненадлежащая вентиляция может привести
к перегреву внутри продукта, а также
вызвать повреждение, пожар или
неисправность.
Убедитесь в наличии достаточного
пространства вокруг продукта, минимум
2,5 см сверху, 2,5 см по бокам и 2,5 см сзади.
• Во время землетрясений держитесь
подальше от данного продукта.
В противном случае продукт может упасть
или опрокинуться, что приведет к травмам.
• Перед перемещением продукта обязательно
выключите питание и отсоедините все
подключенные кабели.
В противном случае кабели могут
зацепиться за ногу или за руку и продукт
может упасть или опрокинуться, что
приведет к травмам или повреждению
продукта.
Подключения
• Если вы планируете подключение внешних
устройств, сначала прочитайте руководство
пользователя по каждому устройству и
подключайте их в соответствии с
инструкциями.
Несоблюдение инструкций может привести
к травме или повреждению.
Потеря слуха
• Избегайте прослушивания звука с высоким
уровнем громкости в течение длительного
времени.В противном случае это может
привести к потере слуха. При
возникновении проблем со слухом
обратитесь к врачу.
• Если вы планируете подключение данного
продукта к другим устройствам, сначала
выключите питание на всех устройствах.

Ru 159
В противном случае это может привести к
потере слуха, поражению электрическим
током или повреждению продукта.
• При включении питания аудиосистемы
всегда включайте питание усилителя
мощности в ПОСЛЕДНЮЮ очередь. При
выключении питания аудиосистемы
выключайте питание усилителя мощности в
ПЕРВУЮ очередь.
В противном случае может возникнуть
потеря слуха или повреждение продукта.
Уход за изделием
• Перед очисткой продукта обязательно
отсоедините штепсель кабеля питания от
розетки переменного тока.
В противном случае возможно поражение
электрическим током.
Эксплуатация
• Не просовывайте руки или пальцы в любые
зазоры или отверстия на продукте.
В противном случае это может привести к
травме.
• Не роняйте посторонние предметы,
например, кусочки металла или бумаги, в
любые отверстия на продукте.
В противном случае это может вызвать
пожар, поражение электрическим током или
повреждение продукта.
• Не применяйте следующие виды
чрезмерного силового воздействия к
продукту.
- Не садитесь на данный продукт.
- Не ставьте тяжелые предметы на данный
продукт.
- Не ставьте данный продукт один на
другой.
- Не применяйте чрезмерное усилие к
кнопкам, переключателям и разъемам
ввода-вывода.
В противном случае это может привести к
травме или повреждению продукта.
• Не тяните за подключенные кабели.
В противном случае продукт может упасть
или опрокинуться, что приведет к травмам
или повреждению продукта.
УВЕДОМЛЕНИЕ
Соблюдайте указанные ниже меры
предосторожности, чтобы избежать
неисправности или повреждения продукта и
предотвратить потерю данных.
Источник питания
• Если вы планируете длительное время не
использовать данный продукт, отсоедините
штепсель кабеля питания от розетки
переменного тока. Даже когда выключатель
[A] (Питание) на передней панели
находится в выключенном положении,
незначительный ток продолжает протекать
через продукт.
Установка
• В зависимости от условий, в которых
используется продукт, телефон,
радиоприемник или телевизор могут
генерировать шум. В этом случае измените
местоположение или ориентацию продукта,
либо окружающие условия.
• Не устанавливайте данный продукт в
местах, подверженных воздействию
следующих факторов.
- Прямые солнечные лучи
- Чрезмерно высокие или низкие
температуры
- Чрезмерное количество пыли
В противном случае может возникнуть
неисправность или повреждение продукта.
• Не устанавливайте данный продукт в
местах, где может образовываться
конденсат из-за резкого значительного
изменения температуры окружающей
среды. Использование продукта при
наличии конденсата может вызвать его
повреждение. Если есть основание
предполагать наличие конденсата на
поверхности продукта или внутри него,
оставьте его на несколько часов без
питания.
Продукт можно использовать после полного
высыхания конденсата.
Эксплуатация
• Не ставьте виниловые, пластиковые или
резиновые изделия на данный продукт. В
противном случае это может привести к
обесцвечиванию или повреждению
поверхности.
Уход за изделием
• Используйте сухую мягкую ткань для
очистки продукта. Не используйте бензин,
растворитель, моющее средство или ткань с
химической пропиткой для очистки
поверхности продукта. В противном случае
это может привести к обесцвечиванию или
повреждению поверхности.
Меры предосторожности в
отношении использования

160 Ru
ПРИМЕЧАНИЕ
В данном разделе описаны меры
предосторожности, которые следует
соблюдать в процессе использования,
функциональные ограничения и представлена
дополнительная информация, которая может
быть полезной.
Утилизация или передача владения
• Если вы планируете передать владение
данным продуктом, приложите к продукту
настоящий документ и поставляемые в
комплекте аксессуары.
• Следуйте правилам органов местного
управления по утилизации данного продукта
и его аксессуаров.
• Следуйте правилам органов местного
управления по утилизации использованных
батареек.
Важная информация
ПРЕДУПРЕЖДЕНИЕ
Использование органов управления или
произведение настроек или выполнение
процедур, не указанных в данной инструкции,
может отразиться на выделении опасной
радиации.

Ru 161
СОДЕРЖАНИЕ
ПЕРЕД ИСПОЛЬЗОВАНИЕМ АППАРАТА 162
Функции . . . . . . . . . . . . . . . . . . . . . . . . . . . . . . . . . . . . . . . . . . . . . . . . . . . . . 162
Сведения о данном руководстве . . . . . . . . . . . . . . . . . . . . . . . . . . . . . 162
Принадлежности . . . . . . . . . . . . . . . . . . . . . . . . . . . . . . . . . . . . . . . . . . . . . 163
ПОДГОТОВКА 164
Подключение к усилителю . . . . . . . . . . . . . . . . . . . . . . . . . . . . . . . . . . . 164
Подключение силового кабеля . . . . . . . . . . . . . . . . . . . . . . . . . . . . . . . 164
Включение питания . . . . . . . . . . . . . . . . . . . . . . . . . . . . . . . . . . . . . . . . . . 165
ВОСПРОИЗВЕДЕНИЕ АУДИО 166
Воспроизведение аудиодиска . . . . . . . . . . . . . . . . . . . . . . . . . . . . . . . . 166
Воспроизведение музыкальных файлов, хранящихся
на диске USB . . . . . . . . . . . . . . . . . . . . . . . . . . . . . . . . . . . . . . . . . . . . . . . . . 167
Расширенные функции. . . . . . . . . . . . . . . . . . . . . . . . . . . . . . . . . . . . . . . 168
Воспроизведение в произвольном порядке . . . . . . . . . . . . . . . . . . . . . . . . . . . . . . . . . . . . . . . 168
Повторное воспроизведения. . . . . . . . . . . . . . . . . . . . . . . . . . . . . . . . . . . . . . . . . . . . . . . . . . . . . . 168
Воспроизведение композиций в указанном порядке
(программное воспроизведение). . . . . . . . . . . . . . . . . . . . . . . . . . . . . . . . . . . . . . . . . . . . . . . . . . 168
Повторное воспроизведение указанного фрагмента
(Повторное воспроизведение фрагмента A-B) . . . . . . . . . . . . . . . . . . . . . . . . . . . . . . . . . . . . . 169
Воспроизведение высококачественного звука (PURE DIRECT) . . . . . . . . . . . . . . . . . . . . . 169
Переключение информации на дисплее . . . . . . . . . . . . . . . . . . . . . . . . . . . . . . . . . . . . . . . . . . . 169
Изменение яркости дисплея . . . . . . . . . . . . . . . . . . . . . . . . . . . . . . . . . . . . . . . . . . . . . . . . . . . . . . . 169
ПРИЛОЖЕНИЕ 170
Названия компонентов . . . . . . . . . . . . . . . . . . . . . . . . . . . . . . . . . . . . . . .170
Передняя панель . . . . . . . . . . . . . . . . . . . . . . . . . . . . . . . . . . . . . . . . . . . . . . . . . . . . . . . . . . . . . . . . . . .170
Дисплей . . . . . . . . . . . . . . . . . . . . . . . . . . . . . . . . . . . . . . . . . . . . . . . . . . . . . . . . . . . . . . . . . . . . . . . . . . . .171
Задняя панель . . . . . . . . . . . . . . . . . . . . . . . . . . . . . . . . . . . . . . . . . . . . . . . . . . . . . . . . . . . . . . . . . . . . . .171
Пульт ДУ. . . . . . . . . . . . . . . . . . . . . . . . . . . . . . . . . . . . . . . . . . . . . . . . . . . . . . . . . . . . . . . . . . . . . . . . . . . .172
Расширенные настройки . . . . . . . . . . . . . . . . . . . . . . . . . . . . . . . . . . . . . .173
Память режима воспроизведения (PLAY MEM) . . . . . . . . . . . . . . . . . . . . . . . . . . . . . . . . . . . . .173
Режим готовности (RDY MODE) . . . . . . . . . . . . . . . . . . . . . . . . . . . . . . . . . . . . . . . . . . . . . . . . . . . . .173
Автоматическое воспроизведение (AUTO PLAY). . . . . . . . . . . . . . . . . . . . . . . . . . . . . . . . . . . .173
Автоматический переход в режим ожидания (AUTO STBY) . . . . . . . . . . . . . . . . . . . . . . . . .173
Поддерживаемые форматы файлов/дисков/дисков USB. . . . . . .174
Технические характеристики. . . . . . . . . . . . . . . . . . . . . . . . . . . . . . . . . .175
Поиск и устранение неисправностей . . . . . . . . . . . . . . . . . . . . . . . . . .176

162 Ru
ПЕРЕД ИСПОЛЬЗОВАНИЕМ АППАРАТА
• Цифровой оптический выход
• Цифровой коаксиальный выход
• Поддержка воспроизведения дисков CD-R и CD-RW
• Поддержка воспроизведения файлов, хранящихся на дисках USB или дисках с
данными (MP3/WMA/AAC/WAV/FLAC)
• Воспроизведение в произвольном порядке (стр. 168)
• Повторное воспроизведения (стр. 168)
• Программное воспроизведение (только аудиодиски) (стр. 168)
• Повторное воспроизведения A-B (только аудиодиски) (стр. 169)
• Функция PURE DIRECT (стр. 169)
• Настраиваемые параметры отображения (отображаемые элементы/яркость)
(стр. 169)
• Дистанционное выключение/переход в режим ожидания
• Память режима воспроизведения (стр. 173)
• Режим готовности (стр. 173)
• Функция автоматического воспроизведения (стр. 173)
• Функция автоматического перехода в режим ожидания (стр. 173)
• В данном руководстве описаны операции, выполняемые преимущественно с
помощью прилагаемого пульта ДУ.
• Все иллюстрации в настоящем руководстве представлены в качестве
инструкций по эксплуатации.
• В настоящем руководстве музыкальный компакт-диск называется
аудиодиском, а компакт-диск, содержащий данные в формате MP3/WMA/AAC/
WAV/FLAC, называется диском с данными.
• Технические характеристики и внешний вид аппарата могут изменяться без
уведомления.
•
ПРЕДУПРЕЖДЕНИЕ – информация, предупреждающая о риске
смерти или получения серьезной травмы.
•
ВНИМАНИЕ – информация, предупреждающая о риске получения
травмы.
• Данные указания следует соблюдать, чтобы избежать
неисправности или повреждения продукта.
• Дополнительная информация, которая может быть
полезной.
Функции Сведения о данном руководстве
Уведомление
Примечание

Ru 163
•Пульт ДУ
• Силовой кабель
• Стереокабель RCA
• Батарейки (AA, R6, UM-3) (x2)
• Руководство пользователя (настоящее руководство)
Принадлежности
Установка батареек в пульт
ДУ
Вставьте батарейки в
правильном направлении.
Рабочий диапазон пульта
ДУ
Направляйте пульт ДУ на
сенсор ДУ на аппарате в
пределах диапазона,
показанного на рисунке
справа.
Батарейки (AA, R6, UM-3)
30° 30°
В
пределах
6 м

164 Ru
ПОДГОТОВКА
ВНИМАНИЕ
• Не подключайте силовой кабель данного аппарата и остальные подключенные устройства
к розеткам переменного тока, пока не завершены все несиловые подключения.
Когда все подключения завершены подключите прилагаемый силовой кабель к
разъему AC IN на аппарате, а затем подключите другой конец к розетке
переменного тока.
Подключение к усилителю Подключение силового кабеля
УсилительУсилитель
Стереокабель RCA
(прилагается) Цифровой коаксиальный
аудиокабель
(продается отдельно)
Цифровой оптический
кабель
(продается отдельно) В настенную
розетку
переменного
тока
Данный аппарат (вид сзади)
Силовой кабель
(прилагается)

Ru 165
Для включения питания аппарата нажмите кнопку A (Питание) на передней
панели.
Примечание
• При нажатии кнопки A (Питание) на пульте ДУ, когда питание аппарата включено,
аппарат перейдет в режим ожидания.
• Индикатор питания на аппарате имеет следующие значения.
Ярко горит: питание включено
Тускло горит: режим ожидания
Не горит: питание выключено
• Данный аппарат имеет функцию автоматического перехода в режим ожидания, которая
позволяет экономить энергопотребление (стр. 173).
(По умолчанию: функция автоматического перехода в режим ожидания включена)
Включение питания
A (Питание)
Индикатор питания

166 Ru
CD/USB
OPEN/CLOSE
ВОСПРОИЗВЕДЕНИЕ АУДИО
Данный аппарат позволяет воспроизводить диски с данными, а
также аудиодиски. Подробнее о типах дисков, которые могут
воспроизводиться на аппарате, см .в разделе “Поддерживаемые
форматы файлов/дисков/дисков USB” (стр. 174).
1Если индикатор USB на передней панели горит,
нажмите CD/USB для переключения в режим
диска.
2Поместите диск в лоток для дисков.
Нажмите кнопку OPEN/CLOSE несколько раз, чтобы
открыть и закрыть лоток для дисков.
Примечание
• Можно также нажать кнопку (Открыть/Закрыть) на
передней панели несколько раз, чтобы открыть и закрыть лоток
для дисков.
• Когда аппарат будет готов к воспроизведению аудио CD, на
дисплее загорится индикатор воспроизводимого носителя (CD).
3Нажмите кнопку (Воспроизведение).
Индикатор (Воспроизведение) на дисплее загорится и
начнется воспроизведение.
Примечание
• Во время воспроизведения аудиофайла загорится индикатор
воспроизводимого носителя, соответствующий формату файла.
Уведомление
• Не засовывайте руку или пальцы в отверстие лотка для дисков. Это
может привести к травме.
Примечание
• После размещения диска в лотке для дисков он закроется и начнется
воспроизведение при выполнении одной из следующих операций.
– Нажмите кнопку (Воспроизведение).
– Нажмите цифровую клавишу, которая соответствует номеру
композиции.
• Можно настроить аппарат таким образом, чтобы воспроизведение
начиналось автоматически при включении питания аппарата или при
переключении в режим диска или USB (стр. 173).
(По умолчанию: функция автоматического воспроизведения включена)
Используйте следующие клавиши пульта ДУ для управления
воспроизведением.
* Кнопки управления на передней панели работают
следующим образом.
(Быстрый переход/поиск назад)
Переход к предыдущей композиции. Переход к началу
текущей композиции при нажатии в процессе
воспроизведения. Если нажать и удерживать кнопку,
выполняется поиск композиций в обратном порядке.
(Быстрый переход/поиск вперед)
Переход в следующей композиции. Если нажать и
удерживать кнопку, выполняется поиск композиций в
прямом порядке.
Воспроизведение аудиодиска
Доступные клавиши Функция
(Воспроизведение) Индикатор (Воспроизведение)
загорится на дисплее и начнется
воспроизведение.
(Пауза)
Индикатор (Пауза) загорится на
дисплее и воспроизведение будет
приостановлено. Либо нажмите ,
чтобы возобновить воспроизведение.
(Остановка) Остановка воспроизведения.
(Поиск назад)* Поиск композиций в обратном порядке.
(Поиск вперед)* Поиск композиций в прямом порядке.
(Быстрый
переход назад)*
Переход к предыдущей композиции.
Переход к началу текущей композиции при
нажатии в процессе воспроизведения.
(Быстрый
переход вперед)* Переход в следующей композиции.
Цифровые клавиши Введите номер композиции, чтобы
напрямую выбрать соответствующую
композицию.
FOLDER ,
(Только для дисков с
данными) Позволяет выбрать папку.
Цифровые
клавиши

Ru 167
CD/USB
С помощью данного аппарата можно воспроизводить
музыкальные файлы (хранящиеся на диске USB). Подробнее о
поддерживаемых дисках USB см. в разделе “Поддерживаемые
форматы файлов/дисков/дисков USB” (стр. 174).
1Если индикатор USB на передней панели
выключен, нажмите CD/USB для переключения
в режим USB.
Индикатор USB на передней панели загорится оранжевым.
2Подключите диск USB к гнезду USB.
Когда аппарат будет готов к воспроизведению, на
дисплее загорится индикатор воспроизводимого носителя
(USB), а индикатор USB на передней панели загорится
зеленым цветом.
Уведомление
• Не используйте USB-удлинители.
3Нажмите кнопку (Воспроизведение).
Индикатор (Воспроизведение) на дисплее загорится и
начнется воспроизведение.
Примечание
• Во время воспроизведения аудиофайла загорится индикатор
воспроизводимого носителя, соответствующий формату файла.
• Если совместимые музыкальные файлы находятся на диске
USB, аппарат будет воспроизводить их в хронологическом
порядке на основе даты создания.
Уведомление
• Не отсоединяйте диск USB во время воспроизведения или пока на
дисплее передней панели горит надпись “USB READING”. В этом
случае сначала нажмите кнопку CD/USB, чтобы переключиться на
режим диска, убедитесь, что индикатор USB выключен, а затем
отсоедините диск.
Используйте следующие клавиши пульта ДУ для управления
воспроизведением.
* Кнопки управления на передней панели работают
следующим образом.
(Быстрый переход/поиск назад)
Переход к предыдущей композиции. Переход к началу
текущей композиции при нажатии в процессе
воспроизведения. Если нажать и удерживать кнопку,
выполняется поиск композиций в обратном порядке.
(Быстрый переход/поиск вперед)
Переход в следующей композиции. Если нажать и
удерживать кнопку, выполняется поиск композиций в
прямом порядке.
Воспроизведение музыкальных файлов, хранящихся на диске USB
Данный аппарат (передняя панель)
Диск USB
Доступные клавиши Функция
(Воспроизведение) Индикатор (Воспроизведение) на
дисплее загорится и начнется
воспроизведение.
(Пауза)
Индикатор (Пауза) на дисплее
загорится и воспроизведение будет
приостановлено. Либо нажмите ,
чтобы возобновить воспроизведение.
(Остановка) Остановка воспроизведения.
(Поиск назад)* Поиск композиций в обратном порядке.
(Поиск вперед)* Поиск композиций в прямом порядке.
(Быстрый
переход назад)*
Переход к предыдущей композиции.
Переход к началу текущей композиции при
нажатии в процессе воспроизведения.
(Быстрый
переход вперед)* Переход в следующей композиции.
FOLDER , Позволяет выбрать папку.

168 Ru
RANDOM
CLEAR
ENTER
REPEAT
PROGRAM
Можно настроить режим воспроизведения и параметры
отображения с помощью расширенных функций.
Воспроизведение в произвольном
порядке
Нажмите кнопку RANDOM, чтобы воспроизводить композиции
в произвольном порядке. При повторном нажатии кнопки
RANDOM настройка воспроизведения в произвольном
порядке будет меняться следующим образом.
Примечание
• Для отмены воспроизведения в произвольной последовательности
откройте лоток для дисков.
Повторное воспроизведения
Нажмите кнопку REPEAT, чтобы воспроизводить композиции
повторно. При повторном нажатии кнопки REPEAT настройка
повторного воспроизведения будет меняться следующим
образом.
Примечание
• Для отмены повторного воспроизведения откройте лоток для
дисков.
Воспроизведение композиций в
указанном порядке (программное
воспроизведение)
Можно воспроизводить композиции на аудиодиске в
указанном порядке.
1Нажмите кнопку PROGRAM, когда
воспроизведение остановлено.
2Используйте цифровые клавиши, чтобы ввести
номер композиции для программирования.
3Нажмите ENTER.
Повторите шаги 2 и 3, чтобы запрограммировать каждую
композицию.
Нажмите кнопку CLEAR, чтобы отменить каждую
запрограммированную композицию, начиная с последней.
4Нажмите кнопку (Воспроизведение).
Аппарат начнет воспроизведение композиций в
запрограммированном порядке.
Примечание
• Программное воспроизведение не работает при использовании
дисков с данными и дисков USB.
• Можно запрограммировать не более 24 композиций.
• Выполните одно из следующих действий, чтобы очистить все
запрограммированные композиции.
– Нажмите кнопку CLEAR, когда воспроизведение остановлено.
– Выключите питание аппарата или переведите его в режим
ожидания.
– Откройте лоток для дисков.
Расширенные функции
Индикатор Значение
RNDM Воспроизведение всех композиций в произвольном
порядке.
Off
Выключение воспроизведения в произвольном порядке.
Индикатор Значение
REP Повторное воспроизведение одной композиции.
REP FOLDER
(Только для
дисков с данными
и дисков USB)
Повторное воспроизведение композиций в
текущей папке.
REP ALL Повторное воспроизведение всех композиций.
Off Выключение повторного воспроизведения.
TRACKTEXT AAC WAV FLAC RESUM RDY TOTAL REMAIN RNDM REP FOLDER ALL A - BCD PROG
TRACKTEXT AAC WAV FLAC RESUM RDY TOTAL REMAIN RNDM REP FOLDER ALL A - BCD PROG
Цифровые
клавиши

Ru 169
A/B
PURE
DIRECT
DISPLAY
DIMMER
Повторное воспроизведение
указанного фрагмента (Повторное
воспроизведение фрагмента A-B)
Можно указать точки начала и окончания фрагмента
композиции во время воспроизведения аудиодиска, чтобы
воспроизвести указанный фрагмент повторно.
1Воспроизведите аудиодиск.
2Нажмите кнопку A/B в точке начала повторного
воспроизведения.
3Нажмите кнопку A/B еще раз в точке окончания
повторного воспроизведения.
Аппарат начнет повторное воспроизведение.
Примечание
• Повторное воспроизведение не работает при использовании дисков
с данными и дисков USB.
• Невозможно указать фрагмент A-B для повторного воспроизведения,
когда функция PURE DIRECT включена.
• Выполните одно из следующих действий, чтобы отменить повторное
воспроизведение фрагмента A-B.
– Нажмите кнопку A/B еще раз.
– Нажмите кнопку (Остановка).
– Откройте лоток для дисков.
Воспроизведение высококачественного
звука (PURE DIRECT)
Если функция PURE DIRECT включена, цифровой
аудиосигнал не будет выводится. Таким образом функция
PURE DIRECT сокращает шумы, которые могут повлиять на
качество звука, позволяя наслаждаться воспроизведением
высококачественного звука.
При повторном нажатии кнопки PURE DIRECT происходит
включение и выключение функции PURE DIRECT.
Примечание
• Для использования функции PURE DIRECT подключите гнезда
ANALOG OUT на задней панели к усилителю. Гнезда DIGITAL OUT не
будут выводить никакие сигналы.
• Если функция PURE DIRECT включена:
– загорится индикатор PURE DIRECT;
– дисплей передней панели будет выключен при воспроизведении;
– только минимальное количество индикаторов и сообщений будет
отображаться в процессе использования аппарата;
– данная настройка будет сохранена после выключения питания
аппарата.
Переключение информации на
дисплее
При повторном нажатии кнопки DISPLAY во время
воспроизведения происходит переключение информации на
дисплее следующим образом.
Примечание
• На информационном дисплее отображается не более 64 символов
(1-байтовые буквенно-числовые знаки и несколько символов).
Изменение яркости дисплея
Нажмите кнопку DIMMER несколько раз, чтобы
переключиться между четырьмя уровнями яркости дисплея.
TEXT AAC WAV FLAC RESUM RDY TOTAL REMAIN RNDM FOLDER ALLPROG CD TRACK REP
TEXT AAC WAV FLAC RESUM RDY TOTAL REMAIN RNDM FOLDER ALLPROG CD TRACK REP
Воспроизводимый
носитель Информация на дисплее
Аудиодиск
Истекшее время Оставшееся время
текущей композиции (TRACK REMAIN)
Общее оставшееся время на диске
(TOTAL REMAIN) Название композиции*
Имя исполнителя* Название альбома*
* При наличии встроенного CD-текста
Диск с данными,
диск USB
Истекшее время Название композиции*
Имя исполнителя* Название альбома*
* При наличии встроенных тегов

170 Ru
ПРИЛОЖЕНИЕ
Передняя панель
1A (Питание) (стр. 165)
2Индикатор питания (стр. 165)
3Гнездо USB (стр. 167)
4Индикатор USB (стр. 167)
5CD/USB (страницы 166, 167)
6PURE DIRECT (стр. 169)
7Индикатор PURE DIRECT (стр. 169)
8Лоток для дисков (стр. 166)
9 (Открыть/Закрыть) (стр. 166)
0Сенсор ДУ (стр. 163)
A (Быстрый переход/поиск назад) (страницы 166, 167)
B (Быстрый переход/поиск вперед) (страницы 166, 167)
C (Воспроизведение) (страницы 166, 167, 168)
D (Пауза) (страницы 166, 167)
E (Остановка) (страницы 166, 167, 168, 169)
Названия компонентов
1 2 3 4 7 0
8 9
5 6 A B C D E

Ru 171
Дисплей
1 / Индикатор (Воспроизведение/Пауза) (страницы 166, 167)
2Индикатор воспроизводимого носителя (страницы 166, 167)
3Индикатор расширенных настроек (стр. 173)
4Индикатор времени (стр. 169)
5Индикатор режима воспроизведения (страницы 168, 169)
6Информационный дисплей (страницы 168, 169, 173)
Задняя панель
1Гнезда ANALOG OUT (стр. 164)
2Гнездо DIGITAL OUT (COAXIAL) (стр. 164)
3Гнездо DIGITAL OUT (OPTICAL) (стр. 164)
4Разъем AC IN (стр. 164)
TRACKCD TEXT AAC WAV FLAC RESUM RDY TOTAL REMAIN PROG RNDM REP FOLDER ALL A - B
1 62 3 54
2 3 41

172 Ru
Пульт ДУ
1A (Питание) (стр. 165)
2Передатчик сигнала ДУ (стр. 163)
3OPEN/CLOSE (стр. 166)
4PROGRAM (стр. 168)
5REPEAT (стр. 168)
6DIMMER (стр. 169)
7RANDOM (стр. 168)
8A/B (стр. 169)
9DISPLAY (стр. 169)
0Цифровые клавиши (страницы 166, 168)
ACLEAR (стр. 168)
BENTER (стр. 168)
C (Поиск назад), (Поиск вперед) (страницы 166, 167)
(Пауза) (страницы 166, 167)
(Быстрый переход назад) (страницы 166, 167)
(Быстрый переход вперед) (страницы 166, 167)
(Воспроизведение) (страницы 166, 167, 168)
(Остановка) (страницы 166, 167, 168, 169)
FOLDER , (страницы 166, 167)
DCD/USB (страницы 166, 167)
EPURE DIRECT (стр. 169)
3
4
9
0
C
7
8
A
B
D
E
6
5
21

Ru 173
В данном разделе описывается настройка различных расширенных функций.
Большинство данных параметров можно настраивать на передней панели. (Для
настройки некоторых параметров требуется пульт ДУ.)
1Переведите аппарат в режим ожидания (стр. 165).
2Нажмите и удерживайте кнопки PURE DIRECT, (Открыть/
Закрыть) и (воспроизведение) одновременно в течение не
менее трех секунд.
Следующий индикатор появится на информационном дисплее передней панели, и
аппарат перейдет в режим настройки. Можно настроить функции памяти режима
воспроизведения, режима готовности, автоматического воспроизведения и
автоматического перехода в режим ожидания в данном порядке.
3Нажмите кнопку или , чтобы включить
или отключить функцию.
4Нажмите кнопку (Остановка).
Значение параметра будет подтверждено и автоматически будет выбран
следующий параметр. Повторите шаги 3 и 4. После завершения всех
настроек следующий индикатор появится на информационном дисплее
передней панели, и аппарат перейдет в режим ожидания.
Примечание
• При нажатии кнопки (Воспроизведение) во время данного процесса значение
параметра в этот момент будет подтверждено, и аппарат перейдет в режим ожидания.
Память режима воспроизведения (PLAY MEM)
Если данная функция включена, аппарат сохраняет настройки повторного
воспроизведения и воспроизведения в произвольном порядке даже после
выключения питания. Когда функция памяти режима воспроизведения
включена, индикатор расширенных настроек (RESUM) загорится на дисплее.
По умолчанию: Выкл.
Примечание
• Если включить питание аппарата после активации функции памяти режима
воспроизведения, аппарат будет воспроизводить последнюю проигрываемую композицию
или файл сначала.
Режим готовности (RDY MODE)
Если данная функция включена, аппарат приостанавливает воспроизведение
каждый раз при завершении композиции. Воспроизведение следующей
композиции начнется после ее выбора. Когда функция режима готовности
включена, индикатор расширенных настроек (RDY) загорится на дисплее.
По умолчанию: Выкл.
Автоматическое воспроизведение (AUTO PLAY)
Если данная функция включена, аппарат автоматически начнет
воспроизведение при включении питания аппарата или при переключении в
режим диска или USB.
По умолчанию: Вкл.
Автоматический переход в режим ожидания
(AUTO STBY)
Если данная функция включена, аппарат автоматически переходит в режим
ожидания, если вы не выполняете с ним никаких операций в течение 20 минут
после остановки воспроизведения.
По умолчанию: Вкл.
Расширенные настройки
PURE DIRECT
TRACKTEXT AAC WAV FLAC RESUM RDY TOTAL REMAIN RNDM REP FOLDER ALLPROG CD TRACKTEXT AAC WAV FLAC RESUM RDY TOTAL REMAIN RNDM REP FOLDER ALLPROG CD
CD TRACK REP TEXT AAC WAV FLAC RESUM RDY TOTAL REMAIN RNDM FOLDER ALLPROG

174 Ru
❑Поддерживаемые форматы файлов
* Только линейный формат PCM.
Примечание
• Файлы на диске данных или диске USB будут воспроизводиться в хронологическом
порядке на основе даты создания.
• Данный аппарат поддерживает диски формата ISO9660.
• Если аппарат воспроизводит файл VBR (переменная скорость передачи битов), точное
истекшее время может не отображаться.
• Содержимое стандарта Digital Rights Management (DRM) нельзя воспроизводить.
❑Поддерживаемые диски
Используйте диски со следующими логотипами.
Уведомление
• Не используйте диски нестандартной формы или диски с наклейками и этикетками. В
противном случае может возникнуть неисправность аппарата.
• Данный аппарат может не воспроизводить некоторые диски CD-RW или диски, которые
были неправильно записаны.
• Для воспроизведения 8-см компакт-диска поместите его во внутреннюю углубленную
область лотка для дисков. Не кладите обычный (12-см) компакт-диск сверху на 8-см диск.
Поддерживаемые форматы файлов/дисков/дисков USB
Файл Частота дискретизации (кГц) Битовая
глубина (бит) Битрейт
(кбит/с) Количество
каналов
MP3 32/44,1/48 — 32-320 2
WMA 32/44.1/48 — 48-192 2
AAC 32/44.1/48 — 8-320 2
WAV * 32/44.1/48/64/88.2/96 16/24 — 2
FLAC 32/44.1/48/64/88.2/96 16/24 — 2
Диск с данными Диск USB
Количество иерархий папок
(включая корневую папку) 99
Количество папок 999 999
Количество файлов 1100 65535
Компакт-диски (аудиодиски)
Диски CD-R и CD-RW
• Диски с одним из следующих описаний:
FOR CONSUMER
FOR CONSUMER USE
FOR MUSIC USE ONLY
• При использовании дисков CD-R или CD-RW аппарат
воспроизводит только финализированные диски.
Примечание
• Данный аппарат может не воспроизводить некоторые диски
CD-R/CD-RW или диски, которые были неправильно записаны.
Диски CD-TEXT
Эти диски содержат встроенную текстовую информацию,
например, названия альбомов, композиций и имена
исполнителей. Данная информация (только буквенно-числовые
знаки и некоторые символы), а также истекшее время
отображаются на экране.

Ru 175
❑Обращение с диском
• Обращайтесь с диском аккуратно, чтобы не поцарапать
поверхность с записью. Не сгибайте диск.
• При наличии отпечатков пальцев или пыли на поверхности
с записью используйте мягкую ткань, чтобы протереть
поверхность прямо от центра к периметру.
• Никогда не используйте очиститель для виниловых
пластинок, средство для снятия статического заряда или другие химические
вещества, чтобы протереть диск.
• Используйте фломастер для нанесения надписей только на сторону с
маркировкой.
• Не оставляйте диск под прямыми солнечными лучами или в местах,
подверженных воздействию высокой температуры или влажности, на
длительное время.
• Не используйте имеющийся в продаже очиститель для оптики. В противном
случае может возникнуть неисправность.
❑Поддерживаемые диски USB
Перед использованием данного аппарата для воспроизведения музыкальных
файлов на диске USB убедитесь в выполнении следующих требований.
• Диск USB соответствует требованиям к классу накопителей большого объема.
• Данные записаны с помощью файловой системы FAT16 или FAT32.
Уведомление
• Некоторые диски USB могут работать неправильно.
• Диски USB, защищенные шифрованием, не могут использоваться.
• Компания Yamaha и ее дилеры не несут ответственности за потерю данных, хранящихся
на диске USB, который подключается к данному аппарату. Рекомендуется создавать
резервную копию данных на случай их потери.
• Компания Yamaha не гарантирует работу или наличие питания любого диска USB.
Данный аппарат имеет следующие технические характеристики.
Аудио
• Уровень выходного сигнала (1 кГц, 0 дБ, Fs 44,1 кГц)................................... 2,0 ±0,3 В
• Отношение сигнал/шум (сеть IHF-A) (1 кГц, 0 дБ, Fs 44,1 кГц) .........105 дБ или выше
• Динамический диапазон (1 кГц, 0 дБ, Fs 44,1 кГц)...............................96 дБ или выше
• Гармоническое искажение (1 кГц, 0 дБ, Fs 44,1 кГц).....................0,003% или меньше
• Частотная характеристика
Аудиодиск...................................................................................................... 2 Гц – 20 кГц
Диск с данными/Диск USB Fs 48 кГц................................................. 2 Гц – 22 кГц
Fs 96 кГц...................................... 2 Гц – 44 кГц, –3 дБ
Лазер
• Тип лазера ...............................................................................................................AIGaAs
• Длина волны.............................................................................................................790 нм
• Выходная мощность лазера......................................................................Макс. 1,04 мВт
Общие характеристики
• Источник питания
Модели для США и Канады........................................... 120 В переменного тока, 60 Гц
Модель для Австралии............................................230-240 В переменного тока, 50 Гц
Модели для Великобритании и Европы ....................... 230 В переменного тока, 50 Гц
Модель для Азии и общая модель ....................110-240 В переменного тока, 50/60 Гц
Модель для Китая .......................................................... 220 В переменного тока, 50 Гц
• Потребляемая мощность...........................................................................................11 Вт
• Потребляемая мощность в режиме ожидания
Переход в режим ожидания (Режим ожидания) ...................................................0,2 Вт
Выключение питания ...............................................................................................0,2 Вт
• Размеры (Ш x В x Г) ...............................................................................435 x 87 x 260 мм
• Вес...............................................................................................................................3,5 кг
* В содержании данного руководства приведены последние на момент публикации
технические характеристики. Для получения последней версии руководства посетите веб-
сайт корпорации Yamaha и загрузите файл с руководством.
Технические характеристики
Выходные гнезда
• Аналоговый аудиовыход x 1
(RCA несбалансированный)
• Цифровой аудиовыход
КОАКСИАЛЬНЫЙ x 1, ОПТИЧЕСКИЙ x 1
Другие гнезда
• USB x 1 (USB 2.0)

176 Ru
Если аппарат функционирует неправильно, см. приведенную ниже таблицу. Если ваша проблема не указана в списке или ее симптомы не устранены после выполнения
описанных ниже инструкций, выключите питание аппарата с помощью кнопки A (Питание) на передней панели, отсоедините силовой кабель и обратитесь к
ближайшему авторизованному дилеру или в сервисный центр Yamaha.
Поиск и устранение неисправностей
Неисправность Причина Решение Стр.
При нажатии кнопки питания
аппарат не включается. Возможно, силовой кабель подключен неправильно. Вставьте силовой кабель плотно в розетку переменного тока. 164
Лоток для дисков не закрывается
полностью. В лоток для дисков попал посторонний предмет. Проверьте лоток для дисков и удалите все посторонние
предметы. —
Не удается воспроизвести
вставленный диск.
Диск поцарапан. Замените диск. —
На лазерной головке внутри аппарата образовался конденсат. Включите питание аппарата, подождите 20 – 30 минут и
попробуйте воспроизвести диск еще раз. —
Диск вставлен вверх ногами. Вставьте диск маркированной стороной вверх. —
Диск грязный или поцарапан. Сотрите грязь с поверхности диска или используйте
нецарапанный диск. 175
Вы пытаетесь воспроизвести файлы в формате, который не
поддерживается аппаратом.
Обязательно используйте диск, который содержит файлы в
формате, который поддерживается аппаратом. 174
Вы пытаетесь воспроизвести диск, который не поддерживается
аппаратом.
Обязательно используйте диск, который поддерживается
аппаратом . 174, 175
Аппарат находится в режиме USB. Нажмите кнопку CD/USB, чтобы переключиться на режим диска. 166, 170,
172
Воспроизведение не начинается
сразу или с правильного места. Диск грязный или поцарапан. Сотрите грязь с поверхности диска или используйте
нецарапанный диск. 175
Не удается воспроизвести
музыкальный файл на диске USB.
Диск USB неправильно подключен к аппарату. Подключите диск USB правильно. 167
Вы пытаетесь воспроизвести файлы в формате, который не
поддерживается аппаратом.
Обязательно используйте USB диск, который содержит файлы в
формате, который поддерживается аппаратом. 174
Аппарат находится в режиме диска. Нажмите кнопку CD/USB, чтобы переключиться на режим USB. 167, 170,
172
Нет звука Аппарат подключен к усилителю неправильно. Проверьте подключение к усилителю. 164
Аудиосигнал не выводится с
устройства, подключенного к
гнездам DIGITAL OUT.
Функция PURE DIRECT включена. Выключите функцию PURE DIRECT. 169

Ru 177
Звук прерывается.
На аппарат влияет вибрация или другое воздействие. Измените местоположение аппарата. —
Диск грязный или поцарапан. Сотрите грязь с поверхности диска или используйте
нецарапанный диск. 175
Слышно гудение или фоновый шум. Стереокабель RCA подключен неплотно. Подключите стереокабель RCA плотно. Если проблема не
устранена, проверьте сам кабель на наличие дефектов. 164
Присутствует шум в тюнере Аппарат расположен близко к тюнеру. Переместите аппарат дальше от тюнера или выключите питание
аппарата. —
Лоток для дисков издает шум. Диск деформирован. Используйте недеформированный диск. —
Нет индикации на дисплее Функция PURE DIRECT включена Выключите функцию PURE DIRECT. 169
Имя папки или файла не
отображается на информационном
дисплее.
В имени папки или файла используются символы, отличные от
однобайтовых буквенно-числовых символов.
Для имени папки или файла используйте только однобайтовые
буквенно-числовые символы. 169
Пульт ДУ не работает или работает
неправильно.
Слабый заряд батареек. Замените все батарейки. 163
Неправильная дистанция или угол. Используйте пульт ДУ в пределах рабочего диапазона. 163
Прямые солнечные лучи или свет (от флуоресцентной лампы
инвертерного типа и т.д.) попадают на сенсор ДУ на аппарате. Измените направление освещения или переместите аппарат. —
Неисправность Причина Решение Стр.

178
Software licenses
This product uses the following software.
Licences de logiciel
Ce produit utilise le logiciel suivant.
FLAC
Copyright © 2000–2009 Josh Coalson
Copyright © 2011–2021 Xiph.Org Foundation
Redistribution and use in source and binary forms, with or without modification, are
permitted provided that the following conditions are met:
- Redistributions of source code must retain the above copyright notice, this list of
conditions and the following disclaimer.
- Redistributions in binary form must reproduce the above copyright notice, this list of
conditions and the following disclaimer in the documentation and/or other materials
provided with the distribution.
- Neither the name of the Xiph.org Foundation nor the names of its contributors may be
used to endorse or promote products derived from this software without specific prior
written permission.
THIS SOFTWARE IS PROVIDED BY THE COPYRIGHT HOLDERS AND
CONTRIBUTORS ``AS IS'' AND ANY EXPRESS OR IMPLIED WARRANTIES,
INCLUDING, BUT NOT LIMITED TO, THE IMPLIED WARRANTIES OF
MERCHANTABILITY AND FITNESS FOR A PARTICULAR PURPOSE ARE
DISCLAIMED. IN NO EVENT SHALL THE FOUNDATION OR CONTRIBUTORS BE
LIABLE FOR ANY DIRECT, INDIRECT, INCIDENTAL, SPECIAL, EXEMPLARY, OR
CONSEQUENTIAL DAMAGES (INCLUDING, BUT NOT LIMITED TO, PROCUREMENT
OF SUBSTITUTE GOODS OR SERVICES; LOSS OF USE, DATA, OR PROFITS; OR
BUSINESS INTERRUPTION) HOWEVER CAUSED AND ON ANY THEORY OF
LIABILITY, WHETHER IN CONTRACT, STRICT LIABILITY, OR TORT (INCLUDING
NEGLIGENCE OR OTHERWISE) ARISING IN ANY WAY OUT OF THE USE OF THIS
SOFTWARE, EVEN IF ADVISED OF THE POSSIBILITY OF SUCH DAMAGE.
INVISIBLE LASER RADIATION WHEN OPEN
AVOID DIRECT EXPOSURE TO THE BEAM
INVISIBLE LASER RADIATION WHEN OPEN
DO NOT STARE INTO BEAM


Yamaha Global Site
https://www.yamaha.com/
Yamaha Downloads
https://download.yamaha.com/
© 2021 Yamaha Corporation
Published 01/2024
IPOD-C0
VHK4310
10-1 Nakazawa-cho, Chuo-ku, Hamamatsu, 430-8650 Japan
-
 1
1
-
 2
2
-
 3
3
-
 4
4
-
 5
5
-
 6
6
-
 7
7
-
 8
8
-
 9
9
-
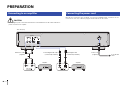 10
10
-
 11
11
-
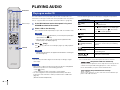 12
12
-
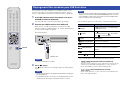 13
13
-
 14
14
-
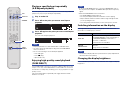 15
15
-
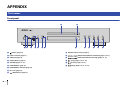 16
16
-
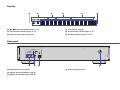 17
17
-
 18
18
-
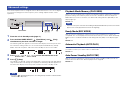 19
19
-
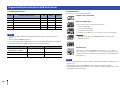 20
20
-
 21
21
-
 22
22
-
 23
23
-
 24
24
-
 25
25
-
 26
26
-
 27
27
-
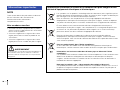 28
28
-
 29
29
-
 30
30
-
 31
31
-
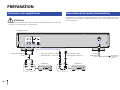 32
32
-
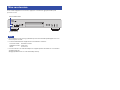 33
33
-
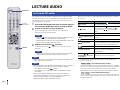 34
34
-
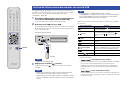 35
35
-
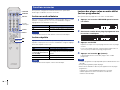 36
36
-
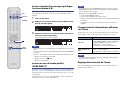 37
37
-
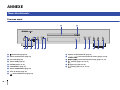 38
38
-
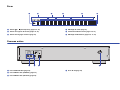 39
39
-
 40
40
-
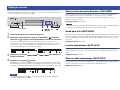 41
41
-
 42
42
-
 43
43
-
 44
44
-
 45
45
-
 46
46
-
 47
47
-
 48
48
-
 49
49
-
 50
50
-
 51
51
-
 52
52
-
 53
53
-
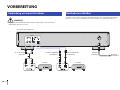 54
54
-
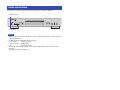 55
55
-
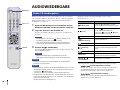 56
56
-
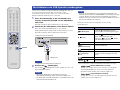 57
57
-
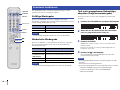 58
58
-
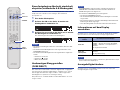 59
59
-
 60
60
-
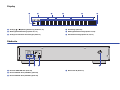 61
61
-
 62
62
-
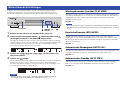 63
63
-
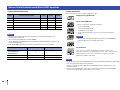 64
64
-
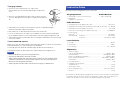 65
65
-
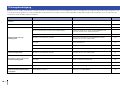 66
66
-
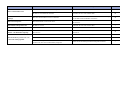 67
67
-
 68
68
-
 69
69
-
 70
70
-
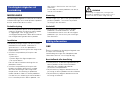 71
71
-
 72
72
-
 73
73
-
 74
74
-
 75
75
-
 76
76
-
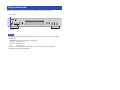 77
77
-
 78
78
-
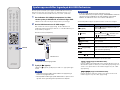 79
79
-
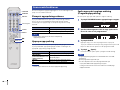 80
80
-
 81
81
-
 82
82
-
 83
83
-
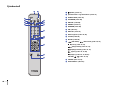 84
84
-
 85
85
-
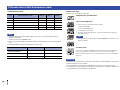 86
86
-
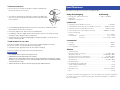 87
87
-
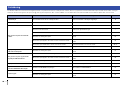 88
88
-
 89
89
-
 90
90
-
 91
91
-
 92
92
-
 93
93
-
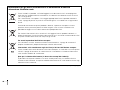 94
94
-
 95
95
-
 96
96
-
 97
97
-
 98
98
-
 99
99
-
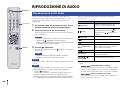 100
100
-
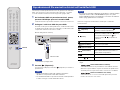 101
101
-
 102
102
-
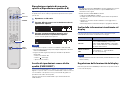 103
103
-
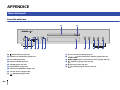 104
104
-
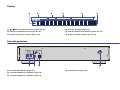 105
105
-
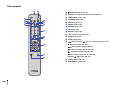 106
106
-
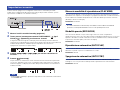 107
107
-
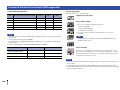 108
108
-
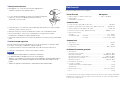 109
109
-
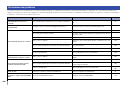 110
110
-
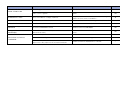 111
111
-
 112
112
-
 113
113
-
 114
114
-
 115
115
-
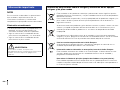 116
116
-
 117
117
-
 118
118
-
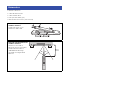 119
119
-
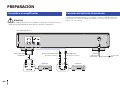 120
120
-
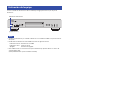 121
121
-
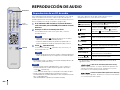 122
122
-
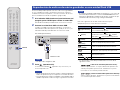 123
123
-
 124
124
-
 125
125
-
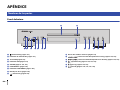 126
126
-
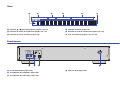 127
127
-
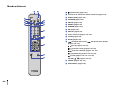 128
128
-
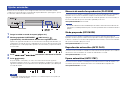 129
129
-
 130
130
-
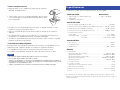 131
131
-
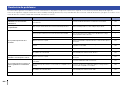 132
132
-
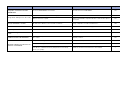 133
133
-
 134
134
-
 135
135
-
 136
136
-
 137
137
-
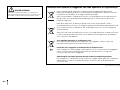 138
138
-
 139
139
-
 140
140
-
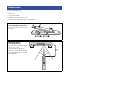 141
141
-
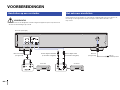 142
142
-
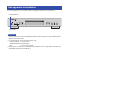 143
143
-
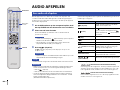 144
144
-
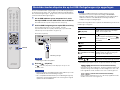 145
145
-
 146
146
-
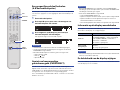 147
147
-
 148
148
-
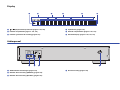 149
149
-
 150
150
-
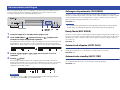 151
151
-
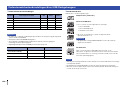 152
152
-
 153
153
-
 154
154
-
 155
155
-
 156
156
-
 157
157
-
 158
158
-
 159
159
-
 160
160
-
 161
161
-
 162
162
-
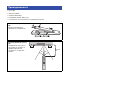 163
163
-
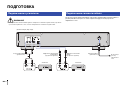 164
164
-
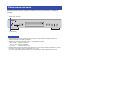 165
165
-
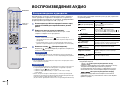 166
166
-
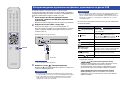 167
167
-
 168
168
-
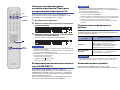 169
169
-
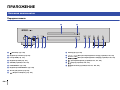 170
170
-
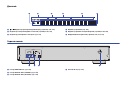 171
171
-
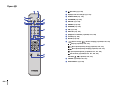 172
172
-
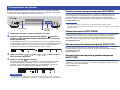 173
173
-
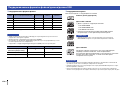 174
174
-
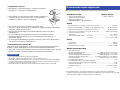 175
175
-
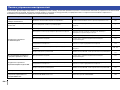 176
176
-
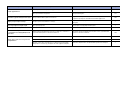 177
177
-
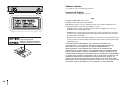 178
178
-
 179
179
-
 180
180


Yamaha CD-S303RK Handleiding
- Categorie
- CD spelers
- Type
- Handleiding
- Deze handleiding is ook geschikt voor
in andere talen
- English: Yamaha CD-S303RK User manual
- italiano: Yamaha CD-S303RK Manuale utente
- русский: Yamaha CD-S303RK Руководство пользователя
- français: Yamaha CD-S303RK Manuel utilisateur
- español: Yamaha CD-S303RK Manual de usuario
- Deutsch: Yamaha CD-S303RK Benutzerhandbuch
- dansk: Yamaha CD-S303RK Brugermanual
- suomi: Yamaha CD-S303RK Ohjekirja
- svenska: Yamaha CD-S303RK Användarmanual