Artsound FL101(PAIR) de handleiding
- Categorie
- Auto luidsprekers
- Type
- de handleiding

2 32 3
2x1x 2x 2x
NL EN
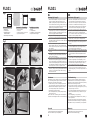
Montage (fi g 2 pag.2)
1 Haal de inbouwluidspreker uit zijn doos. In de doos
vind je een sjabloon. Kijk goed welke lijn van de
sjabloon je nodig hebt, en knip het binnenste er dan
uit. Gooi het binnenste niet weg, je hebt het later nog
nodig! Teken met een potlood af langs de rand, op de
plaats waar je de luidspreker wil monteren.
2 Boor een of meerdere gaatjes langs de binnenrand van
de potloodlijn. Bij een vierkante of rechthoekige luid-
spreker is het handiger vier gaatjes te boren, bij een
ronde is één gaatje misschien voldoende.
3 Zaag met de decoupeerzaag langs de rand, zodat er
een mooi rond, vierkant of rechthoekig gat overblijft.
4 Neem nu de inbouwluidspreker vast. Je kan de grille
eenvoudig verwijderen door eraan te trekken. Enkel de
magneet houdt hem vast.
5 Trek nu de klemmetjes terug naar het uiteinde en
draai ze allemaal naar binnen. Sluit de luidsprekerka-
bel aan. Vergeet dit niet, anders moet je hem er straks
weer uithalen!
6 Stop de inbouwluidspreker in het gat. Draai de schroe-
ven vast.
7 Hierdoor zullen de klemmetjes aan de achterkant
automatisch terug naar buiten draaien, zodat de luid-
spreker zichzelf vastklemt.
8 Als je wil, kan je de luidspreker ook verven. Als je de
binnenkant van de sjabloon (opgelet, je moet er eerst
nog een randje afhalen) op de luidspreker legt, kan je
de rand van de luidspreker gewoon meeverven met de
rol, tegelijk met het plafond. De grille zelf kan je beter
met een fijne borstel of met een spuitbus verven.
9 Als je de luidspreker eruit wil halen, of als je de grille
wil verven, moet je eerst de grille verwijderen. Dit doe
je door er eenvoudig aan te trekken. Enkel de mag-
neet houdt hem vast.
Problemen
Bij problemen neemt u contact op met uw erkende dealer
die u een aantal gerichte vragen zal stellen. Als voorbe-
reiding kunt u alvast deze dingen nagaan:
• U hoort niks meer, m.a.w. de luidspreker speelt niet
meer, of geeft enkel nog de lage of hoge tonen weer.
• Speelt de andere luidspreker nog? Of zijn ze beide
stuk? In dit geval kijkt u best uw versterker na.
• De luidspreker(s) kraakt (kraken).
• Als u de luidspreker driver (woofer) zachtjes indrukt,
schuurt deze of niet?
Op die manier kan u uw dealer gericht verder helpen bij
het stellen van de diagnose. Dank voor uw medewerking.
Troubleshooting
Should you experience problems, please contact your
certifi ed dealer. He or she will ask you several specifi c
questions. In order to be able to answer these questions,
please check the following in advance:
• You can’t hear any sound; in other words, the loud-
speaker is either no longer producing sound, or is only
playing the high or low tones.
• Is the other loudspeaker still producing sound? Or are
both of them defective? If so, it is best to check your
amplifi er.
• The loudspeaker(s) is (are) cracking.
• If you lightly press the loudspeaker driver (woofer), is
there any friction?
If you know the answers to these questions in advance,
your dealer will be better able to help you in diagnosing
the problem. Thank you in advance for your cooperation.
Installation (fi g 2 pag.2)
1 Remove the inwall speaker from the box. In the box,
you will find a stencil. Check carefully to make sure
which line on the stencil you need, and cut the inside
of this out. Do not discard this inside piece; you will
need it again later! Hold the stencil to the spot where
you want to mount the loudspeaker, and using the
pencil, draw an outline along the edge of the stencil.
2 Drill one or more holes along the inside edge of the
pencilled-in line. For square or rectangular speak-
ers, it is easier to drill four holes, whereas for a round
speaker one hole is probably sufficient.
3 Using the jig saw, saw along the edge so that you are
left with a nice, round, square or rectangular hole.
4 Now hold the inwall speaker tight. You can remove the
grille by simply pulling on it. Only the magnet holds it
in place.
5 Pull the clamps back in and turn them all inward. Con-
nect the loudspeaker cable. If you forget to do this,
you will have to remove it again later!
6 Place the inwall speaker in the hole. Tighten the screws.
7 This will cause the clamps at the back to automatically
turn back outwards so that the loudspeaker will lock in
place.
8 If you like, you can also paint the loudspeaker. If you
put the inside of the stencil (important: you have to
remove the edge first) on the loudspeaker, you can
simply paint the edge of the loudspeaker with a roller,
at the same time you paint the ceiling. It is best to
paint the grill with a fine brush or spray paint.
9 If you would like to remove the loudspeaker or paint
the grill, you must remove the grill first. You can do
this by simply pulling on it. Only the magnet holds it in
place.
Inhoud verpakking
Contenu de l’emballage
Packaging contents
• Handleiding
• 2 luidsprekers
• Installatiesjabloon /
schilderschabloon
• Afzonderlijke ArtSoundlogos
• Notice d'utilisation
• 2 enceintes
• Gabarit d'installation / de peinture
• Logos ArtSound séparés
• Manual
• 2 loudspeakers
• Installation / Painting template
• Separate ArtSound logos
Fig 1
Fig 2
Garantie
2 jaar na aankoop datum bij normaal gebruik.
Factuurvoorwaarden zijn van toepassing.
Warranty
2 years after date of purchase for normal use.
Invoice terms and conditions apply.
FL101
1
House of Music nv
Kruishoutem, Belgium
www.artsound.be
Tel. +32 9 380 81 80 - Fax. +32 9 386 12 35
NL
Geachte klant, bedankt en profi ciat met de aankoop van uw luidspreker(s).
Gelieve deze instructies aandachtig te lezen en ze te bewaren.
FR
Cher client, merci d'avoir acheté ces enceintes.
Veuillez lire attentivement ces instructions et les conserver.
EN
Dear Customer, Congratulations on the purchase of your loudspeaker(s).
Please read these instructions carefully and keep them for future reference.
p
a
i
n
t
a
b
l
e
FL101
Technische fi che
• systeem: 2-weg coaxiaal
• woofer: 5,25” polypropyleen
carbon
• tweeter: 0,5” polycarbonaat
• max. vermogen: 70 W
• nominaal vermogen (RMS): 35 W
• dB: 88 dB
• impedantie: 8 ohm
• frequentiebereik: 65 Hz - 20 kHz
• afmetingen mm (h x b x d):
148 x 148 x 70
• gewicht: 0,95 kg / stuk
• kleur: wit
• extra:overschilderbaar
• opties : KIT SQ180/180
Fiche technique
• système : 2 voies coaxial
• woofer : 5,25” carbone
polypropylène
• tweeter : 0,5” polycarbonate
• puissance max. : 70 W
• puissance nominale (RMS) : 35 W
• dB : 88 dB
• impédance : 8 ohm
• plage de fréquences :
65 Hz - 20 kHz
• dimensions mm (h x l x p) :
148 x 148 x 70
• poids : 0,95 kg / pièce
• coleur : blanc
• compléments : peut être peint
• options : KIT SQ180/180
Technical specifi cations
• system : 2-way coaxial
• woofer : 5,25” polypropylene
carbon
• tweeter : 0.5” polycarbonate
• max. power : 70 W
• nominal power (RMS) : 35 W
• dB : 88 dB
• impedance : 8 ohm
• frequency range : 65 Hz - 20 kHz
• dimensions mm (h x b x d) :
148 x 148 x 70
• weight : 0,95 kg / piece
• colour : white
• extra : paintable
• options : KIT SQ180/180
170
70
170
148
FL101

44 1
Ontdek het volledige ArtSound aanbod
op www.artsound.be
Ook verkrijgbaar in deze serie ...
Cette gamme comprend également ...
This range also includes ...
Découvrez la gamme ArtSound
complète sur www.artsound.be
Discover the complete ArtSound
range at www.artsound.be
TM
Art_Sound
House of Music nv
Kruishoutem, Belgium
www.artsound.be
Tel. +32 9 380 81 80 - Fax. +32 9 386 12 35
NL
Geachte klant, bedankt en profi ciat met de aankoop van uw luidspreker(s).
Gelieve deze instructies aandachtig te lezen en ze te bewaren.
FR
Cher client, merci d'avoir acheté ces enceintes.
Veuillez lire attentivement ces instructions et les conserver.
EN
Dear Customer, Congratulations on the purchase of your loudspeaker(s).
Please read these instructions carefully and keep them for future reference.
p
a
i
n
t
a
b
l
e
FR
Installation (fi g 2 pag.2)
1 Retirez l’enceinte de sa boîte. La boîte contient un
gabarit. Regardez quelle ligne du gabarit il vous faut et
découpez-en la partie intérieure. Ne jetez pas celle-ci
: vous en aurez besoin plus tard ! Tracez au crayon
le contour de l’emplacement où vous allez installer
l’enceinte.
2 Percez un ou plusieurs trous sur l’intérieur du contour
tracé au crayon. Si l’enceinte est carrée ou rectangu-
laire, il est plus pratique de percer quatre trous. Si elle
est ronde, un trou sera probablement suffi sant.
3 Faites une découpe à la scie sauteuse sur le contour
pour former un beau trou rond, carré ou rectangulaire.
4 Prenez l’enceinte encastrable. Vous pouvez aisément
retirer la grille en tirant dessus. Elle n’est maintenue
que par un aimant.
5 Ramenez-les maintenant vers l’extrémité et faites-les
tourner vers l’intérieur. Raccordez le câble d’enceinte.
N’oubliez pas de le faire. Sinon, vous devrez le retirer
plus tard !
6 Placez l’enceinte dans le trou. Serrez les vis.
7 Les pinces sur l’arrière vont ainsi automatiquement
tourner vers l’extérieur, de sorte que l’enceinte va se
coincer.
8 Vous pouvez aussi peindre l’enceinte. En posant la par-
tie intérieure du gabarit (attention, vous devez d’abord
en retirer le contour) sur l’enceinte, vous pourrez
peindre le bord de l’enceinte au rouleau dans la même
couleur que le plafond. Pour peindre la grille, utilisez
une brosse à poils fi ns ou un aérosol
9 Pour retirer l’enceinte ou peindre la grille, vous devez
d’abord retirer la grille. Pour ce faire, il suffi t de tirer
dessus ; elle n’est maintenue que par un aimant.
Problèmes
Pour tout problème, contactez votre revendeur agréé, qui
vous posera quelques questions précises. Pour préparer
votre appel, vous pouvez déjà vérifi er les points sui-
vants :
• Vous n'entendez plus rien, autrement dit, l'enceinte ne
fonctionne plus ou ne diffuse plus que les graves ou
les aigus.
• L'autre enceinte fonctionne-t-elle encore ? Ou sont-
elles toutes les deux défectueuses ? Dans ce cas,
mieux vaut vérifi er votre amplifi cateur.
• L'enceinte/les enceintes émet(tent) des craquements.
• Si vous enfoncez légèrement le moteur de l'enceinte
(woofer), celui-ci frotte-t-il ?
De la sorte, votre revendeur saura dans quelle direction
s'orienter pour poser son diagnostic. Merci de votre colla-
boration.
Garantie
2 ans à partir de la date d'achat, dans le cadre d'une
utilisation normale. Les conditions de la facture s'ap-
pliquent.
FL101
FL101
FL301
FL620
FL501
FL501
Technische fi che
• systeem: 2-weg coaxiaal
• woofer: 5,25” polypropyleen
carbon
• tweeter: 0,5” polycarbonaat
• max. vermogen: 70 W
• nominaal vermogen (RMS): 35 W
• dB: 88 dB
• impedantie: 8 ohm
• frequentiebereik: 65 Hz - 20 kHz
• afmetingen mm (h x b x d):
148 x 148 x 70
• gewicht: 0,95 kg / stuk
• kleur: wit
• extra:overschilderbaar
• opties : KIT SQ180/180
Fiche technique
• système : 2 voies coaxial
• woofer : 5,25” carbone
polypropylène
• tweeter : 0,5” polycarbonate
• puissance max. : 70 W
• puissance nominale (RMS) : 35 W
• dB : 88 dB
• impédance : 8 ohm
• plage de fréquences :
65 Hz - 20 kHz
• dimensions mm (h x l x p) :
148 x 148 x 70
• poids : 0,95 kg / pièce
• coleur : blanc
• compléments : peut être peint
• options : KIT SQ180/180
Technical specifi cations
• system : 2-way coaxial
• woofer : 5,25” polypropylene
carbon
• tweeter : 0.5” polycarbonate
• max. power : 70 W
• nominal power (RMS) : 35 W
• dB : 88 dB
• impedance : 8 ohm
• frequency range : 65 Hz - 20 kHz
• dimensions mm (h x b x d) :
148 x 148 x 70
• weight : 0,95 kg / piece
• colour : white
• extra : paintable
• options : KIT SQ180/180
170
70
170
148
-
 1
1
-
 2
2


Artsound FL101(PAIR) de handleiding
- Categorie
- Auto luidsprekers
- Type
- de handleiding