Artsound ASW65.2 Handleiding
- Categorie
- Auto luidsprekers
- Type
- Handleiding

2 3
ASW65.2
NL
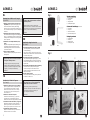
Montage door middel van de beugel
(fi g 2 pag.3)
EN
Installation using the bracket
(fi g 2 pag.3)
FR
Installation à l’aide de l’équerre
(fi g. 2 pag.3)
1 Montage van de beugel aan de wand of aan
het plafond (beide zijn immers mogelijk, alook
zowel horizontale als verticale positionering)
Teken met een pen of potlood de boorgaten op de
muur af. Monteer de beugel op de muur behulp van
schroeven.
2 Bevestiging van de speaker op de beugel
Schroef door middel van bijgeleverde montagebou-
ten (fi g. 1) de luidspreker tussen de uiteinden van
de beugel. Richt de luidspreker onder de gewenste
hoek en span aan.
3 Aansluiten van de luidsprekerkabel (rood/
zwart)
Respecteer de polariteit bij deze handeling: het
rode gedeelte van de kabel dient op de rode
terminal aangesloten te worden en het zwarte
op de zwarte terminal.
4 Indoor/outdoor schakelaar
Schakel de switchknop naargelang van binnen- of
buitengebruik.
1 Mounting the bracket to the wall or ceiling
(both are possible, as are both horizontal and
vertical positioning)
Using a pen or pencil, make marks on the wall to
indicate where to drill the holes. Mount the bracket
to the wall using screws.
2 Mounting the speaker onto the bracket
Using the mounting bolts supplied (fi g. 1), screw
the loudspeaker between the ends of the bracket.
Position the loudspeaker at the desired angle, and
tighten bolts.
3 Connecting the loudspeaker cable (red/black).
Follow the rules of polarity when doing this:
connect the red part of the cable to the red
speaker terminal post, and the black one to the
black terminal post.
4 Indoor/outdoor switch
Set the switch button according to the preference
for indoor or outdoor use.
1 Fixation de l'équerre au mur ou au plafond
(les deux types de fi xation sont possibles, ainsi
qu'un positionnement horizontal ou vertical)
Tracez les trous à forer sur le mur au moyen
d'un crayon ou d'un stylo. Fixez l'équerre au
mur à l'aide de vis.
2 Fixation de l'enceinte à l'équerre
Utilisez les boulons fournis (fi g. 1) pour fi xer
l'enceinte entre les extrémités de l'équerre.
Orientez l'enceinte selon l'angle désiré puis tendez.
3 Connexion du câble d'enceintes (rouge/noir)
Respectez la polarité lors de cette opération : la
partie rouge du câble doit être branchée sur la
borne rouge et la partie noire sur la borne noire.
4 Commutateur intérieur/extérieur
Réglez le commutateur selon que l'enceinte est
utilisée à l'intérieur ou à l'extérieur.
Indien u de voorzijde van uw luidspreker in de
slagregen hangt, sluit u best alles hermetisch
af. Hoe gaat u hierbij te werk?
*
a Verwijder de grill met een puntig voorwerp
b Plaats de rubberen afsluitdop in de basrefl ex-
opening. Op die manier vermijdt u dat er water
insijpelt. (cfr waterproof waarde IP44)
*facultatief
If the front of your loudspeaker risks exposure
during heavy rain, it is best to hermetically
seal the entire unit. How to do this: *
a Remove the grill with a pointed object
b Place the rubber cap in the bass refl ex opening.
This will prevent water from seeping in.
(cfr. waterproof value IP44)
*facultative
Si la face avant de votre enceinte est exposée
à la pluie, veillez à l'étanchéité de l'ensemble.
Comment procéder ?
*
a Retirez la grille à l'aide d'un objet pointu.
b Placez le bouchon en caoutchouc dans l'ouverture
bass-refl ex. Vous éviterez ainsi toute pénétration
d'eau. (cf. valeur d'étanchéité IP44)
*facultatif
ASW65.2
Inhoud verpakking
Contenu de l’emballage
Packaging contents
• 2 luidsprekers
• 2 beugels
• 4 beugelbouten
• 2 waterproof doppen
• 2 enceintes
• 2 équerres
• 4 boulons de fi xation
• 2 bouchons waterproof
• 2 loudspeakers
• 2 brackets
• 4 bracket bolts
• 2 waterproof caps
Fig 1
4x
2x
2x
2x
Fig 2
1
4 a b
2 3

4 1
ook verkrijgbaar in waterproofuitvoering ...
aussi disponible en version waterproof ...
also available in a waterproof model ...
ASW45.2 ASW55.2 ASW65.2 ASRock
Ontdek het volledige ArtSoundaanbod
op www.artsound.be
Découvrez la gamme ArtSound
complète sur www.artsound.be
Discover the complete ArtSound
range at www.artsound.be
TM
Art_Sound
w
a
t
e
r
p
r
o
o
f
ASW65.2
Jobetrade nv
Kruishoutem, Belgium
www.artsound.be
Tel. +32 9 380 81 80 - Fax. +32 9 386 12 35
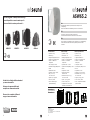
Afmetingen
Dimensions
NL
Geachte klant, bedankt en profi ciat met de aankoop van uw
luidspreker(s).
Gelieve deze instructies aandachtig te lezen en ze te bewaren.
FR
Cher client, merci d'avoir acheté ces enceintes.
Veuillez lire attentivement ces instructions et les conserver.
EN
Dear Customer, Congratulations on the purchase of your loudspeaker(s).
Please read these instructions carefully and keep them for future
reference.
w
a
t
e
r
p
r
o
o
f
Technische fi che
• systeem: 2-weg
• basrefl ex: ja
• magnetisch afgeschermd: nee
• woofer: 6,5" polymica conus
• tweeter: 1” PEI dome
neodymium
• max vermogen: 175 W
• nominaal vermogen (RMS): 85 W
• 87 dB
• impedantie: 8 ohm
• frequentie: 43 Hz - 20 kHz
• afm. (h x b x d):
310 x 240 x 180
• gewicht: 3,13 kg / stuk
• kleur: wit / zwart
• extra: inclusief beugel
spatwaterbestendig
Fiche technique
• système : 2 voies
• bass-refl ex : oui
• blindage magnétique : non
• woofer : 6,5” cône polymica
• tweeter : 1” PEI dome
neodymium
• puissance max. : 175 W
• puissance nominale (RMS) : 85 W
• 87 dB
• impédance : 8 ohms
• plage de fréquences :
43 Hz-20 kHz
• dimensions mm (h x l x p) :
310 x 240 x 180
• poids : 3,13 kg / pièce
• couleur : blanc / noir
• compléments : avec équerre
résistant aux éclaboussures
Technical specifi cations
• system : 2-way
• bass refl ex : yes
• magnetic shielded : no
• woofer : 6,5” polymica cone
• tweeter : 1” PEI dome
neodymium
• max power : 175 W
• nominal power (RMS) : 85 W
• 87 dB
• impedance : 8 ohm
• frequency : 43 Hz - 20 kHz
• dimensions mm (h x w x d) :
310 x 240 x 180
• weight : 3,13 kg / piece
• colour : white / black
• extra : complete with bracket
splash-resistant
240 mm
310 mm
180 mm
Documenttranscriptie
ASW65.2 ASW65.2 NL Fig 1 Montage door middel van de beugel (fig 2 pag.3) 1 Montage van de beugel aan de wand of aan het plafond (beide zijn immers mogelijk, alook zowel horizontale als verticale positionering) Teken met een pen of potlood de boorgaten op de muur af. Monteer de beugel op de muur behulp van schroeven. 2 Bevestiging van de speaker op de beugel Schroef door middel van bijgeleverde montagebouten (fig. 1) de luidspreker tussen de uiteinden van de beugel. Richt de luidspreker onder de gewenste hoek en span aan. 3 Aansluiten van de luidsprekerkabel (rood/ zwart) Respecteer de polariteit bij deze handeling: het rode gedeelte van de kabel dient op de rode terminal aangesloten te worden en het zwarte op de zwarte terminal. 4 Indoor/outdoor schakelaar Schakel de switchknop naargelang van binnen- of buitengebruik. Indien u de voorzijde van uw luidspreker in de slagregen hangt, sluit u best alles hermetisch af. Hoe gaat u hierbij te werk? * a Verwijder de grill met een puntig voorwerp b Plaats de rubberen afsluitdop in de basreflexopening. Op die manier vermijdt u dat er water insijpelt. (cfr waterproof waarde IP44) *facultatief FR Installation à l’aide de l’équerre (fig. 2 pag.3) 1 Fixation de l'équerre au mur ou au plafond (les deux types de fixation sont possibles, ainsi qu'un positionnement horizontal ou vertical) Tracez les trous à forer sur le mur au moyen d'un crayon ou d'un stylo. Fixez l'équerre au mur à l'aide de vis. 2 Fixation de l'enceinte à l'équerre Utilisez les boulons fournis (fig. 1) pour fixer l'enceinte entre les extrémités de l'équerre. Orientez l'enceinte selon l'angle désiré puis tendez. Si la face avant de votre enceinte est exposée à la pluie, veillez à l'étanchéité de l'ensemble. Comment procéder ? * • • • • 4x a Retirez la grille à l'aide d'un objet pointu. b Placez le bouchon en caoutchouc dans l'ouverture bass-reflex. Vous éviterez ainsi toute pénétration d'eau. (cf. valeur d'étanchéité IP44) • • • • *facultatif EN (fig 2 pag.3) 2 Mounting the speaker onto the bracket Using the mounting bolts supplied (fig. 1), screw the loudspeaker between the ends of the bracket. Position the loudspeaker at the desired angle, and tighten bolts. luidsprekers beugels beugelbouten waterproof doppen 2 2 4 2 enceintes équerres boulons de fixation bouchons waterproof Packaging contents 2x • • • • Installation using the bracket 1 Mounting the bracket to the wall or ceiling (both are possible, as are both horizontal and vertical positioning) Using a pen or pencil, make marks on the wall to indicate where to drill the holes. Mount the bracket to the wall using screws. 2 2 4 2 Contenu de l’emballage 2x 2 2 4 2 loudspeakers brackets bracket bolts waterproof caps 2x Fig 2 1 2 3 4 a b 3 Connecting the loudspeaker cable (red/black). Follow the rules of polarity when doing this: connect the red part of the cable to the red speaker terminal post, and the black one to the black terminal post. 4 Indoor/outdoor switch Set the switch button according to the preference for indoor or outdoor use. If the front of your loudspeaker risks exposure during heavy rain, it is best to hermetically seal the entire unit. How to do this: * a Remove the grill with a pointed object b Place the rubber cap in the bass reflex opening. This will prevent water from seeping in. (cfr. waterproof value IP44) *facultative 3 Connexion du câble d'enceintes (rouge/noir) Respectez la polarité lors de cette opération : la partie rouge du câble doit être branchée sur la borne rouge et la partie noire sur la borne noire. 4 Commutateur intérieur/extérieur Réglez le commutateur selon que l'enceinte est utilisée à l'intérieur ou à l'extérieur. 2 Inhoud verpakking 3 ASW65.2 ook verkrijgbaar in waterproofuitvoering ... aussi disponible en version waterproof ... also available in a waterproof model ... NL Geachte klant, bedankt en proficiat met de aankoop van uw luidspreker(s). Gelieve deze instructies aandachtig te lezen en ze te bewaren. FR Cher client, merci d'avoir acheté ces enceintes. Veuillez lire attentivement ces instructions et les conserver. EN Ontdek het volledige ArtSoundaanbod op www.artsound.be Découvrez la gamme ArtSound complète sur www.artsound.be Discover the complete ArtSound range at www.artsound.be ASW65.2 ASRock Technische fiche • systeem: 2-weg • basreflex: ja • magnetisch afgeschermd: nee • woofer: 6,5" polymica conus • tweeter: 1” PEI dome neodymium • max vermogen: 175 W • nominaal vermogen (RMS): 85 W • 87 dB • impedantie: 8 ohm • frequentie: 43 Hz - 20 kHz • afm. (h x b x d): 310 x 240 x 180 • gewicht: 3,13 kg / stuk • kleur: wit / zwart • extra: inclusief beugel spatwaterbestendig 4 Technical specifications • system : 2-way • bass reflex : yes • magnetic shielded : no • woofer : 6,5” polymica cone • tweeter : 1” PEI dome neodymium • max power : 175 W • nominal power (RMS) : 85 W • 87 dB • impedance : 8 ohm • frequency : 43 Hz - 20 kHz • dimensions mm (h x w x d) : 310 x 240 x 180 • weight : 3,13 kg / piece • colour : white / black • extra : complete with bracket splash-resistant 240 mm Afmetingen Dimensions TM Art_Sound Fiche technique • système : 2 voies • bass-reflex : oui • blindage magnétique : non • woofer : 6,5” cône polymica • tweeter : 1” PEI dome neodymium • puissance max. : 175 W • puissance nominale (RMS) : 85 W • 87 dB • impédance : 8 ohms • plage de fréquences : 43 Hz-20 kHz • dimensions mm (h x l x p) : 310 x 240 x 180 • poids : 3,13 kg / pièce • couleur : blanc / noir • compléments : avec équerre résistant aux éclaboussures Jobetrade nv Kruishoutem, Belgium www.artsound.be Tel. +32 9 380 81 80 - Fax. +32 9 386 12 35 [email protected] 1 180 mm rp ro o f w a te ASW55.2 rp ro o 310 mm ASW45.2 Dear Customer, Congratulations on the purchase of your loudspeaker(s). Please read these instructions carefully and keep them for future reference. f w a te-
 1
1
-
 2
2


Artsound ASW65.2 Handleiding
- Categorie
- Auto luidsprekers
- Type
- Handleiding
in andere talen
- English: Artsound ASW65.2 User manual
- français: Artsound ASW65.2 Manuel utilisateur
Gerelateerde papieren
-
Artsound MDC64 Handleiding
-
Artsound MDC6 Handleiding
-
-
-
-
-
-
-
-
Artsound PWR12 de handleiding