
User Manual - Portable Boombox with DAB+/ FM radio,
Bluetooth, CD, cassette and USB Player
DRAAGBARE BOOMBOX MET DAB+/FM-RADIO, BLUETOOTH®, CD-,
CASSETTE- EN USB-SPELER
Bedienungsanleitung – Tragbare Boombox mit DAB+- und FM-Radio,
Bluetooth, CD- und USB-Player sowie Kassettenlaufwerk
Mode d’emploi - Boombox portable avec radio DAB+/ FM, Bluetooth,
CD, cassette et lecteur USB
Manual de usuario – Radiocasete portátil con radio DAB+/ FM,
Bluetooth, CD, casete y reproductor USB
Model SCD-720

-2-
V2.0
INDEX
English••••••••••••••••••••••••••••••••••••••••••••••••••••••••••••••••••••••••••••••••••••• 3
Nederlands•••••••••••••••••••••••••••••••••••••••••••••••••••••••••••••••••••••••••••••••20
Deutsch•••••••••••••••••••••••••••••••••••••••••••••••••••••••••••••••••••••••••••••••••••37
Franç ais•••••••••••••••••••••••••••••••••••••••••••••••••••••••••••••••••••••••••••••••••••55
Españ ol•••••••••••••••••••••••••••••••••••••••••••••••••••••••••••••••••••••••••••••••••••72

-3-
ENGLISH
CAUTION:
Usage of controls or adjustments or performance of procedures other than those specied herein may result in
hazardous radiation exposure.
PRECAUTIONS BEFORE USE
K EEP THESE INSTRUCTIONS IN MIND:
1. Do not cover or block any ventilation openings. When placing the device on a shelf, leave 5 cm (2) free
space around the whole device.
2. Install in accordance with the supplied user manual.
3. Keep the device aay from heat sources such as radiators, heaters, stoves, candles and other heat-
generating products or naked ame. The device can only be used in moderate climates. Extremely cold or
arm environments should be avoided. Working temperature beteen 0 and 35C.
4. Avoid using the device near strong magnetic elds.
5. Electrostatic discharge can disturb normal usage of this device. If so, simply reset and restart the device
folloing the instruction manual. During le transmission, please handle ith care and operate in a static-
free environment.
6. Warning Never insert an object into the product through the vents or openings. High voltage os through
the product and inserting an object can cause electric shock and/or short circuit internal parts. For the
same reason, do not spill ater or liquid on the product.
7. Do not use in et or moist areas such as bathrooms, steamy kitchens or near simming pools.
8. The device shall not be exposed to dripping or splashing and make sure that no objects lled ith liquids,
such as vases, are placed on or near the apparatus.
9. Do not use this device hen condensation may occur. When the unit is used in a arm et room ith
damp, ater droplets or condensation may occur inside the unit and the unit may not function properly;
let the unit stand in poer OFF for 1 or 2 hours before turning on the poer: the unit should be dry before
getting any poer.
10. Although this device is manufactured with the utmost care and checked several times before leaving the
factory, it is still possible that problems may occur, as ith all electrical appliances. If you notice smoke, an
excessive build-up of heat or any other unexpected phenomena, you should disconnect the plug from the
main poer socket immediately.
11. This device must operate on a poer source as specied on the specication label. If you are not sure of
the type of poer supply used in your home, consult your dealer or local poer company.
12. Keep aay from animals. Some animals enjoy biting on poer cords.
13. To clean the device, use a soft dry cloth. Do not use solvents or petrol based uids. To remove severe
stains, you may use a damp cloth ith dilute detergent.
14. The supplier is not responsible for damage or lost data caused by malfunction, misuse, modication of the
device or battery replacement.
15. Do not interrupt the connection hen the device is formatting or transferring les. Otherise, data may be
corrupted or lost.
16. If the unit has USB playback function, the USB memory stick should be plugged into the unit directly. Don’t
use an USB extension cable because it can cause interference resulting in failing of data.
17. The rating label has been marked on the bottom or back panel of the device.
18. This device is not intended for use by people (including children) ith physical, sensory or mental
disabilities, or a lack of experience and knoledge, unless they’re under supervision or have received
instructions about the correct use of the device by the person ho is responsible for their safety.
19. This product is intended for non professional use only and not for commercial or industrial use.
20. Make sure the unit is adjusted to a stable position. Damage caused by using this product in an unstable
position vibrations or shocks or by failure to follo any other arning or precaution contained ithin this
user manual ill not be covered by arranty.
21. Never remove the casing of this device.
22. Never place this device on other electrical equipment.
23. Do not allow children access to plastic bags.
24. Only use attachments/accessories specied by the manufacturer.

-4-
25. Refer all servicing to qualied service personnel. Servicing is required hen the device has been damaged
in any ay, such as the poer supply cord or the plug, hen liquid has been spilled or objects have fallen
into the device, hen the device has been exposed to rain or moisture, does not operate normally, or has
been dropped.
26. Long exposure to loud sounds from personal music players may lead to temporary or permanent hearing
loss.
27. If the product is delivered ith poer cable or AC poer adaptor:
•If any trouble occur, disconnect the AC poer cord and refer servicing to qualied personnel.
•Don’t step on or pinch the poer adaptor. Be very careful, particularly near the plugs and the cable’s exit
point. Do not place heavy items on the poer adaptor, hich may damage it. Keep the entire device out
of children’s reach When playing ith the poer cable, they can seriously injure themselves.
• Unplug this device during lightning storms or when unused for a long period.
•The socket outlet must be installed near the equipment and must be easily accessible.
•Do not overload ac outlets or extension cords. Overloading can cause re or electric shock.
• Devices with class 1 construction should be connected to a main socket outlet with a protective earthed
connection.
•Devices ith class 2 construction do not require a earthed connection.
•Alays hold the plug hen pulling it out of the main supply socket. Do not pull the poer cord. This can
cause a short circuit.
•Do not use a damaged poer cord or plug or a loose outlet. Doing so may result in re or electric shock.
28. If the product contains or is delivered ith a remote control containing coin/cell batteries:
Warning:
•Do not ingest battery, Chemical Burn Hazard or equivalent orking.
•The remote control supplied ith This product contains a coin/button cell battery. If the battery is sal-
loed, it can cause severe internal burns in just 2 hours and can lead to death.
•Keep ne and used batteries aay from children.
•If the battery compartment does not close securely, stop using the product and keep it aay from child-
ren.
•If you think batteries might have been salloed or placed inside any part of the body, seek immediate
medical attention.
29. Caution about the use of Batteries:
•Danger of explosion if battery is incorrectly replaced. Replace only ith the same or equivalent type.
•Battery cannot be subjected to high or lo extreme temperatures, lo air pressure at high altitude
during use, storage or transportation.
•Replacement of a battery ith an incorrect type that can result in an explosion or the leakage of amma-
ble liquid or gas.
•Disposal of a battery into re or a hot oven, or mechanically crushing or cutting of a battery, that can
result in an explosion.
•Leaving a battery in an extremely high temperature surrounding environment that can result in an explo-
sion or that leakage of ammable liquid or gas.
•A battery subjected to extremely lo air pressure that may result in an explosion or the leakage of am-
mable liquid or gas.
•Attention should be dran to the environmental aspects of battery disposal.
INSTALLATION:
• Unpack all parts and remove protective material.
• Do not connect the unit to the mains before checking the mains voltage and before all other connections
have been made.

-5-
W ARNING FOR CD / DVD PLAYER:
This product contains a lo poer laser device
CLASS 1 LASER PRODUCT
APPAREIL LASER DE CALSSE 1
PRODUCO LASER DE CLASE 1
CAUTION
INVISIBLE LASER RADIATION
WHEN OPEN AND INTERLOCKS
DEFEATED
AVOID EXPOSURE TO BEAM
W ARNING: DO NOT TOUCH THE LENS.
W ARNING: When participating in the trac listening to a personal music
player can make the listener less aare of potential dangers such as
approaching cars.
W ARNING: To prevent possible hearing damage, do not listen at high
volume levels for long periods.
ACCESSORIES:
•Poer cord
• Remote control
• Instruction manual
Class 1 Laser Product

-6-
OVERVIEW
12 3 4+
SOURCE
MENU
INFO
ENTER
SCAN
VOLUME
1 2 3 4 5 6 7 8 9 10 11 12 13
1. USB input: Input for USB stick
2. SOURCE: Press this key to choose dierent modes: DAB+/FM/CD/USB/BLUETOOTH/CASSETTE TAPE/AUX IN.
3. MENU / INFO: DAB+: Press to display station information.
Press and hold to enter the Menu for setting change. Press or to select menu item.
FM: Press to display station information.
Press and hold to enter the Menu for setting change. Press or to select menu item.
4. PREVIOUS :DAB+: Press to display the previous station information.
FM: Short press to tune to a dierent frequency. Press and hold to scan the previous available station.
CD/USB/BT: Press to search to the previous track.
5. POWER :Press to turn on the unit. Press again to turn o and go to Standby mode.
6. NUMERIC BUTTONS:
12
3
4+
DAB+/FM: Press these buttons ill recall the stored radio station directly. Press and hold to save the radio
station.
CD/USB: Press the REPEAT button to change to dierent repeat playback operaton. Press the PROGRAM
button to setup the program playback operation. Press the FOLDER button to change the folder
(only for MP3).
BT: Press and hold the PAIR button ill disconnect the current connection and start to search another
ne Bluetooth device.
7. DISPLAY: Display the unit operation status and information.
8. CASSETTE CONTROL BUTTONS: (PAUSE / STOP/EJECT / FORWARD / REWIND / PLAY / RECORD)
9. VOLUME: Adjust the main volume.
10. STOP / ENTER: DAB+ / FM: Press to select the change setting in the menu operation.
CD / USB: Press to stop the playback.
11. NEXT :DAB+: Press to display the next station information.
FM: Short press to tune to a dierent frequency. Press and hold to scan the next available station.
CD/USB/BT:Press to search to the next track.
12. PLAY-PAUSE/SCAN
:
DAB+: Press to start auto scanning all the available DAB+ stations.
FM: Short press to toggle beteen stereo and mono audio. Press and hold to start auto scanning all
the available FM stations.
CD/USB/BT Press to toggle beteen pause and resume playback.
13. CD Disc compartment door
14. Cassette tape compartment door
15. Bass port
16. Loudspeaker
17. Carrying handle

-7-
SOURCE
MENU
INFO
ENTER
SCAN
FOLDER PAIR REPEAT PROGRAM
1234+
VOLUME
CASSETTE RECORDER
1416 15 1615
~AC IN
OPEN OPEN
AUX IN
17 18 19 20 2221
18. Battery compartment door
19. AUX IN: Connect to external audio player
20. Headphone out: Connect to the external headphone
21. Antenna: The antenna should be extended to ensure a good DAB+ / FM reception
22. ~AC in: Connect the poer cord to this jack
REPEAT
RANDOM
VOL
DISPLAY
23
24
25
26
27
28
29
30
31
32
43
42
41
40
39
38
37
36
35
34
44
33
23. Standby
24. Numeric buttons
25. Memory
26. Previous / Tune
27. Folder
28. Repeat
29. Folder
30. Info - Scan - Menu
31. BT Previous - BT Next - BT Play/pause
32. ID3 Tag display - CD/USB Stop - CD/USB Play/pause
33. Volume +/-
34. Mute
35. Random
36. CH-
37. Next / Tune
38. Enter
39. Mono/Stereo
40. CH+
41. Sleep
42. X-Bass
43. Equalizer
44. Source

-8-
BATTERY INSERT
~AC IN
AUX IN
C 1,5V C 1,5V C 1,5V
C 1,5V C 1,5V C 1,5V
+
+
OPEN OPEN
+ 1,5V
+ 1,5V
+ 1,5V
1,5V + 1,5V + 1,5V +
BATTERY OPERATION:
For DC operation, rstly remove the AC plug from the AC outlet and
disconnect the AC cord from the ~ AC IN jack. Remove the battery
compartment door at the rear of the unit. Install 6pcs UM-2 (LR14)
C size batteries (NOT supplied) according to the polarity markings
shon inside of the compartment. Install the battery compartment
door.
Note:
- Since the unit dras a little poer from the batteries in standby
mode, remove the batteries if the unit is not going to be used for
a long time.
- Since the unit is at poer saving status hen it is in battery stand
by mode, you can ONLY use the unit’s STANDBY button by press
and hold it more than 5 seconds to turn on the unit. To turn o,
press the STANDBY button again.
REMOTE CONTROL OPERATION:
A CR2025 battery is already installed in the remote control unit.
Before using, pull out the battery insulation sheet as shon on the
left.
To replace a ne battery, please refer to the gure shon on the left.
When inserting a battery, be sure to do so in the proper direction.

-9-
POW ER ON THE SCD-720
~AC IN
OPEN OPEN
AUX IN
SOURCE
MENU
INFO
ENTER
SCAN
FOLDER PAIR REPEAT PROGRAM
1234+
VOLUME
CASSETTE RECORDER
EAR/HEADPHONE USE
On the back site of the SCD-720 you ill nd the headphone connection.
Use a ear set or headphone ith 3, 5mm stereo jack to connect the headphone to the SCD-720.
If you put in the 3,5mm stereo jack the speakers of the SCD-720 ill turned o.
Only the headphone ill ork no.
You can control the volume by the volume knob. All other functions are the same as normal use ithout headset connected.
~AC IN
OPEN OPEN
AUX IN
SOURCE
MENU
INFO
ENTER
SCAN
FOLDER PAIR REPEAT PROGRAM
1234+
VOLUME
CASSETTE RECORDER
Connect the SCD-720 ith the poer cable to the AC outlet.
If you connect the poer cable into the SCD-720, the batte-
ry poer ill be automatically shut don.
Press the STANDBY button to turn on the unit.
To turn o, press the STANDBY button again.
With the SOURCE button you can select input source
You can selected:
DAB+ RADIO
FM RADIO
CD
USB
BLUETOOTH
TAPE (CASSETTE)
AUDIO IN (AUX)
VOLUME CONTROL:
Rotate the VOLUME knob to change the volume.

-10-
Adjusting the Antenna
The antenna at the rear panel of the unit should be fully extended to ensure a good DAB+ / FM reception. Alter the antenna
position for the best reception.
DAB+ OPERATION
The rst time the DAB+ mode is selected, it ill automatically scan for available DAB+ stations. Wait until the scanning has
nished. The display ill sho the scanning progress. After scanning it ill tune to the rst station.
The available stations in a certain reception band ill be shon in the display. In case of eak reception, the station
may falter or give no sound. Try to move the receiver or rotate the antenna so that the eak DAB+ signal comes in
ithout faltering (station names are still shon hen the signal is eak).
Auto Scan
1. Turn on the unit in DAB+ mode.
2. Press and hold the SCAN button (or press the SCAN button on the remote control) to start auto scanning the available
stations.
Manual Scan
By using the manual scan operation, it can help you to adjust the antenna or search station that is missed hile auto scanning.
1. Turn on the unit in DAB+ mode.
2. Press and hold the MENU button (or press the MENU button on the remote control) to access the menu control.
3. Press the or button until Manual is displayed and then press the ENTER button.
4. Press the or button to select the desired channel (e.g. 12C 227.360MHz) (Selection beteen 5A and 13F).
5. Press the ENTER button to conrm.
6. To select another channel (5A~13F), press the or button and then press the ENTER button to conrm.
7. When the station is found, press the ENTER button to select.
8. To quit manual scan, press the MENU button.
Tuning
After scanning all the available DAB stations, press the or button to display and navigate the station list. Then press
the ENTER button to tune to this station within a few seconds.
Storing DAB+ Presets
You can save up to 20 DAB+ stations.
To use the unit buttons to store the preset:
1. Tune to the station you ish to store.
2. To save it to the preset 1 or 2 or 3, press and hold the numeric button respectively. Then it ill save to that preset number.
3. To save it to other preset channel from 4 to 20, press and hold the numeric button 4. Store ill be displayed.
4. Press the or button to select the desired preset number to store.
5. Press the ENTER to store.
To use the remote control button to store the preset:
1. Tune to the station you ish to store.
2. Press and hold the MEMORY button, Store ill be displayed.
3. Press the or button to select the desired preset number to store.
4. Press the ENTER to store.
Recall Stored DAB+ Presets
To use the unit buttons to recall the preset:
1. To recall the preset channel 1 or 2 or 3, press the numeric button respectively. Then it ill tune to that preset channel.
2. To recall other preset channel from 4 to 20, press the numeric button 4. Recall ill be displayed.
3. Press the or button to select the desired preset number to recall.
4. Press the ENTER to recall.
To use the remote control button to recall the preset:
1. Press the MEMORY button, Recall ill be displayed.
2. Press the or button to select the desired preset number to recall.
3. Press the ENTER to recall.
REPEAT
RANDOM
VOL
DISPLAY
REPEAT
RANDOM
VOL
DISPLAY
DAB+ RADIO

-11-
Displaying DAB+ Station Inf ormation
There are several types of information as listed belo. To change the display information, press the INFO button repeatedly.
Radio Text scrolling Signal Bar Program Type (PTY)
Multiplex Name Frequency Signal Error Rate Audio Bit Rate
1. Radio Text scrolling: Shos music titles or program details provided by the broadcaster.
2. Signal Bar: Transmission signal level. The more characters are displayed, the stronger the signal being received.
To improve the reception adjust the antenna position.
3. Program Type (PTY): Type of program provided by the broadcaster.
4. Multiplex Name: Displays name of multiplex to hich the current station belongs.
5. Frequency: Current channel frequency.
6. Signal Error Rate: Shos the error rate. The larger this value, the more errors it receives. To improve the reception, adjust
the antenna position.
7. Audio Bit Rate: This is the current channel audio Bitrate.
OTHER DAB+ MENU OPERATION
Press and hold the MENU button (or press the MENU button on the remote control) to access the menu control. Then press
the or button for dierent options as described belo.
Dynamic Range Control (DRC) (see Note.)
DRC can make quieter sounds easier to hear hen the unit is used in a noisy environment. The DRC level of a broadcast is
set by the broadcaster and transmitted ith the service. Changing the DRC value on your unit enables you to apply a scaling
factor to this level.
There are three levels of compression:
DRC high: Maximum compression as sent ith the transmitted service
DRC lo: Set to 1/2 that of the sent transmitted service
DRC o: No compression
1. Press and hold the MENU button (or press the MENU button on the remote control) to access the menu control.
2. Press the or button until DRC is displayed and then press the ENTER button.
3. Press the or button to select the DRC value and then press the ENTER to conrm.
4. Press the MENU button to exit the menu control.
Note:
- Not all DAB+ broadcasts are able to use DRC function. If the broadcast does not support DRC then the DRC setting in the
unit ill have no eect.
- After you have adjusted the DRC level the sound may be louder.
Prune
This function removes inactive stations.
1. Press and hold the MENU button (or press the MENU button on the remote control) to access the menu control.
2. Press the or button until Prune is displayed and then press the ENTER button.
3. Press the or button to select Yes and then press the ENTER button to prune the unit.
4. Press the MENU button to exit the menu control.

-12-
Adjusting the Antenna
The antenna at the rear panel of the unit should be fully extended to ensure a good DAB+ / FM reception. Alter the antenna
position for the best reception.
FM RADIO OPERATION
Auto Scan
1. Turn on the unit in FM mode.
2. Press and hold the SCAN button to start auto-scanning and saving the available stations (max. 20 storage).
Manual Scan
1. Press the or button repeatedly to tune to a dierent frequency.
2. Alternatively press and hold the or button to automatically search to the next available station.
Storing FM Presets
You can save up to 20 FM stations.
To use the unit buttons to store the preset:
1. Tune to the station you ish to store.
2. To save it to the preset 1 or 2 or 3, press and hold the numeric button respectively. Then it ill save to that preset number.
3. To save it to other preset channel from 4 to 20, press and hold the numeric button 4. Store ill be displayed.
4. Press the or button to select the desired preset number to store.
5. Press the ENTER to store.
To use the remote control button to store the preset:
1. Tune to the station you ish to store.
2. Press and hold the MEMORY button, Store ill be displayed.
3. Press the or button to select the desired preset number to store.
4. Press the ENTER to store.
Recall Stored FM Presets
To use the unit buttons to recall the preset:
1. To recall the preset channel 1 or 2 or 3, press the numeric button respectively. Then it ill tune to that preset channel.
2. To recall other preset channel from 4 to 20, press the numeric button 4. Recall ill be displayed.
3. Press the or button to select the desired preset number to recall.
4. Press the ENTER to recall.
To use the remote control button to recall the preset:
1. Press the MEMORY button, Recall ill be displayed.
2. Press the or button to select the desired preset number to recall.
3. Press the ENTER to recall.
Stereo/Force Mono Selection
When receiving a Stereo FM radio station, press the button on the unit (or MONO/ST. button on the remote control) ill
switch between stereo audio and force mono audio.
Displaying FM Station Inf ormation
There are several types of information as listed belo. To change the display information press the INFO button repeatedly.
Radio Text Program Type (PTY) Frequency Audio Type
1. Radio Text: Scrolling text hich shos information about music titles or program details provided by the radio
station
2. Program Type (PTY): Type of program provided by the broadcaster
3. Frequency: Current channel frequency
4. Audio Type: Stereo or Mono
OTHER FM MENU OPERATION
Press and hold the MENU button (or press the MENU button on the remote control) to access the menu control. Then press
the or button for dierent options as described on next page.
REPEAT
RANDOM
VOL
DISPLAY
REPEAT
RANDOM
VOL
DISPLAY
FM RADIO

-13-
Scan Setting
1. Press and hold the MENU button (or press the MENU button on the remote control) to access the menu control.
2. Press the or button until Scan is displayed and then press the ENTER button.
3. Press the or button to toggle beteen Strong and All and then press the ENTER button conrm. When the
Strong is selected, only the strong stations are detected. Scanning ill ignore the noisy stations. When All is selected,
all stations ill be detected during FM scanning even if the radio station is a bit noisy.
4. The next time doing a FM scan the unit ill search for the stations based on this conrmed setting.
Audio Setting
1. Press and hold the MENU button (or press the MENU button on the remote control) to access the menu control.
2. Press the or button until Audio is displayed and then press the ENTER button.
3. Press the or button to toggle beteen Stereo or Mono selection and then press the ENTER button conrm.
CD/USB OPERATION
Loading and Playing CD Disc
Open the CD door. Install a disc ith the CD label side facing up. Close the CD door. Press the SOURCE button to CD mode.
After reading, the total number of tracks ill be shon on the display and it ill automatically start to play.
Reading and Playing USB Device
Insert a USB device into the USB input jack. Press the SOURCE button to USB mode. After reading the total number of tracks
ill be shon on the display. It ill automatically start to play.
Play/Pause Control
To pause playback press the button. Press the button again to resume playback.
Stop Control
To stop playback press the button.
Skip Track
During playback press the or button to skip to the previous or next track.
High Speed Music Search
During playback press hold the or button to start high speed searching.
When you release the or button normal speed playback ill resume.
Repeat Play / Random Play
CD Disc mode
During playback press the REPEAT button once, the display shos REP.ONE. The current track ill be played repeatedly.
When pressing the REPEAT button again, the display shos REP.ALL. All tracks ill be played repeatedly.
When pressing the REPEAT button again, the display shos RANDOM. All tracks ill be played in random sequence.
When pressing the REPEAT button again, the unit ill resume to normal playback.
MP3 Disc or MP3 USB mode
During playback press the REPEAT button once, the display shos REP.ONE. The current track ill be played repeatedly.
When pressing the REPEAT button again, the display shos REP.ALBUM. All tracks in the current folder ill be played
repeatedly.
When pressing the REPEAT button again, the display shos REP.ALL. All tracks ill be played repeatedly.
When pressing the REPEAT button again, the display shos RANDOM. All tracks ill be played in random sequence.
When pressing the REPEAT button again, the unit ill resume to normal playback.
Programmed Playback
CD Disc mode
This unit can be programmed to play a sequence of tracks selected.
1. In stop mode press the PROGRAM button, the display shos the program number and the track number.
2. Press the or button to select the desired track.
3. Press the PROGRAM button to save the desired track.
4. Repeat steps 2-3 to store up to 30 programmed tracks.
5. Press the button to start playing the programmed tracks.
6. To clear the program play, press the button twice or change to another mode.
7. During program play you can also do the Repeat One or Repeat All operation, hoever the random play is not
supported.

-14-
MP3 Disc or MP3 USB mode
1. In stop mode press the PROGRAM button, the display shos the program number and the folder number.
2. Press the FOLDER button (or the FOLDER˄ / FOLDER˅ button on the remote control) to select the desired folder.
3. Press the PROGRAM button to save the desired folder.
4. Press the or button to select the desired track.
5. Press the PROGRAM button to save the desired track.
6. Repeat steps 2-3 to program up to 99 programmed tracks.
7. Press the button to start playing the programmed tracks.
8. To clear the program play, press the button twice or change to another mode.
9. During program play you can also do the Repeat One or Repeat All operation, hoever the random play is not
supported.
Note:
- The USB port is only for playback purpose, NOT for external device charging
- Besides playing CDDA audio disc, the unit can also play MP3 le format in CD / USB operation. Hoever, WMA le and
others are not supported.
- If your USB device is loaded ith MP3’s but the display keeps shoing NO on the display, the format of your USB device
might not be compatible with the unit.
- The unit supports USB version 1.1 and 2.0.
- The unit supports USB devices ith capacity up to 32GB.
- The unit may not be compatible ith all USB devices, this is not a problem of the unit.
- For MP3 playback, a maximum of 255 folders ith a maximum of 999 les is supported.
- Due to the USB le read/rite mechanism, the rst le ritten to the usb device ill be played rst and the last le ritten
ill be played last. (The unit ill not sort alphabetically)
Folder Select (MP3 le onl)
During MP3 playback press the FOLDER button (or the FOLDER˄ / FOLDER˅ button on the remote control) to change to the
folder.
In stop mode press the FOLDER button (or the FOLDER˄ / FOLDER˅ button on the remote control) to change to the folder.
Then press the or button to select your desired track to play. Press the button to start track playback.
ID3 Tag Displa (MP3 le onl in hich the ID3 Tag information is included)
Press the DISPLAY button on the remote control ill toggle the ID3 Tag display on/o. When it is on, the MP3 track’s title,
artist and album details ill be displayed.
BLUETOOTH
Please follo the pairing instructions belo to link the unit to your Bluetooth device.
1. Press the SOURCE button repeatedly to enter the Bluetooth mode. The display ill sho BT AUDIO. It ill start
searching and ill display a ashing BT AUDIO.
2. If the unit has never been paired ith a Bluetooth device before or cannot nd the last paired device, the display and the
Bluetooth status indicator ill keep on ashing. Turn on the Bluetooth function of your device and enable the search until
Lenco SCD-720 is found. Select Lenco SCD-720 on the Bluetooth device to make connection. Enter the pass code
0000 if required.
3. After successfully paired the unit ill display the steady BT AUDIO.
4. You can no start playing music from your smartphone irelessly to the speaker.
5. You can press the button to pause or resume the playback.
6. You can press the or button to search to the previous or next song.
Note:
•Press and hold the PAIR button ill disconnect the current connection and start to search another ne Bluetooth
device.
•This product has a bluetooth reception function, you cannot transmit any bluetooth sound ith it (Bluetooth headset or
earset don’t receive signal of the SCD-720): this means that you can receive irelessly a bluetooth sound signal from
an external source like a smartphone.

-15-
CASSETTE TAPE
Press the SOURCE button repeatedly to enter the Cassette tape mode. The display ill sho TAPE. The cassette control
buttons are location at the top front of the unit.
1. Press the CASSETTE STOP/EJECT button to open the cassette tape door.
2. Insert the cassette tape and close the door rmly.
Play side is facing forard
Insert the cassette tape with the tape side
facing up
3. Press the CASSETTE PLAY button to playback.
4. Press the CASSETTE PAUSE button to pause the playback. To resume the playback, press the CASSETTE PAUSE
button to release it.
5. To stop playback, press the CASSETTE STOP/EJECT button.
6. While it is in stop mode, press the CASSETTE FORWARD or REWIND button to forward or rewind the tape.
7. To open the cassette door during stop, press the CASSETTE STOP/EJECT button once.
8. To open the cassette door during playback, press the CASSETTE STOP/EJECT button twice.
9. To record, press the CASSETTE PLAY and RECORD button together.
NOTE:
- Only type 1 Normal cassette tape can be used for recording.
- If there is tape slack, reind the slack using a pencil to avoid damaging the tape or the unit.
- On the back of the cassette are left and right tabs. This tab can be broken out. If this tab is broken out, it is no longer
possible to record on that side of the cassette. When both tabs are removed, it is no longer possible to record to the
cassette. The RECORD button then locks and cannot be pressed anymore.

-16-
OTHER FUNCTIONS
AUX IN
This allos you to connect the sound from an external player through your unit.
1. Plug a 3.5mm audio cable (not included) into your external player line out and the other end into the AUX IN jack.
2. Press the SOURCE button to enter AUX mode. Display shos AUDIO IN.
3. Start your external player to play music.
4. The unit plays the sound.
EQ OPERATION / X BASS
You can enjoy dierent EQ sound eect modes. Press the EQUALIZER button on the remote control ill change to dierent
sound eects of FLAT / ROCK / CLASSIC / POP / VOCAL / JAZZ.
You can also boost the bass eect of the music. Press the X BASS button on the remote control ill toggle the X Bass eect
beteen ON and OFF.
Note:
- When X-Bass is enabled, the EQ sound eect ill be disabled. Pressing EQUALIZER button ill only sho X-Bass On
ithout any EQ eect. To resume the EQ sound eect, press the X-BASS button to turn o rst.
SLEEP FUNCTION
1. When the unit is sitched on, press the SLEEP button on the remote control repeatedly to select a sleep duration from
either SLEEP OFF, 90, 80, 70, 60, 50, 40, 30, 20 or 10 minutes. When the sleep timer is set, the remaining timer ill
periodically be shon on the display.
2. When the sleep timer is zero, the unit ill turn o automatically.
3. To cancel the sleep function, press the STANDBY button to turn o the unit. Or press the SLEEP button repeatedly to
select SLEEP OFF.
LANGUAGE SETUP
You can set the language of the unit.
1. Turn on the unit in DAB+ mode or FM mode.
2. Press and hold the MENU button (or press the MENU button on the remote control) to access the menu control.
3. Press the or button until System is displayed and then press the ENTER button.
4. Press the or button until Language is displayed and then press the ENTER button.
5. Press the or button to toggle beteen dierent languages. Select your desired language and then press the
ENTER button to conrm.
6. Press the MENU button to exit the menu control.
SOFTW ARE VERSION CHECK
You can check the softare version of the unit.
1. Turn on the unit in DAB+ mode or FM mode.
2. Press and hold the MENU button (or press the MENU button on the remote control) to access the menu control.
3. Press the or button until System is displayed and then press the ENTER button.
4. Press the or button until SW ver is displayed and then press the ENTER button to show the software version
number.
5. Press and hold the MENU button (or press the MENU button on the remote control) to exit the menu control
FACTORY RESET
This function resets the unit to the original factory settings.
1. Turn on the unit in DAB+ mode or FM mode.
2. Press and hold the MENU button (or press the MENU button on the remote control) to access the menu control.
3. Press the or button until System is displayed and then press the ENTER button.
4. Press the or button until Reset is displayed and then press the ENTER button.
5. Press the or button until Yes is displayed and then press the ENTER button to reset the unit.
ENERGY SAVING
Due to ErP requirement and protect the environment, the unit ill turn o to the standby mode automatically once no music
has been playing around 15 minutes.
When the unit is poer o due to ErP, you can press the STANDBY button to turn on the unit again.

-17-
FUNCTIONS REMOTE CONTROL
Standby: Press the STANDBY button to turn on the unit.
To turn o, press the STANDBY button again.
Source: Selection of user function: DAB+ RADIO, FM-RA-
DIO, CD, USB, BLUETOOTH, TAPE (CASSET-
TE), AUDIO IN (AUX).
Equalize r: EQ setup: FLAT / ROCK / CLASSIC / POP / VO-
CAL / JAZZ.
X-Bass: Super bass on/o.
Sleep: Sleep time setup: 90-80-70-60-50-40-30-20-10 min.
Mono/Stereo: Mono Stereo selection for FM radio only.
Folder ˄˅: Folder selection for USB and MP3-CD.
Memory: CD: programm CD tracks.
DAB+: programm presets or recall presets.
FM: programm presets or recall presets.
Tune˅ / tune˄: CD/USB/BT: track backard or next.
( / )DAB+: Select scanned stations
FM: Freq. up/don ith 50kHz.
CH+ / CH-: DAB+/FM: Recall presets.
CD/USB/BT: No function.
Repeat : CD: Repeat one or Repeat all.
USB: Repeat one, album or repeat all.
Random: CD/USB: Random function on/o.
DAB/FM FUNCTIONS:
INFO: Sho data information hen receiving dab+ stati-
on.
SCAN: Scanning all dab+ stations.
MENU: Acces to menu functions in combination ith
buttons or and ENTER button.
DAB+/FM f unct ions a nd setup f unct ions.
BLUETOOTH FUNCTIONS:
:backward.
:next.
:play/pause function.
CD/USB FUNCTIONS:
DISPLAY: ID-3 tag on or o.
:Stop function.
:Pause/play function.
VOLUME:
VOL +: Volume up
VOL -: Volume don
REPEAT
RANDOM
VOL
DISPLAY

-18-
o poer
● Ensure that the mains cable is securely connected.
● Ensure that the unit is sitched on.
The unit does not respond hen pressing an uttons.
● Remove the batteries (hen inserted) and remove the poercord for a minute. Then reinsert the batteries.
No sound output
● Turn up the volume.
I can’t nd the Bluetooth name of this unit on m Bluetooth device for Bluetooth pairing
● Ensure that the unit is sitched on.
● Ensure that the Bluetooth function is activated on your Bluetooth device.
● The unit has a Bluetooth function that can receive a signal ithin 10 metres.
Disc in place ut the unit on’t pla
● Ensure that the disc label is facing up.
● Ensure that the disc is clean.
● PAUSE mode may be activated, deactivate it.
● Disc may be dirty, check and clean the disc. If the disc is damaged, replace another undamaged one.
DAB+/FM reception
● Ensure the antenna ire is fully extended.
● Electrical interference in your home can cause poor reception. Move the unit aay from them (especially those
ith motors and transformers).
The unit sitches o automaticall during pla
● Increase the volume level of your connected sound source (DVD player/TV etc.)
Sound interference coming from ireless devices in Speaers
● Move any ireless devices (mobile phone, bluetooth device etc.) aay from the unit.
TROUBLE SHOOTING

-19-
TECHNICAL SPECIFICATIONS
DAB+ radio frequency range: 174.928-239.2 MHz
FM radio frequency range: 87.5-108 MHz
Bluetooth frequency range: 2.402-2.480 GHz
Bluetooth transmission poer: 4 dBm
AC poer input: 230V~ 50Hz 25W
Batteries operation: 6 x 1.5V C (UM-2), not supplied
Speaker output poer: 2 x 6 W
Bluetooth: V5.0
Aux in: 3.5mm stereo jack
Headphone out: 3.5mm stereo jack
Remote control battery: CR2025 x 1pcs
Unit dimension (L x D x H): 390 x 228 x 138 mm
Working Temperature: 0-45C
Total eight: 2.1 kg
● The specication presents only as a reference. The value of eight and size are approximation.
● Our product is improved ceaselessly and the specication and function may be changed ithout prior notice.
Guarantee
Lenco oers service and arranty in accordance to European la, hich means that in case of repairs (both during and after
the arranty period) you should contact your local dealer.
Important note: It is not possible to send products that need repairs to Lenco directly.
Important note: If this unit is opened or accessed by a non ocial service center in any ay, the arranty expires.
This device is not suitable for professional use. In case of professional use, all arranty obligations of the manufacturer ill be
voided.
Disclaimer
Updates to Firmare and/or hardare components are made regularly. Therefore some of the instruction, specications and
pictures in this documentation may dier slightly from your particular situation. All items described in this guide for illustration
purposes only and may not apply to particular situation. No legal right or entitlements may be obtained from the description
made in this manual.
Disposal of the Old Device
This symbol indicates that the relevant electrical product or battery should not be disposed of as general household aste in
Europe. To ensure the correct aste treatment of the product and battery, please dispose them in accordance to any appli-
cable local las of requirement for disposal of electrical equipment or batteries. In so doing, you ill help to conserve natural
resources and improve standards of environmental protection in treatment and disposal of electrical aste (Waste Electrical
and Electronic Equipment Directive).
CE Marking
Hereby, Commaxx B.V. Wiebachstraat 37, 6466 NG Kerkrade, The Netherlands, declares that this product is in compliance
ith the essential EU directive requirements.
The declaration of conformity may be consulted via [email protected]
Service
For more information and helpdesk support, please visit www.lenco.com
Commaxx B.V. Wiebachstraat 37, 6466 NG Kerkrade, The Netherlands.
TECHNICAL OVERVIEW

-20-
NEDERLANDS
LET OP:
H et gebruik van afstandsbedieningen of aanpassingen of de uitvoering van procedures die niet in dit docu-
ment zijn gespeciceerd, kan leiden tot gevaarlijke blootstelling aan straling.
VOORZORGSMAATREGELEN VOOR GEBRUIK
ONTHOUD DE VOLGENDE INSTRUCTIES:
1. Bedek of blokkeer de ventilatieopeningen niet. Wanneer u het apparaat op een schap plaatst, dient u 5 cm
(2) vrije ruimte rondom het gehele apparaat te behouden.
2. Installeer het product volgens de meegeleverde gebruikershandleiding.
3. Houd het apparaat uit de buurt van hittebronnen, zoals radiatoren, verarmingen, kachels, kaarsen
en andere hittegenererende producten of open vuur. Het apparaat kan alleen orden gebruikt in
een gematigd klimaat. Extreem koude of arme omgevingen dienen te orden vermeden. Het
bedrijfstemperatuurbereik ligt tussen 0 C en 35 C.
4. Gebruik dit apparaat niet in de buurt van krachtige magnetische velden.
5. Elektrostatische ontlading kan normaal gebruik van dit apparaat verstoren. U hoeft het apparaat in dit
geval slechts te resetten en opnieu op te starten volgens de gebruikershandleiding. Wees voorzichtig
tijdens bestandsoverdracht en gebruik het product in een omgeving zonder statische interferentie.
6. Waarschuing Steek nooit een voorerp via de ventilatie- of andere openingen in het product. Er is
hoogspanning in het product aanezig en als u er een object insteekt, kan dat een elektrische schok
veroorzaken en/of kortsluiting in de interne onderdelen. Mors om dezelfde reden geen ater of vloeistof
op het product.
7. Gebruik het toestel niet in vochtige ruimtes, zoals badkamers, stomende keukens of in de buurt van
zembaden.
8. Het apparaat mag niet orden blootgesteld aan druppels en spetters en zorg ervoor dat er geen met
vloeistof gevulde voorerpen, zoals vazen, op of in de buurt van het apparaat orden geplaatst.
9. Gebruik dit apparaat niet anneer condensatie kan optreden. Wanneer het apparaat in een arme, natte
ruimte ordt gebruikt, kunnen zich aterdruppels of condens vormen in het apparaat en kan het apparaat
niet goed functioneren. Laat het apparaat 1 of 2 uur uit staan voordat u het inschakelt: het apparaat dient
droog te zijn voordat deze stroom ontvangt.
10. Alhoeel dit apparaat met grote zorg gefabriceerd en verschillende keren genspecteerd is voordat
het de fabriek verlaat, is het nog steeds mogelijk dat er problemen optreden, zoals met alle elektrische
apparaten. Als u rook, een overmatige hitteontikkeling of enig ander onveracht verschijnsel opmerkt,
moet u onmiddellijk de stekker van het netsnoer uit het stopcontact halen.
11. Dit apparaat moet orden gebruikt met een voedingsbron zoals gespeciceerd op het specicatielabel.
Als u tijfelt over het type voeding dat gebruikt ordt in u huis, raadpleeg dan u dealer of plaatselijk
energiebedrijf.
12. Buiten bereik van dieren houden. Sommige dieren kauen graag op voedingskabels.
13. Gebruik een zacht, droog doekje om het apparaat te reinigen. Gebruik geen oplosmiddelen of op benzine
gebaseerde vloeistoen. U kunt een vochtig doekje met verdund schoonmaakmiddel gebruiken om
hardnekkige vlekken te verijderen.
14. De leverancier is niet verantoordelijk voor schade of verloren gegevens veroorzaakt door storing,
misbruik, modicatie van het apparaat of batterijvervanging.
15. Onderbreek nooit de verbinding anneer het apparaat formatteert of bestanden overdraagt. De gegevens
kunnen anders corrupt of verloren raken.
16. Indien het apparaat een USB-afspeelfunctie heeft, moet de USB-geheugenstick rechtstreeks op het
apparaat orden aangesloten. Gebruik geen USB-verlengkabel, omdat die kan leiden tot storingen met
foutieve gegevens als gevolg.
17. Het classicatielabel bevindt zich op de onderkant of het achterpaneel van het apparaat.
18. Dit hulpmiddel is niet bedoeld voor gebruik door mensen (inclusief kinderen) met een fysieke, zintuiglijke
of mentale handicap, of een gebrek aan ervaring en kennis, tenzij zij toezicht of instructies hebben
gekregen over het juiste gebruik van het hulpmiddel door een persoon die verantoordelijk is voor hun
veiligheid.
19. Dit product is alleen voor niet-professioneel gebruik bedoeld en niet voor commercieel of industrieel
gebruik.
20. Verzeker u ervan dat het apparaat in een stabiele positie staat opgesteld. Schade die ordt veroorzaakt
door het gebruik van dit product in een onstabiele positie, trillingen of schokken of het niet opvolgen van

-21-
de aarschuingen of voorzorgsmaatregelen in deze gebruikershandleiding ordt niet gedekt door de
garantie.
21. Verijder nooit de behuizing van dit apparaat.
22. Plaats dit apparaat nooit op andere elektrische apparatuur.
23. Geef kinderen geen gelegenheid in aanraking met plastic zakken te komen.
24. Gebruik uitsluitend uitbreidingen/accessoires gespeciceerd door de fabrikant.
25. Laat alle reparaties over aan gekaliceerd onderhoudspersoneel. Onderhoud is nodig als het apparaat
is beschadigd, bijvoorbeeld als de voedingskabel of de stekker is beschadigd, als er vloeistof op het
apparaat is gemorst, als er voorerpen in het apparaat zijn gevallen, als het apparaat is blootgesteld aan
regen of vocht, als het apparaat niet normaal erkt of als het is gevallen.
26. Langdurige blootstelling aan harde geluiden van persoonlijke muziekspelers kan leiden tot tijdelijk of
permanent gehoorverlies.
27. Als het product ordt geleverd met voedingskabel of isselstroomvoedingsadapter:
•Als er zich problemen voordoen, moet u de voedingskabel loskoppelen en het ter onderhoud aanbieden
aan gekaliceerd personeel.
•Nooit op de voedingsadapter stappen of deze indrukken. Wees zeer voorzichtig, vooral in het gebied
rond de stekkers en de kabelaansluitingen. Plaats geen zare voorerpen op de voedingsadapter, om
beschadiging ervan te voorkomen. Houd het gehele apparaat buiten bereik van kinderen Wanneer
kinderen met de voedingskabel spelen, kunnen zij ernstig letsel oplopen.
•Haal de stekker uit het stopcontact tijdens oneer of anneer u deze langere tijd niet gebruikt.
•Het stopcontact moet in de buurt van de apparatuur zijn genstalleerd en eenvoudig te bereiken zijn.
•Laat AC-stopcontacten of verlengsnoeren nooit overbelast raken. Overbelasting kan brand of een elek-
trische schok veroorzaken.
•Apparaten met een Klasse 1 structuur dienen te orden aangesloten op een stopcontact met een
beschermende aardverbinding.
•Apparaten met een Klasse 2 structuur vereisen geen aardverbinding.
•Houd altijd de stekker vast anneer u deze uit het stopcontact trekt. Trek nooit aan de voedingskabel.
Dit kan tot een kortsluiting leiden.
•Gebruik nooit een beschadigde voedingskabel of stekker of een los stopcontact. Dit vormt namelijk een
risico op brand of elektrische schokken.
28. Indien het product knoopcelbatterijen bevat of ordt geleverd met een afstandsbediening die
knoopcelbatterijen bevat:
Waarschuing:
•Batterij niet inslikken, chemisch brandgevaar of gelijkaardige erking.
•De meegeleverde afstandsbediening bevat een knoopcelbatterij. Als de batterij ordt ingeslikt, kan deze
in slechts 2 uur ernstige interne brandonden veroorzaken en tot de dood leiden.
•Houd nieue en gebruikte batterijen buiten bereik van kinderen.
•Als de batterijhouder niet goed kan orden gesloten, dient u het product niet meer te gebruiken en
buiten bereik van kinderen te houden.
•Als u denkt dat batterijen zijn ingeslikt of binnenin een illekeurig lichaamsdeel terecht zijn gekomen,
dient u onmiddellijk medische hulp te zoeken.
29. Waarschuing m.b.t. het gebruik van batterijen:
•Als de batterij onjuist ordt geplaatst, bestaat er explosiegevaar. Vervang de batterij alleen door een
zelfde of vergelijkbare soort batterij.
•Stel de batterij niet bloot aan extreem hoge of lage temperaturen of een lage luchtdruk op grote hoogte
tijdens gebruik, opslag of transport.
•Vervanging van een batterij door een incorrect type kan leiden tot een ontplong of de lekkage van
ontvlambare vloeistoen of gas.
•Het eggooien van een batterij in het vuur of een hete oven, of het mechanisch verpletteren of insnijden
van een batterij, kan leiden tot een explosie.
•Het achterlaten van een batterij in een omgeving met extreem hoge temperaturen kan leiden tot een
explosie of het lekken van brandbare vloeistof of gas.
•Een batterij die aan een extreem lage luchtdruk ordt blootgesteld, kan leiden tot een explosie of het
lekken van brandbare vloeistof of gas.
•Aandacht voor het milieu is nodig bij het verijderen van de batterijen.
INSTALLATIE:
•Pak alle onderdelen uit en verijder de beschermende materialen.
•Sluit het apparaat niet aan op het stopcontact, voordat u de netspanning hebt gecontroleerd en voordat alle
andere aansluitingen zijn gemaakt.

-22-
W AARSCHUW ING VOOR CD / DVD SPELER:
Dit product bevat een laser met laag vermogen.
KLASSE 1 LASERPRODUCT
APPAREIL LASER DE CALSSE 1
PRODUCO LASER DE CLASE 1
LET OP
ONZICHTBARE STRALING
WANNEER OPEN EN BEVEILIGING
NIET INTACT.
VERMIJD BLOOTSTELLING AAN DE
BUNDEL
W AARSCHUW ING: RAAK DE LENS NIET AAN.
W AARSCHUW ING: Bij deelname aan het verkeer kan het luisteren naar
een persoonlijke muziekspeler de gebruiker minder beust maken van
mogelijke gevaren zoals het naderen van auto’s.
W AARSCHUW ING: Om mogelijke gehoorschade te voorkomen, moet u
niet te lang op hoog volume luisteren.
ACCESSOIRES:
• Netsnoer
• Afstandsbediening
Gebruiksaanijzing
K lasse 1 Laserproduct

-23-
12 3 4+
SOURCE
MENU
INFO
ENTER
SCAN
VOLUME
OVERZICHT
1 2 3 4 5 6 7 8 9 10 11 12 13
1. USB input: Aansluiting voor USB-stick.
2. SOURCE :Druk op deze toets om verschillende modi te kiezen: DAB+/FM/CD/USB/BLUETOOTH/CASSETTE TAPE/AUX IN.
3. MENU / INFO: DAB+: Druk herhaaldelijk om de zenderinformatie eer te geven.
Ingedrukt houden tot het menu opent voor het ijzigen van de instellingen. Druk of
om het menu item te selecteren.
FM: Druk herhaaldelijk om de zenderinformatie eer te geven.
Ingedrukt houden tot het menu opent voor het ijzigen van de instellingen. Druk of
om het menu item te selecteren.
4. TERUG : DAB+: Druk om de informatie van de vorige zender eer te geven.
FM: Korte drukken om af te stemmen op een andere frequentie. Ingedrukt houden om de vorige
beschikbare zender te scannen.
CD/USB/BT:Druk om naar het vorige nummer te gaan of naar het begin van het spelende nummer.
5. POWER : Druk om het toestel aan te zetten. Druk nogmaals om het toestel uit te schakelen en naar de stand-by
modus te gaan.
6. RADIOZENDERS NUMMERIEKE TOETSEN
1234+
:
DAB+/FM: Druk op deze toetsen om het opgeslagen radiostation direct te kiezen. Houd de toets
ingedrukt om het ontvangen radiostation op te slaan.
CD/USB: Druk op de REPEAT-toets (3) om over te schakelen naar een andere herhalingsfunctie.
Druk op de PROGRAM-toets (4+) om de programma-modus in te stellen. Druk op de toets
FOLDER om de map te ijzigen (alleen voor MP3).
BT: Houd de PAIR-toets ingedrukt om de huidige verbinding te verbreken en een ander nieu
Bluetooth-apparaat te zoeken.
7. DISPLAY: Geeft de bedrijfsstatus van het apparaat en de informatie eer.
8. CASSETTE BEDIENINGS TOETSEN: (PAUZE / STOP/EJECT / VOORUIT / TERUGUIT / AFSPELEN / OPNEMEN)
9. VOLUME: Regelt het hoofdvolume.
10. STOP / ENTER: DAB+ / FM:Druk om de menu-instelling te selecteren of vast te leggen.
CD / USB: Druk om het afspelen te stoppen.
11. NEXT : DAB+: Druk om de volgende zenderinformatie eer te geven.
FM: Druk korte op de toets om af te stemmen op een andere frequentie. Ingedrukt houden om
naar het volgende beschikbare station te gaan.
CD/USB/BT: Druk om naar het volgende nummer te zoeken.
12. PLAY-PAUSE/SCAN: DAB+: Druk om te starten met het automatisch scannen van alle beschikbare DAB+ zenders.
FM: Kort indrukken om te isselen tussen stereo en mono audio. Druk om te starten met het
automatisch scannen van alle beschikbare FM-zenders.
CD/USB/BT: Druk om te schakelen tussen pauze en afspelen van de nummers.
13. Klep van het CD-schijfcompartiment
14. Klep van het cassettebandcompartiment

-24-
SOURCE
MENU
INFO
ENTER
SCAN
FOLDER PAIR REPEAT PROGRAM
1234+
VOLUME
CASSETTE RECORDER
1416 15 1615
~AC IN
OPEN OPEN
AUX IN
17 18 19 20 2221
15. Bass poort
16. Luidspreker
17. Draagbeugel
18. Deksel batterijvak
19. AUX IN: Ingang voor externe geluidsbron
20. Oor/kop telefoon uit: Aansluiting voor een externe oorset of koptelefoon (3,5mm stereo plug)
21. Antenne: De antenne dient te orden uitgetrokken tot een zo best mogelijke DAB+ /FM ontvangst is bereikt.
22. ~ AC in: Aansluiting voor het 240V ~ netsnoer
REPEAT
RANDOM
VOL
DISPLAY
23. Standby
24. Numerieke toetsen
25. Geheugen
26. Terug / Tune
27. Folder
28. Herhaal
29. Folder
30. Info - Scan - Menu
31. BT terug - BT Volgende - BT Afspelen/pauze
32. ID3 Tag eergeven - CD/USB Stop - CD/USB Afspelen/Pauze
33. Volume+/-
34. Mute (stilte)
35. Willekeurig
36. CH- (Kanaal-)
37. Volgende / Tune
38. Enter
39. Mono/Stereo
40. CH+ (Kanaal+)
41. Slaap functie
42. X-Bass (Extra Bass)
43. Equalizer
44. Source (Bron)
23
24
25
26
27
28
29
30
31
32
43
42
41
40
39
38
37
36
35
34
44
33

-25-
PLAATSEN BATTERIJEN
~AC IN
AUX IN
C 1,5V C 1,5V C 1,5V
C 1,5V C 1,5V C 1,5V
+
+
OPEN OPEN
+ 1,5V
+ 1,5V
+ 1,5V
1,5V + 1,5V + 1,5V +
W ERK ING OP BATTERIJEN:
Voor de erking op batterijen moet u eerst de netstekker uit het
stopcontact halen en het netsnoer uit de SCD-720-aansluiting halen.
Verijder het klepje van het batterijvakje aan de achterkant van het
apparaat. Plaats 6st UM-2 (LR14) C-batterijen (NIET meegeleverd)
met de juiste polariteit in het batterijvak. Plaats het batterijvakklepje
over het batterijvakje.
opmerking:
-Aangezien het apparaat in de standby-modus een beetje energie
uit de batterijen haalt, moet u de batterijen verijderen als het
apparaat gedurende lange tijd niet ordt gebruikt.
-Omdat het apparaat tijdens batterij gebruik in de standby-modus
in de energiebesparende status staat, erkt de STANDBY-toets
van het apparaat ALLEEN door deze langer dan 5 seconden inge-
drukt te houden om het apparaat in te schakelen. Om het toestel
uit te schakelen, drukt u nogmaals op de STANDBY-toets.
W ERK ING VAN DE AFSTANDSBEDIENING:
Voor het eerste gebruik moet u het label van de plastic batterijbe-
scherming verijderen door aan de lip te trekken.
Voor het vervangen van de batterij ( CR2025).
Open het batterijcompartiment door de borglip in te drukken en uit het
cabinet te trekken.
Vervang de CR2025 knoopcel en plaats de batterijhouder terug in de
afstandsbediening.

-26-
SCD-720 AANZETTEN
Sluit de SCD-720 met de voedingskabel aan op het 240V lichtnet.
Als u de voedingskabel aansluit op de SCD-720,
orden de eventueel geplaatste batterij automatisch
uitgeschakeld.
Druk op de STANDBY-toets om het toestel in te schakelen.
Om het toestel uit te schakelen, drukt u nogmaals op
de STANDBY-toets.
Met de SOURCE-toets kunt u de ingangsbron selecteren
U kunt kiezen uit:
DAB+ RADIO
FM RADIO
CD
USB
BLUETOOTH
TAPE (CASSETTE)
AUDIO IN (AUX)
~AC IN
OPEN OPEN
AUX IN
SOURCE
MENU
INFO
ENTER
SCAN
FOLDER PAIR REPEAT PROGRAM
1234+
VOLUME
CASSETTE RECORDER
OOR/HOOFDTELEFOON GEBRUIK
Op de achterzijde van de SCD-720 vindt u de koptelefoonaansluiting.
Gebruik een oorset of hoofdtelefoon met 3, 5 mm stereo-aansluiting om de hoofdtelefoon aan te sluiten op de SCD-720.
Als je de 3,5mm stereo-aansluiting in de SCD-720 steekt, zullen de luidsprekers van de SCD-720 uitgeschakeld orden.
Alleen de koptelefoon zal nu erken.
U kunt het volume regelen met de volumeknop. Alle andere functies zijn hetzelfde als bij normaal gebruik zonder aangesloten
oorset of hoofdtelefoon.
~AC IN
OPEN OPEN
AUX IN

-27-
Aanpassen van de antenne
De antenne op het achterpaneel van het apparaat moet volledig orden uitgeschoven om een goede DAB+ / FM-ontvangst te
garanderen. Wijzig de positie van de antenne voor de beste ontvangst.
DAB+ W ERK ING
De eerste keer dat de DAB+ functie ordt geselecteerd, zal deze automatisch scannen naar de beschikbare DAB+ zenders.
Wacht tot het scannen klaar is. Het display toont de voortgang van het scannen. Na het scannen start het eerste station.
De beschikbare stations van een bepaalde ontvangstband orden op het display eergegeven. In geval van een
zakke ontvangst kan het station haperen of geen geluid geven. Probeer de ontvanger te verplaatsen of de antenne
te draaien zodat het zakke DAB+ signaal binnenkomt zonder te haperen. (Zendernamen orden nog steeds
getoond als het signaal zak of te zak is).
Automatisch scannen
1. Zet het toestel aan in de DAB+ modus.
2. H oud de toets SCAN ingedrukt (of druk op de toets SCAN op de afstandsbediening) om het automatisch scannen van de
beschikbare zenders te starten.
Handmatig scannen
Door gebruik te maken van de handmatige scanfunctie kan het helpen om de antenne te draaien of aan te passen om de
geenste zender die tijdens het automatisch scannen is gemist, te kunnen ontvangen.
1. Zet het toestel aan in de DAB+ modus.
2. H oud de MENU-toets ingedrukt (of druk op de MENU-toets op de afstandsbediening) om toegang te krijgen tot de menu
bediening.
3. Druk op de of toets tot Handm. afstmmn. ordt eergegeven en druk dan op de ENTER toets.
4. Druk op de of toets om het geenste kanaal (bv. 12C 227.360MHz) te selecteren (Selectie tussen 5A en 13F).
5. Druk op de ENTER-toets om te bevestigen.
6. Om een ander kanaal (5A-13F) te selecteren, drukt u op de of toets en vervolgens op de ENTER toets om te
bevestigen.
7. Wanneer de zender is gevonden, drukt u op de ENTER-toets om te selecteren.
8. Om de handmatige scan te stoppen, drukt u op de MENU-toets.
Af stemmen
Na het scannen van alle beschikbare DAB-zenders drukt u op de toets of om de zenderlijst eer te geven en te
doorlopen. Druk vervolgens op de ENTER-toets om binnen enkele seconden op deze zender af te stemmen.
Opslaan van DAB+ voorinstellingen
U kunt tot 20 DAB+ stations opslaan.
Om de numerieke toetsen van het toestel te gebruiken voor het opslaan van de voorkeurzenders:
1. Stem af op de zender die u ilt opslaan.
2. Om de zender onder 1, 2 of 3 op te slaan, houdt u de numerieke toets ingedrukt. Dan zal de zender orden
opgeslagen onder de geenste voorkeur toets.
3. Om een andere voorkeurszender onder 4 tot 20 op te slaan, houdt u de numerieke toets 4 ingedrukt. Save Preset
ordt eergegeven.
4. Druk op toets of om het geenste voorkeuzenummer te selecteren die u ilt gebruiken om onder op te slaan.
5. Druk op de ENTER om op te slaan.
Om via de afstandsbedieningstoetsen de voorkeurzenders op te slaan:
1. Stem af op een zender die u ilt opslaan.
2. Druk op de toets MEMORY en houd deze ingedrukt, Save Preset ordt eergegeven.
3. Druk op toets of om het geenste voorkeuzenummer te selecteren die u ilt gebruiken om onder op te
slaan.
4. Druk op de ENTER om op te slaan.
DAB+ RADIO
REPEAT
RANDOM
VOL
DISPLAY

-28-
Opgeslagen DAB+ voorkeurze nder terugroepen
De toesteltoetsen gebruiken om de voorkeurszenders terug te roepen.
1. Om de voorkeurszender van kanaal 1, 2 of 3 op te roepen, drukt u respectievelijk op de toets met het geenste nummer.
Dan zal het voorkeurszender orden afgespeeld.
2. Om een andere voorkeurzender onder 4 tot 20 op te roepen, druk op toets 4. Recall Preset verschijnt in het display.
3. Druk op toets of om de geenste voorkeurzender te selecteren om af te spelen.
4. Druk op de ENTER om de zender te starten.
Om via de afstandsbedieningstoetsen de voorkeurzenders te kiezen:
1. Druk op de toets MEMORY, Recall Preset ordt eergegeven.
2. Druk op toets of om de geenste voorkeurzender te selecteren om af te spelen.
3. Druk op de ENTER om de zender te starten.
W eergave van DAB+ Zender Inf ormatie
Er zijn verschillende soorten gegevens mogelijk zoals hieronder vermeld. Om de display-informatie te ijzigen, drukt u her-
haaldelijk op de INFO-toets.
1. Radiotekst scrollen: Toont muziektitels of programmadetails die door de zender zijn verstrekt.
2. Signal Bar: Sterkte van het ontvangen zendsignaal. Hoe meer karakters er orden eergegeven, hoe sterker het
ontvangen signaal is. Om de ontvangst te verbeteren dient u de positie van de antenne aan te passen.
3. Programma Type (PTY): Soort programma dat door de zender ordt aangeboden.
4. Multiplex Naam: Geeft de multiplexnaam eer van de multiplex aartoe de huidige zender behoort.
5. Frequentie: Huidige kanaalfrequentie.
6. Signaalfout: Geeft de foutmarge aan. Hoe groter deze aarde is, hoe meer fouten er orden gemaakt. Om de
ontvangst te verbeteren, past u de positie van de antenne aan.
7. Audio Bit Rate: Dit is de huidige kanaal-audiobitrate.
ANDERE DAB+ MENUFUNCTIES
H oud de MENU-toets ingedrukt (of druk op de MENU-toets op de afstandsbediening) om toegang te krijgen tot de
menubediening. Druk vervolgens op de of toets voor verschillende opties zoals hieronder beschreven.
Dynamic Range Control (DRC) (zi e Opmerking)
DRC kan de zachtere geluiden luider maken voor als het toestel in een laaaierige omgeving ordt gebruikt. Het niveau
van een uitzending in de DRC ordt door de omroeporganisatie vastgesteld en samen met de dienst doorgegeven. Door de
DRC-aarde op u toestel te ijzigen, kunt u het eect op verschillende niveaus toepassen.
Er zijn drie compressieniveaus:
DRC hoog: Maximale compressie anneer dit ordt ondersteund door de uitzendservice van de zender
DRC laag: Halvering van de compressie, anneer deze functie beschikbaar is.
DRC uit: Geen functie
1. H oud de MENU-toets ingedrukt (of druk op de MENU-toets op de afstandsbediening) om toegang te krijgen tot de
menubediening.
2. Druk op de of toets tot DRC ordt eergegeven en druk dan op de ENTER toets.
3. Druk op de toets of om de DRC-aarde te selecteren en druk dan op ENTER om te bevestigen.
4. Druk op de MENU-toets om de menubesturing te verlaten.
Opmerking:
-Niet alle DAB+ uitzendingen kunnen de DRC-functie gebruiken. Als de uitzending de DRC niet ondersteunt, heeft de
DRC-instelling in de eenheid geen eect.
-Nadat u het DRC-niveau hebt aangepast, kan het geluid harder zijn.
Prune
Deze functie verijdert inactieve stations.
1. H oud de MENU-toets ingedrukt (of druk op de MENU-toets op de afstandsbediening) om toegang te krijgen tot de
menubediening.
2. Druk op de of toets tot Prune ordt eergegeven en druk dan op de ENTER toets.
3. Druk op de of toets om Ja te selecteren en druk dan op de ENTER toets om de functie te activeren.
4. Druk op de MENU-toets om de menubesturing te verlaten.
REPEAT
RANDOM
VOL
DISPLAY
Radiotekst scrollen Signal Bar Programma Type (PTY)
Multiplex Naam Frequentie Signal Error Rate Audio Bit Rate

-29-
Aanpassen van de antenne
De antenne op het achterpaneel van het apparaat moet volledig orden uitgeschoven om een goede DAB+ / FM-ontvangst te
garanderen. Wijzig de positie van de antenne voor de beste ontvangst.
FM-RADIOBEDIENING
Automatisch scannen
1. Zet het toestel aan op de FM-functie door te selecteren met de SOURCE toets.
2. H oud de toets SCAN ingedrukt om het automatisch scannen te starten en de beschikbare zenders op te slaan
(max. 20 opslag).
Handmatig scannen
1. Druk herhaaldelijk op de of toets om af te stemmen op een andere frequentie.
2. H oud de of toets ingedrukt om automatisch naar de volgende beschikbare zender te zoeken.
Opslaan van FM-voorinstellingen
U kunt tot 20 FM-zenders opslaan.
Gebruik de toetsen van het toestel om de voorkeurzenders op te slaan:
1. Stem af op de zender die u ilt opslaan.
2. Om de zender op te slaan in de vooraf ingestelde nummers 1, 2 of 3, houdt u de numerieke toets ingedrukt. Dan zal de
zender orden opgeslagen onder het geselecteerde nummer.
3. Om de zender op te slaan onder een nummer van 4 tot 20, houdt u de toets 4+ ingedrukt. Opslaan ordt eergegeven.
4. Druk op de toets of om het geenste voorkeuzenummer te selecteren om op te slaan.
5. Druk op de ENTER om op te slaan.
Om via de afstandsbedieningstoetsen de voorkeurzenders op te slaan:
1. Stem af op de zender die u ilt opslaan.
2. H oud de toets MEMORY ingedrukt, Save Preset ordt eergegeven.
3. Druk op de toets of om het geenste voorkeuzenummer te selecteren dat u ilt opslaan.
4. Druk op de ENTER om op te slaan.
Opgeslagen FM-voorinstellingen oproepen
Om de toetsen van het toestel te gebruiken om de voorkeurzenders op te roepen:
1. Om het vooringestelde nummer 1, 2 of 3 op te roepen, drukt u respectievelijk op de numerieke toets. Dan zal het
afstemmen op dat vooringestelde kanaal.
2. Om een ander vooringesteld nummer van 4 tot 20 op te roepen, drukt u op de numerieke toets 4. Recall ordt
eergegeven.
3. Druk op de toets of om het geenste voorkeuzenummer te selecteren dat u ilt oproepen.
4. Druk op de ENTER-toets om terug te roepen.
Om de toets van de afstandsbediening te gebruiken om de voorkeurzenders op te roepen :
1. Druk op de toets MEMORY, Recall ordt eergegeven.
2. Druk op de toets of om het geenste voorkeuzenummer te selecteren dat u ilt oproepen.
3. Druk op de ENTER-toets om op te roepen.
Stereo/Mono Selectie
Wanneer u een Stereo FM-radiozender ontvangt, drukt u op de toets PLAY/PAUSE op het apparaat (of op de toets MONO/ST.
op de afstandsbediening) om te schakelen tussen stereo-audio of mono-audio.
W eergave van FM-ze nderinf ormatie
Er zijn verschillende soorten informatie zoals hieronder vermeld. Om de eergave-informatie te ijzigen, drukt u herhaaldelijk
op de INFO-toets.
1. Radiotekst: Scrollende tekst met informatie over muziektitels of programmadetails van de radiozender.
2. Type programma (PTY): Soort programma dat door de omroeporganisatie ordt aangeboden.
3. Frequentie: Huidige ontvangstfrequentie.
4. Audiotype: Stereo of Mono.
FM RADIO
REPEAT
RANDOM
VOL
DISPLAY
REPEAT
RANDOM
VOL
DISPLAY
Radiotekst Programma Type (PTY) Frequentie Audiotype

-30-
ANDERE FM MENUBEDIENING
H oud de MENU-toets ingedrukt (of druk op de MENU-toets op de afstandsbediening) om toegang te krijgen tot de
menubediening. Druk vervolgens op de of toets voor verschillende opties zoals hieronder beschreven.
Scaninstelling
1. H oud de MENU-toets ingedrukt (of druk op de MENU-toets op de afstandsbediening) om toegang te krijgen tot de menu
bediening.
2. Druk op de toets of tot Scan ordt eergegeven en druk dan op de toets ENTER.
3. Druk op de of toets om te isselen tussen Strong (sterke zenders) en All (alle zenders) en druk dan op de
ENTER toets om te bevestigen. Wanneer de Strong is geselecteerd, orden alleen de sterke zenders gedetecteerd.
Tijdens scannen zullen de zakke zenders orden overgeslagen. Wanneer All is geselecteerd, zullen alle zenders
orden gedetecteerd tijdens het FM-scannen, zelfs als de radiozender met ruis ordt ontvangen of een frequentie met
hoge veldsterkte zonder signaal.
4. De volgende keer dat een FM-scan ordt uitgevoerd, zullen de zenders orden gezocht op basis van deze instelling.
Audio Setting
1. H oud de MENU-toets ingedrukt (of druk op de MENU-toets op de afstandsbediening) om toegang te krijgen tot de menu
bediening.
2. Druk op de of toets tot Audio ordt eergegeven en druk dan op de ENTER toets.
Druk op de of toets om te isselen tussen Stereo of Mono selectie en druk dan op de ENTER toets om te
bevestigen.
Laden en af spelen van CD’s
Open de CD-klep. Plaats een cd met de cd-labelzijde naar boven. Sluit de CD-klep. Druk op de SOURCE-toets tot CD-modus
is geselecteerd. Na het lezen van de CD ordt het totaal aantal tracks op het display eergegeven en begint automatisch af
te spelen.
Leze n en af spelen van USB-apparaat
Steek een USB-stick in de USB-ingangsaansluiting. Druk op de SOURCE-toets tot de USB-modus is geselecteerd. Na het
lezen ordt het totaal aantal tracks op het display eergegeven en begint automatisch af te beginnen te spelen.
Af speel/Pauze f unctie
Om het afspelen te pauzeren drukt u op de toets . Druk nogmaals op de toets om de eergave te hervatten.
Stop f unctie
Om het afspelen te stoppen drukt u op de -toets.
Track overslaan
Druk tijdens het afspelen op de of toets om naar het vorige of volgende nummer te gaan.
Muzi ek zo eken met hoge snelheid
Houd tijdens het afspelen de of toets ingedrukt om op hoge snelheid te zoeken.
Wanneer u de of toets loslaat, ordt de normale snelheidseergave hervat.
Herhaald af spelen / W illekeurig af spelen
CD-schijf modus
Druk tijdens de eergave één keer op de REPEAT-toets, op het display verschijnt REP.ONE. Het huidige nummer zal
herhaaldelijk orden afgespeeld.
Als u nogmaals op de REPEAT-toets drukt, verschijnt op het display REP.ALL. Alle nummers orden herhaaldelijk
afgespeeld.
Als u nogmaals op de REPEAT-toets drukt, verschijnt op het display RANDOM. Alle nummers orden in illekeurige
volgorde afgespeeld.
Wanneer u opnieu op de REPEAT-toets drukt, zal het toestel terugkeren naar de normale eergave.
MP3-cd of MP3 USB-modus
Druk tijdens de eergave één keer op de REPEAT-toets, op het display verschijnt REP.ONE. Het huidige nummer zal
herhaaldelijk orden afgespeeld.
Wanneer u opnieu op de REPEAT-toets drukt, verschijnt op het display REP.ALBUM. Alle nummers in de huidige map
orden herhaaldelijk afgespeeld.
Als u nogmaals op de REPEAT-toets drukt, verschijnt op het display REP.ALL. Alle nummers orden herhaaldelijk
afgespeeld.
Als u nogmaals op de REPEAT-toets drukt, verschijnt op het display RANDOM. Alle nummers orden in illekeurige
volgorde afgespeeld.
Wanneer u opnieu op de REPEAT-toets drukt, zal het toestel terugkeren naar de normale eergave.
CD/USB OPERATION

-31-
Geprogrammeerde w eergave
CD-modus
Dit apparaat kan orden geprogrammeerd om een reeks geselecteerde tracks af te spelen.
1. Druk in de stopmodus op de toets PROGRAM, het display geeft het programmanummer en het tracknummer eer..
2. Druk op de of toets om het geenste nummer te selecteren.
3. Druk op de toets PROGRAM om het geenste nummer op te slaan.
4. Herhaal de stappen 2-3 om tot 30 geprogrammeerde tracks te programmeren.
5. Druk op de toets om de geprogrammeerde tracks af te spelen.
6. Om het afspelen van het programma te issen, drukt u tee keer op de -toets of schakel over naar een andere modus.
7. Tijdens het afspelen van programma’s kunt u ook de Repeat One of Repeat All functie uitvoeren, maar Random Play
ordt niet ondersteund.
MP3-cd of MP3 USB-modus
1. Druk in de stopmodus op de toets PROGRAM, het display geeft het programmanummer en het mapnummer eer.
2. Druk op de toets FOLDER (of op de toets FOLDER˄ / FOLDER˅ op de afstandsbediening) om de geenste map te
selecteren.
3. Druk op de toets PROGRAM om de geenste map op te slaan.
4. Druk op de of toets om het geenste nummer te selecteren.
5. Druk op de toets PROGRAM om het geenste nummer op te slaan.
6. Herhaal de stappen 2-5 om maximaal 99 geprogrammeerde tracks te programmeren.
7. Druk op de toets om de geprogrammeerde tracks af te spelen.
8. Om het afspelen van het programma te issen, drukt u tee keer op de -toets of schakel over naar een andere modus.
9. Tijdens het afspelen van programma’s kunt u ook de Repeat One of Repeat All functie uitvoeren, maar Random Play
ordt niet ondersteund.
Opmerkingen:
- De USB-poort is alleen bedoeld voor het afspelen, NIET voor het opladen van een extern apparaat.
- Het toestel kan alleen MP3-bestanden afspelen in CD/USB-modus.
- Als u USB-stick is geladen met MP3’s, maar het display blijft NO tonen, is het mogelijk dat het formaat van u
USB-stick niet compatibel is met het apparaat.
- Het apparaat ondersteunt USB-versie 1.1 en 2.0.
- Het apparaat ondersteunt USB-sticks met een capaciteit tot 32GB.
- Het toestel is mogelijk niet compatibel met alle USB-sticks, dit is geen probleem van het toestel.
-Voor MP3-eergave orden maximaal 255 mappen met maximaal 999 bestanden ondersteund.
-Door het USB-le lees/schrijfmechanisme ordt het eerste bestand dat naar het USB-stick ordt geschreven als
eerste afgespeeld en het laatste bestand dat ordt geschreven als laatste (Het toestel zal niet alfabetisch sorteren).
Map selecteren (alleen MP3-bestand)
Druk tijdens de MP3-eergave op de toets FOLDER (of op de toets FOLDER˄ / FOLDER˅ op de afstandsbediening) om
naar de map te gaan.
Druk in de stopmodus op de toets FOLDER (of op de toets FOLDER˄ / FOLDER˅ op de afstandsbediening) om naar de map
te gaan. Druk vervolgens op de toets of om de geenste track te selecteren die u ilt afspelen. Druk op de toets
om het afspelen van de nummers te starten.
ID3 Tag Display (alleen MP3-bestand w aarin de ID3 Tag-inf ormatie is opgenomen)
De toets DISPLAY op de afstandsbediening kan orden gebruikt om de eergave van de ID3-tag aan/uit te schakelen.
Wanneer deze is ingeschakeld, orden de titel, de artiest en de albumgegevens van het MP3-track eergegeven.
Volg de onderstaande koppelingsinstructies om het toestel aan u Bluetooth-apparaat te koppelen.
1. Druk herhaaldelijk op de SOURCE-toets om de Bluetooth-modus in te schakelen. Op het display verschijnt BT AUDIO.
Het zal beginnen met zoeken en zal een knipperende BT AUDIO eergeven.
2. Als het toestel nog nooit eerder met een Bluetooth-apparaat is gekoppeld of het laatste gekoppelde apparaat niet kan
vinden, blijven het scherm en de Bluetooth-statusindicator knipperen. Schakel de Bluetooth-functie van u toestel in en
activeer het zoeken tot Lenco SCD-720 is gevonden. Selecteer Lenco SCD-720 op het Bluetooth-apparaat om
verbinding te maken. Geef indien nodig het achtoord 0000 in.
3. Na het succesvol koppelen zal het apparaat constant BT AUDIO eergeven.
4. U kunt nu beginnen met het draadloos afspelen van muziek vanaf u smartphone naar de luidsprekers.
5. U kunt op de toets drukken om het afspelen te pauzeren of te hervatten.
6. U kunt op de of toets drukken om naar het vorige of volgende nummer te zoeken.
Opmerkingen:
-H oud de PAIR-toets ingedrukt om de huidige verbinding te verbreken en een ander nieu Bluetooth-apparaat te zoeken.
-Dit product heeft een bluetooth-ontvangstfunctie, u kunt er geen Bluetooth-geluid mee egsturen (Bluetooth-hoofdtelefoon
of oorset ontvangen geen signaal van de SCD-720): dit betekent dat u alleen een bluetooth-geluidssignaal kunt ontvangen
van een externe bron zoals een smartphone.
BLUETOOTH

-32-
Druk herhaaldelijk op de SOURCE-toets om de cassetterecordermodus te openen. Op het display verschijnt TAPE.
De bedieningsknoppen van de cassetterecorder bevinden zich aan de bovenzijde van het toestel.
1. Druk op de CASSETTE STOP/EJECT-knop om de cassetterecorderklep te openen.
2. Plaats de cassetteband en sluit de deur goed af.
3. Druk op de knop CASSETTE PLAY om af te spelen.
4. Druk op de knop CASSETTE PAUSE om het afspelen te pauzeren. Om de eergave te hervatten, drukt u op de
knop CASSETTE PAUSE om deze te ontgrendelen.
5. Om het afspelen te stoppen, drukt u op de CASSETTE STOP/EJECT-knop .
6. Druk in de stopmodus op de CASSETTE FORWARD of REWIND knop om de band door te spoelen of terug te
spoelen.
7. Om de cassettedeur tijdens de stop te openen, drukt u eenmaal op de CASSETTE STOP/EJECT-knop .
8. Om de cassettedeur tijdens het afspelen te openen, drukt u tee keer op de CASSETTE STOP/EJECT-knop .
9. Om op te nemen, drukt u de CASSETTE PLAY en RECORD knop samen in.
Opmerkingen:
-Alleen type 1 Normale cassetteband kan orden gebruikt voor opname.
-Als er tape speling is, spoel dan de speling terug met een potlood om te voorkomen dat de tape of het apparaat ordt
beschadigd.
-Achter op de cassette zitten links en rechts een lipje. Dit lipje kan orden uitgebroken. Als dit lipje is uitgebroken is het niet
meer mogelijk om op die zijde van de cassette opnames te maken. Als beide lipjes zijn verijderd is het niet meer mogelijk
om opnames op de cassette te maken. De RECORD knop blokkeert dan en is niet in te drukken.
CASSETTE RECORDER
Speelzijde is naar voren gericht.
Plaats de cassetteband met de
bandzijde naar boven.

-33-
AUX IN (Audio in)
Hierdoor kunt u het geluid van een externe speler via u toestel aansluiten.
1. Sluit een 3,5 mm audiokabel (niet meegeleverd) aan op u externe speler en de andere zijde op de AUX IN-aansluiting.
2. Druk op de toets SOURCE om de AUX-modus te selecteren. Het display toont AUDIO IN.
3. Start u externe speler om muziek af te spelen en regel het geluidsvolume op de externe speler omhoog.
4. Het apparaat speelt het geluid af.
EQ FUNCTIE / X BASS
U kunt genieten van verschillende EQ geluidseecten. Druk op de toets EQUALIZER op de afstandsbediening om over te
schakelen naar verschillende geluidseecten zoals: FLAT / ROCK / CLASSIC / POP / VOCAL / JAZZ.
U kunt ook het bas-eect van de muziek versterken. Druk op de X-BASS toets op de afstandsbediening om het X-Bass eect
te schakelen tussen AAN en UIT.
Opmerking:
-Wanneer X-Bass is ingeschakeld, ordt het EQ geluidseect uitgeschakeld. Als u op de toets EQUALIZER drukt, ordt
alleen X-Bass On eergegeven zonder EQ-eect. Om het EQ geluidseect te hervatten, drukt u eerst op de X-BASS toets
om deze uit te schakelen.
SLAAP FUNCTIE
1. Als het apparaat is ingeschakeld, drukt u herhaaldelijk op de SLEEP-toets op de afstandsbediening om een slaapduur te
kiezen uit SLEEP OFF, 90, 80, 70, 60, 50, 40, 30, 20 of 10 minuten. Wanneer de slaaptimer is ingesteld, zal de resterende
timer periodiek op het display orden eergegeven.
2. Wanneer de slaaptimer op nul staat, ordt het toestel automatisch uitgeschakeld.
3. Om de slaapfunctie te annuleren, drukt u op de STANDBY-toets om het toestel uit te schakelen. Of druk herhaaldelijk op
de SLEEP-toets om SLEEP OFF te selecteren.
TAALINSTELLING
U kunt de taal van het toestel instellen.
4. Zet het toestel aan in de DAB+ -of FM-modus.
5. H oud de MENU-toets ingedrukt (of druk op de MENU-toets op de afstandsbediening) om toegang te krijgen tot de menu
bediening.
6. Druk op de of toets tot System ordt eergegeven en druk dan op de ENTER toets.
7. Druk op de of toets tot Language ordt eergegeven en druk dan op de ENTER toets.
8. Druk op de of toets om te isselen tussen verschillende talen. Selecteer de geenste taal en druk vervolgens op
de ENTER-toets om te bevestigen.
9. Druk op de MENU-toets om de menubesturing te verlaten.
SOFTW AREVERSIECONTROLE
U kunt de softareversie van het apparaat controleren.
1. Zet het toestel aan in de DAB+ - of FM modus.
2. H oud de MENU-toets ingedrukt (of druk op de MENU-toets op de afstandsbediening) om toegang te krijgen tot de
menubediening.
3. Druk op de of toets tot System ordt eergegeven en druk dan op de ENTER toets.
4. Druk op de toets of tot SW ver ordt eergegeven en druk dan op de toets ENTER om het
softareversienummer eer te geven.
5. H oud de MENU-toets ingedrukt (of druk op de MENU-toets op de afstandsbediening) om de menubediening te verlaten.
FABRIEK SRESET
Deze functie zet het toestel terug naar de oorspronkelijke fabrieksinstellingen.
1. Zet het toestel aan in de DAB+ - of FM modus.
2. H oud de MENU-toets ingedrukt (of druk op de MENU-toets op de afstandsbediening) om toegang te krijgen tot de
menubediening.
3. Druk op de of toets tot System ordt eergegeven en druk dan op de ENTER toets.
4. Druk op de of toets tot Reset ordt eergegeven en druk dan op de ENTER toets.
5. Druk op de of toets tot Yes ordt eergegeven en druk dan op de ENTER toets om het apparaat te resetten.
ENERGIEBESPARING
Als gevolg van de ErP-vereiste en de bescherming van het milieu, zal het apparaat automatisch orden uitgeschakeld in de
stand-by-modus zodra er geen muziek ordt afgespeeld rond 15 minuten.
Wanneer het apparaat door ErP is uitgeschakeld, kunt u op de STANDBY-toets drukken om het apparaat eer in te
schakelen.
OTHER FUNCTIONS

-34-
FUNCTIONS REMOTE CONTROL
Standby: Druk op de STANDBY-toets om het toestel in te
schakelen.
Om uit te schakelen, drukt u opnieu op de
STANDBY-toets.
Source: Selectie van de gebruikersfunctie: DAB+ RADIO,
FM-RADIO, CD, USB, BLUETOOTH,
CASSETTE RECORDER (CASSETTE),
AUDIO IN (AUX).
Equalize r: EQ instelling: FLAT / ROCK / CLASSIC / POP /
VOCAL / JAZZ
X-Bass: Extra bass aan of uit (EQ instelling gaat uit).
Sleep: Slaaptijd instellen: 90-80-70-60-50-40-30-20-10 min.
Mono/Stereo: Mono Stereo selectie alleen voor FM-radio.
Folder ˄˅: Map selectie voor USB en MP3-CD
Memory: CD: programma-CD-tracks.
DAB+: programma voorinstellingen of terug
roepen van voorinstellingen
FM: programma voorinstellingen of terug
roepen van voorinstellingen
Tune˅ / tune: CD/USB/BT: track terug of volgende.
( / ) DAB+: Selecteer gescande stations
FM: Freq. omhoog/omlaag met 50kHz.
CH+ / CH-: DAB+/FM: Voorinstellingen oproepen
CD/USB/BT: Geen functie
Repeat : CD: Herhaal één of herhaal alles.
USB: Herhaal één, album of herhaal alles.
Random: CD/USB: Willekeurige functie aan/uit.
DAB/FM FUNCTIONS:
INFO: Data-informatie dab+ signaalontvangststation.
SCAN: Scannen van alle dab+ stations.
MENU: Toegang tot menufuncties in combinatie met
toetsen of en ENTER toets.
DAB+/FM-f unct ies en instelf unct ies
BLUETOOTH-FUNCTIES:
: vorige nummer
: volgende nummer
: afspeel/pauze functie.
CD/USB FUNCTIES:
DISPLAY: ID-3 tag aan of uit.
: Stop functie
: Pauze/afspeel functie
REPEAT
RANDOM
VOL
DISPLAY

-35-
Geen stroom.
● Zorg ervoor dat de netkabel goed is aangesloten.
● Zorg ervoor dat het apparaat is ingeschakeld.
Het apparaat reageert niet als er op een toets w ordt gedrukt.
● Verijder de batterijen (indien geplaatst) en verijder het netsnoer voor een minuut. Plaats vervolgens de
batterijen en netsnoer eer terug.
Geen geluid.
● Zet het volume harder of verijder de hoofdtelefoonplug.
Ik kan de Bluetooth-naam van dit toestel niet vinden op mijn Bluetooth-apparaat voor het koppelen van Bluetooth.
● Zorg ervoor dat het apparaat is ingeschakeld.
● Zorg ervoor dat de Bluetooth-functie op u Bluetooth-apparaat is geactiveerd.
● Het toestel heeft een Bluetooth-functie die een signaal binnen 10 meter kan ontvangen.
CD is goed geplaatst, maar het toestel speelt niet af .
● Zorg ervoor dat het label van de CD naar boven is gericht.
● Zorg ervoor dat de CD schoon is.
● De PAUZE-modus kan orden geactiveerd, gedeactiveerd.
● De CD kan beschadigd of vuil zijn; controleer en reinig de schijf.
DAB+/FM-ontvangst
● Zorg ervoor dat de antenne volledig is uitgeschoven.
● Elektrische storing in u huis kan een slechte ontvangst veroorzaken. Verplaats het apparaat verder van de
storing af (vooral storing van motoren en transformatoren).
Het apparaat schakelt automatisch uit tijdens het af spelen
● Verhoog het volume van u aangesloten geluidsbron (DVD-speler/TV enz.)
Geluidsinterf erentie af komstig van draadloze apparaten in de luidsprekers
● Verplaats alle draadloze apparaten (mobiele telefoon, bluetoothapparaat enz.) uit de buurt van het apparaat.
PROBLEEMOPLOSSING

-36-
TECHNISCHE SPECIFICATIES
DAB+ radiofrequentiebereik: 174.928-239.2 MHz
FM radiofrequentiebereik: 87.5-108 MHz
Bluetooth frequentiebereik: 2.402-2.480 GHz
Bluetooth zendvermogen: 4 dBm
AC stroomingang: 230V~ 50Hz 25W
Batterij gegevens: 6 x 1.5V C (UM-2), niet meegeleverd
Luidsprekeruitgangsvermogen: 2 x 6 W
Bluetooth: V5.0
Aux in: 3.5mm stereo jack
Hoofdtelefoon uitgang: 3.5mm stereo jack
Batterij afstandsbediening: CR2025 x 1pcs
Afmetingen (L x B x H): 390 x 228 x 138 mm
Gebruikstemperatuur: 0-45C
Geicht: 2.1 kg
● De specicatie dient slechts als referentie. De aarde van het geicht en de grootte zijn bij benadering.
● Ons product ordt onophoudelijk verbeterd en de specicaties en functie kunnen zonder voorafgaande kennisgeving
orden geijzigd
Garantie
Lenco biedt service en garantie in overeenstemming met de Europese etgeving, at betekent dat u in geval van reparaties
(zoel tijdens als na de garantieperiode) contact moet opnemen met u lokale dealer.
Belangrijke opmerking:
-Het is niet mogelijk om producten die gerepareerd moeten orden direct naar Lenco te sturen.
-Als dit apparaat ordt geopend of toegankelijk is voor een niet-ocieel servicecentrum, vervalt de garantie.
Dit apparaat is niet geschikt voor professioneel gebruik. In het geval van professioneel gebruik, zullen alle
garantieverplichtingen van de fabrikant vervallen.
Disclaimer
Er orden regelmatig updates van Firmare en/of hardarecomponenten gemaakt. Daarom kunnen sommige instructies,
specicaties en afbeeldingen in deze documentatie licht afijken van u specieke situatie. Alle items die in deze handleiding
ter illustratie orden beschreven, zijn mogelijk niet van toepassing op bepaalde situaties. Aan de beschrijving in deze
handleiding kunnen geen ettelijke rechten of aanspraken orden ontleend.
Verw ijdering van het oude apparaat
Dit symbool geeft aan dat het betreende elektrische product of de batterij niet als algemeen huishoudelijk afval in Europa
mag orden eggegooid. Om de juiste afvalvererking van het product en de batterij te garanderen, dient u deze eg te
gooien in overeenstemming met de geldende lokale etgeving inzake de verijdering van elektrische apparatuur of batterijen.
Op die manier helpt u de natuurlijke hulpbronnen te sparen en de normen voor milieubescherming bij de vererking en
verijdering van elektrisch afval te verbeteren (Richtlijn betreende afgedankte elektrische en elektronische apparatuur).
CE Marking
Commaxx B.V. Wiebachstraat 37, 6466 NG Kerkrade, Nederland, verklaart hierbij dat dit product voldoet aan de essentile
EU richtlijn eisen.
De conformiteitsverklaring kan orden geraadpleegd via [email protected]
Service
Commaxx B.V. Wiebachstraat 37, 6466 NG Kerkrade, Nederland.
TECHNISCH OVERZICHT

– 37-
DEUTSCH
ACHTUNG:
Eine andere als die hier beschriebene Bedienung, Einstellung oder Verwendung der Funktionen kann zu
gefä hrlicher Strahlenbelastung fü hren.
VORSICHTSMASSNAHMEN VOR DER BENUTZUNG
BEFOLGEN SIE IMMER FOLGENDE ANW EISUNGEN:
1. Blockieren oder bedecken Sie keine Lftungsnungen. Wenn Sie das Gert auf ein Regal stellen, lassen
Sie um das gesamte Gert 5 cm (2) freien Platz.
2. Stellen Sie das Gert entsprechend den Aneisungen der mitgelieferten Bedienungsanleitung auf.
3. Halten Sie das Gert von Hitzequellen ie Radiatoren, Heizern, fen, Kerzen oder anderen
hitzeerzeugenden Produkten oder oenen Flammen fern. Das Gert darf nur bei gemigtem Klima
verendet erden. Sehr kalte oder heie Umgebungen sind zu vermeiden. Der Betriebstemperaturbereich
liegt zischen 0 C und 35 C.
4. Meiden Sie bei der Nutzung des Produkts die Nhe starker Magnetfelder.
5. Elektrostatische Entladungen knnen die normale Verendung von diesem Gert stren. Sollte dies
geschehen, fhren Sie einfach einen Reset aus und starten Sie dann das Gert entsprechend den
Aneisungen dieser Bedienungsanleitung neu. Gehen Sie besonders bei Datenbertragungen mit dem
Gert vorsichtig um und fhren Sie diese nur in einer antielektrostatischen Umgebung aus.
6. Warnung Niemals Gegenstnde durch die Lftungsschlitze oder nungen in das Gert stecken. In
diesem Gert iet Hochspannung und das Hineinstecken von Gegenstnden kann zu elektrischem
Schock und/oder Kurzschluss interner elektrischer Bauteile fhren. Aus dem gleichen Grund kein Wasser
oder Flssigkeiten in das Gert geben.
7. Benutzen Sie das Gert nicht in nasser oder feuchter Umgebung ie Bad, Dampfkche oder in der Nhe
von Schimmbecken.
8. Das Gert darf eder Tropf- noch Spritzasser ausgesetzt erden und es drfen keine mit Flssigkeit
gefllten Behlter ie z.B. Vasen auf das Gert oder in der Nhe des Gertes gestellt erden.
9. Benutzen Sie das Gert nicht bei Kondensationsgefahr. Wenn Sie das Gert in einem armen feuchten
Raum benutzen, dann knnen sich im Inneren des Gerts Wassertropfen oder Kondensationen bilden und
zu Fehlfunktionen des Gerts fhren. Schalten Sie in diesem Fall das Gert fr 1 2 Stunden aus, bevor
Sie es erneut einschalten: Das Gert sollte vollstndig getrocknet sein, enn Sie es ieder einschalten.
10. Obohl dieses Gert unter grter Sorgfalt und vor Auslieferung mehrmals berprft urde, knnen
trotzdem ie bei jedem anderen elektrischen Gert auch Probleme auftauchen. Trennen Sie das Gert im
Falle einer Rauchenticklung, starker Hitzeenticklung oder jeden anderen unnatrlichen Erscheinung
sofort vom Netz.
11. Dieses Gert ist durch eine Stromquelle ie auf dem Typenschild angegeben zu betreiben. Halten Sie bei
Unsicherheiten ber die Art Ihrer Stromversorgung in Ihrer Wohnung Rcksprache mit Ihrem Hndler oder
Ihrer Stromzuliefererrma.
12. Halten Sie es von Haustieren fern. Einige Nagetiere lieben es, an Netzkabeln zu nagen.
13. Benutzen Sie fr die Reinigung ein eiches und trockenes Tuch. Benutzen Sie niemals Lsungsmittel
oder Flssigkeiten auf lbasis. Benutzen Sie zum Entfernen hartnckiger Flecken ein feuchtes Tuch mit
mildem Reinigungsmittel.
14. Der Hersteller haftet nicht fr Schden oder Verluste durch Fehlfunktion, Zeckentfremdung oder
Modikation des Gerts oder durch Wechseln der Batterien.
15. Unterbrechen Sie die Verbindung nicht hrend einer Formatierung oder einer Datenbertragung. Bei
Unterbrechung drohen Datenverlust und Datenbeschdigung.
16. Wenn das Gert eine USB-Wiedergabefunktion besitzt, dann stecken Sie den USB-Stick direkt in
das Gert. Verenden Sie kein USB-Verlngerungskabel, eil die erhhte Strungsanflligkeit zu
Datenverlust fhren knnte.
17. Das Typenschild bendet sich an der Unter- oder Rckseite des Gerts.
18. Dieses Gert ist nicht zur Benutzung durch Personen (einschlielich Kinder) mit physischen, sensorischen
oder mentalen Beeintrchtigungen oder ohne ausreichender Erfahrung vorgesehen, es sei denn, sie
erden durch eine verantortliche Person beaufsichtigt oder urden in die ordnungsgeme Bedienung
des Gertes durch eine fr ihre Sicherheit verantortliche Person eingeiesen.
19. Dieses Produkt ist nur fr den nicht-professionellen Gebrauch und nicht fr geerbliche oder industrielle
Zecke bestimmt.
20. Stellen Sie sicher, dass das Gert in einer stabilen Position aufgestellt ist. Schden aufgrund Verendung
dieses Produkts in einer instabilen Position, Vibrationen, Ste oder Nichtbeachtung der anderen in dieser
Bedienungsanleitung enthaltenen Warnungen und Sicherheitshineise erden nicht durch die Garantie
abgedeckt.

– 38-
21. Entfernen Sie niemals das Gehuse dieses Produkts.
22. Stellen Sie das Produkt niemals auf andere elektrische Gerte.
23. Halten Sie Kinder von den Plastiktten fern.
24. Benutzen Sie nur vom Hersteller spezizierte Ereiterungen/Zubehrteile.
25. Lassen Sie alle Eingrie von qualiziertem Servicepersonal ausfhren. Eingrie erden notendig, enn
das Gert auf irgendeine Weise ie beispielseise am Netzkabel oder am Netzstecker beschdigt urde,
Flssigkeit in das Gert eingedrungen ist, Gegenstnde in das Gert gefallen sind, das Gert Regen oder
Feuchtigkeit ausgesetzt ar, es heruntergefallen ist oder nicht ordnungsgem funktioniert.
26. Langes Hren lauter Tne aus einem Musikgert kann zum zeiteiligen oder permanenten Hrverlust
fü hren.
27. Wenn zum Lieferumfang des Produkts ein Netzkabel oder ein Netzadapter gehrt:
•Wenn irgendelche Probleme auftreten, dann ziehen Sie den Netzstecker aus der Netzsteckdose und
setzen Sie sich anschlieend mit einer qualizierten Fachkraft in Verbindung.
•Treten Sie nicht auf das Netzteil und klemmen Sie es auch nicht ein. Geben Sie besonders im nheren
Bereich des Steckers und der Stelle acht, o das Kabel aus dem Gert herausgefhrt ird. Stellen Sie
keine scheren Gegenstnde auf das Netzteil, eil es dadurch beschdigt erden knnte. Halten Sie
das gesamte Gert auerhalb der Reicheite von Kindern Durch Spielen mit dem Netzkabel knnen
sie sich ernsthafte Verletzungen zuziehen.
•Trennen Sie das Gert hrend eines Geitters oder bei lngerer Nichtbenutzung vom Netz.
•Die Wandsteckdose muss sich in der Nhe des Gerts benden und einfach zu erreichen sein.
• Steckdosen und Verlä ngerungsleitungen nicht ü berlasten. Eine Ü berlastung kann zu Brandgefahr bzw.
Stromschlag fü hren.
•Gerte der Schutzklasse 1 sind an eine Netzsteckdose mit Schutzleiter anzuschlieen.
•Gerte der Schutzklasse 2 bentigen keinen Schutzleiteranschluss.
•Halten Sie den Netzstecker in der Hand, enn Sie ihn aus der Netzsteckdose ziehen. Ziehen Sie ihn
nicht durch Zerren am Kabel heraus. Das kann zu einem Kurzschluss fhren.
• Verwenden Sie weder ein beschä digtes Netzkabel noch einen beschä digten Stecker oder eine lockere
Steckdose. Es besteht Brand- und Stromschlaggefahr.
28. Wenn das Produkt mit einer Fernbedienung mit Batterien/Knopfzellen geliefert ird oder das Produkt eine
derartige Fernbedienung umfasst:
Warnung:
•Die Batterie nicht einnehmen, er besteht Vertzungsgefahr.
•Die mit diesem Produkt mitgelieferte Fernbedienung enthlt eine Knopfbatterie. Das Verschlucken
der Batterie kann innerhalb von nur 2 Stunden zu schersten inneren Verbrennungen mit Todesfolge
fü hren.
•Halten Sie neue und gebrauchte Batterien von Kindern fern.
•Verenden Sie dieses Produkt nicht eiter und halten Sie es von Kindern fern, enn das Batteriefach
nicht sicher schliet.
•Suchen Sie umgehend rztliche Hilfe auf, enn Sie vermuten, dass Batterien verschluckt oder in Kr-
pernungen eingefhrt urden.
29. Warnhineise bzgl. der Verendung von Batterien:
•Es besteht Explosionsgefahr, enn die Batterien nicht korrekt eingelegt erden. Nur mit Batterien des
gleichen oder entsprechenden Typs ersetzen.
•Die Batterie darf hrend der Benutzung, Aufbeahrung oder des Transports eder sehr hohen oder
sehr niedrigen Temperaturen noch niedrigem Luftdruck in groen Hhenlagen ausgesetzt erden.
•Die Ersetzung der Batterie mit einem falschen Batterietyp kann zum Explodieren der Batterie oder dem
Auslaufen von entammbarem Gas oder entammbarer Flssigkeit aus der Batterie fhren.
•Die Entsorgung der Batterie in Feuer oder einem heien Ofen oder das mechanische Zerkleinern oder
Zerteilen der Batterie kann zu Explosionen fhren.
•Das Verbleiben der Batterie in einer Umgebung mit sehr hohen Temperaturen kann zum Explodieren
der Batterie oder dem Auslaufen von entammbarem Gas oder entammbarer Flssigkeit fhren.
•Eine einem sehr niedrigen Luftdruck ausgesetzte Batterie kann explodieren oder es kann aus einer
einem sehr niedrigen Luftdruck ausgesetzten Batterie entammbares Gas oder entammbare Flssig-
keit auslaufen.
•Augenmerk ist auf den kologischen Aspekt der Batterieentsorgung zu legen.
AUFSTELLEN:
•Packen Sie alle Teile aus und entfernen Sie danach die Schutzmaterialien.
•Schlieen Sie das Gert nicht eher an das Netz an, bevor Sie die Netzspannung berprft haben und alle
anderen notwendigen Verbindungen hergestellt sind.

– 39-
W ARNUNG FÜ R DEN CD/DVD-PLAYER:
Dieses Produkt enthlt eine Lasereinheit geringer Leistung.
LASERPRODUKT DER KLASSE 1
APPAREIL LASER DE CALSSE 1
PRODUCO LASER DE CLASE 1
ACHTUNG
UNSICHTBARE LASERSTRAHLUNG
BEI FFNEN UND UMGEHEN DER
VERRIEGELUNG NICHT DIREKT IN
DEN STRAHL SCHAUEN
W ARNUNG: BERÜ HREN SIE DIE LINSE NICHT.
W ARNUNG: Bei der Teilnahme am Straenverkehr kann das Hren von
Musik ber ein Musikgert von mglichen Gefahren ie beispielseise
sich nä hernde Fahrzeuge ablenken.
W ARNUNG: Hren Sie nicht ber lngere Zeit bei hohem Lautstrkepe-
gel Musik, um eventuellen Hrschden vorzubeugen.
ZUBEHÖ RTEILE:
• Netzkabel
• Fernbedienung
• Bedienungsanleitung
Laserprodukt der K lasse 1

– 40-
Ü BERSICHT
12 3 4+
SOURCE
MENU
INFO
ENTER
SCAN
VOLUME
1 2 3 4 5 6 7 8 9 10 11 12 13
1. USB-Port: Eingang fr den USB-Stick
2. QUELLE: Diese Taste fr die Ausahl eines der Modi DAB+, FM, CD, USB, BLUETOOTH, KASSETTE oder
AUX-EINGANG drcken.
3. MENU/INFO: DAB+: Diese Taste zur Anzeige der Informationen des Radiosenders drcken.
Diese Taste gedrckt halten, um das Men zum ndern von Einstellungen aufzurufen. Die
Taste oder drcken, um eine Menoption auszuhlen.
FM: Diese Taste zur Anzeige der Informationen des Radiosenders drcken.
Diese Taste gedrckt halten, um das Men zum ndern von Einstellungen aufzurufen. Die
Taste oder drcken, um eine Menoption auszuhlen.
4. ZURCK :DAB+: Drcken, um die vorigen Senderinformationen anzuzeigen
FM: Diese Taste kurz drcken, um eine andere Frequenz auszuhlen. Diese Taste gedrckt
halten, um nach dem nchsten verfgbaren Radiosender zu suchen
CD/USB/BLUETOOTH: Diese Taste drcken, um zum vorherigen Titel zu springen.
5. EIN/AUS :Diese Taste drcken, um das Gert einzuschalten. Diese Taste erneut drcken, um das Gert ieder
auszuschalten und in den Standby-Modus zu echseln.
6. ZIFFERNTASTEN:
1234+
DAB+/FM: Diese Tasten drcken, um den auf der entsprechenden Taste gespeicherten Radiosender
direkt abzurufen. Diese Taste gedrckt halten, um auf der entsprechenden Taste den
aktuellen Radiosender zu speichern.
CD/USB: Die Taste REPEAT drcken, um eine der Optionen fr die iederholte Wiedergabe
auszuhlen. Die Taste PROGRAM drcken, um die Einstellungen fr die programmierte
Wiedergabe vorzunehmen. Die Taste FOLDER drcken, um das Verzeichnis zu echseln
(nur MP3).
BLUETOOTH: Die Taste PAIR gedrckt halten, um die aktuelle Verbindung zu trennen und nach einem
anderen Bluetooth-Gert zu suchen.
7. ANZEIGE: Anzeige des Betriebsmodus und von Informationen.
8. TASTEN FR DIE KASSETTENSTEUERUNG: (PAUSE, STOPP, AUSWURF, VORSPULEN, RCKSPULEN, WIEDERGABE,
AUFZEICHNUNG).
9. LAUTSTRKE: Einstellung der Gesamtlautstrke.
10. STOPP /ENTER: DAB+/FM: Diese Taste drcken, um die zu ndernde Einstellung im Men aufzurufen.
CD/USB: Diese Taste drcken, um die Wiedergabe zu beenden.
11. VOR :DAB+: Drcken, um die nchsten Senderinformationen anzuzeigen
FM: Diese Taste kurz drcken, um eine andere Frequenz auszuhlen. Diese Taste gedrckt
halten, um nach dem nchsten verfgbaren Radiosender zu suchen.
CD/USB/
BLUETOOTH: Diese Taste drcken, um zum nchsten Titel zu springen.
12. WIEDERGABE-
PAUSE/SCAN :DAB+: Diese Taste drcken, um das automatische Scannen nach allen verfgbaren DAB+
Radiosendern zu starten.
FM: Diese Taste kurz drcken, um zischen Stereo- und Monoiedergabe umzuschalten.
Diese Taste gedrckt halten, um das automatische Scannen nach allen verfgbaren FM-
Radiosendern zu starten.
CD/USB/
BLUETOOTH: Diese Taste drcken, um die Wiedergabe zu pausieren oder fortzusetzen.

– 41-
SOURCE
MENU
INFO
ENTER
SCAN
FOLDER PAIR REPEAT PROGRAM
1234+
VOLUME
CASSETTE RECORDER
1416 15 1615
~AC IN
OPEN OPEN
AUX IN
17 18 19 20 2221
13. CD-Fachdeckel
14. Kassettenfachtr
15. Bassreexnung
16. Lautsprecher
17. Tragegri
18. Batteriefachabdeckung
19. AUX-EINGANG: Hier ein externes Audioiedergabegert anschlieen
20. Kopfhrerbuchse: Hier einen externen Kopfhrer anschlieen
21. Antenne: Die Antenne herausziehen, um einen guten DAB+/FM-Empfang sicherzustellen.
22. Netzanschlussbuchse: An diese Buchse das Netzkabel anschlieen
REPEAT
RANDOM
VOL
DISPLAY
23
24
25
26
27
28
29
30
31
32
43
42
41
40
39
38
37
36
35
34
44
33
23. Standby
24. Zierntasten
25. Speicher
26. Zurck/Tune
27. Ordner
28. Wiederholung
29. Ordner
30. Info Suchlauf Men
31. Bluetooth: Vorheriger Titel Nchster Titel Wiedergabe/Pause
32. CD/USB: ID3-Tag-Anzeige Wiedergabe beenden Wiedergabe/Pause
33. Vol+/-
34. Stumm
35. Zufallsiedergabe
36. SENDER-
37. Vor/Tune
38. Eingabe
39. Mono/Stereo
40. SENDER+
41. Schlaf
42. X-Bass
43. Equalizer
44. Quelle

– 42-
EINLEGEN DER BATTERIEN
~AC IN
AUX IN
C 1,5V C 1,5V C 1,5V
C 1,5V C 1,5V C 1,5V
+
+
OPEN OPEN
+ 1,5V
+ 1,5V
+ 1,5V
1,5V + 1,5V + 1,5V +
BATTERIEBETRIEB:
Ziehen Sie fr den Batteriebetrieb zuerst den Netzstecker aus der
Netzsteckdose und danach das Netzkabel aus der Netzanschluss-
buchse ~AC IN des Gerts. Entfernen Sie die Batteriefachabdeckung
auf der Rckseite des Gerts. Legen Sie 6 Batterien der Gre UM-2
(LR14, C) (nicht im Lieferumfang enthalten) gem den im Inneren
des Batteriefachs angegebenen Polaritten ein. Setzen Sie den
Batteriefachdeckel wieder auf das Batteriefach.
H inweis:
- Entfernen Sie die Batterien aus dem Gert, enn Sie es fr
lngere Zeit nicht bentigen, eil das Gert auch im Standby-
Modus etas Batteriestrom verbraucht.
- Sie knnen das Gert NUR mit der Taste STANDBY einschalten,
indem Sie sie mindestens 5 s lang gedrckt halten, eil das Gert
in den Energiesparmodus echselt, enn der Batteriestandby-
Modus aktiv ist. Drcken Sie die Taste STANDBY erneut, um es
auszuschalten.
BEDIENUNG DER FERNBEDIENUNG:
In der Fernbedienung bendet sich bereits eine CR2025-Knopfzelle.
Ziehen Sie ie linksstehend gezeigt vor der ersten Benutzung die
Isolationsfolie der Batterie heraus.
Folgen Sie bitte fü r das Ersetzen der Batterie der linksstehenden
Abbildung. Achten Sie beim Einlegen der Batterien auf die richtige
Ausrichtung der Batterien.

– 43-
EINSCHALTEN DES SCD-720
~AC IN
OPEN OPEN
AUX IN
SOURCE
MENU
INFO
ENTER
SCAN
FOLDER PAIR REPEAT PROGRAM
1234+
VOLUME
CASSETTE RECORDER
BENUTZEN EINES OHR-/K OPFHÖ RERS
Auf der Rckseite Ihres SCD-720 bendet sich eine Buchse fr den Anschluss eines Kopfhrers.
Hier knnen Sie an Ihrem SCD-720 ein Ohrhrerpaar oder einen Kopfhrer mit 3,5-mm-Klinkenstecker anschlieen.
Sobald Sie den 3,5-mm-Klinkenstecker in die Kopfhrerbuchse stecken, erden die Lautsprecher Ihres SCD-720 stummge-
schaltet.
Die Audioausgabe erfolgt dann nur ber die Ohr-/Kopfhrer.
Mit dem Lautstrkeregler knnen Sie die Wiedergabelautstrke einstellen. Alle eiteren Funktionen arbeiten ie bei der
Audioiedergabe ohne Ohr-/Kopfhrer.
~AC IN
OPEN OPEN
AUX IN
SOURCE
MENU
INFO
ENTER
SCAN
FOLDER PAIR REPEAT PROGRAM
1234+
VOLUME
CASSETTE RECORDER
Schlieen Sie Ihr SCD-720 ber das Netzkabel am Strom-
netz an.
Wenn Sie das Netzkabel an der Netzeingangsbuchse des
SCD-720 anschlieen, dann ird automatisch der Batte-
riestrom abgeschaltet.
Drcken Sie die Taste STANDBY, um das Gert einzuschal-
ten.
Drcken Sie die Taste STANDBY erneut, um es auszus-
chalten.
Mit Hilfe der Taste SOURCE knnen Sie die genschte
Signaleingangsquelle aushlen.
Sie kö nnen auswä hlen aus:
DAB+-RADIO
FM-RADIO
CD
USB
BLUETOOTH
TAPE (K ASSETTEN)
AUDIO IN (AUX-Eingang)
LAUTSTÄ RK EREGELUNG:
Drehen Sie den Drehregler VOLUME, um die Lautstrke zu
ä ndern.

– 44-
Ausrichten der Antenne
Die Antenne auf der Rckseite des Gerts sollte vollstndig herausgezogen erden, um einen gutem DAB+-/FM-Empfang
sicherzustellen. ndern Sie die Ausrichtung der Antenne, um den besten Empfang zu erhalten.
DAB+-BEDIENUNG
Wenn Sie den DAB+-Modus das erste Mal aushlen, dann scannt das Gert automatisch nach verfgbaren DAB+-Radio-
sendern. Warten Sie solange, bis dieser Initialscan abgeschlossen ist. Auf dem Display ird der Scanfortschritt angezeigt.
Nach dem Scannen ird automatisch der erste Radiosender ausgehlt.
Auf dem Display erden die verfgbaren Radiosender des jeeiligen Empfangsbandes angezeigt. Bei schachem
Signal kann es zu Wiedergabeaussetzern oder -verzgerungen kommen. Versuchen Sie in diesem Fall, das Radio
so umzustellen oder die Antenne so auszurichten, dass Sie das schache DAB+-Signal ohne Wiedergabeverzge-
rungen empfangen knnen (der Radiosendername ird auch dann angezeigt, enn das Signal schach ist).
Automatischer Scan
1. Schalten Sie das Gert ein und echseln Sie in den DAB+-Modus.
2. Halten Sie die Taste SCAN am Gert gedrckt oder drcken Sie die Taste SCAN auf der Fernbedienung, um das
automatische Scannen nach verfgbaren Radiosendern zu starten.
Manueller Scan
Das Benutzen der manuellen Scanfunktion kann Ihnen beim Einstellen der Antenne oder bei der Suche nach durch das auto-
matische Scannen nicht gefundenen Radiosendern helfen.
1. Schalten Sie das Gert ein und echseln Sie in den DAB+-Modus.
2. Halten Sie die Taste MENU am Gert gedrckt oder drcken Sie die Taste MENU auf der Fernbedienung, um das Menü
anzeigen zu lassen.
3. Drcken Sie die Taste oder solange, bis Manual (Manuell) angezeigt ird und anschlieend zum Besttigen
Ihrer Ausahl die Taste ENTER.
4. Drcken Sie die Taste oder , um den genschten Kanal ie beispielseise 12C 227,360 MHz
(Ausahlbereich: 5A 13F) auszuhlen.
5. Drcken Sie zur Besttigung Ihrer Ausahl die Taste ENTER.
6. Drcken Sie fr die Ausahl eines anderen Kanals (5A 13F) die Taste oder und besttigen Sie Ihre Ausahl
durch Drcken der Taste ENTER.
7. Wenn Sie den genschten Radiosender gefunden haben, dann drcken Sie die Taste ENTER, um ihn auszuwä hlen.
8. Drcken Sie die Taste MENU, um das manuelle Scannen zu beenden.
Einstellen eines Radiosenders
Drcken Sie nach Abschluss des Scannens nach allen verfgbaren DAB-Radiosendern die Taste oder , um die
Senderliste anzeigen zu lassen und in dieser zu navigieren. Wenn Sie den genschten Radiosender gefunden haben, dann
drcken Sie die Taste ENTER, um ihn einzustellen. Es kann ein paar Sekunden dauern, bis der genschte Radiosender
eingestellt ist.
DAB+-Radiosender speichern
Sie knnen bis zu 20 DAB+-Radiosender speichern.
Wie Sie mit Hilfe der Gertetasten Senderspeicherpltze belegen:
1. Stellen Sie den Radiosender ein, den Sie speichern mchten.
2. Halten Sie die Zierntaste 1, 2 oder 3 gedrckt, um den Radiosender auf dem entsprechenden Senderspeicherplatz zu
speichern.
3. Halten Sie die Zierntaste 4 gedrckt, um den Radiosender auf einem der Speicherpltze 4 bis 20 zu speichern. Auf dem
Display ird Store (Speichern) angezeigt.
4. Drcken Sie die Taste oder , um den genschten Senderspeicherplatz auszuhlen.
5. Drcken Sie danach zum Speichern die Taste ENTER.
Wie Sie mit Hilfe der Fernbedienung Senderspeicherpltze belegen:
1. Stellen Sie den Radiosender ein, den Sie speichern mchten.
2. Wenn Sie die Taste MEMORY gedrckt halten, dann ird auf dem Display Store (Speichern) angezeigt.
3. Drcken Sie die Taste oder , um den genschten Senderspeicherplatz auszuhlen.
4. Drcken Sie danach zum Speichern die Taste ENTER.
Abruf en gespeicherter DAB+-Radiosender
Wie Sie mit Hilfe der Gertetasten Senderspeicherpltze abrufen:
1. Drcken Sie die Zierntaste 1, 2 oder 3, um den auf dem entsprechenden Senderspeicherplatz gespeicherten
Radiosender abzurufen. Daraufhin ird dieser Radiosender eingestellt.
2. Drcken Sie die Zierntaste 4, um einen der auf den Senderspeicherpltzen 4 bis 20 gespeicherten Radiosender
abzurufen. Auf dem Display ird Recall (Abruf) angezeigt.
REPEAT
RANDOM
VOL
DISPLAY
DAB+-RADIO

– 45-
3. Drcken Sie die Taste oder , um den abzurufenden Senderspeicherplatz auszuhlen.
4. Drcken Sie die Taste ENTER, um den Senderspeicherplatz abzurufen.
Wie Sie mit Hilfe der Fernbedienung Senderspeicherpltze abrufen:
1. Wenn Sie die Taste MEMORY drcken, dann ird auf dem Display Recall (Abruf) angezeigt.
2. Drcken Sie die Taste oder , um den abzurufenden Senderspeicherplatz auszuhlen.
3. Drcken Sie die Taste ENTER, um den Senderspeicherplatz abzurufen.
Anze ige von DAB+-Radiosenderinf ormationen
Nachstehend erden die verschiedenen Arten von Informationen aufgelistet. Drcken Sie mehrmals die Taste INFO, um die
angezeigte Information zu ndern.
Radio-Lauftext Signalstä rkeleiste Programmart (PTY)
Multiplexname Frequenz Signalfehlerrate Audiobitrate
1. Radio-Lauftext: Zeigt Musiktitel oder Programmdetails an, die vom Rundfunksender bereitgestellt erden.
2. Signalstrkeleiste: Zeigt die Strke des empfangenen Signals an. Je mehr Zeichen angezeigt erden, umso strker ist
das empfangene Signal. Richten Sie die Antenne aus, um den Empfang zu verbessern.
3. Programmart (PTY): Die Art des Programms, das vom Rundfunksender bereitgestellt ird.
4. Multiplexname: Zeigt den Namen des Multiplex an, in dem sich der aktuelle Radiosender bendet.
5. Frequenz: Zeigt die Frequenz des aktuellen Kanals an.
6. Signalfehlerrate: Zeigt die Fehlerrate an. Je grer dieser Wert ist, desto mehr Fehler erden empfangen. Richten Sie
die Antenne aus, um den Empfang zu verbessern.
7. Audiobitrate: Anzeige der Audiobitrate des aktuellen Radiosenders an.
W EITERE DAB+-MENÜ OPTIONEN
Halten Sie die Taste MENU am Gert gedrckt oder drcken Sie die Taste MENU auf der Fernbedienung, um das Menü an-
zeigen zu lassen. Drcken Sie anschlieend die Taste oder , um eine der nachstehend beschriebenen Menoptionen
auszuwä hlen.
DRC (Dynamikbereichkomprimierung) (siehe Hinw eise)
Durch die Dynamikbereichkomprimierung erden leisere Klnge besser hrbar, enn das Gert in einer lauten Umgebung
benutzt ird. Die Dynamikbereichkomprimierungsstufe einer Sendung ird durch den Rundfunksender festgelegt und
zusammen mit dem Dienst bertragen. Durch nderung der Dynamikbereichkomprimierungsstufe knnen Sie die jeeilige
Dynamikbereichkomprimierungsstufe auf den Radiosender anenden.
Ihnen stehen drei Dynamikbereichkomprimierungsstufen zur Verfgung:
DRC high (hohe Dynamikbereichkomprimierung): Maximale Dynamikbereichkomprimierung, ie sie mit dem
Dienst bertragen ird
DRC lo (niedrige Dynamikbereichkomprimierung): 50 der mit dem Dienst bertragenen maximalen Dynamik-
bereichkomprimierung
DRC o (Dynamikbereichkomprimierung deaktiviert): Keine Dynamikbereichkomprimierung
1. Halten Sie die Taste MENU am Gert gedrckt oder drcken Sie die Taste MENU auf der Fernbedienung, um das Menü
anzeigen zu lassen.
2. Drcken Sie die Taste oder solange, bis DRC (DYNAMIKBEREICHKOMPRIMIERUNG) angezeigt ird und
anschlieend zur Besttigung Ihrer Ausahl die Taste ENTER.
3. Drcken Sie die Taste oder , um eine Dynamikbereichkomprimierungsstufe auszuhlen und anschlieend zum
Besttigen Ihrer Ausahl die Taste ENTER.
4. Drcken Sie die Taste MENU, um das Einstellungsmen zu verlassen.
Hinw eis:
- Die Dynamikbereichkomprimierung steht nicht fr allen DAB+-Ausstrahlungen zur Verfgung. Wenn die Ausstrahlung die
Dynamikbereichkomprimierung nicht untersttzt, dann hat die Einstellung der Dynamikbereichkomprimierung des Gerts
keinen Eekt.
- Nachdem Sie eine Dynamikbereichkomprimierungsstufe eingestellt haben, kann es sein, dass die Wiedergabelautstrke
angehoben wird.
Bereinigen
Mit dieser Funktion entfernen Sie inaktive Radiosender.
1. Halten Sie die Taste MENU am Gert gedrckt oder drcken Sie die Taste MENU auf der Fernbedienung, um das Menü
anzeigen zu lassen.
2. Drcken Sie die Taste oder solange, bis Prune (Bereinigung) angezeigt ird und anschlieend zum Besttigen
Ihrer Ausahl die Taste ENTER.
3. Drcken Sie die Taste oder , um Yes (Ja) auszuhlen und anschlieend ENTER, um die Senderbereinigung
zu starten.
4. Drcken Sie die Taste MENU, um das Einstellungsmen zu verlassen.
REPEAT
RANDOM
VOL
DISPLAY

– 46-
Ausrichten der Antenne
Die Antenne auf der Rckseite des Gerts sollte vollstndig herausgezogen erden, um einen gutem DAB+-/FM-Empfang
sicherzustellen. ndern Sie die Ausrichtung der Antenne, um den besten Empfang zu erhalten.
FM-RADIOBEDIENUNG
Automatischer Scan
1. Wechseln Sie in den FM-Modus.
2. Halten Sie die Taste SCAN gedrckt, um das automatische Scannen zu starten und die verfgbaren Radiosender
(max. 20) zu speichern.
Manueller Scan
1. Drcken Sie mehrmals die Taste oder , um eine andere Frequenz einzustellen.
2. Sie knnen aber auch die Taste oder gedrckt halten, um automatisch nach dem nchsten verfgbaren
Radiosender suchen zu lassen.
Speichern auf FM-Senderspeicherplä tze n
Sie knnen bis zu 20 FM-Radiosender speichern.
Wie Sie mit Hilfe der Gertetasten Senderspeicherpltze belegen:
1. Stellen Sie den Radiosender ein, den Sie speichern mchten.
2. Halten Sie die Zierntaste 1, 2 oder 3 gedrckt, um den Radiosender auf dem entsprechenden Speicherplatz zu
speichern. Daraufhin ird dieser Radiosender auf dem entsprechenden Senderspeicherplatz gespeichert.
3. Halten Sie die Zierntaste 4 gedrckt, um den Radiosender auf einem der Speicherpltze 4 bis 20 zu speichern. Auf dem
Display ird Store (Speichern) angezeigt.
4. Drcken Sie die Taste oder , um den genschten Senderspeicherplatz auszuhlen.
5. Drcken Sie danach zum Speichern die Taste ENTER.
Wie Sie mit Hilfe der Fernbedienung Senderspeicherpltze belegen:
1. Stellen Sie den Radiosender ein, den Sie speichern mchten.
2. Wenn Sie die Taste MEMORY gedrckt halten, dann ird auf dem Display Store (Speichern) angezeigt.
3. Drcken Sie die Taste oder , um den genschten Senderspeicherplatz auszuhlen.
4. Drcken Sie danach zum Speichern die Taste ENTER.
Abruf en gespeicherter FM-Senderspeicherplä tze
Wie Sie mit Hilfe der Gertetasten Senderspeicherpltze abrufen:
1. Drcken Sie die Zierntaste 1, 2 oder 3, um den auf dem entsprechenden Senderspeicherplatz gespeicherten
Radiosender abzurufen. Daraufhin ird dieser Radiosender eingestellt.
2. Drcken Sie die Zierntaste 4, um einen der auf den Senderspeicherpltzen 4 bis 20 gespeicherten Radiosender
abzurufen. Auf dem Display ird Recall (Abruf) angezeigt.
3. Drcken Sie die Taste oder , um den abzurufenden Senderspeicherplatz auszuhlen.
4. Drcken Sie die Taste ENTER, um den Senderspeicherplatz abzurufen.
Wie Sie mit Hilfe der Fernbedienung Senderspeicherpltze abrufen:
1. Wenn Sie die Taste MEMORY drcken, dann ird auf dem Display Recall (Abruf) angezeigt.
2. Drcken Sie die Taste oder , um den abzurufenden Senderspeicherplatz auszuhlen.
3. Drcken Sie die Taste ENTER, um den Senderspeicherplatz abzurufen.
Ausw ä hlen von Stereo- und erzw ungener Monow iedergabe
Wenn Sie einen FM-Radiosender in Stereo empfangen, dann drcken Sie die Taste am Gert oder die Taste MONO/ST
auf der Fernbedienung, um zischen Stereo- und erzungener Monoiedergabe umzuschalten.
Anze igen von FM-Radiosenderinf ormationen
Nachstehend erden die verschiedenen Arten von Informationen aufgelistet. Drcken Sie mehrmals die Taste INFO, um die
angezeigte Information zu ndern.
Radiotext Programmart
(PTY) Frequenz Audiotyp
1. Radiotext: Anzeige eines Lauftextes mit Informationen ber Musiktitel oder Programmdetails, die vom
Radiosender bereitgestellt erden
2. Programmart (PTY): Anzeige der Art des Programms, das vom Rundfunksender bereitgestellt ird
3. Frequenz: Anzeige der aktuellen Frequenz des Radiosenders
4. Audiotyp: Anzeige von Stereo oder Mono
REPEAT
RANDOM
VOL
DISPLAY
REPEAT
RANDOM
VOL
DISPLAY
FM-RADIO

– 47-
W EITERE FM-MENÜ OPTIONEN
Halten Sie die Taste MENU am Gert gedrckt oder drcken Sie die Taste MENU auf der Fernbedienung, um das Menü
anzeigen zu lassen. Drcken Sie anschlieend die Taste oder , um eine der auf der folgenden Seite beschriebenen
Menoptionen auszuhlen.
Scaneinstellung
1. Halten Sie die Taste MENU am Gert gedrckt oder drcken Sie die Taste MENU auf der Fernbedienung, um das Menü
anzeigen zu lassen.
2. Drcken Sie die Taste oder solange, bis Scan (Scannen) angezeigt ird und anschlieend zum Besttigen
Ihrer Ausahl die Taste ENTER.
3. Drcken Sie die Taste oder , um zischen Strong (Starke Sender) und All (Alle Sender) auszuhlen und
anschlieend zum Besttigen Ihrer Ausahl die Taste ENTER. Wenn Sie Strong (Starke Sender) aushlen, dann ird
nur nach Radiosendern mit starkem Signal gesucht. Beim Scannen erden verrauschte Radiosender ignoriert. Wenn Sie
All (Alle Sender) ausgehlt haben, dann erden alle Radiosender hrend des Scannens nach FM-Radiosendern
gesucht, auch enn diese stark verrauscht sind.
4. Wenn Sie das nchste Mal einen FM-Radiosenderscan durchfhren, dann ird dieser basierend auf diesen Einstellungen
durchgefü hrt.
Audioeinstellung
1. Halten Sie die Taste MENU am Gert gedrckt oder drcken Sie die Taste MENU auf der Fernbedienung, um das Menü
anzeigen zu lassen.
2. Drcken Sie die Taste oder solange, bis Audio angezeigt ird und anschlieend zum Besttigen Ihrer Ausahl
die Taste ENTER.
3. Drcken Sie die Taste oder , um zischen Stereo (Stereo) und Mono (Mono) auszuhlen und anschlieend
zum Besttigen Ihrer Ausahl die Taste ENTER.
CD/USB-BEDIENUNG
CD einlegen und abspielen
nen Sie das CD-Fach. Legen Sie die CD mit der bedruckten Seite nach oben zeigend ein. Schlieen Sie das CD-Fach
ieder. Drcken Sie die Taste SOURCE, um den CD-Modus auszuhlen. Nach dem Einlesen ird auf der Anzeige die
Gesamttitelzahl angezeigt und automatisch mit der Wiedergabe begonnen.
Einlesen und W iedergeben eines USB-Gerä ts
Schlieen Sie ein USB-Gert am USB-Port an. Drcken Sie die Taste SOURCE, um den USB-Modus auszuhlen. Nach
dem Einlesen ird auf der Anzeige die Gesamttitelzahl angezeigt. Die Titeliedergabe beginnt automatisch.
Pausieren und Fortsetze n der W iedergabe
Drcken Sie die Taste , um die Wiedergabe zu pausieren. Drcken Sie diese Taste erneut, um die Wiedergabe fortzuset-
zen.
Beenden der W iedergabe
Drcken Sie die Taste , um die Wiedergabe zu beenden.
Ü berspringen eines Titels vor-/rü ckw ä rts
Drcken Sie hrend der Wiedergabe die Taste oder , um zum nchsten oder vorherigen Titel zu springen.
Schnellsuche vor-/rü ckw ä rts
Halten Sie hrend der Wiedergabe die Taste oder gedrü ckt, um die Schnellsuche zu starten.
Sobald Sie die Taste oder ieder loslassen, ird die Wiedergabe an der aktuellen Position mit normaler Geschin-
digkeit fortgesetzt.
W iederholte W iedergabe/Zuf allsw iedergabe
CD-Modus
Wenn Sie hrend der Wiedergabe die Taste REPEAT einmal drcken, dann ird auf dem Display REP.ONE (EINZELTI-
TELWIEDERHOLUNG) angezeigt. Der aktuelle Titel ird iederholt iedergegeben.
Wenn Sie die Taste REPEAT erneut drcken, dann ird auf dem Display REP.ALL (ALLES WIEDERHOLEN) angezeigt. Alle
Titel erden iederholt iedergegeben.
Wenn Sie die Taste REPEAT ein eiteres Mal drcken, dann ird auf dem Display RANDOM (ZUFALLSWIEDERGABE)
angezeigt. Alle Titel erden in zuflliger Reihenfolge iedergegeben.
Wenn Sie die Taste REPEAT noch einmal drcken, dann kehrt das Gert in den normalen Wiedergabemodus zurck.

– 48-
MP3-CD-Modus oder MP3-USB-Datenträ germodus
Wenn Sie hrend der Wiedergabe die Taste REPEAT einmal drcken, dann ird auf dem Display REP.ONE (EINZELTI-
TELWIEDERHOLUNG) angezeigt. Der aktuelle Titel ird iederholt iedergegeben.
Wenn Sie die Taste REPEAT erneut drcken, dann ird auf dem Display REP.ALBUM (VERZEICHNIS WIEDERHOLEN)
angezeigt. Alle Titel des aktuellen Verzeichnisses erden iederholt iedergegeben.
Wenn Sie die Taste REPEAT erneut drcken, dann ird auf dem Display REP.ALL (ALLES WIEDERHOLEN) angezeigt. Alle
Titel erden iederholt iedergegeben.
Wenn Sie die Taste REPEAT ein eiteres Mal drcken, dann ird auf dem Display RANDOM (ZUFALLSWIEDERGABE)
angezeigt. Alle Titel erden in zuflliger Reihenfolge iedergegeben.
Wenn Sie die Taste REPEAT noch einmal drcken, dann kehrt das Gert in den normalen Wiedergabemodus zurck.
Programmierte W iedergabe
CD-Modus
Sie knnen dieses Gert fr die Wiedergabe einer Folge von Titeln programmieren.
1. Drcken Sie hierfr bei gestoppter Wiedergabe die Taste PROGRAM, oraufhin auf dem Display die Programmplatz- und
Titelnummer angezeigt ird.
2. Drcken Sie die Taste oder , um den genschten Titel auszuhlen.
3. Drcken Sie die Taste PROGRAM, um den genschten Titel zu speichern.
4. Wiederholen Sie die Schritte 2 3, um bis zu 30 Titel zu programmieren.
5. Drcken Sie die Taste , um die Wiedergabe der programmierten Titel zu beginnen.
6. Drcken Sie zeimal die Taste oder echseln Sie in einen anderen Modus, um die programmierte Wiedergabe zu
beenden.
7. Whrend der programmierten Wiedergabe knnen Sie ebenfalls die Wiederholung eines oder aller Titel aushlen; nur
die Zufallsiedergabe steht Ihnen nicht zur Verfgung.
MP3-CD-Modus oder MP3-USB-Datenträ germodus
1. Drcken Sie bei gestoppter Wiedergabe die Taste PROGRAM, oraufhin auf dem Display die Programmplatz- und
Verzeichnisnummer angezeigt wird.
2. Drcken Sie die Taste FOLDER am Gert oder die Taste FOLDER˄/FOLDER˅ auf der Fernbedienung, um das
gewü nschte Verzeichnis auszuwä hlen.
3. Drcken Sie die Taste PROGRAM, um das genschte Verzeichnis zu speichern.
4. Drcken Sie die Taste oder , um den genschten Titel auszuhlen.
5. Drcken Sie die Taste PROGRAM, um den genschten Titel zu speichern.
6. Wiederholen Sie die Schritte 2 3, um bis zu 99 Titel zu programmieren.
7. Drcken Sie die Taste , um die Wiedergabe der programmierten Titel zu beginnen.
8. Drcken Sie zeimal die Taste oder echseln Sie in einen anderen Modus, um die programmierte Wiedergabe zu
beenden.
9. Whrend der programmierten Wiedergabe knnen Sie ebenfalls die Wiederholung eines oder aller Titel aushlen; nur
die Zufallsiedergabe steht Ihnen nicht zur Verfgung.
Hinw eis:
- Der USB-Port ist nur zu Wiedergabezecken bestimmt. ber den USB-Port knnen Sie KEINE externen Gerte laden.
- Neben der Wiedergabe von CDDA-Audio-CDs kann das Gert im Modus CD/USB ebenfalls Dateien im MP3-Format
wiedergeben.
- Wenn sich auf Ihrem USB-Gert Audiodateien im MP3-Format benden, auf dem Display jedoch eiterhin NO (Keine
Dateien) angezeigt ird, dann ird mglichereise die Spezikation Ihres USB-Gerts nicht untersttzt.
- Das Gert untersttzt USB 1.1 und USB 2.0.
- Das Gert untersttzt USB-Gerte mit einer Kapazitt bis zu 32 GB.
- Das Gert ist u. U. nicht zu allen USB-Gerten kompatibel, as jedoch keine Fehlfunktion des Gerts ist.
- Fr die MP3-Wiedergabe erden maximal 255 Verzeichnisse mit maximal 999 Dateien untersttzt.
- Aufgrund des USB-Datei-Lese-/Schreibmechanismus ird die erste auf das USB-Gert geschriebene Datei zuerst und
die zuletzt auf das USB-Gert geschriebene Datei zuletzt iedergegeben (das Gert sortiert nicht in alphabetischer
Reihenfolge).
Ausw ä hlen eines Verze ichnisses (nur MP3-Dateien)
Drcken Sie hrend der MP3-Wiedergabe die Taste FOLDER am Gert oder die Taste FOLDER˄/FOLDER˅ auf der Fern-
bedienung, um das Verzeichnis zu wechseln.
Drcken Sie bei gestoppter Wiedergabe die Taste FOLDER am Gert oder die Taste FOLDER˄/FOLDER˅ auf der Fernbe-
dienung, um das Verzeichnis zu echseln. Drcken Sie anschlieend die Taste oder , um den Titel auszuhlen, den
Sie iedergeben lassen mchten. Drcken Sie die Taste , um die Wiedergabe des Titels zu starten.
ID3-Tag-Anze ige (nur f ü r MP3-Dateien mit ID3-Tag-Inf ormationen)
Drcken Sie die Taste DISPLAY auf der Fernbedienung, um die Anzeige des ID3-Tags ein- bz. auszuschalten. Wenn die
ID3-Tag-Anzeige aktiviert ist, dann erden Titelname, Knstler/-in und Albumdetails des MP3-Titels angezeigt.

– 49-
BLUETOOTH
Bitte folgen Sie den nachstehenden Aneisungen fr das Koppeln des Gerts mit Ihrem Bluetooth-Gert.
1. Drcken Sie mehrmals die Taste SOURCE, um in den Bluetooth-Modus zu echseln. Auf dem Display ird BT AUDIO
(BLUETOOTH-AUDIO) angezeigt. Die Suche ird gestartet und auf dem Display ird BT AUDIO (BLUETOOTH-AUDIO)
blinkend angezeigt.
2. Wenn das Gert noch nie mit einem Bluetooth-Gert verbunden ar oder es das zuletzt verbundene Gert nicht nden
kann, dann blinken soohl Display als auch Bluetooth-Statusanzeige. Schalten Sie in diesem Fall die Bluetooth-Funktion
Ihres Gerts ein und lassen Sie das Gert anschlieend solange suchen, bis es Lenco SCD-720 gefunden hat. Whlen
Sie auf Ihrem Bluetooth-Gert Lenco SCD-720 aus, um die Verbindung herzustellen. Wenn es erforderlich sein sollte,
dann geben Sie das Passort 0000 ein.
3. Nach erfolgreicher Kopplung ird auf dem Display BT AUDIO (BLUETOOTH AUDIO) angezeigt.
4. Sie knnen nun Ihre drahtlose Smartphone-Musikiedergabe ber den Lautsprecher starten.
5. Sie knnen durch Drcken der Taste die Wiedergabe pausieren oder fortsetzen.
6. Sie knnen durch Drcken der Taste oder zum nchsten oder vorherigen Titel springen.
H inweis:
•Die Taste PAIR gedrckt halten, um die aktuelle Verbindung zu trennen und nach einem anderen Bluetooth-Gert zu
suchen.
•Dieses Produkt besitzt eine Bluetooth-Empfangsfunktion. Sie knnen mit diesem Gert kein Bluetooth-Audio an andere
Gerte senden (Bluetooth-Headsets oder Bluetooth-Ohrhrer empfangen kein Signal vom SCD-720), d. h. Sie knnen
nur Bluetooth-Audiosignale von externen Quellen ie beispielseise einem Smartphone kabellos empfangen.
K ASSETTENFACH
Drcken Sie mehrmals die Taste SOURCE, um in den Kassettenmodus zu echseln. Auf dem Display ird TAPE (KASSET-
TE) angezeigt. Die Bedientasten fr die Kassettensteuerung benden sich auf der Vorderseite des Gerts.
1. Drcken Sie die Taste (Kassette anhalten/auserfen), um die Kassettenfachtr zu nen.
2. Legen Sie eine Kassette ein und schlieen Sie dann die Kassettenfachtr ieder ordnungsgem.
Die iedergegebene Seite zeigt nach vorn.
Eine Kassette mit dem Band nach oben
zeigend einlegen
3. Drcken Sie die Taste (Kassette iedergeben), um die Wiedergabe zu starten.
4. Drcken Sie die Taste (Kassetteniedergabe pausieren), um die Wiedergabe zu pausieren. Drcken Sie die Taste
(Kassetteniedergabe pausieren) erneut, um die Wiedergabe fortzusetzen.
5. Drcken Sie die Taste (Kassette anhalten/auserfen), um die Wiedergabe zu beenden.
6. Drcken Sie bei gestoppter Wiedergabe die Taste (Schnell vorspulen) oder (Schnell zurckspulen), um die
Kassette schnell vor- oder zurckzuspulen.
7. Drcken Sie bei gestoppter Wiedergabe die Taste (Kassette anhalten/auserfen) einmal, um die Kassettenfachtr zu
nen.
8. Wenn Sie die Kassettenfachtr hrend der Wiedergabe nen mchten, dann drcken Sie die Taste (Kassette
anhalten/auserfen) zeimal.
9. Drcken Sie gleichzeitig die Tasten (Kassette iedergeben) und (Aufzeichnung), um die Audioaufzeichnung zu
starten.

– 50-
HINW EIS:
- Fr das Aufzeichnen knnen nur Kassetten vom Typ 1 benutzt erden.
- Wenn das Kassettenband locker ist, dann drehen Sie es mit Hilfe eines Bleistifts solange zurck, bis es stra ist, um einer
Beschdigung der Kassette oder des Gerts vorzubeugen.
- Auf der Kassettenoberseite besitzt die Kassette links und rechts jeeils eine Nase, die herausgebrochen erden
kann. Wenn die Nase herausgebrochen ist, dann kann die jeeilige Seite der Kassette nicht mehr fr Aufzeichnungen
benutzt erden. Wenn beide Nasen herausgebrochen sind, dann knnen beide Seiten der Kassette nicht mehr fr
Aufzeichnungen benutzt erden. In diesem Fall ird die Taste (AUFZEICHNUNG) blockiert, odurch Sie sie nicht
mehr drü cken kö nnen.
W EITERE FUNK TIONEN
AUX-EINGANG
Dieser Eingang ermglicht Ihnen, den Klang externer Audioiedergabegerte ber Ihr Gert iedergeben zu lassen.
1. Stecken Sie ein Ende des Audiokabels mit 3,5-mm-Klinkenstecker (nicht im Lieferumfang enthalten) in den Ausgang Line
Out Ihres externen Audioiedergabegerts und das andere Ende in die Buchse AUX IN.
2. Drcken Sie die Taste SOURCE, um in den AUX-Modus zu echseln. Auf dem Display ird AUDIO IN
(AUDIOEINGANG) angezeigt.
3. Starten Sie Ihr externes Audioiedergabegert, um Musik iederzugeben.
4. Die Audioausgabe erfolgt jetzt ber Ihr Gert.
EQ-BEDIENUNG/SUPERBASS
Mit Ihrem Gert knnen Sie verschiedene EQ-Klangeekte genieen. Drcken Sie die Taste EQUALIZER auf der Fernbedien-
ung, um einen der EQ-Eekte FLAT (LINEAR), ROCK (ROCK), CLASSIC (KLASSIK), POP (POP), VOCAL (SPRACHE) oder
JAZZ (JAZZ) auszuhlen.
Darber hinaus knnen Sie auch den Basseekt der Musik verstrken. Drcken Sie die Taste X-BASS auf der Fernbedien-
ung, um den Superbasseekt ein- bz. auszuschalten.
H inweis:
- Wenn Sie den Superbass aktivieren, dann ird der EQ-Klangeekt deaktiviert. Wenn Sie die Taste EQUALIZER
drcken, dann ird nur X-Bass On (Superbasseekt ein) angezeigt und kein EQ-Klangeekt angeendet. Wenn Sie den
EQ-Klangeekt ieder aktivieren mchten, dann mssen Sie zuerst den Superbass durch Drcken der Taste X-BASS
deaktivieren.
EINSCHLAFAUTOMATIK
1. Drcken Sie bei eingeschaltetem Gert mehrmals die Taste SLEEP auf der Fernbedienung, um enteder SLEEP OFF
(Einschlafautomatik deaktiviert) oder eine Zeitdauer fr die Einschlafautomatik aus 90, 80, 70, 60, 50, 40, 30, 20 oder 10
Minuten auszuhlen. Wenn die Einschlafautomatik aktiviert ist, dann ird die bis zum Ausschalten verbleibende Zeit in
regelmigen Abstnden auf dem Display angezeigt.
2. Wenn die eingestellte Zeit bis zu 0 heruntergezhlt urde, dann ird das Gert automatisch ausgeschaltet.
3. Drcken Sie zum Ausschalten des Gerts die Taste STANDBY oder mehrmals die Taste SLEEP, um die
Einschlafautomatik abzubrechen.

– 51-
SPRACHEINSTELLUNG
Sie knnen die OSD-Sprache Ihres Gerts einstellen.
1. Schalten Sie hierfr das Gert ein und echseln Sie dann in den DAB+- oder FM-Modus.
2. Halten Sie die Taste MENU am Gert gedrckt oder drcken Sie die Taste MENU auf der Fernbedienung, um das Menü
anzeigen zu lassen.
3. Drcken Sie die Taste oder solange, bis System (System) angezeigt ird und anschlieend zum Besttigen
Ihrer Ausahl die Taste ENTER.
4. Drcken Sie die Taste oder solange, bis Language (Sprache) angezeigt ird und anschlieend zum Besttigen
Ihrer Ausahl die Taste ENTER.
5. Drcken Sie die Taste oder , um eine der Sprachen auszuhlen. Whlen Sie die genschte Sprache aus und
besttigen Sie Ihre Ausahl anschlieend mit der Taste ENTER.
6. Drcken Sie die Taste MENU, um das Einstellungsmen zu verlassen.
SOFTW ARE-VERSIONSÜ BERPRÜ FUNG
Sie knnen die Softareversion Ihres Gerts berprfen.
1. Schalten Sie hierfr das Gert ein und echseln Sie dann in den DAB+- oder FM-Modus.
2. Halten Sie die Taste MENU am Gert gedrckt oder drcken Sie die Taste MENU auf der Fernbedienung, um das Menü
anzeigen zu lassen.
3. Drcken Sie die Taste oder solange, bis System (System) angezeigt ird und anschlieend zum Besttigen
Ihrer Ausahl die Taste ENTER.
4. Drcken Sie die Taste oder solange, bis auf der Anzeige SW Ver (Softareversion) angezeigt ird und
anschlieend die Taste ENTER, um sich die Versionsnummer der Software anzeigen zu lassen.
5. Halten Sie die Taste MENU am Gert gedrckt oder drcken Sie die Taste MENU auf der Fernbedienung, um das Menü
zu verlassen.
RÜ CK SETZEN AUF W ERK SEINSTELLUNG
Diese Funktion setzt das Gert auf die ursprngliche Werkseinstellung zurck.
1. Schalten Sie hierfr das Gert ein und echseln Sie dann in den DAB+- oder FM-Modus.
2. Halten Sie die Taste MENU am Gert gedrckt oder drcken Sie die Taste MENU auf der Fernbedienung, um das Menü
anzeigen zu lassen.
3. Drcken Sie die Taste oder solange, bis System (System) angezeigt ird und anschlieend zum Besttigen
Ihrer Ausahl die Taste ENTER.
4. Drcken Sie die Taste oder solange, bis Reset (Rcksetzen) angezeigt ird und anschlieend zum Besttigen
Ihrer Ausahl die Taste ENTER.
5. Drcken Sie die Taste oder solange, bis Yes (Ja) angezeigt ird und anschlieend zum Rcksetzen des Gerts
die Taste ENTER.
ENERGIESPAREN
Aufgrund der Anforderungen der kodesign-Richtlinie und zum Schutz der Umelt schaltet sich das Gert automatisch in den
Standby-Modus, enn innerhalb von 15 Minuten keine Musik iedergegeben urde.
Wenn sich das Gert zum Energiesparen ausgeschaltet hat, dann drcken Sie die Taste STANDBY , um das Gert ieder
einzuschalten.

– 52-
FUNK TIONEN DER FERNBEDIENUNG
Standby: Drcken Sie die Taste STANDBY, um das Gert
einzuschalten.
Drcken Sie die Taste STANDBY erneut, um es
auszuschalten.
Quelle: Diese Taste fr die Ausahl der Signaleingangs-
quellen DAB+-RADIO, FM-RADIO, CD, USB,
BLUETOOTH, KASSETTE (KASSETTEN) oder
AUDIO-EINGANG (AUX) drcken.
Equalize r: EQ-Klangmodus: LINEAR, ROCK, KLASSIK, POP,
SPRACHE oder JAZZ.
X-Bass: Superbass ein/aus.
Sleep: Zeitdauer fr die Einschlafautomatik: 90, 80, 70,
60, 50, 40, 30, 20 oder 10 Min.
Mono/Stereo: Mono-/Stereoiedergabe (nur fr FM-Radio).
Folder ˄˅: Verzeichnisausahl (nur fr USB und MP3-CD).
Memory: CD: Programmierte CD-Titeliedergabe.
DAB+: Speichern auf oder Abruf von Sender-
speicherpltzen.
FM: Speichern auf oder Abruf von Sender-
speicherpltzen.
Tune˅/Tune˄: CD/USB/BLUETOOTH: Titel zurck- oder vorsprin-
gen.
(/ ) DAB+: Aushlen gescannter Radiosender.
FM: Frequenz in 50-kHz-Schritten auf- bz.
abrtsspringen.
CH+/CH-: DAB+/FM: Senderspeicherplatzabruf.
CD/USB/BLUETOOTH: Keine Funktion.
Repeat :CD: Einzeltiteliederholung oder Wieder-
holung aller Titel.
USB: Einzeltiteliederholung, Wiederholung
des Verzeichnisses oder Wiederholung
aller Titel.
Random: CD/USB: Zufallsiedergabe ein/aus.
DAB/FM-FUNK TIONEN:
INFO: Anzeige der mit dem DAB+-Signal bertragenen
Daten/Informationen.
SCAN: Scannen aller DAB+-Radiosender.
MENU: Zugri auf die Menoptionen mit Hilfe der Tasten
oder und ENTER.
DAB+/FM-Funktions- und Einstellungsmenüs.
BLUETOOTH-FUNK TIONEN:
:Zurck.
:Vor.
:Wiedergabe/Pause.
CD/USB-FUNK TIONEN:
ANZEIGE: ID3-Tag-Anzeige ein oder ausschalten.
:Stopp.
:Wiedergabe/Pause.
LAUTSTÄ RK E:
VOL +: Lautstrke anheben
VOL -: Lautstrke verringern
REPEAT
RANDOM
VOL
DISPLAY

– 53-
K ein Strom
● Vergeissern Sie sich, dass das Netzkabel ordnungsgem verbunden ist.
● Vergeissern Sie sich, dass das Gert eingeschaltet ist.
Das Gerä t reagiert nicht auf das Drü cken der Tasten.
● Entfernen Sie die Batterien (falls eingelegt) und ziehen Sie fr eine Minute das Netzkabel vom Gert ab. Legen
Sie anschlieend die Batterien ieder ein.
K eine Tonausgabe
●H eben Sie die Lautstä rke an.
Ich ann den Bluetooth-amen dieses erts auf meinem Bluetooth-ert um oppeln nicht nden
● Vergeissern Sie sich, dass das Gert eingeschaltet ist.
● Vergeissern Sie sich, dass die Bluetooth-Funktion auf Ihrem Bluetooth Gert aktiviert ist.
● Die Bluetooth-Funktion des Gerts kann Signale bis zu einer Entfernung von max. 10 Metern empfangen.
Eine CD ist eingelegt, aber das Gerä t beginnt nicht mit der W iedergabe
● Vergeissern Sie sich, dass die CD mit der bedruckten Seite nach oben zeigend eingelegt ist.
● Vergeissern Sie sich, dass die CD sauber ist.
● Wenn die Wiedergabe pausiert ist, dann setzen Sie die Wiedergabe fort.
● Wenn die CD verschmutzt ist, dann reinigen Sie die CD. Wenn die CD zerkratzt oder beschdigt ist, dann legen
Sie eine unbeschdigte und nicht zerkratzte CD ein.
DAB+/FM-Empf ang
● Vergeissern Sie sich, dass die Antenne vollstndig herausgezogen ist.
● Elektrische Strquellen in Ihrem Haus knnen schlechten Empfang verursachen. Stellen Sie das Gert entfernt
derartiger Strquellen auf; vor allem dann, enn diese Strquellen Motoren und Transformatoren besitzen.
Das Gerä t schaltet sich w ä hrend der W iedergabe automatisch aus
● Heben Sie den Lautstrkepegel Ihres verbundenen Gerts (DVD-Player/Fernsehgert us.) an.
K langstö rungen durch Einstreuung von Drahtlosgerä ten in die Lautsprecher
● Entfernen Sie eventuelle Drahtlosgerte (Mobiltelefon, Bluetooth-Gerte us.) aus der nheren Umgebung des
Gerts.
PROBLEMBEHEBUNG

– 54-
TECHNISCHE DATEN
DAB+-Radio-Frequenzbereich: 174,928 239,2 MHz
FM-Radio-Frequenzbereich: 87,5 108 MHz
Bluetooth Frequenzbereich: 2,402 2,480 GHz
Bluetooth-bertragungsleistung: 4 dBm
AC-Netzeingang: 230 V~/50 Hz, 25 W
Batteriebetrieb: 6 x 1,5-V-Batterie der Gre UM-2 (C); nicht im Lieferumfang enthalten
Lautsprecherausgangsleistung: 2 x 6 W
Bluetooth: V5.0
AUX-Eingang: 3,5-mm-Stereo-Klinkenbuchse
Kopfhrerbuchse: 3,5-mm-Stereo-Klinkenbuchse
Batterie Fernbedienung: 1 x CR2025
Gerteabmessung (L x T x H): 390 x 228 x 138 mm
Betriebstemperatur: 0 45 C
Gesamtgeicht: 2,1 kg
● Diese Angaben dienen lediglich als Richterte. Die Geichts- und Grenangaben sind Nherungserte.
● Unser Produkt ird permanent eiterentickelt und unterliegt bezglich Spezikationen und Funktionen stillscheigen-
den nderungen.
Garantie
Lenco bietet Leistungen und Garantien im Einklang mit Europischem Recht. Setzen Sie sich deshalb im Falle von Reparatu-
ren (soohl hrend als auch nach Ablauf der Garantiezeit) mit Ihrem Fachhndler in Verbindung.
Wichtiger Hineis: Es ist nicht mglich, Produkte fr Reparaturen direkt an Lenco zu schicken.
Wichtiger Hineis: Wenn dieses Gert fr elchen Grund auch immer durch ein nicht ozielles Servicezentrum genet
urde oder durch dieses Servicezentrum darauf zugegrien urde, erlischt die Garantie.
Dieses Gert ist nicht fr professionelle Zecke geeignet. Falls das Gert fr professionelle Zecke eingesetzt ird, erl-
schen alle Garantieverpichtungen seitens des Herstellers.
Haf tungsausschluss
Aktualisierungen der Firmare und/oder Hardare-Komponenten erden regelmig durchgefhrt. Aus diesem Grund
knnen einige der Anleitungen, Spezikationen und Abbildungen in dieser Dokumentation zu dem Ihnen vorliegenden Gert
leicht abeichen. Alle in diesem Handbuch beschriebenen Elemente dienen nur zur Illustration und treen auf Ihre individuelle
Situation mglichereise nicht zu. Aus der in diesem Handbuch gettigten Beschreibung knnen keine Rechtsansprche oder
Leistungsanforderungen geltend gemacht werden.
Entsorgung des Altgerä ts
Dieses Symbol zeigt an, dass das entsprechende Produkt oder dessen Akku/Batterie in Europa nicht mit dem normalen
Hausmll entsorgt erden darf. Um die ordnungsgeme Abfallbehandlung des Produkts und dessen Akku/Batterie zu
gehrleisten, mssen diese im Einklang mit allen anendbaren rtlichen Vorschriften zur Entsorgung von Elektrogerten
und Akkus/Batterien entsorgt erden. Dabei helfen Sie, natrliche Ressourcen zu schonen und Umeltschutzstandards zur
Verertung und Entsorgung von Altgerten aufrecht zu halten (Richtlinie ber Entsorgung Elektrischer und Elektronischer
Altgerte).
CE-K ennze ichen
Hiermit erklrt Commaxx B.V. Wiebachstraat 37, 6466 NG Kerkrade, The Netherlands, dass dieses Produkt den grundstzli-
chen Anforderungen der EU-Richtlinie entspricht.
Die Konformittserklrung kann unter folgendem Link abgerufen erden: [email protected]
Service
Besuchen Sie bitte fr eitere Informationen und unseren Kundendienst unsere Homepage www.lenco.com
Commaxx B.V. Wiebachstraat 37, 6466 NG Kerkrade, Die Niederlande.
TECHNISCHE DATEN

-55-
FRANÇAIS
ATTENTION :
L’utilisation de commandes ou d’ajustements ou l’exécution de procédures autres que celles spéciées dans
le présent document peuvent entraîner une exposition dangereuse aux radiations.
PRÉCAUTIONS AVANT UTILISATION
GARDEZ CES INSTRUCTIONS À L’ESPRIT :
1. Ne couvrez pas et n’obturez pas les ouvertures de ventilation. Lorsque vous placez l’appareil sur une
étagère, laissez 5 cm (2”) d’espace libre tout autour de l’appareil.
2. Installez-le conformément au mode d’emploi fourni.
3. Gardez l’appareil à l’écart des sources de chaleur telles que des radiateurs, appareils de chauage, fours,
bougies et autres produits générant de la chaleur ou une amme nue. L’appareil ne peut être utilisé que
dans des climats modérés. Les environnements extrêmement froids ou chauds doivent être évités. La
plage de température de fonctionnement se situe entre 0° et 35° C.
4. Évitez d’utiliser l’appareil à proximité de champs magnétiques puissants.
5. Des décharges électrostatiques peuvent perturber le fonctionnement de cet appareil. Dans ce cas, il sut
de réinitialiser et de redémarrer l’appareil en suivant le mode d’emploi. Pendant le transfert de chiers,
manipulez l’appareil avec précaution et faites-le fonctionner dans un environnement sans électricité
statique.
6. Mise en garde ! N’introduisez jamais un objet dans l’appareil par les ouvertures et les fentes de ventilation.
Étant donné que des tensions élevées sont présentes à l’intérieur du produit, l’insertion d’un objet peut
entraîner une électrocution et/ou court-circuiter les composants internes. Pour les mêmes raisons, ne
versez pas de l’eau ou un liquide sur le produit.
7. Ne l’utilisez pas dans des endroits humides tels qu’une salle de bain, une cuisine pleine de vapeur ou à
proximité d’une piscine.
8. L’appareil ne doit pas être exposé à des écoulements ou des éclaboussures et aucun objet contenant un
liquide, tel qu’un vase, ne doit être posé sur ou près de l’appareil.
9. N’utilisez pas cet appareil lorsque de la condensation est possible. Lorsque l’appareil est utilisé dans une
pièce humide et chaude, des gouttelettes d’eau ou de la condensation peuvent se former à l’intérieur de
l’appareil et aecter son fonctionnement. Laissez l’appareil hors tension pendant 1 ou 2 heures avant de le
mettre en marche : l’appareil doit être sec avant sa mise sous tension.
10. Bien que ce dispositif soit fabriqué avec le plus grand soin et contrôlé à plusieurs reprises avant de
quitter l’usine, des problèmes peuvent néanmoins survenir, comme avec tous les appareils électriques.
Si l’appareil émet de la fumée ou en cas d’accumulation excessive de la chaleur ou d’un phénomène
inattendu, débranchez immédiatement la che d’alimentation du secteur.
11. Cet appareil doit fonctionner avec la source d’alimentation indiquée sur la plaque signalétique. Si vous
n’êtes pas sûr du type d’alimentation utilisé chez vous, contactez votre revendeur ou le fournisseur local
d’électricité.
12. Tenez l’appareil à l’abri des animaux. Certains animaux aiment ronger les cordons électriques.
13. Pour nettoyer l’appareil, servez-vous d’un chion doux et sec. N’utilisez pas de solvant ni d’autre liquide à
base de pétrole. Pour enlever les taches importantes, vous pouvez vous servir d’un chion humide imbibé
d’une solution de détergent diluée.
14. Le fournisseur n’est pas responsable des dommages ou pertes de données causés par un
dysfonctionnement, une utilisation abusive, une modication de l’appareil ou un remplacement de la
batterie.
15. N’interrompez pas la connexion lorsque l’appareil formate ou transfère des chiers. Dans le cas contraire,
les données pourraient être endommagées ou perdues.
16. Si l’appareil a une fonction de lecture USB, il faut brancher la clé USB directement sur l’appareil. N’utilisez
pas un câble d’extension USB, car cela peut causer des interférences entraînant des pertes de données.
17. L’étiquette de classication se trouve sur le panneau inférieur ou arrière de l’appareil.
18. Cet appareil ne doit pas être utilisé par des personnes (y compris les enfants) sourant de déciences
physiques, sensorielles ou mentales, ou d’un manque d’expérience et de connaissances, à moins qu’elles
n’aient été supervisées ou qu’une personne responsable de leur sécurité ne leur ait donné des instructions
sur l’utilisation correcte de l’appareil.
19. Ce produit est réservé à un usage non professionnel, et non pas à un usage commercial ni industriel.

-56-
20. Vériez que l’appareil est en position stable. La garantie ne couvre pas les dégâts occasionnés par
l’utilisation de cet appareil en position instable, par les vibrations, les chocs ou par la non-observation de
tout autre avertissement ou précaution contenus dans ce mode d’emploi.
21. N’ouvrez jamais cet appareil.
22. Ne placez jamais cet appareil sur un autre appareil électrique.
23. Ne laissez pas les sacs en plastique à la portée des enfants.
24. Utilisez uniquement les accessoires recommandés par le fabricant.
25. Conez l’entretien et les réparations à un personnel qualié. Une réparation est nécessaire lorsque
l’appareil a été endommagé de quelque façon que ce soit, par exemple lorsque le cordon d’alimentation
ou la prise sont endommagés, lorsqu’un liquide s’est déversé ou des objets sont tombés sur l’appareil,
lorsque l’appareil a été exposé à la pluie ou à l’humidité, lorsqu’il ne fonctionne pas correctement ou est
tombé.
26. Une exposition prolongée à la musique avec un volume élevé peut entraîner une perte auditive temporaire
ou permanente.
27. Si l’appareil est livré avec un câble d’alimentation ou un adaptateur secteur :
•En cas de problème, débranchez le cordon d’alimentation CA et conez l’entretien à un personnel
qualié.
• Ne marchez pas sur l’adaptateur secteur ou ne le coincez pas. Faites très attention, en particulier
à proximité des ches et du point de sortie du câble. Ne placez pas d’objets lourds sur l’adaptateur
secteur, car ils pourraient l’endommager. Gardez l’appareil hors de portée des enfants ! Ils pourraient se
blesser gravement s’ils jouent avec le câble d’alimentation.
• Débranchez cet appareil pendant les orages ou lorsqu’il n’est pas utilisé pendant une longue durée.
•La prise secteur doit être installée près de l’appareil et doit être facilement accessible.
• Ne surchargez pas les prises de courant ou les rallonges. Une surcharge peut entraîner un incendie ou
une électrocution.
•Les appareils de classe 1 doivent être branchés à une prise de courant disposant d’une connexion
protectrice à la terre.
• Les appareils à la norme de construction de classe 2 ne nécessitent pas de connexion à la terre.
•Tirez toujours sur la che pour débrancher le cordon de la prise secteur. Ne tirez pas sur le cordon
d’alimentation. Cela pourrait provoquer un court-circuit.
•N’utilisez pas un cordon ou une che d’alimentation endommagé ni une prise desserrée. Vous courez
un risque d’incendie ou de décharge électrique.
28. Si le produit contient ou est livré avec une télécommande contenant des piles boutons :
Avertissement :
•« N’ingérez pas la pile, car vous risquez une brûlure chimique » ou une formule équivalente.
• La télécommande fournie contient une pile bouton/pièce de monnaie. Si la pile est avalée, elle peut
causer de graves brûlures internes en seulement 2 heures et peut entraîner la mort.
• Tenez les piles neuves et usagées hors de portée des enfants.
• Si le compartiment à piles ne se ferme pas correctement, cessez d’utiliser l’appareil et tenez-le hors de
portée des enfants.
• Si vous pensez que les piles ont été avalées ou placées à l’intérieur d’une partie du corps, consultez un
médecin immédiatement.
29. Mise en garde relative à l’utilisation des piles :
•Risque d’explosion si la pile est mal remplacée. Remplacez les piles par des piles d’un type identique
ou équivalent.
•Pendant l’utilisation, le stockage ou le transport, la pile ne doit pas être soumise à des températures
extrêmement élevées ou basses, à une faible pression d’air à haute altitude.
•Le remplacement d’une pile par une autre de type incorrect peut entraîner une explosion ou une fuite de
liquide ou de gaz inammable.
• L’introduction d’une pile dans le feu ou dans un four chaud, l’écrasement ou le découpage mécanique
peut entraîner une explosion.
•L’exposition d’une pile dans un environnement à température extrêmement élevée peut entraîner une
explosion ou une fuite de liquide ou de gaz inammable.
•L’exposition d’une pile à une pression d’air extrêmement basse peut entraîner une explosion ou une
fuite de liquide ou de gaz inammable.
• Veuillez considérer les questions environnementales lors de la mise au rebut des piles.
INSTALLATION :
• Déballez toutes les pièces et enlevez le matériau de protection.
•Ne connectez pas l’unité au secteur avant d’avoir vérié la tension du secteur et avant que toutes les
autres connexions n’aient été eectuées.

-57-
AVERTISSEMENTS RELATIFS AU LECTEUR DE CD/DVD :
Ce produit contient un dispositif laser à faible puissance.
APPAREIL À LASER DE CLASSE 1
APPAREIL Á LASER DE CLASSE 1
PRODUCO LASER DE CLASE 1
MISE EN GARDE
RAYONNEMENT LASER INVISIBLE
LORSQUE L’APPAREIL EST
OUVERT ET QUE LES VERROUS
SONT INEFFICACES, ÉVITEZ
L’EXPOSITION AU FAISCEAU
AVERTISSEMENT : NE TOUCHEZ PAS LA TÊTE DE LECTURE.
AVERTISSEMENT : L’utilisation d’un lecteur de musique personnel dans
la circulation peut détourner l’attention de l’auditeur de dangers poten-
tiels tels que l’approche des voitures.
AVERTISSEMENT : Pour éviter une éventuelle détérioration de l’ouïe,
n’écoutez pas la musique à un niveau de volume élevé pendant des
périodes prolongées.
ACCESSOIRES :
• Cordon d’alimentation
• Télécommande
• Mode d’emploi
Appareil à laser de classe 1

-58-
APERÇU
12 3 4+
SOURCE
MENU
INFO
ENTER
SCAN
VOLUME
1 2 3 4 5 6 7 8 9 10 11 12 13
1. Entrée USB : Entrée pour clé USB
2. SOURCE : Appuyez sur cette touche pour choisir parmi les diérents modes : DAB+/FM/CD/USB/BLUETOOTH/
CASSETTE/AUX IN.
3. MENU / INFO : DAB+ : Appuyez dessus pour acher les informations de la station.
Maintenez enfoncée cette touche pour accéder au menu pour modier les réglages Appuyez sur
ou pour sélectionner le point de menu.
FM : Appuyez dessus pour acher les informations de la station.
Maintenez enfoncée cette touche pour accéder au menu pour modier les réglages Appuyez sur
ou pour sélectionner le point de menu.
4. PRÉCÉDENT :DAB+ : Appuyez cette touche pour acher les informations de la station précédente.
FM : Appuyez brièvement pour syntoniser une autre fréquence. Maintenez la touche enfoncée pour
rechercher la station précédente disponible.
CD/USB/BT : Appuyez dessus pour rechercher la piste précédente.
5. MARCHE/ARRÊT
:
Appuyez dessus pour mettre en marche l’appareil. Rappuyez dessus pour éteindre et passer en mode veille.
6. PAVÉ NUMÉRIQUE :
1234+
DAB+/FM : Appuyez sur ces boutons pour acher directement la station radio mémorisée. Maintenez la
touche enfoncée pour enregistrer la station de radio.
CD/USB : Appuyez sur la touche REPEAT pour passer à une autre opération de lecture répétée. Appuyez
sur la touche PROGRAM pour congurer l’opération de lecture du programme. Appuyez sur la
touche FOLDER pour changer de dossier (uniquement pour les MP3).
BT : Maintenez enfoncée la touche PAIR pour annuler la connexion en cours et lancer la recherche
d’un autre dispositif Bluetooth.
7. AFFICHAGE : Pour acher l'état de fonctionnement de l'appareil et des informations.
8. BOUTONS DE COMMANDE DES CASSETTES : (PAUSE / ARRÊT / ÉJECTION / AVANCE / REMBOBINAGE / LECTURE /
ENREGISTREMENT)
9. VOLUME : Pour régler le volume principal.
10. STOP / ENTER : DAB+ / FM :Appuyez dessus pour sélectionner le réglage à modier dans le menu.
CD / USB : Appuyez sur cette touche pour arrêter la lecture.
11. SUIVANT :DAB+ : Appuyez dessus pour acher les informations de la prochaine station.
FM : Appuyez brièvement pour syntoniser une autre fréquence. Maintenez enfoncé pour rechercher la
prochaine station disponible.
CD/USB/
BT :
Appuyez dessus pour rechercher la piste suivante.
12. LECTURE/PAUSE/
SCAN :
DAB+ : Appuyez sur cette touche pour lancer la recherche automatique de toutes les stations DAB+
disponibles.
FM : Appuyez brièvement pour basculer entre l’audio stéréo et mono. Appuyez sur cette touche pour
lancer la recherche automatique de toutes les stations FM disponibles.
CD/USB/BT:Appuyez sur cette touche pour alterner entre l’interruption et la reprise de la lecture.

-59-
SOURCE
MENU
INFO
ENTER
SCAN
FOLDER PAIR REPEAT PROGRAM
1234+
VOLUME
CASSETTE RECORDER
1416 15 1615
~AC IN
OPEN OPEN
AUX IN
17 18 19 20 2221
13. Porte du compartiment à CD
14. Porte du compartiment à cassettes
15. Port des basses
16. Haut-parleur
17. Poignée de transport
18. Porte du compartiment à piles
19. Entrée auxiliaire : Pour brancher un lecteur audio externe
20. Sortie casque : Pour brancher des écouteurs externes
21. Antenne : L’antenne doit être déployée pour assurer une bonne réception DAB+ / FM
22. ~AC in : Branchez le cordon d’alimentation à cette prise
REPEAT
RANDOM
VOL
DISPLAY
23
24
25
26
27
28
29
30
31
32
43
42
41
40
39
38
37
36
35
34
44
33
23. Mise en veille
24. Boutons numériques
25. Mémoire
26. Précédent / Tune
27. Dossier
28. Répétition
29. Dossier
30. Info - Scan - Menu
31. BT précédent - BT suivant - BT Play/pause
32. Achage ID3 Tag - CD/USB Stop - CD/USB Lecture/Pause
33. Volume+/-
34. Muet
35. Aléatoire
36. STATION-
37. Suivant / Tune
38. Entrée
39. Mono/stéréo
40. STATION+
41. Veille
42. X-BASS
43. Égaliseur
44. Source

-60-
INSERTION DES PILES
~AC IN
AUX IN
C 1,5V C 1,5V C 1,5V
C 1,5V C 1,5V C 1,5V
+
+
OPEN OPEN
+ 1,5V
+ 1,5V
+ 1,5V
1,5V + 1,5V + 1,5V +
FONCTIONNEMENT SUR PILES :
Pour un fonctionnement CC, débranchez d'abord la che CA de la
prise secteur et débranchez le cordon d'alimentation CA de la prise
d’entrée CA. Retirez la porte du compartiment à piles à l’arrière de
l’appareil. Installez 6 piles UM-2 (LR14) de taille C (NON fournies)
en respectant les indications de polarité indiquées à l’intérieur du
compartiment. Installez la porte du compartiment à piles.
Remarque :
- Comme l’appareil consomme un peu d’énergie des piles en mode
veille, retirez les piles si vous ne comptez pas utiliser l’appareil
pendant une longue période.
- Étant donné que l’appareil est en mode d’économie d’énergie
lorsqu’il est en veille sur piles, vous pouvez UNIQUEMENT
appuyer sur le bouton STANDBY de l’appareil et le maintenir
enfoncé pendant plus de 5 secondes pour allumer l’appareil. Pour
l'éteindre, rappuyez sur le bouton STANDBY.
UTILISATION DE LA TÉLÉCOMMANDE :
Une pile CR2025 est déjà installée dans la télécommande.
Avant de l’utiliser, retirez la feuille d’isolation de la batterie comme
indiqué à gauche.
Pour insérer une nouvelle pile, veuillez vous référer à la gure ci-cont-
re. En installant une pile, veillez à suivre les instructions.

-61-
METTEZ LE SCD-720 EN MARCHE
~AC IN
OPEN OPEN
AUX IN
SOURCE
MENU
INFO
ENTER
SCAN
FOLDER PAIR REPEAT PROGRAM
1234+
VOLUME
CASSETTE RECORDER
UTILISATION DES ÉCOUTEURS/DU CASQUE
Vous trouverez la connexion pour le casque sur la face arrière du SCD-720.
Utilisez un casque ou des écouteurs avec une prise stéréo de 3,5 mm pour connecter le casque au SCD-720.
Si vous insérez la prise stéréo 3,5 mm, les haut-parleurs du SCD-720 s’éteignent.
Seul le casque d’écoute fonctionnera désormais.
Vous pouvez contrôler le volume à l’aide du bouton de volume. Toutes les autres fonctions sont identiques à celles d’une
utilisation normale sans casque connecté.
~AC IN
OPEN OPEN
AUX IN
SOURCE
MENU
INFO
ENTER
SCAN
FOLDER PAIR REPEAT PROGRAM
1234+
VOLUME
CASSETTE RECORDER
Branchez le SCD-720 avec le câble d’alimentation à la prise
de courant.
Si vous branchez le SCD-720 à l’alimentation électrique,
l’alimentation de la batterie sera automatiquement coupée.
Appuyez sur le bouton STANDBY pour mettre l'appareil en
marche.
Pour l'éteindre, rappuyez sur le bouton STANDBY.
Vous pouvez sélectionner la source d’entrée à l’aide du
bouton SOURCE.
Vous pouvez sélectiionner :
RADIO DAB+
Radio FM
CD
USB
BLUETOOTH
CASSETTE (CASSETTE)
AUDIO IN (AUX)
Réglage du volume :
Tournez le bouton VOLUME pour modier le volume.

-62-
Ajustement de l’antenne
L’antenne située sur le panneau arrière de l’appareil doit être complètement déployée pour assurer une bonne réception
DAB+/FM. Orientez l’antenne autrement an d’améliorer la réception.
UTILISATION EN DAB+
La première fois que le mode DAB+ est sélectionné, l’appareil recherchera automatiquement les stations DAB+ disponibles.
Attendez que l’appareil ait ni la recherche. L’écran indiquera la progression de la recherche. Après la recherche, la radio se
syntonisera sur la première station.
Les stations disponibles dans une certaine bande de réception s’achent à l’écran. En cas de faible réception, la
station peut vaciller ou ne pas émettre de son. Essayez de déplacer le récepteur ou de faire pivoter l’antenne an
que le faible signal DAB+ arrive sans faiblir (les noms des stations sont toujours achés lorsque le signal est faible).
Recherche automatique
1. Mettez l’appareil en marche et réglez-le en mode DAB+.
2. Appuyez sur la touche SCAN (ou appuyez sur la touche SCAN de la télécommande) et maintenez-la enfoncée pour
lancer la recherche automatique des stations disponibles.
Recherche manuelle
La recherche manuelle peut vous permettre de régler l’antenne ou la station de recherche qui n’a pas été repérée lors de la
recherche automatique.
1. Mettez l’appareil en marche et réglez-le en mode DAB+.
2. Appuyez sur la touche MENU (ou appuyez sur la touche MENU de la télécommande) et maintenez-la enfoncée pour
accéder aux commandes du menu.
3. Appuyez sur la touche ou jusqu’à ce que « Manual » (Manuel) s’ache, puis appuyez sur la touche ENTER.
4. Appuyez sur la touche ou pour sélectionner le canal souhaité (par exemple 12C 227,360 MHz) (Sélection entre
5 A et 13 F).
5. Appuyez sur la touche ENTER pour conrmer.
6. Pour sélectionner un autre canal (5 A - 13 F), appuyez sur la touche ou , puis sur le bouton ENTER pour
conrmer.
7. Une fois que vous avez trouvé la station, appuyez sur le bouton ENTER pour la sélectionner.
8. Pour quitter la recherche manuelle, appuyez sur la touche MENU.
Syntonisation
Après avoir balayé toutes les stations DAB disponibles, appuyez sur la touche ou pour acher et parcourir la liste
des stations. Ensuite, appuyez sur la touche ENTER pour que la radio se syntonise à cette station en quelques secondes.
Mémorisation des présélections DAB+
Vous pouvez mémoriser 20 stations DAB+ au maximum.
Utiliser les boutons de l’unité pour mémoriser le préréglage :
1. Syntonisez la station à mémoriser.
2. Pour l’enregistrer sur le canal préréglé 1, 2 ou 3, appuyez sur la touche numérique et maintenez-la enfoncée. Ensuite, elle
s’enregistre sur ce numéro préréglé.
3. Pour l’enregistrer sur un autre canal préréglé de 4 à 20, appuyez sur la touche numérique « 4 » et maintenez-la enfoncée.
« Store » (Sauvegarde) s’ache.
4. Appuyez sur la touche ou pour sélectionner le numéro de préréglage de votre choix à sauvegarder.
5. Appuyez sur la touche ENTER pour sauvegarder.
Utiliser les boutons de la télécommande pour mémoriser le préréglage :
1. Syntonisez la station à mémoriser.
2. Appuyez sur la touche MEMORY, « Store » (Sauvegarde) s’ache.
3. Appuyez sur la touche ou pour sélectionner le numéro de préréglage de votre choix à sauvegarder.
4. Appuyez sur la touche ENTER pour sauvegarder.
Charger des présélections DAB+ stockées
Utiliser les boutons de l’unité pour rappeler le préréglage :
1. Pour revenir au canal préréglé 1, 2 ou 3, appuyez sur la touche numérique correspondante. Ensuite, il se syntonise sur ce
canal préréglé.
2. Pour revenir à l’autre canal préréglé de 4 à 20, appuyez sur la touche numérique « 4 ». « Recall » (Rappeler) s’ache.
REPEAT
RANDOM
VOL
DISPLAY
RADIO DAB+

-63-
3. Appuyez sur la touche ou pour sélectionner le numéro du préréglage de votre choix à rappeler.
4. Appuyez sur ENTER pour rappeler.
Utiliser les boutons de la télécommande pour rappeler le préréglage :
1. Appuyez sur la touche MEMORY, « Recall » (Rappeler) s’ache.
2. Appuyez sur la touche ou pour sélectionner le numéro du préréglage de votre choix à rappeler.
3. Appuyez sur ENTER pour rappeler.
Achage des informations d’une station DAB+
Les diérents types d’informations existants sont mentionnés ci-dessous. Pour changer les informations achées, appuyez
plusieurs fois sur le bouton INFO.
Délement du texte
de radio Barre de signal Type de programme
(PTY)
Nom de multiplexe Fréquence Taux d’erreurs de
signal Débit binaire audio
1. Délement du texte de radio :Ache des titres de musique ou des détails de programme fournis par le diuseur.
2. Barre de signal : Niveau du signal de transmission. Plus il y a de caractères, plus le signal reçu est fort. Pour
améliorer la réception, ajustez la position de l'antenne.
3. Type de programme (PTY) : Type de programme fourni par le diuseur.
4. Nom de multiplexe : Ache le nom du multiplexe auquel appartient la station en cours.
5. Frequency (Fréquence) : Fréquence du canal actuel.
6. Taux d’erreurs de signal : Indique le taux d’erreurs. Plus cette valeur est grande, plus il y a d’erreurs reçues. Pour
améliorer la réception, ajustez la position de l’antenne.
7. Débit binaire audio : Il s'agit du débit binaire audio de la station en cours.
AUTRES FONCTIONS DU MENU DAB+
Appuyez sur la touche MENU (ou appuyez sur la touche MENU de la télécommande) et maintenez-la enfoncée pour accéder
aux commandes du menu. Appuyez ensuite sur la touche ou pour diérentes options, comme décrit ci-dessous.
Contrôle de la gamme dynamique (DRC) (Voir Remarque.)
DRC peut rendre les sons faibles lus faciles à entendre quand l’appareil est utilisé dans un environnement bruyant. Le niveau
de DRC d’une diusion est déni par le diuseur et transmis avec le service. Une modication de la valeur de DRC sur votre
appareil vous permet d’appliquer un facteur d’échelle à ce niveau.
Il y a trois niveaux de compression :
DRC élevé : Compression maximale telle qu’envoyée avec le service transmis
DRC faible : Réglé sur 1/2 du service transmis envoyé
DRC désactivé : Pas de compression
1. Appuyez sur la touche MENU (ou appuyez sur la touche MENU de la télécommande) et maintenez-la enfoncée pour
accéder aux commandes du menu.
2. Appuyez sur la touche ou jusqu’à ce que « DRC » s’ache, puis appuyez sur la touche ENTER.
3. Appuyez sur la touche ou pour sélectionner la valeur DRC, puis appuyez sur la touche ENTER pour conrmer.
4. Appuyez sur la touche MENU pour quitter le menu.
Remarque :
-Il n’est pas possible d’utiliser la fonction DRC avec certaines diusions DAB+. Si la diusion ne prend pas en charge le
DRC, alors le réglage de DRC dans l’appareil n’aura aucun eet.
-Après avoir réglé le niveau de DRC, le son peut être plus fort.
Éliminer toutes les stations non valables
Cette fonction supprime les stations inactives.
1. Appuyez sur la touche MENU (ou appuyez sur la touche MENU de la télécommande) et maintenez-la enfoncée pour
accéder aux commandes du menu.
2. Appuyez sur la touche ou jusqu’à ce que « Prune » (Éliminer) s’ache, puis appuyez sur la touche ENTER.
3. Appuyez sur la touche ou pour sélectionner « Yes » (Oui), puis appuyez sur la touche ENTER pour éliminer les
stations non valides l’appareil.
4. Appuyez sur la touche MENU pour quitter le menu.
REPEAT
RANDOM
VOL
DISPLAY

-64-
Ajustement de l’antenne
L’antenne située sur le panneau arrière de l’appareil doit être complètement déployée pour assurer une bonne réception
DAB+/FM. Orientez l’antenne autrement an d’améliorer la réception.
UTILISATION DE LA RADIO FM
Recherche automatique
1. Mettez l’appareil en marche et réglez-le en mode FM.
2. Maintenez enfoncé le bouton SCAN pour lancer une recherche automatique et sauvegarder les stations disponibles (max.
20 emplacements).
Recherche manuelle
1. Appuyez à plusieurs reprises sur la touche ou pour syntoniser une autre fréquence.
2. Vous pouvez également appuyer sur la touche ou et la maintenir enfoncée pour rechercher automatiquement le
prochain canal disponible.
Mémorisation des présélections FM
La radio peut mémoriser au total 20 FM stations.
Utiliser les boutons de l’unité pour mémoriser le préréglage :
1. Syntonisez la station à mémoriser.
2. Pour l’enregistrer sur le canal préréglé 1, 2 ou 3, appuyez sur la touche numérique et maintenez-la enfoncée. Ensuite, elle
s’enregistre sur ce numéro préréglé.
3. Pour l’enregistrer sur un autre canal préréglé de 4 à 20, appuyez sur la touche numérique « 4 » et maintenez-la enfoncée.
« Store » (Sauvegarde) s’ache.
4. Appuyez sur la touche ou pour sélectionner le numéro de préréglage de votre choix à sauvegarder.
5. Appuyez sur la touche ENTER pour sauvegarder.
Utiliser les boutons de la télécommande pour mémoriser le préréglage :
1. Syntonisez la station à mémoriser.
2. Appuyez sur la touche MEMORY, « Store » (Sauvegarde) s’ache.
3. Appuyez sur la touche ou pour sélectionner le numéro de préréglage de votre choix à sauvegarder.
4. Appuyez sur la touche ENTER pour sauvegarder.
Charger des présélections FM stockées
Utiliser les boutons de l’unité pour rappeler le préréglage :
1. Pour revenir au canal préréglé 1, 2 ou 3, appuyez sur la touche numérique correspondante. Ensuite, il se syntonise sur ce
canal préréglé.
2. Pour revenir à l’autre canal préréglé de 4 à 20, appuyez sur la touche numérique « 4 ». « Recall » (Rappeler) s’ache.
3. Appuyez sur la touche ou pour sélectionner le numéro du préréglage de votre choix à rappeler.
4. Appuyez sur ENTER pour rappeler.
Utiliser les boutons de la télécommande pour rappeler le préréglage :
1. Appuyez sur la touche MEMORY, « Recall » (Rappeler) s’ache.
2. Appuyez sur la touche ou pour sélectionner le numéro du préréglage de votre choix à rappeler.
3. Appuyez sur ENTER pour rappeler.
Sélection Stéréo/forcer mono
Lorsque vous recevez une station de radio FM stéréo, appuyez sur la touche de l’appareil (ou sur la touche MONO/ST.
de la télécommande) pour basculer entre l’audio stéréo et l’audio mono forcé.
Achage des informations d’une station FM
Les diérents types d’informations existants sont mentionnés ci-dessous. Pour changer les informations achées, appuyez
plusieurs fois sur le bouton INFO.
Texte radio Type de program-
me (PTY) Fréquence Type audio
1. Texte radio : Le texte délant qui ache des informations sur les titres de musique ou des détails de
programme fourni par la station de radio
2. Type de programme (PTY) : Type de programme fourni par le diuseur
3. Frequency (Fréquence) : Fréquence du canal actuel
4. Type audio : Stéréo ou mono
REPEAT
RANDOM
VOL
DISPLAY
REPEAT
RANDOM
VOL
DISPLAY
RADIO FM

-65-
AUTRES UTILISATIONS DU MENU FM
Appuyez sur la touche MENU (ou appuyez sur la touche MENU de la télécommande) et maintenez-la enfoncée pour accéder
aux commandes du menu. Puis, appuyez sur la touche ou pour accéder à diérentes options tel que décrit à la page
suivante.
Réglages de recherche
1. Appuyez sur la touche MENU (ou appuyez sur la touche MENU de la télécommande) et maintenez-la enfoncée pour
accéder aux commandes du menu.
2. Appuyez sur la touche ou jusqu’à ce que « Scan » (Rech) s’ache, puis appuyez sur la touche ENTER.
3. Appuyez sur la touche ou pour basculer entre « Strong » (Fort) et « All » (Tout), puis appuyez sur la touche
ENTER pour conrmer. Lorsque la valeur « Strong » (Fort) est sélectionnée, seules les stations au signal fort sont
détectées. La recherche ignorera les stations qui ont du bruit. Lorsque « All » (Tout) est sélectionné, toutes les stations
seront détectées pendant la recherche FM même si la station de radio comporte un peu de bruit.
4. Lors de la prochaine recherche FM, l’appareil recherchera les stations en se basant sur ce réglage conrmé.
Réglages audio
1. Appuyez sur la touche MENU (ou appuyez sur la touche MENU de la télécommande) et maintenez-la enfoncée pour
accéder aux commandes du menu.
2. Appuyez sur la touche ou jusqu’à ce qu’« Audio » s’ache, puis appuyez sur la touche ENTER.
3. Appuyez sur la touche ou pour basculer entre « Stereo » et « Mono », puis appuyez sur la touche ENTER pour
conrmer.
FONCTIONNEMENT CD/USB
Charger et lire un disque CD
Ouvrez la porte CD. Placez-y un CD avec la face imprimée vers le haut. Fermez la porte du compartiment à CD. Appuyez sur
le bouton SOURCE pour sélectionner le mode CD. Après la lecture, le nombre total de titres s’ache à l’écran et la lecture
commence automatiquement.
Lecture à partir d’une clé USB
Branchez une clé USB dans le port USB. Appuyez sur le bouton SOURCE pour sélectionner le mode USB. Après l'analyse, le
nombre total de pistes s’achera sur l'écran. La lecture se lancera automatiquement.
Commande Lecture/pause
Pour suspendre la lecture, appuyez sur le bouton. Rappuyez sur ce bouton pour reprendre la lecture.
Commande Arrêt
Pour arrêter la lecture, appuyez sur le bouton.
Changement de piste
Pendant la lecture, appuyez sur la touche ou pour passer à la piste précédent ou suivant.
Recherche de musique rapide
Pendant la lecture, appuyez sur la touche ou pour lancer la lecture rapide.
Lorsque vous relâchez la touche ou , la lecture à la vitesse normale recommence.
Lecture répétée/lecture aléatoire
Mode Disque CD
Pendant la lecture, appuyez une fois sur la touche REPEAT, l’écran ache « REP.ONE » (RÉP.UNE). La piste en cours se lira
en boucle.
Lorsque vous appuyez à nouveau sur la touche REPEAT, l’écran ache « REP.ALL » (RÉP.TOUT). Toutes les pistes se liront
en boucle.
Lorsque vous appuyez à nouveau sur la touche REPEAT, l’écran ache « RANDOM » (ALÉATOIRE). Toutes les pistes se
liront dans un ordre aléatoire.
Lorsque vous appuyez à nouveau sur la touche REPEAT, l’appareil revient à la lecture normale.
Mode Disque MP3 ou USB MP3
Pendant la lecture, appuyez une fois sur la touche REPEAT, l’écran ache « REP.ONE » (RÉP.UNE). La piste en cours se lira
en boucle.
Lorsque vous appuyez à nouveau sur la touche REPEAT, l’écran ache « REP.ALBUM » (RÉP.ALBUM). Toutes les pistes
dans le dossier en cours se liront en boucle.
Lorsque vous appuyez à nouveau sur la touche REPEAT, l’écran ache « REP.ALL » (RÉP.TOUT). Toutes les pistes se liront
en boucle.
Lorsque vous appuyez à nouveau sur la touche REPEAT, l’écran ache « RANDOM » (ALÉATOIRE). Toutes les pistes se
liront dans un ordre aléatoire.

-66-
Lorsque vous appuyez à nouveau sur la touche REPEAT, l’appareil revient à la lecture normale.
Lecture programmée
Mode Disque CD
Cet appareil peut être programmé pour lire une séquence de pistes sélectionnées.
1. En mode arrêt, appuyez sur la touche PROGRAM, l’écran ache le numéro de programme et le numéro de piste.
2. Appuyez sur la touche ou pour sélectionner la piste de votre choix.
3. Appuyez sur le bouton PROGRAM pour sauvegarder la piste voulue.
4. Répétez les étapes 2-3 pour sauvegarder jusqu’à 30 pistes programmées.
5. Appuyez sur la touche pour lancer la lecture des pistes programmées.
6. Pour eacer la lecture programmée, appuyez deux fois sur le bouton ou changez de mode.
7. Pendant la lecture du programme, vous pouvez également eectuer l’opération « Repeat One » (Répéter un) ou « Repeat
All » (Répéter tout) ; cependant, la lecture aléatoire n’est pas prise en charge.
Mode Disque MP3 ou USB MP3
1. En mode arrêt, appuyez sur la touche PROGRAM, l’écran ache le numéro de programme et le numéro de dossier.
2. appuyez sur la touche FOLDER (ou la touche FOLDER˄ / FOLDER˅ de la télécommande) pour sélectionner le dossier de
votre choix.
3. Appuyez sur la touche PROGRAM pour sauvegarder le dossier de votre choix.
4. Appuyez sur la touche ou pour sélectionner la piste de votre choix.
5. Appuyez sur le bouton PROGRAM pour sauvegarder la piste voulue.
6. Répétez les étapes 2-3 pour sauvegarder jusqu’à 99 pistes programmées.
7. Appuyez sur la touche pour lancer la lecture des pistes programmées.
8. Pour eacer la lecture programmée, appuyez deux fois sur le bouton ou changez de mode.
9. Pendant la lecture du programme, vous pouvez également eectuer l’opération « Repeat One » (Répéter un) ou « Repeat
All » (Répéter tout) ; cependant, la lecture aléatoire n’est pas prise en charge.
Remarque :
- Le port USB sert uniquement à la lecture, et NON à la recharge d’un appareil externe
-En plus de la lecture de disques audio CDDA, l’appareil peut également lire le format de chier MP3 en mode CD / USB
-Si votre périphérique USB est chargé de chiers MP3, mais l’écran continue d’acher « NO » (AUCUN), le format de votre
périphérique USB pourrait ne pas être compatible avec l’appareil.
- L’appareil prend en charge les versions USB 1.1 et 2.0.
- L’appareil prend en charge les périphériques USB d’une capacité allant jusqu’à 32 Go.
-L’appareil peut ne pas être compatible avec tous les périphériques USB, cela n’est pas un problème.
-Pour la lecture de chiers MP3, un maximum de 255 dossiers et 999 chiers est pris en charge.
-En raison du mécanisme de lecture/écriture de chiers USB, le premier chier écrit sur le périphérique USB sera lu en
premier et le dernier chier écrit sera lu en dernier. (L’appareil ne trie pas par ordre alphabétique)
Sélection du Dossier (chiers MP3 uniquement)
Lors de la lecture MP3, appuyez sur la touche FOLDER (ou la touche FOLDER˄ / FOLDER˅ de la télécommande) pour
passer au dossier.
En mode Arrêt, appuyez sur la touche FOLDER (ou la touche FOLDER˄ / FOLDER˅ de la télécommande) pour passer au
dossier. Appuyez ensuite sur la touche ou pour sélectionner le morceau que vous souhaitez écouter. Appuyez sur la
touche pour lancer la lecture du morceau.
Achage ID3 Tag (Seuls les chiers MP3 incluent les informations ID3 Tag.)
Appuyez sur le bouton DISPLAY DISPLAY de la télécommande pour activer/désactiver l’achage de l’ID3 Tag Lorsque cela
est activé, les détails du titre, de l’artiste et de l'album de la piste MP3 s'achent.
BLUETOOTH
Suivez les instructions d’appariement ci-dessous pour associer l’appareil à votre appareil Bluetooth.
1. Appuyez plusieurs fois sur le bouton SOURCE pour passer en mode Bluetooth. L’écran ache « BT AUDIO ». L’appareil
commence la recherche et « BT AUDIO » clignote.
2. Si l’appareil n’a jamais été apparié à un appareil Bluetooth auparavant ou ne parvient pas à trouver le dernier appareil
apparié, l’écran et l’indicateur d’état Bluetooth continueront de clignoter. Activez la fonction Bluetooth de votre appareil
et activez la recherche jusqu’à ce qu'il ait trouvé « Lenco SCD-720 ». Sélectionnez « Lenco SCD-720 » sur l’appareil
Bluetooth pour établir la connexion. Saisissez le mot de passe « 0000 », si nécessaire.
3. Après un appairage réussi, l’appareil ache « BT AUDIO » en permanence.
4. Vous pouvez maintenant commencer à lire de la musique à partir de votre smartphone sans l sur l’enceinte.
5. Vous pouvez appuyer sur le bouton pour mettre la lecture en pause ou reprendre la playback.
6. Vous pouvez appuyer sur la touche ou pour rechercher la chanson précédente ou suivante.

-67-
Remarque :
• Maintenez enfoncée la touche PAIR pour annuler la connexion en cours et lancer la recherche d’un autre dispositif
Bluetooth.
• Ce produit est doté d’une fonction de réception bluetooth, vous ne pouvez pas l’utiliser pour transmettre de son blue-
tooth (le casque ou l’oreillette Bluetooth ne reçoit pas le signal du SCD-720), cela signie que vous pouvez recevoir
sans l un signal sonore bluetooth provenant d’une source externe comme un smartphone.
CASSETTE
Appuyez sur la touche SOURCE pour passer en mode Cassette. L’écran ache « TAPE » (CASSETTE). Les boutons de
commande des cassettes sont situés sur la partie supérieure avant de l’appareil.
1. Appuyez sur la touche ARRÊTER/ÉJECTER LA CASSETTE pour ouvrir le compartiment de la cassette.
2. Insérez la cassette et fermez correctement la porte.
La face de lecture est tournée vers l’avant
Insérez la cassette avec le côté de la bande
vers le haut
3. Appuyez sur la touche LECTURE DE LA CASSETTE pour lancer la lecture.
4. Appuyez sur la touche de SUSPENDRE LA LECTURE DE LA CASSETTE pour suspendre la lecture. Pour reprendre
la lecture, appuyez sur la touche SUSPENDRE LA LECTURE DE LA CASSETTE pour la relâcher.
5. Pour arrêter la lecture, appuyez sur la touche ARRÊTER/ÉJECTER LA CASSETTE .
6. En mode Arrêt, appuyez sur la touche AVANCER CASSETTE ou REMBOBINER pour avancer ou rembobiner la
cassette.
7. Pour ouvrir la porte du compartiment de la cassette en mode Arrêt, appuyez une fois sur la touche ARRÊTER/ÉJECTER
LA CASSETTE .
8. Pour ouvrir la porte du compartiment de la cassette pendant la lecture, appuyez deux fois sur la touche ARRÊTER/
ÉJECTER LA CASSETTE .
9. Pour enregistrer, appuyez simultanément sur la touche LECTURE CASSETTE et ENREGISTREMENT .
REMARQUE :
-Seule la cassette normale de type 1 peut être utilisée pour l’enregistrement.
-Si la bande a du mou, rembobinez le mou à l’aide d’un crayon pour éviter d’endommager la bande ou l’appareil.
-Au dos de la cassette se trouvent des languettes gauche et droite. Cette languette peut être cassée. Si tel est le cas, il
n’est plus possible d’enregistrer sur ce côté de la cassette. Lorsque les deux languettes sont retirées, il n’est plus possible
d’enregistrer sur la cassette. Le bouton D’ENREGISTREMENT se verrouille alors et ne peut plus être enfoncé.

-68-
AUTRES FONCTIONS
ENTRÉE AUXILIAIRE
Cela vous permet de connecter le son provenant d’un lecteur externe par le biais de votre appareil.
1. Branchez un câble audio de 3,5 mm (non fourni) sur la sortie ligne de votre lecteur externe et l’autre extrémité sur prise
AUX IN.
2. Appuyez sur le bouton SOURCE pour passer en mode AUX. « AUDIO IN » (entrée audio) s'ache.
3. Lancez la lecture de musique sur votre lecteur externe.
4. L’appareil lit le son.
UTILISATION EQ / X BASS
Vous pouvez utiliser diérents modes d’eets sonores d'égaliseur. Appuyez sur la touche ÉGALISEUR de la télécommande
pour passer aux diérents eets sonores FLAT / ROCK / CLASSIC / POP / VOCAL / JAZZ.
Vous pouvez également augmenter l’eet des basses de la musique. Appuyez sur la touche X BASS de la télécommande
pour faire basculer activer ou désactiver l’eet X Bass.
Remarque :
-Lorsque X-Bass est activé, l’eet sonore de l’égaliseur est désactivé. Une pression sur la touche ÉGALISEUR permet
d’activer uniquement X-Bass sans aucun eet d’égalisation. Pour rétablir l’eet sonore de l’égaliseur, appuyez d’abord sur
la touche X-BASS pour désactiver l’eet.
FONCTION VEILLE AUTOMATIQUE
1. Lorsque l’appareil est allumé, appuyez plusieurs fois sur la touche SLEEP de la télécommande pour sélectionner une
durée de veille parmi SLEEP OFF (VEILLE DÉSACTIVÉE), 90, 80, 70, 60, 50, 40, 30, 20 ou 10 minutes. Lorsque la
minuterie de veille est réglée, la minuterie restante s’ache périodiquement à l’écran.
2. Quand le minuteur de sommeil arrive à zéro, l'appareil s'éteint automatiquement.
3. Pour annuler la fonction de sommeil, appuyez sur le bouton STANDBY pour éteindre l’appareil. Ou bien, appuyez
plusieurs fois sur le bouton SLEEP pour sélectionner « SLEEP OFF » (SOMMEIL DÉSACTIVÉ).
CONFIGURATION DE LA LANGUE
Vous pouvez régler la langue de l’appareil.
1. Mettez l’appareil en marche et réglez-le en mode DAB+ ou FM.
2. Appuyez sur la touche MENU (ou appuyez sur la touche MENU de la télécommande) et maintenez-la enfoncée pour
accéder aux commandes du menu.
3. Appuyez sur la touche ou jusqu’à ce que « System (Système) » s’ache, puis appuyez sur la touche ENTER.
4. Appuyez sur la touche ou jusqu’à ce que « Language (Langue) » s’ache, puis appuyez sur la touche ENTER.
5. Appuyez sur la touche ou pour alterner entre les diérentes langues. Sélectionnez la langue voulue et conrmez
en appuyant sur ENTER.
6. Appuyez sur la touche MENU pour quitter le menu.
VÉRIFICATION DE LA VERSION DU LOGICIEL
Vous pouvez vérier la version du logiciel de l’appareil.
1. Mettez l’appareil en marche et réglez-le en mode DAB+ ou FM.
2. Appuyez sur la touche MENU (ou appuyez sur la touche MENU de la télécommande) et maintenez-la enfoncée pour
accéder aux commandes du menu.
3. Appuyez sur la touche ou jusqu’à ce que « System (Système) » s’ache, puis appuyez sur la touche ENTER.
4. Appuyez sur la touche ou jusqu’à ce que « SW ver » s’ache, puis appuyez sur la touche ENTER pour acher
le numéro de version du logiciel.
5. Appuyez sur la touche MENU (ou appuyez sur la touche MENU de la télécommande) et maintenez-la enfoncée pour
quitter les commandes du menu.
RÉINITIALISATION DES RÉGLAGES D’USINE
Cette fonction rétablit les réglages d’usine initiaux de l’appareil.
1. Mettez l’appareil en marche et réglez-le en mode DAB+ ou FM.
2. Appuyez sur la touche MENU (ou appuyez sur la touche MENU de la télécommande) et maintenez-la enfoncée pour
accéder aux commandes du menu.
3. Appuyez sur la touche ou jusqu’à ce que « System (Système) » s’ache, puis appuyez sur la touche ENTER.
4. Appuyez sur la touche ou jusqu’à ce que « Reset » (Réinitialiser) s’ache, puis appuyez sur la touche ENTER.
5. Appuyez sur la touche ou jusqu’à ce que « Yes (Oui » s’ache, puis appuyez sur la touche ENTER pour
réinitialiser l’appareil.
ÉCONOMIE D’ÉNERGIE
En raison des exigences de l’ErP et de la protection de l’environnement, l’appareil se mettra automatiquement en mode veille
quand aucune musique n’est lue pendant environ 15 minutes.
Lorsque l’appareil est hors tension en raison de l’erreur ErP, vous pouvez appuyer sur la touche STANDBY pour rallumer
l’appareil.

-69-
FONCTION DE LA TÉLÉCOMMANDE
Mise en veille : Appuyez sur le bouton STANDBY pour mettre
l'appareil en marche.
Pour l'éteindre, rappuyez sur le bouton STANDBY.
Source : Sélection de la fonction utilisateur : RADIO DAB+,
FM-RADIO, CD, USB, BLUETOOTH, CASSETTE
(CASSETTE), ENTRÉE AUDIO (AUX).
Égaliseur : Conguration de l’égaliseur : FLAT / ROCK /
CLASSIC / POP / VOCAL / JAZZ.
X-Bass : Activer/désactiver Super bass.
Veille : Conguration du temps de veille :
90-80-70-60-50-40-30-20-10 min.
Mono/stéréo : Sélection Mono Stéréo pour la radio FM unique-
ment.
Folder ˄˅ : Sélection de dossiers pour USB et MP3-CD.
Mémoire : CD : Programmations de pistes CD.
DAB+ : programmation ou rappel des présé-
lections.
FM : programmation ou rappel des présé-
lections.
Tune˅ / tune˄ : CD/USB/BT : Recul de piste ou piste suivante.
( / ) DAB+ : Sélection des stations recherchées
FM : Fréq. haut/bas à 50 kHz.
CH+/CH- : DAB+/FM : Rappel des présélections.
CD/USB/BT : Aucune fonction.
Répétition : CD : Répéter un ou répéter tout.
USB : Répéter un, répéter l’album ou
répéter tout.
Aléatoire : CD/USB : Activer/désactiver la fonction aléatoi-
re.
FONCTIONS DAB/FM :
INFO : Acher les informations sur les données lors de la
réception de la station dab+.
RECHERCHE : Rechercher toutes les stations dab+.
MENU : Accéder aux fonctions du menu en combinaison
avec les touches ou et ENTER.
Foncions DAB+/FM e foncions de conguraion.
FONCTIONS BLUETOOTH :
:recul.
: suivant.
:Fonction Lecture/pause.
FONCTIONS CD/USB :
AFFICHAGE : ID-3 tag Marche ou Arrêt.
: Fonction Arrêt.
:Fonction Pause/Lecture.
VOLUME :
VOL+ : Augmenter le volume
VOL- : Diminuer le volume
REPEAT
RANDOM
VOL
DISPLAY

-70-
Pas d’alimentation
● Vériez que le cordon secteur est correctement branché.
●Assurez-vous que l’appareil est allumé.
L’appareil ne répond pas aux touches.
●Retirez les piles (lorsqu’elles sont présentes) et retirez le cordon pendant une minute. Puis réinsérez les piles.
Pas de son
●Augmenter le volume.
Je n’arrive pas à trouver le nom Bluetooth de cet appareil sur mon appareil Bluetooth pour l’appairage Bluetooth
●Assurez-vous que l’appareil est allumé.
●Assurez-vous que Bluetooth est activé sur votre appareil Bluetooth.
● L'unité est dotée de la fonction Bluetooth qui permet de recevoir un signal dans un rayon de 10 mètres.
Disque inséré mais pas de lecture
● Assurez-vous que l'étiquette du disque est orientée vers le haut.
●Assurez-vous que le disque est propre.
● Le mode PAUSE peut être activé, le désactiver.
● Le disque peut être sale, vériez et nettoyez-le. Si le disque est endommagé, remplacez-le par un autre disque
non endommagé.
Réception DAB +/FM
● Vériez que l’antenne laire est complètement déployée.
● Des interférences électriques chez vous peuvent ruiner la réception. Éloignez l'appareil d'elles (en particulier avec
des moteurs et des transformateurs).
L’appareil s’éteint automatiquement pendant la lecture
●Augmentez le niveau de volume de votre source sonore connectée (lecteur DVD/TV, etc.)
Interférences sonores provenant de dispositifs sans l dans les haut-parleurs
● Éloignez tous les appareils sans l (téléphone mobile, appareil Bluetooth, etc.) loin du haut-parleur.
DÉPANNAGE

-71-
CARACTÉRISTIQUES TECHNIQUES
Plage de fréquence radio DAB+ : 174,928-239,2 MHz
Plage de fréquence radio FM : 87,5-108 MHz
Plage de fréquence Bluetooth : 2,402-2,480 GHz
Puissance de transmission Bluetooth : 4 dBm
Entrée d’alimentation CA : 230 V~ 50 Hz 25 W
Fonctionnement sur piles : 6 x 1,5 V « C » (UM-2), non fournies
Puissance de sortie des enceintes : 2 x 6 W
Bluetooth : V5.0
Entrée auxiliaire : Prise jack stéréo de 3,5 mm
Sortie casque : Prise jack stéréo de 3,5 mm
Pile de la télécommande : 1 pile CR2025
Dimensions de l’appareil (L x P x H) : 390 x 228 x 138 mm
Température de fonctionnement : 0-45 °C
Poids total : 2,1 kg
●Les caractéristiques sont indiquées uniquement à titre indicatif. Les valeurs de poids et de taille sont des approximati-
ons.
●Étant donné que nous améliorons constamment nos produits, leurs caractéristiques et fonctions peuvent changer sans
préavis.
Garantie
Lenco propose un service et une garantie conformément à la législation européenne, ce qui signie qu’en cas de besoin de
réparation (aussi bien pendant et après la période de garantie), vous pouvez contacter votre revendeur le plus proche.
Remarque importante : Il n’est pas possible de renvoyer l’appareil pour réparation directement à Lenco.
Remarque importante : si l’appareil est ouvert ou modié de quelque manière que ce soit par un réparateur non agréé, la
garantie sera caduque.
Cet appareil ne convient pas à une utilisation professionnelle. En cas d’utilisation professionnelle, les obligations de garantie
du fabricant seront annulées.
Clause de non-responsabilité
Des mises à jour du logiciel et/ou des composants informatiques sont régulièrement eectuées. Il se peut donc que certaines
instructions, caractéristiques et images présentes dans ce document dièrent légèrement de votre conguration spécique.
Tous les articles décrits dans ce guide sont fournis uniquement à des ns d’illustration et peuvent ne pas s’appliquer à une
conguration spécique. Aucun droit légal ne peut être obtenu depuis les informations contenues dans ce manuel.
Mise au rebut de l’appareil usagé
Ce symbole indique que le produit électrique concerné ainsi que les piles ne doivent pas être jetés avec les autres déchets
ménagers en Europe. Pour garantir un traitement correct des piles et de l’appareil usagés, veuillez les mettre au rebut con-
formément aux réglementations locales en vigueur en matière d’appareils électriques et autres piles. En agissant de la sorte,
vous contribuerez à la préservation des ressources naturelles et à l’amélioration des niveaux de protection environnementale
concernant le traitement et la destruction des déchets électriques (directive sur les déchets des équipements électriques et
électroniques).
Marquage CE
Par la présente, Commaxx B.V. Wiebachstraat 37, 6466 NG Kerkrade, Pays-Bas, déclare que ce produit est conforme aux
exigences principales des directives européennes.
La déclaration de conformité peut être consultée via [email protected]
Service après-vente
Pour en savoir plus et obtenir de l’assistance, visitez www.lenco.com
Commaxx B.V. Wiebachstraat 37, 6466 NG Kerkrade, Pays-Bas.
DONNÉES TECHNIQUES

-72-
ESPAÑ OL
PRECAUCIÓ N:
El uso de controles o ajustes o rendimiento de procedimientos excepto aquellos que los aqu especicados
puede provocar una exposició n peligrosa a la radiació n.
PRECAUCIONES PREVIAS AL USO
TENGA ESTAS INSTRUCCIONES EN MENTE:
1. No cubra o bloquee ninguna apertura de ventilació n. Cuando coloque el dispositivo en una estanterí a,
deje 5 cm (2”) de espacio libre alrededor de todo el dispositivo.
2. Instá lelo conforme al manual de usuario que se adjunta.
3. Mantenga el aparato alejado de fuentes de calor, como radiadores, calentadores, estufas, velas u otros
productos que generen calor o llama viva. El aparato solo puede usarse en climas moderados. Se deben
evitar los ambientes extremadamente frí os o cá lidos. La gama de temperatura de funcionamiento es de
entre 0° y 35°C.
4. Evite usar el dispositivo cerca de campos magnéticos fuertes.
5. Una descarga electrostá tica puede entorpecer el uso normal de este dispositivo. En tal caso, simplemente
reiní cielo siguiendo el manual de instrucciones. Durante la transmisió n de archivos, por favor manéjelo
con cuidado opérelo en un entorno libre de electricidad está tica.
6. ¡ Advertencia! Nunca inserte un objeto en el producto a través de las ventilaciones o aperturas. Alto voltaje
uye a través del producto e insertar un objeto puede provocar una descarga eléctrica y/o un cortocircuito
de sus componentes internos. Por el mismo motivo, no derrame agua o lí quidos en el producto.
7. No lo utilice en zonas hú medas, como cuartos de bañ o, cocinas en las que se forme vapor ni cerca de
piscinas.
8. El aparato no debe exponerse a goteos o salpicaduras y asegú rese de que se colocan sobre o cerca del
aparato objetos llenos de lí quidos, como jarrones.
9. No use este dispositivo cuando se pueda producir condensació n. Cuando la unidad se usa en una sala
hú meda cá lida, se pueden formar gotitas de agua o condensació n en el interior de la unidad y esta
puede no funcionar adecuadamente; deje que la unidad se apague durante 1 o 2 horas antes de volver a
encender la unidad: el aparato debe estar seco antes de conectarse a una fuente de alimentació n.
10. Aunque este dispositivo está fabricado con el má ximo cuidado y comprobado varias veces antes de salir
de fá brica, todaví a es posible que se puedan producir problemas, al igual que con todos los aparatos
eléctricos. Si observa la aparició n de humo, una acumulació n excesiva de calor o cualquier otro fenó meno
inesperado, deberá desconectar inmediatamente el enchufe de la toma de corriente.
11. Este dispositivo debe funcionar con una fuente de alimentacin que se especica en la etiqueta de
especicaciones. Si no est seguro del tipo de alimentacin que se usa en su hogar, consulte con el
distribuidor o una compañ í a eléctrica local.
12. Manténgalo alejado de los animales. A algunos animales les encanta morder los cables de alimentació n.
13. Para limpiar el dispositivo use un pañ o seco y suave. No utilice lí quidos disolventes ni con base de
petró leo. Para eliminar manchas difí ciles, puede usar un pañ o hú medo con detergente diluido.
14. El proveedor no asume ninguna responsabilidad por dañ os o datos perdidos provocados por un
funcionamiento incorrecto, uso incorrecto, modicacin del dispositivo o sustitucin de la batera.
15. No interrumpa la conexin cuando el dispositivo esté formateando o transriendo archivos. En caso
contrario, los datos se pueden estropear o perder.
16. Si la unidad dispone de funció n de reproducció n USB, se debe conectar la memoria USB directamente
en la unidad. No utilice un cable de extensió n USB ya que pueden crear interferencias que causen una
pérdida de datos.
17. La etiqueta calicativa se encuentra en la parte inferior o en el panel posterior del aparato.
18. Este dispositivo no está diseñ ado para su uso por parte de personas (incluye ndo niñ os) con discapacidad
fí sica, sensorial o mental o con falta de experiencia o conocimientos, salvo que se les haya dado
supervisió n o instrucciones acerca del uso correcto del dispositivo por parte de una persona responsable
de su seguridad.
19. Este producto está diseñ ado para un uso no profesional ú nicamente y no para un uso comercial o
industrial.
20. Asegrese de que la unidad esté jada en una posicin estable. La garanta no cubrir los daos

-73-
derivados de usar este producto en una posició n inestable, vibraciones o golpes o por no seguir otras
advertencias o precauciones que aparecen en este manual de usuario.
21. Nunca retire la carcasa del dispositivo.
22. Nunca coloque este dispositivo sobre otro equipo eléctrico.
23. Mantenga las bolsas de plá stico fuera del alcance de los niñ os.
24. Use nicamente los dispositivos/accesorios especicados por el fabricante.
25. Remita todas las reparaciones al personal cualicado. Es necesario el mantenimiento cuando el aparato
presenta cualquier tipo de dañ o, por ejemplo, el cable de alimentació n o el enchufe presentan dañ os; se
ha vertido lí quido sobre el aparato; se han caí do objetos en el aparato; el aparato se ha expuesto a la
lluvia o humedad; el aparato no funciona normalmente o se ha caí do.
26. Una larga exposició n a sonidos elevados de reproductores de mú sica personales puede provocar una
pérdida de audició n temporal o permanente.
27. Si el producto viene con un cable de alimentació n o un adaptador de corriente de CA:
• Si se produce cualquier problema, desconecte el cable de alimentació n CA y remí talo a mantenimiento
por parte de personal cualicado.
• No pise o pince el adaptador de alimentació n. Tenga mucho cuidado, en especial en las zonas alre-
dedor de las tomas y el punto de salida del cable. No coloque objetos pesados en el adaptador de
alimentació n, ya que pueden dañ arlo. ¡ Mantenga el dispositivo fuera del alcance de los niñ os! Si juegan
con el cable de alimentació n, puede sufrir lesiones graves.
• Desconecte el dispositivo durante tormentas eléctricas o cuando no vaya a usarse durante periodos
prolongados de tiempo.
• La salida de la toma debe instalarse cerca del equipo y debe ser fá cilmente accesible.
• No sobrecargue las tomas CA o los cables de extensió n. La sobrecarga puede provocar un incendio o
una descarga eléctrica.
• Los dispositivos con construcció n de Clase 1 deben estar conectados a una toma de corriente con una
conexió n a tierra protegida.
• Los dispositivos con construcció n de Clase 2 no requieren una conexió n a tierra.
• Sujete siempre el enchufe cuando los extraiga de la toma de corriente. No tire del cable de alimenta-
ció n. Esto puede provocar un cortocircuito.
• No utilice un cable de alimentació n o enchufe deteriorado o una toma suelta. Si lo hace, podrí a provo-
car un incendio o una descarga eléctrica.
28. Si el producto contiene o se entrega con un mando a distancia que contiene pilas de botn / celdas:
Advertencia:
• “ Ni ingiera la pila, riesgo de quemadura quí mica” o frase equivalente.
•El mando a distancia que se suministra Este producto contiene una pila de tipo botn/moneda. Si la pila
se traga, puede provocar graves quemaduras internas en só lo 2 horas y podrí a ocasionar la muerte.
• Mantenga las pilas nuevas o usadas fuera del alcance de los niñ os.
• Si el compartimiento de las pilas no se cierra correctamente, deje de usar el producto y no lo deje al
alcance los niñ os.
• Si tiene la sospecha de que una pila ha sido ingerida o se encuentra en algú n lugar del cuerpo, busque
inmediatamente atenció n médica.
29. Precaució n sobre el uso de las pilas:
• Existe riesgo de explosió n si la pila no se sustituye correctamente. Sustitú ya la ú nicamente con otra del
mismo tipo u otro equivalente.
• No se pueden exponer las pilas a temperaturas extremadamente altas o bajas, baja presió n de aire a
gran altitud durante el uso, almacenamiento o transporte.
• Si cambia la pila por otra que no sea la correcta, se puede producir una explosió n o la fuga de lí quidos
o gases inamables.
• Si arroja la pila al fuego o a un horno caliente, o aplasta o cortar mecá nicamente una pila, podrí a provo-
car una explosió n.
• Si deja una pila en un lugar con temperaturas extremadamente altas, se puede producir una explosió n
o una fuga de lquido o gas inamable.
• Si se expone la pila a una presió n de aire extremadamente baja, se puede producir una explosió n o la
fuga de lquidos o gases inamables.
• Se debe prestar atenció n a los aspectos medioambientales sobre la eliminació n de baterí as.
INSTALACIÓ N:
• Desembale todas las piezas y retire el material protector.
• No conecte la unidad a la corriente eléctrica antes de comprobar la tensió n de la corriente y antes de que
se haya n hecho todas las demá s conexiones.

-74-
ADVERTENCIA PARA EL REPRODUCTOR CD / DVD:
Este producto contiene un dispositivo lá ser de baja potencia.
PRODUCTO LÁSER DE CLASE 1
APPAREIL Á LASER DE CALSSE 1
PRODUCO LASER DE CLASE 1
PRECAUCIÓ N
RADIACIÓ N LÁSER INVISIBLE
CUANDO SE ABRA Y LOS CIERRES
SE DESBLOQUEEN EVITE LA
EXPOSICIÓ N AL H AZ
ADVERTENCIA: NO TOQUE LA LENTE.
ADVERTENCIA: Utilizar un reproductor de mú sica personal mientras
participa en el trco puede hacer que el usuario esté menos atento a
los peligros potenciales, como vehí culos que se acercan.
ADVERTENCIA: Para evitar posibles dañ os en la audició n, no la escu-
che a volú menes elevados durante largos periodos de tiempo.
ACCESORIOS:
• Cable eléctrico
• Mando a distancia
• Manual de instrucciones
Producto lá ser de clase 1

-75-
VISTA GENERAL
12 3 4+
SOURCE
MENU
INFO
ENTER
SCAN
VOLUME
1 2 3 4 5 6 7 8 9 10 11 12 13
1. Entrada USB: Entrada para memoria USB
2. FUENTE: Pulse esta tecla para elegir diferentes modos: DAB+/FM/CD/USB/BLUETOOTH/CINTA DE CASETE /
ENTRADA AUXILIAR.
3. MEN /
INFORMACIÓ N:
DAB+ : Pú lselo para mostrar la informació n de la emisora.
Manténgalo pulsado para entrar en el men para un cambio de conguracin. Pulse o
para seleccionar el elemento del menú .
FM: Pú lselo para mostrar la informació n de la emisora.
Manténgalo pulsado para entrar en el men para un cambio de conguracin. Pulse o
para seleccionar el elemento del menú .
4. ANTERIOR :DAB+ : Pú lselo para mostrar la informació n de la emisora anterior.
FM: Pú lselo brevemente para sintonizar una frecuencia diferente. Manténgalo pulsado para buscar la
emisora anterior disponible.
CD/USB/BT: Plselo para buscar la pista anterior.
5. ALIMENTACIÓ N :Pú lselo para encender la unidad. Vuélvalo a pulsar para apagarla y entrar en modo en espera.
6. BOTONES NUMÉRICOS DE LA EMISORA DE RADIO:
1234+
DAB+/FM: Pulse estos botones para recuperar la emisora de radio guardada directamente. Mantenga
pulsado para guardar la emisora de radio.
CD/USB: Pulse el botó n REPEAT para cambiar a diferentes operaciones de repetició n de reproducció n.
Pulse el botn PROGRAM para congurar el funcionamiento de reproduccin del programa.
Pulse el botó n FOLDER para cambiar de carpeta (solo para MP3).
BT: Mantener pulsado el botó n PAIR desconectará la conexió n actual y empezará a buscar un Nuevo
dispositivo Bluetooth.
7. PANTALLA: Muestra el estado de funcionamiento de la unidad y cierta informació n al respecto.
8. BOTONES DE CONTROL DEL CASETE: (PAUSA / PARADA/EXPULSIN / AVANZAR / REBOBINAR / REPRODUCIR / GRABAR)
9. VOLUMEN: Ajusta el volumen principal.
10. PARADA /
ENTRAR:
DAB+ y FM: Plselo para cambiar la conguracin en el funcionamiento del men.
CD / USB: Pú lselo para detener la reproducció n.
11. SIGUIENTE :DAB+ : Pú lselo para mostrar la informació n de la siguiente emisora.
FM: Pú lselo brevemente para sintonizar una frecuencia diferente. Manténgala pulsada para buscar la
siguiente emisora disponible.
CD/USB/BT:Pú lselo para buscar la pista siguiente.
12. REPRODUCCIÓ N-
PAUSA/BSQUEDA
:
DAB+ : Pú lselo para iniciar la bú squeda automá tica de todas las emisoras DAB+ disponibles.
FM: Pú lselo brevemente para cambiar entre audio estéreo o mono. Manténgalo pulsado para iniciar la
bú squeda automá tica de todas las emisoras FM disponibles.
CD/USB/BT:Pú lselo para cambiar entre hacer una pausa o reanudar la reproducció n.
13. Puerta del compartimento del disco del CD

-76-
SOURCE
MENU
INFO
ENTER
SCAN
FOLDER PAIR REPEAT PROGRAM
1234+
VOLUME
CASSETTE RECORDER
1416 15 1615
~AC IN
OPEN OPEN
AUX IN
17 18 19 20 2221
14. Puerta del compartimento de la cinta de casete
15. Puerto de bajos
16. Altavoz
17. Asa de transporte
18. Puerta del compartimento de las pilas
19. ENTRADA
AUXILIAR:
Conéctelo al reproductor de audio externo
20. Salida de
auriculares:
Conéctelo al auricular externo
21. Antena: Se debe extender la antena para asegurar una Buena recepcin DAB+ / FM
22. Entrada ~CA: Conecte el cable de alimentació n a esta toma
REPEAT
RANDOM
VOL
DISPLAY
23
24
25
26
27
28
29
30
31
32
43
42
41
40
39
38
37
36
35
34
44
33
23. En espera
24. Botones numéricos
25. Memoria
26. Anterior / Sintonizar
27. Carp.
28. Repetir
29. Carp.
30. Informació n - Buscar - Menú
31. BT anterior - BT siguiente - BT Reproduccin/pausa
32. Pantalla de etiqueta ID3 Parada de CD/USB Reproduccin / Pausa
de CD/USB
33. Volumen +/-
34. Silencio
35. Aleatorio
36. CH -
37. Siguiente / Sintonizar
38. Entrar
39. Mono/Estéreo
40. CH +
41. Dormir
42. X-Bass
43. Ecualizador
44. Fuente

-77-
INSERCIÓ N DE LAS PILAS
~AC IN
AUX IN
C 1,5V C 1,5V C 1,5V
C 1,5V C 1,5V C 1,5V
+
+
OPEN OPEN
+ 1,5V
+ 1,5V
+ 1,5V
1,5V + 1,5V + 1,5V +
FUNCIONAMIENTO DE LAS PILAS:
Para utilizarlo con CC, retire primero el conector de CA de la toma de
CA y desconecte el cable de CA del conector de entrada de corriente.
Retire la puerta del compartimento de las pilas situada en la parte
posterior de la unidad. Instale 6 pilas UM-2 (LR14) tamañ o C (NO
suministradas) conforme a las marcas de polaridad que se muestran
en el interior del compartimento. Instale la puerta del compartimento
de las pilas.
Nota:
- Como la unidad extrae poca potencia de las pilas en modo en
espera, retire las pilas si la unidad no va a usarse durante un
periodo prolongado de tiempo.
- Como la unidad esté en modo de ahorro de energí a cuando la
baterí a está en modo en espera, SOLO puede usar el botó n
STANDBY manteniéndolo pulsado má s de 5 segundos para
encender la unidad. Para apagarlo, vuelva a pulsar el botó n
STANDBY.
FUNCIONAMIENTO DEL MANDO A DISTANCIA:
En la unidad del mando a distancia ya se encuentra instalada una
pila CR2025.
Antes de usarlo, extraiga la hoja de aislamiento de la baterí a tal y
como se muestra a la izquierda.
Para sustituir una nueva pila, remtase a la gura que se muestra
a la izquierda. Cuando inserte una pila, asegú rese de hacerlo en la
direcció n correcta.

-78-
ENCENDIDO DEL SCD-720
~AC IN
OPEN OPEN
AUX IN
SOURCE
MENU
INFO
ENTER
SCAN
FOLDER PAIR REPEAT PROGRAM
1234+
VOLUME
CASSETTE RECORDER
USO DE AUDÍ FONOS / AURICULARES
En la parte posterior del SCD-720 encontrará la conexió n de los auriculares.
Use un audí fono o auricular con una toma estéreo de 3,5 mm para conectar el auricular al SCD-720.
Si coloca una toma estéreo de 3.5mm los altavoces del SCD-720 se desconectará n.
Solo funcionará n los auriculares.
Puede controlar el volumen mediante el dial de volumen. Todas las demá s funciones son las mismas que el uso normal sin
auricular conectado.
~AC IN
OPEN OPEN
AUX IN
SOURCE
MENU
INFO
ENTER
SCAN
FOLDER PAIR REPEAT PROGRAM
1234+
VOLUME
CASSETTE RECORDER
Conecte el SCD-720 con el cable de alimentació n conecta-
do a la salida CA.
Si conecta el cable de alimentació n al SCD-720, la potencia
de la baterí a se apagará automá ticamente.
Pulse el botó n STANDBY para encender la unidad.
Para apagarlo, vuelva a pulsar el botó n STANDBY.
Con el botó n SOURCE puede seleccionar la fuente de
entrada
Puede seleccionar:
DAB+ RADIO
RADIO FM
CD
USB
BLUETOOTH
CINTA (CASETE)
ENTRADA DE AUDIO (AUXILIAR)
CONTROL DE VOLUMEN:
Gire el dial de VOLUMEN para cambiar el volumen.

-79-
Ajuste de la antena
La antena situada en el panel posterior de la unidad debe estar completamente extendida para asegurar una buena recepció n
DAB+ / FM. Cambie la posicin de la antena para conseguir la mejor recepcin.
FUNCIONAMIENTO DE DAB+
La primera vez que se seleccione el modo DAB+ , buscará automá ticamente las emisoras DAB+ disponibles. Espere hasta
que la bú squeda haya terminado. La pantalla mostrará el progreso de la bú squeda. Tras la bú squeda, sintonizará la primera
emisora.
Se mostrará n las emisoras disponibles en una cierta banda de recepció n en la pantalla. En caso de una recepció n
débil, la emisora puede titubear o no dar sonido. Intente mover el receptor o gire la antena de forma que la señ al
DAB+ débil entre sin titubeos (los nombres de las emisoras todaví a se muestran cuando la señ al es débil).
Bú squeda automá tica
1. Encienda la unidad en modo DAB+ .
2. Mantenga pulsado el botó n SCAN (o pulse el botó n SCAN en el mando a distancia) para iniciar la bú squeda automá tica
de las emisoras disponibles.
Bú squeda manual
Usar la operació n de bú squeda puede ayu darle a ajustar la antena o a buscar una emisora que falte mientras se realiza la
bú squeda automá tica.
1. Encienda la unidad en modo DAB+ .
2. Mantenga pulsado el botó n MENU (o pulse el botó n MENU en el mando a distancia) para acceder al control del menú .
3. Pulse el botó n o hasta que se muestre “ Manual” y posteriormente pulse el botó n ENTER.
4. Pulse el botó n o para seleccionar el canal que desee (por ejemplo, 12C 227,360MH z) (Selecció n entre 5A y
13F).
5. Pulse el botó n ENTER para conrmar.
6. Para seleccionar otro canal (5A~13F), pulse el botó n o y posteriormente pulse el botó n ENTER para conrmarlo.
7. Cuando encuentre la emisora, pulse el botó n ENTER para seleccionarla.
8. Para abandonar la bú squeda manual, pulse el botó n MENU.
Sintoniza ció n
Después de escanear todas las emisoras DAB disponibles, pulse o para ver y navegar por la lista de emisoras. A
continuació n, pulse el botó n ENTER para sintonizar esta emisora en unos pocos segundos.
Guardar presintoní as DAB+
Puede guardar hasta 20 emisoras DAB+ .
Para usar los botones para guardar la presintoní a:
1. Sintonice la emisora que desee guardar.
2. Para guardarlo en la presintoní a 1 o 2 o 3, mantenga pulsado el botó n numérico respectivamente. Posteriormente, lo
guardará en ese nú mero presintonizado.
3. Para guardarlos en otro canal presintonizado del 4 al 20, mantenga pulsado el botó n numérico “ 4”. Se mostrará “ Store
(Guardar)”.
4. Pulse el botó n o para seleccionar el nú mero de presintoní a que desee guardar.
5. Pulse el botó n ENTER para guardarlo.
Para usar el botó n del mando a distancia para guardar la presintoní a:
1. Sintonice la emisora que desee guardar.
2. Mantenga pulsado el botó n MEMORY; se mostrará “ Store (Guardar)”.
3. Pulse el botó n o para seleccionar el nú mero de presintoní a que desee guardar.
4. Pulse el botó n ENTER para guardarlo.
Recuperar presintoní as DAB+ almacenadas
Para usar los botones de la unidad para recordar la presintoní a:
1. Para recuperar el canal preestablecido 1 o 2 o 3, pulse el botó n numérico respectivamente. Entonces sintonizará ese
canal preestablecido.
2. Para recuperar otro canal preestablecido del 4 al 20, pulse el botó n numérico " 4" . Se mostrará “ Recall (Recordar)”.
3. Pulse el botó n o para seleccionar el nú mero de presintoní a que desee recordar.
4. Pulse el botó n ENTER para recordarlo.
Para usar el mando a distancia para recordar la presintoní a:
1. Pulse el botó n MEMORY; se mostrará “ Recall (Recordar)”.
2. Pulse el botó n o para seleccionar el nú mero de presintoní a que desee recordar.
3. Pulse el botó n ENTER para recordarlo.
REPEAT
RANDOM
VOL
DISPLAY
REPEAT
RANDOM
VOL
DISPLAY
DAB+ RADIO

-80-
Mostrar la inf ormació n de la emisora DAB+
Existen varios tipos que informació n que se enumeran a continuació n. Para cambiar la informació n de la pantalla, pulse el
botó n INFO de forma reiterada.
Desplazamiento por
el texto de radio Barra de señ al Tipo de programa
(PTY)
Nombre multiplex Frecuencia Tasa de error de
señ al Tasa bit radio
1. Desplazamiento por el texto de radio: Muestra los tí tulos de mú sica o la informació n del programa proporcionada por la
emisora.
2. Barra de señ al: Nivel de la señ al de transmisió n. Cuantos má s caracteres se muestren, má s fuerte
es la señ al que se recibe. Para mejorar la recepció n, ajuste la posició n de la
antena.
3. Tipo de programa (PTY): Tipo de programa proporcionado por el emisor.
4. Nombre multiplex: Muestra el nombre multiplex a quien pertenece la emisora actual.
5. Frecuencia: Frecuencia del canal actual.
6. Tasa de error de señ al: Muestra el í ndice de error. Cuanto mayo r sea el valor, má s errores recibirá . Para
mejorar la recepció n, ajuste la posició n de la antena.
7. Tasa bit radio: Esta es la tasa de bits de audio del canal actual.
OTRAS OPERACIONES DEL MENÚ DAB+
Mantenga pulsado el botó n MENU (o pulse el botó n MENU en el mando a distancia) para acceder al control del menú . Poste-
riormente, pulse el botó n o para ver las diferentes opciones tal y como se describe debajo.
Gama de control diná mico (DRC) (véase Nota.)
El DRC puede facilitar la audició n de sonidos má s suaves cuando se usa la unidad en un entorno ruidoso. El nivel del DRC
de una emisin lo ja el emisor y se transmite dentro del servicio. Cambiar el valor del DRC en la unidad le permite aplicar un
factor de subida o bajada a este nivel.
Existen tres niveles de compresió n:
DRC alto: Compresió n má xima tal y como se enví a con el servicio transmitido
DRC bajo: Fijado a 1/2 del que se enva en el servicio transmitido
DRC Apagado: Sin compresió n
1. Mantenga pulsado el botó n MENU (o pulse el botó n MENU en el mando a distancia) para acceder al control del menú .
2. Pulse el botó n o hasta que se muestre “ DRC” y posteriormente pulse el botó n ENTER.
3. Pulse el botó n o para seleccionar el valor DRC y posteriormente pulse el botó n ENTER para conrmarlo.
4. Pulse el botó n MENU para salir del control de menú .
Nota:
- No todas las emisiones DAB+ pueden usar la funció n DRC. Si la emisió n no es compatible con DRC entonces la
conguracin DRC en la unidad no tendr ningn efecto.
- Una vez que haya ajustado el nivel DRC el sonido puede ser má s alto.
Eliminar emisoras inactivas
Esta funció n elimina las emisoras inactivas.
1. Mantenga pulsado el botó n MENU (o pulse el botó n MENU en el mando a distancia) para acceder al control del menú .
2. Pulse el botó n o hasta que se muestre “ Prune (Recortar)” y posteriormente pulse el botó n ENTER.
3. Pulse el botó n o para seleccionar “ Yes (Sí )” y posteriormente pulse el botó n ENTER para recortar la unidad.
4. Pulse el botó n MENU para salir del control de menú .

-81-
Ajuste de la antena
La antena situada en el panel posterior de la unidad debe estar completamente extendida para asegurar una buena recepció n
DAB+ / FM. Cambie la posicin de la antena para conseguir la mejor recepcin.
FUNCIONAMIENTO DE LA RADIO FM
Bú squeda automá tica
1. Encienda la unidad en modo FM.
2. Mantenga pulsado el botó n SCAN para iniciar la bú squeda automá tica y guardar las emisoras disponibles
(almacenamiento má x. 20).
Bú squeda manual
1. Pulse el botó n o el botó n de forma reiterada para sintonizar una frecuencia diferente.
2. De forma alternativa, mantenga pulsado el botó n o para buscar automá ticamente la siguiente emisora
disponible.
Guardar presintoní as FM
Puede almacenar hasta 20 FM emisoras.
Para usar los botones para guardar la presintoní a:
1. Sintonice la emisora que desee guardar.
2. Para guardarlo en la presintoní a 1 o 2 o 3, mantenga pulsado el botó n numérico respectivamente. Posteriormente, lo
guardará en ese nú mero presintonizado.
3. Para guardarlos en otro canal presintonizado del 4 al 20, mantenga pulsado el botó n numérico “ 4”. Se mostrará “ Store
(Guardar)”.
4. Pulse el botó n o para seleccionar el nú mero de presintoní a que desee guardar.
5. Pulse el botó n ENTER para guardarlo.
Para usar el botó n del mando a distancia para guardar la presintoní a:
1. Sintonice la emisora que desee guardar.
2. Mantenga pulsado el botó n MEMORY; se mostrará “ Store (Guardar)”.
3. Pulse el botó n o para seleccionar el nú mero de presintoní a que desee guardar.
4. Pulse el botó n ENTER para guardarlo.
Recuperar presintoní as FM almacenadas
Para usar los botones de la unidad para recordar la presintoní a:
1. Para recuperar el canal preestablecido 1 o 2 o 3, pulse el botó n numérico respectivamente. Entonces sintonizará ese
canal preestablecido.
2. Para recuperar otro canal preestablecido del 4 al 20, pulse el botó n numérico " 4" . Se mostrará “ Recall (Recordar)”.
3. Pulse el botó n o para seleccionar el nú mero de presintoní a que desee recordar.
4. Pulse el botó n ENTER para recordarlo.
Para usar el mando a distancia para recordar la presintoní a:
1. Pulse el botó n MEMORY; se mostrará “ Recall (Recordar)”.
2. Pulse el botó n o para seleccionar el nú mero de presintoní a que desee recordar.
3. Pulse el botó n ENTER para recordarlo.
Selecció n de Estéreo/Fuerza Mono
Cuando se reciba una emisora de radio Estéreo FM, pulsar el botó n de la unidad (o el botn MONO/ST. del mando a
distancia) cambiará entre audio estéreo y audio mono forzado.
Mostrar la inf ormació n de una emisora FM
Existen varios tipos que informació n que se enumeran a continuació n. Para cambiar la informació n de la pantalla, pulse el
botó n INFO de forma reiterada.
Radio texto Tipo de programa
(PTY) Frecuencia Tipo de
audio
1. Radio texto: Desplá cese por el texto que muestra informació n sobre los tí tulos musicales o los detalles del
programa que proporciona la emisora de radio
2. Tipo de programa (PTY): Tipo de programa proporcionado por el emisor
3. Frecuencia: Frecuencia del canal actual
4. Tipo de audio: Estéreo o Mono
REPEAT
RANDOM
VOL
DISPLAY
REPEAT
RANDOM
VOL
DISPLAY
RADIO FM

-82-
OTROS FUNCIONAMIENTOS DEL MENÚ FM
Mantenga pulsado el botó n MENU (o pulse el botó n MENU en el mando a distancia) para acceder al control del menú . Poste-
riormente pulse el botó n o para ver las diferentes opciones tal y como se describen en la pá gina siguiente.
onguracin de squeda
1. Mantenga pulsado el botó n MENU (o pulse el botó n MENU en el mando a distancia) para acceder al control del menú .
2. Pulse el botó n o hasta que se muestre “ Scan (Busq)” y posteriormente, pulse el botó n ENTER.
3. Pulse el botó n o para cambiar entre “ Strong (Fuerte)” y “ All (Todas)” y posteriormente pulse el botó n ENTER
para conrmarlo. Cuando se selecciona Strong (Fuerte), solo se detectan las emisoras con fuerza de seal. La
bú squeda ignorará las emisoras con ruido. Cuando se selecciona “ All” (Todas), se detectará n todas las emisoras durante
la bú squeda FM incluso si la emisora de radio presenta mucho ruido de fondo.
4. La prxima vez que realice una bsqueda FM, la unidad buscar las emisoras basndose en la conguracin conrmada.
Ajustes de audio
1. Mantenga pulsado el botó n MENU (o pulse el botó n MENU en el mando a distancia) para acceder al control del menú .
2. Pulse el botó n o hasta que se muestre “ Audio” y posteriormente pulse el botó n ENTER.
3. Pulse el botó n o para cambiar entre la selecció n “ Estéreo” o “ Mono” y a continuació n pulse el botó n ENTER para
conrmarlo.
FUNCIONAMIENTO DEL CD/USB
arga reproduccin de discos D
Abra la tapa del CD. Inserte un disco con el lado de la etiqueta de CD hacia arriba. Cierre la puerta del CD. Pulse el botó n
SOURCE para entrar en modo CD. Tras leerlo, se mostrará en la pantalla el nú mero total de pistas y se iniciará la reproduc-
ció n automá ticamente.
Lectura reproduccin del dispositivo SB
Inserte un dispositivo USB en una toma de entrada USB. Pulse el botó n SOURCE para entrar en modo USB. Tras su lectura
en pantalla se mostrará el nú mero total de pistas. Empezará a reproducir automá ticamente.
Control de reproducció n/pausa
Para hacer una pausa en la reproducció n, pulse el botó n . Pulse el botó n de nuevo para retomar la reproducció n.
Control de parada
Para detener la reproducció n, pulse el botó n .
Saltar pista
Durante la reproducció n, pulse el botó n o para saltar a la pista anterior o siguiente.
Bú squeda de mú sica a alta velocidad
Durante la reproducció n, mantenga pulsado el botó n o para iniciar la bú squeda a gran velocidad.
Cuando suelte el botó n o se reanudará la reproducció n a velocidad normal.
Repetir reproducció n/Reproducció n aleatoria
Modo de disco CD
Durante la reproducció n pulse una vez el botó n REPEAT y la pantalla mostrará “ REP.ONE” (REPETIR UNA). La pista actual
se reproducirá repetidamente.
Cuando vuelva a pulsar el botó n REPEAT, la pantalla muestra “ REP.ALL (REPETIR TODO)”. Todas las pistas se reproducirá n
repetidamente.
Cuando vuelva a pulsar el botó n REPEAT, la pantalla muestra “ RANDOM (ALEATORIO)”. Todas las pistas se reproducirá n en
orden aleatorio.
Cuando vuelva a pulsar el botó n REPEAT, la unidad reanudará la reproducció n normal.
Modo de disco MP3 o USB MP3
Durante la reproducció n pulse una vez el botó n REPEAT y la pantalla mostrará “ REP.ONE” (REPETIR UNA). La pista actual
se reproducirá repetidamente.
Cuando vuelva a pulsar el botó n REPEAT, la pantalla muestra “ REP.ALBUM (REPETIR ÁLBUM)”. Todas las pistas de la
carpeta actual se reproducirá n repetidamente.
Cuando vuelva a pulsar el botó n REPEAT, la pantalla muestra “ REP.ALL (REPETIR TODO)”. Todas las pistas se reproducirá n
repetidamente.
Cuando vuelva a pulsar el botó n REPEAT, la pantalla muestra “ RANDOM (ALEATORIO)”. Todas las pistas se reproducirá n en
orden aleatorio.
Cuando vuelva a pulsar el botó n REPEAT, la unidad reanudará la reproducció n normal.

-83-
Reproduccin programada
Modo de disco CD
Esta unidad puede programarse para reproducir una secuencia de pistas seleccionadas.
1. En modo parada, pulse el botó n PROGRAM, la pantalla muestra el nú mero de programa y el nú mero de pista.
2. Pulse el botó n o para seleccionar la pista que desee.
3. Pulse el botó n PROGRAM para guardar la pista que desee.
4. Repita los pasos 2-3 para guardar hasta 30 pistas programadas.
5. Pulse el botó n para empezar la reproducció n de las pistas programadas.
6. Para borrar la reproducció n programada, pulse dos veces el botó n o cambie a otro modo.
7. Durante la reproducció n del programa asimismo puede hacer la operació n “ Repeat One (Repetir una)” o “ Repeat All
(Repetir todo)”; sin embargo, no es compatible la reproducció n aleatoria.
Modo de disco MP3 o USB MP3
1. En modo parada, pulse el botó n PROGRAM; la pantalla muestra el nú mero de programa y el nú mero de carpeta.
2. Pulse el botó n FOLDER (o el botó n FOLDER˄ / FOLDER˅ del mando a distancia) para seleccionar la carpeta que desee.
3. Pulse el botó n PROGRAM para guardar la carpeta que desee.
4. Pulse el botó n o para seleccionar la pista que desee.
5. Pulse el botó n PROGRAM para guardar la pista que desee.
6. Repita los pasos 2-3 para programar hasta 99 pistas programadas.
7. Pulse el botó n para empezar la reproducció n de las pistas programadas.
8. Para borrar la reproducció n programada, pulse dos veces el botó n o cambie a otro modo.
9. Durante la reproducció n del programa asimismo puede hacer la operació n “ Repeat One (Repetir una)” o “ Repeat All
(Repetir todo)”; sin embargo, no es compatible la reproducció n aleatoria.
Nota:
-El Puerto USB solo tiene la nalidad de reproduccin, NO es para la carga de dispositivos externos
- Ademá s de reproducir discos de audio CDDA, la unidad también puede reproducir formatos de archivo MP3 en el
funcionamiento de CD / USB. Sin embargo, no son compatibles archivos WMA y otros.
- Si el dispositivo USB está cargado con MP3 pero la pantalla sigue mostrando “ NO”, el formato del dispositivo USB puede
que no sea compatible con la unidad.
- La unidad es compatible con una versió n USB 1.1 y 2.0.
- La unidad es compatible con dispositivos USB con una capacidad de hasta 32GB.
- La unidad puede que no sea compatible con todos los dispositivos USB; esto no es un problema de la unidad.
- Para la reproducció n de MP3, son compatibles un má ximo de 255 carpetas y un má ximo de 999 archivos.
-Debido al mecanismo de lectura / escritura del archivo USB, se reproducir primero el primer archivo escrito en el
dispositivo USB y el ultimo archivo escrito se reproducir el ltimo. (La unidad no clasicar alfabéticamente)
Seleccionar Carpeta (solo archivos MP3)
Durante la reproducció n MP3, pulse el botó n FOLDER (o el botó n FOLDER˄ / FOLDER˅ del mando a distancia) para cambi-
ar a la carpeta.
En modo parada, pulse el botó n FOLDER (o el botó n FOLDER˄ / FOLDER˅ del mando a distancia) para cambiar la carpeta.
Posteriormente, pulse el botó n o para seleccionar la pista que desee reproducir. Pulse el botó n para iniciar la
reproducció n de la pista.
Pantalla de etiqueta ID3 (nicamente archivos MP3 en los que se inclua la informacin de la etiqueta ID3)
Pulsar el botó n DISPLAY en el mando a distancia activar / desactivar la pantalla de la etiqueta ID3. Cuando esté encendi-
do, se mostrará n el tí tulo de la pista MP3, el artista y los detalles del á lbum.
BLUETOOTH
Siga estas instrucciones de vinculació n para conectar la unidad a su dispositivo Bluetooth.
1. Pulse el botó n SOURCE de forma reiterada para entrar en el modo Bluetooth. La pantalla mostrará “ BT AUDIO”.
Empezará a buscar y mostrará “ BT AUDIO” parpadeando.
2. Si la unidad no se ha emparejado con un dispositivo Bluetooth antes o no puede encontrar el ú ltimo dispositivo
emparejado, la pantalla y el indicador de estado Bluetooth seguirá n parpadeando. Encienda la funció n Bluetooth de su
dispositivo y active la bú squeda hasta que se encuentre “ Lenco SCD-720”. Seleccione “ Lenco SCD-720” en el dispositivo
Bluetooth para realizar la conexió n. Introduzca la contraseñ a “ 0000” si la solicita.
3. Una vez que se haya emparejado correctamente, la unidad mostrará constantemente “ BT AUDIO”.
4. Ahora puede empezar a reproducir mú sica desde su smartphone de forma inalá mbrica al altavoz.
5. Puede pulsar el botó n para hacer una pausa o reanudar la reproducció n.
6. Puede pulsar el botó n o para buscar la canció n anterior o siguiente.
Nota:
• Mantener pulsado el botó n PAIR desconectará la conexió n actual y empezará a buscar un Nuevo dispositivo Bluetooth.
• Este producto dispone de una funció n de recepció n Bluetooth; no es posible ningú n sonido Bluetooth con el mismo (el
auricular o audfono Bluetooth no recibe seal del SCD-720): esto signica que puede recibir de forma inalmbrica una
señ al de sonido bluetooth desde una fuente externa como un smartphone.

-84-
CINTA DE CASETE
Pulse el botó n SOURCE de forma reiterada para entrar en el modo cinta de casete. La pantalla mostrará “ TAPE CINTA)”. Los
botones del control del casete está n situados en la parte superior delantera de la unidad.
1. Pulse el botn PARADA / EXPULSIN DEL CASETE para abrir la puerta de la cinta de casete.
2. Inserte la cinta de casete y cierre la puerta con fuerza.
La cara que se reproduce da hacia arriba
Inserte la cinta de casete con la cinta de
casete hacia arriba
3. Pulse el botó n REPRODUCCIÓ N DE CASETE para reproducirla.
4. Pulse el botó n PAUSA DEL CASETE para hacer una pausa en la reproducció n. Para reanudar la reproducció n, pulse
el botó n PAUSA DEL CASETE para liberarlo.
5. Para detener la reproduccin, pulse el botn PARADA / EXPULSIN DEL CASETE .
6. Mientras se encuentra en modo parada, pulse el botó n AVANCE DEL CASETE o REBOBINADO para avanzar o
rebobinar la cinta.
7. Para abrir la puerta del casete durante la parada, pulse una vez el botn PARADA / EXPULSIN DEL CASETE .
8. Para abrir la puerta del casete durante la reproduccin, pulse dos veces el botn PARADA / EXPULSIN DEL CASETE
.
9. Para grabar, pulse a la vez los botones REPRODUCCIÓ N DE CASETE y GRABAR .
NOTA:
- Solo se puede usar para grabar la cinta de casete normal tipo 1.
-Si la cinta est oja, rebobine lo que esté ojo usando un lapicero para evitar daar la cinta o la unidad.
- En la parte posterior del casete está n las pestañ as izquierdas y derechas. Estas pestañ as no pueden romperse. Si estas
pestañ as se rompen, ya no es posible grabar en esa cara del casete. Cuando se eliminan ambas pestañ as, ya no es
posible grabar en el casete. El botó n RECORD (GRABAR) posteriormente se bloquea y ya no se puede pulsar.

-85-
OTRAS FUNCIONES
ENTRADA AUX
Esto le permite conectar el sonido de un reproductor externo a través de su unidad.
1. Conecte un cable de audio de 3,5 mm (no incluido) en la salida de lí nea del reproductor externo y en la toma AUX IN.
2. Pulse el botó n SOURCE para entrar en el modo AUX. La pantalla muestra “ ENTRADA AUDIO”.
3. Empiece a reproducir mú sica con el reproductor externo.
4. La unidad reproduce el sonido.
FUNCIONAMIENTO DEL ECUALIZADOR /X-BASS
Puede disfrutar de diferentes modos de efectos de sonido del ecualizador. Pulsar el botó n EQUALIZER en el mando a distan-
cia cambiar a diferentes efectos de sonido de FLAT (PLANO) / ROCK / CLASSIC / POP / VOCAL / JAZZ.
Asimismo puede aumentar el efecto de graves de la mú sica. Pulsar el botó n X BASS en el mando a distancia cambiará el
efecto de bajo X entre CONECTADO Y DESCONECTADO.
Nota:
- Cuando se activa X-Bass, el efecto de sonido del ecualizador se desactivará . Pulsar el botó n EQUALIZER
(ECUALIZADOR) solo mostrará Bajo X conectado sin ningú n efecto de ecualizador. Para reanudar el efecto de sonido del
ecualizador, pulse el botó n X-BASS para apagarlo primero.
FUNCIÓ N RETARDO
1. Cuando la unidad está encendida, pulse el botó n SLEEP en el mando a distancia de forma reiterada para seleccionar la
duració n del retardo de SLEEP OFF (RETARDO DESCONECTADO), 90, 80, 70, 60, 50, 40, 30, 20 o 10 minutos. Cuando
se congure el temporizador de retardo se mostrar el temporizador restante de forma peridica en la pantalla.
2. Cuando el temporizador de retardo llegue a cero, la unidad se apagará automá ticamente.
3. Para cancelar la funció n de retardo, pulse el botó n STANDBY para apagar la unidad. O pulse repetidamente el botó n
SLEEP para seleccionar “ SLEEP OFF” (APAGAR RETARDO).
CONFIGURACIÓ N DE IDIOMA
Puede congurar el idioma de la unidad.
1. Encienda la unidad en modo DAB+ o en modo FM.
2. Mantenga pulsado el botó n MENU (o pulse el botó n MENU en el mando a distancia) para acceder al control del menú .
3. Pulse el botó n o hasta que se muestre “ Syst em (Sistema)” y posteriormente pulse el botó n ENTER.
4. Pulse el botó n o hasta que se muestre “ Language (Idioma)” y posteriormente pulse el botó n ENTER.
5. Pulse el botó n o para cambiar entre los diferentes idiomas. Seleccione el idioma que desee y posteriormente
pulse el botó n ENTER para conrmarlo.
6. Pulse el botó n MENU para salir del control de menú .
COMPROBACIÓ N DE LA VERSIÓ N DE SOFTW ARE
Ahora puede comprobar la versió n del software de la unidad.
1. Encienda la unidad en modo DAB+ o en modo FM.
2. Mantenga pulsado el botó n MENU (o pulse el botó n MENU en el mando a distancia) para acceder al control del menú .
3. Pulse el botó n o hasta que se muestre “ Syst em (Sistema)” y posteriormente pulse el botó n ENTER.
4. Pulse el botó n o hasta que se muestre SW ver y posteriormente pulse el botn ENTER para mostrar el nú mero
de versió n de software.
5. Mantenga pulsado el botó n MENU (o pulse el botó n MENU en el mando a distancia) para salir del control del menú .
RESTAURAR VALORES DE FÁ BRICA
Esta funcin reinicia la unidad a la conguracin de fbrica original.
1. Encienda la unidad en modo DAB+ o en modo FM.
2. Mantenga pulsado el botó n MENU (o pulse el botó n MENU en el mando a distancia) para acceder al control del menú .
3. Pulse el botó n o hasta que se muestre “ Syst em (Sistema)” y posteriormente pulse el botó n ENTER.
4. Pulse el botó n o hasta que se muestre “ Reset (Reiniciar)” y posteriormente pulse el botó n ENTER.
5. Pulse el botó n o hasta que se muestre “ Yes (Sí )” y posteriormente, pulse el botó n ENTER para reiniciar la
unidad.
AHORRO DE ENERGÍ A
Debido a las exigencias de ErP y a la protecció n del medioambiente, el unidad se pagará y pasará al modo en espera de
forma automá tica una vez que no se reproduzca mú sica durante aproximadamente 15 minutos.
Cuando la unidad se encuentra apagada debido a ErP, puede pulsar el botó n STANDBY para volver a encender la unidad.

-86-
FUNCIONES DEL MANDO A DISTANCIA
En espera: Pulse el botó n STANDBY para encender la unidad.
Para apagarlo, vuelva a pulsar el botó n STANDBY.
Fuente: Selecció n de otras funciones: DAB+ RADIO,
FM-RADIO, CD, USB, BLUETOOTH , CINTA
(CASETE), ENTRADA DE AUDIO (AUXILIAR).
Ecualiza dor: Conguracin del Ecualizador: FLAT / ROCK /
CLASSIC / POP / VOCAL / JAZZ.
Bajo X: Sper bajo conectado / desconectado.
Dormir: Conguracin del tiempo de retardo: 90-80-70-60-
50-40-30-20-10 minutos.
Mono/Estéreo: Selecció n de mono estéreo solo para radio FM.
arpeta ˄˅: Selecció n de carpeta para USB y MP3-CD.
Memoria: CD: Programar pistas de CD.
DAB+ : Programar presintoní as o recordar
presintoní as.
FM: Programar presintoní as o recordar
presintoní as.
Sintoniar˅ /
sintoniar ˄: CD/USB/BT: Pista hacia atrs o siguiente.
( / ) DAB+ : Seleccionar las emisoras buscadas
FM: Frecuencia arriba / abajo con 50kHz.
CH+/CH-: DAB+/FM: Recordar presintonas.
CD/USB/BT: No hay funciones.
Repetir : CD: Repetir una o repetir todas.
USB: Repetir una, á lbum o repetir todas.
Aleatorio: CD/USB: Funcin aleatoria conectada / desco-
nectada.
FUNCIONES DAB/FM:
INFORMACIÓ N: Mostrar informació n de datos cuando se reciba la
emisora dab+ .
BÚ SQUEDA: Bú squeda de todas las emisoras dab+ .
MENU: Accede a las funciones del menú en combinació n
con los botones o y el botó n ENTER.
Funciones DAB+/FM y funciones de conguración.
FUNCIONES DE BLUETOOTH:
:hacia atrá s.
:siguiente.
:funcin reproduccin / pausa.
FUNCIONES DE CD/USB:
PANTALLA: Etiqueta ID-3 conectada o desconectada.
:Funció n parada.
:Funcin reproduccin / pausa.
VOLUMEN:
VOL+ : Subir volumen
VOL-: Bajar volumen
REPEAT
RANDOM
VOL
DISPLAY

-87-
No se enciende
●Compruebe que el cable de red está bien conectado.
●Asegú rese de que la unidad está encendida.
La unidad no responde cuando se pulsa cualquier otn.
●Retire las pilas (cuando estén insertadas) y retire el cable de alimentació n durante un minuto. Posteriormente,
vuelva a insertar las pilas.
o ha salida de sonido
●Suba el volumen.
o puedo encontrar el nomre Bluetooth de esta unidad en mi dispositivo Bluetooth para el empareamiento Blue-
tooth
●Asegú rese de que la unidad está encendida.
●Asegú rese de que la funció n Bluetooth está activada en su dispositivo Bluetooth.
●La unidad dispone de una funció n Bluetooth que puede recibir una señ al en 10 metros.
El disco est en su lugar pero la unidad no lo reproduce
●Asegú rese de que la etiqueta del disco está hacia arriba.
●Asegú rese de que el disco está limpio.
●Puede que esté activado el modo PAUSA; desactí velo.
●El disco puede estar sucio; compruebe y limpie el disco. Si el disco presenta dañ os, sustiú ya lo por otros que no
presente dañ os.
Recepció n DAB+/FM
●Asegú rese de que el cable de la antena esté completamente extendido.
●Las interferencias eléctricas en su hogar pueden causar una mala recepció n. Aleje la unidad de las mismas (espe-
cialmente de aparatos con motor y transformadores).
La unidad se apaga automticamente durante la reproduccin
● Suba el volumen de la fuente de sonido conectada (reproductor de DVD/TV, etc.)
Interferencia de sonido que procede de dispositivos inalmricos en Altavoces
●Aleje cualquier dispositivo inalá mbrico (teléfono mó vil, dispositivo Bluetooth, etc.) de la unidad.
SOLUCIÓ N DE PROBLEMAS:

-88-
ESPECIFICACIONES TÉCNICAS
Margen de frecuencias de radio DAB+ : 174,928-239,2 MH z
Alcance de frecuencia de radio FM: 87,5 - 108 MH z
Rango de frecuencias Bluetooth: 2,402 - 2,480 GH z
Potencia de transmisió n Bluetooth: 4 dBm
Entrada de alimentacin CA: 230 V~ 50 Hz 25 W
Funcionamiento con pilas: 6 x 1,5 V “ C” (UM-2), no suministradas
Potencia de salida del altavoz: 2 x 6 W
Bluetooth: V5.0
Entrada auxiliar: Clavija estéreo de 3,5 mm
Salida de auriculares: Clavija estéreo de 3,5 mm
Pila del mando a distancia: 1 CR2025
Dimensiones de la unidad (L x P x A): 390 x 228 x 138 mm
Temperatura de funcionamiento: 0-45°C
Peso total: 2,1 kg
● La especicacin se presenta solo como referencia. Los valores del peso y del tamao son aproximados.
● Nuestro producto se mejora constantemente y las especicaciones y funciones pueden cambiarse sin previo aviso.
Garantí a
Lenco ofrece servicio y garantí a en cumplimiento con las leye s de la Unió n Europea, lo cual implica que, en caso de que su
producto precise ser reparado (tanto durante como después del periodo de garantí a), deberá contactar directamente con su
distribuidor.
Nota importante: No es posible enviar sus reparaciones directamente a Lenco.
Nota importante: Si la unidad es abierta por un centro de servicio no ocial, la garanta quedar anulada.
Este aparato no es adecuado para el uso profesional. En caso de darle un uso profesional, todas las obligaciones de garantí a
del fabricante quedará n anuladas.
Eencin de responsailidad
Regularmente se llevan a cabo actualizaciones en el Firmware y en los componentes del hardware. Por esta razó n, algunas
de las instrucciones, especicaciones e imgenes incluidas en este documento pueden diferir ligeramente respecto a su
situació n particular. Todos los elementos descritos en esta guí a tienen un objetivo de mera ilustració n, y pueden no ser de
aplicació n en su situació n particular. No se puede obtener ningú n derecho ni derecho legal a partir de la descripció n hecha en
este manual.
Eliminacin del antiguo dispositivo
Este sí mbolo indica que no deberá deshacerse del producto eléctrico o baterí a en cuestió n junto con los residuos domésti-
cos, en el á mbito de la UE. Para garantizar un tratamiento residual correcto del producto y su baterí a, por favor, elimí nelos
cumpliendo con las leye s locales aplicables sobre requisitos para el desechado de equipos eléctricos y baterí as. De hacerlo,
ayu dará a conservar recursos naturales y mejorar los está ndares de protecció n medioambiental en el tratamiento y elimina-
ció n de residuos eléctricos (Directiva sobre la Eliminació n de Equipos Eléctricos y Electró nicos).
Marca CE
Por la presente, Commaxx B.V. Wiebachstraat 37, 6466 NG Kerkrade, Pases Bajos, declara que este producto cumple con
las exigencias esenciales de las directivas de la UE.
La declaració n de conformidad puede consultarse mediante techdoc@ commaxxgroup.com
Servicio
Para obtener má s informació n y soporte del departamento técnico, por favor, visite la pá gina web www.lenco.com
Commaxx B.V. Wiebachstraat 37, 6466 NG Kerkrade, Pases Bajos.
VISTA GENERAL TÉCNICA
-
 1
1
-
 2
2
-
 3
3
-
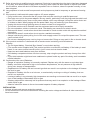 4
4
-
 5
5
-
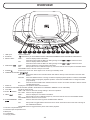 6
6
-
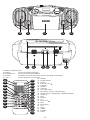 7
7
-
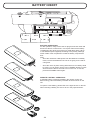 8
8
-
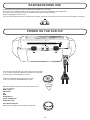 9
9
-
 10
10
-
 11
11
-
 12
12
-
 13
13
-
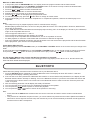 14
14
-
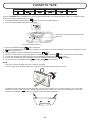 15
15
-
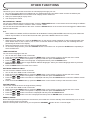 16
16
-
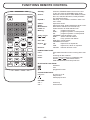 17
17
-
 18
18
-
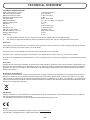 19
19
-
 20
20
-
 21
21
-
 22
22
-
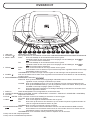 23
23
-
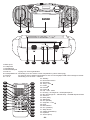 24
24
-
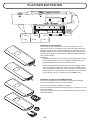 25
25
-
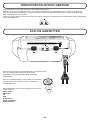 26
26
-
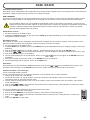 27
27
-
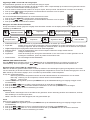 28
28
-
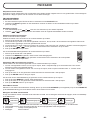 29
29
-
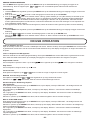 30
30
-
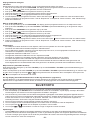 31
31
-
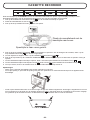 32
32
-
 33
33
-
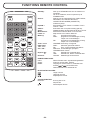 34
34
-
 35
35
-
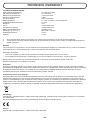 36
36
-
 37
37
-
 38
38
-
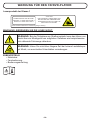 39
39
-
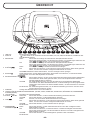 40
40
-
 41
41
-
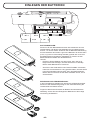 42
42
-
 43
43
-
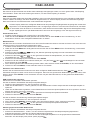 44
44
-
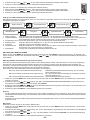 45
45
-
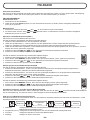 46
46
-
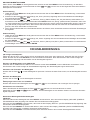 47
47
-
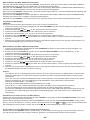 48
48
-
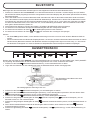 49
49
-
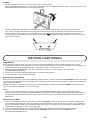 50
50
-
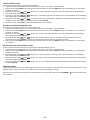 51
51
-
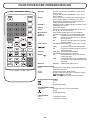 52
52
-
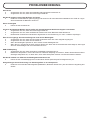 53
53
-
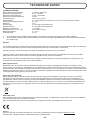 54
54
-
 55
55
-
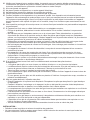 56
56
-
 57
57
-
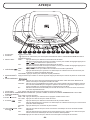 58
58
-
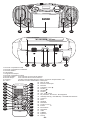 59
59
-
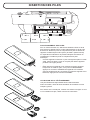 60
60
-
 61
61
-
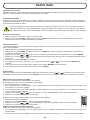 62
62
-
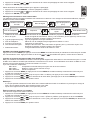 63
63
-
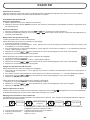 64
64
-
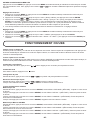 65
65
-
 66
66
-
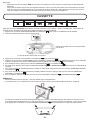 67
67
-
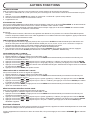 68
68
-
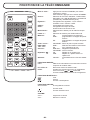 69
69
-
 70
70
-
 71
71
-
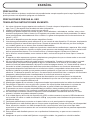 72
72
-
 73
73
-
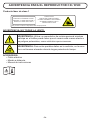 74
74
-
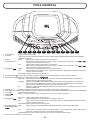 75
75
-
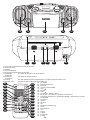 76
76
-
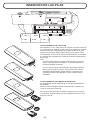 77
77
-
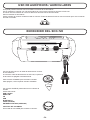 78
78
-
 79
79
-
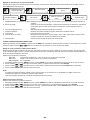 80
80
-
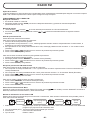 81
81
-
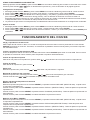 82
82
-
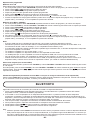 83
83
-
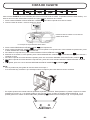 84
84
-
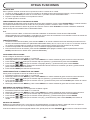 85
85
-
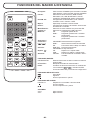 86
86
-
 87
87
-
 88
88


in andere talen
- français: Lenco SCD-720 Manuel utilisateur
- español: Lenco SCD-720 Manual de usuario
- Deutsch: Lenco SCD-720 Benutzerhandbuch