Samsung DVD-R125 Handleiding
- Categorie
- Dvd spelers
- Type
- Handleiding
Deze handleiding is ook geschikt voor

Instruction Manual
DVD-R120/R121
AK68-00842C-00
DVD-R125
English Nederlands Français
00842C-R125-XEB_Cover 2005.6.29 10:9 PM Page 1

IMPORTANT NOTE
The mains lead on this equipment is supplied with a
moulded plug incorporating a fuse. The value of the
fuse is indicated on the pin face of the plug. If it requires
replacing, a fuse approved to BS1362 of the same
rating must be used.
Never use the plug with the fuse cover omitted if the cover
is detachable. If a replacement fuse cover is
required, it must be of the same colour as the pin face of
the plug. Replacement covers are available from your
dealer.
If the fitted plug is not suitable for the power points in your
house or the cable is not long enough to reach a
power point, you should obtain a suitable safety approved
extension lead or consult your dealer for assistance.
However, if there is no alternative to cutting off the plug,
remove the fuse and then safely dispose of the
plug. Do not connect the plug to a mains jack, as there is a
risk of shock hazard from the bared flexible cord.
The product unit accompanying this user manual is
licensed under certain intellectual property rights of certain
third parties. This license is limited to private non-
commercial use by end-user consumers for licensed
contents.
No rights are granted for commercial use.
The license does not cover any product unit other than this
product unit and the license does not extend to any
unlicensed product unit or process conforming to ISO/IEC
11172-3 or ISO/IEC 13818-3 used or sold in combination
with this product unit. The license only covers the use of
this product unit to encode and/or decode audio files
conforming to the ISO/IEC 11172-3 or ISO/IEC 13818-3.
No rights are granted under this license for product features
or functions that do not conform to the ISO/IEC 11172-3 or
ISO/IEC 13818-3.
Warning
Getting Started
2
- English
TO REDUCE THE RISK OF ELECTRIC SHOCK, DO NOT
REMOVE THE COVER(OR BACK).
NO USER-SERVICEABLE PARTS ARE INSIDE. REFER
SERVICING TO QUALIFIED SERVICE PERSONNEL.
This symbol indicates “dangerous
voltage” inside the product that presents
a risk of electric shock or personal injury.
This symbol indicates important
instructions accompanying the product.
Do not install this equipment in a confined space
such as a bookcase or similar unit.
WARNING : To prevent damage which may result in
fire or electric shock hazard, do not
expose this appliance to rain or
moisture.
CAUTION : DVD RECORDER USES AN INVISIBLE
LASER BEAM WHICH CAN CAUSE
HAZARDOUS RADIATION EXPOSURE
IF DIRECTED.
BE SURE TO OPERATE RECORDER
CORRECTLY AS INSTRUCTED.
CAUTION
THIS PRODUCT UTILIZES A LASER.
USE OF CONTROLS OR ADJUSTMENTS OR
PERFORMANCE OF PROCEDURES OTHER THAN
THOSE SPECIFIED HEREIN MAY RESULT IN
HAZARDOUS RADIATION EXPOSURE.
DO NOT OPEN COVERS AND DO NOT REPAIR
YOURSELF. REFER SERVICING TO QUALIFIED
PERSONNEL.
This product satisfies CE regulations when shielded cables
and connectors are used to connect the unit to other
equipment. To prevent electromagnetic interference with
electric appliances, such as radios and televisions, use
shielded cables and connectors for connections.
00842C-R125-XEB_02~17 2005.6.29 10:15 PM Page 2

English -
3
Important Safety Instructions
Read these operating instructions carefully before using
the unit. Follow all the safety instructions listed below.
Keep these operating instructions handy for future
reference.
1) Read these instructions.
2) Keep these instructions.
3) Heed all warnings.
4) Follow all instructions.
5) Do not use this apparatus near water.
6) Clean only with dry cloth.
7) Do not block any ventilation openings, Install in
accordance with the manufacturer's instructions.
8) Do not install near any heat sources such as
radiators, heat registers, stoves, or other apparatus
(including amplifiers) that produce heat.
9) Do not defeat the safety purpose of the polarized or
grounding- type plug. A polarized plug has two
blades with one wider than the other. A grounding-
type plug has two blades and a third grounding
prong. The wide blade or the third prong are
provided for your safety. if the provided plug does not
fit into your outlet, consult an electrician for
replacement of the obsolete outlet.
10) Protect the power cord from being walked on or
pinched particularly at plugs, convenience
receptacles, the point where they exit from the
apparatus.
11) Only use attachments/accessories specified by the
manufacturer.
12) Use only with the cart, stand, tripod, bracket, or
table specified by the manufacturer, or sold with the
apparatus. When a cart is used, use caution when
moving the cart/apparatus combination to avoid
injury from tip-over.
13) Unplug this apparatus during lightning storms or
when unused for long periods of time.
14) Refer all servicing to qualified service personnel.
Servicing is required when the apparatus has been
damaged in any way, such as power-supply cord or
plug is damaged, liquid has been spilled or objects
have fallen into the apparatus, the apparatus has
been exposed to rain or moisture, does not operate
normally, or has been dropped.
Handling Cautions
● Before connecting other components to this recorder,
be sure to turn them all off.
● Do not move the recorder while a disc is being
played, or the disc may be scratched or broken, the
recorder’s internal parts may be damaged.
● Do not put a flower vase filled with water or any small
metal objects on the recorder.
● Be careful not to put your hand into the disc tray.
● Do not place anything other than the disc in the disc
tray.
Getting Started
Precaution
● Exterior interference such as lightning and static
electricity can affect normal operation of this recorder.
If this occurs, turn the recorder off and on again with
the STANDBY/ON button, or disconnect and then
reconnect the AC power cord to the AC power outlet.
The recorder will operate normally.
● Be sure to remove the disc and turn off the recorder
after use.
● Disconnect the AC power cord from the AC outlet
when you don’t intend to use the recorder for long
periods of time.
● Clean the disc by wiping in a straight line from the
inside to the outside of the disc.
Maintenance of Cabinet
For safety reasons, be sure to disconnect the AC power
cord from the AC outlet.
● Do not use benzene, thinner, or other solvents for
cleaning.
● Wipe the cabinet with a soft cloth.
Disc Handling
● Use discs with regular
shapes. If an irregular disc
(a disc with a special shape)
is used, this DVD recorder may be damaged.
Holding discs
● Avoid touching the surface of a
disc where recording is performed.
DVD-RAM, DVD-RW and DVD-R
● Clean with an optional DVD-
RAM/PD disc cleaner (LF-
K200DCA1 where available).
Do not use cleaners or cloths
for CDs to clean DVD-
RAM/DVD-RW/DVD-R discs.
DVD-Video, Audio CD
● Wipe off dirt or contamination on the disc with a soft
cloth.
Cautions on handling discs
● Do not write on the printed side with a ball-point pen
or pencil.
● Do not use record cleaning sprays or antistatic.
Also, do not use volatile chemicals, such as benzene
or thinner.
● Do not apply labels or stickers to discs. (Do not use
discs fixed with exposed tape adhesive or leftover
peeled-off stickers.)
● Do not use scratch-proof protectors or covers.
● Do not use discs printed with label printers available
on the market.
● Do not load warped or cracked discs.
00842C-R125-XEB_02~17 2005.6.29 10:15 PM Page 3

● Use a 700MB(80 minutes) CD-R/RW disc. If possible,
do not use a 800MB(90 minutes) or above disc, as
the disc may not play back.
● If the CD-R/RW disc was not recorded as a closed
session, you may experience a delay in the early
playback time, all recorded files may not play.
● Some CD-R/RW discs may not be playable with this
unit, depending on the device which was used to
burn them. For contents recorded on CD-R/RW
media from CDs for your personal use, playability
may vary depending on contents and discs.
● Disc : CD-R/RW, DVD-R/RW/RAM
● MPEG4 File with following extensions can be played.
: .avi, .divx, .AVI, .DIVX
● MPEG4 Codec format : DivX 3.11 DivX 4.x DivX 5.x
DivX-Pro (without QPEL and GMC)
● Available Audio Format : “MP3”, “MPEG”, “WMA”,
“LPCM”, “AC3”
●
Supported subtitle file formats: .smi, .srt, .sub, .psb, .txt, .ass
DVD-R Disc Playback and Recording
● Once a DVD-R recorded in Video Mode is finalised, it
becomes DVD-Video.
● You can record onto the available space on the disc
and perform editing functions such as giving titles to
discs and programmes and erasing programmes
before finalising.
● When programming is erased from a DVD-R, that
space does not become available. Once an area on a
DVD-R is recorded on, that area is no longer a
vailable for recording, whether the recording is
erased or not.
● It takes about 30 seconds for the unit to complete
recording management information after recording
finishes.
● This product optimizes the DVD-R for each recording.
Optimizing is carried out when you start recording
after inserting the disc or turning on the unit.
Recording onto the disc may become impossible if
optimizing is carried out too many times.
● Playback may be impossible in some cases due to
the condition of recording.
● This unit can play back DVD-R discs recorded and
finalised with a Samsung DVD video recorder. It may
not be able to play some DVD-R discs depending on
the disc and the condition of the recording.
DVD-RW Disc Playback and Recording
● Recording and playback can be performed on DVD-
RW discs in both the Video and VR Modes.
● Once a DVD-RW recorded in both the Video and VR
Modes is finalised, you cannot perform addtional
recording.
● Once a DVD-RW recorded in Video Mode is finalised,
it becomes DVD-Video.
● In both modes, playback can be performed before
and after finalisation, but additional recording,
deleting and editing can not be performed after
finalisation.
● If you want to record the disc in VR Mode and then
record in V Mode, be sure to execute Format.
Be careful when executing Format because all the
recorded data may be lost.
4
- English
Disc Storage
Be careful not to harm the disc because the data on
these discs is highly vulnerable to the environment.
● Do not keep under direct sunlight.
● Keep in a cool ventilated area.
● Store vertically.
● Keep in a clean protection jacket.
● If you move your DVD recorder suddenly from a cold
place to a warm place, condensation may generate
on the operating parts and lens and cause abnormal
disc playback. If this occurs, remove the disc and
wait for one to two hours with the power on before
atttempting playback.
Disc Specifications
DVD-Video
● A digital versatile disc (DVD) can contain up to
135-minutes of images, 8 audio languages and 32
subtitle languages. It is equipped with MPEG-2
picture compression and Dolby digital surrounding,
allowing you to enjoy vivid and clear theatre quality
images in the comfort of your own home.
● When switching from the first layer to the second
layer of a dual-layered DVD Video disc, there may be
momentary distortion in the image and sound.
This is not a malfunction of the unit.
● Once a DVD-R/RW recorded in Video Mode is
finalised, it becomes DVD-Video.
Audio CD
● An audio disc on which 44.1kHz PCM Audio is
recorded
● Plays CD-DA format audio CD-R and CD-RW discs.
The unit may not be able to play some CD-R or CD-
RW discs due to the condition of the recording.
CD-R/RW
● Only CD-R discs with MP3 files recorded with
ISO9660 or JOLIET format can be played back
● Only MP3 files with the ".mp3", ".MP3" extension can
be used.
● For MP3 files recorded with a VBR(Variable Bit
Rates), from 32 Kbps to 320 Kbps, the sound may
cut in out.
● Playable bitrate range is from 56Kbps to 320Kbps.
● The unit can handle a maximum of 500 files and 100
folders.
● Only JPEG files with the ".jpg", ".JPG" extension can
be used.
● The unit can handle a maximum of 500 files and 100
folders.
● Maximum size of progressive JPEG is 3M pixels.
● MOTION JPEG is not supported.
MP3 CD-R/RW
JPEG CD-R/RW
Using CD-R/RW
Using MPEG4 disc
Getting Started
00842C-R125-XEB_02~17 2005.6.29 10:15 PM Page 4

English -
5
● A DVD-RW blank disc is initialized to VR Mode when
first initialized.
● DVD-RW (VR mode)
- This is a format that is used for recording data on a
DVD-RAM or DVD-RW disc. You can record
multiple titles, edit, delete, partial delete, create a
playlist, etc.
- A disc that is recorded in this mode may not be
played by existing DVD Recorder.
● DVD-RW (Video mode)
- This is a format that is used for recording data on a
DVD-RW or DVD-R disc. The disc can be played
by existing DVD Recorder once it has been
finalised.
- If a disc that has been recorded in Video Mode by a
different maker’s recorder but has not been
finalised, it cannot be played or additionally be
recorded by this recorder.
DVD-RAM Disc Playback and Recording
● Ensure that the recording mode is set to VR mode.
Otherwise, this product will not be able to play the
recording.
● You cannot play a DVD-RAM in most DVD components
due to compatibility issues.
● Only DVD-RAM standard Version 2.0. discs can be
played in this unit.
● DVD-RAM recorded on this unit may not work with other
DVD components. To determine compatibility with these
DVD-RAM discs, refer to the user’s manual for the DVD
recorder.
● For cartridge type DVD-RAM discs, remove the cartridge
and use the disc only.
Protection
This DVD Recorder can allow you to protect the
contents of your discs, as described below.
● Programme-protected: See page 72
“Locking(Protecting) a Title”
● Disc-protected: See page 84 “Disc Protection”
✻
DVD-RAM/DVD-RW/DVD-R discs that are
incompatible with the DVD-VIDEO format cannot be
played with this product.
✻ For more information on DVD recording compatibility,
consult your DVD-RAM/DVD-RW/DVD-R
manufacturer.
✻ Use of poor quality DVD-RAM/DVD-RW/DVD-R discs
may cause following unexpected problems including,
without limitation, recording failure, loss of recorded
or edited materials or damage to the recorder.
Do not use the following discs!
● LD, CD-G, CD-I, CD-ROM, DVD-ROM, DVD+R and
DVD+RW discs should not be used in this product.
[Note]
Disc types that can be played : CD/CD-R/CD-
RW/MP3/JPEG/DVD-Video/DVD-RAM/DVD-RW/
DVD-R. For a DVD-R/DVD-RW disc, which has been
recorded in Video Mode on another component, it
can play only when finalised.
●
Some commercial discs and DVD discs purchased
outside your region may not be playable with this
product. When these discs are played, either “No disc."
or "Please check the regional code." will be displayed.
● If your DVD-RW disc is an illegal copy or is not in
DVD video format, it may also not be playable.
● We take no responsibility and offer no compensation
for any recording failure, loss of recorded or edited
material and/or damage to the recorder arising from
usage of unrecommended discs.
COPY PROTECTION
● Many DVD discs are encoded with copy protection.
Because of this, you should only connect your DVD
recorder directly to your TV, not to a VCR.
Connecting to a VCR results in a distorted picture
from copy-protected DVD discs.
● This product incorporates copyright protection
technology that is protected by methods claims of
certain U.S. patents and other intellectual property
rights owned by Macrovision Corporation and other
rights owners. Use of this copyright protection
technology must be authorised by Macrovision
Corporation, is intended for home and other limited
viewing uses only unless otherwise
authorised by Macrovision Corporation.
Reverse engineering or disassembly is prohibited.
Disc Maximum no. of recordings by disc type
DVD-RAM 100,000
DVD-RW 1,000
DVD-R 1
Getting Started
❇ We recommend using one of the discs in the
table as they have been confirmed to be
compatible with this unit. Other discs may not
perform correctly.
Media Disc SPEED
TDK 4x
Beall 4x
DVD-R That’s 4x
Maxell 4x
Panasonic 4x
TDK 2x
Maxell 2x
DVD-RW Optodisc 2x
Radius 2x
Verbatim 2x
Maxell 3x
DVD-RAM
Fujifilm 3x
TDK 2x
Panasonic 3x
00842C-R125-XEB_02~17 2005.6.29 10:15 PM Page 5

6
- English
Getting Started
Getting Started
Warning........................................................................2
Precaution...................................................................3
Important Safety Instructions.............................................3
Handling Cautions..............................................................3
Maintenance of Cabinet.....................................................3
Disc Handling .....................................................................3
Disc Storage.......................................................................4
Disc Specifications.............................................................4
General Features........................................................8
Before reading the user’s manual...........................9
How to use the DVD Recorder.................................9
Unpacking .................................................................11
Accessories.......................................................................11
Preparing the Remote Control.........................................11
Setting the Remote Control.............................................11
Description................................................................13
Front Panel.......................................................................13
Front Panel Display..........................................................13
Rear Panel........................................................................14
Tour of the Remote Control.............................................15
Connecting & Setting Up
Connecting & Setting Up
Quick Overview........................................................16
Connecting the DVD-Recorder..............................17
Additional connections...........................................17
Antenna + DVD Recorder +
external decoder box + TV ....................................18
Other type of connecting the Video output cable
.......18
Case 1 : Connecting to a Video (Composite)
output jack ........................................................19
Case 2 : Connecting to an S-Video output jack.............19
Case 3 : Component Video output jacks........................20
Other type of connecting the Audio output cable ..20
Case 1 : Connecting to your TV......................................20
Case 2 : Connecting to a stereo amplifier with AV
output jacks .....................................................21
Case 3: Connecting to an AV amplifier with a digital
output jack ........................................................21
Connecting HDMI/DVI to a TV
..................................22
Case 1 : Connecting to a TV with HDMI Jack...............22
Case 2 : Connecting to a TV with DVI Jack ..................22
Connecting to AV3 IN, DV input jack....................23
Case 1 : Connecting a VCR, Set-Top Box(STB), DVD
recorder or Camcorder to the AV3 IN jacks ...23
Case 2 : Connecting a Camcorder to the DV IN jack ...23
System Setup
System Setup
On-Screen Menu Navigation..................................24
Plug & Auto Setup...................................................25
Setting the Clock......................................................26
Presetting Channels with the Auto Setup function
.....27
Presetting Channels with the Manual Setup
function......................................................................28
Setting up the Language Options.........................29
EP Mode Time Setting.............................................30
Automatic Chapter Creation..................................30
Setting up the Front Display Options...................31
Setting up NICAM Options.....................................32
DivX(R) Registration................................................33
Setting up the Audio Options................................33
Audio Options...................................................................34
Setting up Video Output Options..........................34
Setting up the Progressive scan...........................35
Canceling the Progressive scan...........................36
Setting up the Display(Video) Options.................36
Display(Video) Options....................................................37
Output selection ...............................................................37
Setting up the Parental Control.............................38
If you forgot your password.............................................38
About the Rating Level....................................................39
About the Change Password..........................................39
Contents
Getting Started
00842C-R125-XEB_02~17 2005.6.29 10:15 PM Page 6

English -
7
Zooming-In........................................................................60
Using Bookmarks.............................................................60
Using Markers..................................................................61
Playing an Audio CD/MP3 .....................................62
Playing an Audio CD (CD-DA)/MP3...............................62
Playing a Picture......................................................66
Playing an MPEG4...................................................67
Playing the Title List................................................68
Editing
Editing
Basic Editing (Title List)...................................................71
Renaming(Labeling) a Title..............................................71
Locking(Protecting) a Title...............................................72
Deleting a Title..................................................................72
Deleting a Section of a Title.............................................73
Advanced Editing (Playlist) .............................................
75
Creating a Playlist............................................................75
Playing Entries in the Playlist..........................................76
Renaming a Playlist Entry...............................................77
Editing a Scene for the Playlist .......................................78
Copying a Playlist Entry to the Playlist...........................81
Deleting a Playlist Entry from the Playlist.......................82
Disc Manager
..............................................................83
Editing the Disc Name.....................................................83
Disc Protection.................................................................84
Formatting a Disc.............................................................84
Delete All Title Lists..........................................................85
Finalising a disc................................................................86
Unfinalising a disc (V/VR mode).....................................87
Additional Information
Additional Information
Troubleshooting.......................................................88
Specifications...........................................................92
Recording
Recording
Before Recording.....................................................40
Recordable discs..............................................................40
Recording Formats ..........................................................41
Recording Mode...............................................................41
Unrecordable video..........................................................41
About INFO Key...............................................................42
Checking the available disc space (Disc Information)...42
Recording the current TV programme you are
watching....................................................................42
Recording from external equipment you are
watching....................................................................44
Copying from a Camcorder ...................................45
Making a One Touch Recording (OTR)................46
Making a Timer Recording.....................................47
Flexible Recording (for Timer recording only) ...48
Editing the Scheduled Record List.......................48
Deleting the Scheduled Record List.....................49
Using the ShowView Feature.................................50
ShowView Extended................................................51
Recording the Standard Timer List ......................51
Playback
Playback
Before Playing..........................................................52
Region code (DVD-Video only).......................................52
Disc types that can be played.........................................52
Discs that cannot be played............................................52
Playing a Disc...........................................................53
Using the Disc Menu & Title Menu .................................54
Using the Search Functions............................................54
Slow Motion Play..............................................................55
Step Motion Play..............................................................55
About ANYKEY ................................................................55
Using the Repeat Function..............................................56
Selecting the Subtitle.......................................................58
Selecting the Audio language..........................................59
Changing the Camera Angle...........................................59
Getting Started
00842C-R125-XEB_02~17 2005.6.29 10:15 PM Page 7

8
- English
General Features
High quality progressive scan
Progressive scanning provides high resolution and
flicker free video. The 10-bit 54-MHz DAC and 2D Y/C
Separating Circuitry provides the highest image
playback and recording quality. (See page 20, 36)
Avariety of functions with an easy-to-use user
interface
The integrated menu system and the messaging
function allow you to perform desired operations both
easily and conveniently. With a DVD-RAM or DVD-RW
disc, you can edit recorded video, create a playlist, edit
video in a specific sequence according to your
requirements.
MPEG4 playback
This DVD Recorder can play MPEG4 formats within an
avi file.
DivX Certification
DivX, DivX Certified, and associated
logos are trademarks of DivXNetworks
Inc. and are used under license.
HDMI (High Definition Multimedia Interface)
HDMI reduces picture noise by allowing a pure digital
video/audio signal path from the DVD recorder to your
TV.
The DVD Recorder allows you to record and play high
quality digital video on DVD-RAM/DVD-RW/DVD-R
discs. You can record and edit digital images on DVD-
RAM/DVD-RW/DVD-R discs as if they were VCR tapes.
High quality digital audio and video recording
and playback
Record up to 16-hours of video with a double sided 9.4
GB DVD-RAM disc, up to 8-hours of images with a 4.7
GB DVD-RAM/DVD-RW/DVD-R disc,
depending on the recording mode.
Selectable Recording Mode
You can set your recorder to one of four different
recording speeds, each varying in recording quality and
length. EP (6Hr or 8Hr) mode yields the most recording
time, LP & SP modes provide less recording time with
higher quality recording, XP mode gives you the highest
quality recording.
Automated Quality Adjustment for Timer
Recording
If FR mode is selected, the video quality is adjusted
automatically so that all video for the scheduled time
can be recorded onto the free disc space.
(See page 48.)
Creating a DVD video title using
DVD-RW/DVD-R disc
With the DVD Recorder, you can create your own DVD
Video titles on 4.7 GB DVD-RW/DVD-R discs.
Copying data from a digital camcorder using a
DV input jack
Record DV Device video onto DVD-RAM or DVD-RW,
DVD-R discs using the DV input jack (IEEE 1394-
4pin/4pin). (See page 45.)
Getting Started
00842C-R125-XEB_02~17 2005.6.29 10:15 PM Page 8

English -
9
1) Be sure to be familiar with Safety Instructions before
using this product. (See pages 2~5)
2) If a problem occurs, check for Troubleshooting.
(See pages 88~91)
About the use of this user’s manual
©2005 Samsung Electronics Co.
All rights reserved; No part or whole of this user’s
manual may be reproduced or copied without the prior
written permission of Samsung Electronics Co.
Copyright
How to use the DVD
Recorder
Step 1
Select the disc type
This unit can record on the following types of discs.
If you want to repeatedly record on the same disc or
you want to edit the disc after recording, select a
rewritable DVD-RW or DVD-RAM type disc.
If you want to save recording without any change,
choose a non-rewritable DVD-R.
Before reading the user’s
manual
Make sure to check the following terms before
reading the user’s manual.
Step 2
Format the disc to start recording
Unlike a VCR, the recorder automatically starts
formatting when an unused disc is inserted. This is
required for the preparation of recording on a disc.
Using a DVD-RAM
This type of disc can be formatted in DVD-Video
Recording format (VR mode). You can edit recorded
image and create a playlist and edit images in a
specific sequence according to your requirements.
Using a DVD-RW
This type of disc can be formatted in either DVD-Video
format (Video mode) or DVD-Video Recording format
(VR mode). For an unused disc, a message that asks
whether to format in VR Mode or not is displayed.
You can play a Video mode disc on various DVD
components. A VR mode disc allows more varied
editing.
Using a DVD-R
This type of disc can be formatted in DVD Video
format. After formatting is complete, you can record on
the disc. You can play this type of discs on various
DVD components only when they have been finalised.
■
You can only use either the VR or
Video mode on a DVD-RW, but not
both at the same time.
■
You can change the DVD-RW
format to another format by
reinitializing. It should be noted that
the disc's data will be lost when
changing formats.
NOTE
Getting Started
Icons that will be used in manual
Icon Term Definition
This involves a function available
DVD
in DVD or DVD-R/DVD-RW
discs that have been recorded
and finalised in Video Mode.
This involves a function available
RAM
in DVD-RAM.
This involves a function available
RW
in DVD-RW.
This involves a function available
R
in DVD-R.
CD
This involves a function available
in a data CD (CD-R or CD-RW).
This involves a function available
JPEG in CD-R/-RW or DVD-R/-RW/-
RAM discs.
This involves a function available
MP3
in CD-R/-RW or DVD-R/-RW/-
RAM discs.
This involves a function available
MPEG4
in CD-R/-RW or DVD-R/-RW/-
RAM discs.
This involves a case where a
Caution function does not operate or
settings may be cancelled.
This involves tips or instructions
NOTE on the page that help each
function operate.
One-Touch
A function that can be operated
button by using only one button.
ANYKEY A function that can be operated
button by using ANYKEY button.
00842C-R125-XEB_02~17 2005.6.29 10:15 PM Page 9

10
- English
Step 3
Recording
There are two different recording methods, Direct
Recording and Timer Recording. Timer recording is
classified as a Date : Once(dd/mm(MON)), Every Day,
MON-SAT, MON-FRI, Every SAT, etc.
Recording mode : XP (high quality mode), SP (standard
quality mode), LP (long recording mode), and EP
(extended mode) according to the recording mode. When
recording is set in the FR mode, the best quality picture is
recorded with regards to the remaining time on the disc.
Step 4
Playing
You can select the title you want to play in a displayed
menu and then immediately start playback.
ADVD consists of sections called titles, and sub
sections called chapters.
During recording, a title is created between two points
where you start and stop recording. Chapters will be
created automatically when you finalise recording on
DVD-R / DVD-RW discs in Video mode.
The chapter’s length (interval between chapters) varies
according to the recording mode.
Step 6
Finalising & Playing on other DVD components
To play your DVD on other DVD components,
finalising may be necessary. First, finish all editing and
recording operations, then finalise the disc.
When using a DVD-RW disc in VR Mode
Although finalising is generally unnecessary when
playing the disc on a VR Mode compatible component,
a finalised disc should be used for playback.
When using a DVD-RW disc in Video Mode
The disc should be finalised first to enable playback on
anything other than this recorder. No more editing or
recording can be made on the disc once it has been
finalised.
When using a DVD-R disc
You should finalise the disc to play it on a component
other than this recorder. You cannot edit or record on
the disc once it has been finalised.
Step 5
Editing a recorded disc
Editing on discs is easier than conventional video
tapes. The recorder supports many different edit
functions, possible only with DVDs.
With a simple and easy edit menu, you can operate
various edit functions, such as delete, copy, rename,
lock, etc., on a recorded title.
Creating a playlist (DVD-RAM/-RW in VR mode)
With this recorder, you can create a new playlist on the
same disc and edit it without the change of the original
recording.
Getting Started
00842C-R125-XEB_02~17 2005.6.29 10:15 PM Page 10

English -
11
Unpacking
Getting Started
Accessories
Check for the supplied accessories below.
Preparing the Remote Control
Install Batteries in the Remote Control
●
Open the battery cover on the back of the remote control.
● Insert two AAA batteries. Make sure that the polarities
(+ and -) are aligned correctly.
● Replace the battery cover.
If the remote does not operate properly:
● Check the polarity + - of the batteries (Dry-Cell)
● Check if the batteries are drained.
● Check if remote sensor is blocked by obstacles.
● Check if there is any fluorescent lighting nearby.
Dispose of batteries according to local
environmental regulations. Do not put them in the
household trash.
Video/Audio Cable
RF Cable for TV
Batteries for Remote
Control (AAA Size)
Remote Control
Instruction Manual
Quick Guide
Setting the Remote Control
You can control certain functions of another
manufacturer’s TV with this remote control.
Control function buttons involve:
STANDBY/ON,
PROG
/
, TV VOL +/-, Direct Number buttons,
TV MUTE, INPUT button.
HDMI Cable DVI Adapter Cable
00842C-R125-XEB_02~17 2005.6.29 10:15 PM Page 11

12
- English
To determine whether your television is
compatible, follow the instructions below.
1. Switch your television on.
2. Point the remote control towards the television.
3. Press and hold the STANDBY/ON button and enter
the two-figure code corresponding to the brand of
your television, by pressing the appropriate number
buttons.
Controllable TV Codes
Result: If your television is compatible with the remote
control, it will switch off.
It is now programmed to operate with the
remote control.
Then you can control the television using the
following buttons after the TV button.
■
If several codes are indicated for your
television brand, try each one in turn until
you find one that works.
■
If you replace the remote control's
batteries, you must set the brand code
again.
NOTE
■
The various functions will not necessarily
work on all televisions. If you encounter
problems, operate the television directly.
NOTE
Button Function
STANDBY/ON Used to switch the television on and off.
INPUT Used to select an external source.
TV VOL (+ or -) Used to adjust the volume of the television.
PROG ( or ) Used to select the desired channel.
TV MUTE Used to toggle the sound on and off.
0~9 Used to input number directly.
BRAND BUTTON
SAMSUNG 01, 02, 03, 04, 05, 06, 07, 08, 09
AIWA 82
ANAM 10, 11, 12, 13, 14, 15, 16, 17, 18
BANG & OLUFSEN 57
BLAUPUNKT 71
BRANDT 73
BRIONVEGA 57
CGE 52
CONTINENTAL EDISON 75
DAEWOO
19, 20, 23, 24, 25, 26, 27, 28, 29, 30, 31, 32, 33, 34
EMERSON 64
FERGUSON 73
FINLUX 06, 49, 57
FORMENTI 57
FUJITSU 84
GRADIENTE 70
GRUNDIG 49, 52, 71
HITACHI 60, 72, 73, 75
IMPERIAL 52
JVC 61, 79
LG 06, 19, 20, 21, 22, 78
LOEWE 06, 69
LOEWE OPTA 06, 57
MAGNAVOX 40
METZ 57
MITSUBISHI 06, 48, 62, 65
MIVAR 52, 77
NEC 83
NEWSAN 68
NOBLEX 66
NOKIA 74
NORDMENDE 72, 73, 75
PANASONIC 53, 54, 74, 75
PHILIPS 06, 55, 56, 57
PHONOLA 06, 56, 57
PIONEER 58, 59, 73, 74
RADIOLA 06, 56
RADIOMARELLI 57
RCA 45, 46
REX 74
SABA 57, 72, 73, 74, 75
SALORA 74
SANYO 41, 42, 43, 44, 48
SCHNEIDER 06
BRAND BUTTON
SELECO 74
SHARP 36, 37, 38, 39, 48
SIEMENS 71
SINGER 57
SINUDYNE 57
SONY 35, 48
TELEAVA 73
TELEFUNKEN 67, 73, 75, 76
THOMSON 72, 73, 75
THOMSON ASIA 80, 81
TOSHIBA 47, 48, 49, 50, 51, 52
WEGA 57
YOKO 06
ZENITH 63
Getting Started
00842C-R125-XEB_02~17 2005.6.29 10:15 PM Page 12

English -
13
Description
Getting Started
Front Panel
Front Panel Display
1. Lights in the record mode.
2. Lights to indicate the timer record mode.
3. Lights in the progressive scan mode.
4. Playing time/clock/current status indicator.
5. Lights when a disc is loaded.
6. Lights when a -R/RW/RAM disc is loaded.
1. STANDBY/ON
Turns the recorder on and off.
2. AV3 INPUT
Connect external equipment.
3. DV-INPUT
Connect external digital equipment with a DV
jack. (such as a camcorder)
4. DISC TRAY
Opens to accept a disc.
5. OPEN/CLOSE
Opens and closes the disc tray.
6. P.SCAN
Selects the progressive scan mode.
7. DISPLAY
Displays the playing status, title/ chapter/ time, etc.
8. SEARCH/SKIP
Goes to the next title/chapter/track or goes back
to the previous title/chapter/track.
9. STOP
Stops disc playback.
10.PLAY/PAUSE
Plays a disc or pauses playback or recording.
11. PROG ( )
Select TV preset Channels.
Same as PROG button on the remote control.
12.REC
Starts recording.
13.Remote Control Reciever
00842C-R125-XEB_02~17 2005.6.29 10:15 PM Page 13

14
- English
1. DIGITAL AUDIO OUT(OPTICAL)
Connects to an amplifier having a digital optical
audio input jack.
2. DIGITAL AUDIO OUT(COAXIAL)
Connects to an amplifier having a digital coaxial
audio input jack.
3. AUDIO OUT
Connects to the audio input of external equipment
using audio cables.
4. VIDEO OUT
Connects the input of external equipment using a
Video cable.
5. S-VIDEO OUT
Connects the input of external equipment using an
S-Video cable.
6. COMPONENT VIDEO OUT
Connects to equipment having Component video
output.
7. AV1(TV) OUTPUT SCART Connector
8. AV2(EXT) INPUT SCART Connector
9. HDMI OUT
10. In from aerial connector
11. Out to TV connector
Rear Panel
Fan
The fan always revolves when the power is on.
Ensure a minimum of 10cm clear space on all sides of
the fan when installing the product.
■
The Antenna connection does not pass
output signal of DVD. To watch a DVD on
your TV, you must connect audio/video or
Scart cables.
NOTE
Getting Started
00842C-R125-XEB_02~17 2005.6.29 10:15 PM Page 14

English -
15
Getting Started
10. MENU Button
Brings up the DVD recorder’s setup menu.
11. OK/DIRECTION Buttons
(
…… †† œœ √√
Buttons)
12. REC MODE Button
This will display the recording status.(XP/SP/LP/EP)
13. REC Button
Use to make a recording on DVD-RAM/-RW/-R
discs.
14. CANCEL Button
15. REPEAT Button
Allows you to repeat a title, chapter, track or disc.
16. OPEN/CLOSE Button
To open and close the disc tray.
17. AUDIO/TV MUTE Button
Use this to access various audio functions on a
disc.(DVD mode)
This operates as Sound Mute. (TV mode)
18. TV Button
Press this to operate TV.
19. INPUT Button
Select line input signal in external input mode
(PROG, AV input or DV INPUT)
20. PROG Button
Select preset channels in a specific order.
Same as PROG buttons in front panel.
21. TITLE LIST/DISC MENU Button
Use this to enter the View Recording list/Disc menu.
22. PLAY LIST/TITLE MENU Button
Use this to return to the Title menu, or to view the
recorded files list.
23. ANYKEY Button
Use this to view the status of the disc that is being
played.
24. SUBTITLE Button
Press this to switch the DVD’s subtitle language.
25. RETURN Button
Returns to a previous menu.
26. MARKER/TIMER Button
Use this to bookmark a position while playing a
disc.
Press to directly enter the Timer Recording Mode
menu while stopping a disc.
27. INFO Button
This will display current settings or disc status.
Tour of the Remote Control
1. STANDBY/ON Button
2. Number Buttons
3. TV/DVD Button
4. DVD Button
Press this when you use a DVD Recorder.
5. TV VOL Buttons
TV volume adjustment.
6. Reverse/Forward Skip Buttons
Press to skip a disc backwards or forwards.
These buttons also function as STEP buttons.
Each press will play one-frame forward or reverse
(see page 55).
7. Reverse/Forward Search Buttons
Press to search a disc backwards or forwards.
8. Stop Button
Press to stop a disc.
9. Play/Pause Button
Press to play/pause a disc.
00842C-R125-XEB_02~17 2005.6.29 10:15 PM Page 15

16
- English
A Quick Overview presented in this guide will give you
enough information to start using the recorder.
Connecting
& Setting Up
Quick Overview
Quick Overview.................................................16
Connecting the DVD-Recorder........................17
Additional connections .....................................17
Antenna + DVD Recorder
+ external decoder box + TV ..........................18
Other type of connecting
the Video output cable......................................18
Other type of connecting
the Audio output cable......................................20
Connecting to HDMI/DVI to a TV....................22
Connecting to AV3 IN, DV input jack...............23
This section involves various methods of
connecting the DVD Recorder to other external
components and required initial setting modes.
Connecting the DVD-Recorder
Additional connections
Antenna + DVD Recorder + external
decoder box + TV
Other type of connecting the
Video output cable
Other type of connecting the Audio
output cable
Connecting to HDMI/DVI to a TV
†
†
†
†
†
Connecting to AV3 IN, DV input jack
†
Connecting & Setting Up
00842C-R125-XEB_02~17 2005.6.29 10:15 PM Page 16

English -
17
Connecting & Setting Up
Connecting the DVD-
Recorder
Additional connections
You can connect your DVD Recorder to a satellite or
digital tuner.
- DVD mode
1. Connect the AV2 connector of DVD Recorder and
VCR/Satellite receiver or digital tuner using a SCART
cable.
2. Connect the AV1 connector to the SCART AV
connector on TV.
3. Turn on the DVD Recorder, VCR/Satellite receiver or
digital tuner and TV.
4. Set Input mode on AV2.
- TV mode
1. Press the TV/DVD button on remote control, then
“TV” appear on Front LED display. (or turn off DVD
Recorder.)
2. You can watch programmes from a satellite or digital
tuner connected to this DVD Recorder, even when
the DVD Recorder is turned off.
You can connect your DVD Recorder to the television
using the SCART cable if the appropriate input is
available on the television.
1. Connect the RF cable as shown.
2. Connect one end of the SCART cable to the AV1
socket on the rear of the DVD Recorder.
3. Plug the other end into the appropriate connector on
the television.
4. Plug in the DVD Recorder and TV
5.Turn on the DVD Recorder and TV.
6. Press the INPUT button on your TV remote control
until the Video signal from the DVD Recorder
appears on the TV screen.
To RF IN
external device
(VCR/Satellite receiver)
To TV
RF Cable
To ANT INPUT
■
The RF cable connection of this product
sends only signals of TV.
You must connect SCART cable or
Audio/Video cables to watch a DVD from
your DVD Recorder.
■
TV mode
Press the TV/DVD button on remote
control, then “TV” appear on Front LED
display (or turn off DVD Recorder).
Then you can watch programmes
received through RF cable.
NOTE
00842C-R125-XEB_02~17 2005.6.29 10:15 PM Page 17

18
- English
Connecting & Setting Up
Antenna + DVD Recorder +
external decoder box + TV
If you connect external decoder box to DVD recorder,
you can record scrambled channels (CANAL+or
Premiere broadcasts) received through the built-in TV
tuner in DVD Recorder.
1. Connect RF antenna cables as shown.
2. Connect the AV1 connector on this recorder to the
SCART AV connector on TV using a SCART cable.
3. Connect the AV2 connector to a SCART AV
connector on decoder box.
4. To watch or record PAY-TV Canal Plus programmes,
set your DVD Recorder to receive the channels using
the on-screen display. (Refer to page 28)
2
3
1
DECODER
Wall
There are several ways to output video signal not using
scart cables. Select one of the following video
connecting that best suits you below.
● Case 1 : Connecting to a Video (Composite) output
jack
● Case 2 : Connecting to an S-Video output jack
● Case 3 : Component Video output jacks
S-Video, Component video and Progressive
Output Modes
● S-Video and Component video output are available
only if your TV supports S-Video input or Component
video input, respectively. If S-Video or Component
video output does not work, check the TV
connections and the TV input selection settings.
● Compared to standard interlaced video, progressive
scan doubles the amount of video lines fed to your
TV, resulting in a more stable, flicker-free, clear
image than interlaced video.
This is only available with TVs that support
progressive scan.
● Progressive Scan Output (576p)
Consumers should note that not all high definition
television sets are fully compatible with this product
and may cause artifacts to be displayed in the
picture, in case of 576 progressive scan picture
problems, It is recommended that the user switch the
connection to the ‘standard definition’ output. If there
are questions regarding our TV set compatibility with
this model 576p DVD Recorder, please contact our
customer service centre.
Other type of connecting
the Video output cable
00842C-R125-XEB_18~41 2005.6.29 10:18 PM Page 18

English -
19
Connecting & Setting Up
Case 2 : Connecting to an
S-Video output jack
1. Connect an S-Video cable (not included) between the
S-VIDEO OUT jack on DVD Recorder and S-VIDEO
INPUT jack on your TV (or AV amplifier).
2. Connect audio cables (white and red) between the
AUDIO OUT jacks on DVD Recorder and AUDIO IN
jacks on TV (or AV amplifier).
● You will enjoy high quality images.
Case 1 : Connecting to a Video
(Composite) output jack
1. Connect a video(yellow) cable between the VIDEO
(yellow) OUT jack on DVD Recorder and VIDEO
(yellow) INPUT jack on your TV (or AV amplifier).
● You will enjoy regular quality images.
2. Connect audio cables (white and red) between the
AUDIO OUT jacks on the DVD Recorder and AUDIO
IN jacks on TV (or AV amplifier).
(See page 20 to 21)
yellow
yellow
Video/Audio Cable
00842C-R125-XEB_18~41 2005.6.29 10:18 PM Page 19

20
- English
Case 3 : Component Video
output jacks
1. Connect Component video cables(not supplied)
between the COMPONENT OUT(Y,P
B
,P
R
) jacks on
DVD Recorder and COMPONENT IN(Y,P
B
,P
R
) jacks
on your TV.
2. Connect audio cables (white and red) between the
AUDIO OUT jacks on the DVD Recorder and AUDIO
IN jacks on TV (or AV amplifier).
(See pages 20 to 21).
● Press the input selection on your TV remote control
until the Component signal from the DVD Recorder
appears on your TV screen.
3. After connecting, refer to the page 34 to 36.
● You will enjoy high quality and accurate colour
reproduction images.
■
The Component jacks will not output video
resolutions above 576p.
To view 720p and 1080i connect the DVD Recorder
to your TV with the supplied HDMI cable.
With HDMI connected, press the P.SCAN button to
alternate between all available resolutions.
(See page 35)
COMPONENT
Pr
Pb
Y
1
2
green
blue
red
green
blue
red
■
Make sure that the colour coded
connections match. The Y, P
B
, P
R
component output jacks of your DVD
Recorder must be connected to the exact
corresponding component input jacks on
your TV.
■
Progressive setting is only available when
the Video Out is set to Component.
(See pages 35~36)
NOTE
There are several ways to output audio signal not using
scart cables. Select the audio connection that best suits
you below.
● Case 1 : Connecting to your TV
● Case 2 : Connecting to a stereo amplifier with AV
output jacks
● Case 3 : Connecting to an AV amplifier with a
digital output jack
Case 1 : Connecting to your TV
If your TV has audio input jacks, use this connection.
Other type of connecting
the Audio output cable
Manufactured under license from Dolby
Laboratories. “Dolby” and the double-D symbol
are trademarks of Dolby Laboratories.
“DTS” and “DTS Digital Out” are trademarks of
Digital Theatre Systems, Inc.
yellow
white
red
yellow
white
red
Connecting & Setting Up
00842C-R125-XEB_18~41 2005.6.29 10:18 PM Page 20

English -
21
Connecting & Setting Up
Case 3: Connecting to an AV
amplifier with a digital
output jack
If your AV amplifier has a Dolby Digital, MPEG2 or
DTS decoder and a digital input jack, use this
connection. To enjoy Dolby Digital, MPEG2 or DTS
sound, you will need to set up the audio settings.
(See page 34)
Case 2 : Connecting to a stereo
amplifier with AV output jacks
If your stereo amplifier only has AUDIO INPUT
jacks(L and R), use the AUDIO OUT jacks.
white
or
red
whitered
Front(L)
speaker
Front(R)
speaker
Rear(L)
Front(L)
Subwoofer Centre
Front(R)
Rear(R)
00842C-R125-XEB_18~41 2005.6.29 10:18 PM Page 21

22
- English
Connecting & Setting Up
If your TV has a HDMI/DVI input, connect HDMI/DVI
cable to a TV. You will enjoy the best quality images
and sounds.
● Case 1 : Connecting to a TV with HDMI Jack
● Case2 : Connecting to a TV with DVI Jack
Case 1 : Connecting to a TV
with HDMI Jack
• Using the HDMI cable connect the HDMI OUT
jack on the rear of the DVD Recorder to the HDMI IN
jack of your TV.
• Press the input selector on your TV remote control
until the HDMI signal from the DVD Recorder appears
on your TV screen.
Case 2 : Connecting to a TV
with DVI Jack
• Using the DVI Adapter Cable, connect the HDMI OUT
jack on the rear of the DVD Recorder to the DVI IN
jack of your TV.
• Using the audio cables, connect the AUDIO (red and
white) OUT jacks on the rear of the DVD Recorder to
the AUDIO (red and white) IN jacks of your TV. Turn
on the DVD recorder and TV.
• Press the input selector on your TV remote control
until the DVI signal from the DVD Recorder appears
on your TV screen.
Connecting HDMI/DVI to a
TV
■
To watch through the HDMI output, set
the digital audio output to PCM.
See page 33~34.
■
Depending on the HDMI device (TV/HDMI
Receiver) you use, audio may not be
supported. If TV does not support Dolby
digital/DTS, Audio output is not available
when you set Digital output as Bitstream
or select DTS On in Audio setup menu.
In this case, set the digital audio output to
PCM or DTS off.
CAUTION
To change HDMI output resolution, see
page 37.
HDMI (High Definition Multimedia
Interface)
HDMI is an interface to enable the digital
transmission of video and audio data with
just a single connector. Since HDMI is
based on DVI, it is completely compatible
with DVI. The only difference between
HDMI and DVI is that HDMI supports
multi-channel audio.
Using HDMI, the DVD recorder transmits
a digital video and audio signal and
displays a vivid picture on a TV having an
HDMI input jack.
HDMI connection description
HDMI connector - Both uncompressed
video data and digital audio data (LPCM
or Bit Stream data).
- Though the DVD recorder uses a HDMI
cable, the DVD recorder outputs only a
pure digital signal to the TV.
- If TV does not support HDCP (High-
bandwidth Digital Content Protection),
snow noise appears on the screen.
Why does Samsung use HDMI?
Analog TVs require an analog video/audio
signal. However, when playing a DVD, the
data transmitted to a TV is digital.
Therefore either a digital-to-analog
converter (in the DVD Recorder) or an
analog-to-digital converter (in the TV) is
required. During this conversion, the
picture quality is degraded due to noise
and signal loss. HDMI technology is
superior because it requires no D/A
conversion and is a pure digital signal
from the DVD recorder to your TV.
What is the HDCP?
HDCP (High-bandwidth Digital Content
Protection) is a system for protecting DVD
content outputted via HDMI from being
copied. It provides a secure digital link
between a video source (PC, DVD. etc)
and a display device (TV, projector. etc).
Content is encrypted at the source device
to prevent unauthorized copies from being
made.
NOTE
white
red
white
red
00842C-R125-XEB_18~41 2005.6.29 10:18 PM Page 22

English -
23
Connecting & Setting Up
This allows you to connect your DVD Recorder to other
external devices and view or record their outputs.
● Case 1 : Connecting a VCR, Set-Top Box(STB), DVD
recorder or Camcorder to the AV3 IN jacks
● Case2 : Connecting a DV Device to the DV IN jack
Case 1 : Connecting a VCR,
Set-Top Box(STB), DVD
recorder or Camcorder to the
AV3 IN jacks
Connecting a VCR or external device to AV3 IN jacks of
the DVD Recorder.
You can record from connected equipment (VCR, STB,
DVD recorder or Camcorder).
Connecting to AV3 IN, DV
input jack
■
AV 3 in selection will be automatically
done. If the input is not selected
automatically, use INPUT button to select
proper input.
■
Copy protected content cannot be
recorded.
NOTE
DVD
STB
VCR
Camcorder
yellow
white
red
yellow
white
red
■
If the input is not selected automatically,
use INPUT button to select proper input.
NOTE
Case 2 : Connecting a
Camcorder to the DV IN jack
If your digital camcorder has a DV output jack, connect
it to the DV input jack of your DVD Recorder.
Camcorder
00842C-R125-XEB_18~41 2005.6.29 10:18 PM Page 23

24
- English
The on-screen menus allow you to enable or disable
various functions on your DVD Recorder.
Use the following buttons to open and navigate through
the on-screen menus.
1
MENU Button
Press this button on the remote control to open the
on-screen MENU.
Press again to exit the on-screen MENU.
2
…… ††
,
œœ √√
Buttons
Press these buttons on remote control to move the
selection bar …†, œ√to cycle through the menu
options.
3
OK Button
Press this button on the remote control to confirm any
new settings.
4
RETURN Button
Press this button on the remote control to return to the
Previous MENU screen displayed or to exit the
on-screen MENU.
System
Setup
On-Screen Menu
Navigation
On-Screen Menu Navigation......................24
Plug & Auto Setup......................................25
Setting the Clock........................................26
Presetting Channels with
the Auto Setup function..............................27
Presetting Channels with
the Manual Setup function .........................28
Setting up the Language Options ..............29
EP Mode Time Setting ...............................30
Automatic Chapter Creation.......................30
Setting up the Front Display Options.........31
Setting up NICAM Options.........................32
DivX(R) Registration...................................33
Setting up the Audio Options .....................33
Setting up Video Output Options................34
Setting up the Progressive scan................35
Canceling the Progressive scan.................36
Setting up the Display(Video) Options.......36
Setting up the Parental Control..................38
System Setup
RETURNOKMOVE EXIT
Timer Record
No Disc
ShowView
√√
Timer Record
√√
ShowView Extended : Off
√√
Programme
Setup
RETURNOKMOVE EXIT
Disc Navigation
DVD-RAM(VR)
Title List
√√
DivX
√√
Photo
√√
Music
√√
Disc Navigation
Playlist
Disc manager
Programme
Setup
00842C-R125-XEB_18~41 2005.6.29 10:18 PM Page 24

English -
25
System Setup
Your DVD Recorder will automatically set itself up when
it is plugged in for the first time. TV stations and clock
will be stored in memory. The process takes a few
minutes. Your DVD Recorder will then be ready for use.
1
Connect the RF cable as indicated on page
18.
(Connecting Your DVD Recorder to the TV Using the RF
Cable and scart cable.)
2
Plug the DVD Recorder into the mains.
“AUTO” in the front panel display flickers.
3
Press a Number button to select the
language.
4
Start the auto setup.
5
Press the OK button, then select “Country”
using the †…œ √ buttons to select your
country.
Plug & Auto Setup
Auto setup will be started.
Check antenna and TV cable connection.
OK Cancel
A(Austria) NL(Netherlands) S(Sweden) PL(Poland)
B(Belgium) I(Italy) CH(Swiss) CZ (Czech)
DK(Denmark) N(Norway) TR(Turkey) Others
FIN(Finland) P(Portugal) GR(Greece)
D(Deutschland) E(Spain) HU(Hungary)
•
Refer to following abbreviation table when selecting “Country”.
•
The DVD Recorder searches for the stations according to a preset
preference list corresponding to the country that you have selected.
6
Press the OK button.
Auto Channel scan will be started.
•
The number of stations automatically stored by the DVD
Recorder depends on the number of stations that it has found.
7
After Auto Channel Scan is completed, Auto
Clock Setting will be started automatically in
10 seconds. If you want to start Auto Clock
Setting immediately, press OK button. If you
do not want to do Auto Clock Setting, press
CANCEL or MENU button.
8
Wait until current date and time are
displayed automatically. If you want to exit
Auto clock setting, press MENU button.
Channel scan
Now, Scanning.
5%
Auto channel scan completed successfully.
Press [OK] button to auto clock set.
OK
Cancel
A
B
DK
FIN
D
NL
I
N
P
E
S
CH
TR
GR
HU
PL
CZ
Others
County Selection
OKMOVE EXIT
Please wait. Now setting the clock.
If you want to exit clock setting,
press the [MENU] button.
Press 1 for English
Touche 2 pour Français
Drücken Sie 3 Für Deutsch
Pulse 4 para Español
Premere 5 per Italiano
Druk op 6 voor Nederlands
00842C-R125-XEB_18~41 2005.6.29 10:18 PM Page 25

2
Press the …† buttons to select Setup, then
press the OK or √ button.
3
Press the …† buttons to select Clock Set,
then press the OK or √ button.
Use navigation …†œ √ buttons to input Time, Date
or Year. Use number buttons to input clock data
directly.
4
Press the …† buttons to select On for the
Auto Clock.
5
Press the OK button, then the date and
time will be saved.
If you don’t press the OK button, it will not be saved.
26
- English
This menu is used to set the current time.
You need to set the time to use timer recording.
1
With the unit in Stop mode/No Disc mode,
press the MENU button.
Setting the Clock
System Setup
■
You must have the RF cable connected to
set the Auto Clock. See page 18
■
The DVD Recorder automatically sets the
clock according to the time signal
broadcast between the channels PR1 to
PR5. If you do not need the Auto clock
set function, select Off.
NOTE
RETURNOKMOVE EXIT
Clock Set
No Disc
12 : 00 01 / JAN / 2005 SAT Off
Time Date Auto Clock
Programme
Setup
RETURNOKMOVE EXIT
Clock Set
No Disc
12 : 00 01 / JAN / 2005 SAT Off
Time Date Auto Clock
Programme
Setup
RETURNOKMOVE EXIT
Setup
No Disc
System
√√
Clock Set
√√
Language
√√
Audio
√√
Video
√√
Parental Control
√√
Install
√√
Programme
Setup
9
Check the date and time.
• if it is : Correct, press OK button then the date and time will
be saved. If you don't press the OK button, the date
and time will be saved automatically after 5 seconds.
• if it is : Incorrect, input correct Time, Date, Year using †…œ
√ buttons or number buttons. Press OK button then
the date and time will be saved. When you need to
change clock setting, you can set up it manually.
■
Now, DVD Recorder is ready for use.
Function for “Plug & Auto Setup” is fixed
already. So if you want to change this fixed
one, you can change it by Presetting the
Stations in OSD “Presetting Channels with
the Manual set up function” menu.
(see page 28)
■
Auto Set up function can be performed by
pressing é (STOP) on the DVD recorder
continuously for 5 seconds or more during
power off with no disc inserted
.
NOTE
RETURNOKMOVE EXIT
Setup
No Disc
12 : 00 01 / JAN / 2005 SAT On
Time Date Auto Clock
Programme
Setup
RETURNOKMOVE EXIT
Timer Record
No Disc
ShowView
√√
Timer Record
√√
ShowView Extended : Off
√√
Programme
Setup
00842C-R125-XEB_18~41 2005.6.29 10:18 PM Page 26

English -
27
System Setup
4
Press the …† buttons to select Auto
Setup, then press the OK or √ button.
The message “Your data will be lost.Press [OK] to
continue, [MENU] to exit.” is displayed.
5
Press the OK button, then press the …†œ
√ buttons to select your “Country”.
• The DVD Recorder searches for the stations
according to a preset preference list corresponding to
the country that you have selected.
6
Press the OK button to continue.
If you want to exit, press the MENU button.
7
Channel scan will be started.
Press the OK button to stop the Auto Setup.
This feature allows you to manually set the DVD
Recorder tuner band to Antenna or Cable, whichever
you connected to the Antenna In jack during initial
setup.
1
With the unit in Stop mode/No Disc mode,
press the MENU button.
2
Press the …† buttons to select Setup, then
press the OK or √ button.
3
Press the …† buttons to select Install, then
press the OK or √ button.
Presetting Channels with
the Auto Setup function
RETURNOKMOVE EXIT
Setup
No Disc
System
√√
Clock Set
√√
Language
√√
Audio
√√
Video
√√
Parental Control
√√
Install
√√
Programme
Setup
RETURNOKMOVE EXIT
Install
No Disc
Auto Setup
√√
Manual Setup
√√
Programme
Setup
RETURNOKMOVE EXIT
Install
No Disc
Auto Setup
√√
Manual Setup
√√
Programme
Setup
Your data will be lost.
Press [OK] to continue, [MENU] to exit.
OK
RETURNOK EXIT
Auto Setup
No Disc
Please wait.
11%
Scanning...
Programme
Setup
Stop
Refer to following table when selecting your
country.
A(Austria) NL(Netherlands) S(Sweden) PL(Poland)
B(Belgium) I(Italy) CH(Swiss) CZ (Czech)
DK(Denmark) N(Norway) TR(Turkey) Others
FIN(Finland) P(Portugal) GR(Greece)
D(Deutschland) E(Spain) HU(Hungary)
A
B
DK
FIN
D
NL
I
N
P
E
S
CH
TR
GR
HU
PL
CZ
Others
County Selection
RETURNOKMOVE EXIT
Install
No Disc
RETURNOKMOVE EXIT
Timer Record
No Disc
ShowView
√√
Timer Record
√√
ShowView Extended : Off
√√
Programme
Setup
00842C-R125-XEB_18~41 2005.6.29 10:18 PM Page 27

28
- English
4
Press the …† buttons to select Manual
Setup, then press the OK or √ button.
5
Press the …† buttons to select a PR
(programme) you wish to edit, delete, or
swap, then press the OK or √ button.
Select Edit, Delete or Swap.
• In case of Edit : you can add or edit PR(programme)
After change PR informations(CH, Name, Decoder,
MFT), select Save, then press the OK button.
- CH : Tune the channel using œ √ buttons.
- Name : Display station name automatically detected in
broadcasting signal. If not detected, you can
edit name by using …†œ √ buttons.
- Decoder : If you set on, you can record scrambled
channels using external decoder box.
Before setting on, refer to connecting
external decoder box in the page 19.
- MFT : You can tune up the channel frequency better
using œ √ buttons.
- System : You can select broadcasting system of the
receivable channel (B/G or L/L’)
• In case of Delete : the channel information of selected
PR(programme) will be removed.
• In case of Swap : You can swap the channel
information of two PR(programme). For example, if you
wish to swap PR2 and PR5, select swap at PR2, then
press the OK or √ button at PR5.
You can add preset channel that Auto Channel Search
missed. And you can delete a channel you wish to
remove. You can programme the order of channels.
1
With the unit in Stop mode/No Disc mode,
press the MENU button.
2
Press the …† buttons to select Setup, then
press the OK or √ button.
3
Press the …† buttons to select Install, then
press the OK or √ button.
Presetting Channels with
the Manual Setup function
System Setup
RETURNOKMOVE EXIT
Setup
No Disc
System
√√
Clock Set
√√
Language
√√
Audio
√√
Video
√√
Parental Control
√√
Install
√√
Programme
Setup
RETURNOKMOVE EXIT
Install
No Disc
Auto Setup
√√
Manual Setup
√√
Programme
Setup
RETURNOKMOVE EXIT
Timer Record
No Disc
ShowView
√√
Timer Record
√√
ShowView Extended : Off
√√
Programme
Setup
MOVE
OK
Manual Setup
Save
RETURNOKMOVE EXIT
Manual Setup
No Disc
01 - - - - - - - - - - / -
√√
02 - - - - - - - - - - / -
√√
03 - - - - - - - - - - / -
√√
04 - - - - - - - - - - / -
√√
05 - - - - - - - - - - / -
√√
06 - - - - - - - - - - / -
√√
07 - - - - - - - - - - / -
√√
PR CH Name Decoder System Edit
RETURNOKMOVE EXIT
Manual Setup
No Disc
01 - - - - - - - - - - / -
√√
02 - - - - - - - - - - / -
√√
03 - - - - - - - - - - / -
√√
04 - - - - - - - - - - / -
√√
05 - - - - - - - - - - / -
√√
06 - - - - - - - - - - / -
√√
07 - - - - - - - - - - / -
√√
PR CH Name Decoder System Edit
Edit
Delete
Swap
PR 01
CH
- - -
Name
- - - -
Decoder
Off
MFT
- - - - - -
System
L/ L’
00842C-R125-XEB_18~41 2005.6.29 10:18 PM Page 28

English -
29
4
Press the …† buttons to select the desired
language option, then press the OK or √
button.
● Audio Language: For the speaker sound.
● Subtitle Language: For the disc subtitles.
● Disc Menu Language: For the disc menu
contained on the disc
● On-Screen Menu Language: For the Player Menu
of your DVD Recorder
● DivX Subtitle: Selecting a supported DivX subtitle
language by region.
5
Press the …† buttons to select the desired
Language, then press the OK or √ button.
If you set the audio, subtitle, disc menu, on-screen
menu and DivX subtitle language in advance, they
will come up automatically every time you watch a
movie.
If the selected language is not recorded on the disc,
the original pre-recorded language is selected.
1
With the unit in Stop mode/No Disc mode,
press the MENU button.
2
Press the …† buttons to select Setup, then
press the OK or √ button.
You can't use the Setup functions during disc
playback.
3
Press the …† buttons to select Language,
then press the OK or √ button.
Language setup menu will be displayed.
Setting up the Language
Options
■
Press the RETURN or œ button to return
to the previous menu.
Press the MENU button to exit the menu.
■
The selected language will only appear if
it is supported on the disc.
■
If the subtitle language is displayed in
broken fonts, change DivX Subtitle to the
appropriate region.
If it still does not work, the format is not
supported.
NOTE
RETURNOKMOVE EXIT
Setup
No Disc
System
√√
Clock Set
√√
Language
√√
Audio
√√
Video
√√
Parental Control
√√
Install
√√
Programme
Setup
RETURNOKMOVE EXIT
Language
No Disc
Audio : Original
√√
Subtitle : Automatic
√√
Disc Menu : English
√√
On-Screen Menu : English
√√
DivX Subtitle : Western
√√
Programme
Setup
RETURNOKMOVE EXIT
Language
No Disc
Audio : Original
√√
Subtitle : Automatic
√√
Disc Menu : English
√√
On-Screen Menu : English
√√
DivX Subtitle : Western
√√
Programme
Setup
Original
English
Français
Deutsch
Español
Italiano
Nederlands
Korean
System Setup
RETURNOKMOVE EXIT
Timer Record
No Disc
ShowView
√√
Timer Record
√√
ShowView Extended : Off
√√
Programme
Setup
Western
Central
Greek
English, Breton, Catalan, Danish, Dutch,
Faroese, Finnish, French, Gaelic, German,
Icelandic, Irish, Italian, Norwegian, Portuguese,
Spanish and Swedish
English, Albanian, Croatian, Czech, Hungarian,
Polish, Romanian, Slovak, Slovene and
Serbian(Latin)
English and modern Greek
00842C-R125-XEB_18~41 2005.6.29 10:18 PM Page 29

30
- English
System Setup
You can select one of four recording modes by pressing
the REC MODE button repeatedly. EP mode is one of four
REC Mode (XP,SP,LP,EP). In EP(Extended Play) mode,
you can set recording time to 6 or 8 hours by this setting.
1
With the unit in Stop mode/No Disc mode,
press the MENU button.
2
Press the …† buttons to select Setup, then
press the OK or √ button.
3
Press the …† buttons to select System,
then press the OK or √ button.
System menu will be displayed.
4
Press the …† buttons to select EP Mode
Time, then press the OK or √ button.
5
Press the …† buttons to select the desired
time, then press the OK or √ button.
EP Mode Time Setting
RETURNOKMOVE EXIT
System
No Disc
EP Mode Time : 6Hours
√√
Chapter Creator : Off
√√
Front Display : Bright
√√
NICAM : On
√√
DivX(R) Registration
√√
Programme
Setup
RETURNOKMOVE EXIT
Setup
No Disc
System
√√
Clock Set
√√
Language
√√
Audio
√√
Video
√√
Parental Control
√√
Install
√√
Programme
Setup
RETURNOKMOVE EXIT
System
No Disc
EP Mode Time : 6Hours
√√
Chapter Creator : Off
√√
Front Display : Bright
√√
NICAM : On
√√
DivX(R) Registration
√√
Programme
Setup
6 Hours
8 Hours
RETURNOKMOVE EXIT
Timer Record
No Disc
ShowView
√√
Timer Record
√√
ShowView Extended : Off
√√
Programme
Setup
A DVD-Video consists of ‘Titles’ and ‘Chapters’.
When you record one programme, it makes one Title.
If you use this function, the Title will be divided into
Chapters.
1
With the unit in Stop mode, press the
MENU button.
2
Press the …† buttons to select Setup, then
press the OK or √ button.
3
Press the …† buttons to select System,
then press the OK or √ button.
System menu will be displayed.
4
Press the …† buttons to select Chapter
Creator, then press the OK or √ button.
Automatic Chapter
Creation
RETURNOKMOVE EXIT
Setup
DVD-RW(V)
System
√√
Clock Set
√√
Language
√√
Audio
√√
Video
√√
Parental Control
√√
Install
√√
Disc Navigation
Disc manager
Programme
Setup
RETURNOKMOVE EXIT
System
DVD-RW(V)
EP Mode Time : 6Hours
√√
Chapter Creator : Off
√√
Front Display : Bright
√√
NICAM : On
√√
DivX(R) Registration
√√
Disc Navigation
Disc manager
Programme
Setup
RETURNOKMOVE EXIT
System
DVD-RW(V)
EP Mode Time : 6Hours
√√
Chapter Creator : Off
√√
Front Display : Bright
√√
NICAM : On
√√
DivX(R) Registration
√√
Disc Navigation
Disc manager
Programme
Setup
Off
On
RETURNOKMOVE EXIT
Disc Navigation
DVD-RW(V)
Title List
√√
Disc Navigation
Disc manager
Programme
Setup
(V mode)
00842C-R125-XEB_18~41 2005.6.29 10:18 PM Page 30

English -
31
System Setup
■
The Automatic Chapter Creation function
does not work during Timer Recording or
when you turn the power off.
■
DVD-R discs cannot be unfinalised.
CAUTION
5
Press the …† buttons to select On or Off,
then press the OK or √ button.
• Off: Select this option when you do not want
(Automatic Chapter Creation).
• On: Select this option when you want (Automatic
Chapter Creation).
6
Press the REC button to start recording.
(See page 43 about how to set recording
speed) The message “Do you want to
create the chapter menu after this
recording?” is displayed.
7
Press the œ √ buttons to select Yes and
press the OK button.
• A new chapter is created according to the selected
recording mode. A chapter will be about 5 minutes long
in XP and SP, and about 15 minutes long in LP and EP
mode.
8
Press the STOP button to stop recording.
9
To display the created chapters, finalise the
disc (see page 86) and then press the DISC
MENU button. The chapter menu will be
displayed.
Do you want to create the chapter menu
after this recording?
Yes
No
CHAPTER
Previous
Top Next
Adjust the brightness of the DVD recorder front panel
display.
1
With the unit in Stop mode/No Disc mode,
press the MENU button.
2
Press the …† buttons to select Setup, then
press the OK or √ button.
3
Press the …† buttons to select System,
then press the OK or √ button.
System menu will be displayed.
Setting up the Front
Display Options
RETURNOKMOVE EXIT
Timer Record
No Disc
ShowView
√√
Timer Record
√√
ShowView Extended : Off
√√
Programme
Setup
RETURNOKMOVE EXIT
Setup
No Disc
System
√√
Clock Set
√√
Language
√√
Audio
√√
Video
√√
Parental Control
√√
Install
√√
Programme
Setup
RETURNOKMOVE EXIT
System
No Disc
EP Mode Time : 6Hours
√√
Chapter Creator : Off
√√
Front Display : Bright
√√
NICAM : On
√√
DivX(R) Registration
√√
Programme
Setup
00842C-R125-XEB_18~41 2005.6.29 10:18 PM Page 31

32
- English
4
Press the …† buttons to select Front
Display, then press the OK or √ button.
5
Press the …† buttons to select the desired
item, then press the OK or √ button.
•Bright : Makes the Front Panel Display bright.
• Dim : Makes the Front Panel Display dim.
• Auto Dim : Makes the Front Panel Display dim
automatically when during power off.
1
With the unit in Stop mode/No Disc mode,
press the MENU button.
2
Press the …† buttons to select Setup, then
press the OK or √ button.
3
Press the …† buttons to select System,
then press the OK or √ button.
System menu will be displayed.
NICAM programmes are divided into 3 types. NICAM
Stereo, NICAM Mono and Bilingual (transmission in
another language). NICAM programmes are always
accompanied by a standard mono sound broadcast and
you can select the desired sound by setting NICAM on or
off.
Setting up NICAM Options
RETURNOKMOVE EXIT
Timer Record
No Disc
ShowView
√√
Timer Record
√√
ShowView Extended : Off
√√
Programme
Setup
RETURNOKMOVE EXIT
Setup
No Disc
System
√√
Clock Set
√√
Language
√√
Audio
√√
Video
√√
Parental Control
√√
Install
√√
Programme
Setup
RETURNOKMOVE EXIT
System
No Disc
EP Mode Time : 6Hours
√√
Chapter Creator : Off
√√
Front Display : Bright
√√
NICAM : On
√√
DivX(R) Registration
√√
Programme
Setup
System Setup
RETURNOKMOVE EXIT
System
No Disc
EP Mode Time : 6Hours
√√
Chapter Creator : Off
√√
Front Display : Bright
√√
NICAM : On
√√
DivX(R) Registration
√√
Programme
Setup
Bright
Dim
Auto Dim
00842C-R125-XEB_18~41 2005.6.29 10:18 PM Page 32

English -
33
4
Press the …† buttons to select NICAM,
then press the OK or √ button.
5
Press the …† buttons to select On or Off,
then press the OK or √ button.
• Off: Only set at this position to record the standard
mono sound during a NICAM broadcast if the stereo
sound is distorted due to inferior reception conditions.
• On: NICAM mode
Please use the Registration code to register this DVD
Recorder with the DivX(R) Video On Demand format.
To more information, visit www.divx.com/vod.
DivX(R) Registration
RETURNOKMOVE EXIT
System
No Disc
EP Mode Time : 6Hours
√√
Chapter Creator : Off
√√
Front Display : Bright
√√
NICAM : On
√√
DivX(R) Registration
√√
Programme
Setup
Off
On
System Setup
You can connect the DVD Recorder to an external amp
or Home Theatre.
Allow you to setup the Audio device and sound status
depending on the audio system in use.
1
With the unit in Stop mode/No Disc mode,
press the MENU button.
2
Press the …† buttons to select Setup, then
press the OK or √ button.
3
Press the …† buttons to select Audio, then
press the OK or √ button.
Audio setup menu will be displayed.
4
Press the …† buttons to select the desired
audio option, then press the OK or √
button.
Setting up the Audio
Options
RETURNOKMOVE EXIT
Setup
No Disc
System
√√
Clock Set
√√
Language
√√
Audio
√√
Video
√√
Parental Control
√√
Install
√√
Programme
Setup
RETURNOKMOVE EXIT
Timer Record
No Disc
ShowView
√√
Timer Record
√√
ShowView Extended : Off
√√
Programme
Setup
RETURNOKMOVE EXIT
Audio
No Disc
Digital Output : PCM
√√
DTS : Off
√√
Dynamic Compression : On
√√
Programme
Setup
RETURNOKMOVE EXIT
Audio
No Disc
Digital Output : PCM
√√
DTS : Off
√√
Dynamic Compression : On
√√
Programme
Setup
PCM
Bitstream
00842C-R125-XEB_18~41 2005.6.29 10:18 PM Page 33

34
- English
5
Press the …† buttons to select the desired
item, then press the OK or √ button.
NOTE
Audio Options
Digital Output
1. PCM : Select this when you have no equipment that
can decode Dolby Digital (or MPEG-2) signal.
When you play Dolby Digital (or MPEG-2) sound
track, the digital output are converted to PCM
Stereo.
2. Bitstream : Output Dolby Digital (or MPEG-2) audio as
bitstream. Select this when your AV
receiver or AV amplifier have Dolby Digital
(or MPEG-2) Decoder.
■
Digital output setting is equally applied to
both Dolby Digital and MPEG-2 audio.
LPCM sound track is always outputted as
PCM. It has no relation with Digital Output
setting.
■
Be sure to select the correct Digital
Output or you will hear no sound or loud
noise.
NOTE
DTS
1. Off : Doesn’t output DTS signal.
Select this when your AV receiver or AV
amplifier does not have DTS decoder.
2. On : Outputs DTS Bitstream via digital output when you
play DTS track.
Select this only when your AV receiver (or AV
amplifier) have DTS decoder.
Dynamic Compression
This is only active when a Dolby Digital signal is
detected.
1. Off : You can enjoy the movie with the standard
Dynamic Range.
2. On :When Movie soundtracks are played at low
volume or from smaller speakers, the system
can apply appropriate compression to make
low-level content more intelligible and prevent
dramatic passages from getting too loud.
■
When DTS soundtrack is played, sound
does not output from AV Audio Output.
NOTE
■
Press the RETURN or œ button to return
to the previous menu.
Press the MENU button to exit the menu.
System Setup
You can enjoy high quality image through RGB or
Component video connections.
1
With the unit in Stop mode/No Disc mode,
press the MENU button.
2
Press the …† buttons to select Setup, then
press the OK or √ button.
3
Press the …† buttons to select Video, then
press the OK or √ button.
Video setup menu will be displayed.
Setting up Video Output
Options
RETURNOKMOVE EXIT
Setup
No Disc
System
√√
Clock Set
√√
Language
√√
Audio
√√
Video
√√
Parental Control
√√
Install
√√
Programme
Setup
RETURNOKMOVE EXIT
Timer Record
No Disc
ShowView
√√
Timer Record
√√
ShowView Extended : Off
√√
Programme
Setup
RETURNOKMOVE EXIT
Video
No Disc
TV Aspect : 4:3 Letter Box
√√
3D Noise Reduction : Off
√√
HDMI/DVI Resolution : 576p
√√
Video Output
:
Component
√√
Programme
Setup
00842C-R125-XEB_18~41 2005.6.29 10:18 PM Page 34

English -
35
System Setup
4
Press the …† buttons to select Video
Output, then press the OK or √ button.
5
Press the …† buttons to select the desired
item, then press the OK or √ button.
In Component mode, you can set video output to
Progressive(P.SCAN) or Interlace, see page 36.
When the HDMI cable is not connected, available video
output jacks are as follow.
Available Video Output Jack
RETURNOKMOVE EXIT
Video
No Disc
TV Aspect : 4:3 Letter Box
√√
3D Noise Reduction : Off
√√
HDMI/DVI Resolution : 576p
√√
Video Output
:
Component
√√
Programme
Setup
Component
RGB
Component Select this when the Recorder is connected
to a TV with Component jack.
RGB Select this to output RGB signals.
Component Output
(Y, Pb, Pr)
AV1 Scart
R, G, B
Composite
X
O
X
O
O
O
O
(TV in progressive mode)
X
X
X
X
X
O
X
O
O
O
O
AV2 Scart
Composite Video out
S-Video out
Composite
Setting mode
RGB Mode
Output jack
P.SCAN off mode (Interlace mode)
P.SCAN on mode
Component mode
If the TV supports Progressive Scan, press the P.SCAN
button on the front of the DVD Recorder to enjoy.
1
With the unit in Stop mode, press the
P.SCAN button on the front of the DVD
Recorder.
The message “Press [Yes] to confirm Progressive scan
mode. Otherwise press [No]” will appear. Press the œ √
buttons to select Yes, and then press the OK button.
2
The message “Please set your TV to
Progressive input. To deactivate, press
[STOP] key.” will appear. Press the OK button.
3
The message “Video Output Mode
Progressive Scan” will appear.
Setting up the Progressive
scan
■
When the HDMI cable is connected, this
screen is not displayed.
■
Progressive setting is only available when
the DVD recorder is in stop mode.
■
Progressive setting is only available when
the Video Out is set to Component.
■
If the P.SCAN button on the DVD
recorder’s front panel is pressed during
playback, the message “This function is
possible only on stop mode” appears on
the screen.
NOTE
Press [Yes] to confirm Progressive scan mode.
Otherwise press [No]
Yes No
Please set your TV to Progressive input.
To deactivate, press [STOP] key.
OK
Video Output Mode
Progressive Scan
■
When the HDMI cable is connected, other
A/V output does not operate.
NOTE
00842C-R125-XEB_18~41 2005.6.29 10:18 PM Page 35

This function allows you to setup the TV screen settings.
1
With the unit in Stop mode/No Disc mode,
press the MENU button.
2
Press the …† buttons to select Setup, then
press the OK or √ button.
3
Press the …† buttons to select Video, then
press the OK or √ button.
Video setup menu will be displayed.
4
Press the …† buttons to select the desired
video option, then press the OK or √ button.
5
Press the …† buttons to select the desired
item, then press the OK or √ button.
Setting up the
Display(Video) Options
■
Press the RETURN or œ button to return
to the previous menu. Press the MENU
button to exit the menu.
NOTE
RETURNOKMOVE EXIT
Setup
No Disc
System
√√
Clock Set
√√
Language
√√
Audio
√√
Video
√√
Parental Control
√√
Install
√√
Programme
Setup
RETURNOKMOVE EXIT
Timer Record
No Disc
ShowView
√√
Timer Record
√√
ShowView Extended : Off
√√
Programme
Setup
RETURNOKMOVE EXIT
Video
No Disc
TV Aspect : 4:3 Letter Box
√√
3D Noise Reduction : Off
√√
HDMI/DVI Resolution : 576p
√√
Video Output
:
Component
√√
Programme
Setup
RETURNOKMOVE EXIT
Video
No Disc
TV Aspect : 4:3 Letter Box
√√
3D Noise Reduction : Off
√√
HDMI/DVI Resolution : 576p
√√
Video Output
:
Component
√√
Programme
Setup
4:3 Letter Box
4:3 Pan-Scan
16:9 Wide
36
- English
System Setup
1
With the unit in Stop mode, press the
P.SCAN button on the front of the DVD
Recorder.
The message “Press [Yes] to confirm Interlace scan
mode. Otherwise press [No]” will appear.
Press the œ √ buttons to select Yes, and then press
the OK button.
2
The message “Please set your TV to
Interlace input. To deactivate, press [STOP]
key.” will appear. Press the OK button.
3
The message “Video Output Mode Interlace
Scan” will appear.
Canceling the Progressive
scan
■
Do not press the P.SCAN button if you
are using a TV that does not support
Progressive mode. Nothing will be
displayed on the screen if pressed.
■
If you press the P.SCAN button by
mistake when your TV does not support
Progressive mode, you need to release
the Progressive mode. To release the
Progressive mode, press the P.SCAN
button on the front panel 3 times.
The screen will recover after the PSO
LED on the front panel display turns off.
NOTE
Press [Yes] to confirm Interlace scan mode.
Otherwise press [No]
Yes No
Please set your TV to Interlace input,
To deactivate, press [STOP] key.
OK
Video Output Mode
Interlace Scan
00842C-R125-XEB_18~41 2005.6.29 10:18 PM Page 36

English -
37
Display(Video) Options
This function depends on disc type. It may not work for
some disc types.
TV Aspect
Depending on the type of television you have, you may
want to adjust the screen setting. (aspect ratio)
• 4:3 Letter Box : Select when you want to see the total
16:9 ratio screen DVD
supplies, even though you have a TV
with a 4:3 ratio screen.
Black bars will appear at the top and
bottom of the screen.
• 4:3 Pan - Scan : Select this for conventional size TV
when you want to see the central
portion of the 16:9 screen. (Extreme left
and right side of movie picture will be
cut off.)
• 16:9 Wide : You can view the full 16:9 picture on your
widescreen TV.
3D Noise Reduction (motion adaptive noise
reduction)
•
On : Provides a clear picture through noise
reduction (for recording).
•
Off : Normal
HDMI/DVI Resolution
This setting is used when the DVD recorder is connected
by HDMI or DVI with Display devices (TV, projector, etc).
•
576p : 720 x 576
•
720p : 1280 x 720
•
1080i : 1920 x 1080
Output selection
• Connect the DVD-Recorder to your TV via HDMI.
Set your TV's input to HDMI.
• Press the P.SCAN button while the unit is in Stop mode
to select the HDMI output resolution as follows:
576p
→
720p
→
1080i.
RETURNOKMOVE EXIT
Video
No Disc
TV Aspect : 4:3 Letter Box
√√
3D Noise Reduction : Off
√√
HDMI/DVI Resolution : 576p
√√
Video Output
:
Component
√√
Programme
Setup
4:3 Letter Box
4:3 Pan-Scan
16:9 Wide
RETURNOKMOVE EXIT
Video
No Disc
TV Aspect : 4:3 Letter Box
√√
3D Noise Reduction : Off
√√
HDMI/DVI Resolution : 576p
√√
Video Output
:
Component
√√
Programme
Setup
Off
On
System Setup
RETURNOKMOVE EXIT
Video
No Disc
TV Aspect : 4:3 Letter Box
√√
3D Noise Reduction : Off
√√
HDMI/DVI Resolution : 576p
√√
Video Output
:
Component
√√
Programme
Setup
■
Progressive scan automatically activates
when HDMI is connected.
■
There will be no HDMI video and audio
outputs unless progressive scan function
is activated.
■
Consult your TV User’s Manual to find out
if your TV supports Progressive Scan.
If Progressive Scan is supported, follow
the TV User’s Manual regarding
Progressive Scan settings in the TV’s
menu system.
■
If Video Output is set incorrectly, the
screen may be blocked.
■
The resolutions available for HDMI/DVI
output depend on the connected TV or
projector. For details, see the user’s
manual of your TV or projector.
■
When the resolution is changed it may
take a few seconds for a normal image to
appear.
■
If you set the HDMI output resolution
720p or 1080i, HDMI output provides
better picture quality.
■
DivX playback screen output can only be
done in 576p.
NOTE
576p
720p
1080i
■
Menu screen will zoom out to 2/3 at
1080i.
NOTE
00842C-R125-XEB_18~41 2005.6.29 10:18 PM Page 37

38
- English
5
Press the OK or √ button to select
Password.
6
Press the …† buttons to select On or Off,
then press the OK or √ button.
The Parental Control function works in conjunction with
DVDs that have been assigned a rating which helps
you control the types of DVDs that your family watches.
There are up to 8 rating levels on a disc.
1
With the unit in Stop mode/No Disc mode,
press the MENU button.
2
Press the …† buttons to select Setup, then
press the OK or √ button.
3
Press the …† buttons to select Parental
Control, then press the OK or √ button.
4
Enter the 4-digit password using the 0 to 9
buttons on the remote control.
The ‘Confirm the password.’ message will be displayed.
Enter your password again.
Setting up the Parental
Control
■
Press the RETURN or œ button to return
to the previous menu. Press the MENU
button to exit the menu.
NOTE
RETURNOKMOVE EXIT
Setup
No Disc
System
√√
Clock Set
√√
Language
√√
Audio
√√
Video
√√
Parental Control
√√
Install
√√
Programme
Setup
RETURNOKMOVE EXIT
Timer Record
No Disc
ShowView
√√
Timer Record
√√
ShowView Extended : Off
√√
Programme
Setup
RETURN
OK
NUMBER
EXIT
Parental Control
No Disc
Create the password
RETURNOK
NUMBER
EXIT
Parental Control
No Disc
Confirm the password
Programme
Setup
Programme
Setup
RETURNOKMOVE EXIT
Parental Control
No Disc
Password :Off
√√
Off
On
Programme
Setup
If you forgot your password
1
Remove the disc.
2
Press and hold (FF) on the front panel
for 5 seconds or more.
System Setup
00842C-R125-XEB_18~41 2005.6.29 10:18 PM Page 38

English -
39
1
Press the …† buttons to select Change
Password.
2
Press the OK or √ button.
The 'Enter the password.' message will be displayed.
3
Enter the 4-digit password using the 0 to 9
buttons on the remote control.
The ‘Confirm the password.’ message will be displayed.
Enter your password again.
1
Press the …† buttons to select Rating
Level.
2
Press the OK or √ button.
The rating level will be displayed.
3
Press the …† buttons to select Rating
Level you want, then press the OK or √
button.
For example, if you select up to Level 6, discs that
contain Level 7, 8 will not play. A larger number
indicates that the programme is intended for adult use
only.
About the Rating Level About the Change Password
RETURNOK
NUMBER
EXIT
Change Password
No Disc
Enter the password
RETURNOK
NUMBER
EXIT
Change Password
No Disc
Confirm the password
***
RETURNOKMOVE EXIT
Parental Control
No Disc
Password : On
√√
Rating Level : Level 1 Kids
√√
Change Password
√√
RETURNOKMOVE EXIT
Parental Control
No Disc
Password :On
√√
Rating Level : Level 1 Kids
√√
Change Password
√√
Level 8 Adults
Level 7
Level 6
Level 5
Level 4
Level 3
Level 2
Level 1 Kids
Programme
Setup
Programme
Setup
RETURNOKMOVE EXIT
Parental Control
No Disc
Password : On
√√
Rating Level : Level 1 Kids
√√
Change Password
√√
Programme
Setup
Programme
Setup
Programme
Setup
■
See page 38 if you forgot your password.
NOTE
System Setup
00842C-R125-XEB_18~41 2005.6.29 10:18 PM Page 39

40
- English
This DVD recorder can record on various types of
discs. Before recording, read the following instructions
and select the disc type according to your preference.
Recordable discs
This recorder can record on the following discs.
DVD-RAM DVD-RW DVD-R
● DVD-RWs and DVD-RAMs are rewritable.
● DVD-Rs are non-rewritable
Compatibility between Samsung and Other
Company’s Recorder
Recording
Before Recording
Before Recording ...........................................40
Recording the current TV programme
you are watching............................................42
Recording from external equipment
you are watching............................................44
Copying from a Camcorder............................45
Making a One Touch Recording (OTR)..........46
Making a Timer Recording.............................47
Flexible Recording
(for Timer recording only)...............................48
Editing the Scheduled Record List.................48
Deleting the Scheduled Record List...............49
Using the ShowView Feature.........................50
ShowView Extended ......................................51
Recording the Standard Timer List ................51
This section shows various DVD recording
methods.
Disc Types Recording Recording Finalising Additional Recording in
format Device Samsung Recorder
DVD-RAM VR Mode
Samsung X Recordable
Other Company X Recordable
Samsung
finalised Not recordable
VR Mode
not finalised Recordable
Other Company
finalised Not recordable
DVD-RW
not finalised Recordable
Samsung
finalised Not recordable
V Mode
not finalised Recordable
Other Company
finalised Not recordable
not finalised Not recordable
Samsung
finalised Not recordable
DVD-R V Mode
not finalised Recordable
Other Company
finalised Not recordable
not finalised Not recordable
■
Finalise
- This closes the DVD-R/RW so no
additional recording can be done.
■
Unfinalise
- This allows additional recording on a
DVD-RW disc originally recorded on the
DVD Recorder.
- A DVD-RW disc that has been recorded
by DAO(Disc At Once) in a PC cannot
be unfinalised.
- A DVD-RW disc that has been recorded
in Video Mode of a different maker’s
recorder cannot be unfinalised.
- A DVD-R disc cannot be unfinalised.
NOTE
Recording
00842C-R125-XEB_18~41 2005.6.29 10:18 PM Page 40

English -
41
Unrecordable video
Video with copy protection cannot be recorded on this
DVD Recorder.
When the DVD Recorder receives a copy guard signal
while recording, recording stops and the following
message appears on the screen.
Concerning Copy Control Signals
TV broadcasts that contain copy control signals may
have one of the following three signal types, Copy-Free,
Copy-Once and Copy-Never. If you want to record a
copy-once type programme, use DVD-RW with CPRM
in VR Mode and DVD-RAM.
Once “Copy Once” has been recorded, recording
cannot be done anymore.
- Content Protection for Recordable Media (CPRM)
CPRM is a mechanism that ties a recording to the
media on which it is recorded. It is supported by some
DVD recorders, but not by many DVD players. Each
blank recordable DVD has a unique 64-bit media ID
etched in the BCA. When protected content is recorded
onto the disc, it can be encrypted with a 56-bit C2
(Cryptomeria) cipher derived from the media ID.
During playback, the ID is read from the BCA and used
to generate a key to decrypt the contents of the disc.
If the contents of the disc are copied to other media, the
ID will be absent or wrong and the data will not be
decryptable.
Recording Formats
Since available functions differ depending on the disc
type, select a disc that best fits your preferences;
When you insert an unused disc, the following message
appears
DVD-RAM: Use after formatting the disc.
DVD-RW: When a blank disc is first inserted, the
message “Do you want to initialize this disc?”
will appear.
When Yes is selected, the disc will be
formatted in VR Mode.
If you want to format in either VR Mode or
Video Mode, refer to Formatting a Disc on
page 84.
DVD-R:Formatting DVD is unnecessary and only Video
Mode Recording is supported
DVD-RW(Video mode)/-R
● Chapters will be created automatically when you
finalise recording on DVD-R / DVD-RW discs in Video
mode. The chapter’s length (interval between
chapters) varies according to the recording mode.
● Simple editing (erasing titles/changing title name)
DVD-RW(VR mode)/-RAM
● This mode allows multiple editing functions (such as
deletion of the whole title, partial deletion of a title,
etc.)
● Various editing options using a created Playlist
Recording Mode
Select one of four recording modes by pressing the REC
MODE button repeatedly while the DVD recorder is in Stop
mode for the desired recording time and picture quality.
In general, picture quality improves as the recording time
decreases. In FR mode, the most suitable record mode is
adjusted automatically, according to remaining time on the
disc and length of the timer recording.
This function is selected only one mode in XP, SP, LP and
EP modes and you can use this mode for timer recording.
Media
Copy-Free Copy-Once Copy-Never
DVD-RW(Ver.1.1)
O
- -
DVD-RW(Ver.1.1)
with CPRM
VR mode
OO
* -
Video mode
O
-
DVD-R
O
-
DVD-RAM(Ver.2.0)
OO
* -
Unformatted Disc
Do you want to format this disc?
Yes No
Uninitialized Disc
Do you want to initialize this disc?
Yes No
Signal type
You cannot record copy protected movie.
Mode Characteristic Recording Times
Data Rates
XP Select when the Approx. 1 hour
(high quality mode) video quality is
about 8 Mbps
important.
SP Select to record in Approx. 2 hours
(standard quality mode)
standard quality.
about 4 Mbps
LP
Select when a long Approx. 4 hours
(long recording mode)
recording time is
about 2 Mbps
required.
EP
Select when a longer Approx. 6 hours/
(extended mode)
recording time is
about 1.2 Mbps
required. Approx. 8 hours
/
about 0.8 Mbps
FR for timer recording only
Approx 60 to 480 Min
(Flexible Recording) see page 48.
Approx 0.8 to 8Mbps
Recording
RETURNOKMOVE EXIT
Disc Manager
DVD-RW(VR)
Disc Name :
√√
Disc Protection : Not Protected
√√
Disc Format : DVD-VR
√√
Disc Finalize
√√
Delete All Title Lists
√√
Disc Navigation
Playlist
Disc manager
Programme
Setup
Choose the recording format for DVD-RW.
DVD-VR DVD-V
00842C-R125-XEB_18~41 2005.6.29 10:18 PM Page 41

Recording
42
- English
Recording the current TV
programme you are
watching
Check that the disc has enough available space for the
recording. Adjust the recording mode.
1
Press the OPEN/CLOSE button and place
a recordable disc on the disc tray.
2
Press the OPEN/CLOSE button to close
the disc tray.
Wait until “LOAD” disappears from the front panel
display.
If an unused DVD-RAM disc is used, you will be
prompted to format first. Make your selection using
the œ √ buttons , then press OK button.
(See page 41.)
If an unused DVD-RW disc is used, whether to
initialize or not will be asked first. Make your selection,
then press the OK button. (See page 41.)
About INFO Key
The INFO function allows you to view the current status
and progress of playback and recording. Depending on
the disc type and status, the displayed screen may be
different.
Checking the available disc
space (Disc Information)
When recording on an used disc, make sure that there
is enough disc space for recording. With DVD-RWs or
DVD-RAMs, you can free up disc space by erasing
titles.
● Press the INFO button.
The display window of disc information appears.
Items in the display differ depending on the disc type
or recording format.
1.
Disc Type
2.
Current information display status
3.
Disc Name
4.
Total Titles : Total number of titles
5.
Total Playlist : Total number of Playlists
6.
Recordable Time : The longest continuous
recording time in each of the recording
modes(approximately)
7.
Date : Current date and time
Before you start
Unformatted Disc
Do you want to format this disc?
Yes No
Uninitialized Disc
Do you want to initialize this disc?
Yes No
DVD-RAM(VR) Disc Info
Disc Name Disc
Total Title 15
Total Playlist 2
Recordable Time 02:12 SP
Protection Not Protected
Screen Recording : PR 1 [SP]
01 JAN 2005 SAT 12:00
12
3
4
5
6
7
00842C-R125-XEB_42~51 2005.6.29 10:20 PM Page 42

English -
43
Recording
To stop recording
Press the STOP ( ) button to stop or finish a
recording in progress.
● When using DVD-RAM/DVD-RW/DVD-R discs, the
message ‘Updating the information of disc.
Please wait for a moment’ is displayed.
3
Press the PROG ( / ) or number
(~)buttons to select the current
programme you want to record.
4
Press the REC MODE button repeatedly,
(or press the REC MODE button, then
press the …† button) to select the
recording speed(quality).
➞
SP ➞ LP ➞ EP ➞ XP
5
Press the REC button.
Information concerning the channel is displayed on
the screen, then recording begins.
Icon( ) is displayed on the front panel.
To view the current status of the disc and progress of
recording : Press the INFO button, the information
about the disc will appear.
Press the INFO button once again to view
information about the recording.
Record Mode
SP (02:12)
Recording : PR 1 [SP]
■
You can not change the recording mode
and the PROG while recording.
■
Recording will stop automatically if there
is no free space left for recording.
■
Up to 99 titles can be recorded onto a
disc.
■
Recording will stop automatically if a copy
protected image is selected.
■
DVD-RAM/DVD-RW discs must be
formatted before starting to record.
Most new discs are sold unformatted.
■
Do not use DVD-R authoring discs with
this DVD recorder.
NOTE
DVD-RAM(VR) Recording Info
Name 01/JAN/2005 12:00 PR
1
Recording Title 15
Created Time 01/JAN/2005 12:00
Recording Time 00:02:05
01 JAN 2005 SAT 12:00
DVD-RAM(VR) Disc Info
Disc Name
Total Title 15
Total Playlist 2
Recordable Time 02:12 SP
Protection Not Protected
Screen Recording : PR 1 [SP]
01 JAN 2005 SAT 12:00
00842C-R125-XEB_42~51 2005.6.29 10:20 PM Page 43

44
- English
Recording
5
Press the REC button.
To pause recording
Press the button to pause a recording in progress.
● Press the button again to resume
recording.
● You can switch channels by pressing the PROG
(/)buttons while recording pauses.
To stop recording
Press the STOP ( ) button to stop or finish a
recording in progress.
● When using DVD-RAM/DVD-RW/DVD-R discs, the
message ‘Updating the information of disc.
Please wait for a moment’ is displayed.
Recording from external
equipment you are
watching
Check that the disc has enough available space for the
recording. Adjust the recording mode.
1
Press the OPEN/CLOSE button, place a
recordable disc on the disc tray.
2
Press the OPEN/CLOSE button to close
the disc tray.
Wait until “LOAD” disappears from the front panel
display.
If an unused DVD-RAM disc is used, whether to
format or not will be asked first. (See page 41)
If an unused DVD-RW disc is used, whether to
initialize or not will be asked first. (See page 41)
3
Press the INPUT button to select the input
source according to the connection you
made.
The front panel display changes in the following
sequence:
➞ PR Number ➞ AV1 ➞ AV2 ➞ AV3 ➞ DV
If you connect a digital camcorder, press the
INPUT button to select DV. (See page 45)
4
Press the REC MODE button repeatedly,
(or press the REC MODE button, then
press the …† button) to select the
recording speed(quality).
➞ SP ➞ LP ➞ EP ➞ XP
Before you start
Record Mode
SP (02:12)
■
You can not change the recording mode
and input source while recording or
Pause.
■
Recording will stop automatically if
there is no free space left for recording.
■
Up to 99 titles can be recorded onto a
disc.
■
Recording will stop automatically if a
copy protected image is selected.
■
DVD-RAM/DVD-RW discs must be
formatted before starting to record.
Most new discs are sold unformatted.
■
Do not use DVD-R authoring discs with
this DVD recorder.
NOTE
00842C-R125-XEB_42~51 2005.6.29 10:20 PM Page 44

English -
45
5
Select the Play icon on the upper part of the
screen to playback the camcorder and find
the starting position to copy.
You can press the PLAY button of the remote control
to play the camcorder.
6
To start recording, use the œ √ to select
( ● ) icon in the top side of the screen, then
press the OK button.
You can press the REC button of the remote control
to start recording. To display playback related icons
on the screen, press any direction button on the
remote control.
To stop recording
Press the STOP ( ) button to stop or finish a
recording in progress.
●
When using DVD-RAM/DVD-RW/DVD-R discs, the
message ‘Updating the information of disc. Please
wait for a moment’ is displayed
Copying from a
Camcorder
You may control the Camcorder using the IEEE1394
(DV) interface.
Check that the disc has enough available space for
the recording. Adjust the recording mode.
1
Press the OPEN/CLOSE button, place a
recordable disc on the disc tray.
2
Press the OPEN/CLOSE button to close
the disc tray.
Wait until “LOAD” disappears from the front panel
display.
If an unused DVD-RAM disc is used, whether to
format or not will be asked first. (See page 41.)
If an unused DVD-RW disc is used, whether to
initialize or not will be asked first. (See page 41.)
3
Press the REC MODE button repeatedly,
(or Press the REC MODE button, then
press the …† button) to select the
recording speed(quality).
➞
SP ➞ LP ➞ EP ➞ XP
4
Press the INPUT button to select DV.
If the input is set to DV, a playback/record menu that
enables camcorder control appears on the top of the
screen.
Before you start
Record Mode
SP (02:12)
■
You can not change the recording mode and
input source while recording.
■
Recording will stop automatically if there is
no free space left for recording.
■
Up to 99 titles can be recorded onto a disc.
■
Recording will stop automatically if a copy
protected image is selected.
■
DVD-RAM/DVD-RW discs must be
formatted before starting to record. Most
new discs are sold unformatted.
■
Do not use DVD-R authoring discs with this
DVD recorder.
NOTE
Recording
DV
The DV device is connected.
RETURNOKMOVE
00842C-R125-XEB_42~51 2005.6.29 10:20 PM Page 45

46
- English
Making a One Touch
Recording (OTR)
You can set the DVD Recorder to record in 30-minute
increments by pressing the REC button.
1
If you want to record a TV channel, press
the PROG ( / ) or number buttons to
select a desired channel.
If you want to record through a
connected external component, press the
INPUT button to select an appropriate
external input (AV1, AV2, AV3 or DV).
● TV PROGRAMME: 1 to 99
2
Press the REC button to start recording.
3
Press the REC button repeatedly to adjust
the desired recording time.
➞ 0:30 ➞ 1:00 ➞ ... 8:00 ➞ Off
To view the current status of the disc and progress
of recording : Press the INFO button, and
information about the disc will appear.
Press the INFO button once again.
Then you can check the information about the title
being recorded.
30 seconds before the recording is done, a
message asking whether you want the recorder to
power off when the recording is done, will appear
on your screen.
To stop recording
Press the STOP ( ) button. The message “Do you
want to stop recording?” is displayed.
● Press the œ √ buttons to select Yes, then press the
OK button.
● Or press the STOP button again.
OTR Mode
0:30
■
The timer counter decreases by the
minute from 8:00 to 0:00, then the DVD
Recorder stops recording.
NOTE
Do you want to stop recording?
Yes No
OTR is going to be ended soon
and power will be turned off automatically.
Press [OK] button to continue to use DVD-Recorder.
OK
DVD-RAM(VR) Recording Info
Name 01/JAN/2005 12:00 PR
1
Recording Title 15
Created Time 01/JAN/2005 12:00
Recording Time 00:02:05
01 JAN 2005 SAT 12:00
DVD-RAM(VR) Disc Info
Disc Name
Total Title 15
Total Playlist 2
Recordable Time 02:12 SP
Protection Not Protected
Screen Recording : PR 1 [SP]
01 JAN 2005 SAT 12:00
Recording
00842C-R125-XEB_42~51 2005.6.29 10:20 PM Page 46

English -
47
• Source : The video input source (“AV1”, “AV2”,
“AV3”) or the broadcasting
channel you want to make a timer
recording from.
• Date : Timer Recording allows setting the
recording time within one month period. Set the
recording day. (day/month)
01/JAN(SAT) Every Day
02/JAN(SUN) MON-SAT
03/JAN(MON) MON-FRI
30/JAN(SUN) Every SAT
31/JAN(MON) Every SUN
• Start/End Time : Start and end time of the timer
recording.
• Mode (Recording Mode) :
- FR (Flexible Recording) : In FR mode, the most
suitable record mode is adjusted automatically,
according to remaining time on the disc and length
of the timer recording. This function is selected
only one mode in XP, SP, LP and EP modes.
- XP (high quality) : Select when video quality is
important. (Approx. 1 hour)
- SP (standard quality) : Select to record in standard
quality. (Approx. 2 hours)
- LP (low quality) : Select when a long recording
time is required.(Approx. 4 hours)
- EP (extended) : Select when a longer recording
time is required. (Approx.6 hours or 8 hours)
• V/P : VPS(Video Programme System) or
PDC(Programme Delivery Control) function.
- If you set this function on, you can control the
starting and ending time of recording by special
signal included in the broadcasting signal.
If a TV programme is shortened or starts earlier or
later than scheduled, this function synchronizes
the starting and ending time of recording with the
actual broadcasting time automatically.
- Set up the start-time EXACTLY according to the
published TV schedule. Otherwise the timer
recording will not operates.
- Do not select PDC or VPS unless you are sure
the programme you wish to record is broadcast
with PDC or VPS.
1. Check the antenna cable is connected.
2. Check the remaining time of the disc.
3. Check the date and time are correct.
Make sure the Clock (Setup-Clock Set) must be set
before you proceed with a timer recording.
(See page 26)
1
With the unit in Stop mode, press the
TIMER button.
Using the MENU button.
● With the unit in Stop mode, press the MENU
button.
● Press the …† buttons to select Programme, then
press the OK or √ button.
● Press the …† buttons to select Timer Record.
2
Press the OK or √ button.
• The Timer Recording screen is displayed.
3
Set timer recording option.
• Fill the input items using the arrow buttons and
number buttons.
œ √ : Moves to the previous/next item,
…†, Number buttons : Sets a value.
Making a Timer Recording
Before you start
RETURNOKMOVE EXIT
Scheduled Record List
DVD-RAM(VR)
No. Source Date Start End Mode V/P Edit
01
---- -- --- --:-- --:-- -- --
√√
Recordable Time 02:12 SP
No. 01
Source Date Start End Mode V/P
PR 01 01/JAN(SAT) 12 : 00 14 : 00 SP Off
Recordable Time 02:12 SP
■
When you are recording at EP mode on a
DVD-RW(V)/-R disc, it may not record the
full 6 or 8 hours because the DVD
recorder uses the VBR(Variable Bit Rate)
ENCODING system. For example, if you
record a program with a lot of action, it
uses a higher bit rate which in turn
consumes more disc memory.
NOTE
RETURNOKMOVE EXIT
Timer Record
DVD-RAM(VR)
ShowView
√√
Timer Record
√√
ShowView Extended : Off
√√
Disc Navigation
Playlist
Disc manager
Programme
Setup
Recording
00842C-R125-XEB_42~51 2005.6.29 10:20 PM Page 47

48
- English
Recording
4
Press the OK button.
● will appear on the front panel. It means that a
timer recording is registered.
If the timer settings overlap
The programmes are recorded in order of priority.
If timer recording is set for the first programme
and then again for the second programme and
both programmes overlap, the following message
will appear on the screen: “This setting is identical
with 1”The message shows that the first
programme has priority. After recording of the first
program is complete, the second program starts
being recorded.
To exit without saving the current setting
Press the MENU button.
To return to the previous menu
Press the RETURN button if you don’t want to set
a timer recording.
5
Turn the power off to finish the Timer
Recording setting. Timer Recording will
not work when the power is on.
● will blink if disc is not inserted.
■
The timer recording time may differ from
the set time depending on disc status
and overall timer recording status (for
example, recording times overlapping, or
when the previous recording ends within
2 minutes before the start time of the next
recording.)
■
You can make the Timer Recording up to
12 programmes.
NOTE
Editing the Scheduled
Record List
Follow these directions to edit the scheduled record list.
1
With the unit in Stop mode, press the
TIMER button.
Using the MENU button.
● With the unit in Stop mode, press the MENU
button.
● Press the …† buttons to select Programme, then
press the OK or √ button.
● Press the …† buttons to select Timer Record.
2
Press the OK or √ button.
3
Press the RETURN button to close the
Timer Recording screen.
4
Press the …† buttons to select the number
of the timer recording you want to edit, then
press the OK or √ button.
● The Edit and Delete items are displayed.
Flexible Recording
(for Timer recording only)
In FR mode, the most suitable record mode is adjusted
automatically, according to remaining time on the disc and
length of the timer recording. This function is selected only
one mode in XP, SP, LP and EP modes and you can use
this mode for timer recording.
The FR mode recording setup is the same as Timer
Recording. When setting the mode in step 3, set FR
Mode.
RETURNOKMOVE EXIT
Timer Record
DVD-RAM(VR)
ShowView
√√
Timer Record
√√
ShowView Extended : Off
√√
Disc Navigation
Playlist
Disc manager
Programme
Setup
RETURNOKMOVE EXIT
Scheduled Record List
DVD-RAM(VR)
No. Source Date Start End Mode V/P Edit
01 PR 01 01 JAN 12 : 00 14 : 00 SP Off
√√
02
---- -- --- --:-- --:-- -- --
√√
Recordable Time 02:12 SP
Edit
Delete
RETURNOKMOVE EXIT
Scheduled Record List
DVD-RAM(VR)
No. Source Date Start End Mode V/P Edit
01
---- -- --- --:-- --:-- -- --
√√
Recordable Time 02:12 SP
No. 01
Source Date Start End Mode V/P
PR 01 01/JAN(SAT) 12 : 00 14 : 00 SP Off
Recordable Time 02:12 SP
00842C-R125-XEB_42~51 2005.6.29 10:20 PM Page 48

English -
49
3
Press the RETURN button to close the
Timer Recording screen.
4
Press the …† buttons to select the number
of the timer recording you want to delete,
then press the OK or √ button.
●
The Edit and Delete items are displayed.
5
Press the …† buttons to select Delete,
then press the OK or √ button.
●
You will be prompted with the delete confirm
message such as ‘Do you want to delete
No.01?’.
6
Press the
œ √
buttons to select Yes, then
press the OK button.
●
The selected entry will be deleted from the list.
7
Press the MENU button after finishing the
operation. The menu screen will disappear.
Deleting the Scheduled
Record List
Follow these directions to delete an entry from the
scheduled record list.
1
With the unit in Stop mode, press the
TIMER button.
Using the MENU button.
● With the unit in Stop mode, press the MENU
button.
● Press the …† buttons to select Programme, then
press the OK or √ button.
● Press the …† buttons to select Timer Record.
2
Press the OK or √ button.
5
Press the …† buttons to select Edit, then
press the OK or √ button.
● The Timer Record Input item is displayed.
Edit the items you want to modify.
See the “Making a Timer Recording” section for
more information on Timer Recording Input items.
6
Press the OK button to confirm the
edited setting.
7
Press the MENU button after finishing the
operation. The menu screen will disappear.
RETURNOKMOVE EXIT
Scheduled Record List
DVD-RAM(VR)
No. Source Date Start End Mode V/P Edit
01 PR 01 01 JAN 12 : 00 14 : 00 SP Off
√√
02
---- -- --- --:-- --:-- -- --
√√
Recordable Time 02:12 SP
Edit
Delete
RETURNOKMOVE EXIT
Scheduled Record List
DVD-RAM(VR)
No. Source Date Start End Mode V/P Edit
01
---- -- --- --:-- --:-- -- --
√√
Recordable Time 02:12 SP
No. 01
Source Date Start End Mode VPS
PR 01 01/JAN(SAT) 12 : 00 14 : 00 SP Off
Recordable Time 02:12 SP
Recording
RETURNOKMOVE EXIT
Scheduled Record List
DVD-RAM(VR)
No. Source Date Start End Mode V/P Edit
01
---- -- --- --:-- --:-- -- --
√√
Recordable Time 02:12 SP
No. 01
Source Date Start End Mode V/P
PR 01 01/JAN(SAT) 12 : 00 14 : 00 SP Off
Recordable Time 02:12 SP
00842C-R125-XEB_42~51 2005.6.29 10:20 PM Page 49

50
- English
Recording
3
Press the OK button.
● The information concerning the programme is
displayed.
● When using the ShowView function for the
first time with stored stations, the programme
number flashes. This one time, you must enter
the PR number manually by pressing the
…† buttons or number buttons.
4
If the programme and times are correct,
press the OK button.
5
Turn the power off by pressing the
STANDBY/ON button to activate the timer
recording setting.
6
Refer to pages 47~49 if you want to:
● Check whether the timer Recording has set
correctly or not.
● Cancel a preset recording
Before presetting your DVD Recorder:
• Switch on both the television and your DVD Recorder.
• Check that the date and time are correct.
Up to twelve programmes can be preset.
1
With the unit in Stop mode, press the
TIMER button. Press the …† buttons to
select ShowView, then press the OK or √
button.
● A message is displayed to allow you to enter the
ShowView code.
Using the MENU button.
● With the unit in Stop mode, press the MENU
button.
● Press the …† buttons to select Programme, then
press the OK or √ button.
2
Press the number buttons to enter the
code of the programme that you want to
record in your television magazine.
● If you want to correct the ShowView code that
you are entering:
● Press the œ button until the digit to be corrected
is cleared.
● Enter the correct digit.
Using the ShowView
Feature
■
The numbers next to each TV programme
listing in the magazines or newspapers
are ShowView code numbers, which allow
you to programme your DVD Recorder
instantly with the remote control. Enter
the ShowView code for the programme
you wish to record.
■
ShowView is a trademark of Gemstar
Development Corporation. The ShowView
system is manufactured under license
from Gemstar Development Corporation.
NOTE
RETURNOK EXIT
DVD-RAM(VR)
Disc Navigation
Playlist
Disc manager
Programme
Setup
Enter ShowView Code number. [0~9]
RETURNOKMOVE EXIT
Scheduled Record List
DVD-RAM(VR)
No. Source Date Start End Mode V/P Edit
01 PR 01 01 JAN 12 : 00 14 : 00 SP Off
√√
02
---- -- --- --:-- --:-- -- --
√√
Recordable Time 02:12 SP
RETURNOKMOVE EXIT
Scheduled Record List
DVD-RAM(VR)
No. Source Date Start End Mode V/P Edit
01
---- -- --- --:-- --:-- -- --
√√
Recordable Time 02:12 SP
No. 01
Source Date Start End Mode V/S
PR 01 01/JAN(SAT) 12 : 00 14 : 00 SP Off
Recordable Time 02:12 SP
00842C-R125-XEB_42~51 2005.6.29 10:20 PM Page 50

English -
51
To prevent delays or overruns, DVD Recorder has a
function called ShowView Extened allowing you to
extend the recording time by up to 60 minutes.
1
With the unit in Stop mode, press the
MENU button.
2
Press the …† buttons to select Programme,
then press the OK or √ button.
3
Press the …† buttons to select ShowView
Extended, then press the OK or √ button
4
Press the …† buttons to select ShowView
Extended time, then press the OK or √
button.
5
Press the MENU button after finishing the
operation.
ShowView Extended
RETURNOKMOVE EXIT
Timer Record
DVD-RAM(VR)
ShowView
√√
Timer Record
√√
ShowView Extended : Off
√√
Disc Navigation
Playlist
Disc manager
Programme
Setup
RETURNOKMOVE EXIT
Timer Record
DVD-RAM(VR)
ShowView
√√
Timer Record
√√
ShowView Extended : Off
√√
Disc Navigation
Playlist
Disc manager
Programme
Setup
Off
10
20
30
40
50
60
Recording the Standard
Timer List
When the start time in the Scheduled record list
reaches while the set is in power off, the set will be
powered on and start the recording automatically.
1
When the scheduled recording is operating,
the programme being recorded will not
display on TV.
● Press the TV/DVD button if you want to see the
programmed being recorded on TV.
● Press the TV/DVD button again if you don’t want to
see the programmed being recorded on TV.
To stop Recording
Press the STOP( ) button, and a message that asks
whether to end recording or not will be displayed.
● When Yes is selected: Recording stops
● When No is selected: Recording continues
Do you want to stop recording?
Yes No
■
If there is not enough disc space or a
copy prevention signal is received during
recording, recording will stop.
■
If there is no free disc space or the disc is
not recordable, recording will not operate.
(You can record after replacing the disc.)
NOTE
You cannot record copy protected movie.
Recording
RETURNOKMOVE EXIT
Disc Navigation
DVD-RAM(VR)
Title List
√√
DivX
√√
Photo
√√
Music
√√
Disc Navigation
Playlist
Disc manager
Programme
Setup
00842C-R125-XEB_42~51 2005.6.29 10:20 PM Page 51

Playback
52
- English
Read the following information before playing a disc.
Region code (DVD-Video only)
Both the DVD recorder and the discs are
coded by region. These regional codes must
match in order for the disc to play. If the codes
do not match, the disc will not play.
The Region Number for this DVD Recorder is
described on the rear panel of the DVD Recorder
.
Disc types that can be played
Discs that cannot be played
● DVD-Video with a region number other than “2” or
“ALL”
● 12cm 2.6 GB and 5.2 GB DVD-RAM
● 3.9 GB DVD-R Disc for Authoring.
● DVD-RAM, DVD-RW(VR mode) not recorded
following the Video Recording Standard
● Unfinalised DVD-R,unfinalised DVD-RW(V mode)
recorded on other equipment.
● DVD-ROM/DVD+RW/PD/MV-Disc, etc
● CVD/CD-ROM/CDV/CD-G/CD-I
Playback
Before Playing
Before Playing...................................................52
Playing a Disc...................................................53
Playing an Audio CD/MP3 ..............................62
Playing a Picture...............................................66
Playing an MPEG4...........................................67
Playing the Title List..........................................68
This section introduces basic functions of playback
and playback by disc type.
DIGITAL OUT
DIGITAL
Dolby Digital DTS Digital Audio
Stereo PAL broadcast
system in U.K,
France, Germany, etc.
MP3DivX
■
Depending on the disc type, it may take
up to one minute to load.
NOTE
Disc Types Disc Logo Recorded content Disc Shape Max. Playing Time
Single sided(12cm)
240
DVD-VIDEO AUDIO + VIDEO
Double sided(12cm)
480
Single sided(8cm) 80
Double sided(8cm) 160
AUDIO-CD AUDIO
Single sided(12cm) 74
Single sided(8cm) 20
1 (XP: Excellent Quality)
Single-sided
2 (SP: Standard Quality)
12cm (4.7GB)
4 (LP: Long Playback)
AUDIO + VIDEO
6 or 8 (EP:Extended)
DVD-RAM
2 (XP: Excellent Quality)
Double-sided
4 (SP: Standard Quality)
12cm (9.4GB)
8 (LP: Long Playback)
12 or 16 (EP:Extended)
1 (XP: Excellent Quality)
DVD-RW AUDIO + VIDEO 12cm (4.7GB)
2 (SP: Standard Quality)
4 (LP: Long Playback)
6 or 8 (EP:Extended)
1 (XP: Excellent Quality)
DVD-R AUDIO + VIDEO 12cm (4.7GB)
2 (SP: Standard Quality)
4 (LP: Long Playback)
6 or 8 (EP:Extended)
CD-R/RW
JPEG
DVD-R/RW/RAM
MP3 - -
MPEG4
00842C-R125-XEB_52~70 2005.6.29 10:23 PM Page 52

English -
53
2
Place a disc gently into the tray with the
disc’s label facing up.
3
Press the OPEN/CLOSE button to close
the disc tray.
● Your DVD Recorder closes the disc tray and plays
the disc automatically.
● The recorder does not play discs automatically after
the initial power on.
● When the recorder is powered on and a disc is in
the tray, the DVD recorder will be activated and wait
in stop status.
● Press the PLAY button to start playback.
● If you insert a MP3 Disc, your DVD Recorder will
display the file list on the screen and start playing.
● If you insert a JPEG Disc, folders and files are
displayed in the thumbnail picture.
● If you want the DVD recorder to play automatically
when it is powered on with a disc in the DVD
recorder, power on with the PLAY button.
4
Press the STOP button to stop playback.
1
Press the OPEN/CLOSE button.
Playing a Disc
■
This DVD recorder can only operate with
discs that are compatible with DVD-RAM
Standard Version 2.0.
■
Playback and/or recording may not work
for some types of discs, or when specific
operations, such as angle change and
aspect ratio adjustment, are being
performed. Information about the discs is
written in detail on the box. Please refer
to this if necessary.
■
Do not allow the disc to become dirty or
scratched. Fingerprints, dirt, dust,
scratches or deposits of cigarette smoke
on the recording surface may make it
impossible to use the disc for recording.
■
DVD-RAM/RW/R discs may not be able to
play on some DVD Recorders, depending
on the DVD recorder, disc and the
condition of the recording.
NOTE
■
When you stop playing disc, the recorder
remembers where you stopped. When
you press the PLAY button again, it will
pick up where you left off. (unless the disc
is removed or the DVD Recorder is
unplugged, or if you press the STOP
button twice.)
NOTE
■
Do not move your DVD Recorder while
playing, as this may cause damage to the
disc.
■
Make sure to press the OPEN/CLOSE
button to open or close the disc tray.
■
Do not push the disc tray while it is being
opened or closed, as this may cause a
product malfunction.
■
Do not place foreign materials on or in the
disc tray.
■
Some functions may perform differently or
be disabled depending on the disc type.
If this occurs, refer to the instructions
written on the disc case.
■
Be especially careful that children's
fingers are not caught between the disc
tray and the tray chassis when it closes.
■
You must only insert one DVD disc at a
time. Inserting two or more discs will not
allow playback and may cause damage to
the DVD recorder.
CAUTION
Playback
00842C-R125-XEB_52~70 2005.6.29 10:23 PM Page 53

54
- English
Playback
Using the Search Functions
1
During play, press the SEARCH ( )
button on the remote control.
● You can scan the programme in reverse.
To return to normal speed playback, press the
button.
● When you press and hold the SEARCH button.
( ), playback is done at the default speed of 4X.
If you release the SEARCH button, playback is
performed at a normal speed.
● The speed marked in this function may be different
from the actual playback speed.
Using the Disc Menu & Title Menu
Some discs contain a dedicated menu system that
allow you to select special functions for the title, such
as chapters, audio tracks, subtitles, film previews,
information on characters, etc.
For DVD-VIDEO discs
1
Press the DISC MENU button to enter the
disc menu of the disc.
● Move to the setup menu related to the playback
operation.
● You can select the audio languages and the
subtitles provided by the disc.
2
Press the TITLE MENU button to move to
the title menu of the disc.
● Use this button if the disc contains more than one
title. Some type of discs may not support the title
menu function.
For DVD-RAM/RW/R discs
1
Press the TITLE LIST button to move to the
Title List.
■
Title List: Title List shows a list to help
you select a title. Since the title
list consists of the information
on video that is actually
recorded, if one title is deleted,
that title cannot be played
again.
■
Play List:This refers to a DVD recorder
of playback, which is made by
selecting a desired scene in the
entire Title List. When one
playlist is played, only the
scene selected by the user will
play and then stop. Since only
the information necessary for
playing a desired scene is
included in a playlist, even if
that playlist is deleted, the
original recording will not be
deleted. (only VR mode)
NOTE
■
No sound is heard during Scan(Search)
mode, except CDs (CD-DA).
NOTE
Searching through a Chapter or Track
DVD-VIDEO/
DVD-RAM/
DVD-RW/DVD-R
MPEG4
AUDIO CD
(CD-DA)
Fast X 2 ➞ Fast X 4 ➞
Fast X 8 ➞ Fast X 16 ➞
Fast X 32 ➞ Fast X 128 ➞
Fast X 2
X 2 ➞ X 4 ➞ X 8 ➞
X 2
00842C-R125-XEB_52~70 2005.6.29 10:23 PM Page 54

English -
55
About ANYKEY
The ANYKEY function allows you to easily search for a
desired scene by accessing title, chapter, track, time.
You can also change the subtitle and audio
settings and set some features including Repeat, Angle,
Zoom.
● If you want to move to a title, a chapter
or a track to find a desired scene.
1
Press the ANYKEY button during
playback.
2
Press the …† buttons to select Title,
Chapter or Track.
3
Press the œ √ or number (0~9) buttons to
select the desired scene.
Press the OK button.
● During play, you can search quickly
through a chapter or track.
1
During play, press the SKIP ( )
button on the remote control.
● If you press the ❙œœ button,
it moves to the beginning of the chapter or track or
marker(DVD-RAM, DVD-RW(VR mode)).
Pressing the button once again within 3 seconds
returns to the beginning of the previous chapter or
track or marker(DVD-RAM, DVD-RW(VR mode)).
● If you press the √√❙ button,
it moves to the next chapter or track or marker
(DVD-RAM,DVD-RW(VR mode)).
Slow Motion Play
1
In pause or step mode, press the SEARCH (
) button on the remote control.
● If you press the √√ button,
Slow 1/8 ➞ Slow 1/4 ➞ Slow 1/2
● If you press the œœ button,
Slow 1/8 ➞ Slow 1/4 ➞ Slow 1/2
● To return to normal speed playback,
press the button.
Press and hold the SEARCH ( ) button during
pause, the disc will play slowly at a 1/4 speed. If the
button is released, the pause operation will resume.
Step Motion Play
1
Press the button on the remote
control in the still mode.
● Each time the button is pressed, a new frame will
appear.
When is pressed, the previous frame will be
activated.
When is pressed, the next frame will be activated.
●
To return to normal speed playback, press the button.
■
The speed marked in this function may be
different from the actual playback speed.
■
Slow motion operates only in the forward
direction on MPEG 4 discs.
NOTE
■
Step motion operates only in the forward
direction on MPEG 4 discs.
NOTE
Skipping Chapters or Tracks
Moving to a scene directly using the ANYKEY
Playback
CHANGEMOVE
DVD-VIDEO
1/10
1/40
00:01:45
ENG
ENG D 5.1CH
Off
1/1
Off
CHANGEMOVE
DVD-VIDEO
1/10
1/40
00:01:45
ENG
ENG D 5.1CH
Off
1/1
Off
Title
Chapter
Time
Subtitle
Audio
Repeat
Angle
Zoom
Title
Chapter
Time
Subtitle
Audio
Repeat
Angle
Zoom
00842C-R125-XEB_52~70 2005.6.29 10:23 PM Page 55

56
- English
Using the Repeat Function
Using the REPEA
Using the REPEA
T button
T button
1
Press the REPEAT button during playback.
2
Press the REPEAT or …† buttons to select
Title or Chapter you want to play repeatedly.
Press the OK button.
Chapter : Repeats the chapter that is playing.
Title : Repeats the title that is playing.
- To return to normal playback -
3
Press the REPEAT buttons to select Off,
then press the …† or REPEAT button and
press OK button.
Press the CANCEL button to return to normal
playback.
● If you want to move to a desired time to
help you find a scene.
1
Press the ANYKEY button during
playback.
2
Press the …† buttons to select Time.
3
Enter the time in the sequence of hours,
minutes, seconds using the number
buttons, then press the OK button.
Repeat
Off
Repeat
Title
■
This may not work for some discs.
When an audio CD(CD-DA) or an MP3
disc is inserted, according to a disc type,
the information display may not be
appear.
■
The Time Search function does not
operate in some discs.
■
To make the screen disappear, press the
ANYKEY again
NOTE
Playing Repeatedly(Repeat Playback)
CHANGEMOVE
DVD-VIDEO
1/10
1/40
00:01:45
ENG
ENG D 5.1CH
Off
1/1
Off
NUMBER
MOVE
DVD-VIDEO
1/10
1/40
00:01:45
ENG
ENG D 5.1CH
Off
1/1
Off
Title
Chapter
Time
Subtitle
Audio
Repeat
Angle
Zoom
Title
Chapter
Time
Subtitle
Audio
Repeat
Angle
Zoom
Playback
00842C-R125-XEB_52~70 2005.6.29 10:23 PM Page 56

English -
57
Using the
Using the
ANYKEY
ANYKEY
button
button
1
Press the ANYKEY button during
playback.
2
Press the …† buttons to select Repeat,
then press the œ √ buttons to select Title or
Chapter you want to play repeatedly.
For A-B Repeat, refer to page 58.
3
Press the OK button.
To make the screen disappear, press the ANYKEY or
RETURN button. Repeat play allows you to repeat a
title or chapter.
Using the REPEA
Using the REPEA
T button
T button
1
Press the REPEAT button during playback.
2
Press the REPEAT button repeatedly to
select Track or Disc you want to play
repeatedly.
To return to normal playback
3
Press the REPEAT button repeatedly to
select Off.
Press the CANCEL button to return to normal
playback.
Using the
Using the
ANYKEY
ANYKEY
button
button
1
Press the ANYKEY button during
playback.
Repeat is highlighted.
2
Press the REPEAT or …† buttons to select
Track or Disc you want to play repeatedly.
Press the OK button.
For MP3 discs, you can select Track,
Folder or Disc.
- To return to normal playback -
3
Press the REPEAT button repeatedly to
select Off.
Press the CANCEL button to return to normal
playback.
■
DVD-RAM, DVD-RW(VR mode),
unfinalised DVD-R and unfinalised DVD-
RW (Video mode) do not repeat a
chapter.
NOTE
Playing Repeatedly(Repeat Playback)
CHANGEMOVE
DVD-VIDEO
1/10
1/40
00:01:45
Off
ENG D 5.1CH
Title
1/1
Off
OKMOVE
DVD-VIDEO
1/10
1/40
00:01:45
Off
ENG D 5.1CH
Title
1/1
Off
OK EXITRETURNMOVE
Music
CD
Repeat : Off Play Option : Normal
01. TRACK 1
02. TRACK 2
03. TRACK 3
04. TRACK 4
05. TRACK 5
06. TRACK 6
4:39
4:31
4:30
3:53
4:23
4:24
00 : 5201. TRACK 1
01/12
Title
Chapter
Time
Subtitle
Audio
Repeat
Angle
Zoom
Title
Chapter
Time
Subtitle
Audio
Repeat
Angle
Zoom
OK EXITRETURNMOVE
Music
CD
Repeat : Track Play Option : Normal
01. TRACK 1
02. TRACK 2
03. TRACK 3
04. TRACK 4
05. TRACK 5
06. TRACK 6
4:39
4:31
4:30
3:53
4:23
4:24
00 : 5201. TRACK 1
01/12
Playback
OK RETURN EXITMOVE
Music
CD
Repeat : Off Play Option : Normal
01. TRACK 1
02. TRACK 2
03. TRACK 3
04. TRACK 4
05. TRACK 5
06. TRACK 6
4:39
4:31
4:30
3:53
4:23
4:24
00 : 5201. TRACK 1
01/12
00842C-R125-XEB_52~70 2005.6.29 10:23 PM Page 57

58
- English
Playback
Selecting the Subtitle
Subtitle languages may not work depending on the disc
type. This is only available during playback.
Using the SUBTITLE button
Using the SUBTITLE button
1
Press the SUBTITLE button during
playback.
2
Press the SUBTITLE or …† buttons to
select the desired subtitle language.
To make the screen disappear, press the CANCEL or
RETURN button.
Using the
Using the
ANYKEY
ANYKEY
button
button
1
Press the ANYKEY button during
playback.
2
Press the …† buttons to select Subtitle,
then press the œ √ buttons to select the
desired subtitle language.
■
The subtitle display may be different
depending on the disc type.
■
Some discs allow you to select the
language for the disc menu only.
NOTE
CHANGEMOVE
DVD-VIDEO
1/10
1/40
00:01:45
Off
ENG D 5.1CH
Title
1/1
Off
CHANGEMOVE
DVD-VIDEO
1/10
1/40
00:01:45
ENG
ENG D 5.1CH
Off
1/1
Off
Subtitle
ENG
Title
Chapter
Time
Subtitle
Audio
Repeat
Angle
Zoom
Title
Chapter
Time
Subtitle
Audio
Repeat
Angle
Zoom
Using the
Using the
ANYKEY
ANYKEY
button
button
1
Press the ANYKEY button during
playback.
2
Press the …† buttons to select Repeat, then
press the √ button to select A-B.
3
Press the OK button.
4
Press the OK button at the point where you
want the repeat play to start (A), then press
it again at the point where you want the
repeat play to stop (B).
Repeat playback of the A-B section starts.
- To return to normal playback -
Select “Off” on the Repeat item.
Press the CANCEL button to return to normal
playback.
■
If you set point (B) before five seconds
has lapsed, the prohibition mark ( ) will
appear.
■
Audio CDs(CD-DA), MP3 and MPEG4
discs do not support the Repeat A-B
function.
NOTE
Playing a Certain section Repeatedly(A-B Repeat Playback)
CHANGEMOVE
DVD-VIDEO
1/10
1/40
00:01:45
Off
ENG D 5.1CH
Title
1/1
Off
OKMOVE
DVD-VIDEO
1/10
1/40
00:01:45
Off
ENG D 5.1CH
A-B
1/1
Off
Title
Chapter
Time
Subtitle
Audio
Repeat
Angle
Zoom
Title
Chapter
Time
Subtitle
Audio
Repeat
Angle
Zoom
(VR mode)
00842C-R125-XEB_52~70 2005.6.29 10:23 PM Page 58

English -
59
Selecting the Audio language
Audio languages may not work depending on the disc
type. This is only available during playback.
Using the
Using the
AUDIO button
AUDIO button
1
Press the AUDIO button during playback.
2
Press the AUDIO or …† buttons to select
the desired audio language.
Using the
Using the
ANYKEY
ANYKEY
button
button
1
Press the ANYKEY button during
playback.
2
Press the …† buttons to select Audio, then
press the œ √ buttons to select the desired
audio language.
■
Audio languages may be different
depending on the disc type.
■
Some discs allow you to select the audio
language for the disc menu only.
NOTE
CHANGEMOVE
DVD-VIDEO
1/10
1/40
00:01:45
Off
ENG D 5.1CH
Title
1/1
Off
CHANGEMOVE
DVD-VIDEO
1/10
1/40
00:01:45
ENG
ENG D 5.1CH
Off
1/1
Off
Audio
ENG Dolby Digital 5.1CH
Title
Chapter
Time
Subtitle
Audio
Repeat
Angle
Zoom
Title
Chapter
Time
Subtitle
Audio
Repeat
Angle
Zoom
Playback
Changing the Camera Angle
When a DVD-VIDEO contains multiple angles of a
particular scene, you can select the Angle function.
This is only available during playback.
If the disc contains multiple angles, the ANGLE mark
appears on the screen.
1
Press the ANYKEY button during playback.
2
Press the …† buttons to select Angle, then
press the œ √ or number buttons to select
the desired angle.
■
This function is disc-dependent, may not
work on all DVDs.
■
This function does not work when a DVD
has not been recorded with a multi-
camera angle system.
NOTE
CHANGEMOVE
DVD-VIDEO
1/10
1/40
00:01:45
Off
ENG D 5.1CH
Off
1/3
Off
CHANGEMOVE
DVD-VIDEO
1/10
1/40
00:01:45
ENG
ENG D 5.1CH
Off
1/3
Off
Title
Chapter
Time
Subtitle
Audio
Repeat
Angle
Zoom
Title
Chapter
Time
Subtitle
Audio
Repeat
Angle
Zoom
(VR mode)
00842C-R125-XEB_52~70 2005.6.29 10:23 PM Page 59

60
- English
Playback
Using Bookmarks
This feature lets you bookmark sections of a DVD-VIDEO
or DVD-R/-RW(V mode), so you can quickly find them.
1
Press the MARKER button during
playback.
2
Press the OK button when the desired
scene appears.
The number 1 is displayed and the scene is
memorized.
3
Press the œ √ button to move to the next
position.
4
Press the OK button when the desired
scene appears.
The number 2 is displayed and the scene is
memorized.
● Repeat above to bookmark other positions.
● You can bookmark up to 10 scenes.
RETURNOKMOVE
Bookmark
RETURNCANCELMOVE
Bookmark
1
PLAY
RETURNCANCELMOVE
Bookmark
1 2
PLAY
■
When the disc tray is opened and then
closed, bookmarks will disappear.
NOTE
Zooming-In
1
Press the ANYKEY button during playback
or pause.
2
Press the …† buttons to select Zoom, then
press the OK button. ( ) will be displayed.
3
Press the …† œ √ buttons to move to the
area you want to enlarge.
4
Press the OK button. The screen will be
enlarged to twice the normal size.
If you press the OK button again after the screen was
enlarged to twice the normal size, the screen size will
be enlarged to four times the normal size.
➞
normal size
➞
2X
➞
4X
➞
2X
■
When the recording is done in EP mode,
the Zoom function is not supported except
when the recording has been done in V
mode.
NOTE
CHANGEMOVE
DVD-VIDEO
1/10
1/40
00:01:45
Off
ENG D 5.1CH
Off
1/1
Off
Title
Chapter
Time
Subtitle
Audio
Repeat
Angle
Zoom
(V mode)
00842C-R125-XEB_52~70 2005.6.29 10:23 PM Page 60

English -
61
Playback
1
Press the MARKER button during
playback.
2
Press the œ √ buttons to select a
bookmarked scene.
3
Press the OK or button to start
playing from the selected scene.
1
Press the MARKER button during
playback.
2
Press the œ √ buttons to select a
bookmarked scene.
3
Press the CANCEL button to delete the
selected bookmark.
RETURNCANCELMOVE
Bookmark
1 2
PLAY
Clearing a bookmark
Playing back a bookmark
RETURNCANCELMOVE
Bookmark
1 2
PLAY
RETURNOKMOVE
Bookmark
1
Using Markers
1
Press the MARKER button during
playback.
2
Press the OK button when the desired
scene appears.
The number 01 is displayed and the scene is
memorized.
3
Press the œ √ button to move to the next
position.
4
Press the OK button when the desired
scene appears.
The number 02 is displayed and the scene is
memorized.
● DVD-RAM or DVD-RW (VR Mode) discs have the
Marker function instead of the Bookmark function.
The Marker function allows you to mark up to 99
scenes. Since the scenes may be displayed as many
different pages, numbering is necessary. If a disc in
use is encoded with Disc Protection, Markers cannot
be set or deleted. Only playback is available.
RETURNOK
Marker
N:0
RETURNCANCELMOVE
PLAY
Marker
N:101
RETURNCANCELMOVE
PLAY
Marker
N:201 02
(VR mode)
00842C-R125-XEB_52~70 2005.6.29 10:23 PM Page 61

62
- English
Playback
Playing an Audio CD (CD-DA)/MP3
Each disc has a variety of menu functions available.
1
Insert an audio CD (CD-DA) into the disc
tray.
The audio CD menu appears and the tracks (songs)
are played automatically.
2
-1 Press the …† buttons to select the track
you want to hear, then press the OK or √
button.
2
-2 Press the number buttons to select the
track (song) and the track (song) is played
automatically.
1. Repeat mode: Repeat off/Repeat Track/Repeat Disc
2. Current track (song): Displays the number of the
track currently being played.
3. Displays the current play index and total track
number.
4. This shows the operating state of a disc and a
playback time corresponding to a portion that is
currently played.
5. Displays the track list (song list) and the playing time
of each track.
6. Button display.
7. Play Option: Normal, Random, Intro or Playlist
Playing an Audio CD/MP3
OK EXITRETURNMOVE
Music
CD
Repeat : Off Play Option : Normal
01. TRACK 1
02. TRACK 2
03. TRACK 3
04. TRACK 4
05. TRACK 5
06. TRACK 6
4:39
4:31
4:30
3:53
4:23
4:24
00 : 5201. TRACK 1
01/12
OK EXITRETURNMOVE
Music
CD
Repeat : Off Play Option : Normal
01. TRACK 1
02. TRACK 2
03. TRACK 3
04. TRACK 4
05. TRACK 5
06. TRACK 6
4:39
4:31
4:30
3:53
4:23
4:24
00 : 5201. TRACK 1
01/12
Playing an Audio CD(CD-DA)
Audio CD(CD-DA) Screen Elements
1
2
3
7
4
5
6
1
Press the MARKER button during
playback.
2
Press the œ √ buttons to select a
bookmarked scene.
3
Press the OK or button to start
playing from the selected scene.
● If you press the button, it moves to the beginning of
the marker. Pressing the button once again within 3
seconds returns to the beginning of the previous
marker.
● If you press the button, it moves to the next
marker.
1
Press the MARKER button during
playback.
2
Press the œ √ buttons to select a
bookmarked scene.
Press the CANCEL button to delete the
selected bookmark.
■
When a marker is cleared while DVD-RAM/-RW (VR
mode) is playing, marker numbers will change.
For example, if the 7th marker is cleared after ten
markers are registered, the marker numbers after
the eighth will automatically move ahead by one and
the 8th marker becomes the 7th.
Clearing a Marker
Playing back a Marker
RETURNCANCELMOVE
PLAY
Marker
N:201 02
Marker
01 02 03 04 05 06 07 08 09 10 √ N:10
RETURNCANCELMOVE
Marker
PLAY
01 02 03 04 05 06 07 08 09 N:9
00842C-R125-XEB_52~70 2005.6.29 10:23 PM Page 62

English -
63
Playback
1.
……††
, 0~9: Selects a track (song).
2.
√√
: Plays the selected track (song).
3. OK button: Plays the selected track (song).
4. () button: Plays the next track.
5. () button: Returns to the beginning of the current
track when pressed during playback. If pressed
again, your DVD recorder moves to and plays the
previous track.
If you press the this button within three seconds after
playback starts, the previous track will be played.
If you press the this button after three seconds, the
current track will be replayed from the beginning.
6. Press the ( / ) button: Fast Play (X2, X4, X8)
7. () button: Stops a track(song).
8. () button: Plays a track(song) or pauses
playback.
9. ANYKEY button: To select the top menu on screen
display (Repeat or Play Option).
Buttons on the Remote Control used for Audio CD(CD-DA) playback
1
Insert an MP3 Disc into the disc tray.
2
Press the
…†
buttons to select the Disc
Navigation, and then press the OK or √
button.
3
Press the
…†
buttons to select the Music,
then press the OK or √ button.
The MP3 menu appears and the tracks(songs) are
played automatically.
4
-1 Press the …† buttons to select the track
(song) you want to hear, then press the
OK or √ button.
4
-2 Press the number buttons to select the
track (song) and the track (song) is played
automatically.
Playing an MP3 Disc
OK RETURN EXITMOVE
Music
CD
Repeat : Off Play Option : Normal
ROOT
Bryan Adams
Bryan Adams_2
Straight from the heart
Run to you
Heaven
00 :22Straight from the heart
ROOT
03/06
RETURNOKMOVE EXIT
Disc Navigation
CD
DivX
√√
Photo
√√
Music
√√
Disc Navigation
Programme
Setup
RETURNOKMOVE EXIT
Disc Navigation
CD
DivX
√√
Photo
√√
Music
√√
Disc Navigation
Programme
Setup
00842C-R125-XEB_52~70 2005.6.29 10:23 PM Page 63

64
- English
Playback
1.
……††
,0~9: Selects a track (song).
2.
√√
: Plays the selected track (song).
3. OK button: Plays back the selected track (song) or
displays the files in the selected folder.
4. RETURN button: Moves to the folder to which the
current song belongs.
5. () button: Plays the next track.
6. () button: Returns to the beginning of the current
track when pressed while playing. If pressed again,
your DVD recorder moves to and plays the previous
track.
If you press the this button within three seconds, the
previous track will be played.
If you press the this button after three seconds, the
current track will be replayed from the beginning.
7. () button: Stops a track(song).
8. () button: Plays a track(song) or pauses
playback.
9. ANYKEY button: To select the top menu on screen
display (Repeat or Play Option).
Buttons on the Remote Control used for MP3 playback
MP3 Screen Elements
OK RETURN EXITMOVE
Music
CD
Repeat : Off Play Option : Normal
ROOT
Bryan Adams
Bryan Adams_2
Straight from the heart
Run to you
Heaven
00 :22Straight from the heart
ROOT
03/06
1
2
3
7
4
5
6
1. Repeat mode: Repeat off, Repeat Track, Repeat
Folder or Repeat Disc
2. Current track (song): Displays the name of the
track being played.
3. Displays the current folder and play index.
4. This shows the operating state of a disc and a
playback time corresponding to a portion that is
currently played.
5. Displays the information for the folder and its tracks.
6. Button display.
7. Play Option : Normal, Random, Intro or Playlist
■
Files of one type: List of files and folders
appears in a defined order.
■
Files of multiple types: Topmost GUI
menu screen (DISC NAVIGATION)
appears.
NOTE
00842C-R125-XEB_52~70 2005.6.29 10:23 PM Page 64

English -
65
Playback
You can register a maximum of 30 tracks in the playlist.
1
Press the ANYKEY button during playback.
Repeat Mode will be highlighted.
2
Press the
œ √
buttons to select
Play Option
.
3
Press the OK button.
The play option screen will appear.
Press the
…†
buttons to select
Playlist
.
4
Press the OK button.
The Playlist screen will appear.
press the …† buttons to select Tracks in the order in
which you want them to play. Press the OK button.
Press the PLAY button to playback playlist.
5
If you playlisted a wrong track, press the √
button, then press the …† buttons to select
wrong track, then press the CANCEL
button.
The wrong track will be removed.
6
Press the PLAY button to playback the
playlist.
The Play Option can be used with an audio CD or MP3
in the Play or Stop mode.
1
Press the ANYKEY button during playback.
Repeat Mode will be highlighted.
● During Stop, Play Option will be highlighted.
2
Press the
œ √
buttons to select
Play Option
,
then p
ress the …† buttons to select the
desired play option (Normal, Random, Intro
or Playlist).
3
Press the …† buttons to select the desired
item (Normal, Random, Intro or Playlist).
● Normal: Tracks on a disc are played in the order in
which they were recorded on the disc.
● Random: The Random option plays a disc’s tracks in
random order. After a random list is generated and
played completely, another random list is generated
and played. Random Play is continued until the play
option is changed.
● Intro: The first 10 seconds of each track will be
played. If you want to listen to the music that you
have selected, press the OK or button.
The play option will be changed to Normal Play.
If you When Intro Play is completed, Normal Play is
performed.
● Playlist: The Playlist playback option allows you to
select the order in which you want tracks to play.
To Programme TracksPlay Option Mode
OK
RETURN EXIT
MOVE
Music
CD
Repeat : Off Play Option : Normal
01. TRACK 1
02. TRACK 2
03. TRACK 3
04. TRACK 4
05. TRACK 5
06. TRACK 6
4:39
4:31
4:30
3:53
4:23
4:24
00 : 5201. TRACK 1
01/12
Music
CD
Repeat : Off
00 : 5201. TRACK 1
OK EXITMOVE
Music
CD
Repeat : Off Play Option : Playlist
01. TRACK 1
02. TRACK 2
03. TRACK 3
04. TRACK 4
05. TRACK 5
06. TRACK 6
00 : 00
OK RETURN EXITMOVE
Music
CD
Repeat : Off Play Option : Normal
01. TRACK 1
02. TRACK 2
03. TRACK 3
04. TRACK 4
05. TRACK 5
06. TRACK 6
4:39
4:31
4:30
3:53
4:23
4:24
00 : 5201. TRACK 1
01/12
OK RETURN EXITMOVE
Music
CD
Repeat : Off
01. TRACK 1
02. TRACK 2
03. TRACK 3
04. TRACK 4
05. TRACK 5
06. TRACK 6
4:39
4:31
4:30
3:53
4:23
4:24
00 : 5201. TRACK 1
01/12
OK
CANCEL EXIT
MOVE
Music
CD
Repeat : Off Play Option : Playlist
01. TRACK 1
02. TRACK 2
03. TRACK 3
04. TRACK 4
05. TRACK 5
06. TRACK 6
01 : 36
1. P_TRACK 1
2. P_TRACK 2
3. P_TRACK 3
1. P_TRACK 1
2. P_TRACK 2
3. P_TRACK 3
4. P_TRACK 4
Play Option : Normal
Play Option : Normal
00842C-R125-XEB_52~70 2005.6.29 10:23 PM Page 65

66
- English
Playback
5
-1 If your press the PLAY() button, the
Slide show screen will appear.
Press the œ √ buttons to set the slide show speed,
then press the OK button.
5
-2 Press the œ √ buttons to select a picture
file in Album screen, then press the OK
button.
: Returns to the Album screen.
: The DVD recorder enters slide show mode.
Before the slide show can begin, the picture
interval (Slide show speed) must be set.
: Each time the OK button is pressed, the
picture rotates 90 degrees clockwise.
: Each time the OK button is pressed, the
picture is enlarged up to 4X(Four times the normal
size).
(Normal ➞ Zoom 2X ➞ Zoom 4X ➞ Zoom 2X ➞
Normal)
● Press the ANYKEY button to display or clear menus.
1
Insert a JPEG into the disc tray.
2
Press the
…†
buttons to select the Disc
Navigation, and then press the OK or √
button.
3
Press the
…†
buttons to select the Photo,
and then press the OK or √ button.
4
Press the …† œ √ buttons to select a
picture.
● To see the next 6 pictures, press the button.
● To see the previous 6 pictures, press the button.
Playing a Picture
RETURNOKMOVE PHOTO
DSC01189
RETURNOKMOVE
DSC01189
Slide Show Speed
OK RETURN EXITMOVE
Photo
CD
Index 6 / 73
Slide Show
ROOT / DSC01189
Page 2 / 13
RETURNOKMOVE EXIT
Disc Navigation
CD
DivX
√√
Photo
√√
Music
√√
Disc Navigation
Programme
Setup
RETURNOKMOVE EXIT
Disc Navigation
CD
DivX
√√
Photo
√√
Music
√√
Disc Navigation
Programme
Setup
00842C-R125-XEB_52~70 2005.6.29 10:23 PM Page 66

English -
67
Playback
Playing an MPEG4
MPEG4 Function Description
MPEG4 File is used to contain the audio and video
data.
MPEG4 File with following extensions can be played.
- .AVI, .DIVX
1
Insert a MPEG4 Disc into the disc tray.
2
Press the
…†
buttons to select the Disc
Navigation, and then press the OK or √
button.
3
Press the
…†
buttons to select the DivX, and
then press the OK or √ button.
4
Press the …† buttons to select the avi file
(DivX), then press the OK, √ or button.
5
When MPEG4 file is played, you can use
following functions.
Pressing the STOP button once during playback will
display the file list, pressing the button again will exit the
menu screen.
Function Description
Skip
( or )
Search
( or )
Slow Motion
Play
Step Motion
Play
During play, press the or button, it moves
forward or backward 5 minutes.
During play, press the SEARCH ( or ) button
and press again to search at a faster speed.
(2X, 4X, 8X)
In pause or step mode, press the SEARCH
button
on the remote control. (1/8X, 1/4X, 1/2X)
Press the button on the remote control in the
still mode.
■
This DVD recorder can play the following
video compression formats,
- MPEG4 Codec format : DivX 3.11 DivX
4.x DivX 5.x DivX-Pro (without QPEL
and GMC)
- Audio format : .MP3, .MPEG, .WMA,
.LPCM, .AC3
■
Supported subtitle file formats: .smi, .srt,
.sub, .psb, .txt, .ass (The subtitle file
should have exactly the same name to
corresponding MPEG4 file name)
■
Some MPEG4 files created on a personal
computer may not be play back.
That is why Codec Type, Version and
Higher resolution over specification is not
supported.
NOTE
RETURNOKMOVE EXIT
Disc Navigation
CD
DivX
√√
Photo
√√
Music
√√
Disc Navigation
Programme
Setup
RETURNOKMOVE EXIT
Disc Navigation
CD
DivX
√√
Photo
√√
Music
√√
Disc Navigation
Programme
Setup
OK RETURN EXITMOVE
DivX
CD
MPEG4
[DivX].###.####.01.avi
[DivX].###.####.01.avi
MPEG4
00/01
00842C-R125-XEB_52~70 2005.6.29 10:23 PM Page 67

68
- English
2
Press the …† buttons to select Disc
Navigation, then press the OK or √ button
twice.
The Title List screen is displayed.
3
Press the …† buttons to select Title, then
press the OK or √ button.
The Edit menu is displayed on the right.
(Play, Rename, Delete, Edit, Protection : See
pages 71~74)
4
Press the …† buttons to select Play to play
the title list, then press the OK button.
The selected entry (title) will be played back.
To view the current status of the disc and progress of
playback : Press the INFO button, the information
about the disc will appear.
Follow these instructions to play back a scene from the
Title List.
Using the TITLE LIST button
Using the TITLE LIST button
1
Press the TITLE LIST button.
The Title List screen is displayed.
2
Press the …† buttons to select an entry
you want to play from Title List, then press
the PLAY (
)
button.
The selected entry (title) will be played back.
3
To stop title play, press the STOP button.
To return the title list screen, press the TITLE LIST
button.
Using the MENU button
Using the MENU button
1
Press the MENU button.
RETURNOKMOVE EXIT
Title List
DVD-RAM(VR)
No. Title Length Edit
19/JAN/2005 12:00 PR12
19/JAN/2005
12:00 SP
01 19/JAN/2005 1 00:00:21
√√
02 19/JAN/2005 1 00:00:03
√√
03 20/JAN/2005 2 00:00:15
√√
04 20/JAN/2005 2 00:00:16
√√
05 21/JAN/2005 1 00:06:32
√√
06 21/JAN/2005 1 00:08:16
√√
07 22/JAN/2005 1 00:09:36
√√
RETURNOKMOVE EXIT
Title List
DVD-RAM(VR)
No. Title Length Edit
21/JAN/2005 11:50 PR11
21/JAN/2005
11:50 SP
01 19/JAN/2005 1 00:00:21
√√
02 19/JAN/2005 1 00:00:03
√√
03 20/JAN/2005 2 00:00:15
√√
04 20/JAN/2005 2 00:00:16
√√
05 21/JAN/2005 1 00:06:32
√√
06 21/JAN/2005 1 00:08:16
√√
07 22/JAN/2005 1 00:09:36
√√
Play
Rename
Delete
Edit
Protection
Playing the Title List
RETURNOKMOVE EXIT
Title List
DVD-RAM(VR)
No. Title Length Edit
19/JAN/2005 12:00 PR12
19/JAN/2005
12:00 SP
01 19/JAN/2005 1 00:00:21
√√
02 19/JAN/2005 1 00:00:03
√√
03 20/JAN/2005 2 00:00:15
√√
04 20/JAN/2005 2 00:00:16
√√
05 21/JAN/2005 1 00:06:32
√√
06 21/JAN/2005 1 00:08:16
√√
07 22/JAN/2005 1 00:09:36
√√
√√
Play
DVD-RAM(VR) Disc Info
Disc Name
Total Title 15
Total Playlist 2
Recordable Time 02:12 SP
Protection Not Protected
Screen Playback
01 JAN 2005 SAT 12:00
Playback
RETURNOKMOVE EXIT
Disc Navigation
DVD-RAM(VR)
Title List
√√
DivX
√√
Photo
√√
Music
√√
Disc Navigation
Playlist
Disc manager
Programme
Setup
00842C-R125-XEB_52~70 2005.6.29 10:23 PM Page 68

English -
69
1. Playback screen for recorded entries.
2. Information window for the selected entry:
Title name, recording date, recording time, lock
status, recording mode
3. Recorded entry No.
4. Recorded entry title
5. Recording length (i.e., the playing time)
6. Title list edit items
Play: Plays the selected entry.
Rename: Renames the title of a selected entry.
Delete: Deletes the selected entry from the list.
Edit: Deletes a section of titles.
Protection: Locks or unlocks the selected entry.
7. Button display.
Title List Screen Elements
RETURNMOVE EXIT
Title List
DVD-RAM(VR)
No. Title Length Edit
02/01/01
00:25:30(PM) SP
01 00:00:21
√√
02 00:00:03
√√
03 Sports 00:00:15
√√
04 Movie 00:00:16
√√
05 00:06:32
√√
06 06 00:08:16
√√
07 07 00:09:36
√√
Play
Rename
Delete
Edit
Protection
RETURNOKMOVE EXIT
Title List
DVD-RAM(VR)
No. Title Length Edit
19/JAN/2005 12:00 PR12
19/JAN/2005
12:00 SP
01 19/JAN/2005 1 00:00:21
√√
02 19/JAN/2005 1 00:00:03
√√
03 20/JAN/2005 2 00:00:15
√√
04 20/JAN/2005 2 00:00:16
√√
05 21/JAN/2005 1 00:06:32
√√
06 21/JAN/2005 1 00:08:16
√√
07 22/JAN/2005 1 00:09:36
√√
1
2
34 5
7
6
■
This may depend on the the disc type.
■
DVD-R/DVD-RW(Video) has limited
editing function.
NOTE
■
You can also play a recorded programme
by pressing the ANYKEY button during
playback.
■
Press the …† buttons to select Title.
■
Press the œ √ buttons to select to play
the title list, then press the OK button.
NOTE
Press the INFO button once again. Then you can
check the information about the title under playback.
5
To stop title play, press the STOP button.
To return the title list screen, press the TITLE LIST
button.
DVD-RAM(VR) Playing Info
Name 01/JAN/2005 12:00 PR
1
Title 1/15
Created Time 01/JAN/2005 12:00
Length
00:01:43 SP
Playing Time
00:13:27
Title Protection Not Protected
01 JAN 2005 SAT 12:00
CHANGEMOVE
DVD-RAM(VR)
1/14
00:01:45
ENG
ENG D 5.1CH
Off
Off
Title
Time
Subtitle
Angle
Repeat
Zoom
Playback
00842C-R125-XEB_52~70 2005.6.29 10:23 PM Page 69

70
- English
● Title List
A title is a section of recorded video and audio.
Title List shows a list to help you select a title.
Since the title list consists of the information on
stream that is actually recorded, if one title is deleted,
that title cannot be played again.
● Play List
This refers to a DVD recorder of playback, which is
made by selecting a desired scene in the entire Title
List. When one playlist is played, only the scene
selected by the user will play and then stop. Since
only the information necessary for playing a desired
scene is included in a playlist, even if that playlist is
deleted, the original stream will not be deleted.
Recording or editing might not be completed if
an error, such as a sudden power failure
occurs.
Please be aware that a material that has been
damaged is unable to be retrieved to its
original content.
Editing
Basic Editing (Title List)......................................71
Advanced Editing (Playlist) ................................75
Disc Manager.....................................................83
This section introduces basic functions of DVD
editing and explains both edit functions for the
recording on a disc and edit functions for the entire
disc.
Editing
00842C-R125-XEB_52~70 2005.6.29 10:23 PM Page 70

English -
71
Editing
Renaming(Labeling) a Title
Follow these instructions to rename a title list entry, i.e.,
to edit the title of a recorded programme.
Using the TITLE LIST button
Using the TITLE LIST button
1
Press the TITLE LIST button.
The Title List screen is displayed
Using the MENU button
● Press the MENU button.
● Press the …† buttons to select Disc Navigation,
then press the OK or √ button twice.
2
Press the …† buttons to select an entry
you want to rename from the Title List,
then press the OK or √ button.
3
Press the …† buttons to select Rename,
then press the OK button.
The Rename screen is displayed.
Basic Editing (Title List)
4
Press the …† œ √ buttons to select the
desired characters, then press the OK
button.
● Back Space: Deletes and moves the cursor
backwards by one position.
(Equivalent to the CANCEL button)
● Space: Enters a blank and moves the cursor one
forward (to the right).
● Delete: Deletes the character at the cursor position.
● Clear: Deletes all the character inputs.
● Save: Registers the character inputs.
5
Press the …† œ √ buttons to select Save,
then press the OK button.
The changed title name is displayed on the title item
of the selected entry.
RETURNOKMOVE EXIT
Title List
DVD-RAM(VR)
No. Title Length Edit
19/JAN/2005 12:00 PR12
19/JAN/2005
12:00 SP
01 19/JAN/2005 1 00:00:21
√√
02 19/JAN/2005 1 00:00:03
√√
03 20/JAN/2005 2 00:00:15
√√
04 20/JAN/2005 2 00:00:16
√√
05 21/JAN/2005 1 00:06:32
√√
06 21/JAN/2005 1 00:08:16
√√
RETURNOKMOVE EXIT
Title List
DVD-RAM(VR)
No. Title Length Edit
Sports (A1)
19/JAN/2005
12:00 SP
01 19/JAN/2005 1 00:00:21
√√
02 19/JAN/2005 1 00:00:03
√√
03 20/JAN/2005 2 00:00:15
√√
04 20/JAN/2005 2 00:00:16
√√
05 Sports(A1) 00:06:32
√√
06 21/JAN/2005 1 00:08:16
√√
RETURNOKMOVE EXIT
Title List
DVD-RAM(VR)
No. Title Length Edit
21/JAN/2005 12:00 PR12
21/JAN/2005
12:00 SP
01 19/JAN/2005 1 00:00:21
√√
02 19/JAN/2005 1 00:00:03
√√
03 20/JAN/2005 2 00:00:15
√√
04 20/JAN/2005 2 00:00:16
√√
05 21/JAN/2005 1 00:06:32
√√
06 21/JAN/2005 1 00:08:16
√√
Play
Rename
Delete
Edit
Protection
RETURNOKMOVE EXIT
Rename
DVD-RAM(VR)
Sports(A1)
RETURNOKMOVE EXIT
Rename
DVD-RAM(VR)
21/JAN/2005 12:00 PR12
00842C-R125-XEB_71~87 2005.6.29 10:25 PM Page 71

72
- English
Editing
Locking(Protecting) a Title
Follow these instructions to lock an entry to protect it
from accidental deletion.
Using the TITLE LIST button
Using the TITLE LIST button
1
Press the TITLE LIST button.
The Title List screen is displayed
Using the MENU button
● Press the MENU button.
● Press the …† buttons to select Disc Navigation,
then press the OK or √ button twice.
2
Press the …† buttons to select an entry
you want to protect in the Title List, then
press the OK or √ button.
3
Press the …† buttons to select Protection,
then press the OK or √ button.
4
Press the œ √ buttons to select On, then
press the OK button. The key icon on the
information window for the selected entry
changes to the locked status. ( ➝ )
Deleting a Title
Follow these instructions to delete an entry from the
Title List.
Using the TITLE LIST button
Using the TITLE LIST button
1
Press the TITLE LIST button.
The Title List screen is displayed
Using the MENU button
● Press the MENU button.
● Press the …† buttons to select Disc Navigation,
then press the OK or √ button twice.
2
Press the …† buttons to select an entry
you want to delete in the Title List, then
press the OK or √ button.
RETURNOKMOVE EXIT
Title List
DVD-RAM(VR)
No. Title Length Edit
Drama
19/JAN/2005
12:00 SP
01 Drama 00:00:21
√√
02 Music 00:00:03
√√
03 Sports 00:00:15
√√
04 Movie 00:00:16
√√
05 Sports(A1) 00:06:32
√√
06 Edu 1 00:08:16
√√
RETURNOKMOVE EXIT
Title List
DVD-RAM(VR)
No. Title Length Edit
19/JAN/2005 12:00 PR12
19/JAN/2005
12:00 SP
01 Drama 00:00:21
√√
02 Music 00:00:03
√√
03 Sports 00:00:15
√√
04 Movie 00:00:16
√√
05 Sports(A1) 00:06:32
√√
06 Edu 1 00:08:16
√√
Play
Rename
Delete
Edit
Protection
RETURNOKMOVE EXIT
Title List
DVD-RAM(VR)
No. Title Length Edit
Drama
19/JAN//2005
12:00 SP
01 Drama 00:00:21
√√
02 Music 00:00:03
√√
03 Sports 00:00:15
√√
04 Movie 00:00:16
√√
05 Sports(A1) 00:06:32
√√
06 Edu 1 00:08:16
√√
RETURNOKMOVE EXIT
Title List
DVD-RAM(VR)
No. Title Length Edit
Sports(A1)
19/JAN/2005
12:00 SP
01 Drama 00:00:21
√√
02 Music 00:00:03
√√
03 Sports 00:00:15
√√
04 Movie 00:00:16
√√
05 Sports(A1) 00:06:32
√√
06 Edu 1 00:08:16
√√
Play
Rename
Delete
Edit
Protection
RETURNOKMOVE EXIT
Title List
DVD-RAM(VR)
No. Title Length Edit
Sports(A1)
19/JAN/2005
12:00 SP
01 Drama 00:00:21
√√
02 Music 00:00:03
√√
03 Sports 00:00:15
√√
04 Movie 00:00:16
√√
05 Sports(A1) 00:06:32
√√
06 Edu 1 00:08:16
√√
Play
Rename
Delete
Edit
Protection
RETURNOKMOVE EXIT
Title List
DVD-RAM(VR)
No. Title Length Edit
Sports(A1)
19/JAN/2005
12:00 SP
01 Drama 00:00:21
√√
02 Music 00:00:03
√√
03 Sports 00:00:15
√√
04 Movie 00:00:16
√√
05 Sports(A1) 00:06:32
√√
06 Edu 1 00:08:16
√√
RETURNOKMOVE EXIT
Title List
DVD-RAM(VR)
Sports(A1)
19/JAN/2005
12:00 SP
Title Protection:
OffOn
00842C-R125-XEB_71~87 2005.6.29 10:25 PM Page 72

English -
73
Editing
Deleting a Section of a Title
Follow these instructions to delete a section of a Title
List entry.
Using the TITLE LIST button
Using the TITLE LIST button
1
Press the TITLE LIST button.
The Title List screen is displayed
Using the MENU button
● Press the MENU button.
● Press the …† buttons to select Disc Navigation,
then press the OK or √ button twice.
2
Press the …† buttons to select an entry
you want to edit from the Title List, then
press the OK or √ button.
3
Press the …† buttons to select Edit, then
press the OK or √ button.
The Edit Title List screen is display
3
Press the …† buttons to select Delete,
then press the OK or √ button.
You will be prompted with a confirmation
message.
DVD-RAM(VR), DVD-RW(VR mode): Since
Playlist is present, the message ‘Do you want to
delete? (Related playlist may be deleted.)’ is
displayed.
DVD-RW(Video mode), DVD-R: Since Playlist is
not present, the message ‘Do you want to delete?’
is displayed.
● The message may depend on the type of disc.
4
Press the œ √ buttons to select Yes, then
press the OK button.
RETURNOKMOVE EXIT
Title List
DVD-RAM(VR)
No. Title Length Edit
Drama
19/JAN/2005
12:00 SP
01 Drama 00:00:21
√√
02 Music 00:00:03
√√
03 Sports 00:00:15
√√
04 Movie 00:00:16
√√
05 Sports(A1) 00:06:32
√√
06 Edu 1 00:08:16
√√
RETURNOKMOVE EXIT
Title List
DVD-RAM(VR)
No. Title Length Edit
Sports(A1)
19/JAN/2005
12:00 SP
01 Drama 00:00:21
√√
02 Music 00:00:03
√√
03 Sports 00:00:15
√√
04 Movie 00:00:16
√√
05 Sports(A1) 00:06:32
√√
06 Edu 1 00:08:16
√√
Play
Rename
Delete
Edit
Protection
RETURNOKMOVE EXIT
Title List
DVD-RAM(VR)
Sports(A1)
19/JAN/2005
12:00 SP
Do you want to delete?
(Related playlists
may be deleted.)
NoYes
■
You cannot delete a protected entry.
If you want to delete a protected entry,
select “Off” in the Title Protection menu.
(See page 72)
■
When the Disc Protection has been set to
Protected, you cannot delete titles.
(See page 84)
■
Once an entry is deleted from the Title
List it cannot be recovered.
■
Once DVD-R, DVD-RW is finalised, it
cannot be deleted.
■
With DVD-R, titles are only deleted from
the menu however, the Title remains
physically on the disc.
NOTE
(VR mode)
RETURNOKMOVE EXIT
Title List
DVD-RAM(VR)
No. Title Length Edit
Sports(A1)
19/JAN/2005
12:00 SP
01 Drama 00:00:21
√√
02 Music 00:00:03
√√
03 Sports 00:00:15
√√
04 Movie 00:00:16
√√
05 Sports(A1) 00:06:32
√√
06 Edu 1 00:08:16
√√
Play
Rename
Delete
Edit
Protection
RETURNOKMOVE EXIT
Edit Title List
DVD-RAM(VR)
Sports(A1)
21/JAN/2005 11:50
00:00:00
Start
End
Delete
Return
Title List No. 05
Start 00:00:00
End 00:00:00
00842C-R125-XEB_71~87 2005.6.29 10:26 PM Page 73

74
- English
Editing
4
Press the OK button at the starting point.
The image and starting point time are displayed in the
section deletion starting point window.
Edit Title List Screen Elements
1. Playback bar
2. Playtime
3. Section deletion starting point window and time
4. Section deletion end point window and time
● Select the start and end points of the section you
want to delete using the playback related buttons.
● Playback related buttons: (
,
,).
5
Press the OK button at the end point.
The image and end point time are displayed in the
Section deletion ending point window.
6
Press the OK button at the Delete.
7
Press œ √ buttons to select Yes, then press
the OK button.
The selected section has been deleted.
To return to the Title List screen, press the …†
buttons to select Return.
■
The length of the section to be deleted
must be at least 5 seconds long.
■
If the length of the section to be deleted is
less than 5 seconds, you will be prompted
with the message 'The range is too
short.'.
■
If the end time precedes the starting
point, you will be prompted with the
message ‘End point cannot be marked
earlier than start point’.
■
The section cannot be deleted when it
includes a still picture.
■
Press the MENU button after the
operation has finished. The Edit Title List
screen will disappear.
NOTE
RETURNOKMOVE EXIT
Edit Title List
DVD-RAM(VR)
Sports(A1)
21/JAN/2005 11:50
00:00:06
Start
End
Delete
Return
Title List No. 05
Start 00:00:06
End 00:00:00
RETURNOKMOVE EXIT
Edit Title List
DVD-RAM(VR)
Sports(A1)
21/JAN/2005 11:50
00:00:06
Start
End
Delete
Return
Title List No. 05
Start 00:00:06
End 00:00:00
1
2
3
4
RETURNOKMOVE EXIT
Edit Title List
DVD-RAM(VR)
Sports(A1)
21/JAN/2005 11:50
00:10:15
Start
End
Delete
Return
Title List No. 05
Start 00:00:06
End 00:10:15
RETURNOKMOVE EXIT
Edit Title List
DVD-RAM(VR)
Sports(A1)
21/JAN/2005 11:50
00:10:15
Start
End
Delete
Return
Title List No. 05
Start 00:00:06
End 00:10:15
RETURNOKMOVE EXIT
Edit Title List
DVD-RAM(VR)
Sports(A1)
21/JAN/2005 11:50
00:10:15
Start
End
Delete
Return
Title List No. 05
Start 00:00:06
End 00:10:10
Do you want to delete?
(Deleted part will not be restored.)
Yes No
00842C-R125-XEB_71~87 2005.6.29 10:26 PM Page 74

English -
75
Editing
5
Press the OK button at the end point.
● The image and end point time are displayed in the
End window.
● The yellow-coloured selection bar moves to the
Make item.
- To make a new playlist -
6
Press the OK button to select the Make.
Anew Scene will be added to the current Playlist.
Anew Make Scene screen is displayed.
- To return to Edit Playlist menu -
7
Press the …† buttons to select Return,
then press the OK button.
The Edit Playlist screen is displayed.
8
Press the MENU or PLAY LIST button after
the operation has finished.
The Edit Playlist screen will disappear.
Creating a Playlist
Follow these instructions to create a new playlist entry
from a recorded title.
1
With the unit in Stop mode, press the
MENU button.
2
Press the …† buttons to select Playlist, then
press the OK or √ button.
3
Press the …† buttons to select New
Playlist, then press the OK or √ button.
The Make Scene screen is displayed.
4
Press the OK button at the start point.
● The image and time at the start point are
displayed on the Start window.
● The yellow-coloured selection bar moves to the
End item.
● Select the starting point of the section from
which you want to create a new scene using the
playback related buttons (
,
,).
Advanced Editing
(Playlist)
■
You can create up to 99 playlist entries.
■
Depending on the kind of disc, the
displayed screen may have a slight
difference.
NOTE
■
You can check and see all the scenes on
Edit Playlist screen.
■
Repeat steps 1~6 if you want to make a
new playlist.
■
Repeat steps 4~6 if you want to make
scenes of the playlist.
NOTE
(VR mode)
RETURNOKMOVE EXIT
Make Scene
DVD-RAM(VR)
New Playlist
19/JAN/2005 12:00
00:00:10
Start
End
Make
Return
Scene No. 001
Start 00:00:00
End 00:00:00
RETURNOKMOVE EXIT
Make Scene
DVD-RAM(VR)
New Playlist
19/JAN/2005 12:00
00:00:10
Start
End
Make
Return
Scene No. 001
Start 00:00:10
End 00:00:00
RETURNOKMOVE EXIT
Edit Playlist
DVD-RAM(VR)
No. Title Length Edit
25/JAN/2005 06:03
7 Scenes
24/JAN/2005 10:43
01 23/JAN/2005/0 00:00:21
√√
02 23/JAN/2005/0 00:00:03
√√
03 24/JAN/2005/1 00:00:15
√√
04 24/JAN/2005/1 00:00:16
√√
05 25/JAN/2005/2 00:06:32
√√
RETURNOKMOVE EXIT
Make Scene
DVD-RAM(VR)
New Playlist
19/JAN/2005 12:00
00:10:00
Start
End
Make
Return
Scene No. 001
Start 00:00:10
End 00:10:00
RETURNOKMOVE EXIT
Playlist
DVD-RAM(VR)
New Playlist
√√
Edit Playlist
√√
Disc Navigation
Playlist
Disc manager
Programme
Setup
Title List: 1/6
Title List: 1/6
Title List: 1/6
00842C-R125-XEB_71~87 2005.6.29 10:26 PM Page 75

76
- English
Editing
3
Press the …† buttons to select Play, then
select the OK button.
The playlist entries will be played.
● To view the current status of the disc and progress
of playback : Press the INFO button, and the
information about the disc will appear.
● Press the INFO button once again. Then you can
check the information about the playlist currently
playing back.
● The screen returns to the Edit Playlist screen when
the playback has finished.
4
Press the STOP button to stop playing.
The screen returns to the Edit Playlist screen.
Playing Entries in the Playlist
Follow these instructions to play the playlist entries.
1
With the unit in Stop mode, press the
PLAY LIST button.
The Edit Playlist screen is displayed.
Using the MENU button
● With the unit in Stop mode, press the MENU
button.
● Press the …† buttons to select Playlist, then
press the OK or √ button.
● Press the …† buttons to select Edit Playlist,
then press the OK or √ button.
2
Press the …† buttons to select the title you
want to edit from the Playlist, then press the
OK or √ button.
The Edit Playlist menu is displayed : Play, Rename,
Edit Screen, Copy, Delete.
(VR mode)
RETURNOKMOVE EXIT
Edit Playlist
DVD-RAM(VR)
No. Title Length Edit
24/JAN/2005 10:43
7 Scenes
24/JAN/2005 10:43
01 23/JAN/2005/0 00:00:21
√√
02 23/JAN/2005/0 00:00:03
√√
03 24/JAN/2005/1 00:00:15
√√
04 24/JAN/2005/1 00:00:16
√√
05 25/JAN/2005/2 00:06:32
√√
RETURNOKMOVE EXIT
Playlist
DVD-RAM(VR)
New Playlist
√√
Edit Playlist
√√
Disc Navigation
Playlist
Disc manager
Programme
Setup
RETURNOKMOVE EXIT
Edit Playlist
DVD-RAM(VR)
No. Title Length Edit
24/JAN/2005 10:43
7 Scenes
24/JAN/2005 10:43
01 23/JAN/2005/0 00:00:21
√√
02 23/JAN/2005/0 00:00:03
√√
03 24/JAN/2005/1 00:00:15
√√
04 24/JAN/2005/1 00:00:16
√√
05 25/JAN/2005/2 00:06:32
√√
Play
Rename
Edit Scene
Copy
Delete
√√
Play
DVD-RAM(VR) Disc Info
Disc Name
Total Title 15
Total Playlist 2
Recordable Time 02:12 SP
Protection Not Protected
Screen Playback [Playlist]
01 JAN 2005 SAT 13:00
DVD-RAM(VR) Playing Info
Name 01/JAN/2005 12:00
Playlist 1/15
Created Time 01/JAN/2005 12:00
Length
00:01:43
Playing Time
00:13:27
Total Scene 1
01 JAN 2005 SAT 13:00
00842C-R125-XEB_71~87 2005.6.29 10:26 PM Page 76

English -
77
4
Enter the desired characters using the …†
œ √ buttons.
● This function is the same as the Rename
function in renaming the title list. (See page 71.)
● The maximum number of characters that can be
entered is 31. All 31 characters can be
displayed by pressing the INFO button twice.
5
Press the …† œ √ buttons to select Save,
then press the OK button.
The changed title is displayed in the title field of the
selected playlist entry.
Renaming a Playlist Entry
Follow these instructions to rename a playlist entry, i.e.
to edit the title of a playlist entry.
1
With the unit in Stop mode, press the
PLAY LIST button.
The Edit Playlist screen is displayed.
Using the MENU button
● With the unit in Stop mode, press the MENU
button.
● Press the …† buttons to select Playlist, then
press the OK or √ button.
● Press the …† buttons to select Edit Playlist,
then press the OK or √ button.
2
Press the …† buttons to select the title you
want to edit from the Playlist, then press the
OK or √ button.
The Edit Playlist menu is displayed :Play, Rename,
Edit Scene, Copy, Delete
3
Press the …† buttons to select Rename, then
press the OK button.
The Rename screen is displayed.
(VR mode)
Editing
RETURNOKMOVE EXIT
Rename
DVD-RAM(VR)
Dolphin
RETURNOKMOVE EXIT
Edit Playlist
DVD-RAM(VR)
No. Title Length Edit
Dolphin
7 Scenes
24/JAN/2005 10:43
01 23/JAN/2005/0 00:00:21
√√
02 23/JAN/2005/0 00:00:03
√√
03 Dolphin 00:00:15
√√
04 24/JAN/2005/1 00:00:16
√√
05 25/JAN/2005/2 00:06:32
√√
RETURNOKMOVE EXIT
Edit Playlist
DVD-RAM(VR)
No. Title Length Edit
24/JAN/2005 10:43
7 Scenes
24/JAN/2005 10:43
01 23/JAN/2005/0 00:00:21
√√
02 23/JAN/2005/0 00:00:03
√√
03 24/JAN/2005/1 00:00:15
√√
04 24/JAN/2005/1 00:00:16
√√
05 25/JAN/2005/2 00:06:32
√√
RETURNOKMOVE EXIT
Edit Playlist
DVD-RAM(VR)
No. Title Length Edit
24/JAN/2005 10:43
7 Scenes
24/JAN/2005 10:43
01 23/JAN/2005/0 00:00:21
√√
02 23/JAN/2005/0 00:00:03
√√
03 24/JAN/2005/1 00:00:15
√√
04 24/JAN/2005/1 00:00:16
√√
05 25/JAN/2005/2 00:06:32
√√
Play
Rename
Edit Scene
Copy
Delete
RETURNOKMOVE EXIT
Edit Playlist
DVD-RAM(VR)
No. Title Length Edit
24/JAN/2005 10:43
7 Scenes
24/JAN/2005 10:43
01 23/JAN/2005/0 00:00:21
√√
02 23/JAN/2005/0 00:00:03
√√
03 24/JAN/2005/1 00:00:15
√√
04 24/JAN/2005/1 00:00:16
√√
05 25/JAN/2005/2 00:06:32
√√
Play
Rename
Edit Scene
Copy
Delete
00842C-R125-XEB_71~87 2005.6.29 10:26 PM Page 77

78
- English
Editing
Editing a Scene for the Playlist
Follow these instructions to edit scenes for a playlist.
1
With the unit in Stop mode, press the
PLAY LIST button.
The Edit Playlist screen is displayed.
Using the MENU button
● With the unit in Stop mode, press the MENU
button.
● Press the …† buttons to select Playlist, then
press the OK or √ button.
● Press the …† buttons to select Edit Playlist,
then press the OK or √ button.
2
Press the …† buttons to select the title you
want to edit from the Playlist, then press the
OK or √ button.
The Edit Playlist menu is displayed.:Play, Rename,
Edit Scene, Copy, Delete
3
Press the …† buttons to select Edit
Scene, then press the OK button.
The Edit Scene screen is displayed.
(VR mode)
4
Press the …† œ √ buttons to select the
scene you want to play, then press the OK
button.
The playlist entry to be played is selected.
5
Press the OK button.
The selected scene is played.
● To stop scene play, press the STOP button.
Playing a Selected Scene
RETURNOKMOVE EXIT
Edit Playlist
DVD-RAM(VR)
No. Title Length Edit
Dolphin
7 Scenes
24/JAN/2005 10:43
01 Science 00:00:17
√√
02 Sky 00:00:06
√√
03 Dolphin 00:00:06
√√
04 Natural 00:00:37
√√
Play
Rename
Edit Scene
Copy
Delete
RETURNOKMOVE EXIT
Edit Playlist
DVD-RAM(VR)
No. Title Length Edit
Dolphin
7 Scenes
24/JAN/2005 10:43
01 Science 00:00:17
√√
02 Sky 00:00:06
√√
03 Dolphin 00:00:06
√√
04 Natural 00:00:37
√√
Play
Rename
Edit Scene
Copy
Delete
RETURNOKMOVE EXIT
Edit Playlist
DVD-RAM(VR)
No. Title Length Edit
Science
7 Scenes
24/JAN/2005 10:43
01 Science 00:00:17
√√
02 Sky 00:00:06
√√
03 Dolphin 00:00:06
√√
04 Natural 00:00:37
√√
RETURNOKMOVE EXIT
Edit Scene
DVD-RAM(VR)
Scene No. 1/7 Playlist No. 3
Play
Modify
Move
Add
Delete
01 00:00:26 02 00:00:07 03 00:00:04
04 00:00:03 05 00:00:11 06 00:00:04
RETURNOKMOVE EXIT
Edit Scene
DVD-RAM(VR)
Scene No. 2/7 Playlist No. 3
Play
Modify
Move
Add
Delete
01 00:00:26 02 00:00:07 03 00:00:04
04 00:00:03 05 00:00:11 06 00:00:04
RETURNOKMOVE EXIT
Edit Scene
DVD-RAM(VR)
Scene No. 2/7 Playlist No. 3
Play
Modify
Move
Add
Delete
01 00:00:26 02 00:00:07 03 00:00:04
04 00:00:03 05 00:00:11 06 00:00:04
√√
Play
00842C-R125-XEB_71~87 2005.6.29 10:26 PM Page 78

English -
79
Editing
7
Press the OK button at the end point of the
scene.
● The image and ending point time are displayed in
the End window.
8
Press the …† buttons to select Change, then
press the OK button.
● The scene you want to modify is changed with the
selected section.
To setup, follow steps 1 to 3 in page 78.
4
Press the …† œ √ buttons to select the
scene you want to modify, then press the
OK button.
5
Press the …† buttons to select Modify,
then press the OK button.
The Modify Scene screen is displayed.
6
Press the OK button at the start point of the
scene.
● The image and starting point time are displayed
on the Start window.
● Select the starting or ending point of the section
you want to modify using the playback related
buttons (
,
,).
Modifying a Scene (Replacing a Scene)
RETURNOKMOVE EXIT
Modify Scene
DVD-RAM(VR)
Natural
23/JAN/2005 03:34
00:00:30
Start
End
Change
Cancel
Scene No. 002
Start 00:00:25
End 00:00:30
RETURNOKMOVE EXIT
Edit Scene
DVD-RAM(VR)
Scene No. 2/7 Playlist No. 3
Play
Modify
Move
Add
Delete
01 00:00:26 02 00:00:07 03 00:00:04
04 00:00:03 05 00:00:11 06 00:00:04
RETURNOKMOVE EXIT
Edit Scene
DVD-RAM(VR)
Scene No. 2/7 Playlist No. 3
Play
Modify
Move
Add
Delete
01 00:00:26 02 00:00:07 03 00:00:04
04 00:00:03 05 00:00:11 06 00:00:04
RETURNOKMOVE EXIT
Modify Scene
DVD-RAM(VR)
Natural
23/JAN/2005 03:34
00:00:00
Start
End
Change
Cancel
Scene No. 002
Start 00:00:00
End 00:00:00
RETURNOKMOVE EXIT
Modify Scene
DVD-RAM(VR)
Natural
23/JAN/2005 03:34
00:00:25
Start
End
Change
Cancel
Scene No. 002
Start 00:00:25
End 00:00:00
Title List: 1/6
Title List: 1/6
Title List: 1/6
00842C-R125-XEB_71~87 2005.6.29 10:26 PM Page 79

80
- English
Editing
To setup, follow steps 1 to 3 in page 78.
4
Press the …† œ √ buttons to select the
scene you want to move (change the
position), then press the OK button.
5
Press the …† buttons to select Move, then
press the OK button.
● A yellow selection window is displayed on the
scene to be moved.
6
Press the …† œ √ buttons to select the
position to which you want to move the
selected scene, then select the OK button.
● The selected scene is moved to the selected
position.
Moving a Scene (Changing the Position of a Scene)
To setup, follow steps 1 to 3 in page 78.
4
Press the …† œ √ buttons to select the
scene that will have a new scene inserted
before it, then press the OK button.
Ayellow selection window is displayed on the scene
to be added as the new scene.
5
Press the …† buttons to select Add, then
press the OK button.
6
Press the OK button at the starting point of
the scene.
● The image and starting point time are displayed in
the Start window.
● Select the end point of the section where you want
to add the new scene using the playback related
buttons (
,
,).
Adding a Scene
■
You cannot move the selected scene to the
position of the next scene, because the
selected scene should be inserted before
that position, which requires no action.
■
Depending on the kind of disc, the displayed
screen may have a slight difference.
NOTE
RETURNOKMOVE EXIT
Edit Scene
DVD-RAM(VR)
Scene No. 3/7 Playlist No. 3
Play
Modify
Move
Add
Delete
01 00:00:26 02 00:00:07 03 00:00:04
04 00:00:03 05 00:00:11 06 00:00:04
RETURNOKMOVE EXIT
Edit Scene
DVD-RAM(VR)
Scene No. 3/7 Playlist No. 3
Play
Modify
Move
Add
Delete
01 00:00:26 02 00:00:07 03 00:00:04
04 00:00:03 05 00:00:11 06 00:00:04
RETURNOKMOVE EXIT
Edit Scene
DVD-RAM(VR)
Scene No. 6/7 Playlist No. 3
Play
Modify
Move
Add
Delete
01 00:00:26 02 00:00:07 03 00:00:04
04 00:00:03 05 00:00:11 06 00:00:04
RETURNOKMOVE EXIT
Edit Scene
DVD-RAM(VR)
Scene No. 5/7 Playlist No. 3
Play
Modify
Move
Add
Delete
01 00:00:26 02 00:00:07 03 00:00:04
04 00:00:03 05 00:00:11 06 00:00:04
RETURNOKMOVE EXIT
Edit Scene
DVD-RAM(VR)
Scene No. 4/7 Playlist No. 3
Play
Modify
Move
Add
Delete
01 00:00:26 02 00:00:07 03 00:00:04
RETURNOKMOVE EXIT
Add Scene
DVD-RAM(VR)
Sclence
23/JAN/2005 06:43
00:00:15
Start
End
Add
Cancel
Scene No. 004
Start 00:00:15
End 00:00:00
RETURNOKMOVE EXIT
Add Scene
DVD-RAM(VR)
Sclence
23/JAN/2005 06:43
00:00:15
Start
End
Add
Cancel
Scene No. 004
Start 00:00:00
End 00:00:00
04 00:00:00 05 00:00:11 06 00:00:04
Title List: 1/6
Title List: 1/6
00842C-R125-XEB_71~87 2005.6.29 10:26 PM Page 80

English -
81
Editing
7
Press the OK button at the end point of the
scene.
● The image and time of the end point are displayed
in the End window.
● To cancel, press the …† buttons to select cancel,
then press the OK button.
8
Press the …† buttons to select Add, then
press the OK button.
● The section you want to add is inserted prior to the
scene selected in step 4.
To setup, follow steps 1 to 3 in page 78.
4
Press the …† œ √ buttons to select the
scene you want to delete, then press the
OK button.
5
Press the …† buttons to select Delete,
then press the OK button.
Deleting a Scene
Copying a Playlist Entry to the
Playlist
Using the PLA
Using the PLA
Y
Y
LIST button
LIST button
1
With the unit in Stop mode, press the
PLAY LIST button.
The Edit Playlist screen is displayed.
Using the MENU button
● With the unit in Stop mode, press the MENU
button.
● Press the …† buttons to select Playlist, then press
the OK or √ button.
● Press the …† buttons to select Edit Playlist, then
press the OK or √ button.
2
Press the …† buttons to select the title you
want to copy to the Playlist, then press the
OK or √ button.
The Edit Playlist menu is displayed.:Play, Rename,
Edit Scene, Copy, Delete
3
Press the …† buttons to select Copy, then
press the OK button.
Playlist that has been selected will be copied.
RETURNOKMOVE EXIT
Add Scene
DVD-RAM(VR)
Sclence
23/JAN/2005 06:43
00:00:35
Start
End
Add
Cancel
Scene No. 004
Start 00:00:15
End 00:00:35
RETURNOKMOVE EXIT
Edit Scene
DVD-RAM(VR)
Scene No. 2/6 Playlist No. 3
Play
Modify
Move
Add
Delete
01 00:00:26 02 00:00:07 03 00:00:04
04 00:00:00 04 00:00:00
RETURNOKMOVE EXIT
Edit Playlist
DVD-RAM(VR)
No. Title Length Edit
Science
7 Scene
23/JAN/2005 06:43
01 Science 00:00:17
√√
02 Sky 00:00:06
√√
03 Dolphin 00:00:06
√√
04 Natural 00:00:37
√√
RETURNOKMOVE EXIT
Edit Playlist
DVD-RAM(VR)
No. Title Length Edit
Dolphin
7 Scene
23/JAN/2005 06:43
01 Science 00:00:17
√√
02 Sky 00:00:06
√√
03 Dolphin 00:00:06
√√
04 Natural 00:00:37
√√
05 Dolphin 00:00:06
√√
RETURNOKMOVE EXIT
Edit Playlist
DVD-RAM(VR)
No. Title Length Edit
Dolphin
7 Scene
23/JAN/2005 06:43
01 Science 00:00:17
√√
02 Sky 00:00:06
√√
03 Dolphin 00:00:06
√√
04 Natural 00:00:37
√√
Play
Rename
Edit Scene
Copy
Delete
RETURNOKMOVE EXIT
Edit Playlist
DVD-RAM(VR)
No. Title Length Edit
Dolphin
7 Scene
23/JAN/2005 06:43
01 Science 00:00:17
√√
02 Sky 00:00:06
√√
03 Dolphin 00:00:06
√√
04 Natural 00:00:37
√√
Play
Rename
Edit Scene
Copy
Delete
RETURNOKMOVE EXIT
Edit Scene
DVD-RAM(VR)
Scene No. 2/6 Playlist No. 3
Play
Modify
Move
Add
Delete
01 00:00:26 02 00:00:07 03 00:00:04
04 00:00:03 05 00:00:11 06 00:00:04
05 00:00:11 06 00:00:00
RETURNOKMOVE EXIT
Edit Scene
DVD-RAM(VR)
Scene No. 4/8 Playlist No. 3
Play
Modify
Move
Add
Delete
01 00:00:26 02 00:00:07 03 00:00:04
04 00:00:15
05 00:00:11 06 00:00:04
Title List: 1/6
00842C-R125-XEB_71~87 2005.6.29 10:26 PM Page 81

82
- English
Editing
3
Press the …† buttons to select Delete,
then press the OK button.
● You will be prompted with the delete confirmation
message 'Do you want to delete?'.
4
Press the œ √ buttons to select Yes, then
press the OK button.
It automatically returned to the Edit Playlist screen
after the delete operation has finished.
Deleting a Playlist Entry from
the Playlist
Using the PLA
Using the PLA
YLIST button
YLIST button
1
With the unit in Stop mode, press the
PLAY LIST button.
The Edit Playlist screen is displayed.
Using the MENU button
● With the unit in Stop mode, press the MENU
button.
● Press the …† buttons to select Playlist, then
press the OK or √ button.
● Press the …† buttons to select Edit Playlist, then
press the OK or √ button.
2
Press the …† buttons to select the title you
want to delete from the Playlist, then press
the OK or √ button.
The Edit Playlist menu is displayed.:Play, Rename,
Edit Scene, Copy, Delete
■
You can create up to 999 scenes on one
disc. In some cases, this may be different
from the actual numbers.
■
Press the MENU button after the
operation has finished. The Edit Playlist
screen will disappear.
NOTE
RETURNOKMOVE EXIT
Edit Playlist
DVD-RAM(VR)
No. Title Length Edit
Science
7 Scene
23/JAN/2005 06:43
01 Science 00:00:17
√√
02 Sky 00:00:06
√√
03 Dolphin 00:00:06
√√
04 Natural 00:00:37
√√
05 Dolphin 00:00:06
√√
RETURNOKMOVE EXIT
Edit Playlist
DVD-RAM(VR)
No. Title Length Edit
Dolphin
7 Scene
23/JAN/2005 06:43
01 Science 00:00:17
√√
02 Sky 00:00:06
√√
03 Dolphin 00:00:06
√√
04 Natural 00:00:37
√√
05 Dolphin 00:00:06
√√
Play
Rename
Edit Scene
Copy
Delete
RETURNOKMOVE EXIT
Edit Playlist
DVD-RAM(VR)
No. Title Length Edit
Natural
7 Scene
23/JAN/2005 06:43
01 Science 00:00:17
√√
02 Sky 00:00:06
√√
03 Dolphin 00:00:06
√√
04 Natural 00:00:37
√√
RETURNOKMOVE EXIT
Edit Playlist
DVD-RAM(VR)
No. Title Length Edit
Dolphin
7 Scene
23/JAN/2005 06:43
01 Science 00:00:17
√√
02 Sky 00:00:06
√√
03 Dolphin 00:00:06
√√
04 Natural 00:00:37
√√
05 Dolphin 00:00:06
√√
Play
Rename
Edit Scene
Copy
Delete
RETURNOKMOVE EXIT
Edit Playlist
DVD-RAM(VR)
Dolphin
7 Scene
23/JAN/2005 06:43
Do you want to delete?
NoYes
RETURNOKMOVE EXIT
Edit Playlist
DVD-RAM(VR)
Dolphin
7 Scene
23/JAN/2005 06:43
Deleting...
(Please wait)
00842C-R125-XEB_71~87 2005.6.29 10:26 PM Page 82

English -
83
Editing
4
Enter the desired characters press the …†
œ √ buttons.
● This function is the same as the Rename
function in renaming the title list. (See page 71.)
● The maximum number of characters that can be
entered is 31. All 31 characters can be
displayed by pressing the INFO button.
5
Press the …† œ √ buttons to select Save,
then press the OK button.
Adisc name is given to the disc.
Editing the Disc Name
Follow these instructions to give a name to a disc.
1
With the unit in Stop mode, press the
MENU button.
2
Press the …† buttons to select Disc
Manager, then press the OK or √ button.
3
Press the …† buttons to select Disc
Name, then press the OK or √ button.
The Edit Name screen is displayed.
Disc Manager
■
You may need to clear disc protect before
beginning editing.
■
Depending on the kind of disc, the
displayed screen may be different.
NOTE
RETURNOKMOVE EXIT
Rename
DVD-RAM(VR)
RETURNOKMOVE EXIT
Rename
DVD-RAM(VR)
Disc
RETURNOKMOVE EXIT
Disc Manager
DVD-RAM(VR)
Disc Name :
√√
Disc Protection : Not Protected
√√
Disc Format
√√
Delete All Title Lists
√√
Disc Navigation
Playlist
Disc manager
Programme
Setup
RETURNOKMOVE EXIT
Disc Manager
DVD-RAM(VR)
Disc Name : Disc
√√
Disc Protection : Not Protected
√√
Disc Format
√√
Delete All Title Lists
√√
Title List
Playlist
Disc manager
Programme
Setup
RETURNOKMOVE EXIT
Disc Navigation
DVD-RAM(VR)
Title List
√√
DivX
√√
Photo
√√
Music
√√
Disc Navigation
Playlist
Disc manager
Programme
Setup
00842C-R125-XEB_71~87 2005.6.29 10:26 PM Page 83

84
- English
Editing
Disc Protection
Disc Protection allows you to protect your discs from
being formatted or deleted due to unintended
operations.
1
With the unit in Stop mode, press the
MENU button.
2
Press the …† buttons to select Disc
Manager, then press the OK or √ button.
3
Press the …† buttons to select Disc
Protection, then press the OK or √ button.
4
Press the …† button to select Protected,
then
Press the OK button.
Formatting a Disc
Use these instructions to format a disc.
The Disc Protection should also be cleared.
1
With the unit in Stop mode, press the
MENU button.
2
Press the …† buttons to select Disc
Manager, then press the OK or √ button.
3
Press the …† buttons to select Disc
Format, then press the OK or √ button.
DVD-RAM
●
You will be prompted with the confirmation
message 'Do you want to format disc?'.
●
You will be prompted with the confirmation
message 'All data will be deleted. Do you
want to continue?'.
RETURNOKMOVE EXIT
Disc Manager
DVD-RAM(VR)
Disc Name :
√√
Disc Protection : Not Protected
√√
Disc Format
√√
Delete All Title Lists
√√
Disc Navigation
Playlist
Disc manager
Programme
Setup
RETURNOKMOVE EXIT
Disc Manager
DVD-RAM(VR)
Disc Name :
√√
Disc Protection : Not Protected
√√
Disc Format
√√
Delete All Title Lists
√√
Disc Navigation
Playlist
Disc manager
Programme
Setup
RETURNOKMOVE EXIT
Disc Manager
DVD-RAM(VR)
Disc Name :
√√
Disc Protection : Not Protected
√√
Disc Format
√√
Delete All Title Lists
√√
Disc Navigation
Playlist
Disc manager
Programme
Setup
RETURNOKMOVE EXIT
Disc Manager
DVD-RAM(VR)
Disc Name :
√√
Disc Protection : Portected
√√
Disc Format
√√
Delete All Title Lists
√√
Disc Navigation
Playlist
Disc manager
Programme
Setup
RETURNOKMOVE EXIT
Disc Manager
DVD-RAM(VR)
Disc Name :
√√
Disc Protection : Not Protected
√√
Disc Format
√√
Delete All Title Lists
√√
Disc Navigation
Playlist
Disc manager
Programme
Setup
Not Protected
Portected
RETURNOKMOVE EXIT
Disc Manager
DVD-RAM(VR)
Disc Name :
√√
Disc Protection : Not Protected
√√
Disc Format
√√
Delete All Title Lists
√√
Disc Navigation
Playlist
Disc manager
Programme
Setup
Do you want to format disc?
Yes No
RETURNOKMOVE EXIT
Disc Navigation
DVD-RAM(VR)
Title List
√√
DivX
√√
Photo
√√
Music
√√
Disc Navigation
Playlist
Disc manager
Programme
Setup
RETURNOKMOVE EXIT
Disc Navigation
DVD-RAM(VR)
Title List
√√
DivX
√√
Photo
√√
Music
√√
Disc Navigation
Playlist
Disc manager
Programme
Setup
00842C-R125-XEB_71~87 2005.6.29 10:26 PM Page 84

English -
85
Editing
2
Press the …† buttons to select Disc
Manager, then press the OK or √ button.
3
Press the …† button to select Delete All
Title Lists, then press the OK or √ button.
● You will be prompted with the confirmation
message ‘Do you want to delete all title lists?'.
● When Protected Entry exists: The Delete All Title
List function will not operate. If there is a title
containing a still picture, however, that function will
not operate. If you want to delete a protected entry,
disable Protect for it on the Lock item.
4
Press the œ √ buttons to select Yes, then
press the OK button.
All title lists are deleted.
DVD-RW
●
You will be prompted with the confirmation
message ‘Choose the recording format for
DVD- RW.’
4
Press the œ √ buttons to select Yes, then
press the OK button.
The disc is formatted.
DVD-VR and DVD-V are defined according to
their recording format.
Delete All Title Lists
1
With the unit in Stop mode, press the
MENU button.
DVD-VR DVD-V
DVD-RAM DVD-RW
DVD-RW DVD-R
DISC
RETURNOKMOVE EXIT
Disc Manager
DVD-RW(VR)
Disc Name :
√√
Disc Protection : Not Protected
√√
Disc Format
√√
Delete All Title Lists
√√
Disc Navigation
Playlist
Disc manager
Programme
Setup
Choose the recording format for DVD-RW.
DVD-VR DVD-V
RETURNOKMOVE EXIT
Disc Manager
DVD-RAM(VR)
Disc Name :
√√
Disc Protection : Not Protected
√√
Disc Format
√√
Delete All Title Lists
√√
Disc Navigation
Playlist
Disc manager
Programme
Setup
RETURNOKMOVE EXIT
Disc Manager
DVD-RAM(VR)
Disc Name :
√√
Disc Protection : Not Protected
√√
Disc Format
√√
Delete All Title Lists
√√
Disc Navigation
Playlist
Disc manager
Programme
Setup
RETURNOKMOVE EXIT
Disc Manager
DVD-RAM(VR)
Disc Name :
√√
Disc Protection : Not Protected
√√
Disc Format
√√
Delete All Title Lists
√√
Disc Navigation
Playlist
Disc manager
Programme
Setup
Do you want to delete all title lists?
Yes No
RETURNOKMOVE EXIT
Disc Navigation
DVD-RAM(VR)
Title List
√√
DivX
√√
Photo
√√
Music
√√
Disc Navigation
Playlist
Disc manager
Programme
Setup
00842C-R125-XEB_71~87 2005.6.29 10:26 PM Page 85

86
- English
Editing
Finalising a disc
After you record titles onto a DVD-RW/DVD-R disc with
your DVD recorder, it needs to be finalised before it can
be played back on external devices.
1
With the unit in Stop mode, press the
MENU button.
2
Press the …† buttons to select Disc
Manager, then press the OK or √ button.
3
Press the …† button to select Disc
Finalise, then press the OK or √ button.
You will be prompted with the message 'Do you want
to finalise disc?'.
If you select Yes, you will be prompted again with the
message ' Disc will be finalised. Do you want to
continue?'
4
Press the œ √ buttons to select Yes, then
press the OK button.
The disc is finalised.
RETURNOKMOVE EXIT
Disc Manager
DVD-RW(VR)
Disc Name :
√√
Disc Protection : Not Protected
√√
Disc Format : DVD-VR
√√
Disc Finalise
√√
Delete All Title Lists
√√
Disc Navigation
Playlist
Disc manager
Programme
Setup
RETURNOKMOVE EXIT
Disc Manager
DVD-RW(VR)
Disc Name :
√√
Disc Protection : Not Protected
√√
Disc Format : DVD-VR
√√
Disc Finalise
√√
Delete All Title Lists
√√
Disc Navigation
Playlist
Disc manager
Programme
Setup
RETURNOKMOVE EXIT
Disc Manager
DVD-R(V)
Disc Name :
√√
Disc Protection : Not Protected
√√
Disc Finalise
√√
Delete All Title Lists
√√
Disc Navigation
Disc manager
Programme
Setup
RETURNOKMOVE EXIT
Disc Manager
DVD-RW(VR)
Disc Name :
√√
Disc Protection : Not Protected
√√
Disc Format : DVD-VR
√√
Disc Finalise
√√
Delete All Title Lists
√√
Disc Navigation
Playlist
Disc manager
Programme
Setup
RETURNOKMOVE EXIT
Disc Manager
DVD-R(V)
Disc Name :
√√
Disc Protection : Not Protected
√√
Disc Finalise
√√
Delete All Title Lists
√√
Disc Navigation
Disc manager
Programme
Setup
Do you want to finalise disc?
Yes No
Disc will be finalised.
Do you want to continue?
Yes No
■
Once a disc is finalised, you cannot
delete entries from the record list.
■
After being finalised, the DVD-R/DVD-
RW(video mode) operates in the same
manner as a DVD-Video.
■
Depending on the disc type, the displayed
screen may be different.
■
Finalising time may be different
depending on the amount of data
recorded on the disc.
■
Data on the disc will be damaged if the
recorder is powered off during finalise
process.
NOTE
RETURNOKMOVE EXIT
Disc Navigation
DVD-RW(VR)
Title List
√√
DivX
√√
Photo
√√
Music
√√
Disc Navigation
Playlist
Disc manager
Programme
Setup
00842C-R125-XEB_71~87 2005.6.29 10:26 PM Page 86

English -
87
Editing
Unfinalising a disc (V/VR mode)
1
With the unit in Stop mode, press the
MENU button.
2
Press the …† buttons to select Disc
Manager, then press the OK or √ button.
3
Press the …† button to select Disc
Unfinalise, then press the OK or √ button.
You will be prompted with the message 'Do you want
to unfinalise disc?'.
If you select Yes, you will be prompted again with the
message ' Disc will be unfinalised. Do you want to
continue?'
4
Press the œ √ buttons to select Yes, then
press the OK button.
The disc is unfinalised.
RETURNOKMOVE EXIT
Disc Manager
DVD-RW(VR:F)
Disc Name :
√√
Disc Format : DVD-VR
√√
Disc Unfinalise
√√
Disc Navigation
Playlist
Disc manager
Programme
Setup
RETURNOKMOVE EXIT
Disc Manager
DVD-RW(VR:F)
Disc Name :
√√
Disc Format : DVD-VR
√√
Disc Unfinalise
√√
Disc Navigation
Playlist
Disc manager
Programme
Setup
Do you want to unfinalise disc?
Yes No
RETURNOKMOVE EXIT
Disc Manager
DVD-RW(VR:F)
Disc Name :
√√
Disc Format : DVD-VR
√√
Disc Unfinalise
√√
Disc Navigation
Playlist
Disc manager
Programme
Setup
Disc will be unfinalised.
Do you want to continue?
Yes No
■
A DVD-RW can be finalised or unfinalised
in Video mode.
■
A DVD-RW can be finalised or unfinalised
in VR mode.
NOTE
Finalise Unfinalise
Mark DVD-Video(RW) DVD-RW(V)
Operation Same as DVD-Video
Additional recording, protection
and deletion are possible.
Finalise Unfinalise
Mark DVD-RW(VR:F) DVD-RW(VR)
Additional recording, Additional recording,
Operation deletion, editing, and deletion, editing, and
protection are impossible. protection are possible.
RETURNOKMOVE EXIT
Disc Navigation
DVD-RW(VR:F)
Title List
√√
DivX
√√
Photo
√√
Music
√√
Disc Navigation
Playlist
Disc manager
Programme
Setup
00842C-R125-XEB_71~87 2005.6.29 10:26 PM Page 87

88
- English
Recording is possible for DVD-
RAM/DVD-RW/DVD-R discs only.
If a programme is copy protected, it
cannot be recorded.
Checkpoint 1
I pressed the REC button but there is no response.
If your DVD recorder malfunctions, go through the
checkpoints below before contacting a Samsung autho-
rised service centre.
Power
Recording
Additional
Information
Troubleshooting
Troubleshooting................................................88
Specifications....................................................92
The DVD recorder requires some time
to initialize and the input will be
displayed for approx. 10 seconds after
it is turned on.
Checkpoint 1
Check whether the power cord is
securely plugged into the power outlet.
Did you set the DVD recorder channel
settings correctly?
Check the free space on your
DVD-RAM/DVD-RW/DVD-R discs.
Checkpoint 1
Checkpoint 2
Checkpoint 3
The input is displayed for a while when the
power is turned on.
Cannot record TV programmes.
Additional Information
00842C-R125-XEB_88~93 2005.6.29 10:29 PM Page 88

English -
89
Playback
Check whether the disc is inserted
correctly with the label facing up.
Check the regional code of the DVD
disc.
This DVD recorder cannot play some
types of discs. (See page 52.)
Checkpoint 1
Checkpoint 2
Checkpoint 3
Cannot play the disc.
You cannot use this operation or
function due to one of the following
reasons:
(1) Your DVD disc restricts it.
(2) Your DVD disc does not support this
feature (for example: angles)
(3) The feature is not available at the
moment.
(4) You've requested a title, chapter, or
scan time that is out of range.
Checkpoint 1
icon appears on the screen.
The disc does not support all selected
functions. In this case, some settings
configured in the settings menu may
not work properly.
Checkpoint 1
Play mode settings are different from the settings
configured in the Settings menu.
The aspect ratio is fixed for DVD discs.
(See pages 36~37)
Checkpoint 1
Cannot change the aspect ratio.
The angle operation is available only
when the disc contains images
captured from different angles.
Checkpoint 1
The angle operation does not work while playing a
DVD disc.
Audio and subtitle languages are
disc-specific. Only the sound and
subtitle languages contained on the
DVD disc are available and displayed in
the disc menu.
Checkpoint 1
The selected audio and/or subtitle language is not
played.
Additional Information
Video
Be sure that the Video Setting is
properly set. (See pages 34 ~ 37)
Check whether there is damage to or
any foreign material on your disc.
Some low quality discs may not play
properly.
If scenes change from dark to bright
suddenly, the screen may shake
vertically temporarily, but this is not a
fault.
Checkpoint 1
Checkpoint 2
Checkpoint 3
Checkpoint 4
The disc revolves, but no image or bad quality
images are displayed.
00842C-R125-XEB_88~93 2005.6.29 10:29 PM Page 89

90
- English
Additional Information
Sound
Checkpoint 1
Checkpoint 2
Checkpoint 3
Checkpoint 4
No sound.
Are you watching a programme in slow
or skip mode?
If you are playing a programme at a
speed other than normal speed, sound
will not be heard.
Check the connections and settings.
(See pages 20~21, 33~34)
Check whether the disc is damaged.
Clean the disc, if necessary.
Check whether the disc is inserted
correctly with the label facing up.
Checkpoint 1
No audio output.
Check whether you have selected the
correct digital output options in the
Audio Output Options menu.
(See page 33~34.)
Re-check the recording time and the
end time settings again.
Recording will be cancelled if the power
is interrupted due to a power failure or
another similar reason while recording.
Checkpoint 1
Checkpoint 2
Timer recording does not work properly.
Timer Recording
Check there is enough space in the
disc for recording.
Check whether the current disc is
recordable or not.
Make sure to check before the start
time of recording.
Checkpoint 1
Checkpoint 2
Timer lamp flickers.
HDMI
Check the Video output is HDMI
enabled.
Check the connection between the TV
and the HDMI jack of the DVD
Recorder.
See if your TV supports this
576p/720p/1080i DVD Recorder.
Checkpoint 1
Checkpoint 2
Checkpoint 3
No HDMI output.
Checkpoint 1
Abnormal HDMI output screen.
If snow noise appears on the screen, it
means that TV does not support HDCP
(High-bandwidth Digital Content
Protection).
00842C-R125-XEB_88~93 2005.6.29 10:29 PM Page 90

English -
91
Remote Control Unit
Read the table of contents and then
find and read the section describing
your problem, follow the instructions
given.
Turn your DVD recorder off and on.
If the problem still persists, contact a
nearby Samsung service centre.
Checkpoint 1
Checkpoint 2
Checkpoint 3
Other problems.
Point the remote control at the remote
control sensor on your DVD recorder.
Allow for proper distance. Remove
obstacles between your DVD recorder
and the remote control.
Check whether the batteries are empty.
Check for the TV/DVD selection button.
Checkpoint 1
Checkpoint 2
Checkpoint 3
The remote control doesn't work.
A recorded disc is played with only the
subtitle and the audio signal which
were selected during recording.
Checkpoint 1
Is it possible to change a subtitle and an audio sig-
nal on a recorded disc?
Other
Press the button on the front panel of
the Recorder for more than 5 seconds with
no disc in the DVD recorder. All settings
including the password will revert to the
factory settings. Do not use this unless
absolutely necessary.
(Note that this function is possible only
when no disc is inserted.)
Checkpoint 1
I forgot my password for parental supervision.
Additional Information
Check your TV system setup correctly.
Screen Jitter may occur when the
frame rate is converted from 50Hz to
60Hz for 720p/1080i HDMI (High
Definition Multimedia Interface) Output.
Please refer to the user’s manual of
your TV.
Checkpoint 1
Checkpoint 2
Checkpoint 3
HDMI output Jitter
00842C-R125-XEB_88~93 2005.6.29 10:29 PM Page 91

92
- English
Specifications
Power requirements
Power consumption
Weight
Dimensions
Operating temp.
Other conditions
Video
Audio
DV Input
Receivable Channels
Audio
Video
Picture Compression format
Audio Compression format
Recording Quality
Audio Frequency Response
AC 220-240V, 50Hz
35 Watts
2,9Kg
430mm(W) x 245mm(D) x 59mm(H)
+5°C to +35°C
Keep level when operating. Less than 75% operating humidity
Composite Video : 1,0 V p-p at 75Ω load, sync negative
Max.Audio Input Level : 2Vrms
IEEE 1394(4p) compatible jack
SECAM L, PAL B/G
Video : Composite, Audio: analogue
Video : Composite, RGB Audio: analogue
Analogue output jacks x 2
Optical/Coaxial digital audio output
Composite Video : Video output jack x 1
S-Video output x 1 (Y:1,0Vp-p, C:0,286Vp-p at 75Ω load)
Component output x 1 (Y: 1,0Vp-p, Pb: 0,70Vp-p, Pr: 0,70Vp-p at 75Ω load)
HDMI/DVI (576p, 720p, 1080i)
Video : Composite, RGB Audio: analogue
MPEG-II
Dolby Digital 2ch/256Kbps, MPEG-II
XP (about 8 Mbps), SP (about 4 Mbps), LP (about 2 Mbps),
EP (about 1,2 Mbps or about 0,8 Mbps)
20 Hz ~ 20 kHz
General
Input
Output
Recording
DVD
48 / 96kHz
48kHz
Disc Type
Analogue Audio Output
Digital Audio Output
AUDIO CD(CD-DA)
44,1kHz
44,1kHz
Audio Output
For DVD discs, audio signals recorded at 96kHz sampling
frequency are converted and output at 48kHz.
Scart Jack
AV1 (Scart TV)
AV2 (Scart Ext)
Scart Jack
AV1 (Scart TV)
Additional Information
00842C-R125-XEB_88~93 2005.6.29 10:29 PM Page 92

UNITED KINGDOM
REPUBLIC OF
IRELAND
This Samsung product is warranted for the period of
twelve (12) months from the original date of
purchase, against defective materials and
workmanship. In the event that warranty service is
required, you should return the product to the retailer
from whom it was purchased.
However, Samsung Authorised Dealers and
Authorised Service Centers in other EC Countries
will comply with the warranty on the terms issued to
purchasers in the country concerned.
In case of difficulty, details of our Authorised Service
Centers are available from:
Samsung Electronics (U.K.) Ltd.,
Euro Service Centre,
Stafford Park 12,
TELFORD, Shropshire TF3 3BJ,
Tel: 0870) 242 0303,
Fax: 01952) 297617
■ WARRANTY CONDITIONS
1. The warranty is only valid if, when warranty ser-
vice is required, the warranty card is fully and prop-
erly completed and is presented with the original
invoice or sales slip or confirmation, and the serial
number on the product has not been defaced.
2. Samsung’s obligations are limited to the repair or,
at its discretion, replacement of the product or the
defective part.
3. Warranty repairs must be carried out by Authorised
Samsung Dealers or Authorised Service Centers.
No re-imbursement will be made for repairs carried
out by non Samsung Dealers and, any such repair
work and damage to the products caused by such
repair work will not be covered by this warranty.
4. This product is not considered to be defective in
materials nor workmanship by reason that it
requires adaptation in order to conform to national
or local technical or safety standards in force in
any Country other than the one for which the
product was originally designed and manufac-
tured. This warranty will not cover, and no re-
imbursement will be made for such adaptation nor
any damage which may result.
5. This warranty covers none of the following:
a) Periodic check ups, maintenance and repair or
replacement of parts due to normal wear and
tear.
b) Cost relating to transport, removal or installation
of the product.
c) Misuse, including the faiure to use this product
for its normal purposes or incorrect installation.
d) Damage caused by Lightning, Water, Fire, Acts
of God, War, Public Disturbances, incorrect
mains voltage, improper ventilation or any other
cause beyond the control of Samsung.
6. This warranty is valid for any person who legally
acquired possession of the product during the
warranty period.
7. The consumers statutory rights in any applicable
national legislation whether against the retailer
arising from the purchase contract or otherwise
are not affected by this warranty. Unless there is
national legislation to the contrary, the rights under
this warranty are the consumers sole rights and
Samsung, its subsidiaries and distributors shall not
be liable for indirect or consequential loss or any
damage to records, compact discs, videos or
audio taper or any other related equipment or
material.
SAMSUNG ELECTRONICS (U.K.) LTD.
00842C-R125-XEB_88~93 2005.6.29 10:29 PM Page 93

AK68-00842C-00
Correct Disposal of This Product
(Waste Electrical & Electronic Equipment)
(Applicable in the European Union and other European countries with separate collection systems)
This marking shown on the product or its literature, indicates that it should not be disposed with other
household wastes at the end of its working life. To prevent possible harm to the environment or human
health from uncontrolled waste disposal, please separate this from other types of wastes and recycle it
responsibly to promote the sustainable reuse of material resources.
Household users should contact either the retailer where they purchased this product, or their local
government office, for details of where and how they can take this item for environmentally safe recycling.
Business users should contact their supplier and check the terms and conditions of the purchase
contract. This product should not be mixed with other commercial wastes for disposal.
00842C-R125-XEB_Cover 2005.6.29 10:9 PM Page 2

Gebruiksaanwijzing
DVD-R125
AK68-00842C-00
English Nederlands Français
00842C-R120-NL_Cover 6/14/05 6:00 PM Page 1

BELANGRIJK
Het netsnoer van dit apparaat is voorzien van een
aangegoten stekker die een zekering bevat. De waarde
van de zekering is op de stekker vermeld (aan de kant met
de pinnen). Als deze vervangen moet worden, moet een
zekering worden gebruikt met dezelfde waarde, die aan de
norm BS1362 voldoet.
Gebruik de stekker nooit terwijl het klepje niet op de
zekering zit (als het klepje afneembaar is). Als het klepje
vervangen moet worden, moet het nieuwe klepje dezelfde
kleur hebben als de pinkant van de stekker. Vervangende
klepjes zijn verkrijgbaar bij uw Samsung dealer.
Als de stekker van het apparaat niet geschikt is voor de
stopcontacten in uw woning of als de kabel niet lang
genoeg is, kunt u zonodig een veilig, goedgekeurd
verlengsnoer gebruiken. Neem bij problemen eventueel
contact op uw dealer.
Als er geen andere oplossing is dan de stekker te
verwijderen, dient u eerst de zekering eruit te halen en
daarna pas - op een veilige manier - de stekker te
verwijderen. Sluit de stekker nooit rechtstreeks op het
hoofdnet aan. Daardoor kunt u een schok krijgen.
Op dit apparaat en de gebruiksaanwijzing rusten
intellectuele eigendomsrechten en auteursrechten van
derden. Het gebruiksrecht van de gelicentieerde inhoud is
beperkt tot niet-commercieel gebruik door eindgebruikers.
Commercieel gebruik hiervan is niet toegestaan.
Het gebruiksrecht beperkt zich tot dit apparaat en strekt
zich niet uit tot andere niet-gelicentieerde onderdelen of
processen die voldoen aan ISO/IEC 11172-3 or ISO/IEC
13818-3 en die in combinatie met dit product gebruikt of
verkocht zijn. De licentie beperkt zich tot het gebruik van dit
product voor het encoderen en/of decoderen van
geluidsbestanden die voldoen aan ISO/IEC 11172-3 of
ISO/IEC 13818-3. Deze licentie houdt geen overdracht van
rechten in voor producteigenschappen of -functies die niet
voldoen aan ISO/IEC 11172-3 of ISO/IEC 13818-3.
Waarschuwing
Aan de slag
2
- Nederlands
VERMIJD ELEKTRISCHE SCHOKKEN DOOR DE KAP
NIET TE OPENEN OF VERWIJDEREN.
BEVAT GEEN ONDERDELEN DIE DOOR DE GEBRUIKER
KUNNEN WORDEN VERVANGEN. LAAT ONDERHOUD
OVER AAN EEN DESKUNDIGE TECHNICUS.
Dit symbool waarschuwt voor gevaarlijke
elektrische spanning in het product, waardoor
kans bestaat op elektrische schokken en
andere persoonlijke ongelukken.
Dit symbool geeft aan dat er belangrijke
instructies bij het product moeten worden
geraadpleegd.
Plaats het toestel niet in een onvoldoende geventileerde
ruimte, zoals een boekenkast.
WAARSCHUWING: Om schade te voorkomen die kan
leiden tot brandgevaar of kans op
elektrische schokken, mag dit
apparaat niet worden blootgesteld aan
regen of vocht.
VOORZICHTIG:
DVD-RECORDERS MAKEN GEBRUIK VAN
ONZICHTBARE LASERSTRALEN DIE
GEVAARLIJK ZIJN WANNEER ZE HET
APPARAAT KUNNEN VERLATEN.
ZORG DAT HET APPARAAT OP DE JUISTE
MANIER WORDT BEDIEND, ZOALS
AANGEGEVEN IN DE INSTRUCTIES.
VOORZICHTIG
DIT PRODUCT MAAKT GEBRUIK VAN EEN LASEREENHEID.
BEDIENEN, AFREGELEN EN ANDERE PROCEDURES
DIE AFWIJKEN VAN DE INSTRUCTIES IN DEZE
GEBRUIKSAANWIJZING KUNNEN LEIDEN TOT
BLOOTSTELLING AAN GEVAARLIJKE STRALING.
OPEN DE BEHUIZING NIET EN PROBEER NIET ZELF
REPARATIES UIT TE VOEREN. LAAT ONDERHOUD /
REPARATIE OVER AAN EEN DESKUNDIGE.
00842C-R125-2~29-NL 6/14/05 6:00 PM Page 2

Nederlands -
3
Belangrijke veiligheidsinstructies
Lees de volgende veiligheids- en bedieningsinstructies
zorgvuldig door voor u het apparaat in gebruik neemt, en
volg ze nauwkeurig op. Bewaar de instructies voor
toekomstig gebruik.
1) Lees deze instructies.
2) Bewaar deze instructies.
3) Let op de waarschuwingen.
4) Volg alle instructies op.
5) Gebruik dit apparaat niet in de buurt van water.
6) Alleen reinigen met een droge doek.
7) Houd de ventilatieopeningen vrij. Stel het apparaat op
volgens de instructies van de fabrikant.
8) Niet installeren in de buurt van warmtebronnen, zoals
een radiator, schoorsteen, kachel, versterker of ander
toestel dat warmte produceert.
9) Monteer geen andere stekker aan het netsnoer. Wanneer
het apparaat is voorzien van een geaarde stekker, is dit in
het belang van uw veiligheid en mag deze niet vervangen
worden door een type zonder aarde-aansluiting. Mocht de
stekker niet in het stopcontact passen, gebruik dan een
ander stopcontact of laat een deskundige installateur een
passend stopcontact aanbrengen.
10) Zorg ervoor dat het netsnoer niet in het looppad ligt,
zodat er geen mensen overheen kunnen lopen of
struikelen. Voorkom dat het snoer klem komt te zitten,
vooral in de buurt van de stekker, het stopcontact en
het punt waar het snoer uit het apparaat komt.
11) Gebruik alleen uitbreidingen of accessoires die door de
fabrikant zijn aangegeven.
12) Alleen gebruiken in combinatie met wagentje,
onderstel, driepoot, steun of tafel volgens specificaties
van de fabrikant of meegeleverd met het apparaat. Als
u het apparaat met een wagentje verplaatst, kunt u
door een rustig tempo schade of verwondingen
voorkomen. Stop niet abrupt omdat het apparaat dan
van het wagentje af kan glijden.
13) Haal de stekker van het apparaat uit het stopcontact
tijdens onweer of als het enige tijd niet gebruikt wordt.
14) Laat onderhoud over aan een deskundige technicus.
Onderhoud is noodzakelijk wanneer het apparaat niet in
orde is, bijvoorbeeld als het netsnoer of de stekker
beschadigd zijn, vloeistof of een voorwerp in het apparaat
terecht is gekomen, het apparaat is blootgesteld aan
regen of vocht, niet goed werkt of gevallen is.
Omgaan met elektrische apparatuur
● Voordat u andere toestellen met de recorder verbindt,
moet u alle apparaten eerst uitschakelen.
● Verplaats de recorder niet terwijl er een DVD/CD wordt
afgespeeld. Als u dit toch doet, kunnen er krassen op de
DVD/CD komen of kan deze breken, en kan de recorder
beschadigd worden.
● Zet geen vaas met water op de recorder.
● Plaats geen kleine metalen voorwerpen op de recorder.
● Kijk uit dat uw hand niet in de lade komt.
● Doe alleen geschikte schijven in de lade, geen andere
voorwerpen.
Aan de slag
Voorzorgsmaatregelen
● Invloeden van buitenaf, zoals bliksem en statische
elektriciteit, kunnen invloed hebben op de werking van de
recorder. Als dit het geval is, zet de recorder dan uit en
weer aan met de aan/uit schakelaar STANDBY/ON of
haal de stekker uit het stopcontact en doe hem er weer in.
Hierna werkt de recorder weer normaal.
● Zorg ervoor dat er na gebruik geen DVD of cd in de
recorder achterblijft en schakel de recorder uit.
● Haal de stekker uit het stopcontact als u de recorder
enige tijd niet gebruikt.
● DVD’s en CD’s reinigt u door ze van binnen naar buiten
in een rechte lijn schoon te vegen.
● Als u de DVD-recorder van een koude naar een warme
omgeving verplaatst, kan er vocht condenseren op
inwendige onderdelen zoals de lens, waardoor de
weergave wordt gestoord. In dat geval verwijdert u de
schijf en wacht u 1-2 uur (terwijl het apparaat aan staat)
voordat u opnieuw probeert om een schijfje af te spelen.
Onderhoud behuizing
In verband met de veiligheid moet u eerst de stekker van
het apparaat uit het stopcontact halen.
● Gebruik geen benzeen, thinner/verfverdunner of andere
oplosmiddelen om de behuizing te reinigen.
● Reinig de behuizing met een zachte doek.
Omgaan met DVD’s en CD’s
● Gebruik geen onregelmatig
gevormde DVD’s of CD’s;
deze kunnen de recorder
beschadigen.
Vasthouden
● Zorg dat u het oppervlak van de
DVD/CD niet aanraakt; dit is vooral
belangrijk voor lege, nog op te
nemen DVD’s en CD’s.
DVD-RAM, DVD-RW en DVD-R
● Reinigen met optionele DVD-RAM/PD
disc reiniger (LF-K200DCA1 waar
beschikbaar). Gebruik voor het
schoonmaken van DVD-RAM/DVD-
RW/DVD-R schijven nooit
reinigers/doekjes die bedoeld zijn voor CD’s.
DVD-Video, Audio CD
● Vuil en vlekken verwijderen met een zachte doek.
Voorzichtig met DVD’s/CD’s
● Beschrijf alleen de bovenzijde (de kant met opdruk) van
een schijfje. Gebruik nooit een balpen of een potlood.
● Gebruik geen schoonmaak- of antistatische spray die
bedoeld is voor grammofoonplaten. Gebruik ook geen
vluchtige chemicaliën als benzeen of thinner/verfverdunner.
00842C-R125-2~29-NL 6/14/05 6:00 PM Page 3

●
Gebruik CD-R/RW-schijven van 700MB (80 minuten).
Gebruik geen schijven van 800MB (90 minuten) of meer,
omdat deze mogelijk niet kunnen worden afgespeeld.
● Als een CD-R of CD-RW schijf in multisessie (multi
session) wordt opgenomen, kan er bij het afspelen
vertraging merkbaar zijn, en is het mogelijk dat sommige
bestanden niet worden weergegeven.
● Het kan voorkomen dat een CD-R/RW schijf niet kan
worden afgespeeld door dit apparaat. Dit hangt samen
met het type schijf en de machine waarop hij is gebrand.
Als u voor persoonlijk gebruik materiaal van een cd
overneemt op CD-R/RW, kan de speelbaarheid ook
afhangen van de inhoud en het type schijf.
●
Schijf : CD-R/RW, DVD-R/RW/RAM
●
MPEG4-bestanden met de volgende extensies kunnen
worden afgespeeld : .avi, .divx, .AVI, .DIVX
●
MPEG4-codec-formaat : DivX 3.11, DivX 4.x, DivX 5.x,
DivX-Pro (zonder QPEL en GMC)
●
Beschikbare audioformaten : "MP3", "MPEG", "WMA",
"LPCM", "AC3"
●
Ondersteunde bestandsformaten ondertiteling : .smi,
.srt, .sub, .psb, .txt, .ass
Opnemen/Weergeven DVD-R
●
Nadat een opneembare DVD in de videomodus is voltooid,
verandert deze in een DVD-Video.
● U kunt opnemen op de vrije ruimte van de schijf. Zolang
de schijf nog niet is afgesloten, kunt u gebruik maken
van bewerkingsfuncties om bijvoorbeeld de opgenomen
programma’s en de schijf zelf van een titel te voorzien, of
bepaalde programma’s te wissen.
● Wanneer een programma wordt gewist van een DVD-R,
komt deze ruimte niet meer vrij. Wanneer er iets wordt
opgenomen op een gedeelte van een DVD-R, is dat
gedeelte niet meer beschikbaar voor opname, ook niet
wanneer de opname wordt gewist.
● Het duurt na afloop van een opname nog ongeveer 30
seconden voor het apparaat klaar is met vastleggen van
informatie over de opname.
● Dit apparaat optimaliseert de DVD-R voor iedere opname.
Dit gebeurt wanneer u een opname start nadat u de schijf
in het apparaat hebt gedaan of het apparaat hebt
aangezet. Wanneer een schijf te vaak wordt
geoptimaliseerd, kunnen verder opnamen onmogelijk
worden.
●
In bepaalde gevallen kan een schijf niet worden
weergegeven in verband met de toestand van de opname.
● Dit apparaat kan DVD-R schijven weergeven die zijn
opgenomen en afgesloten op een Samsung DVD-
recorder. In sommige gevallen kan een DVD-R schijf niet
worden weergegeven, afhankelijk van de schijf en de
toestand van de opname.
Opnemen/Weergeven DVD-RW
● U kunt op DVD-RW-schijven opnemen en deze afspelen
in zowel de modus Video als VR.
● Nadat een in de VR of Video stand opgenomen DVD-RW
is afgesloten, kunt u geen opnamen meer toevoegen.
● Wanneer een in de Video stand opgenomen DVD-RW
wordt afgesloten, verandert hij in een
DVD-Video
.
●
In beide standen kan de schijf altijd worden weergegeven, of hij
nu is afgesloten of niet. Opnamen toevoegen, bewerken of
wissen is echter na afsluiten niet meer mogelijk.
● Als u iets in de Video stand wilt opnemen op een schijf
waarop al in de VR stand is opgenomen, moet u de
schijf eerst formatteren. Let op: formatteren verwijdert
alle gegevens die al op een schijf zijn opgenomen!
● Doe geen zelfklevende etiketten of labels op een DVD of
cd. (NB het is niet mogelijk om beschadigde schijfjes te
repareren met plakband of stickers.)
● Gebruik geen beschermlaag die bedoeld is om schijven
krasbestendig te maken.
● Gebruik geen schijven die met een printer zijn bedrukt.
● Doe geen vervormde of beschadigde schijven in het
apparaat.
DVD/CD bewaren
●
Voorkom schade aan de schijven. Opgeslagen gegevens
zijn buitengewoon kwetsbaar voor omgevingsinvloeden.
●
Niet bewaren op plaatsen waar zonlicht direct toegang heeft.
● Bewaren in een koele, goed geventileerde ruimte.
● Verticaal bewaren.
● Bewaren in schoon beschermhoesje.
Informatie DVD/CD-schijven
Video-DVD
● Een DVD (Digital Versatile Disc) heeft ruimte voor 135
minuten beeld, geluid in 8 talen en ondertitels in 32 talen.
Dankzij mpeg-2 beeldcompressie en Dolby 3D surround
geluid geniet u in uw eigen huiskamer van levendige
bioscoopkwaliteit.
● Bij het afspelen van een DVD-Video met twee lagen kan
bij de overgang van de eerste naar de tweede laag een
korte storing optreden in beeld en geluid. Dit is normaal
en wijst niet op een probleem met het apparaat.
● Wanneer een in de Video stand opgenomen DVD-R of
DVD-RW wordt afgesloten, verandert hij in een DVD-
Video (finalize).
Audio-CD
●
Audio-cd’s zijn cd’s waarop geluid staat dat is opgenomen in
het PCM formaat, samplefrequentie 44,1 kHz.
● Het apparaat kan CD-R en CD-RW schijven weergeven
die zijn opgenomen in het CD-DA formaat. Sommige
CD-R/RW schijven kunnen echter problemen opleveren,
afhankelijk van type schijf en de recorder waarmee is
opgenomen.
CD-R/RW
● Alleen CD-R schijven waarop mp3 bestanden zijn
opgenomen volgens het formaat ISO9660 of JOLIET
kunnen worden weergegeven.
● Alleen MP3 bestanden waarvan de naam eindigt met de
extensie ".mp3" of ".mp3" zijn bruikbaar.
● Bij mp3 bestanden die zijn opgenomen met VBR
(Variable Bit Rate) en een bitsnelheid van 32 Kbps - 320
Kbps kan het geluid af en toe wegvallen.
● Weer te geven bitsnelheid 56Kbps - 320Kbps.
●
Het apparaat herkent maximaal 1000 bestanden en mappen.
● Alleen JPEG bestanden waarvan de naam eindigt met
de extensie ".jpg" of ".JPG" zijn bruikbaar.
●
Het apparaat herkent maximaal 1000 bestanden en mappen.
● De maximumgrootte van een progressive JPEG
afbeelding is 3 miljoen pixels.
● MOTION JPEG wordt niet ondersteund.
4
- Nederlands
CD-R/RW
Een MPEG4-schijf gebruiken
MP3 CD-R/RW
JPEG CD-R/RW
Aan de slag
00842C-R125-2~29-NL 6/14/05 6:00 PM Page 4

Nederlands -
5
● Wanneer een nieuwe DVD-RW schijf wordt
geïnitialiseerd, gebeurt dat in de VR stand.
● DVD-RW (VR stand)
- Het VR formaat kan worden gebruikt om beeldmateriaal
vast te leggen op DVD-RAM en DVD-RW. U kunt onder
andere meerdere titels opnemen, bewerken, verwijderen,
gedeeltelijk verwijderen en een playlist maken.
- Sommige DVD-spelers zijn niet in staat om VR schijven
weer te geven.
● DVD-RW (Video stand)
- Het Video formaat kan worden gebruikt om
beeldmateriaal vast te leggen op DVD-RW en DVD-R.
Nadat de schijf is afgesloten, kan hij worden
weergegeven op de veel normale DVD-spelers.
- Deze recorder kan geen schijven weergeven (of
opnamen toevoegen aan schijven) die in de Video
stand zijn opgenomen op een DVD-recorder van een
ander merk, maar nog niet zijn afgesloten.
Opnemen/Weergeven DVD-RAM
● Zorg dat de VR opnamestand wordt gebruikt, anders kan
de opname niet worden weergegeven op dit apparaat.
● De meeste spelers zijn niet compatibel met DVD-RAM
en kunnen deze schijven niet weergeven.
● Dit apparaat kan uitsluitend DVD-RAM versie 2.0
schijven weergeven.
● Een DVD-RAM opgenomen op deze recorder kan niet
altijd op andere DVD-onderdelen afgespeeld worden.
Zie de gebruikershandleiding voor de speler om de
compatibiliteit met deze DVD-RAM-schijven te bepalen.
● Verwijder bij DVD-RAM-schijven in cartridges de
cartridge en gebruik alleen de schijf.
Op deze DVD-recorder kunt u de inhoud van uw schijven
als volgt beschermen.
● Programma beveiligen: Zie pagina 72
“Titel beveiliging (vergrendelen)"
● Schijf beveiligen: Zie pagina 84 “Schijf beveiligen”
✻ DVD-RAM/DVD-RW/DVD-R schijven die niet compatibel
zijn met het VR/V formaat kunnen niet worden
weergegeven op dit product.
KOPIEERBEVEILIGING
● Veel DVD’s zijn voorzien van een kopieerbeveiliging.
Sluit uw DVD-recorder daarom rechtstreeks aan op uw
TV, en niet via een videorecorder. Aansluiten op een
videorecorder geeft een vervormd beeld bij DVD’s met
kopieerbeveiliging.
● Dit product bevat beschermingstechnologie met het oog
op auteursrechten. Deze technologie wordt beschermd
doordat de gebruikte methodes onder bepaalde in de
VS verleende patenten en andere intellectuele
eigendomsrechten vallen die eigendom zijn van
Macrovision Corporation en andere rechthebbenden.
Voor het gebruik van deze beschermingstechnologie
dient toestemming te zijn verleend Macrovision
Corporation. De beschermingstechnologie is uitsluitend
bedoeld voor thuisgebruik en ander beperkt kijkgebruik
tenzij Macrovision toestemming heeft gegeven voor het
afwijkende gebruik. Reverse engineering en/of
disassembleren zijn niet toegestaan
Aan de slag
✻ Raadpleeg uw DVD-RAM/DVD-RW/DVD-R-fabrikant
voor meer informatie over compatibiliteit van DVD-
opnames.
✻ Het gebruik van DVD-RAM's/DVD-RW's/DVD-R's van
slechte kwaliteit kan onverwachte problemen opleveren,
zoals, zonder enige beperking, mislukte opnamen,
verlies van opgenomen of bewerkte materialen of
schade aan de recorder.
De volgende schijven niet gebruiken
● LD, CD-G, CD-I, CD-ROM, DVD-ROM, DVD+R en
DVD+RW schijven niet gebruiken in dit product.
[NB]
Bruikbare schijftypes: CD/CD-R/CD-RW/MP3/JPEG/
DVD-Video/DVD-RAM/DVD-RW/DVD-R. DVD-R/RW
schijven die op een ander apparaat zijn opgenomen,
kunnen pas worden weergegeven nadat ze afgesloten
zijn.
● Sommige koop-DVD’s, bijvoorbeeld afkomstig uit een
andere regio, kunnen niet worden weergegeven op dit
product. Wanneer zo’n schijf wordt geplaatst, verschijnt
de melding “Geen CD/DVD" of "Regiocode controleren
aub".
● Als u een DVD-R/RW schijf probeert af te spelen die een
illegale kopie bevat of niet het DVD-formaat heeft, kan
het voorkomen dat de schijf niet kan worden
weergegeven.
❇ Recomendamos utilizar uno de los discos de la tabla, ya
que se ha confirmado que son compatibles con esta
unidad.
Otros discos quizá no se reproduzcan correctamente.
● Wij accepteren geen aansprakelijkheid en bieden geen
compensatie voor problemen als mislukte opnamen,
verlies van opgenomen of bewerkte materialen of
schade aan de recorder welke het gevolg zijn van het
gebruik van niet-aanbevolen schijven en accepteren
geen aansprakelijkheid en bieden geen compensatie
voor eventuele schade die resulteert uit bovengenoemde
problemen.
Media Merk Snelheid
TDK 4x
Beall 4x
DVD-R That’s 4x
Maxell 4x
Panasonic 4x
TDK 2x
Maxell 2x
DVD-RW Optodisc 2x
Radius 2x
Verbatim 2x
Maxell 3x
DVD-RAM
Fujifilm 3x
TDK 2x
Panasonic 3x
Media Maximum aantal x opnemen
DVD-RAM 100.000
DVD-RW 1.000
DVD-R 1
00842C-R125-2~29-NL 6/14/05 6:00 PM Page 5

6
- Nederlands
Aan de slag
Aan de slag
Waarschuwing............................................................2
Voorzorgsmaatregelen..............................................3
Belangrijke veiligheidsinstructies.......................................3
Omgaan met elektrische apparatuur ................................3
Onderhoud behuizing.........................................................3
Omgaan met DVD’s en cd’s..............................................3
DVD/CD bewaren ..............................................................4
Informatie DVD/CD schijven..............................................4
Overzicht eigenschappen.........................................8
Voor u de gebruiksaanwijzing leest .......................9
Gebruik van de DVD-recorder .................................9
Uitpakken...................................................................11
Accessoires.......................................................................11
De afstandsbediening voorbereiden ...............................11
De afstandsbediening instellen........................................11
Beschrijving..............................................................13
Voorpaneel........................................................................13
Display voorpaneel...........................................................13
Achterpaneel ....................................................................14
De knoppen van de afstandsbediening..........................15
Aansluiten en Instellen
Aansluiten en Instellen
Overzicht ...................................................................16
De DVD-recorder aansluiten ..................................17
Extra aansluitingen..................................................17
Antenne + DVD-recorder + externe decoderbox +TV
.....18
Andere manier voor het aansluiten
van de video-uitgangskabel ..................................18
Situatie 1 : Aansluiten op een (Composite) video-uitgang
......19
Situatie 2 : Aansluiten op een S-Video-uitgang..............19
Situatie 3 : Componentvideo-uitgangen .........................20
Andere manier voor het aansluiten
van de audio-uitgangskabel...................................20
Situatie 1 : Aansluiten op de TV......................................20
Situatie 2 : Aansluiten op een stereoversterker met AV-
uitgangen .......................................................21
Situatie 3: Aansluiten op een AV-versterker met een
digitale uitgang................................................21
HDMI/DVI aansluiten op een TV ............................22
Situatie 1 : Aansluiten op een tv met een HDMI-aansluiting
...22
Situatie 2 : Aansluiten op een tv met een DVI-aansluiting
......22
Aansluiten op AV3 IN- of DV-IN-aansluitingen....23
Situatie 1 : Een videorecorder, Set-Top box (STB), DVD-
speler of camcorder op de AV3 IN-
aansluitingen aansluiten ...............................23
Situatie 2 : Een camcorder op de DV IN-aansluiting
aansluiten.......................................................23
Systeeminstallatie
Systeeminstallatie
Menunavigatie op het TV-scherm .........................24
Inschakelen en automatisch instellen..................25
De klok instellen.......................................................26
Kanalen voordefiniëren met de functie voor
automatisch instellen..............................................27
Kanalen voordefiniëren met de functie voor
handmatig instellen .................................................28
De taalopties instellen.............................................29
Tijdsinstelling EP-modus........................................30
Automatisch hoofdstuk maken.............................30
De opties voor helderheid display instellen........31
De NICAM-opties instellen .....................................32
DivX(R) Registratie ..................................................33
De geluidsopties instellen......................................33
Geluidsopties....................................................................34
De opties voor video-uitvoer instellen .................34
Progressief scannen instellen...............................35
Progressief scannen annuleren ............................36
De beeldopties (video) instellen............................36
Beeldopties (video) ..........................................................37
Output selection ...............................................................37
Kinderslot instellen..................................................38
Indien u uw toegangscode vergeet.................................38
Het classificatieniveau......................................................39
Het wachtwoord ...............................................................39
Inhoudsopgave
Aan de slag
00842C-R125-2~29-NL 6/14/05 6:00 PM Page 6

Nederlands -
7
Inzoomen..........................................................................60
Favorieten.........................................................................60
Markeringen......................................................................61
Audio-CD of MP3-CD afspelen .............................62
Audio-CD (CD-DA)/mp3 afspelen...................................62
Een foto weergeven.................................................66
Een MPEG4 afspelen...............................................67
Titels uit de Titellijst afspelen ................................68
Beweken
Beweken
Bewerken, basisfuncties (Titellijst).......................71
Naam van een titel wijzigen.............................................71
Titel beveiliging (vergrendelen) .......................................72
Titel verwijderen ..............................................................72
Deel van een titel verwijderen ........................................73
Bewerken, geavanceerd (Playlist).........................75
Playlist maken ..................................................................75
Scènes uit de Playlist afspelen .......................................76
Naam van Playlist scène wijzigen...................................77
Playlist scène opzoeken ..................................................78
Scène binnen de Playlist kopiëren..................................81
Scène uit de Playlist verwijderen ....................................82
Schijfbeheer..............................................................83
Naam van de schijf wijzigen............................................83
Schrijf beveiliging..............................................................84
Schijf formatteren .............................................................84
Alle Titellijsten verwijderen...............................................85
Schijf afsluiten .................................................................86
Afsluiten ongedaan maken (Video of VR modus) ........87
Aanvullende Informatie
Aanvullende Informatie
Problemen oplossen ...............................................88
Specificaties..............................................................92
Opnemen
Opnemen
Voordat u gaat opnemen ........................................40
Geschikte schij ven ..........................................................40
Schijfindelingen en formatteren.......................................41
Opnamekwaliteit...............................................................41
Kopieerbeveiliging ............................................................41
INFO toets ........................................................................42
Resterende schijfruimte opvragen (Schijfinfo)................42
Tv-programma opnemen terwijl u er naar kijkt ..42
Materiaal opnemen van externe apparatuur
terwijl u er naar kijkt ................................................44
Van een camcorder kopiëren.................................45
Opnameduur met 1 toets instellen (OTR)............46
Een timer-opname maken ......................................47
Automatische keuze opnamekwaliteit
(alleen voor timer-opnamen)..................................48
Timer-opname wijzigen...........................................48
Timer-opname wissen.............................................49
ShowView gebruiken...............................................50
ShowView verlengen...............................................51
Timer-opname starten.............................................51
W
W
eergeven
eergeven
Voordat u een schijf afspeelt .................................52
Regiocode (alleen DVD-Video).......................................52
Afspeelbare schijftypes ....................................................52
Schijven die niet kunnen worden afgespeeld.................52
Schijf afspelen..........................................................53
Schijfmenu en titelmenu ..................................................54
Zoekfuncties .....................................................................54
Vertraagde weergave.......................................................55
Beeld-voor-beeld ..............................................................55
ANYKEY functie ...............................................................55
Herhalen ...........................................................................56
Taal van ondertitels selecteren........................................58
Taal van geluidsspoor selecteren....................................59
Beeldhoek kiezen.............................................................59
Aan de slag
00842C-R125-2~29-NL 6/14/05 6:00 PM Page 7

8
- Nederlands
Overzicht eigenschappen
Progressief scannen met hoge kwaliteit
Met progressief scannen krijgt u flikkervrije video van hoge
resolutie. Het 10 bit 54-MHz DAC en 2D Y/C
scheidingscircuit biedt de hoogste kwaliteit beeldweergave
en -opname. (zie pagina’s 20, 36).
Veel functies, comfortabele bediening
Geïntegreerd menusysteem en berichtfunctie maken het
kiezen van de gewenste bewerking eenvoudig en
begrijpelijk. Opnamen op een DVD-RAM of DVD-RW kunt
u wijzigen, in de gewenste volgorde zetten of in een playlist
opnemen.
MPEG4 afspelen
Met deze DVD-recorder kunt u MPEG4-formaten binnen
een avi-bestand afspelen.
DivX-certificatie
DivX, DivX Certified, en de bijbehorende
logo's zijn handelsmerken van
DivXNetworks, Inc en worden gebruikt
onder licentie.
HDMI (High Definition Multimedia Interface)
HDMI vermindert beeldruis door een digitaal
video/audiosignaalpad van de speler naar uw TV.
Met de DVD-recorder is het mogelijk digitale video van
hoge kwaliteit op DVD-RAM/DVD-RW/DVD-R-schijven op
te nemen en af te spelen. U kunt digitale opnamen
vastleggen op DVD-RAM/DVD-RW/DVD-R en op dezelfde
manier bewerken als bij een videoband.
Digitaal beeld- en geluidsmateriaal
opnemen/weergeven in hoge kwaliteit
Tot 12 uur beeldmateriaal opnemen op een dubbelzijdige
9,4 GB DVD-RAM of tot 8 uur beeldmateriaal op een 4,7
GB DVD-RAM/DVD-RW/DVD-R, afhankelijk van de
gekozen opnamekwaliteit.
Instelbare opnamekwaliteit
U kunt uw recorder naar keuze instellen op vijf
verschillende opnamekwaliteiten, waarbij de op te nemen
speelduur langer wordt naarmate de kwaliteit daalt. De
speelduur per DVD is het hoogst in de stand EP (6/8 uur).
Voor hogere kwaliteit en kortere speelduur zijn de standen
LP en SP beschikbaar, terwijl de stand XP de hoogste
kwaliteit oplevert.
Automatische kwaliteitkeuze tijdens timer-opnamen
Wanneer voor de FR kwaliteit is gekozen, wordt de
opnamekwaliteit automatisch aangepast, zodat alle
ingestelde programma’s kunnen worden opgenomen
binnen de beschikbare schijfruimte (zie pagina 48).
Zelf DVD’s opnemen op DVD-RW/DVD-R
Met de DVD-recorder is het mogelijk uw eigen DVD-videotitels
te maken op DVD-RW/DVD-R-schijven van 4,7 GB.
Materiaal van digitale camcorder kopiëren via DV-
aansluiting
Video van een DV-apparaat via de DV-ingangsaansluiting
(IEEE 1394-4pin/4pin) opnemen op DVD-RAM of DVD-
RW, DVD-R-schijven. (zie pagina 45.)
Aan de slag
00842C-R125-2~29-NL 6/14/05 6:00 PM Page 8

Nederlands -
9
1) Zorg dat u geheel vertrouwd bent met de
veiligheids-instructies voor u het product gebruikt
(zie pag. 2~5).
2) Als er een probleem optreedt, zie dan “Problemen
oplossen” (pag. 88~91).
Over deze gebruiksaanwijzing
©2005 Samsung Electronics Co.
Alle rechten voorbehouden. Deze
gebruiksaanwijzing mag niet (geheel of gedeeltelijk)
worden gereproduceerd of gekopieerd zonder
voorafgaande schriftelijke toestemming van
Samsung Electronics Co.
Copyright
Gebruik van de DVD-
Recorder
Stap 1
Type schijf kiezen
Deze recorder kan opnemen op de onderstaande
schijftypes.
Als u dezelfde schijf meer dan eens wilt gebruiken, of
de schijf na het opnemen wilt kunnen wijzigen of
wissen, kies dan voor een herschrijfbaar type schijf
(DVD-RW of DVD-RAM).
Als u de opname zonder verdere wijzigingen wilt bewaren,
kies dan een type dat niet herschrijfbaar is (DVD-R).
Voor u de
gebruiksaanwijzing leest
Neem de volgende informatie door voordat u aan de rest
van de gebruiksaanwijzing begint.
Gebruikte symbolen
Symbool
Betekenis
De aangegeven functie:
DVD
is beschikbaar voor DVD/DVD-R/DVD-
RW schijven die zijn opgenomen en
afgesloten in de Video stand.
RAM is beschikbaar voor DVD-RAM.
RW is beschikbaar voor DVD-RW.
R is beschikbaar voor DVD-R.
CD is beschikbaar voor gegevens-cd
(CD-R of CD-RW).
JPEG
is beschikbaar voor gegevens-cd
met afbeeldingen (CD-R of CD-RW).
MP3
is beschikbaar voor gegevens-cd
met mp3 geluidsbestanden (CD-
R of CD-RW).
MPEG4
Hiervoor is een functie vereist
die beschikbaar is op een
gegevens-CD-R/RW, -DVD-R, -
RW en -RAM.
Let op
is niet beschikbaar of instellingen
kunnen vervallen.
NB
wordt uitgelegd of er worden tips
gegeven.
Voorkeur-
kan worden bediend met een
toets enkele knop.
De knop Een functie die kan worden
ANYKEY gebruikt via de knop ANYKEY.
Stap 2
Schijf formatteren voor opname
Anders dan een videorecorder, moet de DVD-recorder
enige informatie opnemen wanneer er een lege schijf
in wordt gedaan. Dit wordt formatteren genoemd en
moet eenmalig gebeuren voordat er beeldmateriaal
kan worden opgenomen op de nieuwe schijf.
DVD-RAM opnemen/weergeven
Dit type schijf kan worden geformatteerd in het formaat
VR (Video Recording). Hierbij kunt u opgenomen
materiaal wijzigen, een playlist maken en opnamen in
de gewenste weergavevolgorde zetten.
DVD-RW opnemen/weergeven
Dit type schijf kan naar keuze worden geformatteerd in
het formaat Video of DVD-Video Recording format
(VR). Bij een nieuwe, lege schijf verschijnt een bericht
waarin wordt gevraagd of de schijf in VR formaat moet
worden geformatteerd. Wanneer u voor de Video
stand kiest, kan de resulterende schijf op veel DVD-
spelers worden afgespeeld. De VR stand biedt meer
mogelijkheden om de schijf te wijzigen.
DVD-R opnemen/weergeven
Dit type schijf kan worden geformatteerd in het Video
formaat.
Na afloop van het formatteren kunt u opnemen op de schijf.
De resulterende schijf kan, nadat hij is afgesloten, op
veel DVD-spelers worden afgespeeld.
■
U kunt zowel de VR- als de Video-
modus gebruiken op een DVD-RW,
alleen niet tegelijk.
■
Het is mogelijk de DVD-RW-indeling
te wijzigen in een andere indeling
door opnieuw te initialiseren. Houd er
dan wel rekening mee dat de inhoud
van de schijf verloren kan gaan
wanneer u een ander formaat kiest.
NB
Aan de slag
00842C-R125-2~29-NL 6/14/05 6:00 PM Page 9

10
- Nederlands
Stap 3
Opnemen
Er bestaan twee verschillende opnamemethoden,
Directe opname en Timer-opname.
Timer-opname is geclassificeerd als een datum:
Eenmaal (dd/mm(MA)), Elke dag, MA-ZA, Elke ZA, etc,
Opnamemodus : XP (hoge-kwaliteitsmodus), SP
(standaard kwaliteitsmodus), LP (lange-opnamemodus)
en EP (uitgebreide modus) in overeenstemming met
de opnamemodus.
Wanneer het opnemen in de FR-modus is ingesteld,
wordt met de beste kwaliteit opgenomen rekening
houdend met de resterende tijd op de schijf.
Stap 4
Afspelen
U kunt de titel die u wilt afspelen, selecteren in een
weergegeven menu en vervolgens direct afspelen.
Een DVD bestaat uit secties die titels genoemd worden,
en subsecties die hoofdstukken genoemd worden.
Tijdens het opnemen wordt er een titel gemaakt tussen
twee punten: daar waar u begint met opnemen en daar
waar u eindigt. Hoofdstukken worden automatisch
gemaakt wanneer u de opname op DVD-R/DVD-RW-
schijven in videomodus. De lengte van het hoofdstuk
(interval tussen hoofdstukken) hangt af van de
opnamemodus.
Stap 6
Sluiten en op andere DVD-onderdelen afspelen
Wanneer u de DVD op andere DVD-onderdelen wilt
afspelen, is het soms nodig deze te sluiten. Zorg dat u
klaar bent met alle bewerkingen en opnamen en sluit
de schijf.
Een DVD-RW-schijf in de VR-modus gebruiken
Hoewel het over het algemeen niet nodig is de schijf te
sluiten om deze op een onderdeel af te spelen dat
compatibel is met de VR-modus, dient u een gesloten
schijf te gebruiken voor het afspelen.
Een DVD-RW-schijf in de videomodus gebruiken
De schijf moet eerst worden gesloten om op iets
anders dan op deze recorder te kunnen worden
afgespeeld. Als u de schijf hebt gesloten, kunt u deze
niet meer bewerken of iets erop opnemen.
Een DVD-R-schijf gebruiken
De schijf moet eerst worden gesloten om deze op een
ander onderdeel dan op deze recorder te kunnen
afspelen. Als de schijf is gesloten, kan deze niet meer
worden bewerkt of iets erop worden opgenomen.
Stap 5
Een opgenomen schijf bewerken
Een opgenomen schijf bewerken
Het is eenvoudiger om op schijven te bewerken dan
op conventionele videobanden.
De recorder ondersteunt veel verschillende
bewerkingsfuncties, die alleen mogelijk zijn met DVD's.
Met een eenvoudig bewerkingsmenu kunt u diverse
bewerkingsfuncties op een opgenomen titel uitvoeren,
zoals verwijderen, kopiëren, hernoemen, vergrendelen.
Een playlist maken (DVD-RAM/-RW in VR-modus)
Met deze recorder kunt u een nieuwe playlist op
dezelfde schijf maken en bewerken zonder dat de
originele opname wordt gewijzigd.
Aan de slag
00842C-R125-2~29-NL 6/14/05 6:00 PM Page 10

Nederlands -
11
Uitpakken
Accessoires
Controleer of de onderstaande accessoires zijn meegeleverd:
De afstandsbediening voorbereiden
Batterijen plaatsen in de afstandsbediening
● Open het batterijklepje aan de achterkant van de
afstandsbediening.
● Plaats twee AAA batterijen. Let bij het plaatsen op de
correcte polariteit (+ en -).
● Schuif het batterijklepje weer op de afstandsbediening.
Als de afstandsbediening niet correct werkt:
● Controleer de polariteit (+ - ) van de batterijen (Dry-Cell)
● Controleer of de batterijen leeg zijn.
● Controleer of de sensor van de afstandsbediening niet
door voorwerpen wordt geblokkeerd.
● Controleer of er tl-verlichting in de directe omgeving is.
Gooi de batterijen weg volgens de milieuwetten in uw
land. Gooi ze niet bij het huishoudelijk afval.
De afstandsbediening instellen
U kunt met deze afstandsbediening bepaalde functies
van een TV van een andere fabrikant bedienen.
De functieknoppen zijn: STANDBY/ON, PROG
/
,
TV VOL +/-, Direct Number-knoppen, TV MUTE, knop
INPUT.
Aan de slag
Audio- en videokabel
RF-kabel voor TV
Batterijen voor de
afstandsbediening
(AAA-formaat)
Afstandsbediening
Instructiehandleiding
Snelgids
HDMI-kabel
DVI adapterkabel
00842C-R125-2~29-NL 6/14/05 6:00 PM Page 11

12
- Nederlands
U bepaalt of uw televisie compatibel is door de
onderstaande instructies te volgen.
1. Zet de televisie aan.
2. Richt de afstandsbediening op de televisie.
3. Druk op de knop TV, STANDBY/ON en voer de
tweecijferige code in voor het merk van de televisie
door op de juiste cijferknoppen te drukken.
Instelbare TV-codes
Resultaat: Als de televisie compatibel is met de
afstandsbediening, wordt deze
uitgeschakeld. De tv is nu geprogrammeerd
om met de afstandsbediening bediend te
worden.
Daarna kunt u de televisie met de volgende
knoppen achter de knop TV regelen.
■
Als er meerdere codes staan voor het
merk van uw tv, probeer dan elke code uit
totdat u de code vindt die werkt.
■
Als u de batterijen van de
afstandsbediening vervangt, moet u
opnieuw de merkcode instellen.
NB
■
De verschillende functies werken niet
altijd bij alle televisies. Als u problemen
hebt, gebruik dan de knoppen op de
televisie zelf.
NB
Knop Functie
STANDBY/ON Hiermee zet u de televisie aan en uit.
INPUT Hiermee selecteert u een externe bron.
TV VOL(+ of -)
Hiermee past u het volume van de televisie aan.
PROG ( of ) Hiermee selecteert u het gewenste kanaal.
TV MUTE Hiermee zet u het geluid aan en uit.
0~9 Hiermee voert u direct een cijfer in.
MERK KNOP
SAMSUNG 01, 02, 03, 04, 05, 06, 07, 08, 09
AIWA 82
ANAM 10, 11, 12, 13, 14, 15, 16, 17, 18
BANG & OLUFSEN 57
BLAUPUNKT 71
BRANDT 73
BRIONVEGA 57
CGE 52
CONTINENTAL EDISON 75
DAEWOO
19, 20, 23, 24, 25, 26, 27, 28, 29, 30, 31, 32, 33, 34
EMERSON 64
FERGUSON 73
FINLUX 06, 49, 57
FORMENTI 57
FUJITSU 84
GRADIENTE 70
GRUNDIG 49, 52, 71
HITACHI 60, 72, 73, 75
IMPERIAL 52
JVC 61, 79
LG 06, 19, 20, 21, 22, 78
LOEWE 06, 69
LOEWE OPTA 06, 57
MAGNAVOX 40
METZ 57
MITSUBISHI 06, 48, 62, 65
MIVAR 52, 77
NEC 83
NEWSAN 68
NOBLEX 66
NOKIA 74
NORDMENDE 72, 73, 75
PANASONIC 53, 54, 74, 75
PHILIPS 06, 55, 56, 57
PHONOLA 06, 56, 57
PIONEER 58, 59, 73, 74
RADIOLA 06, 56
RADIOMARELLI 57
RCA 45, 46
REX 74
SABA 57, 72, 73, 74, 75
SALORA 74
SANYO 41, 42, 43, 44, 48
SCHNEIDER 06
MERK KNOP
SELECO 74
SHARP 36, 37, 38, 39, 48
SIEMENS 71
SINGER 57
SINUDYNE 57
SONY 35, 48
TELEAVA 73
TELEFUNKEN 67, 73, 75, 76
THOMSON 72, 73, 75
THOMSON ASIA 80, 81
TOSHIBA 47, 48, 49, 50, 51, 52
WEGA 57
YOKO 06
ZENITH 63
Aan de slag
00842C-R125-2~29-NL 6/14/05 6:00 PM Page 12

Nederlands -
13
Aan de slag
Display voorpaneel
1. Gaat branden in de opnamemodus.
2. Gaat branden om de tijdgestuurde-opnamemodus
aan te duiden.
3. Gaat branden in de progressieve-scanmodus.
4. Afspeeltijd/klok/indicator huidige status.
5. Gaat branden wanneer er een schijf wordt geladen.
6. Gaat branden wanneer er een -R/RW/RAM-schijf
wordt geladen.
Voorpaneel
1. STANDBY/ON
Hiermee zet u de recorder aan of uit.
2. AV3-INGANG
Hierop sluit u externe apparatuur aan.
3. DV-INGANG
Hierop sluit u digitale apparatuur met een DV-
uitgang aan (zoals een camcorder).
4. SCHIJFLADE
Deze kan worden geopend om een schijf te
plaatsen.
5. OPEN/CLOSE
Hiermee opent en sluit u de schijflade.
6. P.SCAN
Hiermee selecteert u de progressieve-scanmodus.
7. DISPLAY
Geeft o.a. de afspeelstatus, titel/hoofdstuk/tijd weer.
8. ZOEKEN/OVERSLAAN
Hiermee gaat u naar de volgende/vorige titel, het
volgende/vorige hoofdstuk of de volgende/vorige
track.
9. STOP
Hiermee stopt u het afspelen van de schijf.
10. AFSPELEN/PAUZE
Hiermee speelt u een schijf af of onderbreekt u
het afspelen of opnemen.
11. PROG ( )
Hiermee selecteert u voorgedefinieerde tv-
kanalen. Doet hetzelfde als de knop PROG op de
afstandsbediening.
12. REC
Hiermee start u de opname.
13. Receiver voor afstandsbediening
00842C-R125-2~29-NL 6/14/05 6:00 PM Page 13

1. DIGITAL AUDIO OUT(OPTISCH)
Hierop sluit u een versterker met een digitale
optische audio-ingang aan.
2. DIGITAL AUDIO OUT(COAXIAL)
Hierop sluit u een versterker met een digitale
coaxiale audio-ingang aan.
3. AUDIO OUT
Hierop sluit u de audio-ingang van externe
apparatuur met audiokabels aan.
4. VIDEO OUT
Hierop sluit u de ingang van externe apparatuur met
een videokabel aan.
5. S-VIDEO OUT
Hierop sluit u de ingang van externe apparatuur met
een S-videokabel aan.
6. COMPONENT VIDEO OUT
Hierop sluit u apparatuur met een componentvideo-
ingang aan.
7. Aansluiting voor AV1(TV) OUTPUT SCART-stekker
8. Aansluiting voor AV2(EXT) INPUT SCART-stekker
9. HDMI OUT
10. Ingang voor antennestekker
11. Uitgang voor TV-aansluiting
Achterpaneel
Ventilator
De ventilator draait altijd als het apparaat is ingeschakeld.
Zorg dat er minimaal 10 cm ruimte is aan alle kanten van
de ventilator wanneer het product wordt geïnstalleerd.
■
De antenneaansluiting geeft geen
uitgangssignaal van de DVD door.
Wanneer u een DVD op uw tv wilt
bekijken, moet u audio/videokabels of
scartkabels gebruiken.
NB
14
- Nederlands
Aan de slag
00842C-R125-2~29-NL 6/14/05 6:00 PM Page 14

Nederlands -
15
Aan de slag
10. De knop MENU
Hiermee opent u het instellingenmenu van de DVD-
recorder.
11. Knop OK/richtingsknoppen
(De knoppen
……†† œœ √√
)
12. De knop REC MODE
Hiermee geeft u de opnamestatus weer
(XP/SP/LP/EP)
13. De knop REC
Gebruik deze knop om een opname op DVD-RAM/-
RW/-R-schijven te maken.
14. De knop CANCEL
15. De knop REPEAT
Hiermee kunt u een titel, hoofdstuk, track of schijf
herhalen.
16. De knop OPEN/CLOSE
Hiermee opent en sluit u de schijflade.
17. De knop AUDIO/TV MUTE
Hiermee hebt u toegang tot verschillende
geluidsfuncties op een schijf (DVD-modus).
Hiermee schakelt u het geluid uit. (TV-modus).
18. De knop TV
Druk hierop om de tv te bedienen.
19. De knop INPUT
Hiermee selecteert u het lijningangssignaal in de
externe ingangsmodus (PROG, AV-ingan of DV-
ingang).
20. PROG Knop
Hiermee kunt u voorgedefinieerde kanalen in een
bepaalde volgorde selecteren.
Net als met de PROG-knoppen op het voorpaneel.
21. De knop TITLE LIST/DISC MENU
Hiermee geeft u de lijst met opnamen/menu Schijf
(View Recording list/Disc menu) weer.
22. De knop PLAY LIST/TITLE MENU
Hiermee keert u terug naar het menu Titel (Title menu)
of geeft u de lijst met opgenomen bestanden weer.
23. De knop ANYKEY
Hiermee geeft u de status van de schijf weer die
wordt afgespeeld.
24. De knop SUBTITLE
Druk hierop om een andere DVD-ondertiteltaal weer
te geven.
25. De knop RETURN
Hiermee gaat u terug naar het vorige menu.
26. De knop MARKER/TIMER
Hiermee kunt u een positie markeren tijdens het
afspelen van een schijf.
Druk hierop om het menu Timer-opnamemodus
direct te openen terwijl u een schijf stopt.
27. De knop INFO
Hiermee geeft u de huidige instellingen of
schijfstatus weer.
De knoppen van de
afstandsbediening
1. De knop STANDBY/ON
2. Cijferknoppen
3. De knop TV/DVD
4. De knop DVD
Druk hierop wanneer u een DVD-recorder gebruikt.
5. De knoppen TV VOL(+ of -)
Hiermee past u het volume aan.
6. De knoppen Vooruit/Achteruit overslaan
Hiermee kunt u vooruit of achteruit in de schijf gaan.
Deze knoppen functioneren ook als STEP-knoppen.
Met elke druk op de knop gaat u één frame voor- of
achteruit (zie pagina 55).
7. De knoppen Vooruit/Achteruit zoeken
Hiermee kunt u de schijf naar voren of naar
achteren doorzoeken.
8. De knop Stop
Hiermee stopt u een schijf.
9. De knop Afspelen/Pauze
Druk hierop om een schijf af te spelen/te
onderbreken.
00842C-R125-2~29-NL 6/14/05 6:00 PM Page 15

Met het overzicht in deze handleiding hebt u voldoende
informatie om de recorder te kunnen gebruiken.
Aansluiten
en instellen
Overzicht
Overzicht ...........................................................16
De DVD-Recorder aansluiten..........................17
Extra aansluitingen ...........................................17
Antenne + DVD-Recorder +
externe decoderbox + TV ................................18
Andere manier voor het aansluiten
van de video-uitgangskabel .............................18
Andere manier voor het aansluiten
van de audio-uitgangskabel.............................20
HDMI/DVI aansluiten op een TV .....................22
Aansluiten op AV3-ingang, DV-ingang............23
Deze paragraaf beschrijft diverse methoden om de
DVD-recorder aan te sluiten op andere externe
onderdelen en de vereiste oorspronkelijke
instellingsmodi.
De DVD-recorder aansluiten
Extra aansluitingen
Antenne + DVD-recorder + externe
decoderbox + TV
Andere manier voor het aansluiten
van de Video-uitgangskabel
Andere manier voor het aansluiten
van de Audio-uitgangskabel
HDMI/DVI aansluiten op een TV
†
†
†
†
†
Aansluiten op AV3-ingang, DV-ingang
†
16
- Nederlands
Getting Started
00842C-R125-2~29-NL 6/14/05 6:00 PM Page 16

Nederlands -
17
Aansluiten en instellen
De DVD-Recorder
aansluiten
Extra aansluitingen
U kunt de DVD-Recorder op een satellietontvanger of
digitale tuner aansluiten.
- DVD-modus
1. Sluit de AV2-aansluiting van de DVD-Recorder en
video/satellietontvanger- of digitale tuner aan met
een scartkabel.
2. Sluit de AV1-aansluiting aan op een AV SCART-
aansluiting op de tv.
3. Schakel de DVD-Recorder, de
video/satellietontvanger of digitale tuner en de tv in.
4. Stel de ingangsmodus in op AV2.
- TV-modus
1. Druk op de knop TV/DVD op de afstandsbediening,
waarna "TV" verschijnt op het voorste scherm (of
schakel de DVD-recorder uit).
2. Het is mogelijk programma's te bekijken via een
satellietontvanger of digitale tuner die is aangesloten
op deze DVD-recorder, zelfs wanneer de DVD-
recorder is uitgeschakeld.
Als de televisie over de juiste ingang beschikt, kunt u
met de scartkabel de DVD-Recorder op de televisie
aansluiten.
1. Sluit de RF-kabel aan zoals is weergegeven.
2. Sluit een uiteinde van de scartkabel aan op de AV1-
socket op de achterkant van de DVD-Recorder.
3. Steek het andere uiteinde in de juiste aansluiting op
de televisie.
4. Sluit de DVD-Recorder en de tv aan.
5. Schakel de DVD-Recorder en de tv in.
6. Druk net zolang op de knop INPUT op uw
afstandsbediening, totdat op het scherm van uw tv
het videosignaal van de DVD-Recorder wordt
weergegeven.
Naar RF-
ingang
extern apparaat
(videorecorder/ satellietontvanger)
Naar tv
RF-kabel
Naar antenne-ingang
■
De RF-kabelverbinding van dit product
verzendt alleen tv-signalen.
U moet een scartkabel of audio-
/videokabels gebruiken om met de DVD-
Recorder een DVD te kunnen bekijken.
■
TV-modus
Druk op de knop TV/DVD op de
afstandsbediening, waarna “TV” verschijnt
op het voorste scherm (of schakel de
DVD-recorder uit).
Nu is het mogelijk programma's te bekijken
die via de RF-kabel binnenkomen.
NB
00842C-R125-2~29-NL 6/14/05 6:00 PM Page 17

Antenne + DVD-Recorder +
externe decoderbox + TV
Als u de externe decoderbox op de DVD-recorder
aansluit, kunt u gecodeerde kanalen (uitzendingen van
CANAL+ of Premiere) opnemen die worden ontvangen
via de ingebouwde tv-tuner in de DVD-recorder.
1. Sluit de FR-antennekabels aan zoals is
weergegeven.
2. Gebruik een SCART-kabel om de AV1-aansluiting op
deze recorder aan te sluiten op de AV SCART-
aansluiting op de tv.
3. Sluit de AV2-aansluiting aan op een AV SCART-
aansluiting op de decoderbox.
4. Als u naar betaaltelevisie kijkt, zoals Canal+-
programma's, of deze opneemt, moet u de DVD-
recorder zodanig instellen dat deze de kanalen
ontvangt met het display op het scherm (zie pagina
28).
2
3
1
DECODERBOX
Muur
Er zijn verschillende manieren om videosignalen te
verzenden zonder scartkabels te gebruiken. Selecteer
uit de onderstaande lijst met video-aansluitingen de
aansluiting die voor u het meest geschikt is.
● Situatie 1 : Aansluiten op een (Composite) video-
uitgang
● Situatie 2 : Aansluiten op een S-video-uitgang
● Situatie 3 : Componentvideo-uitgangen
S-video, componentvideo en progressieve
uitvoermodi
● S-video- en componentvideouitgangen zijn alleen
beschikbaar als de tv respectievelijk S-video-invoer of
componentvideo-invoer ondersteunt. Als S-video- of
componentvideo-uitvoer niet werkt, controleer dan de
tv-aansluitingen en de tv-invoerselectie-instellingen.
● Vergeleken met standaard interlaced video wordt bij
progressief scannen het aantal videolijnen
verdubbeld dat naar de tv wordt verzonden, wat
resulteert in een stabieler, flikkervrijer, duidelijker
beeld dan interlaced video. Dit is alleen mogelijk bij
tv's die progressief scannen ondersteunen.
● Progressieve scanuitgang (576p)
Consumenten dienen er rekening mee te houden dat
niet iedere hoge-definitie tv-set volledig compatibel is
met dit product. Dit kan ervoor zorgen dat niet alle
beelden juist worden weergegeven. Als u problemen
ondervindt bij het progressief scannen van beelden
bij de 576, wordt u aangeraden over te schakelen
naar de "standaarddefinitie"-uitvoer. Als u vragen
hebt over de compatibiliteit van onze tv-set met de
DVD-recorder model 576p, kunt u contact opnemen
met onze klantenservice.
Andere manier voor het
aansluiten van de video-
uitgangskabel
18
- Nederlands
Aansluiten en instellen
00842C-R125-2~29-NL 6/14/05 6:00 PM Page 18

Nederlands -
19
Aansluiten en instellen
Situatie 2 : Aansluiten op een
S-Video-uitgang
1. Gebruik een S-videokabel (niet bijgeleverd) om de S-
video-uitgang op de DVD-recorder aan te sluiten op
de S-video-ingang op de tv (of AV-versterker).
2. Gebruik audiokabels (wit en rood) om de AUDIO
OUT-aansluitingen op de DVD-recorder aan te sluiten
op de AUDIO IN-aansluitingen op de tv (of AV-
versterker)
● Hiermee krijgt u een hogere weergavekwaliteit.
Situatie 1 : Aansluiten op een
(Composite) Video-uitgang
1. Gebruik een videokabel (geel) om de video-uitgang
(geel) op de DVD-Recorder aan te sluiten op de
video-ingang (geel) op de tv (of AV-versterker).
● Hiermee krijgt u een normale weergavekwaliteit.
2. Gebruik audiokabels (wit en rood) om de AV-audio-
uitgangen op de DVD-Recorder aan te sluiten op de
audio-ingangen op de tv (of AV-versterker)
(Zie pagina’s 20 tot 21)
geel
geel
Audio- en videokabel
00842C-R125-2~29-NL 6/14/05 6:00 PM Page 19

Situatie 3 : Componentvideo-
uitgangen
1. Gebruik componentvideokabels (niet bijgeleverd) om
de COMPONENT OUT-aansluitingen (Y,P
B
,P
R
) op de
DVD-recorder te verbinden met de COMPONENT IN-
aansluitingen (Y,P
B
,P
R
) op de tv.
2. Gebruik audiokabels (wit en rood) om de AUDIO
OUT-aansluitingen op de DVD-recorder aan te
sluiten op de AUDIO IN-aansluitingen op de tv (of
AV-versterker)
(Zie pagina’s 20 tot 21)
● Druk net zo lang op de knop op uw afstandsbediening
waarmee u de ingang kunt selecteren totdat op het
scherm van uw tv het componentsignaal van de DVD-
recorder wordt weergegeven.
3. Zie na het aansluiten pagina 34, 36.
● Voor een hoge beeldkwaliteit en nauwgezette
kleurweergave.
● De componentaansluiting geeft geen videoresoluties
door van boven de 576p.
Sluit de DVD- recorder met de bijgeleverde HDMI-
kabel aan op uw TV om 720p en 1080i te kunnen
bekijken.
Wanneer de HDMI aangesloten is, drukt u op de
knop P.SCAN om te schakelen tussen alle
beschikbare resoluties. (Zie pagina 35)
COMPONENT
Pr
Pb
Y
1
2
groen
blauw
rood
groen
blauw
rood
■
Zorg ervoor dat de kleurgecodeerde
aansluitingen overeenkomen. De Y, P
B
,
P
R
-componentuitgangen van de DVD-
recorder moeten worden aangesloten op
de exact overeenkomende
componentingangen van de tv.
■
De instelling voor progressief scannen is
alleen beschikbaar wanneer de video-
uitgang op Component is ingesteld.
(zie pagina 35 tot 36).
NB
Er zijn verschillende manieren om geluidssignalen te
verzenden zonder scartkabels te gebruiken. Selecteer
uit de onderstaande lijst met audio-aansluitingen de
aansluiting die voor u het meest geschikt is.
● Situatie 1 : Aansluiten op de TV
● Situatie 2 : Aansluiten op een stereoversterker met
AV-uitgangen
● Situatie 3 : Aansluiten op een AV-versterker met een
digitale uitgang
Situatie 1 : Aansluiten op de TV
Gebruik deze aansluiting als uw tv audio-ingangen heeft.
Andere manier voor het
aansluiten van de audio-
uitgangskabel
Geproduceerd onder licentie van Dolby
Laboratories. "Dolby" en het symbool met de
dubbele D zijn handelsmerken van Dolby
Laboratories.
"DTS" en "DTS Digital Out" zijn handelsmerken
van Digital Theater Systems, Inc.
geel
wit
rood
geel
wit
rood
20
- Nederlands
Aansluiten en instellen
00842C-R125-2~29-NL 6/14/05 6:00 PM Page 20

Nederlands -
21
Aansluiten en instellen
Situatie 3: Aansluiten op een
AV-versterker met een digitale
uitgang
Gebruik deze aansluiting als uw versterker een
Dolby Digital MPEG2 of DTS-decoder en een digitale
ingang heeft. Voor Dolby Ditigal- of DTS-geluid moet
u de geluidsinstellingen instellen (zie pagina 34).
Situatie 2 : Aansluiten op een
stereoversterker met AV-
uitgangen
Gebruik de audio-uitgangen als uw stereoversterker
alleen audio-ingangen (L en R) heeft.
wit
of
Achter (L) Achter (R)
Voor (L) Voor (R)
Subwoofer Midden
rood
witrood
Voorste
speaker (L)
Voorste
speaker (R)
00842C-R125-2~29-NL 6/14/05 6:00 PM Page 21

22
- Nederlands
Aansluiten en instellen
Als uw TV een HDMI/DVI-ingang heeft, sluit u de
HDMI/DVI-kabel aan op een TV. U zult genieten van
beelden en geluiden met de beste kwaliteit.
● Situatie 1 :
Aansluiten op een tv met een HDMI-aansluiting.
● Situatie 2 :
Aansluiten op een tv met een DVI-aansluiting.
Situatie 1 : Aansluiten op een tv met
een HDMI-aansluiting
• Sluit met een HDMI-kabel de HDMI OUT-uitgang aan
de achterzijde van de DVD Recorder aan op de HDMI
IN-ingang van uw TV.
• Druk net zo lang op de knop op uw afstandsbediening
waarmee u de ingang kunt selecteren totdat op het
scherm van uw tv het HDMI-signaal van de DVD
Recorder wordt weergegeven.
Situatie 2 : Aansluiten op een tv
met een DVI-aansluiting
• Verbind met een DVI-adapterkabel het HDMI OUT-
contact aan de achterzijde van de DVD-recorder met
de DVI IN-ingang van uw tv.
• o Verbind met behulp van audiokabels de AUDIO
(rood en wit) OUT uitgangen aan de achterzijde van
de DVD-recorder met de AUDIO (rood en wit) IN
ingangen van uw tv. Schakel de dvd-speler en tv in.
• Druk net zo lang op de knop op uw afstandsbediening
waarmee u de ingang kunt selecteren totdat op het
scherm van uw tv het DVI-signaal van de DVD-
recorder wordt weergegeven.
HDMI/DVI aansluiten op
een TV
■
Als u de HDMI-uitvoer wilt bekijken, moet
u de digitale audio-uitvoer op PCM
instellen. Zie pagina 33-34.
■
Afhankelijk van het HDMI-apparaat
(TV/HDMI-ontvanger) dat u gebruikt, kan het
zijn dat audio niet ondersteund wordt. Als uw
tv Dolby Digital/DTS niet ondersteunt, is
audio-uitvoer niet beschikbaar als u digitale
uitvoer als Bitstream instelt of DTS aan
selecteert in het menu Audio setup
(geluidsinstelling). Zet in dat geval de digitale
uitvoer op PCM of zet DTS op uit.
LET OP
Voor het wijzigen van de HDMI-
uitvoerresolutie, zie pagina 37.
HDMI (High Definition Multimedia Interface)
HDMI is een interface waarmee video- en
audiogegevens met slechts één aansluiting
digitaal kunnen worden verzonden.
Aangezien HDMI gebaseerd is op DVI, is
het volledig compatibel met DVI. Het enige
verschil tussen HDMI en DVI is dat HDMI
meerdere geluidskanalen ondersteunt.
Door middel van HDMI verzendt de DVD-
speler een digitaal video- en audiosignaal
en wordt een helder beeld verkregen op
een TV met een HDMI-ingang.
Beschrijving HDMI-aansluiting
HDMI-aansluiting – Zowel niet-gecomprimeerde
videogegevens en digitale audiogegevens
(LPCM- of Bit Stream-gegevens).
- Hoewel de speler een HDMI-kabel
gebruikt, wordt alleen een puur digitaal
signaal naar de TV verzonden.
-
Als de TV geen HDCP (High-bandwidth
Digital Content Protection) ondersteunt, is
er alleen sneeuw te zien op het scherm.
Waarom gebruikt Samsung wel HDMI?
Analoge TV’s vereisen een analoog
video/audiosignaal. Wanneer echter een DVD
wordt afgespeeld, zijn de gegevens die naar
een TV worden verzonden digitaal. Daarom is
een digitaal-naar-analoog omzetter (in de
DVD-recorder) of een analoog-naar-digitaal
omzetter (in de TV) vereist. Tijdens de
omzetting vertoont het beeld ruis en wordt het
signaal verloren. HDMI-technologie is
superieur, omdat er geen D/A-omzetting nodig
is en het een puur digitaal signaal is van de
speler naar de TV.
Wat is de HDCP?
HDCP (High-bandwidth Digital Content
Protection) is een systeem voor het
beschermen tegen kopiëren van DVD-inhoud
die wordt uitgevoerd via HDMI. Het biedt een
veilige digitale koppeling tussen een
videobron (PC, DVD, etc.) en een weergave-
apparaat (TV, projector, etc.). Inhoud wordt
gecodeerd in het bronapparaat om niet-
geautoriseerd kopiëren te voorkomen.
NB
wit
rood
wit
rood
00842C-R125-2~29-NL 6/14/05 6:00 PM Page 22

Nederlands -
23
Hiermee kunt u de DVD-recorder op andere externe
apparaten aansluiten en hun uitvoer weergeven of
opnemen.
● Situatie 1 : Een videorecorder, set-top box (STB),
DVD-speler of camcorder op de AV3 IN-
aansluitingen aansluiten
● Situatie2 : Een camcorder op de DV IN-aansluiting
aansluiten
Situatie 1 : Een videorecorder,
Set-Top box (STB), DVD-speler
of camcorder op de AV3 IN-
aansluitingen aansluiten
Een videorecorder of extern apparaat op AV3 IN-
aansluitingen van de DVD-recorder aansluiten.
Het is mogelijk om van aangesloten apparatuur op te
nemen (videorecorder, STB, DVD-speler of camcorder.)
Aansluiten op AV3 IN- of
DV-IN-aansluitingen
■
De selectie voor AV3 IN gebeurt
automatisch. Als de ingang niet
automatisch wordt geselecteerd, gebruikt
u de knop INPUT om de juiste ingang te
selecteren.
■
Tegen kopiëren beveiligde inhoud kan niet
worden opgenomen.
NB
DVD
STB
Videorecorder
Camcorder
geel
wit
rood
geel
wit
rood
■
Als de ingang niet automatisch wordt
geselecteerd, gebruikt u de knop INPUT
om de juiste ingang te selecteren.
NB
Situatie 2 : Een camcorder op
de DV IN-aansluiting aansluiten
Als uw digitale camcorder over een DV-uitgang
beschikt, sluit deze dan aan op de DV-ingang van de
DVD-recorder.
Camcorder
Aansluiten en instellen
00842C-R125-2~29-NL 6/14/05 6:00 PM Page 23

24
- Nederlands
Met de menu's op het scherm kunt u diverse functies
op de DVD-recorder in- of uitschakelen.
Gebruik de volgende knoppen om de menu's te openen
en erdoorheen te bladeren.
1
De knop MENU
Druk op deze knop op de afstandsbediening om het
MENU op het scherm te openen.
Druk nogmaals om het MENU af te sluiten.
2
De knoppen
……††
,
œœ √√
Druk op deze knoppen om de selectiebalk te verplaatsen
…† , œ√om door de menuopties te schuiven.
3
De knop OK
Druk op deze knop op de afstandsbediening om alle
nieuwe instellingen te bevestigen.
4
De knop RETURN
Druk op deze knop op de afstandsbediening om terug te
keren naar het laatst weergegeven MENU of om het
MENU op het scherm af te sluiten.
Systeeminst
allatie
Menunavigatie op het TV-
scherm
Menunavigatie op het tv-scherm ................24
Inschakelen en automatisch instellen ........25
De klok instellen .........................................26
Kanalen voordefiniëren met de functie
voor automatisch instellen..........................27
Kanalen voordefiniëren met de functie
voor handmatig instellen ............................28
De taalopties instellen ................................29
Tijdsinstelling EP-modus ............................30
Automatisch hoofdstuk maken ...................30
De opties voor helderheid display instellen
...31
De NICAM-opties instellen .........................32
DivX(R) Registratie.....................................33
De geluidsopties instellen ..........................33
De opties voor video-uitvoer instellen ........34
Progressief scannen instellen ....................35
Progressief scannen annuleren .................36
De beeldopties (video) instellen .................36
Kinderslot instellen .....................................38
Systeeminstallatie
RETURNOKVERPL. EINDE
Timer-Opname
Geen cd/dvd
ShowView
√√
Timer-Opname
√√
ShowView Verlengd : Uit
√√
Programma
Setup
RETURNOKVERPL. EINDE
Schijfnavigatie
DVD-RAM(VR)
Title List
√√
DivX
√√
Foto
√√
Muziek
√√
Schijfnavigatie
Playlist
Schijfbeheer
Programma
Setup
00842C-R125-2~29-NL 6/14/05 6:00 PM Page 24

Nederlands -
25
De DVD-recorder wordt automatisch ingesteld als deze
voor het eerst wordt ingeschakeld. Tv-stations en de
klok worden in het geheugen opgeslagen. Dit proces
duurt enkele minuten. De DVD-recorder is dan klaar
voor gebruik.
1
Sluit de RF-kabel aan zoals op pagina 18 is
aangegeven.
(De DVD-recorder aansluiten op de tv met de RF-kabel
en scartkabel).
2
Sluit de DVD-recorder aan op het
stroomnet.
Op het display van het voorpaneel knippert "AUTO".
3
Kies de gewenste taal met behulp van de
cijferknoppen.
4
Start de automatische installatie.
5
Druk op OK, selecteer vervolgens uw “land”
met de toetsen †…œ √.
Inschakelen en
automatisch instellen
•
Zie de onderstaande tabel met afkortingen bij het selecteren van
"Land".
•
De DVD-recorder zoekt de stations volgens een voorgedefinieerde
voorkeurslijst die overeenkomt met het land dat u hebt geselecteerd.
6
Druk op OK.
Automatisch scannen van kanalen wordt
gestart.
•
Het aantal stations dat automatisch door de DVD-recorder wordt
opgeslagen, hangt af van het aantal gevonden stations.
7
Nadat het automatisch scannen van
kanalen is voltooid, wordt de functie voor
het automatisch instellen van de klok
binnen 10 seconden gestart. Wilt u de
klokfunctie direct starten, dan drukt u op
OK. Als u de functie niet direct automatisch
wilt starten, drukt u op CANCEL of MENU.
8
Wacht totdat de huidige datum en tijd
automatisch worden weergegeven. Als u de
klokfunctie wilt sluiten, drukt u op MENU.
Systeeminstallatie
Autom. instellen wordt gestart.
Controleer de antenne-en tv-kabel aansluiting.
OK Annul.
Zenders scannen
Nu scannen
5%
Automatisch instellen mislukt. Probeer het
opnieuw via het setup menu. Druk op [OK]
om de klok automatisch in te stellen.
OK
Annul.
A
B
DK
FIN
D
NL
I
N
P
E
S
CH
TR
GR
HU
PL
CZ
Ander
Landselectie
OKVERPL. EINDE
Een ogenblik. De klok wordt nu ingesteld.
Als u het instellen van de klok wilt
afsluiten, drukt u op de toets [MENU].
Press 1 for English
Touche 2 pour Français
Drücken Sie 3 Für Deutsch
Pulse 4 para Español
Premere 5 per Italiano
Druk op 6 voor Nederlands
A(Austria) NL(Netherlands) S(Sweden) PL(Poland)
B(Belgium) I(Italy) CH(Swiss) CZ (Czech)
DK(Denmark) N(Norway) TR(Turkey) Ander
FIN(Finland) P(Portugal) GR(Greece)
D(Deutschland) E(Spain) HU(Hungary)
00842C-R125-2~29-NL 6/14/05 6:00 PM Page 25

2
Druk op de knoppen …† om Setup te
selecteren en druk op OK of op de knop √.
3
Druk op de knoppen …† om Klok Instellen
te selecteren en druk op OK of op de knop √.
Gebruik de navigatieknoppen …†œ √ om de tijd,
datum of het jaar in te voeren. Gebruik cijferknoppen
om de klokgegevens direct in te voeren.
4
Druk op de knoppen …† om Aan te
selecteren voor de automatische klokfunctie
5
Druk op de knop OK om de datum en tijd
op te slaan.
Indien u niet op OK drukt, wordt deze gegevens niet
opgeslagen.
26
- Nederlands
Dit menu wordt gebruikt om de huidige tijd in te stellen.
Om de timer-opname te gebruiken moet u de tijd
instellen.
1
Druk op de knop MENU met de eenheid in
de modus Stop/modus Geen schijf.
De klok instellen
■
De RF-kabel moet zijn aangesloten om
de klok automatisch in te stellen.
Zie pagina 18 Aansluitingen.
■
De DVD-recorder stelt automatisch de
klok in, in overeenstemming met het
tijdsignaal dat wordt doorgegeven tussen
de kanalen PR1 t/m PR5. Als u de
automatische klokfunctie niet nodig hebt,
selecteert u Uit.
NB
9
Controleer de datum en de tijd.
• als deze : correct is, drukt u op de knop OK om de datum en
tijd op te slaan. Indien u niet op OK drukt, worden
de datum en tijd na 5 seconden automatisch
opgeslagen.
• als deze : incorrect is, voert u de correcte tijd, datum en het
correcte jaar in met de knoppen †…œ √ of cijferknoppen.
Druk op de knop OK om de datum en tijd op te slaan.
Wanneer u de klokinstelling wilt veranderen, stelt u deze
handmatig in.
■
Nu is de DVD-recorder klaar voor gebruik.
De functie voor "Inschakelen en Automatisch
instellen" is al bepaald. Wilt u deze toch wijzigen,
dan kan dit door de stations vooraf te definiëren in
het menu op het scherm "Kanalen voordefiniëren
met de functie voor handmatig instellen".
(zie pagina 28).
■
De functie Automatisch instellen kan worden
uitgevoerd door 5 seconden of langer op é
(STOP) op de eenheid te drukken terwijl het
apparaat is uitgeschakeld en er geen schijf is
geplaatst.
NB
RETURNOKVERPL. EINDE
Klok Instellen
Geen cd/dvd
12 : 00 01 / JAN / 2005 ZA Uit
Tijd Datum Klock
Automatisch
Programma
Setup
RETURNOKVERPL. EINDE
Klok Instellen
Geen cd/dvd
12 : 00 01 / JAN / 2005 ZA Uit
Tijd Datum Klock
Automatisch
Programma
Setup
RETURNOKVERPL. EINDE
Setup
Geen cd/dvd
Systeem
√√
Klok Instellen
√√
Taal
√√
Geluid
√√
Beeld
√√
Kinderslot
√√
Zenders instellen
√√
Programma
Setup
RETURNOKVERPL. EINDE
Setup
Geen cd/dvd
12 : 00 01 / JAN / 2005 ZA Aan
Tijd Datum Klock
Automatisch
Programma
Setup
RETURNOKVERPL. EINDE
Timer-Opname
Geen cd/dvd
ShowView
√√
Timer-Opname
√√
ShowView Verlengd : Uit
√√
Programma
Setup
Systeeminstallatie
00842C-R125-2~29-NL 6/14/05 6:00 PM Page 26

Nederlands -
27
4
Druk op de knoppen …† om Autom. Instal.
te selecteren en druk op OK of op de knop √.
Het volgende bericht verschijnt: "Uw gegevens
gaan verloren. Druk op [OK] om door te gaan, op
[MENU] om af te sluiten."
5
Druk op OK en druk vervolgens op de
toetsen …†œ √ om uw land te kiezen.
• De DVD-recorder zoekt de stations volgens een
voorgedefinieerde voorkeurslijst die overeenkomt met
het land dat u hebt geselecteerd.
6
Druk op OK om verder te gaan.
Als u wilt sluiten, drukt u op MENU.
7
Het scannen van kanalen wordt gestart.
Druk op OK om het automatisch instellen te stoppen.
Met deze functie kunt u de tunerband van de DVD-recorder
handmatig op Antenne of Kabel instellen, afhankelijk van
welke tijdens de eerste installatie op de antenne-ingang is
aangesloten.
1
Druk op de knop MENU met de eenheid in
de modus Stop/modus Geen schijf.
2
Druk op de knoppen …† om Setup te
selecteren en druk op OK of op de knop √.
3
Druk op de knoppen …† om Zenders
instellen te selecteren en druk op OK of op
de knop √.
Kanalen voordefiniëren
met de functie voor
automatisch instellen
RETURNOKVERPL. EINDE
Setup
Geen cd/dvd
Systeem
√√
Klok Instellen
√√
Taal
√√
Geluid
√√
Beeld
√√
Kinderslot
√√
Zenders instellen
√√
Programma
Setup
RETURNOKVERPL. EINDE
Zenders instellen
Geen cd/dvd
Autom. Instal.
√√
Handmatig Instal.
√√
Programma
Setup
RETURNOKVERPL. EXIT
Zenders instellen
Geen cd/dvd
Autom. Instal.
√√
Handmatig Instal.
√√
Programma
Setup
Uw gegevens gaan verloren. Druk op [OK]
om door te gaan, op [MENU] om af te sluiten.
OK
RETURNOK EINDE
Autom. Instal.
Geen cd/dvd
even geduld aub
11%
Scannen...
Programma
Setup
Stop
A
B
DK
FIN
D
NL
I
N
P
E
S
CH
TR
GR
HU
PL
CZ
Ander
Landselectie
RETURNOKVERPL. EINDE
Zenders instellen
Geen cd/dvd
RETURNOKVERPL. EINDE
Timer-Opname
Geen cd/dvd
ShowView
√√
Timer-Opname
√√
ShowView Verlengd : Uit
√√
Programma
Setup
Systeeminstallatie
Zie de onderstaande tabel bij het selecteren
van uw land.
A(Austria) NL(Netherlands) S(Sweden) PL(Poland)
B(Belgium) I(Italy) CH(Swiss) CZ (Czech)
DK(Denmark) N(Norway) TR(Turkey) Ander
FIN(Finland) P(Portugal) GR(Greece)
D(Deutschland) E(Spain) HU(Hungary)
00842C-R125-2~29-NL 6/14/05 6:00 PM Page 27

28
- Nederlands
4
Druk op de knoppen …† om Handmatig
Instal. te selecteren en druk op OK of op
de knop √.
5
Druk op de knoppen …† om een PR
(programma) te selecteren dat u wilt
bewerken, verwijderen of wisselen, en druk
op OK of op de knop √.
Selecteer Wijzig, Wissen of Wissel.
• Wanneer u wilt bewerken : u kunt een PR
(programma) toevoegen of bewerken, vervolgens kunt
u PR-gegevens wijzigen (CH, Naam, Decoder, MFT),
Opslaan selecteren en op de knop OK drukken.
- CH : Stel het kanaal af met de knoppen œ √ of met de
cijferknoppen.
- Naam : Geeft de zendernaam automatisch weer die in
het zendsignaal is gevonden. Als deze niet
wordt gevonden, kunt u de naam bewerken
met de knoppen …†œ √.
- Decoder : Als u deze inschakelt, kunt u gecodeerde
kanalen opnemen met de externe
decoderbox. Zie de instructies voor het
aansluiten van de externe decoderbox op
pagina 19 voordat u deze inschakelt.
- MFT : Met de knoppen œ √ kunt u de kanaalfrequentie
beter afstellen.
- Systeem : U kunt het uitzendsysteem van het te
ontvangen kanaal selecteren (B/G of L/L’).
• Wanneer u wilt verwijderen : de kanaalgegevens van
het geselecteerde PR (programma) wordt verwijderd.
• Wanneer u wilt wisselen : Het is mogelijk de
kanaalgegevens van twee PR's (programma) te
wisselen. Als u bijvoorbeeld PR2 en PR5 wilt wisselen,
selecteert u Wisselen bij PR2 en drukt u bij PR5 op OK
of op de knop √.
Het is mogelijk een voorgedefinieerd kanaal toe te voegen
dat de functie voor automatisch kanalen zoeken heeft
gemist. Bovendien kunt u een kanaal verwijderen en de
volgorde van kanalen programmeren.
1
Druk op de knop MENU met de eenheid in
de modus Stop/modus Geen schijf.
2
Druk op de knoppen …† om Setup te
selecteren en druk op OK of op de knop √.
3
Druk op de knoppen …† om Zenders
instellen te selecteren en druk op OK of op
de knop √.
Kanalen voordefiniëren
met de functie voor
handmatig instellen
RETURNOKVERPL. EINDE
Setup
Geen cd/dvd
Systeem
√√
Klok Instellen
√√
Taal
√√
Geluid
√√
Beeld
√√
Kinderslot
√√
Zenders instellen
√√
Programma
Setup
RETURNOKVERPL. EINDE
Zenders instellen
Geen cd/dvd
Autom. Instal.
√√
Handmatig Instal.
√√
Programma
Setup
RETURNOKVERPL. EINDE
Timer-Opname
Geen cd/dvd
ShowView
√√
Timer-Opname
√√
ShowView Verlengd : Uit
√√
Programma
Setup
Systeeminstallatie
RETURNOKVERPL. EINDE
Handmatig Instal.
Geen cd/dvd
01 - - - - - - - - - - / -
√√
02 - - - - - - - - - - / -
√√
03 - - - - - - - - - - / -
√√
04 - - - - - - - - - - / -
√√
05 - - - - - - - - - - / -
√√
06 - - - - - - - - - - / -
√√
07 - - - - - - - - - - / -
√√
PR CH Naam Decoder Systeem Wijzig
RETURNOKVERPL. EINDE
Handmatig Instal.
Geen cd/dvd
01 - - - - - - - - - - / -
√√
02 - - - - - - - - - - / -
√√
03 - - - - - - - - - - / -
√√
04 - - - - - - - - - - / -
√√
05 - - - - - - - - - - / -
√√
06 - - - - - - - - - - / -
√√
07 - - - - - - - - - - / -
√√
PR CH Naam Decoder Systeem Wijzig
Wijzig
Wissen
Wissel
VERPL.
OK
Handmatig Instal.
Opslaan
PR 01
CH
- - -
Naam
- - - -
Decoder
Uit
MFT
- - - - - -
Systeem
L/ L’
00842C-R125-2~29-NL 6/14/05 6:01 PM Page 28

Nederlands -
29
4
Druk op de knoppen …† om de gewenste
taaloptie te selecteren en druk op OK of op
de knop √.
● Geluid: Voor het speakergeluid.
● Ondertitels: Voor de ondertitels van de schijf.
● Schijfmenu: Voor het schijfmenu op de schijf.
● Menutaal Speler: Voor het menu van de DVD-
recorder
● DivX-ondertitel: Een ondersteunde DivX-
ondertitelingstaal per regio selecteren.
5
Druk op de knoppen …† om de gewenste
Taal te selecteren en druk op OK of op de
knop √.
Indien u het geluid, de ondertiteling, het menu van de schijf,
het menu op het scherm en de DivX-ondertitel vooraf
instelt, worden de instellingen automatisch ingeschakeld
wanneer u naar een film kijkt.
Indien de geselecteerde taal niet op de schijf is
opgenomen, wordt de taal waarin de schijf werd
opgenomen, geselecteerd.
1
Druk op de knop MENU met de eenheid in
de modus Stop/modus Geen schijf.
2
Druk op de knoppen …† om Setup te
selecteren en druk op OK of op de knop √.
Wanneer er een schijf wordt afgespeeld, kunt u geen
instellingsfuncties gebruiken.
3
Druk op de knoppen …† om Taal te
selecteren en druk op OK of op de knop √.
Het menu met taalinstellingen verschijnt.
De taalopties instellen
■
Druk op de knop RETURN of op de knop
oe œ om naar het vorige menu terug te
keren.
Druk op de knop MENU om het menu af
te sluiten.
■
De geselecteerde taal verschijnt alleen
als deze op de schijf wordt ondersteund.
■
Als de ondertitelingstaal met gebroken
letters wordt weergegeven, past u de
DivX-ondertiteling aan de juiste regio aan.
Werkt de ondertiteling dan nog niet, dan
wordt het formaat niet ondersteund.
NB
RETURNOKVERPL. EINDE
Setup
Geen cd/dvd
Systeem
√√
Klok Instellen
√√
Taal
√√
Geluid
√√
Beeld
√√
Kinderslot
√√
Zenders instellen
√√
Programma
Setup
RETURNOKVERPL. EINDE
Taal
Geen cd/dvd
Geluid : Origineel
√√
Ondertitels : Automatisch
√√
Schijfmenu : Nederlands
√√
Menutaal Speler : Nederlands
√√
DivX-ondertitel : Western
√√
Programma
Setup
RETURNOKVERPL. EINDE
Taal
Geen cd/dvd
Geluid : Origineel
√√
Ondertitels : Automatisch
√√
Schijfmenu : Nederlands
√√
Menutaal Speler : Nederlands
√√
DivX-ondertitel : Western
Programma
Setup
Origineel
English
Français
Deutsch
Español
Italiano
Nederlands
Korean
RETURNOKVERPL. EINDE
Timer-Opname
Geen cd/dvd
ShowView
√√
Timer-Opname
√√
ShowView Verlengd : Uit
√√
Programma
Setup
Systeeminstallatie
Western
Central
Greek
English, Breton, Catalan, Danish, Dutch,
Faroese, Finnish, French, Gaelic, German,
Icelandic, Irish, Italian, Norwegian, Portuguese,
Spanish en Swedish
English, Albanian, Croatian, Czech, Hungarian,
Polish, Romanian, Slovak, Slovene en
Serbian(Latin)
English en modern Greek
00842C-R125-2~29-NL 6/14/05 6:01 PM Page 29

Een DVD-video bestaat uit ‘titels’ en ‘hoofdstukken’.
Als u één programma opneemt, wordt één titel
gemaakt. Als u deze functie gebruikt, wordt de titel
verdeeld in hoofdstukken.
1
Druk op de knop MENU met de eenheid in
de modus Stop/modus Geen schijf.
2
Druk op de knoppen …† om Setup te
selecteren en druk op OK of op de knop √.
3
Druk op de knoppen …† om Systeem te
selecteren en druk op OK of op de knop √.
Het systeemmenu verschijnt.
4
Druk op de knoppen …† om Hoofdstuk
maken te selecteren en druk op OK of op
de knop √.
Automatisch hoofdstuk
maken
30
- Nederlands
U kunt een van de vier opnamemodi selecteren door
herhaaldelijk op de knop REC Mode te drukken.
De EP-modus is een van de vier opnamemodi (XP, SP, LP,
EP). In de EP-modus (Extended Play) kunt u de
opnametijd hiermee tot 6 of 8 uur instellen.
1
Druk op de knop MENU met de eenheid in
de modus Stop/modus Geen schijf.
2
Druk op de knoppen …† om Setup te
selecteren en druk op OK of op de knop √.
3
Druk op de knoppen …† om Systeem te
selecteren en druk op OK of op de knop √.
System menu will be displayed.
4
Druk op de knoppen …† om EP Mode Tijd te
selecteren en druk op OK of op de knop √.
5
Druk op de knoppen …† om de gewenste tijd
te selecteren en druk op OK of op de knop √.
Tijdsinstelling EP-modus
RETURNOKVERPL. EINDE
Systeem
Geen cd/dvd
EP Modus Tijd : 6 Uur
√√
Hoofdstuk maken : Uit
√√
Helderheid Display
: Hoog
√√
NICAM : Aan
√√
DivX(R) Registratie
Programma
Setup
RETURNOKVERPL. EINDE
Setup
Geen cd/dvd
Systeem
√√
Klok Instellen
√√
Taal
√√
Geluid
√√
Beeld
√√
Kinderslot
√√
Zenders instellen
√√
Programma
Setup
RETURNOKVERPL. EINDE
Systeem
Geen cd/dvd
EP Modus Tijd : 6 Uur
√√
Hoofdstuk maken : Uit
√√
Helderheid Display
: Hoog
√√
NICAM : Aan
√√
DivX(R) Registratie
Programma
Setup
6 Uur
8 Uur
RETURNOKVERPL. EINDE
Timer-Opname
Geen cd/dvd
ShowView
√√
Timer-Opname
√√
ShowView Verlengd : Uit
√√
Programma
Setup
RETURNOKVERPL. EINDE
Setup
DVD-RW(V)
Systeem
√√
Klok Instellen
√√
Taal
√√
Geluid
√√
Beeld
√√
Kinderslot
√√
Zenders instellen
√√
Schijfnavigatie
Schijfbeheer
Programma
Setup
RETURNOKVERPL. EINDE
Systeem
DVD-RW(V)
EP Modus Tijd : 6 Uur
√√
Hoofdstuk maken : Uit
√√
Helderheid Display
: Hoog
√√
NICAM : Aan
√√
DivX(R) Registratie
Schijfnavigatie
Schijfbeheer
Programma
Setup
RETURNOKVERPL. EINDE
Systeem
DVD-RW(V)
EP Modus Tijd : 6 Uur
√√
Hoofdstuk maken : Uit
√√
Helderheid Display
: Hoog
√√
NICAM : Aan
√√
DivX(R) Registratie
Schijfnavigatie
Schijfbeheer
Programma
Setup
Uit
Aan
RETURNOKVERPL. EINDE
Schijfnavigatie
DVD-RW(V)
Titellijst
√√
Schijfnavigatie
Schijfbeheer
Programma
Setup
Systeeminstallatie
00842C-R125-30~59-NL 6/14/05 6:05 PM Page 30

Nederlands -
31
5
Druk op de knoppen …† om Aan of Uit te
selecteren en druk op OK of op de knop √.
• Uit: Selecteer deze optie wanneer u geen (Automatisch
hoofdstuk maken) wilt.
• Aan: Selecteer deze optie wanneer u wel (Automatisch
hoofdstuk maken) wilt.
6
Druk op de knop REC om het opnemen te
starten. (zie pagina 43 over hoe u de
opnamesnelheid instelt). Het bericht "Wilt u
het hoofdstukmenu maken na deze
opname?" verschijnt.
7
Druk op œ √ om Ja te selecteren en druk
vervolgens op OK.
•
Elk nieuw hoofdstuk wordt gemaakt op basis van de
geselecteerde opnamemodus. Een hoofdstuk duurt
ongeveer 5 minuten in XP en SP en in de modi LP
en EP 15 minuten.
8
Druk op de knop STOP om het opnemen te
stoppen.
9
U geeft de gemaakte hoofdstukken weer
door de schijf (zie pagina 86) af te sluiten
en op de knop DISC MENU te drukken. Het
hoofdstukmenu verschijnt.
Wilt u het hoofdstukmenu maken
na deze opname?
Ja
Nee
Systeeminstallatie
■
De functie Automatisch hoofdstuk maken
werkt niet tijdens Timer-opname of
wanneer u het apparaat uitschakelt.
■
De voltooiing van DVD-R-schijven kan
niet ongedaan worden gemaakt.
LET OP
HOOFDSTUK
Vorige Boven Volgende
Pas de helderheid van het scherm aan.
1
Druk op de knop MENU met de eenheid in
de modus Stop/modus Geen schijf.
2
Druk op de knoppen …† om Setup te
selecteren en druk op OK of op de knop √.
3
Druk op de knoppen …† om Systeem te
selecteren en druk op OK of op de knop √.
Het systeemmenu verschijnt.
De opties voor helderheid
display instellen
RETURNOKVERPL. EINDE
Timer-Opname
Geen cd/dvd
ShowView
√√
Timer-Opname
√√
ShowView Verlengd : Uit
√√
Programma
Setup
RETURNOKVERPL. EINDE
Setup
Geen cd/dvd
Systeem
√√
Klok Instellen
√√
Taal
√√
Geluid
√√
Beeld
√√
Kinderslot
√√
Zenders instellen
√√
Programma
Setup
RETURNOKVERPL. EINDE
Systeem
Geen cd/dvd
EP Modus Tijd : 6 Uur
√√
Hoofdstuk maken : Uit
√√
Helderheid Display
: Hoog
√√
NICAM : Aan
√√
DivX(R) Registratie
Programma
Setup
00842C-R125-30~59-NL 6/14/05 6:05 PM Page 31

1
Druk op de knop MENU met de eenheid in
de modus Stop/modus Geen schijf.
2
Druk op de knoppen …† om Setup te
selecteren en druk op OK of op de knop √.
3
Druk op de knoppen …† om Systeem te
selecteren en druk op OK of op de knop √.
Het systeemmenu verschijnt.
NICAM-programma's worden verdeeld in 3 typen. NICAM
stereo, NICAM mono en tweetalig (transmissie in andere
taal). NICAM-programma's hebben altijd een standaard
monogeluid en u kunt het gewenste geluid selecteren door
NICAM in of uit te schakelen.
De NICAM-opties instellen
32
- Nederlands
4
Druk op de knoppen …† om Helderheid
Display te selecteren en druk op OK of op
de knop √.
5
Druk op de knoppen …† om het gewenste
item te selecteren en druk op OK of op de
knop √.
• Hood:
Hiermee wordt het display van het voorpaneel helder.
• Laag: Hiermee wordt het display van het voorpaneel
donker.
• Auto: Hiermee wordt het display van het voorpaneel
automatisch donker wanneer het apparaat wordt
uitgeschakeld.
RETURNOKVERPL. EINDE
Systeem
Geen cd/dvd
EP Modus Tijd : 6 Uur
√√
Hoofdstuk maken : Uit
√√
Helderheid Display
: Hoog
√√
NICAM : Aan
√√
DivX(R) Registratie
Programma
Setup
Hoog
Laag
Auto
RETURNOKVERPL. EINDE
Timer-Opname
Geen cd/dvd
ShowView
√√
Timer-Opname
√√
ShowView Verlengd : Uit
√√
Programma
Setup
RETURNOKVERPL. EINDE
Setup
Geen cd/dvd
Systeem
√√
Klok Instellen
√√
Taal
√√
Geluid
√√
Beeld
√√
Kinderslot
√√
Zenders instellen
√√
Programma
Setup
RETURNOKVERPL. EINDE
Systeem
Geen cd/dvd
EP Modus Tijd : 6 Uur
√√
Hoofdstuk maken : Uit
√√
Helderheid Display
: Hoog
√√
NICAM : Aan
√√
DivX(R) Registratie
Programma
Setup
Systeeminstallatie
00842C-R125-30~59-NL 6/14/05 6:05 PM Page 32

Nederlands -
33
4
Druk op de knoppen …† om NICAM te
selecteren en druk op OK of op de knop √.
5
Druk op de knoppen …† om Aan of Uit te
selecteren en druk op OK of op de knop √.
• Uit: Schakel deze optie alleen in bij het opnemen van
het standaard monogeluid tijdens een NICAM-
uitzending, als het stereogeluid wordt verstoord door
slechte ontvangstomstandigheden.
• Aan: NICAM-modus
RETURNOKVERPL. EINDE
Systeem
Geen cd/dvd
EP Modus Tijd : 6 Uur
√√
Hoofdstuk maken : Uit
√√
Helderheid Display
: Hoog
√√
NICAM : Aan
√√
DivX(R) Registratie
Programma
Setup
Uit
Aan
Systeeminstallatie
Voor het aanmelden van deze DVD-recorder voor het
Div(R) Video On Demand-formaat hebt u uw
registratiecode nodig.
Voor meer informatie kunt u terecht op www.divx.com/vod.
DivX(R) Registratie
U kunt de DVD-recorder aansluiten op een externe
versterker of thuisbioscoop.
Hiermee kunt u de instellingen van geluidsapparatuur en
de geluidsstatus regelen afhankelijk van het gebruikte
geluidssysteem.
1
Druk op de knop MENU met de eenheid in
de modus Stop/modus Geen schijf.
2
Druk op de knoppen …† om Setup te
selecteren en druk op OK of op de knop √.
3
Druk op de knoppen …† om Geluid te
selecteren en druk op OK of op de knop √.
Het menu met geluidsinstellingen verschijnt.
4
Druk op de knoppen …† om de gewenste
geluidsoptie te selecteren en druk op OK of
op de knop √.
De geluidsopties instellen
RETURNOKVERPL. EINDE
Setup
Geen cd/dvd
Systeem
√√
Klok Instellen
√√
Taal
√√
Geluid
√√
Beeld
√√
Kinderslot
√√
Zenders instellen
√√
Programma
Setup
RETURNOKVERPL. EINDE
Timer-Opname
Geen cd/dvd
ShowView
√√
Timer-Opname
√√
ShowView Verlengd : Uit
√√
Programma
Setup
RETURNOKVERPL. EINDE
Geluid
Geen cd/dvd
Digitaal UIT Audio : PCM
√√
DTS : Uit
√√
Dynamische compressie
: Aan
√√
Programma
Setup
RETURNOKVERPL. EINDE
Geluid
Geen cd/dvd
Digitaal UIT Audio : PCM
√√
DTS : Uit
√√
Dynamische compressie
: Aan
√√
Programma
Setup
PCM
Bitstream
00842C-R125-30~59-NL 6/14/05 6:05 PM Page 33

U krijgt een hogere weergavekwaliteit met RGB- of
componentvideoaansluitingen.
1
Druk op de knop MENU met de eenheid in
de modus Stop/modus Geen schijf.
2
Druk op de knoppen …† om Setup te
selecteren en druk op OK of op de knop √.
3
Druk op de knoppen …† om Beeld te
selecteren en druk op OK of op de knop √.
Het menu met video-instellingen verschijnt.
De opties voor video-
uitvoer instellen
34
- Nederlands
5
Druk op de knoppen …† om het gewenste
item te selecteren en druk op OK of op de
knop √.
NB
Geluidsopties
Digitaal UIT Audio
1. PCM : Selecteer deze optie wanneer u geen apparatuur
heeft dat het signaal van Dolby Digital (of MPEG-
2) kan decoderen.
Wanneer u een Dolby Digital (of MPEG-2)
audiotrack afspeelt, wordt de digitale uitvoer
omgezet naar PCM-stereo.
2. Bitstream : Voert Dolby Digital-geluid (of MPEG-2) uit
als bitstream. Selecteer deze optie wanneer
uw AV-ontvanger of AV-versterker over een
Dolby Digital- (of MPEG-2-) decoder.
■
De instelling voor digitale uitvoer geldt
zowel voor Dolby Digital- als MPEG-2-
geluid. De LPCM-audiotrack wordt altijd als
PCM uitgevoerd. Het heeft niets te maken
met de instelling voor digitale uitvoer.
■
Selecteer de juiste digitale uitvoer, anders
hoort u geen geluid of hard geluid.
NB
DTS
1. Uit : Verzendt geen DTS-signaal.
Selecteer deze optie wanneer uw AV-ontvanger of
AV-versterker niet voorzien is van een DTS-
decoder.
2. Aan : Verzendt DTS-bitstream via digitale uitvoer
wanneer u een DTS-track afspeelt. Selecteer
deze optie wanneer uw AV-ontvanger of AV-
versterker niet voorzien is van een DTS-decoder.
Dynamische Compressie
Deze is alleen actief wanneer er een Dolby Digital-
signaal is gedetecteerd.
1. Aan : Wanneer u filmmuziek zachtjes afspeelt of met
kleinere speakers, kan het systeem de juiste
compressie toepassen om de zachte inhoud
verstaanbaarder te maken en om te
voorkomen dat dramatische passages te hard
klinken.
2. Uit : U kunt de film bekijken met het standaard
dynamisch bereik.
■
Bij het afspelen van de DTS-audiotrack
wordt het geluid niet via de AV-audio-
uitgang uitgevoerd.
NB
■
Druk op de knop RETURN of op de knop
œ om naar het vorige menu terug te keren.
Druk op de knop MENU om het menu af
te sluiten.
RETURNOKVERPL. EINDE
Setup
Geen cd/dvd
Systeem
√√
Klok Instellen
√√
Taal
√√
Geluid
√√
Beeld
√√
Kinderslot
√√
Zenders instellen
√√
Programma
Setup
RETURNOKVERPL. EINDE
Timer-Opname
Geen cd/dvd
ShowView
√√
Timer-Opname
√√
ShowView Verlengd : Uit
√√
Programma
Setup
RETURNOKVERPL. EINDE
Beeld
Geen cd/dvd
Normaal/Breedbeeld : 4:3 Letter Box
√√
3D-Ruisonderdrukking : Uit
√√
HDMI/DVI Resolution : 576p
√√
uitvoer Beeld
:
Component
√√
Programma
Setup
Systeeminstallatie
00842C-R125-30~59-NL 6/14/05 6:05 PM Page 34

Nederlands -
35
4
Druk op de knoppen …† om
Uitvoer Beeld
te selecteren en druk op OK of op de knop √.
5
Druk op de knoppen …† om het gewenste
item te selecteren en druk op OK of op de
knop √.
In de componentmodus kunt u de video-uitgang op
progressief (P.SCAN) instellen of interlace, zie pagina 36.
Als de HDMI-kabel niet is aangesloten, zullen de video-
uitgangen als volgt beschikbaar zijn.
Beschikbare video-uitgangen
Component Component Selecteer deze optie wanneer
de recorder is aangesloten op een tv met
een componentingang.
RGB Selecteer deze optie om RGB-signalen uit te
voeren.
Componentuitgang
(Y, Pb, Pr)
AV1-scart
R, G, B
Composite
X
O
X
O
O
O
O
(tv in progressiefmodus)
X
X
X
X
X
O
X
O
O
O
O
AV2-scart
Composite Video-uitgang
S-Video-uitgang
Composite
Instellingsmodus
RGB-modus
Uitgang
Modus P.SCAN uit (interlace-modus)
Modus P.SCAN aan
Componentmodus
RETURNOKVERPL. EINDE
Beeld
Geen cd/dvd
Normaal/Breedbeeld : 4:3 Letter Box
√√
3D-ruisonderdrukking : Uit
√√
HDMI/DVI Resolution : 576p
√√
uitvoer Beeld
:
Component
√√
Programma
Setup
Component
RGB
Systeeminstallatie
Als de tv Progressieve scan ondersteunt, drukt u op
de knop P.SCAN op de voorkant van de DVD-
recorder om hogere kwaliteit videobeelden te krijgen.
1
Druk op de knop P.SCAN op de voorkant
van de DVD-recorder terwijl de eenheid in
de stopstand staat.
Het bericht "[Ja] om progressieve scanmodus te
bevestigen. Anders kies [Nee]." verschijnt. Druk op œ
√ om Ja te selecteren en druk vervolgens op OK.
2
Het bericht Stel
de tv in op Interlace invoer.
"Stel TV in op Progressieve invoer. Druk op
[Stop] om te deactiveren." verschijnt. Druk op
OK.
3
Het bericht "Video-uitvoermodus
Progressieve scan" verschijnt.
Progressief scannen
instellen
■
Als de HDMI-kabel is aangesloten, wordt
dit scherm niet weergegeven.
■
De instelling voor progressief scannen is
alleen beschikbaar wanneer de DVD-
recorder in de stopstand staat.
■
De instelling voor progressief scannen is
alleen beschikbaar wanneer de video-
uitgang op Component is ingesteld.
■
Als u tijdens het afspelen op de knop P.SCAN
op het voorpaneel van de DVD-recorder drukt,
verschijnt het bericht "Deze functie is alleen
beschikbaar in de stopstand.".
NB
[Ja] om progressieve scanmodus te bevestigen.
Anders kies [Nee].
Ja Nee
Stel TV in op Progressieve invoer.
Druk op [Stop] om te deactiveren.
OK
Video-uitvoermodus
Progressieve scan
■
Als de HDMI-kabel is aangesloten,
werken andere A/V-uitgangen niet. Als de
resolutie is ingesteld op 576p is de
componentuitgang beschikbaar.
NB
00842C-R125-30~59-NL 6/14/05 6:05 PM Page 35

Met deze functie kunt u de tv-scherminstellingen invoeren.
1
Druk op de knop MENU met de eenheid in
de modus Stop/modus Geen schijf.
2
Druk op de knoppen …† om Setup te
selecteren en druk op OK of op de knop √.
3
Druk op de knoppen …† om Beeld te
selecteren en druk op OK of op de knop √.
Het menu met video-instellingen verschijnt.
4
Druk op de knoppen …† om de gewenste
video-optie te selecteren en druk op OK of op
de knop √.
5
Druk op de knoppen …† om het gewenste item
te selecteren en druk op OK of op de knop √.
De beeldopties (video)
instellen
■
Druk op de knop RETURN of op de knop
oe œ om naar het vorige menu terug te
keren. Druk op de knop MENU om het
menu af te sluiten.
NB
36
- Nederlands
1
Druk op de knop P.SCAN op de voorkant
van de DVD-recorder terwijl de eenheid in
de stopstand staat.
Het bericht "[Ja] om Interlaced scanmodus te bevestigen.
Anders kies [Nee]." verschijnt. Druk op œ √ om Ja te
selecteren en druk vervolgens op OK.
2
Het bericht "Stel TV in op Interlaced invoer.
Druk op [Stop] om te deactiveren."
verschijnt. Druk op OK.
3
Het bericht "Video-uitvoermodus Interlaced
scan" verschijnt.
Progressief scannen
annuleren
■
Druk niet op de knop P.SCAN als u een tv
gebruikt die de progressieve modus niet
ondersteunt. Doet u dit wel, dan wordt er
niets op het scherm weergegeven.
■
Als u per ongeluk toch op de knop
P.SCAN drukt bij een tv die de
progressieve modus niet ondersteunt,
moet u deze modus uitschakelen. U doet
dit door driemaal op de knop P.SCAN op
het voorpaneel te drukken. Het scherm
wordt hersteld wanneer de PSO LED op
het display op het voorpaneel uitgaat.
NB
[Ja] om Interlaced scanmodus te bevestigen.
Anders kies [Nee].
Ja Nee
Stel TV in op Interlaced invoer.
Druk op [Stop] om te deactiveren.
OK
Video-uitvoermodus
Interlaced scan
RETURNOKVERPL. EINDE
Setup
Geen cd/dvd
Systeem
√√
Klok Instellen
√√
Taal
√√
Geluid
√√
Beeld
√√
Kinderslot
√√
Zenders instellen
√√
Programma
Setup
RETURNOKVERPL. EINDE
Timer-Opname
Geen cd/dvd
ShowView
√√
Timer-Opname
√√
ShowView Verlengd : Uit
√√
Programma
Setup
RETURNOKVERPL. EINDE
Beeld
Geen cd/dvd
Normaal/Breedbeeld : 4:3 Letter Box
√√
3D-Ruisonderdrukking : Uit
√√
HDMI/DVI-Resolution : 576p
√√
uitvoer Beeld
:
Component
√√
Programma
Setup
RETURNOKVERPL. EINDE
Beeld
Geen cd/dvd
Normaal/Breedbeeld : 4:3 Letter Box
√√
3D-Ruisonderdrukking : Uit
√√
HDMI/DVI-Resolution : 576P
√√
uitvoer Beeld
:
Component
√√
Programma
Setup
4:3 Letter Box
4:3 Pan-Scan
16:9 Breed
Systeeminstallatie
00842C-R125-30~59-NL 6/14/05 6:05 PM Page 36

Nederlands -
37
Beeldopties (video)
Deze functie hangt af van het schijftype. Bij sommige
schijven werkt deze namelijk niet.
Normaal/Breedbeeld
Afhankelijk van het type televisie kunt u de instellingen
voor het beeld aanpassen (beeldformaat).
• 4:3 Letterbox : Selecteer deze optie als u het gehele
16:9-scherm wilt zien dat DVD biedt, ook
al heeft uw TV een beeldformaat van 4:3.
Aan de boven- en onderkant van het
scherm ziet u zwarte balken.
• 4:3 Pan - Scan : Selecteer deze optie voor conventionele
tv’s als u het centrale deel van het 16:9-
scherm wilt zien. (De uiterste rechter-
en linkerkant van het beeld worden
afgesneden).
• 16:9 Breed : U ziet het volledige 16:-beeld op uw
breedbeeldtelevisie.
3D-Ruisonderdrukking (motion adaptive
ruisonderdrukking)
● Aan : Biedt een helderder beeld via
ruisonderdrukking (voor opnames).
● Uit : Normaal
RETURNOKVERPL. EINDE
Beeld
Geen cd/dvd
Normaal/Breedbeeld : 4:3 Letter Box
√√
3D-Ruisonderdrukking : Uit
√√
HDMI/DVI-Resolution : 576P
√√
uitvoer Beeld
:
Component
√√
Programma
Setup
4:3 Letter Box
4:3 Pan-Scan
16:9 Breed
RETURNOKVERPL. EINDE
Beeld
Geen cd/dvd
Normaal/Breedbeeld : 4:3 Letter Box
√√
3D-Ruisonderdrukking : Uit
√√
HDMI/DVI-Resolution : 576P
√√
uitvoer Beeld
:
Component
√√
Programma
Setup
Uit
Aan
Systeeminstallatie
HDMI/DVI-Resolution
Deze instelling wordt gebruikt wanneer de eenheid wordt
aangesloten door middel van HDMI of DVI op weergave-
apparaten (TV, projector, etc.).
•
576p : 720 x 576
•
720p : 1280 x 720
•
1080i : 1920 x 1080
Uitgangselectie
• Sluit de DVD-Recorder aan op uw TV via HDMI.
Stel de TV-ingang in op HDMI.
• Druk op de knop P.SCAN terwijl de eenheid in de
stopstand staat om de HDMI-uitvoerresolutie als volgt te
selecteren:
576p
→
720p
→
1080i.
RETURNOKVERPL. EINDE
Video
No Disc
Normaal/Breedbeeld : 4:3 Letter Box
√√
3D-Ruisonderdrukking : Uit
√√
HDMI/DVI-Resolution : 576p
√√
uitvoer Beeld
:
Component
√√
Programme
Setup
■
Progressief scannen wordt automatisch
geactiveerd wanneer HDMI aangesloten
is. (Controleer of PSO op het voorpaneel
van de DVD-recorder wordt aangegeven.)
■
Er zal geen HDMI-video- of geluidsuitvoer
zijn als de progressieve scanfunctie niet
ingeschakeld is.
■
Raadpleeg de televisiehandleiding als u
wilt weten of uw televisie progressief
scannen ondersteunt.
Als dat het geval is, bevat de
televisiehandleiding instructies over de
instellingen voor progressief scannen.
Voer deze instructies uit in het
menusysteem van de tv.
■
Als de verkeerde video-uitgang is ingesteld,
wordt het scherm mogelijk geblokkeerd.
■
De beschikbare resoluties voor HDMIDVI-
uitvoer zijn afhankelijk van de
aangesloten TV of projector. Raadpleeg
de gebruiksaanwijzing van uw TV of
projector voor meer informatie.
■
Als de resolutie wordt gewijzigd, kan het
enkele seconden duren voordat beeld
weer normaal wordt weergegeven.
■
Als u de HDMI-uitgangsresolutie instelt op
720p of 1080i, zal de HDMI-uitgang beter
beeldkwaliteit leveren.
■
DivX-weergave kan alleen gegeven
worden bij 567p.
NB
576p
720p
1080i
■
Het Menuscherm zal uitzoomen tot 2/3 bij
1080i.
NB
00842C-R125-30~59-NL 6/14/05 6:05 PM Page 37

38
- Nederlands
5
Druk op de knop OK of op √ om
Toegangscode te selecteren.
6
Druk op de knoppen …† om Aan of Uit te
selecteren en druk op OK of op de knop √.
■
Druk op de knop RETURN of op de knop
oe œ om naar het vorige menu terug te
keren. Druk op de knop MENU om het
menu af te sluiten.
NB
Indien u uw toegangscode vergeet.
1
Verwijder de schijf.
2
Houd de knop (FF) op het voorpaneel
minstens 5 seconden ingedrukt.
RETURNOKVERPL. EINDE
Kinderslot
Geen cd/dvd
Toegangscode :Off
√√
Uit
Aan
Programma
Setup
Systeeminstallatie
De functie Kinderslot werkt bij DVD’s die voorzien zijn
van een classificatie. Zo kunt u controle houden over
het type films waarnaar uw gezin kijkt. Een schijf bevat
maximaal acht classificatieniveaus.
1
Druk op de knop MENU met de eenheid in
de modus Stop/modus Geen schijf.
2
Druk op de knoppen …† om Setup te
selecteren en druk op OK of op de knop √.
3
Druk op de knoppen …† om Kinderslot te
selecteren en druk op OK of op de knop √.
4
Voer de viercijferige toegangscode in met de
knoppen 0 t/m 9 op de afstandsbediening.
Het bericht 'Geef de toegangscode nogmaals in.'
verschijnt. Voer de toegangscode nogmaals in.
Kinderslot instellen
RETURNOKVERPL. EINDE
Setup
Geen cd/dvd
Systeem
√√
Klok Instellen
√√
Taal
√√
Geluid
√√
Beeld
√√
Kinderslot
√√
Zenders instellen
√√
Programma
Setup
RETURNOKVERPL. EINDE
Timer-Opname
Geen cd/dvd
ShowView
√√
Timer-Opname
√√
ShowView Verlengd : Uit
√√
Programma
Setup
RETURN
OK
NUMMER
EINDE
Kinderslot
Geen cd/dvd
Torgangscode Instellen
RETURNOK
NUMMER
EINDE
Kinderslot
Geen cd/dvd
Geef de toegangscode nogmaals in
Programma
Setup
Programma
Setup
00842C-R125-30~59-NL 6/14/05 6:05 PM Page 38

Nederlands -
39
1
Druk op de knoppen …† om
Toegangscode wijzigen te selecteren.
2
Druk op OK of op √.
Het bericht 'Geef de toegangscode in' verschijnt.
3
Voer de viercijferige toegangscode in met
de knoppen 0 t/m 9 op de afstandsbediening.
Het bericht 'Geef de toegangscode nogmaals in' verschijnt.
Voer de toegangscode nogmaals in.
1
Druk op de knoppen …† om het Niveau te
selecteren.
2
Druk op OK of op √.
Het classificatieniveau verschijnt.
3
Druk op de knoppen …† om het gewenste
niveau te selecteren en druk op OK of op
de knop √.
Als u bijvoorbeeld niveau 6 kiest, worden schijven van
niveau 7 of 8 niet afgespeeld. Een hoger cijfer geeft
aan dat het programma alleen door volwassenen
mag worden gebruikt.
Het classificatieniveau Het wachtwoord
■
Zie pagina 38 als u uw toegangscode
bent vergeten.
NB
RETURNOK
NUMMER
EINDE
Toegangscode wijzigen
Geen cd/dvd
Geef de toegangscode in
RETURNOK
NUMMER
EINDE
Toegangscode wijzigen
Geen cd/dvd
Geef de toegangscode nogmaals in
***
RETURNOKVERPL. EINDE
Kinderslot
Geen cd/dvd
Toegangscode : Aan
√√
Niveau :
Niveau 1 Kind
√√
Toegangscode wijzigen
√√
RETURNOKVERPL. EINDE
Kinderslot
Geen cd/dvd
Toegangscode : Aan
√√
Niveau :
Niveau 1 Kind
√√
Toegangscode wijzigen
√√
Niveau 8 Volw.
Niveau 7
Niveau 6
Niveau 5
Niveau 4
Niveau 3
Niveau 2
Niveau 1 Kind
Programma
Setup
Programma
Setup
RETURNOKVERPL. EINDE
Kinderslot
Geen cd/dvd
Toegangscode : Aan
√√
Niveau :
Niveau 1 Kind
√√
Toegangscode wijzigen
√√
Programma
Setup
Programma
Setup
Programma
Setup
Systeeminstallatie
00842C-R125-30~59-NL 6/14/05 6:05 PM Page 39

40
- Nederlands
Dit apparaat kan opnemen op verschillende schijftypes.
Lees voor u begint met opnemen eerst de volgende
aanwijzingen en kies het schijftype dat het beste bij uw
wensen past.
Geschikte schijven
Deze recorder kan opnemen op de volgende schijftypes.
DVD-RAM DVD-RW DVD-R
● DVD-RW en DVD-RAM zijn herschrijfbaar (rewritable)
● DVD-R is niet herschrijfbaar
Compatibiliteit tussen recorders van Samsung en
andere merken
Opnemen
Voordat u gaat opnemen
Voordat u gaat opnemen .................................40
Tv-programma opnementerwijl u er
naar kijkt ............................................................42
Materiaal opnemen van externe
apparatuur terwijl u er naar kijkt.......................44
Van een camcorder kopiëren...........................45
Opnameduur met 1 toets instellen (OTR).......46
Een timer-opname maken ...............................47
Automatische keuze opnamekwaliteit
(alleen voor timer-opnamen)
..............................48
De Lijst van geplande opnamen bewerken ....48
De Lijst van geplande opnamen verwijderen
.....49
De functie ShowView gebruiken .....................50
ShowView verlengen........................................51
Timer-opname starten......................................51
In dit hoofdstuk vindt u verschillende methodes voor
het opnemen van DVD’s.
Schijftypes Opname- Opgenomen Afsluiten Opname toevoegen
formaat met merk (finalise) met Samsung recorder
DVD-RAM VR Mode
Samsung X mogelijk
ander merk X mogelijk
Samsung
afgesloten niet mogelijk
VR Mode
niet afgesloten mogelijk
ander merk afgesloten niet mogelijk
DVD-RW
niet afgesloten mogelijk
Samsung
afgesloten niet mogelijk
V Mode
niet afgesloten mogelijk
ander merk afgesloten niet mogelijk
niet afgesloten niet mogelijk
Samsung
afgesloten niet mogelijk
DVD-R V Mode
niet afgesloten mogelijk
ander merk afgesloten niet mogelijk
niet afgesloten niet mogelijk
■
Afsluiten
- Hiermee wordt een DVD-R/RW afgesloten
en kan er niet meer op worden opgenomen.
■
Afsluiten ongedaan maken
- Hiermee kunt u extra opnamen opslaan op
een DVD-RW-schijf die oorspronkelijk op
de DVD-recorder zijn opgenomen.
- De voltooiing van een DVD-RW-schijf die is
opgenomen met DAO (Disc At Once) in een
pc kan niet ongedaan worden gemaakt.
- Als de DVD-RW is opgenomen in de Video
stand of op een recorder van een ander
merk kan het afsluiten niet ongedaan
worden gemaakt.
- Wanneer een DVD-R eenmaal is afgesloten,
kan dit niet ongedaan worden gemaakt.
NB
Opnemen
00842C-R125-30~59-NL 6/14/05 6:05 PM Page 40

Nederlands -
41
Kopieerbeveiliging
Beeldmateriaal met een kopieerbeveiliging kan met
deze DVD-recorder niet worden opgenomen.
Wanneer de DVD-recorder tijdens het kopiëren een
beveiligingssignaal waarneemt, wordt de opname
afgebroken en verschijnt de volgende melding op het
scherm:
Kopieerbeveiligingssignalen
Als een programma een kopieerbeveiliging bevat, zijn
er drie mogelijkheden: Copy-Free (toegestaan), Copy-
Once (eenmaal toegestaan) of Copy-Never (verboden).
Als u een copy-once proramma wilt opnemen, moet
u een DVD-RW met CPRM in VR stand of DVD-
RAM gebruiken.
Wanneer een Copy-Once programma is opgenomen,
kunnen er geen verdere kopieën van worden gemaakt.
- Inhoudbeveilliging voor opneembare media (CPRM)
CPRM is een mechanisme dat een opname aan de media
koppelt waarop deze is opgenomen. Het wordt
ondersteund door sommige DVD-recorders, maar door
weinig DVD-spelers. Elke lege opneembare DVD heeft een
uniek 64-bits medium-id geëtst in de BCA. Wanneer de
beveiligde inhoud op de schijf is opgenomen, kan deze
worden gecodeerd met een 56 bits C2 (cryptomeria) cipher
afgeleid van de medium-id. Tijdens het afspelen wordt de
id gelezen vanaf de BCA en gebruikt om een sleutel te
genereren om de inhoud van de schijf te ontcijferen. Als de
inhoud van de schijf naar andere media wordt gekopieerd,
ontbreekt de id of is deze verkeerd en kunnen de
gegevens niet worden ontcijferd
Schijfindelingen en formatteren
Aangezien de beschikbare functies verschillen per
schijftype, selecteert u een schijf die het beste aan uw
wensen voldoet; Wanneer u een lege schijf plaatst,
verschijnt het volgende bericht
DVD-RAM: kan worden gebruikt als de schijf is geformatteerd.
DVD-RW: Als een lege disk voor het eerst ingebracht
wordt, zal het bericht "Wilt u deze schijf
initialiseren?" verschijnen.
Als Ja gekozen wordt, zal de vorm in VR
Vorm gebracht worden.
Als u een schijf wilt formatteren voor VR of
DVD-Video, zie dan “Schijf formatteren” op pagina 84.
DVD-R: Hoeft niet te worden geformatteerd. Alleen
de Video stand wordt ondersteund.
DVD-RW (Video stand) / DVD-R
●
Hoofdstukken worden automatisch gemaakt wanneer u de
opname op DVD-R/DVD-RW-schijven in videomodus voltooit
waarbij Hoofdstuk maken (Chapter Creator) op Aan (On) is
ingesteld. De lengte van het hoofdstuk (interval tussen
hoofdstukken) hangt af van de opnamemodus.
● Eenvoudige bewerkingen zijn mogelijk (titels wissen of
andere naam geven).
DVD-RW (VR stand) / DVD-RAM
●
In deze stand zijn verschillende bewerkingfuncties beschikbaar
(zoals geheel of gedeeltelijk verwijderen van een titel, etc.)
● Verschillende bewerkingopties zoals een aan te maken
playlist.
Opnamekwaliteit
Wanneer de recorder op Stop staat, kunt u kiezen tussen
vier verschillende opnamekwaliteiten. Druk zo vaak als
nodig op de toets REC MODE om naar de gewenste
kwaliteit te gaan.
In de FR-modus wordt de meest geschikte
opnamemodus automatisch gewijzigd, volgens de
resterende tijd op de schijf en de lengte van de timer-
opname. Hierbij wordt slechts één van de XP, SP, LP
en EP-modi geselecteerd, die u kunt gebruiken voor
timer-opnamen.
Opnamekwaliteit Kenmerken
Opnameduur
en bitsnelheid
XP Kies hiervoor wanneer circa 1 uur
(hoge kwaliteit) de beeldkwaliteit
circa 8 Mbps
belangrijk is.
SP
Kies hiervoor als standaard
circa 2 uur
(normale kwaliteit)
beeldkwaliteit voldoet. circa 4 Mbps
LP
Kies hiervoor als een circa 4 uur
(lagere kwaliteit)
lange opnameduur
circa 2 Mbps
gewenst is.
EP
Kies hiervoor als de circa 6 uur
(laagste kwaliteit)
langst mogelijke circa 1,2 Mbps
opnameduur gewenst is.
circa 8 uur
circa 0,8 Mbps
FR
Alleen voor timer-opnamen Approx 60 to 480 Min
(Flexible Recording: zie pagina 48. circa 0.8 uur
automatische keuze 8 Mbps
opnamekwaliteit)
Media
Copy-Free Copy-Once Copy-Never
DVD-RW( Ver.1.1)
O
- -
DVD-RW(Ver.1.1)
met CPRM
VR stand
OO
* -
Video stand
O
-
DVD-R
O
-
DVD-RAM( Ver.2.0)
OO
* -
Signaal
Opnemen
RETURNOKVERPL. EINDE
Schijfbeheer
DVD-RW(VR)
Schijfnaam :
√√
Schijfbeveiliging : Niet Beveiligd
√√
Schijfindeling : DVD-VR
√√
Schijf Afsluiten
√√
Alle Titellijsten Verwijderen
√√
Schijfnavigatie
Playlist
Schijfbeheer
Programma
Setup
Kies opname-indeling voor DVD-RW.
DVD-VR DVD-V
Ongeformatteerde schijf.
Wilt u deze schijf formatteren?
Ja Nee
Ongeinitialiseerde schijf.
Wilt u deze schijf initialiseren?
Ja Nee
U kunt tegen kopiëren beveiligde films niet opnemen.
00842C-R125-30~59-NL 6/14/05 6:05 PM Page 41

42
- Nederlands
Opnemen
Tv-programma opnemen
terwijl u er naar kijkt
Controleer of de schijf voldoende ruimte heeft voor
de opname. Pas de opnamemodus aan.
1
Druk op de OPEN/CLOSE toets en doe
een lege schijf in de lade.
2
Druk op de OPEN/CLOSE toets om de lade
te sluiten.
Wacht tot de tekst “LOAD” uit het display verdwijnt.
Als u een lege DVD-RAM schijf hebt geplaatst, wordt
eerst gevraagd of u deze wilt formatteren. Maak een
selectie met de knoppen œ √ en druk op OK (zie
pagina 41).
Als u een lege DVD-RW schijf hebt geplaatst, wordt
eerst gevraagd of u deze wilt initialiseren. Maak een
selectie en druk op OK. (zie pagina 41).
INFO toets
Met de INFO functie ziet u de huidige status/voortgang van
weergave en opname. Afhankelijk van type en status van
de schijf kan het scherm er in werkelijkheid anders uitzien.
Resterende schijfruimte opvragen
(Schijfinfo)
Wanneer u iets wilt opnemen op een gebruikte schijf, moet
u eerst controleren of de schijf wel voldoende vrije ruimte
heeft voor de opname. Als het om een DVD-RW of DVD-
RAM gaat, kunt u bovendien ruimte vrijmaken door
opnamen te wissen.
● Druk op de INFO toets.
Het weergavevenster met schijfinformatie verschijnt.
De werkelijke items in het scherm kunnen afhangen van
het gebruikte type schijf, de schijfindeling en de gekozen
opnamekwaliteit.
1. Type schijf
2. Status huidige informatieweergave
3. Naam van de schijf
4. Aantal titels: Totaal aantal opgenomen titels
5. Aantal playlists: Totaal aantal playlists
6. Opnametijd: De langste ononderbroken opname die
mogelijk is bij de betreffende opnamekwaliteit
(schatting)
7. Datum: Huidige datum en tijd
Voor u begint
Ongeformatteerde schijf.
Wilt u deze schijf formatteren?
Ja Nee
Ongeinitialiseerde schijf.
Wilt u deze schijf initialiseren?
Ja Nee
DVD-RAM(VR) Schijfinfo
Schijfnaam Disc
Aantal Titels 15
Aantal Playlists 2
Opnametijd
02:12 SP
Beveiliging Niet Beveiligd
Scherm Opnemen : PR 1 [SP]
01 JAN 2005 ZA 12:00
12
3
4
5
6
7
00842C-R125-30~59-NL 6/14/05 6:05 PM Page 42

Nederlands -
43
Opname beëindigen
Druk op de STOP ( ) toets om een lopende opname te
beëindigen.
● Bij DVD-RAM/DVD-RW/DVD-R schijven verschijnt nu de
melding: “Schijfinformatie wordt bijgewerkt. Even geduld
aub.”.
3
Ga met de PROG toetsen ( / ) of de
cijfertoetsen ( ~ ) naar de zender zie u
wilt opnemen.
4
Druk enkele malen op de REC MODE toets
(of druk op de REC MODE toets en
vervolgens op de …† toets) om de
opnamekwaliteit in te stellen.
➞
SP
➞
LP
➞
EP
➞
XP
5
Druk op de REC toets.
U ziet informatie over de gekozen zender op het
scherm, waarna de opname wordt gestart.
Het pictogram ( ) wordt op het voorpaneel
weergegeven.
Als u de huidige status van de schijf en de voortgang
van de opname wilt bekijken, drukt u op de INFO
toets, waarna de informatie van de schijf wordt
getoond.
Druk nogmaals op de knop INFO om de informatie
over de opname weer te geven.
■
Tijdens het opnemen kunt u de
opnamekwaliteit en het programma niet
wijzigen.
■
De opname stopt automatisch wanneer
er geen ruimte meer vrij is op de schijf.
■
Er gaan maximaal 99 titels op een
schijf.
■
De opname stopt automatisch wanneer
tegen kopiëren beveiligd materiaal
wordt gekozen.
■
Nieuwe DVD-RAM/DVD-RW schijven
moeten meestal worden geformatteerd
voordat erop kan worden opgenomen.
De meeste schijven worden
ongeformatteerd verkocht.
■
Doe geen DVD-R authoring schijven in
deze recorder.
NB
Opnemen
Opnamemodus
SP (02:12)
Opnemen : PR 1 [SP]
DVD-RAM(VR) Opname-info
Naam 01/JAN/2005 12:00 PR
1
Opnametitel 15
Aanmaaktijd 01/JAN/2005 12:00
Opnametijd 00:02:05
01 JAN 2005 ZA 12:00
DVD-RAM(VR) Schijfinfo
Schijfnaam
Aantal Titels 15
Aantal Playlists 2
Opnametijd 02:12 SP
Beveiliging Niet Beveiligd
Scherm Opnemen : PR 1 [SP]
01 JAN 2005 ZA 12:00
00842C-R125-30~59-NL 6/14/05 6:05 PM Page 43

44
- Nederlands
5
Druk op de REC toets.
Opname pauzeren
Druk op de knop om een opname te onderbreken.
● Druk nogmaals op de knop om het opnemen voort
te zetten.
● Wanneer de opname is gepauzeerd, kunt u met de
PROG ( / ) toetsen een andere zender kiezen.
Opname beëindigen
Druk op de STOP ( ) toets om een lopende opname te
beëindigen.
● Bij DVD-RAM/DVD-RW/DVD-R schijven verschijnt nu de
melding: “Schijfinformatie wordt bijgewerkt. Even geduld
aub.”.
Materiaal opnemen van
externe apparatuur terwijl
u er naar kijkt
Controleer of de schijf voldoende ruimte heeft voor de opname.
Pas eventueel de opnamekwaliteit aan.
1
Druk op de OPEN/CLOSE toets en doe
een lege schijf in de lade.
2
Druk op de OPEN/CLOSE toets om de
lade te sluiten.
Wacht tot de tekst “LOAD” uit het display verdwijnt.
Als u een lege DVD-RAM schijf hebt geplaatst, wordt
eerst gevraagd of u deze wilt formatteren.
(zie pagina 41).
Als u een lege DVD-RW schijf hebt geplaatst, wordt
eerst gevraagd of u deze wilt initialiseren.
(zie pagina 41).
3
Druk op de INPUT toets om de ingang te
kiezen waarop de bron is aangesloten
waarvan u wilt opnemen.
In het display ziet u achtereenvolgens de mogelijkheden:
➞ PROG nummer ➞ AV1 ➞ AV2 ➞ AV3 ➞ DV
Als u een digitale camcorder hebt
aangesloten, drukt u op INPUT tot u de
keuze DV ziet. (zie pagina 45)
4
Druk enkele malen op de REC MODE toets
(of druk op de REC MODE toets en
vervolgens op de …† toets) om de
opnamekwaliteit in te stellen).
➞
SP
➞
LP
➞
EP
➞
XP
Voordat u gaat opnemen
■
Wanneer de recorder aan het opnemen
is, kunt u geen andere ingang of
kwaliteit kiezen.
■
De opname stopt automatisch wanneer
er geen ruimte meer vrij is op de schijf.
■
Er gaan maximaal 99 titels op een schijf.
■
De opname stopt automatisch wanneer
tegen kopiëren beveiligd materiaal
wordt gekozen.
■
Nieuwe DVD-RAM/DVD-RW schijven
moeten meestal worden geformatteerd
voordat erop kan worden opgenomen.
De meeste schijven worden
ongeformatteerd verkocht.
■
Doe geen DVD-R authoring schijven in
deze recorder.
NB
Opnemen
Opnamemodus
SP (02:12)
00842C-R125-30~59-NL 6/14/05 6:05 PM Page 44

Nederlands -
45
Opnemen
5
Selecteer het pictogram Afspelen boven
aan het scherm om de camcorder te laten
afspelen en zoek de startpositie om te
kopiëren.
U kunt op de knop PLAY drukken op de
afstandsbediening om de camcorder af te spelen.
6
U start het opnemen met de knop œ √ om
het opnamepictogram (● ) boven aan het
scherm te selecteren en met de knop OK.
U kunt ook opnemen met de REC knop op de
afstandsbediening. U geeft pictogrammen voor het
afspelen op het scherm weer door op een richtingspijl
op de afstandsbediening te drukken.
Opname beëindigen
Druk op de STOP ( ) toets om een lopende opname te
beëindigen.
● Bij DVD-RAM/DVD-RW/DVD-R schijven verschijnt nu de
melding: “Schijfinformatie wordt bijgewerkt. Even geduld
aub.”.
Van een camcorder
kopiëren
U kunt de camcorder regelen met de interface
IEEE1394 (DV).
Controleer of de schijf voldoende ruimte heeft voor de
opname.
Pas eventueel de opnamekwaliteit aan.
1
Druk op de OPEN/CLOSE toets en doe
een lege schijf in de lade.
2
Druk op de OPEN/CLOSE toets om de
lade te sluiten.
Wacht tot de tekst “LOAD” uit het display verdwijnt.
Als u een lege DVD-RAM schijf hebt geplaatst, wordt
eerst gevraagd of u deze wilt formatteren.
(zie pagina 41).
Als u een lege DVD-RW schijf hebt geplaatst, wordt
eerst gevraagd of u deze wilt initialiseren.
(zie pagina 41).
3
Druk enkele malen op de REC MODE toets
(of druk op de REC MODE toets en
vervolgens op de …† toets) om de
opnamekwaliteit in te stellen).
➞
SP
➞
LP
➞
EP
➞
XP
4
Druk op de knop INPUT om DV te selecteren.
Als de invoer op DV is ingesteld, verschijnt er boven
aan het scherm een afspeel/opnamemenu waarmee
u de camcorder kunt regelen.
Voordat u gaat opnemen
■
Wanneer de recorder aan het opnemen
is, kunt u geen andere ingang of
kwaliteit kiezen.
■
De opname stopt automatisch wanneer
er geen ruimte meer vrij is op de schijf.
■
Er gaan maximaal 99 titels op een schijf.
■
De opname stopt automatisch wanneer
tegen kopiëren beveiligd materiaal
wordt gekozen.
■
Nieuwe
DVD-RAM/DVD-RW
schijven
moeten meestal worden geformatteerd
voordat erop kan worden opgenomen.
De meeste schijven worden
ongeformatteerd verkocht.
■
Doe geen
DVD-R
authoring schijven in
deze recorder.
NB
Opnamemodus
SP (02:12)
DV
Het DV-apparaat is aangesloten.
RETURNOKVERPL.
00842C-R125-30~59-NL 6/14/05 6:05 PM Page 45

46
- Nederlands
Opnameduur met 1 toets
instellen (OTR)
U kunt de dvd-recorder direct laten beginnen met een
opname door op de REC toets te drukken.
1
Als u een tv-zender wilt opnemen, gaat u
met de PROG ( / ) toetsen of de
cijfertoetsen naar de gewenste zender.
Als u wilt opnemen van een aangesloten
extern apparaat, drukt u op de INPUT toets
om de gewenste ingang te selecteren (AV1,
AV2, AV3 of DV).
● TV PROGRAMMA: 1 t/m 99
2
Druk op de knop REC om het opnemen te
starten.
3
Druk herhaaldelijk op de toets REC om de
gewenste opnametijd aan te passen.
➞
0:30
➞
1:00
➞
...8:00
➞
Uit
Als u de huidige status van de schijf en de voortgang
van de opname wilt bekijken, drukt u op de INFO
toets.
Eerst verschijnt de schijfinformatie:
Druk nogmaals op de INFO toets. Nu ziet u de
informatie van de lopende opname.
30 seconden voor de opname afloopt, verschijnt op
uw scherm een melding en krijgt u de gelegenheid
om te voorkomen dat de recorder automatisch wordt
uitgeschakeld wanneer de opname is afgelopen.
Opname bëeindigen
Druk op de STOP ( ) toets. De vraag “Wilt u stoppen met
opnemen?” verschijnt.
● Selecteer Ja met de œ √ toetsen en druk op de OK
toets.
● Of druk tweemaal op de knop STOP.
■
De teller van de timer telt elke minuut af van
8:00 tot 0:00, waarna de DVD-speler stopt
met opnemen.
NB
Opnemen
OTR-Modus
0:30
Wilt u stoppen met opnemen?
Ja Nee
Die OTR-Aufnahme endet in Kürze und das Gerät
wird automatisch ausgeschaltet. Drücken Sie [OK],
um den DVD-Recorder weiter zu benutzen.
OK
DVD-RAM(VR) Opname-info
Naam 01/JAN/2005 12:00 PR
1
Opnametitel 15
Aanmaaktijd 01/JAN/2005 12:00
Opnametijd 00:02:05
01 JAN 2005 ZA 12:00
DVD-RAM(VR) Schijfinfo
Schijfnaam
Aantal Titels 15
Aantal Playlists 2
Opnametijd 02:12 SP
Beveiliging Niet Beveiligd
Scherm Opnemen : PR 1 [SP]
01 JAN 2005 ZA 12:00
00842C-R125-30~59-NL 6/14/05 6:05 PM Page 46

Nederlands -
47
• Bron: De video-ingang (AV1, AV2, AV3 of DV), of
de zender waarvoor u een timer-opname
wilt instellen.
• Datum: Met Timer-opname kunt u de opnametijd
binnen een periode van één maand instellen.
Stel de opnamedag in. (dag/maand)
01/JAN(ZA) Elke dag
02/JAN(ZO) MA-ZA
03/JAN(MA) MA-VR
30/JAN(ZO) Elke ZA
31/JAN(MA) Elke ZO
• Begin/Einde: Begin- en eindtijd van de opname.
• Modus (opnamemodus):
- FR (flexibel opnemen): In de FR-modus wordt de
meest geschikte opnamemodus automatisch
gewijzigd volgens de resterende tijd op de schijf
en de lengte van de timer-opname. Hierbij wordt
slechts één van de XP, SP, LP en EP-modi
geselecteerd.
- XP (hoge kwaliteit): Selecteer deze optie wanneer
de videokwaliteit belangrijk is (ong. 1 uur).
- SP (standaardkwaliteit): Selecteer deze optie om
met standaardkwaliteit op te nemen (ong. 2 uur).
- LP (lage kwaliteit): Selecteer deze optie wanneer
er een lange opnametijd nodig is (ong. 4 uur).
- EP (verlengd): Selecteer deze optie wanneer er
een langere opnametijd nodig is (ong. 6 tot 8 uur).
• V/P : VPS (Video Programme System) of PDC
(Programme Delivery Control) functie.
-
Als u deze functie inschakelt, wordt de begin- en eindtijd
van de opname bepaald door een speciaal signaal dat
met het programma mee-uitgezonden wordt.
Als een tv-programma korter duurt of eerder of
later dan aangekondigd begint, wordt de begin-
c.q. eindtijd van de opname automatisch
aangepast.
- Stel de begintijd EXACT in op de aangekondigde
tijd. Doet u dit niet, dan wordt het programma niet
opgenomen.
- Selecteer PDC of VPS alleen als u zeker weet dat
het programma met PDC of VPS wordt
uitgezonden.
1. Controleer of de antennekabel is aangesloten.
2. Ga na hoeveel ruimte er nog beschikbaar is op de
schijf.
3. Controleer of de datum en tijd juist zijn ingesteld.
Zorg ervoor dat de klok (Instellingen-Klok instellen) is
ingesteld voordat u verdergaat met een timer-opname
(zie pagina 26).
1
Druk in de stopstand op de knop Timer-
Opname.
De knop MENU gebruiken
● Druk in de stopstand op de knop MENU.
●
Druk op de knoppen …† om Programma te
selecteren en druk op OK of op de knop √
.
●
Druk op de knoppen …† om Timer-opname te
selecteren.
2
Druk op OK of op de knop √.
● Het scherm Timer-opname verschijnt.
3
Opties timer-opname instellen.
• Het menu Timer-opname wordt weergegeven.
Vul met de pijltjes- en cijfertoetsen de opties in.
œ √: Naar de vorige/volgende optie.
…†, 0~9: Waarde instellen.
Een timer-opname maken
Voordat u gaat opnemen
Opnemen
■
Wanneer u in de EP-modus op een DVD-
RW(V)/R-schijf opneemt, wordt er mogelijk
geen 6 of 8 uur opgenomen omdat de
eenheid het codeersysteem VBR (Variable
Bit Rate) gebruikt. Als u bijvoorbeeld een
programma opneemt met veel actie,
gebruikt deze een hogere bitsnelheid wat
meer geheugen in beslag neemt.
NB
RETURNOKVERPL. EINDE
Lijst van Geplande Opnamen
DVD-RAM(VR)
Nr. Bron Datum Begin Einde Modus V/P Wijzig
01
---- -- --- --:-- --:-- -- --
√√
Opnametijd 02:12 SP
Nr. 01
Bron Datum Begin Einde Modus V/P
PR 01 01/JAN(ZA) 12 : 00 14 : 00 SP Uit
Opnametijd 02:12 SP
RETURNOKVERPL. EINDE
Tijdgestuurde opname
DVD-RAM(VR)
ShowView
√√
Timer-Opname
√√
ShowView Verlengd : Uit
√√
Schijfnavigatie
Playlist
Schijfbeheer
Programma
Setup
00842C-R125-30~59-NL 6/14/05 6:05 PM Page 47

48
- Nederlands
Opnemen
4
Druk op de OK toets.
● Op het frontpaneel verschijnt het pictogram .
Dit geeft aan dat er een timer-opname is ingesteld.
Als timer-opnamen elkaar overlappen
Als programma’s elkaar overlappen, krijgt het eerste
programma voorrang.
In dat geval verschijnt de volgende melding op het
scherm: “Deze instelling is gelijk aan 1 .”
Dit geeft aan dat het eerste programma voorrang
heeft.
Pas wanneer het eerste programma geheel is
opgenomen, begint de recorder aan het tweede
programma.
Stoppen zonder de instellingen te bewaren
Druk op de MENU.
Terug naar vorig menu
Druk op de RETURN toets als u geen timer-opname
wilt instellen.
5
U rondt de instelling van de timer-opname
af door de DVD recorder uit te zetten.
Als de DVD recorder is ingeschakeld, is
geen timer-opname mogelijk.
● Als geen schijf is geplaatst, gaat knipperen.
■
De timer-opname kan afwijken van de
ingestelde tijd, afhankelijk van de schijf en
de algemene timer-opname status (bijv.
overlappende opnametijden of opname start
minder dan 2 minuten na afloop van de
voorgaande opname).
■
U kunt maximaal 12 timer-opnamen
programmeren.
NB
Timer-opname wijzigen
Volg de volgende aanwijzigen op om een timer-opname te
wijzigen.
1
Druk in de stopstand op de knop TIMER.
De knop MENU gebruiken
● Druk in de stopstand op de knop MENU.
●
Druk op de knoppen …† om Programma te
selecteren en druk op OK of op de knop √.
●
Druk op de knoppen …† om Timer-opname te
selecteren.
2
Druk op OK of op de knop √.
3
Druk op de knop RETURN om het scherm
Timer-opname te sluiten.
4
Druk op de …† toetsen om het
volgnummer te selecteren van de
timer-opname die u wilt veranderen.
Druk vervolgens op de OK of √ toets.
● De items Wijzig en Wissen worden getoond.
Automatische keuze
opnamekwaliteit
(alleen voor timer-opnamen)
In de FR-modus wordt de meest geschikte
opnamemodus automatisch gewijzigd volgens de
resterende tijd op de schijf en de lengte van de timer-
opname. Hierbij wordt slechts één van de XP, SP, LP
en EP-modi geselecteerd, die u kunt gebruiken voor
timer-opnamen.
De instelling hiervan is hetzelfde als die voor de timer-
opname. In stap 3 selecteert u in dit geval FR-stand.
RETURNOKVERPL. EINDE
Timer-Opname
DVD-RAM(VR)
ShowView
√√
Timer-Opname
√√
ShowView Verlengd : Uit
√√
Schijfnavigatie
Playlist
Schijfbeheer
Programma
Setup
RETURNOKVERPL. EINDE
Lijst van Geplande Opnamen
DVD-RAM(VR)
Nr. Bron Datum Begin Einde Modus V/P Wijzig
01 PR 01 01 JAN 12 : 00 14 : 00 SP Uit
√√
02
---- -- --- --:-- --:-- -- --
√√
Opnametijd 02:12 SP
Wijzig
Wissen
RETURNOKVERPL. EINDE
Lijst van Geplande Opnamen
DVD-RAM(VR)
Nr. Bron Datum Begin Einde Modus V/P Wijzig
01
---- -- --- --:-- --:-- -- --
√√
Opnametijd 02:12 SP
Nr. 01
Bron Datum Begin Einde Modus V/P
PR 01 01/JAN(ZA) 12 : 00 14 : 00 SP Uit
Opnametijd 02:12 SP
00842C-R125-30~59-NL 6/14/05 6:05 PM Page 48

Nederlands -
49
3
Druk op de knop RETURN om het scherm
Timer-opname te sluiten.
4
Druk op de …† toetsen om het
volgnummer te selecteren van de
timer-opname die u wilt vewijderen.
Druk vervolgens op de OK.
● De items Bewerk en Wissen worden getoond.
5
Selecteer Wissen met de …† toetsen en
druk op de OK.
● Nu wordt u gevraagd om het wissen te bevestigen.
Voorbeeld: “Wilt u ‘Nr. 01’ verwijderen?”
6
Selecteer Ja met de œ √ toetsen en druk
op de OK toets.
● De geselecteerde opname wordt uit de lijst
verwijderd.
7
Hierna drukt u op de toets MENU, waarna
het menu van het scherm verdwijnt.
Timer-opname wissen
Volg onderstaande stappen op om een geplande opname
uit de lijst te verwijderen.
1
Druk in de stopstand op de knop TIMER.
De knop MENU gebruiken
● Druk in de stopstand op de knop MENU.
●
Druk op de knoppen …† om Programma te
selecteren en druk op OK of tweemaal op de knop √.
●
Druk op de knoppen …† om Timer-opname te
selecteren.
2
Druk op OK of op de knop √.
5
Druk op de …† toetsen om Bewerk te
selecteren en druk vervolgens op de OK of
√ toets.
● Het ingavescherm voor een timer-opname wordt
getoond. Wijzig de gewenste items.
Zie het hoofdstuk “Timer-opname instellen” voor
meer informatie over de invoeropties voor een
Timer-opname.
6
Druk op de toets OK om de wijziging te
bevestigen.
7
Druk op de knop MENU nadat de
bewerking is voltooid. Het menuscherm
verdwijnt.
Opnemen
RETURNOKVERPL. EINDE
Lijst van Geplande Opnamen
DVD-RAM(VR)
Nr. Bron Datum Begin Einde Modus V/P Wijzig
01 PR 01 01 JAN 12 : 00 14 : 00 SP Uit
√√
02
---- -- --- --:-- --:-- -- --
√√
Opnametijd 02:12 SP
Wijzig
Wissen
RETURNOKVERPL. EINDE
Lijst van Geplande Opnamen
DVD-RAM(VR)
Nr. Bron Datum Begin Einde Modus V/P Wijzig
01
---- -- --- --:-- --:-- -- --
√√
Opnametijd 02:12 SP
Nr. 01
Bron Datum Begin Einde Modus V/P
PR 01 01/JAN(ZA) 12 : 00 14 : 00 SP Uit
Opnametijd 02:12 SP
RETURNOKVERPL. EINDE
Lijst van Geplande Opnamen
DVD-RAM(VR)
Nr. Bron Datum Begin Einde Modus V/P Wijzig
01
---- -- --- --:-- --:-- -- --
√√
Opnametijd 02:12 SP
Nr. 01
Bron Datum Begin Einde Modus V/P
PR 01 01/JAN(ZA) 12 : 00 14 : 00 SP Uit
Opnametijd 02:12 SP
00842C-R125-30~59-NL 6/14/05 6:05 PM Page 49

50
- Nederlands
Opnemen
3
Druk op de toets OK.
● De informatie over het programma wordt
getoond.
● Wanneer u de ShowView functie voor de eerste
keer met de vastgelegde zenders gebruikt, gaat
het programmanummer knipperen. Alleen de
eerste keer moet u het PR nummer handmatig
ingeven met de †… toetsen.
4
Als het programma en de tijd juist zijn, drukt
u op de toets OK.
5
Zet de recorder uit, door op de toets
STANDBY/ON te drukken.
6
Kijk op pagina 47 - 49 als u:
● wilt controleren of de timer-opname juist is
ingesteld;
● een timer-opname wilt annuleren.
Voordat u de DVD recorder instelt:
• Zet u zowel de tv als de DVD recorder aan.
• Controleert u de datum en tijd.
U kunt maximaal 12 programma’s instellen.
1
Druk in de stopstand op de knop TIMER.
Druk op de knoppen …† om ShowView te
selecteren en druk op OK of op de knop √.
● Nu wordt een melding getoond, waar u de
ShowView code in kunt geven.
Druk op de toets MENU.
● Druk op de toets MENU als de schijf gestopt is.
● Selecteer met de toets …† Programma en druk
daarna twee keer op de toets OK of √.
2
Geef met de cijfertoetsen de code van
het programma in dat u op wilt nemen.
U vindt deze code in uw tv-gids.
● Als u deze code wilt corrigeren doet u het
volgende:
● Druk op de toets œ tot het te corrigeren cijfer is
gewist.
● Geef het juiste cijfer in.
ShowView gebruiken
■
De nummers die naast elk tv-programma
staan in tijdschriften of kranten zijn
ShowView-nummers, waarmee u de
DVD-recorder direct met de
afstandsbediening kunt programmeren.
Voer de ShowView-code in voor het
programma dat u wilt opnemen.
■
Show View is een gedeponeerd
handelsmerk van Gemstar Development
Corporation. Het ShowView systeem
wordt gefabriceerd onder licentie van
Gemstar Development Corporation.
NB
RETURNOK EINDE
Timer-Opname
DVD-RAM(VR)
Schijfnavigatie
Playlist
Schijfbeheer
Programma
Setup
Immettere il numero Mostra Vista [0~9]
RETURNOKVERPL. EINDE
Lijst van Geplande Opnamen
DVD-RAM(VR)
Nr. Bron Datum Begin Einde Modus V/P Wijzig
01 PR 01 01 JAN 12 : 00 14 : 00 SP Uit
√√
02
---- -- --- --:-- --:-- -- --
√√
Opnametijd 02:12 SP
RETURNOKVERPL. EINDE
Lijst van Geplande Opnamen
DVD-RAM(VR)
Nr. Bron Datum Begin Einde Modus V/P Wijzig
01
---- -- --- --:-- --:-- -- --
√√
Opnametijd 02:12 SP
Nr. 01
Bron Datum Begin Einde Modus V/P
PR 01 01/JAN(ZA) 12 : 00 14 : 00 SP Uit
Opnametijd 02:12 SP
00842C-R125-30~59-NL 6/14/05 6:05 PM Page 50

Nederlands -
51
Om te voorkomen dat een ShowView opname niet
helemaal wordt opgenomen, beschikt uw DVD recorder
over de functie ShowView Verlengd, waarmee u de
opnametijd tot 60 minuten kunt verlengen.
1
Druk in de stopstand op de knop MENU.
2
Selecteer met de †… toetsen Programma en
druk op de toets OK of √.
3
Selecteer met de †… toetsen ShowView
Verlengd
en druk op de toets OK of √
.
4
Druk op de knoppen …† om Show View
Verlengd te selecteren en druk op OK of op
de knop √.
5
Druk vervolgens op de toets MENU.
ShowView verlengen
Opnemen
Timer-opname starten
Als de begintijd in de lijst met geplande opnamen wordt
bereikt terwijl het apparaat is uitgeschakeld, wordt dit
ingeschakeld en wordt de opname automatisch gestart.
1
Als de geplande opname bezig is, wordt het
opgenomen programma niet weergegeven
op de TV.
● Druk op de knop TV/DVD als u het
geprogrammeerde programma dat wordt
opgenomen wilt bekijken op TV.
● Druk nogmaals op de knop TV/DVD als u het
geprogrammeerde programma dat wordt
opgenomen niet wilt bekijken op TV.
Opname beëindigen
Druk op de STOP( ) toets. Nu wordt gevraagd of u
de opname wilt stoppen.
●
Als Ja wordt gekozen: opname stopt
●
Als Nee wordt gekozen: opname blijft lopen.
■
Als tijdens de opname de schijf vol raakt of
een kopieerbeveiligingssignaal wordt
herkend, wordt de opname beëindigd.
■
Als de schijf niet meer over vrije ruimte
beschikt of als de schijf niet meer
opneembaar is, zal het opnemen mislukken.
(U kunt opnemen nadat u de schijf hebt
vervangen.)
NB
U kunt tegen kopiëren beveiligde films niet opnemen.
RETURNOKVERPL. EINDE
Timer-Opname
DVD-RAM(VR)
ShowView
√√
Timer-Opname
√√
ShowView Verlengd : Uit
√√
Schijfnavigatie
Playlist
Schijfbeheer
Programma
Setup
RETURNOKVERPL. EINDE
Timer-Opname
DVD-RAM(VR)
ShowView
√√
Timer-Opname
√√
ShowView Verlengd : Uit
√√
Schijfnavigatie
Playlist
Schijfbeheer
Programma
Setup
Uit
10
20
30
40
50
60
RETURNOKVERPL. EINDE
Schijfnavigatie
DVD-RAM(VR)
Titellijst
√√
DivX
√√
Foto
√√
Muziek
√√
Schijfnavigatie
Playlist
Schijfbeheer
Programma
Setup
Wilt u stoppen met opnemen?
Ja Nee
00842C-R125-30~59-NL 6/14/05 6:05 PM Page 51

52
- Nederlands
Lees de volgende informatie voordat u een schijf afspeelt.
Regiocode (alleen DVD-Video)
Zowel de DVD-recorder als de schijven bevatten
een regiocode. Alleen wanneer de regiocodes
overeenkomen, kan de schijf worden afgespeeld.
De regiocode voor deze DVD-recorder staat op
de achterzijde.
Afspeelbare schijftypes
Schijven die niet kunnen worden
afgespeeld
● DVD-Video met een andere regiocode dan “2” of “ALL”
● 12cm 2,6 GB en 5,2 GB DVD-RAM
● 3,9 GB DVD-R voor authoring
● DVD-RAM/DVD-RW (VR) die niet voldoen aan de Video
Recording norm
● Niet afgesloten DVD-R/RW (Video stand) opgenomen
met een andere recorder
● DVD-ROM/DVD+RW/PD/MV-DISC etc.
● Video-CD/CVD/SVCD/CD-ROM/CDV/CD-G/CD-I
Weergeven
Voordat u een schijf afspeelt
Voordat u een schijf afspeelt ...........................52
Schijf afspelen...................................................53
Audio/mp3-cd afspelen ....................................62
Een foto weergeven .........................................66
Een MPEG4 afspelen ......................................67
Lijst met titels afspelen.....................................68
In dit hoofdstuk vindt u informatie over de
basisfuncties voor opname en weergave op de
verschillende schijftypes.
Type schijf Logo Inhoud Vorm Max. speelduur
enkelzijdig (12cm) 240
DVD-VIDEO AUDIO + VIDEO
dubbelzijdig (12cm)
480
enkelzijdig (8cm) 80
dubbelzijdig (8cm) 160
AUDIO-CD AUDIO
enkelzijdig (12cm) 74
enkelzijdig (8cm) 20
1 (XP: hoge kwaliteit)
2 (SP: normale kwaliteit)
enkelzijdig (12cm)
4 (LP: lagere kwaliteit)
DVD-RAM AUDIO + VIDEO
(4,7GB)
6 of 8 (EP:Verlengd)
2 (XP: hoge kwaliteit)
dubbelzijdig (12cm)
4 (SP:
normale kwaliteit
)
(9,4GB)
8 (LP: lagere kwaliteit)
12 of 16 (EP:Verlengd)
1 (XP: hoge kwaliteit)
DVD-RW AUDIO + VIDEO 12cm (4,7GB)
2 (SP:
normale kwaliteit)
4 (LP:
lagere kwaliteit)
6 of 8 (EP:Verlengd)
1 (XP: hoge kwaliteit)
DVD-R AUDIO + VIDEO 12cm (4,7GB)
2 (SP: Standard kwaliteit)
4 (LP:
lagere kwaliteit)
6 of 8 (EP:Verlengd)
CD-R/RW
JPEG
DVD-R/RW/RAM
MP3 - -
MPEG4
Weergeven
DIGITAL OUT
DIGITAL
Dolby Digital DTS Digital Audio
Stereo PAL tv-systeem in
Engeland, Frankrijk,
Duitsland etc.
MP3DivX
■
Afhankelijk van de schijf duurt het
ongeveer een minuut om te laden.
NB
00842C-R125-30~59-NL 6/14/05 6:05 PM Page 52

Nederlands -
53
2
Doe de schijf voorzichtig in de lade (etiket
boven).
3
Druk op de OPEN/CLOSE toets om de
lade te sluiten.
● Uw DVD-Recorder sluit de lade en speelt de schijf
automatisch af.
● De recorder speelt de schijf niet automatisch af
wanneer hij voor het eerst wordt aangezet.
● Wanneer de recorder wordt aangezet terwijl er een
schijf in de lade zit, gaat hij naar de Stop stand.
● Druk op de PLAY toets om de weergave te starten.
● Als u een mp3 schijf plaatst, toont uw DVD-
Recorder de lijst met bestandsnamen op het
scherm en worden de bestanden afgespeeld.
● Als u een JPEG-schijf plaatst, worden mappen en
bestanden in de miniatuurweergave weergegeven.
● Als u wilt dat het apparaat automatisch afspeelt
zodra u het aanzet en het reeds een schijf bevat,
schakelt u het in met de knop PLAY.
4
Druk op de STOP toets om de weergave te
beëindigen.
1
Druk op de OPEN/CLOSE toets.
Schijf afspelen
■
Deze DVD-Recorder werkt alleen met
schijven die compatibel zijn met de DVD-
RAM norm, versie 2.0.
■
Weergave en/of opname van bepaalde
schijftypes is soms niet mogelijk, bijvoorbeeld
wanneer gebruik wordt gemaakt van wijzigen
van beeldhoek of beeldverhoudingen.
Raadpleeg zo nodig de gedetailleerde
informatie op de doos van de schijf.
■
Voorkom vuil en krassen op de schijf.
Vingerafdrukken, vuil, stof, krassen en
rookaanslag op het op te nemen oppervlak
kunnen ertoe leiden dat de schijf ongeschikt
wordt voor opname.
■
Gebruik waar mogelijk een cartridge ter
bescherming van DVD-RAM/RW/R schijven.
■
Sommige DVD-RAM/RW/R schijven kunnen
niet op alle DVD-spelers worden afgespeeld.
Dit hangt af van de speler, de schijf en de
toestand van de opname.
NB
■
Wanneer u een schijf stopzet, onthoudt de
recorder waar dat gebeurde. Wanneer u
later opnieuw op de PLAY toets drukt, gaat
hij verder waar u gebleven was. (behalve
wanneer de schijf intussen is verwijderd, de
stekker van de speler uit het stopcontact is
gehaald of twee keer op STOP is gedrukt).
NB
■
Verplaats uw DVD-recorder niet terwijl een
schijf wordt weergegeven, anders kan de
schijf beschadigd raken.
■
Open de lade alleen door middel van de
OPEN/CLOSE toets.
■
Duw niet tegen de lade terwijl hij wordt
geopend of gesloten. Dit kan tot storingen
leiden.
■
Leg geen vreemde voorwerpen in of op de
lade.
■
Afhankelijk van het schijftype kunnen
sommige functies afwijken of uitgeschakeld
zijn. Zie in dat geval de aanwijzingen op de
doos van de schijf.
■
Wees vooral voorzichtig met kinderen en
zorg dat er geen vingers kunnen worden
geklemd tussen de lade en de behuizing
wanneer de lade dichtgaat.
■
Plaats slechts één DVD-schijf per keer in de
speler. Wanneer u twee of meer schijven
plaatst, is afspelen niet meer mogelijk en
kan de DVD-speler worden beschadigd.
LET OP
Weergeven
00842C-R125-30~59-NL 6/14/05 6:05 PM Page 53

54
- Nederlands
Weergeven
Zoekfuncties
1
Tijdens weergave drukt u op de SEARCH
( ) toets van de afstandsbediening.
●
U kunt een programma ook achterstevoren
weergeven.
Voor de normale weergavesnelheid drukt u op de
toets.
●
Wanneer u een SEARCH ( ) ingedrukt houdt,
wordt de weergave versneld naar 4X.
Als u de snelspoeltoets toets weer loslaat, gaat
de weergave terug naar de normale snelheid.
●
De snelheid zoals aangegeven in deze functie kan
afwijken van de werkelijke weergavesnelheid.
Schijfmenu en titelmenu
Sommige schijven bevatten een speciaal menusysteem
waarmee u bijzondere functies voor de titel(s) kunt kiezen,
zoals hoofdstukken, geluidstrack, ondertitels, filmtrailers,
informatie over rollen, etc.
Voor DVD-VIDEO schijven
1
Druk op de DISC MENU toets om het menu
van de schijf te openen.
● Ga naar het menu met weergave-instellingen.
● Wanneer de schijf hierover beschikt, kunt u de taal
instellen voor geluid en ondertitels.
2
Druk op de TITLE MENU toets om het
titelmenu van de schijf te openen.
● Gebruik deze toets als de schijf verschillende titels
bevat. Sommige schijftypes hebben geen titelmenu.
Voor DVD-RAM/RW/R schijven
1
Druk op de TITLE LIST toets om naar de
lijst met titels te gaan.
■
Titellijst: Een titel is een afzonderlijke
opname of video stream. In het
menu Titellijst vindt u een lijst van
de aanwezige titels waaruit u kunt
kiezen. De titellijst bevat de
werkelijke opnamen. Als een titel
wordt verwijderd, kan hij niet meer
worden afgespeeld.
■
Playlist: Een playlist bevat een door de
gebruiker opgegeven selectie uit de
titellijst. Wanneer een playlist wordt
afgespeeld, wordt alleen de door
de gebruiker geselecteerde scène
weergegeven, waarna de recorder
stopt. Aangezien een playlist alleen
informatie bevat die verwijst naar
de scène, kan een playlist item
worden verwijderd zonder dat de
originele stream wordt gewist.
(alleen VR-modus)
NB
■
Tijdens het scannen (zoeken) hoort u geen
geluid, behalve bij CD's (CD-DA).
NB
Hoofdstuk of track versneld weergeven
DVD-VIDEO/
DVD-RAM/
DVD-RW/DVD-R
MPEG4
AUDIO CD
(CD-DA)
Snel X 2 ➞ Snel X 4 ➞
Snel X 8 ➞ Snel X 16 ➞
Snel X 32 ➞ Snel X 128
Fast X 2
X 2 ➞ X 4 ➞ X 8 ➞
X 2
00842C-R125-30~59-NL 6/14/05 6:05 PM Page 54

Nederlands -
55
ANYKEY functie
Met de ANYKEY functie kunt u gemakkelijk een bepaalde
scène opzoeken aan de hand van titel, hoofdstuk, track en
tijd. Verder kunt u de instellingen voor ondertitels en geluid
aanpassen en sommige andere mogelijkheden regelen,
zoals Herhalen, beeldhoek en Zoom.
● Als u naar een bepaalde titel, hoofdstuk of
track wilt voor een bepaalde scène.
1
Druk tijdens weergave op de ANYKEY
toets.
2
Druk op de …† toetsen om Titel,
Hoofdstuk of Track te kiezen.
3
Druk op de œ √ toetsen of de cijfertoetsen
(0-9) om de gewenste scène te selecteren.
Druk vervolgens op de OK toets.
● Tijdens de weergave kunt u snel een
hoofdstuk of track doorzoeken.
1
Druk tijdens de weergave op de SKIP (
) toets van de afstandsbediening.
● Als u op de ❙œœ toets drukt,
gaat de weergave naar het begin van het volgende hoofdstuk,
track of markering (DVD-RAM/DVD-RW in VR stand).
Wanneer u de toets binnen 3 seconden opnieuw indrukt,
gaat de weergave naar het begin van het vorige hoofdstuk,
track of markering (DVD-RAM/DVD-RW in VR stand).
● Als u op de √√❙ toets drukt,
gaat de weergave naar het volgende hoofdstuk, track of
markering (DVD-RAM/DVD-RW in VR stand).
Vertraagde weergave
1
Tijdens pauze of beeld-voor-beeld drukt u
op de SEARCH ( ) toets van de
afstandsbediening.
● Als u op de √√ toets drukt:
Langzaam 1/8 ➞ Langzaam 1/4 ➞ Langzaam 1/2
● Als u op de œœ toets drukt:
Langzaam 1/8 ➞ Langzaam 1/4 ➞ Langzaam1/2
● Voor weergave met normale snelheid drukt
u op de toets.
Als u tijdens pauze de SEARCH ( ) toets ingedrukt
houdt, wordt de schijf langzaam afgespeeld (1/4 van de
normale snelheid). Als u de toets loslaat, gaat de recorder
weer naar pauze.
Beeld-voor-beeld
1
Druk vanuit de stopstand op de knop
op de afstandsbediening.
● Steeds wanneer de toets wordt ingedrukt, gaat de
recorder een beeld verder of terug.
Wanneer op wordt gedrukt, wordt het vorige beeld
getoond.
Wanneer op wordt gedrukt, wordt het volgende
beeld getoond.
●
Voor weergave op de normale snelheid drukt u op de toets.
Hoofdstukken of tracks overslaan
Rechtstreeks naar een scene met ANYKEY
Weergeven
WIJZIGVERPL.
DVD-VIDEO
1/10
1/40
00:01:45
ENG
ENG D 5.1CH
Uit
1/1
Uit
WIJZIGVERPL.
DVD-VIDEO
1/10
1/40
00:01:45
ENG
ENG D 5.1CH
Uit
1/1
Uit
Titel
Hoofdstuk
Tijd
Ondertitels
Geluid
Herhalen
Beeldhoek
Zoom
Titel
Hoofdstuk
Tijd
Ondertitels
Geluid
Herhalen
Beeldhoek
Zoom
■
De snelheid zoals aangegeven in deze functie
kan afwijken van de werkelijke weergavesnelheid.
■
Slow-motion werkt alleen in voorwaartse richting
op MPEG4-schijven.
NB
■
Step-motion werkt alleen in voorwaartse richting
op MPEG4-schijven.
NB
00842C-R125-30~59-NL 6/14/05 6:05 PM Page 55

56
- Nederlands
Weergeven
Herhalen
Met de REPEA
Met de REPEA
T toets
T toets
1
Druk tijdens weergave op de REPEAT
toets.
2
Druk op de REPEAT toets of de …†
toetsen om de Titel of het Hoofdstuk te
selecteren dat u herhaaldelijk af wilt spelen.
Druk op de OK toets.
Hoofdstuk: Herhaalt het hoofdstuk dat wordt
afgespeeld.
Titel: Herhaalt de titel die nu wordt afgespeeld.
- Teruggaan naar normale weergave -
3
Druk op de knoppen REPEAT om Uit te
selecteren en druk op de knop …† of
REPEAT en vervolgens op OK.
Druk op de knop CANCEL om verder te gaan met
normaal afspelen.
● Als u naar een bepaald tijdstip wilt om een
scène te vinden.
1
Druk tijdens weergave op de ANYKEY
toets.
2
Druk op de …† toetsen om de Tijd te
selecteren.
3
Gebruik de cijfertoetsen om de tijd op te
geven in uren, minuten en seconden.
Druk vervolgens op de OK toets.
■
Bij sommige schijven is dit niet mogelijk. Met
name wanneer een audio-cd (CD-DA) of
een mp3 schijf is geplaatst, is het mogelijk
dat dit informatiescherm niet verschijnt.
■
De Time Search functie werkt niet voor alle
schijven.
■
Om het scherm te sluiten, drukt u nogmaals
op de ANYKEY toets.
NB
Weergave herhalen
Herhalen
Uit
Herhalen
Titel
WIJZIGVERPL.
DVD-VIDEO
1/10
1/40
00:01:45
ENG
ENG D 5.1CH
Uit
1/1
Uit
NUMMER
VERPL.
DVD-VIDEO
1/10
1/40
00:01:45
ENG
ENG D 5.1CH
Uit
1/1
Uit
Titel
Hoofdstuk
Tijd
Ondertitels
Geluid
Herhalen
Beeldhoek
Zoom
Titel
Hoofdstuk
Tijd
Ondertitels
Geluid
Herhalen
Beeldhoek
Zoom
00842C-R125-30~59-NL 6/14/05 6:05 PM Page 56

Nederlands -
57
Met de
Met de
ANYKEY
ANYKEY
toets
toets
1
Druk tijdens weergave op de ANYKEY toets.
2
Druk op de …† toetsen om Herhalen te
selecteren en druk op de œ √ toetsen om
de Titel of het Hoofdstuk te selecteren dat
u herhaaldelijk af wilt spelen.
Zie pagina 58 voor A-B Repeat (A-B
herhalen).
3
Druk op de OK toets.
Het scherm verdwijnt wanneer u op de ANYKEY of
RETURN toets drukt. Met de herhaalfunctie kunt u
een titel of hoofdstuk herhalen.
Met de REPEA
Met de REPEA
T toets
T toets
1
Druk tijdens weergave op de REPAEAT
toets.
2
Druk enkele malen op de REPEAT toets
om de te herhalen Track te selecteren of
aan te geven dat u de hele schijf wilt
herhalen.
Teruggaan naar de normale weergave
3
Druk enkele malen op de REPEAT toets
om Uit te selecteren.
Druk op de CANCEL toets om terug te gaan naar de
normale weergave.
Met de
Met de
ANYKEY
ANYKEY
toets
toets
1
Druk tijdens weergave op de ANYKEY toets.
Herhalen wordt gemarkeerd.
2
Druk op de REPEAT toets of …† toetsen
om de te herhalen Track te kiezen of aan te
geven dat u de hele schijf wilt herhalen.
Druk op de OK toets.
Bij mp3 schijven kunt u kiezen uit Track,
map of schijf.
- Teruggaan naar de normale weergave -
3
Druk enkele malen op de REPEAT toets
om Uit te selecteren.
Druk op de CANCEL toets om terug te gaan naar de
normale weergave.
■
Op DVD-RAM, DVD-RW (VR stand), niet
afgesloten DVD-R en niet afgesloten
DVD-RW (Video stand) kunnen geen
hoofdstukken worden herhaald.
NB
Weergave herhalen
Weergeven
WIJZIGVERPL.
DVD-VIDEO
1/10
1/40
00:01:45
Uit
ENG D 5.1CH
Uit
1/1
Uit
OKVERPL.
DVD-VIDEO
1/10
1/40
00:01:45
Uit
ENG D 5.1CH
Uit
1/1
Uit
OK RETURN EINDEVERPL.
Muziek
CD
Herhalen : Uit
Afspeeloptie : Normaal
01. TRACK 1
02. TRACK 2
03. TRACK 3
04. TRACK 4
05. TRACK 5
06. TRACK 6
4:39
4:31
4:30
3:53
4:23
4:24
00 : 5201. TRACK 1
01/12
Titel
Hoofdstuk
Tijd
Ondertitels
Geluid
Herhalen
Beeldhoek
Zoom
Titel
Hoofdstuk
Tijd
Ondertitels
Geluid
Herhalen
Beeldhoek
Zoom
OK RETURN EINDEVERPL.
Muziek
CD
Herhalen : Track
Afspeeloptie : Normaal
01. TRACK 1
02. TRACK 2
03. TRACK 3
04. TRACK 4
05. TRACK 5
06. TRACK 6
4:39
4:31
4:30
3:53
4:23
4:24
00 : 5201. TRACK 1
01/12
OK RETURN EINDEVERPL.
Muziek
CD
Herhalen : Uit
Afspeeloptie : Normaal
01. TRACK 1
02. TRACK 2
03. TRACK 3
04. TRACK 4
05. TRACK 5
06. TRACK 6
4:39
4:31
4:30
3:53
4:23
4:24
00 : 5201. TRACK 1
01/12
Herhalen
Uit
00842C-R125-30~59-NL 6/14/05 6:05 PM Page 57

58
- Nederlands
Taal van ondertitels selecteren
Ondertitels zijn niet altijd beschikbaar, afhankelijk van de
schijf. Ondertitels kunnen alleen tijdens weergave worden
gekozen.
Met de SUBTITLE toets
Met de SUBTITLE toets
1
Druk tijdens weergave op de SUBTITLE
toets.
2
Druk op de SUBTITLE toets of …† toetsen
om de gewenste ondertiteltaal te
selecteren.
Het scherm verdwijnt als u op de knop CANCEL of
RETURN drukt.
Met de
Met de
ANYKEY
ANYKEY
toets
toets
1
Druk tijdens weergave op de ANYKEY toets.
2
Druk op de …† toetsen om Ondertitels te
selecteren en druk op de œ √ toetsen voor
de gewenste ondertiteltaal.
■
Het ondertitelmenu kan afwijken, afhankelijk
van het type schijf.
■
Als de ondertitels elkaar overlappen, moet u de
bijschriftfunctie (captions) van uw tv uitzetten.
■
Bij sommige schijven kunt u alleen de taal
van het schijfmenu instellen.
NB
Weergeven
Met de
Met de
ANYKEY
ANYKEY
toets
toets
1
Druk tijdens weergave op de ANYKEY toets.
2
Druk op de …† toetsen om Herhalen te
selecteren en druk op de √ toets voor A-B.
3
Druk op de OK toets.
4
Druk op de OK toets op de plaats waar u
wilt beginnen met herhalen (A) en doe dit
nogmaals op de plaats waar u de herhaling
wilt laten eindigen (B).
De herhaling van het gedeelte A-B wordt gestart.
- Teruggaan naar de normale weergave -
Selecteer Uit bij het item Herhalen.
Druk op de CANCEL toets voor de normale weergave.
■
Als u punt (B) instelt wanneer er minder dan
5 seconden zijn verstreken, verschijnt het
verbodsbordje ( ).
■
Muziek-CD's (CD-DA), MP3- en MPEG4-
schijven ondersteunen de functie Repeat A-
B niet.
NB
Gedeelte herhalen (A-B herhaalde weergave)
(VR modus)
WIJZIGVERPL.
DVD-VIDEO
1/10
1/40
00:01:45
Uit
ENG D 5.1CH
Uit
1/1
Uit
OKVERPL.
DVD-VIDEO
1/10
1/40
00:01:45
Uit
ENG D 5.1CH
A-B
1/1
Uit
Titel
Hoofdstuk
Tijd
Ondertitels
Geluid
Herhalen
Beeldhoek
Zoom
Titel
Hoofdstuk
Tijd
Ondertitels
Geluid
Herhalen
Beeldhoek
Zoom
WIJZIGVERPL.
DVD-VIDEO
1/10
1/40
00:01:45
Uit
ENG D 5.1CH
Titel
1/1
Uit
WIJZIGVERPL.
DVD-VIDEO
1/10
1/40
00:01:45
ENG
ENG D 5.1CH
Uit
1/1
Uit
Ondertitels
ENG
Titel
Hoofdstuk
Tijd
Ondertitels
Geluid
Herhalen
Beeldhoek
Zoom
Titel
Hoofdstuk
Tijd
Ondertitels
Geluid
Herhalen
Beeldhoek
Zoom
00842C-R125-30~59-NL 6/14/05 6:05 PM Page 58

Nederlands -
59
Taal van geluidsspoor selecteren
De taalkeuze is niet altijd beschikbaar, afhankelijk van de
schijf. De taal kan alleen tijdens weergave worden
gekozen.
Met de
Met de
AUDIO toets
AUDIO toets
1
Druk tijdens weergave op de AUDIO toets.
2
Druk op de AUDIO toets of …† toetsen om
de gewenste taal voor het geluidsspoor te
selecteren.
Met de
Met de
ANYKEY
ANYKEY
toets
toets
1
Druk tijdens weergave op de ANYKEY
toets.
2
Druk op de …† toetsen om Geluid te
selecteren en druk op de œ √ toetsen om
de gewenste taal voor het geluidsspoor aan
te geven.
■
Audiotalen verschillen afhankelijk van het
schijftype.
■
Bij sommige schijven kunt u alleen de
audiotaal van het schijfmenu instellen.
NB
Beeldhoek kiezen
Als een Video-DVD meer beeldhoeken bevat van een
bepaalde scène, kunt u gebruik maken van de Angle functie.
Deze is alleen beschikbaar tijdens weergave.
Als de schijf meerdere camerastandpunten bevat, wordt de
indicatie HOEK (ANGLE) op het scherm weergegeven
1
Druk tijdens weergave op de ANYKEY toets.
2
Druk op de …† toetsen om Beeldhoek te
selecteren en druk op de œ √ toetsen of
cijfertoetsen om de gewenste hoek te
selecteren.
Weergeven
(VR modus)
WIJZIGVERPL.
DVD-VIDEO
1/10
1/40
00:01:45
Uit
ENG D 5.1CH
Titel
1/1
Uit
WIJZIGVERPL.
DVD-VIDEO
1/10
1/40
00:01:45
ENG
ENG D 5.1CH
Uit
1/1
Uit
Geluid
ENG Dolby Digital 5.1CH
Titel
Hoofdstuk
Tijd
Ondertitels
Geluid
Herhalen
Beeldhoek
Zoom
Titel
Hoofdstuk
Tijd
Ondertitels
Geluid
Herhalen
Beeldhoek
Zoom
■
Deze functie is schijfafhankelijk en werkt niet
op alle DVD’s.
■
Deze functie werkt niet wanneer een DVD
niet is opgenomen met een multi-camera
beeldhoeksysteem.
NB
WIJZIGVERPL.
DVD-VIDEO
1/10
1/40
00:01:45
Uit
ENG D 5.1CH
Uit
1/3
Uit
WIJZIGVERPL.
DVD-VIDEO
1/10
1/40
00:01:45
ENG
ENG D 5.1CH
Uit
1/3
Uit
Titel
Hoofdstuk
Tijd
Ondertitels
Geluid
Herhalen
Beeldhoek
Zoom
Titel
Hoofdstuk
Tijd
Ondertitels
Geluid
Herhalen
Beeldhoek
Zoom
00842C-R125-30~59-NL 6/14/05 6:05 PM Page 59

Weergeven
Favorieten
Met deze functie kunt u secties van een DVD-VIDEO of
DVD-R/-RW(V-modus) markeren, zodat u ze later snel
terug kunt vinden.
1
Druk tijdens weergave op de MARKER
toets.
2
Druk op de OK toets wanneer de gewenste
scène in beeld komt.
Nummer 1 wordt aangegeven en de scène wordt
onthouden.
3
Druk op de œ √ toets om naar de volgende
positie te gaan.
4
Druk op de OK toets wanneer de gewenste
scène verschijnt.
Nummer 2 wordt aangegeven en de scène wordt
onthouden.
● Herhaal de bovenstaande procedure als u meer
favorieten wilt vastleggen.
● U kunt maximaal 10 scène s als favoriet laten onthouden.
■
Wanneer de lade wordt geopend en
gesloten, worden de favorieten gewist.
NB
(V-modus)
60
- Nederlands
Inzoomen
1
Druk tijdens pauze of weergave op de
ANYKEY toets.
2
Druk op de …† toetsen om Zoom te
selecteren en druk vervolgens op de OK
toets. ( ) wordt getoond.
3
Ga met de …† œ √ toetsen naar het
gebied dat u wilt vergroten.
4
Druk op de OK toets. Het beeld wordt nu
met een factor twee vergroot.
Als u nogmaals op de OK toets drukt, wordt het beeld
vergroot tot vier keer de normale grootte.
➞
normaal ➞ 2X ➞ 4X ➞ 2X
■
Wanneer de opname in de EP-modus wordt
uitgevoerd, wordt de zoomfunctie alleen
ondersteund als de opname in de V-modus
is uitgevoerd.
NB
WIJZIGVERPL.
DVD-VIDEO
1/10
1/40
00:01:45
Uit
ENG D 5.1CH
Uit
1/1
Uit
Titel
Hoofdstuk
Tijd
Ondertitels
Geluid
Herhalen
Beeldhoek
Zoom
RETURNOKVERPL.
Favoriet
RETURNANNUL.VERPL.
Favoriet
1
AFSP.
RETURNANNUL.VERPL.
Favoriet
1 2
AFSP.
00842C-R125-60~94-NL 6/14/05 6:01 PM Page 60

Nederlands -
61
Weergeven
1
Druk tijdens weergave op de MARKER
toets.
2
Druk op de œ √ toetsen om een favoriete
scène te selecteren.
3
Druk op de OK of toets om af te spelen
vanaf de gekozen scène.
1
Druk tijdens weergave op de MARKER
toets.
2
Druk op de œ √ toetsen om een favoriet te
selecteren.
3
Druk op de CANCEL toets om de
geselecteerde favoriet te verwijderen.
Favoriet verwijderen
Favoriet afspelen
RETURNANNUL.VERPL.
Favoriet
1 2
AFSP.
RETURNANNUL.VERPL.
Favoriet
1 2
AFSP.
RETURNOKVERPL.
Favoriet
1
Markeringen
1
Druk tijdens weergave op de MARKER
toets.
2
Druk op de OK toets wanneer de gewenste
scène in beeld komt.
Nummer 01 wordt aangegeven en de scène wordt
onthouden.
3
Druk op de œ √ toets om naar de volgende
positie te gaan.
4
Druk op de OK toets wanneer de gewenste
scene in beeld komt.
Nummer 02 wordt aangegeven en de scene wordt
onthouden.
● DVD-RAM en DVD-RW (VR stand) schijven beschikken
over de functie Markeren in plaats van Favorieten. Met
de functie Markeren kunt u tot 99 scènes markeren.
Aangezien dit al snel een aantal schermen in beslag
neemt, is een nummersysteem nodig. Als een schijf in
gebruik is gecodeerd met Schijfbeveiliging, kunnen er
geen markeringen worden ingesteld of worden
verwijderd. Het is alleen mogelijk om af te spelen.
(VR-modus)
RETURNOK
Markeren
N:0
RETURNANNUL.VERPL.
AFSP.
Markeren
N:101
RETURNANNUL.VERPL.
AFSP.
Markeren
N:201 02
00842C-R125-60~94-NL 6/14/05 6:01 PM Page 61

62
- Nederlands
Weergeven
Audio-CD (CD-DA)/mp3 afspelen
Voor ieder type schijf zijn diverse menufuncties beschikbaar.
1
Doe een Audio-CD (CD-DA) in de lade.
Het audio-cd menu verschijnt en de tracks (nummers)
worden automatisch afgespeeld.
2
-1 Druk op de …† toetsen om de track te
selecteren die u wilt horen en druk
vervolgens op de OK toets of √ toets.
2
-2 Selecteer met de cijfertoetsen de
gewenste track, waarna deze automatisch
wordt afgespeeld.
1. Herhalen: Herhalen Uit/Track herhalen /Schijf herhalen.
2. Huidige track: Toont het volgnummer van de track die
nu wordt afgespeeld.
3. Toont de huidige index en het totaal aantal tracks.
4. Geeft de schijfstatus aan; de weergegeven tijd is het
gedeelte van de schijf dat al is afgespeeld.
5. Toont de lijst met tracks en de speelduur per track.
6. Beschikbare toetsen.
7. Volgorde: Normaal, Willekeurig, Intro of Playlist
Audio-CD of MP3-CD
afspelen
Audio-CD (CD-DA) - indeling scherm
Audio-cd afspelen (CD-DA)
1
Druk tijdens weergave op de MARKER
toets.
2
Ga met de œ √ toetsen naar een
gemarkeerde scène.
3
Druk op de OK of toets om af te spelen
vanaf de geselecteerde scène.
● Wanneer u op de knop drukt, gaat de speler terug naar het
begin van de markering. Door binnen 3 seconden nogmaals op
de knop te drukken keert u terug naar het begin van de vorige
markering.
● Wanneer u op de knop drukt, gaat de speler naar de
volgende markering.
1
Druk tijdens weergave op de MARKER
toets.
2
Druk op de œ √ toetsen om een
gemarkeerde scène te selecteren.
Druk op de CANCEL toets om de
geselecteerde markering te verwijderen.
■
Wanneer een markering wordt verwijderd terwijl een
DVD-RAM/RW (in VR stand) wordt afgespeeld,
veranderen de nummers van de markeringen. Als u
bijvoorbeeld de 7e markering wist nadat er 10
markeringen zijn geregistreerd, worden de markeringen
na de achtste automatisch één vooruit geschoven en
wordt de 8e markering de 7e.
Markering verwijderen
Gemarkeerde scène afspelen
RETURNANNUL.VERPL.
AFSP.
Markeren
N:201 02
Markeren
01 02 03 04 05 06 07 08 09 10 √ N:10
RETURNANNUL.VERPL.
Markeren
AFSP.
01 02 03 04 05 06 07 08 09 N:9
OK RETURN EINDEVERPL.
Muziek
CD
Herhalen : Uit
Afspeeloptie : Normaal
01. TRACK 1
02. TRACK 2
03. TRACK 3
04. TRACK 4
05. TRACK 5
06. TRACK 6
4:39
4:31
4:30
3:53
4:23
4:24
00 : 5201. TRACK 1
01/12
OK RETURN EINDEVERPL.
Muziek
CD
Herhalen : Uit
Afspeeloptie : Normaal
01. TRACK 1
02. TRACK 2
03. TRACK 3
04. TRACK 4
05. TRACK 5
06. TRACK 6
4:39
4:31
4:30
3:53
4:23
4:24
00 : 5201. TRACK 1
01/12
1
2
3
7
4
5
6
00842C-R125-60~94-NL 6/14/05 6:01 PM Page 62

Nederlands -
63
Weergeven
1.
……††
, 0~9: Track (nummer) selecteren.
2.
√√
: Geselecteerde track afspelen.
3. OK toets: Geselecteerde track afspelen.
4. ( ) toets: Volgende track afspelen.
5. ( ) toets: Teruggaan naar het begin van de huidige
track indien ingedrukt tijdens weergave. Nogmaals
indrukken en de DVD-recorder gaat terug naar het begin
van de vorige track.
Als de toets binnen drie seconden nadat de weergave is
gestart wordt ingedrukt, wordt de vorige track direct
gestart.
Als u meer dan drie seconden wacht voor u de toets
indrukt, wordt de huidige track opnieuw gestart.
6. ( / ) toets: versnelde weergave (X2, X4, X8)
7. : Track stoppen.
8. : Track weergeven of pauzeren.
9. De knop ANYKEY: Hiermee selecteert u het bovenste
menu op het scherm Herhalen of Afspeeloptie.
Knoppen op de afstandsbediening voor het afspelen van muziek-CD's (CDDA)
1
Doe een mp3 schijf in de lade.
Het mp3 menu verschijnt en de tracks worden
automatisch afgespeeld.
2
Druk op de knoppen
…†
om Schijfnavigatie
te selecteren en druk op OK of op de knop √.
3
Druk op de knoppen
…†
om Muziek te
selecteren en druk op OK of op de knop √.
Het mp3 menu verschijnt en de tracks worden
automatisch afgespeeld.
4
-1 Druk op de …† toetsen om de track te
selecteren die u wilt horen en druk
vervolgens op de OK toets of √ toets.
4
-2 Selecteer met de cijfertoetsen de
gewenste track, waarna deze automatisch
wordt afgespeeld.
Mp3 schijf afspelen
OK RETURN EINDEVERPL.
Muziek
CD
Herhalen : Uit
Afspeeloptie : Normaal
ROOT
Bryan Adams
Bryan Adams_2
Straight from the heart
Run to you
Heaven
00 :22Straight from the heart
ROOT
03/06
RETURNOKVERPL. EINDE
Schijfnavigatie
CD
DivX
√√
Foto
√√
Muziek
√√
Schijfnavigatie
Programma
Setup
RETURNOKVERPL. EINDE
Schijfnavigatie
CD
DivX
√√
Foto
√√
Muziek
√√
Schijfnavigatie
Programma
Setup
00842C-R125-60~94-NL 6/14/05 6:01 PM Page 63

64
- Nederlands
1.
……††
, 0~9: Track (nummer) selecteren.
2.
√√
: Geselecteerde track afspelen.
3. OK toets: Geselecteerde track afspelen of bestanden in
geselecteerde map tonen.
4. RETURN toets: Naar de map waar de huidige track te
vinden is.
5. ( ) toets: Volgende track afspelen.
6. ( ) toets: Teruggaan naar het begin van de huidige
track indien ingedrukt tijdens weergave. Nogmaals
indrukken en de DVD-recorder gaat terug naar het begin
van de vorige track.
Als deze toets binnen drie seconden nadat de weergave
is gestart wordt ingedrukt, wordt de vorige track gestart.
Als u meer dan drie seconden wacht voor u de toets
indrukt, wordt de huidige track opnieuw gestart.
7. : Track stoppen.
8. : Track weergeven of pauzeren.
9. De knop ANYKEY: Hiermee selecteert u het bovenste
menu op het scherm Herhalen of Afspeeloptie.
Knoppen op de afstandsbediening voor het afspelen van MP3's
Weergeven
MP3 CD - indeling scherm
OK RETURN EINDEVERPL.
Muziek
MP3
Herhalen : Uit
Afspeeloptie : Normaal
ROOT
Bryan Adams
Bryan Adams_2
Straight from the heart
Run to you
Heaven
00 :22Straight from the heart
ROOT
03/06
1
2
3
7
4
5
6
1. Herhalen: Herhalen Uit/Track herhalen/Schijf herhalen)
2. Huidige track: Toont het volgnummer van de track die
nu wordt afgespeeld.
3. Toont de huidige map en index.
4. Geeft de schijfstatus aan; de weergegeven tijd is het
gedeelte van de schijf dat al is afgespeeld.
5. Toont de informatie van de map en de tracks in de map.
6. Beschikbare toetsen.
7. Volgorde: Normaal, Willekeurig, Intro of Playlist.
■
Bestanden van één type: Een lijst van
bestanden en mappen verschijnt in een
bepaalde volgorde.
■
Bestanden van verschillende types: Het
bovenste menuscherm (DISC NAVIGATION
(DISKNAVIGATIE)) verschijnt.
NB
00842C-R125-60~94-NL 6/14/05 6:01 PM Page 64

Nederlands -
65
De functie Afspeeloptie kan worden gebruikt bij audio-CD’s
en MP3-CD’s tijdens weergave of in de Stop stand.
1
Druk tijdens weergave op de knop ANYKEY.
De herhaalfunctie wordt gemarkeerd.
● In de Stop stand is de Afspeeloptie gemarkeerd.
2
Druk op de knoppen œ √ om Afspeeloptie
te selecteren en druk op de knoppen …†
om de gewenste afspeeloptie te selecteren
(Normaal, Willekeurig, Intro of Playlist).
3
Druk op de knoppen …† om het gewenste
item te selecteren (Normaal, Willekeurig,
Intro of Playlist).
● Normaal: De tracks op de schijf worden afgespeeld in de
volgorde waarin ze zijn opgenomen.
● Willekeurig: De tracks op de schijf worden in
willekeurige volgorde afgespeeld. Nadat een lijst is
gegenereerd en geheel afgespeeld, wordt een nieuwe
lijst in willekeurige volgorde aangemaakt en afgespeeld.
De weergave in willekeurige volgorde blijft doorgaan tot
een andere afspeeloptie wordt gekozen.
● Intro: De eerste 10 seconden van iedere track worden
afgespeeld. Als u een nummer verder wilt beluisteren,
drukt u op de OK toets of toets. De afspeeloptie
wordt nu gewijzigd in Normaal.
Wanneer Intro voltooid is, wordt de optie Normaal
(Normal) hervat.
● Playlist: Met de Playlist afspeeloptie kunt u de volgorde
aangeven waarin u de tracks wilt laten afspelen.
U kunt tot 30 tracks opnemen in een playlist.
1
Druk tijdens weergave op de knop ANYKEY.
De herhaalfunctie wordt gemarkeerd.
2
Selecteer Afspeeloptie met de œ √ toetsen.
3
Druk op de OK toets.
Het scherm Afspeeloptie verschijnt.
Druk op de knoppen …† om Playlist te selecteren.
4
Druk op de OK toets.
Het scherm Playlist verschijnt.
Selecteer met de …† toetsen de tracks in de volgorde
waarin u ze wilt afspelen. Druk op de OK toets.
Druk op de PLAY toets om de playlist af te spelen.
5
Als u een verkeerde track in de playlist hebt
gezet, druk dan op de knop √ en dan op de
knoppen …† om de verkeerde track te
selecteren. Druk vervolgens op de
CANCEL-knop.
De verkeerde track wordt verwijderd.
6
Druk op de knop PLAY om de playlist af te
spelen.
Tracks programmeren (playlist)
Afspeeloptie
OK
RETURN EINDE
VERPL.
Muziek
CD
Herhalen : Uit
Afspeeloptie : Normaal
01. TRACK 1
02. TRACK 2
03. TRACK 3
04. TRACK 4
05. TRACK 5
06. TRACK 6
4:39
4:31
4:30
3:53
4:23
4:24
00 : 5201. TRACK 1
01/12
Muziek
CD
Herhalen : Uit
Afspeeloptie : Normaal
00 : 5201. TRACK 1
OK EINDEVERPL.
Muziek
CD
Herhalen : Uit
Afspeeloptie : Playlist
01. TRACK 1
02. TRACK 2
03. TRACK 3
04. TRACK 4
05. TRACK 5
06. TRACK 6
00 : 00
OK RETURN EINDEVERPL.
Muziek
CD
Herhalen : Uit
Afspeeloptie : Normaal
01. TRACK 1
02. TRACK 2
03. TRACK 3
04. TRACK 4
05. TRACK 5
06. TRACK 6
4:39
4:31
4:30
3:53
4:23
4:24
00 : 5201. TRACK 1
01/12
OK RETURN EINDEVERPL.
Muziek
CD
Herhalen : Uit
Afspeeloptie : Normaal
01. TRACK 1
02. TRACK 2
03. TRACK 3
04. TRACK 4
05. TRACK 5
06. TRACK 6
4:39
4:31
4:30
3:53
4:23
4:24
00 : 5201. TRACK 1
01/12
OK
ANNUL. EINDE
VERPL.
Muziek
CD
Herhalen : Uit
Afspeeloptie : Playlist
01. TRACK 1
02. TRACK 2
03. TRACK 3
04. TRACK 4
05. TRACK 5
06. TRACK 6
01 : 36
1. P_TRACK 1
2. P_TRACK 2
3. P_TRACK 3
1. P_TRACK 1
2. P_TRACK 2
3. P_TRACK 3
4. P_TRACK 4
Weergeven
00842C-R125-60~94-NL 6/14/05 6:01 PM Page 65

66
- Nederlands
5
-1 Als u op de PLAY( ) toets drukt,
verschijnt het scherm Diavertoning.
Druk op de knoppen œ √ om de snelheid van de
diavertoning in te stellen en druk op OK.
5
-2 Selecteer met de œ √ toetsen een
afbeeldingbestand in het Album scherm
en druk vervolgens op de OK toets.
: Terugkeren naar het Album scherm.
: De recorder gaat naar de diavertoning.
Voordat deze kan beginnen, moet de wachttijd per
afbeelding worden ingesteld (Snelheid diavertoning).
: Iedere keer dat op de OK toets wordt gedrukt, draait
de afbeelding een kwart slag naar rechts.
: Iedere keer dat op de OK toets wordt gedrukt, wordt
de afbeelding vergroot (maximaal 4X).
(Normaal ➞ Zoom 2X ➞ Zoom 4X ➞ Zoom 2X ➞
Normaal)
● Druk op de ANYKEY toets om menu’s te tonen of
verwijderen.
1
Plaats een JPEG-schijf in de schijflade.
2
Druk op de knoppen …† om Schijfnavigatie
te selecteren en druk op OK of op de knop √.
3
Druk op de knoppen …† om de Foto te
selecteren en druk op OK of op de knop √.
4
Druk op de …† œ √ toetsen om een
afbeelding te selecteren.
●
Voor de volgende 6 afbeeldingen drukt u op de toets.
● Voor de vorige 6 afbeeldingen drukt u op de toets.
Een foto weergeven
RETURNOKVERPL. FOTO
DSC01189
OK RETURN EINDEVERPL.
Foto
CD
Index 6 / 73
Diavertoning
ROOT / DSC01189
Pagina 2 / 13
RETURNOKVERPL.
DSC01189
Snelheid Diavertoning
Weergeven
RETURNOKVERPL. EINDE
Schijfnavigatie
CD
DivX
√√
Foto
√√
Muziek
√√
Schijfnavigatie
Programma
Setup
RETURNOKVERPL. EINDE
Schijfnavigatie
CD
DivX
√√
Foto
√√
Muziek
√√
Schijfnavigatie
Programma
Setup
00842C-R125-60~94-NL 6/14/05 6:01 PM Page 66

Nederlands -
67
Een MPEG4 afspelen
MPEG4 Functiebeschrijving
MPEG4-bestanden bevatten audio- en videogegevens.
MPEG4-bestanden met de volgende extensies kunnen
worden afgespeeld.
- .AVI, .DIVX
1
Plaats een MPEG4-schijf in de schijflade.
2
Druk op de knoppen …† om Schijfnavigatie
te selecteren en druk op OK of op de knop √.
3
Druk op de knoppen …† om DivX te
selecteren en druk op OK of op de knop √.
4
Druk op de knoppen …† om het
avi-bestand (DivX) te selecteren en druk
vervolgens op OK, √ of .
5
Wanneer u een MPEG4-bestand afspeelt,
kunt u de volgende functies gebruiken.
Druk tijdens het afspelen eenmaal op de knop STOP om
de bestandenlijst weer te geven. Druk er nogmaals op
om het menu op het scherm af te sluiten.
Functie Beschrijving
Overslaan
( of )
Zoeken
( of )
Vertraagd
afspelen
Stap voor
stap afspelen
Druk tijdens het afspelen op of om 5 minuten
vooruit of terug te springen.
Druk tijdens het afspelen op SEARCH ( of )
en druk nogmaals voor een hogere zoeksnelheid. 2X,
4X, 8X
Druk in de modus Pause of Step op de knop
SEARCH op de afstandsbediening.
(1/8X, 1/4X, 1/2X)
Druk in de stilstaande modus op de knop op de
afstandsbediening.
■
Deze speler kan de volgende
videocompressieformaten afspelen:
- MPEG4-codec-formaat: DivX 3.11 DivX
4.x DivX 5.x DivX-Pro (zonder QPEL en
GMC)
- Beschikbare audioformaten: “MP3”,
“MPEG”, “WMA”, “LPCM”, “AC3”
■
Ondersteunde bestandsformaten
ondertiteling: .smi, .srt, .sub, .psb, .txt,
.ass (het ondertitelbestand dient exact
dezelfde naam te hebben als het
overeenkomende MPEG4-bestand).
■
Sommige MPEG4-bestanden die op een
pc werden aangemaakt, worden mogelijk
niet afgespeeld. Daarom worden de
Codectypes, versies en hogere resoluties
dan de vermelde, niet worden
ondersteund.
NB
Weergeven
RETURNOKVERPL. EINDE
Schijfnavigatie
CD
DivX
√√
Foto
√√
Muziek
√√
Schijfnavigatie
Programma
Setup
RETURNOKVERPL. EINDE
Schijfnavigatie
CD
DivX
√√
Foto
√√
Muziek
√√
Schijfnavigatie
Programma
Setup
OK RETURN EINDEVERPL.
DivX
CD
MPEG4
[DivX].###.####.01.avi
[DivX].###.####.01.avi
MPEG4
00/01
00842C-R125-60~94-NL 6/14/05 6:02 PM Page 67

68
- Nederlands
2
Selecteer Schijfnavigatie met de …†
toetsen en druk vervolgens twee keer op de
OK of √ toets.
Het Titellijst scherm wordt getoond.
3
Selecteer Titel met de …† toetsen en druk
vervolgens op de OK of √ toets.
Aan de rechterkant wordt het Wijzig-menu getoond.
(Afspelen, Hernoemen, Wissen, Bewerken,
Beveiliging, zie pagina 71-74.)
4
Selecteer met de …† toetsen Afspelen om
de titel af te spelen en druk vervolgens op
de OK toets.
De geselecteerde titel wordt afgespeeld.
Zo bekijkt u de huidige schijfstatus en de voortgang
van de weergave: Druk op de INFO toets waarna de
informatie over de schijf verschijnt.
Volg deze instructies op om een scène uit de Titellijst af te
spelen.
Met de TITLE LIST toets
Met de TITLE LIST toets
1
Druk op de TITLE LIST toets.
Het Titellijst scherm wordt getoond.
2
Druk op de …† toetsen om een titel uit de
Titellijst te kiezen die u wilt afspelen en druk
vervolgens op de PLAY ( ) toets.
De geselecteerde titel wordt weergegeven.
3
Om de weergave van de titel te stoppen,
drukt u op de STOP toets.
Om terug te keren naar het Titellijst scherm, drukt u
op de TITLE LIST toets.
Met de MENU toets
Met de MENU toets
1
Druk op de MENU toets.
Titels uit de Titellijst
afspelen
RETURNOKVERPL. EINDE
Titellijst
DVD-RAM(VR)
Nr. Titel Lengte
Wijzig
19/JAN/2005 12:00 PR12
19/JAN/2005
12:00 SP
01 19/JAN/2005 1 00:00:21
√√
02 19/JAN/2005 1 00:00:03
√√
03 20/JAN/2005 2 00:00:15
√√
04 20/JAN/2005 2 00:00:16
√√
05 21/JAN/2005 1 00:06:32
√√
06 21/JAN/2005 1 00:08:16
√√
07 22/JAN/2005 1 00:09:36
√√
RETURNOKVERPL. EINDE
Titellijst
DVD-RAM(VR)
Nr. Titel Lengte
Wijzig
21/JAN/2005 11:50 PR11
21/JAN/2005
11:50 SP
01 19/JAN/2005 1 00:00:21
√√
02 19/JAN/2005 1 00:00:03
√√
03 20/JAN/2005 2 00:00:15
√√
04 20/JAN/2005 2 00:00:16
√√
05 21/JAN/2005 1 00:06:32
√√
06 21/JAN/2005 1 00:08:16
√√
07 22/JAN/2005 1 00:09:36
√√
Afspelen
Hernoemen
Wissen
Wijzig
Beveiliging
RETURNOKVERPL. EINDE
Titellijst
DVD-RAM(VR)
Nr. Titel Lengte
Wijzig
19/JAN/2005 12:00 PR12
19/JAN/2005
12:00 SP
01 19/JAN/2005 1 00:00:21
√√
02 19/JAN/2005 1 00:00:03
√√
03 20/JAN/2005 2 00:00:15
√√
04 20/JAN/2005 2 00:00:16
√√
05 21/JAN/2005 1 00:06:32
√√
06 21/JAN/2005 1 00:08:16
√√
07 22/JAN/2005 1 00:09:36
√√
√√
Afspelen
DVD-RAM(VR) Schijfinfo
Schijfnaam
Aantal Titels 15
Aantal Playlists 2
Opnametijd 02:12 SP
Beveiliging Niet Beveiligd
Scherm Afspelen
01 JAN 2005 ZA 12:00
Weergeven
RETURNOKVERPL. EINDE
Schijfnavigatie
DVD-RAM(VR)
Titellijst
√√
DivX
√√
Foto
√√
Muziek
√√
Schijfnavigatie
Playlist
Schijfbeheer
Programma
Setup
00842C-R125-60~94-NL 6/14/05 6:02 PM Page 68

Nederlands -
69
1. Weergavescherm voor opgenomen titels.
2. Informatievenster voor de geselecteerde titel: naam,
opnamedatum, opnametijd, status beveiliging,
opnamekwaliteit
3. Nummer opgenomen titel.
4. Naam opgenomen titel.
5. Speelduur
6. Bewerkingsitems Titellijst
Afspelen: Speelt de geselecteerde titel af
Hernoemen: Geeft een geselecteerde titel een andere
naam
Wissen: Verwijdert de geselecteerde titel uit de lijst
Bewerken: Een sectie bewerken.
Beveiliging: Vergrendelt/ontgrendelt de geselecteerde titel
7.Beschikbare toetsen.
Titellijst - indeling scherm
■
Kan afhankelijk zijn van het type schijf.
■
DVD-R/DVD-RW(Video) kent slechts
beperkte bewerkingfunctionaliteit.
NB
■
U kunt ook een opgenomen programma
afspelen door op de ANYKEY toets te
drukken.
■
Selecteer Titel met de …† toetsen.
■
Kies met de œ √ toetsen voor afspelen van
de Titellijst en druk vervolgens op de OK
toets.
NB
Druk nogmaals op de INFO toets. Nu kunt u de
informatie bekijken van de titel die momenteel wordt
afgespeeld.
5
Als u het afspelen van de titel wilt
beëindigen, drukt u op de STOP toets.
Om terug te gaan naar het Titellijst scherm drukt u op
de TITLE LIST toets.
RETURNVERPL. EINDE
Titellijst
DVD-RAM(VR)
Nr. Titel Lengte
Wijzig
02/01/01
00:25:30(PM) SP
01 00:00:21
√√
02 00:00:03
√√
03 Sports 00:00:15
√√
04 Movie 00:00:16
√√
05 00:06:32
√√
06 06 00:08:16
√√
07 07 00:09:36
√√
Afspelen
Hernoemen
Wissen
Wijzig
Beveiliging
RETURNOKVERPL. EINDE
Titellijst
DVD-RAM(VR)
Nr. Titel Lengte
Wijzig
19/JAN/2005 12:00 PR12
19/JAN/2005
12:00 SP
01 19/JAN/2005 1 00:00:21
√√
02 19/JAN/2005 1 00:00:03
√√
03 20/JAN/2005 2 00:00:15
√√
04 20/JAN/2005 2 00:00:16
√√
05 21/JAN/2005 1 00:06:32
√√
06 21/JAN/2005 1 00:08:16
√√
07 22/JAN/2005 1 00:09:36
√√
1
2
34 5
7
6
DVD-RAM(VR) Afspeelinfo
Naam 01/JAN/2005 12:00 PR
1
Titel 1/15
Aanmaaktijd 01/JAN/2005 12:00
Lengte
00:01:43 SP
Speeltijd
00:13:27
Titelbeveiliging Niet Beveiligd
01 JAN 2005 ZA 12:00
WIJZIGVERPL.
DVD-RAM(VR)
1/14
00:01:45
ENG
ENG D 5.1CH
Uit
Uit
Titel
Tijd
Ondertitels
Geluid
Herhalen
Zoom
Weergeven
00842C-R125-60~94-NL 6/14/05 6:02 PM Page 69

Bewerken
70
- Nederlands
● Titellijst
Een Titel is een opgenomen video/audio stream.
De Titellijst bevat een lijst van alle titels op de schijf,
waaruit u een keuze kunt maken.
De Titellijst bevat de werkelijke opnamen. Dit betekent
dat een eenmaal verwijderde titel niet meer kan worden
afgespeeld.
● Playlist
Een playlist bevat een door de gebruiker opgegeven
selectie uit de titellijst. Wanneer een playlist wordt
afgespeeld, wordt alleen de door de gebruiker
geselecteerde scène weergegeven, waarna de recorder
stopt. Aangezien een playlist alleen informatie bevat die
verwijst naar bepaalde scènes, kan een playlist item worden
verwijderd zonder dat de originele stream wordt gewist.
Het opnemen of bewerken wordt mogelijk niet
voltooid als er een fout optreedt, zoals een
plotselinge stroomstoring.
Houd er rekening mee dat het onmogelijk kan
blijken om beschadigd materiaal terug te halen.
Bewerken
Bewerken, basisfuncties (Titellijst)...................71
Bewerken, geavanceerd (Playlist)...................75
Schijfbeheer ......................................................83
In dit hoofdstuk maakt u kennis met de basisfuncties
voor het bewerken van DVD’s, zowel voor
afzonderlijke opnamen als de gehele schijf.
00842C-R125-60~94-NL 6/14/05 6:02 PM Page 70

Nederlands -
71
Naam van een titel wijzigen
Volg de onderstaande aanwijzingen op om de naam van
een opgenomen programma te wijzigen.
Met de TITLE LIST toets
Met de TITLE LIST toets
1
Druk op de TITLE LIST toets.
Het scherm Titellijst wordt getoond
Met de MENU toets
● Druk op de MENU toets.
● Druk op de …† toetsen om Schijfnavigatie te
selecteren en druk vervolgens twee keer op de OK
of √ toets.
2
Selecteer met de …† toetsen een titel uit
de Titellijst die u een andere naam wilt
geven. Druk vervolgens op de OK of √
toets.
3
Ga met de …† toetsen naar Hernoemen en
druk vervolgens op de OK toets.
Het scherm Hernoemen wordt getoond.
Bewerken, basisfuncties
(Titellijst)
4
Selecteer de gewenste tekens met de …†
œ √ toetsen en druk op de OK toets.
● Back Space: Verwijdert en verplaatst de cursor één
positie naar achteren.
(gelijk aan de CANCEL toets).
● Spatie: De cursor gaat een plaats verder
(naar rechts).
● Wissen: Verwijdert het teken onder de cursor.
● Verwijderen: Verwijdert alle ingetoetste tekens.
● Opslaan: Legt de ingetoetste naam vast.
5
Druk op de …† œ √ toetsen om naar
Opslaan te gaan en druk vervolgens op de
OK toets.
De gewijzigde naam van de titel wordt getoond in de
Titellijst.
Bewerken
RETURNOKVERPL. EINDE
Titellijst
DVD-RAM(VR)
Nr. Titel Lengte
Wijzig
19/JAN/2005 12:00 PR12
19/JAN/2005
12:00 SP
01 19/JAN/2005 1 00:00:21
√√
02 19/JAN/2005 1 00:00:03
√√
03 20/JAN/2005 2 00:00:15
√√
04 20/JAN/2005 2 00:00:16
√√
05 21/JAN/2005 1 00:06:32
√√
06 21/JAN/2005 1 00:08:16
√√
RETURNOKVERPL. EINDE
Titellijst
DVD-RAM(VR)
Nr. Titel Lengte
Wijzig
Sports (A1)
19/JAN/2005
12:00 SP
01 19/JAN/2005 1 00:00:21
√√
02 19/JAN/2005 1 00:00:03
√√
03 20/JAN/2005 2 00:00:15
√√
04 20/JAN/2005 2 00:00:16
√√
05 Sports(A1) 00:06:32
√√
06 21/JAN/2005 1 00:08:16
√√
RETURNOKVERPL. EINDE
Titellijst
DVD-RAM(VR)
Nr. Titel Lengte
Wijzig
21/JAN/2005 12:00 PR12
21/JAN/2005
12:00 SP
01 19/JAN/2005 1 00:00:21
√√
02 19/JAN/2005 1 00:00:03
√√
03 20/JAN/2005 2 00:00:15
√√
04 20/JAN/2005 2 00:00:16
√√
05 21/JAN/2005 1 00:06:32
√√
06 21/JAN/2005 1 00:08:16
√√
Afspelen
Hernoemen
Wissen
Wijzig
Beveiliging
ABCDE ab c de
f
g
hi j
klmno
pq
rst
u
z
nwxy
FGH IJ
KLMNO
PQRST
UVWXY
Z
Back Space Space Delete Clear Save
RETURNOKVERPL. EINDE
Hernoemen
DVD-RAM(VR)
BA C D E
GF H I J
LK
M
N O
QP R S T
VU
W
X Y
Z
Backspace
ba c d e
gf h i j
lk
m
n o
qp r s t
vu
w
x y
z
Spatie
21 3 4 5
76 8 9 0
-
-
+ =
.
!
~
@
# $
^
%
&
( )
Verwijd.
21/JAN/2005 12:00 PR12
Wissen
Opslaan
ABCDE ab c de
f
g
hi j
klmno
pq
rst
u
z
nwxy
FGH IJ
KLMNO
PQRST
UVWXY
Z
Back Space Space Delete Clear Save
RETURNOKVERPL. EINDE
Hernoemen
DVD-RAM(VR)
BA C D E
GF H I J
LK
M
N O
QP R S T
VU
W
X Y
Z
Backspace
ba c d e
gf h i j
lk
m
n o
qp r s t
vu
w
x y
z
Spatie
21 3 4 5
76 8 9 0
-
-
+ =
.
!
~
@
# $
^
%
&
( )
Verwijd.
Wissen
Opslaan
Sports(A1)
00842C-R125-60~94-NL 6/14/05 6:02 PM Page 71

72
- Nederlands
Bewerken
Titel beveiliging (vergrendelen)
Volg de onderstaande aanwijzingen op om een titel tegen
onbedoeld wissen te beschermen.
Met de TITLE LIST toets
Met de TITLE LIST toets
1
Druk op de TITLE LIST toets.
Het scherm Titellijst wordt getoond
Met de MENU toets
● Druk op de MENU toets.
● Druk op de …† toetsen om naar Schijfnavigatie
te gaan en druk vervolgens twee keer op de OK of
√ toets.
2
Selecteer met de …† toetsen een titel uit
de Titellijst die u wilt beveiliging.
Druk vervolgens op de OK of √ toets.
3
Druk op de knoppen
…†
om Beveiliging te
selecteren en druk op OK of op de knop
√
.
4
Druk op de œ √ toetsen om Aan te
selecteren en druk vervolgens op de OK
toets. Het slot (symbool bij de titel in het
informatievenster) is nu gesloten. ( ➝ )
Titel verwijderen
Volg de onderstaande aanwijzingen op om een titel uit de
Titellijst te verwijderen.
Met de TITLE LIST toets
Met de TITLE LIST toets
1
Druk op de TITLE LIST toets.
Het scherm Titellijst wordt getoond
Met de MENU toets
● Druk op de MENU toets.
● Ga met de …† toetsen naar Schijfnavigatie en
druk twee keer op de OK of √ toets.
2
Ga met de …† toetsen naar een titel die u
uit de Titellijst wilt verwijderen en druk
vervolgens op de OK of √ toets.
RETURNOKVERPL. EINDE
Titellijst
DVD-RAM(VR)
Nr. Titel Lengte
Wijzig
Drama
19/JAN/2005
12:00 SP
01 Drama 00:00:21
√√
02 Music 00:00:03
√√
03 Sports 00:00:15
√√
04 Movie 00:00:16
√√
05 Sports(A1) 00:06:32
√√
06 Edu 1 00:08:16
√√
RETURNOKVERPL. EINDE
Titellijst
DVD-RAM(VR)
Nr. Titel Lengte
Wijzig
Sports(A1)
19/JAN/2005
12:00 SP
01 Drama 00:00:21
√√
02 Music 00:00:03
√√
03 Sports 00:00:15
√√
04 Movie 00:00:16
√√
05 Sports(A1) 00:06:32
√√
06 Edu 1 00:08:16
√√
Afspelen
Hernoemen
Wissen
Wijzig
Beveiliging
RETURNOKVERPL. EINDE
Titellijst
DVD-RAM(VR)
Nr. Titel Lengte
Wijzig
Drama
19/JAN//2005
12:00 SP
01 Drama 00:00:21
√√
02 Music 00:00:03
√√
03 Sports 00:00:15
√√
04 Movie 00:00:16
√√
05 Sports(A1) 00:06:32
√√
06 Edu 1 00:08:16
√√
RETURNOKVERPL. EINDE
Titellijst
DVD-RAM(VR)
Nr. Titel Lengte
Wijzig
Sports(A1)
19/JAN/2005
12:00 SP
01 Drama 00:00:21
√√
02 Music 00:00:03
√√
03 Sports 00:00:15
√√
04 Movie 00:00:16
√√
05 Sports(A1) 00:06:32
√√
06 Edu 1 00:08:16
√√
Afspelen
Hernoemen
Wissen
Wijzig
Beveiliging
RETURNOKVERPL. EINDE
Titellijst
DVD-RAM(VR)
Nr. Titel Lengte
Wijzig
Sports(A1)
19/JAN/2005
12:00 SP
01 Drama 00:00:21
√√
02 Music 00:00:03
√√
03 Sports 00:00:15
√√
04 Movie 00:00:16
√√
05 Sports(A1) 00:06:32
√√
06 Edu 1 00:08:16
√√
Afspelen
Hernoemen
Wissen
Wijzig
Beveiliging
RETURNOKVERPL. EINDE
Titellijst
DVD-RAM(VR)
Sports(A1)
19/JAN/2005
12:00 SP
Titelbeveiliging:
UitAan
RETURNOKVERPL. EINDE
Titellijst
DVD-RAM(VR)
Nr. Titel Lengte
Wijzig
Sports(A1)
19/JAN/2005
12:00 SP
01 Drama 00:00:21
√√
02 Music 00:00:03
√√
03 Sports 00:00:15
√√
04 Movie 00:00:16
√√
05 Sports(A1) 00:06:32
√√
06 Edu 1 00:08:16
√√
00842C-R125-60~94-NL 6/14/05 6:02 PM Page 72

Nederlands -
73
Deel van een titel verwijderen
Volg de onderstaande aanwijzingen op om een gedeelte
van een opname uit de Titellijst te verwijderen.
Met de TITLE LIST toets
Met de TITLE LIST toets
1
Druk op de TITLE LIST toets.
Het scherm Titellijst wordt getoond
Met de MENU toets
● Druk op de MENU toets.
● Ga met de …† toetsen naar Schijfnavigatie en
druk twee keer op de OK of √ toets.
2
Druk op de …† toetsen om een titel uit de
Titellijst te selecteren die u wilt bewerken.
Druk vervolgens op de OK of √ toets.
3
Druk op de …† toetsen om Wijzig te
selecteren en druk vervolgens op de OK of
√ toets.
Het scherm Titellijst bewerken wordt getoond.
3
Druk op de …† toetsen om Wissen te
selecteren en druk vervolgens op de OK of
√ toets.
De recorder vraagt u de verwijdering te bevestigen.
DVD-RAM (VR), DVD-RW (VR modus): Aangezien er
een playlist is, verschijnt de vraag: “Wilt u dit echt
verwijderen?.”
DVD-RW (Video modus), DVD-R: Er is geen playlist,
dus luidt nu de vraag: “Wilt u dit echt verwijderen?”
● Het bericht hangt af van het schijftype.
4
Druk op de œ √ toetsen om Ja te
selecteren en druk vervolgens op de OK
toets.
■
Beschermde titels kunnen niet verwijderd
worden. Om een beschermde titel te kunnen
verwijderen, moet u eerst “Uit” selecteren in
het menu Titelbeveiliging.
(zie pagina 72).
■
Als de schijfbeveiliging is ingesteld op
Beveiligd, kunt u geen titels verwijderen.
(zie pagina 84)
■
Titels die uit de Titellijst verwijderd zijn,
kunnen niet meer worden teruggehaald.
■
Wanneer een DVD-R/RW eenmaal is
afgesloten, kunnen er geen titels meer
worden verwijderd.
■
Bij DVD-r wordt alleen de titel uit het menu
verwijderd, terwijl de opname zelf op de
schijf aanwezig blijft.
NB
(VR modus)
Bewerken
RETURNOKVERPL. EINDE
Titellijst
DVD-RAM(VR)
Nr. Titel Lengte
Wijzig
Drama
19/JAN/2005
12:00 SP
01 Drama 00:00:21
√√
02 Music 00:00:03
√√
03 Sports 00:00:15
√√
04 Movie 00:00:16
√√
05 Sports(A1) 00:06:32
√√
06 Edu 1 00:08:16
√√
RETURNOKVERPL. EINDE
Titellijst
DVD-RAM(VR)
Nr. Titel Lengte
Wijzig
Sports(A1)
19/JAN/2005
12:00 SP
01 Drama 00:00:21
√√
02 Music 00:00:03
√√
03 Sports 00:00:15
√√
04 Movie 00:00:16
√√
05 Sports(A1) 00:06:32
√√
06 Edu 1 00:08:16
√√
Afspelen
Hernoemen
Wissen
Wijzig
Beveiliging
RETURNOKVERPL. EINDE
Titellijst
DVD-RAM(VR)
Sports(A1)
19/JAN/2005
12:00 SP
Wilt u dit echt verwijderen?
(Gerelateerde playlists
worden mogelijk verwijderd.)
NeeJa
RETURNOKVERPL. EINDE
Titellijst
DVD-RAM(VR)
Nr. Titel Lengte
Wijzig
Sports(A1)
19/JAN/2005
12:00 SP
01 Drama 00:00:21
√√
02 Music 00:00:03
√√
03 Sports 00:00:15
√√
04 Movie 00:00:16
√√
05 Sports(A1) 00:06:32
√√
06 Edu 1 00:08:16
√√
Afspelen
Hernoemen
Wissen
Wijzig
Beveiliging
RETURNOKVERPL. EINDE
Titellijst Bewerken
DVD-RAM(VR)
Sports(A1)
21/JAN/2005 11:50
00:00:00
Begin
Einde
Wissen
Terug
Titellijstnr. 05
Begin 00:00:00
Einde 00:00:00
00842C-R125-60~94-NL 6/14/05 6:02 PM Page 73

74
- Nederlands
Bewerken
6
Druk op OK bij Wissen.
7
Druk op de knoppen œ √ om Ja te
selecteren en druk vervolgens op OK.
Het geselecteerde gedeelte wordt verwijderd.
U keert terug naar het scherm Titellijst door op de
knoppen …† te drukken om Return te selecteren.
4
Druk aan het begin van het te verwijderen
gedeelte op de OK toets.
Het eerste beeld en de starttijd van het te verwijderen
gedeelte worden getoond in het betreffende venster.
Indeling van het Titellijst scherm
1. Weergavebalk
2. Speelduur
3. Venster met startbeeld en starttijd van te
verwijderen deel
4. Venster met stopbeeld en stoptijd van te
verwijderen deel
● Selecteer met de weergavetoetsen het begin- en
eindpunt van het gedeelte dat u wilt verwijderen.
● Weergavetoetsen: (
,
,).
5
Druk aan het einde van het te verwijderen
gedeelte op de OK toets.
Het laatste beeld en de stoptijd van het te verwijderen
gedeelte worden getoond in het betreffende venster.
■
Een te verwijderen gedeelte moet minstens
5 seconden duren.
■
Als de lengte van het te verwijderen
gedeelte minder dan 5 seconden is, ziet u
de melding: “De lengte is te kort.”
■
Als het eindpunt voor het beginpunt ligt, ziet
u de melding: “Eindpunt kan niet voor
beginpunt liggen.”
■
De sectie kan niet worden verwijderd als
deze een stilstaand beeld bevat.
■
Druk op de knop MENU nadat de bewerking
is voltooid. Het scherm Playlist Bewerken
verdwijnt.
NB
RETURNOKVERPL. EINDE
Titellijst Bewerken
DVD-RAM(VR)
Sports(A1)
21/JAN/2005 11:50
00:10:10
Begin
Einde
Wissen
Terug
Titellijstnr. 05
Begin 00:00:06
Einde 00:10:10
RETURNOKVERPL. EINDE
Titellijst Bewerken
DVD-RAM(VR)
Sports(A1)
21/JAN/2005 11:50
00:10:10
Begin
Einde
Wissen
Terug
Titellijstnr. 05
Begin 00:00:06
Einde 00:10:10
RETURNOKVERPL. EINDE
Titellijst Bewerken
DVD-RAM(VR)
Sports(A1)
21/JAN/2005 11:50
00:10:15
Begin
Einde
Wissen
Terug
Titellijstnr. 05
Begin
Einde 00:10:10
Wilt u dit echt verwijderen?
(Verwijderd deel kan niet worden hersteld.)
Ja Nee
RETURNOKVERPL. EINDE
Titellijst Bewerken
DVD-RAM(VR)
Sports(A1)
21/JAN/2005 11:50
00:00:06
Begin
Einde
Wissen
Terug
Titellijstnr. 05
Begin 00:00:06
Einde 00:00:00
RETURNOKVERPL. EINDE
Titellijst Bewerken
DVD-RAM(VR)
Sports(A1)
21/JAN/2005 11:50
00:00:06
Begin
Einde
Wissen
Terug
Titellijstnr. 05
Begin 00:00:06
Einde 00:00:00
1
2
3
4
00842C-R125-60~94-NL 6/14/05 6:02 PM Page 74

Nederlands -
75
5
Druk bij het gewenste eindpunt op de OK
toets.
● Het laatste beeld en de stoptijd van het
geselecteerde gedeelte verschijnen in het onderste
venster.
● Het gele selectiekader gaat naar de keuze Maken.
- Om de nieuwe playlist te maken -
6
Druk op OK om Maken te selecteren.
De scène wordt in de nieuwe Playlist gezet.
Een nieuw scherm Scène maken wordt getoond.
- Om terug te gaan naar het menu Playlist bewerken -
7
Druk op de …† toetsen om Terug te
selecteren en druk vervolgens op de OK
toets.
Het venster Playlist bewerken wordt getoond.
8
Druk na afloop op de MENU of PLAY LIST
toets.
Het scherm Playlist bewerken verdwijnt.
Playlist maken
Volg de onderstaande aanwijzingen op om een nieuwe
playlist te maken op basis van een opgenomen titel.
1
Druk in de stopstand op de knop MENU.
2
Ga met de …† toetsen naar Playlist en
druk vervolgens op de OK of √ toets.
3
Ga met de …† toetsen naar Nieuwe
Playlist en druk op de OK of √ toets.
Het scherm Scène maken wordt getoond.
4
Druk bij het gewenste beginpunt op de OK
toets.
● Het eerste beeld en de starttijd van het
geselecteerde gedeelte verschijnen in het bovenste
venster.
● Het gele selectiekader gaat naar de keuze Einde.
● Selecteer met de weergavetoetsen (
,
,)
het beginpunt van het gedeelte waarvan u een
nieuwe scène wilt maken.
■
U kunt maximaal 99 scènes in een playlist
zetten.
■
Afhankelijk van het type schijf kan het
werkelijke scherm er anders uit zien.
NB
Bewerken, geavanceerd
(Playlist)
■
U kunt alle scènes zien en controleren in het
scherm Playlist bewerken.
■
Herhaal stap 1 /tm 6 als u een nieuwe playlist wilt
maken.
■
Herhaal stap 4 /tm 6 als u scènes van de playlist
wilt maken.
NB
(VR modus)
Bewerken
RETURNOKVERPL. EINDE
Scène Maken
DVD-RAM(VR)
Nieuwe Playlist
19/JAN/2005 12:00
00:00:10
Begin
Einde
Maken
Terug
Scènenr. 001
Begin 00:00:00
Einde 00:00:00
RETURNOKVERPL. EINDE
Scène Maken
DVD-RAM(VR)
Nieuwe Playlist
19/JAN/2005 12:00
00:00:10
Begin
Einde
Maken
Terug
Scènenr. 001
Begin 00:00:10
Einde 00:00:00
RETURNOKVERPL. EINDE
Playlist Bewerken
DVD-RAM(VR)
Nr. Titel Lengte
Wijzig
25/JAN/2005 06:03
7 scènes
23/JAN/2005 06:43
01 23/JAN/2005/0 00:00:21
√√
02 23/JAN/2005/0 00:00:03
√√
03 24/JAN/2005/1 00:00:15
√√
04 24/JAN/2005/1 00:00:16
√√
05 25/JAN/2005/2 00:06:32
√√
RETURNOKVERPL. EINDE
Scène Maken
DVD-RAM(VR)
Nieuwe Playlist
19/JAN/2005 12:00
00:10:00
Begin
Einde
Maken
Terug
Scènenr. 001
Begin 00:00:10
Einde 00:10:00
RETURNOKVERPL. EINDE
Playlist
DVD-RAM(VR)
Nieuwe Playlist
√√
Playlist Bewerken
√√
Schijfnavigatie
Playlist
Schijfbeheer
Programma
Setup
Titellijst: 1/6
Titellijst: 1/6
Titellijst: 1/6
00842C-R125-60~94-NL 6/14/05 6:02 PM Page 75

76
- Nederlands
Bewerken
3
Druk op de …† toetsen om Afspelen te
selecteren. Druk vervolgens op de OK
toets.
De scènes uit de afspeellijst worden afgespeeld.
● Om de huidige schijfstatus en voortgang van de
weergave te zien: Druk op de INFO toets.
De informatie van de schijf wordt getoond.
● Druk nogmaals op de INFO toets. U ziet nu de
informatie van de afspeellijst die momenteel wordt
afgespeeld.
● Na afloop van de weergave wordt het scherm
Playlist bewerken opnieuw getoond.
4
Druk op de STOP toets om de weergave te
beëindigen.
Het scherm Playlist bewerken wordt opnieuw
getoond.
Scènes uit de Playlist afspelen
Volg de onderstaande aanwijzingen op om de scènes uit
de afspeellijst af te spelen.
1
Druk in de stopstand op de knop PLAY
LIST.
Het scherm Playlist bewerken wordt getoond.
Met de MENU toets
● Druk in de stopstand op de knop MENU.
● Ga met de …† toetsen naar Playlist en druk op
de OK of √ toets.
● Ga met de …† toetsen naar Playlist bewerken en
druk op de OK of √ toets.
2
Druk op de …† toetsen om de titel die u
wilt bewerken uit de Playlist te selecteren
en druk vervolgens op de OK of √ toets.
Het menu Playlist bewerken wordt getoond: Afspelen,
Hernoemen, Wijzig Scène, Kopiëren, Wissen.
(VR modus)
RETURNOKVERPL. EINDE
Playlist Bewerken
DVD-RAM(VR)
Nr. Titel Lengte
Wijzig
23/JAN/2005 06:43
7 scènes
23/JAN/2005 06:43
01 23/JAN/2005/0 00:00:21
√√
02 23/JAN/2005/0 00:00:03
√√
03 24/JAN/2005/1 00:00:15
√√
04 24/JAN/2005/1 00:00:16
√√
05 25/JAN/2005/2 00:06:32
√√
RETURNOKVERPL. EINDE
Playlist Bewerken
DVD-RAM(VR)
Nr. Titel Lengte
Wijzig
23/JAN/2005 06:43
7 scènes
23/JAN/2005 06:43
01 23/JAN/2005/0 00:00:21
√√
02 23/JAN/2005/0 00:00:03
√√
03 24/JAN/2005/1 00:00:15
√√
04 24/JAN/2005/1 00:00:16
√√
05 25/JAN/2005/2 00:06:32
√√
Afspelen
Hernoemen
Wijzig Scène
Kopiëren
Wissen
√√
Afspelen
RETURNOKVERPL. EINDE
Playlist
DVD-RAM(VR)
Nieuwe Playlist
√√
Playlist Bewerken
√√
Schijfnavigatie
Playlist
Schijfbeheer
Programma
Setup
DVD-RAM(VR) Schijfinfo
Schijfnaam
Aantal Titels 15
Aantal Playlists 2
Opnametijd 02:12 SP
Beveiliging Niet Beveiligd
Scherm Afspelen [Playlist]
01 JAN 2005 ZA 13:00
DVD-RAM(VR) Afspeelinfo
Naam 01/JAN/2005 12:00
Playlist 1/15
Aanmaaktijd 01/JAN/2005 12:00
Lengte
00:01:43
Speeltijd
00:13:27
Aantal Scènes 1
01 JAN 2005 ZA 13:00
00842C-R125-60~94-NL 6/14/05 6:02 PM Page 76

Nederlands -
77
4
Geef de gewenste tekens in met de …† œ
√ toetsen.
● Deze functie werkt op dezelfde manier als de
Hernoemen functie van de Titellijst (zie pagina 71).
● Er kunnen maximale 31 tekens worden ingetoetst.
Alle 31 tekens kunnen worden bekeken door op de
INFO toets te drukken.
5
Druk op de …† œ √ toetsen om Opslaan
te selecteren. Druk vervolgens op de OK
toets.
De gewijzigde naam verschijnt in de kolom Titel.
Naam van Playlist scène wijzigen
Volg de onderstaande aanwijzingen op om de naam van
een scène uit de playlist te wijzigen.
1
Druk in de stopstand op de knop PLAY
LIST.
Het scherm Playlist bewerken wordt getoond.
Met de MENU toets
● Druk in de stopstand op de knop MENU.
● Ga met de …† toetsen naar Playlist en druk
vervolgens op de OK of √ toets.
● Ga met de …† toetsen naar Playlist Bewerken en
druk vervolgens op de OK of √ toets.
2
Ga in de Playlist met de …† toetsen naar
de titel die u wilt wijzigen en druk
vervolgens op de OK of √ toets.
Het menu Playlist bewerken wordt getoond: Afspelen,
Hernoemen, Wijzig Scène, Kopiëren, Wissen.
3
Druk op de …† toetsen om Hernoemen te
selecteren en druk vervolgens op de OK
toets.
Het scherm Hernoemen wordt getoond.
(VR modus)
Bewerken
RETURNOKVERPL. EINDE
Playlist Bewerken
DVD-RAM(VR)
Nr. Titel Lengte
Wijzig
23/JAN/2005 06:43
7 scènes
23/JAN/2005 06:43
01 23/JAN/2005/0 00:00:21
√√
02 23/JAN/2005/0 00:00:03
√√
03 24/JAN/2005/1 00:00:15
√√
04 24/JAN/2005/1 00:00:16
√√
05 25/JAN/2005/2 00:06:32
√√
RETURNOKVERPL. EINDE
Playlist Bewerken
DVD-RAM(VR)
Nr. Titel Lengte
Wijzig
23/JAN/2005 06:43
7 scènes
23/JAN/2005 06:43
01 23/JAN/2005/0 00:00:21
√√
02 23/JAN/2005/0 00:00:03
√√
03 24/JAN/2005/1 00:00:15
√√
04 24/JAN/2005/1 00:00:16
√√
05 25/JAN/2005/2 00:06:32
√√
Afspelen
Hernoemen
Wijzig Scène
Kopiëren
Wissen
ABCDE ab c de
f
g
hi j
klmno
pq
rst
u
z
nwxy
FGH IJ
KLMNO
PQRST
UVWXY
Z
Back Space Space Delete Clear Save
RETURNOKVERPL. EINDE
Hernoemen
DVD-RAM(VR)
BA C D E
GF H I J
LK
M
N O
QP R S T
VU
W
X Y
Z
Backspace
ba c d e
gf h i j
lk
m
n o
qp r s t
vu
w
x y
z
Spatie
21 3 4 5
76 8 9 0
-
-
+ =
.
!
~
@
# $
^
%
&
( )
Verwijd.
Wissen
Opslaan
Dolphin
RETURNOKVERPL. EINDE
Playlist Bewerken
DVD-RAM(VR)
Nr. Titel Lengte
Wijzig
Dolphin
7 scènes
23/JAN/2005 06:43
01 23/JAN/2005/0 00:00:21
√√
02 23/JAN/2005/0 00:00:03
√√
03 Dolphin 00:00:15
√√
04 24/JAN/2005/1 00:00:16
√√
05 25/JAN/2005/2 00:06:32
√√
00842C-R125-60~94-NL 6/14/05 6:02 PM Page 77

78
- Nederlands
Bewerken
Playlist scène opzoeken
Volg de onderstaande aanwijzingen op om een scène op te
zoeken in de afspeellijst.
1
Druk in de stopstand op de knop PLAY
LIST.
Het scherm Playlist bewerken wordt getoond.
Met de MENU toets
● Druk in de stopstand op de knop MENU.
● Ga met de …† toetsen naar Playlist en druk
vervolgens op de OK of √ toets.
● Ga met de …† toetsen naar Playlist Bewerken en
druk vervolgens op de OK of √ toets.
2
Ga in de Playlist met de …† toetsen naar
de gewenste titel en druk vervolgens op de
OK of √ toets.
Het menu Bewerken Playlist wordt getoond: Afspelen,
Hernoemen, Wijzig Scène, Kopiëren, Wissen.
3
Druk op de …† toetsen om
Wijzig Scène te selecteren en druk
vervolgens op de OK toets.
Het scherm Wijzig scène wordt getoond.
(VR modus)
4
Druk op de …† œ √ toetsen om de scène
te selecteren die u wilt afspelen.
Druk vervolgens op de OK toets.
De af te spelen scène wordt geselecteerd.
5
Druk op de OK toets.
De geselecteerde scène wordt afgespeeld.
● Om de weergave van de scène te beëindigen,
drukt u op de STOP toets.
Geselecteerde scène afspelen
RETURNOKVERPL. EINDE
Playlist Bewerken
DVD-RAM(VR)
Nr. Titel Lengte
Wijzig
Dolphin
7 scènes
23/JAN/2005 06:43
01 Science 00:00:17
√√
02 Sky 00:00:06
√√
03 Dolphin 00:00:06
√√
04 Natural 00:00:37
√√
Afspelen
Hernoemen
Wijzig Scène
Kopiëren
Wissen
RETURNOKVERPL. EINDE
Playlist Bewerken
DVD-RAM(VR)
Nr. Titel Lengte
Wijzig
Dolphin
7 scènes
23/JAN/2005 06:43
01 Science 00:00:17
√√
02 Sky 00:00:06
√√
03 Dolphin 00:00:06
√√
04 Natural 00:00:37
√√
Afspelen
Hernoemen
Wijzig Scène
Kopiëren
Wissen
RETURNOKVERPL. EINDE
Playlist Bewerken
DVD-RAM(VR)
Nr. Titel Lengte
Wijzig
Science
7 scènes
23/JAN/2005 06:43
01 Science 00:00:17
√√
02 Sky 00:00:06
√√
03 Dolphin 00:00:06
√√
04 Natural 00:00:37
√√
RETURNOKVERPL. EINDE
Wijzig Scène
DVD-RAM(VR)
Scènenr. 1/7 Playlistnr. 3
Afspelen
Wijzig
Verpl.
Toev.
Wissen
01 00:00:26 02 00:00:07 03 00:00:04
04 00:00:03 05 00:00:11 06 00:00:04
RETURNOKVERPL. EINDE
Wijzig Scène
DVD-RAM(VR)
Scènenr. 2/7 Playlistnr. 2
Afspelen
wijzig
Verpl.
Toev.
Wissen
01 00:00:26 02 00:00:07 03 00:00:04
04 00:00:03 05 00:00:11 06 00:00:04
RETURNOKVERPL. EINDE
Wijzig Scène
DVD-RAM(VR)
Scènenr. 2/7 Playlistnr. 2
Afspelen
Wijzig
Verpl.
Toev.
Wissen
01 00:00:26 02 00:00:07 03 00:00:04
04 00:00:03 05 00:00:11 06 00:00:04
√√
Afspelen
00842C-R125-60~94-NL 6/14/05 6:02 PM Page 78

Nederlands -
79
7
Druk bij het gewenste eindpunt van de
scène op de OK toets.
●
Het laatste beeld en de stoptijd van het geselecteerde
gedeelte verschijnen in het onderste venster.
8
Druk op de …† toetsen om Wijzig te
selecteren en druk vervolgens op de OK
toets.
● De oorspronkelijke scène wordt vervangen door het
geselecteerde gedeelte.
U voert instellingen in door stap 1 t/m 3 op pagina 78 te
volgen.
4
Druk op de …† œ √ pijltjestoetsen om de
scène te selecteren die u wilt wijzigen.
Druk vervolgens op de OK toets.
5
Ga met de …† toetsen naar Wijzig en druk
vervolgens op de OK toets.
Het scherm Wijzig Scène wordt getoond.
6
Druk bij het beginpunt van de scène op de
OK toets.
●
Het eerste beeld en de starttijd van het geselecteerde
gedeelte verschijnen in het bovenste venster.
● Selecteer met de weergavetoetsen (
,
,)
het gewenste begin- of eindpunt.
Scène bewerken (vervangen)
Bewerken
RETURNOKVERPL. EINDE
Wijzig Scène
DVD-RAM(VR)
Scènenr. 2/7 Playlistnr. 2
Afspelen
Wijzig
Verpl.
Toev.
Wissen
01 00:00:26 02 00:00:07 03 00:00:04
04 00:00:03 05 00:00:11 06 00:00:04
RETURNOKVERPL. EINDE
Scène Wijzigen
DVD-RAM(VR)
Natural
23/JAN/2005 03:34
00:00:00
Begin
Einde
Wijzig
Annul.
Scènenr. 002
Begin 00:00:00
Einde 00:00:00
RETURNOKVERPL. EINDE
Scène Wijzigen
DVD-RAM(VR)
Natural
23/JAN/2005 03:34
00:00:25
Begin
Einde
Wijzig
Annul.
Scènenr. 002
Begin 00:00:25
Einde 00:00:00
RETURNOKVERPL. EINDE
Scène Wijzigen
DVD-RAM(VR)
Natural
23/JAN/2005 03:34
Titellijst: 1/6
Titellijst: 1/6
Titellijst: 1/6
00:00:30
Begin
Einde
wijzig
Annul.
Scènenr. 002
Begin 00:00:25
Einde 00:00:30
RETURNOKVERPL. EINDE
Wijzig Scène
DVD-RAM(VR)
Scènenr. 2/7 Playlistnr. 3
Afspelen
wijzig
Verpl.
Toev.
Wissen
01 00:00:26 02 00:00:07 03 00:00:04
04 00:00:03 05 00:00:11 06 00:00:04
00842C-R125-60~94-NL 6/14/05 6:02 PM Page 79

80
- Nederlands
Bewerken
U voert instellingen in door stap 1 t/m 3 op pagina 78 te
volgen.
4
Druk op de …† œ √ toetsen om de scène
te selecteren die u wilt verplaatsen.
Druk vervolgens op de OK toets.
5
Druk op de …† toetsen om Verpl. te
selecteren. Druk vervolgens op de OK
toets.
● Een geel selectiekader geeft de scène aan die u
gaat verplaatsen.
6
Druk op de …† œ √ toetsen om de plaats
te selecteren waarnaar u de geselecteerde
scène wilt verplaatsen. Druk vervolgens op
de OK toets.
● De geselecteerde scène wordt naar de geselecteerde
positie verplaatst.
Scène verplaatsen binnen Playlist
U voert instellingen in door stap 1 t/m 3 op pagina 78 te
volgen.
4
Druk op de …† œ √ toetsen om de scène
te selecteren waarvoor u een nieuwe scène
wilt tussenvoegen.
Druk vervolgens op de OK toets.
Een geel selectiekader geeft de plaats aan waar de
nieuwe scène wordt tussengevoegd.
5
Druk op de knoppen …† om Toev. te
selecteren en druk op OK.
6
Druk bij het startpunt van de scène op de
OK toets.
● Het eerste beeld en de starttijd van het
geselecteerde gedeelte verschijnen in het bovenste
venster.
● Selecteer het gewenste eindpunt met de
weergavetoetsen (
,
,).
Scène toevoegen
■
U kunt de geselecteerde scène niet verplaatsen
naar de positie van de volgende scène. De
geselecteerde scène wordt namelijk direct voor
de gekozen positie tussengevoegd - en in dit
geval staat hij daar al.
■
Afhankelijk van het type schijf kan het
scherm enigszins afwijken.
NB
RETURNOKVERPL. EINDE
Wijzig Scène
DVD-RAM(VR)
Scènenr. 3/7 Playlistnr. 3
Afspelen
Wijzig
Verpl.
Toev.
Wissen
01 00:00:26 02 00:00:07 03 00:00:04
04 00:00:03 05 00:00:11 06 00:00:04
RETURNOKVERPL. EINDE
Wijzig Scène
DVD-RAM(VR)
Scènenr. 3/7 Playlistnr. 3
Afspelen
Wijzig
Verpl.
Toev.
Wissen
01 00:00:26 02 00:00:07 03 00:00:04
04 00:00:03 05 00:00:11 06 00:00:04
RETURNOKVERPL. EINDE
Wijzig Scène
DVD-RAM(VR)
Scènenr. 6/7 Playlistnr. 6
Afspelen
Wijzig
Verpl.
Toev.
Wissen
01 00:00:26 02 00:00:07 03 00:00:04
04 00:00:03 05 00:00:11 06 00:00:04
RETURNOKVERPL. EINDE
Wijzig Scène
DVD-RAM(VR)
Scènenr. 5/7 Playlistnr. 5
Afspelen
Wijzig
Verpl.
Toev.
Wissen
01 00:00:26 02 00:00:07 03 00:00:04
04 00:00:03 05 00:00:11 06 00:00:04
RETURNOKVERPL. EINDE
Wijzig Scène
DVD-RAM(VR)
Scènenr. 4/3 Playlistnr. 4
Afspelen
Wijzig
Verpl.
Toev.
Wissen
01 00:00:26 02 00:00:07 03 00:00:04
04 00:00:00
RETURNOKVERPL. EINDE
Scène Toevoegen
DVD-RAM(VR)
Sclence
23/JAN/2005 06:43
00:00:15
Begin
Einde
Toev.
Annul.
Scènenr. 004
Begin 00:00:15
Einde 00:00:00
RETURNOKVERPL. EINDE
Scène Toevoegen
DVD-RAM(VR)
Sclence
23/JAN/2005 06:43
00:00:15
Begin
Einde
Toev.
Annul.
Scènenr. 004
Begin 00:00:15
Einde 00:00:00
Titellijst: 1/6
Titellijst: 1/6
00842C-R125-60~94-NL 6/14/05 6:02 PM Page 80

Nederlands -
81
7
Druk bij het eindpunt van de scène op de
OK toets.
●
Het laatste beeld en de stoptijd van het geselecteerde
gedeelte verschijnen in het onderste venster.
●
Als u wilt annuleren, gaat u met de
…†
toetsen naar
Annul. en drukt u vervolgens op de OK toets.
8
Ga met de …† toetsen naar Toev. en druk
vervolgens op de OK toets.
● De sectie die u wilt toevoegen wordt ingevoegd
voor de scène die bij stap 4 is geselecteerd.
U voert instellingen in door stap 1 t/m 3 op pagina 78 te
volgen.
4
Druk op de …† œ √ toetsen om de scène
te selecteren die u wilt verwijderen.
Druk vervolgens op de OK toets.
5
Ga met de …† toetsen naar Wissen en
druk vervolgens op de OK toets.
Scène verwijderen
Scène binnen de Playlist kopiëren
Met de PLA
Met de PLA
Y
Y
LIST toets
LIST toets
1
Druk in de stopstand op de knop PLAY LIST.
Het scherm Playlist bewerken wordt getoond.
Met de MENU toets
● Druk in de stopstand op de knop MENU.
● Ga met de …† toetsen naar Playlist en druk
vervolgens op de OK of √ toets.
● Ga met de …† toetsen naar Playlist bewerken en
druk vervolgens op de OK of √ toets.
2
Druk op de …† toetsen om de scène uit de
Playlist te selecteren die u wilt bewerken.
Druk vervolgens op de OK of √ toets.
Het menu Playlist bewerken wordt getoond: Afspelen,
Hernoemen, Wijzig Scène, Kopiëren, Wissen.
3
Ga met de …† toetsen naar Kopiëren en
druk vervolgens op de OK toets.
De geselecteerde playlist wordt gekopieerd.
Bewerken
RETURNOKVERPL. EINDE
Scène Toevoegen
DVD-RAM(VR)
Sclence
23/JAN/2005 06:43
00:00:35
Begin
Einde
Toev.
Annul.
Scènenr. 004
Begin 00:00:15
Einde 00:00:35
RETURNOKVERPL. EINDE
Wijzig Scène
DVD-RAM(VR)
Scènenr. 4/8 Playlistnr. 3
Afspelen
wijzig
Verpl.
Toev.
Wissen
01 00:00:26 02 00:00:07 03 00:00:04
04 00:00:15
RETURNOKVERPL. EINDE
Wijzig Scène
DVD-RAM(VR)
Scènenr. 2/6 Playlistnr. 3
Afspelen
wijzig
Verpl.
Toev.
Wissen
01 00:00:26 02 00:00:07 03 00:00:04
04 00:00:15
RETURNOKVERPL. EINDE
Wijzig Scène
DVD-RAM(VR)
Scènenr. 2/6 Playlistnr. 3
Afspelen
wijzig
Verpl.
Toev.
Wissen
01 00:00:26 02 00:00:07 03 00:00:04
04 00:00:00
RETURNOKVERPL. EINDE
Playlist Bewerken
DVD-RAM(VR)
Nr. Titel Lengte
Wijzig
Science
7 scènes
23/JAN/2005 06:43
01 Science 00:00:17
√√
02 Sky 00:00:06
√√
03 Dolphin 00:00:06
√√
04 Natural 00:00:37
√√
RETURNOKVERPL. EINDE
Playlist Bewerken
DVD-RAM(VR)
Nr. Titel Lengte
Wijzig
Dolphin
7 scènes
23/JAN/2005 06:43
01 Science 00:00:17
√√
02 Sky 00:00:06
√√
03 Dolphin 00:00:06
√√
04 Natural 00:00:37
√√
05 Dolphin 00:00:06
√√
RETURNOKVERPL. EINDE
Playlist Bewerken
DVD-RAM(VR)
Nr. Titel Lengte
Wijzig
Dolphin
7 scènes
23/JAN/2005 06:43
01 Science 00:00:17
√√
02 Sky 00:00:06
√√
03 Dolphin 00:00:06
√√
04 Natural 00:00:37
√√
Afspelen
Hernoemen
Wijzig Scène
Kopiëren
Wissen
RETURNOKVERPL. EINDE
Playlist Bewerken
DVD-RAM(VR)
Nr. Titel Lengte
Wijzig
Dolphin
7 scènes
23/JAN/2005 06:43
01 Science 00:00:17
√√
02 Sky 00:00:06
√√
03 Dolphin 00:00:06
√√
04 Natural 00:00:37
√√
Afspelen
Hernoemen
Wijzig Scène
Kopiëren
Wissen
06 00:00:0405 00:00:11
05 00:00:11 06 00:00:00
05 00:00:11 06 00:00:04
Titellijst: 1/6
00842C-R125-60~94-NL 6/14/05 6:02 PM Page 81

82
- Nederlands
Bewerken
3
Ga met de …† toetsen naar Wissen en
druk vervolgens op de OK toets.
● U wordt nu gevraagd om de verwijdering te
bevestigen: “Wilt u dit echt verwijderen?”
4
Druk op de œ √ toetsen om Ja te
selecteren en druk vervolgens op de OK
toets.
U keert automatisch terug naar het scherm Playlist
bewerken (Edit Playlist) nadat het verwijderen is
beëindigd.
Scène uit de Playlist verwijderen
Met de toets PLA
Met de toets PLA
Y
Y
LIST
LIST
1
Druk in de stopstand op de knop PLAY LIST.
Het scherm Bewerken Playlist wordt getoond.
Met de MENU toets
● Druk in de stopstand op de knop MENU.
● Ga met de …† toetsen naar Playlist en druk
vervolgens op de OK of √ toets.
● Ga met de …† toetsen naar Playlist bewerken en
druk vervolgens op de OK of √ toets.
2
Druk op de knoppen …† om de titel te
selecteren die u van de playlist wilt
verwijderen, druk dan op de knop OK of √.
Het menu Playlist bewerken wordt getoond: Afspelen,
Hernoemen, Wijzig Scène, Kopiëren, Wissen
■
U kunt tot 999 scènes opnemen op één
schijf. In sommige gevallen wijkt dit af van
het werkelijke aantal.
■
Druk op de knop MENU nadat de bewerking
is voltooid. Het scherm Playlist bewerken
verdwijnt.
NB
RETURNOKVERPL. EINDE
Playlist Bewerken
DVD-RAM(VR)
Nr. Titel Lengte
Wijzig
Science
7 scènes
23/JAN/2005 06:43
01 Science 00:00:17
√√
02 Sky 00:00:06
√√
03 Dolphin 00:00:06
√√
04 Natural 00:00:37
√√
05 Dolphin 00:00:06
√√
RETURNOKVERPL. EINDE
Playlist Bewerken
DVD-RAM(VR)
Nr. Titel Lengte
Wijzig
Dolphin
7 scènes
23/JAN/2005 06:43
01 Science 00:00:17
√√
02 Sky 00:00:06
√√
03 Dolphin 00:00:06
√√
04 Natural 00:00:37
√√
05 Dolphin 00:00:06
√√
Afspelen
Hernoemen
Wijzig Scène
Kopiëren
Wissen
RETURNOKVERPL. EINDE
Playlist Bewerken
DVD-RAM(VR)
Nr. Titel Lengte
Wijzig
Natural
7 scènes
23/JAN/2005 06:43
01 Science 00:00:17
√√
02 Sky 00:00:06
√√
03 Dolphin 00:00:06
√√
04 Natural 00:00:37
√√
RETURNOKVERPL. EINDE
Playlist Bewerken
DVD-RAM(VR)
Nr. Titel Lengte
Wijzig
Dolphin
7 scènes
23/JAN/2005 06:43
01 Science 00:00:17
√√
02 Sky 00:00:06
√√
03 Dolphin 00:00:06
√√
04 Natural 00:00:37
√√
05 Dolphin 00:00:06
√√
Afspelen
Hernoemen
Wijzig Scène
Kopiëren
Wissen
RETURNOKVERPL. EINDE
Playlist Bewerken
DVD-RAM(VR)
Dolphin
7 scènes
23/JAN/2005 06:43
Wilt u dit echt verwijderen?
NeeJa
RETURNOKVERPL. EINDE
Playlist Bewerken
DVD-RAM(VR)
Dolphin
7 scènes
23/JAN/2005 06:43
Bezig met verwijderen...
(even geduld aub)
00842C-R125-60~94-NL 6/14/05 6:02 PM Page 82

Nederlands -
83
4
Geef de gewenste tekens in met behulp
van de …† œ √ toetsen.
● Deze functie is dezelfde als de functie Hernoemen
bij het hernoemen van de titelijst (zie pagina 71).
● Er kunnen maximaal 31 tekens worden
ingevoerd. Deze kunnen worden weergegeven
met behulp van de knop INFO.
5
Ga met de …† œ √ toetsen naar Opslaan
en druk op de OK toets.
De schijf heeft nu de ingetoetste naam.
Naam van de schijf wijzigen
Volg de onderstaande aanwijzingen op om de schijf een
andere naam te geven.
1
Druk in de stopstand op de knop MENU.
2
Ga met de …† toetsen naar Schijfbeheer
en druk vervolgens op de OK of √ toets.
3
Ga met de …† toetsen naar Schijfnaam
en druk vervolgens op de OK of √ toets.
Het scherm Bewerken Name wordt getoond.
Schijfbeheer
■
Soms is het noodzakelijk om de
schijfbeveiliging te verwijderen voordat u
gaat bewerken.
■
Afhankelijk van het type schijf kan het
scherm er enigszins anders uit zien.
NB
Bewerken
RETURNOKVERPL. EINDE
Schijfnavigatie
DVD-RAM(VR)
Titellijst
√√
DivX
√√
Foto
√√
Muziek
√√
RETURNOKVERPL. EINDE
Schijfbeheer
DVD-RAM(VR)
Schijfnaam :
√√
Schijfbeveiliging : Niet Beveiligd
√√
Schijfindeling
√√
Alle Titellijsten Verwijderen
√√
Schijfnavigatie
Playlist
Schijfbeheer
Programma
Setup
Schijfnavigatie
Playlist
Schijfbeheer
Programma
Setup
RETURNOKVERPL. EINDE
Schijfbeheer
DVD-RAM(VR)
Schijfnaam : Disc
√√
Schijfbeveiliging : Niet Beveiligd
√√
Schijfindeling
√√
Alle Titellijsten Verwijderen
√√
Schijfnavigatie
Playlist
Schijfbeheer
Programma
Setup
ABCDE ab c de
f
g
hi j
klmno
pq
rst
u
z
nwxy
FGH IJ
KLMNO
PQRST
UVWXY
Z
Back Space Space Delete Clear Save
RETURNOKVERPL. EINDE
Hernoemen
DVD-RAM(VR)
BA C D E
GF H I J
LK
M
N O
QP R S T
VU
W
X Y
Z
Backspace
ba c d e
gf h i j
lk
m
n o
qp r s t
vu
w
x
y
z
Spatie
21 3 4 5
76 8 9 0
-
-
+ =
.
!
~
@
# $
^
%
&
( )
Verwijd.
Wissen
Opslaan
ABCDE ab c de
f
g
hi j
klmno
pq
rst
u
z
nwxy
FGH IJ
KLMNO
PQRST
UVWXY
Z
Back Space Space Delete Clear Save
RETURNOKVERPL. EINDE
Hernoemen
DVD-RAM(VR)
BA C D E
GF H I J
LK
M
N O
QP R S T
VU
W
X Y
Z
Backspace
ba c d e
gf h i j
lk
m
n o
qp r s t
vu
w
x y
z
Spatie
21 3 4 5
76 8 9 0
-
-
+ =
.
!
~
@
# $
^
%
&
( )
Verwijd.
Wissen
Opslaan
Disc
00842C-R125-60~94-NL 6/14/05 6:02 PM Page 83

84
- Nederlands
Bewerken
Schrijf beveiliging
Met de schrijfbeveiliging kunt u de inhoud van uw schijven
beveiliging tegen onbedoeld wissen of formatteren.
1
Druk in de stopstand op de knop MENU.
2
Druk op de …† toetsen om Schijfbeheer te
selecteren en durk op OK of op de knop √.
3
Druk op de …† toetsen om Schijfnaam te
selecteren en durk op OK of op de knop √.
4
Druk op de OK of de √ toets en vervolgens
op de …† toets om Beveiligd te
selecteren.
Schijf formatteren
Gebruik deze instructies om een schijf in te delen.
De schijfbeveiliging moet ook worden gewist.
1
Druk in de stopstand op de knop MENU.
2
Druk op de …† toetsen om Schijfbeheer te
selecteren
en durk op OK of op de knop √.
3
Druk op de …† toetsen om Schijfindeling
te selecteren
en durk op OK of op de knop √.
DVD-RAM
● U wordt nu gevraagd om het formatteren te
bevestigen: “Wilt u deze schijf formatteren?”
● U moet deze actie nogmaals bevestigen:
“Alle gegevens worden verwijderd. Wilt u doorgaan?”
RETURNOKVERPL. EINDE
Schijfnavigatie
DVD-RAM(VR)
Titellijst
√√
DivX
√√
Foto
√√
Muziek
√√
Schijfnavigatie
Playlist
Schijfbeheer
Programma
Setup
RETURNOKVERPL. EINDE
Schijfbeheer
DVD-RAM(VR)
Schijfnaam :
√√
Schijfbeveiliging : Niet Beveiligd
√√
Schijfindeling
√√
Alle Titellijsten Verwijderen
√√
Schijfnavigatie
Playlist
Schijfbeheer
Programma
Setup
RETURNOKVERPL. EINDE
Schijfnavigatie
DVD-RAM(VR)
Titellijst
√√
DivX
√√
Foto
√√
Muziek
√√
Schijfnavigatie
Playlist
Schijfbeheer
Programma
Setup
RETURNOKVERPL. EINDE
Schijfbeheer
DVD-RAM(VR)
Schijfnaam :
√√
Schijfbeveiliging : Niet Beveiligd
√√
Schijfindeling
√√
Alle Titellijsten Verwijderen
√√
Schijfnavigatie
Playlist
Schijfbeheer
Programma
Setup
RETURNOKVERPL. EINDE
Schijfbeheer
DVD-RAM(VR)
Schijfnaam :
√√
Schijfbeveiliging : Niet Beveiligd
√√
Schijfindeling
√√
Alle Titellijsten Verwijderen
√√
Schijfnavigatie
Playlist
Schijfbeheer
Programma
Setup
RETURNOKVERPL. EINDE
Schijfbeheer
DVD-RAM(VR)
Schijfnaam :
√√
Schijfbeveiliging : Beveiligd
√√
Schijfindeling
√√
Alle Titellijsten Verwijderen
√√
Schijfnavigatie
Playlist
Schijfbeheer
Programma
Setup
RETURNOKVERPL. EINDE
Schijfbeheer
DVD-RAM(VR)
Schijfnaam :
√√
Schijfbeveiliging : Niet Beveiligd
√√
Schijfindeling
√√
Alle Titellijsten Verwijderen
√√
Schijfnavigatie
Playlist
Schijfbeheer
Programma
Setup
Niet Beveiligd
Beveiligd
RETURNOKVERPL. EINDE
Schijfbeheer
DVD-RAM(VR)
Schijfnaam :
√√
Schijfbeveiliging : Niet Beveiligd
√√
Schijfindeling
√√
Alle Titellijsten Verwijderen
√√
Schijfnavigatie
Playlist
Schijfbeheer
Programma
Setup
Wilt u deze schijf formatteren?
Ja Nee
00842C-R125-60~94-NL 6/14/05 6:02 PM Page 84

Nederlands -
85
2
Druk op de …† toetsen om Schijfbeheer
te selecteren.
Druk vervolgens op de OK of √ toets.
3
Druk op de …† toets om Alle Titellijsten
Verwijderen te selecteren
en durk op OK of
op de knop √.
● Ter bevestiging krijgt u de vraag:
“Wilt u alle titellijsten verwijderen?”
● Wanneer er vergrendelde items aanwezig zijn, werkt
de functie Alle titellijsten verwijderen niet.
Ook als er een titel is die een stilstaand beeld bevat,
werkt de functie niet.
Als u een vergrendeld item wilt verwijderen, moet
u eerst de vergrendeling uitzetten.
4
Druk op de œ √ toetsen om Ja te
selecteren
en durk op OK of op de knop √.
Alle Titellijsten worden verwijderd.
DVD-RW
● Beantwoord de volgende vraag:
‘Kies opname-indeling voor DVD-RW.’
4
Druk op de œ √ toetsen om Ja te
selecteren en druk vervolgens op de OK
toets. De schijf wordt nu geformatteerd
DVD-VR en DVD-V zijn schijfindelingen.
Alle Titellijsten verwijderen
1
Druk in de stopstand op de knop MENU.
DVD-VR DVD-V
DVD-RAM DVD-RW
DVD-RW DVD-R
SCHIJF
Bewerken
RETURNOKVERPL. EINDE
Schijfbeheer
DVD-RW(VR)
Schijfnaam :
√√
Schijfbeveiliging : Niet Beveiligd
√√
Schijfindeling
√√
Alle Titellijsten Verwijderen
√√
Alle Titellijsten Verwijderen
√√
Schijfnavigatie
Playlist
Schijfbeheer
Programma
Setup
Kies opname-indeling voor DVD-RW.
DVD-VR DVD-V
RETURNOKVERPL. EINDE
Schijfnavigatie
DVD-RAM(VR)
Titellijst
√√
DivX
√√
Foto
√√
Muziek
√√
RETURNOKVERPL. EINDE
Schijfbeheer
DVD-RAM(VR)
Schijfnaam :
√√
Schijfbeveiliging : Niet Beveiligd
√√
Schijfindeling
√√
Alle Titellijsten Verwijderen
√√
Schijfnavigatie
Playlist
Schijfbeheer
Programma
Setup
Schijfnavigatie
Playlist
Schijfbeheer
Programma
Setup
RETURNOKVERPL. EINDE
Schijfbeheer
DVD-RAM(VR)
Schijfnaam :
√√
Schijfbeveiliging : Niet Beveiligd
√√
Schijfindeling
√√
Alle Titellijsten Verwijderen
√√
Schijfnavigatie
Playlist
Schijfbeheer
Programma
Setup
RETURNOKVERPL. EINDE
Schijfbeheer
DVD-RAM(VR)
Schijfnaam :
√√
Schijfbeveiliging : Niet Beveiligd
√√
Schijfindeling
√√
Alle Titellijsten Verwijderen
√√
Schijfnavigatie
Playlist
Schijfbeheer
Programma
Setup
Wilt u alle titellijsten verwijderen?
Ja Nee
00842C-R125-60~94-NL 6/14/05 6:02 PM Page 85

86
- Nederlands
U krijgt nu de vraag: “Wilt u deze schijf afsluiten?”
Als u Ja selecteert, krijgt u de vraag: “Schijf wordt
afgesloten. Wilt u doorgaan?”
4
Druk op de œ √ toetsen om Ja te
selecteren en druk vervolgens op de OK
toets.
De schijf wordt nu afgesloten.
■
Wanneer een schijf eenmaal is afgesloten,
kunt u geen titels meer verwijderen.
■
Na afsluiten werkt een DVD-R/DVD-RW
(video stand) hetzelfde als een Video-DVD.
■
Afhankelijk van het type schijf, kan het
weergegeven scherm afwijken.
■
De tijd die het afsluiten kost, hangt onder
meer af van de hoeveelheid informatie op de
schijf.
■
De gegevens op de schijf worden
beschadigd als de recorder tijdens het
afsluiten wordt uitgeschakeld.
NB
Bewerken
Schijf afsluiten
Nadat u met uw DVD-recorder titels op een DVD-RW/DVD-
R schijf hebt opgenomen, moet de schijf nog worden
afgesloten voordat hij in andere DVD-spelers kan worden
weergegeven.
1
Druk in de stopstand op de knop MENU.
2
Druk op de …† toetsen om Schijfbeheer
te selecteren en druk vervolgens op de OK
of √ toets.
3
Druk op de …† toets om Schijf Afsluiten te
selecteren
en durk op OK of op de knop √.
RETURNOKVERPL. EINDE
Schijfnavigatie
DVD-RW(VR)
Titellijst
√√
DivX
√√
Foto
√√
Muziek
√√
Schijfnavigatie
Playlist
Schijfbeheer
Programma
Setup
RETURNOKVERPL. EINDE
Schijfbeheer
DVD-RW(VR)
Schijfnaam :
√√
Schijfbeveiliging : Niet Beveiligd
√√
Schijfindeling : DVD-VR
√√
Schijf Afsluiten
√√
Alle Titellijsten Verwijderen
√√
Schijfnavigatie
Playlist
Schijfbeheer
Programma
Setup
RETURNOKVERPL. EINDE
Schijfbeheer
DVD-RW(VR)
Schijfnaam :
√√
Schijfbeveiliging : Niet Beveiligd
√√
Schijfindeling : DVD-VR
√√
Schijf Afsluiten
√√
Alle Titellijsten Verwijderen
√√
Schijfnavigatie
Playlist
Schijfbeheer
Programma
Setup
RETURNOKVERPL. EINDE
Schijfbeheer
DVD-R(V)
Schijfnaam :
√√
Schijfbeveiliging : Niet Beveiligd
√√
Schijf Afsluiten
√√
Alle Titellijsten Verwijderen
√√
Schijfnavigatie
Schijfbeheer
Programma
Setup
RETURNOKVERPL. EINDE
Schijfbeheer
DVD-RW(VR)
Schijfnaam :
√√
Schijfbeveiliging : Niet Beveiligd
√√
Schijfindeling : DVD-VR
√√
Schijf Afsluiten
√√
Alle Titellijsten Verwijderen
√√
Schijfnavigatie
Playlist
Schijfbeheer
Programma
Setup
RETURNOKVERPL. EINDE
Schijfbeheer
DVD-R(V)
Schijfnaam :
√√
Schijfbeveiliging : Niet Beveiligd
√√
Schijf Afsluiten
√√
Alle Titellijsten Verwijderen
√√
Schijfnavigatie
Schijfbeheer
Programma
Setup
Wilt u deze schijf afsluiten?
Ja Nee
Schijf wordt afgesloten.
Wilt u doorgaan?
Ja Nee
00842C-R125-60~94-NL 6/14/05 6:02 PM Page 86

Nederlands -
87
Afsluiten ongedaan maken
(Video of VR modus)
1
Druk in de stopstand op de knop MENU.
2
Druk op de …† toetsen om Schijfbeheer
te selecteren en druk vervolgens op de OK
of √ toets.
3
Druk op de …† toets om Afsluiten Schijf
Ongedaan Maken te selecteren en druk
vervolgens op de OK of √ toets.
U krijgt nu de vraag: “Afsluiten schijf ongedaan
maken?”
Als u Ja selecteert, krijgt u de vraag: “Afsluiten schijf
wordt ongdaan gemaakt. Wilt u doorgaan?”
Bewerken
4
Druk op de œ √ toetsen om Ja te
selecteren en druk vervolgens op de OK
toets.
Het afsluiten wordt ongedaan gemaakt.
■
Een DVD-RW kan worden afgesloten en de
afsluiting kan ongedaan worden gemaakt in
de Video stand.
■
Een DVD-RW kan worden afgesloten en de
afsluiting kan ongedaan worden gemaakt in
de VR stand.
NB
Afgesloten Afsluiten ongedaan gemaakt
Type DVD-Video (RW) DVD-RW(V)
Bewerking Gelijk aan DVD-Video
Opnamen toevoegen, beveiliging
en verwijderen mogelijk
Afgesloten Afsl. ongedaan gemaakt
Type DVD-RW (VR:F) DVD-RW (VR)
Opnamen toevoegen, Opnamen toevoegen,
Bewerking verwijderen, bewerken en verwijderen, bewerken en
beveiliging niet mogelijk. beveiliging mogelijk.
RETURNOKVERPL. EINDE
Schijfnavigatie
DVD-RW(VR:F)
Titellijst
√√
DivX
√√
Foto
√√
Muziek
√√
Schijfnavigatie
Playlist
Schijfbeheer
Programma
Setup
RETURNOKVERPL. EINDE
Schijfbeheer
DVD-RW(VR:F)
Schijfnaam :
√√
Schijfindeling : DVD-VR
√√
Afsluiten Schijf Ongedaan Maken
√√
Schijfnavigatie
Playlist
Schijfbeheer
Programma
Setup
RETURNOKVERPL. EINDE
Schijfbeheer
DVD-RW(VR:F)
Schijfnaam :
√√
Schijfindeling : DVD-VR
√√
Afsluiten Schijf Ongedaan Maken
√√
Schijfnavigatie
Playlist
Schijfbeheer
Programma
Setup
Afsluiten schijf ongedaan maken?
Ja Nee
RETURNOKVERPL. EINDE
Schijfbeheer
DVD-RW(VR:F)
Schijfnaam :
√√
Schijfindeling : DVD-VR
√√
Afsluiten Schijf Ongedaan Maken
√√
Schijfnavigatie
Playlist
Schijfbeheer
Programma
Setup
Afsluiten schijf wordt ongedaan gemaakt.
Wilt u doorgaan?
Ja Nee
00842C-R125-60~94-NL 6/14/05 6:02 PM Page 87

U kunt alleen opnemen wanneer er een
DVD-RAM/DVD-RW/DVD-R schijf met
voldoende vrije ruimte in de lade zit.
Ook als een programma een
kopieerbeveiliging heeft, kan het niet
worden opgenomen.
Check 1
U heeft op de REC toets gedrukt, maar er gebeurt niets.
88
- Nederlands
Als u een probleem hebt met dit product, neem dan de
onderstaande checklist door voordat u contact opneemt
met een geautoriseerd service center van Samsung.
Aanzetten
Opnemen
Aanvullende
Informatie
Problemen oplossen
Problemen oplossen.........................................88
Specificaties......................................................92
De initialisatie van de DVD-recorder
neemt enige tijd in beslag. Het
ingangssignaal wordt ongeveer 10
seconden lang weergegeven.
Check 1
Controleer of de stekker goed in het
stopcontact zit.
Heeft u de zenders van de DVD-recorder
goed ingesteld?
Controleer hoeveel ruimte er vrij is op de
DVD-RAM/DVD-RW/DVD-R schijf.
Check 1
Check 2
Check 3
Het ingangssignaal wordt enige tijd weergegeven
wanneer de recorder wordt aangezet.
Ik kan geen tv-programma’s opnemen.
Aanvullende informatie
00842C-R125-60~94-NL 6/14/05 6:03 PM Page 88

Nederlands -
89
Afspelen
Controleer of de schijf goed in de lade zit
(etiket boven).
Controleer de regiocode van de DVD-
schijf.
Deze DVD-recorder kan bepaalde
schijftypes niet afspelen
(zie pagina 52).
Check 1
Check 2
Check 3
Ik kan de schijf niet afspelen.
U kunt deze bewerking of functie om een
van de volgende redenen niet gebruiken:
(1) De DVD-schijf staat dit niet toe.
(2) De DVD-schijf ondersteunt deze optie
niet (voorbeeld: beeldhoek).
(3) De optie is momenteel niet
beschikbaar.
(4) De titel, het hoofdstuk of het tijdstip dat
u probeert weer te geven staat niet op
de DVD.
Check 1
symbool verschijnt op het scherm.
De schijf ondersteunt niet alle ingestelde
functies. In dat geval kan het voorkomen
dat bepaalde instellingen niet goed
werken.
Check 1
Tijdens weergave zie ik andere instellingen dan die ik
heb gekozen in het menu Instellingen.
DVD-schijven hebben vaste
beeldverhoudingen (zie pagina 36~37).
Check 1
Ik kan de beeldverhoudingen niet wijzigen.
Er kunnen alleen andere beeldhoeken
worden gekozen wanneer het
beeldmateriaal op de schijf is opgenomen
met verschillende camerastandpunten.
Check 1
Ik kan geen beeldhoeken kiezen wanneer ik een DVD
afspeel.
De aanwezigheid van een bepaalde taal
hangt af van de schijf. Alleen de talen die
werkelijk op de DVD staan worden
getoond in het schijfmenu.
Check 1
De geselecteerde taal (geluid en/of ondertiteling) wordt
niet weergegeven.
Aanvullende informatie
Beeld
Zorg ervoor dat de video-instelling correct
is ingesteld (zie pagina 34~37).
Controleer of de schijf is beschadigd of
verontreinigd.
Sommige schijven doen het niet goed
vanwege hun lage kwaliteit.
Bij beeldwisselingen van donker naar licht
kan het scherm even verticaal in trilling
komen. Dit is geen storing.
Check 1
Check 2
Check 3
Check 4
De schijf draait, maar er is geen beeld of het beeld is
van slechte kwaliteit.
00842C-R125-60~94-NL 6/14/05 6:03 PM Page 89

90
- Nederlands
Geluid
Check 1
Check 2
Check 3
Check 4
Geen geluid.
Staat de recorder op vertraagde of versnelde
weergave? Er is alleen geluid wanneer het
programma op de normale snelheid wordt
afgespeeld.
Controleer de aansluitingen en instellingen.
(zie pagina’s 20~21, 33~34).
Controleer of de schijf beschadigd is.
Zo nodig de schijf reinigen.
Controleer of de schijf goed in de lade zit
(etiket boven).
Check 1
Geen geluidssignaal op de uitgangen.
Controleer of u in het menu Geluid -
Uitvoer de correcte instellingen hebt
gekozen voor de digitale uitgang
(zie pagina 33~34).
Aanvullende informatie
Kijk de opnametijden (begin en einde) nog
eens goed na.
Het opnemen wordt geannuleerd als de
stroomvoorziening wordt onderbroken
vanwege een stroomstoring of een
andere vergelijkbare reden.
Check 1
Check 2
Timer-opname werkt niet goed.
Timer-opname
Controleer of de schijf voldoende vrije
ruimte heeft.
Controleer of de huidige schijf
opneembaar (recordable) is.
Let op dat u dit controleert voordat de
opname wordt gestart.
Check 1
Check 2
Timerlampje knippert.
HDMI
Controleer of HDMI voor de video-
uitgang is ingeschakeld.
Controleer de aansluiting tussen de TV
en de HDMI-aansluiting van de DVD-
recorder.
Controleer of uw TV deze
576p/720p/1080i-DVD-recorder
ondersteunt.
Check 1
Check 2
Check 3
Er is geen HDMI-uitvoer.
Check 1
Abnormaal HDMI-uitvoerscherm.
Als er sneeuw te zien is op het scherm,
betekent dit dat de TV geen HDCP
(High-bandwidth Digital Content
Protection) ondersteunt.
00842C-R125-60~94-NL 6/14/05 6:03 PM Page 90

Nederlands -
91
Afstandsbediening
Zoek in de inhoudsopgave van deze
gebruiksaanwijzing een hoofdstuk op
waarin uw probleem wordt behandeld en
volg de daar vermelde aanwijzingen op.
Zet uw DVD-recorder uit en weer aan.
Als het probleem blijft bestaan, neem dan
contact op met een Samsung service
center in de buurt.
Check 1
Check 2
Check 3
Overige problemen.
Richt de afstandsbediening op de sensor
van uw DVD-recorder. Ga niet te ver van
de recorder vandaan. Verwijder eventuele
hindernissen tussen de recorder en de
afstandsbediening.
Controleer of de batterijen leeg zijn.
Druk op de TV/DVD keuzetoets.
Check 1
Check 2
Check 3
De afstandsbediening werkt niet.
Een opgenomen schijf kan alleen worden
afgespeeld met de ondertiteling en het
geluid dat is gekozen tijdens de opname.
Check 1
Kunnen er andere ondertitels en een ander geluids-
spoor worden gekozen op een opgenomen schijf?
Overige
Druk minstens 5 seconden op de knop
op het voorpaneel van de recorder
zonder dat er een schijf is geplaatst. Alle
instellingen, waaronder ook de
toegangscode, staan nu weer op de
fabrieksinstellingen. Doe dit alleen als het
echt niet anders kan.
(NB Deze functie is alleen mogelijk
wanneer er geen schijf in de recorder zit.)
Check 1
Ik ben de toegangscode van het kinderslot vergeten.
Aanvullende informatie
Controleer of uw TV goed is ingesteld.
Trillingen van het beeld kunnen
optreden wanneer de beeldsnelheid
wordt omgezet van 50Hz naar 60Hz
voor 720p/1080i HDMI-uitvoer (High
Definition Multimedia Interface).
Zie de gebruiksaanwijzing van uw tv.
Check 1
Check 2
Check 3
HDMI-uitvoertrillingen
00842C-R125-60~94-NL 6/14/05 6:03 PM Page 91

92
- Nederlands
Specificaties
DVD
48/96 kHz
48 kHz
Type schijf
Analoge audio
Digitale audio
AUDIO-CD (CD-DA)
44,1 kHz
44,1 kHz
Audio uitvoer
Bij DVD schijven wordt een op 96 kHz opgenomen audiosignaal
geconverteerd en uitgevoerd op 48 kHz.
Aanvullende informatie
Aansluitwaarden
Energiegebruik
Gewicht
Afmetingen
Gebruikstemperatuur
Overige vereisten
Beeld
Geluid
DV ingang
Te ontvangen kanalen
Geluid
Beeld
Beeldcompressie
Geluidcompressie
Opnamekwaliteit
Frequentiebereik geluid
220-240 V AC, 50 Hz
35 Watt
2,9 kg
430mm(b) x 250mm(d) x 59mm(h)
+5°C tot +35°C
Waterpas opstellen tijdens gebruik. Luchtvochtigheid max. 75%
Composite video : 1,0 V p-p bij 75Ω belasting, negatieve synchronisatie
S-video invoer (Y: 1,0 V p-p, C: 0,286 V p-p bij 75Ω belasting)
Max. ingangsniveau: 2 Vrms
IEEE 1394 aansluiting, 4-polig
SECAM L, PAL B/G
Video: composite, Audio: analoog
Video: composite, RGB Audio: analoog
Analoge uitgangen x 2
Optische/coaxiale digitale geluiduitgangen
Video uitgang x 1
S-video uitgang x 1 (Y:1,0 V p-p, C:0,286 V p-p bij 75Ω belasting)
Componentuitgang x 1 (Y: 1,0Vp-p, Pb: 0,70Vp-p, Pr: 0,70Vp-p bij 75Ω belasting)
HDMI/DVI (576p, 720p, 1080i)
Video: composite, RGB Audio: analoog
MPEG-2
Dolby Digital 2 kanalen / 256 Kbps, MPEG-2
XP (circa 8 Mbps), SP (circa 4 Mbps), LP (circa 2 Mbps),
EP (ongeveer 1,2 Mbps of ongeveer 0,8 Mbps)
20 Hz - 20 kHz
Algemeen
Ingangen
Uitgangen
Opname
Scart-
aansluiting
AV1 (Scart TV)
AV2 (Scart Ext)
Scart-aansluiting
AV1 (Scart TV)
00842C-R125-60~94-NL 6/14/05 6:03 PM Page 92

Nederlands -
93
Aanvullende informatie
NEDERLAND BELGIË
Dit Samsung-product is gegarandeerd tegen fabricage- en/of materiaalfouten voor een periode van twaalf (12) maanden
gerekend vanaf de oorspronkelijke aankoopdatum, tenzij in de nationale of Europese
wet- of regelgeving een andere garantieperiode is vastgesteld.
Indien aanspraak wordt gemaakt op een reparatie onder garantie, dient u het product te retourneren aan de winkelier waar u
het product gekocht heeft.
Erkende dealers van Samsung danwel door Samsung erkende servicecentra in West-Europese Ianden zullen eveneens
garantie verlenen, echter op de voorwaarden die van toepassing zijn in het betreffende land. Ingeval van problemen kunt u
nadere informatie verkrijgen via de Samsung service- en informatielijn:
Voor Nederland: tel. 0900-2020088 (10 cpm)
Voor België: tel. 02/201.24.18
■ GARANTIECONDITIES
1. De garantie is alleen geldig wanneer de garantiekaart volledig is ingevuld en samen met de originele aankoopbon of -
bevestiging waarop duidelijk het serienummer vermeld staat, wordt overlegd.
2. Samsungs verplichtingen beperken zich tot reparatie of, indien nodig en na haar beoordeling, tot het vervangen van het
product of het defecte onderdeel.
3. Reparaties onder garantie moeten door Samsung erkende service-centra worden uitgevoerd.
Er zal geen vergoeding plaatsvinden voor reparaties uitgevoerd door niet erkende Samsung dealers of niet erkende
servicecentra. Alle daaruit voortvloeiende schades vallen niet onder deze garantie.
4. Aanpassingen aan het product die noodzakelijk zijn om te voldoen aan landelijke of plaatselijke technische of veiligheids-
voorschriften die gelden in enig land anders dan dat waarvoor het product oorspronkelijk is ontworpen en gefabriceerd,
worden niet beschouwd als voortvloeiende uit materiaal- of fabricagefouten.
5. Deze garantie dekt geen van de volgende zaken:
a) Periodieke controles, onderhoud en reparatie of vervanging van onderdelen veroorzaakt door normaal gebruik en slijtage.
Hierbij dient vermeld te worden dat bij alle beeldbuizen, ongeacht het fabrikaat, de helderheid met het verstrijken van de
tijd afneemt.
b) Kosten verbonden aan transport, verwijdering of installatie van het product.
c) Misbruik, inclusief het gebruik voor andere doeleinden dan waarvoor het product bestemd is, of onjuiste installatie.
d) Schade veroorzaakt door bliksem, water, vuur, overmacht, oorlog, rellen, aansluiting op onjuist voltage, onvoldoende
ventilatie, vallen, stoten, onoordeelkundig gebruik of enige andere oorzaak die buiten de controle van Samsung valt.
6. Deze garantie geldt voor iedereen die gedurende de garantieperiode legaal in het bezit is gekomen van het product.
7. De wettelijke rechten van de koper krachtens enigerlei van toepassing zijnde nationale wetgeving, hetzij jegens de verkoper
en voortvloeiend uit het koopcontract, hetzij anderszins, worden door deze garantie niet beïnvloed. Tenzij de nationale
wetgeving anders bepaalt, zijn de rechten voortvloeiend uit deze garantie de enige rechten van de koper, en kunnen
Samsung, haar dochtermaatschappijen en vertegen-woordigingen niet aansprakelijk worden gesteld voor indirect of
voortvloeiend verlies.
EUROPESE GARANTIE
LUXEMBOURG BELGIQUE
Cet appareil Samsung est couvert par une garantie de douze (12) mois - à moins qu’une autre période de garantie ne soit
fixée dans la législation ou réglementation nationale ou européenne - à partir de la date d’achat, pour des défauts de
fabrication et/ou matériaux utilisés. Pour revendiquer le droit de réparation sous garantie, vous devez retourner l’appareil chez
le revendeur où vous l’avez acheté. Les revendeurs officiels de la marque Samsung, ainsi que les centres de services
reconnus par Samsung en Europe de l’Ouest reconnaissent également votre droit de garantie, mais uniquement aux
conditions valables dans le pays en question. En cas de problèmes vous pouvez contacter le numéro de service de Samsung
suivant :
Pour la Belgique : tel. 02/201.24.18
Pour le Luxembourg : tel. 0261 03710
■ CONDITIONS DE GARANTIE
1. La garantie est uniqueement valable quand la carte de garantie – dûment remplie – est remise avec le bon d’achat officiel,
mentionnant le numéro de série de l’appareil.
2. Les obligations de Samsung sont limitées à la réparation ou à son approbation, le remplacement de l’appareil ou de la
pièce en panne.
3. Les réparations sous garantie doivent être exécutées dans les centres de service reconnus par Samsung. Aucune
indemnité ne sera allouée pour des réparations exécutéees par des revendeurs ou centres de service non reconnus par
Samsung. Chaque endommagement qui en résulte n’est pas couvert par cette garantie.
4. Les adaptations nécessaires pour répondre aux normes techniques ou aux normes de sécurité locales ou nationales, autres
que pour le pays pour lequel l’appareil a été originalement développé, ne sont pas considérés comme des défauts de
fabrication ou de matériel.
5. La garantie ne couvre pas les points suivants :
a) Les contrôles périodiques, l’entretien et la réparation ou le remplacement des pièces causés par une utilisation normale
et par l’usure normale.
b) Tous les frais de transport, l’enlèvement ou l’installation du produit.
c) La mauvaise utilisation, y compris l’utilisation du produit pour des buts, autres que pour lequel il a été conçu, et la
mauvaise installation.
d) Tous les endommagements causés par éclair, eau, feu, force majeure, guerre, émeutes, connexion au mauvais voltage,
insuffisamment de ventilation, chute, coups, utilisation non judicieuse, ou toute autre cause imprévisible par Samsung.
6. Cette garantie est valable pour l’acheteur qui a obtenu l’appareil d’une façon légale pendant la période de garantie.
7. Les droits légitimes de l’acheteur, en vertu d’une législation nationale, soit à l’égard du vendeur et résultant du contrat de
vente, soit autrement, ne sont pas influencés par cette garantie. Amoins que la législation nationale le prescrit différemment,
les droits obtenus par cette garantie sont les seuls droits de l’acheteur: ni Samsung, ni ses fillales et ni ses distributeurs
exclusifs peuvent être rendus responsables pour des pertes indirectes ou pour des endommagements de disques, disques
compactes (CD), cassettes vidéo ou audio, ou tout autre appareil ou matériel s’y relatant.
GARANTIE EUROPÉENNE
00842C-R125-60~94-NL 6/14/05 6:03 PM Page 93

AK68-00842C-00
Nederlands
Correcte verwijdering van dit product
(elektrische & elektronische afvalapparatuur)
Dit merkteken op het product of het bijbehorende informatiemateriaal duidt erop dat het niet met ander huishoudelijk
afval verwijderd moet worden aan het einde van zijn gebruiksduur. Om mogelijke schade aan het milieu of de
menselijke gezondheid door ongecontroleerde afvalverwijdering te voorkomen, moet u dit product van andere soorten
afval scheiden en op een verantwoorde manier recyclen, zodat het duurzame hergebruik van materiaalbronnen wordt
bevorderd.
Huishoudelijke gebruikers moeten contact opnemen met de winkel waar ze dit product hebben gekocht of met de
gemeente waar ze wonen om te vernemen waar en hoe ze dit product milieuvriendelijk kunnen laten recyclen.
Zakelijke gebruikers moeten contact opnemen met hun leverancier en de algemene voorwaarden van de
koopovereenkomsten nalezen. Dit product moet niet worden gemengd met ander bedrijfsafval voor verwijdering.
00842C-R120-NL_Cover 6/14/05 6:00 PM Page 2

Manuel de l'utilisateur
DVD-R125
English Nederlands Français
AK68-00842C-00
00842C-R125-XEB-FRA-Cover 2005.6.14 8:21 PM Page 1

Avertissement
Premiers pas avec l’appareil
2
- Français
AFIN DE RÉDUIRE LE RISQUE DE CHOC ÉLECTRIQUE,
NE TENTEZ PAS DE RETIRER LE COUVERCLE (OU LE PANNEAU
ARRIÈRE). AUCUNE DES PIÈCES CONTENUES PAR CET
APPAREIL NE PEUT ÊTRE UTILE À L’UTILISATEUR. CONFIEZ LA
RÉPARATION DE VOTRE APPAREIL À DU PERSONNEL QUALIFIÉ.
Ce symbole indique la présence d’une
“tension dangereuse” à l’intérieur du
produit pouvant présenter un risque de choc
électrique ou de blessure.
Ce symbole indique des instructions
importantes relatives à ce produit.
N'installez pas cet appareil dans un espace confiné tel
qu’une bibliothèque, par exemple.
AVERTISSEMENT :
Afin d’éviter tout dommage
pouvant entraîner un incendie ou un
risque de choc électrique, n’exposez
pas cet appareil à la pluie ou à
l’humidité.
ATTENTION :
LES GRAVEURS DE DVD UTILISENT UN
FAISCEAU LASER INVISIBLE
SUSCEPTIBLES D'ENTRAÎNER UNE
EXPOSITION DANGEREUSE À DES
RADIATIONS. ASSUREZ-VOUS D’UTILISER
CE GRAVEUR CONFORMÉMENTAUX
INSTRUCTIONS.
ATTENTION :
CE PRODUIT UTILISE UN LASER. L’UTILISATION DE
COMMANDES OU DE RÉGLAGES OU L’EXÉCUTION DE
PROCÉDURES AUTRES QUE CELLES INDIQUÉES DANS
LE PRÉSENT MANUEL SONT SUSCEPTIBLE
D’ENTRAÎNER UN RISQUE GRAVE D’EXPOSITION AUX
RADIATIONS. N’OUVREZ PAS L'APPAREIL ET NE TENTEZ
PAS DE LE RÉPARER
VOUS-MÊME. CONFIEZ LA RÉPARATION DE VOTRE
APPAREIL À DU PERSONNEL QUALIFIÉ.
Ce produit est conforme aux réglementations CE
lorsque les câbles blindés et les connecteurs sont
utilisés pour relier l'appareil à un autre équipement.
Pour éviter les interférences électromagnétiques avec
des appareils électriques, tels que des radios et des
téléviseurs, utilisez des câbles blindés et des
connecteurs pour les branchements.
NOTE IMPORTANTE
La ligne d’alimentation de cet équipement contient une
prise avec un fusible. La valeur de ce fusible est indiqué
sur la fiche de la prise. Si celui-ci doit être remplacé, utilisez
un fusible du même ampérage approuvé par le BS1362.
Ne jamais utiliser la prise sans son couvercle si celle-ci est
détachable. Si vous devez remplacer le couvercle du
fusible, il doit être de la même couleur que la fiche de la
prise. Des couvercles de remplacement sont disponibles
chez votre revendeur.
Si le câble d’alimentation ne correspond pas à vos prises
de courant ou si le câble n’est pas assez long, vous
pouvez obtenir un adaptateur sécurisé ou consulter votre
revendeur.
Cependant, si vous n’arrivez pas à débrancher la prise,
enlevez le fusible pour utiliser la prise de façon sûre.
Ne pas connecter la fiche sur une prise de courant du fait
de risque de choc électrique dangergeux via le cordon.
Le produit qui accompagne ce manuel d’utilisateur
incorpore une technologie qui est protégée par les droits de
la propriété intellectuelle.
Cette licence est limitée à un usage privé. Aucun droit n’est
accordé pour un usage commercial. La licence ne couvre
aucun autre produit que celui-ci et n’est pas étendue à tout
autre produit vendu avec celui-ci conformément aux
normes ISO/IEC 11172-3 ou ISO/IEC 13818-3. La licence
ne couvre que l’usage du produit pour coder et/ou décoder
des fichiers audio conformément aux normes ISO/IEC
11172-3 ou ISO/IEC 13818-3. Aucun droit n’est accordé sur
cette licence pour des fonctionnalités qui ne sont pas
conformes aux normes ISO/IEC 11172-3 ou ISO/IEC
13818-3.
00842C-R125-XEB-FRA_02~17 2005.6.14 8:10 PM Page 2

Français -
3
Instructions importantes relatives à la sécurité
Lisez attentivement ces instructions avant d’utiliser l’appareil.
Suivez toutes les instructions relatives à la sécurité indiquées
ci-dessous. Conservez ces instructions à portée de main afin
de pouvoir vous y référer ultérieurement.
1) Lisez ces instructions.
2) Conservez ces instructions.
3) Tenez compte de tous les avertissements.
4) Suivez toutes les instructions.
5) N’utilisez pas cet appareil à proximité d’eau.
6) Nettoyez avec un chiffon sec exclusivement.
7) N’obstruez pas les orifices de ventilation et installez
l’appareil conformément aux instructions du fabricant.
8) N’installez pas l’appareil à proximité d’une source de
chaleur telle qu’un radiateur, un registre de chaleur, un
réchaud ou tout autre appareil (amplificateurs compris)
produisant de la chaleur.
9) Ne désactivez pas les dispositifs de sécurité des fiches
électriques polarisées ou reliées à la terre. Une prise
polarisée comporte deux lames, l’une étant plus large que
l’autre. Une prise reliée à la terre comporte deux lames ainsi
qu’une broche de mise à la terre. La lame large et la
troisième broche sont destinées à assurer votre sécurité : si
la fiche fournie ne s’adapte pas à votre prise murale,
consultez un électricien afin de faire remplacer la prise
obsolète.
10) Protégez le cordon d’alimentation : il ne doit pas être
piétiné ou pincé, notamment au niveau des fiches
électriques, des prises de courant et de l’endroit d’où il sort
de l’appareil.
11) N’utilisez que des accessoires agréés par le fabricant.
12) N’utilisez que le chariot, le support, le trépied, le dispositif
de fixation ou la table spécifiée par le fabricant ou vendue
avec l’appareil. En cas d’utilisation d’un chariot, soyez
prudent lorsque vous déplacez l’ensemble chariot/appareil
afin d’éviter qu’il ne blesse quelqu’un en tombant.
13) Débranchez cet appareil en cas d’orage ou lorsqu’il reste
inutilisé pendant une longue période de temps.
14) Confiez la réparation de votre appareil à du personnel
qualifié. Une réparation est nécessaire lorsque l’appareil a
été endommagé de quelque manière que ce soit : cordon
d’alimentation ou fiche électrique abîmés, liquide qui a été
renversé ou objets qui sont tombés dans l’appareil,
exposition de l’appareil à la pluie ou à l’humidité,
dysfonctionnement de l’appareil ou chute de l’appareil.
Précautions relatives à la manipulation
● Avant de raccorder d’autres composants à ce graveur,
assurez-vous qu’ils soient tous éteints.
● Ne déplacez pas l’appareil lorsqu’un disque est en train
d’être lu : le disque risquerait d’être rayé ou cassé et des
éléments internes du graveur risqueraient d’être
endommagés.
● Ne posez pas de vase rempli d’eau ou tout petit objet
métallique sur le graveur.
● Veillez à ne pas mettre vos doigts sur le plateau.
Premiers pas avec l’appareil
Précautions
● Ne posez rien d’autre qu’un disque sur le plateau.
● Des interférences extérieures (orage, électricité statique)
peuvent affecter le fonctionnement normal de ce graveur.
Dans ce cas, éteignez le graveur puis rallumez-le à l’aide du
bouton STANDBY/ON ou débranchez puis rebranchez le
cordon d’alimentation CA sur la prise murale CA.
Le graveur devrait alors fonctionner normalement.
● Veillez à retirer le disque et à éteindre l’appareil après
utilisation.
● Débranchez le cordon d’alimentation CA de la prise murale
lorsque vous ne pensez pas utiliser l’appareil pendant de
longues périodes de temps.
● Nettoyez le disque en l’essuyant en ligne droite de l’intérieur
vers l’extérieur.
Entretien du boîtier
Pour des raisons de sécurité, assurez-vous de
débrancher le cordon d’alimentation de la prise murale.
● N’utilisez pas de benzène, de diluant ou tout autre produit
solvant pour le nettoyage.
● Essuyez le boîtier avec un chiffon doux.
Manipulation du disque
● N’utilisez que des disques de
forme régulière. Si un disque
présente une forme irrégulière
(une forme particulière),
ce graveur de DVD risque d’être endommagé.
Comment tenir les disques ?
● Évitez de toucher la surface d'un
disque enregistré.
DVD-RAM, DVD-RW et DVD-R
● Nettoyez à l’aide d’un disque
DVD-RAM/PD en option
(LF-K200DCA1). N’utilisez
aucune lingette ou chiffon pour
CD pour nettoyer les disques
DVD-RAM/DVD-RW/DVD-R.
DVD-Video, Audio CD
● Enlevez la poussière ou les traces de salissure présentes
sur le disque à l’aide d’un chiffon doux.
Précautions relatives à la manipulation des disques
● N’écrivez pas sur la face imprimée avec un stylo-bille ou un
crayon à papier.
● N’utilisez pas de produits de nettoyage en aérosol ou
anti-statiques. En outre, n’utilisez aucun produit chimique
volatil (benzène ou diluant).
● Ne collez ni étiquettes, ni autocollants sur les disques .
(n’utilisez pas les disques fixés à l’aide de ruban adhésif ou
comportant des traces d'autocollants arrachés).
● N’utilisez pas de couvercles ou de protections contre les
rayures.
00842C-R125-XEB-FRA_02~17 2005.6.14 8:10 PM Page 3

● La taille maximum des fichiers JPEG progressifs est de 3M
pixels.
● MOTION JPEG n’est pas pris en charge.
● Utilisez des disques CD-R/RW de 700 Mo (80
minutes). Evitez dans la mesure du possible d’utiliser
des disques de 800 Mo (90 minutes) ou d'une capacité
supérieure car le lecteur pourrait ne pas les lire.
● Si le disque CD-R/RW n’a pas été enregistré en session
fermée, il pourra y avoir un décalage au début du temps de
lecture et les fichiers enregistrés risquent de ne pas tous
être lus.
● Certains disques CD-R/RW risquent de ne pas pouvoir être
lus dans cet appareil, selon l'appareil avec lequel ils ont été
gravés. S’agissant des contenus enregistrés sur des CD-
R/RW à partir de CD pour votre usage privé, la lisibilité peut
varier selon le contenu du disque.
● Disque : CD-R/RW, DVD-R/RW/RAM
● Le fichier et les extensions suivantes peuvent être
lus.: .avi, .divx, .AVI, .DIVX
● Format Codec MPEG4 : DivX 3.11, DivX 4.x, DivX
5.x, DivX-Pro (sans QPEL et GMC)
● Format audio disponible : “MP3”, “MPEG”, “WMA”,
“LPCM”, “AC3”
●
Formats de fichier sous-titre pris en charge : .smi, .srt,
.sub, .psb, .txt, .ass
Lecture et enregistrement de disques DVD-R
● Une fois qu'un enregistreur DVD est finalisé en mode
vidéo, il devient un DVD vidéo.
●
Vous pouvez enregistrer sur l’espace disponible du disque et
apporter des modifications telles que donner un titre aux disques et
aux programmes et effacer des programmes avant la finalisation.
●
Lorsque la programmation est effacée d’un DVD-R, cet espace ne
devient pas pour autant disponible. Une fois qu’une zone d’un
DVD-R a été enregistrée, cette zone n’est plus disponible pour
l’enregistrement, que l’enregistrement ait été effacé ou non.
●
Il faut environ 30 secondes à l’appareil pour finir l’enregistrement
des informations de gestion à la fin de l’enregistrement.
● Ce produit optimise les DVD-R pour chaque enregistrement.
L’optimisation est effectuée lorsque vous démarrez
l’enregistrement après avoir inséré le disque ou après avoir
allumé l’appareil. l’enregistrement sur le disque peut devenir
impossible si l’optimisation est effectuée trop souvent.
● La lecture peut être impossible dans certains cas en fonction
des conditions d’enregistrement.
● Cet appareil peut lire des disques DVD-R enregistrés et
finalisés avec un graveur de DVD vidéo Samsung. Il peut ne
pas pouvoir lire certains disques DVD-R selon le type de disque
et les conditions d’enregistrement.
Lecture et enregistrement de disques DVD-RW
● L'enregistrement et la lecture peuvent être réalisés sur des
disques DVD-RW dans les modes Vidéo et VR.
●
Une fois qu’un DVD-RW enregistré en mode VR ou Vidéo a été finalisé,
vous ne pouvez plus effectuer d’enregistrement supplémentaire.
● Une fois qu’un DVD-RW enregistré en mode vidéo est finalisé,
il devient un DVD-Vidéo.
●
Dans les deux modes, la lecture peut être effectuée avant et après
la finalisation, mais tout enregistrement supplémentaire, toute
suppression et toute modification sont impossibles après la
finalisation.
●
Si vous souhaitez enregistrer le disque en mode VR puis
l’enregistrer en mode V, assurez-vous d’exécuter la commande
4
- Français
●
N’utilisez pas de disques comportant des étiquettes imprimées
à l’aide des kits d’impression que l’on trouve sur le marché.
● Ne chargez pas de disques rayés ou fissurés.
Stockage du disque
Faites très attention à ne pas endommager le disque car les
données contenues sur ces disques sont très vulnérables à
l’environnement.
● N'exposez pas les disques à la lumière directe du soleil.
● Conservez-les dans un endroit frais et ventilé.
● Stockez-les verticalement.
● Conservez-les dans une pochette de protection propre.
● Si vous déplacez votre graveur de DVD d’un endroit froid à
un endroit chaud, de la condensation peut se former sur les
éléments de fonctionnement de la lentille et entraîner une
lecture anormale du disque. Dans ce cas, retirez le disque
et attendez une ou deux heures en laissant
l’appareil allumé avant d’essayer de relancer la lecture.
Spécifications du disque
DVD-Video
● Un digital versatile disc (DVD) peut contenir jusqu’à 135
minutes d’images et de son avec 8 langues et 32 langues
de sous-titres. Il prend en charge la compression
d’images MPEG-2 et le son Dolby 3D ambiophonique, ce
qui vous permet de profiter d’images vivantes et nettes de
qualité cinéma dans le confort de votre maison.
● Lorsque vous passez de la première à la deuxième couche
d’un disque DVD Vidéo à deux couches, une distorsion
passagère de l’image et du son peut survenir.
Ceci ne constitue pas un dysfonctionnement de l’appareil.
● Une fois qu’un DVD-R/RW enregistré en mode video est
finalisé, il devient un DVD-Vidéo.
CD audio
●
Un disque audio sur lequel un son 44.1kHz PCM est enregistré
● Lit les disques CD-R et CD-RW au format audio CD-DA.
Cet appareil peut ne pas parvenir à lire certains disques
CD-R et CD- RW selon les conditions d’enregistrement.
CD-R/RW
● Seuls les disques CD-R contenant des fichiers MP3
enregistrés aux formats ISO9660 ou JOLIET peuvent être lus.
● Seuls les fichiers MP3 dotés des extensions “.mp3”, “.MP3”
peuvent être utilisés.
● Pour les fichiers MP3 enregistrés avec un débit binaire
variable, de 32 Kbps à 320 Kbps, le son peut être coupé.
● La gamme de debits binaries pouvant être lus va de
56Kbps à 320Kbps.
● L’appareil peut prendre en charge un maximum de 1,000
fichiers et dossiers.
● Seuls les fichiers JPEG dotés de l’extension “.jpg”, “JPG”
peuvent être utilisés.
● L’appareil peut prendre en charge un maximum de 1,000
fichiers et dossiers.
MP3 CD-R/RW
JPEG CD-R/RW
Utilisation d’un CD-R/RW
Premiers pas avec l’appareil
Utilisation du disque MPEG4
00842C-R125-XEB-FRA_02~17 2005.6.14 8:10 PM Page 4

Français -
5
Formater. Faites attention lorsque vous exécutez la commande
Formater car toutes les données enregistrées risquent d’être
perdues.
● Un disque DVD-RW vierge est initialisé en mode VR lorsqu’il
est initialisé pour la première fois.
● DVD-RW (mode VR)
- C’est un format qui est utilisé pour l’enregistrement de
données sur un disque DVD-RAM ou DVD-RW.
Vous pouvez enregistrer plusieurs titres, modifier,
supprimer, supprimer partiellement, créer une liste
de lecture, etc.
- Un disque enregistré dans ce mode risqué de ne pas
pouvoir être lu par un lecteur DVD existant.
● DVD-RW (mode Vidéo)
-
C’est un format qui est utilisé pour l’enregistrement de
données sur un disque DVD-RW ou DVD-R. Le disque peut
être lu par un lecteur de DVD existant après avoir été
finalisé.
- Si un disque qui a été enregistré en mode Vidéo par un
graveur de marque différente sans être finalisé, il ne peut
être lu ou enregistré par ce graveur.
Lecture et enregistrement de disques DVD-RAM
● Assurez-vous que le mode enregistrement est réglé sur mode
VR. Sinon, ce produit sera incapable de lire l’enregistrement.
● Il est impossible de lire des DVD-RAM dans la plupart des
lecteurs de DVD à cause de problèmes de compatibilité.
● Seuls les DVD-RAM standard Version 2.0. peuvent être lus
dans cet appareil.
● Les DVD-RAM enregistrés sur cet appareil risquent de
ne pas fonctionner avec d'autres composants DVD. Pour
déterminer la compatibilité avec ces disques DVD-RAM,
reportez-vous au guide d'utilisation du lecteur.
● Dans le cas des disques DVD-RAM à cartouche, retirez la
cartouche et n'utilisez que le disque.
✻ L’utilisation de disques DVD-RAM, DVD-RW et DVD-R de
mauvaise qualité risque de provoquer ultérieurement des
problèmes inattendus comprenant, sans se limiter à, l’échec
de l’enregistrement, la perte des documents enregistrés ou
édités ou l’endommagement de l’enregistreur.
N’utilisez pas les disques suivants !
● Les disques LD, CD-G, CD-I, CD-ROM, DVD-ROM,
DVD+R et DVD+RW ne doivent pas être utilisés dans cet
appareil.
[Remarque]
Type de disques pouvant être lus avec cet appareil :
CD/CD-R/CD-RW/MP3/JPEG/DVD-Video/DVD-RAM/DVD-
RW/ DVD-R. Pour un disque DVD-R/DVD-RW, enregistré
en mode Vidéo sur un autre appareil, la lecture n'est
possible qu'après finalisation.
● Certains disques commerciaux et disques DVD achetés
hors de votre région risquent de ne pas pouvoir être lus par
ce produit. Lorsque ces disques sont lus, soit “No disc.” soit
“Please check the regional code.” s’affiche.
●
Si votre disque DVD-RW est une copie illégale ou n’est pas en
format vidéo DVD, il risque également de ne pas pouvoir être
lu.
❇ We recommend using one of the discs in the table
as they have been confirmed to be compatible
with this unit. Other discs may not perform
correctly.
● Nous ne saurons être tenus pour responsable et
n’indemniserons en aucun cas un quelconque échec de
l’enregistrement, une quelconque perte des documents
enregistrés ou édités et/ou un quelconque
endommagement de l’enregistreur dû à l’utilisation de
disques.
PROTECTION CONTRE LA COPIE
● De nombreux disques DVD sont encodés avec un système
de protection contre les copies. De ce fait, vous devriez
brancher votre graveur DVD directement sur votre
téléviseur et non sur un magnétoscope. Le brancher à un
magnétoscope peut entraîner une distorsion de l’image sur
les disques DVD protégés contre les copies.
● Ce produit contient une technologie de protection des droits
qui est protégée par des droits de méthodes de
certains brevets américains et par d’autres droits de
propriété intellectuelle détenus par Macrovision Corporation
et d’autres titulaires. L’utilisation de cette technologie de
protection des droits doit être autorisée par Macrovision et
est destiné uniquement à un usage privé et à d’autres
usages de diffusion limités sauf si autorisés par
Macrovision. La modification ou le démontage de cet
appareil est interdit.
Disque Nb maximum d’enregistrements par support
DVD-RAM 100,000
DVD-RW 1,000
DVD-R 1
Premiers pas avec l’appareil
Protection
Ce graveur de DVD vous permet de protéger le contenu de
vos disques, de la manière ci-dessous.
●
Protection par un programme : Lisez la page 72 “Verrouillage
(Protection) d'un titre”
●
Protection par un disque : Lisez la page 84 “Protection du disque”
✻ Les DVD-RAM/DVD-RW/DVD-R incompatibles avec le
format DVD-VIDEO ne peuvent être lus par cet appareil.
✻ Pour plus d'informations concernant la compatibilité
d'enregistrement des DVD, consultez votre fabricant de
DVD-RAM/DVD-RW/DVD-R.
Média Disque SPEED
TDK 4x
Beall 4x
DVD-R That’s 4x
Maxell 4x
Panasonic 4x
TDK 2x
Maxell 2x
DVD-RW Optodisc 2x
Radius 2x
Verbatim 2x
Maxell 3x
DVD-RAM
Fujifilm 3x
TDK 2x
Panasonic 3x
00842C-R125-XEB-FRA_02~17 2005.6.14 8:10 PM Page 5

6
- Français
Premiers pas avec l’appareil
Premiers pas avec l’appareil
Avertissement..................................................................2
Précautions......................................................................3
Instructions importantes relatives à la sécurité......................3
Précautions relatives à la manipulation .................................3
Entretien du boîtier..................................................................3
Manipulation du disque...........................................................3
Stockage du disque.................................................................4
Spécifications du disque .........................................................4
Caractéristiques générales ...........................................8
Avant de lire le manuel de l’utilisateur........................9
Comment utiliser le graveur DVD?..............................9
Déballage...................................................................11
Accessoires.......................................................................11
Préparation de la télécommande....................................11
Réglage de la télécommande .........................................11
Description................................................................13
Façade..............................................................................13
Affichage en façade ........................................................13
Panneau arrière................................................................14
Aperçu de la télécommande...........................................15
Connexion & Configuration
Connexion & Configuration
Présentation rapide .................................................16
Connexion de l'enregistreur DVD.........................17
Connexions supplémentaires................................17
Antenne + enregistreur DVD + boîtier du
décodeur externe + téléviseur...............................18
Autre type de connexion du câble de sortie vidéo....18
Cas 1 : Connexion à une prise de sortie
vidéo (composite)................................................19
Cas 2 : Connexion à une prise de sortie S-Vidéo.........19
Cas 3 : Prises de sortie Vidéo composant.....................20
Autre type de connexion du câble de sortie audio
.....20
Cas 1 : Connexion à votre téléviseur..............................20
Cas 2 : Connexion à un amplificateur stéréo au moyen
des prises de sortie AV...................................... 21
Cas 3 : Connexion à un amplificateur AV au moyen
d'une prise de sortie numérique .......................21
Raccordement d'un câble HDMI/DVI à un téléviseur
...22
Cas 1 : Raccordement à un téléviseur (prise HDMI).....22
Cas 2 : Raccordement à un téléviseur (prise DVI)....... 22
Connexion à la prise d'entrée AV3 IN, DV ...........23
Cas 1 : Connexion d'un magnétoscope, d'un terminal
utilisateur, d'un lecteur DVD ou d'un caméscope
aux prises AV3 IN (ENTREE AV3).....................23
Cas 2 : Connexion d'un caméscope à la prise d'entrée
DV IN...................................................................23
Installation du système
Installation du système
Navigation dans le menu à l’écran .......................24
Branchement et réglage automatique..................25
Réglage de l’horloge ...............................................26
Pré-réglage des canaux avec la fonction de
réglage automatique................................................27
Pré-réglage des canaux avec la fonction de
réglage manuel.........................................................28
Configuration des options de langue...................29
Réglage de l’heure en mode EP............................30
Création automatique de chapitre ........................30
Configuration des options d’affichage
en façade...................................................................31
Configuration des options NICAM........................32
Enregistrement DivX(R)..........................................33
Configuration des options audio..........................33
Options audio...................................................................34
Configuration des options Sortie Video..............34
Pour activer le réglage “Progressif” ....................35
Pour annuler le réglage “Progressif”...................36
Configuration des options d’affichage (Vidéo)...36
Options d'affichage (Vidéo) .............................................37
Choix de la sortie .............................................................37
Configuration du contrôle parental ......................38
Si vous avez oublié votre code secret............................38
A propos du niveau d'évaluation.....................................39
A propos du Changement de mot de passe..................39
Table des matières
Premiers pas avec l’appareil
00842C-R125-XEB-FRA_02~17 2005.6.14 8:10 PM Page 6

Français -
7
Utilisation des signets............................................................60
Utilisation des marqueurs .....................................................61
Lecture d’un CD audio/MP3........................................62
Lecture d'une image.....................................................66
Lecture d'un fichier MPEG4........................................67
Lecture de la liste de titres..........................................68
Édition
Édition
Édition de base (Liste de titres)............................................71
Renommer (Étiqueter) un titre..............................................71
Verrouiller (Protéger) un titre.................................................72
Supprimer un titre .................................................................72
Supprimer une section d’un titre .........................................73
Édition avancée (Liste de lecture)........................................75
Créer une Liste de lecture ...................................................75
Lire les entrées de la Liste de lecture..................................76
Renommer une entrée dans une liste de lecture................77
Éditer une scène pour une liste de lecture..........................78
Copier une entrée d’une liste de lecture vers
la liste de lecture....................................................................81
Supprimer une entrée de liste de lecture d’une liste
de lecture ...............................................................................82
Gestionnaire de disque..........................................................83
Éditer le nom d’un disque.....................................................83
Protection du disque .............................................................84
Formater un disque...............................................................84
Supprimer toutes les listes de titres.....................................85
Finaliser un disque................................................................86
Ne pas finaliser un dique (mode V/VR) ..............................87
Informations Complémentaires
Informations Complémentaires
Dépannage.....................................................................88
Caractéristiques techniques.......................................92
Enregistrement
Enregistrement
Avant l’enregistrement.................................................40
Disques enregistrables..........................................................40
Formats d’enregistrement.....................................................41
Mode enregistrement............................................................41
Films non enregistrables.......................................................41
A propos de la touche INFO ................................................42
Vérification de l’espace disque
Disponible (Disc Information)................................................42
Enregistrement du programme télévisé que
vous regardez................................................................42
Enregistrement à partir d’une source
extérieure que vous regardez.....................................44
Copie à partir d'un caméscope ..................................45
Enregistrement avec une seule touche (OTR) ........46
Réalisation d'un enregistrement programmé..........47
Enregistrement flexible (pour l’enregistrement par
minuterie uniquement).................................................48
Editer une Minuterie Standard ...................................48
Supprimer une minuterie standard............................49
Utilisation de la fonction ShowView .........................50
ShowView Extened.......................................................51
Enregistrer la liste des dossiers programmés........51
Lecture
Lecture
Avant la lecture..............................................................52
Code de région (DVD-Video uniquement)...........................52
Type de disques pouvant être lus avec cet appareil...........52
Disques ne pouvant être lus avec cet appareil...................52
Lecture d’un disque......................................................53
Utilisation des menus Disque et Titre...................................54
Utilisation des fonctions de recherche.................................54
Ralenti ...................................................................................55
Lecture image par image......................................................55
À propos de la fonction ANYKEY.........................................55
Utilisation de la fonction Repeat...........................................56
Sélection des sous-titres.......................................................58
Sélection de la langue audio ................................................59
Changer l’angle de la caméra ..............................................59
Zoom avant............................................................................60
Premiers pas avec l’appareil
00842C-R125-XEB-FRA_02~17 2005.6.14 8:10 PM Page 7

8
- Français
Caractéristiques générales
Balayage progressif haute qualité
Le balayage progressif procure une vidéo haute résolution et
sans scintillement. Les circuits de séparation 10 bits, 54 MHz
DAC et 2D Y/C procurent la meilleure lecture d'image et la
plus haute qualité d'enregistrement. (Voir pages 20, 36)
Une gamme de fonctions avec interface
d’utilisateur facile à utiliser
Le système de menu intégré et la fonction de messagerie
vous permettent d’exécuter la commande désirée
facilement et de façon pratique. Sur un disque
DVD-RAM ou DVD-RW, vous pouvez éditer des images
enregistrées, créer une liste de diffusion, et éditer des images
dans une séquence spécifique selon vos préférences.
Lecture MPEG4
Grâce à cet enregistreur DVD, vous pouvez lire les
fichiers au format MPEG4 contenus dans un fichier avi.
Certification DivX
DivX, DivX Certified et les logos qui leur
sont associés sont des marques déposées
de DivXNetworks, Inc. et sont utilisés sous
licence.
Interface Multimédia Haute Définition
(HDMI, High Definition Multimedia Interface)
HDMI réduit les défauts d’image en transmettant un signal
audio ou vidéo pur de votre lecteur à votre téléviseur.
L'enregistreur DVD vous permet d'enregistrer et de lire
une vidéo numérique de haute qualité sur les disques
DVD-RAM/DVD-RW/DVD-R.
Vous pouvez enregistrer et
modifier des images numériques sur des disques DVD-
RAM/DVD-RW/DVD-R comme s’il s’agissait d’une cassette
vidéo.
Un enregistrement et une lecture de vidéo et de son
numériques de grande qualité
Enregistrez jusqu’à 16 heures d’images avec un disque
DVD-RAM double face de 9,4 Go et jusqu’à 8 heures
d’images avec un disque DVD-RAM/DVD-RW/DVD-R de 4,7
Go, en fonction du mode d’enregistrement.
Mode d’enregistrement sélectionnable
Vous pouvez régler votre graveur sur l’une des cinq vitesses
d’enregistrement proposées, chacune ayant une influence sur
la qualité et la durée de l’enregistrement. Le mode EP (6 hr ou
8 hr) est le mode qui offer la durée d’enregistrement la plus
longue, les modes LP et SP offrent moins de temps
d’enregistrement mais une meilleure qualité et le mode XP
vous offre la meilleure qualité d’enregistrement.
Réglage automatique de la qualité en mode
programmation
Si le mode FR est sélectionné, la qualité vidéo est réglée
automatiquement de sorte que toutes les images
pendant le temps programmé seront enregistrées sur l’espace
disponible du disque. (Cf. page 48.)
Création d’un titre vidéo DVD sur un disque
DVD-RWD/DVD-R
Avec l'enregistreur DVD, vous pouvez créer vos
propres titres vidéo DVD sur des disques DVD-
RW/DVD-R de 4,7 Go.
Copie de données d’un caméscope numérique
en utilisant une prise de sortie DV
Enregistrez une vidéo DVD sur des disques DVD-RAM ou
DVD-RW, DVD-R en utilisant la prise d'entrée DV (IEEE
1394-4 broches/4 broches). (Cf. page 45.)
Premiers pas avec l’appareil
00842C-R125-XEB-FRA_02~17 2005.6.14 8:10 PM Page 8

Français -
9
1) Assurez-vous de bien maîtriser les Instructions
relatives à la sécurité avant d’utiliser ce produit.
(Consultez les pages 2~5)
2) En cas de problème, consultez la section Dépannage.
(Consultez les pages 88 à 91)
À propos de l’utilisation du manuel de l'utilisateur
©2005 Samsung Electronics Co. Tous droits réservés.
Ce manuel de l’utilisateur ne devra en aucune manière être
reproduit ou copié, intégralement ou partiellement, sans
l’autorisation écrite préalable de Samsung Electronics Co.
Copyright
Comment utiliser le
graveur DVD?
Étape 1
Sélectionnez le type de disque
Cet appareil peut enregistrer sur les types de disques
suivants. Si vous souhaitez effectuer des enregistrements
de manière répétée sur le même disque ou si vous
souhaitez modifier le disque après enregistrement,
choisissez un DVD-RW ou un DVD-RAM de type
réinscriptible.
Si vous souhaitez conserver votre enregistrement en
l’état, choisissez un DVD-R non réinscriptible.
Avant de lire le manuel de
l’utilisateur
Assurez-vous d’avoir vérifié les points suivants avant de lire le
manuel de l'utilisateur.
Icônes utilisées dans le manuel
Icône Terme Définition
Étape 2
Formatez le disque pour commencer l’enregistrement
À la différence d’un magnétoscope, le graveur commence
automatiquement le formatage lorsqu’un disque neuf est
inséré. Cette opération est nécessaire à la préparation d'un
disque en vue de l’enregistrement.
Utilisation d’un DVD-RAM
Ce type de disque peut être formaté au format d’enregistrement
DVD-Video (mode VR). Vous pouvez modifier l’image
enregistrée, créer une liste de lecture et éditer des images selon
une séquence spécifique en fonction de vos besoins.
Utilisation d’un DVD-RW
Ce type de disque peut être formaté soit au format
d’enregistrement DVD-Video (mode Vidéo), soit au format
d’enregistrement DVD-Video (mode VR). Pour un disque
neuf, un message demandant si vous souhaitez ou non
formater le disque en mode VR s’affiche. Vous pouvez lire un
disque en mode Vidéo sur divers types de composants DVD.
Un disque en mode VR permet davantage de modifications.
Utilisation d’un DVD-R
Ce type de disque peut être formaté au format DVD Video.
Une fois le formatage terminé, vous pouvez enregistrer sur le
disque. Vous pouvez lire ce type de disques sur divers
composants DVD s’ils sont finalisés.
■
Vous ne pouvez utiliser que le mode VR
ou Vidéo sur un DVD-RW, mais non les
deux simultanément.
■
Vous pouvez changer le format DVD-RW
pour un autre format par réinitialisation.
Remarque : le changement de format peut
entraîner la perte des données contenues
sur le disque.
REMARQUE
Premiers pas avec l’appareil
DVD
RAM
RW
R
CD
JPEG
MP3
MPEG4
Attention
Remarque
Touche
One-Touch
Bouton
ANYKEY
Concerne une fonction disponible pour
les DVD ou les disques DVD-R/DVD-
RW enregistrés et finalisés en mode
Vidéo.
Concerne une fonction disponible pour
les disques DVD-RAM.
Concerne une fonction disponible pour
les disques DVD-RW.
Concerne une fonction disponible pour
les disques DVD-R.
Concerne une fonction disponible pour un CD
de données (CD-ROM, CD-R ou CD-RW).
Concerne une fonction disponible pour
un CD image (CD-ROM, CD-R ou
CD-RW).
Concerne une fonction disponible pour
un CD de données (CD-ROM, CD-R ou
CD-RW contenant des fichiers MP3).
Cela implique une fonction disponible
dans des données CD-R/RW, DVD-R,
RW, RAM.
Concerne un cas où une fonction ne
fonctionne pas ou dont les paramètres
ont été annulés.
Concerne des manoeuvres
spécifiques rattachées à des fonctions
sur chaque page.
Une fonction pouvant être activée à
l’aide d’une seule touche.
Une fonction qui peut être activée en
utilisant le bouton ANYKEY.
00842C-R125-XEB-FRA_02~17 2005.6.14 8:10 PM Page 9

10
- Français
Etape 3
Enregistrement
Il existe deux méthodes d'enregistrement : l'enregistrement direct
et l'enregistrement programmé. L'enregistrement programmé est
répertorié comme une date : Une fois(jj/mm(LUN)), Tous les
jours, LUN-SAM, Tous les SAM, etc.
Mode d’enregistrement
: XP (mode haute qualité), SP (mode
qualité standard), LP (mode enregistrement long) et EP (mode
étendu) selon le mode d'enregistrement. Lorsque
l'enregistrement est effectué en mode FR, la meilleure qualité
d'image est enregistrée avec une prise en compte du temps
restant sur le disque.
Étape 4
Lecture
Vous pouvez sélectionner le titre que vous souhaitez lire dans un
menu affiché, puis démarrer la lecture immédiatement. Un DVD
se compose de sections appelées titres et de sous-sections
appelées chapitres. Lors de l'enregistrement, un titre est créé
entre deux points où l'enregistrement démarre et s'arrête. Les
chapitres sont créés automatiquement lorsque vous finalisez
l'enregistrement sur des disques DVD-R / DVD-RW en mode
Vidéo. La longueur du chapitre (intervalle entre les chapitres)
varie selon le mode d'enregistrement.
Étape 6
Finalisation & lecture sur d'autres composants DVD
Pour lire votre DVD sur d'autres composants DVD, la
finalisation peut s’avérer nécessaire.
Terminez tout d'abord toutes les opérations d'édition et
d'enregistrement, puis finalisez le disque.
Utilisation d'un disque DVD-RW en mode VR
Même si la finalisation n'est généralement pas nécessaire
pour la lecture du disque sur un composant compatible
en mode VR, un disque finalisé doit être utilisé pour la
lecture.
Utilisation d'un disque DVD-RW en mode Vidéo
Ce disque doit tout d'abord être finalisé pour permettre la
lecture sur un appareil autre que cet enregistreur.
Aucune autre édition ni aucun autre enregistrement ne
peuvent être effectués sur le disque une fois que celui-ci
a été finalisé.
Utilisation d'un disque DVD-R
Vous devez finaliser le disque pour le lire sur un
composant autre que cet enregistreur. Vous ne pouvez
pas éditer ni enregistrer sur le disque une fois qu'il a été
finalisé.
Étape 5
Edition d'un disque enregistré
Il est plus facile d’éditer sur des disques que sur des
cassettes vidéo classiques. L'enregistreur prend en
charge plusieurs fonctions d'édition différentes, possibles
uniquement avec des DVD.
Avec un menu d'édition simple et aisé, vous pouvez
mettre en œuvre plusieurs fonctions d'édition, notamment
supprimer, copier, renommer, verrouiller, etc. sur un titre
enregistré.
Création d'une liste de lecture (DVD-RAM/-RW en
mode VR)
Avec cet enregistreur, vous pouvez créer une nouvelle
liste de lecture sur le même disque et l'éditer sans
modifier l'enregistrement original.
Premiers pas avec l’appareil
00842C-R125-XEB-FRA_02~17 2005.6.14 8:10 PM Page 10

Français -
11
Déballage
Premiers pas avec l’appareil
Accessoires
Vérifiez la présence des accessoires fournis ci-dessous.
Préparation de la télécommande
Insérez les piles dans la télécommande
● Ouvrez le couvercle du compartiment réservé aux piles
situé à l’arrière de la télécommande.
● Placez-y deux piles AAA. Assurez-vous que les polarités
(+ et -) sont bien alignées.
● Replacez le couvercle du compartiment réservé aux piles.
En cas de dysfonctionnement de la télécommande:
● Vérifiez la polarité +/- des piles (pile sèche)
● Vérifiez que les piles ne sont pas déchargées.
● Vérifiez que des obstacles n'entravent pas la course du
faisceau provenant du capteur de la télécommande.
● Vérifiez qu’aucun éclairage fluorescent ne se trouve à
proximité.
Jetez les piles en respectant la réglementation locale en
vigueur sur l'environnement.
Ne les jetez pas avec les ordures ménagères.
Réglage de la télécommande
Vous pouvez commander certaines fonctions d'un téléviseur
d'un autre fabricant grâce à cette télécommande.
Les boutons de fonction de commande comprennent :
les boutons STANDBY/ON, PROG
/
, TV VOL +/-, les
touches numériques directes, les boutons TV MUTE, INPUT.
Câble vidéo/audio
Câble RF pour liaison
à un téléviseur
Piles pour la télécommande
(type AAA)
Télécommande
Manuel d'instructions
Guide rapide
Câble HDMI
Câble DVI
00842C-R125-XEB-FRA_02~17 2005.6.14 8:10 PM Page 11

12
- Français
Pour déterminer si votre téléviseur est compatible,
suivez les instructions ci-dessous.
1. Allumez votre téléviseur.
2. Pointez la télécommande en direction du téléviseur.
3. Appuyez sur le bouton STANDBY/ON et saisissez le code à
deux chiffres correspondant à la marque de votre téléviseur
en appuyant sur les touches numériques appropriées.
Codes TV contrôlables
Résultat: Si votre téléviseur est compatible avec la télé
commande, il s'éteindra.
Il est maintenant programmé pour fonctionner
avec la télécommande.
.
Vous pouvez alors commander le téléviseur à
l'aide des boutons situés après le bouton TV.
■
Si plusieurs codes sont spécifiés pour la
marque de votre téléviseur, essayez chacun
d'eux tour à tour jusqu'à ce que vous trouviez
celui qui fonctionne.
■
vous remplacez les piles de la télécommande,
vous devez régler à nouveau le code de la
marque.
REMARQUE
REMARQUE
■
Les différentes fonctions ne sont pas
nécessairement opérationnelles avec tous les
téléviseurs. Si vous rencontrez des problèmes,
utilisez directement le téléviseur.
Bouton Fonction
STANDBY/ON Utilisé pour allumer et éteindre le téléviseur.
INPUT Utilisé pour sélectionner une source externe.
TV VOL (+ ou -) Utilisé pour régler le volume du téléviseur.
PROG ( ou )
Utilisé pour sélectionner la chaîne souhaitée.
TV MUTE Utilisé pour activer et désactiver le son.
0~9 Utilisé pour entrer directement le numéro.
MARQUE BOUTON
SAMSUNG 01, 02, 03, 04, 05, 06, 07, 08, 09
AIWA 82
ANAM 10, 11, 12, 13, 14, 15, 16, 17, 18
BANG & OLUFSEN 57
BLAUPUNKT 71
BRANDT 73
BRIONVEGA 57
CGE 52
CONTINENTAL EDISON 75
DAEWOO
19, 20, 23, 24, 25, 26, 27, 28, 29, 30, 31, 32, 33, 34
EMERSON 64
FERGUSON 73
FINLUX 06, 49, 57
FORMENTI 57
FUJITSU 84
GRADIENTE 70
GRUNDIG 49, 52, 71
HITACHI 60, 72, 73, 75
IMPERIAL 52
JVC 61, 79
LG 06, 19, 20, 21, 22, 78
LOEWE 06, 69
LOEWE OPTA 06, 57
MAGNAVOX 40
METZ 57
MITSUBISHI 06, 48, 62, 65
MIVAR 52, 77
NEC 83
NEWSAN 68
NOBLEX 66
NOKIA 74
NORDMENDE 72, 73, 75
PANASONIC 53, 54, 74, 75
PHILIPS 06, 55, 56, 57
PHONOLA 06, 56, 57
PIONEER 58, 59, 73, 74
RADIOLA 06, 56
RADIOMARELLI 57
RCA 45, 46
REX 74
SABA 57, 72, 73, 74, 75
SALORA 74
SANYO 41, 42, 43, 44, 48
SCHNEIDER 06
MARQUE BOUTON
SELECO 74
SHARP 36, 37, 38, 39, 48
SIEMENS 71
SINGER 57
SINUDYNE 57
SONY 35, 48
TELEAVA 73
TELEFUNKEN 67, 73, 75, 76
THOMSON 72, 73, 75
THOMSON ASIA 80, 81
TOSHIBA 47, 48, 49, 50, 51, 52
WEGA 57
YOKO 06
ZENITH 63
Premiers pas avec l’appareil
00842C-R125-XEB-FRA_02~17 2005.6.14 8:10 PM Page 12

Affichage en façade
1. S'allume en mode d'enregistrement.
2. S'allume pour indiquer le mode d'enregistrement
programmé.
3. S'allume en mode de balayage progressif.
4. Temps de lecture/horloge/indicateur d'état actuel.
5. S'allume lorsqu'un disque est chargé.
6. S'allume lorsqu'un disque R/RW/RAM est chargé.
Façade
1. STANDBY/ON
Allume et éteint l'enregistreur.
2. AV3 INPUT
Permet de connecter un équipement externe.
3. DV-INPUT
Permet de connecter un équipement numérique
externe avec une prise DV.
(notamment un caméscope)
4. DISC TRAY
Provoque l’ouverture pour recevoir un disque.
5. OPEN/CLOSE
Ouvre et ferme le tiroir disque.
6. P.SCAN
Sélectionne le mode de balayage progressif.
7. DISPLAY
Affiche l'état de lecture, le titre, le chapitre, l'heure, etc.
8. SEARCH/SKIP
Permet d’aller au titre/au chapitre/à la plage suivants ou
de revenir au titre/au chapitre/à la plage précédents.
9. STOP
Arrête la lecture du disque.
10. PLAY/PAUSE
Permet la lecture d’un disque ou la mise en pause de
la lecture ou de l'enregistrement.
11. PROG ( )
Permet de sélectionner les chaînes pré-réglées du
téléviseur.
Identique au bouton PROG de votre télécommande.
12. REC
Démarre l'enregistrement.
13. Récepteur de la télécommande
Français -
13
Description
Premiers pas avec l’appareil
00842C-R125-XEB-FRA_02~17 2005.6.14 8:10 PM Page 13

1. DIGITAL AUDIO OUT(OPTICAL)
Permet la connexion à un amplificateur possédant une
prise d'entrée audio optique numérique.
2. DIGITAL AUDIO OUT(COAXIAL)
Permet la connexion à un amplificateur possédant une
prise d'entrée audio coaxiale numérique.
3. AUDIO OUT
Permet la connexion à l'entrée audio de l'équipement
externe au moyen des câbles audio.
4. VIDEO OUT
Permet la connexion à l'entrée de l'équipement externe
au moyen d'un câble vidéo.
5. S-VIDEO OUT
Permet la connexion à l'entrée de l'équipement externe
au moyen d'un câble S-vidéo.
6. COMPONENT VIDEO OUT
Permet la connexion à un équipement possédant une
sortie vidéo composant.
7. Connecteur AV1(TV) OUTPUT SCART
8. Connecteur AV2(EXT) INPUT SCART
9. SORTIE HDMI
10. Entrée à partir du connecteur d'antenne
11. Sortie vers le connecteur TV
Panneau arrière
Ventilateur
Le ventilateur tourne toujours lorsque l'appareil est sous tension.
Prévoyez un espace libre de 10 cm minimum sur tous les côtés
du ventilateur lors de l'installation de l’appareil.
■
Le branchement de l'antenne ne permet
pas le passage du signal de sortie du
DVD. Pour regarder un DVD sur votre
téléviseur, vous devez connecter les câbles
audio/vidéo ou péritel.
REMARQUE
14
- Français
Premiers pas avec l’appareil
00842C-R125-XEB-FRA_02~17 2005.6.14 8:10 PM Page 14

Français -
15
Premiers pas avec l’appareil
9. Bouton Lecture/Pause
Appuyez sur ce bouton pour lire/mettre en pause un
disque.
10. Bouton MENU
Il permet d’accéder au menu de réglage de
l'enregistreur DVD.
11. Boutons OK/DIRECTION
(Boutons
……†† œœ √√
)
12. Bouton REC MODE
Il permet d'afficher l'état de l'enregistrement.
(XP/SP/LP/EP)
13. Bouton REC
Il est utilisé pour procéder à un enregistrement sur
des disques DVD-RAM/-RW/-R.
14. Bouton CANCEL
15. Bouton REPEAT
Il vous permet de répéter un titre, un chapitre, une
plage ou un disque.
16. Bouton OPEN/CLOSE
Il permet d’ouvrir et de fermer le tiroir disque.
17. Bouton AUDIO/TV MUTE
Utilisez ce bouton pour accéder aux différentes
fonctions audio d’un disque. (Mode DVD)
Il permet de couper le son. (Mode TV)
18. Bouton TV
Appuyez sur ce bouton pour faire fonctionner le
téléviseur.
19. Bouton INPUT
Il permet de sélectionner le signal d'entrée de ligne
en mode d'entrée externe.
(PROG, entrée AV ou entrée DV)
20. Bouton PROG
Il permet de sélectionner les chaînes pré-réglées
dans un ordre spécifique. De la même manière que
les boutons PROG en façade.
21. Bouton TITLE LIST/DISC MENU
Utilisez ce bouton pour entrer dans le menu View
Recording list/Disc.
22. Bouton PLAY LIST/TITLE MENU
Utilisez ce bouton pour revenir au menu Title ou
pour visualiser la liste des fichiers enregistrés.
23. Bouton ANYKEY
Utilisez ce bouton pour visualiser l'état du disque en
cours de lecture.
24. Bouton SUBTITLE
Appuyez sur ce bouton pour commuter sur la
langue des sous-titres du DVD.
25. Bouton RETURN
Il permet de retourner au menu précédent.
26. Bouton MARKER/TIMER
Utilisez ce bouton pour marquer une position lors
de la lecture d'un disque.
Appuyez sur ce bouton pour entrer directement
dans le menu Timer Recording Mode.
Lors de l'arrêt d'un disque.
27. Bouton INFO
Il permet d'afficher les réglages actuels ou l'état du
disque.
Aperçu de la télécommande
1. Bouton STANDBY/ON
2. Touches numériques
3. Bouton TV/DVD
4. Bouton DVD
Appuyez sur ce bouton lorsque vous utilisez un
enregistreur DVD.
5. Boutons TV VOL
Réglage du volume du téléviseur.
6. Boutons de saut en arrière/en avant
Appuyez sur ces boutons pour sauter une partie du
disque vers l’avant ou vers l’arrière.
Ces boutons fonctionnent également comme des
boutons STEP.
Chaque actionnement permettra une lecture image
par image en avant ou en arrière (voir page 55).
7. Boutons de recherche en arrière/en avant
Appuyez sur ces boutons pour rechercher sur un
disque en arrière ou en avant.
8. Bouton d’arrêt
Appuyez sur ce bouton pour arrêter un disque.
00842C-R125-XEB-FRA_02~17 2005.6.14 8:10 PM Page 15

Une présentation rapide exposée dans ce guide vous
apportera suffisamment d'informations pour commencer à
utiliser l'enregistreur.
Connexion &
Configuration
Présentation rapide
Présentation rapide...............................................16
Connexion de l'enregistreur DVD ........................17
Connexions supplémentaires...............................17
Antenne + enregistreur DVD +
boîtier du décodeur externe + téléviseur.............18
Autre type de connexion du câble
de sortie vidéo.......................................................18
Autre type de connexion du câble
de sortie audio.......................................................20
Raccordement d'un câble HDMI/DVI à un
téléviseur................................................................22
Connexion à la prise d'entrée AV3 IN, DV..........23
Cette section contient les différentes méthodes de
connexion de l'enregistreur DVD à d'autres
composants externes et les modes de réglage initiaux
requis.
Connexion de l'enregistreur DVD
Connexions supplémentaires
Antenne + enregistreur DVD + boîtier du
décodeur externe + téléviseur
Autre type de connexion du câble de
sortie vidéo
Autre type de connexion du câble de
sortie audio
Connexion à la prise d'entrée AV3 IN, DV
†
†
†
†
Raccordement d'un câble HDMI/DVI à un
téléviseur
†
†
16
- Français
Connexion & Configuration
00842C-R125-XEB-FRA_02~17 2005.6.14 8:10 PM Page 16

Connexion de
l'enregistreur DVD
Connexions
supplémentaires
Vous pouvez connecter votre enregistreur DVD à un
satellite ou à un syntoniseur numérique.
- Mode DVD
1. Reliez le connecteur AV2 de l'enregistreur DVD et le
récepteur satellite / magnétoscope ou le syntoniseur
numérique à l'aide d'un câble Péritel.
2. Connectez le connecteur AV1 au connecteur Péritel
AV du téléviseur.
3. Allumez l'enregistreur DVD, le récepteur satellite /
magnétoscope ou le syntoniseur numérique et le
téléviseur.
4. Réglez le mode Entrée sur AV2.
- Mode TV
1. Appuyez sur le bouton TV/DVD de votre
télécommande, “TV” s'affiche alors sur l’affichage
frontal à diodes (ou éteignez l'enregistreur DVD.).
2. Vous pouvez visionner les programmes à partir d'un
satellite ou du syntoniseur numérique connecté à cet
enregistreur DVD même si l'enregistreur DVD est
éteint.
Vous pouvez connecter votre enregistreur DVD à votre
téléviseur en utilisant le câble Péritel si le téléviseur est équipé
de l'entrée appropriée.
1. Connectez le câble RF comme indiqué.
2. Reliez l’une des extrémités du câble Péritel à la prise
AV1 située à l’arrière de l'enregistreur DVD.
3. Branchez l’autre extrémité sur la fiche
correspondante du téléviseur.
4. Reliez l'enregistreur DVD et le téléviseur.
5 Allumez l'enregistreur DVD et le téléviseur.
6. Appuyez sur le bouton INPUT de votre
télécommande jusqu’à ce que le signal vidéo de
l'enregistreur DVD s'affiche à l'écran.
Vers l'entrée
RF
dispositif externe
(magnétoscope/récepteur satellite)
Vers le
téléviseur
Câble RF
Vers l'ENTREE ANTENNE
■
La connexion du câble RF de ce produit
ne transmet que des signaux du
téléviseur. Vous devez connecter le câble
Péritel ou les câbles audio/vidéo pour
visionner un DVD à partir de votre
enregistreur DVD.
■
Mode TV
Appuyez sur le bouton TV/DVD de votre
télécommande, "TV" s'affiche alors sur
l’affichage frontal à diodes (ou éteignez
l'enregistreur DVD).
Vous pouvez alors visionner des
programmes reçus par le câble RF.
REMARQUE
Français -
17
Connexion & Configuration
00842C-R125-XEB-FRA_02~17 2005.6.14 8:10 PM Page 17

Antenne + enregistreur
DVD + boîtier du décodeur
externe + téléviseur
Si vous connectez un boîtier décodeur externe à votre
enregistreur DVD, vous pouvez enregistrer des chaînes
cryptées (Programmes CANAL+) grâce au syntoniseur
TV intégré à l'enregistreur DVD.
1. Connectez les câbles d'antenne RF comme indiqué.
2. Connectez le connecteur AV1 de cet enregistreur au
connecteur PERITEL AV de votre téléviseur en
utilisant un câble Péritel.
3. Connectez le connecteur AV2 à un connecteur
PERITEL AV sur le boîtier du décodeur.
4. Pour regarder ou enregistrer les programmes de
Canal Plus, réglez votre enregistreur DVD pour
recevoir les chaînes en utilisant l'affichage à l'écran.
(Reportez-vous à la page 28)
18
- Français
Connexion & Configuration
2
3
1
DECODEUR
Mur
Il existe plusieurs manières pour émettre un signal vidéo sans
utiliser des câbles Péritel.
Sélectionnez l'une des connexions vidéo suivantes vous
convenant le mieux.
● Cas 1 : Connexion à une prise de sortie vidéo (composite)
● Cas 2 : Connexion à une prise de sortie S-Vidéo
● Cas 3 :
Prises de sortie Vidéo composant
Modes S-Vidéo, Vidéo composant et Sortie
progressive
● Les sorties S-Vidéo et Vidéo composant ne sont disponibles
que si votre téléviseur prend respectivement en charge
l'entrée S-Vidéo ou l'entée Vidéo composant.
Si la sortie S-Vidéo ou Vidéo composant ne fonctionne pas,
vérifiez les connexions au téléviseur et les réglages de
sélection d'entrée au téléviseur.
● Si vous comparez à une vidéo entrelacée standard, le
balayage progressif double le nombre de lignes vidéo sur
l’écran de votre téléviseur, ce qui donne une image claire et
sans scintillement plus stable qu'une vidéo entrelacée.
Cette fonction n'est disponible qu'avec les téléviseurs
prenant en charge un balayage progressif.
● Sortie de balayage progressif (576p)
“Notez que tous les téléviseurs haute définition ne sont pas
totalement compatibles avec cet appareil et que des
artefects peuvent apparaître à l'écran lors de la lecture. En
cas de problèmes d'image lors du balayage progressif 576,
il est conseillé de raccorder l'appareil à la sortie ‘définition
standard’.
Si vous avez des questions concernant la compatibilité de
votre téléviseur avec ce modèle 576p d'enregistreur DVD,
veuillez contacter notre Centre de service clients.
Autre type de connexion
du câble de sortie vidéo
00842C-R125-XEB-FRA_18~41 2005.6.14 8:11 PM Page 18

Français -
19
Connexion & Configuration
Cas 2 : Connexion à une prise de
sortie S-Vidéo
1. Connectez un câble S-Video (non fourni) entre la
prise de sortie S-VIDEO OUT de votre enregistreur
DVD et la prise d'entrée S-VIDEO INPUT de votre
téléviseur (ou de l'amplificateur AV).
2. Connectez les câbles audio (blanc et rouge) entre les
prises de sortie AUDIO OUT de l'enregistreur DVD et
les prises d'entrée AUDIO IN du téléviseur (ou de
l'amplificateur AV).
● Profitez d’images de haute qualité.
Cas 1 : Connexion à une prise de
sortie vidéo (composite)
1. Connectez un câble vidéo (jaune) entre la prise VIDEO
OUT (jaune) (SORTIE VIDEO) de votre enregistreur DVD et
la prise VIDEO INPUT (jaune) (ENTREE VIDEO) de votre
téléviseur (ou de l'amplificateur AV).
● Vous obtiendrez régulièrement des images de qualité.
2. Connectez les câbles audio (blanc et rouge) entre les prises
AUDIO OUT (SORTIE AUDIO AV) de votre enregistreur
DVD et les prises AUDIO IN (ENTREE AUDIO) de votre
téléviseur (ou de l'amplificateur AV).
(Voir p.20 à 21).
jaune
jaune
Câble vidéo/audio
00842C-R125-XEB-FRA_18~41 2005.6.14 8:11 PM Page 19

Cas 3 :
Prises de sortie Vidéo
composant
1. Connectez les câbles Vidéo composant (non fournis) entre
les prises COMPONENT OUT (SORTIE COMPOSANT)
(Y,P
B
,P
R
) de l'enregistreur DVD et les prises COMPONENT
IN (ENTREE COMPOSANT) (Y,P
B
,P
R
) de votre téléviseur.
2. Connectez les câbles audio (blanc et rouge) entre les
prises de sortie AUDIO OUT de l'enregistreur DVD et
les prises d'entrée AUDIO IN du téléviseur (ou de
l'amplificateur AV). (Voir p.20 à 21).
● Appuyez sur le bouton de sélection du type
d’entrée situé sur la télécommande de votre
téléviseur jusqu’à ce que le signal Composant de
l’enregistreur DVD apparaisse à l’écran.
3. Une fois la connexion effectuée, reportez-vous aux
pages 34 et 36.
● Profitez d’images de haute qualité dotées d’un
rendu des couleurs parfait.
■
La résolution de la sortie vidéo Composant n’est
jamais supérieure à 576p.
Pour obtenir une résolution 720p et 1080i, reliez
l’enregistreur de DVD à votre téléviseur à l’aide du
câble HDMI fourni avec l’appareil.
Une fois le câble HDMI branché, appuyez sur le
bouton P.SCAN pour faire défiler toutes les
résolutions disponibles
(reportez-vous à la page 35).
COMPONENT
Pr
Pb
Y
2
1
vert
bleu
rouge
vert
bleu
rouge
■
Assurez-vous de la correspondance des
connexions codées par couleur.
Les prises de sortie composant
Y, P
B
,P
R
de
votre enregistreur DVD doivent être
connectées avec une totale
correspondance des couleurs aux prises
d'entrée de composant de votre téléviseur.
■
Le réglage Progressif est disponible
uniquement lorsque Sortie vidéo est réglée
sur Composant. (Voir page 35 et 36)
REMARQUE
Il existe plusieurs manières pour émettre un signal
audio sans utiliser des câbles Péritel.
Sélectionnez la connexion audio ci-dessous qui vous
convient le mieux.
● Cas 1 : Connexion à votre téléviseur
● Cas 2 : Connexion à un amplificateur stéréo au
moyen des prises de sortie AV.
● Cas 3 : Connexion à un amplificateur AV au moyen
d'une prise de sortie numérique
Cas 1 : Connexion à votre
téléviseur
Si votre téléviseur est équipé de prises d'entrée audio,
utilisez cette connexion.
Autre type de connexion
du câble de sortie audio
Fabriqué sous licence de Dolby Laboratories.
“Dolby” et le symbole du double D sont des
marques déposées des laboratoires Dolby.
“DTS” et “DTS Digital Out” sont des marques
déposées de Digital Theater Systems, Inc.
jaune
blanc
rouge
jaune
blanc
rouge
Connexion & Configuration
20
- Français
00842C-R125-XEB-FRA_18~41 2005.6.14 8:11 PM Page 20

Français -
21
Connexion & Configuration
Cas 3: Connexion à un
amplificateur AV au moyen
d'une prise de sortie numérique
Si votre amplificateur AV est équipé d'un décodeur
Dolby Digital, MPEG2 ou DTS et d'une prise d'entrée
numérique, utilisez cette connexion.
Pour profiter du son Dolby Digital, MPEG2 ou DTS,
vous devrez configurer les réglages audio.
(Voir page 34)
Cas 2 : Connexion à un
amplificateur stéréo au moyen
des prises de sortie AV.
Si votre amplificateur stéréo ne possède que des
prises AUDIO INPUT (ENTREE AUDIO) (G et D),
utilisez les prises AUDIO OUT (SORTIE AUDIO).
blancrouge
blancrouge
Haut-parleur
avant (G)
Haut-parleur
avant (D)
ou
Arrière (G)
Avant (G)
Basses Centrale
Avant (D)
Arrière (D)
00842C-R125-XEB-FRA_18~41 2005.6.14 8:11 PM Page 21

Si votre téléviseur possède une entrée HDMI/DVI,
raccordez-lui un câble HDMI/DVI. Vous apprécierez la
très grande qualité d’image et de son.
● Cas 1 : Raccordement à un téléviseur (prise HDMI)
● Cas 2 : Raccordement à un téléviseur (prise DVI)
Cas 1 : Raccordement à un
téléviseur (prise HDMI)
• Raccordez la borne HDMI OUT située à l’arrière de
l’enregistreur DVD / magnétoscope à la borne HDMI
IN de votre téléviseur à l’aide du câble HDMII.
•
Appuyez sur le sélecteur d’entrée de la télécommande
du téléviseur jusqu’à ce que le signal HDMI de
l’enregistreur DVD / magnétoscope apparaisse à l’écran.
Cas 2 : Raccordement à un
téléviseur (prise DVI)
• Utilisez un câble DVI pour raccorder la prise HDMI
OUT située à l’arrière de l'enregistreur DVD à la prise
DVI IN de votre téléviseur.
•
Raccordez les bornes AUDIO OUT (rouge et blanche)
situées à l’arrière de l’enregistreur DVD aux bornes
AUDIO IN (rouge et blanche) de votre téléviseur à l'aide
des câbles audio. Allumez le lecteur DVD et le téléviseur.
• Appuyez sur le sélecteur d’entrée de la télécommande
de votre téléviseur jusqu’à ce que le signal DVI de
l’enregistreur DVD apparaisse à l’écran.
Raccordement d'un câble
HDMI/DVI à un téléviseur
■
Pour visualiser la sortie HDMI/DVI, réglez la
sortie audio numérique sur PCM. Pour plus
d'informations, reportez-vous aux pages 33 et 34.
■
Selon le périphérique HDMI (récepteur de
télévision / HDMI) utilisé, il se peut que le son
ne soit pas pris en charge. Si votre téléviseur
ne prend pas en charge le son Dolby digital /
DTS, la sortie audio n’est pas disponible
lorsque vous réglez la sortie numérique sur
Flot binaire ou lorsque vous sélectionnez DTS
dans le menu Configuration audio.
Dans ce cas, réglez la sortie audio numérique
sur PCM ou désactivez le DTS.
ATTENTION
Pour modifier la résolution de la sortie HDMI,
reportez-vous à la page 37.
Interface Multimédia Haute Définition
(HDMI, High Definition Multimedia Interface)
HDMI est une interface permettant la
transmission numérique de données audio et
vidéo avec une seule fiche. La norme HDMI
reposant sur la norme DVI, elle est entièrement
compatible avec elle. La seule différence entre
ces deux interfaces réside dans le fait qu'HDMI
prend en charge le son à canaux multiples.
Avec HDMI, le lecteur DVD transmet un signal
audio et vidéo numérique et affiche une image
claire sur un téléviseur possédant une prise
d’entrée HDMI.
Descriptif du raccordement HDMI
Connecteur HDMI : données vidéo et audio
numériques décompressées (données LCPM
ou flux de données).
- Bien que le lecteur utilise un câble HDMI, le
lecteur n’envoie qu’un signal numérique pur
au téléviseur.
- Si le téléviseur ne prend pas en charge le
procédé HDCP (Highbandwidth Digital
Content Protection, système de protection du
contenu numérique à large bande passante),
l’image qui s’affiche à l’écran est brouillée.
Pourquoi Samsung utilise-t-il HDMI ?
Les téléviseurs analogiques requièrent un signal
audio et vidéo analogique. Cependant, lorsque
vous lisez un DVD, les données transmises au
téléviseur sont de nature numérique. En
conséquence, vous avez besoin d’un
convertisseur numérique analogique (pour
l’enregistreur DVD) ou d’un convertisseur
analogique numérique (pour le téléviseur).
Pendant cette conversion, la qualité de l’image est
détériorée à cause du bruit et de la perte de
signal. La technologie HDMI a l'immense avantage
de ne nécessiter aucune conversion numérique
analogique et de faire circuler un signal numérique
pur entre le lecteur et votre téléviseur.
Qu’est ce que le HDCP ?
Le système de protection du contenu numérique
à large bande passante HDCP (High-bandwidth
Digital Content Protection) est un procédé
permettant d’empêcher la copie du contenu des
DVD transmis via HDMI. Il constitue un lien
numérique sécurisé entre une source vidéo
(ordinateur, DVD, etc.) et un appareil d’affichage
(téléviseur, projecteur, etc.)
Le contenu est codé dans l’appareil source de
manière à empêcher les copies non-autorisées.
REMARQUE
blanc
rouge
blanc
rouge
22
- Français
Connexion & Configuration
00842C-R125-XEB-FRA_18~41 2005.6.14 8:11 PM Page 22

Français -
23
Connexion & Configuration
Cela vous permet de connecter votre enregistreur DVD à
d'autres dispositifs externes et de visualiser ou d'enregistrer
leurs sorties.
● Cas 1 : Connexion d'un magnétoscope, d'un terminal
utilisateur, d'un lecteur DVD ou d'un caméscope
aux prises AV3 IN (ENTREE AV3).
● Cas 2 : Connexion d'un caméscope à la prise d'entrée
DV IN.
Cas 1 : Connexion d'un
magnétoscope, d'un terminal
utilisateur, d'un lecteur DVD ou
d'un caméscope aux prises AV3 IN
(ENTREE AV3).
Connexion d’un magnétoscope ou d’un dispositif externe aux
prises AV3 IN (ENTREE AV3) de l’enregistreur DVD.
Vous pouvez enregistrer à partir d’un équipement connecté
(magnétoscope, terminal utilisateur, lecteur DVD ou
caméscope).
Connexion à la prise
d'entrée AV3 IN, DV
■
La sélection de AV 3 IN (ENTREE AV 3)
s’effectuera automatiquement. Si l’entrée n’est
pas sélectionnée automatiquement, utilisez le
bouton INPUT pour sélectionner l’entrée
correcte.
■
Le contenu protégé d’une copie ne peut pas
être enregistré.
REMARQUE
DVD
Terminal utilisateur
Magnétoscope
Caméscope
jaune
blanc
rouge
jaune
blanc
rouge
■
Si l’entrée n’est pas sélectionnée
automatiquement, utilisez le bouton
INPUT pour sélectionner l’entrée correcte.
REMARQUE
Cas 2 : Connexion d'un
caméscope à la prise d'entrée
DV IN.
Si votre caméscope numérique possède une prise de
sortie DV, connectez-la à la prise d'entrée DV de votre
enregistreur DVD.
Caméscope
00842C-R125-XEB-FRA_18~41 2005.6.14 8:11 PM Page 23

24
- Français
Les menus à l’écran vous permettent d’activer ou de
désactiver différentes fonctions de votre enregistreur DVD.
Utilisez les boutons suivants pour ouvrir et parcourir les menus
à l’écran.
1
Bouton MENU
Appuyez sur ce bouton situé sur votre télécommande
pour ouvrir le MENU d'affichage à l'écran.
Appuyez à nouveau pour quitter le MENU d'affichage à
l'écran.
2
Boutons
……††
,
œœ √√
Appuyez sur l’un de ces boutons pour déplacer la barre de
sélection …†, œ√afin de parcourir les options du menu.
3
Bouton OK
Appuyez sur ce bouton de votre télécommande pour
confirmer de nouveaux paramètres.
4
Bouton RETURN
Appuyez sur ce bouton de votre télécommande pour
revenir à l'écran du MENU précédent affiché ou pour
quitter le MENU d'affichage à l'écran.
Installation
du système
Navigation dans le menu à
l’écran
Navigation dans le menu à l’écran ......................24
Branchement et réglage automatique.................25
Réglage de l’horloge.............................................26
Pré-réglage des canaux avec la fonction de
réglage automatique.............................................27
Pré-réglage des canaux avec la fonction de
réglage manuel .....................................................28
Configuration des options de langue...................29
Réglage de l’heure en mode EP..........................30
Création automatique de chapitre........................30
Configuration des options d’affichage
en façade...............................................................31
Configuration des options NICAM.......................32
Enregistrement DivX(R)........................................33
Configuration des options audio ..........................33
Configuration des options Sortie Video...............34
Pour activer le réglage “Progressif”.....................35
Pour annuler le réglage “Progressif”....................36
Configuration des options d’affichage (Vidéo) ....36
Configuration du contrôle parental.......................38
Installation du
système
REVENIROKDÉPLA. SORTIE
Enregistrer par Minuterie
Pas De Disque
ShowView
√√
Enregistrer par Minuterie
√√
ShowView Allongé : Non
√√
Programme
Paramétrer
REVENIROKDÉPLA. SORTIE
Navigation par Disque
DVD-RAM(VR)
Liste de Titres
√√
DivX
√√
Photo
√√
Musique
√√
Navigation
par Disque
Liste
de Lecture
Gestion.
de Disque
Programme
Paramétrer
00842C-R125-XEB-FRA_18~41 2005.6.14 8:11 PM Page 24

Français -
25
Installation du
système
Lorsque vous mettez sous tension votre enregistreur DVD
pour la première fois, celui-ci se règle automatiquement.
Les chaînes de télévision et l’horloge sont enregistrées dans la
mémoire. Cette opération prend quelques minutes.
Votre enregistreur DVD est alors prêt à fonctionner.
1
Connectez le câble RF comme indiqué en
page 18.
(Connexion de votre enregistreur DVD à votre téléviseur au
moyen du câble RF et du câble Péritel.)
2
Raccordez l’enregistreur DVD au secteur.
“AUTO” clignote sur l’affichage en façade.
3
Appuyez sur une touche numérique pour
sélectionner la langue.
4
Appuyez sur le bouton OK pour lancer la
configuration automatique.
5
Appuyez sur le bouton OK, sélectionnez
“Pays” à l’aide des boutons
…†œ √
puis
sélectionnez votre pays.
• Reportez-vous au tableau des abréviations suivant lorsque vous
sélectionnez “Pays”.
• Le graveur de DVD recherche les stations en fonction d'une liste
de préférences prédéfinies correspondante au pays que vous
avez sélectionné.
6
Appuyez sur le bouton OK.
Le balayage automatique des canaux peut
démarrer.
• Le nombre de chaînes enregistrées automatiquement par
l’enregistreur DVD est fonction du nombre de chaînes trouvées.
7
Une fois le balayage automatique des canaux
terminé, le réglage automatique de l’horloge
démarre automatique dans les 10 secondes.
Si vous souhaitez démarrer immédiatement le
réglage automatique de l’horloge, appuyez sur
le bouton OK. Si vous ne souhaitez pas
effectuer le réglage automatique de l’horloge,
appuyez sur le bouton CANCEL ou MENU.
8
Patientez jusqu’à ce que la date et l’heure
actuelles s’affichent automatiquement. Si vous
souhaitez quitter le réglage automatique de
l’horloge, appuyez sur le bouton MENU.
Branchement et réglage
automatique
Aprésent chargement des informations
du canal. Vérifiez le branchement
de l’antenne et du câble TV.
OK
Annuler
Recherche des chaînes
Recherche en cours.
5%
Balayage automatique du canal réussi.
Appuyez sur la touche [OK]
pour paramétrer automatiquement l’horloge.
OK
Annuler
Veuillez patienter. Paramétrage de l’horloge.
Si vous souhaitez quitter le menu de réglage
de l'heure, appuyez sur la touche [MENU].
Press 1 for English
Touche 2 pour Français
Drücken Sie 3 Für Deutsch
Pulse 4 para Español
Premere 5 per Italiano
Druk op 6 voor Nederlands
A
B
DK
FIN
D
NL
I
N
P
E
S
CH
TR
GR
HU
PL
CZ
Autres
Sélection pays
OKDÉPLA. SORTIE
A(Austria) NL(Netherlands) S(Sweden) PL(Poland)
B(Belgium) I(Italy) CH(Swiss) CZ(Czech)
DK(Denmark) N(Norway) TR(Turkey) Autres
FIN(Finland) P(Portugal) GR(Greece)
D(Deutschland) E(Spain) HU(Hungary)
00842C-R125-XEB-FRA_18~41 2005.6.14 8:11 PM Page 25

2
Appuyez sur les boutons …† pour
sélectionner Paramétrer, puis appuyez sur le
bouton √ ou OK.
3
Appuyez sur les boutons …† pour sélectionner
Paramétrer Horloge, puis appuyez sur le
bouton √ ou OK.
Utilisez les boutons …†œ √ de navigation pour saisir
l’heure, la date ou l’année. Utilisez les touches
numériques pour saisir directement les données de
l’horloge. Le jour de la semaine s'affiche
automatiquement.
4
Appuyez sur les boutons …† pour sélectionner
Oui pour le réglage de la fonction de réglage
automatique de l’horloge.
5
Appuyez sur le bouton OK et la date et l’heure
seront alors sauvegardées.
Si vous n’appuyez pas sur le bouton OK, elles ne seront
pas sauvegardées.
26
- Français
Ce menu est utilisé pour régler l’heure actuelle.
Vous devez régler l’heure pour utiliser l’enregistrement
programmé.
1
Appuyez sur le bouton MENU, appareil en
mode Arrêt/Pas de disque.
Réglage de l’horloge
Installation du
système
■
Le câble RF doit être connecté afin de régler
l’horloge automatique.
Voir le chapitre (Branchements) en page 18.
■
L’enregistreur DVD règle automatiquement
l’horloge selon la diffusion du signal de l’heure
entre les chaînes PR1 à PR5. Si vous n’avez
pas besoin de la fonction de réglage
automatique de l’horloge, sélectionnez Off
(Arrêt).
REMARQUE
REVENIROKDÉPLA. SORTIE
Enregistrer par Minuterie
Pas De Disque
ShowView
√√
Enregistrer par Minuterie
√√
ShowView Allongé : Non
√√
Programme
Paramétrer
REVENIROKDÉPLA. SORTIE
Paramétrer
Pas De Disque
Système
√√
Paramétrer Horloge
√√
Langue
√√
Audio
√√
Vidéo
√√
Contrôle Parental
√√
Installation
√√
Programme
Paramétrer
REVENIROKDÉPLA. SORTIE
Paramétrer Horloge
Pas De Disque
Programme
Paramétrer
12 : 00 01 / JAN / 2005 SAM Oui
Temps Date
Auto Horloge
REVENIROKDÉPLA. SORTIE
Paramétrer Horloge
Pas De Disque
Programme
Paramétrer
12 : 00 01 / JAN / 2005 SAM Oui
Temps Date
Auto Horloge
9
Vérifiez la date et l’heure.
• Si elles sont : correctes, appuyez sur le bouton OK et la date et
l’heure seront alors sauvegardées.
Si vous n'appuyez pas sur
le bouton OK, la date et l'heure seront sauvegardées
automatiquement après 5 secondes.
• Si elles sont : incorrectes, saisissez l’heure, la date, l’année
correctes à l’aide des boutons …†œ √ Appuyez sur le bouton
OK et la date et l’heure seront alors sauvegardées.
Si vous devez modifier le réglage de l’horloge, vous pouvez le
faire manuellement.
■
L’enregistreur DVD est maintenant prêt à fonctionner.
La fonction “Branchement et réglage automatique” est
déjà réglée. Ainsi, si vous souhaitez modifier la fonction
déjà réglée, vous pouvez la modifier en pré-réglant les
chaînes dans le menu OSD “Presetting Channels with
the Manual set up function” Pré-réglage des canaux à
l’aide de la fonction de configuration manuelle).
(voir page 28)
■
La fonction de réglage automatique peut être exécutée
en appuyant sur é (STOP) sur l’appareil pendant 5
secondes au moins en continu durant l’arrêt, aucun
disque n’étant inséré.
REMARQUE
REVENIROKDÉPLA. SORTIE
Paramétrer Horloge
Pas De Disque
Programme
Paramétrer
12 : 00 01 / JAN / 2005 SAM Oui
Temps Date
Auto Horloge
00842C-R125-XEB-FRA_18~41 2005.6.14 8:11 PM Page 26

Français -
27
Installation du
système
4
Appuyez sur les boutons …† pour
sélectionner Installation Auto , puis appuyez
sur le bouton √ ou OK.
Le message “Vos données seront perdues. Appuyez sur
[OK] pour poursuivre, [MENU] à quitter.” s’affiche.
5
Appuyez sur le bouton OK, puis sur les
boutons …†œ √ pour sélectionner votre pays.
• L’enregistreur DVD recherche les chaînes selon une liste
préférentielle pré-réglée correspondant au pays que vous
avez sélectionné.
6
Appuyez sur le bouton OK pour continuer.
Si vous souhaitez quitter, appuyez sur le bouton MENU.
7
Le balayage des canaux démarre.
Appuyez sur le bouton OK pour arrêter le réglage
automatique.
Cette fonctionnalité vous permet de régler manuellement la
bande du syntoniseur de l’enregistreur DVD sur l’antenne ou
le câble, quel que soit celui que vous avez connecté à la prise
d’entrée de l’antenne lors de l’installation initiale.
1
Appuyez sur le bouton MENU, appareil en
mode Arrêt/Pas de disque.
2
Appuyez sur les boutons …† pour
sélectionner Paramétrer, puis appuyez sur le
bouton √ ou OK.
3
Appuyez sur les boutons …† pour
sélectionner Installation, puis appuyez sur le
bouton √ ou OK.
Pré-réglage des canaux
avec la fonction de réglage
automatique
Reportez-vous au tableau suivant lors de la
sélection de votre pays.
REVENIROKDEPLA. SORTIE
Enregistrer par Minuterie
Pas De Disque
ShowView
√√
Enregistrer par Minuterie
√√
ShowView Allongé : Non
√√
Programme
Paramétrer
REVENIROKDEPLA. SORTIE
Installation
Pas De Disque
Installation Auto
√√
Installation Manuelle
√√
Programme
Paramétrer
REVENIROKDÉPLA. SORTIE
Paramétrer
Pas De Disque
Système
√√
Paramétrer Horloge
√√
Langue
√√
Audio
√√
Vidéo
√√
Contrôle Parental
√√
Installation
√√
Programme
Paramétrer
REVENIROKDEPLA. SORTIE
Installation
Pas De Disque
Installation Auto
√√
Installation Manuelle
√√
Programme
Paramétrer
Vos données seront perdues. Appuyez sur
[OK] pour poursuivre, [MENU] à quitter.
OK
REVENIROK SORTIE
Installation Auto
Pas De Disque
Veuillez attendre
11%
Balayage...
Programme
Paramétrer
Arrêt
Sélection pays
REVENIROKDEPLA. SORTIE
Installation
Pas De Disque
F
A
B
DK
FIN
D
NL
I
N
P
E
S
CH
TR
GR
HU
PL
CZ
Autres
A(Austria) NL(Netherlands) S(Sweden) PL(Poland)
B(Belgium) I(Italy) CH(Swiss) CZ(Czech)
DK(Denmark) N(Norway) TR(Turkey) Autres
FIN(Finland) P(Portugal) GR(Greece)
D(Deutschland) E(Spain) HU(Hungary)
00842C-R125-XEB-FRA_18~41 2005.6.14 8:11 PM Page 27

28
- Français
4
Appuyez sur les boutons …† pour sélectionner
Installation Manuelle, puis appuyez sur le
bouton √ ou OK .
5
Appuyez sur les boutons …† pour
sélectionner un PR (programme) que vous
souhaitez éditer, supprimer ou permuter, puis
appuyez sur le bouton √ ou OK.
Sélectionnez Editer, Suppr. ou Swap.
• En cas d'édition : vous pouvez ajouter ou éditer un PR
(programme). Après la modifications des informations du
PR (CH, Nom, Décodeur, MFT, Système), sélectionnez
Enreg., puis appuyez sur le bouton OK.
- CH : Procédez à la syntonisation d’une chaîne à l’aide des
boutons œ √.
- Nom : Permet d’afficher le nom de la chaîne détecté
automatiquement dans le signal de diffusion. Si il
n’est pas détecté, vous pouvez éditer le nom en
utilisant les boutons …†œ √.
- Décodeur : Si vous l’activez, vous pouvez enregistrer les
chaînes cryptées en utilisant le boîtier du
décodeur externe. Avant de l’activer, reportez-
vous au chapitre concernant la connexion du
boîtier du décodeur externe en page 19.
- MFT : Vous pouvez procéder à une meilleure syntonisation
de la fréquence de la chaîne en utilisant les boutons
œ √.
- Système : Vous pouvez sélectionner le système de diffusion
du canal reçu (B/G ou L/L').
• En cas de suppression : l’information relative à la chaîne
du PR (programme) sélectionné sera supprimée.
• En cas de permutation : Vous pouvez permuter les
informations relatives aux chaînes de deux PR
(programmes). Par exemple, si vous souhaitez permuter
PR2 et PR5, sélectionnez swap (Permuter) pour PR2, puis
appuyez sur le bouton √ ou OK pour PR5.
Vous pouvez ajouter un canal pré-réglé que la
recherche automatique des canaux aurait omis.
Vous pouvez également supprimer un canal que vous
souhaitez retirer.
Vous pouvez programmer l’ordre des canaux.
1
Appuyez sur le bouton MENU, appareil en
mode Arrêt/Pas de disque.
2
Appuyez sur les boutons …† pour
sélectionner Paramétrer, puis appuyez sur le
bouton √ ou OK.
3
Appuyez sur les boutons …† pour
sélectionner Installation, puis appuyez sur le
bouton √ ou OK.
Pré-réglage des canaux
avec la fonction de réglage
manuel
Installation du
système
REVENIROKDEPLA. SORTIE
Enregistrer par Minuterie
Pas De Disque
ShowView
√√
Enregistrer par Minuterie
√√
ShowView Allongé : Non
√√
Programme
Paramétrer
REVENIROKDEPLA. SORTIE
Installation
Pas De Disque
Installation Auto
√√
Installation Manuelle
√√
Programme
Paramétrer
REVENIROKDÉPLA. SORTIE
Paramétrer
Pas De Disque
Système
√√
Paramétrer Horloge
√√
Langue
√√
Audio
√√
Vidéo
√√
Contrôle Parental
√√
Installation
√√
Programme
Paramétrer
DEPLA.
OK
Installation Manuelle
Enreg.
REVENIROKDEPLA. SORTIE
Installation Manuelle
Pas De Disque
01 - - - - - - - - - - / -
√√
02 - - - - - - - - - - / -
√√
03 - - - - - - - - - - / -
√√
04 - - - - - - - - - - / -
√√
05 - - - - - - - - - - / -
√√
06 - - - - - - - - - - / -
√√
07 - - - - - - - - - - / -
√√
PR CH Nom Décodeur Système Éditer
Éditer
Suppr.
Swap
REVENIROKDEPLA. SORTIE
Installation Manuelle
Pas De Disque
01 - - - - - - - - - - / -
√√
02 - - - - - - - - - - / -
√√
03 - - - - - - - - - - / -
√√
04 - - - - - - - - - - / -
√√
05 - - - - - - - - - - / -
√√
06 - - - - - - - - - - / -
√√
07 - - - - - - - - - - / -
√√
PR CH Nom Décodeur Système Éditer
PR 01
CH
- - -
Nom
- - - -
Décodeur
Non
MFT
- - - - - -
Système
L/ L’
00842C-R125-XEB-FRA_18~41 2005.6.14 8:11 PM Page 28

Français -
29
4
Appuyez sur les boutons …† pour sélectionner
l’option de la langue souhaitée, puis appuyez
sur le bouton √ ou OK.
● Audio: Pour le son du haut-parleur.
● Sous-Titre: Pour les sous-titres du disque.
● Menus du Disque: Pour le menu disque contenu sur le
disque
● Menus du l’écran: Pour le menu de lecture de votre
enregistreur DVD
●
Sous-Titre DivX
: Sélection d'une langue de sous-
titre DivX prise en charge par
zone.
5
Appuyez sur les boutons …† pour sélectionner
la Langue souhaitée, puis appuyez sur le
bouton √ ou OK.
Si vous avez réglé préalablement les options audio,
sous-titres, menu disque, menu d'affichage à l'écran,
langue des sous-titres DivX, elles apparaissent
automatiquement à chaque fois que vous visionnez
un film.
Si la langue sélectionnée n’est pas enregistrée sur le
disque, la langue originale pré-enregistrée est sélectionnée.
1
Appuyez sur le bouton MENU, appareil en
mode Arrêt/Pas de disque.
2
Appuyez sur les boutons …† pour
sélectionner Paramétrer, puis appuyez sur le
bouton √ ou OK.
3
Appuyez sur les boutons …† pour
sélectionner Langue, puis appuyez sur le
bouton √ ou OK.
Le menu de réglage de la langue s’affiche.
Configuration des options
de langue
■
Appuyez sur le bouton RETURN ou œ pour
revenir au menu précédent. Appuyez sur le
bouton MENU pour quitter le menu.
■
La langue sélectionnée n’apparaîtra que si elle
est prise en charge par le disque.
■
Si la langue des sous-titres s'affiche avec
des caractères corrompus, faites
correspondre les sous-titres DivX à la
zone correspondante.
Si cela ne fonctionne pas, le format n'est
pas pris en charge.
REMARQUE
Installation du
système
REVENIROKDEPLA. SORTIE
Langue
Pas De Disque
Audio : Original
√√
Sous-Titre : Automatique
√√
Menus du Disque : Français
√√
Menus du l’écran : Français
√√
Sous-Titre DivX : Western
√√
Programme
Paramétrer
REVENIROKDÉPLA. SORTIE
Enregistrer par Minuterie
Pas De Disque
ShowView
√√
Enregistrer par Minuterie
√√
ShowView Allongé : Non
√√
Programme
Paramétrer
REVENIROKDÉPLA. SORTIE
Paramétrer
Pas De Disque
Système
√√
Paramétrer Horloge
√√
Langue
√√
Audio
√√
Vidéo
√√
Contrôle Parental
√√
Installation
√√
Programme
Paramétrer
REVENIROKDEPLA. SORTIE
Langue
Pas De Disque
Audio : Original
√√
Sous-Titre : Automatique
√√
Menus du Disque : Français
√√
Menus du l’écran : Français
√√
Sous-Titre DivX : Western
√√
Programme
Paramétrer
Original
English
Français
Deutsch
Español
Italiano
Nederlands
Korean
Western
Central
Greek
English, Breton, Catalan, Danish, Dutch,
Faroese, Finnish, French, Gaelic, German,
Icelandic, Irish, Italian, Norwegian, Portuguese,
Spanish et Swedish
English, Albanian, Croatian, Czech, Hungarian,
Polish, Romanian, Slovak, Slovene et
Serbian(Latin)
English et modern Greek
00842C-R125-XEB-FRA_18~41 2005.6.14 8:11 PM Page 29

30
- Français
Une vidéo DVD se compose de “Titres” et de
“Chapitres”. Lorsque vous enregistrez un programme,
vous créez par la même occasion un titre.Si vous
utilisez cette fonction, le titre se divise
en chapitres.
1
Appuyez sur le bouton MENU, appareil en
mode Arrêt/Pas de disque.
2
Appuyez sur les boutons …† pour
sélectionner Paramétrer, puis appuyez sur le
bouton √ ou OK.
3
Appuyez sur les boutons …† pour
sélectionner Système, puis appuyez sur le
bouton √ ou OK.
Le menu du système s’affiche.
4
Appuyez sur les boutons …† pour sélectionner
Créateur de chapitres, puis appuyez sur le
bouton √ ou OK.
Création automatique de
chapitre
Installation du
système
Vous pouvez sélectionner l’un des quatre modes d’enregistrement
en appuyant plusieurs fois sur le bouton REC MODE.
Le mode
EP est l'un des quatre modes REC (XP, SP, LP, EP).
En
mode EP (Lecture étendue), vous pouvez régler la durée
d’enregistrement sur 6 ou 8 heures grâce à ce réglage.
1
Appuyez sur le bouton MENU, appareil en
mode Arrêt/Pas de disque.
2
Appuyez sur les boutons …† pour
sélectionner Paramétrer, puis appuyez sur le
bouton √ ou OK.
3
Appuyez sur les boutons …† pour
sélectionner Système, puis appuyez sur le
bouton √ ou OK.
Le menu du système s’affiche.
4
Appuyez sur les boutons …† pour
sélectionner EP Mode Temps, puis appuyez
sur le bouton √ ou OK.
5
Appuyez sur les boutons …† pour
sélectionner l’heure souhaitée, puis appuyez
sur le bouton √ ou OK.
Réglage de l’heure en
mode EP
REVENIROKDEPLA. SORTIE
Système
Pas De Disque
EP Mode Temps : 6 Heures
√√
Créateur de chapitre
: Non
√√
Affichage du Panneau
: Luminosité
√√
NICAM : Oui
√√
DivX(R) Immatriculation
√√
Programme
Paramétrer
REVENIROKDÉPLA. SORTIE
Enregistrer par Minuterie
Pas De Disque
ShowView
√√
Enregistrer par Minuterie
√√
ShowView Allongé : Non
√√
Programme
Paramétrer
REVENIROKDÉPLA. SORTIE
Paramétrer
Pas De Disque
Système
√√
Paramétrer Horloge
√√
Langue
√√
Audio
√√
Vidéo
√√
Contrôle Parental
√√
Installation
√√
Programme
Paramétrer
REVENIROKDEPLA. SORTIE
Système
Pas De Disque
EP Mode Temps : 6Heures
√√
Créateur de chapitre
: Non
√√
Affichage du Panneau
: Luminosité
√√
NICAM : Oui
√√
DivX(R) Immatriculation
√√
Programme
Paramétrer
6 Heures
8 Heures
REVENIROKDÉPLA. SORTIE
Paramétrer
DVD-RW(V)
Système
√√
Paramétrer Horloge
√√
Langue
√√
Audio
√√
Vidéo
√√
Contrôle Parental
√√
Installation
√√
Navigation
par Disque
Gestion.
de Disque
Programme
Paramétrer
REVENIROKDEPLA. SORTIE
Système
DVD-RW(V)
EP Mode Temps : 6 Heures
√√
Créateur de chapitre
: Non
√√
Affichage du Panneau
: Luminosité
√√
NICAM : Oui
√√
DivX(R) Immatriculation
√√
Navigation
par Disque
Gestion.
de Disque
Programme
Paramétrer
REVENIROKDÉPLA. SORTIE
Navigation par Disque
DVD-RW(V)
Liste de Titres
√√
Navigation
par Disque
Gestion.
de Disque
Programme
Paramétrer
REVENIROKDEPLA. SORTIE
Système
DVD-RW(V)
EP Mode Temps : 6 Heures
√√
Créateur de chapitre
: Non
√√
Affichage du Panneau
: Luminosité
√√
NICAM : Oui
√√
DivX(R) Immatriculation
√√
Navigation
par Disque
Gestion.
de Disque
Programme
Paramétrer
Non
Oui
(mode V)
00842C-R125-XEB-FRA_18~41 2005.6.14 8:11 PM Page 30

Français -
31
5
Appuyez sur les boutons …† pour sélectionner
Oui ou Non, puis appuyez sur le bouton √ ou
OK.
• Non : Sélectionnez cette option lorsque vous ne souhaitez pas
la création automatique de chapitres.
• Oui : Sélectionnez cette option lorsque vous souhaitez la
création automatique de chapitres.
6
Appuyez sur le bouton REC pour démarrer
l'enregistrement.
(Voir page 43 pour régler la
vitesse d'enregistrement)
Le message
“Souhaitez-vous créer le menu du chapitre
après cet enr.?” s’affiche.
7
Appuyez sur les boutons œ √ pour sélectionner
Oui, puis appuyez sur le bouton OK.
Un chapitre aura une durée d’environ 5 minutes en XP
ou SP et d'environ 15 minutes en mode LP et EP.
8
Appuyez sur le bouton STOP pour arrêter
l’enregistrement.
9
Pour afficher les chapitres créés, finalisez le
disque (
Voir page 86)
puis appuyez sur le
bouton DISC MENU. Le menu des chapitres
s’affiche.
Installation du
système
Souhaitez-vous créer le menu du chapitre
après cet enr.?
Oui
Non
■
La fonction de création de chapitre
automatique ne fonctionne pas pendant
l'enregistrement programmé ou lorsque vous
coupez l’alimentation.
■
Les disques DVD-R ne peuvent pas être
non-finalisés.
ATTENTION
CHAPITRE
Précédent Haut Suivant
Réglez la luminosité de l'affichage en façade de l'appareil.
1
Appuyez sur le bouton MENU, appareil en
mode Arrêt/Pas de disque.
2
Appuyez sur les boutons …† pour
sélectionner Paramétrer, puis appuyez sur le
bouton √ ou OK.
3
Appuyez sur les boutons …† pour
sélectionner Système, puis appuyez sur le
bouton √ ou OK.
Le menu du système s’affiche.
Configuration des options
d’affichage en façade
REVENIROKDÉPLA. SORTIE
Enregistrer par Minuterie
Pas De Disque
ShowView
√√
Enregistrer par Minuterie
√√
ShowView Allongé : Non
√√
Programme
Paramétrer
REVENIROKDÉPLA. SORTIE
Paramétrer
Pas De Disque
Système
√√
Paramétrer Horloge
√√
Langue
√√
Audio
√√
Vidéo
√√
Contrôle Parental
√√
Installation
√√
Programme
Paramétrer
REVENIROKDEPLA. SORTIE
Système
Pas De Disque
EP Mode Temps : 6 Heures
√√
Créateur de chapitre
: Non
√√
Affichage du Panneau
: Luminosité
√√
NICAM : Oui
√√
DivX(R) Immatriculation
√√
Programme
Paramétrer
00842C-R125-XEB-FRA_18~41 2005.6.14 8:11 PM Page 31

32
- Français
4
Appuyez sur les boutons …† pour
sélectionner Affichage du panneau, puis
appuyez sur le bouton √ ou OK.
5
Appuyez sur les boutons …† pour
sélectionner l’élément souhaité, puis appuyez
sur le bouton √ ou sur OK.
• Luminosité : Rend l'affichage en façade lumineux.
• Réduite : Atténue la luminosité de l'affichage en façade.
• Auto : Permet de réduire automatiquement la luminosité
de l'affichage en façade lorsque l'appareil n'est pas
sous tensio
1
Appuyez sur le bouton MENU, appareil en
mode Arrêt/Pas de disque.
2
Appuyez sur les boutons …† pour
sélectionner Paramétrer, puis appuyez sur
le bouton √ ou OK.
3
Appuyez sur les boutons …† pour
sélectionner Système, puis appuyez sur le
bouton √ ou OK.
Le menu du système s’affiche.
Les programmes NICAM sont divisés en 3 types.
Stéréo NICAM, Mono NICAM et bilingue (transmission
dans une autre langue).
Les programmes NICAM sont toujours accompagnés d'un
programme de son mono standard et vous pouvez
sélectionner le son souhaité en activant ou en désactivant
NICAM.
Configuration des options
NICAM
Installation du
système
REVENIROKDEPLA. SORTIE
Système
Pas De Disque
EP Mode Temps : 6 Heures
√√
Créateur de chapitre
: Non
√√
Affichage du Panneau
: Luminosité
√√
NICAM : Oui
√√
DivX(R) Immatriculation
√√
Programme
Paramétrer
Luminosité
Réduite
Auto
REVENIROKDÉPLA. SORTIE
Paramétrer
Pas De Disque
Système
√√
Paramétrer Horloge
√√
Langue
√√
Audio
√√
Vidéo
√√
Contrôle Parental
√√
Installation
√√
Programme
Paramétrer
REVENIROKDEPLA. SORTIE
Système
Pas De Disque
EP Mode Temps : 6 Heures
√√
Créateur de chapitre
: Non
√√
Affichage du Panneau
: Luminosité
√√
NICAM : Oui
√√
DivX(R) Immatriculation
√√
Programme
Paramétrer
REVENIROKDÉPLA. SORTIE
Enregistrer par Minuterie
Pas De Disque
ShowView
√√
Enregistrer par Minuterie
√√
ShowView Allongé : Non
√√
Programme
Paramétrer
00842C-R125-XEB-FRA_18~41 2005.6.14 8:11 PM Page 32

Français -
33
4
Appuyez sur les boutons …† pour
sélectionner NICAM, puis appuyez sur le
bouton √ ou sur OK.
5
Appuyez sur les boutons …† pour
sélectionner Oui ou Non, puis appuyez sur
le bouton √ ou OK.
• Non : Réglez sur cette position pour enregistrer le son
mono standard pendant une émission NICAM
uniquement si le son stéréo est déformé par des
conditions de réception médiocres.
• Oui : Mode NICAM
Installation du
système
REVENIROKDEPLA. SORTIE
Système
Pas De Disque
EP Mode Temps : 6 Heures
√√
Créateur de chapitre
: Non
√√
Affichage du Panneau
: Luminosité
√√
NICAM : Oui
√√
DivX(R) Immatriculation
√√
Programme
Paramétrer
Non
Oui
Veuillez enregistrer votre enregistreur DVD au format
Vidéo DivX®à la demande à l'aide de votre code
d'enregistrement.
Pour davantage d'informations, rendez-vous sur le site
www.divx.com/vod.
DivX(R) Immatriculation
Vous pouvez relier le DVD-R120 ou le DVD-R121 à un
Home cinéma ou un amplificateur externe.
Cette option vous permet de configurer le dispositif
audio et les paramètres de son en fonction du système
audio en cours d'utilisation.
1
Appuyez sur le bouton MENU, appareil en
mode Arrêt/Pas de disque.
2
Appuyez sur les boutons …† pour
sélectionner Paramétrer, puis appuyez sur le
bouton √ ou sur OK.
3
Appuyez sur les boutons …† pour
sélectionner Audio, puis appuyez sur le
bouton √ ou OK.
Le menu de réglage audio s’affiche.
4
Appuyez sur les boutons …† pour
sélectionner l’option audio souhaitée, puis
appuyez sur le bouton √ ou sur OK.
Configuration des options
audio
REVENIROKDEPLA. SORTIE
Audio
Pas De Disque
Sortie Numérique : PCM
√√
DTS : Non
√√
Compression Dynamique
: Oui
√√
Programme
Paramétrer
REVENIROKDEPLA. SORTIE
Audio
Pas De Disque
Sortie Numérique : PCM
√√
DTS : Non
√√
Compression Dynamique
: Oui
√√
Programme
Paramétrer
PCM
Bitstream
REVENIROKDÉPLA. SORTIE
Paramétrer
Pas De Disque
Système
√√
Paramétrer Horloge
√√
Langue
√√
Audio
√√
Vidéo
√√
Contrôle Parental
√√
Installation
√√
Programme
Paramétrer
REVENIROKDÉPLA. SORTIE
Enregistrer par Minuterie
Pas De Disque
ShowView
√√
Enregistrer par Minuterie
√√
ShowView Allongé : Non
√√
Programme
Paramétrer
00842C-R125-XEB-FRA_18~41 2005.6.14 8:11 PM Page 33

5
Appuyez sur les boutons …† pour
sélectionner l’élément souhaité, puis appuyez
sur le bouton √ ou sur OK.
REMARQUE
Options audio
Sortie Numérique
1. PCM : Sélectionnez cette option si vous ne disposez
pas d'équipement capable de décoder un signal
Dolby Digital (ou MPEG-2). Lors de la lecture de
la bande son Dolby Digital (ou MPEG-2), la
sortie numérique est convertie en stéréo PCM.
2. Bitstream : Sortie audio Dolby Digital (ou MPEG-2) en
tant que flot binaire. Sélectionnez cette
option si votre récepteur AV ou votre
amplificateur AV dispose d'un décodeur
Dolby Digital (ou MPEG-2).
■
Le réglage de la sortie numérique s'applique
aussi bien au son Dolby Digital qu'au son
MPEG-2. La bande son LPCM sort toujours en
PCM. Elle n'a pas de lien avec le réglage de la
sortie numérique.
■
Assurez-vous de sélectionner la sortie
numérique correcte, sinon vous n'entendrez
aucun son ou des bruits violents.
REMARQUE
DTS
1. Non : Aucune sortie de signal DTS.
Sélectionnez cette option si votre récepteur AV ou votre
amplificateur AV ne dispose pas de décodeur DTS.
2. Oui : Un flot binaire DTS est émis via la sortie numérique lors
de la lecture de la bande DTS.
Sélectionnez cette option si votre récepteur AV (ou votre
amplificateur AV) dispose d'un décodeur DTS.
Compression Dynamique
Cette fonction est active uniquement lorsqu'un signal Dolby
Digital est détecté.
1. Non : Vous profitez du film avec la plage dynamique
standard.
2. Oui : Lorsque les bandes son d’un film sont lues à faible
volume ou à partir d'enceintes plus petites, le système
peut appliquer une compression appropriée afin de
rendre les contenus faibles plus audibles et éviter que
les passages dramatiques soient trop bruyants.
■
Lors de la lecture de la bande son DTS, le son
n’est pas émis pas de la sortie AV Audio.
REMARQUE
■
Appuyez sur le bouton RETURN ou œ pour
revenir au menu précédent. Appuyez sur le
bouton MENU pour quitter le menu.
34
- Français
Installation du
système
Vous pouvez profiter d'une image de meilleure qualité
grâce aux connexions RVB ou Vidéo composant.
1
Appuyez sur le bouton MENU, appareil en
mode Arrêt/Pas de disque.
2
Appuyez sur les boutons …† pour
sélectionner Paramétrer, puis appuyez sur le
bouton √ ou OK.
3
Appuyez sur les boutons …† pour
sélectionner Video, puis appuyez sur le
bouton √ ou sur OK.
Le menu de réglage vidéo s’affiche.
Configuration des options
Sortie Video
REVENIROKDEPLA. SORTIE
Video
Pas De Disque
Format Écran
: 4:3 Letter Box
√√
Réduction Bruit 3D
: Non
√√
Réduction HDMI/DVI
: 576p
√√
Sortie Vidéo
: Component
√√
Programme
Paramétrer
REVENIROKDÉPLA. SORTIE
Paramétrer
Pas De Disque
Système
√√
Paramétrer Horloge
√√
Langue
√√
Audio
√√
Vidéo
√√
Contrôle Parental
√√
Installation
√√
Programme
Paramétrer
REVENIROKDÉPLA. SORTIE
Enregistrer par Minuterie
Pas De Disque
ShowView
√√
Enregistrer par Minuterie
√√
ShowView Allongé : Non
√√
Programme
Paramétrer
00842C-R125-XEB-FRA_18~41 2005.6.14 8:11 PM Page 34

Français -
35
Installation du
système
4
Appuyez sur les boutons …† pour
sélectionner Sortie Vidéo, puis appuyez sur le
bouton √ ou sur OK.
5
Appuyez sur les boutons …† pour
sélectionner l’élément souhaité, puis appuyez
sur le bouton √ ou sur OK.
En mode composant, vous pouvez régler la sortie vidéo
sur balayage progressif (P.SCAN) ou Balayage
entrelacé, voir page 36.
Lorsque le câble HDMI n’est pas branché, les prises de
sortie vidéo disponibles sont les suivantes :
Prise Sortie Vidéo disponible
Sélectionnez Composant lorsque l'enregistreur est
raccordé à un téléviseur possédant une prise
Composant.
Sélectionner RVB pour les signaux de sortie RVB.
Component
RVB
Sortie Composant
(Y, Pb, Pr)
Péritel AV1
R, G, B
Composite
X
O
X
O
O
O
O
(Téléviseur en mode progressif)
X
X
X
X
X
O
X
O
O
O
O
Péritel AV2
Sortie Vidéo composite
Sortie S-vidéo
Composite
Mode de réglage
Mode RVB
Prise de sortie
Mode P.SCAN désactivé (mode entrelacé)
Mode P.SCAN activé
Mode Composant
REVENIROKDEPLA. SORTIE
Video
Pas De Disque
Format Écran
: 4:3 Letter Box
√√
Réduction Bruit 3D
: Non
√√
Réduction HDMI/DVI
: 576p
√√
Sortie Vidéo
: Component
√√
Programme
Paramétrer
Si le téléviseur prend en charge le balayage progressif,
appuyez sur le bouton P.SCAN en façade de l'enregistreur
DVD pour profiter d'une meilleure qualité vidéo.
1
Appuyez sur le bouton P.SCAN en façade de
l'enregistreur DVD, appareil en mode Arrêt.
“Veuillez appuyer sur [Oui] pour confirmer le
mode de balayage progressif. Sinon appuyez
sur [Non]
” apparaît. Appuyez sur les boutons œ √ pour
sélectionner Oui, puis appuyez sur le bouton OK.
2
Le message “
Veuillez paramétrer votre TV
sur I’entrée progressive Pour désactiver,
appuyer sur la touche [STOP].
” apparaît.
Appuyez sur le bouton OK.
3
Le message “
Mode Sortie Vidéo, Balayage
progressif,
” apparaît.
Pour activer le réglage
“Progressif”
■
L’écran ne s’affiche pas lorsque le câble
HDMI est branché.
■
Le réglage Progressif est disponible
uniquement lorsque l'enregistreur DVD est
en mode arrêt.
■
Le réglage Progressif est disponible
uniquement lorsque Sortie vidéo est réglée
sur Composant.
■
Si vous appuyez sur le bouton P.SCAN en
façade de l'enregistreur DVD en cours de
lecture, le message “Cette fonction n'est
disponible qu'en mode arrêt” apparaît à
l'écran.
REMARQUE
Veuillez appuyer sur [Oui] pour confirmer
le mode de balayage progressif.
Sinon appuyez sur [Non]
Oui Non
Veuillez paramétrer votre TV
sur I’entrée progressive
Pour désactiver, appuyer sur la touche [STOP].
Oui
Mode Sortie Vidéo,
Balayage progressif,
Component
RGB
■
Lorsque le câble HDMI est branché, l’autre
sortie Audio / Vidéo ne fonctionne pas.
Si la résolution est réglée sur 576p, la sortie
Composant est disponible.
REMARQUE
00842C-R125-XEB-FRA_18~41 2005.6.14 8:11 PM Page 35

Cette fonction vous permet de configurer les paramètres
de l'écran du téléviseur.
1
Appuyez sur le bouton MENU, appareil en mode
Arrêt/Pas de disque.
2
Appuyez sur les boutons …† pour sélectionner
Paramétrer, puis appuyez sur le bouton √ ou OK.
3
Appuyez sur les boutons …† pour sélectionner
Video, puis appuyez sur le bouton √ ou sur OK.
Le menu de réglage vidéo s’affiche.
4
Appuyez sur les boutons …† pour sélectionner
l’option vidéo souhaitée, puis appuyez sur le
bouton √ ou sur OK.
5
Appuyez sur les boutons …† pour sélectionner
l’élément souhaité, puis appuyez sur le bouton
√ ou sur OK.
Configuration des options
d’affichage (Vidéo)
■
Appuyez sur le bouton RETURN ou œ pour
revenir au menu précédent. Appuyez sur le
bouton MENU pour quitter le menu.
REMARQUE
36
- Français
Installation du
système
1
Appuyez sur le bouton P.SCAN en façade de
l'enregistreur DVD, appareil en mode Arrêt.
Le message “
Veuillez appuyer sur [Oui] pour
confirmer le mode de balayage entrelacé. Sinon
appuyez sur [Non]
” Appuyez sur les boutons œ √
pour sélectionner Oui, puis appuyez sur le bouton OK.
2
Le message “
Veuillez paramétrer votre TV
sur I’entrée entrelacée Pour désactiver, appuyer
sur la touche [STOP].
” apparaît. Appuyez sur le
bouton OK.
3
Le message “
Mode Sortie Vidéo, Balayage
entrelacé
” apparaît.
Pour annuler le réglage
“Progressif”
■
N'appuyez pas sur le bouton P.SCAN si votre
téléviseur ne prend pas en charge le mode
Progressif. Rien ne s'affiche à l'écran lorsque
vous appuyez sur ce bouton.
■
Si vous appuyez sur le bouton P.SCAN par
mégarde alors que votre téléviseur ne prend
pas en charge le mode Progressif, vous devrez
désactiver ce dernier. Pour désactiver le mode
Progressif, appuyez trois fois sur le bouton
P.SCAN situé en façade. Après extinction de la
diode lumineuse PSO située sur l’affichage en
façade, l'écran apparaît à nouveau.
REMARQUE
Veuillez appuyer sur [Oui] pour confirmer
le mode de balayage entrelacé.
Sinon appuyez sur [Non]
Oui Non
Veuillez paramétrer votre TV
sur I’entrée entrelacée
Pour désactiver, appuyer sur la touche [STOP].
Oui
Mode Sortie Vidéo,
Balayage entrelacé
REVENIROKDEPLA. SORTIE
Video
Pas De Disque
Format Écran
: 16:9 Large
√√
Réduction Bruit 3D
: Non
√√
Réduction HDMI/DVI
: 576p
√√
Sortie Vidéo
: Component
√√
Programme
Paramétrer
4:3 Letter Box
4:3 Pan-Scan
16:9 Large
REVENIROKDEPLA. SORTIE
Video
Pas De Disque
Format Écran
: 4:3 Letter Box
√√
Réduction Bruit 3D
: Non
√√
Réduction HDMI/DVI
: 576p
√√
Sortie Vidéo
: Component
√√
Programme
Paramétrer
REVENIROKDÉPLA. SORTIE
Paramétrer
Pas De Disque
Système
√√
Paramétrer Horloge
√√
Langue
√√
Audio
√√
Vidéo
√√
Contrôle Parental
√√
Installation
√√
Programme
Paramétrer
REVENIROKDÉPLA. SORTIE
Enregistrer par Minuterie
Pas De Disque
ShowView
√√
Enregistrer par Minuterie
√√
ShowView Allongé : Non
√√
Programme
Paramétrer
00842C-R125-XEB-FRA_18~41 2005.6.14 8:11 PM Page 36

Français -
37
Options d'affichage (Vidéo)
Cette fonction dépend du type de disque. Il est possible qu'elle
ne fonctionne pas pour certains types de disque.
Format Écran
Selon le type de téléviseur, il est possible que vous soyez obligé
d’ajuster le réglage de l’écran. (format de l'image)
• 4:3 Letter Box : Sélectionnez cette option pour voir l’ensemble
de l’écran au format 16/9 que propose le DVD,
même si l’écran de votre téléviseur est au
format 4:3. Des barres noires apparaissent en
haut et en bas de l’écran.
• 4:3 Pan - Scan : Sélectionnez cette option pour le téléviseur de
taille classique lorsque vous souhaitez voir la
partie centrale de l’image au format 16/9 (les
côtés gauche et droit de l’image sont coupés).
• 16:9 Large : Vous pouvez voir l’image 16/9 en entier sur votre
téléviseur à écran large.
Réduction Bruit 3D
● Oui : Procure une image plus nette grâce à la réduction du
bruit (pour enregistrement).
● Non : Normal.
Installation du
système
REVENIROKDEPLA. SORTIE
Video
Pas De Disque
Format Écran
: 16:9 Large
√√
Réduction Bruit 3D
: Non
√√
Réduction HDMI/DVI
: 576p
√√
Sortie Vidéo
: Component
√√
Programme
Paramétrer
Non
Oui
REVENIROKDEPLA. SORTIE
Video
Pas De Disque
Format Écran
: 16:9 Large
√√
Réduction Bruit 3D
: Non
√√
Réduction HDMI/DVI
: 576p
√√
Sortie Vidéo
: Component
√√
Programme
Paramétrer
4:3 Letter Box
4:3 Pan-Scan
16:9 Large
Résolution HDMI/DVI
Ce réglage est utilisé lorsque l’unité est connectée à des
appareils d’affichage (téléviseur, projecteur, etc.) par HDMI
ou DVI.
•
576p : 720 x 576
•
720p : 1280 x 720
•
1080i : 1920 x 1080
Choix de la sortie
• Raccordez le enregistreur DVD à votre téléviseur via
HDMI. Réglez l’entrée de votre téléviseur sur HDMI.
•
Appuyez sur le bouton P.SCAN lorsque l’unité est en mode
Arrêt pour sélectionner la résolution de sortie HDMI. Les
trois niveaux de résolution disponibles sont les suivants :
576p
→
720p
→
1080i.
■
Le balayage progressif s’active
automatiquement lorsque le câble HDMI est
branché (veuillez vous assurer que PSO
s’affiche sur la façade de l’enregistreur
DVD).
■
Les sorties vidéo et audio HDMI ne
fonctionnent que lorsque la fonction
balayage progressif est activée.
■
Reportez-vous au manuel d’utilisation de
votre téléviseur pour vérifier que celui-ci
prend en charge le balayage progressif.
Si tel est le cas, suivez les instructions du
manuel d’utilisation du téléviseur relatives
aux réglages du balayage progressif dans
les menus du téléviseur.
■
Si la sortie vidéo n’est pas correctement
réglée, l’écran risque de se bloquer.
■
Les résolutions disponibles pour la sortie
HDMI/DVI dépendent du téléviseur ou
projecteur connecté. Pour plus de détails,
reportez-vous au manuel d’utilisation de
votre téléviseur ou de votre projecteur.
■
Lorsque la résolution est modifiée, il se peut
que vous deviez attendre quelques
secondes avant qu’une image normale
apparaisse.
■
Si vous réglez la résolution de sortie HDMI
sur 720p ou 1080i, la sortie HDMI offre une
meilleure qualité d'image.
■
La sortie de l’écran de lecture DivX ne peut
être réglée que sur 576p.
REMARQUE
■
L’écran Menu effectue un zoom arrière
2/3 à 1080i.
REMARQUE
REVENIROKDEPLA. SORTIE
Video
Pas De Disque
Format Écran
: 4:3 Letter Box
√√
Réduction Bruit 3D
: Non
√√
Réduction HDMI/DVI
: 576p
√√
Sortie Vidéo
: Component
√√
Programme
Paramétrer
576p
720p
1080i
00842C-R125-XEB-FRA_18~41 2005.6.14 8:11 PM Page 37

38
- Français
4
Saisissez le code secret composé de 4
chiffres à l'aide des boutons numérotés de 0 à
9 de la télécommande.
Le message “Confirmer le mot de passe” s'affiche.
Veuillez ressaisir votre code secret.
5
Appuyez sur le bouton √ ou sur OK pour
sélectionner Utiliser le Code.
6
Appuyez sur les boutons …† pour
sélectionner Oui ou Non, puis appuyez sur le
bouton √ ou OK.
La fonction Contrôle parental peut être utilisée avec des
DVD ayant reçu un niveau de censure, ce qui permet
de contrôler le type de DVD qui peuvent être regardés
en famille. Un disque comporte 8 niveaux d’évaluation.
1
Appuyez sur le bouton MENU, appareil en
mode Arrêt/Pas de disque.
2
Appuyez sur les boutons …† pour
sélectionner Paramétrer, puis appuyez sur le
bouton √ ou OK.
3
Appuyez sur les boutons …† pour
sélectionner Contrôle Parental, puis appuyez
sur le bouton √ ou sur OK.
Configuration du contrôle
parental
■
Appuyez sur le bouton RETURN ou œ pour
revenir au menu précédent. Appuyez sur le
bouton MENU pour quitter le menu.
REMARQUE
Si vous avez oublié votre code secret
1
Retirez le disque.
2
Appuyez pendant plus de 5 secondes sur le
bouton (FF) situé en façade de l’appareil.
Installation du
système
REVENIR
OK
NEUMÉRO
SORTIE
Contrôle Parental
Pas De Disque
Créer le code
REVENIROK
NEUMÉRO
SORTIE
Contrôle Parental
Pas De Disque
Confirmer le mot de passe
Programme
Paramétrer
Programme
Paramétrer
REVENIROKDÉPLA. SORTIE
Paramétrer
Pas De Disque
Système
√√
Paramétrer Horloge
√√
Langue
√√
Audio
√√
Vidéo
√√
Contrôle Parental
√√
Installation
√√
Programme
Paramétrer
REVENIROKDÉPLA. SORTIE
Enregistrer par Minuterie
Pas De Disque
ShowView
√√
Enregistrer par Minuterie
√√
ShowView Allongé : Non
√√
Programme
Paramétrer
REVENIROKDEPLA. SORTIE
Contrôle Parental
Pas De Disque
Utiliser le Code :Non
√√
Non
Oui
Programme
Paramétrer
00842C-R125-XEB-FRA_18~41 2005.6.14 8:11 PM Page 38

Français -
39
1
Appuyez sur les boutons …† pour
sélectionner Modif. Code Secret.
2
Appuyez sur OK ou sur le bouton √.
Le message ‘Entrer code secret.’ s'affiche.
3
Saisissez le code secret composé de 4
chiffres à l'aide des boutons numérotés de
0 à 9 de la télécommande.
Le message ‘Confirmer le mot de passe’s'affiche.
Veuillez ressaisir votre code secret.
1
Appuyez sur les boutons …† pour
sélectionner Niveau de Contrôle.
2
Appuyez sur OK ou sur le bouton √.
Le niveau d'évaluation s'affiche.
3
Appuyez sur les boutons …† pour
sélectionner le niveau d'évaluation souhaité
puis appuyez sur le bouton OK ou √.
Si vous sélectionnez les niveaux 1 à 6 par exemple, les
disques comportant un niveau 7, 8 ne seront pas lus.
Un niveau supérieur indique que le programme est
destiné uniquement aux adultes.
A propos du niveau d'évaluation
A propos du Changement de mot de passe
■
Reportez-vous à la page 38 si vous avez
oublié votre code secret.
REMARQUE
Installation du
système
REVENIROKDEPLA. SORTIE
Contrôle Parental
Pas De Disque
Utiliser le Code : Oui
√√
Niveau de Contrôle :
Niveau 1 Enfants
√√
Modif. Code Secret
√√
REVENIROKDEPLA. SORTIE
Contrôle Parental
Pas De Disque
Utiliser le Code : Oui
√√
Niveau de Contrôle :
Niveau 1 enfants
√√
Modif. Code Secret
√√
Niveau 8 Adulte
Niveau 7
Niveau 6
Niveau 5
Niveau 4
Niveau 3
Niveau 2
Niveau 1 Enfants
Programme
Paramétrer
Programme
Paramétrer
REVENIROK
NEUMÉRO
SORTIE
Modif. Code Secret
Pas De Disque
Enter code secret
REVENIROK
NEUMÉRO
SORTIE
Modif. Code Secret
Pas De Disque
Confirmer le mot de passe
***
REVENIROKDEPLA. SORTIE
Contrôle Parental
Pas De Disque
Utiliser le Code : Oui
√√
Niveau de Contrôle :
Niveau 1 Enfants
√√
Modif. Code Secret
√√
Programme
Paramétrer
Programme
Paramétrer
Programme
Paramétrer
00842C-R125-XEB-FRA_18~41 2005.6.14 8:11 PM Page 39

40
- Français
Cet appareil peut enregistrer sur différents types de
disques. Avant d’enregistrer, lisez les instructions suivantes et
sélectionnez le type de disque de votre choix.
Disques enregistrables
Ce graveur peut enregistrer sur les disques suivants.
DVD-RAM DVD-RW DVD-R
● Les DVD-RW et les DVD-RAM sont réinscriptibles.
● Les DVD-R ne sont pas réinscriptibles.
Compatibilité entre le graveur Samsung et les
graveurs des autres marques
Enregistrement
Avant l’enregistrement
Avant l’enregistrement..........................................40
Enregistrement du programme
télévisé que vous regardez..................................42
Enregistrement à partir d’une source
extérieure que vous regardez..............................44
Copie à partir d'un caméscope............................45
Enregistrement avec une seule touche (OTR)...46
Réalisation d'un enregistrement programmé......47
Enregistrement flexible (pour l’enregistrement
par minuterie uniquement) ...................................48
Editer une Minuterie Standard ............................48
Supprimer une minuterie standard......................49
Utilisation de la fonction ShowView ....................50
ShowView Extened...............................................51
Enregistrer la liste des dossiers programmés.....51
Cette section présente différentes méthodes pour
enregistrer un DVD.
Types de Recording Appareil Finalisation
Enregistrement supplémentaire
disques format d’enregist
avec le graveur Samsung
DVD-RAM Mode VR
Samsung X Enregistrable
Autre société X Enregistrable
Samsung
Finalisé Non enregistrable
Mode VR
Non finalisé Enregistrable
Autre société
Finalisé Non enregistrable
DVD-RW
Non finalisé Enregistrable
Samsung
Finalisé Non enregistrable
Mode V
Non finalisé Enregistrable
Autre société
Finalisé Non enregistrable
Non finalisé Non enregistrable
Samsung
Finalisé Non enregistrable
DVD-R Mode V
Non finalisé Enregistrable
Autre société
Finalisé Non enregistrable
Non finalisé Non enregistrable
■
Finalisé
- Le DVD-R/RW est fermé : aucun
enregistrement supplémentaire ne peut être
fait.
■
Non finalisé
- Cela permet un enregistrement
additionnel sur un disque DVD-RW déjà
enregistré sur l'enregistreur DVD.
- Un disque DVD-RW déjà enregistré en
DAO (Disc At Once) sur un PC ne peut
pas être non-finalisé.
- Un DVD-RW qu ia été enregistré en mode
Vidéo sur un graveur d’une autre marque est
obligatoirement finalisé.
- Un DVD-R est obligatoirement finalisé.
Remarque
Enregistrement
00842C-R125-XEB-FRA_18~41 2005.6.14 8:11 PM Page 40

Films non enregistrables
Les films possédant un système de protection anti-copie ne
peuvent pas être enregistrés sur ce graveur DVD.
Lorsque le graveur DVD reçoit un signal anti-copie
pendant l’enregistrement, celui-ci s’arrête et le message
suivant s’affiche sur l’écran.
A propos des signaux anti-copie
Les programmes qui contiennent des signaux anti-copie
peuvent présenter l’un de ces trois types de signaux : copie
libre, copie unique et copie impossible. Si vous souhaitez
enregistrer un programme de type copie unique, utilisez un
DVD-RW avec CPRM en Mode VR et un DVD-RAM.
✻
Une fois que la “copie unique” a été enregistrée, un nouvel
enregistrement ne peut pas être fait.
-
Protection du contenu pour les supports enregistrables (CPRM)
Le CPRM est un mécanisme qui affecte un enregistrement sur
le support sur lequel il est enregistré. Certains enregistreurs
DVD mais peu de lecteurs DVD le prennent en charge. Chaque
DVD enregistrable vierge a un numéro d'identification de
support 64 bits unique gravé dans le BCA. Lorsque vous
enregistrez un contenu protégé sur le disque, ce dernier est
codé par un chiffre à 56 bits C2 (cryptage) issu du numéro
d'identification du support. Pendant la lecture, ce numéro
d'identification est lu à partir du BCA et utilisé pour générer une
clé permettant de décoder le contenu du disque. Si le contenu
du disque est copié sur un autre support, le numéro
d'identification sera absent ou erroné et les données ne
pourront être décodées.
Français -
41
Formats d’enregistrement
Les fonctions disponibles variant selon le type de disque,
sélectionnez un disque qui répond au mieux à vos besoins.
Lorsque vous insérez un disque neuf, le message suivant
apparaît. DVD-RAM : Utilisation après le formatage du disque.
DVD-RW: Lorsque qu’un disque vierge est inséré en
premier, le message “Disque non initialisé.
Souhaitez-vous initialiser ce disque?” apparaît.
Si vous sélectionnez OUI, le mode sera formaté en
mode VR.
Si vous souhaitez formater en mode VR ou en mode
Vidéo, référez-vous à la section Formater un disque
située à la page 84.
DVD-R: Le formatage des DVD est inutile et seul
l’enregistrement en mode Vidéo est pris en charge.
DVD-RW (mode Vidéo)/-R
● Les chapitres seront créés automatiquement lorsque vous
finaliserez l'enregistrement sur des disques DVD-R / DVD-
RW en mode Vidéo lorsque le créateur de chapitres a été
activé. La longueur du chapitre (intervalle entre les
chapitres) varie selon le mode d'enregistrement.
● Edition simple (effacement des titres/modification du nom du
titre)
DVD-RW (mode VR)/-RAM
● Ce mode autorise des fonctions d’édition multiples
(suppression de l’intégralité d’un titre, suppression partielle
d’un titre, etc.)
● Différentes options d’édition en utilisant une liste de lecture
créée
Mode enregistrement
Sélectionnez l’un des quatre modes d’enregistrement en appuyant
plusieurs fois sur la touche REC MODE lorsque l’appareil est en
mode Stop pour déterminer la durée d’enregistrement et la qualité
d’image désirée. En général, plus la durée d'enregistrement est
courte et meilleure sera la qualité de l'image. En mode FR, le
mode d'enregistrement le plus approprié est réglé
automatiquement, en fonction du temps restant sur le disque
et de la durée d'enregistrement programmée. Cette fonction
est sélectionnée uniquement pour un mode choisi parmi les
modes XP, SP, LP et EP et vous pouvez utiliser ce mode pour
l'enregistrement programmé.
Mode Caractéristique Durées d’enreg
istrement
Support
Copie libre Copie unique
Copie impossible
DVD-RW(Ver.l.l)
O
- -
DVD-RW(Ver.1.1)
avec CPRM
Mode VR
OO
* -
mode Vidéo
O
- -
DVD-R
O
- -
DVD-RAM(Ver.2.0)
OO
* -
Type de signal
Enregistrement
XP
(mode haute qualité)
Env. 1 heure
à 8 Mbps
Env. 2 heures
à 4 Mbps
Entre 60 et 480 min
environ
Env. 0,8 à 8 Mbps
Env. 4 heures
à 2 Mbps
Env. 6 heures
à 1,2 Mbps
Env. 8 heures
à 0,8 Mbps
Sélectionnez ce mode
lorsque la qualité vidéo
est importante.
Sélectionnez ce mode
lorsqu’une longue durée
d’enregistrement est requise.
Pour les enregistrements
programmés, voir page 48.
Sélectionnez ce mode lorsqu’une
durée d’enregistrement plus
longue est nécessaire.
Sélectionnez ce mode pour
enregistrer en qualité standard.
SP
(mode qualité standard)
LP
(mode enregistrement
longue durée)
EP
(mode étendu)
FR
(enregistrement flexible)
Disque non formaté.
Souhaitez-vous formater ce disque ?
Oui Non
Disque non initialisé.
Souhaitez-vous initialiser ce disque ?
Oui Non
REVENIROKDEPLA. SORTIE
Gestionnaire de Disque
DVD-RW(VR)
Nom du Disque :
√√
Protection du disque
: Non protégé
√√
Formate le Disque
√√
Supprimer toutes les listes de titres
√√
Informations protection cartouche
√√
Navigation
par Disque
Liste
de Lecture
Gestion.
de Disque
Programme
Paramétrer
Choisissez le format d'enregistrement du DVD RW.
DVD-VR DVD-V
Vous ne pouvez pas enregistrer de film protégé contre la copie.
00842C-R125-XEB-FRA_18~41 2005.6.14 8:11 PM Page 41

42
- Français
Enregistrement
Enregistrement du
programme télévisé que
vous regardez
Vérifiez que le disque dispose de suffisamment
d'espace pour l'enregistrement. Réglez le mode
d'enregistrement.
1
Appuyez sur la touche OPEN/CLOSE et
insérez un disque enregistrable dans le tiroir à
disque.
2
Appuyez sur la touche OPEN/CLOSE pour
refermer le tiroir.
Patientez jusqu’à ce que “LOAD” disparaisse de
l’affichage du panneau frontal. Si un DVD-RAM neuf est
utilisé, il vous sera d’abord demandé si vous désirez le
formater ou non. Faites votre sélection à l'aide des
boutons
œ √
, puis appuyez sur le bouton OK. (voir page
41)
Faites votre sélection, puis appuyez sur le bouton
OK. (Voir page 41.)
A propos de la touche INFO
La fonction INFO vous permet de voir le statut et la
progression actuels de la lecture et de l’enregistrement. En
fonction du type de disque et du statut, l’affichage sur l’écran
peut être différent.
Vérification de l’espace disque
disponible (Disc Information)
Lorsque vous enregistrez sur un disque déjà en cours
d’utilisation, vérifiez que vous disposez d’un espace disque
suffisant pour l’enregistrement. Vous pouvez libérer de
l’espace sur les DVD-RW et DVD-RAM en effaçant des titres.
● Appuyez sur la touche INFO.
La fenêtre d'affichage des informations relatives au
disque apparaît.
Les informations affichées diffèrent selon le type de disque
utilisé ou le format d’enregistrement.
1. Type de disque
2. Affichage des informations actuelles
3. Nom du disque
4. Total Titles : Total number of titles
5. Total des titres : Nombre total de titres
6. Durée d’enregistrement possible : La plus longue durée
d’enregistrement continue de chancun des modes
d’enregsitrement (approximation)
7. Fenêtre principale : nom du programme de l’affichage
principal
8. Fenêtre incrustée : nom du programme de l’affichage
incrusté
9. Date : Date et heure actuels
Avant de commencer
DVD-RAM(VR) Info disque
Nom du Disque Disque
Titre Entier 15
Liste Lect. Entière 2
Durée Enregistrable
02:12 SP
Protection Non Protégé
Écran
Enregistrement
: PR 1 [SP]
01 JAN 2005 SAM 12:00
12
3
4
5
6
7
Disque non formaté.
Souhaitez-vous formater ce disque ?
Oui Non
Disque non initialisé.
Souhaitez-vous initialiser ce disque ?
Oui Non
00842C-R125-XEB-FRA_42~51 2005.6.14 8:13 PM Page 42

Français -
43
Enregistrement
Arrêter l’enregistrement
Appuyez sur la touche STOP ( ) pour arrêter un
enregistrement en cours.
● Lorsque vous utilisez des DVD-RAM/DVD-RW/DVD-R, le
message “Mise à jour des information du disque.
Veuillez attendre un moment.” s’affiche.
3
Appuyez sur les touches PROG (/) ou
numérotées ( ~ ) pour choisir le
programme que vous souhaitez
enregistrer.
4
Appuyez plusieurs fois sur la touche REC
MODE, (ou appuyez sur la touche REC
MODE puis sur la touche …† ) pour choisir la
vitesse (qualité) d’enregistrement.
➞
SP
➞
LP
➞
EP
➞
XP
5
Appuyez sur la touche REC.
Des informations concernant la chaîne sont affichées sur
l’écran puis l’enregistrement commence.
L'icône ( ) s'affiche sur la façade de l'appareil.
Pour voir l’état actuel du disque et la progression de
l’enregistrement : Appuyez sur la touche INFO et
l’information concernant le disque s’affichera.
Appuyez sur le bouton INFO une nouvelle fois pour
visualiser les informations relatives à l'enregistrement.
■
Vous ne pouvez pas changer le mode
d’enregistrement et le PROG lorsque vous
enregistrez.
■
L’enregistrement s’arrêtera automatiquement
lorsqu’il n’y aura plus d’espace disque pour
l’enregistrement.
■
Vous pouvez enregistrer jusqu’à 99 titres sur
un disque.
■
L’enregistrement s’arrêtera automatiquement si
une image protégée contre la copie est choisie.
■
Les DVD-RAM/DVD-RW doivent être
formatés avant de pouvoir commencer à
enregistrer. La plupart des disques neufs sont
vendus non formatés.
■
N’utilisez pas de DVD-R authoring dans ce
lecteur.
Remarque
Mode Enregistrer
SP (02:12)
●
Enregistrement : PR 1 [SP]
DVD-RAM(VR) Enregistrement info
Nom 01/Jan/2005 12:00 PR
1
Enregistr. Titre 15
Heure de Création 01/Jan/2005 12:00
Durée d'enregistr. 00:02:05
01 JAN 2005 SAM 12:00
DVD-RAM(VR) Info disque
Nom du Disque Disque
Titre Entier 15
Liste Lect. Entière 2
Durée Enregistrable
02:12 SP
Protection Non Protégé
Écran
Enregistrement
: PR 1 [SP]
01 JAN 2005 SAM 12:00
00842C-R125-XEB-FRA_42~51 2005.6.14 8:13 PM Page 43

44
- Français
Enregistrement
5
Appuyez sur la touche REC.
Pour mettre l’enregistrement en pause
Appuyez sur le bouton pour interrompre l'enregistrement
en cours.
● Appuyez de nouveau sur le bouton pour reprendre
l'enregistrement.
● Vous pouvez passer d’une chaîne à une autre en appuyant
sur les touches
PROG (/)lorsque l’enregistrement
est en pause.
Arrêter l’enregistrement
Appuyez sur la touche STOP ( ) pour arrêter un
enregistrement en cours.
● Lorsque vous utilisez des DVD-RAM/DVD-RW/DVD-R, le
message “Mise à jour des information du disque.
Veuillez attendre un moment.” s’affiche.
Enregistrement à partir
d’une source extérieure
que vous regardez
Assurez-vous que le disque a suffisamment d’espace disque
disponible pour l’enregistrement. Choisissez le mode
enregistrement.
1
Appuyez sur la touche OPEN/CLOSE et
insérez un disque enregistrable dans le tiroir à
disque.
2
Appuyez sur la touche OPEN/CLOSE pour
refermer le tiroir.
Patientez jusqu’à ce que “LOAD” disparaisse de
l’affichage du panneau frontal.
Si un DVD-RAM neuf est utilisé, il vous sera d’abord
demandé si vous désirez le formater ou non.
(Cf. page 41)
Si un DVD-RW neuf est utilisé, il vous sera d’abord
demandé si vous désirez l’initialiser ou non.
(Cf. page 41)
3
Appuyez sur la touche INPUT pour
sélectionner l’entrée source selon la
connexion que vous avez faite.
L’affichage sur le panneau frontal change
successivement comme suit :
➞
PR Numéro ➞ AV1 ➞ AV2 ➞ AV3 ➞ DV
Si vous connectez un caméscope digital,
appuyez sur la touche INPUT pour
sélectionner DV. (Cf. page 45)
4
Appuyez plusieurs fois sur la touche REC
MODE, (ou appuyez sur la touche REC
MODE puis sur la touche …†) pour choisir la
vitesse (qualité) d’enregistrement.
➞
SP
➞
LP
➞
EP
➞
XP
■
Vous ne pouvez pas changer de mode
d’enregistrement ni de chaîne en cours
d’enregistrement.
■
L’enregistrement s’arrêtera automatiquement
lorsqu’il n’y aura plus d’espace disque pour
l’enregistrement.
■
Vous pouvez enregistrer jusqu’à 99 titres sur
un disque.
■
L’enregistrement s’arrêtera automatiquement si
une image protégée contre la copie est choisie.
■
Les DVD-RAM/DVD-RW doivent être
formatés avant de pouvoir commencer à
enregistrer. La plupart des disques neufs sont
vendus non formatés.
■
N’utilisez pas de DVD-R authoring dans ce
lecteur.
Remarque
Avant de commencer
Mode Enregistrer
SP (02:112)
00842C-R125-XEB-FRA_42~51 2005.6.14 8:13 PM Page 44

Français -
45
Enregistrement
Vous pouvez commander le caméscope à l'aide de l'interface
IEEE 1394 (DV).
5
Sélectionnez l'icône Play sur la partie
supérieure de l'écran pour lire le contenu du
caméscope et repérer la position du départ
de la copie.
Vous pouvez appuyer sur le bouton PLAY de la
télécommande pour lire le caméscope.
6
Pour lancer l'enregistrement, utilisez le
bouton œ √ pour sélectionner l'icône REC
( ● ) sur la partie supérieure de l'écran, puis
appuyez sur le bouton OK.
Vous pouvez appuyer sur le bouton REC de la
télécommande pour lancer l'enregistrement.
Pour afficher à l'écran les icônes relatifs à la lecture,
appuyez sur n'importe quel bouton de direction de la
télécommande.
Arrêter l’enregistrement
Appuyez sur la touche STOP ( ) pour arrêter un
enregistrement en cours.
● Lorsque vous utilisez des DVD-RAM/DVD-RW/DVD-R, le
message “Mise à jour des informations du disque. Veuillez
attendre un moment” s’affiche.
Copie à partir d'un
caméscope
Assurez-vous que le disque a suffisamment d’espace disque
disponible pour l’enregistrement. Choisissez le mode
enregistrement.
1
Appuyez sur la touche OPEN/CLOSE et
insérez un disque enregistrable dans le tiroir à
disque.
2
Appuyez sur la touche OPEN/CLOSE pour
refermer le tiroir.
Patientez jusqu’à ce que “LOAD” disparaisse de
l’affichage du panneau frontal.
Si un DVD-RAM neuf est utilisé, il vous sera d’abord
demandé si vous désirez le formater ou non.
(Cf. page 41)
Si un DVD-RW neuf est utilisé, il vous sera d’abord
demandé si vous désirez l’initialiser ou non.
(Cf. page 41)
3
Appuyez plusieurs fois sur la touche REC
MODE, (ou appuyez sur la touche REC
MODE puis sur la touche …†) pour choisir la
vitesse (qualité) d’enregistrement.
➞
SP
➞
LP
➞
EP
➞
XP
4
Appuyez sur le bouton INPUT pour
sélectionner DV. Si l'entrée est réglée sur DV,
un menu de lecture/d'enregistrement
permettant de commander le caméscope
s'affiche dans la partie supérieure de l'écran.
■
Vous ne pouvez pas changer de mode
d’enregistrement ni de chaîne en cours
d’enregistrement.
■
L’enregistrement s’arrêtera automatiquement
lorsqu’il n’y aura plus d’espace disque pour
l’enregistrement.
■
Vous pouvez enregistrer jusqu’à 99 titres sur
un disque.
■
L’enregistrement s’arrêtera automatiquement si
une image protégée contre la copie est choisie.
■
Les DVD-RAM/DVD-RW doivent être
formatés avant de pouvoir commencer à
enregistrer. La plupart des disques neufs sont
vendus non formatés.
■
N’utilisez pas de DVD-R authoring dans ce
lecteur.
Remarque
Avant de commencer
Mode Enregistrer
SP (02:112)
DV
Le lecteur DV est connecté.
REVENIROKDÉPLA.
00842C-R125-XEB-FRA_42~51 2005.6.14 8:13 PM Page 45

46
- Français
Enregistrement
Enregistrement avec une
seule touche (OTR)
Vous pouvez programmer votre graveur DVD pour enregistrer
par paliers de 30 minutes en appuyant sur la touche REC.
1
Si vous souhaitez enregistrer une chaîne de
télévision, utilisez les touches PROG(/)
ou numérotées pour sélectionner la chaîne
désirée. Si vous voulez enregistrer à partir
d’une source externe connectée, appuyez sur
la touche INPUT pour sélectionner l’entrée
appropriée (AV1, AV2, AV3 ou DV).
●
TV PROGRAM: 1 à 99
2
Appuyez sur le bouton REC pour démarrer
l'enregistrement.
3
Appuyez sur le bouton REC de façon
répétée pour régler la durée
d'enregistrement souhaitée.
➞ 0:30 ➞ 1:00 ➞ ... 8:00 ➞ Off
Pour voir l’état actuel du disque et la progression de
l’enregistrement : Appuyez sur la touche INFO et
l’information concernant le disque s’affichera.
Appuyez sur la touche INFO une fois de plus.
Vous pouvez ensuite voir les informations
concernant le titre en cours d’enregistrement.
30 secondes avant la fin de l’enregistrement, un
message vous demandant si vous souhaitez que le
graveur s’éteigne ou non à la fin de l’enregistrement
s’affichera sur votre écran.
Arrêter l’enregistrement
Appuyez sur la touche STOP ( ). Le message
“
Souhaitez-vous arrêter l’enregistrement
?” s’affiche.
● Appuyez sur les touches œ √ pour sélectionner Oui, puis
appuyez sur la touche OK.
● Ou appuyez deux fois sur le bouton STOP.
■
Le compteur de la minuterie baisse de
minute en minute de 8:00 à 0:00, puis
l'enregistreur DVD arrête
l'enregistrement.
Remarque
Mode touche unique
0:30
Souhaitez-vous arrêter l’enregistrement ?
Oui Non
OTR va bientôt se terminer et le courant va se couper
automatiquement. Appuyez sur la touche [OK] pour
poursuivre l’utilisation du graveur de DVD.
OK
DVD-RAM(VR) Enregistrement info
Nom 01/Jan/2005 12:00 PR
1
Enregistr. Titre 15
Heure de Création 01/Jan/2005 12:00
Durée d'enregistr. 00:02:05
01 JAN 2005 SAM 12:00
DVD-RAM(VR) Info disque
Nom du Disque Disque
Titre Entier 15
Liste Lect. Entière 2
Durée Enregistrable
02:12 SP
Protection Non Protégé
Écran
Enregistrement
: PR 1 [SP]
01 JAN 2005 SAM 12:00
00842C-R125-XEB-FRA_42~51 2005.6.14 8:13 PM Page 46

Français -
47
Enregistrement
• Source : La source d’entrée vidéo (“AV1”, “AV2”,
“AV3”), ou le canal de diffusion à partir
desquels vous souhaitez effectuer un
enregistrement par minuterie.
• Date : L'enregistrement programmé permet de régler la
durée de l’enregistrement sur une période d'un mois.
Réglez la date d'enregistrement.
(jour/mois)
01/JAN(SAM) Tous les jours
02/JAN(DIM) LUN-SAM
03/JAN(LUN) LUN-VEN
Tous les SAM
30/JAN(DIM)
31/JAN(LUN) Tous les DIM
• Heure de démarrage/d’arrêt : Heure de démarrage et
d’arrêt de
l’enregistrement par
minuterie.
• Mode (Mode d’enregistrement) :
- FR (Enregistrement flexible) : En mode FR, le
mode d'enregistrement le plus adapté est réglé
automatiquement, en fonction du temps restant
sur le disque et de la durée de l'enregistrement
programmé. Cette fonction est sélectionnée
uniquement dans un mode parmi les modes XP,
SP, LP et EP.
- XP (haute qualité) : Doit être sélectionnée lorsque
la qualité vidéo est un critère important.
(Environ 1 heure)
- SP (qualité standard) : Doit être sélectionnée pour
enregistrer en qualité standard. (Environ 2 heures)
- LP (qualité inférieure) : Doit être sélectionnée
lorsqu'une longue durée d'enregistrement est
requise.(Environ 4 heures)
- EP (étendu) : Doit être sélectionnée lorsqu'une
durée d'enregistrement plus longue est requise.
(Environ 6 heures ou 8 heures)
• V/P : Fonction VPS (Video Programme System) ou
PDC(Programme Delivery Control).
- Si vous activez cette fonction, vous pouvez contrôler
l’heure de démarrage et d‘arrêt de l’enregistrement grâce
à un signal spécial compris dans le signal de diffusion. Si
un programme TV est plus court ou démarre plus tôt ou
plus tard que prévu, cette
fonction synchronise automatiquement l’heure de
démarrage et d’arrêt de l’enregistrement avec l’heure de
la diffusion.
- Paramétrez l’heure de démarrage EXACTEMENT selon
le programme TV. Dans le cas contraire,
l’enregistrement par minuterie ne se fera pas.
- Ne sélectionnez pas PDC ou VPS à moins que vous
soyez sûr que le programme que vous souhaitez
enregistrer est diffusé en PDC ou VPS.
1. Vérifiez si le câble de l’antenne est branché.
2. Vérifiez la durée restante du disque.
3. Vérifiez si la date et l'heure sont correctes.
Assurez-vous que l'horloge est réglée (configuration –
réglage de l'horloge) avant d'effectuer un
enregistrement programmé. (Reportez-vous à la page
26)
1
Appuyez sur le bouton TIMER, appareil en
mode Arrêt.
Utilisation du bouton MENU.
● Appuyez sur le bouton MENU, appareil en mode Arrêt.
● Appuyez sur les boutons …† pour sélectionner
Programme, puis appuyez deux fois sur le bouton √
ou OK.
● Appuyez sur le bouton …† pour sélectionner
Enregistrer par Minuterie.
2
Appuyez sur OK ou sur le bouton √.
• L'écran Enregistrement programmé s'affiche.
3
Paramétrez l’option enregistrement par
minuterie.
• L’écran de l’enregistrement par minuterie
s’affiche. Remplissez les éléments d’entrée à l’aide des
flèches et des touches numériques.
œ √ : Accédez à l’élément précédent/suivant,
…†
, boutons numéro
: Permet de paramétrer une
valeur.
Réalisation d'un
enregistrement
programmé
Avant de commencer
■
Lorsque vous enregistrez en mode EP sur un
disque DVD-RW(V)/R, il est possible qu'il
n'enregistre pas la totalité des 6 ou 8 heures car
l'appareil utilise le système d'encodage VBR
(débit binaire variable). Par exemple, si vous
enregistrez un programme avec beaucoup
d'action, le débit binaire sera supérieur, ce qui
consomme davantage d'espace disque.
Remarque
REVENIROKDÉPLA. SORTIE
Enregistrer par Minuterie
DVD-RAM(VR)
ShowView
√√
Enregistrer par Minuterie
√√
ShowView Allongé : Non
√√
Navigation
par Disque
Liste
de Lecture
Gestion.
de Disque
Programme
Paramétrer
REVENIROKDÉPLA. SORTIE
Liste d’Enregistrements Programmée
DVD-RAM(VR)
No. Source Date Start End Mode V/P Edit
01
---- -- --- --:-- --:-- -- --
√√
No. 01
Source Date Démar. Fin Mode V/P
PR 01 01/JAN(SAM) 12 : 00 14 : 00 SP Non
Durée Enregistrable 02:12 SP
Durée Enregistrable 02:12 SP
00842C-R125-XEB-FRA_42~51 2005.6.14 8:13 PM Page 47

48
- Français
Enregistrement
4
Appuyez sur la touche OK.
● s’affiche sur la façade avant. Cela signifie qu’un
enregistrement par minuterie est en cours.
Si les réglages du programmateur se chevauchent
Les programmes sont enregistrés par ordre de priorité.
Si l’enregistrement programmé est réglé pour le premier
programme puis de nouveau pour le second programme
et que les deux programmes se chevauchent, le
message suivant apparaît à l’écran : ‘Ce paramétre est
identique.’ Le message indique que le premier
programme est prioritaire. Une fois le premier
enregistrement terminé, l’enregistrement du second
programme commence.
Pour quitter le réglage actuel sans enregistrer
Appuyez sur la touche MENU.
Pour revenir au menu précédent
Appuyez sur la touche RETURN si vous ne souhaitez
pas programmer d’enregistrement.
5
Éteignez l’appareil pour quitter le
Programmateur. Paramétrage de
l’enregistrement. L’enregistrement par
minuterie ne fonctionnera pas si l’appareil est
allumé.
● clignote si le disque n’est pas inséré.
Editer une Minuterie
Standard
Suivez ces indications pour éditer une liste d’enregistrement
par minuterie.
1
Appuyez sur le bouton TIMER, appareil en
mode Arrêt.
Utilisation du bouton MENU.
● Appuyez sur le bouton MENU, appareil en mode Arrêt.
● Appuyez sur les boutons …† pour sélectionner
Programme, puis appuyez deux fois sur le bouton √
ou OK.
●
Appuyez sur le bouton …† pour sélectionner
Enregistrer par Minuterie.
2
Appuyez sur OK ou sur le bouton √.
3
Appuyez sur le bouton RETURN pour
fermer l'écran Enregistrement programmé.
4
Appuyez sur les touches …† pour
sélectionner le nombre d’Enregistrements
programmés que vous souhaitez modifier,
puis appuyez sur la touche OK ou √.
● Les éléments Éditer et Suppr. s’affichent.
■
La durée de l’enregistrement programmé peut
être différente de celle programmée selon le
disque et le statut d’enregistrement programme
total (par exemple, des heures
d’enregistrement qui se chevauchent, ou
lorsque l’enregistrement précédent se termine
moins de 2 minutes avant le début de
l’enregistrement suivant).
■
Vous pouvez régler le Programmateur pour
enregistrer jusqu’à 12 programmes.
Remarque
Enregistrement flexible
(pour l’enregistrement par
minuterie uniquement)
En mode FR, le mode d'enregistrement le plus adapté est
réglé automatiquement, en fonction du temps restant sur le
disque et de la durée de l'enregistrement programmé.
Cette fonction est sélectionnée uniquement pour un mode
choisi parmi les modes XP, SP, LP et EP et vous pouvez
utiliser ce mode pour l'enregistrement programmé.
Le paramétrage du mode d‘enregistrement FR est identique à
celui de l’enregistrement par minuterie.
Lorsque vous réglez le mode à l’étape 3, choisissez le mode
FR.
REVENIROKDÉPLA. SORTIE
Enregistrer par Minuterie
DVD-RAM(VR)
ShowView
√√
Enregistrer par Minuterie
√√
ShowView Allongé : Non
√√
Navigation
par Disque
Liste
de Lecture
Gestion.
de Disque
Programme
Paramétrer
REVENIROKDÉPLA. SORTIE
Liste d’Enregistrements Programmée
DVD-RAM(VR)
No. Source Date Démar. Fin Mode V/P Éditer
01 PR 01 01 JAN 12 : 00 14 : 00 SP Non
√√
02
---- -- --- --:-- --:-- -- --
√√
Durée Enregistrable 02:12 SP
Éditer
Suppr.
REVENIROKDÉPLA. SORTIE
Liste d’Enregistrements Programmée
DVD-RAM(VR)
No. Source Date Start End Mode V/P Edit
01
---- -- --- --:-- --:-- -- --
√√
No. 01
Source Date Démar. Fin Mode V/P
PR 01 01/JAN(SAM) 12 : 00 14 : 00 SP Non
Durée Enregistrable 02:12 SP
Durée Enregistrable 02:12 SP
00842C-R125-XEB-FRA_42~51 2005.6.14 8:13 PM Page 48

Français -
49
Supprimer une minuterie
standard
3
Appuyez sur le bouton RETURN pour
fermer l'écran Enregistrement programmé.
4
Appuyez sur les touches …† pour
sélectionner le nombre d’Enregistrements
programmés que vous souhaitez
supprimer, puis appuyez sur la touche OK ou √.
● Les éléments Editer et Suppr. s’affichent.
5
Appuyez sur les touches …† pour
sélectionner Suppr., puis appuyez sur la
touche OK ou √.
● Un message de confirmation vous invite à valider votre
choix. Par exemple : ‘
Souhaitez-vous supprimer
‘No.01’ ?’.
6
Appuyez sur les touches œ √ pour
sélectionner Oui, puis appuyez sur la touche
OK.
● L’entrée sélectionnée est supprimée de la liste.
7
Appuyez sur la touche MENU après avoir
terminé cette opération. L’écran du menu
disparaît.
5
Appuyez sur les touches …† pour
sélectionner Éditer, puis appuyez sur la
touche OK ou √.
● L’écran de saisie des enregistrements programmés
s’affiche.
Voir la section “Effectuer une Minuterie Standard” pour
plus d’informations concernant les éléments Entrée
Enregistrement par Minuterie.
6
Appuyez sur la touche OK pour confirmer le
paramétrage édité.
7
Appuyez sur le bouton MENU à la fin de cette
opération. L'écran menu disparaît.
Suivez ces indications pour supprimer une entrée de la liste
d’enregistrement par minuterie.
1
Appuyez sur le bouton TIMER, appareil en
mode Arrêt.
Utilisation du bouton MENU.
● Appuyez sur le bouton MENU, appareil en mode Arrêt.
● Appuyez sur les boutons …† pour sélectionner
Programme, puis appuyez deux fois sur le bouton √
ou OK.
●
Appuyez sur le bouton …† pour sélectionner
Enregistrer par Minuterie.
2
Appuyez sur OK ou sur le bouton √.
Enregistrement
REVENIROKDÉPLA. SORTIE
Liste d’Enregistrements Programmée
DVD-RAM(VR)
No. Source Date Start End Mode V/P Edit
01
---- -- --- --:-- --:-- -- --
√√
No. 01
Source Date Démar. Fin Mode V/P
PR 01 01/JAN(SAM) 12 : 00 14 : 00 SP Non
Durée Enregistrable 02:12 SP
Durée Enregistrable 02:12 SP
REVENIROKDÉPLA. SORTIE
Liste d’Enregistrements Programmée
DVD-RAM(VR)
No. Source Date Démar. Fin Mode V/P Éditer
01 PR 01 01 JAN 12 : 00 14 : 00 SP Non
√√
02
---- -- --- --:-- --:-- -- --
√√
Durée Enregistrable 02:12 SP
Éditer
Suppr.
REVENIROKDÉPLA. SORTIE
Liste d’Enregistrements Programmée
DVD-RAM(VR)
No. Source Date Start End Mode V/P Edit
01
---- -- --- --:-- --:-- -- --
√√
No. 01
Source Date Démar. Fin Mode V/P
PR 01 01/JAN(SAM) 12 : 00 14 : 00 SP Non
Durée Enregistrable 02:12 SP
Durée Enregistrable 02:12 SP
00842C-R125-XEB-FRA_42~51 2005.6.14 8:13 PM Page 49

50
- Français
3
Appuyez sur la touche OK.
● L’information concernant le programme s’affiche.
● Lorsque vous utilisez la fonction ShowView pour la
première fois avec des stations enregistrées, le
numéro du programme clignote. La première fois vous
devez saisir le numéro PR manuellement en appuyant
sur les touches …†.
4
Si le programme et l’heure sont corrects,
appuyes sur la touche OK.
5
Eteignez l’appareil en appuyant sur le
bouton STANDBY/ON pour activer
l’enregistrement par minuterie.
6
Reportez-vous page 47~49 si vous souhaitez :
●
Vérifiez si l’enregistrement par minuterie a été
correctement réglé ou non.
● Annulez un enregistrement préréglé
Avant de prérégler votre Graveur DVD :
• Allumez le téléviseur et votre Graveur DVD
• Vérifiez si la date et l’heure sont correctes
Il est possible de mémoriser jusqu’à 12 programmes.
1
Appuyez sur le bouton TIMER, appareil en
mode Arrêt. Appuyez sur les boutons …†
pour sélectionner ShowView, puis appuyez
sur le bouton √ ou sur OK.
●
Un message vous permettant de saisir le code
ShowView apparaît.
Utilisation de la touche MENU.
● Appuyez sur la touche MENU lorsque le disque
s’est arrêté.
● Appuyez sur les touches …† pour sélectionner
Programme, puis appuyez deux fois sur la touche
OK ou √.
2
Appuyez sur les touches numériques pour
saisir le code du programme que vous
souhaitez enregistrer que vous trouverez dans
votre programme de télévision.
● Si vous souhaitez corriger le code ShowView que
vous saisissez :
● Appuyez sur la touche œ jusqu’à ce que le chiffre à
corriger soit effacé.
● Saisissez le chiffre correct.
Utilisation de la fonction
ShowView
■
Les numéros à côté de chaque programme TV
dans les magazines ou journaux sont les
numéros du code ShowView, qui vous
permettent de programmer votre enregistreur
instantanément avec la télécommande.
Saisissez le code ShowView du programme
que vous souhaitez enregistrer.
■
ShowView est une marque déposée de
Gemstar Development Corporation.
Le système ShowView st fabriqué sous licence
de Gemstar Development Corporation.
Remarque
REVENIROK SORTIE
DVD-RAM(VR)
Navigation
par Disque
Liste
de Lecture
Gestion.
de Disque
Programme
Paramétrer
Saisir ShowView Numéro de code. [0~9]
REVENIROKDÉPLA. SORTIE
Liste d’Enregistrements Programmée
DVD-RAM(VR)
No. Source Date Démar. Fin Mode V/P Éditer
01 PR 01 01 JAN 12 : 00 14 : 00 SP Non
√√
02
---- -- --- --:-- --:-- -- --
√√
Durée Enregistrable 02:12 SP
REVENIROKDÉPLA. SORTIE
Liste d’Enregistrements Programmée
DVD-RAM(VR)
No. Source Date Start End Mode V/P Edit
01
---- -- --- --:-- --:-- -- --
√√
No. 01
Source Date Démar. Fin Mode V/P
PR 01 01/JAN(SAM) 12 : 00 14 : 00 SP Non
Durée Enregistrable 02:12 SP
Durée Enregistrable 02:12 SP
Enregistrement
00842C-R125-XEB-FRA_42~51 2005.6.14 8:13 PM Page 50

Français -
51
Pour éviter les délais ou les renvois, le Graveur DVD dispose
d’une fonction appelée ShowView Extened qui vous permet
d’étendre la durée d’enregistrement jusqu’à 60 minutes.
1
Appuyez sur la touche MENU en mode
Stop.
2
Appuyez sur la touche …† pour
sélectionner Programme et ensuite sur la
touche OK ou √.
3
Appuyez sur les touches …† pour
sélectionner ShowView Allongé.
4
Appuyez sur les boutons …† pour
sélectionner ShowView Extended time (Durée
étendue ShowView), puis appuyez sur le
bouton √ ou sur OK.
5
Appuyez sur la touche MENU une fois
l’opération terminée.
ShowView Extened Enregistrer la liste des
dossiers programmés
Lorsqu’il est l’heure de démarrer l’enregistrement
programmé et que l’appareil est éteint, ce dernier s’allume
et l’enregistrement commence automatiquement.
1
Lorsque l’enregistrement programmé est en
cours, le programme en train d’être
enregistré ne s’affiche pas sur le téléviseur.
● Appuyez sur la touche TV/DVD si vous souhaitez
voir le programme en train d'être enregistré sur le
téléviseur.
● Appuyez de nouveau sur la touche TV/DVD si vous
ne souhaitez pas voir le programme en train d'être
enregistré sur le téléviseur.
Arrêter l’enregistrement
Appuyez sur la touche STOP( ) pour afficher un
message vous demandant si vous voulez ou non arrêter
l’enregistrement.
● Si vous sélectionnez Oui : l’enregistrement s’arrête
● Si vous sélectionnez Non : l’enregistrement continue
■
Si l’espace sur le disque est insuffisant ou
qu’un signal pour la prévention des copies est
reçu en cours d’enregistrement,
l’enregistrement s’arrête.
■
S'il n'y a pas d'espace disque libre ou si le
disque n'est pas enregistrable, l'enregistrement
ne fonctionnera pas. (Vous pouvez continuer
l’enregistrement après avoir remplacé le
disque).
Remarque
REVENIROKDÉPLA. SORTIE
Enregistrer par Minuterie
DVD-RAM(VR)
ShowView
√√
Enregistrer par Minuterie
√√
ShowView Allongé : Non
√√
Liste de Titres
Liste de lecture
Gestionnaire de Disque
Programme
Paramétrer
REVENIROKDÉPLA. SORTIE
Enregistrer par Minuterie
DVD-RAM(VR)
ShowView
√√
Enregistrer par Minuterie
√√
ShowView Allongé : Non
√√
Liste de Titres
Liste de lecture
Gestionnaire de Disque
Programme
Paramétrer
Non
10
20
30
40
50
60
Souhaitez-vous arrêter l’enregistrement?
Oui Non
Vous ne pouvez pas enregistrer de film protégé contre la copie.
Enregistrement
REVENIROKMOVE SORTIE
Navigation par Disque
DVD-RAM(VR)
Liste de Titres
√√
DivX
√√
Photo
√√
Musique
√√
Navigation
par Disque
Liste
de Lecture
Gestion.
de Disque
Programme
Paramétrer
00842C-R125-XEB-FRA_42~51 2005.6.14 8:13 PM Page 51

Lecture
52
- Français
Lisez les informations suivantes avant de lire un disque.
Code de région (DVD-Video uniquement)
Le graveur de DVD comme les disques sont codés par
région. Ces codes régionaux doivent
correspondre pour que le disque puisse être lu.
Si les codes ne correspondent pas, le disque ne pourra
être lu. Le numéro de zone de cet enregistreur DVD est
inscrit sur le panneau arrière de l’enregistreur DVD.
Type de disques pouvant être lus
avec cet appareil
Disques ne pouvant être lus avec
cet appareil
●
DVD-Video avec un numéro de région autre que “2” ou “ALL”
● DVD-RAM 12cm 2,6 Go et 5,2 Go
● DVD-R 3,9 Go
● DVD-RAM, DVD-RW (mode VR) non enregistrés selon la
Video Recording Standard (Norme d’enregistrement vidéo).
● DVD-R non finalisés, DVD-RW (mode vidéo) non finalisés
enregistrés sur un autre appareil.
● Disques DVD-ROM/DVD+RW/PD/MV-Disc, etc
● Video CD/CVD/SVCD/CD-ROM/CDV/CD-G/CD-I
Lecture
Avant la lecture
Avant la lecture......................................................52
Lecture d’un disque...............................................53
Lecture d’un CD audio/MP3.................................62
Lecture d'une image .............................................66
Lecture d'un fichier MPEG4 .................................67
Lecture de la Liste de Titres.................................68
Cette section présente les fonctions de base de la lecture
par type de disque.
DIGITAL OUT
DIGITAL
Disque Dolby
numérique
Disque DTS Disque audio
numérique
Disque
stéréo
Système de
diffusion adopté au
Royaume Uni, France,
Allemagne, etc.
MP3
■
En fonction du type de disque, le chargement
peut prendre jusqu'à une minute.
Remarque
DivX
Type de disque
Logo de disque
Enregistré content Forme de disque
Temps de lecture max.
Monoface (12cm) 240
DVD-VIDÉO AUDIO + VIDÉO
Double face (12cm)
480
Monoface (8cm) 80
Double face (8cm) 160
AUDIO-CD AUDIO
Monoface (12cm) 74
Monoface (12cm) 20
1 (XP: Excellent qualité)
2 (SP : Qualité standard)
Monoface (12cm)
4 (LP : lecture longue)
DVD-RAM AUDIO + VIDÉO
6 ou 8 (EP : étendu)
2 (XP: Excellent qualité)
4 (SP: Qualité standard)
Double face (12cm)
8 (LP : lecture longue)
12 ou 16 (EP : étendu)
1 (XP: Excellent qualité)
DVD-RW AUDIO + VIDÉO 12cm (4.7Go)
2 (SP : Qualité standard)
4 (LP : lecture longue)
6 ou 8 (EP : étendu)
1 (XP: Excellent qualité)
DVD-R AUDIO + VIDÉO 12cm (4.7Go)
2 (SP : Qualité standard)
4 (LP : lecture longue)
6 ou 8 (EP : étendu)
CD-R/RW
JPEG
DVD-R/RW/RAM
MP3 - -
MPEG4
00842C-R125-XEB-FRA_52~70 2005.6.14 8:15 PM Page 52

Français -
53
2
Placez délicatement un disque sur le plateau,
en veillant à ce que l'étiquette soit orientée
vers le haut.
3
Appuyez sur la touche OPEN/CLOSE pour
refermer le plateau.
● Le plateau de votre graveur de DVD se referme et la
lecture commence automatiquement.
● Le graveur ne lit pas les disques automatiquement
après la première mise en route.
● Lorsque le graveur est allumé et qu’un disque est sur
le plateau, l’unité est activée et attend vos instructions
en mode stop.
●
Appuyez sur la touche PLAY pour commencer la lecture.
● Si vous insérez un disque MP3, votre graveur de DVD
affiche la liste des fichiers sur l’écran et commence la
lecture.
●
Si vous insérez un disque JPEG, les dossiers et les
fichiers s’affichent sous forme de vignettes.
● Si vous souhaitez que l'appareil lise automatiquement
à la mise sous tension le disque qu’il contient, mettez
sous tension en utilisant le bouton PLAY.
4
Appuyez sur la touche STOP pour arrêter la
lecture.
1
Appuyez sur la touche OPEN/CLOSE.
Lecture d’un disque
■
Ce graveur de DVD ne peut fonctionner
qu’avec des disques compatibles avec la
norme DVD-RAM Version 2.0.
■
La lecture et/ou l’enregistrement peut être
impossible avec certains types de disques ou
lorsque des opérations spécifiques, telles qu’un
changement d’angle ou un réglage de l’aspect
de ratio, sont effectuées.
Les informations concernant les disques sont
indiquées en détail sur le boîtier.
Veuillez les consulter si nécessaire
■
Ne laissez pas les disques devenir sales ou
rayés. Les traces de doigts, la saleté, la
poussière, les rayures ou les dépôts de fumée
de cigarette sur la surface d’enregistrement
peuvent rendre votre disque inutilisable.
■
Les disques DVD-RAM/RW/R peuvent ne pas
être lus par certains lecteurs de DVD, selon le
lecteur, le disque et les conditions
d’enregistrement.
Remarque
■
Lorsque vous arrêtez la lecture d’un disque, le
graveur garde en mémoire l’endroit où vous
vous êtes arrêté. Ainsi, lorsque vous appuyez
de nouveau sur la touche PLAY, vous
reprenez la lecture là où vous vous êtes arrêté.
(sauf dans les cas où vous retirez le
disque, débranchez l'enregistreur DVD ou
appuyez deux fois sur le bouton STOP).
Remarque
■
Ne déplacez pas votre graveur de DVD en
cours de lecture, ceci pourrait
endommager le disque.
■
Assurez-vous d'utiliser toujours la touche
OPEN/CLOSE pour ouvrir ou fermer le tiroir
disque.
■
Ne poussez pas le tiroir du disque lorsqu'il est
ouvert ou fermé, ceci pourrait entrapiner un
mauvais fonctionnement du produit.
■
Ne placez pas de matériaux étrangers sur ou
dans le tiroir du disque.
■
Certaines fonctions peuvent avoir des
performances différentes ou ne pas fonctionner
selon le type de disque. Si cela se produit,
réferez-vous aux instructions écrites sur le
boîtier du disque.
■
Faites attention à ce que les doigts des enfants
ne soient pas placés entre le tiroir du disque et
le chassis quand il se referme.
■
N’insérez qu’un DVD à la fois. Si vous en
insérez plusieurs, ils ne pourront être lus et
risqueront d’endommager votre lecteur DVD.
ATTENTION
Lecture
00842C-R125-XEB-FRA_52~70 2005.6.14 8:15 PM Page 53

Lecture
54
- Français
Utilisation des fonctions de recherche
1
En cours de lecture, appuyez sur la touche
SEARCH ( ) de la télécommande.
● Vous pouvez parcourir le programme en sens inverse.
Pour revenir à la vitesse de lecture normale, appuyez sur la
touche .
● Lorsque vous maintenez la touche SEARCH enfoncée
( ), la lecture s’effectue à la vitesse rapide par défaut
(4X). Si vous relâchez la touche SEARCH, la lecture
reprend à vitesse normale.
● La vitesse adoptée dans cette fonction peut être
différente de la vitesse réelle de lecture.
Utilisation des menus Disque et Titre
Certains types de disques contiennent un système de menus
spécifique qui vous permet de sélectionner des fonctions
particulières pour le titre, telles que des chapitres, des pistes
audio, des sous-titres, des bandes-annonces de films, des
informations sur les personnages, etc.
Cas des disques DVD-VIDEO
1
Appuyez sur la touche DISC MENU pour
ouvrir le menu Disque du disque.
●
Allez dans le menu de configuration correspondent à la
lecture.
●
Vous pouvez sélectionner la langue audio et les
sous-titres contenus dans le disque.
2
Appuyez sur la touche TITLE MENU pour
aller dans le menu Titre du disque.
●
Utilisez cette touche si le disque contient plus d’un titre.
Certains types de disques peuvent ne pas prendre en
charge la fonction Tide.
Cas des disques DVD-RAM/RW/R
1
Appuyez sur la touche TITLE LIST pour
atteindre la Liste des titres.
■
Liste des titres: Titre fait référence à un flux
vidéo enregistré. La Liste des titres ouvre une
liste destinée à vous aider à sélectionner un
titre. La liste des titres étant constituée
d’informations sur le flux en cours
|d’enregistrement, si un titre est supprimé, ce
titre ne pourra plus être lu.
■
Liste de lecture: Fait référence à une unité de
lecture, qui est créée en sélectionnant une
scène donnée dans la Liste des titres.
Lorsqu’une liste de lecture est lue, seule la
scène sélectionnée par l’utilisateur sera lue.
La lecture s’interrompra automatiquement à la
fin de la scène. Seules les informations
nécessaires à la lecture d’une scène
donnée étant inclues dans une liste de
lecture, même si une liste est supprimée, le flux
original ne sera pas supprimé. (only VR mode)
Remarque
■
En mode Scan (Recherche), aucun son n'est
audible sauf pour les CD (CD-DA).
Remarque
Effectuer une recherche dans un chapitre ou dans une piste
DVD-VIDEO/
DVD-RAM/
DVD-RW/DVD-R
MPEG4
AUDIO CD
(CD-DA)
Rapide X 2 ➞ Rapide X 4 ➞
Rapide X 8 ➞ Rapide X 16 ➞
Rapide X 32 ➞ Rapide X 128
Rapide X 2
X 2 ➞ X 4 ➞ X 8
X 2
00842C-R125-XEB-FRA_52~70 2005.6.14 8:15 PM Page 54

Français -
55
À propos de la fonction ANYKEY
La fonction ANYKEY vous permet de rechercher facilement
une scène particulière en accédant à un titre, à un chapitre, à
une piste ou à un moment. Vous pouvez également modifier
les sous-titres et les paramètres audio et activer certaines
fonctions dont les fonctions Repeat, Angle et Zoom.
● Pour atteindre un titre, un chapitre ou une
piste pour trouver une scène en particulier.
1
Appuyez sur la touche ANYKEY en cours de
lecture.
2
Appuyez sur les touches …† pour
sélectionner le Titre, le Chapitre ou la Piste.
3
Appuyez sur les touches œ √ ou sur les
touches numériques (0~9) pour
sélectionner la scène désirée.
Puis, appuyez sur la touche OK.
● En cours de lecture, vous pouvez effectuez
une recherche rapide dans un chapitre ou
une piste.
1
Appuyez sur la touche SKIP ( ) de la
télécommande.
● Si vous appuyez sur la touche ❙œœ ,
vous atteignez le début du chapitre, de la piste ou du
marqueur (DVD-RAM, DVD-RW(mode VR)). En appuyant
de nouveau sur la touche dans les 3 secondes, vous
revenez au début du chapitre, de la piste ou du marqueur
précédent (DVD-RAM, DVD-RW(mode VR)).
● Si vous appuyez sur la touche √√❙ ,
vous atteignez le chapitre, la piste ou le marqueur suivant
(DVD-RAM,DVD-RW(mode VR)).
Ralenti
1
En mode pause ou image par image, appuyez
sur la touche SEARCH ( ) de la
|télélcommande.
● Si vous appuyez sur la touche √√,
Ralenti 1/8 ➞ Ralenti 1/4 ➞ Ralenti 1/2
● Si vous appuyez sur la touche œœ,
Ralenti 1/8 ➞ Ralenti 1/4 ➞ Ralenti 1/2
● Pour revenir à une vitesse de lecture
normale, appuyez sur la touche .
Maintenez la touche SEARCH ( ) enfoncée en mode
pause : le disque sera lu au ralenti, à 1/4 de sa vitesse normale.
Si la touché est relâchée, la lecture se remet en pause.
Lecture image par image
1
Appuyez sur le bouton de la
télécommande en mode Pause.
● À chaque fois que la touche est enfoncée, un nouveau
cadre apparaît.
Lorsque la touche est enfoncée, le cadre précédent
est activé.
Lorsque la touche est enfoncée, le cadre suivant est
activé.
● Pour revenir à une vitesse de lecture normale, appuyez sur
la touche .
■
La vitesse adoptée dans cette fonction peut
être différente de la vitesse réelle de lecture.
■
La vitesse lente ne fonctionne qu’en avance
sur les disques MPEG4.
Remarque
■
La vitesse pas à pas ne fonctionne qu’en
avance sur les disques MPEG4.
Remarque
Sauter des chapitres ou des pistes
Atteindre directement une scène à l’aide de la touche ANYKEY
Lecture
CHANG.DÉPLA.
DVD-VIDEO
1/10
1/40
00:01:45
ENG
ENG D 5.1CH
Non
1/1
Non
CHANG.DÉPLA.
DVD-VIDEO
1/10
1/40
00:01:45
ENG
ENG D 5.1CH
Non
1/1
Non
Titre
Chapitre
Temps
Sous-titre
Audio
Répétition
Angle
Zoom
Titre
Chapitre
Temps
Sous-titre
Audio
Répétition
Angle
Zoom
00842C-R125-XEB-FRA_52~70 2005.6.14 8:15 PM Page 55

Lecture
56
- Français
Utilisation de la fonction Repeat
Utilisation de la touche REPEA
Utilisation de la touche REPEA
T
T
1
Appuyez sur la touche REPEAT en cours de
lecture.
2
Appuyez sur la touche REPEAT ou sur les
touches …† pour sélectionner le Titre ou le
Chapitre que vous souhaitez lire de manière
répétée.
Appuyez sur la touche OK.
Chapitre : répète la lecture du chapitre en cours.
Titre : répète la lecture du titre en cours.
- Pour revenir à la lecture normale -
3
Appuyez sur le bouton REPEAT pour
sélectionner Non, puis sur le bouton …† ou
REPEAT et enfin, sur le bouton OK.
Appuyez sur la touche CANCEL pour revenir à la lecture
normale.
● Atteindre un temps de lecture spécifique
pour vous aider à retrouver une scène.
1
Appuyez sur la touche ANYKEY en cours de
lecture.
2
Appuyez sur les touches …† pour
sélectionner le Temps.
3
Entrez le temps dans la séquence d’heures,
de minutes et de secondes à l’aide des
touches numériques puis appuyez sur la
touche OK.
■
Il est possible que cette opération ne
fonctionne pas pour certains disques.
Lorsqu’un CD audio (CD-DA) ou un disque
MP3 est inséré, l’affichage des informations
peut ne pas apparaître en fonction du disque
utilisé.
■
La fonction Time Search ne fonctionne pas
avec certains disques.
■
Pour faire disparaître l'écran, appuyez de
nouveau sur la touche ANYKEY.
Remarque
Lecture de manière répétée (Repeat Playback)
CHANG.DÉPLA.
DVD-VIDEO
1/10
1/40
00:01:45
ENG
ENG D 5.1CH
Non
1/1
Non
NUMÉRO
DÉPLA.
DVD-VIDEO
1/10
1/40
00:01:45
ENG
ENG D 5.1CH
Non
1/1
Non
Titre
Chapitre
Temps
Sous-titre
Audio
Répétition
Angle
Zoom
Titre
Chapitre
Temps
Sous-titre
Audio
Répétition
Angle
Zoom
Répétition
Non
Répétition
Titre
00842C-R125-XEB-FRA_52~70 2005.6.14 8:15 PM Page 56

Français -
57
Utilisation de la touche
Utilisation de la touche
ANYKEY
ANYKEY
1
Appuyez sur la touche ANYKEY en cours de
lecture.
2
Appuyez sur les touches …† pour
sélectionner Répétition puis appuyez sur les
touches œ √ pour sélectionner le Titre ou le
Chapitre que vous souhaitez lire de manière
répétée.
Pour plus d'informations sur la répétition A-
B, reportez-vous à la page 58.
3
Appuyez sur la touche OK.
Pour faire disparaître l’écran, appuyez sur la touche
ANYKEY ou RETURN. La répétition de la lecture vous
permet de répéter la lecture d’un titre ou d'un chapitre.
Utilisation de la touche REPEA
Utilisation de la touche REPEA
T
T
1
Appuyez sur la touche REPEAT en cours de
lecture.
2
Appuyez plusieurs fois sur la touche REPEAT
pour sélectionner la Piste ou le Disque que
vous souhaitez lire de manière répétée.
Pour revenir à la lecture normale
3
Appuyez plusieurs fois sur la touche REPEAT
pour sélectionner Non.
Appuyez sur la touche CANCEL pour revenir à la lecture
normale.
Utilisation de la touche
Utilisation de la touche
ANYKEY
ANYKEY
1
Appuyez sur la touche ANYKEY en cours de
lecture.
Repeat est mis en surbrillance.
2
Appuyez sur la touche REPEAT ou sur les
touches …† pour sélectionner la Piste ou le
Disque que vous souhaitez lire de manière
répétée. Appuyez sur la touche OK.
Pour les disques MP3, vous pouvez
sélectionner une Piste, un Dossier ou un
Disque.
- Pour revenir à la lecture normale -
3
Appuyez plusieurs fois sur la touche REPEAT
pour sélectionner Non.
Appuyez sur la touche CANCEL pour revenir à la lecture
normale.
■
Les DVD-RAM, DVD-RW (VR mode), les
DVD-R non finalisés et les DVD-RW (mode
vidéo) non finalisés ne permettent pas la
répétition d’un chapitre.
Remarque
Lecture de manière répétée (Repeat Playback)
Lecture
CHANG.DÉPLA.
DVD-VIDEO
1/10
1/40
00:01:45
ENG
ENG D 5.1CH
Non
1/1
Non
OKDÉPLA.
DVD-VIDEO
1/10
1/40
00:01:45
ENG
ENG D 5.1CH
Titre
1/1
Non
Titre
Chapitre
Temps
Sous-titre
Audio
Répétition
Angle
Zoom
Titre
Chapitre
Temps
Sous-titre
Audio
Répétition
Angle
Zoom
OK
REVENIR
SORTIEDÉPLA.
Musique
CD
Répétition : Non
Option lect.
: Normal
01. TRACK 1
02. TRACK 2
03. TRACK 3
04. TRACK 4
05. TRACK 5
06. TRACK 6
4:39
4:31
4:30
3:53
4:23
4:24
00 : 5201. TRACK 1
01/12
OK SORTIEDÉPLA.
Musique
CD
Répétition : Non
Option lect.
: Normal
01. TRACK 1
02. TRACK 2
03. TRACK 3
04. TRACK 4
05. TRACK 5
06. TRACK 6
4:39
4:31
4:30
3:53
4:23
4:24
00 : 5201. TRACK 1
01/12
REVENIR
OK SORTIEDÉPLA.
Musique
CD
Répétition : Piste
Option lect.
: Normal
01. TRACK 1
02. TRACK 2
03. TRACK 3
04. TRACK 4
05. TRACK 5
06. TRACK 6
4:39
4:31
4:30
3:53
4:23
4:24
00 : 5201. TRACK 1
01/12
REVENIR
00842C-R125-XEB-FRA_52~70 2005.6.14 8:15 PM Page 57

Sélection des sous-titres
Les langues de sous-titres peuvent ne pas fonctionner selon le
disque. Cette fonction n’est disponible qu’en cours de lecture.
Utilisation de la touche SUBTITLE
Utilisation de la touche SUBTITLE
1
Appuyez sur la touche SUBTITLE en cours
de lecture.
2
Appuyez sur la touche SUBTITLE ou sur les
touches …† pour sélectionner la langue de
sous-titre désirée.
Pour que l’écran disparaisse, appuyez sur le bouton
CANCEL ou RETURN.
Utilisation de la touche
Utilisation de la touche
ANYKEY
ANYKEY
1
Appuyez sur la touche ANYKEY en cours de
lecture.
2
Appuyez sur les touches …† pour
sélectionner Sous-titre puis appuyez sur les
touches œ √ pour sélectionner la langue de
sous-titre désirée.
■
L’affichage des sous-titres peut être différent
selon le type de disque.
■
Certains disques ne vous permettent de
sélectionner la langue qu’à partir du menu
Disque.
Remarque
Lecture
58
- Français
Lire une section donnée de manière répétée(Lecture Repeat A-B)
Utilisation de la touche
Utilisation de la touche
ANYKEY
ANYKEY
1
Appuyez sur la touche ANYKEY en cours de
lecture.
2
Appuyez sur les touches …† pour
sélectionner Répétition puis appuyez sur la
touche √ pour sélectionner A-B.
3
Appuyez sur la touche OK.
4
Appuyez sur la touche OK à l’endroit où vous
souhaitez que la répétition de la lecture
commence (A) puis appuyez de nouveau sur
cette touche à
l’endroit où vous souhaitez que la
répétition de la lecture cesse (B).
La répétition de la lecture de la section A-B
commence.
- Pour revenir à la lecture normale -
Sélectionnez Non dans la rubrique Repeat.
Appuyez sur la touche CANCEL pour revenir à la
lecture normale.
(Mode VR)
CHANG.DÉPLA.
DVD-VIDEO
1/10
1/40
00:01:45
ENG
ENG D 5.1CH
Titre
1/1
Non
OKDÉPLA.
DVD-VIDEO
1/10
1/40
00:01:45
ENG
ENG D 5.1CH
A-B
1/1
Non
Titre
Chapitre
Temps
Sous-titre
Audio
Répétition
Angle
Zoom
Titre
Chapitre
Temps
Sous-titre
Audio
Répétition
Angle
Zoom
CHANG.DÉPLA.
DVD-VIDEO
1/10
1/40
00:01:45
ENG
ENG D 5.1CH
Titre
1/1
Non
CHANG.DÉPLA.
DVD-VIDEO
1/10
1/40
00:01:45
ENG
ENG D 5.1CH
Non
1/1
Non
Sous-Titre
ENG
Titre
Chapitre
Temps
Sous-titre
Audio
Répétition
Angle
Zoom
Titre
Chapitre
Temps
Sous-titre
Audio
Répétition
Angle
Zoom
■
Si vous avez défini le point (B) avant que 5
secondes ne se soient écoulées, la
marque d’interdiction ( ) apparaît.
■
Les CD Audio (CD-DA), les disques MP3 et
MPEG4 ne prennent pas en charge la fonction
de répétition A-B.
Remarque
00842C-R125-XEB-FRA_52~70 2005.6.14 8:15 PM Page 58

Français -
59
Sélection de la langue audio
Les langues audio peuvent ne pas fonctionner selon le disque.
Cette fonction n’est disponible qu’en cours de lecture.
Utilisation de la touche
Utilisation de la touche
AUDIO
AUDIO
1
Appuyez sur la touche AUDIO en cours de
lecture.
2
Appuyez sur la touche AUDIO ou sur les
touches …† pour sélectionner la langue audio
désirée.
Utilisation de la touche
Utilisation de la touche
ANYKEY
ANYKEY
1
Appuyez sur la touche ANYKEY en cours de
lecture.
2
Appuyez sur les touches …† pour
sélectionner Audio puis appuyez sur les
touches 4 œ √ pour sélectionner la langue
audio désirée.
■
Les langues audio peuvent varier en fonction
du type de disque.
■
Certains disques ne vous permettent de
sélectionner la langue audio qu’à partir du
menu Disque.
Remarque
Lecture
CHANG.DÉPLA.
DVD-VIDEO
1/10
1/40
00:01:45
Non
ENG D 5.1CH
Titre
1/1
Non
CHANG.DÉPLA.
DVD-VIDEO
1/10
1/40
00:01:45
ENG
ENG D 5.1CH
Non
1/1
Non
Audio
ENG Dolby Digital 5.1CH
Titre
Chapitre
Temps
Sous-titre
Audio
Répétition
Angle
Zoom
Titre
Chapitre
Temps
Sous-titre
Audio
Répétition
Angle
Zoom
Changer l’angle de la caméra
Lorsqu’un DVD-VIDEO contient plusieurs angles pour une
scène spécifique, vous pouvez sélectionner la fonction Angle.
Cette fonction n’est disponible qu’en cours de lecture.
Si le disque contient plusieurs angles, l'indication ANGLE
s’affiche à l’écran.
1
Appuyez sur la touche ANYKEY en cours de
lecture.
2
Appuyez sur les touches …† pour
sélectionner Angle et appuyez sur les touches
œ √ pour sélectionner l’angle désiré.
■
Cette fonction dépend du disque utilisé et peut
ne pas fonctionner avec tous les DVD.
■
Cette fonction ne fonctionne pas lorsque le
DVD n’a pas été enregistré avec un
système de caméra multi-angles.
Remarque
CHANG.DÉPLA.
DVD-VIDEO
1/10
1/40
00:01:45
Non
ENG D 5.1CH
Non
1/3
Non
CHANG.DÉPLA.
DVD-VIDEO
1/10
1/40
00:01:45
ENG
ENG D 5.1CH
Non
1/3
Non
Titre
Chapitre
Temps
Sous-titre
Audio
Répétition
Angle
Zoom
Titre
Chapitre
Temps
Sous-titre
Audio
Répétition
Angle
Zoom
(Mode VR)
00842C-R125-XEB-FRA_52~70 2005.6.14 8:15 PM Page 59

Utilisation des signets
Cette fonction vous permet de placer des signets sur les
sections d'un DVD-VIDEO ou d'un DVD-R/-RW (mode V) afin
de les retrouver rapidement.
1
Appuyez sur la touche MARKER en cours de
lecture.
2
Appuyez sur la touche OK lorsque la scène
désirée apparaît.
Le chiffre 1 s’affiche et la scène est mémorisée.
3
Appuyez sur la touche œ √ pour passer à la
position suivante.
4
Appuyez sur la touche OK lorsque la scène
désirée apparaît.
Le chiffre 2 s’affiche et la scène est mémorisée.
● Répétez l’opération ci-dessus pour mettre d’autres scènes
en signet.
● Vous pouvez mettre jusqu’à 10 scènes en signet.
■
Lorsque le plateau est ouvert puis refermé, les
signets disparaissent.
Remarque
(mode V)
Lecture
60
- Français
Zoom avant
1
Appuyez sur la touche ANYKEY en cours de
lecture ou en mode pause.
2
Appuyez sur les touches …† pour
sélectionner Zoom, puis appuyez sur la
touche OK. ( ) s’affiche.
3
Appuyez sur les touches …† œ √ pour
sélectionner la zone que vous souhaitez
agrandir.
4
Appuyez sur la touche OK. L’écran est
agrandi à deux fois la taille normale.
Si vous appuyez de nouveau sur la touche OK après
que l’écran ait été agrandi à deux fois la taille
normale, la taille de l’écran passe alors à quatre fois la
taille normale.
➞
taille normale ➞ 2X ➞ 4X ➞ 2X
■
Lorsque vous enregistrez en mode EP, la
fonction Zoom n'est pas prise en charge sauf
lorsque vous enregistrez en mode V.
Remarque
CHANG.DÉPLA.
DVD-VIDEO
1/10
1/40
00:01:45
ENG
ENG D 5.1CH
Non
1/1
Non
Titre
Chapitre
Temps
Sous-titre
Audio
Répétition
Angle
Zoom
REVENIROKDÉPLA.
Signet
REVENIR
ANNULER
DÉPLA.
Signet
1
LECT.
REVENIR
ANNULER
DÉPLA.
Signet
1 2
LECT.
00842C-R125-XEB-FRA_52~70 2005.6.14 8:15 PM Page 60

1
Appuyez sur la touche MARKER en cours de
lecture.
2
Appuyez sur les touches œ √ pour
sélectionner une scène mise en signet.
3
Appuyez sur la touche OK ou sur la touche
pour commencer la lecture de la scène
sélectionnée.
1
Appuyez sur la touche MARKER en cours de
lecture.
2
Appuyez sur les touches œ √ pour
sélectionner une scène mise en signet.
3
Appuyez sur la touche CANCEL pour
supprimer le signet sélectionné.
Français -
61
Effacer un signet
Lire un signet
Lecture
REVENIR
ANNULER
DÉPLA.
Signet
1 2
LECT.
REVENIR
ANNULER
DÉPLA.
Signet
1 2
LECT.
REVENIROKDÉPLA.
Signet
1
Utilisation des marqueurs
1
Appuyez sur la touche MARKER en cours de
lecture.
2
Appuyez sur la touche OK lorsque la scène
désirée apparaît.
Le chiffre 01 s’affiche et la scène est mémorisée.
3
Appuyez sur la touche œ √ pour passer à la
position suivante.
4
Appuyez sur la touche OK lorsque la scène
désirée apparaît.
Le chiffre 02 s’affiche et la scène est mémorisée.
● Les disques DVD-RAM ou DVD-RW (VR) possèdent la
fonction Marqueur au lieu de la fonction Signet.
La fonction Marqueur vous permet de marquer jusqu’à 99
scènes. Les scènes affichées pouvant comporter plusieurs
pages, une numérotation est nécessaire.
Si le disque utilisé est codé avec une protection, il n'est pas
possible de définir ou d'effacer des repères. Seule la lecture
est possible.
(mode VR)
REVENIROK
Marqueur
N:0
REVENIR
ANNULER
DÉPLA.
LECT.
Marqueur
N:101
REVENIR
ANNULER
DÉPLA.
LECT.
Marqueur
N:201 02
00842C-R125-XEB-FRA_52~70 2005.6.14 8:15 PM Page 61

62
- Français
Lecture d’un CD audio (CD-DA)/MP3
Chaque disque donne accès à tout un ensemble de
fonctions de menu.
1
Insérez un CD audio (CD-DA) dans le plateau.
Le menu CD audio apparaît et la lecture des pistes
(chansons) commence automatiquement.
2
-1
Appuyez sur les touches …† pour
sélectionner la piste que vous souhaitez
écouter, puis appuyez sur la touche OK ou
√.
2
-2 Appuyez sur les touches numériques
pour sélectionner la piste (chanson) ; la
lecture de la piste (chanson)
commence automatiquement.
1. Mode Répétition : Répétition désactivée/Répétition de la
piste /Répétition du disque
2. Piste (chanson) actuelle : affiche le numéro de la piste en
cours de lecture.
3. affiche le numéro de la piste en cours de lecture et le
nombre total de pistes.
4. Ceci indique l’état de fonctionnement d’un disque et la
durée de lecture correspondant à la portion du disque qui
est actuellement lue.
5. Affiche la liste des pistes (chansons) et le temps de lecture
de chaque piste.
6. Affichage des touches.
7. Option de lecture :
Normal, Aléatoire, Intro ou Liste de lecture
Lecture d’un CD
audio/MP3
Lecture d’un CD audio (CD-DA)
1
Appuyez sur la touche MARKER en cours de
lecture.
2
Appuyez sur les touches œ √ pour
sélectionner une scène mise en signet.
3
Appuyez sur la touche OK ou sur la touche
pour commencer la lecture de la scène
sélectionnée.
● Pour retourner au début du repère, appuyez sur le bouton
. Si vous appuyez à nouveau sur le bouton dans les 3
secondes qui suivent, vous revenez au début du repère
précédent.
● Pour aller au repère suivant, appuyez sur le bouton .
1
Appuyez sur la touche MARKER en cours de
lecture.
2
Appuyez sur les touches œ √ pour
sélectionner une scène mise en signet.
Appuyez sur la touche CANCEL pour
supprimer le signet sélectionné.
■
Lorsqu'un marqueur est effacé pendant la lecture d’un
DVD-RAM/-RW (mode VR), les numéros des marqueurs
changent. Par exemple, si le 7ème repère est effacé alors
que dix repères ont été enregistrés, les numéros des
repères au-delà du huitième baissent automatiquement,
ainsi le 8ème repère devient le 7ème.
Effacer un marqueur
Lire un marqueur
Lecture
REVENIR
ANNULER
DÉPLA.
LECT.
Marqueur
N:201 02
Éléments de l’écran Audio CD(CD-DA)
Marqueur
01 02 03 04 05 06 07 08 09 10
√
N:10
REVENIR
ANNULER
DÉPLA.
Marqueur
LECT.
01 02 03 04 05 06 07 08 09 N:9
OK SORTIE
REVENIR
DÉPLA.
Musique
CD
Répétition : Non
Option lect. : Normal
01. TRACK 1
02. TRACK 2
03. TRACK 3
04. TRACK 4
05. TRACK 5
06. TRACK 6
4:39
4:31
4:30
3:53
4:23
4:24
00 : 5201. TRACK 1
01/12
OK SORTIE
REVENIR
DÉPLA.
Musique
CD
Répétition : Non
Option lect.
: Normal
01. TRACK 1
02. TRACK 2
03. TRACK 3
04. TRACK 4
05. TRACK 5
06. TRACK 6
4:39
4:31
4:30
3:53
4:23
4:24
00 : 5201. TRACK 1
01/12
1
2
3
7
4
5
6
00842C-R125-XEB-FRA_52~70 2005.6.14 8:15 PM Page 62

Français -
63
1.
……††
, 0~9: permet de sélectionner une piste (chanson).
2.
√√
: permet de lire la piste (chanson) sélectionnée.
3. Touche OK: permet de lire la piste (chanson) sélectionnée.
4. Touche ( ): permet de lire la piste (chanson)
sélectionnée.
5. Touche ( ): permet de revenir au début de la piste
actuelle lorsqu’elle est enfoncée en cours de lecture.
Si vous appuyez de nouveau sur cette touche, votre
graveur de DVD commence la lecture de la piste
précédente. Si vous appuyez sur cette touche moins de
trois secondes après le début de la lecture, la lecture de la
piste précédente commence. Si vous appuyez sur cette
touche plus de trois secondes après le début de la lecture,
la piste actuelle sera relue depuis le début.
6. Appuyez sur la touche ( / ): lecture rapide (X2, X4,
X8)
7. Touche ( ): permet d’arrêter la lecture d’une piste
(chanson).
8. Touche ( ): permet de lire une piste (chanson) ou de
mettre la
lecture en pause.
9. Bouton ANYKEY: Pour sélectionner le menu supérieur de
l'affichage à l'écran (option Répétition ou Lecture).
Boutons de la télécommande utilisés pour la lecture de CD audio (CD-DA)
Lecture
1
Insérez un disque MP3 dans le plateau.
2
Appuyez sur les boutons
…†
pour
sélectionner Navigation par Disque puis
appuyez sur le bouton √ ou sur OK.
3
Appuyez sur les boutons
…†
pour
sélectionner Musique puis appuyez sur le
bouton √ ou sur OK.
Le menu MP3 apparaît et la lecture des pistes
(chansons) commence automatiquement.
4
-1
Appuyez sur les touches …† pour
sélectionner la piste que vous souhaitez
écouter, puis appuyez sur la touche OK ou
√.
4
-2
Appuyez sur les touches numériques pour
sélectionner la piste (chanson) ; la lecture
de la piste (chanson) commence
automatiquement.
Lire un disque MP3
REVENIROKDÉPLA. SORTIE
Navigation par Disque
CD
DivX
√√
Photo
√√
Musique
√√
Navigation
par Disque
Programme
Paramétrer
REVENIROKDÉPLA. SORTIE
Navigation par Disque
CD
DivX
√√
Photo
√√
Musique
√√
Navigation
par Disque
Programme
Paramétrer
OK REVENIR SORTIEDÉPLA.
Musique
MP3
Répétition : Non
Option lect. : Normal
Racine
Bryan Adams
Bryan Adams_2
Straight from the heart
Run to you
Heaven
00 :22Straight from the heart
Racine
03/06
00842C-R125-XEB-FRA_52~70 2005.6.14 8:15 PM Page 63

64
- Français
1.
……††
, 0~9: permet de sélectionner une piste (chanson).
2.
√√
: permet de lire la piste (chanson) sélectionnée.
3. Touche OK: permet de lire la piste (chanson) sélectionnée
ou d’afficher les fichiers contenus dans le dossier
sélectionné.
4. Touche RETURN: permet d’atteindre le dossier dans lequel
se trouvent les chansons actuellement lues.
5. Touche ( ): permet de lire la piste suivante.
6. Touche ( ): permet de revenir au début de la piste
actuelle lorsqu’elle est enfoncée en cours de lecture. Si
vous appuyez de nouveau sur cette touche, votre graveur
de DVD commence la lecture de la piste précédente.
Si vous appuyez sur cette touche moins de trois
secondes après le début de la lecture, la lecture de la piste
précédente commence.
Si vous appuyez sur cette touche plus de trois
secondes après le début de la lecture, la piste actuelle sera
relue depuis le début.
7. Touche ( ): permet d’arrêter la lecture d’une piste
(chanson).
8. Touche ( ): permet de lire une piste (chanson) ou de
mettre la lecture en pause.
9. Bouton ANYKEY: Pour sélectionner le menu supérieur de
l'affichage à l'écran (option Répétition ou Lecture).
1. Mode Répétition : Répétition désactivée, Répétition de la
piste, Répétition du dossier ou Répétition du Disque
2. Piste (chanson) actuelle : affiche le numéro de la piste en
cours de lecture.
3. Affiche le dossier actuel et le numéro de la piste en cours de
lecture.
4. Ceci indique l’état de fonctionnement d’un disque et la
durée de lecture correspondant à la portion du disque qui
est actuellement lue.
5. Affiche les informations relatives au dossier et aux pistes
qu’il contient.
6. Affichage des touches.
7. Option de lecture :
Normal, Aléatoire, Intro ou Liste de lect.
Éléments de l’écran MP3
Boutons de la télécommande utilisés pour la lecture de CD audio (CD-DA)
Lecture
OK REVENIR SORTIEDÉPLA.
Musique
MP3
Répétition : Non
Option lect. : Normal
Racine
Bryan Adams
Bryan Adams_2
Straight from the heart
Run to you
Heaven
00 :22
Straight from the heart
Racine
03/06
1
2
3
7
4
5
6
■
Files of one type: List of files and folders
appears in a defined order.
■
Files of multiple types: Topmost GUI
menu screen (DISC NAVIGATION)
appears.
Remarque
00842C-R125-XEB-FRA_52~70 2005.6.14 8:15 PM Page 64

Français -
65
Vous pouvez enregistrer jusqu’à 30 pistes au maximum dans
la liste de lecture.
1
Appuyez sur le bouton ANYKEY au cours de
la lecture. Repeat Mode est mis en surbrillance.
2
Appuyez sur les boutons œ √ pour
sélectionner Option lect..
3
Appuyez sur la touche OK.
L’écran des options de lecture apparaît.
Appuyez sur les boutons …† pour sélectionner Liste de
lect.
4
Appuyez sur la touche OK.
L’écran Liste de lecture apparaît.
Sélectionnez les pistes en respectant l’ordre dans lequel
vous souhaitez qu’elles soient lues à l’aide des touches
…†. Appuyez sur la touche OK. Appuyez sur la touche
PLAY pour commencer la lecture de la liste de lecture.
5
En cas d’erreur lors de la création de votre
liste de lecture, sélectionnez la piste à
supprimer à l’aide des touches …† puis
appuyez sur la touche CANCEL.
La piste sélectionnée sera supprimée.
6
Appuyez sur la touche PLAY au cours de la
Liste de lecture.
Les Options de lecture peuvent être utilisées avec un CD
audio ou MP3 en mode Lecture ou Stop.
1
Appuyez sur le bouton ANYKEY au cours de
la lecture. Repeat Mode est mis en surbrillance.
● En mode Stop, Options de lecture est mis en surbrillance.
2
Appuyez sur les boutons œ √ pour
sélectionner Option lect., puis appuyez sur
les boutons …† pour sélectionner l'option
de lecture souhaitée (Normal, Aléatoire,
Intro ou Liste de lect.).
3
Sélectionnez l’élément de votre choix en
appuyant sur les boutons
…† (Normal,
Aléatoire, Intro ou Liste de lect.).
● Normal: les pistes du disque sont lues dans l’ordre dans
lequel elles ont été enregistrées sur le disque.
● Aléatoire: l’option Aléatoire permet de lire les pistes d’un
disque dans un ordre aléatoire. Une fois qu’une liste
aléatoire a été créée et lue entièrement, une autre liste
aléatoire est créée et lue.
La Lecture aléatoire se poursuit jusqu’à ce que l’option de
lecture soit modifiée.
● Intro: les 10 premières secondes de chaque piste sont lues.
Si vous souhaitez écouter la musique que vous avez
sélectionnée, appuyez sur la touche OK o usur la touche
. L’option de lecture passe en mode Lecture normale.
Une fois la lecture des introductions terminée, la lecture
normale est lancée.
● Liste de lect.: l’option de lecture Liste de lecture vous
permet de sélectionner l’ordre dans lequel vous souhaitez
lire les pistes.
Programmer des pistes
Mode Options de lecture
Lecture
OK REVENIR SORTIEDÉPLA.
Musique
CD
Répétition : Non
Option lect. : Normal
01. TRACK 1
02. TRACK 2
03. TRACK 3
04. TRACK 4
05. TRACK 5
06. TRACK 6
4:39
4:31
4:30
3:53
4:23
4:24
00 : 5201. TRACK 1
01/12
OK REVENIR
SORTIE
DÉPLA.
Musique
CD
Répétition : Non
Option lect. : Normal
01. TRACK 1
02. TRACK 2
03. TRACK 3
04. TRACK 4
05. TRACK 5
06. TRACK 6
4:39
4:31
4:30
3:53
4:23
4:24
00 : 5201. TRACK 1
01/12
OK REVENIR SORTIEDÉPLA.
Musique
CD
Répétition : Non
Option lect. : Normal
01. TRACK 1
02. TRACK 2
03. TRACK 3
04. TRACK 4
05. TRACK 5
06. TRACK 6
4:39
4:31
4:30
3:53
4:23
4:24
00 : 5201. TRACK 1
01/12
Musique
CD
Répétition : Non
Option lect. : Normal
00 : 5201. TRACK 1
OK SORTIEDÉPLA.
Musique
CD
Répétition : Non
Option lect. : Liste de lect.
01. TRACK 1
02. TRACK 2
03. TRACK 3
04. TRACK 4
05. TRACK 5
06. TRACK 6
00 : 00
OK
ANNULER SORTIE
DÉPLA.
Musique
CD
Répétition : Non
Option lect. : Liste de lect.
01. TRACK 1
02. TRACK 2
03. TRACK 3
04. TRACK 4
05. TRACK 5
06. TRACK 6
01 : 36
1. P_TRACK 1
2. P_TRACK 2
3. P_TRACK 3
1. P_TRACK 1
2. P_TRACK 2
3. P_TRACK 3
4. P_TRACK 4
00842C-R125-XEB-FRA_52~70 2005.6.14 8:15 PM Page 65

66
- Français
Lecture
5
-1
Si vous appuyez sur la touche PLAY(),
l’écran Diaporama apparaît.
Appuyez sur les boutons
œ √
pour sélectionner la
vitesse du diaporama, puis appuyez sur le bouton OK.
5
-2
Utilisez les touches œ √ pour sélectionner
un fichier image dans l’écran Album puis
appuyez sur la touche OK.
: permet de revenir à l’écran Album.
: le graveur entre en mode Diaporama.
Avant que le diaporama ne puisse
commencer, l’intervalle entre les images (vitesse du
diaporama) doit être défini.
: à chaque fois que la touche OK est enfoncée, l’image
pivote de 90 degrés vers la droite.
: à chaque fois que la touche OK est enfoncée, l’image
est agrandie jusqu’à 4X.
(Normal ➞ Zoom 2X ➞ Zoom 4X ➞ Zoom 2X ➞
Normal)
● Appuyez sur la touche ANYKEY pour faire apparaître ou
disparaître les menus.
1
Insérez le disque au format JPEG dans le
tiroir disque.
2
Appuyez sur les boutons
…†
pour
sélectionner Navigation par Disque puis
appuyez sur le bouton √ ou sur OK.
3
Appuyez sur les boutons
…†
pour
sélectionner Photo puis appuyez sur le
bouton √ ou sur OK.
4
Appuyez sur les touches …† œ √ pour
sélectionner une image.
● Pour visualiser les 6 images suivantes, appuyez sur
la touche .
● Pour visualiser les 6 images précédentes, appuyez
sur la touche .
Lecture d'une image
OK REVENIR
SORTIE
DÉPLA.
Photo
CD
Index 6 / 73
Diaporama
ROOT / DSC01189
Page 2 / 13
REVENIROKDÉPLA. SORTIE
Navigation par Disque
CD
DivX
√√
Photo
√√
Musique
√√
Navigation
par Disque
Programme
Paramétrer
REVENIROKDÉPLA. SORTIE
Navigation par Disque
CD
DivX
√√
Photo
√√
Musique
√√
Navigation
par Disque
Programme
Paramétrer
REVENIROKDÉPLA. PHOTO
DSC01189
REVENIROKDÉPLA.
DSC01189
vitesse diaporama
00842C-R125-XEB-FRA_52~70 2005.6.14 8:15 PM Page 66

Français -
67
Lecture
Lecture d'un fichier
MPEG4
Description de la fonction MPEG4
Les fichiers MPEG4 permettent de stocker les données
audio et vidéo.
Les fichiers MPEG4 avec les extensions suivantes
peuvent être lus.
- .AVI, .DIVX
1
Insérez le disque au format MPEG4 dans le
tiroir disque.
2
Appuyez sur les boutons
…†
pour
sélectionner Navigation par Disque puis
appuyez sur le bouton √ ou sur OK.
3
Appuyez sur les boutons
…†
pour
sélectionner DivX puis appuyez sur le bouton
√ ou sur OK.
4
Appuyez sur les boutons …† pour
sélectionner le fichier avi (DivX), puis appuyez
sur le bouton √, ou sur OK.
5
Lors de la lecture d'un fichier MPEG4, vous
pouvez utiliser les fonctions suivantes.
Appuyez une fois sur le bouton STOP pendant la lecture
pour afficher la liste des fichiers, appuyez une nouvelle
fois sur le bouton pour quitter l'écran menu.
Fonction Description
Sauter
( ou )
Recherche
( ou )
Lecture
lente
Lecture par
étape
Pour avancer ou reculer de 5 minutes, appuyez sur
le bouton ou pendant la lecture.
Appuyez sur le bouton SEARCH ( ou ) pendant
la lecture, puis appuyez à nouveau pour accélérer la
vitesse de recherche. (2X, 4X, 8X)
En mode pause ou en mode par étape, appuyez sur le
bouton SEARCH de votre télécommande.
(1/8X, 1/4X, 1/2X)
Appuyez sur le bouton de votre
télécommande en mode pause.
■
Ce lecteur peut lire les formats de
compression vidéo suivants,
- Format Codec MPEG4 : DivX 3.11 DivX
4.x DivX 5.x DivX-Pro (sans QPEL et
GMC)
- Format audio : .MP3, .MPEG, .WMA,
.LPCM, .AC3
■
Formats de fichier sous-titre pris en
charge : .smi, .srt, .sub, .psb, .txt, .ass
(le fichier sous-titre doit avoir exactement
le même nom que le fichier MPEG4)
■
Certains fichiers MPEG4 réalisés sur
ordinateur peuvent ne pas être lus. C’est
pourquoi un type de Codec, une Version
et une Résolution plus élevée au-delà de
la spécification ne sont pas pris en
charge.
NOTE
OK REVENIR SORTIEDÉPLA.
DivX
CD
MPEG4
[DivX].###.####.01.avi
[DivX].###.####.01.avi
MPEG4
00/01
REVENIROKDÉPLA. SORTIE
Navigation par Disque
CD
DivX
√√
Photo
√√
Musique
√√
Navigation
par Disque
Programme
Paramétrer
REVENIROKDÉPLA. SORTIE
Navigation par Disque
CD
DivX
√√
Photo
√√
Musique
√√
Navigation
par Disque
Programme
Paramétrer
00842C-R125-XEB-FRA_52~70 2005.6.14 8:15 PM Page 67

68
- Français
2
Appuyez sur les touches …† pour
sélectionner la Navigation par Disque, puis
appuyez deux fois sur la touche OK ou √.
L’écran Liste de titres s’affiche.
3
Appuyez sur les touches …† pour
sélectionner le Titre, puis appuyez sur la
touche OK ou √.
Le menu Edition s’affiche à droite.
(Lecture, Renommer, Supprimer, Éditer,
Protection: consultez les pages 71 à 74).
4
Appuyez sur les touches …† pour
sélectionner “Lecture” et commencer la
lecture de la liste de titres puis appuyez sur la
touche OK.
La lecture de l’entrée (titre) sélectionnée commence.
Pour visualiser le statut actuel du disque ainsi que la
progression de la lecture : appuyez sur la touche INFO
et les informations relatives au disque apparaîtront.
Suivez les instructions suivantes pour lire une scène à partir
de la Liste de titres.
Utilisation de la touche TITLE LIST
Utilisation de la touche TITLE LIST
1
Appuyez sur la touche TITLE LIST.
L’écran Liste de Titres s’affiche.
2
Appuyez sur les touches …† pour
sélectionner l’entrée que vous souhaitez lire à
partir de la Liste de Titres, puis appuyez sur la
touche PLAY ( ).
La lecture de l’entrée (titre) sélectionnée commence.
3
Pour arrêter la lecture du titre, appuyez sur la
touche STOP.
Pour revenir à l’écran Liste de titres, appuyez sur la
touche TITLE LIST.
Utilisation de la touche MENU
Utilisation de la touche MENU
1
Appuyez sur la touche MENU.
Lecture de la Liste de
Titres
Lecture
REVENIROKDÉPLA. SORTIE
Liste de Titres
DVD-RAM(VR)
No. Titre
Longueur
Éditer
19/JAN/2005 12:00 PR12
19/JAN/2005
12:00 SP
01 19/JAN/2005 1 00:00:21
√√
02 19/JAN/2005 1 00:00:03
√√
03 20/JAN/2005 2 00:00:15
√√
04 20/JAN/2005 2 00:00:16
√√
05 21/JAN/2005 1 00:06:32
√√
06 21/JAN/2005 1 00:08:16
√√
07 22/JAN/2005 1 00:09:36
√√
REVENIROKDÉPLA. SORTIE
Liste de Titres
DVD-RAM(VR)
No. Titre
Longueur
Edit
21/JAN/2005 11:50 PR11
21/JAN/2005
11:50 SP
01 19/JAN/2005 1 00:00:21
√√
02 19/JAN/2005 1 00:00:03
√√
03 20/JAN/2005 2 00:00:15
√√
04 20/JAN/2005 2 00:00:16
√√
05 21/JAN/2005 1 00:06:32
√√
06 21/JAN/2005 1 00:08:16
√√
07 22/JAN/2005 1 00:09:36
√√
Lecture
Renommer
Supprimer
Éditer
Protection
√√
Lecture
DVD-RAM(VR) Info disque
Nom du Disque
Titre Entier 15
Liste Lect. Entière 2
Durée Enregistrable
02:12 SP
Protection Non Protégé
Écran Lecture
01 JAN 2005 SAM 12:00
REVENIROKMOVE SORTIE
Navigation par Disque
DVD-RAM(VR)
Liste de Titres
√√
DivX
√√
Photo
√√
Musique
√√
Navigation
par Disque
Liste
de Lecture
Gestion.
de Disque
Programme
Paramétrer
00842C-R125-XEB-FRA_52~70 2005.6.14 8:15 PM Page 68

Français -
69
1. Écran de Lecture des entrées enregistrées.
2. Fenêtre d’information sur l’entrée sélectionée :
Nom du titre, date d’enregistrement, durée d’enregistrement,
statut de verrouillage, mode d’enregistrement
3. N° d’entrée de l’enregistrement
4. Titre de l’entrée enregistrée
5. Durée de l’enregistrement (c.-à-d., le temps de lecture)
6. Éléments d’édition de la liste de titre
Lecture : permet de lire l’entrée sélectionnée.
Renommer : permet de modifier le titre de l’entrée
sélectionnée.
Supprimer : permet de supprimer l’entrée sélectionnée de la
liste.
Éditer : permet de supprimer une section.
Protection : permet de verrouiller ou de déverrouiller l’entrée
sélectionnée.
7. Affichage des touches.
Éléments de l’écran Liste de Titres
■
Ceci dépend du type de disque utilisé.
■
Les DVD-R/DVD-RW (Vidéo) ont des fonctions
d’édition limitées.
Remarque
■
Vous pouvez également lire un programme
enregistré en appuyant sur la touche ANYKEY.
■
Appuyez sur les touches …† pour
sélectionner Titre.
■
Appuyez sur les touches œ √ pour
sélectionner la lecture de la liste de titres puis
appuyez sur la touche OK.
Remarque
Appuyez de nouveau sur la touche INFO Vous avez
alors accès aux informations relatives au titre en cours
de la lecture.
5
Pour arrêter la lecture du titre, appuyez sur la
touche STOP.
Pour revenir à l’écran Liste de titres, appuyez sur la
touche TITLE LIST.
Lecture
DVD-RAM(VR) Lect.ing Info
Nom 01/JAN/2005 12:00 PR
1
Titre 1/15
Heure de Création 01/JAN/2005 12:00
Longueur
00:01:43 SP
Durée de Lecture 00:13:27
Protection Titre Non Protégé
01 JAN 2005 SAM 12:00
CHANG.DÉPLA.
DVD-RAM(VR)
1/14
00:01:45
ENG
ENG D 5.1CH
Non
Non
Titre
Temps
Sous-titre
Audio
Répétition
Zoom
REVENIDÉPLA. SORTIE
Liste de Titres
DVD-RAM(VR)
No. Titre
Longueur
Éditer
02/01/01
00:25:30(PM) SP
01 00:00:21
√√
02 00:00:03
√√
03 Sports 00:00:15
√√
04 Movie 00:00:16
√√
05 00:06:32
√√
06 06 00:08:16
√√
07 07 00:09:36
√√
Lecture
Renommer
Supprimer
Éditer
Protection
REVENIROKDÉPLA. SORTIE
Liste de Titres
DVD-RAM(VR)
No. Titre
Longueur
Éditer
19/JAN/2005 12:00 PR12
19/JAN/2005
12:00 SP
01 19/JAN/2005 1 00:00:21
√√
02 19/JAN/2005 1 00:00:03
√√
03 20/JAN/2005 2 00:00:15
√√
04 20/JAN/2005 2 00:00:16
√√
05 21/JAN/2005 1 00:06:32
√√
06 21/JAN/2005 1 00:08:16
√√
07 22/JAN/2005 1 00:09:36
√√
1
3
3
6
45
2
00842C-R125-XEB-FRA_52~70 2005.6.14 8:15 PM Page 69

70
- Français
● Liste de Titres
Titre fait référence à un flux audio ou vidéo enregistré.
La Liste des titres ouvre une liste destinée à vous aider à
sélectionner un titre. La liste des titres étant constituée
d’informations sur le flux en cours d’enregistrement, si un
titre est supprimé, ce titre ne pourra plus être lu.
● Liste de Lecture
Fait référence à une unité de lecture, qui est créée en
sélectionnant une scène donnée dans la Liste des titres.
Lorsqu’une liste de lecture est lue, seule la scène
sélectionnée par l’utilisateur sera lue. La lecture
s’interrompra automatiquement à la fin de la scène.
Seules les informations nécessaires à la lecture d’une
scène donnée étant inclues dans une liste de lecture, même
si une liste est supprimée, le flux original ne sera pas
supprimé.
L'enregistrement ou l'édition peuvent ne pas se
terminer si un incident tel qu'une soudaine coupure
de courant se produit.
Sachez qu’un matériel qui a été endommagé est
incapable de retrouver son contenu d'origine.
Édition
Édition de base (Liste de Titres)....................................71
Édition avancée (Liste de Lecture)................................75
Gestionnaire de disque..................................................83
Cette section présente les fonctions de base de l’édition
de DVD et explique les fonctions d’édition relatives à
l’enregitrement et les fonctions d’édition du disque entier.
Édition
00842C-R125-XEB-FRA_52~70 2005.6.14 8:16 PM Page 70

Français -
71
Renommer (Étiqueter) un titre
Suivez les instructions suivantes pour renommer une entrée
d’une liste de titres, c.-à-d. pour modifier le titre d’un
programme enregistré.
Utilisation de la touche TITLE LIST
Utilisation de la touche TITLE LIST
1
Appuyez sur la touche TITLE LIST.
L’écran Liste de titres s’affiche.
Utilisation de la touche MENU
● Appuyez sur la touche MENU.
● Appuyez sur les touches …† pour sélectionner
Navigation par Disque, puis appuyez deux fois sur la
touche OK ou √.
2
Appuyez sur les touches …† pour
sélectionner l’entrée que vous souhaitez
renommer dans la Liste de Titres, puis
appuyez sur la touche OK ou √.
3
Appuyez sur les touches …† pour
sélectionner Renommer, puis appuyez sur la
touche OK.
L’écran Renommer apparaît.
Édition de base
(Liste de Titres)
4
Sélectionnez les caractères désirés à l’aide
des flèches …† œ √ , puis appuyez sur la
touche OK.
● Espace Libre:
Supprime le caractère précédent et
fait reculer le curseur d'une position.
(Équivalent de la touche CANCEL).
● Espace: permet d’insérer un espace et de déplacer le
curseur d’une position vers la droite.
● Suppr.: permet de supprimer le caractère situé au
niveau du curseur.
● Effacer:
permet de supprimer tous les caractères saisis.
● Enreg.:
permet d’enregistrer les caractères saisis.
5
Appuyez sur les touches
…† œ √
pour
sélectionner Enreg., puis appuyez sur la
touche OK.
Le nom modifié du titre s’affiche sous la rubrique titre de
l’entrée sélectionnée.
REVENIROKDÉPLA. SORTIE
Liste de Titres
DVD-RAM(VR)
No. Titre
Longueur
Éditer
19/JAN/2005 12:00 PR12
19/JAN/2005
12:00 SP
01 19/JAN/2005 1 00:00:21
√√
02 19/JAN/2005 1 00:00:03
√√
03 20/JAN/2005 2 00:00:15
√√
04 20/JAN/2005 2 00:00:16
√√
05 21/JAN/2005 1 00:06:32
√√
06 21/JAN/2005 1 00:08:16
√√
REVENIROKDÉPLA. SORTIE
Liste de Titres
DVD-RAM(VR)
No. Titre
Longueur
Éditer
Sports (A1)
19/JAN/2005
12:00 SP
01 19/JAN/2005 1 00:00:21
√√
02 19/JAN/2005 1 00:00:03
√√
03 20/JAN/2005 2 00:00:15
√√
04 20/JAN/2005 2 00:00:16
√√
05 Sports(A1) 00:06:32
√√
06 21/JAN/2005 1 00:08:16
√√
REVENIROKDÉPLA. SORTIE
Liste de Titres
DVD-RAM(VR)
No. Titre
Longueur
Éditer
21/JAN/2005 12:00 PR12
21/JAN/2005
12:00 SP
01 19/JAN/2005 1 00:00:21
√√
02 19/JAN/2005 1 00:00:03
√√
03 20/JAN/2005 2 00:00:15
√√
04 20/JAN/2005 2 00:00:16
√√
05 21/JAN/2005 1 00:06:32
√√
06 21/JAN/2005 1 00:08:16
√√
Lecture
Renommer
Supprimer
Éditer
Protection
ABCDE abc de
f
g
hij
klmno
pq
rst
u
z
nwxy
FGHIJ
KLMNO
PQRST
UVWXY
Z
Back Space Space Delete Clear Save
REVENIROKDÉPLA.
SORTIE
Renommer
DVD-RAM(VR)
BA C D E
GF H I J
LK
M
N O
QP R S T
VU
W
X Y
Z
Espace Libre
ba c d e
gf h i j
lk
m
n o
qp r s t
vu
w
x y
z
Espace
21 3 4 5
76 8 9 0
-
-
+ =
.
!
~
@
# $
^
%
&
( )
Effacer
Suppr.
Enreg.
Sports(A1)
Édition
01/JAN/2005 12:00 PR12
00842C-R125-XEB-FRA_71~87 2005.6.14 8:17 PM Page 71

72
- Français
Verrouiller (Protéger) un titre
Suivez les instructions suivantes pour verrouiller une entrée et
ainsi la protéger d’une suppression accidentelle.
Utilisation de la touche TITLE LIST
Utilisation de la touche TITLE LIST
1
Appuyez sur la touche TITLE LIST.
L’écran Liste de titres s’affiche.
Utilisation de la touche MENU
● Appuyez sur la touche MENU.
● Appuyez sur les touches …† pour sélectionner
Navigation par Disque, puis appuyez deux fois sur la
touche OK ou √.
2
Appuyez sur les touches …† pour
sélectionner l’entrée que vous souhaitez
protéger dans la Liste de Titres, puis appuyez
sur la touche OK ou √.
3
Appuyez sur les boutons …† pour
sélectionner Protection, puis appuyez sur
le bouton √ ou OK.
4
Appuyez sur les touches œ √ pour
sélectionner Oui, puis appuyez sur la touche
OK. L’icône en forme de clé de la fenêtre
d’information de l’entrée sélectionnée passe
en statut verrouillé. ( ➝ )
Supprimer un titre
Suivez les instructions suivantes pour supprimer une entrée de
la Liste de titres.
Utilisation de la touche TITLE LIST
Utilisation de la touche TITLE LIST
1
Appuyez sur la touche TITLE LIST.
L’écran Liste de titres s’affiche.
Utilisation de la touche MENU
● Appuyez sur la touche MENU.
● Appuyez sur les touches …† pour sélectionner
Navigation par Disque, puis appuyez deux fois sur la
touche OK ou √.
2
Appuyez sur les touches …† pour
sélectionner l’entrée de la Liste de titres que
vous souhaitez supprimer, puis appuyez sur la
touche OK ou √.
Édition
REVENIROKDÉPLA. SORTIE
Liste de Titres
DVD-RAM(VR)
No. Titre
Longueur
Éditer
Drama
19/JAN/2005
12:00 SP
01 Drama 00:00:21
√√
02 Music 00:00:03
√√
03 Sports 00:00:15
√√
04 Movie 00:00:16
√√
05 Sports(A1) 00:06:32
√√
06 Edu 1 00:08:16
√√
REVENIROKDÉPLA. SORTIE
Liste de Titres
DVD-RAM(VR)
No. Titre
Longueur
Éditer
Sports(A1)
19/JAN/2005
12:00 SP
01 Drama 00:00:21
√√
02 Music 00:00:03
√√
03 Sports 00:00:15
√√
04 Movie 00:00:16
√√
05 Sports(A1) 00:06:32
√√
06 Edu 1 00:08:16
√√
Lecture
Renommer
Supprimer
Éditer
Protection
REVENIROKDÉPLA. SORTIE
Liste de Titres
DVD-RAM(VR)
No. Titre
Longueur
Éditer
Drama
19/JAN//2005
12:00 SP
01 Drama 00:00:21
√√
02 Music 00:00:03
√√
03 Sports 00:00:15
√√
04 Movie 00:00:16
√√
05 Sports(A1) 00:06:32
√√
06 Edu 1 00:08:16
√√
REVENIROKDÉPLA. SORTIE
Liste de Titres
DVD-RAM(VR)
No. Titre
Longueur
Éditer
Sports(A1)
19/JAN/2005
12:00 SP
01 Drama 00:00:21
√√
02 Music 00:00:03
√√
03 Sports 00:00:15
√√
04 Movie 00:00:16
√√
05 Sports(A1) 00:06:32
√√
06 Edu 1 00:08:16
√√
Lecture
Renommer
Supprimer
Éditer
Protection
REVENIROKDÉPLA. SORTIE
Liste de Titres
DVD-RAM(VR)
No. Titre
Longueur
Éditer
Sports(A1)
19/JAN/2005
12:00 SP
01 Drama 00:00:21
√√
02 Music 00:00:03
√√
03 Sports 00:00:15
√√
04 Movie 00:00:16
√√
05 Sports(A1) 00:06:32
√√
06 Edu 1 00:08:16
√√
Lecture
Renommer
Supprimer
Éditer
Protection
REVENIROKDÉPLA. SORTIE
Liste de Titres
DVD-RAM(VR)
Sports(A1)
19/JAN/2005
12:00 SP
Protection du Titre:
NonOui
REVENIROKDÉPLA. SORTIE
Liste de Titres
DVD-RAM(VR)
No. Titre
Longueur
Éditer
Sports(A1)
19/JAN/2005
12:00 SP
01 Drama 00:00:21
√√
02 Music 00:00:03
√√
03 Sports 00:00:15
√√
04 Movie 00:00:16
√√
05 Sports(A1) 00:06:32
√√
06 Edu 1 00:08:16
√√
00842C-R125-XEB-FRA_71~87 2005.6.14 8:17 PM Page 72

Français -
73
Supprimer une section d’un titre
Suivrez les instructions suivantes pour supprimer une section
d’un entrée de la Liste de titres.
Utilisation de la touche TITLE LIST
Utilisation de la touche TITLE LIST
1
Appuyez sur la touche TITLE LIST.
L’écran Liste de titres s’affiche.
Utilisation de la touche MENU
● Appuyez sur la touche MENU.
● Appuyez sur les touches …† pour sélectionner
Navigation par Disque, puis appuyez deux fois sur la
touche OK ou √.
2
Appuyez sur les touches …† pour
sélectionner l’entrée de la Liste de titres que
vous souhaitez modifier, puis appuyez sur la
touche OK ou √.
3
Appuyez sur les touches …† pour
sélectionner Éditer, puis appuyez sur la
touche OK ou √.
L’écran Liste de titres s’affiche.
3
Appuyez sur les touches …† pour
sélectionner Supprimer, puis appuyez sur la
touche OK.
Vous serez invité à valider votre choix dans un message
de confirmation.
DVD-RAM (VR), DVD-RW (mode VR) : si une liste de
lecture est présente, le message ‘Souhaitez-vous
supprimer? (Les listes de lecture liées risquent d’être
supprimées.)’ s’affiche.
DVD-RW (mode Vidéo), DVD-R : si aucune liste de
lecture n’est présente, le message ‘Souhaitez-vous
supprimer?’ s’affiche.
● Le message dépend du type de disque.
4
Appuyez sur les touches œ √ pour
sélectionner Oui, puis appuyez sur la touche
OK.
■
lI est impossible de supprimer une entrée
protégée. Si vous souhaitez supprimer une
entrée protégée, sélectionnez “No” dans le
menu Protection du titre. (voir pages 72)
■
Lorsque la protection du disque est réglée
sur Protégé, vous ne pouvez pas supprimer
des titres. (voir pages 84)
■
Il est impossible de restaurer une entrée qui
a été supprimée de la Liste de titres.
■
Un DVD-R ou un DVD-RW finalisé ne peut
être supprimé.
■
S’agissant des DVD-R, les titres ne sont
supprimés que dans le menu et restent
physiquement présents sur le disque.
Remarque
(mode VR)
Édition
REVENIROKDÉPLA. SORTIE
Liste de Titres
DVD-RAM(VR)
No. Titre
Longueur
Éditer
Drama
19/JAN/2005
12:00 SP
01 Drama 00:00:21
√√
02 Music 00:00:03
√√
03 Sports 00:00:15
√√
04 Movie 00:00:16
√√
05 Sports(A1) 00:06:32
√√
06 Edu 1 00:08:16
√√
REVENIROKDÉPLA. SORTIE
Liste de Titres
DVD-RAM(VR)
No. Titre
Longueur
Éditer
Sports(A1)
19/JAN/2005
12:00 SP
01 Drama 00:00:21
√√
02 Music 00:00:03
√√
03 Sports 00:00:15
√√
04 Movie 00:00:16
√√
05 Sports(A1) 00:06:32
√√
06 Edu 1 00:08:16
√√
Lecture
Renommer
Supprimer
Éditer
Protection
REVENIROKDÉPLA. SORTIE
Liste de Titres
DVD-RAM(VR)
Sports(A1)
19/JAN/2005
12:00 SP
Souhaitez-vous supprimer?
(Les listes de lecture liées
risquent d’être supprimées.)
NoOui
REVENIROKDÉPLA. SORTIE
Liste de Titres
DVD-RAM(VR)
No. Titre
Longueur
Éditer
Sports(A1)
19/JAN/2005
12:00 SP
01 Drama 00:00:21
√√
02 Music 00:00:03
√√
03 Sports 00:00:15
√√
04 Movie 00:00:16
√√
05 Sports(A1) 00:06:32
√√
06 Edu 1 00:08:16
√√
Lecture
Renommer
Supprimer
Éditer
Protection
REVENIROKDÉPLA. SORTIE
Liste de Titres
DVD-RAM(VR)
No. Titre
Longueur
Éditer
Sports(A1)
19/JAN/2005
12:00 SP
01 Drama 00:00:21
√√
02 Music 00:00:03
√√
03 Sports 00:00:15
√√
04 Movie 00:00:16
√√
05 Sports(A1) 00:06:32
√√
06 Edu 1 00:08:16
√√
Lecture
Renommer
Supprimer
Éditer
Protection
00842C-R125-XEB-FRA_71~87 2005.6.14 8:17 PM Page 73

74
- Français
Édition
4
Appuyez sur la touche OK au point de
démarrage.
L’image et l’heure du point de démarrage s’affichent
dans la fenêtre Point de démarrage de la suppression
de la section.
Éléments de l’écran Éditer la liste de titres
1. Barre de lecture
2. Temps de lecture
3. Fenêtre Point de démarrage de la suppression de la
section et heure
4.
Fenêtre Point de fin de la suppression de la section et heure
● Sélectionnez le point de démarrage et le point de
fin de la section que vous souhaitez supprimer à
l’aide des touches liées à la lecture.
● Touches liées à la lecture:
(, , ).
5
Appuyez sur la touche OK au point de fin.
L’image et l’heure du point de fin s’affichent dans la
fenêtre Point de fin de la suppression de la section.
6
Appuyez sur la touch OK au Suppr..
7
Appuyez sur les boutons œ √ pour
sélectionner Oui, puis appuyez sur le
bouton OK.
La section sélectionnée est supprimée.
Pour revenir à l'écran Liste de Titres, appuyez sur les
boutons …† pour sélectionner Retour.
■
La durée de la section à supprimer doit être
supérieure ou égale à 5 secondes.
■
Si la durée de la section à supprimer est
inférieure à 5 secondes, le message ‘La plage
est trop courte’ apparaît.
■
Si le point de fin précède le point de début, le
message ‘Le point de fin ne peut pas se situer
avant le point de démarrage’.
■
Une section contenant une image fixe ne peut
être supprimée.
■
Appuyez sur la touche MENU une fois l’opéra-
tion terminée.
L’écran Liste de titres se referme.
Remarque
REVENIROKDÉPLA. SORTIE
Éditer la Liste de Titres
DVD-RAM(VR)
Sports(A1)
21/JAN/2005 11:50
00:00:06
Démar.
Fin
Suppr.
Termi.
Liste de Titres No. 05
Démar. 00:00:06
Fin 00:00:00
REVENIROKDÉPLA. SORTIE
Éditer la Liste de Titres
DVD-RAM(VR)
Sports(A1)
21/JAN/2005 11:50
00:10:10
Démar.
Fin
Suppr.
Termi.
Liste de Titres No. 05
Démar. 0:00:06
Fin 00:10:10
REVENIROKDÉPLA. SORTIE
Éditer la Liste de Titres
DVD-RAM(VR)
Sports(A1)
21/JAN/2005 11:50
00:10:10
Démar.
Fin
Suppr.
Termi.
Liste de Titres No. 05
Démar. 00:00:06
Fin 00:10:10
REVENIROKDÉPLA. SORTIE
Éditer la Liste de Titres
DVD-RAM(VR)
Sports(A1)
21/JAN/2005 11:50
00:10:15
Démar.
Fin
Suppr.
Termi.
Liste de Titres No. 05
Démar.
Fin 00:10:10
REVENIROKDÉPLA. SORTIE
Éditer la Liste de Titres
DVD-RAM(VR)
Sports(A1)
21/JAN/2005 11:50
00:00:06
Démar.
Fin
Suppr.
Termi.
Liste de Titres No. 05
Démar. 00:00:06
Fin 00:00:00
1
2
3
4
Souhaitez-vous supprimer?
(La partie supprimée ne sera pas restaurée.)
Oui Non
00842C-R125-XEB-FRA_71~87 2005.6.14 8:17 PM Page 74

Français -
75
5
Appuyez sur la touche OK au point de fin.
● L’image et l’heure du point de fin s’affichent dans la
fenêtre Fin.
● La barre de sélection jaune se déplace vers l’élément
Créer.
- Pour créer une nouvelle liste de lecture -
6
Appuyez sur les touches Faire.
Une nouvelle Scène est ajoutée à la Liste de lecture
actuelle. Un nouvel écran Faire une scène s’affiche.
- Pour revenir au menu Éditer une liste de lecture -
7
Appuyez sur les touches …† pour
sélectionner Termi., puis appuyez sur la
touche OK.
L’écran Éditer une liste de lecture s’affiche.
8
Appuyez sur la touche MENU ou PLAY LIST
une fois l’opération terminée.
L’écran Éditer une liste de lecture se referme.
Créer une Liste de Lecture
Suivez les instructions suivantes pour créer une nouvelle liste
de lecture à partir d’un titre enregistré.
1
Appuyez sur le bouton MENU, appareil en
mode Arrêt.
2
Appuyez sur les touches …† pour
sélectionner Liste de Lecture, puis appuyez
sur la touche OK ou √.
3
Appuyez sur les touches …† pour
sélectionner Nouvelle Liste de Lecture, puis
appuyez sur la touche OK ou √.
L’écran Créer une scène s’affiche.
4
Appuyez sur la touche OK au point de
démarrage.
● L’image et l’heure du point de démarrage s’affichent
dans la fenêtre Démarrage.
●
La barre de sélection jaune se déplace vers l’élément Fin.
● Sélectionnez le point de démarrage de la section à
partir de laquelle vous souhaitez créer une nouvelle
scène à l’aide des touches liées à la lecture
(
,
,).
Édition avancée
(Liste de Lecture)
■
Vous pouvez créer jusqu’à 99 listes de lecture.
■
Selon le type de disque utilisé, l’affichage de
l’écran peut être légèrement différent.
Remarque
■
Si vous souhaitez Faire une nouvelle liste de
lecture, allez dans MENU ➞ nouvelle liste de
lecture.
■
Répétez les étapes 1 à 6 si vous
souhaitez établir une nouvelle liste de lec-
ture.
■
Répétez les étapes 4 à 6 si vous voulez
réaliser des scènes à partir de la liste de
lecture.
Remarque
(mode VR)
Édition
REVENIROKDÉPLA. SORTIE
Faire une Scène
DVD-RAM(VR)
Nouvelle Liste de Lecture
19/JAN/04 12:00
00:00:10
Démar.
Fin
Faire
Termi.
Scène No. 001
Démar. 00:00:00
Fin 00:00:00
REVENIROKDÉPLA. SORTIE
Faire une Scène
DVD-RAM(VR)
Nouvelle Liste de Lecture
19/JAN/04 12:00
00:00:10
Démar.
Fin
Faire
Termi.
Scène No. 001
Démar. 00:00:10
Fin 00:00:00
REVENIROKDÉPLA. SORTIE
Éditer la Liste de Lecture
DVD-RAM(VR)
No. Titre
Longueur
Éditer
25/JAN/2005 06:03
7 scènes
23/JAN/2005 06:43
01 23/JAN/2005/0 00:00:21
√√
02 23/JAN/2005/0 00:00:03
√√
03 24/JAN/2005/1 00:00:15
√√
04 24/JAN/2005/1 00:00:16
√√
05 25/JAN/2005/2 00:06:32
√√
REVENIROKDÉPLA. SORTIE
Faire une Scène
DVD-RAM(VR)
Nouvelle Liste de Lecture
19/JAN/04 12:00
00:10:00
Démar.
Fin
Faire
Termi.
Scène No. 001
Démar. 00:00:10
Fin 00:10:00
REVENIROKDÉPLA. SORTIE
Liste de Lecture
DVD-RAM(VR)
Nouvelle Liste de Lecture
√√
Éditer Liste de Lecture
√√
Navigation
par Disque
Liste
de Lecture
Gestion.
de Disque
Programme
Paramétrer
Liste de Titres: 1/6
Liste de Titres: 1/6
Liste de Titres: 1/6
00842C-R125-XEB-FRA_71~87 2005.6.14 8:17 PM Page 75

76
- Français
Édition
3
Appuyez sur les touches …† pour
sélectionner Lecture, puis appuyez sur la
touche OK.
La lecture des entrées de la liste de lecture commence.
● Pour visualiser le statut actuel du disque ainsi que la
progression de la lecture : appuyez sur la touche
INFO pour faire apparaître les informations relatives
au disque.
● Appuyez de nouveau sur la touche INFO
Vous avez alors accès aux informations relatives à la
liste de lecture en cours.
● Vous revenez à l’écran Éditer une liste de lecture
lorsque la lecture est terminée.
4
Appuyez sur la touche STOP pour arrêter la
lecture.
Vous revenez à l’écran Éditer une liste de lecture.
Lire les entrées de la Liste de Lecture
Suivez les instructions suivantes pour lire les entrées de la
liste de lecture.
1
Appuyez sur le bouton PLAY LIST, appareil
en mode Arrêt.
L’écran Éditer une liste de lecture s’affiche.
Utilisation de la touche MENU
● Appuyez sur le bouton MENU, appareil en mode Arrêt.
● Appuyez sur les touches …† pour sélectionner Liste
de Lecture, puis appuyez sur les touches OK ou √.
● Appuyez sur les touches …† pour sélectionner Éditer
la Liste de Lecture, puis appuyez sur les touches OK
ou √.
2
Appuyez sur les touches …† pour
sélectionner l’entrée de la Liste de lecture que
vous souhaitez éditer, puis appuyez sur la
touche OK ou √.
L’écran Éditer une liste de lecture s’affiche : Lecture,
Renommer, Éditer Scène, Copier, Supprimer
(mode VR)
REVENIROKDÉPLA. SORTIE
Éditer la Liste de Lecture
DVD-RAM(VR)
No. Titre
Longueur
Éditer
23/JAN/2005 06:43
7 Scènes
23/JAN/2005 06:43
01 23/JAN/2005/0 00:00:21
√√
02 23/JAN/2005/0 00:00:03
√√
03 24/JAN/2005/1 00:00:15
√√
04 24/JAN/2005/1 00:00:16
√√
05 25/JAN/2005/2 00:06:32
√√
REVENIROKDÉPLA. SORTIE
Éditer la Liste de Lecture
DVD-RAM(VR)
No. Titre
Longueur
Éditer
23/JAN/2005 06:43
7 Scènes
23/JAN/2005 06:43
01 23/JAN/2005/0 00:00:21
√√
02 23/JAN/2005/0 00:00:03
√√
03 24/JAN/2005/1 00:00:15
√√
04 24/JAN/2005/1 00:00:16
√√
05 25/JAN/2005/2 00:06:32
√√
Lecture
Renommer
Éditer Scène
Copier
Suppr.
√√
Lecture
REVENIROKDÉPLA. SORTIE
Liste de Lecture
DVD-RAM(VR)
Nouvelle Liste de Lecture
√√
Éditer la Liste de Lecture
√√
Navigation
par Disque
Liste
de Lecture
Gestion.
de Disque
Programme
Paramétrer
DVD-RAM(VR) Info disque
Nom du Disque
Titre Entier 15
Liste Lect. Entière 2
Durée Enregistrable
02:12 SP
Protection Non Protégé
Écran Principal Lect. [Liste lect.]
01 JAN 2005 SAM 13:00
DVD-RAM(VR) Lecture info
Nom 01/JAN/2005 12:00
Liste de Lecture 1/15
Heure de Création 01/JAN/2005 12:00
Longueur
00:01:43
Durée de Lecture 00:13:27
Scène Entière 1
01 JAN 2005 SAM 13:00
00842C-R125-XEB-FRA_71~87 2005.6.14 8:17 PM Page 76

Français -
77
4
Entrez les caractères désirés à l’aide des
touches …† œ √.
● Cette fonction est la même que la fonction Renommer
de la section Renommer la liste de titres.
(voir page 71).
● Le nombre maximum de caractères pouvant être
saisis est de 31. Les 31 caractères peuvent alors être
affichés en appuyant sur la touche INFO
5
Appuyez sur les touches …† œ √ pour
sélectionner Enreg., puis appuyez sur la
touche OK.
Le nom modifié du titre s’affiche dans le champ titre de
l’entrée de liste de lecture sélectionnée.
Renommer une entrée dans une
Liste de Lecture
Suivez les instructions suivantes pour renommer une entrée
d’une liste de lecture, c.-à-d. pour modifier le titre d’une entrée
d’une liste de lecture.
1
Appuyez sur le bouton PLAY LIST, appareil
en mode Arrêt.
L’écran Éditer une liste de lecture s’affiche.
Utilisation de la touche MENU
● Appuyez sur le bouton MENU, appareil en mode Arrêt.
● Appuyez sur les touches …† pour sélectionner Liste
de Lecture, puis appuyez sur les touches OK ou √.
● Appuyez sur les touches …† pour sélectionner Éditer
la Liste de Lecture, puis appuyez sur les touches OK
ou √.
2
Appuyez sur les touches …† pour
sélectionner l’entrée de la Liste de lecture que
vous souhaitez éditer, puis appuyez sur la
touche OK ou √.
L’écran Éditer une liste de lecture s’affiche : Lecture,
Renommer, Éditer Scène, Copier, Suppr.
3
Appuyez sur les touches …† pour
sélectionner Renommer, puis appuyez sur la
touche OK.
L’écran Renommer apparaît.
(mode VR)
Édition
REVENIROKDÉPLA. SORTIE
Éditer la Liste de Lecture
DVD-RAM(VR)
No. Titre
Longueur
Éditer
Dolphin
7 Scènes
23/JAN/2005 06:43
01 23/JAN/2005/0 00:00:21
√√
02 23/JAN/2005/0 00:00:03
√√
03 Dolphin 00:00:15
√√
04 24/JAN/2005/1 00:00:16
√√
05 25/JAN/2005/2 00:06:32
√√
REVENIROKDÉPLA. SORTIE
Éditer la Liste de Lecture
DVD-RAM(VR)
No. Titre
Longueur
Éditer
23/JAN/2005 06:43
7 Scènes
23/JAN/2005 06:43
01 23/JAN/2005/0 00:00:21
√√
02 23/JAN/2005/0 00:00:03
√√
03 24/JAN/2005/1 00:00:15
√√
04 24/JAN/2005/1 00:00:16
√√
05 25/JAN/2005/2 00:06:32
√√
REVENIROKDÉPLA. SORTIE
Éditer la Liste de Lecture
DVD-RAM(VR)
No. Titre
Longueur
Éditer
23/JAN/2005 06:43
7 Scènes
23/JAN/2005 06:43
01 23/JAN/2005/0 00:00:21
√√
02 23/JAN/2005/0 00:00:03
√√
03 24/JAN/2005/1 00:00:15
√√
04 24/JAN/2005/1 00:00:16
√√
05 25/JAN/2005/2 00:06:32
√√
Lecture
Renommer
Éditer Scène
Copier
Suppr.
ABCDE abc de
f
g
hij
klmno
pq
rst
u
z
nwxy
FGHIJ
KLMNO
PQRST
UVWXY
Z
Back Space Space Delete Clear Save
REVENIROKDÉPLA.
SORTIE
Renommer
DVD-RAM(VR)
BA C D E
GF H I J
LK
M
N O
QP R S T
VU
W
X Y
Z
Espace Libre
ba c d e
gf h i j
lk
m
n o
qp r s t
vu
w
x y
z
Espace
21 3 4 5
76 8 9 0
-
-
+ =
.
!
~
@
# $
^
%
&
( )
Effacer
Suppr.
Enreg.
Dolphin
00842C-R125-XEB-FRA_71~87 2005.6.14 8:17 PM Page 77

78
- Français
Éditer une scène pour une Liste de Lecture
Suivez les instructions suivantes pour éditer des scènes pour
une liste de lecture.
1
Appuyez sur le bouton PLAY LIST, appareil
en mode Arrêt.
L’écran Éditer une liste de lecture s’affiche.
Utilisation de la touche MENU
● Appuyez sur le bouton MENU, appareil en mode Arrêt.
● Appuyez sur les touches …† pour sélectionner Liste
de Lecture, puis appuyez sur les touches OK ou √.
●
Appuyez sur les touches …† pour sélectionner Éditer la
Liste de Lecture, puis appuyez sur les touches OK ou √.
2
Appuyez sur les touches …† pour
sélectionner l’entrée de la Liste de lecture que
vous souhaitez éditer, puis appuyez sur la
touche OK ou √.
L’écran Éditer une liste de lecture s’affiche : Lecture,
Renommer, Éditer Scène, Copier, Suppr.
3
Appuyez sur les touches …† pour
sélectionner Éditer Scène, puis appuyez
sur la touche OK.
L’écran Éditer une scène s’affiche.
(mode VR)
4
Appuyez sur les touches …† œ √ pour
sélectionner la scène que vous souhaitez
lire, puis appuyez sur la touche OK.
L’entrée de liste de lecture à lire est sélectionnée.
5
Appuyez sur la touche OK.
La lecture de la scène sélectionnée commence.
● Pour arrêter la lecture de la scène, appuyez sur la
touche STOP.
Lire une scène sélectionnée
REVENIROKDÉPLA. SORTIE
Éditer la Liste de Lecture
DVD-RAM(VR)
No. Titre
Longueur
Éditer
Dolphin
7 Scènes
23/JAN/2005 06:43
01 Science 00:00:17
√√
02 Sky 00:00:06
√√
03 Dolphin 00:00:06
√√
04 Natural 00:00:37
√√
Lecture
Renommer
Éditer Scène
Copier
Suppr.
REVENIROKDÉPLA. SORTIE
Éditer la Liste de Lecture
DVD-RAM(VR)
No. Titre
Longueur
Éditer
Dolphin
7 Scènes
23/JAN/2005 06:43
01 Science 00:00:17
√√
02 Sky 00:00:06
√√
03 Dolphin 00:00:06
√√
04 Natural 00:00:37
√√
Lecture
Renommer
Éditer Scène
Copier
Suppr.
REVENIROKDÉPLA. SORTIE
Éditer la Liste de Lecture
DVD-RAM(VR)
No. Titre
Longueur
Éditer
Science
7 Scènes
23/JAN/2005 06:43
01 Science 00:00:17
√√
02 Sky 00:00:06
√√
03 Dolphin 00:00:06
√√
04 Natural 00:00:37
√√
REVENIROKDÉPLA. SORTIE
Éditer la Scène
DVD-RAM(VR)
Scène No. 1/7 Liste de Lect. No. 3
Lecture
Modif.
Dépla.
Ajout.
Suppr.
01 00:00:26 02 00:00:07 03 00:00:04
04 00:00:03 05 00:00:11 06 00:00:04
REVENIROKDÉPLA. SORTIE
Éditer la Scène
DVD-RAM(VR)
Scène No. 2/7 Liste de Lect. No. 2
Lecture
Modif.
Dépla.
Ajout.
Suppr.
01 00:00:26 02 00:00:07 03 00:00:04
04 00:00:03 05 00:00:11 06 00:00:04
REVENIROKDÉPLA. SORTIE
Éditer la Scène
DVD-RAM(VR)
Scène No. 2/7 Liste de Lect. No. 2
Lecture
Modif.
Dépla.
Ajout.
Suppr.
01 00:00:26 02 00:00:07 03 00:00:04
04 00:00:03 05 00:00:11 06 00:00:04
√√
Lecture
Édition
00842C-R125-XEB-FRA_71~87 2005.6.14 8:17 PM Page 78

Français -
79
7
Appuyez sur la touche OK au point de fin de
la scène.
● L’image et l’heure du point de fin s’affichent dans la
fenêtre Fin.
8
Appuyez sur les touches …† pour
sélectionner Chang., puis appuyez sur la
touche OK.
● La scène que vous souhaitez modifier est remplacée
par la section sélectionnée.
Pour la configuration, suivez les étapes 1 à 3 de la
page 78.
4
Appuyez sur les touches …† œ √ pour
sélectionner la scène que vous souhaitez
modifier, puis appuyez sur la touche OK.
5
Appuyez sur les touches …† pour
sélectionner Modif., puis appuyez sur la
touche OK.
L’écran Modifier une scène s’affiche.
6
Appuyez sur la touche OK au point de
démarrage de la scène.
● L’image et l’heure du point de démarrage s’affichent
dans la fenêtre Démarrage.
● Sélectionnez le point de démarrage et le point de fin
de la section que vous souhaitez modifier à l’aide des
touches liées à la lecture
(
,
,).
Modifier une scène (Remplacer une scène)
REVENIROKDÉPLA. SORTIE
Modifier une Scène
DVD-RAM(VR)
Natural
23/JAN/2005 03:34:00
00:00:55
Démar.
Fin
Chang.
Annuler
Scène No. 001
Démar. 00:00:25
Fin 00:00:55
REVENIROKDÉPLA. SORTIE
Éditer la Scène
DVD-RAM(VR)
Scène No. 2/7 Liste de Lect. No. 3
Lecture
Modif.
Dépla.
Ajout.
Suppr.
01 00:00:26 02 00:00:07 03 00:00:04
04 00:00:03 05 00:00:11 06 00:00:04
REVENIROKDÉPLA. SORTIE
Éditer la Scène
DVD-RAM(VR)
Scène No. 2/7 Liste de Lect. No. 3
Lecture
Modif.
Dépla.
Ajout.
Suppr.
01 00:00:26 02 00:00:07 03 00:00:04
04 00:00:03 05 00:00:11 06 00:00:04
REVENIROKDÉPLA. SORTIE
Modifier une Scène
DVD-RAM(VR)
Natural
23/JAN/2005 03:34:00
00:00:25
Démar.
Fin
Chang.
Annuler
Scène No. 001
Démar. 00:00:25
Fin 00:00:00
REVENIROKDÉPLA. SORTIE
Modifier une Scène
DVD-RAM(VR)
Natural
23/JAN/2005 03:34:00
00:00:00
Démar.
Fin
Chang.
Annuler
Scène No. 001
Démar. 00:00:00
Fin 00:00:00
Édition
Liste de Titres: 1/6
Liste de Titres: 1/6
Liste de Titres: 1/6
00842C-R125-XEB-FRA_71~87 2005.6.14 8:18 PM Page 79

80
- Français
Édition
Pour la configuration, suivez les étapes 1 à 3 de la
page 78.
4
Appuyez sur les touches …† œ √ pour
sélectionner la scène que vous souhaitez
déplacer (changer de position), puis appuyez
sur la touche OK.
5
Appuyez sur les touches …† pour
sélectionner Dépla., puis appuyez sur la
touche OK.
● Une fenêtre jaune de sélection s’affiche sur la scène à
déplacer.
6
Appuyez sur les touches …† œ √ pour
sélectionner la position vers laquelle vous
souhaitez déplacer la scène, puis appuyez sur
la touche OK.
● La scène sélectionnée est déplacée vers la position
indiquée.
Déplacer une scène (Changer une scène de position)
Pour la configuration, suivez les étapes 1 à 3 de la
page 78.
4
Appuyez sur les touches …† œ √ pour
sélectionner la scène devant laquelle devra
être insérée une nouvelle scène, puis appuyez
sur la touche OK.
Une fenêtre de sélection jaune sur la scène à ajouter
comme nouvelle scène.
5
Appuyez sur les boutons …† pour
sélectionner Ajout., puis appuyez sur le
bouton OK.
6
Appuyez sur la touche OK au point de
démarrage de la scène.
● L’image et l’heure du point de démarrage s’affichent
dans la fenêtre Démarrage.
● Sélectionnez le point de démarrage de la section dans
laquelle vous souhaitez ajouter la nouvelle scène à
l’aide des touches liées à la lecture
(, , ).
Ajouter une scène
■
Vous ne pouvez pas déplacer la scène
sélectionnée vers la position de la scène
suivante, car la scène sélectionnée doit être
insérée avant cette position, qui ne nécessite
aucune action.
■
Selon le type de disque utilisé, l’écran affiché
peut être légèrement différent.
Remarque
REVENIROKDÉPLA. SORTIE
Éditer la Scène
DVD-RAM(VR)
Scène No. 3/7 Liste de Lect. No. 3
Lecture
Modif.
Dépla.
Ajout.
Suppr.
01 00:00:26 02 00:00:07 03 00:00:04
04 00:00:03 05 00:00:11 06 00:00:04
REVENIROKDÉPLA. SORTIE
Éditer la Scène
DVD-RAM(VR)
Scène No. 3/7 Liste de Lect. No. 3
Lecture
Modif.
Dépla.
Ajout.
Suppr.
01 00:00:26 02 00:00:07 03 00:00:04
04 00:00:03 05 00:00:11 06 00:00:04
REVENIROKDÉPLA. SORTIE
Éditer la Scène
DVD-RAM(VR)
Scène No. 6/7 Liste de Lect. No. 3
Lecture
Modif.
Dépla.
Ajout.
Suppr.
01 00:00:26 02 00:00:07 03 00:00:04
04 00:00:03 05 00:00:11 06 00:00:04
REVENIROKDÉPLA. SORTIE
Éditer la Scène
DVD-RAM(VR)
Scène No. 5/7 Liste de Lect. No. 3
Lecture
Modif.
Dépla.
Ajout.
Suppr.
01 00:00:26 02 00:00:07 03 00:00:04
04 00:00:03 05 00:00:11 06 00:00:04
REVENIROKDÉPLA. SORTIE
Éditer la Scène
DVD-RAM(VR)
Scène No. 4/7 Liste de Lect. No. 3
Lecture
Modif.
Dépla.
Ajout.
Suppr.
01 00:00:26 02 00:00:07 03 00:00:04
REVENIROKDÉPLA. SORTIE
Ajouter la Scène
DVD-RAM(VR)
Sclence
23/JAN/2005 06:43
00:00:15
Démar.
Fin
Ajout.
Annuler
Scène No. 004
Démar. 00:00:15
Fin 00:00:00
REVENIROKDÉPLA. SORTIE
Ajouter la Scène
DVD-RAM(VR)
Sclence
23/JAN/2005 06:43
00:00:15
Démar.
Fin
Ajout.
Annuler
Scène No. 004
Démar. 00:00:00
Fin 00:00:00
04 00:00:03
05 00:00:11 06 00:00:04
Liste de Titres: 1/6
Liste de Titres: 1/6
00842C-R125-XEB-FRA_71~87 2005.6.14 8:18 PM Page 80

Français -
81
7
Appuyez sur la touche OK au point de fin de
la scène.
● L’image et l’heure du point de fin s’affichent dans la
fenêtre Fin.
● Pour annuler, appuyez sur les touches …† afin de
sélectionner Annuler puis appuyez sur la touche OK.
8
Appuyez sur les touches …† pour sélection-
ner Ajout., puis appuyez sur la touche OK.
● La section que vous voulez ajouter est insérée avant
la scène sélectionnée à l'étape 4.
Pour la configuration, suivez les étapes 1 à 3 de la
page 78.
4
Appuyez sur les touches
…† œ √
pour
sélectionner la scène que vous souhaitez
supprimer, puis appuyez sur la touche OK.
5
Appuyez sur les touches …† pour
sélectionner Suppr., puis appuyez sur la
touche OK.
Supprimer une scène
Copier une Entrée d’une Liste de
Lecture vers la Liste de Lecture
Utilisation de la touche PLA
Utilisation de la touche PLA
Y
Y
LIST
LIST
1
Appuyez sur le bouton PLAY LIST, appareil
en mode Arrêt.
L’écran Éditer une liste de lecture s’affiche.
Utilisation de la touche MENU
● Appuyez sur le bouton MENU, appareil en mode Arrêt.
● Appuyez sur les touches …† pour sélectionner Liste
de Lecture, puis appuyez sur les touches OK ou √.
●
Appuyez sur les touches …† pour sélectionner Éditer la
Liste de Lecture, puis appuyez sur les touches OK ou √.
2
Appuyez sur les touches …† pour
sélectionner l’entrée de la Liste de lecture que
vous souhaitez éditer, puis appuyez sur la
touche OK ou √.
L’écran Éditer une liste de lecture s’affiche : Lecture,
Renommer, Éditer Scène, Copier, Supprimer
3
Appuyez sur les touches …† pour sélection-
ner Copier, puis appuyez sur la touche OK.
La liste de lecture sélectionnée sera copiée.
Édition
REVENIROKDÉPLA. SORTIE
Ajouter la Scène
DVD-RAM(VR)
Sclence
23/JAN/2005 06:43
00:00:35
Démar.
Fin
Ajout.
Annuler
Scène No. 004
Démar. 00:00:15
Fin 00:00:35
REVENIROKDÉPLA. SORTIE
Éditer la Scène
DVD-RAM(VR)
Scène No. 4/6 Liste de Lect. No. 3
Lecture
Modif.
Dépla.
Ajout.
Suppr.
01 00:00:26 02 00:00:07 03 00:00:04
REVENIROKDÉPLA. SORTIE
Éditer la Scène
DVD-RAM(VR)
Scène No. 2/6 Liste de Lect. No. 3
Lecture
Modif.
Dépla.
Ajout.
Suppr.
01 00:00:26 02 00:00:07 03 00:00:04
04 00:00:15 04 00:00:15
REVENIROKDÉPLA. SORTIE
Éditer la Scène
DVD-RAM(VR)
Scène No. 2/6 Liste de Lect. No. 3
Lecture
Modif.
Dépla.
Ajout.
Suppr.
01 00:00:26 02 00:00:07 03 00:00:04
04 00:00:00 04 00:00:00
REVENIROKDÉPLA. SORTIE
Éditer la Liste de Lecture
DVD-RAM(VR)
No. Titre
Longueur
Éditer
Science
7 Scène
23/JAN/2005 06:43
01 Science 00:00:17
√√
02 Sky 00:00:06
√√
03 Dolphin 00:00:06
√√
04 Natural 00:00:37
√√
REVENIROKDÉPLA. SORTIE
Éditer la Liste de Lecture
DVD-RAM(VR)
No. Titre
Longueur
Éditer
Dolphin
7 Scène
23/JAN/2005 06:43
01 Science 00:00:17
√√
02 Sky 00:00:06
√√
03 Dolphin 00:00:06
√√
04 Natural 00:00:37
√√
05 Dolphin 00:00:06
√√
REVENIROKDÉPLA. SORTIE
Éditer la Liste de Lecture
DVD-RAM(VR)
No. Titre
Longueur
Éditer
Dolphin
7 Scène
23/JAN/2005 06:43
01 Science 00:00:17
√√
02 Sky 00:00:06
√√
03 Dolphin 00:00:06
√√
04 Natural 00:00:37
√√
Lecture
Renommer
Éditer Scène
Copier
Suppr.
REVENIROKDÉPLA. SORTIE
Éditer la Liste de Lecture
DVD-RAM(VR)
No. Titre
Longueur
Éditer
Dolphin
7 Scène
23/JAN/2005 06:43
01 Science 00:00:17
√√
02 Sky 00:00:06
√√
03 Dolphin 00:00:06
√√
04 Natural 00:00:37
√√
Lecture
Renommer
Éditer Scène
Copier
Suppr.
04 00:00:15 05 00:00:11
06 00:00:04
05 00:00:11 06 00:00:04
05 00:00:11 06 00:00:00
Liste de Titres: 1/6
00842C-R125-XEB-FRA_71~87 2005.6.14 8:18 PM Page 81

82
- Français
Édition
3
Appuyez sur les touches …† pour
sélectionner Suppr., puis appuyez sur la
touche OK.
● Le message de confirmation de suppression suivant
s’affiche : ‘Souhaitez-vous supprimer?’.
4
Appuyez sur les touches œ √ pour
sélectionner Oui, puis appuyez sur la touche
OK.
Vous revenez automatiquement à l’écran Éditer la Liste
de Lecture une fois l’opération terminée.
Supprimer une Entrée de Liste de
Lecture d’une Liste de Lecture
Utilisation de la touche PLA
Utilisation de la touche PLA
Y
Y
LIST
LIST
1
Appuyez sur le bouton PLAY LIST, appareil
en mode Arrêt.
L’écran Éditer une liste de lecture s’affiche.
Utilisation de la touche MENU
● Appuyez sur le bouton MENU, appareil en mode Arrêt.
●
A
ppuyez sur les touches …† pour sélectionner Liste
de Lecture, puis appuyez sur les touches OK ou √
●
Appuyez sur les touches …† pour sélectionner Éditer la
Liste de Lecture, puis appuyez sur les touches OK ou √.
2
Appuyez sur les touches …† pour
sélectionner l’entrée de la Liste de lecture que
vous souhaitez éditer, puis appuyez sur la
touche OK ou √.
L’écran Éditer une liste de lecture s’affiche : Lecture,
Renommer, Éditer Scène, Copier, Suppr.
■
Vous pouvez créer jusqu’à 999 scènes sur un
seul disque. Dans certains cas, le nombre de
scènes peut différer.
■
Appuyez sur le bouton MENU à la fin de cette
opération.
L'écran Edit Playlist <Editer la Liste de
Lecture> disparaît.
Remarque
REVENIROKDÉPLA. SORTIE
Éditer la Liste de Lecture
DVD-RAM(VR)
No. Titre
Longueur
Éditer
Science
7 Scène
23/JAN/2005 06:43
01 Science 00:00:17
√√
02 Sky 00:00:06
√√
03 Dolphin 00:00:06
√√
04 Natural 00:00:37
√√
05 Dolphin 00:00:06
√√
REVENIROKDÉPLA. SORTIE
Éditer la Liste de Lecture
DVD-RAM(VR)
No. Titre
Longueur
Éditer
Dolphin
7 Scène
23/JAN/2005 06:43
01 Science 00:00:17
√√
02 Sky 00:00:06
√√
03 Dolphin 00:00:06
√√
04 Natural 00:00:37
√√
05 Dolphin 00:00:06
√√
Lecture
Renommer
Éditer Scène
Copier
Suppr.
REVENIROKDÉPLA. SORTIE
Éditer la Liste de Lecture
DVD-RAM(VR)
No. Titre
Longueur
Éditer
Natural
7 Scène
23/JAN/2005 06:43
01 Science 00:00:17
√√
02 Sky 00:00:06
√√
03 Dolphin 00:00:06
√√
04 Natural 00:00:37
√√
REVENIROKDÉPLA. SORTIE
Éditer la Liste de Lecture
DVD-RAM(VR)
No. Titre
Longueur
Éditer
Dolphin
7 Scène
23/JAN/2005 06:43
01 Science 00:00:17
√√
02 Sky 00:00:06
√√
03 Dolphin 00:00:06
√√
04 Natural 00:00:37
√√
05 Dolphin 00:00:06
√√
Lecture
Renommer
Éditer Scène
Copier
Suppr.
REVENIROKDÉPLA. SORTIE
Éditer la Liste de Lecture
DVD-RAM(VR)
Dolphin
7 Scène
23/JAN/2005 06:43
Souhaitez-vous supprimer?
NonOui
REVENIROKDÉPLA. SORTIE
Éditer la Liste de Lecture
DVD-RAM(VR)
Dolphin
7 Scène
23/JAN/2005 06:43
Suppression en cours...
(Veuillez attendre)
00842C-R125-XEB-FRA_71~87 2005.6.14 8:18 PM Page 82

Français -
83
4
Entrez les caractères désirés à l’aide des
touches
…† œ √
.
● Cette fonction est identique à la fonction
Renommer en renommant la liste des titres.
(Voir page 71.)
● Le nombre maximum de caractères que vous
pouvez saisir est de 31.
Les 31 caractères peuvent être affichés en
appuyant sur le bouton INFO.
5
Appuyez sur les touches
…† œ √
pour
sélectionner Enreg., puis appuyez sur la
touche OK.
Un nom est donné au disque.
Éditer le nom d’un disque
Suivez les instructions suivantes pour donner un nom à un
disque.
1
Appuyez sur le bouton MENU, appareil en
mode Arrêt.
2
Appuyez sur les touches …† pour
sélectionner Gestion. Disque, puis appuyez
sur la touche OK ou √.
3
Appuyez sur les touches …† pour
sélectionner Nom du Disque, puis appuyez
sur la touche OK ou √.
L’écran Éditer le nom s’affiche.
Gestionnaire de disque
■
Il peut s'avérer nécessaire de supprimer la pro-
tection du disque avant de commencer à
éditer.
■
Selon le type de disque utilisé, l’écran affiché
peut être différent.
Remarque
Édition
REVENIROKDÉPLA. SORTIE
Gestionnaire de Disque
DVD-RAM(VR)
Nom du Disque :
√√
Protection du Disque
: Non Protégé
√√
Formater le Disque
√√
Supprimer Toutes les Listes de Titres
√√
Navigation
par Disque
Liste
de Lecture
Gestion.
de Disque
Programme
Paramétrer
REVENIROKDÉPLA. SORTIE
Gestionnaire de Disque
DVD-RAM(VR)
Nom du Disque : Disc
√√
Protection du Disque
: Non Protégé
√√
Formater le Disque
√√
Supprimer Toutes les Listes de Titres
√√
Navigation
par Disque
Liste
de Lecture
Gestion.
de Disque
Programme
Paramétrer
ABCDE abc de
f
g
hij
klmno
pq
rst
u
z
nwxy
FGHIJ
KLMNO
PQRST
UVWXY
Z
Back Space Space Delete Clear Save
REVENIROKDÉPLA.
SORTIE
Renommer
DVD-RAM(VR)
BA C D E
GF H I J
LK
M
N O
QP R S T
VU
W
X Y
Z
Espace Libre
ba c d e
gf h i j
lk
m
n o
qp r s t
vu
w
x y
z
Espace
21 3 4 5
76 8 9 0
-
-
+ =
.
!
~
@
# $
^
%
&
( )
Effacer
Suppr.
Enreg.
ABCDE abc de
f
g
hij
klmno
pq
rst
u
z
nwxy
FGHIJ
KLMNO
PQRST
UVWXY
Z
Back Space Space Delete Clear Save
REVENIROKDÉPLA.
SORTIE
Renommer
DVD-RAM(VR)
BA C D E
GF H I J
LK
M
N O
QP R S T
VU
W
X Y
Z
Espace Libre
ba
c
d
e
g
f h i j
lk
m
n o
qp r s t
vu
w
x y
z
Espace
21 3 4 5
76 8 9 0
-
-
+ =
.
!
~
@
# $
^
%
&
( )
Effacer
Suppr.
Enreg.
Disc
REVENIROKMOVE SORTIE
Navigation par Disque
DVD-RAM(VR)
Liste de Titres
√√
DivX
√√
Photo
√√
Musique
√√
Navigation
par Disque
Liste
de Lecture
Gestion.
de Disque
Programme
Paramétrer
00842C-R125-XEB-FRA_71~87 2005.6.14 8:18 PM Page 83

84
- Français
Édition
Protection du disque
La Protection du disque vous permet de protéger vos disques
d’un formatage ou d’une suppresion due à une mauvaise
manipulation.
1
Appuyez sur le bouton MENU, appareil en
mode Arrêt.
2
Appuyez sur les touches …† pour
sélectionner Gestion. Disque, puis appuyez
sur la touche OK ou √.
3
Appuyez sur les touches …† pour
sélectionner Protection du Disque, puis
appuyez sur la touche OK ou √.
4
Appuyez sur les touches …† pour
sélectionner Protégé, puis appuyez sur la
touche OK ou √.
Formater un disque
Suivez les instructions suivantes pour formater un disque.
La protection du disque doit également être effacée.
1
Appuyez sur le bouton MENU, appareil en
mode Arrêt.
2
Appuyez sur les touches …† pour
sélectionner Gestion. Disque, puis appuyez
sur la touche OK ou √.
3
Appuyez sur les touches …† pour
sélectionner Formater le Disque, puis
appuyez sur la touche OK ou √.
DVD-RAM
● Le message de confirmation suivant s’affiche :
‘Souhaitez-vous formater ce disque?’.
● Le message de confirmation suivant s’affiche : ‘Toutes
les données vont être supprimées. Souhaitez-vous
poursuivre?’.
REVENIROKDÉPLA. SORTIE
Gestionnaire de Disque
DVD-RAM(VR)
Nom du Disque :
√√
Protection du Disque
: Non Protégé
√√
Formater le Disque
√√
Supprimer Toutes les Listes de Titres
√√
Navigation
par Disque
Liste
de Lecture
Gestion.
de Disque
Programme
Paramétrer
REVENIROKDÉPLA. SORTIE
Gestionnaire de Disque
DVD-RAM(VR)
Nom du Disque :
√√
Protection du Disque
: Non Protégé
√√
Formater le Disque
√√
Supprimer Toutes les Listes de Titres
√√
Navigation
par Disque
Liste
de Lecture
Gestion.
de Disque
Programme
Paramétrer
REVENIROKDÉPLA. SORTIE
Gestionnaire de Disque
DVD-RAM(VR)
Nom du Disque :
√√
Protection du Disque
: Non Protégé
√√
Formater le Disque
√√
Supprimer Toutes les Listes de Titres
√√
Navigation
par Disque
Liste
de Lecture
Gestion.
de Disque
Programme
Paramétrer
REVENIROKDÉPLA. SORTIE
Gestionnaire de Disque
DVD-RAM(VR)
Nom du Disque :
√√
Protection du Disque
: Protégé
√√
Formater le Disque
√√
Supprimer Toutes les Listes de Titres
√√
Navigation
par Disque
Liste
de Lecture
Gestion.
de Disque
Programme
Paramétrer
REVENIROKDÉPLA. SORTIE
Gestionnaire de Disque
DVD-RAM(VR)
Nom du Disque :
√√
Protection du Disque
: Non Protégé
√√
Formater le Disque
√√
Supprimer Toutes les Listes de Titres
√√
Navigation
par Disque
Liste
de Lecture
Gestion.
de Disque
Programme
Paramétrer
Non Protégé
Protégé
REVENIROKDÉPLA. SORTIE
Gestionnaire de Disque
DVD-RAM(VR)
Nom du Disque :
√√
Protection du Disque
: Non Protégé
√√
Formater le Disque
√√
Supprimer Toutes les Listes de Titres
√√
Navigation
par Disque
Liste
de Lecture
Gestion.
de Disque
Programme
Paramétrer
Souhaitez-vous formater ce disque?
Oui Non
REVENIROKMOVE SORTIE
Navigation par Disque
DVD-RAM(VR)
Liste de Titres
√√
DivX
√√
Photo
√√
Musique
√√
Navigation
par Disque
Liste
de Lecture
Gestion.
de Disque
Programme
Paramétrer
REVENIROKMOVE SORTIE
Navigation par Disque
DVD-RAM(VR)
Liste de Titres
√√
DivX
√√
Photo
√√
Musique
√√
Navigation
par Disque
Liste
de Lecture
Gestion.
de Disque
Programme
Paramétrer
00842C-R125-XEB-FRA_71~87 2005.6.14 8:18 PM Page 84

Français -
85
2
Appuyez sur les touches …† pour
sélectionner Gestion. Disque, puis appuyez
sur la touche OK ou √.
3
Appuyez sur les touches …† pour sélection-
ner Supprimer Toutes les Liste de Titres,
puis appuyez sur la touche OK ou √.
● Le message de confirmation suivant s’affiche :
‘Souhaitez-vous supprimer toutes les listes de titres?’.
● Si des cellules protégées existent : la fonction
Supprimer toutes les listes de titres ne fonctionnera
pas. Si un titre contient une image fixe, cependant,
cette fonction ne fonctionnera pas. Si vous souhaitez
supprimer une entrée protégée, désactiver l’option
Protéger dans la rubrique Verrouiller.
4
Appuyez sur les touches œ √ pour
sélectionner Oui, puis appuyez sur la touche
OK.
Toutes les listes de titres sont supprimées.
DVD-RW
● Le message de confirmation suivant s’affiche :
‘Choisissez le format d’enregistrement du
DVD-RW’.
4
Appuyez sur les touches œ √ pour
sélectionner Oui, puis appuyez sur la touche
OK. Le disque est formaté.
Les DVD-VR et les DVD-V sont denned selon
leur format d’enregistrement.
Supprimer toutes les listes de titres
1
Appuyez sur le bouton MENU, appareil en
mode Arrêt.
DVD-VR DVD-V
DVD-RAM DVD-RW
DVD-RW DVD-R
DISQUE
Édition
REVENIROKDÉPLA. SORTIE
Gestionnaire de Disque
DVD-RW(VR)
Nom du Disque :
√√
Protection du Disque
: Non Protégé
√√
Formater le Disque
√√
Supprimer Toutes les Listes de Titres
√√
Supprimer Toutes les Listes de Titres
√√
Navigation
par Disque
Liste
de Lecture
Gestion.
de Disque
Programme
Paramétrer
Choisissez le format d’enregistrement du DVD-RW.
DVD-VR DVD-V
REVENIROKDÉPLA. SORTIE
Gestionnaire de Disque
DVD-RAM(VR)
Nom du Disque :
√√
Protection du Disque
: Non Protégé
√√
Formater le Disque
√√
Supprimer Toutes les Listes de Titres
√√
Navigation
par Disque
Liste
de Lecture
Gestion.
de Disque
Programme
Paramétrer
REVENIROKDÉPLA. SORTIE
Gestionnaire de Disque
DVD-RAM(VR)
Nom du Disque :
√√
Protection du Disque
: Non Protégé
√√
Formater le Disque
√√
Supprimer Toutes les Listes de Titres
√√
Navigation
par Disque
Liste
de Lecture
Gestion.
de Disque
Programme
Paramétrer
REVENIROKDÉPLA. SORTIE
Gestionnaire de Disque
DVD-RAM(VR)
Nom du Disque :
√√
Protection du Disque
: Non Protégé
√√
Formater le Disque
√√
Supprimer Toutes les Listes de Titres
√√
Navigation
par Disque
Liste
de Lecture
Gestion.
de Disque
Programme
Paramétrer
Souhaitez-vous supprimer toutes
les listes de titres?
Oui Non
REVENIROKMOVE SORTIE
Navigation par Disque
DVD-RAM(VR)
Liste de Titres
√√
DivX
√√
Photo
√√
Musique
√√
Navigation
par Disque
Liste
de Lecture
Gestion.
de Disque
Programme
Paramétrer
00842C-R125-XEB-FRA_71~87 2005.6.14 8:18 PM Page 85

86
- Français
Le message suivant s’affiche : ‘Souhaitez-vous finaliser
ce disque?’.
Si vous sélectionnez “Oui”, le message suivant s’affiche :
‘Le disque sera finalisé. Souhaitez-vous poursuivre?’.
4
Appuyez sur les touches œ √ pour
sélectionner Oui, puis appuyez sur la touche
OK.
Le disque est finalisé.
■
Une fois qu’un disque a été finalisé, vous ne
pouvez plus supprimer d’entrées dans la liste
des enregistrements.
■
Une fois finalisé, un DVD-R/DVD-RW (mode
vidéo) fonctionne de la même manière qu’un
DVD-Vidéo.
■
Selon le type de disque utilisé, l’écran affiché
peut être légèrement différent.
■
La durée de la finalisation peut varier en
fonction de la quantité de données
enregistrées sur le disque.
■
Les données contenues sur le disque seront
endommagées si le graveur est éteint au cours
du processus de finalisation.
Remarque
Édition
Finaliser un disque
Après avoir enregistré des titres sur un DVD-RW/DVD-R à
l’aide de votre graveur de DVD, le disque doit être finalisé
avant de pouvoir être lu par des appareils extérieurs.
1
Appuyez sur le bouton MENU, appareil en
mode Arrêt.
2
Appuyez sur les touches …† pour
sélectionner Gestion. Disque, puis appuyez
sur la touche OK ou √.
3
Appuyez sur les touches …† pour
sélectionner Finaliser le Disque, puis
appuyez sur la touche OK ou √.
REVENIROKDÉPLA. SORTIE
Gestionnaire de Disque
DVD-RW(VR)
Nom du Disque :
√√
Protection du Disque
: Non Protégé
√√
Formater le Disque : DVD-VR
√√
Finaliser le Disque
√√
Supprimer Toutes les Listes de Titres
√√
Navigation
par Disque
Liste
de Lecture
Gestion.
de Disque
Programme
Paramétrer
REVENIROKDÉPLA. SORTIE
Gestionnaire de Disque
DVD-RW(VR)
Nom du Disque :
√√
Protection du Disque
: Non Protégé
√√
Formater le Disque : DVD-VR
√√
Finaliser le Disque
√√
Supprimer Toutes les Listes de Titres
√√
Navigation
par Disque
Liste
de Lecture
Gestion.
de Disque
Programme
Paramétrer
REVENIROKDÉPLA. SORTIE
Gestionnaire de Disque
DVD-R(V)
Nom du Disque :
√√
Protection du Disque
: Non Protégé
√√
Finaliser le Disque
√√
Supprimer Toutes les Listes de Titres
√√
Navigation
par Disque
Gestion.
de Disque
Programme
Paramétrer
REVENIROKDÉPLA. SORTIE
Gestionnaire de Disque
DVD-RW(VR)
Nom du Disque :
√√
Protection du disque
: Non protégé
√√
Formate le Disque : DVD-VR
√√
Finaliser le disque
√√
Navigation
par Disque
Liste
de Lecture
Gestion.
de Disque
Programme
Paramétrer
REVENIROKDÉPLA. SORTIE
Gestionnaire de Disque
DVD-R(V)
Nom du Disque :
√√
Protection du disque
: Non protégé
√√
Formate le Disque : DVD-VR
√√
Navigation
par Disque
Gestion.
de Disque
Programme
Paramétrer
Souhaitez-vous finaliser ce disque?
Oui Non
Le disque sera finalisé.
Souhaitez-vous poursuivre?
Oui Non
REVENIROKMOVE SORTIE
Navigation par Disque
DVD-RW(VR)
Liste de Titres
√√
DivX
√√
Photo
√√
Musique
√√
Navigation
par Disque
Liste
de Lecture
Gestion.
de Disque
Programme
Paramétrer
00842C-R125-XEB-FRA_71~87 2005.6.14 8:18 PM Page 86

Français -
87
Ne pas finaliser un dique
(mode V/VR)
1
Appuyez sur le bouton MENU, appareil en
mode Arrêt.
2
Appuyez sur les touches …† pour
sélectionner Gestion. Disque, puis appuyez
sur la touche OK ou √.
3
Appuyez sur les touches …† pour
sélectionner Disque Non Finalisé, puis
appuyez sur la touche OK ou √.
Le message “Souhaitez-vous ne pas finaliser ce
disque?” apparaît.
Si vous sélectionnez Oui, le message suivant s’affiche :
‘Le disque ne va pas être finalisé. Souhaitez-vous
poursuivre?’.
Édition
4
Appuyez sur les touches œ √ pour
sélectionner Oui, puis appuyez sur la touche
OK.
Le disque n’est pas finalisé.
■
Un DVD-RW peut être finalisé ou non finalisé
en mode Vidéo.
■
Un DVD-RW peut être finalisé ou non finalisé
en mode VR.
Remarque
Finalisé Non finalisé
Marque DVD-Video(RW) DVD-RW(V)
Finalisé Non finalisé
Marque DVD-RW(VR:F) DVD-RW(VR)
Fonctionne
ment
Fonctionne
ment
Semblable à celui
d’un DVD-Vidéo
Enregistrement supplémen-
taire, suppression, édition et
protection sont impossibles.
Enregistrement supplémen-
taire, suppression, édition et
protection sont possibles.
Enregistrement supplémentaire,
protection et suppression sont possibles.
REVENIROKDÉPLA. SORTIE
Gestionnaire de Disque
DVD-RW(VR:F)
Nom du Disque :
√√
Formater le Disque : DVD-VR
√√
Disque Non Finalisé
√√
Navigation
par Disque
Liste
de Lecture
Gestion.
de Disque
Programme
Paramétrer
REVENIROKDÉPLA. SORTIE
Gestionnaire de Disque
DVD-RW(VR:F)
Nom du Disque :
√√
Formater le Disque : DVD-VR
√√
Disque Non Finalisé
√√
Navigation
par Disque
Liste
de Lecture
Gestion.
de Disque
Programme
Paramétrer
Souhaitez-vous ne pas finaliser le disque?
Oui Non
REVENIROKDÉPLA. SORTIE
Gestionnaire de Disque
DVD-RW(VR:F)
Nom du Disque :
√√
Formater le Disque : DVD-VR
√√
Disque Non Finalisé
√√
Navigation
par Disque
Liste
de Lecture
Gestion.
de Disque
Programme
Paramétrer
Le disque ne sera pas finalisé.
Souhaitez-vous poursuivre?
Oui Non
REVENIROKMOVE SORTIE
Navigation par Disque
DVD-RW(VR:F)
Liste de Titres
√√
DivX
√√
Photo
√√
Musique
√√
Navigation
par Disque
Liste
de Lecture
Gestion.
de Disque
Programme
Paramétrer
00842C-R125-XEB-FRA_71~87 2005.6.14 8:18 PM Page 87

L’enregistrement n’est possible que sur les
disques DVD-RAM/DVD-RW/DVD-R.
Si un programme est protégé contre la
copie, il ne peut être enregistré.
Point à vérifier 1
J’ai appuyé sur la touche REC sans résultat
88
- Français
Si votre produit ne fonctionne pas correctement, examinez les
points de vérification ci-dessous avant de contacter un centre
de service agréé par Samsung.
Alimentation
Enregistrement
Informations
Complémentaires
Dépannage
Dépannage............................................................88
Specification..........................................................92
Le graveur de DVD a besoin d’un peu de
temps pour s’initialiser et l’entrée des
données input ne s’affiche qu’env.
10 secondes après qu’il ait été allumé.
Point à vérifier 1
Vérifiez que le cordon d’alimentation est
correctement branché sur la prise murale.
Les paramètres de chaîne du graveur de
DVD ont-ils été réglés correctement?
Vérifiez l’espace disponible sur votre disque
DVD-RAM/DVD-RW/DVD-R.
Point à vérifier 1
Point à vérifier 2
Point à vérifier 3
L’entrée s’affiche pendant un petit moment lorsque
l'appareil est allumé.
Impossible d’enregistrer des progammes TV.
I
nformations
Complémentaires
00842C-R125-XEB-FRA_88~93 2005.6.14 8:20 PM Page 88

Français -
89
Lecture
Vérifiez que le disque est inséré
correctement, l’étiquette vers le haut.
Vérifiez le code de région du disque DVD.
Ce graveur de DVD peut ne pas pouvoir lire
certains types de disques (voir page 52).
Point à vérifier 1
Point à vérifier 2
Point à vérifier 3
Impossible de lire le disque.
Vous ne pouvez pas utiliser cette fonction à
cause de l’une des raisons suivantes :
(1) Votre disque DVD empêche l’accès à
cette fonction.
(2) Votre disque DVD ne prend pas cette
fonction en charge (par exemple :
angles)
(3) La fonction n’est pas disponible pour le
moment.
(4) Vous avfez demandé un titre, un chapitre
ou une durée de balayage hors de
portée.
Point à vérifier 1
L’icône apparaît à l’écran.
Le disque ne prend pas en charge toutes les
fonctions sélectionnées. Dans ce cas,
certains des paramètres configurés dans le
menu paramètres peuvent ne pas
fonctionner correctement.
Point à vérifier 1
Les paramètres de mode de lecture sont différents des
paramètres configurés dans le menu Paramètres.
Le ratio d’aspect est fixe pour les disques
DVD. (Voir page 36~37).
Point à vérifier 1
Impossible de modifier le ratio d’aspect.
La fonction Angle n’est disponible que
lorsque le disque contient des images
capturées sous des angles différents.
Dans ce cas, une marque d’angle s’affiche
sur l’écran de votre téléviseur.
Point à vérifier 1
La fonction Angle ne fonctionne pas pendant la lecture
d'un disque DVD.
Les langues audio et de sous-titres sont
spécifiques au disque. Seules les langues
audio et de sous-titres contenues sur le
DVD sont disponibles et affichées dans le
menu Disque.
Point à vérifier 1
La langue audio et/ou de sous-titre sélectionnée n’est pas
appliquée.
I
nformations
Complémentaires
Vidéo
Assurez-vous que les paramètres vidéo
sont réglés correctement. (voir pages
34~37).
Vérifiez que le disque n’est pas
endommagé et qu’aucun corps étranger
n’est présent à sa surface.
Certains disques de mauvaise qualité
peuvent ne pas fonctionner correctement.
Si les scènes passent du sombre au clair
soudainement, l’écran peut trembler
verticalement pendant quelques instants,
mais ceci ne constitue pas un
dysfonctionnement.
Vérifiez le réglage du commutateur de
sélection de la sortie vidéo.
Point à vérifier 1
Point à vérifier 2
Point à vérifier 3
Point à vérifier 4
Point à vérifier 5
Le disque tourne, mais aucune image ou seule une image
de mauvaise qualité n’apparaît.
00842C-R125-XEB-FRA_88~93 2005.6.14 8:20 PM Page 89

90
- Français
Son
Point à vérifier 1
Point à vérifier 2
Point à vérifier 3
Point à vérifier 4
Pas de son.
Êtes-vous en train de regarder un
programme en mode lent ou en mode saut?
Si vous lisez un programme à une vitesse
différente de la vitesse normale, aucun son
n’est émis.
Vérifiez les connexions et les paramètres.
(voir pages 20~21 à 33~34).
Vérifiez que le disque n’est pas endom-
magé. Nettoyez le disque, si nécessaire.
Vérifiez que le disque est inséré
correctement, l’étiquette vers le haut.
Point à vérifier 1
Pas de sortie audio.
Vérifiez que vous avez sélectionné les
bonnes options de sortie numérique dans le
menu Options de la sortie audio.
(Voir page 33~34).
I
nformations
Complémentaires
Vérifiez de nouveau les heures de début et
de fin de l'enregistrement.
L'enregistrement sera annulé en cas de
coupure de courant ou autre cause d’arrêt
similaire durant l'enregistrement.
Point à vérifier 1
Point à vérifier 2
L’enregistrement par minuterie ne fonctionne pas correcte-
ment.
Enregitrement par minuterie
Vérifiez que le disque dispose de
suffisamment d’espace disponible pour
pouvoir procéder à l’enregistrement.
Vérifiez que le disque utilisé est bien un
disque enregistrable.
Assurez-vous d’effectuer ces vérifications
avant l’heure de début d’enregistrement.
Point à vérifier 1
Point à vérifier 2
Le témoin lumineux de la minuterie clignote.
HDMI
Vérifiez que la sortie Vidéo est compati-
ble avec la connexion HDMI.
Vérifiez la connexion entre le téléviseur
et la prise HDMI de l’enregistreur DVD.
Vérifiez que votre téléviseur prend en
charge cet enregistreur DVD
576p/720p/1080i.
Checkpoint 1
Checkpoint 2
Checkpoint 3
Aucune sortie HDMI.
Checkpoint 1
Ecran de sortie HDMI anormal.
Si l’image qui s’affiche à l’écran est
brouillée, cela signifie que le téléviseur
ne prend pas en charge le système de
protection du contenu numérique à
large bande passante HDCP.
00842C-R125-XEB-FRA_88~93 2005.6.14 8:20 PM Page 90

Français -
91
Télécommande
Lisez la table des matières afin de trouver et
de lire la section qui décrit votre problème,
puis suivez les instructions qui vous sont
données.
Éteignez puis rallumez votre graveur de
DVD.
Si le problème persiste, contactez le centre
de service Samsung le plus proche.
Point à vérifier 1
Point à vérifier 2
Point à vérifier 3
Autres problèmes.
Pointez la télécommande vers le capteur
infra-rouge de votre graveur de DVD.
Laissez une distance suffisante.
Retirez tout obstacle présent entre votre
graveur de DVD et la télécommande.
Vérifiez que les piles ne sont pas vides.
Vérifiez la position du bouton de
sélection TV/DVD.
Point à vérifier 1
Point à vérifier 2
Point à vérifier 3
La télécommande ne fonctionne pas.
Un disque enregistré ne peut être lu qu’avec
les sous-titres et le signal audio sélectionnés
pour l’enregistrement.
Point à vérifier 1
Est-il possible de modifier un sous-titre et un signal audio
sur un disque enregistré?
Autres
Appuyez sur le bouton situé en
façade de l'enregistreur pendant plus
de 5 secondes sans disque à l'intérieur.
Tous les paramètres (y compris le mot de
passe) seront remplacés par les paramètres
par défaut. N’effectuez cette opération qu’en
cas d’absolue nécessité. (Cette fonction
n’est disponible que lorsqu’aucun disque
n’est inséré dans le graveur).
Point à vérifier 1
J’ai oublié mon mot de passe pour le contrôle parental.
I
nformations
Complémentaires
Vérifiez que votre téléviseur est cor-
rectement configuré.
Le scintillement de l'écran peut se pro-
duire lorsque la fréquence de l'image
passe de 50 Hz à 60 Hz pour une sor-
tie 720p/1080i HDMI (High Definition
Multimedia Interface ou Interface
Multimédia Haute Définition).
Veuillez vous reporter à votre manuel
d’utilisation pour plus de détails.
Checkpoint 1
Checkpoint 2
Checkpoint 3
Scintillement à la sortie HDMI
00842C-R125-XEB-FRA_88~93 2005.6.14 8:20 PM Page 91

92
- Français
Caractéristiques techniques
DVD
48 / 96kHz
48kHz
Type de disque
Sortie audio analogique
Sortie audio numérique
CD AUDIO (CD-DA)
44,1kHz
44,1kHz
Sortie audio
Pour les disques DVD, les signaux audio enregistrés à une fréquence
d’échantillonnage de 96kHz sont convertis et reproduits à 48kHz.
I
nformations
Complémentaires
Alimentation
Consommation
Poids
Dimensions
Temp. de fonctionnement
Autres conditions
Vidéo
Audio
Entrée DV
Canaux pouvant être reçus
Audio
Vidéo
Format de compression image
Format de compression audio
Qualité d’enregistrement
Réponse basse fréquence
220-240V AC, 50Hz
35 Watts
2,9Kg
430mm(W) x 250mm(D) x 59mm(H)
+5°C à +35°C
L’appareil doit rester à plat pendant son fonctionnement. Moins de 75 % d’humidité
Vidéo composite : 1,0 V p-p à une charge de 75 Omega, sync. négative
Niveau d’entrée audio max. : 2Vrms
Prise jack compatible IEEE 1394(4p)
SECAM L, PAL B/G,
Vidéo : Composite, Audio : analogique
Vidéo : Composite, RVB Audio: analogique
Prises jack de sortie analogique 1, 2
Sortie audio numérique optique/coaxiale
Prise jack de sortie vidéo 1
Sortie S- Vidéo 1 (Y : 1,0Vp-p, C : 0,286Vp-p at 75 Omega load)
Sortie composant x 1 (Y : 1,0Vp-p, Pb : 0,70Vp-p, Pr : 0,70Vp-p avec une charge de
75
Ω
ÿ)
HDMI/DVI (576p, 720p, 1080i)
Vidéo : Composite, RVB Audio: analogique
MPEG-II
Dolby Digital 2ch/256Kbps, MPEG-II
XP (env. 8 Mbps), SP (env. 4 Mbps), LP (env. 2 Mbps),
EP (environ 1,2 Mbps ou environ 0,8 Mbps)
20 Hz-20 kHz
Générales
Entrée
Sortie
Enregistrement
Prise Péritel
AV1 (Péritel TV)
AV2 (Péritel Ext)
Prise Péritel
AV1 (Péritel TV)
00842C-R125-XEB-FRA_88~93 2005.6.14 8:20 PM Page 92

FRANCE
Cher Client,
Nous vous remercions d’avoir acheté un produit SAMSUNG.
Au cas où vous auriez besoin de notre service après-vente, nous vous invitons à retourner ce produit au
revendeur qui en a effectué la vente.
Si vous avez un problème, n’hésitez pas à nous contacter à l’adresse suivante:
SAMSUNG SERVICE Paris Nord 2 66,
rue des Vanesses BP 50116 Villepinte 95950 ROISSY CDG CEDEX FRANCE
Tél : 0825 08 65 65 / Fax : 01 48 63 06 38
http://www.samsungservices.com
■ GARANTIE
Sans préjudice de la garantie légale du fabricant ou du vendeur conformément à l’article 1641 du Code Civil, la
société SAMSUNG applique les garanties suivantes:
Par la présente carte, SAMSUNG ELECTRONICS FRANCE garantit que ce produit est exempt de défaut de
matière et de fabrication existant lors de l’acquisition par le client chez un distributeur pour un délai d’un an
(pièces et main d’œuvre), pour les appareils audio, vidéo, télévision et micro ondes.
La période de garantie commence le jour de l’achat de l’appareil.
Elle n’est en aucun cas prolongée par l’échange de l’appareil.
Si ce produit s’avère défectueux pendant la période de garantie en raison de matière ou de fabrication
incorrecte, le distributeur prendra en charge le produit ou à défaut SAMSUNG ELECTRONICS FRANCE dans
les conditions exposées ci-après.
Les filiales de SAMSUNG ELECTRONICS CORPS. ainsi que ses distributeurs et les stations techniques
agréées des autres états membres de l'UE honoreront aussi cette garantie selon les termes et conditions en
vigueur dans le pays où est demandé la réparation.
■ CONDITIONS DE GARANTIE
1. La garantie sera seulement assurée si la facture d’achat et la carte de garantie remises au consommateur
par le distributeur sont présentées et si elles mentionnent:
a) Le nom de l’acheteur,
b) Le nom, l’adresse et le cachet du distributeur,
c) Le nom du modèle et le numéro de série du produit acquis
d) La date d’acquisition de ce produit.
2. SAMSUNG ELECTRONICS FRANCE se réserve le droit de refuser la garantie si tout ou partie de ces
mentions a été enlevé ou modifié après l’acquisition du produit par le client chez le distributeur.
3. Ce produit ne sera jamais considéré comme défectueux en matière ou en fabrication s’il doit être adapté,
changé ou réglé afin d’être conforme aux standards techniques ou de sécurité nationaux ou locaux en
vigueur dans tout autre pays que celui pour lequel il a été fabriqué à l’origine.
Cette garantie ne s’applique pas:
a) À ces adaptations, changements ou réglages qu’ils soient exécutés de façon correcte ou pas,
b) Aux dommages qui en résulteraient.
4. Cette garantie ne couvre pas les cas suivants :
A. Les contrôles périodiques, l’entretien, la réparation et le remplacement de pièces par suite d’usure
normale;
B. Les frais et les risques de transport directs ou indirects à la mise en œuvre de la garantie de ce produit ;
C. Le dommage du produit résultant:
1) D’abus et de mauvais usage, en particulier mais non de façon exclusive à:
a. La négligence ou faute d’utilisateur (utilisation contraire aux instructions ou non prévue, fausse
manœuvre, chute, cassure, fêlure accidentelle), etc.
b. L’installation ou l’utilisation de ce produit en contradiction avec les standards techniques ou de
sécurité en vigueur dans le pays où le produit est utilisé;
2) De réparations faites par les réparateurs non agréés;
3) D’accidents, de cas de force majeure ou de toute autre cause hors du contrôle de SAMSUNG
ELECTRONICS FRANCE, en particulier mais non de façon exclusive : la foudre, l’inondation, l’incendie,
les troubles publics, des piles qui ont coulé, unemauvaise ventilation, etc....
5.Cette garantie ne limite aucunement les droits statutaires du client sous les lois nationales en vigueur.
Faute de lois nationales en vigueur, cette garantie ou son application dans l'UE sera l’unique et exclusif
recours légal du client et ni SAMSUNG ELECTRONICS CORPS., ni ses filiales ne seront tenus pour respons-
ables des dommages directs ou indirects résultant d’une infraction aux conditions de garantie ci-dessus.
SAMSUNG ELECTRONICS FRANCE
00842C-R125-XEB-FRA_88~93 2005.6.14 8:20 PM Page 93

AK68-00842C-00
Comment éliminer ce produit
(déchets d’équipements électriques et électroniques)
(Applicable dans les pays de l’Union Européen et aux autres pays européens disposant de systémes de
collecte sélective)
Ce symbole sur le produit ou sa documentation indique qu’il ne doit pas être éliminé en fin de vie avec les
autres déchets ménagers. L’élimination incontrôlée des déchets pouvant porter préjudice à l’environnement ou à
la santé humaine, veuillez le séparer des autres types de déchets et le recycler de façon responsable.
Vous favoriserez ainsi la réutilisation durable des ressources matérielles.
Les particuliers sont invités à contacter le distributeur leur ayant vendu le produit ou à se renseigner auprès de
leur mairie pour savoir où et comment ils peuvent se débarrasser de ce produit afin qu’il soit recyclé en respec-
tant l’environnement.
Les entreprises sont invitées à contacter leurs fournisseurs et à consulter les conditions de leur contrat de vente.
Ce produit ne doit pas être éliminé avec les autres déchets commerciaux.
00842C-R125-XEB-FRA-Cover 2005.6.14 8:21 PM Page 2
-
 1
1
-
 2
2
-
 3
3
-
 4
4
-
 5
5
-
 6
6
-
 7
7
-
 8
8
-
 9
9
-
 10
10
-
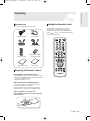 11
11
-
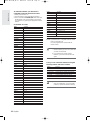 12
12
-
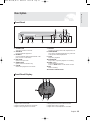 13
13
-
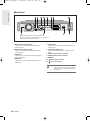 14
14
-
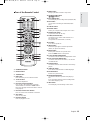 15
15
-
 16
16
-
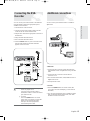 17
17
-
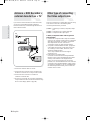 18
18
-
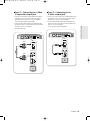 19
19
-
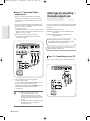 20
20
-
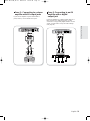 21
21
-
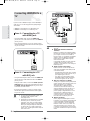 22
22
-
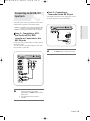 23
23
-
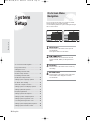 24
24
-
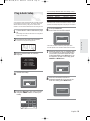 25
25
-
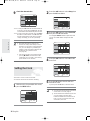 26
26
-
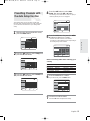 27
27
-
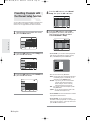 28
28
-
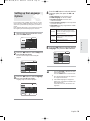 29
29
-
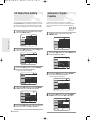 30
30
-
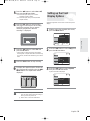 31
31
-
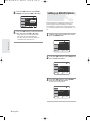 32
32
-
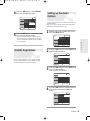 33
33
-
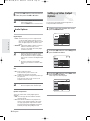 34
34
-
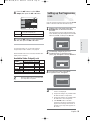 35
35
-
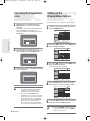 36
36
-
 37
37
-
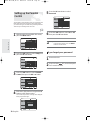 38
38
-
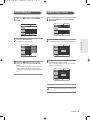 39
39
-
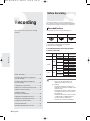 40
40
-
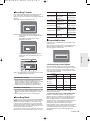 41
41
-
 42
42
-
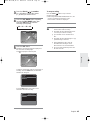 43
43
-
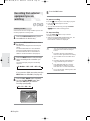 44
44
-
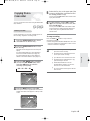 45
45
-
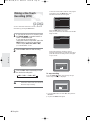 46
46
-
 47
47
-
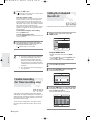 48
48
-
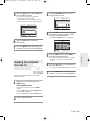 49
49
-
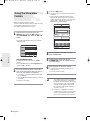 50
50
-
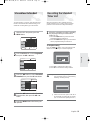 51
51
-
 52
52
-
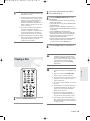 53
53
-
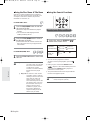 54
54
-
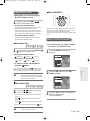 55
55
-
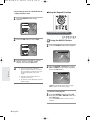 56
56
-
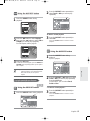 57
57
-
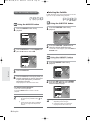 58
58
-
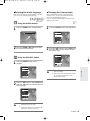 59
59
-
 60
60
-
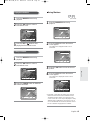 61
61
-
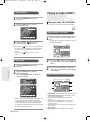 62
62
-
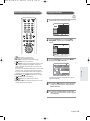 63
63
-
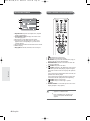 64
64
-
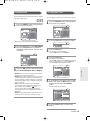 65
65
-
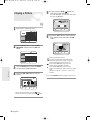 66
66
-
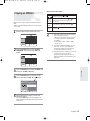 67
67
-
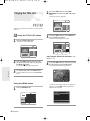 68
68
-
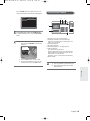 69
69
-
 70
70
-
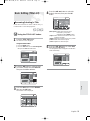 71
71
-
 72
72
-
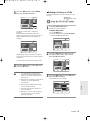 73
73
-
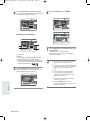 74
74
-
 75
75
-
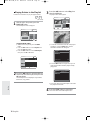 76
76
-
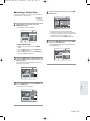 77
77
-
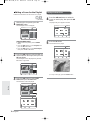 78
78
-
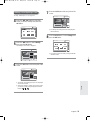 79
79
-
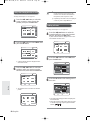 80
80
-
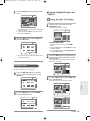 81
81
-
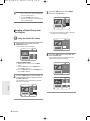 82
82
-
 83
83
-
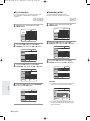 84
84
-
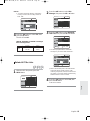 85
85
-
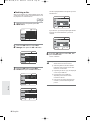 86
86
-
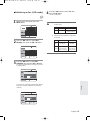 87
87
-
 88
88
-
 89
89
-
 90
90
-
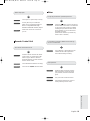 91
91
-
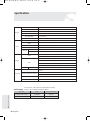 92
92
-
 93
93
-
 94
94
-
 95
95
-
 96
96
-
 97
97
-
 98
98
-
 99
99
-
 100
100
-
 101
101
-
 102
102
-
 103
103
-
 104
104
-
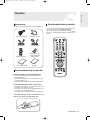 105
105
-
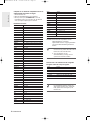 106
106
-
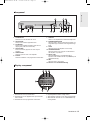 107
107
-
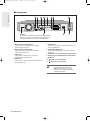 108
108
-
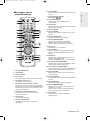 109
109
-
 110
110
-
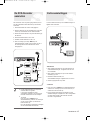 111
111
-
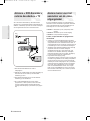 112
112
-
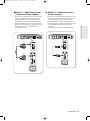 113
113
-
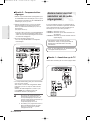 114
114
-
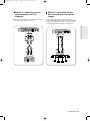 115
115
-
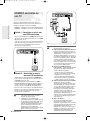 116
116
-
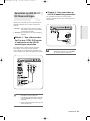 117
117
-
 118
118
-
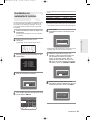 119
119
-
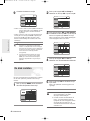 120
120
-
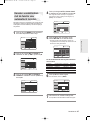 121
121
-
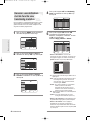 122
122
-
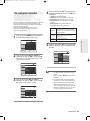 123
123
-
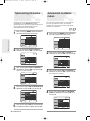 124
124
-
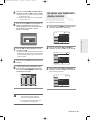 125
125
-
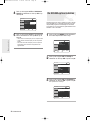 126
126
-
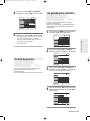 127
127
-
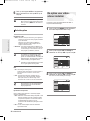 128
128
-
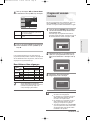 129
129
-
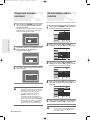 130
130
-
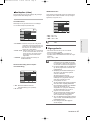 131
131
-
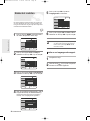 132
132
-
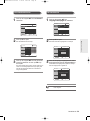 133
133
-
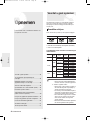 134
134
-
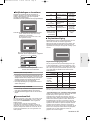 135
135
-
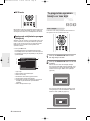 136
136
-
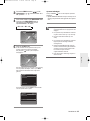 137
137
-
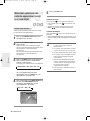 138
138
-
 139
139
-
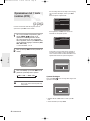 140
140
-
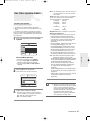 141
141
-
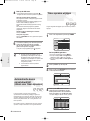 142
142
-
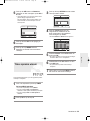 143
143
-
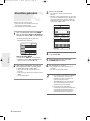 144
144
-
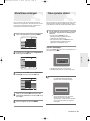 145
145
-
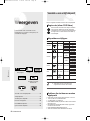 146
146
-
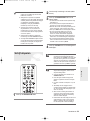 147
147
-
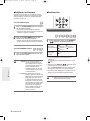 148
148
-
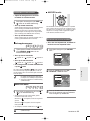 149
149
-
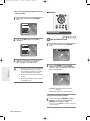 150
150
-
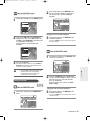 151
151
-
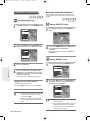 152
152
-
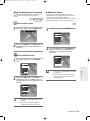 153
153
-
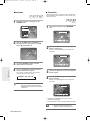 154
154
-
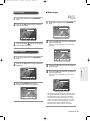 155
155
-
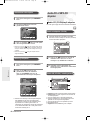 156
156
-
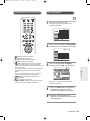 157
157
-
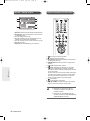 158
158
-
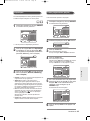 159
159
-
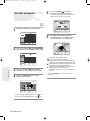 160
160
-
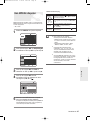 161
161
-
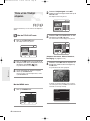 162
162
-
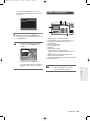 163
163
-
 164
164
-
 165
165
-
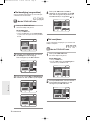 166
166
-
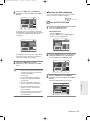 167
167
-
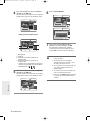 168
168
-
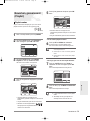 169
169
-
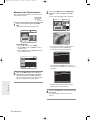 170
170
-
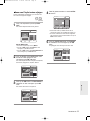 171
171
-
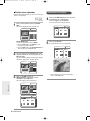 172
172
-
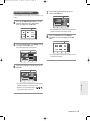 173
173
-
 174
174
-
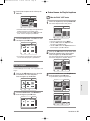 175
175
-
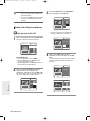 176
176
-
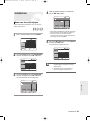 177
177
-
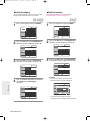 178
178
-
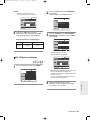 179
179
-
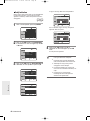 180
180
-
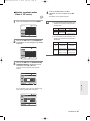 181
181
-
 182
182
-
 183
183
-
 184
184
-
 185
185
-
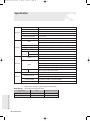 186
186
-
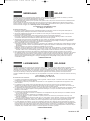 187
187
-
 188
188
-
 189
189
-
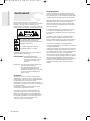 190
190
-
 191
191
-
 192
192
-
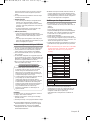 193
193
-
 194
194
-
 195
195
-
 196
196
-
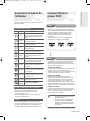 197
197
-
 198
198
-
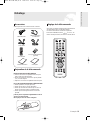 199
199
-
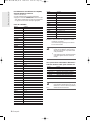 200
200
-
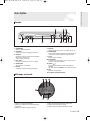 201
201
-
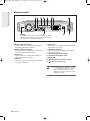 202
202
-
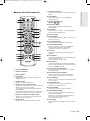 203
203
-
 204
204
-
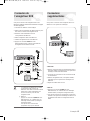 205
205
-
 206
206
-
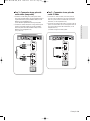 207
207
-
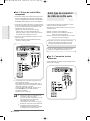 208
208
-
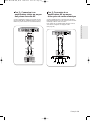 209
209
-
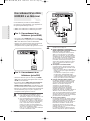 210
210
-
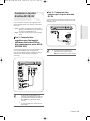 211
211
-
 212
212
-
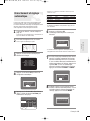 213
213
-
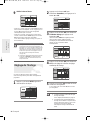 214
214
-
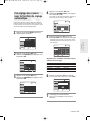 215
215
-
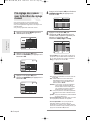 216
216
-
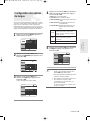 217
217
-
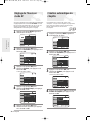 218
218
-
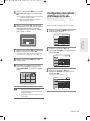 219
219
-
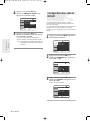 220
220
-
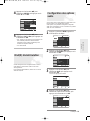 221
221
-
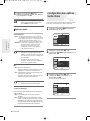 222
222
-
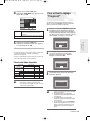 223
223
-
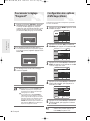 224
224
-
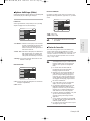 225
225
-
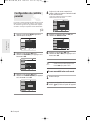 226
226
-
 227
227
-
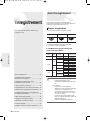 228
228
-
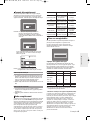 229
229
-
 230
230
-
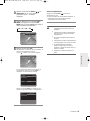 231
231
-
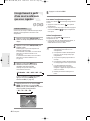 232
232
-
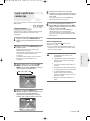 233
233
-
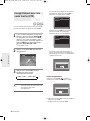 234
234
-
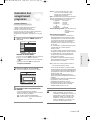 235
235
-
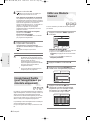 236
236
-
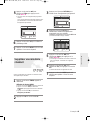 237
237
-
 238
238
-
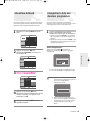 239
239
-
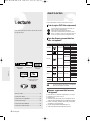 240
240
-
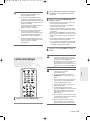 241
241
-
 242
242
-
 243
243
-
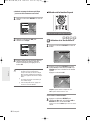 244
244
-
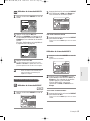 245
245
-
 246
246
-
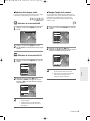 247
247
-
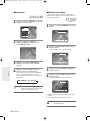 248
248
-
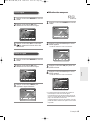 249
249
-
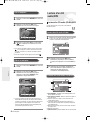 250
250
-
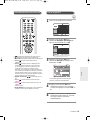 251
251
-
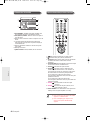 252
252
-
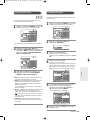 253
253
-
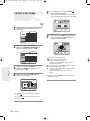 254
254
-
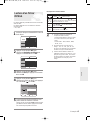 255
255
-
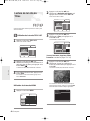 256
256
-
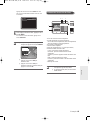 257
257
-
 258
258
-
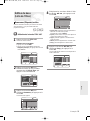 259
259
-
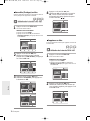 260
260
-
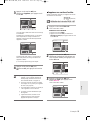 261
261
-
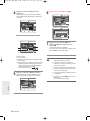 262
262
-
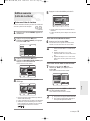 263
263
-
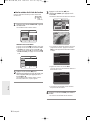 264
264
-
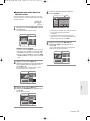 265
265
-
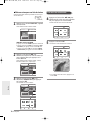 266
266
-
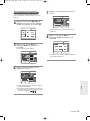 267
267
-
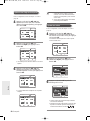 268
268
-
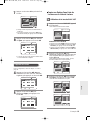 269
269
-
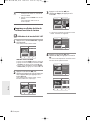 270
270
-
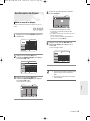 271
271
-
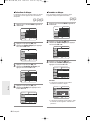 272
272
-
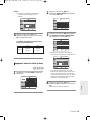 273
273
-
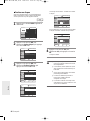 274
274
-
 275
275
-
 276
276
-
 277
277
-
 278
278
-
 279
279
-
 280
280
-
 281
281
-
 282
282


Samsung DVD-R125 Handleiding
- Categorie
- Dvd spelers
- Type
- Handleiding
- Deze handleiding is ook geschikt voor
in andere talen
- English: Samsung DVD-R125 User manual
- français: Samsung DVD-R125 Manuel utilisateur