Tokai ldp-2236k Handleiding
- Categorie
- Dvd spelers
- Type
- Handleiding
Deze handleiding is ook geschikt voor

LDP-2237S
LDP-2237S
LDP-2237S
www.tokai.fr
1
15
29
43
57

Précautions de sécurité.........................................................................................................................2
Présentation du panneau de commandes ...............................................................................................4
Raccordement à un téléviseur ...............................................................................................5
Télécommande.....................................................................................................................................6
Lecture MP3/MPEG4 ...................................................................................................................9
Lecture de CD IMAGE ..........................................................................................................................10
CONFIGURATION SYSTEME .............................................................................................................10
Dépannage .....................................................................................................................................12
Spécifications .....................................................................................................................................13
Accessoires .......................................................................................................................................13
Sommaire
1

Précautions de sécurité
RISK OF ELECTRIC SHOCK
DO NOT OPEN
CAUTION
La sécurité est importante
Afin d'assurer votre sécurité ainsi que celle des autres, lisez
les consignes de sécurité avant d'utiliser ce produit.
Maintenez ces informations dans un endroit sûr afin de pouvoir les
utiliser ultérieurement.
Veuillez lire toutes les consignes de sécurité avant d'utiliser ce produit.
Ce symbole indique que ce produit emploie une double isolation
séparant les tensions dangereuses et les composants accessibles à
l'utilisateur. Lors de l'entretien de l'unité, utilisez seulement des pièces
identiques.
Entretien
Aucune pièce réparable par l'utilisateur ne se trouve dans ce lecteur DVD
portable.
Confiez l'entretien de l'unité à du personnel qualifié.
En cas de doute à propos de l'installation, du fonctionnement ou de la
sécurité de cette unité, consultez votre revendeur.
Disposition des piles
Veuillez vous assurer de correctement disposer les piles.
N'incinérez jamais vos piles, ne les disposez pas avec les déchets ménagers.
Consultez votre municipalité pour connaître les lois en vigueur liées
à la disposition de piles.
Nettoyage
Déconnectez TOUJOURS le lecteur DVD portable avant de le nettoyer.
N'utilisez jamais de nettoyants liquides ou aérosols.
Nettoyez le lecteur DVD portable DVD avec un chiffon doux légèrement
humide (non mouillé).
Ventilation
Les ouvertures du récepteur permettent la ventilation de l'unité.
Ne pas les couvrir ou les obstruer, car ceci peut entrainer une surchauffe.
Ne laissez JAMAIS des enfants introduire des objets étrangers dans
l'unité.
Considérations liées à la sécurité.
Positionnez les câbles de manière à ce que ceux-ci ne soient pas
piétinés ou pincés, et à ce qu'aucun objet ne soit posé dessus ou contre eux.
N'utilisez pas le lecteur DVD portable dans des conditions d'humidité.
N'exposez pas le lecteur DVD portable à l'eau.
N'exposez pas le lecteur DVD aux égouttements et éclaboussures.
Ne posez aucun objet rempli d'eau, tel qu'un vase, sur le lecteur DVD portable.
Ne posez aucune source de flamme nue, telle qu'une bougie, sur le boîtier
du lecteur DVD portable.
Remarque spéciale
Quelques points lumineux ou foncés peuvent se trouver sur l'écran LCD.
Ceci est un phénomène normal sur les écrans à matrice active et ne
représente en aucun cas un dysfonctionnement de l'unité. Ne tentez jamais
de réparer cette unité vous-même. En cas de problème. Eteignez l'unité puis
contactez votre revendeur. L'écran est composé de plusieurs instruments de
haute précision. Tout désassemblage ou modification peut causer des
dommages.
1. L'unité ne doit pas être exposée aux égouttements et éclaboussures, aucun
objet rempli de liquides, tels que les vases, ne doit être posé sur l'unité.
2. La fiche du cordon permet de mettre l'unité hors tension, celle-ci doit donc
rester facilement accessible.
3. Pour totalement mettre l'unité hors tension, déconnectez la fiche du cordon
de la prise murale.
4. la prise du cordon d'alimentation doit rester facilement accessible et ne doit
donc pas être obstruée.
AVERTISSEMENT : afin de réduire les risques liés aux incendies et aux
électrocutions, n'exposez pas cette unité à la pluie ou d'autres câbles.
2

Précautions de sécurité
Précautions Laser
CE LECTEUR DVD EST UN PRODUIT LASER DE CLASSE 1. L'UTILISATION DE COMMANDES, DE
RÉGLAGES OU D'OPTIMISATIONS AUTRES QUE CELLES SPÉCIFIÉES DANS CE MANUEL PEUVENT
SE RÉSULTER PAR UNE DANGEREUSE EXPOSITION A DES RADIATIONS.
CE LECTEUR DVD UTILISE UN ÉMETTEUR LASER REPRÉSENTANT UN RISQUE POUR VOS YEUX,
AFIN DE RÉDUIRE LES RISQUES D'ÉLECTROCUTION, NE RETIREZ PAS LE PANNEAU ARRIÈRE DE
L'APPAREIL. CONFIEZ L'ENTRETIEN DE CET APPAREIL À DU PERSONNEL QUALIFIE.
AFIN D'ÉVITER TOUTE EXPOSITION DIRECTE AUX RADIATIONS LASER, N'OUVREZ PAS LE
BOITIER DE L'APPAREIL. LE RAYON LASER VISIBLE PEUT IRRADIER LORSQUE LE BOITIER
DE L'APPAREIL EST OUVERT OU LORSQUE DES VERROUS DE SÉCURITÉ SONT
DESENCLENCHES. NE JAMAIS REGARDER FIXEMENT LE RAYON LASER.
UTILISATION DU CASQUE OU ECOUTEURS
(non fournis, prise de 3.5mm Diamètre)
Si vous utiliser un casque d'écoute ou des écouteurs avec ce lecteur DVD, prière de respecter les précautions suivantes :
ATTENTION !
A pleine puissance l'écoute prolongée du Baladeur peut endommager l'oreille de l'utilisateur.
Une exposition prolongée à haut niveau de volume provenant de lecteurs audio peut causer une perte de l'ouïe permanente.
REMARQUE S:
1. Baissez le volume avant de brancher les écouteurs,
2. les haut-parleurs sont automatiquement déconnectés lorsque vous branchez des écouteurs à la prise PHONES
3. Réglez le volume d'écoute à un niveau convenable pour les oreilles à l'aide des touches VOLUME.
REGLAGE DU VOLUME
Utiliser le bouton VOLUME situé sur le côté de l'appareil pour augmenter ou diminuer le volume.
3

Présentation du panneau de commandes
ECRAN LCD
HAUT-PARLEUR
COUVERCLE CD
TOUCHE SOURCE
/ PAUSE
TOUCHE LECTURE
TOUCHE ARRET
COMMUTATEUR
D'ALIMENTATION (ON/OFF)
CONNECTEUR CC 12V
(alimentation)
CONNECTEUR ECOUTEURS
CONNECTEUR DE SORTIE AV
COMMANDE DE REGLAGE DU VOLUME
4
PORT COMPATIBLE USB
( )
TOUCHES DE NAVIGATION
TOUCHE TFT
SOURCE
MENU
OK
TFT
VOL
ON OFF
AV OUT PHONE
USB
DC IN 12V
TOUCHE SUIV
TOUCHE PREC
TOUCHE SETUP
OUVERTURE
DISQUE

Raccordement à un téléviseur
Connecteur Ecouteurs
Raccordez une paire d'écouteurs au connecteur Ecouteurs
pour écouter une musique ou un film en privé.
Charge des piles
Lorsque les piles sont épuisées, connectez l'adaptateur de
courant CA à l'unité. La batterie se charge automatiquement.
Réglage du volume
Utilisez la commande de réglage VOLUME située sur le
panneau latéral de l'unité pour régler le volume.
5
L
R
CVBS
ROUGE
BLANC
JAUNE
VIDEO IN
AUDIO IN
Raccordements
Raccordement d'équipements USB
Appuyez sur la touche SOURCE de la télécommande
jusqu'à ce que le mode COMPATIBLE USB soit sélectionné
Interface COMPATIBLE USB
Cette unité dispose d'un port COMPATIBLE USB permettant
de lire des musiques MP3 ou des fichiers JPEG à partir d'un
équipement externe.
Appuyez sur la touche < SOURCE > pour sélectionner le
mode COMPATIBLE USB.
Le mode opératoire est identique à la lecture de disques.
Remarque : le port COMPATIBLE USB est compatible avec
les lecteurs Flash, la compatibilité avec les lecteurs MP3 de
certaines marques n'est pas garantie.
REMARQUE :
Lorsque vous utilisez la fonction COMPATIBLE USB.
N'insérez pas l'équipement dans la mauvaise direction,
ceci peut entrainer des erreurs de fichiers.
Avertissement :
La clé USB doit être directement raccordée à l'unité.
Afin de prévenir toute perte de données par interférences et
transfert, n'utilisez pas de rallonges USB.
VOL
ON OFF
AV OU T PHONE
USB
DC IN 12V

Télécommande
Télécommande
7
9
10
11
12
1
2
3
4
5
6
13
14
15
16
17
8
18
1. Répétition A-B
appuyer 1x : pour définir A,
appuyer 2x : pour définir B,
appuyer 3x :
pour désactiver cette fonction.
2. Prog/répétition
Pression courte : mode répétition
Pression longue (2 sec.) : mode de
programmation DVD
3. Pavé numérique de 0 à 9
4. Configuration
Ouverture du menu de configuration
5. Aller à
Pour se positionner sur un indice
temps précis
6. Avance rapide
7. Suivant
Chapitre ou fichier suivant
8. Précédent
Chapitre ou fichier précédent
9. SOURCE
Sélection du mode d'entrée
10. Affichage
Pour afficher des informations
précises sur le fichier ou le disque
en cours de lecture.
11. Angle / Audio
Pression courte : pour changer de mode audio
(si plusieurs modes sont proposés)
Pression longue (2 sec.) : pour modifier le
repère d'angle
(si plusieurs modes sont proposés)
12. Titre / Sous/titre
Pression courte : modification du mode de
sous-titrage
(si les sous-titres sont disponibles)
Pression longue (2 sec.) : menu titre DVD
13. MENU / ZOOM
Pression courte : pour effectuer un zoom avant
Pression longue (2 sec.) :
touche menu pour menu DVD
14. STOP / RALENTI
Pression courte : stop
Pression longue (2 sec.) : ralenti
15. Touches de navigation( )
16. Retour rapide
17. ENTRER
Pour confirmer et accéder aux options ou pour
entamer la lecture des fichiers.
18. Lecture / Pause
6
Préparation de la télécommande
Placez la télécommande sur une surface plate puis insérez la pile bouton
dans la télécommande de la manière suivante.
1. Poussez le bouton vers la gauche
2. Sortez le tiroir à pile
3. Installez la pile dans le tiroir à pile
Assurez-vous d'insérer les piles en faisant correspondre les bornes des
piles avec les inscriptions situées dans le compartiment.
4. Replacez le tiroir à pile dans la télécommande.
Information sur la pile
Type de pile : 1 pile CR2025, 3 V
Durée de service des piles : environ 1 an (pour une utilisation et
température d'utilisation normale)
Fonctionnement de la télécommande
En cours d'utilisation, pointez la télécommande vers l'unité.
La télécommande fonctionne dans un rayon de 5 m et à un angle de 30'
de l'unité. Aucun obstacle ne doit se trouver entre la télécommande et le
capteur infrarouge, n'exposez pas la télécommande aux rayons de
soleil. Lorsque la télécommande ne fonctionne pas même lorsque vous
l'utilisez près du lecteur, remplacez la pile.
Remarques sur les piles
Lorsque vous pensez ne plus utiliser la télécommande sur une période
prolongée, retirez la pile du compartiment à pile.
Ne faites pas chauffer la pile et ne l'incinérez pas.
Ne pas démonter, déformer ou modifier les piles.
1
2
CR2025

A propos des piles rechargeables intégrées
Cet appareil fonctionne soit sur le pack batterie incorporé (LI-Polymer
de 1300 mAh Li-ion / d'une durée de 1H30 environ) ou soit sur
l'adaptateur secteur AC (fourni).
Précautions liées à la charge des piles
1. Une fois les piles entièrement déchargées, rechargez-les
immédiatement (que vous réutilisiez l'unité ou non) afin de maximiser
la durée de service des piles. Lorsque le niveau de charge est faible,
l'indicateur de charge s'affiche sur le coin supérieur gauche de l'écran
TFT.
2. Pour recharger les piles, raccordez ce lecteur à une source
d'alimentation CA via l'adaptateur de courant CA, l'indicateur de charge
s'allume en rouge, l'indicateur s'allume en vert lorsque la batterie est
entièrement chargée. La durée de charge nécessite 2-2.5 heures
lorsque le lecteur est en éteint et nécessite 4.5-6 heures lorsque le
lecteur est en marche.
Utilisation et entretien des piles rechargeables
1. Assurez-vous de toujours utiliser l adaptateur de courant CA fourni
avec le lecteur pour recharger vos piles.
2. La charge des piles est affect e lorsque la temp rature de charge
chute en dessous de 50F (10 ) ou exc de 95F (35 ).
3. L'autonomie de la batterie lorsqu'une paire d'écouteurs est raccordée
au lecteur est d'environ 1.5 heures.
Télécommande
7
Fonctionnement de la télécommande
LECTURE/PAUSE ( )
En cours de lecture (CD/VCD), appuyez une fois sur la touche
Lecture/Pause pour arrêter momentanément
la lecture, pour reprendre la lecture appuyez de nouveau sur cette
touche.
STOP
Appuyez sur la touche STOP une fois pendant la lecture pour arrêter
la lecture du disque. L'appareil
mémorise le point d'arrêt. Appuyer sur la touche lecture ( ) pour
reprendre la lecture au point d'interruption mémorisé.
Appuyez une deuxième fois sur STOP pour arrêter complètement la
lecture du disque. Pour reprendre lalecture du disque au début,
appuyez sur la touche LECTURE.
MENU
Appuyez sur cette touche en cours de lecture pour afficher le menu
du disque sur l'écran.
En mode affichage menu, sélectionnez les options désirées à l'aide
des touches de navigation .
Puis appuyez sur la touche OK/ENTER pour valider la sélection.
Touche (précédent)
Appuyez sur cette touche pour passer au chapitre ou à la plage
précédente.
Touche (retour rapide)
Appuyez sur cette touche de manière répétée pour reculer
rapidement aux vitesses successives de x2, x4, x8,x16 à chaque
pression sur la touche. Appuyer sur la touche lecture PLAY pour
revenir à une lecture normale du disque.
Touche (suivant)
Appuyez sur cette touche pour passer au chapitre ou à la plage
suivant.
Touche (avance rapide)
Appuyez sur cette touche de manière répétée pour avancer
rapidement aux vitesses successives de x2, x4,x8, x16 à chaque
pression sur la touche. Appuyer sur la touche lecture PLAY pour
revenir à une lecture normale du disque.

Télécommande
8
Touche DISPLAY
Appuyez une fois sur cette touche pour afficher les informations
détaillées sur le disque qui se trouve dans le lecteur.
Appuyez plusieurs fois sur la touche DISPLAY pour afficher d'autres
informations.
Touche AUDIO
Il est possible de changer la langue Audio de celle programmée dans
les configurations initiales du lecteur.
(Selon les langues Audio disponibles sur le disque DVD).
Appuyer sur la touche AUDIO pendant la lecture d'un DVD
A chaque pression sur la touche AUDIO vous pouvez voir les
différentes langues disponibles qui s'affichent sur l'écran et
sélectionner celle que vous désirez.
Touche SUBTITLE (Sous-Titre)
Il est possible de changer la langue des sous-titres en cours de
lecture en appuyant sur la touche SUBTITLE.
A chaque pression sur cette touche vous faites apparaître les
différentes langues de sous-titres disponibles sur le DVD.
Lorsque la langue de sous-titre que vous souhaitez s'affiche à
l'écran, relâchez la touche SUBTITLE.
Note : cette fonction est uniquement possible avec les disques DVD
enregistrés avec des sous-titres multi-langues.
Touche REPEAT (Répétition)
Appuyer sur la touche REPEAT pendant la lecture, pour répéter 1
chapitre ou piste du disque ou bien pour répéter tout le disque.
Touche GOTO (ALLER A)
Cette touche vous permet d'atteindre directement une position
(temps, piste, ou titre) dans le disque et de démarrer la lecture.
Appuyez sur la touche GOTO. Entrez les valeurs dans la rubrique
qui s'affiche ../.. à l'aide des touches numériques, et appuyez sur
OK ou ENTER pour accéder directement.
Sinon appuyez de nouveau sur la touche GOTO pour revenir au
mode de lecture normal.
Touche ANGLE
Permet de visualiser les différents angles de vue enregistrés sur
un DVD pour une même scène filmée.
Appuyez sur la touche ANGLE pendant environ 2 secondes et
vous verrez s'afficher les différents angles de vue pour la scène
en cours. Sélectionnez ensuite l'angle que vous voulez regarder.
Touche ZOOM
Appuyez sur la touche ZOOM en continue en cours de lecture
d'un DVD pour agrandir la taille de l'image x1, x2, x3 ou revenir
à la taille normale.
Cette fonction n'est pas disponible pour les disques audio CD.
DEMARRAGE
1. Mettre le commutateur d'alimentation ON/OFF sur ON.
2. Appuyez sur la touche d'ouverture du couvercle du lecteur DVD
pour ouvrir le compartiment à Disque.
3. Insérez un disque CD ou DVD dans le compartiment et refermez
4. Après avoir fermé le couvercle du compartiment à disque, la
lecture du disque démarre automatiquement.
5. Lorsque un Menu apparaît sur l'écran, utilisez les touches de
navigation ou les touches
numériques pour sélectionner la piste ou le titre de votre choix, et
appuyez sur la touche OK/ENTER pour démarrer.
UTILISATION DE L'ADAPTATEUR SECTEUR AC
Toujours débrancher le lecteur DVD avant de brancher ou de
débrancher le cordon AC de l'adaptateur secteur.
Utiliser l'adaptateur AC fourni. L'utilisation d'un adaptateur d'un
autre type risque de provoquer des
dysfonctionnements ou d'endommager l'appareil.
Un emploi prolongé de l'adaptateur AC risque de provoquer une
surchauffe. Cela est normal et ne doit pas
vous préoccuper.
Lorsque vous n'utilisez pas votre adaptateur, débranchez-le de la
prise murale.
Eloignez l'adaptateur AC de toute source d'humidité, du froid et de
la poussière, sous risque de provoquer
un incendie ou une décharge électrique.

LECTURE MP3/MPEG4
AVI
Mp3
Mp4
Photo
XVID
Repeat off
Mode Normal
Filter
JPEG Preview
Audio
1/7
1
2
101
102
103
104
105
00:00:15
Repeat off
Mode Normal
Filter
Music Playing
Insérez un disque MP3/MPEG4, utilisez les touches de navigation pour ouvrir
le répertoire désiré.
Appuyez sur la touche ENTER pour accéder au sous-répertoire. Utilisez les
touches de navigation pour sélectionner la piste désirée puis ENTER pour lire le
fichier. Appuyez sur la touche PLAY/PAUSE pour mettre en pause la lecture,
appuyez sur la touche stop pour arrêter la lecture. Pour revenir au menu précédent,
appuyez sur les touches de navigation pour choisir l'icône puis appuyez sur la
touche ENTER pour confirmer. Ouvrez le menu option en utilisant les touches de
navigation
Filtre : permet de choisir des catégories de fichiers dans la liste du navigateur.
Répétition : permet de basculer entre plusieurs modes de répétition de lecture
Sélectionnez l'option « 1 seule » pour activer la répétition d'un seul fichier,
sélectionnez l'option « Répertoire » pour activer la répétition de tous
les fichiers du répertoire.
Mode : pour sélectionner un mode de lecture
Normale : lecture normale
Lecture Aléatoire : Permet d'activer le mode lecture aléatoire. Lorsque la lecture atteint
la fin du chapitre/piste sélectionné, la lecture se poursuit sur un autre chapitre/piste.
Intro de musique : sous ce mode, l'unité lira les 10 premières secondes de chaque
fichier puis passera au fichier suivant.
Mode Edition : utilisez cette option pour activer le mode de lecture programmée.
Sélectionnez le mode, appuyez sur la touche de navigation GAUCHE sur le répertoire
puis appuyez sur la touche ENTER pour choisir la piste désirée et appuyez sur la
touche PROG pour programmer dans la liste de lecture.
Visualisation programme : affiche le dossier/répertoire.
Visualisation navigateur : affiche le répertoire de la liste de lecture.
Ajouter au programme : utiliser cette option avec le mode Edition pour créer une liste
de lecture.
Effacer le programme : une fois dans le mode visualisation Navigateur, et en mode
Arrêt complet, (appuyez deux fois sur la touche STOP) utilisez cette option avec le
mode Edition pour supprimer les pistes de la liste de lecture programmée.
9
Fonctionnalités Avancées

LECTURE DE CD IMAGE
1/7
1
2
100
102
103
104
105
Repeat off
Mode Normal
Filter
JPEG Preview
Photo
CONFIGURATION SYSTEME
Language
Video
Rating
Misc
Language
Subtitle
MPEG4 Subtitle
Audio
DVD Menu
Appuyez sur les touches de navigation pour choisir le
répertoire racine et appuyez sur la touche ENTER pour accéder
au sous-répertoire. Appuyez sur les touches de navigation pour
sélectionner l'image désirée et appuyez sur la touche ENTER
pour afficher l'image. Pour revenir au menu précédent,
appuyez sur les touches de navigation pour choisir puis
appuyez sur la touche ENTER.
Rotation de l'image
En mode de lecture d'images, appuyez sur les touches de
navigation pour effectuer une rotation de l'image, appuyez sur la
touche ANGLE pour modifier le mode d'affichage de l'image.
FONCTIONNEMENT DU MENU
Appuyez sur la touche SETUP de la télécommande, le MENU
CONFIGURATION s'affiche. Utilisez les touches de navigation pour
vous déplacer vers le haut ou le bas et sélectionner l'option de votre
choix, appuyez ensuite sur la touche ENTER pour confirmer.
Appuyez sur la touche de navigation GAUCHE pour revenir au menu
principal.
Pour quitter le menu Configuration, appuyez sur la touche SETUP.
Appuyez sur la touche de navigation DROITE pour accéder au
sous-menu.
LANGUE
Sélectionnez Langue dans le menu Configuration.
Langue OSD
Utilisez cette option pour définir la langue du menu et d'affichage.
Sous-titres
Permet de définir la langue par défaut.
Remarque : certains disques ne prennent pas en charge cette fonction.
Sous-titres MPEG4
Permet de définir la langue de sous-titres MPEG4.
Remarque : certains disques ne prennent pas en charge cette fonction.
Audio
Permet de définir la langue de doublage par défaut.
Remarque : certains disques ne prennent pas en charge cette fonction.
10

Language
Video
Rating
Misc
Parental Control
Set Password
Language
Video
Rating
Misc
Use Default Settings
NIVEAU DE LECTURE
Sélectionnez l'option Niveau de lecture du menu Configuration pour
afficher le sous-menu Niveau de lecture :
Remarque : certains disques DVD ne possèdent pas de numéros de
limitation de lecture.
Menu DVD
Permet de définir la langue du menu par défaut des disques DVD.
Remarque : certains disques ne prennent pas en charge cette fonction.
VIDEO
Sélectionnez Vidéo dans le menu Configuration pour afficher le sous-
menu Vidéo :
Système TV
Ce produit prend en charge de nombreux formats de signal TV
(NTSC, PAL).
Lorsque vous raccordez l'unité à un TV, assurez-vous que les deux unités
possèdent les mêmes paramètres de format de signal PAL / NTSC.
Mode Image
Pour régler les effets d'affichage :
Standard : effets par défaut.
Lumineux : configuration offrant une image claire.
Doux : configuration offrant une image douce.
Dynamique : l'utilisateur définit la luminosité, le contraste, les couleurs, etc.
Contrôle parental
Définissez le niveau désiré.
Remarque : certains disques ne prennent pas en charge cette fonction.
Définir un mot de passe
Utilisez le pavé numérique 0-9 pour entrer un code à quatre chiffres (mot
de passe), appuyez ensuite sur la touche ENTER pour confirmer.
Remarque : en cas d'oubli de votre mot de passe, utilisez le mot de
passe universel 6666 pour déverrouiller le lecteur.
DIVERS
Sélectionnez “Divers” (MISC) dans le menu Configuration et afficher le
sous-menu :
* Utiliser les paramètres par défaut
Permet de restaurer la configuration d'usine.
Language
Video
Rating
Misc
Aspect Ratio
TV System
Smart Picture
Le mode d'affichage
Séléctionner le mode d'affichage. 16:9 , 4:3 PS, 4:3 LB
Notes:
Le ratio d'affichage de l'image est liée au format d'enregistrement
du dvd. Certains disques ne peuvent pas s' afficher à l'écran dans le
mode d'aspect de votre choix. Si vous visionner un dvd enregistré
en format 4:3 sur un
écran large (ex : 16:9) , des barres noires apparaissent sur les côtés
gauche et droit de l'écran.
Vous devez régler l'écran de réglage en fonction du type de la
télévision que vous avez.
11
CONFIGURATION SYSTEME

Lorsque vous avez des questions concernant une panne, consultez le guide de dépannage ci-dessous.
AUCUNE IMAGE OU SON
-Assurez-vous d'avoir appuyé sur al touche POWER.
-Assurez-vous que la prise de courant utilisée est opérationnelle.
-Assurez-vous que le cordon d'alimentation est en bon état
-Assurez-vous que la fiche du cordon d'alimentation est fermement
raccordée à la prise de courant.
IMAGE PRESENTE, MAIS AUCUN SON
-Assurez-vous que les connecteurs audio sont fermement raccordés.
-Assurez-vous que les connecteurs audio ne sont pas endommagés.
-Assurez-vous que volume est élevé dans la section VOL/CH.
-Assurez-vous d'avoir correctement configuré les paramètres audio
de votre téléviseur.
-Assurez-vous d'avoir sélectionné la correcte entrée vidéo sur votre
téléviseur.
-Assurez-vous que le son n'est pas coupé.
SON PRESENT, MAIS AUCUNE IMAGE
-Assurez-vous que les connecteurs vidéo sont fermement raccordés.
-Assurez-vous d'avoir sélectionné la correcte entrée vidéo sur votre
téléviseur.
-Assurez-vous que les connecteurs vidéo ne sont pas endommagés.
-Assurez-vous d'avoir correctement configuré les paramètres vidéo
de votre téléviseur.
Dépannage
IMAGE OU SON DE MAUVAISE QUALITE
-Assurez-vous d'avoir correctement configuré les paramètres audio
de votre téléviseur.
-Assurez-vous que le disque est propre et non rayé.
-Assurez-vous que les connecteurs AV sont en bon état.
"DISQUE INCORRECT" S'AFFICHE
-Assurez-vous que le disque n'est pas tordu, sale ou rayé.
-Assurez-vous que le disque n'est pas trop sale ou rayé.
-Assurez-vous que le format du disque est compatible avec le lecteur.
-Veillez à ce que vous n'ayez pas inséré un logiciel. Dans ce cas,
redémarrez le lecteur.
LA TELECOMMANDE NE FONCTIONNE PAS
-Assurez-vous que les piles de la télécommande fonctionnent.
-Pointez la télécommande vers le récepteur infrarouge du lecteur.
-Retirez les obstacles se trouvant entre la télécommande et le lecteur.
L'UNITE NE FONCTIONNE PAS
-Eteignez l'unité puis rallumez-la.
"AUCUN DISQUE" S'AFFICHE
-Assurez-vous d'avoir inséré un disque dans le lecteur.
-Assurez-vous que le disque est correctement inséré.
-Assurez-vous que le disque n'est pas tordu, sale ou rayé.
12

Les spécifications sont sujettes à des modifications sans préavis.
Spécifications
NTSC/PAL
DVD,VCD, CD, MP3, CD-R, CD-RW, JPEG,
DVD+ -R/W, MPEG4,
65dB.
500 lignes
fs 96KHz : 20Hz-20KHz:+/-1dBI
90dB
80dB
< 0.01%
96KHz/24bit
Caractéristiques de
sortie
Couleur TFT-LCD
7 pouces
1Vp-p(75 W)
2 canaux
CC 12V
12W
205x160x40mm
0.8kg
Accessoires
Mode de lecture
Disques pris en
charge
Vidéo
Rapport s/b vidéo
Résolution
de sortie AV
Audio
Réponse en fréquence
Rapport s/b audio
Gamme dynamique
Distorsion
Convertisseur D/A
Périphérique
d'affichage
Taille de l'écran
Sortie vidéo
Sortie audio
Tension
Consommation
d'énergie
Dimensions
Poids
13
AUTRES
Adaptateur Secteur
Télécommande
Sacoche de transport
Câble allume cigares
Manuel d'utilisation.

14

Safety Precautions
16
27
18
PICTURE CD PLAYBACK
MP3/MPEG4 playing
23
24
SYSTEM SETUP
24
Accessories
Panel Illustration
Specifications
27
Table of Contents
15
20
Remote Control
Troubleshooting
26
Connecting to a TV set
19

16
Safety Instructions
CAUTION
RISK OF ELECTRIC SHOCK
DO NOT OPEN
Position the cables so that they cannot be walked on or
pinched by items placed on or against them.
Do not use the set top box in humid or damp conditions.
Do not allow the set top box to get wet.
Do not expose the set top box to dripping or splashing.
Do not place water filled objects such as vases on top of
the set top box.
Do not place naked flame sources, such as candles, on
the top of the set top box.
Cleaning
ALWAYS unplug the set top box before you clean it.
Do not use liquid or aerosol cleaners.
Clean the set top box with a soft, damp (not wet) cloth.
Ventilation
The slots and openings on the set top box are for ventilation.
Do not cover or block them as it may cause overheating.
NEVER let children push anything into the holes or slots on
the case.
Servicing
There are no user serviceable parts in this set top box.
When servicing, refer to qualified service personnel.
Consult your dealer if you are ever in doubt about the
installation, operation or safety of this unit.
Safety is Important
Keep this information in a safe place for future reference.
Please read all the safety information before using the product.
Safety Considerations.
To ensure your safety and the safety of others, please
ensure you read the Safety Instructions before you
operate this product.
Battery Disposal
Please ensure batteries are disposed of safely.
Check with your local authority for disposal regulations.
Never dispose of batteries in a fire or with other household
waste.
This symbol indicates that this product incorporates double
insulation between hazardous mains voltage and user
accessible parts. When servicing use only identical
replacement parts.
WARNING: To reduce the risk of fire or electric shock, do
not expose this apparatus to rain or cords.
1. The apparatus shall not be exposed to dripping or Splashing and
that no objects filled with liquids, such as Vases, shall be placed
the apparatus.
2. The mains plug is used as the disconnect device, the disconnect
device shall remain readily operable.
3. To be completely disconnect the power input, the mains plug of
apparatus shall be disconnected from the mains.
4. The mains plug of apparatus should not be obstructed or should
be easily accessed during intended use.
Special notice
A few highlights or dark spots may occur on the LCD screen. It is a very common
phenomenon of the activematrix display technology, and does not mean any defects
or faults. Never try to repair this machine by yourself. In case of any faults. Please
turn off the unit at once, and notify our Company or the corresponding dealer. The
display is made up of many precision electronic components. Any disassembly or
modification may lead to further damage.

17
Safety Instructions
This Digital Video Disk player employs a Laser System .To ensure proper use of this
product,please read this owner manual carefully and retain for future reference. Should the
unit require maintenance, contact an authorized service
location see service procedure.
Use of controls,adjustment or the performance of procedures other than those specified may
result in hazardous radiation exposure.
To prevent direct exposure to laser beam,do not try to open the enclosure.
Visible and invisible laser radiation when open and interlocks defeated.
DO NOT STARE INTO BEAM
LISTENING WITH HEADPHONE (EARPHONE)
(Not Included)
Connect the plug of the stereo headphone (earphone) into the EARPHONE jack
(marked phones) before use the unit.
CAUTION: Hearing experts advice against exposure to continuous extended play at loud
volume levels while using headphone (earphone), possible hearing loss may result. If you
experience a ringing in the ears, reduce volume or discontinue use. We want you listening for
a life time.

18
DISC DOOR
PHONE JACK
VOLUME CONTROL
Panel Illustration
( , , , )
POWER ( ON/OF)
DC 12V INPUT JACK(power supply)
AV OUTPUT
USB PORT COMPATIBLE
NAVIGATION KEYS
LCD DISPLAY
SPEAKER
OPEN DISC TOP
SETUP
TFT
SOURCE
PREV
NEXT
PLAY/PAUSE
STOP
SOURCE
MENU
OK
TFT
VOL
ON OFF
AV OUT PHONE
USB
DC IN 12V

19
Connecting to a TV Set
Connections
Phone Jack Function
Insert the earphone into the earphone jack, to listen the music
or movie privately.
Battery charging
When the unit battery is powered out, connect the AC adapter
onto the unit. the battery will charge automatically.
Volume adjust
Use VOLUME CONTROL in the side of the unit to adjust the
volume.
L
R
CVBS
Red
White
Yellow
VIDEO IN
AUDIO IN
Connect to the USB PORT COMPATIBLE
Press the SOURCE key on the remote control until you switched
into USB COMPATIBLE work mode
USB COMPATIBLE interface
This unit have a USB COMPATIBLE IN jack to play the MP3 music or
and JPEG files or other files.
Press the < SOURCE > button to choose
USB COMPATIBLE IN mode. All the function is the same to play a disc.
Note: theUSB COMPATIBLE IN port is compatible with flash memories,
it is not warranted the
NOTE:
When using USB COMPATIBLE function. Please do not insert in the
wrong direction, or iwill be corrupted.
Warning:
The USB drive must be connected directly to the unit.
To prevent data loss by interference and transfer, do not use USB
extension cords.
VOL
ON OFF
AV OU T PHONE
USB
DC IN 12V

20
1
2
CR2025
Remote Control
Remote Control
7
9
10
11
12
1
2
3
4
5
6
13
14
15
16
17
8
18
1. A-B Repeat
press 1x: set A ,prss 2x: set B
press3x: disable the function
2. Prog/Repeat
Short press: Repeat mode
Long press (2Sec.):
DVD program mode
3. 0-9 Number Keys
4. Setup
Open the setup menu
5. Goto
Goto a specific time index
6. Fast Forward
7. Next
Next chapter or file
8. Previous
Previous chapter or file
9. SOURCE
Input mode selection,
10. Display
Display detailed informations
of the current file or disc.
11. Angle / Audio
Short press:
Changes the audio mode (if different modes
are available)
Long press (2Sec.):Changes the angle mark
(if different modes are available)
12. Title / Subtitle
Short press: Change subtitle mode
(if subtitles are available)
Long press (2Sec.): DVD Title menu
13. MENU / ZOOM
Short press: Zoom in
Long press (2Sec.): Menu key for DVD Menu
14. STOP / SLOW
Short press: Stop
Long press (2Sec.): Slow motion
15. Navigation keys ( )
16. Fast Rewind
17. ENTER
To confirm and enter options or to play files.
18. Play / Pause
Preparation of the Remote Control
Place the remote control on an even surface and insert the supplied
button cell into the
remote control as follows.
1.Push the button towards left
2.Pull the battery loader out
3.Insert the battery into the receptacle
Make sure the polarity matches the marks
inside the component.
4.Insert the receptacle into the remote control.
Cell data
Battery type: 1x CR2025 , 3 V
Service life: approximately 1 year
(for normal use and roomtemperature)
Using Of Remote Control
Point the remote control towards the main unit when operating.
The remote control works best at a distance less than 5 m and at an
angle of up to 30°to the front of the unit. No obstacles may stand in the
way between remote control and infrared sensor and do not place the
remote control in direct sunlight. If the remote control unit fails to work
even when it is operated near the player, replace the battery.
Notes on batteries
If the remote control is not used for a long period of time, please re
move the battery from the compartment.
Do not heat batteries or dispose of them in fires. Do not
dismantle, deform or modify batteries.

21
Remote Control
Using Of Remote Control
Point the remote control towards the main unit when operating.
The remote control works best at a distance less than 5 m and at an
angle of up to 30°to the front of the unit. No obstacles may stand in the
way between remote control and infrared sensor and do not place the
remote control in direct sunlight. If the remote control unit fails to work
even when it is operated near the player, replace the battery.
About Built-in Rechargeable Battery
Precautions related to battery recharge
1. Once the battery is fully discharged, immediately recharge it
(regardless of whether you plan to use the battery or not) in order to
maximize the battery life. When the power is low, the battery icon will
be shown on the upper left corner of the TFT for warning.
2. To charge the battery, please connect this player to AC mains via
the AC adapter and the charge indicator will turn on in red, and the
indicator will turn into green when the battery is fully charged. This
will take about 2-2.5 hours if the player is in off mode or 4.5-6 hours
if the player is in working mode.
Using and maintaining your rechargeable batteries
1. Please make sure you always use only the AC adapter included with
the player to recharge your batteries.
2. Recharge efficiency will degrade when the environmental tempe
rature drops below 50oF (10 ) or exceed 95oF (35 ).
3. The lasting time of the fully charged battery when a headphone is
connected to the player is approximately 1.5 hours
Notes on batteries
If the remote control is not used for a long period of time, please
remove the battery from the compartment.
Do not heat batteries or dispose of them in fires. Do not dismantle,
deform or modify batteries.
REMOTE CONTROL KEY FUNCTIONS
PLAY/PAUSE
Press this button once(during playback) to pause playback.
Press this button a second time to resume playback.
STOP
Press this button once(during playback) to stop playback; to resume
from the same positon,
Press /PLAY
Press this button a second time to end playing back the disc altogether.
Continue at the start of the disc using .
MENU
Press this button (during playback) to display the menu on the screen.
In menu mode, select the desired option using the buttons.
Then press OK.
Button
Press this button to jump to the beginning of the previous track or chapter
Button(Fast rewind)
Pressing this button repeatedly will increase the rewind speed
successively to 2x,4x,8x,16x
Continue playback at normal speed using
Button
To jump to the beginning of the next track or chapter.
Button(Fast forward)
Pressing this button once to display detailed information about the disc
in the player.(Pressing this button repeatedly).
AUDIO button
During playback the available audio streams are enabled successively
(DVDs can contain up to eight audio streams; e.G.,
for multiple languages.

22
Remote Control
Get started
1.Press POWER switch to turn on the player.
2.Press OPEN button to open the disc tray.
3.Place a disc onto the disc tray.
4.Close the disc cover and the playback starts automatically.
5.When a menu screen appears on the display, move the navigation
buttons or press the numeric buttons to select a preferred track
number, then press OK/ENTER button to start playback
Using the AC adapter
Always turn off the DVD player via the Power on/off switch prior to
connecting or disconnecting the AC adapter. Be sure to use the
supplied AC adapter.
Using a different type of adapter may cause malfunction or damage
to the product. When the AC adapter is used for prolonged periods
of time, it may heat up. This is normal and is not a cause for concern.
When not using the adapter, unplug it from the wall outlet.
Keep the AC adapter free from moisture, cold, and dust. Otherwise,
a risk of fire or electric shock may beresulted in.
SUBTITLE button
During playback, allows you to select a language for subtitles or to turn
subtitles on/off.DVDs can contain up to 32 subtitle tracks .By pressing
this button repeatedly, you call up the following settings:
SUBTITLE 1/N:Subtitle 1 is displayed.
SUBTITLE 2/N:Subtitle 2 is displayed.
SUBTITLE */N:Subtitle * is displayed.
SUBTITLE OFF: No Subtitle.
N represents the total number of subtitle traks included.
This function is only available for DVDs that contain multiple
subtitle tracks.
REPEAT button
Pres the key to repeat a chapter or a title.
GOTO button
Enables you to select a position(time, track or title) at which to start
playback. Use the../..
Buttons to select the desired option. Use the 0-9 number keys to enter the
time directly and then confirm using OK.
Press the GOTO button again to resume normal playback.
ANGLE button
Pressing this button for approx 2 Sec. cycles through the camera
perspectives available for the particular scene(see illustration).
This function is only available for DVDs that contain recordings of
multiple camera perspectives.
ZOOM button
For DVDs the image size is successively changed to the following values
compared to the normal size:1x,2x,3x,off.
This function is not available for Cds.

23
MP3/MPEG4 PLAYING
AVI
Mp3
Mp4
Photo
XVID
Repeat off
Mode Normal
Filter
JPEG Preview
Audio
1/7
1
2
101
102
103
104
105
00:00:15
Repeat off
Mode Normal
Filter
Music Playing
Insert the MP3/MPEG4 disc, use navigation keys to open the desired directory.
Press ENTER to enter the sub directory. Use the navigation keys to select the
desired track and then ENTER to play the file. Press the PLAY/PAUSE key to
pause the playback, press the stop key to stop the play. To return to the upper
menu, press navigation key to choose the icon and press ENTER to confirm.
Open the option menu using the navigation keys
Filter: Allows selecting the categories of files displayed in the browser list.
Repeat: To switch different repeat playing mode
Select single option to enable one file repeat, select folder option to
enable all the files in the folder repeat.
Mode: Select different playing mode
Normal: Normal playback
Shuffle: Shuffle mode enabled. When playback reaches the end of the
current chapter/track, playback jumps to a random chapter/track.
Music Intro: In this mode, the unit will play the first 10 seconds of the file and
then skip to the next file.
Edit Mode: Use this option to enable programmed playback mode. Select the
mode, press LEFT Navigation key to directory and press ENTER to choose the
desired track and press Add to program to program the playback list.
Program view: Display directory/folder.
Brower view: Display playback list directory.
Add to program: Use this in combination with Edit Mode to create a play list.
Clear program: When entered the Browser View and in complete stop state
(press STOP button twice), use this option in combination with Edit Mode to
delete tracks from the playback list.
ADVANCED FEANTURES

PICTURE CD PLAYBACK
1/7
1
2
100
102
103
104
105
Repeat off
Mode Normal
Filter
JPEG Preview
Photo
SYSTEM SETUP
Language
Video
Rating
Misc
Language
Subtitle
MPEG4 Subtitle
Audio
DVD Menu
24
Press Navigation key to choose the root directory and then press
ENTER button to enter into the sub directory. Press key
to choose the desired picture and then press ENTER or PLAY to
enjoy the picture. If youwant to return to the upper menu, press
key to choose the icon and press ENTER button.
Image rotation
In picture play state, press key to rotation the picture,
press ANGLE button to change the picture scan mode.
Navigation
Navigation
Navigation
MENU OPERATION
Press the SETUP button on the remote control and the SETUP MENU will
be displayed. Use the navigation buttons for up and down movement to
select the desired item, then press the ENTER button to confirm.
Press LEFT navigation button return to the main menu. To exit the setup,
press the SETUP button. Press right navigation key to enter the submenu.
LANGUAGE SETUP
Select Language in the setup menu.
display.
Subtitle
Set the default subtitle.
Note: not every disc supports this function.
MPEG4 Subtitle
Set default MPEG4 subtitle encoding option.
Note: not every disc supports this function.
Audio
Set the default audio language.
Note: not every disc supports this function.
Use this item to select the language of the setup menu and screen
OSD Language

Language
Video
Rating
Misc
Parental Control
Set Password
Language
Video
Rating
Misc
Use Default Settings
SYSTEM SETUP
Language
Video
Rating
Misc
Aspect Ratio
TV System
Smart Picture
25
DVD Menu
Set the default DVD menu language.
Note: not every disc supports this function.
VIDEO SETUP
Select Video in the setup menu, and display the Video submenu:
Aspect Ratio
Select the aspect ratio.: 16:9 , 4:3 PS, 4:3LB
Notes:
The image display ratio is related to the recorded disc format. Some
disc can not display images in the aspect ratio you choose. If you play
a disc recorded in 4:3 format on a wide screen TV, black bars will appear
on the left and right side of the screen. You must adjust the screen
setting depending on the type of the television you have.
TV System
This product supports output of various systems (NTSC, PAL).
When connecting to a TV set make sure that both units have the same
PAL / NTSC settings.
Parental Control
Set the desired level.
Note: not every disc supports this function.
Set Password
Use the 0-9 keys to input four digits(password), then press ENTER
to confirm.
Note: If you forget your password, please use the universal password 6666 to unlock.
MISC SETUP
Select MISC in the setup menu, and display the submenu:
* Use Default Settings
Reset data to factory default.
RATING SETUP
Select Rating in the setup menu, and display the Rating submenu:
Note: Not all DVD support ratings.
Smart picture
Adjust display effect:
Standard: default effect.
Bright: internal setting for bright view effect. Soft: internal setting for soft
view effect.
Dynamic: user adjusts brightness, contrast, color etc.

If you have any questions, please consult the troubleshooting guide below.
Troubleshooting
Others
"BAD DISC" DISPLAYED
Ensure the disc is not warped, damaged or deformed.
Ensure the disc is not badly stained or damaged.
Ensure the disc format is compatible with the player.
Please check whether you have tried to play a software CD.
If so, please restart the player.
REMOTE NOT WORKING
Ensure the remote batteries are working.
Point the remote control directly at the player's IR sensor.
Remove any obstacles between the remote and the IR sensor.
UNIT NOT WORKING
Turn off the power, and then turn it on again.
"NO DISC" DISPLAYED
Ensure you have put the disc on the tray.
Ensure the disc is not upside down.
Ensure the disc is not distorted, stainedor scratched.
NO PICTURE OR SOUND
Ensure the power button is on.
Ensure the power outlet is operational.
Ensure the power cord is not damaged.
Ensure the power plug is connected
PICTURE BUT NO SOUND
Ensure the audio jacks are securely connected.
Ensure the audio connector is not damaged.
Ensure the volume is turned up in VOL/CH setup.
Ensure you have set the player's AUDIOsettings correctly.
Ensure you have ENTERed the correct AV input for your TV.
Ensure the audio is not set to mute.
SOUND BUT NO PICTURE
Ensure the video jacks are securely connected.
Ensure you have ENTERed the correct AV input for your TV.
Ensure the video connector is not damaged.
Ensure you have set the player's VIDEO settings correctly.
POOR PICTURE OR SOUND
Ensure you have set the player's AUDIO settings correctly.
Ensure the disc is not scratched or stained.
Ensure the AV connector or the output terminal is not damaged.
26

Accessories
27
Specifications are subject to change without notice.
Others
Specifications
Play mode
Disc mode
Video characteristic
Video S/N ratio
Resolution
Audio characteristic
Frequency response
Audio S/N ratio
Dynamic range
Distortion
D/A Converter
NTSC/PAL
DVD,VCD, CD, MP3, CD-R, CD-RW, JPEG,
DVD+ -R/W, MPEG4,
65dB.
500 lines.
fs 96KHz: 20Hz-20KHz:+/-1dBI
90dB
80dB
< 0.01%
96KHz/24bit
Output characteristic
Display Device
Screen Size
Video output
Audio output
Power Voltage
Power consumption
Size
Weight
Color TFT-LCD
7 inches
1Vp-p(75 W)
2CH
DC IN 12V
12W
206x160x40mm
0.8kg
AC adapter
Remote control
Bag & straps
Car adapter
User manual

28

Precauciones de seguridad..................................................................................................................30
Ilustración del panel.............................................................................................................................32
Conexión con una TV............................................................................................................................33
Mando a distancia .............................................................................................................................34
Reproducción MP3/MPEG4 ..........................................................................................................37
REPRODUCCIÓN DE CD DE IMÁGENES...............................................................................................38
CONFIGURACION DEL SISTEMA .........................................................................................................38
Problemasy soluciones ........................................................................................................................40
Especificaciones..................................................................................................................................41
Accesorios...........................................................................................................................................41
29
INDÍCE

Precauciones de seguridad
CAUTION
RISK OF ELECTRIC SHOCK
DO NOT OPEN
La seguridad es importante
Para garantizar su seguridad y la seguridad de los otros,
por favor lea las instrucciones de seguridad antes de
utilizar este producto.
Conserve esta información en un lugar seguro para futuras consultas.
Por favor lea toda la información de seguridad antes de usar el
producto.
Consideraciones de seguridad
Guíe los cables de modo que no puedan ser pisados o pinchados
por objetos colocados sobre o contra ellos.
No utilice el reproductor DVD portátil en condiciones húmedas ni
mojadas.
No permita que el reproductor DVD sea mojado.
No exponga el reproductor DVD portátil a goteos ni salpicaduras.
No coloque objetos llenos de líquido como jarrones encima del
reproductor DVD portátil.
No coloque fuentes de llamas descubiertas, como velas, encima
del reproductor DVD portátil.
Limpieza
SIEMPRE desenchufe el reproductor DVD antes de limpiarlo.
No utilice limpiadores líquidos ni de aerosol.
Limpie el reproductor DVD con un paño suave y húmedo (no mojado).
Ventilación
Las ranuras y aberturas encima de la caja descodificadora son para
su ventilación.
No las cubra ni bloquee puesto que podría ocasionar un
sobrecalentamiento.
NUNCA permita que los niños metan nada dentro de los agujeros
o ranuras de la carcasa.
Servicio
Este reproductor DVD no tiene piezas reparables por el usuario.
En caso de trabajos de servicio, refiera el trabajo a personal de
servicio calificado.
Consulte a su distribuidor en caso de surgirle dudas acerca de la
instalación, uso o seguridad de esta unidad.
Eliminación de baterías
Por favor asegúrese de que las baterías se eliminen de forma
segura.
Nunca deseche baterías en fuego o con otra basura doméstica.
Consulte con su autoridad local para conocer las normas de
eliminación.
Este símbolo indica que este producto incorpora doble aislante
entre las partes accesibles al usuario y las de voltaje peligroso.
Utilice únicamente piezas de repuesto idénticas a las originales
cuando se le dé servicio.
ADVERTENCIA: Para reducir el riesgo de incendio o descarga
eléctrica, no exponga este aparato a lluvia ni cables.
1. El aparato no debe exponerse a goteos ni salpicaduras y ningún objeto
lleno de líquido, como un jarrón, debe colocarse encima del aparato.
2. El cable de alimentación se usa como mecanismo de desconexión; el
mecanismo de desconexión debe permanecer fácilmente accesible.
3. Para desconectar completamente la entrada de corriente, el cable de
alimentación del aparato debe desconectarse de la toma.
4. El cable de alimentación del aparato no debe obstruirse o debe
permanecer fácilmente accesible durante el uso previsto.
Aviso especial
Podría ocurrir que la pantalla LCD presente algunos puntos oscuros o
brillantes. Es un fenómeno muy común de la tecnología de pantalla por
matriz activa, y no indica ningún defecto o fallo. Nunca intente reparar
esta máquina usted mismo. En caso de algún fallo, por favor apague la
unidad al instante y notifique a nuestra compañía o al distribuidor
correspondiente. La pantalla está compuesta de muchos componentes
electrónicos de precisión. Cualquier desmontaje o modificación podría
llevar a más daños.
30
Introduccion

Precauciones de seguridad
31
Introduccion
ADVERTENCIA LASER :
Este Reproductor de Discos de Vídeo Digital emplea un sistema láser. Para asegurar el uso apropiado de este producto,
lea este manual atentamente y consérvelo para futuras referencias. Si este producto requiere mantenimiento,
comuníquese con un servicio dec técnico autorizado
ubicación ver el procedimiento de servicio.
El uso de controles, ajustes o la realización de procedimientos distintos de los especificados puede provocar una
exposición peligrosa a la radiación.
Para evitar la exposición directa al rayo láser, no trate de abrir el compartimento.
Láser visible e invisible puede causar cuando se abre y cuando los enclavamientos están derrotados.
NO MIRE AL RAYO
ESCUCHAR CON AURICULARES (auricular)
(No incluido)
Conecte el cable de los auriculares estéreo (auriculares) en la toma de AURICULARES (Teléfonos marcados) antes de usar la unidad.
PRECAUCIÓN: Los expertos en audición desaconsejan la exposición prolongada y continua a tocar a un volumen alto durante el uso
de auriculares (auriculares), posible pérdida de audición puede resultar. Si experimenta un zumbido en los oídos, reduzca el volumen
o deje de utilizarlos. Queremos que usted puede escucha de toda la vida.

Ilustración del panel
PANTALLA LCD
ALTAVO Z
INTERRUPTOR POWER
(ON/OFF) (de encendido)
ENTRADA DC 12V
(suministro eléctrico)
SALIDA PARA AURICULARES
SALIDA AV
CONTROL DE VOLUMEN
32
ABRIR TAPA
DEL DISCO
TAPA DEL DISCO
TECLAS DIRECCIONALES
( )
/PAUSE (pausa)PLAY (reproducir)
STOP (detener)
SOURCE (fuente)
PUERTO COMPATIBLE USB
SETUP
TFT
PREV
NEXT
SOURCE
MENU
OK
TFT
VOL
ON OFF
AV OUT PHONE
USB
DC IN 12V

Conectar una TV
Función de salida de auriculares
Inserte los auriculares en la toma para auriculares para
escuchar música o una película en privado.
Recarga de batería
Cuando la batería de la unidad se agote, conecte el adaptador
AC a la unidad. La batería se cargará automáticamente.
Ajustar el volumen
Use el CONTROL DE VOLUMEN lateral de la unidad para
ajustar el volumen.
33
L
R
CVBS
Red
White
Yellow
VIDEO IN
AUDIO IN
CONEXIONES
Conectar con un USB
Pulse la tecla FUNCTION del mando a distancia hasta que haya
cambiado al modo de funcionamiento COMPATIBLE USB.
Interfaz COMPATIBLE USB
Esta unidad tiene una entrada COMPATIBLE USB IN para
reproducir música MP3, archivos JPEG u otros archivos.
Pulse el botón < FUNCTION > para elegir el modo de entrada
COMPATIBLE USB IN.
Todas las funciones son iguales a las de la reproducción de
discos.
Nota: El puerto COMPATIBLE USB IN es compatible con
memorias flash, no está garantizada la compatibilidad con
reproductores MP3 que usen software del usuario.
NOTA:
Al usar la función COMPATIBLE USB. Por favor no inserte en
la dirección incorrecta, o se corromperá.
La memoria de almacenamiento USB debe conectarse
directamente a la unidad.
No utilice el cable de extensión USB con el fin de evitar
interferencias y pérdida de datos durante su transferencia.
VOL
ON OFF
AV OU T PHONE
USB
DC IN 12V

Mando a distancia
Mando a distancia
7
9
10
11
12
1
2
3
4
5
6
13
14
15
16
17
8
18
1. Repeat A-B (Repetición A-B)
Pulse 1x: Fijar A; Pulse 2x: Fijar B
Pulse 3x: Desactivar la función.
2. Prog/Repeat
Pulsación corta: Modo de repetición.
Pulsación larga (2 seg.):
Modo de programación DVD.
3. Teclas numéricas 0-9
4. Setup
Abrir el menú de ajustes.
5. Goto
Pantalla para ir a un punto específico.
6. Fast Forward (Adelantado rápido)
7. Next
Siguiente capítulo o archivo.
8. Previous
Capítulo o archivo anterior.
9. SOURCE
Selección de fuente de entrada.
10. Display
Mostrar información detallada del
archivo o disco actual.
11. Angle / Audio
Pulsación corta:
Cambia el modo de audio (si hay
modos distintos disponibles)
Pulsación larga (2 seg.): Cambia la
marca de ángulo (si hay modos
distintos disponibles)
12. Title / Subtitle
Pulsación corta: Cambiar el modo de
subtitulaje.
(si hay subtítulos disponibles)
Pulsación larga (2 seg.):
Menú de título DVD.
13. MENU / ZOOM
Pulsación corta: Ampliar imagen.
Pulsación larga (2 seg.): Tecla Menu
para el menú DVD.
14. STOP / SLOW
Pulsación corta: Detener.
Pulsación larga (2 seg.): Cámara lenta.
15. Teclas direccionales( )
16. Fast Rewind (Retroceso rápido)
17. ENTER
Para confirmar o entrar a las opciones o
para reproducir archivos.
18. Play / Pause (Repr./Pausa)
Preparativos del mando a distancia
Coloque el mando a distancia en una superficie plana e inserte la batería
tipo botón en el mando a distancia como se señala a continuación:
1. Presione el botón hacia la izquierda.
2. Saque la bandeja de baterías.
3. Inserte la batería en el receptáculo.
Asegúrese de que los polos se correspondan con las marcas dentro
del compartimiento.
4. Inserte la bandeja en el mando a distancia.
Datos de la batería
Tipo de batería: 1x CR2025, 3 V
Duración: Aproximadamente 1 año
(con uso normal y a temperatura ambiente).
Uso del mando a distancia
Apunte el mando a distancia a la unidad principal cuando lo use.
El mando a distancia funciona mejor a una distancia menor de 5 m y
dentro de un ángulo de 30º al frente de la unidad. No debe haber ningún
obstáculo entre el mando a distancia y el sensor infrarrojo y no
coloque el mando en luz directa del sol. Si el mando a distancia falla
incluso al usarlo cerca del reproductor, cambie la batería.
Notas sobre baterías
Si el mando a distancia dejará de usarse durante un periodo de tiempo
extendido, por favor saque la batería de la bandeja.
No caliente las baterías ni las tire al fuego.
No desmonte, deforme ni modifique las baterías.
1
2
CR2025
34

35
Mando a distancia
Precauciones relacionadas con la recarga de la batería
Este lector funciona con una batería recargable Li-Polymer
(1300 mAh Li-ion Battery/ 1h30 max.) o con el adaptador.
1. Cuando la batería esté completamente descargada, recárguela
inmediatamente (a pesar de tener planeado usar o no la batería) para
maximizar su duración. Cuando la carga esté baja, el icono de batería
aparecerá en la esquina superior izquierda de la TFT como
advertencia.
2. Para cargar la batería, por favor conecte este reproductor a una
toma AC vía adaptador AC; el indicador de recarga se pondrá rojo, y
cambiará a verde cuando se haya cargado completamente la batería.
Esto tomará de 2-2.5 horas si el reproductor está apagado o de 4.5-6
horas si está encendido.
Uso y mantenimiento de sus baterías recargables
1. Por favor asegúrese siempre de utilizar únicamente el adaptador
AC incluido con el reproductor para cargar sus baterías.
2. La eficiencia de recarga disminuirá cuando la temperatura del
ambiente baje a menos de 50ºF (10ºC) o suba a más de 95ºF (35ºC).
3. La duración de una batería completamente cargada cuando se
usen unos auriculares es de aproximadamente 1.5 horas.
Funciones del mando a distancia
(play/pause)
Apriete este botón (durante la grabación) para ponerla en pausa.
Apriete este botón una segunda vez para volver a ver la grabación.
Stop
Apriete este botón (durante la grabación) para pararla.
Para parar la grabación y volver a ver desde la misma position apriete
play.
Apriete este botón una segunda vez para acabar de ver la grabación
definitivamente.
Vea desde el principio apretando en el botón play.
MENU
Apriete este botón (durante la grabación) para que aparezca el menú
en la pantalla.
En el modo menú, seleccione la opción escogida utilizando los
botones y apriete OK.
Botón
Apriete este boton para passar al principio de la pista o del
capitulo anterior.
Botón (Rebobinado)
Apriete este botón repetidamente para aumentar la velocidad de
rebobinado, sucesivamente, 2x, 4x, 8x, 16x.
Continúe de ver la grabación normalmente apretando play.
Botón
Apriete este botón para ir al principio de la próxima pista o capitulo.
Botón (adelanto rápido)
Apriete este botón repetidamente para aumentar la velocidad de
adelantamiento, sucesivamente, 2x, 4x, 8x, 16x.
Continúe de ver la grabación normalmente apretando play.
Botón DISPLAY
Apriete este boton una vez para mostrar las informaciones sobre el
disco leido.

Botón AUDIO
Durante la grabación puede cambiar el idioma audio
(cuando el DVD contiene varios idiomas).
Botón de subtítulos
Durante la grabación le permite de seleccionar el idioma de
subtítulos, de poner en marcha o de parar con los subtítulos.
SUBTITULO 1/N: Subtitulo 1 esta Visualizado
SUBTITULO 2/N: Subtitulo 2 esta visualizado
SUBTITULO '/N: Subtitulo 'esta visualizado
SUBTITLE OFF: Los subtítulos no están visualizados
N representa el total de los subtítulos disponibles.
Esta función esta disponible para los DVD que contienen 2 o
más pistas de subtítulos.
REPEAT botón
Apriete el botón para repetir el capitulo o la pista.
GOTO botón
Le permite de seleccionar la posición (time, track o title) deseada
para lanzar la grabación. Utilice los botones ../.. para seleccionar
la opción deseada. Utilice las teclas numéricas para escoger el
tiempo donde quiere que empiece la grabación y confirme
apretando en el botón OK.
ANGLE Botón
Apretando este botón aproximadamente 2 segundos, puede cambiar
el ángulo de vista de la escena.
Esta función puede solamente ser utilizada con DVDs que contienen
varios ángulos para la misma escena.
ZOOM Botón
Para los DVDs el tamaño de la imagen sucesivamente 1x, 2x, 3x, off.
Esta función no esta disponible para los Cds.
36
Mando a distancia
Puesta en marcha
1.Apriete el botón POWER para poner en marcha el lector.
2.Apriete el botón OPEN para abrir el lector.
3.Ponga un disco dentro del lector.
4.Cierre el lector para que la grabación se lance automáticamente
5.Cuando una ventana aparece en el demonstrador, apriete en los
botones numéricos correspondientes a la pista que quiere escuchar,
apriete OK/ENTER para lanzar la pista.
Utilizar el adaptador AC
Siempre que utilice el adaptador AC, verifique que el lector DVD esté
apagado, utilizando el botón ON/OFF. Asegúrese de que utiliza el
adaptador AC que viene con el lector DVD. Utilizar otro adaptador AC
puede ser malo para el lector. Cuando el adaptador funciona por un
largo tiempo, se puede calentar, eso es normal. Cuando no lo utiliza,
sácalo del enchufe. Guárdelo lejos de la humedad, del frio, del polvo.
En caso contrario, hay un riesgo de fuego o choque eléctrico.

REPRODUCCIÓN MP3/MPEG4
AVI
Mp3
Mp4
Photo
XVID
Repeat off
Mode Normal
Filter
JPEG Preview
Audio
1/7
1
2
101
102
103
104
105
00:00:15
Repeat off
Mode Normal
Filter
Music Playing
Ponga el disco MP3/MPEG4, y use las teclas direccionales para abrir el
directorio deseado.
Pulse ENTER para entrar al subdirectorio. Use las teclas direccionales para
seleccionar la pista deseada y pulse ENTER para reproducir el archivo. Pulse la
tecla PLAY/PAUSE para pausar la reproducción; pulse la tecla STOP para detener
la reproducción. Para volver al menú superior, pulse las teclas direccionales para
seleccionar el ícono y pulse ENTER para confirmar. Abra el menú de opciones
usando las teclas direccionales.
Filter (filtro): Permite la selección de las categorías de archivos que se mostrarán
en la lista de exploración.
Repeat (repetir): Para cambiar entre los distintos modos de repetición.
Elija la opción Single para activar la repetición de un solo archivo y seleccione la
opción Folder para activar la repetición de todos los archivos de la carpeta.
Mode (modo): Seleccione distintos modos de reproducción.
Normal: Reproducción normal.
Shuffle (barajar): Para activar el modo Shuffle. Cuando la reproducción llegue al
final del capítulo/pista actual, la reproducción salta a un capítulo/pista aleatorio.
Music Intro (intro): En este modo, la unidad reproducirá los primeros 10 segundos
del archivo y después saltará al siguiente archivo.
Edit Mode (modo Editar): Use esta opción para activar el modo de reproducción
programada. Seleccione el modo, pulse la tecla direccional IZQUIERDA hasta
Directory y pulse ENTER para elegir la pista deseada y después pulse Add to
program para agregarla a la lista de programación.
Program view (vista de programación): Muestra el directorio/carpeta.
Browser view (vista explorador): Muestra el directorio de la lista de reproducción.
Programa (agregar a programación): Use esta opción junto con Edit Mode para
crear una lista de reproducción.
Clear program (borrar programación): Cuando esté en Browser View y con la
reproducción completamente detenida (pulse el botón STOP dos veces), use esta
opción junto con Edit Mode para eliminar pistas de la lista de reproducción.
37
FUNCIONES AVANZADAS

REPRODUCCIÓN DE CD DE IMÁGENES
1/7
1
2
100
102
103
104
105
Repeat off
Mode Normal
Filter
JPEG Preview
Photo
Language
Video
Rating
Misc
Language
Subtitle
MPEG4 Subtitle
Audio
DVD Menu
Pulse las teclas direccionales para elegir el directorio raíz y
pulse el botón ENTER para entrar al subdirectorio. Pulse las
teclas direccionales para elegir la imagen deseada y pulse
ENTER para verla. Si quiere volver al menú superior, use las
teclas direccionales para elegirlo y pulse ENTER.
Girar imagen
En el estado de reproducción de imágenes, pulse las teclas
direccionales para girar la imagen y pulse el botón ANGLE
para cambiar el modo de búsqueda de imágenes.
USO DEL MENÚ
Pulse el botón SETUP del mando a distancia y se mostrará el menú
de ajustes. Use los botones direccionales para desplazarse
verticalmente hasta la opción deseada, y pulse el botón ENTER para
confirmar.
Pulse el botón direccional IZQUIERDA para volver al menú principal.
Para salir de los ajustes, pulse el botón SETUP. Pulse la tecla
direccional DERECHA para entrar al submenú.
AJUSTES DE IDIOMA
Seleccione Language en el menú de ajustes.
OSD Language (idioma OSD)
Use esta opción para seleccionar el idioma del menú de ajustes y la
pantalla.
Subtitle (subtítulos)
Fije el subtitulaje predeterminado.
Nota: No todos los discos admiten esta función.
MPEG4 Subtitle (subtítulos MPEG4)
Fije el subtitulaje MPEG4 predeterminado.
Nota: No todos los discos admiten esta función.
Audio
Fije el idioma de audio predeterminado.
Nota: No todos los discos admiten esta función.
38
CONFIGURACION DEL SISTEMA

Language
Video
Rating
Misc
Parental Control
Set Password
Language
Video
Rating
Misc
Use Default Settings
DVD Menu (menú DVD)
Fije el idioma predeterminado de menú DVD.
Nota: No todos los discos admiten esta función.
AJUSTES DE VÍDEO
Seleccione Video en el menú de ajustes para ver el submenú
de vídeo:
TV System (sistema TV)
Este producto admite salida en varios sistemas (NTSC, PAL).
Cuando lo conecte a una TV asegúrese de que ambas unidades
tengan el mismo ajuste PAL / NTSC.
Smart picture (Imagen Inteligente)
Ajuste el efecto de imagen:
Standard (estándar): Efecto predeterminado.
Bright (brillante): Ajuste interno para un efecto de imagen brillante.
Soft (suave): Ajuste interno para un efecto de imagen suave.
Dynamic (dinámico): El usuario ajusta el brillo, contraste, color, etc.
Parental Control (control paterno)
Fijar el nivel deseado.
Nota: No todos los discos admiten esta función.
Set Password (fijar contraseña)
Use las teclas 0-9 para ingresar una contraseña de cuatro dígitos y
después pulse ENTER para confirmar.
Nota: Si olvida la contraseña, por favor use la contraseña universal
6666 para desbloquearla.
OTROS MISC.
Seleccione MISC en el menú de ajustes para mostrar el submenú de
ajustes misceláneos:
* Use Default Settings (usar ajustes originales)
Restaure los valores originales de fábrica.
AJUSTES DE CLASIFICACIÓN
Seleccione Rating en el menú de ajustes para mostrar el
submenú de clasificación:
Nota: No todos los DVD admiten clasificaciones.
Language
Video
Rating
Misc
Aspect Ratio
TV System
Smart Picture
Tamaño de Visión
Seleccionar Tamaño de Visión. 16:9 , 4:3 PS, 4:3 LB
Nota:
El tamaño de visualización de la imagen esta relacionada con el
formato de Disco grabado. Algunos discos no pueden mostrar
imágenes en el formato que usted seleccione. Si usted utiliza un
disco grabado en formato 4:3 en una TV de pantalla ancha,
saldrán unas líneas negras en la derecha e izquierda de la
pantalla. Usted debe ajustar la configuración de la pantalla,
dependiendo del modelo de TV que utilice.
39
CONFIGURACION DEL SISTEMA

40
Si tiene alguna pregunta, por favor consulte la guía de problemas y soluciones siguiente.
NO HAY IMAGEN O SONIDO
-Asegúrese de que el botón Power esté encendido.
-Asegúrese de que la toma de corriente esté funcionando.
-Asegúrese de que el cable de alimentación no esté dañado.
-Asegúrese de que la clavija de alimentación esté bien conectada a la toma.
IMAGEN SIN SONIDO
-Asegúrese de que todas las tomas de audio estén bien conectadas.
-Asegúrese de que el conecto de audio no esté dañado.
-Asegúrese de que el volumen esté subido en el ajuste VOL/CH.
-Asegúrese de que haber ajustado las opciones de AUDIO del reproductor correctamente.
-Asegúrese de que haber seleccionado la entrada AV correcta en su TV.
-Asegúrese de que el audio no esté silenciad.
SONIDO SIN IMAGEN
-Asegúrese de que las tomas de vídeo estén bien conectadas.
-Asegúrese de haber seleccionado la entrada AV correcta en su TV.
-Asegúrese de que el conector de vídeo no esté dañado.
-Asegúrese de haber fijado correctamente los ajustes de VÍDEO del reproductor.
IMAGEN O SONIDO DEFICIENTE
-Asegúrese de haber fijado correctamente los ajustes de AUDIO del reproductor.
-Asegúrese de que el disco no esté rayado ni sucio.
-Asegúrese de que el conector AV o la terminal de salida no esté dañada.
SE MUESTRA “BAD DISC”
-Asegúrese de que el disco no esté combado, dañado o deformado.
-Asegúrese de que el disco no esté gravemente sucio ni dañado.
-Asegúrese de que el formato de disco sea compatible con el reproductor.
-Compruebe que no haya intentado reproducir un CD de software. De ser así, por favor reinicie el reproductor.
EL MANDO NO FUNCIONA
-Asegúrese de que las baterías del mando estén funcionando.
-Apunte el mando directamente al sensor IR del reproductor.
-Quite cualquier obstáculo entre el mando y el sensor IR.
LA UNIDAD NO FUNCIONA
-Apáguela y vuélvala a encender.
SE MUESTRA "NO DISC"
-Asegúrese de haber puesto un disco en la bandeja.
-Asegúrese de que el disco no esté al revés.
-Asegúrese de que el disco no esté distorsionado, sucio o rayado.
Problemas y soluciones

Las especificaciones están sujetas a cambio sin previo aviso.
Especificaciones
NTSC/PAL
DVD,VCD, CD, MP3, CD-R, CD-RW, JPEG,
DVD+ -R/W, MPEG4,
65dB.
500 líneas
96KHz: 20Hz-20KHz:+/-1dBI
90dB
80dB
< 0.01%
96KHz/24bit
Características de
salida
LCD-TFT a color
7 pulgadas
1Vp-p(75 W)
2CH
Entrada DC de 12V
12W
205x160x40mm
0.8kg
Accesorios
Sistema TV
Tipos de discos
Características de
vídeo
Relación S/N
Resolución Salida AV
Características de
audio
Respuesta en
frecuencia
Relación S/N de
audio
Rango dinámico
Distorsión
Convertidor D/A
Dispositivo de
visualización
Tamaño de pantalla
Salida de vídeo
Salida de audio
Voltaje de alimentación
Consumo eléctrico
Dimensiones
Peso
41
OTROS
Transformador
Mando a distancia
Maletín de transporte
Cable mechero
Manual del Usuario

42

Veiligheidsmaatregelen..........................................................................................................44
Panel illustratie......................................................................................................................46
Aansluiten op een televisietoestel...........................................................................................47
Afstandsbediening.................................................................................................................48
MP3/MPEG4 afspelen ....................................................................................................51
Picture CD afspelen ...............................................................................................................52
Systeem instellen...................................................................................................................53
Problemen Oplossen..............................................................................................................54
Specificaties..........................................................................................................................55
Accessoires ..........................................................................................................................55
Inhoud
43

Speciale opmerking
Veiligheidsmaatregelen
CAUTION
RISK OF ELECTRIC SHOCK
DO NOT OPEN
Reinigen
Ventilatie
Veiligheid is belangrijk
Lees voor uw eigen veiligheid en die van anderen de
Veiligheidsinstructies goed door vóór u dit product gaat
bedienen.
Bewaar deze informatie op een geschikte plek voor verdere raadpleging in de
toekomst.
Lees alstublieft alle instructies goed door voor het product te gebruiken.
Veiligheidsoverwegingen
Plaats de kabels zo dat er niet overheen gelopen kan worden of ze verdrukt
kunnen worden door voorwerpen de er tegenaan of erop zijn geplaatst.
Gebruik de draagbare DVD speler niet in vochtige of klamme omstandigheden.
Laat de draagbare DVD speler niet nat worden.
Stel de draagbare DVD speler niet bloot aan druppelend of spetterend water.
Plaats geen met water gevulde voorwerpen, zoals bloemenvazen, bovenop de
draagbare DVD speler.
Plaats geen open vlambronnen, zoals kaarsen, bovenop de draagbare DVD
speler.
Haal ALTIJD de stekker van de draagbare DVD speler uit het stopcontact
voordat u het apparaat gaat schoonmaken.
Gebruik geen vloeibare schoonmaakmiddelen of spuitbussen om het apparaat
schoon te maken.
Maak de draagbare DVD speler schoon met een zachte, vochtige (niet natte) doek.
De gaten en openingen op deze set-top box zijn voor ventilatie.
Bedek of blokkeer de ventilatiegaten niet, omdat dat oververhitting kan veroorzaken.
Laat NOOIT kinderen dingen in de gaten of openingen van het apparaat stoppen.
Regelmatig onderhoud
In of aan de draagbare DVD speler zitten geen losse gebruikersonderdelen.
Raadpleeg voor het onderhoud van het apparaat gekwalificeerd personeel.
Neem contact op met uw dealer als u op wat voor manier dan ook twijfelt over
de installatie, bediening of veiligheid van dit apparaat.
Verwijderen van batterijen
Verzeker u ervan dat u de batterijen veilig verwijdert.
Gooi de batterijen nooit in vuur weg of met het gewone huishoudelijk afval.
Check bij uw plaatselijke overheid wat de verwijderrichtlijn voor batterijen is.
Dit symbool geeft aan dat dit product een dubbele elektrische isolatie
heeft tussen de gevaarlijke hoofdstroom en de onderdelen die voor de
gebruiker toegankelijk zijn. Gebruik bij het onderhoud alleen identieke
onderdelen om kapotte te vervangen.
WAARSCHUWING: Stel dit apparaat niet bloot aan regen of kabels om het risico
op brand of elektrische schokken te verkleinen.
1. Stel dit apparaat niet bloot aan druppelen of spetteren en plaats geen met
vloeistof gevulde voorwerpen, zoals vazen, op het apparaat.
2. De hoofdstekker wordt gebruikt om het apparaat los te koppelen, deze moet
gemakkelijk te gebruiken blijven.
3. Om het apparaat volledig te ontkoppelen van de stroomtoevoer moet u de
stekker uit het stopcontact halen.
4. De stekker van het apparaat mag niet geblokkeerd worden en moet vrij
toegankelijk zijn tijdens het gebruik.
Er kunnen een paar lichtpuntjes of donkere vlekjes op het LCD-scherm
verschijnen. Dit is een gebruikelijk fenomeen van de 'active matrix'
beeldscherm technologie, en duidt niet op fouten of gebreken. Probeer niet
zelf het apparaat te repareren. In het geval van gebreken, zet de speler
meteen uit en stel ons bedrijf of uw dealer op de hoogte. Het beeldscherm is
opgebouwd uit heel veel precieze elektronische componenten. Demontage of
aanpassingen kunnen tot verdere schade leiden.
44
Inleiding

Laser Waarschuwing
Deze DVD Speler maakt gebruik van een lasersysteem. Om direct contact met de laserstraal te voorkomen mag u het omhulsel niet openen.
Als het apparaat open is en verbindingen kapot zijn, wordt zichtbare laser uitgestraald uit het apparaat. Het gebruik van controle- knoppen
of het uitvoeren van bijstellingen of bedieningen op andere wijzen dan hier beschreven kan tot gevaarlijke radiatie leiden. KIJK NIET NAAR
DE STRAAL!
Luisteren met Stereo Koptelefoon
Als u alleen en ongestoord wil luisteren, sluit u de Koptelefoon aan op de Koptelefoon contact.
OPGELET: Vermijd een te langdurig gebruik en een overmatige geluidssterkte van de koptelefoon.
Waarschuwing:
Langdurige blootstelling aan harde geluiden van persoonlijke muziekspelers kan leiden tot tijdelijk of permanent gehoorverlies.
Volume aanpassen
Gebruik de volume regelaar aan de zijkant van het apparaat om
het volume bij te stellen.
Veiligheidsmaatregelen
45
Inleiding

Panel illustratie
LCD SCHERM
LUIDSPREKER
CD KLEP
OPEN CD KLEP
BRON
AAN/UIT KNOP
DC 12V STEKKERINGANG
(stroomvoorziening)
HOOFDTELEFOON STEKKERINGANG
AV STEKKERUITGANG
VOLUME REGELAAR
46
AFSPELEN/PAUZEREN
USB POORT KOMPATIBLE AANSLUITINGEN
( , , , )
SETUP
TFT
VORIGE
VOLGENDE
STOP
SOURCE
MENU
OK
TFT
VOL
ON OFF
AV OUT PHONE
USB
DC IN 12V
VERPLAATS
(NETSTROOM- INFRAROOD-
SENSOR OPLAADINDICATOR)

Aansluiten op een Tv-toestel
Hoofdtelefoon functie
Sluit de hoofdtelefoon aan op de daarvoor bestemde
stekkeruitgang, om muziek/films individueel te kunnen
beluisteren/bekijken.
Batterij opladen
Als de batterij van de draagbare DVD speler leeg is, sluit
dan de wisselstroomadapter op het apparaat aan. De
batterij zal automatisch opladen.
Volume aanpassen
Gebruik de volume regelaar aan de zijkant van het
apparaat om het volume bij te stellen.
47
L
R
CVBS
Red
White
Yellow
VIDEO IN
AUDIO IN
Verbindingen
Sluit de USB KOMPATIBLE aan
Druk op de SOURCE toets op de afstandsbediening tot u naar de USB
KOMPATIBLE -modus heeft geschakeld
USB KOMPATIBLE interface
Het apparaat beschikt over een USB KOMPATIBLE IN stekkeringang om
MP3 muziek, JPEG bestanden of andere bestanden af te spelen.
Druk op de < SOURCE > knop om naar de USB KOMPATIBLE IN
modus te schakelen.
Alle functies zijn hetzelfde als bij het afspelen van een disk.
Opmerking: de USB KOMPATIBLE IN poort is compatible met flash
geheugen, er wordt niet gegarandeerd dat de poort compatibel is met
MP3-spelers die gebruik maken van hun eigen software.
OPMERKING:
Wanneer u gebruik maakt van de USB KOMPATIBLE -functie,
plaats het USB KOMPATIBLE -apparaat niet in de verkeerde richting.
Dit kan het USB KOMPATIBLE -apparaat beschadigen.
Waarschuwing:
De USB -geheugenstick moet rechtstreeks in het apparaat worden
gestoken.
Er dient geen gebruik gemaakt te worden van de USB -verlengkabel,
om storingen te voorkomen en te voorkomen dat de
gegevensoverdracht mislukt.
VOL
ON OFF
AV OU T PHONE
USB
DC IN 12V

7
9
10
11
12
1
2
3
4
5
6
13
14
15
16
17
8
18
1 A-B Herhalen
pers 1x:ingesteld A,
pers 2x:ingesteld B
pers 3x:uitschakelen
van de functie
2. Prog/Repeat
Korte druk: Herhaalmodus
Lange druk (2Sec.):
DVD-programmeermodus
3. 0-9 Numerieke Toetsen
4. Goto (Ga naar)
Ga naar een specifieke tijdindex
5. Setup
Open het setupmenu
6. Snel Vooruitspoelen
7. Volgende
Volgende hoofdstuk of bestand
8. Vorige
Vorige hoofdstuk of bestand
9. FUNCTION (FUNCTIE)
Invoermodus selectie,
10. Display
Toon gedetailleerde informatie
van het huidige bestand of disk.
11. Angle / Audio (Hoek / Audio)
Korte druk: Verander de audio-
modus (als er verschillende modi
beschikbaar zijn)
Lange druk (2Sec.):Verandert de
hoekmarkering (als er verschillen
de modi beschikbaar zijn)
Afstandsbediening
Afstandsbediening
12. Title / Subtitle (Titel / Ondertitel)
Korte druk:
Verander ondertitelmodus (als er
ondertitels beschikbaar zijn)
Lange druk (2Sec.): DVD-Titelmenu
13. MENU / ZOOM
Korte druk: Zoom in
Lange druk (2Sec.):
Menu toets voor DVD-Menu
14. STOP / SLOW
Korte druk: Stop
Lange druk (2Sec.): Slowmotion
15. Richtingstoetsen
16. Snel Terugspoelen
17. ENTER
Om te bevestigen en opties in te
voeren of bestanden af te spelen.
18. Afspelen / Pauzeren
Voorbereiding van de Afstandsbediening
Plaats de afstandsbediening op een vlakke ondergrond en plaats de
meegeleverde knoopcel als volgt.
1.Druk de knop naar links
2.Trek de batterijhouder naar buiten
3.Plaats de batterij in de houder
Zorg ervoor dat de polariteit overeenkomt met de markeringen binnen in
het component.
4.Plaats de houder in de afstandsbediening.
.
Batterijgegevens
Batterijtype: 1x CR2025, 3 V
Levensduur: ongeveer 1 jaar (bij normaal gebruik op kamertemperatuur)
Gebruik van de Afstandsbediening
Richt de afstandsbediening bij gebruik op het hoofdapparaat.
De afstandsbediening werkt het beste bij een afstand van minder dan
5 m en bij een hoek tot 30' ten opzichte van de voorkant van het apparaat.
Er mogen geen obstakels tussen de afstandsbediening en de infrarood-
sensor staan en de afstandsbediening mag niet in direct zonlicht worden
geplaatst. Vervang de batterij als de afstandsbediening niet werkt, zelfs
wanneer hij dichtbij de speler wordt gebruikt.
1
2
CR2025
Opmerkingen over batterijen
Als de afstandsbediening voor lange tijd niet gebruikt wordt,
verwijder dan de batterijen uit het compartiment.
Warm de batterijen niet of en gooi ze niet in vuur.
Demonteer, vervorm of wijzig batterijen niet.
48

Afstandsbediening
Over de Ingebouwde Oplaadbare Batterij
Voorzorgsmaatregelen met betrekking tot het opladen van de batterij
1. Laad de batterij onmiddellijk op wanneer de batterij volledig ontla
den is (ongeacht of u van plan bent de batterij te gebruiken of niet) om
de levensduur van de batterij te maximaliseren.
Het batterij-icoontje zal ter waarschuwing in de linkerbovenhoek van
het TFT getoond worden wanneer de batterij bijna leeg is.
2. Verbind de AC-adapter met het lichtnet om de batterij op te laden.
De oplaadindicator zal rood oplichten en de indicator zal groen worden
wanneer de batterij volledig is opgeladen. Dit zal ongeveer 2-2.5 uur
duren als de speler uit staat of 4.5-6 uur als de speler wordt gebruikt.
Gebruik en onderhoud van uw oplaadbare batterijen
1. Zorg er altijd voor dat u alleen de bijgeleverde AC-adapter gebruikt
om uw batterijen op te laden met de speler.
2. De oplaadefficiëntie zal afnemen wanneer de omgevingstemperatuur
onder de 50F (10 ) of boven de 95F (35 ) is.
3. Een volledig opgeladen batterij gaat ongeveer 1.5 uur mee wanneer
een hoofdtelefoon is aangesloten op de speler.
Dit product werkt zowel op de oplaadbare Li-Polymer batterij (1300 mAh
Li-ion batterij / 1h30max) of de AC stroomvoorziening
49
(Afspelen / pauzeren) knop
Druk op deze knop eens (tijdens het afspelen) om het afspelen te
onderbreken.
Druk op deze knop een tweede keer om het afspelen te hervatten.
STOP knop
Druk op deze knop eens (tijdens het afspelen) om het afspelen te
stoppen; te hervatten vanaf dezelfde positie, drukt op Afspelen.
Druk op deze knop een tweede keer om het afspelen van de disc
te eindigen. Blijf bij het begin van de schijf gebruikt.
MENU knop
Druk op deze knop (tijdens het afspelen) om het menu op het scherm
weer te geven. In de menu modus selecteert u de gewenste optie met
de knoppen.Dan druk op OK om te bevestigen
knop
Druk op deze knop om naar het begin van de vorige track of
hoofdstuk te gaan
Knop(Vast terugspoelen)
Door het herhaalde drukken van deze knop zal de snelheid van
het terugspoelen toenmen achtereenvolgend aan 2x,4x,8x,16x
Blijven het afspelen op normale snelheid met behulp van .
Knop
Om naar het begin van de volgende track of hoofdstuk te gaan
Knop (Vast vooruiten)
Door het herhaalde drukken van deze knop zal de snelheid van het
terugspoelen toenmen achtereenvolgend aan 2x,4x,8x,16x
Blijven het afspelen op normale snelheid met behulp van .
AUDIO Knop
Tijdens het afspelen ,de beschikbare audio stromen worden
achtereenvolgend ingeschakeld (DVD's kan bevatten tot acht audio
stromen. B,v. voor meerdere talen).
Bediening van Afstandsbediening
Bediening van Afstandsbediening

50
Ondertitel-knop
Tijdens het afspelen, kunt u een taal voor ondertitels te selecteren of
om ondertitels AAN / UIT te zetten. DVD's kan tot en met 32 ondertitels
tracks. Door het herhaalde drukken van deze knoppen kunt u de
volgende instellingen kiezen:
Ondertitel 1 / N: Ondertitel 1 wordt weergegeven.
Ondertitel 2 / N: Ondertitel 2 wordt weergegeven.
Ondertitel 3 / N: Ondertitel 3 wordt weergegeven.
Ondertitel UIT: Er is geen ondertitel.
N staat voor het totaal tracks van ondertitels.
Deze functie is alleen beschikbaar voor DVD's die meervoudige
ondertitel tracks bevatten.
Herhalen-knop
Druk op deze knop om een hoofdstuk of een titel te herhalen.
GA-NAAR knop
Hiermee kunt u een positie (tijd, track of titel) waar te beginnen te
selecteren . Gebruik de ../.. Knoppen om de gewenste optie te
selecteren. Gebruik de cijferknopen 0-9 om de tijd rechtstreeks in te
gaan en daarna bevestig met OK.
ANGL knop
Druk op deze knop voor 2 sec. cycli via de camera beschikbaar zijn voor
de bepaalde scène (zie illustratie)
Deze functie is alleen beschikbaar voor DVD's die opnames van
meerdere camera bevat.
ZOOM Knop
Druk op deze ZOOM knop voortdurend tijdens het afspelen van een DVD
om de foto x1, x2, x3 te vergrotenof naar de normale grootte te hervatten.
Deze functie is niet beschikbaar voor Audio CD.
E
Starten
1.
ruk OPEN knop om de disk lade te openen.
3.Plaats een schijf in de disk lade.
4.Sluit het disc-deksel en wilt het afspelen starten automatisch.
5.Wanneer een menu verschijnt op het scherm, beweegt u de
navigatieknoppen of druk op de numerieke knoppen om een gewenst
nummer te selecteren en dan druk op OK / ENTER knop om het
afspelen te beginnen
AC-adapter Gebruiken
Altijd zet de DVD speler aan via
voorafgaand aan het aansluiten of loskoppelen van de AC-adapter.
Zorg ervoor dat u de geleverde AC-adapter gebruiken.
Met behulp van een ander type adapter kan leiden tot storingen of
schade aan dit product. Als de AC-adapter wordt gebruikt voor
langere tijd, kan het opwarmen. Dit is normaal . Wanneer er geen
gebruik van de adapter, trek het uit het stopcontact. Houd de
AC-adapter vrij van vocht, kou en stof. Anders kan een risico van
brand of een elektrische schok worden resulteerd.
Druk AAN/UIT schakelaar om AAN positie om de speller aan te zetten.
2.D
de aan / uit schakelaar
Bediening van Afstandsbediening

AVI
Mp3
Mp4
Photo
XVID
Repeat off
Mode Normal
Filter
JPEG Preview
Audio
1/7
1
2
101
102
103
104
105
00:00:15
Repeat off
Mode Normal
Filter
Music Playing
Voer de MP3/MPEG4 CD in, gebruik de navigatie toetsen om de gewenste map te
openen.
Druk op ENTER om de submap te openen. Gebruik de navigatietoetsen om het gewenste
nummer te selecteren en vervolgens op ENTER om het af te spelen. Druk op de PLAY/
PAUZE knop om het afspelen te onderbreken, en op STOP op het afspelen te stoppen.
Om terug te keren naar het bovenliggende menu druk op de navigatieknoppen om het
volgende icoontje te kiezen en druk op ENTER om te bevestigen. Open het optiemenu
door de navigatieknoppen te gebruiken.
Filter: Mogelijkheid om de categorieën van mappen te selecteren die aangegeven
worden in de bladerlijst.
Herhaal: Mogelijkheid om verschillende herhaalstanden voor het afspelen te
selecteren.
Selecteer de singleoptie om één bestand te herhalen, selecteer de mapoptie om alle
bestanden in de map te herhalen.
Mode: Mogelijkheid om verschillende afspeel mogelijkheden te selecteren.
Normaal: Normaal afspelen
Shuffle : selecteer de shuffl
Muziek intro: Met Muziek intro speelt het apparaat de eerste 10 seconden van elk
bestand en gaat dan door naar het daarop volgende.
Bewerk modus: Kies deze optie om het Programmeren van afspeellijsten te gebruiken.
Selecteer de optie, druk op de linker navigatieknop om naar de map te gaan en druk op
ENTER om het gewenste nummer te kiezen en druk m de afspeellijst
te programmeren.
Programma view: Toon map.
Blader view: Toon afspeellijsten.
Aan programma toevoegen: gebruik deze modus in combinatie met de Bewerk Modus
om een afspeellijst samen te stellen.
Leeg programma: Als u in de Blader view bent en het apparaat in de volledige STOP-
stand staat (druk twee keer op de STOP knop), gebruik dan deze optie in combinatie
met de Bewerk Modus om nummers te verwijderen uit de afspeellijst.
e (Willekeurige)-modus. Als het afspelen het einde van
het huidige hoofdstuk/nummer bereikt, springt het afspelen naar een willekeurig
volgend hoofdstuk/nummer.
op PROG knop o
51
MP3 / MPEG4 AFSPELEN GEAVANCEERDE FUNCTIES

1/7
1
2
100
102
103
104
105
Repeat off
Mode Normal
Filter
JPEG Preview
Photo
SYSTEEM INSTELLEN
Language
Video
Rating
Misc
Language
Subtitle
MPEG4 Subtitle
Audio
DVD Menu
Druk op de navigatietoetsen om de hoofdmap te kiezen en druk op
ENTER om een submap te openen. Druk op de navigatietoetsen
om de gewenste afbeelding te kiezen en druk op ENTER om te
selecteren. Als u wilt terugkeren naar het bovenliggende menu
drukt u op de navigatietoetsen om te kiezen en vervolgens op
ENTER.
Beeldrotatie
In de stand waarin u afbeeldingen kunt afspelen, drukt u op de
navigatie toetsen om de afbeelding te draaien, druk vervolgens op
de HOEK/ANGLE knop om de scan van de afbeelding te
veranderen.
MENU BEDIENING
Druk op de SETUP knop op de afstandsbediening en het SETUP
MENU wordt getoond. Gebruik de navigatietoetsen naar boven en
beneden om het gewenste item te selecteren, druk daarna op ENTER
om te bevestigen.
Druk op de richtingknop LINKS om terug te keren naar het hoofdmenu.
Druk op de SETUP knop om de instelling te verlaten. Druk op de
rechter navigatietoets om het submenu te openen.
TAAL INSTELLEN
Selecteer de taal in het setup menu.
OSD Taal
Gebruik dit item om de taal te selecteren van het setupmenu en de taal
die op het scherm getoond wordt.
Ondertiteling
Stel de standaard ondertiteling in.
Noot: niet iedere CD ondersteunt deze functie.
MPEG4 Ondertiteling
Stel de standaard MPEG4 ondertiteling codeeroptie in.
Noot: niet iedere CD ondersteunt deze functie.
Audio
Stel de standaard audio taal in.
Noot: niet iedere CD ondersteunt deze functie.
52
FOTO/BEELD CD AFSPELEN

Language
Video
Rating
Misc
Aspect Ratio
TV System
Smart Picture
Language
Video
Rating
Misc
Parental Control
Set Password
Language
Video
Rating
Misc
Use Default Settings
SYSTEEM INSTELLEN
DVD Menu
Stel de standaard taal voor het DVD menu in.
Noot: niet iedere CD ondersteunt deze functie.
VIDEO INSTELLEN
Selecteer Video in het setup menu en het video submenu wordt
getoond:
TV Systeem
Dit apparaat ondersteunt de uitgang van diverse systemen (NTSC,
PAL).
Als u het apparaat aansluit op een tv-toestel let er dan op dat
beide apparaten dezelfde PAL / NTSC instellingen hebben.
Pas beeldscherm effecten aan:
Standaard: standaard effect.
Helder: interne instelling voor helder beeldeffect.
Zacht: interne instelling voor zacht beeldeffect.
Dynamisch: de gebruiker past helderheid, contrast, kleur etc. Aan.
Beeld modus (Smart Picture)
CLASSIFICATIE INSTELLEN
Selecteer CLASSIFICATIE in het setup menu en het submenu wordt
getoond:
Noot: Niet alle DVD's ondersteunen classificaties.
Ouderlijke controle
Stel het gewenste niveau in.
Noot: niet iedere disk ondersteunt deze functie.
Instellen paswoord
Gebruik de 0-9 toetsen om een paswoord van vier nummers in te voeren
en druk daarna op ENTER om het te bevestigen.
Noot: Als u uw paswoord vergeten bent gebruik dan het universele
paswoord 6666 om te ontgrendelen.
* Gebruik standaard instellingen
Zet de data terug naar fabrieksinstellingen.
DIVERSEN INSTELLEN
Selecteer DIVERSEN (MISC) in het setup menu en het submenu wordt
getoond :
Beeldverhouding
Instellen van de beeldverhouding. 16:9, 4:3 PS, 4:3 LB.
Opmerking:
De weergegeven beeldverhouding is afhankelijk van het op het medium
opgenomen beeldformaat. Indien het opgenomen beeldformaat op het
medium en het ingestelde beeldformaat niet overeen komen bestaat de
mogelijkheid dat er geen beeld wordt weergegeven. Wanneer er een
medium wordt afgespeelt opgenomen in 4:3 beeldformaat en deze
wordt afgespeelt op een breedbeeld TV zullen langs de zijkanten van
het beeld zwarte strepen te zien zijn. U kunt dit verhelpen door de
instellingen van uw TV set of de instellingen van de DVD speler aan te
passen.
53

54
Als u vragen heeft, raadpleeg dan de onderstaande probleem oplosgids.
GEEN BEELD OF GELUID
-Zorg ervoor dat het apparaat aan staat.
-Zorg ervoor dat het stopcontact in werking is.
-Zorg ervoor dat het netsnoer niet beschadigd is.
-Zorg ervoor dat de stekker stevig in het stopcontact zit.
BEELD MAAR GEEN GELUID
-Zorg ervoor dat de audio-stekkers goed zijn aangesloten.
-Zorg ervoor dat de audio-connector niet beschadigd is.
-Zorg ervoor dat het volume hoog genoeg is in de VOL/CH setup.
-Zorg ervoor dat u de AUDIO-instellingen van de speler correct heeft ingesteld.
-Zorg ervoor dat u de juiste AV-invoer op uw TV heeft ingevoerd.
-Zorg ervoor dat de audio niet is ingesteld op mute.
GELUID MAAR GEEN BEELD
-Zorg ervoor dat de video-stekkers goed zijn aangesloten.
-Zorg ervoor dat u de juiste AV-invoer op uw TV heeft ingevoerd.
-Zorg ervoor dat de video-connector niet beschadigd is.
-Zorg ervoor dat u de VIDEO-instellingen van de speler correct heeft ingesteld.
SLECHT BEELD OF GELUID
-Zorg ervoor dat u de AUDIO-instellingen van de speler correct heeft ingesteld.
-Zorg ervoor dat de disk niet bekrast of verkleurd is.
-Zorg ervoor dat de AV-connector van de uitvoer-uitgang niet beschadigd is.
"BAD DISC" GETOOND
-Zorg ervoor dat de disk niet vervormd of beschadigd is.
-Zorg ervoor dat de disk niet ernstig verkleurd of beschadigd is.
-Zorg ervoor dat het diskformaat compatible is met de speler.
-Controleer of u geprobeerd heeft een software-CD af te spelen op de speler. Als dit het geval is, herstart de speler.
AFSTANDSBEDIENING WERKT NIET
-Zorg ervoor dat de batterijen in de afstandsbediening werken.
-Richt de afstandsbediening rechtstreeks op de IR-sensor van de speler.
-Verwijder eventuele obstakels tussen de afstandsbediening en de IR-sensor.
APPARAAT WERKT NIET
-Zet het apparaat uit, en vervolgens weer aan.
"NO DISC" GETOOND
-Zorg ervoor dat u een disk op de lade heeft geplaatst.
-Zorg ervoor dat de disk niet ondersteboven in de lade zit.
-Zorg ervoor dat de disk niet vervormd, vuil of bekrast is.
Problemen Oplossen

Specificaties zijn onderhevig aan veranderingen zonder bericht.
Specificaties
NTSC/PAL
DVD,VCD, CD, MP3, CD-R, CD-RW, JPEG,
DVD+ -R/W, MPEG4,
65dB.
500 lijnen
fs 96KHz: 20Hz-20KHz:+/-1dBI
90dB
80dB
< 0.01%
96KHz/24bit
Output karakteristieken
Kleur TFT-LCD
7 inches
1Vp-p(75 W)
2CH
DC IN 12V
15W
206x160x40mm
0.8kg
Accessoires
Afspeel modus
Disk modus
Video karakteristieken
Video S/N ratio
Audio karakteristieken
Frequentie response
Audio S/N ratio
Dynamisch bereik
Vervorming
D/A Omzetter
Beeldscherm
Afmeting beeldscherm
Video uitgang
Audio uitgang
Stroomspanning
Stroomconsumptie
Formaat
Gewicht
Resolutie AV Uitgang
55
OVERIG
AC adaptor
Afstandsbediening
Auto zak/antenne
Auto adaptor
handleiding

56

58
69
60
61
65
66
66
57
Contéudo
Precauções de segurança
Ilustração do painel
Ligar um televisor
MP3/MPEG4 jogando
Reprodução de CD de FOTO
Especificações
Acessórios
Configuração do sistema
Soluções de Problemas
68
69
Telecomando
62

58
CAUTION
RISK OF ELECTRIC SHOCK
DO NOT OPEN
Precaução da segurança
Segurança é importante
O símbolo indica que a tensão perigosa que constitui um risco de
choque elétrico estão presentes dentro desta unidade.
O símbolo indica que existem importantes instruções operacionais e
de manutenção na literatura que acompanha a presente unidade
Mantenha essas informações em um local seguro para referência
em futuro.
Por favor, leia todas as informações de segurança antes de usar o produto.
Consideração da Segurança.
Posição dos cabos para que eles não podem ser caminhou sobre pinçada
por itens ou colocados sobre ou contra eles
Não use o DVD Jogador portátil em condições úmidas ou húmido.
Não permita que o DVD Jogador portátil para molhar.
Não exponha o DVD Player portátil a pingos ou salpicos.
Não coloque água cheia objetos tais como vasos, em cima do portátil DVD
Jogador.
Não coloque fontes de chamas nuas, tais como velas, sobre o início do DVD
Player portátil.
Limpar
SEMPRE desconecte o DVD Player portátil antes de limpá-lo.
Não use limpadores líquidos ou aerossóis.
Limpe o DVD Jogador portátil com um macio e úmido (não molhado) pano..
Ventilação
Os slots e aberturas da instala-topo caixa são para ventilação.
Não cubra ou bloqueá-los, pois pode provocar sobreaquecimento.
Nunca deixe crianças empurrar algo para os buracos ou faixas sobre o caso.
Manutenção
Não há nenhum usuário peças neste DVD Jogador portátil.
Quando a galinha manutenção, consulte a qualificar ied serviço pessoal.
Consulte o seu revendedor se você está sempre em dúvida sobre a instalação,
operação ou a segurança desta unidade
Eliminação da bateria
Por favor, verifique as pilhas são eliminados
Nunca alienar uma das baterias no fogo ou com outros
resíduos domésticos.
Consulte a sua autoridade local para a eliminação
regulamentos.
Este símbolo indica que este produto incorpora dupla
isolamento entre perigosos tensão da rede e acessível ao
utilizador partes. Ao serviço utilizar apenas peças idênticas.
AVISO: Para reduzir o risco de incêndio ou choque eléctrico, não
exponha este aparelho à chuva ou cordas.
1. O aparelho não deve ser exposto a pingos ou salpicos e objectos
cheios de líquidos, tais como copos, não devem ser colocadas no
aparelho.
2. A alimentação é utilizado como plugar thedisconnecção
dispositivo, desligue o aparelho devem permanecer à vista.
3. Para se desligar completamente a alimentação de entrada, a ficha
eléctrica do aparelho deve ser desligado da corrente eléctrica.
4. A ficha eléctrica do aparelho não deve ser obstruído ou deveria
ser facilmente acessado durante o uso pretendido.
Alguns destaques ou manchas escuras podem ocorrer no ecrã LCD. É um fenômeno
muito comum da matriz activa exibir tecnologia, e não significa qualquer defeitos ou
falhas. Nunca tente reparar a máquina por si mesmo. Em caso de eventuais falhas.
Por favor desligar a unidade de uma só vez, e notificar a nossa Companhia ou o
correspondente revendedor. A exibição é feita por um grande número de precisão de
componentes electrónicos. Qualquer desmontagem ou modificação pode conduzir a
danos maiores.
Aviso Especial
INTRODUÇÃO

59
Precaução da segurança
INTRODUÇÃO
PRECAUÇÕES LASER
Este leitor de Disco de Vídeo Digital utiliza um Sistema Laser. Para garantir uma utilização correcta deste produto,
leia atentamente este manual do proprietário e guarde para futura referência. Em caso que o aparelho requere manutenção,
contacte com um serviço autorizado l
Consulte a localização no procedimento do serviço.
Para evitar a exposição directa ao feixe laser, não tente abrir o compartimento.
Radiação laser visível e invisível quando aberto e travas derrotadas.
NÃO OLHE DIRECTAMENTE PARA O FEIXE
OUVIR COM AUSCULTADOR (FONE DE OUVIDO)
(Não Incluído)
Conecte o plugue do auscultador (fone de ouvido) estéreo na tomada de FONE DE OUVIDO (telefones marcados) antes de usar o aparelho.
CAUSÃO: Ouvir recomendação de expecialistas contra a exposição à toca estendida contínua a níveis de volume alto enquanto está a usar
auscultador (fone de ouvido), podendo resultar perda auditiva possível. Se sentir um zumbido nos ouvidos, reduza o volume ou interrompa o
uso. Nós queremos que você escuta por um tempo de vida.
PRODUTO LASER EM CLASSE 1

60
FALADOR
FONTE
Ilustração do painel
TELA LCD
ABRIR TAMPA
DO DISCO
TAMPA DO DISCO
TECLAS DIRECIONAIS
PLAY/PAUSE
REPRODUZIR/PAUSA
( , , , )
TFT
SOURCE
MENU
OK
TFT
VOL
ON OFF
AV OUT PHONE
USB
DC IN 12V
DC 12V INSERIR JACK (poder oferta)
AV SAÍDA
INTERRUPTOR (ON/OFF)
SAIDA DE AUSCULTADORES
CONTROLE DO VOLUME
PORTA USB COMPATIVEL
PRÓXIMO
PREVER
PARAR
CONFIGURAR
ALIMENTAÇÃO IR. CARREGAR

61
Ligar um Televisor
Ligações
Carga de bateria
Quando o aparelho é alimentado pela bateria, ligue o adaptador AC
Ao aparelho. a bateria irá Carregar automaticamente.
Utilize CONTROLE DO VOLUME na parte lateral do aparelho para
ajustar
o volume.
Função da saida de auscultadores
Insira auscltadores na saida de auscultadores, para ouvir a musica
ou filme em privado.
Ajustamento do volume
Conectar ao USB
Pressione a tecla FUNÇÃO no Telecomando até que você tenha
mudado para o modo COMPATÍVEL USB.
Interface COMPATÍVEL USB
Esta unidade tem uma porta compatível USB para reproduzir a
música ou MP3 e JPEG ou outros arquivos.
Pressione o botão “FUNÇÃO” para seleccionar modo COMPATÍVEL
USB.
Toda a função é a mesma a reproduzir um disco.
Nota: a porta COMPATÍVEL USB é compatível com memórias flash,
a compatibilidade com todos os modelos USB nao é garantida.
NOTA:
Ao utilizar a função compatível USB. Por favor, não insira na direção
errada, ou ele vai ser corrompido.
O USB deve ser conectado diretamente à unidade.
Para evitar perda de dados, interferência e transferência, não use
cabos de extensão USB.
ENTRADA DE
VÍDEO
Amarelo CVBS
ENTRADA DE
ÁUDIO
Branco D
Vermelho E
VOL
ON OFF
AV OU T PHONE
USB
DC IN 12V

62
1 A-B repetir
Presione 1x:conjunto A,
Presione 2x:conjunto B
Presione 3x:desativar a função
2.Prog / Repetir
Pressão breve: modo de repetir.
Pressão longa (2 Segundos):
modo de programa de DVD
3.0-9 Teclas Numéricas
4.GOTO
Ir para um índice de tempo específico
5.SETUP
Abrir menu de instalação
6.Avance rapido
7.Próximo
Próximo capítulo ou arquivo
8.Anterior
Capítulo ou arquivo anterior
9.FUNCTION
Selecção de modo de digitação
10.DISPLAY
Mostra as informações detalhados do
arquivo corrente ou disco.
11.ANGLE / Audio
Pressão breve: Muda o modo de áudio
(se diferentes modos estão disponíveis)
Pressão longa (2 Segundos): Altera a
marca de ângulo (se diferentes modos
estão disponíveis)
Telecomando
7
9
10
11
12
1
2
3
4
5
6
13
14
15
16
17
8
18
1
2
CR2025
12.TITLE/SUBTITLE
Pressão breve: Alterar o modo de
legendas (legendas se estiverem
disponíveis)
Pressão longa (2Sec.):
DVD Título menu
13.MENU / ZOOM
Pressão breve: zunir em
Pressão longa (2Sec.):
Menu tecla para DVD Menu
14.STOP/SLOW
Pressão breve: parar
Pressão longa (2Sec.) movimento
lento
15.Teclas de direcções
16.Retroceder
17.ENTER
Para confirmar e passar as opções
ou para reproduzir arquivos.
18.Reproduzir/Pausa
Preparação do Telecomando
Coloque o Telecomando em uma superfície plana e introduzir a célula
botão fornecido para o telecomando da seguinte forma.
1.Puxe o botão para a esquerda
2.Tire carregador da bateria para fora
3.Insira a bateria na tomada.
Certifique-se que a polaridade corresponde as marcas dentro do
componente.
4.Insert o recipiente para o controle remoto.
Dados da célula
Tipo de bateria: 1x CR2025 , 3 V
Vida de serviço: cerca de um ano
(para uso normal e temperatura ambiente)
USO DO TELECOMANDO
Aponte o TELECOMANDO para a unidade principal durante a
operação.
O telecomando funciona melhor, a uma distância inferior a 5 m, e em
um ângulo de até 30 ° para a frente da unidade. Nenhum obstáculo
pode estar no caminho entre o telecomando e sensor de
infravermelhos e não coloque o telecomando à luz solar directa.
Se o telecomando não funciona mesmo quando é operado perto do
aparelho, substituir a pilha.
Notas sobre pilhas
Se o télecomando não for utilizado durante um longo período de tempo,
remova a pilha do compartimento.
Não aqueça as pilhas nem as deite para o fogo. Não desmonte,
desforme ou modifique as pilhas.

63
Telecomando
Sobre a Bateria Interna Recarregável
Precauções relacionadas com a recarga da bateria
1. Quando a bateria estiver totalmente descarregada,
imediatamente recarregá-la (independentemente de
se você planeja usar a bateria ou não), a fim de
maximizar a vida útil da bateria. Quando a energia é
baixo, o ícone da bateria será mostrada no canto
superior esquerdo da TFT de alerta.
2. Para carregar a bateria, ligue o leitor a corrente AC
através do adaptador AC e o indicador de carga acende
em vermelho, e o indicador vai-se transformar em verde
quando a bateria está completamente carregada. Isso
levará cerca de 2-2,5 horas, se o leitor estiver em modo
"desligado" ou 4,5-6 horas, se o aparelho estiver em
modo de funcionamento.
Utilização e manutenção de suas baterias recarregáveis
1. Certifique-se sempre usar apenas o adaptador AC incluído
com o aparelho para recarregar suas baterias.
2. Recarregue a eficiência vai degradar-se quando a
temperatura cai abaixo ambiental 50F (10 ) ou superior
95F (35 ).
3. O tempo de duração da bateria totalmente carregada
quando um auscultador está ligado ao aparelho é de
aproximadamente 1,5 horas.
Funcionamento do telecomando
REPRODUZIR/PAUSA ( )
Durante uma reprodução (CD/VCD), Presione um avez na tecla Reproduzir/
Pausa para meter em pausa, para voltar à reprodução presione de novo nesa
tecla.
STOP
Presione a telca STOP uma vez durante a reprodução para parar a reprodução
do disco. O aparelho memorisa o ponto onde paro. Presione a tecla ( ) para
voltar a reproduzir ao ponto memorizado.
Presione uma segunda vez em STOP ara parar completamente a reprodução
do disco. Para voltar a reproduzir o disco desde o principio, presione a tecla( ).
MENU
Presione esta tecla durante uma reprodução para visualizar o menu do disco
na tela.
Em modo visualização do menu, selecione as opções desejadas graças as
teclas direcionais .
Presione as teclas OK/ENTER para validar a seleção.
Tecla (anterior)
Presione esta tecla para pasar ao capitulo ou arquivo antecedente.
Tecla (voltar rapido)
Presione nesta tecla de maneira repetida para recuar rapidamente as
velocidades sucessivas x2, x4, x8, x16 a cada presão nesta tecla. Presione na
tecla PLAY para voltar a uma reprodução normal do disco.
Tecla (seguinte)
Presione esta tecla para pasar ao capitulo ou arquivo seguinte.
Tecla (avance rapido)
Presione esta tecla de maneira repetida para avançar ràpidamente as
velocidades sucesivas x2, x4,
x8, x16 a cada presão da tecla. Presione a tecla PLAY para voltar a reprodução
normal do disco.
Tecla DISPLAY
Presione uma vez esta tecla para visualizar as informações detalhadas sobre
o disco que esta no seu reprodutor. Presione uma vez mais na tecla DISPLAY
para visualizar outras informações.

Tecla AUDIO
E posivel mudar a lingua audio de aquelas programadas inicialmente
no reprodutor(Segundo as linguas audio disponiveis no disco DVD).
Presione a tecla AUDIO durante a reprodução de um DVD. A cada
presão na tecla AUDIO pode vêr as diferentes linguas disponiveis
que apareçem na tela e selecione a lingua desejada.
Tecla SUBTITLE (Sous-Titre)
E posivel mudar a lingua das legendas durante uma reprodução,
presionando a tecla SUBTITLE.A cada presão nesta tecla vai fazer
aparecer diferentes linguas de legendas disponiveis no DVD.
Cuando a lingua de legendas que deseja aparece na tela, largue a
telca SUBTITLE.
Nota : Esta função é disponivel unicamente com os discos DVD
gravados com legendas multi-linguas.
Tecla REPEAT (Repetição)
Presione a tecla REPEAT durante a reprodução, para repetir 1
capitulo ou arquivo do disco ou para repetir todo o disco.
Tecla GOTO (IR A)
Esta tecla permite lhe atingir diretamente uma posição (tempo,
pista, titulo) no disco e de começar a reprodução.
Appuyez sur la touche GOTO. Entrez les valeurs dans la rubrique
qui s'affiche ../.. à l'aide des
touches numériques, et appuyez sur OK ou ENTER pour accéder
directement.
Sinon appuyez de nouveau sur la touche GOTO pour revenir au
mode de lecture normal.
Tecla ANGLE
Permite de visualizar os diferentes angulos de vista gravados no
DVD para uma mesma cena filmada.
Presione a tecla ANGLE durante 2 segundos e os diferentes
angulos de vista apareçerão para a cena atual. Selecione então
o angulo que quer vêr.
Tecla ZOOM
Presione a tecla ZOOM durante uma reprodução de um DVD para
acrecentar o tamanho da imagem de x1, x2, x3 ou voltar ao
tamanho normal.
Esta função não é disponivel com os discos CD.
64
Telecomando
COMEÇO
1. Ponha a alimentação ON/OFF em ON (LIGAR)
2. Presione a tecla para abrir a tampa do reprodutor DVD.
3. Insira um disco CD ou DVD no compartimento e feche a tampa.
4. Um avez a tampa fechada a reprodução do disco começa
automaticamente.
5. Cuando um MENU aparece na tela, utilise as teclas de navigação
ou as teclas numéricas para selecionar a pista ou o titulo de sua
escolha, e presione a tecla OK/ENTER para começar.
UTILISAÇÃO DO ADAPTADOR ELETRICO
Desligue sempre o reprodutor DVD antes de ligar ou desligar o
adaptador eletrico ou o cabo eletrico.
Utilise o adaptador eletrico fornecido. A utilisação de um adaptador
de outro tipo pode provocar mao funcionamento ou estragar o
aparelho.
Uma utilisação prolongada do adaptador eletrico pode provocar um
aquecimento do adaptador. Iso é normal e não deve preocupar.
Cuando não utilisa o seu adaptador, deve desligar da tomada.
Afaste o adaptador eletrico de todas a fontes de humidade, do frio e
da pueira, se não podera provocar um incendio ou uma descarga
eletrica.

65
AVI
Mp3
Mp4
Photo
XVID
Repeat off
Mode Normal
Filter
JPEG Preview
Audio
1/7
1
2
101
102
103
104
105
00:00:15
Repeat off
Mode Normal
Filter
Music Playing
MP3/MPEG4 JOGANDO
Insira o disco MP3 / MPEG4 , Utilize as teclas de navegação para abrir o
diretório desejado.
Pressinoa ENTRAR para introduzir o sub-diretório. Utilize as teclas de navegação
para selecionar a faixa desejada e em seguida ENTRAR para executar o arquivo.
Pressione o botão PLAY/PAUSE chave para fazer uma pausa na reprodução,
pressione a tecla para parar a parar de jogar. Para voltar ao alto
menu, pressione a tecla navegação escolha o ícone e prima ENTER para
confirmar.
Abra a opção menu usando as teclas de navegação
Filtro: Permite selecionar as categorias de f iles exibidos no navegador
Normal: Normal reprodução
Shuffle: Aleatorio modo ativado. Quando a reprodução chega ao fim do actual capítulo
/ faixa, a reprodução salta para um aleatória capítulo / faixa.
Música Intro: Neste modo, o aparelho reproduz os primeiros 10 segundos do arquivo
e então pule para o próximo arquivo.
Modo de edição: Utilize esta opção para permitir programado o modo de reprodução.
Selecione o modo
pressione a tecla navegação esquerda diretório e pressione ENTRAR para escolher
a faixa desejada, e pressione Adicionar ao programa para programa de reprodução
lista.
VISUALIZAÇÃO PROGRAMA: Mostra diretório / pasta.
VISUALIZAÇÃO NAVEGADOR: Mostrar lista reprodução diretório
Adicionar ao programa: Use este em combinação com Modo de Edição para criar
uma lista de músicas.
Limpar programa: Quando entrou no Navegador Exibir e em completa parar estado
(pressione Paragem duas vezes), use esta opção em conjunto com Modo de Edição
para apagar faixas da lista de reprodução.
FUNÇÕES AVANÇADAS

1/7
1
2
100
102
103
104
105
Repeat off
Mode Normal
Filter
JPEG Preview
Photo
Language
Video
Rating
Misc
Language
Subtitle
MPEG4 Subtitle
Audio
DVD Menu
66
Prima as teclas direcionais para escolher o diretório raiz e
carregue em ENTER para entrar no sub diretório. Presione
Navegação y ke para escolher a imagem desejada e pressione ENTER
para visualizar a imagem. Se você deseja voltar para a parte superior
do menu, prima Tecla de navegação para escolher e prima ENTER.
Imagem rotação
Na foto jogar estado, prima a tecla navegação rotação
a fotografia, pressione botão ANGLE para mudar a imagem
modo SCAN..
Operação do menu
Pressione o botão SETUP no telecomando
MENU de Instalar será exibida. Utilize os botões direção
para cima e para baixo movimento para selecionar o item desejado,
em seguida, pressione o botão ENTER para confirma.
Presione a tecla direita de navegação para entrar no submenu.
Presione a tecla esquerda de navegação para voltar ao menu
principal. Para sair a configuração, pressione o botão SETUP.
Prima tecla navegação direita para entrar no submenu.
Configuração de língua
Selecionar língua no menu de configuração.
Língua OSD
Use este item para escolher o idioma do menu de configuração e
tela de exibição.
Subtítulo
Definir o padrão subtítulo.
Nota: nem todos os discos suporta esta função.
MPEG4 Subtítulo
Definir a codificação padrão MPEG4 subtítulo opção.
Nota: nem todos os discos suporta esta função.
Áudio
Definir o padrão do idioma.
Nota: nem todos os discos suporta esta função.
REPRODUÇÃO DE CD DE FOTO
CONFIGURAÇÃO DO SISTEMA

Language
Video
Rating
Misc
Parental Control
Set Password
Language
Video
Rating
Misc
Use Default Settings
Language
Video
Rating
Misc
Aspect Ratio
TV System
Smart Picture
67
Menu DVD
Definir o idioma padrão menu DVD.
Nota: nem todos os discos suporta esta função.
VÍDEO INSTALAR
Selecione Vídeo no menu de configuração, exibir o vídeo
submenu
Aspecto Ratio
Selecione a relação de aspecto.: 16:9, 4:3 PS, 4:3 LB~
Notas:
O tamanho da imagem está relacionado com o format do disco.
Alguns discos não pode exibir imagens na proporção que você
escolher. Se você reproduzir um disco gravados no
formato 4:3 em uma TV de ecrã panorâmico, barras pretas
aparecerão na esquerdo e lado direito do ecrã. Você deve ajustar
a configuração tela dependendo do tipo de televisão que você tem.
SISTEMA TV
Este produto suporta a saída de vários sistemas (NTSC, PAL).
Quando ligar a um televisor certifique-se que ambas as unidades
têm o mesmo PAL / NTSC definições.
Inteligente foto
Ajustar visor efeito: Norma: padrão efeito.
Brilho: ajuste interno para visualizar efeito brilhante.
Suave: definição interna para ver efeito suave.
Dinâmica: usuário ajusta brilho, contraste, cor etc
Ajustes de clasificação
Selecione Categoria no menu de configuração, e exibir o submenu
Rating:
No ta: Nem todos os DVD apoio classificações..
Control Paterno
Defina o nível desejado.
Nota: nem todos os discos suporta esta função.
Definir Senha
Use as teclas 0-9 para introduzir quatro dígitos (senha) e, em seguida,
prima ENTER para confirmar.
Nota: Se você esquecer sua senha, use a senha universal 6666 para
desbloquear.
MISC SETUP
MISC Seleccione no menu de configuração, e visualizar o submenu:
* Use as configurações padrão
Restaure os valores originais por defeito.
CONFIGURAÇÃO DO SISTEMA

Se você tiver alguma dúvida, consulte o guia de solução de problemas abaixo.
NENHUMA IMAGEM OU SOM
Verifique se o botão de alimentação está ligado.
Verifique-se a tomada está operacional.
Verifique se o cabo de alimentação não está danificado.
Verifique se o plugue está conectado.
IMAGEM MAS NENHUM SOM
Verifique-se as tomadas de áudio estão conectadas firmemente.
Verifique se o conector de áudio não está danificado. Verifique se o volume está alto na configuração VOL / CH.
Verifique-se tem definido configurações do leitor ÁUDIO corretamente.
Verifique se você digitou o AV de entrada corretamente para a sua TV.
Verifique se o áudio não está definido para silenciar.
SOM MAS NENHUMA IMAGEM
Verifique-se as tomadas de vídeo estão conectadas firmemente.
Verifique se você tem a entrada de AV correto para sua TV.
Verifique se o conector de vídeo não está danificado.
Verifique se tem definido as configurações do leitor de vídeo corretamente.
IMAGEM OU SOM RÚIM
Verifique se tem definidas configurações do leitor ÁUDIO corretamente.
Verifique se o disco não está riscado ou manchado.
Verifique se o conector AV ou o terminal de saída não está danificado.
“DISCO MAU” MOSTRADO
Verifique se o disco não está empenado, danificado ou deformado.
Verifique se o disco não está muito manchado ou danificado.
Verifique se o formato de disco é compatível com o aparelho.
Por favor, verifique se você tentou de reproduzir um CD de software. Se assim for, por favor reinicie o aparelho.
TELECOMANDO NÃO FUNCIONA
Asegure-se que as pilhas do telecomando estão a fucionar.
Aponte o telecomando diretamente para o sensor IR do aparelho.
Remova quaisqueres obstáculos entre o telecomando e o sensor IR.
UNIDADE NÃO FUNCIONA
Desligue o aparelho e ligue-o novamente.
“NENHUM DISCO” MOSTRADO
Verifique-se que tem colocado o disco na bandeja.
Verifique se o disco não está de cabeça para baixo.
Verifique se o disco não é distorcida, manchado ou riscado.
68
Soluções de Problemas

69
NTSC/PAL
DVD,VCD, CD, MP3, CD-R, CD-RW, JPEG,
DVD+ -R/W, MPEG4,
65dB.
500 linhas.
fs 96KHz: 20Hz-20KHz:+/-1dBI
90dB
80dB
< 0.01%
96KHz/24bit
Color TFT-LCD
7 inches
2CH
DC IN 12V
12W
206x160x40mm
0.8kg
Especificações
Outras
Vídeo S/N ratio
Aúdio S/N ratio
Dinamico âmbito
Distorição
D/A Convertido
Característica de saída
Dispositivo de reprodução
Tamanho de tela
Saída de vídeo
Saída de aúdio
Voltagem de poder
Consumpção de poder
Tamanho
Peso
As especificações estão sujeitas a alterações sem aviso prévio.
1Vp-p(75 &)
Acessórios
Sistema TV
Tipos de discos
Caracteristicas Video
Resolução saida AV
Caracteristicas Audio
Freqüência de
resposta
Adaptador AC
Telecomando
Saco & tiras
Adaptador para carro
Manual de instruções

70
Documenttranscriptie
LDP-2237S 1 15 29 43 57 LDP-2237S www.tokai.fr LDP-2237S Sommaire Précautions de sécurité.........................................................................................................................2 Présentation du panneau de commandes ...............................................................................................4 Raccordement à un téléviseur ...............................................................................................5 Télécommande.....................................................................................................................................6 Lecture MP3/MPEG4 ...................................................................................................................9 Lecture de CD IMAGE ..........................................................................................................................10 CONFIGURATION SYSTEME Dépannage .............................................................................................................10 .....................................................................................................................................12 Spécifications .....................................................................................................................................13 Accessoires .......................................................................................................................................13 1 Précautions de sécurité Entretien Aucune pièce réparable par l'utilisateur ne se trouve dans ce lecteur DVD portable. Confiez l'entretien de l'unité à du personnel qualifié. En cas de doute à propos de l'installation, du fonctionnement ou de la sécurité de cette unité, consultez votre revendeur. CAUTION RISK OF ELECTRIC SHOCK DO NOT OPEN Disposition des piles Veuillez vous assurer de correctement disposer les piles. N'incinérez jamais vos piles, ne les disposez pas avec les déchets ménagers. Consultez votre municipalité pour connaître les lois en vigueur liées à la disposition de piles. La sécurité est importante Afin d'assurer votre sécurité ainsi que celle des autres, lisez les consignes de sécurité avant d'utiliser ce produit. Maintenez ces informations dans un endroit sûr afin de pouvoir les utiliser ultérieurement. Veuillez lire toutes les consignes de sécurité avant d'utiliser ce produit. Ce symbole indique que ce produit emploie une double isolation séparant les tensions dangereuses et les composants accessibles à l'utilisateur. Lors de l'entretien de l'unité, utilisez seulement des pièces identiques. AVERTISSEMENT : afin de réduire les risques liés aux incendies et aux électrocutions, n'exposez pas cette unité à la pluie ou d'autres câbles. Considérations liées à la sécurité. Positionnez les câbles de manière à ce que ceux-ci ne soient pas piétinés ou pincés, et à ce qu'aucun objet ne soit posé dessus ou contre eux. N'utilisez pas le lecteur DVD portable dans des conditions d'humidité. N'exposez pas le lecteur DVD portable à l'eau. N'exposez pas le lecteur DVD aux égouttements et éclaboussures. Ne posez aucun objet rempli d'eau, tel qu'un vase, sur le lecteur DVD portable. Ne posez aucune source de flamme nue, telle qu'une bougie, sur le boîtier du lecteur DVD portable. 1. L'unité ne doit pas être exposée aux égouttements et éclaboussures, aucun objet rempli de liquides, tels que les vases, ne doit être posé sur l'unité. 2. La fiche du cordon permet de mettre l'unité hors tension, celle-ci doit donc rester facilement accessible. 3. Pour totalement mettre l'unité hors tension, déconnectez la fiche du cordon de la prise murale. 4. la prise du cordon d'alimentation doit rester facilement accessible et ne doit donc pas être obstruée. Nettoyage Déconnectez TOUJOURS le lecteur DVD portable avant de le nettoyer. N'utilisez jamais de nettoyants liquides ou aérosols. Nettoyez le lecteur DVD portable DVD avec un chiffon doux légèrement humide (non mouillé). Remarque spéciale Ventilation Les ouvertures du récepteur permettent la ventilation de l'unité. Ne pas les couvrir ou les obstruer, car ceci peut entrainer une surchauffe. Ne laissez JAMAIS des enfants introduire des objets étrangers dans l'unité. Quelques points lumineux ou foncés peuvent se trouver sur l'écran LCD. Ceci est un phénomène normal sur les écrans à matrice active et ne représente en aucun cas un dysfonctionnement de l'unité. Ne tentez jamais de réparer cette unité vous-même. En cas de problème. Eteignez l'unité puis contactez votre revendeur. L'écran est composé de plusieurs instruments de haute précision. Tout désassemblage ou modification peut causer des dommages. 2 Précautions de sécurité Précautions Laser CE LECTEUR DVD EST UN PRODUIT LASER DE CLASSE 1. L'UTILISATION DE COMMANDES, DE RÉGLAGES OU D'OPTIMISATIONS AUTRES QUE CELLES SPÉCIFIÉES DANS CE MANUEL PEUVENT SE RÉSULTER PAR UNE DANGEREUSE EXPOSITION A DES RADIATIONS. CE LECTEUR DVD UTILISE UN ÉMETTEUR LASER REPRÉSENTANT UN RISQUE POUR VOS YEUX, AFIN DE RÉDUIRE LES RISQUES D'ÉLECTROCUTION, NE RETIREZ PAS LE PANNEAU ARRIÈRE DE L'APPAREIL. CONFIEZ L'ENTRETIEN DE CET APPAREIL À DU PERSONNEL QUALIFIE. AFIN D'ÉVITER TOUTE EXPOSITION DIRECTE AUX RADIATIONS LASER, N'OUVREZ PAS LE BOITIER DE L'APPAREIL. LE RAYON LASER VISIBLE PEUT IRRADIER LORSQUE LE BOITIER DE L'APPAREIL EST OUVERT OU LORSQUE DES VERROUS DE SÉCURITÉ SONT DESENCLENCHES. NE JAMAIS REGARDER FIXEMENT LE RAYON LASER. UTILISATION DU CASQUE OU ECOUTEURS (non fournis, prise de 3.5mm Diamètre) Si vous utiliser un casque d'écoute ou des écouteurs avec ce lecteur DVD, prière de respecter les précautions suivantes : ATTENTION ! A pleine puissance l'écoute prolongée du Baladeur peut endommager l'oreille de l'utilisateur. Une exposition prolongée à haut niveau de volume provenant de lecteurs audio peut causer une perte de l'ouïe permanente. REMARQUE S: 1. Baissez le volume avant de brancher les écouteurs, 2. les haut-parleurs sont automatiquement déconnectés lorsque vous branchez des écouteurs à la prise PHONES 3. Réglez le volume d'écoute à un niveau convenable pour les oreilles à l'aide des touches VOLUME. REGLAGE DU VOLUME Utiliser le bouton VOLUME situé sur le côté de l'appareil pour augmenter ou diminuer le volume. 3 DC IN 12V ON OFF Présentation du panneau de commandes USB VOL AV OUT PHONE ECRAN LCD COMMUTATEUR D'ALIMENTATION (ON/OFF) CONNECTEUR CC 12V (alimentation) CONNECTEUR ECOUTEURS CONNECTEUR DE SORTIE AV COMMANDE DE REGLAGE DU VOLUME PORT COMPATIBLE USB HAUT-PARLEUR COUVERCLE CD TFT SOURCE TOUCHE LECTURE / PAUSE TOUCHE SUIV TOUCHE PREC TOUCHE ARRET TOUCHE TFT TOUCHE SETUP TOUCHE SOURCE MENU TOUCHES DE NAVIGATION ( OK OUVERTURE DISQUE 4 ) Raccordement à un téléviseur Raccordements Raccordement d'équipements USB Appuyez sur la touche SOURCE de la télécommande jusqu'à ce que le mode COMPATIBLE USB soit sélectionné USB VOL AV OUT PHONE DC IN 12V ON OFF Interface COMPATIBLE USB Cette unité dispose d'un port COMPATIBLE USB permettant de lire des musiques MP3 ou des fichiers JPEG à partir d'un équipement externe. Appuyez sur la touche < SOURCE > pour sélectionner le mode COMPATIBLE USB. Le mode opératoire est identique à la lecture de disques. Remarque : le port COMPATIBLE USB est compatible avec les lecteurs Flash, la compatibilité avec les lecteurs MP3 de certaines marques n'est pas garantie. JAUNE VIDEO IN AUDIO IN CVBS BLANC L ROUGE R REMARQUE : Lorsque vous utilisez la fonction COMPATIBLE USB. N'insérez pas l'équipement dans la mauvaise direction, ceci peut entrainer des erreurs de fichiers. Avertissement : La clé USB doit être directement raccordée à l'unité. Afin de prévenir toute perte de données par interférences et transfert, n'utilisez pas de rallonges USB. Connecteur Ecouteurs Raccordez une paire d'écouteurs au connecteur Ecouteurs pour écouter une musique ou un film en privé. Charge des piles Lorsque les piles sont épuisées, connectez l'adaptateur de courant CA à l'unité. La batterie se charge automatiquement. Réglage du volume Utilisez la commande de réglage VOLUME située sur le panneau latéral de l'unité pour régler le volume. 5 Télécommande Télécommande 9 10 11 1 12 3 Préparation de la télécommande 2 Placez la télécommande sur une surface plate puis insérez la pile bouton dans la télécommande de la manière suivante. 1. Poussez le bouton vers la gauche 2. Sortez le tiroir à pile 3. Installez la pile dans le tiroir à pile Assurez-vous d'insérer les piles en faisant correspondre les bornes des piles avec les inscriptions situées dans le compartiment. 4. Replacez le tiroir à pile dans la télécommande. 13 14 15 16 17 18 1. Répétition A-B appuyer 1x : pour définir A, appuyer 2x : pour définir B, appuyer 3x : pour désactiver cette fonction. 2. Prog/répétition Pression courte : mode répétition Pression longue (2 sec.) : mode de programmation DVD 3. Pavé numérique de 0 à 9 4. Configuration Ouverture du menu de configuration 5. Aller à Pour se positionner sur un indice temps précis 6. Avance rapide 7. Suivant Chapitre ou fichier suivant 8. Précédent Chapitre ou fichier précédent 9. SOURCE Sélection du mode d'entrée 10. Affichage Pour afficher des informations précises sur le fichier ou le disque en cours de lecture. 4 5 6 7 8 CR2025 11. Angle / Audio Pression courte : pour changer de mode audio (si plusieurs modes sont proposés) Pression longue (2 sec.) : pour modifier le repère d'angle (si plusieurs modes sont proposés) 12. Titre / Sous/titre Pression courte : modification du mode de sous-titrage (si les sous-titres sont disponibles) Pression longue (2 sec.) : menu titre DVD 13. MENU / ZOOM Pression courte : pour effectuer un zoom avant Pression longue (2 sec.) : touche menu pour menu DVD 14. STOP / RALENTI Pression courte : stop Pression longue (2 sec.) : ralenti 15. Touches de navigation( ) 16. Retour rapide 17. ENTRER Pour confirmer et accéder aux options ou pour entamer la lecture des fichiers. 18. Lecture / Pause 6 1 2 Information sur la pile Type de pile : 1 pile CR2025, 3 V Durée de service des piles : environ 1 an (pour une utilisation et température d'utilisation normale) Fonctionnement de la télécommande En cours d'utilisation, pointez la télécommande vers l'unité. La télécommande fonctionne dans un rayon de 5 m et à un angle de 30' de l'unité. Aucun obstacle ne doit se trouver entre la télécommande et le capteur infrarouge, n'exposez pas la télécommande aux rayons de soleil. Lorsque la télécommande ne fonctionne pas même lorsque vous l'utilisez près du lecteur, remplacez la pile. Remarques sur les piles Lorsque vous pensez ne plus utiliser la télécommande sur une période prolongée, retirez la pile du compartiment à pile. Ne faites pas chauffer la pile et ne l'incinérez pas. Ne pas démonter, déformer ou modifier les piles. Télécommande A propos des piles rechargeables intégrées Cet appareil fonctionne soit sur le pack batterie incorporé (LI-Polymer de 1300 mAh Li-ion / d'une durée de 1H30 environ) ou soit sur l'adaptateur secteur AC (fourni). Précautions liées à la charge des piles 1. Une fois les piles entièrement déchargées, rechargez-les immédiatement (que vous réutilisiez l'unité ou non) afin de maximiser la durée de service des piles. Lorsque le niveau de charge est faible, l'indicateur de charge s'affiche sur le coin supérieur gauche de l'écran TFT. 2. Pour recharger les piles, raccordez ce lecteur à une source d'alimentation CA via l'adaptateur de courant CA, l'indicateur de charge s'allume en rouge, l'indicateur s'allume en vert lorsque la batterie est entièrement chargée. La durée de charge nécessite 2-2.5 heures lorsque le lecteur est en éteint et nécessite 4.5-6 heures lorsque le lecteur est en marche. Utilisation et entretien des piles rechargeables 1. Assurez-vous de toujours utiliser l adaptateur de courant CA fourni avec le lecteur pour recharger vos piles. 2. La charge des piles est affect e lorsque la temp rature de charge chute en dessous de 50F (10 ) ou exc de 95F (35 ). 3. L'autonomie de la batterie lorsqu'une paire d'écouteurs est raccordée au lecteur est d'environ 1.5 heures. Fonctionnement de la télécommande LECTURE/PAUSE ( ) En cours de lecture (CD/VCD), appuyez une fois sur la touche Lecture/Pause pour arrêter momentanément la lecture, pour reprendre la lecture appuyez de nouveau sur cette touche. STOP Appuyez sur la touche STOP une fois pendant la lecture pour arrê ter la lecture du disque. L'appareil mémorise le point d'arrêt. Appuyer sur la touche lecture ( ) pour reprendre la lecture au point d'interruption mémorisé. Appuyez une deuxième fois sur STOP pour arrêter complètement la lecture du disque. Pour reprendre lalecture du disque au début, appuyez sur la touche LECTURE. MENU Appuyez sur cette touche en cours de lecture pour afficher le menu du disque sur l'écran. En mode affichage menu, sélectionnez les options désirées à l'aide des touches de navigation . Puis appuyez sur la touche OK/ENTER pour valider la sélection. Touche (précédent) Appuyez sur cette touche pour passer au chapit re ou à la plage précédente. Touche (retour rapide) Appuyez sur cette touche de manière répétée pour reculer rapidement aux vitesses successives de x2, x4, x8,x16 à chaque pression sur la touche. Appuyer sur la touche lecture PLAY pour revenir à une lecture normale du disque. Touche (suivant) Appuyez sur cette touche pour passer au chapit re ou à la plage suivant. 7 Touche (avance rapide) Appuyez sur cette touche de manière répétée pour avancer rapidement aux vitesses successives de x2, x4,x8, x16 à chaque pression sur la touche. Appuyer sur la touche lecture PLAY pour revenir à une lecture normale du disque. Télécommande Touche ANGLE Permet de visualiser les différents angles de vue enregistrés sur un DVD pour une même scène filmée. Appuyez sur la touche ANGLE pendant environ 2 secondes et vous verrez s'afficher les différents angles de vue pour la scène en cours. Sélectionnez ensuite l'angle que vous voulez regarder. Touche DISPLAY Appuyez une fois sur cette touche pour afficher les informations détaillées sur le disque qui se trouve dans le lecteur. Appuyez plusieurs fois sur la touche DISPLAY pour afficher d'autres informations. Touche AUDIO Il est possible de changer la langue Audio de celle programmée dans les configurations initiales du lecteur. (Selon les langues Audio disponibles sur le disque DVD). Appuyer sur la touche AUDIO pendant la lecture d'un DVD A chaque pression sur la touche AUDIO vous pouvez voir les différentes langues disponibles qui s'affichent sur l'écran et sélectionner celle que vous désirez. Touche ZOOM Appuyez sur la touche ZOOM en continue en cours de lecture d'un DVD pour agrandir la taille de l'image x1, x2, x3 ou revenir à la taille normale. Cette fonction n'est pas disponible pour les disques audio CD. DEMARRAGE 1. Mettre le commutateur d'alimentation ON/OFF sur ON. 2. Appuyez sur la touche d'ouverture du couvercle du lecteur DVD pour ouvrir le compartiment à Disque. 3. Insérez un disque CD ou DVD dans le compartiment et refermez 4. Après avoir fermé le couvercle du compartiment à disque, la lecture du disque démarre automatiquement. 5. Lorsque un Menu apparaît sur l'écran, utilisez les touches de navigation ou les touches numériques pour sélectionner la piste ou le titre de votre choix, et appuyez sur la touche OK/ENTER pour démarrer. Touche SUBTITLE (Sous-Titre) Il est possible de changer la langue des sous-titres en cours de lecture en appuyant sur la touche SUBTITLE. A chaque pression sur cette touche vous faites apparaître les différentes langues de sous-titres disponibles sur le DVD. Lorsque la langue de sous-titre que vous souhaitez s'affiche à l'écran, relâchez la touche SUBTITLE. Note : cette fonction est uniquement possible avec les disques DVD enregistrés avec des sous-titres multi-langues. UTILISATION DE L'ADAPTATEUR SECTEUR AC Toujours débrancher le lecteur DVD avant de brancher ou de débrancher le cordon AC de l'adaptateur secteur. Utiliser l'adaptateur AC fourni. L'utilisation d'un adaptateur d'un autre type risque de provoquer des dysfonctionnements ou d'endommager l'appareil. Un emploi prolongé de l'adaptateur AC risque de provoquer une surchauffe. Cela est normal et ne doit pas vous préoccuper. Lorsque vous n'utilisez pas votre adaptateur, débranchez-le de la prise murale. Eloignez l'adaptateur AC de toute source d'humidité, du froid et de la poussière, sous risque de provoquer un incendie ou une décharge électrique. Touche REPEAT (Répétition) Appuyer sur la touche REPEAT pendant la lecture, pour répéter 1 chapitre ou piste du disque ou bien pour répéter tout le disque. Touche GOTO (ALLER A) Cette touche vous permet d'atteindre directement une position (temps, piste, ou titre) dans le disque et de démarrer la lecture. Appuyez sur la touche GOTO. Entrez les valeurs dans la rubrique qui s'affiche ../.. à l'aide des touches numériques, et appuyez sur OK ou ENTER pour accéder directement. Sinon appuyez de nouveau sur la touche GOTO pour revenir au mode de lecture normal. 8 LECTURE MP3/MPEG4 AVI Mp3 Mp4 Photo Filter Repeat off Mode Normal JPEG Preview XVID Fonctionnalités Avancées Insérez un disque MP3/MPEG4, utilisez les touches de navigation pour ouvrir le répertoire désiré. Appuyez sur la touche ENTER pour accéder au sous-répertoire. Utilisez les touches de navigation pour sélectionner la piste désirée puis ENTER pour lire le fichier. Appuyez sur la touche PLAY/PAUSE pour mettre en pause la lecture, appuyez sur la touche stop pour arrêter la lecture. Pour revenir au menu précédent, appuyez sur les touches de navigation pour choisir l'icône puis appuyez sur la touche ENTER pour confirmer. Ouvrez le menu option en utilisant les touches de navigation Filtre : permet de choisir des catégories de fichiers dans la liste du navigateur. Répétition : permet de basculer entre plusieurs modes de répétition de lecture Sélectionnez l'option « 1 seule » pour activer la répétition d'un seul fichier, sélectionnez l'option « Répertoire » pour activer la répétition de tous les fichiers du répertoire. 1/7 1 2 101 102 103 104 105 Audio 00:00:15 Filter Repeat off Mode Normal Music Playing Mode : pour sélectionner un mode de lecture Normale : lecture normale Lecture Aléatoire : Permet d'activer le mode lecture aléatoire. Lorsque la lecture atteint la fin du chapitre/piste sélectionné, la lecture se poursuit sur un autre chapitre/piste. Intro de musique : sous ce mode, l'unité lira les 10 premières secondes de chaque fichier puis passera au fichier suivant. Mode Edition : utilisez cette option pour activer le mode de lecture programmée. Sélectionnez le mode, appuyez sur la touche de navigation GAUCHE sur le répertoire puis appuyez sur la touche ENTER pour choisir la piste désirée et appuyez sur la touche PROG pour programmer dans la liste de lecture. Visualisation programme : affiche le dossier/répertoire. Visualisation navigateur : affiche le répertoire de la liste de lecture. Ajouter au programme : utiliser cette option avec le mode Edition pour créer une liste de lecture. Effacer le programme : une fois dans le mode visualisation Navigateur, et en mode Arrêt complet, (appuyez deux fois sur la touche STOP) utilisez cette option avec le mode Edition pour supprimer les pistes de la liste de lecture programmée. 9 LECTURE DE CD IMAGE CONFIGURATION SYSTEME FONCTIONNEMENT DU MENU Appuyez sur la touche SETUP de la télécommande, le MENU CONFIGURATION s'affiche. Utilisez les touches de navigation pour vous déplacer vers le haut ou le bas et sélectionner l'option de votre choix, appuyez ensuite sur la touche ENTER pour confirmer. Appuyez sur la touche de navigation GAUCHE pour revenir au menu principal. Pour quitter le menu Configuration, appuyez sur la touche SETUP. Appuyez sur la touche de navigation DROITE pour accéder au sous-menu. 1/7 Photo 1 2 100 102 Filter Repeat off Mode Normal JPEG Preview LANGUE Sélectionnez Langue dans le menu Configuration. 103 104 Language 105 Video Appuyez sur les touches de navigation pour choisir le répertoire racine et appuyez sur la touche ENTER pour accéder au sous-répertoire. Appuyez sur les touches de navigation pour sélectionner l'image désirée et appuyez sur la touche ENTER pour afficher l'image. Pour revenir au menu précédent, appuyez sur les touches de navigation pour choisir puis appuyez sur la touche ENTER. Rating Language Subtitle MPEG4 Subtitle Audio DVD Menu Misc Langue OSD Utilisez cette option pour définir la langue du menu et d'affichage. Rotation de l'image En mode de lecture d'images, appuyez sur les touches de navigation pour effectuer une rotation de l'image, appuyez sur la touche ANGLE pour modifier le mode d'affichage de l'image. Sous-titres Permet de définir la langue par défaut. Remarque : certains disques ne prennent pas en charge cette fonction. Sous-titres MPEG4 Permet de définir la langue de sous-titres MPEG4. Remarque : certains disques ne prennent pas en charge cette fonction. Audio Permet de définir la langue de doublage par défaut. Remarque : certains disques ne prennent pas en charge cette fonction. 10 CONFIGURATION SYSTEME Menu DVD Permet de définir la langue du menu par défaut des disques DVD. Remarque : certains disques ne prennent pas en charge cette fonction. NIVEAU DE LECTURE Sélectionnez l'option Niveau de lecture du menu Configuration pour afficher le sous-menu Niveau de lecture : Remarque : certains disques DVD ne possèdent pas de numéros de limitation de lecture. VIDEO Sélectionnez Vidéo dans le menu Configuration pour afficher le sousmenu Vidéo : Language Video Language Aspect Ratio TV System Smart Picture Video Rating Rating Misc Misc Contrôle parental Définissez le niveau désiré. Remarque : certains disques ne prennent pas en charge cette fonction. Le mode d'affichage Séléctionner le mode d'affichage. 16:9 , 4:3 PS, 4:3 LB Notes: Le ratio d'affichage de l'image est liée au format d'enregistrement du dvd. Certains disques ne peuvent pas s' afficher à l'écran dans le mode d'aspect de votre choix. Si vous visionner un dvd enregistré en format 4:3 sur un écran large (ex : 16:9) , des barres noires apparaissent sur les côtés gauche et droit de l'écran. Vous devez régler l'écran de réglage en fonction du type de la télévision que vous avez. Définir un mot de passe Utilisez le pavé numérique 0-9 pour entrer un code à quatre chiffres (mot de passe), appuyez ensuite sur la touche ENTER pour confirmer. Remarque : en cas d'oubli de votre mot de passe, utilisez le mot de passe universel 6666 pour déverrouiller le lecteur. DIVERS Sélectionnez “Divers” (MISC) dans le menu Configuration et afficher le sous-menu : * Utiliser les paramètres par défaut Permet de restaurer la configuration d'usine. Système TV Ce produit prend en charge de nombreux formats de signal TV (NTSC, PAL). Lorsque vous raccordez l'unité à un TV, assurez-vous que les deux unités possèdent les mêmes paramètres de format de signal PAL / NTSC. Mode Image Pour régler les effets d'affichage : Standard : effets par défaut. Lumineux : configuration offrant une image claire. Doux : configuration offrant une image douce. Dynamique : l'utilisateur définit la luminosité, le contraste, les couleurs, etc. Parental Control Set Password Language Video Rating Misc 11 Use Default Settings Dépannage Lorsque vous avez des questions concernant une panne, consultez le guide de dépannage ci-dessous. AUCUNE IMAGE OU SON -Assurez-vous d'avoir appuyé sur al touche POWER. -Assurez-vous que la prise de courant utilisée est opérationnelle. -Assurez-vous que le cordon d'alimentation est en bon état -Assurez-vous que la fiche du cordon d'alimentation est fermement raccordée à la prise de courant. IMAGE OU SON DE MAUVAISE QUALITE -Assurez-vous d'avoir correctement configuré les paramètres audio de votre téléviseur. -Assurez-vous que le disque est propre et non rayé. -Assurez-vous que les connecteurs AV sont en bon état. IMAGE PRESENTE, MAIS AUCUN SON -Assurez-vous que les connecteurs audio sont fermement raccordés. -Assurez-vous que les connecteurs audio ne sont pas endommagés. -Assurez-vous que volume est élevé dans la section VOL/CH. -Assurez-vous d'avoir correctement configuré les paramètres audio de votre téléviseur. -Assurez-vous d'avoir sélectionné la correcte entrée vidéo sur votre téléviseur. -Assurez-vous que le son n'est pas coupé. SON PRESENT, MAIS AUCUNE IMAGE -Assurez-vous que les connecteurs vidéo sont fermement raccordés. -Assurez-vous d'avoir sélectionné la correcte entrée vidéo sur votre téléviseur. -Assurez-vous que les connecteurs vidéo ne sont pas endommagés. -Assurez-vous d'avoir correctement configuré les paramètres vidéo de votre téléviseur. 12 "DISQUE INCORRECT" S'AFFICHE -Assurez-vous que le disque n'est pas tordu, sale ou rayé. -Assurez-vous que le disque n'est pas trop sale ou rayé. -Assurez-vous que le format du disque est compatible avec le lecteur. -Veillez à ce que vous n'ayez pas inséré un logiciel. Dans ce cas, redémarrez le lecteur. LA TELECOMMANDE NE FONCTIONNE PAS -Assurez-vous que les piles de la télécommande fonctionnent. -Pointez la télécommande vers le récepteur infrarouge du lecteur. -Retirez les obstacles se trouvant entre la télécommande et le lecteur. L'UNITE NE FONCTIONNE PAS -Eteignez l'unité puis rallumez-la. "AUCUN DISQUE" S'AFFICHE -Assurez-vous d'avoir inséré un disque dans le lecteur. -Assurez-vous que le disque est correctement inséré. -Assurez-vous que le disque n'est pas tordu, sale ou rayé. Spécifications AUTRES Mode de lecture NTSC/PAL Disques pris en charge DVD,VCD, CD, MP3, CD-R, CD-RW, JPEG, DVD+ -R/W, MPEG4, Caractéristiques de sortie Périphérique d'affichage Couleur TFT-LCD Taille de l'écran 7 pouces Rapport s/b vidéo 65dB. Sortie vidéo 1Vp-p(75 W) Résolution de sortie AV Audio 500 lignes Sortie audio 2 canaux Tension CC 12V Vidéo Réponse en fréquence fs 96KHz : 20Hz-20KHz:+/-1dBI Rapport s/b audio 90dB Consommation d'énergie Gamme dynamique 80dB Dimensions 205x160x40mm Poids 0.8kg Distorsion < 0.01% Convertisseur D/A 96KHz/24bit 12W Les spécifications sont sujettes à des modifications sans préavis. Accessoires Adaptateur Secteur Télécommande Sacoche de transport Câble allume cigares Manuel d'utilisation. 13 14 Table of Contents Safety Precautions 16 Panel Illustration 18 Connecting to a TV set 19 Remote Control 20 MP3/MPEG4 playing 23 PICTURE CD PLAYBACK 24 SYSTEM SETUP 24 Troubleshooting 26 Specifications 27 Accessories 27 15 Safety Instructions Battery Disposal Please ensure batteries are disposed of safely. Never dispose of batteries in a fire or with other household waste. Check with your local authority for disposal regulations. CAUTION RISK OF ELECTRIC SHOCK DO NOT OPEN Safety is Important This symbol indicates that this product incorporates double insulation between hazardous mains voltage and user accessible parts. When servicing use only identical replacement parts. WARNING: To reduce the risk of fire or electric shock, do not expose this apparatus to rain or cords. To ensure your safety and the safety of others, please ensure you read the Safety Instructions before you operate this product. Keep this information in a safe place for future reference. Please read all the safety information before using the product. Safety Considerations. 1. The apparatus shall not be exposed to dripping or Splashing and that no objects filled with liquids, such as Vases, shall be placed the apparatus. 2. The mains plug is used as the disconnect device, the disconnect device shall remain readily operable. 3. To be completely disconnect the power input, the mains plug of apparatus shall be disconnected from the mains. 4. The mains plug of apparatus should not be obstructed or should be easily accessed during intended use. Position the cables so that they cannot be walked on or pinched by items placed on or against them. Do not use the set top box in humid or damp conditions. Do not allow the set top box to get wet. Do not expose the set top box to dripping or splashing. Do not place water filled objects such as vases on top of the set top box. Do not place naked flame sources, such as candles, on the top of the set top box. Cleaning ALWAYS unplug the set top box before you clean it. Do not use liquid or aerosol cleaners. Clean the set top box with a soft, damp (not wet) cloth. Ventilation Special notice The slots and openings on the set top box are for ventilation. Do not cover or block them as it may cause overheating. NEVER let children push anything into the holes or slots on the case. Servicing There are no user serviceable parts in this set top box. When servicing, refer to qualified service personnel. Consult your dealer if you are ever in doubt about the installation, operation or safety of this unit. A few highlights or dark spots may occur on the LCD screen. It is a very common phenomenon of the activematrix display technology, and does not mean any defects or faults. Never try to repair this machine by yourself. In case of any faults. Please turn off the unit at once, and notify our Company or the corresponding dealer. The display is made up of many precision electronic components. Any disassembly or modification may lead to further damage. 16 Safety Instructions This Digital Video Disk player employs a Laser System .To ensure proper use of this product,please read this owner manual carefully and retain for future reference. Should the unit require maintenance, contact an authorized service location see service procedure. Use of controls,adjustment or the performance of procedures other than those specified may result in hazardous radiation exposure. To prevent direct exposure to laser beam,do not try to open the enclosure. Visible and invisible laser radiation when open and interlocks defeated. DO NOT STARE INTO BEAM LISTENING WITH HEADPHONE (EARPHONE) (Not Included) Connect the plug of the stereo headphone (earphone) into the EARPHONE jack (marked phones) before use the unit. CAUTION: Hearing experts advice against exposure to continuous extended play at loud volume levels while using headphone (earphone), possible hearing loss may result. If you experience a ringing in the ears, reduce volume or discontinue use. We want you listening for a life time. 17 OFF Panel Illustration DC IN 12V ON POWER ( ON/OF) DC 12V INPUT JACK(power supply) PHONE LCD DISPLAY AV OUT PHONE JACK AV OUTPUT USB VOL VOLUME CONTROL USB PORT COMPATIBLE SPEAKER PLAY/PAUSE DISC DOOR TFT SOURCE NEXT PREV STOP TFT SETUP SOURCE MENU NAVIGATION KEYS ( , OK OPEN DISC TOP 18 , , ) Connecting to a TV Set Connections Phone Jack Function Insert the earphone into the earphone jack, to listen the music or movie privately. USB VOL AV OUT PHONE DC IN 12V ON Battery charging OFF When the unit battery is powered out, connect the AC adapter onto the unit. the battery will charge automatically. Volume adjust Use VOLUME CONTROL in the side of the unit to adjust the volume. Connect to the USB PORT COMPATIBLE Yellow CVBS VIDEO IN AUDIO IN Press the SOURCE key on the remote control until you switched into USB COMPATIBLE work mode White Red USB COMPATIBLE interface L This unit have a USB COMPATIBLE IN jack to play the MP3 music or and JPEG files or other files. Press the < SOURCE > button to choose USB COMPATIBLE IN mode. All the function is the same to play a disc. R Note: theUSB COMPATIBLE IN port is compatible with flash memories, it is not warranted the NOTE: When using USB COMPATIBLE function. Please do not insert in the wrong direction, or iwill be corrupted. Warning: The USB drive must be connected directly to the unit. To prevent data loss by interference and transfer, do not use USB extension cords. 19 Remote Control Remote Control 9 10 11 1 12 3 Preparation of the Remote Control Place the remote control on an even surface and insert the supplied button cell into the remote control as follows. 1.Push the button towards left 2.Pull the battery loader out 3.Insert the battery into the receptacle Make sure the polarity matches the marks inside the component. 4.Insert the receptacle into the remote control. 2 13 14 15 16 17 18 4 5 6 7 8 CR2025 1 1. A-B Repeat press 1x: set A ,prss 2x: set B press3x: disable the function 2. Prog/Repeat Short press: Repeat mode Long press (2Sec.): DVD program mode 3. 0-9 Number Keys 4. Setup Open the setup menu 5. Goto Goto a specific time index 6. Fast Forward 7. Next Next chapter or file 8. Previous Previous chapter or file 9. SOURCE Input mode selection, 10. Display Display detailed informations of the current file or disc. 2 11. Angle / Audio Short press: Changes the audio mode (if different modes are available) Long press (2Sec.):Changes the angle mark (if different modes are available) 12. Title / Subtitle Short press: Change subtitle mode (if subtitles are available) Long press (2Sec.): DVD Title menu 13. MENU / ZOOM Short press: Zoom in Long press (2Sec.): Menu key for DVD Menu 14. STOP / SLOW Short press: Stop Long press (2Sec.): Slow motion 15. Navigation keys ( ) 16. Fast Rewind 17. ENTER To confirm and enter options or to play files. 18. Play / Pause Cell data Battery type: 1x CR2025 , 3 V Service life: approximately 1 year (for normal use and roomtemperature) Using Of Remote Control Point the remote control towards the main unit when operating. The remote control works best at a distance less than 5 m and at an angle of up to 30°to the front of the unit. No obstacles may stand in the way between remote control and infrared sensor and do not place the remote control in direct sunlight. If the remote control unit fails to work even when it is operated near the player, replace the battery. Notes on batteries If the remote control is not used for a long period of time, please re move the battery from the compartment. Do not heat batteries or dispose of them in fires. Do not dismantle, deform or modify batteries. 20 Remote Control Using Of Remote Control Point the remote control towards the main unit when operating. The remote control works best at a distance less than 5 m and at an angle of up to 30°to the front of the unit. No obstacles may stand in the way between remote control and infrared sensor and do not place the remote control in direct sunlight. If the remote control unit fails to work even when it is operated near the player, replace the battery. Notes on batteries If the remote control is not used for a long period of time, please remove the battery from the compartment. Do not heat batteries or dispose of them in fires. Do not dismantle, deform or modify batteries. REMOTE CONTROL KEY FUNCTIONS PLAY/PAUSE Press this button once(during playback) to pause playback. Press this button a second time to resume playback. STOP Press this button once(during playback) to stop playback; to resume from the same positon, Press /PLAY Press this button a second time to end playing back the disc altogether. Continue at the start of the disc using . MENU Press this button (during playback) to display the menu on the screen. In menu mode, select the desired option using the buttons. Then press OK. About Built-in Rechargeable Battery Precautions related to battery recharge 1. Once the battery is fully discharged, immediately recharge it (regardless of whether you plan to use the battery or not) in order to maximize the battery life. When the power is low, the battery icon will be shown on the upper left corner of the TFT for warning. 2. To charge the battery, please connect this player to AC mains via the AC adapter and the charge indicator will turn on in red, and the indicator will turn into green when the battery is fully charged. This will take about 2-2.5 hours if the player is in off mode or 4.5-6 hours if the player is in working mode. Button Press this button to jump to the beginning of the previous track or chapter Button(Fast rewind) Pressing this button repeatedly will increase the rewind speed successively to 2x,4x,8x,16x Continue playback at normal speed using Using and maintaining your rechargeable batteries 1. Please make sure you always use only the AC adapter included with the player to recharge your batteries. 2. Recharge efficiency will degrade when the environmental tempe rature drops below 50oF (10 ) or exceed 95oF (35 ). 3. The lasting time of the fully charged battery when a headphone is connected to the player is approximately 1.5 hours Button To jump to the beginning of the next track or chapter. Button(Fast forward) Pressing this button once to display detailed information about the disc in the player.(Pressing this button repeatedly). AUDIO button During playback the available audio streams are enabled successively (DVDs can contain up to eight audio streams; e.G., for multiple languages. 21 Remote Control SUBTITLE button During playback, allows you to select a language for subtitles or to turn subtitles on/off.DVDs can contain up to 32 subtitle tracks .By pressing this button repeatedly, you call up the following settings: SUBTITLE 1/N:Subtitle 1 is displayed. SUBTITLE 2/N:Subtitle 2 is displayed. SUBTITLE */N:Subtitle * is displayed. SUBTITLE OFF: No Subtitle. N represents the total number of subtitle traks included. This function is only available for DVDs that contain multiple subtitle tracks. REPEAT button Pres the key to repeat a chapter or a title. GOTO button Enables you to select a position(time, track or title) at which to start playback. Use the../.. Buttons to select the desired option. Use the 0-9 number keys to enter the time directly and then confirm using OK. Press the GOTO button again to resume normal playback. ANGLE button Pressing this button for approx 2 Sec. cycles through the camera perspectives available for the particular scene(see illustration). This function is only available for DVDs that contain recordings of multiple camera perspectives. ZOOM button For DVDs the image size is successively changed to the following values compared to the normal size:1x,2x,3x,off. This function is not available for Cds. 22 Get started 1.Press POWER switch to turn on the player. 2.Press OPEN button to open the disc tray. 3.Place a disc onto the disc tray. 4.Close the disc cover and the playback starts automatically. 5.When a menu screen appears on the display, move the navigation buttons or press the numeric buttons to select a preferred track number, then press OK/ENTER button to start playback Using the AC adapter Always turn off the DVD player via the Power on/off switch prior to connecting or disconnecting the AC adapter. Be sure to use the supplied AC adapter. Using a different type of adapter may cause malfunction or damage to the product. When the AC adapter is used for prolonged periods of time, it may heat up. This is normal and is not a cause for concern. When not using the adapter, unplug it from the wall outlet. Keep the AC adapter free from moisture, cold, and dust. Otherwise, a risk of fire or electric shock may beresulted in. MP3/MPEG4 PLAYING AVI Mp3 Mp4 Photo XVID ADVANCED FEANTURES Filter Repeat off Mode Normal Insert the MP3/MPEG4 disc, use navigation keys to open the desired directory. Press ENTER to enter the sub directory. Use the navigation keys to select the desired track and then ENTER to play the file. Press the PLAY/PAUSE key to pause the playback, press the stop key to stop the play. To return to the upper menu, press navigation key to choose the icon and press ENTER to confirm. Open the option menu using the navigation keys Filter: Allows selecting the categories of files displayed in the browser list. Repeat: To switch different repeat playing mode JPEG Preview Select single option to enable one file repeat, select folder option to enable all the files in the folder repeat. Mode: Select different playing mode 1/7 1 2 101 102 103 104 105 Audio 00:00:15 Filter Repeat off Mode Normal Music Playing Normal: Normal playback Shuffle: Shuffle mode enabled. When playback reaches the end of the current chapter/track, playback jumps to a random chapter/track. Music Intro: In this mode, the unit will play the first 10 seconds of the file and then skip to the next file. Edit Mode: Use this option to enable programmed playback mode. Select the mode, press LEFT Navigation key to directory and press ENTER to choose the desired track and press Add to program to program the playback list. Program view: Display directory/folder. Brower view: Display playback list directory. Add to program: Use this in combination with Edit Mode to create a play list. Clear program: When entered the Browser View and in complete stop state (press STOP button twice), use this option in combination with Edit Mode to delete tracks from the playback list. 23 PICTURE CD PLAYBACK SYSTEM SETUP MENU OPERATION Press the SETUP button on the remote control and the SETUP MENU will be displayed. Use the navigation buttons for up and down movement to select the desired item, then press the ENTER button to confirm. Press LEFT navigation button return to the main menu. To exit the setup, press the SETUP button. Press right navigation key to enter the submenu. 1/7 Photo 1 2 100 102 Filter Repeat off Mode Normal LANGUAGE SETUP Select Language in the setup menu. JPEG Preview 103 104 105 Language Video Rating Press Navigation key to choose the root directory and then press ENTER button to enter into the sub directory. Press Navigation key to choose the desired picture and then press ENTER or PLAY to enjoy the picture. If youwant to return to the upper menu, press Navigation key to choose the icon and press ENTER button. Language Subtitle MPEG4 Subtitle Audio DVD Menu Misc OSD Language Use this item to select the language of the setup menu and screen display. Image rotation In picture play state, press Navigation key to rotation the picture, press ANGLE button to change the picture scan mode. Subtitle Set the default subtitle. Note: not every disc supports this function. MPEG4 Subtitle Set default MPEG4 subtitle encoding option. Note: not every disc supports this function. Audio Set the default audio language. Note: not every disc supports this function. 24 SYSTEM SETUP DVD Menu Set the default DVD menu language. Note: not every disc supports this function. RATING SETUP Select Rating in the setup menu, and display the Rating submenu: Note: Not all DVD support ratings. VIDEO SETUP Select Video in the setup menu, and display the Video submenu: Language Language Video Video Aspect Ratio TV System Smart Picture Rating Misc Rating Misc Aspect Ratio Select the aspect ratio.: 16:9 , 4:3 PS, 4:3LB Notes: The image display ratio is related to the recorded disc format. Some disc can not display images in the aspect ratio you choose. If you play a disc recorded in 4:3 format on a wide screen TV, black bars will appear on the left and right side of the screen. You must adjust the screen setting depending on the type of the television you have. TV System This product supports output of various systems (NTSC, PAL). When connecting to a TV set make sure that both units have the same PAL / NTSC settings. Parental Control Set Password Parental Control Set the desired level. Note: not every disc supports this function. Set Password Use the 0-9 keys to input four digits(password), then press ENTER to confirm. Note: If you forget your password, please use the universal password 6666 to unlock. MISC SETUP Select MISC in the setup menu, and display the submenu: * Use Default Settings Reset data to factory default. Smart picture Adjust display effect: Standard: default effect. Bright: internal setting for bright view effect. Soft: internal setting for soft view effect. Dynamic: user adjusts brightness, contrast, color etc. Language Video Rating Misc 25 Use Default Settings Troubleshooting Others If you have any questions, please consult the troubleshooting guide below. NO PICTURE OR SOUND Ensure the power button is on. Ensure the power outlet is operational. Ensure the power cord is not damaged. Ensure the power plug is connected PICTURE BUT NO SOUND Ensure the audio jacks are securely connected. Ensure the audio connector is not damaged. Ensure the volume is turned up in VOL/CH setup. Ensure you have set the player's AUDIOsettings correctly. Ensure you have ENTERed the correct AV input for your TV. Ensure the audio is not set to mute. SOUND BUT NO PICTURE Ensure the video jacks are securely connected. Ensure you have ENTERed the correct AV input for your TV. Ensure the video connector is not damaged. Ensure you have set the player's VIDEO settings correctly. "BAD DISC" DISPLAYED Ensure the disc is not warped, damaged or deformed. Ensure the disc is not badly stained or damaged. Ensure the disc format is compatible with the player. Please check whether you have tried to play a software CD. If so, please restart the player. REMOTE NOT WORKING Ensure the remote batteries are working. Point the remote control directly at the player's IR sensor. Remove any obstacles between the remote and the IR sensor. UNIT NOT WORKING Turn off the power, and then turn it on again. "NO DISC" DISPLAYED Ensure you have put the disc on the tray. Ensure the disc is not upside down. Ensure the disc is not distorted, stainedor scratched. POOR PICTURE OR SOUND Ensure you have set the player's AUDIO settings correctly. Ensure the disc is not scratched or stained. Ensure the AV connector or the output terminal is not damaged. 26 Specifications Others Play mode NTSC/PAL Output characteristic Disc mode DVD,VCD, CD, MP3, CD-R, CD-RW, JPEG, DVD+ -R/W, MPEG4, Display Device Color TFT-LCD Screen Size 7 inches Video characteristic Video S/N ratio 65dB. Video output 1Vp-p(75 W) Resolution 500 lines. Audio output 2CH Power Voltage DC IN 12V Audio characteristic Frequency response Audio S/N ratio Dynamic range fs 96KHz: 20Hz-20KHz:+/-1dBI Power consumption 90dB 80dB Distortion < 0.01% D/A Converter 96KHz/24bit 12W Size 206x160x40mm Weight 0.8kg Specifications are subject to change without notice. Accessories AC adapter Remote control Bag & straps Car adapter User manual 27 28 INDÍCE Precauciones de seguridad..................................................................................................................30 Ilustración del panel.............................................................................................................................32 Conexión con una TV............................................................................................................................33 Mando a distancia .............................................................................................................................34 Reproducción MP3/MPEG4 ..........................................................................................................37 REPRODUCCIÓN DE CD DE IMÁGENES...............................................................................................38 CONFIGURACION DEL SISTEMA .........................................................................................................38 Problemasy soluciones ........................................................................................................................40 Especificaciones..................................................................................................................................41 Accesorios...........................................................................................................................................41 29 Introduccion Precauciones de seguridad Servicio Este reproductor DVD no tiene piezas reparables por el usuario. En caso de trabajos de servicio, refiera el trabajo a personal de servicio calificado. Consulte a su distribuidor en caso de surgirle dudas acerca de la instalación, uso o seguridad de esta unidad. CAUTION RISK OF ELECTRIC SHOCK DO NOT OPEN La seguridad es importante Para garantizar su seguridad y la seguridad de los otros, por favor lea las instrucciones de seguridad antes de utilizar este producto. Conserve esta información en un lugar seguro para futuras consultas. Por favor lea toda la información de seguridad antes de usar el producto. Consideraciones de seguridad Guíe los cables de modo que no puedan ser pisados o pinchados por objetos colocados sobre o contra ellos. No utilice el reproductor DVD portátil en condiciones húmedas ni mojadas. No permita que el reproductor DVD sea mojado. No exponga el reproductor DVD portátil a goteos ni salpicaduras. No coloque objetos llenos de líquido como jarrones encima del reproductor DVD portátil. No coloque fuentes de llamas descubiertas, como velas, encima del reproductor DVD portátil. Eliminación de baterías Por favor asegúrese de que las baterías se eliminen de forma segura. Nunca deseche baterías en fuego o con otra basura doméstica. Consulte con su autoridad local para conocer las normas de eliminación. Este símbolo indica que este producto incorpora doble aislante entre las partes accesibles al usuario y las de voltaje peligroso. Utilice únicamente piezas de repuesto idénticas a las originales cuando se le dé servicio. ADVERTENCIA: Para reducir el riesgo de incendio o descarga eléctrica, no exponga este aparato a lluvia ni cables. 1. El aparato no debe exponerse a goteos ni salpicaduras y ningún objeto lleno de líquido, como un jarrón, debe colocarse encima del aparato. 2. El cable de alimentación se usa como mecanismo de desconexión; el mecanismo de desconexión debe permanecer fácilmente accesible. 3. Para desconectar completamente la entrada de corriente, el cable de alimentación del aparato debe desconectarse de la toma. 4. El cable de alimentación del aparato no debe obstruirse o debe permanecer fácilmente accesible durante el uso previsto. Limpieza SIEMPRE desenchufe el reproductor DVD antes de limpiarlo. No utilice limpiadores líquidos ni de aerosol. Limpie el reproductor DVD con un paño suave y húmedo (no mojado). Aviso especial Podría ocurrir que la pantalla LCD presente algunos puntos oscuros o brillantes. Es un fenómeno muy común de la tecnología de pantalla por matriz activa, y no indica ningún defecto o fallo. Nunca intente reparar esta máquina usted mismo. En caso de algún fallo, por favor apague la unidad al instante y notifique a nuestra compañía o al distribuidor correspondiente. La pantalla está compuesta de muchos componentes electrónicos de precisión. Cualquier desmontaje o modificación podría llevar a más daños. Ventilación Las ranuras y aberturas encima de la caja descodificadora son para su ventilación. No las cubra ni bloquee puesto que podría ocasionar un sobrecalentamiento. NUNCA permita que los niños metan nada dentro de los agujeros o ranuras de la carcasa. 30 Introduccion Precauciones de seguridad ADVERTENCIA LASER : Este Reproductor de Discos de Vídeo Digital emplea un sistema láser. Para asegurar el uso apropiado de este producto, lea este manual atentamente y consérvelo para futuras referencias. Si este producto requiere mantenimiento, comuníquese con un servicio dec técnico autorizado ubicación ver el procedimiento de servicio. El uso de controles, ajustes o la realización de procedimientos distintos de los especificados puede provocar una exposición peligrosa a la radiación. Para evitar la exposición directa al rayo láser, no trate de abrir el compartimento. Láser visible e invisible puede causar cuando se abre y cuando los enclavamientos están derrotados. NO MIRE AL RAYO ESCUCHAR CON AURICULARES (auricular) (No incluido) Conecte el cable de los auriculares estéreo (auriculares) en la toma de AURICULARES (Teléfonos marcados) antes de usar la unidad. PRECAUCIÓN: Los expertos en audición desaconsejan la exposición prolongada y continua a tocar a un volumen alto durante el uso de auriculares (auriculares), posible pérdida de audición puede resultar. Si experimenta un zumbido en los oídos, reduzca el volumen o deje de utilizarlos. Queremos que usted puede escucha de toda la vida. 31 OFF Ilustración del panel DC IN 12V ON INTERRUPTOR POWER (ON/OFF) (de encendido) USB VOL AV OUT PHONE PANTALLA LCD ENTRADA DC 12V (suministro eléctrico) SALIDA PARA AURICULARES SALIDA AV CONTROL DE VOLUMEN PUERTO COMPATIBLE USB ALTAVO Z TAPA DEL DISCO TFT SOURCE PLAY (reproducir)/PAUSE (pausa) NEXT PREV STOP (detener) TFT SETUP SOURCE (fuente) MENU TECLAS DIRECCIONALES ( OK ABRIR TAPA DEL DISCO 32 ) CONEXIONES Conectar una TV Función de salida de auriculares Inserte los auriculares en la toma para auriculares para escuchar música o una película en privado. USB VOL AV OUT PHONE DC IN 12V ON OFF Recarga de batería Cuando la batería de la unidad se agote, conecte el adaptador AC a la unidad. La batería se cargará automáticamente. Ajustar el volumen Use el CONTROL DE VOLUMEN lateral de la unidad para ajustar el volumen. Conectar con un USB Pulse la tecla FUNCTION del mando a distancia hasta que haya cambiado al modo de funcionamiento COMPATIBLE USB. Yellow CVBS VIDEO IN AUDIO IN White L Red R Interfaz COMPATIBLE USB Esta unidad tiene una entrada COMPATIBLE USB IN para reproducir música MP3, archivos JPEG u otros archivos. Pulse el botón < FUNCTION > para elegir el modo de entrada COMPATIBLE USB IN. Todas las funciones son iguales a las de la reproducción de discos. Nota: El puerto COMPATIBLE USB IN es compatible con memorias flash, no está garantizada la compatibilidad con reproductores MP3 que usen software del usuario. NOTA: Al usar la función COMPATIBLE USB. Por favor no inserte en la dirección incorrecta, o se corromperá. La memoria de almacenamiento USB debe conectarse directamente a la unidad. No utilice el cable de extensión USB con el fin de evitar interferencias y pérdida de datos durante su transferencia. 33 Mando a distancia Mando a distancia 9 10 11 1 Preparativos del mando a distancia 2 12 3 Coloque el mando a distancia en una superficie plana e inserte la batería tipo botón en el mando a distancia como se señala a continuación: 1. Presione el botón hacia la izquierda. 2. Saque la bandeja de baterías. 3. Inserte la batería en el receptáculo. Asegúrese de que los polos se correspondan con las marcas dentro del compartimiento. 4. Inserte la bandeja en el mando a distancia. 13 14 15 16 17 18 1. Repeat A-B (Repetición A-B) Pulse 1x: Fijar A; Pulse 2x: Fijar B Pulse 3x: Desactivar la función. 2. Prog/Repeat Pulsación corta: Modo de repetición. Pulsación larga (2 seg.): Modo de programación DVD. 3. Teclas numéricas 0-9 4. Setup Abrir el menú de ajustes. 5. Goto Pantalla para ir a un punto específico. 6. Fast Forward (Adelantado rápido) 7. Next Siguiente capítulo o archivo. 8. Previous Capítulo o archivo anterior. 9. SOURCE Selección de fuente de entrada. 10. Display Mostrar información detallada del archivo o disco actual. 11. Angle / Audio Pulsación corta: Cambia el modo de audio (si hay modos distintos disponibles) Pulsación larga (2 seg.): Cambia la marca de ángulo (si hay modos distintos disponibles) 4 5 6 7 8 CR2025 Datos de la batería Tipo de batería: 1x CR2025, 3 V 2 Duración: Aproximadamente 1 año (con uso normal y a temperatura ambiente). 12. Title / Subtitle Pulsación corta: Cambiar el modo de subtitulaje. (si hay subtítulos disponibles) Pulsación larga (2 seg.): Menú de título DVD. 13. MENU / ZOOM Pulsación corta: Ampliar imagen. Pulsación larga (2 seg.): Tecla Menu para el menú DVD. 14. STOP / SLOW Pulsación corta: Detener. Pulsación larga (2 seg.): Cámara lenta. 15. Teclas direccionales( ) 16. Fast Rewind (Retroceso rápido) 17. ENTER Para confirmar o entrar a las opciones o para reproducir archivos. 18. Play / Pause (Repr./Pausa) 1 Uso del mando a distancia Apunte el mando a distancia a la unidad principal cuando lo use. El mando a distancia funciona mejor a una distancia menor de 5 m y dentro de un ángulo de 30º al frente de la unidad. No debe haber ningún obstáculo entre el mando a distancia y el sensor infrarrojo y no coloque el mando en luz directa del sol. Si el mando a distancia falla incluso al usarlo cerca del reproductor, cambie la batería. Notas sobre baterías Si el mando a distancia dejará de usarse durante un periodo de tiempo extendido, por favor saque la batería de la bandeja. No caliente las baterías ni las tire al fuego. No desmonte, deforme ni modifique las baterías. 34 Mando a distancia Funciones del mando a distancia (play/pause) Apriete este botón (durante la grabación) para ponerla en pausa. Apriete este botón una segunda vez para volver a ver la grabación. Precauciones relacionadas con la recarga de la batería Este lector funciona con una batería recargable Li-Polymer (1300 mAh Li-ion Battery/ 1h30 max.) o con el adaptador. 1. Cuando la batería esté completamente descargada, recárguela inmediatamente (a pesar de tener planeado usar o no la batería) para maximizar su duración. Cuando la carga esté baja, el icono de batería aparecerá en la esquina superior izquierda de la TFT como advertencia. 2. Para cargar la batería, por favor conecte este reproductor a una toma AC vía adaptador AC; el indicador de recarga se pondrá rojo, y cambiará a verde cuando se haya cargado completamente la batería. Esto tomará de 2-2.5 horas si el reproductor está apagado o de 4.5-6 horas si está encendido. Uso y mantenimiento de sus baterías recargables 1. Por favor asegúrese siempre de utilizar únicamente el adaptador AC incluido con el reproductor para cargar sus baterías. 2. La eficiencia de recarga disminuirá cuando la temperatura del ambiente baje a menos de 50ºF (10ºC) o suba a más de 95ºF (35ºC). 3. La duración de una batería completamente cargada cuando se usen unos auriculares es de aproximadamente 1.5 horas. Stop Apriete este botón (durante la grabación) para pararla. Para parar la grabación y volver a ver desde la misma position apriete play. Apriete este botón una segunda vez para acabar de ver la grabación definitivamente. Vea desde el principio apretando en el botón play. MENU Apriete este botón (durante la grabación) para que aparezca el menú en la pantalla. En el modo menú, seleccione la opción escogida utilizando los botones y apriete OK. Botón Apriete este boton para passar al principio de la pista o del capitulo anterior. Botón (Rebobinado) Apriete este botón repetidamente para aumentar la velocidad de rebobinado, sucesivamente, 2x, 4x, 8x, 16x. Continúe de ver la grabación normalmente apretando play. Botón Apriete este botón para ir al principio de la próxima pista o capitulo. Botón (adelanto rápido) Apriete este botón repetidamente para aumentar la velocidad de adelantamiento, sucesivamente, 2x, 4x, 8x, 16x. Continúe de ver la grabación normalmente apretando play. Botón DISPLAY Apriete este boton una vez para mostrar las informaciones sobre el disco leido. 35 Mando a distancia Puesta en marcha 1.Apriete el botón POWER para poner en marcha el lector. 2.Apriete el botón OPEN para abrir el lector. 3.Ponga un disco dentro del lector. 4.Cierre el lector para que la grabación se lance automáticamente 5.Cuando una ventana aparece en el demonstrador, apriete en los botones numéricos correspondientes a la pista que quiere escuchar, apriete OK/ENTER para lanzar la pista. Botón AUDIO Durante la grabación puede cambiar el idioma audio (cuando el DVD contiene varios idiomas). Botón de subtítulos Durante la grabación le permite de seleccionar el idioma de subtítulos, de poner en marcha o de parar con los subtítulos. SUBTITULO 1/N: Subtitulo 1 esta Visualizado SUBTITULO 2/N: Subtitulo 2 esta visualizado SUBTITULO '/N: Subtitulo 'esta visualizado SUBTITLE OFF: Los subtítulos no están visualizados N representa el total de los subtítulos disponibles. Esta función esta disponible para los DVD que contienen 2 o más pistas de subtítulos. Utilizar el adaptador AC Siempre que utilice el adaptador AC, verifique que el lector DVD esté apagado, utilizando el botón ON/OFF. Asegúrese de que utiliza el adaptador AC que viene con el lector DVD. Utilizar otro adaptador AC puede ser malo para el lector. Cuando el adaptador funciona por un largo tiempo, se puede calentar, eso es normal. Cuando no lo utiliza, sácalo del enchufe. Guárdelo lejos de la humedad, del frio, del polvo. En caso contrario, hay un riesgo de fuego o choque eléctrico. REPEAT botón Apriete el botón para repetir el capitulo o la pista. GOTO botón Le permite de seleccionar la posición (time, track o title) deseada para lanzar la grabación. Utilice los botones ../.. para seleccionar la opción deseada. Utilice las teclas numéricas para escoger el tiempo donde quiere que empiece la grabación y confirme apretando en el botón OK. ANGLE Botón Apretando este botón aproximadamente 2 segundos, puede cambiar el ángulo de vista de la escena. Esta función puede solamente ser utilizada con DVDs que contienen varios ángulos para la misma escena. ZOOM Botón Para los DVDs el tamaño de la imagen sucesivamente 1x, 2x, 3x, off. Esta función no esta disponible para los Cds. 36 FUNCIONES AVANZADAS REPRODUCCIÓN MP3/MPEG4 AVI Mp3 Mp4 Photo XVID Filter Repeat off Mode Normal JPEG Preview Ponga el disco MP3/MPEG4, y use las teclas direccionales para abrir el directorio deseado. Pulse ENTER para entrar al subdirectorio. Use las teclas direccionales para seleccionar la pista deseada y pulse ENTER para reproducir el archivo. Pulse la tecla PLAY/PAUSE para pausar la reproducción; pulse la tecla STOP para detener la reproducción. Para volver al menú superior, pulse las teclas direccionales para seleccionar el ícono y pulse ENTER para confirmar. Abra el menú de opciones usando las teclas direccionales. Filter (filtro): Permite la selección de las categorías de archivos que se mostrarán en la lista de exploración. Repeat (repetir): Para cambiar entre los distintos modos de repetición. Elija la opción Single para activar la repetición de un solo archivo y seleccione la opción Folder para activar la repetición de todos los archivos de la carpeta. 1/7 1 2 101 102 103 104 105 Audio 00:00:15 Mode (modo): Seleccione distintos modos de reproducción. Filter Normal: Reproducción normal. Shuffle (barajar): Para activar el modo Shuffle. Cuando la reproducción llegue al final del capítulo/pista actual, la reproducción salta a un capítulo/pista aleatorio. Repeat off Mode Normal Music Playing Music Intro (intro): En este modo, la unidad reproducirá los primeros 10 segundos del archivo y después saltará al siguiente archivo. Edit Mode (modo Editar): Use esta opción para activar el modo de reproducción programada. Seleccione el modo, pulse la tecla direccional IZQUIERDA hasta Directory y pulse ENTER para elegir la pista deseada y después pulse Add to program para agregarla a la lista de programación. Program view (vista de programación): Muestra el directorio/carpeta. Browser view (vista explorador): Muestra el directorio de la lista de reproducción. Programa (agregar a programación): Use esta opción junto con Edit Mode para crear una lista de reproducción. Clear program (borrar programación): Cuando esté en Browser View y con la reproducción completamente detenida (pulse el botón STOP dos veces), use esta opción junto con Edit Mode para eliminar pistas de la lista de reproducción. 37 REPRODUCCIÓN DE CD DE IMÁGENES CONFIGURACION DEL SISTEMA USO DEL MENÚ Pulse el botón SETUP del mando a distancia y se mostrará el menú de ajustes. Use los botones direccionales para desplazarse verticalmente hasta la opción deseada, y pulse el botón ENTER para confirmar. Pulse el botón direccional IZQUIERDA para volver al menú principal. Para salir de los ajustes, pulse el botón SETUP. Pulse la tecla direccional DERECHA para entrar al submenú. 1/7 Photo 1 2 100 102 Filter Repeat off Mode Normal JPEG Preview AJUSTES DE IDIOMA Seleccione Language en el menú de ajustes. 103 104 Language 105 Video Rating Pulse las teclas direccionales para elegir el directorio raíz y pulse el botón ENTER para entrar al subdirectorio. Pulse las teclas direccionales para elegir la imagen deseada y pulse ENTER para verla. Si quiere volver al menú superior, use las teclas direccionales para elegirlo y pulse ENTER. Language Subtitle MPEG4 Subtitle Audio DVD Menu Misc OSD Language (idioma OSD) Use esta opción para seleccionar el idioma del menú de ajustes y la pantalla. Girar imagen En el estado de reproducción de imágenes, pulse las teclas direccionales para girar la imagen y pulse el botón ANGLE para cambiar el modo de búsqueda de imágenes. Subtitle (subtítulos) Fije el subtitulaje predeterminado. Nota: No todos los discos admiten esta función. MPEG4 Subtitle (subtítulos MPEG4) Fije el subtitulaje MPEG4 predeterminado. Nota: No todos los discos admiten esta función. Audio Fije el idioma de audio predeterminado. Nota: No todos los discos admiten esta función. 38 CONFIGURACION DEL SISTEMA DVD Menu (menú DVD) Fije el idioma predeterminado de menú DVD. Nota: No todos los discos admiten esta función. AJUSTES DE CLASIFICACIÓN Seleccione Rating en el menú de ajustes para mostrar el submenú de clasificación: Nota: No todos los DVD admiten clasificaciones. AJUSTES DE VÍDEO Seleccione Video en el menú de ajustes para ver el submenú de vídeo: Language Video Language Video Aspect Ratio TV System Smart Picture Rating Misc Rating Parental Control (control paterno) Fijar el nivel deseado. Nota: No todos los discos admiten esta función. Misc Tamaño de Visión Seleccionar Tamaño de Visión. 16:9 , 4:3 PS, 4:3 LB Nota: El tamaño de visualización de la imagen esta relacionada con el formato de Disco grabado. Algunos discos no pueden mostrar imágenes en el formato que usted seleccione. Si usted utiliza un disco grabado en formato 4:3 en una TV de pantalla ancha, saldrán unas líneas negras en la derecha e izquierda de la pantalla. Usted debe ajustar la configuración de la pantalla, dependiendo del modelo de TV que utilice. Set Password (fijar contraseña) Use las teclas 0-9 para ingresar una contraseña de cuatro dígitos y después pulse ENTER para confirmar. Nota: Si olvida la contraseña, por favor use la contraseña universal 6666 para desbloquearla. OTROS MISC. Seleccione MISC en el menú de ajustes para mostrar el submenú de ajustes misceláneos: * Use Default Settings (usar ajustes originales) Restaure los valores originales de fábrica. TV System (sistema TV) Este producto admite salida en varios sistemas (NTSC, PAL). Cuando lo conecte a una TV asegúrese de que ambas unidades tengan el mismo ajuste PAL / NTSC. Smart picture (Imagen Inteligente) Ajuste el efecto de imagen: Standard (estándar): Efecto predeterminado. Bright (brillante): Ajuste interno para un efecto de imagen brillante. Soft (suave): Ajuste interno para un efecto de imagen suave. Dynamic (dinámico): El usuario ajusta el brillo, contraste, color, etc. Parental Control Set Password Language Video Rating Misc 39 Use Default Settings Problemas y soluciones Si tiene alguna pregunta, por favor consulte la guía de problemas y soluciones siguiente. NO HAY IMAGEN O SONIDO -Asegúrese de que el botón Power esté encendido. -Asegúrese de que la toma de corriente esté funcionando. -Asegúrese de que el cable de alimentación no esté dañado. -Asegúrese de que la clavija de alimentación esté bien conectada a la toma. IMAGEN SIN SONIDO -Asegúrese de que todas las tomas de audio estén bien conectadas. -Asegúrese de que el conecto de audio no esté dañado. -Asegúrese de que el volumen esté subido en el ajuste VOL/CH. -Asegúrese de que haber ajustado las opciones de AUDIO del reproductor correctamente. -Asegúrese de que haber seleccionado la entrada AV correcta en su TV. -Asegúrese de que el audio no esté silenciad. SONIDO SIN IMAGEN -Asegúrese de que las tomas de vídeo estén bien conectadas. -Asegúrese de haber seleccionado la entrada AV correcta en su TV. -Asegúrese de que el conector de vídeo no esté dañado. -Asegúrese de haber fijado correctamente los ajustes de VÍDEO del reproductor. IMAGEN O SONIDO DEFICIENTE -Asegúrese de haber fijado correctamente los ajustes de AUDIO del reproductor. -Asegúrese de que el disco no esté rayado ni sucio. -Asegúrese de que el conector AV o la terminal de salida no esté dañada. SE MUESTRA “BAD DISC” -Asegúrese de que el disco no esté combado, dañado o deformado. -Asegúrese de que el disco no esté gravemente sucio ni dañado. -Asegúrese de que el formato de disco sea compatible con el reproductor. -Compruebe que no haya intentado reproducir un CD de software. De ser así, por favor reinicie el reproductor. EL MANDO NO FUNCIONA -Asegúrese de que las baterías del mando estén funcionando. -Apunte el mando directamente al sensor IR del reproductor. -Quite cualquier obstáculo entre el mando y el sensor IR. LA UNIDAD NO FUNCIONA -Apáguela y vuélvala a encender. SE MUESTRA "NO DISC" -Asegúrese de haber puesto un disco en la bandeja. -Asegúrese de que el disco no esté al revés. -Asegúrese de que el disco no esté distorsionado, sucio o rayado. 40 Especificaciones OTROS Sistema TV NTSC/PAL Características de salida Tipos de discos DVD,VCD, CD, MP3, CD-R, CD-RW, JPEG, DVD+ -R/W, MPEG4, Dispositivo de visualización LCD-TFT a color Características de vídeo Tamaño de pantalla 7 pulgadas Relación S/N 65dB. Salida de vídeo 1Vp-p(75 W) Resolución Salida AV 500 líneas Salida de audio Características de audio Respuesta en frecuencia Relación S/N de audio Rango dinámico Voltaje de alimentación 96KHz: 20Hz-20KHz:+/-1dBI Consumo eléctrico 90dB 80dB Distorsión < 0.01% Convertidor D/A 96KHz/24bit 2CH Entrada DC de 12V 12W Dimensiones 205x160x40mm Peso 0.8kg Las especificaciones están sujetas a cambio sin previo aviso. Accesorios Transformador Mando a distancia Maletín de transporte Cable mechero Manual del Usuario 41 42 Inhoud Veiligheidsmaatregelen..........................................................................................................44 Panel illustratie......................................................................................................................46 Aansluiten op een televisietoestel...........................................................................................47 Afstandsbediening.................................................................................................................48 MP3/MPEG4 afspelen ....................................................................................................51 Picture CD afspelen ...............................................................................................................52 Systeem instellen...................................................................................................................53 Problemen Oplossen..............................................................................................................54 Specificaties..........................................................................................................................55 Accessoires ..........................................................................................................................55 43 Veiligheidsmaatregelen Inleiding Regelmatig onderhoud In of aan de draagbare DVD speler zitten geen losse gebruikersonderdelen. Raadpleeg voor het onderhoud van het apparaat gekwalificeerd personeel. Neem contact op met uw dealer als u op wat voor manier dan ook twijfelt over de installatie, bediening of veiligheid van dit apparaat. CAUTION RISK OF ELECTRIC SHOCK DO NOT OPEN Verwijderen van batterijen Verzeker u ervan dat u de batterijen veilig verwijdert. Gooi de batterijen nooit in vuur weg of met het gewone huishoudelijk afval. Check bij uw plaatselijke overheid wat de verwijderrichtlijn voor batterijen is. Veiligheid is belangrijk Lees voor uw eigen veiligheid en die van anderen de Veiligheidsinstructies goed door vóór u dit product gaat bedienen. Dit symbool geeft aan dat dit product een dubbele elektrische isolatie heeft tussen de gevaarlijke hoofdstroom en de onderdelen die voor de gebruiker toegankelijk zijn. Gebruik bij het onderhoud alleen identieke onderdelen om kapotte te vervangen. Bewaar deze informatie op een geschikte plek voor verdere raadpleging in de toekomst. Lees alstublieft alle instructies goed door voor het product te gebruiken. WAARSCHUWING: Stel dit apparaat niet bloot aan regen of kabels om het risico op brand of elektrische schokken te verkleinen. Veiligheidsoverwegingen Plaats de kabels zo dat er niet overheen gelopen kan worden of ze verdrukt kunnen worden door voorwerpen de er tegenaan of erop zijn geplaatst. Gebruik de draagbare DVD speler niet in vochtige of klamme omstandigheden. Laat de draagbare DVD speler niet nat worden. Stel de draagbare DVD speler niet bloot aan druppelend of spetterend water. Plaats geen met water gevulde voorwerpen, zoals bloemenvazen, bovenop de draagbare DVD speler. Plaats geen open vlambronnen, zoals kaarsen, bovenop de draagbare DVD speler. 1. Stel dit apparaat niet bloot aan druppelen of spetteren en plaats geen met vloeistof gevulde voorwerpen, zoals vazen, op het apparaat. 2. De hoofdstekker wordt gebruikt om het apparaat los te koppelen, deze moet gemakkelijk te gebruiken blijven. 3. Om het apparaat volledig te ontkoppelen van de stroomtoevoer moet u de stekker uit het stopcontact halen. 4. De stekker van het apparaat mag niet geblokkeerd worden en moet vrij toegankelijk zijn tijdens het gebruik. Reinigen Haal ALTIJD de stekker van de draagbare DVD speler uit het stopcontact voordat u het apparaat gaat schoonmaken. Gebruik geen vloeibare schoonmaakmiddelen of spuitbussen om het apparaat schoon te maken. Maak de draagbare DVD speler schoon met een zachte, vochtige (niet natte) doek. Ventilatie De gaten en openingen op deze set-top box zijn voor ventilatie. Bedek of blokkeer de ventilatiegaten niet, omdat dat oververhitting kan veroorzaken. Laat NOOIT kinderen dingen in de gaten of openingen van het apparaat stoppen. 44 Speciale opmerking Er kunnen een paar lichtpuntjes of donkere vlekjes op het LCD-scherm verschijnen. Dit is een gebruikelijk fenomeen van de 'active matrix' beeldscherm technologie, en duidt niet op fouten of gebreken. Probeer niet zelf het apparaat te repareren. In het geval van gebreken, zet de speler meteen uit en stel ons bedrijf of uw dealer op de hoogte. Het beeldscherm is opgebouwd uit heel veel precieze elektronische componenten. Demontage of aanpassingen kunnen tot verdere schade leiden. Veiligheidsmaatregelen Inleiding Laser Waarschuwing Deze DVD Speler maakt gebruik van een lasersysteem. Om direct contact met de laserstraal te voorkomen mag u het omhulsel niet openen. Als het apparaat open is en verbindingen kapot zijn, wordt zichtbare laser uitgestraald uit het apparaat. Het gebruik van controle- knoppen of het uitvoeren van bijstellingen of bedieningen op andere wijzen dan hier beschreven kan tot gevaarlijke radiatie leiden. KIJK NIET NAAR DE STRAAL! Luisteren met Stereo Koptelefoon Als u alleen en ongestoord wil luisteren, sluit u de Koptelefoon aan op de Koptelefoon contact. OPGELET: Vermijd een te langdurig gebruik en een overmatige geluidssterkte van de koptelefoon. Waarschuwing: Langdurige blootstelling aan harde geluiden van persoonlijke muziekspelers kan leiden tot tijdelijk of permanent gehoorverlies. Volume aanpassen Gebruik de volume regelaar aan de zijkant van het apparaat om het volume bij te stellen. 45 OFF Panel illustratie DC IN 12V ON AAN/UIT KNOP DC 12V STEKKERINGANG (stroomvoorziening) HOOFDTELEFOON STEKKERINGANG AV STEKKERUITGANG AV OUT PHONE LCD SCHERM VOL VOLUME REGELAAR USB USB POORT KOMPATIBLE AANSLUITINGEN LUIDSPREKER AFSPELEN/PAUZEREN CD KLEP TFT SOURCE VOLGENDE VORIGE STOP TFT SETUP BRON MENU VERPLAATS ( , OK , , ) OPEN CD KLEP (NETSTROOM- INFRAROODSENSOR OPLAADINDICATOR) 46 Verbindingen Aansluiten op een Tv-toestel Hoofdtelefoon functie Sluit de hoofdtelefoon aan op de daarvoor bestemde stekkeruitgang, om muziek/films individueel te kunnen beluisteren/bekijken. USB VOL AV OUT PHONE DC IN 12V ON Batterij opladen Als de batterij van de draagbare DVD speler leeg is, sluit dan de wisselstroomadapter op het apparaat aan. De batterij zal automatisch opladen. OFF Volume aanpassen Gebruik de volume regelaar aan de zijkant van het apparaat om het volume bij te stellen. Sluit de USB KOMPATIBLE aan Druk op de SOURCE toets op de afstandsbediening tot u naar de USB KOMPATIBLE -modus heeft geschakeld Yellow AUDIO IN USB KOMPATIBLE interface Het apparaat beschikt over een USB KOMPATIBLE IN stekkeringang om MP3 muziek, JPEG bestanden of andere bestanden af te spelen. Druk op de < SOURCE > knop om naar de USB KOMPATIBLE IN modus te schakelen. Alle functies zijn hetzelfde als bij het afspelen van een disk. Opmerking: de USB KOMPATIBLE IN poort is compatible met flash geheugen, er wordt niet gegarandeerd dat de poort compatibel is met MP3-spelers die gebruik maken van hun eigen software. CVBS VIDEO IN White L Red R OPMERKING: Wanneer u gebruik maakt van de USB KOMPATIBLE -functie, plaats het USB KOMPATIBLE -apparaat niet in de verkeerde richting. Dit kan het USB KOMPATIBLE -apparaat beschadigen. Waarschuwing: De USB -geheugenstick moet rechtstreeks in het apparaat worden gestoken. Er dient geen gebruik gemaakt te worden van de USB -verlengkabel, om storingen te voorkomen en te voorkomen dat de gegevensoverdracht mislukt. 47 Afstandsbediening Voorbereiding van de Afstandsbediening Afstandsbediening 9 10 11 12 13 1 A-B Herhalen 14 pers 1x:ingesteld A, pers 2x:ingesteld B 15 pers 3x:uitschakelen 16 van de functie 17 2. Prog/Repeat 18 Korte druk: Herhaalmodus Lange druk (2Sec.): DVD-programmeermodus 3. 0-9 Numerieke Toetsen 4. Goto (Ga naar) Ga naar een specifieke tijdindex 5. Setup Open het setupmenu 6. Snel Vooruitspoelen 7. Volgende Volgende hoofdstuk of bestand 8. Vorige Vorige hoofdstuk of bestand 9. FUNCTION (FUNCTIE) Invoermodus selectie, 10. Display Toon gedetailleerde informatie van het huidige bestand of disk. 11. Angle / Audio (Hoek / Audio) Korte druk: Verander de audiomodus (als er verschillende modi beschikbaar zijn) Lange druk (2Sec.):Verandert de hoekmarkering (als er verschillen de modi beschikbaar zijn) 1 Plaats de afstandsbediening op een vlakke ondergrond en plaats de meegeleverde knoopcel als volgt. 2 1.Druk de knop naar links 2.Trek de batterijhouder naar buiten 3 3.Plaats de batterij in de houder Zorg ervoor dat de polariteit overeenkomt met de markeringen binnen in het component. 4.Plaats de houder in de afstandsbediening. 4 5 6 7 8 CR2025 . 1 2 Batterijgegevens 12. Title / Subtitle (Titel / Ondertitel) Batterijtype: 1x CR2025, 3 V Korte druk: Levensduur: ongeveer 1 jaar (bij normaal gebruik op kamertemperatuur) Verander ondertitelmodus (als er ondertitels beschikbaar zijn) Gebruik van de Afstandsbediening Lange druk (2Sec.): DVD-Titelmenu Richt de afstandsbediening bij gebruik op het hoofdapparaat. 13. MENU / ZOOM De afstandsbediening werkt het beste bij een afstand van minder dan Korte druk: Zoom in 5 m en bij een hoek tot 30' ten opzichte van de voorkant van het apparaat. Lange druk (2Sec.): Er mogen geen obstakels tussen de afstandsbediening en de infraroodMenu toets voor DVD-Menu sensor staan en de afstandsbediening mag niet in direct zonlicht worden 14. STOP / SLOW geplaatst. Vervang de batterij als de afstandsbediening niet werkt, zelfs Korte druk: Stop wanneer hij dichtbij de speler wordt gebruikt. Lange druk (2Sec.): Slowmotion Opmerkingen over batterijen 15. Richtingstoetsen Als de afstandsbediening voor lange tijd niet gebruikt wordt, 16. Snel Terugspoelen verwijder dan de batterijen uit het compartiment. 17. ENTER Warm de batterijen niet of en gooi ze niet in vuur. Om te bevestigen en opties in te Demonteer, vervorm of wijzig batterijen niet. voeren of bestanden af te spelen. 18. Afspelen / Pauzeren 48 Afstandsbediening Bediening van Afstandsbediening Over de Ingebouwde Oplaadbare Batterij Dit product werkt zowel op de oplaadbare Li-Polymer batterij (1300 mAh Li-ion batterij / 1h30max) of de AC stroomvoorziening Voorzorgsmaatregelen met betrekking tot het opladen van de batterij 1. Laad de batterij onmiddellijk op wanneer de batterij volledig ontla den is (ongeacht of u van plan bent de batterij te gebruiken of niet) om de levensduur van de batterij te maximaliseren. Het batterij-icoontje zal ter waarschuwing in de linkerbovenhoek van het TFT getoond worden wanneer de batterij bijna leeg is. 2. Verbind de AC-adapter met het lichtnet om de batterij op te laden. De oplaadindicator zal rood oplichten en de indicator zal groen worden wanneer de batterij volledig is opgeladen. Dit zal ongeveer 2-2.5 uur duren als de speler uit staat of 4.5-6 uur als de speler wordt gebruikt. Gebruik en onderhoud van uw oplaadbare batterijen 1. Zorg er altijd voor dat u alleen de bijgeleverde AC-adapter gebruikt om uw batterijen op te laden met de speler. 2. De oplaadefficiëntie zal afnemen wanneer de omgevingstemperatuur onder de 50F (10 ) of boven de 95F (35 ) is. 3. Een volledig opgeladen batterij gaat ongeveer 1.5 uur mee wanneer een hoofdtelefoon is aangesloten op de speler. Bediening van Afstandsbediening (Afspelen / pauzeren) knop Druk op deze knop eens (tijdens het afspelen) om het afspelen te onderbreken. Druk op deze knop een tweede keer om het afspelen te hervatten. STOP knop Druk op deze knop eens (tijdens het afspelen) om het afspelen te stoppen; te hervatten vanaf dezelfde positie, drukt op Afspelen. Druk op deze knop een tweede keer om het afspelen van de disc te eindigen. Blijf bij het begin van de schijf gebruikt. MENU knop Druk op deze knop (tijdens het afspelen) om het menu op het scherm weer te geven. In de menu modus selecteert u de gewenste optie met de knoppen.Dan druk op OK om te bevestigen knop Druk op deze knop om naar het begin van de vorige track of hoofdstuk te gaan Knop(Vast terugspoelen) Door het herhaalde drukken van deze knop zal de snelheid van het terugspoelen toenmen achtereenvolgend aan 2x,4x,8x,16x Blijven het afspelen op normale snelheid met behulp van . Knop Om naar het begin van de volgende track of hoofdstuk te gaan Knop (Vast vooruiten) Door het herhaalde drukken van deze knop zal de snelheid van het terugspoelen toenmen achtereenvolgend aan 2x,4x,8x,16x Blijven het afspelen op normale snelheid met behulp van . AUDIO Knop Tijdens het afspelen ,de beschikbare audio stromen worden achtereenvolgend ingeschakeld (DVD's kan bevatten tot acht audio stromen. B,v. voor meerdere talen). 49 Bediening van Afstandsbediening Starten 1. Druk AAN/UIT schakelaar om AAN positie om de speller aan te zetten. 2.D ruk OPEN knop om de disk lade te openen. 3.Plaats een schijf in de disk lade. 4.Sluit het disc-deksel en wilt het afspelen starten automatisch. 5.Wanneer een menu verschijnt op het scherm, beweegt u de navigatieknoppen of druk op de numerieke knoppen om een gewenst nummer te selecteren en dan druk op OK / ENTER knop om het afspelen te beginnen Ondertitel-knop Tijdens het afspelen, kunt u een taal voor ondertitels te selecteren of om ondertitels AAN / UIT te zetten. DVD's kan tot en met 32 ondertitels tracks. Door het herhaalde drukken van deze knoppen kunt u de volgende instellingen kiezen: Ondertitel 1 / N: Ondertitel 1 wordt weergegeven. Ondertitel 2 / N: Ondertitel 2 wordt weergegeven. Ondertitel 3 / N: Ondertitel 3 wordt weergegeven. Ondertitel UIT: Er is geen ondertitel. N staat voor het totaal tracks van ondertitels. Deze functie is alleen beschikbaar voor DVD's die meervoudige ondertitel tracks bevatten. AC-adapter Gebruiken Altijd zet de DVD speler aan via de aan / uit schakelaar voorafgaand aan het aansluiten of loskoppelen van de AC-adapter. Zorg ervoor dat u de geleverde AC-adapter gebruiken. Met behulp van een ander type adapter kan leiden tot storingen of schade aan dit product. Als de AC-adapter wordt gebruikt voor langere tijd, kan het opwarmen. Dit is normaal . Wanneer er geen gebruik van de adapter, trek het uit het stopcontact. Houd de AC-adapter vrij van vocht, kou en stof. Anders kan een risico van brand of een elektrische schok worden resulteerd. Herhalen-knop Druk op deze knop om een hoofdstuk of een titel te herhalen. GA-NAAR knop Hiermee kunt u een positie (tijd, track of titel) waar te beginnen te selecteren . Gebruik de ../.. Knoppen om de gewenste optie te selecteren. Gebruik de cijferknopen 0-9 om de tijd rechtstreeks in te gaan en daarna bevestig met OK. ANGL E knop Druk op deze knop voor 2 sec. cycli via de camera beschikbaar zijn voor de bepaalde scène (zie illustratie) Deze functie is alleen beschikbaar voor DVD's die opnames van meerdere camera bevat. ZOOM Knop Druk op deze ZOOM knop voortdurend tijdens het afspelen van een DVD om de foto x1, x2, x3 te vergrotenof naar de normale grootte te hervatten. Deze functie is niet beschikbaar voor Audio CD. 50 MP3 / MPEG4 AFSPELEN AVI Mp3 Mp4 Photo XVID Filter Repeat off Mode Normal GEAVANCEERDE FUNCTIES Voer de MP3/MPEG4 CD in, gebruik de navigatie toetsen om de gewenste map te openen. Druk op ENTER om de submap te openen. Gebruik de navigatietoetsen om het gewenste nummer te selecteren en vervolgens op ENTER om het af te spelen. Druk op de PLAY/ PAUZE knop om het afspelen te onderbreken, en op STOP op het afspelen te stoppen. Om terug te keren naar het bovenliggende menu druk op de navigatieknoppen om het volgende icoontje te kiezen en druk op ENTER om te bevestigen. Open het optiemenu door de navigatieknoppen te gebruiken. JPEG Preview Filter: Mogelijkheid om de categorieën van mappen te selecteren die aangegeven worden in de bladerlijst. 1/7 1 2 101 102 103 104 105 Audio 00:00:15 Filter Repeat off Mode Normal Music Playing Herhaal: Mogelijkheid om verschillende herhaalstanden voor het afspelen te selecteren. Selecteer de singleoptie om één bestand te herhalen, selecteer de mapoptie om alle bestanden in de map te herhalen. Mode: Mogelijkheid om verschillende afspeel mogelijkheden te selecteren. Normaal: Normaal afspelen Shuffle : selecteer de shuffle (Willekeurige)-modus. Als het afspelen het einde van het huidige hoofdstuk/nummer bereikt, springt het afspelen naar een willekeurig volgend hoofdstuk/nummer. Muziek intro: Met Muziek intro speelt het apparaat de eerste 10 seconden van elk bestand en gaat dan door naar het daarop volgende. Bewerk modus: Kies deze optie om het Programmeren van afspeellijsten te gebruiken. Selecteer de optie, druk op de linker navigatieknop om naar de map te gaan en druk op ENTER om het gewenste nummer te kiezen en druk op PROG knop o m de afspeellijst te programmeren. Programma view: Toon map. Blader view: Toon afspeellijsten. Aan programma toevoegen: gebruik deze modus in combinatie met de Bewerk Modus om een afspeellijst samen te stellen. Leeg programma: Als u in de Blader view bent en het apparaat in de volledige STOPstand staat (druk twee keer op de STOP knop), gebruik dan deze optie in combinatie met de Bewerk Modus om nummers te verwijderen uit de afspeellijst. 51 SYSTEEM INSTELLEN FOTO/BEELD CD AFSPELEN MENU BEDIENING Druk op de SETUP knop op de afstandsbediening en het SETUP MENU wordt getoond. Gebruik de navigatietoetsen naar boven en beneden om het gewenste item te selecteren, druk daarna op ENTER om te bevestigen. Druk op de richtingknop LINKS om terug te keren naar het hoofdmenu. Druk op de SETUP knop om de instelling te verlaten. Druk op de rechter navigatietoets om het submenu te openen. 1/7 Photo 1 2 100 102 Filter Repeat off Mode Normal JPEG Preview TAAL INSTELLEN Selecteer de taal in het setup menu. 103 104 Language 105 Video Druk op de navigatietoetsen om de hoofdmap te kiezen en druk op ENTER om een submap te openen. Druk op de navigatietoetsen om de gewenste afbeelding te kiezen en druk op ENTER om te selecteren. Als u wilt terugkeren naar het bovenliggende menu drukt u op de navigatietoetsen om te kiezen en vervolgens op ENTER. Rating Language Subtitle MPEG4 Subtitle Audio DVD Menu Misc OSD Taal Gebruik dit item om de taal te selecteren van het setupmenu en de taal die op het scherm getoond wordt. Ondertiteling Stel de standaard ondertiteling in. Noot: niet iedere CD ondersteunt deze functie. Beeldrotatie In de stand waarin u afbeeldingen kunt afspelen, drukt u op de navigatie toetsen om de afbeelding te draaien, druk vervolgens op de HOEK/ANGLE knop om de scan van de afbeelding te veranderen. MPEG4 Ondertiteling Stel de standaard MPEG4 ondertiteling codeeroptie in. Noot: niet iedere CD ondersteunt deze functie. Audio Stel de standaard audio taal in. Noot: niet iedere CD ondersteunt deze functie. 52 SYSTEEM INSTELLEN DVD Menu Stel de standaard taal voor het DVD menu in. Noot: niet iedere CD ondersteunt deze functie. CLASSIFICATIE INSTELLEN Selecteer CLASSIFICATIE in het setup menu en het submenu wordt getoond: Noot: Niet alle DVD's ondersteunen classificaties. VIDEO INSTELLEN Selecteer Video in het setup menu en het video submenu wordt getoond: Language Video Language Aspect Ratio TV System Smart Picture Video Rating Rating Misc Misc Ouderlijke controle Stel het gewenste niveau in. Noot: niet iedere disk ondersteunt deze functie. Beeldverhouding Instellen van de beeldverhouding. 16:9, 4:3 PS, 4:3 LB. Opmerking: De weergegeven beeldverhouding is afhankelijk van het op het medium opgenomen beeldformaat. Indien het opgenomen beeldformaat op het medium en het ingestelde beeldformaat niet overeen komen bestaat de mogelijkheid dat er geen beeld wordt weergegeven. Wanneer er een medium wordt afgespeelt opgenomen in 4:3 beeldformaat en deze wordt afgespeelt op een breedbeeld TV zullen langs de zijkanten van het beeld zwarte strepen te zien zijn. U kunt dit verhelpen door de instellingen van uw TV set of de instellingen van de DVD speler aan te passen. Instellen paswoord Gebruik de 0-9 toetsen om een paswoord van vier nummers in te voeren en druk daarna op ENTER om het te bevestigen. Noot: Als u uw paswoord vergeten bent gebruik dan het universele paswoord 6666 om te ontgrendelen. DIVERSEN INSTELLEN Selecteer DIVERSEN (MISC) in het setup menu en het submenu wordt getoond : * Gebruik standaard instellingen Zet de data terug naar fabrieksinstellingen. TV Systeem Dit apparaat ondersteunt de uitgang van diverse systemen (NTSC, PAL). Als u het apparaat aansluit op een tv-toestel let er dan op dat beide apparaten dezelfde PAL / NTSC instellingen hebben. Beeld modus (Smart Picture) Pas beeldscherm effecten aan: Standaard: standaard effect. Helder: interne instelling voor helder beeldeffect. Zacht: interne instelling voor zacht beeldeffect. Dynamisch: de gebruiker past helderheid, contrast, kleur etc. Aan. Parental Control Set Password Language Video Rating Misc 53 Use Default Settings Problemen Oplossen Als u vragen heeft, raadpleeg dan de onderstaande probleem oplosgids. GEEN BEELD OF GELUID -Zorg ervoor dat het apparaat aan staat. -Zorg ervoor dat het stopcontact in werking is. -Zorg ervoor dat het netsnoer niet beschadigd is. -Zorg ervoor dat de stekker stevig in het stopcontact zit. BEELD MAAR GEEN GELUID -Zorg ervoor dat de audio-stekkers goed zijn aangesloten. -Zorg ervoor dat de audio-connector niet beschadigd is. -Zorg ervoor dat het volume hoog genoeg is in de VOL/CH setup. -Zorg ervoor dat u de AUDIO-instellingen van de speler correct heeft ingesteld. -Zorg ervoor dat u de juiste AV-invoer op uw TV heeft ingevoerd. -Zorg ervoor dat de audio niet is ingesteld op mute. GELUID MAAR GEEN BEELD -Zorg ervoor dat de video-stekkers goed zijn aangesloten. -Zorg ervoor dat u de juiste AV-invoer op uw TV heeft ingevoerd. -Zorg ervoor dat de video-connector niet beschadigd is. -Zorg ervoor dat u de VIDEO-instellingen van de speler correct heeft ingesteld. SLECHT BEELD OF GELUID -Zorg ervoor dat u de AUDIO-instellingen van de speler correct heeft ingesteld. -Zorg ervoor dat de disk niet bekrast of verkleurd is. -Zorg ervoor dat de AV-connector van de uitvoer-uitgang niet beschadigd is. "BAD DISC" GETOOND -Zorg ervoor dat de disk niet vervormd of beschadigd is. -Zorg ervoor dat de disk niet ernstig verkleurd of beschadigd is. -Zorg ervoor dat het diskformaat compatible is met de speler. -Controleer of u geprobeerd heeft een software-CD af te spelen op de speler. Als dit het geval is, herstart de speler. AFSTANDSBEDIENING WERKT NIET -Zorg ervoor dat de batterijen in de afstandsbediening werken. -Richt de afstandsbediening rechtstreeks op de IR-sensor van de speler. -Verwijder eventuele obstakels tussen de afstandsbediening en de IR-sensor. APPARAAT WERKT NIET -Zet het apparaat uit, en vervolgens weer aan. "NO DISC" GETOOND -Zorg ervoor dat u een disk op de lade heeft geplaatst. -Zorg ervoor dat de disk niet ondersteboven in de lade zit. -Zorg ervoor dat de disk niet vervormd, vuil of bekrast is. 54 Specificaties OVERIG Afspeel modus NTSC/PAL Output karakteristieken Disk modus DVD,VCD, CD, MP3, CD-R, CD-RW, JPEG, DVD+ -R/W, MPEG4, Beeldscherm Kleur TFT-LCD Afmeting beeldscherm 7 inches Video S/N ratio 65dB. Video uitgang 1Vp-p(75 W) Resolutie AV Uitgang 500 lijnen Audio uitgang Video karakteristieken 2CH Audio karakteristieken Frequentie response Stroomspanning fs 96KHz: 20Hz-20KHz:+/-1dBI Audio S/N ratio 90dB Dynamisch bereik 80dB Vervorming < 0.01% D/A Omzetter 96KHz/24bit Stroomconsumptie DC IN 12V 15W Formaat 206x160x40mm Gewicht 0.8kg Specificaties zijn onderhevig aan veranderingen zonder bericht. Accessoires AC adaptor Afstandsbediening Auto zak/antenne Auto adaptor handleiding 55 56 Contéudo Precauções de segurança 58 Ilustração do painel Ligar um televisor 60 61 Telecomando 62 MP3/MPEG4 jogando Reprodução de CD de FOTO 65 66 Configuração do sistema 66 Soluções de Problemas 68 Especificações 69 69 Acessórios 57 Precaução da segurança INTRODUÇÃO Eliminação da bateria Por favor, verifique as pilhas são eliminados Nunca alienar uma das baterias no fogo ou com outros resíduos domésticos. Consulte a sua autoridade local para a eliminação regulamentos. CAUTION RISK OF ELECTRIC SHOCK DO NOT OPEN Segurança é importante O símbolo indica que a tensão perigosa que constitui um risco de choque elétrico estão presentes dentro desta unidade. O símbolo indica que existem importantes instruções operacionais e de manutenção na literatura que acompanha a presente unidade Mantenha essas informações em um local seguro para referência em futuro. Por favor, leia todas as informações de segurança antes de usar o produto. Consideração da Segurança. Posição dos cabos para que eles não podem ser caminhou sobre pinçada por itens ou colocados sobre ou contra eles Não use o DVD Jogador portátil em condições úmidas ou húmido. Não permita que o DVD Jogador portátil para molhar. Não exponha o DVD Player portátil a pingos ou salpicos. Não coloque água cheia objetos tais como vasos, em cima do portátil DVD Jogador. Não coloque fontes de chamas nuas, tais como velas, sobre o início do DVD Player portátil. Limpar Este símbolo indica que este produto incorpora dupla isolamento entre perigosos tensão da rede e acessível ao utilizador partes. Ao serviço utilizar apenas peças idênticas. AVISO: Para reduzir o risco de incêndio ou choque eléctrico, não exponha este aparelho à chuva ou cordas. 1. O aparelho não deve ser exposto a pingos ou salpicos e objectos cheios de líquidos, tais como copos, não devem ser colocadas no aparelho. 2. A alimentação é utilizado como plugar thedisconnecção dispositivo, desligue o aparelho devem permanecer à vista. 3. Para se desligar completamente a alimentação de entrada, a ficha eléctrica do aparelho deve ser desligado da corrente eléctrica. 4. A ficha eléctrica do aparelho não deve ser obstruído ou deveria ser facilmente acessado durante o uso pretendido. SEMPRE desconecte o DVD Player portátil antes de limpá-lo. Não use limpadores líquidos ou aerossóis. Limpe o DVD Jogador portátil com um macio e úmido (não molhado) pano.. Ventilação Os slots e aberturas da instala-topo caixa são para ventilação. Não cubra ou bloqueá-los, pois pode provocar sobreaquecimento. Nunca deixe crianças empurrar algo para os buracos ou faixas sobre o caso. Manutenção Não há nenhum usuário peças neste DVD Jogador portátil. Quando a galinha manutenção, consulte a qualificar ied serviço pessoal. Consulte o seu revendedor se você está sempre em dúvida sobre a instalação, operação ou a segurança desta unidade 58 Aviso Especial Alguns destaques ou manchas escuras podem ocorrer no ecrã LCD. É um fenômeno muito comum da matriz activa exibir tecnologia, e não significa qualquer defeitos ou falhas. Nunca tente reparar a máquina por si mesmo. Em caso de eventuais falhas. Por favor desligar a unidade de uma só vez, e notificar a nossa Companhia ou o correspondente revendedor. Aexibição é feita por um grande número de precisão de componentes electrónicos. Qualquer desmontagem ou modificação pode conduzir a danos maiores. Precaução da segurança INTRODUÇÃO PRECAUÇÕES LASER PRODUTO LASER EM CLASSE 1 Este leitor de Disco de Vídeo Digital utiliza um Sistema Laser. Para garantir uma utilização correcta deste produto, leia atentamente este manual do proprietário e guarde para futura referência. Em caso que o aparelho requere manutenção, contacte com um serviço autorizado l Consulte a localização no procedimento do serviço. Para evitar a exposição directa ao feixe laser, não tente abrir o compartimento. Radiação laser visível e invisível quando aberto e travas derrotadas. NÃO OLHE DIRECTAMENTE PARA O FEIXE OUVIR COM AUSCULTADOR (FONE DE OUVIDO) (Não Incluído) Conecte o plugue do auscultador (fone de ouvido) estéreo na tomada de FONE DE OUVIDO (telefones marcados) antes de usar o aparelho. CAUSÃO: Ouvir recomendação de expecialistas contra a exposição à toca estendida contínua a níveis de volume alto enquanto está a usar auscultador (fone de ouvido), podendo resultar perda auditiva possível. Se sentir um zumbido nos ouvidos, reduza o volume ou interrompa o uso. Nós queremos que você escuta por um tempo de vida. 59 OFF Ilustração do painel DC IN 12V ON INTERRUPTOR (ON/OFF) PHONE DC 12V INSERIR JACK (poder oferta) SAIDA DE AUSCULTADORES AV OUT TELA LCD AV SAÍDA USB VOL CONTROLE DO VOLUME PORTA USB COMPATIVEL FALADOR PLAY/PAUSE REPRODUZIR/PAUSA TAMPA DO DISCO TFT SOURCE PRÓXIMO PREVER PARAR TFT CONFIGURAR FONTE MENU TECLAS DIRECIONAIS ( , OK ABRIR TAMPA DO DISCO ALIMENTAÇÃO IR. CARREGAR 60 , , ) Ligar um Televisor Ligações Função da saida de auscultadores Insira auscltadores na saida de auscultadores, para ouvir a musica ou filme em privado. USB VOL AV OUT PHONE DC IN 12V ON Carga de bateria OFF Quando o aparelho é alimentado pela bateria, ligue o adaptador AC Ao aparelho. a bateria irá Carregar automaticamente. Ajustamento do volume Utilize CONTROLE DO VOLUME na parte lateral do aparelho para ajustar o volume. ENTRADA DE VÍDEO ENTRADA DE ÁUDIO Conectar ao USB Pressione a tecla FUNÇÃO no Telecomando até que você tenha mudado para o modo COMPATÍVEL USB. Amarelo CVBS Branco Interface COMPATÍVEL USB Esta unidade tem uma porta compatível USB para reproduzir a música ou MP3 e JPEG ou outros arquivos. Pressione o botão “FUNÇÃO” para seleccionar modo COMPATÍVEL USB. Toda a função é a mesma a reproduzir um disco. Nota: a porta COMPATÍVEL USB é compatível com memórias flash, a compatibilidade com todos os modelos USB nao é garantida. D Vermelho E NOTA: Ao utilizar a função compatível USB. Por favor, não insira na direção errada, ou ele vai ser corrompido. O USB deve ser conectado diretamente à unidade. Para evitar perda de dados, interferência e transferência, não use cabos de extensão USB. 61 Telecomando 9 10 11 1 12 3 2 13 14 15 16 17 18 1 A-B repetir Presione 1x:conjunto A, Presione 2x:conjunto B Presione 3x:desativar a função 2.Prog / Repetir Pressão breve: modo de repetir. Pressão longa (2 Segundos): modo de programa de DVD 3.0-9 Teclas Numéricas 4.GOTO Ir para um índice de tempo específico 5.SETUP Abrir menu de instalação 6.Avance rapido 7.Próximo Próximo capítulo ou arquivo 8.Anterior Capítulo ou arquivo anterior 9.FUNCTION Selecção de modo de digitação 10.DISPLAY Mostra as informações detalhados do arquivo corrente ou disco. 11.ANGLE / Audio Pressão breve: Muda o modo de áudio (se diferentes modos estão disponíveis) Pressão longa (2 Segundos): Altera a marca de ângulo (se diferentes modos estão disponíveis) 4 5 6 7 8 Preparação do Telecomando Coloque o Telecomando em uma superfície plana e introduzir a célula botão fornecido para o telecomando da seguinte forma. 1.Puxe o botão para a esquerda 2.Tire carregador da bateria para fora 3.Insira a bateria na tomada. Certifique-se que a polaridade corresponde as marcas dentro do componente. 4.Insert o recipiente para o controle remoto. Dados da célula Tipo de bateria: 1x CR2025 , 3 V Vida de serviço: cerca de um ano CR2025 (para uso normal e temperatura ambiente) 1 2 12.TITLE/SUBTITLE Pressão breve: Alterar o modo de legendas (legendas se estiverem disponíveis) Pressão longa (2Sec.): DVD Título menu 13.MENU / ZOOM Pressão breve: zunir em Pressão longa (2Sec.): Menu tecla para DVD Menu 14.STOP/SLOW Pressão breve: parar Pressão longa (2Sec.) movimento lento 15.Teclas de direcções 16.Retroceder 17.ENTER Para confirmar e passar as opções ou para reproduzir arquivos. 18.Reproduzir/Pausa 62 USO DO TELECOMANDO Aponte o TELECOMANDO para a unidade principal durante a operação. O telecomando funciona melhor, a uma distância inferior a 5 m, e em um ângulo de até 30 ° para a frente da unidade. Nenhum obstáculo pode estar no caminho entre o telecomando e sensor de infravermelhos e não coloque o telecomando à luz solar directa. Se o telecomando não funciona mesmo quando é operado perto do aparelho, substituir a pilha. Notas sobre pilhas Se o télecomando não for utilizado durante um longo período de tempo, remova a pilha do compartimento. Não aqueça as pilhas nem as deite para o fogo. Não desmonte, desforme ou modifique as pilhas. Telecomando Sobre a Bateria Interna Recarregável Precauções relacionadas com a recarga da bateria 1. Quando a bateria estiver totalmente descarregada, imediatamente recarregá-la (independentemente de se você planeja usar a bateria ou não), a fim de maximizar a vida útil da bateria. Quando a energia é baixo, o ícone da bateria será mostrada no canto superior esquerdo da TFT de alerta. 2. Para carregar a bateria, ligue o leitor a corrente AC através do adaptador AC e o indicador de carga acende em vermelho, e o indicador vai-se transformar em verde quando a bateria está completamente carregada. Isso levará cerca de 2-2,5 horas, se o leitor estiver em modo "desligado" ou 4,5-6 horas, se o aparelho estiver em modo de funcionamento. Utilização e manutenção de suas baterias recarregáveis 1. Certifique-se sempre usar apenas o adaptador AC incluído com o aparelho para recarregar suas baterias. 2. Recarregue a eficiência vai degradar-se quando a temperatura cai abaixo ambiental 50F (10 ) ou superior 95F (35 ). 3. O tempo de duração da bateria totalmente carregada quando um auscultador está ligado ao aparelho é de aproximadamente 1,5 horas. Funcionamento do telecomando REPRODUZIR/PAUSA ( ) Durante uma reprodução (CD/VCD), Presione um avez na tecla Reproduzir/ Pausa para meter em pausa, para voltar à reprodução presione de novo nesa tecla. STOP Presione a telca STOP uma vez durante a reprodução para parar a reprodução do disco. O aparelho memorisa o ponto onde paro. Presione a tecla ( ) para voltar a reproduzir ao ponto memorizado. Presione uma segunda vez em STOP ara parar completamente a reprodução do disco. Para voltar a reproduzir o disco desde o principio, presione a tecla( ). MENU Presione esta tecla durante uma reprodução para visualizar o menu do disco na tela. Em modo visualização do menu, selecione as opções desejadas graças as teclas direcionais . Presione as teclas OK/ENTER para validar a seleção. Tecla (anterior) Presione esta tecla para pasar ao capitulo ou arquivo antecedente. Tecla (voltar rapido) Presione nesta tecla de maneira repetida para recuar rapidamente as velocidades sucessivas x2, x4, x8, x16 a cada presão nesta tecla. Presione na tecla PLAY para voltar a uma reprodução normal do disco. Tecla (seguinte) Presione esta tecla para pasar ao capitulo ou arquivo seguinte. Tecla (avance rapido) Presione esta tecla de maneira repetida para avançar ràpidamente as velocidades sucesivas x2, x4, x8, x16 a cada presão da tecla. Presione a tecla PLAY para voltar a reprodução normal do disco. Tecla DISPLAY Presione uma vez esta tecla para visualizar as informações detalhadas sobre o disco que esta no seu reprodutor. Presione uma vez mais na tecla DISPLAY para visualizar outras informações. 63 Telecomando Tecla AUDIO E posivel mudar a lingua audio de aquelas programadas inicialmente no reprodutor(Segundo as linguas audio disponiveis no disco DVD). Presione a tecla AUDIO durante a reprodução de um DVD. A cada presão na tecla AUDIO pode vêr as diferentes linguas disponiveis que apareçem na tela e selecione a lingua desejada. Tecla SUBTITLE (Sous-Titre) E posivel mudar a lingua das legendas durante uma reprodução, presionando a tecla SUBTITLE.A cada presão nesta tecla vai fazer aparecer diferentes linguas de legendas disponiveis no DVD. Cuando a lingua de legendas que deseja aparece na tela, largue a telca SUBTITLE. Nota : Esta função é disponivel unicamente com os discos DVD gravados com legendas multi-linguas. Tecla REPEAT (Repetição) Presione a tecla REPEAT durante a reprodução, para repetir 1 capitulo ou arquivo do disco ou para repetir todo o disco. Tecla GOTO (IR A) Esta tecla permite lhe atingir diretamente uma posição (tempo, pista, titulo) no disco e de começar a reprodução. Appuyez sur la touche GOTO. Entrez les valeurs dans la rubrique qui s'affiche ../.. à l'aide des touches numériques, et appuyez sur OK ou ENTER pour accéder directement. Sinon appuyez de nouveau sur la touche GOTO pour revenir au mode de lecture normal. Tecla ANGLE Permite de visualizar os diferentes angulos de vista gravados no DVD para uma mesma cena filmada. Presione a tecla ANGLE durante 2 segundos e os diferentes angulos de vista apareçerão para a cena atual. Selecione então o angulo que quer vêr. Tecla ZOOM Presione a tecla ZOOM durante uma reprodução de um DVD para acrecentar o tamanho da imagem de x1, x2, x3 ou voltar ao tamanho normal. Esta função não é disponivel com os discos CD. 64 COMEÇO 1. Ponha a alimentação ON/OFF em ON (LIGAR) 2. Presione a tecla para abrir a tampa do reprodutor DVD. 3. Insira um disco CD ou DVD no compartimento e feche a tampa. 4. Um avez a tampa fechada a reprodução do disco começa automaticamente. 5. Cuando um MENU aparece na tela, utilise as teclas de navigação ou as teclas numéricas para selecionar a pista ou o titulo de sua escolha, e presione a tecla OK/ENTER para começar. UTILISAÇÃO DO ADAPTADOR ELETRICO Desligue sempre o reprodutor DVD antes de ligar ou desligar o adaptador eletrico ou o cabo eletrico. Utilise o adaptador eletrico fornecido. A utilisação de um adaptador de outro tipo pode provocar mao funcionamento ou estragar o aparelho. Uma utilisação prolongada do adaptador eletrico pode provocar um aquecimento do adaptador. Iso é normal e não deve preocupar. Cuando não utilisa o seu adaptador, deve desligar da tomada. Afaste o adaptador eletrico de todas a fontes de humidade, do frio e da pueira, se não podera provocar um incendio ou uma descarga eletrica. MP3/MPEG4 JOGANDO AVI Mp3 Mp4 Photo XVID 1/7 1 2 101 102 103 104 105 FUNÇÕES AVANÇADAS Filter Repeat off Mode Normal JPEG Preview Audio 00:00:15 Filter Repeat off Mode Normal Insira o disco MP3 / MPEG4 , Utilize as teclas de navegação para abrir o diretório desejado. Pressinoa ENTRAR para introduzir o sub-diretório. Utilize as teclas de navegação para selecionar a faixa desejada e em seguida ENTRAR para executar o arquivo. Pressione o botão PLAY/PAUSE chave para fazer uma pausa na reprodução, pressione a tecla para parar a parar de jogar. Para voltar ao alto menu, pressione a tecla navegação escolha o ícone e prima ENTER para confirmar. Abra a opção menu usando as teclas de navegação Filtro: Permite selecionar as categorias de f iles exibidos no navegador Normal: Normal reprodução Shuffle: Aleatorio modo ativado. Quando a reprodução chega ao fim do actual capítulo / faixa, a reprodução salta para um aleatória capítulo / faixa. Música Intro: Neste modo, o aparelho reproduz os primeiros 10 segundos do arquivo e então pule para o próximo arquivo. Modo de edição: Utilize esta opção para permitir programado o modo de reprodução. Selecione o modo pressione a tecla navegação esquerda diretório e pressione ENTRAR para escolher a faixa desejada, e pressione Adicionar ao programa para programa de reprodução lista. VISUALIZAÇÃO PROGRAMA: Mostra diretório / pasta. VISUALIZAÇÃO NAVEGADOR: Mostrar lista reprodução diretório Music Playing Adicionar ao programa: Use este em combinação com Modo de Edição para criar uma lista de músicas. Limpar programa: Quando entrou no Navegador Exibir e em completa parar estado (pressione Paragem duas vezes), use esta opção em conjunto com Modo de Edição para apagar faixas da lista de reprodução. 65 CONFIGURAÇÃO DO SISTEMA REPRODUÇÃO DE CD DE FOTO Operação do menu Pressione o botão SETUP no telecomando MENU de Instalar será exibida. Utilize os botões direção para cima e para baixo movimento para selecionar o item desejado, em seguida, pressione o botão ENTER para confirma. Presione a tecla direita de navegação para entrar no submenu. Presione a tecla esquerda de navegação para voltar ao menu principal. Para sair a configuração, pressione o botão SETUP. Prima tecla navegação direita para entrar no submenu. 1/7 Photo 1 2 100 102 Filter Repeat off Mode Normal JPEG Preview Configuração de língua Selecionar língua no menu de configuração. 103 104 Language 105 Video Prima as teclas direcionais para escolher o diretório raiz e carregue em ENTER para entrar no sub diretório. Presione Navegação y ke para escolher a imagem desejada e pressione ENTER para visualizar a imagem. Se você deseja voltar para a parte superior do menu, prima Tecla de navegação para escolher e prima ENTER. Imagem rotação Na foto jogar estado, prima a tecla navegação rotação a fotografia, pressione botão ANGLE para mudar a imagem modo SCAN.. Rating Language Subtitle MPEG4 Subtitle Audio DVD Menu Misc Língua OSD Use este item para escolher o idioma do menu de configuração e tela de exibição. Subtítulo Definir o padrão subtítulo. Nota: nem todos os discos suporta esta função. MPEG4 Subtítulo Definir a codificação padrão MPEG4 subtítulo opção. Nota: nem todos os discos suporta esta função. Áudio Definir o padrão do idioma. Nota: nem todos os discos suporta esta função. 66 CONFIGURAÇÃO DO SISTEMA Ajustes de clasificação Selecione Categoria no menu de configuração, e exibir o submenu Rating: No ta: Nem todos os DVD apoio classificações.. Menu DVD Definir o idioma padrão menu DVD. Nota: nem todos os discos suporta esta função. VÍDEO INSTALAR Selecione Vídeo no menu de configuração, exibir o vídeo submenu Language Video Language Video Aspect Ratio TV System Smart Picture Rating Misc Rating Misc Aspecto Ratio Selecione a relação de aspecto.: 16:9, 4:3 PS, 4:3 LB~ Notas: O tamanho da imagem está relacionado com o format do disco. Alguns discos não pode exibir imagens na proporção que você escolher. Se você reproduzir um disco gravados no formato 4:3 em uma TV de ecrã panorâmico, barras pretas aparecerão na esquerdo e lado direito do ecrã. Você deve ajustar a configuração tela dependendo do tipo de televisão que você tem. SISTEMA TV Este produto suporta a saída de vários sistemas (NTSC, PAL). Quando ligar a um televisor certifique-se que ambas as unidades têm o mesmo PAL / NTSC definições. Inteligente foto Ajustar visor efeito: Norma: padrão efeito. Brilho: ajuste interno para visualizar efeito brilhante. Suave: definição interna para ver efeito suave. Dinâmica: usuário ajusta brilho, contraste, cor etc Parental Control Set Password Control Paterno Defina o nível desejado. Nota: nem todos os discos suporta esta função. Definir Senha Use as teclas 0-9 para introduzir quatro dígitos (senha) e, em seguida, prima ENTER para confirmar. Nota: Se você esquecer sua senha, use a senha universal 6666 para desbloquear. MISC SETUP MISC Seleccione no menu de configuração, e visualizar o submenu: * Use as configurações padrão Restaure os valores originais por defeito. Language Video Rating Misc 67 Use Default Settings Soluções de Problemas Se você tiver alguma dúvida, consulte o guia de solução de problemas abaixo. NENHUMA IMAGEM OU SOM Verifique se o botão de alimentação está ligado. Verifique-se a tomada está operacional. Verifique se o cabo de alimentação não está danificado. Verifique se o plugue está conectado. IMAGEM MAS NENHUM SOM Verifique-se as tomadas de áudio estão conectadas firmemente. Verifique se o conector de áudio não está danificado. Verifique se o volume está alto na configuração VOL / CH. Verifique-se tem definido configurações do leitor ÁUDIO corretamente. Verifique se você digitou o AV de entrada corretamente para a sua TV. Verifique se o áudio não está definido para silenciar. SOM MAS NENHUMA IMAGEM Verifique-se as tomadas de vídeo estão conectadas firmemente. Verifique se você tem a entrada de AV correto para sua TV. Verifique se o conector de vídeo não está danificado. Verifique se tem definido as configurações do leitor de vídeo corretamente. IMAGEM OU SOM RÚIM Verifique se tem definidas configurações do leitor ÁUDIO corretamente. Verifique se o disco não está riscado ou manchado. Verifique se o conector AV ou o terminal de saída não está danificado. “DISCO MAU” MOSTRADO Verifique se o disco não está empenado, danificado ou deformado. Verifique se o disco não está muito manchado ou danificado. Verifique se o formato de disco é compatível com o aparelho. Por favor, verifique se você tentou de reproduzir um CD de software. Se assim for, por favor reinicie o aparelho. TELECOMANDO NÃO FUNCIONA Asegure-se que as pilhas do telecomando estão a fucionar. Aponte o telecomando diretamente para o sensor IR do aparelho. Remova quaisqueres obstáculos entre o telecomando e o sensor IR. UNIDADE NÃO FUNCIONA Desligue o aparelho e ligue-o novamente. “NENHUM DISCO” MOSTRADO Verifique-se que tem colocado o disco na bandeja. Verifique se o disco não está de cabeça para baixo. Verifique se o disco não é distorcida, manchado ou riscado. 68 Especificações Outras Sistema TV NTSC/PAL Característica de saída Tipos de discos DVD,VCD, CD, MP3, CD-R, CD-RW, JPEG, DVD+ -R/W, MPEG4, Dispositivo de reprodução Tamanho de tela Caracteristicas Video Vídeo S/N ratio 65dB. Resolução saida AV 500 linhas. Color TFT-LCD 7 inches Saída de vídeo 1Vp-p(75 &) Saída de aúdio 2CH Voltagem de poder DC IN 12V Caracteristicas Audio Freqüência de resposta Aúdio S/N ratio Dinamico âmbito fs 96KHz: 20Hz-20KHz:+/-1dBI Consumpção de poder 90dB 80dB Distorição < 0.01% D/A Convertido 96KHz/24bit 12W Tamanho 206x160x40mm Peso 0.8kg As especificações estão sujeitas a alterações sem aviso prévio. Acessórios Adaptador AC Telecomando Saco & tiras Adaptador para carro Manual de instruções 69 70-
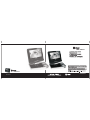 1
1
-
 2
2
-
 3
3
-
 4
4
-
 5
5
-
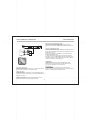 6
6
-
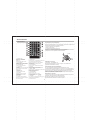 7
7
-
 8
8
-
 9
9
-
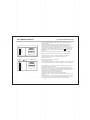 10
10
-
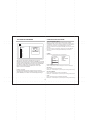 11
11
-
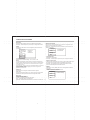 12
12
-
 13
13
-
 14
14
-
 15
15
-
 16
16
-
 17
17
-
 18
18
-
 19
19
-
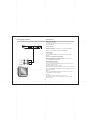 20
20
-
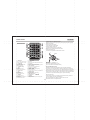 21
21
-
 22
22
-
 23
23
-
 24
24
-
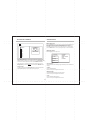 25
25
-
 26
26
-
 27
27
-
 28
28
-
 29
29
-
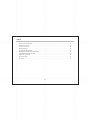 30
30
-
 31
31
-
 32
32
-
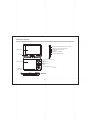 33
33
-
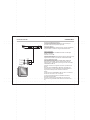 34
34
-
 35
35
-
 36
36
-
 37
37
-
 38
38
-
 39
39
-
 40
40
-
 41
41
-
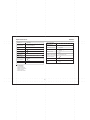 42
42
-
 43
43
-
 44
44
-
 45
45
-
 46
46
-
 47
47
-
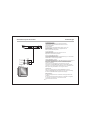 48
48
-
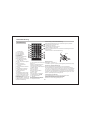 49
49
-
 50
50
-
 51
51
-
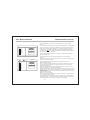 52
52
-
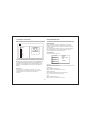 53
53
-
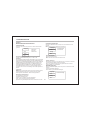 54
54
-
 55
55
-
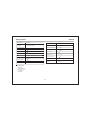 56
56
-
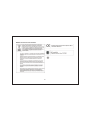 57
57
-
 58
58
-
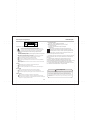 59
59
-
 60
60
-
 61
61
-
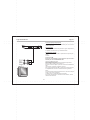 62
62
-
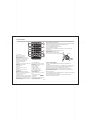 63
63
-
 64
64
-
 65
65
-
 66
66
-
 67
67
-
 68
68
-
 69
69
-
 70
70
-
 71
71


Tokai ldp-2236k Handleiding
- Categorie
- Dvd spelers
- Type
- Handleiding
- Deze handleiding is ook geschikt voor
in andere talen
- English: Tokai ldp-2236k User manual
- français: Tokai ldp-2236k Manuel utilisateur
- español: Tokai ldp-2236k Manual de usuario
- português: Tokai ldp-2236k Manual do usuário
Andere documenten
-
Philips PET735/00 Handleiding
-
Salora 24LEF-6000TDW Handleiding
-
Kompernass SILVERCREST KH 6500 LECTEUR DVD MOBILE de handleiding
-
Salora 22LED2005TD Handleiding
-
Lenco CD-200 Handleiding
-
Lenco CD-201 Handleiding
-
Lenco DVP-938 Handleiding
-
Denver MT-779DVBT de handleiding
-
Salora 22LED3305TD Handleiding
-
LG DP281B-P de handleiding