
PAI3101F
Gebruiksaanwijzing
User Manual
Notice d'utilisation
Kookplaat
Hob
Table de cuisson

INHOUDSOPGAVE
Veiligheidsinformatie 2
Veiligheidsvoorschriften 4
Montage 7
Beschrijving van het product 9
Dagelijks gebruik 11
Aanwijzingen en tips 13
Onderhoud en reiniging 15
Probleemoplossing 16
Technische gegevens 18
Energiezuinigheid 19
Wijzigingen voorbehouden.
GA NAAR ONZE WEBSITE VOOR:
Advies over gebruik, brochures, het oplossen van problemen, service- en
reparatie-informatie:
www.progress-hausgeraete.de/support
VEILIGHEIDSINFORMATIE
Lees zorgvuldig de meegeleverde instructies voor installatie
en gebruik van het apparaat. De fabrikant is niet
verantwoordelijk voor verwondingen of schade die voortvloeit
uit de onjuiste installatie of het onjuiste gebruik. Bewaar de
instructies altijd op een veilige, toegankelijke plek voor
toekomstig gebruik.
Veiligheid van kinderen en kwetsbare mensen
• Dit apparaat kan worden gebruikt door kinderen van 8 jaar
en ouder en door mensen met beperkte lichamelijke,
zintuiglijke of verstandelijke vermogens of een gebrek aan
ervaring en kennis, indien zij onder toezicht staan of
instructies hebben gekregen over het veilig gebruiken van
het apparaat en indien zij de eventuele gevaren begrijpen.
• Kinderen tussen de 3 en 8 jaar oud en personen met
zware en complexe beperkingen dienen altijd uit de buurt
van het apparaat te worden gehouden, tenzij ze
voortdurend onder toezicht staan.
• Kinderen jonger dan 3 jaar dienen, mits zij voortdurend
onder toezicht staan, bij het apparaat uit de buurt te
worden gehouden.
• Laat kinderen niet met het apparaat spelen.
2 Progress

• Houd alle verpakkingen uit de buurt van kinderen en
verwijder ze op gepaste wijze.
• WAARSCHUWING: Houd kinderen en huisdieren uit de
buurt van het apparaat als het in werking is of afkoelt.
Makkelijk toegankelijke onderdelen worden heet tijdens
gebruik.
• Als het apparaat is voorzien van een kinderslot, dient dit te
worden geactiveerd.
• Kinderen mogen zonder toezicht geen reinigings- en
onderhoudswerkzaamheden aan het apparaat uitvoeren.
Algemene veiligheid
• WAARSCHUWING: Het apparaat en de toegankelijke
onderdelen ervan worden heet tijdens gebruik. U dient te
voorkomen de verwarmingselementen aan te raken.
• WAARSCHUWING: Onbewaakt koken op een fornuis met
vet of olie kan gevaarlijk zijn en tot brand leiden.
• Probeer NOOIT om een brand te blussen met water.
Schakel het apparaat uit en bedek dan de vlam, bv. met
een deksel of een vuurdeken.
• LET OP: Het apparaat mag niet van stroom worden
voorzien door een extern schakelapparaat, zoals een
tijdklok, of aangesloten worden op een circuit dat door het
elektriciteitsbedrijf regelmatig aan en uit wordt geschakeld.
• LET OP: Het kookproces moet bewaakt worden. Een kort
kookproces moet voortdurend bewaakt worden.
• WAARSCHUWING: Brandgevaar: Bewaar geen
voorwerpen op de kookplaten.
• Metalen voorwerpen, zoals messen, vorken, lepels en
deksels mogen niet op de kookplaat worden geplaatst,
aangezien ze heet kunnen worden.
• Gebruik het apparaat niet voordat u het in de ingebouwde
structuur installeert.
• Gebruik geen stoomreiniger om het apparaat schoon te
maken.
• Schakel het kookplaatelement uit na elk gebruik met de
bedieningstoetsen. Vertrouw niet op de pandetector.
Progress 3

• Als de glaskeramische / glazen oppervlakte gebarsten is,
schakel het apparaat dan uit en trek de stekker uit het
stopcontact. In het geval het apparaat direct op de stroom
is aangesloten met een aansluitdoos, verwijdert u de
zekering om het apparaat van de stroom te halen. Neem in
beide gevallen contact op met de erkende servicedienst.
• Als de voedingskabel beschadigd is, moet de fabrikant,
een erkende serviceverlener of een gekwalificeerd
persoon deze vervangen teneinde gevaarlijke situaties te
voorkomen.
• WAARSCHUWING: Gebruik alleen kookplaatbeschermers
die door de fabrikant van het kookapparaat zijn ontworpen
of door de fabrikant van het apparaat in de
gebruiksinstructies als geschikt zijn aangegeven of
kookplaatbeschermers die in het apparaat zijn
geïntegreerd. Het gebruik van ongeschikte
kookplaatbeschermers kan ongelukken veroorzaken.
VEILIGHEIDSVOORSCHRIFTEN
Installatie
WAARSCHUWING! Alleen een
erkende installatietechnicus
mag het apparaat installeren.
WAARSCHUWING! Gevaar
voor letsel of schade aan het
apparaat.
• Verwijder alle verpakkingsmaterialen.
• Installeer en gebruik geen beschadigd
apparaat.
• Volg de installatie-instructies die zijn
meegeleverd met het apparaat.
• Houd de minimumafstand naar andere
apparaten en units in acht.
• Pas altijd op bij verplaatsing van het
apparaat, want het is zwaar. Gebruik
altijd veiligheidshandschoenen en
gesloten schoeisel.
• Dicht de oppervlakken af met kit om te
voorkomen dat ze gaan opzetten door
vocht.
• Bescherm de bodem van het apparaat
tegen stoom en vocht.
• Installeer het apparaat niet naast een
deur of onder een raam. Dit voorkomt
dat heet kookgerei van het apparaat
valt als de deur of het raam wordt
geopend.
• Als het apparaat geïnstalleerd is boven
lades zorg er dan voor dat de ruimte
tussen de onderkant van het apparaat
en de bovenste lade voldoende is voor
luchtcirculatie.
• De onderkant van het apparaat kan
heet worden. Zorg ervoor dat u onder
het apparaat een scheidingspaneel
installeert dat gemaakt is van triplex,
keukenkastmateriaal of ander niet-
brandbaar materiaal om te voorkomen
dat hij de bodem raakt.
• Het afscheidingspaneel moet het
volledige gebied onder de kookplaat
bedekken.
• Zorg ervoor dat er een ventilatieruimte
van 2 mm tussen het werkblad en de
voorzijde van de eenheid eronder wordt
4 Progress

vrijgelaten. De garantie dekt geen
schade veroorzaakt door het gebrek
aan een adequate ventilatieruimte.
Aansluiting aan het
elektriciteitsnet
WAARSCHUWING! Gevaar
voor brand en elektrische
schokken.
• Alle elektrische aansluitingen moeten
door een gediplomeerd elektromonteur
worden gemaakt.
• Dit apparaat moet worden aangesloten
op een geaard stopcontact.
• Verzeker u ervan dat de stekker uit het
stopcontact is getrokken, voordat u
welke werkzaamheden dan ook
uitvoert.
• Zorg ervoor dat de parameters op het
vermogensplaatje overeenkomen met
elektrische vermogen van de
netstroom.
• Zorg ervoor dat het apparaat correct is
geïnstalleerd. Losse en onjuiste
stroomkabels of stekkers (indien van
toepassing) kunnen ervoor zorgen dat
de contactklem te heet wordt.
• Gebruik de juiste stroomkabel.
• Voorkom dat de stroomkabels verstrikt
raken.
• Zorg ervoor dat er een
schokbescherming wordt geïnstalleerd.
• Gebruik het klem om spanning op het
snoer te voorkomen.
• Zorg ervoor dat de stroomkabel of
stekker (indien van toepassing) het
hete apparaat of heet kookgerei niet
aanraakt als u het apparaat op de
nabijgelegen contactdozen aansluit.
• Gebruik geen adapters met meerdere
stekkers en verlengkabels.
• Zorg dat u de hoofdstekker (indien van
toepassing) of kabel niet beschadigt.
Neem contact op met onze service-
afdeling of een elektromonteur om een
beschadigde hoofdkabel te vervangen.
• De schokbescherming van delen onder
stroom en geïsoleerde delen moet op
zo'n manier worden bevestigd dat het
niet zonder gereedschap kan worden
verplaatst.
• Steek de stekker pas in het stopcontact
als de installatie is voltooid. Zorg ervoor
dat het netsnoer na installatie
bereikbaar is.
• Als het stopcontact los zit, mag u de
stekker niet in het stopcontact steken.
• Trek niet aan het netsnoer om het
apparaat los te koppelen. Trek altijd
aan de stekker.
• Gebruik enkel correcte
isolatievoorzieningen:
stroomonderbrekers, zekeringen
(schroefzekeringen moeten uit de
houder worden verwijderd),
aardlekschakelaars en contactgevers.
• De elektrische installatie moet een
isolatieapparaat bevatten waardoor het
apparaat volledig van het lichtnet
afgesloten kan worden. Het
isolatieapparaat moet een
contactopening hebben met een
minimale breedte van 3 mm.
Gebruik
WAARSCHUWING! Gevaar
voor letsel, brandwonden of
elektrische schokken.
• Verwijder voor gebruik (indien van
toepassing) de verpakking, labels en
beschermfolie.
• Dit apparaat is uitsluitend bestemd voor
huishoudelijk gebruik.
• De specificatie van dit apparaat niet
wijzigen.
• Zorg ervoor dat de ventilatieopeningen
niet geblokkeerd zijn.
• Laat het apparaat tijdens het gebruik
niet onbeheerd achter.
• Zet de kookzone op "uit" na elk
gebruik.
• Vertrouw niet alleen op de pandetector.
• Leg geen bestek of pannendeksels op
de kookzones. Deze kunnen heet
worden.
• Bedien het apparaat niet met natte
handen of als het contact maakt met
water.
Progress 5

• Het apparaat mag niet worden gebruikt
als werkblad of aanrecht.
• Sluit het apparaat direct af van de
stroomtoevoer als het oppervlak van
het apparaat gebroken is. Dit om
elektrische schokken te voorkomen.
• Gebruikers met een pacemaker
moeten een afstand van minimaal 30
cm bewaren van de inductiekookzones
als het apparaat in werking is.
• Als u eten in de hete olie doet, kan het
spatten.
WAARSCHUWING! Risico op
brand en explosie
• Wanneer ze verwarmd worden, kunnen
vetten en oliën ontvlambare dampen
afgeven. Houd vlammen of verwarmde
voorwerpen uit de buurt van vet en olie
als u hiermee kookt.
• De dampen die hete olie afgeeft
kunnen spontane ontbranding
veroorzaken.
• Gebruikte olie die voedselresten bevat
kan brand veroorzaken bij een lagere
temperatuur dan olie die voor de eerste
keer wordt gebruikt.
• Plaats geen ontvlambare producten of
items die vochtig zijn door ontvlambare
producten in, bij of op het apparaat.
WAARSCHUWING! Risico op
schade aan het apparaat.
• Zet geen heet kookgerei op het
bedieningspaneel.
• Leg geen hete deksel op het glazen
oppervlak van de kookplaat.
• Laat kookgerei niet droogkoken.
• Laat geen voorwerpen of kookgerei op
het apparaat vallen. Het oppervlak kan
beschadigen.
• Activeer de kookzones niet met lege
pannen of zonder pannen erop.
• Geen aluminiumfolie op het apparaat
leggen.
• Pannen van gietijzer, aluminium of met
beschadigde bodems kunnen krassen
veroorzaken in het glas / glaskeramiek.
Til deze voorwerpen altijd op als u ze
moet verplaatsen op het
kookoppervlak.
• Dit apparaat is uitsluitend bestemd om
mee te koken. Het mag niet worden
gebruikt voor andere doeleinden, zoals
het verwarmen van een kamer.
Onderhoud en reiniging
• Reinig het apparaat regelmatig om te
voorkomen dat het materiaal van het
oppervlak achteruitgaat.
• Schakel het apparaat uit en laat het
afkoelen voordat u het schoonmaakt.
• Gebruik geen waterstralen en stoom
om het apparaat te reinigen.
• Maak het apparaat schoon met een
vochtige zachte doek. Gebruik alleen
neutrale schoonmaakmiddelen.
Gebruik geen schuurmiddelen,
schuursponsjes, oplosmiddelen of
metalen voorwerpen.
Service
• Neem contact op met de erkende
servicedienst voor reparatie van het
apparaat. Gebruik alleen originele
reserveonderdelen.
• Met betrekking tot de lamp(en) in dit
product en reservelampen die
afzonderlijk worden verkocht: Deze
lampen zijn bedoeld om bestand te zijn
tegen extreme fysieke omstandigheden
in huishoudelijke apparaten, zoals
temperatuur, trillingen, vochtigheid, of
zijn bedoeld om informatie te geven
over de operationele status van het
apparaat. Ze zijn niet bedoeld voor
gebruik in andere toepassingen en zijn
niet geschikt voor verlichting in
huishoudelijke ruimten.
Verwijdering
WAARSCHUWING! Gevaar
voor letsel of verstikking.
• Neem contact met uw plaatselijke
overheid voor informatie m.b.t. correcte
afvalverwerking van het apparaat.
• Haal de stekker uit het stopcontact.
• Snijd het netsnoer vlak bij het apparaat
af en gooi het weg.
6 Progress

MONTAGE
WAARSCHUWING!
Raadpleeg de hoofdstukken
Veiligheid.
Voor montage
Voordat u de kookplaat installeert, dient u
de onderstaande informatie van het
typeplaatje te noteren. Het typeplaatje
bevindt zich onderop de kookplaat.
Model .......................................
Productnummer
(PNC) ........................................
Serienummer ...........................
Ingebouwde kookplaten
Inbouwkookplaten mogen alleen worden
gebruikt nadat zij ingebouwd zijn in
geschikte inbouwunits of werkbladen die
aan de normen voldoen.
Aansluitkabel
• De kookplaat is voorzien van een
aansluitsnoer.
• Voor het vervangen van een
beschadigde voedingskabel, gebruikt u
het kabeltype: H05V2V2-F dat een
temperatuur van 90 °C of hoger
weerstaat. Neem contact op met een
klantenservice bij u in de buurt.
De afdichting bevestigen -
Installatie aan bovenkant
1. Reinig het werkblad rond de plek waar
het gat moet worden uitgezaagd.
2. Bevestig de meegeleverde afdichtstrip
van 2 x 6 mm tegen de onderrand van
de kookplaat langs de buitenrand van
de keramische plaat. Rek de
afdichtstrip niet uit. Zorg dat de
uiteinden van de afdichtstrip zich in het
midden van een van de zijden van de
kookplaat bevinden.
3. Tel een paar millimeter bij de af te
knippen lengte van de afdichtstrip.
4. Duw de twee uiteinden van de
afdichtstrip samen.
Montage
min.
50mm
min.
500mm
min.
2mm
Progress 7

min. 2 mm
A
B
A
12 mm
28 mm
38 mm
B
57 mm
41 mm
31 mm
min
30 mm
min. 500 mm
< 20 mm
> 20 mm
min. 2 mm
A
B
A
12 mm
28 mm
38 mm
B
57 mm
41 mm
31 mm
min. 500 mm
270
+1
mm
R 5mm
min.
55mm
490
+1
mm
min.
38 mm
min.
2 mm
min.
12 mm
min.
2 mm
8 Progress

Installatie van meer dan één
kookplaat
40-50 mm
50 mm
55 mm
30 mm
min. 500 mm
490 mm
270 mm
2
0
+
2
0
+
BESCHRIJVING VAN HET PRODUCT
Indeling kookplaat
145 mm
210 mm
1
1
2
1
Inductiekookzone
2
Bedieningspaneel
Bedieningspaneel lay-out
1 2 3 4 5 6
79 810
Gebruik de tiptoetsen om het apparaat te bedienen. De displays, indicatielampjes en
geluiden tonen welke functies worden gebruikt.
Progress 9

Tip‐
toets
Functie Opmerking
1
AAN/UIT De kookplaat in- en uitschakelen.
2
Blokkering / Kinderbeveili‐
gingsinrichting
Het bedieningspaneel vergrendelen/ontgren‐
delen.
3
Pauzeren De functie in- en uitschakelen.
4
- Kookstanddisplay De kookstand weergeven.
5
- Timerindicatie voor de
kookzones
Geeft aan voor welke zone u de tijd instelt.
6
- Timerdisplay De tijd in minuten weergeven.
7
- Om de kookzone te selecteren.
8
/
- De tijd verlengen of verkorten.
9
/
- Het instellen van de kookstand.
10
PowerBoost Het inschakelen van de functie.
Kookstanddisplays
Scherm Beschrijving
De kookzone is uitgeschakeld.
-
De kookzone wordt gebruikt.
Pauzeren werkt.
PowerBoost werkt.
+ cijfer
Er is een storing.
/ /
OptiHeat Control (3-staps restwarmte-indicator): doorgaan met koken /
warmhoudstand / restwarmte.
Blokkering / Kinderbeveiligingsinrichting werkt.
Het kookgerei is niet geschikt of te klein, of er is geen kookgerei op de
kookzone geplaatst.
Automatische uitschakeling werkt.
10 Progress

OptiHeat Control (3-staps
restwarmte-indicator)
WAARSCHUWING! / /
Er bestaat
verbrandingsgevaar door
restwarmte.
De aanduidingen tonen het niveau van de
restwarmte voor de kookzones die u
momenteel gebruikt. De aanduidingen
kunnen ook aangaan voor de
nabijgelegen kookzones, zelfs als u deze
niet gebruikt.
De inductiekookzones creëren de voor het
kookproces benodigde warmte direct in de
bodem van de pan. Het glaskeramiek
wordt verwarmd door de warmte van de
pannen.
DAGELIJKS GEBRUIK
WAARSCHUWING!
Raadpleeg de hoofdstukken
Veiligheid.
In- of uitschakelen
Raak 1 seconde aan om de kookplaat
in– of uit te schakelen.
Automatische uitschakeling
De functie schakelt de kookplaat
automatisch uit als:
• alle kookzones zijn uitgeschakeld,
• u de kookstand niet instelt nadat u de
kookplaat hebt ingeschakeld,
• u iets hebt gemorst of iets langer dan
10 seconden op het bedieningspaneel
hebt gelegd (een pan, doek, etc.). Er
klinkt een geluidssignaal en de
kookplaat wordt uitgeschakeld.
Verwijder het voorwerp of reinig het
bedieningspaneel.
• De kookplaat te heet wordt
(bijvoorbeeld als een steelpan droog
kookt). De kookzone moet afgekoeld
zijn voordat u de kookplaat weer kunt
gebruiken.
• u ongeschikte pannen gebruikt. Het
symbool gaat branden en na 2
minuten schakelt de kookzone
automatisch uit.
• u een kookzone niet uitschakelt of de
kookstand verandert. Na een tijdje gaat
aan en schakelt de kookplaat uit.
De verhouding tussen kookstand en de
tijd waarna de kookplaat uitschakelt:
Warmte-instelling De kookplaat
wordt uitgescha‐
keld na
, 1 - 2
6 uur
3 - 4 5 uur
5 4 uur
6 - 9 1,5 uur
De kookstand
aanraken om te verhogen.
aanraken om te verlagen. Raak en
tegelijkertijd aan om de kookzone uit te
schakelen.
PowerBoost
Deze functie maakt meer vermogen
beschikbaar voor de inductiekookzones.
De functie kan voor een beperkte tijdsduur
voor uitsluitend de inductiekookzone
worden geactiveerd. Daarna wordt de
inductiekookzone automatisch
teruggeschakeld naar de hoogste
kookstand.
Zie het hoofdstuk 'Technische
gegevens'.
Om de functie voor een kookzone in te
schakelen: raak
aan. gaat branden.
De functie uitschakelen: raak of
aan.
Progress 11

Timer
• Timer met aftelfunctie
U kunt deze functie gebruiken om de
lengte van één kooksessie in te stellen.
Stel eerst de warmtestand voor de
kookzone in en dan de functie.
Om de kookzone in te stellen: tik
herhaaldelijk op totdat het lampje van
een kookzone verschijnt.
Om de functie te activeren of de tijd te
wijzigen: tik op of van de timer om
de tijd in te stellen (00 - 99 minuten). Als
het lampje van de kookzone gaat
knipperen, wordt de tijd afgeteld.
Om de resterende tijd te zien: tik op
om de kookzone in te stellen. Het
indicatielampje van de kookzone begint te
knipperen. Op het display wordt de
resterende tijd weergegeven.
Om de functie te deactiveren: tik op
om de kookzone in te stellen en tik
vervolgens op
. De resterende tijd telt
terug tot 00. Het indicatielampje van de
kookzone verdwijnt.
Als de aftelling beëindigd is,
klinkt er een geluidssignaal en
knippert 00. De kookzone
wordt uitgeschakeld.
Om de functie te stoppen: tik op .
• Kookwekker
U kunt deze functie gebruiken wanneer de
kookplaat is ingeschakeld maar de
kookzones niet werken. De warmtestand
op het display toont
.
Om de functie te activeren: tik op
en
tik vervolgens op
of van de timer om
de tijd in te stellen. Als de tijd verstreken
is, klinkt er een geluidssignaal en knippert
00.
Om de functie te stoppen: tik op
.
Om de functie te deactiveren: tik op
en tik vervolgens op . De resterende tijd
telt terug tot 00.
De functie heeft geen invloed
op de werking van de
kookzones.
Pauzeren
Deze functie stelt alle kookzones die
werken in op de laagste warmtestand.
Als de functie in werking is, zijn alle
andere symbolen op de
bedieningspanelen vergrendeld.
De functie stopt de timerfunctie niet.
Tik op om de functie in te schakelen.
gaat aan.De warmte-instelling wordt
verlaagd naar 1.
Voor het uitschakelen van de functie
raakt u aan. De voorgaande
warmteinstelling gaat aan.
Blokkering
U kunt het bedieningspaneel vergrendelen
terwijl de kookzones in werking zijn.
Hiermee wordt voorkomen dat de
kookstand per ongeluk wordt veranderd.
Stel eerst de kookstand in.
De functie inschakelen: raak aan.
gaat gedurende 4 seconden aan. De timer
blijft aan.
De functie uitschakelen: Raak
aan.
De vorige kookstand gaat aan.
Als u de kookplaat uitzet, stopt
u deze functie ook.
Kinderbeveiligingsinrichting
Deze functie voorkomt dat de kookplaat
onbedoeld wordt gebruikt.
Om de functie te activeren: activeer de
kookplaat met
. Stel geen
warmteinstelling in. Raak 4 seconden
12 Progress

aan. gaat aan. Schakel de kookplaat
uit met .
Om de functie te deactiveren: activeer
de kookplaat met . Stel geen
warmteinstelling in. Raak 4 seconden
aan. gaat aan. Schakel de kookplaat
uit met .
Om de functie voor slechts één
kooksessie te onderdrukken: activeer
de kookplaat met . gaat aan. Raak
4 seconden aan. Stel de kookstand in
binnen 10 seconden. U kunt de
kookplaat bedienen. Als u de kookplaat
uitschakelt met
, treedt de functie weer
in werking.
OffSound Control (In- en
uitschakelen van de geluiden)
Schakel de kookplaat uit. Raak 3
seconden aan. Het display gaat aan en
uit. Raak
3 seconden aan. of
gaat branden. Raak aan van de zone
linksvoor om één van het volgende te
kiezen:
• - de signalen zijn uit
• - de signalen zijn aan
Om uw keuze te bevestigen moet u
wachten tot de kookplaat automatisch
uitschakelt.
Als de functie op staat, kunt u de
geluiden alleen horen als:
• u aanraakt
• Kookwekker naar beneden komt
• Timer met aftelfunctie naar beneden
komt
• u iets op het bedieningspaneel plaatst.
Stroommanagement
• Alle kookzones zijn aangesloten op één
fase. Zie afbeelding.
• De functie wordt geactiveerd als de
totale elektriciteitslading van de
kookzones de maximale
elektriciteitslading van de fase
overschrijdt.
• De functie verdeelt het vermogen
tussen de kookzones.
• De functie verlaagt het vermogen naar
de andere kookzones.
• De weergave van de warmte-instelling
van de verlaagde zones wisselt af
tussen de gekozen warmte-instelling en
de verlaagde warmte-instelling. Na
enige tijd blijft de weergave van de
warmte-instelling van de verlaagde
zones op de verlaagde warmtestand
staan.
AANWIJZINGEN EN TIPS
WAARSCHUWING!
Raadpleeg de hoofdstukken
Veiligheid.
Pannen
Voor inductiekookzones creëert
een sterk elektromagnetisch
veld de hitte in de pannen zeer
snel.
Gebruik de inductiekookzones met
geschikte pannen.
Progress 13

• De bodem van de pannen moet zo dik
en vlak mogelijk zijn.
• Zorg ervoor dat bodems schoon en
droog zijn voordat de pannen op de
kookplaat worden gezet.
• Schuif of wrijf de pan niet over het
keramische glas, om krassen te
voorkomen.
Panmaterialen
• goed: gietijzer, staal, geëmailleerd
staal, roestvrij staal, meerlaagse
bodem (aangemerkt als geschikt door
de fabrikant).
• niet goed: aluminium, koper, messing,
glas, keramiek, porselein.
Een pan is geschikt voor een
inductiekookplaat als:
• water op de hoogste kookstand binnen
korte tijd wordt verwarmd,
• een magneet op de onderkant van het
kookgerei plakt.
Afmetingen van pannen
• Inductiekookzones passen zich tot op
zekere hoogte automatisch aan de
afmetingen van pannen aan.
• De efficiëntie van de kookzone hangt
samen met de diameter van de pan.
Pannen met een diameter kleiner dan
het minimum ontvangen slechts een
deel van het vermogen dat door de
kookzone wordt gegenereerd.
• Gebruik zowel om veiligheidsredenen
als voor optimale kookresultaten geen
pannen groter dan aangegeven in de
kookzonespecificaties. Zorg ervoor dat
pannen tijdens het koken niet dicht bij
het bedieningspaneel blijven. Dit kan
invloed hebben op de werking van het
bedieningspaneel of onbedoeld de
kookplaatfuncties activeren.
Raadpleeg de technische
gegevens.
Lawaai tijdens gebruik
Als u dit hoort:
• kraakgeluid: de pan is gemaakt van
verschillende materialen (een
sandwich-constructie).
• fluitend geluid: bij gebruik van een
kookzone met een hoge kookstand en
als het kookgerei is gemaakt van
verschillende materialen (een
sandwich-constructie).
• zoemend geluid: als u hoge
kookstanden gebruikt.
• klikken: er treedt elektrische schakeling
op.
• sissend, brommend: de ventilator
werkt.
Deze geluiden zijn normaal en hebben
niets met een defect te maken.
Voorbeelden van
kooktoepassingen
De correlatie tussen de kookstand en het
stroomverbruik van de kookzone is niet
lineair. Wanneer u de kookstand verhoogt,
is dit niet proportioneel met de toename in
stroomverbruik van de kookzone. Het
betekent dat een kookzone op de medium
kookstand minder dan de helft van het
vermogen gebruikt.
De gegevens in de volgende
tabel dienen slechts als
richtlijn.
Warmte-in‐
stelling
Gebruik om: Tijd
(min)
Tips
- 1
Bereide gerechten warmhou‐
den.
zoals
nodig
Een deksel op het kookgerei
doen.
1 - 2 Hollandaisesaus, smelten: bo‐
ter, chocolade, gelatine.
5 - 25 Van tijd tot tijd mengen.
14 Progress

Warmte-in‐
stelling
Gebruik om: Tijd
(min)
Tips
1 - 2 Stollen: luchtige omeletten, ge‐
bakken eieren.
10 -
40
Met deksel bereiden.
2 - 3 Zachtjes aan de kook brengen
van rijst en gerechten op melk‐
basis, reeds bereide gerechten
opwarmen.
25 -
50
Voeg minimaal twee keer zo
veel vocht toe als rijst en roer
gerechten op melkbasis hal‐
verwege de procedure door.
3 - 4 Stomen van groenten, vis en
vlees.
20 -
45
Voeg een paar eetlepels vocht
toe.
4 - 5 Aardappelen stomen. 20 -
60
Gebruik max. ¼ l water voor
750 g aardappelen.
4 - 5 Bereiden van grotere hoeveel‐
heden voedsel, stoofschotels
en soepen.
60 -
150
Tot 3 l vloeistof plus ingrediën‐
ten.
6 - 7 Lichtjes braden: kalfsoester,
cordon bleu van kalfsvlees, ko‐
teletten, rissoles, worstjes, le‐
ver, roux, eieren, pannenkoe‐
ken, donuts.
zoals
nodig
Halverwege de bereidingstijd
omdraaien.
7 - 8 Door-en-door gebraden, opge‐
bakken aardappelen, lenden‐
biefstukken, steaks.
5 - 15 Halverwege de bereidingstijd
omdraaien.
9 Aan de kook brengen van water, pasta koken, aanbraden van vlees (gou‐
lash, stoofvlees), frituren van friet.
Aan de kook brengen van grote hoeveelheden water. PowerBoost is geacti‐
veerd.
ONDERHOUD EN REINIGING
WAARSCHUWING!
Raadpleeg de hoofdstukken
Veiligheid.
Algemene informatie
• Maak de kookplaat na ieder gebruik
schoon.
• Gebruik altijd kookgerei met een
schone bodem.
• Krassen of donkere vlekken op de
oppervlakte hebben geen invloed op de
werking van de kookplaat.
• Gebruik een specifiek
schoonmaakmiddel voor het oppervlak
van de kookplaat.
• Gebruik een speciale schraper voor de
glazen plaat.
De kookplaat schoonmaken
• Verwijder direct: gesmolten kunststof,
plastic folie, suiker en suikerhoudend
voedsel, anders kan dit schade aan de
kookplaat veroorzaken. Doe voorzichtig
om brandwonden te voorkomen.
Gebruik de speciale schraper op de
glazen plaat en verwijder resten door
Progress 15

het blad over het oppervlak te
schuiven.
• Verwijder nadat de kookplaat
voldoende is afgekoeld: kalk- en
waterkringen, vetspatten en
metaalachtig glanzende verkleuringen.
Reinig de kookplaat met een vochtige
doek en een beetje niet-schurend
reinigingsmiddel. Droog de kookplaat
na reiniging af met een zachte doek.
• Verkleuring glanzende metalen
verwijderen: reinig het glazen
oppervlak met een doek en een
oplossing van water met azijn.
PROBLEEMOPLOSSING
WAARSCHUWING!
Raadpleeg de hoofdstukken
Veiligheid.
Wat moet u doen als ...
Probleem Mogelijke oorzaak Oplossing
U kunt de kookplaat niet
inschakelen of bedienen.
De kookplaat is niet aange‐
sloten op een stopcontact of
niet goed geïnstalleerd.
Controleer of de kookplaat
goed aangesloten is op het
lichtnet.
De zekering is doorgesla‐
gen.
Verzeker u ervan dat de zeke‐
ring de oorzaak van de storing
is. Als de zekeringen keer op
keer doorslaan, neemt u con‐
tact op met een erkende in‐
stallateur.
Stel gedurende 10 seconden
geen kookstand in.
Schakel de kookplaat opnieuw
in en stel de kookstand binnen
10 seconden in.
U hebt 2 of meer sensorvel‐
den tegelijkertijd aangeraakt.
Raak slechts één sensorveld
aan.
Pauzeren werkt. Raadpleeg "Dagelijks ge‐
bruik".
Water of vetvlekken op het
bedieningspaneel.
Reinig het bedieningspaneel.
Er klinkt een geluidssig‐
naal en de kookplaat
wordt uitgeschakeld.
Als de kookplaat wordt
uitgeschakeld, klinkt er
een geluidssignaal.
U hebt iets op een of meer
sensorvelden geplaatst.
Verwijder het voorwerp van de
sensorvelden.
De kookplaat wordt uitge‐
schakeld.
U hebt iets op het sensor‐
veld geplaatst .
Verwijder het voorwerp van
het sensorveld.
16 Progress

Probleem Mogelijke oorzaak Oplossing
De restwarmte-indicator
gaat niet aan.
De zone is niet heet omdat
deze slechts kortstondig is
gebruikt, of de sensor is be‐
schadigd.
Als de zone voldoende lang
gebruikt is om heet te zijn,
neemt u contact op met een
erkende servicedienst.
De kookstand schakelt
tussen twee niveaus.
Stroommanagement werkt. Raadpleeg "Dagelijks ge‐
bruik".
De sensorvelden worden
heet.
De pan is te groot of u
plaatst deze te dicht bij de
bedieningsknoppen.
Plaats grotere pannen indien
mogelijk op de achterste kook‐
zones.
Er klinkt geen geluidsig‐
naal wanneer u de tiptoet‐
sen van het bedienings‐
paneel aanraakt.
De signalen zijn uit. Schakel de geluiden in. Raad‐
pleeg "Dagelijks gebruik".
gaat aan.
Kinderbeveiligingsinrichting
of Blokkering werkt.
Raadpleeg "Dagelijks ge‐
bruik".
gaat aan.
Er staat geen pan op de zo‐
ne.
Plaats een pan op de zone.
De pan is niet geschikt. Gebruik geschikte pannen. Zie
'Aanwijzingen en tips'.
De diameter van de bodem
van de pan is te klein voor
de zone.
Gebruik pannen met de juiste
afmetingen. Raadpleeg de
technische gegevens.
en een getal gaan
branden.
Er is een fout opgetreden in
de kookplaat.
Schakel de kookplaat uit en
schakel deze na 30 seconden
weer in. Indien opnieuw
wordt weergegeven, trekt u de
stekker van de kookplaat uit
het stopcontact. Steek de
stekker van de kookplaat er na
30 seconden weer in. Als het
probleem zich blijft voordoen,
neemt u contact op met een
erkende servicedienst.
U kunt een constant piep‐
geluid horen.
De elektrische aansluiting is
verkeerd.
Trek de stekker van de kook‐
plaat uit het stopcontact. Laat
de installatie controleren door
een erkende elektricien.
Als u het probleem niet kunt
oplossen...
Als u niet zelf het probleem kunt
verhelpen, neem dan contact op met uw
verkoper of de serviceafdeling. Zie voor
deze gegevens het typeplaatje. Geef ook
de driecijferige code voor het
glaskeramiek (bevindt zich op de hoek
van het glazen oppervlak) en de
Progress 17

foutmelding die wordt weergegeven.
Verzeker u ervan dat u de kookplaat
correct gebruikt heeft. Bij onjuist gebruik
van het apparaat wordt het bezoek van de
onderhoudstechnicus van de
klantenservice of de vakhandelaar in
rekening gebracht, zelfs tijdens de
garantieperiode. De instructies over het
service center en de garantiebepalingen
vindt u in het garantieboekje.
TECHNISCHE GEGEVENS
Specificatie kookzones
Kookzone Nominaal ver‐
mogen (max
warmte-in‐
stelling) [W]
PowerBoost
[W]
PowerBoost
maximale
duur [min]
Diameter
kookgerei
[mm]
Middenvoor 2300 3700 10 180 - 210
Middenachter 1400 2500 4 125 - 145
Het vermogen van de kookzones kan
binnen een bepaalde kleine marge
verschillen van de gegevens in de tabel.
Dit kan veranderen afhankelijk van het
materiaal en de afmetingen van het
kookgerei.
Gebruik voor optimale kookresultaten
alleen kookgerei met een diameter die niet
groter is dan vermeld in de tabel.
Labels meegeleverd in de zak
met accessoires
Bevestig de stickers zoals hieronder
weergegeven:
MOD.
PROD.NO.
SER.NO
DATA
MOD.
PROD.NO.
SER.NO
DATA
MOD.
PROD.NO.
SER.NO.
03 IT
MADE IN ITALY
TYPE
IP20
0049
A B C
A. Plak het op de garantiekaart en
verstuur dit deel (indien van
toepassing).
B. Plak het op de garantiekaart en
bewaar dit deel (indien van
toepassing).
18 Progress

C. Plak het op het instructieboekje.
ENERGIEZUINIGHEID
Productinformatie volgens EU 66/2014 alleen geldig voor EU-markt
Modelidentificatie PAI3101F
Type kookplaat Ingebouwde kook‐
plaat
Aantal kookzones 2
Verwarmingstechnologie Inductie
Diameter ronde kookzones (Ø) Middenvoor
Middenachter
21,0 cm
14,5 cm
Energieverbruik per kookzone (EC electric
cooking)
Middenvoor
Middenachter
188,9 Wh/kg
183,4 Wh/kg
Energieverbruik van de kookplaat (EC electric hob) 186,2 Wh/kg
EN 60350-2 - Huishoudelijke elektrische
kookapparaten - deel 2: Kookplaten -
Methodes voor het meten van de prestatie
Energiebesparing
U kunt elke dag energie besparen tijdens
het koken door de onderstaande tips te
volgen.
• Warm alleen de hoeveelheid water op
die u nodig heeft.
• Doe indien mogelijk altijd een deksel op
de pan.
• Zet uw kookgerei op de kookzone
voordat u deze activeert.
• Zet kleiner kookgerei op kleinere
kookzones.
• Plaats het kookgerei precies in het
midden van de kookzone.
• Gebruik de restwarmte om het eten
warm te houden of te smelten.
MILIEUBESCHERMING
Recycleer de materialen met het symbool
. Gooi de verpakking in een geschikte
afvalcontainer om het te recycleren.
Bescherm het milieu en de
volksgezondheid en recycleer op een
correcte manier het afval van elektrische
en elektronische apparaten. Gooi
apparaten gemarkeerd met het symbool
niet weg met het huishoudelijk afval.
Breng het product naar het milieustation
bij u in de buurt of neem contact op met
de gemeente.
Progress 19

CONTENTS
Safety information 20
Safety instructions 22
Installation 24
Product description 27
Daily use 28
Hints and tips 31
Care and cleaning 32
Troubleshooting 33
Technical data 35
Energy efficiency 36
Subject to change without notice.
VISIT OUR WEBSITE TO:
Get usage advice, brochures, trouble shooter, service and repair
information:
www.progress-hausgeraete.de/support
SAFETY INFORMATION
Before the installation and use of the appliance, carefully
read the supplied instructions. The manufacturer is not
responsible for any injuries or damage that are the result of
incorrect installation or usage. Always keep the instructions
in a safe and accessible location for future reference.
Children and vulnerable people safety
• This appliance can be used by children aged from 8 years
and above and persons with reduced physical, sensory or
mental capabilities or lack of experience and knowledge if
they have been given supervision or instruction concerning
the use of the appliance in a safe way and understand the
hazards involved.
• Children between 3 and 8 years of age and persons with
very extensive and complex disabilities shall be kept away
from the appliance unless continuously supervised.
• Children of less than 3 years of age should be kept away
from the appliance unless continuously supervised.
• Do not let children play with the appliance.
• Keep all packaging away from children and dispose of it
appropriately.
20 Progress

• WARNING: Keep children and pets away from the
appliance when it operates or when it cools down.
Accessible parts become hot during use.
• If the appliance has a child safety device, it should be
activated.
• Children shall not carry out cleaning and user maintenance
of the appliance without supervision.
General Safety
• WARNING: The appliance and its accessible parts
become hot during use. Care should be taken to avoid
touching heating elements.
• WARNING: Unattended cooking on a hob with fat or oil
can be dangerous and may result in fire.
• NEVER try to extinguish a fire with water, but switch off the
appliance and then cover flame e.g. with a lid or a fire
blanket.
• CAUTION: The appliance must not be supplied through an
external switching device, such as a timer, or connected to
a circuit that is regularly switched on and off by a utility.
• CAUTION: The cooking process has to be supervised. A
short term cooking process has to be supervised
continuously.
• WARNING: Danger of fire: Do not store items on the
cooking surfaces.
• Metallic objects such as knives, forks, spoons and lids
should not be placed on the hob surface since they can get
hot.
• Do not use the appliance before installing it in the built-in
structure.
• Do not use a steam cleaner to clean the appliance.
• After use, switch off the hob element by its control and do
not rely on the pan detector.
• If the glass ceramic surface / glass surface is cracked,
switch off the appliance and unplug it from the mains. In
case the appliance is connected to the mains directly using
junction box, remove the fuse to disconnect the appliance
Progress 21

from power supply. In either case contact the Authorised
Service Centre.
• If the supply cord is damaged, it must be replaced by the
manufacturer, an authorized Service or similarly qualified
persons in order to avoid a hazard.
• WARNING: Use only hob guards designed by the
manufacturer of the cooking appliance or indicated by the
manufacturer of the appliance in the instructions for use as
suitable or hob guards incorporated in the appliance. The
use of inappropriate guards can cause accidents.
SAFETY INSTRUCTIONS
Installation
WARNING! Only a qualified
person must install this
appliance.
WARNING! Risk of injury or
damage to the appliance.
• Remove all the packaging.
• Do not install or use a damaged
appliance.
• Follow the installation instructions
supplied with the appliance.
• Keep the minimum distance from other
appliances and units.
• Always take care when moving the
appliance as it is heavy. Always use
safety gloves and enclosed footwear.
• Seal the cut surfaces with a sealant to
prevent moisture from causing swelling.
• Protect the bottom of the appliance
from steam and moisture.
• Do not install the appliance next to a
door or under a window. This prevents
hot cookware from falling from the
appliance when the door or the window
is opened.
• If the appliance is installed above
drawers make sure that the space,
between the bottom of the appliance
and the upper drawer is sufficient for air
circulation.
• The bottom of the appliance can get
hot. Make sure to install a separation
panel made from plywood, kitchen
carcass material or other non-
flammable materials under the
appliance to prevent access to the
bottom.
• The separation panel has to cover the
area under the hob completely.
• Make sure that the ventilation space of
2 mm, between the worktop and the
front of the below unit, is free. The
warranty does not cover damages
caused by the lack of an adequate
ventilation space.
Electrical Connection
WARNING! Risk of fire and
electric shock.
• All electrical connections should be
made by a qualified electrician.
• The appliance must be earthed.
• Before carrying out any operation make
sure that the appliance is disconnected
from the power supply.
• Make sure that the parameters on the
rating plate are compatible with the
electrical ratings of the mains power
supply.
• Make sure the appliance is installed
correctly. Loose and incorrect electricity
mains cable or plug (if applicable) can
make the terminal become too hot.
• Use the correct electricity mains cable.
22 Progress

• Do not let the electricity mains cable
tangle.
• Make sure that a shock protection is
installed.
• Use the strain relief clamp on the cable.
• Make sure the mains cable or plug (if
applicable) does not touch the hot
appliance or hot cookware, when you
connect the appliance to the near
sockets.
• Do not use multi-plug adapters and
extension cables.
• Make sure not to cause damage to the
mains plug (if applicable) or to the
mains cable. Contact our Authorised
Service Centre or an electrician to
change a damaged mains cable.
• The shock protection of live and
insulated parts must be fastened in
such a way that it cannot be removed
without tools.
• Connect the mains plug to the mains
socket only at the end of the
installation. Make sure that there is
access to the mains plug after the
installation.
• If the mains socket is loose, do not
connect the mains plug.
• Do not pull the mains cable to
disconnect the appliance. Always pull
the mains plug.
• Use only correct isolation devices: line
protecting cut-outs, fuses (screw type
fuses removed from the holder), earth
leakage trips and contactors.
• The electrical installation must have an
isolation device which lets you
disconnect the appliance from the
mains at all poles. The isolation device
must have a contact opening width of
minimum 3 mm.
Use
WARNING! Risk of injury,
burns and electric shock.
• Remove all the packaging, labelling
and protective film (if applicable) before
first use.
• This appliance is for household use
only.
• Do not change the specification of this
appliance.
• Make sure that the ventilation openings
are not blocked.
• Do not let the appliance stay
unattended during operation.
• Set the cooking zone to “off” after each
use.
• Do not rely on the pan detector.
• Do not put cutlery or saucepan lids on
the cooking zones. They can become
hot.
• Do not operate the appliance with wet
hands or when it has contact with
water.
• Do not use the appliance as a work
surface or as a storage surface.
• If the surface of the appliance is
cracked, disconnect immediately the
appliance from the power supply. This
to prevent an electrical shock.
• Users with a pacemaker must keep a
distance of minimum 30 cm from the
induction cooking zones when the
appliance is in operation.
• When you place food into hot oil, it may
splash.
WARNING! Risk of fire and
explosion
• Fats and oil when heated can release
flammable vapours. Keep flames or
heated objects away from fats and oils
when you cook with them.
• The vapours that very hot oil releases
can cause spontaneous combustion.
• Used oil, that can contain food
remnants, can cause fire at a lower
temperature than oil used for the first
time.
• Do not put flammable products or items
that are wet with flammable products
in, near or on the appliance.
WARNING! Risk of damage to
the appliance.
• Do not keep hot cookware on the
control panel.
• Do not put a hot pan cover on the glass
surface of the hob.
• Do not let cookware boil dry.
Progress 23

• Be careful not to let objects or
cookware fall on the appliance. The
surface can be damaged.
• Do not activate the cooking zones with
empty cookware or without cookware.
• Do not put aluminium foil on the
appliance.
• Cookware made of cast iron, aluminium
or with a damaged bottom can cause
scratches on the glass / glass ceramic.
Always lift these objects up when you
have to move them on the cooking
surface.
• This appliance is for cooking purposes
only. It must not be used for other
purposes, for example room heating.
Care and cleaning
• Clean the appliance regularly to
prevent the deterioration of the surface
material.
• Switch off the appliance and let it cool
down before cleaning.
• Do not use water spray and steam to
clean the appliance.
• Clean the appliance with a moist soft
cloth. Use only neutral detergents. Do
not use abrasive products, abrasive
cleaning pads, solvents or metal
objects.
Service
• To repair the appliance contact the
Authorised Service Centre. Use original
spare parts only.
• Concerning the lamp(s) inside this
product and spare part lamps sold
separately: These lamps are intended
to withstand extreme physical
conditions in household appliances,
such as temperature, vibration,
humidity, or are intended to signal
information about the operational status
of the appliance. They are not intended
to be used in other applications and are
not suitable for household room
illumination.
Disposal
WARNING! Risk of injury or
suffocation.
• Contact your municipal authority for
information on how to discard the
appliance correctly.
• Disconnect the appliance from the
mains supply.
• Cut off the mains electrical cable close
to the appliance and dispose of it.
INSTALLATION
WARNING! Refer to Safety
chapters.
Before the installation
Before you install the hob, write down the
information below from the rating plate.
The rating plate is on the bottom of the
hob.
Model .......................................
PNC .........................................
Serial number ...........................
Built-in hobs
Only use the built-in hobs after you
assemble the hob into correct built-in units
and work surfaces that align to the
standards.
Connection cable
• The hob is supplied with a connection
cable.
• To replace the damaged mains cable,
use the cable type: H05V2V2-F which
withstands a temperature of 90 °C or
higher. Speak to your local Service
Centre.
Attaching the seal - On-top
installation
1. Clean the worktop around the cut out
area.
24 Progress

2. Attach the supplied 2x6mm seal stripe
to the lower edge of the hob, along the
outer edge of the glass ceramic. Do
not stretch it. Make sure that the ends
of the seal stripe are located in the
middle of one side of the hob.
3. Add some millimetres to the length
when you cut the seal stripe.
4. Join the two ends of the seal stripe
together.
Assembly
min.
50mm
min.
500mm
min.
2mm
min. 2 mm
A
B
A
12 mm
28 mm
38 mm
B
57 mm
41 mm
31 mm
min
30 mm
min. 500 mm
< 20 mm
> 20 mm
min. 2 mm
A
B
A
12 mm
28 mm
38 mm
B
57 mm
41 mm
31 mm
min. 500 mm
Progress 25

270
+1
mm
R 5mm
min.
55mm
490
+1
mm
min.
38 mm
min.
2 mm
min.
12 mm
min.
2 mm
Installation of more than one
hob
40-50 mm
50 mm
55 mm
30 mm
min. 500 mm
490 mm
270 mm
2
0
+
2
0
+
26 Progress

PRODUCT DESCRIPTION
Cooking surface layout
145 mm
210 mm
1
1
2
1
Induction cooking zone
2
Control panel
Control panel layout
1 2 3 4 5 6
79 810
Use the sensor fields to operate the appliance. The displays, indicators and sounds tell
which functions operate.
Sen‐
sor
field
Function Comment
1
ON / OFF To activate and deactivate the hob.
2
Lock / Child Safety Device To lock / unlock the control panel.
3
Pause To activate and deactivate the function.
4
- Heat setting display To show the heat setting.
5
- Timer indicators of cooking
zones
To show for which zone you set the time.
6
- Timer display To show the time in minutes.
7
- To select the cooking zone.
Progress 27

Sen‐
sor
field
Function Comment
8
/
- To increase or decrease the time.
9
/
- To set a heat setting.
10
PowerBoost To activate the function.
Heat setting displays
Display Description
The cooking zone is deactivated.
-
The cooking zone operates.
Pause operates.
PowerBoost operates.
+ digit
There is a malfunction.
/ /
OptiHeat Control (3 step Residual heat indicator): continue cooking /
keep warm / residual heat.
Lock / Child Safety Device operates.
Incorrect or too small cookware or no cookware on the cooking zone.
Automatic Switch Off operates.
OptiHeat Control (3 step
Residual heat indicator)
WARNING! / / There
is a risk of burns from residual
heat.
The indicators show the level of the
residual heat for the cooking zones you
are currently using. The indicators may
also come on for the neighbouring cooking
zones even if you are not using them.
The induction cooking zones produce the
heat necessary for the cooking process
directly in the bottom of the cookware. The
glass ceramic is heated by the heat of the
cookware.
DAILY USE
WARNING! Refer to Safety
chapters.
28 Progress

Activating and deactivating
Touch for 1 second to activate or
deactivate the hob.
Automatic Switch Off
The function deactivates the hob
automatically if:
• all cooking zones are deactivated,
• you do not set the heat setting after you
activate the hob,
• you spill something or put something
on the control panel for more than 10
seconds (a pan, a cloth, etc.). An
acoustic signal sounds and the hob
deactivates. Remove the object or
clean the control panel.
• the hob gets too hot (e.g. when a
saucepan boils dry). Let the cooking
zone cool down before you use the hob
again.
• you use incorrect cookware. The
symbol comes on and the cooking
zone deactivates automatically after 2
minutes.
• you do not deactivate a cooking zone
or change the heat setting. After some
time
comes on and the hob
deactivates.
The relation between the heat setting
and the time after which the hob
deactivates:
Heat setting The hob deacti‐
vates after
, 1 - 2
6 hours
3 - 4 5 hours
5 4 hours
6 - 9 1.5 hour
The heat setting
Touch to increase the heat setting.
Touch to decrease the heat setting.
Touch and at the same time to
deactivate the cooking zone.
PowerBoost
This function makes more power available
to the induction cooking zones. The
function can be activated for the induction
cooking zone only for a limited period of
time. After this time the induction cooking
zone automatically sets back to the
highest heat setting.
Refer to “Technical data”
chapter.
To activate the function for a cooking
zone: touch . comes on.
To deactivate the function: touch or
.
Timer
• Count Down Timer
You can use this function to set the length
of a single cooking session.
First set the heat setting for the cooking
zone, then set the function.
To set the cooking zone: touch
repeatedly until the indicator of a cooking
zone appears.
To activate the function or change the
time: touch or of the timer to set the
time (00 - 99 minutes). When the indicator
of the cooking zone starts to flash, the
time counts down.
To see the remaining time: touch to
set the cooking zone. The indicator of the
cooking zone starts to flash. The display
shows the remaining time.
To deactivate the function: touch to
set the cooking zone and then touch .
The remaining time counts down to 00.
The indicator of the cooking zone
disappears.
When the countdown ends, an
acoustic signal sounds and 00
flashes. The cooking zone
deactivates.
Progress 29

To stop the sound: touch .
• Minute Minder
You can use this function when the hob is
activated and the cooking zones do not
operate. The heat setting display shows
.
To activate the function: touch
and
then touch or of the timer to set the
time. When the time finishes, an acoustic
signal sounds and 00 flashes.
To stop the sound: touch .
To deactivate the function: touch and
then touch . The remaining time counts
down to 00.
The function has no effect on
the operation of the cooking
zones.
Pause
This function sets all cooking zones that
operate to the lowest heat setting.
When the function operates, all other
symbols on the control panels are locked.
The function does not stop the timer
functions.
Touch to activate the function.
comes on. The heat setting is lowered
to 1.
To deactivate the function, touch .
The previous heat setting comes on.
Lock
You can lock the control panel while
cooking zones operate. It prevents an
accidental change of the heat setting.
Set the heat setting first.
To activate the function: touch
.
comes on for 4 seconds. The Timer stays
on.
To deactivate the function: touch
.
The previous heat setting comes on.
When you deactivate the hob,
you also deactivate this
function.
Child Safety Device
This function prevents an accidental
operation of the hob.
To activate the function: activate the hob
with . Do not set any heat setting.
Touch for 4 seconds. comes on.
Deactivate the hob with .
To deactivate the function: activate the
hob with . Do not set any heat setting.
Touch for 4 seconds. comes on.
Deactivate the hob with .
To override the function for only one
cooking time: activate the hob with .
comes on. Touch for 4 seconds. Set
the heat setting in 10 seconds. You can
operate the hob. When you deactivate the
hob with the function operates again.
OffSound Control (Deactivation
and activation of the sounds)
Deactivate the hob. Touch for 3
seconds. The display comes on and goes
out. Touch for 3 seconds. or
comes on. Touch of the front left zone
to choose one of the following:
• - the sounds are off
• - the sounds are on
To confirm your selection wait until the
hob deactivates automatically.
When the function is set to
you can
hear the sounds only when:
• you touch
• Minute Minder comes down
• Count Down Timer comes down
• you put something on the control panel.
30 Progress

Power management
• All cooking zones are connected to one
phase. See the illustration.
• The function activates when the total
electricity loading of the cooking zones
exceeds maximum electricity loading of
the phase.
• The function divides the power
between cooking zones.
• The function decreases the power to
the other cooking zones.
• The heat setting display of the reduced
zones alternates between the chosen
heat setting and the reduced heat
setting. After some time the heat
setting display of the reduced zones
stays on the reduced heat setting.
HINTS AND TIPS
WARNING! Refer to Safety
chapters.
Cookware
For induction cooking zones a
strong electro-magnetic field
creates the heat in the
cookware very quickly.
Use the induction cooking zones with
suitable cookware.
• The bottom of the cookware must be as
thick and flat as possible.
• Ensure pan bases are clean and dry
before placing on the hob surface.
• In order to avoid scratches, do not slide
or rub the pot across the ceramic glass.
Cookware material
• correct: cast iron, steel, enamelled
steel, stainless steel, multi-layer bottom
(with a correct marking from a
manufacturer).
• not correct: aluminium, copper, brass,
glass, ceramic, porcelain.
Cookware is suitable for an induction
hob if:
• water boils very quickly on a zone set
to the highest heat setting.
• a magnet pulls on to the bottom of the
cookware.
Cookware dimensions
• Induction cooking zones adapt to the
dimension of the bottom of the
cookware automatically.
• The cooking zone efficiency is related
to the diameter of the cookware. The
cookware with a diameter smaller than
the minimum receives only a part of the
power generated by the cooking zone.
• For both safety reasons and optimal
cooking results, do not use cookware
larger than indicated in "Cooking zones
specification". Avoid keeping cookware
close to the control panel during the
cooking session. This might impact the
functioning of the control panel or
accidentally activate hob functions.
Refer to "Technical data".
The noises during operation
If you can hear:
• crack noise: cookware is made of
different materials (a sandwich
construction).
• whistle sound: you use a cooking zone
with a high power level and the
cookware is made of different materials
(a sandwich construction).
• humming: you use a high power level.
• clicking: electric switching occurs.
• hissing, buzzing: the fan operates.
Progress 31

The noises are normal and do not
indicate any malfunction.
Examples of cooking
applications
The correlation between the heat setting
of a zone and its consumption of power is
not linear. When you increase the heat
setting, it is not proportional to the
increase of the consumption of power. It
means that a cooking zone with the
medium heat setting uses less than a half
of its power.
The data in the table is for
guidance only.
Heat setting Use to: Time
(min)
Hints
- 1
Keep cooked food warm. as
nec‐
essary
Put a lid on the cookware.
1 - 2 Hollandaise sauce, melt: but‐
ter, chocolate, gelatine.
5 - 25 Mix from time to time.
1 - 2 Solidify: fluffy omelettes, baked
eggs.
10 -
40
Cook with a lid on.
2 - 3 Simmer rice and milkbased
dishes, heat up ready-cooked
meals.
25 -
50
Add at least twice as much liq‐
uid as rice, mix milk dishes
halfway through the proce‐
dure.
3 - 4 Steam vegetables, fish, meat. 20 -
45
Add a couple of tablespoons
of liquid.
4 - 5 Steam potatoes. 20 -
60
Use max. ¼ l of water for 750
g of potatoes.
4 - 5 Cook larger quantities of food,
stews and soups.
60 -
150
Up to 3 l of liquid plus ingredi‐
ents.
6 - 7 Gentle fry: escalope, veal cor‐
don bleu, cutlets, rissoles,
sausages, liver, roux, eggs,
pancakes, doughnuts.
as
nec‐
essary
Turn halfway through.
7 - 8 Heavy fry, hash browns, loin
steaks, steaks.
5 - 15 Turn halfway through.
9 Boil water, cook pasta, sear meat (goulash, pot roast), deep-fry chips.
Boil large quantities of water. PowerBoost is activated.
CARE AND CLEANING
WARNING! Refer to Safety
chapters.
General information
• Clean the hob after each use.
32 Progress

• Always use cookware with a clean
base.
• Scratches or dark stains on the surface
have no effect on how the hob
operates.
• Use a special cleaner suitable for the
surface of the hob.
• Use a special scraper for the glass.
Cleaning the hob
• Remove immediately: melted plastic,
plastic foil, sugar and food with sugar,
otherwise, the dirt can cause damage
to the hob. Take care to avoid burns.
Use a special hob scraper on the glass
surface at an acute angle and move the
blade on the surface.
• Remove when the hob is sufficiently
cool: limescale rings, water rings, fat
stains, shiny metallic discoloration.
Clean the hob with a moist cloth and a
non-abrasive detergent. After cleaning,
wipe the hob dry with a soft cloth.
• Remove shiny metallic
discoloration: use a solution of water
with vinegar and clean the glass
surface with a cloth.
TROUBLESHOOTING
WARNING! Refer to Safety
chapters.
What to do if...
Problem Possible cause Remedy
You cannot activate or op‐
erate the hob.
The hob is not connected to
an electrical supply or it is
connected incorrectly.
Check if the hob is correctly
connected to the electrical
supply.
The fuse is blown. Make sure that the fuse is the
cause of the malfunction. If the
fuse is blown again and again,
contact a qualified electrician.
You do not set the heat set‐
ting for 10 seconds.
Activate the hob again and set
the heat setting in less than 10
seconds.
You touched 2 or more sen‐
sor fields at the same time.
Touch only one sensor field.
Pause operates. Refer to "Daily use".
There is water or fat stains
on the control panel.
Clean the control panel.
An acoustic signal sounds
and the hob deactivates.
An acoustic signal sounds
when the hob is deactiva‐
ted.
You put something on one or
more sensor fields.
Remove the object from the
sensor fields.
Progress 33

Problem Possible cause Remedy
The hob deactivates. You put something on the
sensor field .
Remove the object from the
sensor field.
Residual heat indicator
does not come on.
The zone is not hot because
it operated only for a short
time or the sensor is dam‐
aged.
If the zone operated sufficient‐
ly long to be hot, speak to an
Authorised Service Centre.
The heat setting changes
between two levels.
Power management oper‐
ates.
Refer to "Daily use".
The sensor fields become
hot.
The cookware is too large or
you put it too near to the
controls.
Put large cookware on the rear
zones, if possible.
There is no sound when
you touch the panel sen‐
sor fields.
The sounds are deactivated. Activate the sounds. Refer to
"Daily use".
comes on.
Child Safety Device or Lock
operates.
Refer to "Daily use".
comes on.
There is no cookware on the
zone.
Put cookware on the zone.
The cookware is unsuitable. Use suitable cookware. Refer
to "Hints and tips".
The diameter of the bottom
of the cookware is too small
for the zone.
Use cookware with correct di‐
mensions. Refer to "Technical
data".
and a number come
on.
There is an error in the hob. Deactivate the hob and acti‐
vate it again after 30 seconds.
If comes on again, discon‐
nect the hob from the electrical
supply. After 30 seconds, con‐
nect the hob again. If the prob‐
lem continues, speak to an
Authorised Service Centre.
You can hear a constant
beep noise.
The electrical connection is
incorrect.
Disconnect the hob from the
electrical supply. Ask a quali‐
fied electrician to check the in‐
stallation.
If you cannot find a solution...
If you cannot find a solution to the problem
yourself, contact your dealer or an
Authorised Service Centre. Give the data
from the rating plate. Give also three digit
letter code for the glass ceramic (it is in
the corner of the glass surface) and an
error message that comes on. Make sure,
you operated the hob correctly. If not the
servicing by a service technician or dealer
will not be free of charge, also during the
34 Progress

warranty period. The instructions about
the Service Centre and conditions of
guarantee are in the guarantee booklet.
TECHNICAL DATA
Cooking zones specification
Cooking zone Nominal pow‐
er (maximum
heat setting)
[W]
PowerBoost
[W]
PowerBoost
maximum du‐
ration [min]
Cookware di‐
ameter [mm]
Middle front 2300 3700 10 180 - 210
Middle rear 1400 2500 4 125 - 145
The power of the cooking zones can be
different in some small range from the
data in the table. It changes with the
material and dimensions of the cookware.
For optimal cooking results use cookware
no larger than the diameter in the table.
Labels supplied with the
accessories bag
Stick the adhesive labels as indicated
below:
MOD.
PROD.NO.
SER.NO
DATA
MOD.
PROD.NO.
SER.NO
DATA
MOD.
PROD.NO.
SER.NO.
03 IT
MADE IN ITALY
TYPE
IP20
0049
A B C
A. Stick it on Guarantee Card and send
this part (if applicable).
B. Stick it on Guarantee Card and keep
this part (if applicable).
C. Stick it on instruction booklet.
Progress 35

ENERGY EFFICIENCY
Product information according to EU 66/2014 valid for EU market
only
Model identification PAI3101F
Type of hob Built-In Hob
Number of cooking zones 2
Heating technology Induction
Diameter of circular cooking zones (Ø) Middle front
Middle rear
21.0 cm
14.5 cm
Energy consumption per cooking zone (EC
electric cooking)
Middle front
Middle rear
188.9 Wh / kg
183.4 Wh / kg
Energy consumption of the hob (EC electric hob) 186.2 Wh / kg
EN 60350-2 - Household electric cooking
appliances - Part 2: Hobs - Methods for
measuring performance
Energy saving
You can save energy during everyday
cooking if you follow below hints.
• When you heat up water, use only the
amount you need.
• If it is possible, always put the lids on
the cookware.
• Before you activate the cooking zone
put the cookware on it.
• Put the smaller cookware on the
smaller cooking zones.
• Put the cookware directly in the centre
of the cooking zone.
• Use the residual heat to keep the food
warm or to melt it.
ENVIRONMENTAL CONCERNS
Recycle materials with the symbol . Put
the packaging in relevant containers to
recycle it. Help protect the environment
and human health by recycling waste of
electrical and electronic appliances. Do
not dispose of appliances marked with the
symbol with the household waste.
Return the product to your local recycling
facility or contact your municipal office.
36 Progress

TABLE DES MATIÈRES
Informations de sécurité 37
Consignes de sécurité 39
Installation 42
Description de l'appareil 44
Utilisation quotidienne 46
Conseils 49
Entretien et Nettoyage 51
Dépannage 51
Caractéristiques techniques 54
Rendement énergétique 55
Sous réserve de modifications.
VISITEZ NOTRE SITE WEB POUR :
Obtenir des conseils d’utilisation, des brochures, un dépanneur, des
informations sur le service et les réparations :
www.progress-hausgeraete.de/support
INFORMATIONS DE SÉCURITÉ
Avant d'installer et d'utiliser cet appareil, lisez
soigneusement les instructions fournies. Le fabricant ne
pourra être tenu pour responsable des blessures et dégâts
résultant d'une mauvaise installation ou utilisation.
Conservez toujours les instructions dans un lieu sûr et
accessible pour vous y référer ultérieurement.
Sécurité des enfants et des personnes vulnérables
• Cet appareil peut être utilisé par des enfants âgés d'au
moins 8 ans et par des personnes ayant des capacités
physiques, sensorielles ou mentales réduites ou dénuées
d’expérience ou de connaissance, s'ils sont correctement
surveillés ou si des instructions relatives à l'utilisation de
l'appareil en toute sécurité leur ont été données et s’ils
comprennent les risques encourus.
• Les enfants entre 3 et 8 ans et les personnes ayant un
handicap très important et complexe doivent être tenus à
l'écart de l'appareil, à moins d'être surveillés en
permanence.
• Les enfants de moins de 3 ans doivent être tenus à l'écart
de l'appareil, à moins d'être surveillés en permanence.
• Ne laissez pas les enfants jouer avec l'appareil.
Progress 37

• Ne laissez pas les emballages à la portée des enfants et
jetez-les convenablement.
• AVERTISSEMENT : Tenez les enfants et les animaux
éloignés de l'appareil lorsqu'il est en cours de
fonctionnement ou lorsqu'il refroidit. Les parties
accessibles deviennent chaudes en cours d'utilisation.
• Si l'appareil est équipé d'un dispositif de sécurité enfants,
nous vous recommandons de l'activer.
• Le nettoyage et l'entretien ne doivent pas être effectués
par des enfants sans surveillance.
Sécurité générale
• AVERTISSEMENT : L'appareil et ses parties accessibles
deviennent chauds pendant son fonctionnement. Veillez à
ne pas toucher les éléments chauffants.
• AVERTISSEMENT : Il peut être dangereux de laisser
chauffer de la graisse ou de l'huile sans surveillance sur
une table de cuisson car cela pourrait provoquer un
incendie.
• N'essayez JAMAIS d'éteindre un feu avec de l'eau.
Éteignez l'appareil puis couvrez les flammes, par exemple
avec un couvercle ou une couverture ignifuge.
• ATTENTION : L'appareil ne doit pas être branché à
l'alimentation en utilisant un appareil de connexion externe
comme un minuteur, ou branché à un circuit qui est
régulièrement activé/désactivé par un fournisseur
d'énergie.
• ATTENTION : Toute cuisson doit être surveillée. Une
cuisson courte doit être surveillée en permanence.
• AVERTISSEMENT : Risque d'incendie ! N'entreposez rien
sur les surfaces de cuisson.
• Ne posez pas d'objets métalliques tels que couteaux,
fourchettes, cuillères ou couvercles sur la table de cuisson
car ils pourraient chauffer.
• N'utilisez pas l'appareil avant de l'avoir installé dans la
structure encastrée.
• N'utilisez pas de nettoyeur vapeur pour nettoyer l'appareil.
38 Progress

• Après utilisation, éteignez toujours la zone de cuisson à
l'aide de la manette de commande correspondante et ne
vous fiez pas à la détection des récipients.
• Si la surface vitrocéramique / en verre est fissurée,
éteignez l'appareil et débranchez-le. Si l'appareil est
branché à l'alimentation secteur directement en utilisant
une boîte de jonction, retirez le fusible pour déconnecter
l'appareil de l'alimentation secteur. Dans tous les cas,
contactez le service après-vente agréé.
• Si le câble d'alimentation est endommagé, il doit être
remplacé par le fabricant, un service de maintenance
agréé ou un technicien qualifié afin d'éviter tout danger.
• AVERTISSEMENT : Utilisez uniquement les dispositifs de
protection pour table de cuisson conçus ou indiqués
comme adaptés par le fabricant de l'appareil de cuisson
dans les instructions d'utilisation, ou les dispositifs de
protection pour table de cuisson intégrés à l'appareil.
L'utilisation de dispositifs de protection non adaptés peut
entraîner des accidents.
CONSIGNES DE SÉCURITÉ
Installation
AVERTISSEMENT! L'appareil
doit être installé uniquement
par un professionnel qualifié.
AVERTISSEMENT! Risque de
blessure corporelle ou de
dommages matériels.
• Retirez l'intégralité de l'emballage.
• N'installez pas et ne branchez pas un
appareil endommagé.
• Suivez scrupuleusement les
instructions d'installation fournies avec
l'appareil.
• Respectez l'espacement minimal requis
par rapport aux autres appareils et
éléments.
• Soyez toujours vigilants lorsque vous
déplacez l'appareil car il est lourd.
Utilisez toujours des gants de sécurité
et des chaussures fermées.
• Isolez les surfaces découpées à l'aide
d'un matériau d'étanchéité pour éviter
que la moisissure cause des
gonflements.
• Protégez la partie inférieure de
l'appareil de la vapeur et de l'humidité.
• N'installez pas l'appareil à proximité
d'une porte ou sous une fenêtre. Les
récipients chauds risqueraient de
tomber de l'appareil lors de l'ouverture
de celles-ci.
• Si l'appareil est installé au-dessus de
tiroirs, assurez-vous qu'il y a
suffisamment d'espace entre le fond de
l'appareil et le tiroir supérieur pour que
l'air puisse circuler.
• Le dessous de l'appareil peut devenir
très chaud. Veillez à installer un
panneau de séparation sous l'appareil
pour en bloquer l'accès. Ce panneau
peut être en contreplaqué, provenir
d'un autre meuble de cuisine, et doit
Progress 39

être composé d'un matériau non
inflammable.
• Le panneau de séparation doit couvrir
entièrement l'espace sous la table de
cuisson.
• Assurez-vous de laisser un espace de
ventilation de 2 mm entre le plan de
travail et l'avant de l'appareil qui est
installé dessous. La garantie ne couvre
pas les dommages causés par
l'absence d'un espace de ventilation
adéquat.
Branchement électrique
AVERTISSEMENT! Risque
d'incendie ou d'électrocution.
• Tous les raccordements électriques
doivent être effectués par un électricien
qualifié.
• L’appareil doit être relié à la terre.
• Avant toute intervention, assurez-vous
que l'appareil est débranché.
• Assurez-vous que les paramètres
figurant sur la plaque signalétique
correspondent aux données électriques
nominale de l’alimentation secteur.
• Assurez-vous que l'appareil est bien
installé. Un câble d'alimentation lâche
et inapproprié ou une fiche (si
présente) non serrée peuvent être à
l'origine d'une surchauffe des bornes.
• Utilisez le câble d'alimentation
électrique approprié.
• Ne laissez pas le câble d'alimentation
s'emmêler.
• Assurez-vous qu'une protection anti-
électrocution est installée.
• Utilisez un collier anti-traction sur le
câble.
• Assurez-vous que le câble
d'alimentation ou la fiche (si présente)
n'entrent pas en contact avec les
surfaces brûlantes de l'appareil ou les
récipients brûlants lorsque vous
branchez l'appareil à des prises
électriques situées à proximité.
• N'utilisez pas d'adaptateurs multiprise
et de rallonges.
• Veillez à ne pas endommager la fiche
secteur (si présente) ni le câble
d'alimentation. Contactez notre service
après-vente agréé ou un électricien
pour remplacer le câble d'alimentation
s'il est endommagé.
• La protection contre les chocs des
parties sous tension et isolées doit être
fixée de telle manière qu'elle ne puisse
pas être enlevée sans outils.
• Ne branchez la fiche secteur dans la
prise secteur qu'à la fin de l'installation.
Assurez-vous que la prise secteur est
accessible après l'installation.
• Si la prise secteur est détachée, ne
branchez pas la fiche secteur.
• Ne tirez pas sur le câble secteur pour
débrancher l'appareil. Tirez toujours sur
la fiche de la prise secteur.
• N'utilisez que des systèmes d'isolation
appropriés : des coupe-circuits, des
fusibles (les fusibles à visser doivent
être retirés du support), un disjoncteur
différentiel et des contacteurs.
• L'installation électrique doit comporter
un dispositif d'isolation qui vous permet
de déconnecter l'appareil du secteur à
tous les pôles. Le dispositif d'isolement
doit avoir une largeur d'ouverture de
contact de 3 mm minimum.
Utilisation
AVERTISSEMENT! Risque de
blessures, de brûlures ou
d'électrocution.
• Avant la première utilisation, retirez les
emballages, les étiquettes et les films
de protection (si présents).
• Cet appareil est exclusivement destiné
à une utilisation domestique.
• Ne modifiez pas les caractéristiques de
cet appareil.
• Assurez-vous que les orifices de
ventilation ne sont pas bouchés.
• Ne laissez jamais l'appareil sans
surveillance pendant son
fonctionnement.
• Éteignez les zones de cuisson après
chaque utilisation.
• Ne vous fiez pas uniquement au
détecteur de récipient.
40 Progress

• Ne posez pas de couverts ou de
couvercles sur les zones de cuisson.
Elles sont chaudes.
• N'utilisez jamais cet appareil avec les
mains mouillées ou lorsqu'il est en
contact avec de l'eau.
• N'utilisez jamais l'appareil comme plan
de travail ou comme plan de stockage.
• Si la surface de l'appareil présente des
fêlures, débranchez immédiatement
l'appareil pour éviter tout risque
d'électrocution.
• Les porteurs de pacemakers doivent
rester à une distance minimale de
30 cm des zones de cuisson à
induction lorsque l'appareil est en cours
de fonctionnement.
• Lorsque vous versez un aliment dans
de l'huile chaude, elle peut
éclabousser.
AVERTISSEMENT! Risque
d'incendie et d'explosion.
• Les graisses et l'huile chaudes peuvent
dégager des vapeurs inflammables.
Tenez les flammes ou les objets
chauds éloignés des graisses et de
l'huile lorsque vous vous en servez
pour cuisiner.
• Les vapeurs dégagées par l'huile très
chaude peuvent provoquer une
combustion spontanée.
• L'huile qui a servi contient des restes
d'aliments pouvant provoquer un
incendie à température plus faible que
l'huile n'ayant jamais servi.
• Ne placez pas de produits
inflammables ou d'éléments imbibés de
produits inflammables à l'intérieur ou à
proximité de l'appareil, ni sur celui-ci.
AVERTISSEMENT! Risque
d'endommagement de
l'appareil.
• Ne laissez pas de récipients chauds
sur le bandeau de commande.
• Ne posez pas de couvercle de
casserole chaud sur la surface en verre
de la table de cuisson.
• Ne laissez pas le contenu des
récipients s'évaporer entièrement.
• Prenez soin de ne pas laisser tomber
d'objets ou de récipients sur l'appareil.
Sa surface risque d'être endommagée.
• Ne faites jamais fonctionner les zones
de cuisson avec des récipients de
cuisson vides ou sans aucun récipient
de cuisson.
• Ne placez jamais de papier aluminium
sur l'appareil.
• N'utilisez pas de récipients en fonte ou
en aluminium, ni de récipients dont le
fond est endommagé et rugueux. Ils
risqueraient de rayer le verre ou la
surface vitrocéramique. Soulevez
toujours ces objets lorsque vous devez
les déplacer sur la surface de cuisson.
• Cet appareil est exclusivement destiné
à un usage culinaire. Ne l'utilisez pas
pour des usages autres que celui pour
lequel il a été conçu, à des fins de
chauffage par exemple.
Entretien et Nettoyage
• Nettoyez régulièrement l'appareil afin
de maintenir le revêtement en bon état.
• Mettez à l'arrêt l'appareil et laissez-le
refroidir avant de le nettoyer.
• Ne pulvérisez pas d'eau ni de vapeur
pour nettoyer l'appareil.
• Nettoyez l'appareil avec un chiffon
doux humide. Utilisez uniquement des
produits de lavage neutres. N'utilisez
pas de produits abrasifs, de tampons à
récurer, de solvants ni d'objets
métalliques.
Service
• Pour réparer l'appareil, contactez le
service après-vente agréé. Utilisez
uniquement des pièces de rechange
d'origine.
• Concernant la/les lampe(s) à l’intérieur
de ce produit et les lampes de
rechange vendues séparément : Ces
lampes sont conçues pour résister à
des conditions physiques extrêmes
dans les appareils électroménagers,
telles que la température, les
vibrations, l’humidité, ou sont conçues
pour signaler des informations sur le
Progress 41

statut opérationnel de l’appareil. Elles
ne sont pas destinées à être utilisées
dans d'autres applications et ne
conviennent pas à l’éclairage des
pièces d’un logement.
Mise au rebut
AVERTISSEMENT! Risque de
blessure ou d'asphyxie.
• Contactez votre service municipal pour
obtenir des informations sur la marche
à suivre pour mettre l'appareil au rebut.
• Débranchez l'appareil de l'alimentation
électrique.
• Coupez le câble d'alimentation au ras
de l'appareil et mettez-le au rebut.
INSTALLATION
AVERTISSEMENT! Reportez-
vous aux chapitres concernant
la sécurité.
Avant l'installation
Avant d'installer la table de cuisson, notez
les informations de la plaque signalétique
ci-dessous. La plaque signalétique se
trouve au bas de la table de cuisson.
Modèle ...........................
PNC .............................
Numéro de série ....................
Tables de cuisson intégrées
Les tables de cuisson encastrables ne
peuvent être mises en fonctionnement
qu'après avoir été installées dans des
meubles et sur des plans de travail
homologués et adaptés.
Câble d'alimentation
• La table de cuisson est fournie avec un
câble d'alimentation.
• Pour remplacer le câble d'alimentation
endommagé, utilisez le type de câble
suivant : H05V2V2-F qui doit supporter
une température minimale de 90 °C.
Contactez votre service après-vente.
Installation du joint - Installation
superposée
1. Nettoyez la zone de découpe du plan
de travail.
2. Placez le joint de 2x6 mm fourni sur le
bord inférieur de la table de cuisson, le
long du bord externe de la surface
vitrocéramique. N'étirez pas le joint.
Assurez-vous que les extrémités du
joint se trouvent au milieu d'un bord
latéral de la table de cuisson.
3. Lorsque vous découpez le joint,
ajoutez quelques millimètres de
longueur.
4. Rassemblez les deux extrémités du
joint.
42 Progress

Montage
min.
50mm
min.
500mm
min.
2mm
min. 2 mm
A
B
A
12 mm
28 mm
38 mm
B
57 mm
41 mm
31 mm
min
30 mm
min. 500 mm
< 20 mm
> 20 mm
min. 2 mm
A
B
A
12 mm
28 mm
38 mm
B
57 mm
41 mm
31 mm
min. 500 mm
270
+1
mm
R 5mm
min.
55mm
490
+1
mm
min.
38 mm
min.
2 mm
Progress 43

min.
12 mm
min.
2 mm
Installation de plusieurs tables
de cuisson
40-50 mm
50 mm
55 mm
30 mm
min. 500 mm
490 mm
270 mm
2
0
+
2
0
+
DESCRIPTION DE L'APPAREIL
Description de la table de cuisson
145 mm
210 mm
1
1
2
1
Zone de cuisson à induction
2
Bandeau de commande
44 Progress

Description du bandeau de commande
1 2 3 4 5 6
79 810
Les touches sensitives permettent de faire fonctionner l'appareil. Les affichages, les
voyants et les signaux sonores indiquent les fonctions activées.
Tou‐
che
sen‐
siti‐
ve
Fonction Commentaire
1
MARCHE/ARRÊT Pour allumer et éteindre la table de cuisson.
2
Touches Verrouil. / Dispo‐
sitif de sécurité enfant
Pour verrouiller ou déverrouiller le bandeau
de commande.
3
Pause Pour activer et désactiver la fonction.
4
- Indicateur du niveau de
cuisson
Pour indiquer le niveau de cuisson.
5
- Voyants du minuteur des
zones de cuisson
Pour indiquer la zone à laquelle se réfère la
durée sélectionnée.
6
- Affichage du minuteur Pour indiquer la durée, en minutes.
7
- Pour choisir la zone de cuisson.
8
/
- Pour augmenter ou diminuer la durée.
9
/
- Pour sélectionner un niveau de cuisson.
10
PowerBoost Pour activer la fonction.
Progress 45

Affichage du niveau de cuisson
Afficheur Description
La zone de cuisson est désactivée.
-
La zone de cuisson est activée.
Pause est activé.
PowerBoost est activé.
+ chiffre
Une anomalie de fonctionnement s'est produite.
/ /
OptiHeat Control (indicateur de chaleur résiduelle en 3 étapes): conti‐
nuer la cuisson / maintien au chaud / chaleur résiduelle.
Touches Verrouil. / Dispositif de sécurité enfant est activée.
Le récipient est inapproprié ou trop petit, ou bien il n'y a pas de récipient
sur la zone de cuisson.
Arrêt automatique est activé.
OptiHeat Control (indicateur de
chaleur résiduelle en 3 étapes)
AVERTISSEMENT! / /
Il y a risque de brûlures par
la chaleur résiduelle.
Les voyants indiquent le niveau de
chaleur résiduelle des zones de cuisson
que vous utilisez actuellement. Les
voyants des zones voisines peuvent
également s'allumer, même si vous ne les
utilisez pas.
Les zones de cuisson à induction
génèrent la chaleur nécessaire
directement sur le fond des récipients de
cuisson. La vitrocéramique est chauffée
par la chaleur des récipients.
UTILISATION QUOTIDIENNE
AVERTISSEMENT! Reportez-
vous aux chapitres concernant
la sécurité.
Activation et désactivation
Appuyez sur pendant 1 seconde pour
activer ou désactiver la table de cuisson.
Arrêt automatique
Cette fonction arrête la table de
cuisson automatiquement si :
• toutes les zones de cuisson sont
désactivées,
• vous ne réglez pas le niveau de
cuisson après avoir allumé la table de
cuisson,
• vous avez renversé quelque chose ou
placé un objet sur le bandeau de
commande pendant plus de
10 secondes (une casserole, un
torchon, etc.). Un signal sonore retentit
et la table de cuisson s'éteint. Enlevez
l’objet ou nettoyez le bandeau de
commande.
• la table de cuisson surchauffe (par ex.
lorsqu'un récipient chauffe à vide).
Laissez la zone de cuisson refroidir
46 Progress

avant d'utiliser à nouveau la table de
cuisson.
• vous avez utilisé un récipient inadapté.
Le symbole s'allume et la zone de
cuisson se désactive automatiquement
au bout de 2 minutes.
• vous ne désactivez pas la zone de
cuisson ou ne modifiez pas le niveau
de cuisson. Au bout de quelques
instants, s'allume et la table de
cuisson s'éteint.
La relation entre le niveau de cuisson
et la durée après laquelle la table de
cuisson s'éteint :
Niveau de cuisson La table de cuis‐
son s'éteint au
bout de
, 1 - 2
6 heures
3 - 4 5 heures
5 4 heures
6 - 9 1,5 heure
Niveau de cuisson
Appuyez sur pour augmenter le niveau
de cuisson. Appuyez sur pour diminuer
le niveau de cuisson. Appuyez
simultanément sur et pour
désactiver la zone de cuisson.
PowerBoost
Cette fonction vous permet d'augmenter la
puissance des zones de cuisson à
induction. La fonction peut être activée
pour la zone de cuisson à induction
uniquement pour une durée limitée.
Lorsque cette durée est écoulée, la zone
de cuisson à induction revient
automatiquement au niveau de cuisson le
plus élevé.
Reportez-vous au chapitre
« Caractéristiques
techniques ».
Pour activer la fonction pour une zone
de cuisson : appuyez sur . s’allume.
Pour désactiver la fonction : appuyez
sur ou .
Minuteur
• Minuteur à rebours
Vous pouvez utiliser cette fonction pour
régler la durée d’une seule session de
cuisson.
Sélectionnez d'abord le niveau de cuisson
de la zone de cuisson, puis réglez la
fonction.
Pour sélectionner la zone de cuisson :
appuyez sur à plusieurs reprises
jusqu'à ce que l'indicateur d’une zone de
cuisson apparaisse.
Pour activer la fonction ou modifier la
durée : appuyez sur la touche ou
du minuteur pour régler la durée (de 00 à
99 minutes). Lorsque le voyant de la zone
de cuisson commence à clignoter, le
décompte commence.
Pour voir le temps restant : appuyez sur
la touche pour sélectionner la zone de
cuisson. Le voyant de la zone de cuisson
commence à clignoter. L'affichage indique
la durée restante.
Pour désactiver la fonction : appuyez
sur
pour sélectionner la zone de
cuisson, puis appuyez sur . Le
décompte s’effectue jusqu’à 00.
L'indicateur de la zone de cuisson
disparaît.
Lorsque le compte à rebours
est terminé, un signal sonore
retentit et 00 clignote. La zone
de cuisson se désactive.
Pour arrêter le signal sonore : appuyez
sur
.
• Minuteur
Vous pouvez utiliser cette fonction lorsque
la table de cuisson est allumée et les
zones de cuisson ne sont pas activées.
Progress 47

L'affichage du niveau de cuisson indique
.
Pour activer la fonction : appuyez sur la
touche puis sur la touche ou du
minuteur pour régler la durée. Lorsque le
temps est écoulé, un signal sonore retentit
et 00 clignote.
Pour arrêter le signal sonore : appuyez
sur .
Pour désactiver la fonction : appuyez
sur puis appuyez sur . Le décompte
s’effectue jusqu’à 00.
Cette fonction est sans effet
sur le fonctionnement des
zones de cuisson.
Pause
Cette fonction sélectionne le niveau de
cuisson le plus bas pour toutes les zones
de cuisson activées.
Lorsque la fonction est en cours, tous les
autres symboles du bandeau de
commande sont verrouillés.
La fonction ne désactive pas les fonctions
du minuteur.
Appuyez sur
pour activer la fonction.
apparaît.Le niveau de cuisson passe
à 1.
Pour désactiver la fonction, appuyez sur
. Le niveau de cuisson précédent est
activé.
Touches Verrouil.
Vous pouvez verrouiller le bandeau de
commande pendant que les zones de
cuisson fonctionnent. Vous éviterez ainsi
une modification accidentelle du réglage
du niveau de cuisson.
Réglez d'abord le niveau de cuisson.
Pour activer la fonction : appuyez sur
. s'affiche pendant 4 secondes. Le
minuteur reste activé.
Pour désactiver la fonction : appuyez
sur . Le niveau de cuisson précédent
s'allume.
Lorsque vous éteignez la table
de cuisson, cette fonction est
également désactivée.
Dispositif de sécurité enfant
Cette fonction permet d'éviter une
utilisation involontaire de la table de
cuisson.
Pour activer la fonction : activez la table
de cuisson avec
. Ne sélectionnez pas
de réglage de niveau de cuisson. Appuyez
sur
pendant 4 secondes. s'allume.
Éteignez la table de cuisson en appuyant
sur .
Pour désactiver la fonction : activez la
table de cuisson avec . Ne sélectionnez
pas de réglage de niveau de cuisson.
Appuyez sur pendant 4 secondes.
s'allume. Éteignez la table de cuisson en
appuyant sur .
Pour désactiver la fonction le temps
d'une cuisson : activez la table de
cuisson avec
. s'allume. Appuyez sur
pendant 4 secondes. Réglez le niveau
de cuisson dans les 10 secondes qui
suivent. Vous pouvez utiliser la table de
cuisson. Lorsque vous éteignez la table
de cuisson avec , la fonction est de
nouveau activée.
OffSound Control
(Désactivation et activation des
signaux sonores)
Éteignez la table de cuisson. Appuyez sur
pendant 3 secondes. L'affichage
s'allume, puis s'éteint. Appuyez sur
pendant 3 secondes. ou s’allume.
Appuyez sur de la zone avant gauche
pour choisir l'une des options suivantes :
48 Progress

• - les signaux sonores sont
désactivés
• - les signaux sonores sont activés
Pour confirmer le réglage, attendez que la
table de cuisson s'éteigne
automatiquement.
Lorsque cette fonction est réglée sur ,
l'appareil émet des signaux sonores
uniquement lorsque :
• vous appuyez sur
• Minuteur se termine
• Minuteur à rebours se termine
• vous posez un objet sur le bandeau de
commande.
Gestion alimentation
• Toutes les zones de cuisson sont
reliées à une phase. Reportez-vous à
l'illustration.
• La fonction s'active lorsque la charge
électrique totale des zones de cuisson
dépasse la charge électrique maximale
de la phase.
• La fonction répartit la puissance entre
les zones de cuisson.
• La fonction diminue la puissance des
autres zones de cuisson.
• L'affichage des niveaux de cuisson des
zones réduites alterne entre le niveau
de cuisson choisi et le niveau de
cuisson réduit. Après quelques
minutes, l'affichage des niveaux de
cuisson des zones réduites affiche le
niveau de cuisson réduit seul.
CONSEILS
AVERTISSEMENT! Reportez-
vous aux chapitres concernant
la sécurité.
Récipients de cuisson
Pour les zones de cuisson à
induction, un champ
électromagnétique puissant
crée très rapidement la chaleur
dans le récipient.
Utilisez les zones de cuisson à induction
avec un récipient de cuisson adapté.
• Le fond du récipient de cuisson doit
être aussi plat et épais que possible.
• Assurez-vous que le fond du récipient
est propre avant de le placer sur la
surface de la table de cuisson.
• Afin d’éviter les rayures, ne faites pas
glisser et ne frottez pas le récipient sur
la surface vitrocéramique.
Matériaux des récipients de cuisson
• corrects : fonte, acier, acier émaillé,
acier inoxydable, fond multicouche
(homologué par le fabricant).
• incorrects : aluminium, cuivre, laiton,
verre, céramique, porcelaine.
Les récipients de cuisson conviennent
pour l’induction si :
• une petite quantité d’eau contenue
dans un récipient chauffe dans un bref
laps de temps sur une zone de cuisson
réglée sur le niveau de cuisson
maximal.
• un aimant adhère au fond du récipient.
Dimensions des récipients de cuisson
• Les zones de cuisson à induction
s’adaptent automatiquement au
diamètre du fond du récipient utilisé.
• L’efficacité de la zone de cuisson
dépend du diamètre du récipient. Un
récipient plus petit que le diamètre
minimal recommandé ne reçoit qu’une
Progress 49

petite partie de la puissance générée
par la zone de cuisson.
• Pour des raisons de sécurité et des
résultats de cuisson optimaux, n’utilisez
pas de récipient plus grand qu’indiqué
dans la section « Caractéristiques des
zones de cuisson ». Évitez de garder
les récipients à proximité du bandeau
de commande durant la cuisson. Cela
peut affecter le fonctionnement du
bandeau de commande ou activer
accidentellement les fonctions de la
table de cuisson.
Reportez-vous au chapitre
« Caractéristiques
techniques ».
Bruits pendant le
fonctionnement
Si vous entendez :
• craquement : le récipient est composé
de différents matériaux (conception
« sandwich »).
• sifflement : vous utilisez une zone de
cuisson avec un niveau de puissance
élevé et le récipient est composé de
différents matériaux (conception
« sandwich »).
• bourdonnement : vous utilisez un
niveau de puissance élevé.
• cliquetis : une commutation électrique
se produit.
• sifflement, bourdonnement : le
ventilateur fonctionne.
Ces bruits sont normaux et n'indiquent
pas une anomalie de l'appareil.
Exemples de cuisson
Le rapport entre le niveau de cuisson et la
consommation énergétique de la zone de
cuisson n'est pas linéaire. Lorsque vous
augmentez le niveau de cuisson, cela
n'est pas proportionnel avec
l'augmentation de la consommation
d'énergie. Cela veut dire qu'une zone de
cuisson avec le niveau de cuisson moyen
utilise moins de la moitié de sa puissance.
Les données du tableau sont
fournies à titre indicatif
uniquement.
Niveau de
cuisson
Utilisation : Durée
(min)
Conseils
- 1
Conserver les aliments cuits
au chaud.
au be‐
soin
Placez un couvercle sur le ré‐
cipient.
1 - 2 Sauce hollandaise, faire fon‐
dre : beurre, chocolat, gélatine.
5 - 25 Mélangez de temps en temps.
1 - 2 Solidifier : omelettes, œufs co‐
cotte.
10 -
40
Couvrez pendant la cuisson.
2 - 3 Faire mijoter des plats à base
de riz et de laitage, réchauffer
des plats cuisinés.
25 -
50
Ajoutez au moins deux fois
plus d'eau que de riz. Remuez
les plats à base de lait durant
la cuisson.
3 - 4 Cuire à la vapeur des légu‐
mes, du poisson et de la vian‐
de.
20 -
45
Ajoutez quelques cuillerées à
soupe de liquide.
4 - 5 Cuire des pommes de terre à
la vapeur.
20 -
60
Utilisez ¼ l d'eau max. pour
750 g de pommes de terre.
50 Progress

Niveau de
cuisson
Utilisation : Durée
(min)
Conseils
4 - 5 Cuire de grandes quantités
d'aliments, des ragoûts et des
soupes.
60 -
150
Ajoutez jusqu’à 3 litres de li‐
quide, plus les ingrédients.
6 - 7 Faire revenir : escalopes, cor‐
dons bleus de veau, côtelettes,
rissolettes, saucisses, foie,
roux, œufs, crêpes, beignets.
au be‐
soin
Retournez à la moitié du
temps.
7 - 8 Cuisson à température élevée
des pommes de terre risso‐
lées, filets, steaks.
5 - 15 Retournez à la moitié du
temps.
9 Faire bouillir de l'eau, cuire des pâtes, griller de la viande (goulasch, bœuf
braisé), cuire des frites.
Faites bouillir une grande quantité d'eau. PowerBoost est activée.
ENTRETIEN ET NETTOYAGE
AVERTISSEMENT! Reportez-
vous aux chapitres concernant
la sécurité.
Informations générales
• Nettoyez la table de cuisson après
chaque utilisation.
• Utilisez toujours un récipient dont le
fond est propre.
• Les rayures ou les taches sombres sur
la surface n'ont aucune incidence sur le
fonctionnement de la table de cuisson.
• Utilisez un nettoyant spécialement
adapté à la surface de la table de
cuisson.
• Utilisez un racloir spécial pour la vitre.
Nettoyage de la table de
cuisson
• Enlevez immédiatement : le plastique
fondu, les feuilles de plastique, le sucre
et les aliments contenant du sucre car
la saleté peut endommager la table de
cuisson. Veillez à ne pas vous brûler.
Tenez le racloir spécial incliné sur la
surface vitrée et faites glisser la lame
du racloir pour enlever les salissures.
• Une fois que la table de cuisson a
suffisamment refroidi, enlevez :
traces de calcaire et d'eau, projections
de graisse, décolorations métalliques
luisantes. Nettoyez la table de cuisson
à l'aide d'un chiffon humide et d'un
détergent non abrasif. Après le
nettoyage, séchez la table de cuisson à
l'aide d'un chiffon doux.
• Pour retirer les décolorations
métalliques brillantes : utilisez une
solution d'eau additionnée de vinaigre
et nettoyez la surface vitrée avec un
chiffon.
DÉPANNAGE
AVERTISSEMENT! Reportez-
vous aux chapitres concernant
la sécurité.
Progress 51

Que faire si...
Problème Cause possible Solution
Vous ne pouvez pas allu‐
mer la table de cuisson ni
la faire fonctionner.
La table de cuisson n’est
pas branchée à une source
d’alimentation électrique ou
le branchement est incor‐
rect.
Vérifiez que la table de cuis‐
son est correctement bran‐
chée à une source d’alimenta‐
tion électrique.
Le fusible a disjoncté. Assurez-vous que le fusible
est la cause du dysfonctionne‐
ment. Si les fusibles disjonc‐
tent de manière répétée, faites
appel à un électricien qualifié.
Vous ne réglez pas le niveau
de cuisson dans les 10 se‐
condes.
Allumez de nouveau la table
de cuisson et réglez le niveau
de cuisson en moins de 10 se‐
condes.
Vous avez appuyé sur plu‐
sieurs touches sensitives en
même temps.
Appuyez sur une seule touche
sensitive.
La fonction Pause est acti‐
vée.
Reportez-vous au chapitre
« Utilisation quotidienne ».
Il y a de l’eau ou des taches
de graisse sur le bandeau
de commande.
Nettoyez le bandeau de com‐
mande.
Un signal sonore retentit
et la table de cuisson
s’éteint.
Un signal sonore retentit
lorsque la table de cuis‐
son est éteinte.
Vous avez posé quelque
chose sur une ou plusieurs
touches sensitives.
Retirez l’objet des touches
sensitives.
La table de cuisson
s’éteint.
Vous avez posé quelque
chose sur la touche sensitive
.
Retirez l’objet de la touche
sensitive.
Le voyant de chaleur rési‐
duelle ne s’allume pas.
La zone de cuisson n’est
pas chaude parce qu’elle n’a
fonctionné que peu de
temps ou le capteur est en‐
dommagé.
Si la zone a eu assez de
temps pour chauffer, faites ap‐
pel à un service après-vente
agréé.
Le niveau de cuisson os‐
cille entre deux niveaux.
La fonction Gestion alimen‐
tation est activée.
Reportez-vous au chapitre
« Utilisation quotidienne ».
52 Progress

Problème Cause possible Solution
Les touches sensitives
deviennent chaudes.
Le récipient est trop grand
ou vous le placez trop près
des commandes.
Placez les récipients de gran‐
de taille sur les zones de cuis‐
son arrière, si possible.
Aucun signal sonore ne
se fait entendre lorsque
vous appuyez sur les tou‐
ches sensitives du ban‐
deau.
Les signaux sonores sont
désactivés.
Activez les signaux sonores.
Reportez-vous au chapitre
« Utilisation quotidienne ».
s’affiche.
Dispositif de sécurité enfant
ou Touches Verrouil. est ac‐
tivé.
Reportez-vous au chapitre
« Utilisation quotidienne ».
s’affiche.
Il n’y a pas de récipient sur
la zone.
Posez un récipient sur la zone.
Le récipient n’est pas adap‐
té.
Utilisez un récipient adapté.
Reportez-vous au chapitre
« Conseils ».
Le diamètre du fond du réci‐
pient de cuisson est trop pe‐
tit pour la zone.
Utilisez des récipients dont les
dimensions sont correctes.
Reportez-vous au chapitre
« Caractéristiques techni‐
ques ».
et un chiffre s’affi‐
chent.
Une erreur s’est produite
dans la table de cuisson.
Éteignez la table de cuisson et
rallumez-la au bout de 30 se‐
condes. Si s’affiche à nou‐
veau, débranchez la table de
cuisson de la prise électrique.
Au bout de 30 secondes, re‐
branchez la table de cuisson.
Si le problème persiste, con‐
tactez le service après-vente
agréé.
Un bip constant se dé‐
clenche.
Le branchement électrique
est incorrect.
Débranchez l’appareil de l’ali‐
mentation électrique. Deman‐
dez à un électricien qualifié de
vérifier l’installation.
Si vous ne trouvez pas de
solution...
Si vous ne trouvez pas de solution au
problème, veuillez contacter votre
revendeur ou un service après-vente
agréé. Veuillez lui fournir les informations
se trouvant sur la plaque signalétique.
Donnez également la combinaison à
3 lettres et chiffres pour la vitrocéramique
(située dans un des coins de la surface en
verre) et le message d'erreur qui s'affiche.
Assurez-vous d'utiliser correctement
l'appareil. En cas d'erreur de manipulation
de la part de l'utilisateur, le déplacement
du technicien du service après-vente ou
Progress 53

du vendeur pourra être facturé, même en
cours de garantie. Les instructions
relatives au service après-vente et aux
conditions de garantie figurent dans le
livret de garantie.
CARACTÉRISTIQUES TECHNIQUES
Caractéristiques des zones de cuisson
Zone de cuis‐
son
Puissance
nominale (ni‐
veau de cuis‐
son max.)
PowerBoost
(W)
PowerBoost
durée maxi‐
male [min]
Diamètre des
récipients de
cuisine (mm)
Avant centrale 2300 3700 10 180 - 210
Arrière centra‐
le
1400 2500 4 125 - 145
La puissance des zones de cuisson peut
varier en fonction des données du
tableau. Elle change en fonction du
matériau et des dimensions du récipient.
Pour des résultats de cuisson optimaux,
utilisez des récipients qui ne dépassent
pas les diamètres indiqués dans le
tableau.
Étiquettes fournies dans le
sachet des accessoires
Collez les étiquettes adhésives comme
indiqué ci-dessous :
MOD.
PROD.NO.
SER.NO
DATA
MOD.
PROD.NO.
SER.NO
DATA
MOD.
PROD.NO.
SER.NO.
03 IT
MADE IN ITALY
TYPE
IP20
0049
A B C
A. Collez-la sur la carte de garantie et
envoyez cette partie (le cas échéant).
B. Collez-la sur la carte de garantie et
conservez cette partie (le cas
échéant).
C. Collez-la sur la notice d'utilisation.
54 Progress

RENDEMENT ÉNERGÉTIQUE
Informations sur le produit conformément à la norme EU 66/2014
valable pour le marché européen uniquement
Identification du modèle PAI3101F
Type de table de cuisson Table de cuisson in‐
tégrée
Nombre de zones de cuisson 2
Technologie de chauffage Induction
Diamètre des zones de cuisson circulaires
(Ø)
Avant centrale
Arrière centrale
21,0 cm
14,5 cm
Consommation d'énergie selon la zone de
cuisson (EC electric cooking)
Avant centrale
Arrière centrale
188,9 Wh/kg
183,4 Wh/kg
Consommation d'énergie de la table de cuisson (EC electric hob) 186,2 Wh/kg
EN 60350-2 - Appareils de cuisson
domestiques électriques - Partie 2 :
Tables de cuisson - Méthodes de mesure
des performances
Économie d'énergie
Vous pouvez économiser de l'énergie au
quotidien en suivant les conseils suivants.
• Si vous faites chauffer de l'eau, ne
faites chauffer que la quantité dont
vous avez réellement besoin.
• Si possible, couvrez toujours les
récipients de cuisson avec un
couvercle pendant la cuisson.
• Activez toujours la zone de cuisson
après avoir posé le récipient dessus.
• Placez les plus petits récipients sur les
plus petites zones de cuisson.
• Posez directement le récipient au
centre de la zone de cuisson.
• Vous pouvez utiliser la chaleur
résiduelle pour conserver les aliments
au chaud ou pour faire fondre.
EN MATIÈRE DE PROTECTION DE L'ENVIRONNEMENT
Recyclez les matériaux portant le symbole
. Déposez les emballages dans les
conteneurs prévus à cet effet. Contribuez
à la protection de l'environnement et à
votre sécurité, recyclez vos produits
électriques et électroniques. Ne jetez pas
les appareils portant le symbole avec
les ordures ménagères. Emmenez un tel
produit dans votre centre local de
Progress 55
*****

recyclage ou contactez vos services
municipaux.
56 Progress
*


www.progress-hausgeraete.de
867366404-A-502020
Documenttranscriptie
Gebruiksaanwijzing User Manual Notice d'utilisation Kookplaat Hob Table de cuisson PAI3101F 2 Progress INHOUDSOPGAVE Veiligheidsinformatie Veiligheidsvoorschriften Montage Beschrijving van het product Dagelijks gebruik 2 4 7 9 11 Aanwijzingen en tips Onderhoud en reiniging Probleemoplossing Technische gegevens Energiezuinigheid GA NAAR ONZE WEBSITE VOOR: 13 15 16 18 19 Wijzigingen voorbehouden. Advies over gebruik, brochures, het oplossen van problemen, service- en reparatie-informatie: www.progress-hausgeraete.de/support VEILIGHEIDSINFORMATIE Lees zorgvuldig de meegeleverde instructies voor installatie en gebruik van het apparaat. De fabrikant is niet verantwoordelijk voor verwondingen of schade die voortvloeit uit de onjuiste installatie of het onjuiste gebruik. Bewaar de instructies altijd op een veilige, toegankelijke plek voor toekomstig gebruik. Veiligheid van kinderen en kwetsbare mensen • • • • Dit apparaat kan worden gebruikt door kinderen van 8 jaar en ouder en door mensen met beperkte lichamelijke, zintuiglijke of verstandelijke vermogens of een gebrek aan ervaring en kennis, indien zij onder toezicht staan of instructies hebben gekregen over het veilig gebruiken van het apparaat en indien zij de eventuele gevaren begrijpen. Kinderen tussen de 3 en 8 jaar oud en personen met zware en complexe beperkingen dienen altijd uit de buurt van het apparaat te worden gehouden, tenzij ze voortdurend onder toezicht staan. Kinderen jonger dan 3 jaar dienen, mits zij voortdurend onder toezicht staan, bij het apparaat uit de buurt te worden gehouden. Laat kinderen niet met het apparaat spelen. Progress 3 • • • • Houd alle verpakkingen uit de buurt van kinderen en verwijder ze op gepaste wijze. WAARSCHUWING: Houd kinderen en huisdieren uit de buurt van het apparaat als het in werking is of afkoelt. Makkelijk toegankelijke onderdelen worden heet tijdens gebruik. Als het apparaat is voorzien van een kinderslot, dient dit te worden geactiveerd. Kinderen mogen zonder toezicht geen reinigings- en onderhoudswerkzaamheden aan het apparaat uitvoeren. Algemene veiligheid • • • • • • • • • • WAARSCHUWING: Het apparaat en de toegankelijke onderdelen ervan worden heet tijdens gebruik. U dient te voorkomen de verwarmingselementen aan te raken. WAARSCHUWING: Onbewaakt koken op een fornuis met vet of olie kan gevaarlijk zijn en tot brand leiden. Probeer NOOIT om een brand te blussen met water. Schakel het apparaat uit en bedek dan de vlam, bv. met een deksel of een vuurdeken. LET OP: Het apparaat mag niet van stroom worden voorzien door een extern schakelapparaat, zoals een tijdklok, of aangesloten worden op een circuit dat door het elektriciteitsbedrijf regelmatig aan en uit wordt geschakeld. LET OP: Het kookproces moet bewaakt worden. Een kort kookproces moet voortdurend bewaakt worden. WAARSCHUWING: Brandgevaar: Bewaar geen voorwerpen op de kookplaten. Metalen voorwerpen, zoals messen, vorken, lepels en deksels mogen niet op de kookplaat worden geplaatst, aangezien ze heet kunnen worden. Gebruik het apparaat niet voordat u het in de ingebouwde structuur installeert. Gebruik geen stoomreiniger om het apparaat schoon te maken. Schakel het kookplaatelement uit na elk gebruik met de bedieningstoetsen. Vertrouw niet op de pandetector. 4 Progress • • • Als de glaskeramische / glazen oppervlakte gebarsten is, schakel het apparaat dan uit en trek de stekker uit het stopcontact. In het geval het apparaat direct op de stroom is aangesloten met een aansluitdoos, verwijdert u de zekering om het apparaat van de stroom te halen. Neem in beide gevallen contact op met de erkende servicedienst. Als de voedingskabel beschadigd is, moet de fabrikant, een erkende serviceverlener of een gekwalificeerd persoon deze vervangen teneinde gevaarlijke situaties te voorkomen. WAARSCHUWING: Gebruik alleen kookplaatbeschermers die door de fabrikant van het kookapparaat zijn ontworpen of door de fabrikant van het apparaat in de gebruiksinstructies als geschikt zijn aangegeven of kookplaatbeschermers die in het apparaat zijn geïntegreerd. Het gebruik van ongeschikte kookplaatbeschermers kan ongelukken veroorzaken. VEILIGHEIDSVOORSCHRIFTEN Installatie WAARSCHUWING! Alleen een erkende installatietechnicus mag het apparaat installeren. WAARSCHUWING! Gevaar voor letsel of schade aan het apparaat. • Verwijder alle verpakkingsmaterialen. • Installeer en gebruik geen beschadigd apparaat. • Volg de installatie-instructies die zijn meegeleverd met het apparaat. • Houd de minimumafstand naar andere apparaten en units in acht. • Pas altijd op bij verplaatsing van het apparaat, want het is zwaar. Gebruik altijd veiligheidshandschoenen en gesloten schoeisel. • Dicht de oppervlakken af met kit om te voorkomen dat ze gaan opzetten door vocht. • Bescherm de bodem van het apparaat tegen stoom en vocht. • Installeer het apparaat niet naast een deur of onder een raam. Dit voorkomt dat heet kookgerei van het apparaat valt als de deur of het raam wordt geopend. • Als het apparaat geïnstalleerd is boven lades zorg er dan voor dat de ruimte tussen de onderkant van het apparaat en de bovenste lade voldoende is voor luchtcirculatie. • De onderkant van het apparaat kan heet worden. Zorg ervoor dat u onder het apparaat een scheidingspaneel installeert dat gemaakt is van triplex, keukenkastmateriaal of ander nietbrandbaar materiaal om te voorkomen dat hij de bodem raakt. • Het afscheidingspaneel moet het volledige gebied onder de kookplaat bedekken. • Zorg ervoor dat er een ventilatieruimte van 2 mm tussen het werkblad en de voorzijde van de eenheid eronder wordt Progress 5 vrijgelaten. De garantie dekt geen schade veroorzaakt door het gebrek aan een adequate ventilatieruimte. Aansluiting aan het elektriciteitsnet WAARSCHUWING! Gevaar voor brand en elektrische schokken. • Alle elektrische aansluitingen moeten door een gediplomeerd elektromonteur worden gemaakt. • Dit apparaat moet worden aangesloten op een geaard stopcontact. • Verzeker u ervan dat de stekker uit het stopcontact is getrokken, voordat u welke werkzaamheden dan ook uitvoert. • Zorg ervoor dat de parameters op het vermogensplaatje overeenkomen met elektrische vermogen van de netstroom. • Zorg ervoor dat het apparaat correct is geïnstalleerd. Losse en onjuiste stroomkabels of stekkers (indien van toepassing) kunnen ervoor zorgen dat de contactklem te heet wordt. • Gebruik de juiste stroomkabel. • Voorkom dat de stroomkabels verstrikt raken. • Zorg ervoor dat er een schokbescherming wordt geïnstalleerd. • Gebruik het klem om spanning op het snoer te voorkomen. • Zorg ervoor dat de stroomkabel of stekker (indien van toepassing) het hete apparaat of heet kookgerei niet aanraakt als u het apparaat op de nabijgelegen contactdozen aansluit. • Gebruik geen adapters met meerdere stekkers en verlengkabels. • Zorg dat u de hoofdstekker (indien van toepassing) of kabel niet beschadigt. Neem contact op met onze serviceafdeling of een elektromonteur om een beschadigde hoofdkabel te vervangen. • De schokbescherming van delen onder stroom en geïsoleerde delen moet op zo'n manier worden bevestigd dat het • • • • • niet zonder gereedschap kan worden verplaatst. Steek de stekker pas in het stopcontact als de installatie is voltooid. Zorg ervoor dat het netsnoer na installatie bereikbaar is. Als het stopcontact los zit, mag u de stekker niet in het stopcontact steken. Trek niet aan het netsnoer om het apparaat los te koppelen. Trek altijd aan de stekker. Gebruik enkel correcte isolatievoorzieningen: stroomonderbrekers, zekeringen (schroefzekeringen moeten uit de houder worden verwijderd), aardlekschakelaars en contactgevers. De elektrische installatie moet een isolatieapparaat bevatten waardoor het apparaat volledig van het lichtnet afgesloten kan worden. Het isolatieapparaat moet een contactopening hebben met een minimale breedte van 3 mm. Gebruik WAARSCHUWING! Gevaar voor letsel, brandwonden of elektrische schokken. • Verwijder voor gebruik (indien van toepassing) de verpakking, labels en beschermfolie. • Dit apparaat is uitsluitend bestemd voor huishoudelijk gebruik. • De specificatie van dit apparaat niet wijzigen. • Zorg ervoor dat de ventilatieopeningen niet geblokkeerd zijn. • Laat het apparaat tijdens het gebruik niet onbeheerd achter. • Zet de kookzone op "uit" na elk gebruik. • Vertrouw niet alleen op de pandetector. • Leg geen bestek of pannendeksels op de kookzones. Deze kunnen heet worden. • Bedien het apparaat niet met natte handen of als het contact maakt met water. 6 Progress • Het apparaat mag niet worden gebruikt als werkblad of aanrecht. • Sluit het apparaat direct af van de stroomtoevoer als het oppervlak van het apparaat gebroken is. Dit om elektrische schokken te voorkomen. • Gebruikers met een pacemaker moeten een afstand van minimaal 30 cm bewaren van de inductiekookzones als het apparaat in werking is. • Als u eten in de hete olie doet, kan het spatten. WAARSCHUWING! Risico op brand en explosie • Wanneer ze verwarmd worden, kunnen vetten en oliën ontvlambare dampen afgeven. Houd vlammen of verwarmde voorwerpen uit de buurt van vet en olie als u hiermee kookt. • De dampen die hete olie afgeeft kunnen spontane ontbranding veroorzaken. • Gebruikte olie die voedselresten bevat kan brand veroorzaken bij een lagere temperatuur dan olie die voor de eerste keer wordt gebruikt. • Plaats geen ontvlambare producten of items die vochtig zijn door ontvlambare producten in, bij of op het apparaat. WAARSCHUWING! Risico op schade aan het apparaat. • Zet geen heet kookgerei op het bedieningspaneel. • Leg geen hete deksel op het glazen oppervlak van de kookplaat. • Laat kookgerei niet droogkoken. • Laat geen voorwerpen of kookgerei op het apparaat vallen. Het oppervlak kan beschadigen. • Activeer de kookzones niet met lege pannen of zonder pannen erop. • Geen aluminiumfolie op het apparaat leggen. • Pannen van gietijzer, aluminium of met beschadigde bodems kunnen krassen veroorzaken in het glas / glaskeramiek. Til deze voorwerpen altijd op als u ze moet verplaatsen op het kookoppervlak. • Dit apparaat is uitsluitend bestemd om mee te koken. Het mag niet worden gebruikt voor andere doeleinden, zoals het verwarmen van een kamer. Onderhoud en reiniging • Reinig het apparaat regelmatig om te voorkomen dat het materiaal van het oppervlak achteruitgaat. • Schakel het apparaat uit en laat het afkoelen voordat u het schoonmaakt. • Gebruik geen waterstralen en stoom om het apparaat te reinigen. • Maak het apparaat schoon met een vochtige zachte doek. Gebruik alleen neutrale schoonmaakmiddelen. Gebruik geen schuurmiddelen, schuursponsjes, oplosmiddelen of metalen voorwerpen. Service • Neem contact op met de erkende servicedienst voor reparatie van het apparaat. Gebruik alleen originele reserveonderdelen. • Met betrekking tot de lamp(en) in dit product en reservelampen die afzonderlijk worden verkocht: Deze lampen zijn bedoeld om bestand te zijn tegen extreme fysieke omstandigheden in huishoudelijke apparaten, zoals temperatuur, trillingen, vochtigheid, of zijn bedoeld om informatie te geven over de operationele status van het apparaat. Ze zijn niet bedoeld voor gebruik in andere toepassingen en zijn niet geschikt voor verlichting in huishoudelijke ruimten. Verwijdering WAARSCHUWING! Gevaar voor letsel of verstikking. • Neem contact met uw plaatselijke overheid voor informatie m.b.t. correcte afvalverwerking van het apparaat. • Haal de stekker uit het stopcontact. • Snijd het netsnoer vlak bij het apparaat af en gooi het weg. Progress 7 MONTAGE WAARSCHUWING! Raadpleeg de hoofdstukken Veiligheid. Voor montage Voordat u de kookplaat installeert, dient u de onderstaande informatie van het typeplaatje te noteren. Het typeplaatje bevindt zich onderop de kookplaat. Model ....................................... Productnummer (PNC) ........................................ Serienummer ........................... Ingebouwde kookplaten Inbouwkookplaten mogen alleen worden gebruikt nadat zij ingebouwd zijn in geschikte inbouwunits of werkbladen die aan de normen voldoen. Aansluitkabel • De kookplaat is voorzien van een aansluitsnoer. Montage min. 500mm min. 50mm min. 2mm • Voor het vervangen van een beschadigde voedingskabel, gebruikt u het kabeltype: H05V2V2-F dat een temperatuur van 90 °C of hoger weerstaat. Neem contact op met een klantenservice bij u in de buurt. De afdichting bevestigen Installatie aan bovenkant 1. Reinig het werkblad rond de plek waar het gat moet worden uitgezaagd. 2. Bevestig de meegeleverde afdichtstrip van 2 x 6 mm tegen de onderrand van de kookplaat langs de buitenrand van de keramische plaat. Rek de afdichtstrip niet uit. Zorg dat de uiteinden van de afdichtstrip zich in het midden van een van de zijden van de kookplaat bevinden. 3. Tel een paar millimeter bij de af te knippen lengte van de afdichtstrip. 4. Duw de twee uiteinden van de afdichtstrip samen. 8 Progress min. 2 mm A min. 2 mm A B < 20 mm > 20 mm min. 500 mm min 30 mm B 57 mm 41 mm 31 mm A 12 mm 28 mm 38 mm B min. 500 mm A 12 mm 28 mm 38 mm B 57 mm 41 mm 31 mm min. 38 mm min. 2 mm R 5mm min. 55mm 490+1mm 270+1mm min. 12 mm min. 2 mm Progress 9 Installatie van meer dan één kookplaat 50 mm min. 500 mm 40-50 mm 490+02 mm 55 mm 30 mm 270+02 mm BESCHRIJVING VAN HET PRODUCT Indeling kookplaat 1 Inductiekookzone 2 Bedieningspaneel 1 145 mm 1 210 mm 2 Bedieningspaneel lay-out 1 2 3 4 10 9 5 8 6 7 Gebruik de tiptoetsen om het apparaat te bedienen. De displays, indicatielampjes en geluiden tonen welke functies worden gebruikt. 10 Progress Tip‐ toets Functie Opmerking 1 AAN/UIT De kookplaat in- en uitschakelen. 2 Blokkering / Kinderbeveili‐ gingsinrichting Het bedieningspaneel vergrendelen/ontgren‐ delen. 3 Pauzeren De functie in- en uitschakelen. - Kookstanddisplay De kookstand weergeven. - Timerindicatie voor de kookzones Geeft aan voor welke zone u de tijd instelt. - Timerdisplay De tijd in minuten weergeven. - Om de kookzone te selecteren. / - De tijd verlengen of verkorten. / - Het instellen van de kookstand. PowerBoost Het inschakelen van de functie. 4 5 6 7 8 9 10 Kookstanddisplays Scherm Beschrijving De kookzone is uitgeschakeld. De kookzone wordt gebruikt. - Pauzeren werkt. PowerBoost werkt. + cijfer Er is een storing. / OptiHeat Control (3-staps restwarmte-indicator): doorgaan met koken / warmhoudstand / restwarmte. / Blokkering / Kinderbeveiligingsinrichting werkt. Het kookgerei is niet geschikt of te klein, of er is geen kookgerei op de kookzone geplaatst. Automatische uitschakeling werkt. Progress 11 OptiHeat Control (3-staps restwarmte-indicator) WAARSCHUWING! / Er bestaat verbrandingsgevaar door restwarmte. / De aanduidingen tonen het niveau van de restwarmte voor de kookzones die u momenteel gebruikt. De aanduidingen kunnen ook aangaan voor de nabijgelegen kookzones, zelfs als u deze niet gebruikt. De inductiekookzones creëren de voor het kookproces benodigde warmte direct in de bodem van de pan. Het glaskeramiek wordt verwarmd door de warmte van de pannen. DAGELIJKS GEBRUIK WAARSCHUWING! Raadpleeg de hoofdstukken Veiligheid. Warmte-instelling In- of uitschakelen Raak 1 seconde aan om de kookplaat in– of uit te schakelen. Automatische uitschakeling De functie schakelt de kookplaat automatisch uit als: • alle kookzones zijn uitgeschakeld, • u de kookstand niet instelt nadat u de kookplaat hebt ingeschakeld, • u iets hebt gemorst of iets langer dan 10 seconden op het bedieningspaneel hebt gelegd (een pan, doek, etc.). Er klinkt een geluidssignaal en de kookplaat wordt uitgeschakeld. Verwijder het voorwerp of reinig het bedieningspaneel. • De kookplaat te heet wordt (bijvoorbeeld als een steelpan droog kookt). De kookzone moet afgekoeld zijn voordat u de kookplaat weer kunt gebruiken. • u ongeschikte pannen gebruikt. Het gaat branden en na 2 symbool minuten schakelt de kookzone automatisch uit. • u een kookzone niet uitschakelt of de kookstand verandert. Na een tijdje gaat aan en schakelt de kookplaat uit. De verhouding tussen kookstand en de tijd waarna de kookplaat uitschakelt: ,1-2 De kookplaat wordt uitgescha‐ keld na 6 uur 3-4 5 uur 5 4 uur 6-9 1,5 uur De kookstand aanraken om te verhogen. aanraken om te verlagen. Raak en tegelijkertijd aan om de kookzone uit te schakelen. PowerBoost Deze functie maakt meer vermogen beschikbaar voor de inductiekookzones. De functie kan voor een beperkte tijdsduur voor uitsluitend de inductiekookzone worden geactiveerd. Daarna wordt de inductiekookzone automatisch teruggeschakeld naar de hoogste kookstand. Zie het hoofdstuk 'Technische gegevens'. Om de functie voor een kookzone in te schakelen: raak aan. gaat branden. De functie uitschakelen: raak aan. of 12 Progress Timer • Timer met aftelfunctie U kunt deze functie gebruiken om de lengte van één kooksessie in te stellen. Stel eerst de warmtestand voor de kookzone in en dan de functie. Om de kookzone in te stellen: tik herhaaldelijk op totdat het lampje van een kookzone verschijnt. Om de functie te activeren of de tijd te wijzigen: tik op of van de timer om de tijd in te stellen (00 - 99 minuten). Als het lampje van de kookzone gaat knipperen, wordt de tijd afgeteld. Om de resterende tijd te zien: tik op om de kookzone in te stellen. Het indicatielampje van de kookzone begint te knipperen. Op het display wordt de resterende tijd weergegeven. Om de functie te deactiveren: tik op om de kookzone in te stellen en tik vervolgens op . De resterende tijd telt terug tot 00. Het indicatielampje van de kookzone verdwijnt. Als de aftelling beëindigd is, klinkt er een geluidssignaal en knippert 00. De kookzone wordt uitgeschakeld. Om de functie te stoppen: tik op . • Kookwekker U kunt deze functie gebruiken wanneer de kookplaat is ingeschakeld maar de kookzones niet werken. De warmtestand op het display toont . en Om de functie te activeren: tik op tik vervolgens op of van de timer om de tijd in te stellen. Als de tijd verstreken is, klinkt er een geluidssignaal en knippert 00. Om de functie te stoppen: tik op . Om de functie te deactiveren: tik op en tik vervolgens op . De resterende tijd telt terug tot 00. De functie heeft geen invloed op de werking van de kookzones. Pauzeren Deze functie stelt alle kookzones die werken in op de laagste warmtestand. Als de functie in werking is, zijn alle andere symbolen op de bedieningspanelen vergrendeld. De functie stopt de timerfunctie niet. Tik op om de functie in te schakelen. gaat aan.De warmte-instelling wordt verlaagd naar 1. Voor het uitschakelen van de functie raakt u aan. De voorgaande warmteinstelling gaat aan. Blokkering U kunt het bedieningspaneel vergrendelen terwijl de kookzones in werking zijn. Hiermee wordt voorkomen dat de kookstand per ongeluk wordt veranderd. Stel eerst de kookstand in. De functie inschakelen: raak aan. gaat gedurende 4 seconden aan. De timer blijft aan. De functie uitschakelen: Raak De vorige kookstand gaat aan. aan. Als u de kookplaat uitzet, stopt u deze functie ook. Kinderbeveiligingsinrichting Deze functie voorkomt dat de kookplaat onbedoeld wordt gebruikt. Om de functie te activeren: activeer de kookplaat met . Stel geen warmteinstelling in. Raak 4 seconden Progress 13 aan. gaat aan. Schakel de kookplaat uit met . Om de functie te deactiveren: activeer de kookplaat met . Stel geen 4 seconden warmteinstelling in. Raak aan. gaat aan. Schakel de kookplaat uit met . Om de functie voor slechts één kooksessie te onderdrukken: activeer de kookplaat met . gaat aan. Raak 4 seconden aan. Stel de kookstand in binnen 10 seconden. U kunt de kookplaat bedienen. Als u de kookplaat uitschakelt met , treedt de functie weer in werking. OffSound Control (In- en uitschakelen van de geluiden) Schakel de kookplaat uit. Raak 3 seconden aan. Het display gaat aan en uit. Raak 3 seconden aan. of gaat branden. Raak aan van de zone linksvoor om één van het volgende te kiezen: • - de signalen zijn uit • - de signalen zijn aan Om uw keuze te bevestigen moet u wachten tot de kookplaat automatisch uitschakelt. • Kookwekker naar beneden komt • Timer met aftelfunctie naar beneden komt • u iets op het bedieningspaneel plaatst. Stroommanagement • Alle kookzones zijn aangesloten op één fase. Zie afbeelding. • De functie wordt geactiveerd als de totale elektriciteitslading van de kookzones de maximale elektriciteitslading van de fase overschrijdt. • De functie verdeelt het vermogen tussen de kookzones. • De functie verlaagt het vermogen naar de andere kookzones. • De weergave van de warmte-instelling van de verlaagde zones wisselt af tussen de gekozen warmte-instelling en de verlaagde warmte-instelling. Na enige tijd blijft de weergave van de warmte-instelling van de verlaagde zones op de verlaagde warmtestand staan. Als de functie op staat, kunt u de geluiden alleen horen als: aanraakt • u AANWIJZINGEN EN TIPS WAARSCHUWING! Raadpleeg de hoofdstukken Veiligheid. Pannen Voor inductiekookzones creëert een sterk elektromagnetisch veld de hitte in de pannen zeer snel. Gebruik de inductiekookzones met geschikte pannen. 14 Progress • De bodem van de pannen moet zo dik en vlak mogelijk zijn. • Zorg ervoor dat bodems schoon en droog zijn voordat de pannen op de kookplaat worden gezet. • Schuif of wrijf de pan niet over het keramische glas, om krassen te voorkomen. Panmaterialen • goed: gietijzer, staal, geëmailleerd staal, roestvrij staal, meerlaagse bodem (aangemerkt als geschikt door de fabrikant). • niet goed: aluminium, koper, messing, glas, keramiek, porselein. Een pan is geschikt voor een inductiekookplaat als: • water op de hoogste kookstand binnen korte tijd wordt verwarmd, • een magneet op de onderkant van het kookgerei plakt. Afmetingen van pannen • Inductiekookzones passen zich tot op zekere hoogte automatisch aan de afmetingen van pannen aan. • De efficiëntie van de kookzone hangt samen met de diameter van de pan. Pannen met een diameter kleiner dan het minimum ontvangen slechts een deel van het vermogen dat door de kookzone wordt gegenereerd. • Gebruik zowel om veiligheidsredenen als voor optimale kookresultaten geen pannen groter dan aangegeven in de kookzonespecificaties. Zorg ervoor dat pannen tijdens het koken niet dicht bij het bedieningspaneel blijven. Dit kan invloed hebben op de werking van het bedieningspaneel of onbedoeld de kookplaatfuncties activeren. Warmte-in‐ stelling -1 1-2 Raadpleeg de technische gegevens. Lawaai tijdens gebruik Als u dit hoort: • kraakgeluid: de pan is gemaakt van verschillende materialen (een sandwich-constructie). • fluitend geluid: bij gebruik van een kookzone met een hoge kookstand en als het kookgerei is gemaakt van verschillende materialen (een sandwich-constructie). • zoemend geluid: als u hoge kookstanden gebruikt. • klikken: er treedt elektrische schakeling op. • sissend, brommend: de ventilator werkt. Deze geluiden zijn normaal en hebben niets met een defect te maken. Voorbeelden van kooktoepassingen De correlatie tussen de kookstand en het stroomverbruik van de kookzone is niet lineair. Wanneer u de kookstand verhoogt, is dit niet proportioneel met de toename in stroomverbruik van de kookzone. Het betekent dat een kookzone op de medium kookstand minder dan de helft van het vermogen gebruikt. De gegevens in de volgende tabel dienen slechts als richtlijn. Gebruik om: Tijd (min) Tips Bereide gerechten warmhou‐ den. zoals nodig Een deksel op het kookgerei doen. Hollandaisesaus, smelten: bo‐ ter, chocolade, gelatine. 5 - 25 Van tijd tot tijd mengen. Progress 15 Warmte-in‐ stelling Gebruik om: Tijd (min) Tips 1-2 Stollen: luchtige omeletten, ge‐ bakken eieren. 10 40 Met deksel bereiden. 2-3 Zachtjes aan de kook brengen van rijst en gerechten op melk‐ basis, reeds bereide gerechten opwarmen. 25 50 Voeg minimaal twee keer zo veel vocht toe als rijst en roer gerechten op melkbasis hal‐ verwege de procedure door. 3-4 Stomen van groenten, vis en vlees. 20 45 Voeg een paar eetlepels vocht toe. 4-5 Aardappelen stomen. 20 60 Gebruik max. ¼ l water voor 750 g aardappelen. 4-5 Bereiden van grotere hoeveel‐ heden voedsel, stoofschotels en soepen. 60 150 Tot 3 l vloeistof plus ingrediën‐ ten. 6-7 Lichtjes braden: kalfsoester, cordon bleu van kalfsvlees, ko‐ teletten, rissoles, worstjes, le‐ ver, roux, eieren, pannenkoe‐ ken, donuts. zoals nodig Halverwege de bereidingstijd omdraaien. 7-8 Door-en-door gebraden, opge‐ bakken aardappelen, lenden‐ biefstukken, steaks. 5 - 15 Halverwege de bereidingstijd omdraaien. 9 Aan de kook brengen van water, pasta koken, aanbraden van vlees (gou‐ lash, stoofvlees), frituren van friet. Aan de kook brengen van grote hoeveelheden water. PowerBoost is geacti‐ veerd. ONDERHOUD EN REINIGING WAARSCHUWING! Raadpleeg de hoofdstukken Veiligheid. Algemene informatie • Maak de kookplaat na ieder gebruik schoon. • Gebruik altijd kookgerei met een schone bodem. • Krassen of donkere vlekken op de oppervlakte hebben geen invloed op de werking van de kookplaat. • Gebruik een specifiek schoonmaakmiddel voor het oppervlak van de kookplaat. • Gebruik een speciale schraper voor de glazen plaat. De kookplaat schoonmaken • Verwijder direct: gesmolten kunststof, plastic folie, suiker en suikerhoudend voedsel, anders kan dit schade aan de kookplaat veroorzaken. Doe voorzichtig om brandwonden te voorkomen. Gebruik de speciale schraper op de glazen plaat en verwijder resten door 16 Progress het blad over het oppervlak te schuiven. • Verwijder nadat de kookplaat voldoende is afgekoeld: kalk- en waterkringen, vetspatten en metaalachtig glanzende verkleuringen. Reinig de kookplaat met een vochtige doek en een beetje niet-schurend reinigingsmiddel. Droog de kookplaat na reiniging af met een zachte doek. • Verkleuring glanzende metalen verwijderen: reinig het glazen oppervlak met een doek en een oplossing van water met azijn. PROBLEEMOPLOSSING WAARSCHUWING! Raadpleeg de hoofdstukken Veiligheid. Wat moet u doen als ... Probleem Mogelijke oorzaak Oplossing U kunt de kookplaat niet inschakelen of bedienen. De kookplaat is niet aange‐ sloten op een stopcontact of niet goed geïnstalleerd. Controleer of de kookplaat goed aangesloten is op het lichtnet. De zekering is doorgesla‐ gen. Verzeker u ervan dat de zeke‐ ring de oorzaak van de storing is. Als de zekeringen keer op keer doorslaan, neemt u con‐ tact op met een erkende in‐ stallateur. Stel gedurende 10 seconden geen kookstand in. Schakel de kookplaat opnieuw in en stel de kookstand binnen 10 seconden in. U hebt 2 of meer sensorvel‐ den tegelijkertijd aangeraakt. Raak slechts één sensorveld aan. Pauzeren werkt. Raadpleeg "Dagelijks ge‐ bruik". Water of vetvlekken op het bedieningspaneel. Reinig het bedieningspaneel. Er klinkt een geluidssig‐ naal en de kookplaat wordt uitgeschakeld. Als de kookplaat wordt uitgeschakeld, klinkt er een geluidssignaal. U hebt iets op een of meer sensorvelden geplaatst. Verwijder het voorwerp van de sensorvelden. De kookplaat wordt uitge‐ schakeld. U hebt iets op het sensor‐ Verwijder het voorwerp van het sensorveld. veld geplaatst . Progress 17 Probleem Mogelijke oorzaak Oplossing De restwarmte-indicator gaat niet aan. De zone is niet heet omdat deze slechts kortstondig is gebruikt, of de sensor is be‐ schadigd. Als de zone voldoende lang gebruikt is om heet te zijn, neemt u contact op met een erkende servicedienst. De kookstand schakelt tussen twee niveaus. Stroommanagement werkt. Raadpleeg "Dagelijks ge‐ bruik". De sensorvelden worden heet. De pan is te groot of u plaatst deze te dicht bij de bedieningsknoppen. Plaats grotere pannen indien mogelijk op de achterste kook‐ zones. Er klinkt geen geluidsig‐ naal wanneer u de tiptoet‐ sen van het bedienings‐ paneel aanraakt. De signalen zijn uit. Schakel de geluiden in. Raad‐ pleeg "Dagelijks gebruik". gaat aan. Kinderbeveiligingsinrichting of Blokkering werkt. Raadpleeg "Dagelijks ge‐ bruik". gaat aan. Er staat geen pan op de zo‐ ne. Plaats een pan op de zone. De pan is niet geschikt. Gebruik geschikte pannen. Zie 'Aanwijzingen en tips'. De diameter van de bodem van de pan is te klein voor de zone. Gebruik pannen met de juiste afmetingen. Raadpleeg de technische gegevens. en een getal gaan branden. Er is een fout opgetreden in de kookplaat. Schakel de kookplaat uit en schakel deze na 30 seconden U kunt een constant piep‐ geluid horen. De elektrische aansluiting is verkeerd. weer in. Indien opnieuw wordt weergegeven, trekt u de stekker van de kookplaat uit het stopcontact. Steek de stekker van de kookplaat er na 30 seconden weer in. Als het probleem zich blijft voordoen, neemt u contact op met een erkende servicedienst. Als u het probleem niet kunt oplossen... Als u niet zelf het probleem kunt verhelpen, neem dan contact op met uw Trek de stekker van de kook‐ plaat uit het stopcontact. Laat de installatie controleren door een erkende elektricien. verkoper of de serviceafdeling. Zie voor deze gegevens het typeplaatje. Geef ook de driecijferige code voor het glaskeramiek (bevindt zich op de hoek van het glazen oppervlak) en de 18 Progress foutmelding die wordt weergegeven. Verzeker u ervan dat u de kookplaat correct gebruikt heeft. Bij onjuist gebruik van het apparaat wordt het bezoek van de onderhoudstechnicus van de klantenservice of de vakhandelaar in rekening gebracht, zelfs tijdens de garantieperiode. De instructies over het service center en de garantiebepalingen vindt u in het garantieboekje. TECHNISCHE GEGEVENS Specificatie kookzones Kookzone Nominaal ver‐ mogen (max warmte-in‐ stelling) [W] PowerBoost [W] PowerBoost maximale duur [min] Diameter kookgerei [mm] Middenvoor 2300 3700 10 180 - 210 Middenachter 1400 2500 4 125 - 145 Labels meegeleverd in de zak met accessoires Het vermogen van de kookzones kan binnen een bepaalde kleine marge verschillen van de gegevens in de tabel. Dit kan veranderen afhankelijk van het materiaal en de afmetingen van het kookgerei. Bevestig de stickers zoals hieronder weergegeven: Gebruik voor optimale kookresultaten alleen kookgerei met een diameter die niet groter is dan vermeld in de tabel. A B MOD. MOD. PROD.NO. PROD.NO. SER.NO SER.NO DATA DATA A. Plak het op de garantiekaart en verstuur dit deel (indien van toepassing). C 0049 MOD. PROD.NO. SER.NO. TYPE IP20 03 IT MADE IN ITALY B. Plak het op de garantiekaart en bewaar dit deel (indien van toepassing). Progress 19 C. Plak het op het instructieboekje. ENERGIEZUINIGHEID Productinformatie volgens EU 66/2014 alleen geldig voor EU-markt Modelidentificatie PAI3101F Type kookplaat Ingebouwde kook‐ plaat Aantal kookzones 2 Verwarmingstechnologie Inductie Diameter ronde kookzones (Ø) Middenvoor Middenachter 21,0 cm 14,5 cm Energieverbruik per kookzone (EC electric cooking) Middenvoor Middenachter 188,9 Wh/kg 183,4 Wh/kg Energieverbruik van de kookplaat (EC electric hob) EN 60350-2 - Huishoudelijke elektrische kookapparaten - deel 2: Kookplaten Methodes voor het meten van de prestatie Energiebesparing U kunt elke dag energie besparen tijdens het koken door de onderstaande tips te volgen. • Warm alleen de hoeveelheid water op die u nodig heeft. 186,2 Wh/kg • Doe indien mogelijk altijd een deksel op de pan. • Zet uw kookgerei op de kookzone voordat u deze activeert. • Zet kleiner kookgerei op kleinere kookzones. • Plaats het kookgerei precies in het midden van de kookzone. • Gebruik de restwarmte om het eten warm te houden of te smelten. MILIEUBESCHERMING Recycleer de materialen met het symbool . Gooi de verpakking in een geschikte afvalcontainer om het te recycleren. Bescherm het milieu en de volksgezondheid en recycleer op een correcte manier het afval van elektrische en elektronische apparaten. Gooi apparaten gemarkeerd met het symbool niet weg met het huishoudelijk afval. Breng het product naar het milieustation bij u in de buurt of neem contact op met de gemeente. 20 Progress CONTENTS Safety information Safety instructions Installation Product description Daily use 20 22 24 27 28 Hints and tips Care and cleaning Troubleshooting Technical data Energy efficiency VISIT OUR WEBSITE TO: 31 32 33 35 36 Subject to change without notice. Get usage advice, brochures, trouble shooter, service and repair information: www.progress-hausgeraete.de/support SAFETY INFORMATION Before the installation and use of the appliance, carefully read the supplied instructions. The manufacturer is not responsible for any injuries or damage that are the result of incorrect installation or usage. Always keep the instructions in a safe and accessible location for future reference. Children and vulnerable people safety • • • • • This appliance can be used by children aged from 8 years and above and persons with reduced physical, sensory or mental capabilities or lack of experience and knowledge if they have been given supervision or instruction concerning the use of the appliance in a safe way and understand the hazards involved. Children between 3 and 8 years of age and persons with very extensive and complex disabilities shall be kept away from the appliance unless continuously supervised. Children of less than 3 years of age should be kept away from the appliance unless continuously supervised. Do not let children play with the appliance. Keep all packaging away from children and dispose of it appropriately. Progress 21 • • • WARNING: Keep children and pets away from the appliance when it operates or when it cools down. Accessible parts become hot during use. If the appliance has a child safety device, it should be activated. Children shall not carry out cleaning and user maintenance of the appliance without supervision. General Safety • • • • • • • • • • • WARNING: The appliance and its accessible parts become hot during use. Care should be taken to avoid touching heating elements. WARNING: Unattended cooking on a hob with fat or oil can be dangerous and may result in fire. NEVER try to extinguish a fire with water, but switch off the appliance and then cover flame e.g. with a lid or a fire blanket. CAUTION: The appliance must not be supplied through an external switching device, such as a timer, or connected to a circuit that is regularly switched on and off by a utility. CAUTION: The cooking process has to be supervised. A short term cooking process has to be supervised continuously. WARNING: Danger of fire: Do not store items on the cooking surfaces. Metallic objects such as knives, forks, spoons and lids should not be placed on the hob surface since they can get hot. Do not use the appliance before installing it in the built-in structure. Do not use a steam cleaner to clean the appliance. After use, switch off the hob element by its control and do not rely on the pan detector. If the glass ceramic surface / glass surface is cracked, switch off the appliance and unplug it from the mains. In case the appliance is connected to the mains directly using junction box, remove the fuse to disconnect the appliance 22 Progress • • from power supply. In either case contact the Authorised Service Centre. If the supply cord is damaged, it must be replaced by the manufacturer, an authorized Service or similarly qualified persons in order to avoid a hazard. WARNING: Use only hob guards designed by the manufacturer of the cooking appliance or indicated by the manufacturer of the appliance in the instructions for use as suitable or hob guards incorporated in the appliance. The use of inappropriate guards can cause accidents. SAFETY INSTRUCTIONS Installation WARNING! Only a qualified person must install this appliance. WARNING! Risk of injury or damage to the appliance. • Remove all the packaging. • Do not install or use a damaged appliance. • Follow the installation instructions supplied with the appliance. • Keep the minimum distance from other appliances and units. • Always take care when moving the appliance as it is heavy. Always use safety gloves and enclosed footwear. • Seal the cut surfaces with a sealant to prevent moisture from causing swelling. • Protect the bottom of the appliance from steam and moisture. • Do not install the appliance next to a door or under a window. This prevents hot cookware from falling from the appliance when the door or the window is opened. • If the appliance is installed above drawers make sure that the space, between the bottom of the appliance and the upper drawer is sufficient for air circulation. • The bottom of the appliance can get hot. Make sure to install a separation panel made from plywood, kitchen carcass material or other nonflammable materials under the appliance to prevent access to the bottom. • The separation panel has to cover the area under the hob completely. • Make sure that the ventilation space of 2 mm, between the worktop and the front of the below unit, is free. The warranty does not cover damages caused by the lack of an adequate ventilation space. Electrical Connection WARNING! Risk of fire and electric shock. • All electrical connections should be made by a qualified electrician. • The appliance must be earthed. • Before carrying out any operation make sure that the appliance is disconnected from the power supply. • Make sure that the parameters on the rating plate are compatible with the electrical ratings of the mains power supply. • Make sure the appliance is installed correctly. Loose and incorrect electricity mains cable or plug (if applicable) can make the terminal become too hot. • Use the correct electricity mains cable. Progress 23 • Do not let the electricity mains cable tangle. • Make sure that a shock protection is installed. • Use the strain relief clamp on the cable. • Make sure the mains cable or plug (if applicable) does not touch the hot appliance or hot cookware, when you connect the appliance to the near sockets. • Do not use multi-plug adapters and extension cables. • Make sure not to cause damage to the mains plug (if applicable) or to the mains cable. Contact our Authorised Service Centre or an electrician to change a damaged mains cable. • The shock protection of live and insulated parts must be fastened in such a way that it cannot be removed without tools. • Connect the mains plug to the mains socket only at the end of the installation. Make sure that there is access to the mains plug after the installation. • If the mains socket is loose, do not connect the mains plug. • Do not pull the mains cable to disconnect the appliance. Always pull the mains plug. • Use only correct isolation devices: line protecting cut-outs, fuses (screw type fuses removed from the holder), earth leakage trips and contactors. • The electrical installation must have an isolation device which lets you disconnect the appliance from the mains at all poles. The isolation device must have a contact opening width of minimum 3 mm. Use WARNING! Risk of injury, burns and electric shock. • Remove all the packaging, labelling and protective film (if applicable) before first use. • This appliance is for household use only. • Do not change the specification of this appliance. • Make sure that the ventilation openings are not blocked. • Do not let the appliance stay unattended during operation. • Set the cooking zone to “off” after each use. • Do not rely on the pan detector. • Do not put cutlery or saucepan lids on the cooking zones. They can become hot. • Do not operate the appliance with wet hands or when it has contact with water. • Do not use the appliance as a work surface or as a storage surface. • If the surface of the appliance is cracked, disconnect immediately the appliance from the power supply. This to prevent an electrical shock. • Users with a pacemaker must keep a distance of minimum 30 cm from the induction cooking zones when the appliance is in operation. • When you place food into hot oil, it may splash. WARNING! Risk of fire and explosion • Fats and oil when heated can release flammable vapours. Keep flames or heated objects away from fats and oils when you cook with them. • The vapours that very hot oil releases can cause spontaneous combustion. • Used oil, that can contain food remnants, can cause fire at a lower temperature than oil used for the first time. • Do not put flammable products or items that are wet with flammable products in, near or on the appliance. WARNING! Risk of damage to the appliance. • Do not keep hot cookware on the control panel. • Do not put a hot pan cover on the glass surface of the hob. • Do not let cookware boil dry. 24 Progress • Be careful not to let objects or cookware fall on the appliance. The surface can be damaged. • Do not activate the cooking zones with empty cookware or without cookware. • Do not put aluminium foil on the appliance. • Cookware made of cast iron, aluminium or with a damaged bottom can cause scratches on the glass / glass ceramic. Always lift these objects up when you have to move them on the cooking surface. • This appliance is for cooking purposes only. It must not be used for other purposes, for example room heating. Care and cleaning • Clean the appliance regularly to prevent the deterioration of the surface material. • Switch off the appliance and let it cool down before cleaning. • Do not use water spray and steam to clean the appliance. • Clean the appliance with a moist soft cloth. Use only neutral detergents. Do not use abrasive products, abrasive cleaning pads, solvents or metal objects. Service • To repair the appliance contact the Authorised Service Centre. Use original spare parts only. • Concerning the lamp(s) inside this product and spare part lamps sold separately: These lamps are intended to withstand extreme physical conditions in household appliances, such as temperature, vibration, humidity, or are intended to signal information about the operational status of the appliance. They are not intended to be used in other applications and are not suitable for household room illumination. Disposal WARNING! Risk of injury or suffocation. • Contact your municipal authority for information on how to discard the appliance correctly. • Disconnect the appliance from the mains supply. • Cut off the mains electrical cable close to the appliance and dispose of it. INSTALLATION WARNING! Refer to Safety chapters. Before the installation Before you install the hob, write down the information below from the rating plate. The rating plate is on the bottom of the hob. Model ....................................... PNC ......................................... Serial number ........................... and work surfaces that align to the standards. Connection cable • The hob is supplied with a connection cable. • To replace the damaged mains cable, use the cable type: H05V2V2-F which withstands a temperature of 90 °C or higher. Speak to your local Service Centre. Built-in hobs Attaching the seal - On-top installation Only use the built-in hobs after you assemble the hob into correct built-in units 1. Clean the worktop around the cut out area. Progress 25 2. Attach the supplied 2x6mm seal stripe to the lower edge of the hob, along the outer edge of the glass ceramic. Do not stretch it. Make sure that the ends of the seal stripe are located in the middle of one side of the hob. 3. Add some millimetres to the length when you cut the seal stripe. 4. Join the two ends of the seal stripe together. Assembly min. 500mm min. 50mm min. 2mm min. 2 mm A min. 2 mm B < 20 mm B 57 mm 41 mm 31 mm B > 20 mm min. 500 mm A 12 mm 28 mm 38 mm A min 30 mm min. 500 mm A 12 mm 28 mm 38 mm B 57 mm 41 mm 31 mm 26 Progress min. 38 mm min. 2 mm R 5mm min. 55mm 490+1mm 270+1mm min. 12 mm min. 2 mm Installation of more than one hob 50 mm min. 500 mm 40-50 mm 490+02 mm 55 mm 30 mm 270+02 mm Progress 27 PRODUCT DESCRIPTION Cooking surface layout 1 Induction cooking zone 2 Control panel 1 145 mm 1 210 mm 2 Control panel layout 1 2 3 4 10 9 5 8 6 7 Use the sensor fields to operate the appliance. The displays, indicators and sounds tell which functions operate. Sen‐ sor field Function Comment 1 ON / OFF To activate and deactivate the hob. 2 Lock / Child Safety Device To lock / unlock the control panel. 3 Pause To activate and deactivate the function. - Heat setting display To show the heat setting. - Timer indicators of cooking zones To show for which zone you set the time. - Timer display To show the time in minutes. - To select the cooking zone. 4 5 6 7 28 Progress Sen‐ sor field 8 9 Function Comment / - To increase or decrease the time. / - To set a heat setting. PowerBoost To activate the function. 10 Heat setting displays Display Description The cooking zone is deactivated. The cooking zone operates. - Pause operates. PowerBoost operates. + digit There is a malfunction. / OptiHeat Control (3 step Residual heat indicator): continue cooking / keep warm / residual heat. / Lock / Child Safety Device operates. Incorrect or too small cookware or no cookware on the cooking zone. Automatic Switch Off operates. OptiHeat Control (3 step Residual heat indicator) WARNING! / / There is a risk of burns from residual heat. The indicators show the level of the residual heat for the cooking zones you DAILY USE WARNING! Refer to Safety chapters. are currently using. The indicators may also come on for the neighbouring cooking zones even if you are not using them. The induction cooking zones produce the heat necessary for the cooking process directly in the bottom of the cookware. The glass ceramic is heated by the heat of the cookware. Progress 29 Activating and deactivating PowerBoost Touch for 1 second to activate or deactivate the hob. This function makes more power available to the induction cooking zones. The function can be activated for the induction cooking zone only for a limited period of time. After this time the induction cooking zone automatically sets back to the highest heat setting. Automatic Switch Off The function deactivates the hob automatically if: • all cooking zones are deactivated, • you do not set the heat setting after you activate the hob, • you spill something or put something on the control panel for more than 10 seconds (a pan, a cloth, etc.). An acoustic signal sounds and the hob deactivates. Remove the object or clean the control panel. • the hob gets too hot (e.g. when a saucepan boils dry). Let the cooking zone cool down before you use the hob again. • you use incorrect cookware. The symbol comes on and the cooking zone deactivates automatically after 2 minutes. • you do not deactivate a cooking zone or change the heat setting. After some comes on and the hob time deactivates. The relation between the heat setting and the time after which the hob deactivates: Heat setting ,1-2 The hob deacti‐ vates after 6 hours 3-4 5 hours 5 4 hours 6-9 1.5 hour The heat setting Touch to increase the heat setting. Touch to decrease the heat setting. and at the same time to Touch deactivate the cooking zone. Refer to “Technical data” chapter. To activate the function for a cooking zone: touch . comes on. To deactivate the function: touch . or Timer • Count Down Timer You can use this function to set the length of a single cooking session. First set the heat setting for the cooking zone, then set the function. To set the cooking zone: touch repeatedly until the indicator of a cooking zone appears. To activate the function or change the time: touch or of the timer to set the time (00 - 99 minutes). When the indicator of the cooking zone starts to flash, the time counts down. To see the remaining time: touch to set the cooking zone. The indicator of the cooking zone starts to flash. The display shows the remaining time. to To deactivate the function: touch set the cooking zone and then touch . The remaining time counts down to 00. The indicator of the cooking zone disappears. When the countdown ends, an acoustic signal sounds and 00 flashes. The cooking zone deactivates. 30 Progress To stop the sound: touch . • Minute Minder You can use this function when the hob is activated and the cooking zones do not operate. The heat setting display shows . To activate the function: touch and then touch or of the timer to set the time. When the time finishes, an acoustic signal sounds and 00 flashes. To stop the sound: touch . To deactivate the function: touch and then touch . The remaining time counts down to 00. The function has no effect on the operation of the cooking zones. Pause This function sets all cooking zones that operate to the lowest heat setting. When the function operates, all other symbols on the control panels are locked. The function does not stop the timer functions. Touch to activate the function. comes on. The heat setting is lowered to 1. To deactivate the function, touch . The previous heat setting comes on. Lock You can lock the control panel while cooking zones operate. It prevents an accidental change of the heat setting. Set the heat setting first. To activate the function: touch . comes on for 4 seconds. The Timer stays on. To deactivate the function: touch . The previous heat setting comes on. When you deactivate the hob, you also deactivate this function. Child Safety Device This function prevents an accidental operation of the hob. To activate the function: activate the hob with . Do not set any heat setting. Touch for 4 seconds. comes on. Deactivate the hob with . To deactivate the function: activate the hob with . Do not set any heat setting. Touch for 4 seconds. comes on. Deactivate the hob with . To override the function for only one cooking time: activate the hob with . comes on. Touch for 4 seconds. Set the heat setting in 10 seconds. You can operate the hob. When you deactivate the hob with the function operates again. OffSound Control (Deactivation and activation of the sounds) Deactivate the hob. Touch for 3 seconds. The display comes on and goes out. Touch for 3 seconds. or comes on. Touch of the front left zone to choose one of the following: • - the sounds are off - the sounds are on • To confirm your selection wait until the hob deactivates automatically. When the function is set to you can hear the sounds only when: • you touch • Minute Minder comes down • Count Down Timer comes down • you put something on the control panel. Progress 31 Power management • All cooking zones are connected to one phase. See the illustration. • The function activates when the total electricity loading of the cooking zones exceeds maximum electricity loading of the phase. • The function divides the power between cooking zones. • The function decreases the power to the other cooking zones. • The heat setting display of the reduced zones alternates between the chosen heat setting and the reduced heat setting. After some time the heat setting display of the reduced zones stays on the reduced heat setting. HINTS AND TIPS WARNING! Refer to Safety chapters. Cookware For induction cooking zones a strong electro-magnetic field creates the heat in the cookware very quickly. Use the induction cooking zones with suitable cookware. • The bottom of the cookware must be as thick and flat as possible. • Ensure pan bases are clean and dry before placing on the hob surface. • In order to avoid scratches, do not slide or rub the pot across the ceramic glass. Cookware material • correct: cast iron, steel, enamelled steel, stainless steel, multi-layer bottom (with a correct marking from a manufacturer). • not correct: aluminium, copper, brass, glass, ceramic, porcelain. Cookware is suitable for an induction hob if: • water boils very quickly on a zone set to the highest heat setting. • a magnet pulls on to the bottom of the cookware. Cookware dimensions • Induction cooking zones adapt to the dimension of the bottom of the cookware automatically. • The cooking zone efficiency is related to the diameter of the cookware. The cookware with a diameter smaller than the minimum receives only a part of the power generated by the cooking zone. • For both safety reasons and optimal cooking results, do not use cookware larger than indicated in "Cooking zones specification". Avoid keeping cookware close to the control panel during the cooking session. This might impact the functioning of the control panel or accidentally activate hob functions. Refer to "Technical data". The noises during operation If you can hear: • crack noise: cookware is made of different materials (a sandwich construction). • whistle sound: you use a cooking zone with a high power level and the cookware is made of different materials (a sandwich construction). • humming: you use a high power level. • clicking: electric switching occurs. • hissing, buzzing: the fan operates. 32 Progress The noises are normal and do not indicate any malfunction. Examples of cooking applications setting, it is not proportional to the increase of the consumption of power. It means that a cooking zone with the medium heat setting uses less than a half of its power. The correlation between the heat setting of a zone and its consumption of power is not linear. When you increase the heat Heat setting The data in the table is for guidance only. Use to: Time (min) Hints Keep cooked food warm. as nec‐ essary Put a lid on the cookware. 1-2 Hollandaise sauce, melt: but‐ ter, chocolate, gelatine. 5 - 25 Mix from time to time. 1-2 Solidify: fluffy omelettes, baked eggs. 10 40 Cook with a lid on. 2-3 Simmer rice and milkbased dishes, heat up ready-cooked meals. 25 50 Add at least twice as much liq‐ uid as rice, mix milk dishes halfway through the proce‐ dure. 3-4 Steam vegetables, fish, meat. 20 45 Add a couple of tablespoons of liquid. 4-5 Steam potatoes. 20 60 Use max. ¼ l of water for 750 g of potatoes. 4-5 Cook larger quantities of food, stews and soups. 60 150 Up to 3 l of liquid plus ingredi‐ ents. 6-7 Gentle fry: escalope, veal cor‐ don bleu, cutlets, rissoles, sausages, liver, roux, eggs, pancakes, doughnuts. as nec‐ essary Turn halfway through. 7-8 Heavy fry, hash browns, loin steaks, steaks. 5 - 15 Turn halfway through. 9 Boil water, cook pasta, sear meat (goulash, pot roast), deep-fry chips. -1 Boil large quantities of water. PowerBoost is activated. CARE AND CLEANING WARNING! Refer to Safety chapters. General information • Clean the hob after each use. Progress 33 • Always use cookware with a clean base. • Scratches or dark stains on the surface have no effect on how the hob operates. • Use a special cleaner suitable for the surface of the hob. • Use a special scraper for the glass. Cleaning the hob • Remove immediately: melted plastic, plastic foil, sugar and food with sugar, otherwise, the dirt can cause damage to the hob. Take care to avoid burns. Use a special hob scraper on the glass surface at an acute angle and move the blade on the surface. • Remove when the hob is sufficiently cool: limescale rings, water rings, fat stains, shiny metallic discoloration. Clean the hob with a moist cloth and a non-abrasive detergent. After cleaning, wipe the hob dry with a soft cloth. • Remove shiny metallic discoloration: use a solution of water with vinegar and clean the glass surface with a cloth. TROUBLESHOOTING WARNING! Refer to Safety chapters. What to do if... Problem Possible cause Remedy You cannot activate or op‐ erate the hob. The hob is not connected to an electrical supply or it is connected incorrectly. Check if the hob is correctly connected to the electrical supply. The fuse is blown. Make sure that the fuse is the cause of the malfunction. If the fuse is blown again and again, contact a qualified electrician. You do not set the heat set‐ ting for 10 seconds. Activate the hob again and set the heat setting in less than 10 seconds. You touched 2 or more sen‐ sor fields at the same time. Touch only one sensor field. Pause operates. Refer to "Daily use". There is water or fat stains on the control panel. Clean the control panel. You put something on one or more sensor fields. Remove the object from the sensor fields. An acoustic signal sounds and the hob deactivates. An acoustic signal sounds when the hob is deactiva‐ ted. 34 Progress Problem Possible cause Remedy The hob deactivates. You put something on the Remove the object from the sensor field. sensor field . Residual heat indicator does not come on. The zone is not hot because it operated only for a short time or the sensor is dam‐ aged. If the zone operated sufficient‐ ly long to be hot, speak to an Authorised Service Centre. The heat setting changes between two levels. Power management oper‐ ates. Refer to "Daily use". The sensor fields become hot. The cookware is too large or you put it too near to the controls. Put large cookware on the rear zones, if possible. There is no sound when you touch the panel sen‐ sor fields. The sounds are deactivated. Activate the sounds. Refer to "Daily use". comes on. Child Safety Device or Lock operates. Refer to "Daily use". comes on. There is no cookware on the zone. Put cookware on the zone. The cookware is unsuitable. Use suitable cookware. Refer to "Hints and tips". The diameter of the bottom of the cookware is too small for the zone. Use cookware with correct di‐ mensions. Refer to "Technical data". There is an error in the hob. Deactivate the hob and acti‐ vate it again after 30 seconds. on. and a number come You can hear a constant beep noise. If comes on again, discon‐ nect the hob from the electrical supply. After 30 seconds, con‐ nect the hob again. If the prob‐ lem continues, speak to an Authorised Service Centre. The electrical connection is incorrect. If you cannot find a solution... If you cannot find a solution to the problem yourself, contact your dealer or an Authorised Service Centre. Give the data from the rating plate. Give also three digit Disconnect the hob from the electrical supply. Ask a quali‐ fied electrician to check the in‐ stallation. letter code for the glass ceramic (it is in the corner of the glass surface) and an error message that comes on. Make sure, you operated the hob correctly. If not the servicing by a service technician or dealer will not be free of charge, also during the Progress 35 warranty period. The instructions about the Service Centre and conditions of guarantee are in the guarantee booklet. TECHNICAL DATA Cooking zones specification Cooking zone Nominal pow‐ er (maximum heat setting) [W] PowerBoost [W] PowerBoost maximum du‐ ration [min] Cookware di‐ ameter [mm] Middle front 2300 3700 10 180 - 210 Middle rear 1400 2500 4 125 - 145 The power of the cooking zones can be different in some small range from the data in the table. It changes with the material and dimensions of the cookware. For optimal cooking results use cookware no larger than the diameter in the table. A Labels supplied with the accessories bag Stick the adhesive labels as indicated below: B MOD. MOD. PROD.NO. PROD.NO. SER.NO SER.NO DATA DATA C 0049 MOD. PROD.NO. SER.NO. TYPE IP20 03 IT MADE IN ITALY A. Stick it on Guarantee Card and send this part (if applicable). B. Stick it on Guarantee Card and keep this part (if applicable). C. Stick it on instruction booklet. 36 Progress ENERGY EFFICIENCY Product information according to EU 66/2014 valid for EU market only Model identification PAI3101F Type of hob Built-In Hob Number of cooking zones 2 Heating technology Induction Diameter of circular cooking zones (Ø) Middle front Middle rear 21.0 cm 14.5 cm Energy consumption per cooking zone (EC electric cooking) Middle front Middle rear 188.9 Wh / kg 183.4 Wh / kg Energy consumption of the hob (EC electric hob) EN 60350-2 - Household electric cooking appliances - Part 2: Hobs - Methods for measuring performance Energy saving You can save energy during everyday cooking if you follow below hints. • When you heat up water, use only the amount you need. 186.2 Wh / kg • If it is possible, always put the lids on the cookware. • Before you activate the cooking zone put the cookware on it. • Put the smaller cookware on the smaller cooking zones. • Put the cookware directly in the centre of the cooking zone. • Use the residual heat to keep the food warm or to melt it. ENVIRONMENTAL CONCERNS Recycle materials with the symbol . Put the packaging in relevant containers to recycle it. Help protect the environment and human health by recycling waste of electrical and electronic appliances. Do not dispose of appliances marked with the symbol with the household waste. Return the product to your local recycling facility or contact your municipal office. Progress 37 TABLE DES MATIÈRES Informations de sécurité Consignes de sécurité Installation Description de l'appareil Utilisation quotidienne 37 39 42 44 46 Conseils Entretien et Nettoyage Dépannage Caractéristiques techniques Rendement énergétique VISITEZ NOTRE SITE WEB POUR : 49 51 51 54 55 Sous réserve de modifications. Obtenir des conseils d’utilisation, des brochures, un dépanneur, des informations sur le service et les réparations : www.progress-hausgeraete.de/support INFORMATIONS DE SÉCURITÉ Avant d'installer et d'utiliser cet appareil, lisez soigneusement les instructions fournies. Le fabricant ne pourra être tenu pour responsable des blessures et dégâts résultant d'une mauvaise installation ou utilisation. Conservez toujours les instructions dans un lieu sûr et accessible pour vous y référer ultérieurement. Sécurité des enfants et des personnes vulnérables • • • • Cet appareil peut être utilisé par des enfants âgés d'au moins 8 ans et par des personnes ayant des capacités physiques, sensorielles ou mentales réduites ou dénuées d’expérience ou de connaissance, s'ils sont correctement surveillés ou si des instructions relatives à l'utilisation de l'appareil en toute sécurité leur ont été données et s’ils comprennent les risques encourus. Les enfants entre 3 et 8 ans et les personnes ayant un handicap très important et complexe doivent être tenus à l'écart de l'appareil, à moins d'être surveillés en permanence. Les enfants de moins de 3 ans doivent être tenus à l'écart de l'appareil, à moins d'être surveillés en permanence. Ne laissez pas les enfants jouer avec l'appareil. 38 Progress • • • • Ne laissez pas les emballages à la portée des enfants et jetez-les convenablement. AVERTISSEMENT : Tenez les enfants et les animaux éloignés de l'appareil lorsqu'il est en cours de fonctionnement ou lorsqu'il refroidit. Les parties accessibles deviennent chaudes en cours d'utilisation. Si l'appareil est équipé d'un dispositif de sécurité enfants, nous vous recommandons de l'activer. Le nettoyage et l'entretien ne doivent pas être effectués par des enfants sans surveillance. Sécurité générale • • • • • • • • • AVERTISSEMENT : L'appareil et ses parties accessibles deviennent chauds pendant son fonctionnement. Veillez à ne pas toucher les éléments chauffants. AVERTISSEMENT : Il peut être dangereux de laisser chauffer de la graisse ou de l'huile sans surveillance sur une table de cuisson car cela pourrait provoquer un incendie. N'essayez JAMAIS d'éteindre un feu avec de l'eau. Éteignez l'appareil puis couvrez les flammes, par exemple avec un couvercle ou une couverture ignifuge. ATTENTION : L'appareil ne doit pas être branché à l'alimentation en utilisant un appareil de connexion externe comme un minuteur, ou branché à un circuit qui est régulièrement activé/désactivé par un fournisseur d'énergie. ATTENTION : Toute cuisson doit être surveillée. Une cuisson courte doit être surveillée en permanence. AVERTISSEMENT : Risque d'incendie ! N'entreposez rien sur les surfaces de cuisson. Ne posez pas d'objets métalliques tels que couteaux, fourchettes, cuillères ou couvercles sur la table de cuisson car ils pourraient chauffer. N'utilisez pas l'appareil avant de l'avoir installé dans la structure encastrée. N'utilisez pas de nettoyeur vapeur pour nettoyer l'appareil. Progress 39 • • • • Après utilisation, éteignez toujours la zone de cuisson à l'aide de la manette de commande correspondante et ne vous fiez pas à la détection des récipients. Si la surface vitrocéramique / en verre est fissurée, éteignez l'appareil et débranchez-le. Si l'appareil est branché à l'alimentation secteur directement en utilisant une boîte de jonction, retirez le fusible pour déconnecter l'appareil de l'alimentation secteur. Dans tous les cas, contactez le service après-vente agréé. Si le câble d'alimentation est endommagé, il doit être remplacé par le fabricant, un service de maintenance agréé ou un technicien qualifié afin d'éviter tout danger. AVERTISSEMENT : Utilisez uniquement les dispositifs de protection pour table de cuisson conçus ou indiqués comme adaptés par le fabricant de l'appareil de cuisson dans les instructions d'utilisation, ou les dispositifs de protection pour table de cuisson intégrés à l'appareil. L'utilisation de dispositifs de protection non adaptés peut entraîner des accidents. CONSIGNES DE SÉCURITÉ Installation AVERTISSEMENT! L'appareil doit être installé uniquement par un professionnel qualifié. AVERTISSEMENT! Risque de blessure corporelle ou de dommages matériels. • Retirez l'intégralité de l'emballage. • N'installez pas et ne branchez pas un appareil endommagé. • Suivez scrupuleusement les instructions d'installation fournies avec l'appareil. • Respectez l'espacement minimal requis par rapport aux autres appareils et éléments. • Soyez toujours vigilants lorsque vous déplacez l'appareil car il est lourd. Utilisez toujours des gants de sécurité et des chaussures fermées. • Isolez les surfaces découpées à l'aide d'un matériau d'étanchéité pour éviter que la moisissure cause des gonflements. • Protégez la partie inférieure de l'appareil de la vapeur et de l'humidité. • N'installez pas l'appareil à proximité d'une porte ou sous une fenêtre. Les récipients chauds risqueraient de tomber de l'appareil lors de l'ouverture de celles-ci. • Si l'appareil est installé au-dessus de tiroirs, assurez-vous qu'il y a suffisamment d'espace entre le fond de l'appareil et le tiroir supérieur pour que l'air puisse circuler. • Le dessous de l'appareil peut devenir très chaud. Veillez à installer un panneau de séparation sous l'appareil pour en bloquer l'accès. Ce panneau peut être en contreplaqué, provenir d'un autre meuble de cuisine, et doit 40 Progress être composé d'un matériau non inflammable. • Le panneau de séparation doit couvrir entièrement l'espace sous la table de cuisson. • Assurez-vous de laisser un espace de ventilation de 2 mm entre le plan de travail et l'avant de l'appareil qui est installé dessous. La garantie ne couvre pas les dommages causés par l'absence d'un espace de ventilation adéquat. Branchement électrique AVERTISSEMENT! Risque d'incendie ou d'électrocution. • Tous les raccordements électriques doivent être effectués par un électricien qualifié. • L’appareil doit être relié à la terre. • Avant toute intervention, assurez-vous que l'appareil est débranché. • Assurez-vous que les paramètres figurant sur la plaque signalétique correspondent aux données électriques nominale de l’alimentation secteur. • Assurez-vous que l'appareil est bien installé. Un câble d'alimentation lâche et inapproprié ou une fiche (si présente) non serrée peuvent être à l'origine d'une surchauffe des bornes. • Utilisez le câble d'alimentation électrique approprié. • Ne laissez pas le câble d'alimentation s'emmêler. • Assurez-vous qu'une protection antiélectrocution est installée. • Utilisez un collier anti-traction sur le câble. • Assurez-vous que le câble d'alimentation ou la fiche (si présente) n'entrent pas en contact avec les surfaces brûlantes de l'appareil ou les récipients brûlants lorsque vous branchez l'appareil à des prises électriques situées à proximité. • N'utilisez pas d'adaptateurs multiprise et de rallonges. • Veillez à ne pas endommager la fiche secteur (si présente) ni le câble • • • • • • d'alimentation. Contactez notre service après-vente agréé ou un électricien pour remplacer le câble d'alimentation s'il est endommagé. La protection contre les chocs des parties sous tension et isolées doit être fixée de telle manière qu'elle ne puisse pas être enlevée sans outils. Ne branchez la fiche secteur dans la prise secteur qu'à la fin de l'installation. Assurez-vous que la prise secteur est accessible après l'installation. Si la prise secteur est détachée, ne branchez pas la fiche secteur. Ne tirez pas sur le câble secteur pour débrancher l'appareil. Tirez toujours sur la fiche de la prise secteur. N'utilisez que des systèmes d'isolation appropriés : des coupe-circuits, des fusibles (les fusibles à visser doivent être retirés du support), un disjoncteur différentiel et des contacteurs. L'installation électrique doit comporter un dispositif d'isolation qui vous permet de déconnecter l'appareil du secteur à tous les pôles. Le dispositif d'isolement doit avoir une largeur d'ouverture de contact de 3 mm minimum. Utilisation AVERTISSEMENT! Risque de blessures, de brûlures ou d'électrocution. • Avant la première utilisation, retirez les emballages, les étiquettes et les films de protection (si présents). • Cet appareil est exclusivement destiné à une utilisation domestique. • Ne modifiez pas les caractéristiques de cet appareil. • Assurez-vous que les orifices de ventilation ne sont pas bouchés. • Ne laissez jamais l'appareil sans surveillance pendant son fonctionnement. • Éteignez les zones de cuisson après chaque utilisation. • Ne vous fiez pas uniquement au détecteur de récipient. Progress 41 • Ne posez pas de couverts ou de couvercles sur les zones de cuisson. Elles sont chaudes. • N'utilisez jamais cet appareil avec les mains mouillées ou lorsqu'il est en contact avec de l'eau. • N'utilisez jamais l'appareil comme plan de travail ou comme plan de stockage. • Si la surface de l'appareil présente des fêlures, débranchez immédiatement l'appareil pour éviter tout risque d'électrocution. • Les porteurs de pacemakers doivent rester à une distance minimale de 30 cm des zones de cuisson à induction lorsque l'appareil est en cours de fonctionnement. • Lorsque vous versez un aliment dans de l'huile chaude, elle peut éclabousser. AVERTISSEMENT! Risque d'incendie et d'explosion. • Les graisses et l'huile chaudes peuvent dégager des vapeurs inflammables. Tenez les flammes ou les objets chauds éloignés des graisses et de l'huile lorsque vous vous en servez pour cuisiner. • Les vapeurs dégagées par l'huile très chaude peuvent provoquer une combustion spontanée. • L'huile qui a servi contient des restes d'aliments pouvant provoquer un incendie à température plus faible que l'huile n'ayant jamais servi. • Ne placez pas de produits inflammables ou d'éléments imbibés de produits inflammables à l'intérieur ou à proximité de l'appareil, ni sur celui-ci. AVERTISSEMENT! Risque d'endommagement de l'appareil. • Ne laissez pas de récipients chauds sur le bandeau de commande. • Ne posez pas de couvercle de casserole chaud sur la surface en verre de la table de cuisson. • Ne laissez pas le contenu des récipients s'évaporer entièrement. • Prenez soin de ne pas laisser tomber d'objets ou de récipients sur l'appareil. Sa surface risque d'être endommagée. • Ne faites jamais fonctionner les zones de cuisson avec des récipients de cuisson vides ou sans aucun récipient de cuisson. • Ne placez jamais de papier aluminium sur l'appareil. • N'utilisez pas de récipients en fonte ou en aluminium, ni de récipients dont le fond est endommagé et rugueux. Ils risqueraient de rayer le verre ou la surface vitrocéramique. Soulevez toujours ces objets lorsque vous devez les déplacer sur la surface de cuisson. • Cet appareil est exclusivement destiné à un usage culinaire. Ne l'utilisez pas pour des usages autres que celui pour lequel il a été conçu, à des fins de chauffage par exemple. Entretien et Nettoyage • Nettoyez régulièrement l'appareil afin de maintenir le revêtement en bon état. • Mettez à l'arrêt l'appareil et laissez-le refroidir avant de le nettoyer. • Ne pulvérisez pas d'eau ni de vapeur pour nettoyer l'appareil. • Nettoyez l'appareil avec un chiffon doux humide. Utilisez uniquement des produits de lavage neutres. N'utilisez pas de produits abrasifs, de tampons à récurer, de solvants ni d'objets métalliques. Service • Pour réparer l'appareil, contactez le service après-vente agréé. Utilisez uniquement des pièces de rechange d'origine. • Concernant la/les lampe(s) à l’intérieur de ce produit et les lampes de rechange vendues séparément : Ces lampes sont conçues pour résister à des conditions physiques extrêmes dans les appareils électroménagers, telles que la température, les vibrations, l’humidité, ou sont conçues pour signaler des informations sur le 42 Progress statut opérationnel de l’appareil. Elles ne sont pas destinées à être utilisées dans d'autres applications et ne conviennent pas à l’éclairage des pièces d’un logement. Mise au rebut • Contactez votre service municipal pour obtenir des informations sur la marche à suivre pour mettre l'appareil au rebut. • Débranchez l'appareil de l'alimentation électrique. • Coupez le câble d'alimentation au ras de l'appareil et mettez-le au rebut. AVERTISSEMENT! Risque de blessure ou d'asphyxie. INSTALLATION AVERTISSEMENT! Reportezvous aux chapitres concernant la sécurité. Avant l'installation Avant d'installer la table de cuisson, notez les informations de la plaque signalétique ci-dessous. La plaque signalétique se trouve au bas de la table de cuisson. Modèle ........................... PNC ............................. Numéro de série .................... Tables de cuisson intégrées Les tables de cuisson encastrables ne peuvent être mises en fonctionnement qu'après avoir été installées dans des meubles et sur des plans de travail homologués et adaptés. Câble d'alimentation • La table de cuisson est fournie avec un câble d'alimentation. • Pour remplacer le câble d'alimentation endommagé, utilisez le type de câble suivant : H05V2V2-F qui doit supporter une température minimale de 90 °C. Contactez votre service après-vente. Installation du joint - Installation superposée 1. Nettoyez la zone de découpe du plan de travail. 2. Placez le joint de 2x6 mm fourni sur le bord inférieur de la table de cuisson, le long du bord externe de la surface vitrocéramique. N'étirez pas le joint. Assurez-vous que les extrémités du joint se trouvent au milieu d'un bord latéral de la table de cuisson. 3. Lorsque vous découpez le joint, ajoutez quelques millimètres de longueur. 4. Rassemblez les deux extrémités du joint. Progress 43 Montage min. 500mm min. 50mm min. 2mm min. 2 mm A min. 2 mm A B < 20 mm > 20 mm min. 500 mm B 57 mm 41 mm 31 mm A 12 mm 28 mm 38 mm B min 30 mm min. 500 mm A 12 mm 28 mm 38 mm B 57 mm 41 mm 31 mm min. 38 mm min. 2 mm R 5mm min. 55mm 490+1mm 270+1mm 44 Progress min. 12 mm min. 2 mm Installation de plusieurs tables de cuisson 50 mm min. 500 mm 40-50 mm 490+02 mm 55 mm 30 mm 270+02 mm DESCRIPTION DE L'APPAREIL Description de la table de cuisson 1 Zone de cuisson à induction 2 Bandeau de commande 145 mm 1 1 210 mm 2 Progress 45 Description du bandeau de commande 1 2 3 4 10 9 5 8 6 7 Les touches sensitives permettent de faire fonctionner l'appareil. Les affichages, les voyants et les signaux sonores indiquent les fonctions activées. Tou‐ che sen‐ siti‐ ve Fonction Commentaire 1 MARCHE/ARRÊT Pour allumer et éteindre la table de cuisson. 2 Touches Verrouil. / Dispo‐ sitif de sécurité enfant Pour verrouiller ou déverrouiller le bandeau de commande. 3 Pause Pour activer et désactiver la fonction. - Indicateur du niveau de cuisson Pour indiquer le niveau de cuisson. - Voyants du minuteur des zones de cuisson Pour indiquer la zone à laquelle se réfère la durée sélectionnée. - Affichage du minuteur Pour indiquer la durée, en minutes. - Pour choisir la zone de cuisson. / - Pour augmenter ou diminuer la durée. / - Pour sélectionner un niveau de cuisson. PowerBoost Pour activer la fonction. 4 5 6 7 8 9 10 46 Progress Affichage du niveau de cuisson Afficheur Description La zone de cuisson est désactivée. La zone de cuisson est activée. - Pause est activé. PowerBoost est activé. + chiffre Une anomalie de fonctionnement s'est produite. / OptiHeat Control (indicateur de chaleur résiduelle en 3 étapes): conti‐ nuer la cuisson / maintien au chaud / chaleur résiduelle. / Touches Verrouil. / Dispositif de sécurité enfant est activée. Le récipient est inapproprié ou trop petit, ou bien il n'y a pas de récipient sur la zone de cuisson. Arrêt automatique est activé. OptiHeat Control (indicateur de chaleur résiduelle en 3 étapes) AVERTISSEMENT! / / Il y a risque de brûlures par la chaleur résiduelle. Les voyants indiquent le niveau de chaleur résiduelle des zones de cuisson que vous utilisez actuellement. Les voyants des zones voisines peuvent également s'allumer, même si vous ne les utilisez pas. Les zones de cuisson à induction génèrent la chaleur nécessaire directement sur le fond des récipients de cuisson. La vitrocéramique est chauffée par la chaleur des récipients. UTILISATION QUOTIDIENNE AVERTISSEMENT! Reportezvous aux chapitres concernant la sécurité. Activation et désactivation Appuyez sur pendant 1 seconde pour activer ou désactiver la table de cuisson. Arrêt automatique Cette fonction arrête la table de cuisson automatiquement si : • toutes les zones de cuisson sont désactivées, • vous ne réglez pas le niveau de cuisson après avoir allumé la table de cuisson, • vous avez renversé quelque chose ou placé un objet sur le bandeau de commande pendant plus de 10 secondes (une casserole, un torchon, etc.). Un signal sonore retentit et la table de cuisson s'éteint. Enlevez l’objet ou nettoyez le bandeau de commande. • la table de cuisson surchauffe (par ex. lorsqu'un récipient chauffe à vide). Laissez la zone de cuisson refroidir Progress 47 avant d'utiliser à nouveau la table de cuisson. • vous avez utilisé un récipient inadapté. Le symbole s'allume et la zone de cuisson se désactive automatiquement au bout de 2 minutes. • vous ne désactivez pas la zone de cuisson ou ne modifiez pas le niveau de cuisson. Au bout de quelques s'allume et la table de instants, cuisson s'éteint. La relation entre le niveau de cuisson et la durée après laquelle la table de cuisson s'éteint : Niveau de cuisson ,1-2 La table de cuis‐ son s'éteint au bout de 6 heures 3-4 5 heures 5 4 heures 6-9 1,5 heure Niveau de cuisson Appuyez sur pour augmenter le niveau pour diminuer de cuisson. Appuyez sur le niveau de cuisson. Appuyez simultanément sur et pour désactiver la zone de cuisson. PowerBoost Cette fonction vous permet d'augmenter la puissance des zones de cuisson à induction. La fonction peut être activée pour la zone de cuisson à induction uniquement pour une durée limitée. Lorsque cette durée est écoulée, la zone de cuisson à induction revient automatiquement au niveau de cuisson le plus élevé. Reportez-vous au chapitre « Caractéristiques techniques ». Pour activer la fonction pour une zone de cuisson : appuyez sur . s’allume. Pour désactiver la fonction : appuyez sur ou . Minuteur • Minuteur à rebours Vous pouvez utiliser cette fonction pour régler la durée d’une seule session de cuisson. Sélectionnez d'abord le niveau de cuisson de la zone de cuisson, puis réglez la fonction. Pour sélectionner la zone de cuisson : à plusieurs reprises appuyez sur jusqu'à ce que l'indicateur d’une zone de cuisson apparaisse. Pour activer la fonction ou modifier la durée : appuyez sur la touche ou du minuteur pour régler la durée (de 00 à 99 minutes). Lorsque le voyant de la zone de cuisson commence à clignoter, le décompte commence. Pour voir le temps restant : appuyez sur pour sélectionner la zone de la touche cuisson. Le voyant de la zone de cuisson commence à clignoter. L'affichage indique la durée restante. Pour désactiver la fonction : appuyez sur pour sélectionner la zone de cuisson, puis appuyez sur . Le décompte s’effectue jusqu’à 00. L'indicateur de la zone de cuisson disparaît. Lorsque le compte à rebours est terminé, un signal sonore retentit et 00 clignote. La zone de cuisson se désactive. Pour arrêter le signal sonore : appuyez sur . • Minuteur Vous pouvez utiliser cette fonction lorsque la table de cuisson est allumée et les zones de cuisson ne sont pas activées. 48 Progress L'affichage du niveau de cuisson indique . Pour activer la fonction : appuyez sur la touche puis sur la touche ou du minuteur pour régler la durée. Lorsque le temps est écoulé, un signal sonore retentit et 00 clignote. Pour arrêter le signal sonore : appuyez sur . Pour désactiver la fonction : appuyez sur puis appuyez sur . Le décompte s’effectue jusqu’à 00. Cette fonction est sans effet sur le fonctionnement des zones de cuisson. Pause Cette fonction sélectionne le niveau de cuisson le plus bas pour toutes les zones de cuisson activées. Lorsque la fonction est en cours, tous les autres symboles du bandeau de commande sont verrouillés. La fonction ne désactive pas les fonctions du minuteur. Appuyez sur pour activer la fonction. apparaît.Le niveau de cuisson passe à 1. Pour désactiver la fonction, appuyez sur . Le niveau de cuisson précédent est activé. Touches Verrouil. Vous pouvez verrouiller le bandeau de commande pendant que les zones de cuisson fonctionnent. Vous éviterez ainsi une modification accidentelle du réglage du niveau de cuisson. Réglez d'abord le niveau de cuisson. Pour activer la fonction : appuyez sur . s'affiche pendant 4 secondes. Le minuteur reste activé. Pour désactiver la fonction : appuyez sur . Le niveau de cuisson précédent s'allume. Lorsque vous éteignez la table de cuisson, cette fonction est également désactivée. Dispositif de sécurité enfant Cette fonction permet d'éviter une utilisation involontaire de la table de cuisson. Pour activer la fonction : activez la table de cuisson avec . Ne sélectionnez pas de réglage de niveau de cuisson. Appuyez sur pendant 4 secondes. s'allume. Éteignez la table de cuisson en appuyant sur . Pour désactiver la fonction : activez la table de cuisson avec . Ne sélectionnez pas de réglage de niveau de cuisson. Appuyez sur pendant 4 secondes. s'allume. Éteignez la table de cuisson en appuyant sur . Pour désactiver la fonction le temps d'une cuisson : activez la table de cuisson avec . s'allume. Appuyez sur pendant 4 secondes. Réglez le niveau de cuisson dans les 10 secondes qui suivent. Vous pouvez utiliser la table de cuisson. Lorsque vous éteignez la table de cuisson avec , la fonction est de nouveau activée. OffSound Control (Désactivation et activation des signaux sonores) Éteignez la table de cuisson. Appuyez sur pendant 3 secondes. L'affichage s'allume, puis s'éteint. Appuyez sur pendant 3 secondes. ou s’allume. Appuyez sur de la zone avant gauche pour choisir l'une des options suivantes : Progress 49 • - les signaux sonores sont désactivés • - les signaux sonores sont activés Pour confirmer le réglage, attendez que la table de cuisson s'éteigne automatiquement. Lorsque cette fonction est réglée sur , l'appareil émet des signaux sonores uniquement lorsque : • vous appuyez sur • Minuteur se termine • Minuteur à rebours se termine • vous posez un objet sur le bandeau de commande. • La fonction répartit la puissance entre les zones de cuisson. • La fonction diminue la puissance des autres zones de cuisson. • L'affichage des niveaux de cuisson des zones réduites alterne entre le niveau de cuisson choisi et le niveau de cuisson réduit. Après quelques minutes, l'affichage des niveaux de cuisson des zones réduites affiche le niveau de cuisson réduit seul. Gestion alimentation • Toutes les zones de cuisson sont reliées à une phase. Reportez-vous à l'illustration. • La fonction s'active lorsque la charge électrique totale des zones de cuisson dépasse la charge électrique maximale de la phase. CONSEILS AVERTISSEMENT! Reportezvous aux chapitres concernant la sécurité. Récipients de cuisson Pour les zones de cuisson à induction, un champ électromagnétique puissant crée très rapidement la chaleur dans le récipient. Utilisez les zones de cuisson à induction avec un récipient de cuisson adapté. • Le fond du récipient de cuisson doit être aussi plat et épais que possible. • Assurez-vous que le fond du récipient est propre avant de le placer sur la surface de la table de cuisson. • Afin d’éviter les rayures, ne faites pas glisser et ne frottez pas le récipient sur la surface vitrocéramique. Matériaux des récipients de cuisson • corrects : fonte, acier, acier émaillé, acier inoxydable, fond multicouche (homologué par le fabricant). • incorrects : aluminium, cuivre, laiton, verre, céramique, porcelaine. Les récipients de cuisson conviennent pour l’induction si : • une petite quantité d’eau contenue dans un récipient chauffe dans un bref laps de temps sur une zone de cuisson réglée sur le niveau de cuisson maximal. • un aimant adhère au fond du récipient. Dimensions des récipients de cuisson • Les zones de cuisson à induction s’adaptent automatiquement au diamètre du fond du récipient utilisé. • L’efficacité de la zone de cuisson dépend du diamètre du récipient. Un récipient plus petit que le diamètre minimal recommandé ne reçoit qu’une 50 Progress petite partie de la puissance générée par la zone de cuisson. • Pour des raisons de sécurité et des résultats de cuisson optimaux, n’utilisez pas de récipient plus grand qu’indiqué dans la section « Caractéristiques des zones de cuisson ». Évitez de garder les récipients à proximité du bandeau de commande durant la cuisson. Cela peut affecter le fonctionnement du bandeau de commande ou activer accidentellement les fonctions de la table de cuisson. élevé et le récipient est composé de différents matériaux (conception « sandwich »). • bourdonnement : vous utilisez un niveau de puissance élevé. • cliquetis : une commutation électrique se produit. • sifflement, bourdonnement : le ventilateur fonctionne. Ces bruits sont normaux et n'indiquent pas une anomalie de l'appareil. Reportez-vous au chapitre « Caractéristiques techniques ». Le rapport entre le niveau de cuisson et la consommation énergétique de la zone de cuisson n'est pas linéaire. Lorsque vous augmentez le niveau de cuisson, cela n'est pas proportionnel avec l'augmentation de la consommation d'énergie. Cela veut dire qu'une zone de cuisson avec le niveau de cuisson moyen utilise moins de la moitié de sa puissance. Bruits pendant le fonctionnement Si vous entendez : • craquement : le récipient est composé de différents matériaux (conception « sandwich »). • sifflement : vous utilisez une zone de cuisson avec un niveau de puissance Niveau de cuisson Exemples de cuisson Les données du tableau sont fournies à titre indicatif uniquement. Utilisation : Durée (min) Conseils Conserver les aliments cuits au chaud. au be‐ soin Placez un couvercle sur le ré‐ cipient. 1-2 Sauce hollandaise, faire fon‐ dre : beurre, chocolat, gélatine. 5 - 25 Mélangez de temps en temps. 1-2 Solidifier : omelettes, œufs co‐ cotte. 10 40 Couvrez pendant la cuisson. 2-3 Faire mijoter des plats à base de riz et de laitage, réchauffer des plats cuisinés. 25 50 Ajoutez au moins deux fois plus d'eau que de riz. Remuez les plats à base de lait durant la cuisson. 3-4 Cuire à la vapeur des légu‐ mes, du poisson et de la vian‐ de. 20 45 Ajoutez quelques cuillerées à soupe de liquide. 4-5 Cuire des pommes de terre à la vapeur. 20 60 Utilisez ¼ l d'eau max. pour 750 g de pommes de terre. -1 Progress 51 Niveau de cuisson Utilisation : Durée (min) Conseils 4-5 Cuire de grandes quantités d'aliments, des ragoûts et des soupes. 60 150 Ajoutez jusqu’à 3 litres de li‐ quide, plus les ingrédients. 6-7 Faire revenir : escalopes, cor‐ dons bleus de veau, côtelettes, rissolettes, saucisses, foie, roux, œufs, crêpes, beignets. au be‐ soin Retournez à la moitié du temps. 7-8 Cuisson à température élevée des pommes de terre risso‐ lées, filets, steaks. 5 - 15 Retournez à la moitié du temps. 9 Faire bouillir de l'eau, cuire des pâtes, griller de la viande (goulasch, bœuf braisé), cuire des frites. Faites bouillir une grande quantité d'eau. PowerBoost est activée. ENTRETIEN ET NETTOYAGE AVERTISSEMENT! Reportezvous aux chapitres concernant la sécurité. Informations générales • Nettoyez la table de cuisson après chaque utilisation. • Utilisez toujours un récipient dont le fond est propre. • Les rayures ou les taches sombres sur la surface n'ont aucune incidence sur le fonctionnement de la table de cuisson. • Utilisez un nettoyant spécialement adapté à la surface de la table de cuisson. • Utilisez un racloir spécial pour la vitre. Nettoyage de la table de cuisson • Enlevez immédiatement : le plastique fondu, les feuilles de plastique, le sucre DÉPANNAGE AVERTISSEMENT! Reportezvous aux chapitres concernant la sécurité. et les aliments contenant du sucre car la saleté peut endommager la table de cuisson. Veillez à ne pas vous brûler. Tenez le racloir spécial incliné sur la surface vitrée et faites glisser la lame du racloir pour enlever les salissures. • Une fois que la table de cuisson a suffisamment refroidi, enlevez : traces de calcaire et d'eau, projections de graisse, décolorations métalliques luisantes. Nettoyez la table de cuisson à l'aide d'un chiffon humide et d'un détergent non abrasif. Après le nettoyage, séchez la table de cuisson à l'aide d'un chiffon doux. • Pour retirer les décolorations métalliques brillantes : utilisez une solution d'eau additionnée de vinaigre et nettoyez la surface vitrée avec un chiffon. 52 Progress Que faire si... Problème Cause possible Solution Vous ne pouvez pas allu‐ mer la table de cuisson ni la faire fonctionner. La table de cuisson n’est pas branchée à une source d’alimentation électrique ou le branchement est incor‐ rect. Vérifiez que la table de cuis‐ son est correctement bran‐ chée à une source d’alimenta‐ tion électrique. Le fusible a disjoncté. Assurez-vous que le fusible est la cause du dysfonctionne‐ ment. Si les fusibles disjonc‐ tent de manière répétée, faites appel à un électricien qualifié. Vous ne réglez pas le niveau de cuisson dans les 10 se‐ condes. Allumez de nouveau la table de cuisson et réglez le niveau de cuisson en moins de 10 se‐ condes. Vous avez appuyé sur plu‐ sieurs touches sensitives en même temps. Appuyez sur une seule touche sensitive. La fonction Pause est acti‐ vée. Reportez-vous au chapitre « Utilisation quotidienne ». Il y a de l’eau ou des taches de graisse sur le bandeau de commande. Nettoyez le bandeau de com‐ mande. Un signal sonore retentit et la table de cuisson s’éteint. Un signal sonore retentit lorsque la table de cuis‐ son est éteinte. Vous avez posé quelque chose sur une ou plusieurs touches sensitives. Retirez l’objet des touches sensitives. La table de cuisson s’éteint. Vous avez posé quelque chose sur la touche sensitive Retirez l’objet de la touche sensitive. . Le voyant de chaleur rési‐ duelle ne s’allume pas. La zone de cuisson n’est pas chaude parce qu’elle n’a fonctionné que peu de temps ou le capteur est en‐ dommagé. Si la zone a eu assez de temps pour chauffer, faites ap‐ pel à un service après-vente agréé. Le niveau de cuisson os‐ cille entre deux niveaux. La fonction Gestion alimen‐ tation est activée. Reportez-vous au chapitre « Utilisation quotidienne ». Progress 53 Problème Cause possible Solution Les touches sensitives deviennent chaudes. Le récipient est trop grand ou vous le placez trop près des commandes. Placez les récipients de gran‐ de taille sur les zones de cuis‐ son arrière, si possible. Aucun signal sonore ne se fait entendre lorsque vous appuyez sur les tou‐ ches sensitives du ban‐ deau. Les signaux sonores sont désactivés. Activez les signaux sonores. Reportez-vous au chapitre « Utilisation quotidienne ». s’affiche. Dispositif de sécurité enfant ou Touches Verrouil. est ac‐ tivé. Reportez-vous au chapitre « Utilisation quotidienne ». s’affiche. Il n’y a pas de récipient sur la zone. Posez un récipient sur la zone. Le récipient n’est pas adap‐ té. Utilisez un récipient adapté. Reportez-vous au chapitre « Conseils ». Le diamètre du fond du réci‐ pient de cuisson est trop pe‐ tit pour la zone. Utilisez des récipients dont les dimensions sont correctes. Reportez-vous au chapitre « Caractéristiques techni‐ ques ». et un chiffre s’affi‐ chent. Une erreur s’est produite dans la table de cuisson. Éteignez la table de cuisson et rallumez-la au bout de 30 se‐ Un bip constant se dé‐ clenche. Le branchement électrique est incorrect. condes. Si s’affiche à nou‐ veau, débranchez la table de cuisson de la prise électrique. Au bout de 30 secondes, re‐ branchez la table de cuisson. Si le problème persiste, con‐ tactez le service après-vente agréé. Si vous ne trouvez pas de solution... Si vous ne trouvez pas de solution au problème, veuillez contacter votre revendeur ou un service après-vente agréé. Veuillez lui fournir les informations se trouvant sur la plaque signalétique. Débranchez l’appareil de l’ali‐ mentation électrique. Deman‐ dez à un électricien qualifié de vérifier l’installation. Donnez également la combinaison à 3 lettres et chiffres pour la vitrocéramique (située dans un des coins de la surface en verre) et le message d'erreur qui s'affiche. Assurez-vous d'utiliser correctement l'appareil. En cas d'erreur de manipulation de la part de l'utilisateur, le déplacement du technicien du service après-vente ou 54 Progress du vendeur pourra être facturé, même en cours de garantie. Les instructions relatives au service après-vente et aux conditions de garantie figurent dans le livret de garantie. CARACTÉRISTIQUES TECHNIQUES Caractéristiques des zones de cuisson Zone de cuis‐ son Puissance nominale (ni‐ veau de cuis‐ son max.) PowerBoost (W) PowerBoost durée maxi‐ male [min] Diamètre des récipients de cuisine (mm) Avant centrale 2300 3700 10 180 - 210 Arrière centra‐ le 1400 2500 4 125 - 145 La puissance des zones de cuisson peut varier en fonction des données du tableau. Elle change en fonction du matériau et des dimensions du récipient. Pour des résultats de cuisson optimaux, utilisez des récipients qui ne dépassent pas les diamètres indiqués dans le tableau. A Étiquettes fournies dans le sachet des accessoires Collez les étiquettes adhésives comme indiqué ci-dessous : B MOD. MOD. PROD.NO. PROD.NO. SER.NO SER.NO DATA DATA C 0049 MOD. PROD.NO. SER.NO. TYPE IP20 03 IT MADE IN ITALY A. Collez-la sur la carte de garantie et envoyez cette partie (le cas échéant). B. Collez-la sur la carte de garantie et conservez cette partie (le cas échéant). C. Collez-la sur la notice d'utilisation. Progress 55 RENDEMENT ÉNERGÉTIQUE Informations sur le produit conformément à la norme EU 66/2014 valable pour le marché européen uniquement Identification du modèle PAI3101F Type de table de cuisson Table de cuisson in‐ tégrée Nombre de zones de cuisson 2 Technologie de chauffage Induction Diamètre des zones de cuisson circulaires (Ø) Avant centrale Arrière centrale 21,0 cm 14,5 cm Consommation d'énergie selon la zone de cuisson (EC electric cooking) Avant centrale Arrière centrale 188,9 Wh/kg 183,4 Wh/kg Consommation d'énergie de la table de cuisson (EC electric hob) EN 60350-2 - Appareils de cuisson domestiques électriques - Partie 2 : Tables de cuisson - Méthodes de mesure des performances 186,2 Wh/kg • Si possible, couvrez toujours les récipients de cuisson avec un couvercle pendant la cuisson. • Activez toujours la zone de cuisson après avoir posé le récipient dessus. • Placez les plus petits récipients sur les plus petites zones de cuisson. • Posez directement le récipient au centre de la zone de cuisson. • Vous pouvez utiliser la chaleur résiduelle pour conserver les aliments au chaud ou pour faire fondre. Économie d'énergie Vous pouvez économiser de l'énergie au quotidien en suivant les conseils suivants. • Si vous faites chauffer de l'eau, ne faites chauffer que la quantité dont vous avez réellement besoin. EN MATIÈRE DE PROTECTION DE L'ENVIRONNEMENT Recyclez les matériaux portant le symbole électriques et électroniques. Ne jetez pas les appareils portant le symbole avec les ordures ménagères. Emmenez un tel produit dans votre centre local de . Déposez les emballages dans les conteneurs prévus à cet effet. Contribuez à la protection de l'environnement et à votre sécurité, recyclez vos produits * 56 Progress recyclage ou contactez vos services municipaux. * www.progress-hausgeraete.de 867366404-A-502020-
 1
1
-
 2
2
-
 3
3
-
 4
4
-
 5
5
-
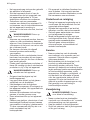 6
6
-
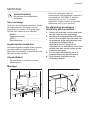 7
7
-
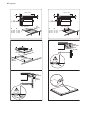 8
8
-
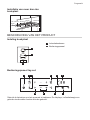 9
9
-
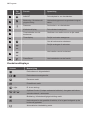 10
10
-
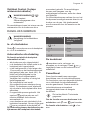 11
11
-
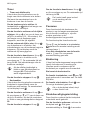 12
12
-
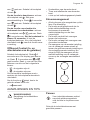 13
13
-
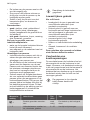 14
14
-
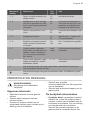 15
15
-
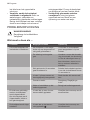 16
16
-
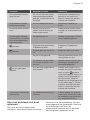 17
17
-
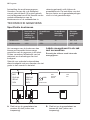 18
18
-
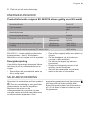 19
19
-
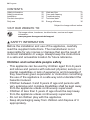 20
20
-
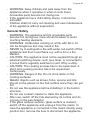 21
21
-
 22
22
-
 23
23
-
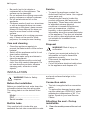 24
24
-
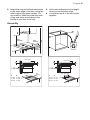 25
25
-
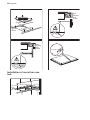 26
26
-
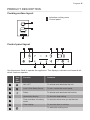 27
27
-
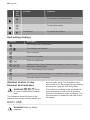 28
28
-
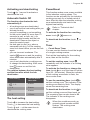 29
29
-
 30
30
-
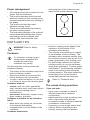 31
31
-
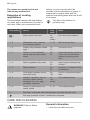 32
32
-
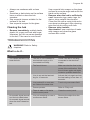 33
33
-
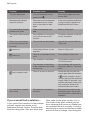 34
34
-
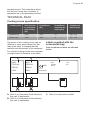 35
35
-
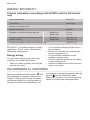 36
36
-
 37
37
-
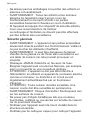 38
38
-
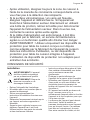 39
39
-
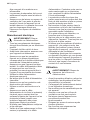 40
40
-
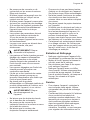 41
41
-
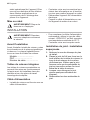 42
42
-
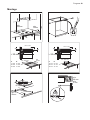 43
43
-
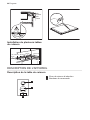 44
44
-
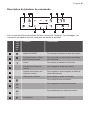 45
45
-
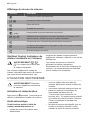 46
46
-
 47
47
-
 48
48
-
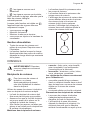 49
49
-
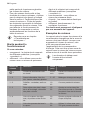 50
50
-
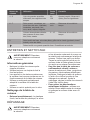 51
51
-
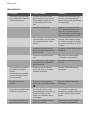 52
52
-
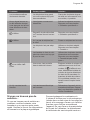 53
53
-
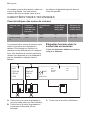 54
54
-
 55
55
-
 56
56
-
 57
57
-
 58
58
-
 59
59
-
 60
60


in andere talen
- English: Progress PAI3101F User manual
- français: Progress PAI3101F Manuel utilisateur