
I0841 - Rev.2
Adjustable end foot
UTILIZZO PREVISTO
- Il piedino ha lo scopo di supportare l’estremità
dell’asta quando la barriera è chiusa.
!
Qualsiasi altro utilizzo non espressamente indicato
è vietato e potrebbe pregiudicare l’integrità del
prodotto e/o rappresentare fonte di pericolo.
LIMITI DI UTILIZZO
- È consentito installare il piedino soltanto sui
modelli di barriere specificati nei cataloghi FAAC
e GENIUS.
- È consentito installare un piedino per ogni asta.
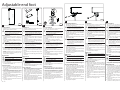
- Il piedino ha un’altezza regolabile tra 730 mm e
1155 mm (1).
!
Per prevenire urti sul piedino durante il movimento,
è raccomandata l’installazione di un dispositivo
acustico per segnalare il pericolo. È raccomandata
l’applicazione di adesivi catarifrangenti sul piedino.
UTILIZZO NON CONSENTITO
- È vietato un impiego diverso dall’utilizzo previsto.
- È vietato un impiego che supera i limiti di utilizzo.
- È vietato modificare qualsiasi componente del
prodotto.
- È vietato rimuovere il tappo in gomma posto all’e-
stremità inferiore del piedino.
INSTALLAZIONE
!
Rispettare le quote e le coppie di serraggio specificate.
Le quote sono espresse in mm.
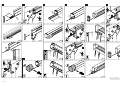
1. Verificare il contenuto della fornitura (2).
2. Chiudere la barriera.
3. In base al modello di asta, seguire la sequenza di
installazione illustrata A, B o C.
OPERAZIONI FINALI
1. Regolare l’altezza del piedino: allentare manual-
mente il tubo inferiore, estenderlo fino al piano
di calpestio e serrarlo manualmente. Non usare
attrezzi (3).
2. Verificare se la molla di bilanciamento è adatta
al peso complessivo dell’asta e dei suoi accessori
(vedere il manuale di istruzioni della barriera). Se
necessario sostituire la molla di bilanciamento con
il modello corretto.
3. Bilanciare l’asta seguendo la procedura specificata
nel manuale di istruzioni della barriera.
4. Verificare manualmente il serraggio del tubo
inferiore.
5. Verificare il funzionamento dell’automazione
eseguendo alcuni cicli.
INTENDED USE
- The purpose of the foot is to support the end of the
beam when the barrier is closed.
!
Any other use that is not expressly specified in these
instructions is prohibited and could affect the integri-
ty of the product and/or represent a source of danger.
LIMITATIONS OF USE
- The foot should only be installed on the models
of barriers specified in the FAAC and GENIUS
catalogues.
- Only one foot should be installed for each beam.
- The height of the foot can be adjusted between
730 mm and 1155 mm (1).
!
To prevent the foot from being hit whilst it is moving,
it is recommended to install an acoustic warning
device to signal the danger. It is recommended to
apply reflective stickers to the foot.
UNAUTHORISED USE
- Uses other than the intended use are prohibited.
- Uses that exceed its operational limits are pro-
hibited.
- No component part of the product may be mod-
ified.
- Do NOT remove the rubber plug at the lower end
of the foot.
INSTALLATION
!
Keep to the specified dimensions and the fastening
torques.
The dimensions are in mm
1. Check the package contents (2).
2. Close the barrier.
3. Follow the installation procedure shown according
to the model of the beam A, B or C.
FINAL OPERATIONS
1. Adjust the height of the foot: loosen the lower
tube, extend it to the level of the ground and
tighten it manually. Do not use tools (3).
2. Make sure that the balancing spring is suitable
for the weight of the beam together with its ac-
cessories (see the barrier instructions manual). If
necessary, replace the balancing spring with the
correct model.
3. Balance the beam following the procedure speci-
fied in the barrier instructions manual.
4. Manually check the tightening of the lower tube.
5. Check the operation of the automation by opening
and closing the barrier several times.
UTILISATION PRÉVUE
- Le pied a pour fonction de soutenir l’extrémité de
la lisse lorsque la barrière est fermée.
!
Toute autre utilisation non spécifiée est interdite et
pourrait compromettre l’intégrité du produit et / ou
représenter une source de danger.
LIMITES D’UTILISATION
- On ne peut installer le pied que sur les modèles
de barrières spécifiés dans les catalogues FAAC
et GENIUS.
- On peut installer un pied pour chaque lisse.
- Le pied a une hauteur réglable entre 730 mm et
1155 mm (1).
!
Pour prévenir les chocs contre le pied durant le mouve-
ment on recommande d’installer un dispositif sonore
pour signaler le danger. On recommande l’application
d’autocollants réfléchissants sur le pied.
UTILISATION INTERDITE
- Tout usage non prévu est interdit.
- Tout usage dépassant les limites d’utilisation est
interdit.
- Il est interdit de modifier les composants quels qu’il
soit du produit.
- Il est interdit d’enlever le bouchon en caoutchouc
situé à l’extrémité inférieure du pied.
INSTALLATION
!
Respecter les cotes et les couples de serrage spécifiés.
Les cotes sont exprimées en mm.
1. Vérifier le contenu de la fourniture (2).
2. Fermer la barrière.
3. Suivant le modèle de lisse, suivre l’ordre d’installa-
tion illustré A, B ou C.
OPÉRATIONS FINALES
1. Régler la hauteur du pied : desserrer manuellement
le tube inférieur, l’étendre au niveau du sol et le
serrer manuellement. Ne pas utiliser d’outils (3).
2. Vérifier si le ressort d’équilibrage est compatible
avec le poids total de la lisse et de ses accessoires
(voir le manuel d’instructions de la barrière). Au
besoin, remplacer le ressort d’équilibrage par le
modèle approprié.
3. Équilibrer la lisse en suivant la procédure spécifiée
dans le manuel d’instructions de la barrière.
4. Vérifier manuellement le serrage du tube inférieur.
5. Vérifier le fonctionnement de l’automatisation en
exécutant quelques cycles.
VORGESEHENER GEBRAUCH
- Der Fuß soll das Ende des Balkens stützen, wenn
die Schranke geschlossen ist.
!
Jede andere, nicht ausdrücklich angeführte Verwen-
dung ist verboten und könnte das Produkt beschädi-
gen und/oder eine Gefahrenquelle darstellen.
VERWENDUNGSEINSCHRÄNKUNGEN
- Der Fuß darf nur auf den Schrankenmodellen
installiert werden, die in den FAAC und GENIUS
Katalogen angegeben sind.
- Es darf ein Fuß pro Schrankenbalken installiert
werden.
- Die Höhe des Fußes ist zwischen 730 mm und 1155
mm einstellbar (1).
!
Um Stöße auf den Fuß während der Bewegung zu
verhindern, wird das Installieren eines akustischen
Signalgebers empfohlen, der auf die Gefahr hinweist.
Es wird empfohlen, Licht reflektierende Aufkleber auf
dem Fuß anzubringen.
NICHT GESTATTETER GEBRAUCH
- Jeder andere Einsatz als die bestimmungsgemäße
Verwendung ist verboten.
- Ein Einsatz, der die Verwendungseinschränkungen
überschreitet, ist verboten.
- Kein Bauteil des Produkts darf verändert werden.
- Es ist verboten, den Gummideckel am unteren Ende
des Fußes zu entfernen.
INSTALLATION
!
Die angegebenen Werte und Anzugsmomente
beachten.
Die Werte werden in mm angegeben.
1. Den Inhalt der Lieferung überprüfen (2).
2. Die Schranke schließen.
3. Je nach Schrankenbalkenmodell, die dargestellte
Installationsreihenfolge A, B oder C befolgen.
ABSCHLIESSENDE TÄTIGKEITEN
1. Die Höhe des Fußes einstellen: Den unteren
Schlauch von Hand lockern, ihn bis zum Fußbo-
den ausweiten und von Hand festziehen. Keine
Werkzeuge verwenden (3).
2. Überprüfen, ob sich die Ausgleichsfeder für das Ge-
samtgewicht des Balkens und seiner Zubehörteile
eignet (siehe das Handbuch der Schranke). Falls
nötig, die Ausgleichsfeder mit einem geeigneten
Modell austauschen.
3. Den Balken gemäß dem im Handbuch der Schran-
ke beschriebenen Vorgang ausgleichen.
4. Von Hand den Anzug des unteren Schlauchs
überprüfen.
5. Den Betrieb der Automation durch Ausführen
einiger Zyklen überprüfen.
USO PREVISTO
- El objetivo de la pata es soportar el extremo de la
barra cuando la barrera está cerrada.
!
Está prohibido cualquier otro uso no indicado expre-
samente, ya que podría poner en riesgo la integridad
del producto o resultar peligroso.
LÍMITES DE USO
- Solo se permite la instalación de la pata sobre los
modelos de barreras especificados en los catálogos
FAAC y GENIUS.
- Se permite la instalación de una pata por barra.
- La pata presenta una altura regulable entre 730
mm y 1155 mm (1).
!
Para prevenir choques con la pata durante su
movimiento, se recomienda la instalación de un dis-
positivo acústico que indique el peligro existente. Se
recomienda colocar adhesivos reflectantes en la pata.
USO NO PERMITIDO
- Está prohibido un uso distinto del previsto.
- Está prohibido cualquier uso que exceda los límites
de uso.
- Está prohibido modificar cualquier componente
del producto.
- Está prohibido retirar el tapón de goma colocado
en el extremo inferior de la pata.
INSTALACIÓN
!
Respetar las cotas y los pares de apriete especificados.
Las cotas se expresan en mm.
1. Verificar el contenido del suministro (2).
2. Cerrar la barrera.
3. En función del modelo de barra, seguir la secuencia
de instalación ilustrada A, B o C.
OPERACIONES FINALES
1. Regular la altura de la pata: aflojar manualmente
el tubo inferior, extenderlo hasta la superficie del
pavimento y apretarlo manualmente. No utilizar
herramientas (3).
2. Verificar que el muelle de equilibrado es adecuado
al peso total de la barra y de sus accesorios (ver el
manual de instrucciones de la barrera). Si fuese
necesario, sustituir el muelle de equilibrado por
el modelo correcto.
3. Equilibrar la barra siguiendo el procedimiento
especificado en el manual de instrucciones de
la barrera.
4. Comprobar manualmente el apriete del tubo
inferior.
5. Comprobar el funcionamiento de la automatiza-
ción llevando a cabo algunos ciclos.
BEOOGD GEBRUIK
- De voet dient voor het ondersteunen van het
uiteinde van de arm van de gesloten slagboom.
!
Elk ander niet-uitdrukkelijk aangegeven gebruik
is verboden en kan de integriteit van het product
aantasten en/of een gevaar vormen.
GEBRUIKSBEPERKINGEN
- De voet mag alleen geïnstalleerd worden op de
modellen slagboom die beschreven worden in de
catalogi FAAC en GENIUS.
- Per slagboomarm mag er één voet geïnstalleerd
worden.
- De hoogte van de voet kan worden aangepast
tussen 730 en 1155 mm (1).
!
Om tijdens de beweging stoten op de voet te voorko-
men, wordt aangeraden een akoestische alarmvoor-
ziening te installeren om het gevaar te signaleren.
Het wordt aanbevolen om op de voet reflecterende
stickers aan te brengen.
ONEIGENLIJK GEBRUIK
- Elk ander dan het voorziene gebruik is verboden.
- Een gebruik voorbij de gebruiksbeperkingen is
verboden.
- Het is verboden om enig onderdeel van het product
te wijzigen.
- Het is verboden om de rubberen dop op het onder-
ste uiteinde van de voet te verwijderen.
INSTALLATIE
!
Neem de aangegeven maten en aanhaalmomenten
in acht.
De maten zijn uitgedrukt in mm.
1. Controleer de inhoud van de verpakking (2).
2. Sluit de slagboom.
3. Volg, op basis van het model van de slagboomarm,
de afgebeelde installatievolgorde A, B of C.
EINDHANDELINGEN
1. Pas de hoogte van de voet aan: schroef de onderste
buis met de hand los, schuif hem uit tot op het
vloeroppervlak en scherp handmatig aan. Gebruik
hiervoor geen gereedschap (3).
2. Controleer of de balansveer geschikt is voor het
totale gewicht van de slagboomarm en zijn ac-
cessoires (zie de handleiding van de slagboom).
Vervang, indien nodig, de balansveer met een
geschikt model.
3. Balanceer de slagboomarm uit volgens de in
de handleiding van de slagboom beschreven
procedure.
4. Controleer handmatig de aanscherping van de
onderste buis.
5. Controleer de werking van het automatiserings-
systeem door enkele cycli uit te voeren.
IT EN FR
DE ES NL
1
730 - 1155
2
1
2
3
4
Pagina wordt geladen...
Documenttranscriptie
Adjustable end foot 1 730 - 1155 2 1 2 3 IT EN FR UTILIZZO PREVISTO INTENDED USE UTILISATION PRÉVUE - Il piedino ha lo scopo di supportare l’estremità dell’asta quando la barriera è chiusa. - The purpose of the foot is to support the end of the beam when the barrier is closed. - Le pied a pour fonction de soutenir l’extrémité de la lisse lorsque la barrière est fermée. Any other use that is not expressly specified in these Toute autre utilisation non spécifiée est interdite et altro utilizzo non espressamente indicato ! instructions ! pourrait ! Qualsiasi is prohibited and could affect the integricompromettre l’intégrité du produit et / ou è vietato e potrebbe pregiudicare l’integrità del ty of the product and/or represent a source of danger. prodotto e/o rappresentare fonte di pericolo. LIMITI DI UTILIZZO - È consentito installare il piedino soltanto sui modelli di barriere specificati nei cataloghi FAAC e GENIUS. - È consentito installare un piedino per ogni asta. - Il piedino ha un’altezza regolabile tra 730 mm e 1155 mm ( 1 ). ! Per prevenire urti sul piedino durante il movimento, è raccomandata l’installazione di un dispositivo acustico per segnalare il pericolo. È raccomandata l’applicazione di adesivi catarifrangenti sul piedino. UTILIZZO NON CONSENTITO - È vietato un impiego diverso dall’utilizzo previsto. - È vietato un impiego che supera i limiti di utilizzo. - È vietato modificare qualsiasi componente del prodotto. - È vietato rimuovere il tappo in gomma posto all’estremità inferiore del piedino. INSTALLAZIONE LIMITATIONS OF USE - The foot should only be installed on the models of barriers specified in the FAAC and GENIUS catalogues. - Only one foot should be installed for each beam. - The height of the foot can be adjusted between 730 mm and 1155 mm (1 ). ! To prevent the foot from being hit whilst it is moving, it is recommended to install an acoustic warning device to signal the danger. It is recommended to apply reflective stickers to the foot. UNAUTHORISED USE - Uses other than the intended use are prohibited. - Uses that exceed its operational limits are prohibited. - No component part of the product may be modified. - Do NOT remove the rubber plug at the lower end of the foot. représenter une source de danger. LIMITES D’UTILISATION - On ne peut installer le pied que sur les modèles de barrières spécifiés dans les catalogues FAAC et GENIUS. - On peut installer un pied pour chaque lisse. - Le pied a une hauteur réglable entre 730 mm et 1155 mm (1 ). ! Pour prévenir les chocs contre le pied durant le mouvement on recommande d’installer un dispositif sonore pour signaler le danger. On recommande l’application d’autocollants réfléchissants sur le pied. UTILISATION INTERDITE - Tout usage non prévu est interdit. - Tout usage dépassant les limites d’utilisation est interdit. - Il est interdit de modifier les composants quels qu’il soit du produit. - Il est interdit d’enlever le bouchon en caoutchouc situé à l’extrémité inférieure du pied. ! Rispettare le quote e le coppie di serraggio specificate. ! Keep to the specified dimensions and the fastening ! Respecter les cotes et les couples de serrage spécifiés. torques. Le quote sono espresse in mm. Les cotes sont exprimées en mm. 1. Verificare il contenuto della fornitura ( 2). The dimensions are in mm 1. Vérifier le contenu de la fourniture (2). 2. Chiudere la barriera. 3. In base al modello di asta, seguire la sequenza di installazione illustrata A, B o C. OPERAZIONI FINALI 1. Regolare l’altezza del piedino: allentare manualmente il tubo inferiore, estenderlo fino al piano di calpestio e serrarlo manualmente. Non usare attrezzi ( 3). 2. Verificare se la molla di bilanciamento è adatta al peso complessivo dell’asta e dei suoi accessori (vedere il manuale di istruzioni della barriera). Se necessario sostituire la molla di bilanciamento con il modello corretto. 3. Bilanciare l’asta seguendo la procedura specificata nel manuale di istruzioni della barriera. 4. Verificare manualmente il serraggio del tubo inferiore. 5. Verificare il funzionamento dell’automazione eseguendo alcuni cicli. I0841 - Rev.2 INSTALLATION INSTALLATION 1. Check the package contents (2). 2. Close the barrier. 3. Follow the installation procedure shown according to the model of the beam A, B or C. 2. Fermer la barrière. 3. Suivant le modèle de lisse, suivre l’ordre d’installation illustré A, B ou C. FINAL OPERATIONS 1. Régler la hauteur du pied : desserrer manuellement le tube inférieur, l’étendre au niveau du sol et le serrer manuellement. Ne pas utiliser d’outils (3). 2. Vérifier si le ressort d’équilibrage est compatible avec le poids total de la lisse et de ses accessoires (voir le manuel d’instructions de la barrière). Au besoin, remplacer le ressort d’équilibrage par le modèle approprié. 3. Équilibrer la lisse en suivant la procédure spécifiée dans le manuel d’instructions de la barrière. 4. Vérifier manuellement le serrage du tube inférieur. 5. Vérifier le fonctionnement de l’automatisation en exécutant quelques cycles. 1. Adjust the height of the foot: loosen the lower tube, extend it to the level of the ground and tighten it manually. Do not use tools (3). 2. Make sure that the balancing spring is suitable for the weight of the beam together with its accessories (see the barrier instructions manual). If necessary, replace the balancing spring with the correct model. 3. Balance the beam following the procedure specified in the barrier instructions manual. 4. Manually check the tightening of the lower tube. 5. Check the operation of the automation by opening and closing the barrier several times. OPÉRATIONS FINALES 4 DE ES NL VORGESEHENER GEBRAUCH USO PREVISTO BEOOGD GEBRUIK - Der Fuß soll das Ende des Balkens stützen, wenn die Schranke geschlossen ist. - El objetivo de la pata es soportar el extremo de la barra cuando la barrera está cerrada. - De voet dient voor het ondersteunen van het uiteinde van de arm van de gesloten slagboom. Jede andere, nicht ausdrücklich angeführte VerwenEstá prohibido cualquier otro uso no indicado expreander niet-uitdrukkelijk aangegeven gebruik ! dung ! samente, ! isElkverboden ist verboten und könnte das Produkt beschädiya que podría poner en riesgo la integridad en kan de integriteit van het product gen und/oder eine Gefahrenquelle darstellen. VERWENDUNGSEINSCHRÄNKUNGEN - Der Fuß darf nur auf den Schrankenmodellen installiert werden, die in den FAAC und GENIUS Katalogen angegeben sind. - Es darf ein Fuß pro Schrankenbalken installiert werden. - Die Höhe des Fußes ist zwischen 730 mm und 1155 mm einstellbar (1 ). del producto o resultar peligroso. LÍMITES DE USO - Solo se permite la instalación de la pata sobre los modelos de barreras especificados en los catálogos FAAC y GENIUS. - Se permite la instalación de una pata por barra. - La pata presenta una altura regulable entre 730 mm y 1155 mm (1 ). aantasten en/of een gevaar vormen. GEBRUIKSBEPERKINGEN - De voet mag alleen geïnstalleerd worden op de modellen slagboom die beschreven worden in de catalogi FAAC en GENIUS. - Per slagboomarm mag er één voet geïnstalleerd worden. - De hoogte van de voet kan worden aangepast tussen 730 en 1155 mm ( 1). prevenir choques con la pata durante su ! Para Stöße auf den Fuß während der Bewegung zu de beweging stoten op de voet te voorkomovimiento, se recomienda la instalación de un dis! Umverhindern, ! Ommen,tijdens wird das Installieren eines akustischen wordt aangeraden een akoestische alarmvoorpositivo acústico que indique el peligro existente. Se Signalgebers empfohlen, der auf die Gefahr hinweist. Es wird empfohlen, Licht reflektierende Aufkleber auf dem Fuß anzubringen. NICHT GESTATTETER GEBRAUCH - Jeder andere Einsatz als die bestimmungsgemäße Verwendung ist verboten. - Ein Einsatz, der die Verwendungseinschränkungen überschreitet, ist verboten. - Kein Bauteil des Produkts darf verändert werden. - Es ist verboten, den Gummideckel am unteren Ende des Fußes zu entfernen. INSTALLATION angegebenen Werte und Anzugsmomente ! Diebeachten. Die Werte werden in mm angegeben. 1. Den Inhalt der Lieferung überprüfen (2). 2. Die Schranke schließen. 3. Je nach Schrankenbalkenmodell, die dargestellte Installationsreihenfolge A, B oder C befolgen. ABSCHLIESSENDE TÄTIGKEITEN 1. Die Höhe des Fußes einstellen: Den unteren Schlauch von Hand lockern, ihn bis zum Fußboden ausweiten und von Hand festziehen. Keine Werkzeuge verwenden (3). 2. Überprüfen, ob sich die Ausgleichsfeder für das Gesamtgewicht des Balkens und seiner Zubehörteile eignet (siehe das Handbuch der Schranke). Falls nötig, die Ausgleichsfeder mit einem geeigneten Modell austauschen. 3. Den Balken gemäß dem im Handbuch der Schranke beschriebenen Vorgang ausgleichen. 4. Von Hand den Anzug des unteren Schlauchs überprüfen. 5. Den Betrieb der Automation durch Ausführen einiger Zyklen überprüfen. recomienda colocar adhesivos reflectantes en la pata. USO NO PERMITIDO - Está prohibido un uso distinto del previsto. - Está prohibido cualquier uso que exceda los límites de uso. - Está prohibido modificar cualquier componente del producto. - Está prohibido retirar el tapón de goma colocado en el extremo inferior de la pata. INSTALACIÓN ziening te installeren om het gevaar te signaleren. Het wordt aanbevolen om op de voet reflecterende stickers aan te brengen. ONEIGENLIJK GEBRUIK - Elk ander dan het voorziene gebruik is verboden. - Een gebruik voorbij de gebruiksbeperkingen is verboden. - Het is verboden om enig onderdeel van het product te wijzigen. - Het is verboden om de rubberen dop op het onderste uiteinde van de voet te verwijderen. ! Respetar las cotas y los pares de apriete especificados. de aangegeven maten en aanhaalmomenten Las cotas se expresan en mm. ! Neem in acht. 1. Verificar el contenido del suministro (2). 2. Cerrar la barrera. De maten zijn uitgedrukt in mm. 3. En función del modelo de barra, seguir la secuencia INSTALLATIE de instalación ilustrada A, B o C. OPERACIONES FINALES 1. Regular la altura de la pata: aflojar manualmente el tubo inferior, extenderlo hasta la superficie del pavimento y apretarlo manualmente. No utilizar herramientas (3). 2. Verificar que el muelle de equilibrado es adecuado al peso total de la barra y de sus accesorios (ver el manual de instrucciones de la barrera). Si fuese necesario, sustituir el muelle de equilibrado por el modelo correcto. 3. Equilibrar la barra siguiendo el procedimiento especificado en el manual de instrucciones de la barrera. 4. Comprobar manualmente el apriete del tubo inferior. 5. Comprobar el funcionamiento de la automatización llevando a cabo algunos ciclos. 1. Controleer de inhoud van de verpakking ( 2). 2. Sluit de slagboom. 3. Volg, op basis van het model van de slagboomarm, de afgebeelde installatievolgorde A, B of C. EINDHANDELINGEN 1. Pas de hoogte van de voet aan: schroef de onderste buis met de hand los, schuif hem uit tot op het vloeroppervlak en scherp handmatig aan. Gebruik hiervoor geen gereedschap ( 3). 2. Controleer of de balansveer geschikt is voor het totale gewicht van de slagboomarm en zijn accessoires (zie de handleiding van de slagboom). Vervang, indien nodig, de balansveer met een geschikt model. 3. Balanceer de slagboomarm uit volgens de in de handleiding van de slagboom beschreven procedure. 4. Controleer handmatig de aanscherping van de onderste buis. 5. Controleer de werking van het automatiseringssysteem door enkele cycli uit te voeren.-
 1
1
-
 2
2


in andere talen
Gerelateerde papieren
-
Genius SPIN 3 4 6 424 Handleiding
-
Genius RAINBOW 324 524 724 C Handleiding
-
-
-
-
-
-
-
Genius Blizzard 500C 900C Handleiding
-