Electrolux EC2230AOW1 Handleiding
- Categorie
- Diepvriezers
- Type
- Handleiding


INHOUDSOPGAVE
1. VEILIGHEIDSINFORMATIE............................................................................... 3
2. VEILIGHEIDSVOORSCHRIFTEN...................................................................... 4
3. WERKING...........................................................................................................6
4. HET EERSTE GEBRUIK.................................................................................... 7
5. DAGELIJKS GEBRUIK.......................................................................................7
6. AANWIJZINGEN EN TIPS..................................................................................8
7. ONDERHOUD EN REINIGING.......................................................................... 9
8. PROBLEEMOPLOSSING.................................................................................10
9. MONTAGE .......................................................................................................12
10. GELUIDEN..................................................................................................... 13
11. TECHNISCHE INFORMATIE......................................................................... 14
WE DENKEN AAN U
Bedankt voor het kopen van een Electrolux-apparaat. U koos voor een product
dat jaren professionele ervaring en innovatie bevat. Ingenieus en stijlvol, het werd
ontworpen met u in het achterhoofd. Wanneer u het gebruikt, kunt u er op
vertrouwen dat u keer op keer fantastische resultaten zult krijgen.
Welkom bij Electrolux.
Ga naar onze website voor:
Advies over gebruik, brochures, het oplossen van problemen en
onderhoudsinformatie:
www.electrolux.com/webselfservice
Registreer uw product voor een betere service:
www.registerelectrolux.com
Koop accessoires, verbruiksartikelen en originele reserveonderdelen voor uw
apparaat:
www.electrolux.com/shop
KLANTENSERVICE
Gebruik altijd originele onderdelen.
Als u contact opneemt met de klantenservice zorg dat u de volgende gegevens
bij de hand hebt: model, productnummer, serienummer.
Deze informatie wordt vermeld op het typeplaatje.
Waarschuwing / Belangrijke veiligheidsinformatie
Algemene informatie en tips
Milieu-informatie
Wijzigingen voorbehouden.
www.electrolux.com2

1. VEILIGHEIDSINFORMATIE
Lees zorgvuldig de meegeleverde instructies voor
installatie en gebruik van het apparaat. De fabrikant is
niet verantwoordelijk voor letsel en schade veroorzaakt
door een foutieve installatie. Bewaar de instructies van
het apparaat voor toekomstig gebruik.
1.1 Veiligheid van kinderen en kwetsbare mensen
• Dit apparaat kan worden gebruikt door kinderen van 8
jaar en ouder en door mensen met beperkte
lichamelijke, zintuiglijke of verstandelijke vermogens of
een gebrek aan ervaring en kennis, indien zij onder
toezicht staan of instructies hebben gekregen over het
veilig gebruiken van het apparaat en indien zij de
eventuele gevaren begrijpen.
• Laat kinderen niet met het apparaat spelen.
• Reiniging en onderhoud mag niet worden uitgevoerd
door kinderen zonder toezicht.
• Houd alle verpakkingsmaterialen uit de buurt van
kinderen.
1.2 Algemene veiligheid
• Dit apparaat is bedoeld voor huishoudelijk gebruik of
gelijksoortige toepassingen zoals:
– Boerderijen, personeelskeukens in winkels,
kantoren of andere werkomgevingen
– Door gasten in hotels, motels, bed&breakfasts en
andere woonomgevingen
• Houd de ventilatieopeningen altijd vrij van obstructies;
dit geldt zowel voor losstaande als ingebouwde
modellen.
• Gebruik geen mechanische of andere middelen om
het ontdooiproces te versnellen, behalve die middelen
die door de fabrikant zijn aanbevolen.
• Let op dat u het koelcircuit niet beschadigt.
NEDERLANDS 3

• Gebruik geen elektrische apparaten in de koelkast,
tenzij deze door de fabrikant worden aanbevolen.
• Gebruik geen waterstralen of stoom om het apparaat
te reinigen.
• Maak het apparaat schoon met een vochtige, zachte
doek. Gebruik alleen neutrale schoonmaakmiddelen.
Gebruik geen schuurmiddelen, schuursponsjes,
oplosmiddelen of metalen voorwerpen.
• Bewaar geen explosieve substanties zoals
spuitbussen met drijfgas in dit apparaat.
• Als de voedingskabel beschadigd is, moet de
fabrikant, een erkende serviceverlener of een
gekwalificeerd persoon deze vervangen teneinde
gevaarlijke situaties te voorkomen.
2. VEILIGHEIDSVOORSCHRIFTEN
2.1 Montage
WAARSCHUWING!
Alleen een erkende
installatietechnicus mag het
apparaat installeren.
• Verwijder alle verpakkingsmaterialen.
• Installeer en gebruik geen beschadigd
apparaat.
• Volg de installatie-instructies op die
zijn meegeleverd met het apparaat.
• Wees voorzichtig met het verplaatsen
van het apparaat, het is zwaar. Draag
altijd veiligheidshandschoenen.
• Zorg ervoor dat rond het apparaat
lucht kan circuleren.
• Wacht ten minste 4 uur alvorens het
apparaat aan de netstroom aan te
sluiten. Hierdoor kan de olie terug in
de compressor stromen.
• Installeer het apparaat niet in de
nabijheid van radiators, fornuizen,
ovens of kookplaten.
• De achterzijde van het apparaat moet
tegen de muur worden geplaatst.
• Installeer het apparaat niet op een
plaats met direct zonlicht.
• Gebruik dit apparaat niet in gebieden
die te vochtig of te koud zijn, zoals
bijgebouwen, garages of kelders.
• Til de voorkant van het apparaat op
als u hem wilt verplaatsen, om
krassen op de vloer te voorkomen.
2.2 Aansluiting op het
elektriciteitsnet
WAARSCHUWING!
Gevaar voor brand en
elektrische schokken.
• Dit apparaat moet worden
aangesloten op een geaard
stopcontact.
• Controleer of de elektrische informatie
op het typeplaatje overeenkomt met
de stroomvoorziening. Zo niet, neem
dan contact op met een
elektromonteur.
• Gebruik altijd een correct
geïnstalleerd, schokbestendig
stopcontact.
• Gebruik geen meerwegstekkers en
verlengsnoeren.
• Zorg dat u de elektrische onderdelen
(hoofdstekker, kabel, compressor)
niet beschadigt. Neem contact met de
erkende servicedienst of een
elektricien om de elektrische
onderdelen te wijzigen.
www.electrolux.com4

• De stroomkabel moet lager blijven
dan het niveau van de stopcontact.
• Steek de stekker pas in het
stopcontact als de installatie is
voltooid. Zorg ervoor dat het netsnoer
na installatie bereikbaar is.
• Trek niet aan het netsnoer om het
apparaat los te koppelen. Trek altijd
aan de stekker.
2.3 Gebruik
WAARSCHUWING!
Gevaar op letsel,
brandwonden of elektrische
schokken.
• De specificatie van het apparaat mag
niet worden veranderd.
• Plaats geen elektrische apparaten
(bijv. ijsmachines) in het apparaat
tenzij uitdrukkelijk geschikt verklaard
door de fabrikant.
• Zorg ervoor dat u het koelcircuit niet
beschadigt. Het bevat isobutaan
(R600a), aardgas met een hoge
ecologische compatibiliteit. Dit gas is
ontvlambaar.
• Als er schade aan het koelcircuit
optreedt, zorg er dan voor dat er zich
geen vlammen en andere
ontstekingsbronnen in de kamer
bevinden. Ventileer de kamer goed.
• Zet geen hete items op de
kunststofonderdelen van het
apparaat.
• Bewaar geen ontvlambare gassen en
vloeistoffen in het apparaat.
• Plaats geen ontvlambare producten of
items die vochtig zijn door
ontvlambare producten in, bij of op
het apparaat.
• Raak de compressor of condensator
niet aan. Ze zijn heet.
2.4 Binnenverlichting
• Het type lampje gebruikt voor dit
apparaat is niet geschikt voor de
verlichting van huishoudelijke ruimten.
2.5 Onderhoud en reiniging
WAARSCHUWING!
Gevaar voor letsel of schade
aan het apparaat.
• Schakel het apparaat uit en trek de
stekker uit het stopcontact voordat u
onderhoudshandelingen verricht.
• Het koelcircuit van dit apparaat bevat
koolwaterstoffen. Enkel bevoegde
personen mogen de eenheid
onderhouden en herladen.
• Controleer regelmatig de afvoer van
het apparaat en reinig het indien
nodig. Indien de afvoer verstopt is, zal
er water op de bodem van het
apparaat liggen.
2.6 Verwijdering
WAARSCHUWING!
Gevaar voor letsel of
verstikking.
• Haal de stekker uit het stopcontact.
• Snij het netsnoer van het apparaat af
en gooi dit weg.
• Verwijder de deur om te voorkomen
dat kinderen en huisdieren opgesloten
raken in het apparaat.
• Het koelcircuit en de
isolatiematerialen van dit apparaat
zijn ozonvriendelijk.
• Het isolatieschuim bevat ontvlambare
gassen. Neem contact met uw
plaatselijke overheid voor informatie
m.b.t. correcte afvalverwerking van
het apparaat.
• Veroorzaak geen schade aan het deel
van de koeleenheid dat zich naast de
warmtewisselaar bevindt.
NEDERLANDS 5

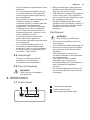
3. WERKING
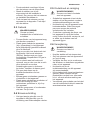
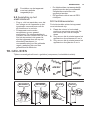
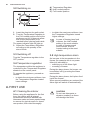
3.1 Bedieningspaneel
21 3
1
Temperatuurknop
2
Stroomindicatielampje
3
Alarmlampje hoge temperatuur
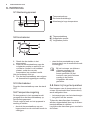
3.2 Inschakelen
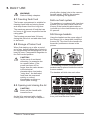
B
C
A
A) Thermostaatknop
B) Halfgeladen positie
C) Volgeladen positie
1. Steek dan de stekker in het
stopcontact.
2. Draai de thermostaatknop naar de
volgeladen positie en wacht 24 uur
voordat u voedsel in de koelkast
plaatst, zodat de correcte
temperatuur kan worden bereikt.
Het stroomlampje licht op.
3. Pas de thermostaatknop aan volgens
de hoeveelheid opgeslagen voeding.
3.3 Uitschakelen
Draai de thermostaatknop naar de stand
OFF.
3.4 Temperatuurregeling
De temperatuur in het apparaat wordt
geregeld door de thermostaatknop op
het bedieningspaneel.
Ga als volgt te werk om het apparaat in
werking te stellen:
• draai de thermostaatknop op een
lagere stand om de minimale koude te
verkrijgen.
• draai de thermostaatknop op een
hogere stand om de maximale koude
te verkrijgen.
Bij het invriezen van kleinere
volumes voeding is de
positie Halfgeladen de
meest geschikte. Bij het
invriezen van grote volumes
voeding is de positie
Volgeladen de meest
geschikte.
3.5 Alarm bij hoge temperatuur
Een toename van de temperatuur in de
vriezer (bijvoorbeeld door stroomuitval)
wordt aangeduid door
• het aanspringen van het alarmlampje
• het geluid van de zoemer
Tijdens de alarmfase kan de zoemer
worden uitgeschakeld door op de Alarm-
resetschakelaar te drukken
Leg tijdens de alarmfase geen voedsel in
de vriezer.
www.electrolux.com6

Als de normale omstandigheden hersteld
worden gaat het alarmlampje
automatisch uit.
4. HET EERSTE GEBRUIK
4.1 De binnenkant
schoonmaken
Voordat u het apparaat voor de eerste
keer gebruikt, wast u de binnenkant en
de interne accessoires met lauwwarm
water en een beetje neutrale zeep om de
typische geur van een nieuw product
weg te nemen. Droog daarna grondig af.
LET OP!
Gebruik geen oplosmiddelen
of schuurmiddelen. Deze
beschadigen de lak.
5. DAGELIJKS GEBRUIK
WAARSCHUWING!
Raadpleeg de hoofdstukken
Veiligheid.
5.1 Invriezen van vers voedsel
Het vriesvak is geschikt voor het
invriezen van vers voedsel en om
diepvriesvoedsel langere tijd te bewaren.
De maximale hoeveelheid voedsel die in
24 uur kan worden ingevroren wordt
aangegeven op het typeplaatje.
1)
Het invriesproces duurt 24 uur. voeg
tijdens deze periode geen ander voedsel
toe om in te vriezen.
5.2 Het bewaren van
ingevroren voedsel
Als u het apparaat voor het eerst, of na
een periode dat het niet gebruikt is,
inschakelt, moet het apparaat voordat u
er producten in plaatst eerst minstens 24
uur werken met de thermostaatknop in
de stand Vol.
LET OP!
In het geval van onbedoelde
ontdooiing, bijvoorbeeld als
de stroom langer is
uitgevallen dan de duur die
op de kaart met technische
kenmerken onder "maximale
bewaartijd bij stroomuitval" is
vermeld, moet het ontdooide
voedsel snel geconsumeerd
worden of onmiddellijk
bereid worden en dan weer
worden ingevroren (nadat
het afgekoeld is).
5.3 Het openen en sluiten van
het deksel
LET OP!
Trek nooit met grote kracht
aan het handvat
Omdat het deksel is uitgerust met een
strak sluitende afsluiting, is het niet
gemakkelijk om hem direct na het sluiten
opnieuw te openen (door het vacuüm dat
aan de binnenkant wordt gevormd)
Wacht een paar minuten voordat u het
apparaat weer opent
5.4 Laag vriessysteem
Het apparaat is uitgerust met een laag
vriessysteem (er bevindt zich een
1)
Raadpleeg "Technische gegevens"
NEDERLANDS 7

afsluiter in de achterkant aan de
binnenzijde van de vriezer) die de
vorming van ijs in de vrieskist tot 80
percent vermindert.
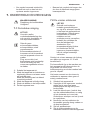
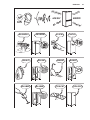
5.5 Opslagmanden
Hang de manden aan de bovenrand van
de vriezer (A) of plaats ze in de vriezer
(B). Draai de handvaten voor deze twee
posities zoals getoond in de afbeelding
en zet ze vast
A B
De onderstaande afbeeldingen tonen
hoeveel manden in de verschillende
vriezermodellen kunnen worden
geplaatst
De manden schuiven in elkaar
230
806606 946 1061
1201 1336 1611
U kunt extra manden kopen bij uw
plaatselijke klantenservice
6. AANWIJZINGEN EN TIPS
WAARSCHUWING!
Raadpleeg de hoofdstukken
Veiligheid.
6.1 Tips voor het invriezen
Om u te helpen om het beste van het
invriesproces te maken, volgen hier een
paar belangrijke tips:
• De maximale hoeveelheid voedsel die
in 24 uur ingevroren kan worden, is
vermeld op het typeplaatje.
• Het invriesproces duurt 24 uur. Voeg
gedurende deze periode niet meer in
te vriezen voedsel toe.
• Vries alleen verse en grondig
schoongemaakte levensmiddelen van
uitstekende kwaliteit in.
• Bereid het voedsel in kleine porties
voor, zo kan het snel en volledig
worden ingevroren en zo kunt u later
alleen die hoeveelheid laten
ontdooien die u nodig heeft.
• Wikkel het voedsel in aluminiumfolie
of plastic en zorg ervoor dat de pakjes
luchtdicht zijn.
• Leg vers, nog niet ingevroren voedsel
niet tegen het al ingevroren voedsel,
om te voorkomen dat dit laatste warm
wordt.
• Mager voedsel kan beter worden
ingevroren dan vet voedsel. Zout
zorgt dat het voedsel minder lang in
de vriezer goed blijft.
• Water bevriest, als dit rechtstreeks uit
het vriesvak geconsumeerd wordt,
kan het aan de huid vastvriezen.
• Het is aan te bevelen de invriesdatum
op elk pakje te vermelden, dan kunt u
zien hoe lang het al bewaard is.
6.2 Tips voor het bewaren van
ingevroren voedsel
Om de beste resultaten van dit apparaat
te verkrijgen, dient u
• verzeker u ervan dat de commercieel
ingevroren levensmiddelen op
geschikte wijze door de
detailhandelaar werden opgeslagen;
• zorg ervoor dat de ingevroren
levensmiddelen zo snel mogelijk van
de winkel naar uw vriezer gebracht
worden;
• het deksel niet vaak te openen of
langer open te laten dan strikt
noodzakelijk
www.electrolux.com8

• Als voedsel eenmaal ontdooid is,
bederft het snel en kan het niet
opnieuw worden ingevroren.
• Bewaar het voedsel niet langer dan
de door de fabrikant aangegeven
bewaarperiode.
7. ONDERHOUD EN REINIGING
WAARSCHUWING!
Raadpleeg de hoofdstukken
Veiligheid.
7.1 Periodieke reiniging
LET OP!
Voordat u welke
onderhoudshandeling dan
ook verricht, de stekker uit
het stopcontact trekken.
Gebruik geen
schoonmaakmiddelen,
schuurmiddelen, sterk
geparfumeerde
schoonmaakproducten of
boenwas om de binnenkant
van het apparaat schoon te
maken
Zorg ervoor dat u het
koelsysteem niet beschadigt.
Het is niet nodig om het
compressorgedeelte schoon
te maken
1. Schakel het apparaat uit.
2. Maak het apparaat en toebehoren
regelmatig schoon met warm water
en neutrale zeep
Maak de afsluiting van het deksel
voorzichtig schoon
3. Maak het apparaat volledig droog
4. Steek de stekker in het stopcontact.
5. Zet het apparaat aan.
7.2 De vriezer ontdooien
LET OP!
Gebruik nooit scherpe
metalen gereedschappen
om rijp af te schrapen omdat
u hiermee het apparaat kunt
beschadigen. Gebruik geen
mechanische of andere
middelen om het
ontdooiproces te versnellen,
behalve die middelen die
door de fabrikant zijn
aanbevolen. Een
temperatuurstijging tijdens
het ontdooien van de
ingevroren levensmiddelen,
kan de veilige bewaartijd
verkorten.
Ontdooi de vriezer wanneer de rijplaag
een dikte van ongeveer 10-15 mm
bereikt heeft.
De hoeveelheid rijp op de wanden van
het apparaat wordt vergroot door de
hoge mate van vocht in de
buitenomgeving en als het voedsel niet
goed is verpakt.
Het beste moment om de vriezer te
ontdooien is wanneer deze geen of
weinig voedsel bevat.
1. Schakel het apparaat uit.
2. Verwijder al het ingevroren voedsel,
wikkel het in een paar lagen
krantenpapier en leg het op een
koele plaats.
3. Laat het deksel open, haal de dop
van de ontdooiwaterafvoer en vang
al het dooiwater op in een bak
Gebruik een schraper om het ijs snel
te verwijderen.
4. Na afloop van het ontdooien de
binnenkant grondig droog maken en
de dop terugzetten.
5. Zet het apparaat aan.
6. Zet de thermostaatknop op de
maximale koude en laat het apparaat
NEDERLANDS 9

twee tot drie uur in deze instelling
werken.
7. Zet het eerder verwijderde voedsel
terug in het vriesvak.
7.3 Periodes dat het apparaat
niet gebruikt wordt
Neem de volgende
voorzorgsmaatregelen als het apparaat
gedurende lange tijd niet gebruikt wordt:
1. Schakel het apparaat uit en trek de
stekker uit het stopcontact.
2. Haal al het voedsel eruit
3. Ontdooi het apparaat en toebehoren
en maak alles schoon
4. Laat het deksel open om
onaangename geurtjes te voorkomen
Als uw apparaat aan blijft
staan, vraag dan iemand om
het zo nu en dan te
controleren, om te
voorkomen dat het
bewaarde voedsel bederft
als de stroom uitvalt.
8. PROBLEEMOPLOSSING
WAARSCHUWING!
Raadpleeg de hoofdstukken
Veiligheid.
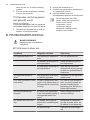
8.1 Wat moet u doen als…
Probleem Mogelijke oorzaak Oplossing
Het apparaat werkt niet. Het apparaat is uitgescha‐
keld.
Zet het apparaat aan.
De stekker zit niet goed in
het stopcontact.
Steek de stekker goed in
het stopcontact.
Er staat geen spanning op
het stopcontact.
Sluit aan op een ander
stopcontact. Neem contact
op met een gekwalificeerd
elektricien.
Het apparaat maakt la‐
waai.
Het apparaat is niet stevig
en stabiel geplaatst.
Controleer of het apparaat
stabiel staat.
Er is een hoorbaar of zicht‐
baar alarm.
De kist is kortgeleden aan‐
gezet of de temperatuur in
het apparaat is nog steeds
te hoog.
Zie "Alarm hoge tempera‐
tuur" en neem contact op
met de dichtstbijzijnde
klantenservice als het pro‐
bleem blijft bestaan.
Stroomindicatielampje
knippert.
Er is een fout opgetreden
in de temperatuurmeting of
het apparaat werkt niet
goed.
Neem contact op met de
service-afdeling.
De deksel sluit niet volle‐
dig.
De deksel wordt geblok‐
keerd door voedselverpak‐
kingen.
Rangschik de verpakkin‐
gen op de juiste wijze, zie
de sticker in het apparaat.
Er is te veel rijp. Verwijder de overmatige
rijp.
www.electrolux.com10

Probleem Mogelijke oorzaak Oplossing
De deksel gaat moeilijk
open.
De pakkingen van de dek‐
sel zijn vies of plakkerig.
Maak de pakkingen van de
deksel schoon.
Het lampje werkt niet. Het lampje is stuk. Zie 'Het lampje vervangen'.
De compressor werkt con‐
tinu.
De temperatuur is goed in‐
gesteld.
Raadpleeg het hoofdstuk
'Bediening'.
Er zijn grote hoeveelheden
voedsel tegelijk in de vrie‐
zer geplaatst.
Wacht een paar uur en
controleer dan nogmaals
de temperatuur.
De omgevingstemperatuur
is te hoog.
Zie het typeplaatje voor de
klimaatklasse.
Het voedsel dat in het ap‐
paraat werd geplaatst, was
te warm.
Laat voedsel afkoelen tot
kamertemperatuur voordat
u het opslaat.
De deksel is niet goed ge‐
sloten.
Controleer of de deksel
goed sluit en dat de pak‐
kingen onbeschadigd en
schoon zijn.
Er is te veel rijp en ijs. De deksel is niet correct
gesloten of de deurpakking
is vervormd/vies.
Raadpleeg 'Openen en
sluiten van deksel'.
De dop van de waterafvoer
bevindt zich niet op de juis‐
te plaats.
Plaats de dop voor de wa‐
terafvoer op de juiste ma‐
nier.
De temperatuur is goed in‐
gesteld.
Raadpleeg het hoofdstuk
'Bediening'.
De temperatuur in het ap‐
paraat is te laag/hoog.
De temperatuurknop is niet
goed ingesteld.
Stel een hogere/lagere
temperatuur in.
De deksel is niet goed ge‐
sloten.
Raadpleeg 'Openen en
sluiten van deksel'.
De temperatuur van het
product is te hoog.
Laat het product afkoelen
tot kamertemperatuur voor‐
dat u het opbergt.
Er worden veel producten
tegelijk bewaard.
Bewaar minder producten
tegelijk.
De dikte van de rijp is meer
dan 4-5 mm.
Ontdooi het apparaat.
De deksel is te vaak geo‐
pend.
Open de deksel alleen als
het nodig is.
In te vriezen producten zijn
te dicht bij elkaar ge‐
plaatst.
Zorg ervoor dat er koude
luchtcirculatie in het appa‐
raat aanwezig is.
NEDERLANDS 11

8.2 Klantenservice
Als het apparaat nog steeds niet naar
behoren werkt na uitvoeren van de
bovenstaande controles, neem dan
contact op met de dichtstbijzijnde
erkende klantenservice.
Om snel geholpen te kunnen worden is
het van belang dat u het model en
serienummer van uw apparaat doorgeeft.
Deze kunt u vinden op het garantiebewijs
of op het typeplaatje aan de rechterkant
aan de buitenkant van het apparaat.
8.3 Het lampje vervangen
WAARSCHUWING!
Verwijder de afdekking van
het lampje op het moment
van vervangen niet Laat de
vriezer niet werken als de
afdekking van het lampje
beschadigd is of ontbreekt.
1. Trek de stekker uit het stopcontact.
2. Vervang het kapotte lampje door een
nieuw lampje met hetzelfde
vermogen dat speciaal bedoeld is
voor huishoudelijke apparaten (het
maximumvermogen is vermeld op de
afdekking van het lampje).
3. Steek de stekker in het stopcontact.
4. Open het deksel Controleer of het
lampje gaat branden.
9. MONTAGE
WAARSCHUWING!
Raadpleeg de hoofdstukken
Veiligheid.
9.1 Opstelling
LET OP!
Wanneer u een oud
apparaat met een slot of een
vergrendeling op het deksel
afvoert, moet u ervoor
zorgen dat dit onklaar wordt
gemaakt om te voorkomen
dat kleine kinderen erin
opgesloten raken
Het apparaat moet geïnstalleerd worden
op een droge, goed geventileerde plaats
binnen waar de omgevingstemperatuur
overeenkomt met de klimaatklasse die
vermeld is op het typeplaatje van het
apparaat:
Kli‐
maat‐
klasse
Omgevingstemperatuur
SN +10°C tot + 32°C
Kli‐
maat‐
klasse
Omgevingstemperatuur
N +16°C tot + 32°C
ST +16°C tot + 38°C
T +16°C tot + 43°C
Bij bepaalde modeltypes
kunnen er functionele
problemen ontstaan als deze
temperaturen niet worden
gerespecteerd. De juiste
werking van het apparaat
kan enkel gegarandeerd
worden als het opgegeven
temperatuurbereik wordt
gerespecteerd. Als u vragen
hebt m.b.t. de
montagelocatie van het
apparaat, raadpleeg dan de
dealer, uw klantenservice of
de dichtstbijzijnde
technische dienst
www.electrolux.com12

De stekker van het apparaat
moet na installatie
toegankelijk zijn
9.2 Aansluiting op het
elektriciteitsnet
• Zorg er vóór het aansluiten voor dat
het voltage en de frequentie op het
typeplaatje overeenkomen met de
stroomtoevoer in uw huis.
• Dit apparaat moet worden
aangesloten op een geaard
stopcontact. De netsnoerstekker is
voorzien van een contact voor dit doel
Als het stopcontact niet geaard is,
sluit het apparaat dan aan op een
afzonderlijk aardepunt, in
overeenstemming met de geldende
regels, raadpleeg hiervoor een
gekwalificeerd elektricien
• De fabrikant kan niet aansprakelijk
gesteld worden als bovenstaande
veiligheidsvoorschriften niet
opgevolgd worden.
• Dit apparaat voldoet aan de EEG-
richtlijnen.
9.3 Ventilatievereisten
De luchtcirculatie achter het apparaat
moet voldoende zijn.
1. Plaats de vriezer in horizontale
positie op een stevig oppervlak De
kist moet op alle vier de voetjes
staan
2. Zorg ervoor dat de ruimte tussen het
apparaat en de achterwand 5 cm is
3. Zorg ervoor dat de ruimte tussen het
apparaat en de zijkanten 5 cm is
10. GELUIDEN
Tijdens normaal gebruik hoort u geluiden (compressor, koelmiddelcirculatie).
BRRR!
HISSS!
CLICK!
BLUBB!
CRACK!
SSSRR
R!
OK
CLICK!
CLICK!
SSSRRR!
SSSRRR!
NEDERLANDS 13

BRRR!
BRRR!
HISSS!
HISSS!
BLUBB!
BLUBB!
CRACK!CRACK!
11. TECHNISCHE INFORMATIE
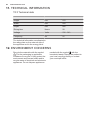
11.1 Technische gegevens
Hoogte mm 876
Breedte mm 806
Diepte mm 665
Maximale bewaartijd bij stroomuitval Uur 28
Spanning Volt 230 - 240
Frequentie Hz 50
De technische gegevens staan op het
typeplaatje aan de buitenkant van het
apparaat en op het energielabel.
12. MILIEUBESCHERMING
Recycle de materialen met het symbool
. Gooi de verpakking in een geschikte
verzamelcontainer om het te recyclen.
Help om het milieu en de
volksgezondheid te beschermen en
recycle het afval van elektrische en
elektronische apparaten. Gooi apparaten
www.electrolux.com14

gemarkeerd met het symbool niet weg
met het huishoudelijk afval. Breng het
product naar het milieustation bij u in de
buurt of neem contact op met de
gemeente.
NEDERLANDS 15

CONTENTS
1. SAFETY INFORMATION..................................................................................17
2. SAFETY INSTRUCTIONS................................................................................18
3. OPERATION.....................................................................................................19
4. FIRST USE....................................................................................................... 20
5. DAILY USE....................................................................................................... 21
6. HINTS AND TIPS............................................................................................. 22
7. CARE AND CLEANING....................................................................................22
8. TROUBLESHOOTING......................................................................................23
9. INSTALLATION................................................................................................ 25
10. NOISES.......................................................................................................... 26
11. TECHNICAL INFORMATION......................................................................... 28
WE’RE THINKING OF YOU
Thank you for purchasing an Electrolux appliance. You’ve chosen a product that
brings with it decades of professional experience and innovation. Ingenious and
stylish, it has been designed with you in mind. So whenever you use it, you can
be safe in the knowledge that you’ll get great results every time.
Welcome to Electrolux.
Visit our website for:
Get usage advice, brochures, trouble shooter, service information:
www.electrolux.com/webselfservice
Register your product for better service:
www.registerelectrolux.com
Buy Accessories, Consumables and Original spare parts for your appliance:
www.electrolux.com/shop
CUSTOMER CARE AND SERVICE
Always use original spare parts.
When contacting our Authorised Service Centre, ensure that you have the
following data available: Model, PNC, Serial Number.
The information can be found on the rating plate.
Warning / Caution-Safety information
General information and tips
Environmental information
Subject to change without notice.
www.electrolux.com16

1. SAFETY INFORMATION
Before the installation and use of the appliance, carefully
read the supplied instructions. The manufacturer is not
responsible if an incorrect installation and use causes
injuries and damages. Always keep the instructions with
the appliance for future reference.
1.1 Children and vulnerable people safety
• This appliance can be used by children aged from 8
years and above and persons with reduced physical,
sensory or mental capabilities or lack of experience
and knowledge if they have been given supervision or
instruction concerning use of the appliance in a safe
way and understand the hazards involved.
• Do not let children play with the appliance.
• Cleaning and user maintenance shall not be made by
children without supervision.
• Keep all packaging away from children.
1.2 General Safety
• This appliance is intended to be used in household
and similar applications such as:
– Farm houses; staff kitchen areas in shops, offices
and other working environments
– By clients in hotels, motels, bed and breakfast and
other residential type environments
• Keep ventilation openings, in the appliance enclosure
or in the built-in structure, clear of obstruction.
• Do not use mechanical devices or other means to
accelerate the defrosting process, other than those
recommended by the manufacturer.
• Do not damage the refrigerant circuit.
• Do not use electrical appliances inside the food
storage compartments of the appliance, unless they
are of the type recommended by the manufacturer.
ENGLISH 17

• Do not use water spray and steam to clean the
appliance.
• Clean the appliance with a moist soft cloth. Only use
neutral detergents. Do not use abrasive products,
abrasive cleaning pads, solvents or metal objects.
• Do not store explosive substances such as aerosol
cans with a flammable propellant in this appliance.
• If the supply cord is damaged, it must be replaced by
the manufacturer, its Authorised Service Centre or
similarly qualified persons in order to avoid a hazard.
2. SAFETY INSTRUCTIONS
2.1 Installation
WARNING!
Only a qualified person must
install this appliance.
• Remove all the packaging.
• Do not install or use a damaged
appliance.
• Obey the installation instruction
supplied with the appliance.
• Always be careful when you move the
appliance because it is heavy. Always
wear safety gloves.
• Make sure the air can circulate
around the appliance.
• Wait at least 4 hours before
connecting the appliance to the power
supply. This is to allow the oil to flow
back in the compressor.
• Do not install the appliance close to
radiators or cookers, oven or hobs.
• The rear of the appliance must stand
against the wall.
• Do not install the appliance where
there is direct sunlight.
• Do not install this appliance in areas
that are too humid or too colds, such
as the construction appendices,
garages or wine cellars.
• When you move the appliance, lift it
by the front edge to avoid scratching
the floor.
2.2 Electrical connection
WARNING!
Risk of fire and electrical
shock.
• The appliance must be earthed.
• Make sure that the electrical
information on the rating plate agrees
with the power supply. If not, contact
an electrician.
• Always use a correctly installed
shockproof socket.
• Do not use multi-plug adapters and
extension cables.
• Make sure not to cause damage to
the electrical components (e.g. mains
plug, mains cable, compressor).
Contact the Authorised Service
Centre or an electrician to change the
electrical components.
• The mains cable must stay below the
level of the mains plug.
• Connect the mains plug to the mains
socket only at the end of the
installation. Make sure that there is
access to the mains plug after the
installation.
• Do not pull the mains cable to
disconnect the appliance. Always pull
the mains plug.
2.3 Use
WARNING!
Risk of injury, burns,
electrical shock or fire.
www.electrolux.com18

• Do not change the specification of this
appliance.
• Do not put electrical appliances (e.g.
ice cream makers) in the appliance
unless they are stated applicable by
the manufacturer.
• Be careful not to cause damage to the
refrigerant circuit. It contains
isobutane (R600a), a natural gas with
a high level of environmental
compatibility. This gas is flammable.
• If damage occurs to the refrigerant
circuit, make sure that there are no
flames and sources of ignition in the
room. Ventilate the room.
• Do not let hot items to touch the
plastic parts of the appliance.
• Do not store flammable gas and liquid
in the appliance.
• Do not put flammable products or
items that are wet with flammable
products in, near or on the appliance.
• Do not touch the compressor or the
condenser. They are hot.
2.4 Internal light
• The type of lamp used for this
appliance is not suitable for
household room illumination
2.5 Care and cleaning
WARNING!
Risk of injury or damage to
the appliance.
• Before maintenance, deactivate the
appliance and disconnect the mains
plug from the mains socket.
• This appliance contains hydrocarbons
in the cooling unit. Only a qualified
person must do the maintenance and
the recharging of the unit.
• Regularly examine the drain of the
appliance and if necessary, clean it. If
the drain is blocked, defrosted water
collects in the bottom of the
appliance.
2.6 Disposal
WARNING!
Risk of injury or suffocation.
• Disconnect the appliance from the
mains supply.
• Cut off the mains cable and discard it.
• Remove the door to prevent children
and pets to be closed inside of the
appliance.
• The refrigerant circuit and the
insulation materials of this appliance
are ozone-friendly.
• The insulation foam contains
flammable gas. Contact your
municipal authority for information on
how to discard the appliance
correctly.
• Do not cause damage to the part of
the cooling unit that is near the heat
exchanger.
3. OPERATION
3.1 Control panel
21 3
1
Temperature regulator
2
Power indicator light
3
High temperature alarm light
ENGLISH 19

3.2 Switching on
B
C
A
A) Temperature Regulator
B) Half Loaded position
C) Full Loaded position
1. Insert the plug into the wall socket.
2. Turn the Temperature Regulator to
the Full Loaded position and let the
appliance run for 24 hours to allow
the correct temperature to be
reached before placing food inside.
The power indicator light will light up.
3. Adjust the Temperature Regulator
according to the quantity of the
stored foods.
3.3 Switching off
Turn the Temperature regulator to the
OFF position.
3.4 Temperature regulation
The temperature within the appliance is
controlled by the Temperature Regulator
situated on the control panel.
To operate the appliance, proceed as
follows:
• to obtain the minimum coldness, turn
the Temperature Regulator toward
lower settings.
• to obtain the maximum coldness. turn
the Temperature Regulator toward
higher settings.
In case of freezing less food
volumes, the Half Loaded
setting is the most suitable.
In case of freezing much
food volumes, the Full
Loaded setting is the most
suitable.
3.5 High temperature alarm
An increase in the temperature in the
freezer (for example due to an power
failure) is indicated by:
• switching on of the Alarm light
• sounding of buzzer
During the alarm phase, the buzzer can
be switched off by pressing the Alarm
reset switch.
During the alarm phase, don't place food
inside the freezer.
When normal conditions are restored the
Alarm light will switch off automatically.
4. FIRST USE
4.1 Cleaning the interior
Before using the appliance for the first
time, the interior and all internal
accessories should be washed with
lukewarm water and some neutral soap
to remove the typical smell of a brand-
new product, then dried thoroughly.
CAUTION!
Do not use detergents or
abrasive powders, as these
will damage the finish.
www.electrolux.com20

5. DAILY USE
WARNING!
Refer to Safety chapters.
5.1 Freezing fresh food
The freezer compartment is suitable for
freezing fresh food and storing frozen
and deep-frozen food for a long time.
The maximum amount of food that can
be frozen in 24 hours is specified on the
rating plate.
1)
The freezing process lasts 24 hours:
during this period do not add other food
to be frozen.
5.2 Storage of frozen food
When first starting-up or after a period
out of use, before putting the products in
the compartment let the appliance run at
least 24 hours Temperature Regulator to
the Full Loaded position.
CAUTION!
In the event of accidental
defrosting, for example due
to a power failure, if the
power has been off for
longer than the value shown
in the technical
characteristics chart under
"rising time", the defrosted
food must be consumed
quickly or cooked
immediately and then re-
frozen (after cooling).
5.3 Opening and closing the lid
CAUTION!
Never pull the handle with
immense force.
As the lid is equipped with a tightly
closing seal, it is not easy to reopen it
shortly after closing (due to the vacuum
formed inside). Wait for few minutes
before reopening the appliance.
5.4 Low frost system
The appliance is equipped with Low frost
system (you can see a valve inside the
freezer in the backside) what reduces
ice-build-up in the chest freezer by up to
80 percent.
5.5 Storage baskets
Hang the baskets on the upper edge of
the freezer (A) or place them inside the
freezer (B). Turn and fix the handles for
these two positions as shown in the
picture.
A B
The following pictures show how many
baskets can be placed inside the various
freezer models.
The baskets will slide into each other.
230
806606 946 1061
1201 1336 1611
You can purchase additional baskets
from your local Service Centre.
1)
Refer to "Technical data"
ENGLISH 21

6. HINTS AND TIPS
WARNING!
Refer to Safety chapters.
6.1 Hints for freezing
To help you make the most of the
freezing process, here are some hints:
• The maximum quantity of food which
can be frozen in 24 hours is shown on
the rating plate.
• The freezing process takes 24 hours.
No further food to be frozen should be
added during this period.
• Freeze only top quality, fresh and
thoroughly cleaned foodstuffs.
• Prepare food in small portions to
enable it to be rapidly and completely
frozen and to make it possible
subsequently to thaw only the quantity
required.
• Wrap up the food in aluminium foil or
polythene and make sure that the
packages are airtight.
• Do not allow fresh, unfrozen food to
touch food which is already frozen,
thus avoiding a rise in temperature of
the latter.
• Lean foods store better and longer
than fatty ones; salt reduces the
storage life of food.
• Water ices, if consumed immediately
after removal from the freezer
compartment, can possibly cause the
skin to be freeze burnt.
• It is advisable to show the freezing in
date on each individual pack to
enable you to keep tab of the storage
time.
6.2 Hints for storage of frozen
food
To obtain the best performance from this
appliance, you should:
• make sure that the commercially
frozen foodstuffs were adequately
stored by the retailer;
• be sure that frozen foodstuffs are
transferred from the store to the
freezer in the shortest possible time;
• not open the lid frequently or leave it
open longer than absolutely
necessary.
• Once defrosted, food deteriorates
rapidly and cannot be refrozen.
• Do not exceed the storage period
indicated by the food manufacturer.
7. CARE AND CLEANING
WARNING!
Refer to Safety chapters.
7.1 Periodic cleaning
CAUTION!
Unplug the appliance before
carrying out any
maintenance operation.
Do not use detergents,
abrasive products, highly
perfumed cleaning products
or wax polishes to clean the
inner side of the appliance.
Prevent damage to the
cooling system.
There is no need to clean
the compressor area.
1. Switch off the appliance.
2. Regularly clean the appliance and
the accessories with warm water and
neutral soap.
Clean the lid seal carefully.
3. Fully dry the appliance.
4. Connect the mains plug to the mains
socket.
5. Switch on the appliance.
www.electrolux.com22

7.2 Defrosting the freezer
CAUTION!
Never use sharp metal tools
to scrape off frost as you
could damage the appliance.
Do not use a mechanical
device or any artificial
means to speed up the
thawing process other than
those recommended by the
manufacturer. A temperature
rise of the frozen food packs,
during defrosting, may
shorten their safe storage
life.
Defrost the freezer when the frost layer
reaches a thickness of about 10-15 mm.
The amount of frost on the walls of the
appliance will be increased by the high
level of the outer environment humidity
and if the frozen food is not wrapped
properly.
The best time to defrost the freezer when
it contains no or only a little food.
1. Switch off the appliance.
2. Remove any stored food, wrap it in
several layers of newspaper and put
it in a cool place.
3. Leave the lid open , remove the plug
from the defrost water drain and
collect all defrost water on a tray.
Use a scraper to remove ice quickly.
4. When defrosting is completed, dry
the interior thoroughly and refit the
plug.
5. Switch on the appliance.
6. Set the temperature regulator to
obtain the maximum coldness and
run the appliance for two or three
hours using this setting.
7. Reload the previously removed food
into the compartment.
7.3 Periods of non-operation
When the appliance is not in use for long
periods, take the following precautions:
1. Switch off the appliance and
disconnect the appliance from
electricity supply.
2. Remove all food
3. Defrost and clean the appliance and
all accessories.
4. Leave the lid open to prevent
unpleasant smells.
If the cabinet will be kept on,
ask somebody to check it
once in a while to prevent
the food inside from spoiling
in case of a power failure.
8. TROUBLESHOOTING
WARNING!
Refer to Safety chapters.
8.1 What to do if...
Problem Possible cause Solution
The appliance does not
operate.
The appliance is switched
off.
Switch on the appliance.
The mains plug is not con‐
nected to the mains socket
correctly.
Connect the mains plug to
the mains socket correctly.
There is no voltage in the
mains socket.
Connect to a different elec‐
trical mains socket. Con‐
tact a qualified electrician.
ENGLISH 23

Problem Possible cause Solution
The appliance is noisy. The appliance is not sup‐
ported properly.
Check if the appliance
stands stable.
Audible or visual alarm is
on.
The cabinet has been re‐
cently switched on or the
temperature in the appli‐
ance is too high.
Refer to "High Tempera‐
ture Alarm" and if the prob‐
lem still occurs contact the
nearest Authorized Service
Centre.
Power indicator light is
flashing.
An error has occurred in
measuring the temperature
or the appliance is not
working properly.
Contact the nearest Au‐
thorized Service Centre.
The lid doesn't close com‐
pletely.
Food packages are block‐
ing the lid.
Arrange the packages in
the right way, see the stick‐
er in the appliance.
There is excessive frost. Eliminate excess frost.
The lid is difficult to open. The lid gaskets are dirty or
sticky.
Clean the lid gaskets.
The lamp does not work. The lamp is defective. Refer to "Replacing the
lamp".
The compressor operates
continually.
Temperature is set incor‐
rectly.
Refer to "Operation" chap‐
ter.
Large quantities of food to
be frozen were put in at
the same time.
Wait some hours and then
check the temperature
again.
The room temperature is
too high.
Refer to climate class chart
on the rating plate.
Food placed in the appli‐
ance was too warm.
Allow food to cool to room
temperature before storing.
The lid is not closed prop‐
erly.
Check if the lid closes well
and the gaskets are un‐
damaged and clean.
There is too much frost
and ice.
The lid is not closed cor‐
rectly or the gasket is de‐
formed/dirty.
Refer to "Opening and
closing the lid".
The water drainage plug is
not correctly positioned.
Position the water drain‐
age plug in the correct
way.
Temperature is set incor‐
rectly.
Refer to "Operation" chap‐
ter.
The temperature in the ap‐
pliance is too low/too high.
The temperature regulator
is not set correctly.
Set a higher/lower temper‐
ature.
www.electrolux.com24

Problem Possible cause Solution
The lid is not closed cor‐
rectly.
Refer to "Opening and
closing the lid".
The products' temperature
is too high.
Let the product tempera‐
ture decrease to room tem‐
perature before storage.
Many products are stored
at the same time.
Store less products at the
same time.
The thickness of the frost
is greater than 4-5 mm.
Defrost the appliance.
The lid has been opened
often.
Open the lid only if neces‐
sary.
Products to be frozen are
placed too closely to each
other.
Make sure that there is
cold air circulation in the
appliance.
8.2 Customer Service
If your appliance is still not working
properly after making the above checks,
contact the nearest Authorised Service
Centre.
To obtain fast service, it is essential that
when you apply for it you specify the
model and serial number of your
appliance which can be found either on
the guarantee certificate or on the rating
plate located on the external right side of
the appliance.
8.3 Replacing the lamp
WARNING!
Do not remove the lamp
cover at the time of
replacement. Do not operate
the freezer if the lamp cover
is damaged or missing.
1. Disconnect the mains plug from the
mains socket.
2. Replace the used lamp with a new
lamp of the same power and
specifically designed for household
appliances (the maximum power is
shown on the lamp cover).
3. Connect the mains plug to the mains
socket.
4. Open the lid. Make sure that the
lamp comes on.
9. INSTALLATION
WARNING!
Refer to Safety chapters.
ENGLISH 25

9.1 Positioning
CAUTION!
If you are discarding an old
appliance that has a lock or
catch on the lid, you must
ensure that it is made
unusable to prevent young
children being trapped
inside.
This appliance can be installed in a dry,
well ventilated indoor where the ambient
temperature corresponds to the climate
class indicated on the rating plate of the
appliance:
Climate
class
Ambient temperature
SN +10°C to + 32°C
N +16°C to + 32°C
ST +16°C to + 38°C
T +16°C to + 43°C
Some functional problems
might occur for some types
of models when operating
outside of that range. The
correct operation can only
be guaranteed within the
specified temperature range.
If you have any doubts
regarding where to install the
appliance, please turn to the
vendor, to our customer
service or to the nearest
Service Centre
The appliance shall have the
plug accessible after
installation.
9.2 Electrical connection
• Before plugging in, ensure that the
voltage and frequency shown on the
rating plate correspond to your
domestic power supply.
• The appliance must be earthed. The
power supply cable plug is provided
with a contact for this purpose. If the
domestic power supply socket is not
earthed, connect the appliance to a
separate earth in compliance with
current regulations, consulting a
qualified electrician.
• The manufacturer declines all
responsibility if the above safety
precautions are not observed.
• This appliance complies with the
E.E.C. Directives.
9.3 Ventilation requirements
The airflow behind the appliance must be
sufficient.
1. Put the freezer in horizontal position
on a firm surface. The cabinet must
be on all four feet.
2. Make sure that the clearance
between the appliance and rear wall
is 5 cm.
3. Make sure that the clearance
between the appliance and the sides
is 5 cm.
10. NOISES
There are some sounds during normal running (compressor, refrigerant circulation).
www.electrolux.com26

BRRR!
HISSS!
CLICK!
BLUBB!
CRACK!
SSSRR
R!
OK
CLICK!
CLICK!
SSSRRR!
SSSRRR!
BRRR!
BRRR!
HISSS!
HISSS!
BLUBB!
BLUBB!
CRACK!CRACK!
ENGLISH 27

11. TECHNICAL INFORMATION
11.1 Technical data
Height mm 876
Width mm 806
Depth mm 665
Rising time Hours 28
Voltage Volts 230 - 240
Frequency Hz 50
The technical information are situated in
the rating plate on the external side of
the appliance and in the energy label.
12. ENVIRONMENT CONCERNS
Recycle the materials with the symbol
. Put the packaging in applicable
containers to recycle it. Help protect the
environment and human health and to
recycle waste of electrical and electronic
appliances. Do not dispose appliances
marked with the symbol with the
household waste. Return the product to
your local recycling facility or contact
your municipal office.
*
www.electrolux.com28

ENGLISH 29

www.electrolux.com30

ENGLISH 31

www.electrolux.com/shop
804181210-A-312015
-
 1
1
-
 2
2
-
 3
3
-
 4
4
-
 5
5
-
 6
6
-
 7
7
-
 8
8
-
 9
9
-
 10
10
-
 11
11
-
 12
12
-
 13
13
-
 14
14
-
 15
15
-
 16
16
-
 17
17
-
 18
18
-
 19
19
-
 20
20
-
 21
21
-
 22
22
-
 23
23
-
 24
24
-
 25
25
-
 26
26
-
 27
27
-
 28
28
-
 29
29
-
 30
30
-
 31
31
-
 32
32


Electrolux EC2230AOW1 Handleiding
- Categorie
- Diepvriezers
- Type
- Handleiding
in andere talen
- English: Electrolux EC2230AOW1 User manual
Gerelateerde artikelen
-
Electrolux EC4230AOW2 Handleiding
-
Electrolux EC3230AOW2 Handleiding
-
-
-
-
-
-
-
-