
75518_V2_05/07/2019
FR
EN
DE
ES
2-11 / 55-56
5-6 / 12-18 / 55-56
5-6 / 19-25 / 55-56
5-6 / 26-32 / 55-56
DIAG-STARTIUM 60-12
DIAG-STARTIUM 60-24
www.gys.fr
RU
5-6 / 33-40 / 55-56
NL
5-6 / 41-47 / 55-56
IT
5-6 / 48-54 / 55-56

2
DIAG-STARTIUM 60-12 / 60-24
FR
Notice originale
2
INSTRUCTIONS DE SÉCURITÉ
Ce manuel d’utilisation comprend des indications sur le
fonctionnement de l’appareil et les précautions à suivre pour la
sécurité de l’utilisateur. Merci de le lire attentivement avant la première
utilisation et de le conserver soigneusement pour toute relecture
future. Ces instructions doivent être lues et bien comprises avant
toute opération. Toute modification ou maintenance non indiquée
dans le manuel ne doit pas être entreprise. Tout dommage corporel
ou matériel dû à une utilisation non-conforme aux instructions de ce
manuel ne pourra être retenu à la charge du fabricant. En cas de
problème ou d’incertitude, veuiller consulter une personne qualifiée
pour manier correctement l’appareil. Cet appareil doit être utilisé
uniquement pour faire de la recharge et/ou du démarrage et/
ou de l’alimentation dans les limites indiquées sur l’appareil et le
manuel. Il faut respecter les instructions relatives à la sécurité. En cas
d’utilisation inadéquate ou dangereuse, le fabricant ne pourra être
tenu responsable.
Appareil destiné à un usage à l’intérieur. Il ne doit pas être exposé
à la pluie.
Cet appareil peut être utilisé par des enfants âgés d’au moins 8 ans
et par des personnes ayant des capacités physiques, sensorielles
ou mentales réduites ou dénuées d’expérience ou de connaissance,
s’ils (si elles) sont correctement surveillé(e)s ou si des instructions
relatives à l’utilisation de l’appareil en toute sécurité leur ont été
données et si les risques encourus ont été appréhendés. Les enfants
ne doivent pas jouer avec l’appareil. Le nettoyage et l’entretien
par l’usager ne doivent pas être effectués par des enfants sans
surveillance.
A n’utiliser en aucun cas pour charger des piles ou des batteries
non-rechargeables.
Ne pas utiliser l’appareil, si le cordon d’alimentation ou la fiche de
secteur sont endommagés.
Ne jamais charger une batterie gelée ou endommagée.
Ne pas couvrir l’appareil.
Ne pas placer l’appareil à proximité d’une source de chaleur et à
des températures durablement élevées (supérieures à 50°C).
Ne pas obstruer les ouvertures de ventilation. Se référer à la partie
installation avant d’utiliser l’appareil.
Le mode de fonctionnement automatique ainsi que les restrictions
applicables à l’utilisation sont expliqués ci-après dans ce mode
d’emploi.
Risque d’explosion et d’incendie!
Une batterie en charge peut émettre des gaz explosif.
• Pendant la charge, la batterie doit être placée dans un
emplacement bien aéré.

3
DIAG-STARTIUM 60-12 / 60-24
FR
Notice originale
3
• Eviter les flammes et les étincelles. Ne pas fumer.
• Protéger les surfaces de contacts électriques de la batterie à
l’encontre des courts-circuits.
Risque de projection d’acide !
• Porter des lunettes et des gants de protection.
• En cas de contact avec les yeux ou la peau, rincer immédiatement
à l’eau et consulter un médecin sans tarder.
Connexion / déconnexion
• Déconnecter l’alimentation avant de brancher ou de débrancher
les connexions sur la batterie.
• La borne de la batterie non reliée au châssis doit être connectée la
première. L’autre connexion doit être effectuée sur le châssis loin
de la batterie et de la canalisation de combustible. Le chargeur
de batterie doit alors être raccordé au réseau.
• Après l’opération de charge, débrancher le chargeur de batterie
du réseau puis retirer la connexion du châssis et enfin la connexion
de la batterie, dans l’ordre indiqué.
Raccordement :
• Cet appareil doit être raccordé à un socle de prise de courant
relié à la terre.
Class A
• Ce matériel destiné aux environnements industriels (classe A) n’est
pas prévu pour être utilisé dans un site résidentiel où le courant
électrique est fourni par le réseau public d’alimentation basse
tension. Il peut y avoir des difficultés potentielles pour assurer
la compatibilité électromagnétique dans ces sites, à cause des
perturbations conduites, aussi bien que rayonnées à fréquence
radioélectrique.
• Ce matériel n’est pas conforme à la CEI 61000-3-12 et est des-
tiné à être raccordé à des réseaux basse tension privés connectés
au réseau public d’alimentation seulement au niveau moyenne et
haute tension. S’il est connecté à un réseau public d’alimentation
basse tension, il est de la responsabilité de l’installateur ou de
l’utilisateur du matériel de s’assurer, en consultant l’opérateur du
réseau de distribution, que le matériel peut être connecté.
Entretien :
• Si le câble d’alimentation est endommagé, il doit être remplacé
par le fabricant, son service après-vente ou des personnes de
qualification similaire afin d’éviter un danger
• L’entretien doit être effectué que par une personne qualifiée.

4
DIAG-STARTIUM 60-12 / 60-24
FR
Notice originale
• Avertissement ! Débrancher toujours la fiche de la prise secteur
avant d’effectuer des travaux sur l’appareil.
• Régulièrement, enlever le capot et dépoussiérer à la soufflette.
En profiter pour faire vérifier la tenue des connexions électriques
avec un outil isolé par un personnel qualifié.
• N’utiliser en aucun cas des solvants ou autres produits nettoyants
agressifs
• Nettoyer les surfaces de l’appareil à l’aide d’un chiffon sec.
Réglementation :
• Appareil conforme aux directives européennes.
• La déclaration de conformité est disponible sur notre site internet.
• Marque de conformité EAC (Communauté économique
Eurasienne).
Mise au rebut :
Ce matériel fait l’objet d’une collecte sélective. Ne pas jeter dans
une poubelle domestique.

5
DIAG-STARTIUM 60-12 / 60-24
INTERFACE DU PRODUIT / PRODUCT INTERFACE / VORDERSEITE DES GERÄTES / INTERFAZ DEL PRO-
DUCTO / ИНТЕРФЕЙС АППАРАТА / OMSCHRIJVING / INTERFACCIA DEL PRODOTTO
1112 10
9
8
3
4
5
6
7
2
1
1112
13
10
9
8
3
4
5
6
7
2
1

6
DIAG-STARTIUM 60-12 / 60-24
FR EN DE ES RU NL IT
1
Boutons de réglages
des valeurs pour les
modes DIAG + et
TIMER
Value adjustment
keys in DIAG + and
TIMER modes
Tasten zur
Einstellung der
Spannung für die
DIAG + und TIMER
Funktionen
Botones de ajuste
de valores para los
modos DIAG+ y
TIMER
Кнопки
регулировки
величин для
режимов DIAG + et
TIMER.
Instellen waarde in
DIAG + en TIMER
programma’s
Pulsante di
regolazione dei
valori per i modi
DIAG + e TIMER
2 Afcheur Screen Anzeige Marcador Индикатор Display Schermo
3 Afchage en Minute Minute display Anzeige in Minuten
Indicación en
minutos
Индикация в
минутах
Display in minuten
Visualizzazione in
Minuti
4 Afchage en Volt Volt display Anzeige in Volt
Indicación en
voltios
Индикация в
Вольтах
Display in Volts
Visualizzazione
in Volt
5
Afchage en
Pourcentage
Percentage display Anzeige in Prozent
Indicación en
porcentaje
Индикация в
Процентах
Display in
procenten
Visualizzazione in
Percentuale
6
LED signalant une
erreur
Error LED Fehler-LED
LED que indica un
error
Светодиод,
указывающий
ошибку
Fout/Error LED
LED di
segnalazione
errore
7
LED signalant que la
sélection est active
(Les pinces sont
sous tension)
LED showing the
charging speed has
been selected
LED signalisiert,
dass die Auswahl
aktiv ist (die
Klemmen sind unter
Spannung)
LED que indica
que la selección
está activa (las
pinzas están bajo
tensión)
Светодиод,
указывающий, что
выбор активирован
(зажимы под
напряжением)
LED welke
indiceert dat de
laadcapaciteit is
geselecteerd.
LED di
segnalazione che la
selezione è attiva
(I morsetti sono
sotto tensione)
8
Bouton de mise en
route de la sélection
Key to start the
selected mode
Taste zur
Aktivierung der
Auswahl
Botón de puesta
en marcha de la
selección
Кнопка запуска
выбора.
inschakelen
geselecteerde
programma
Pulsante di
selezione
9
Bouton de mise
en route du mode
START
START ENGINE key
Taste zur
Aktivierung des
Startmodus
Botón de puesta
en marcha en
modo START
Кнопка запуска
режима START.
START MOTOR
toets
Pulsante di avvio
modo START
10
LED mode de
sélection
Mode selection LED
LED die die
Möglichkeit der
Einstellung anzeigt
LED modo de
selección
Светодиод
выбранного
режима.
Programma
selectie LED
LED modo di
selezione
11
Bouton de sélection
du type de batterie
ou des différentes
fonctions
Battery type or
function selection
key
Taste zur
Einstellung des
Batterietyps und
der verschiedenen
Funktionen
Botón de selección
del tipo de batería
o de las diferentes
funciones
Кнопка выбора
типа батареи
или различных
функций.
Batterij type of
funktie selectie
toets
Pulsante selezione
tipo di batteria o
differenti funzioni
12
Bouton de sélection
de l’allure de charge
Charging speed
selection key
Taste zur
Einstellung der
Ladestärke
Botón de selección
de velocidad de
carga
Кнопка выбора
скорости зарядки.
Laadsnelheid toets
Pulsante selezione
dell’andamento di
carica
13
Bouton de sélection
de tension de la
batterie
Battery voltage
selection key
Taste zur
Einstellung der
Batteriespannung
Botón de selección
de tensión de la
batería
Кнопка выбора
напряжения
батареи.
Batterij spanning
toets
Pulsante di
selezione tensione
della batteria
• Remarque : L’afcheur n’est pas un outil de mesure, il ne donne qu’une indication sur la tension. L’étalonnage n’est pas possible.
• The screen is not a measuring tool it only gives an approximated voltage. Calibration is not possible.
• Bemerkung: Die Anzeige ist kein Messgerät, sie gibt nur einen Hinweis über die Spannung. Die Kalibrierung ist nicht möglich.
• Nota: el marcador no es una herramienta de medida, solo indica sobre la tensión La calibración no es posible.
• Примечание: Индикатор не является инструментом измерения, он дает лишь информацию по напряжению. Калибровка не возможна.
• Het scherm geeft een indicatie aan in voltage. Het is geen meetgereedschap. Calibratie is niet mogelijk.
• Attenzione : Lo schermo non è un utensile di misuarazione, dà solo un’indicazione sulla tensione. La calibratura non è possibile.

7
DIAG-STARTIUM 60-12 / 60-24
FR
Notice originale
DESCRIPTION GÉNÉRALE
Les appareils DIAG-STARTIUM sont destinés à la recharge et au démarrage des batteries au plomb à l’électrolyte
(liquide, AGM ou gélié) 12V (6 éléments) pour le modèle 60-12 et 6V (3 éléments), 12V (6 éléments) et 24V (12
éléments) pour le modèle 60-24 :
Montage de la poignée et des roues :
ALIMENTATION ÉLECTRIQUE
Vérier que l’alimentation et ses protections (fusibles) sont compatibles avec le courant nécessaire
en utilisation. L’appareil doit être placé de façon telle que la che de prise de courant soit accessible.
Il doit être relié à une prise de courant AVEC terre et selon les recommandations suivantes :
DIAG-STARTIUM 60-12 DIAG-STARTIUM 60-24
Tension secteur 230V - 1 ph 230V - 1 ph
Protection 16 A 16 A
Puissance de
charge
2000 W 2000 W
démarrage
10 000 W 10 000 W
La section de câble recommandée en cas de rallonge : 3 x 2,5 mm².
RACCORDEMENT ET DÉBRANCHEMENT
• Avant tout raccordement à une batterie, vérier que
l’appareil n’est pas connecté au réseau d’alimentation et
que le bouton marche/arrêt est sur OFF.
• Localiser les 2 pôles + et - de la batterie. (Une inversion de
polarité peut endommager le fusible).
• Éloigner les câbles de toutes surfaces chauffantes ou
coupantes. Bien séparer les 2 câbles et éviter qu’ils soient
pincés.
Une fois le connecteur branché sur «12V» ou «24V», une LED s’allume sur l’interface pour bien conrmer l’entrée
choisie. Si la tension choisie ne correspond pas à la tension de la batterie, la charge ne pourra pas commencer.
Diag-Startium 60-12 Diag-Startium 60-24

8
DIAG-STARTIUM 60-12 / 60-24
FR
Notice originale
Démarrage et charge d’une batterie installée sur le véhicule :
Dans le cas où le pôle négatif de la batterie est branché sur le châssis :
1.
Brancher la pince rouge sur le pôle + de la batterie.
2. Brancher la pince noire sur le châssis du véhicule, de façon à ce qu’elle soit éloignée des canalisations de
combustible (carburant, huile) et de la batterie.
3.
Brancher l’appareil au réseau d’alimentation.
4. Choisir le mode d’utilisation, l’allure de charge et mettre le DIAG-STARTIUM en marche.
5. Après utilisation, mettre le bouton marche/arrêt sur OFF, débrancher le chargeur du réseau d’alimentation
puis retirer d’abord la pince noire et enn la pince rouge.
Certains véhicules ont le pôle positif de la batterie branché sur le châssis, dans ce cas :
1.
Brancher la pince noire sur le pôle négatif de la batterie.
2. Brancher la pince rouge sur le châssis du véhicule, de façon à ce qu’elle soit éloignée des canalisations de
combustible et de la batterie.
3.
Brancher l’appareil au réseau d’alimentation.
4.
Choisir le mode d’utilisation, l’allure de charge et mettre le DIAG-STARTIUM en marche.
5. Après utilisation, mettre le bouton marche/arrêt sur OFF, débrancher le chargeur du réseau d’alimentation
puis retirer d’abord la pince rouge et enn la pince noire.
Charge d’une batterie non-connectée au véhicule :
1. Brancher la pince rouge sur le pôle positif de la batterie et la pince noire sur le pôle négatif de la batterie.
2.
Brancher l’appareil au réseau d’alimentation.
3.
Choisir le mode d’utilisation, l’allure de charge et mettre le DIAG-STARTIUM en marche.
4. Après utilisation, mettre le bouton marche/arrêt sur OFF, débrancher le chargeur du réseau d’alimentation
puis retirer d’abord la pince rouge et enn la pince noire.
UTILISATION EN MODE CHARGEUR (CF. INTERFACE)
DIAG-STARTIUM 60-12 DIAG-STARTIUM 60-24
Capacité
de charge
6V - 20 - 900 Ah
12V 20 - 900 Ah 20 - 900 Ah
24V - 20 - 525 Ah
Précautions préalables
• Choisir un local abrité et sufsamment aéré ou spécialement aménagé.
• Enlever les bouchons de la batterie (si celle-ci en est munie) et s’assurer que le niveau de liquide (électrolyte) est
sufsant. Dans le cas contraire ajouter de l’eau déminéralisée et nettoyer soigneusement les bornes et cosses de la
batterie.
• Vérier que la capacité de la batterie en Ampère-heure et la tension en Volt sont compatibles avec votre chargeur.
Test de la batterie
Avant d’effectuer une charge, il est possible de tester l’état de la batterie. Brancher le connecteur de la pince rouge sur
«12» ou «24V» en respectant la tension indiquée sur la batterie. L’afcheur indique alors l’état de santé de la batterie.
Il alterne entre la tension réelle et le pourcentage de charge. Une batterie 6V est à 100% de ses capacités si sa tension
est supérieure à 6,4V. Elle est à 0% si sa tension est inférieure à 5,9V. Une batterie 12V est à 100% de ses capacités si
sa tension est supérieure à 12,8V. Elle est à 0% si sa tension est inférieure à 11,8V. Pour le 24V, la batterie est à 100%
de ses capacités si sa tension est supérieure à 25,6V. Elle est à 0% si sa tension est inférieure à 23,6V.
Charge (cf. interface, p.5)
Une fois le chargeur connecté sur la batterie en suivant les recommandations (voir chap. raccordement et débranchement),
brancher le connecteur de la pince rouge sur la tension : «12V» ou «24V». Choisir l’allure de charge (p.5, n°12) en
respectant la capacité de la batterie (voir tableau ci-après), choisir le type de batterie (n°11) puis presser (appui court)
sur le bouton START/STOP (n°8). Pour arrêter la charge à tout moment, appuyer de nouveau sur le bouton START/STOP.
Risque d’explosion ou de projection d’acide en cas d’une mauvaise sélection de la tension
(24V pour une batterie de 12V).

9
DIAG-STARTIUM 60-12 / 60-24
FR
Notice originale
DIAG-STARTIUM 60-12 DIAG-STARTIUM 60-24
12V 6V 12V 24V
Charge 1 20-75Ah(5A) 20-75Ah(5A) 20-75Ah(5A) 20-75Ah(5A)
Charge 2 60-225Ah(15A) 60-225Ah(15A) 60-225Ah(15A) 40-150Ah(10A)
Charge 3 130-450Ah(30A) 130-450Ah(30A) 130-450Ah(30A) 85-300Ah(20A)
Charge 4 225-900Ah(60A) 225-900Ah(60A) 225-900Ah(60A) 150-525Ah(35A)
Trois témoins permettent d’indiquer que la batterie est en charge :
- La LED de charge (n°7).
- L’afcheur : Il indique par alternance la tension et le pourcentage de charge (une évolution des deux valeurs doit être
constatée).
- Les LED d’afchage tension et pourcentage (n°4 et 5). Elles s’éclairent en continu et alternent au même rythme que
l’afcheur.
Remarque : la charge ne débutera que si la tension de la batterie est supérieure ou égale à 1V. L’avancement de la
charge est exprimé en %. 0% = récupération de la batterie et 100% = batterie chargée.
% Niveau de charge batterie Phase
0% Récupération de la batterie Phase de test
25% Début de charge
Boost
50% 50% de charge
75% Charge des % restant Absorption
100% Batterie chargée Floating
Redémarrage automatique (fonction utilisable uniquement pour la charge)
En cas de coupure d’alimentation :
- Lors d’une charge normale, le DIAG-STARTIUM s’éteint. Lorsqu’il se rallume il ne relance pas la charge. Il faut alors
la relancer manuellement.
- Lors d’une charge avec la fonction «Redémarrage automatique» , le DIAG-STARTIUM s’éteint. Lorsqu’il se rallume il
relance automatiquement la charge.
Pour utiliser le mode «Redémarrage automatique» :
- Connecter le chargeur en suivant les recommandations,
- Choisir l’allure de charge et le type de batterie en respectant les caractéristiques de cette dernière,
- Puis effectuer un appui long (> 5 secondes) sur le bouton START/STOP.
Un témoin permet de vérier que la charge est bien en mode «Redémarrage automatique» :
- Les LED d’afchage tension et pourcentage (n°4 et 5). Elles ne s’éclairent plus en continu comme lors d’une charge
normale mais clignotent.
Dans ce mode, pour arrêter la charge appuyer sur le bouton (8).
Une coupure d’alimentation ne coupera plus la charge.
Fonction DIAG+ (en 12V seulement)
Ce mode permet au DIAG-STARTIUM de compenser le courant utilisé, par un véhicule à l’arrêt (jusqu’à 60A), pour tester
les gros consommateurs (ventilation moteur, lève-vitre, suspension électriques etc.) en délivrant une tension stabilisée.
Cette tension est réglable de 12V à 15V par pas de 0,1 grâce aux boutons (1).
Fonction UNIVERSAL
Dans le cas où le type de batterie (liquide, Gel, AGM, Start/Stop) n’est pas connu, sélectionner UNIVERSAL par défaut.
Fonction TIMER
La fonction TIMER (n°11) permet de choisir un temps de charge réglable de 10 à 120 min par pas de 10min et permet
de démarrer la charge sous 1V et sans batterie.
La charge de cette fonction TIMER est manuelle. Elle entraîne les différences suivantes :
• Quelque soit l’état de santé de la batterie (batterie sulphatée ou court-circuitée, tension < 1V), la charge sera toujours
lancée.
• La charge démarre même si le raccordement n’est pas bien effectué : pinces déconnectées ou en court-circuit. Il y a
donc un risque d’étincelles si les recommandations de raccordement ne sont pas respectées.

10
DIAG-STARTIUM 60-12 / 60-24
FR
Notice originale
Deux témoins permettent de vérier que la charge a bien été lancée :
- L’afcheur (n°2). Il indique par alternance la tension de la batterie en volts et le temps restant en minutes.
- Les LED d’afchage tension et minutes (n°3 et 4). Elles s’éclairent en continu et alternent au même rythme que
l’afcheur.
La charge s’arrête de plusieurs manières :
- Au bout du temps qui a été choisi.
- Lors d’une coupure d’alimentation
- En appuyant sur le bouton (8).
Charge de plusieurs batteries simultanément
Il est possible de charger plusieurs batteries simultanément en les connectant en parallèle. Les bornes positives reliées
à la pince rouge et les bornes négatives reliées à la pince noire. Ces batteries ou regroupement de batteries doivent
être de même tension 12 ou 24V.
La charge en série n’est pas recommandée.
UTILISATION EN MODE DÉMARREUR (INTERFACE, P.5)
Précautions préalables
• Ne pas déconnecter la batterie du véhicule. Le branchement de la batterie peut entraîner la perte d’information et une
éventuelle impossibilité de redémarrage.
Démarrage
Une fois que vous avez connecté le démarreur sur la batterie en suivant les recommandations (voir raccordement et
débranchement), il faut appuyer sur le bouton 9 pour choisir le mode «START ENGINE», une précharge se met en
route. L’appui sur n’importe quel bouton provoque l’arrêt de ce mode.
• Le mode «START ENGINE» détecte les batteries sulfatées et refuse dans ce cas le démarrage.
L’appareil lance une désulfatation automatique avant tout démarrage an de protéger l’électronique
embarquée.
• Si la batterie est trop abimée (sulfatée par exemple), le chargeur bloque le démarrage. Dans ce cas,
le DIAG-STARTIUM indique par intermittence « CIP » (Charge in Progress) et 0%. Cela signie que la
récupération de la batterie est en cours. Tant que l’abréviation «CIP» apparaît sur l’écran, il n’est pas
possible de démarrer le véhicule.
DIAG-STARTIUM 60-12 50 - 220 Ah / 160 Ah Instantané précharge 5 min.
DIAG-STARTIUM 60-24 6-12-24V : 50 - 220 Ah / 160 Ah Instantané précharge 5 min. minimum
Bien respecter le temps de précharge conseillé en fonction de la capacité de la batterie.
Une fois la précharge effectuée, se rendre au poste de contrôle du véhicule. La fonction «démarreur» s’active au
moment où la première tentative de démarrage commence (en tournant la clé). La durée de la tentative doit être de
10 sec maximum (un décompte apparaît sur l’afcheur).
Si votre moteur ne démarre pas, attendre 2 minutes entre chaque tentative de démarrage.
Nb : Si le véhicule ne démarre pas, il peut avoir un problème autre qu’une batterie en mauvais état : alternateur, bougie
de préchauffage…
Après utilisation, suivre les recommandations de débranchement (p.6-7).
TEST DE L’ALTERNATEUR
Si la batterie du véhicule est régulièrement en panne, le problème peut provenir de l’alternateur.
Les DIAG-STARTIUM disposent d’une fonction «test de l’alternateur» (p5, n°11). Elle permet d’afcher la capacité de
charge de l’alternateur en indiquant par intermittance la tension et le pourcentage.
Pour utiliser cette fonction le véhicule doit être en marche. Suivre les recommandations de branchement (p.7),
et choisir la fonction «Test de l’alternateur» sur l’interface.
Le pourcentage indiqué renseigne sur l’état de santé de l’alternateur :
Défaut de surcharge. Défaut de sous charge, la batterie n’est pas correctement rechargée.
A 100% Alternateur correct.
Entre 100% et 200% Défaut de surcharge.

11
FR
DIAG-STARTIUM 60-12 / 60-24
Notice originale
PROTECTIONS
Ces appareils ont été conçus avec un maximum de protections :
• Les pinces de charge sont entièrement isolées.
• Un fusible assure la protection contre l’inversion de polarité et les courts-circuits. Le remplacement demande une
intervention manuelle.
DIAG-STARTIUM 60-12/60-24
• La protection thermique est assurée par un thermostat (refroidissement environ 1/4h). Le voyant de défaut s’allume
en cas de surchauffe, l’afcheur indique «th».
• En cas de défaut de l’appareil, une protection thermique supplémentaire coupe l’alimentation du générateur sans
indication pour l’utilisateur. Mettre l’appareil dans un local aéré et attendre 15 minutes.
• En cas de défaut secteur, l’appareil se met en protection, seule la LED de défaut s’allume et l’afcheur indique «dEF».
Si le défaut est trop important un fusible interne protège le poste. Ce fusible doit être remplacé par un technicien SAV.
ANOMALIES, CAUSES, REMÈDE
Anomalies Causes Remèdes
La LED error s’allume Problème d’alimentation secteur. Vérier votre alimentation secteur.
La LED error s’allume et le Buzzer sonne
Pinces en court-circuit ou inversion de polarité.
Vérier si les fusibles ne sont pas fondu.
Ne pas mettre les pinces en court-circuit.
Inverser les polarités.
La batterie que vous souhaitez charger est
défaillante.
Contrôler à l’aide d’un voltmètre la tension
à ses bornes. Si cette tension monte
instantanément à plus de 2,5V par élément la
batterie peut être sulfatée ou endommagée.
Erreur tension (12 -24 V)
Vérier que la batterie est bien connectée en
12 ou 24V.
Batterie non présente ou <1V. Afchage : «BAt
HS»
Brancher une batterie.
Sélectionner TIMER si la batterie à une tension
<1V.
Suite à une utilisation intensive, votre appareil
s’est mis en coupure thermique. Afchage :
«th»
Patientez 1/4h pour laisser l’appareil refroidir.
Aucune LED ne s’allume
Défaut d’alimentation important Vérier votre alimentation.
Surchauffe du générateur, la protection
thermique «th» s’enclenche.
Aérer le local.
Le bouton marche/arrêt n’est pas enclenché. Enclencher le bouton marche/arrêt.
En mode START ENGINE, si l’afcheur indique
0%. Le démarrage est impossible.
La batterie est sulfatée, le démarrage est
empêché an de protéger l’électronique
embarquée du véhicule.
Effectuer une recharge de la batterie avant de
relancer un START ENGINE.
La batterie bouillonne.
La sélection de tension 12 ou 24V n’est pas
correcte.
Vérier la tension de votre batterie et la
brancher correctement.
La batterie a des éléments en court-circuit.
La batterie est irrécupérable, elle doit être
changée.
Étincelles aux pinces
Inversion de polarité Brancher les pinces dans le bon sens (+/+;-/-)
Mode timer actif Cf. Raccordement et débranchement
CONDITIONS DE GARANTIE
La garantie couvre tous défauts ou vices de fabrication pendant 2 ans, à compter de la date d’achat (pièces et main
d’oeuvre).
La garantie ne couvre pas :
• Toutes autres avaries dues au transport.
• L’usure normale des pièces (Ex. : câbles, pinces, etc.).
• Les incidents dus à un mauvais usage (erreur d’alimentation, chute, démontage).
• Les pannes liées à l’environnement (pollution, rouille, poussière).
En cas de panne, retourner l’appareil à votre distributeur, en y joignant :
- un justicatif d’achat daté (ticket de sortie de caisse, facture….)
- une note explicative de la panne.

12
DIAG-STARTIUM 60-12 / 60-24
EN
Translation of the original instructions
SAFETY INSTRUCTIONS
This manual includes guidelines on the operation of your device
and the precautions to follow for your own safety. Ensure it is read
carefully before first use and keep it handy for future reference.
These instructions should be read and understood before anyone
operates the product. Any modifications or maintenance that are not
specified in the manual should not be undertaken. The manufacturer
is not liable for any injury or damage due to non-compliance with
the instruction manual. In case of problems or uncertainties, please
consult a qualified person that is able to handle the device correctly.
This device should only be used for charging, start-up and power
supply within the limits indicated on the device and in the manual.
The safety instructions must be followed. In case of improper or
unsafe use, the manufacturer cannot be held responsible
Device suitable for indoor use only. Do not expose to rain or
excessive moisture.
This device may be used by children from age 8 and by persons
with reduced physical, sensory or mental capabilities or lack of
experience and knowledge, provided that they are under supervision
or have been told how to use the device safely and are aware of
the potential risks. Children must not use the device as a plaything.
Cleaning and servicing tasks may not be carried out by children
unless they are supervised.
Do not use for charging non-rechargeable batteries
Do not operate the device with a damaged power supply cord or
a damaged mains plug.
Never charge a frozen or damaged battery.
Do not cover the device
Do not place the device near a fire or subject it to heat or to longterm
temperatures exceeding 50°C.
Do not obstruct the cooling vents. Refer to the installation section
before operating the machine.
The automatic mode of operation and usage restrictions are
explained below in these operating instructions.
Risk of explosion and re!
A battery being charged can emit explosive gas.
• During the charge, the battery must be placed in a well
ventilated area.
• Avoid flames and sparks. Do not smoke.
• Protect the electrical contacts of the battery against short-circuiting.
Acid projection hazard!
•Wear safety goggles and protective gloves

13
DIAG-STARTIUM 60-12 / 60-24
EN
Translation of the original instructions
• If your eyes or skin come into contact with battery acid, rinse the
affected part of the body with plenty of water and seek immediate
medical assistance.
Connection / disconnection:
• Disconnect the power supply before connecting/disconnecting
the device to/from the battery
• The terminal of the battery that is not connected to the car frame
must be connected first. The other connection must be made on
the car frame, far from the battery and the fuel line. The battery
charger must be connected to the power supply network.
• After the charging process, disconnect the battery charger from
the power supply network and remove the connector from the
car frame and then the connector from the battery, in this order.
Connection:
• This device must be connected to an earthed power supply
Class A
• This equipment is intended for industrial environments (class A)
and not for residential sites where the electric current is supplied
by the public low-voltage power supply network. There may be
potential difficulties in ensuring electromagnetic compatibility on
these sites, because of the conducted interferences, as well as
radiated radioelectrical frequency.
• This product does not comply with IEC 61000-3-12 and is in-
tended to be connected to private low voltage networks which
are connected to public supply network only at the medium and
high voltage level. If connected to a public low-voltage supply
network, it is the responsibility of the installer or user of the equip-
ment to ensure, by consulting the operator of the electrical distri-
bution network, that the hardware can be connected.
Maintenance:
• If the power supply cable is damaged, it must be replaced by the
manufacturer, its service agent or an equally qualified person.
• Service should be performed by a qualified person.
• Warning! Always remove the power plug from the wall socket
before carrying out any work on the device.
• Regularly take off the cover and remove dust with an air gun. Take
the opportunity to have a qualified person check the electrical
connections with an insulated tool.
• Under no circumstances should solvents or other aggressive
cleaning agents be used.
• Clean the device’s surfaces with a soft, dry cloth.
Regulations
• The device complies with European Directive.
• The certificate of compliance is available on our website.

14
DIAG-STARTIUM 60-12 / 60-24
EN
Translation of the original instructions
• EAC conformity mark (Eurasian Economic Commission)
Disposal:
This product should be disposed of at an appropriate recycling
facility. Do not dispose of in domestic waste.
GENERAL DESCRIPTION
DIAG-STARTIUM products are designed for charging and starting 12V (6 elements) lead acid batteries (electrolyte, Gel
and AGM) for the model 60-12 and 6V (3 elements), 12V (6 elements) and 24V (12 elements) for the model 60-24:
Assembly - handle and wheels :
POWER SUPPLY
Check that the power and protection (fuse and / or circuit breaker) are compatible with the current required. The
appliance must be positioned so that the plug socket is accessible.
It must be connected to a grounded outlet according to the following recommendation:
DIAG-STARTIUM 60-12 DIAG-STARTIUM 60-24
Power supply 230V - 1 ph 230V - 1 ph
Protection 16 A 16 A
Charging
power
charge
2000 W 2000 W
Starting
10 000 W 10 000 W
The recommended cross-section for an extension is : 3 x 2,5 mm².
CONNECTION AND DISCONNECTION
• Before any connection to a vehicle battery, make sure
that the booster isn’t connected to the mains and that the
booster’s switch is set to OFF.
• Locate the + and - battery terminals. (polarity reversal can
damage the fuse).
• Keep the cables away from hot or sharp surfaces. Separate
the 2 cables properly and avoid pinching them.
Once the connector is plugged on «12V» or «24V», a LED switches on under the corresponding interface to conrm the
selected voltage input. If the selected voltage does not match the battery voltage, the charge cannot start.

15
DIAG-STARTIUM 60-12 / 60-24
EN
Translation of the original instructions
Diag-Startium 60-12 Diag-Startium 60-24
Start and charge a battery in-situ :
In the event that the negative terminal is plugged onto the car’s chassis :
1.
Connect the red clamp to the battery’s positive terminal.
2. Connect the black clamp to the vehicle’s chassis, make sure it is a safe distance from the battery and the
fuel/exhaust pipe.
3.
Connect the device to the mains.
4. Choose the user mode, charge speed and switch the DIAG-STARTIUM on.
5. After use, set the switch to OFF, disconnect the charger from the mains then remove the black clamp,
followed by the red clamp.
Some vehicles have the positive terminal plugged onto the car chassis, in this event :
1.
Connect the black clamp to the battery’s negative terminal.
2. Connect the red clamp to the vehicle’s chassis, make sure it is a safe distance from the battery and the
fuel/exhaust pipe.
3.
Connect the device to the mains.
4.
Choose the user mode, charge speed and switch the DIAG-STARTIUM on.
5. After use, set the switch to OFF, disconnect the charger from the mains then remove the red clamp rst
and the black clamp last.
Charging a battery when disconnected from the vehicle :
1.
Connect the red clamp to the battery’s positive terminal and the black clamp to the battery’s negative
terminal.
2.
Connect the device to the mains.
3.
Choose the user mode, charge speed and switch the DIAG-STARTIUM on.
4. After use, set the switch to OFF, disconnect the charger from the mains then remove the red clamp rst
and the black clamp last.
USE IN CHARGING MODE (SEE INTERFACE)
DIAG-STARTIUM 60-12 DIAG-STARTIUM 60-24
Charging
capacity
6V - 20 - 900 Ah
12V 20 - 900 Ah 20 - 900 Ah
24V - 20 - 525 Ah
Precautions before use
• Choose a sufciently ventilated area
• Remove the caps on the battery (if any) and make sure the water level (electrolyte) is sufcient. Otherwise add the
deionized water and carefully clean the battery terminals.
• Check that the battery capacity in ampere-hours and voltage in volts are compatible with your charger.

16
DIAG-STARTIUM 60-12 / 60-24
EN
Translation of the original instructions
Testing the battery
Before peforming a charge, it is possible to test the battery level. Connect the red clamp connector on «12V» or «24V»
depending on the voltage indicated on the battery. The display indicates the battery’s state of health. It alternates
between the actual voltage and the state of charge percentage. A 6V battery is at a 100% capacity if its voltage is
superior to 6,4V. It is at 0% if its voltage is inferior to 5,9V. A 12V battery is at a 100% capacity if its voltage is superior
to 12.8V. It is at 0% if its voltage is inferior to 11.8V. A 24V battery is at a 100% capacity if its voltage is superior to
25.6V. It is at 0% if its voltage is inferior to 23.6V.
Charge
Once the charger is connected to the battery while following the recommended procedure (see chapter. connection
and disconnection), plug the red clamp’s connector on the voltage : «12V» or «24V». Select the charge speed (p.4,
n°12) with respect to the battery capacity (see table below), choose the battery type (n°11) then briey press the
START/STOP button (n°8). To stop the charge at any time, press the START/STOP button.
Risk of explosion or acid projections if the wrong voltage is selected (24V for a 12V battery).
By default the appliance is congured to charging level «3» and battery type: «Universal».
DIAG-STARTIUM 60-12 DIAG-STARTIUM 60-24
12V 6V 12V 24V
Charge 1 20-75Ah(5A) 20-75Ah(5A) 20-75Ah(5A) 20-75Ah(5A)
Charge 2 60-225Ah(15A) 60-225Ah(15A) 60-225Ah(15A) 40-150Ah(10A)
Charge 3 130-450Ah(30A) 130-450Ah(30A) 130-450Ah(30A) 85-300Ah(20A)
Charge 4 225-900Ah(60A) 225-900Ah(60A) 225-900Ah(60A) 150-525Ah(35A)
Three indicators show that the battery is charging :
- The charge LED (n°7).
- The display : It alternates between the battery voltage and the percentage of charge (an evolution of both values
should be noticed).
- The voltage and percentage LEDs (n°4 and 5). They remain on and alternate at the same time as the display.
The charge progression is shown in percentage (%).
% Battery charge level Phase
0% Battery charge level Testing phase
25% Charge start
Boost
50% Charge at 50%
75% Charging the remaining % Absorption
100%
Charged battery Floating
Automatic restart (Can be used only when charging)
In the event of a power cut :
- During a normal charge, the DIAG-STARTIUM switches off. When it switches back on, it does not resume the
charge. It must be manually resumed.
- During a charge with the «Automatic restart» feature on, the DIAG- STARTIUM switches off. When it switches
backon, it automatically resumes the charge.
To use the «Automatic restart» mode :
- Connect the charger according to the instructions,
- Choose the charging speed and the battery type with respect to its characteristics,
- Then keep the START/STOP button pressed (> 5 seconds).
An indicator helps to check if the charge is indeed in «Automatic restart» mode :
- The voltage and percentage LEDs (n°4 and 5). They do not stay on but will blink.
In this mode, Press the (8) button to stop the charge.
A power supply cut will not stop the charge from resuming.
DIAG + function (12V only)
On a stationary vehicle the device supplies up to 60A to enable the operation and testing high-energy
consumers: engine fan, window regulator, electronic suspension, etc... By supplying a steady voltage.
This voltage can be adjusted from 12V to 15V by 0.1V steps with key 1.

17
DIAG-STARTIUM 60-12 / 60-24
EN
Translation of the original instructions
UNIVERSAL function
In the event that it is not possible to accurately determine the battery type (liquid, gel, AGM, Start/Stop) then we
recommend that the UNIVERSAL settting is selected, this is also the default setting.
TIMER function
The TIMER feature (n°11) is used to set a charging time from 10 to 120 min (by steps of 10 min) and allows to start
the charge when the battery is disconnected or below 1V.
The charge when using the TIMER feature is manual. This has the following consequences :
• Whatever is the battery health status (sulfated, short circuited, voltage < 1V), the charge will always be triggered.
• The charge starts even if the battery connection is faulty: clamps disconnected or in short circuit There is a risk of
sparks if the connection instructions are not observed.
Two indicators can help to check that the charge has started :
- The display (n°2). -It alternates between the battery voltage and the remaining time in minutes.
- The voltage and minutes LEDs (n°3 and 4). They remain on and alternate at the same time as the display.
The charge may be be stopped in several ways :
- At the end of the selected time.
- When there is a power supply cut
- By pressing the (8) button.
Charging several batteries simultaneously.
It is possible to charge several batteries simultaneously by connecting them in parallel. The positive terminals
connected to the red clamp and the negative terminals connected to the black clamp. These batteries or battery
groups must be of the same voltage, 12V or 24V.
Charging batteries in series is not recommended.
USE IN START MODE
Precautions before use
• Do not disconnect the battery fom the vehicle. Connecting the battery can lead to the vehicle’s memory loss and a
potential impossibility to restart it.
Starting
Once the starter connected to the battery (see connection and disconnection) press key 9 to select the «START
ENGINE» mode. When this function is activated a precharge will start. Pressing any key will stop this mode.
• The «START ENGINE» mode detects sulfated batteries and will thus refuse to start the vehicle. The
machine will automatically start the desulfating procedure in order to protect on-board electronics.
• If the battery is excessively damaged (e.g. sulfated), the charger will block the start. In this event, the
startium intermittently indicates « CIP » (Charge in Progress) and 0%. This means that battery recovery
is in progress. As long as «CIP» appears on the display, it is not possible to start the vehicle.
DIAG-STARTIUM 60-12 50 - 220 Ah / 160 Ah Instantaneous 5 min precharge
DIAG-STARTIUM 60-24 6-12-24V : 50 - 220 Ah / 160 Ah Instantaneous 5 min precharge minimum
Once the precharge is done, go to the vehicle’s dashboard. The «start» feature will activate when the rst attempt to
start is initiated (by turning the key). The attempt time must be for 10 secs maximum (a countdown appears on the
display). If your engine does not start, wait 2 minutes between each start attempt.
Nb : If the vehicle does not start, it may be a problem other than a faulty battery e.g. alternator, glowplug…
After usage, follow the recommended disconnection procedure (p.15-16).
TESTING THE ALTERNATOR
If the vehicle battery is regularly out of order, the problem may come form the alternator.
The DIAG-STARTIUM have an «alternator test» feature (p5, n°11). It can show the alternator’s charge capacity by
intermittently displaying the voltage and the perrcentage.
To use this feature, the vehicle must be started. Follow the recommended connection procedure (p.15-16), and
choose the «Alternator test» feature on the control panel.

18
DIAG-STARTIUM 60-12 / 60-24
EN
Translation of the original instructions
The indicated percentage displays the alternator’s state of health :
Between 0 and a 100% Undercharge fault, the battery is not correctly charged.
At a 100% Alternator all good.
Between a 100% and 200% Overcharge fault.
PROTECTION
These clamps have been designed for maximum protection :
• The charging clamps are fully insulated.
• A fuse guarantees protection against polarity inversion and short circuits. Replacing it requires manual intervention.
DIAG-STARTIUM 60-12/60-24
• The thermal protection is monitored by a thermostat (cooling for approximately 1/4h). The fault indicator switches
on, the display shows «th».
• If the machine is faulty, an extra thermal protection cuts the machine’s power supply without further indications for
the user. Place the machine in a well ventilated area and wait 15 minutes.
• In the event of power supply fault, the machine will enter fault protection mode, The error LED switches on and the
display shows «dEF». If the fault is major, an internal fuse protects the machine. This fuse must be replaced by an
aftersales technician.
TROUBLESHOOTING
Remedies Causes Remedies
Error LED ashes Power supply issue. Check the power supply.
Error LED ashes and alarm beep
Clamps in short-circuit or polarity reversal.
Check if the fuses have blown.
Do not put the clamps in short-circuit. Reverse
the polarity.
The battery is faulty.
Check the voltage at the battery terminals with
a voltmeter. If the voltage instantaneously
increase by more than 2.5V by element the
battery can be sulphated or damaged.
Voltage error (6V-12V-24V)
Check if the battery is correctly connected
either in 6V, 12V or 24V.
Battery not detected or <1V. Display : «BAt
HS»
Connect the battery.
Select TIMER if the battery voltage is <1V.
After intensive use the device goes to thermal
protection. Display : «th»
Wait 1/4h for the device to cool down.
The LEDs won’t light up
Power supply issue. Check the power supply.
The internal fuse is melt. Send the device back to GYS after sales.
The ON/OFF switch is not engaged. Switch the ON/OFF button.
In START ENGINE mode, if the screen displays
0%. Restart impossible.
The battery is sulphated, start is avoided to
protect the vehicle electronics.
Recharge the battery prior using START
ENGINE.
Battery is boiling.
The voltage selected 12 or 24V is not correct.
Check the battery voltage and connect it
following the recommended connection.
The battery has element in short-circuit.
The battery cannot be recovered, it must be
replaced.
WARRANTY
The warranty covers faulty workmanship for 2 years from the date of purchase (parts and labour).
The warranty does not cover:
• Transit damage.
• Normal wear of parts (eg. : cables, clamps, etc..).
• Damages due to misuse (power supply error, dropping of equipment, disassembling).
• Environment related failures (pollution, rust, dust).
In case of failure, return the unit to your distributor together with:
- The proof of purchase (receipt etc ...)
- A description of the fault reported

19
DIAG-STARTIUM 60-12 / 60-24
DE
Übersetzung der Originalbetriebsanleitung
SICHERHEITSANWEISUNGEN
Diese Betriebsanleitung enthält Sicherheits- und Betriebshinweise.
Bitte lesen Sie diese Anleitung aufmerksam durch, bevor Sie das
Gerät zum ersten Mal benutzen und bewahren Sie diese sorgfältig
auf. Die Nichteinhaltung dieser Anweisungen und Hinweise kann
mitunter zu schweren Personen- und Sachschäden führen. Nehmen
Sie keine Wartungarbeiten oder Veränderungen am Gerät vor,
wenn diese nicht explizit in der Anleitung genannt werden. Der
Hersteller haftet nicht für Verletzungen oder Schäden, die durch
unsachgemäße Handhabung dieses Gerätes enstanden sind. Bei
Problemen oder Fragen zum korrekten Gebrauch dieses Gerätes,
wenden Sie sich bitte an entsprechend qualifiziertes und geschultes
Fachpersonal. Dieses Gerät darf ausschließlich zum Laden/Starten
und/oder zur Spannungsversorgung für die in der Anleitung oder
auf dem Gerät genannten Anforderungen genutzt werden. Die
Sicherheitshinweise müssen in jedem Fall beachtet werden. Im Fall
einer unangemessenen oder gefährlichen Verwendung kann der
Hersteller nicht haftbar gemacht werden
Schützen Sie das Gerät vor Feuchtigkeit und Nässe.
Schützen Sie das Gerät vor unbefugtem Gebrauch. Kinder unter 8
Jahren düfen nicht mit diesem Gerät spielen. Befinden sich Kinder
oder Personen mit eingeschränkten körperlichen oder geistigen
Fähigkeiten sowie Personen ohne explizite Erfahrung im Umgang
mit dem Produkt in der Nähe des Gerätes, sorgen Sie bitte für
ausreichend Schutz und Kontrolle bei Benutzung des Gerätes.
Laden Sie nie defekte oder nicht aufladbare Batterien.
Benutzen Sie das Gerät nicht, wenn der Stecker, die Klemmen oder
das Zubehör defekt ist.
Laden Sie niemals eine beschädigte oder gefrorene Batterie.
Decken Sie das Gerät während der Nutzung nicht ab.
Lagern Sie das Gerät nicht in der Nähe einer Wärmequelle oder
bei dauerhaft hohen Temperaturen (über 50°C).
Blockieren Sie nicht die Belüftungsöffnungen des Gerätes. Bitte
beachten Sie den Punkt «Installation» der Betriebsanleitung vor
Gebrauch des Gerätes.
Der Automatik-Modus sowie die Einschränkungen bei der Benutzung
werden nachfolgend in der Betriebsanleitung erklärt.
Explosions- und Brandgefahr!
Während des Ladevorgangs können explosive Gase entstehen.
• Während des Ladevorgangs muss die Batterie in einem gut
belüfteten Bereich plaziert werden.
• Vermeiden Sie Funken und Flammen. Rauchen Sie nicht!
• Schützen Sie die Pole der Batterie vor Kurzschlüssen.

20
DIAG-STARTIUM 60-12 / 60-24
DE
Übersetzung der Originalbetriebsanleitung
Es besteht die Gefahr von Säurespritzern!
• Tragen Sie eine Schutzbrille und Handschuhe.
• Bei Kontakt der Batteriesäure mit den Augen oder der Haut
gründlich mit Wasser nachspülen und sofort einen Arzt aufsuchen.
Verbinden/Trennen
• Trennen Sie das Gerät vom Spannungsnetz bevor Sie Kabel und
Zangen anschließen oder trennen.
• Versichern Sie sich immer, dass die rote Klemme zuerst mit dem
«+» Pol der Batterie verbunden wird. Falls es nötig ist die schwarze
Klemme mit der Fahrzeugkarosserie zu verbinden, versichern
Sie sich, dass es einen Sicherheitsabstand von der Batterie zum
Benzintank/Aufspuff gibt. Achten Sie während der Ladung auf
einen frei zugänglichen Netzanschluss.
• Beachten Sie am Ende des Ladevorgangs folgendes: Trennen Sie
erst das Gerät vom Stromnetz und entfernen Sie dann erst die
Klemmen von der Batterie.
Anschluss
• Beachten Sie die Anschlussreihenfolge.
Class A
• Dieses GYS Gerät ist ein Gerät der Klasse A und eignet sich für
den industriellen und professionellen Gebrauch. In einem ande-
ren Umfeld ist die elektromagnetische Verträglichkeit schwieriger
zu gewährleisten.
• Dieses Gerät entspricht nicht der Richtlinie CEI 61000-3-12. Es
liegt in Ihrer Verantwortung sicherzustellen, ob das Gerät für
Ihren Netzstromanschluss geeignet ist, bevor Sie es an das Netz
anschließen. Bei Fragen wenden Sie sich bitte an Ihren zuständi-
gen Stromnetzbetreiber.
Wartung:
• Ist das Ladegerät und/oder die Kabel defekt/beschädigt, geben
Sie das Ladegerät zur Reparatur zum Hersteller bzw. an einen
geeigneten Fachbetrieb.
• Die Wartung und Reparatur darf nur von entsprechend geschultem
und qualifiziertem Fachpersonal durchgeführt werden.
• Achtung! Alle Kontrollarbeiten oder Wartungen dürfen nur
duchgeführt werden, wenn das Gerät ausgeschaltet und die
Stromversorgung unterbrochen ist.
• Öffnen Sie regelmäßig das Gehäuse und entfernen Sie Staub
und andere Ablagerungen. Beachten Sie hierbei die geltenden
Sicherheitsvorschriften.
• Benutzen Sie niemals Lösungsmittel oder anderen aggressiven
Reinigungsprodukte.
• Reinigen Sie die Oberfläche des Gerätes mithilfe eines trockenen
Lappen.

21
DIAG-STARTIUM 60-12 / 60-24
DE
Übersetzung der Originalbetriebsanleitung
Richtlinien:
• Das Gerät entspricht den europäischen Richtlinien und Normen.
• Die Konformitätserklärung finden Sie auf unsere Webseite.
• EAC-Konformitätszeichen (Eurasische Wirtschaftsgemeinschaft)
Entsorgung:
Produkt für selektives Einsammeln (Sondermüll). Werfen Sie es
daher nicht in den Hausmüll!
BESCHREIBUNG
Die DIAG-STARTIUM sind geeignet um Bleibatterien mit üssigem Elektrolyt zu laden und zu starten. Batterien 12 V
(6 Elemente) für das Modell 60-12 und Batterien 6 V (3 Elemente), 12 V (6 Elemente) und 24 V (12 Elemente) für das
Modell 60-24:
Montage des Griffs und der Räder:
NETZANSCHLUSS
Überprüfen Sie, ob Stromversorgung und Schutzeinrichtungen (Sicherungen) zum Betrieb des Gerätes ausreichend sind.
Stellen Sie das Gerät so auf, dass der Anschlussstecker leicht erreichbar ist. Das Gerät soll an einen Netzanschluss MIT
Schutzleiter angeschlossen werden und dabei sollen die nachfolgenden Vorschriften beachtet werden:
DIAG-STARTIUM 60-12 DIAG-STARTIUM 60-24
Netzspannung 230V - 1 ph 230V - 1 ph
Sicherung
16 A 16 A
Leistung
Laden
2000 W 2000 W
Starten
10 000 W 10 000 W
Kabelquerschnitt bei eventueller Kabelverlängerung 3 x 2,5 mm².
ANSCHLUSS UND TRENNEN
• WICHTIG! Vor den Anschluss an die Batterie sicherstellen,
dass das Gerät nicht an das Spannungsnetz angeschlossen
ist und der ON/OFF-Schalter auf OFF steht.
• Die Polarität der Batterie prüfen (Achtung: die Sicherung
schmilzt bei falschem Anschluss).
• Die Kabel unter keinem Umständen in direkten Kontakt mit
heißen oder scharfkantigen Teilen bringen oder knicken.
Das Gerät auf die Position «12V» oder «24V» einstellen oder eine LED leuchtet auf den Bedienfeld. Falls die ausgewählte
Ladespannung und die Batteriespannung nicht übereinstimmen, startet der Ladevorgang nicht.

22
DIAG-STARTIUM 60-12 / 60-24
DE
Übersetzung der Originalbetriebsanleitung
Diag-Startium 60-12 Diag-Startium 60-24
Laden und Starten einer im Fahrzeug angeschlossen Batterie:
Der Minuspol der Batterie ist der Massepunkt:
1.
Die rote Anschlussklemme mit dem Pluspol der Batterie verbinden.
2. Die schwarze Anschlussklemme an einer blanken Stelle der Karrosserie, in ausreichenden Abstand zu
Brennstofeitungen und Batterie anklemmen.
3.
Das Gerät an das Spannungsnetz anschließen.
4. Der ON/OFF-Schalter auf ON stellen und den Anwendungsmodus sowie die Ladestromstärke einstellen.
5. Nach Ende des Ladevorgangs den ON/OFF-Schalter auf OFF stellen. Erst das Ladegerät vom Netz trennen,
danach die schwarze Klemme und zuletzt die rote Klemme abklemmen.
Der Pluspol der Batterie ist der Massepunkt:
1.
Die schwarze Anschlussklemme mit dem Pluspol der Batterie verbinden.
2. Die rote Anschlussklemme an einer blanken Stelle der Karrosserie, in ausreichenden Abstand zu
Brennstofeitungen und Batterie anklemmen.
3.
Das Gerät an das Spannungsnetz anschließen.
4.
Der ON/OFF-Schalter auf ON stellen und den Anwendungsmodus sowie die Ladestromstärke einstellen.
5. Nach Ende des Ladevorgangs den ON/OFF-Schalter auf OFF stellen. Erst das Ladegerät vom Netz trennen
danach die schwarze Klemme und zuletzt die rote Klemme abklemmen.
Laden einer nicht im Fahrzeug angeschlossenen Batterie:
1.
Die rote Anschlussklemme mit dem Pluspol und die schwarze Anschlussklemme mit dem Minuspol
verbinden.
2.
Das Gerät an das Spannungsnetz anschließen.
3.
Der ON/OFF-Schalter auf ON stellen und den Anwendungsmodus sowie die Ladestromstärke einstellen.
4. Nach Ende des Ladevorgangs den ON/OFF-Schalter auf OFF stellen. Erst das Ladegerät vom Netz trennen,
danach die schwarze Klemme und zuletzt die rote Klemme abklemmen.
GEBRAUCH IM LADEMODUS (CF. BEDIENFELD)
DIAG-STARTIUM 60-12 DIAG-STARTIUM 60-24
Batteriestärke
6V - 20 - 900 Ah
12V
20 - 900 Ah 20 - 900 Ah
24V - 20 - 525 Ah
Sicherheitshinweise
• Benutzen Sie das Gerät nur in gut belüfteten, trockenen Innenräumen.
• Falls vorhanden, entfernen Sie die Batteriezellendeckel und prüfen Sie den Flüssigkeitsstand. Falls nötig mit destilliertem
Wasser auffüllen. Reinigen Sie Batteriekontakte und –pole.
• Vergewissern Sie sich, dass Kapazität (in Ampere-Stunden) und Spannung (in Volt) der Batterie mit der Kapazität des
Ladegerätes übereinstimmen.

23
DIAG-STARTIUM 60-12 / 60-24
DE
Übersetzung der Originalbetriebsanleitung
Test der Batterie
Vor dem Ladevorgang kann der Batteriezustand getestet werden. Schließen Sie die rote Klemme, je nach Batterie, auf
«12V» oder «24V» an. Die Anzeige zeigt dann die tatsächliche Spannung und den Zustand der Batterie in Prozent an. Eine
6V Batterie hat 100% ihrer Kapazität, wenn dieSpannung mehr als als 6,4V beträgt. Sie hat 0% ihrer Kapazität, wenn die
Spannnung niedriger als 5,9V ist0. Eine 12V Batterie hat 100% ihrer Kapazität, wenn dieSpannung mehr als als 12,8V
beträgt. Sie hat 0% ihrer Kapazität, wenn die Spannnung niedriger als 11,8V ist. Eine 24V Batterie hat 100% ihrer Kapazität,
wenn die Spannung mehr als 25,6V beträgt. Sie hat 0% ihrer Kapazität, wenn die Spannung niedriger als 23,6V ist.
Ladevorgang
Sobald das Gerät den Anweisungen entsprechend an der Batterie angeschlossen wurde (s. Abschnitt «Anschluss und
Trennen»), schließen Sie die rote Klemme, je nach Batterie, auf «12V» oder «24V») an und stellen den Ladestrom je
nach Batteriekapazität ein (Seite 4, Taste 12). Anschließend wählen Sie den Batterietyp aus (Taste 11) und drücken Sie
auf den START/STOP-Taste (Taste 8). Zum Beenden des Ladevorgangs drücken Sie wieder auf die START/STOP-Taste.
Bei falscher Spannungsauswahl (24V für eine 12V-Batterie) kann Batteriesäure freigesetzt
wer-den oder die Batterie explodieren.
Die Standardeinstellung des Ladestroms ist «3» und des Batterietyps «Universal».
DIAG-STARTIUM 60-12 DIAG-STARTIUM 60-24
12V 6V 12V 24V
Laden 1 20-75Ah(5A) 20-75Ah(5A) 20-75Ah(5A) 20-75Ah(5A)
Laden 2 60-225Ah(15A) 60-225Ah(15A) 60-225Ah(15A) 40-150Ah(10A)
Laden 3 130-450Ah(30A) 130-450Ah(30A) 130-450Ah(30A) 85-300Ah(20A)
Laden 4 225-900Ah(60A) 225-900Ah(60A) 225-900Ah(60A) 150-525Ah(35A)
Der Ladevorgang wird über drei verschiedene Signal-LED angezeigt:
- Ladung aktiviert LED (Symbol 7).
- Im Display wird abwechselnd die Spannung und der Ladefortschritt in Prozent angezeigt (beide Werte müssen
ansteigen).
- Die entsprechenden LED (Taste 4 und 5) zeigt den aktuell angezeigten Wert an.
Der Fortschritt des Ladevorgangs wird in Prozent (%) angegeben.
% Ladefortschritt Phase
0% Batterietest Testphase
25% Start des Ladevorgangs
Boost
50% Batterie zu 50 Prozent aufgeladen
75% Letzte Phase des Ladevorgangs Absorption
100%
aufgeladene Batterie Floating
Auadennicht möglich
Start des Ladevorgangs nicht möglich, weil:
- die Batteriespannung unter 1V liegt.
- die Batteriespannung nicht der am Ladegerät ausgewählten Spannung entspricht.
Der Ladevorgang wird beendet, wenn:
- der START/STOP-Schalter wieder gedrückt wird.
- der Ladevorgang länger als 16 Stunden dauert.
Wenn die Batterie aufgeladen ist, schaltet das DIAG-STARTIUM in den Ladungserhaltungsmodus.
Ein Entladen der Batterie wird verhindert und die aufgeladene Batterie bleibt 100 Prozent.
Beginnt beim Auaden einer Trockenbatterie der Elektrolyt zu kochen, ist die Batterie beschädigt.
Beenden Sie den Ladevorgang sofort, um eine Explosion der Batterie zur vermeiden.
- Die Spannungsversorgung wurde unterbrochen und die «Automatischer Neustart»-Funktion ist nicht aktiviert.
DIAG+ Funktion (nur bei 12 V)
Zur Energieversorgung und Stützung der Bordbatterie während der Diagnose bei Motorstillstand an sämtlichen
elektronischen Verbrauchern bis 60A bei 12V (Motorkühlung, Fensterheber, Bordelektronik usw.).
Die Spannung kann zwischen 12 und 15 V, in 0,1 V Schritte mittels der Tasten (1) eingestellt werden.
UNIVERSAL Modus
Falls der Batterietyp nicht bekannt ist, UNIVERSAL als Batterietyp auswählen.

24
DIAG-STARTIUM 60-12 / 60-24
DE
Übersetzung der Originalbetriebsanleitung
TIMER Funktion
Mit der TIMER-Funktion ist ein zeitgesteuertes Laden von Batterien unter 1V möglich. Mit der TIMER-Taste (11) kann die
Ladezeit von 10 bis 120 min in 10min-Schritten eingestellt werden.
Es handelt sich um einen manuellen Ladevorgang. Folgende Dinge sind zu beachten:
• Der Ladevorgang beginnt unabhängig vom Batteriezustand (sulfatierte oder Kurzschlussbatterie, Spannung <1V).
• Bei Aktivierung liegt auch ohne Anschluss an eine Batterie Spannung an den Polzangen. Bei Kurzschluss oder Verpolung
besteht die Gefahr der Funkenbildung. Bitte beachten Sie die Sicherheitshinweise.
Der Ladevorgang wird über zwei Anzeigen angezeigt:
- Die Anzeige (2) zeigt alternativ die Spannung in V und die verbleibende Zeit in min.
- Die Spannung-LED und die Zeit-LED (3 und 4) leuchten abwechselnd.
Der Ladevorgang ist beendet, wenn:
- die eingestellte Zeit abgelaufen ist.
- bei Unterbrechung der Spannungversorgung.
- Beim Drücken auf die (8) Taste.
Paralleler Ladevorgang mehrerer Batterien
In Parallelschaltung können mehrere Batterien gleichzeitig geladen werden. Schließen Sie die rote Zange am Pluspol und
die schwarze Zange am Minuspol der Batterie an. Batterien in Parallelschaltung müssen alle die gleiche Spannung haben.
Laden in Reihenschaltung wird nicht empfohlen.
GEBRAUCH IM STARTMODUS
Sicherheitshinweise
• Klemmen Sie unter keinen Umständen die Batterie vom Fahrzeug ab! Das Abklemmen kann Informationsverlust
verursachen und einen weiteren Startversuch verhindern.
Inbetriebnahme
Sobald das Gerät den Anweisungen entsprechend an der Batterie angeschlossen wurde (s. Abschnitt «Anschluss und
Trennen»), wählen Sie den «START ENGINE» Modus durch Drücken der Taste 9 aus. Eine Vorladung startet. Durch
Drücken einer beliebigen Taste wird dieser Modus beendet.
• Der «START ENGINE»-Modus erkennt entladene Batterien und verweigert in diesem Fall das Starten. Vor
jedem Start macht das Gerät eine automatische Desulfatierung, damit die Bordelektronik geschützt wird.
• Ist die Batterie stark beschädigt (z.B. sulfatiert), wird das Starten des Fahrzeugs verhindert, um die
Fahrzeugelektronik zu schützen. Im Display erscheint dann abwechselnd «CIP» (Charge in Progress)
und 0%. Die Regenierung hat begonnen. Solange die «CIP»-Abkürzung angezeigt wird, ist das Starten
des Fahrzeugs unmöglich.
DIAG-STARTIUM 60-12 50 - 220 Ah / 160 Ah unverzögert Vorladung 5 min
DIAG-STARTIUM 60-24 6-12-24V : 50 - 220 Ah / 160 Ah unverzögert Vorladung 5 min minimum
Starten Sie nach Ende der Vorladung das Fahrzeug. Der Startversuch darf maximal 10 Sek. lang sein (wird im Display
angezeigt). Sollte der Motor nicht anspringen, wiederholen Sie nach 2-minütiger Wartezeit den Vorgang.
Hinweis: Springt der Motor auch nach mehreren Versuchen nicht an, liegt das Problem entweder an einer
tiefentladenen Batterie oder an anderen Defekten (Mechanik, Elektronik, Batteriedefekt usw).
Klemmen Sie das Gerät den Anweisungen entsprechend von der Batterie ab (S.24)
TEST DER LICHTMASCHINE
Sollte die Fahrzeugsbatterie häuger entladen sein, kann ein Defekt der Lichtmaschine die Ursache sein.
Die DIAG-STARTIUM beistzen eine «Lichtmaschinentest»-Funktion (S. 5, (7)) Sie ermöglicht die Anzeige der Ladekapazität
der Lichtmaschine durch die abwechselnde Anzeige der Spannung und des Prozentsatz.
Für den Test der Lichtmaschine muss das Fahrzeug laufen. Sobald das Gerät den Anweisungen entsprechend an
der Batterie angeschlossen wurde (S.23-24), wählen Sie die «Lichtmaschinentest»-Funktion auf den Bedienfeld.
Der angezeigte Prozentwert zeigt den Zustand der Lichtmaschine an:
zwischen 0 und 100% Unterlast-Fehler, die Batterie wird nicht richtig aufgeladen
Bei 100% Lichtmaschine in Ordnung
zwischen 100 und 200% Überlast-Fehler

25
DIAG-STARTIUM 60-12 / 60-24
DE
Übersetzung der Originalbetriebsanleitung
SCHUTZFUNKTIONEN
Ihr Gerät ist mit verschiedenen Schutzfunktionen ausgestattet:
• Vollisolierte Ladeklemmen.
• Schutz vor Verpolung und Kurzschluss: eine Doppelsicherung schützt das Gerät. Manueller Austausch.
DIAG-STARTIUM 60-12/60-24
• Der Überhitzungsschutz erfolgt durch ein Thermostat (Abkühlzeit 15 min). Die Fehler-LED leuchtet bei einer Überhitzung,
die Anzeige zeigt «th».
• Das Gerät verfügt über einen thermischen Überlastschutz, der es im Falle eine Überhitzung abschaltet. Lassen Sie das
Gerät dann 15 min an einem gut durchlüfteten Ort abkühlen.
• Im Fall eines Überspannungsfehlers schützt sich das Gerät. Die Fehler-LED leuchtet und die Anzeige zeigt «dEF». Ist
die Überspannung zu hoch, schützt eine interne Sicherung das Gerät. Diese Sicherung muss durch einen Techniker
des Kundendiensts ersetzt werden.
BETRIEBSSTÖRUNG, URSACHEN, ABHILFEN
Betriebstörungen Ursachen Abhilfen
Die Fehler-LED leuchtet. Kein oder schlechter Netzkontakt. Überprüfen Sie den Netzanschluss.
Die Fehler-LED leuchtet und der Summer ertönt.
Kurzschluss oder Verpolung der Klemmen.
Überprüfen Sie den Zustand der Schutzsicherung.
Die Klemmen nicht kurzschliessen. Die
Polaritäten umpolen.
Die zu ladende Batterie ist stark beschädigt.
Überprüfen Sie mit einem Voltmeter, ob
Spannung an den Batteriepolen herrscht.
Beträgt die Spannung über 2,5V pro Element,
ist die Batterie sulfatiert oder beschädigt.
Fehler bei der Spannung (12 - 24 V) (nur für
60-24).
Überprüfen Sie ob die Batterie richtig an 6 V, 12
V oder 24 V angeschlossen ist.
Keine Batterie oder Batterie <1 V. Anzeige: «BAt
HS»
Eine Batterie anschliessen.
Die Funktion TIMER auswählen, falls die
Spannung der Batterie unter 1 V liegt.
Nach einer intensiven Benutzung ist der
Wärmeschutz aktiv. Anzeige : «th»
15 min abwarten, so dass das Gerät abkühlen
kann.
Keine LED leuchtet.
Bedeutendes Problem beim Netzanschluss. Überprüfen Sie den Netzanschluss.
Die interne Sicherung ist geschmolzen. Das Gerät zum Kundendienst schicken.
Der ON/OFF Schalter steht nicht auf ON. Den ON/OFF Schalter auf ON stellen.
Im START ENGINE Modus zeigt die Anzeige 0%.
Das Starten ist unmöglich.
Die Batterie ist sulfatiert, das Starten wird
verhindert, um die Elektronik des Fahrzeuges zu
schützen.
Vorladung der Batterie, bevor ein Startvorgang
im START ENGINE Modus durchgeführt wird.
Die Batterie kocht.
Die Auswahl 12 oder 24V stimmt nicht (nur für
60-24).
Die Spannung der Batterie überprüfen und sie
korrekt anschliessen.
Kurzschluss durch Batterie.
Die Batterie kann nicht repariert werden, sie
muss ersetzt werden.
HERSTELLERGARANTIE
Die Garantieleistung des Herstellers erfolgt ausschließlich bei Fabrikations- oder Materialfehlern, die binnen 24
Monate nach Kauf angezeigt werden (Nachweis Kaufbeleg). Nach Anerkenntnis des Garantieanspruchs durch den
Hersteller bzw. seines Beauftragten erfolgen eine für den Käufer kostenlose Reparatur und ein kostenloser Ersatz von
Ersatzteilen. Der Garantiezeitraum bleibt aufgrund erfolgter Garantieleistungen unverändert.
Ausschluss:
Die Garantieleistung erfolgt nicht bei Defekten, die durch unsachgemäßen Gebrauch, Sturz oder harte Stöße sowie
durch nicht autorisierte Reparaturen oder durch Transportschäden, die infolge des Einsendens zur Reparatur,
hervorgerufen worden sind. Keine Garantie wird für Verschleißteile (z.B. Kabel, Klemmen, Vorsatzscheiben usw.) sowie
bei Gebrauchsspuren übernommen.
Das betreffende Gerät bitte immer mit Kaufbeleg und kurzer Fehlerbeschreibung ausschließlich über den Fachhandel
einschicken. Die Reparatur erfolgt erst nach Erhalt einer schriftlichen Akzeptanz (Unterschrift) des zuvor vorgelegten
Kostenvoranschlags durch den Besteller. Im Fall einer Garantieleistung trägt GYS ausschießlich die Kosten für den
Rückversand an den Fachhändler.

26
DIAG-STARTIUM 60-12 / 60-24
ES
Traducción de las instrucciones originales
INSTRUCCIONES DE SEGURIDAD
Este manual de uso incluye indicaciones sobre el funcionamiento
de su aparato y las precauciones a seguir para su seguridad. Lea
atentamente este documento antes del primer uso y consérvelo
para una futura lectura. Estas instrucciones deben leerse y ser
comprendidas antes de toda operación. Toda modificación
o mantenimiento no indicado en el manual no se debe llevar a
cabo. Todo daño físico o material debido a un uso no conforme
con las instrucciones de este manual no podrá atribuírsele al
fabricante. En caso de problema o de incertidumbre, consulte con
una persona cualificada para manejar correctamente el aparato.
Este aparato se debe utilizar solamente para realizar la recarga
y/o el arranque y/o la alimentación eléctrica dentro de los
límites indicados en el aparato y el manual. Se deben respetar las
instrucciones relativas a la seguridad: En caso de uso inadecuado
o peligroso, el fabricante no podrá considerarse responsable.
Aparato destinado a un uso en interior. No se debe exponer a la
lluvia.
Este aparato se puede utilizar por niños de al menos 8 años y
por personas con capacidades físicas, sensoriales o mentales
reducidas o sin experiencia o conocimiento, siempre y cuando estén
correctamente vigilados o si han recibido instrucciones respecto al
uso del aparato con toda seguridad y si los riesgos que conllevan
se hayan comprendido. Los niños no deben jugar con el aparato.
Los niños sin vigilancia no deben limpiar ni efectuar mantenimiento
alguno del aparato.
En ningún caso se debe usar este aparato para cargar pilas o
baterías no recargables.
No utilice el aparato si el cable de suministro de corriente o la
clavija están dañados.
No cargue nunca una batería helada.
No cubra el aparato.
No colocar el aparato cerca de una fuente de calor y a temperaturas
muy elevadas (superiores a 50ºC).
No obstruya las aperturas de ventilación. Lea la parte de instalación
antes de utilizar el aparato.
El modo de funcionamiento automático y las restricciones de uso
están explicadas en este manual.
Riesgo de explosión y de incendio.
Una batería en carga puede emitir gases explosivos.
• Durante la carga, la batería debe ponerse en un lugar aireado.
• Evite las llamas y las chispas. No fume.
• Proteja las superficies de contactos eléctricos de la batería contra
cortocircuitos.

27
DIAG-STARTIUM 60-12 / 60-24
ES
Traducción de las instrucciones originales
Riesgo de proyección de ácido.
•Lleve gafas y guantes de protección.
• En caso de contacto con los ojos o la piel, aclare con agua
abundantemente y consulte con un médico sin demora.
Conexión / desconexión:
• Desconecte la alimentación eléctrica antes de conectar o
desconectar las conexiones sobre la batería.
• El borne de la batería no conectado al chasis debe conectarse
primero. La otra conexión se debe efectuar en el chasis, lejos de
la batería y de la canalización de combustible. El cargador de
baterías debe conectarse después a la red eléctrica.
• Tras la operación de carga, desconecte el cargador de la red
eléctrica, retire la conexión del chasis y la conexión de la batería,
en este orden.
Conexiones:
• Este aparato debe conectarse a una toma de corriente conectado
a tierra.
Class A
• Este material está destinado a entornos industriales (clase A) y
no está previsto para ser usado en un lugar residencial donde la
corriente eléctrica está suministrada por la red pública de baja
tensión. Puede haber dificultades potenciales para asegurar la
compatibilidad electromagnética en estos lugares, debido a per-
turbaciones de frecuencia radioeléctrica.
• Este material no es conforme con la CEI 61000-3-12 y se debe
conectar a redes privadas de baja tensión conectadas a la red
pública solo a media y alta tensión. Si se conecta a la red
pública de baja tensión, es responsabilidad del instalador o del
usuario del material asegurarse, consultando a un operador de
la red de distribución, que el aparato se puede conectar.a
Mantenimiento:
• Si se daña el cable de alimentación, deberá ser reemplazado por
el fabricante, su servicio post-venta o una persona cualificada,
para evitar todo peligro.
• El mantenimiento solo debe realizarlo una persona cualificada.
• ¡Advertencia! Desconecte siempre la clavija de la corriente antes
de trabajar sobre el aparato.
• Con regularidad, quite la cubierta protectora y quite el polvo
con una pistola de aire comprimido. Aproveche para que una
persona cualificada compruebe la fijación de las conexiones
eléctricas con una herramienta aislada.
• No utilice en ningún caso disolventes u otros productos de
limpieza agresivos.
• Limpie las superficies del aparato con un trapo seco.

28
DIAG-STARTIUM 60-12 / 60-24
ES
Traducción de las instrucciones originales
Normativa:
• Aparato conforme a las directivas europeas.
• La declaración de conformidad está disponible en nuestra página
Web.
• Marca de conformidad EAC (Comunidad económica Euroasiática)
Desecho:
Este material es objeto de una recogida selectiva. No lo deposite
en un contenedor doméstico.
DESCRIPCIÓN GENERAL
Los aparatos DIAG-STARTIUM están diseñados para la recarga y el arranque de baterías al plomo y electrolito (líquido,
AGM o gel) de 12V (6 elementos)con el modelo 60-12 y 6V (3 elementos), 12V (6 elementos) y 24V (12 elementos) con
el modelo 60-24:
Montaje del soporte y de las ruedas:
ALIMENTACIÓN ELÉCTRICA
Compruebe que la red eléctrica y sus protecciones (fusibles) sean compatibles con la corriente
necesaria para su uso. El aparato debe colocarse de forma que la toma de corriente sea accesible.
Se debe conectar a un enchufe CON toma de tierra y siguiendo las recomendaciones siguientes:
DIAG-STARTIUM 60-12 DIAG-STARTIUM 60-24
Tensión de corriente 230V - 1 ph 230V - 1 ph
Protección 16 A 16 A
Potencia de
carga
carga
2000 W 2000 W
arranque
10 000 W 10 000 W
La sección de cable recomendada en casa de prolongador es: 3 x 2,5 mm².
CONEXIÓN Y DESCONEXIÓN
• Antes de conectar a una batería, compruebe que el aparato
no esté conectado a una red eléctrica y que el botón de
encendido/apagado esté en OFF.
• Localice los 2 polos + y - de la batería. (una inversión de
polaridad puede dañar el fusible).
• Aleje los cables de todas las supercies calientes o cortantes.
Separe los dos cables y evite que algún objeto ejerza presión
sobre este.
Aleje los cables de todas las supercies calientes o cortantes. Separe los dos cables y evite que algún objeto ejerza
presión sobre este.

29
DIAG-STARTIUM 60-12 / 60-24
ES
Traducción de las instrucciones originales
Diag-Startium 60-12 Diag-Startium 60-24
Arranque y carga de una batería instalada sobre el vehículo:
Cuando el polo negativo de la batería está conectado al chasis:
1. Conecte la pinza roja en el polo positivo de la batería.
2. Conecte la pinza negra al chasis del vehículo, de manera que esté alejada de las canalizaciones de
combustibles (carburante, aceite) y de la batería.
3. Conecte el aparato a la red eléctrica.
4. Elija el modo de uso, la velocidad de carga y encienda el DIAG-STARTIUM.
5. Después del uso, ponga el botón de encendido/apagado en OFF, desconecte primero el cargador de la red
eléctrica, luego desconecte la pinzar negra y nalmente la pinza roja.
Ciertos vehículos tienen el polo positivo de la batería conectado al chasis, en este caso :
1. Conecte la pinza negra en el polo negativo de la batería.
2. Conecte la pinza negra al chasis del vehículo, de manera que esté alejada de las canalizaciones de
combustibles y de la batería.
3. Conecte el aparato a la red eléctrica..
4. Elija el modo de uso, la velocidad de carga y encienda el DIAG-STARTIUM.
5. Después del uso, ponga el botón de encendido/apagado en OFF, desconecte primero el cargador de la red
eléctrica, luego desconecte la pinzar roja y nalmente la pinza negra.
Carga de una batería no conectada al vehículo :
1. Conecte la pinza roja en el polo positivo de la batería y la pinza negra sobre el polo negativo de la batería.
2.
Conecte el aparato a la red eléctrica.
3.
Elija el modo de uso, la velocidad de carga y encienda el DIAG-STARTIUM.
4. Después del uso, ponga el botón de encendido/apagado en OFF, desconecte primero el cargador de la red
eléctrica, luego desconecte la pinzar roja y nalmente la pinza negra.
USO EN MODO CARGADOR (VÉASE INTERFAZ)
DIAG-STARTIUM 60-12 DIAG-STARTIUM 60-24
Capacidad
de carga
6V - 20 - 900 Ah
12V
20 - 900 Ah 20 - 900 Ah
24V - 20 - 525 Ah
Precauciones previas
• Úselo en un lugar resguardado y sucientemente aireado o especialmente preparado.
• Quite los tapones de la batería (si hubiera) y asegúrese de que el nivel de líquido (electrolito) sea suciente. En caso
contrario, añada agua desmineralizada y limpie minuciosamente los bornes y los terminales de batería.
• Compruebe que la capacidad de la batería en amperios-hora y la tensión en voltios sea compatible con su cargador.
Comprobar la batería
Antes de efectuar una carga, se puede comprobar el estado de la batería. Conecte el conector de la pinza roja en el 12
24V respetando la tensión indicada en la batería. La pantalla indica entonces el estado de salud de la batería. Alterna
entre tensión real y el porcentaje de carga. Una batería de 6V estará al 100% de su capacidad si su tensión es superior
a 6,4V. Estará a 0% si su tensión es inferior a 5,9V. Una batería de 12V estará al 100% de su capacidad si su tensión
es superior a 12,8V. Estará a 0% si su tensión es inferior a 11,8V. Una batería de 24V estará al 100% de su capacidad
si su tensión es superior a 25,6V. Estará a 0% si su tensión es inferior a 23,6V.

30
DIAG-STARTIUM 60-12 / 60-24
ES
Traducción de las instrucciones originales
Carga
Una vez que el cargador se ha conectado a la batería siguiendo las recomendaciones (ver parte de conexión y
desconexión), conecte el conector de la pinza roja sobre la tensión: 12 o 24V. Seleccione la velocidad de carga
(p.5, nº12) respetando la capacidad de la batería (ver tabla de abajo), elija el tipo de batería (nº11) y presiones
(brevemente) sobre el botón START/STOP (nº8). Para detener la carga en cualquier momento, presione de nuevo el
botón START/STOP.
Riesgo de explosión o de proyección de ácido en caso de una mala selección de tensión
(24V para una batería de 12V).
DIAG-STARTIUM 60-12 DIAG-STARTIUM 60-24
12V 6V 12V 24V
Carga 1 20-75Ah(5A) 20-75Ah(5A) 20-75Ah(5A) 20-75Ah(5A)
Carga 2 60-225Ah(15A) 60-225Ah(15A) 60-225Ah(15A) 40-150Ah(10A)
Carga 3 130-450Ah(30A) 130-450Ah(30A) 130-450Ah(30A) 85-300Ah(20A)
Carga 4
225-900Ah(60A) 225-900Ah(60A) 225-900Ah(60A) 150-525Ah(35A)
Los indicadores luminosos permiten saber que la batería está en carga:
- La pantalla: indica por intermitencia la tensión y el porcentaje de carga (una evolución de los dos valores se debe
constatar).
- Los LED de indicación de tensión y porcentaje (nº4 y 5). Se encienden en continuo y alternan al mismo ritmo que la
pantalla.
El avance de la carga se indica en %.
% Nivel de carga de batería Fase
0% Recuperación de la batería Fase de test
25% Inicio de carga
Boost
50% 50% de carga
75% Carga de los % restantes Absorción
100% Batería cargada Floating
Reinicio automático (función utilizable solo para la carga)
En caso de interrupción eléctrica:
- Durante una carga normal, el DIAG-STARTIUM se apaga. Cuando se enciende de nuevo no reinicia la carga. Por lo
tanto, hay que iniciarla de forma manual.
- Durante una carga con la función «Reinicio automático», el DIAG-STARTIUM se apaga. Cuando se enciende de
nuevo, inicia automáticamente la carga.
Para utilizar el modo «Reinicio automático»:
- Conecte el cargador siguiendo las recomendaciones,
- Seleccione la velocidad de carga y el tipo de batería respetando las características de esta,
- Luego presione durante un rato (> 5 segundos) sobre el botón START/STOP.
Un indicador permite comprobar que la carga se ha iniciado en modo «Reinicio automático»:
- Los LED de indicación de tensión y porcentaje (nº4 y 5). No se encienden en continuo como en una carga normal,
pero parpadean.
En este, para detener la carga, presione sobre el botón (8). La interrupción del suministro eléctrico
no cortará la carga.
Función DIAG+ (en 12V únicamente)
Este modo permite compensar la corriente utilizada por un vehículo parado (hasta 60A) para comprobar los
dispositivos eléctricos de mayor consumo: ventilación del motor, el elevalunas, la suspensión eléctrica, etc
Esta tensión se puede ajustar de 12V a 15V por secuencias de 0,1 mediante los botones (1).
Función UNIVERSAL
En caso en que no se conozca el tipo de batería (líquido, gel, AGM, Start/Stop), seleccione UNIVERSAL por defecto.
Función TIMER
La función TIMER (14) permite elegir un tiempo de carga ajustable de 10 a 120 minutos por secuencias de 10 minutos
y permite iniciar la carga a partir de 1V y sin batería.

31
DIAG-STARTIUM 60-12 / 60-24
ES
Traducción de las instrucciones originales
La carga de esta función TIMER es manual. Conlleva las diferencias siguientes:
• Sea cual sea el estado de la batería (batería sulfatada o cortocircuitada, tensión <1V), la carga se iniciará igualmente.
• La carga inicia incluso si la conexión no se ha realizado correctamente: pinzas desconectadas o en cortocircuito. Hay
un riesgo de chispas si las recomendaciones de conexión no se respetan.
Dos indicadores permiten comprobar que la carga se ha iniciado:
- La pantalla (nº2) Indica por intermitencia la tensión de la batería en voltios y el tiempo restante en minutos.
- LED de indicación de tensión y minutos (nº3 y 4). Se encienden en continuo y alternan al mismo ritmo que la pantalla.
La carga se detiene de varias maneras:
- Tras el periodo de tiempo elegido.
- En caso de interrupción eléctrica
- Presionando sobre el botón (8).
Carga de varias baterías simultáneamente
Puede cargar varias baterías de forma simultánea conectándolas en paralelo. Los bornes positivos deben conectarse
a la pinza roja y los bornes negativos a la pinza negra. Las baterías deben tener la misma tensión, 12 o 24V.
Sin embargo, la carga en serie no está recomendada.
USO EN MODO ARRANCADOR
Precauciones previas
• No desconecte la batería del vehículo. La conexión de la batería puede conllevar una pérdida de información y una
eventual imposibilidad de volver a arrancar.
Arranque
Una vez que se haya conectado el arrancador sobre la batería siguiendo las recomendaciones (véase la sección Conexión
y desconexión), presione el botón 9 para elegir el modo «START ENGINE», se iniciará una precarga. Presionar cualquier
botón detiene este modo.
• El modo «START ENGINE» detecta las baterías sulfatadas y no hace posible el arranque si fuese el
caso. El aparato inicia una desulfatación automática antes de comenzar para proteger los dispositivos
electrónicos a bordo.
• La batería está demasiado dañada (sulfatada por ejemplo), el cargador impide el arranque. En este
caso, el DIAG-STARTIUM indica por intermitencia « CIP » (Charge in Progress) y 0%. Esto signica que
la recuperación de la batería está en proceso. Mientras la abreviación «CIP» aparezca en pantalla, no es
posible arrancar el vehículo.
DIAG-STARTIUM 60-12 50 - 220 Ah / 160 Ah Instantáneo Precarga 5 min
DIAG-STARTIUM 60-24 6-12-24V : 50 - 220 Ah / 160 Ah Instantáneo Precarga 5 min minimum
Una vez que se ha efectuado la precarga, diríjase al panel de control del vehículo. La función «arrancador» se
activa cuando el primer intento de arranque comienza (al girar la llave). La duración de cada intento debe ser de 10
segundos máximo (un contador aparece en pantalla).
Si su motor no arranca, espere 2 minutos entre cada intento de arranque.
Nota : Un vehículo que no arranca puede tener un problema que no tenga que ver con una batería en mal estado:
alternador, bujía, etc.
Tras su uso, siga las instrucciones de desconexión (p.31-32).
COMPROBAR EL ALTERNADOR
Si la batería del vehículo se encuentra averiada regularmente, el problema puede provenir del alternador.
Los DIAG-STARTIUM disponen de una función «test del alternador» (p5, n°11). Este función permite indicar la capacidad
de carga del alternador indicando de forma intermitente la tensión y el porcentaje.
Para utilizar esta función, el vehículo debe estar encendido. Siga las recomendaciones de conexión (p.31-
32), y elija la función «test del alternador» en la interfaz.
El porcentaje indicado informa del estado de salud del alternador:

32
DIAG-STARTIUM 60-12 / 60-24
ES
Traducción de las instrucciones originales
Entre 0 y 100% Fallo de baja carga, la batería no está correctamente recargada.
A 100% Alternador correcto.
Entre 100% y 200% Fallo de sobrecarga.
PROTECCIONES
Estos aparatos han sido diseñados con todas las protecciones posibles :
• Las pinzas de carga están completamente aisladas.
• Un fusible provee protección contra inversiones de polaridad y cortocircuitos. Reemplazarlo requiere un
procedimiento manual.
DIAG-STARTIUM 60-12/60-24
• Un termostato protege contra el sobrecalentamiento del aparato (el enfriamiento requiere 1/4h). La luz del indicador
de fallo se encienden caso de sobrecarga, el marcador indica «th».
• En caso de fallo del aparato, una protección térmica complementaria corta el suministro eléctrico del generador sin
indicarlo al usuario. Coloque el aparato en un lugar aireado y espere 15 minutos.
• En caso de fallo de corriente, el aparato se protege y solo queda encendido el LED de fallo y el marcador indica «dEF».
Si el fallo es demasiado importante, el fusible interno protege el aparato. Este fusible debe remplazarlo un técnico.
ANOMALÍAS, CAUSAS Y SOLUCIONES
Anomalías Causas Soluciones
El LED de error se enciende problema de suministro eléctrico. Compruebe su red eléctrica.
El LED de error se enciende y hay una señal
sonora
Pinzas en cortocircuito o inversión de polaridad
Compruebe que los fusibles no estén fundidos.
No ponga las pinzas en corto-circuito. Invierta
las polaridades.
La batería que desea cargar está defectuosa.
Compruebe la tensión de los bornes con un
voltímetro. Si la tensión sube instantáneamente
a más de 2,5V en cada uno, es posible que la
batería esté dañada o sulfatada.
Error de tensión (6-12-24V)
Compruebe que la batería esté bien conectada
en 6, 12 o 24V.
No hay batería o presenta una tensión por
debajo de 1V. Se indica: «BAt HS»
Conecte una batería.
Seleccione TIMER si la batería tiene una
tensión por debajo de 1V.
Tras un uso intensivo, su aparato se pone en
interrupción térmica. Se indica: «th»
Espere 1/4h a que se enfríe.
No se enciende ningún LED
Fallo de corriente importante Compruebe su red eléctrica.
El fusible interno está fundido
Lleve el aparato al servicio técnico acreditado
por GYS
El botón encendido/apagado no se ha activado. Active el botón de encendido/apagado.
En modo START ENGINE, si el marcador indica
0%. El arranque es imposible.
La batería está sulfatada, el arranque no
se permite para proteger los dispositivos
electrónicos del vehículo.
Efectúe una recarga de la batería antes de
iniciar un START ENGINE.
La batería hierve.
La selección de tensión (12 o 24V) no es
correcta.
Compruebe la tensión de su batería y conéctela
correctamente.
La batería tiene elementos en cortocircuito La batería es irrecuperable, se debe cambiar.
GARANTÍA
La garantía cubre todos los defectos o vicios de fabricación durante 2 años, a partir de la fecha de compra (piezas y
mano de obra)
La garantía no cubre:
• Todas las otras averías resultando del transporte
• El desgaste normal de las piezas (cables, pinzas…)
• Los incidentes resultando de un mal uso (error de alimentación, caída, desmontaje)
• Los fallos relacionados con el entorno (polución, oxidación, polvo…)
En caso de fallo, regresen la maquina a su distribuidor, adjuntando:
• Un justicativo de compra con fecha (recibo, factura…)
• Una nota explicativa del fallo

33
DIAG-STARTIUM 60-12 / 60-24
RU
Перевод оригинальных инструкций
ПРАВИЛА БЕЗОПАСНОСТИ
Данная инструкция описывает функционирование вашего
устройства и меры предосторожности в целях обеспечения
вашей безопасности. Пожалуйста, прочтите ее перед
первым использованием и сохраните, чтобы при надобности
перечитать. Эти указания должны быть прочтены и поняты до
начала сварочных работ. Изменения и ремонт, не указанные в
этой инструкции, не должны быть предприняты.Производитель
не несет ответственности за травмы и материальные
повреждения связанные с несоответствующим данной
инструкции использованием аппарата. В случае проблемы или
сомнений, обратитесь к квалифицированному профессионалу
для правильного подключения. Этот аппарат должен быть
использован только для перезаряда и/или запуска и/или
питания в пределах указанных на заводской табличке и/или
в инструкции. Соблюдайте правила безопасности. В случае
неадекватного или опасного использования производитель не
несет ответственности.
Аппарат предназначен для использования в помещении. Не
выставлять под дождь.
Этот аппарат может быть использован детьми старше 8 лет, а
также персонами с ограниченными физическими, сенсорными
или умственными возможностями, а также не обладающими
опытом и знаниями, при условии если за ними надлежащим
образом наблюдают или если с ними провели инструктаж по
безопасному использованию аппарата и если все возможные
риски были предусмотрены. Дети не должны играть с
устройством. Чистка и уход не должны производится детьми
без надлежащего присмотра.
Ни в коем случае не используйте это устройство для зарядки
батареек или незаряжаемых батарей.
Не используйте аппарат если сетевой шнур или вилка
повреждены.
Никогда не заряжайте поврежденный или замерзший
аккумулятор.
Не покрывайте аппарат.
Не устанавливать аппарат рядом с источником тепла и не
подвергать высоким температурам (выше 50°C) в течении
длительного периода.
Не перекрывайте вентиляционные отверстия. Перед
использованием ознакомьтесь с разделом «установка»
инструкции.
Автоматический режим, а также ограничения при его
использовании, описаны далее в этой инструкции.
Риск пожара и взрыва!
При заряде батарея может выпустить взрывоопасный газ.
• Во время зарядки АКБ должна быть помещена в хорошо
проветриваемом месте.

34
DIAG-STARTIUM 60-12 / 60-24
RU
Перевод оригинальных инструкций
• Избегайте пламени и искр. Не курить.
• Защитите поверхности батареи от электрического контакта
во избежание короткого замыкания.
Риск кислотных брызг!
• Носите защитные очки и перчатки.
• В случае контакта с глазами или кожей, промойте обильно
водой и проконсультируйте врача без промедления.
Подключение / отключение :
• Отключите подачу питания перед тем как подключать или
отключать соединения к батарее.
• Сначала подключите клемму АКБ, не соединенную с шасси.
Второе подсоединение должно быть осуществлено на шасси
как можно дальше от АКБ и от трубопроводов топливной
системы. Затем, подключите зарядное устройство к сети.
• После зарядки отключите зарядное устройство от сети,
затем отсоедините зажим от шасси и, наконец, зажим от
аккумулятора. Действуйте в указанном порядке.
Подключение:
• Это устройство должно быть в розетку с заземлением.
Class A
• Этот аппарат класса A, предназначенный для промышленных
помещений, не подходит для использования в жилых
кварталах, где электрический ток подается общественной
системой питания низкого напряжения. В таких кварталах
могут возникнуть трудности обеспечения электромагнитную
совместимость из-за кондуктивных и индуктивных помех на
радиочастоте.
• Этот аппарат не соответствует директиве CEI 61000-3-
12 и предназначен для работы от частных электросетей,
подведенных к общественным электросетям только среднего
и высокого напряжения. Специалист, установивший аппарат,
или пользователь, должны убедиться, обратившись при
надобности к организации, отвечающей за эксплуатацию
системы питания, в том, что он может к ней подключиться.
Уход:
• Если шнур питания поврежден, он должен быть
заменен производителем, его сервисной службой или
квалифицированным специалистом во избежание опасности.
• Техническое обслуживание должно производиться только
квалифицированным специалистом.
• Внимание! Отключите аппарат от розетки до начала
ремонтных работ.

35
DIAG-STARTIUM 60-12 / 60-24
RU
Перевод оригинальных инструкций
• Регулярно открывайте аппарат и продувайте его, чтобы очистить
от пыли. Необходимо также проверять все электрические
соединения с помощью изолированного инструмента.
Проверка должна осуществляться квалифицированным
специалистом.
• Ни в коем случае не использовать растворители или другие
коррозийные моющие средства.
• Очистить поверхность аппарат с помощью сухой тряпки.
Нормы и правила:
• Аппарат соответствует директивам Евросоюза
• Декларация соответствия есть на нашем сайте.
• Знак соответствия EAC (Евразийское соответствие качества)
Утилизация:
Этот аппарат подлежит переработке. Не выбрасывать в общий
мусоросборник.
ОПИСАНИЕ
Аппараты DIAG-STARTIUM предназначены для зарядки и запуска свинцовых АКБ с жидкостным электролитом 12В
(6 элементов) для модели 60-12 и 6В (3 элемента), 12В (6 элементов) и 24В (12 элементов) для модели 60-24 :
Монтирование ручки и колесиков :
ЭЛЕКТРОПИТАНИЕ
Проверьте что питание и его защиты (плавкие предохранители) совместимы с током, необходимым
для работы аппарата. Аппарат должен быть расположен так, чтобы вилка была доступна.
Он обязательно должен быть подключен к розетке С ЗАЗЕМЛЕНИЕМ и следуя следующим рекомендациям:
DIAG-STARTIUM 60-12 DIAG-STARTIUM 60-24
Напряжение сети 230V - 1 ph 230V - 1 ph
Защита
16 A 16 A
Мощность
зарядки
2000 W 2000 W
запуск
10 000 W 10 000 W
Рекомендованное сечение кабеля при использовании удлинителя : 3 x 2,5 мм².

36
DIAG-STARTIUM 60-12 / 60-24
RU
Перевод оригинальных инструкций
ПОДКЛЮЧЕНИЕ И ОТКЛЮЧЕНИЕ
• Перед тем, как подключить аппарат к АКБ, проверьте,
что аппарат не подключен к сети питания и что кнопка
ВКЛ/ВЫКЛ в положении OFF.
• Определите местонахождение полюсов + и
-аккумулятора. (Инверсия полярности может повредить
предохранитель).
• Кабели не должны находиться рядом с режущими или
горячими поверхностями. Удалите кабели один от
другого и проверьте, что они не защемлены.
При подключение коннектора на «12V» или «24V», загорится светодиод на передней панели как подтверждение
выбранного параметра. Если выбранное напряжение не соответствует напряжению АКБ, зарядка не начнется.
Diag-Startium 60-12 Diag-Startium 60-24
Запуск и зарядка АКБ, установленной на машине :
Если отрицательный полюс АКБ подключен к шасси, то:
1.
Подключите красный зажим к полюсу + АКБ.
2. Подключите черный зажим к шасси автомобиля таким образом, чтобы он был как можно дальше от
трубопроводов топливной системы и от АКБ.
3.
Подключите аппарат к сети.
4. Выбрать режим использования, скорость зарядки и включить DIAG-STARTIUM.
5. После использования поставьте кнопку ВКЛ/ВЫКЛ в положение OFF. Отключите сначала зарядное
устройство от сети, затем отсоедините черный зажим и, наконец, красный.
На некоторых автомобилях положительный полюс АКБ подключен к шасси. В этом случае:
1.
Подсоедините черный зажим к отрицательному полюсу АКБ.
2. Подсоедините красный зажим к шасси автомобиля как можно дальше от трубопроводов топливной
системы и от АКБ.
3.
Подключите аппарат к сети.
4.
Выбрать режим использования, скорость зарядки и включить DIAG-STARTIUM.
5. Après utilisation, mettre le bouton marche/arrêt sur OFF, débrancher le chargeur du réseau d’alimentation
puis retirer d’abord la pince rouge et enn la pince noire.
Зарядка АКБ, неподключенной к автомобилю:
1.
Подсоедините красный зажим к положительному полюсу АКБ, а черный зажим - к отрицательному
полюсу.
2.
Подключите аппарат к сети.
3.
Выбрать режим использования, скорость зарядки и включить DIAG-STARTIUM.
4. После использования поставьте кнопку ВКЛ/ВЫКЛ в положение OFF. Отключите сначала зарядное
устройство от сети, затем отсоедините красный зажим и, наконец, черный.

37
DIAG-STARTIUM 60-12 / 60-24
RU
Перевод оригинальных инструкций
ИСПОЛЬЗОВАНИЕ В РЕЖИМЕ ЗАРЯДКИ (СМ. ИНТЕРФЕЙС)
DIAG-STARTIUM 60-12 DIAG-STARTIUM 60-24
Емкость
заряда
6V - 20 - 900 Ah
12V 20 - 900 Ah 20 - 900 Ah
24V - 20 - 525 Ah
Меры предосторожности
• Выберите крытое и хорошо проветриваемое помещение или же специально оборудованное помещение.
• Снимите пробки с АКБ (если они имеются) и убедитесь в том, что уровень жидкости (электролита) достаточный.
В противном случае, долейте деминерализованной воды и тщательно прочистите клеммы и наконечники АКБ.
• Проверьте, что емкость АКБ в Ампер-часах и напряжение в Вольтах соответствуют зарядному устройству.
Тест АКБ
Перед тем, как произвести зарядку, вы можете протестировать состояние АКБ. Подключите коннектор зажима на
12 или 24 В, соблюдая напряжение, указанное на АКБ. Экран покажет состояние аккумулятора. Он попеременно
покажет реальное напряжение и уровень заряда в процентах. 6-вольтовая АКБ на 100% своих возможностей,
если её напряжение превышает 6,4 В. Она на 0%, если её напряжение ниже 5,9 В. 12-вольтовая АКБ на 100%
своих возможностей, если её напряжение превышает 12,8 В. Она на 0%, если её напряжение ниже 11,8 В. Для 24
вольт АКБ на 100% своих возможностей, если её напряжение превышает 25,6 В. Она на 0%, если её напряжение
ниже 23,6 В.
Зарядка
После того, как вы подключите зарядное устройство к АКБ, следуя указаниям (см. § Подключение и
отключение), выберите напряжение АКБ (кнопка 13 только для модели 60-24), затем выберите скорость
зарядки (кнопка 12), соблюдая емкость АКБ, выберите тип АКБ (кнопка 11).
Опасность взрыва или выброса кислоты в случае ошибки выбора напряжения (24В
для аккумулятора 12В).
По умолчанию аппарат настроен на скорость зарядки номер «3» и на «универсальный» тип АКБ.
DIAG-STARTIUM 60-12 DIAG-STARTIUM 60-24
12V 6V 12V 24V
Зарядка 1 20-75Ah(5A) 20-75Ah(5A) 20-75Ah(5A) 20-75Ah(5A)
Зарядка 2 60-225Ah(15A) 60-225Ah(15A) 60-225Ah(15A) 40-150Ah(10A)
Зарядка 3 130-450Ah(30A) 130-450Ah(30A) 130-450Ah(30A) 85-300Ah(20A)
Зарядка 4 225-900Ah(60A) 225-900Ah(60A) 225-900Ah(60A) 150-525Ah(35A)
3 светодиода показывают, что АКБ находится в процессе зарядки:
- Индикатор зарядки (n°7).
- Экран: он попеременно покажет напряжение и уровень заряда в процентах (эти два значения должны меняться).
- Индикаторы напряжения и процентной доли (n°4 и 5). Они загораются попеременно, соответственно значению
отображенному в этот момент на экране.
Прогресс зарядки выражается в %.
% Уровень заряда аккумулятора Фаза
0% Восстановление аккумулятора Фаза проверки
25% Начало заряда
Форсирование
50% 50% заряда
75% Зарядка остающихся % Поглощение
100% АКБ заряжена Floating (подзаряд)
Автоматический перезапуск (функция доступна только для зарядки)
В случае отключения питания:
- При нормальной зарядке DIAG-STARTIUM выключится. Когда он заново включится, зарядка не возобновится.
В этом случае ее нужно перезапустить вручную.
- Во время заряда с функцией «Автоматический перезапуск», DIAG-STARTIUM выключается. Когда он заново
включится, зарядка возобновится автоматически.

38
DIAG-STARTIUM 60-12 / 60-24
RU
Перевод оригинальных инструкций
Для использования режима «Автоматический перезапуск»:
- Подключите зарядку следуя инструкциям,
- Выбрать скорость зарядки и тип батареи соблюдая ее характеристики,
- Затем нажмите удерживая (> 5 сек) кнопку START/STOP.
Следующие индикаторы позволяют убедиться, что функция «Автоматический перезапуск» активирована:
- Индикаторы напряжения и процентной доли (n°4 и 5). Они больше не горят как при обычной зарядке, а мигают
.
В этом режиме для остановки зарядки нажмите на кнопку (8).
Отключение электропитания больше не будет прерывать зарядку.
Функция DIAG+ (только для 12В АКБ)
Этот режим позволяет компенсировать ток, используемый стоящим на месте
автомобилем (до 60 А) для тестирования крупных потребителей: вентиляция двигателя,
стеклоподъёмник, электрические подвески и т.д., генерируя стабилизированное напряжение.
Это напряжение регулируется от 12 В до 15 В ступенями 0,1 с помощью кнопок (1).
Функция UNIVERSAL
Если тип АКБ неизвестен (с жидким, гелевым электролитом, AGM, Start/Stop), по умолчанию выберите UNIVERSAL.
Функция TIMER
Функция TIMER (n°11) позволяет выбрать регулируемое время зарядки от 10 до 120 мин шагами в 10 минут, а
также начать заряжать при напряжении ниже 1 В и без батареи.
TIMER - это ручная функция заряда. Она обладает следующими различиями:
• Вне зависимости состояния АКБ (сульфатация или короткое замыкание, напряжение < 1V) - заряд в любом
случае будет запущен.
• Заряд начнется даже если подключение было сделано неправильно: отсоединенные или закороченные зажимы.
Таким образом, существует риск появления искр, если подключение сделано некорректно.
Два светодиода показывают, что АКБ находится в процессе зарядки:
- ндикатор (n°2). Он попеременно указывает напряжение АКБ в Вольтах и оставшееся время зарядки в минутах.
- Индикаторы напряжения и времени (n°3 и 4). Они загораются попеременно, соответственно значению
отображенному в этот момент на экране.
Зарядка останавливается в следующих случаях :
- По окончанию выбранного времени.
- При отключении электричества
- Нажатием на кнопку (8).
Зарядка нескольких АКБ одновременно
Вы можете заряжать несколько АКБ одновременно, подсоединив их параллельно.
Положительные клеммы подсоединены к красному зажиму,а отрицательные - к черному. Эти
батареи или же объединения батарей должны иметь одинаковое напряжение 12 или 24 В.
Последовательное подключение не рекомендуется.
ИСПОЛЬЗОВАНИЕ В РЕЖИМЕ ЗАПУСКА
Меры предосторожности
• Не отсоединяйте АКБ от автомобиля. Подключение АКБ может привести к потере данных и к невозможности
запустить двигатель.
Запуск
Запуск
Как только вы подключили пусковое устройство к батарее, следуя указаниям (см. подключение и отключение),
нажмите на кнопку 9 для выбора режима «START ENGINE». Начинается предварительная зарядка. Этот режим
можно остановить, нажав на любую кнопку.

39
DIAG-STARTIUM 60-12 / 60-24
RU
Перевод оригинальных инструкций
• Режим «START ENGINE» определяет сульфатированные батареи и в случае их присутствия
отказывается запускать двигатель. Аппарат начинает автоматический цикл десульфатации
перед тем, как совершить запуск, чтобы защитить бортовую электронику.
• Если АКБ слишком поврежденная (например, сульфатированная), то зарядное устройство
блокирует запуск. В этом случае аппарат Startium попеременно показывает « CIP » (Charge in
Progress) и 0%. Это означает, что батарея в процессе восстановления. Пока буквы «CIP» видны
на дисплее, завести автомобиль невозможно.
DIAG-STARTIUM 60-12 50 - 220 Aч / 160 Aч мгновенно предзарядка 5 мин.
DIAG-STARTIUM 60-24 6-12-24V : 50 - 220 Aч / 160 Aч мгновенно
предзарядка 5 мин.
minimum
Как только предварительная зарядка окончена, сядьте за руль автомобиля. Функция «запуска» активируется
в момент первой попытки запуска двигателя (при повороте ключа). Продолжительность попытки не должна
превышать 10 секунд максимум (на дисплее появляется посекундный отсчет).
Если двигатель не заводится, сделайте 2-х минутный перерыв после каждой попытки запуска.
Nb : Автомобиль, который не заводится может иметь иную проблему, чем АКБ в плохом состоянии : альтернатор,
свечи накаливания,…
После использования следуйте рекомендациям по отключению (стр. 39-40).
ТЕСТ АЛЬТЕРНАТОРА
Если АКБ автомобиля регулярно отказывает, то проблема может быть в альтернаторе.
Аппараты DIAG-STARTIUM имеют функцию «Тестирование альтернатора» (стр. 5, n°11). Она показывает
зарядную емкость альтернатора, попеременно афишируя напряжение и процентное выражение.
Для использования этой функции автомобиль должен быть заведен. Следуйте рекомендациям по
подсоединения (стр. 39-40) и выберите функцию «Тестирование альтернатора» на интерфейсе.
Процентное выражение указывает на состояние альтернатора:
Между 0 и 100% Недостаточная зарядка, батарея недостаточно заряжена.
При 100% Альтернатор ОК.
Между 100% и 200% Ошибка перезарядки.
ЗАЩИТЫ
Эти аппараты разработаны с максимальным количеством защит :
• Зажимы зарядки полностью изолированы.
• Плавкий предохранитель обеспечивает защиту против инверсии полярности и коротких замыканий. Замена
требует ручного вмешательства.
DIAG-STARTIUM 60-12/60-24
• Термозащита обеспечивается термореле (охлаждение примерно 1/4 часа). Световой индикатор отказов
загорается в случае перегрева, дисплей афиширует «th».
• В случае дефекта в аппарате дополнительная термозащита прервет питание источника без предупреждения
пользователя. Поставить аппарат в хорошо проветриваемое помещение и подождать 15 минут.
• В случае проблемы с сетевым питанием в аппарате включается защита. Только загорается светодиод отказа и
дисплей показывает «dEF». Если нарушение слишком значительное, то аппарат защищен встроенным плавким
предохранителем. Этот плавкий предохранитель должен быть заменен сервисным специалистом.

40
DIAG-STARTIUM 60-12 / 60-24
RU
Перевод оригинальных инструкций
НЕИСПРАВНОСТИ, ИХ ПРИЧИНЫ И УСТРАНЕНИЕ
Неисправности Причины Устранение
Загорается светодиод Error Проблема сетевого питания. Проверьте сетевое питание.
Загорается светодиод Error и раздается
звуковой сигнал.
Зажимы закорочены или инверсия
полярности.
Проверьте, не расплавились ли плавкие
предохранители.
Не закорачивайте зажимы. Поменяйте
полярность.
Батарея, которую вы хотите зарядить,
неисправна.
Проверьте с помощью вольтметра
напряжение на клеммах АКБ.
Если это напряжение мгновенно вырастает
до 2,5 В на элемент, то АКБ может быть
сульфатирована или повреждена.
Ошибка напряжения (6 - 12 - 24 В)
Проверьте, что батарея подключена в
конфигурации 6, 12 или 24 В.
Батарея отсутствует или < 1 В. Индикация :
«BAt HS»
Подключите батарею.
Если напряжение АКБ < 1 В, то выберите
TIMER.
В аппарате включилась термозащита
вследствие интенсивного использования.
Индикация : «th»
Дайте аппарату остынуть в течение 1/4
часа.
Ни один светодиод не включается.
Прекращение питания. Проверьте питание.
Расплавился встроенный плавкий
предохранитель.
Верните аппарат в сервисную службу GYS.
Кнопка ВКЛ/ВЫКЛ не влючена. Включите кнопку ВКЛ/ВЫКЛ.
Если дисплей афиширует 0% в режиме
START ENGINE. Запуск невозможен.
Батарея сульфатирована, запуск
невозможен, чтобы защитить бортовую
электронику автомобиля.
Перед тем, как снова запустить режим
START ENGINE, перезарядите батарею.
Батарея кипит.
Неправильно выбрано напряжение 12 или
24 В.
Проверьте напряжение батареи и правильно
подключите ее.
Элементы батареи закорочены.
Батарея не подлежит восстановлению. Ее
надо заменить.
ГАРАНТИЯ
Гарантия распространяется на любой заводской дефект или брак в течение 2х лет с даты покупки изделия
(запчасти и рабочая сила).
Гарантия не распространяется на:
• Любые поломки, вызванные транспортировкой.
• Нормальный износ деталей (Например : кабели, зажимы и т.д.).
• Случаи неправильного использования (ошибка питания, падение, разборка).
• Случаи выхода из строя из-за окружающей среды (загрязнение воздуха, коррозия, пыль).
При выходе из строя, обратитесь в пункт покупки аппарата с предъявлением следующих документов:
- документ, подтверждающий покупку (с датой): кассовый чек, инвойс....
- описание поломки.

41
DIAG-STARTIUM 60-12 / 60-24
NL
Vertaling van de oorspronkelijke gebruiksaanwijzing
BELANGRIJKE VEILIGHEIDSINSTRUCTIES
In deze gebruiksaanwijzing vindt u de aanwijzingen over het
functioneren van uw toestel en de veiligheidsvoorzorgsmaatregelen.
Leest u dit document aandachtig door voor u het apparaat in gebruik
neemt. Bewaar dit document als naslagwerk. Deze instructies moeten
eerst goed gelezen en begrepen worden alvorens het apparaat te
gebruiken. Voer geen enkele verandering en/of onderhoud uit die
niet beschreven staat in deze handleiding. Ieder lichamelijk letsel
of materiële schade veroorzaakt door het onjuist opvolgen van de
instructies in deze handleiding kan niet op de fabrikant verhaald
worden. Raadpleeg in geval van problemen of vragen een
gekwalificeerde onderhoudsmonteur. Dit apparaat kan uitsluitend
gebruikt worden als oplader of als stroomvoorziening, volgens de
instructies vermeld op het apparaat en in de handleiding. Volg altijd
nauwkeurig de veiligheidsinstructies op. Bij oneigenlijk of gevaarlijk
gebruik kan de fabrikant van dit product niet aansprakelijk gesteld
worden.
Dit apparaat is bestemd voor gebruik binnen. Niet blootstellen aan
regen.
Dit apparaat kan allen gebruikt worden door kinderen vanaf 8 jaar
en door personen met lagere lichamelijke, zintuiglijke of mentale
vaardigheden of gebrek aan ervaring of kennis als deze goed
begeleid worden of als in de handleiding aangeven staat dat het
toestel veilig en zonder risico gebruikt kan worden. Kinderen mogen
niet met het apparaat spelen. Schoonmaak en onderhoud mogen
niet gedaan worden door kinderen zonder toezicht.
Niet geschikt voor het opladen van niet-oplaadbare batterijen of
accu’s.
Gebruik het apparaat niet als de stroomkabel of de stekker defect
zijn.
Probeer nooit een bevroren of een defecte accu op te laden.
Het apparaat niet bedekken.
Het apparaat niet dichtbij een warmtebron plaatsen en niet
blootstellen aan blijvend hoge temperatuur (hoger dan 50°C).
De ventilatie openingen niet toedekken. Volg de installatie-instructies
in deze handleiding voor het opstarten van het apparaat.
De automatische modus en de gebruiksbeperkingen van het
apparaat worden in deze handleiding beschreven.
Ontplofngs- en brandgevaarlijk!
Een opladende accu kan explosief gas uitstoten.
• Plaats de accu tijdens het opladen in een goed geventileerde
ruimte.
• Vermijd vuur en vonken. Niet roken.
• Scherm de elektrische delen van de accu af om kortsluiting te
voorkomen.

42
DIAG-STARTIUM 60-12 / 60-24
NL
Vertaling van de oorspronkelijke gebruiksaanwijzing
Let op : zuur-projectie gevaar.
• Draag altijd een veiligheidsbril en veiligheidshandschoenen.
• In geval van oog- of huidcontact, meteen met veel water afspoelen
en onmiddellijk een arts raadplegen.
Aansluiten / Afsluiten :
• Sluit de stroomvoorziening af, alvorens de accu aan te sluiten of
los te koppelen.
• De aansluitklem van de accu die niet is aangesloten op een chassis
moet als eerst aangekoppeld worden. De andere verbinding
moet plaats vinden op de chassis, ver van de accu en van de
brandstofkanalisering. De accu oplader moet vervolgens op het
net aangesloten worden.
• Koppel na het laden eerst de acculader van de netspanning los.
Koppel daarna de connectie van de chassis los, en pas daarna
de connectie met de accu.
Aansluiten :
• Dit apparaat moet aangesloten aan de netspanning met een
geaard stopcontact.
Class A
• Deze apparatuur is bestemd voor een industriële omgeving
(Klasse A), en is niet geschikt voor huiselijk gebruik met een open-
bare stroomvoorziening. Het kan moeilijk zijn om de elektro-
ma-gnetische compatibiliteit in deze omgeving te garanderen, als
gevolg van storingen en uitgezonden radiofrequenties.
• Dit materieel is niet conform aan de CEI 61000-3-12 norm en
is bestemd voor aansluiting aan lage spanningsnetwerken,
aangesloten aan een openbaar netwerk. Als het materieel
wordt aangesloten op een lage spanningsnetwerk, is het de
verantwoordelijkheid van de installateur of de gebruiker van
het materieel er zich van te verzekeren, na raadpleging van de
stroomleverancier, dat het materieel inderdaad veilig aangeslo-
ten kan worden.
Onderhoud :
• Als de voedingskabel beschadigd is, dient deze vervangen
te worden door de fabrikant, zijn reparatie dienst of een
gekwalificeerde technicus, om gevaar te vermijden.
• Het onderhoud dient uitsluitend door een gekwalificeerde
onderhoudsmonteur te gedaan te worden.
• Waarschuwing ! Altijd de stekker uit het stopcontact halen
alvorens eventuele onderhoudswerkzaamheden te verrichten.
• Haal regelmatig de kap van het apparaat en blaas het stof weg
met een elektrisch stofblazertje. Laat tegelijkertijd de elektrische
aansluitingen controleren door een gekwalificeerd technicus (met
behulp van geïsoleerd gereedschap).

43
DIAG-STARTIUM 60-12 / 60-24
NL
Vertaling van de oorspronkelijke gebruiksaanwijzing
• Nooit oplosmiddelen of andere agressieve schoonmaakmiddelen
gebruiken.
• De oppervlaktes van het apparaat reinigen met een droge doek.
Regelgeving :
• Het apparaat is in overeenstemming met met de Europese
richtlijnen
• De conformiteitsverklaring is te vinden op onze internetsite.
• EAC (Euraziatische Economische Gemeenschap) merk
Afvalverwerking :
Afzonderlijke inzameling vereist. Niet met het huishoudelijke afval
wegwerpen.
BESCHRIJVING
DIAG-STARTIUM producten zijn laden en starten 12 volt voor lood-calcium batterijen,6 elementen Gel and AGM voor
het model 60-12 en 6V (3 elements), 12V (6 elements) and 24V (12 elements) voor het model 60-24:
Bijgeleverd - beugel en wielen :
VOEDING
Controleer of de stroomtoevoer en beveiliging (zekering en/of onderbreker) gelijk zijn aan de gevraagde hoeveelheid
stroom. Het toestel moet zo neergezet zijn dat stekker toegankelijk is.
Het moet aangesloten zijn op randaarde tegen de volgende voorwaarden
DIAG-STARTIUM 60-12 DIAG-STARTIUM 60-24
Netspanning 230V - 1 ph 230V - 1 ph
Beveiliging
16 A 16 A
Vermogen van
laden
2000 W 2000 W
opstarten
10 000 W 10 000 W
Aanbevolen kabel indien er verlengd dient te worden : 3 x 2.5 mm².
AANSLUITEN EN AFKOPPELEN.
• Verzeker u ervan, voor het aankoppelen aan een accu, dat
het toestel niet is aangesloten op de netspanning en dat de
schakelaar op OFF staat.
• Kijk waar de 2 polen (+ en -) van de accu zich bevinden.
(Polariteitsomwisseling kan de zekering beschadigen).
• Houd de kabels ver van verwarmde oppervlaktes of
snijvlakken. Leg de twee kabels apart en voorkom dat ze
afgekneld worden.
Als de koppeling aangesloten is op «12V» of «24V», gaat een ledlampje branden op het bedieningspaneel, om uw keuze
te bevestigen. Als de gekozen spanning niet overeenkomt met de spanning van de accu, zal het opladen niet kunnen
beginnen.

44
DIAG-STARTIUM 60-12 / 60-24
NL
Vertaling van de oorspronkelijke gebruiksaanwijzing
Diag-Startium 60-12 Diag-Startium 60-24
Opstarten en laden van een accu die aangekoppeld aan het voertuig is:
Wanneer de negatieve pool van de accu aan het chassis gekoppeld is :
1. Koppel de rode klem op pool + van de accu.
2. Koppel de zwarte klem op het chassis van het voertuig, zodanig dat deze zich niet te dichtbij de
brandstoeidingen (brandstof, olie...) en de accu bevindt.
3. Sluit het apparaat aan op de netspanning.
4. Kies de gebruiksmodus, de laadsnelheid en start de DIAG-STARTIUM.
5. Zet na gebruik de aan/uit knop op OFF, koppel de lader van de netspanning af, en koppel dan eerst de
zwarte en daarna de rode klem af.
Bij sommige voertuigen is de positieve pool van de accu aan het chassis gekoppeld. In dit geval :
1. Sluit de zwarte klem aan op de negatieve pool van de accu.
2. Sluit de rode klem aan op het chassis van het voertuig, zodanig dat deze zich niet te dichtbij de
brandstoeidingen (brandstof, olie...) en de accu bevindt.
3. Sluit het apparaat aan op de netspanning.
4. Kies de gebruiksmodus, de laadsnelheid en start de DIAG-STARTIUM.
5. Zet na gebruik de aan/uit knop op OFF, koppel de lader van de netspanning af, en koppel dan eerst de
rode en daarna de zwarte klem af.
Laden van een accu die niet aangekoppeld aan het voertuig is:
1. Sluit de rode klem aan de + pool van de accu en de zwarte klem op de - pool van de accu.
2. Sluit het apparaat aan op de netspanning.
3. Kies de gebruiksmodus, de laadsnelheid en start de DIAG-STARTIUM.
4. Zet na gebruik de aan/uit knop op OFF, koppel de lader van de netspanning af, en koppel dan eerst de
rode en daarna de zwarte klem af.
GEBRUIK IN LAAD PROGRAMMA
DIAG-STARTIUM 60-12 DIAG-STARTIUM 60-24
Laadcapaciteit
6V - 20 - 900 Ah
12V
20 - 900 Ah 20 - 900 Ah
24V - 20 - 525 Ah
Vorzorgsmaatregelen voor gebruik
• Zorg voor een goed geventileerde ruimte.
• Verwijder de afdekkappen (indien aanwezig) van de batterij en zorg dat het vloeistof nivo voldoende( lood-calcium)
is. Vul zonodig bij met gedestilleerd water en reinig de polen. Stel de lader in op de gewenst ampers en voltage in
ampere-hours and voltage.
Het testen van de batterij.
Alvorens met het laden te beginnen, is het mogelijk om de status van de accu te testen. Sluit de rode klem op «12» of
«24V» in overeenstemming met de spanning die aangegeven staat op de accu. Het display toont dan de status van
de accu. Hij geeft om beurten de reële spanning en het laad percentage aan. Een 6V accu is op 100% van de capaciteit

45
DIAG-STARTIUM 60-12 / 60-24
NL
Vertaling van de oorspronkelijke gebruiksaanwijzing
als de spanning hoger dan 6,4V is. Hij is op 0% indien de spanning lager is dan 5,9V. Een 12V accu is op 100% van de
capaciteit als de spanning hoger dan 12,8V is. Hij is op 0% indien de spanning lager is dan 11,8V. Een 24V accu is op
100% van zijn capaciteit als de spanning hoger is dan 25,6V. Hij is op 0% indien de spanning lager is dan 23,6V.
Laden
Wanneer de lader volgens de aanbevelingen is aangesloten op de accu (zie hoofdstuk aansluiten en loskoppelen),
koppel de aansluiting van de rode klem aan op de spanning : «12V» of «24V». Kies de laadsnelheid (pagina 5, n°12)
en houd daarbij rekening met de capaciteit van uw accu (zie tabel hier onder), kies het type accu (n° 11) en druk
vervolgens kort op de START/STOP knop (n° 8). Om het laden te stoppen kunt u op ieder gewenst moment op de
START/STOP knop drukken.
Wanneer de verkeerde spanning gekozen wordt (24V voor een 12V-accu) bestaat het risico
op ontplofng of zuurprojectie.
DIAG-STARTIUM 60-12 DIAG-STARTIUM 60-24
12V 6V 12V 24V
Laden 1 20-75Ah(5A) 20-75Ah(5A) 20-75Ah(5A) 20-75Ah(5A)
Laden 2 60-225Ah(15A) 60-225Ah(15A) 60-225Ah(15A) 40-150Ah(10A)
Laden 3 130-450Ah(30A) 130-450Ah(30A) 130-450Ah(30A) 85-300Ah(20A)
Laden 4
225-900Ah(60A) 225-900Ah(60A) 225-900Ah(60A) 150-525Ah(35A)
Drie elementen geven aan dat de accu aan het opladen is :
- Het laad ledlampje (n°7).
- Het display : toont om beurten de spanning en het laadpercentage (er moet vooruitgang in de twee waarden te
constateren zijn).
- De ledlampjes die de spanning en het percentage tonen (n° 4 en 5). Ze branden continu en wisselen in hetzelfde ritme
als het display.
De voortgang van het laden wordt in % uitgedrukt.
% Oplaadniveau van de accu Fase
0% Herstel van de accu Testfase
25% Start laden
Boost
50% 50% opgeladen
75% Opladen van de resterende % Absorptie
100% Accu opgeladen Floating
Automatische herstart (kan alleen bij het laden gebruit worden)
In geval van een stroomonderbreking :
- Tijdens een normale oplaadprocedure zal de STARTIUM uitgaan. Wanneer de DIAG-STARTIUM weer aangaat zal hij
niet beginnen op te laden. Hij moet dan handmatig geactiveerd worden.
- Tijdens een laadprocedure met de functie «Automatisch herstarten» gaat de DIAG-STARTIUM uit. Wanneer de
DIAG-STARTIUM weer aangaat zal hij automatisch weer beginnen met laden.
Voor het gebruik van de modus «Automatisch herstarten» :
- Sluit de lader aan volgens de instructies,
- Kies de laadsnelheid en het type accu, rekening houdend met de kenmerken van de accu,
- Druk daarna langer dan 5 seconden op de START/STOP knop.
Een lampje geeft aan dat de functie «Automatisch herstarten» is geactiveerd.
- De ledlampjes spanning en percentage (n° 4 en 5). Deze branden niet meer continu, zoals ze doen tijdens een
normale laadprocedure, maar knipperen.
Druk, om het laadproces in deze modus te onderbreken, op de (8) knop. Een stroomonderbreking
zal het laadproces niet meer onderbreken.
DIAG + funktie (alleen 12V )
Bij een stationair draaiend voertuig het toestel levert tot 60A om de hoge gebruikers te activeren en te testen:
ventilator, raambediening, electronisch geregelde vering etc... Om zodoende een constante stroom toevoer te hebben.
This voltage can be adjusted from 12V to 15V by 0.1V steps with key 1.
Universele functie
In het geval dat men niet het juiste type batterij kan herkennen (lood-calcium, gel, AGM, Start/Stop) dan raden wij aan
de Universele instelling te activerendit is ook de standaard instelling.

46
DIAG-STARTIUM 60-12 / 60-24
NL
Vertaling van de oorspronkelijke gebruiksaanwijzing
TIMER functie
Met de TIMER functie (n°11) kan een variabele laadperiode van 10 tot 120 minuten gekozen worden, met stappen van
10 minuten. Tevens kan geladen worden onder 1V en zonder accu.
Het laden van de functie TIMER is handmatig. De functie geeft de volgende verschillen :
• Het opladen wordt altijd opgestart, onafhankelijk van de staat van de accu (gesulfateerde accu, accu in kortsluiting,
spanning lager dan 1V).
• Het laden start, zelfs als de aansluitingen niet correct zijn : klemmen afgekoppeld of kortsluiting. Er bestaat dus een
risico op vonkvorming als de aanbevelingen voor het correct aansluiten niet opgevolgd worden.
Twee lampjes geven aan dat het laden is opgestart :
- Display (n° 2). Geeft afwisselend de spanning van de accu in volt en de resterende laadtijd in minuten aan.
- De LED lampjes spanning en minuten (n° 3 en 4). Ze branden continu en wisselen in hetzelfde ritme als het display.
Het laden stopt op verschillende manieren :
- Aan het eind van de ingestelde periode.
- Tijdens een stroomonderbreking
- Met een druk op de (8) knop.
Gelijktijdig laden van meerdere accu’s
Met behulp van een parallel aansluiting kunt u meerdere accu’s tegelijk laden. De positieve polen verbonden met de rode klem en
de negatieve polen aangesloten op de zwarte klem. Deze accu’s of groepen accu’s moeten van dezelfde spanning zijn : 12V of 24V.
Het serie laden wordt niet aanbevolen.
GEBRUIK IN START PROGRAMMA
Voorzorgsmaatregelen voor gebruik.
• Koppel de accu niet los van het voertuig. Het aansluiten van de accu kan verlies van gegevens veroorzaken en
eventueel het opstarten verhinderen.
Starten
Als de starter aangesloten is aan de batterij (zie aansluitprocedure) druk op toets 9 om «START ENGINE» te selecteren.
Als deze funktie is geactiveerd een voorstart zal plaatsvinden. Indrukken van elke toets zal dit programma stoppen.
• De modus «START ENGINE» herkent gesulfateerde accu’s en weigert in dat geval het opstarten. Voor
iedere opstart procedure begint het toestel met een automatische désulfatie om de auto-elektronica te
beschermen.
• Als de accu te zeer beschadigd is (bijvoorbeeld gesulfateerd) blokkeert de lader het opstarten. In dit
geval geeft de startium afwisselend «CIP» (Charge in Progress) en 0% aan. Dit betekent dat het herstel
van de accu gaande is. Zolang de afkorting «CIP» op de display verschijnt is het niet mogelijk om het
voertuig op te starten.
DIAG-STARTIUM 60-12 50 - 220 Ah / 160 Ah Continu 5 min voorladen
DIAG-STARTIUM 60-24 6-12-24V : 50 - 220 Ah / 160 Ah Continu 5 min voorladen minimum
Begeef u, wanneer het voorladen voltooid is, naar het dashboard van het voertuig. De «starter» functie wordt
geactiveerd op het moment dat de eerste startpoging wordt gedaan (door de contactsleutel om te draaien). De duur
van de poging mag maximaal 10 seconden zijn (aftellen wordt getoond op het display).
Wacht, als uw motor niet start, 2 minuten tussen iedere start poging.
Nb : Als het voertuig niet start, betekent dat niet altijd dat de accu in slechte staat verkeert. De oorzaak van het
probleem kan ook in de dynamo, de gloeibougie of elders liggen.
Koppel na gebruik los volgens de aanbevelingen (p.47-48).
HET TESTEN VAN DE DYNAMO.
Als de accu van het voertuig regelmatig defect is kan het probleem bij de dynamo liggen.
De STARTIUM apparaten hebben een «dynamo-test» functie (p5, n11). Deze toont de laadcapaciteit van de dynamo
en geeft om beurten de spanning en het percentage weer.
Om deze functie te kunnen gebruiken moet het voertuig gestart zijn. Volg de aanbevelingen voor de
aansluitingen (p.47-48) en kies de functie «dynamo-test» op het bedieningspaneel.

47
DIAG-STARTIUM 60-12 / 60-24
NL
Vertaling van de oorspronkelijke gebruiksaanwijzing
Het aangegeven percentage informeert u over de staat van de dynamo :
Tussen 0 en 100% De accu is niet correct opgeladen.
A 100% Dynamo correct.
Tussen 100% en 200% Overbelasting.
BEVEILIGING.
Deze apparaten zijn ontworpen met een maximale beveiliging :
• De laadklemmen zijn volledig geïsoleerd.
• Een zekering biedt bescherming tegen omgekeerde polariteit en kortsluiting. Het vervangen moet handmatig gebeuren.
DIAG-STARTIUM 60-12/60-24
• De thermische beveiliging wordt verzekerd door een thermostaat (afkoeling ongeveer een kwartier). In het geval van
oververhitting gaat het storingslampje aan, en het display toont «th».
• In geval van een storing, zorgt de extra thermische beveiliging ervoor dat de generator uitgaat zonder indicatie voor
de gebruiker. Plaats het apparaat in een goed geventileerde ruimte en wacht 15 minuten.
• In geval van een stroomstoring schakelt het apparaat over op beveiliging, alleen het error LED lampje gaat aan en
het display toont «dEF.» Als het probleem te groot is wordt het toestel door een interne zekering beschermd. Deze
zekering moet door de technische dienst worden vervangen.
PROBLEEM OPLOSSEN.
Storingen Probleem Oplossingen
Fout LED knippert Netvoedingsprobleem Controleer de netvoeding.
Fout LED knippert en maakt geluid
Klemmen op verkeerde polen of kortsluiting.
Controleer de zekeringen op defect.
Klemmen terug plaatsen op juiste polen.
Batterij is defekt
Controleer het voltage van de batterij met
een voltmeter. Als het voltage direct toeneemt
met meer dan 2.5 volt dan is de batterij
gesulfateerd of defekt.
Voltage fout
Controleer of de batterij goed is aangesloten in
12 of 24 volt.
Batterij ziet de tester niet of < 1 volt Display :
«BAt HS»
Sluit de batterij aan.
schakel TIMER in als de voltage is <1V.
Na intensief gebruik schakelt de thermische
beveiliging in. Display : «th»
Wacht 15 minuten tot het toestel afgekoeld is.
De LED lampjes branden niet.
Probleem in de voeding. Controleer de voeding.
De zekering inwendig is gesmolten Toestel terugsturen naar GYS dealer
Aan/uit schakelaar is niet gekoppeld Vervang de aan/uit schakelaar
In START ENGINE programma,als het scherm
o% aangeeft is een herstart niet mogelijk.
De batterij is gesulfateerd, start wordt
vermeden om de voertuig electronica te
beschermen.
Herlaad de batterij voor gebruik programma
START ENGINE.
Batterij kookt
Het geselecteerde voltage 12 of 24 volt klopt
niet.
Controleer de batterij en sluit deze conform de
aanbevelingen aan.
De batterij heeft kortsluiting in een element.
Batterij kan niet «recovered»worden, vervang
batterij.
GARANTIE
De garantie dekt alle gebreken en fabricagefouten gedurende twee jaar vanaf de aankoopdatum (onderdelen en
arbeidsloon).
De garantie dekt niet :
• Alle overige schade als gevolg van vervoer.
• De gebruikelijke slijtage van onderdelen (Bijvoorbeeld : kabels, klemmen, enz.).
• Incidenten als gevolg van verkeerd gebruik (verkeerde elektrische voeding, vallen, ontmanteling).
• Gebreken ten gevolge van de gebruiksomgeving (vervuiling, roest, stof).
In geval van storing moet het apparaat teruggestuurd worden naar uw distributeur, samen met:
- Een gedateerd aankoopbewijs (betaalbewijs, factuur ...).
- Een beschrijving van de storing.

48
DIAG-STARTIUM 60-12 / 60-24
IT
Traduzione delle istruzioni originali
ISTRUZIONI DI SICUREZZA
Questo manuale descrive il funzionamento del carica-batterie e le
precauzioni da seguire per vostra sicurezza. Leggere attentamente
prima dell’uso e conservare con cura per poter consultarlo
successivamente. Queste istruzioni devono essere lette e comprese
prima dell’uso. Ogni modifica o manutenzione non indicata nel
manuale non deve essere effettuata. Ogni danno corporale o
materiale dovuto ad un uso non conforme alle istruzioni presenti
in questo manuale non potrà essere considerata a carico del
fabbricante. In caso di problema o d’incertezza, si prega di
consultare una persona qualificata per manipolare correttamente
il dispositivo. Questo dispositivo deve essere usato soltanto per
fare la ricarica e/o riavvio e/o alimentazione entro i limiti indicati
sul dispositivo e su questo manuale. Bisogna rispettare le istruzioni
relative alla sicurezza. In caso di uso inadeguato o pericoloso, il
fabbricante non potrà essere ritenuto responsabile.
Dispositivo da usare all’interno. Non deve essere esposto alla
pioggia.
Questo dispositivo può essere usato da bambini di età superiore
a 8 anni, da persone con capacità fisiche, sensoriali o mentali
ridotte e da persone senza esperienza o conoscenze, se esse
sono correttamente sorvegliate o se le istruzioni relative all’uso del
dispositivo in sicurezza gli sono state trasmesse e che i rischi intrapresi
sono stati presi in considerazione. I bambini non devono giocare
con il dispositivo. Le pulizie e la manutenzione fati dall’utente non
devono essere effettuati da bambini non sorvegliati.
Non usare in nessun caso per caricare pile o batterie non ricaricabili.
Non usare il dispositivo se il cavo di alimentazione o la presa sono
danneggiati.
Non caricare mai una batteria ghiacciata o danneggiata.
Non coprire il dispositivo.
Non spostare il dispositivo in prossimità di fonti di calore e
temperature spesso elevate (superiori a 50°C).
Non ostruire le aperture della ventilazione. Riferirsi alla parte
installazione prima di usare il dispositivo.
Il modo di funzionamento automatico così come le restrizioni
applicabili all’uso sono spiegate in seguito su questo manuale.
Rischio di esplosione e d’incendio!
Una batteria in carica può emettere dei gas esplosivi.
• Durante la carica, la batteria deve essere messa in un luogo
ben ventilato.
• Evitare fiamme e scintille. Non fumare.
• Proteggere le superficie della batteria da corto-circuiti.
Rischio di proiezioni acide!

49
DIAG-STARTIUM 60-12 / 60-24
IT
Traduzione delle istruzioni originali
• Portare occhiali e guanti di protezione.
• In caso di contatto con gli occhi o con la pelle, sciacquare
abbondantemente e consultare un medico immediatamente.
Connessione / Sconnessione:
• Scollegare l’alimentazione prima di collegare o scollegare le
connessioni della batteria.
• Il terminale della batteria non collegato al telaio deve essere
collegato per primo. L’altra connessione deve essere effettuata
sul telaio, lontano dalla batteria e dal serbatoio del carburante.
Il caricatore del carica batterie deve essere collegato alla rete
elettrica.
• Dopo l’operazione di carica, scollegare il caricatore della
batteria dalla presa poi togliere la connessione dal telaio e in
seguito la connessione della batteria, nell’ordine indicato.
Collegamento :
• Questo dispositivo deve essere collegato ad una presa di corrente
con messa a terra.
Class A
• Questo dispositivo destinato agli ambienti industriali (classe A)
non è stato concepito per essere usato in un sito residenziale
laddove la corrente elettrica sia fornita dal sistema pubblico di
alimentazione di bassa tensione. Potrebbero esserci difficoltà po-
tenziali per assicurare la compatibilità elettromagnetica in questi
siti, a causa delle perturbazioni condotte o irradiate.
• Questo materiale non è conforme alla CEI 61000-3-12 e è des-
tinato ad essere collegato alle reti di bassa tensione private col-
legate alla rete pubblica di alimentazione soltanto a livello di
media e alta tensione. Se è collegato al sistema pubblico di ali-
mentazione di bassa tensione, è di responsabilità dell’installa-
tore o dell’utilizzatore del materiale di assicurarsi, consultando
l’operatore della reta pubblica di distribuzione, che il materiale
possa essere collegato ad esso.
Manutenzione:
• Se il cavo di alimentazione è danneggiato, esso deve essere
sostituito dal fabbricante, dal suo servizio post-vendita o da
persone di qualifiche simili per evitare pericoli.
• La manutenzione deve essere effettuata da una persona qualificata
• Attenzione! Scollegare sempre la schede dalla presa elettrica
prima di effettuare ogni manipolazione sul dispositivo.
• Regolarmente, togliere il coperchio e spolverare all’aiuto del
soffiatore. Cogliere l’occasione per far verificare le connessioni
elettriche con un utensile isolato da persone qualificate.
• Non usare in nessun caso solventi o altri prodotti pulenti aggressivi.
• Pulire le superfici del dispositivo con uno straccio secco.

50
DIAG-STARTIUM 60-12 / 60-24
IT
Traduzione delle istruzioni originali
Regolamentazione:
• Dispositivo in conformità con le direttive europee
• La dichiarazione di conformità è disponibile sul nostro sito internet.
• Marca di conformità EAC (Comunità Economica Eurasiatica)
Scarto:
Questo materiale è soggetto alla raccolta differenziata. Non deve
essere smaltito con i rifiuti domestici.
DESCRIZIONE GENERALE
Gli apparecchi DIAG-STARTIUM sono destinati alla ricarica ed all’avviamento delle batterie al piombo ad elettrolito
(liquido, AGM o gel) 12V (6 elementi) per i modelli 60-12 e 6V (3 elementi), 12V (6 elementi) e 24V (12 elementi) per
il modello 60-24 :
Montaggio dell’impugnatura e delle ruote :
ALIMENTAZIONE ELETTRICA
Vericare se l’alimentazione e le protezioni (fusibili) siano compatibili con la corrente necessaria per
l’uso. Il dispositivo deve essere posizionato in modo tale che la presa sia facilmente raggiungibile
Deve essere collegato ad una presa CON messa a terra e seguire le raccomandazioni che seguono:
DIAG-STARTIUM 60-12 DIAG-STARTIUM 60-24
Tensione settore 230V - 1 ph 230V - 1 ph
Protezione 16 A 16 A
Capacità di
carica
2000 W 2000 W
avviamento
10 000 W 10 000 W
La sezione di cavo consigliata in caso di uso con prolunga: 3 x 2,5 mm².
COLLEGAMENTO E SCOLLEGAMENTO
• Prima di ogni collegamento ad una batteria, vericare che
il dispositivo non sia più collegato alla rete elettrica e che il
tasto avvio/arresto sia su OFF.
• Localizzare i 2 poli + et - della batteria. (Un’inversione di
polarità può danneggiare il fusibile).
• Allontanare i cavi da tutte le supercie calde o taglienti.
Separare correttamente i 2 cavi ed evitare che essi siano
pinzati.
Una volta il connettore collegato su «12V» o «24V», una LED si accende sull’interfaccia del prodotto per poter confermare
l’entrata scelta. Se la tensione scelta non corrisponde alla tensione della batteria, la carica non si avvierà.

51
DIAG-STARTIUM 60-12 / 60-24
IT
Traduzione delle istruzioni originali
Diag-Startium 60-12 Diag-Startium 60-24
Avviamento e carica di una batteria installata sul veicolo :
Nel caso un cui il polo negativo della batteria sia collegato al telaio :
1. Collegare il morsetto rosso sul polo + della batteria.
2. Collegare il morsetto nero sul telaio del veicolo, in modo tale che quest’ultima si trovi a distanza dei tubi
del serbatoiro (carburante, olio) e della batteria.
3. Collegare il dispositivo alla rete di alimentazione.
4. Scegliere il modo d’uso, la velocità di carica e avviare lo DIAG-STARTIUM.
5. Dopo ogni uso, mettere il tasto avvio/arresto suOFF, scollegare il caricabatterie dalla rete elettrica e in
seguito ritirare prima il morsetto nero, poi il morsetto rosso.
Certi veicoli hanno il polo positivo della batteria collegato al telaio, in tale caso:
1. Collegare il morsetto nero sul polo negativo della batteria.
2. Collegare il morsetto rosso al telaio del veicolo, in modo tale che esso sia lontano dal tubo del carburante
e dalla batteria.
3. Collegare il dispositivo alla rete di alimentazione.
4. Scegliere il modo d’uso, la velocità di carica e avviare lo DIAG-STARTIUM.
5. Dopo ogni uso, mettere il tasto avvio/arresto su OFF, scollegare il caricabatterie dalla rete elettrica, in
seguito ritirare il morsetto rosse, e poi il morsetto nero.
Carica di una batteria non collegata al veicolo:
1. Collegare il morsetto rosso sul polo positivo della batteria e il morsetto nero sul polo negativo.
2. Collegare il dispositivo alla rete di alimentazione.
3. Scegliere il modo d’uso, la velocità di carica e avviare lo DIAG-STARTIUM.
4. Dopo ogni uso, mettere il tasto avvio/arresto su OFF, scollegare il caricabatterie dalla rete elettrica, in
seguito ritirare il morsetto rosse, e poi il morsetto nero.
USO IN MODO CARICABATTERIE (CF: INTERFACCIA)
DIAG-STARTIUM 60-12 DIAG-STARTIUM 60-24
Capacità di
carica
6V - 20 - 900 Ah
12V 20 - 900 Ah 20 - 900 Ah
24V
- 20 - 525 Ah
Precauzioni prima dell’uso
• Scegliere un luogo aerato o appositamente allestito.
• Togliere i tappi della batteria (se ce ne sono) e assicurarvi che il livello del liquido (elettrolito) sia sufciente. In caso
contrario, aggiungere dell’acqua demineralizzata e pulire accuratamente i terminali e i connettori della batteria.
• Vericare che la capacità della batteria in Ampère-ora e la tensione in Volt siano compatibili con il vostro caricabatterie
Test della batteria
Prima di effettuare una carica, è possibile effettuare un test sullo stato della batteria. Collegare il connettore del morsetto
rosso su «12» o «24V» rispettando la tensione indicata sulla batteria. Lo schermo indicherà allora lo stato di salute della
batteria. I risultati si alternano fra tensione reale e percentuale di carica. Una batteria 6V è al 100% delle sue capacità se
la tensione è superiore a 6,4V. La batteria è a 0% se la tensione è inferiore a 5,9V. Una batteria 12V è al 100% delle sue
capacità se la tensione è superiore a 12,8V. La batteria è a 0% se la tensione è inferiore a 11,8V. Per il 24V, la batteria
è al 100% delle sue capacità se la tensione è superiore a 25,6V. La batteria è a 0% se la tensione è inferiore a 23,6V.

52
DIAG-STARTIUM 60-12 / 60-24
IT
Traduzione delle istruzioni originali
Carica
Quando il caricabatterie sarà collegato alla batteria (seguendo le raccomandazioni di collegamento, vedere capitolo
collegamento e scollegamento), collegare il connettore del morsetto rosso sulla tensione: «12V» o «24V». Scegliere
la velocità della carica (p.5, n°12) rispettando la capacità della batteria (vedere tabella sottostante), scegliere il tipo di
batteria (n°11) poi premere (pressione veloce) sul tasto START/STOP (n°8). Per fermare la carica ad ogni momento,
premere di nuovo sul tasto START/STOP.
Rischio d’esplosione o di proiezioni acide in caso di selezione erronea della tensione (24V
per una batteria 12V).
DIAG-STARTIUM 60-12 DIAG-STARTIUM 60-24
12V 6V 12V 24V
Carica 1 20-75Ah(5A) 20-75Ah(5A) 20-75Ah(5A) 20-75Ah(5A)
Carica 2 60-225Ah(15A) 60-225Ah(15A) 60-225Ah(15A) 40-150Ah(10A)
Carica 3 130-450Ah(30A) 130-450Ah(30A) 130-450Ah(30A) 85-300Ah(20A)
Carica 4 225-900Ah(60A) 225-900Ah(60A) 225-900Ah(60A) 150-525Ah(35A)
re spie permettono di indicare che la batteria è sotto carica:
- La LED di carica (n°7).
- Lo schermo: Indica in alternanza la tensione e la percentuale di carica (un’evoluzione dei due valori deve essere
constatata).
- Le LED di visualizzazione tensione e percentuale (n°4 et 5). Si accendono continuamente e alternano allo stesso ritmo
che lo schermo.
L’avanzamento della carica è mostrato in %.
% Livello di carica di batteira Fase
0% Ricupero della batteria Fase di test
25% Inizia carica
Boost
50% 50% di carica
75% Carica della % rimanente Assorbimento
100%
Batteria carica Floating
Riavvio automatico (funzione utilizzabile solo per la carica)
In caso di taglio di corrente:
- Durante una carica normale, lo DIAG-STARTIUM si spegne. Quando si riaccende non riavvia la carica. Bisogna allora
rilanciarla manualmente.
- Durante una carica con la funzione «Riavvio automatico» , lo DIAG-STARTIUM si spegne. Quando si riaccende,
rilancia automaticamente la carica.
Per usare il modo «Riavvio automatico»:
- Collegare il caricabatterie seguendo i consigli,
- Scegliere la velocità di carica e il tipo di batteria rispettando le caratteristiche di quest’ultima,
- In seguito, effettuare una pressione lunga (> 5 secondi) sul tasto START/STOP.
Una spia permette di vericare se la carica è in modo «Riavvio automatico»:
- Le LED di visualizzazione tensione e percentuale (n°4 et 5). Non si accendono più normalmente come durante una
carica normale, ma lampeggiano.
In questo modo, per arrestare la carica premere sul tasto (8). Un’interruzione di corrente non fermerà
più la carica.
Funzione DIAG+ (solo in 12V)
Qusta modalità permette di compensare la corrente utilizzata, da un veicolo fermo (no a 60 A) per testare i grandi
consumatori : ventilazione motore, alza-cristalli, sospensioni elettroniche etc... rilasciando una tensione stabilizzata.
Questa tensione è regolabile da 12V a 15V per passi di 0,1 grazie ai pulsanti (1).
Funzione UNIVERSALE
Nel caso in cui il tipo di batteria (liquido, Gel, AGM, Start/Stop) non sia riconosciuto, scegliere UNIVERSALE
automaticamente.
Funzione TIMER
La funzione TIMER (n°11) permette la scelta di un tempo di carica regolabile tra 10 e 120 min. per soglie di 10min. e
permette l’avviamento della carica al di sotto di 1V et senza batteria.

53
DIAG-STARTIUM 60-12 / 60-24
IT
Traduzione delle istruzioni originali
La carica della funzione TIMER è manuale. Le differenze sono:
• Non importa lo stato della batteria (solfatata o in corto-circuito, tensione <1V), la carica sarà sempre avviata.
• La carica si avvia anche se il collegamento non è stato effettuato correttamente: morsetti scollegati o in corto-circuito.
C’è dunque un rischio di faville se i consigli di collegamento non vengono rispettati.
Due spie permettono di vericare che la caria sia stata avviata:
- Lo schermo (n°2). Indica alternatamente la tensione della batteria in Volt e il tempo rimasto in minuti.
- Le LED di visualizzazione tensione e minuti (n°3 e 4). Si accendono continuamente e alternano allo stesso ritmo che
lo schermo.
La carica si ferma in differenti modi:
- Alla ne del tempo scelto.
- Durante un’interruzione di corrente
- Premendo sul tasto (8).
Ricarica di diverse batterie simultaneamente
E’ possibile caricare diverse batterie simultaneamente collegandole in parallelo. I terminali positivi collegati al morsetto
rosso e i terminali negativi collegati al morsetto nero. Queste batterie o raggruppamenti di batterie devono avere la
stessa tensione 12 o 24V.
La carica in serie è sconsigliata.
USO IN MODALITÀ STARTER
Precauzioni prima dell’uso
• Non scollegare la batteria dal veicolo. Il collegamento della batteria può portare alla perdita di informazioni e eventuale
impossibilità di riavviare il motore
Avviamento
Dopo aver collegato l’avviatore alla batteria e seguito le raccomandazioni (vedi collegamenti e scollegamenti), premere
il pulsante 9 per scegliere il modo «START ENGINE», una precarica si avvia. La pressione su qualsiasi tasto provocaa
l’arresto di questo modo.
• Il modo «START ENGINE» rileva le batterie solfatate e riuta in questo caso l’avviamento. Il dispositivo
lancia una desolforazione automatica prima dell’avviamento per proteggere le parti elettroniche del
veicolo.
• Se la batteria è troppo danneggiata (solfatata, ad esempio), il caricabatterie blocca l’avviamento. In tale
caso, lo startium indica per intermittenza « CIP » (Charge in Progress) e 0%. Ciò vuol dire che il ricupero
della batteria è in corso. Fino a quando l’abbreviazione «CIP» appare sullo schermo, non è possibile
avviare il veicolo.
DIAG-STARTIUM 60-12 50 - 220 Ah / 160 Ah Istantanea precarica 5 min.
DIAG-STARTIUM 60-24 6-12-24V : 50 - 220 Ah / 160 Ah Istantanea precarica 5 min. minimo
Una volta la pre-carica effettuata, posizionarsi nell’abitacolo del veicolo. La funzione «avviatore» si attiva al momento
del primo tentativo di avviamento (al girare la chiave). La durata del tentativo deve essere di 10 secondi al massimo
(un conto alla rovescia appare sullo schermo).
Se il motore non si avvia, aspettare 2 minuti tra ogni prova di avviamento.*
Nb: Se il veicolo non si avvia, potrebbe esserci un altro problema non relazionato alla batteria in cattivo stato: alternatore,
candela di preriscaldamento…
Dopo l’uso, seguire i consigli di scollegamento (p.55-56).
TEST DELL’ALTERNATORE
Se la batteria del veicolo si guasta spesso, il problema potrebbe provenire dall’alternatore.
GLI DIAG-STARTIUM dispongono di una funzione «test dell’alternatore» (p5, n°11). Questa funzione permette di
visualizzare la capacità di carica dell’alternatore indicando per intermittenza la tensione e la percentuale.
Per fare uso di questa funzione il veicolo deve essere acceso. Seguire i consigli di collegamento (p.55-56), e
scegliere la funzione «Test dell’alternatore» su l’interfaccia.
La percentuale indicata informa sullo stato di salute dell’alternatore:

54
DIAG-STARTIUM 60-12 / 60-24
IT
Traduzione delle istruzioni originali
Fra 0 e 100% Difetto di carica insufciente, la batteria non è correttamente caricata.
A 100% Alternatore corretto.
Fra 100% e 200% Difetto di sovraccarica.
PROTEZIONI
Questi dispositivi sono stati creati con il massimo delle protezioni:
• I morsetti di carica sono completamente isolati.
• Un fusibile protegge da inversioni di polarità e corto-circuiti. La sostituzione richiede un intervento manuale.
DIAG-STARTIUM 60-12/60-24
• La protezione termica è assicurata da un termostato (raffreddamento per circa 15 minuti). La spia di difetto si accende
in caso di surriscaldamento, lo schermo indica «th».
• In caso di problema con il dispositivo, una protezione termica supplementare taglia l’alimentazione del generatore
senza l’indicazione per l’utente. Posizionare il dispositivo in un luogo ventilato e attendere 15 minuti.
• In caso di difetto con la presa, il dispositivo di mette in protezione e solo la LED di difetto si accende, mentre lo
schermo indica «DEF». Se il difetto è troppo grande un fusibile interno proteggerà la il dispositivo. Questo fusibile deve
essere sostituito da un tecnico del servizio post-vendita.
ANOMALIE, CAUSE, RIMEDI
Anomalie Cause Rimedi
Il LED errore si accende problema di rete d’alimentazione. Vérier votre alimentation secteur.
Il LED errore s’accende e il Buzzer suona
Morsetti in corto-circuito o inversione di
polarità.
Vérier si les fusibles ne sont pas fondu.
Ne pas mettre les pinces en court-circuit.
Inverser les polarités.
La batteria che cercate di caricare è difettosa
Contrôler à l’aide d’un voltmètre la tension
à ses bornes. Si cette tension monte
instantanément à plus de 2,5V par élément la
batterie peut être sulfatée ou endommagée.
Errore di tensione (6-12-24V)
Vérier que la batterie est bien connectée en
12 ou 24V.
Batteria non presentee o <1V. Schermata :
«BAt HS»
Brancher une batterie.
Sélectionner TIMER si la batterie à une tension
<1V.
In seguito ad un uso intensivo, il vostro
dispositivo si è messo su interruzione termica
Schermata : «th»
Patientez 1/4h pour laisser l’appareil refroidir.
Nessun LED si accende
Problema di alimentazione importante Vericate la vostra alimentazione.
Il fusibile interno è fuso
Inviate il dispositivo al Servizio post vendita
(SAV) di GYS.
Il pulsante avvio/arresto non è acceso. Accendete il pulsante avvio/arresto.
In modo START ENGINE, se lo schermo indica
0%. L’avviamento è impossibile.
La batteria è solfatata, l’avviamento è impedito
per proteggere l’elettronica di bordo del
veicolo.
Effettuare una ricarica della batteria prima di
rilanciare lo START ENGINE.
La batteria ribolle.
La selezione della tensione 6, 12 o 24V non è
corretta.
Vericate la tensione della vostra batteria e
collegarla correttamente.
La batteria ha degli elementi in corto circuito.
La batteria è irrecuperabile, deve essere
sostituita.
GARANZIA
La garanzia copre qualsiasi difetto di fabbricazione per 2 anni, a partire dalla data d’acquisto (pezzi e mano d’opera).
La garanzia non copre:
• Danni dovuti al trasporto.
• La normale usura dei pezzi (Es. : cavi, morsetti, ecc.).
• Gli incidenti causati da uso improprio (errore di alimentazione, cadute, smontaggio).
• I guasti legati all’ambiente (inquinamento, ruggine, polvere).
In caso di guasto, rinviare il dispositivo al distributore, allegando:
- la prova d’acquisto con data (scontrino, fattura...)
- una nota esplicativa del guasto.

55
DIAG-STARTIUM 60-12 / 60-24
SCHÉMA ÉLECTRIQUE / CIRCUIT DIAGRAM / SCHALTPLAN / DIAGRAMA ELECTRICO /
ЭЛЕКТРИЧЕСКАЯ СХЕМА / ELEKTRISCHE SCHEMA / SCEMA ELETTRICO
AC1
AC2
COM
Charge
DEM
52460
AC1
AC2
COM
Charge
DEM
+12V
+24V
+
-
~
~
A
B
C
D
E
F
G
+Fuse
H
I
J
K
L
M
N
DIAG STARTIUM
12V - 026513
DIAG STARTIUM
6-12-24V - 026520
A 97279 97281
B 51344 51344
C 71931 71931
D S95344 71932
E 51955 51956
F 52222 52222
G 51400 51400
Fuse 054547
H 51023 51023
I 96096 96098
J 96095 96097
K - 51463
L 51348 51348
M 21493 21493
N 51350 51350

56
DIAG-STARTIUM 60-12 / 60-24
ICONES / SYMBOLS / ZEICHENERKLÄRUNG / ICONOS / CИMBOЛЫ / PICTOGRAMMEN / ICONA
Produit dont le fabricant participe à la valorisation des emballages en cotisant à un système
global de tri, collecte sélective et recyclage des déchets d’emballages ménagers. / Product
whose manufacturer is involved in the packaging’s recycling process by contributing to a global
system of sorting, collecting and recycling of households’ packaging waste. / Für die Entsor-
gung Ihres Gerätes gelten besondere Bestimmungen (Sondermüll). / Producto sobre el cual el
fabricante participa mediante una valorización de los embalajes cotizando a un sistema global
de separación, recogida selectiva y reciclado de los deshechos de embalajes domésticos. /
Продукт, производитель которого участвует в переработке упаковки путем отчислений в
глобальную систему сортировки, раздельного сбора и переработки отходов упаковки. /
De fabrikant van dit produkt neemt deel aan de inzameling en de recycling van afval door bij te
dragen aan een globaal inzamel- en recyclesysteem van verpakkingen van huishoudelijk afval.
/ Il fabbricante partecipa alla valorizzazione delle confezioni grazie a dei versamenti ad un sis-
tema globale di smistamento, coletta selettiva e riciclaggio dei riuti di imballaggi domestici.
Produit recyclable qui relève d’une consigne de tri (selon le décret n°2014-1577). / Recy-clable
product that falls within waste sorting recommendations. / Recyclingprodukt, der durch Mülltren-
nung entsorgt werden muss. / Producto reciclable que requiere una separación determinada.
/ Перерабатываемый продукт, подпадаемый под определенные правила сортировки. /
Afzonderlijke inzameling vereist. Gooi dit produkt niet bij het huishoudelijk afval. / Prodotto
riciclabile soggetto a raccolta selettiva.
Fusible - Fuse - Sicherung - Fusible - Плавкий предохранитель (300A). - Netzekering (300A)
- Fusibile
Protégé contre l’accès aux parties dangereuses des corps solides de diam >12,5mm (équivalent doigt de
la main) et contre les chutes verticales de gouttes d’eau. / Protected against rain and against ngers
access to dangerous parts. / Schutz vor Eindringen von festen Fremdkörpern (Durchmesser >12,5mm =
Finger einer Hand). Schutz gegen Berühren mit einem Finger und senkrecht fallendes Tropfwasser. /
protegido contra el acceso a partes peligrosas con el dedo, y contra las caídas verticales de gotas de agua.
/ Защищен против доступа твердых тел диаметром > 12,5 мм (размером с палец руки) в опасные
места. Защищен против доступа пальцев в опасные места и против вертикального попадания
капель воды. / Beschermd tegen toegang tot gevaarlijke delen met een vinger en tegen verticaal vallende
waterdruppels. / Aree Pericolose protette per impedire il contatto con l’utente, e contro cadute verticali
di gocce d’acqua.
< 70dB
Niveau de bruit / Noise level / Störpegel / Nivel de ruido / Уровень шума / Geluidsniveau / Livello di
rumore / Nível de ruído
GYS SAS
1, rue de la Croix des Landes
CS 54159
53941 SAINT-BERTHEVIN Cedex
France
-
 1
1
-
 2
2
-
 3
3
-
 4
4
-
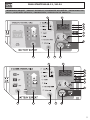 5
5
-
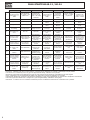 6
6
-
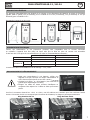 7
7
-
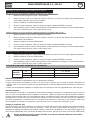 8
8
-
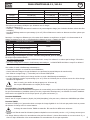 9
9
-
 10
10
-
 11
11
-
 12
12
-
 13
13
-
 14
14
-
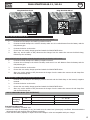 15
15
-
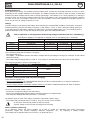 16
16
-
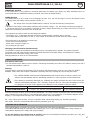 17
17
-
 18
18
-
 19
19
-
 20
20
-
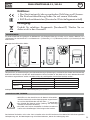 21
21
-
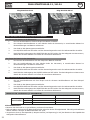 22
22
-
 23
23
-
 24
24
-
 25
25
-
 26
26
-
 27
27
-
 28
28
-
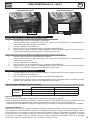 29
29
-
 30
30
-
 31
31
-
 32
32
-
 33
33
-
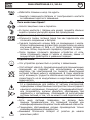 34
34
-
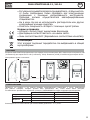 35
35
-
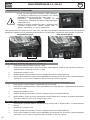 36
36
-
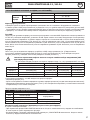 37
37
-
 38
38
-
 39
39
-
 40
40
-
 41
41
-
 42
42
-
 43
43
-
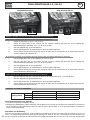 44
44
-
 45
45
-
 46
46
-
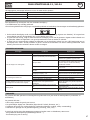 47
47
-
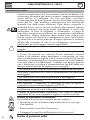 48
48
-
 49
49
-
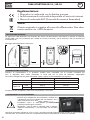 50
50
-
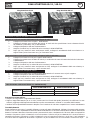 51
51
-
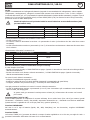 52
52
-
 53
53
-
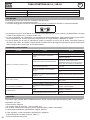 54
54
-
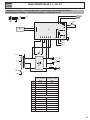 55
55
-
 56
56


in andere talen
Gerelateerde papieren
-
GYS WATTMATIC 100 Data papier
-
GYS DIAG-STARTIUM 60-24 Data papier
-
GYS DIAG-STARTIUM 60-12 Data papier
-
GYS START 200 de handleiding
-
GYS STARTIUM 330E de handleiding
-
GYS CT 160 de handleiding
-
-
GYS STARTIUM 980E - 12/24 V Data papier
-
GYS ENERGY 124 Data papier
-