
Ref. nr.: 102.326
INSTRUCTION MANUAL
GEBRUIKSAANWIJZING
BEDIENUNGSANLEITUNG
MANUAL DE INSTRUCCIONES
MANUEL D'INSTRUCTIONS
V1.1

2
INDEX
ENGLISH ................................................................................................................................................................................. 4
UNPACKING INSTRUCTION .................................................................................................................................................................................... 5
PRODUCT OVERVIEW ............................................................................................................................................................................................. 5
REMOTE CONTROL .................................................................................................................................................................................................. 5
TURNING THE UNIT ON/OFF ................................................................................................................................................................................. 5
SETTING THE CLOCK ............................................................................................................................................................................................... 6
CHECKING THE CLOCK ........................................................................................................................................................................................... 6
ALARM OPERATION ................................................................................................................................................................................................. 6
RADIO OPERATION .................................................................................................................................................................................................. 6
PRESET RADIO STATIONS ...................................................................................................................................................................................... 7
CD PLAYER OPERATION ......................................................................................................................................................................................... 7
PLAY MODE SETTINGS ............................................................................................................................................................................................ 8
PLAY TRACK SEQUENCE PROGRAMMING .......................................................................................................................................................... 8
BT OPERATION ......................................................................................................................................................................................................... 9
PRESET EQ ................................................................................................................................................................................................................. 9
MUTE .......................................................................................................................................................................................................................... 9
SLEEP ......................................................................................................................................................................................................................... 9
USING THE AUXILIARY INPUT ............................................................................................................................................................................... 9
NEDERLANDS ........................................................................................................................................................................ 10
UITPAKKEN ............................................................................................................................................................................................................ 11
OVERZICHT ............................................................................................................................................................................................................ 11
AFSTANDBEDIENING............................................................................................................................................................................................ 11
AAN-/UITZETTEN .................................................................................................................................................................................................. 11
KLOKINSTELLINGEN ............................................................................................................................................................................................. 12
DE KLOK BEKIJKEN ............................................................................................................................................................................................... 12
ALARM/WEKKER ................................................................................................................................................................................................... 12
RADIO ..................................................................................................................................................................................................................... 12
VOORINGESTELDE RADIOZENDERS ................................................................................................................................................................. 13
CD-SPELER ............................................................................................................................................................................................................. 13
INSTELLINGEN AFSPEELMODUS ........................................................................................................................................................................ 14
PROGRAMMERING AFSPEELVOLGORDE ......................................................................................................................................................... 14
BT STREAMING AUDIO......................................................................................................................................................................................... 15
VOORINGESTELDE EQUALIZER .......................................................................................................................................................................... 15
MUTE ....................................................................................................................................................................................................................... 15
SLEEP ...................................................................................................................................................................................................................... 15
AUX INGANG .......................................................................................................................................................................................................... 15
DEUTSCH .............................................................................................................................................................................. 16
AUSPACKEN ........................................................................................................................................................................................................... 17
PRODUKTÜBERSICHT .......................................................................................................................................................................................... 17
FERNBEDIENUNG .................................................................................................................................................................................................. 17
EIN-/AUSSCHALTEN ............................................................................................................................................................................................. 17
UHR-EINSTELLUNGEN ......................................................................................................................................................................................... 17
DIE UHR ZEIGEN.................................................................................................................................................................................................... 18
ALARM/WECKER ................................................................................................................................................................................................... 18
RADIO ..................................................................................................................................................................................................................... 18
VOREINGESTELLTE RADIOSENDER ................................................................................................................................................................... 19
CD-PLAYER ............................................................................................................................................................................................................ 19
EINSTELLUNGEN FÜR DEN WIEDERGABEMODUS ......................................................................................................................................... 20
PROGRAMMIERUNG DER WIEDERGABESEQUENZ ........................................................................................................................................ 20
BT STREAMING AUDIO......................................................................................................................................................................................... 21
VOREINGESTELLTER EQUALIZER....................................................................................................................................................................... 21
MUTE (STUMMSCHALTEN) .................................................................................................................................................................................. 21
SLEEP ...................................................................................................................................................................................................................... 21
AUX EINGANG ....................................................................................................................................................................................................... 21
ESPAÑOL .............................................................................................................................................................................. 22
INSTRUCCIONES DE DESEMBALAJE ................................................................................................................................................................. 23
VISION GENERAL DEL PRODUCTO .................................................................................................................................................................... 23
CONTROL REMOTO .............................................................................................................................................................................................. 23
ENCENDER/APAGAR LA UNIDAD ...................................................................................................................................................................... 23
AJUSTE DEL RELOJ ............................................................................................................................................................................................... 24
MOSTRAR EL RELOJ ............................................................................................................................................................................................. 24
FUNCIONAMIENTO DE LA ALARMA .................................................................................................................................................................. 24
FUNCIONAMIENTO DE LA RADIO ...................................................................................................................................................................... 25
EMISORAS DE RADIO PRESELECCIONADAS.................................................................................................................................................... 25
FUNCIONAMIENTO DEL REPRODUCTOR DE CD ............................................................................................................................................ 25
AJUSTES DEL MODO DE JUEGO ........................................................................................................................................................................ 26
PROGRAMACIÓN DE LA SECUENCIA DE PISTAS DE REPRODUCCIÓN ....................................................................................................... 26

3
OPERACIÓN BT ...................................................................................................................................................................................................... 27
PRESET EQ (ECUALIZADOR PREESTABLECIDO) ............................................................................................................................................. 27
MUTE ....................................................................................................................................................................................................................... 27
SLEEP ...................................................................................................................................................................................................................... 27
UTILIZANDO LA ENTRADA AUXILIAR ................................................................................................................................................................ 27
FRANÇAIS ............................................................................................................................................................................. 28
DEBALLAGE ............................................................................................................................................................................................................ 29
PRESENTATION ..................................................................................................................................................................................................... 29
TÉLÉCOMMANDE .................................................................................................................................................................................................. 29
MISE EN MARCHE/ARRÊT DE L'APPAREIL ........................................................................................................................................................ 29
RÉGLER L'HORLOGE ............................................................................................................................................................................................. 29
MONTRER L'HORLOGE ........................................................................................................................................................................................ 30
FONCTIONNEMENT DE L'ALARME ..................................................................................................................................................................... 30
FONCTIONNEMENT DE LA RADIO ..................................................................................................................................................................... 30
STATIONS DE RADIO PRÉRÉGLÉES ................................................................................................................................................................... 31
FONCTIONNEMENT DU LECTEUR CD ............................................................................................................................................................... 31
PARAMÈTRES DU MODE DE LECTURE .............................................................................................................................................................. 32
PROGRAMMATION DE LA SÉQUENCE DE LECTURE DES PISTES ................................................................................................................. 32
FONCTIONNEMENT DE BT .................................................................................................................................................................................. 33
ÉGALISEUR PRÉDÉFINI......................................................................................................................................................................................... 33
MUTE ....................................................................................................................................................................................................................... 33
SLEEP (DORMIR/SOMMEIL) ................................................................................................................................................................................ 33
UTILISATION DE L'ENTRÉE AUXILIAIRE ............................................................................................................................................................ 33
TECHNICAL SPECIFICATION / TECHNISCHE SPECIFICATIE / TECHNISCHE DATEN / ESPECIFICACIONES TÉCNICAS /
SPÉCIFICATIONS TECHNIQUES............................................................................................................................................... 35

4
Congratulations to the purchase of this Audizio product. Please read this manual thoroughly prior to using the unit in order to
benefit fully from all features.
Read the manual prior to using the unit. Follow the instructions in order not to invalidate the warranty. Take all precautions to
avoid fire and/or electrical shock. Repairs must only be carried out by a qualified technician in order to avoid electrical shock.
Keep the manual for future reference.
- Prior to using the unit, please ask advice from a
specialist. When the unit is switched on for the first
time, some smell may occur. This is normal and will
disappear after a while.
- The unit contains voltage carrying parts. Therefore, do
NOT open the housing.
- Do not place metal objects or pour liquids into the unit
This may cause electrical shock and malfunction.
- Do not place the unit near heat sources such as
radiators, etc. Do not place the unit on a vibrating
surface. Do not cover the ventilation holes.
- The unit is not suitable for continuous use.
- Be careful with the mains lead and do not damage it. A
faulty or damaged mains lead can cause electrical shock
and malfunction.
- When unplugging the unit from a mains outlet, always
pull the plug, never the lead.
- Do not plug or unplug the unit with wet hands.
- If the plug and/or the mains lead are damaged, they
need to be replaced by a qualified technician.
- If the unit is damaged to such an extent that internal
parts are visible, do NOT plug the unit into a mains
outlet and DO NOT switch the unit on. Contact your
dealer. Do NOT connect the unit to a rheostat or
dimmer.
- To avoid fire and shock hazard, do not expose the unit
to rain and moisture.
- All repairs should be carried out by a qualified
technician only.
- Connect the unit to an earthed mains outlet (220-
240Vac/50Hz) protected by a 10-16A fuse.
- During a thunderstorm or if the unit will not be used for
a longer period, unplug it from the mains. The rule is:
Unplug it from the mains when not in use.
- If the unit has not been used for a longer period,
condensation may occur. Let the unit reach room
temperature before you switch it on. Never use the unit
in humid rooms or outdoors.
- To prevent accidents in companies, you must follow the
applicable guidelines and follow the instructions.
- Do not repeatedly switch the fixture on and off. This
shortens the lifetime.
- Keep the unit out of the reach of children. Do not leave
the unit unattended.
- Do not use cleaning sprays to clean switches. The
residues of these sprays cause deposits of dust and
grease. In case of malfunction, always seek advice from
a specialist.
- Do not force the controls.
- This unit is with speaker inside which can cause
magnetic field. Keep this unit at least 60cm away from
computer or TV.
- If this product has a built-in lead-acid rechargeable
battery. Please recharge the battery every 3 months if
you are not going to use the product for a long period of
time. Otherwise the battery may be permanently
damaged.
- If the battery is damaged, please replace with same
specifications battery. And dispose the damaged
battery environment friendly.
- If the unit has fallen, always have it checked by a
qualified technician before you switch the unit on
again.
- Do not use chemicals to clean the unit. They damage
the varnish. Only clean the unit with a dry cloth.
- Keep away from electronic equipment that may cause
interference.
- Only use original spares for repairs, otherwise serious
damage and/or dangerous radiation may occur.
- Switch the unit off prior to unplugging it from the mains
and/or other equipment. Unplug all leads and cables
prior to moving the unit.
- Make sure that the mains lead cannot be damaged when
people walk on it. Check the mains lead before every
use for damages and faults!
- The mains voltage is 220-240Vac/50Hz. Check if power
outlet match. If you travel, make sure that the mains
voltage of the country is suitable for this unit.
- Keep the original packing material so that you can
transport the unit in safe conditions.
This mark attracts the attention of the user to high voltages that are present inside the housing and that are of
sufficient magnitude to cause a shock hazard.
This mark attracts the attention of the user to important instructions that are contained in the manual and that he
should read and adhere to.
The unit has been certified CE. It is prohibited to make any changes to the unit. They would invalidate the CE certificate and
their guarantee!
NOTE: To make sure that the unit will function normally, it must be used in rooms with a temperature between 5°C/41°F and
35°C/95°F.
Electric products must not be put into household waste. Please bring them to a recycling centre. Ask your local authorities or your
dealer about the way to proceed. The specifications are typical. The actual values can slightly change from one unit to the other.
Specifications can be changed without prior notice.
Do not attempt to make any repairs yourself. This would invalid your warranty. Do not make any changes to the unit. This would also invalid
your warranty. The warranty is not applicable in case of accidents or damages caused by inappropriate use or disrespect of the warnings
contained in this manual. Audizio cannot be held responsible for personal injuries caused by a disrespect of the safety recommendations and
warnings. This is also applicable to all damages in whatever form.

5
CAUTION! Immediately upon receiving the product, carefully unpack the carton, check the contents to ensure that all parts
are present, and have been received in good condition. Notify the shipper immediately and retain packing material for
inspection if any parts appear damage from shipping or the package itself shows signs of mishandling. Save the package and
all packing materials. In the event that the product must be returned to the factory, it is important that the product be
returned in the original factory box and packing.
If the device has been exposed to drastic temperature fluctuation (e.g. after transportation), do not switch it on immediately.
The arising condensation water might damage your device. Leave the device switched off until it has reached room
temperature.
1. Open/Close CD compartment
2. Volume control
3. Lcd display
4. IR remote control receiver
5. Power ON/Standby
6. Source Button
7. Clock set/memory
8. Channel –/Channel +
9. CD: stop ◼/BT pair
10. CD/BT: play/pause / Radio: auto search function
11. CB/BT: skip next / Tune +
12. CD/BT: skip previous / Tune –
13. Aux input jack
14. USB input
15. Speaker output connector
16. Headphone jack
17. DC power input
18. Antenna
1. ON/Standby
2. Numpad
3. Program
4. CD/USB previous / Tuner down
5. Equalizer
6. X-Bass / Pause/play
7. Repeat
8. BT mode: skip next track
9. BT mode: skip previous track
10. BT mode pairing
11. Source
12. Clock set
13. Timer
14. Sleep
15. Folder up/channel up
16. FM mode: mono/stereo
17. Enter
18. CD/USB next / Tuner up
19. Folder down/channel down
20. Random/intro
21. Mute
22. BT mode: play/pause
23. Volume up/down
24. CD/USB mode: play/pause
25. CD stop ◼
1. In standby mode, push POWER/STANDBY on the main unit or remote control to turn the unit ON. The unit will turn on, the
last selected input mode icon will show on the LCD display.
2. To turn the unit OFF (into standby), push POWER/STANDBY on the main unit or remote control again. The LCD DISPLAY will
go dim and show the current time. The standby mode indicator lights.

6
After plugging the DC power adapter into the unit, “00:00” will appear and blink on the LCD display.
1. In Power Off (Standby) mode, press and hold CLOCK SET on remote control or main unit, the 24 HOUR format “24H” will
appear on display.
2. Press or on remote control or main unit to select 24 Hour format if desired. Otherwise, press CLOCK SET to
confirm 12 Hour clock format and enter clock setup mode. Hour digits will be flashing.
3. Press or on remote control or main unit to adjust the hour. Press and hold the button for fast advance/reverse
setting.
Note: Make sure the hour is set so that the PM indicator is displayed correctly.
4. Press CLOCK SET on the remote control to confirm the hour setting, the minute digits will flash to prompt for input.
5. Press or on the remote control or main unit to adjust the minute. Press and hold the button for fast
advance/reverse setting.
6. Press CLOCK SET on remote control again to complete the setting.
NOTE: The clock and radio station presets will need to be reset if the power is interrupted or in the event of a power outage.
“00:00” will appear and start blinking on the LCD display to notify you that the power was interrupted and the clock will need
to be reset. Please follow above steps 1-6 to reset the clock.
The unit will show the current time in standby mode. To check the current time in Power ON mode, press CLOCK SET on main
unit or remote control, the current time will show for 5 seconds and then return to the previous screen.
SETTING THE ALARM CLOCK
This function allows the system to turn on automatically and wake you using a beeping alarm, CD/USB/FM music or buzzer.
Timer start time (ON):
1. Press and hold, in standby mode, the TIMER button on the remote control until the display shows “On”, and the hour digits
flash.
2. Press the or buttons to adjust the hour digits, and then press the ENTER button to confirm. The minute digits will
flash on the display.
3. Press the or buttons to adjust the minute digits, and then press the ENTER button to confirm.
Timer end time (OFF):
4. When the “On” Timer Clock is set, the display will show “OFF” and the hour digits will flash.
5. Press the or buttons to adjust the hour digits, and then press the ENTER button to confirm. The minute digits will
flash on the display.
6. Press the or buttons on the remote control to adjust the minute digits, and then press the ENTER button to confirm.
7. Press the or buttons to select CD, USB, FM or BU (buzzer) mode, then press the ENTER button to confirm. The
display will show “VOL#”.
8. Press the or buttons to adjust the volume, and then press the ENTER button to confirm.
9. Press the TIMER button to select "Timer On", the Timer is set.
10. In standby mode, the icon “ ” will show on the display to indicate the Timer is On.
NOTE:
If “Wake to CD/USB” is selected but a CD or USB drive are not inserted, the alarm will default to the Beeping Alarm
automatically when the alarm time is reached.
For ‘Wake to Radio”, the system will default to the last FM radio station listened to prior to switching off.
The crescendo alarm will increase to the volume level you have set.
ACTIVATE/DE-ACTIVATE ALARM FUNCTION
1. To activate the ALARM, press the TIMER button, and the alarm icon “ ” will show on the LCD display.
2. Cancel the ALARM function by pressing the TIMER button again. The alarm icon “ ” will disappear from the LCD display.
WAKE TO RADIO, CD/USB OR BUZZER ALARM
•When the alarm time is reached, the CD/USB, radio or beeping alarm will sound for 60 minutes, then shut off and reset itself
for the following day (without pressing the snooze button).
•To stop the alarm immediately after it sounds, press the POWER button on remote control or on main unit once. It resets
itself for the following day.
•To cancel the following day alarm, tap the TIMER button once, the alarm icon “ ” will disappear from the LCD display.
1. Tap the POWER/STANDBY button on main unit or remote control to turn on the unit.
2. Tap the SOURCE button on main unit or remote control to select FM mode.
3. To manually tune to a specific radio station, tap the TUNE or button on either main unit or remote control
repeatedly. Use this manual tuning method to tune in to weaker stations that are bypassed by Automatic Tuning method.
4. To automatically tune to the next available radio station, press and hold the or buttons on main unit or remote
control for 1-2 seconds until “SCA” readout appears on the display, then release the button. The tuner will stop scanning
when it receives the next broadcasting station of adequate signal strength.

7
5. Turn the volume control on main unit or press the volume buttons on remote control to adjust to the desired volume
level.
FM / FM STEREO RECEPTION
When listening to the FM radio, press the ST./MONO button on remote control to switch between stereo mode and mono
mode. The FM stereo icon “ST” appears on the display when unit is set in stereo mode. It is preferable to receive the program
in mono when you are receiving a weak station.
HINTS FOR BEST RECEPTION:
For best FM reception, the FM wire antenna located on the back of the unit should be fully unwrapped and extended.
NOTE: Automatic tuning depends on the signal strength of the broadcasting station, so weak stations may be skipped. You
can manually tune to find the weak stations if a station gets skipped. With strong signals, the tuner may stop before it reaches
the actual broadcast frequency, so you may need to manually tune for the best reception.
1. Press the POWER button on main unit or remote control to turn on the unit.
2. Press the SOURCE Button on main unit or remote control to select FM radio mode.
3. Press and hold the TUNE or TUNE button on the main unit or remote control until “SCA” readout appears on the
display. Release the button for auto search & program preset channels. Auto searching and program will stop at P01 after
scan finished.
Note: If the channels stored during the auto search & program preset are not the ones you want to save, use the method
below for manually saving radio presets.
4. Tune to the desired radio station either by “manually” or “automatically” tuning method.
5. Press the PROG. button on the remote control, the next available preset memory number and a flashing number will show
on the LCD display (Note: ”P01” will show in the display if you are programming a preset for the first time).
6. Tap the CHANNEL -/+ buttons on main unit or remote control to select the preset number you want to assign the station
to.
7. Tap the PROG. button on the remote control to confirm the setting.
8. Repeat above steps 4 - 8 to preset up to 30 FM stations.
RECALLING PRESET MEMORY CHANNELS
In radio mode, recall the pre-set channels by pressing the CHANNEL -/+ buttons on main unit or the numbers on remote
control.
Note:
Besides commercial CDs, this CD player will also play self-compiled CD-R/RW, MP3 discs. Do not attempt to play CD-ROM,
CDI, VCD, DVD or computer CDs.
IMPORTANT:
It may take up to 10 seconds for the actual playback to begin. If playback does not start at all, it is possibly due to the quality
of the CD-R/RW, MP3 disc and/or the compatibility of the CD compilation software. The manufacturer is not responsible for
the playback quality of CD-R/RW, MP3 discs.
Do not stick a label to either side of the disc. It may cause a serious malfunction.
PLAYING CD
1. Press the POWER/STANDBY button on main unit or remote control to turn the unit on.
2. Press the SOURCE button on remote control or main unit to select CD mode and press “Open/close disc compartment” (on
top of the compartment lid).
3. Place a CD on the center spindle with its label side facing out towards the CD lid. Close the disc compartment.
4. The unit starts to read the disc, “---” flashes on the display. After a few seconds, the total number of tracks show on the
LCD display.
5. Press the PLAY/PAUSE button on main unit or remote control, PLAY indicator shows on the display, the CD will start
playing the first track.
6. Turn the volume control on main unit or press the volume control buttons on the remote control to adjust to the desired
volume level.
7. To pause playback, press the PLAY/PAUSE button on main unit or remote control. The track time will be paused and the
play indicator will blink on the display. To resume playing, press the PLAY/PAUSE button again.
8. You can choose to play your favorite track by pressing the SKIP NEXT button or SKIP PREVIOUS button. The LCD
display will indicate the current track number.
9. To locate a particular section within a track, press and hold the or button until the section is found. Release the
button to continue playing your selection.
10. To stop playing, press the STOP ◼ button.
PLAYING CD-R/RW, MP3 WITH FOLDER
1. Press the SOURCE button on the remote control, and load an MP3 disc.
2. Press the FOLDER -/+ button to select desired playback folder.
3. Select the desired file to be played by pressing the SKIP NEXT or SKIP PREVIOUS button.
4. Press the PLAY/PAUSE button. Playback will start and the file name will be displayed.

8
In case of playback with the folder mode on, press the FOLDER -/+ buttons, and the folder can be selected even though it is in
playback/pause mode. It will continue playback/pause mode in the 1st track of the selected folder.
TO PLAY BACK USB/MP3 PLAYER WITH FOLDER
1. Press the SOURCE button on the remote control or on the main unit to select the USB function. Connect the USB memory
device that contains playable MP3 format files. When the USB memory is connected to the main unit, the device
information will be displayed.
2. Press the FOLDER -/+ button to select desired playback folder.
3. Select desired file to be played back by pressing the or button.
4. Press the PAUSE/PLAY button. Playback will start and the file name will be displayed.
NOTE:
This product is not compatible with MTP and AAC file systems from USB mass storage devices or MP3 players.
This unit supports FAT16 and FAT32, but some USB storage media may not support both file systems. For details, refer to the
operation manual of the USB storage device in question or contact the manufacturer.
SKIP AND SEARCH MODE
1. During playback or pause mode, press the SKIP NEXT or SKIP PREVIOUS button to go to the next track or go back to
the beginning of the current track.
2. During playback, press and hold the or button to search within the current track with audible high speed playback.
NOTE: The following is only functional by using the remote control.
Press the REPEAT button on the remote control to select different repeat play modes when a CD is playing:
Repeat 1 Repeat All Normal
REPEAT 1 - the track currently playing will repeat continuously. “REPEAT 1” appears on the display.
REPEAT ALL - all tracks will repeat continuously. “REPEAT ALL” appears on the display.
RANDOM PLAY
When the RANDOM/INTRO button is pressed, the “RAND“ indicator will appear on the LCD display. The tracks on the disc will
be played in random order automatically.
Cancel Random Play:
Press RANDOM/INTRO until the “RAND” indicator disappears.
NOTE:
Pressing the button during random play will initiate a skip to the track selected next by random operation. On the other hand,
the button does not allow you to select the previous track.
Random Intro Normal
INTRO PLAYBACK
1. Press RANDOM/INTRO on the remote control. The “INTRO” indicator will appear on the display. The unit will play only the
first 10 seconds of each track (intro).
2. Press RANDOM/INTRO on the remote control again to resume normal playback.
NOTE: The following is only functional by using the remote control.
This function allows the tracks to be played in a programmed sequence. The user can program up to 32 tracks in CD mode or
99 tracks in MP3 mode.
NOTE: This program can only be set in STOP mode.
1. Press the PROG. button on the remote control, “P01” and “PROG” appear on the display (“P01” will be shown if you are
programming for the first time).
2. Use the or button on the main unit or the remote control to select the desired track. The track number will appear
on the display.
3. Press the PROG. button on the remote control to store the selected track in the memory, the program number will
advance one (i.e.“P02”) on the display.
4. Repeat steps 2 to 3 to store more tracks. You can store up to 32 CD tracks or 99 MP3 tracks. Display will show “FUL” after
tracks have been programmed and memory is full.
5. Press PAUSE/PLAY on the main unit or the remote control to start playing the CD in the programmed sequence.
6. Press the REPEAT button on remote control to select Repeat 1/All if desired.
7. To stop play, press the STOP ◼ button on the main unit or on the remote control.
8. To cancel the program altogether, press the STOP ◼ button on main unit or remote control twice. The “PROG” icon will
disappear from the display.

9
Press the POWER/STANDBY button to turn ON the unit, follow the instructions below to connect with BT.
Pairing a BT streaming capable smartphone (or other BT capable device) to the Audizio Toulon:
1. Press the POWER/STANDBY button on the main unit or the remote control to turn on the unit.
2. Press the SOURCE button on the main unit or remote control to select BT mode, “bt” blinks on the display.
3. Turn on the BT streaming function of your BT capable device and enable the search or scan function to find the Audizio
Toulon.
Select "Audizio Toulon" from the device list when it appears on your devices’ screen. If required, enter the pass code
“0000” to pair.
4. After successfully pairing device and Toulon, the display will show “bt” continuously (the blinking has stopped). You can
begin playing music from your device wirelessly.
5. After selecting your favorite song, press the PLAY/PAUSE button on the main unit or on the remote control to play or
pause the song.
6. Turn the volume control on the main unit or press the volume buttons on the remote control to adjust to the desired
volume level.
7. Press the or button on the main unit or on the remote control to skip to previous or next song.
8. If you want to pair the Audizio Toulon with another BT enabled device, press and hold the PAIR Button for 3 seconds or
turn off the BT function of device currently paired with Audizio Toulon then repeat the steps above.
NOTE: The following is only functional by using the remote control.
This unit provides 4 different EQ modes to enhance your listening experience. You can select the desired effect by pressing
the EQ Button on remote control at following sequence:
ROCKPOPJAZZCLASSICOFF
NOTE: The following is only functional by using the remote control.
Press the MUTE button on the remote control to mute the sound output from the speaker. “V 00” will appear on the display.
Press the MUTE button again to resume to speaker playback.
NOTE: The following is only functional by using the remote control.
The sleep timer allows you to turn the unit off automatically after a preset time is reached.
1. To activate the sleep timer, turn the unit on and press the SOURCE button to select FM radio, CD, USB, BT or AUX IN.
2. Press the SLEEP button on the remote control, “SLEEP” appears on the display.
3. Repeatedly press the SLEEP button to select a sleep time. The unit will turn off after 10, 20, 30, 40, 50, 60, 70, 80 or 90
minutes. Wait for 3 seconds after your selection for the unit to confirm the selection, the unit will play for the selected
length of time then automatically shut down.
4. To cancel the sleep timer, press the SLEEP button repeatedly until the timer on the display shows “OFF”, the sleep time
icon “SLEEP” disappears from the display. To turn the unit off before the selected length of time, press the
POWER/STANDBY button at any time.
NOTE: To check the remaining sleep time, press the SLEEP button once. If you are falling asleep to music from an external
device connected to the AUX input, the sleep timer will shut off the power to this system but it will not turn off the external
device.
NOTE: AUX cable is not supplied.
You can use the auxiliary input jack to connect an external playback device (for example a CD player or MP3 player).
Press the SOURCE button until you see “AUX” appearing on the display.
Plug the end of a 3.5 mm jack – 3.5 mm jack cable into the AUX IN socket on the front panel. Connect the other end of the
cable to your external device. Switch on your external device and choose your favorite soundfile.

10
Hartelijk dank voor de aanschaf van dit Audizio product. Neemt u a.u.b. een paar momenten de tijd om deze handleiding
zorgvuldig te lezen, aangezien wij graag willen dat u onze producten snel en volledig gebruikt.
Lees deze handleiding eerst door alvorens het product te gebruiken. Volg de instructies op anders zou de garantie wel eens
kunnen vervallen. Neem ook altijd alle veiligheidsmaatregelen om brand en/of een elektrische schok te voorkomen. Tevens
is het ook raadzaam om reparaties / modificaties e.d. over te laten aan gekwalificeerd personeel om een elektrische schok te
voorkomen. Bewaar deze handleiding ook voor toekomstig gebruik.
- Bewaar de verpakking zodat u indien het apparaat defect is,
dit in de originele verpakking kunt opsturen om
beschadigingen te voorkomen.
- Voordat het apparaat in werking wordt gesteld, altijd eerst
een deskundige raadplegen. Bij het voor de eerste keer
inschakelen kan een bepaalde reuk optreden. Dit is normaal
en verdwijnt na een poos.
- In het apparaat bevinden zich onder spanning staande
onderdelen; open daarom NOOIT dit apparaat.
- Plaats geen metalen objecten en mors geen vloeistof in het
effect. Dit kan leiden tot elektrische schokken of defecten.
- Toestel niet opstellen in de buurt van warmtebronnen zoals
radiatoren etc. en niet op een vibrerende onder- grond
plaatsen. Dek ventilatieopeningen nooit af.
- Het apparaat is niet geschikt voor continu gebruik.
- Wees voorzichtig met het netsnoer en beschadig deze niet.
Als het snoer kapot of beschadigd is, kan dit leiden tot
elektrische schokken of defecten.
- Als u de stekker uit het stopcontact neemt, trek dan niet aan
het snoer, maar aan de stekker.
- Om brand of elektrische schok te voorkomen, dient u dit
apparaat niet bloot te stellen aan regen of vocht.
- Verwijder of plaats een stekker nooit met natte handen
resp. uit en in het stopcontact.
- Indien zowel de stekker en/of netsnoer als snoeringang in
het apparaat beschadigd zijn dient dit door een vakman
hersteld te worden.
- Indien het apparaat zo beschadigd is dat inwendige
(onder)delen zichtbaar zijn mag de stekker NOOIT in het
stopcontact worden geplaatst en het apparaat NOOIT
worden ingeschakeld. Neem in dit geval contact op met de
dealer.
- Sluit het apparaat nooit op een dimmer aan.
- Reparatie aan het apparaat dient te geschieden door een
vakman of een deskundige.
- Sluit het apparaat alleen aan op een 220-240VAC / 50Hz
(geaard) stopcontact, verbonden met een 10-16A
meterkastgroep.
- Bij onweer altijd de stekker uit het stopcontact halen, zo ook
wanneer het apparaat voor een langere tijd niet gebruikt
wordt. Stelregel: Bij geen gebruik stekker verwijderen.
- Als u het apparaat lang niet gebruikt heeft en het weer wil
gebruiken kan er condens ontstaan; laat het apparaat eerst
op kamertemperatuur komen alvorens het weer in
werking te stellen.
- Apparaat nooit in vochtige ruimten en buiten gebruiken.
- Om ongevallen in bedrijven te voorkomen moet rekening
worden gehouden met de daarvoor geldende richtlijnen
en moeten de aanwijzingen/waarschuwingen worden
gevolgd.
- Het apparaat buiten bereik van kinderen houden.
Bovendien mag het apparaat nooit onbeheerd gelaten
worden.
- Gebruik geen schoonmaakspray om de schakelaars te
reinigen. Restanten van deze spray zorgen ervoor dat
smeer en stof ophopen. Raadpleeg bij storing te allen
tijde een deskundige.
- Gebruik geen overmatige kracht bij het bedienen van het
apparaat.
- Dit apparaat kan magnetisch veld veroorzaken. Houd dit
apparaat ten minste 60 cm afstand van de computer of tv.
- Indien dit apparaat beschikt over een loodaccu, dient deze
tenminste elke 3 maanden opgeladen te worden indien
deze voor een langere periode niet wordt gebruikt anders
bestaat de kans dat de accu permanent beschadigd.
- Bij een ongeval met dit product altijd eerst een des-
kundige raadplegen alvorens opnieuw te gebruiken.
- Tracht het apparaat niet schoon te maken met chemische
oplossingen. Dit kan de lak beschadigen. Gebruik een
droge doek om schoon te maken.
- Blijf uit de buurt van elektronische apparatuur die
bromstoringen zouden kunnen veroorzaken.
- Bij reparatie dienen altijd originele onderdelen te worden
gebruikt om onherstelbare beschadigingen en/of
ontoelaatbare straling te voorkomen.
- Schakel eerst het toestel uit voordat u het netsnoer
verwijdert. Verwijder netsnoer en aansluitsnoeren
voordat u dit product gaat verplaatsen.
- Zorg ervoor dat het netsnoer niet beschadigd/defect kan
raken wanneer mensen erover heen lopen. Het netsnoer
vóór ieder gebruik controleren op breuken/defecten!
- In Nederland/België is de netspanning 220-240Vac/50Hz.
Indien u reist (en u neemt het apparaat mee) informeer
dan naar de netspanning in het land waar u verblijft.
Deze markering wordt weergegeven om u erop attent te maken dat een levensgevaarlijke spanning in het product
aanwezig is en dat bij aanraking van deze delen een elektrische schok wordt verkregen.
Deze instructiemarkering wordt weergegeven om u erop te wijzen dat de instructie zeer belangrijk is om te lezen
en/of op te volgen.
OPMERKING: Om zeker te zijn van een correcte werking, dient u dit apparaat in een ruimte te gebruiken waar de temperatuur
tussen de 5°C/41°F en 35°C/95°F ligt.
Raadpleeg eventueel www.wecycle.nl en/of www.vrom.nl v.w.b. het afdanken van elektronische apparaten in het kader van de
WEEE-regeling. Vele artikelen kunnen worden gerecycled, gooi ze daarom niet bij het huisvuil maar lever ze in bij een gemeentelijk
depot of uw dealer. Lever ook afgedankte batterijen in bij uw gemeentelijk depot of bij de dealer, zie www.stibat.nl
Alle (defecte) artikelen dienen gedurende de garantieperiode altijd retour te worden gezonden in de originele verpakking. Voer zelf geen
reparaties uit aan het toestel; in élk geval vervalt de totale garantie. Ook mag het toestel niet eigenmachtig worden gemodificeerd, ook in dit
geval vervalt de totale garantie. Ook vervalt de garantie bij ongevallen en beschadigingen in élke vorm t.g.v. onoordeelkundig gebruik en het
niet in achtnemen van het gestelde in deze gebruiksaanwijzing. Tevens aanvaardt Audizio geen enkele aansprakelijkheid in geval van
persoonlijke ongelukken als gevolg van het niet naleven van veiligheidsinstructies en waarschuwingen . Dit geldt ook voor gevolgschade in
wélke vorm dan ook.

11
LET OP! Onmiddellijk na ontvangst, zorgvuldig uitpakken van de doos, controleer de inhoud om ervoor te zorgen dat alle
onderdelen aanwezig zijn en zijn in goede staat zijn ontvangen. Bij transportschade of ontbreken van onderdelen
onmiddellijk de verkopende partij inlichten. Bewaar de verpakking en het verpakkingsmateriaal. Indien het product moet
worden teruggestuurd, is het belangrijk dat het product in originele verpakking wordt geretourneerd.
Als het apparaat is blootgesteld aan drastische temperatuurverschillen (bv. na het transport), schakel het apparaat niet
onmiddellijk in. De ontstane condensatie kan het apparaat beschadigen. Zorg ervoor dat het apparaat op kamertemperatuur
komt en steek vervolgens de voeding stekker in het stopcontact/wandcontactdoos.
1. Openen/Sluiten CD-vak
2. Volumeregeling
3. Lcd-scherm
4. IR afstandsbediening ontvanger
5. AAN/Standby
6. Source (geluidsbron)
7. Klok instellen/geheugen
8. Channel –/Channel +
9. CD: stop ◼/BT pair
10. CD/BT: afspelen/pauzeren / Radio: auto-zoekfunctie
11. CB/BT: volgende nummer (skip) / Tune +
12. CD/BT: vorige nummer (skip) / Tune –
13. Aux jack-ingang
14. USB-ingang
15. Luidsprekeruitgang
16. Hoofdtelefoonaansluiting
17. DC stroomingang
18. Antenne
1. AAN/Standby
2. Numerieke toetsen
3. Program
4. CD/USB vorige / Tuner lager
5. Equalizer
6. X-Bass / Afspelen/pauzeren
7. Repeat
8. BT-modus: volgende nummer (skip)
9. BT-modus: vorige nummer (skip)
10. BT pairing
11. Source (geluidsbron)
12. Klokinstellingen
13. Timer
14. Slaapmodus
15. Map hoger/channel hoger
16. FM-modus: mono/stereo
17. Enter
18. CD/USB volgende nummer (skip) / Tuner hoger
19. Map lager/channel lager
20. Random/intro
21. Mute
22. BT-modus: afspelen/pauzeren
23. Volume hoger/lager
24. CD/USB modus: afspelen/pauzeren
25. CD stop ◼
1. Druk in standby modus op ON/STANDBY op het hoofdtoestel of de afstandsbediening om het toestel AAN te zetten. Het
toestel wordt ingeschakeld en het icoon van de laatst geselecteerde ingangsmodus verschijnt op het LCD-scherm.
2. Om het apparaat UIT (in standby) te zetten, drukt u opnieuw op ON/STANDBY op het hoofdtoestel of op de
afstandsbediening. Het LCD-scherm wordt gedimd en toont de huidige tijd. De indicator voor de stand-by modus licht op.

12
Nadat u de gelijkstroomadapter in het toestel hebt gestoken, verschijnt en knippert "00:00" op het LCD-scherm.
1. In de uit (standby) modus, houd CLOCK SET op de afstandsbediening of het hoofdtoestel ingedrukt, het 24 uurs-formaat
"24H" zal op het scherm verschijnen.
2. Druk op of op de afstandsbediening of het hoofdtoestel om desgewenst de 24 uursnotatie te selecteren. Druk
anders op CLOCK SET om de 12 uursnotatie te bevestigen en ga naar het instellen van de tijd. Uurcijfers zullen knipperen.
3. Druk op of op de afstandsbediening of op het hoofdtoestel om het uur in te stellen. Houd de toets ingedrukt om
snel vooruit/achteruit in de tijd te gaan.
Opmerking: Zorg ervoor dat het uur zo is ingesteld dat de PM-indicator correct wordt weergegeven.
4. Druk op CLOCK SET op de afstandsbediening of het hoofdtoestel om de instelling van het uur te bevestigen, de cijfers
voor de minuten zullen nu knipperen.
5. Druk op of op de afstandsbediening of op het hoofdtoestel om de minuten in te stellen. Houd de toets ingedrukt
om snel vooruit/achteruit in de tijd te gaan.
6. Druk nogmaals op CLOCK SET op de afstandsbediening om de instelling te voltooien.
OPMERKING: De klok en de opgeslagen radiozenders moeten opnieuw worden ingesteld als de stroom wordt onderbroken of
in geval van een stroomstoring. "00:00" knippert op het LCD-display om u te melden dat de stroom werd onderbroken en de
klok opnieuw moet worden ingesteld. Volg de bovenstaande stappen 1-6 om de klok opnieuw in te stellen.
Het toestel zal de huidige tijd tonen in standby modus. Om de huidige tijd te kunnen zien wanneer het toestel aan staat, drukt
u CLOCK SET op het hoofdtoestel of op de afstandsbediening, de huidige tijd wordt gedurende 5 seconden weergegeven.
DE WEKKER INSTELLEN
Met deze functie kan het systeem automatisch worden ingeschakeld en wordt u gewekt met een piepend alarm, CD/USB/FM-
muziek of zoemer.
Timer starttijd (ON):
1. Houd, in standby modus, de TIMER toets op de afstandsbediening ingedrukt tot het display "On" toont, en de uurcijfers
knipperen.
2. Druk op de of knoppen om de uurcijfers aan te passen, en druk dan op de ENTER knop om te bevestigen. De
minuutcijfers zullen knipperen op het display.
3. Druk op de of knoppen om de minuten aan te passen, en druk dan op de ENTER-toets om te bevestigen.
Timer eindtijd (OFF):
4. Wanneer de "On" timer klok is ingesteld, zal het display "OFF" tonen en zullen de uurcijfers knipperen.
5. Druk op de of knoppen om de uurcijfers aan te passen, en druk dan op de ENTER-toets om te bevestigen. De
minuutcijfers zullen knipperen op het display.
6. Druk op of van de afstandsbediening om de cijfers van de minuten aan te passen, en druk dan op ENTER om te
bevestigen.
7. Druk op de of toets om CD, USB, FM of BU (buzzer) modus te kiezen, druk dan op ENTER om te bevestigen. Op het
display zal "VOL#" verschijnen.
8. Druk op of om het volume in te stellen, en druk dan op ENTER om te bevestigen.
9. Druk op de TIMER toets om "Timer On" te selecteren, de Timer is ingesteld.
10. In de standby-modus verschijnt het " " symbool op het display om aan te geven dat de timer is ingeschakeld.
OPMERKING:
Als "Wake to CD/USB" is geselecteerd maar er is geen CD of USB-stick geplaatst, zal de wekker automatisch overschakelen op
het piep-weksignaal zodra de wektijd is bereikt.
Bij "Wake to Radio" zal het systeem standaard overschakelen op de laatste FM-radiozender die u heeft beluisterd voordat u
de wekker uitzette.
Het weksignaalvolume zal toenemen tot het volume dat u hebt ingesteld.
ALARM FUNCTIE ACTIVEREN/DE-ACTIVEREN
1. Om het ALARM te activeren, druk op de TIMER toets, en het alarmicoon “” verschijnt op het lcd-scherm.
2. Annuleer de ALARM functie door nogmaals op de TIMER toets te drukken. Het alarmicoon " " zal verdwijnen van het LCD
scherm.
•Wanneer de wektijd is bereikt, zal het CD/USB-, radio- of piepalarm gedurende 60 minuten afgaan, vervolgens uitschakelen
en zichzelf resetten voor de volgende dag (zonder op de snooze-knop te drukken).
•Om het alarm onmiddellijk te stoppen nadat het is afgegaan, drukt u eenmaal op de POWER/STANDBY-knop op de
afstandsbediening of op het hoofdtoestel. Het reset zichzelf voor de volgende dag.
•Om het alarm voor de volgende dag te annuleren, druk eenmaal op de TIMER knop, het alarmicoon " " zal van het lcd-
scherm verdwijnen.
1. Druk op de POWER/STANDBY knop op het hoofdtoestel of de afstandsbediening om het toestel aan te zetten.
2. Druk op SOURCE op het hoofdtoestel of op de afstandsbediening om de FM-modus te selecteren.

13
3. Druk herhaaldelijk op TUNE of op het hoofdtoestel of de afstandsbediening om handmatig op een bepaalde
radiozender af te stemmen. Gebruik deze methode van handmatig afstemmen om af te stemmen op zwakkere zenders die
worden gepasseerd door de automatische afstemmethode.
4. Om automatisch af te stemmen op de volgende beschikbare radiozender, houdt u de of knoppen op het
hoofdtoestel of de afstandsbediening gedurende 1-2 seconden ingedrukt tot “SCA” op het display wordt weergegeven,
laat dan de knop los. De tuner zal stoppen met scannen wanneer hij de volgende radiozender met voldoende
signaalsterkte ontvangt.
5. Draai de volumeregelaar op het hoofdtoestel of druk op de volumeknoppen op de afstandsbediening om het gewenste
volumeniveau in te stellen.
FM / FM STEREO ONTVANGST
Wanneer u naar de FM-radio luistert, drukt u op de ST./MONO toets op de afstandsbediening om te schakelen tussen stereo
modus en mono modus. Het FM stereo icoon "ST" verschijnt op het display wanneer het apparaat in stereo modus staat. Het is
beter om de zender in mono te ontvangen wanneer u een zwakke zender ontvangt.
TIPS VOOR DE BESTE ONTVANGST:
Voor de beste FM-ontvangst moet de FM-draadantenne aan de achterkant van het toestel volledig uitgerold en uitgestrekt
zijn.
OPMERKING: Automatisch afstemmen is afhankelijk van de signaalsterkte van de zender, dus zwakke zenders kunnen worden
overgeslagen. U kunt handmatig afstemmen om de zwakke zenders te vinden als een zender wordt overgeslagen. Bij sterke
signalen is het mogelijk dat de tuner stopt voordat hij de werkelijke uitzendfrequentie bereikt, zodat u wellicht handmatig
moet afstemmen voor de beste ontvangst.
1. Druk op de POWER/STANDBY knop op het hoofdtoestel of de afstandsbediening om het toestel aan te zetten.
2. Druk op de SOURCE knop op het hoofdtoestel of de afstandsbediening om de FM-radiomodus te selecteren.
3. Houd TUNE of op het hoofdtoestel of de afstandsbediening ingedrukt tot “SCA” op het display wordt
weergegeven. Laat de toets los voor het automatisch zoeken & programmeren van voorkeurskanalen. Het automatisch
zoeken en programmeren stopt bij P01 nadat het scannen is voltooid.
OPMERKING: Als de kanalen die zijn opgeslagen tijdens het automatisch zoeken en programmeren niet de kanalen zijn die u
wilt opslaan, gebruikt u de onderstaande methode voor het handmatig opslaan van voorkeuzezenders.
4. Stem af op het gewenste radiostation, hetzij door "manueel" of "automatisch" afstemmen.
5. Druk op de PROG. toets van de afstandsbediening, het volgende beschikbare opgeslagen voorkeurszender en een
knipperend nummer verschijnen op de LCD-display (Opmerking: "P01" verschijnt op de display als u voor de eerste keer
een voorkeurszender programmeert).
6. Druk op CHANNEL -/+ op het hoofdtoestel of afstandsbediening om het voorkeuzenummer te kiezen waaraan u de zender
wilt toewijzen.
7. Druk op de PROG. toets van de afstandsbediening om de instelling te bevestigen.
8. Herhaal bovenstaande stappen 4 - 8 om tot 30 FM zenders voor te programmeren.
OPROEPEN VAN VOORGEPROGRAMMEERDE VOORKEURSZENDERS
Roep in radiomodus de vooringestelde kanalen op door op CHANNEL -/+ van het hoofdtoestel of de numerieke toetsen van
de afstandsbediening te drukken.
OPMERKING:
Naast commerciële CD's kan deze CD-speler ook zelfgecompileerde CD-R/RW, MP3 discs afspelen. Probeer geen CD-ROM,
CDI, VCD, DVD of computer-CD's af te spelen.
BELANGRIJK:
Het kan tot 10 seconden duren voor het daadwerkelijke afspelen begint. Als het afspelen helemaal niet begint, ligt dat
mogelijk aan de kwaliteit van de CD-R/RW, MP3 disc en/of de compatibiliteit van de CD-compilatiesoftware. De fabrikant is
niet verantwoordelijk voor de afspeelkwaliteit van CD-R/RW, MP3 discs.
Plak geen etiket op de disc. Dit kan ernstige storingen veroorzaken.
CD AFSPELEN
1. Druk op de POWER/STANDBY toets op het hoofdtoestel of de afstandsbediening om het toestel aan te zetten.
2. Druk op SOURCE op de afstandsbediening of op het hoofdtoestel om de CD-modus te selecteren en druk op "Open/close"
(op de bovenkant van het CD-compartimentdeksel).
3. Plaats een CD op de middelste spoel met de labelzijde naar het CD-deksel toe. Sluit het CD-compartiment.
4. Het apparaat begint de CD te lezen, "---" knippert op het display. Na een paar seconden verschijnt het totaal aantal tracks
op het LCD-display.
5. Druk op PLAY/PAUSE op het hoofdtoestel of de afstandsbediening, de PLAY indicator verschijnt op het display, de CD
begint met het afspelen van het eerste nummer.
6. Draai aan de volumeknop op het hoofdtoestel of druk op de volumeknoppen van de afstandsbediening om het gewenste
volumeniveau in te stellen.

14
7. Om het afspelen te pauzeren, drukt u op de PLAY/PAUSE toets op het hoofdtoestel of de afstandsbediening. De tijd van
het nummer zal worden gepauzeerd en de play-indicator zal op het display knipperen. Om het afspelen te hervatten,
drukt u nogmaals op de PLAY/PAUSE toets.
8. U kunt ervoor kiezen uw favoriete nummer af te spelen door op de toets SKIP NEXT of SKIP PREVIOUS te drukken.
Het LCD display zal het huidige nummer aangeven.
9. Om een bepaalde sectie binnen een track op te zoeken, houdt u of ingedrukt totdat de sectie is gevonden. Laat de
toets los om uw selectie verder af te spelen.
10. Om het afspelen te stoppen, drukt u op de ◼ STOP-toets.
AFSPELEN VAN CD-R/RW, MP3 MET MAP
1. Druk op SOURCE op de afstandsbediening en laad een MP3-schijf.
2. Druk op FOLDER -/+ om de gewenste map voor de weergave te selecteren.
3. Selecteer het gewenste af te spelen bestand door op SKIP NEXT of SKIP PREVIOUS te drukken.
4. Druk op de PLAY/PAUSE toets. Het afspelen zal beginnen en de bestandsnaam zal worden weergegeven.
AFSPELEN VAN USB/MP3 MET MAP
1. Druk op SOURCE op de afstandsbediening of op het hoofdtoestel om de USB-functie te selecteren. Sluit een USB-stick aan
die afspeelbare MP3-bestanden bevat. Wanneer het USB-geheugen is aangesloten op het hoofdtoestel, zal de
apparaatinformatie worden weergegeven.
2. Druk op FOLDER -/+ om de gewenste map voor de weergave te selecteren.
3. Selecteer het gewenste bestand dat moet worden afgespeeld door op of te drukken.
4. Druk op PAUSE/PLAY. Het afspelen zal beginnen en de bestandsnaam zal worden weergegeven.
OPMERKING:
Dit product is niet compatibel met MTP- en AAC-bestandssystemen van USB-apparaten voor massaopslag of MP3-spelers.
Dit toestel ondersteunt FAT16 en FAT32, maar het is mogelijk dat sommige USB-opslagmedia beide bestandssystemen niet
ondersteunen. Raadpleeg voor meer informatie de gebruiksaanwijzing van het USB-opslagapparaat in kwestie of neem
contact op met de fabrikant.
OVERSLAAN EN ZOEKMODUS
1. Druk, tijdens afspelen of in pauze, op de toets SKIP NEXT of SKIP PREVIOUS om naar het volgende nummer te gaan
of terug te keren naar het begin van het huidige nummer.
2. Houd tijdens weergave of ingedrukt om binnen het huidige nummer te spoelen/zoeken met hoge spoelsnelheid.
OPMERKING: Het volgende is alleen functioneel met behulp van de afstandsbediening.
Druk op REPEAT op de afstandsbediening om verschillende herhaalmodi te selecteren:
Repeat 1 Repeat All Normal
REPEAT 1 - het nummer dat op dat moment wordt afgespeeld wordt continu herhaald. "REPEAT 1" verschijnt op het display.
REPEAT ALL - alle nummers worden continu herhaald. "REPEAT ALL" verschijnt op het display.
WILLEKEURIG AFSPELEN
Wanneer de RANDOM/INTRO-toets wordt ingedrukt, zal de "RAND" indicator op het LCD scherm verschijnen. De nummers op
de schijf worden automatisch in willekeurige volgorde afgespeeld.
Willekeurig Afspelen Annuleren:
Druk meermaals op de RANDOM/INTRO-toets zodat de "RAND" indicator van het display verdwijnt.
OPMERKING:
Door op de toets te drukken tijdens willekeurig afspelen, gaat u naar het volgende nummer dat door de willekeurige
procedure is gekozen. Anderzijds kunt u met deze toets niet naar het vorige nummer gaan.
Random Intro Normal
INTRO’S AFSPELEN
1. Druk op RANDOM/INTRO op de afstandsbediening. De "INTRO" indicator verschijnt op het display. Het toestel zal alleen
de eerste 10 seconden (intro) van elk nummer afspelen.
2. Druk nogmaals op RANDOM/INTRO op de afstandsbediening om de normale weergave te hervatten.
OPMERKING: Het volgende is alleen functioneel met behulp van de afstandsbediening.
Met deze functie kunnen de tracks in een geprogrammeerde volgorde worden afgespeeld. De gebruiker kan maximaal 32
tracks in CD-modus of 99 tracks in MP3-modus programmeren.
OPMERKING: Dit programma kan alleen in STOP-modus worden ingesteld.
1. Druk op de PROG. toets van de afstandsbediening, "P01" en "PROG" verschijnen op het display ("P01" wordt getoond als u
voor de eerste keer programmeert).
2. Gebruik of op het hoofdtoestel of de afstandsbediening om het gewenste muzieknummer te kiezen. Het
muzieknummer verschijnt op het display.
3. Druk op de PROG. toets van de afstandsbediening om het gekozen fragment in het geheugen op te slaan, het
programmanummer springt één (d.w.z. "P02") verder op het display.

15
4. Herhaal stappen 2 en 3 om meer muzieknummers op te slaan. U kunt maximaal 32 CD-tracks of 99 MP3-tracks opslaan.
Het display toont "FUL" nadat de tracks zijn geprogrammeerd en het geheugen vol is.
5. Druk op PAUSE/PLAY op het hoofdtoestel of op de afstandsbediening om het afspelen van de CD in de geprogrammeerde
volgorde te starten.
6. Druk op de REPEAT toets van de afstandsbediening om Repeat 1/All te selecteren indien gewenst.
7. Om het afspelen te stoppen, drukt u op de ◼ STOP toets op het hoofdtoestel of op de afstandsbediening.
8. Om het programma helemaal te annuleren, drukt u tweemaal op de ◼STOP toets op het hoofdtoestel of op de
afstandsbediening. Het "PROG" icoon zal van het display verdwijnen.
Druk op de POWER/STANDBY toets om het toestel aan te zetten, volg de onderstaande instructies om verbinding te maken
met BT.
Koppelen van een BT-streaming capabele smartphone (of ander BT geschikt apparaat) aan de Audizio Toulon:
1. Druk op POWER/STANDBY op het hoofdtoestel of op de afstandsbediening om het toestel in te schakelen.
2. Druk op de SOURCE toets van het hoofdtoestel of de afstandsbediening om de BT-modus te selecteren, "bt" knippert op
het display.
3. Schakel de BT streaming functie van uw BT capabele apparaat in en activeer de zoek- of scanfunctie om de Audizio Toulon
te vinden.
Selecteer "Audizio Toulon" in de lijst met apparaten wanneer deze op het scherm van uw apparaten verschijnt. Voer
indien nodig de toegangscode "0000" in om te koppelen.
4. Na succesvolle koppeling van het toestel en de Toulon, zal het display ononderbroken "bt" tonen (het knipperen is
gestopt). U kunt beginnen met het draadloos afspelen van muziek van uw toestel.
5. Nadat u uw favoriete nummer hebt gekozen, drukt u op PLAY/PAUSE op het hoofdtoestel of op de afstandsbediening om
het nummer af te spelen of te pauzeren.
6. Draai aan de volumeknop op het hoofdtoestel of druk op de volumetoetsen van de afstandsbediening om het gewenste
volumeniveau in te stellen.
7. Druk op de of toets op het hoofdtoestel of op de afstandsbediening om naar het vorige of volgende nummer te
gaan.
8. Als u de Audizio Toulon met een ander apparaat met BT-functie wilt koppelen, houdt dan de PAIR-knop 3 seconden
ingedrukt of schakel de BT-functie uit van het apparaat dat momenteel met de Audizio Toulon is gekoppeld en herhaal
vervolgens de bovenstaande stappen.
OPMERKING: Het volgende is alleen functioneel met behulp van de afstandsbediening.
Dit toestel biedt 4 verschillende EQ-modi om uw luisterervaring te verbeteren. U kunt het gewenste effect selecteren door
op de EQ-knop van de afstandsbediening te drukken in de volgende volgorde:
ROCKPOPJAZZCLASSICOFF
OPMERKING: Het volgende is alleen functioneel met behulp van de afstandsbediening.
Druk op MUTE (op de afstandsbediening) om het geluid uit de luidspreker te dempen. "V 00" verschijnt op het display.
Druk nogmaals op MUTE om de weergave via de luidspreker te hervatten.
OPMERKING: Het volgende is alleen functioneel met behulp van de afstandsbediening.
Met de sleeptimer kunt u het toestel automatisch uitschakelen nadat een vooraf ingestelde tijd is bereikt.
1. Om de slaaptimer te activeren, zet u het toestel aan en drukt u op SOURCE om FM-radio, CD, USB, BT of AUX IN te
selecteren.
2. Druk op de SLEEP-toets van de afstandsbediening, "SLEEP" verschijnt op het display.
3. Druk herhaaldelijk op SLEEP om een slaaptijd te selecteren. Het toestel schakelt automatisch uit na 10, 20, 30, 40, 50, 60,
70, 80 of 90 minuten. Wacht na uw keuze 3 seconden tot het toestel de keuze bevestigt, het toestel speelt dan gedurende
de gekozen tijdsduur en schakelt dan automatisch uit.
4. Om de slaaptimer te annuleren, drukt u herhaaldelijk op de SLEEP toets totdat de timer op het display "OFF" toont, het
slaaptijd icoon "SLEEP" verdwijnt van het display. Om het toestel uit te schakelen vóór de geselecteerde tijdsduur, drukt u
op de POWER/STANDBY toets op eender welk moment.
OPMERKING: Om de resterende slaaptijd te controleren, drukt u eenmaal op SLEEP. Als u in slaap valt bij muziek van een
extern apparaat dat op de AUX-ingang is aangesloten, zal de slaaptimer het hoofdtoestel uitschakelen, het externe apparaat
zal niet worden uitgeschakeld!
OPMERKING: AUX-kabel is niet meegeleverd.
U kunt de aux-ingang gebruiken om een extern afspeelapparaat (bijvoorbeeld een CD-speler of MP3-speler) aan te sluiten.
Druk op SOURCE tot u "AUX" op het display ziet verschijnen. Steek het ene uiteinde van een 3,5 mm jack - 3,5 mm jack kabel
in de AUX IN aansluiting op het voorpaneel. Sluit het andere uiteinde van de kabel aan op uw externe apparaat. Schakel uw
externe apparaat in en kies uw gewenste geluidsbestand.

16
Vielen Dank für den Kauf dieses Audizio gerat. Nehmen Sie sich einen Augenblick Zeit, um diese Anleitung sorgfältig
durchzulesen, damit sie die Möglichkeiten, die unser Produkt bietet, sofort voll ausnutzen können.
Lesen Sie erst die Anleitung vollständig vor der ersten Inbetriebnahme durch. Befolgen Sie die Anweisung, da sonst jeglicher
Garantieanspruch verfällt. Treffen Sie stets alle Sicherheits-vorkehrungen um Feuer und/oder Stromschlag zu vermeiden.
Reparaturen dürfen nur von qualifiziertem Fachpersonal ausgeführt werden, um Stromschlag zu vermeiden. Bewahren Sie
diese Anleitung für spätere Bezugnahme auf.
- Bewahren Sie die Verpackung auf, um das Gerät im
Bedarfsfall sicher transportieren zu können.
- Bevor das Gerät in Betrieb genommen wird, muss es erst
von einem Fachmann überprüft werden. Bei der ersten
Benutzung kann etwas Geruch auftreten. Das ist normal und
verschwindet nach einer Weile
- Das Gerät enthält unter Spannung stehende Teile. Daher
NIEMALS das Gehäuse öffnen.
- Keine Metallgegenstände oder Flüssigkeiten ins Gerät
dringen lassen. Sie können zu Stromschlag und Defekten
führen.
- Gerät nicht in der Nähe von Wärmequellen wie Heizkörpern
aufstellen. Nicht auf eine vibrierende Oberfläche stellen.
Niemals die Belüftungsschlitze abdecken.
- Das Gerät ist nicht für Dauerbetrieb geeignet.
- Gehen Sie vorsichtig mit dem Netzkabel um und
beschädigen Sie es nicht. Eine beschädigte Netzschnur kann
zu Stromschlag und Defekten führen.
- Wenn Sie das Gerät vom Netz trennen, immer am Stecker
ziehen, niemals an der Schnur.
- Um Feuer und Stromschlag zu vermeiden, das Gerät vor
Regen und Feuchtigkeit schützen.
- Den Stecker nie mit nassen Händen in eine Netzsteckdose
stecken oder abziehen.
- Wenn sowohl der Stecker und/oder die Netzschnur bzw. der
Kabeleintritt ins Gerät beschädigt sind, müssen sie von
einem Fachmann repariert werden.
- Wenn das Gerät so beschädigt ist, dass Innenteile sichtbar
sind, darf der Stecker NICHT in eine Steckdose gesteckt
werden und das Gerät darf NICHT eingeschaltet werden.
Wenden Sie sich in dem Fall an Ihren Fachhändler. Das Gerät
darf nicht an einen Dimmer angeschlossen werden.
- Reparaturen dürfen nur von einem Fachmann oder
Sachverständigen ausgeführt werden.
- Das Gerät nur an eine geerdete 10-16A Netzsteckdose mit
220-240V AC/50Hz Spannung anschließen.
- Bei Gewitter oder längerem Nichtgebrauch den Netzstecker
abziehen. Die Regel gilt: Bei Nichtgebrauch Netzstecker
abziehen.
- Wenn das Gerät längere Zeit nicht benutzt wurde, kann sich
Kondenswasser gebildet haben. Lassen Sie das Gerät erst
auf Zimmertemperatur kommen, bevor Sie es einschalten.
Das Gerät nicht in feuchten Räumen oder im Freien
benutzen.
- Um Unfällen in der Öffentlichkeit vorzubeugen, müssen
die geltenden Richtlinien beachtet und die
Anweisungen/Warnungen befolgt werden.
- Niemals das Gerät kurz hintereinander ein- und
ausschalten. Dadurch verkürzt sich die Lebensdauer
erheblich.
- Das Gerät außerhalb der Reichweite von Kindern halten.
Das Gerät niemals unbeaufsichtigt lassen.
- Die Regler nicht mit Reinigungssprays reinigen. Diese
hinterlassen Rückstände, die zu Staub- und
Fettansammlungen führen. Bei Störungen immer einen
Fachmann um Rat fragen.
- Das Gerät nur mit sauberen Händen bedienen.
- Das Gerät nicht mit Gewalt bedienen.
- Dieses Gerät kann dazu führen Magnetfeld. Halten Sie das
Gerät mindestens 60 cm vom Computer oder Fernseher.
- Wenn dieses Gerät eine Blei-Säure-Batterie hat, soll dies
jede 3 Monate zumindest wieder aufgeladen werden,
wenn es nicht für eine längere Zeit nicht benutzt wird,
sonst ist es möglich, dass die Batterie dauerhaft
beschädigt.
- Fachmann um Rat fragen, bevor Sie es wieder einschalten.
- Keine chemischen Reinigungsmittel benutzen, die den
Lack beschädigen. Das Gerät nur mit einem trockenen
Tuch abwischen.
- Nicht in der Nähe von elektronischen Geräten benutzen,
die Brummstörungen verursachen können.
- Bei Reparaturen nur die Original-Ersatzteile verwenden,
um starke Schäden und/oder gefährliche Strahlungen zu
vermeiden.
- Bevor Sie das Netz- und/oder Anschlusskabel abziehen,
erst das Gerät ausschalten. Netz- und Anschlusskabel
abziehen, bevor Sie das Gerät umstellen.
- Sorgen Sie dafür, dass das Netzkabel nicht beschädigt
werden kann, wenn Menschen darüber laufen. Das
Netzkabel vor jedem Einsatz auf Brüche/Schadstellen
überprüfen.
- In Deutschland beträgt die Netzspannung 220-240V AC /
50Hz. Wenn Sie das Gerät auf Reisen mitnehmen, prüfen
Sie, ob die örtliche Netzspannung den Anforderungen des
Geräts entspricht.
Dieses Zeichen weist den Benutzer darauf hin, dass lebensgefährliche Spannungen im Gerät anliegen, die bei
Berührung einen Stromschlag verursachen.
Dieses Zeichen lenkt die Aufmerksamkeit des Benutzers auf wichtige Hinweise in der Anleitung hin, die unbedingt
eingehalten werden müssen.
HINWEIS: Um einen einwandfreien Betrieb zu gewährleisten, muss die Raumtemperatur zwischen 5° und 35°C.
liegen.
Tronios BV Registrierungsnummer: DE93980108 (ElektroG).
Dieses Produkt darf am Ende seiner Lebensdauer nicht über den normalen Haushaltsabfall entsorgt werden, sondern muss an einem
Sammelpunkt für das Recycling abgegeben werden. Hiermit leisten Sie einen wichtigen Beitrag zum Schutze unserer Umwelt.
Tronios BV Registrierungsnummer: 21003000 (BatterieG).
Lithiumbatterien und Akkupacks sollten nur im entladenen Zustand in die Altbatteriesammelgefäße bei Handel und bei öffentlich-
rechtlichen Entsorgungsträgern gegeben werden. Bei nicht vollständig entladenen Batterien Vorsorge gegen Kurzschlüß treffen durch
Isolieren der Pole mit Klebestreifen. Der Endnutzer ist zur Rückgabe von Altbatterien gesetzlich verpflichtet.
Reparieren Sie das Gerät niemals selbst und nehmen Sie niemals eigenmächtig Veränderungen am Gerät vor. Sie verlieren dadurch den
Garantieanspruch. Der Garantieanspruch verfällt ebenfalls bei Unfällen und Schäden in jeglicher Form, die durch unsachgemäßen
Gebrauch und Nichtbeachtung der Warnungen und Sicherheitshinweise in dieser Anleitung entstanden sind. Audizio ist in keinem Fall
verantwortlich für persönliche Schäden in Folge von Nichtbeachtung der Sicherheitsvorschriften und Warnungen. Dies gilt auch für
Folgeschäden jeglicher Form.

17
Packen Sie das Gerät sofort nach Empfang aus und prüfen Sie den Inhalt. Wenn Teile fehlen oder beschädigt sind,
benachrichtigen Sie sofort den Spediteur und bewahren Sie die Verpackung auf. Falls ein Gerät ins Werk zurückgeschickt
werden muss, ist es wichtig, dass es in der Originalverpackung versandt wird.
Das Gerät darf nicht in Betrieb genommen werden, nachdem es von einem kalten in einen warmen Raum gebracht wurde. Das
dabei entstehende Kondenswasser kann unter Umständen Ihr Gerät zerstören. Lassen Sie das Gerät solange uneingeschaltet,
bis es Zimmertemperatur erreicht hat!
1. CD-Fach öffnen/schließen
2. Lautstärkeregler
3. LCD-Anzeige
4. IR-Fernbedienungsempfänger
5. EIN/Standby
6. Source (Quelle)
7. Uhrzeiteinstellung/Speicher
8. Kanal –/Kanal +
9. CD: Stopp ◼/BT pair
10. CD/BT: abspielen/pausieren / Radio: auto-Suchfunktion
11. CB/BT: nächster Song (skip) / Tune +
12. CD/BT: vorheriger Song (skip) / Tune –
13. Aux jack-Eingang
14. USB-Eingang
15. Lautsprecherausgang
16. Kopfhöreranschluss
17. DC Stromeingang
18. Antenne
1. EIN/Standby
2. Numerische Tasten
3. Programm
4. CD/USB vorherige Song (skip) / Tuner niedriger
5. Equalizer
6. X-Bass / Abspielen/pausieren
7. Repeat (wiederholen)
8. BT-modus: nächster Song (skip)
9. BT-modus: vorheriger Song (skip)
10. BT pairing (Kopplung)
11. Source (Quelle)
12. Uhrzeiteinstellung
13. Timer
14. Schlafmodus
15. Ordner höher /Kanal höher
16. FM-modus: mono/stereo
17. Enter
18. CD/USB nächster Song (skip) / Tuner höher
19. Ordner niedriger/Kanal niedriger
20. Random/Intro
21. Mute
22. BT-modus: abspielen/pausieren
23. Lautstärke höher/niedriger
24. CD/USB Modus: abspielen/pausieren
25. CD stopp ◼
1. Drücken Sie im Standby-Modus POWER/STANDBY auf dem Hauptgerät oder der Fernbedienung, um das Gerät
einzuschalten. Das Gerät schaltet sich ein und das Symbol des zuletzt gewählten Eingangsmodus erscheint auf dem LCD.
2. Um das Gerät auszuschalten (Standby), drücken Sie erneut POWER/STANDBY am Hauptgerät oder auf der Fernbedienung.
Der LCD-Bildschirm wird gedimmt und zeigt die aktuelle Uhrzeit an. Die Anzeige für den Standby-Modus leuchtet auf.
Nach dem Einstecken des Gleichstromadapters blinkt "00:00" auf dem LCD-Display.
1. Wenn Sie im ausgeschalteten Zustand (Standby) CLOCK SET auf der Fernbedienung oder dem Hauptgerät gedrückt halten,
erscheint das 24-Stunden-Format "24H" auf dem Bildschirm.

18
2. Drücken Sie oder auf der Fernbedienung oder dem Hauptgerät, um das 24-Stunden-Format auszuwählen, falls
erforderlich. Andernfalls drücken Sie CLOCK SET, um das 12-Stunden-Format zu bestätigen, und fahren mit der
Einstellung der Uhrzeit fort. Die Stundenziffern blinken.
3. Drücken Sie oder auf der Fernbedienung oder auf dem Hauptgerät, um die Stunde einzustellen. Halten Sie die
Taste gedrückt, um die Zeit vor-/zurückzuspulen.
Hinweis: Vergewissern Sie sich, dass die Stunde so eingestellt ist, dass die PM-Anzeige korrekt angezeigt wird.
4. Drücken Sie CLOCK SET auf der Fernbedienung oder auf dem Hauptgerät, um die Stundeneinstellung zu bestätigen.
5. Drücken Sie oder auf der Fernbedienung oder auf dem Hauptgerät, um die Minuten einzustellen. Halten Sie die
Taste gedrückt, um die Zeit vor-/zurückzuspulen.
6. Drücken Sie erneut CLOCK SET auf der Fernbedienung, um die Einstellung abzuschließen.
HINWEIS: Bei einer Stromunterbrechung oder einem Stromausfall müssen die Uhr und die gespeicherten Radiosender neu
eingestellt werden. Auf dem LCD-Display blinkt "00:00", um Sie darüber zu informieren, dass die Stromversorgung
unterbrochen wurde und die Uhr neu eingestellt werden muss. Führen Sie die Schritte 1-6 aus, um die Uhr zurückzusetzen.
Das Gerät zeigt die aktuelle Uhrzeit im Standby-Modus an. Um die aktuelle Uhrzeit bei eingeschaltetem Gerät abzulesen,
drücken Sie CLOCK SET am Hauptgerät oder auf der Fernbedienung; die aktuelle Uhrzeit wird 5 Sekunden lang angezeigt.
EINSTELLEN DES WECKERS
Mit dieser Funktion wird das System automatisch eingeschaltet und weckt Sie mit einem Weckton, CD/USB/FM-Musik oder
einem Summer.
Timer-Startzeit (ON):
1. Halten Sie, in Standby-Modus, die TIMER-Taste auf der Fernbedienung gedrückt, bis auf dem Display "On" erscheint und
die Stundenziffern blinken.
2. Drücken Sie die oder Tasten, um die Stunden einzustellen, und drücken Sie dann zur Bestätigung die ENTER-Taste.
Die Minutenziffern blinken auf dem Display.
3. Drücken Sie die oder Tasten, um die Minuten einzustellen, und drücken Sie dann zur Bestätigung die ENTER -Taste.
Timer-Endzeit(OFF):
4. Wenn die "ON" Zeitschaltuhr gestellt ist, zeigt das Display "OFF" an und die Stundenziffern werden blinken.
5. Drücken Sie die oder Tasten, um die Stunden einzustellen, und drücken Sie dann zur Bestätigung die ENTER -Taste.
Die Minutenziffern blinken auf dem Display.
6. Drücken Sie oder auf der Fernbedienung, um die Minuten einzustellen, und drücken Sie dann zur Bestätigung auf
ENTER.
7. Drücken Sie die oder Tasten, um den Modus CD, USB, FM oder BU (Summer) auszuwählen, und drücken Sie dann zur
Bestätigung auf ENTER. VOL#" wird auf dem Display gezeigt.
8. Drücken Sie die oder Tasten, um die Lautstärke einzustellen und drücken Sie dann ENTER zur Bestätigung.
9. Drücken Sie die TIMER-Taste, um "Timer on" auszuwählen, der Timer wird eingestellt.
10. Im Standby-Modus erscheint das Symbol " " auf dem Display, um anzuzeigen, dass der Timer eingeschaltet ist.
HINWEIS:
Wenn "Wake to CD/USB" ausgewählt ist, aber keine CD oder kein USB-Stick eingelegt ist, schaltet der Wecker automatisch auf
Piepton um, wenn die Weckzeit erreicht ist.
Bei "Wake to Radio" stellt das System standardmäßig den FM-Radiosender ein, den Sie vor dem Ausschalten des Weckers
zuletzt gehört haben.
Die Lautstärke des Alarms wird auf die von Ihnen eingestellte Lautstärke erhöht.
AKTIVIERUNG/DEAKTIVIERUNG DER ALARMFUNKTION
1. Um den ALARM zu aktivieren, drücken Sie die TIMER-Taste und das Alarmsymbol " " erscheint auf der LCD-Anzeige.
2. Brechen Sie die ALARM-Funktion ab, indem Sie die TIMER-Taste erneut drücken. Das Alarmsymbol " " verschwindet von
der LCD-Anzeige.
• Wenn die Weckzeit erreicht ist, ertönt der CD/USB-, Radio- oder Piepser-Alarm 60 Minuten lang, schaltet sich dann aus und
setzt sich für den nächsten Tag zurück (ohne Betätigung der Schlummertaste).
• Um den Alarm sofort nach dem Ertönen zu stoppen, drücken Sie einmal die POWER/STANDBY-Taste auf der Fernbedienung
oder auf dem Hauptgerät. Es wird sich für den nächsten Tag selbst zurücksetzen
• Um den Alarm für den nächsten Tag abzubrechen, drücken Sie einmal die TIMER-Taste, das Alarmsymbol " " verschwindet
dann von der LCD-Anzeige.
1. Drücken Sie die Taste POWER/STANDBY auf dem Hauptgerät oder der Fernbedienung, um das Gerät einzuschalten.
2. Drücken Sie SOURCE auf dem Hauptgerät oder auf der Fernbedienung, um den FM-Modus auszuwählen.
3. Drücken Sie wiederholt TUNE oder auf dem Hauptgerät oder der Fernbedienung, um manuell einen bestimmten
Radiosender einzustellen. Verwenden Sie diese Methode der manuellen Abstimmung, um schwächere Sender
einzustellen, die von der automatischen Abstimmungsmethode umgangen werden.
4. Um automatisch den nächsten verfügbaren Radiosender einzustellen, halten Sie die oder Tasten auf dem
Hauptgerät oder der Fernbedienung 1-2 Sekunden lang gedrückt, bis “SCA” wird gezeigt, und lassen Sie dann die Taste
los. Der Tuner beendet den Suchlauf, wenn er den nächsten Radiosender mit ausreichender Signalstärke empfängt.

19
5. Drehen Sie den Lautstärkeregler am Hauptgerät oder drücken Sie die Lautstärketasten auf der Fernbedienung, um den
gewünschten Lautstärkepegel einzustellen.
UKW MONO/UKW STEREO EMPFANG
Wenn Sie UKW-Radio hören, drücken Sie die Taste ST./MONO auf der Fernbedienung, um zwischen Stereo- und Monobetrieb
umzuschalten. Das UKW-Stereosymbol "ST" erscheint auf dem Display, wenn sich das Gerät im Stereobetrieb befindet. Wenn
Sie einen schwachen Sender empfangen, ist es besser, den Sender im Mono-Modus zu empfangen.
TIPPS FÜR DEN BESTEN EMPFANG:
Für einen optimalen UKW-Empfang sollte die UKW-Drahtantenne auf der Rückseite des Geräts vollständig ausgezogen und
ausgerollt sein.
HINWEIS: Die automatische Abstimmung hängt von der Signalstärke der Sender ab, so dass schwache Sender möglicherweise
übersprungen werden. Wenn ein Sender übersprungen wird, können Sie manuell nach schwachen Sendern suchen. Bei
starken Signalen kann es vorkommen, dass der Tuner anhält, bevor er die eigentliche Sendefrequenz erreicht, und Sie müssen
den Tuner manuell einstellen, um den besten Empfang zu erhalten.
1. Drücken Sie die POWER/STANDBY-Taste auf dem Hauptgerät oder der Fernbedienung, um das Gerät einzuschalten.
2. Drücken Sie die SOURCE-Taste auf dem Hauptgerät oder der Fernbedienung, um den FM-Radiomodus zu wählen.
3. Halten Sie TUNE oder auf dem Hauptgerät oder der Fernbedienung gedrückt, bis “SCA” angezeigt wird. Lassen Sie
die Taste für die automatische Suche und Programmierung der voreingestellten Kanäle los. Die automatische Suche und
Programmierung stoppt bei P01, nachdem der Scanvorgang abgeschlossen ist.
HIWEIS: Wenn die bei der automatischen Suche und Programmierung gespeicherten Kanäle nicht die sind, die Sie speichern
möchten, verwenden Sie die nachstehende Methode, um voreingestellte Kanäle manuell zu speichern.
4. Stellen Sie den gewünschten Radiosender entweder durch "manuelle" oder "automatische" Einstellung ein.
5. Drücken Sie die PROG.-Taste auf der Fernbedienung, die nächste verfügbare gespeicherte Voreinstellung und eine
blinkende Nummer erscheinen auf dem LCD-Display (Hinweis: "P01" erscheint auf dem Display, wenn Sie eine
Voreinstellung zum ersten Mal programmieren).
6. Drücken Sie CHANNEL -/+ am Hauptgerät oder Fernbedienung, um die Voreinstellungsnummer auszuwählen, der Sie den
Sender zuordnen möchten.
7. Drücken Sie die PROG.-Taste auf der Fernbedienung, um die Einstellung zu bestätigen.
8. Wiederholen Sie die Schritte 4 - 8, um bis zu 30 UKW-Sender zu speichern.
AUFRUFEN VON VOREINGESTELLTEN RADIOSENDERN
Rufen Sie die voreingestellten Kanäle im Radiobetrieb durch Drücken von CHANNEL -/+ am Hauptgerät oder der Zifferntasten
auf der Fernbedienung auf.
HINWEIS:
Neben handelsüblichen CDs kann dieser CD-Player auch selbst kompilierte CD-R/RWs und MP3-Discs abspielen. Versuchen
Sie nicht, CD-ROM, CDI, VCD, DVD oder Computer-CDs abzuspielen.
WICHTIG:
Es kann bis zu 10 Sekunden dauern, bis die eigentliche Wiedergabe beginnt. Wenn die Wiedergabe überhaupt nicht startet,
kann die Ursache in der Qualität der CD-R/RW, der MP3-Disc und/oder der Kompatibilität der CD-Compilationssoftware
liegen. Der Hersteller ist nicht verantwortlich für die Wiedergabequalität von CD-R/RW, MP3-Discs.
Kleben Sie kein Etikett auf die Disc. Andernfalls kann es zu schwerwiegenden Fehlfunktionen kommen.
CD ABSPIELEN
1. Drücken Sie die POWER/STANDBY-Taste auf dem Hauptgerät oder der Fernbedienung, um das Gerät einzuschalten.
2. Drücken Sie SOURCE auf der Fernbedienung oder auf dem Hauptgerät, um den CD-Modus auszuwählen, und drücken Sie
"Öffnen/Schließen" (auf der Oberseite des CD-Fachdeckels).
3. Legen Sie eine CD auf die mittlere Spule, wobei die beschriftete Seite zum CD-Deckel zeigt. Schließen Sie das CD-Fach.
4. Das Gerät beginnt mit dem Einlesen der CD, "---" blinkt auf dem Display. Nach ein paar Sekunden erscheint auf dem LCD-
Display die Gesamtzahl der Titel.
5. Drücken Sie PLAY/PAUSE auf dem Hauptgerät oder der Fernbedienung, die PLAY-Anzeige erscheint auf dem Display, die
CD beginnt mit der Wiedergabe des ersten Titels.
6. Drehen Sie den Lautstärkeregler am Hauptgerät oder drücken Sie die Lautstärketasten auf der Fernbedienung, um den
gewünschten Lautstärkepegel einzustellen.
7. Um die Wiedergabe anzuhalten, drücken Sie die Taste PLAY/PAUSE auf dem Hauptgerät oder der Fernbedienung. Die Zeit
des Liedes wird angehalten und der Play-Indikator blinkt auf dem Display. Um die Wiedergabe fortzusetzen, drücken
Sie erneut die PLAY/PAUSE-Taste.
8. Sie können Ihren Lieblingstitel durch Drücken der Taste SKIP NEXT oder SKIP PREVIOUS abspielen lassen. Auf dem
LCD-Display wird der aktuelle Titel angezeigt.
9. Um nach einem bestimmten Abschnitt innerhalb eines Titels zu suchen, halten Sie oder gedrückt, bis der Abschnitt
gefunden wurde. Lassen Sie die Taste los, um mit der Wiedergabe Ihrer Auswahl fortzufahren.
10. Um die Wiedergabe zu stoppen, drücken Sie die ◼ STOP-Taste.

20
WIEDERGABE CD-R/RW, MP3 MIT ORDNER(N)
1. Drücken Sie SOURCE auf der Fernbedienung und legen Sie eine MP3-Disc ein.
2. Drücken Sie FOLDER -/+, um den gewünschten Ordner für die Wiedergabe auszuwählen.
3. Wählen Sie mit SKIP NEXT oder SKIP PREVIOUS die gewünschte Datei aus, die abgespielt werden soll.
4. Drücken Sie PLAY/PAUSE. Die Wiedergabe wird gestartet und der Dateiname wird angezeigt.
WIEDERGABE USB/MP3 MIT ORDNER(N)
1. Drücken Sie SOURCE auf der Fernbedienung oder auf dem Hauptgerät, um die USB-Funktion auszuwählen. Schließen Sie
ein USB-Speichergerät mit abspielbaren MP3-Dateien an. Wenn das USB-Speichergerät an das Hauptgerät angeschlossen
ist, werden die Geräteinformationen angezeigt.
2. Drücken Sie FOLDER -/+, um den gewünschten Ordner für die Wiedergabe auszuwählen.
3. Wählen Sie die abzuspielende Datei durch Drücken von oder .
4. Drücken Sie PAUSE/PLAY. Die Wiedergabe wird gestartet und der Dateiname wird angezeigt.
HINWEIS:
Dieses Produkt ist nicht kompatibel mit MTP- und AAC-Dateisystemen von USB-Massenspeichergeräten oder MP3-Playern.
Dieses Gerät unterstützt FAT16 und FAT32, aber einige USB-Massenspeichergeräte unterstützen möglicherweise nicht beide
Dateisysteme. Weitere Informationen finden Sie in der Bedienungsanleitung des jeweiligen USB-Speichergeräts oder
wenden Sie sich an den Hersteller.
ÜBERSPRINGEN UND SUCHEN
1. Drücken Sie während der Wiedergabe oder in einer Pause SKIP NEXT oder SKIP PREVIOUS , um zum nächsten Titel
zu springen oder zum Anfang des aktuellen Titels zurückzukehren.
2. Halten Sie während der Wiedergabe oder gedrückt, um innerhalb des aktuellen Titels einen schnellen
Vorlauf/Schnellvorlauf durchzuführen.
HINWEIS: Die folgenden Funktionen sind nur mit der Fernbedienung möglich.
Drücken Sie REPEAT auf der Fernbedienung, um verschiedene Wiederholungsmodi auszuwählen:
Repeat 1 Repeat All Normal
REPEAT 1 - der gerade gespielte Titel wird kontinuierlich wiederholt. Auf dem Display erscheint "REPEAT 1".
REPEAT ALL - alle Titel werden kontinuierlich wiederholt. Auf dem Display erscheint "REPEAT ALL".
SHUFFLE SPIELEN
Wenn die RANDOM/INTRO-Taste gedrückt wird, erscheint die Anzeige "RAND" auf dem LCD-Bildschirm. Die Titel auf der Disc
werden automatisch in zufälliger Reihenfolge wiedergegeben.
Zufallswiedergabe Abbrechen:
Drücken Sie erneut RANDOM/INTRO bis die Anzeige "RAND" verschwindet.
HINWEIS:
Wenn Sie die Taste während der Zufallswiedergabe drücken, wird zum nächsten durch das Zufallsverfahren ausgewählten
Titel weitergeschaltet. Andererseits können Sie mit dieser Taste nicht zum vorherigen Titel wechseln.
Random Intro Normal
INTRO’S (EINLEITUNGEN) ABSPIELEN
1. Drücken Sie RANDOM/INTRO auf der Fernbedienung. Die Anzeige "INTRO" erscheint auf dem Display. Das Gerät spielt nur
die ersten 10 Sekunden (Intro) eines jeden Titels.
2. Drücken Sie erneut RANDOM/INTRO auf der Fernbedienung, um die normale Wiedergabe fortzusetzen.
HINWEIS: Die folgenden Funktionen sind nur mit der Fernbedienung möglich.
Mit dieser Funktion können Titel in einer programmierten Reihenfolge abgespielt werden. Der Benutzer kann bis zu 32 Titel
im CD-Modus oder 99 Titel im MP3-Modus programmieren.
HINWEIS: Dieses Programm kann nur im STOP-Modus eingestellt werden.
1. Drücken Sie die PROG.-Taste auf der Fernbedienung, "P01" und "PROG" erscheinen auf dem Display ("P01" erscheint bei
der ersten Programmierung).
2. Verwenden Sie oder auf dem Hauptgerät oder der Fernbedienung, um den gewünschten Titel auszuwählen. Der
Titel erscheint auf dem Display.
3. Drücken Sie die PROG.-Taste auf der Fernbedienung, um den gewählten Titel zu speichern, die Programmnummer springt
um eins (z.B. "P02") weiter im Display.
4. Wiederholen Sie die Schritte 2 und 3, um weitere Titel zu speichern. Sie können bis zu 32 CD-Titel oder 99 MP3-Titel
speichern. Das Display zeigt "FUL" an, nachdem die Titel programmiert wurden und der Speicher voll ist.
5. Drücken Sie PAUSE/PLAY auf dem Hauptgerät oder auf der Fernbedienung, um die Wiedergabe der CD in der
programmierten Reihenfolge zu starten.
6. Drücken Sie REPEAT auf der Fernbedienung, um Wiederholung 1/Alle zu wählen, falls gewünscht.
7. Um die Wiedergabe zu beenden, drücken Sie ◼STOP am Hauptgerät oder auf der Fernbedienung.

21
8. Um das Programm vollständig abzubrechen, drücken Sie zweimal die ◼STOP-Taste auf dem Hauptgerät oder auf der
Fernbedienung. Das "PROG"-Symbol verschwindet aus dem Display.
Drücken Sie die POWER/STANDBY-Taste, um das Gerät einzuschalten, und folgen Sie den nachstehenden Anweisungen, um
eine Verbindung mit BT herzustellen.
Koppeln eines BT-Streaming-fähigen Smartphones (oder eines anderen BT-fähigen Geräts) mit Audizio Toulon:
1. Drücken Sie POWER/STANDBY auf dem Hauptgerät oder der Fernbedienung, um das Gerät einzuschalten.
2. Drücken Sie die SOURCE-Taste auf dem Hauptgerät oder der Fernbedienung, um den BT-Modus auszuwählen. "bt" blinkt
auf dem Display.
3. Schalten Sie die BT-Streaming-Funktion Ihres BT-fähigen Geräts ein und aktivieren Sie die Such- oder Scan-Funktion, um
das Audizio Toulon zu finden.
Wählen Sie "Audizio Toulon" aus der Geräteliste, wenn es auf dem Bildschirm Ihres Geräts erscheint. Geben Sie bei
Bedarf den Passcode "0000" für die Kopplung ein.
4. Nach erfolgreicher Kopplung von Gerät und Toulon erscheint auf dem Display kontinuierlich "bt" (das Blinken hat
aufgehört). Sie können die drahtlose Musikwiedergabe von Ihrem Gerät aus starten.
5. Nachdem Sie Ihren Lieblingstitel ausgewählt haben, drücken Sie PLAY/PAUSE am Hauptgerät oder auf der Fernbedienung,
um den Titel abzuspielen oder anzuhalten.
6. Drehen Sie den Lautstärkeregler am Hauptgerät oder drücken Sie die Lautstärketasten auf der Fernbedienung, um den
gewünschten Lautstärkepegel einzustellen.
7. Drücken Sie oder auf dem Hauptgerät oder auf der Fernbedienung, um zum vorherigen oder nächsten Titel zu
wechseln.
8. Wenn Sie das Audizio Toulon mit einem anderen BT-fähigen Gerät koppeln möchten, halten Sie die PAIR-Taste 3
Sekunden lang gedrückt oder schalten Sie die BT-Funktion des derzeit mit dem Audizio Toulon gekoppelten Geräts aus
und wiederholen Sie dann die oben genannten Schritte.
HINWEIS: Die folgenden Funktionen sind nur mit der Fernbedienung möglich.
Dieses Gerät bietet 4 verschiedene EQ-Modi, um Ihr Hörerlebnis zu verbessern. Sie können den gewünschten Effekt durch
Drücken der EQ-Taste auf der Fernbedienung in folgender Reihenfolge auswählen:
ROCKPOPJAZZCLASSICOFF
HINWEIS: Die folgenden Funktionen sind nur mit der Fernbedienung möglich.
Drücken Sie MUTE (auf der Fernbedienung), um den Ton aus dem Lautsprecher stummzuschalten. Auf dem Display erscheint
"V 00". Drücken Sie erneut auf MUTE, um die Tonwiedergabe über den Lautsprecher fortzusetzen.
HINWEIS: Die folgenden Funktionen sind nur mit der Fernbedienung möglich.
Der Sleep-Timer ermöglicht das automatische Ausschalten des Geräts nach Erreichen einer voreingestellten Zeit.
1. Um den Sleep Timer zu aktivieren, schalten Sie das Gerät ein und drücken Sie SOURCE, um FM Radio, CD, USB, BT oder AUX
IN auszuwählen.
2. Drücken Sie die SLEEP-Taste auf der Fernbedienung, "SLEEP" erscheint auf dem Display.
3. Drücken Sie wiederholt SLEEP, um eine Schlafzeit auszuwählen. Das Gerät schaltet sich nach 10, 20, 30, 40, 50, 60, 70, 80
oder 90 Minuten automatisch ab. Warten Sie nach der Auswahl 3 Sekunden, bis das Gerät die Auswahl bestätigt. Dann
spielt das Gerät die gewählte Dauer ab und schaltet sich automatisch aus.
4. Um den Einschlaftimer abzubrechen, drücken Sie wiederholt die SLEEP-Taste, bis der Timer "OFF" anzeigt; das Einschlaf-
Timer-Symbol "SLEEP" verschwindet dann vom Display. Um das Gerät vor der gewählten Zeitspanne auszuschalten,
können Sie jederzeit die Taste POWER/STANDBY drücken.
HINWEIS: Um die verbleibende Schlafzeit zu überprüfen, drücken Sie einmal auf SLEEP. Wenn Sie zu Musik von einem
externen Gerät, das an den AUX-Eingang angeschlossen ist, einschlafen, schaltet der Sleep-Timer das Hauptgerät aus, das
externe Gerät wird nicht ausgeschaltet!
HINWEIS: AUX-Kabel ist nicht im Lieferumfang enthalten.
Über den AUX-Eingang können Sie ein externes Wiedergabegerät (z. B. einen CD-Player oder MP3-Player) anschließen.
Drücken Sie SOURCE, bis Sie "AUX" auf dem Display sehen.
Stecken Sie ein Ende eines 3,5-mm-Klinkenkabels in die AUX IN-Buchse an der Vorderseite. Schließen Sie das andere Ende
des Kabels an Ihr externes Gerät an. Schalten Sie Ihr externes Gerät ein und wählen Sie die gewünschte Sounddatei.

22
Felicitaciones a la compra de este producto Audizio. Por favor lea atentamente este manual antes de usar el aparato para
disfrutar al completo de sus prestaciones.
Seguir las instrucciones le permite no invalidar la garantía. Tome todas las precauciones para evitar que se produzca fuego o
una descarga eléctrica. Las reparaciones solo deben llevarse a cabo por técnicos cualificados para evitar descargas eléctricas.
Guarde el manual para futuras consultas.
sentirse cierto olor. Esto es normal y desaparece al poco tiempo.
- Este aparato contiene piezas que llevan voltaje. Por lo
tanto NO abra la carcasa.
- No coloque objetos metálicos o vierta líquidos dentro
del aparato Podría producir descargas eléctricas y fallos
en el funcionamiento.
- No coloque el aparato cerca de fuentes de calor tipo
radiadores, etc. No coloque el aparato en superficies
vibratorias. No tape los agujeros de ventilación.
- Este aparato no está preparado para un uso continuado.
- Tenga cuidado con el cable de alimentación y no lo
dañe. Un daño o defecto en el cable de alimentación
puede producir una descarga eléctrica o fallo en el
funcionamiento.
- Cuando desconecte el aparato de la toma de corriente,
siempre tire de la clavija, nunca del cable.
- No enchufe o desenchufe el aparato con las manos
mojadas.
- Si la clavija y/o el cable de alimentación están dañados,
necesitan reemplazarse por un técnico cualificado.
- Si el aparato está dañado de modo que puedan verse
sus partes internas, NO conecte el aparato a la toma de
corriente y NO lo encienda. Contacte con su
distribuidor. NO conecte el aparato a un reostato o
dimmer.
- Para evitar un fuego o peligro de descarga, no exponga
el aparato a la lluvia y a la humedad.
- Todas las reparaciones deben llevarse a cabo
exclusivamente por técnicos cualificados.
- Conecte el aparato a una toma de corriente con toma de
tierra (220-240Vca/50Hz) protegida por un fusible de
10-16A.
- Durante una tormenta o si el aparato no va a usarse
durante un periodo largo de tiempo, desconéctelo de la
toma de corriente. La regla es: Desconéctelo si no lo va
a usar.
- Si el aparato no se ha usado en mucho tiempo puede
producirse condensación. Deje el aparato a temperatura
ambiente antes de encenderlo. Nunca utilice el aparato
en ambientes húmedos o en el exterior.
- Para prevenir accidentes en las empresas, debe seguir
las directrices aplicables y seguir las instrucciones.
- No lo apague y encienda repetidamente. Esto acorta su
tiempo de vida.
- Mantenga el aparato fuera del alcance de los niños. No
deje el aparato sin vigilancia.
- No utilice sprays limpiadores para limpiar los
interruptores. Los residuos de estos sprays producen
depósitos de polvo y grasa. En caso de mal
funcionamiento, siempre consulte a un profesional.
- No fuerce los controles.
- Si el aparato se ha caído, siempre haga que lo verifique
un técnico cualificado antes de encenderlo otra vez.
- NO utilice productos químicos para limpiar el aparato.
Dañan el barniz. Tan solo límpielo con un trapo seco.
- Manténgalo lejos de equipos electrónicos ya que
pueden producir interferencias.
- Si este producto incorpora una batería recargable con
base ácida, por favor recarge bateria cada 3 meses si no
va a usar la unidad por un tiempo prolongado. En caso
contrario la batería podría dañarse.
- Solo utilice recambios originales para las reparaciones,
de otro modo pueden producirse daños serios y/o
radiaciones peligrosas.
- Apague el aparato antes de desconectarlo de la toma de
corriente y/o de otros equipos. Desconecte todos los
cables y conexiones antes de mover el aparato.
- Asegúrese de que el cable de alimentación no puede
dañarse cuando la gente lo pise. Compruebe el cable de
alimentación antes de cada uso por si hay daños o
defectos.
- El voltaje de funcionamiento es 220-240Vca/50Hz.
Compruebe que la toma de corriente coincide. Si tiene
que viajar, asegúrese de que el voltaje del país es el
adecuado para este aparato.
- Guarde el embalaje original para poder transportar el
aparato en condiciones seguras.
Esta señal advierte al usuario de la presencia de alto voltaje en el interior de la carcasa y que es de la suficiente
magnitud como para producir una descarga eléctrica.
Esta señal advierte al usuario de que el manual contiene instrucciones importantes que han de leerse y seguirse al pie
de la letra.
NOTA: Para asegurarse de que el aparato funcione correctamente, debe usarse en ambientes a una temperatura de entre
5°C/41°F y 35°C/95°F.
Los productos electrónicos no pueden tirarse a la basura normal. Por favor lleve este producto a un centro de reciclaje. Pregunte a
la autoridad local en caso de duda. Las especificaciones son generales. Los valores actuales pueden variar de una unidad a otra. Las
especificaciones pueden variar sin previo aviso.
Nunca intente reparar usted mismo este equipo. Esta manipulación anulará la garantía. No realice cambios en la unidad. Esta manipulación
anulará la garantía. Esta garantía no es aplicable en caso de accidente o daños ocasionados por uso indebido del aparato o mal uso del
mismo. Audizio no se hace responsable de daños personales causados por el no seguimiento de las normas e instrucciones de este manual.
Esto es aplicable también a los daños de cualquier tipo.

23
ATENCIÓN! Inmediatamente después de recibir un dispositivo, desempaque cuidadosamente la caja de cartón, compruebe el
contenido para asegurarse de que todas las partes están presentes, y se han recibido en buenas condiciones. Notifique
inmediatamente al transportista y conserve el material de embalaje para la inspección por si aparecen daños causados por el
transporte o el propio envase muestra signos de mal manejo. Guarde el paquete y todos los materiales de embalaje. En el
caso de que deba ser devuelto a la fábrica, es importante que el aparato sea devuelto en la caja de la fábrica y embalaje
originales.
Si el aparato ha estado expuesto a grandes cambios de temperatura (tras el transporte), no lo enchufe inmediatamente. La
condensación de agua producida podría dañar su aparato. Deje el dispositivo apagado hasta que se haya alcanzado la
temperatura ambiente.
1. Abrir/cerrar el compartimento del CD
2. Control de volumen
3. Pantalla LCD
4. Receptor de control remoto IR
5. Encendido/espera
6. Botón de la fuente
7. Conjunto de reloj/memoria
8. Canal –/Canal +
9. CD: stop ◼/BT pair
10. CD/BT: reproducir/pausar / Radio: función de búsqueda automática
11. CB/BT: skip siguiente / Tune +
12. CD/BT: skip anterior / Tune –
13. Toma de entrada auxiliar
14. Entrada USB
15. Conector de salida de altavoces
16. Toma de auriculares
17. Entrada de corriente continua
18. Antena
1. Encendido/espera
2. Teclas numéricas
3. Programa
4. CD/USB anterior / Tuner abajo
5. Ecualizador
6. X-Bass / Pausa/reproducción
7. Repita
8. BT mode: skip siguiente pista
9. BT mode: skip pista anterior
10. BT mode: pairing
11. Fuente
12. Juego de relojes
13. Timer (temporizador)
14. Sleep (dormir)
15. Carpeta arriba/canal arriba
16. Modo FM: mono/estéreo
17. Enter
18. CD/USB siguiente / Tuner arriba
19. Carpeta abajo/canal abajo
20. Random/intro
21. Silencio
22. BT mode: reproducir/pausar
23. Subir/bajar el volumen
24. CD/USB mode: reproducir/pausar
25. CD stop ◼
1. En el modo de espera, pulse POWER/STANDBY en la unidad principal o en el mando a distancia para encender la unidad.
La unidad se encenderá, el icono del último modo de entrada seleccionado se mostrará en la pantalla LCD.
2. Para apagar la unidad (en espera), pulse de nuevo POWER/STANDBY en la unidad principal o en el mando a distancia. La
PANTALLA LCD se oscurece y muestra la hora actual. El indicador del modo de espera se ilumina.

24
Después de enchufar el adaptador de corriente continua en la unidad, aparecerá "00:00" y parpadeará en la pantalla LCD.
1. En el modo de apagado (Standby), mantenga pulsado CLOCK SET en el mando a distancia o en la unidad principal, el
formato de 24 horas "24H" aparecerá en la pantalla.
2. Pulse o en el mando a distancia o en la unidad principal para seleccionar el formato de 24 horas si lo desea. De lo
contrario, pulse CLOCK SET para confirmar el formato de reloj de 12 horas y entrar en el modo de configuración del reloj.
Los dígitos de las horas parpadearán.
3. Pulse o en el mando a distancia o en la unidad principal para ajustar la hora. Mantenga pulsado el botón para
ajustar el avance/retroceso rápido.
NOTA: Asegúrese de que la hora está ajustada para que el indicador PM se muestre correctamente.
4. Pulse CLOCK SET en el mando a distancia para confirmar el ajuste de la hora, los dígitos de los minutos parpadearán para
solicitar la entrada.
5. Pulse o en el mando a distancia o en la unidad principal para ajustar los minutos. Mantenga pulsado el botón para
el ajuste de avance/retroceso rápido.
6. Pulse de nuevo CLOCK SET en el mando a distancia para completar el ajuste.
NOTA: El reloj y las preselecciones de emisoras de radio necesitarán ser reiniciados si se interrumpe la alimentación o en
caso de un corte de energía. Aparecerá "00:00" y empezará a parpadear en la pantalla LCD para notificarle que la
alimentación se ha interrumpido y que el reloj necesita ser reiniciado. Por favor, siga los pasos anteriores 1-6 para
restablecer el reloj.
La unidad mostrará la hora actual en el modo de espera. Para comprobar la hora actual en el modo de encendido, pulse
CLOCK SET en la unidad principal o en el mando a distancia, la hora actual se mostrará durante 5 segundos y luego volverá a
la pantalla anterior.
AJUSTE DE LA ALARMA DEL RELOJ
Esta función permite que el sistema se encienda automáticamente y te despierte mediante un pitido de alarma, música de
CD/USB/FM o un timbre.
Hora de inicio del temporizador (ON):
1. Mantenga pulsado, en modo de espera, el botón TIMER del mando a distancia hasta que la pantalla muestre "On", y los
dígitos de la hora parpadeen.
2. Pulse los botones o para ajustar los dígitos de la hora y luego pulse el botón ENTER para confirmar. Los dígitos de
los minutos parpadearán en la pantalla.
3. Pulse los botones o para ajustar los dígitos de los minutos y luego pulse el botón ENTER para confirmar.
Hora de finalización del temporizador (OFF):
4. Cuando se ajusta el reloj temporizador "On", la pantalla mostrará "OFF" y los dígitos de la hora parpadearán.
5. Pulse los botones o para ajustar los dígitos de la hora y luego pulse el botón ENTER para confirmar. Los dígitos de
los minutos parpadearán en la pantalla.
6. Pulse los botones o del mando a distancia para ajustar los dígitos de los minutos y, a continuación, pulse el botón
ENTER para confirmar.
7. Pulse los botones o para seleccionar el modo CD, USB, FM o BU (timbre), y luego pulse el botón ENTER para
confirmar. En la pantalla mostrará "VOL#".
8. Pulse los botones o para ajustar el volumen y luego pulse el botón ENTER para confirmar.
9. Pulse el botón TIMER para seleccionar "Timer On", el temporizador se ajusta.
10. En el modo de espera, el icono " " aparecerá en la pantalla para indicar que el temporizador está activado.
NOTA:
Si se selecciona "Wake to CD/USB" pero no se introduce un CD o una unidad USB, la alarma pasará por defecto a la alarma de
pitido automáticamente cuando se alcance la hora de la alarma.
En el caso de "Despertar a la radio", el sistema se ajustará por defecto a la última emisora de radio FM escuchada antes de
apagarse. La alarma in crescendo aumentará hasta el nivel de volumen que hayas ajustado.
ACTIVAR/DESACTIVAR LA FUNCIÓN DE ALARMA
1. Para activar la ALARMA, pulse el botón TIMER, y el icono de alarma " " aparecerá en la pantalla LCD.
2. Cancele la función de ALARMA pulsando de nuevo el botón TIMER. El icono de alarma " " desaparecerá de la pantalla
LCD.
DESPERTARSE CON LA RADIO, EL CD/USB O LA ALARMA DEL ZUMBADOR
• Al llegar a la hora de la alarma, el CD/USB, la radio o el pitido de la alarma sonarán durante 60 minutos, luego se apagarán y
se reiniciarán para el día siguiente (sin pulsar el botón de repetición/snooze).
• Para detener la alarma inmediatamente después de que suene, pulse una vez el botón POWER del mando a distancia o de la
unidad principal. Se reinicia para el día siguiente.
• Para cancelar la alarma del día siguiente, pulse el botón TIMER una vez, el icono de la alarma " " desaparecerá de la
pantalla LCD.

25
1. Pulse el botón POWER/STANDBY de la unidad principal o del mando a distancia para encender la unidad.
2. Pulse el botón SOURCE de la unidad principal o del mando a distancia para seleccionar el modo FM.
3. Para sintonizar manualmente una emisora de radio específica, pulse repetidamente el botón TUNE o de la unidad
principal o del mando a distancia. Utilice este método de sintonización manual para sintonizar las emisoras más débiles
que se omiten con el método de sintonización automática.
4. Para sintonizar automáticamente la siguiente emisora de radio disponible, mantenga pulsados los botones o de la
unidad principal o del mando a distancia durante 1 ó 2 segundos hasta que aparezca "SCA" en la pantalla, entonces suelte
el botón. El sintonizador dejará de buscar cuando reciba la siguiente emisora con una intensidad de señal adecuada.
5. Pulse el control de volumen de la unidad principal o del mando a distancia para ajustar el nivel de volumen deseado.
RECEPCIÓN FM / FM ESTÉREO
Cuando escuche la radio FM, pulse el botón ST./MONO del mando a distancia para cambiar entre el modo estéreo y el modo
mono. El icono de FM estéreo "ST" aparece en la pantalla cuando la unidad está en modo estéreo. Es preferible recibir el
programa en mono cuando se recibe una emisora débil.
CONSEJOS PARA UNA MEJOR RECEPCIÓN:
Para una mejor recepción de FM, la antena de cable de FM situada en la parte trasera de la unidad debe estar completamente
desenvuelta y extendida.
NOTA: La sintonización automática depende de la intensidad de la señal de la emisora, por lo que pueden saltarse emisoras
débiles. Puede sintonizar manualmente para encontrar las emisoras débiles si se salta una emisora. Con señales fuertes, el
sintonizador puede detenerse antes de llegar a la frecuencia de emisión real, por lo que es posible que tenga que sintonizar
manualmente para obtener la mejor recepción.
1. Pulse el botón POWER de la unidad principal o del mando a distancia para encender la unidad.
2. Pulse el botón SOURCE de la unidad principal o del mando a distancia para seleccionar el modo de radio FM.
3. Mantenga pulsado el botón TUNE o TUNE en la unidad principal o en el mando a distancia hasta que aparezca la
indicación "SCA" en la pantalla. Suelte el botón para la búsqueda automática y la programación de los canales
preseleccionados. La búsqueda automática y la programación se detendrán en P01 una vez finalizada la búsqueda.
NOTA: Si los canales almacenados durante la búsqueda automática y la preselección de programas no son los que desea
guardar, utilice el siguiente método para guardar manualmente las preselecciones de radio.
4. Sintonice la emisora de radio deseada mediante el método de sintonización "manual" o "automática".
5. Pulse el botón PROG. del mando a distancia, el siguiente número de memoria de preselección disponible y un número
parpadeante aparecerán en la pantalla LCD (Nota: "P01" aparecerá en la pantalla si está programando una preselección
por primera vez).
6. Pulse los botones CHANNEL -/+ de la unidad principal o del mando a distancia para seleccionar el número de preselección
al que desea asignar la emisora.
7. Pulse el botón PROG. del mando a distancia para confirmar el ajuste.
8. Repita los pasos anteriores 4 - 8 para preseleccionar hasta 30 emisoras FM.
RECUPERACIÓN DE CANALES DE MEMORIA PREESTABLECIDOS
En el modo de radio, recupere los canales preestablecidos pulsando los botones CHANNEL -/+ de la unidad principal o los
números del mando a distancia.
NOTA:
Además de los CD comerciales, este reproductor de CD también reproducirá discos CD-R/RW y MP3 autocompilados. No
intente reproducir CD-ROM, CDI, VCD, DVD o CD de ordenador.
ATENCIÓN:
La reproducción puede tardar hasta 10 segundos en comenzar. Si la reproducción no se inicia en absoluto, posiblemente se
deba a la calidad del disco CD-R/RW, MP3 y/o a la compatibilidad del software de compilación de CD. El fabricante no se hace
responsable de la calidad de reproducción de los discos CD-R/RW, MP3.
No pegue una etiqueta en ninguno de los lados del disco. Puede causar un mal funcionamiento grave.
REPRODUCIR CD
1. Pulse el botón POWER/STANDBY de la unidad principal o del mando a distancia para encender la unidad.
2. Pulse el botón SOURCE del mando a distancia o de la unidad principal para seleccionar el modo CD y pulse "Open/close
disc compartment" (en la parte superior de la tapa del compartimento).
3. Coloque un CD en el eje central con la cara de la etiqueta hacia la tapa del CD. Cierre el compartimento para discos.
4. La unidad comienza a leer el disco, "---" parpadea en la pantalla. Después de unos segundos, el número total de pistas
muestra un segundo en la pantalla LCD.
5. Pulse el botón PLAY/PAUSE en la unidad principal o en el mando a distancia, el indicador PLAY se muestra en la
pantalla, el CD comenzará a reproducir la primera pista.
6. Gire el control de volumen de la unidad principal o pulse los botones de control de volumen del mando a distancia para
ajustar el nivel de volumen deseado.
7. Para pausar la reproducción, pulse el botón PLAY/PAUSE de la unidad principal o del mando a distancia. El tiempo de la
pista se pondrá en pausa y el indicador de Play parpadeará en la pantalla. Para reanudar la reproducción, pulse de
nuevo el botón PLAY/PAUSE.

26
8. Puede elegir reproducir su pista favorita pulsando el botón SKIP NEXT o SKIP PREVIOUS . La pantalla LCD indicará
el número de la pista actual.
9. Para localizar una sección concreta dentro de una pista, mantenga pulsado el botón o hasta encontrar la sección.
Suelte el botón para continuar reproduciendo su selección.
10. Para detener la reproducción, pulse el botón STOP ◼.
REPRODUCCIÓN DE CD-R/RW, MP3 CON CARPETA
1. Pulse el botón SOURCE del mando a distancia y cargue un disco MP3.
2. Pulse el botón FOLDER -/+ para seleccionar la carpeta de reproducción deseada.
3. Seleccione el archivo que desea reproducir pulsando el botón SKIP NEXT o SKIP PREVIOUS .
4. Pulse el botón PLAY/PAUSE. Se iniciará la reproducción y se mostrará el nombre del archivo.
En caso de reproducción con el modo de carpeta activado, pulse los botones FOLDER -/+, y podrá seleccionar la carpeta
aunque esté en modo de reproducción/pausa. Continuará el modo de reproducción/pausa en la 1ª pista de la carpeta
seleccionada.
PARA REPRODUCIR EL REPRODUCTOR USB/MP3 CON CARPETA
1. Pulse el botón SOURCE del mando a distancia o de la unidad principal para seleccionar la función USB. Conecte el
dispositivo de memoria USB que contenga archivos reproducibles en formato MP3. Cuando la memoria USB esté
conectada a la unidad principal, se mostrará la información del dispositivo.
2. Pulse el botón FOLDER -/+ para seleccionar la carpeta de reproducción deseada.
3. Seleccione el archivo que desea reproducir pulsando el botón o .
4. Pulse el botón PAUSE/PLAY. Se iniciará la reproducción y se mostrará el nombre del archivo.
NOTA:
Este producto no es compatible con los sistemas de archivos MTP y AAC de dispositivos de almacenamiento masivo USB o
reproductores MP3. Esta unidad admite FAT16 y FAT32, pero es posible que algunos medios de almacenamiento USB no
admitan ambos sistemas de archivos. Para más detalles, consulte el manual de instrucciones del dispositivo de
almacenamiento USB en cuestión o póngase en contacto con el fabricante.
SKIP (SALTAR) Y MODO DE BÚSQUEDA
1. Durante la reproducción o el modo de pausa, pulse el botón SKIP NEXT o SKIP PREVIOUS para ir a la siguiente pista
o volver al principio de la pista actual.
2. Durante la reproducción, mantenga pulsado el botón o para buscar dentro de la pista actual con una reproducción
audible de alta velocidad.
NOTA: Lo siguiente sólo funciona con el mando a distancia.
Pulse el botón REPEAT del mando a distancia para seleccionar diferentes modos de reproducción repetida cuando se
reproduce un CD:
Repeat 1 Repeat All Normal
REPEAT 1 - la pista que se está reproduciendo se repetirá continuamente. En la pantalla aparece "REPEAT 1".
REPEAT ALL - todas las pistas se repetirán continuamente. "REPEAT ALL" aparece en la pantalla.
JUEGO ALEATORIO
Al pulsar el botón RANDOM/INTRO, el indicador "RAND" aparecerá en la pantalla LCD. Las pistas del disco se reproducirán
automáticamente en orden aleatorio.
Cancelar la reproducción aleatoria:
Pulse el botón RANDOM/INTRO hasta que el indicador "RAND" desaparezca.
NOTA:
Al pulsar el botón durante la reproducción aleatoria, se iniciará un salto a la pista seleccionada a continuación mediante la
operación aleatoria. Por otro lado, el botón no permite seleccionar la pista anterior.
Random Intro Normal
REPRODUCCIÓN INTRO
1. Pulse RANDOM/INTRO en el mando a distancia. El indicador "INTRO" aparecerá en la pantalla. La unidad reproducirá sólo
los primeros 10 segundos de cada pista (intro).
2. Pulse de nuevo RANDOM/INTRO en el mando a distancia para reanudar la reproducción normal.
NOTA: Lo siguiente sólo funciona con el mando a distancia.
Esta función permite reproducir las pistas en una secuencia programada. El usuario puede programar hasta 32 pistas en modo
CD o 99 pistas en modo MP3.
NOTA: Este programa sólo puede ajustarse en modo STOP.
1. Pulse el botón PROG. del mando a distancia, en la pantalla aparecen "P01" y "PROG" ("P01" aparecerá si es la primera vez
que se programa).
2. Utilice los botones o de la unidad principal o del mando a distancia para seleccionar la pista deseada. El número de
la pista aparecerá en la pantalla.
3. Pulse el botón PROG. del mando a distancia para almacenar la pista seleccionada en la memoria, el número de programa
avanzará uno (por ejemplo, "P02") en la pantalla.

27
4. Repita los pasos 2 y 3 para almacenar más pistas. Puede almacenar hasta 32 pistas de CD o 99 pistas de MP3. La pantalla
mostrará "FUL" una vez que se hayan programado las pistas y la memoria esté llena.
5. Pulse PAUSE/PLAY en la unidad principal o en el mando a distancia para iniciar la reproducción del CD en la secuencia
programada.
6. Pulse el botón REPEAT del mando a distancia para seleccionar Repetir 1/Todo si lo desea.
7. Para detener la reproducción, pulse el botón STOP ◼ de la unidad principal o del mando a distancia.
8. Para cancelar el programa por completo, pulse dos veces el botón STOP ◼ de la unidad principal o del mando a distancia.
El icono "PROG" desaparecerá de la pantalla.
Pulse el botón POWER/STANDBY para encender la unidad, siga las siguientes instrucciones para conectarse con BT.
Emparejar un smartphone con capacidad de transmisión BT (u otro dispositivo con capacidad BT) con el Audizio Toulon:
1. Pulse el botón POWER/STANDBY de la unidad principal o del mando a distancia para encender la unidad.
2. Pulse el botón SOURCE de la unidad principal o del mando a distancia para seleccionar el modo BT, "bt" parpadea en la
pantalla.
3. Encienda la función de transmisión BT de su dispositivo con capacidad BT y active la función de búsqueda o exploración
para encontrar el Audizio Toulon.
Seleccione "Audizio Toulon" en la lista de dispositivos cuando aparezca en la pantalla de los mismos. Si es necesario,
introduzca el código de acceso "0000" para emparejar el dispositivo.
4. Después de emparejar con éxito el dispositivo y Toulon, la pantalla mostrará "bt" de forma continua (el parpadeo se ha
detenido). Puede comenzar a reproducir música desde su dispositivo de forma inalámbrica.
5. Después de seleccionar su canción favorita, pulse el botón PLAY/PAUSE en la unidad principal o en el mando a distancia
para reproducir o pausar la canción.
6. Gire el control de volumen de la unidad principal o pulse los botones de volumen del mando a distancia para ajustar el
nivel de volumen deseado.
7. Pulse el botón o en la unidad principal o en el mando a distancia para saltar a la canción anterior o siguiente.
8. Si desea emparejar el Audizio Toulon con otro dispositivo habilitado para BT, mantenga pulsado el botón PAIR durante 3
segundos o desactive la función BT del dispositivo actualmente emparejado con el Audizio Toulon y repita los pasos
anteriores.
NOTA: Lo siguiente sólo funciona con el mando a distancia.
Esta unidad ofrece 4 modos de ecualización diferentes para mejorar su experiencia auditiva. Puede seleccionar el efecto
deseado pulsando el botón EQ del mando a distancia en la siguiente secuencia:
ROCKPOPJAZZCLASSICOFF
NOTA: Lo siguiente sólo funciona con el mando a distancia.
Pulse el botón MUTE del mando a distancia para silenciar la salida de sonido del altavoz. En la pantalla aparecerá "V 00".
Pulse de nuevo el botón MUTE para reanudar la reproducción del altavoz.
NOTA: Lo siguiente sólo funciona con el mando a distancia.
El temporizador de reposo permite apagar el aparato automáticamente una vez alcanzado un tiempo preestablecido.
1. Para activar el temporizador de apagado, encienda la unidad y pulse el botón SOURCE para seleccionar radio FM, CD, USB,
BT o AUX IN.
2. Pulse el botón SLEEP del mando a distancia, en la pantalla aparece "SLEEP".
3. Pulse repetidamente el botón SLEEP para seleccionar el tiempo de reposo. La unidad se apagará después de 10, 20, 30,
40, 50, 60, 70, 80 o 90 minutos. Espere 3 segundos después de su selección para que la unidad confirme la selección, la
unidad tocará durante el tiempo seleccionado y luego se apagará automáticamente.
4. Para cancelar el temporizador de reposo, pulse el botón SLEEP repetidamente hasta que el temporizador en la pantalla
muestre "OFF", el icono de tiempo de reposo "SLEEP" desaparece de la pantalla. Para apagar la unidad antes del tiempo
seleccionado, pulse el botón POWER/STANDBY en cualquier momento.
NOTA: Para comprobar el tiempo de sueño restante, pulse el botón SLEEP una vez. Si se está durmiendo con la música de un
dispositivo externo conectado a la entrada AUX, el temporizador de reposo apagará la alimentación de este sistema pero no
apagará el dispositivo externo.
NOTA: El cable AUX no se suministra.
Puede utilizar la toma de entrada auxiliar para conectar un dispositivo de reproducción externo (por ejemplo, un reproductor
de CD o de MP3). Pulse el botón SOURCE hasta que aparezca "AUX" en la pantalla.
Enchufe el extremo de un cable jack de 3,5 mm - jack de 3,5 mm en la toma AUX IN del panel frontal. Conecte el otro extremo
del cable a su dispositivo externo. Enciende tu dispositivo externo y elige tu archivo de sonido favorito.

28
Nous vous remercions d’avoir acheté un produit Audizio. Veuillez lire la présente notice avant l’utilisation afin de pouvoir en
profiter pleinement.
Veuillez lire la notice avant toute utilisation. Respectez impérativement les instructions afin de continuer à bénéficier de la
garantie. Prenez toutes les précautions nécessaires pour éviter tout incendie ou décharge électrique. Seul un technicien
spécialisé peut effectuer les réparations. Nous vous conseillons de conserver la présente notice pour pouvoir vous y reporter
ultérieurement.
- Avant d’utiliser l’appareil, prenez conseil auprès d’un
spécialiste. Lors de la première mise sous tension, il est
possible qu’une odeur soit perceptible. C’est normal,
l’odeur disparaîtra peu de temps après.
- L’appareil contient des composants porteurs de tension.
N’OUVREZ JAMAIS le boîtier.
- Ne placez pas des objets métalliques ou du liquide sur
l’appareil, cela pourrait causer des décharges
électriques et dysfonctionnements.
- Ne placez pas l’appareil à proximité de sources de
chaleur, par exemple radiateur. Ne positionnez pas
l’appareil sur une surface vibrante. N’obturez pas les
ouïes de ventilation.
- L’appareil n’est pas conçu pour une utilisation en
continu.
- Faites attention au cordon secteur, il ne doit pas être
endommagé.
- Lorsque vous débranchez l’appareil de la prise secteur,
tenez-le par la prise, ne tirez jamais sur le cordon.
- Ne branchez pas et ne débranchez pas l’appareil avec
les mains mouillées.
- Seul un technicien spécialisé peut remplacer la fiche
secteur et / ou le cordon secteur.
- Si l’appareil est endommagé et donc les éléments
internes sont visibles, ne branchez pas l’appareil, NE
L’ALLUMEZ PAS. Contactez votre revendeur. NE
BRANCHEZ PAS l’appareil à un rhéostat ou un dimmer.
- Pour éviter tout risque d’incendie ou de décharge
électrique, n’exposez pas l’appareil à la pluie ou à
l’humidité.
- Seul un technicien habilité et spécialisé peut effectuer
les réparations
- Branchez l’appareil à une prise secteur 220-240 Vac/50
Hz avec terre, avec un fusible 10-16 A.
- Pendant un orage ou en cas de non-utilisation
prolongée de l’appareil, débranchez l’appareil du
secteur.
- En cas de non-utilisation prolongée de l’appareil, de la
condensation peut être créée. Avant de l’allumer,
laissez l’appareil atteindre la température ambiante. Ne
l’utilisez jamais dans des pièces humides ou en
extérieur.
- Afin d’éviter tout accident en entreprise, vous devez
respecter les conseils et instructions.
- N’allumez pas et n’éteignez pas l’appareil de manière
répétée. Cela réduit sa durée de vie.
- Conservez l’appareil hors de la portée des enfants. Ne
laissez pas l’appareil sans surveillance.
- N’utilisez pas d’aérosols pour nettoyer les
interrupteurs. Les résidus créent des dépôts et de la
graisse. En cas de dysfonctionnement, demandez
conseil à un spécialiste.
- Ne forcez pas les réglages.
- L’appareil contient un haut-parleur pouvant engendrer
des champs magnétiques. Tenez cet appareil à 60 cm au
moins d’un téléviseur ou ordinateur.
- Si le produit comprend un accumulateur intégré plomb-
acide, rechargez l'accumulateur tous les 3 mois en cas
de non-utilisation prolongée de l'appareil. Sinon,
l'accumulateur pourrait être endommagé de manière
permanente.
- Si l’accumulateur est endommagé, remplacez-le par un
accumulateur de même type et déposez l’ancien
accumulateur dans un container de recyclage adapté.
- Si l’appareil est tombé, faites-le toujours vérifier par un
technicien avant de le rallumer.
- Pour nettoyer l’appareil, n’utilisez pas de produits
chimiques qui abîment le revêtement, utilisez
uniquement un tissu sec.
- Tenez toujours l’appareil éloigné de tout équipement
électrique pouvant causer des interférences.
- Pour toute réparation, il faut impérativement utiliser
des pièces d’origine, sinon il y a risque de dommages
graves et / ou de radiations dangereuses.
- Eteignez toujours l’appareil avant de le débrancher du
secteur et de tout autre appareil. Débranchez tous les
cordons avant de déplacer l’appareil.
- Assurez-vous que le cordon secteur n’est pas abîmé si
des personnes viennent à marcher dessus. Avant toute
utilisation, vérifiez son état.
- La tension d’alimentation est de 220-240Vac/50 Hz.
Vérifiez la compatibilité. Si vous voyagez, vérifiez que
la tension d’alimentation du pays est compatible avec
l’appareil.
- Conservez l’emballage d’origine pour pouvoir
transporter l’appareil en toute sécurité.
Ce symbole doit attirer l’attention de l’utilisateur sur les tensions élevées présentes dans le boîtier de l’appareil,
pouvant engendrer une décharge électrique.
Ce symbole doit attirer l’attention de l’utilisateur sur des instructions importantes détaillées dans la notice, elles
doivent être lues et respectées.
Cet appareil porte le symbole CE. Il est interdit d’effectuer toute modification sur l’appareil. La certification CE et la garantie
deviendraient caduques !
NOTE: Pour un fonctionnement normal de l’appareil, il doit être utilisé en intérieur avec une plage de température maximale
autorisée entre 5°C/41°F et 35°C/95°F.
Ne jetez pas les produits électriques dans la poubelle domestique. Déposez-les dans une décharge. Demandez conseil aux
autorisés ou à votre revendeur. Données techniques réservées. Les valeurs actuelles peuvent varier d’un produit à l’autre. Tout
droit de modification réservée sans notification préalable.
N’essayez pas de réparer l’appareil vous-même. Vous perdriez tout droit à la garantie. Ne faites aucune modification sur l’appareil. Vous
perdriez tout droit à la garantie La garantie deviendrait également caduque en cas d’accidents ou dommages causes par une utilisation
inappropriée de l’appareil ou un non-respect des consignes présentes dans cette notice. Audizio ne pourrait être tenu responsable en cas
de dommages matériels ou corporels causés par un non-respect des consignes de sécurité et avertissements. Cela est également valable
pour tous les dommages quelle que soit la forme.

29
ATTENTION ! Immédiatement après réception, vérifiez le contenu du carton et assurez-vous que tous les éléments sont bien
présents et en bon état. Si besoin, faites les réserves nécessaires si le matériel ou les cartons sont endommagés. SI l’appareil
doit être retourné, faites-le dans l’emballage d’origine. Si l’appareil a été exposé à des fluctuations importantes de
températures (par exemple après le transport), ne l’allumez pas immédiatement. De la condensation peut survenir. Laissez
l’appareil éteint le temps qu’il atteigne la température ambiante.
1. Ouverture/fermeture du compartiment CD
2. Réglage du volume
3. Affichage LCD
4. Récepteur de télécommande IR
5. Mise sous tension/veille (standby)
6. Source
7. Réglage de l'horloge/mémoire
8. Canal –/Canal +
9. CD: stop ◼/BT pair
10. CD/BT: jouer/pause / Radio: fonction de recherche automatique
11. CB/BT: passer au suivant / Tune +
12. CD/BT: passer au précédent / Tune –
13. Prise d'entrée auxiliaire
14. Entrée USB
15. Connecteur de sortie haut-parleur
16. Prise pour casque d'écoute
17. Entrée de l'alimentation en courant continu
18. Antenne
1. Mise sous tension/veille (standby)
2. Touches numériques
3. Programme
4. CD/USB précédent / Tuner bas
5. Égaliseur
6. X-Bass / Jouer/pause
7. Répétez
8. BT mode: passer à la chanson suivante
9. BT mode: Passer à la chanson précédente
10. BT mode: pairing
11. Source
12. Réglage de l'horloge
13. Minuterie
14. Sleep (dormir)
15. Dossier en haut /canal en haut
16. FM mode: mono/stereo
17. Enter
18. CD/USB suivante / Tuner en haut
19. Dossier en bas /canal en bas
20. Random/intro
21. Mute
22. BT mode: jouer/pause
23. Volume haut/bas
24. CD/USB mode: jouer/pause
25. CD stop ◼
1. En mode veille, appuyez sur la touche POWER/STANDBY de l'unité principale ou de la télécommande pour allumer
l'appareil. L'appareil s'allume, l'icône du dernier mode d'entrée sélectionné s'affiche sur l'écran LCD.
2. Pour mettre l'appareil à l'arrêt (en veille), appuyez à nouveau sur la touche POWER/STANDBY de l'unité principale ou de la
télécommande. L'écran LCD s'éteint et affiche l'heure actuelle. L'indicateur du mode veille s'allume.
Après avoir branché l'adaptateur d'alimentation CC dans l'unité, "00:00" apparaîtra et clignotera sur l'écran LCD.
1. En mode d'arrêt (Standby), appuyez et maintenez CLOCK SET sur la télécommande ou l'unité principale, le format 24
HEURES "24H" apparaîtra sur l'écran.
2. Appuyez sur ou sur la télécommande ou l'unité principale pour sélectionner le format 24 heures si vous le
souhaitez. Sinon, appuyez sur CLOCK SET pour confirmer le format 12 heures et entrer dans le mode de réglage de
l'horloge. Les chiffres des heures clignotent.

30
3. Appuyez sur ou sur la télécommande ou l'unité principale pour régler l'heure. Maintenez la touche enfoncée pour
un réglage rapide de l'avance/retour.
REMARQUE: Assurez-vous que l'heure est réglée de manière à ce que l'indicateur PM s'affiche correctement.
4. Appuyez sur la touche CLOCK SET de la télécommande pour confirmer le réglage de l'heure, les chiffres des minutes
clignotent pour vous inviter à les saisir.
5. Appuyez sur ou sur la télécommande ou l'unité principale pour régler les minutes. Maintenez la touche enfoncée
pour un réglage rapide de l'avance/retour.
6. Appuyez à nouveau sur la touche CLOCK SET de la télécommande pour terminer le réglage.
REMARQUE: Les préréglages de l'horloge et des stations de radio devront être réinitialisés si l'alimentation est interrompue
ou en cas de panne de courant. "00:00" apparaîtra et commencera à clignoter sur l'écran LCD pour vous informer que
l'alimentation a été interrompue et que l'horloge doit être réinitialisée. Veuillez suivre les étapes 1 à 6 ci-dessus pour
réinitialiser l'horloge.
L'appareil affiche l'heure actuelle en mode veille. Pour vérifier l'heure actuelle en mode Marche, appuyez sur la touche
CLOCK SET de l'unité principale ou de la télécommande, l'heure actuelle s'affiche pendant 5 secondes, puis revient à l'écran
précédent.
RÉGLAGE DE L'ALARME
Cette fonction permet au système de s'allumer automatiquement et de vous réveiller en utilisant une alarme sonore, une
musique CD/USB/FM ou un buzzer.
Heure de démarrage de la minuterie (ON):
1. En mode veille, appuyez et maintenez enfoncée la touche TIMER de la télécommande jusqu'à ce que l'écran affiche "On"
et que les chiffres des heures clignotent.
2. Appuyez sur les boutons ou pour régler les chiffres des heures, puis appuyez sur le bouton ENTER pour confirmer.
Les chiffres des minutes clignotent à l'écran.
3. Appuyez sur les boutons ou pour régler les chiffres des minutes, puis appuyez sur le bouton ENTER pour
confirmer.
Heure de fin de la minuterie (OFF):
4. Lorsque l'horloge de la minuterie "On" est réglée, l'écran affiche "OFF" et les chiffres des heures clignotent.
5. Appuyez sur les boutons ou pour régler les chiffres des heures, puis appuyez sur le bouton ENTER pour confirmer.
Les chiffres des minutes clignotent à l'écran.
6. Appuyez sur les boutons ou de la télécommande pour régler les chiffres des minutes, puis appuyez sur le bouton
ENTER pour confirmer.
7. Appuyez sur les boutons ou pour sélectionner le mode CD, USB, FM ou BU (buzzer), puis appuyez sur le bouton
ENTER pour confirmer. L'écran affiche "VOL#".
8. Appuyez sur les boutons ou pour régler le volume, puis appuyez sur le bouton ENTER pour confirmer.
9. Appuyez sur la touche TIMER pour sélectionner "Timer On", la minuterie est réglée.
10. En mode veille, l'icône " " s'affiche sur l'écran pour indiquer que la minuterie est activée.
REMARQUE:
Si l'option "Wake to CD/USB" est sélectionnée mais qu'aucun CD ou clé USB n'est inséré, l'alarme se met automatiquement à
émettre des bips lorsque l'heure de l'alarme est atteinte.
Pour l'option "Wake to Radio", le système utilise par défaut la dernière station de radio FM écoutée avant l'extinction.
L'alarme crescendo augmente jusqu'au niveau de volume que vous avez réglé.
ACTIVER/DÉSACTIVER LA FONCTION D'ALARME
1. Pour activer l'ALARME, appuyez sur le bouton TIMER, et l'icône d'alarme " " apparaîtra sur l'écran LCD.
2. Annulez la fonction ALARME en appuyant à nouveau sur le bouton TIMER. L'icône d'alarme " " disparaît de l'écran LCD.
RÉVEIL PAR RADIO, CD/USB OU ALARME SONORE
• Lorsque l'heure de l'alarme est atteinte, le CD/USB, la radio ou l'alarme sonore retentit pendant 60 minutes, puis s'éteint et
se réinitialise pour le jour suivant (sans appuyer sur le bouton snooze).
• Pour arrêter l'alarme immédiatement après son déclenchement, appuyez une fois sur la touche POWER de la télécommande
ou de l'unité principale. Elle se réinitialise pour le jour suivant.
• Pour annuler l'alarme du jour suivant, appuyez une fois sur le bouton TIMER, l'icône d'alarme " " disparaîtra de l'écran LCD.
1. Appuyez sur la touche POWER/STANDBY de l'unité principale ou de la télécommande pour allumer l'appareil.
2. Appuyez sur la touche SOURCE de l'unité principale ou de la télécommande pour sélectionner le mode FM.
3. Pour syntoniser manuellement une station de radio spécifique, appuyez plusieurs fois sur la touche TUNE ou de
l'unité principale ou de la télécommande. Utilisez cette méthode de réglage manuel pour syntoniser des stations plus
faibles qui sont contournées par la méthode de réglage automatique.
4. Pour syntoniser automatiquement la prochaine station de radio disponible, appuyez sur les touches ou de l'unité
principale ou de la télécommande pendant 1 à 2 secondes jusqu'à ce que l'indication "SCA" apparaisse à l'écran, puis

31
relâchez la touche. Le tuner arrêtera de balayer lorsqu'il recevra la prochaine station de radiodiffusion dont le signal est
suffisamment puissant.
5. Tournez le bouton de volume de l'unité principale ou appuyez sur les boutons de volume de la télécommande pour régler
le niveau de volume souhaité.
RÉCEPTION F.M. / F.M. STÉRÉO
Lorsque vous écoutez la radio FM, appuyez sur la touche ST./MONO de la télécommande pour passer du mode stéréo au
mode mono. L'icône stéréo FM "ST" apparaît sur l'écran lorsque l'appareil est réglé en mode stéréo. Il est préférable de
recevoir le programme en mono lorsque vous recevez une station faible.
CONSEILS POUR UNE MEILLEURE RÉCEPTION:
Pour une meilleure réception FM, l'antenne filaire FM située à l'arrière de l'appareil doit être complètement déroulée et
étendue.
REMARQUE: La syntonisation automatique dépend de l'intensité du signal de la station de radiodiffusion, de sorte que les
stations faibles peuvent être ignorées. Vous pouvez syntoniser manuellement pour trouver les stations faibles si une station
est sautée. Avec des signaux forts, le tuner peut s'arrêter avant d'atteindre la fréquence de diffusion réelle, vous devrez donc
peut-être effectuer un réglage manuel pour obtenir la meilleure réception.
1. Appuyez sur la touche POWER de l'unité principale ou de la télécommande pour allumer l'appareil.
2. Appuyez sur le bouton SOURCE de l'unité principale ou de la télécommande pour sélectionner le mode radio FM.
3. Appuyez sur la touche TUNE ou TUNE de l'unité principale ou de la télécommande et maintenez-la enfoncée
jusqu'à ce que l'indication "SCA" apparaisse à l'écran. Relâchez le bouton pour la recherche automatique et la
programmation des chaînes préréglées. La recherche et la programmation automatiques s'arrêtent à P01 une fois la
recherche terminée.
REMARQUE: Si les chaînes mémorisées lors de la recherche automatique et de la présélection de programmes ne sont pas
celles que vous souhaitez sauvegarder, utilisez la méthode ci-dessous pour sauvegarder manuellement les présélections
radio.
4. Syntonisez la station de radio souhaitée en utilisant la méthode de syntonisation "manuelle" ou "automatique".
5. Appuyez sur le bouton PROG. de la télécommande, le prochain numéro de présélection disponible et un numéro
clignotant s'affichent sur l'écran LCD (Remarque : "P01" s'affiche si vous programmez une présélection pour la première
fois).
6. Appuyez sur les touches CHANNEL -/+ de l'unité principale ou de la télécommande pour sélectionner le numéro de
préréglage auquel vous souhaitez affecter la station.
7. Appuyez sur le bouton PROG. de la télécommande pour confirmer le réglage.
8. Répétez les étapes 4 à 8 ci-dessus pour prérégler jusqu'à 30 stations FM.
RAPPELER LES CANAUX DE MÉMOIRE
En mode radio, rappelez les chaînes préréglées en appuyant sur les boutons CHANNEL -/+ de l'unité principale ou sur les
chiffres de la télécommande.
REMARQUE: Outre les CD commerciaux, ce lecteur CD peut également lire des CD-R/RW auto-compilés, des disques MP3.
N'essayez pas de lire des CD-ROM, CDI, VCD, DVD ou des CD d'ordinateur.
IMPORTANT:
Il peut s'écouler jusqu'à 10 secondes avant que la lecture ne commence. Si la lecture ne démarre pas du tout, cela peut être
dû à la qualité du disque CD-R/RW, MP3 et/ou à la compatibilité du logiciel de compilation de CD. Le fabricant n'est pas
responsable de la qualité de lecture des disques CD-R/RW, MP3.
Ne collez pas d'étiquette sur l'une des faces du disque. Cela pourrait provoquer un grave dysfonctionnement.
LECTURE D'UN CD
1. Appuyez sur la touche POWER/STANDBY de l'unité principale ou de la télécommande pour allumer l'appareil.
2. Appuyez sur la touche SOURCE de la télécommande ou de l'unité principale pour sélectionner le mode CD et appuyez sur
"Ouvrir/fermer le compartiment à disques" (sur le dessus du couvercle du compartiment).
3. Placez un CD sur la broche centrale, la face étiquetée vers l'extérieur, en direction du couvercle du CD. Fermez le
compartiment à disque.
4. L'appareil commence à lire le disque, "---" clignote sur l'écran. Après quelques secondes, le nombre total de pistes
s'affiche une seconde sur l'écran LCD.
5. Appuyez sur le bouton PLAY/PAUSE de l'unité principale ou de la télécommande, l'indicateur PLAY s'affiche à l'écran, le
CD commence à lire la première piste.
6. Tournez le réglage du volume sur l'unité principale ou appuyez sur les boutons de réglage du volume de la télécommande
pour régler le niveau de volume souhaité.
7. Pour mettre la lecture en pause, appuyez sur le bouton PLAY/PAUSE de l'unité principale ou de la télécommande. La durée
de la piste sera mise en pause et l'indicateur de play clignotera à l'écran. Pour reprendre la lecture, appuyez à nouveau
sur le bouton PLAY/PAUSE.
8. Vous pouvez choisir de lire votre piste préférée en appuyant sur le bouton SKIP NEXT ou SKIP PREVIOUS . L'écran
LCD indique le numéro de la piste en cours.
9. Pour localiser une section particulière dans une piste, appuyez sur la touche ou et maintenez-la enfoncée jusqu'à
ce que la section soit trouvée. Relâchez la touche pour poursuivre la lecture de votre sélection.
10. Pour arrêter la lecture, appuyez sur le bouton STOP ◼.

32
LECTURE DE CD-R/RW, MP3 AVEC DOSSIER
1. Appuyez sur la touche SOURCE de la télécommande et chargez un disque MP3.
2. Appuyez sur la touche FOLDER -/+ pour sélectionner le dossier de lecture souhaité.
3. Sélectionnez le fichier que vous souhaitez lire en appuyant sur la touche SKIP NEXT ou SKIP PREVIOUS .
4. Appuyez sur le bouton PLAY/PAUSE. La lecture commence et le nom du fichier s'affiche.
En cas de lecture avec le mode dossier activé, appuyez sur les boutons FOLDER -/+, et le dossier peut être sélectionné même
s'il est en mode lecture/pause. La lecture se poursuit en mode lecture/pause dans la 1ère piste du dossier sélectionné.
LECTURE DE USB/MP3 AVEC DOSSIER
1. Appuyez sur la touche SOURCE de la télécommande ou de l'unité principale pour sélectionner la fonction USB. Connectez
le dispositif de mémoire USB qui contient des fichiers lisibles au format MP3. Lorsque la clé USB est connectée à l'unité
principale, les informations sur l'appareil s'affichent.
2. Appuyez sur la touche FOLDER -/+ pour sélectionner le dossier de lecture souhaité.
3. Sélectionnez le fichier à lire en appuyant sur la touche ou .
4. Appuyez sur le bouton PAUSE/PLAY. La lecture commence et le nom du fichier s'affiche.
REMARQUE:
Ce produit n'est pas compatible avec les systèmes de fichiers MTP et AAC des périphériques de stockage de masse USB ou
des lecteurs MP3. Cet appareil prend en charge les systèmes de fichiers FAT16 et FAT32, mais certains supports de stockage
USB peuvent ne pas prendre en charge ces deux systèmes de fichiers. Pour plus de détails, reportez-vous au manuel
d'utilisation du périphérique de stockage USB en question ou contactez le fabricant.
SAUT ET MODE DE RECHERCHE
1. Pendant la lecture ou en mode pause, appuyez sur la touche SKIP NEXT ou SKIP PREVIOUS pour passer à la piste
suivante ou revenir au début de la piste en cours.
2. Pendant la lecture, appuyez sur la touche ou et maintenez-la enfoncée pour effectuer une recherche dans la piste
en cours avec une lecture rapide audible.
REMARQUE : Les fonctions suivantes ne sont disponibles qu'à l'aide de la télécommande.
Appuyez sur la touche REPEAT de la télécommande pour sélectionner les différents modes de lecture répétée lorsqu'un CD
est en cours de lecture:
Repeat 1 Repeat All Normal
REPEAT 1 - la chanson en cours de lecture sera répétée en continu. L'écran affiche "REPEAT 1".
REPEAT ALL - toutes les chansons sont répétées en continu. "REPEAT ALL" apparaît à l'écran.
JEU ALÉATOIRE
Lorsque vous appuyez sur la touche RANDOM/INTRO, l'indicateur "RAND" s'affiche sur l'écran LCD. Les pistes du disque sont
lues automatiquement dans un ordre aléatoire.
Annuler la lecture aléatoire:
Appuyez sur la touche RANDOM/INTRO jusqu'à ce que l'indicateur "RAND" disparaisse.
REMARQUE:
Si vous appuyez sur le bouton pendant la lecture aléatoire, vous passerez à la piste suivante sélectionnée par l'opération
aléatoire. En revanche, cette touche ne permet pas de sélectionner la piste précédente.
Random Intro Normal
LECTURE D’INTRO
1. Appuyez sur la touche RANDOM/INTRO de la télécommande. L'indicateur "INTRO" s'affiche à l'écran. L'appareil ne lit que
les 10 premières secondes de chaque piste (intro).
2. Appuyez à nouveau sur la touche RANDOM/INTRO de la télécommande pour reprendre la lecture normale.
REMARQUE: Ce qui suit n'est fonctionnel qu'à l'aide de la télécommande.
Cette fonction permet de lire les pistes dans un ordre programmé. L'utilisateur peut programmer jusqu'à 32 pistes en mode
CD ou 99 pistes en mode MP3.
REMARQUE: Ce programme ne peut être réglé qu'en mode STOP.
1. Appuyez sur la touche PROG. de la télécommande, "P01" et "PROG" s'affichent à l'écran ("P01" s'affiche si vous
programmez pour la première fois).
2. Utilisez le bouton ou de l'unité principale ou de la télécommande pour sélectionner la piste souhaitée. Le numéro
de la piste s'affiche à l'écran.
3. Appuyez sur le bouton PROG. de la télécommande pour enregistrer la piste sélectionnée dans la mémoire, le numéro du
programme avance d'une unité (par exemple "P02") sur l'écran.
4. Répétez les étapes 2 et 3 pour stocker d'autres pistes. Vous pouvez stocker jusqu'à 32 pistes de CD ou 99 pistes de MP3.
L'écran affiche "FUL" une fois que les pistes ont été programmées et que la mémoire est pleine.
5. Appuyez sur PAUSE/PLAY sur l'unité principale ou sur la télécommande pour commencer la lecture du CD dans la
séquence programmée.
6. Appuyez sur la touche REPEAT de la télécommande pour sélectionner Répéter 1/Tout si vous le souhaitez.

33
7. Pour arrêter la lecture, appuyez sur le bouton STOP ◼ de l'unité principale ou de la télécommande.
8. Pour annuler complètement le programme, appuyez deux fois sur la touche STOP ◼ de l'unité principale ou de la
télécommande. L'icône "PROG" disparaît de l'écran.
Appuyez sur le bouton POWER/STANDBY pour allumer l'appareil, suivez les instructions ci-dessous pour vous connecter avec
BT.
Jumelage d'un smartphone compatible avec le streaming BT (ou tout autre appareil compatible BT) à l'Audizio Toulon:
1. Appuyez sur la touche POWER/STANDBY de l'unité principale ou de la télécommande pour allumer l'appareil.
2. Appuyez sur la touche SOURCE de l'unité principale ou de la télécommande pour sélectionner le mode BT, "bt" clignote à
l'écran.
3. Activez la fonction de streaming BT de votre appareil compatible BT et activez la fonction de recherche ou de balayage
pour trouver l'Audizio Toulon.
Sélectionnez "Audizio Toulon" dans la liste des appareils lorsqu'elle apparaît sur l'écran de vos appareils. Si
nécessaire, entrez le code d'accès "0000" pour le couplage.
4. Après avoir réussi à coupler l'appareil et Toulon, l'écran affiche "bt" en continu (le clignotement s'est arrêté). Vous pouvez
commencer à écouter la musique de votre appareil sans fil.
5. Après avoir sélectionné votre chanson préférée, appuyez sur le bouton PLAY/PAUSE de l'unité principale ou de la
télécommande pour lire ou mettre en pause la chanson.
6. Tournez le bouton de volume de l'unité principale ou appuyez sur les boutons de volume de la télécommande pour régler
le niveau de volume souhaité.
7. Appuyez sur la touche ou de l'unité principale ou de la télécommande pour passer au morceau précédent ou
suivant.
8. Si vous souhaitez jumeler l'Audizio Toulon avec un autre appareil compatible BT, appuyez sur le bouton PAIR pendant 3
secondes ou désactivez la fonction BT de l'appareil actuellement jumelé avec l'Audizio Toulon, puis répétez les étapes ci-
dessus.
REMARQUE: Les éléments suivants ne sont fonctionnels qu'à l'aide de la télécommande.
Cet appareil propose 4 modes d'égalisation différents pour améliorer votre expérience d'écoute. Vous pouvez sélectionner
l'effet souhaité en appuyant sur le bouton EQ de la télécommande selon la séquence suivante:
ROCKPOPJAZZCLASSICOFF
REMARQUE: Les éléments suivants ne sont fonctionnels qu'à l'aide de la télécommande.
Appuyez sur la touche MUTE de la télécommande pour couper le son émis par l'enceinte. L'écran affiche "V 00".
Appuyez à nouveau sur la touche MUTE pour reprendre la lecture de l'enceinte.
REMARQUE: Les éléments suivants ne sont fonctionnels qu'à l'aide de la télécommande.
La minuterie de mise en veille vous permet d'éteindre automatiquement l'appareil après une durée prédéfinie.
1. Pour activer la minuterie de sommeil, allumez l'appareil et appuyez sur la touche SOURCE pour sélectionner la radio FM, le
CD, l'USB, le BT ou l'AUX IN.
2. Appuyez sur la touche SLEEP de la télécommande, "SLEEP" apparaît sur l'écran.
3. Appuyez à plusieurs reprises sur le bouton SLEEP pour sélectionner une durée de sommeil. L'appareil s'éteindra après 10,
20, 30, 40, 50, 60, 70, 80 ou 90 minutes. Attendez 3 secondes après votre sélection pour que l'unité confirme la sélection,
l'unité jouera pendant la durée sélectionnée puis s'éteindra automatiquement.
4. Pour annuler la minuterie de sommeil, appuyez sur la touche SLEEP à plusieurs reprises jusqu'à ce que la minuterie affiche
"OFF", l'icône de temps de sommeil "SLEEP" disparaît de l'écran. Pour éteindre l'appareil avant la durée sélectionnée,
appuyez sur la touche POWER/STANDBY à tout moment.
REMARQUE: Pour vérifier le temps de sommeil restant, appuyez une fois sur la touche SLEEP. Si vous vous endormez au son
de la musique d'un appareil externe connecté à l'entrée AUX, le minuteur de mise en veille coupe l'alimentation de ce
système mais pas celle de l'appareil externe.
REMARQUE: Le câble auxiliaire n'est pas fourni.
Vous pouvez utiliser la prise d'entrée auxiliaire pour connecter un appareil de lecture externe (par exemple un lecteur CD ou
un lecteur MP3). Appuyez sur la touche SOURCE jusqu'à ce que vous voyiez "AUX" s'afficher sur l'écran.
Branchez l'extrémité d'un câble jack 3,5 mm - jack 3,5 mm dans la prise AUX IN du panneau avant. Connectez l'autre extrémité
du câble à votre appareil externe. Allumez votre appareil externe et choisissez votre fichier son préféré.

34

35
Playback options : BT streaming, CD, FM radio, USB
Input connections : 3.5mm jack, USB
Output connections : 3.5mm jack
Speaker connections : Speaker 2-pin
Output power : 50W
Impedance : 6 Ohm
Power Supply : 100-240VAC 50/60Hz (9V Adapter)
Dimensions (L x W x H) : Unit: 190 x 180 x 105mm, Speaker: 123 x 130 x 172mm
Weight (per unit) : 2,30 kg
The specifications are typical. The actual values can slightly change from one unit to the other. Specifications can
be changed without prior notice.
The products referred to in this manual conform to the European Community Directives to which they are
subject:
• Low Voltage (LVD) 2014/35/EU
• Electromagnetic Compatibility (EMC) 2014/30/EU
• Radio Equipment Directive (RED) 2014/53/EU
• Restriction of Hazardous Substances (RoHS) 2011/65/EU

Specifications and design are subject to change without prior notice.
www.tronios.com
Copyright © 2022 by Tronios The Netherlands
-
 1
1
-
 2
2
-
 3
3
-
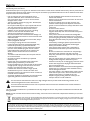 4
4
-
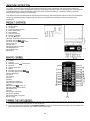 5
5
-
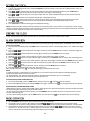 6
6
-
 7
7
-
 8
8
-
 9
9
-
 10
10
-
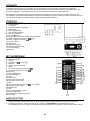 11
11
-
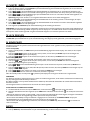 12
12
-
 13
13
-
 14
14
-
 15
15
-
 16
16
-
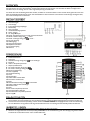 17
17
-
 18
18
-
 19
19
-
 20
20
-
 21
21
-
 22
22
-
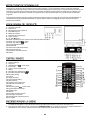 23
23
-
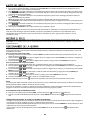 24
24
-
 25
25
-
 26
26
-
 27
27
-
 28
28
-
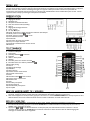 29
29
-
 30
30
-
 31
31
-
 32
32
-
 33
33
-
 34
34
-
 35
35
-
 36
36


in andere talen
- français: audizio 102.326 Manuel utilisateur
- español: audizio 102.326 Manual de usuario
- Deutsch: audizio 102.326 Benutzerhandbuch
Gerelateerde papieren
-
audizio 102.310 Handleiding
-
-
-
-
-
-
-
-
-