TechniSat DIGITRADIO Bike 1 Handleiding
- Categorie
- Radio's
- Type
- Handleiding

Operating instructions
DIGITRADIO Bike 1
DAB+/UKW bike radio with Bluetooth and battery operation

2
1
Illustrations
1.1
Top view
1
Display
5
Select/Info
2
On/Standby
6
Up
▶
3
Mode/Menu
7
Preset
(favourites memory)
4
Down
◀
8/9
Volume
loud/quiet

3
1.2
View from behind
1
Power supply connection DC-IN 5 V, 2 A (MicroUSB connection)
2
Antenna

4
2
Table of contents
1
Figures..........................................................................................2
1.1
Top view ............................................................................................................2
1.2
View from behind...............................................................................................3
2
Table of contents .........................................................................4
3
Safety instructions .......................................................................8
3.1
Foreword
..........................................................................................................
8
3.2
Characters and symbols used ...........................................................................9
3.3
Intended use....................................................................................................11
3.4
Safe handling of the product ...........................................................................11
3.4.1
Legal information .............................................................................................14
3.4.2
Service notes ...................................................................................................16
4
Description of the DIGITRADIO Bike 1
................................................
18
4.1
The scope of delivery.......................................................................................18
4.2
The special features of the DIGITRADIO Bike 1 .............................................18
4.3
Preparing the DIGITRADIO Bike 1 for operation ..............................................19
4.3.1
Charge battery.................................................................................................19
4.3.2
Align antenna...................................................................................................20

5
4.4
Mounting the DIGITRADIO Bike 1 on the bike..................................................22
4.4.1
Handlebar mounting.........................................................................................22
4.4.2
Frame assembly ..............................................................................................23
4.5
Placing the DIGITRADIO Bike 1 in the radio holder..........................................25
4.6
General device functions.................................................................................27
4.6.1
Switch on the device........................................................................................27
4.6.2
Switch off the device ........................................................................................28
4.6.3
Source selection ..............................................................................................28
4.6.4
Setting the volume ...........................................................................................28
4.6.5
Display.............................................................................................................29
4.6.6
Call up display screens ....................................................................................30
5
Menu operation...........................................................................31
6
The DAB+ (digital radio) function
......................................................32
6.1
What is DAB+ ..................................................................................................32
6.2
DAB+ (digital radio) reception..........................................................................32
6.2.1
Carry out a complete search............................................................................33
6.2.2
Select transmitter.............................................................................................33
6.2.3
Store DAB+ stations in a memory location......................................................34
6.2.4
Recalling DAB+ stations from a memory location ...........................................35
6.2.5
Overwriting/deleting a programme position memory .......................................35

6
6.2.6
Signal strength .................................................................................................35
6.2.7
Set manually....................................................................................................36
6.2.8
Volume adjustment (DRC)...............................................................................37
6.2.9
Delete inactive transmitters .............................................................................37
7
FM (VHF) operation
.........................................................................38
7.1
Switch on FM radio mode................................................................................38
7.2
FM (VHF) reception with RDS information ......................................................39
7.3
Automatic station search .................................................................................39
7.4
Manual station search......................................................................................40
7.5
Search setting..................................................................................................40
7.6
Audio setting....................................................................................................41
7.7
Storing FM stations in a memory location .......................................................41
7.8
Recalling FM stations from a memory location................................................42
7.9
Overwriting/deleting a programme position memory .......................................42
8
Bluetooth ....................................................................................42
8.1
Switch on Bluetooth operation ........................................................................43
8.2
Pairing an external device ...............................................................................43
8.3
Slide on coupling .............................................................................................45
9
Other
functions............................................................................45

7
9.1
Sleep timer.......................................................................................................45
9.2
Equaliser..........................................................................................................46
9.2.1
MyEQ...............................................................................................................47
10
System settings..........................................................................47
10.1
Time and date settings ....................................................................................47
10.1.1
Set time/date manually....................................................................................47
10.1.2
Time update.....................................................................................................48
10.1.3
Setting the time format.....................................................................................49
10.1.4
Set date format................................................................................................50
10.2
Display brightness............................................................................................50
10.3
Language.........................................................................................................51
10.4
Factory setting .................................................................................................51
10.5
SW version .......................................................................................................53
11
Cleaning......................................................................................53
12
Eliminate
errors
...........................................................................54
13
Technical data / manufacturer's information
.......................................56

8
3
Safety instructions
3.1
Foreword
Dear customers,
Thank you fo r purchasing a TechniSat digital radio. These operating instructions
are intended to help you familiarise yourself with the extensive functions of your
new device and make optimum use of them. It will help you to use the device safely
and as intended. It is intended for any person who installs, operates, cleans or
disposes of the device.
Keep the operating instructions in a safe place for future reference.
You can find a current version of the operating instructions in the download area of your
product on the TechniSat website
www.technisat.de.
We hope you enjoy your TechniSat digital radio!
Yours
TechniSat Team

9
3.2
Signs and symbols used
in these operating instructions:
Indicates a safety instruction which, if disregarded, can lead to serious injuries.
can lead to injuries or death. Observe the following signal words:
DANGER - Serious injuries with fatal consequences
WARNING - Serious injuries, possibly fatal
ATTENTION - Injuries
Indicates a note that you must observe to avoid device defects, data
loss/misuse or unintentional operation. It also describes additional
functions for your device.
Warning of electrical voltage. Follow all safety instructions to avoid electric
shock. Never open the appliance.

10
On the device:
Indoor use - Appliances with this symbol are only suitable for indoor use.
Protection class II - Electrical appliances in protection class II are electrical
appliances that have continuous double and/or reinforced insulation and no
connection options for a protective conductor. The housing of an insulated
electrical appliance of protection class II can partially or completely form the
additional or reinforced insulation.
Your appliance bears the CE mark and fulfils all required EU standards.
Electronic devices do not belong in household waste, but must be disposed of
properly in accordance with Directive 2012/19/EU of the European Parliament
and Council of 4 July 2012 on waste electrical and electronic equipment
(WEEE).
At the end of its service life, please dispose of this appliance at the designated
public collection points.

11
3.3
Intended
use
The DIGITRADIO Bike 1 is designed to receive DAB+/UKW radio programmes. It can
be mounted on bicycles using the accessories supplied. The device is designed for
private use and is not suitable for commercial purposes.
3.4
Safe handling of the product
Please observe the following instructions in order t o minimise safety risks, avoid
damage to the appliance and contribute to environmental protection.
Please read all safety instructions carefully and keep them for future reference.
Always follow all warnings and instructions in these operating instructions and on the
back of the appliance.
WARNING!
Never open the appliance!
Touching live parts is life-threatening!
WARNING!
Choking hazard! Do not leave the packaging and its parts to children. Choking
hazard due to film and other packaging materials.

12
Observe all the following instructions to use the appliance as intended
and to prevent appliance defects and personal injury.
-
Do not repair the appliance yourself. Repairs may only be carried out by
trained specialists. Please contact our customer service centres.
-
The appliance may only be operated in the ambient conditions specified. Do
not expose the appliance to heat sources that heat the appliance in addition to
normal use.
-
In the event of a conspicuous appliance defect, odour or smoke development,
significant malfunctions or damage to the housing, contact the service
department immediately.
-
The appliance may only be operated with the specified mains voltage and only
with the power supply unit supplied. Never attempt to operate the device with a
different voltage or a different power supply unit.
-
As this appliance is disconnected from the mains by unplugging the mains
adapter, it is essential that it is easily accessible at all times.

13
-
If the appliance is damaged, it must not be put into operation.
-
Foreign objects, e.g. needles, coins, etc., must not fall into the interior of the
device. Do not touch the connection contacts with metal objects or your fingers.
This may result in short circuits.
-
This appliance is not intended for use by persons (including children) with
reduced physical, sensory or mental capabilities, or lack of experience and/or
knowledge, unless they have been given supervision or instruction concerning
use of the appliance by a person responsible for their safety.
-
Modifications to the appliance are prohibited.
-
Only mount the device on the bike using the accessories supplied and
check that it is mounted correctly before every ride.
-
Do not listen to music at too high a volume in road traffic. Observe the
applicable traffic regulations.
-
Do not operate the radio while driving. Risk of falling!
-
The appliance is suitable for use in temperate climates.

14
3.4.1
Legal
information
Hereby, TechniSat declares that the radio equipment type
DIGITRADIO Bike 1 is in compliance with Directive 2014/53/EU. The
full text of the EU
Declaration of conformity is available at the following Internet address:
http://konf.tsat.de/?ID=23127
TechniSat is not liable for product damage due to external influences, wear
and tear or improper handling, unauthorised repairs, modifications or
accidents.
Subject to changes and printing errors. Status 04/22.
Reproduction and duplication only with the authorisation of the publisher.
The latest version of the manual is available in PDF format in the download
area of the TechniSat homepage at www.technisat.com.


16
3.4.2
Service instructions
This product is quality-tested and comes with a statutory warranty
period of 24 months from the date of purchase. Please keep the
invoice as proof of purchase. With
For warranty claims, please contact the dealer of the product.
Please note!
For questions and information or if there is a problem with this device,
please contact our technical hotline:
Mon. - Fri. 8:00 - 18:00 under Tel.:
03925/9220 1800.
Repair orders can also be ordered directly online
at www.technisat.de/reparatur.

17
If you need to return the device, please use only the following address:
TechniSat Digital GmbH
Service Centre
Nordstr. 4a
39418 Staßfurt
The names of the companies, institutions or brands mentioned are trademarks or
registered trademarks of their respective owners.

18
4 Description of the DIGITRADIO Bike 1
4.1
The
scope of delivery
Please check that the scope of delivery is complete before commissioning:
1x DIGITRADIO Bike 1
1x radio holder
1x quick release
1x power supply unit
2x belts
4x screws
1x operating instructions
4.2
The special features of the DIGITRADIO Bike 1
The DIGITRADIO Bike 1 consists of a DAB+/UKW receiver with the following functions:
-
You can store up to 20 DAB+ and 20 FM stations.
-
The radio receives on the frequencies FM 87.5-108 MHz (analogue) and
DAB+ 174.9-239.2 MHz (digital).
-
Universal mounting options especially for bicycles.
-
Music playback via a Bluetooth connection.
-
Battery operation.

19
4.3
Preparing the DIGITRADIO Bike 1 for operation
4.3.1
Charge
battery
Before using the DIGITRADIO Bike 1 for the first time, you should first fully charge the
battery.
Make sure that the operating voltage of the power supply unit matches the
local mains voltage before plugging it into the wall socket.
WARNING!
Do not touch the mains plug with wet hands, risk of electric shock!
ATTENTION!
Lay the mains cable so that nobody can trip over it.
>
Connect the supplied mains adapter to the socket labelled DC-IN (1) on the
back of the DIGITRADIO Bike 1. To do this, lift the protective cover of the
socket and fold it upwards. Then connect the power supply unit to the mains.

20
>
The charge status is shown on the display by means of a BaGerie symbol if
the DIGITRADIO Bike 1 is in standby mode.
If the device is in operation and the battery is fully charged, [Fully charged]
appears continuously on the display.
4.3.2
Align
antenna
The number and quality of the stations to be received depends on the reception
conditions at the installation site. Excellent reception can be achieved with the aerial.
>
Fold the antenna out of the holder on the back of the DIGITRADIO Bike 1 and
set it upright.
The exact alignment of the telescopic antenna is important, especially in the
fringe areas of DAB+ reception. On the Internet, for example, you can find
"www.dabplus.de" to quickly find the location of the nearest transmitter mast.
Start the first scan outdoors in the direction of the transmitter mast. If the
weather is poor, DAB+ reception may only be possible to a limited extent.

21
Do not touch the aerial while a station is playing. This can lead to impaired
reception and audio dropouts.
Depending on the mounting position of the DIGITRADIO Bike 1 on the
bike, the
antenna
can
also remain folded in. However, reception
problems and dropouts in playback may occur more frequently in
this case.

22
Radio
holder
Screws
Quick release
4.4
Mounting the DIGITRADIO Bike 1 on the bike
There are several ways to mount the DIGITRADIO Bike 1 on your bike, which are
explained below.
4.4.1
Handlebar mounting
The DIGITRADIO Bike 1 can be attached to the handlebars of your bike using the radio
holder and the quick release. First attach the quick release to the radio holder using
the 2 screws supplied.
Depending on the diameter of the handlebar tube, you can use the rubber
adapter in the quick release.

23
4.4.2
Frame assembly
If you have already fitted a bottle cage to your bike, you can place the DIGITRADIO
Bike 1 in it. Check that the DIGITRADIO Bike 1 is securely fastened before every
journey.
The DIGITRADIO Bike 1 is designed to be compatible with most bottle cages.
However, depending on the type/design of the bottle cage, the DIGITRADIO
Bike 1 may sit too loosely.
In this case, use the radio holder supplied.
Quick release

24
Radio
holder
Scratch
protection
Strap
The supplied radio holder can be attached in various ways:
1.
With the 2 screws supplied (use the holes on the frame of your bike for the bottle
cage).
2.
Using the supplied straps at any point on the frame. To do this, first attach the
rubber strip under the radio holder to protect the frame from scratches or
damage.
3.
A combination of screws and belts, depending on the position.
Even if the DIGITRADIO Bike 1 is installed correctly, it is possible, especially
when travelling over very rough terrain, that the DIGITRADIO Bike 1 may fall
out of the holder. Therefore, if possible, secure it additionally against falling out.

25

26
1
2
4.5
Placing the DIGITRADIO Bike 1 in the radio holder
>
Slide the DIGITRADIO Bike 1 from the left (in the direction of
the arrow) into the radio holder (1) until it engages in the end
position (2)
>
To remove it, lift the DIGITRADIO Bike 1 slightly on the left-hand side and pull it
out of the holder to the left.

27
A
There is a small nipple (A) on the inside of the radio holder on the left-hand
side, which engages in the corresponding hole (B) on the underside of the
DIGITRADIO Bike 1. Check that it is correctly seated:
BSide view

28
4.6
General device functions
WARNING!
Danger of falling! Do not operate the device while travelling.
4.6.1
Switch on the
device
>
Press the On/Standby button (2) to switch on the DIGITRADIO Bike 1.
After switching on for the first time, you must first set the [Language]. To do
this, use the ◀ or ▶ buttons to select one of the available languages and
confirm your selection by pressing the Select/ Info button. The device then
automatically performs a complete search in DAB mode. During the search, the
display information shows the progress and the number of digital radio stations
found.
Once the station search is complete, the first DAB+ programme is played.

29
4.6.2
Switch off the
device
In battery mode:
>
Pressing the On/Standby button switches the device to power saving mode
and the display goes out. The message [Power off] appears briefly on the
display.
In power supply operation
>
Press the On/Standby button to switch the device to standby mode. The
message [Standby] appears briefly on the display, followed by the time/date
and the battery charge status.
4.6.3
Source selection
>
The Mode/Menu button (3) can be used to switch between the sources
DAB+ (digital radio), FM (FM) and Bluetooth. To do this, briefly press the
ok button until the desired source is shown on the display.
4.6.4
Setting the
volume
>
Adjust the volume using the Volume + and - buttons (8, 9).
The set volume is shown on the display using a bar chart.

30
If the volume is turned down completely (mute) in Bluetooth mode, the device
switches to standby mode after approx. 15 minutes.
4.6.5
Display
Depending on the selected function or option, the following information is
shown
on the
display:
Channel name,
frequency, menu
name
Display indicators,
menu options,
volume

31
4.6.6
Call up
display screens
>
Press and hold the Select/Info button to switch through the displays. You
have the option of displaying the following information:
In DAB+ mode:
[Laufext] (scrolling text with additional information that the broadcasters may
provide), [Title], [Artist], [Signal quality], [Programme type],
[Ensemble], [Frequency], [Signal error], [Bit rate /Codec], [Batterie],
[Time], and [Date].
In FM/UKW mode:
[Radio text] (if broadcast), [Programme type] (PTY), [Frequency],
[Audio information], [Batterie], [Time], and [Date].
In Bluetooth mode:
[Status], [Batterie], [Time], and [Date].

32
5
Menu operation
You can access all functions and settings of the DIGITRADIO Bike 1 via the menu. The
menu is navigated using the Mode/Menu, Down◀, Up▶ and Select/Info buttons.
The menu is divided into submenus and contains different menu items or functions that
can be activated depending on the selected source. To open
menu, simply press and hold the Mode/Menu button. To switch to submenus, first
press the Down◀, Up▶ buttons to display a submenu and then the Select/Info
button to call up the submenu. An asterisk (*) marks a currently selected function.
Close the menu: Press the Mode/Menu button several times
(depending on which submenu you are in) until the current radio
programme is displayed again.
Settings are only saved by pressing the Select/Info button. If the
Mode/Menu button is pressed in the meantime, the settings are not
accepted and saved (the Mode/Menu button takes on the function of a "Back"
button and the menu is exited).
Functions and buttons to be pressed are described in these operating
instructions in fat is shown. Display indications in [square brackets].

33
Some texts (e.g. menu entries, station information) may be too long to be
shown on the display. After a short time, these will then be displayed as a loud
text.
6 The DAB+ (digital radio) function
6.1
What is DAB+
DAB+ is a digital format that allows you to listen to crystal-clear sound without noise.
Unlike conventional analogue radio stations, DAB+ broadcasts several stations on the
same frequency. Further information can be found at www.dabplus.de or
www.dabplus.ch.
6.2
DAB+ (digital radio) reception
>
Press the Mode/Menu button briefly until [DAB] appears on the display.
When DAB+ is started for the first time, a complete station search is
performed. Once the scan is complete, the first station is played in
alphanumeric order.

34
6.2.1
Carry out a complete search
The automatic scan Full scan scans all DAB+ bands
III channels and thus finds all stations broadcast in the reception area.
Once the search is complete, the first station is played in alphanumeric order.
>
Open the menu by pressing and holding the Mode/Menu button and
then use the Down◀, Up▶ buttons to select the [Complete
search] entry. Press the Select/Info button.
>
The display shows [Search...].
During the search, a progress bar and the number of channels found
are displayed.
6.2.2
Select
transmitter
>
Press the Down◀, Up▶ buttons to call up the station list and switch
between the available stations.

35
Depending on the setting under MENU > [Change station], the
Select/Info button must then be pressed to play the selected station
(option: Change station > List) or the station is played automatically (option:
Change station > Channel).
The channel list can also be called up via MENU > [Channel list].
6.2.3
Store DAB+ stations in a memory location
The programme memory can store up to 20 stations in the DAB+
range.
>
First select the desired channel (see point 6.2.2).
>
To store this station in a memory location, press and hold the Preset button
during playback until [Favourite memory] appears in the display. Then use
the Down◀, Up▶ buttons to select a favourite memory (1...20). Press the
Select/Info button to save.
>
Repeat this procedure to save additional transmitters.

36
6.2.4
Recalling DAB+ stations from a memory location
>
To recall a station that you have previously stored in the FAV memory, briefly
press the Preset button and use the Down◀, Up▶ buttons to select a
station preset (1...20). Press the Select/Info button to play the station.
If no station is stored in the selected programme position, [(empty)]
appears in the display.
6.2.5
Overwriting/deleting a programme position memory
>
Simply save a new channel to a favourite memory location as
described.
All memory locations are deleted when the factory settings are called up.
6.2.6
Signal strength
>
Press and hold the Select/Info button several times until the signal strength
bar is displayed.
>
The signal strength is shown on the display using a bar chart.
The marker shows the minimum signal strength.

37
Transmitters whose signal strength is below the required minimum signal
strength are not transmitting a sufficient signal. If necessary, realign the aerial
or change the location.
6.2.7
Set
manually
This menu item is used to check the reception channels and can be used to align the
aerial. Furthermore, transmitters can be added manually.
>
Open the menu and use the Down◀, Up▶ buttons to select the
[Manual setting] entry and press the Select/Info button.
>
Use the Down◀, Up▶ and Select/Info buttons to select a channel (5A to
13F). The signal strength is now shown on the display. If a DAB+ station is
received on a channel, the ensemble name of the station is displayed. The
antenna can now be aligned for maximum signal strength.
Transmitters whose signal strength is below the required minimum signal
strength are not transmitting a sufficient signal. If necessary, realign the aerial
or change the location.

38
If there are stations on the set frequency or channel that have
not
yet
been
saved in the station list, these will now also be saved.
6.2.8
Volume control
(DRC)
The volume adjustment menu item is used to set the compression rate, which
compensates for dynamic fluctuations and the associated volume variations.
>
Open the menu and use the Down◀, Up▶ buttons to select the
[Volume adjustment] entry.
>
Press the Select/Info button.
DRC high
-High compression
DRC low
-Low compression
DRC off
-compression switched off.
>
Confirm by pressing the Select/Info button.
6.2.9
Delete inactive transmitters
This menu item is used to remove old and no longer receivable channels from the
channel list.

39
>
Open the menu and use the Down◀, Up▶ buttons to select the
[Delete inactive channels] entry.
>
Press the Select/Info button.
You will be asked [Delete] whether the inactive transmitters should be deleted.
>
Use Down◀, Up▶ to select the [Yes] entry and confirm by pressing the
Select/Info button.
7 FM (VHF) operation
7.1
Switch on FM radio mode
>
Press the Mode/Menu button briefly until [FM] appears on the display.
When switching on for the first time, the frequency 87.5 MHz is set.
If you have already set or saved a station, the radio will play the last station
set.
The station name appears for RDS stations.

40
7.2
FM (VHF) reception with RDS information
RDS is a procedure for transmitting additional information about FM stations.
Broadcasters with RDS transmit their station name or programme type, f o r
e x a m p l e . This is shown on the display. The device can display the RDS
information RT (radio text), PS (station name), PTY (programme type).
7.3
Automatic
station search
>
Press the Select/Info button to start the channel search.
Alternatively:
>
Press and hold the Down◀, Up▶ buttons to start the station search.
If an FM station with a sufficiently strong signal is found,
the search
stops
and the station is played. If an RDS station is
received, the station
name and, if applicable, the radio text will appear.
To tune to weaker stations, please use the manual station search.

41
7.4
Manual
station search
>
Briefly press the Down◀, Up▶ buttons several times to set the desired
station or frequency.
The display shows the frequency in steps of 0.05 MHz.
7.5
Search
setting
The sensitivity of the search run can be set in this menu item.
>
Open the menu and use the Down◀, Up▶ buttons to select the
[Search setting] entry. Press Select/Info.
>
Select whether the search should only stop for strong channels [Only strong
channels] or for all channels (including weak channels) [All channels].
With the All channels setting, the automatic search stops at every available
channel. This can result in weak stations
being played back
with
noise.
However, more stations are also found in this way than with the "Only
strong stations" setting.
>
Confirm by pressing the Select/Info button.

42
7.6
Audio
setting
>
Open the menu and use the Down◀, Up▶ buttons to select the
[Audio setting] entry. Press Select/Info.
>
Use Down◀, Up▶ to select the entry [Stereo possible] or [Mono only] to
play back in stereo or only in mono sound when FM reception is weak.
>
Confirm by pressing the Select/Info button.
7.7
Store FM stations in a memory location
The programme memory can store up to 20 stations in the FM range.
>
First set the desired transmitter frequency.
>
To store this station in a memory location, press and hold the Preset button
during playback until [Favourite memory] appears in the display. Then use
the Down◀, Up▶ buttons to select a favourite memory (1...20). Press the
Select/Info button to save.
>
Repeat this procedure to save additional transmitters.

43
7.8
Recalling FM stations from a memory location
>
To recall a station that you have previously stored in the FAV memory, briefly
press the Preset button and use the Down◀, Up▶ buttons to select a
station preset (1...20). Press the Select/Info button to play the station.
If no station is stored in the selected programme position, [(empty)]
appears in the display.
7.9
Overwriting/deleting a programme position memory
>
Simply save a new channel to the respective memory location as
described.
All memory locations are deleted when the factory settings are called up.
8
Bluetooth
In Bluetooth mode, you can play music from a connected smartphone or tablet via
the speakers of the DIGITRADIO Bike 1. To do this, both devices must first be
"paired" with each other.

44
8.1
Switch on Bluetooth operation
>
Press the Mode/Menu button briefly until [Bluetooth] appears on the display.
When switching on for the first time, an external device (smartphone/tablet)
must first be paired.
If an external device that is within range has already been paired, the
connection is established automatically. Depending on the connected device,
music playback may start automatically.
8.2
Pairing an external device
To pair an external device, e.g. a smartphone or tablet, with the DIGITRADIO Bike 1,
proceed as follows:
>
Start Bluetooth mode as described in section 8.1.
>
Bluetooth] and [Pair Bluetooth] appear on the display.
>
Now start the search for nearby Bluetooth devices on your external device.
You may need to activate the Bluetooth function on your external device first.

45
To activate the Bluetooth function on your external device and perform a
search, please refer to the operating instructions for your external device.
During the pairing process, both devices should be within 10cm of each other.
>
The entry DIGITRADIO Bike 1 should now appear in the list of Bluetooth
devices found on your external device. Tap on it to complete the pairing
process. Once the pairing process has been successfully completed, you
will hear a confirmation tone.
>
BT connected] appears on the display.
Depending on the Bluetooth protocol of your external device, you can control
the music playback using the playback buttons on the DIGITRADIO Bike 1:
Play/pause
- Button
Select/Info
Next title
- Button
Up▶
Previous title
- 2x button
Down◀
Title from the beginning
- Button
Down◀
Volume
- Keys
Volume
+/-

46
Alternatively, you can use the playback controls of the music app on your
external device.
8.3
Revive
coupling
To cancel an active pairing, select Menu > [Disconnect] and press the
Select/Info button. Note that the device to be unpaired must be connected to the
DIGITRADIO Bike 1 if you want to unpair it. You can then pair a new device as
described in section 8.2.
Alternatively, you can also set up the pairing on your external device. Follow the
instructions in the operating instructions for your external device.
9
Further
functions
9.1
Sleep
timer
The sleep timer switches the DIGITRADIO Bike 1 off automatically after the set time or
into standby mode (in mains operation).

47
>
Open the menu and use the Down◀, Up▶ buttons to select the
[Sleep] entry. Press Select/Info.
>
Use Down◀, Up▶ to select a time period after which the DIGITRADIO Bike 1
should switch off. You can choose between Off, 15, 30, 45, 60, 90 and
120
minutes.
>
Press the Select/Info button to accept the setting.
If you want to check the remaining time with an active sleep timer, simply
open the menu > Sleep again. If you want to switch off an active sleep
timer, select Sleep > Off.
9.2
Equaliser
You can use the equaliser to adjust the sound to suit your preferences.
>
Open the menu and use the Down◀, Up▶ buttons to select the
[Equaliser] entry. Press Select/Info.
>
Select the [Normal] entry for a sound reproduction that is optimised for the
device, or [MyEQ...] to set the highs and lows manually. Press Select/Info to
accept the selection.

48
9.2.1
MyEQ
>
Select Menu > Equaliser > MyEQ and press Select/Info.
>
Use Down◀, Up▶ to select either [Treble] to adjust the treble or [Bass] to
adjust the bass. Then press Select/Info.
>
With Down◀, Up▶ you can now set a value between -7 and +7.
Press Select/Info to accept the setting.
Select [Loudness] to achieve a balanced music reproduction even at low
volumes.
10
System settings
10.1
Time and date settings
>
Open the menu and use the Down◀, Up▶ buttons to select the
[Time] entry. Press Select/Info.
10.1.1
Set time/date manually
Depending on the time update setting (point 10.1.2), you must set the time and date
manually.

49
>
Open the menu and use the Down◀, Up▶ buttons to select the
[Time] > [Set time/date] entry. Press Select/Info.
>
The first digits (hours) of the time flash and can be changed using the
Down◀, Up▶ can be changed.
>
Press Select/Info to accept the setting.
>
The next digits (minutes) of the time then flash and can also be changed
as described above.
>
After each additional setting, press the Select/Info button to skip to the
next setting.
>
Proceed as described above for the date.
>
After all settings have been made and Select/Info
is pressed, [Time Saved] appears on the display.
10.1.2
Time update
In this submenu, you can specify whether the time update should take place
automatically via DAB+ or FM (FM) or whether you want to enter it manually (point
10.1.1).

50
>
Open the menu and use the Down◀, Up▶ buttons to select the
[Time] > [Time update] entry and press Select/Info.
>
Use the Down◀, Up▶ buttons to select the following options:
[All sources] (update via DAB+ and FM)
[Update from DAB] (update only via DAB+)
[Update from FM] (update only via FM)
[No update] (time/date must be entered manually, see
Point 10.1.1).
>
Press the Select/Info button to save the setting.
10.1.3
Setting the
time format
In the Set 12/24 hours submenu, you can activate the 12 or 24 hour format.
>
Open the menu and use the Down◀, Up▶ buttons to select the
[Time]
> [Set 12/24 hours] entry and press Select/Info.
>
Use Down◀, Up▶ to select one of the following options:
[24 hours]
[12
hours]

51
>
Press the Select/Info button to save.
10.1.4
Set
date format
In the Set date format submenu, you can specify the format for displaying the date.
>
Open the menu and use the Down◀, Up▶ buttons to select the
[Time]
> [Set date format] entry and press Select/Info.
>
Use Down◀, Up▶ to select one of the following options:
[DD-MM-YYYY] (day, month, year)
[MM-DD-YYYY] (month, day, year)
>
Press the Select/Info button to save.
10.2
Display brightness
You can set the display brightness for both operation and standby (mains
operation).
>
Open the menu and use the Down◀, Up▶ buttons to select the
[Lighting] entry. Press Select/Info.
>
Use Down◀, Up▶ to select one of the following functions:

52
[Operation] controls the brightness in the normal, switched-on state. Here
you can choose between the brightness levels [High], [Medium] and
[Low]. Use Down◀, Up▶ to select a brightness level and press
Select/Info to save.
[Standby] controls the brightness in standby mode (mains operation). Here
you can choose between the brightness levels [High], [Medium] and
[Low]. Use Down◀, Up▶ to select a brightness level and press
Select/Info to save.
10.3
Language
>
Open the menu and use the Down◀, Up▶ buttons to select the
[Language] entry and press Select/Info.
>
Use Down◀, Up▶ to select one of the available languages and confirm
your selection by pressing the Select/Info button.
10.4
Factory setting
If you change the location of the device, e.g. if you move house, you may no longer be
able to receive the saved channels. In this case, resetting to the factory settings will
allow you to restore all saved channels.

53
Delete channels to then start a new channel search.
>
Open the menu and use the Down◀, Up▶ buttons to select the
[Factory settings] entry. Press Select/Info.
>
Use Down◀, Up▶ to select the [Yes] entry to perform the factory
setting and press Select/Info.
All previously saved channels and settings are deleted. The device is now
in the factory settings.
>
The display shows [Restart...] and the device starts with the language
selection [Language]. Use Down◀, Up▶ to select one of the available
languages and confirm the selection by pressing the Select/ Info button. The
device then automatically performs a complete search in DAB mode. During the
search, the display information shows the progress and the number of digital
radio stations found.
Once the station search is complete, the first DAB+ programme is played.

54
10.5
SW version
Under SW version you can query the currently installed SW version.
>
Open the menu and use the Down◀, Up▶ buttons to select the [SW
version] entry.
>
Press Select/Info. The current SW version is displayed.
11
Cleaning
To avoid the risk of electric shock, do not clean the appliance with a wet cloth
or under running water. Disconnect the mains plug and switch off the appliance
before cleaning!
Do not use scouring pads, scouring powder or solvents such as alcohol or
petrol.
Do not use any of the following substances: Salt water, insecticide ammonia,
chlorinated or acidic solvents (ammonia).
Clean the housing with a soft cloth moistened with water. Do not use spirits,
thinners, etc.; they could damage the surface of the device.

55
Only clean the display with a soft cotton cloth. If necessary, use a cotton cloth
with small amounts of non-alkaline, diluted water- or alcohol-based soapy water.
Rub the cotton cloth gently over the surface.
12
Eliminate
errors
If the device does not work as intended, check it using the following table.
Symptom
Possible
cause/remedy
Device cannot be switched on.
The device is not supplied with power. Connect
the power adapter correctly to the socket and to
the device. Charge the battery.
No sound can be heard.
Increase the volume.
The display does not switch on.
Disconnect the appliance from the mains and
reapply power.

56
Symptom
Possible
cause/remedy
Reception via DAB+/FM is poor.
Change the position of the antenna or the
DIGITRADIO Bike 1.
Device cannot be operated.
Disconnect the appliance from the mains and
reapply power.
Poor Bluetooth connection and
dropouts
Do not exceed the maximum range of 10m via
Bluetooth.
If you a r e still unable to rectify the fault after the checks described, please contact the
technical hotline.

57
13 Technical data / manufacturer's information
Reception paths
DAB+, FM, Bluetooth
Power supply
Via external power supply unit supplied
Integrated Li-Ion battery 4000mAh
Frequencies
FM: 87.5-108 MHz
DAB+: 174-240 MHz
Bluetooth: 2.402-2.480 GHz Transmission
power: Class 2/max. +4 dBm
Protection class
IP65
Power consumption (mains
operation)
In operation max.: 10 W
Standby: < 1 W*
Music performance
5 W RMS
Working temperature
0 °C ~ 40 °C
Storage conditions
-10°C ~ 50°C / < 95% air humidity
Weight (g)
461
Dimensions (WxHxD) mm
165 x 73 x 71

58
Technical data of the supplied power supply unit
Manufacturer
TechniSat Digital GmbH, Julius-Saxler-
Straße 3, D-54550 Daun
Model identifier
BQ12E-0502000-G
Input voltage
AC 100 - 240 V
Input alternating current frequency
50/60 Hz
Output voltage
DC 5.0 V
Output current
2,0 A
Output power
10,0 W
Consistent efficiency in operation
79,5 %
Power consumption at no load
0,07 W
*Battery fully charged
Technical changes and errors excepted.

59

60

Translated with DeepL 27042022ORTVV5SA
61

Mode d'emploi
DIGITRADIO Bike 1
Radio DAB+/OMC pour vélo avec Bluetooth et batterie rechargeable

2
1
Illustrations
1.1
Vue de dessus
1
Écran
5
Select/Info
2
En marche/en
veille
6
Up
▶
3
Mode/Menu
7
Preset
(mémoire des
favoris)

3
4
Down
◀
8/9
Volume
fort/faible

4
1.2
Vue de l'arrière
1
Connecteur d'alimentation DC-IN 5 V, 2 A (connecteur MicroUSB)
2
Antenne

5
2
Table des matières
1
Illustrations ..................................................................................2
1.1
Vue de dessus...................................................................................................2
1.2
Vue de l'arrière ..................................................................................................3
2
Table des matières .......................................................................4
3
Consignes de sécurité..................................................................8
3.1
Préface
.............................................................................................................
8
3.2
Caractères et symboles utilisés.........................................................................9
3.3
Utilisation conforme à l'usage prévu................................................................11
3.4
Manipuler le produit en toute sécurité .............................................................11
3.4.1
Mentions légales..............................................................................................14
3.4.2
Conseils de service..........................................................................................16
4
Description du DIGITRADIO Bike 1
....................................................
18
4.1
Le contenu de la livraison ................................................................................18
4.2
Les caractéristiques particulières du DIGITRADIO Bike 1..............................18
4.3
Préparer le DIGITRADIO Bike 1 pour l'utilisation..............................................19
4.3.1
Recharger la batterie .......................................................................................19
4.3.2
Orienter l'antenne ............................................................................................20

6
4.4
Monter le DIGITRADIO Bike 1 sur le vélo ........................................................22
4.4.1
Montage sur guidon .........................................................................................22
4.4.2
Montage du cadre............................................................................................23
4.5
Placer le DIGITRADIO Bike 1 dans le support radio.........................................25
4.6
Fonctions générales de l'appareil....................................................................27
4.6.1
Allumer l'appareil .............................................................................................27
4.6.2
Éteindre l'appareil ............................................................................................28
4.6.3
Choix de la source ...........................................................................................28
4.6.4
Régler le volume..............................................................................................28
4.6.5
Présentoir ........................................................................................................29
4.6.6
Appeler les affichages à l'écran........................................................................30
5
Utilisation du menu ....................................................................31
6
La fonction DAB+ (radio numérique)
..................................................32
6.1
Qu'est-ce que le DAB+ ? .................................................................................32
6.2
Réception DAB+ (radio numérique).................................................................32
6.2.1
Effectuer une recherche complète...................................................................33
6.2.2
Sélectionner une chaîne ..................................................................................33
6.2.3
Enregistrer des stations DAB+ sur un emplacement mémoire........................34
6.2.4
Rappel de stations DAB+ à partir d'un emplacement mémoire.......................35
6.2.5
Écraser/effacer une mémoire d'emplacement de programme.........................35

7
6.2.6
Intensité du signal ............................................................................................35
6.2.7
Régler manuellement ......................................................................................36
6.2.8
Réglage du volume (DRC) ..............................................................................37
6.2.9
Supprimer les chaînes inactives ......................................................................37
7
Fonctionnement FM (VHF)
................................................................38
7.1
Activer le mode radio FM.................................................................................38
7.2
Réception FM (FM) avec informations RDS ....................................................39
7.3
Recherche automatique des chaînes...............................................................39
7.4
Recherche manuelle des chaînes....................................................................40
7.5
Réglage de la recherche..................................................................................40
7.6
Réglage audio .................................................................................................41
7.7
Enregistrer des stations FM sur un emplacement mémoire ............................41
7.8
Rappel des stations FM à partir d'un emplacement mémoire .........................42
7.9
Écraser/effacer une mémoire d'emplacement de programme.........................42
8
Bluetooth....................................................................................42
8.1
Activer le fonctionnement Bluetooth ...............................................................43
8.2
Coupler un appareil externe ............................................................................43
8.3
Couplage en saillie ..........................................................................................45
9
Autres
fonctions ..........................................................................45

8
9.1
Minuteur de sommeil ........................................................................................45
9.2
Égaliseur..........................................................................................................46
9.2.1
MonEQ ............................................................................................................47
10
Paramètres du système ..............................................................47
10.1
Réglages de l'heure et de la date ....................................................................47
10.1.1
Régler l'heure/la date manuellement...............................................................47
10.1.2
Mise à jour de l'heure.......................................................................................48
10.1.3
Régler le format de l'heure...............................................................................49
10.1.4
Régler le format de la date ..............................................................................50
10.2
Luminosité de l'écran .......................................................................................50
10.3
Langue.............................................................................................................51
10.4
Réglage d'usine ...............................................................................................51
10.5
Version SW.......................................................................................................53
11
Nettoyer......................................................................................53
12
Éliminer les
erreurs
......................................................................54
13
Données techniques / Remarques du fabricant
....................................56

9
3
Consignes de sécurité
3.1
Préface
Chers clients
Nous vous remercions d'avoir choisi une radio numérique de TechniSat. Le
présent mode d'emploi a pour but de vous aider à découvrir les nombreuses
fonctions de votre nouvel appareil et à les utiliser de manière optimale. Il vous aide
à l'utiliser de manière sûre et conforme. Il s'adresse à toute personne qui installe,
utilise, nettoie ou se débarrasse de l'appareil.
Conservez soigneusement le mode d'emploi pour une utilisation ultérieure.
Vous trouverez une version actuelle du mode d'emploi dans la zone de téléchargement
de votre produit sur le site Internet de TechniSat
www.technisat.de.
Nous vous souhaitons beaucoup de plaisir avec
votre radio numérique TechniSat !
Votre
L'équipe TechniSat

10
3.2
Caractères et symboles utilisés
dans ce mode d'emploi :
Indique une consigne de sécurité qui, si elle n'est pas respectée, peut entraîner
des blessures graves.
blessures ou la mort. Respectez les mots de signalisation suivants :
DANGER - Blessures graves pouvant entraîner la mort
AVERTISSEMENT - Blessures graves, éventuellement mortelles
ATTENTION - Blessures
Indique une remarque dont vous devez absolument tenir compte pour
éviter les défauts de l'appareil, la perte/l'utilisation abusive de données ou
une utilisation non souhaitée. Il décrit en outre d'autres fonctions de votre
appareil.
Avertissement relatif à la tension électrique. Suivez toutes les consignes de
sécurité afin d'éviter tout risque de choc électrique. N'ouvrez jamais l'appareil.

11
Sur l'appareil :
Utilisation à l'intérieur - Les appareils portant ce symbole ne peuvent être utilisés
qu'à l'intérieur.
Classe de protection II - Les appareils électriques de la classe de protection
II sont des appareils électriques qui possèdent une double isolation et/ou
une isolation renforcée continue et qui n'ont pas de possibilités de
raccordement pour un conducteur de protection. Le boîtier d'un appareil
électrique de classe de protection II entouré d'un matériau isolant peut
constituer partiellement ou entièrement l'isolation supplémentaire ou
renforcée.
Votre appareil porte le marquage CE et répond à toutes les normes européennes
requises.
Les appareils électroniques ne doivent pas être jetés avec les ordures
ménagères, mais doivent être éliminés de manière appropriée - conformément à
la directive 2012/19/UE du Parlement européen et du Conseil du 4 juillet 2012
relative aux déchets d'équipements électriques et électroniques (DEEE).
BiGe à la fin de son utilisation, déposez cet appareil dans les points de collecte

12
publics prévus à cet effet pour qu'il soit éliminé.

13
3.3
Utilisation
prévue
Le DIGITRADIO Bike 1 est conçu pour recevoir les émissions de radio DAB+/OMC. Il
peut être monté sur des vélos à l'aide des accessoires fournis. L'appareil est conçu
pour un usage privé et ne convient pas à des fins commerciales.
3.4
Manipulation sûre du produit
BiGe, veuillez respecter les consignes suivantes afin d e minimiser les risques
pour la sécurité, d'éviter d'endommager l'appareil et de contribuer à la protection
de l'environnement.
Lisez attentivement toutes les consignes de sécurité et conservez-les pour toute
question ultérieure. Respectez toujours tous les avertissements et consignes figurant
dans ce mode d'emploi et au dos de l'appareil.
AVERTISSEMENT !
N'ouvrez jamais l'appareil !
Le contact avec des pièces sous tension est dangereux pour la vie !
AVERTISSEMENT !
Risque d'étouffement ! Ne pas laisser l'emballage et ses éléments aux enfants.
Risque d'étouffement par les films et autres matériaux d'emballage.

14
Respectez toutes les consignes suivantes pour une utilisation
conforme de l'appareil et pour prévenir les défauts de l'appareil et les
dommages corporels.
-
Ne réparez pas l'appareil vous-même. Une réparation ne peut être effectuée
que par un personnel spécialisé et formé. Adressez-vous à nos services
après-vente.
-
L'appareil ne doit être utilisé que dans les conditions environnementales
indiquées à cet effet. N'exposez pas l'appareil à des sources de chaleur qui le
réchaufferaient en plus de l'utilisation normale.
-
En cas de défaut notable de l'appareil, de dégagement d'odeur ou de fumée,
de dysfonctionnements importants, de dommages sur le boîtier, contacter
immédiatement le service après-vente.
-
L'appareil ne doit être utilisé qu'avec la tension de réseau prescrite et
uniquement avec le bloc d'alimentation fourni. N'essayez jamais d'utiliser
l'appareil avec une autre tension ou un autre bloc d'alimentation.
-
Étant donné que, sur cet appareil, la séparation du réseau électrique
s'effectue en débranchant le bloc d'alimentation, il est absolument
nécessaire que celui-ci soit facilement accessible à tout moment.

15
-
Si l'appareil présente des dommages, il ne doit pas être mis en service.
-
Ne pas laisser tomber de corps étrangers à l'intérieur de l'appareil, par exemple
des aiguilles, des pièces de monnaie, etc. Ne pas toucher les contacts de
connexion avec des objets métalliques ou avec les doigts. Il pourrait en résulter
des courts-circuits.
-
Cet appareil n'est pas destiné à être utilisé par des personnes (y compris des
enfants) dont les capacités physiques, sensorielles ou mentales sont réduites ou
qui manquent d'expérience et/ou de connaissances, à moins qu'elles ne soient
surveillées par une personne responsable de leur sécurité ou qu'elles n'aient
reçu de celle-ci des instructions sur la manière d'utiliser l'appareil.
-
Il est interdit de procéder à des transformations sur l'appareil.
-
Ne montez l'appareil sur le vélo qu'avec les accessoires fournis et vérifiez le
montage correct avant chaque sortie.
-
N'écoutez pas de musique à un volume trop élevé dans la circulation.
Respectez les règles en vigueur dans la circulation routière.
-
Ne manipulez pas la radio en conduisant. Risque de chute !
-
L'appareil est adapté à une utilisation dans un climat tempéré.

16
3.4.1
Mentions
légales
Par la présente, TechniSat déclare que le type d'équipement radio
DIGITRADIO Bike 1 est conforme à la directive 2014/53/UE. Le texte
complet de la directive européenne
La déclaration de conformité est disponible à l'adresse Internet
suivante : hGp://konf.tsat.de/?ID=23127
TechniSat ne peut être tenu responsable des dommages causés au produit
par des influences extérieures, l'usure ou une manipulation inappropriée,
une réparation non autorisée, des modifications ou des accidents.
Sous réserve de modifications et d'erreurs d'impression. Mise à jour 04/22.
Copie et reproduction uniquement avec l'autorisation de l'éditeur. La version
actuelle du mode d'emploi est disponible au format PDF dans la zone de
téléchargement de la page d'accueil TechniSat à l'adresse
www.technisat.de.


18
3.4.2
Instructions de service
Ce produit a fait l'objet d' un contrôle de qualité et bénéficie d'une
garantie légale de 24 mois à compter de la date d'achat. Veuillez
conserver la facture comme preuve d'achat. Pour
Pour toute demande de garantie, veuillez vous adresser au revendeur du
produit.
Remarque !
Pour toute question ou information, ou si vous rencontrez un problème
avec cet appareil, notre hotline technique est à votre disposition :
Du lundi au vendredi de 8h00 à 18h00 au
03925/9220 1800.
Les demandes de réparation peuvent également
être effectuées directement en ligne sur
www.technisat.de/reparatur, beaukragt.

19
Pour un éventuel envoi de l'appareil, veuillez utiliser exclusivement l'adresse suivante :
TechniSat Digital GmbH
Centre de service
Nordstr. 4a
39418 Staßfurt
Les noms des sociétés, institutions ou marques mentionnées sont des marques
commerciales ou des marques déposées de leurs propriétaires respectifs.

20
4 Description du DIGITRADIO Bike 1
4.1
Le
contenu de la livraison
Avant la mise en service, vérifiez que le contenu de la livraison est complet :
1x DIGITRADIO Bike 1
1x support de radio
1x serrage rapide 1x
adaptateur secteur
2x courroies
4x vis
1x manuel d'utilisation
4.2
Les caractéristiques particulières du DIGITRADIO Bike 1
Le DIGITRADIO Bike 1 se compose d'un récepteur DAB+/OMC, avec les fonctions
suivantes :
-
Vous pouvez enregistrer jusqu'à 20 stations DAB+ et 20 stations FM.
-
La radio reçoit sur les fréquences FM 87,5-108 MHz (analogique) et DAB+
174,9-239,2 MHz (numérique).
-
Possibilités de montage universelles, spécialement pour les vélos.
-
Lecture de musique via une connexion Bluetooth.
-
Fonctionnement sur batterie.

21
4.3
Préparer le DIGITRADIO Bike 1 pour l'utilisation
4.3.1
Recharger la
batterie
Avant d'utiliser le DIGITRADIO Bike 1 pour la première fois, il est conseillé de charger
complètement la batterie.
Assurez-vous que la tension de fonctionnement du bloc d'alimentation
correspond à la tension du réseau local avant de le brancher sur la prise
murale.
AVERTISSEMENT !
Ne pas toucher la fiche d'alimentation avec les mains mouillées, risque de choc
électrique !
ATTENTION !
Placez le câble d'alimentation de manière à ce que personne ne puisse trébucher
dessus.
>
Raccordez le bloc d'alimentation fourni à la prise DC-IN (1) située à l'arrière
du DIGITRADIO Bike 1. Pour ce faire, soulevez le couvercle de protection de
la prise et rabattez-le vers le haut. Connectez ensuite le bloc d'alimentation
au réseau électrique.

22
>
L'état de charge est représenté à l'écran par un symbole de baGerie si le
DIGITRADIO Bike 1 est en mode veille.
Lorsque l'appareil est en service et que la batterie est entièrement chargée,
l'écran affiche [Charge complète] en permanence.
4.3.2
Orienter l
'antenne
Le nombre et la qualité des chaînes à recevoir dépendent des conditions de réception sur
le lieu d'installation. L'antenne permet d'obtenir une excellente réception.
>
Dépliez l'antenne de son support à l'arrière du DIGITRADIO Bike 1 et
redressez-la.
Il est important de bien orienter l'antenne télescopique, en particulier dans
les zones périphériques de la réception DAB+. Sur Internet, on peut par
exemple consulter
"www.dabplus.de" permet de trouver rapidement l'emplacement du pylône
de transmission le plus proche.
Commencez la première recherche à l'extérieur en direction du mât émetteur.
En cas de mauvais temps, la réception DAB+ peut être limitée.

23
Ne touchez pas l'antenne pendant la lecture d'une station. Cela peut entraîner
des perturbations de la réception et des sauts de son.
Selon la position de montage du DIGITRADIO Bike 1 sur le vélo,
l'
antenne
peut
aussi rester repliée. Cependant, des problèmes de
réception et des sauts dans la lecture peuvent alors survenir plus
fréquemment.

24
Support
radio
Vis
Dispositif de
serrage rapide
4.4
Monter le DIGITRADIO Bike 1 sur le vélo
Pour monter le DIGITRADIO Bike 1 sur votre vélo, il existe plusieurs possibilités,
expliquées ci-dessous.
4.4.1
Montage sur guidon
Le DIGITRADIO Bike 1 peut être fixé au guidon de votre vélo à l'aide du support de
radio et de l'attache rapide. Fixez d'abord l'attache rapide au support de la radio à
l'aide des 2 vis fournies.
Selon le diamètre du tube du guidon, vous pouvez utiliser l'adaptateur en
caoutchouc dans le dispositif de serrage rapide.

25
4.4.2
Montage sur cadre
Si vous avez déjà monté un porte-bidon sur votre vélo, vous pouvez y placer le
DIGITRADIO Bike 1. Avant chaque sortie, vérifiez que le DIGITRADIO Bike 1 est
bien fixé.
Le DIGITRADIO Bike 1 est conçu pour être compatible avec la plupart des
porte-bidons. Toutefois, en fonction de la conception du porte-bidon, il se peut
que le DIGITRADIO Bike 1 soit trop lâche.
Dans ce cas, utilisez le support radio fourni.
Dispositif de
serrage rapide

26
Support
radio
Protection
contre les
rayures
Courroi
e
Le support radio fourni peut être fixé de différentes manières :
1.
Avec les 2 vis fournies (utilisez les trous du cadre de votre vélo pour le porte-
bidon).
2.
A l'aide des sangles fournies, à n'importe quel endroit du cadre. Pour ce faire,
fixez d'abord la bande en caoutchouc sous le support de la radio afin de
protéger le cadre des rayures ou des dommages.
3.
Une combinaison de vis et de courroies, selon la position.
Même si le montage est effectué selon les instructions, il peut arriver, en
particulier lors de la traversée d'un terrain très accidenté, que le DIGITRADIO
Bike 1 s'arrête.
tombe de son support. C'est pourquoi il faut, dans la mesure du possible, le

27
sécuriser davantage pour éviter qu'il ne tombe.

28
1
2
4.5
Placer le DIGITRADIO Bike 1 dans le support radio
>
Insérez le DIGITRADIO Bike 1 par la gauche (dans le sens de
la flèche) dans le support radio (1) jusqu'à ce qu'il s'enclenche
en position finale (2).
>
Pour le retirer, soulevez légèrement le DIGITRADIO Bike 1 sur le côté gauche et
tirez-le vers la gauche pour le sortir du support.

29
A
Sur le support de la radio se trouve à l'intérieur, sur le côté gauche, un petit
téton (A) qui s'enclenche dans le trou correspondant (B) sur la face
inférieure du DIGITRADIO Bike 1. Vérifie qu'il est bien fixé :
BVue latérale

30
4.6
Fonctions générales de l'appareil
AVERTISSEMENT !
Risque de chute ! Ne manipulez pas l'appareil en conduisant.
4.6.1
Allumer l'
appareil
>
En appuyant sur la touche Marche/Veille (2), vous allumez le DIGITRADIO
Bike 1.
Après la première mise en marche, vous devez d'abord définir la [langue]. Pour
ce faire, sélectionnez l'une des langues disponibles à l'aide des touches ◀ ou ▶
et confirmez votre choix en appuyant sur la touche Select/ Info. Ensuite,
l'appareil e f f e c t u e automatiquement une recherche complète en mode DAB.
Pendant la recherche, les informations affichées indiquent la progression et le
nombre de stations de radio numérique trouvées.
Une fois la recherche des stations terminée, le premier programme DAB+ est
diffusé.

31
4.6.2
Éteindre l'
appareil
En fonctionnement sur batterie :
>
En appuyant sur la touche Marche/Veille, l'appareil passe en mode
d'économie d'énergie et l'affichage de l'écran s'éteint. L'indication [Power off]
s'affiche brièvement à l'écran.
En mode d'alimentation
>
En appuyant sur la touche Marche/Veille, l'appareil passe en mode veille.
L'indication [Standby] apparaît brièvement à l'écran, puis l'heure/la date et
l'état de charge de la batterie s'affichent à l'écran.
4.6.3
Choix de la source
>
Le bouton Mode/Menu (3) permet de basculer entre les sources DAB+
(radio numérique), FM (FM) et Bluetooth. Pour ce faire, appuyer
brièvement sur la touche so ok jusqu'à ce que la source souhaitée s'affiche à
l'écran.
4.6.4
Régler
le volume
>
Réglez le volume à l'aide des boutons Volume + et - (8, 9).
Le volume réglé est indiqué à l'écran par un diagramme à barres.

32
En mode Bluetooth, si le volume est baissé de manière compacte (muet),
l'appareil passe en mode veille au bout d'environ 15 minutes.
4.6.5
Écran
Selon la fonction ou l'option sélectionnée, l'écran
affiche
les informations suivantes :
Nom de la chaîne,
fréquence, nom du
menu
Affichages à
l'écran, options de
menu, volume

33
4.6.6
Appeler
les affichages à l'écran
>
En maintenant la touche Select/Info enfoncée, vous pouvez faire défiler les
affichages à l'écran. Vous avez le choix d'afficher les informations suivantes :
En mode DAB+ :
[LauŁext] (texte défilant contenant des informations supplØmentaires que les
stations peuvent fournir), [Titre], [Artiste], [QualitØ du signal], [Type de
programme], [
Ensemble], [FØquence], [Erreur de signal], [Bitrate /Codec],
[BaUerie],
[Heure], et [Date].
En mode FM/OMC :
[Texte radio] (si diffusé), [Type de programme] (PTY), [Fréquence],
[Informations audio], [BaUerie], [Heure], et [Date].
En mode Bluetooth :
[État], [BaUerie], [Heure], et [Date].

34
5
Utilisation du menu
Le menu permet d'accéder à toutes les fonctions et à tous les réglages du
DIGITRADIO Bike 1. La navigation dans le menu s'effectue à l'aide des touches
Mode/Menu, Down◀, Up▶ et Select/Info. Le menu est divisé en sous-menus et
contient, selon la source sélectionnée, différents points de menu ou fonctions
activables. Pour ouvrir
du menu, il suffit de maintenir le bouton Mode/Menu enfoncé. Pour passer aux sous-
menus, appuyer d'abord sur les boutons Down◀, Up▶ pour afficher un sous-menu,
puis sur le bouton Select/Info pour accéder au sous-menu. Un astérisque (*) met en
évidence une fonction actuellement sélectionnée.
Fermer le menu : Appuyer plusieurs fois sur le bouton Mode/Menu
(selon le sous-menu dans lequel vous vous trouvez) jusqu'à ce que le
programme radio actuel s'affiche à nouveau.
Les réglages ne sont enregistrés qu'en appuyant sur le bouton Select/Info. Si
l'on appuie sur le bouton Mode/Menu pendant ce temps, les réglages ne sont
pas appliqués ni enregistrés (le bouton Mode/Menu fait office de bouton
"Retour" et le menu est quitté).
Les fonctions et les touches à appuyer sont décrites dans ce mode d'emploi en
feU est représenté. Affichages à l'écran entre [crochets].

35
Certaines représentations textuelles (par ex. entrées de menu, informations
sur les chaînes) sont éventuellement trop longues pour être affichées à
l'écran. Elles s'affichent alors au bout de quelques instants sous la forme d'un
laukext.
6 La fonction DAB+ (radio numérique)
6.1
Qu'est-ce que le DAB+ ?
Le DAB+ est un format numérique qui permet d'écouter un son cristallin, sans
parasites. Contrairement aux radios analogiques traditionnelles, le DAB+ diffuse
plusieurs stations sur la même fréquence. Pour plus d'informations, consultez par
exemple les sites www.dabplus.de ou www.dabplus.ch.
6.2
Réception DAB+ (radio numérique)
>
Appuyez brièvement sur le bouton Mode/Menu jusqu'à ce que [DAB] s'affiche à
l'écran.
Lorsque le DAB+ est lancé pour la première fois, une recherche complète
des stations est effectuée. Une fois la recherche terminée, la première
station est diffusée dans l'ordre alphanumérique.

36
6.2.1
Effectuer une recherche complète
La recherche automatique Recherche complète balaye toutes les bandes DAB+.
III - canaux et trouve ainsi toutes les chaînes diffusées dans la zone de
réception.
Une fois la recherche terminée, la première chaîne est diffusée dans l'ordre
alphanumérique.
>
Ouvrez le menu en maintenant le bouton Mode/Menu enfoncé, puis
sélectionnez [Recherche complète] à l'aide des boutons Down◀,
Up▶. Appuyez sur le bouton Select/Info.
>
L'écran affiche [Recherche...].
Pendant la recherche, une barre de progression et le nombre de
chaînes trouvées s'affichent.
6.2.2
Sélectionner
une chaîne
>
En appuyant sur les touches Down◀, Up▶, il est possible d'accéder à la liste
des chaînes et de
passer d'une chaîne disponible à l'autre.

37
Selon le réglage effectué dans MENU > [Changer de chaîne], il faut
ensuite appuyer sur la touche Select/Info pour lire la chaîne sélectionnée
(option : Changer de chaîne > Liste) ou la chaîne est lue automatiquement
(option : Changer de chaîne > Canal).
La liste des chaînes peut également être affichée via le MENU > [Liste des
chaînes].
6.2.3
Enregistrer les stations DAB+ sur un emplacement mémoire
La mémoire de programmes peut enregistrer jusqu'à 20 stations
dans la plage DAB+ .
>
Sélectionnez d'abord la chaîne souhaitée (voir point 6.2.2).
>
Pour enregistrer cette station dans une mémoire, maintenez la touche
Preset enfoncée pendant la lecture jusqu'à ce que [Mémoire favorite]
s'affiche à l'écran. Sélectionnez ensuite une mémoire favorite (1...20) à l'aide
des touches Down◀, Up▶. Appuyez sur la touche Select/Info pour
enregistrer.
>
Pour enregistrer d'autres stations, répétez cette procédure.

38
6.2.4
Appel de stations DAB+ à partir d'un emplacement mémoire
>
Pour rappeler une station que vous avez préalablement enregistrée dans la
mémoire FAV, appuyez brièvement sur la touche Preset et sélectionnez
une station préréglée (1...20) à l'aide des touches Down◀, Up▶. Appuyez
sur le bouton Select/Info pour écouter la station.
Si aucune station n'est mémorisée sur l'emplacement de programme
sélectionné, l'écran affiche [(vide)].
6.2.5
Écraser/effacer une mémoire d'emplacement de programme
>
Enregistrez simplement une nouvelle chaîne sur un emplacement de
mémoire favori, comme décrit.
Lors du rappel des réglages d'usine, tous les emplacements de mémoire sont
effacés.
6.2.6
Intensité du signal
>
Maintenez le bouton Select/Info enfoncé plusieurs fois jusqu'à ce que la barre
d'intensité du signal s'affiche.
>
L'intensité du signal est représentée à l'écran par un diagramme à barres.

39
Le marqueur indique l'intensité minimale du signal.

40
Les émetteurs dont l'intensité du signal est inférieure à l'intensité minimale
requise n'émettent pas un signal suffisant. Le cas échéant, réorientez
l'antenne ou changez d'emplacement.
6.2.7
Régler
manuellement
Ce point de menu sert à vérifier les canaux de réception et peut être utilisé pour
orienter l'antenne. En outre, il est possible d'ajouter des chaînes manuellement.
>
Ouvrez le menu et sélectionnez [Réglage manuel] à l'aide des
boutons Down◀, Up▶ et appuyez sur le bouton Select/Info.
>
Sélectionner un canal (5A à 13F) à l'aide des touches Down◀, Up▶ et
Select/Info. L'intensité du signal s'affiche alors à l'écran. Si une station
DAB+ est captée sur un canal, le nom d'ensemble de la station s'affiche.
L'antenne peut maintenant être orientée pour obtenir une puissance de signal
maximale.
Les émetteurs dont l'intensité du signal est inférieure à l'intensité minimale
requise n'émettent pas un signal suffisant. Le cas échéant, réorientez
l'antenne ou changez d'emplacement.

41
Si des stations se trouvent sur la fréquence ou le canal réglé et qu'elles
n'ont pas
encore
été enregistrées dans la liste des stations, elles seront
également enregistrées.
6.2.8
Réglage du volume
(DRC)
L'option de menu Ajustement du volume permet de régler le taux de compression
qui compense les fluctuations de la dynamique et les variations de volume qui en
découlent.
>
Ouvrez le menu et sélectionnez [Réglage du volume] à l'aide des
boutons Down◀, Up▶.
>
Appuyez sur le bouton Select/Info.
DRC élevé
-Compression
élevée
DRC bas
-Basse compression
DRC désactivé
-Compression désactivée.
>
Confirmez en appuyant sur la touche Select/Info.
6.2.9
Supprimer les chaînes inactives
Ce point de menu sert à supprimer de la liste des chaînes les anciennes chaînes
qui ne peuvent plus être reçues.

42
>
Ouvrez le menu et sélectionnez [Supprimer les chaînes inactives]
à l'aide des touches Down◀, Up▶.
>
Appuyez sur le bouton Select/Info.
La question [Supprimer] est posée pour savoir si les émetteurs inactifs doivent être
supprimés.
>
Utilisez Down◀, Up▶ pour sélectionner [Oui] et confirmez en appuyant
sur le bouton Select/Info.
7 Fonctionnement FM (VHF)
7.1
Activer le mode radio FM
>
Appuyez brièvement sur le bouton Mode/Menu jusqu'à ce que [FM]
s'affiche à l'écran. Lors de la première mise en marche, la fréquence est
réglée sur 87,5 MHz.
Si vous avez déjà réglé ou mémorisé une station, la radio joue la dernière
station réglée.
Pour les stations RDS, le nom de la station s'affiche.

43
7.2
réception FM (FM) avec informations RDS
Le RDS est un procédé de transmission d'informations supplémentaires sur les
stations FM. Les stations de radio dotées du RDS diffusent par exemple le nom de
leur station ou le type de programme. Celui-ci est affiché à l'écran. L'appareil peut
afficher les informations RDS RT (texte radio), PS (nom de la station), PTY (type
de programme).
7.3
Recherche
automatique
des chaînes
>
Appuie sur le bouton Select/Info pour lancer la recherche des
chaînes. Alternative :
>
Maintenez les touches Down◀, Up▶ enfoncées pour lancer la recherche
des chaînes.
Si une station FM avec un signal suffisamment puissant est trouvée,
la
recherche
s'arrête
et la station est diffusée. Si une station RDS est
reçue,
le nom de la station et, le cas échéant, le texte radio s'affichent.
Pour régler les stations les plus faibles, utilisez la recherche manuelle.

44
7.4
Recherche
manuelle
des chaînes
>
Appuyer brièvement plusieurs fois sur les touches Down◀, Up▶ pour régler
la station, ou la fréquence souhaitée.
L'écran affiche la fréquence par incréments de 0,05 MHz.
7.5
Réglage
de la recherche
Ce point de menu permet de régler la sensibilité de la recherche.
>
Ouvrez le menu et sélectionnez [Réglage de la recherche] à l'aide
des boutons Down◀, Up▶. Appuyez sur Select/Info.
>
Choisissez si la recherche doit s'arrêter uniquement sur les chaînes fortes
[chaînes fortes uniquement] ou sur toutes les chaînes (y compris les
chaînes faibles) [toutes les chaînes].
Avec le réglage Toutes les chaînes, la recherche automatique s'arrête à
chaque chaîne disponible. Cela peut avoir pour conséquence que les stations
faibles
soient reproduites
avec un
bruit de fond. Toutefois, il permet de
trouver davantage de stations que le réglage "Stations fortes uniquement".
>
Confirmez en appuyant sur le bouton Select/Info.

45
7.6
Réglage
audio
>
Ouvrez le menu et sélectionnez [Réglage audio] à l'aide des boutons
Down◀, Up▶. Appuyez sur Select/Info.
>
Utilisez Down◀, Up▶ pour sélectionner [Stéréo possible] ou [Mono
seulement] pour lire en stéréo ou en son mono seulement lorsque la réception
FM est faible.
>
Confirmez en appuyant sur le bouton Select/Info.
7.7
Enregistrer les stations FM sur un emplacement mémoire
La mémoire de programmes peut enregistrer jusqu'à 20 stations dans la gamme
FM.
>
Réglez d'abord la fréquence de la station souhaitée.
>
Pour enregistrer cette station dans une mémoire, maintenez la touche
Preset enfoncée pendant la lecture jusqu'à ce que [Mémoire favorite]
s'affiche à l'écran. Sélectionnez ensuite une mémoire favorite (1...20) à l'aide
des touches Down◀, Up▶. Appuyez sur la touche Select/Info pour
enregistrer.

46
>
Pour enregistrer d'autres stations, répétez cette procédure.

47
7.8
Rappel des stations FM à partir d'un emplacement mémoire
>
Pour rappeler une station que vous avez préalablement enregistrée dans la
mémoire FAV, appuyez brièvement sur la touche Preset et sélectionnez
une station préréglée (1...20) à l'aide des touches Down◀, Up▶. Appuyez
sur le bouton Select/Info pour écouter la station.
Si aucune station n'est mémorisée sur l'emplacement de programme
sélectionné, l'écran affiche [(vide)].
7.9
Écraser/effacer une mémoire d'emplacement de programme
>
Enregistrez simplement une nouvelle station sur l'emplacement
mémoire correspondant, comme décrit.
Lors du rappel des réglages d'usine, tous les emplacements de mémoire sont
effacés.
8
Bluetooth
En mode Bluetooth, vous pouvez écouter la musique d'un smartphone ou d'une
tablette connecté(e) sur les haut-parleurs du DIGITRADIO Bike 1. Pour ce faire, les
deux appareils doivent d'abord être "couplés" ensemble.

48
8.1
Activer le fonctionnement Bluetooth
>
Appuyez brièvement sur le bouton Mode/Menu jusqu'à ce que [Bluetooth]
s'affiche à l'écran.
Lors de la première mise en marche, il faut d'abord coupler un appareil
externe (smartphone/tablette).
Si un appareil externe se trouvant à portée a déjà été couplé, la connexion est
établie automatiquement. Selon l'appareil connecté, la lecture de la musique
peut démarrer automatiquement.
8.2
Coupler un appareil externe
Pour coupler un appareil externe, par exemple un smartphone ou une tablette, avec le
DIGITRADIO Bike 1, procédez comme suit :
>
Démarrez le mode Bluetooth comme décrit au point 8.1.
>
L'écran affiche [Bluetooth] et [BiUe Couplage].
>
Démarrez maintenant la recherche d'appareils Bluetooth à proximité sur votre
appareil externe. Il se peut que vous deviez d'abord activer la fonction
Bluetooth sur votre appareil externe.

49
Pour savoir comment activer la fonction Bluetooth sur votre appareil externe
et effectuer une recherche, consultez le mode d'emploi de votre appareil
externe.
Pendant le processus de couplage, les deux appareils doivent se trouver à
moins de 10 cm l'un de l'autre.
>
L'entrée DIGITRADIO Bike 1 doit maintenant apparaître dans la liste
des appareils Bluetooth trouvés sur votre appareil externe. Tapez dessus
pour terminer le processus de couplage. Si la procédure de couplage est
terminée avec succès, un signal de confirmation retentit.
>
L'écran affiche [BT connecté].
Selon le protocole Bluetooth de votre appareil externe, vous pouvez contrôler la
lecture de la musique à l'aide des touches de lecture du DIGITRADIO Bike 1 :
Lecture/Pause
- Touche
Sélectionn
er/Info
Titre suivant
- Touche
Up▶
Titre précédent
- 2x bouton
Down◀
Titre depuis le début
- Touche
Down◀

50
Volume sonore
- Boutons
Volume
+/-

51
Vous pouvez également utiliser les commandes de lecture de l'application
Musique de votre appareil externe.
8.3
Coller
le couplage
Pour annuler un couplage actif, sélectionnez dans le menu > [Séparer] et appuyez
sur la touche Select/Info. Notez que l'appareil à découpler doit être connecté au
DIGITRADIO Bike 1 si vous souhaitez le découpler. Vous pouvez ensuite coupler un
nouvel appareil comme décrit au point 8.2.
Vous pouvez également définir le couplage sur votre appareil externe. Pour ce
faire, suivez les instructions du mode d'emploi de votre appareil externe.
9
Autres
fonctions
9.1
Minuteur
de sommeil
Grâce à la minuterie de mise en veille, le DIGITRADIO Bike 1 s'éteint automatiquement
après la durée programmée ou se met en veille (en mode secteur).

52
>
Ouvrez le menu et sélectionnez [Sleep] à l'aide des boutons Down◀,
Up▶. Appuyez sur Select/Info.
>
Utilisez Down◀, Up▶ pour sélectionner une période après laquelle le
DIGITRADIO Bike 1 doit s'éteindre. Vous avez le choix entre Arrêt, 15, 30,
45, 60, 90 et
120
minutes.
>
Appuyez sur le bouton Select/Info pour valider le réglage.
Si vous souhaitez vérifier le temps encore disponible lorsque la minuterie de
veille est active, il vous suffit d'ouvrir à nouveau le menu > Sleep. Si vous
souhaitez désactiver une minuterie de mise en veille active, sélectionnez
Sleep > Off.
9.2
Égaliseur
L'égaliseur vous permet d'adapter le son à vos souhaits.
>
Ouvrez le menu et sélectionnez [Equalizer] avec les boutons
Down◀, Up▶. Appuyez sur Select/Info.
>
Sélectionnez l'entrée [Normal] pour un son parfaitement adapté à l'appareil ou
[MonEQ...] pour régler manuellement les aigus et les basses. Appuyez sur

53
Select/Info pour valider la sélection.

54
9.2.1
MonEQ
>
Sélectionnez Menu > Égaliseur > MonEQ et appuyez sur Select/Info.
>
Utilisez Down◀, Up▶ pour sélectionner soit [Aigus] pour ajuster les aigus,
soit [Basses] pour ajuster les basses. Appuyez ensuite sur Select/Info.
>
Avec Down◀, Up▶, vous pouvez maintenant régler une valeur entre -7 et +7.
Appuyez sur Select/Info pour valider le réglage.
Sélectionnez [Loudness] pour obtenir une lecture équilibrée de la musique,
même à faible volume.
10
Paramètres du système
10.1
Réglage de l'heure et de la date
>
Ouvrez le menu et sélectionnez [Heure] à l'aide des boutons Down◀,
Up▶. Appuyez sur Select/Info.
10.1.1
Régler l'heure/la date manuellement
Selon le réglage de la mise à jour de l'heure (point 10.1.2), vous devez régler l'heure et la

55
date manuellement.

56
>
Ouvrez le menu et sélectionnez [Heure] > [Régler l'heure/la date] à
l'aide des boutons Down◀, Up▶. Appuyez sur Select/Info.
>
Les premiers chiffres (heures) de l'heure clignotent et peuvent être modifiés à
l'aide des touches
Down◀, Up▶ peuvent être modifiés.
>
Appuyez sur Select/Info pour valider le réglage.
>
Ensuite, les chiffres suivants (minutes) de l'heure clignotent et peuvent
également être modifiés comme décrit précédemment.
>
Après chaque réglage supplémentaire, appuyez sur le bouton Select/Info
pour passer au réglage suivant.
>
Pour la date, procédez comme décrit précédemment.
>
Une fois que tous les réglages ont été effectués et que vous avez sélectionné
pour la dernière fois Select/Info
a été enfoncée, [Heure enregistrée] s'affiche à l'écran.
10.1.2
Mise à jour de l'heure
Dans ce sous-menu, vous pouvez définir si la mise à jour de l'heure doit se faire
automatiquement via DAB+ ou FM (FM) ou si vous souhaitez la saisir manuellement


58
>
Ouvrez le menu et sélectionnez [Heure] > [Mise à jour de l'heure]
avec les boutons Down◀, Up▶ et appuyez sur Select/Info.
>
Utilisez les boutons Down◀, Up▶ pour sélectionner les options suivantes :
[Toutes les sources] (mise à jour via DAB+ et
FM) [Mise à jour de DAB] (mise à jour via DAB+
uniquement) [Mise à jour de FM] (mise à jour
via FM uniquement)
[Pas de mise à jour] (l'heure/la date doivent être saisies manuellement, voir
point 10.1.1).
>
Appuyez sur le bouton Select/Info pour enregistrer le réglage.
10.1.3
Régler le
format de l'heure
Dans le sous-menu Régler 12/24 heures, vous pouvez activer le format 12 ou 24
heures.
>
Ouvrez le menu et sélectionnez
[Horloge] > [Réglage 12/24 heures]
avec les boutons Down◀, Up▶
et appuyez sur Select/Info.
>
Utilisez Down◀, Up▶ pour sélectionner l'une des options suivantes :
[24 heures]

59
[12
heures]

60
>
Appuyez sur le bouton Select/Info pour enregistrer.
10.1.4
Régler le
format de la date
Dans le sous-menu Réglage du format de la date, vous pouvez définir le format
d'affichage de la date.
>
Ouvrez le menu et sélectionnez
[Heure] > [Réglage du format de la
date]
avec les boutons Down◀, Up▶
et appuyez sur Select/Info.
>
Utilisez Down◀, Up▶ pour sélectionner l'une des options suivantes :
[JJ-MM-AAAA] (jour, mois, année)
[MM-JJ-AAAA] (mois, jour, année)
>
Appuyez sur le bouton Select/Info pour enregistrer.
10.2
Luminosité de l'écran
Vous pouvez régler la luminosité de l'écran aussi bien en fonctionnement qu'en
veille (fonctionnement sur secteur).
>
Ouvrez le menu et sélectionnez [Eclairage] à l'aide des touches
Down◀, Up▶. Appuyez sur Select/Info.

61
>
Utilisez Down◀, Up▶ pour sélectionner l'une des fonctions suivantes :

62
Le bouton [Fonctionnement] permet de régler la luminosité lorsque
l'appareil est allumé. Vous pouvez choisir ici entre les niveaux de luminosité
[Elevé], [MiUel] et [Faible]. Utilisez Down◀, Up▶ pour sélectionner un
niveau de luminosité et appuyez sur Select/Info pour enregistrer.
[Standby] règle la luminosité en mode veille (fonctionnement sur secteur).
Vous pouvez choisir ici entre les niveaux de luminosité [Elevé], [MiUel] et
[Faible]. Utilisez Down◀, Up▶ pour sélectionner un niveau de luminosité
et appuyez sur Select/Info pour enregistrer.
10.3
Langue
>
Ouvrez le menu et sélectionnez [Langue] avec les boutons Down◀,
Up▶ et appuyez sur Select/Info.
>
Utilisez Down◀, Up▶ pour sélectionner l'une des langues disponibles et
confirmez votre choix en appuyant sur le bouton Select/Info.
10.4
Réglage d'usine
Si vous changez l'emplacement de l'appareil, par exemple en cas de déménagement, il
se peut que vous ne receviez plus les chaînes mémorisées. Dans ce cas, la réinitialisation
des paramètres d'usine vous permet de retrouver toutes les stations mémorisées.

63
Effacer une chaîne pour ensuite lancer une nouvelle recherche de chaînes.
>
Ouvrez le menu et sélectionnez [Réglage d'usine] à l'aide des
touches Down◀, Up▶. Appuyez sur Select/Info.
>
Utilisez Down◀, Up▶ pour sélectionner [Oui] pour exécuter le réglage
d'usine et appuyez sur Select/Info.
Toutes les chaînes et tous les réglages précédemment enregistrés sont
effacés. L'appareil se trouve maintenant dans l'état de livraison.
>
L'écran affiche [Redémarrage...] et l'appareil démarre avec le choix de la
langue [Langue]. Utilisez Down◀, Up▶ pour sélectionner l'une des langues
disponibles et confirmez votre choix en appuyant sur la touche Select/ Info.
Ensuite, l'appareil e f f e c t u e automatiquement une recherche complète en
mode DAB. Pendant la recherche, les informations affichées indiquent la
progression et le nombre de stations de radio numérique trouvées.
Une fois la recherche des stations terminée, le premier programme DAB+ est
diffusé.

64
10.5
Version SW
Sous Version SW, vous pouvez consulter la version SW actuellement installée.
>
Ouvrez le menu et sélectionnez [SW-Version] à l'aide des touches
Down◀, Up▶.
>
Appuyez sur Select/Info. La version actuelle du logiciel s'affiche.
11
Nettoyer
Pour éviter tout risque d'électrocution, ne pas nettoyer l'appareil avec un chiffon
mouillé ou sous l'eau courante. Avant le nettoyage, débranchez la fiche secteur
et éteignez l'appareil !
Vous ne devez pas utiliser d'éponges à récurer, de poudres à récurer ou de
solvants tels que l'alcool ou l'essence.
Ne pas utiliser les substances suivantes : Eau salée, gel insecticide, gel de
solution chloré ou acide (ammoniaque).
Nettoyez le boîtier avec un chiffon doux humidifié d'eau. N'utilisez pas d'alcool à
brûler, de diluants, etc. ; ils pourraient endommager la surface de l'appareil.

65
Nettoyer l'écran uniquement avec un chiffon en coton doux. Le cas échéant,
utiliser un chiffon en coton avec de petites quantités d'eau savonneuse non
alcaline diluée à base d'eau ou d'alcool.
Frotter doucement la surface avec le chiffon en coton.
12
Éliminer les
erreurs
Si l'appareil ne fonctionne pas comme prévu, vérifiez-le à l'aide du tableau ci-
dessous.
Symptôme
Cause possible/remède
L'appareil ne s'allume pas.
L'appareil n'est pas alimenté en électricité.
Branchez correctement l'adaptateur secteur à
la prise de courant et à l'appareil. Rechargez la
batterie.
Il n'y a pas de son.
Augmenter le volume.
L'écran ne s'allume pas.
Débrancher l'appareil du réseau électrique et
le réalimenter en électricité.

66
Symptôme
Cause possible/remède
La réception via DAB+/FM est
mauvaise.
Changez la position de l'antenne ou du
DIGITRADIO Bike 1.
L'appareil ne peut pas être utilisé.
Débrancher l'appareil du réseau électrique et
le réalimenter en électricité.
Mauvaise connexion Bluetooth et
ratés
Ne pas dépasser la portée maximale via
Bluetooth de 10m.
Si vous ne parvenez pas à résoudre le problème après avoir effectué les vérifications
décrites, contactez la hotline technique.

67
13 Données techniques / Remarques du fabricant
Voies de réception
DAB+, FM, Bluetooth
Alimentation électrique
Par adaptateur secteur externe fourni
Batterie Li-Ion intégrée 4000mAh
Fréquences
VHF : 87,5-108 MHz
DAB+ : 174-240 MHz
Bluetooth : 2,402-2,480 GHz Puissance
d'émission : Classe 2/max. +4 dBm
Classe de protection
IP65
Consommation électrique
(fonctionnement sur secteur)
En fonctionnement max. : 10
W en veille : < 1 W*
Puissance musicale
5 W RMS
Température de travail
0 °C ~ 40 °C
Conditions de stockage
-10°C ~ 50°C / < 95% d'humidité dans la trappe
Poids (g)
461
Dimensions (LxHxP) mm
165 x 73 x 71

68
Caractéristiques techniques du bloc d'alimentation fourni
Fabricant
TechniSat Digital GmbH, Julius-Saxler-
Straße 3, D-54550 Daun
Identification du modèle
BQ12E-0502000-G
Tension d'entrée
AC 100 - 240 V
Fréquence du courant alternatif d'entrée
50/60 Hz
Tension de sortie
DC 5,0 V
Courant de sortie
2,0 A
Puissance de sortie
10,0 W
Efficacité opérationnelle constante
79,5 %
Puissance absorbée à charge nulle
0,07 W
*Batterie entièrement chargée
Sous réserve de modifications techniques et d'erreurs.

69

70

Translated with DeepL 27042022ORTVV5SA
71

Bedieningsinstructies
DIGITRADIO Fiets 1
DAB+/UKW-fietsradio met Bluetooth en batterijvoeding

2
1
Illustraties
1.1
Bovenaanzicht
1
Weergave
5
Selecteer/Info
2
Aan/Stand-by
6
Omhoog
▶
3
Modus/menu
7
Preset
(favorietengeheugen)
4
Omlaag
◀
8/9
Volume
luid/stil

3
1.2
Zicht van achteren
1
Aansluiting voeding DC-IN 5 V, 2 A (MicroUSB-aansluiting)
2
Antenne

4
2
Inhoudsopgave
1
Cijfers ...........................................................................................2
1.1
Bovenaanzicht ...................................................................................................2
1.2
Achteraanzicht ...................................................................................................3
2
Inhoudsopgave .............................................................................4
3
Veiligheidsinstructies...................................................................8
3.1
Voorwoord
.......................................................................................................
8
3.2
Gebruikte tekens en symbolen ..........................................................................9
3.3
Beoogd gebruik ...............................................................................................11
3.4
Veilig gebruik van het product .........................................................................11
3.4.1
Wettelijke informatie ........................................................................................14
3.4.2
Service-opmerkingen .......................................................................................16
4
Beschrijving van de DIGITRADIO Bike 1
.............................................
18
4.1
De omvang van de levering .............................................................................18
4.2
De speciale kenmerken van de DIGITRADIO Bike 1 ......................................18
4.3
De DIGITRADIO Bike 1 voorbereiden op gebruik.............................................19
4.3.1
Batterij opladen................................................................................................19
4.3.2
Antenne uitlijnen ..............................................................................................20

5
4.4
De DIGITRADIO Bike 1 op de fiets monteren...................................................22
4.4.1
Montage op stuur .............................................................................................22
4.4.2
Montage frame.................................................................................................23
4.5
De DIGITRADIO Bike 1 in de radiohouder plaatsen .........................................25
4.6
Algemene apparaatfuncties .............................................................................27
4.6.1
Het apparaat inschakelen................................................................................27
4.6.2
Het apparaat uitschakelen...............................................................................28
4.6.3
Bron selectie ....................................................................................................28
4.6.4
Het volume instellen ........................................................................................28
4.6.5
Weergave ........................................................................................................29
4.6.6
Display-schermen oproepen ............................................................................30
5
Menubediening ...........................................................................31
6
De DAB+ (digitale radio) functie
........................................................32
6.1
Wat is DAB+ ....................................................................................................32
6.2
DAB+ (digitale radio) ontvangst.......................................................................32
6.2.1
Een volledige zoekopdracht uitvoeren.............................................................33
6.2.2
Selecteer zender..............................................................................................33
6.2.3
DAB+ zenders opslaan in een geheugenlocatie..............................................34
6.2.4
DAB+ zenders oproepen vanaf een geheugenlocatie .....................................35
6.2.5
Geheugen van een programmapositie overschrijven/wissen ..........................35

6
6.2.6
Signaalsterkte ..................................................................................................35
6.2.7
Handmatig instellen .........................................................................................36
6.2.8
Volumeregeling (DRC) ....................................................................................37
6.2.9
Inactieve zenders verwijderen .........................................................................37
7
FM-bediening (VHF)
.........................................................................38
7.1
FM-radiomodus inschakelen............................................................................38
7.2
FM-ontvangst (VHF) met RDS-informatie........................................................39
7.3
Automatisch zenders zoeken...........................................................................39
7.4
Handmatig zenders zoeken .............................................................................40
7.5
Zoekinstelling...................................................................................................40
7.6
Audio-instelling.................................................................................................41
7.7
FM-zenders opslaan in een geheugenlocatie..................................................41
7.8
FM-zenders oproepen vanaf een geheugenlocatie .........................................42
7.9
Geheugen van een programmapositie overschrijven/wissen ..........................42
8
Bluetooth ....................................................................................42
8.1
Bluetooth-bediening inschakelen....................................................................43
8.2
Een extern apparaat koppelen ........................................................................43
8.3
Schuifkoppeling................................................................................................45
9
Andere
functies ...........................................................................45

7
9.1
Slaaptimer........................................................................................................45
9.2
Equalizer..........................................................................................................46
9.2.1
MyEQ...............................................................................................................47
10
Systeeminstellingen ...................................................................47
10.1
Tijd- en datuminstellingen................................................................................47
10.1.1
Tijd/datum handmatig instellen........................................................................47
10.1.2
Tijd update.......................................................................................................48
10.1.3
De tijdnotatie instellen......................................................................................49
10.1.4
Datumformaat instellen....................................................................................50
10.2
Helderheid display ...........................................................................................50
10.3
Taal .................................................................................................................51
10.4
Fabrieksinstelling .............................................................................................51
10.5
SW-versie ........................................................................................................53
11
Schoonmaak...............................................................................53
12
Fouten
elimineren ........................................................................54
13
Technische gegevens / informatie fabrikant
........................................56

8
3
Veiligheidsinstructies
3.1
Voorwoord
Geachte klanten,
Hartelijk dank vo or d e aanschaf van een digitale TechniSat-radio. Deze
gebruiksaanwijzing is bedoeld om u met de uitgebreide functies van uw nieuwe
apparaat vertrouwd te maken en er optimaal gebruik van te maken. Het zal u
helpen om het apparaat veilig en zoals bedoeld te gebruiken. De handleiding is
bedoeld voor iedereen die het apparaat installeert, bedient, reinigt of afdankt.
Bewaar de gebruiksaanwijzing op een veilige plaats voor toekomstig gebruik.
Een actuele versie van de gebruiksaanwijzing vindt u in de downloadsectie van uw
product op de TechniSat-website
www.technisat.de.
We wensen u veel plezier met uw digitale
TechniSat-radio!
Hoogachtend
TechniSat-team

9
3.2
Tekens en symbolen die
in deze handleiding worden gebruikt:
Geeft een veiligheidsinstructie aan die bij niet-naleving kan leiden tot ernstig letsel.
kan leiden tot letsel of de dood. Neem de volgende signaalwoorden in acht:
GEVAAR - Ernstig letsel met dodelijke afloop
WAARSCHUWING - Ernstig letsel, mogelijk dodelijk
LET OP - Verwondingen
Geeft een opmerking aan die u in acht moet nemen om defecten aan het
apparaat, gegevensverlies/misbruik of onbedoelde bediening te
voorkomen. Het beschrijft ook extra functies voor uw apparaat.
Waarschuwing voor elektrische spanning. Volg alle veiligheidsinstructies om
elektrische schokken te voorkomen. Open het apparaat nooit.

10
Op het apparaat:
Gebruik binnenshuis - Apparaten met dit symbool zijn alleen geschikt voor
gebruik binnenshuis.
Beschermingsklasse II - Elektrische apparaten van beschermingsklasse II
zijn elektrische apparaten met doorlopende dubbele en/of versterkte isolatie
en zonder aansluitmogelijkheden voor een aardleiding. De behuizing van
een geïsoleerd elektrisch apparaat van beschermingsklasse II kan geheel of
gedeeltelijk de extra of versterkte isolatie vormen.
Uw apparaat draagt de CE-markering en voldoet aan alle vereiste EU-normen.
Elektronische apparaten horen niet bij het huishoudelijk afval, maar moeten op
de juiste manier worden verwijderd in overeenstemming met Richtlijn
2012/19/EU van het Europees Parlement en de Raad van 4 juli 2012
betreffende afgedankte elektrische en elektronische apparatuur (AEEA).
Lever dit apparaat aan het einde van de levensduur in bij de daarvoor bestemde
openbare inzamelpunten.

11
3.3
Beoogd
gebruik
De DIGITRADIO Bike 1 is ontworpen om DAB+/UKW-radioprogramma's te
ontvangen. Het kan op fietsen worden gemonteerd met behulp van de meegeleverde
accessoires. Het apparaat is ontworpen voor privégebruik en is niet geschikt voor
commerciële doeleinden.
3.4
Veilig gebruik van het product
Neem de volgende instructies in acht om veiligheidsrisico's tot een minimum te
beperken, schade aan het apparaat te voorkomen en bij te dragen aan de
bescherming van het milieu.
Lees alle veiligheidsinstructies zorgvuldig door en bewaar ze voor toekomstig
gebruik. Volg altijd alle waarschuwingen en instructies in deze gebruiksaanwijzing en
op de achterkant van het apparaat.
WAARSCHUWING!
Open het apparaat nooit!
Het aanraken van levende delen is levensgevaarlijk!
WAARSCHUWING!
Verstikkingsgevaar! Laat de verpakking en de onderdelen ervan niet achter bij
kinderen. Verstikkingsgevaar door folie en andere verpakkingsmaterialen.

12
Neem alle volgende instructies in acht voor het beoogde gebruik van
het apparaat en om defecten aan het apparaat en persoonlijk letsel te
voorkomen.
-
Repareer het apparaat niet zelf. Reparaties mogen alleen worden uitgevoerd
door getrainde specialisten. Neem contact op met onze klantenservice.
-
Het apparaat mag alleen worden gebruikt in de aangegeven
omgevingsomstandigheden. Stel het apparaat niet bloot aan warmtebronnen
die het apparaat verwarmen naast het normale gebruik.
-
Neem in geval van een opvallend defect aan het apparaat, geur- of
rookontwikkeling, ernstige storingen of schade aan de behuizing onmiddellijk
contact op met de serviceafdeling.
-
Het apparaat mag alleen worden gebruikt met de aangegeven netspanning en
alleen met de meegeleverde voedingseenheid. Probeer het apparaat nooit te
gebruiken met een andere spanning of een andere voedingseenheid.
-
Aangezien dit apparaat van het lichtnet wordt losgekoppeld door de
stekker van de netadapter uit het stopcontact te trekken, is het essentieel
dat deze altijd gemakkelijk toegankelijk is.

13
-
Als het apparaat beschadigd is, mag het niet in gebruik worden
genomen.
-
Vreemde voorwerpen, zoals naalden, munten, enz. mogen niet in het inwendige
van het apparaat vallen. Raak de aansluitcontacten niet aan met metalen
voorwerpen of uw vingers. Dit kan kortsluiting veroorzaken.
-
Dit apparaat is niet bedoeld voor gebruik door personen (inclusief kinderen) met
verminderde lichamelijke, zintuiglijke of geestelijke vermogens, of met een
gebrek aan ervaring en/of kennis, tenzij zij onder toezicht staan of instructies
hebben gekregen over het gebruik van het apparaat van een persoon die
verantwoordelijk is voor hun veiligheid.
-
Wijzigingen aan het apparaat zijn verboden.
-
Monteer het apparaat alleen op de fiets met de meegeleverde accessoires
en controleer voor elke rit of het correct is gemonteerd.
-
Luister niet naar muziek met een te hoog volume in het verkeer. Houd u aan
de geldende verkeersregels.
-
Bedien de radio niet tijdens het rijden. Valgevaar!
-
Het apparaat is geschikt voor gebruik in een gematigd klimaat.

14
3.4.1
Juridische
informatie
TechniSat verklaart hierbij dat de radioapparatuur van het type
DIGITRADIO Bike 1 in overeenstemming is met Richtlijn 2014/53/EU.
De volledige tekst van de EU
De conformiteitsverklaring is beschikbaar op het volgende
internetadres: hGp://konf.tsat.de/?ID=23127
TechniSat is niet aansprakelijk voor productschade als gevolg van invloeden
van buitenaf, slijtage of ondeskundige behandeling, onbevoegde reparaties,
wijzigingen of ongevallen.
Wijzigingen en drukfouten voorbehouden. Status 04/22.
Reproductie en vermenigvuldiging alleen met toestemming van de uitgever.
De nieuwste versie van de handleiding is beschikbaar in PDF-formaat in het
downloadgedeelte van de TechniSat homepage op www.technisat.de.


16
3.4.2
Service-instructies
Dit product is getest op kwaliteit en wordt geleverd met een
wettelijke garantieperiode van 24 maanden vanaf de aankoopdatum.
Bewaar de factuur als bewijs van aankoop. Met
Neem voor garantieclaims contact op met de dealer van het product.
Let op!
Neem voor vragen en informatie of als er een probleem is met dit
apparaat contact op met onze technische hotline:
Ma. - vr. 8:00 - 18:00 onder Tel.:
03925/9220 1800.
Reparatieopdrachten kunnen ook direct online
worden aangevraagd op
www.technisat.de/reparatur.

17
Als u het apparaat moet retourneren, gebruik dan alleen het volgende adres:
TechniSat Digital GmbH
Servicecentrum
Nordstr. 4a
39418 Staßfurt
De namen van de genoemde bedrijven, instellingen of merken zijn handelsmerken of
gedeponeerde handelsmerken van hun respectieve eigenaars.

18
4 Beschrijving van de DIGITRADIO Bike 1
4.1
De
omvang van de levering
Controleer voor ingebruikname of de levering compleet is: 1x DIGITRADIO
Bike 1
1x radiohouder
1x snelsluiting 1x
voedingseenheid
2x riemen 4x
schroeven
1x gebruiksaanwijzing
4.2
De speciale kenmerken van de DIGITRADIO Bike 1
De DIGITRADIO Bike 1 bestaat uit een DAB+/UKW-ontvanger met de volgende functies:
-
Je kunt tot 20 DAB+- en 20 FM-zenders opslaan.
-
De radio ontvangt op de frequenties FM 87.5-108 MHz (analoog) en DAB+
174.9-239.2 MHz (digitaal).
-
Universele bevestigingsopties speciaal voor fietsen.
-
Muziek afspelen via een Bluetooth-verbinding.
-
Batterijvoeding.

19
4.3
De DIGITRADIO Bike 1 voorbereiden op gebruik
4.3.1
Batterij
opladen
Voordat u de DIGITRADIO Bike 1 voor het eerst gebruikt, moet u eerst de batterij volledig
opladen.
Zorg ervoor dat de bedrijfsspanning van de voedingseenheid overeenkomt
met de plaatselijke netspanning voordat u de stekker in het stopcontact
steekt.
WAARSCHUWING!
Raak de netstekker niet aan met natte handen, dit kan elektrische schokken
veroorzaken!
LET OP!
Leg het netsnoer zo dat niemand erover kan struikelen.
>
Sluit de meegeleverde netadapter aan op de DC-IN (1) aansluiting aan de
achterzijde van de DIGITRADIO Bike 1. Til hiervoor de beschermkap van de
aansluiting op en klap deze omhoog. Sluit vervolgens de voedingsadapter
aan op het lichtnet.

20
>
De laadstatus wordt op het display weergegeven door middel van een
BaGerie-symbool als de DIGITRADIO Bike 1 in stand-bymodus staat.
Als het apparaat in gebruik is en de batterij volledig is opgeladen, verschijnt
[Volledig opgeladen] continu op het scherm.
4.3.2
Antenne
uitlijnen
Het aantal en de kwaliteit van de zenders die kunnen worden ontvangen, hangt af van de
ontvangstomstandigheden op de installatielocatie. Met de antenne kan een uitstekende
ontvangst worden bereikt.
>
Klap de antenne uit de houder aan de achterkant van de DIGITRADIO Bike 1
en zet hem rechtop.
De exacte uitlijning van de telescopische antenne is belangrijk, vooral in de
randgebieden van DAB+ ontvangst. Op internet kun je bijvoorbeeld het volgende
vinden
"www.dabplus.de" om snel de locatie van de dichtstbijzijnde zendmast te
vinden.
Start de eerste scan buiten in de richting van de zendmast. Bij slecht weer is
DAB+ ontvangst mogelijk slechts beperkt mogelijk.

21
Raak de antenne niet aan terwijl er een zender wordt afgespeeld. Dit kan leiden
tot verminderde ontvangst en het wegvallen van het geluid.
Afhankelijk van de montagepositie van de DIGITRADIO Bike 1 op de
fiets kan de
antenne ook ingeklapt blijven. In dit geval kunnen er
echter vaker ontvangstproblemen en onderbrekingen bij het afspelen
optreden.

22
Radiohoude
r
Schroeven
Snelle
ontkoppeling
4.4
De DIGITRADIO Bike 1 op de fiets monteren
Er zijn verschillende manieren om de DIGITRADIO Bike 1 op je fiets te monteren.
4.4.1
Montage op stuur
De DIGITRADIO Bike 1 kan aan het stuur van je fiets worden bevestigd met behulp
van de radiohouder en de snelsluiting. Bevestig eerst de snelsluiting aan de
radiohouder met de 2 meegeleverde schroeven.
Afhankelijk van de diameter van de stuurbuis kun je de rubberen adapter in
de snelspanner gebruiken.

23
4.4.2
Montage frame
Als u al een bidonhouder op uw fiets hebt gemonteerd, kunt u de DIGITRADIO Bike
1 erin plaatsen. Controleer voor elke rit of de DIGITRADIO Bike 1 goed vastzit.
De DIGITRADIO Bike 1 is ontworpen om compatibel te zijn met de meeste
bidonhouders. Afhankelijk van het type/ontwerp van de bidonhouder kan de
DIGITRADIO Bike 1 echter te los zitten.
Gebruik in dat geval de meegeleverde radiohouder.
Snelle
ontkoppeling

24
Radiohoude
r
Beschermin
g tegen
krassen
Riem
De meegeleverde radiohouder kan op verschillende manieren worden bevestigd:
1.
Met de 2 meegeleverde schroeven (gebruik de gaten op het frame van je fiets
voor de bidonhouder).
2.
Gebruik de meegeleverde riemen op elk punt van het frame. Bevestig
hiervoor eerst de rubberen strip onder de radiohouder om het frame te
beschermen tegen krassen of beschadigingen.
3.
Een combinatie van schroeven en riemen, afhankelijk van de positie.
Zelfs als de DIGITRADIO Bike 1 correct is geïnstalleerd, is het mogelijk, vooral
bij het rijden over zeer ruw terrein, dat de DIGITRADIO Bike 1 eruit valt.
uit de houder valt. Zet hem daarom, indien mogelijk, extra vast tegen eruit vallen.

25
1
2
4.5
De DIGITRADIO Bike 1 in de radiohouder plaatsen
>
Schuif de DIGITRADIO Bike 1 van links (in de richting van de
pijl) in de radiohouder (1) tot hij vastklikt in de eindstand (2).
>
Om het te verwijderen, tilt u de DIGITRADIO Bike 1 iets op aan de linkerkant en
trekt u het naar links uit de houder.

26
A
Aan de binnenkant van de radiohouder aan de linkerkant zit een klein
nippeltje (A) dat in het overeenkomstige gaatje (B) aan de onderkant van de
DIGITRADIO Bike 1 grijpt. Controleer of het goed vastzit:
BZijaanzicht

27
4.6
Algemene apparaatfuncties
WAARSCHUWING!
Valgevaar! Gebruik het apparaat niet tijdens het reizen.
4.6.1
Het apparaat
inschakelen
>
Druk op de On/Standby knop (2) om de DIGITRADIO Bike 1 in te schakelen.
Na de eerste keer inschakelen moet u eerst de [Taal] instellen. Gebruik
hiervoor de knoppen ◀ of ▶ om een van de beschikbare talen te selecteren en
bevestig uw keuze door op de knop Select/ Info te drukken. Het apparaat
voert dan automatisch een volledige zoekactie uit in DAB-modus. Tijdens het
zoeken toont het display de voortgang en het aantal gevonden digitale
radiozenders.
Zodra het zoeken naar zenders is voltooid, wordt het eerste DAB+ programma
afgespeeld.

28
4.6.2
Schakel het
apparaat
uit
In batterijmodus:
>
Als u op de Aan/Standby-toets drukt, schakelt het apparaat over naar de
energiespaarstand en gaat het scherm uit. De melding [Power off] verschijnt
kort op het display.
In voedingsmodus
>
Druk op de Aan/Standby knop om het apparaat in standby modus te
zetten. Het bericht [Stand-by] verschijnt kort op het display, gevolgd door de
tijd/datum en de laadstatus van de batterij.
4.6.3
Bron selectie
>
De Mode/Menu knop (3) kan worden gebruikt om te schakelen tussen de
bronnen DAB+ (digitale radio), FM (FM) en Bluetooth. Druk hiervoor kort
op de ok-knop totdat de gewenste bron wordt weergegeven op het display.
4.6.4
Het
volume
instellen
>
Pas het volume aan met de knoppen Volume + en - (8, 9).
Het ingestelde volume wordt op het display weergegeven in een staafdiagram.

29
Als het volume volledig is gedempt (mute) in de Bluetooth-modus, schakelt
het apparaat na ongeveer 15 minuten over naar de stand-bymodus.
4.6.5
Weergave
Afhankelijk van de geselecteerde functie of optie wordt de volgende informatie op het
display
weergegeven:
Kanaalnaam,
frequentie,
menunaam
Display-
indicatoren, menu-
opties, volume

30
4.6.6
Display-schermen
oproepen
>
Houd de knop Select/Info ingedrukt om door de displays te schakelen. U
hebt de mogelijkheid om de volgende informatie weer te geven:
In DAB+ modus:
[LauŁext] (scrollende tekst met aanvullende informatie die de omroepen
kunnen verstrekken), [Title], [Artist], [Signal quality], [Programme type],
[Ensemble], [Frequency], [Signal error], [Bit rate /Codec], [BaUerie],
[Time] en [Date].
In FM/UKW-modus:
[Radiotekst] (indien uitgezonden), [Programmatype] (PTY), [Frequentie],
[Audio-informatie], [BaUerie], [Tijd] en [Datum].
In Bluetooth-modus:
[Status], [BaUerie], [Tijd] en [Datum].

31
5
Menubediening
Via het menu hebt u toegang tot alle functies en instellingen van de DIGITRADIO Bike
1. U navigeert door het menu met de toetsen Mode/Menu, Down◀, Up▶ en
Select/Info. Het menu is onderverdeeld in submenu's en bevat verschillende menu-
items of functies die kunnen worden geactiveerd afhankelijk van de geselecteerde
bron. Om te openen
menu, houd je gewoon de knop Modus/Menu ingedrukt. Om naar submenu's over te
schakelen, drukt u eerst op de knoppen Down◀, Up▶ om een submenu weer te geven
en vervolgens op de knop Select/Info om het submenu op te roepen. Een sterretje
(*) markeert een momenteel geselecteerde functie.
Sluit het menu: Druk meerdere keren op de knop Modus/Menu
(afhankelijk van in welk submenu je je bevindt) totdat het huidige
radioprogramma weer wordt weergegeven.
Instellingen worden alleen opgeslagen door op de knop Select/Info te
drukken. Als er ondertussen op de knop Modus/Menu wordt gedrukt,
worden de instellingen niet geaccepteerd en opgeslagen (de knop
Modus/Menu krijgt de functie van een "Terug"-knop en het menu wordt
verlaten).
Functies en knoppen die moeten worden ingedrukt, worden in deze

32
gebruiksaanwijzing beschreven in
feU wordt weergegeven. Aanduidingen tussen [vierkante haakjes] weergeven.

33
Sommige teksten (bijv. menuopties, zenderinformatie) kunnen te lang zijn om
op het display te worden weergegeven. Na een korte tijd worden ze dan
weergegeven als een luide tekst.
6 De DAB+ (digitale radio) functie
6.1
Wat is DAB+
DAB+ is een digitaal formaat waarmee je naar kristalhelder geluid zonder ruis kunt
luisteren. In tegenstelling tot conventionele analoge radiozenders, zendt DAB+
meerdere zenders uit op dezelfde frequentie. Meer informatie is te vinden op
www.dabplus.de of www.dabplus.ch.
6.2
DAB+ (digitale radio) ontvangst
>
Druk kort op de knop Modus/Menu tot [DAB] op het display verschijnt.
Wanneer DAB+ voor de eerste keer wordt opgestart, wordt een volledige
zenderzoekloop uitgevoerd. Zodra het zoeken is voltooid, wordt de eerste
zender in alfanumerieke volgorde afgespeeld.

34
6.2.1
Voer een volledige zoekopdracht uit
De automatische scan Volledige scan scant alle DAB+ banden
III kanalen en vindt zo alle zenders die in het ontvangstgebied worden
uitgezonden.
Zodra het zoeken is voltooid, wordt de eerste zender afgespeeld in
alfanumerieke volgorde.
>
Open het menu door de knop Modus/Menu ingedrukt te houden en
gebruik vervolgens de knoppen omlaag◀, omhoog▶ om het item
[Volledig zoeken] te selecteren. Druk op de knop Select/Info.
>
Op het display verschijnt [Zoeken...].
Tijdens het zoeken worden een voortgangsbalk en het aantal
gevonden kanalen weergegeven.
6.2.2
Selecteer
zender
>
Druk op de knoppen omlaag◀, omhoog▶ om de zenderlijst op te roepen en
tussen de beschikbare zenders te schakelen.

35
Afhankelijk van de instelling onder MENU > [Kanaal wijzigen], moet u
vervolgens op de knop Selecteren/Info drukken om het geselecteerde
kanaal af te spelen (optie: Kanaal wijzigen > Lijst) of wordt het kanaal
automatisch afgespeeld (optie: Kanaal wijzigen > Kanaal).
De kanaallijst kan ook worden opgeroepen via MENU > [Kanaallijst].
6.2.3
DAB+ zenders opslaan in een geheugenlocatie
Het programmageheugen kan tot 20 zenders in het DAB+ bereik
opslaan.
>
Selecteer eerst het gewenste kanaal (zie punt 6.2.2).
>
Om deze zender op te slaan in een geheugenlocatie, houdt u tijdens weergave
de Preset-toets ingedrukt tot [Favourite memory] op het display
verschijnt. Gebruik vervolgens de omlaag◀, omhoog▶ toetsen om een
favoriet geheugen te selecteren (1...20). Druk op Select/Info om op te slaan.
>
Herhaal deze procedure om extra zenders op te slaan.

36
6.2.4
DAB+ zenders oproepen vanaf een geheugenlocatie
>
Om een zender op te roepen die u eerder hebt opgeslagen in het FAV-
geheugen, drukt u kort op de Preset-knop en gebruikt u de omlaag◀,
omhoog▶ knoppen om een voorkeuzezender te selecteren (1...20). Druk op
de Select/Info knop om de zender af te spelen.
Als er geen zender is opgeslagen in de geselecteerde programmapositie,
verschijnt [(empty)] op het display.
6.2.5
Geheugen voor een programmapositie overschrijven/wissen
>
Sla gewoon een nieuw kanaal op een favoriete geheugenlocatie op
zoals beschreven.
Alle geheugenlocaties worden gewist wanneer de fabrieksinstellingen worden
opgeroepen.
6.2.6
Signaalsterkte
>
Houd de knop Select/Info enkele keren ingedrukt tot de signaalsterktebalk
wordt weergegeven.
>
De signaalsterkte wordt op het scherm weergegeven in een staafdiagram.

37
De markering geeft de minimale signaalsterkte aan.

38
Zenders waarvan de signaalsterkte lager is dan de vereiste minimum
signaalsterkte zenden onvoldoende signaal uit. Richt indien nodig de antenne
opnieuw of verander de locatie.
6.2.7
Handmatig
instellen
Dit menu-item wordt gebruikt om de ontvangstkanalen te controleren en kan worden
gebruikt om de antenne uit te lijnen. Bovendien kunnen zenders handmatig worden
toegevoegd.
>
Open het menu en gebruik de knoppen omlaag◀, omhoog▶ om het
item [Manual setting] te selecteren en druk op de knop Select/Info.
>
Gebruik de knoppen Down◀, Up▶ en Select/Info om een kanaal te
selecteren (5A tot 13F). De signaalsterkte wordt nu weergegeven op het
display. Als een DAB+ zender wordt ontvangen op een kanaal, wordt de
ensemblenaam van de zender weergegeven. De antenne kan nu worden
gericht voor maximale signaalsterkte.
Zenders waarvan de signaalsterkte lager is dan de vereiste minimum
signaalsterkte zenden onvoldoende signaal uit. Richt indien nodig de antenne
opnieuw of verander de locatie.

39
Als er zenders op de ingestelde frequentie of het ingestelde kanaal zijn die
nog
niet zijn opgeslagen in de zenderlijst, dan worden deze nu ook
opgeslagen.
6.2.8
Volumeregeling
(DRC)
Het menuonderdeel Volume aanpassen wordt gebruikt om de compressiesnelheid in
te stellen, die dynamische fluctuaties en de bijbehorende volumeveranderingen
compenseert.
>
Open het menu en gebruik de knoppen omlaag◀, omhoog▶ om het
item [Volume aanpassen] te selecteren.
>
Druk op de knop Select/Info.
DRC hoog
-Hoge compressie
DRC laag
- Lage compressie
DRC uit
-compressie uitgeschakeld.
>
Bevestig door op de knop Select/Info te drukken.
6.2.9
Inactieve zenders verwijderen
Dit menu-item wordt gebruikt om oude en niet langer te ontvangen kanalen uit de
kanaallijst te verwijderen.

40
>
Open het menu en gebruik de knoppen omlaag◀, omhoog▶ om het
item [Inactieve kanalen verwijderen] te selecteren.
>
Druk op de knop Select/Info.
U wordt gevraagd [Verwijderen] of de inactieve zenders moeten worden verwijderd.
>
Gebruik Down◀, Up▶ om het item [Yes] te selecteren en bevestig dit
door op de knop Select/Info te drukken.
7 FM-bediening (VHF)
7.1
Schakel de FM-radiomodus in
>
Druk kort op de knop Modus/Menu tot [FM] op het display verschijnt.
Bij de eerste keer inschakelen wordt de frequentie 87,5 MHz ingesteld.
Als je al een zender hebt ingesteld of opgeslagen, zal de radio de laatst
ingestelde zender afspelen.
De zendernaam verschijnt voor RDS-zenders.

41
7.2
FM-ontvangst (VHF) met RDS-informatie
RDS is een procedure voor het uitzenden van extra informatie over FM-zenders.
Zenders met RDS geven bijvoorbeeld hun zendernaam of programmatype door.
Dit wordt weergegeven op het display. Het apparaat kan de RDS-informatie RT
(radiotekst), PS (zendernaam), PTY (programmatype) weergeven.
7.3
Automatisch
zenders zoeken
>
Druk op de knop Select/Info om het zoeken naar kanalen te starten.
Alternatief:
>
Houd de knoppen omlaag◀, omhoog▶ ingedrukt om de kanaalscan te
starten.
Als een FM-zender met een voldoende sterk signaal wordt gevonden,
stopt
het zoeken en wordt de zender afgespeeld. Als een RDS-zender
wordt ontvangen, worden de zendernaam en, indien van toepassing,
de radiotekst weergegeven.
Gebruik de handmatige zenderzoekfunctie om af te stemmen op
zwakkere zenders.

42
7.4
Handmatig
zenders zoeken
>
Druk verschillende keren kort op de knoppen omlaag◀, omhoog▶ om de
gewenste zender of frequentie in te stellen.
Het display toont de frequentie in stappen van 0,05 MHz.
7.5
Zoekinstelling
De gevoeligheid van de zoekloop kan worden ingesteld in dit menu.
>
Open het menu en gebruik de knoppen omlaag◀, omhoog▶ om het
item [Zoekinstelling] te selecteren. Druk op Select/Info.
>
Selecteer of het zoeken alleen moet stoppen voor sterke kanalen [Alleen
sterke kanalen] of voor alle kanalen (inclusief zwakke kanalen) [Alle
kanalen].
Met de instelling Alle kanalen stopt het automatisch zoeken bij elk
beschikbaar kanaal. Dit kan ertoe leiden
dat
zwakke zenders met
ruis worden
afgespeeld. Er worden op deze manier echter ook meer zenders gevonden
dan met de instelling "Alleen sterke zenders".
>
Bevestig door op de knop Select/Info te drukken.

43
7.6
Audio-instelling
>
Open het menu en gebruik de knoppen omlaag◀, omhoog▶ om het
item [Audio-instelling] te selecteren. Druk op Select/Info.
>
Gebruik Down◀, Up▶ om de optie [Stereo mogelijk] of [Alleen mono] te
selecteren om in stereo of alleen monogeluid af te spelen wanneer de FM-
ontvangst zwak is.
>
Bevestig door op de knop Select/Info te drukken.
7.7
FM-zenders opslaan op een geheugenlocatie
Het programmageheugen kan tot 20 zenders in het FM-bereik opslaan.
>
Stel eerst de gewenste zenderfrequentie in.
>
Om deze zender op te slaan in een geheugenplaats, houdt u tijdens weergave
de Preset-toets ingedrukt tot [Favourite memory] op de display
verschijnt. Gebruik vervolgens de omlaag◀, omhoog▶ toetsen om een
favoriet geheugen te selecteren (1...20). Druk op Select/Info om op te slaan.
>
Herhaal deze procedure om extra zenders op te slaan.

44
7.8
FM-zenders oproepen vanaf een geheugenlocatie
>
Om een zender op te roepen die u eerder hebt opgeslagen in het FAV-
geheugen, drukt u kort op de Preset-knop en gebruikt u de omlaag◀,
omhoog▶ knoppen om een voorkeuzezender te selecteren (1...20). Druk op
de Select/Info knop om de zender af te spelen.
Als er geen zender is opgeslagen in de geselecteerde programmapositie,
verschijnt [(empty)] op het display.
7.9
Geheugen van een programmapositie overschrijven/wissen
>
Sla gewoon een nieuw kanaal op de respectieve geheugenlocatie op
zoals beschreven.
Alle geheugenlocaties worden gewist wanneer de fabrieksinstellingen worden
opgeroepen.
8
Bluetooth
In de Bluetooth-modus kunt u muziek van een aangesloten smartphone of tablet
afspelen via de luidsprekers van de DIGITRADIO Bike 1. Om dit te doen, moeten
beide apparaten eerst met elkaar "gekoppeld" zijn. Hiervoor moeten beide

45
apparaten eerst met elkaar worden "gekoppeld".

46
8.1
Bluetooth inschakelen
>
Druk kort op de knop Modus/Menu tot [Bluetooth] op het scherm verschijnt.
Bij de eerste keer inschakelen moet er eerst een extern apparaat
(smartphone/tablet) gekoppeld worden.
Als een extern apparaat binnen bereik al gekoppeld is, wordt de verbinding
automatisch tot stand gebracht. Afhankelijk van het aangesloten apparaat kan
het afspelen van muziek automatisch starten.
8.2
Een extern apparaat koppelen
Om een extern apparaat, bijv. een smartphone of tablet, te koppelen met de
DIGITRADIO Bike 1, gaat u als volgt te werk:
>
Start de Bluetooth-modus zoals beschreven in sectie 8.1.
>
Bluetooth] en [Bluetooth koppelen] verschijnen op het scherm.
>
Start nu het zoeken naar Bluetooth-apparaten in de buurt op je externe
apparaat. Mogelijk moet je eerst de Bluetooth-functie activeren op je externe
apparaat.

47
Om de Bluetooth-functie op je externe apparaat te activeren en een
zoekopdracht uit te voeren, raadpleeg je de gebruiksaanwijzing van je
externe apparaat.
Tijdens het koppelproces moeten beide apparaten zich binnen 10 cm van elkaar
bevinden.
>
Het item DIGITRADIO Bike 1 zou nu moeten verschijnen in de lijst met
Bluetooth-apparaten op je externe apparaat. Tik erop om het
koppelingsproces te voltooien. Zodra het koppelingsproces met succes is
voltooid, hoort u een bevestigingstoon.
>
BT connected] verschijnt op het scherm.
Afhankelijk van het Bluetooth-protocol van je externe apparaat, kun je het
afspelen van muziek regelen met de afspeelknoppen op de DIGITRADIO Bike
1:
Afspelen/pauzeren
- Knop
Selecteer/I
nfo
Volgende titel
- Knop
Omhoog
Vorige titel
- 2x knop
Neer◀

48
Titel vanaf het begin
- Knop
Neer◀
Volume
- Sleutels
Volume
+/-

49
Je kunt ook de afspeelknoppen van de muziek-app op je externe apparaat
gebruiken.
8.3
Koppeling
opwekken
Om een actieve koppeling te annuleren, selecteert u Menu > [Ontkoppelen] en
drukt u op de knop Selecteren/Info. Het apparaat dat niet gekoppeld moet worden,
moet verbonden zijn met de DIGITRADIO Bike 1 als u het wilt ontkoppelen. U kunt
vervolgens een nieuw apparaat koppelen zoals beschreven in hoofdstuk 8.2.
U kunt de koppeling ook instellen op uw externe apparaat. Volg de instructies in
de gebruiksaanwijzing van je externe apparaat.
9
Verdere
functies
9.1
Slaaptimer
De sleeptimer schakelt de DIGITRADIO Bike 1 automatisch uit na de ingestelde tijd of in
stand-bymodus (bij netvoeding).

50
>
Open het menu en gebruik de knoppen omlaag◀, omhoog▶ om het
item [Sleep] te selecteren. Druk op Select/Info.
>
Gebruik Down◀, Up▶ om een tijdsperiode te selecteren waarna de
DIGITRADIO Bike 1 moet uitschakelen. U kunt kiezen uit Uit, 15, 30, 45, 60,
90 en 90 minuten.
120
minuten.
>
Druk op de knop Select/Info om de instelling te accepteren.
Als u de resterende tijd van een actieve slaaptimer wilt controleren, opent u
gewoon opnieuw het menu > Slaap. Als u een actieve slaaptimer wilt
uitschakelen, selecteert u Slaap > Uit.
9.2
Equalizer
Je kunt de equalizer gebruiken om het geluid aan je voorkeuren aan te passen.
>
Open het menu en gebruik de knoppen omlaag◀, omhoog▶ om het
item [Equaliser] te selecteren. Druk op Select/Info.
>
Selecteer de optie [Normaal] voor een geluidsweergave die is
geoptimaliseerd voor het apparaat, of [MyEQ...] om de hoge en lage tonen
handmatig in te stellen. Druk op Select/Info om de selectie te accepteren.

51
9.2.1
MyEQ
>
Selecteer Menu > Equaliser > MyEQ en druk op Select/Info.
>
Gebruik Down◀, Up▶ om ofwel [Treble] te selecteren om de hoge tonen
aan te passen of [Bass] om de lage tonen aan te passen. Druk vervolgens op
Select/Info.
>
Met Down◀, Up▶ kun je nu een waarde instellen tussen -7 en +7.
Druk op Select/Info om de instelling te accepteren.
Selecteer [Loudness] voor een evenwichtige muziekweergave, zelfs bij een
laag volume.
10
Systeeminstellingen
10.1
Tijd- en datuminstellingen
>
Open het menu en gebruik de knoppen omlaag◀, omhoog▶ om het
item [Time] te selecteren. Druk op Select/Info.
10.1.1
Tijd/datum handmatig instellen
Afhankelijk van de instelling voor het bijwerken van de tijd (punt 10.1.2), moet u de tijd en

52
datum handmatig instellen.

53
>
Open het menu en gebruik de knoppen omlaag◀, omhoog▶ om het
item [Time] > [Set time/date] te selecteren. Druk op Select/Info.
>
De eerste cijfers (uren) van de tijd knipperen en kunnen worden gewijzigd met
de knop
Omlaag◀, omhoog▶ kan worden gewijzigd.
>
Druk op Select/Info om de instelling te accepteren.
>
De volgende cijfers (minuten) van de tijd knipperen en kunnen ook worden
gewijzigd zoals hierboven beschreven.
>
Druk na elke extra instelling op de knop Select/Info om naar de volgende
instelling te gaan.
>
Ga te werk zoals hierboven beschreven voor de datum.
>
Nadat alle instellingen zijn gemaakt en Select/Info
wordt ingedrukt, verschijnt [Opgeslagen tijd] op het scherm.
10.1.2
Tijd update
In dit submenu kunt u aangeven of de tijd automatisch moet worden bijgewerkt via
DAB+ of FM (FM) of dat u de tijd handmatig wilt invoeren (punt 10.1.1).

54
>
Open het menu en gebruik de knoppen omlaag◀, omhoog▶ om het
item [Time] > [Time update] te selecteren en druk op Select/Info.
>
Gebruik de knoppen omlaag◀, omhoog▶ om de volgende opties te selecteren:
[Alle bronnen] (update via DAB+ en FM)
[Update van DAB] (update alleen via DAB+)
[Update van FM] (update alleen via FM)
[Geen update] (tijd/datum moet handmatig worden ingevoerd, zie
Punt 10.1.1).
>
Druk op de knop Select/Info om de instelling op te slaan.
10.1.3
De
tijdnotatie
instellen
In het submenu Set 12/24 hours kun je de 12- of 24-uursnotatie activeren.
>
Open het menu en gebruik de knoppen omlaag◀, omhoog▶ om het
item [Time] > [Set 12/24 hours] te
selecteren
en druk op Select/Info.
>
Gebruik Omlaag◀, Omhoog▶ om een van de volgende opties te selecteren:
[24 uur]
[12
uur]

55
>
Druk op de knop Select/Info om op te slaan.
10.1.4
Datumnotatie
instellen
In het submenu Set date format (Datumnotatie instellen) kunt u de notatie voor
het weergeven van de datum opgeven.
>
Open het menu en gebruik de knoppen omlaag◀, omhoog▶ om het
item [Time] > [Set date format] te
selecteren
en druk op Select/Info.
>
Gebruik Omlaag◀, Omhoog▶ om een van de volgende opties te selecteren:
[DD-MM-YYYY] (dag, maand, jaar)
[MM-DD-YYYY] (maand, dag, jaar)
>
Druk op de knop Select/Info om op te slaan.
10.2
Helderheid display
U kunt de helderheid van het scherm instellen voor zowel gebruik als stand-by
(netvoeding).
>
Open het menu en gebruik de knoppen omlaag◀, omhoog▶ om het
item [Lighting] te selecteren. Druk op Select/Info.

56
>
Gebruik Omlaag◀, Omhoog▶ om een van de volgende functies te selecteren:

57
[Bediening] regelt de helderheid in de normale, ingeschakelde toestand.
Hier kunt u kiezen tussen de helderheidsniveaus [Hoog], [Gemiddeld] en
[Laag]. Gebruik Down◀, Up▶ om een helderheidsniveau te selecteren en
druk op Select/Info om op te slaan.
[Stand-by] regelt de helderheid in de stand-bymodus (netvoeding). Hier kunt
u kiezen tussen de helderheidsniveaus [Hoog], [Gemiddeld] en [Laag].
Gebruik Down◀, Up▶ om een helderheidsniveau te selecteren en druk op
Select/Info om op te slaan.
10.3
Taal
>
Open het menu en gebruik de knoppen omlaag◀, omhoog▶ om het
item [Language] te selecteren en druk op Select/Info.
>
Gebruik Omlaag◀, Omhoog▶ om een van de beschikbare talen te
selecteren en bevestig uw keuze door op de knop Kies/Info te drukken.
10.4
Fabrieksinstelling
Als je de locatie van het apparaat verandert, bijvoorbeeld als je verhuist, is het mogelijk
dat je de opgeslagen kanalen niet langer kunt ontvangen. In dit geval kunt u door de
fabrieksinstellingen te resetten alle opgeslagen kanalen herstellen.

58
Verwijder kanalen om vervolgens een nieuw kanaal te zoeken.
>
Open het menu en gebruik de knoppen omlaag◀, omhoog▶ om het
item [Fabrieksinstellingen] te selecteren. Druk op Select/Info.
>
Gebruik Down◀, Up▶ om het item [Yes] te selecteren om de
fabrieksinstelling uit te voeren en druk op Select/Info.
Alle eerder opgeslagen kanalen en instellingen worden gewist. Het
apparaat staat nu in de fabrieksinstellingen.
>
Op het scherm verschijnt [Herstart...] en het apparaat start met de taalselectie
[Taal]. Gebruik Down◀, Up▶ om een van de beschikbare talen te selecteren
en bevestig de selectie door op de knop Select/ Info te drukken. Het
apparaat voert vervolgens automatisch een volledige zoekactie uit in DAB-
modus. Tijdens het zoeken toont het display de voortgang en het aantal
gevonden digitale radiozenders.
Zodra het zoeken naar zenders is voltooid, wordt het eerste DAB+ programma
afgespeeld.

59
10.5
SW-versie
Onder SW-versie kun je de momenteel geïnstalleerde SW-versie opvragen.
>
Open het menu en gebruik de knoppen omlaag◀, omhoog▶ om het
item [SW-versie] te selecteren.
>
Druk op Select/Info. De huidige SW-versie wordt weergegeven.
11
Schoonmaken
Reinig het apparaat niet met een natte doek of onder stromend water om het
risico op elektrische schokken te voorkomen. Trek de stekker uit het
stopcontact en schakel het apparaat uit voordat u het schoonmaakt!
Gebruik geen schuursponsjes, schuurpoeder of oplosmiddelen zoals alcohol
of benzine.
Gebruik geen van de volgende stoffen: Zout water, insecticide ammoniak,
gechloreerde of zure oplosmiddelen (ammoniak).
Maak de behuizing schoon met een zachte doek die bevochtigd is met water.
Gebruik geen spiritus, verdunners, enz.; deze kunnen het oppervlak van het
apparaat beschadigen.

60
Reinig het scherm alleen met een zachte katoenen doek. Gebruik indien nodig
een katoenen doek met een kleine hoeveelheid niet-alkalisch, verdund
zeepwater op water- of alcoholbasis.
Wrijf voorzichtig met de katoenen doek over het oppervlak.
12 Fouten
elimineren
Als het apparaat niet werkt zoals bedoeld, controleer het dan aan de hand van de
volgende tabel.
Symptoom
Mogelijke
oorzaak/remedie
Apparaat kan niet worden
ingeschakeld.
Het apparaat krijgt geen stroom. Sluit de
voedingsadapter correct aan op het stopcontact
en op het apparaat. Laad de batterij op.
Er is geen geluid hoorbaar.
Verhoog het volume.
Het scherm wordt niet ingeschakeld.
Haal de stekker uit het stopcontact en zet het
apparaat weer aan.

61
Symptoom
Mogelijke
oorzaak/remedie
De ontvangst via DAB+/FM is
slecht.
De positie van de antenne of de DIGITRADIO
Bike 1 wijzigen.
Apparaat kan niet worden bediend.
Haal de stekker uit het stopcontact en zet het
apparaat weer aan.
Slechte Bluetooth-verbinding en
uitval
Overschrijd het maximale bereik van 10m niet
via Bluetooth.
Als u de storing na de beschreven controles nog steeds n i e t kunt verhelpen, neem dan
contact op met de technische hotline.

62
13 Technische gegevens / informatie fabrikant
Ontvangstpaden
DAB+, FM, Bluetooth
Stroomvoorziening
Via externe voeding meegeleverd
Geïntegreerde Li-Ion batterij 4000mAh
Frequenties
FM: 87,5-108 MHz
DAB+: 174-240 MHz
Bluetooth: 2,402-2,480 GHz
Zendvermogen: Klasse 2/max. +4 dBm
Beschermingsklasse
IP65
Stroomverbruik (netvoeding)
In bedrijf max.: 10 W Stand-by:
< 1 W*
Muziekuitvoering
5 W RMS
Bedrijfstemperatuur
0 °C ~ 40 °C
Opslagomstandigheden
-10°C ~ 50°C / < 95% luchtvochtigheid
Gewicht (g)
461
Afmetingen (BxHxD) mm
165 x 73 x 71

63
Technische gegevens van de meegeleverde voedingseenheid
Fabrikant
TechniSat Digital GmbH, Julius-Saxler-
Straße 3, D-54550 Daun
Modelaanduiding
BQ12E-0502000-G
Ingangsspanning
AC 100 - 240 V
Ingangsfrequentie wisselstroom
50/60 Hz
Uitgangsspanning
DC 5,0 V
Uitgangsstroom
2,0 A
Uitgangsvermogen
10,0 W
Consistente efficiëntie in gebruik
79,5 %
Stroomverbruik bij nullast
0,07 W
*Batterij volledig opgeladen
Technische wijzigingen en fouten voorbehouden.

64

65

66
Translated with DeepL 27042022ORTVV5SA
-
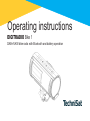 1
1
-
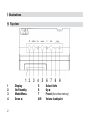 2
2
-
 3
3
-
 4
4
-
 5
5
-
 6
6
-
 7
7
-
 8
8
-
 9
9
-
 10
10
-
 11
11
-
 12
12
-
 13
13
-
 14
14
-
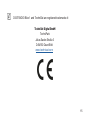 15
15
-
 16
16
-
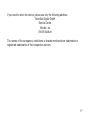 17
17
-
 18
18
-
 19
19
-
 20
20
-
 21
21
-
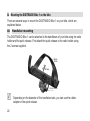 22
22
-
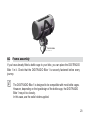 23
23
-
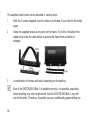 24
24
-
 25
25
-
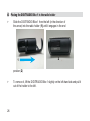 26
26
-
 27
27
-
 28
28
-
 29
29
-
 30
30
-
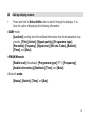 31
31
-
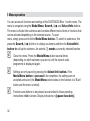 32
32
-
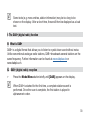 33
33
-
 34
34
-
 35
35
-
 36
36
-
 37
37
-
 38
38
-
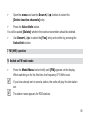 39
39
-
 40
40
-
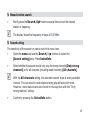 41
41
-
 42
42
-
 43
43
-
 44
44
-
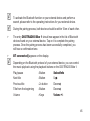 45
45
-
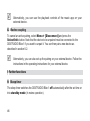 46
46
-
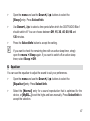 47
47
-
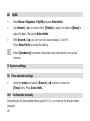 48
48
-
 49
49
-
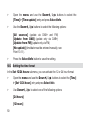 50
50
-
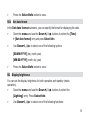 51
51
-
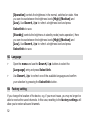 52
52
-
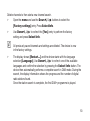 53
53
-
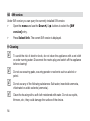 54
54
-
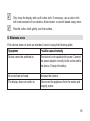 55
55
-
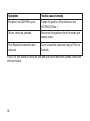 56
56
-
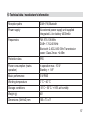 57
57
-
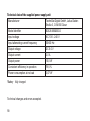 58
58
-
 59
59
-
 60
60
-
 61
61
-
 62
62
-
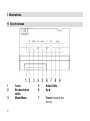 63
63
-
 64
64
-
 65
65
-
 66
66
-
 67
67
-
 68
68
-
 69
69
-
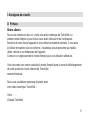 70
70
-
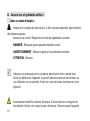 71
71
-
 72
72
-
 73
73
-
 74
74
-
 75
75
-
 76
76
-
 77
77
-
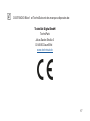 78
78
-
 79
79
-
 80
80
-
 81
81
-
 82
82
-
 83
83
-
 84
84
-
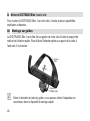 85
85
-
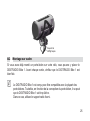 86
86
-
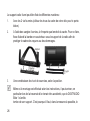 87
87
-
 88
88
-
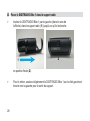 89
89
-
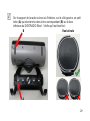 90
90
-
 91
91
-
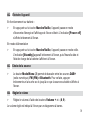 92
92
-
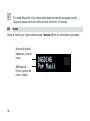 93
93
-
 94
94
-
 95
95
-
 96
96
-
 97
97
-
 98
98
-
 99
99
-
 100
100
-
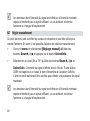 101
101
-
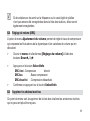 102
102
-
 103
103
-
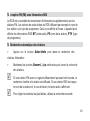 104
104
-
 105
105
-
 106
106
-
 107
107
-
 108
108
-
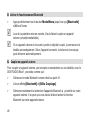 109
109
-
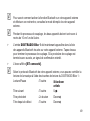 110
110
-
 111
111
-
 112
112
-
 113
113
-
 114
114
-
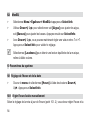 115
115
-
 116
116
-
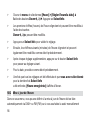 117
117
-
 118
118
-
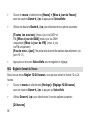 119
119
-
 120
120
-
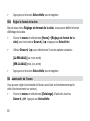 121
121
-
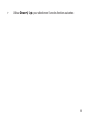 122
122
-
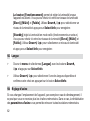 123
123
-
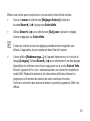 124
124
-
 125
125
-
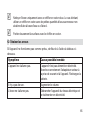 126
126
-
 127
127
-
 128
128
-
 129
129
-
 130
130
-
 131
131
-
 132
132
-
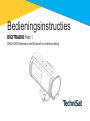 133
133
-
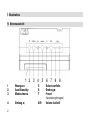 134
134
-
 135
135
-
 136
136
-
 137
137
-
 138
138
-
 139
139
-
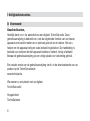 140
140
-
 141
141
-
 142
142
-
 143
143
-
 144
144
-
 145
145
-
 146
146
-
 147
147
-
 148
148
-
 149
149
-
 150
150
-
 151
151
-
 152
152
-
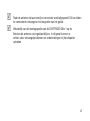 153
153
-
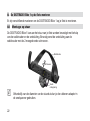 154
154
-
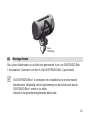 155
155
-
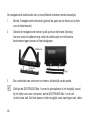 156
156
-
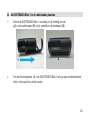 157
157
-
 158
158
-
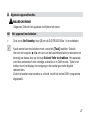 159
159
-
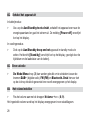 160
160
-
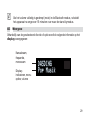 161
161
-
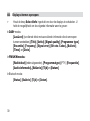 162
162
-
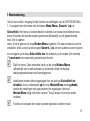 163
163
-
 164
164
-
 165
165
-
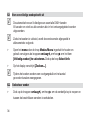 166
166
-
 167
167
-
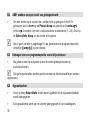 168
168
-
 169
169
-
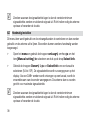 170
170
-
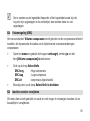 171
171
-
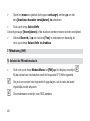 172
172
-
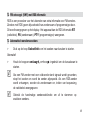 173
173
-
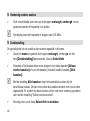 174
174
-
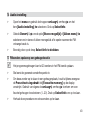 175
175
-
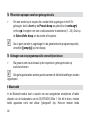 176
176
-
 177
177
-
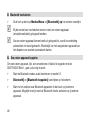 178
178
-
 179
179
-
 180
180
-
 181
181
-
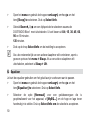 182
182
-
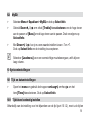 183
183
-
 184
184
-
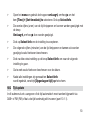 185
185
-
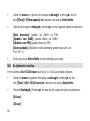 186
186
-
 187
187
-
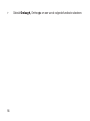 188
188
-
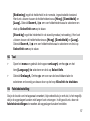 189
189
-
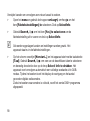 190
190
-
 191
191
-
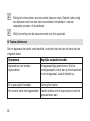 192
192
-
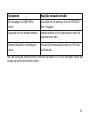 193
193
-
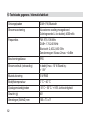 194
194
-
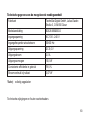 195
195
-
 196
196
-
 197
197
-
 198
198


TechniSat DIGITRADIO Bike 1 Handleiding
- Categorie
- Radio's
- Type
- Handleiding
in andere talen
Gerelateerde papieren
-
TechniSat DIGITRADIO 10 IR de handleiding
-
TechniSat DIGITRADIO 370 CD IR de handleiding
-
-
-
TechniSat DIGITRADIO 371 CD BT de handleiding
-
TechniSat DIGITRADIO 3 BLACK/SILVER de handleiding
-
-
-
TechniSat DIGITRADIO 451 CD IR WOOD de handleiding
-
TechniSat DIGITRADIO 30 de handleiding