
Bedienungsanleitung
Assembly & Instruction Manual
Manual de instrucciones
Instructions de montage
Manuale di assemblaggio e di istruzioni
Montagehandleiding
Instrukcja montażu i obsługi
Manual de Instruções & Montagem
DE SOLAR- UND HYDRAULIK-ROBOTER-BAUSATZ - 12-in-1
EN 12 in 1 SOLAR & HYDRAULIC CONSTRUCTION KIT
ES KIT ROBOT SOLAR E HIDRÁULICO - 12 en 1
FR KIT DE CONSTRUCTION SOLAIRE & HYDRAULIQUE - 12 EN 1
NL BOUWKIT OP ZONNE-ENERGIE - 12-IN-1
PL SOLARNY, HYDRAULICZNY ZESTAW KONSTRUKCYJNY 12 W 1
PT KIT DE CONSTRUÇÃO SOLAR & HIDRÁULICO 12 em 1
IT KIT DI COSTRUZIONE SOLARE & IDRAULICO 12 IN 1
KSR17

Inhalt / Contents / Índice / Sommaire / Inhoudstafel
Zawartość / Conteúdo da embalagem / Indice
Einführung / Product Introduction / Introducción / Introduction / Inleiding / Opis produktu / Introdução Sobre o Produto
Presentazione del prodotto 1
Benötigte Werkzeuge / Tools You May Need / Herramientas necesarias / Outillage nécessaire / Benodigde gereedschappen
Niezbędne narzędzia / Ferramentas Que Vai Necessitar / Attrezzi che potrebbero servire 1
Liste der mechanischen Teilen / Mechanical Parts List / Lista de componentes mecánicos / Liste de pièces mécaniques
Lijst met mechanische onderdelen / Lista części mechanicznych / Lista das Peças Mecânicas / Elenco delle parti meccaniche 1
Kunststoffteile / Plastic Parts / Piezas de plástico / Pièces en plastique / Plastic onderdelen / Części plastikowe / Peças Plásticas1
Parti in plastica 2
Mechanische Montage / Mechanical Assembly / Montaje mecánico / Montage mécanique / Mechanische montage / Zespół mechaniczny
Montagem Mecânica / Insieme meccanico
Solarmodul montieren / Solar Module Assembly / Montar la placa solar / Monter le module solaire / De zonnemodule monteren
Montaż modułu solarnego / Montagem do Módulo Solar / Montaggio del modulo solare
3
Getriebeeinheit montieren / Gear Box Assembly / Montar el engranaje / Monter la boîte d’engrenages / De tandwielkast monteren
Montaż zespołu przekładni / Caixa de Velocidades / Assemblaggio della scatola degli ingranaggi
3
Getriebeeinheit testen / Gear Box Testing / Probar el engranaje / Tester la boîte d'engrenages / De tandwielkast testen
Test zespołu przekładni / Testar a Caixa de Velocidades / Prova di gruppi di trasmissione
5
Augen und Klauen testen / Eye & Claw Testing / Probar los ojos y las garras / Tester les yeux & les griffes / De ogen & klauwen testen
Test oczu i łap/chwytaków / Testar Olho & Garra / Prova di occhi e branca/benna
5
Hydraulikmodul montieren / Hydraulic Module Assembly / Montar el módulo hidráulico / Monter le module hydraulique
De hydraulische module monteren / Montaż modułu hydraulicznego / Montagem do Módulo Hidráulico / Montaggio del modulo idraulico
5
Hydraulikmodul testen / Hydraulic Module Testing / Probar el módulo hidráulico / Tester le module hydraulique
De hydraulische module testen / Test modułu hydraulicznego / Testar o Módulo Hidráulico / Prova di modulo idraulico
7
(1) Gelände-Fahrzeug / (1) Obstacle avoiding Rover / (1) Vehículo todo terreno / (1) Véhicule tout-terrain / (1) Terreinvoertuig
(1) Łazik omijający przeszkody / (1) Todo-o-Terreno Que Evita Obstáculos / (1) Jeep che evita gli ostacoli
9
(2) Gabelstapler / (2) Forklift / (2) Carretilla elevadora / (2) Chariot élévateur / (2) Heftruck / (2) Wózek widłowy
(2) Empilhadora / (2) Carrello di forca 12
(3) Affe / (3) Monkey / (3) Mono / (3) Singe / (3) Aap / (3) Małpa / (3) Macaco / (3) Scimmia 14
(4) Strauß / (4) Ostrich / (4) Avestruz / (4) Autruche / (4) Struisvogel / (4) Struś / (4) Avestruz / (4) Struzzo 17
(5) Bagger / (5) Excavator / (5) Excavadora / (5) Excavatrice / (5) Graafmachine / (5) Koparka / (5) Escavadora / (5) Escavatore 21
(6) Skorpion / (6) Scorpion / (6) Escorpión / (6) Scorpion / (6) Schorpioen / (6) Skorpion / (6) Escorpiãocada / (6) Scorpione 25
(7) Herr & Hund / (7) Master & dog / (7) Amo y perro / (7) Duo maître & chien / (7) Baasje & hond / (7) Pan i pies / (7) Dono & cão
(7) Signor e cane 29
(8) Elefant / (8) Elephant / (8) Elefante / (8) Éléphant / (8) Olifant / (8) Słoń / (8) Elefante / (8) Elefante 32
(9) Buggy / (9) Buggy / (9) Buggy / (9) Buggy / (9) Buggy / (9) Buggy / (9) Escaravelho / (9) Buggy 35
(10) Krokodil / (10) Crocodile / (10) Cocodrilo / (10) Crocodile / (10) Krokodil / (10) Krokodyl / (10) Crocodilo / (10) Coccodrillo 39
(11) Pterosaurus / (11) Pterosaurs / (11) Pterosaurio / (11) Ptérosaure / (11) Pterosauriër / (11) Pterozaur / (11) Pterossauros
(11) Pterosauro 44
(12) Tyrannosaurus / (12) T-Rex 49 / (12) Tiranosaurio / (12) T-Rex / (12) T-Rex / (12) Tyranozaur / (12) T-Rex / (12) T-Rex 50
Sortimentskasten montieren / Storage box assembly / Montar el organizador / Monter la boîte d'assortiment / De opbergdoos monteren
Montaż pudełka do przechowywania / Montagem da caixa de arrumação / Montaggio del contenitore per la conservazione
8
Hinweise: Kunststoffteile demontieren / Tips: Plastic Parts Disassembly / Consejos: Desmontar las piezas de plástico
Conseils: Démonter les pièces en plastique / Tips: De plastic onderdelen demonteren / Wskazówki: Demontaż części plastikowych
Dicas: Desmontagem das Peças Plásticas / Indicazioni: Smontaggio degli elementi di plastica /
9
12 verschiedene Roboter / 12 Robot Modes / 12 diferentes animales o robots / 12 différents robots / 12 verschillende robots
12 trybów robota / 12 Modos Robot / 12 Modi di Robot
Bemerkungen! Sehr wichtig - Hydraulikmodul / Notices! Very Important – Hydraulic Module
¡Observaciones! Muy importante – Módulo hidráulico / Attention ! Très important - Module hydraulique
Opgelet! Zeer belangrijk – Hydraulische module / Uwaga! Bardzo ważne - Moduł hydrauliczny
Observações! Muito Importante – Módulo Hidráulico / Attenzione!! Molto importante – Modulo idraulico 7

Tissue-Papier
Tissue Paper
papel tisú
papier absorbant
keukenroln
Ręcznik papierowy
Papel
Scottex
Behälter und Wasser
Cup & Water
recipiente y agua
verre d'eau
glas water
Szklanka z wodą
Copo & Água
Bicchiere & Acqua
Schraubendreher
Screwdriver
destornillador
tournevis
schroevendraaier
Śrubokręt
Chave de Fendas
Cacciavite
Seitenschneider
Diagonal Cutter
Alicates de corte en diagonal
Pince coupante
Zijkniptang
Obcinak boczny
X-ato
Cutter diagonale
Motor mit Anschlüssen x 1 / Motor With Connectors 1pc
Motor con conectores x 1 / Moteur avec connecteurs 1 pce
Motor met aansluitingen 1 st. / Silnik ze złączami 1 szt.
Motor Com Conector 1 unidade / Motore con connettori
Solarmodul mit Federn x 1 / Solar Panel With Springs 1pc
Panel solar con muelles x 1 / Panneau solaire avec ressorts 1 pce
Zonnepaneel met veren 1 st.
Panel słoneczny ze sprężynami 1 szt.
Painel Solar Com Molas 1 unidade
Panello solare con molla 1 pz.
Flexibler Schlauch (15 cm) x 1 / Soft Tube (15cm) 1pc
Tubo flexible (15 cm) x 1 / Tube flexible (15 cm) 1 pce
Flexibele slang (15 cm) 1 st. / Miękka rurka (15 cm) 1 szt.
Tubo Macio (15cm) 1 unidade
Tubo morbido (15 cm) 1 pz.
P1 P2 P3
Verbinden Sie die Kabel nicht mit dem Netz.
Don’t connect the wires to the mains.
No conecte los cables a la red eléctrica.
Ne pas connecter les câbles au réseau électrique.
Sluit de kabels niet aan op de netspanning.
Nie podłączać przewodów do sieci zasilającej.
Não ligue os fios à tomada elétrica.
Non collegare i cavi alla rete di alimentazione.
Mit diesem solar- und wasserbetriebene Roboter-Bausatz können zwölf verschiedene Tiere und Roboter aufgebaut werden. Jedes Modell verfügt über viele funktionelle Bewegungen. Sie können zwischen
kletterndem Affen>Maul öffnendem Krokodil und>T-Rex>laufendem Strauß>mit Stachel angreifendem Skorpion>im Zickzack fahrendem Buggy usw. wechseln. Dank der Kombination dieser zwei Kräfte können
sich diese Roboter leicht bewegen. Darüber hinaus bieten sie auch eine großartige Interaktion mit den Kindern.
Mit diesem Bausatz können Kinder aktiv zwei Formen alternativer Energie lernen und werden sie spielerisch für eine saubere Energie der Zukunft begeistert! Weil diese Modelle mit Sonnen- und Wasserkraft
betrieben werden, benötigen diese keine Batterien. Bei direkter Sonneneinstrahlung setzt der Roboter/das Tier sich in Bewegung. Der Bausatz ermöglicht es Kindern, mit Ihm im Freien zu spielen und ermutigt
sie die Welt zu erkunden.
Die Modellierung und die Bewegungen beziehen sich auf echte Tiere mit Ihren offensichtlichsten Eigenschaften (z.B. Elefantenrüssel, Pteranodonflügel). Beim Spielen können die Kinder diese Eigenschaften
erkennen und dabei beobachten, wie sie funktionieren. Wenn Kinder ihre eigene unendliche Fantasie nutzen, können sie sogar eine ganz neue Art erschaffen.
The solar and hydraulic powered robot can be transformed into twelve different animals and mechanic robots. Every model features multitude of functional and biomimicry movements and unique modeling. The
user can change from climbing monkey>mouth opening crocodile and T-Rex>running ostrich>claws attacking scorpion>zigzagging buggy and more. Combining these two power, these adorable robots can move
easily and also provide great interaction with kids.
12 In 1 solar hydraulic powered robot is designed to have children learn the benefit of alternative energy and basic concept of these technologies. This product is powered by the sun and water, there are no
batteries required. The robot can move in direct sunlight and allows children to play with it outdoors and also encourage them to explore the world.
The modeling and the movement of the models are referred to natural animals which include its most obvious characteristic, such as elephant's trunk and pteranodon's wing. While the children are playing with
them, they can realize the function of these characteristic and observe how they work. For more, the children can use their own infinite imagination to create a brand new species.
Este robot funciona con energía solar e hidráulica y se puede transformar en doce animales y robots diferentes (mono, tiranosaurio, escorpión, excavadora, etc.). Los robots pueden desplazarse fácilmente y
harán las delicias de los niños.
El robot hidráulico y solar 12 en 1 les enseñará a los niños todos los beneficios de las energías alternativas. No se necesitan pilas ya que funciona con energía solar y agua. Se desplaza cuando le da la luz
del sol directamente, y esto hace que los niños jueguen con él en exteriores y exploren el mundo.
Porque los modelos son réplicas de animales auténticos, los niños descubrirán sus características y su funcionamiento mientras juegan. Incluso podrán crear nuevas especies utilizando su imaginación.
De hydraulische robot op zonne- energie kan worden omgevormd tot twaalf verschillende dieren en mechanische robots. Elk model heeft een verscheidenheid aan functionele en realistische bewegingen en
een unieke vorm. De hobbyist kan schakelen tussen klimmende aap>mond openen krokodil en T-Rex>lopende struisvogel>prikkende schorpioen>zigzag rijdende buggy, enz. Door deze twee krachten te
combineren, kunnen deze schattige robots gemakkelijk bewegen en zijn ze ook een bron van interactie met kinderen.
De 12-in-1 hydraulische robot op zonne-energie is ontworpen voor kinderen om de voordelen van alternatieve energie en het basisbegrip van deze technologieën aan te leren. Dit product wordt aangedreven
door zon en water, dus er zijn geen batterijen nodig. De robot kan in direct zonlicht bewegen en laat kinderen buiten spelen en moedigt hen ook aan om de wereld te verkennen.
De vorm en bewegingen van de modellen verwijzen naar echte dieren, met inbegrip van hun meest voor de hand liggende kenmerken, zoals de slurf van de olifant en de vleugel van de Pteranodon. Al spelend
kunnen kinderen meer leren over het functioneren van dergelijke dieren en ze in actie observeren. Bovendien kunnen kinderen hun eigen oneindige verbeelding gebruiken en een compleet nieuwe soort creëren.
Robot napędzany modułem solarnym lub hydraulicznym może przybrać formę dwunastu różnych zwierząt i robotów mechanicznych. Każdy model posiada mnóstwo ruchów funkcjonalnych na bazie biomimikry
oraz charakteryzuje się wyjątkowym odwzorowaniem. Użytkownik ma do wyboru wspinającą się małpkę>krokodyla i tyranozaura kłapiącego paszczą>biegającego strusia>skorpiona atakującego swoimi
szczypcami>pojazd buggy jeżdżący zygzakiem i wiele więcej. Dzięki takim supermocom urocze robociki mogą z łatwością się poruszać oraz nawiązywać zabawne interakcje z dziećmi.
Robot zasilany modułem słonecznym i hydraulicznym 12w1 zaprojektowano, aby uczyć dzieci o zaletach alternatywnych źródeł energii i podstawowej koncepcji takich technologii. Produkt jest zasilany promieni-
ami słonecznymi i wodą, baterie nie są wymagane. Robot działa po wystawieniu na bezpośrednie oddziaływanie promieni słonecznych, dzięki czemu dzieci mogą bawić się nim na dworze i razem odkrywać
świat.
Modelowanie i ruchy robota były wzorowane na prawdziwych zwierzętach, dlatego widoczne są ich najbardziej charakterystyczne cechy: trąba słonia albo skrzydło pteranodona. Podczas zabawy dzieci mogą
dowiedzieć się więcej o funkcjonowaniu takich zwierząt i obserwować je w akcji. Dając się ponieść swej nieskończonej wyobraźni dzieci mogą też stworzyć całkowicie nowy gatunek.
O robot solar e hidráulico pode ser transformado em doze diferentes animais e robots mecânicos. Cada um dos modelos apresenta uma diversidade de movimentos funcionais e biomimétricos e um design
único. O utilizador pode escolher entre o macaco que trepa>o crocodilo e T-Rex de boca aberta>a avestruz que corre>o escorpião que ataca com as suas garras>o escaravelho que anda em ziguezague e
muito mais. Ao combinarem estas duas características, estes adoráveis robots podem mover-se facilmente e interagir imenso com as crianças.
Este robot solar e hidráulico foi concebido para ensinar às crianças os benefícios das energias alternativas e alguns conceitos básico dessas tecnologias. Este produto funciona a luz solar e água, pelo que
não necessita de pilhas. O robot movimenta-se sob a luz solar e permite às crianças brincarem com ele no exterior ao mesmo tempo que as encoraja a explorar o mundo.
O formato e o movimento dos modelos imita os próprios animais o que inclui as suas principais características, tais como a tromba do elefrante e a asa do pteranodonte. Enquanto brincam, as crianças podem
observar as funções destas características e perceber como funcionam. Para além disto, as crianças podem ainda usar a sua infinita imaginação e criar espécies totalmente novas.
Robot alimentator con modulo solare oppure idraulico può assumere la forma di dodici animali diversi e robot meccanici. Ogni modello possiede molti movimenti funzionali su base di biomimetica e si caratterizza
di una particolare approssimazione. Utente può scegliere una scimmia che si arrampica>coccodrillo e tirannosauro che blatera la bocca>struzzo che corre>scorpione che attacca con le sue pinze>macchina
buggy che va a zig zag e tanti altri. Grazie a tali superpoteri i robottini carini possono muoversi con facilità e fare interazioni con bambini.
Robot alimentato con modulo solare e idraulico 12in1 è stato progettato per indicare ai bambini i vantaggi delle fonti alternative di energia e di concetto di base di tali tecnologie. Prodotto è alimentato dai raggi
di sole e con l’acqua, le batterie non sono richieste. Robot funziona subito dopo viene esposto all’influenza diretta di raggi di sole, grazie a cui i bambini possono giocare fuori e insieme a lui scoprire il mondo.
Modellatura e movimenti di robot erano ispirati ai veri animali perciò sono visibili le loro caratteristiche: proboscide di elefante oppure ala di pteranodonte. Durante il gioco i bambini possono imparare di più sul
funzionamento di questo animali e osservarli in azione. Inoltre, i bambini possono usare la propria immaginazione infinita per creare specie totalmente nuove.
1
Einführung / Product Introduction / Introducción / Introduction / Inleiding / Opis produktu / Apresentação do Produto / Presentazione del prodotto
Benötigte Werkzeuge / Tools You May Need / Herramientas Necesarias / Outillage Nécessaire / Benodigde Gereedschappen
Niezbędne Narzędzia / Ferramentas Que Pode Necessitar / Attrezzi Che Potrebbero Servire
Liste der mechanischen Teilen
Mechanical Parts List
Lista de componentes mecánicos
Liste de pièces mécaniques
Lijst met mechanische onderdelen
Lista części mechanicznych
Lista das Peças Mecânicas
Elenco degli elementi meccanici
Das Produkt enthält scharfe Ecken und Spitzen.
Product contains functional edges and sharp points.
El producto incluye bordes funcionales y puntos afilados.
Certaines pièces sont pointues ou coupantes.
Product bevat functionele scherpe hoeken en punte.
Produkt zawiera ostre krawędzie i zakończenia.
O produto tem arestas funcionais e pontos afiados.
Il prodotto presenta bordi e spigoli appuntiti.

Ritzel (gelb) x 1 / Pinion Gear (yellow) 1pc
Piñon (amarillo) x 1 / Pignon (jaune) 1 pce
Rondsel (geel) 1 st. / Wałek zębaty (żółty) 1 szt.
Pinhão de Engrenagem (amarelo) 1 unidade
Rullo dentato (giallo) 1 pz.
Zahnrad mit Welle x 1 / Gear With Shaft 1pc
Rueda dentada con eje x 1 / Engrenage avec arbre 1 pce
Tandwiel met as 1 st. / Koło zębate z wałkiem 1 szt.
Engrenagem Com Haste 1 unidade
Ruota dentata con rullo 1 pz.
Zahnrad (rot) x 1 / Gear (Red) 1pc
Corona (rojo) x 1 / Engrenage (rouge) 1 pce
Tandwiel (rood) 1 st. / Koło zębate (czerwone) 1 szt.
Engrenagem (vermelho) 1 unidade
Ruota dentata (rossa) 1 pz.
P4 P5 P6
2
Zahnrad (grün) x 2 / Gear (Green) 2pc
Corona (verde) x 2 / Engrenage (vert) 2 pcs
Tandwiel (groen) 1 st. / Koło zębate (zielone) 2 szt.
Engrenagem (verde) 2 unidades
Ruota dentata (verde) 2 pz.
Blechschraube x 2 / Tapping Screw 2pc
Tornillo autoroscante x 2 / Vis taraudeuse 2 pcs
Zelftappende schroef 2 st. / Wkręt samogwintujący 2 szt.
Parafusos 2 unidades
Vite autofilettante 2 pz.
Schwamm x 2 / Sponge 2 pc
Esponja x 2 / Éponge 2 pcs
Spons 2 st. / Gąbka 2 szt.
Esponja 2 unidades / Spugna 2 pz.
P7 P8 P9
Runde Welle x 1 / Round Shaft 1pc
Eje redondo x 1 / Arbre rond 1 pce
Ronde as 1 st. / Wałek okrągły 1 szt.
Haste Redonda 1 unidade
Rullo rotondo 1 pz.
Seil x 1 / Rope 1pc
Cuerda x 1 / Corde 1 pce
Touw 1 st. / Lina 1 szt.
Corda 1 unidade
Corda 1 pz.
Kappe (rot) x 2 / Cap (Red) 2pc
Tapa (rojo) x 2 / Bouchon (rouge) 2 pcs
Dop (rood) 2 st. / Zaślepka (czerwona) 2 szt.
Tampa (vermelha) 2 unidades
Tappo (rosso) 2 pz.
P10 P11 P12
Trennwand (Pappkarton) x 1 / Cardboard divider 1pc
Separador de cartón x 1 / Diviseur en carton 1 pce
Kartonnen verdeler 1 st. / Przekładka kartonowa 1 szt.
Divisor em cartão 1 unidade
Distanziatore di cartone
Beutel mit Öl x 1 / Oil Bag 1pc
Bolsa con aceite x 1 / Sac à huile 1 pce
Zakje met olie 1 st. / Saszetka z olejem 1 szt.
Recipente Para Óleo 1 unidade
Bustina con olio
P13 P14
! Schneiden Sie gegebenenfalls die Kunststoffteile. Schneiden Sie diese aber nicht im Voraus.
! Cut the plastic parts when they are required. Do not cut them in advance.
! Si fuera necesario, corte las piezas de plástico. Pero no las corte de antemano.
! Couper les pièces en plastique au fur et à mesure du montage. Ne pas couper les pièces en avance.
! Knip de plastic onderdelen pas uit op het moment dat u ze nodig hebt. Knip de onderdelen niet uit op voorhand uit.
! Części plastikowe należy wycinać w momencie, gdy są potrzebne. Nie wycinać z wyprzedzeniem.
! Corte as peças plásticas na altura em que tal for necessário. Não as corte antecipadamente.
! Corte as peças plásticas na altura em que tal for necessário.
E
DCBA
Hinweis: Schneiden Sie die Grate vor Montage ab. / Tip : cut off the burrs before assembly
Consejo: Corte las rebabas antes del montaje. / Conseil : couper les ébarbures des pièces avant le montage
Tip : knip de bramen af voor de montage / Wskazówka: przed montażem usunąć pozostałości ramki
Dica : cortar as rebarbas antes da montagem / Suggerimento: tagliare via le sbavature prima di assemblare
350mm
140mm
Kunststoffteile / Plastic Parts / Piezas de plástico / Pièces en plastique / Plastic onderdelen / Części plastikowe / Peças Plásticas / Parti in plastica
! Berühren Sie niemals das Öl beim Befestigen des flexiblen Schlauchs.
! Do not touch the oil while fitting the soft tube.
! No toque el aceite al fijar el tubo flexible.
! Ne pas toucher l'huile pendant le montage du tube flexible.
! Raak de olie niet aan tijdens het monteren van de flexibele slang.
! Podczas mocowania rurki nie dotykać oleju.
! Não toque no óleo enquanto encaixa o tubo macio.
! Non toccare l’olio durante il montaggio di tubo.
Grat
Burr
Rebaba
Ebarbure
Sbavatura
Braam
Pozostałość
Rebarba
Grat
Burr
Rebaba
Ebarbure
Sbavatura
Braam
Pozostałość
Rebarba

1 32
1
3 4 5
2
Endprodukt
Finished Product
Producto terminado
Produit fini
Afgewerkt product
Gotowy element
Produto Acabado
Elemento finito
3
A14
P9 x2
2
2
1
1
P10
P5
P7
B3
C1
B10
A5
B26
P4
P1
P5
Klicken / Click
Clic / Clic
klik / Klik
Clique / Clic
Klicken / Click
Clic / Clic
klik / Klik
Clique / Clic
P2
B31
B25
( Grün / Green
Verde / Vert
Groen / Zielone
Verde / verde)
( Grün / Green
Verde / Vert
Groen / Zielone
Verde / verde )
P7
( Grün / Green
Verde / Vert
Groen / Zielone
Verde / Verde )
( Grün / Green / Verde
Vert / Groen / Zielone
Verde / Verde )
P7
P7
Solarmodul / Solar Module
Módulo Solar / Module Solaire
Zonnemodule / Moduł Solarny
Módulo Solar / Modulo solare
Solarmodul montieren / Solar Module Assembly / Montar la placa solar / Monter le module solaire
De zonnemodule monteren / Montaż modułu solarnego / Montagem do Módulo Solar / Montaggio del modulo solare
Getriebeeinheit montieren / Gear Box Assembly / Montar el engranaje / Monter la boîte d'engrenages / De tandwielkast monteren
Montaż zespołu przekładni / Montagem Caixa de Velocidades / Assemblaggio della scatola degli ingranaggi

6 7
8
10
11
9
12 13
4
P8
P6
B18
P8
B18
B18
B18
C1 P7
P5
P6
P7
B21
B21
C14 C14
A6
B4 B2
( Grün / Green / Verde
Vert / Groen / Zielone
Verde / Verde )
( rot / Red / rojo / rouge
rood / Czerwone
Vermelho / Rosso )
( Rot / Red / Rojo
Rouge / Rood
Czerwone
Vermelho / Rosso )
( Grün / Green
Verde / Vert
Groen / Zielone
Verde / Verde )
Getriebeeinheit / Gear Box
Engranaje / boîte d'engrenages
tandwielkast / Zespół przekładni
Caixa de Velocidades
Scatola degli ingranaggi

1 2
Zylinder #1 montieren / Cylinder #1 Assembly / Montar cilindro #1 / Monter cylindre #1
Cilinder #1 monteren / Montaż siłownika #1 / Cilindro #1 Montagem / Montaggio di cilindro #1
Getriebeeinheit testen / Gear Box Testing / Probar el engranaje / Tester la boîte d'engrenages / De tandwielkast testen
Test zespołu przekładni / Testar Caixa de Velocidades / Prova del gruppo di trasmissione
1
2
Hydraulik modul montieren / Hydraulic Module Assembly / Montar el módulo hidráulico / Monter le module hydraulique
De hydraulische module monteren / Montaż modułu hydraulicznego / Montagem do Módulo Hidráulico / Montaggio del modulo idraulico
5
Tissue-Papier
Tissue Paper
Papel tisú
Papier absorbant
Vel keukenpapier
Ręcznik papierowy
Papel
Scottex
P14
Vergießen Sie kein Öl aus dem C18-Behälter.
Vergießen Sie kein Öl.
Do not spill any oil from the C18 oil sink.
Keep oil contained.
No derrame aceite del depósito C18.
Mantenga el aceite en el depósito.
Ne pas déverser de l'huile du récipient C18.
Fermer le sac à huile.
Mors geen olie uit het C18-reservoir.
Sluit het zakje met olie.
Nie rozlewać oleju ze zbiorniczka C18.
Zabezpieczyć przed rozlaniem się oleju.
Não deixe escapar nenhum óleo do recipiente C18.
Conserve o óleo contido.
Non spargere l’olio dal contenitore C18.
Assicurare l’olio da rovesciarsi.
Ölen Sie das Teil / Oil the part / Lubrique la pieza
Lubrifier la pièce / Smeer het onderdeel met olie
Oliwienie części / Lubrifique a peça / Ingrassaggio di elementi
C18
E1
P12
B17 2
1
E1
C12
C13
Methode 1: Sonne / Way 1 : SUN / Manera 1: SOL
Manière 1 : SOLEIL / Manier 1: ZON
Sposób 1 : SŁOŃCE / 1 modo: SOLEGGIATO
Methode 2: Halogenlampe (50 W & höher)
Way 2 : 50w & up halogen
Manera 2: bombilla halógena (50 W y superior)
Manière 2 : Lampe halogène de 50 W ou supérieur
Manier 2: halogeenlamp 50 W & hoger
Sposób 2: Lampa halogenowa 50W lub więcej
Opção 2 : HALOGÉNEO 50W & SUPERIOR
2 modo: Lampada alogeno 50W oppure di più
Testen / Testing / Someter a prueba
Tester / Testen / Testowanie / Teste
Prove
Die Teile ölen / How To Oil The Parts / Lubricar las piezas / Lubrifier les pièces
De onderdelen oliën / Oliwienie części / Como Lubrificar as Peças
Ingrassaggio degli elementi
A12
A9
C15
Auge montieren / Eye Assembly / Montar el ojo
Monter les yeux / Oog monteren / Montaż oka
Montagem do Olho / Montaggio di occhio
Klaue (rechte) montieren / Claw (Right) Assembly
Montar la garra (derecha) / Monter la griffe (droite)
Klauw (rechts) monteren / Montaż łapy (prawej)
Montagem da Garra (Direita)
Klaue (linke) montieren / Claw (Left) Assembly
Montar la garra (izquierda) / Monter la griffe (gauche)
Klauw (links) monteren / Montaż łapy (lewej)
Montagem da Garra (Esquerda)
A1
B38
A20 A2 A8 A13
Auge / Eye / Ojo
Œil / Oog / Oko
Olho / Occhio
Funktioniert die Getriebeeinheit nicht, montieren Sie diese dann wieder (siehe Seite 2-3).
If gearbox doesn’t work, refer back to Page 2-3 for re-assembly.
Si el engranaje no funciona, consulte la página 2-3 para volver a montarlo.
Si la boîte d'engrenages ne fonctionne pas, voir les pages 2-3 pour remonter.
Als de tandwielkast niet werkt, zie pagina 2-3 voor de montage.
Jeżeli zespół przekładni nie działa, patrz strony 2-3 w celu ponownego montażu
Se a caixa de velocidades não funcionar, regresse à página 2-3 para a voltar a montar.
Se il gruppo di trasmissione non funziona, guarda le pagine 2-3 per la ricostruzione.
Rot / Red / Rojo
Rouge / Rood
Czerwony / Vermelho
Rosso
Schwarz / Black / Negro / noir
zwart / Czarny / Preto / Nero
Getriebeeinheit / Gear Box / Engranaje
Boîte D'engrenages / Tandwielkast
Zespół Przekładni / Caixa De Velocidades
Gruppo Di Trasmissione
Montage / Assembly
Montaje / Montage
Montage / Montaż
Montagem
Assemblaggio
Solarmodul
Solar Module
Módulo solar
Module solaire
Zonnemodule
Moduł solarny
Módulo Solar
Modulo solare
Zylinder #1 / Cylinder #1 / Cilindro #1 / Cylindre #1
Cilinder #1 / Siłownik #1 / Cilindro #1 / Cilindro #1
Klicken / Click / Clic
Clic / klik / Klik
Clique / Clic
Klicken / Click / Clic
Clic / klik / Klik
Clique / Clic
Klaue (rechte) / Claw (Right)
Garra (derecha) / Griffe (droite)
Klauw (rechts) / Łapa (prawa)
Garra (Direita)
Montaggio di branca (destra)
Klaue (rechte) / Claw (Right)
Garra (derecha) / Griffe (droite)
Klauw (rechts) / Łapa (prawa)
Garra (Direita)
Montaggio di branca (sinistra)

3
4
5
Zylinder #2 montieren / Cylinder #2 Assembly / Montar cilindro #2 / Monter cylindre #2
Cilinder #2 monteren / Montaż siłownika #2 / Cilindro #2 Montagem / Montaggio di cilindro #2
Wiederholen Sie Schritt und , um den Zylinder mit
Wasser zu füllen.
Re-do to fill up the cylinder with water
Repita el paso y para llenar el cilindro con agua.
Répéter les étapes et pour Remplir le cylindre
avec de l'eau.
Herhaal de stappen en om de cilinder met water
te vullen.
Powtórzyć kroki i , aby napełnić siłownik wodą
Repita para encher o cilindro com água.
Ripetere le tappe e per riempire il pistone con l’acqua.
Ölen Sie das Teil
Oil the part
Lubrique la pieza
Lubrifier la pièce
Smeer het onderdeel met olie
Naoliwić część
Lubrifique a peça
Ingrassare l’elemento
C10
C11
B19
P12
2
E2
Zylinder #1 mit Wasser füllen
How To Fill Up The Cylinder #1 With Water
Llenar el cilindro #1 con agua
Remplir cylindre #1 avec de l'eau
Cilinder #1 met water vullen
Napełnianie siłownika #1 wodą
Como Encher o Cilindro #1 Com Água
Riempimento del cilindro #1 con l’acqua
1 2 3 3
3
3
3
3
3
2
2
2
2
3
3
2
2
Füllen Sie Zylinder #1 und den flexiblen Schlauch mit Wasser.
Fill Cylinder #1 and Soft Tube with water
Llene el cilindro #1 y el tubo flexible con agua.
Remplir cylindre #2 et le tube flexible avec de l'eau
Vul cilinder #1 en de flexibele slang met water
Napełnić siłownik #1 i miękką rurkę wodą
Encha o Cilindro #1 e Tubo Macio com água
Riempire il pistone #1 e il tubo morbido con l’acqua
6
1
Drücken Sie ganz runter.
Push to the end
Presione hasta el extremo.
Enfoncer jusqu'au bout
Duw helemaal naar beneden
Wcisnąć do końca
Empurrar até ao fim
Premere fino alla fine
Ziehen Sie ganz hoch.
Pull up entirely
Levántelo completamente.
Tirer complètement vers l'arrière
Trek helemaal naar omhoog
Wyciągnąć maksymalnie
Puxar para cima totalmente
Estrarre interamente
Zylinder #1 / Cylinder #1
Cilindro #1 / Cylindre #1
Cilinder #1 / Siłownik #1
Cilindro # 1 / Cilindro #1
Zylinder #1 / Cylinder #1
Cilindro #1 / Cylindre #1
Cilinder #1 / Siłownik #1
Cilindro #1 / Cilindro #1
Zylinder #1 / Cylinder #1
Cilindro #1 / Cylindre #1
Cilinder #1 / Siłownik #1
Cilindro #1 / Cilindro #1
Zylinder #1 / Cylinder #1
Cilindro #1 / Cylindre #1
Cilinder #1 / Siłownik #1
Cilindro #1 / Cilindro #1
Zylinder #1 / Cylinder #1
Cilindro #1 / Cylindre #1
Cilinder #1 / Siłownik #1
Cilindro #1 / Cilindro #1
Zylinder #2 / Cylinder #2 / Cilindro #2 / Cylindre #2
Cilinder #2 / Siłownik #2 / Cilindro #2 / / Cilindro #2
Klicken / Click / Clic
Clic / klik / Klik
Clique / Clic
Klicken / Click / Clic
Clic / klik / Klik
Clique / Clic
Behälter & Wasser
Cup & Water
Recipiente y agua
Verre d'eau
Glas water
Kubek z wodą
Copo & Águav
Bicchiere con l’acqua
Wasser/ Water
agua / Eau
Water / Woda
Água / L’acqua
Ziehen Sie den Kolben hoch (siehe Abb.).
Pull up the piston to the top (as shown below).
Coloque el pistón en la posición superior (véase la fig.).
Tirer le piston vers le haut (voir ci-dessous).
Trek de zuiger omhoog (zie boven).
Wyciągnąć tłok do góry (jak pokazano poniżej).
Puxe o pistão até acima (conforme indicado abaixo).
Trarre il pistone (come è stato presentato di sotto).
Drücken Sie den Kolben runter.
Press down the piston to the bottom.
Presione el pistón hacia abajo.
Pousser le piston vers le bas.
Duw de zuiger omlaag.
Docisnąć tłok do dna.
Pressione o pistão para baixo.
Serrare il pistone fino al fondo.
2
2
Behälter & Wasser
Cup & Water
Recipiente y agua
Verre d'eau
Glas water
Kubek z wodą
Copo & Águav
Bicchiere con l’acqua
P3 ( flexibler Schlauch / Soft Tube
tubo flexible / tube flexible
flexibele slang / Miękka rurka
Tubo Macio )

6 7
7
Zylinder #2 mit Wasser füllen
Fill Up The Cylinder #2 With Water
Llenar el cilindro #2 con agua
Remplir le cylindre avec de l'eau
Vul cilinder #2 met water
Napełnić siłownik #2 wodą
Encha o Cilindro #2 Com Água
Riempire il cilindro #2 con l’acqua
Drücken Sie den Kolben von Zylinder #2 runter.
Press down the piston of cylinder #2 to the bottom.
Presione el pistón de cilindro #2 hacia abajo.
Pousser le piston du cylindre #2 vers le bas.
Duw de zuiger van cilinder #2 omlaag.
Docisnąć tłok siłownika #2 do dna.
Pressione o pistão do cilindro #2 para baixo.
Serrare il pistone del cilindro #2 fino al fondo.
Hydraulikmodul / Hydraulic module
Módulo hidráulico / Module hydraulique
Hydraulische module / Moduł hydrauliczny
Módulo hidráulico / Modulo idraulico
Drücken Sie ganz runter / Push to the end
Presione hasta el extremo / Enfoncer jusqu'au bout
Duw helemaal naar beneden / Wcisnąć do końca
Empurrar até ao fim / Estrarre fino alla fine
Drücken Sie ganz runter
Push to the end
Presione hasta el extremo
Enfoncer jusqu'au bout
Duw helemaal naar beneden
Wcisnąć do końca
Empurrar até ao fim
zu viel Luft
excess air
exceso de aire
excès d'air
overtollige lucht
nadmiar powietrza
Excesso de ar
eccesso d’aria
Zylinder #2
Cylinder #2
Cilindro #2
Cylindre #2
Cilinder #2
Siłownik #2
Cilindro #2
Cilindro #2
Zylinder #2 / Cylinder #2
Cilindro #2 / Cylindre #2
Cilinder #2 / Siłownik #2
Cilindro #2 / Cilindro #2
Zylinder #2 / Cylinder #2
Cilindro #2 / Cylindre #2
Cilinder #2 / Siłownik #2
Cilindro #2 / Cilindro #2
Zylinder #1 / Cylinder #1
Cilindro #1 / Cylindre #1
Cilinder #1 / Siłownik #1
Cilindro #1 / Cilindro #1
Zylinder #1 / Cylinder #1
Cilindro #1 / Cylindre #1
Cilinder #1 / Siłownik #1
Cilindro #1 / Cilindro #1
zu viel Luft
excess air
exceso de aire
excès d'air
overtollige lucht
nadmiar powietrza
Excesso de ar
eccesso d’aria
Zylinder #1 / Cylinder #1
Cilindro #1 / Cylindre #1
Cilinder #1 / Siłownik #1
Cilindro #1 / Cilindro #1
Wasser/ Water
agua / Eau
Water / Woda
Água / L’acqua
Ist dies der Fall, füllen Sie den Zylinder dann mit Wasser (siehe Seite 5-6, Schritt 4-7).
If hydraulic module experiences above failures, back to page 5-6, step 4-7 and fill up the cylinder with water.
Si fuera el caso, vuelva a la página 5-6, paso 4-7 y llene el cilindro con agua.
Si le module hydraulique ne fonctionne pas correctement (voir ci-dessus), se référer à la page 5-6, répéter les étapes 4-7 et remplir le cylindre avec de l'eau.
Als de hydraulische module niet correct functioneert (zie hierboven), ga dan terug naar pagina 5-6, herhaal de stappen 4-7 en vul de cilinder met water.
W razie awarii modułu hydraulicznego (jak powyżej), należy wrócić do strony 5-6, powtórzyć kroki 4-7 i napełnić siłownik wodą.
Caso o módulo hidráulico apresente as falhas acima mencionadas, volte à página 5-6, passo 4-7 e encha o cilindro com água.
Nel caso di guasto del modulo idraulico (come sopra), bisogna tornare alla pagina 5-6, ripetere le tappe 4-7 e riempire il cilindro l’acqua.
P3
Flexibler Schlauch
Soft Tube
Tubo Flexible
Tube Flexible
Flexibele Slang
Miękka Rurka
Tubo Macio
Tubo Morbido
Flexibler Schlauch
Soft Tube
Tubo Flexible
Tube Flexible
Flexibele Slang
Miękka Rurka
Tubo Macio
Tubo Morbido
P3
Bemerkungen!! Sehr wichtig - Hydraulikmodul / Notices!! Very important – Hydraulic Module / ¡Observaciones! Muy importante – Módulo hidráulico
Attention ! Très important – Module hydraulique / Opgelet! Zeer belangrijk – Hydraulische module / Uwaga!! Bardzo ważne - moduł hydrauliczny
Observações!! Muito Importante – Módulo Hidráulico / Attenzione!! Molto importante - modulo idraulico
Bemerkung 2 : Drücken Sie Zylinder #2 während der Montage nicht runter und ziehen Sie ihn nicht hoch.
Notice 2 : During assembly of each model, do not push or pull Cylinder #2 when hydraulic module is installed.
Observación 2 : Durante el montaje, no presione ni levante el cilindro #2.
Note 2 : Ne pas appuyer ou tirer sur le cylindre #2 lors du montage de chaque modèle.
Opmerking 2 : Druk niet op cilinder #2 en trek deze er niet uit tijdens de montage.
Uwaga 2 : Podczas montażu każdego modelu nie należy dociskać ani wyciągać siłownika #2, gdy
montowany jest moduł hydrauliczny.
Observação 2 : Durante a montagem de cada modelo, não puxe ou empurre o Cilindro #2 se o módulo
hidráulico estiver instalado.
Nota 2: Durante il montaggio di ogni modello non spingere né tirare fuori il cilindro #2 quando viene montato
il modulo idraulico.
Bemerkung 1 : Stellen Sie vor der Montage sicher, dass das Hydraulikmodul korrekt funktioniert.
Notice 1 : Ensure Hydraulic Module is without the above failures before assembly of each model.
Observación 1 : Antes del montaje, asegúrese de que el cilindro funcione correctamente.
Note 1 : S'assurer que le module hydraulique fonctionne correctement avant le montage d'un modèle.
Opmerking 1 : Zorg ervoor dat de hydraulische module correct functioneert voordat u begint met de montage.
Uwaga 1 : Upewnić się, że moduł hydrauliczny jest w pełni sprawny przed rozpoczęciem montażu dowolnego
modelu.
Observação 1 : Certifique-se de que o Módulo Hidráulico não apresenta as falhas acima descritas antes
da montagem de cada modelo.
Nota 1: Prima di iniziare il montaggio di qualsiasi modello assicurarsi che il modulo idraulico sia pienamente
efficiente.
Ist dies der Fall, füllen Sie den Zylinder dann mit Wasser (siehe Seite 5-6, Schritt 4-7).
In these cases, go back to page 5-6, step 4-7 and fill up the cylinder with water
Si fuera el caso, vuelva a la página 5-6, paso 4-7 y llene el cilindro con agua.
Le cas échéant, se référer aux pages 5-6, répéter les étapes 4-7 et remplir le cylindre avec de l'eau.
Ga in deze gevallen terug naar pagina 5-6, herhaal de stappen 4-7 en vul de cilinder met water.
W takich przypadkach należy wrócić do strony 5-6, powtórzyć kroki 4-7 i napełnić siłownik wodą.
Nestes casos, volte à página 5-6, passo 4-7 e encha o cilindro com água
In tali casi bisogna tornare alla pagina 5-6, ripetere i passi 4-7 e riempire il cilindro con l’acqua.
Zylinder #2 / Cylinder #2
Cilindro #2 / Cylindre #2
Cilinder #2 / Siłownik #2
Cilindro #2 / Cilindro #2 Ziehen / Pull
Tirar / Tirer
Trekken
Wyciągnąć
PULL / Tirare
Ziehen / Pull
Tirar / Tirer
Trekken
Wyciągnąć
water leakage
Leck
water leakage
fuga de agua
fuite d'eau
water lekt
wyciek wody
Fuga de água
perdita d’acqua
Zu Wenig Wasser
Insufficient Water
Agua Insuficiente
Insuffisamment
D'eau
Onvoldoende Water
Niewystarczająca
Ilość Wody
Água Insuficiente
Quantità D’acqua
Non Sufficiente
Beispiel : Strauß / Example : Ostrich
Ejemplo : Avestruz
Exemple : Autruche
Bijvoorbeeld : Struisvogel
Przykład : Struś
Exemplo : Avestruz
Esempio: Struzzo
Hydraulikmodul testen / Hydraulic Module Testing / Probar el módulo hidráulico / Monter le module hydraulique
De hydraulische module testen / Test modułu hydraulicznego / Testar o Módulo Hidráulico / Prova del modulo idraulico

8
P13
1
4
32
Sortimentskasten
Color box
Organizador
Boîte colorée
Gekleurde doos
Kolorowe pudełko
Caixa colorida
Contenitore colorato
Sortimentskasten / Color box / Organizador
Boîte colorée / Gekleurde doos / Kolorowe pudełko
Caixa colorida / Contenitore colorato
x2
Claw (R)
B5 B6
A9
B7 B8 D9
C4 C8
D8
B9
A3 D7
A7
x2Eye
x2B20 x2B33
x4C22
x2C21
x2C20x4C19
B34
A10 A11
A12
B12 B13
B29B24B23 B30
B27
B28 C16 A18 A19
B11
B35 B37 A15 A16 B16 B15
B36
x4B14 A17
B22
C17
B32C5 x2 C6 x2
D2 x22
D1 x44
B1 x2
A4 x4
D3 x11
D6 x2
C9 x2
C3 x4
D5 x4
C7 x6
D4 x6
C2 x4
x2
Claw (L)
Sortimentskasten montieren / Storage Box Assembly / Montar el organizador / Monter la boîte d'assortiment / De opbergdoos monteren
Montaż pudełka do przechowywania / Montagem da Caixa de Arrumação / Montaggio del contenitore per la conservazione
2
1
1
2
Teile sortieren und lagern (siehe Abb.) / Sorting & Storing parts (as per the right illustration) into the box. / Ordenar y almacenar las piezas (véase la fig.).
Assortir & ranger les pièces (voir ill.) dans la boîte. / Onderdelen sorteren & opbergen (zie afb. rechts) in de doos.
Sortowanie i przechowywanie części
(zgodnie z ilustracją po prawej stronie)
w pudełku.
Organizar & Arrumar as peças
(conforme imagem à direita) na caixa.
Selezione e conservazione degli elementi
(secondo l’illustrazione a destra) nel contenitore.
Hinweise – Zylinder #1 demontieren
Tips – disassembly of Cylinder #1
Consejos – Desmontar cilindro #1
Conseils – démonter le cylindre #1
Tips – cilinder #1 demonteren
Wskazówki – demontaż siłownika #1
Dicas – desmontagem do Cilindro #1
Indicazioni – smontaggio del cilindro #1
B12 B13
x2
x2 x2
Eye
Claw (R) Claw (L)
B5 B6 B7 B8 C6
A19 A18
A7
D9
A3
C22B14 A17
A16A15
B20
B35
A10 A11
A9 C16
B28
A12
B34 B36 B37
B33 C4 C8
C17
C2
B32
A4
B15B16
B27
B24 B30 C19 C20 C7 B11 B9
D1 D2
D4
D3
C21
C9
B22
D5
D6
D8
D7
C3
B23 B29
B1
C5
Page 56
Bemerkung 3 : Um die Demontage zu vereinfachen, entfernen Sie zuerst Zylinder #1 und danach Zylinder #2.
Notice 3 : To smooth the disassembly steps, take down Cylinder #1 first, then Cylinder #2.
Observación 3 : Para facilitar el desmontaje, primero, quite cilindro #1 y luego cilindro #2.
Note 3 : Pour faciliter le démontage, démonter d'abord le cylindre #1, puis cylindre #2
Opmerking 3 : Om het demonteren te vergemakkelijken, verwijder eerst cilinder #1 en vervolgens cilinder #2
Uwaga 3 : Aby ułatwić demontaż, należy najpierw zdjąć siłownik, #1, a następnie siłownik #2.
Observação 3 : Para tornar a desmontagem mais fácil, tire primeiro o Cilindro #1 e depois o Cilindro #2
Uwaga 3: Per facilitare lo smontaggio bisogna prima rimuovere il cilindro #1 e successivamente il cilindro #2.
Zylinder #1 / Cylinder #1
Cilindro #1 / Cylindre #1
Cilinder #1 / Siłownik #1
Cilindro #1 / Cilindro #1
Festhalten / Hold / Sujetar / Tenir / Houden
Przytrzymać / HOLD / Hold
Festhalten / Hold / Sujetar / Tenir / Houden
Przytrzymać / HOLD / Hold
Drücken
Push
Presionar
Pousser
Drukken
Wcisnąć
PUSH
Spingere
Drücken
Push
Presionar
Pousser
Drukken
Wcisnąć
PUSH
Spingere

9
C6
B7 B8
Solarmodul / Solar Module
Módulo Solar / Module Solaire
Zonnemodule / Moduł Solarny
Módulo Solar / Modulo solare
Getriebeeinheit / Gear Box
Engranaje / Boîte D'engrenages
Tandwielkast / Zespół Przekładni
Caixa De Velocidades
Gruppo di trasmissione
Auge x 2 / Eye x 2
Ojo x 2 / Œil x 2
Oog x 2 / Oko x 2
Olho x 2 / Occhio x 2
A12A9
! Überprüfen Sie vor der Montage, die Luft im Zylinder und füllen Sie ihn ggf. mit Wasser.
! Before assembly check the air condition in the cylinder and add water if necessary
! Antes del montaje, compruebe el aire en el cilindro y, si fuera necesario, llénelo con agua.
! Avant le montage, vérifier le volume d'air dans le cylindre et ajouter de l'eau si nécessaire
Hydraulikmodul
Hydraulic module
Módulo hidráulico
Module hydraulique
Hydraulische module
Moduł hydrauliczny
Módulo Hidráulico
Modulo idraulico
Klaue (rechte) / Claw (Right)
Garra (derecha) / Griffe (droite)
Klauw (rechts) / Łapa (prawa)
Garra (Direita) / Branca (destra)
Klaue (linke) / Claw (Left)
Garra (izquierda) / Griffe (gauche)
Klauw (links) / Łapa (lewa)
Garra (Esquerda) / Branca (sinistra)
Solar Module Assembly
1. Das C16-Hilfswerkzeug verwenden / How to use C16- assistance tool / Utilizar la herramienta de ayuda C16 / Utiliser l'outil d'aide / De C16-hulptool gebruiken
Sposób użytkowania narzędzia pomocniczego C16 / Como usar a ferramenta de ajuda C16 / Sposób użytkowania narzędzia pomocniczego C16
2. Ziehen Sie die Teile und lassen Sie los. / Pull and Release the parts / Tire de las piezas y suéltelas. / Tirer et relâcher les pièces / Trek en laat de onderdelen los
Pociągnąć i oddzielić części / Puxe e Solte as peças / Tirare e dividere gli elementi
Hinweise : Kunststoffteile demontieren / Tips : Plastic parts Disassembly / Consejos: Desmontar las piezas de plástico
Conseils : Démonter les pièces en plastique / Tips : De plastic onderdelen demonteren / Wskazówki: Demontaż elementów plastikowych
Dicas : Desmontagem das Peças Plásticas / Indicazioni: Smontaggio degli elementi di plastica
D1
D2
D2
D2D1
D5
D6
D4
D8
C16
Ziehen
Pull
Tirar
Tirer
Trekken
Wyciągnąć
PULL
Tirare
Ziehen / Pull
Tirar / Tirer
Trekken
Wyciągnąć
PULL
Tirare
Ziehen / Pull
Tirar / Tirer
Trekken / Wyciągnąć
PULL / Tirare
Ziehen / Pull / Tirar / Tirer / Trekken
Wyciągnąć / PULL / Tirare
Ziehen / Pull / Tirar / Tirer / Trekken
Wyciągnąć / PULL / Tirare
Ziehen / Pull
Tirar / Tirer
Trekken
Wyciągnąć
PULL
Tirare
Ziehen / Pull
Tirar / Tirer
Trekken
Wyciągnąć
PULL
Tirare
Ziehen / Pull
Tirar / Tirer
Trekken
Wyciągnąć
PULL
Tirare
Ziehen / Pull
Tirar / Tirer
Trekken
Wyciągnąć
PULL
Tirare
01. Gelände-Fahrzeug montieren / 01. Obstacle avoiding Rover Assembly / 01. Montar el vehículo todo terreno / 01. Monter le véhicule tout-terrain
01. Terreinvoertuig / 01. Łazik omijający przeszkody - Montaż / 01. Montagem do Todo-o-Terreno Que Evita Obstáculos / 01. Jeep che evita gli ostacoli – Montaggio
! Voor de montage, controleer de hoeveelheid lucht in de cilinder en voeg water toe indien nodig.
! Przed montażem sprawdzić ilość powietrza w siłowniku i w razie potrzeby dolać wody.
! Antes de iniciar a montagem verifique o estado do ar no cilindro e adicione água se necessário.
! Prima del montaggio controllare la quantità d’aria in cilindro e se necessario aggiungere l’acqua

2
2
1
1
D8
B33
C6
B8
B22
B33 D7 D8C19x4 C3x4 C5x2B22
10
B7
C17
D1
D1
D2
D1
D1
D2
D1
2
1
D7
Stellen Sie die Kurvenscheibe vor der Montage ein (siehe Abb.).
Adjust the cam (as below fig) before assembly.
Antes del montaje, ajuste la leva (consulte la fig.).
Avant le montage, régler la came (voir ill.).
Stel de nok af (zie afb.) voor de montage.
Przed montażem wyregulować krzywkę (zgodnie z poniższą ilustracją).
Ajuste a cam (conforme figura abaixo) antes da montagem.
Prima del montaggio regolare la camma (secondo la presente illustrazione).
D1x6 D2x6 D5x2
1 : 1
Zylinder #2 / Cylinder #2
Cilindro #2 / Cylindre #2
Cilinder #2 / Siłownik #2
Cilindro #2 / Cilindro #2
Zylinder #1 / Cylinder #1
Cilindro #1 / Cylindre #1
Cilinder #1 / Siłownik #1
Cilindro #1 / Cilindro #1
Getriebeeinheit / Gear Box
Engranaje / Boîte D'engrenages
Tandwielkast / Zespół Przekładni
Caixa De Velocidades / Gruppo di trasmissione
Klaue (rechte) / Claw (Right)
Garra (derecha) / Griffe (droite)
Klauw (rechts) / Łapa (prawa)
Garra (Direita) / Branca (destra)
Klaue (linke) / Claw (Left)
Garra (izquierda) / Griffe (gauche)
Klauw (links) / Łapa (lewa)
Garra (Esquerda) / Branca (sinistra)
C17
1
2 3 4
5 6 7
Klicken
Click
Clic
Clic
klik
Klik
Clique
Clic
Klicken
Click
Clic
Clic
klik
Klik
Clique
Clic
Klicken
Click
Clic
Clic
klik
Klik
Clique
Clic
Klicken / Click / Clic
Clic / klik / Klik
Clique / Clic

Solarmodul / Solar Module
Módulo Solar / Module Solaire
Zonnemodule / Moduł Solarny
Módulo Solar / Modulo solare
Getriebeeinheit / Gear Box
Engranaje / Boîte D'engrenages
Tandwielkast / Zespół Przekładni
Caixa De Velocidades
Gruppo di trasmissione
Rot / Red / Rojo / rouge / rood
Czerwony / Vermelho / Rosso
Schwarz / Black / Negro / noir / zwart
Czarny / Preto / Nero
11
C3
Vorderrad / Front wheel / Rueda delantera / Roue avant
Voorwiel / Koło przednie / Roda dianteira / Ruota anteriore
Hinterrad / Rear wheel / Rueda trasera / Roue arrière
Achterwiel / Koło tylne / Roda traseira / Ruota posteriore
Hinterrad / Rear wheel / Rueda trasera / Roue arrière
Achterwiel / Koło tylne / Roda traseira
Hinterrad
Rear wheel
Rueda trasera
Roue arrière
Achterwiel
Koło tylne
Roda traseira
C19 C19
D2 D2
C3
Vorderansicht / Front View / Vista frontal / Vue frontale / Voorkant
Widok z przodu / Vista Fronta / Vista anteriorel
C5
C5
D5
x2 D5
Das Gelände-Fahrzeug fährt in eine andere Richtung,
wenn es gegen ein Hindernis stößt.
The rover goes and turns the other way when it is blocked by objects
El vehículo todo terreno cambiará de dirección cuando choque con un objeto.
Lorsque le véhicule s'approche d'un obstacle, il fait demi-tour et reprend son chemin
Wanneer het voertuig een obstakel nadert, dan zal deze zich omkeren en wegrijden
Gdy łazik napotka przeszkodę, obróci się i pójdzie w innym kierunku
O veículo todo-o-terreno avança e dá a volta sempre que encontra obstáculos
Quando jeep incontra un ostacolo, si gira e va in altra direzione
A9
A12
Schwarz
Black
Negro
noir
zwart
Czarny
Preto
Nero
Rot
Red
Rojo
rouge
rood
Czerwony
Vermelho
Rosso
8 9
10
12
14
13
11
Solarmodul / Solar Module
Módulo Solar / Module Solaire
Zonnemodule / Moduł Solarny
Módulo Solar / Modulo solare
Auge
Eye
Ojo
Œil
Oog
Oko
Olho
Occhio
Vorderrad (rechtes)
Front wheel (R)
Rueda delantera (derecha)
Roue avant (R)
Voorwiel (R)
Koło przednie (P)
Roda dianteira (D)
Ruota anteriore (D)
Pfeil nach oben
Arrow up
Flecha hacia arriba
Flèche vers le haut
Pijl naar boven
Strzałka w górę
Seta para cima
Freccia su
Vorderrad (rechtes)
Front wheel (R)
Rueda delantera (derecha)
Roue avant (R)
Voorwiel (R)
Koło przednie (P)
Roda dianteira (D)
Ruota anteriore (D)
Pfeil nach oben
Arrow up
Flecha hacia arriba
Flèche vers le haut
Pijl naar boven
Strzałka w górę
Seta para cima
Freccia su
Vorderrad (linkes)
Front wheel (L)
Rueda delantera (izquierda)
Roue avant (L)
Voorwiel (L)
Koło przednie (L)
Roda dianteira (E)
Ruota anteriore (S)
Pfeil nach unten
Arrow down
Flecha hacia abajo
Flèche vers le bas
Pijl naar beneden
Strzałka w dół
Seta para baixo
Freccia giù
Vorderrad (linkes)
Front wheel (L)
Rueda delantera (izquierda)
Roue avant (L)
Voorwiel (L)
Koło przednie (L)
Roda dianteira (E)
Ruota anteriore (S)
Pfeil nach unten
Arrow down
Flecha hacia abajo
Flèche vers le bas
Pijl naar beneden
Strzałka w dół
Seta para baixo
Freccia giù

D7C19x4 C21x2 C3x4 C7x3B20x2
B36 B37
B5 B6
A19A18
12
D2
D2
D7
D6
D6
D2
D1x2
D1
C21
D1
A18
D2
D1x2
D1
C21
D1
A19
2
1
Teil 1
Part 1
Pieza 1
Pièce 1
Deel 1
Część 1
Parte 1
Parte 1
Teil 1
Part 1
Pieza 1
Pièce 1
Deel 1
Część 1
Parte 1
Parte 1
Teil 2
Part 2
Pieza 2
Pièce 2
Deel 2
Część 2
Parte 2
Parte 2
Teil 2
Part 2
Pieza 2
Pièce 2
Deel 2
Część 2
Parte 2
Parte 2
A12A9
D1x10 D2x8 D6x2
1 : 1
Solarmodul / Solar Module
Módulo Solar / Module Solaire
Zonnemodule / Moduł Solarny
Módulo Solar / Modulo solare
Getriebeeinheit / Gear Box
Engranaje / Boîte D'engrenages
Tandwielkast / Zespół Przekładni
Caixa De Velocidades
Gruppo di trasmissione
Hydraulikmodul
Hydraulic module
Módulo hidráulico
Module hydraulique
Hydraulische module
Moduł hydrauliczny
Módulo Hidráulico
Modulo idraulico
Zylinder #2 / Cylinder #2
Cilindro #2 / Cylindre #2
Cilinder #2 / Siłownik #2
Cilindro #2 / Cilindro #2
Zylinder #2 / Cylinder #2
Cilindro #2 / Cylindre #2
Cilinder #2 / Siłownik #2
Cilindro #2 / / Cilindro #2
! Überprüfen Sie vor der Montage, die Luft im Zylinder und füllen Sie ihn ggf. mit Wasser.
! Before assembly check the air condition in the cylinder and add water if necessary
! Antes del montaje, compruebe el aire en el cilindro y, si fuera necesario, llénelo con agua.
! Avant le montage, vérifier le volume d'air dans le cylindre et ajouter de l'eau si nécessaire.
02. Gabelstapler montieren / 02. Forklift Assembly / 02. Montar la carretilla elevadora / 02. Monter le chariot élévateur
02. De heftruck monteren / 02. Wózek widłowy - Montaż / 02. Montagem da Empilhadora / 02. Carrello a forca - Montaggio
! Voor de montage, controleer de hoeveelheid lucht in de cilinder en voeg water toe indien nodig.
! Przed montażem sprawdzić ilość powietrza w siłowniku i w razie potrzeby dolać wody.
! Antes de iniciar a montagem verifique o estado do ar no cilindro e adicione água se necessário.
! Prima del montaggio controllare la quantità d’aria in cilindro e se necessario aggiungere acqua.
Getriebeeinheit / Gear Box
Engranaje / Boîte D'engrenages
Tandwielkast / Zespół Przekładni
Caixa De Velocidades
Gruppo di trasmissione
1
4
2 3

13
C7
C7
B36
B37
B20
B5
B6
A12
A9
B20
C7
D1
D1
C19
D2
C3
2
1
Solarmodul / Solar Module
Módulo Solar / Module Solaire
Zonnemodule / Moduł Solarny
Módulo Solar / Modulo solare
Klicken
Click
Clic
Clic
klik
Klik
Clique
Clic
Klicken
Click
Clic
Clic
klik
Klik
Clique
Clic
Klicken
Click
Clic
Clic
klik
Klik
Clique
Clic
Klicken / Click / Clic
Clic / klik / Klik
Clique / Clic
5 6
7
9
8
10

14
B5 B6
D8C22x4
C3x4 C7x4 B32
B34 B35 B36 B37 B22
B14x2
B11 B9A16 B7 B8
A16
D2 B22
D8
2
2
1
D1x2 D2x13 D4x4 D5x2
1 : 1
Schwarz / Black / Negro / noir
Zwart / Czarny / Preto / Nero
Rot / Red / Rojo / rouge / rood
Czerwony / Vermelho / Rosso
Solarmodul / Solar Module
Módulo Solar / Module Solaire
Zonnemodule / Moduł Solarny
Módulo Solar / Modulo solare
Getriebeeinheit / Gear Box
Engranaje / Boîte D'engrenages
Tandwielkast / Zespół Przekładni
Caixa De Velocidades
Gruppo di trasmissione
Hydraulikmodul
Hydraulic module
Módulo hidráulico
Module hydraulique
Hydraulische module
Moduł hydrauliczny
Módulo Hidráulico
Modulo idraulico
Auge x 2 / Eye xx 2
Ojo x 2 / Œil x 2
Oog x 2 / Oko x 2
Olho x 2 / Occhio x 2
Zylinder #2 / Cylinder #2
Cilindro #2 / Cylindre #2
Cilinder #2 / Siłownik #2
Cilindro #2 / Cilindro #2
Zylinder #2 / Cylinder #2
Cilindro #2 / Cylindre #2
Cilinder #2 / Siłownik #2
Cilindro #2 / Cilindro #2
Getriebeeinheit
Gear Box
Engranaje
Boîte D'engrenages
Tandwielkast
Zespół Przekładni
Caixa De Velocidades
Gruppo di trasmissione
! Überprüfen Sie vor der Montage, die Luft im Zylinder und füllen Sie ihn ggf. mit W
! Before assembly check the air condition in the cylinder and add water if necessary
! Antes del montaje, compruebe el aire en el cilindro y, si fuera necesario, llénelo con agua.
! Avant le montage, vérifier le volume d'air dans le cylindre et ajouter de l'eau si nécessaire
! Voor de montage, controleer de hoeveelheid lucht in de cilinder en voeg water toe indien nodig.
! Przed montażem sprawdzić ilość powietrza w siłowniku i w razie potrzeby dolać wody
! Antes de iniciar a montagem verifique o estado do ar no cilindro e adicione água se necessário.
! Prima del montaggio controllare la quantità d’aria in cilindro e se necessario aggiungere acqua.
03. Affe montieren / 03. Monkey Assembly / 03. Montar el mono / 03. Monter le singe / 03. De aap monteren / 03. Małpka – Montaż
03. Montagem do Macaco / 03. Scimmia - Montaggio
1 2 3
11
Solarmodul / Solar Module
Módulo Solar / Module Solaire
Zonnemodule / Moduł Solarny
Módulo Solar / Modulo solare
Getriebeeinheit / Gear Box
Engranaje / Boîte D'engrenages
Tandwielkast / Zespół Przekładni
Caixa De Velocidades
Gruppo di trasmissione
Rot / Red / Rojo / rouge / rood
Czerwony / Vermelho / Rosso
Schwarz / Black / Negro / noir / zwart
Czarny / Preto / Nero

15
B35
D2
D2
D2
D2
C22
C22
B8
B6
B5
B7
B34
C22
C22
2
1
D2
C3 D2
Linke Seite / Left Side / Parte izquierda / Côté gauche
Linkerkant / Strona lewa / Lado Esquerdo / Lato sinistro
▼
Rechte Seite / Right Side / Parte derecha
Côté droit / Rechterkant / Strona prawa
Lado Direito / Lato destro
▼
C7
C7
D4
D4
C7
C7
D4
D4
Arm (linker)
Arm (Left)
Brazo (izquierda)
Bras (gauche)
Arm (links)
Ręka (lewa)
Braço (Esquerda)
Arm (linker)
Arm (Left)
Brazo (izquierda)
Bras (gauche)
Arm (links)
Ręka (lewa)
Braço (Esquerda)
Mano (sinistra)
Bein (linkes)
Leg (Left)
Pata (izquierda)
Patte (gauche)
Poot (links)
Noga (lewa)
Perna (Esquerda)
Gamba (sinistra)
Arm (rechter)
Arm (Right)
Brazo (derecho)
Bras (droit)
Arm (rechts)
Ręka (prawa)
Braço (Direita)
Arm (rechter)
Arm (Right)
Brazo (derecho)
Bras (droit)
Arm (rechts)
Ręka (prawa)
Braço (Direita)
Mano (destra)
Bein (rechtes)
Leg (Right)
Pata (derecho)
Bras (gauche)
Poot (rechts)
Noga (prawa)
Perna (Esquerda)
Gamba (destra)
4 5
6 7 8
9 10 11
12 13 14
Klicken
Click
Clic
Clic
klik
Klik
Clique
Clic
Klicken
Click
Clic
Clic
klik
Klik
Clique
Clic
Klicken
Click
Clic
Clic
klik
Klik
Clique
Clic
Klicken / Click / Clic
Clic / klik / Klik
Clique / Clic

B32
B14
B14
B9
B36
B11
B37
D1x2
C22 x 4: befestigen Sie diese Teile am Seil.
C22x4 hang on the rope
C22 x 4: Fije estas piezas a la cuerda.
C22x4 fixer la corde
C22x4 bevestig aan het touw
C22x4 zaczepić na linie
C22x4 para pendurar na corda
C22x4 agganciare su corda
D5
D5
P11
C22
C22
C22
C22
15 16 17
18
19 20
Solarmodul / Solar Module
Módulo Solar / Module Solaire
Zonnemodule / Moduł Solarny
Módulo Solar / Modulo solare
x2
Auge / Eye
Ojo / Œil
Oog / Oko
Olho / Occhio
Schwarz
Black
Negro
noir
zwart
Czarny
Preto
Nero
Rot
Red
Rojo
rouge
rood
Czerwony
Vermelho
Rosso
16
Solarmodul / Solar Module
Módulo Solar / Module Solaire
Zonnemodule / Moduł Solarny
Módulo Solar / Modulo solare
Getriebeeinheit / Gear Box
Engranaje / Boîte D'engrenages
Tandwielkast / Zespół Przekładni
Caixa De Velocidades
Gruppo di trasmissione
Rot / Red / Rojo / rouge / rood
Czerwony / Vermelho / Rosso
Schwarz / Black / Negro / noir / zwart
Czarny / Preto / Nero

C17 D8C22C3x2 C7
B20x2
B32
B33x2
B37B14
B15 B16B5 B6
B9 B11A18
A19
A4x2
C6x2B7 B8
17
D1
D8
C22
C17
B5
D2
B14
B6
B37
D1
Auge / Eye / Ojo
Œil / Oog / Oko
Olho / Occhio
Auge / Eye / Ojo
Œil / Oog / Oko
Olho / Occhio
D1x18 D2x8 D3x5 D4x3
D4
Zylinder #2 / Cylinder #2
Cilindro #2 / Cylindre #2
Cilinder #2 / Siłownik #2
Cilindro #2 / Cilindro #2
! Überprüfen Sie vor der Montage, die Luft im Zylinder und füllen Sie ihn ggf. mit W
! Before assembly check the air condition in the cylinder and add water if necessary
! Antes del montaje, compruebe el aire en el cilindro y, si fuera necesario, llénelo con agua.
! Avant le montage, vérifier le volume d'air dans le cylindre et ajouter de l'eau si nécessaire
! Voor de montage, controleer de hoeveelheid lucht in de cilinder en voeg water toe indien nodig.
! Przed montażem sprawdzić ilość powietrza w siłowniku i w razie potrzeby dolać wody
! Antes de iniciar a montagem verifique o estado do ar no cilindro e adicione água se necessário.
! Prima del montaggio controllare la quantità d’aria in cilindro e se necessario aggiungere acqua.
04. Strauß montieren/ /04. Ostrich Assembly / 04. Montar el avestruz / 04. Monter l'autruche/ / 04. De struisvogel monteren
04. Struś - Montaż/ / 04. Montagem da Avestruz / 04. Struzzo - Montaggio
1
2 3 4
22
1
1
1 : 1
Solarmodul / Solar Module
Módulo Solar / Module Solaire
Zonnemodule / Moduł Solarny
Módulo Solar / Modulo solare
Getriebeeinheit / Gear Box
Engranaje / Boîte D'engrenages
Tandwielkast / Zespół Przekładni
Caixa De Velocidades
Gruppo di Trasmissione
Auge X 2 / Eye X2
Ojo X 2 / Œil X2
Oog X2 / Oko X2
Olho X2 / Occhio x2
Hydraulikmodul
Hydraulic module
Módulo hidráulico
Module hydraulique
Hydraulische module
Moduł hydrauliczny
Módulo Hidráulico
Modulo idraulico
Klaue (rechte) / Claw (Right)
Garra (derecha) / Griffe (droite)
Klauw (rechts) / Łapa (prawa)
Garra (Direita) / Branca (destra)
Klaue (linke) / Claw (Left)
Garra (izquierda) / Griffe (gauche)
Klauw (links) / Łapa (lewa)
Garra (Esquerda) / Branca (sinistra)

18
D1 A4
D1
D2
B32
D3
A4
D1x2
C7
B9
D4
B11
D4
Klicken
Click
Clic
Clic
klik
Klik
Clique
Click
Klicken
Click
Clic
Clic
klik
Klik
Clique
Click
Klicken
Click
Clic
Clic
klik
Klik
Clique
Click
Solarmodul / Solar Module
Módulo Solar / Module Solaire
Zonnemodule / Moduł Solarny
Módulo Solar /Modulo solare
5
7 8 9
6
2
2
1
1
10 11

B20
C6 C6
D3
D1
D3
B33
B20
D3
D1
D3
B33
Part 2
D2
D2
C3
D1x3 B7
A19
D1x2
D1x3
B8
A18
D1x2
12
13 14
19
Teil 1
Part 1
Pieza 1
Pièce 1
Deel 1
Część 1
Parte 1
Parte 1
Teil 2
Part 2
Pieza 2
Pièce 2
Deel 2
Część 2
Parte 2
Parte 2
Linkes Bein
Left leg
pata izquierda
patte gauche
linkerpoot
Noga lewa
Perna esquerda
Gamba destra
Rechtes Bein
Right leg
Pata derecha
Patte droite
Rechterpoot
Noga prawa
Perna direita
Gamba sinistra
Klaue (rechte) / Claw (Right)
Garra (derecha) / Griffe (droite)
Klauw (rechts) / Łapa (prawa)
Garra (Direita) / Branca (destra)
Klaue (linke) / Claw (Left)
Garra (izquierda) / Griffe (gauche)
Klauw (links) / Łapa (lewa)
Garra (Esquerda) / Branca (sinistra)

20
B16
D2
2 2
1 1
B15
D2
Schwarz
Black
Negro
noir
zwart
Czarny
Preto
Nero
Rot
Red
Rojo
rouge
rood
Czerwony
Vermelho
Rosso
Linkes Bein / Left Leg
Pata Izquierda / Patte Gauche
Linkerpoot / Noga Lewa
Perna Esquerda / Gamba sinistra
Rechtes Bein / Right leg
Pata derecha / Patte droite
Rechterpoot / Noga prawa
Perna direita / Gamba destra
Solarmodul / Solar Module
Módulo Solar / Module Solaire
Zonnemodule / Moduł Solarny
Módulo Solar / Modulo solare
Getriebeeinheit / Gear Box
Engranaje / Boîte D'engrenages
Tandwielkast / Zespół Przekładni
Caixa De Velocidades
Gruppo di trasmissione
Rot / Red / Rojo / rouge / rood
Czerwony / Vermelho / Rosso
Schwarz / Black / Negro / noir / zwart
Czarny / Preto / Nero
15
17
16

B36 B37 B27 D9
C19x4
C22x3
C3x2
C7
B34 B35
B9 B11 A15
A18A19
A7
A4x2
21
C22
B37
A4
D1x2
D1
C22
A9
D1
C22
B36
B27
C17
D2
D1
B9
D1x2 A12
A4
A12
A11A10
A9
D1x14 D2x7 D4x2
D4
1 : 1
2
2
3
3
3
4
5
5
1
1
Teil 1
Part 1
Pieza 1
Pièce 1
Deel 1
Część 1
Parte 1
Parte 1
! Überprüfen Sie vor der Montage, die Luft im Zylinder und füllen Sie ihn ggf. mit Wasser.
! Before assembly check the air condition in the cylinder and add water if necessary
! Antes del montaje, compruebe el aire en el cilindro y, si fuera necesario, llénelo con agua.
! Avant le montage, vérifier le volume d'air dans le cylindre et ajouter de l'eau si nécessaire
05. Bagger montieren / 05. Excavator Assembly / 05. Montar la excavadora / 05. Monter l'excavatrice / 05. De graafmachine monteren
05. Koparka - Montaż / 05. Montagem da Escavadora / 05. Escavatore – Montaggio
! Voor de montage, controleer de hoeveelheid lucht in de cilinder en voeg water toe indien nodig.
! Przed montażem sprawdzić ilość powietrza w siłowniku i w razie potrzeby dolać wody.
! Antes de iniciar a montagem verifique o estado do ar no cilindro e adicione água se necessário.
! Prima del montaggio controllare la quantità d’aria in cilindro e se necessario aggiungere acqua.
1
2
Solarmodul / Solar Module
Módulo Solar / Module Solaire
Zonnemodule / Moduł Solarny
Módulo Solar / Modulo solare
Getriebeeinheit / Gear Box
Engranaje / Boîte D'engrenages
Tandwielkast / Zespół Przekładni
Caixa De Velocidades
Gruppo di trasmissione
Hydraulikmodul
Hydraulic module
Módulo hidráulico
Module hydraulique
Hydraulische module
Moduł hydrauliczny
Módulo Hidráulico
Modulo idraulico

Teil 1
Part 1
Pieza 1
Pièce 1
Deel 1
Część 1
Parte 1
Parte 1
Teil 2
Part 2
Pieza 2
Pièce 2
Deel 2
Część 2
Parte 2
Parte 1
Teil 2
Part 2
Pieza 2
Pièce 2
Deel 2
Część 2
Parte 2
Parte 2
22
D1x2
B34
A15
D4
D1x3
A19
D2
A7
C7
B11
Getriebeeinheit / Gear Box
Engranaje / Boîte D'engrenages
Tandwielkast / Zespół Przekładni
Caixa De Velocidades
Gruppo di trasmissione
3
6 7
4
5

23
B35
C17
D9
D2
D2
D2
A18
D1x2
Zylinder #2 / Cylinder #2
Cilindro #2 / Cylindre #2
Cilinder #2 / Siłownik #2
Cilindro #2 / Cilindro #2
8 9
1110
12 13

24
C19
C19
A10
A11
2
1
Hinterrad
Rear wheel
Rueda trasera
Roue arrière
Achterwiel
Koło tylne
Roda traseira
Hinterrad
Rear wheel
Rueda trasera
Roue arrière
Achterwiel
Koło tylne
Roda traseira
Ruota posteriore
Hinterrad / Rear wheel / Rueda trasera / Roue arrière
Achterwiel / Koło tylne / Roda traseira / Ruota posteriore
Zylinder #1 / Cylinder #1
Cilindro #1 / Cylindre #1
Cilinder #1 / Siłownik #1
Cilindro #1 / Cilindro #1
Klicken
Click
Clic
Clic
klik
Klik
Clique
Click
Klicken
Click
Clic
Clic
klik
Klik
Clique
Click
Klicken
Click
Clic
Clic
klik
Klik
Clique
Click
Solarmodul / Solar Module
Módulo Solar / Module Solaire
Zonnemodule / Moduł Solarny
Módulo Solar / Modulo solare
Getriebeeinheit / Gear Box
Engranaje / Boîte D'engrenages
Tandwielkast / Zespół Przekładni
Caixa De Velocidades
Gruppo di trasmissione
Rot / Red / Rojo / rouge / rood
Czerwony / Vermelho / Rosso
Schwarz / Black / Negro / noir / zwart
Czarny / Preto / Nero
14
16
17
15
C19
D2
C3
Schwarz
Black
Negro
noir
zwart
Czarny
Preto
Nero
Rot
Red
Rojo
rouge
rood
Czerwony
Vermelho
Rosso

B36 B37B7 B8A15 A16 A17
C21x2C3x4 C5x2 C7x6 C9x2
B32 B34 B35B14x2 B15 B16 A4x4
25
D2
D2
B35
B34
B11
D5
B14
D2
B9
D5
B14
D2
A12 A11A10 A9
C22x4C4 C8 B9 B11
A18A19 D1x17 D2x16 D4x4 D5x2
1 : 1
Solarmodul / Solar Module
Módulo Solar / Module Solaire
Zonnemodule / Moduł Solarny
Módulo Solar / Modulo solare
Getriebeeinheit / Gear Box
Engranaje / Boîte D'engrenages
Tandwielkast / Zespół Przekładni
Caixa De Velocidades
Gruppo di trasmissione
Hydraulikmodul
Hydraulic module
Módulo hidráulico
Module hydraulique
Hydraulische module
Moduł hydrauliczny
Módulo Hidráulico
Modulo idraulico
Auge X 2 / Eye X2
Ojo X 2 / Œil X2
Oog X2 / Oko X2
Olho X2 / Occhio x2
Solarmodul / Solar Module
Módulo Solar / Module Solaire
Zonnemodule / Moduł Solarny
Módulo Solar / Modulo solare
! Überprüfen Sie vor der Montage, die Luft im Zylinder und füllen Sie ihn ggf. mit Wasser.
! Before assembly check the air condition in the cylinder and add water if necessary
! Antes del montaje, compruebe el aire en el cilindro y, si fuera necesario, llénelo con agua.
! Avant le montage, vérifier le volume d'air dans le cylindre et ajouter de l'eau si nécessaire
06. Skorpion montieren / 06. Scorpion Assembly / 06. Montar el escorpión / 06. Monter le scorpion / 06. De schorpioen monteren
06. Skorpion - Montaż / 06. Montagem do Escorpião / 06. Scorpione - Montaggio
! Voor de montage, controleer de hoeveelheid lucht in de cilinder en voeg water toe indien nodig.
! Przed montażem sprawdzić ilość powietrza w siłowniku i w razie potrzeby dolać wody.
! Antes de iniciar a montagem verifique o estado do ar no cilindro e adicione água se necessário.
! Prima del montaggio controllare la quantità d’aria in cilindro e se necessario aggiungere acqua.
1 2

26
C7
D1
C7
C5
C5
D1
A17
C4
C8
B32
D1
2
1
D2
C3 D2
Zylinder #2 / Cylinder #2
Cilindro #2 / Cylindre #2
Cilinder #2 / Siłownik #2
Cilindro #2 / Cilindro #2
Zylinder #1 / Cylinder #1
Cilindro #1 / Cylindre #1
Cilinder #1 / Siłownik #1
Cilindro #1 / Cilindro #1
x2
Auge / Eye
Ojo / Œil
Oog / Oko
Olho / Occhio
Linke Seite
Left Side
Parte izquierda
Côté gauche
Linkerkant
Strona lewa
Lado Esquerdo
Lato sinistro
Rechte Seite
Right Side
Parte derecha
Côté droit
Rechterkant
Strona prawa
Lado Direito
Lato destro
Klicken / Click / Clic / Clic
Klik / Klik / Clique / Click
Klicken / Click / Clic / Clic
Klik / Klik / Clique / Click
3 4
5
6 7

27
A18
D1
A16
C22
D1
D1
D1
D1
C9
B37
C22
C21
D1
D1
D1
D1
B36
C22
C9
D1
A19
A15
C22
C21
A12 A10
A9
A11
D1
D2
A4 C7
D4
Teil 1
Part 1
Pieza 1
Pièce 1
Deel 1
Część 1
Parte 1
Parte 1
Teil 1
Part 1
Pieza 1
Pièce 1
Deel 1
Część 1
Parte 1
Parte 1
Teil 1
Part 1
Pieza 1
Pièce 1
Deel 1
Część 1
Parte 1
Parte 1
Teil 1
Part 1
Pieza 1
Pièce 1
Deel 1
Część 1
Parte 1
Parte 1
Teil 1
Part 1
Pieza 1
Pièce 1
Deel 1
Część 1
Parte 1
Parte 1
Linke Schere
Left Pincer
Pinza Izquierda
Branchie Gauche
Linkerschaar
Szczypce Lewe
Pinça Esquerda
Pinze sinistre
Rechte Schere
Right Pincer
Pinza Derecha
Branchie Droite
Rechterschaar
Szczypce Prawe
Pinça Direita
Pinze destre
8
9
10 11

28
B15
B16
B7
B8
Linke Schere
Left Pincer
Pinza Izquierda
Branchie Gauche
Linkerschaar
Szczypce Lewe
Pinça Esquerda
Pinze sinistre
Rechte Schere
Right Pincer
Pinza Derecha
Branchie Droite
Rechterschaar
Szczypce Prawe
Pinça Direita
Pinze destre
Solarmodul / Solar Module
Módulo Solar / Module Solaire
Zonnemodule / Moduł Solarny
Módulo Solar / Modulo solare
12
14
15
13
Schwarz
Black
Negro
Noir
Zwart
Czarny
Preto
Nero
Rot
Red
Rojo
Rouge
Rood
Czerwony
Vermelho
Rosso
Solarmodul / Solar Module
Módulo Solar / Module Solaire
Zonnemodule / Moduł Solarny
Módulo Solar / Modulo solare
Getriebeeinheit / Gear Box
Engranaje / Boîte D'engrenages
Tandwielkast / Zespół Przekładni
Caixa De Velocidades
Gruppo di trasmissione
Rot / Red / Rojo / rouge / rood
Czerwony / Vermelho / Rosso
Schwarz / Black / Negro / noir / zwart
Czarny / Preto / Nero

! Überprüfen Sie vor der Montage, die Luft im Zylinder und füllen Sie ihn ggf. mit Wasser.
! Before assembly check the air condition in the cylinder and add water if necessary
! Antes del montaje, compruebe el aire en el cilindro y, si fuera necesario, llénelo con agua.
! Avant le montage, vérifier le volume d'air dans le cylindre et ajouter de l'eau si nécessaire
07. Herr & Hund montieren / 07. Master & dog Assembly / 07. Montar el amo y el perro / 07. Monter le maître & chien
07. Baasje & hond monteren / 07. Pies i Pan - Montaż / 07. Montagem do Dono & Cão / 07. Cane e Signore - Montaggio
! Voor de montage, controleer de hoeveelheid lucht in de cilinder en voeg water toe indien nodig.
! Przed montażem sprawdzić ilość powietrza w siłowniku i w razie potrzeby dolać wody.
! Antes de iniciar a montagem verifique o estado do ar no cilindro e adicione água se necessário.
! Prima del montaggio controllare la quantità d’aria in cilindro e se necessario aggiungere acqua.
1 2
Solarmodul / Solar Module
Módulo Solar / Module Solaire
Zonnemodule / Moduł Solarny
Módulo Solar / Modulo solare
Getriebeeinheit / Gear Box
Engranaje / Boîte D'engrenages
Tandwielkast / Zespół Przekładni
Caixa De Velocidades
Gruppo di trasmissione
Hydraulikmodul
Hydraulic module
Módulo hidráulico
Module hydraulique
Hydraulische module
Moduł hydrauliczny
Módulo Hidráulico
Modulo idraulico
Auge x 2 / Eye x2
Ojo x 2 / Œil x2
Oog x2 / Oko x2
Olho x2 / Occhio x2
D7 D8C2x4 C3x2 C5x2
C6x2
C7x4 C9
B20x2
B32
B33x2
B34 B35 B36 B37B22B15 B16
B5 B6
B7 B8 B9 B11
A15 A16 A18A19
A4x4
29
A10
C5
C5
D5
D5
D1x24 D2x10 D3 D4x5 D5x4
1 : 1
x2
Auge / Eye / Ojo / Œil
Oog / Oko / Olho / Occhio
Solarmodul / Solar Module
Módulo Solar / Module Solaire
Zonnemodule / Moduł Solarny
Módulo Solar / Modulo solare
Getriebeeinheit
Gear Box
Engranaje
Boîte D'engrenages
Tandwielkast
Zespół Przekładni
Caixa De Velocidades
Gruppo di trasmissione
D1 B36
B37
B5
B35
D1
D1
B6
D4
B34 D1 D1
D1
D3
D4

3
4
5
30
D2
C3
D2
Rechtes Bein
Right Leg
Pata Derecha
Patte Droite
Rechterpoot
Noga Prawa
Perna Direita
Gamba destra
Linkes bein
Left leg
Pata izquierda
Patte gauche
Linkerpoot
Noga lewa
Perna esquerda
Gamba sinistra
A4
B15
D4
D2
A4
B16
D4
D2
D1 D1
D1x4
A18
C7
B20
B33
D1
B8
C6
D1
D1
D1x4
A19
C7
B20
B33
D1
B7
C6

Solarmodul / Solar Module
Módulo Solar / Module Solaire
Zonnemodule / Moduł Solarny
Módulo Solar / Modulo solare
Getriebeeinheit / Gear Box
Engranaje / Boîte D'engrenages
Tandwielkast / Zespół Przekładni
Caixa De Velocidades
Gruppo di trasmissione
Rot / Red / Rojo / rouge / rood
Czerwony / Vermelho / Rosso
Schwarz / Black / Negro / noir / zwart
Czarny / Preto / Nero
6 7 8
9
10 11
Schwarz
Black
Negro
Noir
Zwart
Czarny
Preto
Nero
Rot
Red
Rojo
Rouge
Rood
Czerwony
Vermelho
Rosso
31
2
2
1
1
2
1
Zylinder #1 / Cylinder #1
Cilindro #1 / Cylindre #1
Cilinder #1 / Siłownik #1
Cilindro #1 / Cilindro #1
Zylinder #2 / Cylinder #2
Cilindro #2 / Cylindre #2
Cilinder #2 / Siłownik #2
Cilindro #2 / Cilindro #2
C7
D2
C2
B22
C9
D8
D7
B9
A15
A16
D1
A10
D2
D1
A4
D1
D1
C2
A4
B32
D4
B11
C7
D2
C2 D5
D5
D2
C2
Klicken
Click
Clic
Clic
klik
Klik
Clique
Click
Klicken
Click
Clic
Clic
klik
Klik
Clique
Click
Klicken / Click / Clic
Clic / klik / Klik
Clique / Click

D1
D1
B1 B23
C22
D1
A17 C21
C21 B22
D1
B29
B12
B24
B13
D1
B1
A16
D1
C21x2
C22x2 C7x4C4 C8
B22 B29 B14x4B1x2
A17
D8
C2x2
C3x4
B34 B35
B15 B16
B7 B8
A15 A16
A18A19
B12 B13 B23
B24
32
B6B5A11A10
B15
C22
2
D8
D1x14 D2x14 D3x2 D4x4
1 : 1
Auge / Eye
Ojo / Œil
Oog / Oko
Olho / Occhio
Auge / Eye
Ojo / Œil
Oog / Oko
Olho / Occhio
Zylinder #2 / Cylinder #2
Cilindro #2 / Cylindre #2
Cilinder #2 / Siłownik #2
Cilindro #2 / Cilindro #2
Getriebeeinheit
Gear Box
Engranaje
Boîte D'engrenages
Tandwielkast
Zespół Przekładni
Caixa De Velocidades
Gruppo di trasmissione
2
1
! Überprüfen Sie vor der Montage, die Luft im Zylinder und füllen Sie ihn ggf. mit Wasser.
! Before assembly check the air condition in the cylinder and add water if necessary
! Antes del montaje, compruebe el aire en el cilindro y, si fuera necesario, llénelo con agua.
! Avant le montage, vérifier le volume d'air dans le cylindre et ajouter de l'eau si nécessaire
08. Elefant montieren / 08. Elephant Assembly / 08. Montar el elefante / 08. Monter l'éléphant
08. De olifant monteren / 08. Słoń - Montaż / 08. Montagem do Elefante / 08. Elefante - Montaggio
! Voor de montage, controleer de hoeveelheid lucht in de cilinder en voeg water toe indien nodig.
! Przed montażem sprawdzić ilość powietrza w siłowniku i w razie potrzeby dolać wody.
! Antes de iniciar a montagem verifique o estado do ar no cilindro e adicione água se necessário.
! Prima del montaggio controllare la quantità d’aria in cilindro e se necessario aggiungere acqua.
1
2
3
Auge x 2 / Eye x2
Ojo x 2 / Œil x2
Oog x2 / Oko x2
Olho x2 / Occhio x2
Solarmodul / Solar Module
Módulo Solar / Module Solaire
Zonnemodule / Moduł Solarny
Módulo Solar / Modulo solare
Getriebeeinheit / Gear Box
Engranaje / Boîte D'engrenages
Tandwielkast / Zespół Przekładni
Caixa De Velocidades
Gruppo di trasmissione
Hydraulikmodul
Hydraulic module
Módulo hidráulico
Module hydraulique
Hydraulische module
Moduł hydrauliczny
Módulo Hidráulico
Modulo idraulico

B15
D3
B14
B34
B14
B16
D3 B14
B35
B14
33
2
1
D2
C3 D2
Zylinder #1 / Cylinder #1
Cilindro #1 / Cylindre #1
Cilinder #1 / Siłownik #1
Cilindro #1
Klicken
Click
Clic
Clic
klik
Klik
Clique
Click
Klicken
Click
Clic
Clic
klik
Klik
Clique
Click
Klicken / Click / Clic
Clic / klik / Klik
Clique / Click
Klicken / Click
Clic / Clic / klik
Klik / Clique/Click
Linke Seite
Left Side
Parte izquierda
Côté gauche
Linkerkant
Strona lewa
Lado Esquerdo
Lato sinistro
A10
A11
Rechte Seite
Right Side
Parte derecha
Côté droit
Rechterkant
Strona prawa
Lado Direito
Lato destro
Solarmodul / Solar Module
Módulo Solar / Module Solaire
Zonnemodule / Moduł Solarny
Módulo Solar
4
6
7
9 1110
8
5

D1x2
B8
C2
D2
D2
B7
C2
D1x2
D2
D2
C7
C8
C7
C4
D1x2 A19
D2
C7
B5
34
D4
D4
D4
D4
D1x2
B6
D2
C7
A18 Vorderbein (rechtes)
Front Leg (R)
Pata delantera (derecha)
patte avant (R)
voorpoot (R)
Noga przednia (P)
Perna Dianteira (D)
Gamba anteriore (D)
Vorderbein (linkes)
Front Leg (L)
Pata delantera (izquierda)
patte avant (L)
voorpoot (L)
Noga przednia (L)
Perna Dianteira (E)
Gamba anteriore (E)
PRETO
Hinterbein (rechtes)
Rear Leg (R)
Pata trasera (derecha)
Patte arrière (R)
Rechterpoot (R)
Noga tylna (P)
Perna Traseira (D)
Gamba posteriore (D)
Hinterbein (linkes)
Rear Leg (L)
Pata trasera (izquierda)
Patte arrière (L)
Rechterpoot (L)
Noga tylna (L)
Perna Traseira (E)
Gamba posteriore (E)
Schwarz
Black
Negro
Noir
Zwart
Czarny
Preto
Nero
Rot
Red
Rojo
Rouge
Rood
Czerwony
Vermelho
Rosso
Solarmodul / Solar Module
Módulo Solar / Module Solaire
Zonnemodule / Moduł Solarny
Módulo Solar / Modulo solare
Getriebeeinheit / Gear Box
Engranaje / Boîte D'engrenages
Tandwielkast / Zespół Przekładni
Caixa De Velocidades
Gruppo di trasmissione
Rot / Red / Rojo / rouge / rood
Czerwony / Vermelho / Rosso
Schwarz / Black / Negro / noir / zwart
Czarny / Preto / Nero
12
13
14

! Überprüfen Sie vor der Montage, die Luft im Zylinder und füllen Sie ihn ggf. mit Wasser.
! Before assembly check the air condition in the cylinder and add water if necessary
! Antes del montaje, compruebe el aire en el cilindro y, si fuera necesario, llénelo con agua.
! Avant le montage, vérifier le volume d'air dans le cylindre et ajouter de l'eau si nécessaire
09. Buggy montieren / 09. Buggy Assembly / 09. Montar el Buggy / 09. Monter le buggy / 09. De buggy monteren
09. Buggy - Montaż / 09. Montagem do Escaravelho / 09. Buggy - Montaggio
! Voor de montage, controleer de hoeveelheid lucht in de cilinder en voeg water toe indien nodig.
! Przed montażem sprawdzić ilość powietrza w siłowniku i w razie potrzeby dolać wody.
! Antes de iniciar a montagem verifique o estado do ar no cilindro e adicione água se necessário.
! Prima del montaggio controllare la quantità d’aria in cilindro e se necessario aggiungere acqua.
1
3
2
Zylinder #2 / Cylinder #2
Cilindro #2 / Cylindre #2
Cilinder #2 / Siłownik #2
Cilindro #2 / / Cilindro #2
C20x2
C6
35
A3 D7 D8
C19x4
C3x2
C4
C7x5
C8
B32 B34 B35
B36 B37
B9B11A15 A16
A7 A4
A11
A10A12
A9
B32
D4
4
1 : 1
D1x25 D2x5 D3x2 D4x3 D5x2
Getriebeeinheit / Gear Box
Engranaje / Boîte D'engrenages
Tandwielkast / Zespół Przekładni
Caixa De Velocidades
Gruppo di trasmissione
D8
B11 B9
D7
D1
D1x2
D1
A3
A7
D1x2
Klaue (rechte)
Claw (Right)
Garra (derecha)
Griffe (droite)
Klauw (rechts)
Łapa (prawa)
Garra (Direita)
Benna (destra)
Solarmodul / Solar Module
Módulo Solar / Module Solaire
Zonnemodule / Moduł Solarny
Módulo Solar / Modulo solare
Getriebeeinheit / Gear Box
Engranaje / Boîte D'engrenages
Tandwielkast / Zespół Przekładni
Caixa De Velocidades
Gruppo di trasmissione
Hydraulikmodul
Hydraulic module
Módulo hidráulico
Module hydraulique
Hydraulische module
Moduł hydrauliczny
Módulo Hidráulico
Modulo idraulico

5
6 7
8
36
C19
D2
C3
3
2
55
4
1
Klaue (rechte) / Claw (Right)
Garra (derecha) / Griffe (droite)
Klauw (rechts) / Łapa (prawa)
Garra (Direita) / Benna (destra)
C7
D1
D1
C8 D1
D1
D1
C7
D1
D1
B35
B34 D4
D4
C6
D1
D1
D1
B36
A12
B37 D1
D1
D1
A9
D1
D1
C4
C7
D1
C7
Stecken Sie D4 ganz ein.
Push D4 to the bottom entirely
Introduzca D4 completamente.
Pousser D4 complètement vers le bas
Duw D4 helemaal naar beneden
Docisnąć całkowicie D4
Empurre D4 até ao fundo
Serrare D4 fino al fondo

9
11
12
10
37
C19
C20
D2
2
1
Klicken / Click / Clic
Clic / klik / Klik
Clique / Click
Klicken / Click / Clic
Clic / klik / Klik
Clique / Click
Klicken / Click / Clic
Clic / klik / Klik
Clique / Click
Klicken / Click / Clic
Clic / klik / Klik
Clique / Click
Hinterrad / Rear wheel
Rueda trasera / Roue arrière
Achterwiel / Koło tylne
Roda traseira / Ruota posteriorea
Hinterrad / Rear wheel
Rueda trasera / Roue arrière
Achterwiel / Koło tylne
Roda traseira / Ruota posteriore
Hinterrad / Rear wheel
Rueda trasera / Roue arrière
Achterwiel / Koło tylne
Roda traseira / Ruota posteriore
C7
D2
D1
A4

13
15
17
16
14
A16
38
Schwarz
Black
Negro
noir
zwart
Czarny
Preto
Nero
Rot
Red
Rojo
rouge
rood
Czerwony
Vermelho
Rosso
D1
D5
D5
A10
D3
D3
A11
D1
A15
Solarmodul / Solar Module
Módulo Solar / Module Solaire
Zonnemodule / Moduł Solarny
Módulo Solar / / Modulo solare
Solarmodul / Solar Module
Módulo Solar / Module Solaire
Zonnemodule / Moduł Solarny
Módulo Solar / Modulo solare
Getriebeeinheit / Gear Box
Engranaje / Boîte D'engrenages
Tandwielkast / Zespół Przekładni
Caixa De Velocidades
Gruppo di trasmissione
Rot / Red / Rojo / rouge / rood
Czerwony / Vermelho / Rosso
Schwarz / Black / Negro / noir / zwart
Czarny / Preto / Nero

C21x2C5x2 C7x4
A3
C3x4
C4 C8
B32 B34 B35
B36 B37
B27 B28 B29 B30B15 B16
B5B6
B7 B8 B9 B11 A17
A7
A4x2 B23 B24
A15 A16
39
B1x2
C17
D2
D5
D2
D1x24 D2x14 D3x4 D4x4 D5
1 : 1
! Überprüfen Sie vor der Montage, die Luft im Zylinder und füllen Sie ihn ggf. mit Wasser.
! Before assembly check the air condition in the cylinder and add water if necessary
! Antes del montaje, compruebe el aire en el cilindro y, si fuera necesario, llénelo con agua.
! Avant le montage, vérifier le volume d'air dans le cylindre et ajouter de l'eau si nécessaire
10. Krokodil montieren / 10. Crocodile Assembly / 10. Montar el cocodrilo / 10. Monter le crocodile / 10. De krokodil monteren
10. Krokodyl - Montaż / 10. Montagem do Crocodilo / 10. Coccodrillo - Montaggio
! Voor de montage, controleer de hoeveelheid lucht in de cilinder en voeg water toe indien nodig.
! Przed montażem sprawdzić ilość powietrza w siłowniku i w razie potrzeby dolać wody.
! Antes de iniciar a montagem verifique o estado do ar no cilindro e adicione água se necessário.
! Prima del montaggio controllare la quantità d’aria in cilindro e se necessario aggiungere acqua.
Getriebeeinheit / Gear Box
Engranaje / Boîte D'engrenages
Tandwielkast / Zespół Przekładni
Caixa De Velocidades
Gruppo di trasmissioneav
Zylinder #2 / Cylinder #2
Cilindro #2 / Cylindre #2
Cilinder #2 / Siłownik #2
Cilindro #2 // Cilindro #2
Auge X 2 / Eye X2
Ojo X 2 / Œil X2
Oog X2 / Oko X2
Olho X2 / Occhio
Klaue (rechte) / Claw (Right)
Garra (derecha) / Griffe (droite)
Klauw (rechts) / Łapa (prawa)
Garra (Direita) / Branca (destra)
Klaue (linke)
Claw (Left)
Garra (izquierda)
Griffe (gauche)
Klauw (links)
Łapa (lewa)
Garra (Esquerda)
Branca (sinistra)
Solarmodul / Solar Module
Módulo Solar / Module Solaire
Zonnemodule / Moduł Solarny
Módulo Solar / Modulo solare
Getriebeeinheit / Gear Box
Engranaje / Boîte D'engrenages
Tandwielkast / Zespół Przekładni
Caixa De Velocidades
Gruppo di trasmissione
Hydraulikmodul
Hydraulic module
Módulo hidráulico
Module hydraulique
Hydraulische module
Moduł hydrauliczny
Módulo Hidráulico
Modulo idraulico
A4
B16
D3
D3
C4
C8
D3 A17
B15
A4
1 2
3

40
2
2
2
2
1
1
D1
A7
D1
D3
B36
D1
D1
B37
B28
D1
Auge / Eye
Ojo / Œil
Oog / Oko
Olho / Occhio
B35
D1
B9
C21
D1
C5
D1
D1
D1
A3
B27
D1 D1
D1
B34
D1
B11
C21
D1
4
6
7
8
9
5

41
2
1
Klicken / Click / Clic
Clic / klik / Klik
Clique / Occhio
Klicken
Click
Clic
Clic
klik
Klik
Clique
Occhio
Klicken / Click / Clic
Clic / klik / Klik
Clique / Occhio
Solarmodul / Solar Module
Módulo Solar / Module Solaire
Zonnemodule / Moduł Solarny
Módulo Solar / Modulo solare
C17
D1
A16
B32
A15
D1
10
12
13
14
11

42
2
11
D2
C3 D2
Solarmodul / Solar Module
Módulo Solar / Module Solaire
Zonnemodule / Moduł Solarny
Módulo Solar / Modulo solare
Linke Seite
Left Side
Parte izquierda
Côté gauche
Linkerkant
Strona lewa
Lado Esquerdo
Lato sinistro
Rechte Seite
Right Side
Parte derecha
Côté droit
Rechterkant
Strona prawa
Lado Direito
Lato destro
D1
D4
D4
D4
D4
D1
B23
B29
B1
B24
B30
B1
15
16 17
18 19

43
Vorderbein (Rechtes)
Front Leg (R)
Pata Delantera (Derecha)
Patte Avant (R)
Voorpoot (R)
Noga Przednia (P)
Perna Dianteira (D)
Gamba anteriore (D)
Hinterbein (Rechtes)
Rear Leg (R)
Pata Trasera (Derecha)
Patte Arrière (R)
Achterpoot (R)
Noga Tylna (P)
Perna Traseira (D)
Gamba posteriore (D)
Vorderbein (Linkes)
Front Leg (L)
Pata Delantera (Izquierda)
Patte Avant (L)
Voorpoot (L)
Noga Przednia (L)
Perna Dianteira (E)
Gamba anteriore (S)
Hinterbein (Linkes)
Rear Leg (L)
Pata Trasera (Izquierda)
Patte Arrière (L)
Achterpoot (L)
Noga Tylna (L)
Perna Traseira (E)
Gamba posteriore (S)
Klaue (linkes) / Claw (Left)
Garra (izquierda) / griffe (gauche)
Klauw (links) / Łapa (lewa)
Garra (Esquerda) / Branca (sinistra)
Klaue (linkes) / Claw (Left)
Garra (izquierda) / griffe (gauche)
Klauw (links) / Łapa (lewa)
Garra (Esquerda) / / Branca (sinistra)
Klaue (rechtes) / Claw (Right)
Garra (derecha) / griffe (droite)
Klauw (rechts) / Łapa (prawa)
Garra (Direita) / Branca (destra)
Klaue (rechtes) / Claw (Right)
Garra (derecha) / griffe (droite)
Klauw (rechts) / Łapa (prawa)
Garra (Direita) / Branca (destra)
Schwarz
Black
Negro
noir
zwart
Czarny
Preto
Nero
Rot
Red
Rojo
rouge
rood
Czerwony
Vermelho
Rosso
Solarmodul / Solar Module
Módulo Solar / Module Solaire
Zonnemodule / Moduł Solarny
Módulo Solar / Modulo solare
Getriebeeinheit / Gear Box
Engranaje / Boîte D'engrenages
Tandwielkast / Zespół Przekładni
Caixa De Velocidades
Gruppo di trasmissione
Rot / Red / Rojo / rouge / rood
Czerwony / Vermelho / Rosso
Schwarz / Black / Negro / noir / zwart
Czarny / Preto / Nero
B8 B6
B5
D2
D2
D1
D2
D1
C7
C7 C7
B7
D2
D1
C7
D1
20
21
22

! Überprüfen Sie vor der Montage, die Luft im Zylinder und füllen Sie ihn ggf. mit Wasser.
! Before assembly check the air condition in the cylinder and add water if necessary
! Antes del montaje, compruebe el aire en el cilindro y, si fuera necesario, llénelo con agua.
! Avant le montage, vérifier le volume d'air dans le cylindre et ajouter de l'eau si nécessaire
11. Pterosaurus montieren / 11. Pterosaurs Assembly / 11. Montar el pterosaurio / 11. Monter le ptérosaure
11. De Pterosauriër monteren / 11. Pterozaur - Montaż / 11. Montagem do Pterossauro / 11. Pterosauro – Montaggio
! Voor de montage, controleer de hoeveelheid lucht in de cilinder en voeg water toe indien nodig.
! Przed montażem sprawdzić ilość powietrza w siłowniku i w razie potrzeby dolać wody.
! Antes de iniciar a montagem verifique o estado do ar no cilindro e adicione água se necessário.
! Prima del montaggio controllare la quantità d’aria in cilindro e se necessario aggiungere acqua.
Auge X 2 / Eye X2
Ojo X 2 / Œil X2
Oog X2 / Oko X2
Olho X2 / Occhio X2
Klaue (rechte) / Claw (Right)
Garra (derecha) / Griffe (droite)
Klauw (rechts) / Łapa (prawa)
Garra (Direita) / Branca (destra)
Klaue (linke) / Claw (Left)
Garra (izquierda) / Griffe (gauche)
Klauw (links) / Łapa (lewa)
Garra (Esquerda) / Branca (sinistra)
Solarmodul / Solar Module
Módulo Solar / Module Solaire
Zonnemodule / Moduł Solarny
Módulo Solar / Modulo solare
Getriebeeinheit / Gear Box
Engranaje / Boîte D'engrenages
Tandwielkast / Zespół Przekładni
Caixa De Velocidades
Gruppo di trasmissione
Hydraulikmodul
Hydraulic module
Módulo hidráulico
Module hydraulique
Hydraulische module
Moduł hydrauliczny
Módulo Hidráulico
Modulo idraulico
C22
C6x2
B20x2B33x2
B22B16
B5B6
B7 B8
A17 A12A9
44
A3
C3x2
C4
C7x5
C8
B32
B34 B35
B36 B37
B9B11
A15 A16
A18A19
A7
A4x4
A11A10
C21x2 C5x2 B29B12 B13B14x3 B1x2 B23 B24
D7 D8
C17
D1x34 D2x12 D3 D5x3 D6x2
1 : 1

1
3
2
4
5 6 7
45
D1x2
C21
B20
B7
D1x2
C7 D1
C6
B33
D1x2
C7
D1
C6
B33
D1x2
C21
B20
B8
Getriebeeinheit / Gear Box
Engranaje / Boîte D'engrenages
Tandwielkast / Zespół Przekładni
Caixa De Velocidades
Gruppo di trasmissione
Getriebeeinheit
Gear Box
Engranaje
Boîte D'engrenages
Tandwielkast
Zespół Przekładni
Caixa De Velocidades
Gruppo di trasmissione
Zylinder #2 / Cylinder #2
Cilindro #2 / Cylindre #2
Cilinder #2 / Siłownik #2
Cilindro #2 / Cilindro #2
D1x2
B5
C3
D2
A4
D1
D1
D1
D1x2
D2
C7
D8 B6 A7
A3
D2
D2
D2
D2
D7
C7
D1
A4
D3

8 9
10
46
D2
C8
C4
D2
B34
D1x2
B11
B35
D1x2
B9
D1
C17
D1
B16

11 12
47
22
3
4
1
1
D5
A18
D2
A12
D6
D5
A19
D2
A9
D6
B14
C7
B32
D1
Klaue (linkes) / Claw (Left)
Garra (izquierda) / griffe (gauche)
Klauw (links) / Łapa (lewa)
Garra (Esquerda) / Branca (destra)
Klaue (rechtes) / Claw (Right)
Garra (derecha) / griffe (droite)
Klauw (rechts) / Łapa (prawa)
Garra (Direita) / Branca (sinistra)

13
15
14
48
2
22
4
3
1
1 1
5
5
Auge / Eye
Ojo / Œil
Oog / Oko
Olho / Occhio
Auge / Eye
Ojo / Œil
Oog / Oko
Olho / Occhio
D1
D1B1
C22
B22
B12
B13
C5
C5 B37 A17
B29
B23
B14
A10
D1
D1
B24
B36 D5
A4
D1 D1
A16
B14
D1
A11
A4
D1
D1
A15
B1

16
18
17
49
2
1
2
1
Klicken
Click
Clic
Clic
klik
Klik
Clique
Click
Klicken / Click / Clic
Clic / klik / Klik
Clique / Click
Klicken / Click / Clic
Clic / klik / Klik
Clique / Click
Solarmodul / Solar Module
Módulo Solar / Module Solaire
Zonnemodule / Moduł Solarny
Módulo Solar / Modulo solare
Getriebeeinheit / Gear Box
Engranaje / Boîte D'engrenages
Tandwielkast / Zespół Przekładni
Caixa De Velocidades
Gruppo di trasmissione
Rot / Red / Rojo / rouge / rood
Czerwony / Vermelho / Rosso
Schwarz / Black / Negro / noir / zwart
Czarny / Preto / Nero
Schwarz
Black
Negro
noir
zwart
Czarny
Preto
Rosso
Rot
Red
Rojo
rouge
rood
Czerwony
Vermelho
Nero

A3
C4
C6x2
C8
B34 B35
B5 B6
B7 B8
B9 B11
A15 A16
A17A18A19
A7
B27 B28 B29 B30B12 B13B1x2 B23 B24
C16 D7C3x2 C5x2 C7X4B36 B37 B22A4X4 C17
A11
A10
A12
A9
B20X2 B33X2 B15 B16 D1x40 D2x12 D3x10 D4x4 D6x2
1 : 1
! Überprüfen Sie vor der Montage, die Luft im Zylinder und füllen Sie ihn ggf. mit Wasser.
! Before assembly check the air condition in the cylinder and add water if necessary
! Antes del montaje, compruebe el aire en el cilindro y, si fuera necesario, llénelo con agua.
! Avant le montage, vérifier le volume d'air dans le cylindre et ajouter de l'eau si nécessaire
12. Tyrannosaurus montieren / 12. T-Rex Assembly / 12. Montar el tiranosaurio / 12. Monter le T-Rex
12. De T-Rex monteren / 12. Tyranozaur - Montaż / 12. Montagem do T-Rex / 12. Tirannosauro - Montaggio
! Voor de montage, controleer de hoeveelheid lucht in de cilinder en voeg water toe indien nodig.
! Przed montażem sprawdzić ilość powietrza w siłowniku i w razie potrzeby dolać wody.
! Antes de iniciar a montagem verifique o estado do ar no cilindro e adicione água se necessário.
! Prima del montaggio controllare la quantità d’aria in cilindro e se necessario aggiungere acqua
Auge X 2 / Eye X2
Ojo X 2 / Œil X2
Oog X2 / Oko X2
Olho X2 / Occhio X2
Klaue (rechte) / Claw (Right)
Garra (derecha) / Griffe (droite)
Klauw (rechts) / Łapa (prawa)
Garra (Direita) / Branca (destra)
Klaue (linke) / Claw (Left)
Garra (izquierda) / Griffe (gauche)
Klauw (links) / Łapa (lewa)
Garra (Esquerda) / Branca (sinistra)
50
Solarmodul / Solar Module
Módulo Solar / Module Solaire
Zonnemodule / Moduł Solarny
Módulo Solar / Modulo solare
Getriebeeinheit / Gear Box
Engranaje / Boîte D'engrenages
Tandwielkast / Zespół Przekładni
Caixa De Velocidades
Gruppo di trasmissione
Hydraulikmodul
Hydraulic module
Módulo hidráulico
Module hydraulique
Hydraulische module
Moduł hydrauliczny
Módulo Hidráulico
Modulo idraulico

Zylinder #2 / Cylinder #2
Cilindro #2 / Cylindre #2
Cilinder #2 / Siłownik #2
Cilindro #2 / Cilindro #2
Kopf Teil 1
Head Part 1
Cabeza pieza 1
Kop Deel 1
Głowa część 1
Cabeça Parte 1
Testa parte 1
Kopf Teil 1
Head Part 1
Cabeza pieza 1
Kop Deel 1
Głowa część 1
Cabeça Parte 1
Testa parte 1
Kopf Teil 2
Head Part 2
Cabeza pieza 2
Kop Deel 2
Głowa część 2
Cabeça Parte 2
Testa parte 2
Kopf Teil 2
Head Part 2
Cabeza pieza 2
Kop Deel 2
Głowa część 2
Cabeça Parte 2
Testa parte 2
D2
D2
D2
D1
A10 D1 A15
D1 A11
A16
D7
D6
D2
D1
B6
C16
D1
D3
B5
A12
D3
A9
D3
A7
D1
D1
D6
A3
D1
D1
D2
D2
D4
D4
51
1 2
3
5
6
7
4
Getriebeeinheit / Gear Box
Engranaje / Boîte D'engrenages
Tandwielkast / Zespół Przekładni
Caixa De Velocidades
Gruppo di trasmissione

Kopf Teil 3
Head Part 3
Cabeza pieza 3
Tête pièce 3
Kop Deel 3
Głowa część 3
Cabeça Parte 3
Testa parte 3
Kopf Teil 4
Head Part 4
Cabeza pieza 4
Tête pièce 4
Kop Deel 4
Głowa część 4
Cabeça Parte 4
Testa parte 4
Klaue (rechte) / Claw (Right)
Garra (derecha) / Griffe (droite)
Klauw (rechts) / Łapa (prawa)
Garra (Direita) / Branca (destra)
Klaue (linke) / Claw (Left)
Garra (izquierda) / Griffe (gauche)
Klauw (links) / Łapa (lewa)
Garra (Esquerda) / Branca (sinistra)
Kopf Teil 3 / Head Part 3
Cabeza pieza 3 / Tête pièce 3
Kop Deel 3 / Głowa część 3
Cabeça Parte 3 / Testa parte 3
Kopf Teil 4 / Head Part 4
Cabeza pieza 4 / Tête pièce 4
Kop Deel 4 / Głowa część 4
Cabeça Parte 4 / Testa parte 4
D1
D1
D1
B35 D1
C5
D3
D3
B30
B1
D3
B28
C4
B24
D1
C8
B23
B29
B1
B27
D1
C5
D1
D1
B34
Auge / Eye
Ojo / Œil
Oog / Oko
Olho / Occhio
Auge / Eye
Ojo / Œil
Oog / Oko
Olho / Occhio
52
8
9
10
12
13
11

D1
D1
B9
B11
D1
D1
C17
Zylinder #1 / Cylinder #1
Cilindro #1 / Cylindre #1
Cilinder #1 / Siłownik #1
Cilindro #1 / Cilindro #1
Klicken / Click / Clic
Clic / klik / Klik
Clique / Click
Klicken / Click / Clic
Clic / klik / Klik
Clique / Click
Klicken
Click
Clic
Clic
klik
Klik
Clique
Click
53
14
15

B36
B37
C7
A4
D1
D1
A17
C7
C7
D1
A4
C7
D1
54
16
17
19
18

D2
C3
D2
Linke Seite
Left Side
Parte izquierda
Côté gauche
Linkerkant
Strona lewa
Lado Esquerdo
Lato destro
Rechte Seite
Right Side
Parte derecha
Côté droit
Rechterkant
Strona prawa
Lado Direito
Lato sinistro
D1 B22
A4
B13
B12
D1
D1
A4
55
20
21
22
23
24

D1
B20
B20
D1x3
D1
D2
D1x3
D3
C6
D3
C6
D1x2
D1x2
B33
B8
D2
D3
B16
A19
D3
B33
B7
A18
B15
D4
D4
56
25
26

Schwarz
Black
Negro
noir
zwart
Czarny
Preto
Nero
Rot
Red
Rojo
rouge
rood
Czerwony
Vermelho
Rosso
Solarmodul / Solar Module
Módulo Solar / Module Solaire
Zonnemodule / Moduł Solarny
Módulo Solar / Modulo solare
Getriebeeinheit / Gear Box
Engranaje / Boîte D'engrenages
Tandwielkast / Zespół Przekładni
Caixa De Velocidades
Gruppo di trasmissione
Rot / Red / Rojo / rouge / rood
Czerwony / Vermelho / Rosso
Schwarz / Black / Negro / noir / zwart
Czarny / Preto / Nero
1. Gehen Sie nach draußen in die Sonne. Der Roboter funktioniert am besten an einem sonnigen Tag.
2.Für Spaß im Innenbereich, benutzen Sie dann eine Halogenlampe (50 W). Das Gerät funktioniert nicht, wenn es bewölkt ist, im
Schatten, bei indirektem Sonnenlicht oder Neonlicht.
1. Take outside under direct sunlight. Best results are obtained when operated on a sunny day.
2 .For indoor fun, use a 50 watt halogen light. The product will not run on a cloudy day, shadded locations, indirect sunlight, or under
a Fluorescent light.
1. Váyase fuera en la luz solar directa. Obtendrá los mejores resultados durante un día soleado.
2. Para el uso en interiores, utilice una bombilla halógena de 50 W. El robot no funcionará en caso de muchas nubes, a la sombra,
en luz solar indirecta o luz fluorescente.
1. Jouez à l'extérieur en plein soleil. Les meilleurs résultats sont obtenus lors d'une journée ensoleillée.
2. Pour un usage à l'extérieur, utilisez une lampe halogène de 50 W. Le produit ne fonctionne pas quand le ciel est nuageux, aux
endroits ombragés, sous la lumière indirecte du soleil ou sous une lumière fluorescente.
1. Neem het product mee naar buiten in de zon. De beste resultaten worden verkregen bij gebruik op een zonnige dag.
2. Voor plezier binnenshuis, gebruik een halogeenlamp (50 W). Het product werkt niet op een bewolkte dag, in schaduwachtige
omgevingen, bij indirect zonlicht of fluorescerend licht.
1. Wynieść na dwór i ustawić bezpośrednio na słońcu. Najlepsze wyniki uzyskuje się w słoneczne dni.
2. Wewnątrz pomieszczeń można użyć lampy halogenowej o mocy 50 W. Produkt nie będzie działać w pochmurne dni, w miejscach
zacienionych, przy pośrednim nasłonecznieniu lub oświetleniu fluorescencyjnym.
1. Levar para o exterior, sob luz solar direta. Os resultados são muito melhores em dias de sol.
2. Para usar no interior, utilize uma lâmpada de halogéneo de 50 W. Este aparelho não funciona em dias nublados, locais sombrios,
sob luz solar indireta ou sob luzes sobfluorescentes.
1. Prendere fuori e mettere direttamente al sole. I migliori risultati si ottengono in giorni di sole.
2. Dentro le stanze si possono usare delle lampade alogene di potenza pari a 50 W. Prodotto non funzionerà in giorni nuvolosi, in posti
d’ombra, con un’indiretta insolazione oppure illuminazione fluorescente.
Probieren Sie !
Try on me !
Inténtelo !
Essayez-moi !
Probeer mij!
Wypróbuj mnie!
Tenta-me!
Provami!
Halogenlampe 50 W und höhe
50w & UP Halogen
bombilla halógena (50 W y superior)
lampe halogène (50 W ou supérieur)
halogeenlamp (50 W & hoger)
Lampa halogenowa 50W lub więcej
lâmpada de halogéneo de 50w
& SUPEIOR
Lampada alogena 50W o più
Halogenlampe 50 W und höhe
50w & UP Halogen
bombilla halógena (50 W y superior)
lampe halogène (50 W ou supérieur)
halogeenlamp (50 W & hoger)
Lampa halogenowa 50W lub więcej
lâmpada de halogéneo de 50w
& SUPEIOR
Lampada alogena 50W o più
SONNIG / SUNNY / SOLEADO / SOLEIL
ZONNIG / SŁONECZNIE / SOL / SOLEGGIATO
IN INNENRÄUMEN / IN HOUSE
EN INTERIORES / A L'INTÉRIEUR
BINNENSHUIS / WDOMU / EM CASA / A CASA
min. Leistung
Low power
potencia mín.
faible puissance
laag vermogen
Niski poziom energii
Pouca carga
Basso livello di energia
BEWÖLKT / CLOUDY / NUBLADO / NUAGEUX
BEWOLKT / POCHMURNO
NUBLADO / NUVOLOSO
Max. Leistung
Full Energy
Potencia Máx.
Pleine Puissance
100 % Vermogen
Pełnia Energii
Carga Total
Pieno di energia
57
27
Nun ist es an der Zeit, etwas Spaß zu haben! / It’s time to have some FUN! / Es hora de divertirse un poco!
Il est temps de s'amuser ! / Tijd om plezier te maken / A teraz czas na ZABAWĘ! / Está na hora de se DIVERTIR!
E adesso il tempo per DIVERTIMENTO!

58
B12 B13
x2
x2 x2
Eye
Claw (R) Claw (L)
B5 B6 B7 B8 C6
A19 A18
A7
D9
A3
C22
B14 A17
A16A15
B20
B35
A10 A11
A9 C16
B28A12
B34 B36 B37
B33 C4 C8
C17
C2
B32
A4
B15B16
B27
B24 B30 C19 C20 C7 B11 B9
D1D2
D4
D3
C21
C9
B22
D5
D6
D8
D7
C3
B23 B29
B1
C5
Sortimentskasten
Color box
Organizador
Boîte colorée
Gekleurde doos
Kolorowe pudełko
Caixa colorida
Contenitore colorato
x2
Claw (R)
B5 B6
A9
B7 B8 D9
C4 C8
D8B9
A3 D7
A7
x2Eye
x2B20 x2B33
x4C22
x2C21
x2C20x4C19
B34
A10 A11
A12
B12 B13
B29B24B23 B30
B27
B28 C16 A18 A19
B11
B35 B37 A15 A16 B16 B15B36
x4B14 A17
B22
C17
B32C5 x2 C6 x2
D2 x22
D1 x44
B1 x2
A4 x4
D3 x11
D6 x2
C9 x2
C3 x4
D5 x4
C7 x6
D4 x6
C2 x4
x2
Claw (L)

HANDLEIDING
1. Inleiding
Aan alle ingezetenen van de Europese Unie Belangrijke milieu-informatie betreffende dit product
Dit symbool op het toestel of de verpakking geeft aan dat, als het na zijn levenscyclus wordt weggeworpen, dit toestel schade kan
toebrengen aan het milieu. Gooi dit toestel (en eventuele batterijen) niet bij het gewone huishoudelijke afval; het moet bij een
gespecialiseerd bedrijf terechtkomen voor recyclage. U moet dit toestel naar uw verdeler of naar een lokaal recyclagepunt brengen.
Respecteer de plaatselijke milieuwetgeving.
Dank u voor uw aankoop! Lees deze handleiding grondig door voor u het toestel in gebruik neemt. Werd het toestel beschadigd
tijdens het transport, installeer het dan niet en raadpleeg uw dealer.
KSR17
USER MANUAL
1. Introduction
To all residents of the European Union
Important environmental information about this product
This symbol on the device or the package indicates that disposal of the device after its lifecycle could harm the environment.
Do not dispose of the unit (or batteries) as unsorted municipal waste; it should be taken to a specialized company for recycling.
This device should be returned to your distributor or to a local recycling service. Respect the local environmental rules.
Thank you for choosing Velleman ! Please read the manual thoroughly before bringing this device into service.
If the device was damaged in transit, do not install or use it and contact your dealer.
2. Safety Instructions
Choking hazard due to small parts. Not for children under 3 years.
3. General Guidelines
4. Installation
If in doubt, contact your local waste disposal authorities.
Read and understand this manual and all safety signs before using this appliance.
Recommended age: 14+.
Protect from rain, moisture, splashing and dripping liquids, shocks and abuse, extreme heat, and dust.
Choking hazard due to small parts. Not for children under 3 years.
Refer to the Velleman® Service and Quality Warranty on the last pages of this manual.
All modifications of the device are forbidden for safety reasons. Damage caused by user modifications to the device is not
covered by the warranty.
Only use the device for its intended purpose. Using the device in an unauthorised way will void the warranty.
Damage caused by disregard of certain guidelines in this manual is not covered by the warranty and the dealer will not
accept responsibility for any ensuing defects or problems.
Nor Velleman nv nor its dealers can be held responsible for any damage (extraordinary, incidental or indirect) – of any
nature (financial, physical…) arising from the possession, use or failure of this product.
Keep this manual for future reference.
Refer to the manual on www.velleman.eu for instructions on how to assemble the device.
© COPYRIGHT NOTICE
The copyright to this manual is owned by Velleman nv. All worldwide rights reserved.
No part of this manual may be copied, reproduced, translated or reduced to any electronic medium or otherwise without the prior written
consent of the copyright holder.
Use this device with original accessories only. Velleman nv cannot be held responsible in the event of damage
or injury resulting from (incorrect) use of this device. For more info concerning this product and the latest
version of this manual, please visit our website www.velleman.eu. The information in this manual is subject
to change without prior notice.
Hebt u vragen, contacteer dan de plaatselijke autoriteiten betreffende de verwijdering.
59
2. Veiligheidsvoorschriften
Verstikkingsgevaar – bevat kleine onderdelen. Niet geschikt voor kinderen jonger dan 3 jaar.
Lees en begrijp deze handleiding en de veiligheidsinstructies vóór ingebruikname.
Aanbevolen leeftijd: 14+.
Bescherm tegen regen, vochtigheid en opspattende vloeistoffen, schokken extreme temperaturen en stof.
3. Algemene richtlijnen
Raadpleeg de Velleman® service- en kwaliteitsgarantie achteraan deze handleiding. Om veiligheidsredenen mag u geen
wijzigingen aanbrengen. Schade door wijzigingen die de gebruiker heeft aangebracht aan het toestel valt niet onder de garantie.
Gebruik het toestel enkel waarvoor het gemaakt is. De garantie vervalt automatisch bij ongeoorloofd gebruik.
De garantie geldt niet voor schade door het negeren van bepaalde richtlijnen in deze handleiding en uw dealer zal de
verantwoordelijkheid afwijzen voor defecten of problemen die hier rechtstreeks verband mee houden.
Noch Velleman nv noch zijn verdelers kunnen aansprakelijk gesteld worden voor schade (buitengewoon, incidenteel of
onrechtstreeks) – van welke aard dan ook (financieel, fysisch…) voortvloeiend uit het bezit, gebruik of falen van dit product.
Bewaar deze handleiding voor verdere raadpleging.

MODE D'EMPLOI
1. Introduction
Aux résidents de l'Union européenne Informations environnementales importantes concernant ce produit
Ce symbole sur l'appareil ou l'emballage indique que l’élimination d’un appareil en fin de vie peut polluer l'environnement.
Ne pas jeter un appareil électrique ou électronique (et des piles éventuelles) parmi les déchets municipaux non sujets au tri
sélectif ; une déchetterie traitera l’appareil en question. Renvoyer l'appareil à votre fournisseur ou à un service de recyclage
local. Respecter la réglementation locale relative à la protection de l’environnement.
En cas de questions, contacter les autorités locales pour élimination.
Nous vous remercions de votre achat ! Lire attentivement le présent mode d'emploi avant la mise en service de l’appareil.
Si l'appareil a été endommagé pendant le transport, ne pas l’installer et consulter votre revendeur.
2. Consignes de sécurité
Risque d’étouffement – contient de petites pièces. Ne convient pas aux enfants de moins de 3 ans.
Lire et comprendre ce mode d'emploi et toutes les consignes de sécurité avant d'utiliser l'appareil.
Âge conseillé : 14+.
Protéger de la pluie, de l’humidité et des projections d’eau, des chocs et de l'abus, des températures extrêmes et de la poussière.
KSR17
4. Montage
Voor meer informatie over de montage, raadpleeg de handleiding op www.velleman.eu.
© AUTEURSRECHT
Velleman nv heeft het auteursrecht voor deze handleiding. Alle wereldwijde rechten voorbehouden.
Het is niet toegestaan om deze handleiding of gedeelten ervan over te nemen, te kopiëren, te vertalen, te bewerken en op te slaan op
een elektronisch medium zonder voorafgaande schriftelijke toestemming van de rechthebbende.
Gebruik dit toestel enkel met originele accessoires. Velleman nv is niet aansprakelijk voor schade of kwetsuren bij
(verkeerd) gebruik van dit toestel. Voor meer informatie over dit product en de laatste versie van deze handleiding,
zie www.velleman.eu. De informatie in deze handleiding kan te allen tijde worden gewijzigd zonder voorafgaande
kennisgeving.
60
3. Directives générales
Se référer à la garantie de service et de qualité Velleman® en fin de ce mode d'emploi.Toute modification est interdite pour des
raisons de sécurité. Les dommages occasionnés par des modifications par le client ne tombent pas sous la garantie.
N’utiliser l'appareil qu’à sa fonction prévue. Un usage impropre annule d'office la garantie.La garantie ne se s’applique pas aux
dommages survenus en négligeant certaines directives de ce mode d'emploi et votre revendeur déclinera toute responsabilité
pour les problèmes et les défauts qui en résultent.Ni Velleman SA ni ses distributeurs ne peuvent être tenus responsables des
dommages exceptionnels, imprévus ou indirects, quelles que soient la nature (financière, corporelle,etc.), causés par
la possession, l’utilisation ou le dysfonctionnement de ce produit.
Garder ce mode d'emploi pour toute référence ultérieure.
4. Installation
Pour plus d'informations sur le montage, consulter le mode d'e mploi sur www.velleman.eu.
© DROITS D’AUTEUR
Velleman SA est l’ayant droit des droits d’auteur de ce mode d'emploi. Tous droits mondiaux réservés.
Toute reproduction, traduction, copie ou diffusion, intégrale ou partielle, du contenu de ce mode d'emploi par quelque procédé ou sur
tout support électronique que ce soit est interdite sans l’accord préalable écrit de l’ayant droit.
N'employer cet appareil qu’avec des accessoires d’origine. Velleman SA ne peut, dans la mesure conforme au droit
applicable être tenue responsable des dommages ou lésions (directs ou indirects) pouvant résulter de l’utilisation
de cet appareil. Pour plus d'informations concernant cet article et la dernière version de ce mode d'emploi,
consulter notre site www.velleman.eu. Les spécifications et le continu de ce mode d'emploi peuvent être modifiés
sans notification préalable.
MANUAL DEL USUARIO
1. Introducción
A los ciudadanos de la Unión Europea Importantes informaciones sobre el medio ambiente concerniente a este producto.
Este símbolo en este aparato o el embalaje indica que, si tira las muestras inservibles, podrían dañar el medio ambiente.
No tire este aparato (ni las pilas, si las hubiera) en la basura doméstica; debe ir a una empresa especializada en reciclaje.
Devuelva este aparato a su distribuidor o a la unidad de reciclaje local. Respete las leyes locales en relación con el medio ambiente.
Si tiene dudas, contacte con las autoridades locales para residuos.
¡Gracias por elegir Velleman! Lea atentamente las instrucciones del manual antes de usar el aparato. Si ha sufrido algún daño en el
transporte no lo instale y póngase en contacto con su distribuidor.

61
2. Instrucciones de seguridad
Riesgo de asfixia –incluye piezas pequeñas. No apto para niños menores de 3 años.
3. Normas generales
4. Instalación
Lea y comprenda este manual y todas las instrucciones de seguridad antes de usar el aparato.
Edad recomendada: 14+.
No exponga este equipo a lluvia, humedad, polvo, temperaturas extremas ni a ningún tipo de salpicadura o goteo.
Evite usar excesiva fuerza.
Véase la Garantía de servicio y calidad Velleman® al final de este manual del usuario.Por razones de seguridad, las modificaciones
no autorizadas del aparato están prohibidas. Los daños causados por modificaciones no autorizadas, no están cubiertos por
la garantía.Utilice sólo el aparato para las aplicaciones descritas en este manual Su uso incorrecto anula la garantía completamente.
Los daños causados por descuido de las instrucciones de seguridad de este manual invalidarán su garantía y su distribuidor no será
responsable de ningún daño u otros problemas resultantes.Ni Velleman nv ni sus distribuidores serán responsables de los daños
extraordinarios, ocasionales o indirectos, sea cual sea la índole (financiera, física, etc.), causados por la posesión, el uso o el fallo
de este producto.Guarde este manual del usuario para cuando necesite consultarlo.
Para más información sobre el montaje, consulte el manual del usuario en www.velleman.eu.
KSR17
© DERECHOS DE AUTOR
Velleman NV dispone de los derechos de autor para este manual del usuario. Todos los derechos mundiales reservados.
Está estrictamente prohibido reproducir, traducir, copiar, editar y guardar este manual del usuario o partes de ello sin el consentimiento
previo por escrito del propietario del copyright.
Utilice este aparato sólo con los accesorios originales. Velleman NV no será responsable de daños ni lesiones
causados por un uso (indebido) de este aparato. Para más información sobre este producto y la versión más
reciente de este manual del usuario, visite nuestra página www.velleman.eu. Se pueden modificar las
especificaciones y el contenido de este manual sin previo aviso.
BEDIENUNGSANLEITUNG
1. Einführung
An alle Einwohner der Europäischen UnionWichtige Umweltinformationen über dieses Produkt.
Dieses Symbol auf dem Produkt oder der Verpackung zeigt an, dass die Entsorgung dieses Produktes nach seinem Lebenszyklus der
Umwelt Schaden zufügen kann. Entsorgen Sie die Einheit (oder verwendeten Batterien) nicht als unsortierter Hausmüll; die Einheit
oder verwendeten Batterien müssen von einer spezialisierten Firma zwecks Recycling entsorgt werden. Diese Einheit muss an den
Händler oder ein örtliches Recycling-Unternehmen retourniert werden. Respektieren Sie die örtlichen Umweltvorschriften.
Falls Zweifel bestehen, wenden Sie sich für Entsorgungsrichtlinien an Ihre örtliche Behörde.
2. Sicherheitshinweise
Erstickungsgefahr –enthält kleine Teile. Nicht für Kinder unter 3 Jahren geeignet.
Lesen und begreifen Sie diese Bedienungsanleitung und die Sicherheitshinweise vor Inbetriebnahme.
empfohlenes Alter: 14+.
Schützen Sie das Gerät vor Regen, Feuchte, Staub und extremen Temperaturen. Vermeiden Sie rohe Gewalt. Setzen Sie das Gerät
keiner Flüssigkeit wie z.B. Tropf- oder Spritzwasser, aus. Schützen Sie das Gerät vor Regen, Feuchte, Staub und extremen
Temperaturen. Vermeiden Sie rohe Gewalt. Setzen Sie das Gerät keiner Flüssigkeit wie z.B. Tropf- oder Spritzwasser, aus.
3. Allgemeine Richtlinien
4. Installation
Siehe Velleman® Service- und Qualitätsgarantie am Ende dieser Bedienungsanleitung. Eigenmächtige Veränderungen sind aus
Sicherheitsgründen verboten. Bei Schäden verursacht durch eigenmächtige Änderungen erlischt der Garantieanspruch.
Verwenden Sie das Gerät nur für Anwendungen beschrieben in dieser Bedienungsanleitung. Bei falscher Anwendung dieses
Gerätes erlischt der Garantieanspruch. Bei Schäden, die durch Nichtbeachtung der Bedienungsanleitung verursacht werden,
erlischt der Garantieanspruch. Für daraus resultierende Folgeschäden übernimmt der Hersteller keine Haftung.
Weder Velleman nv noch die Händler können für außergewöhnliche, zufällige oder indirekte Schäden irgendwelcher
Art (finanziell, physisch, usw.), die durch Besitz, Gebrauch oder Defekt verursacht werden, haftbar gemacht werden.
Bewahren Sie diese Bedienungsanleitung für künftige Einsichtnahme auf.
Die Bedienungsanleitung finden Sie unter www.velleman.eu.
Verwenden Sie dieses Gerät nur mit originellen Zubehörteilen. Velleman NV übernimmt keine Haftung für Schaden
oder Verletzungen bei (falscher) Anwendung dieses Gerätes. Mehr Informationen zu diesem Produkt und die
neueste Version dieser Bedienungsanleitung finden Sie hier: www.velleman.eu. Alle Änderungen ohne vorherige
Ankündigung vorbehalten.

KSR17
© URHEBERRECHT
Velleman NV besitzt das Urheberrecht für diese Bedienungsanleitung. Alle weltweiten Rechte vorbehalten.
Ohne vorherige schriftliche Genehmigung des Urhebers ist es nicht gestattet, diese Bedienungsanleitung ganz oder in Teilen zu
reproduzieren, zu kopieren, zu übersetzen, zu bearbeiten oder zu speichern.
INSTRUKCJA OBSŁUGI
1. Wstęp
Przeznaczona dla mieszkańców Unii Europejskiej.Ważne informacje dotyczące środowiska.
Dziękujemy za zakup produktu Velleman! Prosimy o dokładne zapoznanie się z instrukcją obsługi przed użyciem urządzenia.
Nie montować ani nie używać urządzenia, jeśli zostało uszkodzone podczas transportu -należy skontaktować się ze sprzedawcą.
Niniejszy symbol umieszczony na urządzeniu bądź opakowaniu wskazuje, że utylizacja produktu może być szkodliwa dla środowiska.
Nie należy wyrzucać urządzenia (lub baterii) do zbiorczego pojemnika na odpady komunalne, należy je przekazać specjalistycznej
firmie zajmującej się recyklingiem. Niniejsze urządzenie należy zwrócić dystrybutorowi lub lokalnej firmie świadczącej usługi
recyklingu. Przestrzegać lokalnych zasad dotyczących środowiska.
W razie wątpliwości należy skontaktować się z lokalnym organem odpowiedzialnym za utylizację odpadów.
62
2. Wskazówki bezpieczeństwa
Istnieje ryzyko zadławienia się ze względu na małe części. Nieodpowiednie dla dzieci w wieku poniżej 3 lat.
3. Informacje ogólne
4. Montaż
Przed zastosowaniem urządzenia należy zapoznać się z niniejszą instrukcją oraz symbolami bezpieczeństwa.
Zalecany wiek: 14+.
Chronić przed deszczem, wilgocią,rozpryskami i ściekającymi cieczami, wstrząsami i niewłaściwym użytkowaniem, nadmiernym
ciepłem oraz pyłem.
Proszę zapoznać się z informacjami w części Usługi i gwarancja jakości Velleman®na końcu niniejszej instrukcji.
Wprowadzanie zmian w urządzeniu jest zabronione ze względów bezpieczeństwa. Uszkodzenia spowodowane zmianami
wprowadzonymi przez użytkownika nie podlegają gwarancji.Stosować urządzenie wyłącznie zgodnie z przeznaczeniem.
Używanie urządzenia w niedozwolony sposób spowoduje unieważnienie gwarancji.Gwarancja nie obejmuje uszkodzeń
spowodowanych nieprzestrzeganiem niniejszej instrukcji, a sprzedawca nie ponosi odpowiedzialności za wynikłe uszkodzenia
lub problemy.Firma Velleman ani jej dystrybutorzy nie ponoszą odpowiedzialności za jakiekolwiek szkody (nadzwyczajne,
przypadkowe lub pośrednie) dowolnej natury (finansowe, fizyczne…), wynikające z posiadania, użytkowania lub awarii
niniejszego produktu. Zachować niniejszą instrukcję na przyszłość.
Wytyczne dotyczące metody montażu urządzenia dostępne są w instrukcji na stronie www.velleman.eu.
© INFORMACJA O PRAWACH AUTORSKICH
Właścicielem praw autorskich do niniejszej instrukcji jest firma Velleman nv.
Wszelkie prawa są zastrzeżone na całym świecie.
Żadna część niniejszej instrukcji nie może być kopiowana, powielana, tłumaczona ani przenoszona na jakikolwiek nośnik elektroniczny
(lub w inny sposób) bez wcześniejszej pisemnej zgody właściciela praw autorskich.
Należy używać wyłącznie oryginalnych akcesoriów. Firma Velleman nvnie ponosi odpowiedzialności za uszkodzenia
lub urazy wynikające z (niewłaściwego) korzystania z niniejszego urządzenia. Aby uzyskać więcej informacji
dotyczących produktu oraz najnowszą wersję niniejszej instrukcji, należy odwiedzić naszą stronę internetową
www.velleman.eu. Informacje zawarte w niniejszej instrukcji obsługi mogą ulec zmianie bez wcześniejszego
powiadomienia.
2. Instruções de segurança
Perigo de asfixia devido às peças pequenas. Não aconselhável para crianças com idades inferiores a 3 anos.
Leia este manual atentamente antes da utilização ou instalação.
Idade recomendada: 14+.
Proteger da chuva, humidade, respingos e gotejamento, quedas e manuseamento abusivo, calor extremo e poeira.
MANUAL DO UTILIZADOR
1. Introdução
Aos cidadãos da União EuropeiaImportantes informações sobre o meio ambiente no que respeita a este produto.
Agradecemos o facto de ter adquirido este aparelho. Leia atentamente as instruções do manual antes de usar o aparelho.
Caso o aparelho tenha sofrido algum dano durante o transporte não o instale e entre em contacto com o seu distribuidor.
Este símbolo no aparelho ou na embalagem indica que, enquanto desperdícios, poderão causar danos no meio ambiente.
Não coloque a unidade (ou as pilhas) no depósito de lixo municipal; deve dirigir-se a uma empresa especializada em reciclagem.
Devolva o aparelho ao seu distribuidor ou ao posto de reciclagem local. Respeite a legislação local relativa ao meio ambiente.
Em caso de dúvidas, contacte com as autoridades locais para os resíduos.

KSR17
63
3. Normas gerais
4. Instalação
Consulte a Garantia de Serviço e Qualidade Velleman®na parte final deste manual do utilizador.Por razões de segurança,
estão proibidas quaisquer modificações do aparelho desde que não autorizadas. Os danos causados por modificações não
autorizadas do aparelho não estão cobertos pela garantia.Utilize o aparelho apenas para as aplicações descritas neste manual.
Uma utilização incorreta anula a garantia completamente.Danos causados pelo não cumprimento das normas de segurança
referidas neste manual anulam a garantia e o seu distribuidor não será responsável por quaisquer danos ou outros problemas
daí resultantes.Nem Velleman NV nem os seus distribuidores podem ser responsabilizados por quaisquer danos (extraordinário,
incidental ou indireto) -de qualquer natureza decorrentes (financeira, física...)a partir da posse, uso ou falha do produto.
Guarde este manual para posterior consulta.
Consulte o manualem www.velleman.eu para obter instruções sobre como montar o aparelho.
© DIREITOS DE AUTOR
A Velleman NV detém os direitos de autor deste manual do utilizador. Todos os direitos mundiaisreservados.
Nenhuma parte deste manual pode ser copiada, reproduzida, traduzida ou resumida por qualquer eletrónica, ou de outra forma,
sem prévio consentimento por parte da detentora dos direitos de autor.
Utilize este aparelho apenas com acessórios originais. A Velleman NV não será responsável por quaisquer danos
ou lesões causados pelo uso (indevido) do aparelho. Para mais informação sobre este produto e para aceder à
versão mais recente deste manualdo utilizador, visite a nossa página www.velleman.eu. Podem alterar-se as
especificações e o conteúdo deste manual sem aviso prévio.
MANUALE D’USO
1. Introduzione
A tutti i residenti dell’Unione Europea
Informazioni ambientali importanti su questo prodotto
In caso di dubbi, contattare il locale ente di smaltimento rifiuti.
La ringraziamo per aver scelto Velleman! Leggere attentamente il manuale prima di mettere in servizio questo dispositivo.
Se il dispositivo si è danneggiato durante il trasporto, non installarlo o utilizzarlo e contattare il rivenditore.
2. Istruzioni di sicurezza
Pericolo di soffocamento a causa di piccole parti. Non adatto a bambini di età inferiore a 3 anni.
Età consigliata: 14+.
Questo simbolo sul dispositivo o sulla confezione indica che lo smaltimento del dispositivo dopo il suo ciclo di vita potrebbe
nuocere all’ambiente. Non smaltire l’unità (ospecializzata. Consegnare questo dispositivo al propriodistributore o a un servizio
di riciclaggio locale. Rispettare le normative ambientali locali.
Leggere e comprendere questo manuale e tutti i segnali di sicurezza prima di utilizzare questo apparecchio.
Proteggere dalla pioggia, dall'umidità, dagli schizzi o gocce di liquidi, dagli urti, dal colore estremo e della polvere.
3. Linee guida generali
Fare riferimento al Servizio Velleman®e alla Garanzia di qualità nelle ultime pagine di questo manuale.
Eventuali modifiche del dispositivo sono vietate per motivi di sicurezza. I danni arrecati da eventuali modifiche dell’utente al
dispositivo non sono coperti dalla garanzia.
Utilizzare il dispositivo esclusivamente per lo scopo previsto. L’uso del dispositivo in modo non autorizzato renderà nulla la garanzia.
I danni derivanti dall’inosservanza delle indicazioni fornite nel presente manuale non sono coperti da garanzia; il venditore non sarà
ritenuto responsabile di eventuali danni cagionati a cose o persone.
Né Velleman nv né i suoi rivenditori possono essere ritenuti responsabili per qualsiasi danno (straordinario, incidentale o indiretto)-
di qualsiasi natura (finanziaria, fisica ...) derivanti dal possesso, l'uso o la rottura di questo prodotto.
Conservare questo manuale per eventuali riferimenti futuri.
4. Installazione
Riferirsi al manuale su www.velleman.eu per le istruzioni per l'uso.
Utilizzare questo dispositivo solo con gli accessori originali. Velleman nv non può essere ritenuta responsabile in caso di
danni o lesioni derivanti dall’uso (errato) di questo dispositivo. Per ulteriori informazioni relative a questo prodotto,
vi preghiamo di visitare il nostro sito www.velleman.eu. Le informazioni contenute in questo manuale sono soggette a
modifiche senza preavviso.
© AVVISO DI COPYRIGHT
Il copyright di questo manuale è di proprietà di Velleman nv. Tutti i diritti mondiali sono riservati.
Nessuna parte di questo manuale può essere copiata, riprodotta, tradotta o ridotta a qualsiasi supporto elettronico o altro senza il preventi vo
consenso scritto del detentore del copyright.

64
EN
NL
Velleman® Service and Quality Warranty
Since its foundation in 1972, Velleman® acquired extensive experience in the electronics world and
currently distributes its products in over 85 countries.
All our products fulfil strict quality requirements and legal stipulations in the EU. In order to ensure the
quality, our products regularly go through an extra quality check, both by an internal quality department and
by specialized external organisations. If, all precautionary measures notwithstanding, problems should
occur, please make appeal to our warranty (see guarantee conditions).
General Warranty Conditions Concerning Consumer Products (for EU):
• All consumer products are subject to a 24-month warranty on production flaws and defective material as
from the original date of purchase.
• Velleman® can decide to replace an article with an equivalent article, or to refund the retail value totally
or partially when the complaint is valid and a free repair or replacement of the article is impossible, or if the
expenses are out of proportion. You will be delivered a replacing article or a refund at the value of 100% of
the purchase price in case of a flaw occurred in the first year after the date of purchase and delivery, or a
replacing article at 50% of the purchase price or a refund at the value of 50% of the retail value in case of a
flaw occurred in the second year after the date of purchase and delivery.
• Not covered by warranty: - all direct or indirect damage caused after delivery to the article (e.g. by
oxidation, shocks, falls, dust, dirt, humidity...), and by the article, as well as its contents (e.g. data loss),
compensation for loss of profits;
- consumable goods, parts or accessories that are subject to an aging process during normal use, such as
batteries (rechargeable, non-rechargeable, built-in or replaceable), lamps, rubber parts, drive belts...
(unlimited list);
- flaws resulting from fire, water damage, lightning, accident, natural disaster, etc.…;
- flaws caused deliberately, negligently or resulting from improper handling, negligent maintenance,
abusive use or use contrary to the manufacturer’s instructions;
- damage caused by a commercial, professional or collective use of the article (the warranty validity will be
reduced to six (6) months when the article is used professionally);
- damage resulting from an inappropriate packing and shipping of the article;
- all damage caused by modification, repair or alteration performed by a third party without written
permission by Velleman®.
• Articles to be repaired must be delivered to your Velleman® dealer, solidly packed (preferably in the
original packaging), and be completed with the original receipt of purchase and a clear flaw description.
• Hint: In order to save on cost and time, please reread the manual and check if the flaw is caused by
obvious causes prior to presenting the article for repair. Note that returning a non-defective article can also
involve handling costs.
• Repairs occurring after warranty expiration are subject to shipping costs
• The above conditions are without prejudice to all commercial warranties.
The above enumeration is subject to modification according to the article (see article’s manual).
EN
FR
Garantie de service et de qualité Velleman®
Depuis 1972, Velleman® a gagné une vaste expérience dans le secteur de l’électronique et est
actuellement distributeur dans plus de 85 pays. Tous nos produits répondent à des exigences de qualité
rigoureuses et à des dispositions légales en vigueur dans l’UE. Afin de garantir la qualité, nous soumettons
régulièrement nos produits à des contrôles de qualité supplémentaires, tant par notre propre service
qualité que par un service qualité externe. Dans le cas improbable d’un défaut malgré toutes les
précautions, il est possible d’invoquer notre garantie (voir les conditions de garantie).
Conditions générales concernant la garantie sur les produits grand public (pour l’UE) :
• tout produit grand public est garanti 24 mois contre tout vice de production ou de matériaux à dater du
jour d’acquisition effective ;
• si la plainte est justifiée et que la réparation ou le remplacement d’un article est jugé impossible, ou
lorsque les coûts s’avèrent disproportionnés, Velleman® s’autorise à remplacer ledit article par un article
équivalent ou à rembourser la totalité ou une partie du prix d’achat. Le cas échéant, il vous sera consenti
un article de remplacement ou le remboursement complet du prix d’achat lors d’un défaut dans un délai de
1 an après l’achat et la livraison, ou un article de remplacement moyennant 50% du prix d’achat ou le
remboursement de 50% du prix d’achat lors d’un défaut après 1 à 2 ans.
• sont par conséquent exclus :
- tout dommage direct ou indirect survenu à l’article après livraison (p.ex. dommage lié à l’oxydation, choc,
chute, poussière, sable, impureté…) et provoqué par l’appareil, ainsi que son contenu (p.ex. perte de
données) et une indemnisation éventuelle pour perte de revenus ;
- toute pièce ou accessoire nécessitant un remplacement causé par un usage normal comme p.ex. piles
(rechargeables comme non rechargeables, intégrées ou remplaçables), ampoules, pièces en caoutchouc,
courroies… (liste illimitée) ;
- tout dommage qui résulte d’un incendie, de la foudre, d’un accident, d’une catastrophe naturelle, etc. ;
- out dommage provoqué par une négligence, volontaire ou non, une utilisation ou un entretien incorrect,
ou une utilisation de l’appareil contraire aux prescriptions du fabricant ;
-tout dommage à cause d’une utilisation commerciale, professionnelle ou collective de l’appareil (la
période de garantie sera réduite à 6 mois lors d’une utilisation professionnelle) ;
-tout dommage à l’appareil qui résulte d’une utilisation incorrecte ou différente que celle pour laquelle il a
été initialement prévu comme décrit dans la notice ;
-tout dommage engendré par un retour de l’appareil emballé dans un conditionnement non ou
insuffisamment protégé.-toute réparation ou modification effectuée par une tierce personne sans
l’autorisation explicite de SA Velleman® ;
-frais de transport de et vers Velleman® si l’appareil n’est plus couvert sous la garantie.
• toute réparation sera fournie par l’endroit de l’achat. L’appareil doit nécessairement être accompagné du
bon d’achat d’origine et être dûment conditionné (de préférence dans l’emballage d’origine avec mention
du défaut) ;
• tuyau : il est conseillé de consulter la notice et de contrôler câbles, piles, etc. avant de retourner
l’appareil. Un appareil retourné jugé défectueux qui s’avère en bon état de marche pourra faire l’objet
d’une note de frais à charge du consommateur ;
• une réparation effectuée en-dehors de la période de garantie fera l’objet de frais de transport ;
• toute garantie commerciale ne porte pas atteinte aux conditions susmentionnées.
La liste susmentionnée peut être sujette à une complémentation selon le type de l’article et être
mentionnée dans la notice d’emploi.
Velleman® service- en kwaliteitsgarantie
Velleman® heeft sinds zijn oprichting in 1972 een ruime ervaring opgebouwd in de elektronicawereld en
verdeelt op dit moment producten in meer dan 85 landen. Al onze producten beantwoorden aan strikte
kwaliteitseisen en aan de wettelijke bepalingen geldig in de EU. Om de kwaliteit te waarborgen, ondergaan
onze producten op regelmatige tijdstippen een extra kwaliteitscontrole, zowel door onze eigen
kwaliteitsafdeling als door externe gespecialiseerde organisaties. Mocht er ondanks deze voorzorgen toch
een probleem optreden, dan kunt u steeds een beroep doen op onze waarborg (zie waarborgvoor-
waarden).
Algemene waarborgvoorwaarden consumentengoederen (voor Europese Unie):
• Op alle consumentengoederen geldt een garantieperiode van 24 maanden op productie- en
materiaalfouten en dit vanaf de oorspronkelijke aankoopdatum.
• Indien de klacht gegrond is en een gratis reparatie of vervanging van een artikel onmogelijk is of indien
de kosten hiervoor buiten verhouding zijn, kan Velleman® beslissen het desbetreffende artikel te
vervangen door een gelijkwaardig artikel of de aankoopsom van het artikel gedeeltelijk of volledig terug te
betalen. In dat geval krijgt u een vervangend product of terugbetaling ter waarde van 100% van de
aankoopsom bij ontdekking van een gebrek tot één jaar na aankoop en levering, of een vervangend
product tegen 50% van de kostprijs of terugbetaling van 50 % bij ontdekking na één jaar tot 2 jaar.
• Valt niet onder waarborg:
- alle rechtstreekse of onrechtstreekse schade na de levering veroorzaakt aan het toestel (bv. door
oxidatie, schokken, val, stof, vuil, vocht...), en door het toestel, alsook zijn inhoud (bv. verlies van data),
vergoeding voor eventuele winstderving.
- verbruiksgoederen, onderdelen of hulpstukken die onderhevig zijn aan veroudering door normaal gebruik
zoals bv. batterijen (zowel oplaadbare als niet-oplaadbare, ingebouwd of vervangbaar), lampen, rubberen
onderdelen, aandrijfriemen... (onbeperkte lijst).
- defecten ten gevolge van brand, waterschade, bliksem, ongevallen, natuurrampen, enz.
- defecten veroorzaakt door opzet, nalatigheid of door een onoordeelkundige behandeling, slecht
onderhoud of abnormaal gebruik of gebruik van het toestel strijdig met de voorschriften van de fabrikant. -
schade ten gevolge van een commercieel, professioneel of collectief gebruik van het apparaat (bij
professioneel gebruik wordt de garantieperiode herleid tot 6 maand).
- schade veroorzaakt door onvoldoende bescherming bij transport van het apparaat.
- alle schade door wijzigingen, reparaties of modificaties uitgevoerd door derden zonder toestemming van
Velleman®.
• Toestellen dienen ter reparatie aangeboden te worden bij uw Velleman®-verdeler. Het toestel dient
vergezeld te zijn van het oorspronkelijke aankoopbewijs. Zorg voor een degelijke verpakking (bij voorkeur
de originele verpakking) en voeg een duidelijke foutomschrijving bij.
• Tip: alvorens het toestel voor reparatie aan te bieden, kijk nog eens na of er geen voor de hand liggende
reden is waarom het toestel niet naar behoren werkt (zie handleiding). Op deze wijze kunt u kosten en tijd
besparen. Denk eraan dat er ook voor niet-defecte toestellen een kost voor controle aangerekend kan
worden.
• Bij reparaties buiten de waarborgperiode zullen transportkosten aangerekend worden.
• Elke commerciële garantie laat deze rechten onverminderd.
Bovenstaande opsomming kan eventueel aangepast worden naargelang de aard van het product
(zie handleiding van het betreffende product).
ES
Garantía de servicio y calidad Velleman®
Desde su fundación en 1972 Velleman® ha adquirido una amplia experiencia como distribuidor en el
sector de la electrónica en más de 85 países. Todos nuestros productos responden a normas de calidad
rigurosas y disposiciones legales vigentes en la UE. Para garantizar la calidad, sometemos nuestros
productos regularmente a controles de calidad adicionales, tanto a través de nuestro propio servicio de
calidad como de un servicio de calidad externo. En el caso improbable de que surgieran problemas a
pesar de todas las precauciones, es posible recurrir a nuestra garantía (véase las condiciones de
garantía).
Condiciones generales referentes a la garantía sobre productos de venta al público (para la Unión
Europea):
• Todos los productos de venta al público tienen un período de garantía de 24 meses contra errores de
producción o errores en materiales desde la adquisición original;
• Si la queja está fundada y si la reparación o sustitución de un artículo no es posible, o si los gastos son
desproporcionados, Velleman® autoriza reemplazar el artículo por un artículo equivalente o reembolsar la
totalidad o una parte del precio de compra. En este caso, usted recibirá un artículo de recambio o el
reembolso completo del precio de compra si encuentra algún fallo hasta un año después de la compra y
entrega, o un artículo de recambio al 50% del precio de compra o el reembolso del 50% del precio de
compra si encuentra un fallo después de 1 año y hasta los 2 años después de la compra y entrega.
Por consiguiente, están excluidos entre otras cosas:
-todos los daños causados directa o indirectamente al aparato (p.ej. por oxidación, choques, caída,...) y a
su contenido (p.ej. pérdida de datos) después de la entrega y causados por el aparato, y cualquier
indemnización por posible pérdida de ganancias;
-partes o accesorios, que estén expuestos al desgaste causado por un uso normal,como por ejemplo
baterías (tanto recargables como no recargables, incorporadas o reemplazables), bombillas, partes de
goma, etc. (lista ilimitada);
-defectos causados por un incendio, daños causados por el agua, rayos, accidentes, catástrofes
naturales, etc.;
-defectos causados a conciencia, descuido o por malos tratos, un mantenimiento inapropiado o un uso
anormal del aparato contrario a las instrucciones del fabricante;
-daños causados por un uso comercial, profesional o colectivo del aparato (el período de garantía se
reducirá a 6 meses con uso profesional);
-daños causados por un uso incorrecto o un uso ajeno al que está previsto el producto inicialmente como
está descrito en el manual del usuario;-daños causados por una protección insuficiente al transportar el
aparato.-daños causados por reparaciones o modificaciones efectuadas por una tercera persona sin la
autorización explícita de Velleman®;-se calcula gastos de transporte de y a Velleman® si el aparato ya no
está cubierto por la garantía.
• Cualquier artículo que tenga que ser reparado tendrá que ser devuelto a su distribuidor Velleman®.
Devuelva el aparato con la factura de compra original y transpórtelo en un embalaje sólido (preferente-
mente el embalaje original). Incluya también una buena descripción del fallo;
• Consejo: Lea el manual del usuario y controle los cables, las pilas, etc. antes de devolver el aparato. Si
no se encuentra un defecto en el artículo los gastos podrían correr a cargo del cliente;
• Los gastos de transporte correrán a carga del cliente para una reparación efectuada fuera del período de
garantía.
• Cualquier gesto comercial no disminuye estos derechos.
La lista previamente mencionada puede ser adaptada según el tipo de artículo (véase el manual del
usuariodel artículo en cuestión).

65
DE PT
Velleman ® usługi i gwarancja jakości
Od czasu założenia w 1972, Velleman® zdobył bogate doświadczenie w dziedzinie światowej
elektroniki. Obecnie firma dystrybuuje swoje produkty w ponad 85 krajach.
Wszystkie nasze produkty spełniają surowe wymagania jakościowe oraz wypełniają normy i dyrektywy
obowiązujące w krajach UE. W celu zapewnienia najwyższej jakości naszych produktów, przechodzą
one regularne oraz dodatkowo wyrywkowe badania kontroli jakości, zarówno naszego wewnętrznego
działu jakości jak również wyspecjalizowanych firm zewnętrznych. Pomimo dołożenia wszelkich starań
czasem mogą pojawić się problemy techniczne, prosimy odwołać się do gwarancji (patrz warunki
gwarancji).
Ogólne Warunki dotyczące gwarancji:
• Wszystkie produkty konsumenckie podlegają 24-miesięcznej gwarancji na wady produkcyjne i
materiałowe od daty zakupu.
• W przypadku, gdy usterka jest niemożliwa do usunięcia lub koszt usunięcia jest nadmiernie wysoki
Velleman ® może zdecydować o wymianie artykułu na nowy, wolny od wad lub zwrócić zapłaconą
kwotę.
Zwrot gotówki może jednak nastąpić z uwzględnieniem poniższych warunków:
- zwrot 100% ceny zakupu w przypadku, gdy wada wystąpiła w ciągu pierwszego roku od daty zakupu i
dostawy
- wymiana wadliwego artykułu na nowy, wolny od wad z odpłatnością 50% ceny detalicznej lub zwrot
50% kwoty ceny nabycia w przypadku gdy wada wystąpiła w drugim roku od daty zakupu i dostawy.
• Produkt nie podlega naprawie gwarancyjnej:
- gdy wszystkie bezpośrednie lub pośrednie szkody spowodowane są działaniem czynników
środowiskowych lub losowych (np. przez utlenianie, wstrząsy, upadki, kurz, brud, ...), wilgotności;
- gwarant nie ponosi odpowiedzialności za szkody wynikających z utraty danych;
- produkty konsumenckie, części zamienne lub akcesoria podatne na process starzenia, wynikającego z
normalnego użytkowania, np: baterie (ładowalne, nieładowalne, wbudowane lub wymienne), żarówki,
paski napędowe, gumowe elementy napędowe... (nieograniczona lista);
- usterka wynika z działania pożaru, zalania wszelkimi cieczami, uderzenia pioruna, upadku lub klęski
żywiołowej, itp.;
- usterka wynika z zaniedbań eksploatacyjnych tj. umyślne bądź nieumyślne zaniechanie czyszczenia,
konserwacji, wymiany materiałów ekspolatacyjnych, niedbalstwa lub z niewłaściwego obchodzenia się
lub niezgodnego użytkowania z instrukcją producenta;
- szkody wynikające z nadmiernego użytkowania gdy nie jest do tego celu przeznaczony tj. działalność
komerycjna, zawodowa lub wspólne użytkowanie przez wiele osób - okres obowiązywania gwarancji
zostanie obniżony do 6 (sześć) miesięcy;
- Szkody wynikające ze źle zabezpieczonej wysyłki produktu;
- Wszelkie szkody spowodowane przez nieautoryzowaną naprawę, modyfikację, przeróbkę produktu
przez osoby trzecie jak również bez pisemnej zgody firmy Velleman ®.
• Uszkodzony produkt musi zostać dostarczony do sprzedawcy ® Velleman, solidnie zapakowany
(najlepiej w oryginalnym opakowaniu), wraz z wyposażeniem z jakim produkt został sprzedany. W
przypadku wysyłki towaru w opakowaniu innym niż oryginalnym ryzyko usterki produktu oraz tego skutki
przechodzą na właściciela produktu. Wraz z niesprawnym produktem należy dołączyć jasny i
szczegółowy opis jego usterki, wady;
• Wskazówka: Aby zaoszczędzić na kosztach i czasie, proszę szczegółowo zapoznać się z instrukcja
obsługi; czy przyczyną wady są okoliczności techniczne czy też wynikaja wyłącznie z nieznajomości
obsługi produktu. W przypadku wysyłki sprawnego produktu do serwisu nabywca może zostać
obciążony kosztmi obsługi oraz transportu.
• W przypadku napraw pogwarancyjnych lub odpłatnych klient ponosi dodatkowo koszt wysyłki produktu
do i z serwisu. wymienione wyżej warunki są bez uszczerbku dla wszystkich komercyjnych gwarancji.
Powyższe postanowienia mogą podlegać modyfikacji w zależności od wyrobu (patrz art obsługi).
PL IT
Garantia de serviço e de qualidade Velleman®
Desde a sua fundação em 1972 Velleman® tem adquirido uma amplia experiencia no sector da eletrónica
com uma distribuição em mais de 85 países.
Todos os nossos produtos respondem a exigências rigorosas e a disposições legais em vigor na UE. Para
garantir a qualidade, submetemos regularmente os nossos produtos a controles de qualidade
suplementares, com o nosso próprio serviço qualidade como um serviço de qualidade externo. No caso
improvável de um defeito mesmo com as nossas precauções, é possível invocar a nossa garantia. (ver as
condições de garantia).
Condições gerais com respeito a garantia sobre os produtos grande público (para a UE):
• qualquer produto grande público é garantido 24 mês contra qualquer vício de produção ou materiais a
partir da data de aquisição efectiva;
• no caso da reclamação ser justificada e que a reparação ou substituição de um artigo é impossível, ou
quando os custo são desproporcionados, Velleman® autoriza-se a substituir o dito artigo por um artigo
equivalente ou a devolver a totalidade ou parte do preço de compra. Em outro caso, será consentido um
artigo de substituição ou devolução completa do preço de compra no caso de um defeito no prazo de 1
ano depois da data de compra e entrega, ou um artigo de substituição pagando o valor de 50% do preço
de compra ou devolução de 50% do preço de compra para defeitos depois de 1 a 2 anos.
• estão por consequência excluídos:
- todos os danos directos ou indirectos depois da entrega do artigo (p.ex. danos ligados a oxidação,
choques, quedas, poeiras, areias, impurezas…) e provocado pelo aparelho, como o seu conteúdo (p.ex.
perca de dados) e uma indemnização eventual por perca de receitas;
- consumíveis, peças ou acessórios sujeitos a desgaste causado por um uso normal, como p.ex. pilhas
(recarregáveis, não recarregáveis, incorporadas ou substituíveis), lâmpadas, peças em borracha
correias… (lista ilimitada);
- todos os danos que resultem de um incêndio, raios, de um acidente, de una catastrophe natural, etc.;
- danos provocados por negligencia, voluntária ou não, uma utilização ou manutenção incorrecta, ou uma
utilização do aparelho contrária as prescrições do fabricante ;
- todos os danos por causa de uma utilização comercial, profissional ou colectiva do aparelho ( o período
de garantia será reduzido a 6 meses para uma utilização profissional);
- todos os danos no aparelho resultando de uma utilização incorrecta ou diferente daquela inicialmente
prevista e descrita no manual de utilização;
- todos os danos depois de uma devolução não embalada ou mal protegida ao nível do acondicionamento.
- todas as reparações ou modificações efectuadas por terceiros sem a autorização de SA Velleman®; -
despesas de transporte de e para Velleman® se o aparelho não estiver coberto pela garantia.
• qualquer reparação será fornecida pelo local de compra. O aparelho será obrigatoriamente acompanha-
do do talão ou factura de origem e bem acondicionado (de preferência dentro da embalagem de origem
com indicação do defeito ou avaria);
• dica: aconselha-mos a consulta do manual e controlar cabos, pilhas, etc. antes de devolver o aparelho.
Um aparelho devolvido que estiver em bom estado será cobrado despesas a cargo do consumidor;
• uma reparação efectuada fora da garantia, será cobrado despesas de transporte;
• qualquer garantia comercial não prevalece as condições aqui mencionadas.
A lista pode ser sujeita a um complemento conforme o tipo de artigo e estar mencionada no
manual de utilização.
Velleman® Service-und Qualitätsgarantie
Seit der Gründung in 1972 hat Velleman® sehr viel Erfahrung als Verteiler in der Elektronikwelt in über 85
Ländern aufgebaut.
Alle Produkte entsprechen den strengen Qualitätsforderungen und gesetzlichen Anforderungen in der EU.
Um die Qualität zu gewährleisten werden unsere Produkte regelmäßig einer zusätzlichen Qualitätskon-
trolle unterworfen, sowohl von unserer eigenen Qualitätsabteilung als auch von externen spezialisierten
Organisationen. Sollten, trotz aller Vorsichtsmaßnahmen, Probleme auftreten, nehmen Sie bitte die
Garantie in Anspruch (siehe Garantiebedingungen).
Allgemeine Garantiebedingungen in Bezug auf Konsumgüter (für die Europäische Union):
• Alle Produkte haben für Material-oder Herstellungsfehler eine Garantieperiode von 24 Monaten ab
Verkaufsdatum.
• Wenn die Klage berechtigt ist und falls eine kostenlose Reparatur oder ein Austausch des Gerätes
unmöglich ist, oder wenn die Kosten dafür unverhältnismäßig sind, kann Velleman® sich darüber
entscheiden, dieses Produkt durch ein gleiches Produkt zu ersetzen oder die Kaufsumme ganz oder
teilweise zurückzuzahlen. In diesem Fall erhalten Sie ein Ersatzprodukt oder eine Rückzahlung im Werte
von 100% der Kaufsumme im Falle eines Defektes bis zu 1 Jahr nach Kauf oder Lieferung, oder Sie
bekommen ein Ersatzprodukt im Werte von 50% der Kaufsumme oder eine Rückzahlung im Werte von
50 % im Falle eines Defektes im zweiten Jahr.
• Von der Garantie ausgeschlossen sind:
-alle direkten oderindirekten Schäden, die nach Lieferung am Gerät und durch das Gerät verursacht
werden (z.B. Oxidation, Stöße, Fall, Staub, Schmutz, Feuchtigkeit, ...), sowie auch der Inhalt (z.B.
Datenverlust), Entschädigung für eventuellen Gewinnausfall.
-Verbrauchsgüter, Teile oder Zubehörteile, die durch normalen Gebrauch dem Verschleiß ausgesetzt sind,
wie z.B. Batterien (nicht nur aufladbare, sondern auch nicht aufladbare, eingebaute oder ersetzbare),
Lampen, Gummiteile, Treibriemen, usw. (unbeschränkte Liste).
-Schäden verursacht durch Brandschaden, Wasserschaden, Blitz, Unfälle, Naturkatastrophen, usw.
-Schäden verursacht durch absichtliche, nachlässige oder unsachgemäße Anwendung, schlechte
Wartung, zweckentfremdete Anwendung oder Nichtbeachtung von Benutzerhinweisen in der Bedienung-
sanleitung.
-Schäden infolge einer kommerziellen, professionellen oder kollektiven Anwendung des Gerätes
(bei gewerblicher Anwendung wird die Garantieperiode auf 6 Monate zurückgeführt).
-Schäden verursacht durch eine unsachgemäße Verpackung und unsachgemäßen Transport des Gerätes.
-alle Schäden verursacht durch unautorisierte Änderungen, Reparaturen oder Modifikationen, die von
einem Dritten ohne Erlaubnis von Velleman® vorgenommen werden.
• Im Fall einer Reparatur, wenden Sie sichan Ihren Velleman®-Verteiler. Legen Sie das Produkt
ordnungsgemäß verpackt (vorzugsweise die Originalverpackung) und mit dem Original-Kaufbeleg vor.
Fügen Sie eine deutliche Fehlerbeschreibung hinzu.
• Hinweis: Um Kosten und Zeit zu sparen, lesen Sie die Bedienungsanleitung nochmals und überprüfen
Sie, ob es keinen auf de Hand liegenden Grund gibt, ehe Sie das Gerät zur Reparatur zurückschicken.
Stellt sich bei der Überprüfung des Gerätes heraus, dass kein Geräteschaden vorliegt, könnte dem
Kunden eine Untersuchungspauschale berechnet.
• Für Reparaturen nach Ablauf der Garantiefrist werden Transportkosten berechnet.
• Jede kommerzielle Garantie lässt diese Rechte unberührt.
Die oben stehende Aufzählung kann eventuell angepasst werden gemäß der Art des Produktes
(siehe Bedienungsanleitung des Gerätes).
Garanzia di Qualità Velleman®
Velleman® ha oltre 35 anni di esperienza nel mondo dell'elettronica e distribuisce i suoi prodotti in oltre 85
paesi.
Tutti i nostri prodotti soddisfano rigorosi requisiti di qualità e rispettano le disposizioni giuridiche dell'Unione
europea. Al fine di garantire la massima qualità, i nostri prodotti vengono regolarmente sottoposti ad ulteriori
controlli, effettuati sia da un re parto interno di qualità che da organizzazioni esterne specializzate. Se,
nonostante tutti questi accorgimenti, dovessero sorgere dei problemi, si prega di fare appello alla garanzia
prevista (vedi condizioni generali di garanzia).
Condizioni generali di garanzia per i prodotti di consumo:
• Questo prodotto è garantito per il periodo stabilito dalle vigenti norme legislative, a decorrere dalla data di
acquisto, contro i difetti di materiale o di fabbricazione. La garanzia è valida solamente se l’unità è acc
ompagnata dal documento d’acquisto originale.
• Futura Elettronica provvederà, in conformità con la presente garanzia (fatto salvo quanto previsto dalla
legge applicabile), a eliminare i difetti mediante la riparazione o, qualora Futura Elettronica lo rit enesse
necessario, alla sostituzione dei componenti difettosi o del prodotto stesso con un altro avente identiche
caratteristiche.
• Le spese di spedizione o riconsegna del prodotto sono a carico del cliente.
• La garanzia decade nel caso di uso improprio, manomissione o installazione non corretta dell’apparecchio
o se il difetto di conformità non viene denunciato entro un termine di 2 mesi dalla data in cui si è scoperto il
difetto.
• Il venditore non è ritenuto responsabile dei danni derivanti dall’uso improprio del dispositivo.
• L’apparecchio deve essere rispedito con l’imballaggio originale; non si assumono responsabilità per danni
derivanti dal trasporto.
• Il prodotto deve ess ere accompagnato da un’etichetta riportante i propri dati personali e un recapito
telefonico; è necessario inoltre allegare copia dello scontrino fiscale o della fattura attestante la data
dell’acquisto.
L’eventuale riparazione sarà a pagamento se:
• Sono scaduti i tempi previsti.
• Non viene fornito un documento comprovante la data d’acquisto.
• Non è visibile sull’apparecchio il numero di serie.
• L’unità è stata usata oltre i limiti consentiti, è stata modificata, installata impropriamente, è stata apert a o
manomessa.

Copyright © 2018 CIC. Alle Rechte vorbehalten
Copyright © 2018 CIC. All rights reserved
Copyright © 2018 CIC. Todos los derechos reservados
Droits d'auteur © 2018 CIC. Tous droits réservés
KSR17
KSR17I-2
Made in Taiwan
Imported by Velleman nv
Legen Heirweg 33, 9890 Gavere, Belgium
www.velleman.eu
ACHTUNG:
ERSTICKUNGSGEFAHR
Nicht für Kinder unter
3 Jahren geeignet
Kleinteile
WARNING :
CHOKING HAZARD
Not for children under
3 years
Small parts
ADVERTENCIA:
RIESGO DE ASFIXIA
No apto para niños
menores de 3 años
Pequeñas piezas
AVERTISSEMENT :
RISQUE D'ÉTOUFFEMENT
Ne convient pas aux
enfants de moins de 3 ans
Partie arrière
AVVERTENZA:
PERICOLO DI SOFFOCAMENTO
Non adatto a bambini di
età inferiore a 3 anni
Parti piccole
WAARSCHUWING:
VERSTIKKINGSGEVAAR
Niet geschikt voor kinderen
jonger dan 3 jaar
Kleine onderdelen
OSTRZEŻENIE:
NIEBEZPIECZEŃSTWO ZADŁAWIENIA
Nie nadaje się dla dzieci
w wieku poniżej 3 lat.
Małe części
ATENÇÃO:
RISCO DE ASFIXIA
Não é indicado para crianças
com menos de 3 anos
Peças pequenas
DE SOLAR- UND HYDRAULIK-ROBOTER-BAUSATZ - 12-in-1
EN 12 in 1 SOLAR & HYDRAULIC CONSTRUCTION KIT
ES KIT ROBOT SOLAR E HIDRÁULICO - 12 en 1
FR KIT DE CONSTRUCTION SOLAIRE & HYDRAULIQUE - 12 EN 1
NL BOUWKIT OP ZONNE-ENERGIE - 12-IN-1
PL SOLARNY, HYDRAULICZNY ZESTAW KONSTRUKCYJNY 12 W 1
PT KIT DE CONSTRUÇÃO SOLAR & HIDRÁULICO 12 em 1
IT KIT DI COSTRUZIONE SOLARE & IDRAULICO 12 IN 1
Copyright © 2018 CIC. Tutti i diritti riservati
Auteursrecht © 2018 CIC. Alle rechten voorbehouden
Copyright © 2018 CIC. Wszystkie prawa zastrzeżone
Copyright © 2018 CIC. Todos os direitos reservados.
-
 1
1
-
 2
2
-
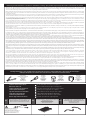 3
3
-
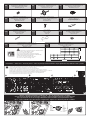 4
4
-
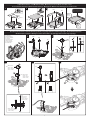 5
5
-
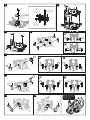 6
6
-
 7
7
-
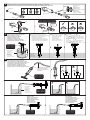 8
8
-
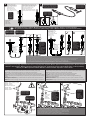 9
9
-
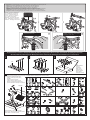 10
10
-
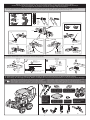 11
11
-
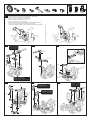 12
12
-
 13
13
-
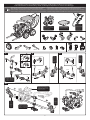 14
14
-
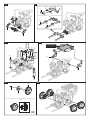 15
15
-
 16
16
-
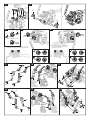 17
17
-
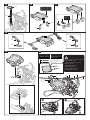 18
18
-
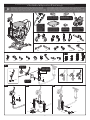 19
19
-
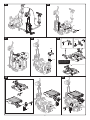 20
20
-
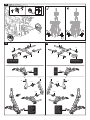 21
21
-
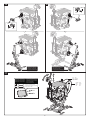 22
22
-
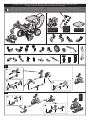 23
23
-
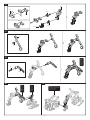 24
24
-
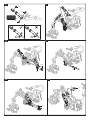 25
25
-
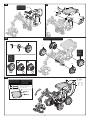 26
26
-
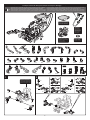 27
27
-
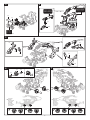 28
28
-
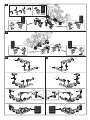 29
29
-
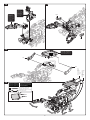 30
30
-
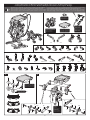 31
31
-
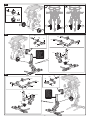 32
32
-
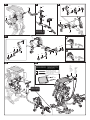 33
33
-
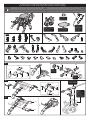 34
34
-
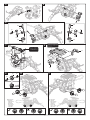 35
35
-
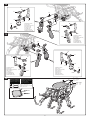 36
36
-
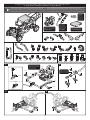 37
37
-
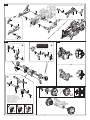 38
38
-
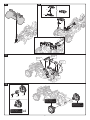 39
39
-
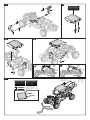 40
40
-
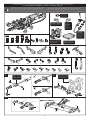 41
41
-
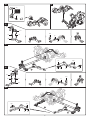 42
42
-
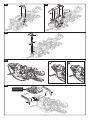 43
43
-
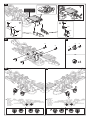 44
44
-
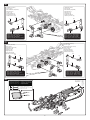 45
45
-
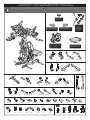 46
46
-
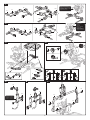 47
47
-
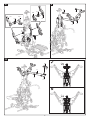 48
48
-
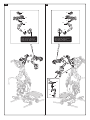 49
49
-
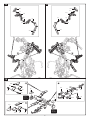 50
50
-
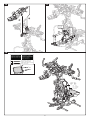 51
51
-
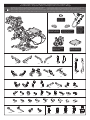 52
52
-
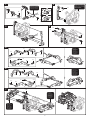 53
53
-
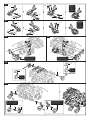 54
54
-
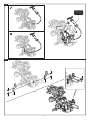 55
55
-
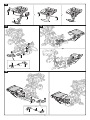 56
56
-
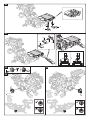 57
57
-
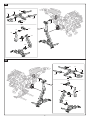 58
58
-
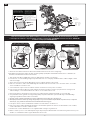 59
59
-
 60
60
-
 61
61
-
 62
62
-
 63
63
-
 64
64
-
 65
65
-
 66
66
-
 67
67
-
 68
68


in andere talen
- italiano: Velleman 01_02-618 12 Manuale utente
- français: Velleman 01_02-618 12 Manuel utilisateur
- español: Velleman 01_02-618 12 Manual de usuario
- Deutsch: Velleman 01_02-618 12 Benutzerhandbuch
- português: Velleman 01_02-618 12 Manual do usuário
- polski: Velleman 01_02-618 12 Instrukcja obsługi