Yamaha CRW3200IX Handleiding
- Categorie
- Optische schijfstations
- Type
- Handleiding
Deze handleiding is ook geschikt voor


(DECLARATION OF CONFORMITY PROCEDURE)
Responsible Party: Yamaha Electronics Corporation, USA.
Address: 6660 Orangethorpe Avenue
Buena Park, CA 90620
Telephone: 714-522-9105
Fax: 714-670-0108
Type of Equipment: CD Recordable/Rewritable Drive
Model Name: CRW3200IX
This device complies with Part 15 of the FCC Rules.
Operation is subject to the following conditions:
1) this device may not cause harmful interference, and
2) this device must accept any interference received including interference that
may cause undesired operation.
See user manual instructions if interference to radio reception is suspected.
FCC INFORMATION (U.S.A.)
1. IMPORTANT NOTICE: DO NOT MODIFY THIS UNIT!
This product, when installed as indicated in the instructions contained in this manual, meets FCC requirements.
Modifications not expressly approved by Yamaha may void your authority, granted by the FCC, to use the product.
2. IMPORTANT: When connecting this product to accessories and/or another product use only high quality shielded cables.
Cable/s supplied with this product MUST be used. Follow all installation instructions. Failure to follow instructions could void
your FCC authorization to use this product in the USA.
3. NOTE: This product has been tested and found to comply with the requirements listed in FCC Regulations, Part 15 for Class
“B” digital devices. Compliance with these requirements provides a reasonable level of assurance that your use of this product
in a residential environment will not result in harmful interference with other electronic devices. This equipment generates/uses
radio frequencies and, if not installed and used according to the instructions found in the users manual, may cause
interference harmful to the operation of other electronic devices. Compliance with FCC regulations does not guarantee that
interference will not occur in all installations. If this product is found to be the source of interference, which can be determined
by turning the product “OFF” and “ON”, please try to eliminate the problem by using one of the following measures:
Relocate either this product or the device that is being affected by the interference.
Utilize power outlets that are on different branch (circuit breaker or fuse) circuits or install AC line filter/s.
In the case of radio or TV interference, relocate/reorient the antenna. If the antenna lead-in is 300 ohm ribbon lead, change
the lead-in to coaxial type cable.
If these corrective measures do not produce satisfactory results, please contact the local retailer authorized to distribute this
type of product. If you can not locate the appropriate retailer, please contact Yamaha Electronics Corporation, USA.
6660 Orangethorpe Avenue, Buena Park, CA 90620 U.S.A.

CAUTION - VISIBLE AND / OR INVISIBLE LASER RADIATION WHEN OPEN.
AVOID EXPOSURE TO BEAM.
VARNING - SYNLIG OCH / ELLER OSYNLIG LASERSTRÅLNING NÄR DENNA
DEL ÄR ÖPPNAD. STRÅLEN ÄR FARLIG.
VARO ! AVATTAESSA OLET ALTTIINA NÄKYVÄLLE JA / TAI
NÄKYMÄTÖMÄLLE LASERSÄTEILYLLE. ÄLÄ KATSO SÄTEESEEN.
VARNING - SYNLIG OCH / ELLER OSYNLIG LASERSTRÅLNING NÄR DENNA DEL
ÄR ÖPPNAD. BETRAKTA EJ STRÅLEN.
VORSICHT ! SICHTBARE UND / ODER UNSICHTBARE LASERSTRAHLUNG
WENN ABDECKUNG GEÖFFNET. NICHT DEM STRAHL AUSSETZEN.
ATTENTION - RADIATION VISIBLE ET / OU INVISIBLE LORSQUE L’APPAREIL
EST OUVERT. EVITEZ TOUTE EXPOSITION AU FAISCEAU.
COMPLIES WITH 21 CFR CHAPTER 1, SUBCHAPTER J.
CLASS 1 LASER PRODUCT
LASER KLASSE 1 PRODUKT
LUOKAN 1 LASERLAITE
KLASS 1 LASER APPARAT
PRODUIT LASER DE CLASSE 1
DANGER - VISIBLE AND / OR INVISIBLE LASER
RADIATION WHEN OPEN. AVOID DIRECT EXPOSURE
TO BEAM.
CAUTION
Use of controls or adjustments or performance of
procedures other than those specified herein may result
in hazardous radiation exposure.
Laser Product Class: Class 1
Laser Diode Properties
Wavelength: 780 – 787 nm
Pulse Durations and Max. Output
at the lens of the Laser Pickup Unit
Read Mode: 0.85 mW (Continuous)
Write Mode: Max. 48 mW
(for 212 ns, Min. Cycle 57.9 ns)
ACHTUNG
Halten Sie sich beim Bedienen und Einstellen der
Bedienungselemente sowie bei der Bedienungsabfolge
an die Anleitung, da sonst gefährliche Strahlen austreten
können.
ATTENTION
L’emploi de commandes, de réglages ou un choix de
procédures différents des spécifications de cette
brochure peut entraîner une exposition à d’éventuelles
radiations pouvant être dangereuses.
PRECAUCION
El usar los controles o ajustar o realizar procedimientos
diferentes a los especificados aquí resultará en
peligrosas exposiciones a la radiación.
VARO! AVATTAESSA JA SUOJALUKITUS OHITETTAESSA
OLET ALTTINA NÄKYMÄTTÖMÄLLE
LASERSÄTEILYLLE. ÄLÄ KATSO SÄTEESEEN.
VARNING! OSYNLIG LASERSTRÅLNING NÄR DENNA DEL ÄR
ÖPPNAD OCH SPÄRREN ÄR URKOPPLAD.
BETRAKTA EJ STRÅLEN. STRÅLEN ÄR FARLIG.
Laserprodukt-Klasse: Klasse 1
Eigenschaften der Laserdiode
Wellenlänge: 780 – 787 nm
Impulsdauer und max. Ausgang an der Linse der
Laser-Abtasteinheit
Lesemodus: 0,85 mW (kontinuierlich)
Schreibmodus: Max. 48 mW
(für 212 ns, Zyklusmin. 57,9 ns)
Classe du produit laser: Classe 1
Caractéristiques de la diode laser
Longueur d’onde: 780 – 787 nm
Durée des impulsions et sortie maximum depuis
la lentille du bloc capteur optique
Mode de lecture: 0,85 mW (continue)
Mode de gravure: max. 48 mW
(pour 212 ns, cycle min. 57,9 ns)
Clase de producto láser: Clase 1
Propiedades del diodo láser
Longitud de onda: 780 – 787 nm
Duración del pulso y potencia de salida máxima
en el objetivo de la unidad captora láser
Modo de lectura: 0,85 mW (continua)
Modo de escritura: máx. 48 mW
(para 212 ns, ciclo mínimo 57,9 ns)

i
OWNER’S MANUAL
English

ii
SAFETY PRECAUTIONS
PLEASE READ THE FOLLOWING WARNINGS AND CAUTIONS CAREFULLY TO
PREVENT PERSONAL INJURY AND DAMAGE TO THE DEVICE.
These precautions explain how to use the device properly and safely, thereby preventing
injury to yourself and others. This section has been sub-divided into a WARNING section
and a CAUTION section, according to the likelihood and nature of any potential injuries or
damage inflicted. They relate to your personal safety, and also help you prevent the risk
of damage to the device. Please read these sections carefully prior to proceeding.
WARNING
Always follow these basic precautions to avoid short-circuit, damage, fire, or other
hazards, and to avoid serious injury or fatal accident from electrical shock.
●
Do not attempt to open or disassemble the device to avoid the risk of electrical shock,
fire, or malfunction.
●
Do not look directly at the laser source to avoid the risk of eye damage or blindness.
●
Do not insert fingers or foreign objects into the device to avoid the risk of electrical
shock, fire, malfunction, or personal injury.
●
Do not expose the device to high humidity or place liquid containers such as a flower
vase on the device to avoid the risk of electrical shock, fire, or malfunction.
●
Do not expose the device to temperature outside the range 5 – 35 °C (41 – 95 °F) to
avoid the risk of fire, deformation of the device panel, or malfunction.
●
Do not expose the device to dusty place to avoid the risk of fire or malfunction.
●
Always follow the owner’s manual to set up or connect the devices properly to avoid
the risk of electrical shock, fire, malfunction, or personal injury.
●
If unusual smells, sounds or smoke come from the device, or if foreign objects such
as liquid get into the device, turn off and unplug the computer immediately to avoid
the risk of electrical shock, fire, or malfunction. Contact the store of purchase or your
nearest Yamaha dealer (listed at the back of this manual).
●
Be sure that the computer is electrically grounded to avoid the risk of electrical shock.
●
Prior to cleaning the drive, always unplug the computer or do not handle the plug with
wet hands to avoid the risk of electrical shock.
●
Use the included AC adapter to avoid the risk of fire or malfunction.

iii
●
Clean the AC power plug regularly to avoid the risk of fire due to insulation failure
such as humidity.
●
Do not unplug the AC adapter by pulling the cable, and do not place objects on the
cable to avoid the risk of electrical shock, fire, or malfunction.
●
Plug in the AC adapter fully to avoid the risk of electrical shock or fire.
●
Do not connect many devices to an electrical outlet. Maintain the rated power of the
outlet to avoid the risk of fire due to overheating.
CAUTION
Always follow these basic precautions to avoid physical injury to yourself or others,
and damage to the device or other property.
●
Always unplug the computer if it will not be used for a prolonged period or if there is a
possibility of lightning, to avoid the risk of electrical shock, fire, or short-circuit.
●
Do not use the device near other electrical appliances such as televisions, radios, or
speakers to avoid the risk of interferences between each other.
●
Do not place the device unstably to avoid the risk of malfunction or personal injury by
its falling down.
●
Do not place the device with a possibility of excessive vibration to avoid the risk of
damage to written data or malfunction.
●
Place the device horizontally to avoid the risk of damage to written data.
●
Prior to transporting the device, remove the disc from the disc tray to avoid the risk of
damage to written data.
●
Use soft, dry cloths to wipe the device. Do not use benzene, paint thinner, detergents,
or chemically treated wiped cloths, and do not place vinyl, plastic, or rubber objects
on the device to avoid the risk of malfunction or damage to the surface of the device.
●
Do not rest your weight on or place heavy objects on the device, and do not apply
excessive force to the buttons, switches, or connectors to avoid the risk of damage to
the device or personal injury.
●
Be careful not to short-circuit the AC power plug with metal objects to avoid the risk of
malfunction.
●
Do not wrap the power cable around the AC adapter to avoid the risk of breaking the
wire or malfunction.

iv
●
Do not listen to audio with headphones at high volume for prolonged period to avoid
auditory disorder.
●
Prior to turning on the computer, always minimize the volume to avoid auditory
disorder by a sudden burst of sound at high volume.
●
Do not place the device near magnets or anything magnetized such as a display to
avoid the risk of interferences between each other.
●
Have the device serviced regularly to avoid internal dust buildup that can cause
malfunction, damage or fire. For service information and service charges, contact the
store of purchase or your nearest Yamaha dealer (listed at the back of this manual).
WARRANTY
YAMAHA AND ITS SUPPLIERS ACCEPT NO LIABILITY FOR ANY PROBLEMS THAT OCCUR AS A
RESULT OF ANY OPERATIONS CARRIED OUT OTHER THAN THOSE STATED IN THE MANUAL
THAT COMES WITH THIS PRODUCT, OR THE LOSS OR THE DAMAGE OF ANY DATA CAUSED AS
A RESULT OF USING THIS PRODUCT.
Precautions for Transportation
Transporting the device unfixed may damage its internal mechanism or circuits.
• Remove the disc from the disc tray of the device.
• Put the device in the original box.
Prior to use, check that the complete accessories are included. (Refer to the original box.)
• ©2001 YAMAHA CORPORATION. All Rights Reserved.
• This document may not, in whole or in part, be copied, photocopied, reproduced, translated,
transmitted, or reduced to any electronic medium of machine readable form without prior consent
in writing from Yamaha.
• Windows is a registered trademark of Microsoft Corporation.
• Apple, Macintosh, Mac OS, and FireWire are registered trademarks of Apple Computer, Inc.
• i.LINK is a trademark of Sony Corporation.
• SafeBurn™ is a trademark of Yamaha Corporation.
• All other trademarks are the property of their respective companies.
™ and ® marks are not specified in this manual.

v
Table of Contents
Features of the CRW3200IX Drive ................................................1
Names and Functions of Parts.....................................................3
Front Panel...............................................................................................3
Rear Panel................................................................................................4
Precautions on Use.................................................................. 5
Handling Discs ........................................................................................5
Copyright.................................................................................................5
Disclaimer of Indemnity..........................................................................5
Compatible Discs.....................................................................................6
System Requirements ..............................................................................7
Preparing the CRW3200IX Drive .................................................10
Serial Number........................................................................................10
Set Up the CRW3200IX Drive on Windows.........................................11
Set Up the CRW3200IX Drive on Macintosh.......................................18
Connecting/Disconnecting the CRW3200IX Drive to/from the Computer...21
Loading/Ejecting a Disc ...........................................................22
Troubleshooting.....................................................................24
Firmware.............................................................................30
CRW3200IX Drive Specifications ................................................31
Technical Notes.....................................................................35
IEEE1394...............................................................................................35
Buffer Underrun Protection Function....................................................35
Connecting Multiple IEEE1394 Devices ..............................................36
Writing Methods....................................................................................37
For details about how to install and use the CD writing software, refer to the
documentation that comes with it.
• The information contained in this manual is subject to change without prior notice.
• Reproduction of this manual, either in part or in full, is expressly forbidden.

1
Features of the CRW3200IX Drive
High speed writing/reading
The CRW3200IX drive supports up to 24X-speed writing for CD-R discs, and up to
10X-speed writing/rewriting for CD-RW discs. In addition, the drive supports data
reading and digital audio data extraction at up to 40X speed.
Tip
• The Partial CAV method permits 24X-speed writing for CD-R discs.
• The CLV method and the 4X – 10X Full CAV method permit 10X-speed writing/
rewriting for CD-RW discs.
IEEE1394 interface
The CRW3200IX drive uses an IEEE1394 interface that enables you to use the drive
as soon as it is connected to the computer.
The CRW3200IX drive supports a hot plug function that enables you to connect/
disconnect the drive while the computer is turned on.
SafeBurn™ (Enhanced stability writing technology)
The generous 8 MB buffer memory provides sufficient data storage to enable stable
disc writing at high speeds. Even if data transfer from the computer is interrupted,
the Buffer Underrun Protection function is activated to save CD-R discs from a
writing error. (P. 35)
“Optimum Write Speed Control” adjusts the writing speed to the optimum rate for
every CD-R disc automatically. You can set the maximum writing speed with your
CD writing software.
• Optimum Write Speed Control can be activated when the maximum writing speed is
set at 12X or more.
• The minimum writing speed to be automatically selected is 8X. Manually set the
optimum writing speed if a writing speed supported by a disc is less than 8X.
High fidelity digital audio
The CRW3200IX drive supports extraction of digital audio data at up to 40X speed
using CD writing software, as well as recording digital audio with high fidelity even
at 24X-speed writing.
Note

2
Audio Master Quality Recording (High quality audio writing mode)
Audio Master Quality Recording enables you to create high quality audio CDs. This
mode is available for CD-R discs with a capacity of 650 MB and 700 MB. (P. 38)
Audio CDs that are created with Audio Master Quality Recording may not be played
back on certain audio recorders and CD-R/RW drives.
CD-MRW (CD Mount Rainier ReWriting)
CD-MRW is a new standard of packet writing. Compared to the ordinary packet
writing, CD-MRW provides many useful functions such as background formatting.
(P. 39)
Note

3
Names and Functions of Parts
➀
Disc tray
Holds the disc. It is opened or closed by
pressing the eject button. (P. 22)
➁
Manual eject hole
Forcibly opens the disc tray when the tray
cannot be opened by pressing the eject
button. (P. 23)
➂
Eject button
Press to open or close the disc tray. (P. 22)
➃
Headphone jack
Connects headphones or external speakers
to the drive; has stereo mini-jack
specifications.
➄
Headphone volume dial
Controls the volume of the headphones.
The volume increases as the dial is turned
to the right.
➅
LED
Indicates the operational status of the
CRW3200IX drive by its colors and
blinking patterns.
Lights or blinks blue
• Lights: Standby (with disc)
• Blinks: Opening/Closing disc tray, or
reading disc information (TOC)
• Blinks rapidly: Playback audio
• Blinks irregularly: Reading data
Lights or blinks purple
• Lights: Standby (no disc) or the disc tray
is open
• Blinks: Accessing for writing or test
writing
• Blinks rapidly: Writing
Blinks orange
• Malfunction
Front Panel
➅
➁
➃➄
➀➂


5
Precautions on Use
To avoid trouble, such as writing errors, loss of recorded data, and malfunction of
the drive, take the following precautions when handling discs.
• Do not place discs in a hot or damp place or where they will be exposed to direct
sunlight.
• Do not touch the disc surface. Hold the disc by the edge when handling it.
• Remove dust and dirt from the disc surface. Use an air spray to remove dust. The
disc surface may be scratched if strongly wiped with a dry cloth.
• Do not stick labels to the disc surface or write anything on it except where
designated.
• Do not clean discs with chemicals or detergents.
• Do not bend or drop discs.
It is prohibited by law to duplicate copyright material for non-personal use without
the prior consent of the copyright holder. When copying material with your CD-R/
RW drive, take due care not to infringe the copyright.
• Yamaha assumes no liability for the loss of any profits incurred as a result of the
loss or corruption of data written on a CD-R or CD-RW, for any loss or damage
caused by or arising out of extraordinary circumstances (including circumstances
that Yamaha has foreseen or could foresee), nor for any damages incurred or
claimed by a third party.
• After handling important data, make a comparison between the original and the
copied data (to confirm that the data has been copied properly).
• In no event shall Yamaha be liable for any damage to discs due to a buffer
underrun error (P. 35) or for any other reason, or the inability to use distributed
discs with your drive.
• Yamaha assumes no liability for the inability to write/playback discs because of
their format.
Handling Discs
Copyright
Disclaimer of Indemnity

6
Discs that can be written on
The CRW3200IX drive can write on the following discs.
For the latest information about discs previously checked for compatibility with the
drive, refer to the following website.
YAMAHA CD-R/RW Drive website
URL: http://www.yamaha.co.jp/english/product/computer/
Compatible Discs
CD-R discs
• The CRW3200IX drive can write at 1X, 2X, 4X, 8X, 12X, 16X or 24X speed.
• CD-R discs can be played back on a CD-ROM drive or a CD player.
• 24X-speed writing is enabled with Partial CAV method. (P. 7)
• Check the writing speeds your disc supports prior to writing.
CD-RW discs
• The CRW3200IX drive can write/rewrite at 2X or 4X speed.
• CD-RW discs can be read/played back on a device (e.g. CD-ROM drive) that
supports “CD-RW” discs.
Some discs support only 2X speed.
High Speed CD-RW discs
• The CRW3200IX drive can write/rewrite at 4X, 8X or 10X speed.
• High Speed CD-RW discs can be read/played back on a CD-RW drive that
bears the High Speed CD-RW logo or a device (e.g. CD-ROM drive) that
supports “CD-RW” discs.
• When using the packet writing method (P. 38) for writing/rewriting onto High
Speed CD-RW discs, you can select the 4X – 10X Full CAV method. For more
information refer to the documentation that comes with your CD writing software.
(Your CD writing software must support the Full CAV method, as does the CD
Writing software that comes with the CRW3200IX drive.)
• The Full CAV method is recommended when opening and editing a file on a CD-
RW disc with an application software.
• In order to write, erase, read or play back High Speed CD-RW discs, use a CD-R/
RW drive that bears the High Speed CD-RW logo. When using a CD-ROM drive
to read/play back High Speed CD-RW discs, use a drive that supports CD-RW
discs.
If these discs are used with a CD-R/RW drive not bearing the High Speed CD-RW
logo, the discs may not be recognized, resulting in a computer not operating
properly or other malfunctions occurring.
Refer to the YAMAHA website below prior to attempting to read/play back these
discs on a YAMAHA CD-R/RW drive not bearing the High Speed CD-RW logo.
URL: http://www.yamaha.co.jp/english/product/computer/
Note
Note
Note

Precautions on Use
7
Partial CAV (Constant Angular Velocity)
The CLV (Constant Linear Velocity) method is generally used to write data on a CD-R
disc. In writing using the CLV method, the disc rotation speed is adjusted to keep the data
writing speed (data transfer rate) constant on all parts of the disc.
In contrast, the CAV (Constant Angular Velocity) method exercises control so as to keep
the disc rotation speed constant. Since the CAV method makes it possible to substantially
increase the maximum data transfer rate without straining of the drive, it is adopted today
for most CD-ROM drives.
CD formats define the constant linear density of written data so that the amount of written
data per disc rotation will increase as the writing point moves from the inner track to the
outer track.
With the CAV method, therefore, data is transferred at a higher rate when it is written on
the outer tracks of the disc. To achieve 24X-speed writing, the CRW3200IX drive
employs the Partial CAV method, which is a combination of the CAV method for inner
tracks and the CLV method for outer tracks.
The Partial CAV method controls the disc rotation speed so that the CRW3200IX drive
starts writing at 18X speed on inner tracks, increasing the speed to 24X as the read/write
head moves outward and holds the speed at 24X on outer tracks.
Tip
The CRW3200IX drive supports 8 cm discs.
Use only circular discs. Do not use any irregular shaped discs such as heart-shaped or
star-shaped discs to avoid the risk of malfunction.
The CRW3200IX drive is designed to operate in the following computer
environment. If your computer does not meet these requirements, the CRW3200IX
drive may not operate or write at the maximum speed.
For Windows
Computer (PC/AT compatible)
• CPU: Pentium II-class or higher, 300 MHz or faster
• RAM: 64 MB or more
64 MB or more is required (128 MB is recommended) for Windows 2000
Professional, while 128 MB or more is required (256 MB is recommended) for
Windows XP.
Note
System Requirements

8
•CD-ROM drive
The CRW3200IX drive cannot be used to boot the computer or to set up an operating
system.
• Hard drive space
Writing data on a CD-R/RW disc requires 50 MB to 100 MB of free space as a
working area on the hard drive. When writing data on a CD-R/RW disc after
creating an image file, there must be enough free space on the hard drive to store
the image file in addition to the working area (a total of up to 900 MB).
However, hard drive space for image files is not required when directly writing
onto a CD-R/RW disc from a hard drive or CD-ROM using the CRW3200IX
drive (on-the-fly writing).
Image file
You can collect the data files to be written on a CD-R/RW disc into a single image file.
The image file is useful for writing the same data onto multiple discs. For details, refer
to the documentation that comes with the CD writing software.
• A spare PCI expansion slot or a CardBas slot for an IEEE1394 interface card
(if one hasn’t been installed or built-in)
• IEEE1394 port
An optional IEEE1394 interface card (OHCI compatible) is required to connect
the CRW3200IX drive for the computer without an IEEE1394 port.
The IEEE1394 interface cards that have been already recognized to support the
CRW3200IX drive are as follows.
For the latest information about IEEE1394 interface cards supporting the
CRW3200IX drive, refer to the following websites.
YAMAHA CD-R/RW Drive website
URL: http://www.yamaha.co.jp/english/product/computer/
Some IEEE1394 interface cards may not support the CRW3200IX drive. Even if the
interface card operates properly in the computer, the interface card may not support
IEEE1394 interface CD-R/RW drives. For details, refer to the documentation that
comes with the IEEE1394 interface card.
Yamaha recommends that you use an IEEE1394 interface card listed above that has
been recognized to support the CRW3200IX drive.
Note
Manufacturer Product Card Type
Advansys ASB30400 PCI
SIIG NN2603 PCI
Note
Continued on next page
04GB-PrecautionsOnUse.fm Page 8 Friday, November 16, 2001 4:02 PM

Precautions on Use
9
Operating system
Windows 98 Second Edition, Windows Me, Windows 2000 Professional, or
Windows XP.
CD writing software
The CRW3200IX drive requires CD writing software to write onto a CD-R/RW
disc. Use the CD writing software that supports the CRW3200IX drive.
For details about installing and using the CD writing software, refer to the
documentation that comes with the CD writing software.
For Macintosh
Computer (Macintosh with a FireWire port)
• CPU: PowerPC G3, 300 MHz or faster
• RAM: 64 MB or more
• CD-ROM drive
The CRW3200IX drive cannot be used to boot the computer or to set up an operating
system.
• Hard drive space
Writing data on a CD-R/RW disc requires 50 MB to 100 MB of free space as a
working area on the hard drive. When writing data on a CD-R/RW disc after
creating image file, there must be enough free space on the hard drive to store the
image file in addition to the working area (a total of up to 900 MB).
However, hard drive space for image file is not required when directly writing
onto a CD-R/RW disc from hard drive or CD-ROM using the CRW3200IX drive
(on-the-fly writing).
Image file
You can collect the data files to be written on a CD-R/RW disc into a single image file.
The image file is useful for writing the same data onto multiple discs. For details, refer
to the documentation that comes with the CD writing software.
Operating system
Mac OS 8.6 and 9 to 9.2 (Classic API with Mac OS X is not supported.)
CD writing software
The CRW3200IX drive requires CD writing software to write onto a CD-R/RW
disc. Use the CD writing software that supports the CRW3200IX drive.
For details about installing and using the CD writing software, refer to the
documentation that comes with the CD writing software.
Note

10
Preparing the CRW3200IX Drive
The serial number is printed on the label on the bottom of your CRW3200IX drive.
When you have a question about the drive or need user support services, the serial
number is required.
Please write the serial number down in the space below. It may be difficult to check
the serial number after setting up the drive or for any other reason.
Serial Number
Serial Number
Serial number
(10 characters: 3 letters +
7 numbers)

Preparing the CRW3200IX Drive (Windows)
11
Place the CRW3200IX drive horizontally.
1
Remove all IEEE1394 devices connected to the computer, and
turn on the computer.
2
Be sure that the power switch on the rear panel of the
CRW3200IX drive is turned off (STANDBY), and connect the
included AC adapter to the DC-IN connector of the drive.
The arrow on the adapter plug faces to the screw (the left side of the
connector).
Set Up the CRW3200IX Drive on Windows
Note
DC-IN connector
Screw Arrow

12
3
Connect the included power cable to the AC adapter (
➀
).
Connect the other end of the power cable to the wall socket
(
➁
).
• Use the included AC adapter only. Do not use other adapters.
• The AC adapter may become warm during use under normal conditions.
• The AC adapter consumes power, shown in the table below, while connected to
the wall socket even if the power switch of the CRW3200IX drive is turned off.
Remove the power cable from the wall socket when not using the CRW3200IX
drive for a prolonged period.
Note
Power source Power consumption
100 V, 120 V 0.8 W
220 V 0.9 W
230 V, 240 V 1.0 W
Power cable (included)
➀
➁

Preparing the CRW3200IX Drive (Windows)
13
4
Turn on the power switch of the CRW3200IX drive.
When turning on the CRW3200IX drive, be sure that the LED on the front panel
blinks blue and then lights purple. (P. 3)
5
Connect the CRW3200IX drive and the computer with the
included IEEE1394 cable.
The included IEEE1394 cable has a 6-pin IEEE1394 connector at each end.
Depending on your computer environment such as a laptop computer with a 4-pin
type IEEE1394 port, an IEEE1394 cable with a 4-pin IEEE1394 connector at one
end may be required.
Note
Note
Blinks blue and then
lights purple
6-pin IEEE1394
connector
4-pin IEEE1394
connector

14
Connecting to a desktop computer
Connecting to a laptop computer
• You can connect the IEEE1394 cable to either IEEE1394 port of the
CRW3200IX drive.
• The IEEE1394 standards define the maximum length of a single IEEE1394
cable as 4.5 meters.
• To connect multiple IEEE1394 devices, refer to “Connecting Multiple
IEEE1394 Devices.” (P. 36)
Note
IEEE1394 port
IEEE1394 cable
CRW3200IX rear panel
IEEE1394 ports
IEEE1394 ports
IEEE1394 cable
CRW3200IX
rear panel
IEEE1394
interface card
IEEE1394 ports

Preparing the CRW3200IX Drive (Windows)
15
6
Check recognition of the CRW3200IX drive.
After connecting the CRW3200IX drive to the computer, follow the steps
below to check that the drive is recognized properly by the computer.
For Windows 98 Second Edition/Me
1
Select Start on the task bar, then Settings, Control Panel, System, and
Device Manager tab. The Device Manager dialog box appears.
For Windows Me, if the
System
icon is not found in the
Control Panel
window, click
view all Control Panel options
on the left side of the window.
2 Check that the following icons are shown.
a:
“1394 Bus Controller” (Fig.1)
b:
“YAMAHA CRW3200E” in the “CDROM” item (Fig.1)
c:
“SBP2 Compliant IEEE 1394 device” in the “SBP2” item (Fig.2)
Note
b
a
Figure 1
c
Figure 2 (scroll down)
(This screen is an
example on
Windows Me.)

16
For Windows 2000 Professional
1 Select Start on the task bar, then Settings, Control Panel, System,
Hardware tab, and Device Manager. The Device Manager dialog box
appears.
2 Check that the following icons are shown.
a:
“YAMAHA CRW3200IX IEEE 1394 SBP2 Device” in the “DVD/CD-
ROM drives” item
b:
“IEEE 1394 Bus host controllers”
For Windows XP
1
Select Start on the task bar, then Control Panel, System, Hardware tab,
and Device Manager. The Device Manager dialog box appears.
If the System icon is not shown in the Control Panel window, click Switch to
Classic View on the left side of the window.
Note
a
b
Continued on next page

Preparing the CRW3200IX Drive (Windows/Macintosh)
17
2
Check that the following icons are shown.
a:
“YAMAHA CRW3200IX IEEE 1394 SBP2 Device” in the “DVD/CD-
ROM drives” item
b:
“IEEE 1394 Bus host controllers”
c:
“SBP2 Compliant IEEE 1394 device” in the “SBP2 IEEE 1394 Devices”
item
The drive name is not shown or there is or mark.
The CRW3200IX drive has not been recognized properly. Check the cable
connections and settings.
7
Install CD writing software.
Install the CD writing software. For details about how to install CD writing
software, refer to the documentation that comes with it.
a
b
c

18
Place the CRW3200IX drive horizontally.
1
Follow page 11 – 13, and connect the AC adapter to the
CRW3200IX drive. Turn on the drive.
2
Connect the CRW3200IX drive and the computer with the
included IEEE1394 cable.
• You can connect the IEEE1394 cable to either IEEE1394 port of the
CRW3200IX drive.
• The IEEE1394 standards define the maximum length of a single IEEE1394
cable as 4.5 meters.
• To connect multiple IEEE1394 devices, refer to “Connecting Multiple
IEEE1394 Devices.” (P. 36)
Set Up the CRW3200IX Drive on Macintosh
Note
Note
IEEE1394
(FireWire) ports
CRW3200IX rear panel
IEEE1394 cable
IEEE1394 ports

Preparing the CRW3200IX Drive (Macintosh)
19
3
Check recognition of the CRW3200IX drive.
After connecting the CRW3200IX drive to the computer, follow the steps
below to check that the drive is recognized by the computer properly.
1
Select Apple System Profiler from the Apple menu.
2
Select Devices and Volumes.
3 “fw609e” and “sbp609e” (or drive names in some versions) in the
“FireWire” column should be shown when the CRW3200IX drive has
been recognized properly.
The FireWire version is shown in this window.
“sbp609e”
The FireWire version is shown.
“fw609e”
“CRW3200E”
The FireWire version is shown.
“fw609e”

20
• In the case that other FireWire storage devices such as a hard drive or an MO
drive are connected to the computer, “fw609e” and “sbp609e” are shown in the
column when any device is recognized. To check that the CRW3200IX drive is
recognized properly, un-mount icons of those devices, and then remove those
devices temporarily.
• If the “FireWire” item is not shown, the FireWire interface of the computer is
not recognized by the Mac OS. Contact the manufacturer of the computer.
• If the “fw609e” and “sbp609e” (or drive names in some versions) are not shown
even with the “FireWire” item shown, the CRW3200IX drive is not recognized
by the Mac OS. In such a case, contact the store of purchase or your nearest
Yamaha dealer (listed at the back of this manual).
• The FireWire version in Mac OS that supports the CRW3200IX drive is 2.0 or
later.
• The extension files that support the CRW3200IX drive are required to mount
and read the disc even if the drive is recognized by Apple System Profiler. The
extension files come with the CD writing software. For details, refer to the
documentation that comes with the CD writing software.
4
Install the CD writing software.
Install the CD writing software. For details about how to install the CD
writing software, refer to the documentation that comes with it.
Note
“CRW3200E” (device name) corresponding to the CRW3200IX drive (product
name) will be shown on your CD writing software when the drive is recognized
by the CD writing software properly.
For details about how to check recognition of the CRW3200IX drive with the CD
writing software, refer to documentation that comes with the CD writing software.

21
Connecting/Disconnecting the
CRW3200IX Drive to/from the Computer
The CRW3200IX drive can be connected/disconnected while the computer is turned
on (hot plug).
However, follow the steps below to disconnect the CRW3200IX drive while the
computer is turned on.
1
Quit the writing software if it is activated.
2
Be sure to remove any disc from the disc tray.
3
For Windows Me/2000 Professional, select Unplug or Eject Hardware on the
task bar and follow the steps on the screen to disconnect the drive.
For Windows XP, select Safely Remove Hardware on the task bar and follow
the steps on the screen to disconnect the drive.
For Macintosh, disconnect the CRW3200IX drive.
• For Windows 98 Second Edition, do not disconnect IEEE1394 device from the
computer turned on to avoid improper operation.
• Be sure not to disconnect the CRW3200IX drive or connect/disconnect other
IEEE1394 devices from the computer when writing with the drive.
Note
Be sure not to turn off the CRW3200IX drive when the drive is connected to the
computer turned on. The computer or other IEEE1394 devices may not operate
properly depending on a type of host adapter or a CD writing software.
Disconnect the CRW3200IX drive from the computer prior to turning off the
drive.
(This screen is an example on Windows Me.)

22
Loading/Ejecting a Disc
Prior to the operation, check that the CRW3200IX drive is turned on.
1
Open the disc tray by pressing the eject button.
2
Place the disc onto the disc tray properly with its label facing
upward.
Or remove the disc from the disc tray carefully so not to damage it.
3
Close the disc tray by pressing the eject button or by gently
pushing the disc tray into the drive.
• Place or remove the disc after the disc tray has fully opened. Do not push or pull
the disc tray with applying excessive force to avoid damage to the drive or the
disc.
• The disc tray does not open while the application software prohibits ejecting,
including when the drive accesses the disc.
Note
Press the eject button.
Place or remove the disc
onto/from the disc tray.

Loading/Ejecting a Disc
23
Manually Ejecting a Disc
If the disc tray fails to open for some reason, such as a power failure, follow the
steps below to remove the disc from the drive.
Frequent use of this operation may cause malfunction of the drive.
1
Prepare a thin pin-like object, such as a straightened paper
clip.
Use an object less than 2 mm in diameter and more than 3 cm in length.
2
Turn off the CRW3200IX drive.
3
Insert the thin pin-like object straight into the manual eject
hole, and push it in.
When the disc tray opens, remove the disc.
4
Turn on the CRW3200IX drive, and close the disc tray.
Note
Manual eject hole

24
Troubleshooting
1 The CRW3200IX drive is not turned on when the power switch is ON.
(The front panel LED does not light.)
●
Are the AC adapter and the power cable connected properly?
Turn off the power switch and check that the CRW3200IX drive, the AC adapter,
the power cable, and the AC outlet are connected properly. (P. 11, 12)
If not, connect them properly, and then turn on the CRW3200IX drive.
If the CRW3200IX is not turned on (the front panel LED does not light) even if they
are connected properly, contact the store of purchase or your nearest Yamaha dealer
(listed at the back of this manual).
2 The operating system does not start up properly.
●
Is the IEEE1394 interface card installed properly?
Refer to the documentation that comes with the IEEE1394 interface card.
3 The CRW3200IX drive is not recognized by the operating system.
(Refer to page 15 for Windows or page 19 for Macintosh to check recognition
of the CRW3200IX drive.)
●
Are the drive and IEEE1394 interface card connected properly to the computer
with a proper IEEE1394 cable?
Turn off the CRW3200IX drive and the computer. Check that the IEEE1394 cable is
fully connected to the CRW3200IX drive. (P. 13 for Windows, P. 18 for Macintosh)
●
Is the IEEE1394 interface card recognized by the operating system properly?
Follow the documentation that comes with the IEEE1394 interface card or the
computer, and check that the IEEE1394 interface card is recognized by the operating
system properly.
If the IEEE1394 interface card is recognized, contact the store of purchase or your
nearest Yamaha dealer (listed at the back of this manual).
If not, refer to the documentation that comes with the IEEE1394 interface card or the
computer. If the IEEE1394 interface card is still not recognized, there may be a
problem with the device driver or elsewhere.
Contact the manufacturer of the IEEE1394 interface card or the computer.
Refer to the YAMAHA CD-R/RW Drive website for the latest support data,
including information on troubleshooting.
YAMAHA CD-R/RW Drive website
URL: http://www.yamaha.co.jp/english/product/computer/
Europe
URL: http://www.yamaha-it.de/

Troubleshooting
25
4 The disc tray does not open when you press the eject button.
●
Is the CRW3200IX drive turned on? (Does the LED on the front panel light?)
Refer to “The CRW3200IX drive is not turned on when the power switch is ON.
(The front panel LED does not light.).” (Troubleshooting, Item 1)
●
Is any CD writing software being used?
Some CD writing software prohibits ejecting while accessing. (If you are using such
a software program, the disc tray does not open even if the eject button is pressed.)
In such a case, follow the steps in the software window to eject the disc, or quit the
CD writing software prior to pressing the eject button.
●
Is the disc icon shown on the screen? (For Macintosh)
When the disc icon is shown on the screen, the eject button cannot be used. Drag the
disc icon into the Trash and drop it there to unmount the disc to open the disc tray.
●
Is the disc tray opened when the computer is restarted?
Quit all running application software, restart your computer, and press the eject
button of the CRW3200IX drive.
For Macintosh, when the disc icon is shown on the screen, the eject button cannot be
used. Drag the disc icon into the Trash and drop it there to unmount the disc to open
the disc tray.
●
Is the disc tray opened when the IEEE1394 cable is removed from the CRW3200IX
drive?
Remove the IEEE1394 cable from the drive while the AC adapter is connected, and
press the eject button.
●
Turn off the computer and the CRW3200IX drive, and remove the disc following
“Manually Ejecting a Disc.” (P. 23)
If the disc tray is caught in the drive and does not come out, or if it cannot be opened
or closed using the eject button after it is pulled out manually, contact the store of
purchase or your nearest Yamaha dealer (listed at the back of this manual).
5 The disc is ejected without order (or it comes out spontaneously).
●
Is the disc set properly (horizontally) on the disc tray?
Set the disc properly, and close the disc tray.
●
Is the disc dusty or dirty?
Remove dust or dirt from the disc using an air spray or a dry soft cloth. To avoid
damaging discs, wipe the disc gently from the center perpendicular to the edge of the
disc.

26
●
Does the drive accept other discs (audio CD, CD-ROM, blank CD-R disc, etc.)?
If a specific disc is ejected, the disc itself may be damaged or deformed.
If all discs are ejected, contact the store of purchase or your nearest Yamaha dealer
(listed at the back of this manual).
6 No data can be read from a disc.
●
Is the disc ejected without order?
Refer to “The disc is ejected without order (or it comes out spontaneously).”
(Troubleshooting, Item 5)
●
Is the disc compatible with the drive? (P. 6, 31)
Be sure that the disc is compatible with the CRW3200IX drive.
●
Is the disc dusty or dirty?
Remove dust or dirt from the disc using an air spray or a dry soft cloth. To avoid
damaging discs, wipe the disc gently from the center perpendicular to the edge of the
disc.
●
Can data be read from other discs (audio CD, CD-ROM, etc.)?
If no data can be read from a specific disc, data may be written in a format that the
drive cannot recognize, or the disc itself may be damaged or deformed. Note that no
data can be read from blank discs, and the CRW3200IX drive infrequently fail to
read data correctly from a disc even if the disc is compatible with the drive.
●
Are the extension files supporting the CRW3200IX installed? (For Macintosh)
If the extension files supporting the drive are not installed, the disc cannot be
mounted or read. The extension files come with the CD writing software.
For details, refer to the documentation that comes with the CD writing software.
●
Does the LED on the front panel of the CRW3200IX drive light correctly when a
disc is inserted?
When a disc is inserted, the LED will blink blue for a moment and then light blue.
(P. 3)
If no data can be read from a specific disc, data may be written in a format that the
drive cannot recognize, or the disc may be damaged or deformed.
If the LED on the front panel remains purple (stating that the drive cannot recognize
the disc) no matter what type of disc is inserted, contact the store of purchase or your
nearest Yamaha dealer (listed at the back of this manual).

Troubleshooting
27
7 The playback of an audio CD (CD-DA) cannot be heard.
Check that the volume is not set to the minimum level.
Be sure that headphones or external speakers are properly connected to the
CRW3200IX drive.
For Windows Me/XP, change the settings as follows. (If Windows Media Player 7.0
or later is used with Windows Me/XP, this problem can happen since the digital
playback option is activated by default setting.)
For Windows Me
1
In the Device Manager dialog box (P. 15), select YAMAHA CRW3200E
Properties and then Properties tab.
2 Uncheck the “Enable digital CD audio for this CD-ROM device” in the “Digital
CD Playback” item.
3
Start “Windows Media Player.” In the menu bar, select Tools, Options and CD
Audio tab.
4
Uncheck the “Digital playback” in the “Playback Settings” item.
Uncheck
(This screen is an example
on Windows Me.)
Uncheck
(This screen is an
example on Windows
Media Player 7.0.)

28
For Windows XP
1 Follow page 27 “For Windows Me”, and uncheck the “Enable digital CD audio
for this CD-ROM device.”
2
Start “Windows Media Player.” In the menu bar, select Tools, Options, Devices
tab, CD-RW Drive, and Properties.
3
Select “Analog” in the “Playback” item.
8 No data can be read from any CDs, a disc is ejected spontaneously, or the
LED remains purple when a disc is inserted. (The LED does not change from
lighting purple to blinking blue and then lighting blue.) (P. 3)
Disconnect the IEEE1394 cable from your drive while the AC adapter is connected.
Insert the disc once again. If a specific disc is automatically ejected or cannot be
read, the disc itself may have a problem. If the drive does not accept any compatible
discs (and the LED remains purple), contact the store of purchase or your nearest
Yamaha dealer (listed at the back of this manual).
Select
(This screen is an
example on Windows
Media Player 8.0.)

Troubleshooting
29
9 The error message “Buffer Underrun” is shown.
If your CD writing software supports Buffer Underrun Protection, you must activate
it. For details, refer to the documentation that comes with your CD writing software.
To prevent the occurrence of a buffer underrun and to increase the efficiency of data
writing, try the following:
– Reduce the data writing speed.
– Create an image file on the hard drive.
– Optimize the hard drive. (Defragmentation)
– Do not start any application software including screen savers during data writing.
– Deactivate the power management for the hard drive.
– Set the data transfer mode of any IDE device such as a hard drive or CD-ROM
drive to DMA.
– Deactivate the Windows Active Desktop.
– Quit all memory-resident software programs.
– Check your CD writing software settings with the documentation that comes with
it.
• If there is an IEEE1394 device with lower data transfer speed connected between the
computer and the CRW3200IX drive, the data transfer between those two will be
slowed, which may cause failure in writing a disc.
• A writing error may happen if the drive is vibrated while data is being written on a
CD-R or a CD-RW disc.
10
Other problems
●
Isn’t more than one CD writing software installed in your computer?
Installing more than one CD writing software in a computer may cause instability of
operation.
●
CD writing software must support the CRW3200IX drive in order to recognize the
drive.
Contact the manufacturer of your CD writing software to see whether the software
supports the CRW3200IX drive.
Note

30
Firmware
Firmware refers to the operating software designed for your CD-R/RW drive. It is
stored in the drive’s flash memory so that it can be rewritten.
To enhance operation reliability, Yamaha continues improving the firmware and
makes updates available on the internet. You can find information about the latest
firmware at the following websites.
YAMAHA CD-R/RW Drive website
URL: http://www.yamaha.co.jp/english/product/computer/
Europe
URL: http://www.yamaha-it.de/
These websites contain the latest YAMAHA CD-R/RW drive user support
information including information about the firmware.
Refer to the website regularly to check the latest information.
Checking the firmware version in the CRW3200IX drive
For Windows 98 Second Edition/Me
In the Device Manager dialog box (P. 15), select YAMAHA CRW3200E to
display the YAMAHA CRW3200E Properties dialog box, and then select the
Settings tab.
For Windows 2000 Professional/XP
The firmware version cannot be shown with Device Manager dialog box. Check the
firmware version with the CD writing software. For details about how to use the
software, refer to the documentation that comes with it.
For Macintosh
Check the firmware version with the CD writing software. For details about how to
use the software, refer to the documentation that comes with it.
The revision number shown
here varies depending on the
version of the firmware in the
drive as set at default.
(This screen is an example
on Windows Me.)
06GB-Operation.fm Page 30 Thursday, November 15, 2001 7:16 PM

31
CRW3200IX Drive Specifications
*1
includes multisession
*2
proper disc required
*3
proper application software required
*4
proper application software may be required depending on the format
Supported Formats
Write Read Play back
*4
CD-DA
●●●
CD TEXT
●●●
CD-ROM
*1
●●●
Mixed Mode CD-ROM
(CD-ROM+CD-DA)
●●●
CD-ROM XA
*1
●●●
Photo CD
*1
●
*2 *3
●●
Video CD
●●●
CD-i
●●
*3
—
CD EXTRA
*1
●●●
Writing Methods Disc-at-Once (DAO)
Session-at-Once (SAO)
Track-at-Once (TAO)
Packet Writing
Audio Master Quality Recording (High quality audio writing
mode)
CD-MRW (CD Mount Rainier Rewriting)
Writing/Reading
Speed
Writing CD-R 1X, 2X, 4X, 8X, 12X, 16X (CLV),
24X (18X – 24X Partial CAV)
CD-RW 2X, 4X, 8X, 10X (CLV),
4X – 10X Full CAV (Packet writing)
Reading 40X (max.) Full CAV
Note) • DATA: 40X (max.)
• CD-DA: 40X (max.) in audio extraction
• CD-DA: 1X only in audio playback
• Video CD: 10X (max.)
• Session closed disc: 40X (max.)
• Session unclosed disc: 12X (max.)
CD-R 1X, 2X, 4X, 8X, 12X, 16X, 24X (18X – 24X Partial CAV)
writing: CD-R discs specified in Orange Book Part 2, Ver. 3.1.
Note) Use a CD-R disc that matches the writing speed.
CD-RW 2X or 4X writing:
Orange Book Part 3, Vol.1, Ver. 2.0-compliant discs
4X, 8X, 10X, 4X – 10X Full CAV (Packet writing) writing:
Orange Book Part 3, Vol.2, Ver. 1.0-compliant discs
Note) For 2X writing, Book Part 3, Vol.1, Ver. 1.0-compliant
discs can be used.

32
Data Capacity 700 MB (with a 79-minute disc)
650 MB (with a 74-minute disc)
550 MB (with a 63-minute disc)
Maximum Recording Time
in Audio Master Quality
Recording
68 min. (700 MB)
63 min. (650 MB)
Data Transfer Rate
(Mode 1)
1X: 150 KB/sec. 12X: 1,800 KB/sec.
2X: 300 KB/sec. 16X: 2,400 KB/sec.
4X: 600 KB/sec. 24X: 3,600 KB/sec.
8X: 1,200 KB/sec. 32X: 4,800 KB/sec.
10X: 1,500 KB/sec. 40X: 6,000 KB/sec.
Interface IEEE1394-a compliant, 400 Mbps
Two 6-pin connectors (power not supplied to connectors [port])
Data Buffer Size 8 MB (3,176 sectors)
Average Access Time 130 msec. (random access)
Sector Size 2,048 – 2,448 bytes
Installing Style Horizontal
Disc Loading Type Front auto-loading tray type
Audio Out Line Out specifications
• Frequency Band: 20 – 20,000 Hz
• Output level: 700 mVrms
Power Consumption 18 W (writing/playback)
7 W (standby)
Operating Environment Temperature: +5 – +35 ºC
Humidity : 25 – 80% RH (no condensation)
Dimensions Width : 164.0 mm
Height : 56.0 mm
Depth : 265.0 mm
Weight 1.6 kg

CRW3200IX Drive Specifications
33
AC adapter (AD-301205)
Rated Input Voltage 100 – 240 V AC
Rated Input Current 1.0 A or less
Rated Output Voltage +5 V, +12 V DC
Rated Output Current 1.5 A
Terminal Output Polarity 1 : +12 V DC
2 : GND
3 : +5 V DC
4 : GND
5 : +5 V DC
Operating Environment Temperature: +5 – +35 ºC
Humidity : 25 – 80% RH (no condensation)
Dimensions
(includes projection)
Width : 79.5 mm
Height: 32.0 mm
Depth : 147.0 mm
Weight
(includes the power cable)
430 g (approx.)
1
2
4
5
3

34
Safety/EMC Compliance
The CRW3200IX drive conforms to the following specifications.
Note that the specifications of the CRW3200IX drive are subject to change without
notice due to improvements.
Country/
Region
Compliance Specifications
Remarks
Standard Item Name and Number
USA Safety Electricity UL60950 Information Technology
Equipment
Laser 21CFR1040.10
FDA Chapter 1,
Subchapter J
Class I Laser Product
EMC Emission 47CFR15
FCC Part 15, Subpart B
Peripheral Device
Canada Safety Electricity CSA C22.2 No. 60950 Information Technology
Equipment
EMC Emission ICES-003 Class B Digital Device
EU Safety Electricity EN60950 Information Technology
Equipment
Laser EN60825 Class 1 Laser Product
EMC Emission EN55022 Class B Information
Technology Equipment
Immunity EN55024
EN61000-3-2
EN61000-3-3
Australia
New Zealand
EMC Emission AS/NZ 3548 Class B Information
Technology Equipment
Japan
Safety Electricity Electrical Appliance
and Material Safety
EMC Emission VCCI Class B Information
Technology Equipment

35
Technical Notes
IEEE1394 is a global standard approved by Institute of Electrical and Electronics
Engineers (IEEE). The serial interface has a broad bandwidth and is fast enough to
transfer large amounts of digital video and audio data bi-directionally between
electronic devices including computer peripherals. Defined as FireWire or i.LINK,
the IEEE1394 interface enables units to transfer data or various controls over a
single IEEE1394 cable. IEEE1394 enables a daisy-chain of devices (serial
connection) to transfer data between any two devices in the chain. IEEE1394 also
supports a tree (parallel) collection of devices. In addition to this flexibility,
IEEE1394 also eliminates the need for complicated settings such as device ID and
termination as found with SCSI (Small Computer System Interface) type interfaces.
As of this writing, IEEE1394 supports three different data transfer rates: 100 Mbps,
200 Mbps, and 400 Mbps.
CD-R/RW drives are equipped with a buffer memory, which temporarily stores data
that is being transferred. When the buffer memory becomes empty due to a delay of
data transfer for any reason, a writing error happens. Such condition is defined as
buffer underrun, and such an error is defined as a buffer underrun error.
Buffer Underrun Protection is featured in the CRW3200IX drive.
When buffer underrun almost happens, Buffer Underrun Protection temporarily
suspends the writing process. Writing resumes when enough data has accumulated
in the buffer memory. Buffer Underrun Protection in the CRW3200IX drive is
extremely accurate, resulting in seamless recording before and after suspension.
Test writing
Test writing is a function to check for the possible occurrence of buffer underrun in your
computer environment. When Buffer Underrun Protection of the CD writing software is
activated, the test writing function cannot be operated. Buffer Underrun Protection
should be deactivated to operate the test writing function.
IEEE1394
Buffer Underrun Protection Function

36
The following describes how to connect multiple IEEE1394 devices including the
CRW3200IX drive to the computer.
Connecting in a daisy-chain
This method is used to connect in series multiple IEEE1394 devices to one
IEEE1394 port. Up to 17 IEEE1394 devices (including the host adapter) can be
connected through one channel.
Connecting in a tree
This method is used to connect in branches multiple IEEE1394 devices through the
device, host adapter for example, with more than two IEEE1394 ports. Up to 63
IEEE1394 devices (including the host adapter) can be connected.
Connecting Multiple IEEE1394 Devices
A single daisy-chain can contain up to 17 devices including
the host adapter.
CRW3200IX
A maximum single cable length:
4.5 m
A maximum single
cable length: 4.5 m
• Each path (A-B, A-C, B-C) can contain up to 17 devices including the host adapter.
• An entire system can contain up to 63 devices including the host adapter.
CRW3200IX
B
C
A

Technical Notes
37
Note on Connecting IEEE1394 Devices
• Connect the CRW3200IX drive directly to the computer.
• If there is an IEEE1394 device with lower data transfer speed connected between
the computer and the CRW3200IX drive, the data transfer between those two will
be slowed, which may cause failure in writing a disc.
• The IEEE1394 ports on the CRW3200IX drive have 6-pin connectors, but do not
supply power (IEEE1394 bus power).
• Be sure not to connect the devices with closed-loop as follows.
Disc-at-Once (DAO)
This method is used to write all data onto a disc in one operation. It writes multiple
pieces of data without placing a space between data, starting with the innermost
track of the disc. Once data is written by this method, no data can be added to the
same disc even if there is free space available on the disc. This method is useful for
making a backup copy of an entire disc.
Track-at-Once (TAO)
This method is used to write data on a disc on a track-by-track basis. A track can be
defined as the smallest unit of area that contains an ordinary program, image file,
text file, etc. This method enables you to add data to the same disc, one track of data
at a time, as long as there is free space available on the disc. A disc that contains data
written in several sessions is defined as a multi-session disc.
An area that records data and management information (Lead-in/Lead-out) is
defined as a session. Lead-in and Lead-out are signals written for stating the starting
and ending points of one session.
Ordinary audio CD players can only play back single-session discs or the first session on
a multi-session disc. Do not record audio data on the second and subsequent sessions.
Writing Methods
Note

38
Session-at-Once (SAO)
This method is used to write data on a disc on a session-by-session basis. Unlike
Track-at-Once described above, Session-at-Once enables you to record multiple
tracks onto a disc at a time. CD EXTRA, for example, uses this method to write
multiple pieces of audio data (or multiple tracks) in the first session and information
required for computers in the second session. This method enables you to add data
into the same disc, one session at a time, as long as there is free space available on
the disc. A disc that contains data written in several sessions by this method is
defined as a multi-session disc, like a disc written by the Track-at-Once method.
Packet Writing
This method is used to record data onto a disc on a file-by-file basis. This method
divides a track into small segments called “packets” so that data can be written on a
packet-by-packet basis, which means that you can write data in much the same way
as you copy data to a floppy or hard drive. Since the data can be written easily,
packet writing is proper to daily data backup. Packet writing also enables you to add
packets to a disc as long as there is free space available on the disc.
• Discs need to be formatted for packet writing prior to use.
• Formatting a CD-RW disc using packet writing software reduces its storage capacity
by about 100 MB since packet writing requires exclusive space for itself.
• For CD-R discs, deleting data means masking data but not actually removing data.
Therefore, actual free space in a CD-R never be increased even if data is deleted.
Audio Master Quality Recording (High quality audio writing mode)
This method enables you to record high quality data that can be played back with the
1.4 m/s linear velocity.
• Audio Master Quality Recording (High quality audio writing mode) is enabled with
the 4X speed Disc-at-Once writing method.
• Maximum recording time is 63 minutes for a 650 MB CD-R disc and 68 minutes for a
700 MB CD-R disc.
Note
Note

Technical Notes
39
CD-MRW (CD Mount Rainier ReWriting)
This method is a new standard of packet writing for a CD-RW disc and supports
defect control by the drive, background formatting, and disc ejecting during
formatting. It enables you to use a CD-RW disc like a floppy disk.
Formatting a CD-RW disc using CD-MRW reduces its storage capacity by about 150 MB
since CD-MRW itself requires exclusive disc space.
Note

If you have any questions, please contact the store of purchase or your nearest Yamaha dealer
listed below. Contact Yamaha Corporation Japan from outside of the listed countries.
Falls Sie weitere Fragen haben, wenden Sie sich an Ihren Fachhändler oder den örtlichen
Yamaha-Händler (eine Liste der Yamaha-Händler befindet sich am Ende dieses Handbuchs).
Aus anderen Ländern als den aufgeführten wenden Sie sich an Yamaha Corporation Japan.
Si vous avez des questions à poser, veuillez prendre contact avec le magasin où vous avez fait
l’achat de l’appareil ou un revendeur de matériel Yamaha le plus proche de votre domicile
parmi ceux énumérés ci-dessous. Prenez contact avec Yamaha Corporation Japan si vous ne
vous trouvez pas dans un des pays mentionnés:
Si tiene alguna duda, póngase en contacto con el establecimiento de adquisición o con su
representante Yamaha más cercano indicado a continuación. En caso de países no
contemplados en la lista, póngase en contacto con Yamaha Corporation Japan:
EUROPE, EASTERN EUROPE and
RUSSIA
Yamaha Elektronik Europa GmbH
IT-Sales Division
Siemensstrasse 22-34,
D-25462 Rellingen, GERMANY
URL: http://www.yamaha-it.de/
TEL: +80092624222
(AUSTRIA, BELGIUM, DENMARK, FINLAND,
FRANCE, GERMANY, HUNGARY, ICELAND,
IRELAND, ITALY, LUXEMBOURG,
NETHERLANDS, NORWAY, PORTUGAL, SPAIN,
SWEDEN, SWITZERLAND, UNITED KINGDOM)
TEL: +80093067
(MONACO)
If you are calling from outside the countries mentioned
above, or if you can’t get through on the Yamaha toll-
free number, use the following number instead:
TEL: +3214400793
U.S.A.
Yamaha Electronics Corporation, USA
6660 Orangethorpe Avenue,
Buena Park, CA 90620, U.S.A.
TEL: +1 714 522 9105
FAX: +1 714 670 0108
URL: http://www.yamaha.com/
CANADA
Yamaha Canada Music Ltd.
135 Milner Avenue, Scarborough,
Ontario M1S 3R1, CANADA
TEL: +1 416 298 5664
FAX: +1 416 292 0732
URL: http://www.yamaha.ca/
AUSTRALIA
Yamaha Music Australia Pty., Ltd.
Level 1, 99 Queensbridge Street
Southbank, Victoria 3006
AUSTRALIA
TEL: +61 3 9693 5111
FAX: +61 3 9699 2332
SINGAPORE, MALAYSIA, KOREA,
THAILAND, PHILIPPINES, INDIA,
VIETNAM, CAMBODIA,
MYANMAR, INDONESIA and IRAN
Yamaha Electronics Asia Pte Ltd.
138 Cecil Street
#05-02/03 Cecil Court, Singapore 069538 SINGAPORE
TEL: +65 223 3992
FAX: +65 223 9810
TAIWAN
Yamaha KHS Music Co., Ltd.
11F, No.150, Tun Hua North Rd.
Taipei,TAIWAN R.O.C.
TEL: +886 2 2713 8999
FAX: +886 2 2713 8666
URL: http://www.yamahakhs.com/
JAPAN
Yamaha Corporation
AV & IT Business Group
IT Sales & Marketing Division
10-1 Nakazawa-cho, Hamamatsu-shi, Shizuoka-ken
430-8650, JAPAN
TEL: +81 53 460 3433
FAX: +81 53 467 2110
URL: http://www.yamaha.co.jp/english/
Distributors and Head Offices / Vertriebs- und Hauptgeschäftsstelle
Distributeurs et sièges sociaux / Distribuidores y Casas matrices

Documenttranscriptie
(DECLARATION OF CONFORMITY PROCEDURE) Responsible Party: Address: Telephone: Fax: Type of Equipment: Model Name: Yamaha Electronics Corporation, USA. 6660 Orangethorpe Avenue Buena Park, CA 90620 714-522-9105 714-670-0108 CD Recordable/Rewritable Drive CRW3200IX This device complies with Part 15 of the FCC Rules. Operation is subject to the following conditions: 1) this device may not cause harmful interference, and 2) this device must accept any interference received including interference that may cause undesired operation. See user manual instructions if interference to radio reception is suspected. FCC INFORMATION (U.S.A.) 1. IMPORTANT NOTICE: DO NOT MODIFY THIS UNIT! This product, when installed as indicated in the instructions contained in this manual, meets FCC requirements. Modifications not expressly approved by Yamaha may void your authority, granted by the FCC, to use the product. 2. IMPORTANT: When connecting this product to accessories and/or another product use only high quality shielded cables. Cable/s supplied with this product MUST be used. Follow all installation instructions. Failure to follow instructions could void your FCC authorization to use this product in the USA. 3. NOTE: This product has been tested and found to comply with the requirements listed in FCC Regulations, Part 15 for Class “B” digital devices. Compliance with these requirements provides a reasonable level of assurance that your use of this product in a residential environment will not result in harmful interference with other electronic devices. This equipment generates/uses radio frequencies and, if not installed and used according to the instructions found in the users manual, may cause interference harmful to the operation of other electronic devices. Compliance with FCC regulations does not guarantee that interference will not occur in all installations. If this product is found to be the source of interference, which can be determined by turning the product “OFF” and “ON”, please try to eliminate the problem by using one of the following measures: Relocate either this product or the device that is being affected by the interference. Utilize power outlets that are on different branch (circuit breaker or fuse) circuits or install AC line filter/s. In the case of radio or TV interference, relocate/reorient the antenna. If the antenna lead-in is 300 ohm ribbon lead, change the lead-in to coaxial type cable. If these corrective measures do not produce satisfactory results, please contact the local retailer authorized to distribute this type of product. If you can not locate the appropriate retailer, please contact Yamaha Electronics Corporation, USA. 6660 Orangethorpe Avenue, Buena Park, CA 90620 U.S.A. Laser Product Class: Class 1 Laser Diode Properties Wavelength: 780 – 787 nm Pulse Durations and Max. Output at the lens of the Laser Pickup Unit Read Mode: 0.85 mW (Continuous) Write Mode: Max. 48 mW (for 212 ns, Min. Cycle 57.9 ns) Laserprodukt-Klasse: Klasse 1 Eigenschaften der Laserdiode Wellenlänge: 780 – 787 nm Impulsdauer und max. Ausgang an der Linse der Laser-Abtasteinheit Lesemodus: 0,85 mW (kontinuierlich) Schreibmodus: Max. 48 mW (für 212 ns, Zyklusmin. 57,9 ns) Classe du produit laser: Classe 1 Caractéristiques de la diode laser Longueur d’onde: 780 – 787 nm Durée des impulsions et sortie maximum depuis la lentille du bloc capteur optique Mode de lecture: 0,85 mW (continue) Mode de gravure: max. 48 mW (pour 212 ns, cycle min. 57,9 ns) Clase de producto láser: Clase 1 Propiedades del diodo láser Longitud de onda: 780 – 787 nm Duración del pulso y potencia de salida máxima en el objetivo de la unidad captora láser Modo de lectura: 0,85 mW (continua) Modo de escritura: máx. 48 mW (para 212 ns, ciclo mínimo 57,9 ns) DANGER - VISIBLE AND / OR INVISIBLE LASER RADIATION WHEN OPEN. AVOID DIRECT EXPOSURE TO BEAM. CLASS 1 LASER PRODUCT LASER KLASSE 1 PRODUKT LUOKAN 1 LASERLAITE KLASS 1 LASER APPARAT PRODUIT LASER DE CLASSE 1 COMPLIES WITH 21 CFR CHAPTER 1, SUBCHAPTER J. CAUTION Use of controls or adjustments or performance of procedures other than those specified herein may result in hazardous radiation exposure. ACHTUNG Halten Sie sich beim Bedienen und Einstellen der Bedienungselemente sowie bei der Bedienungsabfolge an die Anleitung, da sonst gefährliche Strahlen austreten können. ATTENTION L’emploi de commandes, de réglages ou un choix de procédures différents des spécifications de cette brochure peut entraîner une exposition à d’éventuelles radiations pouvant être dangereuses. PRECAUCION El usar los controles o ajustar o realizar procedimientos diferentes a los especificados aquí resultará en peligrosas exposiciones a la radiación. VARO! AVATTAESSA JA SUOJALUKITUS OHITETTAESSA OLET ALTTINA NÄKYMÄTTÖMÄLLE LASERSÄTEILYLLE. ÄLÄ KATSO SÄTEESEEN. VARNING! OSYNLIG LASERSTRÅLNING NÄR DENNA DEL ÄR ÖPPNAD OCH SPÄRREN ÄR URKOPPLAD. BETRAKTA EJ STRÅLEN. STRÅLEN ÄR FARLIG. CAUTION - VISIBLE AND / OR INVISIBLE LASER RADIATION WHEN OPEN. AVOID EXPOSURE TO BEAM. - SYNLIG OCH / ELLER OSYNLIG LASERSTRÅLNING NÄR DENNA DEL ÄR ÖPPNAD. STRÅLEN ÄR FARLIG. VARO ! AVATTAESSA OLET ALTTIINA NÄKYVÄLLE JA / TAI NÄKYMÄTÖMÄLLE LASERSÄTEILYLLE. ÄLÄ KATSO SÄTEESEEN. VARNING - SYNLIG OCH / ELLER OSYNLIG LASERSTRÅLNING NÄR DENNA DEL ÄR ÖPPNAD. BETRAKTA EJ STRÅLEN. VORSICHT ! SICHTBARE UND / ODER UNSICHTBARE LASERSTRAHLUNG WENN ABDECKUNG GEÖFFNET. NICHT DEM STRAHL AUSSETZEN. ATTENTION - RADIATION VISIBLE ET / OU INVISIBLE LORSQUE L’APPAREIL EST OUVERT. EVITEZ TOUTE EXPOSITION AU FAISCEAU. VARNING English OWNER’S MANUAL i SAFETY PRECAUTIONS PLEASE READ THE FOLLOWING WARNINGS AND CAUTIONS CAREFULLY TO PREVENT PERSONAL INJURY AND DAMAGE TO THE DEVICE. These precautions explain how to use the device properly and safely, thereby preventing injury to yourself and others. This section has been sub-divided into a WARNING section and a CAUTION section, according to the likelihood and nature of any potential injuries or damage inflicted. They relate to your personal safety, and also help you prevent the risk of damage to the device. Please read these sections carefully prior to proceeding. WARNING Always follow these basic precautions to avoid short-circuit, damage, fire, or other hazards, and to avoid serious injury or fatal accident from electrical shock. ● Do not attempt to open or disassemble the device to avoid the risk of electrical shock, fire, or malfunction. ● Do not look directly at the laser source to avoid the risk of eye damage or blindness. ● Do not insert fingers or foreign objects into the device to avoid the risk of electrical shock, fire, malfunction, or personal injury. ● Do not expose the device to high humidity or place liquid containers such as a flower vase on the device to avoid the risk of electrical shock, fire, or malfunction. ● Do not expose the device to temperature outside the range 5 – 35 °C (41 – 95 °F) to avoid the risk of fire, deformation of the device panel, or malfunction. ● Do not expose the device to dusty place to avoid the risk of fire or malfunction. ● Always follow the owner’s manual to set up or connect the devices properly to avoid the risk of electrical shock, fire, malfunction, or personal injury. ● If unusual smells, sounds or smoke come from the device, or if foreign objects such as liquid get into the device, turn off and unplug the computer immediately to avoid the risk of electrical shock, fire, or malfunction. Contact the store of purchase or your nearest Yamaha dealer (listed at the back of this manual). ● Be sure that the computer is electrically grounded to avoid the risk of electrical shock. ● Prior to cleaning the drive, always unplug the computer or do not handle the plug with wet hands to avoid the risk of electrical shock. ● Use the included AC adapter to avoid the risk of fire or malfunction. ii ● Clean the AC power plug regularly to avoid the risk of fire due to insulation failure such as humidity. ● Do not unplug the AC adapter by pulling the cable, and do not place objects on the cable to avoid the risk of electrical shock, fire, or malfunction. ● Plug in the AC adapter fully to avoid the risk of electrical shock or fire. ● Do not connect many devices to an electrical outlet. Maintain the rated power of the outlet to avoid the risk of fire due to overheating. CAUTION Always follow these basic precautions to avoid physical injury to yourself or others, and damage to the device or other property. ● Always unplug the computer if it will not be used for a prolonged period or if there is a possibility of lightning, to avoid the risk of electrical shock, fire, or short-circuit. ● Do not use the device near other electrical appliances such as televisions, radios, or speakers to avoid the risk of interferences between each other. ● Do not place the device unstably to avoid the risk of malfunction or personal injury by its falling down. ● Do not place the device with a possibility of excessive vibration to avoid the risk of damage to written data or malfunction. ● Place the device horizontally to avoid the risk of damage to written data. ● Prior to transporting the device, remove the disc from the disc tray to avoid the risk of damage to written data. ● Use soft, dry cloths to wipe the device. Do not use benzene, paint thinner, detergents, or chemically treated wiped cloths, and do not place vinyl, plastic, or rubber objects on the device to avoid the risk of malfunction or damage to the surface of the device. ● Do not rest your weight on or place heavy objects on the device, and do not apply excessive force to the buttons, switches, or connectors to avoid the risk of damage to the device or personal injury. ● Be careful not to short-circuit the AC power plug with metal objects to avoid the risk of malfunction. ● Do not wrap the power cable around the AC adapter to avoid the risk of breaking the wire or malfunction. iii ● Do not listen to audio with headphones at high volume for prolonged period to avoid auditory disorder. ● Prior to turning on the computer, always minimize the volume to avoid auditory disorder by a sudden burst of sound at high volume. ● Do not place the device near magnets or anything magnetized such as a display to avoid the risk of interferences between each other. ● Have the device serviced regularly to avoid internal dust buildup that can cause malfunction, damage or fire. For service information and service charges, contact the store of purchase or your nearest Yamaha dealer (listed at the back of this manual). WARRANTY YAMAHA AND ITS SUPPLIERS ACCEPT NO LIABILITY FOR ANY PROBLEMS THAT OCCUR AS A RESULT OF ANY OPERATIONS CARRIED OUT OTHER THAN THOSE STATED IN THE MANUAL THAT COMES WITH THIS PRODUCT, OR THE LOSS OR THE DAMAGE OF ANY DATA CAUSED AS A RESULT OF USING THIS PRODUCT. Precautions for Transportation Transporting the device unfixed may damage its internal mechanism or circuits. • Remove the disc from the disc tray of the device. • Put the device in the original box. Prior to use, check that the complete accessories are included. (Refer to the original box.) • ©2001 YAMAHA CORPORATION. All Rights Reserved. • This document may not, in whole or in part, be copied, photocopied, reproduced, translated, transmitted, or reduced to any electronic medium of machine readable form without prior consent in writing from Yamaha. • Windows is a registered trademark of Microsoft Corporation. • Apple, Macintosh, Mac OS, and FireWire are registered trademarks of Apple Computer, Inc. • i.LINK is a trademark of Sony Corporation. • SafeBurn™ is a trademark of Yamaha Corporation. • All other trademarks are the property of their respective companies. ™ and ® marks are not specified in this manual. iv Table of Contents Features of the CRW3200IX Drive ................................................ 1 Names and Functions of Parts ..................................................... 3 Front Panel...............................................................................................3 Rear Panel................................................................................................4 Precautions on Use.................................................................. 5 Handling Discs ........................................................................................5 Copyright .................................................................................................5 Disclaimer of Indemnity..........................................................................5 Compatible Discs.....................................................................................6 System Requirements ..............................................................................7 Preparing the CRW3200IX Drive .................................................10 Serial Number........................................................................................10 Set Up the CRW3200IX Drive on Windows.........................................11 Set Up the CRW3200IX Drive on Macintosh .......................................18 Connecting/Disconnecting the CRW3200IX Drive to/from the Computer...21 Loading/Ejecting a Disc ...........................................................22 Troubleshooting.....................................................................24 Firmware.............................................................................30 CRW3200IX Drive Specifications ................................................31 Technical Notes.....................................................................35 IEEE1394...............................................................................................35 Buffer Underrun Protection Function....................................................35 Connecting Multiple IEEE1394 Devices ..............................................36 Writing Methods....................................................................................37 For details about how to install and use the CD writing software, refer to the documentation that comes with it. • The information contained in this manual is subject to change without prior notice. • Reproduction of this manual, either in part or in full, is expressly forbidden. v Features of the CRW3200IX Drive High speed writing/reading The CRW3200IX drive supports up to 24X-speed writing for CD-R discs, and up to 10X-speed writing/rewriting for CD-RW discs. In addition, the drive supports data reading and digital audio data extraction at up to 40X speed. Tip • The Partial CAV method permits 24X-speed writing for CD-R discs. • The CLV method and the 4X – 10X Full CAV method permit 10X-speed writing/ rewriting for CD-RW discs. IEEE1394 interface The CRW3200IX drive uses an IEEE1394 interface that enables you to use the drive as soon as it is connected to the computer. The CRW3200IX drive supports a hot plug function that enables you to connect/ disconnect the drive while the computer is turned on. SafeBurn™ (Enhanced stability writing technology) The generous 8 MB buffer memory provides sufficient data storage to enable stable disc writing at high speeds. Even if data transfer from the computer is interrupted, the Buffer Underrun Protection function is activated to save CD-R discs from a writing error. (P. 35) “Optimum Write Speed Control” adjusts the writing speed to the optimum rate for every CD-R disc automatically. You can set the maximum writing speed with your CD writing software. Note • Optimum Write Speed Control can be activated when the maximum writing speed is set at 12X or more. • The minimum writing speed to be automatically selected is 8X. Manually set the optimum writing speed if a writing speed supported by a disc is less than 8X. High fidelity digital audio The CRW3200IX drive supports extraction of digital audio data at up to 40X speed using CD writing software, as well as recording digital audio with high fidelity even at 24X-speed writing. 1 Audio Master Quality Recording (High quality audio writing mode) Audio Master Quality Recording enables you to create high quality audio CDs. This mode is available for CD-R discs with a capacity of 650 MB and 700 MB. (P. 38) Note Audio CDs that are created with Audio Master Quality Recording may not be played back on certain audio recorders and CD-R/RW drives. CD-MRW (CD Mount Rainier ReWriting) CD-MRW is a new standard of packet writing. Compared to the ordinary packet writing, CD-MRW provides many useful functions such as background formatting. (P. 39) 2 Names and Functions of Parts Front Panel ➀ ➃ ➁ ➄ ➂ ➅ ➀ Disc tray ➅ LED Holds the disc. It is opened or closed by pressing the eject button. (P. 22) Indicates the operational status of the CRW3200IX drive by its colors and blinking patterns. ➁ Manual eject hole Forcibly opens the disc tray when the tray cannot be opened by pressing the eject button. (P. 23) ➂ Eject button Press to open or close the disc tray. (P. 22) ➃ Headphone jack Connects headphones or external speakers to the drive; has stereo mini-jack specifications. ➄ Headphone volume dial Controls the volume of the headphones. The volume increases as the dial is turned to the right. 3 Lights or blinks blue • Lights: Standby (with disc) • Blinks: Opening/Closing disc tray, or reading disc information (TOC) • Blinks rapidly: Playback audio • Blinks irregularly: Reading data Lights or blinks purple • Lights: Standby (no disc) or the disc tray is open • Blinks: Accessing for writing or test writing • Blinks rapidly: Writing Blinks orange • Malfunction Rear Panel ➀ ➁ ➂ ➃ ➀ LINE OUT jacks (L/R) ➂ DC-IN connector Connect audio devices such as external speakers. Connects the included AC adapter. (P. 11) ➁ POWER switch (STANDBY/ON) Turns the power on/off. (P. 11, 13) ➃ IEEE1394 ports Connect the included IEEE1394 cable. (P. 13 for Windows, P. 18 for Macintosh) 4 Precautions on Use Handling Discs To avoid trouble, such as writing errors, loss of recorded data, and malfunction of the drive, take the following precautions when handling discs. • Do not place discs in a hot or damp place or where they will be exposed to direct sunlight. • Do not touch the disc surface. Hold the disc by the edge when handling it. • Remove dust and dirt from the disc surface. Use an air spray to remove dust. The disc surface may be scratched if strongly wiped with a dry cloth. • Do not stick labels to the disc surface or write anything on it except where designated. • Do not clean discs with chemicals or detergents. • Do not bend or drop discs. Copyright It is prohibited by law to duplicate copyright material for non-personal use without the prior consent of the copyright holder. When copying material with your CD-R/ RW drive, take due care not to infringe the copyright. Disclaimer of Indemnity • Yamaha assumes no liability for the loss of any profits incurred as a result of the loss or corruption of data written on a CD-R or CD-RW, for any loss or damage caused by or arising out of extraordinary circumstances (including circumstances that Yamaha has foreseen or could foresee), nor for any damages incurred or claimed by a third party. • After handling important data, make a comparison between the original and the copied data (to confirm that the data has been copied properly). • In no event shall Yamaha be liable for any damage to discs due to a buffer underrun error (P. 35) or for any other reason, or the inability to use distributed discs with your drive. • Yamaha assumes no liability for the inability to write/playback discs because of their format. 5 Compatible Discs Discs that can be written on The CRW3200IX drive can write on the following discs. For the latest information about discs previously checked for compatibility with the drive, refer to the following website. YAMAHA CD-R/RW Drive website URL: http://www.yamaha.co.jp/english/product/computer/ CD-R discs • The CRW3200IX drive can write at 1X, 2X, 4X, 8X, 12X, 16X or 24X speed. • CD-R discs can be played back on a CD-ROM drive or a CD player. Note • 24X-speed writing is enabled with Partial CAV method. (P. 7) • Check the writing speeds your disc supports prior to writing. CD-RW discs • The CRW3200IX drive can write/rewrite at 2X or 4X speed. • CD-RW discs can be read/played back on a device (e.g. CD-ROM drive) that supports “CD-RW” discs. Note Some discs support only 2X speed. High Speed CD-RW discs • The CRW3200IX drive can write/rewrite at 4X, 8X or 10X speed. • High Speed CD-RW discs can be read/played back on a CD-RW drive that bears the High Speed CD-RW logo or a device (e.g. CD-ROM drive) that supports “CD-RW” discs. Note • When using the packet writing method (P. 38) for writing/rewriting onto High Speed CD-RW discs, you can select the 4X – 10X Full CAV method. For more information refer to the documentation that comes with your CD writing software. (Your CD writing software must support the Full CAV method, as does the CD Writing software that comes with the CRW3200IX drive.) • The Full CAV method is recommended when opening and editing a file on a CDRW disc with an application software. • In order to write, erase, read or play back High Speed CD-RW discs, use a CD-R/ RW drive that bears the High Speed CD-RW logo. When using a CD-ROM drive to read/play back High Speed CD-RW discs, use a drive that supports CD-RW discs. If these discs are used with a CD-R/RW drive not bearing the High Speed CD-RW logo, the discs may not be recognized, resulting in a computer not operating properly or other malfunctions occurring. Refer to the YAMAHA website below prior to attempting to read/play back these discs on a YAMAHA CD-R/RW drive not bearing the High Speed CD-RW logo. URL: http://www.yamaha.co.jp/english/product/computer/ 6 Precautions on Use Partial CAV (Constant Angular Velocity) The CLV (Constant Linear Velocity) method is generally used to write data on a CD-R disc. In writing using the CLV method, the disc rotation speed is adjusted to keep the data writing speed (data transfer rate) constant on all parts of the disc. In contrast, the CAV (Constant Angular Velocity) method exercises control so as to keep the disc rotation speed constant. Since the CAV method makes it possible to substantially increase the maximum data transfer rate without straining of the drive, it is adopted today for most CD-ROM drives. CD formats define the constant linear density of written data so that the amount of written data per disc rotation will increase as the writing point moves from the inner track to the outer track. With the CAV method, therefore, data is transferred at a higher rate when it is written on the outer tracks of the disc. To achieve 24X-speed writing, the CRW3200IX drive employs the Partial CAV method, which is a combination of the CAV method for inner tracks and the CLV method for outer tracks. The Partial CAV method controls the disc rotation speed so that the CRW3200IX drive starts writing at 18X speed on inner tracks, increasing the speed to 24X as the read/write head moves outward and holds the speed at 24X on outer tracks. Tip The CRW3200IX drive supports 8 cm discs. Note Use only circular discs. Do not use any irregular shaped discs such as heart-shaped or star-shaped discs to avoid the risk of malfunction. System Requirements The CRW3200IX drive is designed to operate in the following computer environment. If your computer does not meet these requirements, the CRW3200IX drive may not operate or write at the maximum speed. For Windows Computer (PC/AT compatible) • CPU: Pentium II-class or higher, 300 MHz or faster • RAM: 64 MB or more 64 MB or more is required (128 MB is recommended) for Windows 2000 Professional, while 128 MB or more is required (256 MB is recommended) for Windows XP. 7 04GB-PrecautionsOnUse.fm Page 8 Friday, November 16, 2001 4:02 PM • CD-ROM drive Note The CRW3200IX drive cannot be used to boot the computer or to set up an operating system. • Hard drive space Writing data on a CD-R/RW disc requires 50 MB to 100 MB of free space as a working area on the hard drive. When writing data on a CD-R/RW disc after creating an image file, there must be enough free space on the hard drive to store the image file in addition to the working area (a total of up to 900 MB). However, hard drive space for image files is not required when directly writing onto a CD-R/RW disc from a hard drive or CD-ROM using the CRW3200IX drive (on-the-fly writing). Image file You can collect the data files to be written on a CD-R/RW disc into a single image file. The image file is useful for writing the same data onto multiple discs. For details, refer to the documentation that comes with the CD writing software. • A spare PCI expansion slot or a CardBas slot for an IEEE1394 interface card (if one hasn’t been installed or built-in) • IEEE1394 port An optional IEEE1394 interface card (OHCI compatible) is required to connect the CRW3200IX drive for the computer without an IEEE1394 port. The IEEE1394 interface cards that have been already recognized to support the CRW3200IX drive are as follows. Manufacturer Product Card Type Advansys ASB30400 PCI SIIG NN2603 PCI For the latest information about IEEE1394 interface cards supporting the CRW3200IX drive, refer to the following websites. YAMAHA CD-R/RW Drive website URL: http://www.yamaha.co.jp/english/product/computer/ Note Some IEEE1394 interface cards may not support the CRW3200IX drive. Even if the interface card operates properly in the computer, the interface card may not support IEEE1394 interface CD-R/RW drives. For details, refer to the documentation that comes with the IEEE1394 interface card. Yamaha recommends that you use an IEEE1394 interface card listed above that has been recognized to support the CRW3200IX drive. Continued on next page 8 Precautions on Use Operating system Windows 98 Second Edition, Windows Me, Windows 2000 Professional, or Windows XP. CD writing software The CRW3200IX drive requires CD writing software to write onto a CD-R/RW disc. Use the CD writing software that supports the CRW3200IX drive. For details about installing and using the CD writing software, refer to the documentation that comes with the CD writing software. For Macintosh Computer (Macintosh with a FireWire port) • CPU: PowerPC G3, 300 MHz or faster • RAM: 64 MB or more • CD-ROM drive Note The CRW3200IX drive cannot be used to boot the computer or to set up an operating system. • Hard drive space Writing data on a CD-R/RW disc requires 50 MB to 100 MB of free space as a working area on the hard drive. When writing data on a CD-R/RW disc after creating image file, there must be enough free space on the hard drive to store the image file in addition to the working area (a total of up to 900 MB). However, hard drive space for image file is not required when directly writing onto a CD-R/RW disc from hard drive or CD-ROM using the CRW3200IX drive (on-the-fly writing). Image file You can collect the data files to be written on a CD-R/RW disc into a single image file. The image file is useful for writing the same data onto multiple discs. For details, refer to the documentation that comes with the CD writing software. Operating system Mac OS 8.6 and 9 to 9.2 (Classic API with Mac OS X is not supported.) CD writing software The CRW3200IX drive requires CD writing software to write onto a CD-R/RW disc. Use the CD writing software that supports the CRW3200IX drive. For details about installing and using the CD writing software, refer to the documentation that comes with the CD writing software. 9 Preparing the CRW3200IX Drive Serial Number The serial number is printed on the label on the bottom of your CRW3200IX drive. When you have a question about the drive or need user support services, the serial number is required. Please write the serial number down in the space below. It may be difficult to check the serial number after setting up the drive or for any other reason. Serial number (10 characters: 3 letters + 7 numbers) Serial Number 10 Preparing the CRW3200IX Drive (Windows) Set Up the CRW3200IX Drive on Windows Note Place the CRW3200IX drive horizontally. 1 Remove all IEEE1394 devices connected to the computer, and turn on the computer. 2 Be sure that the power switch on the rear panel of the CRW3200IX drive is turned off (STANDBY), and connect the included AC adapter to the DC-IN connector of the drive. The arrow on the adapter plug faces to the screw (the left side of the connector). DC-IN connector Screw 11 Arrow 3 Connect the included power cable to the AC adapter (➀). Connect the other end of the power cable to the wall socket (➁). ➀ Power cable (included) ➁ Note • Use the included AC adapter only. Do not use other adapters. • The AC adapter may become warm during use under normal conditions. • The AC adapter consumes power, shown in the table below, while connected to the wall socket even if the power switch of the CRW3200IX drive is turned off. Remove the power cable from the wall socket when not using the CRW3200IX drive for a prolonged period. Power source Power consumption 100 V, 120 V 0.8 W 220 V 0.9 W 230 V, 240 V 1.0 W 12 Preparing the CRW3200IX Drive (Windows) 4 Turn on the power switch of the CRW3200IX drive. Blinks blue and then lights purple Note When turning on the CRW3200IX drive, be sure that the LED on the front panel blinks blue and then lights purple. (P. 3) 5 Connect the CRW3200IX drive and the computer with the included IEEE1394 cable. Note The included IEEE1394 cable has a 6-pin IEEE1394 connector at each end. Depending on your computer environment such as a laptop computer with a 4-pin type IEEE1394 port, an IEEE1394 cable with a 4-pin IEEE1394 connector at one end may be required. 6-pin IEEE1394 connector 13 4-pin IEEE1394 connector Connecting to a desktop computer IEEE1394 port IEEE1394 ports CRW3200IX rear panel IEEE1394 cable Connecting to a laptop computer IEEE1394 ports IEEE1394 interface card IEEE1394 ports IEEE1394 cable CRW3200IX rear panel Note • You can connect the IEEE1394 cable to either IEEE1394 port of the CRW3200IX drive. • The IEEE1394 standards define the maximum length of a single IEEE1394 cable as 4.5 meters. • To connect multiple IEEE1394 devices, refer to “Connecting Multiple IEEE1394 Devices.” (P. 36) 14 Preparing the CRW3200IX Drive (Windows) 6 Check recognition of the CRW3200IX drive. After connecting the CRW3200IX drive to the computer, follow the steps below to check that the drive is recognized properly by the computer. For Windows 98 Second Edition/Me 1 Select Start on the task bar, then Settings, Control Panel, System, and Device Manager tab. The Device Manager dialog box appears. Note For Windows Me, if the System icon is not found in the Control Panel window, click view all Control Panel options on the left side of the window. 2 Check that the following icons are shown. a: “1394 Bus Controller” (Fig.1) b: “YAMAHA CRW3200E” in the “CDROM” item (Fig.1) c: “SBP2 Compliant IEEE 1394 device” in the “SBP2” item (Fig.2) Figure 1 a b Figure 2 (scroll down) c (This screen is an example on Windows Me.) 15 For Windows 2000 Professional 1 Select Start on the task bar, then Settings, Control Panel, System, Hardware tab, and Device Manager. The Device Manager dialog box appears. 2 Check that the following icons are shown. a: “YAMAHA CRW3200IX IEEE 1394 SBP2 Device” in the “DVD/CDROM drives” item b: “IEEE 1394 Bus host controllers” a b For Windows XP 1 Select Start on the task bar, then Control Panel, System, Hardware tab, and Device Manager. The Device Manager dialog box appears. Note If the System icon is not shown in the Control Panel window, click Switch to Classic View on the left side of the window. Continued on next page 16 Preparing the CRW3200IX Drive (Windows/Macintosh) 2 Check that the following icons are shown. a: “YAMAHA CRW3200IX IEEE 1394 SBP2 Device” in the “DVD/CDROM drives” item b: “IEEE 1394 Bus host controllers” c: “SBP2 Compliant IEEE 1394 device” in the “SBP2 IEEE 1394 Devices” item a b c The drive name is not shown or there is or mark. The CRW3200IX drive has not been recognized properly. Check the cable connections and settings. 7 Install CD writing software. Install the CD writing software. For details about how to install CD writing software, refer to the documentation that comes with it. 17 Set Up the CRW3200IX Drive on Macintosh Note Place the CRW3200IX drive horizontally. 1 Follow page 11 – 13, and connect the AC adapter to the CRW3200IX drive. Turn on the drive. 2 Connect the CRW3200IX drive and the computer with the included IEEE1394 cable. IEEE1394 (FireWire) ports IEEE1394 ports CRW3200IX rear panel IEEE1394 cable Note • You can connect the IEEE1394 cable to either IEEE1394 port of the CRW3200IX drive. • The IEEE1394 standards define the maximum length of a single IEEE1394 cable as 4.5 meters. • To connect multiple IEEE1394 devices, refer to “Connecting Multiple IEEE1394 Devices.” (P. 36) 18 Preparing the CRW3200IX Drive (Macintosh) 3 Check recognition of the CRW3200IX drive. After connecting the CRW3200IX drive to the computer, follow the steps below to check that the drive is recognized by the computer properly. 1 Select Apple System Profiler from the Apple menu. 2 Select Devices and Volumes. 3 “fw609e” and “sbp609e” (or drive names in some versions) in the “FireWire” column should be shown when the CRW3200IX drive has been recognized properly. The FireWire version is shown in this window. “sbp609e” “fw609e” The FireWire version is shown. “CRW3200E” “fw609e” The FireWire version is shown. 19 Note • In the case that other FireWire storage devices such as a hard drive or an MO drive are connected to the computer, “fw609e” and “sbp609e” are shown in the column when any device is recognized. To check that the CRW3200IX drive is recognized properly, un-mount icons of those devices, and then remove those devices temporarily. • If the “FireWire” item is not shown, the FireWire interface of the computer is not recognized by the Mac OS. Contact the manufacturer of the computer. • If the “fw609e” and “sbp609e” (or drive names in some versions) are not shown even with the “FireWire” item shown, the CRW3200IX drive is not recognized by the Mac OS. In such a case, contact the store of purchase or your nearest Yamaha dealer (listed at the back of this manual). • The FireWire version in Mac OS that supports the CRW3200IX drive is 2.0 or later. • The extension files that support the CRW3200IX drive are required to mount and read the disc even if the drive is recognized by Apple System Profiler. The extension files come with the CD writing software. For details, refer to the documentation that comes with the CD writing software. 4 Install the CD writing software. Install the CD writing software. For details about how to install the CD writing software, refer to the documentation that comes with it. “CRW3200E” (device name) corresponding to the CRW3200IX drive (product name) will be shown on your CD writing software when the drive is recognized by the CD writing software properly. For details about how to check recognition of the CRW3200IX drive with the CD writing software, refer to documentation that comes with the CD writing software. 20 Connecting/Disconnecting the CRW3200IX Drive to/from the Computer The CRW3200IX drive can be connected/disconnected while the computer is turned on (hot plug). However, follow the steps below to disconnect the CRW3200IX drive while the computer is turned on. 1 Quit the writing software if it is activated. 2 Be sure to remove any disc from the disc tray. 3 For Windows Me/2000 Professional, select Unplug or Eject Hardware on the task bar and follow the steps on the screen to disconnect the drive. For Windows XP, select Safely Remove Hardware on the task bar and follow the steps on the screen to disconnect the drive. For Macintosh, disconnect the CRW3200IX drive. (This screen is an example on Windows Me.) Note • For Windows 98 Second Edition, do not disconnect IEEE1394 device from the computer turned on to avoid improper operation. • Be sure not to disconnect the CRW3200IX drive or connect/disconnect other IEEE1394 devices from the computer when writing with the drive. Be sure not to turn off the CRW3200IX drive when the drive is connected to the computer turned on. The computer or other IEEE1394 devices may not operate properly depending on a type of host adapter or a CD writing software. Disconnect the CRW3200IX drive from the computer prior to turning off the drive. 21 Loading/Ejecting a Disc Prior to the operation, check that the CRW3200IX drive is turned on. 1 Open the disc tray by pressing the eject button. Press the eject button. 2 Place the disc onto the disc tray properly with its label facing upward. Or remove the disc from the disc tray carefully so not to damage it. Place or remove the disc onto/from the disc tray. 3 Close the disc tray by pressing the eject button or by gently pushing the disc tray into the drive. Note • Place or remove the disc after the disc tray has fully opened. Do not push or pull the disc tray with applying excessive force to avoid damage to the drive or the disc. • The disc tray does not open while the application software prohibits ejecting, including when the drive accesses the disc. 22 Loading/Ejecting a Disc Manually Ejecting a Disc If the disc tray fails to open for some reason, such as a power failure, follow the steps below to remove the disc from the drive. Note Frequent use of this operation may cause malfunction of the drive. 1 Prepare a thin pin-like object, such as a straightened paper clip. Use an object less than 2 mm in diameter and more than 3 cm in length. 2 Turn off the CRW3200IX drive. 3 Insert the thin pin-like object straight into the manual eject hole, and push it in. When the disc tray opens, remove the disc. Manual eject hole 4 23 Turn on the CRW3200IX drive, and close the disc tray. Troubleshooting Refer to the YAMAHA CD-R/RW Drive website for the latest support data, including information on troubleshooting. YAMAHA CD-R/RW Drive website URL: http://www.yamaha.co.jp/english/product/computer/ Europe URL: http://www.yamaha-it.de/ 1 The CRW3200IX drive is not turned on when the power switch is ON. (The front panel LED does not light.) ● 2 The operating system does not start up properly. ● 3 Are the AC adapter and the power cable connected properly? Turn off the power switch and check that the CRW3200IX drive, the AC adapter, the power cable, and the AC outlet are connected properly. (P. 11, 12) If not, connect them properly, and then turn on the CRW3200IX drive. If the CRW3200IX is not turned on (the front panel LED does not light) even if they are connected properly, contact the store of purchase or your nearest Yamaha dealer (listed at the back of this manual). Is the IEEE1394 interface card installed properly? Refer to the documentation that comes with the IEEE1394 interface card. The CRW3200IX drive is not recognized by the operating system. (Refer to page 15 for Windows or page 19 for Macintosh to check recognition of the CRW3200IX drive.) ● Are the drive and IEEE1394 interface card connected properly to the computer with a proper IEEE1394 cable? Turn off the CRW3200IX drive and the computer. Check that the IEEE1394 cable is fully connected to the CRW3200IX drive. (P. 13 for Windows, P. 18 for Macintosh) ● Is the IEEE1394 interface card recognized by the operating system properly? Follow the documentation that comes with the IEEE1394 interface card or the computer, and check that the IEEE1394 interface card is recognized by the operating system properly. If the IEEE1394 interface card is recognized, contact the store of purchase or your nearest Yamaha dealer (listed at the back of this manual). If not, refer to the documentation that comes with the IEEE1394 interface card or the computer. If the IEEE1394 interface card is still not recognized, there may be a problem with the device driver or elsewhere. Contact the manufacturer of the IEEE1394 interface card or the computer. 24 Troubleshooting 4 5 25 The disc tray does not open when you press the eject button. ● Is the CRW3200IX drive turned on? (Does the LED on the front panel light?) Refer to “The CRW3200IX drive is not turned on when the power switch is ON. (The front panel LED does not light.).” (Troubleshooting, Item 1) ● Is any CD writing software being used? Some CD writing software prohibits ejecting while accessing. (If you are using such a software program, the disc tray does not open even if the eject button is pressed.) In such a case, follow the steps in the software window to eject the disc, or quit the CD writing software prior to pressing the eject button. ● Is the disc icon shown on the screen? (For Macintosh) When the disc icon is shown on the screen, the eject button cannot be used. Drag the disc icon into the Trash and drop it there to unmount the disc to open the disc tray. ● Is the disc tray opened when the computer is restarted? Quit all running application software, restart your computer, and press the eject button of the CRW3200IX drive. For Macintosh, when the disc icon is shown on the screen, the eject button cannot be used. Drag the disc icon into the Trash and drop it there to unmount the disc to open the disc tray. ● Is the disc tray opened when the IEEE1394 cable is removed from the CRW3200IX drive? Remove the IEEE1394 cable from the drive while the AC adapter is connected, and press the eject button. ● Turn off the computer and the CRW3200IX drive, and remove the disc following “Manually Ejecting a Disc.” (P. 23) If the disc tray is caught in the drive and does not come out, or if it cannot be opened or closed using the eject button after it is pulled out manually, contact the store of purchase or your nearest Yamaha dealer (listed at the back of this manual). The disc is ejected without order (or it comes out spontaneously). ● Is the disc set properly (horizontally) on the disc tray? Set the disc properly, and close the disc tray. ● Is the disc dusty or dirty? Remove dust or dirt from the disc using an air spray or a dry soft cloth. To avoid damaging discs, wipe the disc gently from the center perpendicular to the edge of the disc. ● 6 Does the drive accept other discs (audio CD, CD-ROM, blank CD-R disc, etc.)? If a specific disc is ejected, the disc itself may be damaged or deformed. If all discs are ejected, contact the store of purchase or your nearest Yamaha dealer (listed at the back of this manual). No data can be read from a disc. ● Is the disc ejected without order? Refer to “The disc is ejected without order (or it comes out spontaneously).” (Troubleshooting, Item 5) ● Is the disc compatible with the drive? (P. 6, 31) Be sure that the disc is compatible with the CRW3200IX drive. ● Is the disc dusty or dirty? Remove dust or dirt from the disc using an air spray or a dry soft cloth. To avoid damaging discs, wipe the disc gently from the center perpendicular to the edge of the disc. ● Can data be read from other discs (audio CD, CD-ROM, etc.)? If no data can be read from a specific disc, data may be written in a format that the drive cannot recognize, or the disc itself may be damaged or deformed. Note that no data can be read from blank discs, and the CRW3200IX drive infrequently fail to read data correctly from a disc even if the disc is compatible with the drive. ● Are the extension files supporting the CRW3200IX installed? (For Macintosh) If the extension files supporting the drive are not installed, the disc cannot be mounted or read. The extension files come with the CD writing software. For details, refer to the documentation that comes with the CD writing software. ● Does the LED on the front panel of the CRW3200IX drive light correctly when a disc is inserted? When a disc is inserted, the LED will blink blue for a moment and then light blue. (P. 3) If no data can be read from a specific disc, data may be written in a format that the drive cannot recognize, or the disc may be damaged or deformed. If the LED on the front panel remains purple (stating that the drive cannot recognize the disc) no matter what type of disc is inserted, contact the store of purchase or your nearest Yamaha dealer (listed at the back of this manual). 26 Troubleshooting 7 The playback of an audio CD (CD-DA) cannot be heard. Check that the volume is not set to the minimum level. Be sure that headphones or external speakers are properly connected to the CRW3200IX drive. For Windows Me/XP, change the settings as follows. (If Windows Media Player 7.0 or later is used with Windows Me/XP, this problem can happen since the digital playback option is activated by default setting.) For Windows Me 1 In the Device Manager dialog box (P. 15), select YAMAHA CRW3200E Properties and then Properties tab. 2 Uncheck the “Enable digital CD audio for this CD-ROM device” in the “Digital CD Playback” item. Uncheck (This screen is an example on Windows Me.) 3 Start “Windows Media Player.” In the menu bar, select Tools, Options and CD Audio tab. 4 Uncheck the “Digital playback” in the “Playback Settings” item. Uncheck (This screen is an example on Windows Media Player 7.0.) 27 For Windows XP 1 Follow page 27 “For Windows Me”, and uncheck the “Enable digital CD audio for this CD-ROM device.” 2 Start “Windows Media Player.” In the menu bar, select Tools, Options, Devices tab, CD-RW Drive, and Properties. 3 Select “Analog” in the “Playback” item. Select (This screen is an example on Windows Media Player 8.0.) 8 No data can be read from any CDs, a disc is ejected spontaneously, or the LED remains purple when a disc is inserted. (The LED does not change from lighting purple to blinking blue and then lighting blue.) (P. 3) Disconnect the IEEE1394 cable from your drive while the AC adapter is connected. Insert the disc once again. If a specific disc is automatically ejected or cannot be read, the disc itself may have a problem. If the drive does not accept any compatible discs (and the LED remains purple), contact the store of purchase or your nearest Yamaha dealer (listed at the back of this manual). 28 Troubleshooting 9 The error message “Buffer Underrun” is shown. If your CD writing software supports Buffer Underrun Protection, you must activate it. For details, refer to the documentation that comes with your CD writing software. To prevent the occurrence of a buffer underrun and to increase the efficiency of data writing, try the following: – Reduce the data writing speed. – Create an image file on the hard drive. – Optimize the hard drive. (Defragmentation) – Do not start any application software including screen savers during data writing. – Deactivate the power management for the hard drive. – Set the data transfer mode of any IDE device such as a hard drive or CD-ROM drive to DMA. – Deactivate the Windows Active Desktop. – Quit all memory-resident software programs. – Check your CD writing software settings with the documentation that comes with it. Note • If there is an IEEE1394 device with lower data transfer speed connected between the computer and the CRW3200IX drive, the data transfer between those two will be slowed, which may cause failure in writing a disc. • A writing error may happen if the drive is vibrated while data is being written on a CD-R or a CD-RW disc. 10 Other problems 29 ● Isn’t more than one CD writing software installed in your computer? Installing more than one CD writing software in a computer may cause instability of operation. ● CD writing software must support the CRW3200IX drive in order to recognize the drive. Contact the manufacturer of your CD writing software to see whether the software supports the CRW3200IX drive. 06GB-Operation.fm Page 30 Thursday, November 15, 2001 7:16 PM Firmware Firmware refers to the operating software designed for your CD-R/RW drive. It is stored in the drive’s flash memory so that it can be rewritten. To enhance operation reliability, Yamaha continues improving the firmware and makes updates available on the internet. You can find information about the latest firmware at the following websites. YAMAHA CD-R/RW Drive website URL: http://www.yamaha.co.jp/english/product/computer/ Europe URL: http://www.yamaha-it.de/ These websites contain the latest YAMAHA CD-R/RW drive user support information including information about the firmware. Refer to the website regularly to check the latest information. Checking the firmware version in the CRW3200IX drive For Windows 98 Second Edition/Me In the Device Manager dialog box (P. 15), select YAMAHA CRW3200E to display the YAMAHA CRW3200E Properties dialog box, and then select the Settings tab. The revision number shown here varies depending on the version of the firmware in the drive as set at default. (This screen is an example on Windows Me.) For Windows 2000 Professional/XP The firmware version cannot be shown with Device Manager dialog box. Check the firmware version with the CD writing software. For details about how to use the software, refer to the documentation that comes with it. For Macintosh Check the firmware version with the CD writing software. For details about how to use the software, refer to the documentation that comes with it. 30 CRW3200IX Drive Specifications Supported Formats Write Read Play back *4 CD-DA ● ● ● CD TEXT ● ● ● CD-ROM *1 ● ● ● Mixed Mode CD-ROM (CD-ROM+CD-DA) ● ● ● CD-ROM XA *1 ● ● ● Photo CD *1 ● *2 *3 ● ● Video CD ● ● ● CD-i ● ● *3 — CD EXTRA *1 ● ● ● *1 *2 *3 *4 includes multisession proper disc required proper application software required proper application software may be required depending on the format Writing Methods Writing/Reading Speed Disc-at-Once (DAO) Session-at-Once (SAO) Track-at-Once (TAO) Packet Writing Audio Master Quality Recording (High quality audio writing mode) CD-MRW (CD Mount Rainier Rewriting) Writing CD-R 1X, 2X, 4X, 8X, 12X, 16X (CLV), 24X (18X – 24X Partial CAV) CD-RW 2X, 4X, 8X, 10X (CLV), 4X – 10X Full CAV (Packet writing) Reading 40X (max.) Full CAV Note) • DATA: 40X (max.) • CD-DA: 40X (max.) in audio extraction • CD-DA: 1X only in audio playback • Video CD: 10X (max.) • Session closed disc: 40X (max.) • Session unclosed disc: 12X (max.) CD-R 1X, 2X, 4X, 8X, 12X, 16X, 24X (18X – 24X Partial CAV) writing: CD-R discs specified in Orange Book Part 2, Ver. 3.1. Note) Use a CD-R disc that matches the writing speed. CD-RW 2X or 4X writing: Orange Book Part 3, Vol.1, Ver. 2.0-compliant discs 4X, 8X, 10X, 4X – 10X Full CAV (Packet writing) writing: Orange Book Part 3, Vol.2, Ver. 1.0-compliant discs Note) For 2X writing, Book Part 3, Vol.1, Ver. 1.0-compliant discs can be used. 31 Data Capacity 700 MB (with a 79-minute disc) 650 MB (with a 74-minute disc) 550 MB (with a 63-minute disc) Maximum Recording Time in Audio Master Quality Recording 68 min. (700 MB) 63 min. (650 MB) Data Transfer Rate (Mode 1) 1X: 150 KB/sec. 2X: 300 KB/sec. 4X: 600 KB/sec. 8X: 1,200 KB/sec. 10X: 1,500 KB/sec. Interface IEEE1394-a compliant, 400 Mbps Two 6-pin connectors (power not supplied to connectors [port]) Data Buffer Size 8 MB (3,176 sectors) Average Access Time 130 msec. (random access) Sector Size 2,048 – 2,448 bytes Installing Style Horizontal Disc Loading Type Front auto-loading tray type Audio Out Line Out specifications • Frequency Band: 20 – 20,000 Hz • Output level: 700 mVrms Power Consumption 18 W (writing/playback) 7 W (standby) Operating Environment Temperature : +5 – +35 ºC Humidity : 25 – 80% RH (no condensation) Dimensions Width : 164.0 mm Height : 56.0 mm Depth : 265.0 mm Weight 1.6 kg 12X: 16X: 24X: 32X: 40X: 1,800 KB/sec. 2,400 KB/sec. 3,600 KB/sec. 4,800 KB/sec. 6,000 KB/sec. 32 CRW3200IX Drive Specifications AC adapter (AD-301205) Rated Input Voltage 100 – 240 V AC Rated Input Current 1.0 A or less Rated Output Voltage +5 V, +12 V DC Rated Output Current 1.5 A Terminal Output Polarity 1 2 3 33 1: 2: 3: 4: 5 5: 4 +12 V DC GND +5 V DC GND +5 V DC Operating Environment Temperature: +5 – +35 ºC Humidity : 25 – 80% RH (no condensation) Dimensions (includes projection) Width : 79.5 mm Height: 32.0 mm Depth : 147.0 mm Weight (includes the power cable) 430 g (approx.) Safety/EMC Compliance The CRW3200IX drive conforms to the following specifications. Country/ Region USA Canada EU Compliance Specifications Standard Safety Item Name and Number Remarks Electricity UL60950 Information Technology Equipment Laser 21CFR1040.10 FDA Chapter 1, Subchapter J Class I Laser Product EMC Emission 47CFR15 Peripheral Device FCC Part 15, Subpart B Safety Electricity CSA C22.2 No. 60950 Information Technology Equipment EMC Emission ICES-003 Class B Digital Device Safety Electricity EN60950 Information Technology Equipment EMC Laser EN60825 Class 1 Laser Product Emission EN55022 Class B Information Technology Equipment Immunity EN55024 EN61000-3-2 EN61000-3-3 Australia New Zealand EMC Emission AS/NZ 3548 Japan Safety Electricity Electrical Appliance and Material Safety EMC Emission VCCI Class B Information Technology Equipment Class B Information Technology Equipment Note that the specifications of the CRW3200IX drive are subject to change without notice due to improvements. 34 Technical Notes IEEE1394 IEEE1394 is a global standard approved by Institute of Electrical and Electronics Engineers (IEEE). The serial interface has a broad bandwidth and is fast enough to transfer large amounts of digital video and audio data bi-directionally between electronic devices including computer peripherals. Defined as FireWire or i.LINK, the IEEE1394 interface enables units to transfer data or various controls over a single IEEE1394 cable. IEEE1394 enables a daisy-chain of devices (serial connection) to transfer data between any two devices in the chain. IEEE1394 also supports a tree (parallel) collection of devices. In addition to this flexibility, IEEE1394 also eliminates the need for complicated settings such as device ID and termination as found with SCSI (Small Computer System Interface) type interfaces. As of this writing, IEEE1394 supports three different data transfer rates: 100 Mbps, 200 Mbps, and 400 Mbps. Buffer Underrun Protection Function CD-R/RW drives are equipped with a buffer memory, which temporarily stores data that is being transferred. When the buffer memory becomes empty due to a delay of data transfer for any reason, a writing error happens. Such condition is defined as buffer underrun, and such an error is defined as a buffer underrun error. Buffer Underrun Protection is featured in the CRW3200IX drive. When buffer underrun almost happens, Buffer Underrun Protection temporarily suspends the writing process. Writing resumes when enough data has accumulated in the buffer memory. Buffer Underrun Protection in the CRW3200IX drive is extremely accurate, resulting in seamless recording before and after suspension. Test writing Test writing is a function to check for the possible occurrence of buffer underrun in your computer environment. When Buffer Underrun Protection of the CD writing software is activated, the test writing function cannot be operated. Buffer Underrun Protection should be deactivated to operate the test writing function. 35 Connecting Multiple IEEE1394 Devices The following describes how to connect multiple IEEE1394 devices including the CRW3200IX drive to the computer. Connecting in a daisy-chain This method is used to connect in series multiple IEEE1394 devices to one IEEE1394 port. Up to 17 IEEE1394 devices (including the host adapter) can be connected through one channel. A single daisy-chain can contain up to 17 devices including the host adapter. CRW3200IX A maximum single cable length: 4.5 m Connecting in a tree This method is used to connect in branches multiple IEEE1394 devices through the device, host adapter for example, with more than two IEEE1394 ports. Up to 63 IEEE1394 devices (including the host adapter) can be connected. A CRW3200IX B C A maximum single cable length: 4.5 m • Each path (A-B, A-C, B-C) can contain up to 17 devices including the host adapter. • An entire system can contain up to 63 devices including the host adapter. 36 Technical Notes Note on Connecting IEEE1394 Devices • Connect the CRW3200IX drive directly to the computer. • If there is an IEEE1394 device with lower data transfer speed connected between the computer and the CRW3200IX drive, the data transfer between those two will be slowed, which may cause failure in writing a disc. • The IEEE1394 ports on the CRW3200IX drive have 6-pin connectors, but do not supply power (IEEE1394 bus power). • Be sure not to connect the devices with closed-loop as follows. Writing Methods Disc-at-Once (DAO) This method is used to write all data onto a disc in one operation. It writes multiple pieces of data without placing a space between data, starting with the innermost track of the disc. Once data is written by this method, no data can be added to the same disc even if there is free space available on the disc. This method is useful for making a backup copy of an entire disc. Track-at-Once (TAO) This method is used to write data on a disc on a track-by-track basis. A track can be defined as the smallest unit of area that contains an ordinary program, image file, text file, etc. This method enables you to add data to the same disc, one track of data at a time, as long as there is free space available on the disc. A disc that contains data written in several sessions is defined as a multi-session disc. An area that records data and management information (Lead-in/Lead-out) is defined as a session. Lead-in and Lead-out are signals written for stating the starting and ending points of one session. Note Ordinary audio CD players can only play back single-session discs or the first session on a multi-session disc. Do not record audio data on the second and subsequent sessions. 37 Session-at-Once (SAO) This method is used to write data on a disc on a session-by-session basis. Unlike Track-at-Once described above, Session-at-Once enables you to record multiple tracks onto a disc at a time. CD EXTRA, for example, uses this method to write multiple pieces of audio data (or multiple tracks) in the first session and information required for computers in the second session. This method enables you to add data into the same disc, one session at a time, as long as there is free space available on the disc. A disc that contains data written in several sessions by this method is defined as a multi-session disc, like a disc written by the Track-at-Once method. Packet Writing This method is used to record data onto a disc on a file-by-file basis. This method divides a track into small segments called “packets” so that data can be written on a packet-by-packet basis, which means that you can write data in much the same way as you copy data to a floppy or hard drive. Since the data can be written easily, packet writing is proper to daily data backup. Packet writing also enables you to add packets to a disc as long as there is free space available on the disc. Note • Discs need to be formatted for packet writing prior to use. • Formatting a CD-RW disc using packet writing software reduces its storage capacity by about 100 MB since packet writing requires exclusive space for itself. • For CD-R discs, deleting data means masking data but not actually removing data. Therefore, actual free space in a CD-R never be increased even if data is deleted. Audio Master Quality Recording (High quality audio writing mode) This method enables you to record high quality data that can be played back with the 1.4 m/s linear velocity. Note • Audio Master Quality Recording (High quality audio writing mode) is enabled with the 4X speed Disc-at-Once writing method. • Maximum recording time is 63 minutes for a 650 MB CD-R disc and 68 minutes for a 700 MB CD-R disc. 38 Technical Notes CD-MRW (CD Mount Rainier ReWriting) This method is a new standard of packet writing for a CD-RW disc and supports defect control by the drive, background formatting, and disc ejecting during formatting. It enables you to use a CD-RW disc like a floppy disk. Note Formatting a CD-RW disc using CD-MRW reduces its storage capacity by about 150 MB since CD-MRW itself requires exclusive disc space. 39 Distributors and Head Offices / Vertriebs- und Hauptgeschäftsstelle Distributeurs et sièges sociaux / Distribuidores y Casas matrices If you have any questions, please contact the store of purchase or your nearest Yamaha dealer listed below. Contact Yamaha Corporation Japan from outside of the listed countries. Falls Sie weitere Fragen haben, wenden Sie sich an Ihren Fachhändler oder den örtlichen Yamaha-Händler (eine Liste der Yamaha-Händler befindet sich am Ende dieses Handbuchs). Aus anderen Ländern als den aufgeführten wenden Sie sich an Yamaha Corporation Japan. Si vous avez des questions à poser, veuillez prendre contact avec le magasin où vous avez fait l’achat de l’appareil ou un revendeur de matériel Yamaha le plus proche de votre domicile parmi ceux énumérés ci-dessous. Prenez contact avec Yamaha Corporation Japan si vous ne vous trouvez pas dans un des pays mentionnés: Si tiene alguna duda, póngase en contacto con el establecimiento de adquisición o con su representante Yamaha más cercano indicado a continuación. En caso de países no contemplados en la lista, póngase en contacto con Yamaha Corporation Japan: EUROPE, EASTERN EUROPE and RUSSIA AUSTRALIA Yamaha Elektronik Europa GmbH IT-Sales Division Siemensstrasse 22-34, D-25462 Rellingen, GERMANY URL: http://www.yamaha-it.de/ Yamaha Music Australia Pty., Ltd. Level 1, 99 Queensbridge Street Southbank, Victoria 3006 AUSTRALIA TEL: +61 3 9693 5111 FAX: +61 3 9699 2332 TEL: +80092624222 (AUSTRIA, BELGIUM, DENMARK, FINLAND, FRANCE, GERMANY, HUNGARY, ICELAND, IRELAND, ITALY, LUXEMBOURG, NETHERLANDS, NORWAY, PORTUGAL, SPAIN, SWEDEN, SWITZERLAND, UNITED KINGDOM) SINGAPORE, MALAYSIA, KOREA, THAILAND, PHILIPPINES, INDIA, VIETNAM, CAMBODIA, MYANMAR, INDONESIA and IRAN TEL: +80093067 (MONACO) If you are calling from outside the countries mentioned above, or if you can’t get through on the Yamaha tollfree number, use the following number instead: TEL: +3214400793 U.S.A. Yamaha Electronics Corporation, USA 6660 Orangethorpe Avenue, Buena Park, CA 90620, U.S.A. TEL: +1 714 522 9105 FAX: +1 714 670 0108 URL: http://www.yamaha.com/ CANADA Yamaha Canada Music Ltd. 135 Milner Avenue, Scarborough, Ontario M1S 3R1, CANADA TEL: +1 416 298 5664 FAX: +1 416 292 0732 URL: http://www.yamaha.ca/ Yamaha Electronics Asia Pte Ltd. 138 Cecil Street #05-02/03 Cecil Court, Singapore 069538 SINGAPORE TEL: +65 223 3992 FAX: +65 223 9810 TAIWAN Yamaha KHS Music Co., Ltd. 11F, No.150, Tun Hua North Rd. Taipei,TAIWAN R.O.C. TEL: +886 2 2713 8999 FAX: +886 2 2713 8666 URL: http://www.yamahakhs.com/ JAPAN Yamaha Corporation AV & IT Business Group IT Sales & Marketing Division 10-1 Nakazawa-cho, Hamamatsu-shi, Shizuoka-ken 430-8650, JAPAN TEL: +81 53 460 3433 FAX: +81 53 467 2110 URL: http://www.yamaha.co.jp/english/-
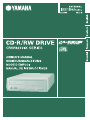 1
1
-
 2
2
-
 3
3
-
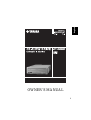 4
4
-
 5
5
-
 6
6
-
 7
7
-
 8
8
-
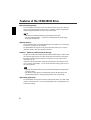 9
9
-
 10
10
-
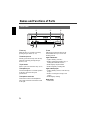 11
11
-
 12
12
-
 13
13
-
 14
14
-
 15
15
-
 16
16
-
 17
17
-
 18
18
-
 19
19
-
 20
20
-
 21
21
-
 22
22
-
 23
23
-
 24
24
-
 25
25
-
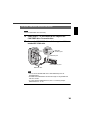 26
26
-
 27
27
-
 28
28
-
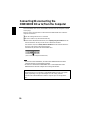 29
29
-
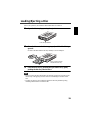 30
30
-
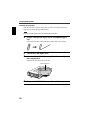 31
31
-
 32
32
-
 33
33
-
 34
34
-
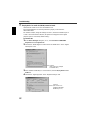 35
35
-
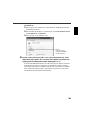 36
36
-
 37
37
-
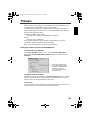 38
38
-
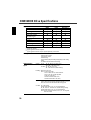 39
39
-
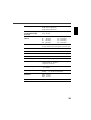 40
40
-
 41
41
-
 42
42
-
 43
43
-
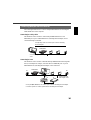 44
44
-
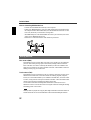 45
45
-
 46
46
-
 47
47
-
 48
48
-
 49
49


Yamaha CRW3200IX Handleiding
- Categorie
- Optische schijfstations
- Type
- Handleiding
- Deze handleiding is ook geschikt voor
in andere talen
- English: Yamaha CRW3200IX User manual
- italiano: Yamaha CRW3200IX Manuale utente
- français: Yamaha CRW3200IX Manuel utilisateur
- Deutsch: Yamaha CRW3200IX Benutzerhandbuch
- dansk: Yamaha CRW3200IX Brugermanual
- suomi: Yamaha CRW3200IX Ohjekirja
- svenska: Yamaha CRW3200IX Användarmanual
- Türkçe: Yamaha CRW3200IX Kullanım kılavuzu
- română: Yamaha CRW3200IX Manual de utilizare
Gerelateerde papieren
-
Yamaha CRW-F1DX de handleiding
-
-
-
-
-
-
-
-
-