
Ferm BV • P.O. Box 30159 • 8003 CD Zwolle • The Netherlands • www.ferm.com 0506-29
UK Subject to change
NL Wijzigingen voorbehouden
UK
Art. nr. ATM1008
FTK-160
NL
USERS MANUAL 04
GEBRUIKSAANWIJZING 12
www.ferm.com
Pagina laadt ...
Pagina laadt ...
Pagina laadt ...
Pagina laadt ...

Ferm 19
Gebruik geen reinigende olie of toevoegingen aangezien deze smeermiddelen een versnelde
slijtage van afdichtingen en randen in het apparaat veroorzaken, wat resulteert in een slechte
prestatie en frequent onderhoud van het gereedschap.
Gebruik Airline Smeerolie voor de luchtinlaat in het handvat van de luchttacker.
Wanneer er geen olienevelaar wordt gebruikt, voeg dan een of tweemaal per dag olie toe in de
snelkoppeling tijdens gebruik. Er is slechts een paar druppels olie per keer benodigd. Te veel
olie zal zich alleen ophopen in het apparaat wat te merken zal zijn tijdens het nieten.
Gebruik bij koud weer
Bij gebruik tijdens koud weer, nabij of onder het vriespunt, kan het vocht in de luchtleiding
bevriezen en gebruik van het apparaat onmogelijk maken. We raden u aan om een speciaal
wintersmeermiddel voor luchtgereedschap te gebruiken of permanente antivries (glycol) als
smeermiddel bij koud weer.
Berg het gereedschap niet op in een koude omgeving om vorst of ijsvorming op de
bedieningskranen en mechanismen die storing in het apparaat kunnen veroorzaken
te voorkomen.
Opmerking: Enkele commerciële droogvloeistoffen voor luchtleidingen zijn schadelijk voor
O-ringen en afsluitingen. Gebruik deze luchtdrogers voor lage temperaturen niet zonder de
compatibiliteit te controleren.
Milieu
Om transportbeschadiging te voorkomen, wordt de machine in een stevige verpakking
geleverd. De verpakking is zo veel mogelijk gemaakt van recyclebaar materiaal. Maak daarom
gebruik van de mogelijkheid om de verpakking te recyclen.
Garantie
Lees voor de garantievoorwaarden de apart bijgevoegde garantiekaart.
Wij verklaren dat dit product voldoet aan de volgende normen of normatieve documenten
EN792-1, EN792-13
overeenkomstig de bepalingen in de richtlijnen
98/37 EEC
vanaf 01-06-2005
ZWOLLE NL
W. Kamphof
Quality department
CE
CONFORMITEITSVERKLARING (NL)
NL
06 Ferm
b) Make sure that the environment in which you will be working has dedicated
ventilation.
c) Protect your nose and mouth with a dedicated mask.
• Do not use the compressor when the electrical cable or the plug is damaged, and instruct
an authorised Support Service to replace them with an original part.
• When the compressor is placed on a surface higher than the floor, it should be secured to
prevent it from falling down during operation.
• Do not put objects or your hands in the protective covers to avoid physical damage and
damage to the compressor.
• Do not use the compressor as a blunt instrument against persons, objects or animals in
order to prevent serious damage.
•If the compressor is no longer in use, always take the plug out of the plug socket.
• Always make sure that compressed-air hoses are used for compressed air and which are
characterised by a maximum pressure adjusted to that of the compressor. Do not try to
repair the hose if it is damaged.
Never use any oxygen, inflammable gases or compressed air from gas bottles to
supply pressure to this appliance, due to the hazard of explosion and the potential for
serious injury.
Quick-detachable couplings
Connect an air hose to the appliance using a QD (quick-detachable) coupling. The QD
coupling also disengages the air pressure from the tool when it is disconnected.
Air hoses
Air hoses should be able to sustain a working pressure of at least 10 Bar. The air supply hose
should be equipped with a QD coupling to enable ""quick uncoupling" from the air stapler.
Compressed air
Only use clean, regulated compressed air for this tool.
Pressure regulator
For safe operation of the air stapler, a pressure regulator with an operating range of 4-7 Bar is
required for regulation of the working pressure. Do not connect the air stapler to an air pressure
that might possibly exceed 10 Bar, as this may cause damage to the air stapler, and could also
result in injuries.
Operating pressure
Never exceed the recommended maximum pressure, as this will cause a substantial increase
in the rate of wear. The air supply must be sufficient to maintain the appliance’s working
pressure. Should the pressure diminish, the driving power of the air stapler will be reduced.
See "TECHNICAL SPECIFICATIONS" for the correct working pressure of the air stapler.
Oil and water separator
Dirt and water in the air supply are the main cause of wear on pneumatic tools. An oil and water
separator will help to ensure clean air pressure for the best performance and least wear on the
air stapler. The oil and water separator must be regularly tapped off, in order to function
effectively in supplying clean air pressure to the tool. Consult the manufacturer’s instructions
for the correct maintenance of the oil and water separator. A contaminated and blocked filter
will cause a reduction in the pressure, which will negatively influence the performance of the
air stapler.
3. AIR SUPPLY AND CONNECTIONS
UK

18 Ferm
Wanneer u onderhoud pleegt aan de luchttacker, let dan op de waarschuwingen in
deze gebruiks-aanwijzing en wees extra voorzichtig bij het controleren van de
luchttacker bij problemen.
Vervangende onderdelen
Bij vervangende onderdelen worden originele onderdelen geadviseerd. Gebruik geen
alternatieve onderdelen die geen gelijke prestatie leveren aan het originele apparaat.
Montageprocedure bij onderhoud
Wanneer u de luchttacker repareert, zorg er dan voor dat de interne delen schoon en
gesmeerd zijn. Gebruik Parker "O"-Lube of iets gelijkwaardigs op alle O-ringen. Coat alle O-
ringen met O-Lube voor montage. Gebruik een kleine hoeveelheid olie op alle bewegende
oppervlakken en pennen. Voeg na het in elkaar zetten een paar druppels smeermiddel voor
luchtgereedschap toe via de luchtleidingfitting voor u overgaat tot testen.
Luchtdruk en volume
Luchtvolume is net zo belangrijk als luchtdruk. Het luchtvolume dat aan de luchttacker
geleverd wordt kan onvoldoende zijn door te defecte koppelingen en geknikte slangen, of
door de effecten van vuil en water in het systeem. Een beperkte luchtstroom zal het gevolg
hebben dat de luchttacker een ontoereikend luchtvolume ontvangt, ook al is de afgelezen
druk hoog. Dit zal resulteren in foutieve werking door verminderde drijfkracht.
Voordat u de problemen naloopt, moet u eerst vanaf de compressor tot de luchttacker
nalopen op beperkende aansluitingen, gedraaide slangen en andere dingen die kunnen
voorkomen dat er voldoende lucht naar het apparaat stroomt.
Smeren
Frequent, maar niet overtollig, smeren is vereist voor de beste werking. Olie toegevoegd via
een olienevelaar zal de interne delen smeren. Gebruik een smeermiddel voor
luchtgereedschap, Mobil Velocite #10, of gelijkwaardig.
7. ONDERHOUD VAN DE LUCHT TACKER
Probleem Oorzaak Oplossing
Overslaan van nietjes, Lekke hoofdpakking. Draai de schroeven
onderbroken toevoer aan/vervang de pakking.
O-ring trekkerklep Vervang O-ring.
gescheurd/versleten.
Gebroken slagpen. Vervang de slagpen(controleer
zuiger O-ring).
Droog, vuil magazijn. Maak schoon, smeer met
smeermiddel voor
luchtgereedschap.
Versleten magazijn. Vervang het magazijn.
Nietjes komen vast te zitten. Invoerkanaal versleten. Vervang magazijn.
Verkeerde maat nietjes. Gebruik alleen geschikte
nietjes met de juiste maat.
Gebogen nietjes. Staak het gebruik van deze
nietjes.
Gebroken slagpen. Vervang de slagpen.
NL
Ferm 07
When in use, always wear eye protection that meets the ANSI specifications, and
offers protection both in front and at the sides from flying objects when loading,
operating and maintaining the air stapler. Flying fasteners and splinters can cause
severe injury.
The employer or user must insist that proper eye protection is worn. Eye protection equipment
should meet the specification of the American National Standards Institute, ANSI Z87.1-1979
and must offer protection from both the front and the sides.
Remark: Glasses without side shield and face protector do not offer sufficient protection.
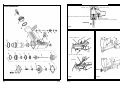
Loading with fasteners
Fig.5
• Disconnect the air hose.
• Release the fastener latch and withdraw this along the fastener guide unit.
• Insert 1 fastener strip into the magazine.
Load with fastener points upwards.
•Press the fastener guide unit back into the magazine, and lock the fastener latch.
• Reconnect the air hose to the air stapler.
When in use, always wear eye protection that meets the ANSI specifications, and
offers protection both in front and at the sides from flying objects when loading,
operating and maintaining the air stapler. Flying fasteners and splinters can cause
severe injury.
Before using the air stapler
• Read the general safety instructions and warnings in these instructions for use carefully.
• Refer to the specifications earlier in these instructions for the correct operating conditions
for the air stapler.
Make sure the stapler is lubricated properly before using it the first time.
Basic operation of the air stapler
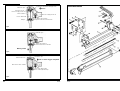
Fig.1 - 4
A piston powered by compressed air drives the air stapler. Illustrations 1 – 4 on page 2 + 3
show how the air stapler works.
Operating
Activated by a trigger
Pressing the trigger activates the air stapler. Every time the trigger is pressed, the air stapler
will drive a fastener into the workpiece.
5. OPERATING THE AIR STAPLER
4. LOADING THE AIR STAPLER
UK

Ferm 17
Probleem Oorzaak Oplossing
Tacker slaat geen nieten Slagpen komt niet volledig Spuit een kleine hoeveelheid
terug in rust positie. dunne olie (kruipolie / WD-40 /
naaimachine olie) achter in de
tacker bij luchtaansluiting.
Schiet een aantal malen zonder
nieten in het magazijn.
Slagpen loopt nu soepel en
probleem is opgelost.
De luchttacker werkt niet. Te weinig luchttoevoer Controleer de apparatuur van
de luchttoevoer.
Machine is droog, tekort aan Gebruik smeermiddel voor
smering. luchtgereedschap.
Versleten O-ringen Vervang O-ringen.
hoofdklep.
Gebroken cilinderveer. Vervang cilinderveer.
Hoofdklep zit vast in kap. Demontage/Controle/Smeren
Gebrek aan slagkracht Machine is droog, tekort aan Gebruik smeermiddel voor
smering. luchtgereedschap.
Gebroken veer cilinderkap. Vervang kapveer.
O-ring, afsluitingen
gescheurd of gebarsten. Vervang O-ring/afsluitingen.
Geblokkeerde nietkop. Controleer de zuiger, veer
hoofdklep.
Trekkerconstructie Vervang trekkerconstructie.
versleten/lek.
Vuil, smeer verzameld op Demonteer nietkop/aandrijving
aandrijving. om deze schoon te maken.
Cilinderhuls niet juist Demonteer deze om dit te
geplaatst op onderste zuiger. corrigeren.
Hoofdklep droog. Demonteren en smeren.
Te lage luchtdruk. Controleer de apparatuur van
de luchttoevoer.
Overslaan van nietjes, Versleten zuiger. Vervang zuiger.
onderbroken toevoer Smeer, vuil in aandrijfweg. Demonteren nietkop en
aandrijving schoonmaken.
Beperking in de luchttoevoer, Vervang de snelkoppeling.
onvoldoende luchtstroom
door de snelkoppeling.
Versleten O-ring zuiger. Vervang O-ring, controleer
aandrijving.
Machine is droog, tekort aan Gebruik smeermiddel voor
smering. luchtgereedschap.
Beschadigde aanduwveer Vervang veer.
van het magazijn.
Lage luchtdruk. Controleer luchttoevoer naar
gereedschap.
Nietjes te kort voor apparaat. Gebruik alleen geschikte
nietjes.
Gebogen nietjes. Staak het gebruik van deze
nietjes.
Verkeerde maat nietjes. Gebruik alleen geschikte
nietjes.
NL
08 Ferm
Keep your hands well clear of the fastener head. On no account should you point the
air stapler at any person or animal.
Setting the driving depth
• The driving depth of the fastener can be adjusted by shifting the position of the plate
(fig.6).
• Loosen the two lower Allen screws of the front plate, and slide the plate downwards until
the desired depth is reached. Retighten the two screws.
Remark: When operating, press the tool firmly against the work surface so that the fastener
gets driven deep enough.
Checking operation of the air stapler
Remove all fasteners from the air stapler before you perform a check.
• Hold the tool firmly by the handgrip, without your finger on the trigger.
• Set the fastener head of the tool against the work surface.
•Press the trigger so that the hammer pin emerges. Release the trigger and the cycle is
complete.
Every time the trigger is pressed, the air stapler will make a complete cycle.
The stapler has a hand-safety in stead of a push-safety.
Failure Cause Solution
Trigger valve housing O-ring cracked or broken. Replace O-ring.
leaking air.
Trigger valve pin leaking air. O-ring or seals cracked or Replace O-ring/seals.
broken.
Frame, fastener head Loosen the screws in the Re-tighten and check again.
leaking air. fastener head.
O-ring cracked or broken. Replace O-ring.
Piston cracked/worn. Replace piston.
Frame, head leaking air. Cracked gasket. Replace gasket.
Cracked/worn piston head Replace piston.
valve.
Loosen the screws in the Re-tighten and check again.
head.
Stapler fails to drive Driving pin does not fully Squirt a little light oil
fasteners. return to rest position. (penetrating oil / WD-40 /
sewing machine oil) into the air
input connector of the stapler.
6. TROUBLESHOOTING
UK

16 Ferm
Blijf met uw handen uit de buurt van de nietkop. Richt in geen geval de luchttacker op
personen of dieren.
Instellen inslag diepte
• Door het verstellen van de plaat (fig.6) kan de inslagdiepte van het nietje ingesteld
worden.
• Draai de twee onderste inbusbouten van de voorste plaat los en verschuif de plaat naar
beneden tot de gewenste diepte is verkregen. Draai vervolgens de twee bouten weer
vast.
Opmerking: Druk de tacker stevig tegen het werkoppervlak zodat het nietje voldoende diep
wordt ingedreven.
De tacker heeft geen duwveiligheid maar een handveiligheid.
Controle werking luchttacker
Verwijder alle nietjes uit het apparaat voor u de controle uitvoert.
• Houd het gereedschap stevig bij het handvat vast zonder uw vinger aan de trekker.
• Plaats de nietkop van het apparaat tegen het werkoppervlak.
• Haal de trekker over zodat de slagpen naar buiten komt.
• Laat de trekker los en de cyclus is compleet.
De luchttacker zal iedere keer wanneer de trekker wordt overgehaald een bewerking
maken.
Probleem Oorzaak Oplossing
Behuizing trekkerklep lekt O-ring gescheurd of Vervang O-ring.
lucht. gebarsten.
Stift trekkerklep lekt lucht. O-ring, afsluitingen Vervang O-ring/afsluitingen.
gescheurd of gebarsten.
Frame, nietkop lekt lucht Draai de schroeven van de Vastdraaien en opnieuw
nietkop los. controleren.
O-ring gescheurd of Vervang O-ring.
gebarsten.
Zuiger gescheurd/versleten. Vervang zuiger.
Frame, kap lekt lucht Gescheurde pakking. Vervang pakking.
Gescheurde/versleten Vervang zuiger.
zuiger hoofdklep.
Draai de schroeven van de Vastdraaien en opnieuw
kap los. controleren.
6. OPLOSSEN VAN PROBLEMEN
NL
Ferm 09
Failure Cause Solution
Stapler fails to drive Driving pin does not fully Fire the stapler a few times
fasteners. return to rest position. with an unloaded magazine.
The driving pin will now run
freely and the problem is
solved.
The air stapler is "dead". Air supply insufficient. Check the mains air supply /
compressor.
Machine is dry, insufficient Apply lubricating oil for
lubrication. pneumatic tools.
Worn O-rings in head valve. Replace O-rings.
Broken cylinder spring. Replace cylinder spring.
Head valve stuck in head. Disassemble/Check/Lubricate.
Lack of driving power. Machine is dry, insufficient Apply lubricating oil for
lubrication. pneumatic tools.
Broken spring in cylinder Replace head spring.
head.
O-ring or seals cracked or Replace O-ring/seals.
broken.
Jammed fastener head. Check the piston, head valve
spring.
Trigger assembly worn/leaky. Replace trigger assembly.
Dirt and grease accumulated Disassemble fastener head/
in drive assembly. drive assembly and clean it.
Cylinder case not correctly Disassemble, and reassemble
mounted on lower piston. correctly.
Head valve dry. Disassemble and lubricate.
Insufficient working pressure. Check the mains air supply /
compressor.
Skipping staples, Worn piston. Replace piston.
intermittent feed. Dirt and grease accumulated Disassemble fastener head/
in drive assembly. drive assembly and clean it.
Restricted air supply, Replace the quick-detachable
insufficient airflow through coupling.
the quick-detachable
coupling.
Worn piston O-ring. Replace O-ring, check drive
assembly.
Machine is dry, insufficient Apply lubricating oil for
lubrication. pneumatic tools.
Damaged magazine feed Replace spring.
pressure spring.
Low air pressure. Check air supply to the tool.
Fasteners too short for this Only use specified fasteners.
tool.
Bent fasteners. Cease using these fasteners.
Incorrect size fasteners.
Only use specified fasteners.
Leaky head gasket. Tighten the screws / replace
the gasket.
Trigger valve O-ring Replace O-ring.
cracked/worn.
Broken drive pin. Replace the drive pin (check
piston O-ring).
UK

Ferm 15
Tijdens gebruik altijd oogbescherming dragen die overeenkomt met de ANSI
specificaties en zowel van voren als van opzij bescherming biedt tegen
rondvliegende delen bij het laden, bedienen en onderhouden van de luchttacker.
Rondvliegend bevestigingsmateriaal en splinters, kunnen ernstig letsel veroorzaken.
De werkgever en/of gebruiker moet erop toezien dat juiste oogbescherming wordt gedragen.
Oogbeschermingsmaterialen moeten voldoen aan de eisen van de American National
Standards Institute, ANSI Z87.1-1979 en moeten zowel van voren als van opzij bescherming
bieden.
Opmerking: Brillen zonder zijschild en gezichtsbeschermers bieden onvoldoende
bescherming.
Laden van nieten
Fig.5
• Ontkoppel de luchtslang.
• Ontkoppel de nietenvergrendeling en trek deze terug langs de nietengeleide-unit.
• Plaats 1 strip met nieten in het magazijn.
Laden met de punten naar boven.
• Druk de nietengeleide-unit naar binnen en zet de vergrendeling weer vast.
• Sluit de luchtslang weer aan op de luchttacker.
Tijdens gebruik altijd oogbescherming dragen die overeenkomt met de ANSI
specificaties en zowel van voren als van opzij bescherming biedt tegen
rondvliegende delen bij het laden, bedienen en onderhouden van de luchttacker.
Rondvliegend bevestigingsmateriaal en splinters, kunnen ernstig letsel veroorzaken.
Voorafgaand aan het gebruik van de luchttacker
• Lees de algemene veiligheidsinstructies en de waarschuwingen in deze
gebruiksaanwijzing aandachtig door.
• Zie de specificaties in deze gebruiksaanwijzing voor het juiste gebruik van de luchttacker.
Zorg er voor dat de tacker goed geölied is, voordat u het apparaat de eerste keer
gebruikt.
Basisbediening van de luchttacker
Fig.1 - 4
De luchttacker wordt aangedreven door een met perslucht aangedreven zuiger. De illustraties
1 - 4 op pagina 2 + 3 tonen de werking van de luchttacker.
Bediening
Bediening met een trekker
De luchttacker wordt bediend door het overhalen van de trekker. Iedere keer dat de trekker
wordt overgehaald zal de luchttacker een nietje indrijven.
5. BEDIENING VAN DE LUCHTTACKER
4. LADEN VAN DE LUCHTTACKER
NL
10 Ferm
Whenever performing maintenance on the air stapler, pay attention to the warnings
given in these instructions for use, and be extra cautious when troubleshooting
problems with the air stapler.
Replacing parts
Original parts are recommended when replacement of parts is necessary. Do not use any
alternative parts that cannot perform as well as the original parts in the appliance.
Working practice when preforming maintenance
Whenever you are repairing the air stapler, take care to clean and lubricate the internal parts.
Use Parker "O-Lube" or similar on all O-rings. Coat all O-rings with O-Lube before
reassembling. Apply oil lightly to all moving surfaces and pins. Finally, following complete
assembly, squirt a few drops of pneumatic tool lubricant into the air input fitting, before
commencing testing.
Air pressure and volume
Air volume is just as important as air pressure. The air volume that is delivered to the air stapler
may be insufficient due to defective couplings and crimped hoses, or through the effect of
contamination and water in the system. The consequence of a restricted airflow is that the air
stapler receives an inadequate air volume, even though the air pressure reading is high. This
will lead to defective operation, through reduced driving power.
Before you begin with troubleshooting, you should first inspect the path from compressor to
air stapler for restricted connections, twisted hoses and anything else that might prevent
sufficient air from flowing to the appliance.
Lubrication
Frequent, but not excessive, lubrication is essential for optimum functioning. Oil injected from
an oil mist lubricator will lubricate the internal parts continuously. Use a lubricant for
pneumatic tools, Mobil Velocite #10, or equivalent. Use no cleaning oil or additives, as these
lubricants can cause accelerated wear of seals and edges in the appliance, resulting in a poor
performance and frequent maintenance of the tool.
Please use Airline Lubricating Oil into the air inlet on the handle of the Aitstapler.
When there is no oil mist lubricator available, add oil via the QD coupling once or twice a day,
while using. Just a few droplets of oil each time is sufficient. Excessive oil will simply
accumulate in the appliance, which will become noticeable when tacking.
7. MAINTAINING THE AIR STAPLER
Failure Cause Solution
Skipping staples, Dry, dirty magazine. Clean, lubricate using oil for
intermittent feed. pneumatic tools.
Worn magazine. Replace the magazine.
Fasteners keep jamming. Fastener guide worn. Replace the magazine.
Incorrect size fasteners. Only use specified fasteners of
the correct size.
Bent fasteners. Cease using these fasteners.
Broken drive pin. Replace the drive pin.
UK

14 Ferm
• Als de elektrische kabel of de stekker beschadigd zijn de compressor niet gebruiken en
zich tot een geautoriseerde assistentiedienst wenden voor de vervanging ervan met een
origineel onderdeel.
•Als de compressor op een boekenrek of een oppervlak hoger dan de vloer geplaatst
wordt moet hij vastgezet worden om te vermijden dat hij valt tijdens de werking.
• Geen voorwerpen en handen binnenin de beschermingsroosters steken om fysieke
schade en schade aan de compressor te voorkomen.
• De compressor niet als stomp voorwerp tegenover personen, dingen of dieren gebruiken
om zware schade te vermijden.
•Als de compressor niet meer gebruikt wordt, altijd de stekker uit het stopcontact trekken.
• Zich ervan vergewissen steeds pneumatische buizen te gebruiken voor samengeperste
lucht die gekenmerkt zijn door een maximum druk aangepast aan die van de compressor.
De buis niet trachten te herstellen als ze beschadigd is.
Gebruik geen zuurstof, brandbare gassen of perslucht in gasflessen als voeding voor
dit apparaat in verband met explosiegevaar wat verwondingen kan veroorzaken.
Snelkoppelingen
Verbind een luchtslang door middel van een snelkoppeling aan het apparaat. De
snelkoppeling verwijderd ook de luchtdruk van het gereedschap wanneer deze wordt
losgekoppeld.
Luchtslangen
Luchtslangen moeten een werkdruk kunnen hebben van minimaal 10 Bar. De luchtslang moet
een snelkoppeling hebben voor het "snel ontkoppelen" van de luchttacker.
Perslucht
Gebruik alleen schone gereguleerde perslucht als voeding voor dit gereedschap.
Drukregelaar
Voor een veilige werking van de luchttacker is een drukregelaar met een werkdruk van 4-7 Bar
vereist om de werkdruk te regelen. Sluit de luchttacker niet aan op luchtdruk die
mogelijkerwijs een druk van 10 Bar kan overschrijden, omdat dit schade kan toebrengen aan
de luchttacker, wat kan resulteren in verwondingen.
Werkdruk
Overschrijd de aanbevolen maximum werkdruk niet aangezien de slijtage van het apparaat in
grote mate zal toenemen. De luchttoevoer moet voldoende zijn om de werkdruk op het
apparaat te houden. Het wegvallen van de druk zal de slagkracht van de luchttacker
verminderen. Zie de "TECHNISCHE SPECIFICATIES" voor het instellen van de correcte
werkdruk van de luchttacker.
Olie- en waterafscheider
Vuil en water in de luchttoevoer zijn de grootste veroorzakers van slijtage in pneumatische
gereedschappen. Een olie- en waterafscheider helpt bij het verkrijgen van schone luchtdruk
voor de beste prestaties en minimale slijtage van de luchttacker. De olie- en waterafscheider
moet geleegd worden om effectief te zijn in het aanvoeren van schone perslucht naar het
gereedschap. Raadpleeg de instructies van de fabrikant voor correct onderhoud van de olie-
en waterafscheider. Een vuil en verstopt filter zal een terugval in de druk veroorzaken wat de
prestaties van de luchttacker vermindert.
3. LUCHTTOEVOER EN KOPPELINGEN
NL
Ferm 11
Use during cold weather
With operation during cold weather, close to or below freezing point, moisture in the air
pipeline can freeze, making use of the appliance impossible. We recommend the use of a
special winter lubricant for pneumatic tools, or the permanent use of antifreeze (glycol) as
lubricant when the temperatures are low.
Avoid storing the tool in a cold environment, to prevent frost or ice formation on the
operating valves and mechanisms, which might cause malfunction of the appliance.
Remark: Some commercial dehydrating fluids for air pipelines are harmful to O-rings and
seals. Do not use these desiccants for low temperatures without being certain of compatibility.
Environment
To prevent damage in transit, the machine is delivered in sturdy protective packaging. The
packaging is, as much as possible, made from recycled materials. Therefore, take every
possible step to recycle the packaging.
Warranty
For the conditions of warranty, please refer to the separately provided warranty card.
We declare under our sole responsibility that this product is in conformity with the following
standards or standardized documents
EN792-1, EN792-13
in accordance with the regulations:
98/37 EEC
from 01-06-2005
ZWOLLE NL
W. Kamphof
Quality department
CE
DECLARATION OF CONFORMITY (UK)
UK

Ferm 13
Draag bij gebruik van deze machine gehoorbescherming
Draag een veiligheidsbril.
Lees de instructies.
Smeer het apparaat
Let op de volgende punten voor veilig gebruik van de luchttacker in aanvulling op de
overige waarschuwingen in deze gebruiksaanwijzing:
• Gebruik de luchttacker alleen voor datgene waarvoor het bedoeld is.
• Gebruik de luchttacker nooit op een manier die ervoor kan zorgen dat een nietje wordt
gericht op de gebruiker of op omstanders.
•Gebruik de luchttacker niet als hamer
• Draag de luchttacker altijd aan het handvat. Draag de luchttacker nooit aan de luchtslang.
•Breng geen veranderingen of aanpassingen aan in het ontwerp of de functie van de
luchttacker zonder toestemming.
•Wees er altijd op bedacht dat verkeerd gebruik kunnen leiden tot verwonding van uzelf en
anderen.
• Laat de luchttacker nooit onbeheerd achter met een aangesloten luchtslang.
• Gebruik de luchttacker niet wanneer er geen leesbaar waarschuwingslabel op zit.
Speciale veiligheidsvoorschriften voor luchtgereedschap en compressoren
•Voor een goede werking van de machine met een volledige voortdurende lading bij
maximum werkingsdruk, zich ervan vergewissen dat de temperatuur van de
werkingsomgeving in gesloten omgeving niet hoger is dan +25°C.
• Men raadt aan de compressor te gebruiken met een maximum werking van 70% in één
uur met volle lading, dit om een goede werking van het product in de tijd toe te staan.
• Zeker vermijden dat eender welke verbinding met de tank onder druk wordt
losgeschroefd, zich er steeds van vergewissen dat de tank ontladen is.
• Het is verboden gaten, lassen te maken of moedwillig de tank van de samengeperste
lucht te vervormen.
•Geen handelingen op de compressor uitvoeren zonder eerst de stekker uit het
stopcontact te hebben getrokken.
• Geen waterstralen of stralen van ontvlambare vloeistoffen op de compressor richten.
• Geen ontvlambare voorwerpen in de buurt van de compressor zetten.
• Tijdens de stilstanden in het gebruik de drukregelaar in stand “0” (OFF) zetten (uit).
• Nooit de luchtstraal op personen of dieren richten.
• De compressor niet transporteren met de tank onder druk.
• Opletten want enkele delen van de compressor zoals kop en doorvoerbuizen kunnen
hoge temperaturen bereiken. Deze onderdelen niet aanraken om brandwonden te
vermijden.
• De compressor transporteren door hem op te heffen of door gebruik te maken van de
speciale grepen of handvaten.
•Kinderen en dieren moeten ver van de werkingszone van de machine gehouden worden.
• Als u de compressor gebruikt om te schilderen:
a) Niet werken in gesloten omgevingen of in de nabijheid van open vlammen.
b) Zich ervan vergewissen dat de omgeving waar gewerkt wordt een aangepaste
luchtverversing heeft.
c) Neus en mond beschermen met een aangepast masker.
NL
12 Ferm
LUCHTTACKER
Lees de veiligheids- en bedieningsinstructies van luchtgereedschap en
compressoren voor gebruik van het apparaat zorgvuldig door!
DE NUMMERS IN DE NU VOLGENDE TEKST VERWIJZEN NAAR DE AFBEELDINGEN OP
PAGINA 2 + 3.
Inhoud
1. Technische specificaties
2. Veligheidsvoorschriften
3. Luchttoevoer en koppelingen
4. Laden van de luchttacker
5. Bediening van de luchttacker
6. Oplossen van problemen
7. Onderhoud van de luchttacker
Inhoud verpakking
1 Luchttacker
1Veiligheidsbril
1 Flesje machine olie
1 Strip nieten 22 mm
1 Din koppeling
1 Orion koppeling
1 Gebruiksaanwijzing
1 Garantiekaart
1Veiligheidsvoorschriften
Verklaring van symbolen
In deze gebruiksaanwijzing worden de volgende pictogrammen gebruikt:
Duidt op mogelijk lichamelijk letsel, levensgevaar of kans op beschadiging van de
machine indien de instructies in deze gebruiksaanwijzing worden genegeerd.
Pas op: elektrische stroom!
Verwijder onmiddelijk de stekker uit het stopcontact tijdens
onderhoudswerkzaamheden!
Deze machine voldoet aan alle toepasselijke Europese veiligheidsvoorschriften.
2. VEILIGHEIDSVOORSCHRIFTEN
Luchtdruk | 4-7 bar (60-100 psi)
Max. niet grootte | 1,05 x 5,1 x 0,58 mm
1. TECHNISCHE SPECIFICATIES
NL
Documenttranscriptie
Art. nr. ATM1008 FTK-160 UK Subject to change NL Wijzigingen voorbehouden UK USERS MANUAL 04 NL GEBRUIKSAANWIJZING 12 www.ferm.com Ferm BV • P.O. Box 30159 • 8003 CD Zwolle • The Netherlands • www.ferm.com 0506-29 UK b) • • • • • • Make sure that the environment in which you will be working has dedicated ventilation. c) Protect your nose and mouth with a dedicated mask. Do not use the compressor when the electrical cable or the plug is damaged, and instruct an authorised Support Service to replace them with an original part. When the compressor is placed on a surface higher than the floor, it should be secured to prevent it from falling down during operation. Do not put objects or your hands in the protective covers to avoid physical damage and damage to the compressor. Do not use the compressor as a blunt instrument against persons, objects or animals in order to prevent serious damage. If the compressor is no longer in use, always take the plug out of the plug socket. Always make sure that compressed-air hoses are used for compressed air and which are characterised by a maximum pressure adjusted to that of the compressor. Do not try to repair the hose if it is damaged. Gebruik geen reinigende olie of toevoegingen aangezien deze smeermiddelen een versnelde slijtage van afdichtingen en randen in het apparaat veroorzaken, wat resulteert in een slechte prestatie en frequent onderhoud van het gereedschap. Gebruik Airline Smeerolie voor de luchtinlaat in het handvat van de luchttacker. Wanneer er geen olienevelaar wordt gebruikt, voeg dan een of tweemaal per dag olie toe in de snelkoppeling tijdens gebruik. Er is slechts een paar druppels olie per keer benodigd. Te veel olie zal zich alleen ophopen in het apparaat wat te merken zal zijn tijdens het nieten. Gebruik bij koud weer Bij gebruik tijdens koud weer, nabij of onder het vriespunt, kan het vocht in de luchtleiding bevriezen en gebruik van het apparaat onmogelijk maken. We raden u aan om een speciaal wintersmeermiddel voor luchtgereedschap te gebruiken of permanente antivries (glycol) als smeermiddel bij koud weer. 3. AIR SUPPLY AND CONNECTIONS Never use any oxygen, inflammable gases or compressed air from gas bottles to supply pressure to this appliance, due to the hazard of explosion and the potential for serious injury. Quick-detachable couplings Connect an air hose to the appliance using a QD (quick-detachable) coupling. The QD coupling also disengages the air pressure from the tool when it is disconnected. Air hoses Air hoses should be able to sustain a working pressure of at least 10 Bar. The air supply hose should be equipped with a QD coupling to enable ""quick uncoupling" from the air stapler. Berg het gereedschap niet op in een koude omgeving om vorst of ijsvorming op de bedieningskranen en mechanismen die storing in het apparaat kunnen veroorzaken te voorkomen. Opmerking: Enkele commerciële droogvloeistoffen voor luchtleidingen zijn schadelijk voor O-ringen en afsluitingen. Gebruik deze luchtdrogers voor lage temperaturen niet zonder de compatibiliteit te controleren. Milieu Om transportbeschadiging te voorkomen, wordt de machine in een stevige verpakking geleverd. De verpakking is zo veel mogelijk gemaakt van recyclebaar materiaal. Maak daarom gebruik van de mogelijkheid om de verpakking te recyclen. Garantie Lees voor de garantievoorwaarden de apart bijgevoegde garantiekaart. Compressed air Only use clean, regulated compressed air for this tool. Pressure regulator For safe operation of the air stapler, a pressure regulator with an operating range of 4-7 Bar is required for regulation of the working pressure. Do not connect the air stapler to an air pressure that might possibly exceed 10 Bar, as this may cause damage to the air stapler, and could also result in injuries. CE CONFORMITEITSVERKLARING (NL) Wij verklaren dat dit product voldoet aan de volgende normen of normatieve documenten EN792-1, EN792-13 Operating pressure Never exceed the recommended maximum pressure, as this will cause a substantial increase in the rate of wear. The air supply must be sufficient to maintain the appliance’s working pressure. Should the pressure diminish, the driving power of the air stapler will be reduced. See "TECHNICAL SPECIFICATIONS" for the correct working pressure of the air stapler. Oil and water separator Dirt and water in the air supply are the main cause of wear on pneumatic tools. An oil and water separator will help to ensure clean air pressure for the best performance and least wear on the air stapler. The oil and water separator must be regularly tapped off, in order to function effectively in supplying clean air pressure to the tool. Consult the manufacturer’s instructions for the correct maintenance of the oil and water separator. A contaminated and blocked filter will cause a reduction in the pressure, which will negatively influence the performance of the air stapler. 06 NL Ferm overeenkomstig de bepalingen in de richtlijnen 98/37 EEC vanaf 01-06-2005 ZWOLLE NL W. Kamphof Quality department Ferm 19 UK Probleem Overslaan van nietjes, onderbroken toevoer NL Oorzaak Lekke hoofdpakking. O-ring trekkerklep gescheurd/versleten. Gebroken slagpen. Droog, vuil magazijn. Versleten magazijn. 4. LOADING THE AIR STAPLER Oplossing Draai de schroeven aan/vervang de pakking. Vervang O-ring. Vervang de slagpen(controleer zuiger O-ring). Maak schoon, smeer met smeermiddel voor luchtgereedschap. Vervang het magazijn. When in use, always wear eye protection that meets the ANSI specifications, and offers protection both in front and at the sides from flying objects when loading, operating and maintaining the air stapler. Flying fasteners and splinters can cause severe injury. The employer or user must insist that proper eye protection is worn. Eye protection equipment should meet the specification of the American National Standards Institute, ANSI Z87.1-1979 and must offer protection from both the front and the sides. Remark: Glasses without side shield and face protector do not offer sufficient protection. Nietjes komen vast te zitten. Invoerkanaal versleten. Verkeerde maat nietjes. Gebogen nietjes. Gebroken slagpen. Vervang magazijn. Gebruik alleen geschikte nietjes met de juiste maat. Staak het gebruik van deze nietjes. Vervang de slagpen. Loading with fasteners Fig.5 • Disconnect the air hose. • Release the fastener latch and withdraw this along the fastener guide unit. • Insert 1 fastener strip into the magazine. Load with fastener points upwards. • • 7. ONDERHOUD VAN DE LUCHT TACKER Wanneer u onderhoud pleegt aan de luchttacker, let dan op de waarschuwingen in deze gebruiks-aanwijzing en wees extra voorzichtig bij het controleren van de luchttacker bij problemen. Press the fastener guide unit back into the magazine, and lock the fastener latch. Reconnect the air hose to the air stapler. 5. OPERATING THE AIR STAPLER Vervangende onderdelen Bij vervangende onderdelen worden originele onderdelen geadviseerd. Gebruik geen alternatieve onderdelen die geen gelijke prestatie leveren aan het originele apparaat. When in use, always wear eye protection that meets the ANSI specifications, and offers protection both in front and at the sides from flying objects when loading, operating and maintaining the air stapler. Flying fasteners and splinters can cause severe injury. Montageprocedure bij onderhoud Wanneer u de luchttacker repareert, zorg er dan voor dat de interne delen schoon en gesmeerd zijn. Gebruik Parker "O"-Lube of iets gelijkwaardigs op alle O-ringen. Coat alle Oringen met O-Lube voor montage. Gebruik een kleine hoeveelheid olie op alle bewegende oppervlakken en pennen. Voeg na het in elkaar zetten een paar druppels smeermiddel voor luchtgereedschap toe via de luchtleidingfitting voor u overgaat tot testen. Luchtdruk en volume Luchtvolume is net zo belangrijk als luchtdruk. Het luchtvolume dat aan de luchttacker geleverd wordt kan onvoldoende zijn door te defecte koppelingen en geknikte slangen, of door de effecten van vuil en water in het systeem. Een beperkte luchtstroom zal het gevolg hebben dat de luchttacker een ontoereikend luchtvolume ontvangt, ook al is de afgelezen druk hoog. Dit zal resulteren in foutieve werking door verminderde drijfkracht. Voordat u de problemen naloopt, moet u eerst vanaf de compressor tot de luchttacker nalopen op beperkende aansluitingen, gedraaide slangen en andere dingen die kunnen voorkomen dat er voldoende lucht naar het apparaat stroomt. Smeren Frequent, maar niet overtollig, smeren is vereist voor de beste werking. Olie toegevoegd via een olienevelaar zal de interne delen smeren. Gebruik een smeermiddel voor luchtgereedschap, Mobil Velocite #10, of gelijkwaardig. 18 Ferm Before using the air stapler • Read the general safety instructions and warnings in these instructions for use carefully. • Refer to the specifications earlier in these instructions for the correct operating conditions for the air stapler. Make sure the stapler is lubricated properly before using it the first time. Basic operation of the air stapler Fig.1 - 4 A piston powered by compressed air drives the air stapler. Illustrations 1 – 4 on page 2 + 3 show how the air stapler works. Operating Activated by a trigger Pressing the trigger activates the air stapler. Every time the trigger is pressed, the air stapler will drive a fastener into the workpiece. Ferm 07 UK Keep your hands well clear of the fastener head. On no account should you point the air stapler at any person or animal. Probleem Tacker slaat geen nieten Oorzaak Slagpen komt niet volledig terug in rust positie. Oplossing Spuit een kleine hoeveelheid dunne olie (kruipolie / WD-40 / naaimachine olie) achter in de tacker bij luchtaansluiting. Schiet een aantal malen zonder nieten in het magazijn. Slagpen loopt nu soepel en probleem is opgelost. De luchttacker werkt niet. Te weinig luchttoevoer Controleer de apparatuur van de luchttoevoer. Gebruik smeermiddel voor luchtgereedschap. Vervang O-ringen. Setting the driving depth • The driving depth of the fastener can be adjusted by shifting the position of the plate (fig.6). • Loosen the two lower Allen screws of the front plate, and slide the plate downwards until the desired depth is reached. Retighten the two screws. Remark: When operating, press the tool firmly against the work surface so that the fastener gets driven deep enough. Machine is droog, tekort aan smering. Versleten O-ringen hoofdklep. Gebroken cilinderveer. Hoofdklep zit vast in kap. Checking operation of the air stapler Remove all fasteners from the air stapler before you perform a check. • • • Hold the tool firmly by the handgrip, without your finger on the trigger. Set the fastener head of the tool against the work surface. Press the trigger so that the hammer pin emerges. Release the trigger and the cycle is complete. Gebrek aan slagkracht Every time the trigger is pressed, the air stapler will make a complete cycle. Trekkerconstructie versleten/lek. Vuil, smeer verzameld op aandrijving. Cilinderhuls niet juist geplaatst op onderste zuiger. Hoofdklep droog. Te lage luchtdruk. The stapler has a hand-safety in stead of a push-safety. 6. TROUBLESHOOTING Failure Trigger valve housing leaking air. Solution Replace O-ring. Overslaan van nietjes, onderbroken toevoer Trigger valve pin leaking air. O-ring or seals cracked or broken. Replace O-ring/seals. Frame, fastener head leaking air. Re-tighten and check again. Frame, head leaking air. Stapler fails to drive fasteners. 08 Cause O-ring cracked or broken. Loosen the screws in the fastener head. O-ring cracked or broken. Piston cracked/worn. Cracked gasket. Cracked/worn piston head valve. Loosen the screws in the head. Driving pin does not fully return to rest position. Machine is droog, tekort aan smering. Gebroken veer cilinderkap. O-ring, afsluitingen gescheurd of gebarsten. Geblokkeerde nietkop. Replace O-ring. Replace piston. Replace gasket. Replace piston. Re-tighten and check again. Squirt a little light oil (penetrating oil / WD-40 / sewing machine oil) into the air input connector of the stapler. Ferm Ferm NL Vervang cilinderveer. Demontage/Controle/Smeren Gebruik smeermiddel voor luchtgereedschap. Vervang kapveer. Vervang O-ring/afsluitingen. Controleer de zuiger, veer hoofdklep. Vervang trekkerconstructie. Demonteer nietkop/aandrijving om deze schoon te maken. Demonteer deze om dit te corrigeren. Demonteren en smeren. Controleer de apparatuur van de luchttoevoer. Versleten zuiger. Smeer, vuil in aandrijfweg. Vervang zuiger. Demonteren nietkop en aandrijving schoonmaken. Beperking in de luchttoevoer, Vervang de snelkoppeling. onvoldoende luchtstroom door de snelkoppeling. Versleten O-ring zuiger. Vervang O-ring, controleer aandrijving. Machine is droog, tekort aan Gebruik smeermiddel voor smering. luchtgereedschap. Beschadigde aanduwveer Vervang veer. van het magazijn. Lage luchtdruk. Controleer luchttoevoer naar gereedschap. Nietjes te kort voor apparaat. Gebruik alleen geschikte nietjes. Gebogen nietjes. Staak het gebruik van deze nietjes. Verkeerde maat nietjes. Gebruik alleen geschikte nietjes. 17 UK Blijf met uw handen uit de buurt van de nietkop. Richt in geen geval de luchttacker op personen of dieren. NL Instellen inslag diepte • Door het verstellen van de plaat (fig.6) kan de inslagdiepte van het nietje ingesteld worden. • Draai de twee onderste inbusbouten van de voorste plaat los en verschuif de plaat naar beneden tot de gewenste diepte is verkregen. Draai vervolgens de twee bouten weer vast. Failure Stapler fails to drive fasteners. Cause Driving pin does not fully return to rest position. Solution Fire the stapler a few times with an unloaded magazine. The driving pin will now run freely and the problem is solved. The air stapler is "dead". Air supply insufficient. Check the mains air supply / compressor. Apply lubricating oil for pneumatic tools. Replace O-rings. Replace cylinder spring. Disassemble/Check/Lubricate. Machine is dry, insufficient lubrication. Worn O-rings in head valve. Broken cylinder spring. Head valve stuck in head. Opmerking: Druk de tacker stevig tegen het werkoppervlak zodat het nietje voldoende diep wordt ingedreven. De tacker heeft geen duwveiligheid maar een handveiligheid. Lack of driving power. Controle werking luchttacker Verwijder alle nietjes uit het apparaat voor u de controle uitvoert. • • • • Trigger assembly worn/leaky. Dirt and grease accumulated in drive assembly. Cylinder case not correctly mounted on lower piston. Head valve dry. Insufficient working pressure. Houd het gereedschap stevig bij het handvat vast zonder uw vinger aan de trekker. Plaats de nietkop van het apparaat tegen het werkoppervlak. Haal de trekker over zodat de slagpen naar buiten komt. Laat de trekker los en de cyclus is compleet. De luchttacker zal iedere keer wanneer de trekker wordt overgehaald een bewerking maken. Skipping staples, intermittent feed. 6. OPLOSSEN VAN PROBLEMEN Probleem Behuizing trekkerklep lekt lucht. Oorzaak O-ring gescheurd of gebarsten. Oplossing Vervang O-ring. Stift trekkerklep lekt lucht. O-ring, afsluitingen gescheurd of gebarsten. Vervang O-ring/afsluitingen. Frame, nietkop lekt lucht Draai de schroeven van de nietkop los. O-ring gescheurd of gebarsten. Zuiger gescheurd/versleten. Vastdraaien en opnieuw controleren. Vervang O-ring. Gescheurde pakking. Gescheurde/versleten zuiger hoofdklep. Draai de schroeven van de kap los. Vervang pakking. Vervang zuiger. Frame, kap lekt lucht 16 Vervang zuiger. Vastdraaien en opnieuw controleren. Ferm Machine is dry, insufficient lubrication. Broken spring in cylinder head. O-ring or seals cracked or broken. Jammed fastener head. Ferm Apply lubricating oil for pneumatic tools. Replace head spring. Replace O-ring/seals. Check the piston, head valve spring. Replace trigger assembly. Disassemble fastener head/ drive assembly and clean it. Disassemble, and reassemble correctly. Disassemble and lubricate. Check the mains air supply / compressor. Replace piston. Disassemble fastener head/ drive assembly and clean it. Replace the quick-detachable coupling. Worn piston. Dirt and grease accumulated in drive assembly. Restricted air supply, insufficient airflow through the quick-detachable coupling. Worn piston O-ring. Replace O-ring, check drive assembly. Machine is dry, insufficient Apply lubricating oil for lubrication. pneumatic tools. Damaged magazine feed Replace spring. pressure spring. Low air pressure. Check air supply to the tool. Fasteners too short for this Only use specified fasteners. tool. Bent fasteners. Cease using these fasteners. Incorrect size fasteners. Only use specified fasteners. Leaky head gasket. Tighten the screws / replace the gasket. Trigger valve O-ring Replace O-ring. cracked/worn. Broken drive pin. Replace the drive pin (check piston O-ring). 09 UK Failure Skipping staples, intermittent feed. Cause Dry, dirty magazine. Worn magazine. Fasteners keep jamming. Fastener guide worn. Incorrect size fasteners. Bent fasteners. Broken drive pin. 4. LADEN VAN DE LUCHTTACKER Solution Clean, lubricate using oil for pneumatic tools. Replace the magazine. Replace the magazine. Only use specified fasteners of the correct size. Cease using these fasteners. Replace the drive pin. NL Tijdens gebruik altijd oogbescherming dragen die overeenkomt met de ANSI specificaties en zowel van voren als van opzij bescherming biedt tegen rondvliegende delen bij het laden, bedienen en onderhouden van de luchttacker. Rondvliegend bevestigingsmateriaal en splinters, kunnen ernstig letsel veroorzaken. De werkgever en/of gebruiker moet erop toezien dat juiste oogbescherming wordt gedragen. Oogbeschermingsmaterialen moeten voldoen aan de eisen van de American National Standards Institute, ANSI Z87.1-1979 en moeten zowel van voren als van opzij bescherming bieden. Opmerking: Brillen zonder zijschild en gezichtsbeschermers bieden onvoldoende bescherming. 7. MAINTAINING THE AIR STAPLER Whenever performing maintenance on the air stapler, pay attention to the warnings given in these instructions for use, and be extra cautious when troubleshooting problems with the air stapler. Replacing parts Original parts are recommended when replacement of parts is necessary. Do not use any alternative parts that cannot perform as well as the original parts in the appliance. Laden van nieten Fig.5 • Ontkoppel de luchtslang. • Ontkoppel de nietenvergrendeling en trek deze terug langs de nietengeleide-unit. • Plaats 1 strip met nieten in het magazijn. Laden met de punten naar boven. Working practice when preforming maintenance Whenever you are repairing the air stapler, take care to clean and lubricate the internal parts. Use Parker "O-Lube" or similar on all O-rings. Coat all O-rings with O-Lube before reassembling. Apply oil lightly to all moving surfaces and pins. Finally, following complete assembly, squirt a few drops of pneumatic tool lubricant into the air input fitting, before commencing testing. Air pressure and volume Air volume is just as important as air pressure. The air volume that is delivered to the air stapler may be insufficient due to defective couplings and crimped hoses, or through the effect of contamination and water in the system. The consequence of a restricted airflow is that the air stapler receives an inadequate air volume, even though the air pressure reading is high. This will lead to defective operation, through reduced driving power. Before you begin with troubleshooting, you should first inspect the path from compressor to air stapler for restricted connections, twisted hoses and anything else that might prevent sufficient air from flowing to the appliance. Lubrication Frequent, but not excessive, lubrication is essential for optimum functioning. Oil injected from an oil mist lubricator will lubricate the internal parts continuously. Use a lubricant for pneumatic tools, Mobil Velocite #10, or equivalent. Use no cleaning oil or additives, as these lubricants can cause accelerated wear of seals and edges in the appliance, resulting in a poor performance and frequent maintenance of the tool. Please use Airline Lubricating Oil into the air inlet on the handle of the Aitstapler. When there is no oil mist lubricator available, add oil via the QD coupling once or twice a day, while using. Just a few droplets of oil each time is sufficient. Excessive oil will simply accumulate in the appliance, which will become noticeable when tacking. 10 Ferm • • Druk de nietengeleide-unit naar binnen en zet de vergrendeling weer vast. Sluit de luchtslang weer aan op de luchttacker. 5. BEDIENING VAN DE LUCHTTACKER Tijdens gebruik altijd oogbescherming dragen die overeenkomt met de ANSI specificaties en zowel van voren als van opzij bescherming biedt tegen rondvliegende delen bij het laden, bedienen en onderhouden van de luchttacker. Rondvliegend bevestigingsmateriaal en splinters, kunnen ernstig letsel veroorzaken. Voorafgaand aan het gebruik van de luchttacker • Lees de algemene veiligheidsinstructies en de waarschuwingen in deze gebruiksaanwijzing aandachtig door. • Zie de specificaties in deze gebruiksaanwijzing voor het juiste gebruik van de luchttacker. Zorg er voor dat de tacker goed geölied is, voordat u het apparaat de eerste keer gebruikt. Basisbediening van de luchttacker Fig.1 - 4 De luchttacker wordt aangedreven door een met perslucht aangedreven zuiger. De illustraties 1 - 4 op pagina 2 + 3 tonen de werking van de luchttacker. Bediening Bediening met een trekker De luchttacker wordt bediend door het overhalen van de trekker. Iedere keer dat de trekker wordt overgehaald zal de luchttacker een nietje indrijven. Ferm 15 UK • NL • • • • • Als de elektrische kabel of de stekker beschadigd zijn de compressor niet gebruiken en zich tot een geautoriseerde assistentiedienst wenden voor de vervanging ervan met een origineel onderdeel. Als de compressor op een boekenrek of een oppervlak hoger dan de vloer geplaatst wordt moet hij vastgezet worden om te vermijden dat hij valt tijdens de werking. Geen voorwerpen en handen binnenin de beschermingsroosters steken om fysieke schade en schade aan de compressor te voorkomen. De compressor niet als stomp voorwerp tegenover personen, dingen of dieren gebruiken om zware schade te vermijden. Als de compressor niet meer gebruikt wordt, altijd de stekker uit het stopcontact trekken. Zich ervan vergewissen steeds pneumatische buizen te gebruiken voor samengeperste lucht die gekenmerkt zijn door een maximum druk aangepast aan die van de compressor. De buis niet trachten te herstellen als ze beschadigd is. Use during cold weather With operation during cold weather, close to or below freezing point, moisture in the air pipeline can freeze, making use of the appliance impossible. We recommend the use of a special winter lubricant for pneumatic tools, or the permanent use of antifreeze (glycol) as lubricant when the temperatures are low. Avoid storing the tool in a cold environment, to prevent frost or ice formation on the operating valves and mechanisms, which might cause malfunction of the appliance. Remark: Some commercial dehydrating fluids for air pipelines are harmful to O-rings and seals. Do not use these desiccants for low temperatures without being certain of compatibility. Environment To prevent damage in transit, the machine is delivered in sturdy protective packaging. The packaging is, as much as possible, made from recycled materials. Therefore, take every possible step to recycle the packaging. 3. LUCHTTOEVOER EN KOPPELINGEN Gebruik geen zuurstof, brandbare gassen of perslucht in gasflessen als voeding voor dit apparaat in verband met explosiegevaar wat verwondingen kan veroorzaken. Snelkoppelingen Verbind een luchtslang door middel van een snelkoppeling aan het apparaat. De snelkoppeling verwijderd ook de luchtdruk van het gereedschap wanneer deze wordt losgekoppeld. Warranty For the conditions of warranty, please refer to the separately provided warranty card. CE DECLARATION OF CONFORMITY (UK) Luchtslangen Luchtslangen moeten een werkdruk kunnen hebben van minimaal 10 Bar. De luchtslang moet een snelkoppeling hebben voor het "snel ontkoppelen" van de luchttacker. We declare under our sole responsibility that this product is in conformity with the following standards or standardized documents EN792-1, EN792-13 in accordance with the regulations: Perslucht Gebruik alleen schone gereguleerde perslucht als voeding voor dit gereedschap. 98/37 EEC Drukregelaar Voor een veilige werking van de luchttacker is een drukregelaar met een werkdruk van 4-7 Bar vereist om de werkdruk te regelen. Sluit de luchttacker niet aan op luchtdruk die mogelijkerwijs een druk van 10 Bar kan overschrijden, omdat dit schade kan toebrengen aan de luchttacker, wat kan resulteren in verwondingen. Werkdruk Overschrijd de aanbevolen maximum werkdruk niet aangezien de slijtage van het apparaat in grote mate zal toenemen. De luchttoevoer moet voldoende zijn om de werkdruk op het apparaat te houden. Het wegvallen van de druk zal de slagkracht van de luchttacker verminderen. Zie de "TECHNISCHE SPECIFICATIES" voor het instellen van de correcte werkdruk van de luchttacker. from 01-06-2005 ZWOLLE NL W. Kamphof Quality department Olie- en waterafscheider Vuil en water in de luchttoevoer zijn de grootste veroorzakers van slijtage in pneumatische gereedschappen. Een olie- en waterafscheider helpt bij het verkrijgen van schone luchtdruk voor de beste prestaties en minimale slijtage van de luchttacker. De olie- en waterafscheider moet geleegd worden om effectief te zijn in het aanvoeren van schone perslucht naar het gereedschap. Raadpleeg de instructies van de fabrikant voor correct onderhoud van de olieen waterafscheider. Een vuil en verstopt filter zal een terugval in de druk veroorzaken wat de prestaties van de luchttacker vermindert. 14 Ferm Ferm 11 LUCHTTACKER Draag bij gebruik van deze machine gehoorbescherming Lees de veiligheids- en bedieningsinstructies van luchtgereedschap en compressoren voor gebruik van het apparaat zorgvuldig door! NL NL Draag een veiligheidsbril. DE NUMMERS IN DE NU VOLGENDE TEKST VERWIJZEN NAAR DE AFBEELDINGEN OP PAGINA 2 + 3. Inhoud 1. Technische specificaties 2. Veligheidsvoorschriften 3. Luchttoevoer en koppelingen 4. Laden van de luchttacker 5. Bediening van de luchttacker 6. Oplossen van problemen 7. Onderhoud van de luchttacker Smeer het apparaat Let op de volgende punten voor veilig gebruik van de luchttacker in aanvulling op de overige waarschuwingen in deze gebruiksaanwijzing: • • • • • 1. TECHNISCHE SPECIFICATIES Luchtdruk Max. niet grootte | 4-7 bar (60-100 psi) | 1,05 x 5,1 x 0,58 mm • • • Inhoud verpakking 1 Luchttacker 1 Veiligheidsbril 1 Flesje machine olie 1 Strip nieten 22 mm 1 Din koppeling 1 Orion koppeling 1 Gebruiksaanwijzing 1 Garantiekaart 1 Veiligheidsvoorschriften 2. VEILIGHEIDSVOORSCHRIFTEN Verklaring van symbolen In deze gebruiksaanwijzing worden de volgende pictogrammen gebruikt: Duidt op mogelijk lichamelijk letsel, levensgevaar of kans op beschadiging van de machine indien de instructies in deze gebruiksaanwijzing worden genegeerd. Pas op: elektrische stroom! Verwijder onmiddelijk de stekker uit het stopcontact tijdens onderhoudswerkzaamheden! Deze machine voldoet aan alle toepasselijke Europese veiligheidsvoorschriften. 12 Lees de instructies. Ferm Gebruik de luchttacker alleen voor datgene waarvoor het bedoeld is. Gebruik de luchttacker nooit op een manier die ervoor kan zorgen dat een nietje wordt gericht op de gebruiker of op omstanders. Gebruik de luchttacker niet als hamer Draag de luchttacker altijd aan het handvat. Draag de luchttacker nooit aan de luchtslang. Breng geen veranderingen of aanpassingen aan in het ontwerp of de functie van de luchttacker zonder toestemming. Wees er altijd op bedacht dat verkeerd gebruik kunnen leiden tot verwonding van uzelf en anderen. Laat de luchttacker nooit onbeheerd achter met een aangesloten luchtslang. Gebruik de luchttacker niet wanneer er geen leesbaar waarschuwingslabel op zit. Speciale veiligheidsvoorschriften voor luchtgereedschap en compressoren • Voor een goede werking van de machine met een volledige voortdurende lading bij maximum werkingsdruk, zich ervan vergewissen dat de temperatuur van de werkingsomgeving in gesloten omgeving niet hoger is dan +25°C. • Men raadt aan de compressor te gebruiken met een maximum werking van 70% in één uur met volle lading, dit om een goede werking van het product in de tijd toe te staan. • Zeker vermijden dat eender welke verbinding met de tank onder druk wordt losgeschroefd, zich er steeds van vergewissen dat de tank ontladen is. • Het is verboden gaten, lassen te maken of moedwillig de tank van de samengeperste lucht te vervormen. • Geen handelingen op de compressor uitvoeren zonder eerst de stekker uit het stopcontact te hebben getrokken. • Geen waterstralen of stralen van ontvlambare vloeistoffen op de compressor richten. • Geen ontvlambare voorwerpen in de buurt van de compressor zetten. • Tijdens de stilstanden in het gebruik de drukregelaar in stand “0” (OFF) zetten (uit). • Nooit de luchtstraal op personen of dieren richten. • De compressor niet transporteren met de tank onder druk. • Opletten want enkele delen van de compressor zoals kop en doorvoerbuizen kunnen hoge temperaturen bereiken. Deze onderdelen niet aanraken om brandwonden te vermijden. • De compressor transporteren door hem op te heffen of door gebruik te maken van de speciale grepen of handvaten. • Kinderen en dieren moeten ver van de werkingszone van de machine gehouden worden. • Als u de compressor gebruikt om te schilderen: a) Niet werken in gesloten omgevingen of in de nabijheid van open vlammen. b) Zich ervan vergewissen dat de omgeving waar gewerkt wordt een aangepaste luchtverversing heeft. c) Neus en mond beschermen met een aangepast masker. Ferm 13-
 1
1
-
 2
2
-
 3
3
-
 4
4
-
 5
5
-
 6
6
-
 7
7
-
 8
8
-
 9
9
-
 10
10
-
 11
11
-
 12
12


in andere talen
- English: Ferm ATM1008 User manual
Gerelateerde artikelen
Andere documenten
-
Milwaukee M12 BCST Sub Compact Cable Stapler Handleiding
-
Hitachi N 5008AC Handleiding
-
-
Draper Storm Force Air Stapler/Nailer Handleiding
-
Metabo KOMBI 32 Handleiding
-
Parkside PDT 40 C2 de handleiding
-
-
GYS CORDLESS STAPLER FOR BUMPER REPAIR Data papier
-
Silverline 269131 Handleiding
-
Scheppach 7906100715 Handleiding