
NL
Gebruiksaanwijzing 2
EN
User manual 11
FR
Notice d'utilisation 19
DE
Benutzerinformation 28
Vaste kookplaat
Hob
Zone de cuisson
Kochfeld mit Kochplatten
ZEE3921I

Inhoud
Veiligheidsinformatie _ _ _ _ _ _ _ _ _ _ _ _ _ 2
Veiligheidsvoorschriften _ _ _ _ _ _ _ _ _ _ _ 3
Beschrijving van het product _ _ _ _ _ _ _ _ _ 5
Dagelijks gebruik _ _ _ _ _ _ _ _ _ _ _ _ _ _ _ 5
Nuttige aanwijzingen en tips _ _ _ _ _ _ _ _ _ 6
Onderhoud en reiniging _ _ _ _ _ _ _ _ _ _ _ 6
Probleemoplossing _ _ _ _ _ _ _ _ _ _ _ _ _ _ 7
Montage _ _ _ _ _ _ _ _ _ _ _ _ _ _ _ _ _ _ _ 8
Technische informatie _ _ _ _ _ _ _ _ _ _ _ _ 10
Milieubescherming _ _ _ _ _ _ _ _ _ _ _ _ _ 10
Wijzigingen voorbehouden.
Veiligheidsinformatie
Lees zorgvuldig de meegeleverde instructies voor installatie en ge-
bruik van het apparaat. De fabrikant is niet verantwoordelijk voor let-
sel en schade veroorzaakt door een foutieve installatie. Bewaar de
instructies van het apparaat voor toekomstig gebruik.
Veiligheid van kinderen en kwetsbare mensen
Waarschuwing! Gevaar voor verstikking, letsel of permanente
invaliditeit.
• Dit apparaat kan worden gebruikt door kinderen van 8 jaar en ou-
der en door mensen met beperkte lichamelijke, zintuiglijke of ver-
standelijke vermogens of een gebrek aan ervaring en kennis, in-
dien zij onder toezicht staan van een volwassene of van iemand
die verantwoordelijk is voor hun veiligheid.
• Laat kinderen niet met het apparaat spelen.
• Houd alle verpakkingsmaterialen uit de buurt van kinderen.
• Houd kinderen en huisdieren uit de buurt van het apparaat als het
in werking is of afkoelt. Het apparaat is heet.
• Als het apparaat is uitgerust met een kinderbeveiliging, raden wij
aan dit te activeren.
• Reiniging en onderhoud mag niet worden uitgevoerd door kinde-
ren zonder toezicht.
Algemene veiligheid
• Het apparaat en de toegankelijke onderdelen ervan worden heet
tijdens gebruik. De verwarmingselementen niet aanraken.
2
www.zanussi.com

• Bedien het apparaat niet met een externe timer of een apart af-
standbedieningssysteem.
• Zonder toezicht koken op een kookplaat met vet of olie kan ge-
vaarlijk zijn en brandgevaar opleveren.
• Probeer brand nooit met water te blussen, maar schakel in plaats
daarvan het apparaat uit en bedek de vlam, d.w.z. met een deksel
of blusdeken.
• Bewaar geen voorwerpen op de kookplaten.
• Gebruik geen stoomreiniger om het apparaat schoon te maken.
• Metalen voorwerpen, zoals messen, vorken, lepels en deksels mo-
gen niet op de kookplaat worden geplaatst, aangezien ze heet
kunnen worden.
Veiligheidsvoorschriften
Installatie
Waarschuwing! Alleen een erkende
installatietechnicus mag het apparaat
installeren.
• Verwijder alle verpakkingsmaterialen.
• Installeer en gebruik geen beschadigd appa-
raat.
• Volg de installatie-instructies op die zijn mee-
geleverd met het apparaat.
• Houd de minimumafstand naar andere appa-
raten en units in acht.
• Wees voorzichtig met het verplaatsen van
het apparaat, het is zwaar. Draag altijd veilig-
heidshandschoenen.
• Dicht de oppervlakken af met kit om te voor-
komen dat ze gaan opzetten door vocht.
• Bescherm de bodem van het apparaat tegen
stoom en vocht.
• Installeer het apparaat niet naast een deur of
onder een raam. Dit voorkomt dat hete pen-
nen van het apparaat vallen als de deur of
het raam wordt geopend.
• Als het apparaat geïnstalleerd is boven lades
zorg er dan voor dat de ruimte tussen de on-
derkant van het apparaat en de bovenste la-
de voldoende is voor luchtcirculatie.
• De onderkant van het apparaat kan heet wor-
den. Wij raden aan om een onbrandbaar
scheidingspaneel te plaatsen onder het ap-
paraat om te voorkomen dat de onderkant
kan worden aangeraakt.
Aansluiting aan het elektriciteitsnet
Waarschuwing! Gevaar voor brand en
elektrische schokken.
• Alle elektrische aansluitingen moeten door
een gediplomeerd elektromonteur worden
gemaakt.
• Dit apparaat moet worden aangesloten op
een geaard stopcontact.
• Verzeker u ervan dat de stekker uit het stop-
contact is getrokken, voordat u welke werk-
zaamheden dan ook uitvoert.
• Gebruik de juiste stroomkabel.
• Voorkom dat de stroomkabels verstrikt raken.
• Zorg ervoor dat de stroomkabel of stekker
(indien van toepassing) het hete apparaat of
heet kookgerei niet aanraakt als u het appa-
3
www.zanussi.com

raat op de nabijgelegen contactdozen aan-
sluit
• Zorg ervoor dat het apparaat correct is geïn-
stalleerd. Losse en onjuiste stroomkabels of
stekkers (indien van toepassing) kunnen er-
voor zorgen dat de contactklem te heet
wordt.
• Zorg ervoor dat er een schokbescherming
wordt geïnstalleerd.
• Zorg ervoor dat het snoer niet wordt belast
door trekken.
• Zorg dat u de hoofdstekker (indien van toe-
passing) of kabel niet beschadigt. Neem
contact op met de service-afdeling of een
elektromonteur om een beschadigde hoofd-
kabel te vervangen.
• De elektrische installatie moet een isolatieap-
paraat bevatten waardoor het apparaat volle-
dig van het lichtnet afgesloten kan worden.
Het isolatieapparaat moet een contactope-
ning hebben met een minimale breedte van 3
mm.
• Gebruik alleen de juiste isolatie-apparaten:
stroomonderbrekers, zekeringen (schroefze-
keringen moeten uit de houder worden ver-
wijderd), aardlekschakelaars en contactge-
vers.
Gebruik van het apparaat
Waarschuwing! Gevaar op letsel,
brandwonden of elektrische schokken
• Gebruik dit apparaat in een huishoudelijke
omgeving.
• De specificatie van het apparaat mag niet
worden veranderd.
• Bedien het apparaat niet met een externe ti-
mer of een apart afstandbedieningssysteem.
• Laat het apparaat tijdens het gebruik niet on-
beheerd achter.
• Bedien het apparaat niet met natte handen of
als het contact maakt met water.
• Leg geen bestek of deksels van steelpannen
op de kookzones. Ze zijn heet.
• Zet de kookzone op "uit" na elk gebruik.
• Het apparaat mag niet worden gebruikt als
werkblad of aanrecht.
Waarschuwing! Brand- of
explosiegevaar.
• Verhitte vetten en olie kunnen ontvlambare
damp afgeven. Houd vlammen of verwarmde
voorwerpen uit de buurt van vet en olie als u
er mee kookt.
• De dampen die hete olie afgeeft kunnen
spontane ontbranding veroorzaken.
• Gebruikte olie die voedselresten bevat kan
brand veroorzaken bij een lagere temperatuur
dan olie die voor de eerste keer wordt ge-
bruikt.
• Plaats geen ontvlambare producten of items
die vochtig zijn door ontvlambare producten
in, bij of op het apparaat.
• Probeer niet om een brand te blussen met
water. Haal het apparaat uit het stopcontact
en dek de vlammen af met een deksel of
blusdeken.
Waarschuwing! Risico op schade aan
het apparaat.
• Zet geen hete pannen op het bedieningspa-
neel.
• Laat kookgerei niet droogkoken.
• Laat pannen niet afkoelen op de kookplaat.
• Activeer de kookzones niet met lege pannen
of zonder pannen erop.
• Geen aluminiumfolie op het apparaat leggen.
• Laat geen zure vloeistoffen, zoals bijv. azijn,
citroensap of reinigingsmiddelen voor het
verwijderen van kalkaanslag, in aanraking ko-
men met de kookplaat. Hierdoor kunnen dof-
fe plekken ontstaan.
Onderhoud en reiniging
Waarschuwing! Risico op schade aan
het apparaat.
• Reinig het apparaat regelmatig om te voorko-
men dat het materiaal van het oppervlak ach-
teruitgaat.
• Gebruik geen waterstralen of stoom om het
apparaat te reinigen.
• Maak het apparaat schoon met een vochtige,
zachte doek. Gebruik alleen neutrale schoon-
4
www.zanussi.com

maakmiddelen. Gebruik geen schuurmidde-
len, schuursponsjes, oplosmiddelen of meta-
len voorwerpen.
Verwijdering
Waarschuwing! Gevaar voor letsel of
verstikking.
• Neem contact met uw plaatselijke overheid
voor informatie m.b.t. correcte afvalverwer-
king van het apparaat.
• Haal de stekker uit het stopcontact.
• Snijd het netsnoer van het apparaat af en
gooi dit weg.
Beschrijving van het product
Indeling kookplaat
1
2
3
4
180
mm
145
mm
1
Achterste kookzone 1500 W
2
Voorste kookzone 1000 W
3
Stroomindicatielampje
4
Bedieningsknoppen
Bedieningsknoppen elektrische
kookzones
Symbool Functie
0 uit-stand
Symbool Functie
1 minimale warmte
6 maximale warmte
Dagelijks gebruik
Waarschuwing! Raadpleeg de
hoofdstukken Veiligheid.
Om de temperatuur in te schakelen en de in-
stelling te verhogen de knop linksom draaien.
Draai de knop naar rechts om de kookstand te
verlagen. Draai de knop naar 0 om het apparaat
uit te schakelen.
Het controlelampje gaat branden als een of bei-
de kookzones wordt ingeschakeld, en blijft
branden tot de kookzones worden uitgescha-
keld.
Voor het eerste gebruik
Plaats pannen met water op elke kookzone, stel
de maximale stand in en laat het apparaat 10
minuten werken. Dit is om restanten van het ap-
paraat te verbranden. Laat hierna het apparaat
20 minuten werken in de laagste stand. Tijdens
deze periode kan er een nare geur en rook op-
treden. Dit is normaal. Zorg dat er voldoende
luchtcirculatie is.
Snelkookplaat
De rode stip in het midden van de plaat toont
aan dat de plaat een snelkookplaat is. Een snel-
kookplaat wordt sneller warm dan normale pla-
ten.
De snelkookplaat is op het oppervlak aange-
bracht en kan na enige tijd losraken. Dit heeft
geen effect op de werking van het apparaat.
De snelkookplaat kan roken en een geur ver-
spreiden bij het eerste gebruik. De rook en geur
verdwijnen na een tijdje.
5
www.zanussi.com

Nuttige aanwijzingen en tips
Waarschuwing! Raadpleeg de
hoofdstukken Veiligheid.
Energie besparen
• Doe indien mogelijk altijd een deksel op
de pan.
• Zet de pan op de vaste kookplaat voor-
dat u deze inschakelt.
• Schakel voor het einde van de berei-
dingstijd de vaste kookplaat uit, om ge-
bruik te maken van de restwarmte.
• Voor goede resultaten moet de diameter
van de pan dezelfde afmeting hebben
als de kookzone.
Pannen
• De bodem van de pan moet zo dik en
vlak mogelijk zijn.
Gebruik pannen met een bodem die ge-
schikt zijn voor de afmeting van de kookzo-
ne.
Kookgebied Diameter van het kookgerei
Voorkant max. 145 mm
Kookgebied Diameter van het kookgerei
Achterkant max. 180 mm
Voorbeelden van kooktoepassingen
Warmte
instel-
ling:
Gebruik om:
1 Warm te houden
2 Zachtjes sudderen
3 Sudderen
4 Frituren / gratineren
5 Aan de kook brengen
6 Aan de kook brengen / snel frituren /
heet frituren
Informatie over acrylamides
Belangrijk! Volgens recente
wetenschappelijke informatie kan het intensief
bruinen van levensmiddelen (met name in
producten die zetmeel bevatten), een
gezondheidsrisico vormen tengevolge van
acrylamides. Om die reden adviseren wij
levensmiddelen zoveel mogelijk bij lage
temperaturen gaar te laten worden en de
gerechten niet te veel te bruinen.
Onderhoud en reiniging
Waarschuwing! Raadpleeg de
hoofdstukken Veiligheid.
Reinig het apparaat na elk gebruik.
Gebruik altijd kookgerei met een schone bo-
dem.
Waarschuwing! Trek voordat u de
kookplaat gaat schoonmaken altijd eerst
de stekker uit het stopcontact en laat de
kookplaat afkoelen
De kookplaat kan het beste worden
schoongemaakt als hij nog warm is; etens-
resten kunnen gemakkelijker verwijderd worden
als ze nog warm zijn
Waarschuwing! Scherpe voorwerpen en
schurende reinigingsmiddelen
beschadigen het apparaat.
Het reinigen van het apparaat met een
stoomstraal- of hogedrukreiniger is om
veiligheidsredenen verboden.
Krassen of donkere vlekken hebben geen
invloed op de werking van het apparaat.
Verwijderen van vuil:
1. Gebruik het fijn schuurmiddel of een
schuurspons om het vuil te verwijderen.
2. Reinig het apparaat met een vochtige doek
en een beetje afwasmiddel.
6
www.zanussi.com

3. Verwarm de kookplaat op een lage tempe-
ratuur en laat deze opdrogen.
4. Om de kookplaten te onderhouden, wrijf de
kookzones met een beetje olijfolie op een
keukenpapiertje in om roest te voorkomen
Belangrijk! Gebruik een schoonmaakmiddel
voor roestvrij staal om de roestvrij stalen randen
schoon te maken.
De roestvrijstalen rand van de plaat kan
iets verkleuren als gevolg van thermische
belasting.
Probleemoplossing
Probleem Mogelijke oorzaak en oplossing
Het apparaat werkt helemaal niet. • Controleer de zekering van de stroomvoorziening in de stoppenkast
van het huis. Neem contact op met een bevoegde elektricien als de
zekering steeds doorbrandt.
De kookzone wordt niet warm. • Controleer of het apparaat goed is aangesloten en de elektriciteit is
ingeschakeld.
• Controleer of u aan de juiste regelknop draait.
• Controleer de zekering van de stroomvoorziening in de stoppenkast
van het huis. Neem contact op met een bevoegde elektricien, als de
zekering steeds doorbrandt.
De kookplaat functioneert niet
naar tevredenheid.
• Zorg ervoor dat de kookplaat schoon en droog is.
• Zorg ervoor dat het kookgerei de juiste maat heeft voor de kookzone.
• Zorg ervoor dat het kookgerei een vlakke bodem heeft.
• Zorg ervoor dat de warmte-instelling correct is voor het soort berei-
ding.
7
www.zanussi.com

Als er een storing optreedt, probeer dan eerst
zelf een oplossing voor het probleem te vinden.
Als u niet zelf het probleem kunt verhelpen,
neem dan contact op met uw verkoper of de
serviceafdeling.
Als u het apparaat verkeerd heeft gebruikt,
of als de installatie niet is uitgevoerd door
een erkende monteur, dan is het bezoek van de
klantenservicemonteur of van uw leverancier
mogelijk niet gratis, zelfs niet in de garantieperi-
ode.
Labels meegeleverd in de zak met
accessoires
Bevestig de stickers zoals hieronder weergege-
ven:
MOD.
PROD.NO.
SER.NO
DATA
MOD.
PROD.NO.
SER.NO
DATA
MODELMODEL
MOD.
PROD.NO.
SER.NO.
03 IT
MADE IN ITALY
TYPE
230V-50Hz
IP20
0049
1 2 3
1
Plak de sticker op de garantiekaart en ver-
stuur dit deel.
2
Plak de sticker op de garantiekaart en be-
waar dit deel.
3
Plak de sticker op het instructieboekje.
Deze gegevens zijn nodig om u snel en
goed te kunnen helpen. Deze gegevens
vindt u op het typeplaatje.
• Modelbeschrijving ............
• Productnummer (PNC) .............
• Serienummer (S.N.)..............
Gebruik alleen originele reserveonderdelen.
Deze zijn verkrijgbaar bij onze klantenservice en
erkende winkels met reserveonderdelen.
Montage
Waarschuwing! Raadpleeg de
hoofdstukken Veiligheid.
Montage
Waarschuwing! Neem de instructies
zorgvuldig door en volg ze op. Risico op
letsel of beschadiging van het apparaat.
• Zorg dat er geen transportschade aan het
apparaat is. Sluit geen beschadigd apparaat
aan. Indien nodig, neem contact op met de
leverancier.
• Installeer inbouwapparaten alleen nadat u het
apparaat in de conrrecte inbouweenheden
en werkoppervlakten hebt gemonteerd. Zorg
dat de inbouweenheden en oppervlakten vol-
doen aan de normen.
• Houd u aan alle wetten, voorschriften, richtlij-
nen en normen die van kracht zijn in het land
waar het apparaat wordt gebruikt (veilig-
8
www.zanussi.com

heidsvoorschriften, recyclingvoorschriften,
veiligheidsvoorschriften met betrekking tot
elektrische installaties, enz.)
Waarschuwing! Risico op letsel door
elektrische stroom.
• De netaansluiting staat onder stroom.
• Schakel de stroomtoevoer naar de netaan-
sluiting uit.
• Als de bevestigingssteun zich in de buurt van
het aansluitblok bevindt, controleer dan altijd
of de aansluitkabel niet in aanraking komt
met de rand van de bevestigingssteun.
Aansluiting aan het elektriciteitsnet
• Zorg er voor dat het aangegeven voltage en
het type stroom op het typeplaatje overeen-
komen met het voltage en stroomtype van uw
lokale stroomleverancier.
• Dit apparaat wordt geleverd met een net-
snoer. Dit moet zijn voorzien van een ge-
schikte stekker, die geschikt is voor de be-
lasting die vermeld is op het identificatiepla-
tje. Zorg dat u de stekker in een goed stop-
contact steekt.
• Gebruik altijd een correct ge?stalleerd,
schokbestendig stopcontact.
• Zorg ervoor dat het netsnoer na installatie
bereikbaar is.
• Trek niet aan het netsnoer om het apparaat
los te koppelen. Trek altijd aan de stekker.
• Er is brandgevaar als het apparaat verbinding
maakt met een verlengkabel, een adapter of
een meervoudige aansluiting. Zorg ervoor dat
de aarde-aansluiting overeenkomt met de
normen en regelgeving.
• Laat de stroomkabel niet warmer worden dan
90° C.
Zorg ervoor dat u de blauwe neutrale kabel
aansluit op de aansluiting met de letter "N" er-
op. Sluit de bruine (of zwarte) fasekabel aan op
de aansluiting met de letter "L". Zorg dat de fa-
sekabel altijd verbinding maakt.
Vervanging van het aansluitsnoer
Gebruik om de aansluitkabel te vervangen al-
leen het type H05V2V2-F T90 of een gelijk-
soortig type. Zorg ervoor dat de doorsnede van
het snoer geschikt is voor het voltage en de be-
drijfstemperatuur. De geel/groene aardedraad
moet ongeveer 2 cm langer zijn dan de bruine
(of zwarte) fasedraad.
Montage
40-50 mm
55 mm
30 mm
min. 650 mm
490 mm
min. 100 mm
270 mm
B
A
A) afdichting voor verwijdering
B) meegeleverde steunen
Let op! Installeer het apparaat alleen op
een werkblad met een plat oppervlak.
Mogelijkheden voor inbouw
Keukenmeubel met deur
Het paneel geïnstalleerd onder de kookplaat
moet eenvoudig te verwijderen zijn en eenvou-
dig toegang bieden indien technische hulp no-
dig is.
min 20 mm
(max 150 mm)
30 mm
60 mm
b
a
a) Verwijderbaar paneel
b) Ruimte voor aansluitingen
9
www.zanussi.com

Keukenmeubel met oven
De afmetingen van de uitsparing voor de kook-
plaat moeten overeenkomen met de voorge-
schreven inbouwmaten en het keukenmeubel
moet voorzien zijn van ventilatiegaten om een
continue luchttoevoer te kunnen garanderen.
Om veiligheidsredenen en om een gemakkelijke
verwijdering van de oven uit het meubel moge-
lijk te maken, moeten de elektrische aansluitin-
gen van de kookplaat en de oven afzonderlijk
geïnstalleerd worden.
50 cm
2
360 cm
2
180 cm
2
120 cm
2
Technische informatie
Afmetingen kookplaat
Breedte: 290 mm
Lengte: 510 mm
Inbouwafmetingen kookplaat
Breedte: 270 mm
Lengte: 490 mm
Vermogen kookplaten
Achterste kookzone 180
mm
1.5 kW
Voorste kookzone 145
mm
1.0 kW
Totaal vermogen 2.5 kW
Elektrische voeding 230 V ~ 50 Hz
Milieubescherming
Het symbool op het product of op de
verpakking wijst erop dat dit product niet als
huishoudafval mag worden behandeld, maar
moet worden afgegeven bij een verzamelpunt
waar elektrische en elektronische apparatuur
wordt gerecycled. Als u ervoor zorgt dat dit
product op de juiste manier wordt verwijderd,
voorkomt u mogelijke negatieve gevolgen voor
mens en milieu die zich zouden kunnen
voordoen in geval van verkeerde
afvalverwerking. Voor gedetailleerdere
informatie over het recyclen van dit product,
kunt u contact opnemen met de gemeente, de
gemeentereiniging of de winkel waar u het
product hebt gekocht.
Verpakkingsmateriaal
De verpakkingsmaterialen zijn milieuvrien-
delijk en herbruikbaar. De kunststof onder-
delen zijn gemarkeerd, bijv.: >PE<,>PS<, etc.
Gooi het verpakkingsmateriaal weg in de juiste
afvalcontainer bij uw plaatselijke afvalverwer-
kingsdienst.
10
www.zanussi.com

Contents
Safety information _ _ _ _ _ _ _ _ _ _ _ _ _ _ 11
Safety instructions _ _ _ _ _ _ _ _ _ _ _ _ _ 12
Product description _ _ _ _ _ _ _ _ _ _ _ _ _ 14
Daily use _ _ _ _ _ _ _ _ _ _ _ _ _ _ _ _ _ _ _ 14
Helpful hints and tips _ _ _ _ _ _ _ _ _ _ _ _ 14
Care and cleaning _ _ _ _ _ _ _ _ _ _ _ _ _ 15
Troubleshooting _ _ _ _ _ _ _ _ _ _ _ _ _ _ _ 15
Installation _ _ _ _ _ _ _ _ _ _ _ _ _ _ _ _ _ _ 16
Technical information _ _ _ _ _ _ _ _ _ _ _ _ 18
Environment concerns _ _ _ _ _ _ _ _ _ _ _ 18
Subject to change without notice.
Safety information
Before the installation and use of the appliance, carefully read the
supplied instructions. The manufacturer is not responsible if an in-
correct installation and use causes injuries and damages. Always
keep the instructions with the appliance for future reference.
Children and vulnerable people safety
Warning! Risk of suffocation, injury or permanent disability.
• This appliance can be used by children aged from 8 years and
above and persons with reduced physical, sensory or mental ca-
pabilities or lack of experience and knowledge if they are super-
vised by an adult or a person who is responsible for their safety.
• Do not let children play with the appliance.
• Keep all packaging away from children.
• Keep children and pets away from the appliance when it operates
or when it cools down. Accessible parts are hot.
• If the appliance has a child safety device, we recommend that you
activate it.
• Cleaning and user maintenance shall not be made by children
without supervision.
General Safety
• The appliance and its accessible parts become hot during use.
Do not touch the heating elements.
• Do not operate the appliance by means of an external timer or
separate remote-control system.
11
www.zanussi.com

• Unattended cooking on a hob with fat or oil can be dangerous
and may result in fire.
• Never try to extinguish a fire with water, but switch off the appli-
ance and then cover flame e.g. with a lid or a fire blanket.
• Do not store items on the cooking surfaces.
• Do not use a steam cleaner to clean the appliance.
• Metallic objects such as knives, forks, spoons and lids should not
be placed on the hob surface since they can get hot.
Safety instructions
Installation
Warning! Only a qualified person must
install this appliance.
• Remove all the packaging.
• Do not install or use a damaged appliance.
• Obey the installation instruction supplied
with the appliance.
• Keep the minimum distance from the other
appliances and units.
• Always be careful when you move the appli-
ance because it is heavy. Always wear safety
gloves.
• Seal the cut surfaces with a sealant to pre-
vent moisture to cause swelling.
• Protect the bottom of the appliance from
steam and moisture.
• Do not install the appliance adjacent to a
door or under a window. This prevents hot
cookware to fall from the appliance when the
door or the window is opened.
• If the appliance is installed above drawers
make sure that the space, between the bot-
tom of the appliance and the upper drawer,
is sufficient for air circulation.
• The bottom of the appliance can get hot. We
recommend to install a non-combustile sepa-
ration panel under the appliance to prevent
access to the bottom.
Electrical connection
Warning! Risk of fire and electrical shock.
• All electrical connections must be made by a
qualified electrician.
• The appliance must be earthed.
• Before carrying out any operation make sure
that the appliance is disconnected from the
power supply.
• Use the correct electricity mains cable.
• Do not let the electricity mains cable tangle.
• Make sure the mains cable or plug (if appli-
cable) does not touch the hot appliance or
hot cookware, when you connect the appli-
ance to the near sockets
• Make sure the appliance is installed correct-
ly. Loose and incorrect electricity mains ca-
ble or plug (if applicable) can make the termi-
nal become too hot.
• Make sure that a shock protection is instal-
led.
• Use the strain relief clamp on cable.
• Make sure not to cause damage to the mains
plug (if applicable) or to the mains cable.
Contact the Service or an electrician to
change a damaged mains cable.
• The electrical installation must have an isola-
tion device which lets you disconnect the ap-
pliance from the mains at all poles. The isola-
tion device must have a contact opening
width of minimum 3 mm.
• Use only correct isolation devices: line pro-
tecting cut-outs, fuses (screw type fuses re-
12
www.zanussi.com

moved from the holder), earth leakage trips
and contactors.
Use
Warning! Risk of injury, burns or electric
shock.
• Use this appliance in a household environ-
ment.
• Do not change the specification of this appli-
ance.
• Do not use an external timer or a separate re-
mote-control system to operate the appli-
ance.
• Do not let the appliance stay unattended
during operation.
• Do not operate the appliance with wet hands
or when it has contact with water.
• Do not put cutlery or saucepan lids on the
cooking zones. They become hot.
• Set the cooking zone to “off” after use.
• Do not use the appliance as a work or as a
storage surface.
Warning! Risk of fire or explosion.
• Fats and oil when heated can release flam-
mable vapours. Keep flames or heated ob-
jects away from fats and oils when you cook
with them.
• The vapours that very hot oil releases can
cause spontaneous combustion.
• Used oil, that can contain food remnants, can
cause fire at a lower temperature than oil
used for the first time.
• Do not put flammable products or items that
are wet with flammable products in, near or
on the appliance.
• Do not try to extinguish a fire with water. Dis-
connect the appliance and cover the flame
with a lid or a fire blanket.
Warning! Risk of damage to the
appliance.
• Do not keep hot cookware on the control
panel.
• Do not let cookware to boil dry.
• Do not let cookware cool down on the hot-
plate.
• Do not activate the cooking zones with emp-
ty cookware or without cookware.
• Do not put aluminium foil on the appliance.
• Do not let acid liquids, for example vinegar,
lemon juice or limescale remover touch the
hob. This can cause matt patches.
Care and Cleaning
Warning! Risk of damage to the
appliance.
• Clean regularly the appliance to prevent the
deterioration of the surface material.
• Do not use water spray and steam to clean
the appliance.
• Clean the appliance with a moist soft cloth.
Only use neutral detergents. Do not use
abrasive products, abrasive cleaning pads,
solvents or metal objects.
Disposal
Warning! Risk of injury or suffocation.
• Contact your municipal authority for informa-
tion on how to discard the appliance correct-
ly.
• Disconnect the appliance from the mains
supply.
• Cut off the mains cable and discard it.
13
www.zanussi.com

Product description
Cooking surface layout
1
2
3
4
180
mm
145
mm
1
Rear cooking zone 1500 W
2
Front cooking zone 1000 W
3
Power indicator
4
Control knobs
Electric cooking zones control knobs
Symbol Function
0 off position
Symbol Function
1 minimum heat
6 maximum heat
Daily use
Warning! Refer to the Safety chapters.
To switch on and increase the heat setting turn
the knob counterclockwise. To decrease the
heat setting turn the knob clockwise. To switch
off turn the knob to the 0.
Power indicator is activated when either of the
zones are turned on, and will stay on until the
cooking zones are switched off.
Before first use
Put cookware containing water on each cook-
ing zone, set the maximum position and operate
the appliance for 10 min. This is to burn off the
residue in the appliance. After that, operate the
appliance at minimum position for 20 min. Dur-
ing this period, an odour and smoke can occur.
This is normal. Make sure that the airflow is suf-
ficient.
Rapid hot plate
A red dot in the middle of the plate shows a
rapid hot plate. A rapid hot plate heats up faster
than usual plates.
The red dot is painted on the surface and can
come off after some time. It does not have an
effect on the performance of the appliance.
The rapid hot plate can smoke and make an
odour when you use it for the first time. The
smoke and an odour will go off after a while.
Helpful hints and tips
Warning! Refer to the Safety chapters.
Energy saving
• If possible, always put the lids on the
cookware.
• Put cookware on a solid hotplate before
you start it.
• Stop the solid hotplate before the end
of the cooking time to use residual heat.
• For satisfactory results, the diameter of
pans and cooking zones must have the
same dimensions.
Cookware
14
www.zanussi.com

• The bottom of the cookware must be as
thick and flat as possible.
Use pots and pans with bottom applicable
to the dimension of cooking zone.
Cooking area Diameters of cookware
Front max. 145 mm
Rear max. 180 mm
Examples of cooking applications
Heat
setting:
Use to:
1 Keeping warm
2 Gentle simmering
Heat
setting:
Use to:
3 Simmering
4 Frying / browning
5 Bringing to the boil
6 Bringing to the boil / quick frying /
deep-frying
Information on acrylamides
Important! According to the newest scientific
knowledge, if you brown food (specially the one
which contains starch), acrylamides can pose a
health risk. Thus, we recommend that you cook
at the lowest temperatures and do not brown
food too much.
Care and cleaning
Warning! Refer to the Safety chapters.
Clean the appliance after each use.
Always use cookware with clean bottom.
Warning! Before any maintenance or
cleaning can be carried out, you must
disconnect the hob from the electricity supply.
The hob is best cleaned while it is still
warm, as spillage can be removed more
easily than if it is left to cool.
Warning! Sharp objects and abrasive
cleaning agents will damage the
appliance.
For your safety, do not clean the appliance with
steam blasters or high-pressure cleaners.
Scratches or dark stains have no effect on
how the appliance operates.
Removing the dirt:
1. Use the fine scouring powder or a scouring
pad to remove the dirt.
2. Clean the appliance with a damp cloth and
some detergent.
3. Heat the hotplate to a low temperature and
leave to dry.
4. To maintain the hotplates, wipe the plates
with a drop of olive oil on a kitchen towel to
prevent rust.
Important! For stainless steel edges of the
hob use cleaner for stainless steel.
The stainless steel edge of the plate can
be slightly discoloured as a result of the
thermal load.
Troubleshooting
Problem Possible cause and remedy
The appliance does not operate. • Examine the fuse in the electrical system of the house in the fuse box.
If the fuses blow time after time, speak to an authorised electrician.
15
www.zanussi.com

Problem Possible cause and remedy
The cooking zone does not heat
up.
• Make sure that the appliance is plugged in and the electrical supply
is switched on.
• Make sure that you turn the correct control knob.
• Examine the fuse in the electrical system of the house in the fuse box.
If the fuses blow time after time, speak to an authorised electrician.
The effectiveness of the hob is not
satisfactory.
• Make sure that the hob is clean and dry.
• Make sure that the cookware is the correct size for the cooking zone.
• Make sure that the cookware has a flat bottom.
• Make sure that the heat setting is correct for this type of cooking.
If there is a fault, first try to find a solution to the
problem yourself. If you cannot find a solution to
the problem yourself, speak your dealer or the
local Service Force Centre.
If you operated the appliance incorrectly,
or the installation was not carried out by a
registered engineer, the visit from the customer
service technician or dealer may not take place
free of charge, even during the warranty period.
Labels supplied with the accessories bag
Stick the adhesive labels as indicated below:
MOD.
PROD.NO.
SER.NO
DATA
MOD.
PROD.NO.
SER.NO
DATA
MODELMODEL
MOD.
PROD.NO.
SER.NO.
03 IT
MADE IN ITALY
TYPE
230V-50Hz
IP20
0049
1 2 3
1
Stick it on Guarantee Card and send this
part
2
Stick it on Guarantee Card and keep this
part
3
Stick it on instruction booklet
These data are necessary to help you
quickly and correctly. These data are
available on the supplied rating plate.
• Model description .................
• Product number (PNC) .................
• Serial Number (S.N.) .................
Use the original spare parts only. They are
available at Service Force Centre and approved
spare parts shops.
Installation
16
www.zanussi.com

Warning! Refer to the Safety chapters.
Installation
Warning! Read and follow the
instructions carefully. There is a risk of
injury or damage to the appliance.
• Make sure that there is no damage to the ap-
pliance from the transportation. Do not con-
nect a damaged appliance. Speak to the
supplier if necessary.
• Install built-in appliances only after you as-
semble the appliance into correct built-in
units and work surfaces. Make sure that
built-in units and surfaces obey the stand-
ards.
• Obey all orders and standards in force in the
country where you use the appliance (safety
standards, recycling standards, electrical
safety standards etc.)
Warning! Risk of injury from electrical
current.
• The electrical mains terminal is live.
• Make electrical mains terminal free of volt-
age.
• If the fixing bracket is near to the terminal
block, do not let the connection cable come
in contact with the edge of the bracket.
Electrical connection
• Make sure that the rated voltage and type of
power on the rating plate agree with the volt-
age and the power of the local power supply.
• This appliance is supplied with a mains ca-
ble. It has to be supplied with a correct plug
which can hold the load that the rating plate
rates. Make sure that you install the plug in a
correct socket.
• Always use a correctly installed shockproof
socket.
• Make sure that there is an access to the
mains plug after the installation.
• Do not pull the mains cable to disconnect
the appliance. Always pull the mains plug.
• There is a risk of fire when the appliance is in
connection with an extension cable, an
adapter or a multiple connection. Make sure
that the ground connection agrees with the
standards and regulations.
• Do not let the power cable to heat up to a
temperature higher than 90° C.
Make sure that you connect the blue neutral ca-
ble to the terminal with a letter "N" on it. Con-
nect the brown (or black) phase cable to the
terminal which has a letter "L". Keep the phase
cable connected at all times.
Replacement of the connection cable
To replace the connection cable use only
H05V2V2-F T90 or equivalent type. Make sure
that the cable section is applicable to the volt-
age and the working temperature. The yellow/
green earth wire must be approximately 2 cm
longer than the brown (or black) phase wire.
Assembly
40-50 mm
55 mm
30 mm
min. 650 mm
490 mm
min. 100 mm
270 mm
B
A
A) seal to remove
B) supplied brackets
Caution! Install the appliance only on a
worktop with flat surface.
Possibilities for insertion
Kitchen unit with door
The panel installed below the hob must be easy
to remove and let an easy access in case a
technical assistance intervention is necessary.
17
www.zanussi.com

min 20 mm
(max 150 mm)
30 mm
60 mm
b
a
a) Removable panel
b) Space for connections
Kitchen unit with oven
The hob recess dimensions must obey the indi-
cation and the kitchen unit must be equipped
with vents to let a continuous supply of air. The
electrical connection of the hob and the oven
must be installed separately for safety reasons
and to let easy remove oven from the unit.
50 cm
2
360 cm
2
180 cm
2
120 cm
2
Technical information
Hob dimensions
Width: 290 mm
Length: 510 mm
Hob recess dimensions
Width: 270 mm
Length: 490 mm
Hot plate rating
Rear cooking zone 180
mm
1.5 kW
Front cooking zone 145
mm
1.0 kW
Total rating 2.5 kW
Electric supply 230 V ~ 50 Hz
Environment concerns
The symbol on the product or on its
packaging indicates that this product may not
be treated as household waste. Instead it
should be taken to the appropriate collection
point for the recycling of electrical and
electronic equipment. By ensuring this product
is disposed of correctly, you will help prevent
potential negative consequences for the
environment and human health, which could
otherwise be caused by inappropriate waste
handling of this product. For more detailed
information about recycling of this product,
please contact your local council, your
household waste disposal service or the shop
where you purchased the product.
Packaging material
The packaging materials are friendly to the
environment and can be recycled. The
plastic components are identified by marking:
>PE<,>PS<, etc. Discard the packaging mate-
rials as household waste at the waste disposal
facilities in your municipality.
18
www.zanussi.com

Sommaire
Consignes de sécurité _ _ _ _ _ _ _ _ _ _ _ 19
Instructions de sécurité _ _ _ _ _ _ _ _ _ _ _ 20
Description de l'appareil _ _ _ _ _ _ _ _ _ _ 22
Utilisation quotidienne _ _ _ _ _ _ _ _ _ _ _ 22
Conseils utiles _ _ _ _ _ _ _ _ _ _ _ _ _ _ _ _ 23
Entretien et nettoyage _ _ _ _ _ _ _ _ _ _ _ 24
En cas d'anomalie de fonctionnement _ _ _ 24
Installation _ _ _ _ _ _ _ _ _ _ _ _ _ _ _ _ _ _ 25
Caracteristiques techniques _ _ _ _ _ _ _ _ 27
En matière de protection de l'environnement
_ _ _ _ _ _ _ _ _ _ _ _ _ _ _ _ _ _ _ _ _ _ _ _ 27
Sous réserve de modifications.
Consignes de sécurité
Avant d'installer et d'utiliser cet appareil, lisez soigneusement les
instructions fournies. Le fabricant ne peut être tenu pour responsa-
ble des dommages et blessures liés à une mauvaise installation ou
utilisation. Conservez toujours cette notice avec votre appareil pour
vous y référer ultérieurement.
Sécurité des enfants et des personnes vulnérables
Avertissement Risque d'asphyxie, de blessure ou d'invalidité
permanente.
• Cet appareil peut être utilisé par des enfants de plus de 8 ans,
ainsi que des personnes dont les capacités physiques, sensoriel-
les et mentales sont réduites ou dont les connaissances et l'expé-
rience sont insuffisantes, à condition d'être surveillés par une per-
sonne responsable de leur sécurité.
• Ne laissez pas les enfants jouer avec l'appareil.
• Ne laissez pas les emballages à la portée des enfants.
• Tenez les enfants et les animaux éloignés de l'appareil lorsqu'il est
en cours de fonctionnement ou lorsqu'il refroidit. Les parties ac-
cessibles sont chaudes.
• Si l'appareil est équipé d'un dispositif de sécurité enfants, nous
vous recommandons de l'activer.
• Les enfants ne doivent pas nettoyer ni entreprendre une opération
de maintenance sur l'appareil sans surveillance.
19
www.zanussi.com

Sécurité générale
• L'appareil et ses parties accessibles deviennent chauds pendant
son fonctionnement. Ne touchez pas les éléments chauffants.
• Ne faites pas fonctionner l'appareil avec un minuteur externe ou
un système de commande à distance.
• Il peut être dangereux de laisser chauffer de la graisse ou de l'hui-
le sans surveillance sur une table de cuisson car cela pourrait
provoquer un incendie.
• N'essayez jamais d'éteindre un feu avec de l'eau. Mettez à l'arrêt
l'appareil puis couvrez les flammes, par exemple avec un couver-
cle ou une couverture ignifuge.
• N'entreposez rien sur les surfaces de cuisson.
• N’utilisez pas de nettoyeur vapeur pour nettoyer l'appareil.
• Ne posez pas d'objets métalliques tels que couteaux, fourchettes,
cuillères ou couvercles sur la table de cuisson car ils pourraient
chauffer.
Instructions de sécurité
Installation
Avertissement L'appareil doit être
installé uniquement par un professionnel
qualifié.
• Retirez l'intégralité de l'emballage.
• N'installez pas et ne branchez pas un appa-
reil endommagé.
• Suivez scrupuleusement les instructions
d'installation fournies avec l'appareil.
• Respectez la distance minimale requise avec
les autres appareils et éléments.
• Soyez toujours vigilants lorsque vous dépla-
cez l'appareil car il est lourd. Portez toujours
des gants de sécurité.
• Isolez les surfaces découpées à l'aide d'un
matériau d'étanchéité pour éviter que la moi-
sissure ne provoque de gonflements.
• Protégez la partie inférieure de l'appareil de
la vapeur et de l'humidité.
• N'installez pas l'appareil près d'une porte ou
sous une fenêtre. Les récipients chauds ris-
queraient de tomber de l'appareil lors de l'ou-
verture de celles-ci.
• Si l'appareil est installé au-dessus de tiroirs,
assurez-vous qu'il y a suffisamment d'espace
entre le fond de l'appareil et le tiroir supérieur
pour que l'air puisse circuler.
• Le dessous de l'appareil peut devenir très
chaud. Nous vous recommandons d'installer
un panneau de séparation ignifuge sous l'ap-
pareil pour en bloquer l'accès.
Branchement électrique
Avertissement Risque d'incendie ou
d'électrocution.
• L'ensemble des branchements électriques
doit être effectué par un technicien qualifié.
• L'appareil doit être relié à la terre.
20
www.zanussi.com

• Avant toute intervention, assurez-vous que
l'appareil est débranché.
• Utilisez le câble d'alimentation électrique ap-
proprié.
• Ne laissez pas le câble d'alimentation s'em-
mêler.
• Assurez-vous que le câble d'alimentation ou
la fiche (si présente) n'entrent pas en contact
avec les surfaces brûlantes de l'appareil ou
les récipients brûlants lorsque vous branchez
l'appareil à des prises électriques situées à
proximité.
• Assurez-vous que l'appareil est bien installé.
Un câble d'alimentation lâche et inapproprié
ou une fiche (si présente) non serrée peu-
vent être à l'origine d'une surchauffe des bor-
nes.
• Assurez-vous qu'une protection anti-électro-
cution est installée.
• Utilisez un collier anti-traction sur le câble.
• Veillez à ne pas endommager la fiche secteur
(si présente) ni le câble d'alimentation. Con-
tactez le service après-vente ou un électri-
cien pour remplacer le câble d'alimentation
s'il est endommagé.
• L'installation électrique doit être équipée d'un
dispositif d'isolement à coupure omnipolaire.
Le dispositif d'isolement doit présenter une
distance d'ouverture des contacts d'au moins
3 mm.
• N'utilisez que des systèmes d'isolation ap-
propriés : des coupe-circuits, des fusibles
(les fusibles à visser doivent être retirés du
support), un disjoncteur différentiel et des
contacteurs.
Utilisation
Avertissement Risque de blessures, de
brûlures ou d'électrocution.
• Utilisez cet appareil dans un environnement
domestique.
• Ne modifiez pas les caractéristiques de cet
appareil.
• Ne faites pas fonctionner l'appareil avec un
minuteur externe ou un système de comman-
de à distance.
• Ne laissez jamais l'appareil sans surveillance
pendant son fonctionnement.
• N'utilisez jamais cet appareil avec les mains
mouillées ou lorsqu'il est en contact avec de
l'eau.
• Ne posez pas de couverts ou de couvercles
sur les zones de cuisson. Elles sont chaudes.
• Éteignez les zones de cuisson après chaque
utilisation.
• N'utilisez jamais l'appareil comme plan de
travail ni comme plan de stockage.
Avertissement Risque d'explosion ou
d'incendie.
• Les graisses et l'huile chaudes peuvent dé-
gager des vapeurs inflammables. Tenez les
flammes ou les objets chauds éloignés des
graisses et de l'huile lorsque vous vous en
servez pour cuisiner.
• Les vapeurs dégagées par l'huile très chaude
peuvent provoquer une combustion sponta-
née.
• L'huile qui a servi contient des restes d'ali-
ments qui peuvent provoquer un incendie à
température plus faible que l'huile n'ayant ja-
mais servi.
• Ne placez pas de produits inflammables ou
d'éléments imbibés de produits inflammables
à l'intérieur, à proximité ou sur l'appareil.
• Ne tentez pas d'éteindre un incendie avec de
l'eau. Débranchez l'appareil et couvrez les
flammes à l'aide d'un couvercle ou d'une
couverture à incendie.
Avertissement Risque de dommage de
l'appareil.
• Ne laissez pas de récipients chauds sur le
bandeau de commande.
• Ne laissez pas le contenu des récipients de
cuisson s'évaporer.
• Ne laissez pas de récipients chauds refroidir
sur la plaque.
• Ne faites jamais fonctionner les zones de
cuisson avec des récipients de cuisson vides
ou sans aucun récipient de cuisson.
21
www.zanussi.com

• Ne placez jamais de papier aluminium sur
l'appareil.
• Ne laissez pas de liquides acides, tels que
du vinaigre, du jus de citron ou du produit
détartrant, entrer en contact avec la table de
cuisson. Cela peut provoquer l'apparition de
taches mates.
Entretien et nettoyage
Avertissement Risque de dommage de
l'appareil.
• Nettoyez régulièrement l'appareil afin de
maintenir le revêtement en bon état.
• Ne pulvérisez pas d'eau ni de vapeur pour
nettoyer l'appareil.
• Nettoyez l'appareil avec un chiffon doux hu-
mide. Utilisez uniquement des produits de la-
vage neutres. N'utilisez pas de produits abra-
sifs, de tampons à récurer, de solvants ou
d'objets métalliques.
Mise au rebut
Avertissement Risque de blessure ou
d'asphyxie.
• Contactez votre service municipal pour obte-
nir des informations sur la marche à suivre
pour mettre l'appareil au rebut.
• Débranchez l'appareil de l'alimentation sec-
teur.
• Coupez le câble d'alimentation et mettez-le
au rebut.
Description de l'appareil
Description de la table de cuisson
1
2
3
4
180
mm
145
mm
1
Zone de cuisson arrière à 1500 W
2
Zone de cuisson avant à 1000 W
3
Voyant de mise sous tension
4
Manettes de commande
Manettes de commande des zones de
cuisson électriques
Symbole Fonction
0 position Arrêt
Symbole Fonction
1 chaleur minimale
6 chaleur maximale
Utilisation quotidienne
Avertissement Reportez-vous aux
chapitres concernant la sécurité.
Pour mettre en fonctionnement la zone de cuis-
son et augmenter le niveau de cuisson, tournez
la manette dans le sens des aiguilles d'une
montre. Pour diminuer la température, tournez
la manette dans le sens des aiguilles d'une
montre. Pour mettre à l'arrêt la zone de cuisson,
positionnez la manette sur 0.
Le voyant de fonctionnement s'allume dès l'acti-
vation de l'une des zones de cuisson, et reste
22
www.zanussi.com

allumé jusqu'à ce que les zones de cuisson
soient mises à l'arrêt.
Avant la première utilisation
Placez un récipient de cuisson contenant de
l'eau sur chaque zone de cuisson, réglez sur la
position maximum et laissez l'appareil fonction-
ner pendant 10 minutes. Ceci afin de d'éliminer
les résidus dans l'appareil. Ensuite, faites fonc-
tionner l'appareil sur la position minimum pen-
dant 20 minutes. Pendant cette période, il se
peut qu'une odeur et de la fumée apparaissent.
Ce phénomène est normal. Vérifiez que la venti-
lation environnante est suffisante.
Plaque de cuisson rapide
Un point rouge au milieu de la plaque montre
une plaque à chauffage rapide. Une plaque à
chauffage rapide chauffe plus vite que les pla-
ques classiques.
Le point rouge est peint sur la surface et peut
disparaître après quelque temps. Cela n'affecte
pas le fonctionnement de l'appareil.
La plaque à chauffage rapide peut fumer et
produire une odeur quand on l'utilise pour la
première fois. La fumée et l'odeur se dissipe-
ront après quelque temps.
Conseils utiles
Avertissement Reportez-vous aux
chapitres concernant la sécurité.
Économie d'énergie
• Si possible, couvrez toujours les réci-
pients de cuisson avec un couvercle
pendant la cuisson.
• Déposez toujours le récipient sur la zo-
ne de cuisson avant de mettre celle-ci
en fonctionnement.
• Mettez à l'arrêt les zones de cuisson
avant la fin du temps de cuisson pour
utiliser la chaleur résiduelle.
• Pour obtenir des résultats satisfaisants,
le diamètre des plats et des zones de
cuisson doit être identique.
Récipient de cuisson
• Le fond du récipient de cuisson doit
être lisse, propre et sec, aussi plat et
épais que possible avant chaque utilisa-
tion.
Utilisez des casseroles et des poêles dont
le fond est compatible avec la dimension
de la zone de cuisson.
Zone de cuis-
son
Diamètre du récipient
Avant max. 145 mm
Zone de cuis-
son
Diamètre du récipient
Arrière max. 180 mm
Exemples de cuisson
Niveau
de régla-
ge
:
Utilisation :
1 Maintien au chaud
2 Faire mijoter doucement
3 Faire mijoter
4 Faire frire / gratiner
5 Porte à ébullition
6 Bouillir / Saisir / Frire
Informations sur l'acrylamide
Important Selon les connaissances
scientifiques les plus récentes, faire brunir les
aliments de manière intensive, en particulier les
produits contenant de l'amidon, peut nuire à la
santé à cause de l'acrylamide. C'est pourquoi
nous vous recommandons de faire cuire les
aliments à basse température et de ne pas trop
les faire brunir.
23
www.zanussi.com

Entretien et nettoyage
Avertissement Reportez-vous aux
chapitres concernant la sécurité.
Nettoyez l'appareil après chaque utilisation.
Utilisez toujours des récipients de cuisson dont
le fond est propre et sec, lisse et plat.
Avertissement Avant toute opération
d'entretien ou de nettoyage, vous devez
impérativement débrancher électriquement la
table de cuisson.
Il est préférable de nettoyer la table de
cuisson lorsqu'elle est encore chaude. Éli-
miner les taches incrustées est en effet plus fa-
cile lorsque les zones sont encore chaudes que
lorsqu'elles sont froides.
Avertissement Les objets pointus/
tranchants et les produits de nettoyage
abrasifs peuvent endommager l'appareil.
Par mesure de sécurité, il est interdit de
nettoyer l'appareil avec un appareil à jet de
vapeur ou à haute pression.
Les rayures ou les taches sombres n'ont
aucune incidence sur le fonctionnement
de l'appareil.
Pour enlever les salissures :
1. Éliminez les salissures à l'aide d'une pou-
dre ou d'un tampon à récurer.
2. Nettoyez l'appareil à l'aide d'un chiffon hu-
mide et d'un peu de détergent.
3. Faites chauffer la plaque à basse tempéra-
ture et laissez sécher.
4. Pour entretenir les plaques chauffantes,
essuyez-les avec une goutte d'huile d'olive
sur une feuille d'essuie-tout pour éviter la
rouille.
Important Pour les bords de la table de
cuisson en acier inoxydable, utilisez un
nettoyant spécial pour acier inoxydable.
Le rebord en acier inoxydable des plaques
peut subir une légère décoloration en rai-
son de la charge thermique.
En cas d'anomalie de fonctionnement
Problème Cause et solution possibles
L'appareil ne fonctionne pas du
tout.
• Vérifiez le fusible du système électrique de l'habitation dans la boîte à
fusibles. Si les fusibles grillent de manière répétée, faites appel à un
électricien agréé.
La zone de cuisson ne chauffe
pas.
• Vérifiez que l'appareil est bien branché et allumé.
• Assurez-vous d'avoir utilisé la bonne manette de commande.
• Vérifiez le fusible du système électrique de l'habitation dans la boîte à
fusibles. Si les fusibles grillent de manière répétée, faites appel à un
électricien agréé.
L'efficacité de la table de cuisson
n'est pas satisfaisante.
• Assurez-vous que la table de cuisson est propre et sèche.
• Assurez-vous que le diamètre du récipient de cuisson utilisé est
adapté à la zone de cuisson.
• Assurez-vous que le fond du récipient de cuisson utilisé est parfaite-
ment plat.
• Assurez-vous que le niveau de cuisson utilisé est adapté au type de
préparation.
Certaines anomalies de fonctionnement peu-
vent dépendre d'opérations d'entretien non cor-
rectes ou d'oubli et peuvent être résolues à l'ai-
de des indications fournies dans le tableau,
24
www.zanussi.com

sans faire appel à un service après-vente. Si
l'anomalie persiste, contactez votre magasin
vendeur ou votre service après-vente.
Si un problème résulte d'une mauvaise uti-
lisation ou si l'installation de l'appareil n'a
pas été réalisée par un professionnel qualifié, le
déplacement du technicien du service après
vente ou du revendeur peut être facturé même
en cours de garantie.
Étiquettes fournies avec le sac
d'accessoires
Collez les étiquettes adhésives comme indiqué
ci-dessous :
MOD.
PROD.NO.
SER.NO
DATA
MOD.
PROD.NO.
SER.NO
DATA
MODELMODEL
MOD.
PROD.NO.
SER.NO.
03 IT
MADE IN ITALY
TYPE
230V-50Hz
IP20
0049
1 2 3
1
Collez-la sur la carte de garantie et en-
voyez cette partie
2
Collez-la sur la carte de garantie et conser-
vez cette partie
3
Collez-la sur la notice d'utilisation
Ces informations sont nécessaires pour
pouvoir vous offrir une aide rapide et
adaptée. Ces données figurent sur la pla-
que signalétique fournie.
• Description du modèle ............
• Référence produit (PNC) ............
• Numéro de série (S.N.) ............
Utilisez exclusivement des pièces d'origine cer-
tifiées constructeur. Elles sont disponibles au-
près de votre service après-vente.
Installation
Avertissement Reportez-vous aux
chapitres concernant la sécurité.
Installation
Avertissement Veuillez lire attentivement
les instructions et les suivre
scrupuleusement. Vous risqueriez de vous
blesser ou d'endommager l'appareil.
• Assurez-vous que l'appareil n'a pas été en-
dommagé pendant le transport. Ne branchez
pas un appareil endommagé. Si nécessaire,
contactez votre magasin vendeur.
• N'utilisez des appareils encastrables
qu'après les avoir installés dans des meubles
d'encastrement et sous des plans de travail
appropriés. Assurez-vous que les meubles
d'encastrement et les plans de travail sont
conformes aux normes et réglementations.
25
www.zanussi.com

• Respectez les directives et les normes en vi-
gueur dans le pays où vous utiliserez l'appa-
reil (réglementations relatives à la sécurité,
au recyclage, à la sécurité des appareils
électriques, etc.)
Avertissement Risque de choc
électrique.
• La borne d'alimentation est sous tension.
• Mettez la borne d'alimentation hors tension.
• Si la patte de scellement se trouve à proximi-
té du répartiteur, assurez-vous que le câble
d'alimentation n'entre pas en contact avec le
bord de la patte.
Branchement électrique
• Vérifiez que la tension nominale et le type
d'alimentation figurant sur la plaque signaléti-
que correspondent aux valeurs d'alimentation
locales.
• Cet appareil est fourni avec un câble d'ali-
mentation. Une fiche appropriée, capable de
supporter la charge indiquée sur la plaque si-
gnalétique, doit être adaptée au câble d'ali-
mentation. Assurez-vous que la fiche est
branchée dans une prise correcte.
• Utilisez toujours une prise de courant de sé-
curité correctement installée.
• Assurez-vous que la prise de courant est ac-
cessible une fois l'appareil installé.
• Ne tirez jamais sur le câble d'alimentation
pour débrancher l'appareil. Tirez toujours sur
la fiche.
• L'appareil ne doit pas être raccordé à l'aide
d'un prolongateur, d'un adaptateur ni d'une
prise multiple (risque d'incendie). Assurez-
vous que le raccordement à la terre est con-
forme aux normes et réglementations.
• Le câble d'alimentation ne doit pas être ex-
posé à une température supérieure à 90 °C.
Assurez-vous de connecter le câble neutre bleu
à la borne portant la lettre « N ». Connectez le
câble de phase marron (ou noir) à la borne por-
tant la lettre « L ». Le câble de phase doit rester
connecté en permanence.
Remplacement du câble d'alimentation
Ne remplacez le câble de raccordement
qu'avec un câble de type H05V2V2-F T90 ou
équivalent. Assurez-vous que la section du câ-
ble convient à la tension et à la température de
fonctionnement. Le câble de terre jaune/vert
doit être plus long d'environ 2 cm que le câble
de phase marron (ou noir).
Montage
40-50 mm
55 mm
30 mm
min. 650 mm
490 mm
min. 100 mm
270 mm
B
A
A) joint à retirer
B) équerres fournies
Attention Installez l'appareil uniquement
sur un plan de travail dont la surface est
plane.
Possibilités d'insertion
Élément de cuisine avec porte
Le panneau installé sous la table de cuisson
doit être facilement amovible et facile d'accès
au cas où une intervention technique serait né-
cessaire.
26
www.zanussi.com

min 20 mm
(max 150 mm)
30 mm
60 mm
b
a
a) Panneau amovible
b) Espace pour les branchements
Au-dessus d'un four
Les dimensions de la niche d'encastrement de
la table de cuisson doivent être conformes aux
indications et l'élément de cuisine doit être
équipé d'aérations pour assurer un apport d'air
continu. Les branchements électriques de la ta-
ble de cuisson et du four doivent être installés
séparément pour des raisons de sécurité et
pour permettre de retirer facilement le four de
l'ensemble.
50 cm
2
360 cm
2
180 cm
2
120 cm
2
Caracteristiques techniques
Dimensions de la table de
cuisson
Largeur : 290 mm
Longueur : 510 mm
Dimensions de la niche
d'encastrement de la table de
cuisson
Largeur : 270 mm
Longueur : 490 mm
Puissance des zones de
cuisson
Zone de cuisson arrière
180 mm
1.5 kW
Zone de cuisson avant
145 mm
1.0 kW
Puissance totale 2.5 kW
Alimentation électrique 230 V ~ 50 Hz
En matière de protection de l'environnement
Le symbole sur le produit ou son emballage
indique que ce produit ne peut être traité
comme déchet ménager. Il doit être remis au
point de collecte dédié à cet effet (collecte et
recyclage du matériel électrique et
électronique).
En procédant à la mise au rebut de l'appareil
dans les règles de l’art, nous préservons
l'environnement et notre sécurité, s’assurant
ainsi que les déchets seront traités dans des
conditions optimum.
Pour obtenir plus de détails sur le recyclage de
ce produit, veuillez prendre contact avec les
services de votre commune ou le magasin où
vous avez effectué l'achat.
Emballage
Tous les matériaux d'emballage sont éco-
logiques et recyclables. Les composants
en plastique sont identifiables grâce aux sigles :
>PE<,>PS<, etc. Veuillez jeter les matériaux
d'emballage dans le conteneur approprié du
centre de collecte des déchets de votre com-
mune.
27
www.zanussi.com

Inhalt
Sicherheitsinformationen _ _ _ _ _ _ _ _ _ _ 28
Sicherheitshinweise _ _ _ _ _ _ _ _ _ _ _ _ _ 29
Gerätebeschreibung _ _ _ _ _ _ _ _ _ _ _ _ 31
Täglicher Gebrauch _ _ _ _ _ _ _ _ _ _ _ _ _ 31
Praktische Tipps und Hinweise _ _ _ _ _ _ _ 32
Reinigung und Pflege _ _ _ _ _ _ _ _ _ _ _ _ 32
Fehlersuche _ _ _ _ _ _ _ _ _ _ _ _ _ _ _ _ _ 33
Montage _ _ _ _ _ _ _ _ _ _ _ _ _ _ _ _ _ _ _ 34
Technische Daten _ _ _ _ _ _ _ _ _ _ _ _ _ _ 36
Umwelttipps _ _ _ _ _ _ _ _ _ _ _ _ _ _ _ _ _ 36
Änderungen vorbehalten.
Sicherheitsinformationen
Lesen Sie vor der Montage und Verwendung des Geräts sorgfältig
die mitgelieferte Anleitung. Der Hersteller haftet nicht für Verletzun-
gen oder Schäden, die durch eine fehlerhafte Montage entstehen.
Bewahren Sie die Anleitung zum Nachschlagen auf.
Sicherheit von Kindern und schutzbedürftigen
Personen
Warnung! Es besteht Erstickungsgefahr, das Risiko von
Verletzungen oder permanenten Behinderungen.
• Dieses Gerät kann dann von Kindern ab 8 Jahren, von Personen
mit eingeschränkten körperlichen, sensorischen oder geistigen
Fähigkeiten sowie von Personen ohne bisherige Erfahrung im Um-
gang mit solchen Geräten bedient werden, wenn sie dabei von ei-
ner Person, die für ihre Sicherheit verantwortlich ist, beaufsichtigt
werden.
• Kinder dürfen nicht mit dem Gerät spielen.
• Halten Sie das Verpackungsmaterial von Kindern fern.
• Halten Sie Kinder und Haustiere vom Gerät fern, wenn es in Be-
trieb oder in der Abkühlphase ist. Berührbare Teile sind heiss.
• Falls Ihr Gerät mit einer Kindersicherung ausgestattet ist, empfeh-
len wir, diese einzuschalten.
• Reinigung und Wartung des Geräts darf nicht von Kindern ohne
Aufsicht erfolgen.
28
www.zanussi.com

Allgemeine Sicherheit
• Das Gerät und die zugänglichen Geräteteile werden während des
Betriebs heiß. Berühren Sie nicht die Heizelemente.
• Schalten Sie das Gerät nicht über eine externe Zeitschaltuhr oder
eine separate Fernsteuerung ein.
• Kochen mit Fett oder Öl auf einem unbeaufsichtigten Kochfeld ist
gefährlich und kann zu einem Brand führen.
• Versuchen Sie nicht einen Brand mit Wasser zu löschen, sondern
schalten Sie das Gerät aus und bedecken Sie die Flamme mit ei-
nem Deckel oder einer Feuerlöschdecke.
• Legen Sie keine Gegenstände auf dem Kochfeld ab.
• Benutzen Sie zum Reinigen des Gerätes keinen Dampfreiniger.
• Legen Sie keine Metallgegenstände wie Messer, Gabeln, Löffel
oder Topfdeckel auf die Oberfläche des Kochfelds, da diese heiß
werden können.
Sicherheitshinweise
Montage
Warnung! Nur eine qualifizierte Fachkraft
darf den elektrischen Anschluss des
Geräts vornehmen.
• Entfernen Sie das gesamte Verpackungsma-
terial.
• Stellen Sie ein beschädigtes Gerät nicht auf
und benutzen Sie es nicht.
• Halten Sie sich an die mitgelieferte Montage-
anleitung.
• Die Mindestabstände zu anderen Geräten
und Küchenmöbeln sind einzuhalten.
• Seien Sie beim Umsetzen des Geräts vor-
sichtig, denn es ist schwer. Tragen Sie stets
Sicherheitshandschuhe.
• Dichten Sie die Ausschnittskanten mit einem
Dichtungsmittel ab, um ein Aufquellen durch
Feuchtigkeit zu verhindern.
• Schützen Sie die Geräteunterseite vor
Dampf und Feuchtigkeit.
• Installieren Sie das Gerät nicht direkt neben
einer Tür oder unter einem Fenster. So kann
heißes Kochgeschirr nicht herunterfallen,
wenn die Tür oder das Fenster geöffnet wird.
• Wird das Gerät über Schubladen eingebaut,
achten Sie darauf, dass zwischen dem Gerä-
teboden und der oberen Schublade ein aus-
reichender Abstand für die Luftzirkulation
vorhanden ist.
• Der Boden des Geräts kann heiß werden.
Wir empfehlen eine feuerfeste Trennplatte
unter dem Gerät anzubringen, damit der Bo-
den nicht zugänglich ist.
Elektrischer Anschluss
Warnung! Brand- und
Stromschlaggefahr.
• Die elektrischen Anschlüsse müssen von ei-
nem qualifizierten Elektriker ausgeführt wer-
den.
• Das Gerät muss geerdet sein.
29
www.zanussi.com

• Vor der Durchführung jeglicher Arbeiten
muss das Gerät von der elektrischen Strom-
versorgung getrennt werden.
• Stellen Sie sicher, dass Sie das richtige Ka-
bel für den elektrischen Netzanschluss ver-
wenden.
• Achten Sie darauf, dass das Netzkabel nicht
lose hängt oder sich verheddert.
• Stellen Sie beim elektrischen Anschluss des
Gerätes sicher, dass das Netzkabel oder ggf.
der Netzstecker nicht mit dem heißen Gerät
oder heißem Kochgeschirr in Berührung
kommt.
• Achten Sie darauf, dass das Gerät ord-
nungsgemäß montiert wird. Wenn freiliegen-
de oder ungeeignete Netzkabel oder Netz-
stecker verwendet werden, kann der An-
schluss überhitzen.
• Sorgen Sie dafür, dass ein Berührungs-
schutz installiert wird.
• Kabel zugentlasten.
• Achten Sie darauf, Netzstecker und Netzka-
bel nicht zu beschädigen. Wenden Sie sich
zum Austausch des beschädigten Netzka-
bels an den Kundendienst oder einen Elektri-
ker.
• Die elektrische Installation muss eine Trenn-
einrichtung aufweisen, mit der Sie das Gerät
allpolig von der Stromversorgung trennen
können. Die Trenneinrichtung muss mit einer
Kontaktöffnungsbreite von mindestens 3 mm
ausgeführt sein.
• Verwenden Sie nur geeignete Trennvorrich-
tungen: Überlastschalter, Sicherungen
(Schraubsicherungen müssen aus dem Hal-
ter entfernt werden können), Fehlerstrom-
schutzschalter und Schütze.
Gebrauch
Warnung! Es besteht Verletzungs-,
Verbrennungs- und Stromschlaggefahr.
• Das Gerät ist für die Verwendung im Haus-
halt vorgesehen.
• Nehmen Sie keine technischen Änderungen
am Gerät vor.
• Schalten Sie das Gerät nicht über eine exter-
ne Zeitschaltuhr oder eine separate Fern-
steuerung ein.
• Lassen Sie das Gerät bei Betrieb nicht un-
beaufsichtigt.
• Bedienen Sie das Gerät nicht mit feuchten
oder nassen Händen oder wenn es mit Was-
ser in Kontakt gekommen ist.
• Legen Sie kein Besteck und keine Topfde-
ckel auf die Kochzonen. Sie werden heiß.
• Schalten Sie die Kochzonen nach jedem Ge-
brauch aus.
• Benutzen Sie das Gerät nicht als Arbeits-
oder Abstellfläche.
Warnung! Es besteht Explosions- und
Brandgefahr.
• Erhitzte Öle und Fette können brennbare
Dämpfe freisetzen. Halten Sie Flammen oder
erhitzte Gegenstände beim Kochen mit Fet-
ten und Ölen von diesen fern.
• Die von sehr heißem Öl freigesetzten Dämp-
fe können eine Selbstzündung verursachen.
• Bereits verwendetes Öl kann Lebensmittel-
reste enthalten und einen Brand bei niedrig-
eren Temperaturen als frisches Öl verursa-
chen.
• Platzieren Sie keine entflammbaren Produkte
oder Gegenstände, die mit entflammbaren
Produkten benetzt sind, im Gerät, auf dem
Gerät oder in der Nähe des Geräts.
• Löschen Sie eine Flamme nicht mit Wasser.
Schalten Sie das Gerät aus und bedecken
Sie die Flamme mit einem Deckel oder einer
Feuerlöschdecke.
Warnung! Das Gerät könnte beschädigt
werden.
• Stellen Sie kein heißes Kochgeschirr auf das
Bedienfeld.
• Lassen Sie das Kochgeschirr nicht leerko-
chen.
• Lassen Sie das Kochgeschirr nicht auf der
Kochplatte abkühlen.
• Schalten Sie die Kochzonen nicht mit leerem
oder ohne Kochgeschirr ein.
30
www.zanussi.com

• Legen Sie keine Alufolie auf das Gerät.
• Lassen Sie keine säurehaltigen Flüssigkeiten
wie Essig, Zitronensaft oder kalklösende Rei-
nigungsmittel mit dem Kochfeld in Berührung
kommen. Diese könnten matte Flecken verur-
sachen.
Reinigung und Pflege
Warnung! Das Gerät könnte beschädigt
werden.
• Reinigen Sie das Gerät regelmäßig, um eine
Abnutzung des Oberflächenmaterials zu ver-
hindern.
• Reinigen Sie das Gerät nicht mit einem
Wasser- oder Dampfstrahl.
• Reinigen Sie das Geräts mit einem weichen,
feuchten Tuch. Verwenden Sie ausschließ-
lich Neutralreiniger. Benutzen Sie keine
Scheuermittel, scheuernde Reinigungs-
schwämmchen, Lösungsmittel oder Metall-
gegenstände.
Entsorgung
Warnung! Verletzungs- oder
Erstickungsgefahr.
• Für Informationen zur ordnungsgemäßen Ent-
sorgung des Gerätes wenden Sie sich an die
zuständige kommunale Behörde vor Ort.
• Trennen Sie das Gerät von der Stromversor-
gung.
• Schneiden Sie das Netzkabel ab und entsor-
gen Sie es.
Gerätebeschreibung
Kochfeldanordnung
1
2
3
4
180
mm
145
mm
1
Hintere Kochzone 1500 W
2
Vordere Kochzone 1000 W
3
Betriebs-Kontrolllampe
4
Einstellknöpfe
Kochzonen-Schalter
Symbol Funktion
0 Position „Aus“
Symbol Funktion
1 Niedrigste Kochstufe
6 Höchste Kochstufe
Täglicher Gebrauch
Warnung! Siehe Sicherheitshinweise.
Drehen Sie zum Einschalten und Erhöhen der
Kochstufe den Schalter entgegen dem Uhrzei-
gersinn. Drehen Sie den Schalter im Uhrzeiger-
sinn, um die Kochstufe zu verringern. Drehen
Sie den Schalter auf 0, um die Kochzone aus-
zuschalten.
Die Betriebs-Kontrolllampe leuchtet, sobald ei-
ne der Kochzonen eingeschaltet wird und
leuchtet solange, bis die Kochzonen ausge-
schaltet werden.
31
www.zanussi.com

Vor der ersten Inbetriebnahme
Stellen Sie Kochgeschirr mit Wasser auf jede
Kochzone, stellen Sie die höchste Kochstufe
ein und lassen Sie das Gerät 10 Minuten ein-
geschaltet. Auf diese Weise werden die Rück-
stände im Gerät verbrannt. Lassen Sie dann
das Gerät auf der niedrigsten Kochstufe 20 Mi-
nuten eingeschaltet. Während dieser Zeit kann
es zu Geruchs- und Rauchentwicklung kom-
men. Das ist normal. Sorgen Sie für eine ausrei-
chende Belüftung.
Blitzkochzone
Die Blitzkochzone ist mit einem roten Punkt in
ihrer Mitte gekennzeichnet. Sie heizt sich
schneller als herkömmliche Kochzonen auf.
Der rote Punkt ist auf die Kochzone gemalt und
kann sich nach einiger Zeit lösen. Dies hat je-
doch keine Auswirkung auf den Gerätebetrieb.
Beim ersten Gebrauch der Blitzkochzone kön-
nen sich Rauch und Gerüche entwickeln. Diese
nehmen nach einiger Zeit ab.
Praktische Tipps und Hinweise
Warnung! Siehe Sicherheitshinweise.
Energie sparen
• Verschließen Sie das Kochgeschirr,
wenn möglich, immer mit einem Deckel.
• Stellen Sie das Kochgeschirr auf die
Kochzone und schalten Sie diese erst
dann ein.
• Schalten Sie die Kochzone vor dem En-
de der Garzeit aus, um die Restwärme
zu nutzen.
• Für zufriedenstellende Ergebnisse sollte
der Durchmesser des Geschirrs und der
verwendeten Kochzone gleich groß
sein.
Kochgeschirr
• Der Boden des Kochgeschirrs sollte so
dick und flach wie möglich sein.
Verwenden Sie Töpfe und Pfannen mit ei-
nem Boden, der der Größe der Kochzone
entspricht.
Kochzone Durchmesser des Kochge-
schirrs
Vorn max. 145 mm
Kochzone Durchmesser des Kochge-
schirrs
Hinten max. 180 mm
Anwendungsbeispiele zum Kochen
Koch-
stufe:
Verwendung:
1 Warmhalten
2 Sanftes Köcheln
3 Köcheln
4 Braten/Bräunen
5 Zum Kochen bringen
6 Zum Kochen bringen/Schnell-Braten/
Frittieren
Informationen zu Acrylamiden
Wichtig! Nach neuesten wissenschaftlichen
Erkenntnissen kann die Bräunung von
Lebensmitteln, speziell bei stärkehaltigen
Produkten, eine gesundheitliche Gefährdung
durch Acrylamid verursachen. Daher empfehlen
wir, bei möglichst niedrigen Temperaturen zu
garen und die Speisen nicht zu stark zu
bräunen.
Reinigung und Pflege
Warnung! Siehe Sicherheitshinweise.
Reinigen Sie das Gerät nach jedem Gebrauch.
Achten Sie immer darauf, dass der Boden des
Kochgeschirrs sauber ist.
32
www.zanussi.com

Warnung! Trennen Sie vor Reinigungs-
oder Wartungsarbeiten das Kochfeld
immer vom Netz.
Das Kochfeld lässt sich am einfachsten
reinigen, solange es noch warm ist; auf
diese Weise können Speisereste leichter ent-
fernt werden.
Warnung! Scharfe Gegenstände und
scheuernde Reinigungsmittel können das
Gerät beschädigen.
Reinigen Sie das Gerät aus Sicherheitsgründen
nicht mit einem Dampfstrahl- oder
Hochdruckreiniger.
Kratzer oder dunkle Flecken beeinträchti-
gen die Funktionsfähigkeit des Geräts
nicht.
Entfernen von Verunreinigungen:
1. Verwenden Sie feines Scheuerpulver oder
ein Scheuerschwämmchen, um Ver-
schmutzungen zu entfernen.
2. Reinigen Sie das Gerät mit einem feuchten
Tuch und etwas Spülmittel.
3. Anschließend die Kochplatte leicht aufhei-
zen und trocknen lassen.
4. Reiben Sie die Kochzonen zur Vermeidung
von Rost mit einem Tuch und einem Trop-
fen Olivenöl ein.
Wichtig! Verwenden Sie für die
Edelstahlrahmen des Kochfelds ein
handelsübliches Reinigungsmittel für Edelstahl.
Der Edelstahlrahmen der Kochplatte kann
sich aufgrund der Hitzebelastung leicht
verfärben.
Fehlersuche
Problem Mögliche Ursache und Abhilfe
Das Gerät funktioniert nicht. • Sehen Sie im Sicherungskasten nach, ob die Sicherung des Geräts
ausgelöst hat. Wenn die Sicherung öfter auslöst, wenden Sie sich an
eine Elektrofachkraft.
Die Kochzone heizt nicht auf. • Vergewissern Sie sich, dass das Gerät und die Stromversorgung
eingeschaltet sind.
• Drehen Sie den richtigen Kochzonenknopf.
• Sehen Sie im Sicherungskasten nach, ob die Sicherung des Geräts
ausgelöst hat. Wenn die Sicherung öfter auslöst, wenden Sie sich an
eine Elektrofachkraft.
Die Heizleistung des Kochfelds ist
nicht zufriedenstellend.
• Vergewissern Sie sich, dass das Kochfeld sauber und trocken ist.
• Kontrollieren Sie, ob das Kochgeschirr die für die Kochzone passen-
de Größe hat.
• Verwenden Sie ausschließlich Kochgeschirr mit ebenen Böden.
• Stellen Sie sicher, dass die Einstellung für die Kochart geeignet ist.
33
www.zanussi.com

Wenn ein Problem vorliegt, versuchen Sie zu-
nächst, die Ursache des Problems herauszufin-
den und das Problem selbst zu beheben. Wenn
Sie das Problem nicht selbst lösen können,
wenden Sie sich an Ihren Händler oder an den
Kundendienst.
Wenn Sie das Gerät falsch bedient haben
oder es nicht von einer autorisierten Fach-
kraft angeschlossen wurde, kann auch während
der Garantiezeit für den Besuch eines Kunden-
diensttechnikers oder Händlers eine Gebühr
anfallen.
Im Zubehörbeutel mitgelieferte Aufkleber
Bringen Sie die Aufkleber, wie unten gezeigt,
an:
MOD.
PROD.NO.
SER.NO
DATA
MOD.
PROD.NO.
SER.NO
DATA
MODELMODEL
MOD.
PROD.NO.
SER.NO.
03 IT
MADE IN ITALY
TYPE
230V-50Hz
IP20
0049
1 2 3
1
Kleben Sie ihn auf die Garantiekarte und
verschicken Sie diesen Teil
2
Kleben Sie ihn auf die Garantiekarte und
behalten Sie diesen Teil
3
Kleben Sie ihn auf die Gebrauchsanwei-
sung
Halten Sie folgende Angaben bereit, da-
mit Ihr Anliegen schnell und ordnungsge-
mäß bearbeitet werden kann. Die erfor-
derlichen Angaben finden Sie auf dem Ty-
penschild.
• Modell ............
• Produktnummer (PNC) ............
• Seriennummer (S.N.) ............
Verwenden Sie ausschließlich Originalersatztei-
le. Diese sind beim Kundendienst und autori-
sierten Ersatzteilhändlern erhältlich.
Montage
Warnung! Siehe Sicherheitshinweise.
Montage
Warnung! Lesen Sie die
Gebrauchsanleitung sorgfältig und folgen
Sie den Anweisungen. Es besteht
Verletzungsgefahr und das Gerät könnte
beschädigt werden.
• Vergewissern Sie sich, dass das Gerät beim
Transport nicht beschädigt wurde. Schließen
Sie das Gerät nicht an, wenn Beschädigun-
gen festzustellen sind. Wenden Sie sich bei
Bedarf an den Lieferanten.
• Einbaugeräte dürfen nur nach dem Einbau in
bzw. unter normgerechte, passende Einbau-
schränke und Arbeitsplatten betrieben wer-
den. Achten Sie darauf, dass die Einbau-
schränke und Arbeitsplatten den Normen
entsprechen.
34
www.zanussi.com

• Halten Sie unbedingt alle geltenden Vor-
schriften und Normen (Sicherheitsvorschrif-
ten, Vorschriften zum Recycling, Vorschriften
zur elektrischen Sicherheit usw.) des Landes
ein, in dem Sie das Gerät verwenden.
Warnung! Es besteht Verletzungsgefahr
durch Stromschläge.
• Die Netzanschlussklemme liegt an Span-
nung.
• Die Netzanschlussklemme muss spannungs-
frei gemacht werden.
• Wenn sich die Montagehalterung in der Nä-
he der Klemmenleiste befindet, sorgen Sie
dafür, dass das Netzanschlusskabel nie in
Kontakt mit der Kante der Halterung kommt.
Elektrischer Anschluss
• Vergewissern Sie sich, dass die Netzspan-
nung und -frequenz in Ihrer Region mit den
auf dem Typenschild angegebenen An-
schlusswerten übereinstimmen.
• Das Gerät wird mit einem Netzkabel geliefert.
Dazu muss ein passender Stecker verwendet
werden, der für die auf dem Typenschild an-
gegebene Gesamtstromaufnahme ausgelegt
ist. Achten Sie darauf, den Stecker in eine
passende Steckdose zu stecken.
• Das Gerät darf ausschließlich an eine ord-
nungsgemäß installierte Schutzkontaktsteck-
dose angeschlossen werden.
• Stellen Sie sicher, dass der Netzstecker
nach der Montage noch zugänglich ist.
• Ziehen Sie nicht am Netzkabel, um das Gerät
von der Spannungsversorgung zu trennen.
Ziehen Sie dazu immer direkt am Netzste-
cker.
• Es besteht Brandgefahr, wenn das Gerät mit
einem Verlängerungskabel, Adapter oder an
eine Mehrfachsteckdose angeschlossen
wird. Stellen Sie sicher, dass die Massever-
bindung den Normen und Vorschriften ent-
spricht.
• Das Netzkabel darf nicht heißer als 90 °C
werden.
Schließen Sie den blauen Nullleiter an die mit
„N“ gekennzeichnete Klemme an. Schließen Sie
das braune (oder schwarze) Phasenkabel an
die mit „L“ gekennzeichnete Klemme an. Las-
sen Sie das Phasenkabel stets angeschlossen.
Netzkabel ersetzen
Ersetzen Sie das Netzkabel ausschließlich
durch eines vom Typ H05V2V2-F T90 o. ä.
Vergewissern Sie sich, dass der Kabelquer-
schnitt für die Spannung und Arbeitstemperatur
geeignet ist. Der gelb-grüne Erdleiter muss ca.
2 cm länger als der braune (bzw. schwarze)
Phasenleiter sein.
Montage
40-50 mm
55 mm
30 mm
min. 650 mm
490 mm
min. 100 mm
270 mm
B
A
A) zu entfernende Dichtung
B) mitgelieferte Halterungen
Vorsicht! Montieren Sie das Gerät nur in
einer flachen Arbeitsplatte.
Einbaumöglichkeiten
Unterbaumöbel mit Tür
Die unter dem Kochfeld eingebaute Platte muss
sich leicht entfernen lassen und einen einfa-
chen Zugang im Fall einer notwendigen Repa-
ratur ermöglichen.
35
www.zanussi.com

min 20 mm
(max 150 mm)
30 mm
60 mm
b
a
a) Entfernbare Platte
b) Raum für Anschlüsse
Unterbaumöbel mit Backofen
Die Abmessungen der Kochfeldaussparung
müssen den Angaben entsprechen, und die
Unterbaumöbel müssen mit Lüftungsschlitzen
versehen werden, um eine ständige Luftzufuhr
zu gewährleisten. Kochfeld und Backofen müs-
sen aus Sicherheitsgründen über separate
elektrische Anschlüsse verfügen. Der Backofen
muss sich leicht aus dem Unterbauschrank ent-
fernen lassen.
50 cm
2
360 cm
2
180 cm
2
120 cm
2
Technische Daten
Abmessungen des Kochfelds
Breite: 290 mm
Länge 510 mm
Abmessungen der
Kochfeldaussparung
Breite: 270 mm
Länge 490 mm
Leistung der Kochzonen
Hintere Kochzone 180
mm
1.5 kW
Vordere Kochzone 145
mm
1.0 kW
Gesamtleistung 2.5 kW
Netzanschluss 230 V, 50 Hz
Umwelttipps
Das Symbol auf dem Produkt oder seiner
Verpackung weist darauf hin, dass dieses
Produkt nicht als normaler Haushaltsabfall zu
behandeln ist, sondern an einem Sammelpunkt
für das Recycling von elektrischen und
elektronischen Geräten abgegeben werden
muss. Durch Ihren Beitrag zum korrekten
Entsorgen dieses Produkts schützen Sie die
Umwelt und die Gesundheit Ihrer Mitmenschen.
Umwelt und Gesundheit werden durch falsches
Entsorgen gefährdet. Weitere Informationen
über das Recycling dieses Produkts erhalten
Sie von Ihrer Gemeinde, Ihrer Müllabfuhr oder
dem Geschäft, in dem Sie das Produkt gekauft
haben.
Verpackungsmaterial
Die Verpackungsmaterialien sind umwelt-
verträglich und wiederverwertbar. Kunst-
stoffteile sind mit internationalen Abkürzungen
wie z. B. >PE<,>PS< usw. gekennzeichnet.
Entsorgen Sie das Verpackungsmaterial bei
den kommunalen Entsorgungsstellen in den da-
für vorgesehenen Behältern.
36
www.zanussi.com

37
www.zanussi.com

38
www.zanussi.com

39
www.zanussi.com

www.zanussi.com/shop
397221502-A-372012
-
 1
1
-
 2
2
-
 3
3
-
 4
4
-
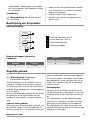 5
5
-
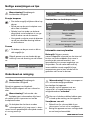 6
6
-
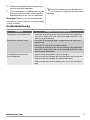 7
7
-
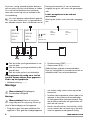 8
8
-
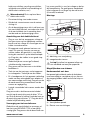 9
9
-
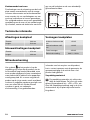 10
10
-
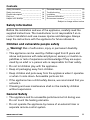 11
11
-
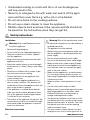 12
12
-
 13
13
-
 14
14
-
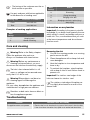 15
15
-
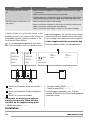 16
16
-
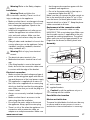 17
17
-
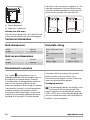 18
18
-
 19
19
-
 20
20
-
 21
21
-
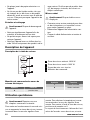 22
22
-
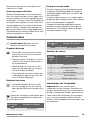 23
23
-
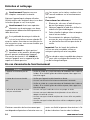 24
24
-
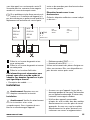 25
25
-
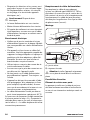 26
26
-
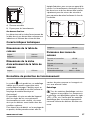 27
27
-
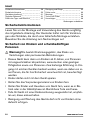 28
28
-
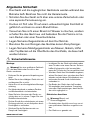 29
29
-
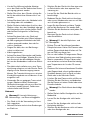 30
30
-
 31
31
-
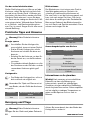 32
32
-
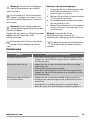 33
33
-
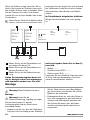 34
34
-
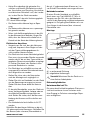 35
35
-
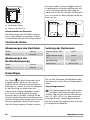 36
36
-
 37
37
-
 38
38
-
 39
39
-
 40
40


in andere talen
- English: Zanussi ZEE3921IXA User manual
- français: Zanussi ZEE3921IXA Manuel utilisateur
- Deutsch: Zanussi ZEE3921IXA Benutzerhandbuch