Philips SPD1100BD/93 Handleiding
- Categorie
- Optische schijfstations
- Type
- Handleiding
Pagina wordt geladen...
Pagina wordt geladen...
Pagina wordt geladen...
Pagina wordt geladen...

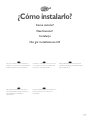
How to install?
Einbau des Laufwerks
Comment installer?
Come installare
Hoe installeren?
5
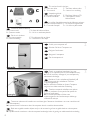
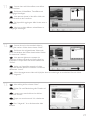
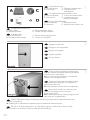
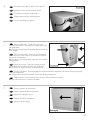
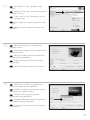
Please refer to your PC manual or
contact your local dealer for more
information.
Weitere Informationen finden Sie im
PC-Handbuch bzw. können Sie bei
Ihrem Händler erfragen.
Pour plus d'informations, reportez-vous
au mode d’emploi de l'ordinateur ou
contactez votre revendeur.
Fare riferimento al manuale del PC o
contattare il proprio rivenditore locale
per ulteriori informazioni.
Zie de handleiding bij uw PC of neem
contact op met uw lokale leverancier
voor meer informatie.
UK D F
I NL

6
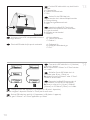
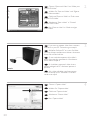
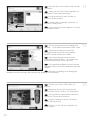
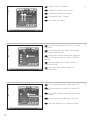
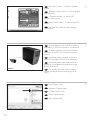
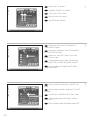
Touch an unpainted metal part (eg. your
heating or an unpainted part of your computer case).
➤ This will avoid any damage to your computer by
electrostatic discharge.
Berühren Sie ein unlackiertes Metallteil (z.B.
Ihre Heizung oder ein unlackiertes Teil Ihres
Computergehäuses).
➤ Das verhindert Schäden an Ihrem Computer
aufgrund von elektrostatischer Entladung.
Touchez une partie métallique non peinte
(p. ex. un radiateur ou une partie non peinte du
boîte de l'ordinateur).
➤ Ce contact permettra d'éviter tout
endommagement de l'ordinateur par décharge
d'électricité statique.
Toccare un elemento di metallo non verniciato (p.es. l’elemento riscaldante o uno non verniciato del
case del computer).
➤ In questo modo si eviteranno danni al computer dovuti a scariche elettrostatiche.
Raak een ongelakt metalen object aan (b.v. de verwarming of een ongelakt deel van de computer-
behuizing).
➤ Op deze manier voorkomt u dat de computer beschadigd raakt als gevolg van elektrostatische ontlading.
3
Switch your computer off.
Schalten Sie Ihren Computer aus.
Éteignez l’ordinateur.
Spegnere il computer.
Zet de computer uit.
2
1
This can be found in the box:
A: Your new drive C: The Nero software disc
B: This manual D: 4 screws in a small bag
Verpackungsinhalt:
A: Ein neues Laufwerk C: Die Nero Software-CD
B: Dieses Handbuch D: 4 Schrauben in einem
kleinen Beutel
Le coffret d'emballage contient les éléments suivants :
A : Votre nouveau lecteur C : Le disque du logiciel Nero
B : Ce mode d'emploi D : 4 vis dans un petit sachet
Contenuto della confezione:
A: La nuova unità C: Il disco del software Nero
B: Questo manuale D: 4 viti in un sacchetto piccolo
Dit zit er in de doos:
A: Uw nieuwe station C: De software-disk van Nero
B: Deze handleiding D: 4 schroeven in een zakje
UK
D
F
I
NL
UK
D
F
I
NL
UK
D
F
I
NL
Pagina wordt geladen...

8
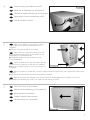
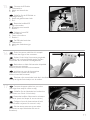
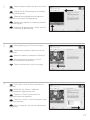
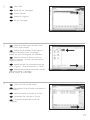
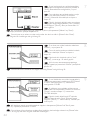
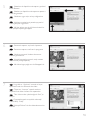
If you replace a drive, take it out and check
which setting it has ("Master" or "Slave").
Remember this setting and go to step 10.
Wenn Sie ein Laufwerk ersetzen, bauen Sie
es aus und überprüfen Sie seine Einstellung
("Master" oder "Slave"). Merken Sie sich diese
Einstellung und gehen Sie zu Schritt 10.
Si vous remplacez un lecteur, sortez-le et
vérifiez ses réglages ("Maître" ("Master") ou "Esclave"
("Slave")). Notez ces réglages et passez à l'étape 10.
In caso di sostituzione di un'unità, estrarla e
verificarne le impostazioni ("Master" o "Slave").
Annotare l'impostazione e andare al punto 10.
Als u een station gaat vervangen moet u hem verwijderen en kijken welke instelling het had ("Master"
of "Slave"). Onthoud deze instelling en ga naar stap 10.
If you have no drive installed, remember
"Master" and go to step 10.
Wenn noch kein Laufwerk installiert ist,
merken Sie sich "Master" und gehen Sie zu Schritt 10.
Si aucun lecteur n'est encore installé, notez
"Maître" ("Master") et passez à l'étape 10.
Se non è installata alcuna unità, annotare
l'impostazione "Master" e andare al punto 10.
Als er geen station geïnstalleerd is, moet u
"Master" onthouden en naar stap 10 gaan.
D
F
I
NL
UK
If you add a drive, check the drive has which
remains in the PC ("Master" or "Slave", see step 11),
remember the OTHER setting.
Wenn Sie ein Laufwerk hinzufügen,
überprüfen Sie die Einstellung des bereits
vorhandenen Laufwerks im PC ("Master" oder
"Slave", siehe auch Schritt 11) und merken Sie sich
die ANDERE Einstellung.
Si vous ajoutez un lecteur, vérifiez les
réglages du lecteur qui se trouve dans l'ordinateur
("Maître" ("Master") ou "Esclave" ("Slave"), voir
l'étape 11) et notez l'AUTRE réglage.
In caso di integrazione di un'unità, controllare l'impostazione dell'unità che resta nel PC ("Master"
o "Slave", vedere il punto 11) e annotare l'ALTRA impostazione.
Als u een station toevoegt, moet u het station controleren dat in de PC blijft ("Master" of "Slave",
zie stap 11), onthoud de ANDERE instelling.
UK
D
F
NL
I
9
8
7
UK
D
F
I
NL
Pagina wordt geladen...
Pagina wordt geladen...

11
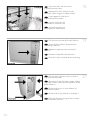
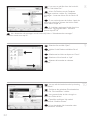
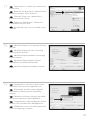
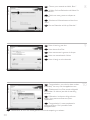
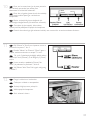
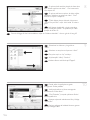
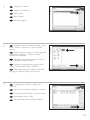
Connect the IDE cable
A: Coloured line.
B: Notch and closed hole.
C: Pin1.
Schließen Sie das IDE-Kabel an.
A: Farbige Leitung.
B: Kerbe und geschlossenes Loch.
C: Pin1.
Raccordez le câble IDE
A : Ligne de couleur
B : Encoche et trou bouché
C : Broche 1
Collegare il cavo IDE
A: Linea colorata.
B: Tacca e foro chiuso.
C: Piedino 1.
De IDE-kabel aansluiten
A: Gekleurde lijn.
B: Nokje plus ontbrekend gat.
C: Pin 1.
UK
D
F
I
NL
15
16
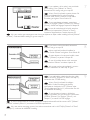
Find a free power cable like this example.
Please note the edges of the connector.
Suchen Sie ein freies Stromversorgungskabel,
das häufig wie in diesem Beispiel gezeigt aussieht.
Die Kanten des Anschlusses sind abgerundet.
Recherchez un câble d’alimentation disponible,
comme dans cet exemple.
Notez la position des bords du connecteur.
Individuare un cavo di alimentazione
disponibile, come quello nell'esempio.
Notare i bordi del connettori.
Zoek een vrije stroomkabel, zoals die in de afbeelding.
Let op de afgeschuinde hoekjes van de stekker.
UK
D
F
I
NL
17
Connect the power cable into your drive
(the edges from step 16 will be on top).
Schließen Sie das Netzkabel am Laufwerk an
(die Kanten von Schritt 16 sind oben).
Raccordez le câble d'alimentation au lecteur
(les bords à partir de l'étape 16 sont au-dessus).
Collegare il cavo di alimentazione all'unità
(i bordi indicati nel punto 16 saranno in alto).
Sluit het stroomsnoer aan op uw station
(de randen van stap 16 bevinden zich aan de
bovenkant).
UK
D
F
I
NL

12
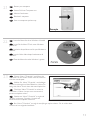
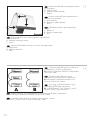
Secure the drive with the screws
(if possible on both sides).
Befestigen Sie das Laufwerk mit den
Schrauben (wenn möglich an beiden Seiten).
Fixez l’appareil à l’aide des vis
(si possible des deux côtés).
Fissare l'unità con le viti
(se possibile su entrambi i lati).
Schroef het station vast
(zo mogelijk aan beide zijden).
20
19
18
UK
D
F
I
NL
Put the cover you took off in step 5 back on.
Setzen Sie die in Schritt 5 abgenommene
Abdeckung wieder auf.
Replacez le capot que vous avez retiré à
l’étape 5.
Rimettere il coperchio tolto al punto 5.
Plaats de in stap 5 verwijderde kast weer terug.
UK
D
F
I
NL
Put the screws (if there were any) back in
and reconnect the cables.
Schrauben Sie die Schrauben (sofern welche
vorhanden waren) wieder ein und schließen Sie die
Kabel wieder an.
Resserrez la ou les vis, le cas échéant, et
rebranchez les câbles.
Riavvitare le viti (se presenti) e ricollegare i
cavi.
Plaats de schroeven terug (als die er waren)
en sluit de kabels weer aan.
UK
D
F
I
NL

13
21
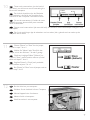
Restart your computer.
Starten Sie Ihren Computer neu.
Allumez l’ordinateur.
Riavviare il computer.
Start uw computer opnieuw op.
UK
D
F
I
NL
22
Insert the Nero disc when Windows is loaded.
Legen Sie die Nero CD ein, wenn Windows
geladen ist.
Insérez le disque Nero une fois que Windows a
démarré.
Inserire il disco Nero dopo il caricamento di
Windows.
Plaats de Nero-disc nadat Windows is gestart.
UK
D
F
I
NL
23
Choose “Nero 7 Essentials” and follow the
instructions on the screen. When finished, continue
with the next chapter.
Wählen Sie „Nero 7 Essentials“ und befolgen
Sie die Anweisungen auf dem Bildschirm. Wenn Sie
fertig sind, fahren Sie mit dem nächstem Kapitel fort.
Choisissez 'Nero 7 Essentials' et suivez les
instructions à l'écran. Lorque vous avez terminé,
passez au chapitre suivant.
Selezionare “Nero 7 Essentials” e seguire le
istruzioni a schermo. Quando si è terminato,
continuare con il capitolo successivo.
Kies “Nero 7 Essentials” en volg de aanwijzingen op het scherm. Ga, als u klaar bent,
verder met het volgende hoofdstuk.
UK
D
F
I
NL
Pagina wordt geladen...

15
Up to date?
Sind Sie auf dem neuesten Stand?
Vos logiciels sont-ils à jour ?
Aggiornamento
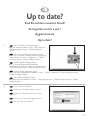
Up to date?
2
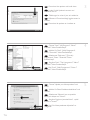
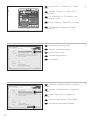
Click “Check for updates”.
Klicken Sie auf “Nach Updates suchen“.
Cliquez sur 'Recherchez les mises-à-jour
logiciels'.
Fare clic su “Controlla gli aggiornamenti”.
Klik op “Zoek naar updates”.
UK
D
F
I
NL
1
Start the Philips Intelligent Agent.
➤ If not available, choose “Start”,“(All) Programs”,
“Philips Intelligent Agent”,“Philips Intelligent
Agent”.
Starten Sie den Philips Intelligent Agent.
➤ Wenn er auf dem Desktop nicht zur Verfügung
steht, wählen Sie “Start“, „Programme“,“Philips
Intelligent Agent“,“Philips Intelligent Agent“.
Lancez Philips Intelligent Agent.
➤ S'il n'est pas directement disponible,
sélectionnez 'Démarrer', '(Tous les) Programmes',
'Philips Intelligent Agent', 'Philips Intelligent Agent'.
Avviare Philips Intelligent Agent.
➤ Se non fosse disponibile, selezionare “Start”,“(Tutti i) Programmi”,“Philips Intelligent Agent”,
“Philips Intelligent Agent”.
Start Philips Intelligent Agent.
➤ Indien niet beschikbaar,kies “Start”,“(Alle) programma’s”,“Philips Intelligent Agent”,“Philips
Intelligent Agent”.
UK
D
F
I
NL

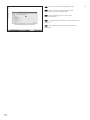
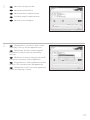
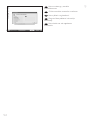
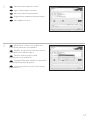
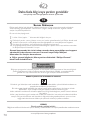
Choose "Update your Nero products" and
"Next".
Wählen Sie "Nero Produkte aktualisieren" und
"Weiter".
Sélectionnez "Mettre à jour vos produits
Nero" puis cliquez sur "Suivant".
Scegliere "Aggiorna i prodotti Nero", quindi
fare clic su "Avanti".
Kies "Uw Nero-producten bijwerken" en
"Volgende".
Choose "Start", "(All) Programs", "Nero 7
Essentials", "Nero ProductSetup".
Wählen Sie "Start", "(Alle) Programme",
"Nero 7 Essentials", "Nero ProductSetup".
Sélectionnez "Démarrer", "(Tous les)
Programmes", "Nero 7 Essentials", "Nero
ProductSetup".
Scegliere "Start", "Tutti i programmi", "Nero 7
Essentials", "Nero ProductSetup".
Kies "Start", "(Alle) Programma’s", "Nero 7
Essentials", "Nero ProductSetup".
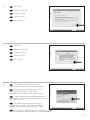
Download the updates and install them.
Laden Sie die Updates herunter und
installieren Sie sie.
Téléchargez les mises à jour et installez-les.
Effettuare il Download degli aggiornamenti e
installarli.
Download de updates en installeer ze.
16
5
4
3
F
I
NL
UK
D
F
I
NL
UK
D
F
I
NL
UK
D
Pagina wordt geladen...
Pagina wordt geladen...
Pagina wordt geladen...
Pagina wordt geladen...
Pagina wordt geladen...

22
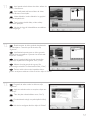
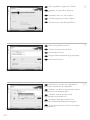
If you want to add files from the hard disk,
choose “Add Video Files”.
Wenn Sie Dateien von der Festplatte
hinzufügen möchten, wählen Sie „Videodaten
hinzufügen“. Ansonsten fahren Sie mit Schritt 10
fort.
Si vous voulez ajouter des fichiers à partir du
disque dur, choisissez 'Ajouter des fichiers vidéo'.
Sinon, allez à l'étape 10.
Se si desidera aggiungere file dal disco fisso,
selezionare “Aggiungi File Video”. Altrimenti
passare al punto 10.
Als u bestanden wilt toevoegen van de harde schijf, kiest u “Videobestanden toevoegen”.
Ga anders verder met stap 10.
You can edit the loaded movies by choosing
“Edit Movie”.
Sie können die geladenen Filme bearbeiten,
indem Sie “Film bearbeiten“ wählen.
Vous pouvez éditer les films chargés en
choisissant 'Editer le film'.
È possibile modificare i film caricati
selezionando “Modifica Filmato”.
U kunt de geladen films bewerken door
“Film bewerken” te kiezen.
Select the files and click ‘Open”.
Wählen Sie die Dateien und klicken Sie auf
“Öffnen“.
Sélectionnez les fichiers et cliquez sur 'Ouvrir'.
Selezionare i file e fare clic su “Apri”.
Selecteer de bestanden en selecteer
‘Openen”.
10
9
8
UK
D
F
I
NL
UK
D
F
I
NL
UK
D
I
NL
F

23
You can here add video effects, text effects
and transitions.
Sie können Videoeffekte, Texteffekte und
Übergänge hinzufügen.
Vous pouvez ajouter ici des effets vidéo, des
effets de texte et des transitions.
Qui è possibile aggiungere effetti video, testo e
transizioni.
Hier kunt u video-effecten, teksteffecten en
overgangen toevoegen.
11
12
13
UK
D
F
I
NL
You can also trim the recorded video by
sliding the markers. When done, choose “Next”.
Sie können das aufgezeichnete Video auch
durch Verschieben der Marker beschneiden. Klicken
Sie danach auf “Weiter“.
Vous pouvez également recouper les
séquences vidéo enregistrées en faisant glisser les
marqueurs. Lorsque vous avez terminé, choisissez
'Suivant'.
Inoltre, qui è possibile accorciare il video
registrato, facendo scorrere i marcatori. Al termine
selezionare “Avanti”.
U kunt de opgenomen video ook bijsnijden door de markeringen te verschuiven. Kies, als u klaar
bent, “Volgende”.
UK
D
F
I
NL
After editing all files, choose “Next”.
Klicken Sie nach Bearbeitung aller Dateien auf
“Weiter“.
Lorsque vous avez édité tous les fichiers,
choisissez 'Suivant'.
Dopo aver terminato tutti i file, selezionare
“Avanti”.
Kies “Volgende”, als u alle bestanden hebt
bewerkt
UK
D
I
NL
F

24
Enter the title in the “Header” field and click
“Edit menu”.
Geben Sie den Titel im Feld „Kopfzeile“ ein
und klicken Sie auf “Menü bearbeiten“.
Entrez le titre dans la zone 'En-tête' et
cliquez sur 'Editez le Menu'.
Inserire il titolo nel campo “Intestazion” e
fare clic su “Modif. menu”.
Voer de titel in het veld “Koptekst” in en klik
op “Bewerken menu”.
Preview your movie. Click “Next” to
continue.
Betrachten Sie nun eine Vorschau Ihres
Videos. Klicken Sie auf “Weiter“, um fortzufahren.
Vous pouvez alors prévisualiser votre film.
Cliquez sur 'Suivant' pour continuer.
Eseguire l’anteprima del film. Fare clic su
“Avanti” per continuare.
Preview uw film. Klik op “Volgende” om
verder te gaan.
You can change the layout, the background,
add titles,… here. When done, choose “Next” twice.
Sie können jetzt das Layout oder den
Hintergrund ändern und Titel usw. hinzufügen.
Klicken Sie danach zweimal auf “Weiter“.
Vous pouvez changer la mise en forme,
l'arrière-plan, ajouter des titres… ici. Lorsque vous
avez terminé, choisissez 'Suivant' deux fois.
Qui è possibile modificare il layout, lo sfondo,
aggiungere titoli ecc. Al termine selezionare due volte
“Avanti”.
Hier kunt u de indeling en de achtergrond
veranderen en titels toevoegen. Klik twee keer op “Volgende” als u klaar bent.
16
15
14
UK
D
F
I
NL
UK
D
F
I
NL
UK
D
I
NL
F
Pagina wordt geladen...
Pagina wordt geladen...
Pagina wordt geladen...
Pagina wordt geladen...
Pagina wordt geladen...
Pagina wordt geladen...
Pagina wordt geladen...
Pagina wordt geladen...
Pagina wordt geladen...
Pagina wordt geladen...
Pagina wordt geladen...
Pagina wordt geladen...
Pagina wordt geladen...

38
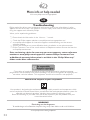
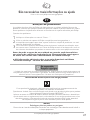
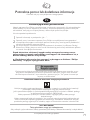
Meer informatie of hulp nodig
Ga naar www.philips.com/storageupdates
Probleemoplossing
De optische schijfstations van Philips zijn met de grootst mogelijke zorg gemaakt. Als zich
problemen voordoen, blijkt vaak dat het station zelf geen defecten heeft. U kunt de meeste
van deze problemen eenvoudig oplossen door de hulpprogramma's van Philips te gebruiken.
Wat te doen bij problemen:
1
Controleer de informatie in de handleiding.
2
Ga naar de ondersteuningssites van Philips op www.philips.com/storageupdates en
www.philips.com/support voor interactieve ondersteuning, probleemoplossing en de
laatste software-updates.
3
Als zich tijdens installatie of gebruik andere problemen voordoen, kunt u contact
opnemen met Philips Customer Care via het e-mailadres of de telefoonnummers die u
kunt vinden op www.philips.com/contact.
Voordat u een beroep doet op de garantie op een station,moet u een
referentienummer voor retourzending vragen op
www.philips.com/support of bij Philips Customer Care.
➤ Er is aanvullende garantie-informatie beschikbaar in de map "Philips
Warranty" op de schijf met de Nero-software.
“Het zonder toestemming vervaardigen van kopieën van auteursrechtelijk beschermde
werken, inclusief computer programma’s, bestanden, uitzendingen en geluidsopnames, kan
een inbreuk op auteursrechten en een strafbaar feit zijn. De apparatuur dient niet voor
dergelijke doeleinden gebruikt te worden.”
WEEE-markering: Verwijdering van uw oud product
Uw product is vervaardigd van kwalitatief hoogwaardige materialen en onderdelen, welke
gerecycled en opnieuw gebruikt kunnen worden.
Als u op uw product een doorstreepte afvalcontainer op wieltjes ziet, betekent dit dat het
product valt onder de EU-richtlijn 2002/96/EC.
Win inlichtingen in over de manier waarop elektrische en elektronische producten in uw regio
gescheiden worden ingezameld.
Neem bij de verwijdering van oude producten de lokale wetgeving in acht en plaats deze
producten niet bij het gewone huishoudelijke afval. Als u oude producten correct verwijdert
voorkomt u negatieve gevolgen voor het milieu en de volksgezondheid.
PAS OP
Plastic zakken kunnen gevaarlijk zijn.
Om gevaar van verstikking te voorkomen houd de zak buiten bereik van kleine kinderen.
www.philips.com/storageupdates
NL
Pagina wordt geladen...
Pagina wordt geladen...
Pagina wordt geladen...
Pagina wordt geladen...
Pagina wordt geladen...
Pagina wordt geladen...
Pagina wordt geladen...
Pagina wordt geladen...
Pagina wordt geladen...
Pagina wordt geladen...

49
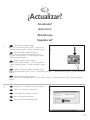
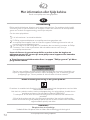
¿Actualizar?
Atualizado?
Güncel mi?
Aktualizacja
Uppdaterad?
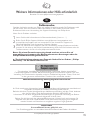
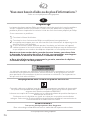
1
Inicie Philips Intelligent Agent.
➤ Si no está disponible, elija “Inicio”, “Programas”,
“Philips Intelligent Agent”, “Philips Intelligent Agent”.
Iniciar o Philips Intelligent Agent.
➤ Se não estiver disponível, selecione “Iniciar”,
“(Todos) os programas”, “Philips Intelligent Agent”,
“Philips Intelligent Agent”.
Philips Intelligent Agent’ı başlat.
➤ Eğer hazır değilse, “Başlat”, “(Tüm) Programlar”,
“Philips Intelligent Agent”, “Philips Intelligent Agent”ı
seçin.
Uruchom program Philips Intelligent Agent.
➤ Jeśli jest niedostępny, kliknij „Start”, „(Wszystkie) programy”, „Philips Intelligent Agent”, „Philips Intelligent
Agent”.
Starta Philips Intelligent Agent.
➤ Om det inte är tillgängligt väljer du "Start", "(Alla) Program", "Philips Intelligent Agent", "Philips Intelligent
Agent".
UKE
PT
TR
PL
SV
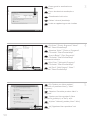
2
Haga clic en “Comprobar las actualizaciones”.
Clique em “Verificar atualizações”.
“Güncellemeleri işaretle”ye tıklayın.
Kliknij “Sprawdź aktualizacje”.
Klicka på "Sök efter uppdateringar".
E
PT
TR
PL
SV
Pagina wordt geladen...
Pagina wordt geladen...
Pagina wordt geladen...
Pagina wordt geladen...
Pagina wordt geladen...
Pagina wordt geladen...
Pagina wordt geladen...
Pagina wordt geladen...
Pagina wordt geladen...
Pagina wordt geladen...
Pagina wordt geladen...
Pagina wordt geladen...
Pagina wordt geladen...
Pagina wordt geladen...
Pagina wordt geladen...
Pagina wordt geladen...
Pagina wordt geladen...
Pagina wordt geladen...
Pagina wordt geladen...
Pagina wordt geladen...
Pagina wordt geladen...
Pagina wordt geladen...
Pagina wordt geladen...
Pagina wordt geladen...
Pagina wordt geladen...
Pagina wordt geladen...
Pagina wordt geladen...
Documenttranscriptie
How to install? Einbau des Laufwerks Comment installer? Come installare Hoe installeren? UK Please refer to your PC manual or contact your local dealer for more information. I Fare riferimento al manuale del PC o contattare il proprio rivenditore locale per ulteriori informazioni. D Weitere Informationen finden Sie im PC-Handbuch bzw. können Sie bei Ihrem Händler erfragen. F Pour plus d'informations, reportez-vous au mode d’emploi de l'ordinateur ou contactez votre revendeur. NL Zie de handleiding bij uw PC of neem contact op met uw lokale leverancier voor meer informatie. 5 UK This can be found in the box: A: Your new drive C: The Nero software disc B: This manual D: 4 screws in a small bag 1 D Verpackungsinhalt: A: Ein neues Laufwerk C: Die Nero Software-CD B: Dieses Handbuch D: 4 Schrauben in einem kleinen Beutel F Le coffret d'emballage contient les éléments suivants : A : Votre nouveau lecteur C : Le disque du logiciel Nero B : Ce mode d'emploi D : 4 vis dans un petit sachet I Contenuto della confezione: A: La nuova unità C: Il disco del software Nero B: Questo manuale D: 4 viti in un sacchetto piccolo NL Dit zit er in de doos: A: Uw nieuwe station B: Deze handleiding C: De software-disk van Nero D: 4 schroeven in een zakje UK Switch your computer off. D Schalten Sie Ihren Computer aus. F Éteignez l’ordinateur. I Spegnere il computer. NL Zet de computer uit. UK Touch an unpainted metal part (eg. your heating or an unpainted part of your computer case). ➤ This will avoid any damage to your computer by electrostatic discharge. D Berühren Sie ein unlackiertes Metallteil (z.B. Ihre Heizung oder ein unlackiertes Teil Ihres Computergehäuses). ➤ Das verhindert Schäden an Ihrem Computer aufgrund von elektrostatischer Entladung. F Touchez une partie métallique non peinte (p. ex. un radiateur ou une partie non peinte du boîte de l'ordinateur). ➤ Ce contact permettra d'éviter tout endommagement de l'ordinateur par décharge d'électricité statique. I Toccare un elemento di metallo non verniciato (p.es. l’elemento riscaldante o uno non verniciato del case del computer). ➤ In questo modo si eviteranno danni al computer dovuti a scariche elettrostatiche. NL Raak een ongelakt metalen object aan (b.v. de verwarming of een ongelakt deel van de computerbehuizing). ➤ Op deze manier voorkomt u dat de computer beschadigd raakt als gevolg van elektrostatische ontlading. 6 2 3 UK If you replace a drive, take it out and check which setting it has ("Master" or "Slave"). Remember this setting and go to step 10. 7 D Wenn Sie ein Laufwerk ersetzen, bauen Sie es aus und überprüfen Sie seine Einstellung ("Master" oder "Slave"). Merken Sie sich diese Einstellung und gehen Sie zu Schritt 10. F Si vous remplacez un lecteur, sortez-le et vérifiez ses réglages ("Maître" ("Master") ou "Esclave" ("Slave")). Notez ces réglages et passez à l'étape 10. I In caso di sostituzione di un'unità, estrarla e verificarne le impostazioni ("Master" o "Slave"). Annotare l'impostazione e andare al punto 10. NL Als u een station gaat vervangen moet u hem verwijderen en kijken welke instelling het had ("Master" of "Slave"). Onthoud deze instelling en ga naar stap 10. UK If you have no drive installed, remember "Master" and go to step 10. 8 Wenn noch kein Laufwerk installiert ist, merken Sie sich "Master" und gehen Sie zu Schritt 10. D F Si aucun lecteur n'est encore installé, notez "Maître" ("Master") et passez à l'étape 10. I Se non è installata alcuna unità, annotare l'impostazione "Master" e andare al punto 10. NL Als er geen station geïnstalleerd is, moet u "Master" onthouden en naar stap 10 gaan. UK If you add a drive, check the drive has which remains in the PC ("Master" or "Slave", see step 11), remember the OTHER setting. D Wenn Sie ein Laufwerk hinzufügen, überprüfen Sie die Einstellung des bereits vorhandenen Laufwerks im PC ("Master" oder "Slave", siehe auch Schritt 11) und merken Sie sich die ANDERE Einstellung. F Si vous ajoutez un lecteur, vérifiez les réglages du lecteur qui se trouve dans l'ordinateur ("Maître" ("Master") ou "Esclave" ("Slave"), voir l'étape 11) et notez l'AUTRE réglage. I In caso di integrazione di un'unità, controllare l'impostazione dell'unità che resta nel PC ("Master" o "Slave", vedere il punto 11) e annotare l'ALTRA impostazione. NL Als u een station toevoegt, moet u het station controleren dat in de PC blijft ("Master" of "Slave", zie stap 11), onthoud de ANDERE instelling. 8 9 15 UK Connect the IDE cable A: Coloured line. B: Notch and closed hole. C: Pin1. D Schließen Sie das IDE-Kabel an. A: Farbige Leitung. B: Kerbe und geschlossenes Loch. C: Pin1. F Raccordez le câble IDE A : Ligne de couleur B : Encoche et trou bouché C : Broche 1 I Collegare il cavo IDE A: Linea colorata. B: Tacca e foro chiuso. C: Piedino 1. NL De IDE-kabel aansluiten A: Gekleurde lijn. B: Nokje plus ontbrekend gat. C: Pin 1. 16 UK Find a free power cable like this example. Please note the edges of the connector. D Suchen Sie ein freies Stromversorgungskabel, das häufig wie in diesem Beispiel gezeigt aussieht. Die Kanten des Anschlusses sind abgerundet. F Recherchez un câble d’alimentation disponible, comme dans cet exemple. Notez la position des bords du connecteur. I Individuare un cavo di alimentazione disponibile, come quello nell'esempio. Notare i bordi del connettori. NL Zoek een vrije stroomkabel, zoals die in de afbeelding. Let op de afgeschuinde hoekjes van de stekker. 17 UK Connect the power cable into your drive (the edges from step 16 will be on top). D Schließen Sie das Netzkabel am Laufwerk an (die Kanten von Schritt 16 sind oben). F Raccordez le câble d'alimentation au lecteur (les bords à partir de l'étape 16 sont au-dessus). I Collegare il cavo di alimentazione all'unità (i bordi indicati nel punto 16 saranno in alto). NL Sluit het stroomsnoer aan op uw station (de randen van stap 16 bevinden zich aan de bovenkant). 11 UK Secure the drive with the screws (if possible on both sides). 18 D Befestigen Sie das Laufwerk mit den Schrauben (wenn möglich an beiden Seiten). F Fixez l’appareil à l’aide des vis (si possible des deux côtés). I Fissare l'unità con le viti (se possibile su entrambi i lati). NL Schroef het station vast (zo mogelijk aan beide zijden). UK Put the cover you took off in step 5 back on. Setzen Sie die in Schritt 5 abgenommene Abdeckung wieder auf. 19 D F Replacez le capot que vous avez retiré à l’étape 5. I NL Rimettere il coperchio tolto al punto 5. Plaats de in stap 5 verwijderde kast weer terug. UK Put the screws (if there were any) back in and reconnect the cables. D Schrauben Sie die Schrauben (sofern welche vorhanden waren) wieder ein und schließen Sie die Kabel wieder an. F Resserrez la ou les vis, le cas échéant, et rebranchez les câbles. I Riavvitare le viti (se presenti) e ricollegare i cavi. NL Plaats de schroeven terug (als die er waren) en sluit de kabels weer aan. 12 20 21 22 UK Restart your computer. D Starten Sie Ihren Computer neu. F Allumez l’ordinateur. I Riavviare il computer. NL Start uw computer opnieuw op. UK Insert the Nero disc when Windows is loaded. Legen Sie die Nero CD ein, wenn Windows geladen ist. D F Insérez le disque Nero une fois que Windows a démarré. I Inserire il disco Nero dopo il caricamento di Windows. NL 23 Plaats de Nero-disc nadat Windows is gestart. UK Choose “Nero 7 Essentials” and follow the instructions on the screen. When finished, continue with the next chapter. D Wählen Sie „Nero 7 Essentials“ und befolgen Sie die Anweisungen auf dem Bildschirm. Wenn Sie fertig sind, fahren Sie mit dem nächstem Kapitel fort. F Choisissez 'Nero 7 Essentials' et suivez les instructions à l'écran. Lorque vous avez terminé, passez au chapitre suivant. I Selezionare “Nero 7 Essentials” e seguire le istruzioni a schermo. Quando si è terminato, continuare con il capitolo successivo. NL Kies “Nero 7 Essentials” en volg de aanwijzingen op het scherm. Ga, als u klaar bent, verder met het volgende hoofdstuk. 13 Up to date? Sind Sie auf dem neuesten Stand? Vos logiciels sont-ils à jour ? Aggiornamento Up to date? 1 UK Start the Philips Intelligent Agent. ➤ If not available, choose “Start”,“(All) Programs”, “Philips Intelligent Agent”,“Philips Intelligent Agent”. D Starten Sie den Philips Intelligent Agent. ➤ Wenn er auf dem Desktop nicht zur Verfügung steht, wählen Sie “Start“, „Programme“,“Philips Intelligent Agent“,“Philips Intelligent Agent“. F Lancez Philips Intelligent Agent. ➤ S'il n'est pas directement disponible, sélectionnez 'Démarrer', '(Tous les) Programmes', 'Philips Intelligent Agent', 'Philips Intelligent Agent'. I Avviare Philips Intelligent Agent. ➤ Se non fosse disponibile, selezionare “Start”,“(Tutti i) Programmi”,“Philips Intelligent Agent”, “Philips Intelligent Agent”. NL Start Philips Intelligent Agent. ➤ Indien niet beschikbaar, kies “Start”,“(Alle) programma’s”,“Philips Intelligent Agent”,“Philips Intelligent Agent”. 2 UK D Click “Check for updates”. Klicken Sie auf “Nach Updates suchen“. Cliquez sur 'Recherchez les mises-à-jour logiciels'. F I NL Fare clic su “Controlla gli aggiornamenti”. Klik op “Zoek naar updates”. 15 UK Download the updates and install them. Laden Sie die Updates herunter und installieren Sie sie. D F 3 Téléchargez les mises à jour et installez-les. Effettuare il Download degli aggiornamenti e installarli. I NL Download de updates en installeer ze. UK Choose "Start", "(All) Programs", "Nero 7 Essentials", "Nero ProductSetup". 4 D Wählen Sie "Start", "(Alle) Programme", "Nero 7 Essentials", "Nero ProductSetup". F Sélectionnez "Démarrer", "(Tous les) Programmes", "Nero 7 Essentials", "Nero ProductSetup". I Scegliere "Start", "Tutti i programmi", "Nero 7 Essentials", "Nero ProductSetup". NL Kies "Start", "(Alle) Programma’s", "Nero 7 Essentials", "Nero ProductSetup". UK Choose "Update your Nero products" and "Next". D Wählen Sie "Nero Produkte aktualisieren" und "Weiter". F Sélectionnez "Mettre à jour vos produits Nero" puis cliquez sur "Suivant". I Scegliere "Aggiorna i prodotti Nero", quindi fare clic su "Avanti". NL Kies "Uw Nero-producten bijwerken" en "Volgende". 16 5 UK If you want to add files from the hard disk, choose “Add Video Files”. 8 D Wenn Sie Dateien von der Festplatte hinzufügen möchten, wählen Sie „Videodaten hinzufügen“. Ansonsten fahren Sie mit Schritt 10 fort. F Si vous voulez ajouter des fichiers à partir du disque dur, choisissez 'Ajouter des fichiers vidéo'. Sinon, allez à l'étape 10. I Se si desidera aggiungere file dal disco fisso, selezionare “Aggiungi File Video”. Altrimenti passare al punto 10. NL Als u bestanden wilt toevoegen van de harde schijf, kiest u “Videobestanden toevoegen”. Ga anders verder met stap 10. UK Select the files and click ‘Open”. Wählen Sie die Dateien und klicken Sie auf “Öffnen“. 9 D F Sélectionnez les fichiers et cliquez sur 'Ouvrir'. I Selezionare i file e fare clic su “Apri”. Selecteer de bestanden en selecteer ‘Openen”. NL UK You can edit the loaded movies by choosing “Edit Movie”. D Sie können die geladenen Filme bearbeiten, indem Sie “Film bearbeiten“ wählen. F Vous pouvez éditer les films chargés en choisissant 'Editer le film'. I È possibile modificare i film caricati selezionando “Modifica Filmato”. NL U kunt de geladen films bewerken door “Film bewerken” te kiezen. 22 10 11 UK You can here add video effects, text effects and transitions. D Sie können Videoeffekte, Texteffekte und Übergänge hinzufügen. F Vous pouvez ajouter ici des effets vidéo, des effets de texte et des transitions. I Qui è possibile aggiungere effetti video, testo e transizioni. NL Hier kunt u video-effecten, teksteffecten en overgangen toevoegen. 12 UK You can also trim the recorded video by sliding the markers. When done, choose “Next”. D Sie können das aufgezeichnete Video auch durch Verschieben der Marker beschneiden. Klicken Sie danach auf “Weiter“. F Vous pouvez également recouper les séquences vidéo enregistrées en faisant glisser les marqueurs. Lorsque vous avez terminé, choisissez 'Suivant'. I Inoltre, qui è possibile accorciare il video registrato, facendo scorrere i marcatori. Al termine selezionare “Avanti”. NL U kunt de opgenomen video ook bijsnijden door de markeringen te verschuiven. Kies, als u klaar bent, “Volgende”. 13 UK After editing all files, choose “Next”. D Klicken Sie nach Bearbeitung aller Dateien auf “Weiter“. F Lorsque vous avez édité tous les fichiers, choisissez 'Suivant'. I Dopo aver terminato tutti i file, selezionare “Avanti”. NL Kies “Volgende”, als u alle bestanden hebt bewerkt 23 UK Enter the title in the “Header” field and click “Edit menu”. 14 D Geben Sie den Titel im Feld „Kopfzeile“ ein und klicken Sie auf “Menü bearbeiten“. F Entrez le titre dans la zone 'En-tête' et cliquez sur 'Editez le Menu'. I Inserire il titolo nel campo “Intestazion” e fare clic su “Modif. menu”. NL Voer de titel in het veld “Koptekst” in en klik op “Bewerken menu”. UK You can change the layout, the background, add titles,… here. When done, choose “Next” twice. 15 D Sie können jetzt das Layout oder den Hintergrund ändern und Titel usw. hinzufügen. Klicken Sie danach zweimal auf “Weiter“. F Vous pouvez changer la mise en forme, l'arrière-plan, ajouter des titres… ici. Lorsque vous avez terminé, choisissez 'Suivant' deux fois. I Qui è possibile modificare il layout, lo sfondo, aggiungere titoli ecc. Al termine selezionare due volte “Avanti”. NL Hier kunt u de indeling en de achtergrond veranderen en titels toevoegen. Klik twee keer op “Volgende” als u klaar bent. UK Preview your movie. Click “Next” to continue. D Betrachten Sie nun eine Vorschau Ihres Videos. Klicken Sie auf “Weiter“, um fortzufahren. F Vous pouvez alors prévisualiser votre film. Cliquez sur 'Suivant' pour continuer. I Eseguire l’anteprima del film. Fare clic su “Avanti” per continuare. NL Preview uw film. Klik op “Volgende” om verder te gaan. 24 16 Meer informatie of hulp nodig Ga naar www.philips.com/storageupdates NL Probleemoplossing De optische schijfstations van Philips zijn met de grootst mogelijke zorg gemaakt. Als zich problemen voordoen, blijkt vaak dat het station zelf geen defecten heeft. U kunt de meeste van deze problemen eenvoudig oplossen door de hulpprogramma's van Philips te gebruiken. Wat te doen bij problemen: 1 2 3 Controleer de informatie in de handleiding. Ga naar de ondersteuningssites van Philips op www.philips.com/storageupdates en www.philips.com/support voor interactieve ondersteuning, probleemoplossing en de laatste software-updates. Als zich tijdens installatie of gebruik andere problemen voordoen, kunt u contact opnemen met Philips Customer Care via het e-mailadres of de telefoonnummers die u kunt vinden op www.philips.com/contact. Voordat u een beroep doet op de garantie op een station, moet u een referentienummer voor retourzending vragen op www.philips.com/support of bij Philips Customer Care. ➤ Er is aanvullende garantie-informatie beschikbaar in de map "Philips Warranty" op de schijf met de Nero-software. “Het zonder toestemming vervaardigen van kopieën van auteursrechtelijk beschermde werken, inclusief computer programma’s, bestanden, uitzendingen en geluidsopnames, kan een inbreuk op auteursrechten en een strafbaar feit zijn. De apparatuur dient niet voor dergelijke doeleinden gebruikt te worden.” WEEE-markering: Verwijdering van uw oud product Uw product is vervaardigd van kwalitatief hoogwaardige materialen en onderdelen, welke gerecycled en opnieuw gebruikt kunnen worden. Als u op uw product een doorstreepte afvalcontainer op wieltjes ziet, betekent dit dat het product valt onder de EU-richtlijn 2002/96/EC. Win inlichtingen in over de manier waarop elektrische en elektronische producten in uw regio gescheiden worden ingezameld. Neem bij de verwijdering van oude producten de lokale wetgeving in acht en plaats deze producten niet bij het gewone huishoudelijke afval. Als u oude producten correct verwijdert voorkomt u negatieve gevolgen voor het milieu en de volksgezondheid. PAS OP Plastic zakken kunnen gevaarlijk zijn. Om gevaar van verstikking te voorkomen houd de zak buiten bereik van kleine kinderen. 38 www.philips.com/storageupdates ¿Actualizar? Atualizado? Güncel mi? Aktualizacja Uppdaterad? 1 UK E Inicie Philips Intelligent Agent. ➤ Si no está disponible, elija “Inicio”, “Programas”, “Philips Intelligent Agent”, “Philips Intelligent Agent”. PT Iniciar o Philips Intelligent Agent. ➤ Se não estiver disponível, selecione “Iniciar”, “(Todos) os programas”, “Philips Intelligent Agent”, “Philips Intelligent Agent”. TR Philips Intelligent Agent’ı başlat. ➤ Eğer hazır değilse, “Başlat”, “(Tüm) Programlar”, “Philips Intelligent Agent”, “Philips Intelligent Agent”ı seçin. PL Uruchom program Philips Intelligent Agent. ➤ Jeśli jest niedostępny, kliknij „Start”, „(Wszystkie) programy”, „Philips Intelligent Agent”, „Philips Intelligent Agent”. SV Starta Philips Intelligent Agent. ➤ Om det inte är tillgängligt väljer du "Start", "(Alla) Program", "Philips Intelligent Agent", "Philips Intelligent Agent". 2 E Haga clic en “Comprobar las actualizaciones”. PT Clique em “Verificar atualizações”. TR “Güncellemeleri işaretle”ye tıklayın. PL Kliknij “Sprawdź aktualizacje”. SV Klicka på "Sök efter uppdateringar". 49-
 1
1
-
 2
2
-
 3
3
-
 4
4
-
 5
5
-
 6
6
-
 7
7
-
 8
8
-
 9
9
-
 10
10
-
 11
11
-
 12
12
-
 13
13
-
 14
14
-
 15
15
-
 16
16
-
 17
17
-
 18
18
-
 19
19
-
 20
20
-
 21
21
-
 22
22
-
 23
23
-
 24
24
-
 25
25
-
 26
26
-
 27
27
-
 28
28
-
 29
29
-
 30
30
-
 31
31
-
 32
32
-
 33
33
-
 34
34
-
 35
35
-
 36
36
-
 37
37
-
 38
38
-
 39
39
-
 40
40
-
 41
41
-
 42
42
-
 43
43
-
 44
44
-
 45
45
-
 46
46
-
 47
47
-
 48
48
-
 49
49
-
 50
50
-
 51
51
-
 52
52
-
 53
53
-
 54
54
-
 55
55
-
 56
56
-
 57
57
-
 58
58
-
 59
59
-
 60
60
-
 61
61
-
 62
62
-
 63
63
-
 64
64
-
 65
65
-
 66
66
-
 67
67
-
 68
68
-
 69
69
-
 70
70
-
 71
71
-
 72
72
-
 73
73
-
 74
74
-
 75
75
-
 76
76


Philips SPD1100BD/93 Handleiding
- Categorie
- Optische schijfstations
- Type
- Handleiding
in andere talen
- English: Philips SPD1100BD/93 User manual
- italiano: Philips SPD1100BD/93 Manuale utente
- français: Philips SPD1100BD/93 Manuel utilisateur
- español: Philips SPD1100BD/93 Manual de usuario
- Deutsch: Philips SPD1100BD/93 Benutzerhandbuch
- português: Philips SPD1100BD/93 Manual do usuário
- svenska: Philips SPD1100BD/93 Användarmanual
- Türkçe: Philips SPD1100BD/93 Kullanım kılavuzu
- polski: Philips SPD1100BD/93 Instrukcja obsługi
Gerelateerde papieren
-
Philips SPD2515BD/97 Handleiding
-
Philips SPD2204BM/00 Handleiding
-
Philips SPD7000BD/00 Handleiding
-
-
Philips SPD2519BD/97 Handleiding
-
Philips SPD2417BD/97 Handleiding
-
Philips SPD2201BD/97 Handleiding
-
-
Philips SPD6104BD/97 Handleiding
-
Philips SPD4000CC-00 Handleiding