Lenco Classic Phono TT-110BKRD de handleiding
- Categorie
- Audio draaitafels
- Type
- de handleiding
Deze handleiding is ook geschikt voor

1
Model No: TT-110
USER MANUAL – Turntable with Bluetooth reception and Built-in speakers
GEBRUIKERSHANDLEIDING – platenspeler met bluetoothontvangst en ingebouwde luidsprekers
BEDIENUNGSANLEITUNG – Plattenspieler mit Bluetooth-Empfang und integrierten Lautsprechern
MODE D’EMPLOI – Platine avec réception Bluetooth et haut-parleurs intégrés
MANUAL DE USUARIO – Tocadiscos con recepción Bluetooth y altavoces integrados
MANUALE D’USO – Giradischi con ricezione Bluetooth e altoparlanti integrati

2
Index:
English .................................................................................................................................... 3
Nederlands ........................................................................................................................... 13
Deutsch ................................................................................................................................ 24
Français ................................................................................................................................ 36
Español ................................................................................................................................. 47
Italiano ................................................................................................................................. 58
Version: 2.0

3
English
CAUTION:
Usage of controls or adjustments or performance of procedures other than those specified herein may result
in hazardous radiation exposure.
PRECAUTIONS BEFORE USE
KEEP THESE INSTRUCTIONS IN MIND:
1. Do not cover or block any ventilation openings. When placing the device on a shelf, leave 5 cm (2”) free
space around the whole device.
2. Install in accordance with the supplied user manual.
3. Keep the device away from heat sources such as radiators, heaters, stoves, candles and other heat-
generating products or naked flame. The device can only be used in moderate climates. Extremely cold
or warm environments should be avoided. Working temperature between 0° and 35°C.
4. Avoid using the device near strong magnetic fields.
5. Electrostatic discharge can disturb normal usage of this device. If so, simply reset and restart the device
following the instruction manual. During file transmission, please handle with care and operate in a
static-free environment.
6. Warning! Never insert an object into the product through the vents or openings. High voltage flows
through the product and inserting an object can cause electric shock and/or short circuit internal parts.
For the same reason, do not spill water or liquid on the product.
7. Do not use in wet or moist areas such as bathrooms, steamy kitchens or near swimming pools.
8. The device shall not be exposed to dripping or splashing and make sure that no objects filled with
liquids, such as vases, are placed on or near the apparatus.
9. Do not use this device when condensation may occur. When the unit is used in a warm wet room with
damp, water droplets or condensation may occur inside the unit and the unit may not function
properly; let the unit stand in power OFF for 1 or 2 hours before turning on the power: the unit should
be dry before getting any power.
10. Although this device is manufactured with the utmost care and checked several times before leaving
the factory, it is still possible that problems may occur, as with all electrical appliances. If you notice
smoke, an excessive build-up of heat or any other unexpected phenomena, you should disconnect the
plug from the main power socket immediately.
11. This device must operate on a power source as specified on the specification label. If you are not sure
of the type of power supply used in your home, consult your dealer or local power company.
12. Keep away from animals. Some animals enjoy biting on power cords.
13. To clean the device, use a soft dry cloth. Do not use solvents or petrol based fluids. To remove severe
stains, you may use a damp cloth with dilute detergent.
14. The supplier is not responsible for damage or lost data caused by malfunction, misuse, modification of
the device or battery replacement.
15. Do not interrupt the connection when the device is formatting or transferring files. Otherwise, data
may be corrupted or lost.
16. If the unit has USB playback function, the USB memory stick should be plugged into the unit directly.
Don’t use an USB extension cable because it can cause interference resulting in failing of data.
17. The rating label has been marked on the bottom or back panel of the device.
18. This device is not intended for use by people (including children) with physical, sensory or mental
disabilities, or a lack of experience and knowledge, unless they’re under supervision or have received
instructions about the correct use of the device by the person who is responsible for their safety.
19. This product is intended for non professional use only and not for commercial or industrial use.
20. Make sure the unit is adjusted to a stable position. Damage caused by using this product in an unstable
position vibrations or shocks or by failure to follow any other warning or precaution contained within
this user manual will not be covered by warranty.
21. Never remove the casing of this device.
22. Never place this device on other electrical equipment.
23. Do not allow children access to plastic bags.
24. Only use attachments/accessories specified by the manufacturer.

4
25. Refer all servicing to qualified service personnel. Servicing is required when the device has been
damaged in any way, such as the power supply cord or the plug, when liquid has been spilled or objects
have fallen into the device, when the device has been exposed to rain or moisture, does not operate
normally, or has been dropped.
26. Long exposure to loud sounds from personal music players may lead to temporary or permanent
hearing loss.
27. If the product is delivered with power cable or AC power adaptor:
⚫ If any trouble occur, disconnect the AC power cord and refer servicing to qualified personnel.
⚫ Don’t step on or pinch the power adaptor. Be very careful, particularly near the plugs and the
cable’s exit point. Do not place heavy items on the power adaptor, which may damage it. Keep
the entire device out of children’s reach! When playing with the power cable, they can seriously
injure themselves.
⚫ Unplug this device during lightning storms or when unused for a long period.
⚫ The socket outlet must be installed near the equipment and must be easily accessible.
⚫ Do not overload ac outlets or extension cords. Overloading can cause fire or electric shock.
⚫ Devices with class 1 construction should be connected to a main socket outlet with a protective
earthed connection.
⚫ Devices with class 2 construction do not require a earthed connection.
⚫ Always hold the plug when pulling it out of the main supply socket. Do not pull the power cord.
This can cause a short circuit.
⚫ Do not use a damaged power cord or plug or a loose outlet. Doing so may result in fire or electric
shock.
28. If the product contains or is delivered with a remote control containing coin/cell batteries:
Warning:
⚫ “Do not ingest battery, Chemical Burn Hazard” or equivalent working.
⚫ [The remote control supplied with] This product contains a coin/button cell battery. If the battery
is swallowed, it can cause severe internal burns in just 2 hours and can lead to death.
⚫ Keep new and used batteries away from children.
⚫ If the battery compartment does not close securely, stop using the product and keep it away from
children.
⚫ If you think batteries might have been swallowed or placed inside any part of the body, seek
immediate medical attention.
29. Caution about the use of Batteries:
⚫ Danger of explosion if battery is incorrectly replaced. Replace only with the same or equivalent
type.
⚫ Battery cannot be subjected to high or low extreme temperatures, low air pressure at high altitude
during use, storage or transportation.
⚫ Replacement of a battery with an incorrect type that can result in an explosion or the leakage of
flammable liquid or gas.
⚫ Disposal of a battery into fire or a hot oven, or mechanically crushing or cutting of a battery, that
can result in an explosion.
⚫ Leaving a battery in an extremely high temperature surrounding environment that can result in an
explosion or that leakage of flammable liquid or gas.
⚫ A battery subjected to extremely low air pressure that may result in an explosion or the leakage of
flammable liquid or gas.
⚫ Attention should be drawn to the environmental aspects of battery disposal.
INSTALLATION
• Unpack all parts and remove protective material.
• Do not connect the unit to the mains before checking the mains voltage and before all other connections
have been made.

5
Accessories included:
User manual
Power adaptor

6
Location of Controls
1. Turntable deck
2. Turntable shaft
3. Center hole adaptor
4. Tone arm
5. Cueing lever
6. Tone arm clip

7
7. Turntable speed selector
8. Auto stop control switch
9. LED status indicator
10. Power switch/Volume control
11. Headphone jack
12. Stylus
13. Lock catch
14. Carrying handle
15. Speaker
16. Aux in jack
17. Line out channel R/L
18. DC in jack
19. Pair
20. Previous track
21. Next track
22. Play/pause
23. Mode
24. Mode indicator
Mode
1. Short press “Mode” to select the playing mode.
2. Blue LED will be flashed when Bluetooth is pairing.
3. Blue LED will be illuminated when Bluetooth is connected
4. Red LED will be illuminated when it is turntable mode.
5. Green LED will be illuminated when it is Aux in mode.
Using the turntable
1. Place the turntable case on a flat level surface.
2. Insert the adaptor cord into the Dc jack at the rear of the case and plug the adaptor into the mains supply
socket.
3. On first use, ensure that the cable tie is removed from the player arm.
4. Remove the stylus cover and keep in a safe place for future use

8
5. Move the speed selector to the speed (33,45 or 78rpm) corresponding to the record to the played
6. Turn the Volume knob to turn the turntable on and the mode indicator will illuminate red
7. Place a record onto the turntable spindle and unclip the tone arm
8. Use the cuing lever to lift the tone arm and move the arm so that the stylus is positioned just inside the
edge of the record or aligned with the start of the track to be played.
9. Slowly lower the arm and after a short interval the record will start to play
10. Adjust the volume to the desired level by rotating the volume control knob
11. When the end of the record has been reached the turntable will stop
12. Use the lever again to lift the tone arm (the deck will start to rotate again), move it back to the clip and
lower into the cradle. The deck will stop
13. Secure the tine arm using the clip and refit the stylus cover after use and always before moving the
turntable
14. To turn off the turntable at any time, lift the tone arm on the record and turn the volume knob fully
anticlockwise.
Note
Some records have larger center hole and it may be necessary to fit the center hole adaptor to the turntable
shaft before placing the record on the turntable. Always refit the stylus cover and secure the turntable arm
using the clip before moving the turntable.
Using with auxiliary device
1. Auxiliary analogue audio equipment can be connected and amplified via the turntable.
2. Connect the auxiliary equipment using a 3.5mm jack cable (cable not included) into the LINE IN jack.
3. Press the play button on the auxiliary equipment and use the track controls as usual on the auxiliary
device.
4. The volume can be adjusted using the volume knob on the turntable or the controls on the connected
auxiliary device.
5. To turn off the unit at the any time turn the volume knob fully anticlockwise.
Using headphones (not included)
A stereo headphone jack has been provided so that the turntable can be used without disturbing others.
Plug in the headphones at the point marked headphone near the volume knob and adjust the listening
volume to your chosen level. Excessive sound pressure from earphones and headphones can cause hearing
loss. The turntable speakers will not operate when earphones are fitted.

9
Connecting the turntable to external speaker
In connecting the turntable to external speakers (via a suitable amplifier)
Use a twin phono to twin phono lead (not included) to connect the RCA output jacks to the Audio in of the
amplifier. Ensure red plugs are inserted into the red sockets and white into white.
Using with Bluetooth device
Check that your turntable is in Bluetooth mode. If you are not already in Bluetooth mode, short press the
Mode button until you are in Bluetooth mode (Blue LED will be illuminated). It will begin to search for
Bluetooth devices (Blue LED flashed during pairing).
In Bluetooth Mode:
1. Your device will search for Bluetooth.
2. On the device (e.g. iPhone/iPad/Android/other phone/Tablet/Computer), turn on Bluetooth connectivity
and ensure that it is ‘discoverable’.
Note: If necessary, refer to the instructions for your device to add or set up Bluetooth.
3. Select to ‘Add new device’, if necessary.
Note: Some products will automatically search for a new device and so the ‘Add new device’ option is not
available.
4. When found, your device will be displayed as ‘Lenco TT-110’. Select and begin pairing.
5. When pairing is complete ‘Bluetooth Connected’ will be displayed.
6. Now that you have paired your device with the turntable, it will connect to it when it is within range, which
is about 10 meter or less (33 feet or less), line of sight.
7. Your device will remain paired with the turntable unless you decide to disconnect or ‘unpair’ it.
8. You can short press “Pair” to reconnect.
Playing Bluetooth
1. Press “Back” for previous track of your Bluetooth device.
2. Press “Next” for next track of your Bluetooth device.
3. Press “Play/pause” for play or pause of your Bluetooth device.
HOW TO REPLACE THE NEEDLE
To replace the needle, please refer to the instructions below.
Removing the needle from the cartridge
1. Place a screwdriver at the tip of the stylus and push downward as shown in direction “A”.
2. Remove the stylus by pulling the stylus forward and pushing downward.
Installing the Stylus
1. Hold the tip of the stylus and insert the stylus by pressing as shown in direction “B”.
2. Push the stylus upward as in direction “C” until the stylus locks into the tip position.

10
NOTES
We advise you to clean your records with an anti-static cloth to gain maximum enjoyment from them.
We would also point out that for the same reason your stylus should be replaced periodically (approximately
every 250 playback hours)
TIPS FOR BETTER TURNTABLE PERFORMANCE
1. When opening or closing the turntable cover, handle it gently, gripping it either at the centre or at each
side.
2. Do not touch the needle tip with your fingers; avoid bumping the needle against the turntable platter or
record edge.
3. Frequently clean the needle tip-use a soft brush in a “back-to-front” motion only.
4. If you must use a needle cleaning fluid, use very sparingly.
5. Gently wipe the turntable player housing with a soft cloth. Use only a small amount of mild detergent to
clean the turntable player.
6. Never apply harsh chemicals or solvents to any part of the turntable system.
SPECIFICATIONS
Type
Belt drive
drive motor
DC motor
speed
33 1/3 rpm, 45 rpm, 78 rpm
wow and flutter
<0.35%
turntable platter
200mm
cartridge
Type
ceramic cartridge
Stylus
0.7 mil
optimum tracking force
6 gram
output
300-500mv
frequency response
,+/-20dB

11
crosstalk
10db
signal to noise ration ( S/N)
18db
General
Adaptor
Input AC 100-240V, 50/60Hz, 0.3A max.
Output DC5V 1A
product
DC5V 1A
audio output (line out)
300-500mv
power consumption
5W
Power adaptor.
Output DC 5V 1A
Input AC 100-240V, 50/60Hz, 0.3A max.
Bluetooth Pairing name:
Lenco TT-110
Headphone socket:
3.5mm
Operating Temperature:
0°C‐40°C
Storage Temperature:
-20°C‐70°C
Due to continuing improvement, the features and the design are subject to change without notice
Power supply adaptor (For EU only)
Use only the power supply listed in the user instructions
Information
Value and precision
Manufacturers name or trade
mark, commercial registration
and address
DongGuan Obelieve Electronic Co., Ltd
Huazhaoxin Industrial park B-4/F, Golden
phoenix industrial zone, Fenggan town,
Dongguan city, Guangdong province, China
Model Identifier
0BL-0501000E
Input voltage
100-240V
Input AC frequency
50/60Hz
Output voltage
5V
Output current
1A
Output Power
5W
Average active efficiency
73.62
No load Power consumption
≤ 0.10

12
Guarantee
Lenco offers service and warranty in accordance to European law, which means that in case of repairs (both
during and after the warranty period) you should contact your local dealer.
Important note: It is not possible to send products that need repairs to Lenco directly.
Important note: If this unit is opened or accessed by a non-official service center in any way, the warranty
expires.
This device is not suitable for professional use. In case of professional use, all warranty obligations of the
manufacturer will be voided.
Disclaimer
Updates to Firmware and/or hardware components are made regularly. Therefore some of the instruction,
specifications and pictures in this documentation may differ slightly from your particular situation. All items
described in this guide for illustration purposes only and may not apply to particular situation. No legal right
or entitlements may be obtained from the description made in this manual.
Disposal of the Old Device
This symbol indicates that the relevant electrical product or battery should not be
disposed of as general household waste in Europe. To ensure the correct waste
treatment of the product and battery, please dispose them in accordance to any
applicable local laws of requirement for disposal of electrical equipment or batteries.
In so doing, you will help to conserve natural resources and improve standards of
environmental protection in treatment and disposal of electrical waste (Waste
Electrical and Electronic Equipment Directive).
CE Marking
Hereby, Lenco Benelux B.V., Thermiekstraat 1a, 6361 HB Nuth, The Netherlands,
declares that this product is in compliance with the essential EU directive
requirements.
The declaration of conformity may be consulted via techdoc@commaxxgroup.com
WARNING: To prevent possible hearing damage, do not listen at high volume levels for
long periods.
Service
For more information and helpdesk support, please visit www.lenco.com
Lenco Benelux BV, Thermiekstraat 1a, 6361 HB Nuth, The Netherlands.

13
Nederlands
LET OP:
Gebruik van bedieningen of afstellingen of uitvoer van procedures anders dan gespecificeerd in deze
documentatie kan leiden tot blootstelling aan schadelijke straling.
VOORZORGSMAATREGELEN VOOR GEBRUIK
ONTHOUD DE VOLGENDE INSTRUCTIES:
1. Bedek of blokkeer de ventilatieopeningen niet. Wanneer u het apparaat op een schap plaatst, dient u
5 cm (2”) vrije ruimte rondom het gehele apparaat te behouden.
2. Installeer het product volgens de meegeleverde gebruikershandleiding.
3. Houd het apparaat uit de buurt van hittebronnen, zoals radiatoren, verwarmingen, kachels, kaarsen en
andere hittegenererende producten of open vuur. Het apparaat kan alleen worden gebruikt in een
gematigd klimaat. Extreem koude of warme omgevingen dienen te worden vermeden.
Bedrijfstemperatuur tussen 0 °C en 35 °C.
4. Gebruik dit apparaat niet in de buurt van krachtige magnetische velden.
5. Elektrostatische ontlading kan normaal gebruik van dit apparaat verstoren. U hoeft het apparaat in dit
geval slechts te resetten en opnieuw op te starten volgens de gebruikershandleiding. Wees voorzichtig
tijdens bestandsoverdracht en gebruik het product in een omgeving zonder statische interferentie.
6. Waarschuwing! Steek nooit een voorwerp via de ventilatie- of andere openingen in het product. Er is
hoogspanning in het product aanwezig en als u er een object insteekt, kan dat een elektrische schok
veroorzaken en/of kortsluiting in de interne onderdelen. Mors om dezelfde reden geen water of
vloeistof op het product.
7. Gebruik het toestel niet in vochtige ruimtes, zoals badkamers, stomende keukens of in de buurt van
zwembaden.
8. Het apparaat mag niet worden blootgesteld aan druppels en spetters en zorg ervoor dat er geen met
vloeistof gevulde voorwerpen, zoals vazen, op of in de buurt van het apparaat worden geplaatst.
9. Gebruik dit apparaat niet wanneer condensatie kan optreden. Wanneer het apparaat in een warme en
vochtige kamer wordt gebruikt, dan kunnen er waterdruppels of condensatie binnenin het apparaat
worden gevormd waardoor het apparaat mogelijk niet meer goed functioneert; houd het apparaat 1 of
2 uur op UIT staan voordat u de voeding weer inschakelt: het apparaat dient droog te zijn voordat deze
stroom ontvangt.
10. Alhoewel dit apparaat met grote zorg gefabriceerd en verschillende keren geïnspecteerd is voordat het
de fabriek verlaat, is het nog steeds mogelijk dat er problemen optreden, zoals met alle elektrische
apparaten. Als u rook, een overmatige hitteontwikkeling of enig ander onverwacht verschijnsel
opmerkt, moet u onmiddellijk de stekker van het netsnoer uit het stopcontact halen.
11. Dit apparaat moet werken op een voedingsbron, zoals aangegeven op het specificatieplaatje. Als u
twijfelt over het type voeding dat gebruikt wordt in uw huis, raadpleeg dan uw dealer of plaatselijk
energiebedrijf.
12. Buiten bereik van dieren houden. Sommige dieren bijten graag aan netsnoeren.
13. Gebruik een zacht, droog doekje om het apparaat te reinigen. Gebruik geen oplosmiddelen of op
benzine gebaseerde vloeistoffen. U kunt een vochtig doekje met verdund schoonmaakmiddel gebruiken
om hardnekkige vlekken te verwijderen.
14. De leverancier is niet verantwoordelijk voor schade of verloren gegevens veroorzaakt door storing,
misbruik, modificatie van het apparaat of batterijvervanging.
15. Onderbreek nooit de verbinding wanneer het apparaat formatteert of bestanden overdraagt. De
gegevens kunnen anders corrupt of verloren raken.
16. Indien het apparaat een USB-afspeelfunctie heeft, moet de USB-geheugenstick rechtstreeks op het
apparaat worden aangesloten. Gebruik geen USB-verlengkabel, omdat die kan leiden tot storingen met
foutieve gegevens als gevolg.
17. Het nominale specificatielabel is te vinden op het paneel aan de onder- of achterkant van het apparaat.
18. Dit apparaat is niet bestemd voor gebruik door mensen (inclusief kinderen) met fysieke, zintuiglijke of
geestelijke gebreken of gebrek aan kennis en ervaring, tenzij zij onder toezicht staan of instructies
hebben over het juiste gebruik van het apparaat hebben gekregen van de persoon die verantwoordelijk
is voor hun veiligheid.
19. Dit product is alleen voor niet-professioneel gebruik bedoeld en niet voor commercieel of industrieel
gebruik.

14
20. Verzeker u ervan dat het apparaat in een stabiele positie staat opgesteld. Beschadigingen veroorzaakt
door het gebruik van dit apparaat in een onstabiele positie, trillingen of schokken of door het niet
opvolgen van andere waarschuwingen of voorzorgsmaatregelen beschreven in deze
gebruikshandleiding worden niet gedekt door de garantie.
21. Verwijder nooit de behuizing van dit apparaat.
22. Plaats dit apparaat nooit op andere elektrische apparatuur.
23. Geef kinderen geen gelegenheid in aanraking met plastic zakken te komen.
24. Gebruik uitsluitend uitbreidingen/accessoires gespecificeerd door de fabrikant.
25. Laat alle reparaties over aan gekwalificeerd onderhoudspersoneel. Onderhoud is nodig wanneer het
toestel op enige wijze beschadigd is, zoals het netsnoer of de stekker, wanneer er vloeistof in het
toestel is gemorst of voorwerpen in zijn terechtgekomen, wanneer het toestel aan regen of vocht is
blootgesteld, niet normaal werkt of is gevallen.
26. Langdurige blootstelling aan harde geluiden van persoonlijke muziekspelers kan leiden tot tijdelijk of
permanent gehoorverlies.
27. Als het product wordt geleverd met voedingskabel of AC-stroomadapter:
⚫ Als er problemen optreden, koppel de wisselstroomvoedingskaart dan los en laat reparaties over
aan bevoegd personeel.
⚫ Nooit op de stroomadapter stappen of deze indrukken. Wees voornamelijk voorzichtig in de buurt
van de stekkers en het punt waar de kabel uit het apparaat komt. Plaats geen zware voorwerpen
op de stroomadapter, om beschadiging ervan te voorkomen. Houd het gehele apparaat buiten
bereik van kinderen! Wanneer kinderen met de voedingskabel spelen, kunnen zij ernstig letsel
oplopen.
⚫ Haal de stekker uit het stopcontact tijdens onweer of wanneer u deze langere tijd niet gebruikt.
⚫ Het stopcontact moet in de buurt van de apparatuur zijn geïnstalleerd en eenvoudig te bereiken
zijn.
⚫ Overbelast stopcontacten of verlengsnoeren niet. Overbelasting kan brand of een elektrische
schok veroorzaken.
⚫ Apparaten met een Klasse 1 structuur dienen te worden aangesloten op een stopcontact met een
beschermende aardverbinding.
⚫ Apparaten met een Klasse 2 structuur vereisen geen aardverbinding.
⚫ Houd altijd de stekker vast wanneer u deze uit het stopcontact trekt. Trek nooit aan de
voedingskabel. Dit kan tot een kortsluiting leiden.
⚫ Gebruik nooit een beschadigde voedingskabel of stekker of een los stopcontact. Dit vormt namelijk
een risico op brand of elektrische schokken.
28. Indien het product knoopcelbatterijen bevat of wordt geleverd met een afstandsbediening die
knoopcelbatterijen bevat:
Waarschuwing:
⚫ "Batterij niet inslikken, chemisch brandgevaar” of gelijkwaardige werking.
⚫ (De afstandsbediening meegeleverd met) Dit product bevat een munt/knoopcelbatterij. Als de
batterij wordt ingeslikt, kan deze in slechts 2 uur ernstige interne brandwonden veroorzaken en tot
de dood leiden.
⚫ Houd nieuwe en gebruikte batterijen buiten bereik van kinderen.
⚫ Als de batterijhouder niet goed kan worden gesloten, dient u het product niet meer te gebruiken
en buiten bereik van kinderen te houden.
⚫ Als u denkt dat batterijen zijn ingeslikt of binnenin een willekeurig lichaamsdeel terecht zijn
gekomen, dient u onmiddellijk medische hulp te zoeken.
29. Waarschuwing m.b.t. het gebruik van batterijen:
⚫ Als de batterij onjuist wordt geplaatst, bestaat er explosiegevaar. Vervang de batterij alleen door
een zelfde of vergelijkbare soort batterij.
⚫ Stel de batterij niet bloot aan extreem hoge of lage temperaturen of een lage luchtdruk op grote
hoogte tijdens gebruik, opslag of transport.
⚫ Vervanging van een batterij door een incorrect type kan leiden tot een ontploffing of de lekkage
van ontvlambare vloeistoffen of gas.
⚫ Verwijdering van een batterij in vuur of een hete oven of het mechanisch verpletteren of snijden
van een batterij kan leiden tot een ontploffing.
⚫ Laat een batterij nooit achter in omgevingen met extreem hoge temperaturen, anders kan dit
leiden tot een ontploffing of de lekkage van ontvlambare vloeistoffen of gas.

15
⚫ Stel een batterij nooit bloot aan een extreem lage luchtdruk, anders kan dit leiden tot een
ontploffing of de lekkage van ontvlambare vloeistoffen of gas.
⚫ Aandacht voor het milieu is nodig bij het verwijderen van de batterijen.
INSTALLATIE
• Pak alle onderdelen uit en verwijder de beschermende materialen.
• Sluit het apparaat niet aan op het stopcontact, voordat u de netspanning hebt gecontroleerd en voordat
alle andere aansluitingen zijn gemaakt.
Inbegrepen toebehoren:
Handleiding
Voedingsadapter

16
Plaats van de bedieningen
1. Dek platenspeler
2. Platenspeleras
3. Middengatadapter
4. Toonarm
5. Hendel
6. Toonarmclip

17
7. Toerenregelaar platenspeler
8. Bedieningsschakelaar automatische stop
9. Ledstatusindicator
10. Aan/uit-knop/volumeknop
11. Koptelefoonaansluiting
12. Stylus
13. Slot
14. Handgreep om te dragen
15. Luidspreker
16. Aux in-aansluiting
17. Line-uitgang kanaal R/L
18. DC in-aansluiting
19. Koppelen
20. Vorige nummer
21. Volgende nummer
22. Afspelen/pauzeren
23. Modus
24. Modusindicator
Modus
1. Druk kort op "Mode (Modus)" om de afspeelmodus te selecteren.
2. De blauwe led knippert als de bluetooth wordt gekoppeld.
3. De blauwe led licht op wanneer de bluetooth is verbonden.
4. De rode led licht op wanneer het in de platenspelermodus staat.
5. De groene led licht op als het in Aux in-modus staat.
De platenspeler gebruiken
1. Plaats de platenspeler op een vlak en waterpas oppervlak.
2. Steek de voedingskabel in de DC-ingang aan de achterkant van de behuizing en steek de stekker in een
stopcontact.
3. Zorg ervoor dat bij eerste gebruik de , zorg ervoor dat de kabelbinder wordt verwijderd van de toonarm.

18
4. Verwijder de styluskap en bewaar deze op een veilige plaats voor toekomstig gebruik
5. Stel de toerenregelaar in op het juiste aantal toeren (33,45 of 78 rpm) die overeenkomt met de af te
spelen plaat.
6. Draai aan de volumeknop om de platenspeler in te schakelen. De modusindicator zal rood oplichten.
7. Plaats een plaat op de platenspeler en maak de toonarm los
8. Gebruik de hendel om de toonarm op te tillen en verplaats de toonarm, zodat de stylus net binnen de
rand van de plaat is gepositioneerd of uitgelijnd is met het begin van het af te spelen nummer.
9. Laat de toonarm langzaam zaken. Na een korte pauze begint de plaat af te spelen
10. Stel het volume in op het gewenste niveau door aan de volumeknop te draaien
11. De platenspeler stopt wanneer het einde van de plaat is bereikt.
12. Gebruik de hendel opnieuw om de toonarm op te tillen (het dek begint weer te draaien), beweeg de
toonarm terug naar de clip en laat de toonarm zakken in de houder. Het dek stopt.
13. Beveilig de toonarm met behulp van de clip en plaats de styluskap terug na gebruik en altijd bij het
verplaatsen van de platenspeler.
14. Til de toonarm op van de plaat en draai de volumeknop linksom om de platenspeler uit te schakelen.
Opmerking
Sommige platen hebben een groter middengat en het kan nodig zijn om de middengatadapter op de
platenspeleras te plaatsen voordat u de plaats op de platenspeler plaats. Plaats altijd de styluskap altijd
terug en beveilig de toonarm met behulp van de clip voordat u de platenspeler verplaatst.
Gebruik met hulpapparaat
1. Analoge hulpapparatuur kan op de platenspeler worden aangesloten en versterkt
2. Sluit de hulpapparatuur met behulp van een 3,5 mm aansluitkabel (kabel niet Inbegrepen) aan op de LINE
IN-aansluiting.
3. Druk op de afspeelknop van de hulpapparaat en selecteer een nummer zoals gebruikelijk op het
hulpapparaat.
4. Het volume kan worden ingesteld met behulp van de volumeknop op de platenspeler of de bedieningen
van het aangesloten hulpapparaat.
5. Draai de volumeknop helemaal naar links om de platenspeler uit te schakelen.

19
Gebruik van koptelefoon (niet inbegrepen)
Een stereo koptelefoonaansluiting is voorzien, zodat de platenspeler kan worden gebruikt zonder anderen te
storen. Plug de koptelefoon nabij de gemarkeerde koptelefoon nabij de volumeknop en stel het
luistervolume in op uw gekozen niveau. Overmatige geluidsdruk van oortelefoons en koptelefoons kan
gehoorverlies veroorzaken. De luidsprekers van de platenspeler werken niet als een koptelefoon is
aangesloten.
De platenspeler aansluiten op een externe luidspreker
Voor het aansluiten van de platenspeler op externe luidsprekers (via een geschikte versterker), gebruik een
dubbele tulpverloopkabel (niet inbegrepen) om de RCA-uitgangsaansluiting aan te sluiten op de Audio in van
de versterker. Zorg ervoor dat rode stekkers in de rode aansluitingen worden gestoken en de witte stekkers
in de witte aansluitingen.
Gebruik met bluetoothapparaat
Controleer of uw platenspeler in bluetoothmodus staat. Als u nog niet in bluetoothmodus bent, druk dan kort
op de knop Mode (Modus) totdat u in bluetoothmodus bent (de blauwe led zal oplichten). Het zal beginnen
te zoeken naar bluetoothapparaten (de blauwe led knippert tijdens het koppelen).
In bluetoothmodus:
1. De platenspeler zoekt naar bluetooth.
2. Schakel op het apparaat (bijvoorbeeld iPhone/iPad/Android/andere telefoon/tablet/computer)
bluetoothconnectiviteit in zorg ervoor dat het zichtbaar is.
Opmerking: Raadpleeg indien nodig de instructies voor uw apparaat om bluetooth toe te voegen of in te
stellen.
3. Selecteer indien nodig "Add new device (Nieuw apparaat toevoegen)".
Opmerking: Sommige producten zullen automatisch naar een nieuw apparaat zoeken en is daarom de optie
'Add new device (Nieuw apparaat toevoegen)' niet beschikbaar.
4. Wanneer gevonden wordt uw apparaat als "Lenco TT-110" weergegeven. Selecteer en begin met koppelen.
5. Wanneer het koppelen is voltooid, wordt 'Bluetooth Connected (Bluetooth verbonden)' weergegeven.
6. Nu u uw apparaat heeft gekoppeld met de platenspeler, zal het verbinden met de platenspeler wanneer
het binnen bereik is, dat is ongeveer 10 meter of minder.
7. Uw apparaat blijft gekoppeld met de platenspeler tenzij u besluit de verbinding los te koppelen of te
ontkoppelen.
8. U kunt kort op "Pair (Koppelen)" drukken om opnieuw verbinding te maken.
Bluetooth afspelen
1. Druk op "Back (Terug)" Voor het vorige nummer van uw bluetoothapparaat.
2. Druk op "Next (Volgende)" voor het volgende nummer van uw bluetoothapparaat.
3. Druk op "Play/pause (Afspelen/pauzeren)" om uw bluetoothapparaat af te spelen of te pauzeren.

20
HET VERVANGEN VAN DE NAALD
Om de naald te vervangen, verwijzen wij u naar de onderstaande instructies. Het verwijderen van de naald
uit het element
1. Plaats een schroevendraaier tegen de punt van de stylus en duw naar onderen zoals weergegeven in
aanwijzing “A”.
2. Verwijder de stylus door de stylus naar voren te trekken en naar onderen te duwen.
De stylus installeren
1. Houd de punt van de stylus vast en steek de stylus in door te drukken zoals weergegeven in aanwijzing “B”.
2. Duw de stylus naar boven zoals in aanwijzing “C” totdat de stylus in de puntstand staat.
EN
NL
Guide Pins (inside)
Geleidepennen (binnen)
OPMERKINGEN
Wij adviseren u uw platen schoon te maken met een anti-statische doek om maximaal van ze te genieten.
Om dezelfde reden dient uw stylus periodiek te worden vervangen (circa elke 250 afspeeluren).
TIPS VOOR EEN GOED GEBRUIK VAN UW PLATENSPELER
1. Ga voorzichtig te werk bij het openen of sluiten van de stofkap door deze in het midden of aan beide
zijden tegelijk vast te pakken.
2. Raak de naaldpunt niet met uw vingers aan. Vermijd het stoten van de naald tegen de draaitafel of tegen
de rand van de plaat.
3. Reinig de naald regelmatig. Gebruik daarvoor een zachte borstel en beweeg alleen van achteren naar
voren.
4. Als u een reinigingsvloeistof voor de naald moet gebruiken, gebruik deze dan zeer spaarzaam.
5. Veeg de behuizing van de platenspeler voorzichtig af met een zachte doek. Gebruik slechts een klein
beetje mild reinigingsmiddel om de platenspeler af te nemen.
6. Gebruik nooit agressieve chemicaliën of oplosmiddelen om onderdelen van het draaitafelsysteem te
reinigen.

21
SPECIFICATIES
Type
Riemaandrijving
drive motor
Gelijkstroommotor
speed
33 1/3 tpm, 45 tpm, 78 tpm
wow and flutter
<0,35%
turntable platter
200 mm
cartridge
Type
Keramisch
Stylus
0,7 millimeter
optimum tracking force
6 gram
output
300-500 mv
frequency response
,+/-20 dB
crosstalk
10 db
signal to noise ration ( S/N)
18 db
General
Adaptor
Invoer AC 100-240 V, 50/60 Hz, max. 0,3 A
uitvoer DC 5 V, 1 A
product
DC5V;1A
audio output (line out)
300-500 mv
power consumption
5 W
Voedingsadapter.
Uitvoer DC 5 V, 1 A
Invoer AC 100-240 V, 50/60 Hz, max. 0,3 A
Koppelnaam bluetooth:
Lenco TT-110
Koptelefoonaansluiting:
3,5 mm
Bedrijfstemperatuur:
0 °C tot 40 °C
Opslagtemperatuur:
-20 °C tot 70 °C
Vanwege doorlopende verbeteringen zijn de functies en het ontwerp zonder nadere aankondiging
onderhevig aan wijzigingen
Voedingsadapter (alleen voor EU)
Gebruik uitsluitend de lichtnetdapter die in de gebruiksaanwijzing wordt vermeld

22
Informatie
Waarde en precisie
Naam of handelsmerk van de
fabrikant, handelsregistratie
en adres
DongGuan Obelieve Electronic Co., Ltd
Huazhaoxin Industrial park B-4 / F, Golden
phoenix industrial zone, Fenggan town,
Dongguan city, Guangdong province, China
Modelaanduiding
0BL-0501000E
Ingangsspanning
100-240 V
Ingangsfrequentie
wisselstroom
50/60 Hz
Uitgangsspanning
5 V
Uitgangsstroom
1 A
Uitgang
5 W
Gemiddelde actieve efficiëntie
73,62
Verbruik onbelast vermogen
≤ 0.10
Garantie
Lenco biedt service en garantie aan overeenkomstig met de Europese wetgeving. Dit houdt in dat u, in het
geval van reparaties (zowel tijdens als na de garantieperiode), uw lokale handelaar moet contacteren.
Belangrijke opmerking: Het is niet mogelijk om producten die moeten worden gerepareerd rechtstreeks naar
Lenco te sturen.
Belangrijke opmerking: De garantie verloopt als een onofficieel servicecenter het apparaat op wat voor manier
dan ook heeft geopend, of er toegang toe heeft gekregen.
Het apparaat is niet geschikt voor professioneel gebruik. In het geval van professioneel gebruik worden alle
garantieverplichtingen van de fabrikant nietig verklaard.
Disclaimer
Er worden regelmatig updates in de firmware en/of hardwarecomponenten gemaakt. Daardoor kunnen
gedeelten van de instructie, de specificaties en afbeeldingen in deze documentatie enigszins verschillen van
uw eigen situatie. Alle onderwerpen die staan beschreven in deze handleiding zijn bedoeld als illustratie en
zijn niet van toepassing op specifieke situaties. Aan de beschrijving in dit document kunnen geen rechten
worden ontleend.

23
Afvoer van het oude apparaat
Dit symbool geeft aan dat het betreffende elektrische product of de accu/batterij
niet mag worden verwijderd als algemeen huishoudelijk afval in Europa. Zorg voor
een juiste afvalverwerking door het product en de accu/batterij in overeenstemming
met alle van toepassing zijnde lokale wetten voor het verwijderen van elektrische
apparatuur of accu's/batterijen te verwijderen. Als u dit doet, helpt u de natuurlijke
bronnen te behouden en de standaard van milieubescherming te verbeteren bij de
behandeling en verwijdering van elektrisch afval (Afgedankte Elektrische en
Elektronische Apparatuur).
CE-markering
Lenco Benelux B.V., Thermiekstraat 1a, 6361 HB Nuth, Nederland, verklaart hierbij
dat dit product voldoet aan de vereisten van de essentiële EU-richtlijnen.
De verklaring van conformiteit kan worden aangevraagd via
techdoc@commaxxgroup.com
WAARSCHUWING: Luister nooit voor lange tijd op hoge volumeniveaus, om
mogelijke gehoorbeschadiging te voorkomen.
Service
Bezoek voor meer informatie en helpdeskondersteuning www.lenco.com
Lenco Benelux BV, Thermiekstraat 1a, 6361 HB, Nuth, Nederland.

24
Deutsch
ACHTUNG:
Eine andere als die hier beschriebene Bedienung, Einstellung oder Verwendung der Funktionen kann zu
gefährlicher Strahlenbelastung führen.
VORSICHTSMASSNAHMEN VOR DER BENUTZUNG
BEFOLGEN SIE IMMER FOLGENDE ANWEISUNGEN:
1. Blockieren oder bedecken Sie keine Lüftungsöffnungen. Wenn Sie das Gerät auf ein Regal stellen, lassen
Sie um das gesamte Gerät 5 cm (2”) freien Platz.
2. Stellen Sie das Gerät entsprechend den Anweisungen der mitgelieferten Bedienungsanleitung auf.
3. Halten Sie das Gerät von Hitzequellen wie Radiatoren, Heizern, Öfen, Kerzen oder anderen
hitzeerzeugenden Produkten oder offenen Flammen fern. Das Gerät darf nur bei gemäßigtem Klima
verwendet werden. Sehr kalte oder heiße Umgebungen sind zu vermeiden. Die Betriebstemperatur
liegt zwischen 0 °C und 35 °C.
4. Meiden Sie bei der Nutzung des Produkts die Nähe starker Magnetfelder.
5. Elektrostatische Entladungen können die normale Verwendung von diesem Gerät stören. Sollte dies
geschehen, führen Sie einfach einen Reset aus und starten Sie dann das Gerät entsprechend den
Anweisungen dieser Bedienungsanleitung neu. Gehen Sie besonders bei Datenübertragungen mit dem
Gerät vorsichtig um und führen Sie diese nur in einer antielektrostatischen Umgebung aus.
6. Warnung! Niemals Gegenstände durch die Lüftungsschlitze oder Öffnungen in das Gerät stecken. In
diesem Gerät fließt Hochspannung und das Hineinstecken von Gegenständen kann zu elektrischem
Schock und/oder Kurzschluss interner elektrischer Bauteile führen. Aus dem gleichen Grund kein
Wasser oder Flüssigkeiten in das Gerät geben.
7. Benutzen Sie das Gerät nicht in nasser oder feuchter Umgebung wie Bad, Dampfküche oder in der Nähe
von Schwimmbecken.
8. Das Gerät darf weder Tropf- noch Spritzwasser ausgesetzt werden und es dürfen keine mit Flüssigkeit
gefüllten Behälter wie z.B. Vasen auf das Gerät oder in der Nähe des Gerätes gestellt werden.
9. Benutzen Sie das Gerät nicht bei Kondensationsgefahr. Wenn Sie das Gerät in einem warmen feuchten
Raum mit Dampf benutzen, dann können Wassertropfen oder Kondensation in das Gerät eindringen
und u. U. zu Fehlfunktionen des Geräts führen. Schalten Sie in diesem Fall das Gerät für 1 – 2 Stunden
aus, bevor Sie es erneut einschalten: Das Gerät sollte vollständig getrocknet sein, wenn Sie es wieder
einschalten.
10. Obwohl dieses Gerät unter größter Sorgfalt und vor Auslieferung mehrmals überprüft wurde, können
trotzdem wie bei jedem anderen elektrischen Gerät auch Probleme auftauchen. Trennen Sie das Gerät
im Falle einer Rauchentwicklung, starker Hitzeentwicklung oder jeden anderen unnatürlichen
Erscheinung sofort vom Netz.
11. Dieses Gerät ist durch eine Stromquelle wie auf dem Typenschild angegeben zu betreiben. Halten Sie
bei Unsicherheiten über die Art Ihrer Stromversorgung in Ihrer Wohnung Rücksprache mit Ihrem
Händler oder Ihrer Stromzuliefererfirma.
12. Halten Sie es von Haustieren fern. Einige Nagetiere lieben es, an Netzkabeln zu nagen.
13. Benutzen Sie für die Reinigung ein weiches und trockenes Tuch. Benutzen Sie niemals Lösungsmittel
oder Flüssigkeiten auf Ölbasis. Benutzen Sie zum Entfernen hartnäckiger Flecken ein feuchtes Tuch mit
mildem Reinigungsmittel.
14. Der Hersteller haftet nicht für Schäden oder Verluste durch Fehlfunktion, Zweckentfremdung oder
Modifikation des Geräts oder durch Wechseln der Batterien.
15. Unterbrechen Sie die Verbindung nicht während einer Formatierung oder einer Datenübertragung. Bei
Unterbrechung drohen Datenverlust und Datenbeschädigung.
16. Wenn das Gerät eine USB-Wiedergabefunktion besitzt, dann stecken Sie den USB-Stick direkt in das
Gerät. Verwenden Sie kein USB-Verlängerungskabel, weil die erhöhte Störungsanfälligkeit zu
Datenverlust führen könnte.
17. Das Typenschild befindet sich an der Unter- oder Rückseite des Gerätes.
18. Dieses Gerät ist nicht zur Benutzung durch Personen (auch Kinder) mit physischen, sensorischen oder
mentalen Beeinträchtigungen oder ohne ausreichender Erfahrung vorgesehen, es sei denn, sie werden
durch eine verantwortliche Person beaufsichtigt oder wurden in die ordnungsgemäße Bedienung des
Gerätes durch eine für ihre Sicherheit verantwortlichen Person eingewiesen.

25
19. Dieses Produkt ist nur für den nicht-professionellen Gebrauch und nicht für gewerbliche oder
industrielle Zwecke bestimmt.
20. Stellen Sie sicher, dass das Gerät in einer stabilen Position aufgestellt ist. Schäden, die durch
Verwendung dieses Produkts in einer instabilen Position, durch Vibrationen, Stöße oder
Nichtbeachtung der anderen in diesem Handbuch enthaltenen Warnungen und Vorwarnungen
entstehen, werden nicht durch die Garantie abgedeckt.
21. Entfernen Sie niemals das Gehäuse dieses Produkts.
22. Stellen Sie das Produkt niemals auf andere elektrische Geräte.
23. Halten Sie Kinder von den Plastiktüten fern.
24. Benutzen Sie nur vom Hersteller spezifizierte Erweiterungen/Zubehörteile.
25. Lassen Sie alle Eingriffe von qualifiziertem Servicepersonal ausführen. Eingriffe werden notwendig,
wenn das Gerät in irgendeiner Weise beschädigt wurde, beispielsweise am Netzkabel oder am
Netzstecker oder wenn Flüssigkeit in das Gerät gelangt ist bzw. Gegenstände in das Gerät gefallen sind,
das Gerät Regen oder Feuchtigkeit ausgesetzt war, es heruntergefallen ist oder nicht ordnungsgemäß
funktioniert.
26. Langes Hören lauter Töne aus einem Musikgerät kann zum zeitweiligen oder permanenten Hörverlust
führen.
27. Wenn zum Lieferumfang des Produkts ein Netzkabel oder ein Netzadapter gehört:
⚫ Wenn irgendwelche Probleme auftreten, dann trennen Sie das Gerät vom Stromnetz und setzen
Sie sich anschließend mit einer qualifizierten Fachkraft in Verbindung.
⚫ Treten Sie nicht auf das Netzteil und klemmen Sie es auch nicht ein. Seien Sie im näheren Bereich
des Steckers und der Herausführungen des Kabels besonders vorsichtig. Stellen Sie keine schweren
Gegenstände auf das Netzteil, weil es dadurch beschädigt werden könnte. Halten Sie das gesamte
Gerät außerhalb der Reichweite von Kindern! Durch Spielen mit dem Netzkabel können sie sich
ernsthafte Verletzungen zuziehen.
⚫ Trennen Sie das Gerät während eines Gewitters oder bei längerer Nichtbenutzung vom Netz.
⚫ Die Wandsteckdose muss sich in der Nähe des Geräts befinden und einfach zu erreichen sein.
⚫ Steckdosen und Verlängerungsleitungen nicht überlasten. Eine Überlastung kann zu Brandgefahr
bzw. Stromschlag führen.
⚫ Geräte der Schutzklasse 1 sind an eine Netzsteckdose mit Schutzleiter anzuschließen.
⚫ Geräte der Schutzklasse 2 benötigen keinen Schutzleiteranschluss.
⚫ Halten Sie den Netzstecker in der Hand, wenn Sie ihn aus der Netzsteckdose ziehen. Ziehen Sie ihn
nicht durch Zerren am Kabel heraus. Das kann zu einem Kurzschluss führen.
⚫ Verwenden Sie weder ein beschädigtes Netzkabel noch einen beschädigten Stecker oder eine
lockere Steckdose. Es besteht Brand- und Stromschlaggefahr.
28. Wenn das Produkt mit einer Fernbedienung mit Batterien/Knopfzellen geliefert wird oder das Produkt
eine derartige Fernbedienung umfasst:
Warnung:
⚫ „Die Batterie nicht einnehmen, er besteht Verätzungsgefahr”.
⚫ [Die mit diesem Produkt mitgelieferte Fernbedienung] enthält eine Knopfbatterie. Das
Verschlucken der Batterie kann innerhalb von nur 2 Stunden zu schwersten inneren
Verbrennungen mit Todesfolge führen.
⚫ Halten Sie neue und gebrauchte Batterien von Kindern fern.
⚫ Verwenden Sie dieses Produkt nicht weiter und halten Sie es von Kindern fern, wenn das
Batteriefach nicht sicher schließt.
⚫ Suchen Sie umgehend ärztliche Hilfe auf, wenn Sie vermuten, dass Batterien verschluckt oder in
Körperöffnungen eingeführt wurden.
29. Warnhinweise bzgl. der Verwendung von Batterien:
⚫ Es besteht Explosionsgefahr, wenn die Batterien nicht korrekt eingelegt werden. Nur mit Batterien
des gleichen oder entsprechenden Typs ersetzen.
⚫ Die Batterie darf während der Benutzung, Aufbewahrung oder des Transports weder sehr hohen
oder sehr niedrigen Temperaturen noch niedrigem Luftdruck in großen Höhenlagen ausgesetzt
werden.
⚫ Die Ersetzung der Batterie mit einem falschen Batterietyp kann zum Explodieren der Batterie oder
dem Auslaufen von entflammbarem Gas oder entflammbarer Flüssigkeit aus der Batterie führen.
⚫ Die Entsorgung der Batterie in Feuer oder einem heißen Ofen oder das mechanische Zerkleinern
oder Zerteilen der Batterie kann zu Explosionen führen.

26
⚫ Das Verbleiben der Batterie in einer Umgebung mit sehr hohen Temperaturen kann zum
Explodieren der Batterie oder dem Auslaufen von entflammbarem Gas oder entflammbarer
Flüssigkeit führen.
⚫ Eine einem sehr niedrigen Luftdruck ausgesetzte Batterie kann explodieren oder es kann aus einer
einem sehr niedrigen Luftdruck ausgesetzten Batterie entflammbares Gas oder entflammbare
Flüssigkeit auslaufen.
⚫ Augenmerk ist auf den ökologischen Aspekt der Batterieentsorgung zu legen.
ANBRINGEN
• Packen Sie alle Teile aus und entfernen Sie danach die Schutzmaterialien.
• Schließen Sie das Gerät nicht eher an das Netz an, bevor Sie die Netzspannung überprüft haben und alle
anderen notwendigen Verbindungen hergestellt sind.
Im Lieferumfang enthaltene Zubehörteile:
Bedienungsanleitung
Netzadapter

27
Bedienelemente
1. Plattenspielerdeck
2. Plattentellerspindel
3. Mittellochadapter
4. Tonarm
5. Tonarm-Lifthebel
6. Tonarmhalter

28
7. Plattenteller-Geschwindigkeitswähler
8. Schalter automatische Abschaltsteuerung
9. Betriebszustandsanzeige-LED
10. Ein/Aus-Schalter / Lautstärkeregler
11. Kopfhörerbuchse
12. Tonnadel
13. Verschluss
14. Tragegriff
15. Lautsprecher
16. AUX-Eingangsbuchse
17. LINE-Ausgang linker/rechter Kanal
18. Stromversorgungseingang
19. Koppeln
20. Vorheriger Titel
21. Nächster Titel
22. Wiedergabe/Pause
23. Modus
24. Modusanzeige-LED
Modus
1. Drücken Sie kurz „Modus“, um den Wiedergabemodus auszuwählen.
2. Während der Bluetooth-Kopplung blinkt die Modusanzeige-LED Blau.
3. Wenn die Bluetooth-Verbindung erfolgreich aufgebaut wurde, dann leuchtet die Modusanzeige-LED
kontinuierlich Blau.
4. Wenn der Plattenspielermodus ausgewählt ist, dann leuchtet die Modusanzeige-LED Rot.
5. Wenn der AUX-Eingangsmodus ausgewählt ist, dann leuchtet die Modusanzeige-LED Grün.
Benutzen des Plattenspielers
1. Stellen Sie den Plattenspielerkoffer auf eine ebene Oberfläche.
2. Schließen Sie den Netzadapter am Stromversorgungseingang auf der Rückseite des Plattenspielerkoffers
an und stecken Sie anschließend den Netzadapter in eine Netzsteckdose.
3. Vergewissern Sie sich bei der ersten Benutzung des Plattenspielers, dass der Kabelbinder vom Tonarm
entfernt wurde.
4. Nehmen Sie danach den Tonnadelschutz ab und bewahren Sie ihn für zukünftige Verwendung an einem
sicheren Platz auf.

29
5. Wählen Sie mit Hilfe des Plattenteller-Geschwindigkeitswählers die für die wiederzugebende Schallplatte
benötigte Geschwindigkeit (33, 45 oder 78 U/min) aus.
6. Drehen Sie den Lautstärkeregler, um den Plattenspieler einzuschalten, woraufhin die
Betriebszustandsanzeige-LED Rot leuchtet.
7. Legen Sie eine Schallplatte auf den Plattenteller und nehmen Sie anschließend den Tonarm aus dem
Tonarmhalter.
8. Heben Sie den Tonarm mit Hilfe des Tonarm-Lifthebels an und bewegen Sie anschließend den Tonkopf so,
dass er sich über der Schallplatte bzw. über der Startrille des wiederzugebenden Titels befindet.
9. Senken Sie den Tonarm nun vorsichtig ab. Kurz darauf beginnt die Wiedergabe der Schallplatte.
10. Stellen Sie durch Drehen des Lautstärkereglers den gewünschten Lautstärkepegel ein.
11. Wenn das Ende der Schallplatte erreicht wird, stoppt die Plattentellerrotation automatisch.
12. Heben Sie den Tonarm mit Hilfe des Tonarm-Lifthebels erneut an (der Plattenteller beginnt wieder zu
rotieren) und bewegen Sie ihn zurück zum Tonarmhalter. Senken Sie den Tonarm hier ab. Die
Plattentellerrotation wird daraufhin wieder gestoppt.
13. Rasten Sie den Tonarm wieder im Tonarmhalter ein und setzen Sie nach Beendigung der Benutzung den
Tonnadelschutz wieder auf den Tonkopf, bevor Sie den Plattenspieler umstellen/transportieren.
14. Sie können den Plattenspieler jederzeit ausschalten, indem Sie den auf der Schallplatte aufliegenden
Tonarm anheben und anschließend den Laustärkeregler ganz nach links drehen.
Hinweis
Einige Schallplatten besitzen ein größeres Mittelloch. Bei diesen Schallplatten ist es notwendig, dass Sie den
Mittellochadapter auf die Plattentellerspindel stecken, bevor Sie die Schallplatte auf den Plattenteller legen.
Setzen Sie immer den Tonnadelschutz auf den Tonkopf und fixieren Sie den Tonarm im Tonarmhalter, bevor
Sie den Plattenspieler umstellen/transportieren.
Benutzen des Plattenspielers mit einem externen Gerät
1. Sie können externe analoge Audiogeräte an den Plattenspieler anschließen und deren Audiosignal über
den Plattenspieler verstärken.
2. Schließen Sie Ihr externes Audiogerät über ein Audiokabel mit 3,5-mm-Klinkenbuchse (nicht im
Lieferumfang enthalten) an der Eingangsbuchse LINE IN des Plattenspielers an.
3. Starten Sie die Wiedergabe mit Hilfe der Wiedergabetaste des externen Audiogeräts und benutzen Sie die
Audiosteuerung Ihres externen Audiogeräts in gewohnter Weise.

30
4. Die Lautstärke können Sie sowohl über den Lautstärkeregler des Plattenspielers als auch des
angeschlossenen externen Audiogeräts steuern.
5. Sie können den Plattenspieler jederzeit ausschalten, indem Sie seinen Lautstärkeregler ganz nach links
drehen.
Benutzen eines Kopfhörers (nicht im Lieferumfang enthalten)
Der Plattenspieler besitzt eine Kopfhörerbuchse, damit Sie den Plattenspieler benutzen können, ohne
andere Personen zu stören. Schließen Sie den Kopfhörer an der mit einem Kopfhörersymbol
gekennzeichneten Buchse unterhalb des Lautstärkereglers an und stellen Sie anschließend die gewünschte
Wiedergabelautstärke ein. Übermäßiger Schalldruck der Ohrhörer und Kopfhörer kann zu Gehörverlust
führen. Sobald Sie einen Kopf-/Ohrhörer anschließen, werden die Lautsprecher des Plattenspielers
stummgeschaltet.
Anschließen externer Lautsprecher an den Plattenspieler
Wenn Sie über einen geeigneten Verstärker an Ihrem Plattenspieler externe Lautsprecher anschließen
möchten, dann verbinden Sie die Cinch-Ausgänge des Plattenspielers über ein Cinch-Stereo-auf-Cinch-
Stereo- Audiokabel (nicht im Lieferumfang enthalten) mit den Audioeingängen des externen Verstärkers.
Vergewissern Sie sich, dass die roten Cinchstecker an den roten Cinchbuchsen und die weißen Cinchstecker
an den weißen Cinchbuchsen angeschlossen sind.
Benutzen des Geräts mit einem Bluetooth-Gerät
Vergewissern Sie sich, dass sich Ihr Plattenspieler im Bluetooth-Modus befindet. Wenn er sich nicht im
Bluetooth-Modus befindet, dann drücken Sie die Taste Modus solange kurz, bis sich der Plattenspieler im
Bluetooth-Modus befindet (die Modusanzeige-LED leuchtet Blau). Anschließend beginnt der Plattenspieler mit
der Suche nach Bluetooth-Geräten (während des Koppelns blinkt die LED Blau).
Im Bluetooth-Modus:
1. Ihr Plattenspieler sucht nach Bluetooth-Geräten.
2. Aktivieren Sie die Bluetooth-Konnektivität des Bluetooth-Geräts (z. B. iPhone, iPad, Android-Mobilgerät,
sonstige Mobiltelefone, Tablet-PC oder PC) und vergewissern Sie sich, dass dieses Gerät erkennbar ist.
Hinweis: Schlagen Sie bei Bedarf in der Bedienungsanleitung zu Ihrem Gerät nach, um zu erfahren, wie
Bluetooth aktiviert oder eingerichtet werden kann.
3. Wählen Sie gegebenenfalls „Add new device“ (Neues Gerät hinzufügen) aus.
Hinweis: Einige Produkte suchen automatisch nach neuen Geräten. Bei diesen Geräten steht die Option
„Add new device“ (Neues Gerät hinzufügen) nicht zur Verfügung.
4. Wenn Ihr Plattenspieler gefunden wurde, dann wird er in der Liste gefundener Bluetooth-Geräte als
„Lenco TT-110“ angezeigt. Wählen Sie ihn aus und stellen Sie eine Verbindung her.
5. Wenn das Koppeln abgeschlossen ist, dann wird „Bluetooth Connected“ (Bluetooth verbunden) angezeigt.

31
6. Jetzt, wo Ihr Plattenspieler mit dem Bluetooth-Gerät gekoppelt ist, verbindet es sich immer mit ihm,
sobald es sich innerhalb der Verbindungsreichweite (Sichtlinie) von max. ca. 10 m (33 Fuß) befindet.
7. Ihr Bluetooth-Gerät bleibt solange mit dem Plattenspieler gekoppelt, bis Sie die Verbindung bzw. Kopplung
beider Geräte manuell trennen.
8. Zum Wiederverbinden können Sie kurz „Koppeln“ drücken.
Bluetooth-Wiedergabe
1. Drücken Sie „Zurück“, um zum vorherigen Titel Ihres Bluetooth-Geräts zu springen.
2. Drücken Sie „Vor“, um zum nächsten Titel Ihres Bluetooth-Geräts zu springen.
3. Drücken Sie „Wiedergabe/Pause“, um die Wiedergabe Ihres Bluetooth-Geräts zu starten, zu pausieren
oder fortzusetzen.
ERSETZEN DER TONNADEL
Folgen Sie für das Ersetzen der Tonnadel der nachfolgenden Anleitung.
Entnehmen der Tonnadel aus dem Tonkopf
1. Setzen Sie einen Schraubendreher an der Spitze der Tonabnehmernadel an. Drücken Sie dann wie in der
Abbildung gezeigt nach unten in Richtung „A“.
2. Nehmen Sie danach die Tonabnehmernadel ab, indem Sie ziehen und nach unten drücken.
Einsetzen der Tonabnehmernadel
1. Halten Sie die Tonabnehmernadel an der Spitze und setzen Sie dann die Tonabnehmernadel ein, indem
Sie diese wie abgebildet in Richtung „B“ drücken.
2. Drücken Sie nun die Tonabnehmernadel in Richtung „C“ nach oben, bis die Tonabnehmernadel in der für
die Nadel vorgesehenen Position einrastet.
EN
DE
Guide Pins (inside)
Führungsstifte (innen)

32
HINWEISE
Wir empfehlen Ihnen, Ihre Platten mit einem antistatischen Tuch zu reinigen, um maximales Musikerlebnis
von den Platten zu erhalten.
Wir möchten Sie aus selben Grund darauf hinweisen, Ihre Tonnadel regelmäßig (ungefähr alle 250
Wiedergabestunden) zu wechseln.
TIPPS FÜR BESSERE PLATTERSPIELERLEISTUNG
1. Seien Sie behutsam, wenn Sie den Staubschutz des Plattenspielers öffnen oder schließen. Fassen Sie ihn
entweder in der Mitte oder an jeder Seite an.
2. Berühren Sie nicht die Tonnadelspitze mit den Fingern. Vermeiden Sie weiterhin das Aufsetzen der
Tonnadel auf dem Plattenteller oder dem Schallplattenrand.
3. Reinigen Sie regelmäßig die Tonnadelspitze mit einem weichen Pinsel. Bewegen Sie den Pinsel dabei nur
von hinten nach vorn.
4. Wenn es nötig ist, eine Tonnadelreinigungslösung zu verwenden, dann verwenden Sie diese sehr
sparsam.
5. Wischen Sie das Gehäuse des Plattenspielers behutsam mit einem weichen Lappen ab. Verwenden Sie für
die Reinigung des Plattenspielers nur eine minimale Menge eines milden Reinigungsmittels.
6. Verwenden Sie auf keinen Fall für irgendeines der Plattenspielerteile scharfe Chemikalien oder
Lösungsmittel.
TECHNISCHE DATEN
Typ
Riemenantrieb
Antriebsmotor
Gleichstrommotor
Geschwindigkeit
33⅓ U/min, 45 U/min, 78 U/min
Gleichlaufschwankung
<0,35 %
Plattenteller
200 mm
Tonabnehmer
Typ
Keramiktonabnehmer
Tonnadel
0,7 mil
Optimale Auflagekraft
6 Gramm
Ausgabe
300 – 500 mV
Frequenzgang
, ±20 dB
Übersprechen
10 dB
Signal-Rausch-Verhältnis
( S/N)
18 dB
Allgemein
Netzadapter
Eingang: 100 – 240 V~, 50/60 Hz, max. 0,3 A

33
Ausgang: 5 V DC/1 A
Produkt
5 V DC/1 A
Audioausgang (Line Ausgang)
300 – 500 mV
Leistungsaufnahme
5 W
Netzteil.
Ausgang: 5 V DC, 1 A
Eingang: 100 – 240 V~, 50/60 Hz, max. 0,3 A
Bluetooth-
Kopplungsname:
Lenco TT-110
Kopfhörerbuchse:
3,5 mm
Betriebstemperatur:
0 °C – 40 °C
Lagertemperatur:
-20 °C – 70 °C
Aufgrund ständiger Weiterentwicklung kann es zu stillschweigenden Änderungen der Funktionen und des
Designs kommen

34
Netzadapter (nur für EU)
Verwenden Sie nur die im Handbuch angegebene Stromversorgung
Informationen
Wert und Genauigkeit
Name des Herstellers oder der
Handelsmarke, kommerzielle
Zulassung und Anschrift
DongGuan Obelieve Electronic Co., Ltd
Huazhaoxin Industrial park B-4/F, Golden
phoenix industrial zone, Fenggan town,
Dongguan city, Guangdong province, China
Modellidentifikator
0BL-0501000E
Eingangsspannung
100 – 240 V
Wechselstromfrequenz des
AC-Eingangs
50/60 Hz
Ausgangsspannung
5 V
Ausgangsstrom
1 A
Ausgangsleistung
5 W
Durchschnittliche Effizienz bei
Normallast
73,62
Leistungsaufnahme bei Nulllast
≤ 0.10
Garantie
Lenco bietet Leistungen und Garantien im Einklang mit Europäischem Recht. Setzen Sie sich deshalb im Falle
von Reparaturen (sowohl während als auch nach Ablauf der Garantiezeit) mit Ihrem Fachhändler in
Verbindung. Wichtiger Hinweis: Es ist nicht möglich, Produkte für Reparaturen direkt an Lenco zu schicken.
Wichtiger Hinweis: Wenn dieses Gerät für welchen Grund auch immer durch ein nicht offizielles Service-Center
geöffnet wurde oder durch dieses Service-Center darauf zugegriffen wurde, erlischt die Garantie.
Dieses Gerät ist nicht für professionelle Zwecke geeignet. Falls das Gerät für professionelle Zwecke
eingesetzt wird, erlöschen alle Garantieverpflichtungen seitens des Herstellers.
Haftungsausschluss
Aktualisierungen der Firmware und/oder Hardware-Komponenten werden regelmäßig durchgeführt. Aus
diesem Grund können einige der Anleitungen, Spezifikationen und Abbildungen in dieser Dokumentation zu
dem Ihnen vorliegenden Gerät leicht abweichen. Alle in diesem Handbuch beschriebenen Elemente dienen
nur zur Illustration und treffen auf Ihre individuelle Situation möglicherweise nicht zu. Aus der in diesem
Handbuch getätigten Beschreibung können keine Rechtsansprüche oder Leistungsanforderungen geltend
gemacht werden.

35
Entsorgung des Altgeräts
Dieses Symbol zeigt an, dass das entsprechende Produkt oder dessen Akku/Batterie
in Europa nicht mit dem normalen Hausmüll entsorgt werden darf. Um die
ordnungsgemäße Abfallbehandlung des Produkts und dessen Akku/Batterie zu
gewährleisten, müssen diese im Einklang mit allen anwendbaren örtlichen
Vorschriften zur Entsorgung von Elektrogeräten und Akkus/Batterien entsorgt
werden. Dabei helfen Sie, natürliche Ressourcen zu schonen und
Umweltschutzstandards zur Verwertung und Entsorgung von Altgeräten aufrecht zu
halten (Richtlinie über Entsorgung Elektrischer und Elektronischer Altgeräte).
CE-Kennzeichen
Hiermit erklärt Lenco Benelux B.V., Thermiekstraat 1a, 6361 HB Nuth, The
Netherlands, dass dieses Produkt den grundsätzlichen Anforderungen der EU-
Richtlinie entspricht. Die Konformitätserklärung kann unter folgendem Link
abgerufen werden: techdoc@commaxxgroup.com
WARNUNG: Hören Sie nicht für längere Zeit mit einem hohen Lautstärkepegel, um
dauerhaften Hörschäden vorzubeugen.
Service
Besuchen Sie bitte für weitere Informationen und unseren Kundendienst unsere Homepage www.lenco.com
Lenco Benelux BV, Thermiekstraat 1a, 6361 HB Nuth, The Netherlands.

36
Français
ATTENTION :
L’utilisation de commandes ou de réglages ou l’exécution de procédures autres que celles spécifiées dans ce
manuel peut entraîner une exposition à des rayonnements dangereux.
PRÉCAUTIONS AVANT UTILISATION
GARDEZ CES INSTRUCTIONS À L’ESPRIT :
1. Ne couvrez pas et n’obturez pas les ouvertures de ventilation. Lorsque vous placez l’appareil sur une
étagère, laissez 5 cm (2”) d’espace libre tout autour de l’appareil.
2. Installez-le conformément au mode d’emploi fourni.
3. Gardez l’appareil à l’écart des sources de chaleur telles que des radiateurs, appareils de chauffage,
fours, bougies et autres produits générant de la chaleur ou une flamme nue. L’appareil ne peut être
utilisé que dans des climats modérés. Les environnements extrêmement froids ou chauds doivent être
évités. Température de fonctionnement entre 0° et 35° C.
4. Évitez d’utiliser l’appareil à proximité de champs magnétiques puissants.
5. Des décharges électrostatiques peuvent perturber le fonctionnement de cet appareil. Dans ce cas, il
suffit de réinitialiser et de redémarrer l’appareil en suivant le mode d’emploi. Pendant le transfert de
fichiers, manipulez l’appareil avec précaution et faites-le fonctionner dans un environnement sans
électricité statique.
6. Mise en garde ! N’introduisez jamais un objet dans l’appareil par les ouvertures et les fentes de
ventilation. Étant donné que des tensions élevées sont présentes à l’intérieur du produit, l’insertion
d’un objet peut entraîner une électrocution ou court-circuiter les composants internes. Pour les mêmes
raisons, ne versez pas de l’eau ou un liquide sur le produit.
7. Ne l’utilisez pas dans des endroits humides tels qu’une salle de bain, une cuisine pleine de vapeur ou à
proximité d’une piscine.
8. L’appareil ne doit pas être exposé à des écoulements ou des éclaboussures et aucun objet contenant
un liquide, tel qu’un vase, ne doit être posé sur ou près de l’appareil.
9. N’utilisez pas cet appareil lorsque de la condensation est possible. Lorsque vous utilisez l’appareil dans
une pièce chaude et humide, des gouttelettes d’eau ou de la condensation peuvent se former à
l’intérieur de l’appareil. Dans ce cas, l’appareil peut ne pas fonctionner correctement. Pour éviter tout
risque, laissez l’appareil hors tension pendant 1 ou 2 heures avant de le mettre en marche : l’appareil
doit être totalement sec avant de le mettre en marche.
10. Bien que ce dispositif soit fabriqué avec le plus grand soin et contrôlé à plusieurs reprises avant de
quitter l’usine, des problèmes peuvent néanmoins survenir, comme avec tous les appareils électriques.
Si l’appareil émet de la fumée ou en cas d’accumulation excessive de la chaleur ou d’un phénomène
inattendu, débranchez immédiatement la fiche d’alimentation du secteur.
11. Cet appareil doit fonctionner avec la source d’alimentation indiquée sur la plaque signalétique. Si vous
n’êtes pas sûr du type d’alimentation utilisé chez vous, contactez votre revendeur ou le fournisseur
local d’électricité.
12. Tenez l’appareil à l’abri des animaux. Certains animaux adorent mordre les cordons d’alimentation.
13. Pour nettoyer l’appareil, servez-vous d’un chiffon doux et sec. N’utilisez pas de solvant ni d’autre
liquide à base de pétrole. Pour enlever les taches importantes, vous pouvez vous servir d’un chiffon
humide imbibé d’une solution de détergent diluée.
14. Le fournisseur n’est pas responsable des dommages ou pertes de données causés par un
dysfonctionnement, une utilisation abusive, une modification de l’appareil ou un remplacement de la
batterie.
15. N’interrompez pas la connexion lorsque l’appareil formate ou transfère des fichiers. Dans le cas
contraire, les données pourraient être endommagées ou perdues.
16. Si l’appareil a une fonction de lecture USB, il faut brancher la clé USB directement sur l’appareil.
N’utilisez pas un câble d’extension USB, car cela peut causer des interférences entraînant des pertes de
données.
17. La plaque signalétique se situe en dessous ou à l’arrière de l’appareil.

37
18. Cet appareil ne doit pas être utilisé par des personnes (enfants compris) souffrant de handicaps
physiques, sensoriels ou mentaux, ou manquant d’expérience et de connaissances, sauf si elles sont
sous surveillance ou ont reçu des instructions sur l’utilisation correcte de l’appareil par la personne qui
est responsable de leur sécurité.
19. Ce produit est réservé à un usage non professionnel, et non pas à un usage commercial ni industriel.
20. Vérifiez que l’appareil est en position stable. La garantie ne couvre pas les dégâts occasionnés par
l’utilisation de cet appareil en position instable, par les vibrations, les chocs ou par la non-observation
de tout autre avertissement ou précaution contenus dans ce mode d’emploi.
21. N’ouvrez jamais cet appareil.
22. Ne placez jamais cet appareil sur un autre appareil électrique.
23. Ne laissez pas les sacs en plastique à la portée des enfants.
24. Utilisez uniquement les accessoires recommandés par le fabricant.
25. Confiez l’entretien et les réparations à un personnel qualifié. Une réparation est nécessaire lorsque
l’appareil a été endommagé de quelque façon que ce soit, par exemple lorsque le cordon
d’alimentation ou la prise sont endommagés, lorsqu’un liquide a été renversé ou des objets ont été
introduits dans l’appareil, lorsque l’appareil a été exposé à la pluie ou à l’humidité, lorsqu’il ne
fonctionne pas correctement ou lorsque l’appareil est tombé.
26. Une exposition prolongée à la musique avec un volume élevé peut entraîner une perte auditive
temporaire ou permanente.
27. Si l’appareil est livré avec un câble d’alimentation ou un adaptateur secteur :
⚫ En cas de problème, débranchez le cordon d’alimentation CA et confiez l’entretien à un personnel
qualifié.
⚫ Ne marchez pas sur l’adaptateur secteur ou ne le coincez pas. Faites très attention, en particulier à
proximité des fiches et du point de sortie du câble. Ne placez pas d’objets lourds sur l’adaptateur
secteur, car ils pourraient l’endommager. Gardez l’appareil hors de portée des enfants ! Ils
pourraient se blesser gravement s’ils jouent avec le câble d’alimentation.
⚫ Débranchez cet appareil pendant les orages ou lorsqu’il n’est pas utilisé pendant une longue
durée.
⚫ La prise secteur doit être installée près de l’appareil et doit être facilement accessible.
⚫ Ne surchargez pas les prises de courant ou les rallonges. Une surcharge peut entraîner un incendie
ou une électrocution.
⚫ Les appareils de classe 1 doivent être branchés à une prise de courant disposant d’une connexion
protectrice à la terre.
⚫ Les appareils de classe 2 ne nécessitent pas de connexion à la terre.
⚫ Tirez toujours sur la fiche pour débrancher le cordon de la prise secteur. Ne tirez pas sur le cordon
d’alimentation. Cela pourrait provoquer un court-circuit.
⚫ N’utilisez pas un cordon ou une fiche d’alimentation endommagé ni une prise desserrée. Vous
courez un risque d’incendie ou de décharge électrique.
28. Si le produit contient ou est livré avec une télécommande contenant des piles boutons :
Avertissement :
⚫ « N’ingérez pas la pile, car vous risquez une brûlure chimique » ou une formule équivalente.
⚫ [La télécommande fournie avec] Ce produit contient une pile bouton. Si la pile est avalée, elle peut
causer de graves brûlures internes en seulement 2 heures et peut entraîner la mort.
⚫ Tenez les piles neuves et usagées hors de portée des enfants.
⚫ Si le compartiment à piles ne se ferme pas correctement, cessez d’utiliser l’appareil et tenez-le
hors de portée des enfants.
⚫ Si vous pensez que les piles ont été avalées ou placées à l’intérieur d’une partie du corps,
consultez un médecin immédiatement.
29. Mise en garde relative à l’utilisation des piles :
⚫ Risque d’explosion si la pile est mal remplacée. Remplacez les piles par des piles d’un type
identique ou équivalent.
⚫ Pendant l’utilisation, le stockage ou le transport, la pile ne doit pas être soumise à des
températures extrêmement élevées ou basses, à une faible pression d’air à haute altitude.
⚫ Le remplacement d’une pile par une autre de type incorrect peut entraîner une explosion ou une
fuite de liquide ou de gaz inflammable.
⚫ L’introduction d’une pile dans le feu ou dans un four chaud, l’écrasement ou le découpage
mécanique peut entraîner une explosion.

38
⚫ L’exposition d’une pile dans un environnement à température extrêmement élevée peut
entraîner une explosion ou une fuite de liquide ou de gaz inflammable.
⚫ L’exposition d’une pile à une pression d’air extrêmement basse peut entraîner une explosion ou
une fuite de liquide ou de gaz inflammable.
⚫ Veuillez considérer les questions environnementales lors de la mise au rebut des piles.
INSTALLATION
• Déballez toutes les pièces et enlevez le matériau de protection.
• Ne connectez pas l’unité au secteur avant d’avoir vérifié la tension du secteur et avant que toutes les
autres connexions n’aient été effectuées.
Accessoires fournis :
Mode d’emploi
Adaptateur secteur

39
Emplacement des commandes
1. Plateforme de la platine
2. Arbre du tourne-disque
3. Adaptateur pour trou central
4. Bras de lecture
5. Levier de signalisation
6. Clip de bras de lecture
7. Sélecteur de vitesse de la platine
8. Interrupteur de commande d’arrêt automatique

40
9. LED d’indication de l’état
10. Interrupteur d’alimentation/ Commande du volume
11. Prise casque
12. Pointe de lecture
13. Mentonnet
14. Poignée de transport
15. Haut-parleur
16. Prise d’entrée Aux
17. Sortie de canal R/L
18. Prise d'entrée CC
19. Coupler
20. Morceau précédent
21. Morceau suivant
22. Lecture/pause
23. Mode
24. Indicateur de mode
Mode
1. Appuyez brièvement sur « Mode » pour sélectionner le mode de lecture.
2. La LED bleue clignote lorsque le Bluetooth est couplé.
3. La LED bleue s’allume lorsque le Bluetooth est connecté.
4. Le voyant rouge s’allume lorsque l’appareil est en mode platine.
5. Le voyant vert s’allume lorsque l’appareil est en mode Entrée auxiliaire.
Utilisation de la platine
1. Placez la caisse de la platine sur une surface plane.
2. Insérez le cordon de l’adaptateur dans la prise CC à l’arrière du boîtier et branchez l’adaptateur à la prise
d’alimentation secteur.
3. Lors de la première utilisation, assurez-vous que l’attache du câble est retirée du bras du lecteur.
4. Retirez le couvercle du stylet et conservez-le dans un endroit sûr pour une utilisation ultérieure.
5. Déplacez le sélecteur de vitesse sur la vitesse (33,45 ou 78 tr/min) correspondant au disque à lire.
6. Tournez le bouton de volume pour allumer la platine et le voyant de mode s’allume en rouge.
7. Placez un disque sur l’axe de la platine et déclipsez le bras de lecture.

41
8. Utilisez le levier de signalisation pour soulever le bras de lecture et déplacez le bras de manière à ce que
le stylet soit positionné juste à l’intérieur du bord du disque ou aligné avec le début de la piste à lire.
9. Baissez lentement le bras et après un court intervalle, le disque commence à jouer.
10. Ajustez le volume au niveau souhaité en tournant le bouton de réglage du volume.
11. Lorsque vous atteignez la fin du disque, la platine s’arrête.
12. Utilisez à nouveau le levier pour soulever le bras de lecture (la platine recommence à tourner), remettez-
le sur le clip et abaissez-le dans le socle. La platine va s’arrêter.
13. Après utilisation, fixez le bras de fourches à l’aide du clip et remettez toujours le couvercle du stylet en
place avant de déplacer la platine.
14. Pour éteindre la platine à tout moment, soulevez le bras de lecture du disque et tournez le bouton de
volume à fond dans le sens inverse des aiguilles d’une montre.
Remarque
Certains disques ont un trou central plus grand et il peut être nécessaire de monter l’adaptateur du trou
central sur le manche de la platine avant de placer le disque sur cette dernière. Remettez toujours le
couvercle du stylet en place et fixez le bras de la platine à l’aide du clip avant de déplacer la platine.
Utilisation avec un appareil auxiliaire
1. Des équipements audio analogiques auxiliaires peuvent être connectés et amplifiés via la platine.
2. Connectez l’équipement auxiliaire à l’aide d’un câble jack de 3,5 mm (câble non fourni) dans la prise
LINE IN.
3. Appuyez sur le bouton de lecture de l’équipement auxiliaire et utilisez les commandes de piste comme
d’habitude sur l’appareil auxiliaire.
4. Le volume peut être réglé à l’aide du bouton de volume sur la platine ou des commandes de l’appareil
auxiliaire connecté.
5. Pour éteindre l’appareil à tout moment, tournez le bouton de volume à fond dans le sens antihoraire.
Utilisation d’un casque (non fourni)
Une prise casque stéréo est prévue pour une utilisation de la platine sans déranger les autres. Branchez les
écouteurs à l’endroit marqué casque près du bouton de volume et réglez le volume d’écoute au niveau
choisi. Une pression acoustique excessive des écouteurs peut endommager votre audition. Les haut-parleurs
de la platine ne fonctionnent pas lorsque des écouteurs sont connectés.

42
Connexion de la platine au haut-parleur externe
Si vous souhaitez connecter la platine à des haut-parleurs externes (via un amplificateur approprié), utilisez
un câble phono double vers phono double (non fourni) pour connecter les prises de sortie RCA à l’entrée
audio de l’amplificateur. Veillez à ce que les fiches rouges soient insérées dans les prises rouges et les prises
blanches dans les prises blanches.
Utilisation avec un appareil Bluetooth
Vérifiez que votre platine est en mode Bluetooth. Si vous n’êtes pas encore en mode Bluetooth, appuyez
brièvement sur le bouton Mode jusqu’à ce que l’appareil passe en mode Bluetooth (la LED bleue s’allume).
Il commence à rechercher les appareils Bluetooth (la LED bleue clignote pendant le couplage).
En mode Bluetooth :
1. Votre appareil recherche Bluetooth.
2. Sur l’appareil (par exemple, iPhone/iPad/Android/autre téléphone/Tableau/ordinateur), activez la
connectivité Bluetooth et assurez-vous qu’elle est « discoverable » (visible).
Remarque : Si nécessaire, reportez-vous aux instructions de votre radio pour ajouter ou configurer
Bluetooth.
3. Sélectionnez « Add new device (Ajouter un nouveau dispositif) », si nécessaire.
Remarque : Certains appareils rechercheront automatiquement un nouveau dispositif, par conséquent
l’option « Add new device (Ajouter un nouveau dispositif) » ne sera pas disponible.
4. Une fois trouvé, votre appareil s’affiche sous le nom de « Lenco TT-110 ». Sélectionnez-le et commencez
l’appariement.
5. Une fois l’appairage effectué « Bluetooth Connected (Connexion Bluetooth effectuée) » s’affiche.
6. Maintenant que vous avez couplé votre appareil avec la platine, il s’y connectera lorsqu’il sera à portée,
c’est-à-dire à une distance d’environ 10 mètres ou moins, de la ligne de vision.
7. Votre appareil reste couplé avec la platine à moins que vous ne décidiez de le déconnecter ou de le
désappairer.
8. Vous pouvez appuyer brièvement sur « Appairage » pour vous reconnecter.
Lecture Bluetooth
1. Appuyez sur « Retour » pour passer à la piste précédente de votre appareil Bluetooth.
2. Appuyez sur « Suivant » pour passer à la piste suivante de votre appareil Bluetooth.
3. Appuyez sur « Lecture/ pause » pour lire ou suspendre votre appareil Bluetooth.
COMMENT CHANGER LA TÊTE DE LECTURE
Pour changer la tête de lecture, consultez les instructions ci-dessous. Démontage de la tête de lecture hors
de la cartouche
1. Placez un tournevis sur la pointe de la tête de lecture et poussez vers le bas comme indiqué dans le sens
« A ».

43
2. Enlevez la tête de lecture en la tirant vers l'avant et en poussant vers le bas.
Installation de la tête de lecture
1. Tenez la pointe de la tête de lecture et insérez la tête de lecture en appuyant comme indiqué dans le
sens « B ».
2. Poussez la tête de lecture vers le haut comme indiqué dans le sens « C » jusqu’à ce que la tête de lecture
se bloque dans la position de la pointe.
EN
FR
Guide Pins (inside)
Tiges de guidage (internes)
REMARQUE
Nous vous conseillons de nettoyer vos disques avec un tissu anti-statique afin de les apprécier au mieux.
Remarque : pour la même raison, votre tête de lecture doit être changée périodiquement (environ toutes les
250 heures de lecture).
CONSEILS POUR UNE MEILLEURE PERFORMANCE DE TOURNE-DISQUE
1. En ouvrant ou en fermant le couvercle du tourne-disque, manipulez-le délicatement, en le tenant soit au
centre soit de chaque côté.
2. Ne touchez pas la pointe de la tête de lecture avec vos doigts, évitez de cogner la tête de lecture contre le
plateau du tourne-disque ou le bord du disque.
3. Nettoyez fréquemment la pointe de la tête de lecture en utilisant une brosse douce en faisant
uniquement des mouvements « avant-arrière ».
4. Si vous devez utiliser un liquide de nettoyage de tête de lecture, utilisez-en avec grande parcimonie.
5. Nettoyez précautionneusement le boîtier du tourne-disque à l'aide d'un chiffon doux. Utilisez seulement
un peu de détergent doux pour nettoyer le tourne-disque.
6. N’appliquez jamais de produits chimiques ni de solvants forts sur aucune pièce du système de tourne-
disque.

44
CARACTÉRISTIQUES TECHNIQUES
Type
Entraînement par courroie
Moteur d'entraînement
Moteur CC
Vitesse
33 1/3 tours, 45 tours, 78 tours
Pleurage et scintillement
<0,35%
Plateau
200 mm
Cellule
Type
Céramique
Pointe de lecture
0,7 mm
Force d'appui optimale
6 grammes
Sortie
300 à 500 mV
Plage de fréquence
,+/-20 dB
diaphonie
10 db
rapport signal/bruit ( S/N)
18 db
Caractéristiques Générales
Adaptateur
Entrée CA 100-240 V~50/60 Hz ; 0,3 A max.
Sortie CC 5 V 1 A
produit
5 V CC/1 A
Sortie audio (sortie de ligne)
300 à 500 mV
Puissance consommée :
5 W
Adaptateur de puissance.
Sortie CC 5 V 1 A
Entrée CA 100-240 V~50/60 Hz ; 0,3 A max.
Nom d’appairage
Bluetooth :
Lenco TT-110
Prise casque :
3,5 mm
Température de
fonctionnement :
0 °C-40 °C
Température de
stockage :
-20 °C‐70 °C
Du fait de l’amélioration continue, les caractéristiques et la conception sont modifiables sans préavis
Adaptateur d’alimentation (uniquement pour l’Europe)
Utilisez uniquement l’alimentation électrique indiquée dans le mode d’emploi.

45
Informations
Valeur et précision
Nom ou marque du fabricant,
enregistrement commercial et
adresse
DongGuan Obelieve Electronic Co., Ltd
Huazhaoxin Industrial park B-4/F, Golden
phoenix industrial zone, Fenggan town,
Dongguan city, Guangdong province, China
Référence du modèle
0BL-0501000E
Tension d’entrée
100-240 V
Fréquence du CA d’entrée
50/60 Hz
Tension de sortie
5 V
Courant de sortie
1 A
Puissance de sortie
5 W
Rendement moyen en mode
actif
73,62
Consommation électrique sans
charge
≤ 0.10
Garantie
Lenco propose un service et une garantie conformément à la législation européenne, ce qui signifie qu’en
cas de besoin de réparation (aussi bien pendant et après la période de garantie), vous pouvez contacter
votre revendeur le plus proche.
Remarque importante : Il n’est pas possible de renvoyer l’appareil pour réparation directement à Lenco.
Remarque importante : si l’appareil est ouvert ou modifié de quelque manière que ce soit par un réparateur
non agréé, la garantie sera caduque.
Cet appareil ne convient pas à une utilisation professionnelle. En cas d’utilisation professionnelle, les
obligations de garantie du fabricant seront annulées.
Clause de non-responsabilité
Des mises à jour du logiciel ou des composants informatiques sont régulièrement effectuées. Il se peut donc
que certaines instructions, caractéristiques et images présentes dans ce document diffèrent légèrement de
votre configuration spécifique. Tous les articles décrits dans ce guide sont fournis uniquement à des fins
d’illustration et peuvent ne pas s’appliquer à une configuration spécifique. Aucun droit légal ne peut être
obtenu depuis les informations contenues dans ce manuel.

46
Mise au rebut de l’appareil usagé
Ce symbole indique que le produit électrique concerné ainsi que les piles ne doivent
pas être jetés avec les autres déchets ménagers en Europe. Pour garantir un
traitement correct des piles et de l’appareil usagés, veuillez les mettre au rebut
conformément aux réglementations locales en vigueur en matière d’appareils
électriques et autres piles. En agissant de la sorte, vous contribuerez à la
préservation des ressources naturelles et à l’amélioration des niveaux de protection
environnementale concernant le traitement et la destruction des déchets
électriques (directive sur les déchets des équipements électriques et électroniques).
Marquage CE
Par la présente, Lenco Benelux B.V., Thermiekstraat 1a, 6361 HB Nuth, Pays-Bas,
déclare que ce produit est conforme aux exigences principales des directives
européennes.
La déclaration de conformité peut être consultée via techdoc@commaxxgroup.com
AVERTISSEMENT : Pour éviter une éventuelle détérioration de l’ouïe, n’écoutez pas
la musique à un niveau de volume élevé pendant des périodes prolongées.
Service après-vente
Pour en savoir plus et obtenir de l’assistance, visitez www.lenco.com.
Lenco Benelux BV, Thermiekstraat 1a, 6361 HB, Nuth, Pays-Bas.

47
Español
PRECAUCIÓN:
El uso de los controles o ajustes o el funcionamiento de los procedimientos excepto a aquellos especificados
aquí pueden provocar una exposición peligrosa a la radiación.
PRECAUCIONES PREVIAS AL USO
TENGA ESTAS INSTRUCCIONES EN MENTE:
1. No cubra o bloquee ninguna apertura de ventilación. Cuando coloque el dispositivo en una estantería,
deje 5 cm (2”) de espacio libre alrededor de todo el dispositivo.
2. Instálelo conforme al manual de usuario que se adjunta.
3. Mantenga el aparato alejado de fuentes de calor, como radiadores, calentadores, estufas, velas u otros
productos que generen calor o llama viva. El aparato solo puede usarse en climas moderados. Se deben
evitar los ambientes extremadamente fríos o cálidos. Temperatura de funcionamiento entre 0 ° y 35 °C.
4. Evite usar el dispositivo cerca de campos magnéticos fuertes.
5. Una descarga electrostática puede entorpecer el uso normal de este dispositivo. En tal caso,
simplemente reinícielo siguiendo el manual de instrucciones. Durante la transmisión de archivos, por
favor manéjelo con cuidado opérelo en un entorno libre de electricidad estática.
6. ¡Advertencia! Nunca inserte un objeto en el producto a través de las ventilaciones o aperturas. Alto
voltaje fluye a través del producto e insertar un objeto puede provocar una descarga eléctrica y/o un
cortocircuito de sus componentes internos. Por el mismo motivo, no derrame agua o líquidos en el
producto.
7. No lo utilice en zonas húmedas, como cuartos de baño, cocinas en las que se forme vapor ni cerca de
piscinas.
8. El aparato no debe exponerse a goteos o salpicaduras y asegúrese de que se colocan sobre o cerca del
aparato objetos llenos de líquidos, como jarrones.
9. No use este dispositivo cuando se pueda producir condensación. Cuando la unidad se usa en una
habitación cálida y húmeda con gotas de agua o humedad se puede producir condensación dentro de la
unidad y la unidad puede que no funcione correctamente; deje que la unidad permanezca apagada
durante 1 o 2 horas antes de volver a encenderla: el aparato debe estar seco antes de conectarse a una
fuente de alimentación.
10. Aunque este dispositivo está fabricado con el máximo cuidado y comprobado varias veces antes de salir
de fábrica, todavía es posible que se puedan producir problemas, al igual que con todos los aparatos
eléctricos. Si observa la aparición de humo, una acumulación excesiva de calor o cualquier otro
fenómeno inesperado, deberá desconectar inmediatamente el enchufe de la toma de corriente.
11. Este dispositivo debe funcionar con una fuente de alimentación que se especifica en la etiqueta de
especificaciones. Si no está seguro del tipo de alimentación que se usa en su hogar, consulte con el
distribuidor o una compañía eléctrica local.
12. Manténgalo alejado de los animales. Algunos animales disfrutan mordiendo cables de alimentación.
13. Para limpiar el dispositivo use un paño seco y suave. No utilice líquidos disolventes ni con base de
petróleo. Para eliminar manchas difíciles, puede usar un paño húmedo con detergente diluido.
14. El proveedor no asume ninguna responsabilidad por daños o datos perdidos provocados por un
funcionamiento incorrecto, uso incorrecto, modificación del dispositivo o sustitución de la batería.
15. No interrumpa la conexión cuando el dispositivo esté formateando o transfiriendo archivos. En caso
contrario, los datos se pueden estropear o perder.
16. Si la unidad dispone de función de reproducción USB, se debe conectar la memoria USB directamente
en la unidad. No utilice cables de extensión USB ya que pueden crear interferencias que causen una
pérdida de datos.
17. Se ha marcado la etiqueta identificativa en la parte inferior o en el panel posterior del aparato.
18. Este aparato no está diseñado para su uso por personas (incluyendo niños) con discapacidades físicas,
sensoriales o mentales o con falta de experiencia o conocimientos, salvo que estén bajo la supervisión o
hayan recibido formación sobre el uso correcto del dispositivo por parte de una persona responsable de
su seguridad.
19. Este producto está diseñado para un uso no profesional únicamente y no para un uso comercial o
industrial.

48
20. Asegúrese de que la unidad esté fijada en una posición estable. La garantía no cubrirá los daños
derivados de usar este producto en una posición inestable, vibraciones o golpes o por no seguir otras
advertencias o precauciones que aparecen en este manual de usuario.
21. Nunca retire la carcasa del dispositivo.
22. Nunca coloque este dispositivo sobre otro equipo eléctrico.
23. Mantenga las bolsas de plástico fuera del alcance de los niños.
24. Use únicamente los dispositivos/accesorios especificados por el fabricante.
25. Remita todas las reparaciones al personal cualificado. El mantenimiento es necesario cuando el
dispositivo presenta cualquier tipo de daños, como en el cable de alimentación o en el enchufe, cuando
se ha vertido líquido o han caído objetos en el aparato, cuando el aparato se ha visto expuesto a la
lluvia o humedad, cuando no funciona normalmente o cuando se ha caído.
26. Una larga exposición a sonidos elevados de reproductores de música personales puede provocar una
pérdida de audición temporal o permanente.
27. Si el producto viene con un cable de alimentación o un adaptador de corriente de CA:
⚫ Si se produce cualquier problema, desconecte el cable de alimentación CA y remítase al
mantenimiento de personal cualificado.
⚫ No pise o pince el adaptador de alimentación. Tenga mucho cuidado, en especial cerca de las
tomas y el punto de salida del cable. No coloque objetos pesados en el adaptador de
alimentación, ya que pueden dañarlo. ¡Mantenga el dispositivo fuera del alcance de los niños!
Si juegan con el cable de alimentación, puede sufrir lesiones graves.
⚫ Desconecte el dispositivo durante tormentas eléctricas o cuando no vaya a usarse durante
periodos prolongados de tiempo.
⚫ La salida de la toma debe instalarse cerca del equipo y debe ser fácilmente accesible.
⚫ No sobrecargue las tomas CA o los cables de extensión. La sobrecarga puede provocar un incendio
o una descarga eléctrica.
⚫ Los dispositivos con construcción de Clase 1 deben estar conectados a una toma de corriente con
una conexión a tierra protegida.
⚫ Los dispositivos con construcción Clase 2 no requieren una conexión a tierra.
⚫ Sujete siempre el enchufe cuando los extraiga de la toma de corriente. No tire del cable de
alimentación. Esto puede provocar un cortocircuito.
⚫ No utilice un cable de alimentación o enchufe deteriorado o una toma suelta. Si lo hace, podría
provocar un incendio o una descarga eléctrica.
28. Si el producto contiene o se entrega con un mando a distancia que contiene pilas de botón / celdas:
Advertencia:
⚫ “Ni ingiera la pila, riesgo de quemadura química” o frase equivalente.
⚫ [El mando a distancia que se suministra] Este producto contiene una pila de tipo botón/moneda.
Si se ingiere la pila, puede provocar graves quemaduras internas en sólo 2 horas y podría
ocasionar la muerte.
⚫ Mantenga las pilas nuevas o usadas fuera del alcance de los niños.
⚫ Si el compartimiento de las pila no se cierra correctamente, deje de usar el producto y no lo deje al
alcance los niños.
⚫ Si tiene la sospecha de que una pila ha sido ingerida o se encuentra en algún lugar del cuerpo,
busque inmediatamente atención médica.
29. Precaución sobre el uso de las pilas:
⚫ Existe riesgo de explosión si la pila no se sustituye correctamente. Sustitúyala únicamente con otra
del mismo tipo u otro equivalente.
⚫ No se pueden exponer las pilas a temperaturas extremadamente altas o bajas, baja presión de aire
a gran altitud durante el uso, almacenamiento o transporte.
⚫ Si cambia las pilas por otras que no son las correctas, se puede producir una explosión o la fuga de
líquidos o gases inflamables.
⚫ Si arroja las pilas al fuego o a un horno caliente, o aplasta o cortar mecánicamente una pila, podría
provocar una explosión.
⚫ Si deja las pilas en un lugar con temperaturas extremadamente altas, se puede producir una
explosión o una fuga de líquido o gas inflamable.
⚫ Si se exponen las pilas a una presión de aire extremadamente baja, se puede producir una
explosión o la fuga de líquidos o gases inflamables.
⚫ Se debe prestar atención a los aspectos medioambientales sobre la eliminación de baterías.

49
INSTALACIÓN
• Desembale todas las piezas y retire el material protector.
• No conecte la unidad a la corriente eléctrica antes de comprobar la tensión de la corriente y antes de que
se hayan hecho todas las demás conexiones.
Accesorios incluidos:
Manual del usuario
Adaptador de corriente

50
Ubicación de los controles
1. Plato del tocadiscos
2. Eje del tocadiscos
3. Adaptador del agujero central
4. Brazo
5. Palanca de levantamiento
6. Sujeción del brazo
7. Selector de velocidad del tocadiscos
8. Interruptor de control de parada automática
9. Indicador de estado LED

51
10. Interruptor de alimentación / Control de volumen
11. Conector de auriculares
12. Aguja
13. Sujeción de cierre
14. Asa de transporte
15. Altavoz
16. Conector de entrada auxiliar
17. Canal de salida de línea R/L
18. Conector de entrada de CC
19. Emparejamiento
20. Pista anterior
21. Siguiente pista
22. Reproducir/Pausa
23. Modo
24. Indicador de modo
Modo
1. Pulse brevemente “Modo” para seleccionar el modo de reproducción.
2. Parpadeará el LED de color azul cuando el Bluetooth se esté emparejando.
3. Se iluminará el LED azul cuando se conecte el Bluetooth
4. Se iluminará el LED rojo cuando esté en modo tocadiscos.
5. Se iluminará el LED verde cuando esté en modo entrada auxiliar.
Uso del tocadiscos
1. Coloque el tocadiscos sobre una superficie plana y nivelada.
2. Inserte el cable del adaptador en la toma CC situada en la parte posterior de la funda y conecte el
adaptador en la toma de corriente
3. Al usarlo por primera vez, asegúrese de que se retira la sujeción del cable del brazo del reproductor.
4. Retire la cubierta de la aguja y guárdela en un lugar seguro para un uso futuro.
5. Mueva el selector de velocidad a la velocidad (33,45 o 78rpm) que se corresponda con el disco que se va
a reproducir.
6. Gire el dial de volumen para encender el tocadiscos y el indicador de modo se iluminará de color rojo.
7. Coloque un disco en el eje del tocadiscos y quite la sujeción al brazo.

52
8. Use la palanca de bajada para levantar el brazo y mueva el brazo de forma que la aguja se coloque justo
en el interior del borde del disco o alineada con el inicio de la pista que se va a reproducir.
9. Baje lentamente el brazo y tras un breve intervalo el disco se empezará a reproducir.
10. Ajuste el volumen al nivel que desee girando el dial de control de volumen.
11. Cuando se haya llegado al final del disco, el tocadiscos se detendrá.
12. Vuelva a usar la palanca para levantar el brazo (el plato empezará a volver a girar), muévalo hacia la
sujeción y bájelo al soporte. El plato se detendrá.
13. Asegure el brazo pequeño usando la sujeción y vuelva a colocar la cubierta de la aguja tras su uso y
siempre antes de mover el tocadiscos.
14. Para apagar el tocadiscos en cualquier momento, levantar el brazo del disco y gire completamente el dial
de volumen en sentido antihorario.
Nota
Algunos discos tienen un agujero central más grande y puede que sea necesario ajustar el adaptador del
agujero central al eje del tocadiscos antes de colocar el disco en el tocadiscos. Vuelva siempre a colocar la
cubierta de la aguja y asegure el brazo del tocadiscos usando la sujeción antes de mover el tocadiscos.
Uso del dispositivo auxiliar
1. El equipo de audio analógico auxiliar puede conectarse y amplificarse mediante el tocadiscos.
2. Conecte el equipo auxiliar usando un cable de toma de 3.5mm (cable no incluido) en la toma LINE IN.
3. Pulse el botón de reproducción del equipo auxiliar y use los controles de pista como se haría
normalmente en el dispositivo auxiliar.
4. Se puede ajustar el volumen usando el dial de volumen del tocadiscos o los controles del dispositivo
auxiliar conectado.
5. Para apagar la unidad en cualquier momento, gire completamente el dial de volumen en sentido
antihorario.
Uso de los auriculares (no incluidos)
Se proporciona una toma de auricular estéreo de forma que el tocadiscos puede usarse sin molestar a otras
personas. Conecte los auriculares en el punto marcado del auricular cerca del dial de volumen y ajuste el
volumen de audición al nivel que elija. Una presión de sonido excesiva en los cascos y auriculares puede
causar pérdida de audición. Los altavoces del tocadiscos no funcionarán cuando están conectados los
auriculares.

53
Conexión del tocadiscos a un altavoz externo
Conecte el tocadiscos a altavoces externos (mediante un amplificador adecuado)
Use un cable fono gemelo a fono gemelo (no incluido) para conectar las tomas de salida RCA a la entrada de
audio del amplificador. Asegúrese de que las tomas rojas se insertan en las tomas rojas y las blancas en las
blancas.
Uso con un dispositivo Bluetooth
Compruebe que el tocadiscos está en modo Bluetooth. Si todavía no se encuentra en modo Bluetooth, pulse
brevemente el botón Modo hasta que se encuentre en modo Bluetooth (se iluminará el LED de color azul).
Empezará a buscar dispositivos Bluetooth (El LED de color azul parpadeará durante el emparejamiento).
En modo Bluetooth:
1. Su dispositivo buscará el Bluetooth.
2. En el dispositivo (por ejemplo, iPhone/iPad/Android/otros teléfono /Tablet/ ordenador), conecte la
conectividad Bluetooth y asegúrese de que se encuentra “descubrible”.
Nota: Si es necesario, remítase a las instrucciones de su dispositivo para añadir o configurar el Bluetooth.
3. Seleccione “Añadir un nuevo dispositivo” si es necesario.
Nota: Algunos productos buscarán automáticamente un Nuevo dispositivo y así la opción “Añadir un nuevo
dispositivo” no está disponible.
4. Cuando lo encuentre, se mostrará el dispositivo como “Lenco TT-110”. Selecciónelo e inicie el
emparejamiento.
5. Cuando el emparejamiento esté complete, se mostrará “Bluetooth Connected (Bluetooth conectado)”.
6. Ahora que ha emparejado el dispositivo con el tocadiscos, se conectará al mismo cuando se encuentre
dentro de su alcance, que es aproximadamente 10 metros o menos (33 pies o menos), en la línea de visión.
7. El dispositivo permanecerá conectado con el tocadiscos salvo que decide desconectarlo o
“desemparejarlo”.
8. Puede pulsar brevemente “Pair (Emparejar)” para volverlo a conectar.
Reproducción por Bluetooth
1. Pulse “Atrás” para ir a la pista anterior del dispositivo Bluetooth.
2. Pulse “Siguiente” para ir a la pista siguiente del dispositivo Bluetooth.
3. Pulse “Reproducción/ pausa” para reproducir o hacer una pausa en el dispositivo Bluetooth.
CÓMO SUSTITUIR LA AGUJA
Consulte las instrucciones siguientes para sustituir la aguja.
Retirar la aguja del cartucho
1. Sitúe un destornillador en el extremo de la aguja y apriete hacia abajo como se muestra en dirección “A”.
2. Retire la aguja tirando de ella hacia delante y empujando hacia atrás.

54
Instalar la aguja.
1. Sujete el extremo de la aguja e insértela apretando como se muestra en dirección “B”.
2. Empuje la aguja hacia arriba en dirección “C” hasta que el extremo quede bloqueado.
EN
ES
Guide Pins (inside)
Pasadores guía (interior)
NOTA
Le aconsejamos limpiar los discos con un paño antiestático para sacarle el máximo provecho.
Señalamos también que por el mismo motivo la aguja debería cambiarse periódicamente (aproximadamente
cada 250 horas de reproducción)
CONSEJOS PARA UN MEJOR FUNCIONAMIENTO DEL TOCADISCOS
1. Cuando abra o cierre la cubierta del tocadiscos, manéjela con suavidad, agarrándola del centro o de cada
lado.
2. No toque la punta de la aguja con los dedos. Evite golpear la aguja contra el plato del tocadiscos o el
borde del disco.
3. Limpie periódicamente la punta de la aguja con un cepillo suave y haciendo solo movimientos de atrás
hacia delante.
4. Si necesita usar líquido para limpiar la aguja, utilice muy poca cantidad.
5. Limpie suavemente con un paño el espacio del tocadiscos. Utilice una pequeña cantidad de detergente
suave para limpiar el tocadiscos.
6. Nunca utilice productos químicos ni disolventes agresivos en ninguna pieza del sistema tocadiscos.
ESPECIFICACIONES
Tipo
Correa de accionamiento
Motor de accionamiento
Motor DC
velocidad
33 1/3 rpm, 45 rpm, 78 rpm
ululación tremola
<0,35%
Plato de tocadiscos
200mm

55
cartucho
Tipo
Cerámica
Aguja
0.7 mil
Fuerza de tracción óptima
6 gramos
Salida
300-500mv
Respuesta de frecuencia
,+/-20dB
comunicación cruzada
10db
ratio señal a ruido ( S/N)
18db
General
Adaptador
Entrada CA 100-240V, 50/60Hz, 0.3A máximo
salida CC5V 1A
producto
CC5 V;1 A
salida de audio (salida de
línea)
300-500mv
Consumo de energía:
5 W
Adaptador de corriente:
Salida CC 5V 1A
Entrada CA 100-240V, 50/60Hz, 0.3A máximo
Nombre de
emparejamiento
Bluetooth:
Lenco TT-110
Toma de auriculares:
3.5mm
Temperatura de
funcionamiento:
0°C‐40°C
Temperatura de
almacenamiento:
-20°C‐70°C
Debido a las continuas mejoras, las características y el diseño de la unidad están sujetos a cambios sin previo
aviso
Adaptador de corriente (Sólo para la UE)
Utilice únicamente la fuente de alimentación indicada en las instrucciones de uso
Información
Valor y precisión
Nombre de los fabricantes o
marcas registradas, registro
comercial y dirección
DongGuan Obelieve Electronic Co., Ltd
Huazhaoxin Industrial park B-4/F, Golden
phoenix industrial zone, Fenggan town,

56
Dongguan city, Guangdong province, China
Identificador del modelo
0BL-0501000E
Tensión de entrada
100-240V
Frecuencia CA de entrada
50/60HZ
Tensión de salida
5 V
Corriente de salida
1 A
Potencia de salida
5 W
Eficiencia activa media
73.62
Consumo energético sin carga
≤ 0.10
Garantía
Lenco ofrece servicio y garantía en cumplimiento con las leyes de la Unión Europea, lo cual implica que, en
caso de que su producto precise ser reparado (tanto durante como después del periodo de garantía), deberá
contactar directamente con su distribuidor.
Nota importante: No es posible enviar sus reparaciones directamente a Lenco.
Nota importante: Si la unidad es abierta por un centro de servicio no oficial, la garantía quedará anulada.
Este aparato no es adecuado para el uso profesional. En caso de darle un uso profesional, todas las
obligaciones de garantía del fabricante quedarán anuladas.
Exención de responsabilidad
Regularmente se llevan a cabo actualizaciones en el Firmware y en los componentes del hardware. Por esta
razón, algunas de las instrucciones, especificaciones e imágenes incluidas en este documento pueden diferir
ligeramente respecto a su situación particular. Todos los elementos descritos en esta guía tienen un objetivo
de mera ilustración, y pueden no ser de aplicación en su situación particular. No se puede obtener ningún
derecho ni derecho legal a partir de la descripción hecha en este manual.
Eliminación del antiguo dispositivo
Este símbolo indica que no deberá deshacerse del producto eléctrico o batería en
cuestión junto con los residuos domésticos, en el ámbito de la UE. Para garantizar un
tratamiento residual correcto del producto y su batería, por favor, elimínelos
cumpliendo con las leyes locales aplicables sobre requisitos para el desechado de
equipos eléctricos y baterías. De hacerlo, ayudará a conservar recursos naturales y
mejorar los estándares de protección medioambiental en el tratamiento y eliminación
de residuos eléctricos (Directiva sobre la Eliminación de Equipos Eléctricos y
Electrónicos).
Marca CE

57
Por la presente, Lenco Benelux B.V., Thermiekstraat 1a, 6361 HB Nuth, Países
Bajos, declara que este producto cumple con las exigencias esenciales de las
directivas de la UE.
La declaración de conformidad puede consultarse mediante
techdoc@commaxxgroup.com
ADVERTENCIA: Para evitar posibles daños en la audición, no la escuche a volúmenes
elevados durante largos periodos de tiempo.
Servicio
Para obtener más información y soporte del departamento técnico, por favor, visite la página web
www.lenco.com
Lenco Benelux BV, Thermiekstraat 1a, 6361 HB, Nuth, Países Bajos.

58
Italiano
ATTENZIONE:
L'utilizzo di controlli o regolazioni o l'esecuzione di procedure diverse da quelle specificate può causare
l'esposizione a radiazioni pericolose.
PRECAUZIONI PRIMA DELL'USO
CONSERVARE QUESTE ISTRUZIONI:
1. Non coprire o bloccare le aperture di ventilazione. Quando si posiziona il dispositivo su uno scaffale,
lasciare uno spazio libero di 5 cm (2") attorno all'intero perimetro.
2. Installare secondo quanto riportato nel manuale fornito.
3. Tenere il dispositivo lontano da sorgenti termiche come radiatori, termosifoni, stufe, candele e altri
prodotti che generano calore o fiamme libere. Il dispositivo può essere utilizzato solo in climi moderati.
Evitare ambienti estremamente freddi o caldi. Working temperature between 0° and 35°C.
4. Evitare l'uso del dispositivo in presenza di forti campi magnetici.
5. Le scariche elettrostatiche possono interferire con il normale utilizzo di questo dispositivo. In tal caso, è
sufficiente ripristinare e riavviare il dispositivo seguendo il manuale di istruzioni. Durante la
trasmissione di file, maneggiarlo con cura e operare in un ambiente privo di elettricità statica.
6. Avviso! Non inserire mai oggetti nel prodotto attraverso le prese d'aria o le aperture. All'interno del
prodotto sono presenti tensioni elevate e l'inserimento di un oggetto può provocare scariche elettriche
e/o cortocircuiti. Per lo stesso motivo, non versare acqua o liquidi sul prodotto.
7. Non utilizzare in aree umide o bagnate come bagni, cucine con vapore o piscine.
8. Non esporre il dispositivo a schizzi o gocciolamenti di liquidi; non poggiare sopra o accanto al
dispositivo oggetti contenenti liquidi, ad esempio vasi.
9. Non utilizzare questo dispositivo in caso di condensa. Quando l'unità viene utilizzata in una stanza calda
e bagnata con umidità presente, potrebbero prodursi gocce d'acqua o condensa all'interno dell'unità e
l'unità potrebbe non funzionare correttamente; lasciare l'unità spenta per 1 o 2 ore prima di accenderla
nuovamente. L'unità deve essere asciutta prima della connessione all'alimentzione.
10. Sebbene questo dispositivo sia fabbricato con la massima cura e controllato più volte prima di lasciare
la fabbrica, è comunque possibile che si verifichino problemi come per qualsiasi altra apparecchiatura
elettrica. Se si nota fumo, eccessivo accumulo di calore o altri fenomeni imprevisti, scollegare
immediatamente la spina dalla presa di alimentazione principale.
11. Questo dispositivo deve funzionare con una fonte di alimentazione con i valori indicati sull'etichetta
delle specifiche. Se non si è sicuri del tipo di alimentazione utilizzata in casa, consultare il rivenditore o
la compagnia elettrica locale.
12. Tenere fuori dalla portata degli animali domestici, Some animals enjoy biting on power cords.
13. Per pulire il dispositivo, utilizzare un panno morbido e asciutto. Non usare solventi o liquidi a base di
benzina. Per rimuovere le macchie persistenti, è possibile utilizzare un panno umido con detergente
diluito.
14. Il fornitore non è responsabile per danni o perdita di dati causati da malfunzionamento, uso improprio,
modifica del dispositivo o sostituzione della batteria.
15. Non interrompere la connessione quando il dispositivo sta formattando o trasferendo file. In caso
contrario, i dati potrebbero essere danneggiati o andare persi.
16. Se l'unità dispone della funzione di riproduzione USB, la chiavetta USB deve essere collegata
direttamente all'unità. Non utilizzare una prolunga USB perché può causare interferenze con
conseguenti anomalie dati.
17. L'etichetta dei dati è riportata sul pannello inferiore o posteriore dell'apparecchio.
18. Questo dispositivo non è destinato all'uso da parte di persone (compresi i bambini) con disabilità
fisiche, sensoriali o mentali, o mancanti di esperienza e conoscenza, a meno che non siano sotto
supervisione o abbiano ricevuto istruzioni circa l'uso corretto del dispositivo da parte di chi è
responsabile per la loro sicurezza.
19. Questo prodotto è destinato esclusivamente all'uso non professionale e non commerciale o industriale.
20. Assicurarsi che l'unità sia collocata in una posizione stabile. I danni causati dall'uso di questo prodotto
in una posizione instabile, vibrazioni o urti o la mancata osservanza di qualsiasi altro avvertimento o
precauzione indicati in questo manuale utente non saranno coperti da garanzia.
21. Non rimuovere mai la carcassa di questo dispositivo.
22. Non posizionare mai questo dispositivo su altre apparecchiature elettriche.

59
23. Non permettere ai bambini di accedere ai sacchetti di plastica.
24. Utilizzare solo collegamenti/accessori specificati dal produttore.
25. Rivolgersi a personale qualificato per l'assistenza. La manutenzione è necessaria quando l'apparecchio
è stato danneggiato in qualsiasi modo, come ad esempio quando il cavo o la presa di alimentazione o
sono deteriorati, quando è stato versato un liquido, quando sono caduti nell'apparecchio degli oggetti,
quando l'apparecchio è stato esposto a pioggia o umidità, quando non funziona normalmente o
quando è caduto.
26. L'esposizione prolungata ai suoni ad alto volume dei lettori musicali può causare una perdita
temporanea o permanente dell'udito.
27. Se il prodotto viene consegnato con cavo di alimentazione o adattatore di alimentazione CA:
⚫ In caso di problemi, scollegare la scheda di alimentazione CA e rivolgersi a personale qualificato.
⚫ Non calpestare o schiacciare l'alimentatore. Fare molta attenzione, in particolare vicino alle prese
e al punto di uscita del cavo. Non posizionare oggetti pesanti sull'alimentatore in quanto
potrebbero danneggiarlo. Tenere il dispositivo fuori dalla portata dei bambini. Giocando con il
cavo di alimentazione possono infortunarsi seriamente.
⚫ Scollegare il dispositivo durante i temporali o quando non viene utilizzato per un lungo periodo.
⚫ La presa di corrente deve essere installata vicino all'apparecchio e deve essere facilmente
accessibile.
⚫ Non sovraccaricare le prese CA né le prolunghe. Il sovraccarico può causare incendi o scariche
elettriche.
⚫ I dispositivi con struttura di classe 1 devono essere collegati a una presa di rete con connessione
di messa a terra di protezione.
⚫ I dispositivi con struttura di classe 2 non richiedono un collegamento a terra.
⚫ Tenere sempre la spina quando la si estrae dalla presa di rete. Non tirare il cavo di alimentazione.
Ciò può causare un cortocircuito.
⚫ Non utilizzare un cavo o una presa di alimentazione danneggiati o una presa non fissata. Tale
azione potrebbe provocare incendi o scariche elettriche.
28. Se il prodotto contiene o viene consegnato con un telecomando contenente batterie a pulsante/a
bottone:
Avvertenza:
⚫ "Non ingerire la batteria, pericolo di ustioni chimiche" o funzionamento equivalente.
⚫ [Il telecomando in dotazione con] Il presente prodotto contiene una pila a bottone. Se ingerita, la
batteria può causare gravi ustioni interne in sole 2 ore e portare alla morte.
⚫ Tenere le batterie, nuove o usate, fuori dalla portata dei bambini.
⚫ Se il vano batteria non si chiude completamente, interrompere l’uso del dispositivo e tenerlo fuori
della portata dei bambini.
⚫ Se si teme che delle batterie possano essere state inghiottite o essere venute a contatto con
qualsiasi parte interna del corpo, contattare immediatamente un medico.
29. Precauzioni sull'uso delle batterie:
⚫ Pericolo di esplosione se la batteria viene sostituita in modo errato. Sostituire solo con lo stesso
tipo o equivalente.
⚫ Non sottoporre le batterie a temperature estreme alte o basse, bassa pressione dell'aria ad alta
quota durante l'uso, lo stoccaggio o il trasporto.
⚫ La sostituzione con una batteria di tipo errato può provocare un'esplosione o la perdita di liquidi o
gas infiammabili.
⚫ Lo smaltimento di una batteria nel fuoco o in un forno caldo o lo schiacciamento o il taglio
meccanico di una batteria possono provocare un'esplosione.
⚫ Lasciare una batteria in un ambiente circostante a temperatura estremamente elevata può
provocare un'esplosione o una perdita di liquidi o gas infiammabili.
⚫ Una batteria soggetta a una pressione dell'aria estremamente bassa può provocare un'esplosione
o una perdita di liquidi o gas infiammabili.
⚫ È necessario prestare attenzione agli aspetti ambientali legati allo smaltimento delle batterie.

60
INSTALLAZIONE
• Disimballare tutte le parti e rimuovere il materiale protettivo.
• Non collegare l’unità alla rete elettrica prima di avere controllato la tensione di rete e prima che siano
stati effettuati tutti gli altri collegamenti.
Accessori inclusi nella fornitura:
Manuale d’uso
Alimentatore

61
Pozione dei comandi
1. Piano del giradischi
2. Albero motore del giradischi
3. Adattatore per foro centrale
4. Braccio di lettura
5. Leva di posizionamento
6. Fermo del braccio di lettura

62
7. Selettore di velocità del giradischi
8. Interruttore di arresto automatico
9. Indicatore di stato a LED
10. Interruttore di alimentazione/Regolazione del volume
11. Jack per cuffie
12. Stylus
13. Chiusura a scatto
14. Maniglia per il trasporto
15. Altoparlante
16. Jack di ingresso Aux
17. Uscita audio (Line out) canale R/L
18. Jack di ingresso CC
19. Associazione
20. Brano precedente
21. Brano successivo
22. Riproduzione/pausa
23. Modalità
24. Indicatore di modalità
Modalità
1. Premere brevemente “Modalità” per selezionare la modalità di riproduzione.
2. Il LED blu lampeggia quando il Bluetooth è in fase di associazione.
3. Il LED blu si accende quando il Bluetooth è connesso
4. Il LED rosso si accende quando viene selezionata la modalità giradischi.
5. Il LED verde si accende quando viene selezionata la modalità Aux in.
Utilizzo del giradischi
1. Posizionare l’alloggiamento del giradischi su una superficie piana.
2. Inserire un'estremità del cavo dell'adattatore nella presa CC sul retro dell'alloggiamento e inserire l'altra
estremità dell'adattatore nella presa di alimentazione.
3. Al primo utilizzo, assicurarsi che la fascetta venga rimossa dal braccio del lettore.
4. Rimuovere il cappuccio di protezione della testina e conservarla in un luogo sicuro per utilizzi futuri
5. Spostare il selettore di velocità (a 33,45 o 78 giri/min) in modo che corrisponda a quella del disco
riprodotto
6. Ruotare la manopola di regolazione del volume per accendere il giradischi, l’indicatore di modalità
diventerà rosso

63
7. Posizionare un disco sul mandrino del giradischi e sganciare il braccio di lettura
8. Usare la leva di posizionamento per sollevare il braccio di lettura e spostarlo in modo che la puntina
venga posizionata esattamente sul bordo del disco o orientata in modo tale da poter avviare la
riproduzione del brano.
9. Abbassare lentamente il braccio e dopo qualche istante verrà avviata la riproduzione del disco
10. Regolare il volume al livello desiderato ruotando la manopola di regolazione del volume
11. Al termine della riproduzione del disco, il giradischi si ferma
12. Utilizzare nuovamente la leva per sollevare il braccio di lettura (il piano inizierà a ruotare di nuovo),
riportare il braccio verso il fermo e abbassarlo nell’apposito supporto. A questo punto il piano si ferma
13. Fissare il braccio di lettura con il fermo e reinserire il cappuccio della puntina dopo l'uso e sempre prima
di spostare il giradischi.
14. Per spegnere il giradischi in qualsiasi momento, sollevare il braccio di lettura sul disco e ruotare la
manopola del volume completamente in senso antiorario.
Nota
Alcuni dischi presentano un foro centrale più grande e potrebbe essere necessario montare l'adattatore per
il foro centrale sull'albero del giradischi prima di posizionare il disco. Prima di spostare il giradischi, reinserire
sempre il cappuccio della puntina e fissare il braccio del giradischi tramite l’apposito fermo.
Utilizzo tramite dispositivo ausiliario
1. Gli apparecchi analogici audio ausiliari possono essere collegati e amplificati tramite il giradischi.
2. Collegare l’apparecchio ausiliario utilizzando un cavo jack da 3,5 mm (non incluso) da inserire nel
connettore jack LINE IN.
3. Premere il pulsante di riproduzione sull’apparecchio ausiliario e utilizzare i comandi di riproduzione su
quest’ultimo come di consueto.
4. Il volume può essere regolato tramite la manopola di regolazione del volume del giradischi o i comandi
del dispositivo ausiliario.
5. Per spegnere l’unità in qualsiasi momento, ruotare completamente la manopola del volume in senso
antiorario.
Utilizzo delle cuffie (non incluse)
Per utilizzare il giradischi senza disturbare gli altri, nella fornitura è stato incluso un jack per cuffie stereo.
Inserire le cuffie nel punto di collegamento contrassegnato con tale dicitura accanto alla manopola di
regolazione del volume e regolare il volume al livello desiderato. Un’eccessiva pressione sonora generata da
auricolari o cuffie può comportare la perdita dell’udito. Gli altoparlanti del giradischi non saranno operativi
quando vengono collegate le cuffie.

64
Collegamento del giradischi a un altoparlante esterno
Per il collegamento del giradischi a degli altoparlanti esterni (tramite un amplificatore adatto)
Usare un cavo phono a due connettori (non incluso) per collegare i jack di uscita RCA all'ingresso Audio
dell'amplificatore. Assicurarsi di collegare i connettori rossi e bianchi nelle rispettive prese dello stesso
colore.
Utilizzo di un dispositivo Bluetooth
Assicurarsi che il giradischi si trovi in modalità Bluetooth. In caso contrario, premere brevemente il pulsante
Modalità finché non viene impostata la modalità Bluetooth (il LED blu si accende). Verrà avviata la ricerca dei
dispositivi Bluetooth (il LED blu lampeggia durante l’associazione).
In modalità Bluetooth:
1. Il proprio dispositivo effettua la ricerca Bluetooth.
2. Sul dispositivo (ad es. iPhone/iPad/Android/altro telefono/Tablet/Computer), attivare la connettività
Bluetooth e fare in modo che sia ‘visibile’.
Nota: se necessario, fare riferimento alle istruzioni del proprio dispositivo per aggiungere o configurare il
Bluetooth.
3. Selezionare ‘Aggiungi dispositivo’, se necessario.
Nota: alcuni prodotti effettuano la ricerca dei nuovi dispositivi in modo automatico, pertanto in tal caso
l’opzione ‘Aggiungi nuovo dispositivo’ non sarà disponibile.
4. Una volta trovato, il proprio dispositivo verrà visualizzato come ‘Lenco TT-110’. Selezionare e avviare
l’associazione.
5. Al termine dell’associazione, verrà visualizzato ‘Bluetooth connesso’.
6. A questo punto, dopo aver associato il dispositivo al giradischi, quest’ultimo si connetterà ad esso entro
un raggio d’azione di circa 10 metri o meno (33 piedi o meno), in linea visiva.
7. Il proprio dispositivo rimarrà associato al giradischi a meno che non si decida di disconnetterlo o
‘annullare l’associazione’ .
8. È possibile premere brevemente “Associa” per la riconnessione.
Riproduzione Bluetooth
1. Premere “Indietro” per passare al brano precedente del proprio dispositivo Bluetooth.
2. Premere “Avanti” per passare al brano successivo del proprio dispositivo Bluetooth.
3. Premere “Riproduzione/pausa” per riprodurre o mettere in pausa il proprio dispositivo Bluetooth.
COME SOSTITUIRE LA PUNTINA
Per sostituire la puntina, fare riferimento alle istruzioni che seguono.
Rimozione della puntina dalla cartuccia
1. Posizionare un cacciavite sulla punta della testina e spingere verso il basso nella direzione indicata nel
punto "A” del disegno.
2. Rimuovere la testina tirandola in avanti e spingendola verso il basso.

65
Installazione della testina
1. Tenere la punta della testina e inserirla spingendola nella direzione indicata nel punto "B" del disegno.
2. Spingere la testina verso l’alto nella direzione indicata nel punto “C” del disegno fino allo scatto in
posizione della puntina.
EN
IT
Guide Pins (inside)
Perni guida (all'interno)
NOTE
Si consiglia di pulire i dischi con un panno antistatico per poterli sfruttare al massimo.
Si ricorda inoltre che per lo stesso motivo la testina deve essere sostituita periodicamente (circa ogni 250 ore
di riproduzione)
SUGGERIMENTI PER PRESTAZIONI OTTIMALI DEL GIRADISCHI
1. Quando si apre o si chiude il coperchio del giradischi, maneggiarlo con delicatezza, afferrandolo al centro
o per entrambi i lati.
2. Evitare di toccare la puntina con le dita; evitare di urtare la puntina contro il piatto del giradischi o il
bordo del disco.
3. Pulire spesso la punta della testina, usare un pennello morbido limitandosi a un movimento "da dietro in
avanti".
4. Nel caso in cui sia necessario usare un liquido per la pulizia della puntina, utilizzarlo con molta
parsimonia.
5. Pulire delicatamente l'alloggiamento del giradischi con un panno morbido. Utilizzare soltanto una piccola
quantità di detergente delicato per pulire il giradischi.
6. Evitare in ogni caso di applicare prodotti chimici aggressivi o solventi su qualsiasi parte del giradischi.

66
SPECIFICHE
Tipo
trasmissione a cinghia
Motore di trasmissione
Motore CC
velocità
33 1/3 giri/min, 45 giri/min, 78 giri/min
wow and flutter
<0,35%
Piatto girevole
200mm
testina
Tipo
testina in ceramica
Puntina
0.7 mil
Forza di tracciamento
ottimale
6 grammi
uscita
300-500 mv
Risposta in frequenza
,+/-20 dB
diafonia
10 db
rapporto segnale-rumore
(S/N)
18 db
Generale
Adattatore
Ingresso CA 100-240 V, 50/60 Hz, 0,3 A max.
Uscita CC 5 V 1 A
prodotti
CC 5 V 1 A
uscita audio (Line-Out)
300-500 mv
Consumo
5 W
Alimentatore.
Uscita CC 5 V 1 A
Ingresso CA 100-240 V, 50/60 Hz, 0,3 A max.
Nome di associazione
Bluetooth:
Lenco TT-110
Presa per cuffie:
3,5 mm
Temperatura di
esercizio:
0‐40 °C
Temperatura di
stoccaggio:
-20‐70 °C
In virtù dei continui miglioramenti, le caratteristiche e il design sono soggetti a modifiche senza preavviso
Adattatore di alimentazione (solo per UE)
Utilizzare solo l'alimentazione indicata nel presente manuale

67
Informazioni
Valore e precisione
Manufacturers name or trade
mark, commercial registration
and address
DongGuan Obelieve Electronic Co., Ltd Parco
industriale Huazhaoxin B-4/F, zona industriale
Golden phoenix, città di Fenggan, città di
Dongguan, provincia di Guangdong, Cina
Identificatore del modello
0BL-0501000E
Tensione in ingresso
100-240V
Frequenza in ingresso CA
50/60 Hz
Tensione in uscita
5 V
Corrente in uscita
1 A
Potenza in uscita
5 W
Efficienza media attiva
73,62
No load Power consumption
≤ 0,10
Garanzia
Lenco offre assistenza e garanzia in conformità con la legge europea, il che significa che in caso di riparazioni
(sia durante che dopo il periodo di garanzia) è necessario contattare il rivenditore locale.
Nota importante: Non è possibile inviare direttamente a Lenco i prodotti da riparare.
Nota importante: Qualora l’unità venga aperta o manomessa in qualsiasi modo da un centro di assistenza
non riconosciuto, la garanzia decade.
Questo dispositivo non è adatto per l’uso professionale. Qualora l’unità venga utilizzata per scopi
professionali, tutti gli obblighi del produttore derivanti dalla garanzia sono nulli.
Clausola di esclusione della responsabilità
Il firmware e/o i componenti hardware vengono aggiornati regolarmente. Pertanto, è possibile che alcune
parti relative a istruzioni, specifiche e immagini contenute nella presente documentazione siano diverse da
quanto riscontrato nel singolo caso. Tutte le descrizioni incluse in questa guida sono fornite a puro titolo
illustrativo e non si applicano necessariamente alla specifica situazione. Nessun diritto legale o contrattuale
può derivare dalle descrizioni contenute nel presente libretto di istruzioni.
Smaltimento a fine vita del dispositivo
Questo simbolo indica che in Europa è vietato gettare il relativo prodotto elettrico o
batteria tra i rifiuti domestici. Per il corretto smaltimento a fine vita del prodotto e
della batteria, attenersi alle vigenti normative locali per il trattamento dei rifiuti da
apparecchiature elettriche ed elettroniche e delle batterie. In tal modo si contribuisce
a salvaguardare le risorse naturali e a migliorare gli standard per la protezione

68
dell’ambiente nel trattamento dei rifiuti da apparecchiature elettriche ed elettroniche
(Direttiva RAEE).
Marchio CE
Con la presente, Lenco Benelux B.V., Thermiekstraat 1a, 6361 HB Nuth, Paesi
Bassi, dichiara che questo prodotto è conforme ai requisiti essenziali della Direttiva
europea.
The declaration of conformity may be consulted via techdoc@commaxxgroup.com
AVVERTENZA: per prevenire possibili danni all’udito, evitare l’ascolto ad alto volume
per periodi di tempo prolungati.
Assistenza
Per ulteriori informazioni e accesso all’helpdesk, visitare il sito www.lenco.com
Lenco Benelux BV, Thermiekstraat 1a, 6361 HB, Nuth, Paesi Bassi.
Documenttranscriptie
Model No: TT-110 USER MANUAL – Turntable with Bluetooth reception and Built-in speakers GEBRUIKERSHANDLEIDING – platenspeler met bluetoothontvangst en ingebouwde luidsprekers BEDIENUNGSANLEITUNG – Plattenspieler mit Bluetooth-Empfang und integrierten Lautsprechern MODE D’EMPLOI – Platine avec réception Bluetooth et haut-parleurs intégrés MANUAL DE USUARIO – Tocadiscos con recepción Bluetooth y altavoces integrados MANUALE D’USO – Giradischi con ricezione Bluetooth e altoparlanti integrati 1 Index: English .................................................................................................................................... 3 Nederlands ........................................................................................................................... 13 Deutsch ................................................................................................................................ 24 Français ................................................................................................................................ 36 Español ................................................................................................................................. 47 Italiano ................................................................................................................................. 58 Version: 2.0 2 English CAUTION: Usage of controls or adjustments or performance of procedures other than those specified herein may result in hazardous radiation exposure. PRECAUTIONS BEFORE USE KEEP THESE INSTRUCTIONS IN MIND: 1. Do not cover or block any ventilation openings. When placing the device on a shelf, leave 5 cm (2”) free space around the whole device. 2. Install in accordance with the supplied user manual. 3. Keep the device away from heat sources such as radiators, heaters, stoves, candles and other heatgenerating products or naked flame. The device can only be used in moderate climates. Extremely cold or warm environments should be avoided. Working temperature between 0° and 35°C. 4. Avoid using the device near strong magnetic fields. 5. Electrostatic discharge can disturb normal usage of this device. If so, simply reset and restart the device following the instruction manual. During file transmission, please handle with care and operate in a static-free environment. 6. Warning! Never insert an object into the product through the vents or openings. High voltage flows through the product and inserting an object can cause electric shock and/or short circuit internal parts. For the same reason, do not spill water or liquid on the product. 7. Do not use in wet or moist areas such as bathrooms, steamy kitchens or near swimming pools. 8. The device shall not be exposed to dripping or splashing and make sure that no objects filled with liquids, such as vases, are placed on or near the apparatus. 9. Do not use this device when condensation may occur. When the unit is used in a warm wet room with damp, water droplets or condensation may occur inside the unit and the unit may not function properly; let the unit stand in power OFF for 1 or 2 hours before turning on the power: the unit should be dry before getting any power. 10. Although this device is manufactured with the utmost care and checked several times before leaving the factory, it is still possible that problems may occur, as with all electrical appliances. If you notice smoke, an excessive build-up of heat or any other unexpected phenomena, you should disconnect the plug from the main power socket immediately. 11. This device must operate on a power source as specified on the specification label. If you are not sure of the type of power supply used in your home, consult your dealer or local power company. 12. Keep away from animals. Some animals enjoy biting on power cords. 13. To clean the device, use a soft dry cloth. Do not use solvents or petrol based fluids. To remove severe stains, you may use a damp cloth with dilute detergent. 14. The supplier is not responsible for damage or lost data caused by malfunction, misuse, modification of the device or battery replacement. 15. Do not interrupt the connection when the device is formatting or transferring files. Otherwise, data may be corrupted or lost. 16. If the unit has USB playback function, the USB memory stick should be plugged into the unit directly. Don’t use an USB extension cable because it can cause interference resulting in failing of data. 17. The rating label has been marked on the bottom or back panel of the device. 18. This device is not intended for use by people (including children) with physical, sensory or mental disabilities, or a lack of experience and knowledge, unless they’re under supervision or have received instructions about the correct use of the device by the person who is responsible for their safety. 19. This product is intended for non professional use only and not for commercial or industrial use. 20. Make sure the unit is adjusted to a stable position. Damage caused by using this product in an unstable position vibrations or shocks or by failure to follow any other warning or precaution contained within this user manual will not be covered by warranty. 21. Never remove the casing of this device. 22. Never place this device on other electrical equipment. 23. Do not allow children access to plastic bags. 24. Only use attachments/accessories specified by the manufacturer. 3 25. Refer all servicing to qualified service personnel. Servicing is required when the device has been damaged in any way, such as the power supply cord or the plug, when liquid has been spilled or objects have fallen into the device, when the device has been exposed to rain or moisture, does not operate normally, or has been dropped. 26. Long exposure to loud sounds from personal music players may lead to temporary or permanent hearing loss. 27. If the product is delivered with power cable or AC power adaptor: ⚫ If any trouble occur, disconnect the AC power cord and refer servicing to qualified personnel. ⚫ Don’t step on or pinch the power adaptor. Be very careful, particularly near the plugs and the cable’s exit point. Do not place heavy items on the power adaptor, which may damage it. Keep the entire device out of children’s reach! When playing with the power cable, they can seriously injure themselves. ⚫ Unplug this device during lightning storms or when unused for a long period. ⚫ The socket outlet must be installed near the equipment and must be easily accessible. ⚫ Do not overload ac outlets or extension cords. Overloading can cause fire or electric shock. ⚫ Devices with class 1 construction should be connected to a main socket outlet with a protective earthed connection. ⚫ Devices with class 2 construction do not require a earthed connection. ⚫ Always hold the plug when pulling it out of the main supply socket. Do not pull the power cord. This can cause a short circuit. ⚫ Do not use a damaged power cord or plug or a loose outlet. Doing so may result in fire or electric shock. 28. If the product contains or is delivered with a remote control containing coin/cell batteries: Warning: ⚫ “Do not ingest battery, Chemical Burn Hazard” or equivalent working. ⚫ [The remote control supplied with] This product contains a coin/button cell battery. If the battery is swallowed, it can cause severe internal burns in just 2 hours and can lead to death. ⚫ Keep new and used batteries away from children. ⚫ If the battery compartment does not close securely, stop using the product and keep it away from children. ⚫ If you think batteries might have been swallowed or placed inside any part of the body, seek immediate medical attention. 29. Caution about the use of Batteries: ⚫ Danger of explosion if battery is incorrectly replaced. Replace only with the same or equivalent type. ⚫ Battery cannot be subjected to high or low extreme temperatures, low air pressure at high altitude during use, storage or transportation. ⚫ Replacement of a battery with an incorrect type that can result in an explosion or the leakage of flammable liquid or gas. ⚫ Disposal of a battery into fire or a hot oven, or mechanically crushing or cutting of a battery, that can result in an explosion. ⚫ Leaving a battery in an extremely high temperature surrounding environment that can result in an explosion or that leakage of flammable liquid or gas. ⚫ A battery subjected to extremely low air pressure that may result in an explosion or the leakage of flammable liquid or gas. ⚫ Attention should be drawn to the environmental aspects of battery disposal. INSTALLATION • Unpack all parts and remove protective material. • Do not connect the unit to the mains before checking the mains voltage and before all other connections have been made. 4 Accessories included: User manual Power adaptor 5 Location of Controls 1. 2. 3. 4. 5. 6. Turntable deck Turntable shaft Center hole adaptor Tone arm Cueing lever Tone arm clip 6 7. 8. 9. 10. 11. 12. 13. 14. 15. 16. 17. 18. 19. 20. 21. 22. 23. 24. Turntable speed selector Auto stop control switch LED status indicator Power switch/Volume control Headphone jack Stylus Lock catch Carrying handle Speaker Aux in jack Line out channel R/L DC in jack Pair Previous track Next track Play/pause Mode Mode indicator Mode 1. Short press “Mode” to select the playing mode. 2. Blue LED will be flashed when Bluetooth is pairing. 3. Blue LED will be illuminated when Bluetooth is connected 4. Red LED will be illuminated when it is turntable mode. 5. Green LED will be illuminated when it is Aux in mode. Using the turntable 1. Place the turntable case on a flat level surface. 2. Insert the adaptor cord into the Dc jack at the rear of the case and plug the adaptor into the mains supply socket. 3. On first use, ensure that the cable tie is removed from the player arm. 4. Remove the stylus cover and keep in a safe place for future use 7 5. Move the speed selector to the speed (33,45 or 78rpm) corresponding to the record to the played 6. Turn the Volume knob to turn the turntable on and the mode indicator will illuminate red 7. Place a record onto the turntable spindle and unclip the tone arm 8. Use the cuing lever to lift the tone arm and move the arm so that the stylus is positioned just inside the edge of the record or aligned with the start of the track to be played. 9. Slowly lower the arm and after a short interval the record will start to play 10. Adjust the volume to the desired level by rotating the volume control knob 11. When the end of the record has been reached the turntable will stop 12. Use the lever again to lift the tone arm (the deck will start to rotate again), move it back to the clip and lower into the cradle. The deck will stop 13. Secure the tine arm using the clip and refit the stylus cover after use and always before moving the turntable 14. To turn off the turntable at any time, lift the tone arm on the record and turn the volume knob fully anticlockwise. Note Some records have larger center hole and it may be necessary to fit the center hole adaptor to the turntable shaft before placing the record on the turntable. Always refit the stylus cover and secure the turntable arm using the clip before moving the turntable. Using with auxiliary device 1. Auxiliary analogue audio equipment can be connected and amplified via the turntable. 2. Connect the auxiliary equipment using a 3.5mm jack cable (cable not included) into the LINE IN jack. 3. Press the play button on the auxiliary equipment and use the track controls as usual on the auxiliary device. 4. The volume can be adjusted using the volume knob on the turntable or the controls on the connected auxiliary device. 5. To turn off the unit at the any time turn the volume knob fully anticlockwise. Using headphones (not included) A stereo headphone jack has been provided so that the turntable can be used without disturbing others. Plug in the headphones at the point marked headphone near the volume knob and adjust the listening volume to your chosen level. Excessive sound pressure from earphones and headphones can cause hearing loss. The turntable speakers will not operate when earphones are fitted. 8 Connecting the turntable to external speaker In connecting the turntable to external speakers (via a suitable amplifier) Use a twin phono to twin phono lead (not included) to connect the RCA output jacks to the Audio in of the amplifier. Ensure red plugs are inserted into the red sockets and white into white. Using with Bluetooth device Check that your turntable is in Bluetooth mode. If you are not already in Bluetooth mode, short press the Mode button until you are in Bluetooth mode (Blue LED will be illuminated). It will begin to search for Bluetooth devices (Blue LED flashed during pairing). In Bluetooth Mode: 1. Your device will search for Bluetooth. 2. On the device (e.g. iPhone/iPad/Android/other phone/Tablet/Computer), turn on Bluetooth connectivity and ensure that it is ‘discoverable’. Note: If necessary, refer to the instructions for your device to add or set up Bluetooth. 3. Select to ‘Add new device’, if necessary. Note: Some products will automatically search for a new device and so the ‘Add new device’ option is not available. 4. When found, your device will be displayed as ‘Lenco TT-110’. Select and begin pairing. 5. When pairing is complete ‘Bluetooth Connected’ will be displayed. 6. Now that you have paired your device with the turntable, it will connect to it when it is within range, which is about 10 meter or less (33 feet or less), line of sight. 7. Your device will remain paired with the turntable unless you decide to disconnect or ‘unpair’ it. 8. You can short press “Pair” to reconnect. Playing Bluetooth 1. Press “Back” for previous track of your Bluetooth device. 2. Press “Next” for next track of your Bluetooth device. 3. Press “Play/pause” for play or pause of your Bluetooth device. HOW TO REPLACE THE NEEDLE To replace the needle, please refer to the instructions below. Removing the needle from the cartridge 1. Place a screwdriver at the tip of the stylus and push downward as shown in direction “A”. 2. Remove the stylus by pulling the stylus forward and pushing downward. Installing the Stylus 1. Hold the tip of the stylus and insert the stylus by pressing as shown in direction “B”. 2. Push the stylus upward as in direction “C” until the stylus locks into the tip position. 9 NOTES We advise you to clean your records with an anti-static cloth to gain maximum enjoyment from them. We would also point out that for the same reason your stylus should be replaced periodically (approximately every 250 playback hours) TIPS FOR BETTER TURNTABLE PERFORMANCE 1. When opening or closing the turntable cover, handle it gently, gripping it either at the centre or at each side. 2. Do not touch the needle tip with your fingers; avoid bumping the needle against the turntable platter or record edge. 3. Frequently clean the needle tip-use a soft brush in a “back-to-front” motion only. 4. If you must use a needle cleaning fluid, use very sparingly. 5. Gently wipe the turntable player housing with a soft cloth. Use only a small amount of mild detergent to clean the turntable player. 6. Never apply harsh chemicals or solvents to any part of the turntable system. SPECIFICATIONS Type drive motor speed wow and flutter turntable platter Belt drive DC motor 33 1/3 rpm, 45 rpm, 78 rpm <0.35% 200mm cartridge Type Stylus optimum tracking force output frequency response ceramic cartridge 0.7 mil 6 gram 300-500mv ,+/-20dB 10 10db crosstalk signal to noise ration ( S/N) 18db General Adaptor product audio output (line out) power consumption Power adaptor. Input AC 100-240V, 50/60Hz, 0.3A max. Output DC5V 1A DC5V 1A 300-500mv 5W Output DC 5V 1A Input AC 100-240V, 50/60Hz, 0.3A max. Bluetooth Pairing name: Lenco TT-110 Headphone socket: 3.5mm Operating Temperature: 0°C‐40°C Storage Temperature: -20°C‐70°C Due to continuing improvement, the features and the design are subject to change without notice Power supply adaptor (For EU only) Use only the power supply listed in the user instructions Information Value and precision Manufacturers name or trade DongGuan Obelieve Electronic Co., Ltd mark, commercial registration Huazhaoxin Industrial park B-4/F, Golden and address phoenix industrial zone, Fenggan town, Dongguan city, Guangdong province, China Model Identifier 0BL-0501000E Input voltage 100-240V Input AC frequency 50/60Hz Output voltage 5V Output current 1A Output Power 5W Average active efficiency 73.62 No load Power consumption ≤ 0.10 11 Guarantee Lenco offers service and warranty in accordance to European law, which means that in case of repairs (both during and after the warranty period) you should contact your local dealer. Important note: It is not possible to send products that need repairs to Lenco directly. Important note: If this unit is opened or accessed by a non-official service center in any way, the warranty expires. This device is not suitable for professional use. In case of professional use, all warranty obligations of the manufacturer will be voided. Disclaimer Updates to Firmware and/or hardware components are made regularly. Therefore some of the instruction, specifications and pictures in this documentation may differ slightly from your particular situation. All items described in this guide for illustration purposes only and may not apply to particular situation. No legal right or entitlements may be obtained from the description made in this manual. Disposal of the Old Device This symbol indicates that the relevant electrical product or battery should not be disposed of as general household waste in Europe. To ensure the correct waste treatment of the product and battery, please dispose them in accordance to any applicable local laws of requirement for disposal of electrical equipment or batteries. In so doing, you will help to conserve natural resources and improve standards of environmental protection in treatment and disposal of electrical waste (Waste Electrical and Electronic Equipment Directive). CE Marking Hereby, Lenco Benelux B.V., Thermiekstraat 1a, 6361 HB Nuth, The Netherlands, declares that this product is in compliance with the essential EU directive requirements. The declaration of conformity may be consulted via [email protected] WARNING: To prevent possible hearing damage, do not listen at high volume levels for long periods. Service For more information and helpdesk support, please visit www.lenco.com Lenco Benelux BV, Thermiekstraat 1a, 6361 HB Nuth, The Netherlands. 12 Nederlands LET OP: Gebruik van bedieningen of afstellingen of uitvoer van procedures anders dan gespecificeerd in deze documentatie kan leiden tot blootstelling aan schadelijke straling. VOORZORGSMAATREGELEN VOOR GEBRUIK ONTHOUD DE VOLGENDE INSTRUCTIES: 1. Bedek of blokkeer de ventilatieopeningen niet. Wanneer u het apparaat op een schap plaatst, dient u 5 cm (2”) vrije ruimte rondom het gehele apparaat te behouden. 2. Installeer het product volgens de meegeleverde gebruikershandleiding. 3. Houd het apparaat uit de buurt van hittebronnen, zoals radiatoren, verwarmingen, kachels, kaarsen en andere hittegenererende producten of open vuur. Het apparaat kan alleen worden gebruikt in een gematigd klimaat. Extreem koude of warme omgevingen dienen te worden vermeden. Bedrijfstemperatuur tussen 0 °C en 35 °C. 4. Gebruik dit apparaat niet in de buurt van krachtige magnetische velden. 5. Elektrostatische ontlading kan normaal gebruik van dit apparaat verstoren. U hoeft het apparaat in dit geval slechts te resetten en opnieuw op te starten volgens de gebruikershandleiding. Wees voorzichtig tijdens bestandsoverdracht en gebruik het product in een omgeving zonder statische interferentie. 6. Waarschuwing! Steek nooit een voorwerp via de ventilatie- of andere openingen in het product. Er is hoogspanning in het product aanwezig en als u er een object insteekt, kan dat een elektrische schok veroorzaken en/of kortsluiting in de interne onderdelen. Mors om dezelfde reden geen water of vloeistof op het product. 7. Gebruik het toestel niet in vochtige ruimtes, zoals badkamers, stomende keukens of in de buurt van zwembaden. 8. Het apparaat mag niet worden blootgesteld aan druppels en spetters en zorg ervoor dat er geen met vloeistof gevulde voorwerpen, zoals vazen, op of in de buurt van het apparaat worden geplaatst. 9. Gebruik dit apparaat niet wanneer condensatie kan optreden. Wanneer het apparaat in een warme en vochtige kamer wordt gebruikt, dan kunnen er waterdruppels of condensatie binnenin het apparaat worden gevormd waardoor het apparaat mogelijk niet meer goed functioneert; houd het apparaat 1 of 2 uur op UIT staan voordat u de voeding weer inschakelt: het apparaat dient droog te zijn voordat deze stroom ontvangt. 10. Alhoewel dit apparaat met grote zorg gefabriceerd en verschillende keren geïnspecteerd is voordat het de fabriek verlaat, is het nog steeds mogelijk dat er problemen optreden, zoals met alle elektrische apparaten. Als u rook, een overmatige hitteontwikkeling of enig ander onverwacht verschijnsel opmerkt, moet u onmiddellijk de stekker van het netsnoer uit het stopcontact halen. 11. Dit apparaat moet werken op een voedingsbron, zoals aangegeven op het specificatieplaatje. Als u twijfelt over het type voeding dat gebruikt wordt in uw huis, raadpleeg dan uw dealer of plaatselijk energiebedrijf. 12. Buiten bereik van dieren houden. Sommige dieren bijten graag aan netsnoeren. 13. Gebruik een zacht, droog doekje om het apparaat te reinigen. Gebruik geen oplosmiddelen of op benzine gebaseerde vloeistoffen. U kunt een vochtig doekje met verdund schoonmaakmiddel gebruiken om hardnekkige vlekken te verwijderen. 14. De leverancier is niet verantwoordelijk voor schade of verloren gegevens veroorzaakt door storing, misbruik, modificatie van het apparaat of batterijvervanging. 15. Onderbreek nooit de verbinding wanneer het apparaat formatteert of bestanden overdraagt. De gegevens kunnen anders corrupt of verloren raken. 16. Indien het apparaat een USB-afspeelfunctie heeft, moet de USB-geheugenstick rechtstreeks op het apparaat worden aangesloten. Gebruik geen USB-verlengkabel, omdat die kan leiden tot storingen met foutieve gegevens als gevolg. 17. Het nominale specificatielabel is te vinden op het paneel aan de onder- of achterkant van het apparaat. 18. Dit apparaat is niet bestemd voor gebruik door mensen (inclusief kinderen) met fysieke, zintuiglijke of geestelijke gebreken of gebrek aan kennis en ervaring, tenzij zij onder toezicht staan of instructies hebben over het juiste gebruik van het apparaat hebben gekregen van de persoon die verantwoordelijk is voor hun veiligheid. 19. Dit product is alleen voor niet-professioneel gebruik bedoeld en niet voor commercieel of industrieel gebruik. 13 20. Verzeker u ervan dat het apparaat in een stabiele positie staat opgesteld. Beschadigingen veroorzaakt door het gebruik van dit apparaat in een onstabiele positie, trillingen of schokken of door het niet opvolgen van andere waarschuwingen of voorzorgsmaatregelen beschreven in deze gebruikshandleiding worden niet gedekt door de garantie. 21. Verwijder nooit de behuizing van dit apparaat. 22. Plaats dit apparaat nooit op andere elektrische apparatuur. 23. Geef kinderen geen gelegenheid in aanraking met plastic zakken te komen. 24. Gebruik uitsluitend uitbreidingen/accessoires gespecificeerd door de fabrikant. 25. Laat alle reparaties over aan gekwalificeerd onderhoudspersoneel. Onderhoud is nodig wanneer het toestel op enige wijze beschadigd is, zoals het netsnoer of de stekker, wanneer er vloeistof in het toestel is gemorst of voorwerpen in zijn terechtgekomen, wanneer het toestel aan regen of vocht is blootgesteld, niet normaal werkt of is gevallen. 26. Langdurige blootstelling aan harde geluiden van persoonlijke muziekspelers kan leiden tot tijdelijk of permanent gehoorverlies. 27. Als het product wordt geleverd met voedingskabel of AC-stroomadapter: ⚫ Als er problemen optreden, koppel de wisselstroomvoedingskaart dan los en laat reparaties over aan bevoegd personeel. ⚫ Nooit op de stroomadapter stappen of deze indrukken. Wees voornamelijk voorzichtig in de buurt van de stekkers en het punt waar de kabel uit het apparaat komt. Plaats geen zware voorwerpen op de stroomadapter, om beschadiging ervan te voorkomen. Houd het gehele apparaat buiten bereik van kinderen! Wanneer kinderen met de voedingskabel spelen, kunnen zij ernstig letsel oplopen. ⚫ Haal de stekker uit het stopcontact tijdens onweer of wanneer u deze langere tijd niet gebruikt. ⚫ Het stopcontact moet in de buurt van de apparatuur zijn geïnstalleerd en eenvoudig te bereiken zijn. ⚫ Overbelast stopcontacten of verlengsnoeren niet. Overbelasting kan brand of een elektrische schok veroorzaken. ⚫ Apparaten met een Klasse 1 structuur dienen te worden aangesloten op een stopcontact met een beschermende aardverbinding. ⚫ Apparaten met een Klasse 2 structuur vereisen geen aardverbinding. ⚫ Houd altijd de stekker vast wanneer u deze uit het stopcontact trekt. Trek nooit aan de voedingskabel. Dit kan tot een kortsluiting leiden. ⚫ Gebruik nooit een beschadigde voedingskabel of stekker of een los stopcontact. Dit vormt namelijk een risico op brand of elektrische schokken. 28. Indien het product knoopcelbatterijen bevat of wordt geleverd met een afstandsbediening die knoopcelbatterijen bevat: Waarschuwing: ⚫ "Batterij niet inslikken, chemisch brandgevaar” of gelijkwaardige werking. ⚫ (De afstandsbediening meegeleverd met) Dit product bevat een munt/knoopcelbatterij. Als de batterij wordt ingeslikt, kan deze in slechts 2 uur ernstige interne brandwonden veroorzaken en tot de dood leiden. ⚫ Houd nieuwe en gebruikte batterijen buiten bereik van kinderen. ⚫ Als de batterijhouder niet goed kan worden gesloten, dient u het product niet meer te gebruiken en buiten bereik van kinderen te houden. ⚫ Als u denkt dat batterijen zijn ingeslikt of binnenin een willekeurig lichaamsdeel terecht zijn gekomen, dient u onmiddellijk medische hulp te zoeken. 29. Waarschuwing m.b.t. het gebruik van batterijen: ⚫ Als de batterij onjuist wordt geplaatst, bestaat er explosiegevaar. Vervang de batterij alleen door een zelfde of vergelijkbare soort batterij. ⚫ Stel de batterij niet bloot aan extreem hoge of lage temperaturen of een lage luchtdruk op grote hoogte tijdens gebruik, opslag of transport. ⚫ Vervanging van een batterij door een incorrect type kan leiden tot een ontploffing of de lekkage van ontvlambare vloeistoffen of gas. ⚫ Verwijdering van een batterij in vuur of een hete oven of het mechanisch verpletteren of snijden van een batterij kan leiden tot een ontploffing. ⚫ Laat een batterij nooit achter in omgevingen met extreem hoge temperaturen, anders kan dit leiden tot een ontploffing of de lekkage van ontvlambare vloeistoffen of gas. 14 ⚫ ⚫ Stel een batterij nooit bloot aan een extreem lage luchtdruk, anders kan dit leiden tot een ontploffing of de lekkage van ontvlambare vloeistoffen of gas. Aandacht voor het milieu is nodig bij het verwijderen van de batterijen. INSTALLATIE • Pak alle onderdelen uit en verwijder de beschermende materialen. • Sluit het apparaat niet aan op het stopcontact, voordat u de netspanning hebt gecontroleerd en voordat alle andere aansluitingen zijn gemaakt. Inbegrepen toebehoren: Handleiding Voedingsadapter 15 Plaats van de bedieningen 1. Dek platenspeler 2. Platenspeleras 3. Middengatadapter 4. Toonarm 5. Hendel 6. Toonarmclip 16 7. Toerenregelaar platenspeler 8. Bedieningsschakelaar automatische stop 9. Ledstatusindicator 10. Aan/uit-knop/volumeknop 11. Koptelefoonaansluiting 12. Stylus 13. Slot 14. Handgreep om te dragen 15. Luidspreker 16. Aux in-aansluiting 17. Line-uitgang kanaal R/L 18. DC in-aansluiting 19. Koppelen 20. Vorige nummer 21. Volgende nummer 22. Afspelen/pauzeren 23. Modus 24. Modusindicator Modus 1. Druk kort op "Mode (Modus)" om de afspeelmodus te selecteren. 2. De blauwe led knippert als de bluetooth wordt gekoppeld. 3. De blauwe led licht op wanneer de bluetooth is verbonden. 4. De rode led licht op wanneer het in de platenspelermodus staat. 5. De groene led licht op als het in Aux in-modus staat. De platenspeler gebruiken 1. Plaats de platenspeler op een vlak en waterpas oppervlak. 2. Steek de voedingskabel in de DC-ingang aan de achterkant van de behuizing en steek de stekker in een stopcontact. 3. Zorg ervoor dat bij eerste gebruik de , zorg ervoor dat de kabelbinder wordt verwijderd van de toonarm. 17 4. Verwijder de styluskap en bewaar deze op een veilige plaats voor toekomstig gebruik 5. Stel de toerenregelaar in op het juiste aantal toeren (33,45 of 78 rpm) die overeenkomt met de af te spelen plaat. 6. Draai aan de volumeknop om de platenspeler in te schakelen. De modusindicator zal rood oplichten. 7. Plaats een plaat op de platenspeler en maak de toonarm los 8. Gebruik de hendel om de toonarm op te tillen en verplaats de toonarm, zodat de stylus net binnen de rand van de plaat is gepositioneerd of uitgelijnd is met het begin van het af te spelen nummer. 9. Laat de toonarm langzaam zaken. Na een korte pauze begint de plaat af te spelen 10. Stel het volume in op het gewenste niveau door aan de volumeknop te draaien 11. De platenspeler stopt wanneer het einde van de plaat is bereikt. 12. Gebruik de hendel opnieuw om de toonarm op te tillen (het dek begint weer te draaien), beweeg de toonarm terug naar de clip en laat de toonarm zakken in de houder. Het dek stopt. 13. Beveilig de toonarm met behulp van de clip en plaats de styluskap terug na gebruik en altijd bij het verplaatsen van de platenspeler. 14. Til de toonarm op van de plaat en draai de volumeknop linksom om de platenspeler uit te schakelen. Opmerking Sommige platen hebben een groter middengat en het kan nodig zijn om de middengatadapter op de platenspeleras te plaatsen voordat u de plaats op de platenspeler plaats. Plaats altijd de styluskap altijd terug en beveilig de toonarm met behulp van de clip voordat u de platenspeler verplaatst. Gebruik met hulpapparaat 1. Analoge hulpapparatuur kan op de platenspeler worden aangesloten en versterkt 2. Sluit de hulpapparatuur met behulp van een 3,5 mm aansluitkabel (kabel niet Inbegrepen) aan op de LINE IN-aansluiting. 3. Druk op de afspeelknop van de hulpapparaat en selecteer een nummer zoals gebruikelijk op het hulpapparaat. 4. Het volume kan worden ingesteld met behulp van de volumeknop op de platenspeler of de bedieningen van het aangesloten hulpapparaat. 5. Draai de volumeknop helemaal naar links om de platenspeler uit te schakelen. 18 Gebruik van koptelefoon (niet inbegrepen) Een stereo koptelefoonaansluiting is voorzien, zodat de platenspeler kan worden gebruikt zonder anderen te storen. Plug de koptelefoon nabij de gemarkeerde koptelefoon nabij de volumeknop en stel het luistervolume in op uw gekozen niveau. Overmatige geluidsdruk van oortelefoons en koptelefoons kan gehoorverlies veroorzaken. De luidsprekers van de platenspeler werken niet als een koptelefoon is aangesloten. De platenspeler aansluiten op een externe luidspreker Voor het aansluiten van de platenspeler op externe luidsprekers (via een geschikte versterker), gebruik een dubbele tulpverloopkabel (niet inbegrepen) om de RCA-uitgangsaansluiting aan te sluiten op de Audio in van de versterker. Zorg ervoor dat rode stekkers in de rode aansluitingen worden gestoken en de witte stekkers in de witte aansluitingen. Gebruik met bluetoothapparaat Controleer of uw platenspeler in bluetoothmodus staat. Als u nog niet in bluetoothmodus bent, druk dan kort op de knop Mode (Modus) totdat u in bluetoothmodus bent (de blauwe led zal oplichten). Het zal beginnen te zoeken naar bluetoothapparaten (de blauwe led knippert tijdens het koppelen). In bluetoothmodus: 1. De platenspeler zoekt naar bluetooth. 2. Schakel op het apparaat (bijvoorbeeld iPhone/iPad/Android/andere telefoon/tablet/computer) bluetoothconnectiviteit in zorg ervoor dat het zichtbaar is. Opmerking: Raadpleeg indien nodig de instructies voor uw apparaat om bluetooth toe te voegen of in te stellen. 3. Selecteer indien nodig "Add new device (Nieuw apparaat toevoegen)". Opmerking: Sommige producten zullen automatisch naar een nieuw apparaat zoeken en is daarom de optie 'Add new device (Nieuw apparaat toevoegen)' niet beschikbaar. 4. Wanneer gevonden wordt uw apparaat als "Lenco TT-110" weergegeven. Selecteer en begin met koppelen. 5. Wanneer het koppelen is voltooid, wordt 'Bluetooth Connected (Bluetooth verbonden)' weergegeven. 6. Nu u uw apparaat heeft gekoppeld met de platenspeler, zal het verbinden met de platenspeler wanneer het binnen bereik is, dat is ongeveer 10 meter of minder. 7. Uw apparaat blijft gekoppeld met de platenspeler tenzij u besluit de verbinding los te koppelen of te ontkoppelen. 8. U kunt kort op "Pair (Koppelen)" drukken om opnieuw verbinding te maken. Bluetooth afspelen 1. Druk op "Back (Terug)" Voor het vorige nummer van uw bluetoothapparaat. 2. Druk op "Next (Volgende)" voor het volgende nummer van uw bluetoothapparaat. 3. Druk op "Play/pause (Afspelen/pauzeren)" om uw bluetoothapparaat af te spelen of te pauzeren. 19 HET VERVANGEN VAN DE NAALD Om de naald te vervangen, verwijzen wij u naar de onderstaande instructies. Het verwijderen van de naald uit het element 1. Plaats een schroevendraaier tegen de punt van de stylus en duw naar onderen zoals weergegeven in aanwijzing “A”. 2. Verwijder de stylus door de stylus naar voren te trekken en naar onderen te duwen. De stylus installeren 1. Houd de punt van de stylus vast en steek de stylus in door te drukken zoals weergegeven in aanwijzing “B”. 2. Duw de stylus naar boven zoals in aanwijzing “C” totdat de stylus in de puntstand staat. EN NL Guide Pins (inside) Geleidepennen (binnen) OPMERKINGEN Wij adviseren u uw platen schoon te maken met een anti-statische doek om maximaal van ze te genieten. Om dezelfde reden dient uw stylus periodiek te worden vervangen (circa elke 250 afspeeluren). TIPS VOOR EEN GOED GEBRUIK VAN UW PLATENSPELER 1. Ga voorzichtig te werk bij het openen of sluiten van de stofkap door deze in het midden of aan beide zijden tegelijk vast te pakken. 2. Raak de naaldpunt niet met uw vingers aan. Vermijd het stoten van de naald tegen de draaitafel of tegen de rand van de plaat. 3. Reinig de naald regelmatig. Gebruik daarvoor een zachte borstel en beweeg alleen van achteren naar voren. 4. Als u een reinigingsvloeistof voor de naald moet gebruiken, gebruik deze dan zeer spaarzaam. 5. Veeg de behuizing van de platenspeler voorzichtig af met een zachte doek. Gebruik slechts een klein beetje mild reinigingsmiddel om de platenspeler af te nemen. 6. Gebruik nooit agressieve chemicaliën of oplosmiddelen om onderdelen van het draaitafelsysteem te reinigen. 20 SPECIFICATIES Type drive motor speed wow and flutter turntable platter Riemaandrijving Gelijkstroommotor 33 1/3 tpm, 45 tpm, 78 tpm <0,35% 200 mm cartridge Type Stylus optimum tracking force output frequency response crosstalk signal to noise ration ( S/N) Keramisch 0,7 millimeter 6 gram 300-500 mv ,+/-20 dB 10 db 18 db General Adaptor product audio output (line out) power consumption Voedingsadapter. Invoer AC 100-240 V, 50/60 Hz, max. 0,3 A uitvoer DC 5 V, 1 A DC5V;1A 300-500 mv 5W Uitvoer DC 5 V, 1 A Invoer AC 100-240 V, 50/60 Hz, max. 0,3 A Koppelnaam bluetooth: Lenco TT-110 Koptelefoonaansluiting: 3,5 mm Bedrijfstemperatuur: 0 °C tot 40 °C Opslagtemperatuur: -20 °C tot 70 °C Vanwege doorlopende verbeteringen zijn de functies en het ontwerp zonder nadere aankondiging onderhevig aan wijzigingen Voedingsadapter (alleen voor EU) Gebruik uitsluitend de lichtnetdapter die in de gebruiksaanwijzing wordt vermeld 21 Informatie Waarde en precisie Naam of handelsmerk van de DongGuan Obelieve Electronic Co., Ltd fabrikant, handelsregistratie Huazhaoxin Industrial park B-4 / F, Golden en adres phoenix industrial zone, Fenggan town, Dongguan city, Guangdong province, China Modelaanduiding 0BL-0501000E Ingangsspanning 100-240 V Ingangsfrequentie wisselstroom 50/60 Hz Uitgangsspanning 5V Uitgangsstroom 1A Uitgang 5W Gemiddelde actieve efficiëntie 73,62 Verbruik onbelast vermogen ≤ 0.10 Garantie Lenco biedt service en garantie aan overeenkomstig met de Europese wetgeving. Dit houdt in dat u, in het geval van reparaties (zowel tijdens als na de garantieperiode), uw lokale handelaar moet contacteren. Belangrijke opmerking: Het is niet mogelijk om producten die moeten worden gerepareerd rechtstreeks naar Lenco te sturen. Belangrijke opmerking: De garantie verloopt als een onofficieel servicecenter het apparaat op wat voor manier dan ook heeft geopend, of er toegang toe heeft gekregen. Het apparaat is niet geschikt voor professioneel gebruik. In het geval van professioneel gebruik worden alle garantieverplichtingen van de fabrikant nietig verklaard. Disclaimer Er worden regelmatig updates in de firmware en/of hardwarecomponenten gemaakt. Daardoor kunnen gedeelten van de instructie, de specificaties en afbeeldingen in deze documentatie enigszins verschillen van uw eigen situatie. Alle onderwerpen die staan beschreven in deze handleiding zijn bedoeld als illustratie en zijn niet van toepassing op specifieke situaties. Aan de beschrijving in dit document kunnen geen rechten worden ontleend. 22 Afvoer van het oude apparaat Dit symbool geeft aan dat het betreffende elektrische product of de accu/batterij niet mag worden verwijderd als algemeen huishoudelijk afval in Europa. Zorg voor een juiste afvalverwerking door het product en de accu/batterij in overeenstemming met alle van toepassing zijnde lokale wetten voor het verwijderen van elektrische apparatuur of accu's/batterijen te verwijderen. Als u dit doet, helpt u de natuurlijke bronnen te behouden en de standaard van milieubescherming te verbeteren bij de behandeling en verwijdering van elektrisch afval (Afgedankte Elektrische en Elektronische Apparatuur). CE-markering Lenco Benelux B.V., Thermiekstraat 1a, 6361 HB Nuth, Nederland, verklaart hierbij dat dit product voldoet aan de vereisten van de essentiële EU-richtlijnen. De verklaring van conformiteit kan worden aangevraagd via [email protected] WAARSCHUWING: Luister nooit voor lange tijd op hoge volumeniveaus, om mogelijke gehoorbeschadiging te voorkomen. Service Bezoek voor meer informatie en helpdeskondersteuning www.lenco.com Lenco Benelux BV, Thermiekstraat 1a, 6361 HB, Nuth, Nederland. 23 Deutsch ACHTUNG: Eine andere als die hier beschriebene Bedienung, Einstellung oder Verwendung der Funktionen kann zu gefährlicher Strahlenbelastung führen. VORSICHTSMASSNAHMEN VOR DER BENUTZUNG BEFOLGEN SIE IMMER FOLGENDE ANWEISUNGEN: 1. Blockieren oder bedecken Sie keine Lüftungsöffnungen. Wenn Sie das Gerät auf ein Regal stellen, lassen Sie um das gesamte Gerät 5 cm (2”) freien Platz. 2. Stellen Sie das Gerät entsprechend den Anweisungen der mitgelieferten Bedienungsanleitung auf. 3. Halten Sie das Gerät von Hitzequellen wie Radiatoren, Heizern, Öfen, Kerzen oder anderen hitzeerzeugenden Produkten oder offenen Flammen fern. Das Gerät darf nur bei gemäßigtem Klima verwendet werden. Sehr kalte oder heiße Umgebungen sind zu vermeiden. Die Betriebstemperatur liegt zwischen 0 °C und 35 °C. 4. Meiden Sie bei der Nutzung des Produkts die Nähe starker Magnetfelder. 5. Elektrostatische Entladungen können die normale Verwendung von diesem Gerät stören. Sollte dies geschehen, führen Sie einfach einen Reset aus und starten Sie dann das Gerät entsprechend den Anweisungen dieser Bedienungsanleitung neu. Gehen Sie besonders bei Datenübertragungen mit dem Gerät vorsichtig um und führen Sie diese nur in einer antielektrostatischen Umgebung aus. 6. Warnung! Niemals Gegenstände durch die Lüftungsschlitze oder Öffnungen in das Gerät stecken. In diesem Gerät fließt Hochspannung und das Hineinstecken von Gegenständen kann zu elektrischem Schock und/oder Kurzschluss interner elektrischer Bauteile führen. Aus dem gleichen Grund kein Wasser oder Flüssigkeiten in das Gerät geben. 7. Benutzen Sie das Gerät nicht in nasser oder feuchter Umgebung wie Bad, Dampfküche oder in der Nähe von Schwimmbecken. 8. Das Gerät darf weder Tropf- noch Spritzwasser ausgesetzt werden und es dürfen keine mit Flüssigkeit gefüllten Behälter wie z.B. Vasen auf das Gerät oder in der Nähe des Gerätes gestellt werden. 9. Benutzen Sie das Gerät nicht bei Kondensationsgefahr. Wenn Sie das Gerät in einem warmen feuchten Raum mit Dampf benutzen, dann können Wassertropfen oder Kondensation in das Gerät eindringen und u. U. zu Fehlfunktionen des Geräts führen. Schalten Sie in diesem Fall das Gerät für 1 – 2 Stunden aus, bevor Sie es erneut einschalten: Das Gerät sollte vollständig getrocknet sein, wenn Sie es wieder einschalten. 10. Obwohl dieses Gerät unter größter Sorgfalt und vor Auslieferung mehrmals überprüft wurde, können trotzdem wie bei jedem anderen elektrischen Gerät auch Probleme auftauchen. Trennen Sie das Gerät im Falle einer Rauchentwicklung, starker Hitzeentwicklung oder jeden anderen unnatürlichen Erscheinung sofort vom Netz. 11. Dieses Gerät ist durch eine Stromquelle wie auf dem Typenschild angegeben zu betreiben. Halten Sie bei Unsicherheiten über die Art Ihrer Stromversorgung in Ihrer Wohnung Rücksprache mit Ihrem Händler oder Ihrer Stromzuliefererfirma. 12. Halten Sie es von Haustieren fern. Einige Nagetiere lieben es, an Netzkabeln zu nagen. 13. Benutzen Sie für die Reinigung ein weiches und trockenes Tuch. Benutzen Sie niemals Lösungsmittel oder Flüssigkeiten auf Ölbasis. Benutzen Sie zum Entfernen hartnäckiger Flecken ein feuchtes Tuch mit mildem Reinigungsmittel. 14. Der Hersteller haftet nicht für Schäden oder Verluste durch Fehlfunktion, Zweckentfremdung oder Modifikation des Geräts oder durch Wechseln der Batterien. 15. Unterbrechen Sie die Verbindung nicht während einer Formatierung oder einer Datenübertragung. Bei Unterbrechung drohen Datenverlust und Datenbeschädigung. 16. Wenn das Gerät eine USB-Wiedergabefunktion besitzt, dann stecken Sie den USB-Stick direkt in das Gerät. Verwenden Sie kein USB-Verlängerungskabel, weil die erhöhte Störungsanfälligkeit zu Datenverlust führen könnte. 17. Das Typenschild befindet sich an der Unter- oder Rückseite des Gerätes. 18. Dieses Gerät ist nicht zur Benutzung durch Personen (auch Kinder) mit physischen, sensorischen oder mentalen Beeinträchtigungen oder ohne ausreichender Erfahrung vorgesehen, es sei denn, sie werden durch eine verantwortliche Person beaufsichtigt oder wurden in die ordnungsgemäße Bedienung des Gerätes durch eine für ihre Sicherheit verantwortlichen Person eingewiesen. 24 19. Dieses Produkt ist nur für den nicht-professionellen Gebrauch und nicht für gewerbliche oder industrielle Zwecke bestimmt. 20. Stellen Sie sicher, dass das Gerät in einer stabilen Position aufgestellt ist. Schäden, die durch Verwendung dieses Produkts in einer instabilen Position, durch Vibrationen, Stöße oder Nichtbeachtung der anderen in diesem Handbuch enthaltenen Warnungen und Vorwarnungen entstehen, werden nicht durch die Garantie abgedeckt. 21. Entfernen Sie niemals das Gehäuse dieses Produkts. 22. Stellen Sie das Produkt niemals auf andere elektrische Geräte. 23. Halten Sie Kinder von den Plastiktüten fern. 24. Benutzen Sie nur vom Hersteller spezifizierte Erweiterungen/Zubehörteile. 25. Lassen Sie alle Eingriffe von qualifiziertem Servicepersonal ausführen. Eingriffe werden notwendig, wenn das Gerät in irgendeiner Weise beschädigt wurde, beispielsweise am Netzkabel oder am Netzstecker oder wenn Flüssigkeit in das Gerät gelangt ist bzw. Gegenstände in das Gerät gefallen sind, das Gerät Regen oder Feuchtigkeit ausgesetzt war, es heruntergefallen ist oder nicht ordnungsgemäß funktioniert. 26. Langes Hören lauter Töne aus einem Musikgerät kann zum zeitweiligen oder permanenten Hörverlust führen. 27. Wenn zum Lieferumfang des Produkts ein Netzkabel oder ein Netzadapter gehört: ⚫ Wenn irgendwelche Probleme auftreten, dann trennen Sie das Gerät vom Stromnetz und setzen Sie sich anschließend mit einer qualifizierten Fachkraft in Verbindung. ⚫ Treten Sie nicht auf das Netzteil und klemmen Sie es auch nicht ein. Seien Sie im näheren Bereich des Steckers und der Herausführungen des Kabels besonders vorsichtig. Stellen Sie keine schweren Gegenstände auf das Netzteil, weil es dadurch beschädigt werden könnte. Halten Sie das gesamte Gerät außerhalb der Reichweite von Kindern! Durch Spielen mit dem Netzkabel können sie sich ernsthafte Verletzungen zuziehen. ⚫ Trennen Sie das Gerät während eines Gewitters oder bei längerer Nichtbenutzung vom Netz. ⚫ Die Wandsteckdose muss sich in der Nähe des Geräts befinden und einfach zu erreichen sein. ⚫ Steckdosen und Verlängerungsleitungen nicht überlasten. Eine Überlastung kann zu Brandgefahr bzw. Stromschlag führen. ⚫ Geräte der Schutzklasse 1 sind an eine Netzsteckdose mit Schutzleiter anzuschließen. ⚫ Geräte der Schutzklasse 2 benötigen keinen Schutzleiteranschluss. ⚫ Halten Sie den Netzstecker in der Hand, wenn Sie ihn aus der Netzsteckdose ziehen. Ziehen Sie ihn nicht durch Zerren am Kabel heraus. Das kann zu einem Kurzschluss führen. ⚫ Verwenden Sie weder ein beschädigtes Netzkabel noch einen beschädigten Stecker oder eine lockere Steckdose. Es besteht Brand- und Stromschlaggefahr. 28. Wenn das Produkt mit einer Fernbedienung mit Batterien/Knopfzellen geliefert wird oder das Produkt eine derartige Fernbedienung umfasst: Warnung: ⚫ „Die Batterie nicht einnehmen, er besteht Verätzungsgefahr”. ⚫ [Die mit diesem Produkt mitgelieferte Fernbedienung] enthält eine Knopfbatterie. Das Verschlucken der Batterie kann innerhalb von nur 2 Stunden zu schwersten inneren Verbrennungen mit Todesfolge führen. ⚫ Halten Sie neue und gebrauchte Batterien von Kindern fern. ⚫ Verwenden Sie dieses Produkt nicht weiter und halten Sie es von Kindern fern, wenn das Batteriefach nicht sicher schließt. ⚫ Suchen Sie umgehend ärztliche Hilfe auf, wenn Sie vermuten, dass Batterien verschluckt oder in Körperöffnungen eingeführt wurden. 29. Warnhinweise bzgl. der Verwendung von Batterien: ⚫ Es besteht Explosionsgefahr, wenn die Batterien nicht korrekt eingelegt werden. Nur mit Batterien des gleichen oder entsprechenden Typs ersetzen. ⚫ Die Batterie darf während der Benutzung, Aufbewahrung oder des Transports weder sehr hohen oder sehr niedrigen Temperaturen noch niedrigem Luftdruck in großen Höhenlagen ausgesetzt werden. ⚫ Die Ersetzung der Batterie mit einem falschen Batterietyp kann zum Explodieren der Batterie oder dem Auslaufen von entflammbarem Gas oder entflammbarer Flüssigkeit aus der Batterie führen. ⚫ Die Entsorgung der Batterie in Feuer oder einem heißen Ofen oder das mechanische Zerkleinern oder Zerteilen der Batterie kann zu Explosionen führen. 25 ⚫ ⚫ ⚫ Das Verbleiben der Batterie in einer Umgebung mit sehr hohen Temperaturen kann zum Explodieren der Batterie oder dem Auslaufen von entflammbarem Gas oder entflammbarer Flüssigkeit führen. Eine einem sehr niedrigen Luftdruck ausgesetzte Batterie kann explodieren oder es kann aus einer einem sehr niedrigen Luftdruck ausgesetzten Batterie entflammbares Gas oder entflammbare Flüssigkeit auslaufen. Augenmerk ist auf den ökologischen Aspekt der Batterieentsorgung zu legen. ANBRINGEN • Packen Sie alle Teile aus und entfernen Sie danach die Schutzmaterialien. • Schließen Sie das Gerät nicht eher an das Netz an, bevor Sie die Netzspannung überprüft haben und alle anderen notwendigen Verbindungen hergestellt sind. Im Lieferumfang enthaltene Zubehörteile: Bedienungsanleitung Netzadapter 26 Bedienelemente 1. Plattenspielerdeck 2. Plattentellerspindel 3. Mittellochadapter 4. Tonarm 5. Tonarm-Lifthebel 6. Tonarmhalter 27 7. Plattenteller-Geschwindigkeitswähler 8. Schalter automatische Abschaltsteuerung 9. Betriebszustandsanzeige-LED 10. Ein/Aus-Schalter / Lautstärkeregler 11. Kopfhörerbuchse 12. Tonnadel 13. Verschluss 14. Tragegriff 15. Lautsprecher 16. AUX-Eingangsbuchse 17. LINE-Ausgang linker/rechter Kanal 18. Stromversorgungseingang 19. Koppeln 20. Vorheriger Titel 21. Nächster Titel 22. Wiedergabe/Pause 23. Modus 24. Modusanzeige-LED Modus 1. Drücken Sie kurz „Modus“, um den Wiedergabemodus auszuwählen. 2. Während der Bluetooth-Kopplung blinkt die Modusanzeige-LED Blau. 3. Wenn die Bluetooth-Verbindung erfolgreich aufgebaut wurde, dann leuchtet die Modusanzeige-LED kontinuierlich Blau. 4. Wenn der Plattenspielermodus ausgewählt ist, dann leuchtet die Modusanzeige-LED Rot. 5. Wenn der AUX-Eingangsmodus ausgewählt ist, dann leuchtet die Modusanzeige-LED Grün. Benutzen des Plattenspielers 1. Stellen Sie den Plattenspielerkoffer auf eine ebene Oberfläche. 2. Schließen Sie den Netzadapter am Stromversorgungseingang auf der Rückseite des Plattenspielerkoffers an und stecken Sie anschließend den Netzadapter in eine Netzsteckdose. 3. Vergewissern Sie sich bei der ersten Benutzung des Plattenspielers, dass der Kabelbinder vom Tonarm entfernt wurde. 4. Nehmen Sie danach den Tonnadelschutz ab und bewahren Sie ihn für zukünftige Verwendung an einem sicheren Platz auf. 28 5. Wählen Sie mit Hilfe des Plattenteller-Geschwindigkeitswählers die für die wiederzugebende Schallplatte benötigte Geschwindigkeit (33, 45 oder 78 U/min) aus. 6. Drehen Sie den Lautstärkeregler, um den Plattenspieler einzuschalten, woraufhin die Betriebszustandsanzeige-LED Rot leuchtet. 7. Legen Sie eine Schallplatte auf den Plattenteller und nehmen Sie anschließend den Tonarm aus dem Tonarmhalter. 8. Heben Sie den Tonarm mit Hilfe des Tonarm-Lifthebels an und bewegen Sie anschließend den Tonkopf so, dass er sich über der Schallplatte bzw. über der Startrille des wiederzugebenden Titels befindet. 9. Senken Sie den Tonarm nun vorsichtig ab. Kurz darauf beginnt die Wiedergabe der Schallplatte. 10. Stellen Sie durch Drehen des Lautstärkereglers den gewünschten Lautstärkepegel ein. 11. Wenn das Ende der Schallplatte erreicht wird, stoppt die Plattentellerrotation automatisch. 12. Heben Sie den Tonarm mit Hilfe des Tonarm-Lifthebels erneut an (der Plattenteller beginnt wieder zu rotieren) und bewegen Sie ihn zurück zum Tonarmhalter. Senken Sie den Tonarm hier ab. Die Plattentellerrotation wird daraufhin wieder gestoppt. 13. Rasten Sie den Tonarm wieder im Tonarmhalter ein und setzen Sie nach Beendigung der Benutzung den Tonnadelschutz wieder auf den Tonkopf, bevor Sie den Plattenspieler umstellen/transportieren. 14. Sie können den Plattenspieler jederzeit ausschalten, indem Sie den auf der Schallplatte aufliegenden Tonarm anheben und anschließend den Laustärkeregler ganz nach links drehen. Hinweis Einige Schallplatten besitzen ein größeres Mittelloch. Bei diesen Schallplatten ist es notwendig, dass Sie den Mittellochadapter auf die Plattentellerspindel stecken, bevor Sie die Schallplatte auf den Plattenteller legen. Setzen Sie immer den Tonnadelschutz auf den Tonkopf und fixieren Sie den Tonarm im Tonarmhalter, bevor Sie den Plattenspieler umstellen/transportieren. Benutzen des Plattenspielers mit einem externen Gerät 1. Sie können externe analoge Audiogeräte an den Plattenspieler anschließen und deren Audiosignal über den Plattenspieler verstärken. 2. Schließen Sie Ihr externes Audiogerät über ein Audiokabel mit 3,5-mm-Klinkenbuchse (nicht im Lieferumfang enthalten) an der Eingangsbuchse LINE IN des Plattenspielers an. 3. Starten Sie die Wiedergabe mit Hilfe der Wiedergabetaste des externen Audiogeräts und benutzen Sie die Audiosteuerung Ihres externen Audiogeräts in gewohnter Weise. 29 4. Die Lautstärke können Sie sowohl über den Lautstärkeregler des Plattenspielers als auch des angeschlossenen externen Audiogeräts steuern. 5. Sie können den Plattenspieler jederzeit ausschalten, indem Sie seinen Lautstärkeregler ganz nach links drehen. Benutzen eines Kopfhörers (nicht im Lieferumfang enthalten) Der Plattenspieler besitzt eine Kopfhörerbuchse, damit Sie den Plattenspieler benutzen können, ohne andere Personen zu stören. Schließen Sie den Kopfhörer an der mit einem Kopfhörersymbol gekennzeichneten Buchse unterhalb des Lautstärkereglers an und stellen Sie anschließend die gewünschte Wiedergabelautstärke ein. Übermäßiger Schalldruck der Ohrhörer und Kopfhörer kann zu Gehörverlust führen. Sobald Sie einen Kopf-/Ohrhörer anschließen, werden die Lautsprecher des Plattenspielers stummgeschaltet. Anschließen externer Lautsprecher an den Plattenspieler Wenn Sie über einen geeigneten Verstärker an Ihrem Plattenspieler externe Lautsprecher anschließen möchten, dann verbinden Sie die Cinch-Ausgänge des Plattenspielers über ein Cinch-Stereo-auf-CinchStereo- Audiokabel (nicht im Lieferumfang enthalten) mit den Audioeingängen des externen Verstärkers. Vergewissern Sie sich, dass die roten Cinchstecker an den roten Cinchbuchsen und die weißen Cinchstecker an den weißen Cinchbuchsen angeschlossen sind. Benutzen des Geräts mit einem Bluetooth-Gerät Vergewissern Sie sich, dass sich Ihr Plattenspieler im Bluetooth-Modus befindet. Wenn er sich nicht im Bluetooth-Modus befindet, dann drücken Sie die Taste Modus solange kurz, bis sich der Plattenspieler im Bluetooth-Modus befindet (die Modusanzeige-LED leuchtet Blau). Anschließend beginnt der Plattenspieler mit der Suche nach Bluetooth-Geräten (während des Koppelns blinkt die LED Blau). Im Bluetooth-Modus: 1. Ihr Plattenspieler sucht nach Bluetooth-Geräten. 2. Aktivieren Sie die Bluetooth-Konnektivität des Bluetooth-Geräts (z. B. iPhone, iPad, Android-Mobilgerät, sonstige Mobiltelefone, Tablet-PC oder PC) und vergewissern Sie sich, dass dieses Gerät erkennbar ist. Hinweis: Schlagen Sie bei Bedarf in der Bedienungsanleitung zu Ihrem Gerät nach, um zu erfahren, wie Bluetooth aktiviert oder eingerichtet werden kann. 3. Wählen Sie gegebenenfalls „Add new device“ (Neues Gerät hinzufügen) aus. Hinweis: Einige Produkte suchen automatisch nach neuen Geräten. Bei diesen Geräten steht die Option „Add new device“ (Neues Gerät hinzufügen) nicht zur Verfügung. 4. Wenn Ihr Plattenspieler gefunden wurde, dann wird er in der Liste gefundener Bluetooth-Geräte als „Lenco TT-110“ angezeigt. Wählen Sie ihn aus und stellen Sie eine Verbindung her. 5. Wenn das Koppeln abgeschlossen ist, dann wird „Bluetooth Connected“ (Bluetooth verbunden) angezeigt. 30 6. Jetzt, wo Ihr Plattenspieler mit dem Bluetooth-Gerät gekoppelt ist, verbindet es sich immer mit ihm, sobald es sich innerhalb der Verbindungsreichweite (Sichtlinie) von max. ca. 10 m (33 Fuß) befindet. 7. Ihr Bluetooth-Gerät bleibt solange mit dem Plattenspieler gekoppelt, bis Sie die Verbindung bzw. Kopplung beider Geräte manuell trennen. 8. Zum Wiederverbinden können Sie kurz „Koppeln“ drücken. Bluetooth-Wiedergabe 1. Drücken Sie „Zurück“, um zum vorherigen Titel Ihres Bluetooth-Geräts zu springen. 2. Drücken Sie „Vor“, um zum nächsten Titel Ihres Bluetooth-Geräts zu springen. 3. Drücken Sie „Wiedergabe/Pause“, um die Wiedergabe Ihres Bluetooth-Geräts zu starten, zu pausieren oder fortzusetzen. ERSETZEN DER TONNADEL Folgen Sie für das Ersetzen der Tonnadel der nachfolgenden Anleitung. Entnehmen der Tonnadel aus dem Tonkopf 1. Setzen Sie einen Schraubendreher an der Spitze der Tonabnehmernadel an. Drücken Sie dann wie in der Abbildung gezeigt nach unten in Richtung „A“. 2. Nehmen Sie danach die Tonabnehmernadel ab, indem Sie ziehen und nach unten drücken. Einsetzen der Tonabnehmernadel 1. Halten Sie die Tonabnehmernadel an der Spitze und setzen Sie dann die Tonabnehmernadel ein, indem Sie diese wie abgebildet in Richtung „B“ drücken. 2. Drücken Sie nun die Tonabnehmernadel in Richtung „C“ nach oben, bis die Tonabnehmernadel in der für die Nadel vorgesehenen Position einrastet. EN DE Guide Pins (inside) Führungsstifte (innen) 31 HINWEISE Wir empfehlen Ihnen, Ihre Platten mit einem antistatischen Tuch zu reinigen, um maximales Musikerlebnis von den Platten zu erhalten. Wir möchten Sie aus selben Grund darauf hinweisen, Ihre Tonnadel regelmäßig (ungefähr alle 250 Wiedergabestunden) zu wechseln. TIPPS FÜR BESSERE PLATTERSPIELERLEISTUNG 1. Seien Sie behutsam, wenn Sie den Staubschutz des Plattenspielers öffnen oder schließen. Fassen Sie ihn entweder in der Mitte oder an jeder Seite an. 2. Berühren Sie nicht die Tonnadelspitze mit den Fingern. Vermeiden Sie weiterhin das Aufsetzen der Tonnadel auf dem Plattenteller oder dem Schallplattenrand. 3. Reinigen Sie regelmäßig die Tonnadelspitze mit einem weichen Pinsel. Bewegen Sie den Pinsel dabei nur von hinten nach vorn. 4. Wenn es nötig ist, eine Tonnadelreinigungslösung zu verwenden, dann verwenden Sie diese sehr sparsam. 5. Wischen Sie das Gehäuse des Plattenspielers behutsam mit einem weichen Lappen ab. Verwenden Sie für die Reinigung des Plattenspielers nur eine minimale Menge eines milden Reinigungsmittels. 6. Verwenden Sie auf keinen Fall für irgendeines der Plattenspielerteile scharfe Chemikalien oder Lösungsmittel. TECHNISCHE DATEN Typ Antriebsmotor Geschwindigkeit Gleichlaufschwankung Plattenteller Tonabnehmer Typ Tonnadel Optimale Auflagekraft Ausgabe Frequenzgang Übersprechen Signal-Rausch-Verhältnis ( S/N) Allgemein Netzadapter Riemenantrieb Gleichstrommotor 33⅓ U/min, 45 U/min, 78 U/min <0,35 % 200 mm Keramiktonabnehmer 0,7 mil 6 Gramm 300 – 500 mV , ±20 dB 10 dB 18 dB Eingang: 100 – 240 V~, 50/60 Hz, max. 0,3 A 32 Ausgang: 5 V DC/1 A 5 V DC/1 A Produkt Audioausgang (Line Ausgang) 300 – 500 mV 5W Leistungsaufnahme Netzteil. Ausgang: 5 V DC, 1 A Eingang: 100 – 240 V~, 50/60 Hz, max. 0,3 A BluetoothKopplungsname: Lenco TT-110 Kopfhörerbuchse: 3,5 mm Betriebstemperatur: 0 °C – 40 °C Lagertemperatur: -20 °C – 70 °C Aufgrund ständiger Weiterentwicklung kann es zu stillschweigenden Änderungen der Funktionen und des Designs kommen 33 Netzadapter (nur für EU) Verwenden Sie nur die im Handbuch angegebene Stromversorgung Informationen Wert und Genauigkeit Name des Herstellers oder der DongGuan Obelieve Electronic Co., Ltd Handelsmarke, kommerzielle Huazhaoxin Industrial park B-4/F, Golden Zulassung und Anschrift phoenix industrial zone, Fenggan town, Dongguan city, Guangdong province, China Modellidentifikator 0BL-0501000E Eingangsspannung 100 – 240 V Wechselstromfrequenz des AC-Eingangs 50/60 Hz Ausgangsspannung 5V Ausgangsstrom 1A Ausgangsleistung 5W Durchschnittliche Effizienz bei Normallast 73,62 Leistungsaufnahme bei Nulllast ≤ 0.10 Garantie Lenco bietet Leistungen und Garantien im Einklang mit Europäischem Recht. Setzen Sie sich deshalb im Falle von Reparaturen (sowohl während als auch nach Ablauf der Garantiezeit) mit Ihrem Fachhändler in Verbindung. Wichtiger Hinweis: Es ist nicht möglich, Produkte für Reparaturen direkt an Lenco zu schicken. Wichtiger Hinweis: Wenn dieses Gerät für welchen Grund auch immer durch ein nicht offizielles Service-Center geöffnet wurde oder durch dieses Service-Center darauf zugegriffen wurde, erlischt die Garantie. Dieses Gerät ist nicht für professionelle Zwecke geeignet. Falls das Gerät für professionelle Zwecke eingesetzt wird, erlöschen alle Garantieverpflichtungen seitens des Herstellers. Haftungsausschluss Aktualisierungen der Firmware und/oder Hardware-Komponenten werden regelmäßig durchgeführt. Aus diesem Grund können einige der Anleitungen, Spezifikationen und Abbildungen in dieser Dokumentation zu dem Ihnen vorliegenden Gerät leicht abweichen. Alle in diesem Handbuch beschriebenen Elemente dienen nur zur Illustration und treffen auf Ihre individuelle Situation möglicherweise nicht zu. Aus der in diesem Handbuch getätigten Beschreibung können keine Rechtsansprüche oder Leistungsanforderungen geltend gemacht werden. 34 Entsorgung des Altgeräts Dieses Symbol zeigt an, dass das entsprechende Produkt oder dessen Akku/Batterie in Europa nicht mit dem normalen Hausmüll entsorgt werden darf. Um die ordnungsgemäße Abfallbehandlung des Produkts und dessen Akku/Batterie zu gewährleisten, müssen diese im Einklang mit allen anwendbaren örtlichen Vorschriften zur Entsorgung von Elektrogeräten und Akkus/Batterien entsorgt werden. Dabei helfen Sie, natürliche Ressourcen zu schonen und Umweltschutzstandards zur Verwertung und Entsorgung von Altgeräten aufrecht zu halten (Richtlinie über Entsorgung Elektrischer und Elektronischer Altgeräte). CE-Kennzeichen Hiermit erklärt Lenco Benelux B.V., Thermiekstraat 1a, 6361 HB Nuth, The Netherlands, dass dieses Produkt den grundsätzlichen Anforderungen der EURichtlinie entspricht. Die Konformitätserklärung kann unter folgendem Link abgerufen werden: [email protected] WARNUNG: Hören Sie nicht für längere Zeit mit einem hohen Lautstärkepegel, um dauerhaften Hörschäden vorzubeugen. Service Besuchen Sie bitte für weitere Informationen und unseren Kundendienst unsere Homepage www.lenco.com Lenco Benelux BV, Thermiekstraat 1a, 6361 HB Nuth, The Netherlands. 35 Français ATTENTION : L’utilisation de commandes ou de réglages ou l’exécution de procédures autres que celles spécifiées dans ce manuel peut entraîner une exposition à des rayonnements dangereux. PRÉCAUTIONS AVANT UTILISATION GARDEZ CES INSTRUCTIONS À L’ESPRIT : 1. Ne couvrez pas et n’obturez pas les ouvertures de ventilation. Lorsque vous placez l’appareil sur une étagère, laissez 5 cm (2”) d’espace libre tout autour de l’appareil. 2. Installez-le conformément au mode d’emploi fourni. 3. Gardez l’appareil à l’écart des sources de chaleur telles que des radiateurs, appareils de chauffage, fours, bougies et autres produits générant de la chaleur ou une flamme nue. L’appareil ne peut être utilisé que dans des climats modérés. Les environnements extrêmement froids ou chauds doivent être évités. Température de fonctionnement entre 0° et 35° C. 4. Évitez d’utiliser l’appareil à proximité de champs magnétiques puissants. 5. Des décharges électrostatiques peuvent perturber le fonctionnement de cet appareil. Dans ce cas, il suffit de réinitialiser et de redémarrer l’appareil en suivant le mode d’emploi. Pendant le transfert de fichiers, manipulez l’appareil avec précaution et faites-le fonctionner dans un environnement sans électricité statique. 6. Mise en garde ! N’introduisez jamais un objet dans l’appareil par les ouvertures et les fentes de ventilation. Étant donné que des tensions élevées sont présentes à l’intérieur du produit, l’insertion d’un objet peut entraîner une électrocution ou court-circuiter les composants internes. Pour les mêmes raisons, ne versez pas de l’eau ou un liquide sur le produit. 7. Ne l’utilisez pas dans des endroits humides tels qu’une salle de bain, une cuisine pleine de vapeur ou à proximité d’une piscine. 8. L’appareil ne doit pas être exposé à des écoulements ou des éclaboussures et aucun objet contenant un liquide, tel qu’un vase, ne doit être posé sur ou près de l’appareil. 9. N’utilisez pas cet appareil lorsque de la condensation est possible. Lorsque vous utilisez l’appareil dans une pièce chaude et humide, des gouttelettes d’eau ou de la condensation peuvent se former à l’intérieur de l’appareil. Dans ce cas, l’appareil peut ne pas fonctionner correctement. Pour éviter tout risque, laissez l’appareil hors tension pendant 1 ou 2 heures avant de le mettre en marche : l’appareil doit être totalement sec avant de le mettre en marche. 10. Bien que ce dispositif soit fabriqué avec le plus grand soin et contrôlé à plusieurs reprises avant de quitter l’usine, des problèmes peuvent néanmoins survenir, comme avec tous les appareils électriques. Si l’appareil émet de la fumée ou en cas d’accumulation excessive de la chaleur ou d’un phénomène inattendu, débranchez immédiatement la fiche d’alimentation du secteur. 11. Cet appareil doit fonctionner avec la source d’alimentation indiquée sur la plaque signalétique. Si vous n’êtes pas sûr du type d’alimentation utilisé chez vous, contactez votre revendeur ou le fournisseur local d’électricité. 12. Tenez l’appareil à l’abri des animaux. Certains animaux adorent mordre les cordons d’alimentation. 13. Pour nettoyer l’appareil, servez-vous d’un chiffon doux et sec. N’utilisez pas de solvant ni d’autre liquide à base de pétrole. Pour enlever les taches importantes, vous pouvez vous servir d’un chiffon humide imbibé d’une solution de détergent diluée. 14. Le fournisseur n’est pas responsable des dommages ou pertes de données causés par un dysfonctionnement, une utilisation abusive, une modification de l’appareil ou un remplacement de la batterie. 15. N’interrompez pas la connexion lorsque l’appareil formate ou transfère des fichiers. Dans le cas contraire, les données pourraient être endommagées ou perdues. 16. Si l’appareil a une fonction de lecture USB, il faut brancher la clé USB directement sur l’appareil. N’utilisez pas un câble d’extension USB, car cela peut causer des interférences entraînant des pertes de données. 17. La plaque signalétique se situe en dessous ou à l’arrière de l’appareil. 36 18. Cet appareil ne doit pas être utilisé par des personnes (enfants compris) souffrant de handicaps physiques, sensoriels ou mentaux, ou manquant d’expérience et de connaissances, sauf si elles sont sous surveillance ou ont reçu des instructions sur l’utilisation correcte de l’appareil par la personne qui est responsable de leur sécurité. 19. Ce produit est réservé à un usage non professionnel, et non pas à un usage commercial ni industriel. 20. Vérifiez que l’appareil est en position stable. La garantie ne couvre pas les dégâts occasionnés par l’utilisation de cet appareil en position instable, par les vibrations, les chocs ou par la non-observation de tout autre avertissement ou précaution contenus dans ce mode d’emploi. 21. N’ouvrez jamais cet appareil. 22. Ne placez jamais cet appareil sur un autre appareil électrique. 23. Ne laissez pas les sacs en plastique à la portée des enfants. 24. Utilisez uniquement les accessoires recommandés par le fabricant. 25. Confiez l’entretien et les réparations à un personnel qualifié. Une réparation est nécessaire lorsque l’appareil a été endommagé de quelque façon que ce soit, par exemple lorsque le cordon d’alimentation ou la prise sont endommagés, lorsqu’un liquide a été renversé ou des objets ont été introduits dans l’appareil, lorsque l’appareil a été exposé à la pluie ou à l’humidité, lorsqu’il ne fonctionne pas correctement ou lorsque l’appareil est tombé. 26. Une exposition prolongée à la musique avec un volume élevé peut entraîner une perte auditive temporaire ou permanente. 27. Si l’appareil est livré avec un câble d’alimentation ou un adaptateur secteur : ⚫ En cas de problème, débranchez le cordon d’alimentation CA et confiez l’entretien à un personnel qualifié. ⚫ Ne marchez pas sur l’adaptateur secteur ou ne le coincez pas. Faites très attention, en particulier à proximité des fiches et du point de sortie du câble. Ne placez pas d’objets lourds sur l’adaptateur secteur, car ils pourraient l’endommager. Gardez l’appareil hors de portée des enfants ! Ils pourraient se blesser gravement s’ils jouent avec le câble d’alimentation. ⚫ Débranchez cet appareil pendant les orages ou lorsqu’il n’est pas utilisé pendant une longue durée. ⚫ La prise secteur doit être installée près de l’appareil et doit être facilement accessible. ⚫ Ne surchargez pas les prises de courant ou les rallonges. Une surcharge peut entraîner un incendie ou une électrocution. ⚫ Les appareils de classe 1 doivent être branchés à une prise de courant disposant d’une connexion protectrice à la terre. ⚫ Les appareils de classe 2 ne nécessitent pas de connexion à la terre. ⚫ Tirez toujours sur la fiche pour débrancher le cordon de la prise secteur. Ne tirez pas sur le cordon d’alimentation. Cela pourrait provoquer un court-circuit. ⚫ N’utilisez pas un cordon ou une fiche d’alimentation endommagé ni une prise desserrée. Vous courez un risque d’incendie ou de décharge électrique. 28. Si le produit contient ou est livré avec une télécommande contenant des piles boutons : Avertissement : ⚫ « N’ingérez pas la pile, car vous risquez une brûlure chimique » ou une formule équivalente. ⚫ [La télécommande fournie avec] Ce produit contient une pile bouton. Si la pile est avalée, elle peut causer de graves brûlures internes en seulement 2 heures et peut entraîner la mort. ⚫ Tenez les piles neuves et usagées hors de portée des enfants. ⚫ Si le compartiment à piles ne se ferme pas correctement, cessez d’utiliser l’appareil et tenez-le hors de portée des enfants. ⚫ Si vous pensez que les piles ont été avalées ou placées à l’intérieur d’une partie du corps, consultez un médecin immédiatement. 29. Mise en garde relative à l’utilisation des piles : ⚫ Risque d’explosion si la pile est mal remplacée. Remplacez les piles par des piles d’un type identique ou équivalent. ⚫ Pendant l’utilisation, le stockage ou le transport, la pile ne doit pas être soumise à des températures extrêmement élevées ou basses, à une faible pression d’air à haute altitude. ⚫ Le remplacement d’une pile par une autre de type incorrect peut entraîner une explosion ou une fuite de liquide ou de gaz inflammable. ⚫ L’introduction d’une pile dans le feu ou dans un four chaud, l’écrasement ou le découpage mécanique peut entraîner une explosion. 37 ⚫ ⚫ ⚫ L’exposition d’une pile dans un environnement à température extrêmement élevée peut entraîner une explosion ou une fuite de liquide ou de gaz inflammable. L’exposition d’une pile à une pression d’air extrêmement basse peut entraîner une explosion ou une fuite de liquide ou de gaz inflammable. Veuillez considérer les questions environnementales lors de la mise au rebut des piles. INSTALLATION • Déballez toutes les pièces et enlevez le matériau de protection. • Ne connectez pas l’unité au secteur avant d’avoir vérifié la tension du secteur et avant que toutes les autres connexions n’aient été effectuées. Accessoires fournis : Mode d’emploi Adaptateur secteur 38 Emplacement des commandes 1. Plateforme de la platine 2. Arbre du tourne-disque 3. Adaptateur pour trou central 4. Bras de lecture 5. Levier de signalisation 6. Clip de bras de lecture 7. Sélecteur de vitesse de la platine 8. Interrupteur de commande d’arrêt automatique 39 9. LED d’indication de l’état 10. Interrupteur d’alimentation/ Commande du volume 11. Prise casque 12. Pointe de lecture 13. Mentonnet 14. Poignée de transport 15. Haut-parleur 16. Prise d’entrée Aux 17. Sortie de canal R/L 18. Prise d'entrée CC 19. Coupler 20. Morceau précédent 21. Morceau suivant 22. Lecture/pause 23. Mode 24. Indicateur de mode Mode 1. Appuyez brièvement sur « Mode » pour sélectionner le mode de lecture. 2. La LED bleue clignote lorsque le Bluetooth est couplé. 3. La LED bleue s’allume lorsque le Bluetooth est connecté. 4. Le voyant rouge s’allume lorsque l’appareil est en mode platine. 5. Le voyant vert s’allume lorsque l’appareil est en mode Entrée auxiliaire. Utilisation de la platine 1. Placez la caisse de la platine sur une surface plane. 2. Insérez le cordon de l’adaptateur dans la prise CC à l’arrière du boîtier et branchez l’adaptateur à la prise d’alimentation secteur. 3. Lors de la première utilisation, assurez-vous que l’attache du câble est retirée du bras du lecteur. 4. Retirez le couvercle du stylet et conservez-le dans un endroit sûr pour une utilisation ultérieure. 5. Déplacez le sélecteur de vitesse sur la vitesse (33,45 ou 78 tr/min) correspondant au disque à lire. 6. Tournez le bouton de volume pour allumer la platine et le voyant de mode s’allume en rouge. 7. Placez un disque sur l’axe de la platine et déclipsez le bras de lecture. 40 8. Utilisez le levier de signalisation pour soulever le bras de lecture et déplacez le bras de manière à ce que le stylet soit positionné juste à l’intérieur du bord du disque ou aligné avec le début de la piste à lire. 9. Baissez lentement le bras et après un court intervalle, le disque commence à jouer. 10. Ajustez le volume au niveau souhaité en tournant le bouton de réglage du volume. 11. Lorsque vous atteignez la fin du disque, la platine s’arrête. 12. Utilisez à nouveau le levier pour soulever le bras de lecture (la platine recommence à tourner), remettezle sur le clip et abaissez-le dans le socle. La platine va s’arrêter. 13. Après utilisation, fixez le bras de fourches à l’aide du clip et remettez toujours le couvercle du stylet en place avant de déplacer la platine. 14. Pour éteindre la platine à tout moment, soulevez le bras de lecture du disque et tournez le bouton de volume à fond dans le sens inverse des aiguilles d’une montre. Remarque Certains disques ont un trou central plus grand et il peut être nécessaire de monter l’adaptateur du trou central sur le manche de la platine avant de placer le disque sur cette dernière. Remettez toujours le couvercle du stylet en place et fixez le bras de la platine à l’aide du clip avant de déplacer la platine. Utilisation avec un appareil auxiliaire 1. Des équipements audio analogiques auxiliaires peuvent être connectés et amplifiés via la platine. 2. Connectez l’équipement auxiliaire à l’aide d’un câble jack de 3,5 mm (câble non fourni) dans la prise LINE IN. 3. Appuyez sur le bouton de lecture de l’équipement auxiliaire et utilisez les commandes de piste comme d’habitude sur l’appareil auxiliaire. 4. Le volume peut être réglé à l’aide du bouton de volume sur la platine ou des commandes de l’appareil auxiliaire connecté. 5. Pour éteindre l’appareil à tout moment, tournez le bouton de volume à fond dans le sens antihoraire. Utilisation d’un casque (non fourni) Une prise casque stéréo est prévue pour une utilisation de la platine sans déranger les autres. Branchez les écouteurs à l’endroit marqué casque près du bouton de volume et réglez le volume d’écoute au niveau choisi. Une pression acoustique excessive des écouteurs peut endommager votre audition. Les haut-parleurs de la platine ne fonctionnent pas lorsque des écouteurs sont connectés. 41 Connexion de la platine au haut-parleur externe Si vous souhaitez connecter la platine à des haut-parleurs externes (via un amplificateur approprié), utilisez un câble phono double vers phono double (non fourni) pour connecter les prises de sortie RCA à l’entrée audio de l’amplificateur. Veillez à ce que les fiches rouges soient insérées dans les prises rouges et les prises blanches dans les prises blanches. Utilisation avec un appareil Bluetooth Vérifiez que votre platine est en mode Bluetooth. Si vous n’êtes pas encore en mode Bluetooth, appuyez brièvement sur le bouton Mode jusqu’à ce que l’appareil passe en mode Bluetooth (la LED bleue s’allume). Il commence à rechercher les appareils Bluetooth (la LED bleue clignote pendant le couplage). En mode Bluetooth : 1. Votre appareil recherche Bluetooth. 2. Sur l’appareil (par exemple, iPhone/iPad/Android/autre téléphone/Tableau/ordinateur), activez la connectivité Bluetooth et assurez-vous qu’elle est « discoverable » (visible). Remarque : Si nécessaire, reportez-vous aux instructions de votre radio pour ajouter ou configurer Bluetooth. 3. Sélectionnez « Add new device (Ajouter un nouveau dispositif) », si nécessaire. Remarque : Certains appareils rechercheront automatiquement un nouveau dispositif, par conséquent l’option « Add new device (Ajouter un nouveau dispositif) » ne sera pas disponible. 4. Une fois trouvé, votre appareil s’affiche sous le nom de « Lenco TT-110 ». Sélectionnez-le et commencez l’appariement. 5. Une fois l’appairage effectué « Bluetooth Connected (Connexion Bluetooth effectuée) » s’affiche. 6. Maintenant que vous avez couplé votre appareil avec la platine, il s’y connectera lorsqu’il sera à portée, c’est-à-dire à une distance d’environ 10 mètres ou moins, de la ligne de vision. 7. Votre appareil reste couplé avec la platine à moins que vous ne décidiez de le déconnecter ou de le désappairer. 8. Vous pouvez appuyer brièvement sur « Appairage » pour vous reconnecter. Lecture Bluetooth 1. Appuyez sur « Retour » pour passer à la piste précédente de votre appareil Bluetooth. 2. Appuyez sur « Suivant » pour passer à la piste suivante de votre appareil Bluetooth. 3. Appuyez sur « Lecture/ pause » pour lire ou suspendre votre appareil Bluetooth. COMMENT CHANGER LA TÊTE DE LECTURE Pour changer la tête de lecture, consultez les instructions ci-dessous. Démontage de la tête de lecture hors de la cartouche 1. Placez un tournevis sur la pointe de la tête de lecture et poussez vers le bas comme indiqué dans le sens « A ». 42 2. Enlevez la tête de lecture en la tirant vers l'avant et en poussant vers le bas. Installation de la tête de lecture 1. Tenez la pointe de la tête de lecture et insérez la tête de lecture en appuyant comme indiqué dans le sens « B ». 2. Poussez la tête de lecture vers le haut comme indiqué dans le sens « C » jusqu’à ce que la tête de lecture se bloque dans la position de la pointe. EN FR Guide Pins (inside) Tiges de guidage (internes) REMARQUE Nous vous conseillons de nettoyer vos disques avec un tissu anti-statique afin de les apprécier au mieux. Remarque : pour la même raison, votre tête de lecture doit être changée périodiquement (environ toutes les 250 heures de lecture). CONSEILS POUR UNE MEILLEURE PERFORMANCE DE TOURNE-DISQUE 1. En ouvrant ou en fermant le couvercle du tourne-disque, manipulez-le délicatement, en le tenant soit au centre soit de chaque côté. 2. Ne touchez pas la pointe de la tête de lecture avec vos doigts, évitez de cogner la tête de lecture contre le plateau du tourne-disque ou le bord du disque. 3. Nettoyez fréquemment la pointe de la tête de lecture en utilisant une brosse douce en faisant uniquement des mouvements « avant-arrière ». 4. Si vous devez utiliser un liquide de nettoyage de tête de lecture, utilisez-en avec grande parcimonie. 5. Nettoyez précautionneusement le boîtier du tourne-disque à l'aide d'un chiffon doux. Utilisez seulement un peu de détergent doux pour nettoyer le tourne-disque. 6. N’appliquez jamais de produits chimiques ni de solvants forts sur aucune pièce du système de tournedisque. 43 CARACTÉRISTIQUES TECHNIQUES Entraînement par courroie Moteur CC 33 1/3 tours, 45 tours, 78 tours <0,35% 200 mm Type Moteur d'entraînement Vitesse Pleurage et scintillement Plateau Cellule Type Pointe de lecture Force d'appui optimale Sortie Plage de fréquence diaphonie rapport signal/bruit ( S/N) Céramique 0,7 mm 6 grammes 300 à 500 mV ,+/-20 dB 10 db 18 db Caractéristiques Générales Entrée CA 100-240 V~50/60 Hz ; 0,3 A max. Sortie CC 5 V 1 A 5 V CC/1 A produit Sortie audio (sortie de ligne) 300 à 500 mV 5W Puissance consommée : Adaptateur Adaptateur de puissance. Sortie CC 5 V 1 A Entrée CA 100-240 V~50/60 Hz ; 0,3 A max. Nom d’appairage Lenco TT-110 Bluetooth : Prise casque : 3,5 mm Température de fonctionnement : 0 °C-40 °C Température de stockage : -20 °C‐70 °C Du fait de l’amélioration continue, les caractéristiques et la conception sont modifiables sans préavis Adaptateur d’alimentation (uniquement pour l’Europe) Utilisez uniquement l’alimentation électrique indiquée dans le mode d’emploi. 44 Informations Valeur et précision Nom ou marque du fabricant, DongGuan Obelieve Electronic Co., Ltd enregistrement commercial et Huazhaoxin Industrial park B-4/F, Golden adresse phoenix industrial zone, Fenggan town, Dongguan city, Guangdong province, China Référence du modèle 0BL-0501000E Tension d’entrée 100-240 V Fréquence du CA d’entrée 50/60 Hz Tension de sortie 5V Courant de sortie 1A Puissance de sortie 5W Rendement moyen en mode actif 73,62 Consommation électrique sans charge ≤ 0.10 Garantie Lenco propose un service et une garantie conformément à la législation européenne, ce qui signifie qu’en cas de besoin de réparation (aussi bien pendant et après la période de garantie), vous pouvez contacter votre revendeur le plus proche. Remarque importante : Il n’est pas possible de renvoyer l’appareil pour réparation directement à Lenco. Remarque importante : si l’appareil est ouvert ou modifié de quelque manière que ce soit par un réparateur non agréé, la garantie sera caduque. Cet appareil ne convient pas à une utilisation professionnelle. En cas d’utilisation professionnelle, les obligations de garantie du fabricant seront annulées. Clause de non-responsabilité Des mises à jour du logiciel ou des composants informatiques sont régulièrement effectuées. Il se peut donc que certaines instructions, caractéristiques et images présentes dans ce document diffèrent légèrement de votre configuration spécifique. Tous les articles décrits dans ce guide sont fournis uniquement à des fins d’illustration et peuvent ne pas s’appliquer à une configuration spécifique. Aucun droit légal ne peut être obtenu depuis les informations contenues dans ce manuel. 45 Mise au rebut de l’appareil usagé Ce symbole indique que le produit électrique concerné ainsi que les piles ne doivent pas être jetés avec les autres déchets ménagers en Europe. Pour garantir un traitement correct des piles et de l’appareil usagés, veuillez les mettre au rebut conformément aux réglementations locales en vigueur en matière d’appareils électriques et autres piles. En agissant de la sorte, vous contribuerez à la préservation des ressources naturelles et à l’amélioration des niveaux de protection environnementale concernant le traitement et la destruction des déchets électriques (directive sur les déchets des équipements électriques et électroniques). Marquage CE Par la présente, Lenco Benelux B.V., Thermiekstraat 1a, 6361 HB Nuth, Pays-Bas, déclare que ce produit est conforme aux exigences principales des directives européennes. La déclaration de conformité peut être consultée via [email protected] AVERTISSEMENT : Pour éviter une éventuelle détérioration de l’ouïe, n’écoutez pas la musique à un niveau de volume élevé pendant des périodes prolongées. Service après-vente Pour en savoir plus et obtenir de l’assistance, visitez www.lenco.com. Lenco Benelux BV, Thermiekstraat 1a, 6361 HB, Nuth, Pays-Bas. 46 Español PRECAUCIÓN: El uso de los controles o ajustes o el funcionamiento de los procedimientos excepto a aquellos especificados aquí pueden provocar una exposición peligrosa a la radiación. PRECAUCIONES PREVIAS AL USO TENGA ESTAS INSTRUCCIONES EN MENTE: 1. No cubra o bloquee ninguna apertura de ventilación. Cuando coloque el dispositivo en una estantería, deje 5 cm (2”) de espacio libre alrededor de todo el dispositivo. 2. Instálelo conforme al manual de usuario que se adjunta. 3. Mantenga el aparato alejado de fuentes de calor, como radiadores, calentadores, estufas, velas u otros productos que generen calor o llama viva. El aparato solo puede usarse en climas moderados. Se deben evitar los ambientes extremadamente fríos o cálidos. Temperatura de funcionamiento entre 0 ° y 35 °C. 4. Evite usar el dispositivo cerca de campos magnéticos fuertes. 5. Una descarga electrostática puede entorpecer el uso normal de este dispositivo. En tal caso, simplemente reinícielo siguiendo el manual de instrucciones. Durante la transmisión de archivos, por favor manéjelo con cuidado opérelo en un entorno libre de electricidad estática. 6. ¡Advertencia! Nunca inserte un objeto en el producto a través de las ventilaciones o aperturas. Alto voltaje fluye a través del producto e insertar un objeto puede provocar una descarga eléctrica y/o un cortocircuito de sus componentes internos. Por el mismo motivo, no derrame agua o líquidos en el producto. 7. No lo utilice en zonas húmedas, como cuartos de baño, cocinas en las que se forme vapor ni cerca de piscinas. 8. El aparato no debe exponerse a goteos o salpicaduras y asegúrese de que se colocan sobre o cerca del aparato objetos llenos de líquidos, como jarrones. 9. No use este dispositivo cuando se pueda producir condensación. Cuando la unidad se usa en una habitación cálida y húmeda con gotas de agua o humedad se puede producir condensación dentro de la unidad y la unidad puede que no funcione correctamente; deje que la unidad permanezca apagada durante 1 o 2 horas antes de volver a encenderla: el aparato debe estar seco antes de conectarse a una fuente de alimentación. 10. Aunque este dispositivo está fabricado con el máximo cuidado y comprobado varias veces antes de salir de fábrica, todavía es posible que se puedan producir problemas, al igual que con todos los aparatos eléctricos. Si observa la aparición de humo, una acumulación excesiva de calor o cualquier otro fenómeno inesperado, deberá desconectar inmediatamente el enchufe de la toma de corriente. 11. Este dispositivo debe funcionar con una fuente de alimentación que se especifica en la etiqueta de especificaciones. Si no está seguro del tipo de alimentación que se usa en su hogar, consulte con el distribuidor o una compañía eléctrica local. 12. Manténgalo alejado de los animales. Algunos animales disfrutan mordiendo cables de alimentación. 13. Para limpiar el dispositivo use un paño seco y suave. No utilice líquidos disolventes ni con base de petróleo. Para eliminar manchas difíciles, puede usar un paño húmedo con detergente diluido. 14. El proveedor no asume ninguna responsabilidad por daños o datos perdidos provocados por un funcionamiento incorrecto, uso incorrecto, modificación del dispositivo o sustitución de la batería. 15. No interrumpa la conexión cuando el dispositivo esté formateando o transfiriendo archivos. En caso contrario, los datos se pueden estropear o perder. 16. Si la unidad dispone de función de reproducción USB, se debe conectar la memoria USB directamente en la unidad. No utilice cables de extensión USB ya que pueden crear interferencias que causen una pérdida de datos. 17. Se ha marcado la etiqueta identificativa en la parte inferior o en el panel posterior del aparato. 18. Este aparato no está diseñado para su uso por personas (incluyendo niños) con discapacidades físicas, sensoriales o mentales o con falta de experiencia o conocimientos, salvo que estén bajo la supervisión o hayan recibido formación sobre el uso correcto del dispositivo por parte de una persona responsable de su seguridad. 19. Este producto está diseñado para un uso no profesional únicamente y no para un uso comercial o industrial. 47 20. Asegúrese de que la unidad esté fijada en una posición estable. La garantía no cubrirá los daños derivados de usar este producto en una posición inestable, vibraciones o golpes o por no seguir otras advertencias o precauciones que aparecen en este manual de usuario. 21. Nunca retire la carcasa del dispositivo. 22. Nunca coloque este dispositivo sobre otro equipo eléctrico. 23. Mantenga las bolsas de plástico fuera del alcance de los niños. 24. Use únicamente los dispositivos/accesorios especificados por el fabricante. 25. Remita todas las reparaciones al personal cualificado. El mantenimiento es necesario cuando el dispositivo presenta cualquier tipo de daños, como en el cable de alimentación o en el enchufe, cuando se ha vertido líquido o han caído objetos en el aparato, cuando el aparato se ha visto expuesto a la lluvia o humedad, cuando no funciona normalmente o cuando se ha caído. 26. Una larga exposición a sonidos elevados de reproductores de música personales puede provocar una pérdida de audición temporal o permanente. 27. Si el producto viene con un cable de alimentación o un adaptador de corriente de CA: ⚫ Si se produce cualquier problema, desconecte el cable de alimentación CA y remítase al mantenimiento de personal cualificado. ⚫ No pise o pince el adaptador de alimentación. Tenga mucho cuidado, en especial cerca de las tomas y el punto de salida del cable. No coloque objetos pesados en el adaptador de alimentación, ya que pueden dañarlo. ¡Mantenga el dispositivo fuera del alcance de los niños! Si juegan con el cable de alimentación, puede sufrir lesiones graves. ⚫ Desconecte el dispositivo durante tormentas eléctricas o cuando no vaya a usarse durante periodos prolongados de tiempo. ⚫ La salida de la toma debe instalarse cerca del equipo y debe ser fácilmente accesible. ⚫ No sobrecargue las tomas CA o los cables de extensión. La sobrecarga puede provocar un incendio o una descarga eléctrica. ⚫ Los dispositivos con construcción de Clase 1 deben estar conectados a una toma de corriente con una conexión a tierra protegida. ⚫ Los dispositivos con construcción Clase 2 no requieren una conexión a tierra. ⚫ Sujete siempre el enchufe cuando los extraiga de la toma de corriente. No tire del cable de alimentación. Esto puede provocar un cortocircuito. ⚫ No utilice un cable de alimentación o enchufe deteriorado o una toma suelta. Si lo hace, podría provocar un incendio o una descarga eléctrica. 28. Si el producto contiene o se entrega con un mando a distancia que contiene pilas de botón / celdas: Advertencia: ⚫ “Ni ingiera la pila, riesgo de quemadura química” o frase equivalente. ⚫ [El mando a distancia que se suministra] Este producto contiene una pila de tipo botón/moneda. Si se ingiere la pila, puede provocar graves quemaduras internas en sólo 2 horas y podría ocasionar la muerte. ⚫ Mantenga las pilas nuevas o usadas fuera del alcance de los niños. ⚫ Si el compartimiento de las pila no se cierra correctamente, deje de usar el producto y no lo deje al alcance los niños. ⚫ Si tiene la sospecha de que una pila ha sido ingerida o se encuentra en algún lugar del cuerpo, busque inmediatamente atención médica. 29. Precaución sobre el uso de las pilas: ⚫ Existe riesgo de explosión si la pila no se sustituye correctamente. Sustitúyala únicamente con otra del mismo tipo u otro equivalente. ⚫ No se pueden exponer las pilas a temperaturas extremadamente altas o bajas, baja presión de aire a gran altitud durante el uso, almacenamiento o transporte. ⚫ Si cambia las pilas por otras que no son las correctas, se puede producir una explosión o la fuga de líquidos o gases inflamables. ⚫ Si arroja las pilas al fuego o a un horno caliente, o aplasta o cortar mecánicamente una pila, podría provocar una explosión. ⚫ Si deja las pilas en un lugar con temperaturas extremadamente altas, se puede producir una explosión o una fuga de líquido o gas inflamable. ⚫ Si se exponen las pilas a una presión de aire extremadamente baja, se puede producir una explosión o la fuga de líquidos o gases inflamables. ⚫ Se debe prestar atención a los aspectos medioambientales sobre la eliminación de baterías. 48 INSTALACIÓN • Desembale todas las piezas y retire el material protector. • No conecte la unidad a la corriente eléctrica antes de comprobar la tensión de la corriente y antes de que se hayan hecho todas las demás conexiones. Accesorios incluidos: Manual del usuario Adaptador de corriente 49 Ubicación de los controles 1. Plato del tocadiscos 2. Eje del tocadiscos 3. Adaptador del agujero central 4. Brazo 5. Palanca de levantamiento 6. Sujeción del brazo 7. Selector de velocidad del tocadiscos 8. Interruptor de control de parada automática 9. Indicador de estado LED 50 10. Interruptor de alimentación / Control de volumen 11. Conector de auriculares 12. Aguja 13. Sujeción de cierre 14. Asa de transporte 15. Altavoz 16. Conector de entrada auxiliar 17. Canal de salida de línea R/L 18. Conector de entrada de CC 19. Emparejamiento 20. Pista anterior 21. Siguiente pista 22. Reproducir/Pausa 23. Modo 24. Indicador de modo Modo 1. Pulse brevemente “Modo” para seleccionar el modo de reproducción. 2. Parpadeará el LED de color azul cuando el Bluetooth se esté emparejando. 3. Se iluminará el LED azul cuando se conecte el Bluetooth 4. Se iluminará el LED rojo cuando esté en modo tocadiscos. 5. Se iluminará el LED verde cuando esté en modo entrada auxiliar. Uso del tocadiscos 1. Coloque el tocadiscos sobre una superficie plana y nivelada. 2. Inserte el cable del adaptador en la toma CC situada en la parte posterior de la funda y conecte el adaptador en la toma de corriente 3. Al usarlo por primera vez, asegúrese de que se retira la sujeción del cable del brazo del reproductor. 4. Retire la cubierta de la aguja y guárdela en un lugar seguro para un uso futuro. 5. Mueva el selector de velocidad a la velocidad (33,45 o 78rpm) que se corresponda con el disco que se va a reproducir. 6. Gire el dial de volumen para encender el tocadiscos y el indicador de modo se iluminará de color rojo. 7. Coloque un disco en el eje del tocadiscos y quite la sujeción al brazo. 51 8. Use la palanca de bajada para levantar el brazo y mueva el brazo de forma que la aguja se coloque justo en el interior del borde del disco o alineada con el inicio de la pista que se va a reproducir. 9. Baje lentamente el brazo y tras un breve intervalo el disco se empezará a reproducir. 10. Ajuste el volumen al nivel que desee girando el dial de control de volumen. 11. Cuando se haya llegado al final del disco, el tocadiscos se detendrá. 12. Vuelva a usar la palanca para levantar el brazo (el plato empezará a volver a girar), muévalo hacia la sujeción y bájelo al soporte. El plato se detendrá. 13. Asegure el brazo pequeño usando la sujeción y vuelva a colocar la cubierta de la aguja tras su uso y siempre antes de mover el tocadiscos. 14. Para apagar el tocadiscos en cualquier momento, levantar el brazo del disco y gire completamente el dial de volumen en sentido antihorario. Nota Algunos discos tienen un agujero central más grande y puede que sea necesario ajustar el adaptador del agujero central al eje del tocadiscos antes de colocar el disco en el tocadiscos. Vuelva siempre a colocar la cubierta de la aguja y asegure el brazo del tocadiscos usando la sujeción antes de mover el tocadiscos. Uso del dispositivo auxiliar 1. El equipo de audio analógico auxiliar puede conectarse y amplificarse mediante el tocadiscos. 2. Conecte el equipo auxiliar usando un cable de toma de 3.5mm (cable no incluido) en la toma LINE IN. 3. Pulse el botón de reproducción del equipo auxiliar y use los controles de pista como se haría normalmente en el dispositivo auxiliar. 4. Se puede ajustar el volumen usando el dial de volumen del tocadiscos o los controles del dispositivo auxiliar conectado. 5. Para apagar la unidad en cualquier momento, gire completamente el dial de volumen en sentido antihorario. Uso de los auriculares (no incluidos) Se proporciona una toma de auricular estéreo de forma que el tocadiscos puede usarse sin molestar a otras personas. Conecte los auriculares en el punto marcado del auricular cerca del dial de volumen y ajuste el volumen de audición al nivel que elija. Una presión de sonido excesiva en los cascos y auriculares puede causar pérdida de audición. Los altavoces del tocadiscos no funcionarán cuando están conectados los auriculares. 52 Conexión del tocadiscos a un altavoz externo Conecte el tocadiscos a altavoces externos (mediante un amplificador adecuado) Use un cable fono gemelo a fono gemelo (no incluido) para conectar las tomas de salida RCA a la entrada de audio del amplificador. Asegúrese de que las tomas rojas se insertan en las tomas rojas y las blancas en las blancas. Uso con un dispositivo Bluetooth Compruebe que el tocadiscos está en modo Bluetooth. Si todavía no se encuentra en modo Bluetooth, pulse brevemente el botón Modo hasta que se encuentre en modo Bluetooth (se iluminará el LED de color azul). Empezará a buscar dispositivos Bluetooth (El LED de color azul parpadeará durante el emparejamiento). En modo Bluetooth: 1. Su dispositivo buscará el Bluetooth. 2. En el dispositivo (por ejemplo, iPhone/iPad/Android/otros teléfono /Tablet/ ordenador), conecte la conectividad Bluetooth y asegúrese de que se encuentra “descubrible”. Nota: Si es necesario, remítase a las instrucciones de su dispositivo para añadir o configurar el Bluetooth. 3. Seleccione “Añadir un nuevo dispositivo” si es necesario. Nota: Algunos productos buscarán automáticamente un Nuevo dispositivo y así la opción “Añadir un nuevo dispositivo” no está disponible. 4. Cuando lo encuentre, se mostrará el dispositivo como “Lenco TT-110”. Selecciónelo e inicie el emparejamiento. 5. Cuando el emparejamiento esté complete, se mostrará “Bluetooth Connected (Bluetooth conectado)”. 6. Ahora que ha emparejado el dispositivo con el tocadiscos, se conectará al mismo cuando se encuentre dentro de su alcance, que es aproximadamente 10 metros o menos (33 pies o menos), en la línea de visión. 7. El dispositivo permanecerá conectado con el tocadiscos salvo que decide desconectarlo o “desemparejarlo”. 8. Puede pulsar brevemente “Pair (Emparejar)” para volverlo a conectar. Reproducción por Bluetooth 1. Pulse “Atrás” para ir a la pista anterior del dispositivo Bluetooth. 2. Pulse “Siguiente” para ir a la pista siguiente del dispositivo Bluetooth. 3. Pulse “Reproducción/ pausa” para reproducir o hacer una pausa en el dispositivo Bluetooth. CÓMO SUSTITUIR LA AGUJA Consulte las instrucciones siguientes para sustituir la aguja. Retirar la aguja del cartucho 1. Sitúe un destornillador en el extremo de la aguja y apriete hacia abajo como se muestra en dirección “A”. 2. Retire la aguja tirando de ella hacia delante y empujando hacia atrás. 53 Instalar la aguja. 1. Sujete el extremo de la aguja e insértela apretando como se muestra en dirección “B”. 2. Empuje la aguja hacia arriba en dirección “C” hasta que el extremo quede bloqueado. EN ES Guide Pins (inside) Pasadores guía (interior) NOTA Le aconsejamos limpiar los discos con un paño antiestático para sacarle el máximo provecho. Señalamos también que por el mismo motivo la aguja debería cambiarse periódicamente (aproximadamente cada 250 horas de reproducción) CONSEJOS PARA UN MEJOR FUNCIONAMIENTO DEL TOCADISCOS 1. Cuando abra o cierre la cubierta del tocadiscos, manéjela con suavidad, agarrándola del centro o de cada lado. 2. No toque la punta de la aguja con los dedos. Evite golpear la aguja contra el plato del tocadiscos o el borde del disco. 3. Limpie periódicamente la punta de la aguja con un cepillo suave y haciendo solo movimientos de atrás hacia delante. 4. Si necesita usar líquido para limpiar la aguja, utilice muy poca cantidad. 5. Limpie suavemente con un paño el espacio del tocadiscos. Utilice una pequeña cantidad de detergente suave para limpiar el tocadiscos. 6. Nunca utilice productos químicos ni disolventes agresivos en ninguna pieza del sistema tocadiscos. ESPECIFICACIONES Tipo Motor de accionamiento velocidad ululación tremola Plato de tocadiscos Correa de accionamiento Motor DC 33 1/3 rpm, 45 rpm, 78 rpm <0,35% 200mm 54 cartucho Tipo Aguja Fuerza de tracción óptima Salida Respuesta de frecuencia comunicación cruzada ratio señal a ruido ( S/N) Cerámica 0.7 mil 6 gramos 300-500mv ,+/-20dB 10db 18db General Adaptador producto salida de audio (salida de línea) Consumo de energía: Adaptador de corriente: Entrada CA 100-240V, 50/60Hz, 0.3A máximo salida CC5V 1A CC5 V;1 A 300-500mv 5W Salida CC 5V 1A Entrada CA 100-240V, 50/60Hz, 0.3A máximo Nombre de emparejamiento Bluetooth: Lenco TT-110 Toma de auriculares: 3.5mm Temperatura de funcionamiento: 0°C‐40°C Temperatura de almacenamiento: -20°C‐70°C Debido a las continuas mejoras, las características y el diseño de la unidad están sujetos a cambios sin previo aviso Adaptador de corriente (Sólo para la UE) Utilice únicamente la fuente de alimentación indicada en las instrucciones de uso Información Valor y precisión Nombre de los fabricantes o DongGuan Obelieve Electronic Co., Ltd marcas registradas, registro Huazhaoxin Industrial park B-4/F, Golden comercial y dirección phoenix industrial zone, Fenggan town, 55 Dongguan city, Guangdong province, China Identificador del modelo 0BL-0501000E Tensión de entrada 100-240V Frecuencia CA de entrada 50/60HZ Tensión de salida 5V Corriente de salida 1A Potencia de salida 5W Eficiencia activa media 73.62 Consumo energético sin carga ≤ 0.10 Garantía Lenco ofrece servicio y garantía en cumplimiento con las leyes de la Unión Europea, lo cual implica que, en caso de que su producto precise ser reparado (tanto durante como después del periodo de garantía), deberá contactar directamente con su distribuidor. Nota importante: No es posible enviar sus reparaciones directamente a Lenco. Nota importante: Si la unidad es abierta por un centro de servicio no oficial, la garantía quedará anulada. Este aparato no es adecuado para el uso profesional. En caso de darle un uso profesional, todas las obligaciones de garantía del fabricante quedarán anuladas. Exención de responsabilidad Regularmente se llevan a cabo actualizaciones en el Firmware y en los componentes del hardware. Por esta razón, algunas de las instrucciones, especificaciones e imágenes incluidas en este documento pueden diferir ligeramente respecto a su situación particular. Todos los elementos descritos en esta guía tienen un objetivo de mera ilustración, y pueden no ser de aplicación en su situación particular. No se puede obtener ningún derecho ni derecho legal a partir de la descripción hecha en este manual. Eliminación del antiguo dispositivo Este símbolo indica que no deberá deshacerse del producto eléctrico o batería en cuestión junto con los residuos domésticos, en el ámbito de la UE. Para garantizar un tratamiento residual correcto del producto y su batería, por favor, elimínelos cumpliendo con las leyes locales aplicables sobre requisitos para el desechado de equipos eléctricos y baterías. De hacerlo, ayudará a conservar recursos naturales y mejorar los estándares de protección medioambiental en el tratamiento y eliminación de residuos eléctricos (Directiva sobre la Eliminación de Equipos Eléctricos y Electrónicos). Marca CE 56 Por la presente, Lenco Benelux B.V., Thermiekstraat 1a, 6361 HB Nuth, Países Bajos, declara que este producto cumple con las exigencias esenciales de las directivas de la UE. La declaración de conformidad puede consultarse mediante [email protected] ADVERTENCIA: Para evitar posibles daños en la audición, no la escuche a volúmenes elevados durante largos periodos de tiempo. Servicio Para obtener más información y soporte del departamento técnico, por favor, visite la página web www.lenco.com Lenco Benelux BV, Thermiekstraat 1a, 6361 HB, Nuth, Países Bajos. 57 Italiano ATTENZIONE: L'utilizzo di controlli o regolazioni o l'esecuzione di procedure diverse da quelle specificate può causare l'esposizione a radiazioni pericolose. PRECAUZIONI PRIMA DELL'USO CONSERVARE QUESTE ISTRUZIONI: 1. Non coprire o bloccare le aperture di ventilazione. Quando si posiziona il dispositivo su uno scaffale, lasciare uno spazio libero di 5 cm (2") attorno all'intero perimetro. 2. Installare secondo quanto riportato nel manuale fornito. 3. Tenere il dispositivo lontano da sorgenti termiche come radiatori, termosifoni, stufe, candele e altri prodotti che generano calore o fiamme libere. Il dispositivo può essere utilizzato solo in climi moderati. Evitare ambienti estremamente freddi o caldi. Working temperature between 0° and 35°C. 4. Evitare l'uso del dispositivo in presenza di forti campi magnetici. 5. Le scariche elettrostatiche possono interferire con il normale utilizzo di questo dispositivo. In tal caso, è sufficiente ripristinare e riavviare il dispositivo seguendo il manuale di istruzioni. Durante la trasmissione di file, maneggiarlo con cura e operare in un ambiente privo di elettricità statica. 6. Avviso! Non inserire mai oggetti nel prodotto attraverso le prese d'aria o le aperture. All'interno del prodotto sono presenti tensioni elevate e l'inserimento di un oggetto può provocare scariche elettriche e/o cortocircuiti. Per lo stesso motivo, non versare acqua o liquidi sul prodotto. 7. Non utilizzare in aree umide o bagnate come bagni, cucine con vapore o piscine. 8. Non esporre il dispositivo a schizzi o gocciolamenti di liquidi; non poggiare sopra o accanto al dispositivo oggetti contenenti liquidi, ad esempio vasi. 9. Non utilizzare questo dispositivo in caso di condensa. Quando l'unità viene utilizzata in una stanza calda e bagnata con umidità presente, potrebbero prodursi gocce d'acqua o condensa all'interno dell'unità e l'unità potrebbe non funzionare correttamente; lasciare l'unità spenta per 1 o 2 ore prima di accenderla nuovamente. L'unità deve essere asciutta prima della connessione all'alimentzione. 10. Sebbene questo dispositivo sia fabbricato con la massima cura e controllato più volte prima di lasciare la fabbrica, è comunque possibile che si verifichino problemi come per qualsiasi altra apparecchiatura elettrica. Se si nota fumo, eccessivo accumulo di calore o altri fenomeni imprevisti, scollegare immediatamente la spina dalla presa di alimentazione principale. 11. Questo dispositivo deve funzionare con una fonte di alimentazione con i valori indicati sull'etichetta delle specifiche. Se non si è sicuri del tipo di alimentazione utilizzata in casa, consultare il rivenditore o la compagnia elettrica locale. 12. Tenere fuori dalla portata degli animali domestici, Some animals enjoy biting on power cords. 13. Per pulire il dispositivo, utilizzare un panno morbido e asciutto. Non usare solventi o liquidi a base di benzina. Per rimuovere le macchie persistenti, è possibile utilizzare un panno umido con detergente diluito. 14. Il fornitore non è responsabile per danni o perdita di dati causati da malfunzionamento, uso improprio, modifica del dispositivo o sostituzione della batteria. 15. Non interrompere la connessione quando il dispositivo sta formattando o trasferendo file. In caso contrario, i dati potrebbero essere danneggiati o andare persi. 16. Se l'unità dispone della funzione di riproduzione USB, la chiavetta USB deve essere collegata direttamente all'unità. Non utilizzare una prolunga USB perché può causare interferenze con conseguenti anomalie dati. 17. L'etichetta dei dati è riportata sul pannello inferiore o posteriore dell'apparecchio. 18. Questo dispositivo non è destinato all'uso da parte di persone (compresi i bambini) con disabilità fisiche, sensoriali o mentali, o mancanti di esperienza e conoscenza, a meno che non siano sotto supervisione o abbiano ricevuto istruzioni circa l'uso corretto del dispositivo da parte di chi è responsabile per la loro sicurezza. 19. Questo prodotto è destinato esclusivamente all'uso non professionale e non commerciale o industriale. 20. Assicurarsi che l'unità sia collocata in una posizione stabile. I danni causati dall'uso di questo prodotto in una posizione instabile, vibrazioni o urti o la mancata osservanza di qualsiasi altro avvertimento o precauzione indicati in questo manuale utente non saranno coperti da garanzia. 21. Non rimuovere mai la carcassa di questo dispositivo. 22. Non posizionare mai questo dispositivo su altre apparecchiature elettriche. 58 23. Non permettere ai bambini di accedere ai sacchetti di plastica. 24. Utilizzare solo collegamenti/accessori specificati dal produttore. 25. Rivolgersi a personale qualificato per l'assistenza. La manutenzione è necessaria quando l'apparecchio è stato danneggiato in qualsiasi modo, come ad esempio quando il cavo o la presa di alimentazione o sono deteriorati, quando è stato versato un liquido, quando sono caduti nell'apparecchio degli oggetti, quando l'apparecchio è stato esposto a pioggia o umidità, quando non funziona normalmente o quando è caduto. 26. L'esposizione prolungata ai suoni ad alto volume dei lettori musicali può causare una perdita temporanea o permanente dell'udito. 27. Se il prodotto viene consegnato con cavo di alimentazione o adattatore di alimentazione CA: ⚫ In caso di problemi, scollegare la scheda di alimentazione CA e rivolgersi a personale qualificato. ⚫ Non calpestare o schiacciare l'alimentatore. Fare molta attenzione, in particolare vicino alle prese e al punto di uscita del cavo. Non posizionare oggetti pesanti sull'alimentatore in quanto potrebbero danneggiarlo. Tenere il dispositivo fuori dalla portata dei bambini. Giocando con il cavo di alimentazione possono infortunarsi seriamente. ⚫ Scollegare il dispositivo durante i temporali o quando non viene utilizzato per un lungo periodo. ⚫ La presa di corrente deve essere installata vicino all'apparecchio e deve essere facilmente accessibile. ⚫ Non sovraccaricare le prese CA né le prolunghe. Il sovraccarico può causare incendi o scariche elettriche. ⚫ I dispositivi con struttura di classe 1 devono essere collegati a una presa di rete con connessione di messa a terra di protezione. ⚫ I dispositivi con struttura di classe 2 non richiedono un collegamento a terra. ⚫ Tenere sempre la spina quando la si estrae dalla presa di rete. Non tirare il cavo di alimentazione. Ciò può causare un cortocircuito. ⚫ Non utilizzare un cavo o una presa di alimentazione danneggiati o una presa non fissata. Tale azione potrebbe provocare incendi o scariche elettriche. 28. Se il prodotto contiene o viene consegnato con un telecomando contenente batterie a pulsante/a bottone: Avvertenza: ⚫ "Non ingerire la batteria, pericolo di ustioni chimiche" o funzionamento equivalente. ⚫ [Il telecomando in dotazione con] Il presente prodotto contiene una pila a bottone. Se ingerita, la batteria può causare gravi ustioni interne in sole 2 ore e portare alla morte. ⚫ Tenere le batterie, nuove o usate, fuori dalla portata dei bambini. ⚫ Se il vano batteria non si chiude completamente, interrompere l’uso del dispositivo e tenerlo fuori della portata dei bambini. ⚫ Se si teme che delle batterie possano essere state inghiottite o essere venute a contatto con qualsiasi parte interna del corpo, contattare immediatamente un medico. 29. Precauzioni sull'uso delle batterie: ⚫ Pericolo di esplosione se la batteria viene sostituita in modo errato. Sostituire solo con lo stesso tipo o equivalente. ⚫ Non sottoporre le batterie a temperature estreme alte o basse, bassa pressione dell'aria ad alta quota durante l'uso, lo stoccaggio o il trasporto. ⚫ La sostituzione con una batteria di tipo errato può provocare un'esplosione o la perdita di liquidi o gas infiammabili. ⚫ Lo smaltimento di una batteria nel fuoco o in un forno caldo o lo schiacciamento o il taglio meccanico di una batteria possono provocare un'esplosione. ⚫ Lasciare una batteria in un ambiente circostante a temperatura estremamente elevata può provocare un'esplosione o una perdita di liquidi o gas infiammabili. ⚫ Una batteria soggetta a una pressione dell'aria estremamente bassa può provocare un'esplosione o una perdita di liquidi o gas infiammabili. ⚫ È necessario prestare attenzione agli aspetti ambientali legati allo smaltimento delle batterie. 59 INSTALLAZIONE • Disimballare tutte le parti e rimuovere il materiale protettivo. • Non collegare l’unità alla rete elettrica prima di avere controllato la tensione di rete e prima che siano stati effettuati tutti gli altri collegamenti. Accessori inclusi nella fornitura: Manuale d’uso Alimentatore 60 Pozione dei comandi 1. 2. 3. 4. 5. 6. Piano del giradischi Albero motore del giradischi Adattatore per foro centrale Braccio di lettura Leva di posizionamento Fermo del braccio di lettura 61 7. 8. 9. 10. 11. 12. 13. 14. 15. 16. 17. 18. 19. 20. 21. 22. 23. 24. Selettore di velocità del giradischi Interruttore di arresto automatico Indicatore di stato a LED Interruttore di alimentazione/Regolazione del volume Jack per cuffie Stylus Chiusura a scatto Maniglia per il trasporto Altoparlante Jack di ingresso Aux Uscita audio (Line out) canale R/L Jack di ingresso CC Associazione Brano precedente Brano successivo Riproduzione/pausa Modalità Indicatore di modalità Modalità 1. Premere brevemente “Modalità” per selezionare la modalità di riproduzione. 2. Il LED blu lampeggia quando il Bluetooth è in fase di associazione. 3. Il LED blu si accende quando il Bluetooth è connesso 4. Il LED rosso si accende quando viene selezionata la modalità giradischi. 5. Il LED verde si accende quando viene selezionata la modalità Aux in. Utilizzo del giradischi 1. Posizionare l’alloggiamento del giradischi su una superficie piana. 2. Inserire un'estremità del cavo dell'adattatore nella presa CC sul retro dell'alloggiamento e inserire l'altra estremità dell'adattatore nella presa di alimentazione. 3. Al primo utilizzo, assicurarsi che la fascetta venga rimossa dal braccio del lettore. 4. Rimuovere il cappuccio di protezione della testina e conservarla in un luogo sicuro per utilizzi futuri 5. Spostare il selettore di velocità (a 33,45 o 78 giri/min) in modo che corrisponda a quella del disco riprodotto 6. Ruotare la manopola di regolazione del volume per accendere il giradischi, l’indicatore di modalità diventerà rosso 62 7. Posizionare un disco sul mandrino del giradischi e sganciare il braccio di lettura 8. Usare la leva di posizionamento per sollevare il braccio di lettura e spostarlo in modo che la puntina venga posizionata esattamente sul bordo del disco o orientata in modo tale da poter avviare la riproduzione del brano. 9. Abbassare lentamente il braccio e dopo qualche istante verrà avviata la riproduzione del disco 10. Regolare il volume al livello desiderato ruotando la manopola di regolazione del volume 11. Al termine della riproduzione del disco, il giradischi si ferma 12. Utilizzare nuovamente la leva per sollevare il braccio di lettura (il piano inizierà a ruotare di nuovo), riportare il braccio verso il fermo e abbassarlo nell’apposito supporto. A questo punto il piano si ferma 13. Fissare il braccio di lettura con il fermo e reinserire il cappuccio della puntina dopo l'uso e sempre prima di spostare il giradischi. 14. Per spegnere il giradischi in qualsiasi momento, sollevare il braccio di lettura sul disco e ruotare la manopola del volume completamente in senso antiorario. Nota Alcuni dischi presentano un foro centrale più grande e potrebbe essere necessario montare l'adattatore per il foro centrale sull'albero del giradischi prima di posizionare il disco. Prima di spostare il giradischi, reinserire sempre il cappuccio della puntina e fissare il braccio del giradischi tramite l’apposito fermo. Utilizzo tramite dispositivo ausiliario 1. Gli apparecchi analogici audio ausiliari possono essere collegati e amplificati tramite il giradischi. 2. Collegare l’apparecchio ausiliario utilizzando un cavo jack da 3,5 mm (non incluso) da inserire nel connettore jack LINE IN. 3. Premere il pulsante di riproduzione sull’apparecchio ausiliario e utilizzare i comandi di riproduzione su quest’ultimo come di consueto. 4. Il volume può essere regolato tramite la manopola di regolazione del volume del giradischi o i comandi del dispositivo ausiliario. 5. Per spegnere l’unità in qualsiasi momento, ruotare completamente la manopola del volume in senso antiorario. Utilizzo delle cuffie (non incluse) Per utilizzare il giradischi senza disturbare gli altri, nella fornitura è stato incluso un jack per cuffie stereo. Inserire le cuffie nel punto di collegamento contrassegnato con tale dicitura accanto alla manopola di regolazione del volume e regolare il volume al livello desiderato. Un’eccessiva pressione sonora generata da auricolari o cuffie può comportare la perdita dell’udito. Gli altoparlanti del giradischi non saranno operativi quando vengono collegate le cuffie. 63 Collegamento del giradischi a un altoparlante esterno Per il collegamento del giradischi a degli altoparlanti esterni (tramite un amplificatore adatto) Usare un cavo phono a due connettori (non incluso) per collegare i jack di uscita RCA all'ingresso Audio dell'amplificatore. Assicurarsi di collegare i connettori rossi e bianchi nelle rispettive prese dello stesso colore. Utilizzo di un dispositivo Bluetooth Assicurarsi che il giradischi si trovi in modalità Bluetooth. In caso contrario, premere brevemente il pulsante Modalità finché non viene impostata la modalità Bluetooth (il LED blu si accende). Verrà avviata la ricerca dei dispositivi Bluetooth (il LED blu lampeggia durante l’associazione). In modalità Bluetooth: 1. Il proprio dispositivo effettua la ricerca Bluetooth. 2. Sul dispositivo (ad es. iPhone/iPad/Android/altro telefono/Tablet/Computer), attivare la connettività Bluetooth e fare in modo che sia ‘visibile’. Nota: se necessario, fare riferimento alle istruzioni del proprio dispositivo per aggiungere o configurare il Bluetooth. 3. Selezionare ‘Aggiungi dispositivo’, se necessario. Nota: alcuni prodotti effettuano la ricerca dei nuovi dispositivi in modo automatico, pertanto in tal caso l’opzione ‘Aggiungi nuovo dispositivo’ non sarà disponibile. 4. Una volta trovato, il proprio dispositivo verrà visualizzato come ‘Lenco TT-110’. Selezionare e avviare l’associazione. 5. Al termine dell’associazione, verrà visualizzato ‘Bluetooth connesso’. 6. A questo punto, dopo aver associato il dispositivo al giradischi, quest’ultimo si connetterà ad esso entro un raggio d’azione di circa 10 metri o meno (33 piedi o meno), in linea visiva. 7. Il proprio dispositivo rimarrà associato al giradischi a meno che non si decida di disconnetterlo o ‘annullare l’associazione’ . 8. È possibile premere brevemente “Associa” per la riconnessione. Riproduzione Bluetooth 1. Premere “Indietro” per passare al brano precedente del proprio dispositivo Bluetooth. 2. Premere “Avanti” per passare al brano successivo del proprio dispositivo Bluetooth. 3. Premere “Riproduzione/pausa” per riprodurre o mettere in pausa il proprio dispositivo Bluetooth. COME SOSTITUIRE LA PUNTINA Per sostituire la puntina, fare riferimento alle istruzioni che seguono. Rimozione della puntina dalla cartuccia 1. Posizionare un cacciavite sulla punta della testina e spingere verso il basso nella direzione indicata nel punto "A” del disegno. 2. Rimuovere la testina tirandola in avanti e spingendola verso il basso. 64 Installazione della testina 1. Tenere la punta della testina e inserirla spingendola nella direzione indicata nel punto "B" del disegno. 2. Spingere la testina verso l’alto nella direzione indicata nel punto “C” del disegno fino allo scatto in posizione della puntina. EN IT Guide Pins (inside) Perni guida (all'interno) NOTE Si consiglia di pulire i dischi con un panno antistatico per poterli sfruttare al massimo. Si ricorda inoltre che per lo stesso motivo la testina deve essere sostituita periodicamente (circa ogni 250 ore di riproduzione) SUGGERIMENTI PER PRESTAZIONI OTTIMALI DEL GIRADISCHI 1. Quando si apre o si chiude il coperchio del giradischi, maneggiarlo con delicatezza, afferrandolo al centro o per entrambi i lati. 2. Evitare di toccare la puntina con le dita; evitare di urtare la puntina contro il piatto del giradischi o il bordo del disco. 3. Pulire spesso la punta della testina, usare un pennello morbido limitandosi a un movimento "da dietro in avanti". 4. Nel caso in cui sia necessario usare un liquido per la pulizia della puntina, utilizzarlo con molta parsimonia. 5. Pulire delicatamente l'alloggiamento del giradischi con un panno morbido. Utilizzare soltanto una piccola quantità di detergente delicato per pulire il giradischi. 6. Evitare in ogni caso di applicare prodotti chimici aggressivi o solventi su qualsiasi parte del giradischi. 65 SPECIFICHE Tipo Motore di trasmissione trasmissione a cinghia Motore CC velocità 33 1/3 giri/min, 45 giri/min, 78 giri/min wow and flutter Piatto girevole <0,35% 200mm testina Tipo Puntina Forza di tracciamento ottimale uscita Risposta in frequenza diafonia rapporto segnale-rumore (S/N) testina in ceramica 0.7 mil 6 grammi 300-500 mv ,+/-20 dB 10 db 18 db Generale Adattatore Ingresso CA 100-240 V, 50/60 Hz, 0,3 A max. Uscita CC 5 V 1 A prodotti CC 5 V 1 A uscita audio (Line-Out) 300-500 mv Consumo 5W Alimentatore. Uscita CC 5 V 1 A Ingresso CA 100-240 V, 50/60 Hz, 0,3 A max. Nome di associazione Bluetooth: Lenco TT-110 Presa per cuffie: 3,5 mm Temperatura di esercizio: Temperatura di stoccaggio: 0‐40 °C -20‐70 °C In virtù dei continui miglioramenti, le caratteristiche e il design sono soggetti a modifiche senza preavviso Adattatore di alimentazione (solo per UE) Utilizzare solo l'alimentazione indicata nel presente manuale 66 Informazioni Valore e precisione Manufacturers name or trade DongGuan Obelieve Electronic Co., Ltd Parco mark, commercial registration industriale Huazhaoxin B-4/F, zona industriale and address Golden phoenix, città di Fenggan, città di Dongguan, provincia di Guangdong, Cina Identificatore del modello 0BL-0501000E Tensione in ingresso 100-240V Frequenza in ingresso CA 50/60 Hz Tensione in uscita 5V Corrente in uscita 1A Potenza in uscita 5W Efficienza media attiva 73,62 No load Power consumption ≤ 0,10 Garanzia Lenco offre assistenza e garanzia in conformità con la legge europea, il che significa che in caso di riparazioni (sia durante che dopo il periodo di garanzia) è necessario contattare il rivenditore locale. Nota importante: Non è possibile inviare direttamente a Lenco i prodotti da riparare. Nota importante: Qualora l’unità venga aperta o manomessa in qualsiasi modo da un centro di assistenza non riconosciuto, la garanzia decade. Questo dispositivo non è adatto per l’uso professionale. Qualora l’unità venga utilizzata per scopi professionali, tutti gli obblighi del produttore derivanti dalla garanzia sono nulli. Clausola di esclusione della responsabilità Il firmware e/o i componenti hardware vengono aggiornati regolarmente. Pertanto, è possibile che alcune parti relative a istruzioni, specifiche e immagini contenute nella presente documentazione siano diverse da quanto riscontrato nel singolo caso. Tutte le descrizioni incluse in questa guida sono fornite a puro titolo illustrativo e non si applicano necessariamente alla specifica situazione. Nessun diritto legale o contrattuale può derivare dalle descrizioni contenute nel presente libretto di istruzioni. Smaltimento a fine vita del dispositivo Questo simbolo indica che in Europa è vietato gettare il relativo prodotto elettrico o batteria tra i rifiuti domestici. Per il corretto smaltimento a fine vita del prodotto e della batteria, attenersi alle vigenti normative locali per il trattamento dei rifiuti da apparecchiature elettriche ed elettroniche e delle batterie. In tal modo si contribuisce a salvaguardare le risorse naturali e a migliorare gli standard per la protezione 67 dell’ambiente nel trattamento dei rifiuti da apparecchiature elettriche ed elettroniche (Direttiva RAEE). Marchio CE Con la presente, Lenco Benelux B.V., Thermiekstraat 1a, 6361 HB Nuth, Paesi Bassi, dichiara che questo prodotto è conforme ai requisiti essenziali della Direttiva europea. The declaration of conformity may be consulted via [email protected] AVVERTENZA: per prevenire possibili danni all’udito, evitare l’ascolto ad alto volume per periodi di tempo prolungati. Assistenza Per ulteriori informazioni e accesso all’helpdesk, visitare il sito www.lenco.com Lenco Benelux BV, Thermiekstraat 1a, 6361 HB, Nuth, Paesi Bassi. 68-
 1
1
-
 2
2
-
 3
3
-
 4
4
-
 5
5
-
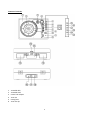 6
6
-
 7
7
-
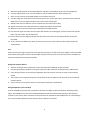 8
8
-
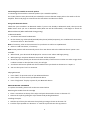 9
9
-
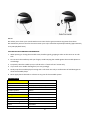 10
10
-
 11
11
-
 12
12
-
 13
13
-
 14
14
-
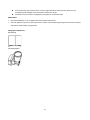 15
15
-
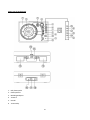 16
16
-
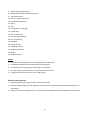 17
17
-
 18
18
-
 19
19
-
 20
20
-
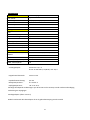 21
21
-
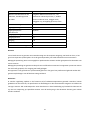 22
22
-
 23
23
-
 24
24
-
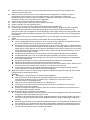 25
25
-
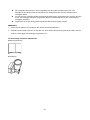 26
26
-
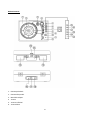 27
27
-
 28
28
-
 29
29
-
 30
30
-
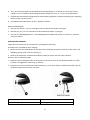 31
31
-
 32
32
-
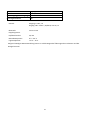 33
33
-
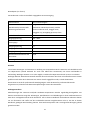 34
34
-
 35
35
-
 36
36
-
 37
37
-
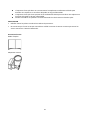 38
38
-
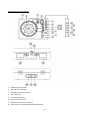 39
39
-
 40
40
-
 41
41
-
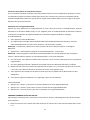 42
42
-
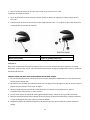 43
43
-
 44
44
-
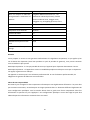 45
45
-
 46
46
-
 47
47
-
 48
48
-
 49
49
-
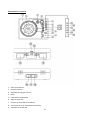 50
50
-
 51
51
-
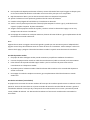 52
52
-
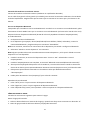 53
53
-
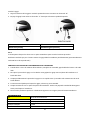 54
54
-
 55
55
-
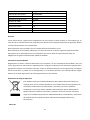 56
56
-
 57
57
-
 58
58
-
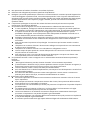 59
59
-
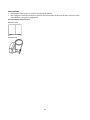 60
60
-
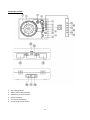 61
61
-
 62
62
-
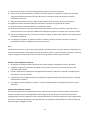 63
63
-
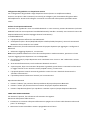 64
64
-
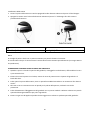 65
65
-
 66
66
-
 67
67
-
 68
68


Lenco Classic Phono TT-110BKRD de handleiding
- Categorie
- Audio draaitafels
- Type
- de handleiding
- Deze handleiding is ook geschikt voor
in andere talen
- English: Lenco Classic Phono TT-110BKRD Owner's manual
- italiano: Lenco Classic Phono TT-110BKRD Manuale del proprietario
- français: Lenco Classic Phono TT-110BKRD Le manuel du propriétaire
- español: Lenco Classic Phono TT-110BKRD El manual del propietario
- Deutsch: Lenco Classic Phono TT-110BKRD Bedienungsanleitung