
CLENA Nederland – www.clena.nl
NL - Handleiding - Montage – Veiligheidsvoorschriften voor Vloerreiniger
UK – Operation – Assembly – Safety Notes for Surface Cleaner

CLENA Nederland – www.clena.nl
pag. 2
Veiligheid
In geval van niet-naleving van deze handleiding, is er gevaar voor lichamelijk letsel, gevaar voor uw leven
en materiële schade.
Informatie - Gebruik
Raadpleeg de handleiding alstublieft! Verkeerd gebruik kan leiden tot ernstig letsel.
Lees de handleiding goed door voordat u de vloerreiniger gaat gebruiken.
Daarnaast moeten de vereiste veiligheids- en wettelijke voorschriften voor het juist gebruik worden
nageleefd. Dit geldt ook voor alle toebehoren die worden gebruikt.
Algemene Veiligheidsinstructies
Bij beschadigingen, die door het onzorgvuldig naleven van deze handleiding veroorzaakt worden, vervalt
uw recht op garantie.
Bij eventuele voorkomende schade aan u of derden nemen wij geen aansprakelijkheid.
Bij bedrijfs- en letselschade die door een onvolledige naleving of het niet geheel in acht nemen van de
veiligheidsvoorschriften veroorzaakt worden, nemen wij eveneens geen aansprakelijkheid.
In de hiervoor genoemde gevallen vervalt elk recht op garantie. Vanwege veiligheids- en
goedkeuringseisen is het ombouwen en/of veranderen van de vloerreiniger niet toegestaan.
Houdt u strikt aan deze handleiding.
U dient te allen tijde de voorschriften ter voorkoming van ongevallen in acht te nemen.
- Houdt het apparaat uit de buurt en buiten het bereik van kinderen.
- Niet aan de onderkant van het apparaat voelen/reiken, indien deze aangesloten en gebruiksklaar is.
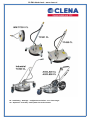
Beschrijving
Met de aanschaf van deze vloerreiniger heeft u een product aangeschaft welke is ontworpen volgens de
laatste stand van zaken m.b.t. techniek.
Dit product voldoet aan de eisen van de geldende Europese, nationale- en internationale richtlijnen. De
conformiteit is bewezen, de bijbehorende verklaringen en documenten zijn bij de fabrikant te
verkrijgen. Om deze status te behouden en te zorgen voor een veilig gebruik, moet u deze handleiding
als gebruiker naleven.
Voorgenomen Gebruik
Deze vloerreiniger is ontworpen voor het grondig reinigen van oppervlakten buitenshuis.
Dit apparaat maakt het mogelijk om de omgeving rondom uw woning of bedrijf snel en effectief te
kunnen reinigen. De rotorarm is uitgerust met diagonaal aangebrachte nozzles (spuitpunten), een
gelijkmatige reiniging is gegarandeerd.
De vloerreiniger is geschikt voor gebruik met een hogedrukreiniger.
Reiniging & Verzorging
De vloerreiniger niet te dicht op het oppervlak afstellen, hierdoor kan de borstelhouder door
oneffenheden/ongelijkheden vervormd worden.
Het apparaat niet direct met een hogedrukreiniger schoonspuiten, gebruik hiervoor uitsluitend een
poetslap of doek in combinatie met normaal leidingwater om uw vloerreiniger schoon te maken.
Eventueel kunt u een niet-professioneel reinigingsmiddel gebruiken.
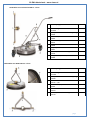
Montage
1.Schroef de 2 nozzles (2 nozzle ¼” AG) in de rotorarm.
Monteer nu de lans van uw hogedrukreiniger aan uw vloerreiniger en schroef deze goed vast.
2.Sluit nu uw hogedrukreiniger aan en de vloerreiniger is klaar voor gebruik.

CLENA Nederland – www.clena.nl
pag. 3
Onderhoud - Waarschuwing
Voordat u onderhoud, reparaties ed. gaat uitvoeren, zorg er dan voor dat de vloerreiniger niet
aangesloten is op de hogedrukreiniger. Dit om te voorkomen dat de vloerreiniger onder druk staat, wat
kan lijden tot lichamelijk letsel of materiële schade.
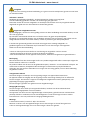
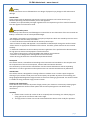
Vervangen van de slang
Ontkoppel de slang aan beide zijden van de aansluiting (zie foto).
Sluit vervolgens een nieuwe slang aan op beide aansluitingen.
slangaansluiting draaikoppeling slangaansluiting beugelverbinding
Vervangen van de nozzles
Het is vrij eenvoudig om een verstopte, versleten of beschadigde nozzle te vervangen. Draai ze van de
rotorarm af en vervang deze voor een nieuwe. Een verstopte nozzle kan m.b.v. een verbogen paperclip
of speld gereinigd worden.
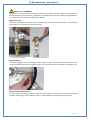
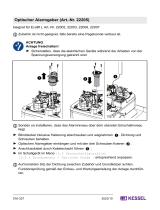
Inbouw Easy Repair Kit in rotorarm
Om de Easy Repair Kit in te kunnen bouwen moet u eerst de slangaansluiting van de draaikoppeling (zie
foto links boven, rood omcirkeld) losdraaien. Verwijder het defecte onderdeel (de Easy Repair Kit) en
vervang deze voor een identiek onderdeel en draai de slangaansluiting weer vast.

CLENA Nederland – www.clena.nl
pag. 4
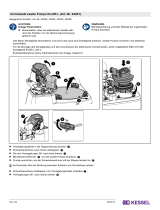
Vervangen complete rotorarm
1. Verwijder de slangaansluiting uit de draaikoppeling op de behuizing,
(eerst de slangaansluiting losmaken).
2. Leg een lap onder de draaiarm om te voorkomen dat deze op de grond valt en beschadigd.
3. Draai de 3 moeren op de behuizing rond de draaikoppeling los.
Verwijder de behuizing van de draaiarm, controleer de nozzles en vervang zonodig.
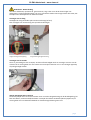
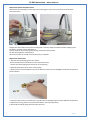
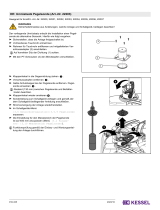
Vervangen filter in rotorarm
Verwijder de draaikoppeling van de reiniger.
- draai de slang aansluiting aan de bovenkant van de draaikoppeling los
- draai de onderkant van de pijp los van de behuizing
Verwijder het onderste gedeelte van de draaikoppeling.
Druk voorzichtig met een kleine schroevendraaier in de draaikoppeling om de binnenste behuizing te
verwijderen (zie foto).
Reinig het filter en controleer de O-ring op slijtage/beschadiging, vervang zonodig.
Plaats de O-ring en het filter, plaats de slang terug en sluit deze weer aan.

CLENA Nederland – www.clena.nl
pag. 5
Vervangen O-ringen in draaikoppeling
- slangaansluiting aan de bovenzijde van de draaikoppeling losmaken en verwijderen
- haal het onderste deel van de slangaansluiting eraf
- vervang de O-ringen m.b.v. de daarvoor beschikbare Easy Repair Kit
- plaats het onderste deel van de slangaansluiting terug
- vervolgens draait u de slangaansluiting terug op z’n plek en sluit de slang weer aan.
Probleemoplossingen
Controleer de onderstaande lijst van foutoplossingen voordat u uw plaatselijke leverancier vraagt om
assistentie.
probleem
mogelijke oorzaak
oplossing
nozzle verstopt
vervuilde nozzle
reinig met paperclip/speld
beide nozzles sproeien niet
filter vervuilt
reinigen of vervangen filter
waterlekkage boven
rubberenrand/spatrand
beschadigde
rubberenrand/spatrand
vervang de rubberenrand/spatrand
de wielen rollen niet,
zijn geblokkeerd
wielen vervuild
maak de wielen schoon
Technische Specificaties
WW
TC 301 CL
TC301 CL
TC 420 CL
Industrial
TC 520 CL
AGCL
TC 520 CL
AGCL
TC 800 CL
Werkbreedte
300 mm
300 mm
400 mm
500 mm
500 mm
800 mm
Maximale Druk
200 bar
250 bar
250 bar
275 bar
350 bar
350 bar
Maximale
waterdoorstroom
13 l/min.
15 l/min.
19 l/min.
22 l/min.
22 l/min.
30 l/min.
Optioneel
HD pistool
en lans
HD pistool
enlans
Materiaal
RVS
Maximale
temperatuur
90 °C
Gewicht
2,7 kg.
3,5 kg.
6,8 kg.
16 kg.
26 kg.
30 kg.

CLENA Nederland – www.clena.nl
pag. 6
Onderdelen voor TC301 CL - Clena
Onderdelen voor TC420 CL - Clena
nr.
omschrijving / bestelnummer
aantal
Terrasreiniger – TC301 CL
210301
1
complete rotorarm met draaikoppeling
22001
1
2
nozzles – 1,05
22132
2
3
rubber rand / spatrand – 950 mm
22019
1
4
wielen
22040
3
5
slang 600 mm, M22 x 1,5
22006
1
6
Easy Repair Kit
22010
1
7
M22 x 1,5 Pistoolaansluiting
22534
1
nr.
omschrijving / bestelnummer
aantal
Terrasreiniger – TC420 CL
210420
1
complete rotorarm met draaikoppeling
22002
1
2
nozzles – 1,05
22132
2
3
rubber rand / spatrand – 1.330 mm
22019
1
4
wielen
22040
4
5
slang 600 mm, M22 x 1,5
22006
1
6
Easy Repair Kit
22010
1
7
M22 x 1,5 Pistoolaansluiting
22534
1

CLENA Nederland – www.clena.nl
pag. 7
Onderdelen voor Industrial TC520 CL – Clena
Onderdelen voor WW TC301 CL - Clena
nr.
omschrijving / bestelnummer
aantal
Terrasreiniger - Industrial TC520 CL
211520
1
complete rotorarm met draaikoppeling
22004
1
2
nozzles – 1,3
22007
2
3
rubber rand / spatrand – 1.640 mm
22019
1
4
wielen
22003
3
5
Easy Repair Kit
22011
1
6
M22 x 1,5 Pistoolaansluiting
22534
1
7
slang 850 mm, M22 x 1,5
22085
1
nr.
omschrijving / bestelnummer
aantal
Wandreiniger – WW TC301 CL
214301
1
complete rotorarm met draaikoppeling
22060
1
2
nozzles
22032 – 1,05
2
3
rubber rand / spatrand – 950 mm
22019
1
4
borstelrand – 950 mm
22064
1
5
M22 x 1,5 Pistoolaansluiting
22534
1

CLENA Nederland – www.clena.nl
pag. 8
Onderdelen voor AGCL 520 – AGCL 800 - Clena
nr.
omschrijving / bestelnummer
aantal
Terrasreiniger - AGCL 520 CL
212520
Terrasreiniger - AGCL 800 CL
213800
1
complete rotorarm met draaikoppeling
22004 – AGCL 520
1
2
complete rotorarm met draaikoppeling
22031 – AGCL 800
1
3
nozzles – 1,3 – AGCL 520
22007
2
4
nozzles – 1,05 – AGCL 800
22032
4
5
rubber rand/spatrand – 1.640 mm
22019 – AGCL 520
1
6
rubber rand/spatrand – 2.550 mm
22019 – AGCL 800
1
7
wiel - compleet
22029
2
8
dubbel wiel
22030
1
9
Easy Repair Kit
22011
1
10
slang 1.000 mm – AGCL 520
22001
1
11
slang 1.200 mm – AGCL 800
2201 2
1

CLENA Nederland – www.clena.nl
pag. 9
Safety
If these instructions are not followed there is a danger of physical injury, danger to life and material
damage.
Intended Use
Please comply with the Operating Instructions! Incorrect operation can lead to serious injury.
Read the Operating Instructions before you use the appliance.
In addition, the required safety and legal regulations for the respective type of use must be observed.
This also applies to all accessories used.
General safety notes
The warranty claim becomes void if damages are caused due to non-observance of this user manual. No
liability is assumed in case of consequential damages.
- No liability is assumed in case of damage to property and persons which are caused by incorrect use or
non-compliance with the safety instructions.
- In case of all above mentioned indicents all warranty claims lapse.
- Due to reasons of safety and approval it is not allowed to rebuild and/or change the surface cleaner.
- Please ensure an appropriate installation of the device. Therefore, please observe the user manual
carefully.
- In industrial establishments the accident prevention regulations of the professional trade association
for high pressure cleaner and equipment must be observed.
- As a matter of principle it is strictly forbidden that childeren use the device.
- This device is not designed for cleaning beds of stones and steps.
- Please do not grab under the connected and operational device.
Description
The surface cleaner is manufactured according to the latest technical standards. It also complies with
the requirements of the current European, national and international directives.
The conformity is proven and the manufacturer has the relevant declarations and corresponding
documents. In order to guarantee a safe operation this user manual should be strictly adhered to.
Intended Use
The surface cleaner is designed for cleaning surfaces in outdoor areas. It makes a quick and gentle
cleaning of your surfaces round your home and company site possible. By means of the rotating arm
being equipped with diagonal arranged nozzles an extensive cleaning is guaranteed. The surface cleaner
is suitable for being used with a high pressure cleaner.
Cleaning and maintenance
Please do not clean this device by means of high pressure jets. Please use a customary cleaning agent.
Wen putting down the surface cleaner please take care that splash guard is not deformed by
unevenness.
Assembly
1. Please screw 2 nozzles (2 nozzles ¼” M are required) into the rotating arm. Please plug your
spray gun into the connection and screw it tight.
2. The high pressure cleaner can now be connected and the device is then ready for operation.

CLENA Nederland – www.clena.nl
pag. 10
Maintenance – WARNING
Disconnect the surface cleaner from the pressure washer and ensure that the washer is not pressurized
before performing and inspections, maintenance or adjustments to avoid any wildly spraying fluid that
can easily cause personal injury and property damage.
Replace the Hose
Disconnect the bottom of the hose from the swivel piping and the top from the handle, as shown below,
then reconnect a new hose to these connections.
hose-swivel connection hose-handle connection
Replace a Nozzle
To replace a dogged, worm, or damaged nozzle, simply unscrew it from the sprayer and screw on a new
or cleaned replacement nozzle. Plugged nozzles can be easily cleaned with a needle or small paper clip.
Replace a Swivel Complete Part
To replace part of the swivel complete, simply loosen the large screw, remove the unwanted part (above
or below the housing), replace it with an new or refurbished part and retighten the large screw.

CLENA Nederland – www.clena.nl
pag. 11
Replace the Swivel Complete Fixture
Remove the swivel piping from the top of the housing (you may have to remove the hose bottom
connection first).
Support the swivel fixture below the housing with a rolled up cloth to avoid the fixture dropping onto
the flooor, possibly causing damage to it.
Loosen the three nuts on top of the housing around the swivel fixture.
Lift the housing off the swivel fixture.
Check the nozzles on the old swivel as they may te reusable.
Replace the Swivel Filter
1. Remove the swivel piping from the cleaner:
- disconnect the hose connection from the top of the swivel.
- remove the swivel piping from the fixture in the housing.
2. Remove the bottom piece of the swivel piping.
3. Gently push a small screwdriver up into the bottom of the swivel to dislodge the internal components
(shown below).
4. Clean the filter screen and check the O-ring for wear or damage. Replace either defective component.
5. Replace the O-ring, filter screen and sieve holder in the top of the swivel.
6. Re-install the swivel piping and reconnect the hose.

CLENA Nederland – www.clena.nl
pag. 12
Replace the Swivel O-Rings
1. Disconnect the hose connection from the top of the swivel piping.
2. Remove the swivel piping from the swivel fixture in the housing.
3. Remove the bottom piece of the swivel as shown below.
4. Replace the O-rings with replacement from the Easy Repair Kit.
5. Reinstall the bottom piece in the swivel piping.
6. Reinstall the swivel piping in the housing fixture.
7. Reconnect the hose to the swivel piping.
Troubleshooting
Please check the list below before addressing the problems to servicing personnel including the local
dealer. If the problem continues after the following troubleshooting, please call your local dealer for
future assistance.
problem
possible cause
solution
nozzle blocked (not spraying)
dirty nozzle
twist the nozzle off and clean by
needle or paperclip
both nozzles are not spraying
dirty filter
clean or replace filter (see
maintenance section)
spray outward from sealing lip
damaged sealing lip
replace the sealing lip
caster won’t roll or swivel
dirt in caster
clean the caster
Technical Specifications
WW
TC 301 CL
TC301 CL
TC 420 CL
Industrial
TC 520 CL
AGCL
TC 520 CL
AGCL
TC 800 CL
Cleaning width
12.5 in
12 in
16 in
20 in
20 in
32 in
Max. pressure
3,000 PSI
3,600 PSI
3,600 PSI
4,000 PSI
5,000 PSI
5,000 PSI
Max. flow
3.5 GPM
4 GPM
5 GPM
6 GPM
6 GPM
8 GPM
Optional
HD gun
and lance
HD gun
and lance
Material
Stainless-steel
Max. temperature
200 °F
Weight
6 lbs.
7.7 lbs.
15 lbs.
36 lbs.
57 lbs.
66 lbs.

CLENA Nederland – www.clena.nl
pag. 13
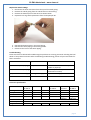
Parts Diagramm - TC301 CL - Clena
Parts Diagramm - TC420 CL - Clena
item
description / ordernumber
Qty.
Surface Cleaner - TC301 CL
210301
1
Swivel complete
22001
1
2
nozzles – 1,05
22132
2
3
sealing lip – 950 mm
22019
1
4
caster
22040
3
5
hose 600 mm, M22 x 1,5
22006
1
6
Easy Repair Kit
22010
1
7
M22 x 1,5 nipple
22534
1
item
description / ordernumber
Qty.
Surface Cleaner – TC420 CL
210420
1
1
swivel complete
22002
1
2
nozzles – 1,05
22032
2
3
sealing lip – 1,330 mm
22019
1
4
caster
22040
4
5
hose 600 mm, M22 x 1,5
22006
1
6
Easy Repair Kit
22010
1
7
M22 x 1,5 nipple
22534
1

CLENA Nederland – www.clena.nl
pag. 14
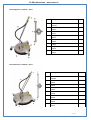
Parts Diagramm - Industrial TC520 CL – Clena
Parts Diagramm - WW TC301 CL - Clena
item
description / ordernumber
Qty.
Surface Cleaner – Industrial TC520 CL
211520
1
swivel complete
22004
1
2
nozzles – 1,3
22007
2
3
sealing lip – 1,640 mm
22019
1
4
caster complete component
22003
3
5
Easy Repair Kit
22011
1
6
M22 x 1,5 nipple
22534
1
7
hose 850 mm, M22 x 1,5
22085
1
item
description / ordernumber
Qty.
Surface Cleaner – WW TC301 CL
214301
1
swivel complete
22060
1
2
nozzles
22032 – 1,05
2
3
sealing lip – 950 mm
22019
1
4
brush lip – 950 mm
22064
1
5
M22 x 1,5 nipple
22534
1

CLENA Nederland – www.clena.nl
pag. 15
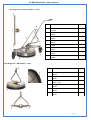
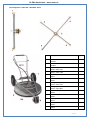
Parts Diagramm - AGCL 520 – AGCL 800 - Clena
item
description / ordernumber
Qty.
Surface Cleaner – AGCL 520 CL
212520
Surface Cleaner – AGCL 800 CL
213800
1
swivel complete
22004 – AGCL 520
1
2
swivel complete
22031 – AGCL 800
1
3
nozzles – 1,3 – AGCL 520
22007
2
4
nozzles – 1,05 – AGCL 800
22032
4
5
sealing lip – 1,640 mm
22019 – AGCL 520
1
6
sealing lip – 2,550 mm
22019 – AGCL 800
1
7
caster complete component
22029
2
8
twin caster
22030
1
9
Easy Repair Kit
22011
1
10
hose 1,000 mm – AGCL 520
22001
1
11
hose 1,200 mm – AGCL 800
22012
1

CLENA Nederland – www.clena.nl
pag. 16
www.clena.nl
Specialist in Professionele Hogedrukreinigers
en Toebehoren.
-
 1
1
-
 2
2
-
 3
3
-
 4
4
-
 5
5
-
 6
6
-
 7
7
-
 8
8
-
 9
9
-
 10
10
-
 11
11
-
 12
12
-
 13
13
-
 14
14
-
 15
15
-
 16
16


Clena AGCL520 CL Operation Assembly Safety Notes
- Type
- Operation Assembly Safety Notes
- Deze handleiding is ook geschikt voor
in andere talen
- English: Clena AGCL520 CL
Andere documenten
-
Eaton RMQ-Titan M22-PV60P Original Operating Instructions
-
NAD M22 V2 Handleiding
-
NAD M22 Handleiding
-
 Kessel 016-337 Beiblatt Optischer Alarmgeber Installation and Operating Instructions
-
 Kessel 016-334 Beiblatt Aktivkohlefilter DN 70 Installation and Operating Instructions
-
 Kessel 016-333 Beiblatt Umrüstsatz für zweite Pumpe Installation and Operating Instructions
-
 Kessel 016-335 Beiblatt Umrustset Pegelsonde - Ecolift L Installation and Operating Instructions
-
Mettler Toledo Pre- Handleiding
-
-
 Hach 9586sc Basic User Manual


