
User manual
M A N U E L D ' U T I L I S A T I O N
G E B R U I K S A A N W I J Z I N G
G E B R A U C H S A N W E I S U N G
M A N U A L E D I I S T R U Z I O N I
M A N U A L D E I N S T R U C C I O N E S
I N S T R U K C J A O B S
Ł
U G I
N Á V O D K O B S L U Z E
LiNX 200

Instrukcje dla wyspecjalizowanego
All rights reserved, including translation.
Tous droits réservés, y compris la traduction.
Alle rechten, inclusief vertaling, voorbehouden.
Alle Rechte, auch an der Übersetzung, vorbehalten.
Tutti i diritti riservati (anche sulla traduzione).
Todos los derechos reservados, incluidos los de la
traducción.
Wszelkie prawa zastrzeżone, łącznie z tłumaczeniem.
Všechna práva vyhrazena, včetně překladu.
EN
Instructions for specialist dealer
This instruction manual is part and parcel of the
product and must accompany every product
sold.
Version: C, 2023-03
FR
Instructions pour les distributeurs
Ce manuel d'instructions fait partie du produit et
doit accompagner chaque produit vendu.
Version : C, 2023-03
NL
Instructies voor de vakhandelaar
Deze handleiding is deel van het product en
dient bij iedere product te worden geleverd.
Versie: C, 2023-03
DE
Hinweise für den Fachhändler
Diese Gebrauchsanweisung ist Bestand-teil des
Produkts und ist bei jeder Produkts
auszuhändigen.
Version: C, 2023-03
IT
Istruzioni per il rivenditore
Il presente Manuale di istruzioni è parte
integrante del prodotto e deve essere fornito
assieme alla prodotto.
Versione: C, 2023-03
ES
Instrucciones destinadas a los distribuidores
especializados
El presente manual de instrucciones es parte
integrante del producto y se debe adjuntar a
todas las producto que se vendan.
Versión: C, 2023-03
PL
sprzedawcy
Niniejsza instrukcja obsługi jest nieodłączną
częścią produktu i musi być dołączona do
każdego sprzedawanego produktu.
Wersja: C, 2023-03
CS
Pokyny pro specializovaného prodejce
Tento návod k obsluze je součástí dodávky a
musí být součástí každého prodaného
produktu.
Verze: C, 2023-03
Multi version: C, 2023-03

LiNX 200
2023-03
Content
1
EN
NL
Content
Content ....................................................................................................................... 1
Preface........................................................................................................................ 2
1 Description .................................................................................................... 3
2 Before use ..................................................................................................... 4
2.1 General safety instructions ............................................................................. 4
3 Driving ........................................................................................................... 5
4 Operating console functions ....................................................................... 6
4.1 Switching ON / OFF ........................................................................................ 6
4.2 Failures and blocks ......................................................................................... 6
4.3 Battery status and charging ............................................................................ 6
4.4 Joystick operation (driving and braking) .......................................................... 8
4.5 Operating console lock ................................................................................... 8
4.6 Adjusting your body position ........................................................................... 9
4.7 Changing drive function ................................................................................ 10
4.8 Horn .............................................................................................................. 11
4.9 Lighting ......................................................................................................... 11
5 Troubleshooting .......................................................................................... 12

LiNX 200
2023-03
Preface
2
EN
NL
Preface
Important note
This manual reflects the latest product developments. Vermeiren has the right to implement
changes to this type of product without being imposed to any obligation to adapt or replace similar
products previously delivered.
Pictures are used to clarify the instructions in this manual. Details of the depicted product may
deviate from your product.
Information available
On our website http://www.vermeiren.com/ you will always find the most recent version of the
information in this manual. Please consult this website regularly for possible updates.
Visually impaired people can download the electronic version of this manual and have it read out
by means of a text-to-speech software application.
User manual of the operating console
For user and specialist dealer
User manual of wheelchair
For user and specialist dealer
Installation manual of wheelchair
For specialist dealer
User manual of battery and charger
For user and specialist dealer

LiNX 200
2023-03
Description
3
EN
NL
1 Description
The operating console built into your electric wheelchair enables you to control all the driving,
steering, braking and operating processes, as well as other adjusting motors (lifting column, seat
and back adjuster). The wheelchair's electrical unit and electronics are constantly being monitored
internally.
The following pictures show all parts that are relevant to the user.
Important parts
1. Battery charge indicator
2. ON / OFF button with
status indicator
3.
Speed switch
4.
Position adjustment button
5. Drive function button
6.
Horn button
7. Drive and actuator status
8. Driving lights and right
indicator
9. Hazard lights and left
indicator
10.
Joystick
11. Software installation
connection
12.
Battery charger connection
11
12
2
1
3
6
10
5
4
7
9
8

LiNX 200
2023-03
Before use
4
EN
NL
2 Before use
Risk of injuries and damage
Do NOT install, maintain or use
this product unless you have read and fully understood all
instructions in this manual and all relevant manuals regarding the wheelchair
equipped with
this product.
Do not try to open or disassemble the console in any case - there are no user-serviceable
parts
inside.
In case of doubts or questions, do not hesitate to contact your local specialist dealer, your care
provider, or your technical adviser to help you with this.
2.1 General safety instructions
Keep the following general warnings in mind during use:
The operating consoles have been tested for electromagnetic compatibility on typical,
representative vehicles and comply with the appropriate EMC standards:
EN 12184: 2014, ISO7176-21: 2009. Nevertheless, sources of electromagnetic field may
influence the driving performance of your wheelchair, like the fields of mobile phones, power
generators or high-power energy sources. On the other hand, the electronics of your
wheelchair can affect other electronic appliances too, like alarm systems of shops and
automatic doors. We therefore advise you to check your operating console / wheelchair
regularly for damage and wear, since these may enlarge the interference.
Be aware that the surface of the operating console may get very hot due to solar radiation or
heating devices. Be careful when touching.
Make sure that the controller does not become colder or hotter than the allowed minimum
and maximum temperature, see the wheelchair user manual.
Before switching the wheelchair on, be aware of your environment/situation. Adjust your
speed accordingly before driving off. We advise you to use the slowest speed setting to drive
indoors. For outdoor driving you can adjust the speed to a suitable speed at which you feel
comfortable and safe.
Do not touch the connector pins. If you touch the pins, they can become dirty, or they can be
damaged by electrostatic discharge.
If the wheelchair has not been fitted with a hand guard for the operating console, be aware
that your hand will not be protected from crushing, for example while manoeuvring towards a
table.
The XLR connector on the controller is to be used exclusively for the intended purpose of
charging the battery. The warranty will lapse if any unauthorized device is connected to this
port.
Make sure that the battery charger that is used with the vehicle has a drive-inhibited function
that is correctly connected for use with the controller. This drive-inhibited feature is intended
to prevent the chair from driving while the battery is being charged. If you are not sure, ask
your dealer.
Immediately turn the controller off and consult your service agent if the vehicle:
o is damaged;
o does not behave the same every time;
o does not respond normally, the way you expect it to;
o becomes hotter than normal;
o smokes;
o does not change its speed when you adjust the speed dial;
WARNING
Vermeiren is responsible for software updates/repairs. For adaptations in the software
contact Vermeiren, see our website
http://www.
vermeiren
.com/

LiNX 200
2023-03
Driving
5
EN
NL
odisplays a fault on its fault indicator and the controller does not perform normally.
Turn the controller off:
owhen you do not use it;
obefore you get in or out of the wheelchair;
oif your vehicle drives by itself or against your will. When you turn the controller off, the
vehicle will halt.
In case a serious incident has occurred involving your product, notify Vermeiren or your
specialist dealer as well as the competent authority in your country.
3 Driving
1. Press the ON/OFF button.
2. If the light on the ON/OFF button is green, the wheelchair is powered and ready to go.
3. Check the battery status indicator. Charge the battery if necessary (see §4.3).
4. Select the driving program and adjust the driving speed using the speed switch, see drive
functions in §4.7.
5. Start moving the wheelchair by operating the joystick slowly forwards/backwards.
6. The speed will increase when you push the joystick further out of the centre.
7. To turn left or right, push the joystick to the left or right. Use your direction indicators when
driving outdoors, see §4.9.
8. To brake, move the joystick to neutral position.
9. After arrival, check the battery status and press the ON/OFF button.
10. Charge the battery if necessary.

LiNX 200
2023-03
Operating console functions
6
EN
NL
4 Operating console functions
The operating console enables you to control all driving components as well as the motors to
adjust your body position. For your own safety, and to prevent that the wheelchair gets damaged,
movements are monitored by the electronics. This may result in block of movement, speed
decrease or complete stop.
4.1 Switching ON / OFF
Put the joystick in the neutral (central) position before pressing the ON/OFF button.
If the console is switched on with the joystick out of the neutral position, the wheelchair will
not drive. Release the joystick (return to neutral) within 5 seconds to unlock the drive. If the
joystick is not released within 5 seconds, the fault turns into a Module
fault which is
indicated by the red blinking LED in the ON/OFF button. The wheelchair will not drive. To
clear the Module fault, release the joystick and switch the operating console OFF and then
ON
again
.
To switch the operating console ON, press the ON/OFF button once.
The LED (status indicator) in the ON/OFF button goes on. When it turns green, the operating
console is ready for operation. When the LED starts blinking in red, there is a failure, see
§4.2 and §5.
To switch the operating console OFF when it is ON: press the button once.
The operating console will power down and the status indicator goes out.
4.1.1 Emergency stop
If you need to stop a driving or body-positioning movement quickly, press the ON/OFF button to
perform an EMERGENCY STOP. The wheelchair will come to a halt quickly.
4.1.2 Sleep mode
The operating console will go into sleep mode after a period of inactivity (default 5 minutes).
When the system sleeps, it is partially turned off to reduce energy consumption.
To reactivate the operating console, press a button or move the joystick.
4.2 Failures and blocks
When the operating console is powered and a failure appears, the ON/OFF button
starts blinking in red. The number of blinks indicates the fault code. In case of a failure,
one or all functions of the operating console are blocked. For more information, see
§5.
4.3 Battery status and charging
Risk of injuries and damage
Follow the charging instructions in the wheelchair instruction manual and
the suppliers’ manual
of the battery charger.
WARNING

LiNX 200
2023-03
Operating console functions
7
EN
NL
The battery charge indicator (located above the on/off
button) is used to indicate that your wheelchair power is
on. The indicator provides an estimate of the remaining
battery capacity.
In the following table all battery indications and their
meanings are collected.
Table 1: Battery charge indicator
Display Description Meaning Remarks
All LED's dark. System off.
All LED's are lit and the
green LED's are flashing.
System on.
High voltage warning:
battery voltage level has
risen above the high voltage
warning set-point.
Warning: battery too full.
Slow down if you are driving
down a slope.
All LED's are lit. System on. LED's show the charge
level.: Full battery (between
80 and 100% of full
capacity)
1 Green led is lit. System on. Battery level is decreasing.
Only red and amber LED's
lit.
Low battery level. Battery half full. Start the
return journey.
Red and amber LED's lit. Very low battery level. Battery low (between 0 and
20% of full capacity).
Recharge soon.
Only Red LED lit. Battery almost empty. Recharge now.
1 Red Led is flashing. Battery empty.
Low voltage warning:
battery voltage level
decreased below its low
voltage warning set-point.
Recharge immediately.
First red LED flashes on
the battery indicator.
The status indicator will
display a flash code 2 or 7.
The horn will sound once
every 10 seconds.
Battery voltage decreases
below the battery cut-off
voltage.
Battery is fully discharged,
and it is good practice to
stop discharge at this point.
The display and wheelchair
shut down automatically.
Battery
charge
indicator

LiNX 200
2023-03
Operating console functions
8
EN
NL
4.3.1 Charging
Driving is prevented (inhibited) while the system is being charged.
Charging is possible without switching the operating console ON. To
see the battery
status indicator, switch it ON.
Plug the battery charger into the remote's XLR socket (12), see
Figure 1.
The battery charger indicator will indicate the system is being
charged by cycling between a left to right chase sequence, and
then displaying the approximate battery charge state at the end
of the chase sequence.
Battery-charging indication
4.4 Joystick operation (driving and braking)
Operating the joystick in a specific direction will move the electric wheelchair
in that direction. The speed of movement depends on the displacement of
the joystick. If the joystick is pushed/pulled to maximum displacement, the
speed will be maximal (within the selected drive mode).
By moving the joystick to its central position (neutral) during driving, the
brakes will start working until the wheelchair stops:
For gradual braking, move the joystick slowly
For a quick stop, release the joystick; the wheelchair will stop as
quickly as possible.
Joystick movements
Make sure that the joystick is in neutral (central) position when pressing the on/off button,
otherwise the electronics will be locked.
After switching the operating console ON by the ON/OFF button, the joystick
has to stay
in
the central position for at
least five seconds. The console has been programmed this way
for technical and safety reasons. If the
joystick and ON/OFF button are activated at the same
time, the steering unit is locked and will only unlock after switching completely OFF.
Make sure that the free-wheel lever is in braking position BEFORE switching the wheelchair
ON. Electromagnetic brakes do NOT function if the wheelchair is in free-wheel mode. This
is indicated on the operating console. Driving is not possible.
4.5 Operating console lock
The lock function is primarily used to prevent unauthorized use of the wheelchair, but it can also
help prevent unintentional use of the controls when the system is not used for any length of time.
When the system is locked, the system is powered down and the user controls are not responsive.
If the power button is pressed when the system is locked, the locked status is displayed to the
user by the battery gauge.

LiNX 200
2023-03
Operating console functions
9
EN
NL
To lock the system: press and hold the power button for 7 seconds.
When entering the locked state, the battery gauge will indicate the transition by
flashing LED's 1, 3, and 5 (far left, middle, and far right) 3 times.
To unlock the system: press the power button once, and then press the horn
button twice — the horn button must be pressed twice within 10 seconds of
pressing the power button.
If the user does not execute the unlock sequence correctly, within the required
time frame, or the power button is pressed again before the unlock sequence is
complete, the system will return to the locked state.
During an unlock attempt, the battery gauge will indicate that the system is in a
locked state by flashing LED's 1, 3, and 5 (far left, middle, and far right) until either
the system is powered off, unlocked, or until the sequence timeout of ±10s is
reached and the controller switches off automatically.
4.6 Adjusting your body position
Risk of injuries or damage
Be aware that the stability decreases when the wheelchair is moved from sitting straigh
t to
inclined position.
Make sure
that
there is enough space around the wheelchair to operate the backrest and seat.
The wheelchair's adjusting functions can be operated using the adjusting function button.
Depending on your type of wheelchair, there can be up to 6 functions.
Press the top of the button to select the next adjusting function. Press the bottom
of the button to select the previous adjusting function.
To adjust your body position, move the joystick to the front or back.
To return to the basic sitting position, move the joystick to the back for each
adjusting movement.
Position adjustment button
The selected adjusting function is displayed on the actuator status indicator as shown below. The
display only shows the available/programmed functions in your wheelchair.
Adjust function Display Adjust function Display
Seat inclination
Backrest inclination
Lift
Leg rest left
Leg rest right
Leg rests simultaneous /
central footplate
CAUTION

LiNX 200
2023-03
Operating console functions
10
EN
NL
Unspecified
None
4.7 Changing drive function
The wheelchair's speed functions can be operated using the drive select button.
There are three available drive functions.
Press the top of the button to select the next drive function. Press the bottom
of the button to select the previous drive function.
Drive function button
The selected drive function is indicated on the drive function indicator, to the right-hand side of
the drive select button. The indicator has three LED’s, one for each available drive function. When
drive function 1 is selected, only the bottom indicator will be lit. For drive function 3, all LED’s will
be lit.
The maximum driving speed by maximal deflection of the joystick depends on the selected drive
submenu (1, 2 or 3) and the manual speed setting in this submenu.
4.7.1 Adjusting the driving speed
In each of the three drive functions, the speed can be adjusted in 10
discrete steps between lowest (left) and highest (right) speed, using
the speed switch. This rotary switch is located around the ON/OFF
button. As a visual reminder, a speed symbol is positioned above the
speed switch to indicate the low and high positions.
Speed switch
4.7.2 Limited driving speed
For your safety, the driving speed of your wheelchair will be automatically reduced when certain
body position alterations have been made. The drive of the wheelchair is then limited to the lowest
speed setting, or even becomes completely blocked.
Backrest inclination Driving inhibition indicator
Driving and speed limitations occur when:
the lift has been adjusted to a higher position. Only speed setting 1 is available.
the backrest inclination exceeds a certain angle (see figure 7):
1
2
3
Slow Fast

LiNX 200
2023-03
Operating console functions
11
EN
NL
1. All functions of your wheelchair are available.
2. Only speed setting 1 is available.
3. Driving your wheelchair is no longer possible. Raise the backrest until the block is
lifted.
To notify the user that all driving is inhibited, the drive wheel LED on the actuator status indicator
slowly pulses on and off, as well as the LED referring to the adjustment that causes the block.
The LED's pulse for the duration of driving or adjusting function demand.
E.g. Figure 8: The backrest and drive wheel LED’s on the indicator are pulsing. This means
that the backrest inclination is too large, causing driving inhibition.
To lift the speed/driving limitations, lower the lift to standard (lowest) position, and adjust your
seat and backrest to upright sitting position.
4.8 Horn
Press the horn button (6) to warn bystanders, see Figure 1. The horn will sound as long as the
button is pressed.
4.9 Lighting
4.9.1 Front and back lights
To switch on the front and back lights,
press and quickly release the right-hand
lighting button (A) once. The LED behind
the right-hand button will remain lit as long
as the lights are on.
To switch off the lights, press the right-hand or left-hand lighting button (A/B).
4.9.2 Hazard warning lights
To switch on the hazard warning lights, press and quickly release the left-hand lighting
button (B) once. The LED's behind the left-hand and right-hand button will flash on and off
as long as the hazard warning lights are operating.
To switch off the hazard warning lights, press the left-hand or right-hand lighting button
(A/B).
4.9.3 Indicator lights
To switch on either indicator, press the left-hand or right-hand lighting button once,
depending on the direction you want to go. The LED behind the button will flash on and off
as long as the indicator lights in that direction are operating.
To switch off either indicator, press the left-hand or right-hand lighting button.
When the hazard warning lights are on, they stay on, even when the operating console
is switched off by the ON/OFF button.
The main
lights
go out
when the operating console is switched off.
Operation of the lights
A
B

LiNX 200
2023-03
Troubleshooting
12
EN
NL
5 Troubleshooting
Risk of injuries and damage to the operating console or wheelchair
NEVER attempt to repair the operating console yourself.
For failures of the operating console, you need to contact your specialist dealer. He
/She
decides if the console needs to be reprogrammed.
In case of failure, a fault code is displayed by the blinking LED in the ON-OFF button, see §4.2.
The following table summarises the possible fault codes. Some problems can be solved by
yourself. For all problems marked in grey, consult your specialist dealer.
Table 2: Troubleshooting
Code
Problem
Meaning
1 Remote / joystick error
Verify that the joystick is in the neutral position when switching
ON the operating console.
Check
the joystick: not damaged and working properly.
2 Network or configuration
error
1. Check all connection points and cables.
2. Verify the correct working of the software.
If you cannot
find
any fault
,
contact your specialist dealer.
3
Left motor
(or its connection)
is defective.
1. Verify whether the plugs of both motors have been inserted
properly.
2. Check the plug contacts of both motors for corrosion or
damage.
This fault also appears when the motors are disconnected.
Connect again and restart the system.
4
Right motor
(or its connection) is
defective.
As described above.
5
Left parking brake
(or its connection)
is defective or neutral
active.
1. Verify whether the motors' plugs have been inserted properly.
2. Check the plugs for corrosion or damage.
6
Right parking brake
(or its connection)
Is defective.
As described above.
7 Module error
(other than Remote)
One of the wheelchair parts may be damaged except the operator
control.
WARNING

LiNX 200
2023-03
Table des matières
1
EN
FR
NL
Table des matières
Table des matières..................................................................................................... 1
Avant-propos ............................................................................................................. 2
1 Description .................................................................................................... 3
2 Avant l'utilisation .......................................................................................... 4
2.1 Consignes générales de sécurité .................................................................... 4
3 Conduite ........................................................................................................ 5
4 Les fonctions de la console de commande ................................................ 6
4.1 Mise en marche et arrêt .................................................................................. 6
4.2 Pannes et indicateurs ..................................................................................... 6
4.3 État de la batterie et recharge ......................................................................... 6
4.4 Fonctionnement du joystick (conduite et freinage) .......................................... 8
4.5 Verrouillage de la console de commande ....................................................... 8
4.6 Réglage de la position corporelle .................................................................... 9
4.7 Modification des fonctions de conduite ......................................................... 10
4.8 Klaxon ........................................................................................................... 11
4.9 Éclairage ....................................................................................................... 11
5 Résolution des problèmes ......................................................................... 12

LiNX 200
2023-03
Avant-propos
2
EN
FR
NL
Avant-propos
Remarque importante
Ce manuel est le reflet des derniers développements du produit. Vermeiren a le droit d’apporter
des modifications à ce type de produit sans être tenu d'adapter ou de remplacer des produits
similaires fournis précédemment.
Les images sont fournies afin de clarifier les instructions de ce manuel. Les détails du produit
illustré peuvent diverger de votre produit.
Informations disponibles
Sur notre site Internet http://www.vermeiren.com/, vous trouverez toujours la dernière version des
informations décrites dans le présent manuel. Veuillez consulter régulièrement ce site Internet
pour connaître les éventuelles mises à jour.
Les personnes malvoyantes peuvent télécharger la version électronique de ce manuel et la lire
au moyen d'une application de texte-parole.
Manuel d'utilisation de la console de commande
Pour l'utilisateur et le revendeur spécialisé
Manuel d'utilisation du fauteuil roulant
Pour l'utilisateur et le revendeur spécialisé
Manuel d'installation du fauteuil roulant
Pour le revendeur spécialisé
Manuel d'utilisation de la batterie et du chargeur
Pour l'utilisateur et le revendeur spécialisé

LiNX 200
2023-03
Description
3
EN
FR
NL
1 Description
La console de commande intégrée à votre fauteuil roulant électrique vous permet de commander
tous les processus de conduite, de direction, de freinage et de fonctionnement, ainsi d'autres
moteurs de réglage (dispositif de réglage de la colonne de levage, du siège et du dossier).
L'installation électrique et l'électronique du fauteuil roulant sont constamment surveillées en
interne.
Les illustrations suivantes montrent toutes les pièces qui concernent l’utilisateur.
Éléments importants
1. Indicateur de batterie
2. Bouton ON/OFF avec
indicateur d'état
3.
Commutateur de vitesse
4.
Bouton de réglage de position
5. Bouton de fonction
d'entraînement
6.
Bouton de klaxon
7. Entraînement et état de
l'actionneur
8. Feux de conduite et clignotant
droit
9. Feux de détresse et clignotant
gauche
10.
Joystick
11. Raccordement installation de
logiciel
12. Raccordement chargeur de
batterie
11
12
2
1
3
6
10
5 4
7
9
8

LiNX 200
2023-03
Avant l'utilisation
4
EN
FR
NL
2 Avant l'utilisation
Risque de dommages corporels et matériels
N'installez, n'entretenez et n'utilisez PAS ce produit sans avoir lu et pleinement compris toutes
les instructions du présent manuel et de tous les manuels importants concernant le fauteuil
roulant équipé de ce produit.
N'essayez en aucun cas d'ouvrir ou
de démonter la console, elle ne contient aucune pièce
destinée à l'utilisateur.
En cas de doutes ou de questions, n’hésitez pas à prendre contact avec votre revendeur local,
votre prestataire de soins ou votre conseiller technique qui pourra vous aider.
2.1 Consignes générales de sécurité
Tenez compte des avertissements généraux suivants pendant l’emploi :
La compatibilité électromagnétique des consoles de commande a été testée sur des
véhicules représentatifs et caractéristiques, et celles-ci respectent les normes CEM
appropriées :
EN 12184 : 2014, ISO7176-21 : 2009. Les sources de champ magnétique, comme les
téléphones mobiles, les générateurs électriques ou les sources d'énergie à haute puissance,
peuvent cependant influencer les performances de conduite de votre fauteuil roulant.
L’électronique de votre fauteuil roulant peut à son tour également affecter d’autres appareils
électroniques comme des systèmes d'alarme de magasins et des portes automatiques. Nous
vous recommandons par conséquent de vérifier si votre console de commande/fauteuil
roulant ne présente pas de dégâts ou d'usure qui pourraient encore augmenter l'interférence.
Veuillez garder à l'esprit que la surface de la console de commande peut devenir très chaude
en raison des rayons du soleil ou de dispositifs de chauffage. Faites donc attention lorsque
vous la touchez.
Assurez-vous que le dispositif de commande ne devienne pas plus froid ou plus chaud que
la température minimale et maximale autorisée, cf. le manuel d'utilisation du fauteuil roulant.
Avant de mettre le fauteuil roulant en marche, soyez conscient de votre
environnement/situation. Adaptez-y votre vitesse avant de démarrer. Nous vous conseillons
d'utiliser la vitesse la plus basse pour rouler à l'intérieur. Dans le cadre d'un usage à
l’extérieur, vous pouvez passer à une vitesse appropriée dans laquelle vous vous sentez à
l’aise et en sécurité.
Ne touchez pas les broches de connexion. En les touchant, vous pouvez les souiller, ou elles
peuvent être endommagées par décharge électrostatique.
Si le fauteuil roulant n'a pas été équipé d'une protection de la main pour la console de
commande, n'oubliez pas que votre main ne sera pas protégée contre l'écrasement, par
exemple en manœuvrant vers une table.
Le connecteur XLR sur le panneau de commandes est exclusivement utilisé pour l'objectif
visé du chargement de la batterie et/ou de la programmation du panneau de commandes.
La connexion d'un appareil non compatible à ce port entraîne la perte de la garantie.
Assurez-vous que le chargeur de la batterie utilisé en combinaison avec le fauteuil roulant
dispose d'une fonction qui empêche la conduite et est correctement connecté au panneau de
commandes. Cette fonction a pour objectif d'empêcher le fauteuil roulant d'avancer pendant
le chargement des batteries. Si vous n'êtes pas certain, contactez votre commerçant.
Déconnectez immédiatement le panneau de commandes et contactez le commerçant si le
véhicule:
o est endommagé ;
AVERTISSEMENT
Vermeiren est responsable des mises à jours/réparations du logiciel. Pour des adaptations
au logiciel, prenez contact avec Vermeiren, cf. notre site Internet
http://www.
vermeiren
.com/

LiNX 200
2023-03
Conduite
5
EN
FR
NL
o présente un fonctionnement instable ;
o réagit de façon anormale ou imprévisible ;
o chauffe plus que la normale ;
o se coince ;
o ne change pas de vitesse lorsque vous manipulez le régulateur de vitesse ;
o indique une erreur sur l'indicateur d'erreurs et le panneau de commandes ne réagit pas
normalement.
Éteignez le panneau de commandes:
o lorsque vous ne l'utilisez pas ;
o lorsque vous montez ou descendez du fauteuil roulant ;
o lorsque le fauteuil roulant roule tout seul ou contre votre volonté. Si vous éteignez le
panneau de commandes, le fauteuil roulant s'arrête.
En cas d'incident grave impliquant votre produit, informez Vermeiren ou votre revendeur
spécialisé ainsi que l'autorité compétente de votre pays.
3 Conduite
1. Appuyez sur le bouton ON/OFF.
2. Si le voyant sur le bouton ON/OFF est vert, le fauteuil roulant est alimenté et prêt à partir.
3. Vérifiez l'indicateur d'état de la batterie. Chargez la batterie si nécessaire (cf. §4.3).
4. Sélectionnez le programme de conduite et réglez la vitesse de conduite à l'aide du
commutateur de vitesse, cf. les fonctions d'entraînement du §4.7.
5. Commencez à faire bouger le fauteuil roulant en actionnant doucement le joystick vers
l'avant/arrière.
6. La vitesse augmentera lorsque vous éloignerez le joystick du centre.
7. Pour tourner à gauche ou à droite, poussez le joystick vers la gauche ou la droite. Utilisez
vos indicateurs de direction lorsque vous conduisez en extérieur, cf. §4.9.
8. Pour freiner, déplacez le joystick en position neutre.
9. Après l'arrivée, vérifiez l'état de la batterie et appuyez sur le bouton ON/OFF.
10. Chargez la batterie si nécessaire.

LiNX 200
2023-03
Les fonctions de la console de commande
6
EN
FR
NL
4 Les fonctions de la console de commande
La console de commande vous permet de contrôler tous les composants d'entraînement, ainsi
que les moteurs permettant de régler la position de votre corps. Pour votre propre sécurité, et
éviter que le fauteuil roulant ne s'endommage, les mouvements sont surveillés par l'électronique.
Il peut en résulter un blocage des mouvements, une baisse de vitesse ou un arrêt complet.
4.1 Mise en marche et arrêt
Mettez le joystick en position neutre (au centre) avant d'appuyer sur le bouton ON/OFF.
Si la console est mise en marche lorsque le joystick n'est pas en position neutre, le
fauteuil roulant restera immobilisé. Relâchez le joystick (retour au neutre) dans les 5
secondes pour débloquer l'entraînement. Si le joystick n'est pas relâché dans les 5
secondes, l'erreur se transforme en erreur de module, ce qui est indiqué par le voyant
clignotant rouge dans le bouton ON/OFF. Le fauteuil roulant restera immobilisé. Pour
supprimer l'erreur de module, relâchez le joystick, et éteignez et rallumez à nouveau
la console de commande.
Pour allumer la console de commande, appuyez sur le bouton ON/OFF une fois.
Le témoin (indicateur d'état) dans le bouton ON/OFF s'allume. Quand il devient vert, la
console de commande est prête à fonctionner. Quand le voyant commence à clignoter en
rouge, il y a une panne, cf. §4.2 et §5.
Pour éteindre la console de commande lorsqu'elle est allumée : appuyez une fois
sur le bouton.
La console de commande se mettra hors tension et l'indicateur d'état s'éteindra.
4.1.1 Arrêt d'urgence
Si vous devez arrêter la conduite ou modifier rapidement la position de votre corps, appuyez sur
le bouton ON/OF pour réaliser un ARRÊT D'URGENCE. Le fauteuil roulant s'arrêtera rapidement.
4.1.2 Mise en veille
La console de commande se mettra en veille après une période d'inactivité (réglage par défaut 5
minutes).
Lorsque le système est en veille, il est partiellement éteint pour réduire la consommation
d'énergie.
Pour réactiver la console de commande, appuyez sur un bouton ou déplacez le joystick.
4.2 Pannes et indicateurs
Lorsque la console de commande est alimentée et une panne apparaît, le bouton
ON/OFF commence à clignoter en rouge. Le nombre de clignotements indique le code
d’erreur. En cas de panne, une ou toutes les fonctions de la console de commande
sont bloquées. Pour de plus amples informations, cf. §5.
4.3 État de la batterie et recharge
Risque de dommages corporels et matériels
Suivez les instructions de recharge dans le mode d'emploi du fauteuil roulant et dans le manuel
du fournisseur du chargeur de la batterie.
AVERTISSEMENT

LiNX 200
2023-03
Les fonctions de la console de commande
7
EN
FR
NL
L'indicateur de charge de batterie (situé au-dessus du
bouton on/off) est utilisé pour indiquer si votre fauteuil
roulant est sous tension. L'indicateur fournit une
estimation de la capacité de batterie restante.
Le tableau suivant présente toutes les indications de
batterie et leur signification.
Tableau 1 : Indicateur de batterie
Affichage Écran Description Signification Remarques
Toutes les LED sont
éteintes.
Système coupé.
Toutes les LED sont
allumées et les LED vertes
clignotent.
Système allumé.
Avertissement de haute
tension : la tension de la
batterie dépasse la valeur
définie pour l'avertissement
haute tension.
Avertissement : batterie trop
chargée.
Roulez plus lentement
lorsque vous descendez
une pente.
Toutes les LED sont
allumées.
Système allumé. Les LED indiquent l'état de
la charge : Batterie pleine :
entre 81 et 100 % de la
capacité.
1 LED verte allumée. Système allumé. La charge de la batterie
diminue.
Seules les LED rouges et
orange sont allumées.
Niveau de batterie faible. Batterie à moitié chargée.
Entamez le voyage de
retour.
Une LED rouge et une
orange sont allumées.
Batterie très faible. Batterie faible (entre 0 et 20
% de la pleine capacité).
Recharger rapidement.
Quelques LED rouges
allumées.
Batterie presque vide. Recharger maintenant.
1 LED rouge clignote. Batterie vide.
Avertissement de basse
tension : la tension de la
batterie dépasse la valeur
définie pour l'avertissement
basse tension.
Recharger immédiatement.
La première LED rouge
clignote sur l'indicateur de
batterie.
Le statut affiché est un
flash code 2 ou 7.
L'avertisseur retentit une
fois, durant 10 secondes.
La tension de la batterie
passe en-deçà de la tension
de mise hors tension de la
batterie.
La batterie est
complètement vide, il est
préférable de prendre
l'habitude d'éviter un
déchargement total. La
commande et le fauteuil
roulant s'éteignent
automatiquement.
Indicateur
de charge
de la batterie

LiNX 200
2023-03
Les fonctions de la console de commande
8
EN
FR
NL
4.3.1 Recharge
La conduite est empêchée (inhibée) lorsque le système se recharge.
La recharge est possible sans allumer la console de commande. Pour voir l'indicateur
d'état de la batterie, mettez
-
la en marche.
Branchez le chargeur de batterie sur le port de chargement de la
commande (12), cf. Figure 1.
L'indicateur de batterie montre que la commande est rechargée
en allumant les LED successivement de gauche à droite lors
d'une série de plusieurs clignotements. Il indique ensuite le taux
de chargement estimé de la batterie à la fin du dernier
clignotement.
Indication de charge de la batterie
4.4 Fonctionnement du joystick (conduite et freinage)
Actionner le joystick dans un certain sens déplace le fauteuil roulant
électrique dans cette direction. La vitesse de mouvement dépend du
déplacement du joystick. Si le joystick est poussé/tiré à un déplacement
maximum, la vitesse sera maximale (dans le mode d'entraînement
sélectionné).
Lorsque le joystick est déplacé à sa position centrale (neutre) pendant la
conduite, les freins s'enclenchent jusqu'à l'arrêt du fauteuil roulant :
Pour un freinage progressif, déplacez lentement le joystick.
Pour un arrêt rapide, relâchez le joystick ; le fauteuil roulant s'arrêtera
dans les plus brefs délais.
Mouvements du joystick
Assurez
-
vous que le joystick est en position (centrale) neutre quand vous appuyez sur le
bouton on/off pour ne pas verrouiller l'électronique.
Après avoir mis en marche la console de commande à l'aide du bouton ON/OFF, le joystick
doit rester en position
centrale pendant au moins cinq secondes. La console a été
programmée de cette manière pour des raisons techniques et de sécurité. Si le joystick et
le bouton ON/OFF sont activés en même temps, le boîtier de direction se verrouille et ne
sera déverrouillé q
u'après un arrêt complet.
Assurez
-vous que le levier de déblocage est en position de freinage AVANT de mettre le
fauteuil roulant en MARCHE. Les freins électromagnétiques ne fonctionnent PAS si le
fauteuil roulant est en mode déblocage. Cela est indiqué sur la console de fonctionnement.
La conduite est impossible.
4.5 Verrouillage de la console de commande
La fonction de verrouillage est principalement utilisée pour empêcher une utilisation non autorisée
du fauteuil roulant, mais elle peut également aider à empêcher une utilisation non intentionnelle
des commandes lorsque le système n'est pas utilisé pendant une certaine durée. Lorsque le
système est verrouillé, le système est mis hors tension et les commandes utilisateur ne répondent
plus. Si le bouton de mise en marche est enfoncé lorsque le système est verrouillé, le statut
verrouillé s'affiche à l'utilisateur par la jauge de la batterie.

LiNX 200
2023-03
Les fonctions de la console de commande
9
EN
FR
NL
Pour bloquer le système, appuyez sur la touche ON/OFF et maintenez-la
enfoncée pendant 4 secondes.
Lorsque vous vous trouvez dans le statut de blocage, l'indicateur de batteries
affiche la commutation en faisant clignoter 3 fois les LED 1, 3 et 5 (le plus à
gauche, au centre et le plus à droite).
Pour déverrouiller le système, appuyez une fois sur la touche ON/OFF, puis
appuyez deux fois sur la touche du klaxon. Le bouton du klaxon doit être enfoncé
deux fois dans les 10 secondes après avoir appuyé sur le bouton
MARCHE/ARRÊT.
Si l'utilisateur n'exécute pas la séquence de déverrouillage correctement, en
temps requis, ou si le bouton de mise en marche est renfoncé avant que la
séquence de déverrouillage ne soit terminée, le système reviendra à l'état
verrouillé.
Au cours d'une tentative de déblocage, le témoin des batteries indique que le
panneau de commandes est dans un statut de blocage en faisant clignoter les
LED 1, 3 et 5 (le plus à gauche, au centre et le plus à droite) jusqu'à ce que le
panneau de commandes soit déconnecté, déverrouillé ou jusqu'à ce que l'on ait
atteint la répétition du cycle de ± 15 secondes et que le panneau de commandes
se déconnecte automatiquement.
4.6 Réglage de la position corporelle
Risque de dommages corporels ou matériels
N'oubliez pas que la stabilité diminue lorsque le fauteuil
roulant passe de la position assise
droite à la position inclinée.
Assurez-
vous qu'il y a assez d'espace autour du fauteuil roulant pour faire fonctionner le
dossier et le siège.
Les fonctions de réglage du fauteuil roulant peuvent être actionnées à l'aide du bouton des
fonctions de réglage S. Selon votre type de fauteuil roulant, il peut y avoir jusqu'à 6 fonctions.
Appuyez sur le haut du bouton pour sélectionner la fonction de réglage suivante.
Appuyez sur le bas du bouton pour sélectionner la fonction de réglage précédente.
Pour régler la position corporelle, déplacez le joystick vers l'avant ou l'arrière.
Pour revenir à la position assise de base, déplacez le joystick vers l'arrière pour
chaque mouvement de réglage.
Bouton de réglage de position
La fonction de réglage sélectionnée est affichée sur l'indicateur du statut de
conduite/du moteur, comme affiché ci-dessous. L'écran affiche uniquement les fonctions
disponibles/programmées pour votre fauteuil roulant.
Fonction de réglage Affichage Écran Fonction de réglage Affichage Écran
Inclinaison de l'assise
Inclinaison du dossier
Élévateur
Repose-jambes gauche
ATTENTION

LiNX 200
2023-03
Les fonctions de la console de commande
10
EN
FR
NL
Repose-jambes droite
Les deux repose-jambe
simultanément / repose-
jambes central
Pas de spécifications
Rien
4.7 Modification des fonctions de conduite
Les fonctions de vitesse du fauteuil roulant peuvent être actionnées à l'aide du
bouton de sélection de l'entraînement. Il y a trois fonctions d'entraînement
disponibles.
Appuyez sur le haut du bouton pour sélectionner la fonction d'entraînement
suivante. Appuyez sur le bas du bouton pour sélectionner la fonction
d'entraînement précédente.
Bouton de fonction d'entraînement
La fonction d'entraînement sélectionnée est indiquée sur un voyant de fonction de l'entraînement,
vers le côté droit du bouton de sélection de l'entraînement. L'indicateur présente trois LED, une
pour chaque fonction d'entraînement. Lorsque la fonction d'entraînement 1 est sélectionnée, seul
l'indicateur du bas est allumé. Pour la fonction d'entraînement 3, toutes les LED sont allumées.
La vitesse de conduite maximale à la déviation maximale du joystick dépend de la fonction
d'entraînement sélectionnée (1, 2 ou 3) et du réglage de vitesse manuel dans cette fonction.
4.7.1 Réglage de la vitesse de conduite
Dans chacune des trois fonctions d'entraînement, 10 étapes
distinctes permettent de passer de la vitesse de la plus basse (à
gauche) à la plus élevée (à droite), à l'aide du commutateur de
vitesse. Ce commutateur rotatif est situé autour du bouton ON/OFF.
Pour rappel visuel, un symbole de vitesse est positionné au-dessus
du commutateur de vitesse afin d'indiquer les positions inférieures et
supérieures.
Commutateur de vitesse
4.7.2 Vitesse de conduite limitée
Pour votre sécurité, la vitesse de conduite de votre fauteuil roulant sera automatiquement réduite
lorsque certaines modifications de position corporelle ont été réalisées. L'entraînement du fauteuil
roulant est alors limité au réglage de vitesse inférieur, ou même est complètement bloqué.
Inclinaison du dossier Indicateur d'inhibition de conduite
1
2
3
Lent Rapide

LiNX 200
2023-03
Les fonctions de la console de commande
11
EN
FR
NL
Les limitations de conduite et de vitesse se produisent lorsque :
le levage a été réglé à une position supérieure. Seul le réglage vitesse 1 est disponible.
l'inclinaison du dossier dépasse un certain angle (cf. figure 7) :
1. Toutes les fonctions de votre fauteuil roulant sont disponibles.
2. Seul le réglage de vitesse 1 est disponible.
3. La conduite de votre fauteuil roulant n'est plus possible. Relevez le dossier jusqu'à
ce que le blocage soit éliminé.
Pour indiquer à l'utilisateur que la conduite est inhibée, le voyant d'entraînement de roue sur
l'indicateur d'état de l'actionneur émet des impulsions lentes, ainsi que le voyant qui se réfère au
réglage qui cause le blocage.
P. ex. figure 8 : les LED du dossier et de la roue d'entraînement sur l'indicateur émettent des
impulsions. Cela signifie que l'inclinaison du dossier est trop importante, causant une
inhibition de conduite.
Pour supprimer les limites de vitesse/conduite, abaissez le levage à la position standard
(inférieure), et réglez votre siège et votre dossier à la position assise droite.
4.8 Klaxon
Appuyez sur le bouton de klaxon (6) pour avertir les personnes aux alentours, cf. figure 1. Le
klaxon retentit aussi longtemps que le bouton est enfoncé.
4.9 Éclairage
4.9.1 Feux avant et arrière
Pour allumer les feux avant et arrière,
enfoncez et relâchez rapidement le
bouton d'éclairage droit (A) une fois. La
LED du bouton droit restera allumée aussi
longtemps que les feux sont allumés.
Pour éteindre les feux, appuyez sur le bouton d'éclairage droit ou gauche (A/B).
4.9.2 Clignoteurs d'avertissement
Pour activer les clignoteurs d'avertissement, appuyez une fois sur le bouton d'éclairage
gauche (B) et relâchez-le rapidement. Les LED situés derrière le bouton gauche et le
bouton droit clignotent jusqu'à ce que les clignoteurs d'avertissement soient activés.
Pour déconnecter les clignoteurs d'avertissement, appuyez sur la touche d'éclairage gauche
ou droite (A/B).
4.9.3 Clignotants
Pour mettre en marche un clignotant, appuyez une fois sur le bouton de clignotant gauche
ou droit, selon la direction où vous voulez vous rendre. La LED derrière le bouton clignotera
aussi longtemps que les clignotants sont enclenchés dans cette direction.
Pour arrêter un clignotant, appuyez sur le bouton gauche ou droit (A/B).
Lorsque les feux de détresse sont allumés, ils le
restent, même lorsque la console de
commande est éteinte au moyen du bouton ON/OFF.
Les feux principaux s'éteignent lorsque la console de commande est arrêtée.
Fonctionnement des feux
A
B

LiNX 200
2023-03
Résolution des problèmes
12
EN
FR
NL
5 Résolution des problèmes
Risque de
dommages corporels et matériels à la console de commande
ou au fauteuil roulant
N'essayez JAMAIS de réparer la console de commande vous-même.
En cas de panne de la console de commande, veuillez prendre contact avec votre revendeur
spécialisé.
Il
décide si la console doit être reprogrammée.
En cas de panne, un code d'erreur est indiqué par le voyant clignotant dans le bouton ON-OFF,
cf. §4.2. Le tableau suivant résume les codes d'erreur possibles. Vous pouvez résoudre certains
problèmes vous-même. Pour tous les problèmes indiqués en grisé, consultez votre revendeur
spécialisé.
Tableau 2 : Résolution des problèmes
Code
Problème
Signification
1
Panne de la commande /
manette
Vérifiez si le joystick est en position neutre lorsque vous
mettez en marche la console de commande.
Contrôlez le joystick : non endommagé et fonctionne
correctement.
2
Panne de réseau ou de
configuration
1. Vérifiez toutes les branchements et câbles.
2. Vérifiez le bon fonctionnement du logiciel.
Si vous ne trouvez pas d'erreur, prenez contact avec votre
revendeur spécialisé.
3
Le moteur gauche (ou la
connexion) est défectueux.
1. Vérifiez si les prises des deux moteurs ont été insérées
convenablement.
2. Vérifiez la présence éventuelle de rouille ou de dégâts
sur les contacts à fiche des deux moteurs.
Cette erreur apparaît également lorsque les moteurs sont
débranchés.
Rebranchez-les et redémarrez le système.
4 Le moteur droite (ou la
connexion) est défectueux.
Comme décrit ci-dessus.
5
Le frein de stationnement
gauche (ou la connexion) est
défectueux ou la position
neutre du fauteuil roulant est
active.
1. Vérifiez si les fiches des moteurs ont été correctement
insérées.
2. Vérifiez la présence éventuelle de rouille ou de dégâts
sur les fiches.
6
Le frein de stationnement droite
(ou la connexion) est
défectueux.
Comme décrit ci-dessus.
7 Panne de module (autre que la
commande)
Une des pièces du fauteuil roulant peut être endommagée
en dehors de la
commande de l'opérateur.
AVERTISSEMENT

LiNX 200
2023-03
Inhoud
1
NL
Inhoud
Inhoud ........................................................................................................................ 1
Voorwoord .................................................................................................................. 2
1 Omschrijving ................................................................................................. 3
2 Voor gebruik .................................................................................................. 4
2.1 Algemene veiligheidsmaatregelen .................................................................. 4
3 Rijden ............................................................................................................. 5
4 Besturingsfuncties ....................................................................................... 6
4.1 In-/Uitschakelen .............................................................................................. 6
4.2 Storingen en blokkeringen .............................................................................. 6
4.3 Batterijstatus en opladen ................................................................................ 6
4.4 Joystickbediening (rijden en remmen) ............................................................ 8
4.5 Besturingsblokkering ....................................................................................... 8
4.6 Lichaamspositie aanpassen ............................................................................ 9
4.7 Rijfunctie veranderen .................................................................................... 10
4.8 Claxon ........................................................................................................... 11
4.9 Lichten .......................................................................................................... 11
5 Probleemoplossing ..................................................................................... 12

LiNX 200
2023-03
Voorwoord
2
NL
Voorwoord
Belangrijke opmerking
Deze handleiding houdt rekening met de recentste productontwikkelingen. De Firma Vermeiren
behoudt zich het recht voor om wijzigingen aan dit type product door te voeren zonder verplicht
te zijn om voordien geleverde producten aan te passen of te vervangen.
Afbeeldingen van het product worden gebruikt om de instructies in deze handleiding te
verduidelijken. Details van het afgebeelde product kunnen afwijken van uw aangekochte product.
Beschikbare informatie
Op onze website http://www.vermeiren.com/ kan u steeds de meest recente versie terugvinden
van de informatie in deze handleiding. Contacteer deze website regelmatig voor mogelijke
updates.
Mensen met een visuele beperking kunnen de elektronische versie van deze handleiding
downloaden en laten voorlezen door een tekst-naar-spraak programma.
Gebruiksaanwijzing van de besturing
Voor de gebruiker en vakhandelaar
Gebruiksaanwijzing van de rolstoel
Voor de gebruiker en vakhandelaar
Installatiehandleiding van de rolstoel
Voor de vakhandelaar
Handleiding van de batterij en lader
Voor de gebruiker en vakhandelaar

LiNX 200
2023-03
Omschrijving
3
NL
1 Omschrijving
De besturing van uw elektrische rolstoel laat toe dat u alle rij-, stuur-, rem- en operationele
processen van uw rolstoel kan bedienen, alsook andere motoren om uw lichaamshouding aan te
passen. De elektrische installatie van uw rolstoel en de elektronica zelf worden voortdurend intern
gecontroleerd.
De volgende foto's tonen alle onderdelen die relevant zijn voor de gebruiker.
Figuur 1 Belangrijke onderdelen
1. Batterij-indicator
2. AAN/UIT-knop met
statusindicator
3.
Snelheidsregelaar
4. Selectieknop voor
positieverstelling
5. Selectieknop voor rijfunctie
6.
Claxon
7. Rij- en actuatorstatus
8. Rijlichten en rechter
richtingaanwijzer
9. Waarschuwingslichten en linker
richtingaanwijzer
10.
Joystick
11. Aansluiting voor software-
installatie
12.
Aansluiting voor batterijlader
11
12
2
1
3
6
10
5
4
7
9
8

LiNX 200
2023-03
Voor gebruik
4
NL
2 Voor gebruik
Gevaar voor letsel of beschadiging
Installeer, onderhoud of gebruik dit product NIET voordat u alle instructies in deze handleiding
gelezen en begrepen heeft, alsook alle andere relevante handleidingen die betrekking hebben
op de rolstoel.
Probeer de besturing nooit te open of te demonteren -
er zijn geen door de gebruiker te
repareren onderdelen.
Als u nog vragen heeft of als u ergens aan twijfelt, aarzel dan niet om contact op te nemen met
uw lokale vakhandelaar, zorgverlener, of technisch adviseur om u te helpen.
2.1 Algemene veiligheidsmaatregelen
Houd rekening met de volgende algemene waarschuwingen tijdens het gebruik:
De besturing werd getest op elektromagnetische compatibiliteit bij representatieve
voertuigen, en voldoet aan de relevante EMC-standaarden:
EN 12184: 2014, ISO7176-21: 2009. Toch kunnen elektromagnetische velden de rijprestatie
van uw rolstoel beïnvloeden, bijvoorbeeld bij gsm's, stroomgeneratoren of energiebronnen
met hoog vermogen. De elektronica van uw rolstoel kan echter ook andere elektrische
apparaten beïnvloeden, zoals alarmsystemen in winkels en automatische deuren. We raden
daarom aan om uw besturing/rolstoel regelmatig te checken op schade of slijtage aangezien
dit de storing kan vergroten.
Houd er rekening mee dat het oppervlak van de besturing zeer warm kan worden door
zonnestraling of verwarmingstoestellen. Wees daarom voorzichtig bij het aanraken.
Zorg ervoor dat de besturing niet kouder of warmer wordt dan de voorgeschreven minimum
en maximumtemperatuur, zie de gebruiksaanwijzing van de rolstoel.
Wees u bewust van uw omgeving/situatie vooraleer de rolstoel in te schakelen. Pas uw
snelheid aan bij vertrek. We adviseren om de laagste snelheidsinstelling te gebruiken
wanneer u binnenshuis rijdt. Bij buitengebruik kan u de snelheid aanpassen tot een snelheid
waarbij u zich veilig en comfortabel voelt.
Raak de connectorpinnen niet aan. Als u de pinnen aanraakt, kunnen ze vuil worden, of
beschadigd raken door elektrostatische ontlading.
Als uw rolstoel niet uitgerust werd met een handbeschermer voor de besturing, wees u er dan
bewust van dat uw hand niet beschermd wordt tegen knellen, bijvoorbeeld bij het
manoeuvreren naar een tafel.
De XLR-connector op de besturing wordt uitsluitend gebruikt voor het beoogde doel van het
opladen van de batterij. Garantie vervalt als onbevoegde apparatuur op deze poort wordt
aangesloten.
Zorg ervoor dat de batterijlader die wordt gebruikt in combinatie met de rolstoel een functie
heeft waardoor het rijden wordt verhinderd, en dat deze goed is aangesloten met de
besturing. Deze functie verhindert dat de rolstoel kan rijden gedurende het laden van de
batterijen. Indien u niet zeker bent, raadpleeg dan uw vakhandelaar.
Zet de besturing onmiddellijk uit en contacteer de vakhandelaar indien het voertuig:
o beschadigd is;
o zich niet altijd hetzelfde gedraagt;
o niet normaal reageert, zoals u verwacht;
o warmer wordt dan normaal;
o smoort;
o niet van snelheid verandert wanneer u de snelheidsregelaar aanpast;
WAARSCHUWING
Vermeiren is verantwoordelijk voor software
-
updates en herstellingen. Voor aanpassingen
aan de software, contacteer Vermeiren. Zie onze website:
http://www.
vermeiren
.com/

LiNX 200
2023-03
Rijden
5
NL
o een fout aangeeft op de foutindicator en de besturing niet normaal reageert.
Schakel de besturing uit:
o wanneer u deze niet gebruikt;
o wanneer u in of uit de rolstoel stapt;
o als de rolstoel uit zichzelf rijdt of tegen uw wil in. Als u de besturing uitschakelt, zal de
rolstoel tot stilstand komen.
Indien zich een ernstig incident heeft voorgedaan met uw product, breng dan Vermeiren of uw
gespecialiseerde dealer op de hoogte, evenals de bevoegde autoriteit in uw land.
3 Rijden
1. Duw op de AAN/UIT-knop.
2. Als het lampje van de AAN/UIT knop groen is, staat uw rolstoel aan en is hij klaar voor gebruik.
3. Controleer de batterij-indicator. Laad de batterij indien nodig (zie 4.3).
4. Selecteer het rijprogramma en pas de snelheid aan met de snelheidsregelaar, zie rijfuncties
in 4.7.
5. Beweeg de rolstoel door de joystick zachtjes naar voor/achter te duwen.
6. De snelheid zal toenemen als u de joystick verder uit het midden wegduwt.
7. Om naar links of rechts te draaien, duwt u de joystick naar links of rechts. Gebruik de
richtingaanwijzers wanneer u buiten rijdt, zie 4.9.
8. Om te remmen, beweegt u de joystick naar neutrale positie.
9. Controleer bij aankomst de batterijstatus en duw op de AAN/UIT-knop.
10. Laad de batterij op, indien nodig.

LiNX 200
2023-03
Besturingsfuncties
6
NL
4 Besturingsfuncties
De besturing laat toe dat u alle rijonderdelen kan bedienen, alsook de motoren om uw
lichaamshouding aan te passen. Om uw eigen veiligheid te garanderen, en om te voorkomen dat
de rolstoel beschadigd raakt, worden alle bewegingen bewaakt door de elektronica. Dit kan leiden
tot een bewegingsvergrendeling, afname in snelheid of volledige stilstand.
4.1 In-/Uitschakelen
Zet de joystick in neutrale (centrale) positie vooraleer de AAN/UIT-knop in te drukken.
Als de besturing wordt aangezet met de joystick uit neutrale positie, zal de rolstoel niet
rijden. Laat de joystick los (laat terugkeren naar neutrale positie) binnen 5 seconden om te
kunnen rijden. Als de joystick niet binnen 5 seconden wordt losgelaten, verandert de fout
in een modulefout die wordt aangeduid met een rood knipperende LED op de AAN/UIT-
knop. De rolstoel zal niet rijden. Om de modulefout op te lossen, laat u de joystick los en
schakelt u de besturing UIT en weer AAN.
Om de besturing AAN te zetten, drukt u één keer op de AAN/UIT-knop.
De LED (statusindicator) van de AAN/UIT-knop licht op. Wanneer deze groen wordt, is de
besturing klaar voor gebruik. Wanneer de LED in het rood knippert, is er een storing, zie 4.2
en hoofdstuk 5.
Om de besturing UIT te zetten, drukt u één keer op de AAN/UIT-knop.
Het systeem wordt uitgeschakeld, en de statusindicator gaat uit.
4.1.1 Noodstop
Indien de rolstoel snel moet stoppen, of een zitbeweging moet stoppen, kan U de AAN/UIT knop
indrukken om een NOODSTOP uit te voeren. De rolstoel komt tot een snelle stilstand.
4.1.2 Slaapstand
De besturing gaat in slaapstand na een inactieve periode (standaard 5 minuten).
Wanneer het systeem in slaapstand gaat, wordt het gedeeltelijk uitgeschakeld om
energieverbruik te verminderen.
Om de besturing te heractiveren, drukt u op een willekeurige knop of beweegt u de joystick.
4.2 Storingen en blokkeringen
Wanneer de besturing aan staat en er een fout optreedt, zal de AAN/UIT-knop rood
knipperen. Het aantal flitsen geeft het type storing weer. In geval van een storing
zullen één of alle functies van de besturing geblokkeerd worden. Voor meer
informatie, zie hoofdstuk 5.
4.3 Batterijstatus en opladen
Gevaar voor letsel of beschadiging
Volg de laadinstructies in de
gebruiksaanwijzingen van de rolstoel en de batterijlader.
WAARSCHUWING

LiNX 200
2023-03
Besturingsfuncties
7
NL
De batterij-indicator (boven de AAN/UIT-knop) geeft aan
dat uw rolstoel is ingeschakeld. De indicator geeft ook
een schatting van de resterende batterijcapaciteit.
De volgende tabel toont alle batterij-indicaties en hun
betekenis.
Tabel1: Batterij-indicator
Display Omschrijving Betekenis Opmerkingen
Alle LEDs uit. Systeem uit.
Alle LEDs gaan branden
en de groene LEDs zijn
aan het knipperen.
Systeem aan.
Hoge
spanningswaarschuwing:
de spanning van de batterij
komt boven de instelwaarde
van de hoge
spanningswaarschuwing.
Waarschuwing: batterij te
vol.
Rijd trager als u van een
helling rijdt.
Alle LEDs branden
constant.
Systeem aan. LEDs geven de
laadtoestand weer: Volle
batterij (tussen 81 en 100%
van de volle capaciteit).
1 groene led brandt. Systeem aan. Batterijniveau is aan het
verminderen.
Enkel rode en oranje LEDs
branden.
Laag batterijniveau. Batterij is halfvol. Start de
terugreis.
Rode en oranje LEDs
branden.
Zeer laag batterijniveau. Batterij laag (tussen 0 en
20% van de volle
capaciteit). Snel opladen.
Enkel rode LED brandt. Batterij bijna leeg. Nu opladen.
1 rode LED is knippert. Batterij leeg.
Lage
spanningswaarschuwing:
de spanning van de batterij
komt beneden de
instelwaarde van de lage
spanningswaarschuwing.
Onmiddellijk herladen.
Eerste rode LED gaat
knipperen op de batterij-
indicator.
De statusindicator geeft
een flashcode 2 of 7 weer.
De claxon maakt geluid
om de 10 seconden.
De spanning van de batterij
zakt beneden de batterij-
uitschakelspanning.
De batterij is volledig leeg,
en het is een goede
gewoonte om onmiddellijk
te stoppen met ontladen. De
besturing en rolstoel
schakelen automatisch uit.
Batterij-
indicator

LiNX 200
2023-03
Besturingsfuncties
8
NL
4.3.1 Opladen
Rijden wordt voorkomen (geblokkeerd) terwijl het systeem wordt opgeladen.
Het is mogelijk om op te laden zonder de besturing aan te zetten. Om de batterij-
indicator te zien, dient u de besturing wel in te schakelen.
Steek de batterijlader in de aansluiting op de besturing (12), zie
figuur 1.
De batterij-indicator geeft aan dat het systeem wordt opgeladen
door de LEDs achtereenvolgens van links naar rechts te laten
branden. Daarna geeft het de geschatte laadtoestand van de
batterij aan.
Figuur 2 Aanduiding van opladende batterij
4.4 Joystickbediening (rijden en remmen)
Door de joystick in een specifieke richting te duwen, zal de elektrische
rolstoel in die richting bewegen. De snelheid hangt af van de mate waarin u
de joystick wegduwt uit het midden. Als de joystick maximaal naar buiten
wordt geduwd, zal de snelheid ook maximaal zijn (binnen de geselecteerde
rijfunctie).
Door de joystick weer naar centrale (neutrale) positie te bewegen tijdens het
rijden, zullen de remmen beginnen te werken totdat de rolstoel stopt.
Om geleidelijk te remmen, beweegt u de joystick zachtjes.
Voor een snelle stop, laat u de joystick los; de rolstoel zal zo snel
mogelijk stoppen.
Figuur 3 Joystickbewegingen
Zorg ervoor dat de joystick in neutrale (centrale) positie staat vooraleer de AAN/UIT-
knop in
te drukken, anders zal de elektronica blokkeren.
Nadat u de besturing heeft ingeschakeld met de AAN/UIT-
knop, moet de joystick nog
minstens 5 seconden in neutrale positie blijven staan. De besturing werd zo
geprogrammeerd voor technische en veiligheidsredenen. Als de joystick en AAN/UIT-
knop
tegelijkertijd worden geactiveerd, zal de besturing
blokkeren. Dit kan enkel worden
opgeheven door de besturing volledig UIT te schakelen.
Zorg ervoor dat de vrijloophendel in rempositie staat VOORDAT u de rolstoel AAN zet.
Elektromagnetische remmen werken NIET als de rolstoel in vrijloopmodus staat. Dit wordt
aangegeven op de besturing. Rijden is niet mogelijk.
4.5 Besturingsblokkering
De besturingsblokkering wordt vooral gebruikt om te beperken wie de besturing kan gebruiken,
maar het kan ook helpen voorkomen dat de besturing onbedoeld gebruikt wordt wanneer het
systeem gedurende langere tijd niet in gebruik is. Wanneer het systeem vergrendeld is, wordt
het uitgeschakeld, en de bedieningen voor de gebruiker zijn niet responsief. Als de AAN/UIT-
knop wordt ingedrukt wanneer het systeem geblokkeerd is, wordt de blokkeerstatus met de
batterij-indicator aan de gebruiker getoond.

LiNX 200
2023-03
Besturingsfuncties
9
NL
Om het systeem te blokkeren: druk op de AAN/UIT-knop en houd deze
gedurende 7 seconden ingedrukt.
Bij het starten van de blokkage geeft de batterij-indicator de omschakeling weer
door de LEDs 1, 3 en 5 (meest links, midden en meest rechts) driemaal te laten
knipperen.
Om het systeem te ontgrendelen: druk éénmaal op de AAN/UIT-knop, en
vervolgens tweemaal op de claxonknop - de claxonknop moet binnen 10
seconden na het indrukken van de AAN/UIT toets tweemaal worden ingedrukt.
Indien de gebruiker de ontgrendelprocedure niet correct uitvoert, binnen het
vooropgestelde tijdsframe, of de AAN/UIT-knop terug indrukt alvorens de
ontgrendelprocedure volledig uit te voeren, dan wordt de besturing opnieuw
geblokkeerd.
Tijdens een ontgrendelpoging geeft de batterij-indicator weer dat de besturing in
blokkeerstatus is door de LED's 1, 3 en 5 (meest links, midden, meest rechts) te
laten knipperen totdat de besturing wordt uitgeschakeld, ontgrendeld, of totdat de
cyclus time-out van ±10s bereikt is en de besturing automatisch uitschakelt.
4.6 Lichaamspositie aanpassen
Gevaar voor letsel of beschadiging
Houd er rekening mee dat de stabiliteit van uw rolstoel vermindert wanneer u de positie
aanpast van rechtop zittend naar gekanteld.
Zorg ervoor dat u voldoende ruimte heeft rondom de rolstoel om de
rugsteun en zit aan te
passen.
De verstelfuncties van de rolstoel kunnen bediend worden met de knop voor positieverstelling.
Afhankelijk van het type rolstoel zijn er tot 6 functies mogelijk.
Druk op de bovenkant van de knop om de volgende verstelfunctie te selecteren.
Druk op de onderkant van de knop om de vorige verstelfunctie te selecteren.
Beweeg de joystick naar voor of achter om uw lichaamspositie aan te passen.
Om terug te keren naar de basis zithouding, beweegt u de joystick naar achter
voor iedere functie.
Figuur 4 Selectieknop voor positieverstelling
De geselecteerde verstelfunctie wordt weergegeven op de actuator statusindicator zoals
hieronder getoond. Het display geeft enkel de beschikbare/geprogrammeerde functies voor uw
rolstoel weer.
Verstelfunctie Display Verstelfunctie Display
Inclinatie van de zit
Inclinatie van de rug
Lift
Beensteun links
VOORZICHTIG

LiNX 200
2023-03
Besturingsfuncties
10
NL
Beensteun rechts
Beensteun gelijktijdig /
Centrale voetplaat
Ongespecifieerd
Geen
4.7 Rijfunctie veranderen
De snelheidsfuncties van de rolstoel kunnen bediend worden met de knop voor
rijfunctie. Er zijn drie mogelijke rijfuncties.
Druk op de bovenkant van de knop om de volgende rijfunctie te selecteren.
Druk op de onderkant van de knop om de vorige rijfunctie te selecteren.
Figuur 5 Selectieknop voor rijfunctie
De geselecteerde rijfunctie wordt weergegeven op de rijfunctie-indicator aan de rechterzijde van
de selectieknop. De indicator heeft drie LEDs, een voor iedere mogelijke rijfunctie. Wanneer
rijfunctie 1 geselecteerd is, zal enkel de onderste LED branden. Voor rijfunctie 3 zullen alle LEDs
branden.
De maximale snelheid bij maximale verplaatsing van de joystick hangt af van de geselecteerde
rijfunctie (1, 2 of 3) en de manuele snelheidsinstelling binnen die functie.
4.7.1 De rijsnelheid aanpassen
Binnen iedere van de drie rijfuncties kan de snelheid nog aangepast
worden met de snelheidsregelaar, dit in 10 discrete stappen tussen
traagste (links) en snelste (rechts) snelheid. Deze draaiknop bevindt
zich rond de AAN/UIT-knop. Als geheugensteuntje werd er een
snelheidssymbool aangebracht boven de snelheidsregelaar, om de
trage en snelle posities aan te duiden.
Figuur 6 Snelheidsregelaar
4.7.2 Gelimiteerde rijsnelheid
Voor uw veiligheid zal de rijsnelheid van de rolstoel automatisch verlaagd worden wanneer
bepaalde verstellingen in lichaamspositie werden gemaakt. De snelheid wordt dan gelimiteerd tot
de laagste rijfunctie, of er treedt zelfs een volledige vergrendeling op.
Figuur 7 Inclinatie van de rug Figuur 8 Rijvergrendeling indicator
1
2
3
Traag
Snel

LiNX 200
2023-03
Besturingsfuncties
11
NL
Rij- en snelheidsbeperkingen treden op wanneer:
de lift werd ingesteld op een hogere positie. Enkel rijfunctie 1 is beschikbaar.
de ruginclinatie een bepaalde hoek overschrijdt (zie figuur 7):
1. Alle functies op uw rolstoel zijn beschikbaar.
2. Enkel rijfunctie 1 is beschikbaar.
3. Rijden is niet meer mogelijk. Verhoog de rugsteun totdat de vergrendeling wordt
opgeheven.
Om de gebruiker te informeren dat er een rijvergrendeling opgetreden is, zal de LED van het
rijwiel op de actuator statusindicator langzaam pinken, samen met de LED van de verstelling die
de vergrendeling veroorzaakt.
Bijv. Figuur 8: De LED van de rugsteun en het rijwiel pinken op de indicator. Dit betekent dat
de ruginclinatie te groot is, waardoor een rijvergrendeling optreedt.
Om de rij-/snelheidsbeperking op te heffen, laat u de lift zakken tot de standaard (laagste) positie,
en brengt u uw zit en rugsteun terug tot rechtop zittende positie.
4.8 Claxon
Druk op de claxonknop (6) om omstaanders te waarschuwen, zie figuur 1. De claxon werkt zolang
u de knop ingedrukt houdt.
4.9 Lichten
4.9.1 Voor- en achterlichten
Om de voor- en achterlichten in te
schakelen, drukt u eenmaal op de rechtse
verlichtingsknop (A) en laat deze snel
weer los. De LED achter de rechtse
verlichtingsknop blijft branden zolang de
lichten aan zijn.
Om de lichten uit te schakelen, drukt u op de linkse of rechtse verlichtingsknop (A/B).
4.9.2 Waarschuwingslichten
Om de waarschuwingslichten in te schakelen, drukt u eenmaal op de linkse verlichtingsknop
(B) en laat deze snel weer los. De LEDs achter de linkse en rechtse verlichtingsknoppen
blijven pinken zolang de waarschuwingslichten aan zijn.
Om de waarschuwingslichten uit te schakelen, drukt u op de linkse of rechtse
verlichtingsknop (A/B).
4.9.3 Richtingaanwijzers
Om een van de richtingaanwijzers in te schakelen, drukt u eenmaal op de linkse of rechtse
verlichtingsknop, afhankelijk van welke richting u uitgaat. De LED achter de verlichtingsknop
blijft pinken zolang de richtingaanwijzer in die richting aan is.
Om de richtingsaanwijzer uit te schakelen, drukt u op de linkse of rechtse verlichtingsknop
(A/B).
Wanneer de waarschuwingslichten aan zijn, blijven ze aan, ook wanneer de besturing
wordt uitgeschakeld met de AAN/UIT-knop.
De voor
-
en achterlichten gaan uit wanneer de besturing wordt uitgeschakeld.
Figuur 9 Bediening van de lichten
A
B

LiNX 200
2023-03
Probleemoplossing
12
NL
5 Probleemoplossing
Gevaar voor letsel of beschadiging aan de besturing of rolstoel
Probeer NOOIT zelf de besturing te repareren.
Bij storingen in de besturing dient u contact op te nemen met uw vakhandelaar.
Hij /Zij zal beslissen of de besturing geherprogrammeerd moet worden.
Bij storing wordt een foutcode weergegeven door de knipperende LED op de AAN/UIT-knop, zie
4.2. De volgende tabel somt de mogelijke foutcodes op. Sommige problemen kan u zelf oplossen.
Voor alle storingen in het grijs dient u echter uw vakhandelaar te contacteren.
Tabel 2: Probleemoplossing
Code
Probleem
Betekenis
1 Storing besturing/joystick
Controleer of de joystick in de neutrale positie staat als u de
rolstoel inschakelt.
Controleer of de joystick niet beschadigd is en goed
functioneert.
2
Netwerk- of
configuratiestoring
1. Controleer alle aansluitingspunten en kabels.
2. Controleer de software.
Als u geen defect kan vinden, contacteer dan uw vakhandelaar.
3
Linkse motor
(of de aansluiting)
is defect.
1. Controleer of de stekkers van beide motoren correct zijn
aangesloten.
2. Controleer de stekkercontacten van beide motoren op
corrosie of schade.
Deze fout wordt ook aangegeven wanneer de motoren niet
aangesloten zijn. Sluit terug aan en herstart het systeem.
4
Rechtermotor
(of de aansluiting) is
defect.
Zoals hierboven beschreven.
5
Linkse parkeerrem
(of de aansluiting)
is defect, of neutrale
positie van de rolstoel is
actief.
1. Controleer of de stekkers van beide motoren correct zijn
aangesloten.
2. Controleer de stekkercontacten op corrosie of schade.
6
Rechtse parkeerrem
(of de aansluiting)
is defect.
Zoals hierboven beschreven.
7
Module fout
(andere dan de
besturing)
Eén van de rolstoelonderdelen kan beschadigd zijn, uitgezonderd
van de besturing.
WAARSCHUWING

LiNX 200
2023-03
Inhalt
1
EN
NL
DE
Inhalt
Inhalt ........................................................................................................................ 1
Vorwort ....................................................................................................................... 2
1 Beschreibung ................................................................................................ 3
2 Vor der Benutzung ........................................................................................ 4
2.1 Allgemeine Sicherheitshinweise...................................................................... 4
3 Fahren ............................................................................................................ 5
4 Funktionen der Bedienkonsole .................................................................... 6
4.1 Ein- und Ausschalten ...................................................................................... 6
4.2 Fehler und Blockaden ..................................................................................... 6
4.3 Akkustatus und Aufladung .............................................................................. 6
4.4 Joystick-Betrieb (fahren und bremsen) ........................................................... 8
4.5 Sperren der Bedienkonsole ............................................................................ 8
4.6 Anpassen der Sitzposition .............................................................................. 9
4.7 Ändern der Fahrfunktion ............................................................................... 10
4.8 Signalhorn ..................................................................................................... 11
4.9 Beleuchtung .................................................................................................. 11
5 Störungsbeseitigung .................................................................................. 12

LiNX 200
2023-03
Vorwort
2
EN
NL
DE
Vorwort
Wichtiger Hinweis
Dieses Handbuch enthält die neuesten Produktentwicklungen. Vermeiren behält sich das Recht
vor, Veränderungen an dieser Art von Produkt vorzunehmen, ohne eine Verpflichtung
einzugehen, ähnliche bereits ausgelieferte Produkte anzupassen oder auszutauschen.
Die Abbildungen dienen zur Verdeutlichung der Anweisungen in diesem Handbuch. Das gezeigte
Produkt kann in Details von Ihrem Produkt abweichen.
Verfügbare Informationen
Auf unserer Webseite http://www.vermeiren.com/ finden Sie stets die aktuellste Version der in
diesem Handbuch beschriebenen Informationen. Informieren Sie sich bitte regelmäßig auf dieser
Website nach eventuell verfügbaren Aktualisierungen.
Sehbehinderte Menschen können sich die elektronische Version dieses Handbuchs
herunterladen und mit Hilfe einer Sprachsyntheselösung („Text-to-Speech-Software“) vorlesen
lassen.
Benutzerhandbuch für die Bedienkonsole
Für Benutzer und Fachhändler
Benutzerhandbuch für einen Rollstuhl
Für Benutzer und Fachhändler
Montageanleitung für einen Rollstuhl
Für Fachhändler
Benutzerhandbuch für Akku und Ladegerät
Für Benutzer und Fachhändler

LiNX 200
2023-03
Beschreibung
3
EN
NL
DE
1 Beschreibung
Mit der in Ihren elektrischen Rollstuhl integrierten Bedienkonsole können Sie sowohl sämtliche
Fahr-, Lenk-, Brems- und Betriebsprozesse als auch andere Stellmotoren steuern (Hubsäule,
Sitz- und Rücklehnenverstellung). Elektroeinheit und Elektronik des Rollstuhls werden intern
kontinuierlich überwacht.
Das folgenden Abbildungen zeigen alle Komponenten, die für den Benutzer wichtig sind.
1. Akkuladestandsanzeige
2. EIN / AUS-Taste mit
Statusanzeige
3.
Geschwindigkeitsschalter
4.
Positionsanpassungstaste
5. Fahrfunktionstaste
6.
Signalhorntaste
7. Antriebs- und Aktuatorstatus
8. Fahrlicht und Blinker rechts
9. Warnblinkleuchten und Blinker
links
10.
Joystick
11. Softwareinstallationsanschluss
12.
Akkuladegerätanschluss
11
12
2
1
3
6
10
5 4
7
9
8

LiNX 200
2023-03
Vor der Benutzung
4
EN
NL
DE
2 Vor der Benutzung
Gefahr von Personen- oder Sachschäden
Dieses Produkt darf NICHT montiert, gewartet oder benutzt werden, es sei denn, dass zuvor
sämtliche Anweisungen in diesem Handbuch sowie alle relevanten Handbücher in Bezug auf
den mit diesem Produkt ausgestatteten Rollstuhl aufmerksam gelesen und vollstän
dig
verstanden wurden.
Versuchen Sie unter keinen Umständen, die Konsole zu öffnen oder zu demontieren –
es
befinden sich keine benutzerseitig zu wartenden Teile darin.
Bei Zweifeln oder Fragen wenden Sie sich bitte zwecks Hilfe an Ihren
Fachhändler,
Pflegedienst oder Fachberater.
2.1 Allgemeine Sicherheitshinweise
Beachten Sie bei der Benutzung die folgenden allgemeinen Warnhinweise:
Die Bedienkonsolen wurden an typischen, repräsentativen Fahrzeugen auf
elektromagnetische Verträglichkeit getestet und entsprechen den relevanten EMV-Normen:
EN 12184: 2014, ISO7176-21: 2009. Dennoch können Quellen elektromagnetischer Felder
wie Mobiltelefone, Stromgeneratoren oder Energiequellen mit hoher Leistung die Fahrleistung
Ihres Rollstuhls beeinträchtigen. Andererseits kann auch die Elektronik Ihres Rollstuhls
Einfluss auf andere elektronische Geräte wie Alarmanlagen in Geschäften und Automatiktüren
haben. Wir empfehlen daher, dass Sie Ihre Bedienkonsole und Ihren Rollstuhl regelmäßig auf
Beschädigungen und Verschleiß überprüfen, weil dies solche Beeinträchtigungen verstärken
könnte.
Beachten Sie, dass die Oberfläche der Bedienkonsole aufgrund von Umgebungstemperatur,
Sonneneinstrahlung oder Heizkörpern sehr warm werden könnte. Seien Sie daher vorsichtig
beim Berühren.
Achten Sie darauf, dass die Bedienkonsole die zulässige Minimal- oder Maximaltemperatur
nicht unter- oder überschreitet (siehe Rollstuhl-Benutzerhandbuch).
Achten Sie vor dem Einschalten des Rollstuhls darauf, in welcher Umgebung/Situation Sie sich
befinden. Stellen Sie Ihre Geschwindigkeit entsprechend ein, bevor Sie losfahren. Wir
empfehlen, beim Fahren in Innenräumen die langsamste Geschwindigkeitseinstellung zu
wählen. Beim Fahren im Freien können Sie eine Geschwindigkeit wählen, bei der Sie sich wohl
und sicher fühlen.
Berühren Sie die Anschlussstifte nicht. Sie könnten verschmutzt oder aufgrund einer
elektrostatischen Entladung beschädigt werden.
Falls der Rollstuhl keinen Handschutz für die Bedienkonsole hat, ist Ihre Hand nicht vor
Verletzungen geschützt (beispielsweise beim Heranmanövrieren an einen Tisch).
Der XLR-Anschluss an der Steuerung darf nur für den beabsichtigten Zweck, das heißt das
Aufladen der Batterie und/oder Programmieren der Steuerung, verwendet werden. Die
Garantie erlischt, wenn ein nicht autorisiertes Gerät an diesen Anschluss angeschlossen wird.
Achten Sie darauf, dass das mit dem Fahrzeug verwendete Batterieladegerät eine
Fahrsperrfunktion hat, die für die Verwendung mit der Steuerung richtig angeschlossen ist. Die
Fahrsperrfunktion soll verhindern, dass der Rollstuhl fährt, während die Batterie geladen wird.
Wenn Sie unsicher sind, fragen Sie Ihren Händler.
Schalten Sie die Steuerung umgehend aus und wenden Sie sich an Ihren Servicevertreter,
wenn das Fahrzeug:
o beschädigt ist;
o sich immer wieder anders verhält;
o sich nicht normal verhält, wie Sie es erwarten;
WARNUNG
Für Softwareupdates/-
reparaturen ist Vermeiren zuständig. Für Anpassungen der Software
wenden Sie sich bitte an Vermeiren; siehe unsere Website
http://www.
vermeiren
.com/

LiNX 200
2023-03
Fahren
5
EN
NL
DE
o heißer als normal wird;
o raucht;
o seine Geschwindigkeit nicht ändert, wenn Sie den Geschwindigkeitsregler betätigen;
o einen Fehler auf der Fehleranzeige anzeigt und die Steuerung nicht normal funktioniert.
Schalten Sie die Steuerung aus:
o wenn Sie sie nicht verwenden;
o wenn Sie sich auf den Rollstuhl setzen oder ihn verlassen;
o wenn das Fahrzeug von selbst oder gegen Ihren Willen fährt. Wenn Sie die Steuerung
ausschalten, hält das Fahrzeug an.
Sollte sich ein schwerwiegender Zwischenfall mit Ihrem Produkt ereignet haben, benachrichtigen
Sie Vermeiren oder Ihren Fachhändler sowie die zuständige Behörde in Ihrem Land.
3 Fahren
1. Drücken Sie auf die EIN/AUS-Taste.
2. Wenn die LED der EIN/AUS-Taste grün leuchtet, ist der Rollstuhl betriebsbereit.
3. Kontrollieren Sie die Akkustatusanzeige. Laden Sie den Akku ggf. auf (siehe Abschnitt 4.3).
4. Wählen Sie das Fahrprogramm und stellen Sie mit dem Geschwindigkeitsschalter die
Fahrgeschwindigkeit mit ein (siehe Fahrfunktionen in Abschnitt 4.7).
5. Setzen Sie den Rollstuhl in Bewegung, indem Sie den Joystick langsam nach vorn/hinten
bewegen.
6. Die Geschwindigkeit nimmt zu, je stärker der Joystick aus seiner Mittelstellung gedrückt wird.
7. Um nach links oder rechts zu fahren, drücken Sie den Joystick entsprechend nach links bzw.
rechts. Bei Fahren im Freien sind die Fahrtrichtungsanzeiger zu betätigen (siehe Abschnitt
4.9).
8. Um abzubremsen, bringen Sie den Joystick in die Neutralstellung.
9. Kontrollieren Sie nach der Ankunft den Akkustatus und betätigen Sie die EIN/AUS-Taste.
10. Laden Sie den Akku ggf. auf.

LiNX 200
2023-03
Funktionen der Bedienkonsole
6
EN
NL
DE
4 Funktionen der Bedienkonsole
Mit der Bedienkonsole können Sie sowohl sämtliche Fahrkomponenten als auch die Stellmotoren
zum Anpassen der Sitzposition steuern. Zu Ihrer eigenen Sicherheit und zur Vermeidung von
Schäden am Rollstuhl werden die Bewegungen von der Elektronik überwacht. Dies kann dazu
führen, dass die Bewegung blockiert, die Geschwindigkeit verringert oder die Fahrt komplett
gestoppt wird.
4.1 Ein- und Ausschalten
Bringen Sie den Joystick in die Neutral(Mittel)stellung, bevor Sie die EIN/AUS-Taste
betätigen.
Falls die Konsole eingeschaltet wird, während sich der Joystick nicht in der
Neutralstellung befindet, fährt der Rollstuhl nicht. Lassen Sie den Joystick innerhalb
von 5 Sekunden los (zurück zu Neutral), um die Antriebssperre aufzuheben. Falls der
Joystick nicht innerhalb von 5 Sekunden losgelassen wird, wird aus dem Fehler ein
Modulfehler, der durch eine rot blinkende LED in der EIN/AUS-Taste angezeigt wird.
Der Rollstuhl lässt sich dann nicht mehr bewegen. Um den Modulfehler zu beheben,
lassen Sie den Joystick los und schalten die Bedienkonsole zunächst AUS und dann
wieder EIN.
Um die Bedienkonsole einzuschalten, betätigen Sie die EIN/AUS-Taste einmal.
Die LED (Statusanzeige) in der EIN/AUS-Taste leuchtet auf. Wenn sie grün leuchtet, ist die
Bedienkonsole wieder betriebsbereit. Sollte die LED anfangen rot zu blinken, liegt ein Fehler
vor (siehe Abschnitt 4.2 und Abschnitt 5).
Um die Bedienkonsole auszuschalten, betätigen Sie die EIN/AUS-Taste einmal.
Die Bedienkonsole wird ausgeschaltet und die Statusanzeige erlischt.
4.1.1 Notstopp
Um die Fahrt oder Sitzeinstellung abrupt zu stoppen, drücken Sie die EIN/AUS-Taste, um einen
NOTSTOPP vorzunehmen. Der Rollstuhl kommt daraufhin umgehend zum Stehen.
4.1.2 Ruhemodus
Nach einer bestimmten Inaktivitätsdauer (Standardvorgabe 5 Minuten) wechselt die
Bedienkonsole in den Ruhemodus.
Das System ist dann teilweise ausgeschaltet, um den Energieverbrauch zu reduzieren.
Um die Bedienkonsole wieder zu aktivieren, betätigen Sie eine Taste oder bewegen den Joystick.
4.2 Fehler und Blockaden
Falls bei eingeschalteter Bedienkonsole ein Fehler auftritt, beginnt die EIN/AUS-Taste
rot zu blinken. Die Blinkhäufigkeit gibt den Fehlercode an. Im Fall eines Fehlers sind
eine oder alle Funktionen der Bedienkonsole blockiert. Für weitergehende
Informationen siehe Abschnitt 5.
4.3 Akkustatus und Aufladung
Gefahr von Personen- oder Sachschäden
Befolgen Sie die Ladeanweisungen in der Bedienungsanleitung zum Rollstuhl sowie im
Benutzerhandbuch des Akkuladegeräts.
WARNUNG

LiNX 200
2023-03
Funktionen der Bedienkonsole
7
EN
NL
DE
Die Akkuladestandsanzeige (über der EIN/AUS-Taste)
zeigt an, dass Ihr Rollstuhl eingeschaltet ist. Die Anzeige
gibt eine Einschätzung der verbleibenden Akkukapazität.
Die nachstehende Tabelle enthält alle Akkuanzeigen
und deren Bedeutung.
Tabelle 1: Akkuladestandsanzeige
Anzeige Beschreibung Bedeutung Anmerkungen
Alle LED´s erloschen. System aus.
Alle LEDs leuchten und
die grünen LEDs blinken.
System an.
Überspannungswarnung:
Der Ladezustand hat den
Überspannungswert
überschritten.
Warnung: Akku ist zu voll.
Reduzieren Sie die
Geschwindigkeit, wenn Sie
eine Steigung
hinunterfahren.
Alle LED´s stetig
leuchtend.
System an. LED´s zeigen den
Ladezustand an: Akkus voll
(zwischen 81 % und 100 %
der Gesamtkapazität)
1 grüne LED leuchtet. System an. Der Ladestand ist
gesunken.
Nur rote und orange LEDs
leuchten.
Niedrige Batterieladung. Batterie halb voll beladen.
Machen Sie sich auf den
Heimweg.
Die rote und und eine
orange LED leuchten.
Sehr niedrige Akkuladung. Akkus fast leer (zwischen 0
% und 20 % der
Gesamtkapazität). Bald
aufladen.
Nur die rote LED leuchtet. Der Akku ist fast leer. Laden Sie ihn jetzt auf.
Eine rote LED blinkend. Akku ist leer.
Unterspannungswarnung:
Der Ladezustand ist unter
den Unterspannungswert
gefallen.
Laden Sie ihn sofort auf.
Die rote LED an der
Ladeanzeige blinkt.
Die Statusleuchte zeigt
den Blinkcode 2 oder 7 an.
Die Hupe ertönt alle 10
Sekunden.
Die Spannung der Akkus
sinkt unter den
Abschaltwert.
Die Akkus sind vollständig
entladen und sollten nicht
weiter entladen werden.
Display und Rollstuhl
werden automatisch
ausgeschaltet.
Akku-
ladestands-
anzeige

LiNX 200
2023-03
Funktionen der Bedienkonsole
8
EN
NL
DE
4.3.1 Aufladung
Solange das System aufgeladen wird, kann nicht gefahren werden.
Der Ladevorgang ist möglich, ohne die Bedienkonsole einzuschalten. Um die
Akkustatusanzeige zu kontrollieren, muss der Schalter auf EIN gestellt werden.
Schließen Sie das Ladegerät an die XLR-Buchse (12) an, siehe
Abb. 1.
Die Ladeanzeige zeigt das Laden des Systems durch das
abwechselnde Aufleuchten der LEDs von links nach rechts an.
Anschließend wird der ungefähre Ladestand angezeigt.
4.4 Joystick-Betrieb (fahren und bremsen)
Wenn der Joystick in eine bestimmte Richtung bewegt wird, fährt der
Elektrorollstuhl in die betreffende Richtung. Die Fahrgeschwindigkeit ist
davon abhängig, wie stark der Joystick aus der Neutralstellung bewegt wird.
Wenn der Joystick in die maximale Auslenkung gedrückt/gezogen wird, ist
die Geschwindigkeit am größten (innerhalb des gewählten Fahrmodus).
Wenn der Joystick während des Fahrens in seine Mittelstellung (Neutral)
gebracht wird, wird der Rollstuhl bis zum Stillstand abgebremst:
Um behutsam abzubremsen, bewegen Sie den Joystick entsprechend
langsam.
Um sofort zu stoppen, lassen Sie den Joystick los; der Rollstuhl wird
daraufhin umgehend zum Stehen gebracht.
Achten Sie darauf, dass sich der Joystick in seiner Neutral(Mitte
l)stellung befindet, wenn
Sie die EIN/AUS-Taste betätigen. Andernfalls wird die Elektronik gesperrt.
Nachdem die Bedienkonsole mit der EIN/AUS-
Taste eingeschaltet wurde, muss der Joystick
mindestens 5 Sekunden lang in der Mittelstellung verbleiben. Die B
edienkonsole wurde aus
technischen und sicherheitsrelevanten Gründen so programmiert. Falls der Joystick und die
EIN/AUS-
Taste gleichzeitig betätigt werden, wird die Lenkung blockiert und lässt sich nur
wieder entsperren, indem das System komplett ausgesch
altet wird.
Achten Sie darauf, dass sich der Freilaufhebel in der Bremsstellung befindet, BEVOR Sie
den Rollstuhl einschalten. Die elektromagnetischen Bremsen funktionieren NICHT, wenn
sich der Rollstuhl im Freilaufmodus befindet. Dies wird auf der Bedienkonsole angezeigt.
Fahren ist dann nicht möglich.
4.5 Sperren der Bedienkonsole
Die Sperrfunktion ist hauptsächlich dafür vorgesehen, eine unbefugte Benutzung des Rollstuhls
zu unterbinden. Sie kann aber auch eine unbeabsichtigte Bedienung der Steuerungselemente
verhindern, falls das System für längere Zeit nicht benutzt wird. Wenn das System gesperrt ist,
wird es heruntergefahren und die Bedienelemente reagieren nicht mehr. Wenn man bei einem
gesperrten System die EIN/AUS-Taste betätigt, wird über die Akkuladestandsanzeige der
Gesperrt-Status angezeigt.

LiNX 200
2023-03
Funktionen der Bedienkonsole
9
EN
NL
DE
Halten Sie zum Sperren des Systems die Netztaste 7 Sekunden lang gedrückt.
Wenn das System in den gesperrten Zustand geht, wird dies durch die
Batterieanzeige durch dreimaliges Blinken der LEDs 1, 3 und 5 (ganz links, Mitte
und ganz rechts) angezeigt.
Drücken Sie zum Entsperren des Systems die Netztaste einmal und
anschließend die Hupe-Taste zweimal. Die Hupe-Taste muss innerhalb von 10
Sekunden nach Drücken der Netztaste zweimal gedrückt werden.
Falls der Benutzer die Entsperrsequenz innerhalb der vorgegebenen Frist nicht
korrekt ausführt oder die EIN/AUS-Taste erneut betätigt wird, bevor die
Entsperrsequenz abgeschlossen ist, wechselt das System wieder in den
Gesperrt-Status.
Während eines Entsperrversuchs gibt die Batterieanzeige durch Blinken der
LEDs 1, 3 und 5 (ganz links, Mitte, ganz rechts) an, dass sich das System im
gesperrten Zustand befindet, bis entweder das System ausgeschaltet oder
entsperrt wird oder die Zeitüberschreitung der Sequenz ±15 Sekunden erreicht
ist und die Steuerung sich automatisch abschaltet.
4.6 Anpassen der Sitzposition
Gefahr von Personen- oder Sachschäden
Denken Sie daran, dass sich die Stabilität verringert, wenn die Sitzposition im Rollstuhl von
aufrecht zu geneigt verändert wird.
Achten Sie darauf,
dass genügend Platz um den Rollstuhl herum vorhanden ist, um
Rückenlehne und Sitz zu verstellen.
Einstellungen am Rollstuhl können mit der Positionsanpassungstaste vorgenommen werden. Je
nach Rollstuhltyp können bis zu 6 Funktionen verfügbar sein.
Drücken Sie oben auf die Taste, um die nächste Einstellfunktion zu wählen.
Drücken Sie unten auf die Taste, um die vorige Einstellfunktion zu wählen.
Um die Sitzposition einzustellen, bewegen Sie den Joystick nach vorn oder hinten.
Um zur ursprünglichen Sitzposition zurückzukehren, bewegen Sie den Joystick für
jede vorgenommene Einstellung zurück.
Die ausgewählte Einstellfunktion wird auf der Antriebs-/Aktuatorstatusanzeige wie unten
dargestellt angezeigt. Die Anzeige zeigt nur die verfügbaren/programmierten Funktionen Ihres
Rollstuhls.
Verstellfunktion Anzeige Verstellfunktion Anzeige
Sitzkantelung
Rückenkantelung
Lift
Beinstütze links
VORSICHT

LiNX 200
2023-03
Funktionen der Bedienkonsole
10
EN
NL
DE
Beinstütze rechts
Beinstützen gleichzeitig /
zentrale Fußplatte
Nicht angegeben
Keine
4.7 Ändern der Fahrfunktion
Die Geschwindigkeitseinstellungen des Rollstuhls können mit der
Fahrtauswahltaste vorgenommen werden. Es sind drei Fahrfunktionen verfügbar.
Drücken Sie oben auf die Taste, um die nächste Fahrfunktion zu wählen.
Drücken Sie unten auf die Taste, um die vorige Fahrfunktion zu wählen.
Die gewählte Fahrfunktion wird auf der Fahrfunktionsanzeige rechts neben der Fahrtauswahltaste
angezeigt. Die Anzeige hat drei LEDs,jeweils eine für jede verfügbare Fahrfunktion. Bei Auswahl
der Fahrfunktion 1 leuchtet nur die untere LED. Bei Auswahl der Fahrfunktion 3 leuchten alle
LEDs.
Die Höchstgeschwindigkeit bei maximaler Auslenkung des Joysticks ist von der jeweils gewählten
Fahrfunktion (1, 2 oder 3) sowie der manuellen Geschwindigkeitseinstellung für diese Funktion
abhängig.
4.7.1 Anpassen der Fahrgeschwindigkeit
In jeder der drei Fahrfunktionen kann die Geschwindigkeit mit dem
entsprechenden Drehschalter in 10 Einzelschritten zwischen minimal
(links) und maximal (rechts) angepasst werden. Dieser Drehschalter
ist um die EIN/AUS-Taste herum angeordnet. Als optischer Hinweis
befindet sich über dem Drehschalter ein Geschwindigkeitssymbol,
um die Minimal- und Maximalposition anzuzeigen.
4.7.2 Beschränkte Fahrgeschwindigkeit
Zu Ihrer Sicherheit wird die Fahrgeschwindigkeit des Rollstuhls automatisch reduziert, wenn
bestimmte Veränderungen der Sitzstellung vorgenommen wurden. Der Antrieb des Rollstuhls
wird dann auf die geringste Geschwindigkeitseinstellung beschränkt oder sogar vollständig
blockiert.
1
2
3
Langsam
Schnell

LiNX 200
2023-03
Funktionen der Bedienkonsole
11
EN
NL
DE
Fahr- und Geschwindigkeitsbegrenzungen erfolgen, wenn:
der Lift auf eine höhere Position verstellt wurde; verfügbar ist nur
Geschwindigkeitseinstellung 1
die Rückenlehnenneigung einen bestimmten Winkel überschreitet (siehe Abb. 7):
1. Alle Funktionen Ihres Rollstuhls sind verfügbar.
2. Nur Geschwindigkeitseinstellung 1 ist verfügbar.
3. Der Rollstuhl kann nicht mehr bewegt werden. Heben Sie die Rückenlehne an, bis
die Sperre aufgehoben ist.
Als Hinweis für den Benutzer, dass mit dem Rollstuhl nicht mehr gefahren werden kann, blinkt
Antriebsrad-LED auf der Aktuatorstatusanzeige langsam; zudem zeigt die LED an, welche
Einstellungsveränderung die Blockade verursacht hat.
Beispiel Abb. 8: Die Rückenlehnen- und Antriebsrad-LEDs auf der Anzeige blinken. Dies
bedeutet, dass die Rückenlehne zu sehr geneigt ist und eine Fahrtunterbindung verursacht
hat.
Um die Geschwindigkeits-/Fahrtbeschränkungen aufzuheben, senken Sie den Lift auf die
Standardposition (unterste) ab und bringen Sitz und Rückenlehne in eine aufrechte Sitzposition.
4.8 Signalhorn
Drücken Sie die Signalhorntaste (6), um Passanten zu warnen (siehe Abb. 1). Das Signalhorn
ertönt so lange, wie die Taste betätigt wird.
4.9 Beleuchtung
4.9.1 Front- und Rückleuchten
Um die Front- und Rückleuchten
einzuschalten, drücken Sie einmal kurz
die rechte Beleuchtungstaste (A). Die
LED hinter der rechten Beleuchtungstaste
leuchtet so lange, wie die Leuchten
eingeschaltet sind.
Um die Leuchten auszuschalten, drücken Sie die rechte oder linke Beleuchtungstaste (A/B).
4.9.2 Warnblinker
Um die Warnblinker einzuschalten, drücken Sie die linke Beleuchtungstaste (B) einmal kurz.
Die LEDs der linken Taste und rechten Taste blinken, solange die Warnblinker in Betrieb
sind.
Um die Warnblinker auszuschalten, drücken Sie die linke oder rechte Beleuchtungstaste
(A/B).
4.9.3 Fahrtrichtungsanzeigen
Um eine der Fahrtrichtungsanzeigen einzuschalten, drücken Sie (je nachdem, wohin Sie
fahren wollen) die linke bzw. die rechte Beleuchtungstaste einmal. Die LED hinter der Taste
blinkt so lange, wie der entsprechende Fahrtrichtungsanzeiger eingeschaltet ist.
Um einen Fahrtrichtungsanzeiger auszuschalten, drücken Sie die linke oder rechte
Beleuchtungstaste (A/B).
Nachdem die Warnblinkleuchten
eingeschaltet wurden, bleiben Sie es auch dann, wenn
die Bedienkonsole mit der EIN/AUS-Taste ausgeschaltet wird.
Die Fahrleuchten gehen aus, wenn die Bedienkonsole ausgeschaltet wird.
A
B

LiNX 200
2023-03
Störungsbeseitigung
12
EN
NL
DE
5 Störungsbeseitigung
Gefahr von Verletzungen und Schäden an der
Bedienkonsole oder am
Rollstuhl.
Versuchen Sie KEINESFALLS, die Bedienkonsole selbst zu reparieren.
Bei Fehlern an der Bedienkonsole müssen Sie sich an Ihren Fachhändler wenden.
Er entscheidet, ob die Konsole neu programmiert werden muss.
Bei einer Störung wird durch die blinkende LED in der EIN/AUS-Taste ein Fehlercode angezeigt
(siehe Abschnitt 4.2). Mögliche Fehlercodes sind in der folgenden Tabelle zusammengefasst.
Einige Probleme können Sie auch selbst beheben. Bei allen grau hinterlegten Fehlern wenden
Sie sich bitte an Ihren Fachhändler.
Tabelle 2: Störungsbeseitigung
Code
Problem
Bedeutung
1
Fehler an
Fernbedienung/Joystick
Überprüfen Sie, ob sich beim Einschalten der Bedienkonsole der
Joystick in seiner Neutral(Mittel)stellung befindet.
Überprüfen Sie, ob der Joystick beschädigt ist oder nicht
einwandfrei funktioniert.
2
Netzwerk- oder
Konfigurationsfehler
1. Überprüfen Sie alle Anschlüsse und Kabel.
2. Überprüfen Sie, ob die Software einwandfrei funktioniert.
Falls Sie keinen Fehler feststellen können, wenden Sie sich bitte
an Ihren Fachhändler.
3
Linker Motor (oder
Anschluss) defekt
1. Überprüfen Sie, ob die Stecker der beiden Motoren korrekt
angeschlossen sind.
2. Kontrollieren Sie die Steckerkontakte beider Motoren auf
Korrosion oder Beschädigung.
Dieser Fehler tritt auch auf, wenn die Motoren abgetrennt
sind.
Schließen Sie sie wieder an und starten Sie das System neu.
4 Rechter Motor (oder
Anschluss) defekt.
Siehe oben.
5
Linke Parkbremse (oder
Anschluss) defekt oder
neutral aktiv.
1. Überprüfen Sie, ob die Stecker der beiden Motoren korrekt
angeschlossen sind.
2. Kontrollieren Sie die Steckerkontakte auf Korrosion oder
Beschädigung.
6 Rechte Parkbremse
(oder Anschluss) defekt.
Siehe oben.
7
Modulfehler (nicht an der
Fernbedienung)
Eventuell ist nicht die Bedienkonsole, sondern eine der
Rollstuhlkomponenten beschädigt.
WARNUNG

LiNX 200
2023-03
Indice
1
EN
NL
IT
Indice
Indice ........................................................................................................................ 1
Premessa.................................................................................................................... 2
1 Descrizione .................................................................................................... 3
2 Prima dell’uso ............................................................................................... 4
2.1 Istruzioni generali di sicurezza ........................................................................ 4
3 Guida .................................................................. 5
4 Funzioni della console di comando ............................................................ 6
4.1 Accensione/spegnimento ................................................................................ 6
4.2 Guasti e blocchi .............................................................................................. 6
4.3 Stato e ricarica delle batterie .......................................................................... 6
4.4 Azionamento del joystick (guida e frenata) ..................................................... 8
4.5 Blocco della console di comando .................................................................... 8
4.6 Regolazione della posizione del corpo ............................................................ 9
4.7 Cambio della funzione di guida ..................................................................... 10
4.8 Clacson ......................................................................................................... 11
4.9 Luci ............................................................................................................... 11
5 Soluzione dei problemi di funzionamento ................................................ 12

LiNX 200
2023-03
Premessa
2
EN
NL
IT
Premessa
Nota importante
Questo manuale rispecchia gli sviluppi più recenti del prodotto. Vermeiren si riserva il diritto di
introdurre modifiche di questo tipo di prodotto senza alcun obbligo di adattare o sostituire i prodotti
analoghi consegnati in precedenza.
Le immagini vengono utilizzate per chiarire le istruzioni contenute nel manuale. I dettagli del
prodotto raffigurato possono essere diversi da quelli del prodotto in uso.
Informazioni disponibili
Sul sito Web di Vermeiren, all'indirizzo http://www.vermeiren.com/, è sempre disponibile la
versione più recente delle informazioni contenute in questo manuale. Visitare con regolarità tale
sito per verificare l’esistenza di eventuali aggiornamenti.
Le persone ipovedenti possono scaricare la versione elettronica di questo manuale e farlo leggere
da un software applicativo di sintesi vocale.
Manuale d'uso della console di comando
Per l'utente e il rivenditore specializzato
Manuale d'uso della carrozzina
Per l'utente e il rivenditore specializzato
Manuale di installazione della carrozzina
Per il rivenditore specializzato
Manuale d'uso della batteria e del caricabatterie
Per l'utente e il rivenditore specializzato

LiNX 200
2023-03
Descrizione
3
EN
NL
IT
1 Descrizione
La console di comando integrata nella carrozzina elettrica permette di controllare tutte le
operazioni di guida, sterzatura, frenata e azionamento, nonché di altri motori elettrici di
regolazione (del montante di sollevamento, del sedile e dello schienale). I gruppi elettrici ed
elettronici della carrozzina sono oggetto di un costante monitoraggio interno.
Le immagini riportate di seguito mostrano tutti i componenti di rilievo per l'utente.
1. Indicatore dello stato di carica
della batteria
2. Pulsante ON/OFF con indicatore
di stato
3.
Interruttore della velocità
4. Pulsante di regolazione della
posizione
5. Pulsante della funzione di guida
6.
Pulsante del clacson
7. Stato della trazione e degli
attuatori
8. Luci di marcia e indicatore di
direzione destro
9. Luci di emergenza e indicatore di
direzione sinistro
10.
Joystick
11. Collegamento per l'installazione
del software
12. Collegamento per la ricarica della
batteria
11
12
2
1
3
6
10
5 4
7
9
8

LiNX 200
2023-03
Prima dell’uso
4
EN
NL
IT
2 Prima dell’uso
Rischio di lesioni e danni
NON procedere all'installazione, alla manutenzione o all'uso di questo prodotto senza avere
letto e compreso a fondo tutte le istruzioni contenute in questo manuale e in tutti i manuali
pertinenti relativi alla carrozzina dotata di questo prodotto.
Non
tentare in alcun caso di aprire o smontare la console, poiché al suo interno non sono
presenti componenti di cui l'utente possa effettuare la manutenzione.
In caso di dubbi o domande, non esitare a rivolgersi al proprio rivenditore specializzato di zona,
al proprio fornitore di cure sanitarie o a un consulente tecnico per un aiuto al riguardo.
2.1 Istruzioni generali di sicurezza
Durante l’uso, tenere presenti le seguenti avvertenze generali:
Le console di comando sono state sottoposte a prove di compatibilità elettromagnetica su
veicoli tipici e rappresentativi, e sono conformi alle norme EMC appropriate, EN 12184:2014
e ISO 7176-21:2009. Le fonti di campi elettromagnetici, come quelli di telefoni cellulari,
generatori di corrente o fonti energetiche di grande potenza, possono tuttavia influire sulle
prestazioni di guida della carrozzina. L’elettronica della carrozzina può d’altro canto influire
su altri apparati elettronici, come i sistemi di allarme dei negozi e le porte automatiche. Si
consiglia pertanto di sottoporre la carrozzina a verifiche regolari degli eventuali danni e
dell’usura, poiché i medesimi possono rendere più intense le interferenze.
Non dimenticare che la superficie della console di comando può diventare molto calda a
causa della radiazione solare o di dispositivi di riscaldamento. Prestare attenzione quando si
tocca la console.
Accertarsi che la centralina di controllo non raggiunga temperature inferiori o superiori
rispettivamente ai valori minimo e massimo consentiti; vedere il manuale d'uso della
carrozzina.
Prima di accendere la carrozzina, prestare attenzione all’ambiente / alla situazione in cui ci si
trova. Regolare di conseguenza la velocità prima di mettersi in movimento. Per l’uso al
coperto, si consiglia di adottare l’impostazione di velocità minima. Per l’uso all’aperto, è
possibile regolare la velocità su un valore appropriato, che dia una sensazione di comfort e
sicurezza.
Non toccare i pin dei connettori. Se li si tocca, i pin possono sporcarsi, oppure subire danni
dovuti a scariche elettrostatiche.
Se la carrozzina non è dotata di un riparo per le mani per la console di comando, non
dimenticare che le mani non sono protette dallo schiacciamento, ad esempio quando ci si
dirige verso un tavolo.
Il connettore XLR sull'unità di controllo va utilizzato esclusivamente per lo scopo per il quale
è stato progettato, ossia caricare le batterie e/o programmare l'unità di controllo. La garanzia
decade qualora alla porta vengano collegati dispositivi non autorizzati.
Verificare che il caricabatterie usato per il veicolo disponga di una funzione di blocco della
marcia correttamente collegata per l'uso con l'unità di controllo. Tale funzione è pensata per
impedire che la carrozzina venga messa in moto mentre la batteria è sotto carica. In caso di
dubbi, chiedere al rivenditore.
Spegnere immediatamente l'unità di controllo e consultare il proprio rappresentante per
l'assistenza se il veicolo:
AVVERTENZA
Vermeiren è responsabile degli aggiornamenti / delle riparazioni del software. Per eventuali
adattamenti del software, rivolgersi a Vermeiren; vedere il suo sito Web
http://www.
vermeiren
.com/

LiNX 200
2023-03
Guida
5
EN
NL
IT
o È danneggiato
o Non presenta sempre lo stesso funzionamento
o Non risponde normalmente, nel modo in cui dovrebbe
o Si surriscalda
o Emette fumo
o Non cambia velocità mediante l'apposito regolatore
o Segnala un guasto sull'apposito indicatore e l'unità di controllo non funziona
normalmente.
Spegnere l'unità di controllo:
o Quando non viene usata
o Prima di salire o scendere dalla carrozzina
o Se il veicolo si muove autonomamente senza l'intervento dell'utilizzatore. Spegnendo
l'unità di controllo, il veicolo si ferma.
Nel caso in cui si sia verificato un grave incidente con il vostro prodotto, informate Vermeiren o il
vostro rivenditore specializzato e l'autorità competente del vostro paese.
3 Guida
1. Premere il pulsante ON/OFF.
2. Se la luce presente sul pulsante ON/OFF è verde, la carrozzina è alimentata e pronta a
muoversi.
3. Verificare l'indicatore dello stato delle batterie. Caricare la batteria secondo necessità (vedere
il § 4.3).
4. Selezionare il programma di guida e regolare la velocità di marcia utilizzando l'interruttore
della velocità; vedere le funzioni di guida nel § 4.7.
5. Mettere in movimento la carrozzina spostando lentamente in avanti / all'indietro il joystick.
6. La velocità aumenta quando si allontana maggiormente il joystick dalla posizione centrale.
7. Per curvare verso destra o verso sinistra, spingere il joystick verso destra o verso sinistra.
Quando si guida all'aperto, utilizzare gli indicatori di direzione; vedere il § 4.9.
8. Per frenare, portare il joystick nella posizione di folle.
9. Una volta giunti a destinazione, verificare lo stato delle batterie e premere il pulsante ON/OFF.
10. Caricare la batteria secondo necessità.

LiNX 200
2023-03
Funzioni della console di comando
6
EN
NL
IT
4 Funzioni della console di comando
La console di comando permette di controllare tutti i componenti di azionamento e i motori elettrici
di regolazione della posizione del corpo. Per garantire la sicurezza dell'utente ed evitare di
danneggiare la carrozzina, i movimenti sono monitorati dall'elettronica. Ciò può dare luogo al
blocco di alcuni movimenti, a riduzioni della velocità o ad arresti completi.
4.1 Accensione/spegnimento
Prima di premere il pulsante ON/OFF, portare il joystick nella posizione di folle (centrale).
Se la console viene accesa con il joystick in una posizione diversa da quella di folle,
la carrozzina non si mette in movimento. Per sbloccare la trazione, rilasciare il joystick
(riportandolo in folle) entro 5 secondi. Se il joystick non viene rilasciato entro 5
secondi, il guasto diventa un guasto del modulo; tale situazione è indicata dalla
presenza di un LED rosso lampeggiante nel pulsante ON/OFF. La carrozzina non si
mette in movimento. Per cancellare il guasto del modulo, rilasciare il joystick, quindi
spegnere e riaccendere la console di comando.
Per accendere la console di comando, premere una volta il pulsante ON/OFF.
Il LED (indicatore di stato) presente nel pulsante ON/OFF si illumina. Quando il LED diventa
verde, la console di comando è pronta per l'uso. Se il LED inizia a lampeggiare con luce
rossa, è presente un guasto; vedere il § 4.2 e il § 5.
Per spegnere la console di comando quando è accesa, premere una volta il
pulsante ON/OFF.
La console di comando e l'indicatore di stato si spengono.
4.1.1 Arresto di emergenza
Se occorre arrestare rapidamente un movimento di guida o di posizionamento del corpo, eseguire
un ARRESTO DI EMERGENZA premendo il pulsante ON/OFF. La carrozzina si arresta
rapidamente.
4.1.2 Modalità di sospensione
Dopo un periodo di inattività (la cui durata predefinita è pari a 5 minuti), la console di comando
passa alla modalità di sospensione.
In tale modalità, il sistema è parzialmente disattivato per ridurre il consumo energetico.
Per riattivare la console di comando, premere un pulsante o spostare il joystick.
4.2 Guasti e blocchi
Quando la console di comando è accesa e si verifica un guasto, il pulsante ON/OFF
inizia a lampeggiare con luce rossa. Il numero di lampi indica il codice di guasto. In
caso di guasto, una o tutte le funzioni della console di comando sono bloccate. Per
maggiori informazioni, vedere il § 5.
4.3 Stato e ricarica delle batterie
Rischio di lesioni e danni
Seguire le indicazioni di
ricarica contenute nel manuale di istruzioni della carrozzina e nel
manuale del fornitore del caricabatterie.
AVVERTENZA

LiNX 200
2023-03
Funzioni della console di comando
7
EN
NL
IT
L'indicatore dello stato di carica della batteria (situato
sopra il pulsante ON/OFF) serve per indicare che
l'alimentazione della carrozzina è inserita. Esso fornisce
anche una stima della capacità residua della batteria.
La tabella riportata di seguito riepiloga tutte le indicazioni
relative alla batteria e il rispettivo significato.
Tabella 1: Indicatore dello stato di carica della batteria
Indicazione Descrizione Descrizione
Significato
Osservazioni
Tutti i LED spenti. Il sistema è spento.
Tutti i LED illuminati e LED
verdi lampeggianti.
Sistema inserito.
Avviso sovravoltaggio,
tensione troppo elevata: il
livello di tensione della
batteria ha superato il punto
impostato per l'avviso.
Avviso: batteria troppo
carica.
In caso di marcia in discesa,
rallentare.
Tutti i LED accesi in
permanenza.
Sistema inserito. I LED indicano il livello di
carica: la batteria è
considerata carica con
capacità compresa tra 81%
e 100%.
1 indicatore luminoso
verde acceso.
Sistema inserito. Il livello di carica della
batteria sta diminuendo.
Accesi solo LED rossi e
gialli.
Carica delle batterie bassa. La carica della batteria è a
metà. Intraprendere il
viaggio di ritorno.
LED rossi e gialli accesi. Il livello di carica della
batteria è molto scarso.
Il livello della batteria è
considerato scarso con
capacità compresa tra 0% e
20%. Ricaricare la batteria il
prima possibile.
Solo LED rossi accesi. La batteria è quasi scarica. Ricaricare subito la batteria.
Un LED rosso lampeggia. La batteria è scarica.
Avviso basso voltaggio: il
livello di tensione della
batteria è sceso al di sotto
del punto impostato per
l'avviso.
Ricaricare la batteria
immediatamente.
Primo LED rosso
lampeggiante
sull'indicatore della
batteria.
L'indicatore di stato
visualizzerà un codice
lampeggiante 2 o 7.
Il clacson emetterà un
segnale acustico ogni 10
secondi.
Il voltaggio della batteria
diminuisce al di sotto del
voltaggio di arresto.
La batteria è
completamente scarica, si
consiglia di spegnere la
carrozzina. Il display e la
carrozzina si spegneranno
automaticamente.
Indicatore
di carica
della
batteria

LiNX 200
2023-03
Funzioni della console di comando
8
EN
NL
IT
4.3.1 Ricarica
Durante la ricarica del sistema, la guida è disabilitata (inibita).
È possibile eseguire la ricarica senza accendere la console di comando. Per
visualizzare l'indicatore dello stato della batteria, accendere la console.
Collegare il caricatore al connettore XLR del telecomando (12),
vedere la figura 1.
L'indicatore del caricabatterie segnala che il sistema è in fase di
carica tramite un sequenza ciclica da sinistra a destra, al termine
di ogni sequenza verrà visualizzato lo stato di carica
approssimativo della batteria.
4.4 Azionamento del joystick (guida e frenata)
L'azionamento del joystick in una determinata direzione fa spostare la
carrozzina elettrica in tale direzione. La velocità di spostamento dipende dallo
spostamento del joystick. Se il joystick viene spinto/tirato fino allo
spostamento massimo, la velocità è massima (nell'ambito della modalità di
guida selezionata).
Spostando il joystick nella posizione centrale (folle) durante la guida, i freni
si attivano fino a quando la carrozzina non si arresta:
Per una frenata graduale, spostare lentamente il joystick.
Per un arresto rapido, rilasciare il joystick; la carrozzina si arresta il più
rapidamente possibile.
Quando si preme il pulsante ON/OFF, accertarsi che il joystick si trovi nella posizione di folle
(centrale), poiché in caso contrario l'elettronica viene bloccata.
Dopo l'accensione della console di comando con il pulsante ON/OFF, il joystick deve
rimanere nella posizione centrale per almeno cinque secondi. La console è stata
programmata in questo modo per motivi tecnici e di
sicurezza. Se si attivano
contemporaneamente il joystick e il pulsante ON/OFF, il gruppo sterzante viene bloccato, e
si sblocca soltanto dopo uno spegnimento completo.
Accertarsi che la leva di ruota libera si trovi nella posizione frenata PRIMA di
accendere la
carrozzina. I freni elettromagnetici NON funzionano se la carrozzina si trova nella modalità
a ruota libera. Tale condizione è indicata sulla console di comando. La guida non è
possibile.
4.5 Blocco della console di comando
La funzione di blocco è studiata principalmente per evitare l'uso non autorizzato della carrozzina,
ma può anche essere di aiuto per prevenire l'azionamento accidentale dei comandi quando il
sistema non viene utilizzato per un certo tempo. Quando viene bloccato, il sistema viene spento
e non risponde ai comandi dell'utente. Se si preme il pulsante di accensione quando il sistema è
bloccato, lo stato di blocco viene segnalato all'utente dall'indicatore della batteria.

LiNX 200
2023-03
Funzioni della console di comando
9
EN
NL
IT
Per bloccare il sistema, tenere premuto il pulsante di accensione per 7 secondi.
Quando lo stato di blocco è attivo, l'indicatore della batteria lo segnala facendo
lampeggiare tre volte i LED 1, 3 e 5 (ultimo a sinistra, centrale e ultimo a destra).
Per sbloccare il sistema, premere una volta il pulsante di accensione, quindi
premere due volte il clacson entro 10 secondi.
Se l'utente non esegue correttamente la sequenza di sblocco entro l'intervallo di
tempo richiesto, oppure se il pulsante di accensione viene nuovamente premuto
prima della conclusione della sequenza di sblocco, il sistema ritorna nello stato
bloccato.
Durante un tentativo di sblocco, l'indicatore della batteria segnala che il sistema
si trova nello stato di blocco facendo lampeggiare i LED 1, 3 e 5 (ultimo a sinistra,
centrale e ultimo a destra) finché il sistema non si spegne, non si sblocca oppure
finché non trascorrono i 15 secondi di timeout della sequenza dopo i quali l'unità
di controllo si spegne automaticamente.
4.6 Regolazione della posizione del corpo
Rischio di lesioni o di danni
Non dimenticare che la stabilità della carrozzina diminuisce quando la si porta dalla posizione
seduta eretta a quella inclinata.
Accertarsi che intorno alla carrozzina sia disponibile uno spazio sufficiente per azionare lo
schienale e il sedile.
Le funzioni di regolazione della carrozzina possono essere azionate servendosi dell'apposito
pulsante. A seconda del tipo di carrozzina, possono esservi fino a 6 funzioni.
Premere la parte superiore del pulsante per selezionare la funzione di regolazione
successiva. Premere la parte inferiore del pulsante per selezionare la funzione di
regolazione precedente.
Per regolare la posizione del corpo, spostare il joystick in avanti o all'indietro.
Per ritornare alla posizione di seduta di base, spostare il joystick all'indietro per
ciascun movimento di regolazione.
La funzione di regolazione selezionata viene visualizzata sull'indicatore di stato di
marcia/dell'attuatore, come raffigurato di seguito. Il display riporta solo le funzioni
disponibili/programmate per la carrozzina.
Funzione di regolazione Display Funzione di regolazione Display
Inclinazione del sedile
Inclinazione dello
schienale
Sollevamento
Poggiagambe sinistro
ATTENZIONE

LiNX 200
2023-03
Funzioni della console di comando
10
EN
NL
IT
Poggiagambe destro
Poggiagambe
simultaneamente /
pedana centrale
Non specificato
Nessuno
4.7 Cambio della funzione di guida
Le funzioni relative alla velocità della carrozzina possono essere azionate
servendosi del pulsante di selezione della guida. Sono disponibili tre funzioni di
guida.
Premere la parte superiore del pulsante per selezionare la funzione di guida
successiva. Premere la parte inferiore del pulsante per selezionare la funzione
di guida precedente.
La funzione di guida selezionata è visualizzata sull'apposito indicatore, a destra del pulsante di
selezione della guida. L'indicatore dispone di tre LED, uno per ciascuna funzione di guida
disponibile. Quando è selezionata la funzione di guida 1, è illuminato soltanto l'indicatore inferiore.
Nel caso della funzione di guida 3, tutti i LED sono illuminati.
La massima velocità di marcia corrispondente al massimo spostamento del joystick dipende dalla
funzione di guida selezionata (1, 2 o 3) e dall'impostazione manuale della velocità di tale funzione.
4.7.1 Regolazione della velocità di marcia
In ciascuna delle tre funzioni di guida, è possibile regolare la velocità
su 10 valori discreti fra il minimo (a sinistra) e il massimo (a destra)
utilizzando l'interruttore della velocità. Tale interruttore girevole è
situato intorno al pulsante ON/OFF. Come promemoria visivo, sopra
l'interruttore della velocità è presente un simbolo che indica la
posizione bassa e quella alta.
4.7.2 Limitazione della velocità di marcia
Per la sicurezza dell'utente, la velocità di marcia della carrozzina viene automaticamente ridotta
quando sono state apportate determinate variazioni della posizione del corpo. In tal caso è
possibile che la carrozzina venga bloccata completamente o che la sua velocità di marcia sia
limitata all'impostazione minima.
1
2
3
Lenta Veloce

LiNX 200
2023-03
Funzioni della console di comando
11
EN
NL
IT
Si verificano limitazioni della guida e della velocità quando:
il sollevatore è stato regolato su una posizione più alta. In tal caso è disponibile soltanto
l'impostazione di velocità 1.
l'inclinazione dello schienale è superiore a un dato angolo (vedere la Figura 7):
1. Tutte le funzioni della carrozzina sono disponibili.
2. È disponibile soltanto l'impostazione di velocità 1.
3. Non è più possibile guidare la carrozzina. Sollevare lo schienale fino a quando il
blocco viene annullato.
Per avvisare l'utente che la guida è completamente inibita, il LED delle ruote motrici presente
sull'indicatore dello stato degli attuatori pulsa lentamente, e così pure il LED relativo alla
regolazione che causa il blocco.
Esempio della Figura 8: sull'indicatore pulsano i LED dello schienale e delle ruote motrici. Ciò
significa che l'inclinazione dello schienale è eccessiva e causa l'inibizione della guida.
Per eliminare le limitazioni relative alla velocità/guida, abbassare il sollevatore fino alla posizione
standard (la più bassa), quindi regolare il sedile e lo schienale portandoli nella posizione di seduta
verticale.
4.8 Clacson
Premere il pulsante (6) del clacson per avvisare le altre persone; vedere la Figura 1. Il clacson
suona fintanto che si tiene premuto il pulsante.
4.9 Luci
4.9.1 Luci anteriori e posteriori
Per accendere le luci anteriori e posteriori,
premere e rilasciare rapidamente una
volta il pulsante destro (A) delle luci.
Fintanto che le luci sono accese, il LED
presente dietro il pulsante destro rimane
illuminato.
Per spegnere le luci, premere il pulsante destro o sinistro delle luci (A/B).
4.9.2 Luci di emergenza
Per accendere le luci di emergenza, premere e rilasciare rapidamente una volta il pulsante
della freccia a sinistra (B). I LED del pulsante di sinistra e destra lampeggiano per tutto il
tempo in cui le luci di emergenza rimangono in funzione.
Per spegnere le luci di emergenza, premere il pulsante della freccia destra o sinistra (A/B).
4.9.3 Indicatori di direzione
Per attivare un indicatore di direzione, premere una volta il pulsante sinistro o destro delle
luci, a seconda della direzione in cui si desidera andare. Il LED situato dietro il pulsante
lampeggia fintanto che gli indicatori di direzione attivati rimangono in funzione.
Per disattivare un indicatore di direzione, premere il pulsante sinistro o destro delle luci
(A/B).
Una volta attivate,
le luci di emergenza rimangono attive anche se la console di comando
viene spenta con il pulsante ON/OFF.
Quando la console di comando viene spenta, le luci principali si spengono.
A
B

LiNX 200
2023-03
Soluzione dei problemi di funzionamento
12
EN
NL
IT
5 Soluzione dei problemi di funzionamento
Rischio di lesioni e di danni alla console di comando o alla carrozzina
NON tentare MAI di riparare personalmente la console di comando.
Per i guasti della console di comando, occorre rivolgersi al proprio rivenditore specializzato,
che decide se occorre riprogrammarla.
In caso di guasto, il LED presente nel pulsante ON/OFF lampeggia fornendo un codice di guasto;
vedere il § 4.2. La tabella riportata di seguito riassume i possibili codici di guasto. Alcuni problemi
possono essere risolti dall'utente. Per tutti i problemi contrassegnati in grigio, rivolgersi al proprio
rivenditore specializzato.
Tabella 2: Soluzione dei problemi di funzionamento
Codice
Problema
Significato
1
Errore telecomando /
joystick
Verificare che il joystick si trovi nella posizione di folle
all'accensione della console di comando.
Verificare che il joystick non sia danneggiato e funzioni
correttamente.
2
Errore di rete o
configurazione
1. Verificare tutti i punti e i cavi di collegamento.
2. Verificare che il software funzioni correttamente.
Se non si riesce a identificare alcun guasto, rivolgersi al proprio
rivenditore specializzato.
3
Motore di sinistra (o
relativo collegamento)
difettoso.
1. Verificare che gli spinotti di entrambi i motori elettrici siano
stati inseriti correttamente.
2. Verificare che i contatti degli spinotti di entrambi i motori
elettrici non siano corrosi o danneggiati.
Questo guasto viene visualizzato anche quando i
motori elettrici sono scollegati.
Ricollegarli e riavviare il sistema.
4
Motore di destra (o
relativo collegamento)
difettoso.
Come sopra.
5
Freno di stazionamento
di sinistra (o relativo
collegamento) difettoso
oppure marcia in folle.
1. Verificare che gli spinotti dei motori elettrici siano stati
inseriti correttamente.
2. Verificare che gli spinotti non siano corrosi o danneggiati.
6
Freno di stazionamento
di destra (o relativo
collegamento) difettoso.
Come sopra.
7 Errore modulo (diverso
dal telecomando)
È possibile che un componente della carrozzina diverso dalla
console di comando sia danneggiato.
AVVERTENZA

EN
NL
ES
LiNX 200
2023-03
Contenido
1
Contenido
Contenido ................................................................................................................... 1
Introducción ............................................................................................................... 2
1 Descripción ................................................................................................... 3
2 Antes de su uso ............................................................................................ 4
2.1 Instrucciones generales de seguridad ............................................................ 4
3 Conducción ................................................................................................... 5
4 Funciones del panel de control ................................................................... 6
4.1 Encendido y apagado ..................................................................................... 6
4.2 Fallos y bloqueos ............................................................................................ 6
4.3 Estado de la batería y su carga ...................................................................... 6
4.4 Funcionamiento de la palanca de mando (conducir y frenar) ......................... 8
4.5 Bloqueo del panel de control .......................................................................... 9
4.6 Ajuste de la posición del cuerpo ..................................................................... 9
4.7 Cambiar la función de conducción ................................................................ 10
4.8 Bocina ........................................................................................................... 11
4.9 Iluminación .................................................................................................... 11
5 Resolución de problemas .......................................................................... 13

EN
NL
ES
LiNX 200
2023-03
Introducción
2
Introducción
Nota importante
Este manual refleja los desarrollos más recientes del producto. Vermeiren se reserva el derecho
a implementar cambios en este tipo de producto sin que ello suponga obligación alguna de
adaptar o cambiar productos similares previamente entregados.
Las imágenes están presentes para clarificar las instrucciones contenidas en este manual. Los
detalles del producto mostrado pueden variar con su producto.
Información disponible
En nuestro sitio web http://www.vermeiren.com/ siempre encontrará la versión más reciente de
la información en este manual. Consulte este sitio web de manera regular para estar al tanto de
posibles actualizaciones.
Las personas con discapacidad visual pueden descargarse la versión electrónica del manual y
utilizar un software de síntesis de voz para poder oír su contenido.
Manual de usuario del panel de control
Para el usuario y el distribuidor especializado
Manual de usuario de la silla de ruedas
Para el usuario y el distribuidor especializado
Manual de instalación de la silla de ruedas
Para el distribuidor especializado
Manual de usuario de la batería y el cargador
Para el usuario y el distribuidor especializado

EN
NL
ES
LiNX 200
2023-03
Descripción
3
1 Descripción
El panel de control integrado a la silla de ruedas eléctrica permite el control de todos los procesos
de conducción, dirección, frenado y manejo, así como de otros motores de ajuste (columna
elevadora, ajustador del asiento y el respaldo). La unidad eléctrica de la silla de ruedas y los
sistemas electrónicos están constantemente monitorizados internamente.
La siguiente imagen muestra todas las partes relevantes para el usuario.
1. Indicador de carga de la batería
2. Botón de apagado y encendido
con indicador de estado
3.
Perilla de velocidad
4.
Botón regulador de posición
5. Botón de función de conducción
6.
Botón de la bocina
7. Estado de conducción y del
actuador
8. Luces de conducción e
intermitente derecho
9. Luces de emergencia e
intermitente izquierdo
10.
Palanca de mando
11. Conexión instalación de software
12.
Conexión de carga de la batería
11
12
2
1
3
6
10
5 4
7
9
8

EN
NL
ES
LiNX 200
2023-03
Antes de su uso
4
2 Antes de su uso
Riesgo de lesiones y daños
NO instalar, mantener o utilizar este producto sin haber leído y entendido plenamente todas
las instrucciones de este manual y otros manuales relevantes sobre la silla de ruedas equipada
con este producto.
No intentar abrir o desmontar la consola bajo
ningún pretexto; No contiene partes reparables
por el usuario.
En caso de dudas o preguntas, contactar con su distribuidor especializado local, proveedor de
cuidados o asesor técnico para recibir asesoramiento.
2.1 Instrucciones generales de seguridad
Tener en cuenta las siguientes advertencias durante su utilización:
Los paneles de control han pasado por pruebas de compatibilidad electromagnética en
vehículos típicos y representativos, y cumplen con los estándares EMC adecuados:
EN 12184: 2014, ISO7176-21: 2009. Aun así, es posible que un campo electromagnético
influya en la conducción de la silla de ruedas, como los campos de teléfonos móviles,
generadores eléctricos, o fuentes de alimentación de alta potencia. Por otro lado, los
componentes electrónicos de la silla de ruedas también pueden afectar a otros aparatos
eléctricos, como los sistemas de alarma de las tiendas y puertas automáticas. Por tanto, se
recomienda comprobar regularmente que el panel de control / la silla de ruedas no presente
daños o desgastes, ya que podrían agravar la interferencia.
Téngase en cuenta que la superficie del panel de control puede llegar calentarse demasiado
a causa de la luz del sol o equipos de calefacción. Tener siempre cuidado al tocar la silla de
ruedas.
Asegurarse de que el panel de control no exceda la temperatura mínima y máxima permitida,
véase el manual de usuario de la silla de ruedas.
Antes de poner en marcha la silla de ruedas, tener en cuenta el entorno/situación. Ajustar
adecuadamente la velocidad antes de comenzar a conducir. Se recomienda ir a la velocidad
mínima al conducir en interiores. Para conducir en exteriores, se puede ajustar la velocidad
hasta aquella en la que se sienta seguro y cómodo el usuario.
No tocar las clavijas de conexión. No tocar las clavijas, ya que pueden llegar a ensuciarse o
a dañarse debido a descargas electrostáticas.
Si la silla no viene prevista de un protector de manos para el panel de control, téngase en
cuenta que la mano no estará protegida contra el aplastamiento, como, por ejemplo, cuando
se conduce hacia una mesa.
El conector XLR del controlador solo debe utilizarse para el fin para el que está concebido
(cargar la batería o programar el controlador). La garantía perderá su validez si se conecta
a este puerto cualquier dispositivo no autorizado.
Asegúrese de que el cargador de la batería que se emplea en el vehículo dispone de la
función de inhibición de la conducción, y que dicha función se puede conectar correctamente
para utilizarla con el controlador. Esta función de inhibición de la conducción tiene como
objetivo impedir que la silla avance mientras se esté cargando la batería. Si no está seguro,
pregunte a su proveedor.
Apague inmediatamente el controlador y consulte a su agente de servicio si se da alguna de
las siguientes circunstancias en el vehículo:
o Está dañado.
AVISO
Vermeiren es responsable de actualizaciones/reparaciones del software. Para
adaptaciones en el software, contactar con Vermeiren. Consultar nuestro sitio web
http://www.
vermeiren
.com/

EN
NL
ES
LiNX 200
2023-03
Conducción
5
o Se comporta de forma distinta en las distintas ocasiones en que se utiliza.
o No responde con normalidad, de la forma esperada.
o Se calienta más de lo normal.
o Emite humos.
o No cambia de velocidad cuando se ajusta el control de velocidad.
o Se visualiza un error en el indicador de errores y el controlador no funciona con
normalidad.
Apague el controlador en los casos siguientes:
o Cuando no use el vehículo.
o Antes de sentarse en la silla de ruedas o levantarse de ella.
o Si el vehículo se mueve solo o contra su voluntad. Cuando apague el controlador, el
vehículo se detendrá.
En caso de que se produzca un incidente grave con su producto, notifique a Vermeiren o a su
distribuidor especializado, así como a la autoridad competente de su país.
3 Conducción
1. Encender el botón de encendido/apagado.
2. Si la luz del botón de encendido/apagado es verde, la silla de ruedas está encendida y lista
para usar.
3. Comprobar el indicador de la batería. Cargar la batería si fuera necesario (véase §4.3).
4. Seleccionar el programa de conducción y ajustar la velocidad utilizando la perilla de
velocidad, véanse las funciones de conducción en §4.7.
5. Para empezar a mover la silla de ruedas, mover la palanca de mando lentamente hacia
delante/atrás.
6. La velocidad incrementa cuando se empuja la palanca de mando más lejos del centro.
7. Para girar a la izquierda o derecha, empujar la palanca de mando a la izquierda o derecha.
Utilizar los intermitentes al conducir en el exterior, véase §4.9.
8. Para frenar, mover la palanca de mando a la posición neutral.
9. Una vez llegado a su destino, comprobar el estado de la batería y presionar el botón de
encendido/apagado.
10. Cargar la batería si fuera necesario.

EN
NL
ES
LiNX 200
2023-03
Funciones del panel de control
6
4 Funciones del panel de control
El panel de control permite controlar todos los componentes de conducción y así como los
motores para ajustar la posición del cuerpo. Por la seguridad del usuario y para evitar que la silla
de ruedas se dañe, los movimientos están monitorizados por componentes electrónicos. Eso
puede resultar en que se bloquee el movimiento, se reduzca la velocidad o se detenga
completamente la silla de ruedas.
4.1 Encendido y apagado
Colocar la palanca de mando en la posición neutral (central) antes de presionar el botón
de encendido/apagado.
Si se enciende la consola con la palanca de mando fuera de la posición central, la silla
de ruedas no funcionará. Soltar la palanca de mando (volver a neutral) en un plazo de 5
segundos para desbloquear la conducción. Si la palanca de mando no se suelta en un
plazo de 5 segundos, el fallo se convertirá en un Fallo del módulo indicado por un LED
rojo parpadeante en el botón de encendido/apagado. La silla de ruedas no podrá
conducirse. Para retirar el Fallo del módulo, soltar la palanca de mando y apagar y luego
volver a encender el panel de control.
Para encender el panel de control, presionar el botón de encendido/apagado.
El LED (indicador de estado) en el botón de encendido/apagado se enciende. Cuando la
luz se vuelva verde, el panel de control estará listo para su uso. Cuando el LED parpadea
en rojo, significa que hay un fallo, véase §4.2 y §5.
Para apagar el panel de control cuando está encendido, presionar el botón una
vez.
El panel de control y el indicador de estado se apagarán.
4.1.1 Parada de emergencia
Si se necesita frenar o parar un movimiento de ajuste del cuerpo rápidamente, presionar el botón
de encendido/apagado para realizar una PARADA DE EMERGENCIA. La silla de ruedas se
parará rápidamente.
4.1.2 Modo de espera
El panel de control entrará en modo de espera después de un período de inactividad (5 minutos
por defecto).
Cuando el sistema está en modo espera, está parcialmente apagado para reducir el consumo de
electricidad.
Para reactivar el panel de control, presionar un botón o mover la palanca de mando.
4.2 Fallos y bloqueos
Cuando el panel de control está encendido y aparece un fallo, el botón de
encendido/apagado comenzará a parpadear en rojo. El número de parpadeos indica
el código de fallo. En caso de un fallo, una o todas las funciones del panel de control
se bloquearán. Para más información, véase §5.
4.3 Estado de la batería y su carga
Riesgo de lesiones y daños
Seguir las instrucciones de carga en el manual de instrucciones de la silla de ruedas y en el
manual del
proveedor del cargador de batería.
AVISO

EN
NL
ES
LiNX 200
2023-03
Funciones del panel de control
7
El indicador de carga de la batería (situado encima del
botón de encendido/apagado) se utiliza para indicar que
la silla de ruedas está encendida. El indicador
proporciona una estimación de la capacidad restante de
la batería.
En la siguiente tabla, se recogen todas las indicaciones
de la batería y sus significados.
Tabla 1: Indicador de carga de la batería
Indicación Descripción Significado Comentarios
Todos los LED apagados. Sistema apagado.
Todos los LED iluminados
y los LED de color verde
parpadean.
Sistema encendido.
Advertencia de voltaje alto:
el nivel de voltaje de la
batería ha superado el
punto de referencia de
advertencia de voltaje alto.
Advertencia: la batería está
demasiado llena.
Reduzca la velocidad si
está descendiendo por una
pendiente.
Todos los LED
encendidos.
Sistema encendido. Los LED muestran el nivel
de carga: batería cargada
(entre 81-100% de su
capacidad total)
Un LED verde iluminado. Sistema encendido. El nivel de la batería está
bajando.
Sólo los LED de color rojo
y naranja iluminados.
Carga de la batería baja. Batería a mitad de
capacidad. Emprenda el
viaje de vuelta.
Un LED rojo y uno naranja
iluminados.
Nivel de la batería muy bajo.
Batería baja (entre 0-20%
de su capacidad total).
Recárguela pronto.
Sólo un LED rojo
iluminado.
Batería prácticamente
vacía.
Recárguela ahora.
Parpadea 1 LED rojo. La batería está sin carga.
Advertencia de voltaje bajo:
el nivel de voltaje de la
batería está por debajo del
punto de referencia de
advertencia de voltaje bajo.
Recárguela de inmediato.
El primer LED de color rojo
parpadeará en el
indicador de batería.
El indicador de estado
mostrará un código de
parpadeo 2 o 7.
La bocina sonará una vez
cada 10 segundos.
El voltaje de la batería está
por debajo del voltaje de
parada de la batería.
La batería está totalmente
descargada y se
recomienda detener la
descarga en este momento.
La pantalla y la silla de
ruedas se apagarán
automáticamente.
Indicador
de
carga de
la batería

EN
NL
ES
LiNX 200
2023-03
Funciones del panel de control
8
4.3.1 Recargando
La conducción está bloqueada (inhibida) mientras el sistema se recarga.
La recarga es posible sin tener que encender el panel de control. Encender el panel de
control para consultar el indicador de la batería.
Conecte el cargador de baterías al enchufe XLR del mando
(12), véase Figura 1.
El indicador del cargador de baterías indicará que el sistema se
está cargando pasando por una secuencia progresiva de
izquierda a derecha; luego mostrará el estado de carga
aproximada de la batería al final de la secuencia.
4.4 Funcionamiento de la palanca de mando (conducir y frenar)
Al mover la palanca de mando en una dirección específica, la silla de
ruedas se moverá en esa dirección. La velocidad del movimiento depende
del desplazamiento de la palanca de mando. Para alcanzar la velocidad
máxima (dentro del modo de conducción seleccionado), empujar/tirar de
la palanca de mando hasta su desplazamiento límite.
Al mover la palanca de mando a su posición central (neutral) durante su
conducción, los frenos comenzarán a funcionar hasta que la silla de
ruedas se pare:
Para un frenado gradual, mover la palanca de mando lentamente.
Para una parada más rápida, soltar la palanca de mando; la silla de
ruedas se parará lo antes posible.
Asegurarse de que la palanca de mando está en la posición neutral (central) antes de
presionar el botón de encendido/apagado, ya que, si no, los componentes electrónicos se
bloquearán.
Después de encender el panel de control usando el botón de encendido/a
pagado, la
palanca de mando tiene que permanecer en la posición central por lo menos durante cinco
segundos. La consola ha sido programada de esta manera por cuestiones técnicas y de
seguridad. Si la palanca de mando y el botón de apagado/encendido se acti
van a la misma
vez, el mecanismo de dirección se bloqueará y sólo se desbloqueara cuando se apague
completamente.
Asegurarse de que la palanca de rueda libre está en la posición de freno ANTES de
encender la silla de ruedas. Los frenos electromagnéticos NO funcionan si la silla de
ruedas está en modo rueda libre. Esto viene indicado en el panel de control. No se puede
conducir.

EN
NL
ES
LiNX 200
2023-03
Funciones del panel de control
9
4.5 Bloqueo del panel de control
La función de bloqueo se usa principalmente para evitar acceso no autorizado a la silla de ruedas,
pero también puede ayudar a prevenir el uso no intencionado de los mandos cuando el sistema
no está en uso durante cualquier período de tiempo. Cuando el sistema está bloqueado, el
sistema está apagado y los mandos del usuario no responden. Si se aprieta el botón de
encendido cuando el sistema está bloqueado, el estado de bloqueo se indicará al usuario
mediante el indicador de batería.
Para bloquear el sistema, pulse y mantenga pulsado el botón de encendido
durante 7 segundos.
Cuando se establece el estado bloqueado, los ledes 1, 3 y 5 (extremo
izquierdo, central y extremo derecho) parpadean 3 veces en el indicador de
batería.
Para desbloquear el sistema, pulse el botón de encendido una vez, y a
continuación pulse el botón de bocina dos veces (el botón de bocina debe
pulsarse dos veces en 10 segundos justo después de pulsar el botón de
encendido).
Si el usuario no lleva a cabo correctamente la secuencia de desbloqueo
dentro del plazo de tiempo requerido o se presiona otra vez el botón de
encendido antes de que se complete la secuencia de desbloqueo, el sistema
volverá a bloquearse.
Durante el intento de desbloqueo, el indicador de batería informa de que el
sistema continúa bloqueado con el parpadeo de los ledes 1, 3 y 5 (extremo
izquierdo, central y extremo derecho). Los ledes continuarán parpadeando
hasta que el sistema se apague, se desbloquee o transcurran
aproximadamente 15 segundos durante la secuencia, en cuyo caso el
controlador se apagará automáticamente.
4.6 Ajuste de la posición del cuerpo
Riesgo de lesiones o daños
Téngase en cuenta que la estabilidad se reduce cuando la silla de ruedas se cambia de una
posición de sentado recta a una inclinada.
Asegurarse de que hay suficiente espacio
alrededor de la silla de ruedas para manejar el
respaldo y el asiento.
Las funciones de ajuste de la silla de ruedas pueden manejarse utilizando el botón de función de
ajuste. Dependiendo del tipo de silla de ruedas, puede haber hasta 6 funciones.
Presionar el botón superior para seleccionar la siguiente función de ajuste.
Presionar el botón inferior para seleccionar la función de ajuste anterior.
Para ajustar la posición del cuerpo, mover la palanca de mando hacia delante o
atrás.
Para volver a la posición de sentado estándar, mover la palanca de mando hacia
atrás por cada movimiento de ajuste.
La función de ajuste seleccionada aparece en el indicador de estado de conducción/actuador,
como se muestra a continuación. La pantalla solo muestra las funciones disponibles o
programadas en su silla de ruedas.
PRECAUCIÓN

EN
NL
ES
LiNX 200
2023-03
Funciones del panel de control
10
Función de ajuste Pantalla Función de ajuste Pantalla
Inclinación del asiento
Inclinación del respaldo
Elevación
Reposapiernas izquierdo
Reposapiernas derecho
Reposapiernas
simultáneamente / paleta
central
Sin especificar
Ninguna
4.7 Cambiar la función de conducción
Las funciones de velocidad de la silla de ruedas pueden manejarse utilizando el
botón de selección de conducción. Hay tres funciones de conducción disponibles.
Presionar el botón superior para seleccionar la siguiente función de
conducción. Presionar el botón inferior para seleccionar la función de
conducción anterior.
La función de conducción seleccionada viene indicada en el indicador de la función de
conducción, a la derecha del botón de selección de conducción. El indicador tiene tres LED, una
para cada función de conducción disponible. Cuando se selecciona la función de conducción 1,
sólo se encenderá el indicador inferior. Para la función de conducción 3, se encenderán todos
los LED.
La velocidad máxima que se puede alcanzar al mover la palanca de mando a una posición límite
depende de la función de conducción (1, 2 ó 3) y el ajuste de velocidad manual en esta función.
4.7.1 Ajustar la velocidad
En cada una de las tres funciones de conducción, se puede ajustar
la velocidad en 10 pasos discretos entre la velocidad mínima (izq.) y
la máxima (dcho.) utilizando la perilla de velocidad. Esta perilla se
encuentra alrededor del botón de encendido/apagado. Como
recordatorio visual, hay un símbolo de velocidad posicionado encima
de la perilla de velocidad para indicar las posiciones máximas y
mínimas.
4.7.2 Velocidad limitada
Por su seguridad, el sistema de conducción de la silla de ruedas reduce automáticamente la
velocidad cuando se han realizado ciertas alteraciones en la posición del cuerpo. La conducción
de la silla de ruedas se limita a la velocidad más baja o, incluso, se bloquea completamente.
Lento
Ráp
ido

EN
NL
ES
LiNX 200
2023-03
Funciones del panel de control
11
Los límites de conducción y velocidad se activan cuando:
el elevador se ajusta a una posición más alta. Sólo está disponible la velocidad 1.
la inclinación del respaldo excede un ángulo determinado (véase figura 7):
1. Todas las funciones de la silla de ruedas están disponibles.
2. Sólo está disponible la velocidad 1.
3. Ya no se puede conducir la silla de ruedas. Elevar el respaldo hasta que se
desbloquee.
Para notificar que todo tipo de conducción está inhibida, el LED con forma de la rueda motriz del
indicador del actuador parpadea lentamente, al igual que el LED que indica que ajuste está
causando el bloqueo.
P. ej. Figura 8: Los LED del respaldo y la rueda motriz en el indicador están parpadeando
lentamente. Esto significa que el respaldo está demasiado inclinado, lo que hace que se
inhiba la conducción.
Para retirar los límites de velocidad/conducción, bajar el elevador a la posición estándar (más
baja) y ajustar el asiento y el respaldo a una posición de sentado recta.
4.8 Bocina
Presionar el botón de la bocina (6) para alertar a transeúntes, véase Figura 1. La bocina sonará
mientras se mantenga el botón presionado.
4.9 Iluminación
4.9.1 Luces delanteras y traseras
Para encender las luces delanteras y
traseras, presionar y soltar rápidamente el
botón de las luces de la derecha (A) una
vez. El LED detrás del botón de la
derecha permanecerá encendido
mientras las luces estén encendidas.
Para apagar las luces, volver a presionar el botón de las luces de la izquierda o la derecha
(A/B).
4.9.2 Luces de emergencia
Para encender las luces de emergencia, pulse y suelte rápidamente el botón del
intermitente izquierdo (B) una sola vez. Los ledes situados detrás de los botones izquierdo
y derecho parpadearán mientras las luces de emergencia estén en funcionamiento.
Para apagar las luces de emergencia, pulse el botón del intermitente izquierdo o derecho
(A/B).
1
2
3
A
B

EN
NL
ES
LiNX 200
2023-03
Funciones del panel de control
12
4.9.3 Luces intermitentes
Para encender cualquiera de los intermitentes, presionar el botón de las luces de la derecha
o de la izquierda, dependiendo de la dirección a la que se quiera ir. El LED detrás del botón
parpadeará mientras el intermitente de la dirección presionada esté en funcionamiento.
Para apagar cualquiera de los intermitentes, volver a presionar el botón de las luces de la
izquierda o la derecha (A/B).
Las luces de aviso permanecerán encendidas, incluso si se apaga el panel de control
con el botón de encendido/apagado.
Las luces principales se apagan cuando se apaga el panel de control.

EN
NL
ES
LiNX 200
2023-03
Resolución de problemas
13
5 Resolución de problemas
Riesgo de lesiones y daños al panel de control o a la silla de ruedas
No intentar NUNCA reparar el panel de control por su cuenta.
Si hay algún problema con el panel de control, debe contactar con su distribuidor
especializado.
El distribuidor decidirá si hay que reprogramar la
consola.
En caso de fallo, el LED del botón de encendido/apagado indicará un código de fallo
parpadeando, véase §4.2. La siguiente tabla contiene todos los códigos de fallo posibles.
Algunos problemas los puede resolver el usuario. Para el resto de problemas resaltados en gris,
consultar con un distribuidor especializado al respecto.
Tabla 2: Resolución de problemas
Código
Problema
Significado
1
Error del mando / joystick
Comprobar que la palanca de mando esté en la posición
neutral al encender el panel de control.
Comprobar la palanca de mando: funciona debidamente y no
está dañada.
2
Error de red o de
configuración
1. Comprobar todos los puntos de conexión y cables.
2. Comprobar que el software funciona debidamente.
Si no se encuentra ningún fallo, ponerse en contacto con un
distribuidor especializado.
3
El motor izquierdo (o su
conexión) está defectuoso
1. Comprobar que los conectores de ambos motores estén
debidamente enchufados.
2. Comprobar que los contactos de ambos motores no estén
corroídos o dañados.
Este fallo también aparece cuando los motores están
desconectados.
Conectar otra vez y reiniciar el sistema.
4 El motor derecho (o su
conexión) está defectuoso Como se describe anteriormente.
5
El freno de
estacionamiento izquierdo
(o su conexión) está
defectuoso o neutralizado.
1. Comprobar que los conectores de los motores estén
debidamente enchufados.
2. Comprobar que los contactos de ambos motores no estén
corroídos o dañados.
6
El freno de
estacionamiento derecho
(o su conexión) está
defectuoso.
Como se describe anteriormente.
7 Error del módulo (diferente
al del mando)
Una de las piezas de la silla de ruedas podría estar dañadas
(excluido el panel de control).
AVISO


LiNX 200
2023-03
Spis treści
1
EN
NL
PL
Spis treści
Spis treści .................................................................................................................. 1
Wstęp ........................................................................................................................ 2
1 Opis ................................................................................................................ 3
2 Przed użyciem ............................................................................................... 4
2.1 Ogólne instrukcje bezpieczeństwa .................................................................. 4
3 Jazda .............................................................................................................. 5
4 Funkcje konsoli kierowniczej ...................................................................... 6
4.1 Włączanie i wyłączanie ................................................................................... 6
4.2 Usterki i blokady.............................................................................................. 6
4.3 Stan akumulatora i ładowanie ......................................................................... 6
4.4 Obsługa joysticka (jazda i hamowanie) ........................................................... 8
4.5 Blokada konsoli kierowniczej .......................................................................... 8
4.6 Dostosowywanie pozycji ciała ......................................................................... 9
4.7 Zmiana funkcji jazdy ..................................................................................... 10
4.8 Klakson ......................................................................................................... 11
4.9 Oświetlenie ................................................................................................... 11
5 Diagnozowanie i rozwiązywanie problemów ............................................ 12

LiNX 200
2023-03
Wstęp
2
EN
NL
PL
Wstęp
Ważna uwaga
Instrukcja obejmuje najnowsze rozwiązania zastosowane w produkcie. Firma Vermeiren ma
prawo do wprowadzania zmian w produktach tego typu bez obowiązku adaptowania lub wymiany
podobnych, poprzednio dostarczonych produktów.
Ilustracje stanowią dodatkowe objaśnienia do instrukcji w niniejszym podręczniku. Szczegóły
przedstawionego produktu mogą się różnić od rzeczywistego produktu posiadanego przez
użytkownika.
Dostępne informacje
W naszej witrynie internetowej http://www.vermeiren.com/ zawsze znajduje się najnowsza wersja
informacji zamieszczonych w instrukcji. Prosimy regularnie odwiedzać witrynę, ponieważ
możemy w niej zamieszczać zaktualizowane informacje.
Osoby z zaburzeniami wzroku mogą pobrać elektroniczną wersję niniejszej instrukcji i odsłuchać
ją przy użyciu oprogramowania zamieniającego tekst na mowę.
Instrukcja użytkownika konsoli kierowniczej
Dla użytkownika i wyspecjalizowanego sprzedawcy
Instrukcja użytkownika wózka inwalidzkiego
Dla użytkownika i wyspecjalizowanego sprzedawcy
Instrukcja instalacji wózka inwalidzkiego
Dla wyspecjalizowanego sprzedawcy
Instrukcja użytkownika akumulatora i ładowarki
Dla użytkownika i wyspecjalizowanego sprzedawcy

LiNX 200
2023-03
Opis
3
EN
NL
PL
1 Opis
Konsola kierownicza wbudowana w elektryczny wózek inwalidzki umożliwia użytkownikowi pełną
kontrolę nad jazdą, kierowaniem, hamowaniem i obsługą. Pozwala też na sterowanie silnikami
regulacyjnymi (kolumna podnosząca, regulator siedziska i oparcia). Układ elektryczny i
elektronika wózka inwalidzkiego są nieprzerwanie monitorowane wewnętrznie.
Na kolejnych rysunkach przedstawiono wszystkie części istotne z punktu widzenia użytkownika.
1. Wskaźnik ładowania
akumulatora
2. Przycisk wł./wył. ze
wskaźnikiem stanu
3.
Przełącznik prędkości
4.
Przycisk regulacji pozycji
5. Przycisk funkcji jazdy
6.
Przycisk klaksonu
7. Stan napędu i siłowników
8. Światła do jazdy i prawy
kierunkowskaz
9. Światła awaryjne i lewy
kierunkowskaz
10.
Joystick
11. Złącze do instalacji
oprogramowania
12. Złącze do ładowarki
akumulatora
11
12
2
1
3
6
10
5 4
7
9
8

LiNX 200
2023-03
Przed użyciem
4
EN
NL
PL
2 Przed użyciem
Ryzyko obrażeń i uszkodzeń
NIE WOLNO instalować, konserwować ani używać produktu, zanim użytkownik wcześniej nie
przeczyta i nie zrozumie całkowicie wszystkich informacji w niniejszej instrukcji, a także we
wszystkich odnośnych instrukcjach dotyczących wózka inwalidzkiego, w którym
niniejszy
produkt jest zamontowany.
W żadnym przypadku nie wolno podejmować prób otwierania ani rozmontowania konsoli
—
wewnątrz nie ma żadnych elementów, które mógłby serwisować użytkownik.
W razie wątpliwości i pytań prosimy o kontakt z lokalnym wyspecj
alizowanym sprzedawcą,
opiekunem lub doradcą technicznym, który udzieli pomocy.
2.1 Ogólne instrukcje bezpieczeństwa
Podczas eksploatacji należy pamiętać o następujących ogólnych ostrzeżeniach:
Konsole kierownicze przetestowano pod kątem kompatybilności elektromagnetycznej (EMC)
w typowych reprezentatywnych pojazdach. Wykazano zgodność z następującymi normami
EMC:
EN 12184: 2014, ISO7176-21: 2009. Niemniej jednak, źródła pola elektromagnetycznego,
takie jak telefony komórkowe, agregaty prądotwórcze i źródła energii wielkiej mocy mogą
zakłócić działanie mechanizmów jezdnych wózka. Z drugiej strony, układy elektroniczne
wózka mogą zakłócić działanie innych urządzeń elektronicznych, takich jak systemy
alarmowe w sklepach lub drzwi automatyczne. Dlatego zalecamy, aby regularnie kontrolować
konsolę kierowniczą/wózek pod kątem uszkodzeń i zużycia, ponieważ mogą one powodować
większe zakłócenia.
Należy pamiętać, że powierzchnia konsoli kierowniczej może się bardzo rozgrzać od słońca
lub urządzeń grzewczych. Dotykając jej, należy zachować ostrożność.
Upewnić się, że minimalna i maksymalna temperatura konsoli nie przekracza dozwolonych
wartości, patrz instrukcja użytkownika wózka inwalidzkiego.
Przed włączeniem wózka zwrócić uwagę na sytuację/otoczenie, w których użytkownik się
znajduje. Przed ruszeniem dobrać prędkość do warunków jazdy. Zalecamy, aby w
pomieszczeniach jeździć z najniższą prędkością. W przypadku jazdy na zewnątrz można
dostosować prędkość do takiej, przy której użytkownik czuje się wygodnie i bezpiecznie.
Nie dotykać styków złącza. Dotknięcie może zanieczyścić styki lub je uszkodzić w wyniku
wyładowania elektrostatycznego.
Jeśli wózek nie jest wyposażony w osłonę ręki montowaną przy konsoli kierowniczej, należy
pamiętać, że ręka nie będzie chroniona przed przygnieceniem np. podczas podjeżdżania do
stołu.
Złącze XLR sterownika może być używane wyłącznie zgodnie z przeznaczeniem, czyli do
ładowania akumulatora i programowania sterownika. Gwarancja zostanie unieważniona, jeśli
do portu zostanie podłączone niedozwolone urządzenie.
Należy upewnić się, że ładowarka akumulatorów używana w pojeździe jest wyposażona w
funkcję wstrzymania jazdy, która jest prawidłowo podłączona do sterownika. Funkcja
wstrzymania jazdy uniemożliwia jazdę wózkiem inwalidzkim podczas ładowania akumulatora.
W razie wątpliwości należy skonsultować się ze sprzedawcą.
W następujących przypadkach należy natychmiast wyłączyć sterownik i skontaktować się z
zespołem serwisowym:
o jeśli pojazd jest uszkodzony
o jeśli pojazd nie pracuje w przewidywalny sposób
OSTRZEŻENIE
Za aktualizacje/naprawy oprogramowania odpowiada Vermeiren. Aby dowiedzieć się więcej
na temat modyfikacji i dostosowywania oprogramowania, należy się
skontaktować z
Vermeiren. Zapraszamy do odwiedzenia witryny
http://www.
vermeiren
.com/
.

LiNX 200
2023-03
Jazda
5
EN
NL
PL
o jeśli pojazd nie działa prawidłowo, zgodnie z oczekiwaniami
o jeśli pojazd zbyt mocno nagrzewa się
o jeśli pojazd dymi
o jeśli pojazd nie zmienia prędkości po zmianie ustawienia pokrętła prędkości
o jeśli pojazd wyświetla błąd i sterownik działa nieprawidłowo.
Wyłącz sterownik:
o gdy go nie używasz
o przed wchodzeniem na wózek i schodzeniem z niego
o jeśli pojazd porusza się sam lub niezgodnie z zamierzeniem. Po wyłączeniu sterownika
pojazd zatrzyma się.
W przypadku wystąpienia poważnego incydentu z udziałem produktu, należy powiadomić firmę
Vermeiren lub specjalistycznego sprzedawcę, jak również właściwe władze w swoim kraju.
3 Jazda
1. Nacisnąć przycisk wł./wył.
2. Zapalenie się zielonej kontrolki na przycisku wł./wył. wskazuje, że wózek jest włączony i
gotowy do jazdy.
3. Sprawdzić wskaźnik stanu akumulatora. Naładować akumulator w razie potrzeby (patrz §4.3).
4. Wybrać program jazdy i dostosować prędkość jazdy za pomocą przełącznika prędkości, patrz
funkcje jazdy w §0.
5. Rozpocząć jazdę wózkiem, powoli przechylając joystick do przodu/do tyłu.
6. Im dalej odchyli się joystick od środka, tym szybciej będzie jechał wózek.
7. Aby skręcić w lewo lub w prawo, przechylić joystick w lewą lub prawą stronę. Podczas jazdy
na otwartym powietrzu używać kierunkowskazów, patrz §4.9.
8. Aby zahamować, ustawić joystick w położeniu neutralnym.
9. Po dojechaniu na miejsce sprawdzić stan akumulatora i nacisnąć przycisk wł./wył.
10. W razie potrzeby naładować akumulator.

LiNX 200
2023-03
Funkcje konsoli kierowniczej
6
EN
NL
PL
4 Funkcje konsoli kierowniczej
Konsola kierownicza umożliwia sterowanie wszystkimi elementami napędowymi oraz silnikami
służącymi do regulacji pozycji ciała. Ruchami wózka sterują układy elektroniczne, aby zwiększyć
bezpieczeństwo użytkownika i zapobiec uszkodzeniu wózka. Może to spowodować zablokowanie
ruchu, zmniejszenie prędkości lub całkowite zatrzymanie.
4.1 Włączanie i wyłączanie
Ustawić joystick w położeniu neutralnym (środkowym) przed naciśnięciem przycisku
wł./wył.
Jeśli konsola zostanie włączona, gdy joystick jest odchylony od położenia neutralnego,
wózek nie będzie jechał. Aby odblokować napęd, puścić joystick (powrócić do położenia
neutralnego) w ciągu 5 sekund. Jeśli joystick nie zostanie puszczony w ciągu 5 sekund,
wystąpi usterka modułu. Będzie to wskazane przez czerwoną migającą kontrolkę LED na
przycisku wł./wył. Jazda wózkiem nie będzie możliwa. Aby usunąć usterkę modułu, puścić
joystick, wyłączyć i ponownie w
łączyć konsolę kierowniczą.
Aby włączyć konsolę kierowniczą, nacisnąć jeden raz przycisk wł./wył.
Zapali się kontrolka LED (wskaźnik stanu) na przycisku wł./wył. Gdy kontrolka świeci się na
zielono, konsola kierownicza jest gotowa do pracy. Jeśli kontrolka LED zaczyna migać na
czerwono, oznacza to usterkę, patrz §4.2 i §0.
Aby wyłączyć konsolę kierowniczą, gdy jest włączona: nacisnąć przycisk jeden
raz.
Konsola kierownicza się wyłączy, a wskaźnik stanu zgaśnie.
4.1.1 Zatrzymanie awaryjne
Jeśli zajdzie potrzeba szybkiego zatrzymania jazdy lub ruchu mechanizmu pozycjonującego
ciało, nacisnąć przycisk wł./wył., aby wykonać ZATRZYMANIE AWARYJNE. Wózek szybko się
zatrzyma.
4.1.2 Tryb uśpienia
Po pewnym okresie braku aktywności (domyślnie 5 minut) konsola kierownicza przejdzie w tryb
uśpienia.
Gdy system jest uśpiony, pewne jego elementy są wyłączone, aby ograniczyć zużycie energii.
Aby wybudzić konsolę kierowniczą, nacisnąć któryś przycisk lub poruszyć joystickiem.
4.2 Usterki i blokady
Gdy konsola kierownicza jest włączona i wystąpi usterka, przycisk wł./wył. zacznie
migać na czerwono. Liczba mignięć oznacza kod usterki. W razie usterki jedna lub
wszystkie funkcje konsoli kierowniczej są zablokowane. Więcej informacji: patrz §0.
4.3 Stan akumulatora i ładowanie
Ryzyko obrażeń i uszkodzeń
Postępować zgodnie z instrukcjami ładowania w instrukcji wózka inwalidzkiego i instrukcji
ładowarki dostarczonej przez jej producenta.
OSTRZEŻENIE

LiNX 200
2023-03
Funkcje konsoli kierowniczej
7
EN
NL
PL
Wskaźnik ładowania baterii (położony nad przyciskiem
wł./wył.) wskazuje, że zasilanie wózka jest włączone.
Ten wskaźnik pokazuje szacunkową ilość pozostałego
naładowania akumulatora.
Poniższa tabela zawiera wszystkie wskazania
akumulatora i ich znaczenia.
Tabela 1: Wskaźnik ładowania akumulatora
Wskazanie Opis Znaczenie Uwagi
Wszystkie diody LED
zgaszone.
System wyłączony.
Wszystkie diody świecą się,
a diody zielone migają.
System włączony
Ostrzeżenie o wysokim
poziomie napięcia: poziom
napięcia akumulatora
zwiększył się ponad
ostrzegawczą wartość
zadaną wysokiego
napięcia.
Ostrzeżenie: akumulator
przeładowany.
Jeśli zjeżdżasz ze
wzniesienia, zwolnij.
Wszystkie diody LED
świecą światłem ciągłym.
System włączony Diody wyświetlają poziom
naładowania: Akumulator
naładowany (między 81 a
100% pełnego poziomu
naładowania)
Świeci się jedna zielona
dioda.
System włączony Poziom naładowania
akumulatora obniża się.
Świeci się jedynie czerwona
i żółta dioda.
Niski poziom naładowania
akumulatorów.
Akumulator w połowie
naładowany. Najwyższy
czas zawrócić.
Świeci się czerwona i żółta
dioda.
Bardzo niski poziom
naładowania akumulatora.
Niski poziom naładowania
akumulatora (między 0 a
20% pełnego poziomu
naładowania). Wkrótce
naładuj.
Świeci się jedynie czerwona
dioda.
Akumulator prawie
wyładowany.
Bezzwłocznie naładuj.
Miga jedna z diod. Akumulator wyładowany.
Ostrzeżenie o niskim
poziomie napięcia: poziom
napięcia akumulatora
obniżył się do
ostrzegawczej wartości
zadanej niskiego napięcia.
Natychmiast naładuj.
Na wskaźniku poziomu
naładowania akumulatorów
będzie migać pierwsza
czerwona dioda.
Wskaźnik stanu wyświetli
migający kod błędu 2 lub 7.
Klakson będzie emitował
dźwięk raz na 10 sekund.
Napięcie akumulatora
obniża się poniżej wartości
zadanej napięcia
akumulatora.
Akumulator jest całkowicie
wyładowany i w takiej
sytuacji warto zawsze
przerwać proces
rozładowywania.
Wyświetlacz i wózek
automatycznie się
wyłączają.
Wskaźnik
ładowania
akumulatora

LiNX 200
2023-03
Funkcje konsoli kierowniczej
8
EN
NL
PL
4.3.1 Ładowanie
Podczas ładowania jazda jest niemożliwa (wyłączona i zablokowana).
Można ładować akumulator bez włączania konsoli kierowniczej. Aby uruchomić
wskaźnik stanu akumulatora, należy włączyć konsolę.
Podłącz ładowarkę akumulatorów do gniazda XLR elementu
sterowania (12), patrz Rysunek1.
Wskaźnik naładowania akumulatorów wyświetli informację, że
system jest w trakcie procesu ładowania przez powtarzanie
sekwencji ruchu paska od lewej do prawej. Następnie wskaże
przybliżony poziom naładowania akumulatora pod koniec każdej
sekwencji ruchu paska.
4.4 Obsługa joysticka (jazda i hamowanie)
Przechylenie joysticka w wybranym kierunku spowoduje jazdę elektrycznego
wózka inwalidzkiego w tym kierunku. Prędkość jazdy zależy od przechylenia
joysticka. Jeśli popchnie/pociągnie się joystick do maksymalnego
przechylenia, osiągnie się prędkość maksymalną (w ramach wybranego
trybu jazdy).
Po przesunięciu joysticka do położenia środkowego (neutralnego) podczas
jazdy zaczną działać hamulce, a wózek się zatrzyma:
Aby hamować stopniowo, należy przesuwać joystick powoli.
Aby zatrzymać się szybko, puścić joystick. Wózek zatrzyma się tak
szybko, jak to możliwe.
Upewnić się, że joystick jest w położeniu neutralnym (środkowym) przed naciśnięciem
przycisku wł./wył. W przeciwnym razie układy elektroniczne zostaną zablokowane.
Po włączeniu kons
oli kierowniczej za pomocą przycisku wł./wył. joystick musi pozostać w
położeniu środkowym przez co najmniej pięć sekund. Konsolę zaprogramowano w ten
sposób z przyczyn technicznych i bezpieczeństwa. Jeśli joystick i przycisk wł./wył. zostaną
aktywowane je
dnocześnie, konsola zostanie zablokowana. Aby ją odblokować, należy ją
wyłączyć.
PRZED WŁĄCZENIEM wózka upewnić się, że dźwignia wolnego koła jest w pozycji
hamowania. Hamulce elektromagnetyczne NIE działają, gdy wózek jest w trybie wolnego
koła.
Jest to wskazane na konsoli kierowniczej. Jazda jest wówczas niemożliwa.
4.5 Blokada konsoli kierowniczej
Funkcja blokady przede wszystkim uniemożliwia obsługę wózka przez nieupoważnioną osobę.
Zapobiega też przypadkowemu uruchomieniu funkcji konsoli, gdy system pozostaje nieużywany
przez pewien czas. Gdy system jest zablokowany, jest wówczas wyłączony i elementy sterowania
nie działają. Jeśli przycisk zasilania zostanie naciśnięty, gdy system jest zablokowany,
użytkownik jest informowany o blokadzie przez wskaźnik akumulatora.

LiNX 200
2023-03
Funkcje konsoli kierowniczej
9
EN
NL
PL
Aby zablokować system, należy nacisnąć i przytrzymać przez 7 sekundy
przycisk zasilania.
Przejście do stanu zablokowania jest sygnalizowane przez wskaźnik
akumulatora za pomocą 3 mignięć diod 1, 3 i 5 (skrajna lewa, środkowa i skrajna
prawa).
Aby odblokować system, należy nacisnąć jeden raz przycisk zasilania, a
następnie nacisnąć dwa razy przycisk „Klakson" – przycisk „Klakson" musi być
naciśnięty dwa razy w ciągu 10 sekund od naciśnięcia przycisku zasilania.
Jeśli użytkownik nie wykona prawidłowej sekwencji odblokowania w ciągu
określonego czasu lub jeśli przed zakończeniem sekwencji odblokowania
zostanie ponownie naciśnięty przycisk zasilania, system powróci do stanu
blokady.
Podczas odblokowywania wskaźnik akumulatora będzie sygnalizował, że system
znajduje się w stanie zablokowania, migając diodami 1, 3 i 5 (skrajna lewa,
środkowa i skrajna prawa) aż do chwili wyłączenia systemu, jego odblokowania
lub upłynięcia limitu czasu procedury wynoszącego około 15 sekund, po którym
sterownik zostanie automatycznie wyłączony.
4.6 Dostosowywanie pozycji ciała
Ryzyko obrażeń i uszkodzeń
Uwaga: stabilność wózka jest mniejsza, gdy wózek przestawi się z pozycji siedzenia prosto
do pozycji nachylonej.
Upewnić się, że
wokół wózka jest wystarczająco dużo miejsca na regulację oparcia i siedziska.
Funkcje regulacji wózka można obsługiwać przy użyciu przycisku funkcji regulacji. Zależnie od
typu wózka, może być dostępnych maksymalnie 6 funkcji.
Nacisnąć górę przycisku, aby wybrać kolejną funkcję regulacji. Nacisnąć dół
przycisku, aby wybrać poprzednią funkcję regulacji.
Aby dostosować pozycję ciała, przesunąć joystick do przodu lub do tyłu.
Aby powrócić do podstawowej pozycji siedzącej, przesunąć joystick do tyłu dla
każdego ruchu regulacji.
Wybrana funkcja regulacji jest sygnalizowana przez wskaźnik stanu jazdy/siłownika, jak
pokazano poniżej. Wyświetlane są jedynie dostępne/zaprogramowane funkcje wózka
inwalidzkiego.
Funkcja regulacji Wskazanie Funkcja regulacji Wskazanie
Odchylenie siedzenia
Funkcja regulacji
Podnoszenie
Nachylenia oparcia
UWAGA

LiNX 200
2023-03
Funkcje konsoli kierowniczej
10
EN
NL
PL
Wspornik prawej nogi
Wspornik lewej nogi /
centralna podpórka pod
stopy
Nieokreślone
Wsporniki obu nóg
4.7 Zmiana funkcji jazdy
Funkcje prędkości wózka można obsługiwać przy użyciu przycisku wyboru jazdy.
Dostępne są trzy funkcje jazdy.
Nacisnąć górę przycisku, aby wybrać kolejną funkcję jazdy. Nacisnąć dół
przycisku, aby wybrać poprzednią funkcję jazdy.
Wybraną funkcję jazdy wskazuje wskaźnik funkcji jazdy z prawej strony przycisku
wyboru jazdy. Wskaźnik składa się z trzech kontrolek LED, każda dla innej dostępnej funkcji
jazdy. Po wybraniu funkcji jazdy 1 zapali się tylko dolna kontrolka. W przypadku funkcji jazdy 3
zapalą się wszystkie kontrolki.
Maksymalna prędkość jazdy osiągana przy całkowitym przechyleniu joysticka zależy od wybranej
funkcji jazdy (1, 2 lub 3) i od ręcznego ustawienia prędkości w tej funkcji.
4.7.1 Regulacja prędkości jazdy
W każdej z trzech funkcji jazdy można przy użyciu przełącznika
prędkości ustawić prędkość w 10 oddzielnych krokach, od
najmniejszej (z lewej strony) do największej (z prawej strony). Ten
obrotowy przełącznik jest położony naokoło przycisku wł./wył. Nad
przełącznikiem prędkości znajduje się symbol prędkości, który
wizualnie wskazuje dużą i małą prędkość.
4.7.2 Ograniczona prędkość jazdy
Ze względu na bezpieczeństwo użytkownika, prędkość jazdy wózka będzie automatycznie
ograniczana po wykonaniu określonych modyfikacji pozycji ciała. Jazda wózkiem jest wówczas
ograniczona do najniższego ustawienia prędkości lub jest całkowicie uniemożliwiona.
1
2
3
Wolno Szybko

LiNX 200
2023-03
Funkcje konsoli kierowniczej
11
EN
NL
PL
Ograniczenia jazdy i prędkości występują, gdy:
podnośnik ustawiono w wyższym położeniu. Dostępne jest tylko ustawienie prędkości 1.
pochylenie oparcia przekracza określony kąt (patrz ilustracja 7):
1. Dostępne są wszystkie funkcje wózka.
2. Dostępne jest tylko ustawienie prędkości 1.
3. Jazda wózkiem jest niemożliwa. Podnieść oparcie aż do zwolnienia blokady.
Aby powiadomić użytkownika o wyłączeniu możliwości jazdy, kontrolka LED koła napędzanego
na wskaźniku stanu siłowników powoli miga. Miga również kontrolka LED wskazująca element
regulacyjny, który spowodował blokadę.
Np. Rysunek 8: Migają kontrolki oparcia i koła napędzanego. To oznacza, że oparcie jest za
bardzo pochylone i uniemożliwia jazdę.
Aby anulować ograniczenia prędkości/jazdy, opuścić podnośnik do standardowego (najniższego)
położenia i ustawić siedzisko oraz oparcie w położeniu siedzenia pionowo.
4.8 Klakson
Nacisnąć przycisk klaksonu (6), aby ostrzec osoby postronne, patrz Rysunek 1. Sygnał klaksonu
trwa, dopóki nie puści się przycisku.
4.9 Oświetlenie
4.9.1 Światła przednie i tylne
Aby włączyć światła przednie i tylne,
nacisnąć jeden raz i od razu puścić
prawy przycisk świateł (A). Kontrolka
LED prawego przycisku będzie się
świeciła, gdy światła są włączone.
Aby wyłączyć światła, nacisnąć prawy lub lewy przycisk świateł (A/B).
4.9.2 Światła awaryjne
Aby włączyć światła awaryjne, należy nacisnąć i szybko zwolnić lewy przycisk świateł.
Diody za lewym i prawym przyciskiem będą migać, gdy włączone są światła awaryjne.
Aby wyłączyć światła awaryjne, należy nacisnąć lewy lub prawy przycisk świateł (A/B).
4.9.3 Kierunkowskazy
Aby włączyć kierunkowskaz, nacisnąć jeden raz lewy lub prawy przycisk świateł,
odpowiednio do kierunku, w którym chce się jechać. Kontrolka LED przycisku będzie
migała, dopóki światła kierunkowskazu w danym kierunku są włączone.
Aby wyłączyć kierunkowskaz, nacisnąć prawy lub lewy przycisk świateł (A/B).
Gdy światła awaryjne zostaną włączone, nie wyłączą się nawet w przypadku wyłączenia
konsoli przyciskiem wł./wył.
W przypadku wyłączenia konsoli główne światła gasną
.
A
B

LiNX 200
2023-03
Diagnozowanie i rozwiązywanie problemów
12
EN
NL
PL
5 Diagnozowanie i rozwiązywanie problemów
Ryzyko obrażeń i uszkodzeń konsoli kierowniczej i wózka
NIGDY nie podejmować prób samodzielnej naprawy konsoli kierowniczej.
Jeśli dojdzie do usterki konsoli kierowniczej, należy się
skontaktować z wyspecjalizowanym
sprzedawcą.
Podejmie on decyzję, czy konsola wymaga przeprogramowania.
W razie usterki, jej kod wskazuje migająca kontrolka LED w przycisku wł./wył. patrz § 4.2.
Poniższa tabela zawiera zestawienie możliwych kodów usterki. Niektóre problemy może
rozwiązać sam użytkownik. W przypadku wszystkich problemów oznaczonych kolorem szarym
należy się skontaktować z wyspecjalizowanym sprzedawcą.
Tabela 2: Diagnozowanie i rozwiązywanie problemów
Kod
Problem
Znaczenie
1
Błąd elementu sterującego /
joysticka
Sprawdzić, czy w momencie włączania konsoli joystick jest
w położeniu neutralnym.
Sprawdzić, czy joystick nie jest uszkodzony i czy działa
prawidłowo.
2
Błąd sieci lub konfiguracji
1. Sprawdzić wszystkie terminale i kable.
2. Sprawdzić, czy oprogramowanie działa prawidłowo.
Jeśli nie uda się zlokalizować usterki, skontaktować się z
wyspecjalizowanym sprzedawcą.
3
Lewy silnik (lub jego
podłączenie) jest uszkodzony.
1. Sprawdzić, czy prawidłowo podłączono wtyczki obu
silników.
2. Sprawdzić, czy styki we wtyczkach obu silników nie są
skorodowane lub uszkodzone.
Ta usterka występuje również wtedy, gdy silniki są
odłączone.
Podłączyć je ponownie i zrestartować system.
4 Prawy silnik (lub jego
podłączenie) jest uszkodzony. Jak opisano powyżej.
5
Lewy hamulec postojowy (lub
jego podłączenie) jest
uszkodzony albo mechanizm
jest na biegu jałowym.
1. Sprawdzić, czy prawidłowo włożono wtyczki obu
silników.
2. Sprawdzić, czy wtyczki nie są skorodowane lub
uszkodzone.
6
Prawy hamulec postojowy (lub
jego podłączenie) jest
uszkodzony.
Jak opisano powyżej.
7 Błąd modułu (inny niż elementu
sterującego)
Może być uszkodzona któraś część wózka inna niż konsola
obsługowa.
OSTRZEŻENIE

LiNX 200
2023-03
Obsah
1
EN
NL
PL
CS
Obsah
Obsah ........................................................................................................................ 1
Předmluva .................................................................................................................. 2
1 Popis .............................................................................................................. 3
2 Před použitím ................................................................................................ 4
2.1 Všeobecné bezpečnostní pokyny ................................................................... 4
3 Jízda ............................................................................................................... 5
4 Funkce ovládacího panelu ........................................................................... 6
4.1 Zapnutí a vypnutí ............................................................................................ 6
4.2 Chyby a blokování .......................................................................................... 6
4.3 Stav a nabíjení baterie .................................................................................... 6
4.4 Ovládání joysticku (jízda a brzdění) ................................................................ 8
4.5 Blokování ovládacího panelu .......................................................................... 8
4.6 Nastavení polohy těla ..................................................................................... 9
4.7 Změna jízdní funkce ...................................................................................... 10
4.8 Houkačka ...................................................................................................... 11
4.9 Osvětlení ....................................................................................................... 11
5 Odstraňování závad .................................................................................... 12

LiNX 200
2023-03
Předmluva
2
EN
NL
PL
CS
Předmluva
Důležitá poznámka
Tento návod odráží nejnovější vývoj výrobku. Společnost Vermeiren má právo zavádět změny
tohoto typu výrobku bez jakékoli povinnosti upravit nebo vyměnit podobné výrobky, které již byly
dodány.
K objasnění pokynů v tomto návodu se používají obrázky. Detaily znázorněného výrobku se
mohou od skutečného konkrétního výrobku lišit.
Dostupné informace
Na naší webové stránce http://www.vermeiren.com/ vždy najdete nejnovější verzi informací v
tomto návodu. Navštěvujte tuto webovou stránku pravidelně kvůli možným aktualizacím.
Osoby se zhoršeným zrakem si mohou stáhnout elektronickou verzi tohoto návodu a nechat si ji
číst pomocí softwarové aplikace převádějící text na řeč.
Návod k použití ovládacího panelu
Pro uživatele a specializované prodejce
Návod k použití kolečkového křesla
Pro uživatele a specializované prodejce
Návod k instalaci kolečkového křesla
Pro specializované prodejce
Návod k použití baterie a nabíječky
Pro uživatele a specializované prodejce

LiNX 200
2023-03
Popis
3
EN
NL
PL
CS
1 Popis
Ovládací panel zabudovaný do elektrického kolečkového křesla umožňuje obsluhovat všechny
funkce jízdy, řízení, brzdění a provozu, ale také další servomotory (zvedací sloupek, nastavení
sedáku a opěradla). Elektrická jednotka a elektronika kolečkového křesla jsou průběžně interně
monitorovány.
Následující obrázky znázorňují všechny součásti podstatné pro uživatele.
Důležité součásti
1. Ukazatel nabití baterie
2. Tlačítko ZAP/VYP se stavovou
kontrolkou
3. Přepínač rychlosti
4. Tlačítko nastavení polohy
5.
Tlačítko jízdní funkce
6. Tlačítko houkačky
7. Stav pohonu a ovladače
8. Jízdní světla a ukazatel změny
směru doprava
9. Výstražná světla a ukazatel
změny směru doleva
10. Joystick
11. Přípojka pro instalaci softwaru
12.
Přípojka
nabíječky baterie
2
1
3
6
10
5 4
7
9
8
11
12

LiNX 200
2023-03
Před použitím
4
EN
NL
PL
CS
2 Před použitím
Nebezpečí zranění a poškození
Neinstalujte, neudržujte ani nepoužívejte tento výrobek, pokud jste si nepřečetli a plně
nepochopili všechny pokyny v tomto návodu a všech souvisejících návodech týkajících se
kolečkového křesla vybaveného tímto zařízením.
Za žádných okolností se nepokoušejte otevřít nebo rozebrat ovládací panel –
uvnitř nejsou
žádné součásti vyžadující údržbu uživatele.
V případě pochybností nebo dotazů neváhejte požádat svého místního specializovaného
prodejce, svého poskytovatele péče nebo svého technického poradce, aby vám pomohl.
2.1 Všeobecné bezpečnostní pokyny
Během používání mějte na paměti následující všeobecná varování:
Ovládací panely jsou odzkoušené z hlediska elektromagnetické kompatibility na typických,
reprezentativních vozících a odpovídají příslušným normám EMC:
EN 12184: 2014, ISO 7176-21: 2009. Zdroje elektromagnetického pole mohou nicméně
ovlivnit výkon pohonu kolečkového křesla, přičemž se jedná o pole mobilních telefonů,
elektrogenerátorů nebo vysoce výkonných zdrojů energie. Na druhou stranu, elektronika
kolečkového křesla může také ovlivňovat jiné elektronické přístroje, např. poplašné systémy
v obchodech a automatické dveře. Doporučujeme proto pravidelně kontrolovat ovládací
panel a kolečkové křeslo s ohledem na poškození a opotřebení, protože tyto stavy mohou
zesilovat rušení.
Mějte na paměti, že povrch ovládacího panelu se může silně zahřívat působením slunečního
záření nebo topných zařízení. Buďte opatrní při dotýkání.
Dbejte na to, aby se ovládací jednotka neochladila nebo nezahřála více než na povolenou
minimální, resp. maximální teplotu, viz návod k použití kolečkového křesla.
Před zapnutím kolečkového křesla překontrolujte okolní prostředí a situaci. Než vyjedete,
nastavte vhodně svou rychlost. Při pojíždění uvnitř budov doporučujeme používat
nejpomalejší nastavení rychlosti. Při jízdě venku můžete nastavit rychlost na vhodnou
úroveň, při které se budete cítit komfortně a v bezpečí.
Nedotýkejte se kolíků konektoru. Jestliže se dotknete kolíků, mohou se znečistit nebo
poškodit elektrostatickým výbojem.
Pokud kolečkové křeslo není vybaveno chráničem ruky pro ovládací panel, mějte na paměti,
že vaše ruka není chráněna před zmáčknutím, například během manévrování
u stolu.
Konektor XLR na ovládací jednotce se smí používat výhradně k určenému účelu nabíjení
baterie. Pokud k tomuto portu připojíte jakékoli neschválené zařízení, zanikne záruka.
Ujistěte se, že nabíječka baterie používaná s vozíkem má funkci potlačení pohonu, která je
správně zapojena pro použití s ovládací jednotkou. Tato funkce potlačení pohonu má za
úkol bránit rozjetí křesla, pokud se nabíjí baterie. Nebudete-li si jisti, informujte se u svého
prodejce.
Okamžitě vypněte ovládací jednotku a kontaktujte svého servisního zástupce, pokud vozík:
o je poškozený;
o nechová se pokaždé stejně;
o nereaguje normálně, způsobem, jaký byste od něj očekávali;
o zahřeje se více než normálně;
VAROVÁNÍ
Společnost Vermeiren je odpovědná za aktualizace softwaru a opravy. V případě úprav v
softwaru kontaktujte společnost Vermeiren, viz naše webová stránka
http://www.
vermeiren
.com/

LiNX 200
2023-03
Jízda
5
EN
NL
PL
CS
o kouří;
o nemění rychlost, když přestavíte ovladač rychlosti;
o hlásí chybu na ukazateli chyb a ovládací jednotka nefunguje normálně.
Vypněte ovládací jednotku:
o když ji nepoužíváte;
o předtím, než opustíte kolečkové křeslo nebo si na něj sednete;
o pokud se vozík rozjede sám od sebe nebo proti vaší vůli. Když vypnete ovládací
jednotku, vozík se zastaví.
V případě, že došlo k závažnému incidentu s vaším výrobkem, informujte společnost Vermeiren
nebo svého specializovaného prodejce a příslušný úřad ve vaší zemi.
3 Jízda
1. Stiskněte tlačítko ZAP/VYP.
2. Pokud kontrolka v tlačítku ZAP/VYP zeleně svítí, je kolečkové křeslo zapnuté a připravené k
jízdě.
3. Zkontrolujte ukazatel stavu baterie. V případě potřeby nabijte baterii (viz §4.3).
4. Zvolte jízdní program a nastavte rychlost jízdy přepínačem rychlosti, viz jízdní funkce v §4.7.
5. Rozjeďte kolečkové křeslo pomalým pohybem joysticku dopředu nebo dozadu.
6. Když stlačíte joystick dál ze středu, zvýší se rychlost.
7. Chcete-li zatočit doleva nebo doprava, stlačte joystick doleva nebo doprava. Při jízdě venku
používejte ukazatele změny směru, viz §4.9.
8. Chcete-li zabrzdit, přemístěte joystick do neutrální polohy.
9. Po příjezdu zkontrolujte stav baterie a stiskněte tlačítko ZAP/VYP.
10. V případě potřeby nabijte baterii.

LiNX 200
2023-03
Funkce ovládacího panelu
6
EN
NL
PL
CS
4 Funkce ovládacího panelu
Ovládací panel umožňuje obsluhovat všechny jízdní součásti, jakož i motorky pro nastavení
polohy těla. Pro vaši vlastní bezpečnost, a aby se kolečkové křeslo nepoškodilo, jsou pohyby
monitorovány elektronikou. To může vést k zablokování pohybu, snížení rychlosti nebo úplnému
zastavení.
4.1 Zapnutí a vypnutí
Před stisknutím tlačítka ZAP/VYP umístěte joystick do neutrální (středové) polohy.
Jestliže se ovládací panel zapne s joystickem mimo neutrální polohu, kolečkové křeslo
nepojede. Aby se odblokoval pohon, uvolněte nejpozději do 5 sekund joystick
(vraťte ho
do neutrální polohy). Pokud do 5 sekund neuvolníte joystick, změní se chyba na chybu
modulu, která je signalizována červeným blikáním LED kontrolky v tlačítku ZAP/VYP.
Kolečkové křeslo nejede. Abyste odstranili chybu modulu, uvolněte joystick a
vypněte a
pak znovu zapněte ovládací panel.
Chcete-li zapnout ovládací panel, stiskněte jednou tlačítko ZAP/VYP.
Rozsvítí se LED kontrolka (stavová kontrolka) v tlačítku ZAP/VYP. Jestliže se rozsvítí
zeleně, je ovládací panel připravený k provozu. Pokud LED kontrolka začne červeně blikat,
znamená to chybu, viz §4.2 a §5.
Chcete-li vypnout ovládací panel, když je zapnutý: stiskněte jednou tlačítko.
Ovládací panel se vypne a stavová kontrolka zhasne.
4.1.1 Nouzové zastavení
Pokud potřebujete rychle zastavit jízdu nebo pohyb polohování těla, stiskněte tlačítko ZAP/VYP,
aby proběhlo nouzové zastavení. Kolečkové křeslo se rychle zastaví.
4.1.2 Režim spánku
Po určité době nečinnosti (standardně 5 minut) přechází ovládací panel do režimu spánku.
Když systém spí, je částečně vypnutý, aby se snížila spotřeba elektrické energie.
Chcete-li ovládací panel znovu aktivovat, stiskněte tlačítko nebo pohněte joystickem.
4.2 Chyby a blokování
Když je ovládací panel zapnutý a dojde k chybě, začne červeně blikat tlačítko
ZAP/VYP. Počet bliknutí udává kód chyby. V případě chyby jsou zablokovány jedna
nebo všechny funkce ovládacího panelu. Další informace viz §5.
4.3 Stav a nabíjení baterie
Nebezpečí zranění a poškození
Postupujte podle pokynů pro nabíjení v návodu k použití kolečkového křesla a v návodu od
dodavatele nabíječky baterie.
VAROVÁNÍ

LiNX 200
2023-03
Funkce ovládacího panelu
7
EN
NL
PL
CS
Pro signalizaci, jestli je zapnuto elektrické napájení
kolečkového křesla, se používá ukazatel nabití baterie
(umístěný nad tlačítkem ZAP/VYP). Ukazatel poskytuje
odhad zbývající kapacity baterie.
V následující tabulce jsou shrnuty všechny indikace
baterie a jejich významy.
Tabulka 1: Ukazatel nabití baterie
Displej Popis Význam Poznámky
Všechny LED kontrolky
zhasnuté.
Systém vypnutý.
Všechny LED kontrolky
svítí a zelené LED
kontrolky blikají.
Systém zapnutý.
Varování při vysokém
napětí: úroveň napětí
baterie vzrostla nad
nastavenou hodnotu
varování při vysokém
napětí.
Varování: baterie příliš
nabitá.
Zpomalte, pokud jedete
dolů ze svahu.
Všechny LED kontrolky
svítí.
Systém zapnutý.
LED kontrolky udávají
úroveň nabití: Nabitá
baterie (mezi 80 a 100 %
plné kapacity)
Svítí 1 zelená LED
kontrolka.
Systém zapnutý.
Úroveň baterie klesá.
Svítí pouze červené a
oranžové LED kontrolky.
Nízká úroveň baterie.
Baterie napůl nabitá.
Vydejte se na zpáteční
cestu.
Svítí červené a oranžové
LED kontrolky.
Velmi nízká úroveň baterie.
Baterie vybitá (mezi 0 a 20
% plné kapacity). Brzy
dobijte.
Svítí pouze červená LED
kontrolka.
Baterie téměř prázdná.
Dobijte hned.
Bliká 1 červená LED
kontrolka.
Baterie
prázdná. Varování
při nízkém napětí: úroveň
napětí baterie klesla pod
nastavenou hodnotu
varování při nízkém napětí.
Okamžitě dobijte.
Bliká první červená LED
kontrolka na ukazateli
baterie.
Stavový indikátor hlásí
blikací kód 2 nebo 7.
Každých 10 sekund zazní
houkačka.
Napětí baterie kleslo pod
vypínací úroveň.
Baterie je úplně vybitá a je
vhodné ji v tomto okamžiku
přestat vybíjet. Displej a
kolečkové křeslo se
automaticky vypnou.
Ukazatel
nabití
baterie

LiNX 200
2023-03
Funkce ovládacího panelu
8
EN
NL
PL
CS
4.3.1 Nabíjení
Během nabíjení systému není možné rozjet vozík (potlačený pohon).
Nabíjení je možné bez zapnutí ovládacího panelu. Chcete-
li vidět ukazatel stavu baterie,
zapněte ovládací panel.
Zapojte nabíječku baterie do vzdálené zásuvky XLR (12), viz
Obrázek 1.
Ukazatel nabíjení baterie signalizuje, že se systém nabíjí,
postupným rozsvěcením kontrolek zleva doprava a pak
zobrazením přibližného stavu nabití baterie na konci sekvence.
Signalizace nabíjení baterie
4.4 Ovládání joysticku (jízda a brzdění)
Při pohybu joysticku v určitém směru se elektrické kolečkové křeslo
pohybuje v tomto směru. Rychlost pohybu závisí na výchylce joysticku. Je-
li joystick stlačený/přitažený do maximální výchylky, je rychlost maximální
(ve zvoleném jízdním režimu).
Při přestavení joysticku do jeho středové (neutrální) polohy během jízdy
začnou pracovat brzdy, dokud se kolečkové křeslo nezastaví:
Při postupném brzdění pohybujte pomalu joystickem.
Pro rychlé zastavení joystick uvolněte; kolečkové křeslo se zastaví,
jak to bude nejrychleji možné.
Pohyby joysticku
Při stisknutí tlačítka ZAP/VYP se ujistěte, že je joystick ve středové (neutrální) poloze, jinak
se zablokuje elektronika.
Po zapnutí ovládacího panelu tlačítkem ZAP/VYP musí joystick zůstat nej
méně pět sekund
ve středové poloze. Ovládací panel je tímto způsobem naprogramovaný z technických a
bezpečnostních důvodů. Pokud aktivujete současně joystick a tlačítko ZAP/VYP, zablokuje
se řídicí jednotka a odblokuje se až po úplném vypnutí.
PŘED zapnutím kolečkového křesla se přesvědčte, že je páčka volnoběhu v poloze
brzdění. Je-li kolečkové křeslo v režimu volnoběhu, NEFUNGUJÍ elektromagnetické brzdy.
To je signalizováno na ovládacím panelu. Jízda není možná.
4.5 Blokování ovládacího panelu
Funkce blokování se používá především k zabránění nepovolanému použití kolečkového křesla,
ale může také pomoci zabránit náhodnému použití ovládacích prvků, když systém není nějakou
dobu používán. Když je systém zablokovaný, má vypnuté elektrické napájení a uživatelské
ovladače nereagují. Je-li stisknuto tlačítko napájení, když je systém zablokovaný, zobrazí se
zablokovaný stav uživateli na ukazateli baterie.

LiNX 200
2023-03
Funkce ovládacího panelu
9
EN
NL
PL
CS
Chcete-li zablokovat systém: stiskněte tlačítko napájení a přidržte stisknuté 7
sekund.
Přechod do zablokovaného stavu je signalizován ukazatelem baterie trojím
zablikáním LED kontrolek 1, 3 a 5 (úplně vlevo, uprostřed a úplně vpravo)..
Chcete-li odblokovat systém: stiskněte jednou tlačítko napájení a potom dvakrát
tlačítko houkačky – tlačítko houkačky musíte dvakrát stisknout do 10 sekund od
stisknutí tlačítka napájení.
Jestliže neprovedete postup odblokování správně a ve stanoveném časovém
rámci, nebo znovu stisknete tlačítko napájení předtím, než bude sekvence
odblokování kompletní, vrátí se systém do zablokovaného stavu.
Během pokusu o odblokování signalizuje ukazatel baterie, že je systém v
zablokovaném stavu, blikáním LED kontrolek 1, 3 a 5 (úplně vlevo, uprostřed a
úplně vpravo), dokud systém není buď vypnutý, nebo odblokovaný, nebo dokud
není dosažen časový limit sekvence ±10 sekund, kdy se automaticky vypne
ovládací jednotka.
4.6 Nastavení polohy těla
Nebezpečí zranění nebo poškození
Pamatujte si, že když se kolečkové křeslo přestaví ze vzpřímené sedací
polohy do nakloněné
polohy, sníží se stabilita.
Ujistěte se, že je kolem kolečkového křesla dost prostoru na ovládání opěradla a sedáku.
Nastavovací funkce kolečkového křesla je možné obsluhovat s použitím tlačítka nastavovacích
funkcí. V závislosti na typu kolečkového křesla může být k dispozici až 6 funkcí.
Stisknutím horní části tlačítka se vybírá další nastavovací funkce. Stisknutím
spodní části tlačítka se vybírá předchozí nastavovací funkce.
Chcete-li nastavit polohu těla, pohněte joystickem dopředu nebo dozadu.
Při návratu do základní sedací polohy pohněte joystickem dozadu pro každý
nastavovací pohyb.
Tlačítko nastavení polohy
Vybraná nastavovací funkce je zobrazena na ukazateli pohonu a aktuátoru, jak je znázorněno
níže. Displej ukazuje pouze dostupné, resp. naprogramované funkce kolečkového křesla.
Nastavovací funkce Displej Nastavovací funkce Displej
Sklon sedáku
Sklon opěradla
Zdvih
Opěrka nohy levá
POZOR

LiNX 200
2023-03
Funkce ovládacího panelu
10
EN
NL
PL
CS
Opěrka nohy pravá
Opěrky nohou současně /
středová nožní deska
Nespecifikováno
Žádná
4.7 Změna jízdní funkce
Funkce rychlosti kolečkového křesla je možné obsluhovat s použitím tlačítka volby
jízdy. K dispozici jsou tři jízdní funkce.
Stisknutím horní části tlačítka se vybírá další jízdní funkce. Stisknutím spodní
části tlačítka se vybírá předchozí jízdní funkce.
Tlačítko jízdní funkce
Vybraná jízdní funkce je indikována na ukazateli jízdní funkce na pravé straně od tlačítka volby
jízdy. Ukazatel má tři LED kontrolky, jednu pro každou dostupnou jízdní funkci. Když je zvolena
jízdní funkce 1, svítí pouze dolní kontrolka. Při jízdní funkci 3 svítí všechny LED kontrolky.
Maximální rychlost jízdy při maximální výchylce joysticku závisí na vybrané jízdní funkci (1, 2
nebo 3) a ručním nastavení rychlosti v této funkci.
4.7.1 Nastavení rychlosti jízdy
V každé ze tří jízdních funkcí je možné nastavovat rychlost s použitím
přepínače rychlosti v 10 oddělených krocích mezi nejnižší (vlevo) a
nejvyšší (vpravo) rychlostí. Tento otočný přepínač je umístěný ve formě
prstence okolo tlačítka ZAP/VYP. Jako vizuální připomínka je nad
přepínačem rychlosti umístěn symbol rychlosti, který označuje nízké a
vysoké polohy.
Přepínač rychlosti
4.7.2 Omezená rychlost jízdy
Pro vaši bezpečnost se automaticky omezuje rychlost jízdy kolečkového křesla, když jsou
provedeny určité změny polohy těla. Pohon kolečkového křesla je pak omezený na nejnižší
nastavení rychlosti, nebo se dokonce úplně zablokuje.
Sklon opěradla Ukazatel potlačení pohonu
1
2
3
Slow Fast

LiNX 200
2023-03
Funkce ovládacího panelu
11
EN
NL
PL
CS
K omezení jízdy a rychlosti dochází, když:
zdvih byl nastaven do vyšší polohy. K dispozici je pouze nastavení rychlosti 1.
sklon opěradla překročí určitý úhel (viz obrázek 7):
1. K dispozici jsou všechny funkce kolečkového křesla.
2. K dispozici je pouze nastavení rychlosti 1.
3. Jízda kolečkového křesla není nadále možná. Zvedněte opěradlo, dokud se
blokování nezruší.
Aby byl uživatel upozorněn, že je celý pohon potlačený, bliká pomalu LED kontrolka hnacího kola
na ukazateli stavu ovladače spolu s LED kontrolkou náležející k nastavení, které způsobilo
zablokování.
Např. obrázek 8: Blikají LED kontrolky opěradla a hnacího kola na ukazateli. To znamená, že
je sklon opěradla příliš velký, což má za následek potlačení pohonu.
Chcete-li zrušit omezení rychlosti/jízdy, snižte zdvih do standardní (nejnižší) polohy a nastavte
sedák a opěradlo do vzpřímené sedací polohy.
4.8 Houkačka
Chcete-li varovat osoby v okolí, stiskněte tlačítko houkačky (6), viz obrázek 1. Houkačka zní,
dokud je tlačítko stisknuté.
4.9 Osvětlení
4.9.1 Přední a zadní světla
Chcete-li zapnout přední a zadní světla,
stiskněte jednou a rychle. uvolněte
pravé tlačítko osvětlení (A).
Pokud jsou světla zapnutá, svítí LED
kontrolka za pravým tlačítkem.
Chcete-li světla vypnout, stiskněte pravé nebo levé tlačítko osvětlení (A/B).
4.9.2 Výstražná světla
Chcete-li zapnout výstražná světla, stiskněte jednou a rychle uvolněte levé tlačítko
osvětlení (B). Pokud pracují výstražná světla, blikají LED kontrolky za levým a pravým
tlačítkem.
Chcete-li výstražná světla vypnout, stiskněte levé nebo pravé tlačítko osvětlení (A/B).
4.9.3 Ukazatele změny směru jízdy
Chcete-li stisknout některý z ukazatelů změny směru jízdy, stiskněte jednou levé nebo
pravé tlačítko osvětlení, v závislosti na směru, kterým se chystáte jet. Pokud pracují
ukazatele změny směru jízdy, bliká LED kontrolka za tlačítkem v příslušném směru.
Chcete-li kterýkoli z ukazatelů změny směru jízdy vypnout, stiskněte levé nebo pravé
tlačítko osvětlení (A/B).
Když jsou zapnutá výstražná světla, zůstávají zapnutá i po v
ypnutí ovládacího panelu
tlačítkem ZAP/VYP.
Hlavní světla při vypnutí ovládacího panelu zhasnou.
Ovládání světel
A
B

LiNX 200
2023-03
Odstraňování závad
12
EN
NL
PL
CS
5 Odstraňování závad
Nebezpečí zranění a poškození ovládacího panelu nebo kolečkového
křesla
NIKDY se nepokoušejte sami opravit ovládací panel.
Při
závadách ovládacího panelu musíte kontaktovat svého specializovaného prodejce. Ten
rozhodne, jestli je nutné ovládací panel přeprogramovat.
V případě závady se zobrazí kód chyby formou blikání LED kontrolky v tlačítku ZAP/VYP, viz
§4.2. Možné chybové kódy jsou shrnuté v následující tabulce. Některé problémy můžete vyřešit
sami. Při všech problémech označených šedě se poraďte se svým specializovaným prodejcem.
Tabulka 2: Odstraňování závad
Kód
Problém
Význam
1 Vzdálená chyba / chyba
joysticku
Zkontrolujte, jestli je joystick při zapnutí ovládacího panelu v
neutrální poloze.
Zkontrolujte joystick: není poškozený a správně funguje.
2 Chyba sítě nebo
konfigurace
1. Zkontrolujte všechny připojovací body a kabely.
2. Ověřte správné fungování softwaru.
Pokud nemůžete najít žádnou závadu, kontaktujte svého
specializovaného prodejce.
3
Levý motor
(nebo jeho připojení) je
vadný.
1. Zkontrolujte, jestli jsou správně zapojeny zástrčky obou
motorů.
2. Zkontrolujte kontakty zástrček obou motorů s ohledem na
korozi nebo poškození.
Tato chyba se rovněž objevuje, když jsou motory odpojené.
Znovu připojte a restartujte systém.
4
Pravý motor
(nebo jeho připojení) je
vadný. Jak je popsáno výše.
5
Levá parkovací brzda
(nebo její připojení) je
vadná nebo je aktivován
neutrál.
1. Zkontrolujte, jestli jsou správně zapojeny zástrčky motorů.
2. Zkontrolujte zástrčky s ohledem na korozi nebo poškození.
6
Pravá parkovací brzda
(nebo její připojení) je
vadná. Jak je popsáno výše.
7 Chyba modulu
(jiná než vzdálená)
Některá ze součástí kolečkového křesla může být poškozená
(kromě ovládání).
VAROVÁNÍ


-
 1
1
-
 2
2
-
 3
3
-
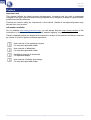 4
4
-
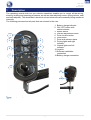 5
5
-
 6
6
-
 7
7
-
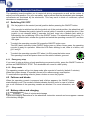 8
8
-
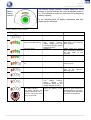 9
9
-
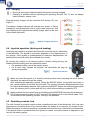 10
10
-
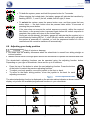 11
11
-
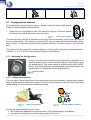 12
12
-
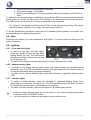 13
13
-
 14
14
-
 15
15
-
 16
16
-
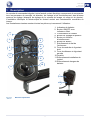 17
17
-
 18
18
-
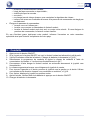 19
19
-
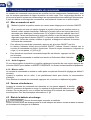 20
20
-
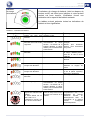 21
21
-
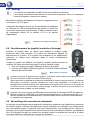 22
22
-
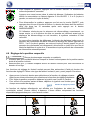 23
23
-
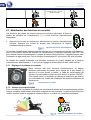 24
24
-
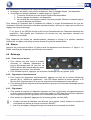 25
25
-
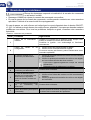 26
26
-
 27
27
-
 28
28
-
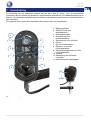 29
29
-
 30
30
-
 31
31
-
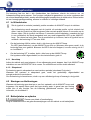 32
32
-
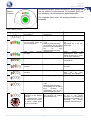 33
33
-
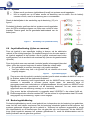 34
34
-
 35
35
-
 36
36
-
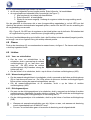 37
37
-
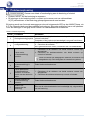 38
38
-
 39
39
-
 40
40
-
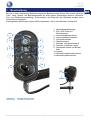 41
41
-
 42
42
-
 43
43
-
 44
44
-
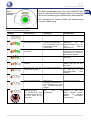 45
45
-
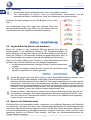 46
46
-
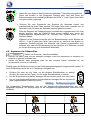 47
47
-
 48
48
-
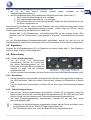 49
49
-
 50
50
-
 51
51
-
 52
52
-
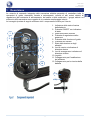 53
53
-
 54
54
-
 55
55
-
 56
56
-
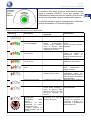 57
57
-
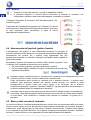 58
58
-
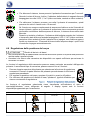 59
59
-
 60
60
-
 61
61
-
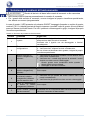 62
62
-
 63
63
-
 64
64
-
 65
65
-
 66
66
-
 67
67
-
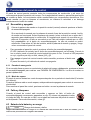 68
68
-
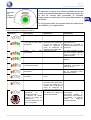 69
69
-
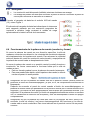 70
70
-
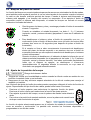 71
71
-
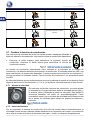 72
72
-
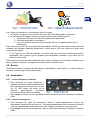 73
73
-
 74
74
-
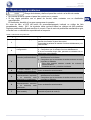 75
75
-
 76
76
-
 77
77
-
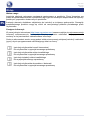 78
78
-
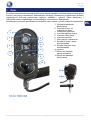 79
79
-
 80
80
-
 81
81
-
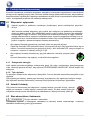 82
82
-
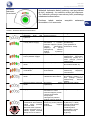 83
83
-
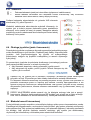 84
84
-
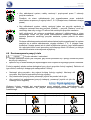 85
85
-
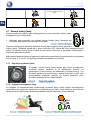 86
86
-
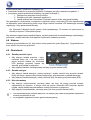 87
87
-
 88
88
-
 89
89
-
 90
90
-
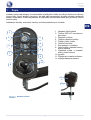 91
91
-
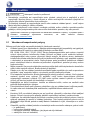 92
92
-
 93
93
-
 94
94
-
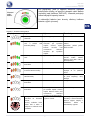 95
95
-
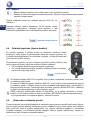 96
96
-
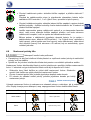 97
97
-
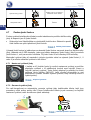 98
98
-
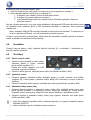 99
99
-
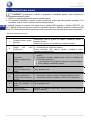 100
100
-
 101
101
-
 102
102
-
 103
103
-
 104
104


in andere talen
- italiano: Vermeiren LiNX 200 Manuale utente
- français: Vermeiren LiNX 200 Manuel utilisateur
- español: Vermeiren LiNX 200 Manual de usuario
- Deutsch: Vermeiren LiNX 200 Benutzerhandbuch
- slovenčina: Vermeiren LiNX 200 Používateľská príručka
- polski: Vermeiren LiNX 200 Instrukcja obsługi