
PRODUCT OF
DO721K
Handleiding Koezetapparaat Grind and Brew
Mode d’emploi Cafetière Grind and Brew
Gebrauchsanleitung Kaeeautomat Grind and Brew
Instruction booklet Coee maker Grind and Brew
Manual de instrucciones Cafetera eléctrica Grind and Brew
Istruzioni per l’uso Caettiera Grind and Brew
Návod k použití Překapávač s vlastním mlýnkem
Návod na použitie Prekvapkávač s vlastným mlynčekom

Lees aandachtig alle instructies - bewaar deze handleiding voor latere raadpleging.
Lisez attentivement les instructions - gardez le mode d’emploi pour utilisation ultérieur.
Lesen Sie genau die Anweisungen - bewahren Sie die Gebrauchsanleitung für spätere
heranziehung.
Read all instructions carefully - save this instruction manual for future reference.
Lea detenidamente todas las instrucciones - Conserve este manual para futura referencia.
Leggere con attenzione le istruzioni - conservarle per future consultazioni.
Před použitím si důkladně přečtěte tento manuál - manuál si uschovejte i pro případ
budoucího nahlédnutí.
Pred použitím si dôkladne prečítajte tento manuál - manuál si uschovajte aj pre prípad
budúceho nahliadnutie.
Required for R32/R290 Refrigerant only
CAUTION
: RISK OF FIRE
NL Nederlands 3
FR Français 10
DE Deutsch 17
EN English 24
ES Espagnol 30
IT Italiano 36
CZ Čeština 42
SK Slovenčina 49

3
DO721K
www.domo-elektro.be
NL
GARANTIE
Geachte klant,
Al onze producten ondergaan steeds een strenge kwaliteitscontrole,
alvorens ze aan je worden aangeboden. Mocht je desondanks toch nog
problemen hebben met jouw toestel, dan betreuren wij dit ten zeerste.
In dat geval verzoeken wij je contact op te nemen met onze klantendienst.
Onze medewerkers zullen je met plezier verder helpen.
+32 14 21 71 91 [email protected]
Maandag – Donderdag : 8.30u – 12.00u en van 13.00u – 17.00u
Vrijdag : 8.30u – 12.00u en van 13.00u – 16.30u
Dit apparaat heeft een garantietermijn van 2 jaar vanaf de datum van aankoop. Gedurende de
garantieperiode zal de distributeur volledige verantwoording op zich nemen voor gebreken die
aanwijsbaar berusten op materiaal- of constructiefouten. Wanneer dergelijke gebreken voorkomen, zal
het apparaat, indien nodig, vervangen of gerepareerd worden. De garantieperiode van 2 jaar zal op dit
moment niet terug beginnen, maar loopt verder tot 2 jaar na de aankoop van het toestel. De garantie
wordt verleend op basis van het kassaticket. Indien je apparaat defect is binnen de garantietermijn van 2
jaar, dan mag je het toestel samen met het originele kassaticket binnenbrengen in de winkel waar je het
toestel hebt aangekocht.
De garantie op accessoires en onderdelen die onderhevig zijn aan slijtage, bedraagt 6 maanden.
De garantie en verantwoordelijkheid/aansprakelijkheid van de leverancier en fabrikant vervallen
automatisch in de volgende gevallen:
· Bij het niet naleven van de instructies in deze handleiding.
· Bij verkeerde aansluiting, vb. te hoge elektrische spanning.
· Bij verkeerd, hardhandig of abnormaal gebruik.
· Bij onvoldoende of verkeerd onderhoud.
· Bij herstelling of wijziging van het toestel door de consument of niet gemachtigde derden.
· Bij gebruik van onderdelen of accessoires welke niet worden aanbevolen of geleverd door de
leverancier / fabrikant.
VEILIGHEIDSVOORSCHRIFTEN
Wanneer je elektrische toestellen gebruikt, moeten volgende veiligheidsinstructies in acht genomen
worden:
· Lees deze instructies zorgvuldig door. Bewaar deze handleiding om later te raadplegen.
· Verwijder voor het eerste gebruik alle verpakkingsmaterialen en eventuele promotionele stickers.
Zorg ervoor dat kinderen niet met de verpakkingsmaterialen spelen.
· Dit toestel is geschikt om te gebruiken in de huishoudelijke omgeving en in gelijkaardige omgevingen
zoals:
· Keukenhoek voor personeel van winkels, kantoren en andere gelijkaardige professionele
omgevingen
· Boerderijen
· Hotel- en motelkamers en andere omgevingen met een residentieel karakter
· Gastenkamers, of gelijkaardige

4
DO721K
NL
· Dit toestel mag gebruikt worden door kinderen vanaf 16 jaar en personen met een fysieke of
sensoriële beperking of mensen met een beperkte mentale capaciteit of gebrek aan ervaring of
kennis, op voorwaarde dat deze personen toezicht krijgen of instructies hebben gekregen over het
gebruik van het toestel op een veilige manier en dat ze ook de gevaren kennen bij het gebruik van het
toestel. Kinderen mogen niet met het toestel spelen. Het onderhoud en de reiniging van het toestel
mogen niet door kinderen gebeuren tenzij ze ouder zijn dan 16 jaar en onder toezicht staan.
· Houd het toestel en de voedingskabel buiten het bereik van kinderen jonger dan 16 jaar.
· Trek de stekker uit het stopcontact wanneer het toestel niet in gebruik is, vooraleer onderdelen te
monteren of demonteren en vooraleer het toestel te reinigen. Laat het toestel aoelen vooraleer
onderdelen te monteren of demonteren en vooraleer het toestel te reinigen.
· Als de voedingskabel beschadigd is, moet hij vervangen worden door de fabrikant, een service center
of gekwaliceerde personen om ongevallen te vermijden.
· OPGELET: om ongevallen te vermijden, mag dit toestel niet bediend worden door een externe
bediening, zoals een externe timer, of op een net aangesloten worden dat regelmatig op- en afgezet
wordt.
Het toestel kan warm worden tijdens het gebruik. We raden aan om - buiten bij het handvat - het
toestel niet aan te raken, om brandwonden te vermijden.
· Laat een werkend toestel niet zonder toezicht achter.
· Gebruik of bewaar het toestel niet buiten.
· Gebruik het toestel enkel voor het doel waarvoor het bestemd is.
· Kijk voor gebruik na of het voltage vermeld op het toestel overeenkomt met het voltage van het
elektriciteitsnet thuis.
· De voedingskabel moet steeds aangesloten worden op een stopcontact dat geïnstalleerd en geaard is
volgens de lokale standaarden en normen.
· Gebruik het toestel nooit wanneer de voedingskabel of stekker beschadigd is, na een slechte werking
van het toestel of wanneer het toestel beschadigd is. Breng het toestel dan naar de dienst na verkoop
van DOMO of het dichtsbijzijnde gekwaliceerde service center voor nazicht, reparatie of elektrische/
mechanische aanpassingen. Probeer het toestel nooit eigenhandig te repareren.
· Dompel het toestel, de voedingskabel of de stekker nooit onder in water of een andere vloeistof. Dit
om elektrische schokken of brand te voorkomen.
· Gebruik dit toestel niet met natte handen.
· Dit toestel is voorzien van een korte voedingskabel, zodat personen er niet in verstrikt kunnen
raken of over een langere voedingskabel kunnen vallen. GEBRUIK HET TOESTEL NOOIT MET EEN
VERLENGKABEL.
· Rol de voedingskabel volledig af om oververhitting van de kabel te voorkomen.
· Laat de voedingskabel niet over de rand van een tafel of aanrecht hangen of in aanraking komen met
een heet oppervlak.
· Laat de voedingskabel niet onder of rond het toestel hangen.
· Plaats het toestel nooit op of in de buurt van een hete elektrische kookplaat, een heet gasfornuis,
gootsteen of een warme oven.
· Plaats het toestel nooit in de buurt van ontvlambare materialen, gassen of explosieven.
· Sluit de voedingskabel pas op het stopcontact aan nadat het toestel zeker correct gemonteerd is. Om
het toestel te verwijderen van het stopcontact, moet de bediening eerst in de «OFF» of «0» positie
gezet worden. Daarna mag de stekker uit het stopcontact verwijderd worden. Trek nooit aan de
voedingskabel of het toestel zelf om de stekker uit het stopcontact te verwijderen.
· Als het toestel niet goed onderhouden wordt, kan dit de levensduur van het toestel drastisch
verminderen en een gevaarlijke situatie veroorzaken.

5
DO721K
www.domo-elektro.be
NL
· Bij het opwarmen van water is het mogelijk dat hete stoom door de lter of een andere opening naar
buiten komt. Hou daarom jouw handen uit de buurt van het toestel wanneer het in werking is.
· Ongevallen of schade veroorzaakt door het niet volgen van deze regels zijn op eigen risico. Noch de
fabrikant of de importeur, noch de leverancier kan daar dan verantwoordelijk voor geacht worden.
· Overschrijd de MAX-indicatie niet bij het vullen van het toestel.
· Wees voorzichtig om geen vloeistof te morsen op de voedingskabel.
· Het toestel mag niet ondergedompeld worden in water of eender welke vloeistof om te reinigen.
· Gebruik enkel de accessoires die bij het toestel meegeleverd worden.
· Verplaats het toestel nooit terwijl het nog in gebruik is of wanneer het nog warm is. Laat het toestel
altijd eerst aoelen vooraleer het te verplaatsen.
· Gebruik het koezetapparaat nooit leeg. Zorg er altijd voor dat er water in het reservoir zit wanneer je
het toestel aan zet.
· Gebruik het toestel niet wanneer de kan schade vertoont.
· Zet een hete kan niet op een natte of koude ondergrond.
· Gebruik het koezetapparaat nooit zonder het deksel op de kan.
· Laat een lege kan nooit op een warme warmhoudplaat staan. De kan zou kunnen barsten.
BEWAAR DEZE INSTRUCTIES OM LATER TE RAADPLEGEN
ONDERDELEN
1. Bonenreservoir
2. Waterreservoir
3. Niveaumarkeringen van het reservoir
4. Draaiknop malingsgroeid
5. Bedieningspaneel met LCD display
6. Drukknop openen zwenklter
7. Zwenklter
8. Filterhouder
9. Permanente lter
10. Deksel lterhouder
11. Druppelstop
12. Glazen kan van 1,5 l
13. Handvat glazen kan
14. Warmhoudplaat
BEDIENINGSPANEEL
15. Timertoets
16. Toets voor gemalen koe
17. Toets voor koesterkte
18. Aan-uittoets
19. Uren-toets
20. Minuten-toets
21. Toets voor hoeveelheid kopjes
15 21
16 17 18 19 20
7
8
9
10
11
1
3
6
2
4
5
13
12
14

6
DO721K
NL
VOOR HET EERSTE GEBRUIK
· Controleer of alle accessoires bij het toestel zitten en of het toestel niet beschadigd is.
· Laat eerst enkel water doorlopen, zonder koe toe te voegen. Vul hierbij het waterreservoir tot aan de
maximumaanduiding, zet de koezetmachine aan en laat deze een of twee keer volledig doorlopen.
Giet hierna het water weg en maak de lter, de lterhouder, de kan en het deksel van de kan grondig
schoon met warm water.
GEBRUIK
TIJD INSTELLEN
1. Steek de stekker in het stopcontact. Op de display verschijnt “12:00”.
2. Druk op de aan-uittoets. Op de display knippert “12:00”.
3. Druk op de uren-toets
tot het juiste uur op de display staat.
4. Druk op de minuten-toets tot de juiste minuten op de display staan.
5. Als je geen toets meer drukt, is het tijdstip bevestigd.
KOFFIEZETTEN MET KOFFIEBONEN
1. Open het waterreservoir en vul het, met behulp van de glazen kan, met de
gewenste hoeveelheid water. Overschrijd hierbij de maximumaanduiding niet.
2. Druk op de knop voor het openen van de zwenklter.
3. Plaats de permanente lter of een papieren lter in de lterhouder. Zorg dat
de lterhouder correct geplaatst is in het toestel. Plaats het deksel van de
lterhouder en draai de zwenklter weer in het toestel.
4. Open het bonenreservoir. Vul het met koebonen en plaats het deksel terug op het reservoir. Doe
nooit meer dan 200 g koebonen in het bonenreservoir.
5. Plaats de kan op de warmhoudplaat, onder de druppelstop.
6. Steek de stekker in het stopcontact en druk op de aan-uittoets
. Stel de tijd in volgens de
richtlijnen.
7. Druk op de toets voor hoeveelheid kopjes tot op de display het gewenste aantal kopjes
verschijnt. Je kan kiezen tussen 2, 4, 6, 8,10 of 12 kopjes. Zorg ervoor dat de hoeveelheid water in
het waterreservoir overeenkomt met dit aantal. De standaardinstelling, als je niet op deze toets
drukt, is 12 kopjes.
8. Druk op de toets voor koesterkte om de sterkte te bepalen:
· mild
· medium
· sterk
9. Draai aan de malingsgroeidknop om de groeid te bepalen voor het malen van de bonen. Als je
de knop naar de kleine bonen draait, zal de gemalen koe jner en dus ook sterker van smaak zijn.
Draai je de knop naar de grotere bonen, zal de koemolen groer malen.
10. Druk op de aan-uittoets . De koemolen zal beginnen malen, na enkele seconde verschijnt het
symbool
op de display en zal de koe beginnen doorlopen.
11. Als de koe klaar is, hoor je een signaal en verdwijnt het symbool op de display.

7
DO721K
www.domo-elektro.be
NL
KOFFIEZETTEN MET GEMALEN KOFFIE
1. Open het waterreservoir en vul het, met behulp van de glazen kan, met de gewenste hoeveelheid
water. Overschrijd hierbij de maximumaanduiding niet.
2. Druk op de knop voor het openen van de zwenklter.
3. Plaats de permanente lter of een papieren lter
in de lterhouder. Zorg dat de lterhouder correct
geplaatst is in het toestel.
4. Doe de gewenste hoeveelheid gemalen koe in de
lter. Plaats het deksel van de lterhouder en draai de
zwenklter weer in het toestel.
5. Plaats de kan op de warmhoudplaat, onder de
druppelstop.
6. Steek de stekker in het stopcontact en druk op de aan-uittoets
. Stel de tijd in volgens de
richtlijnen.
7. Druk op de toets voor hoeveelheid kopjes tot op de display het gewenste aantal kopjes
verschijnt. Je kan kiezen tussen 2, 4, 6, 8,10 of 12 kopjes. Zorg ervoor dat de hoeveelheid water in
het waterreservoir overeenkomt met dit aantal. De standaardinstelling, als je niet op deze toets
drukt, is 12 kopjes.
8. Druk op de toets voor gemalen koe . Deze zal rood oplichten.
9. Druk op de aan-uittoets . Het indicatielampje zal nu rood gaan branden en de koe zal beginnen
doorlopen. Op de display verschijnt het symbool .
10. Als de koe klaar is, hoor je een signaal en verdwijnt het symbool op de display.
· Je kan op elk moment gedurende maximum 30 seconden de kan uit het koezetapparaat nemen en
koe schenken. Het toestel zal dan automatisch stoppen met druppelen.
· De uiteindelijke hoeveelheid koe zal altijd iets minder zijn dan de hoeveelheid water die je er hebt
ingedaan, aangezien de koe water absorbeert.
· Wees voorzichtig bij het uitschenken, de koe is heet wanneer hij net is doorgelopen.
· Om veiligheidsredenen is het verstandig om het deksel van de glazen kan op de kan te houden. Zo
blijft de koe ook beter warm.
· Het toestel houdt de koe 40 minuten warm en schakelt dan automatisch uit. Voor een optimale
smaak serveer je echter best de koe meteen nadat hij is doorgelopen.
· Zorg er altijd voor dat het koezetapparaat uitgeschakeld is en trek altijd de stekker uit het
stopcontact wanneer het toestel niet in gebruik is.
TIPS VOOR LEKKERE KOFFIE
· Een propere koezetmachine is essentieel om lekkere koe te maken. Maak het apparaat dus
regelmatig schoon volgens de richtlijnen.
· Gebruik altijd vers, koud water in het toestel.
· Bewaar koe en koebonen op een droge, koele plaats.
· Hergebruik geen koe, aangezien dit de smaak van de koe sterk zal doen afnemen. Ook het
heropwarmen van koe is niet aan te raden.

8
DO721K
NL
TIMER INSTELLEN
1. Zorg ervoor dat de tijd correct staat ingesteld.
2. Maak het toestel klaar om koe te zetten zoals het bij “gebruik” vermeld staat maar druk nog niet
op de aan-uittoets.
3. Druk op de timertoets gedurende 5 seconden. Het uur op de display zal knipperen.
4. Drup op de urentoets en de minutentoets om de timer in te stellen.
5. Druk nog een keer op de timertoets om te bevestigen. Het indicatielampje zal nu rood oplichten
en op de display verschijnt het symbool
. Als je niet op de timertoets drukt om te bevestigen,
verschijnt het huidige tijdstip terug op de display. Het ingestelde uur wordt wel onthouden, maar de
timerfunctie is dan niet ingeschakeld. Druk alsnog op de timertoets om de functie in te schakelen.
6. De koe zal beginnen doorlopen op het, met de timer, ingestelde tijdstip.
· Indien je de timerfunctie wil annuleren, druk dan terug timertoets. Het rode indicatielampje van de
timertoets gaat uit en het symbool op de de display verdwijnt.
· Zolang je de stekker niet uit het stopcontact haalt, zal het uur van de timer onthouden worden. Als
je dagelijks de koe wil laten starten op hetzelfde tijdstip volstaat het om 1x op de timertoets te
drukken om de timerfunctie in te schakelen. Het toestel onthoudt het eerder gekozen uur en het is
niet nodig om het tijdstip opnieuw in te stellen. Als je toch een ander tijdstip wil instellen ga dan terug
te werk zoals het eerder omschreven stappenplan.
· Als je timer is ingesteld, en je wil controleren hoelaat dit was, druk dan enkele seconde op de
timertoets. Het uur wordt even getoond. Als je dan geen toets drukt, verschijnt vanzelf weer het
huidige uur.
REINIGING EN ONDERHOUD
Opgelet: trek de stekker uit het stopcontact en laat het toestel aoelen alvorens het te reinigen. Dompel
het snoer, de stekker of het toestel nooit onder in water of andere vloeistoen om het risico op elektrische
schokken te vermijden. Zorg er na elk gebruik voor dat de stekker uit het stopcontact wordt getrokken.
· Reinig de glazen kan, de lterhouder en de permanente lter in warm water met een zacht detergent.
· Wrijf de behuizing van het toestel schoon met een zachte, vochtige doek om vlekken te verwijderen.
· Veeg na gebruik eventuele condensdruppeltjes op het toestel af.
· Gebruik een vochtige doek om de warmhoudplaat van het toestel schoon te vegen. Gebruik hiervoor
nooit schurende producten.
ONTKALKEN
Wanneer?
Ontkalk je koezetapparaat regelmatig. Een regelmatige ontkalking zorgt voor een constante kwaliteit
van de koe, een lager energieverbruik en verlengt de duurzaamheid van jouw koezetapparaat.
Bij normaal gebruik raden we aan het apparaat elke 3 à 4 weken te ontkalken.
Hoe?
1. Vul de kan met 1/4 azijn en 3/4 koud water.
2. Giet het mengsel in het waterreservoir en zet het koezetapparaat aan. Laat het mengsel
doorlopen - zonder koe toe te voegen - volgens rubriek “Gebruik / Koezetten met gemalen
koe” en herhaal dit totdat er geen gele vloeistof meer uit komt.

9
DO721K
www.domo-elektro.be
NL
3. Giet het mengsel uit.
4. Laat het toestel nu nog minstens 2 keer doorlopen met enkel water, totdat er geen azijngeur meer
overblijft.
MILIEURICHTLIJNEN
Dit symbool op het product of op de verpakking wijst erop dat dit product niet
als huishoudafval mag worden behandeld. Het moet naar een plaats worden
gebracht waar elektrische en elektronische apparatuur wordt gerecycleerd.
Als je ervoor zorgt dat dit product op de correcte manier wordt verwijderd,
voorkom je mogelijk voor mens en milieu negatieve gevolgen die zich zouden
kunnen voordoen in geval van verkeerde afvalbehandeling. Voor meer
details in verband met het recycleren van dit product, neem je best contact
op met de gemeentelijke instanties, het bedrijf of de dienst belast met de
verwijdering van huishoudafval of de winkel waar je het product hebt gekocht.
Het verpakkingsmateriaal is recycleerbaar. Behandel de verpakking
milieubewust.

10
DO721K
FR
GARANTIE
Cher client,
Tous nos produits sont soumis à des contrôles qualité stricts avant
d’être proposés à la vente. Si vous deviez toutefois rencontrer
un problème avec votre appareil, nous le déplorons vivement.
Dans ce cas, nous vous invitons à prendre contact avec notre service clientèle.
Nos collaboratrices se feront un plaisir de vous aider !
+32 14 21 71 91 [email protected]
Du lundi au jeudi : 8 h 30 – 12 h et 13 h – 17 h
Vendredi : 8 h 30 – 12 h et 13 h – 16 h 30
Cet appareil est garanti 2 ans à compter de la date d’achat. Durant la période de garantie, le distributeur
assumera l’entière responsabilité en cas de défauts de fonctionnement (matériel) ou de fabrication. Si un
tel problème survient, l’appareil sera remplacé ou réparé. La période de garantie de 2 ans ne reprend pas
à zéro, mais se poursuit (jusqu’à 2 ans à compter de la date d’achat de l’appareil). La garantie est accordée
sur la base du ticket de caisse.
Pour les accessoires et les éléments d’usure, une garantie de 6 mois s’applique.
La garantie et la responsabilité du fournisseur et du fabricant n’ont plus eet dans les cas suivants :
· Les instructions du manuel n’ont pas été suivies.
· Mauvais raccordement, par ex. tension électrique trop forte.
· Utilisation contraire, brutale ou anormale.
· Entretien insusant ou non conforme.
· Réparation ou modication de l’appareil par le consommateur ou un tiers non autorisé.
· Utilisation d’éléments ou d’accessoires qui ne sont pas recommandés ou fournis par le fournisseur/
fabricant.
CONSIGNES DE SÉCURITÉ
Les consignes de sécurité suivantes doivent être respectées lors de l’utilisation de tout appareil électrique:
· Lisez ces consignes très attentivement. Conservez ce mode d’emploi an de pouvoir le consulter
ultérieurement.
· Avant la première utilisation, enlevez tous les éléments d’emballage et les éventuels autocollants
promotionnels. Veillez à ce que les enfants ne jouent pas avec les matériaux d’emballage.
· Cet appareil est conçu pour être utilisé dans un environnement domestique ou dans des
environnements comparables, tels que :
· Coin-cuisine du personnel dans les commerces, les bureaux et autres environnements
professionnels comparables
· Fermes
· Chambres d’hôtel ou de motel et autres environnements à caractère résidentiel
· Chambres d’hôtes ou comparables
· Cet appareil peut être utilisé par des enfants âgés de 16 ans ou plus et par des personnes présentant
un handicap physique ou sensoriel, une capacité mentale limitée ou un manque d’expérience ou
de connaissances, à condition que ces personnes soient sous surveillance ou qu’elles aient reçu des
instructions sur la manière d’utiliser l’appareil en toute sécurité et qu’elles connaissent les dangers liés

11
DO721K
www.domo-elektro.be
FR
à son utilisation. Les enfants ne peuvent pas jouer avec cet appareil. L’entretien et le nettoyage de
l’appareil ne peuvent pas être eectués par des enfants, sauf s’ils sont âgés de plus de 16 ans et sous la
surveillance d’un adulte.
· Gardez l’appareil et le cordon électrique hors de portée des enfants.
· Débranchez l’appareil lorsqu’il n’est pas utilisé ainsi qu’avant d’installer ou d’enlever des pièces et
avant de nettoyer l’appareil. Mettez au préalable tous les boutons en position « arrêt » et débranchez
l’appareil en saisissant la che électrique. Ne tirez jamais sur le cordon pour retirer la che de la prise.
· En cas de dégâts au cordon d’alimentation, celui-ci doit être remplacé par le fabricant, un centre de
services ou une personne qualiée, an d’éviter tout accident.
· ATTENTION : Pour éviter tout accident, cet appareil ne peut pas être actionné via une commande
externe comme un minuteur extérieur, ni être raccordé à un réseau régulièrement mis sous tension ou
hors tension.
· Les surfaces de cet appareil s’échauent en cours d’utilisation. Pour éviter toute brûlure, il est
recommandé de ne pas toucher cet appareil, à l’exception des poignées.
· Ne laissez jamais un appareil en service sans surveillance.
· N’utilisez pas l’appareil à l’extérieur.
· N’utilisez l’appareil que pour l’usage auquel il est destiné.
· Vériez avant usage si la tension indiquée sur l’appareil correspond à la tension du réseau électrique de
votre domicile.
· Le cordon d’alimentation doit toujours être branché dans une prise de courant placée et mise à la terre
conformément aux normes et standards locaux.
· N’utilisez jamais l’appareil lorsque le cordon d’alimentation ou la che est endommagé(e), après un
mauvais fonctionnement de l’appareil ou lorsque l’appareil est lui-même endommagé. Portez dans
ce cas l’appareil au service après vente de DOMO ou au centre de services qualié le plus proche,
pour contrôle, réparation ou modications électriques/mécaniques. Ne tentez jamais de réparer cet
appareil vous-même.
· N’immergez jamais l’appareil, le cordon d’alimentation ou la che dans l’eau ou tout autre liquide. Ceci
an d’éviter des chocs électriques ou un incendie.
· N’utilisez pas l’appareil si vous avez les mains mouillées.
· Cet appareil est muni d’un cordon d’alimentation court, an d’éviter que des personnes ou objets
s’enroulent dans le cordon ou ne tombent à cause de ce dernier. N’UTILISEZ JAMAIS CET APPAREIL
AVEC UNE RALLONGE ÉLECTRIQUE.
· Déroulez complètement le cordon d’alimentation.
· Ne laissez pas le cordon d’alimentation pendre sur une surface chaude, ni sur le rebord d’une table ou
d’un plan de travail.
· Ne laissez pas le cordon d’alimentation se coincer sous l’appareil ou pendre autour de celui-ci.
· Ne placez jamais l’appareil sur ou à proximité d’une plaque de cuisson à gaz ou électrique chaude, ni
sur l’évier ou un four en fonctionnement.
· Gardez l’appareil éloigné des matériaux inammables, gaz ou explosifs.
· Ne branchez l’appareil qu’après être sûr qu’il soit correctement monté. Pour débrancher l’appareil, la
commande doit être préalablement placée en position « OFF » ou « 0 ». Après quoi, la che électrique
peut être retirée de la prise de courant. Ne tirez jamais sur le cordon d’alimentation ni sur l’appareil
pour le débrancher.
· Si l’appareil n’est pas correctement entretenu, sa durée de vie peut en être fortement diminuée et une
situation de danger en résulter.
· Lorsque l’eau est chauée, il est possible que de la vapeur s’échappe par le ltre ou une autre ouverture
; il est donc important de ne pas approcher vos mains de l’appareil lorsque celui-ci fonctionne.

12
DO721K
FR
7
8
9
10
11
1
3
6
2
4
5
13
12
14
· Les accidents ou dommages causés par le non-respect de ces consignes sont à vos propres risques.
Ni le fabricant, ni l’importateur, ni le fournisseur ne peuvent, dans ce cas, en être tenus pour
responsables.
· Ne dépassez jamais l’indication MAX lorsque vous remplissez l’appareil.
· Assurez-vous de ne pas renverser de liquide sur le cordon d’alimentation.
· L’appareil ne peut pas être immergé dans l’eau ou tout autre liquide lors du nettoyage.
· N’utilisez que les accessoires livrés avec l’appareil.
· Ne déplacez jamais l’appareil lorsqu’il fonctionne ou qu’il est encore chaud. Laissez toujours refroidir
l’appareil avant de le déplacer.
· N’utilisez jamais la cafetière électrique à vide. Assurez-vous toujours que le réservoir contient de l’eau
lorsque vous allumez l’appareil.
· N’utilisez pas l’appareil si la verseuse est endommagé.
· Ne placez pas une verseuse chaude sur une surface humideou froide.
· N’utilisez jamais la cafetière électrique sans avoir mis le couvercle sur la verseuse.
· Ne laissez jamais une verseuse vide sur une plaque chauante chaude. Le récipient pourrait se fendre.
CONSERVEZ CES CONSIGNES POUR POUVOIR LES CONSULTER ULTÉRIEUREMENT
PARTIES
1. Réservoir à grains
2. Réservoir d’eau
3. Indication du niveau d’eau
4. Molette pour la nesse de
broyage
5. Panneau de commande avec
écran LCD
6. Bouton poussoir pour ouvrir le
ltre orientable
7. Filtre orientable
8. Porte-ltre
9. Filtre permanent
10. Couvercle du porte-ltre
11. Bouchon anti-gouttes
12. Verseuse en verre 1,5 l
13. Poignée
14. Plaque chauante
PANNEAU DE COMMANDE
15. Bouton de minuterie
16. Bouton pour le café moulu
17. Bouton pour l’intensité du café
18. Bouton marche-arrêt
19. Bouton des heures
20. Bouton des minutes
21. Bouton pour la quantité de tasses
15 21
16 17 18 19 20

13
DO721K
www.domo-elektro.be
FR
AVANT LA PREMIÈRE UTILISATION
· Vériez que vous possédez tous les accessoires et que l’appareil n’est pas endommagé.
· Laissez d’abord couler l’eau sans café. Remplissez le réservoir d’eau au maximum, allumez la cafetière
et laissez-la se vider une ou deux fois complètement. Jetez ensuite l’eau et nettoyez le ltre, le porte-
ltre, la verseuse et le couvercle de la verseuse à l’eau chaude.
UTILISATION
RÉGLAGE DE L’HEURE
1. Branchez l’appareil. L’écran ache « 12:00 ».
2. Appuyez sur le bouton de marche/arrêt. L’heure « 12:00 » clignote à l’écran.
3. Appuyez sur le bouton des heures
jusqu’à ce que la bonne heure s’ache à l’écran.
4. Appuyez sur le bouton des minutes jusqu’à ce que les bonnes minutes s’achent à l’écran.
5. Si vous n’appuyez plus sur aucun bouton, l’heure est conrmée.
PRÉPARATION AVEC DES GRAINS DE CAFÉ
1. Ouvrez le réservoir d’eau et remplissez-le avec la quantité d’eau souhaitée à
l’aide de la cruche en verre. Ne dépassez pas le niveau maximal.
2. Appuyez sur le bouton pour ouvrir le ltre orientable.
3. Placez le ltre permanent ou un ltre en papier dans le porte-ltre. Assurez-
vous que le porte-ltre est correctement inséré dans l’appareil. Replacez le
couvercle du porte-ltre et remettez le ltre orientable en place.
4. Ouvrez le réservoir à grains. Remplissez-le de grains de café et replacez le couvercle sur le réservoir.
Ne mettez jamais plus de 200 g de café en grains dans le récipient à grains.
5. Placez le bol sur la plaque chauante, sous le système antigoutte.
6. Branchez la che dans la prise et appuyez sur le bouton marche/arrêt
. Réglez l’heure selon les
directives.
7. Appuyez sur le bouton pour la quantité de tasses jusqu’à ce que le nombre de tasses souhaité
soit aché. Vous pouvez choisir entre 2, 4, 6, 8, 10 ou 12 tasses. Assurez-vous que la quantité d’eau
dans le réservoir correspond à ce nombre. Le réglage par défaut, si vous n’appuyez pas sur ce
bouton, est de 12 tasses.
8. Appuyez sur le bouton pour l’intensité du café pour déterminer l’intensité :
· doux
· moyen
· fort
9. Tournez le bouton pour la nesse de broyage pour déterminer la nesse de broyage des grains.
Si vous tournez le bouton vers les petits grains, le café moulu sera plus n et aura donc un goût
plus prononcé. Si vous tournez le bouton vers les grains plus gros, le moulin à café broie plus
grossièrement.
10. Appuyez sur le bouton de marche/arrêt . Le moulin à café commence à moudre, après quelques
secondes, le symbole apparaît à l’écran et le café commence à couler.
11. Lorsque le café est prêt, vous entendez un signal et le symbole disparaît de l’écran.

14
DO721K
FR
PRÉPARATION AVEC DU CAFÉ MOULU
1. Ouvrez le réservoir d’eau et remplissez-le avec la quantité d’eau souhaitée à l’aide de la cruche en
verre. Ne dépassez pas le niveau maximal.
2. Appuyez sur le bouton pour ouvrir le ltre orientable.
3. Placez le ltre permanent ou un ltre en papier dans
le porte-ltre. Assurez-vous que le porte-ltre est
correctement inséré dans l’appareil.
4. Mettez la quantité souhaitée de café moulu dans le
ltre. Replacez le couvercle du porte-ltre et remettez
le ltre orientable en place.
5. Placez le bol sur la plaque chauante, sous le système
antigoutte.
6. Branchez la che dans la prise et appuyez sur le bouton marche/arrêt
. Réglez l’heure selon les
directives.
7. Appuyez sur le bouton pour la quantité de tasses jusqu’à ce que le nombre de tasses souhaité
soit aché. Vous pouvez choisir entre 2, 4, 6, 8, 10 ou 12 tasses. Assurez-vous que la quantité d’eau
dans le réservoir correspond à ce nombre. Le réglage par défaut, si vous n’appuyez pas sur ce
bouton, est de 12 tasses.
8. Appuyez sur le bouton pour le café moulu . Il s’allumera en rouge.
9. Appuyez sur le bouton de marche/arrêt . Le témoin lumineux s’allume alors en rouge et le café
commence à couler. Le symbole s’ache à l’écran.
10. Lorsque le café est prêt, vous entendez un signal et le symbole disparaît de l’écran.
· Vous pouvez ôter la verseuse de la cafetière électrique à tout moment, pendant une durée maximale
de 30 secondes, et servir le café. L’appareil arrêtera automatiquement de couler.
· La quantité nale de café sera toujours légèrement inférieure à la quantité d’eau que vous aurez
utilisée, car le café absorbe l’eau.
· Soyez prudent en le versant, le café est brûlant lorsqu’il vient de couler.
· Pour des raisons de sécurité, il est recommandé de ne pas enlever le couvercle de la verseuse. Le café
reste ainsi plus chaud.
· La plaque chauante maintiendra le café chaud jusqu’à 40 minutes. Après ces 40 minutes, l’appareil se
débranchera. Pour un goût optimal, servez le café de préférence juste après son écoulement.
· Assurez-vous toujours que la cafetière électrique est éteinte et débranchez toujours la che de la prise
de courant lorsque vous n’utilisez pas l’appareil.
CONSEILS POUR UN MEILLEUR CAFÉ
· La propreté de la cafetière est essentielle pour faire du bon café. Nettoyez donc régulièrement
l’appareil selon les instructions. Mettez toujours de l’eau propre et froide dans l’appareil.
· Conservez le café dans un endroit sec et frais.
· Ne réutilisez pas le café, car cela diminuera fortement le goût du café. Il est également déconseillé de
réchauer le café.

15
DO721K
www.domo-elektro.be
FR
RÉGLAGE DE LA MINUTERIE
1. Assurez-vous que l’heure est correctement réglée.
2. Installez l’appareil pour préparer du café comme indiqué à la rubrique « Utilisation » mais n’appuyez
pas encore sur le bouton marche/arrêt.
3. Appuyez sur le bouton de minuterie pendant 5 secondes. L’heure sur l’écran clignote.
4. Appuyez sur le bouton des heures et sur le bouton des minutes pour régler la minuterie.
5. Appuyez à nouveau sur le bouton de minuterie pour conrmer. Le témoin s’allume alors en rouge et
le symbole
apparaît à l’écran. Si vous n’appuyez pas sur le bouton de minuterie pour conrmer,
l’heure actuelle s’ache à nouveau à l’écran. L’heure réglée est mémorisée, mais la fonction de
minuterie est désactivée. Appuyez à nouveau sur le bouton de minuterie pour activer la fonction.
6. Le café commencera à s’égoutter dans la carafe à l’heure dénie avec la minuterie.
· Si vous souhaitez annuler la fonction de minuterie, appuyez à nouveau sur le bouton de minuterie. Le
témoin rouge du bouton de minuterie s’éteint et le symbole disparaît de l’écran.
· Tant que vous ne débranchez pas le cordon d’alimentation, l’heure de la minuterie sera mémorisée.
Si vous souhaitez que votre café démarre à la même heure chaque jour, il vous sut d’appuyer une
fois sur le bouton de minuterie pour activer la fonction de minuterie. L’appareil se souvient de l’heure
précédemment sélectionnée et il n’est pas nécessaire de la régler à nouveau. Si vous souhaitez tout de
même xer une autre heure, revenez aux étapes décrites plus haut.
· Si votre minuterie est réglée et que vous voulez vérier à quelle heure, appuyez sur le bouton de
minuterie pendant quelques secondes. L’heure est indiquée brièvement. Si vous n’appuyez sur aucun
bouton, l’heure actuelle réapparaît automatiquement.
NETTOYAGE ET ENTRETIEN
Attention: Retirez la che électrique de la prise de courant et laissez l’appareil refroidir avant de le
nettoyer. N’immergez jamais le câble, la che électrique ou l’appareil dans l’eau ou dans un autre liquide
an d’éviter tout risque d’électrocution. Veillez à ce que la che électrique soit retirée de la prise de
courant après chaque utilisation.
· Nettoyez la carafe en verre et le ltre amovible à l’eau chaude avec un détergent doux.
· Nettoyez le socle de l’appareil avec un chion doux humide an d’enlever les taches.
· Essuyez les éventuelles gouttes de condensation sur l’appareil.
· Utilisez un chion doux an de nettoyer la plaque chauante de l’appareil. N’utilisez jamais de produit
abrasif.
DÉTARTRAGE
Quand?
Détartrez régulièrement votre cafetière électrique. Un détartrage régulier assure une qualité constante du
café, une faible consommation d’énergie et une durée de vie prolongée de votre appareil.
Pour une utilisation normale, nous vous conseillons de détartrer l’appareil toutes les 3 à 4 semaines.
Comment?
1. Remplissez la verseuse de 1/4 de vinaigre et de 3/4 d’eau froide.
2. Versez le mélange dans le réservoir d’eau et allumez l’appareil. Laissez couler le mélange — sans café
— et répétez jusqu’à disparition du liquide jaune.

16
DO721K
FR
3. Jetez le mélange.
4. Faites passez de l’eau claire au moins 2 fois dans l’appareil jusqu’à ce que toute odeur de vinaigre ait
disparu.
MISE AU REBUT
Ce symbole sur le produit ou son emballage indique que ce produit ne peut
être traité comme déchet ménager. Il doit plutôt être remis au point de
ramassage concerné, se chargeant du recyclage du matériel électrique et
électronique. En vous assurant que ce produit est éliminé correctement, vous
favorisez la prévention des conséquences négatives pour l’environnement et
la santé humaine qui, sinon, seraient le résulat d’un traitement inapproprié
des déchets de ce produit. Pour obtenir plus de détails sur le recyclage de ce
produit, veuillez prendre contact avec le bureau municipal de votre région,
votre service d’éliminiation des déchets ménagers ou le magasin où vous avez
acheté le produit.
L’emballage est recyclable. Traitez l’emballage écologiquement.

17
DO721K
www.domo-elektro.be
DE
GARANTIE
Sehr geehrter Kunde,
Sämtliche unserer Produkte unterliegen einer strengen Qualitätskontrolle,
bevor Sie Ihnen angeboten werden. Sollten dennoch
Probleme mit Ihrem Gerät auftreten, bedauern wir dies zutiefst.
Wir möchten Sie in diesem Fall bitten, unseren Kundenservice zu kontaktieren.
Unsere Mitarbeiter helfen Ihnen gern weiter!
+32 14 21 71 91 [email protected]
Montag – Donnerstag: 8:30 Uhr – 12:00 Uhr und von 13:00 Uhr – 17:00 Uhr
Freitag: 8:30 Uhr – 12:00 Uhr und von 13:00 Uhr – 16:30 Uhr
Dieses Gerät hat eine Garantiefrist von 2 Jahren ab dem Kaufdatum. Während der Garantiezeit
übernimmt der Hersteller die vollständige Verantwortung für Mängel, die nachweislich auf Material- oder
Konstruktionsfehler zurückzuführen sind. Wenn derartige Mängel auftreten, wird das Gerät wenn nötig
ausgetauscht oder repariert. Die Garantiezeit von 2 Jahren beginnt in diesem Moment nicht erneut,
sondern sie läuft bis 2 Jahre nach dem Kaufdatum weiter. Die Garantie wird auf der Grundlage des
Kassenbons gewährt.
Die Garantie auf Accessoires und Verschleißteile beträgt 6 Monate.
Die Garantie und die Verantwortung/Haftung des Lieferanten und Herstellers entfallen automatisch in
den folgenden Fällen:
· Bei Nichtbeachtung der Anweisungen in dieser Bedienungsanleitung.
· Bei falschem Anschluss, z.B. bei einer zu hohen Stromspannung.
· Bei falscher, grober oder abnormaler Verwendung.
· Bei unzureichender oder falscher Wartung.
· Bei vom Verbraucher oder von nicht ermächtigten Dritten vorgenommenen Reparaturen oder
Änderungen am Gerät.
· Bei der Verwendung von Ersatzteilen oder Accessoires, die nicht vom Lieferanten / Hersteller
empfohlen oder geliefert werden.
SICHERHEITSVORKEHRUNGEN
Wenn Sie elektrische Geräte verwenden, müssen folgende Sicherheitshinweise beachtet werden:
· Lesen Sie diese Hinweise sorgfältig durch. Bewahren Sie diese Bedienungsanleitung zum späteren
Nachschlagen auf.
· Entfernen Sie vor dem ersten Gebrauch alle Verpackungsmaterialien und möglichen Werbeauleber.
Sorgen Sie dafür, dass Kinder nicht mit den Verpackungsmaterialien spielen.
· Dieses Gerät eignet sich für den Einsatz im Haushalt und in ähnlichen Umfeldern, zum Beispiel in
folgenden Bereichen:
· Küchenbereich für Mitarbeiter von Geschäften, Büros und anderen ähnlichen beruichen
Umfeldern.
· Bauernhöfe
· Hotel- und Motelzimmer und andere Bereiche mit wohnungsähnlichem Charakter
· Gästezimmer oder Ähnliches

18
DO721K
DE
· Diese Gerät darf von Kindern ab 16 Jahren und Menschen mit körperlichen oder sensorischen
Behinderungen oder Menschen mit eingeschränkten geistigen Fähigkeiten oder mangelnder
Erfahrung bzw. Sachkenntnis unter der Bedingung verwendet werden, dass diese Personen
beaufsichtigt werden oder sie eine Anleitung zur sicheren Verwendung des Geräts erhalten haben und
sich der Gefahren bei der Verwendung des Geräts bewusst sind. Kinder dürfen nicht mit dem Gerät
spielen. Die Wartung und Reinigung des Geräts darf nicht durch Kinder ausgeführt werden, außer
diese sind älter als 16 Jahre und werden von einem Erwachsenen beaufsichtigt.
· Netzstecker ziehen, wenn das Gerät nicht in Gebrauch ist, bevor Teile montiert oder abmontiert
werden und vor der Reinigung. Stellen Sie zunächst alle Schalter auf „Aus“ und ziehen Sie den Stecker
am Stecker selbst aus der Steckdose. Ziehen Sie den Stecker nie am Netzkabel aus der Steckdose.
· Wenn das Netzkabel beschädigt ist, sollte es, um Unfälle auszuschließen, durch den Hersteller, den
Kundendienst oder eine qualizierte Person ersetzt werden.
· ACHTUNG: Zur Vermeidung von Unfällen sollte das Gerät nicht mit einem externen Zusatzgerät, wie
z. B. über einen externen Timer oder an einen Stromkreislauf angeschlossen werden, der regelmäßig
ein- und ausgeschaltet wird.
· Die Oberächen dieses Geräts werden während des Gebrauchs heiß. Wir empfehlen zur Vermeidung
von Brandverletzungen, das Gerät - außer an den Grien - nicht zu berühren.
· Eingeschaltetes Gerät nie unbeaufsichtigt stehen lassen.
· Verwenden Sie das Gerät nicht im Freien.
· Gerät nur für den vorgesehenen Zweck verwenden.
· Vor Gebrauch überprüfen, ob die auf dem Gerät angegebene Spannung mit dem des Stromnetzes
übereinstimmt.
· Das Netzkabel muss stets an eine Steckdose angeschlossen werden, die gemäß den örtlichen
Standards und Normen isoliert und geerdet wurde.
· Verwenden Sie das Gerät nie, wenn das Netzkabel oder der Stecker beschädigt ist, wenn es nicht
richtig funktioniert oder beschädigt ist. Bringen Sie das Gerät in diesem Fall zur Durchsicht,
Reparatur oder für elektrische/mechanische Anpassungen zum Kundendienst von DOMO oder zum
nächstgelegenen Servicecenter. Versuchen Sie nie, das Gerät selbst zu reparieren.
· Tauchen Sie das Gerät, das Kabel oder den Stecker auf keinen Fall in Wasser oder andere Flüssigkeiten.
Dies dient der Vermeidung von elektrischen Stromschlägen und Feuer.
· Verwenden Sie das Gerät nicht mit nassen Händen.
· Dieses Gerät ist mit einem kurzen Netzkabel ausgestattet, um das Risiko zu vermeiden, dass Personen
oder Gegenstände über/an einem längeren Netzkabel hängen bleiben oder darüber fallen. DIESES
GERÄT SOLLTE AUF KEINEN FALL MIT EINEM VERLÄNGERUNGSKABEL VERWENDET WERDEN.
· Rollen Sie das Netzkabel vollständig ab, um eine Überhitzung des Kabels zu vermeiden.
· Lassen Sie das Netzkabel nicht auf einer heißen Oberäche oder über einen Tischrand oder eine
Arbeitsplatte herunter hängen.
· Lassen Sie das Netzkabel nicht unter oder rund um das Gerät hängen.
· Stellen Sie das Gerät niemals auf einen heißen Gasherd oder ein heißes elektrisches Kochfeld bzw. in
deren Nähe, nicht in eine Spüle und nicht in einen heißen Ofen.
· Halten Sie das Gerät von brennbaren Materialien, Gas und explosiven Stoen fern.
· Schließen Sie das Netzkabel erst an die Steckdose an, wenn das Gerät korrekt zusammengebaut
wurde. Um das Gerät vom Netzstrom zu trennen, muss der Bedienschalter zuerst in die „AUS“- oder
„0“-Position gestellt werden. Anschließend kann der Stecker aus der Steckdose gezogen werden.
Ziehen Sie nie am Gerät oder am Netzkabel, um den Stecker aus der Steckdose zu ziehen.
· Wenn das Gerät nicht gut gewartet wird, kann dies die Lebensdauer des Geräts drastisch verringern
und zu Gefahrensituationen führen.

19
DO721K
www.domo-elektro.be
DE
· Beim Wasserkochen ist es möglich, dass heißer Dampf durch den Filter oder eine andere Önung
austritt, es ist daher wichtig, die Hände beim Betrieb des Geräts von diesem fernzuhalten.
· Für Unfälle oder Schäden, die durch die Nichtbefolgung dieser Regeln verursacht werden, haften
Sie selbst. Weder der Hersteller noch der Importeur oder der Lieferant können in solchen Fällen zur
Verantwortung gezogen werden.
· Beim Befüllen des Geräts darf die Höchstfüllstandanzeige „MAX“ nicht überschritten werden.
· Es ist darauf zu achten, dass keine Flüssigkeit über das Netzkabel verschüttet wird.
· Das Gerät darf zur Reinigung nicht in Wasser oder andere Flüssigkeiten eingetaucht werden.
· Verwenden Sie nur das Zubehör, das mit dem Gerät mitgeliefert wird.
· Versetzen oder tragen Sie das Gerät nicht, solange es noch in Betrieb oder noch heiß ist. Lassen Sie
das Gerät erst abkühlen, bevor es an einen anderen Ort gestellt wird.
· Verwenden Sie die Kaeemaschine niemals in leerem Zustand. Achten Sie immer darauf, dass sich
Wasser im Wasserbehälter bendet, bevor Sie das Gerät einschalten.
· Benutzen Sie das Gerät nicht, wenn die Kanne beschädigt ist.
· Stellen Sie die heiße Kanne nicht auf eine nasse oder kalte Fläche.
· Verwenden Sie die Kaeemaschine niemals ohne den Deckel auf der Kanne.
· Lassen Sie die leere Kanne niemals auf der warmen Heizplatte stehen. Dadurch kann sie zerspringen.
BEWAHREN SIE DIESE HINWEISE ZUM SPÄTEREN NACHSCHLAGEN AUF
TEILE
1. Bohnenbehälter
2. Wasserreservoir
3. Tassen-Markierung
4. Drehknopf für den Mahlgrad
5. Bedienfeld mit LCD-Anzeige
6. Drucktaste zum Önen des
Schwenklters
7. Schwenklter
8. Filterbehälter
9. Dauerlter
10. Deckel des Filterhalters
11. Tropfstopp
12. Glaskanne 1,5 l
13. Gri
14. Warmhalteplatte
BEDIENFELD
15. Timer-Taste
16. Taste für Kaeepulver
17. Taste für die Kaeestärke
18. Ein-/Aus-Taste
19. Stundentaste
20. Minutentaste
21. Taste für die Tassenanzahl
15 21
16 17 18 19 20
7
8
9
10
11
1
3
6
2
4
5
13
12
14

20
DO721K
DE
VOR DER ERSTEN INBETRIEBNAHME
· Kontrollieren Sie, ob alle Zubehörteile mitgeliefert wurden und ob das Gerät nicht beschädigt ist.
· Lassen Sie zuerst nur Wasser durchlaufen ohne Kaee hinzuzufügen. Befüllen Sie dabei das
Wasserreservoir bis zur höchsten Markierung, schalten Sie die Kaeemaschine ein lassen Sie die
Maschine ein oder zweimal vollständig durchlaufen. Gießen Sie anschließend das Wasser weg und
reinigen Sie den Filter, den Filterbehälter, die Kanne und den Deckel der Kanne gründlich mit warmem
Wasser.
GEBRAUCH
ZEIT EINSTELLEN
1. Netzstecker in die Steckdose stecken. Auf dem Display wird „12:00“ angezeigt.
2. Drücken Sie die Ein-/Aus-Taste. Auf dem Display blinkt „12:00“.
3. Drücken Sie die Stundentaste
, bis die richtige Stundenangabe auf dem Display erscheint.
4. Drücken Sie die Minutentaste , bis die richtige Minutenangabe auf dem Display erscheint.
5. Wenn Sie keine weitere Taste drücken, wird die Uhrzeit bestätigt.
KAFFEEZUBEREITUNG MIT KAFFEEBOHNEN
1. Önen Sie den Wassertank und füllen Sie ihn mit Hilfe der Glaskanne mit der
gewünschten Wassermenge. Überschreiten Sie hierbei nicht die Indikation für
die maximale Füllmenge.
2. Drücken Sie die Taste zum Önen des Schwenklters.
3. Setzen Sie den Dauerlter oder einen Papierlter in den Filterhalter ein.
Achten Sie darauf, dass der Filterhalter korrekt im Gerät eingesetzt ist. Setzen
Sie den Deckel des Filterhalters auf und drehen Sie den Schwenklter wieder
in das Gerät.
4. Önen Sie den Bohnenbehälter. Füllen Sie ihn mit Kaeebohnen und setzen Sie den Deckel wieder
auf den Behälter. Geben Sie niemals mehr als 200 g Kaeebohnen in den Bohnenbehälter.
5. Stellen Sie die Kanne auf die Warmhalteplatte unter den Tropfstopp.
6. Stecken Sie den Stecker in die Steckdose und drücken Sie die Ein-/Aus-Taste
. Stellen Sie die
Uhrzeit gemäß den Anweisungen ein.
7. Drücken Sie die Taste für die Tassenanzahl bis die gewünschte Anzahl von Tassen auf dem
Display erscheint. Sie können zwischen 2, 4, 6, 8,10 oder 12 Tassen wählen. Achten Sie darauf, dass
die Wassermenge im Wassertank mit dieser Anzahl übereinstimmt. Wenn Sie diese Taste nicht
drücken, ist die Standardeinstellung 12 Tassen.
8. Drücken Sie die Taste für die Kaeestärke , um die Stärke zu bestimmen:
· mild
· mittel
· stark
9. Drehen Sie den Drehknopf für den Mahlgrad, um den Mahlgrad für das Mahlen der Bohnen zu
bestimmen. Wenn Sie den Drehknopf auf die kleinen Bohnen drehen, wird der Kaee feiner
gemahlenen und daher auch stärker schmecken. Wenn Sie den Knopf auf die größeren Bohnen
drehen, wird die Kaeemühle gröber mahlen.
10. Drücken Sie die Ein-/Aus-Taste . Die Kaeemühle beginnt zu arbeiten. Nach einigen Sekunden
erscheint das Symbol auf dem Display und der Kaee beginnt, durchzulaufen.
11. Wenn Kaee fertig ist, ertönt ein Signal und das Symbol auf dem Display verschwindet.

21
DO721K
www.domo-elektro.be
DE
KAFFEEZUBEREITUNG MIT KAFFEEPULVER
1. Önen Sie den Wassertank und füllen Sie ihn mit Hilfe der Glaskanne mit der gewünschten
Wassermenge. Überschreiten Sie hierbei nicht die Indikation für die maximale Füllmenge.
2. Drücken Sie die Taste zum Önen des Schwenklters.
3. Setzen Sie den Dauerlter oder einen Papierlter
in den Filterhalter ein. Achten Sie darauf, dass der
Filterhalter korrekt im Gerät eingesetzt ist.
4. Geben Sie die gewünschte Menge an Kaeepulver in
den Filter. Setzen Sie den Deckel des Filterhalters auf
und drehen Sie den Schwenklter wieder in das Gerät.
5. Stellen Sie die Kanne auf die Warmhalteplatte unter
den Tropfstopp.
6. Stecken Sie den Stecker in die Steckdose und drücken Sie die Ein-/Aus-Taste
. Stellen Sie die
Uhrzeit gemäß den Anweisungen ein.
7. Drücken Sie die Taste für die Tassenanzahl bis die gewünschte Anzahl von Tassen auf dem
Display erscheint. Sie können zwischen 2, 4, 6, 8,10 oder 12 Tassen wählen. Achten Sie darauf, dass
die Wassermenge im Wassertank mit dieser Anzahl übereinstimmt. Wenn Sie diese Taste nicht
drücken, ist die Standardeinstellung 12 Tassen.
8. Drücken Sie die Taste für Kaeepulver . Sie leuchtet rot auf.
9. Drücken Sie die Ein-/Aus-Taste . Die Leuchtanzeige leuchtet jetzt rot und der Kaee beginnt,
durchzulaufen. Auf dem Display erscheint das Symbol .
10. Wenn Kaee fertig ist, ertönt ein Signal und das Symbol auf dem Display verschwindet.
· Sie können die Kanne jederzeit für maximal 30 Sekunden von der Kaeemaschine nehmen, um Kaee
auszuschenken. Das Gerät wird dann automatisch auören zu tropfen.
· Die endgültige Kaeemenge wird immer etwas weniger sein als die eingefüllte Wassermenge, da der
Kaee Wasser absorbiert.
· Seien Sie bitte vorsichtig beim Schenken, der Kaee ist heiß, wenn er gerade durchgelaufen ist.
· Aus Sicherheitsgründen ist es ratsam, den Deckel der Glaskanne auf der Kanne zu lassen. So bleibt der
Kaee auch besser warm.
· Das Gerät hält der Kaee 40 Minuten warm. Danach wird das Gerät automatisch ausgeschaltet.
Für einen optimalen Geschmack ist es empfehlenswert, den Kaee einzuschenken, sobald dieser
durchgelaufen ist.
· Schalten Sie die Kaeemaschine immer aus und ziehen Sie den Stecker aus der Steckdose, wenn das
Gerät nicht in Betrieb ist.
TIPPS FÜR LECKEREN KAFFEE
· Eine saubere Kaeemaschine ist eine Voraussetzung für leckeren Kaee. Reinigen Sie also das Gerät
regelmäßig gemäß den Hinweisen in der Gebrauchsanweisung. Benutzen Sie immer frisches, kaltes
Wasser im Gerät.
· Lagern Sie Kaee trocken und kühl.
· Verwenden Sie einmal benutzten Kaee nicht wieder, da der Geschmack des Kaees stark nachlassen
wird. Auch das Aufwärmen von Kaee ist nicht empfehlenswert.

22
DO721K
DE
EINSTELLUNG DES TIMERS
1. Stellen Sie sicher, dass die Uhrzeit korrekt eingestellt ist.
2. Das Gerät, wie unter „Verwendung“ beschrieben, für die Zubereitung von Kaee vorbereiten, jedoch
noch nicht die Ein-/Aus-Taste betätigen.
3. Halten Sie die Timer-Taste 5 Sekunden lang gedrückt. Die Uhrzeit auf dem Display beginnt zu
blinken.
4. Die Stunden-Taste und die Minuten-Taste drücken, um den Timer einzustellen.
5. Drücken Sie die Timer-Taste zur Bestätigung erneut. Die Leuchtanzeige leuchtet jetzt rot auf und
auf dem Display erscheint das Symbol
. Wenn Sie die Timer-Taste nicht zur Bestätigung drücken,
erscheint wieder die aktuelle Uhrzeit auf dem Display. Die eingestellte Uhrzeit wird gespeichert,
aber die Timer-Funktion ist dann nicht eingeschaltet. Drücken Sie die Timer-Taste erneut, um die
Funktion einzuschalten.
6. Die Kaeezubereitung beginnt zu der mit dem Timer eingestellten Zeit.
· Wenn Sie die Timer-Funktion abbrechen möchten, drücken Sie die Timer-Taste erneut. Die rote
Leuchtanzeige der Timer-Taste erlischt und das Symbol verschwindet vom Display.
· Solange Sie den Stecker nicht aus der Steckdose ziehen, wird die Uhrzeit der Timers gespeichert.
Wenn Sie möchten, dass der Kaee jeden Tag zum selben Zeitpunkt zubereitet wird, genügt es, 1x
auf die Timer-Taste zu drücken, um die Timer-Funktion einzuschalten. Das Gerät speichert die zuvor
gewählte Uhrzeit und es ist nicht erforderlich, den Zeitpunkt erneut einzustellen. Wenn Sie doch einen
anderen Zeitpunkt einstellen möchten, befolgen Sie wieder die zuvor beschriebenen Schritte.
· Wenn der Timer eingestellt ist, und Sie die eingestellte Uhrzeit überprüfen möchten, halten Sie die
Timer-Taste einige Sekunden lang gedrückt. Die Uhrzeit wird kurz angezeigt. Wenn Sie dann keine
Taste drücken, erscheint wieder die aktuelle Uhrzeit.
REINIGUNG UND WARTUNG
Achtung: Ziehen Sie den Stecker aus der Steckdose und lassen Sie das Gerät abkühlen, bevor Sie es
reinigen. Tauchen Sie das Kabel, den Stecker oder das Gerät nie in Wasser oder andere Flüssigkeiten,
um das Risiko eines Stromschlags zu vermeiden. Ziehen Sie nach jeder Nutzung den Stecker aus der
Steckdose.
· Die Glaskanne und der herausnehmbare Filter sollten in warmem Wasser mit einem milden
Reinigungsmittel gereinigt werden.
· Reiben Sie das Gehäuse des Gerätes mit einem weichen, feuchten Tuch sauber, um Flecken zu
entfernen.
· Wischen Sie nach der Nutzung eventuelle Tropfen Kondenswasser vom Gerät.
· Benutzen Sie ein feuchtes Tuch für die Reinigung der Warmhalteplatte des Gerätes. Benutzen Sie dafür
nie Scheuermittel.
ENTKALKUNG
Wann?
Entkalken Sie Ihre Kaeemaschine regelmäßig. Eine regelmäßige Entkalkung sorgt für eine konstante
Qualität des Kaees, einen niedrigeren Energieverbrauch und verlängert die Lebensdauer Ihrer
Kaeemaschine.
Bei normaler Nutzung empfehlen wir Ihnen, das Gerät alle 3 bis 4 Wochen zu reinigen.

23
DO721K
www.domo-elektro.be
DE
Wie?
1. Füllen Sie die Kanne mit 1/4 Essig und 3/4 kaltem Wasser.
2. Gießen Sie das Gemisch in das Wasserreservoir und schalten Sie die Kaeemaschine ein. Lassen Sie
das Gemisch durchlaufen ohne Kaee hinzuzufügen und wiederholen Sie diesen Vorgang, bis keine
gelbe Flüssigkeit mehr austritt.
3. Gießen Sie das Gemisch aus.
4. Lassen Sie jetzt noch mindestens 2 Mal nur Wasser durch das Gerät laufen, bis kein Essiggeruch
mehr vorhanden ist.
ENTSORGEN
Dieses Symbol auf dem Produkt oder seiner Verpackung weist darauf hin, dass
dieses Produkt nicht als normaler Haushaltsabfall zu behandeln ist, sondern
an einem Sammelpunkt für das Recyling von elektrischen und elektronischen
Geräten abgegeben werden muss. Durch Ihren Beitrag zum korrekten
Entsorgen dieses Produkts schützen Sie die Umwelt und die Gesundheit Ihrer
Mitmenschen. Umwelt und Gesundheit werden durch falsches Entsorgen
gefährdet. Weitere Informationen über das Recycling dieses Produkts
erhalten Sie von Ihren Rathaus, Ihrer Müllabfuhr oder dem Geschäft, in dem
Sie das Produkt gekauft haben.
Das Verpackungsmaterial ist wiederverwertbar. Entsorgen Sie die Verpackung
umweltgerecht und führen Sie sie der Wertstosammlung zu.

24
DO721K
EN
WARRANTY
Dear client ,
All of our products are always submitted to a strict quality control before they are sold to you.
Should you nevertheless experience problems with your device, we sincerely regret this.
In that case, we kindly request you to contact our customer service.
Our sta will gladly assist you.
+32 14 21 71 91 [email protected]
Monday – Thursday: 8.30 – 12.00 and 13.00 – 17.00
Friday: 8.30 – 12.00 and 13.00 – 16.30
This appliance has a two year warranty period. During this period the manufacturer is responsible for
any failures that are the direct result of construction failure. When these failures occur the appliance will
be repaired or replaced if necessary. The warranty will not be valid when the damage to the appliance is
caused by wrong use, not following the instructions or repairs executed by a third party. The guarantee is
issued with the original till receipt. All parts, which are subject to wear, are excluded from the warranty.
If your device breaks down within the 2-year warranty period, you can return the device together with
your receipt to the shop where you purchased it.
The guarantee on accessories and components that are liable to wear-and-tear is only 6 months.
The guarantee and responsibility of the supplier and manufacturer lapse automatically in the following
cases:
· If the instructions in this manual have not been followed.
· In case of incorrect connection, e.g., electrical voltage that is too high.
· In case of incorrect, rough or abnormal use.
· In case of insucient or incorrect maintenance.
· In case of repairs or alterations to the device by the consumer or non-authorised third parties.
· If the customer used parts or accessories that are not recommended or provided by the supplier /
manufacturer.
SAFETY INSTRUCTIONS
When using electrical appliances, basic safety precautions should always be taken, including the
following:
· Read all instructions carefully. Keep this manual for future reference.
· Make sure all packaging materials and promotional stickers have been removed before using the
appliance for the rst time. Make sure children cannot play with the packaging materials.
· This appliance is intended to be used in household and similar applications such as:
· sta kitchen areas in shops, oces and other working environments;
· farm houses;
· by clients in hotels, motels and other residential type environments;
· bed and breakfast type environments.
· Children should be supervised to ensure that they do not play with the appliance.
· This appliance can be used by children aged from 16 years and above and persons with reduced
physical, sensory or mental capabilities or lack of experience and knowledge if they have been given

25
DO721K
www.domo-elektro.be
EN
supervision or instruction concerning use of the appliance in a safe way and understand the hazards
involved. Children shall not play with the appliance. Cleaning and user maintenance shall not be made
by children unless they are older than 16 and supervised.
· Keep the appliance and its cord out of reach of children younger than 16 years.
· The appliance must be disconnected from its power source when not in use, during service and when
replacing parts. Allow to cool before putting on or taking o parts, and before cleaning the appliance.
· If the supply cord is damaged, it must be replaced by the manufacturer, its service agent or similarly
qualied persons in order to avoid a hazard.
· CAUTION: In order to avoid a hazard this appliance must not be supplied through an external
switching device, such as a timer, or connected to a circuit that is regularly switched on and o by the
utility.
· The surfaces of the appliance are likely to get hot during use. It is advised not to touch the surfaces of
the appliance other than the handles to avoid burns.
· Never leave the appliance unattended while it is functioning.
· Do not use or store this appliance outdoors.
· Do not use this appliance for other than intended use.
· Check carefully that the voltage and frequency of the power net match the indications on the rating
label of the appliance.
· The plug must be plugged into an appropriate outlet that is installed and grounded in accordance with
all local standards and requirements.
· Do not operate this appliance with a damaged cord or plug or in the event the appliance malfunctions
or has been damaged in any manner. Return the appliance to the DOMO Service Department or its
service agent for examination, repair, or electrical or mechanical adjustment. Do not try to repair the
appliance yourself.
· To protect against electrical shock or burns, do not immerse unit, cord, or plug in water or other liquid.
· Do not operate the appliance with wet hands.
· A short power supply cord is provided to reduce the risk of becoming entangled in or tripping over a
longer cord. DO NOT USE WITH AN EXTENSION CORD.
· Unwrap the cord completely to prevent overheating of the cord.
· Do not let the power supply cord hang over the edge of a counter, or touch hot surfaces.
· Do not allow the power cord supply to run underneath or around the unit.
· Do not place on or near a hot gas or electric burner or sink, or in a heated oven.
· Do not place near ammable materials, gases or explosives.
· Make sure the appliance is correctly assembled, then plug the cord in the wall outlet. To disconnect,
turn controls to “OFF” or “0” position, then remove the plug from the wall. Never pull the cord or
appliance to remove the plug from the socket.
· Failure to maintain this appliance in a clean condition could adversely aect the life of the appliance
and possibly result in a hazardous situation.
· During boiling, hot steam may come through the lter or any other opening. Keep hands and face at a
safe distance during operation.
· Any injury or damage caused by failure to comply with these rules are at your own risk. Neither the
manufacturer, importer, or the supplier may be held liable.
· Do not overll the kettle. Never add water above the maximum level marked on the appliance.
· Do not spill any liquid on the connector.
· The appliance must not be immersed in water or any other liquid for cleaning
· Only use the utensils delivered with the appliance.
· Do not move the appliance while in use or when still hot. Allow to cool before moving the appliance.

26
DO721K
EN
· Never use the coee maker when it is empty. Always make sure that there is water in the water tank
when you switch on the appliance.
· Do not use the appliance when it shows signs of damage.
· Do not put a hot carafe on a wet or cold surface.
· Never use the coee maker without the lid on the carafe.
· Never leave an empty carafe on a hot keep-warm plate. The carafe could crack.
SAVE THESE INSTRUCTIONS FOR FUTURE REFERENCE
PARTS
1. Bean reservoir
2. Water tank
3. Water level indications
4. Grind coarseness dial
5. Keep-warm plate
6. Swivel lter open push button
7. Swivel lter
8. Filter holder
9. Permanent lter
10. Filter holder lid
11. Drip stop
12. Glass carafe 1,5 l
13. Handle
14. Keep-warm plate
CONTROL PANEL
15. Timer button
16. Ground coee button
17. Coee strength button
18. On-o button
19. Hours button
20. Minutes button
21. Number of cups button
BEFORE THE FIRST USE
· Check if all accessories are included and if the appliance is not damaged.
· First let water run through the appliance, without adding coee. To do so, ll the water tank up to
the maximum level, switch on the coee maker and let the water run through completely. Dispose of
the water and repeat one or two times. Afterwards, clean the lter, lter holder, carafe and lid of the
carafe thoroughly with warm water.
15 21
16 17 18 19 20
7
8
9
10
11
1
3
6
2
4
5
13
12
14

27
DO721K
www.domo-elektro.be
EN
USE
SETTING THE TIME
1. Put the plug in the socket. The display will show “12:00”.
2. Press the on-o button. ‘12:00’ will blink on the display.
3. Press the hour button
until the correct hour appears on the display.
4. Press the minutes button until the correct minutes appear on the display.
5. If you do not press any more buttons, the time is set.
MAKING COFFEE WITH COFFEE BEANS
1. Open the water reservoir and ll it with the desired amount of water using the
glass coee pot. Do not exceed the maximum indicator.
2. Press the button to open the swivel lter.
3. Place the permanent lter or a paper lter in the lter holder. Make sure that
the lter holder is correctly inserted into the appliance. Place the lid back on
the lter holder and push the swivel lter back into the appliance.
4. Open the bean reservoir. Fill the reservoir with coee beans and place the lid
back on it. Never add more than 200 grams of coee beans in the bean reservoir.
5. Place the coee pot on the hot plate under the drip stop.
6. Plug in plug into the power socket and press the on-o button
. Set the time by following the
guidelines.
7. Press the number of cups button until the desired number of cups appears on the display.
You can select 2, 4, 6, 8, 10, or 12 cups. Make sure that the amount of water in the water reservoir
matches this number. If you do not press this button, the default setting is 12 cups.
8. Press the coee strength button to set the strength:
· mild
· medium
· strong
9. Turn the grind coarseness dial to set the coarseness for grinding the beans. If you turn the dial
towards the small beans, the ground coee will be ner and the taste stronger. If you turn the dial
towards the larger beans, the coee grinder will grind coarser.
10. Press the on-o button . The coee grinder will start grinding. After a few seconds, the symbol
will appear on the display and coee will start owing.
11. When the coee is ready, you will hear a signal and the symbol on the display will disappear.
MAKING COFFEE WITH GROUND COFFEE
1. Open the water reservoir and ll it with the desired amount of water using the glass coee pot. Do
not exceed the maximum indicator.
2. Press the button to open the swivel lter.
3. Place the permanent lter or a paper lter in the lter
holder. Make sure that the lter holder is correctly
inserted into the appliance.
4. Put the desired amount of ground coee into the
lter. Place the lid back on the lter holder and push
the swivel lter back into the appliance.

28
DO721K
EN
5. Place the coee pot on the hot plate under the drip stop.
6. Plug in plug into the power socket and press the on-o button . Set the time by following the
guidelines.
7. Press the number of cups button until the desired number of cups appears on the display.
You can select 2, 4, 6, 8, 10, or 12 cups. Make sure that the amount of water in the water reservoir
matches this number. If you do not press this button, the default setting is 12 cups.
8. Press the button for ground coee . It will light up red.
9. Press the on-o button . The indicator lamp will now light up red and coee will start to ow. The
symbol appears on the display.
10. When the coee is ready, you will hear a signal and the symbol on the display will disappear.
· You can remove the carafe from the coee maker at any chosen time for a maximum of 30 seconds to
pour coee. The appliance will stop dripping automatically.
· The nal amount of coee will always be a little less than the amount of water you put in, because the
coee absorbs water.
· Be careful while pouring, the coee is hot right after brewing.
· For safety reasons it is considered wise to keep the lid on the carafe. This way the coee also stays
warm.
· The device will keep the coee warm for up to 40 minutes. Afterwards, the device will shut o
automatically. To maintain an optimal coee taste, it is best to serve the coee right after brewing.
· Always make sure that the coee maker is switched o and unplug the power cord from the outlet
when the appliance is not in use.
POINTERS FOR GREAT COFFEE
· A clean coee maker is essential to make great tasting coee. Clean the appliance regularly according
to the guidelines. Always use fresh, cold water in the coee maker.
· Store coee in a dry and cool place.
· Do not reuse any coee, as this will greatly aect the taste of your coee. We also do not recommend
reheating coee.
SETTING THE TIMER
1. Make sure the time is set correctly.
2. Prepare the appliance to set coee as indicated under “use” but do not press the on/o button yet.
3. Press the timer button for 5 seconds. The hour on the display will blink.
4. To set the timer, press the hours button and the minutes button.
5. Press the timer button again to conrm. The indicator lamp will now light up red and the symbol
will appear on the display. If you do not press the timer button to conrm, the current time appears
again on the display. The hour set is stored, but the timer function is not activated. Press the timer
button again to activate the function.
6. The coee will begin to run at the time that has been set using the timer.
· If you want to cancel the timer function, press the timer button again. The red indicator lamp of the
timer button goes out and the symbol on the display disappears.
· As long as you do not remove the plug from the power socket, the timer hour will be stored. If you
want your coee made at the same time every day, all you have to do is press the timer button once
to activate the timer function. The device remembers the previously selected time and you do need to
set the time again. If you still want to set a dierent time, proceed as described in the previous steps.

29
DO721K
www.domo-elektro.be
EN
· If your timer is set and you want to check the time, press the timer button for a few seconds. The hour
will be displayed briey. If you do not press a button, the current time automatically appears again.
CLEANING AND MAINTENANCE
Caution: Unplug the appliance and let it cool down before cleaning it. Never immerse the cord, the plug
or the appliance in water or other uids in order to avoid the risk of electrical shock. After each use, make
sure the plug is removed from the outlet.
· Clean the glass pot and removable lter in hot water using a gentle detergent.
· Wipe the product’s exterior body with a soft, damp cloth to remove stains.
· Wipe o water droplets after using the appliance.
· Use a damp cloth to wipe the keep-warm plate clean. Never use abrasive cleaning materials to do so.
DECALCIFICATION
When?
Regularly decalcify your coee maker. Regular decalcication contributes to a constant coee quality, a
lower energy use and prolongs the durability of your coee maker.
At normal use we recommend to decalcify the appliance every 3 to 4 weeks.
How?
1. Fill the carafe with 1/4 of vinegar and 3/4 of cold water.
2. Pour the mixture into the water tank and turn on the coee maker. Let the mixture run through -
without adding coee - and repeat until the liquid dripping out has lost its yellow colour.
3. Pour out the mixture.
4. Now let the coee maker run at least twice with only water, until the vinegar smell has disappeared.
ENVIRONMENTAL GUIDELINES
This symbol on the product or on its packaging indicates that this product may
not be treated as household waste. Instead it must be brought to the applicable
collection point for recycling of electrical and electronic equipment. By ensuring
this product is disposed of correctly, you will help prevent potential negative
consequences for the environment and human health, which could otherwise
be caused by inappropriate waste handling of this product. For more detailed
information about recycling of this product, please contact your local city oce,
your household waste disposal service or the shop where you purchased the
product.
The packaging is recyclable. Please treat the packaging ecologically.

30
DO721K
ES
GARANTIA
Este aparato tiene un periodo de garantía de 2 años a partir de la fecha de compra. Durante el periodo
de garantía, el distribuidor será completamente responsable de los defectos directamente asignables
a errores del material y fabricación. Cuando se detecten este tipo de errores, y siempre que se estime
necesario, el aparato se sustituirá o reparará. A partir de ese momento, el periodo de garantía de 2 años
no volverá a iniciarse, sino que seguirá siendo de 2 años a partir del momento de compra. La garantía se
concede sobre la base del recibo de caja.
La garantía de los accesorios y componentes sujetos a desgaste es de 6 meses.
La garantía y la responsabilidad/imputabilidad del proveedor y el fabricante expiran automáticamente en
los siguientes casos:
· Cuando no se cumplan las instrucciones que aparecen en este manual.
· En el caso de una conexión inadecuada, por ejemplo, a una tensión eléctrica demasiado alta.
· En caso de uso incorrecto, brusco o anormal.
· En caso de insuciente o incorrecto mantenimiento.
· Si el consumidor o un tercero no autorizado realizan reparaciones o modicaciones en el aparato.
· Si se usan componentes o accesorios que no están recomendados o que no son suministrados por el
proveedor/fabricante.
INSTRUCCIONES DE SEGURIDAD
Cuando utilice aparatos eléctricos, se deben seguir las instrucciones de seguridad mencionadas a
continuación:
· Lea detenidamente estas instrucciones. Conserve este manual para consultarlo posteriormente.
· Antes del primer uso retire todos los materiales de embalaje y etiquetas promocionales. Asegúrese de
que los niños no puedan jugar con el material de embalaje.
· Este aparato es adecuado para su uso en el ámbito doméstico y entornos similares como:
· Zona de cocina para el personal de tiendas, ocinas y otros entornos profesionales similares.
· Granjas.
· Habitaciones de hoteles y moteles, y otros entornos de carácter residencial.
· Habitaciones de invitados o similares.
· Supervise en todo momento a los niños para que no jueguen con el aparato.
· Este aparato puede ser utilizado por niños de 16 años o más, personas con discapacidad física o
sensorial, o personas con capacidad mental limitada o falta de experiencia o conocimiento, siempre,
y en tanto en cuanto, dichas personas estén vigiladas o hayan recibido instrucciones sobre el uso del
aparato de manera segura y conozcan los peligros del uso del mismo. Los niños no deben jugar con el
ventilador. El mantenimiento y la limpieza del dispositivo no deben ser realizados por niños, a menos
que tengan 16 años o más y estén supervisados por un adulto.
· Mantenga el aparato fuera del alcance de los niños.
· Saque el enchufe de la toma de corriente cuando no use el aparato, antes de montar o desmontar
piezas y antes de limpiarlo. Ponga primero todos los botones en posición de apagado y desconecte el
cable de alimentación de la toma de corriente. No tire nunca del cable de alimentación para sacar el
enchufe de la toma de corriente.
· Si el cable de alimentación está dañado, para evitar accidentes, debe sustituirlo el fabricante, un
centro de reparación autorizado o una persona cualicada.
· ATENCIÓN: para evitar peligros, el aparato no debe ser controlado con un dispositivo externo, como
un temporizador externo, ni debe conectarse a una red que se encienda y se apague con frecuencia.

31
DO721K
www.domo-elektro.be
ES
· Las supercies de este aparato se calientan durante el uso. Recomendamos no tocar la supercie de
este aparato, exceptuando las asas, para evitar quemaduras.
· No deje nunca sin vigilancia un aparato en marcha.
· No utilice el aparato al aire libre.
· Utilice el aparato únicamente para el n para el que está destinado.
· Antes de utilizarlo, compruebe si el voltaje indicado en el aparato coincide con el voltaje de la red
eléctrica de su vivienda.
· El cable de alimentación debe estar conectado a una toma de corriente que debe haber sido instalada
y conectada a tierra de acuerdo con las normas y reglamentos locales.
· No utilice nunca el aparato si el cable de alimentación o el enchufe están dañados, después de un
mal funcionamiento del aparato o cuando el aparato está dañado. En el caso de que el aparato esté
dañado, llévelo al servicio de postventa de DOMO o al centro de servicio cualicado más cercano
para su inspección, reparación o para realizar ajustes eléctricos/mecánicos. Nunca intente reparar el
aparato por su cuenta.
· Nunca sumerja el aparato, el cable de alimentación o el enchufe en agua o en cualquier otro líquido.
Esto evitará choques eléctricos o incendios.
· No utilice el aparato con las manos mojadas.
· Este aparato está provisto de un cable de alimentación corto para evitar que personas u objetos se
enreden en el mismo o se caigan. NUNCA UTILICE EL APARATO CON UN CABLE ALARGADOR.
· Desenrolle el cable de alimentación completamente para evitar el sobrecalentamiento del mismo.
· No deje que el cable de alimentación cuelgue sobre supercies calientes o sobre el borde de una mesa
o encimera.
· No permita que el cable de alimentación cuelgue por debajo o alrededor del aparato.
· No coloque nunca el aparato encima ni cerca de una placa de cocina eléctrica o de gas, un fregadero o
un horno encendido.
· No coloque nunca el aparato cerca de materiales inamables, gases o explosivos.
· Solo debe introducir el cable de alimentación en la toma de corriente después de que el aparato
se haya montado correctamente. Antes de retirar el cable del aparato de la toma de corriente, el
control se debe poner en la posición «OFF» o «0». A continuación podrá retirar el cable de la toma
de corriente. Nunca tire del aparato o del cable de alimentación para retirar el enchufe de la toma de
corriente.
· Si no se realiza un correcto mantenimiento del aparato, la vida útil del aparato se reducirá
drásticamente y se podrían producir situaciones peligrosas.
· Al hervir agua, es posible que salga vapor caliente a través del ltro u otra abertura; por eso es
importante mantener las manos alejadas del aparato mientras está en funcionamiento.
· Los accidentes o los daños ocasionados por el no seguimiento de estas normas son su propia
responsabilidad. Ni el fabricante, ni el importador ni el distribuidor pueden ser considerados
responsables a este respecto.
· No supere la indicación MAX al llenar el aparato.
· Tenga cuidado de no derramar líquido sobre el cable de alimentación.
· El aparato no se puede sumergir en agua ni en ningún otro líquido para su limpieza.
· Utilice únicamente los accesorios incluidos con el aparato.
· No mueva nunca el aparato cuando se encuentre todavía en funcionamiento ni mientras siga estando
caliente. Espere siempre a que el aparato se enfríe antes de cambiarlo de lugar.
CONSERVE ESTAS INSTRUCCIONES PARA CONSULTARLAS POSTERIORMENTE

32
DO721K
ES
PIEZAS
1. Depósito de granos
2. Depósito de agua
3. Marcas de nivel
4. Botón giratorio para espesor de
molienda
5. Panel de control con pantalla
LCD
6. Pulsador de apertura del ltro
giratorio
7. Filtro giratorio
8. Soporte del ltro
9. Filtro permanente
10. Tapa del soporte de ltro
11. Tapón de goteo
12. Jarra de vidrio 1,5 l
13. Asa
14. Placa para mantener la temperatura
PANEL DE CONTROL
15. Botón de temporización
16. Botón de café molido
17. Botón de fuerza del café
18. Botón de encendido/apagado
19. Botón de horas
20. Botón de minutos
21. Botón de número de tazas
ANTES DEL PRIMER USO
· Compruebe que todos los accesorios se encuentran en el aparato, así como que este no está dañado.
· En primer lugar debe dejar pasar solamente el agua, sin añadir café. Para ello, llene el tanque de agua
hasta la indicación máxima, encienda la cafetera y deje que toda el agua pase completamente una o
dos veces. A continuación, vierta el agua y limpie a fondo el ltro, el soporte del ltro, la jarra y la tapa
de la jarra con agua tibia.
USO
AJUSTAR LA HORA
1. Introduzca el enchufe en la toma de corriente. En la pantalla aparece “12:00”.
2. Pulse el botón de encendido/apagado. En la pantalla parpadea «12:00».
3. Pulse el botón de horas
hasta que aparezca la hora correcta en la pantalla.
4. Pulse el botón de minutos hasta que aparezcan los minutos correctos en la pantalla.
5. En cuanto deje de pulsar el botón, se conrmará la hora.
15 21
16 17 18 19 20
7
8
9
10
11
1
3
6
2
4
5
13
12
14

33
DO721K
www.domo-elektro.be
ES
HACER CAFÉ CON GRANOS DE CAFÉ
1. Abra el depósito de agua y llénelo con la cantidad de agua deseada utilizando
la jarra de cristal. No supere la indicación de cantidad máxima.
2. Pulse el botón para abrir el ltro giratorio.
3. Coloque el ltro permanente o un ltro de papel en el soporte de ltro.
Procure colocar debidamente el soporte de ltro en el aparato. Coloque la
tapadera del soporte de ltro y gire el ltro giratorio en su sitio.
4. Abra el depósito de granos. Llénelo de granos y vuelva a colocar la tapa en el
depósito. No eche nunca más de 200 gr de granos de café al depósito.
5. Coloque la jarra en la placa de calentamiento, debajo del sistema antigoteo.
6. Introduzca el enchufe en la toma de corriente y presione el botón de encendido/apagado
. Ajuste
la hora conforme a las instrucciones.
7. Pulse el botón de la cantidad de tazas hasta que aparezca en la pantalla el número deseado de
tazas. Puede elegir entre 2, 4, 6, 8, 10 y 12 tazas. Procure que la cantidad de agua en el depósito de
agua coincida con este número. Si no pulsa este botón, la cantidad estándar es de 12 tazas.
8. Pulse la tecla de fuerza del café para determinar la fuerza:
· suave
· medio
· fuerte
9. Gire el botón para el espesor de molienda de los granos. Si gira el botón hacia los granos pequeños,
el café se molerá más no y tendrá un sabor más fuerte. Si gira el botón hacia los granos más
grandes, el café se molerá más grueso.
10. Pulse el botón de encendido/apagado . El molinillo empieza a moler, al cabo de unos segundos
aparece el símbolo en la pantalla y el café empieza a gotear.
11. Cuando esté listo el café, oirá una señal y desaparecerá el símbolo de la pantalla.
HACER CAFÉ CON CAFÉ MOLIDO
1. Abra el depósito de agua y llénelo con la cantidad de agua deseada utilizando la jarra de cristal. No
supere la indicación de cantidad máxima.
2. Pulse el botón para abrir el ltro giratorio.
3. Coloque el ltro permanente o un ltro de papel en
el soporte de ltro. Procure colocar debidamente el
soporte de ltro en el aparato.
4. Eche la cantidad deseada de café molido al ltro.
Coloque la tapadera del soporte de ltro y gire el ltro
giratorio en su sitio.
5. Coloque la jarra en la placa de calentamiento, debajo del sistema antigoteo.
6. Introduzca el enchufe en la toma de corriente y presione el botón de encendido/apagado
. Ajuste
la hora conforme a las instrucciones.
7. Pulse el botón de la cantidad de tazas hasta que aparezca en la pantalla el número deseado de
tazas. Puede elegir entre 2, 4, 6, 8, 10 y 12 tazas. Procure que la cantidad de agua en el depósito de
agua coincida con este número. Si no pulsa este botón, la cantidad estándar es de 12 tazas.
8. Pulse el botón de café molido . Éste se iluminará de rojo.
9. Pulse el botón de encendido/apagado . Se encenderá de rojo el indicador luminoso y el café
empieza a gotear. El símbolo aparece en la pantalla.
10. Cuando esté listo el café, oirá una señal y desaparecerá el símbolo de la pantalla.

34
DO721K
ES
· Puede retirar la jarra de la cafetera en cualquier momento durante un máximo de 30 segundos para
verter café. El aparato dejará de gotear de forma automática.
· La cantidad nal de café siempre será menor que la cantidad de agua que ha introducido, ya que el
café absorbe el agua.
· Tenga cuidado cuando sirva el café, ya que este estará muy caliente cuando esté recién preparado.
· Por razones de seguridad, es aconsejable mantener la tapa en la jarra de vidrio. De esta manera, el
café se mantiene caliente.
· El aparato mantiene el café caliente durante 40 minutos y, a continuación, se apaga automáticamente.
Sin embargo, para garantizar un sabor óptimo, le recomendamos servir el café inmediatamente
después de prepararlo.
· Siempre debe asegurarse de que el aparato está apagado y siempre debe desenchufarlo de la toma de
corriente cuando el aparato no se esté utilizando.
CONSEJOS PARA PREPARAR UN CAFÉ DELICIOSO
· Una cafetera limpia es esencial para preparar un buen café. Por lo tanto, limpie el aparato
regularmente de acuerdo con las recomendaciones. Siempre debe utilizar agua fresca y fría en el
aparato.
· Conserve el café en un lugar seco y fresco.
· No reutilice café, ya que esto empeorará considerablemente el sabor del café. Tampoco se recomienda
recalentar el café.
AJUSTE DEL TEMPORIZADOR
1. Procure ajustar correctamente la hora.
2. Prepare el aparato para hacer café de la manera indicada en “uso”, pero no presione todavía en el
botón de encendido/apagado.
3. Presione el botón de temporización durante 5 segundos. La hora en la pantalla parpadea.
4. Presione el botón de las horas y el botón de los minutos para ajustar el temporizador.
5. Vuelva a presionar el botón de temporización para conrmar. El indicador luminoso se enciende de
rojo y en la pantalla aparece el símbolo
. Si no pulsa el botón de temporización para conrmar,
volverá a aparecer la hora actual en la pantalla. El aparato recordará la hora ajustada pero no estará
activada la función de temporización. Pulse el botón de temporización para activar la función.
6. El café empezará a salir a la hora establecida en el temporizador.
· Si desea anular la función de temporización, vuelva a pulsar el botón de temporización. Se apagará el
indicador luminoso rojo del botón de temporización y desaparecerá el símbolo de la pantalla.
· Mientras no desenchufe el aparato, se recordará la hora del temporizador. Si quiere que el café se
haga cada día a la misma hora, basta con pulsar 1x el botón de temporización para activar la función
de temporización. El aparato recordará la hora previamente seleccionada y no es necesario volver a
ajustar la hora. Si desea ajustar otra hora, repita los pasos arriba mencionados.
· Cuando tenga el temporizador ajustado y desea comprobar la hora, pulse unos segundos el botón de
temporización. Se visualizará brevemente la hora. Si no aprieta otro botón, volverá a aparecer la hora
actual.

35
DO721K
www.domo-elektro.be
ES
LIMPIEZA Y MANTENIMIENTO
Atención: Retire el enchufe de la toma de corriente y deje que la unidad se enfríe antes de empezar a
limpiar. Nunca sumerja el cable, el enchufe o el aparato en agua o en otros líquidos con el n de evitar el
riesgo de una descarga eléctrica. Asegúrese de que el enchufe está desconectado después de cada uso.
· Limpie la jarra de vidrio y el ltro extraíble en agua caliente con un detergente suave.
· Frote la carcasa del aparato con un paño suave y húmedo para eliminar las manchas.
· Si es necesario, después del uso, limpie las gotas de condensación del aparato.
· Utilice un paño húmedo para limpiar la placa para mantener la temperatura. Nunca utilice productos
abrasivos.
DESCALCIFICACIÓN
¿Cuándo?
Descalcique la cafetera regularmente. Una descalcicación regular asegura una calidad constante del
café, menor consumo de energía y una prolongación de la vida útil de su cafetera.
Cuando su uso es normal, se recomienda descalcicar el aparato cada 3 o 4 semanas.
¿Cómo?
1. Llene la jarra con 1/4 de vinagre y 3/4 de agua fría.
2. Vierta la mezcla en el tanque de agua y encienda la cafetera. Deje que la mezcla pase por el ltro -
sin añadir café - y repita hasta que no salga líquido amarillo.
3. Vierta la mezcla.
4. Deje que el aparato funcione al menos dos veces más con agua, hasta que ya no quede olor a
vinagre.
DIRECTRICES MEDIOAMBIENTALES
El símbolo en el producto o en el embalaje indica que este producto no puede
ser tratado como residuo doméstico. Se debe llevar a un lugar en el que se
reciclan equipos eléctricos y electrónicos. Si se asegura de que este producto
se desecha correctamente, usted ayudará a evitar posibles consecuencias
negativas para las personas y el medio ambiente que serían causadospor
un tratamiento de residuos inadecuado. Para obtener información más
detallada sobre el reciclaje de este producto, póngase en contacto con su
ayuntamiento, o con la empresa o departamento responsable del servicio de
recogida de basura doméstica, o con la tienda donde adquirió el producto.
El material de embalaje es reciclable. Trate el embalaje de una manera
medioambientalmente responsable.

36
DO721K
IT
GARANZIA
La garanzia dell’apparecchio è valida per 2 anni a partire dalla data di acquisto. Durante il periodo di
validità della garanzia, il distributore si assume la piena responsabilità dei difetti dei materiali o di quelli
di fabbricazione. In caso di presenza di tali difetti, se necessario, si procederà alla sostituzione o alla
riparazione dell’apparecchio. Il periodo di garanzia di 2 anni non ricomincia in quel momento, ma continua
per 2 anni dalla data di acquisto dell’apparecchio. Per la garanzia fa fede la data riportata sullo scontrino.
Se l’apparecchio si rivela difettoso nel periodo di validità della garanzia, cioè 2 anni, potete portarlo,
insieme allo scontrino, nel negozio dove l’avete acquistato.
La garanzia sugli accessori e sui componenti soggetti a usura è di 6 mesi.
La garanzia e la responsabilità del negoziante e del produttore decadono automaticamente nei seguenti
casi:
· mancata osservanza delle istruzioni contenute nel presente manuale;
· errato collegamento, per esempio con tensione elettrica troppo alta;
· uso errato, anormale e manesco;
· manutenzione insuciente o errata;
· riparazione o modiche all’apparecchio eseguite dal cliente o da terzi non autorizzati;
· uso di accessori o componenti non raccomandati o forniti dal negoziante o dal produttore.
INDICAZIONI DI SICUREZZA
· Quando si utilizzano dispositivi elettrici, è necessario tenere presenti le seguenti istruzioni di sicurezza:
· Leggere con attenzione le presenti istruzioni. Conservare le istruzioni per possibili future consultazioni.
· Prima di utilizzare il prodotto, togliere tutti gli imballi e gli eventuali adesivi promozionali. Assicurarsi
che i bambini non giochino con gli imballaggi.
· Questo apparecchio è destinato unicamente all’uso domestico e in ambienti analoghi, quali:
· angoli cottura riservati al personale nei negozi, negli uci e in altri ambienti professionali
· Fattorie
· Camere di alberghi, motel e altre strutture ricettive residenziali
· Camere per vacanze o ambienti analoghi
· L’apparecchio può essere utilizzato da bambini di età superiore a 16 anni e da persone con ridotte
capacità siche, sensoriali o mentali, o con mancanza di esperienza o conoscenza, solo se sorvegliati
o se hanno ricevuto istruzioni sull’uso sicuro dell’apparecchio e ne comprendono i rischi. I bambini
non possono giocare con l’apparecchio. Le operazioni di pulizia e di manutenzione non devono essere
eettuate dai bambini di età inferiore a 16 anni e senza sorveglianza.
· Tenere l’apparecchio fuori dalla portata dei bambini di età inferiore a 16 anni.
· Togliere la spina dalla presa quando l’apparecchio non è in funzione, prima di montarne o smontarne
i componenti e prima di pulirlo. Lasciare rareddare l’apparecchio prima di montare o smontare i
componenti e prima di pulirlo.
· Se il cavo di alimentazione è danneggiato, deve essere sostituito dal produttore, da un centro
assistenza o da persone qualicate, questo per evitare incidenti.
· ATTENZIONE: per evitare il rischio di incidenti, l’apparecchio non deve essere utilizzato con strumenti
esterni, come ad esempio un timer e non deve essere collegato a una rete che viene accesa e spenta in
continuazione.
· L’apparecchio potrebbe surriscaldarsi durante il normale utilizzo. Consigliamo di aerrare
l’apparecchio servendosi dell’impugnatura e di non toccarlo in altri punti per evitare ustioni.
· Non far funzionare l’apparecchio senza sorveglianza.
· Non utilizzare o conservare l’apparecchio all’aperto.

37
DO721K
www.domo-elektro.be
IT
· Utilizzare l’apparecchio solo per lo scopo previsto.
· Prima dell’uso, controllare che il voltaggio riportato sull’apparecchio corrisponda a quello della rete
elettrica domestica.
· Il cavo di alimentazione deve essere sempre collegato a una presa installata correttamente e con
messa a terra in conformità alla normativa locale vigente.
· Non utilizzare mai l’apparecchio se il cavo di alimentazione o la spina sono danneggiati, dopo un
malfunzionamento o quando è danneggiato. In questi casi, portare l’apparecchio al servizio assistenza
post-vendita di DOMO o al centro assistenza autorizzato più vicino per farlo controllare, riparare
o per apportare le necessarie modiche elettriche o tecniche. Non cercare mai di riparare da soli
l’apparecchio.
· Non immergere mai l’apparecchio, il cavo o la spina in acqua o in altri liquidi. Questo per evitare scosse
elettriche o incendi.
· Non utilizzare l’apparecchio con le mani bagnate.
· L’apparecchio è munito di un cavo di alimentazione corto; se fosse più lungo, ci sarebbe pericolo di
inciampare o di rimanere impigliati. NON UTILIZZARE MAI L’APPARECCHIO CON UNA PROLUNGA.
· Srotolare completamente il cavo di alimentazione per evitare che si surriscaldi.
· Non lasciare il cavo di alimentazione penzolante sul bordo del tavolo o della cucina ed evitare che
venga a contatto con superci calde.
· Non lasciare mai il cavo di alimentazione penzolante sotto l’apparecchio.
· Non posizionare mai l’apparecchio vicino a fornelli elettrici o a gas caldi, al lavandino o a un forno
acceso.
· Non posizionare mai l’apparecchio vicino a materiali inammabili, gas o esplosivi.
· Inserire il cavo di alimentazione nella presa solo dopo aver correttamente montato l’apparecchio.
Per staccare l’apparecchio dalla presa, assicurarsi che sia su “OFF” o in posizione “0”. Solo dopo sarà
possibile staccarlo dalla presa. Non tirare mai il cavo di alimentazione o l’apparecchio per staccare la
spina dalla presa di corrente.
· Se l’apparecchio non viene pulito bene, la sua durata di vita può ridursi in modo drastico e possono
vericarsi situazioni pericolose.
· Quando si riscalda l’acqua, è possibile che esca del vapore dal ltro o da altre aperture. Tenere le mani
lontane dall’apparecchio quando è in funzione.
· Gli incidenti o i danni causati dalla mancata osservanza delle presenti istruzioni sono responsabilità
dell’utilizzatore. Non possono essere ritenuti responsabili per tali danni né il produttore, né
l’importatore, né il fornitore.
· Non riempire l’apparecchio oltre il livello massimo indicato.
· Fare attenzione a non versare nessun liquido sul cavo di alimentazione.
· Per la pulizia, l’apparecchio non deve essere immerso in acqua o in altri liquidi.
· Utilizzare solo gli accessori forniti insieme all’apparecchio.
· Non spostare mai l’apparecchio mentre è in uso o se è ancora caldo. Prima di spostare l’apparecchio,
lasciarlo sempre rareddare.
· Non utilizzare mai la macchina del caè vuota. Assicurarsi che il serbatoio contenga sempre acqua
quando l’apparecchio viene acceso.
· Non utilizzare l’apparecchio se la caraa mostra segni di danneggiamento.
· Non appoggiare la caraa calda su superci bagnate o fredde.
· Non utilizzare mai la macchina del caè senza il coperchio sulla caraa.
· Non lasciare mai la caraa vuota sulla piastra riscaldante. Potrebbe rompersi.
CONSERVARE LE ISTRUZIONI PER POSSIBILI FUTURE CONSULTAZIONI

38
DO721K
IT
COMPONENTI
1. Recipiente per caè in grani
2. Serbatoio dell’acqua
3. Indicazione di livello del serbatoio
4. Manopola di selezione del grado
di macinatura
5. Pannello di controllo con display
LCD
6. Pulsante di apertura del ltro
mobile
7. Filtro mobile
8. Supporto del ltro
9. Filtro permanente
10. Coperchio del portaltro
11. Salvagoccia
12. Caraa in vetro da 1,5 litri
13. Maniglia caraa in vetro
14. Piastra riscaldante
PANNELLO DI CONTROLLO
15. Tasto timer
16. Tasto per caè macinato
17. Tasto per intensità del caè
18. Tasto di accensione/spegnimento
19. Tasto ore
20. Tasto minuti
21. Tasto per quantità tazze
PRIMA DELL’USO
· Controllare la presenza di tutti gli accessori e che l’apparecchio non sia danneggiato.
· Fare scendere prima un po’ d’acqua, senza aggiungere caè. Riempire il serbatoio dell’acqua no al
massimo livello, accendere la macchina del caè e lasciarla svuotare una o due volte. Buttare l’acqua e
lavare accuratamente con acqua calda il ltro, il supporto del ltro, la caraa e il coperchio.
UTILIZZO
IMPOSTAZIONE DELL’ORA
1. Inserire la spina nella presa di corrente. Sul display appare “12:00”.
2. Premere il tasto di accensione/spegnimento. Sul display lampeggia “12:00”.
3. Premere il tasto ore
no a far comparire sul display l’ora giusta.
4. Premere il tasto minuti no a far comparire sul display i minuti giusti.
5. Se non si premono più tasti, l’orario viene confermato
15 21
16 17 18 19 20
7
8
9
10
11
1
3
6
2
4
5
13
12
14

39
DO721K
www.domo-elektro.be
IT
FARE IL CAFFÈ CON CAFFÈ IN GRANI
1. Aprire il serbatoio dell’acqua e versarvi la quantità di acqua desiderata usando
la caraa in vetro. Non superare l’indicazione di livello massimo.
2. Premere il pulsante per aprire il ltro mobile.
3. Inserire il ltro permanente o un ltro in carta nel portaltro. Assicurarsi che
il portaltro sia posizionato correttamente nell’apparecchio. Posizionare il
coperchio del portaltro e riportare il ltro mobile nell’apparecchio.
4. Aprire il recipiente per caè in grani. Versarvi il caè in grani e rimettere il coperchio sul recipiente.
Non mettere mai più di 200 g di chicchi di caè nel recipiente per caè in grani.
5. Mettere la caraa sul piatto di tenuta in caldo, sotto il fermagoccia.
6. Inserire la spina nella presa elettrica e premere il tasto di accensione/spegnimento
. Impostare il
tempo secondo le linee guida.
7. Premere il tasto per la quantità di tazze no a far comparire sul display la quantità desiderata.
È possibile scegliere tra 2, 4, 6, 8, 10 o 12 tazze. Assicurarsi che la quantità di acqua nel serbatoio
dell’acqua corrisponda a tale quantità. Se non si preme questo tasto, l’impostazione predenita è 12
tazze.
8. Premere il tasto per l’intensità del caè per scegliere l’intensità:
· leggero
· medio
· forte
9. Girare la manopola di selezione del grado di macinatura per scegliere il grado di macinatura dei
chicchi. Se si gira la manopola in direzione dei chicchi piccoli, il caè sarà macinato più nemente e
quindi avrà un sapore più intenso. Se si gira la manopola in direzione dei chicchi più grandi, il caè
sarà macinato meno nemente.
10. Premere il tasto di accensione/spegnimento . Il macinacaè inizia a macinare, dopo alcuni
secondi compare il simbolo sul display e il caè comincia ad essere erogato.
11. Quando il caè sarà pronto, si udirà un segnale acustico e il simbolo scomparirà dal display.
FARE IL CAFFÈ CON CAFFÈ MACINATO
1. Aprire il serbatoio dell’acqua e versarvi la quantità di acqua desiderata usando la caraa in vetro.
Non superare l’indicazione di livello massimo.
2. Premere il pulsante per aprire il ltro mobile.
3. Inserire il ltro permanente o un ltro in carta nel
portaltro. Assicurarsi che il portaltro sia posizionato
correttamente nell’apparecchio.
4. Versare nel ltro la quantità di caè macinato
desiderata. Posizionare il coperchio del portaltro e
riportare il ltro mobile nell’apparecchio.
5. Mettere la caraa sul piatto di tenuta in caldo, sotto il fermagoccia.
6. Inserire la spina nella presa elettrica e premere il tasto di accensione/spegnimento
. Impostare il
tempo secondo le linee guida.
7. Premere il tasto per la quantità di tazze no a far comparire sul display la quantità desiderata.
È possibile scegliere tra 2, 4, 6, 8, 10 o 12 tazze. Assicurarsi che la quantità di acqua nel serbatoio
dell’acqua corrisponda a tale quantità. Se non si preme questo tasto, l’impostazione predenita è 12
tazze.
8. Premere il tasto per caè macinato . Questo si accendere di colore rosso.

40
DO721K
IT
9. Premere il tasto di accensione/spegnimento . L’indicatore luminoso si accenderà di colore rosso e
il caè comincerà ad essere erogato. Sul display compare il simbolo .
10. Quando il caè sarà pronto, si udirà un segnale acustico e il simbolo scomparirà dal display.
· È possibile togliere la caraa dalla macchina in ogni momento per al massimo 30 secondi e versare il
caè. L’apparecchio smette automaticamente di gocciolare.
· La quantità nale di caè sarà sempre leggermente inferiore alla quantità di acqua iniziale, perché il
caè assorbe.
· Fare attenzione quando si versa il caè, perché è molto caldo.
· Per ragioni di sicurezza, si consiglia di non togliere il coperchio dalla caraa in vetro. In questo modo, il
caè rimarrà anche più caldo.
· L’apparecchio mantiene caldo il caè per 40 minuti e poi si spegne automaticamente. Per gustare un
ottimo caè, servirlo immediatamente.
· Assicurarsi sempre che la macchina del caè sia spenta e togliere sempre la spina dalla presa di
corrente quando l’apparecchio non è in uso.
SUGGERIMENTI PER AVERE UN BUON CAFFÈ
· Per preparare un buon caè, è essenziale che la macchina sia sempre pulita. Lavarla quindi con
regolarità seguendo le istruzioni. Utilizzare sempre acqua fresca.
· Conservare il caè in un luogo fresco e asciutto.
· Non riutilizzare il caè, perché il gusto si ridurrà moltissimo. Si sconsiglia anche di riscaldare il caè.
IMPOSTAZIONE TIMER
1. Assicurarsi che il tempo sia stato impostato correttamente.
2. Preparare la macchina del caè come descritto in “Utilizzo”, ma non premere il tasto on/o.
3. Premere il tasto timer per 5 secondi. L’ora sul display lampeggerà.
4. Premere il tasto delle ore e dei minuti per impostare il timer.
5. Premere ancora una volta il tasto timer per confermare. A questo punto l’indicatore luminoso si
accende in rosso e sul display compare il simbolo
. Se non si preme tasto timer per confermare, sul
display compare di nuovo l’ora attuale. L’ora impostata viene memorizzata ma la funzionalità timer
non è attivata. Premere ancora una volta il tasto timer per attivare la funzionalità.
6. Il caè inizia a scendere secondo l’impostazione del timer.
· Per annullare la funzionalità timer, premere di nuovo il tasto timer. L’indicatore luminoso rosso del
tasto timer si spegne e il simbolo scompare dal display.
· Se la spina non viene scollegata dalla presa elettrica, l’orario del timer rimane memorizzato. Se si
desidera far avviare la preparazione del caè quotidianamente alla stessa ora, è suciente premere
una volta il tasto timer per attivare la funzionalità timer. L’apparecchio memorizza l’orario impostato
precedentemente e non occorre impostarlo di nuovo. Se si desidera impostare un nuovo orario,
procedere come descritto sopra.
· Se il timer è impostato e si desidera vericare quale orario è stato selezionato, premere per alcuni
secondi il tasto timer. L’orario compare brevemente. Se non si premono tasti, ricompare l’ora attuale.

41
DO721K
www.domo-elektro.be
IT
PULIZIA E MANUTENZIONE
Attenzione: Togliere la spina dalla presa di corrente e lasciare rareddare completamente l’apparecchio
prima di pulirlo. Non immergere mai l’apparecchio, il cavo o la spina in acqua o in altri liquidi, per evitare il
rischio di scosse elettriche. Dopo ogni utilizzo, assicurarsi di togliere la spina dalla presa di corrente.
· Pulire la caraa di vetro e il ltro rimovibile con acqua calda e un detergente neutro.
· Pulire la parte esterna dell’apparecchio con un panno morbido e umido per togliere le macchie.
· Dopo l’uso, eliminare eventuali gocce di condensa dall’apparecchio.
· Utilizzare un panno umido per pulire la piastra riscaldante dell’apparecchio. Non utilizzare mai
prodotti abrasivi.
DECALCIFICAZIONE
Quando?
La macchina del caè deve essere decalcicata con regolarità. La regolare decalcicazione garantisce la
qualità costante del caè, un minore utilizzo di energia e prolunga la durata di vita della macchina.
In condizioni d’uso normale, il nostro consiglio è di decalcicare la macchina ogni 3/4 settimane.
Come?
1. Riempire la caraa con 1/4 di aceto e 3/4 di acqua fredda.
2. Mettere la miscela nel serbatoio dell’acqua e accendere la macchina. Lasciare colare il liquido, senza
aggiungere caè, e ripetere l’operazione no a quando il liquido che esce non è più giallo.
3. Buttare la miscela di acqua e aceto.
4. Fare funzionare l’apparecchio per almeno 2 volte solo con acqua, per eliminare completamente
l’odore dell’aceto.
MISURE AMBIENTALI
Il simbolo sul prodotto o sulla confezione indica che esso non deve essere
trattato come riuto domestico. Deve, al contrario, essere conferito al
punto di raccolta predisposto per il riciclo delle apparecchiature elettriche
ed elettroniche. Facendo in modo che questo prodotto venga smaltito
correttamente aiuterete a prevenire potenziali conseguenze negative per
l’ambiente e la salute dell’uomo, che potrebbero essere causate da uno
smaltimento non corretto. Per maggiori informazioni sul riciclo di questo
prodotto, consultare le autorità comunali, l’azienda o il servizio responsabili
della raccolta dei riuti domestici o il negozio in cui il prodotto è stato
acquistato.
Il materiale di imballaggio è riciclabile. Lo smaltimento dell’imballaggio deve
avvenire al ne di tutelare l’ambiente.

42
DO721K
CZ
ZÁRUKA
Práva a povinnosti prodávajícího a kupujícího ohledně práv z vadného plnění se řídí příslušnými obecně
závaznými předpisy dle občanského zákoníku.
1. Trvání záruky: 2 roky
2. Záruka se nevztahuje
a) na mechanické poškození
b) nesprávné používání v rozporu s návodem k použití
3. Záruka zaniká:
- při použití spotřebiče jinak než v je uvedeno v manuálu (nesprávným postupem)
- při provádění opravy nebo změny na spotřebiči osobou jinou než pověřenou naším servisem
Prodávající odpovídá kupujícímu, že zboží při převzetí nemá vady. Zejména prodávající odpovídá
kupujícímu, že v době, kdy kupující zboží převzal:
· má zboží takové vlastnosti, které výrobce v tomto návodu popisuje,
· se zboží hodí k účelu, ke kterému výrobce uvádí,
· zboží odpovídá jakostí nebo provedením smluvenému vzorku nebo předloze, byla-li jakost nebo
provedení určeno podle smluveného vzorku nebo předlohy,
· zboží vyhovuje požadavkům právních předpisů.
Projeví-li se vada v průběhu šesti měsíců od převzetí, má se za to, že zboží bylo vadné již při převzetí.
Pokud není u výrobku uvedeno jinak, činí záruční doba 24 měsíců. Záruční doba počíná běžet od převzetí
věci kupujícím.
Práva z vadného plnění uplatňuje kupující u prodávajícího na adrese jeho provozovny, v níž je přijetí
reklamace možné s ohledem na sortiment prodávaného zboží, případně i v sídle nebo místě podnikání. Za
okamžik uplatnění reklamace se považuje okamžik, kdy prodávající obdržel od kupujícího reklamované
zboží.
Reklamaci lze také uplatnit v servisním středisku na adrese DOMO-elektro s.r.o., Na Kobyle 783, 345 06
Kdyně, Česká republika, tel. (+420) 379 422 550, [email protected]
Pro rychlé a bezproblémové vyřízení reklamace doporučujeme přiložit k reklamaci doklad o koupi a průvodní
dopis s popisem závady a zpáteční adresou s telefonickým kontaktem.
BEZPEČNOSTNÍ POKYNY
Při používání jakkéhokoli el. spotřebiče dbejte zvýšené opatrnosti a dodržujte určitá bezpečnostní
pravidla:
· Pečlivě si přečtěte tyto informace a manuál nechte i pro pozdější nahlédnutí.
· Ujistěte se, že před použitím odlepíte a odstraníte veškeré reklamní a ochranné fólie.
· Děti si s ochrannými ani reklamními polepy nesmí hrát.
· Přístroj je určen pro používání v domácnostech a podobných prostředích, tak jako je:
· kuchyňky v obchodech, kancelářích atd.
· chaty, chalupy
· hotely, penziony a jiné dočasné ubytování
· Dohlédněte, aby si děti nehrály s přístrojem.

43
DO721K
www.domo-elektro.be
CZ
· Tento spotřebič mohou používat děti ve věku 16 let a starší a osoby se sníženými fyzickými,
smyslovými nebo mentálními schopnostmi, nebo nedostatkem zkušeností a znalostí pokud jsou
pod neustálým dozorem nebo byly poučeny o používání spotřebiče bezpečným způsobem a rozumí
případným nebezpečím. Děti si s přístrojem nesmějí hrát. Čištění a údržbu prováděnou uživatelem
nesmějí provádět děti bez dozoru.
· Čistění a běžnou údržbu smí provádět pouze osoby starší 16 let a při tom být pod dohledem.
· Přístroj a jeho el. kabel skladujte mimo dosah dětí.
· Pokud přístroj nepoužíváte, nebo se jej chystáte rozebírat či měnit součásti, tak ho odpojte od el.
napětí. Před rozebírání, skládáním i před čistěním, vždy nechte přístroj dostatečně vychladnout. Nikdy
netahejte přímo za kabel, vypojujte za zástrčku.
· Pokud je přívodní kabel poškozen, musí být vždy okamžitě opraven v odborném servise nebo
proškolenou osobou.
· POZOR: tento přístroj nesmí být používán s žádnou externí součástkou (např. časovač …) ani jiné
dálkové ovládání.
· Povrch přístroje může být během používání horký, proto doporučujeme se ho během procesu pečení
nedotýkat.
· Nikdy nenechávejte spuštěný přístroj bez dozoru.
· Nikdy nepoužívejte přístroj venku.
· Nikdy nepoužívejte jinak, než je zamýšleno a určeno výrobcem.
· Před použitím zkontrolujte, zda parametry el. sítě odpovídají požadovaným parametrům na
informativním štítku přístroje.
· Pokud je přístroj nebo přívodní kabel poškozený, nikdy se ho nesnažte opravit sami doma. Vždy ho
svěřte odbornému servisu DOMO, který jej prohlédne a případně opraví.
· Abyste se vyvarovali úrazu elektrickým proudem nebo popáleninám, nesmíte nikdy potápět kabel,
síťovou zástrčku nebo samotný přístroj do vody nebo jiných tekutin.
· Nesahejte na přístroj s mokrýma rukama.
· Kratší přivodní kabel je vyráběn záměrně, aby se snížilo riziko zakopnutí či strhnutí přístroje ze stolu.
Nepoužívejte prodlužovací kabely.
· Vždy přívodní kabel kompletně odmotejte, aby se předešlo přehřívání tohoto kabelu.
· Nenechávejte viset kabel přístroje přes ostré hrany a vyvarujte se toho, aby přišel do styku s horkými
plochami.
· Přívodní kabel nikdy nesmí být pod přístrojem ani omotán kolem něj.
· Neumisťujte přístroj v blízkosti el. sporáků či trub, ani na místech kde je zvýšené teplo.
· Neumisťujte přístroj do blízkosti hořlavých ani vznětlivých materiálů.
· Ujistěte se, že je přístroj dobře sestaven a až poté zapojte do el. sítě. Před odpojením z el. sítě vždy
vypojte hlavní vypínač do polohy „0“ nebo „OFF“ a až poté odpojte. Nikdy netahejte za kabel, vždy
odpojujte přímo tahem za pevnou zástrčku.
· Zanedbaná údržba a nečistoty mohou vést ke zkrácené životnosti přístroje. Při extrémní nečistotě
dokonce hrozí riziko požáru.
· Během procesu vaření je pravděpodobné, že z něj bude pářit velmi horká pára. Buďte opatrní a držte
obličej i ruce v bezpečné vzdálenosti.
· Vždy používejte dle doporučeného návodu. Výrobce ani prodejce není schopen nést vzniklé riziko z
důvodu špatného použití.
· Do přístroje nikdy nelijte více vody než je vyznačené povolené maximum.
· Zamezte, aby se voda nedostala do útrob přístroje ani na hřející plotýnku.
· Přístroj ani nesmí být ponořen do vody, a to ani při čištění.
· Ke kávovaru používejte pouze originální součásti a příslušenství.

44
DO721K
CZ
· Nemanipulujte s přístrojem, pokud je zapojen a právě ohřívá. Vždy nechte přístroj vychladnout, až
potom přemisťujte.
· Přístroj nezapínejte na prázdno (bez vody).
· Přístroj vždy používejte na stabilním, rovném a suchém místě.
NÁVOD SI USCHOVEJTE PRO POZDĚJŠÍ NAHLÉDNUTÍ
ČÁSTI
1. Zásobník na kávová zrna
2. Zásobník vody
3. Vodoznak
4. Regulace hrubosti mletí
5. Ovládací panel s LCD displejem
6. Tlačítko otevření prostoru s ltrem
7. Adaptér na držák ltrů
8. Držák ltru
9. Permanentní ltr
10. Víko nad ltrem
11. Ventil se zabráněním odkapu
12. Skleněná konvice 1,5 l
13. Rukojeť
14. Nahřívací plotýnka
OVLÁDACÍ PANEL
15. Tlačítko časovače
16. Použití mleté kávy
17. Volba síly kávy
18. Hlavní on/o vypínač
19. Nastavení „hodin“
20. Nastavení „minut“
21. Volba objemu (počet šálků)
PŘED PRVNÍM POUŽITÍM
· Zkontrolujte všechno příslušenství a části kávovaru, zda nejsou nějak viditelně poškozeny.
· Poprvé nechte překapat celý zásobník čisté vody bez kávy. Naplňte plný zásobník vody. Kávovar
zapněte a nechte celý obsah převařit. Vodu vylijte a proces opakujte ještě jednou. Potom v teplé vodě
umyjte držák ltru, ltr a celou konvici. Po umytí je přístroj připraven k používání.
15 21
16 17 18 19 20
7
8
9
10
11
1
3
6
2
4
5
13
12
14

45
DO721K
www.domo-elektro.be
CZ
POUŽITÍ
NASTAVENÍ ČASU
1. Zasuňte zástrčku do zásuvky. Na displeji se zobrazí “12:00”.
2. Po stisknutí tlačítka on/o se na displeji rozbliká „12:00“.
3. Tlačítkem pro nastavení hodin
nastavte správnou hodinu.
4. Následně stiskněte tlačítko minut a nastavte správně i minuty.
5. Pokud nestisknete žádná další tlačítka (chvíli nic nemačkejte),tak se nastavený čas potvrdí.
PŘÍPRAVA KÁVY Z KÁVOVÝCH ZRN
1. Otevřete zásobník vody a naplňte ho čistou vodou. Nikdy nepřekračujte
maximální vyznačený objem vody v zásobníku.
2. Pomocí tlačítka na boku přístroje otevřete prostor s ltrem (výklopná část).
3. Do držáku ltru vložte permanentní ltr (nebo papírový ltr). Držák s ltrem
usaďte na své místo do výklopného adaptéru. Uzavřete víkem a výklopnou
část opět zavřete (zatlačte do přístroje).
4. Zásobník na kávové zrna otevřete a naplňte jej. Naplněný zásobník
opět zavřete víkem. Zásobník pojme max 200g zrn, toto množství nikdy
nepřekračujte.
5. Do prostoru nahřívací plotýnky a pod odkap vody položte prázdnou konvici.
6. Přístroj připojte do el. sítě a stiskněte tlačítko zapnutí / vypnutí
. Nastavte čas podle pokynů.
7. Pomocí tlačítka množství šálků si zvolte objem. Mačkejte, dokud se na displeji neobjeví
požadovaný počet šálků. Můžete si vybrat mezi 2, 4, 6, 8, 10 nebo 12 šálky. Důležité je, aby množství
vody v zásobníku odpovídalo nastavené volbě objemu. Přednastavené výchozí nastavení, (pokud nic
nestisknete) je 12 šálků.
8. Stisknutím tlačítka síly kávy určete sílu nápoje:
· slabší
· střední
· silný
9. Otáčením regulace mlýnku si nastavte požadovanou hrubost mletí. Pokud otáčíte ovladačem na
menší zrna, bude se káva mlýt jemnější a tím bude i chuťově silnější. Pokud otočíte knoíkem na
větší zrna, bude mletí hrubější.
10. Kávovar zapněte hlavním tlačítkem on/o . Mlýnek rovnou začne mlýt a po několika sekundách
se na displeji zobrazí symbol . Následně se už začne káva překapávat a téct.
11. Jakmile je káva překapána a hotova, tak se ozve zvukový signál a zhasne příslušný symbol z
displeje.
PŘÍPRAVA KÁVY Z NAMLETÉ KÁVY
1. Otevřete zásobník vody a naplňte ho čistou vodou.
Nikdy nepřekračujte maximální vyznačený objem
vody v zásobníku.
2. Pomocí tlačítka na boku přístroje otevřete prostor s
ltrem (výklopná část).
3. Do držáku ltru vložte permanentní ltr a ještě
nejlépe kávový papírový ltr. Držák s ltrem usaďte na
své místo do výklopného adaptéru.

46
DO721K
CZ
4. Do ltru nasypte vámi zvolené množství již namleté kávy a držák uzavřete víkem. Výklopnou část
opět zavřete (zatlačte do přístroje).
5. Do prostoru nahřívací plotýnky a pod odkap umístěte prázdnou konvici.
6. Přístroj připojte do el. sítě a stiskněte tlačítko zapnutí / vypnutí . Nastavte čas podle pokynů.
7. Pomocí tlačítka množství šálků si zvolte objem. Mačkejte, dokud se na displeji neobjeví
požadovaný počet šálků. Můžete si vybrat mezi 2, 4, 6, 8, 10 nebo 12 šálky. Důležité je, aby množství
vody v zásobníku odpovídalo nastavené volbě objemu. Přednastavené výchozí nastavení, (pokud nic
nestisknete) je 12 šálků.
8. Nyní stiskněte tlačítko „použití mleté kávy“ , u kterého se rozsvítí červená kontrolka.
9. Kávovar zapněte hlavním tlačítkem on/o . Rozsvítí se červená kontrolka a na displeji se zobrazí
symbol . Káva se rovnou začne překapávat a téct.
10. Jakmile je celý objem překapán a hotov, tak se ozve zvukový signál a zhasne příslušný symbol z
displeje.
· Během procesu překapávání je možné kdykoli konvici vyjmout (max. na 30 vteřin) a nalít si kávu.
Odkapávací ventil automaticky vypne a kávu zadrží po dobu těchto 30 vteřin. Je nutné konvici co
nejdříve vrátit na své místo.
· Výsledný objem kávy bude o něco nižší než objem původní vody. Namletá káva totiž absorbuje část
vody.
· Při nalévání kávy buďte opatrní, čerstvě překapaná káva je velmi horká.
· Z bezpečnostních důvodů doporučujeme mít neustále víko na konvici. Káva zůstane déle teplá a je to
bezpečnější při nalévání.
· Po této maximální době přístroj automaticky vypne. Chcete-li si vychutnat tu pravou chuť kávy, je
nejlepší kávu pít ihned po převaření.
· Po každé když se kávovar nepoužívá, musí být vypnutý a vypojený z el. sítě.
RADY PRO PŘÍPRAVU KÁVY
· Rozhodující je vždy čistý a udržovaný kávovar. Čistěte a odvápňujte dle níže popsaného návodu. Pro
přípravu kávy používejte vždy čerstvě napuštěnou a studenou vodu.
· Zrnkovou kávu uchovávejte v chladu a suchu.
· Nepoužívejte kávu na vícekrát. Již jednou vylouhovaná a použitá káva není vhodná na další použití.
Pokud již připravená káva vychladne, není dobré ji znovu ohřívat. Taková káva ztratí většinu aroma a
nemusí být chutná.
NASTAVENÍ ČASOVAČE
1. Ujistěte se, že máte správně nastaven čas.
2. Připravte přístroj pro přípravu kávy, jak je uvedeno v části ”Použití”, ale ještě nemačkejte tlačítko
hlavního spínače.
3. Stiskněte tlačítko časovače alespoň na 5 sekund. Na displeji se rozblikají číslice hodin.
4. Pro nastavení časovače stiskněte tlačítko pro nastavení hodin a tlačítko pro nastavení minut.
5. Opětovným stiskem časovače potvrďte nastavení. Kontrolka se rozsvítí červeně a na displeji se
zobrazí symbol
. Pokud byste nastavení nepotvrdili dalším stiskem časovače, tak se na displeji
znovu objeví aktuální čas (hodiny). Nastavení sice bude zapamatováno, ale časovač nebude
aktivován. Funkci je vždy potřeba aktivovat ještě stiskem tlačítka časovače.
6. Káva se začne připravovat v době, která byla nastavena pomocí časovače.

47
DO721K
www.domo-elektro.be
CZ
· Pokud chcete časovač vyrušit/vypnout, tak stačí znovu stisknout tlačítko časovače. Červená kontrolka
časovače zhasne a z displeje zmizí symbol .
· Dokud bude kávovar zapojen v el. síti, tak bude nastavení časovače v paměti. Pro ulehčení práce tedy
lze shrnout tak, že pokud chcete, abyste měli každý den ve stejnou hodinu teplou čerstvou kávu,
tak stačí pouze zapnout funkci časovače (1 stisk tlačítka). Přístroj si pamatuje dříve vybraný čas a ve
stejnou hodinu se automaticky spustí. Jestliže chcete nastavit jiný čas, musíte přenastavit dle výše
popsaných kroků.
· Pokud máte časovač nastaven a chcete jen zjistit na jakou hodinu, tak můžete na několik vteřin
podržet tlačítko časovače. Na displeji se vám krátce zobrazí hodina nastavení. Pokud už dále nic
nestisknete, tak se znovu zobrazí pouze aktuální čas (hodiny).
ČIŠTĚNÍ A ÚDRŽBA
POZOR: Před čištěním nechte přístroj zcela vychladnout. Nikdy neponořujte přívodní kabel ani přístroj
pod vodu (riskujete úraz el. proudem a poškození přístroje). Po každém použití přístroj odpojte z el. sítě.
· Vyčistěte skleněnou nádobu a odnímatelný ltr v horké vodě jemný mycím prostředkem.
· Povrch přístroje otírejte měkkým vlhkým hadříkem.
· Pro otírání nahřívací plotýnky používejte pouze měkký navlhčený hadřík.
· Nikdy nepoužívejte abrazivní čistidla.
ODVÁPNĚNÍ
Kdy?
Kávovar je potřeba pravidelně odvápňovat. Pravidelně odvápňovaný kávovar zaručuje stále stejnou
kvalitu kávy, menší spotřebu energie a delší životnost vašeho přístroje.
Při klasickém používání doporučujeme odvápňovat každé 3-4 týdny.
Jak?
1. Nalijte ¼ konvice bílého octa a ¾ studené vody.
2. Tuto směs nalijte do zásobníku a kávovar zapněte. Bez jakkéhokoli přidání kávy nebo čaje nechte
překapat. Celý proces opakujte až do chvíle, kdy bude překapaná voda čirá.
3. Octovou znečištěnou vodu vylijte.
4. Do kávovaru nalijte čistou vodu a převařte. Vodu vylijte a opět opakujte proces s čistou vodou až do
chvíle kdy z kávovaru zmizí zápach octa. Přístroj vypněte.

48
DO721K
CZ
OHLED NA ŽÍVOTNÍ PROSTŘEDÍ
Symbol na přístroji či na jeho obalu znamená, že s tímto výrobkem
není možno nakládat jako s běžným domovním odpadem, nýbrž musí
být odevzdán na místech určených ke sběru a likvidaci elektrických a
elektronických zařízení. Dodržením tohoto doporučení chráníte životní
prostředí a zdraví spoluobčanů. Více informací o možnostech likvidace
nebezpečného odpadu obdržíte na obecních nebo městských úřadech,
sběrných dvorech nebo v prodejně, kde jste přístroj zakoupili.
Obalové materiály jsou recyklovatelné, nakládejte s nimi podle předpisů pro
životní prostředí.

49
DO721K
www.domo-elektro.be
SK
ZÁRUKA
Práva a povinnosti predávajúceho a kupujúceho ohľadom práv z chybného plnenia sa riadi príslušnými
všeobecne záväznými predpismi podľa občianskeho zákonníka.
1. Trvanie záruky: 2 roky
2. Záruka sa nevzťahuje
a) na mechanické poškodenie
b) nesprávne používanie v rozpore s návodom na použitie
3. Záruka zaniká:
- pri použití spotrebiča inak ako v je uvedené v manuále (nesprávnym postupom)
- pri vykonávaní opravy alebo zmeny na spotrebiči osobou inou než poverenou naším servisom
Predávajúci zodpovedá kupujúcemu, že tovar pri prevzatí nemá vady. Najmä predávajúci zodpovedá
kupujúcemu, že v čase, keď kupujúci tovar prevzal:
· má tovar také vlastnosti, ktoré výrobca v tomto návode popisuje,
· sa tovar hodí k účelu, ku ktorému výrobca uvádza,
· tovar zodpovedá kvalitou alebo prevedením dohovorené vzorky alebo predlohe, ak bola akosť alebo
prevedenie určené podľa dohodnutého vzorky alebo predlohy,
· tovar vyhovuje požiadavkám právnych predpisov.
Ak sa prejavia vada v priebehu šiestich mesiacov od prevzatia, má sa za to, že tovar bol chybný už pri
prevzatí.
Pokiaľ nie je pri výrobku uvedené inak, je záručná doba 24 mesiacov. Záručná doba začína plynúť od
prevzatia veci kupujúcim.
Práva z chybného plnenia uplatňuje kupujúci u predávajúceho na adrese jeho prevádzky, v ktorej je
prijatie reklamácie možné s ohľadom na sortiment predávaného tovaru, prípadne aj v sídle alebo mieste
podnikania. Za okamih uplatnenia reklamácie sa považuje okamih, kedy predávajúci dostal od kupujúceho
reklamovaný tovar.
Reklamáciu možno tiež uplatniť v servisnom stredisku na adrese DOMO-elektro s.r.o., Na Kobyle 783,
345 06 Kdyně, Česká republika, tel. (+420) 379 422 550, [email protected]
Pre rýchle a bezproblémové vybavenie reklamácie odporúčame priložiť k reklamácii doklad o kúpe a
sprievodný list s popisom závady a spiatočnou adresou s telefonickým kontaktom.
BEZPEČNOSTNÉ POKYNY
· Pri používaní jakkéhokoli el. spotrebiče dbajte na zvýšenú opatrnosť a dodržujte určitá bezpečnostné
pravidlá:
· Starostlivo si prečítajte tieto informácie a manuál nechajte aj k neskoršiemu nahliadnutiu.
· Uistite sa, že pred použitím odlepíte a odstránite všetky reklamné a ochranné fólie.
· Deti sa s ochrannými ani reklamnými polepy nesmie hrať.
· Prístroj je určený pre používanie v domácnostiach a podobných prostrediach, tak ako je:
· kuchynky v obchodoch, kanceláriách atď.
· chaty, chalupy
· hotely, penzióny a iné dočasné ubytovanie
· Dohliadnite, aby sa deti nehrali s prístrojom.

50
DO721K
SK
· Tento spotrebič môžu používať deti vo veku 16 rokov a staršie a osoby so zníženými fyzickými,
zmyslovými alebo mentálnymi schopnosťami, alebo nedostatkom skúseností a znalostí ak sú pod
neustálym dozorom alebo boli poučené o používaní spotrebiča bezpečným spôsobom a rozumejú
prípadným nebezpečenstvám. Deti si s prístrojom nesmú hrať. Čistenie a údržbu vykonávanú
používateľom nesmú vykonávať deti bez dozoru.
· Čistenie a bežnú údržbu môžu vykonávať len osoby staršie ako 16 rokov a pri tom byť pod
dohľadom.
· Prístroj a jeho el. kábel skladujte mimo dosahu detí.
· Pokiaľ prístroj nepoužívate, alebo sa ho chystáte rozoberať či meniť súčasti, tak ho odpojte od el.
napätia. Pred rozoberanie, skladaním aj pred čistením, vždy nechajte prístroj dostatočne vychladnúť.
Nikdy neťahajte priamo za kábel, vypojujte za zástrčku.
· Pokiaľ je prívodný kábel poškodený, musí byť vždy okamžite opravený v odbornom servise alebo
preškolenou osobou.
· POZOR: tento prístroj nesmie byť používaný s žiadnu externú súčiastkou (napr. časovač ...) ani iné
diaľkové ovládanie.
· Povrch prístroja môže byť počas používania horúci, preto odporúčame sa ho počas procesu pečenia
nedotýkať.
· Nikdy nenechávajte spustený prístroj bez dozoru.
· Nikdy nepoužívajte prístroj vonku.
· Nikdy nepoužívajte inak, než je zamýšľané a určené výrobcom.
· Pred použitím skontrolujte, či parametre el. siete odpovedajú požadovaným parametrom na
informatívnym štítku prístroja.
· Pokiaľ je prístroj alebo prívodný kábel poškodený, nikdy sa ho nesnažte opraviť sami doma. Vždy ho
zverte odbornému servisu DOMO, ktorý ho prezrie a prípadne opraví.
· Aby ste zabránili úrazu elektrickým prúdom, nesmiete nikdy potápať kábel, sieťovú zástrčku alebo
samotný prístroj do vody alebo iných tekutín.
· Nesiahajte na prístroj s mokrými rukami.
· Kratšie prívodný kábel je vyrábaný zámerne, aby sa znížilo riziko zakopnutia či strhnutí prístroja zo
stola. Nepoužívajte predlžovacie káble.
· Vždy prívodný kábel kompletne odmotajte, aby sa predišlo prehrievaniu tohto kábla.
· Nenechávajte visieť kábel prístroja cez hranu stola a vyvarujte sa toho, aby prišiel do styku s horúcimi
plochami.
· Prívodný kábel nikdy nesmie byť pod prístrojom ani omotaný okolo neho.
· Neumiestňujte prístroj v blízkosti el. sporákov či rúr, ani na miestach kde je zvýšené teplo.
· Neumiestňujte prístroj do blízkosti horľavých ani horľavých materiálov.
· Uistite sa, že je prístroj dobre zostavený a až potom zapojte do el. siete. Pred odpojením z el. siete
vždy vypojte hlavný vypínač do polohy “0” alebo “OFF” a až potom odpojte. Nikdy neťahajte za kábel,
vždy odpájajte priamo ťahom za pevnú zástrčku.
· Zanedbaná údržba a nečistoty môžu viesť ku skrátenej životnosti prístroja. Pri extrémnej nečistote
dokonca hrozí riziko požiaru.
· Počas procesu varenia je pravdepodobné, že z neho bude páriť veľmi horúca para. Buďte opatrní a
držte tvár aj ruky v bezpečnej vzdialenosti.
· Vždy používajte podľa odporúčaného návodu. Výrobca ani predajca nie je schopný znášať vzniknuté
riziko z dôvodu zlého použitia.
· Prístroj zapájajte iba do uzemnenej zásuvky, ktorá zodpovedá miestnym normám.
· Do prístroja nikdy nelejte viac vody ako je vyznačené povolené maximum.
· Zamedzte, aby sa voda nedostala do útrob prístroja ani na hrejúce platničku.
· Prístroj ani nesmie byť ponorený do vody, a to ani pri čistení.

51
DO721K
www.domo-elektro.be
SK
· Ku kávovaru používajte iba originálne súčasti a príslušenstvo.
· Nemanipulujte s prístrojom, ak je zapojený a práve ohrieva. Vždy nechajte prístroj vychladnúť, až
potom premiestňujte.
· Prístroj nezapínajte naprázdno (bez vody).
· Prístroj vždy používajte na stabilnom, rovnom, suchom mieste.
NÁVOD SI USCHOVAJTE PRE NESKORŠIU NAHLIADNUTIU
ČASTI
1. Zásobník na kávové zrná
2. Zásobník vody
3. Vodoznak
4. Regulácia hrubosti mletia
5. Ovládací panel s LCD displejom
6. Tlačidlo otvorenie priestoru s ltrom
7. Adaptér na držiak ltrov
8. Držiak ltra
9. Permanentný lter
10. Veko nad ltrom
11. Ventil sa zabránením odkvapu
12. Sklenená kanvica 1,5 l
13. Rukoväť
14. Nahrievacia platnička
OVLÁDACÍ PANEL
15. Tlačidlo časovača
16. Použitie mletej kávy
17. Voľba sily kávy
18. Hlavné on/o vypínač
19. Nastavenie “hodín”
20. Nastavenie “minút”
21. Voľba objemu (počet šálok)
PRED PRVÝM POUŽITÍM
· Skontrolujte všetko príslušenstvo a časti kávovaru, či nie sú nejako viditeľne poškodené.
· Prvýkrát nechajte prekvapkať celý zásobník čistej vody bez kávy. Naplňte plný zásobník vody. Kávovar
zapnite a nechajte celý obsah prevariť. Vodu vylejte a proces opakujte ešte raz. Potom v teplej vode
umyte držiak ltra, lter a celú kanvicu. Po umytí je prístroj pripravený na používanie.
15 21
16 17 18 19 20
7
8
9
10
11
1
3
6
2
4
5
13
12
14

52
DO721K
SK
POUŽITIE
NASTAVENIE ČASU
1. Zasuňte zástrčku do zásuvky. Na displeji sa zobrazí “12:00”.
2. Po stlačení tlačidla on/o sa na displeji rozbliká “12:00”.
3. Tlačidlom pre nastavenie hodín
nastavte správnu hodinu.
4. Následne stlačte tlačidlo minút a nastavte správne aj minúty.
5. Pokiaľ nestlačíte žiadne ďalšie tlačidlá (chvíli nič nestláčajte), tak sa nastavený čas potvrdí.
PRÍPRAVA KÁVY Z KÁVOVÝCH
1. Otvorte zásobník vody a naplňte ho čistou vodou. Nikdy neprekračujte
maximálny vyznačený objem vody v zásobníku.
2. Pomocou tlačidla na boku prístroja otvorte priestor s ltrom (výklopná časť).
3. Do držiaka ltra vložte permanentný lter (alebo papierový lter). Držiak s
ltrom usaďte na svoje miesto do výklopného adaptéra. Uzavrite vekom a
výklopnou časť opäť zatvorte (zatlačte do prístroja).
4. Zásobník na kávové zrná otvorte a naplňte ho. Naplnený zásobník opäť zavrite
vekom. Zásobník pojme max 200g zŕn, toto množstvo nikdy neprekračujte.
5. Do priestoru nahrievacie platničky a pod odkvap vody položte prázdnu kanvicu.
6. Prístroj pripojte do el. siete a stlačte tlačidlo on/o
. Nastavte čas podľa pokynov.
7. Pomocou tlačidla množstvo šálok si zvoľte objem. Stláčajte, kým sa na displeji neobjaví
požadovaný počet šálok. Môžete si vybrať medzi 2, 4, 6, 8, 10 alebo 12 šálky. Dôležité je, aby
množstvo vody v zásobníku zodpovedalo nastavenej voľbe objemu. Prednastavené východiskové
nastavenie, (ak nič nestlačíte) je 12 šálok.
8. Stlačením tlačidla sily kávy určte silu nápoja:
· slabšie
· stredná
· silný
9. Otáčaním regulácia mlynčeka si nastavte požadovanú hrubosť mletia. Ak otáčate ovládačom na
menšie zrná, bude sa káva mlýt jemnejšie a tým bude aj chuťovo silnejší. Ak otočíte gombíkom na
väčšie zrná, bude mletie hrubší.
10. Kávovar zapnite hlavným tlačidlom on/o . Mlynček rovno začne mlýt a po niekoľkých sekundách
sa na displeji zobrazí symbol . Následne sa už začne káva prekvapkávať a tiecť.
11. Akonáhle je káva překapána a hotová, tak sa ozve zvukový signál a zhasne príslušný symbol z
displeja.
PRÍPRAVA KÁVY Z MLETÉ KÁVY
1. Otvorte zásobník vody a naplňte ho čistou vodou. Nikdy neprekračujte maximálny vyznačený objem
vody v zásobníku.
2. Pomocou tlačidla na boku prístroja otvorte priestor s ltrom (výklopná časť).
3. Do držiaka ltra vložte permanentný lter a ešte
najlepšie kávový papierový lter. Držiak s ltrom
usaďte na svoje miesto do výklopného adaptéra.
4. Do ltra nasypte vami zvolené množstvo už namletej
kávy a držiak uzavrite vekom. Výklopnou časť opäť
zatvorte (zatlačte do prístroja).

53
DO721K
www.domo-elektro.be
SK
5. Do priestoru nahrievacie platničky a pod odkvap umiestnite prázdnu kanvicu.
6. Prístroj pripojte do el. siete a stlačte tlačidlo on/o Nastavte čas podľa pokynov.
7. Pomocou tlačidla množstvo šálok si zvoľte objem. Stláčajte, kým sa na displeji neobjaví
požadovaný počet šálok. Môžete si vybrať medzi 2, 4, 6, 8, 10 alebo 12 šálky. Dôležité je, aby
množstvo vody v zásobníku zodpovedalo nastavenej voľbe objemu. Prednastavené východiskové
nastavenie, (ak nič nestlačíte) je 12 šálok.
8. Teraz stlačte tlačidlo “použitie mletej kávy” , u ktorého sa rozsvieti červená kontrolka.
9. Kávovar zapnite hlavným tlačidlom on / o . Rozsvieti sa červená kontrolka a na displeji sa zobrazí
symbol . Káva sa rovno začne prekvapkávať a tiecť.
10. Akonáhle je celý objem překapán a hotový, tak sa ozve zvukový signál a zhasne príslušný symbol
z displeja.
· Počas procesu prekvapkávania je možné kedykoľvek kanvicu vybrať (max. na 30 sekúnd) a naliať
si kávu. Odkvapkávacia ventil automaticky vypne a kávu zadržia počas týchto 30 sekúnd. Je nutné
kanvicu čo najskôr vrátiť na svoje miesto.
· Výsledný objem kávy bude o niečo nižší ako objem pôvodnej vody. Namletá káva totiž absorbuje časť
vody.
· Pri nalievaní kávy buďte opatrní, čerstvo překapaná káva je veľmi horúca.
· Z bezpečnostných dôvodov odporúčame mať neustále veko na kanvicu. Káva zostane dlhšie teplá a je
to bezpečnejšie pri nalievaní.
· Po tejto maximálnej dobe prístroj automaticky vypne. Ak si chcete vychutnať tú pravú chuť kávy, je
najlepšie kávu piť ihneď po prevarení.
· Po každej keď sa kávovar nepoužíva, musí byť vypnutý a vypojený z el. siete.
RADY PRE PRÍPRAVU KÁVY
· Rozhodujúca je vždy čistý a udržiavaný kávovar. Čistite a odvápňujte podľa nížšie popísaného návodu.
Na prípravu kávy používajte vždy čerstvo napustenú a studenú vodu.
· Zrnkovú kávu uchovávajte v chlade a suchu.
· Nepoužívajte kávu na viackrát. Už raz vylúhované a použitá káva nie je vhodná na ďalšie použitie.
Ak už pripravená káva vychladne, nie je dobré ju znovu ohrievať. Takáto káva stratí väčšinu arómu a
nemusí byť chutná.
NASTAVENIE ČASOVAČA
1. Uistite sa, že máte správne nastavený čas.
2. Pripravte prístroj na prípravu kávy, ako je uvedené v časti “Použitie”, ale ešte nestláčajte tlačidlo
hlavného spínača.
3. Stlačte tlačidlo časovača aspoň na 5 sekúnd. Na displeji sa rozblikajú číslice hodín.
4. Pre nastavenie časovača stlačte tlačidlo pre nastavenie hodín a tlačidlo pre nastavenie minút.
5. Opätovným stlačením časovača potvrďte nastavenie. Kontrolka sa rozsvieti červeno a na displeji
sa zobrazí symbol
. Ak by ste nastavenie nepotvrdili ďalším stlačením časovača, tak sa na
displeji znovu objaví aktuálny čas (hodiny). Nastavenie síce bude zapamätané, ale časovač nebude
aktivovaný. Funkciu je vždy potrebné aktivovať ešte stlačením tlačidla časovača.
6. Káva sa začne pripravovať v dobe, ktorá bola nastavená pomocou časovača.

54
DO721K
SK
· Pokiaľ chcete časovač vyrušiť / vypnúť, tak stačí znovu stlačiť tlačidlo časovača. Červená kontrolka
časovača zhasne a z displeja zmizne symbol .
· Kým bude kávovar zapojený v el. sieti, tak bude nastavenie časovača v pamäti. Pre uľahčenie práce
teda možno zhrnúť tak, že ak chcete, aby ste mali každý deň v rovnakú hodinu teplú čerstvú kávu, tak
stačí len zapnúť funkciu časovača (1 stlačenie tlačidla). Prístroj si pamätá skôr vybraný čas a v rovnakú
hodinu sa automaticky spustí. Ak chcete nastaviť iný čas, musíte prestaviť podľa vyššie popísaných
krokov.
· Pokiaľ máte časovač nastavený a chcete len zistiť na akú hodinu, tak môžete na niekoľko sekúnd
podržať tlačidlo časovača. Na displeji sa vám krátko zobrazí hodina nastavenia. Pokiaľ už ďalej nič
nestlačíte, tak sa opäť zobrazí iba aktuálny čas (hodiny).
ČISTENIE A ÚDRŽBA
POZOR: Pred čistením nechajte prístroj celkom vychladnúť. Nikdy neponárajte prívodný kábel ani prístroj
pod vodu (riskujete úraz el. Prúdom a poškodenia prístroja). Po každom použití prístroj odpojte z el. siete.
· Vyčistite sklenenú nádobu a odnímateľný lter v horúcej vode jemný umývacím prostriedkom.
· Povrch prístroja utierajte mäkkou vlhkou handričkou.
· Pre otieranie nahrievacie platničky používajte len mäkkú navlhčenú handričku.
· Nikdy nepoužívajte abrazívne čistidlá.
ODVÁPNENIE
Kedy?
Kávovar je potrebné pravidelne odvápňovať. Pravidelné odvápňovanie kávovar zaručuje stále rovnakú
kvalitu kávy, menšiu spotrebu energie a dlhšiu životnosť vášho prístroja.
Pri klasickom používaní odporúčame odvápňovať každé 3-4 týždne.
Ako?
1. Nalejte ¼ kanvice bieleho octu a ¾ studenej vody.
2. Túto zmes nalejte do zásobníka a kávovar zapnite. Bez jakkéhokoli pridanie kávy alebo čaju nechajte
prekvapkať. Celý proces opakujte až do chvíle, kedy bude překapaná voda číra.
3. Octovú znečistenú vodu vylejte.
4. Do kávovaru nalejte čistú vodu a prevarte. Vodu vylejte a opäť opakujte proces s čistou vodou až do
chvíle kedy z kávovaru zmizne zápach octu. Prístroj vypnite.

55
DO721K
www.domo-elektro.be
SK
OHĽAD NA ŽIVOTNÉ PROSTREDIE
Symbol na prístroji alebo na jeho obale znamená, že s týmto výrobkom
nie je možné nakladať ako s domovým odpadom, ale musí byť odovzdaný
na miestach určených na zber a likvidáciu elektrických a elektronických
zariadení. Dodržaním tohto odporúčania chránite životné prostredie a zdravie
spoluobčanov. Viac informácií o možnostiach likvidácie nebezpečného
odpadu obdržíte na obecných alebo mestských úradoch, zberných dvoroch
alebo v predajni, kde ste prístroj zakúpili.
Obalové materiály sú recyklovateľné, nakladajte s nimi podľa predpisov pre
životné prostredie.

LINEA 2000 BV - Dompel 9 - 2200 Herentals - Belgium - Tel: +32 14 21 71 91 - Fax: +32 14 21 54 63
BESTEL
de originele
Domo-accessoires
en -onderdelen
online via:
of scan hier:
COMMANDEZ
d’authentiques
accessoires et
pièces Domo en
ligne sur:
ou scannez ici:
BESTELLEN SIE
die Domo
Original-Zubehör
und -Ersatzteile
online über:
oder hier scannen:
ORDER
the original
Domo
accessories and
parts online at:
or scan here:
webshop.domo-elektro.be
Webshop
Documenttranscriptie
DO721K Handleiding Koffiezetapparaat Grind and Brew Mode d’emploi Cafetière Grind and Brew Gebrauchsanleitung Kaffeeautomat Grind and Brew Instruction booklet Coffee maker Grind and Brew Manual de instrucciones Cafetera eléctrica Grind and Brew Istruzioni per l’uso Caffettiera Grind and Brew Návod k použití Překapávač s vlastním mlýnkem Návod na použitie Prekvapkávač s vlastným mlynčekom PRODUCT OF Required for R32/R290 Refrigerant only CAUTION OF FIRE Lees aandachtig alle instructies - bewaar deze handleiding voor latere: RISK raadpleging. Lisez attentivement les instructions - gardez le mode d’emploi pour utilisation ultérieur. Lesen Sie genau die Anweisungen - bewahren Sie die Gebrauchsanleitung für spätere heranziehung. Read all instructions carefully - save this instruction manual for future reference. Lea detenidamente todas las instrucciones - Conserve este manual para futura referencia. Leggere con attenzione le istruzioni - conservarle per future consultazioni. Před použitím si důkladně přečtěte tento manuál - manuál si uschovejte i pro případ budoucího nahlédnutí. Pred použitím si dôkladne prečítajte tento manuál - manuál si uschovajte aj pre prípad budúceho nahliadnutie. NL Nederlands 3 FR Français 10 DE Deutsch 17 EN English 24 ES Espagnol 30 IT Italiano 36 CZ Čeština 42 SK Slovenčina 49 NL GARANTIE Geachte klant, Al onze producten ondergaan steeds een strenge kwaliteitscontrole, alvorens ze aan je worden aangeboden. Mocht je desondanks toch nog problemen hebben met jouw toestel, dan betreuren wij dit ten zeerste. In dat geval verzoeken wij je contact op te nemen met onze klantendienst. Onze medewerkers zullen je met plezier verder helpen. +32 14 21 71 91 [email protected] Maandag – Donderdag : 8.30u – 12.00u en van 13.00u – 17.00u Vrijdag : 8.30u – 12.00u en van 13.00u – 16.30u Dit apparaat heeft een garantietermijn van 2 jaar vanaf de datum van aankoop. Gedurende de garantieperiode zal de distributeur volledige verantwoording op zich nemen voor gebreken die aanwijsbaar berusten op materiaal- of constructiefouten. Wanneer dergelijke gebreken voorkomen, zal het apparaat, indien nodig, vervangen of gerepareerd worden. De garantieperiode van 2 jaar zal op dit moment niet terug beginnen, maar loopt verder tot 2 jaar na de aankoop van het toestel. De garantie wordt verleend op basis van het kassaticket. Indien je apparaat defect is binnen de garantietermijn van 2 jaar, dan mag je het toestel samen met het originele kassaticket binnenbrengen in de winkel waar je het toestel hebt aangekocht. De garantie op accessoires en onderdelen die onderhevig zijn aan slijtage, bedraagt 6 maanden. De garantie en verantwoordelijkheid/aansprakelijkheid van de leverancier en fabrikant vervallen automatisch in de volgende gevallen: · Bij het niet naleven van de instructies in deze handleiding. · Bij verkeerde aansluiting, vb. te hoge elektrische spanning. · Bij verkeerd, hardhandig of abnormaal gebruik. · Bij onvoldoende of verkeerd onderhoud. · Bij herstelling of wijziging van het toestel door de consument of niet gemachtigde derden. · Bij gebruik van onderdelen of accessoires welke niet worden aanbevolen of geleverd door de leverancier / fabrikant. VEILIGHEIDSVOORSCHRIFTEN Wanneer je elektrische toestellen gebruikt, moeten volgende veiligheidsinstructies in acht genomen worden: · Lees deze instructies zorgvuldig door. Bewaar deze handleiding om later te raadplegen. · Verwijder voor het eerste gebruik alle verpakkingsmaterialen en eventuele promotionele stickers. Zorg ervoor dat kinderen niet met de verpakkingsmaterialen spelen. · Dit toestel is geschikt om te gebruiken in de huishoudelijke omgeving en in gelijkaardige omgevingen zoals: · Keukenhoek voor personeel van winkels, kantoren en andere gelijkaardige professionele omgevingen · Boerderijen · Hotel- en motelkamers en andere omgevingen met een residentieel karakter · Gastenkamers, of gelijkaardige www.domo-elektro.be DO721K 3 NL · · · · · · · · · · · · · · · · · · · · · 4 Dit toestel mag gebruikt worden door kinderen vanaf 16 jaar en personen met een fysieke of sensoriële beperking of mensen met een beperkte mentale capaciteit of gebrek aan ervaring of kennis, op voorwaarde dat deze personen toezicht krijgen of instructies hebben gekregen over het gebruik van het toestel op een veilige manier en dat ze ook de gevaren kennen bij het gebruik van het toestel. Kinderen mogen niet met het toestel spelen. Het onderhoud en de reiniging van het toestel mogen niet door kinderen gebeuren tenzij ze ouder zijn dan 16 jaar en onder toezicht staan. Houd het toestel en de voedingskabel buiten het bereik van kinderen jonger dan 16 jaar. Trek de stekker uit het stopcontact wanneer het toestel niet in gebruik is, vooraleer onderdelen te monteren of demonteren en vooraleer het toestel te reinigen. Laat het toestel afkoelen vooraleer onderdelen te monteren of demonteren en vooraleer het toestel te reinigen. Als de voedingskabel beschadigd is, moet hij vervangen worden door de fabrikant, een service center of gekwalificeerde personen om ongevallen te vermijden. OPGELET: om ongevallen te vermijden, mag dit toestel niet bediend worden door een externe bediening, zoals een externe timer, of op een net aangesloten worden dat regelmatig op- en afgezet wordt. Het toestel kan warm worden tijdens het gebruik. We raden aan om - buiten bij het handvat - het toestel niet aan te raken, om brandwonden te vermijden. Laat een werkend toestel niet zonder toezicht achter. Gebruik of bewaar het toestel niet buiten. Gebruik het toestel enkel voor het doel waarvoor het bestemd is. Kijk voor gebruik na of het voltage vermeld op het toestel overeenkomt met het voltage van het elektriciteitsnet thuis. De voedingskabel moet steeds aangesloten worden op een stopcontact dat geïnstalleerd en geaard is volgens de lokale standaarden en normen. Gebruik het toestel nooit wanneer de voedingskabel of stekker beschadigd is, na een slechte werking van het toestel of wanneer het toestel beschadigd is. Breng het toestel dan naar de dienst na verkoop van DOMO of het dichtsbijzijnde gekwalificeerde service center voor nazicht, reparatie of elektrische/ mechanische aanpassingen. Probeer het toestel nooit eigenhandig te repareren. Dompel het toestel, de voedingskabel of de stekker nooit onder in water of een andere vloeistof. Dit om elektrische schokken of brand te voorkomen. Gebruik dit toestel niet met natte handen. Dit toestel is voorzien van een korte voedingskabel, zodat personen er niet in verstrikt kunnen raken of over een langere voedingskabel kunnen vallen. GEBRUIK HET TOESTEL NOOIT MET EEN VERLENGKABEL. Rol de voedingskabel volledig af om oververhitting van de kabel te voorkomen. Laat de voedingskabel niet over de rand van een tafel of aanrecht hangen of in aanraking komen met een heet oppervlak. Laat de voedingskabel niet onder of rond het toestel hangen. Plaats het toestel nooit op of in de buurt van een hete elektrische kookplaat, een heet gasfornuis, gootsteen of een warme oven. Plaats het toestel nooit in de buurt van ontvlambare materialen, gassen of explosieven. Sluit de voedingskabel pas op het stopcontact aan nadat het toestel zeker correct gemonteerd is. Om het toestel te verwijderen van het stopcontact, moet de bediening eerst in de «OFF» of «0» positie gezet worden. Daarna mag de stekker uit het stopcontact verwijderd worden. Trek nooit aan de voedingskabel of het toestel zelf om de stekker uit het stopcontact te verwijderen. Als het toestel niet goed onderhouden wordt, kan dit de levensduur van het toestel drastisch verminderen en een gevaarlijke situatie veroorzaken. DO721K Bij het opwarmen van water is het mogelijk dat hete stoom door de filter of een andere opening naar buiten komt. Hou daarom jouw handen uit de buurt van het toestel wanneer het in werking is. Ongevallen of schade veroorzaakt door het niet volgen van deze regels zijn op eigen risico. Noch de fabrikant of de importeur, noch de leverancier kan daar dan verantwoordelijk voor geacht worden. Overschrijd de MAX-indicatie niet bij het vullen van het toestel. Wees voorzichtig om geen vloeistof te morsen op de voedingskabel. Het toestel mag niet ondergedompeld worden in water of eender welke vloeistof om te reinigen. Gebruik enkel de accessoires die bij het toestel meegeleverd worden. Verplaats het toestel nooit terwijl het nog in gebruik is of wanneer het nog warm is. Laat het toestel altijd eerst afkoelen vooraleer het te verplaatsen. Gebruik het koffiezetapparaat nooit leeg. Zorg er altijd voor dat er water in het reservoir zit wanneer je het toestel aan zet. Gebruik het toestel niet wanneer de kan schade vertoont. Zet een hete kan niet op een natte of koude ondergrond. Gebruik het koffiezetapparaat nooit zonder het deksel op de kan. Laat een lege kan nooit op een warme warmhoudplaat staan. De kan zou kunnen barsten. BEWAAR DEZE INSTRUCTIES OM LATER TE RAADPLEGEN · · · · · · · · · · · NL · ONDERDELEN 1. 2. 3. 4. 5. 6. 7. 8. 9. 10. 11. 12. 13. 14. Bonenreservoir Waterreservoir Niveaumarkeringen van het reservoir Draaiknop malingsgrofheid Bedieningspaneel met LCD display Drukknop openen zwenkfilter Zwenkfilter Filterhouder Permanente filter Deksel filterhouder Druppelstop 7 Glazen kan van 1,5 l Handvat glazen kan Warmhoudplaat 10 1 9 2 4 3 6 5 8 11 13 12 14 BEDIENINGSPANEEL 15. 16. 17. 18. 19. 20. 21. Timertoets Toets voor gemalen koffie Toets voor koffiesterkte Aan-uittoets Uren-toets Minuten-toets Toets voor hoeveelheid kopjes 15 16 www.domo-elektro.be 17 21 18 19 20 DO721K 5 NL VOOR HET EERSTE GEBRUIK · · Controleer of alle accessoires bij het toestel zitten en of het toestel niet beschadigd is. Laat eerst enkel water doorlopen, zonder koffie toe te voegen. Vul hierbij het waterreservoir tot aan de maximumaanduiding, zet de koffiezetmachine aan en laat deze een of twee keer volledig doorlopen. Giet hierna het water weg en maak de filter, de filterhouder, de kan en het deksel van de kan grondig schoon met warm water. GEBRUIK TIJD INSTELLEN 1. 2. 3. 4. 5. Steek de stekker in het stopcontact. Op de display verschijnt “12:00”. Druk op de aan-uittoets. Op de display knippert “12:00”. tot het juiste uur op de display staat. Druk op de uren-toets Druk op de minuten-toets tot de juiste minuten op de display staan. Als je geen toets meer drukt, is het tijdstip bevestigd. KOFFIEZETTEN MET KOFFIEBONEN 1. Open het waterreservoir en vul het, met behulp van de glazen kan, met de gewenste hoeveelheid water. Overschrijd hierbij de maximumaanduiding niet. 2. Druk op de knop voor het openen van de zwenkfilter. 3. Plaats de permanente filter of een papieren filter in de filterhouder. Zorg dat de filterhouder correct geplaatst is in het toestel. Plaats het deksel van de filterhouder en draai de zwenkfilter weer in het toestel. 4. Open het bonenreservoir. Vul het met koffiebonen en plaats het deksel terug op het reservoir. Doe nooit meer dan 200 g koffiebonen in het bonenreservoir. 5. Plaats de kan op de warmhoudplaat, onder de druppelstop. 6. Steek de stekker in het stopcontact en druk op de aan-uittoets . Stel de tijd in volgens de richtlijnen. 7. Druk op de toets voor hoeveelheid kopjes tot op de display het gewenste aantal kopjes verschijnt. Je kan kiezen tussen 2, 4, 6, 8,10 of 12 kopjes. Zorg ervoor dat de hoeveelheid water in het waterreservoir overeenkomt met dit aantal. De standaardinstelling, als je niet op deze toets drukt, is 12 kopjes. 8. Druk op de toets voor koffiesterkte om de sterkte te bepalen: · mild · medium · sterk 9. Draai aan de malingsgrofheidknop om de grofheid te bepalen voor het malen van de bonen. Als je de knop naar de kleine bonen draait, zal de gemalen koffie fijner en dus ook sterker van smaak zijn. Draai je de knop naar de grotere bonen, zal de koffiemolen groffer malen. 10. Druk op de aan-uittoets . De koffiemolen zal beginnen malen, na enkele seconde verschijnt het symbool op de display en zal de koffie beginnen doorlopen. 11. Als de koffie klaar is, hoor je een signaal en verdwijnt het symbool op de display. 6 DO721K NL KOFFIEZETTEN MET GEMALEN KOFFIE 1. 2. 3. 4. 5. 6. 7. 8. 9. 10. · · · · · · Open het waterreservoir en vul het, met behulp van de glazen kan, met de gewenste hoeveelheid water. Overschrijd hierbij de maximumaanduiding niet. Druk op de knop voor het openen van de zwenkfilter. Plaats de permanente filter of een papieren filter in de filterhouder. Zorg dat de filterhouder correct geplaatst is in het toestel. Doe de gewenste hoeveelheid gemalen koffie in de filter. Plaats het deksel van de filterhouder en draai de zwenkfilter weer in het toestel. Plaats de kan op de warmhoudplaat, onder de druppelstop. Steek de stekker in het stopcontact en druk op de aan-uittoets . Stel de tijd in volgens de richtlijnen. Druk op de toets voor hoeveelheid kopjes tot op de display het gewenste aantal kopjes verschijnt. Je kan kiezen tussen 2, 4, 6, 8,10 of 12 kopjes. Zorg ervoor dat de hoeveelheid water in het waterreservoir overeenkomt met dit aantal. De standaardinstelling, als je niet op deze toets drukt, is 12 kopjes. Druk op de toets voor gemalen koffie . Deze zal rood oplichten. Druk op de aan-uittoets . Het indicatielampje zal nu rood gaan branden en de koffie zal beginnen doorlopen. Op de display verschijnt het symbool . Als de koffie klaar is, hoor je een signaal en verdwijnt het symbool op de display. Je kan op elk moment gedurende maximum 30 seconden de kan uit het koffiezetapparaat nemen en koffie schenken. Het toestel zal dan automatisch stoppen met druppelen. De uiteindelijke hoeveelheid koffie zal altijd iets minder zijn dan de hoeveelheid water die je er hebt ingedaan, aangezien de koffie water absorbeert. Wees voorzichtig bij het uitschenken, de koffie is heet wanneer hij net is doorgelopen. Om veiligheidsredenen is het verstandig om het deksel van de glazen kan op de kan te houden. Zo blijft de koffie ook beter warm. Het toestel houdt de koffie 40 minuten warm en schakelt dan automatisch uit. Voor een optimale smaak serveer je echter best de koffie meteen nadat hij is doorgelopen. Zorg er altijd voor dat het koffiezetapparaat uitgeschakeld is en trek altijd de stekker uit het stopcontact wanneer het toestel niet in gebruik is. TIPS VOOR LEKKERE KOFFIE · · · · Een propere koffiezetmachine is essentieel om lekkere koffie te maken. Maak het apparaat dus regelmatig schoon volgens de richtlijnen. Gebruik altijd vers, koud water in het toestel. Bewaar koffie en koffiebonen op een droge, koele plaats. Hergebruik geen koffie, aangezien dit de smaak van de koffie sterk zal doen afnemen. Ook het heropwarmen van koffie is niet aan te raden. www.domo-elektro.be DO721K 7 NL TIMER INSTELLEN 1. 2. 3. 4. 5. 6. · · · Zorg ervoor dat de tijd correct staat ingesteld. Maak het toestel klaar om koffie te zetten zoals het bij “gebruik” vermeld staat maar druk nog niet op de aan-uittoets. Druk op de timertoets gedurende 5 seconden. Het uur op de display zal knipperen. Drup op de urentoets en de minutentoets om de timer in te stellen. Druk nog een keer op de timertoets om te bevestigen. Het indicatielampje zal nu rood oplichten en op de display verschijnt het symbool . Als je niet op de timertoets drukt om te bevestigen, verschijnt het huidige tijdstip terug op de display. Het ingestelde uur wordt wel onthouden, maar de timerfunctie is dan niet ingeschakeld. Druk alsnog op de timertoets om de functie in te schakelen. De koffie zal beginnen doorlopen op het, met de timer, ingestelde tijdstip. Indien je de timerfunctie wil annuleren, druk dan terug timertoets. Het rode indicatielampje van de timertoets gaat uit en het symbool op de de display verdwijnt. Zolang je de stekker niet uit het stopcontact haalt, zal het uur van de timer onthouden worden. Als je dagelijks de koffie wil laten starten op hetzelfde tijdstip volstaat het om 1x op de timertoets te drukken om de timerfunctie in te schakelen. Het toestel onthoudt het eerder gekozen uur en het is niet nodig om het tijdstip opnieuw in te stellen. Als je toch een ander tijdstip wil instellen ga dan terug te werk zoals het eerder omschreven stappenplan. Als je timer is ingesteld, en je wil controleren hoelaat dit was, druk dan enkele seconde op de timertoets. Het uur wordt even getoond. Als je dan geen toets drukt, verschijnt vanzelf weer het huidige uur. REINIGING EN ONDERHOUD Opgelet: trek de stekker uit het stopcontact en laat het toestel afkoelen alvorens het te reinigen. Dompel het snoer, de stekker of het toestel nooit onder in water of andere vloeistoffen om het risico op elektrische schokken te vermijden. Zorg er na elk gebruik voor dat de stekker uit het stopcontact wordt getrokken. · · · · Reinig de glazen kan, de filterhouder en de permanente filter in warm water met een zacht detergent. Wrijf de behuizing van het toestel schoon met een zachte, vochtige doek om vlekken te verwijderen. Veeg na gebruik eventuele condensdruppeltjes op het toestel af. Gebruik een vochtige doek om de warmhoudplaat van het toestel schoon te vegen. Gebruik hiervoor nooit schurende producten. ONTKALKEN Wanneer? Ontkalk je koffiezetapparaat regelmatig. Een regelmatige ontkalking zorgt voor een constante kwaliteit van de koffie, een lager energieverbruik en verlengt de duurzaamheid van jouw koffiezetapparaat. Bij normaal gebruik raden we aan het apparaat elke 3 à 4 weken te ontkalken. Hoe? 1. Vul de kan met 1/4 azijn en 3/4 koud water. 2. Giet het mengsel in het waterreservoir en zet het koffiezetapparaat aan. Laat het mengsel doorlopen - zonder koffie toe te voegen - volgens rubriek “Gebruik / Koffiezetten met gemalen koffie” en herhaal dit totdat er geen gele vloeistof meer uit komt. 8 DO721K Giet het mengsel uit. Laat het toestel nu nog minstens 2 keer doorlopen met enkel water, totdat er geen azijngeur meer overblijft. NL 3. 4. MILIEURICHTLIJNEN Dit symbool op het product of op de verpakking wijst erop dat dit product niet als huishoudafval mag worden behandeld. Het moet naar een plaats worden gebracht waar elektrische en elektronische apparatuur wordt gerecycleerd. Als je ervoor zorgt dat dit product op de correcte manier wordt verwijderd, voorkom je mogelijk voor mens en milieu negatieve gevolgen die zich zouden kunnen voordoen in geval van verkeerde afvalbehandeling. Voor meer details in verband met het recycleren van dit product, neem je best contact op met de gemeentelijke instanties, het bedrijf of de dienst belast met de verwijdering van huishoudafval of de winkel waar je het product hebt gekocht. Het verpakkingsmateriaal is recycleerbaar. Behandel de verpakking milieubewust. www.domo-elektro.be DO721K 9 GARANTIE FR Cher client, Tous nos produits sont soumis à des contrôles qualité stricts avant d’être proposés à la vente. Si vous deviez toutefois rencontrer un problème avec votre appareil, nous le déplorons vivement. Dans ce cas, nous vous invitons à prendre contact avec notre service clientèle. Nos collaboratrices se feront un plaisir de vous aider ! +32 14 21 71 91 [email protected] Du lundi au jeudi : 8 h 30 – 12 h et 13 h – 17 h Vendredi : 8 h 30 – 12 h et 13 h – 16 h 30 Cet appareil est garanti 2 ans à compter de la date d’achat. Durant la période de garantie, le distributeur assumera l’entière responsabilité en cas de défauts de fonctionnement (matériel) ou de fabrication. Si un tel problème survient, l’appareil sera remplacé ou réparé. La période de garantie de 2 ans ne reprend pas à zéro, mais se poursuit (jusqu’à 2 ans à compter de la date d’achat de l’appareil). La garantie est accordée sur la base du ticket de caisse. Pour les accessoires et les éléments d’usure, une garantie de 6 mois s’applique. La garantie et la responsabilité du fournisseur et du fabricant n’ont plus effet dans les cas suivants : · Les instructions du manuel n’ont pas été suivies. · Mauvais raccordement, par ex. tension électrique trop forte. · Utilisation contraire, brutale ou anormale. · Entretien insuffisant ou non conforme. · Réparation ou modification de l’appareil par le consommateur ou un tiers non autorisé. · Utilisation d’éléments ou d’accessoires qui ne sont pas recommandés ou fournis par le fournisseur/ fabricant. CONSIGNES DE SÉCURITÉ Les consignes de sécurité suivantes doivent être respectées lors de l’utilisation de tout appareil électrique: · Lisez ces consignes très attentivement. Conservez ce mode d’emploi afin de pouvoir le consulter ultérieurement. · Avant la première utilisation, enlevez tous les éléments d’emballage et les éventuels autocollants promotionnels. Veillez à ce que les enfants ne jouent pas avec les matériaux d’emballage. · Cet appareil est conçu pour être utilisé dans un environnement domestique ou dans des environnements comparables, tels que : · Coin-cuisine du personnel dans les commerces, les bureaux et autres environnements professionnels comparables · Fermes · Chambres d’hôtel ou de motel et autres environnements à caractère résidentiel · Chambres d’hôtes ou comparables · Cet appareil peut être utilisé par des enfants âgés de 16 ans ou plus et par des personnes présentant un handicap physique ou sensoriel, une capacité mentale limitée ou un manque d’expérience ou de connaissances, à condition que ces personnes soient sous surveillance ou qu’elles aient reçu des instructions sur la manière d’utiliser l’appareil en toute sécurité et qu’elles connaissent les dangers liés 10 DO721K · · · · · · · · · · · · · · · · · · · · www.domo-elektro.be DO721K FR · · à son utilisation. Les enfants ne peuvent pas jouer avec cet appareil. L’entretien et le nettoyage de l’appareil ne peuvent pas être effectués par des enfants, sauf s’ils sont âgés de plus de 16 ans et sous la surveillance d’un adulte. Gardez l’appareil et le cordon électrique hors de portée des enfants. Débranchez l’appareil lorsqu’il n’est pas utilisé ainsi qu’avant d’installer ou d’enlever des pièces et avant de nettoyer l’appareil. Mettez au préalable tous les boutons en position « arrêt » et débranchez l’appareil en saisissant la fiche électrique. Ne tirez jamais sur le cordon pour retirer la fiche de la prise. En cas de dégâts au cordon d’alimentation, celui-ci doit être remplacé par le fabricant, un centre de services ou une personne qualifiée, afin d’éviter tout accident. ATTENTION : Pour éviter tout accident, cet appareil ne peut pas être actionné via une commande externe comme un minuteur extérieur, ni être raccordé à un réseau régulièrement mis sous tension ou hors tension. Les surfaces de cet appareil s’échauffent en cours d’utilisation. Pour éviter toute brûlure, il est recommandé de ne pas toucher cet appareil, à l’exception des poignées. Ne laissez jamais un appareil en service sans surveillance. N’utilisez pas l’appareil à l’extérieur. N’utilisez l’appareil que pour l’usage auquel il est destiné. Vérifiez avant usage si la tension indiquée sur l’appareil correspond à la tension du réseau électrique de votre domicile. Le cordon d’alimentation doit toujours être branché dans une prise de courant placée et mise à la terre conformément aux normes et standards locaux. N’utilisez jamais l’appareil lorsque le cordon d’alimentation ou la fiche est endommagé(e), après un mauvais fonctionnement de l’appareil ou lorsque l’appareil est lui-même endommagé. Portez dans ce cas l’appareil au service après vente de DOMO ou au centre de services qualifié le plus proche, pour contrôle, réparation ou modifications électriques/mécaniques. Ne tentez jamais de réparer cet appareil vous-même. N’immergez jamais l’appareil, le cordon d’alimentation ou la fiche dans l’eau ou tout autre liquide. Ceci afin d’éviter des chocs électriques ou un incendie. N’utilisez pas l’appareil si vous avez les mains mouillées. Cet appareil est muni d’un cordon d’alimentation court, afin d’éviter que des personnes ou objets s’enroulent dans le cordon ou ne tombent à cause de ce dernier. N’UTILISEZ JAMAIS CET APPAREIL AVEC UNE RALLONGE ÉLECTRIQUE. Déroulez complètement le cordon d’alimentation. Ne laissez pas le cordon d’alimentation pendre sur une surface chaude, ni sur le rebord d’une table ou d’un plan de travail. Ne laissez pas le cordon d’alimentation se coincer sous l’appareil ou pendre autour de celui-ci. Ne placez jamais l’appareil sur ou à proximité d’une plaque de cuisson à gaz ou électrique chaude, ni sur l’évier ou un four en fonctionnement. Gardez l’appareil éloigné des matériaux inflammables, gaz ou explosifs. Ne branchez l’appareil qu’après être sûr qu’il soit correctement monté. Pour débrancher l’appareil, la commande doit être préalablement placée en position « OFF » ou « 0 ». Après quoi, la fiche électrique peut être retirée de la prise de courant. Ne tirez jamais sur le cordon d’alimentation ni sur l’appareil pour le débrancher. Si l’appareil n’est pas correctement entretenu, sa durée de vie peut en être fortement diminuée et une situation de danger en résulter. Lorsque l’eau est chauffée, il est possible que de la vapeur s’échappe par le filtre ou une autre ouverture ; il est donc important de ne pas approcher vos mains de l’appareil lorsque celui-ci fonctionne. 11 FR · Les accidents ou dommages causés par le non-respect de ces consignes sont à vos propres risques. Ni le fabricant, ni l’importateur, ni le fournisseur ne peuvent, dans ce cas, en être tenus pour responsables. Ne dépassez jamais l’indication MAX lorsque vous remplissez l’appareil. Assurez-vous de ne pas renverser de liquide sur le cordon d’alimentation. L’appareil ne peut pas être immergé dans l’eau ou tout autre liquide lors du nettoyage. N’utilisez que les accessoires livrés avec l’appareil. Ne déplacez jamais l’appareil lorsqu’il fonctionne ou qu’il est encore chaud. Laissez toujours refroidir l’appareil avant de le déplacer. N’utilisez jamais la cafetière électrique à vide. Assurez-vous toujours que le réservoir contient de l’eau lorsque vous allumez l’appareil. N’utilisez pas l’appareil si la verseuse est endommagé. Ne placez pas une verseuse chaude sur une surface humideou froide. N’utilisez jamais la cafetière électrique sans avoir mis le couvercle sur la verseuse. Ne laissez jamais une verseuse vide sur une plaque chauffante chaude. Le récipient pourrait se fendre. CONSERVEZ CES CONSIGNES POUR POUVOIR LES CONSULTER ULTÉRIEUREMENT · · · · · · · · · · PARTIES 1. 2. 3. 4. 5. 6. 7. 8. 9. 10. 11. 12. 13. 14. Réservoir à grains Réservoir d’eau Indication du niveau d’eau Molette pour la finesse de broyage Panneau de commande avec écran LCD Bouton poussoir pour ouvrir le filtre orientable Filtre orientable Porte-filtre Filtre permanent Couvercle du porte-filtre Bouchon anti-gouttes Verseuse en verre 1,5 l Poignée Plaque chauffante 10 1 9 12 8 11 7 Bouton de minuterie Bouton pour le café moulu Bouton pour l’intensité du café Bouton marche-arrêt Bouton des heures Bouton des minutes Bouton pour la quantité de tasses DO721K 3 6 5 13 12 14 15 PANNEAU DE COMMANDE 15. 16. 17. 18. 19. 20. 21. 2 4 16 17 21 18 19 20 · · Vérifiez que vous possédez tous les accessoires et que l’appareil n’est pas endommagé. Laissez d’abord couler l’eau sans café. Remplissez le réservoir d’eau au maximum, allumez la cafetière et laissez-la se vider une ou deux fois complètement. Jetez ensuite l’eau et nettoyez le filtre, le portefiltre, la verseuse et le couvercle de la verseuse à l’eau chaude. UTILISATION FR AVANT LA PREMIÈRE UTILISATION RÉGLAGE DE L’HEURE 1. 2. Branchez l’appareil. L’écran affiche « 12:00 ». Appuyez sur le bouton de marche/arrêt. L’heure « 12:00 » clignote à l’écran. 3. Appuyez sur le bouton des heures 4. 5. Appuyez sur le bouton des minutes jusqu’à ce que les bonnes minutes s’affichent à l’écran. Si vous n’appuyez plus sur aucun bouton, l’heure est confirmée. jusqu’à ce que la bonne heure s’affiche à l’écran. PRÉPARATION AVEC DES GRAINS DE CAFÉ 1. Ouvrez le réservoir d’eau et remplissez-le avec la quantité d’eau souhaitée à l’aide de la cruche en verre. Ne dépassez pas le niveau maximal. 2. Appuyez sur le bouton pour ouvrir le filtre orientable. 3. Placez le filtre permanent ou un filtre en papier dans le porte-filtre. Assurezvous que le porte-filtre est correctement inséré dans l’appareil. Replacez le couvercle du porte-filtre et remettez le filtre orientable en place. 4. Ouvrez le réservoir à grains. Remplissez-le de grains de café et replacez le couvercle sur le réservoir. Ne mettez jamais plus de 200 g de café en grains dans le récipient à grains. 5. Placez le bol sur la plaque chauffante, sous le système antigoutte. 6. Branchez la fiche dans la prise et appuyez sur le bouton marche/arrêt . Réglez l’heure selon les directives. 7. Appuyez sur le bouton pour la quantité de tasses jusqu’à ce que le nombre de tasses souhaité soit affiché. Vous pouvez choisir entre 2, 4, 6, 8, 10 ou 12 tasses. Assurez-vous que la quantité d’eau dans le réservoir correspond à ce nombre. Le réglage par défaut, si vous n’appuyez pas sur ce bouton, est de 12 tasses. 8. Appuyez sur le bouton pour l’intensité du café pour déterminer l’intensité : · doux · moyen · fort 9. Tournez le bouton pour la finesse de broyage pour déterminer la finesse de broyage des grains. Si vous tournez le bouton vers les petits grains, le café moulu sera plus fin et aura donc un goût plus prononcé. Si vous tournez le bouton vers les grains plus gros, le moulin à café broie plus grossièrement. 10. Appuyez sur le bouton de marche/arrêt . Le moulin à café commence à moudre, après quelques secondes, le symbole apparaît à l’écran et le café commence à couler. 11. Lorsque le café est prêt, vous entendez un signal et le symbole disparaît de l’écran. www.domo-elektro.be DO721K 13 PRÉPARATION AVEC DU CAFÉ MOULU 1. FR 2. 3. 4. 5. 6. 7. Ouvrez le réservoir d’eau et remplissez-le avec la quantité d’eau souhaitée à l’aide de la cruche en verre. Ne dépassez pas le niveau maximal. Appuyez sur le bouton pour ouvrir le filtre orientable. Placez le filtre permanent ou un filtre en papier dans le porte-filtre. Assurez-vous que le porte-filtre est correctement inséré dans l’appareil. Mettez la quantité souhaitée de café moulu dans le filtre. Replacez le couvercle du porte-filtre et remettez le filtre orientable en place. Placez le bol sur la plaque chauffante, sous le système antigoutte. Branchez la fiche dans la prise et appuyez sur le bouton marche/arrêt . Réglez l’heure selon les directives. Appuyez sur le bouton pour la quantité de tasses jusqu’à ce que le nombre de tasses souhaité soit affiché. Vous pouvez choisir entre 2, 4, 6, 8, 10 ou 12 tasses. Assurez-vous que la quantité d’eau dans le réservoir correspond à ce nombre. Le réglage par défaut, si vous n’appuyez pas sur ce bouton, est de 12 tasses. 8. Appuyez sur le bouton pour le café moulu 9. Appuyez sur le bouton de marche/arrêt 10. commence à couler. Le symbole s’affiche à l’écran. Lorsque le café est prêt, vous entendez un signal et le symbole · · · · · · . Il s’allumera en rouge. . Le témoin lumineux s’allume alors en rouge et le café disparaît de l’écran. Vous pouvez ôter la verseuse de la cafetière électrique à tout moment, pendant une durée maximale de 30 secondes, et servir le café. L’appareil arrêtera automatiquement de couler. La quantité finale de café sera toujours légèrement inférieure à la quantité d’eau que vous aurez utilisée, car le café absorbe l’eau. Soyez prudent en le versant, le café est brûlant lorsqu’il vient de couler. Pour des raisons de sécurité, il est recommandé de ne pas enlever le couvercle de la verseuse. Le café reste ainsi plus chaud. La plaque chauffante maintiendra le café chaud jusqu’à 40 minutes. Après ces 40 minutes, l’appareil se débranchera. Pour un goût optimal, servez le café de préférence juste après son écoulement. Assurez-vous toujours que la cafetière électrique est éteinte et débranchez toujours la fiche de la prise de courant lorsque vous n’utilisez pas l’appareil. CONSEILS POUR UN MEILLEUR CAFÉ · · · 14 La propreté de la cafetière est essentielle pour faire du bon café. Nettoyez donc régulièrement l’appareil selon les instructions. Mettez toujours de l’eau propre et froide dans l’appareil. Conservez le café dans un endroit sec et frais. Ne réutilisez pas le café, car cela diminuera fortement le goût du café. Il est également déconseillé de réchauffer le café. DO721K 1. 2. 3. 4. 5. 6. · · · Assurez-vous que l’heure est correctement réglée. Installez l’appareil pour préparer du café comme indiqué à la rubrique « Utilisation » mais n’appuyez pas encore sur le bouton marche/arrêt. Appuyez sur le bouton de minuterie pendant 5 secondes. L’heure sur l’écran clignote. Appuyez sur le bouton des heures et sur le bouton des minutes pour régler la minuterie. Appuyez à nouveau sur le bouton de minuterie pour confirmer. Le témoin s’allume alors en rouge et le symbole apparaît à l’écran. Si vous n’appuyez pas sur le bouton de minuterie pour confirmer, l’heure actuelle s’affiche à nouveau à l’écran. L’heure réglée est mémorisée, mais la fonction de minuterie est désactivée. Appuyez à nouveau sur le bouton de minuterie pour activer la fonction. Le café commencera à s’égoutter dans la carafe à l’heure définie avec la minuterie. FR RÉGLAGE DE LA MINUTERIE Si vous souhaitez annuler la fonction de minuterie, appuyez à nouveau sur le bouton de minuterie. Le témoin rouge du bouton de minuterie s’éteint et le symbole disparaît de l’écran. Tant que vous ne débranchez pas le cordon d’alimentation, l’heure de la minuterie sera mémorisée. Si vous souhaitez que votre café démarre à la même heure chaque jour, il vous suffit d’appuyer une fois sur le bouton de minuterie pour activer la fonction de minuterie. L’appareil se souvient de l’heure précédemment sélectionnée et il n’est pas nécessaire de la régler à nouveau. Si vous souhaitez tout de même fixer une autre heure, revenez aux étapes décrites plus haut. Si votre minuterie est réglée et que vous voulez vérifier à quelle heure, appuyez sur le bouton de minuterie pendant quelques secondes. L’heure est indiquée brièvement. Si vous n’appuyez sur aucun bouton, l’heure actuelle réapparaît automatiquement. NETTOYAGE ET ENTRETIEN Attention: Retirez la fiche électrique de la prise de courant et laissez l’appareil refroidir avant de le nettoyer. N’immergez jamais le câble, la fiche électrique ou l’appareil dans l’eau ou dans un autre liquide afin d’éviter tout risque d’électrocution. Veillez à ce que la fiche électrique soit retirée de la prise de courant après chaque utilisation. · · · · Nettoyez la carafe en verre et le filtre amovible à l’eau chaude avec un détergent doux. Nettoyez le socle de l’appareil avec un chiffon doux humide afin d’enlever les taches. Essuyez les éventuelles gouttes de condensation sur l’appareil. Utilisez un chiffon doux afin de nettoyer la plaque chauffante de l’appareil. N’utilisez jamais de produit abrasif. DÉTARTRAGE Quand? Détartrez régulièrement votre cafetière électrique. Un détartrage régulier assure une qualité constante du café, une faible consommation d’énergie et une durée de vie prolongée de votre appareil. Pour une utilisation normale, nous vous conseillons de détartrer l’appareil toutes les 3 à 4 semaines. Comment? 1. Remplissez la verseuse de 1/4 de vinaigre et de 3/4 d’eau froide. 2. Versez le mélange dans le réservoir d’eau et allumez l’appareil. Laissez couler le mélange — sans café — et répétez jusqu’à disparition du liquide jaune. www.domo-elektro.be DO721K 15 3. 4. Jetez le mélange. Faites passez de l’eau claire au moins 2 fois dans l’appareil jusqu’à ce que toute odeur de vinaigre ait disparu. MISE AU REBUT FR Ce symbole sur le produit ou son emballage indique que ce produit ne peut être traité comme déchet ménager. Il doit plutôt être remis au point de ramassage concerné, se chargeant du recyclage du matériel électrique et électronique. En vous assurant que ce produit est éliminé correctement, vous favorisez la prévention des conséquences négatives pour l’environnement et la santé humaine qui, sinon, seraient le résulat d’un traitement inapproprié des déchets de ce produit. Pour obtenir plus de détails sur le recyclage de ce produit, veuillez prendre contact avec le bureau municipal de votre région, votre service d’éliminiation des déchets ménagers ou le magasin où vous avez acheté le produit. L’emballage est recyclable. Traitez l’emballage écologiquement. 16 DO721K GARANTIE Sehr geehrter Kunde, Sämtliche unserer Produkte unterliegen einer strengen Qualitätskontrolle, bevor Sie Ihnen angeboten werden. Sollten dennoch Probleme mit Ihrem Gerät auftreten, bedauern wir dies zutiefst. Wir möchten Sie in diesem Fall bitten, unseren Kundenservice zu kontaktieren. Unsere Mitarbeiter helfen Ihnen gern weiter! [email protected] DE +32 14 21 71 91 Montag – Donnerstag: 8:30 Uhr – 12:00 Uhr und von 13:00 Uhr – 17:00 Uhr Freitag: 8:30 Uhr – 12:00 Uhr und von 13:00 Uhr – 16:30 Uhr Dieses Gerät hat eine Garantiefrist von 2 Jahren ab dem Kaufdatum. Während der Garantiezeit übernimmt der Hersteller die vollständige Verantwortung für Mängel, die nachweislich auf Material- oder Konstruktionsfehler zurückzuführen sind. Wenn derartige Mängel auftreten, wird das Gerät wenn nötig ausgetauscht oder repariert. Die Garantiezeit von 2 Jahren beginnt in diesem Moment nicht erneut, sondern sie läuft bis 2 Jahre nach dem Kaufdatum weiter. Die Garantie wird auf der Grundlage des Kassenbons gewährt. Die Garantie auf Accessoires und Verschleißteile beträgt 6 Monate. Die Garantie und die Verantwortung/Haftung des Lieferanten und Herstellers entfallen automatisch in den folgenden Fällen: · Bei Nichtbeachtung der Anweisungen in dieser Bedienungsanleitung. · Bei falschem Anschluss, z.B. bei einer zu hohen Stromspannung. · Bei falscher, grober oder abnormaler Verwendung. · Bei unzureichender oder falscher Wartung. · Bei vom Verbraucher oder von nicht ermächtigten Dritten vorgenommenen Reparaturen oder Änderungen am Gerät. · Bei der Verwendung von Ersatzteilen oder Accessoires, die nicht vom Lieferanten / Hersteller empfohlen oder geliefert werden. SICHERHEITSVORKEHRUNGEN Wenn Sie elektrische Geräte verwenden, müssen folgende Sicherheitshinweise beachtet werden: · Lesen Sie diese Hinweise sorgfältig durch. Bewahren Sie diese Bedienungsanleitung zum späteren Nachschlagen auf. · Entfernen Sie vor dem ersten Gebrauch alle Verpackungsmaterialien und möglichen Werbeaufkleber. Sorgen Sie dafür, dass Kinder nicht mit den Verpackungsmaterialien spielen. · Dieses Gerät eignet sich für den Einsatz im Haushalt und in ähnlichen Umfeldern, zum Beispiel in folgenden Bereichen: · Küchenbereich für Mitarbeiter von Geschäften, Büros und anderen ähnlichen beruflichen Umfeldern. · Bauernhöfe · Hotel- und Motelzimmer und andere Bereiche mit wohnungsähnlichem Charakter · Gästezimmer oder Ähnliches www.domo-elektro.be DO721K 17 · · DE · · · · · · · · · · · · · · · · · · · 18 Diese Gerät darf von Kindern ab 16 Jahren und Menschen mit körperlichen oder sensorischen Behinderungen oder Menschen mit eingeschränkten geistigen Fähigkeiten oder mangelnder Erfahrung bzw. Sachkenntnis unter der Bedingung verwendet werden, dass diese Personen beaufsichtigt werden oder sie eine Anleitung zur sicheren Verwendung des Geräts erhalten haben und sich der Gefahren bei der Verwendung des Geräts bewusst sind. Kinder dürfen nicht mit dem Gerät spielen. Die Wartung und Reinigung des Geräts darf nicht durch Kinder ausgeführt werden, außer diese sind älter als 16 Jahre und werden von einem Erwachsenen beaufsichtigt. Netzstecker ziehen, wenn das Gerät nicht in Gebrauch ist, bevor Teile montiert oder abmontiert werden und vor der Reinigung. Stellen Sie zunächst alle Schalter auf „Aus“ und ziehen Sie den Stecker am Stecker selbst aus der Steckdose. Ziehen Sie den Stecker nie am Netzkabel aus der Steckdose. Wenn das Netzkabel beschädigt ist, sollte es, um Unfälle auszuschließen, durch den Hersteller, den Kundendienst oder eine qualifizierte Person ersetzt werden. ACHTUNG: Zur Vermeidung von Unfällen sollte das Gerät nicht mit einem externen Zusatzgerät, wie z. B. über einen externen Timer oder an einen Stromkreislauf angeschlossen werden, der regelmäßig ein- und ausgeschaltet wird. Die Oberflächen dieses Geräts werden während des Gebrauchs heiß. Wir empfehlen zur Vermeidung von Brandverletzungen, das Gerät - außer an den Griffen - nicht zu berühren. Eingeschaltetes Gerät nie unbeaufsichtigt stehen lassen. Verwenden Sie das Gerät nicht im Freien. Gerät nur für den vorgesehenen Zweck verwenden. Vor Gebrauch überprüfen, ob die auf dem Gerät angegebene Spannung mit dem des Stromnetzes übereinstimmt. Das Netzkabel muss stets an eine Steckdose angeschlossen werden, die gemäß den örtlichen Standards und Normen isoliert und geerdet wurde. Verwenden Sie das Gerät nie, wenn das Netzkabel oder der Stecker beschädigt ist, wenn es nicht richtig funktioniert oder beschädigt ist. Bringen Sie das Gerät in diesem Fall zur Durchsicht, Reparatur oder für elektrische/mechanische Anpassungen zum Kundendienst von DOMO oder zum nächstgelegenen Servicecenter. Versuchen Sie nie, das Gerät selbst zu reparieren. Tauchen Sie das Gerät, das Kabel oder den Stecker auf keinen Fall in Wasser oder andere Flüssigkeiten. Dies dient der Vermeidung von elektrischen Stromschlägen und Feuer. Verwenden Sie das Gerät nicht mit nassen Händen. Dieses Gerät ist mit einem kurzen Netzkabel ausgestattet, um das Risiko zu vermeiden, dass Personen oder Gegenstände über/an einem längeren Netzkabel hängen bleiben oder darüber fallen. DIESES GERÄT SOLLTE AUF KEINEN FALL MIT EINEM VERLÄNGERUNGSKABEL VERWENDET WERDEN. Rollen Sie das Netzkabel vollständig ab, um eine Überhitzung des Kabels zu vermeiden. Lassen Sie das Netzkabel nicht auf einer heißen Oberfläche oder über einen Tischrand oder eine Arbeitsplatte herunter hängen. Lassen Sie das Netzkabel nicht unter oder rund um das Gerät hängen. Stellen Sie das Gerät niemals auf einen heißen Gasherd oder ein heißes elektrisches Kochfeld bzw. in deren Nähe, nicht in eine Spüle und nicht in einen heißen Ofen. Halten Sie das Gerät von brennbaren Materialien, Gas und explosiven Stoffen fern. Schließen Sie das Netzkabel erst an die Steckdose an, wenn das Gerät korrekt zusammengebaut wurde. Um das Gerät vom Netzstrom zu trennen, muss der Bedienschalter zuerst in die „AUS“- oder „0“-Position gestellt werden. Anschließend kann der Stecker aus der Steckdose gezogen werden. Ziehen Sie nie am Gerät oder am Netzkabel, um den Stecker aus der Steckdose zu ziehen. Wenn das Gerät nicht gut gewartet wird, kann dies die Lebensdauer des Geräts drastisch verringern und zu Gefahrensituationen führen. DO721K Beim Wasserkochen ist es möglich, dass heißer Dampf durch den Filter oder eine andere Öffnung austritt, es ist daher wichtig, die Hände beim Betrieb des Geräts von diesem fernzuhalten. Für Unfälle oder Schäden, die durch die Nichtbefolgung dieser Regeln verursacht werden, haften Sie selbst. Weder der Hersteller noch der Importeur oder der Lieferant können in solchen Fällen zur Verantwortung gezogen werden. Beim Befüllen des Geräts darf die Höchstfüllstandanzeige „MAX“ nicht überschritten werden. Es ist darauf zu achten, dass keine Flüssigkeit über das Netzkabel verschüttet wird. Das Gerät darf zur Reinigung nicht in Wasser oder andere Flüssigkeiten eingetaucht werden. Verwenden Sie nur das Zubehör, das mit dem Gerät mitgeliefert wird. Versetzen oder tragen Sie das Gerät nicht, solange es noch in Betrieb oder noch heiß ist. Lassen Sie das Gerät erst abkühlen, bevor es an einen anderen Ort gestellt wird. Verwenden Sie die Kaffeemaschine niemals in leerem Zustand. Achten Sie immer darauf, dass sich Wasser im Wasserbehälter befindet, bevor Sie das Gerät einschalten. Benutzen Sie das Gerät nicht, wenn die Kanne beschädigt ist. Stellen Sie die heiße Kanne nicht auf eine nasse oder kalte Fläche. Verwenden Sie die Kaffeemaschine niemals ohne den Deckel auf der Kanne. Lassen Sie die leere Kanne niemals auf der warmen Heizplatte stehen. Dadurch kann sie zerspringen. BEWAHREN SIE DIESE HINWEISE ZUM SPÄTEREN NACHSCHLAGEN AUF · · · · · · · · · · · DE · TEILE 1. 2. 3. 4. 5. 6. 7. 8. 9. 10. 11. 12. 13. 14. Bohnenbehälter Wasserreservoir Tassen-Markierung Drehknopf für den Mahlgrad Bedienfeld mit LCD-Anzeige Drucktaste zum Öffnen des Schwenkfilters Schwenkfilter Filterbehälter Dauerfilter Deckel des Filterhalters Tropfstopp Glaskanne 1,5 l Griff Warmhalteplatte 10 1 9 2 4 3 6 5 8 11 7 13 12 14 BEDIENFELD 15. 16. 17. 18. 19. 20. 21. Timer-Taste Taste für Kaffeepulver Taste für die Kaffeestärke Ein-/Aus-Taste Stundentaste Minutentaste Taste für die Tassenanzahl 15 16 www.domo-elektro.be 17 21 18 19 20 DO721K 19 VOR DER ERSTEN INBETRIEBNAHME · · Kontrollieren Sie, ob alle Zubehörteile mitgeliefert wurden und ob das Gerät nicht beschädigt ist. Lassen Sie zuerst nur Wasser durchlaufen ohne Kaffee hinzuzufügen. Befüllen Sie dabei das Wasserreservoir bis zur höchsten Markierung, schalten Sie die Kaffeemaschine ein lassen Sie die Maschine ein oder zweimal vollständig durchlaufen. Gießen Sie anschließend das Wasser weg und reinigen Sie den Filter, den Filterbehälter, die Kanne und den Deckel der Kanne gründlich mit warmem Wasser. GEBRAUCH DE ZEIT EINSTELLEN 1. 2. 3. 4. 5. Netzstecker in die Steckdose stecken. Auf dem Display wird „12:00“ angezeigt. Drücken Sie die Ein-/Aus-Taste. Auf dem Display blinkt „12:00“. , bis die richtige Stundenangabe auf dem Display erscheint. Drücken Sie die Stundentaste Drücken Sie die Minutentaste , bis die richtige Minutenangabe auf dem Display erscheint. Wenn Sie keine weitere Taste drücken, wird die Uhrzeit bestätigt. KAFFEEZUBEREITUNG MIT KAFFEEBOHNEN 1. Öffnen Sie den Wassertank und füllen Sie ihn mit Hilfe der Glaskanne mit der gewünschten Wassermenge. Überschreiten Sie hierbei nicht die Indikation für die maximale Füllmenge. 2. Drücken Sie die Taste zum Öffnen des Schwenkfilters. 3. Setzen Sie den Dauerfilter oder einen Papierfilter in den Filterhalter ein. Achten Sie darauf, dass der Filterhalter korrekt im Gerät eingesetzt ist. Setzen Sie den Deckel des Filterhalters auf und drehen Sie den Schwenkfilter wieder in das Gerät. 4. Öffnen Sie den Bohnenbehälter. Füllen Sie ihn mit Kaffeebohnen und setzen Sie den Deckel wieder auf den Behälter. Geben Sie niemals mehr als 200 g Kaffeebohnen in den Bohnenbehälter. 5. Stellen Sie die Kanne auf die Warmhalteplatte unter den Tropfstopp. 6. Stecken Sie den Stecker in die Steckdose und drücken Sie die Ein-/Aus-Taste . Stellen Sie die Uhrzeit gemäß den Anweisungen ein. 7. Drücken Sie die Taste für die Tassenanzahl bis die gewünschte Anzahl von Tassen auf dem Display erscheint. Sie können zwischen 2, 4, 6, 8,10 oder 12 Tassen wählen. Achten Sie darauf, dass die Wassermenge im Wassertank mit dieser Anzahl übereinstimmt. Wenn Sie diese Taste nicht drücken, ist die Standardeinstellung 12 Tassen. 8. Drücken Sie die Taste für die Kaffeestärke , um die Stärke zu bestimmen: · mild · mittel stark · 9. Drehen Sie den Drehknopf für den Mahlgrad, um den Mahlgrad für das Mahlen der Bohnen zu bestimmen. Wenn Sie den Drehknopf auf die kleinen Bohnen drehen, wird der Kaffee feiner gemahlenen und daher auch stärker schmecken. Wenn Sie den Knopf auf die größeren Bohnen drehen, wird die Kaffeemühle gröber mahlen. 10. Drücken Sie die Ein-/Aus-Taste . Die Kaffeemühle beginnt zu arbeiten. Nach einigen Sekunden erscheint das Symbol auf dem Display und der Kaffee beginnt, durchzulaufen. 11. Wenn Kaffee fertig ist, ertönt ein Signal und das Symbol auf dem Display verschwindet. 20 DO721K 1. 2. 3. 4. 5. 6. 7. 8. 9. 10. · · · · · · Öffnen Sie den Wassertank und füllen Sie ihn mit Hilfe der Glaskanne mit der gewünschten Wassermenge. Überschreiten Sie hierbei nicht die Indikation für die maximale Füllmenge. Drücken Sie die Taste zum Öffnen des Schwenkfilters. Setzen Sie den Dauerfilter oder einen Papierfilter in den Filterhalter ein. Achten Sie darauf, dass der Filterhalter korrekt im Gerät eingesetzt ist. Geben Sie die gewünschte Menge an Kaffeepulver in den Filter. Setzen Sie den Deckel des Filterhalters auf und drehen Sie den Schwenkfilter wieder in das Gerät. Stellen Sie die Kanne auf die Warmhalteplatte unter den Tropfstopp. Stecken Sie den Stecker in die Steckdose und drücken Sie die Ein-/Aus-Taste . Stellen Sie die Uhrzeit gemäß den Anweisungen ein. Drücken Sie die Taste für die Tassenanzahl bis die gewünschte Anzahl von Tassen auf dem Display erscheint. Sie können zwischen 2, 4, 6, 8,10 oder 12 Tassen wählen. Achten Sie darauf, dass die Wassermenge im Wassertank mit dieser Anzahl übereinstimmt. Wenn Sie diese Taste nicht drücken, ist die Standardeinstellung 12 Tassen. Drücken Sie die Taste für Kaffeepulver . Sie leuchtet rot auf. Drücken Sie die Ein-/Aus-Taste . Die Leuchtanzeige leuchtet jetzt rot und der Kaffee beginnt, durchzulaufen. Auf dem Display erscheint das Symbol . Wenn Kaffee fertig ist, ertönt ein Signal und das Symbol auf dem Display verschwindet. DE KAFFEEZUBEREITUNG MIT KAFFEEPULVER Sie können die Kanne jederzeit für maximal 30 Sekunden von der Kaffeemaschine nehmen, um Kaffee auszuschenken. Das Gerät wird dann automatisch aufhören zu tropfen. Die endgültige Kaffeemenge wird immer etwas weniger sein als die eingefüllte Wassermenge, da der Kaffee Wasser absorbiert. Seien Sie bitte vorsichtig beim Schenken, der Kaffee ist heiß, wenn er gerade durchgelaufen ist. Aus Sicherheitsgründen ist es ratsam, den Deckel der Glaskanne auf der Kanne zu lassen. So bleibt der Kaffee auch besser warm. Das Gerät hält der Kaffee 40 Minuten warm. Danach wird das Gerät automatisch ausgeschaltet. Für einen optimalen Geschmack ist es empfehlenswert, den Kaffee einzuschenken, sobald dieser durchgelaufen ist. Schalten Sie die Kaffeemaschine immer aus und ziehen Sie den Stecker aus der Steckdose, wenn das Gerät nicht in Betrieb ist. TIPPS FÜR LECKEREN KAFFEE · · · Eine saubere Kaffeemaschine ist eine Voraussetzung für leckeren Kaffee. Reinigen Sie also das Gerät regelmäßig gemäß den Hinweisen in der Gebrauchsanweisung. Benutzen Sie immer frisches, kaltes Wasser im Gerät. Lagern Sie Kaffee trocken und kühl. Verwenden Sie einmal benutzten Kaffee nicht wieder, da der Geschmack des Kaffees stark nachlassen wird. Auch das Aufwärmen von Kaffee ist nicht empfehlenswert. www.domo-elektro.be DO721K 21 EINSTELLUNG DES TIMERS 1. 2. 3. DE 4. 5. 6. · · · Stellen Sie sicher, dass die Uhrzeit korrekt eingestellt ist. Das Gerät, wie unter „Verwendung“ beschrieben, für die Zubereitung von Kaffee vorbereiten, jedoch noch nicht die Ein-/Aus-Taste betätigen. Halten Sie die Timer-Taste 5 Sekunden lang gedrückt. Die Uhrzeit auf dem Display beginnt zu blinken. Die Stunden-Taste und die Minuten-Taste drücken, um den Timer einzustellen. Drücken Sie die Timer-Taste zur Bestätigung erneut. Die Leuchtanzeige leuchtet jetzt rot auf und auf dem Display erscheint das Symbol . Wenn Sie die Timer-Taste nicht zur Bestätigung drücken, erscheint wieder die aktuelle Uhrzeit auf dem Display. Die eingestellte Uhrzeit wird gespeichert, aber die Timer-Funktion ist dann nicht eingeschaltet. Drücken Sie die Timer-Taste erneut, um die Funktion einzuschalten. Die Kaffeezubereitung beginnt zu der mit dem Timer eingestellten Zeit. Wenn Sie die Timer-Funktion abbrechen möchten, drücken Sie die Timer-Taste erneut. Die rote Leuchtanzeige der Timer-Taste erlischt und das Symbol verschwindet vom Display. Solange Sie den Stecker nicht aus der Steckdose ziehen, wird die Uhrzeit der Timers gespeichert. Wenn Sie möchten, dass der Kaffee jeden Tag zum selben Zeitpunkt zubereitet wird, genügt es, 1x auf die Timer-Taste zu drücken, um die Timer-Funktion einzuschalten. Das Gerät speichert die zuvor gewählte Uhrzeit und es ist nicht erforderlich, den Zeitpunkt erneut einzustellen. Wenn Sie doch einen anderen Zeitpunkt einstellen möchten, befolgen Sie wieder die zuvor beschriebenen Schritte. Wenn der Timer eingestellt ist, und Sie die eingestellte Uhrzeit überprüfen möchten, halten Sie die Timer-Taste einige Sekunden lang gedrückt. Die Uhrzeit wird kurz angezeigt. Wenn Sie dann keine Taste drücken, erscheint wieder die aktuelle Uhrzeit. REINIGUNG UND WARTUNG Achtung: Ziehen Sie den Stecker aus der Steckdose und lassen Sie das Gerät abkühlen, bevor Sie es reinigen. Tauchen Sie das Kabel, den Stecker oder das Gerät nie in Wasser oder andere Flüssigkeiten, um das Risiko eines Stromschlags zu vermeiden. Ziehen Sie nach jeder Nutzung den Stecker aus der Steckdose. · · · · Die Glaskanne und der herausnehmbare Filter sollten in warmem Wasser mit einem milden Reinigungsmittel gereinigt werden. Reiben Sie das Gehäuse des Gerätes mit einem weichen, feuchten Tuch sauber, um Flecken zu entfernen. Wischen Sie nach der Nutzung eventuelle Tropfen Kondenswasser vom Gerät. Benutzen Sie ein feuchtes Tuch für die Reinigung der Warmhalteplatte des Gerätes. Benutzen Sie dafür nie Scheuermittel. ENTKALKUNG Wann? Entkalken Sie Ihre Kaffeemaschine regelmäßig. Eine regelmäßige Entkalkung sorgt für eine konstante Qualität des Kaffees, einen niedrigeren Energieverbrauch und verlängert die Lebensdauer Ihrer Kaffeemaschine. Bei normaler Nutzung empfehlen wir Ihnen, das Gerät alle 3 bis 4 Wochen zu reinigen. 22 DO721K Wie? 1. Füllen Sie die Kanne mit 1/4 Essig und 3/4 kaltem Wasser. 2. Gießen Sie das Gemisch in das Wasserreservoir und schalten Sie die Kaffeemaschine ein. Lassen Sie das Gemisch durchlaufen ohne Kaffee hinzuzufügen und wiederholen Sie diesen Vorgang, bis keine gelbe Flüssigkeit mehr austritt. 3. Gießen Sie das Gemisch aus. 4. Lassen Sie jetzt noch mindestens 2 Mal nur Wasser durch das Gerät laufen, bis kein Essiggeruch mehr vorhanden ist. Dieses Symbol auf dem Produkt oder seiner Verpackung weist darauf hin, dass dieses Produkt nicht als normaler Haushaltsabfall zu behandeln ist, sondern an einem Sammelpunkt für das Recyling von elektrischen und elektronischen Geräten abgegeben werden muss. Durch Ihren Beitrag zum korrekten Entsorgen dieses Produkts schützen Sie die Umwelt und die Gesundheit Ihrer Mitmenschen. Umwelt und Gesundheit werden durch falsches Entsorgen gefährdet. Weitere Informationen über das Recycling dieses Produkts erhalten Sie von Ihren Rathaus, Ihrer Müllabfuhr oder dem Geschäft, in dem Sie das Produkt gekauft haben. DE ENTSORGEN Das Verpackungsmaterial ist wiederverwertbar. Entsorgen Sie die Verpackung umweltgerecht und führen Sie sie der Wertstoffsammlung zu. www.domo-elektro.be DO721K 23 WARRANTY Dear client , All of our products are always submitted to a strict quality control before they are sold to you. Should you nevertheless experience problems with your device, we sincerely regret this. In that case, we kindly request you to contact our customer service. Our staff will gladly assist you. +32 14 21 71 91 [email protected] EN Monday – Thursday: 8.30 – 12.00 and 13.00 – 17.00 Friday: 8.30 – 12.00 and 13.00 – 16.30 This appliance has a two year warranty period. During this period the manufacturer is responsible for any failures that are the direct result of construction failure. When these failures occur the appliance will be repaired or replaced if necessary. The warranty will not be valid when the damage to the appliance is caused by wrong use, not following the instructions or repairs executed by a third party. The guarantee is issued with the original till receipt. All parts, which are subject to wear, are excluded from the warranty. If your device breaks down within the 2-year warranty period, you can return the device together with your receipt to the shop where you purchased it. The guarantee on accessories and components that are liable to wear-and-tear is only 6 months. The guarantee and responsibility of the supplier and manufacturer lapse automatically in the following cases: · If the instructions in this manual have not been followed. · In case of incorrect connection, e.g., electrical voltage that is too high. · In case of incorrect, rough or abnormal use. · In case of insufficient or incorrect maintenance. · In case of repairs or alterations to the device by the consumer or non-authorised third parties. · If the customer used parts or accessories that are not recommended or provided by the supplier / manufacturer. SAFETY INSTRUCTIONS When using electrical appliances, basic safety precautions should always be taken, including the following: · Read all instructions carefully. Keep this manual for future reference. · Make sure all packaging materials and promotional stickers have been removed before using the appliance for the first time. Make sure children cannot play with the packaging materials. · This appliance is intended to be used in household and similar applications such as: · staff kitchen areas in shops, offices and other working environments; · farm houses; · by clients in hotels, motels and other residential type environments; · bed and breakfast type environments. · Children should be supervised to ensure that they do not play with the appliance. · This appliance can be used by children aged from 16 years and above and persons with reduced physical, sensory or mental capabilities or lack of experience and knowledge if they have been given 24 DO721K · · · · · · · · · · · · · · · · · · · · · · · · · · www.domo-elektro.be DO721K EN · · supervision or instruction concerning use of the appliance in a safe way and understand the hazards involved. Children shall not play with the appliance. Cleaning and user maintenance shall not be made by children unless they are older than 16 and supervised. Keep the appliance and its cord out of reach of children younger than 16 years. The appliance must be disconnected from its power source when not in use, during service and when replacing parts. Allow to cool before putting on or taking off parts, and before cleaning the appliance. If the supply cord is damaged, it must be replaced by the manufacturer, its service agent or similarly qualified persons in order to avoid a hazard. CAUTION: In order to avoid a hazard this appliance must not be supplied through an external switching device, such as a timer, or connected to a circuit that is regularly switched on and off by the utility. The surfaces of the appliance are likely to get hot during use. It is advised not to touch the surfaces of the appliance other than the handles to avoid burns. Never leave the appliance unattended while it is functioning. Do not use or store this appliance outdoors. Do not use this appliance for other than intended use. Check carefully that the voltage and frequency of the power net match the indications on the rating label of the appliance. The plug must be plugged into an appropriate outlet that is installed and grounded in accordance with all local standards and requirements. Do not operate this appliance with a damaged cord or plug or in the event the appliance malfunctions or has been damaged in any manner. Return the appliance to the DOMO Service Department or its service agent for examination, repair, or electrical or mechanical adjustment. Do not try to repair the appliance yourself. To protect against electrical shock or burns, do not immerse unit, cord, or plug in water or other liquid. Do not operate the appliance with wet hands. A short power supply cord is provided to reduce the risk of becoming entangled in or tripping over a longer cord. DO NOT USE WITH AN EXTENSION CORD. Unwrap the cord completely to prevent overheating of the cord. Do not let the power supply cord hang over the edge of a counter, or touch hot surfaces. Do not allow the power cord supply to run underneath or around the unit. Do not place on or near a hot gas or electric burner or sink, or in a heated oven. Do not place near flammable materials, gases or explosives. Make sure the appliance is correctly assembled, then plug the cord in the wall outlet. To disconnect, turn controls to “OFF” or “0” position, then remove the plug from the wall. Never pull the cord or appliance to remove the plug from the socket. Failure to maintain this appliance in a clean condition could adversely affect the life of the appliance and possibly result in a hazardous situation. During boiling, hot steam may come through the filter or any other opening. Keep hands and face at a safe distance during operation. Any injury or damage caused by failure to comply with these rules are at your own risk. Neither the manufacturer, importer, or the supplier may be held liable. Do not overfill the kettle. Never add water above the maximum level marked on the appliance. Do not spill any liquid on the connector. The appliance must not be immersed in water or any other liquid for cleaning Only use the utensils delivered with the appliance. Do not move the appliance while in use or when still hot. Allow to cool before moving the appliance. 25 · Never use the coffee maker when it is empty. Always make sure that there is water in the water tank when you switch on the appliance. Do not use the appliance when it shows signs of damage. Do not put a hot carafe on a wet or cold surface. Never use the coffee maker without the lid on the carafe. Never leave an empty carafe on a hot keep-warm plate. The carafe could crack. · · · · SAVE THESE INSTRUCTIONS FOR FUTURE REFERENCE EN PARTS 1. 2. 3. 4. 5. 6. 7. 8. 9. 10. 11. 12. 13. 14. Bean reservoir Water tank Water level indications Grind coarseness dial Keep-warm plate Swivel filter open push button Swivel filter Filter holder Permanent filter Filter holder lid Drip stop Glass carafe 1,5 l Handle Keep-warm plate 10 1 9 2 4 3 6 5 8 11 7 13 12 14 CONTROL PANEL 15. 16. 17. 18. 19. 20. 21. Timer button Ground coffee button Coffee strength button On-off button Hours button Minutes button Number of cups button 15 16 17 21 18 19 20 BEFORE THE FIRST USE · · 26 Check if all accessories are included and if the appliance is not damaged. First let water run through the appliance, without adding coffee. To do so, fill the water tank up to the maximum level, switch on the coffee maker and let the water run through completely. Dispose of the water and repeat one or two times. Afterwards, clean the filter, filter holder, carafe and lid of the carafe thoroughly with warm water. DO721K USE SETTING THE TIME 1. 2. 3. 4. 5. Put the plug in the socket. The display will show “12:00”. Press the on-off button. ‘12:00’ will blink on the display. until the correct hour appears on the display. Press the hour button Press the minutes button until the correct minutes appear on the display. If you do not press any more buttons, the time is set. MAKING COFFEE WITH COFFEE BEANS Open the water reservoir and fill it with the desired amount of water using the glass coffee pot. Do not exceed the maximum indicator. 2. Press the button to open the swivel filter. 3. Place the permanent filter or a paper filter in the filter holder. Make sure that the filter holder is correctly inserted into the appliance. Place the lid back on the filter holder and push the swivel filter back into the appliance. 4. Open the bean reservoir. Fill the reservoir with coffee beans and place the lid back on it. Never add more than 200 grams of coffee beans in the bean reservoir. 5. Place the coffee pot on the hot plate under the drip stop. 6. Plug in plug into the power socket and press the on-off button . Set the time by following the guidelines. 7. Press the number of cups button until the desired number of cups appears on the display. You can select 2, 4, 6, 8, 10, or 12 cups. Make sure that the amount of water in the water reservoir matches this number. If you do not press this button, the default setting is 12 cups. 8. Press the coffee strength button to set the strength: · mild · medium · strong 9. Turn the grind coarseness dial to set the coarseness for grinding the beans. If you turn the dial towards the small beans, the ground coffee will be finer and the taste stronger. If you turn the dial towards the larger beans, the coffee grinder will grind coarser. 10. Press the on-off button . The coffee grinder will start grinding. After a few seconds, the symbol will appear on the display and coffee will start flowing. 11. When the coffee is ready, you will hear a signal and the symbol on the display will disappear. EN 1. MAKING COFFEE WITH GROUND COFFEE 1. 2. 3. 4. Open the water reservoir and fill it with the desired amount of water using the glass coffee pot. Do not exceed the maximum indicator. Press the button to open the swivel filter. Place the permanent filter or a paper filter in the filter holder. Make sure that the filter holder is correctly inserted into the appliance. Put the desired amount of ground coffee into the filter. Place the lid back on the filter holder and push the swivel filter back into the appliance. www.domo-elektro.be DO721K 27 5. 6. 7. 8. 9. 10. · · EN · · · · Place the coffee pot on the hot plate under the drip stop. Plug in plug into the power socket and press the on-off button . Set the time by following the guidelines. Press the number of cups button until the desired number of cups appears on the display. You can select 2, 4, 6, 8, 10, or 12 cups. Make sure that the amount of water in the water reservoir matches this number. If you do not press this button, the default setting is 12 cups. . It will light up red. Press the button for ground coffee Press the on-off button . The indicator lamp will now light up red and coffee will start to flow. The symbol appears on the display. When the coffee is ready, you will hear a signal and the symbol on the display will disappear. You can remove the carafe from the coffee maker at any chosen time for a maximum of 30 seconds to pour coffee. The appliance will stop dripping automatically. The final amount of coffee will always be a little less than the amount of water you put in, because the coffee absorbs water. Be careful while pouring, the coffee is hot right after brewing. For safety reasons it is considered wise to keep the lid on the carafe. This way the coffee also stays warm. The device will keep the coffee warm for up to 40 minutes. Afterwards, the device will shut off automatically. To maintain an optimal coffee taste, it is best to serve the coffee right after brewing. Always make sure that the coffee maker is switched off and unplug the power cord from the outlet when the appliance is not in use. POINTERS FOR GREAT COFFEE · · · A clean coffee maker is essential to make great tasting coffee. Clean the appliance regularly according to the guidelines. Always use fresh, cold water in the coffee maker. Store coffee in a dry and cool place. Do not reuse any coffee, as this will greatly affect the taste of your coffee. We also do not recommend reheating coffee. SETTING THE TIMER 1. 2. 3. 4. 5. 6. · · 28 Make sure the time is set correctly. Prepare the appliance to set coffee as indicated under “use” but do not press the on/off button yet. Press the timer button for 5 seconds. The hour on the display will blink. To set the timer, press the hours button and the minutes button. Press the timer button again to confirm. The indicator lamp will now light up red and the symbol will appear on the display. If you do not press the timer button to confirm, the current time appears again on the display. The hour set is stored, but the timer function is not activated. Press the timer button again to activate the function. The coffee will begin to run at the time that has been set using the timer. If you want to cancel the timer function, press the timer button again. The red indicator lamp of the timer button goes out and the symbol on the display disappears. As long as you do not remove the plug from the power socket, the timer hour will be stored. If you want your coffee made at the same time every day, all you have to do is press the timer button once to activate the timer function. The device remembers the previously selected time and you do need to set the time again. If you still want to set a different time, proceed as described in the previous steps. DO721K · If your timer is set and you want to check the time, press the timer button for a few seconds. The hour will be displayed briefly. If you do not press a button, the current time automatically appears again. CLEANING AND MAINTENANCE Caution: Unplug the appliance and let it cool down before cleaning it. Never immerse the cord, the plug or the appliance in water or other fluids in order to avoid the risk of electrical shock. After each use, make sure the plug is removed from the outlet. · · · · Clean the glass pot and removable filter in hot water using a gentle detergent. Wipe the product’s exterior body with a soft, damp cloth to remove stains. Wipe off water droplets after using the appliance. Use a damp cloth to wipe the keep-warm plate clean. Never use abrasive cleaning materials to do so. When? Regularly decalcify your coffee maker. Regular decalcification contributes to a constant coffee quality, a lower energy use and prolongs the durability of your coffee maker. At normal use we recommend to decalcify the appliance every 3 to 4 weeks. EN DECALCIFICATION How? 1. Fill the carafe with 1/4 of vinegar and 3/4 of cold water. 2. Pour the mixture into the water tank and turn on the coffee maker. Let the mixture run through without adding coffee - and repeat until the liquid dripping out has lost its yellow colour. 3. Pour out the mixture. 4. Now let the coffee maker run at least twice with only water, until the vinegar smell has disappeared. ENVIRONMENTAL GUIDELINES This symbol on the product or on its packaging indicates that this product may not be treated as household waste. Instead it must be brought to the applicable collection point for recycling of electrical and electronic equipment. By ensuring this product is disposed of correctly, you will help prevent potential negative consequences for the environment and human health, which could otherwise be caused by inappropriate waste handling of this product. For more detailed information about recycling of this product, please contact your local city office, your household waste disposal service or the shop where you purchased the product. The packaging is recyclable. Please treat the packaging ecologically. www.domo-elektro.be DO721K 29 GARANTIA Este aparato tiene un periodo de garantía de 2 años a partir de la fecha de compra. Durante el periodo de garantía, el distribuidor será completamente responsable de los defectos directamente asignables a errores del material y fabricación. Cuando se detecten este tipo de errores, y siempre que se estime necesario, el aparato se sustituirá o reparará. A partir de ese momento, el periodo de garantía de 2 años no volverá a iniciarse, sino que seguirá siendo de 2 años a partir del momento de compra. La garantía se concede sobre la base del recibo de caja. La garantía de los accesorios y componentes sujetos a desgaste es de 6 meses. La garantía y la responsabilidad/imputabilidad del proveedor y el fabricante expiran automáticamente en los siguientes casos: · Cuando no se cumplan las instrucciones que aparecen en este manual. · En el caso de una conexión inadecuada, por ejemplo, a una tensión eléctrica demasiado alta. · En caso de uso incorrecto, brusco o anormal. · En caso de insuficiente o incorrecto mantenimiento. · Si el consumidor o un tercero no autorizado realizan reparaciones o modificaciones en el aparato. · Si se usan componentes o accesorios que no están recomendados o que no son suministrados por el proveedor/fabricante. ES INSTRUCCIONES DE SEGURIDAD 30 Cuando utilice aparatos eléctricos, se deben seguir las instrucciones de seguridad mencionadas a continuación: · Lea detenidamente estas instrucciones. Conserve este manual para consultarlo posteriormente. · Antes del primer uso retire todos los materiales de embalaje y etiquetas promocionales. Asegúrese de que los niños no puedan jugar con el material de embalaje. · Este aparato es adecuado para su uso en el ámbito doméstico y entornos similares como: · Zona de cocina para el personal de tiendas, oficinas y otros entornos profesionales similares. · Granjas. · Habitaciones de hoteles y moteles, y otros entornos de carácter residencial. · Habitaciones de invitados o similares. · Supervise en todo momento a los niños para que no jueguen con el aparato. · Este aparato puede ser utilizado por niños de 16 años o más, personas con discapacidad física o sensorial, o personas con capacidad mental limitada o falta de experiencia o conocimiento, siempre, y en tanto en cuanto, dichas personas estén vigiladas o hayan recibido instrucciones sobre el uso del aparato de manera segura y conozcan los peligros del uso del mismo. Los niños no deben jugar con el ventilador. El mantenimiento y la limpieza del dispositivo no deben ser realizados por niños, a menos que tengan 16 años o más y estén supervisados por un adulto. · Mantenga el aparato fuera del alcance de los niños. · Saque el enchufe de la toma de corriente cuando no use el aparato, antes de montar o desmontar piezas y antes de limpiarlo. Ponga primero todos los botones en posición de apagado y desconecte el cable de alimentación de la toma de corriente. No tire nunca del cable de alimentación para sacar el enchufe de la toma de corriente. · Si el cable de alimentación está dañado, para evitar accidentes, debe sustituirlo el fabricante, un centro de reparación autorizado o una persona cualificada. · ATENCIÓN: para evitar peligros, el aparato no debe ser controlado con un dispositivo externo, como un temporizador externo, ni debe conectarse a una red que se encienda y se apague con frecuencia. DO721K · · · · · · · · · · · · · · · · · · · · · · · Las superficies de este aparato se calientan durante el uso. Recomendamos no tocar la superficie de este aparato, exceptuando las asas, para evitar quemaduras. No deje nunca sin vigilancia un aparato en marcha. No utilice el aparato al aire libre. Utilice el aparato únicamente para el fin para el que está destinado. Antes de utilizarlo, compruebe si el voltaje indicado en el aparato coincide con el voltaje de la red eléctrica de su vivienda. El cable de alimentación debe estar conectado a una toma de corriente que debe haber sido instalada y conectada a tierra de acuerdo con las normas y reglamentos locales. No utilice nunca el aparato si el cable de alimentación o el enchufe están dañados, después de un mal funcionamiento del aparato o cuando el aparato está dañado. En el caso de que el aparato esté dañado, llévelo al servicio de postventa de DOMO o al centro de servicio cualificado más cercano para su inspección, reparación o para realizar ajustes eléctricos/mecánicos. Nunca intente reparar el aparato por su cuenta. Nunca sumerja el aparato, el cable de alimentación o el enchufe en agua o en cualquier otro líquido. Esto evitará choques eléctricos o incendios. No utilice el aparato con las manos mojadas. Este aparato está provisto de un cable de alimentación corto para evitar que personas u objetos se enreden en el mismo o se caigan. NUNCA UTILICE EL APARATO CON UN CABLE ALARGADOR. Desenrolle el cable de alimentación completamente para evitar el sobrecalentamiento del mismo. No deje que el cable de alimentación cuelgue sobre superficies calientes o sobre el borde de una mesa o encimera. No permita que el cable de alimentación cuelgue por debajo o alrededor del aparato. No coloque nunca el aparato encima ni cerca de una placa de cocina eléctrica o de gas, un fregadero o un horno encendido. No coloque nunca el aparato cerca de materiales inflamables, gases o explosivos. Solo debe introducir el cable de alimentación en la toma de corriente después de que el aparato se haya montado correctamente. Antes de retirar el cable del aparato de la toma de corriente, el control se debe poner en la posición «OFF» o «0». A continuación podrá retirar el cable de la toma de corriente. Nunca tire del aparato o del cable de alimentación para retirar el enchufe de la toma de corriente. Si no se realiza un correcto mantenimiento del aparato, la vida útil del aparato se reducirá drásticamente y se podrían producir situaciones peligrosas. Al hervir agua, es posible que salga vapor caliente a través del filtro u otra abertura; por eso es importante mantener las manos alejadas del aparato mientras está en funcionamiento. Los accidentes o los daños ocasionados por el no seguimiento de estas normas son su propia responsabilidad. Ni el fabricante, ni el importador ni el distribuidor pueden ser considerados responsables a este respecto. No supere la indicación MAX al llenar el aparato. Tenga cuidado de no derramar líquido sobre el cable de alimentación. El aparato no se puede sumergir en agua ni en ningún otro líquido para su limpieza. Utilice únicamente los accesorios incluidos con el aparato. No mueva nunca el aparato cuando se encuentre todavía en funcionamiento ni mientras siga estando caliente. Espere siempre a que el aparato se enfríe antes de cambiarlo de lugar. ES · CONSERVE ESTAS INSTRUCCIONES PARA CONSULTARLAS POSTERIORMENTE www.domo-elektro.be DO721K 31 PIEZAS 1. 2. 3. 4. 5. 6. 7. 8. 9. 10. 11. 12. 13. 14. Depósito de granos 10 Depósito de agua Marcas de nivel 9 Botón giratorio para espesor de molienda Panel de control con pantalla LCD 8 Pulsador de apertura del filtro giratorio Filtro giratorio 7 Soporte del filtro Filtro permanente Tapa del soporte de filtro Tapón de goteo Jarra de vidrio 1,5 l Asa Placa para mantener la temperatura 1 2 4 3 6 5 11 13 12 14 ES PANEL DE CONTROL 15. 16. 17. 18. 19. 20. 21. Botón de temporización Botón de café molido Botón de fuerza del café Botón de encendido/apagado Botón de horas Botón de minutos Botón de número de tazas 15 16 17 21 18 19 20 ANTES DEL PRIMER USO · · Compruebe que todos los accesorios se encuentran en el aparato, así como que este no está dañado. En primer lugar debe dejar pasar solamente el agua, sin añadir café. Para ello, llene el tanque de agua hasta la indicación máxima, encienda la cafetera y deje que toda el agua pase completamente una o dos veces. A continuación, vierta el agua y limpie a fondo el filtro, el soporte del filtro, la jarra y la tapa de la jarra con agua tibia. USO AJUSTAR LA HORA 1. 2. 3. 4. 5. 32 Introduzca el enchufe en la toma de corriente. En la pantalla aparece “12:00”. Pulse el botón de encendido/apagado. En la pantalla parpadea «12:00». Pulse el botón de horas hasta que aparezca la hora correcta en la pantalla. Pulse el botón de minutos hasta que aparezcan los minutos correctos en la pantalla. En cuanto deje de pulsar el botón, se confirmará la hora. DO721K HACER CAFÉ CON GRANOS DE CAFÉ Abra el depósito de agua y llénelo con la cantidad de agua deseada utilizando la jarra de cristal. No supere la indicación de cantidad máxima. 2. Pulse el botón para abrir el filtro giratorio. 3. Coloque el filtro permanente o un filtro de papel en el soporte de filtro. Procure colocar debidamente el soporte de filtro en el aparato. Coloque la tapadera del soporte de filtro y gire el filtro giratorio en su sitio. 4. Abra el depósito de granos. Llénelo de granos y vuelva a colocar la tapa en el depósito. No eche nunca más de 200 gr de granos de café al depósito. 5. Coloque la jarra en la placa de calentamiento, debajo del sistema antigoteo. 6. Introduzca el enchufe en la toma de corriente y presione el botón de encendido/apagado . Ajuste la hora conforme a las instrucciones. 7. Pulse el botón de la cantidad de tazas hasta que aparezca en la pantalla el número deseado de tazas. Puede elegir entre 2, 4, 6, 8, 10 y 12 tazas. Procure que la cantidad de agua en el depósito de agua coincida con este número. Si no pulsa este botón, la cantidad estándar es de 12 tazas. 8. Pulse la tecla de fuerza del café para determinar la fuerza: · suave · medio · fuerte 9. Gire el botón para el espesor de molienda de los granos. Si gira el botón hacia los granos pequeños, el café se molerá más fino y tendrá un sabor más fuerte. Si gira el botón hacia los granos más grandes, el café se molerá más grueso. 10. Pulse el botón de encendido/apagado . El molinillo empieza a moler, al cabo de unos segundos aparece el símbolo en la pantalla y el café empieza a gotear. 11. Cuando esté listo el café, oirá una señal y desaparecerá el símbolo de la pantalla. ES 1. HACER CAFÉ CON CAFÉ MOLIDO 1. 2. 3. 4. 5. 6. 7. 8. 9. 10. Abra el depósito de agua y llénelo con la cantidad de agua deseada utilizando la jarra de cristal. No supere la indicación de cantidad máxima. Pulse el botón para abrir el filtro giratorio. Coloque el filtro permanente o un filtro de papel en el soporte de filtro. Procure colocar debidamente el soporte de filtro en el aparato. Eche la cantidad deseada de café molido al filtro. Coloque la tapadera del soporte de filtro y gire el filtro giratorio en su sitio. Coloque la jarra en la placa de calentamiento, debajo del sistema antigoteo. Introduzca el enchufe en la toma de corriente y presione el botón de encendido/apagado . Ajuste la hora conforme a las instrucciones. Pulse el botón de la cantidad de tazas hasta que aparezca en la pantalla el número deseado de tazas. Puede elegir entre 2, 4, 6, 8, 10 y 12 tazas. Procure que la cantidad de agua en el depósito de agua coincida con este número. Si no pulsa este botón, la cantidad estándar es de 12 tazas. Pulse el botón de café molido . Éste se iluminará de rojo. Pulse el botón de encendido/apagado . Se encenderá de rojo el indicador luminoso y el café empieza a gotear. El símbolo aparece en la pantalla. Cuando esté listo el café, oirá una señal y desaparecerá el símbolo de la pantalla. www.domo-elektro.be DO721K 33 · · · · · · Puede retirar la jarra de la cafetera en cualquier momento durante un máximo de 30 segundos para verter café. El aparato dejará de gotear de forma automática. La cantidad final de café siempre será menor que la cantidad de agua que ha introducido, ya que el café absorbe el agua. Tenga cuidado cuando sirva el café, ya que este estará muy caliente cuando esté recién preparado. Por razones de seguridad, es aconsejable mantener la tapa en la jarra de vidrio. De esta manera, el café se mantiene caliente. El aparato mantiene el café caliente durante 40 minutos y, a continuación, se apaga automáticamente. Sin embargo, para garantizar un sabor óptimo, le recomendamos servir el café inmediatamente después de prepararlo. Siempre debe asegurarse de que el aparato está apagado y siempre debe desenchufarlo de la toma de corriente cuando el aparato no se esté utilizando. CONSEJOS PARA PREPARAR UN CAFÉ DELICIOSO · · · Una cafetera limpia es esencial para preparar un buen café. Por lo tanto, limpie el aparato regularmente de acuerdo con las recomendaciones. Siempre debe utilizar agua fresca y fría en el aparato. Conserve el café en un lugar seco y fresco. No reutilice café, ya que esto empeorará considerablemente el sabor del café. Tampoco se recomienda recalentar el café. ES AJUSTE DEL TEMPORIZADOR 1. 2. 3. 4. 5. 6. · · · 34 Procure ajustar correctamente la hora. Prepare el aparato para hacer café de la manera indicada en “uso”, pero no presione todavía en el botón de encendido/apagado. Presione el botón de temporización durante 5 segundos. La hora en la pantalla parpadea. Presione el botón de las horas y el botón de los minutos para ajustar el temporizador. Vuelva a presionar el botón de temporización para confirmar. El indicador luminoso se enciende de rojo y en la pantalla aparece el símbolo . Si no pulsa el botón de temporización para confirmar, volverá a aparecer la hora actual en la pantalla. El aparato recordará la hora ajustada pero no estará activada la función de temporización. Pulse el botón de temporización para activar la función. El café empezará a salir a la hora establecida en el temporizador. Si desea anular la función de temporización, vuelva a pulsar el botón de temporización. Se apagará el indicador luminoso rojo del botón de temporización y desaparecerá el símbolo de la pantalla. Mientras no desenchufe el aparato, se recordará la hora del temporizador. Si quiere que el café se haga cada día a la misma hora, basta con pulsar 1x el botón de temporización para activar la función de temporización. El aparato recordará la hora previamente seleccionada y no es necesario volver a ajustar la hora. Si desea ajustar otra hora, repita los pasos arriba mencionados. Cuando tenga el temporizador ajustado y desea comprobar la hora, pulse unos segundos el botón de temporización. Se visualizará brevemente la hora. Si no aprieta otro botón, volverá a aparecer la hora actual. DO721K LIMPIEZA Y MANTENIMIENTO Atención: Retire el enchufe de la toma de corriente y deje que la unidad se enfríe antes de empezar a limpiar. Nunca sumerja el cable, el enchufe o el aparato en agua o en otros líquidos con el fin de evitar el riesgo de una descarga eléctrica. Asegúrese de que el enchufe está desconectado después de cada uso. · · · · Limpie la jarra de vidrio y el filtro extraíble en agua caliente con un detergente suave. Frote la carcasa del aparato con un paño suave y húmedo para eliminar las manchas. Si es necesario, después del uso, limpie las gotas de condensación del aparato. Utilice un paño húmedo para limpiar la placa para mantener la temperatura. Nunca utilice productos abrasivos. DESCALCIFICACIÓN ¿Cómo? 1. Llene la jarra con 1/4 de vinagre y 3/4 de agua fría. 2. Vierta la mezcla en el tanque de agua y encienda la cafetera. Deje que la mezcla pase por el filtro sin añadir café - y repita hasta que no salga líquido amarillo. 3. Vierta la mezcla. 4. Deje que el aparato funcione al menos dos veces más con agua, hasta que ya no quede olor a vinagre. ES ¿Cuándo? Descalcifique la cafetera regularmente. Una descalcificación regular asegura una calidad constante del café, menor consumo de energía y una prolongación de la vida útil de su cafetera. Cuando su uso es normal, se recomienda descalcificar el aparato cada 3 o 4 semanas. DIRECTRICES MEDIOAMBIENTALES El símbolo en el producto o en el embalaje indica que este producto no puede ser tratado como residuo doméstico. Se debe llevar a un lugar en el que se reciclan equipos eléctricos y electrónicos. Si se asegura de que este producto se desecha correctamente, usted ayudará a evitar posibles consecuencias negativas para las personas y el medio ambiente que serían causadospor un tratamiento de residuos inadecuado. Para obtener información más detallada sobre el reciclaje de este producto, póngase en contacto con su ayuntamiento, o con la empresa o departamento responsable del servicio de recogida de basura doméstica, o con la tienda donde adquirió el producto. El material de embalaje es reciclable. Trate el embalaje de una manera medioambientalmente responsable. www.domo-elektro.be DO721K 35 GARANZIA La garanzia dell’apparecchio è valida per 2 anni a partire dalla data di acquisto. Durante il periodo di validità della garanzia, il distributore si assume la piena responsabilità dei difetti dei materiali o di quelli di fabbricazione. In caso di presenza di tali difetti, se necessario, si procederà alla sostituzione o alla riparazione dell’apparecchio. Il periodo di garanzia di 2 anni non ricomincia in quel momento, ma continua per 2 anni dalla data di acquisto dell’apparecchio. Per la garanzia fa fede la data riportata sullo scontrino. Se l’apparecchio si rivela difettoso nel periodo di validità della garanzia, cioè 2 anni, potete portarlo, insieme allo scontrino, nel negozio dove l’avete acquistato. La garanzia sugli accessori e sui componenti soggetti a usura è di 6 mesi. La garanzia e la responsabilità del negoziante e del produttore decadono automaticamente nei seguenti casi: · mancata osservanza delle istruzioni contenute nel presente manuale; · errato collegamento, per esempio con tensione elettrica troppo alta; · uso errato, anormale e manesco; · manutenzione insufficiente o errata; · riparazione o modifiche all’apparecchio eseguite dal cliente o da terzi non autorizzati; · uso di accessori o componenti non raccomandati o forniti dal negoziante o dal produttore. INDICAZIONI DI SICUREZZA · · · · IT · · · · · · · · 36 Quando si utilizzano dispositivi elettrici, è necessario tenere presenti le seguenti istruzioni di sicurezza: Leggere con attenzione le presenti istruzioni. Conservare le istruzioni per possibili future consultazioni. Prima di utilizzare il prodotto, togliere tutti gli imballi e gli eventuali adesivi promozionali. Assicurarsi che i bambini non giochino con gli imballaggi. Questo apparecchio è destinato unicamente all’uso domestico e in ambienti analoghi, quali: · angoli cottura riservati al personale nei negozi, negli uffici e in altri ambienti professionali · Fattorie · Camere di alberghi, motel e altre strutture ricettive residenziali · Camere per vacanze o ambienti analoghi L’apparecchio può essere utilizzato da bambini di età superiore a 16 anni e da persone con ridotte capacità fisiche, sensoriali o mentali, o con mancanza di esperienza o conoscenza, solo se sorvegliati o se hanno ricevuto istruzioni sull’uso sicuro dell’apparecchio e ne comprendono i rischi. I bambini non possono giocare con l’apparecchio. Le operazioni di pulizia e di manutenzione non devono essere effettuate dai bambini di età inferiore a 16 anni e senza sorveglianza. Tenere l’apparecchio fuori dalla portata dei bambini di età inferiore a 16 anni. Togliere la spina dalla presa quando l’apparecchio non è in funzione, prima di montarne o smontarne i componenti e prima di pulirlo. Lasciare raffreddare l’apparecchio prima di montare o smontare i componenti e prima di pulirlo. Se il cavo di alimentazione è danneggiato, deve essere sostituito dal produttore, da un centro assistenza o da persone qualificate, questo per evitare incidenti. ATTENZIONE: per evitare il rischio di incidenti, l’apparecchio non deve essere utilizzato con strumenti esterni, come ad esempio un timer e non deve essere collegato a una rete che viene accesa e spenta in continuazione. L’apparecchio potrebbe surriscaldarsi durante il normale utilizzo. Consigliamo di afferrare l’apparecchio servendosi dell’impugnatura e di non toccarlo in altri punti per evitare ustioni. Non far funzionare l’apparecchio senza sorveglianza. Non utilizzare o conservare l’apparecchio all’aperto. DO721K · · · · · · · · · · · · · · · · · · · · · · · · Utilizzare l’apparecchio solo per lo scopo previsto. Prima dell’uso, controllare che il voltaggio riportato sull’apparecchio corrisponda a quello della rete elettrica domestica. Il cavo di alimentazione deve essere sempre collegato a una presa installata correttamente e con messa a terra in conformità alla normativa locale vigente. Non utilizzare mai l’apparecchio se il cavo di alimentazione o la spina sono danneggiati, dopo un malfunzionamento o quando è danneggiato. In questi casi, portare l’apparecchio al servizio assistenza post-vendita di DOMO o al centro assistenza autorizzato più vicino per farlo controllare, riparare o per apportare le necessarie modifiche elettriche o tecniche. Non cercare mai di riparare da soli l’apparecchio. Non immergere mai l’apparecchio, il cavo o la spina in acqua o in altri liquidi. Questo per evitare scosse elettriche o incendi. Non utilizzare l’apparecchio con le mani bagnate. L’apparecchio è munito di un cavo di alimentazione corto; se fosse più lungo, ci sarebbe pericolo di inciampare o di rimanere impigliati. NON UTILIZZARE MAI L’APPARECCHIO CON UNA PROLUNGA. Srotolare completamente il cavo di alimentazione per evitare che si surriscaldi. Non lasciare il cavo di alimentazione penzolante sul bordo del tavolo o della cucina ed evitare che venga a contatto con superfici calde. Non lasciare mai il cavo di alimentazione penzolante sotto l’apparecchio. Non posizionare mai l’apparecchio vicino a fornelli elettrici o a gas caldi, al lavandino o a un forno acceso. Non posizionare mai l’apparecchio vicino a materiali infiammabili, gas o esplosivi. Inserire il cavo di alimentazione nella presa solo dopo aver correttamente montato l’apparecchio. Per staccare l’apparecchio dalla presa, assicurarsi che sia su “OFF” o in posizione “0”. Solo dopo sarà possibile staccarlo dalla presa. Non tirare mai il cavo di alimentazione o l’apparecchio per staccare la spina dalla presa di corrente. Se l’apparecchio non viene pulito bene, la sua durata di vita può ridursi in modo drastico e possono verificarsi situazioni pericolose. Quando si riscalda l’acqua, è possibile che esca del vapore dal filtro o da altre aperture. Tenere le mani lontane dall’apparecchio quando è in funzione. Gli incidenti o i danni causati dalla mancata osservanza delle presenti istruzioni sono responsabilità dell’utilizzatore. Non possono essere ritenuti responsabili per tali danni né il produttore, né l’importatore, né il fornitore. Non riempire l’apparecchio oltre il livello massimo indicato. Fare attenzione a non versare nessun liquido sul cavo di alimentazione. Per la pulizia, l’apparecchio non deve essere immerso in acqua o in altri liquidi. Utilizzare solo gli accessori forniti insieme all’apparecchio. Non spostare mai l’apparecchio mentre è in uso o se è ancora caldo. Prima di spostare l’apparecchio, lasciarlo sempre raffreddare. Non utilizzare mai la macchina del caffè vuota. Assicurarsi che il serbatoio contenga sempre acqua quando l’apparecchio viene acceso. Non utilizzare l’apparecchio se la caraffa mostra segni di danneggiamento. Non appoggiare la caraffa calda su superfici bagnate o fredde. Non utilizzare mai la macchina del caffè senza il coperchio sulla caraffa. Non lasciare mai la caraffa vuota sulla piastra riscaldante. Potrebbe rompersi. IT · · CONSERVARE LE ISTRUZIONI PER POSSIBILI FUTURE CONSULTAZIONI www.domo-elektro.be DO721K 37 COMPONENTI 1. 2. 3. 4. 5. 6. 7. 8. 9. 10. 11. 12. 13. 14. Recipiente per caffè in grani Serbatoio dell’acqua Indicazione di livello del serbatoio Manopola di selezione del grado di macinatura Pannello di controllo con display LCD Pulsante di apertura del filtro mobile Filtro mobile Supporto del filtro 7 Filtro permanente Coperchio del portafiltro Salvagoccia Caraffa in vetro da 1,5 litri Maniglia caraffa in vetro Piastra riscaldante 10 1 9 2 4 3 6 5 8 11 13 12 14 PANNELLO DI CONTROLLO IT 15. 16. 17. 18. 19. 20. 21. Tasto timer Tasto per caffè macinato Tasto per intensità del caffè Tasto di accensione/spegnimento Tasto ore Tasto minuti Tasto per quantità tazze 15 16 17 21 18 20 PRIMA DELL’USO · · Controllare la presenza di tutti gli accessori e che l’apparecchio non sia danneggiato. Fare scendere prima un po’ d’acqua, senza aggiungere caffè. Riempire il serbatoio dell’acqua fino al massimo livello, accendere la macchina del caffè e lasciarla svuotare una o due volte. Buttare l’acqua e lavare accuratamente con acqua calda il filtro, il supporto del filtro, la caraffa e il coperchio. UTILIZZO IMPOSTAZIONE DELL’ORA 38 19 1. 2. 3. Inserire la spina nella presa di corrente. Sul display appare “12:00”. Premere il tasto di accensione/spegnimento. Sul display lampeggia “12:00”. Premere il tasto ore fino a far comparire sul display l’ora giusta. 4. 5. Premere il tasto minuti fino a far comparire sul display i minuti giusti. Se non si premono più tasti, l’orario viene confermato DO721K FARE IL CAFFÈ CON CAFFÈ IN GRANI 1. Aprire il serbatoio dell’acqua e versarvi la quantità di acqua desiderata usando la caraffa in vetro. Non superare l’indicazione di livello massimo. 2. Premere il pulsante per aprire il filtro mobile. 3. Inserire il filtro permanente o un filtro in carta nel portafiltro. Assicurarsi che il portafiltro sia posizionato correttamente nell’apparecchio. Posizionare il coperchio del portafiltro e riportare il filtro mobile nell’apparecchio. 4. Aprire il recipiente per caffè in grani. Versarvi il caffè in grani e rimettere il coperchio sul recipiente. Non mettere mai più di 200 g di chicchi di caffè nel recipiente per caffè in grani. 5. Mettere la caraffa sul piatto di tenuta in caldo, sotto il fermagoccia. 6. Inserire la spina nella presa elettrica e premere il tasto di accensione/spegnimento . Impostare il tempo secondo le linee guida. 7. Premere il tasto per la quantità di tazze fino a far comparire sul display la quantità desiderata. È possibile scegliere tra 2, 4, 6, 8, 10 o 12 tazze. Assicurarsi che la quantità di acqua nel serbatoio dell’acqua corrisponda a tale quantità. Se non si preme questo tasto, l’impostazione predefinita è 12 tazze. 8. Premere il tasto per l’intensità del caffè per scegliere l’intensità: · leggero · medio · forte 9. Girare la manopola di selezione del grado di macinatura per scegliere il grado di macinatura dei chicchi. Se si gira la manopola in direzione dei chicchi piccoli, il caffè sarà macinato più finemente e quindi avrà un sapore più intenso. Se si gira la manopola in direzione dei chicchi più grandi, il caffè sarà macinato meno finemente. 10. Premere il tasto di accensione/spegnimento . Il macinacaffè inizia a macinare, dopo alcuni secondi compare il simbolo sul display e il caffè comincia ad essere erogato. 11. Quando il caffè sarà pronto, si udirà un segnale acustico e il simbolo scomparirà dal display. 1. 2. 3. 4. 5. 6. 7. 8. Aprire il serbatoio dell’acqua e versarvi la quantità di acqua desiderata usando la caraffa in vetro. Non superare l’indicazione di livello massimo. Premere il pulsante per aprire il filtro mobile. Inserire il filtro permanente o un filtro in carta nel portafiltro. Assicurarsi che il portafiltro sia posizionato correttamente nell’apparecchio. Versare nel filtro la quantità di caffè macinato desiderata. Posizionare il coperchio del portafiltro e riportare il filtro mobile nell’apparecchio. Mettere la caraffa sul piatto di tenuta in caldo, sotto il fermagoccia. Inserire la spina nella presa elettrica e premere il tasto di accensione/spegnimento . Impostare il tempo secondo le linee guida. Premere il tasto per la quantità di tazze fino a far comparire sul display la quantità desiderata. È possibile scegliere tra 2, 4, 6, 8, 10 o 12 tazze. Assicurarsi che la quantità di acqua nel serbatoio dell’acqua corrisponda a tale quantità. Se non si preme questo tasto, l’impostazione predefinita è 12 tazze. Premere il tasto per caffè macinato . Questo si accendere di colore rosso. www.domo-elektro.be DO721K IT FARE IL CAFFÈ CON CAFFÈ MACINATO 39 9. 10. · · · · · · Premere il tasto di accensione/spegnimento . L’indicatore luminoso si accenderà di colore rosso e il caffè comincerà ad essere erogato. Sul display compare il simbolo . Quando il caffè sarà pronto, si udirà un segnale acustico e il simbolo scomparirà dal display. È possibile togliere la caraffa dalla macchina in ogni momento per al massimo 30 secondi e versare il caffè. L’apparecchio smette automaticamente di gocciolare. La quantità finale di caffè sarà sempre leggermente inferiore alla quantità di acqua iniziale, perché il caffè assorbe. Fare attenzione quando si versa il caffè, perché è molto caldo. Per ragioni di sicurezza, si consiglia di non togliere il coperchio dalla caraffa in vetro. In questo modo, il caffè rimarrà anche più caldo. L’apparecchio mantiene caldo il caffè per 40 minuti e poi si spegne automaticamente. Per gustare un ottimo caffè, servirlo immediatamente. Assicurarsi sempre che la macchina del caffè sia spenta e togliere sempre la spina dalla presa di corrente quando l’apparecchio non è in uso. SUGGERIMENTI PER AVERE UN BUON CAFFÈ · · · Per preparare un buon caffè, è essenziale che la macchina sia sempre pulita. Lavarla quindi con regolarità seguendo le istruzioni. Utilizzare sempre acqua fresca. Conservare il caffè in un luogo fresco e asciutto. Non riutilizzare il caffè, perché il gusto si ridurrà moltissimo. Si sconsiglia anche di riscaldare il caffè. IMPOSTAZIONE TIMER IT 1. 2. 3. 4. 5. 6. · · · 40 Assicurarsi che il tempo sia stato impostato correttamente. Preparare la macchina del caffè come descritto in “Utilizzo”, ma non premere il tasto on/off. Premere il tasto timer per 5 secondi. L’ora sul display lampeggerà. Premere il tasto delle ore e dei minuti per impostare il timer. Premere ancora una volta il tasto timer per confermare. A questo punto l’indicatore luminoso si accende in rosso e sul display compare il simbolo . Se non si preme tasto timer per confermare, sul display compare di nuovo l’ora attuale. L’ora impostata viene memorizzata ma la funzionalità timer non è attivata. Premere ancora una volta il tasto timer per attivare la funzionalità. Il caffè inizia a scendere secondo l’impostazione del timer. Per annullare la funzionalità timer, premere di nuovo il tasto timer. L’indicatore luminoso rosso del tasto timer si spegne e il simbolo scompare dal display. Se la spina non viene scollegata dalla presa elettrica, l’orario del timer rimane memorizzato. Se si desidera far avviare la preparazione del caffè quotidianamente alla stessa ora, è sufficiente premere una volta il tasto timer per attivare la funzionalità timer. L’apparecchio memorizza l’orario impostato precedentemente e non occorre impostarlo di nuovo. Se si desidera impostare un nuovo orario, procedere come descritto sopra. Se il timer è impostato e si desidera verificare quale orario è stato selezionato, premere per alcuni secondi il tasto timer. L’orario compare brevemente. Se non si premono tasti, ricompare l’ora attuale. DO721K PULIZIA E MANUTENZIONE Attenzione: Togliere la spina dalla presa di corrente e lasciare raffreddare completamente l’apparecchio prima di pulirlo. Non immergere mai l’apparecchio, il cavo o la spina in acqua o in altri liquidi, per evitare il rischio di scosse elettriche. Dopo ogni utilizzo, assicurarsi di togliere la spina dalla presa di corrente. · · · · Pulire la caraffa di vetro e il filtro rimovibile con acqua calda e un detergente neutro. Pulire la parte esterna dell’apparecchio con un panno morbido e umido per togliere le macchie. Dopo l’uso, eliminare eventuali gocce di condensa dall’apparecchio. Utilizzare un panno umido per pulire la piastra riscaldante dell’apparecchio. Non utilizzare mai prodotti abrasivi. DECALCIFICAZIONE Quando? La macchina del caffè deve essere decalcificata con regolarità. La regolare decalcificazione garantisce la qualità costante del caffè, un minore utilizzo di energia e prolunga la durata di vita della macchina. In condizioni d’uso normale, il nostro consiglio è di decalcificare la macchina ogni 3/4 settimane. Come? 1. Riempire la caraffa con 1/4 di aceto e 3/4 di acqua fredda. 2. Mettere la miscela nel serbatoio dell’acqua e accendere la macchina. Lasciare colare il liquido, senza aggiungere caffè, e ripetere l’operazione fino a quando il liquido che esce non è più giallo. 3. Buttare la miscela di acqua e aceto. 4. Fare funzionare l’apparecchio per almeno 2 volte solo con acqua, per eliminare completamente l’odore dell’aceto. Il simbolo sul prodotto o sulla confezione indica che esso non deve essere trattato come rifiuto domestico. Deve, al contrario, essere conferito al punto di raccolta predisposto per il riciclo delle apparecchiature elettriche ed elettroniche. Facendo in modo che questo prodotto venga smaltito correttamente aiuterete a prevenire potenziali conseguenze negative per l’ambiente e la salute dell’uomo, che potrebbero essere causate da uno smaltimento non corretto. Per maggiori informazioni sul riciclo di questo prodotto, consultare le autorità comunali, l’azienda o il servizio responsabili della raccolta dei rifiuti domestici o il negozio in cui il prodotto è stato acquistato. IT MISURE AMBIENTALI Il materiale di imballaggio è riciclabile. Lo smaltimento dell’imballaggio deve avvenire al fine di tutelare l’ambiente. www.domo-elektro.be DO721K 41 ZÁRUKA Práva a povinnosti prodávajícího a kupujícího ohledně práv z vadného plnění se řídí příslušnými obecně závaznými předpisy dle občanského zákoníku. 1. Trvání záruky: 2 roky 2. Záruka se nevztahuje a) na mechanické poškození b) nesprávné používání v rozporu s návodem k použití 3. Záruka zaniká: - při použití spotřebiče jinak než v je uvedeno v manuálu (nesprávným postupem) - při provádění opravy nebo změny na spotřebiči osobou jinou než pověřenou naším servisem CZ Prodávající odpovídá kupujícímu, že zboží při převzetí nemá vady. Zejména prodávající odpovídá kupujícímu, že v době, kdy kupující zboží převzal: · má zboží takové vlastnosti, které výrobce v tomto návodu popisuje, · se zboží hodí k účelu, ke kterému výrobce uvádí, · zboží odpovídá jakostí nebo provedením smluvenému vzorku nebo předloze, byla-li jakost nebo provedení určeno podle smluveného vzorku nebo předlohy, · zboží vyhovuje požadavkům právních předpisů. Projeví-li se vada v průběhu šesti měsíců od převzetí, má se za to, že zboží bylo vadné již při převzetí. Pokud není u výrobku uvedeno jinak, činí záruční doba 24 měsíců. Záruční doba počíná běžet od převzetí věci kupujícím. Práva z vadného plnění uplatňuje kupující u prodávajícího na adrese jeho provozovny, v níž je přijetí reklamace možné s ohledem na sortiment prodávaného zboží, případně i v sídle nebo místě podnikání. Za okamžik uplatnění reklamace se považuje okamžik, kdy prodávající obdržel od kupujícího reklamované zboží. Reklamaci lze také uplatnit v servisním středisku na adrese DOMO-elektro s.r.o., Na Kobyle 783, 345 06 Kdyně, Česká republika, tel. (+420) 379 422 550, [email protected] Pro rychlé a bezproblémové vyřízení reklamace doporučujeme přiložit k reklamaci doklad o koupi a průvodní dopis s popisem závady a zpáteční adresou s telefonickým kontaktem. 42 BEZPEČNOSTNÍ POKYNY Při používání jakkéhokoli el. spotřebiče dbejte zvýšené opatrnosti a dodržujte určitá bezpečnostní pravidla: · Pečlivě si přečtěte tyto informace a manuál nechte i pro pozdější nahlédnutí. · Ujistěte se, že před použitím odlepíte a odstraníte veškeré reklamní a ochranné fólie. · Děti si s ochrannými ani reklamními polepy nesmí hrát. · Přístroj je určen pro používání v domácnostech a podobných prostředích, tak jako je: · kuchyňky v obchodech, kancelářích atd. · chaty, chalupy · hotely, penziony a jiné dočasné ubytování · Dohlédněte, aby si děti nehrály s přístrojem. DO721K · · · · · · · · · · · · · · · · · · · · · · · · · · · Tento spotřebič mohou používat děti ve věku 16 let a starší a osoby se sníženými fyzickými, smyslovými nebo mentálními schopnostmi, nebo nedostatkem zkušeností a znalostí pokud jsou pod neustálým dozorem nebo byly poučeny o používání spotřebiče bezpečným způsobem a rozumí případným nebezpečím. Děti si s přístrojem nesmějí hrát. Čištění a údržbu prováděnou uživatelem nesmějí provádět děti bez dozoru. Čistění a běžnou údržbu smí provádět pouze osoby starší 16 let a při tom být pod dohledem. Přístroj a jeho el. kabel skladujte mimo dosah dětí. Pokud přístroj nepoužíváte, nebo se jej chystáte rozebírat či měnit součásti, tak ho odpojte od el. napětí. Před rozebírání, skládáním i před čistěním, vždy nechte přístroj dostatečně vychladnout. Nikdy netahejte přímo za kabel, vypojujte za zástrčku. Pokud je přívodní kabel poškozen, musí být vždy okamžitě opraven v odborném servise nebo proškolenou osobou. POZOR: tento přístroj nesmí být používán s žádnou externí součástkou (např. časovač …) ani jiné dálkové ovládání. Povrch přístroje může být během používání horký, proto doporučujeme se ho během procesu pečení nedotýkat. Nikdy nenechávejte spuštěný přístroj bez dozoru. Nikdy nepoužívejte přístroj venku. Nikdy nepoužívejte jinak, než je zamýšleno a určeno výrobcem. Před použitím zkontrolujte, zda parametry el. sítě odpovídají požadovaným parametrům na informativním štítku přístroje. Pokud je přístroj nebo přívodní kabel poškozený, nikdy se ho nesnažte opravit sami doma. Vždy ho svěřte odbornému servisu DOMO, který jej prohlédne a případně opraví. Abyste se vyvarovali úrazu elektrickým proudem nebo popáleninám, nesmíte nikdy potápět kabel, síťovou zástrčku nebo samotný přístroj do vody nebo jiných tekutin. Nesahejte na přístroj s mokrýma rukama. Kratší přivodní kabel je vyráběn záměrně, aby se snížilo riziko zakopnutí či strhnutí přístroje ze stolu. Nepoužívejte prodlužovací kabely. Vždy přívodní kabel kompletně odmotejte, aby se předešlo přehřívání tohoto kabelu. Nenechávejte viset kabel přístroje přes ostré hrany a vyvarujte se toho, aby přišel do styku s horkými plochami. Přívodní kabel nikdy nesmí být pod přístrojem ani omotán kolem něj. Neumisťujte přístroj v blízkosti el. sporáků či trub, ani na místech kde je zvýšené teplo. Neumisťujte přístroj do blízkosti hořlavých ani vznětlivých materiálů. Ujistěte se, že je přístroj dobře sestaven a až poté zapojte do el. sítě. Před odpojením z el. sítě vždy vypojte hlavní vypínač do polohy „0“ nebo „OFF“ a až poté odpojte. Nikdy netahejte za kabel, vždy odpojujte přímo tahem za pevnou zástrčku. Zanedbaná údržba a nečistoty mohou vést ke zkrácené životnosti přístroje. Při extrémní nečistotě dokonce hrozí riziko požáru. Během procesu vaření je pravděpodobné, že z něj bude pářit velmi horká pára. Buďte opatrní a držte obličej i ruce v bezpečné vzdálenosti. Vždy používejte dle doporučeného návodu. Výrobce ani prodejce není schopen nést vzniklé riziko z důvodu špatného použití. Do přístroje nikdy nelijte více vody než je vyznačené povolené maximum. Zamezte, aby se voda nedostala do útrob přístroje ani na hřející plotýnku. Přístroj ani nesmí být ponořen do vody, a to ani při čištění. Ke kávovaru používejte pouze originální součásti a příslušenství. www.domo-elektro.be DO721K CZ · 43 · Nemanipulujte s přístrojem, pokud je zapojen a právě ohřívá. Vždy nechte přístroj vychladnout, až potom přemisťujte. Přístroj nezapínejte na prázdno (bez vody). Přístroj vždy používejte na stabilním, rovném a suchém místě. · · NÁVOD SI USCHOVEJTE PRO POZDĚJŠÍ NAHLÉDNUTÍ ČÁSTI 1. 2. 3. 4. 5. 6. 7. 8. 9. 10. 11. 12. 13. 14. Zásobník na kávová zrna Zásobník vody Vodoznak Regulace hrubosti mletí Ovládací panel s LCD displejem Tlačítko otevření prostoru s filtrem Adaptér na držák filtrů Držák filtru Permanentní filtr Víko nad filtrem Ventil se zabráněním odkapu 7 Skleněná konvice 1,5 l Rukojeť Nahřívací plotýnka 10 1 9 2 4 3 6 5 8 11 13 12 14 OVLÁDACÍ PANEL 15. 16. 17. 18. 19. 20. 21. Tlačítko časovače Použití mleté kávy Volba síly kávy Hlavní on/off vypínač Nastavení „hodin“ Nastavení „minut“ Volba objemu (počet šálků) 15 16 18 19 20 CZ PŘED PRVNÍM POUŽITÍM · · 44 17 21 Zkontrolujte všechno příslušenství a části kávovaru, zda nejsou nějak viditelně poškozeny. Poprvé nechte překapat celý zásobník čisté vody bez kávy. Naplňte plný zásobník vody. Kávovar zapněte a nechte celý obsah převařit. Vodu vylijte a proces opakujte ještě jednou. Potom v teplé vodě umyjte držák filtru, filtr a celou konvici. Po umytí je přístroj připraven k používání. DO721K POUŽITÍ NASTAVENÍ ČASU 1. 2. 3. 4. 5. Zasuňte zástrčku do zásuvky. Na displeji se zobrazí “12:00”. Po stisknutí tlačítka on/off se na displeji rozbliká „12:00“. nastavte správnou hodinu. Tlačítkem pro nastavení hodin Následně stiskněte tlačítko minut a nastavte správně i minuty. Pokud nestisknete žádná další tlačítka (chvíli nic nemačkejte),tak se nastavený čas potvrdí. PŘÍPRAVA KÁVY Z KÁVOVÝCH ZRN Otevřete zásobník vody a naplňte ho čistou vodou. Nikdy nepřekračujte maximální vyznačený objem vody v zásobníku. 2. Pomocí tlačítka na boku přístroje otevřete prostor s filtrem (výklopná část). 3. Do držáku filtru vložte permanentní filtr (nebo papírový filtr). Držák s filtrem usaďte na své místo do výklopného adaptéru. Uzavřete víkem a výklopnou část opět zavřete (zatlačte do přístroje). 4. Zásobník na kávové zrna otevřete a naplňte jej. Naplněný zásobník opět zavřete víkem. Zásobník pojme max 200g zrn, toto množství nikdy nepřekračujte. 5. Do prostoru nahřívací plotýnky a pod odkap vody položte prázdnou konvici. 6. Přístroj připojte do el. sítě a stiskněte tlačítko zapnutí / vypnutí . Nastavte čas podle pokynů. 7. Pomocí tlačítka množství šálků si zvolte objem. Mačkejte, dokud se na displeji neobjeví požadovaný počet šálků. Můžete si vybrat mezi 2, 4, 6, 8, 10 nebo 12 šálky. Důležité je, aby množství vody v zásobníku odpovídalo nastavené volbě objemu. Přednastavené výchozí nastavení, (pokud nic nestisknete) je 12 šálků. 8. Stisknutím tlačítka síly kávy určete sílu nápoje: · slabší · střední · silný 9. Otáčením regulace mlýnku si nastavte požadovanou hrubost mletí. Pokud otáčíte ovladačem na menší zrna, bude se káva mlýt jemnější a tím bude i chuťově silnější. Pokud otočíte knoflíkem na větší zrna, bude mletí hrubější. 10. Kávovar zapněte hlavním tlačítkem on/off . Mlýnek rovnou začne mlýt a po několika sekundách se na displeji zobrazí symbol . Následně se už začne káva překapávat a téct. 11. Jakmile je káva překapána a hotova, tak se ozve zvukový signál a zhasne příslušný symbol z displeje. CZ 1. PŘÍPRAVA KÁVY Z NAMLETÉ KÁVY 1. 2. 3. Otevřete zásobník vody a naplňte ho čistou vodou. Nikdy nepřekračujte maximální vyznačený objem vody v zásobníku. Pomocí tlačítka na boku přístroje otevřete prostor s filtrem (výklopná část). Do držáku filtru vložte permanentní filtr a ještě nejlépe kávový papírový filtr. Držák s filtrem usaďte na své místo do výklopného adaptéru. www.domo-elektro.be DO721K 45 4. 5. 6. 7. 8. 9. 10. · · · · · · Do filtru nasypte vámi zvolené množství již namleté kávy a držák uzavřete víkem. Výklopnou část opět zavřete (zatlačte do přístroje). Do prostoru nahřívací plotýnky a pod odkap umístěte prázdnou konvici. Přístroj připojte do el. sítě a stiskněte tlačítko zapnutí / vypnutí . Nastavte čas podle pokynů. si zvolte objem. Mačkejte, dokud se na displeji neobjeví Pomocí tlačítka množství šálků požadovaný počet šálků. Můžete si vybrat mezi 2, 4, 6, 8, 10 nebo 12 šálky. Důležité je, aby množství vody v zásobníku odpovídalo nastavené volbě objemu. Přednastavené výchozí nastavení, (pokud nic nestisknete) je 12 šálků. Nyní stiskněte tlačítko „použití mleté kávy“ , u kterého se rozsvítí červená kontrolka. Kávovar zapněte hlavním tlačítkem on/off . Rozsvítí se červená kontrolka a na displeji se zobrazí symbol . Káva se rovnou začne překapávat a téct. Jakmile je celý objem překapán a hotov, tak se ozve zvukový signál a zhasne příslušný symbol z displeje. Během procesu překapávání je možné kdykoli konvici vyjmout (max. na 30 vteřin) a nalít si kávu. Odkapávací ventil automaticky vypne a kávu zadrží po dobu těchto 30 vteřin. Je nutné konvici co nejdříve vrátit na své místo. Výsledný objem kávy bude o něco nižší než objem původní vody. Namletá káva totiž absorbuje část vody. Při nalévání kávy buďte opatrní, čerstvě překapaná káva je velmi horká. Z bezpečnostních důvodů doporučujeme mít neustále víko na konvici. Káva zůstane déle teplá a je to bezpečnější při nalévání. Po této maximální době přístroj automaticky vypne. Chcete-li si vychutnat tu pravou chuť kávy, je nejlepší kávu pít ihned po převaření. Po každé když se kávovar nepoužívá, musí být vypnutý a vypojený z el. sítě. RADY PRO PŘÍPRAVU KÁVY · · · Rozhodující je vždy čistý a udržovaný kávovar. Čistěte a odvápňujte dle níže popsaného návodu. Pro přípravu kávy používejte vždy čerstvě napuštěnou a studenou vodu. Zrnkovou kávu uchovávejte v chladu a suchu. Nepoužívejte kávu na vícekrát. Již jednou vylouhovaná a použitá káva není vhodná na další použití. Pokud již připravená káva vychladne, není dobré ji znovu ohřívat. Taková káva ztratí většinu aroma a nemusí být chutná. CZ NASTAVENÍ ČASOVAČE 1. 2. 3. 4. 5. 6. 46 Ujistěte se, že máte správně nastaven čas. Připravte přístroj pro přípravu kávy, jak je uvedeno v části ”Použití”, ale ještě nemačkejte tlačítko hlavního spínače. Stiskněte tlačítko časovače alespoň na 5 sekund. Na displeji se rozblikají číslice hodin. Pro nastavení časovače stiskněte tlačítko pro nastavení hodin a tlačítko pro nastavení minut. Opětovným stiskem časovače potvrďte nastavení. Kontrolka se rozsvítí červeně a na displeji se zobrazí symbol . Pokud byste nastavení nepotvrdili dalším stiskem časovače, tak se na displeji znovu objeví aktuální čas (hodiny). Nastavení sice bude zapamatováno, ale časovač nebude aktivován. Funkci je vždy potřeba aktivovat ještě stiskem tlačítka časovače. Káva se začne připravovat v době, která byla nastavena pomocí časovače. DO721K · · · Pokud chcete časovač vyrušit/vypnout, tak stačí znovu stisknout tlačítko časovače. Červená kontrolka časovače zhasne a z displeje zmizí symbol . Dokud bude kávovar zapojen v el. síti, tak bude nastavení časovače v paměti. Pro ulehčení práce tedy lze shrnout tak, že pokud chcete, abyste měli každý den ve stejnou hodinu teplou čerstvou kávu, tak stačí pouze zapnout funkci časovače (1 stisk tlačítka). Přístroj si pamatuje dříve vybraný čas a ve stejnou hodinu se automaticky spustí. Jestliže chcete nastavit jiný čas, musíte přenastavit dle výše popsaných kroků. Pokud máte časovač nastaven a chcete jen zjistit na jakou hodinu, tak můžete na několik vteřin podržet tlačítko časovače. Na displeji se vám krátce zobrazí hodina nastavení. Pokud už dále nic nestisknete, tak se znovu zobrazí pouze aktuální čas (hodiny). ČIŠTĚNÍ A ÚDRŽBA POZOR: Před čištěním nechte přístroj zcela vychladnout. Nikdy neponořujte přívodní kabel ani přístroj pod vodu (riskujete úraz el. proudem a poškození přístroje). Po každém použití přístroj odpojte z el. sítě. · · · · Vyčistěte skleněnou nádobu a odnímatelný filtr v horké vodě jemný mycím prostředkem. Povrch přístroje otírejte měkkým vlhkým hadříkem. Pro otírání nahřívací plotýnky používejte pouze měkký navlhčený hadřík. Nikdy nepoužívejte abrazivní čistidla. ODVÁPNĚNÍ Kdy? Kávovar je potřeba pravidelně odvápňovat. Pravidelně odvápňovaný kávovar zaručuje stále stejnou kvalitu kávy, menší spotřebu energie a delší životnost vašeho přístroje. Při klasickém používání doporučujeme odvápňovat každé 3-4 týdny. CZ Jak? 1. Nalijte ¼ konvice bílého octa a ¾ studené vody. 2. Tuto směs nalijte do zásobníku a kávovar zapněte. Bez jakkéhokoli přidání kávy nebo čaje nechte překapat. Celý proces opakujte až do chvíle, kdy bude překapaná voda čirá. 3. Octovou znečištěnou vodu vylijte. 4. Do kávovaru nalijte čistou vodu a převařte. Vodu vylijte a opět opakujte proces s čistou vodou až do chvíle kdy z kávovaru zmizí zápach octa. Přístroj vypněte. www.domo-elektro.be DO721K 47 OHLED NA ŽÍVOTNÍ PROSTŘEDÍ Symbol na přístroji či na jeho obalu znamená, že s tímto výrobkem není možno nakládat jako s běžným domovním odpadem, nýbrž musí být odevzdán na místech určených ke sběru a likvidaci elektrických a elektronických zařízení. Dodržením tohoto doporučení chráníte životní prostředí a zdraví spoluobčanů. Více informací o možnostech likvidace nebezpečného odpadu obdržíte na obecních nebo městských úřadech, sběrných dvorech nebo v prodejně, kde jste přístroj zakoupili. CZ Obalové materiály jsou recyklovatelné, nakládejte s nimi podle předpisů pro životní prostředí. 48 DO721K ZÁRUKA Práva a povinnosti predávajúceho a kupujúceho ohľadom práv z chybného plnenia sa riadi príslušnými všeobecne záväznými predpismi podľa občianskeho zákonníka. 1. Trvanie záruky: 2 roky 2. Záruka sa nevzťahuje a) na mechanické poškodenie b) nesprávne používanie v rozpore s návodom na použitie 3. Záruka zaniká: - pri použití spotrebiča inak ako v je uvedené v manuále (nesprávnym postupom) - pri vykonávaní opravy alebo zmeny na spotrebiči osobou inou než poverenou naším servisom Predávajúci zodpovedá kupujúcemu, že tovar pri prevzatí nemá vady. Najmä predávajúci zodpovedá kupujúcemu, že v čase, keď kupujúci tovar prevzal: · má tovar také vlastnosti, ktoré výrobca v tomto návode popisuje, · sa tovar hodí k účelu, ku ktorému výrobca uvádza, · tovar zodpovedá kvalitou alebo prevedením dohovorené vzorky alebo predlohe, ak bola akosť alebo prevedenie určené podľa dohodnutého vzorky alebo predlohy, · tovar vyhovuje požiadavkám právnych predpisov. Ak sa prejavia vada v priebehu šiestich mesiacov od prevzatia, má sa za to, že tovar bol chybný už pri prevzatí. Pokiaľ nie je pri výrobku uvedené inak, je záručná doba 24 mesiacov. Záručná doba začína plynúť od prevzatia veci kupujúcim. Práva z chybného plnenia uplatňuje kupujúci u predávajúceho na adrese jeho prevádzky, v ktorej je prijatie reklamácie možné s ohľadom na sortiment predávaného tovaru, prípadne aj v sídle alebo mieste podnikania. Za okamih uplatnenia reklamácie sa považuje okamih, kedy predávajúci dostal od kupujúceho reklamovaný tovar. Reklamáciu možno tiež uplatniť v servisnom stredisku na adrese DOMO-elektro s.r.o., Na Kobyle 783, 345 06 Kdyně, Česká republika, tel. (+420) 379 422 550, [email protected] Pre rýchle a bezproblémové vybavenie reklamácie odporúčame priložiť k reklamácii doklad o kúpe a sprievodný list s popisom závady a spiatočnou adresou s telefonickým kontaktom. · · · · · · Pri používaní jakkéhokoli el. spotrebiče dbajte na zvýšenú opatrnosť a dodržujte určitá bezpečnostné pravidlá: Starostlivo si prečítajte tieto informácie a manuál nechajte aj k neskoršiemu nahliadnutiu. Uistite sa, že pred použitím odlepíte a odstránite všetky reklamné a ochranné fólie. Deti sa s ochrannými ani reklamnými polepy nesmie hrať. Prístroj je určený pre používanie v domácnostiach a podobných prostrediach, tak ako je: · kuchynky v obchodoch, kanceláriách atď. · chaty, chalupy · hotely, penzióny a iné dočasné ubytovanie Dohliadnite, aby sa deti nehrali s prístrojom. www.domo-elektro.be DO721K SK BEZPEČNOSTNÉ POKYNY 49 · · · · · · · · · · · · · · · · · · · · · · SK · 50 · · · · · Tento spotrebič môžu používať deti vo veku 16 rokov a staršie a osoby so zníženými fyzickými, zmyslovými alebo mentálnymi schopnosťami, alebo nedostatkom skúseností a znalostí ak sú pod neustálym dozorom alebo boli poučené o používaní spotrebiča bezpečným spôsobom a rozumejú prípadným nebezpečenstvám. Deti si s prístrojom nesmú hrať. Čistenie a údržbu vykonávanú používateľom nesmú vykonávať deti bez dozoru. Čistenie a bežnú údržbu môžu vykonávať len osoby staršie ako 16 rokov a pri tom byť pod dohľadom. Prístroj a jeho el. kábel skladujte mimo dosahu detí. Pokiaľ prístroj nepoužívate, alebo sa ho chystáte rozoberať či meniť súčasti, tak ho odpojte od el. napätia. Pred rozoberanie, skladaním aj pred čistením, vždy nechajte prístroj dostatočne vychladnúť. Nikdy neťahajte priamo za kábel, vypojujte za zástrčku. Pokiaľ je prívodný kábel poškodený, musí byť vždy okamžite opravený v odbornom servise alebo preškolenou osobou. POZOR: tento prístroj nesmie byť používaný s žiadnu externú súčiastkou (napr. časovač ...) ani iné diaľkové ovládanie. Povrch prístroja môže byť počas používania horúci, preto odporúčame sa ho počas procesu pečenia nedotýkať. Nikdy nenechávajte spustený prístroj bez dozoru. Nikdy nepoužívajte prístroj vonku. Nikdy nepoužívajte inak, než je zamýšľané a určené výrobcom. Pred použitím skontrolujte, či parametre el. siete odpovedajú požadovaným parametrom na informatívnym štítku prístroja. Pokiaľ je prístroj alebo prívodný kábel poškodený, nikdy sa ho nesnažte opraviť sami doma. Vždy ho zverte odbornému servisu DOMO, ktorý ho prezrie a prípadne opraví. Aby ste zabránili úrazu elektrickým prúdom, nesmiete nikdy potápať kábel, sieťovú zástrčku alebo samotný prístroj do vody alebo iných tekutín. Nesiahajte na prístroj s mokrými rukami. Kratšie prívodný kábel je vyrábaný zámerne, aby sa znížilo riziko zakopnutia či strhnutí prístroja zo stola. Nepoužívajte predlžovacie káble. Vždy prívodný kábel kompletne odmotajte, aby sa predišlo prehrievaniu tohto kábla. Nenechávajte visieť kábel prístroja cez hranu stola a vyvarujte sa toho, aby prišiel do styku s horúcimi plochami. Prívodný kábel nikdy nesmie byť pod prístrojom ani omotaný okolo neho. Neumiestňujte prístroj v blízkosti el. sporákov či rúr, ani na miestach kde je zvýšené teplo. Neumiestňujte prístroj do blízkosti horľavých ani horľavých materiálov. Uistite sa, že je prístroj dobre zostavený a až potom zapojte do el. siete. Pred odpojením z el. siete vždy vypojte hlavný vypínač do polohy “0” alebo “OFF” a až potom odpojte. Nikdy neťahajte za kábel, vždy odpájajte priamo ťahom za pevnú zástrčku. Zanedbaná údržba a nečistoty môžu viesť ku skrátenej životnosti prístroja. Pri extrémnej nečistote dokonca hrozí riziko požiaru. Počas procesu varenia je pravdepodobné, že z neho bude páriť veľmi horúca para. Buďte opatrní a držte tvár aj ruky v bezpečnej vzdialenosti. Vždy používajte podľa odporúčaného návodu. Výrobca ani predajca nie je schopný znášať vzniknuté riziko z dôvodu zlého použitia. Prístroj zapájajte iba do uzemnenej zásuvky, ktorá zodpovedá miestnym normám. Do prístroja nikdy nelejte viac vody ako je vyznačené povolené maximum. Zamedzte, aby sa voda nedostala do útrob prístroja ani na hrejúce platničku. Prístroj ani nesmie byť ponorený do vody, a to ani pri čistení. DO721K · · Ku kávovaru používajte iba originálne súčasti a príslušenstvo. Nemanipulujte s prístrojom, ak je zapojený a práve ohrieva. Vždy nechajte prístroj vychladnúť, až potom premiestňujte. Prístroj nezapínajte naprázdno (bez vody). Prístroj vždy používajte na stabilnom, rovnom, suchom mieste. · · NÁVOD SI USCHOVAJTE PRE NESKORŠIU NAHLIADNUTIU ČASTI 1. 2. 3. 4. 5. 6. 7. 8. 9. 10. 11. 12. 13. 14. 10 Zásobník na kávové zrná Zásobník vody Vodoznak 9 Regulácia hrubosti mletia Ovládací panel s LCD displejom Tlačidlo otvorenie priestoru s filtrom Adaptér na držiak filtrov 8 Držiak filtra Permanentný filter Veko nad filtrom 7 Ventil sa zabránením odkvapu Sklenená kanvica 1,5 l Rukoväť Nahrievacia platnička OVLÁDACÍ PANEL 15. 16. 17. 18. 19. 20. 21. Tlačidlo časovača Použitie mletej kávy Voľba sily kávy Hlavné on/off vypínač Nastavenie “hodín” Nastavenie “minút” Voľba objemu (počet šálok) 1 2 4 3 6 5 11 13 12 14 15 16 17 21 18 19 20 · · Skontrolujte všetko príslušenstvo a časti kávovaru, či nie sú nejako viditeľne poškodené. Prvýkrát nechajte prekvapkať celý zásobník čistej vody bez kávy. Naplňte plný zásobník vody. Kávovar zapnite a nechajte celý obsah prevariť. Vodu vylejte a proces opakujte ešte raz. Potom v teplej vode umyte držiak filtra, filter a celú kanvicu. Po umytí je prístroj pripravený na používanie. www.domo-elektro.be DO721K SK PRED PRVÝM POUŽITÍM 51 POUŽITIE NASTAVENIE ČASU 1. 2. 3. 4. 5. Zasuňte zástrčku do zásuvky. Na displeji sa zobrazí “12:00”. Po stlačení tlačidla on/off sa na displeji rozbliká “12:00”. nastavte správnu hodinu. Tlačidlom pre nastavenie hodín Následne stlačte tlačidlo minút a nastavte správne aj minúty. Pokiaľ nestlačíte žiadne ďalšie tlačidlá (chvíli nič nestláčajte), tak sa nastavený čas potvrdí. PRÍPRAVA KÁVY Z KÁVOVÝCH 1. Otvorte zásobník vody a naplňte ho čistou vodou. Nikdy neprekračujte maximálny vyznačený objem vody v zásobníku. 2. Pomocou tlačidla na boku prístroja otvorte priestor s filtrom (výklopná časť). 3. Do držiaka filtra vložte permanentný filter (alebo papierový filter). Držiak s filtrom usaďte na svoje miesto do výklopného adaptéra. Uzavrite vekom a výklopnou časť opäť zatvorte (zatlačte do prístroja). 4. Zásobník na kávové zrná otvorte a naplňte ho. Naplnený zásobník opäť zavrite vekom. Zásobník pojme max 200g zŕn, toto množstvo nikdy neprekračujte. 5. Do priestoru nahrievacie platničky a pod odkvap vody položte prázdnu kanvicu. 6. Prístroj pripojte do el. siete a stlačte tlačidlo on/off . Nastavte čas podľa pokynov. 7. Pomocou tlačidla množstvo šálok si zvoľte objem. Stláčajte, kým sa na displeji neobjaví požadovaný počet šálok. Môžete si vybrať medzi 2, 4, 6, 8, 10 alebo 12 šálky. Dôležité je, aby množstvo vody v zásobníku zodpovedalo nastavenej voľbe objemu. Prednastavené východiskové nastavenie, (ak nič nestlačíte) je 12 šálok. 8. Stlačením tlačidla sily kávy určte silu nápoja: · slabšie · stredná · silný 9. Otáčaním regulácia mlynčeka si nastavte požadovanú hrubosť mletia. Ak otáčate ovládačom na menšie zrná, bude sa káva mlýt jemnejšie a tým bude aj chuťovo silnejší. Ak otočíte gombíkom na väčšie zrná, bude mletie hrubší. 10. Kávovar zapnite hlavným tlačidlom on/off . Mlynček rovno začne mlýt a po niekoľkých sekundách sa na displeji zobrazí symbol . Následne sa už začne káva prekvapkávať a tiecť. 11. Akonáhle je káva překapána a hotová, tak sa ozve zvukový signál a zhasne príslušný symbol z displeja. PRÍPRAVA KÁVY Z MLETÉ KÁVY 1. SK 2. 3. 4. 52 Otvorte zásobník vody a naplňte ho čistou vodou. Nikdy neprekračujte maximálny vyznačený objem vody v zásobníku. Pomocou tlačidla na boku prístroja otvorte priestor s filtrom (výklopná časť). Do držiaka filtra vložte permanentný filter a ešte najlepšie kávový papierový filter. Držiak s filtrom usaďte na svoje miesto do výklopného adaptéra. Do filtra nasypte vami zvolené množstvo už namletej kávy a držiak uzavrite vekom. Výklopnou časť opäť zatvorte (zatlačte do prístroja). DO721K 5. 6. 7. 8. 9. 10. · · · · · · Do priestoru nahrievacie platničky a pod odkvap umiestnite prázdnu kanvicu. Prístroj pripojte do el. siete a stlačte tlačidlo on/off Nastavte čas podľa pokynov. Pomocou tlačidla množstvo šálok si zvoľte objem. Stláčajte, kým sa na displeji neobjaví požadovaný počet šálok. Môžete si vybrať medzi 2, 4, 6, 8, 10 alebo 12 šálky. Dôležité je, aby množstvo vody v zásobníku zodpovedalo nastavenej voľbe objemu. Prednastavené východiskové nastavenie, (ak nič nestlačíte) je 12 šálok. , u ktorého sa rozsvieti červená kontrolka. Teraz stlačte tlačidlo “použitie mletej kávy” Kávovar zapnite hlavným tlačidlom on / off . Rozsvieti sa červená kontrolka a na displeji sa zobrazí symbol . Káva sa rovno začne prekvapkávať a tiecť. Akonáhle je celý objem překapán a hotový, tak sa ozve zvukový signál a zhasne príslušný symbol z displeja. Počas procesu prekvapkávania je možné kedykoľvek kanvicu vybrať (max. na 30 sekúnd) a naliať si kávu. Odkvapkávacia ventil automaticky vypne a kávu zadržia počas týchto 30 sekúnd. Je nutné kanvicu čo najskôr vrátiť na svoje miesto. Výsledný objem kávy bude o niečo nižší ako objem pôvodnej vody. Namletá káva totiž absorbuje časť vody. Pri nalievaní kávy buďte opatrní, čerstvo překapaná káva je veľmi horúca. Z bezpečnostných dôvodov odporúčame mať neustále veko na kanvicu. Káva zostane dlhšie teplá a je to bezpečnejšie pri nalievaní. Po tejto maximálnej dobe prístroj automaticky vypne. Ak si chcete vychutnať tú pravú chuť kávy, je najlepšie kávu piť ihneď po prevarení. Po každej keď sa kávovar nepoužíva, musí byť vypnutý a vypojený z el. siete. RADY PRE PRÍPRAVU KÁVY · · · Rozhodujúca je vždy čistý a udržiavaný kávovar. Čistite a odvápňujte podľa nížšie popísaného návodu. Na prípravu kávy používajte vždy čerstvo napustenú a studenú vodu. Zrnkovú kávu uchovávajte v chlade a suchu. Nepoužívajte kávu na viackrát. Už raz vylúhované a použitá káva nie je vhodná na ďalšie použitie. Ak už pripravená káva vychladne, nie je dobré ju znovu ohrievať. Takáto káva stratí väčšinu arómu a nemusí byť chutná. 3. 4. 5. 6. Uistite sa, že máte správne nastavený čas. Pripravte prístroj na prípravu kávy, ako je uvedené v časti “Použitie”, ale ešte nestláčajte tlačidlo hlavného spínača. Stlačte tlačidlo časovača aspoň na 5 sekúnd. Na displeji sa rozblikajú číslice hodín. Pre nastavenie časovača stlačte tlačidlo pre nastavenie hodín a tlačidlo pre nastavenie minút. Opätovným stlačením časovača potvrďte nastavenie. Kontrolka sa rozsvieti červeno a na displeji sa zobrazí symbol . Ak by ste nastavenie nepotvrdili ďalším stlačením časovača, tak sa na displeji znovu objaví aktuálny čas (hodiny). Nastavenie síce bude zapamätané, ale časovač nebude aktivovaný. Funkciu je vždy potrebné aktivovať ešte stlačením tlačidla časovača. Káva sa začne pripravovať v dobe, ktorá bola nastavená pomocou časovača. www.domo-elektro.be DO721K SK NASTAVENIE ČASOVAČA 1. 2. 53 · · · Pokiaľ chcete časovač vyrušiť / vypnúť, tak stačí znovu stlačiť tlačidlo časovača. Červená kontrolka časovača zhasne a z displeja zmizne symbol . Kým bude kávovar zapojený v el. sieti, tak bude nastavenie časovača v pamäti. Pre uľahčenie práce teda možno zhrnúť tak, že ak chcete, aby ste mali každý deň v rovnakú hodinu teplú čerstvú kávu, tak stačí len zapnúť funkciu časovača (1 stlačenie tlačidla). Prístroj si pamätá skôr vybraný čas a v rovnakú hodinu sa automaticky spustí. Ak chcete nastaviť iný čas, musíte prestaviť podľa vyššie popísaných krokov. Pokiaľ máte časovač nastavený a chcete len zistiť na akú hodinu, tak môžete na niekoľko sekúnd podržať tlačidlo časovača. Na displeji sa vám krátko zobrazí hodina nastavenia. Pokiaľ už ďalej nič nestlačíte, tak sa opäť zobrazí iba aktuálny čas (hodiny). ČISTENIE A ÚDRŽBA POZOR: Pred čistením nechajte prístroj celkom vychladnúť. Nikdy neponárajte prívodný kábel ani prístroj pod vodu (riskujete úraz el. Prúdom a poškodenia prístroja). Po každom použití prístroj odpojte z el. siete. · · · · Vyčistite sklenenú nádobu a odnímateľný filter v horúcej vode jemný umývacím prostriedkom. Povrch prístroja utierajte mäkkou vlhkou handričkou. Pre otieranie nahrievacie platničky používajte len mäkkú navlhčenú handričku. Nikdy nepoužívajte abrazívne čistidlá. ODVÁPNENIE Kedy? Kávovar je potrebné pravidelne odvápňovať. Pravidelné odvápňovanie kávovar zaručuje stále rovnakú kvalitu kávy, menšiu spotrebu energie a dlhšiu životnosť vášho prístroja. Pri klasickom používaní odporúčame odvápňovať každé 3-4 týždne. SK Ako? 1. Nalejte ¼ kanvice bieleho octu a ¾ studenej vody. 2. Túto zmes nalejte do zásobníka a kávovar zapnite. Bez jakkéhokoli pridanie kávy alebo čaju nechajte prekvapkať. Celý proces opakujte až do chvíle, kedy bude překapaná voda číra. 3. Octovú znečistenú vodu vylejte. 4. Do kávovaru nalejte čistú vodu a prevarte. Vodu vylejte a opäť opakujte proces s čistou vodou až do chvíle kedy z kávovaru zmizne zápach octu. Prístroj vypnite. 54 DO721K OHĽAD NA ŽIVOTNÉ PROSTREDIE Symbol na prístroji alebo na jeho obale znamená, že s týmto výrobkom nie je možné nakladať ako s domovým odpadom, ale musí byť odovzdaný na miestach určených na zber a likvidáciu elektrických a elektronických zariadení. Dodržaním tohto odporúčania chránite životné prostredie a zdravie spoluobčanov. Viac informácií o možnostiach likvidácie nebezpečného odpadu obdržíte na obecných alebo mestských úradoch, zberných dvoroch alebo v predajni, kde ste prístroj zakúpili. SK Obalové materiály sú recyklovateľné, nakladajte s nimi podľa predpisov pre životné prostredie. www.domo-elektro.be DO721K 55 Webshop BESTEL de originele Domo-accessoires en -onderdelen online via: COMMANDEZ d’authentiques accessoires et pièces Domo en ligne sur: BESTELLEN SIE die Domo Original-Zubehör und -Ersatzteile online über: ORDER the original Domo accessories and parts online at: webshop.domo-elektro.be of scan hier: ou scannez ici: oder hier scannen: or scan here: LINEA 2000 BV - Dompel 9 - 2200 Herentals - Belgium - Tel: +32 14 21 71 91 - Fax: +32 14 21 54 63-
 1
1
-
 2
2
-
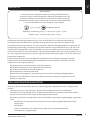 3
3
-
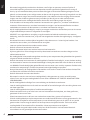 4
4
-
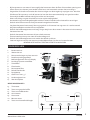 5
5
-
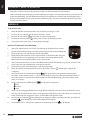 6
6
-
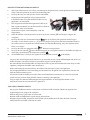 7
7
-
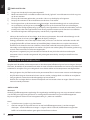 8
8
-
 9
9
-
 10
10
-
 11
11
-
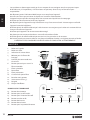 12
12
-
 13
13
-
 14
14
-
 15
15
-
 16
16
-
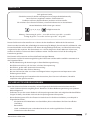 17
17
-
 18
18
-
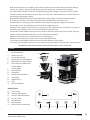 19
19
-
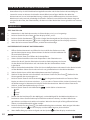 20
20
-
 21
21
-
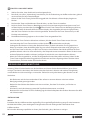 22
22
-
 23
23
-
 24
24
-
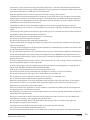 25
25
-
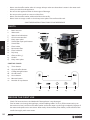 26
26
-
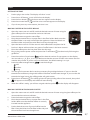 27
27
-
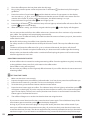 28
28
-
 29
29
-
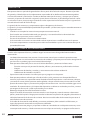 30
30
-
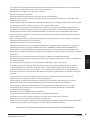 31
31
-
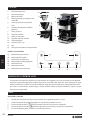 32
32
-
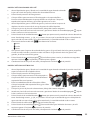 33
33
-
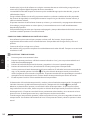 34
34
-
 35
35
-
 36
36
-
 37
37
-
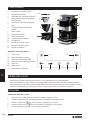 38
38
-
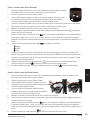 39
39
-
 40
40
-
 41
41
-
 42
42
-
 43
43
-
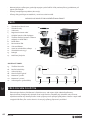 44
44
-
 45
45
-
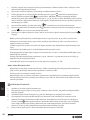 46
46
-
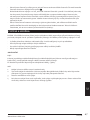 47
47
-
 48
48
-
 49
49
-
 50
50
-
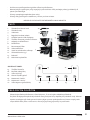 51
51
-
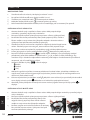 52
52
-
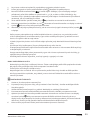 53
53
-
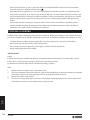 54
54
-
 55
55
-
 56
56


in andere talen
- English: Domo DO721K User manual
- italiano: Domo DO721K Manuale utente
- français: Domo DO721K Manuel utilisateur
- español: Domo DO721K Manual de usuario
- Deutsch: Domo DO721K Benutzerhandbuch
- slovenčina: Domo DO721K Používateľská príručka
- čeština: Domo DO721K Uživatelský manuál
Gerelateerde artikelen
-
Domo DO723K Handleiding
-
Domo DO712K de handleiding
-
-
-
Domo DO333IP de handleiding
-
-
Domo DO709K DO474K de handleiding
-
Domo DO708K de handleiding
-
Domo DO442KM de handleiding
-
Domo DO478K DO488WK de handleiding
Andere documenten
-
Russell Hobbs BUCKINGHAM THERMAL Handleiding
-
 Russell Hobbs Allure Grind & Brew Handleiding
-
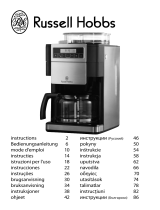 Russell Hobbs 18331-56 Platinum Collection Handleiding
-
 Russell Hobbs 25620-56 Handleiding
-
Kenwood CM900 Handleiding
-
COSYLIFE CL-FS03 Rouge de handleiding
-
Unold 28736 Data papier
-
Clatronic KA 2689 de handleiding
-
-


