FUJITSU SIEMENS AMILO Desktop L Series de handleiding
- Categorie
- Accessoires voor het maken van koffie
- Type
- de handleiding

Copyright
© Fujitsu Siemens Computers 2008
Published by
Fujitsu Siemens Computers GmbH
Mies-van-der-Rohe-Straße 8
80807 München, Germany
Contact
www.fujitsu-siemens.com/support
All rights reserved, including intellectual property rights.
Technical data subject to modi cations and delivery subject
to availability. Any liability that the data and illustrations are
complete, actual or correct is excluded. Designations may be
trademarks and/or copyrights of the respective manufacturer,
the use of which by third parties for their own purposes may
infringe the rights of such owner. For further information see
http://www.fujitsu-siemens.com/terms_of_use.html
AMILO Desktop L Series
AMILO Desktop P Series
First-time setup
SAP: 10600985329
FSP: 440000389
Deutsch
English
Français
Italiano
Nederlands
10600985329
AMILO_Desktop_L_P_Cover.indd 1 28.08.2008 15:05:17

AMILO Desktop L Series
AMILO Desktop P Series
Erstinbetriebnahme
Deutsch
English
Français
Italiano
Nederlands

Microsoft, MS
Windows and Windows Vista are registered trademarks of the Microsoft Corporation.
Adobe Reader is
a trademark of Adobe Systems Incorporated.
MultiMediaCard
is a reg istered trademark o f Infineon Technologies AG
Sony and Memory
Stick are registered trademarks of Sony Electronics, Inc.
All other tradem
arks referenced are trademarks or r egiste red trademarks of their
respective own
ers, whose protected rights are acknowledged.
Copyright © Fuji
tsu Siemens Computers GmbH 2008
All rights reserv
ed, including rights of tran slation, reproduction by printing, copying
or similar method
s, either in part or in whole.
Non-compliance i
s subject to c ompensation for damages.
All rights reserv
ed, including rights created by patent grant or registration of a utility model or design.
Subject to ava ila
bility and technical modifications.

Inhalt
Deutsch
Inhalt
Innovative Technologie ................................................................ 1
WeitereInformationen ................................................................... 1
Betriebsanleitung"AMILODesktop" ................................................... 1
Darstellungsmittel ....................................................................... 2
WichtigeHinweise ..................................................................... 3
AnschlüsseundBedienelemente ....................................................... 4
Anschlüsse ............................................................................. 4
Anzeigen und Bedienelemente ........................................................... 6
Inbetriebnahme ........................................................................ 7
Lieferinhalt auspacken und überprüfen . ................................................... 7
Schritte der Erstinbetriebnahme . . . ....................................................... 7
Gerätaufstellen ......................................................................... 8
ExterneGeräteanschließen ............................................................. 8
Leitungen anschließen . . . . ........................................................... 8
Leitungen lösen . . . .................................................................. 9
Bildschirmanschließen .............................................................. 9
MausundTastatur .................................................................. 9
ExterneGeräteandieUSB-Anschlüsseanschließen ................................... 9
Gerät an die Netzspannung ansch ließen . . . . . . ............................................ 10
ErstesEinschalten:dieSoftwarewirdinstalliert ............................................ 10
BildschirmundGeräteinschalten ..................................................... 11
InstallationderSoftware ............................................................. 11
Bedienung ............................................................................. 12
Geräteinschalten ....................................................................... 12
Gerätausschalten ...................................................................... 12
AnzeigenamGerät ..................................................................... 13
Speicherkarten-Lesegerät ............................................................... 14
Speicherkarteeinsetzen ............................................................. 15
Speicherkarte entnehmen . ........................................................... 16
TechnischeDaten ...................................................................... 17
AMILODesktopL/AMILODesktopP .................................................... 17
10600985329, Ausgabe 1 Deutsch

Inhalt
Deutsch 10600985329, Ausgabe 1

Innovative Technologie
Innovative Technologie
... und ergonomisches Design machen Ihren AMILO Desktop zu einem
benutzerfreundlichen und zuverlässigen Desktop-PC.
Ihr Gerät ist mit einem Microsoft Windows-Betriebssystem ausgestattet. Dieses
ist bereits vorinstalliert und für Sie optimal konfiguriert. Das Ge rät ist sofort
startbereit, wenn Sie es zum ersten Mal einschalten.
Ihr Gerät ist mit neuester Technologie ausgestattet, damit Sie Ihre Computer-Erfahrung optimal
umsetzen können.
• stromsparende Intel CPU
• Gehäuse im neuen schwarz/weißen Design von Fujitsu Siemens Computers
Mit dem ben utze rfreundlichen "BIOS-Setup-Utility" können Sie die Hardware Ihres
Geräts steuern und Ihr System besser vor unb efugtem Zugriff schützen, indem Sie
die leistungsfähigen Passwort-Eigenschaften nutzen.
Diese Betriebsanleitung zeigt Ihnen unter anderem, wie Sie Ihr Gerät in Betrieb nehmen und bedienen.
Weitere Informationen
Allgemeine Informationen zu Ihrem Gerät finden Sie in der Betriebsanleitung "AMILO
Desktop".
Softwarebezogene Teile dieser A n leitung beziehen sich auf Microsoft-Produkte,
falls sie zum Lieferumfang Ihres Geräts gehören.
Beachten Sie bei der Installation von anderen Softwareprodukten die
Bedienungsanleitungen des Herstellers.
Betriebsanleitung "AMILO Desktop"
Die Betriebsanleitung "AMILO Desktop" finden Sie im Windows-Startmenü unter Alle Programme
- Fujitsu Siemens Computers oder im Internet unter "www.fujitsu-siemens.com/support".
10600985329, Ausgabe 1 Deutsch - 1

Innovative Technologie
Darstellungsmittel
kennzeichnet Hinweise, bei deren Nichtbeachtung Ihre Gesundheit, die
Funktionsfähigkeit Ihres Geräts oder die Sicherheit Ihrer Daten gefährdet
sind. Die Gewährleistung erlischt, wenn Sie durch Nichtbeachtung dieser
Hinweise Defekte am Gerät verursachen
kennzeichnet wichtige Info rmationen für den sachgerechten Umgang mit
dem Gerät
►
kennzeichnet einen Arbeitsschritt, den S ie ausführen müssen
kennzeichnet ein Resultat
Diese Schrift
kennzeichnet Eingaben, die Sie mit der Tastatur in einem Programm-Dialog
oder in einer Kommandozeile vornehmen, z. B. Ihr Passwort (Name123)
oder einen Befehl, um ein Programm zu starten (start.exe)
Diese Schrift
kennzeichnet Informationen, die von einem Programm am Bildschirm
ausgegeben w erden, z. B.: Die Installation ist abgeschlossen!
Diese Schrift
kennzeichnet
• Begriffe und Texte in einer Softwareoberfläche, z. B.: Klicken Sie auf
Speichern.
• Namen von Programmen oder Dateien, z. B. Windows oder setup.exe.
"Diese Schrift"
kennzeichnet
• Querverweise auf einen anderen Absch nitt z. B. "Sicherheitshinweise"
• Querverweise auf eine externe Quelle, z. B. eine Webadresse: Lesen
Sie weiter auf "www.fujitsu-siemens.com"
• Namen von CDs, DVDs sowie Bezeichnungen und Titel von anderen
Materialien, z. B.: "CD/DVD Drivers & U tilities" oder Handbuch
"Sicherheit"
Abc
kennzeichnet eine Taste auf der Tastatur, z. B:
F10
Diese Schrift kennzeichnet B eg riffe und Texte, die betont oder hervorgehoben werden,
z. B.: Gerät nicht ausschalten
2 - Deutsch 10600985329, Ausg abe 1

Wichtige Hinweise
Wichtige Hinweise
Beachten Sie die Sicherheitshinweise im Handbuch " Sicherh eit" und in
der Betriebsanleitung "AMILO Desktop".
10600985329, Ausgabe 1 Deutsch - 3

Anschlüsse und Bedienelem ente
Anschlüsse und B edienelemente
In diesem Kapitel werden die einzelnen Hardware-Komponenten Ihres Geräts vorgestellt.
Sie erhalten eine Übersicht über die Anzeigen und die A nschlüsse des Geräts . Machen Sie
sich mit diesen E lemente n vertraut, bevor Sie mit de m Gerät arbeiten.
Die nachfolgende Abbildung kann von Ihrer Konfiguration abweichen.
Anschlüsse
Bezeichnung Abbildung Symbol
Spannungsversorgung des PC
Netzanschluss
4 - Deutsch 10600985329, Ausg abe 1

Anschlüsse und Bedienelemente
Bezeichnung Abbildung Symbol
Sound (Externe Tonquellen, z. B.
Aktivlautsprecher, Mikrofon)
• Sound onboard
Bei zusätzlich eingebauter
Soundkarte ist die Soundfunktion
auf dem Mainboard nicht aktiviert
bzw. „Sound onboard“ ist nicht
vorhanden.
3,5-mm-Klinkenbuchsen
Line In
Line Out
Mic
Digitaler Soundanschluss, siehe
auch Handbuch zu m Mainboard.
Cinch-Anschluss (Coax)
SPDIF Out
Anschluss für USB-Geräte (z. B.
Tastatur; Maus IR-Sender /
Empfänger-Modul, Scanner,
Drucker)
USB 2.0
Wichtiger Hinweis zu USB 2.0: Um
eine sichere Datenübertragungsrate
zu gewährleisten, empfehlen wir
Ihnen, USB-Anschlusskabel mit
einer Länge von max. 3 m z u
verwenden.
USB-Buchse
oder USB
Anschluss für Firewire- oder
IEEE-1394-kompatible Geräte (z. B.
Videorekorder, Digitalkamera)
FireWire
FireWire-Buchse
1394
Netzwerk oder DSL-Modem
RJ-45-Buch se
oder
oder LAN
10600985329, Ausgabe 1 Deutsch - 5

Anschlüsse und Bedienelem ente
Bezeichnung Abbildung Symbol
Videoeingangs- und
Ausgangsanschluss (optional)
(siehe Dokumentation zur
VGA-Karte)
4- od. mehrpolige Buchse
SVIDEO IN
SVIDEO OUT
Anschluss für digitales Videosignal
(Monitor)
DVI
Digitale Audio-Video-
Schnittstelle
HDMI
Anzeigen und Bedienelemente
Bezeichnung Symbol Bedeutung
Hauptschalter
Schalter zum Ein-/Ausschalten. Das Gerät kann
nicht mehr aus dem Netzwerk g estartet werden
(WakeonLAN).
Ein-/Ausschalter Schalter zum Hochfahren des Systems.
• Ein-/Ausschalter leuchtet weiß: Das System ist
eingeschaltet.
• Ein-/Ausschalter blinkt gelb: Auf die Festplatte
wird zugegriffen.
• Ein-/Ausschalter blinkt weiß: Das System ist im
Energiesparmodus.
6 - Deutsch 10600985329, Ausg abe 1

Inbetriebnahm e
Inbetriebnahme
Inbetriebnahme
Beachten Sie die Sicherheitshinweise im Kapitel "Wichtige Hinweise", Seite 3 .
Lieferinhalt auspacken und überprüfen
Die Originalverpackung de r Geräte sollten Sie für einen eventuellen Transport aufbewahren.
VerpackungLieferinhaltVerpackung
► Packen Sie alle Teile aus.
► Prüfen Sie den Verpackungsinhalt auf sichtbare Transportschäden.
► Prüfen Sie, ob die Lieferung mit den Anga ben auf dem Lieferschein übereinstimmt.
Wenn Sie Transportschäden oder Unstimmigkeiten zwischen Verp ackungsinhalt und
Lieferschein feststellen, informieren Sie unverzüglich Ihre Ve rkaufsstelle!
Schritte der Erstinbetriebnahme
Erstinbetriebnahm e,ÜbersichtInbetriebnahme
Es sind nur wenige Schritte nö tig, um Ihr neues Gerät das erste Mal in Bet rieb zu nehmen:
• Stellplatz für das Gerät wählen un d Gerät aufste llen
• Externe Geräte anschließen
• Nennspannung überprüfen und Gerät an das Stromnetz anschließen
• Gerät einschalten
Mehr zu den einzelnen Schritten erfahren Sie in den folgenden Abschnitten.
Externe Geräte
Wenn Sie zusätzlich zu Ihrem G erät andere externe Geräte erhalten haben (z. B.
einen Drucker), schließen Sie diese erst nach der Erstinstallation an. Wie Sie diese
externen Geräte anschließen, ist in den folgenden Abschnitten beschrieben.
Laufwerke und Baugruppen
Wenn Sie Laufwerke oder Baugruppen zusätzlich zu Ihrem Gerät erhalten
haben, bau en Sie diese erst nach der Erstinstallation ein. Das Einbauen
von Laufwerken und Baugruppen ist im Handbuch "AMILO Desktop" im
Kapitel"Systemerweiterungen" beschrieben.
10600985329, Ausgabe 1 Deutsch - 7

Inbetriebnahm e
Gerät aufstellen
BildschirmarbeitsplatzErgonomischGerät
Berücksichtigen Sie beim Aufstellen des Geräts die Empfe hlungen und
Sicherheitshinweise im Handbuch "Sicherheit".
Stellen Sie das Gerät nur in der dafür vo rgesehene n Betriebslage
(senkrecht auf den Standfüßen) auf.
Wir empfehlen Ihnen, das Gerät auf e ine rutschfeste Unterlage zu stellen. Bei der Vielfalt
der bei Möbeln verwendete n Beschichtungen und Lacke ist es nicht auszuschließen,
dass die Kunststoff-Füße Schäden auf der Stellfläche verursachen.
Stellen Sie nicht mehrere Geräte übe reinander.
Das Gerät darf nur auf den Standfüßen stehend in Betrieb genommen werden.
Abhängig vom Standort Ihres Gerä ts kann e s zu störe nden Vibrationen und Geräuschen
kommen. Um dies zu vermeiden, sollte bei Gehäuseseiten ohne Lüftungsflächen ein
Mindestabstand von 3 mm zu anderen Geräten oder Gegenständen eingehalten werden.
Achten Sie darauf, dass d as Gerät ausreichend belüftet wird. Die Lüftungsflächen d es
Bildschirms und des Geräts dürfen nicht verde ckt werden, um Üb erhitzung zu vermeiden.
Setzen Sie das Gerät keinen extremen Umgebungsbedingungen aus (siehe "AMILO
Desktop L / AMILO Desktop P", Seite 17, Abschnitt "Umgebungsbedingungen").
Schützen S ie das G erät vor Staub, Feuchtigkeit und Hitze.
Externe Geräte anschließen
Lesen Sie die Dokumentation zum externen Gerät, bevor Sie es anschließen.
Außer bei USB-Geräten müssen die Netzstecker gezogen sein, wenn
Sie externe Geräte anschließen!
Bei Gewitter dürfen Sie Leitungen weder stecken noch lösen.
Fassen Sie beim Lösen einer Leitung immer am Stecker an. Ziehen
Sie nicht an der Leitung!
Halten Sie beim Anschließen oder Lösen von L eitungen die nachfolgend
beschriebene Reihenfolge ein.
Leitungen anschließen
► Alle betroffenen Geräte ausschalten.
KabelLeitung
► Die Netzstecker aller betroffenen Ge räte aus den Schutzkontakt-Steckdosen ziehen.
► Alle Leitungen am Gerät und an den externen Geräten stecken. Beachten Sie auf jeden
Fall die Sicherheitshinweise im Kapitel "Wichtige Hinweise", Seite 3 .
► Alle Datenübertragungsleitungen in die vorgesehenen Steckvorrichtungen
der Daten-/Fernmeldenetze stecken.
► Alle Netzstecker in die geerdeten Schutzkontakt-Steckdosen stecken.
8 - Deutsch 10600985329, Ausg abe 1

Inbetriebnahm e
Leitungen lösen
► Alle betroffenen Geräte ausschalten.
Leitung
► Die Netzstecker aller betroffenen Geräte aus den Schutzkontakt-Steckdosen ziehen.
► Alle Datenübertragungsleitungen aus den S teckvorricht ungen der Daten-/Fernmeldenetze
ziehen.
► Alle Leitungen am Gerät und an den externen Geräten lösen.
Bildschirm anschließen
► Bereiten Sie den Bildschirm vor, wie in der Betriebsanleitung zum Bildschirm
beschrieben (z. B. Leitungen stecken).
Bildschirm
► Stecken Sie die Datenleitung in den B ildschirmanschluss des Geräts.
Je nach Ausbaustufe Ihres Geräts und Ihres Bildschirms, können Sie die
Datenleitung auch an die D VI-Schnittstelle anschließen.
► Schließen Sie die Netzleitung des Bildschirms an eine geerdete Schutzkontakt-Steckdose an.
Maus und Tastatur
Zum Lieferumfang Ihres Geräts gehören eine Maus und eine Tastatur. Eine Beschreibung
hierzu finden Sie in der Betriebsanleitung "AMILO Desktop".
Maus und Tastatur anschließen
► Schließen Sie Maus und Tastatur an je eine USB-Schnittstelle an, siehe "Externe
Geräte an die USB-Anschlüsse anschließen", Seite 9 .
Externe Geräte an die USB-Anschlüsse anschließen
USB-GeräteUSB-AnschlussExterneGeräteGeräte
An die USB-Anschlüsse können Sie eine Vielzahl externer Geräte anschließen
(z. B. Drucker, Scanner, Modem oder Tastatur).
USB-Geräte sind hot-plug-fähig. Daher können die Leitungen von USB-Geräten
bei eingeschaltetem Gerät angeschlossen und gelöst werden.
Weitere Informationen finden Sie in der Dokumentation zu den USB-Geräten.
► Schließen Sie die Datenleitung an das externe Gerät an.
► Schließen Sie die Datenleitung an einen USB-Anschluss Ihres Geräts an.
10600985329, Ausgabe 1 Deutsch - 9

Inbetriebnahm e
Gerätetreiber
Die externen USB-Geräte, die Sie an einen der USB-Anschlüsse anschließen,
benötigen üblicherweise keine eigenen Treiber, da die notwendige Software
bereits im Betriebssystem enthalten ist. Wenn das externe USB-Gerät jedoch
eine eigene Software benötigt, installieren Sie diese von dem Datenträger,
der mit dem USB-Ge rät geliefert wurde.
Vom vorderen USB-Anschluss Ihres Ge räts z um externen USB-Gerät darf nur eine
maximal 3 m lange Leitung verwendet werden, um USB 2.0 zu gewährleisten.
Gerät an die Netzspannung anschließen
Netzadapter
2
1
► Schließen Sie die Netzleitung am Gerät an (1).
► Stecken Sie den Netzstecker in eine geerdete Schutzkontakt-Steckdose (2).
Erstes Einschalten: die Software wird installiert
InstallationSoftwareInstallation
Wenn das Gerät in ein Netzwerk eingebunden wird, sind bei der Software-Installation
Angaben zu Benutzer, Server und Netzwerkprotokoll nötig.
Wenn Sie das Gerät zum ersten Mal einschalten, wird die mitgelieferte So ftware installiert und
konfiguriert. Planen Sie etwas Zeit da für ein, denn dieser Vorgang darf nicht unterbrochen werden.
Nach dem Beginn der Installation darf das Gerät nicht ausgeschaltet
werden, bis die Installation abgeschlossen ist!
Während der Installation darf das Gerät nur bei Aufforderung neu gestartet werden!
Die Installation wird sonst nicht korrekt durchgeführt und der Festplatteninhalt
muss vollständig wiederhergestellt w erden.
10 - Deutsch 10600985329, Ausgabe 1

Inbetriebnahm e
Bildschirm und Gerät einschalten
► Schalten Sie den Bildschirm ein (siehe Betriebsanleitung des Bildschirms).
1
2
► Stellen S ie den Hauptschalter an der Rückseite des Geräts auf Position "I" (1).
► Drücken Sie den Ein-/Ausschalter an der Vorderseite des Geräts.
Die Betriebsanzeige leuchtet, das Gerät startet.
Installation der Software
► Befolgen Sie während der Installation die Anweisungen am Bildschirm.
SoftwareInst allation
► Lesen Sie bei Unklarheiten bezüglich der angeforderten Eingabedaten in der
Hilfe zu Ihrem Betrieb ss ystem nach .
Weitere Informationen zum System sowie Treiber, Ut ilities und Updates
finden Sie im Handbuch zur Wiederherstellung installierter Software und im
Internet unter "http://www.fujitsu-siemens.com/support".
10600985329, Ausgabe 1 Deutsch - 11

Bedienung
Bedienung
Gerät einschalten
► Schalten Sie ge gebenenf alls den Bildschirm ein (siehe Betriebsanleitung des Bildschirms).
GerätBildschirm
► Drücken Sie den Ein-/Ausschalter an der Vorderseite des Geräts.
Gerät ausschalten
► Beenden Sie ordnung sgemäß Ihr Betriebssystem.
GerätBildschirm
► Wenn das Betriebssystem das Gerät nicht automatisch in einen Energiesparmodus fährt
oder ausschaltet, drücken Sie den Ein-/Ausscha lter mindestens 4 Seku nden.
Das Gerät verbraucht dann ein Minimum an Energie.
Der Ein-/Ausschalter trennt das Gerät nicht von der Netzspannung. Zur vollständigen
Trennung von der Netzspannung müssen S ie den N etzste cker au s der Steckdose z iehen.
► Schalten Sie gegebe nenfalls den Bildschirm aus (si ehe Betriebsanleitung des Bildschirms).
12 - Deutsch 10600985329, Ausgabe 1

Bedienung
Anzeigen am Gerät
Betriebsanze igeGerät
Die Anzeigen finden Sie an der Vorde rseite des Gehäuses.
2
1
1 = Statusanzeige Speicherkarten-Lesegerät 2 = Betriebsanzeige
Statusanzeige Speicherkarten-Lesegerät
• Die An zeige leuchtet dauerhaft:
Eine Speicherkart e ist eingesteckt.
• Die Anzeige blinkt:
Auf die eingesteckte Speicherkarte wird zugegriffen.
• Die Anzeige leuchtet nicht:
Es befindet sich keine Speicherkart e im Lesegerät.
10600985329, Ausgabe 1 Deutsch - 13

Bedienung
Betriebsanzeige
Betriebsanze ige
Im Energiesparmodus darf das Gerät nicht vom Netz getrenn t werden, da
dies sonst zu einem Datenverlust führen kann.
• Die Anzeige leuchtet weiß:
Das Gerät ist eingeschaltet.
• Die Anzeige blinkt weiß:
Das Gerät ist im Energiesparmodus. Nach dem Einschalten mit dem Ein-/Ausschalter sch alte t
das Ge rät ein oder kehrt in den Zustand zurück, der vor dem Energiesparmo dus gegeben war.
• Die Anzeige blinkt g elb:
Es wird auf die Festplatte zugegriffen.
• Die Anzeige leuchtet nicht:
Das Gerät ist vom Netz getrennt oder betriebsbereit. Ist das Gerät betriebsbereit,
kann das Gerät mit dem Ein-/Ausschalter eingeschaltet werden.
Speicherkarten-Lesegerät
Steckplatz
Ihr Gerät ist an der Frontseite mit einem Speicherkarten-Lesegerät ausgestattet.
SD/MMC
XD
MS
CF/MD
1
1 = Statusanzeige Speicherkartenlesegerät
14 - Deutsch 10600985329, Ausgabe 1

Bedienung
Mögliche Kartentypen ohne Adapter:
• CompactFlash Card (Typ I und II) (CF)
• CompactFlash Ultra DMA
• IBM Microdrive (MD)
• SecureDigital Card (SD)
• SecureDigital Card HC (SD H C)
• MultiMedia Card (MMC)
• Memory Stick (MS)
• Memory S tick Pro
• xD Picture Card (xD)
• xD Picture Card M type
• xD Picture Card H type
Mögliche Kartentypen mit Adapter:
• Memory S tick Duo
• Memory Stick Pro Duo
• Memory Stick Micro
• Reduced-Size MultiMedia Card (RS-MMC)
• MultiMedia Card micro (MMC micro)
• MultiMedia Card mobile (MMC mobile)
• Mini-SecureDigital Card (Mini SD)
• Micro SecureDigital Card (Micro SD)
Beachten Sie beim Umgang mit Speicherkarten die Hinweise des Herstellers.
Adapter für Ihre Speicherkarte erhalten Sie im Fachhandel.
Speicherkarte einsetzen
► Schieben Sie die Speicherkarte vorsichtig in
den Steckplatz. Das Sc hriftfeld muss nach
oben zeigen. Wenden Sie keine Gewalt an,
da sonst die empfindlichen Kontaktflächen
beschädigt werden können.
Speicherkart e
Die Statusanzeige des Speicherkarten-Lesegeräts
leuchtet dauerhaft.
10600985329, Ausgabe 1 Deutsch - 15

Bedienung
Speicherkarte entnehmen
Speicherkart e
Warten Sie unbedingt, bis die Statusanze ige nicht mehr blinkt,
bevor Sie die Karte entfernen.
► Ziehen Sie die Sp eicherkarte aus
dem Steckplatz.
16 - Deutsch 10600985329, Ausgabe 1

Technische Daten
Technische Daten
AMILO Desktop L / AMILO Desktop P
Elektrische Daten
Eingehaltene Sicherheitsstandards: CE, Produktsicherheit LVD 2006/9 5/EC,
IEC60950-1, EN60950-1 , EMV: 2004/108/EC,
EN55022, class B, EN55024, EN61000-3-2/3,
RTTE 1999/5/EC, Umweltstandards: RoHS
FSC-03230
Schutzklasse:
I
Nennspannungsbereich 220 V -240 V
Nennfrequenz
50 Hz - 60 Hz
Abmessungen
Breite/Tiefe/Höhe:
373 mm x 175 mm x 398 mm
Gewicht
im Grundausbau:
9,6 kg
Umgebungsbedingungen
Temperatur
Betrieb
15 °C .... 35 °C
Transport
–25 °C .... 60 °C
Betauung ist im Betrieb nicht zulässig!
Das Datenblatt zu diesem Geräten bietet weitere technische D aten. Sie finden
das Daten blatt im Internet unter "www.fujitsu-siemens.com".
10600985329, Ausgabe 1 Deutsch - 17

Technische Daten
18 - Deutsch 10600985329, Ausgabe 1

AMILO Desktop L Series
AMILO Desktop P Series
Initial startup
Deutsch
English
Français
Italiano
Nederlands

Microsoft, MS
Windows and Windows Vista are registered trademarks of the Microsoft Corporation.
Adobe Reader is
a trademark of Adobe Systems Incorporated.
MultiMediaCard
is a reg istered trademark o f Infineon Technologies AG
Sony and Memory
Stick are registered trademarks of Sony Electronics, Inc.
All other tradem
arks referenced are trademarks or r egiste red trademarks of their
respective own
ers, whose protected rights are acknowledged.
Copyright © Fuji
tsu Siemens Computers GmbH 2008
All rights reserv
ed, including rights of tran slation, reproduction by printing, copying
or similar method
s, either in part or in whole.
Non-compliance i
s subject to c ompensation for damages.
All rights reserv
ed, including rights created by patent grant or registration of a utility model or design.
Subject to ava ila
bility and technical modifications.

Contents
English
Contents
Innovative technology ................................................................. 1
Furtherinformation ...................................................................... 1
Operatinginstructionsforthe"AMILODesktop" ........................................ 1
Notational conventions .................................................................. 2
Importantinformation .................................................................. 3
Connections and Controls ............................................................. 4
Connections . . .......................................................................... 4
Displaysandcontrols ................................................................... 6
Gettingstarted ......................................................................... 7
Unpacking an d checking the equipment supplied . . ........................................ 7
Stepsforinitialstartup ................................................................... 7
Settingupthedevice .................................................................... 8
Connecting externa l devices . . ........................................................... 8
Connecting the cables . . . . ........................................................... 8
Disconnecting the cables . ........................................................... 8
Connecting the monitor . . . ........................................................... 9
Mouse and keyboard . . . . . ........................................................... 9
Connecting external devices to the USB ports . ........................................ 9
Connecting the machine to the mains . . ................................................... 10
Switchingonforthefirsttime:installingthesoftware ....................................... 10
Switchonthemonitorandthemachine ............................................... 10
Installationofthesoftware ........................................................... 11
Operation .............................................................................. 12
Switchthedeviceon .................................................................... 12
Switchingoffthedevice ................................................................. 12
Displaysonthemachine ................................................................. 13
Memory card reader . . . .................................................................. 14
Insertingthememorycard ........................................................... 15
Takingoutthememorycard .......................................................... 15
Technicaldata ......................................................................... 16
AMILODesktopL/AMILODesktopP .................................................... 16
10600985329, edition 1 English

Contents
English 10600985329, edition 1

Innovative technology
Innovative technology
... and ergonomic design make your AMILO Desktop a user-friendly and reliable Desktop PC.
You r machine is equipped with a Microsoft Windows operating system. This is already pre-installed
and optimally configured for you. The machine is ready to start immediately when you first switch it on.
You r machine is equipped with the latest technology so that you can fully
exploit your computer experience.
• power-saving Intel CPU
• Casing in the new black/white design from Fujitsu Siemens Computers
With the user-friendly "BIOS Setup U tility" you can control the hardware of your machine and better
protect your system against unauthorised access, using the pow erful password facilities.
These opera ting instructions show you amongst other things how to start
up and ope rate your machine.
Further information
General information on your machine c an be found in the "AMILO
Desktop" operating instructions.
Software-related parts of these instructions refer to Microsoft products, where
these are included in the scope of supply of your machine.
When installing other software products, refer to the operating instructions
issued by the manufacturer.
Operating instructions for the "AMILO Desktop"
The operating instructions for the "AMILO Desktop" can be found in the Windows Start menu under
All Programs - F ujitsu Siemens Computers or on the Internet under "www.fujitsu-siemens.com/support".
10600985329, edition 1 English - 1

Innovative technology
Notational conventions
Pay particular attention to text marke d with this symbol. Failure to observe
this w a rning will endanger your life, will damage the device or lead to loss
of data. The warranty will be invalidated if you cause defects in the device
through failure to take notice of this warning
indicates important information that is required to use the device properly.
►
indicates an activity that must be perf ormed in the order shown
indicates a result
This style
flags data entered using the keyboard in a prog ram dialog or comma nd
line, e.g. your password (Name123) or a command to launch a program
(start.exe)
This style
refers to information displayed by a program on the screen, e.g.:
Installation is completed
This style
is for
• terms and texts in a software user interface, e.g.: Click Save.
• names of programs or files, e.g. Windows or setup.exe.
"This style"
is for
• cross-references to another section, e.g. "Safety information"
• cross-references to an external source, e.g. a web address: For more
information, go to " www.fujitsu-siemens.com"
• indicates names of CDs and DVDs as well as names and titles of other
materials, e.g.: "CD/DVD Drivers & Utilities" or "Safety" manual
Abc
refers to a k ey on the keyboard, e.g .:
F10
This style
flags concepts and text that are emphasised or highlighted, e.g.: Do not
switch off device
2 - English 10600985329, edition 1

Important informat ion
Important information
Comply w ith the safety information in the "Safety" manual and in the
operating instructions "AMILO Desktop".
10600985329, edition 1 English - 3

Connections and Controls
Connections and Controls
This chapter describes the individual hardware components of your machine. It gives
you an overview of the displays and c onnections of the machine . F amiliarise yourself
with these elements before you start to use the machine.
Your configuration may va ry from the illustration below.
Connections
Description Figure Symbol
PC power supply
Mains connection
4 - English 10600985329, edition 1

Connections and Controls
Description Figure Symbol
Sound (external sound sources, e.g.
active loudspeaker, microphone)
• Sound onboard
When an additional sound card is
installed, there is no sound function
on the motherboard, and “Sound
onboard“ is not a vailable.
3.5 mm jack sockets
Line In
Line Out
Mic
Digital sound connection, see also
motherboard manual.
Cinch connection (Coax)
SPDIF Out
Connection for USB devices (e.g.
keyboard, mouse IR sender/receiver
module, scanner, printer)
USB 2.0
Important information on USB 2.0:
In order to guarantee a reliable da ta
transfer rate, we recommend that
you use a USB connection cable no
longer than 3 m.
USB socket
or USB
Connection for FireWire or
IEEE-1394-compatible devices (e.g.
video recorder, digital camera)
FireWire
FireWire socket
1394
Network or DSL modem
RJ-45 so cket
or
or LAN
Video input and output connection
(optional)
(see documentation for the VGA
card)
4-pin or multi-pin socket
SVIDEO IN
SVIDEO OUT
10600985329, edition 1 English - 5

Connections and Controls
Description Figure Symbol
Connection for digital video signal
(monitor)
DVI
Digital Audio-Video Interface
HDMI
Displays and controls
Description Symbol Meaning
Main switch
Switch for s witching on and off. The machine can no
longer be started from the network (Wake on LAN).
On/off switch Switch for booting up the system.
• On/off switch lights up white: The system is
switched on.
• On/off switch flashes yellow: The hard disk is
being acce ssed.
• On/off switch flashes white: The system is in
power-saving mode.
6 - English 10600985329, edition 1

Getting started
Getting started
Gettingstarted
Please ob serve the safety information in the "Important information", Page 3 chapter.
Unpacking and checking the equipment supplied
Keep the original packaging of the equipment in case you need to return it.
PackagingEq uipmentsuppliedPackaging,
► Remove all the equipment from the packaging.
► After removal from the packaging, check the equipment for e vidence of damage in transport.
► Check that that the equipment ma tches the delivery note.
If you find damage in transport or a mismatch w ith the delivery note,
inform your sales office without delay!
Steps for initial startup
Initialstartup,overviewStarting Up
Only a few steps are required to start up you r m achine for the first time:
• Select the position for your machine and p lace it there
• Connect the external devices
• Check the rated voltage and connect the machine to the mains
• Switchonthemachine
You can fi nd more details on the individual steps in the following sections.
External d evices
If you wish to attach other external devices (such as a printer) to your machine,
complete the initial installation of your machine before connecting them. The steps for
connecting these external devices are described in the following sections.
Drives and modules
If you wish to fit other drives or modules to your machine, com plete the initial installation
of your machine before fittingthem.Thestepsforfitting drives and modules a re
described in the "AMILO Desktop" manual in the chapter"System expansion" .
10600985329, edition 1 English - 7

Getting started
Setting up the device
Videoworkstat io nErgonomicDevice ,
When installing your device, please read the recommendations and
safety notes in the "Safety" manual.
Do not place the machine in any position other than the one in tended (upright on its feet).
We recommend that you place your device on a surface w ith good anti-slip qualities.
In view of the multitude of different finishes and varnishes used on furniture, it is
possible that the rubber feet will mark the surface they stand on.
Do not stack several devices on top of each other.
Do not start the ma chine in any p osition other than upright on its fe et.
Depending on the location of your machine, it may emit annoying vibration or noises.
To avoid this, allow a minimum clearance of 3 m m from other equipment or objects
at the sides of the casing where there are no ventilation g rilles.
Make sure that the device is adequately ventilated. In order to avo id overheating,
do not cover the ventilation area of the monitor or the device.
Do not expose the device to extreme ambient conditions (see "AMILO
Desktop L / AMILO Desktop P", Page 16, "Ambient conditions"). Protect
the device against dust, humidity and heat.
Connecting external devices
Read the documentation on the external device before connecting it.
With the exception of USB de vices, always remove all power plugs
before connecting external devices!
Do not connect or disconnect cables during a thunderstorm.
Always t ake hold of th e actual plug. Never unplug a cable by pulling the cable itself.
Connect and disconnect the cables in the order described below.
Connecting the cab les
► Turn off all power and equipment switches.
CordCable,
► Remove all power plugs from the grounded mains outlets.
► Connect all the cables to th e device and the external devices. Please make sure that you
always observe the safety notes provided in "Important information", Page 3 .
► Plug all data communication cables into the appropriate sockets.
► Plug all po wer cables into the grounded mains outlets.
Disconnecting the ca ble s
► Switch off all affected devices.
Cable,
► Remove all power plugs from the grounded mains outlets.
► Unplug all data communication cables from the appropriate sockets.
► Disconnect all of the cables from the device and from the external devices.
8 - English 10600985329, edition 1

Getting started
Connecting the monitor
► Follow the instructions co ntained in the monitor manual to prepare the monitor
for operation (e.g. connecting cables).
Monitor
► Plug the data cable into the m onitor port of the device.
Depending on the expansion stage of your machine and you r monitor, you
can also connect the data cable to the DVI interface.
► Plug the monitor power cable into the grounded mains outlet.
Mouse and keyboard
You r machine is supplied with a m ouse and a keyboard. A description of these devices
can be found in the o perating instructions for the " AMILO Desktop".
Connecting the mouse and keyboard
► Connect the mouse and keyboard each to a USB port, see "Connecting
external devices to the USB ports", Page 9 .
Connecting external devices to the USB ports
USBdevices,USBport,Externaldevice s,Devices,
You can connect a wide range of external devices to the USB ports (e.g.
printer, sca nner, modem or keyboard).
USB devices are hot-pluggable. This means y ou can connect and disconnect
USB cables while your device is switched on.
Additional information can be found in the documentation for the USB devices.
► Connect the data cable to the ext ernal device.
► Connect the data cable to one of the USB ports on your device.
Device drivers
The external USB d evices you connect to the USB ports usually require no
driver of their own, as the require d software is already included in th e operating
system. However, if the external USB device requires its own software, please
install it from the data carrier provided with the U SB device.
To ensure U S B 2.0, the length of the cab le used between the front USB port of
your device and the external USB device must not exceed 3 m.
10600985329, edition 1 English - 9

Getting started
Connecting the machine to the mains
Mainsadapt er,
2
1
► Connect the mains cable to the machine (1).
► Plug the mains plug into a three-pin socket ( 2).
Switching on for the first time: installing the software
Installing,Software,Installing,
If the device is integrated into a network, the use r and server details as well as the
network protocol are required during the software installation.
When you switch on the device for the first time, the supplied software is insta lled and configured.
Plan a reasonable amount of time fo r this, as this process must no t be interrup ted.
Once the installation has been started the device must not be switched
off, unless the installation has bee n completed.
During installation, the device may only be rebooted when you are requested to do so!
The installation will otherwise not be carried out correctly and the contents
of the hard disk must be completely restored.
10 - English 10600985329, edition 1

Getting started
Switch on the monitor and the machine
► Switch on the monitor (see operating instructions for the monitor).
1
2
► Switch the main switch at the back of the machine to position "I" (1).
► Press the on/off button on the front of the machine.
The o perational display will light up and the machine will start.
Installation of the software
► During installation, follow the instructions on the screen.
SoftwareInst allation
► If anything is unclear regarding the data you are asked to input, read the
online Help in your operating system.
Further information on the system, its drivers, utilities and updates can be
found in the manual for reinstalling installed software and on the Internet
under "h ttp://ww w.fujitsu-siemens.com/support".
10600985329, edition 1 English - 11

Operation
Operation
Switch the device on
► If necessary, switch the monitor on (see the operating manua l for the monitor).
Device,Monitor,
► Press the ON/OFF switch on the front of the device.
Switching off the device
► Shut down the operating system properly.
DeviceMonitor
► If the operating system does not automatically switch t he device into power-saving mode
or switch it off, press t he ON/OFF switch for at least 4 seconds.
The device then consumes a minimum amount of energy.
The ON/OFF s witch does n ot fully disconne ct the TV from the mains voltage. To
completely disconnect the mains voltage, remove the power p lug from the power socket.
► If necessary, switch the monitor off (see the operating manual for the monitor).
12 - English 10600985329, edition 1

Operation
Displays on the machine
Operational dis playMachine
The displays appear on the front of the casing.
2
1
1 = Memory card reader status display 2 = Operational display
Memory card reader status display
• The display lights up continuously: A memory card has been inserted.
•Thedisplayflashes: The memory card is being accessed.
• The display remains unlit: There is no memory card in the reader.
Operational display
Operational dis play
Do not disconnect the machine from the mains whilst in power-saving
mode, otherw ise data may be lost.
• The display lights up white: The machine is switched on.
• The display flashes white: The machine is in power-saving mode. After switching
on at the on/off switch the machine switches on or reverts to the status it was
in before power-saving m ode was initiated.
• The display flashes yellow: The hard disk is being accessed.
• The display remains unlit: The machine is not connected to the mains or is not ready for
operation. If the m achine is ready for operation, it can be switched on at the on/o ff switch.
10600985329, edition 1 English - 13

Operation
Memory card reader
Slot
A memory card reader is incorporated in the front of your machine.
SD/MMC
XD
MS
CF/MD
1
1 = Memory card reader status display
Card types that can be read without an adapter:
• CompactFlash Card (types I and II) (CF)
• CompactFlash Ultra DMA
• IBM Microdrive (MD)
• SecureDigital Card (SD)
• SecureDigital Card HC (SD HC)
• MultiMedia Card (MMC)
•MemoryStick(MS)
•MemoryStickPro
• xD Pictu re Card (xD)
•xDPictureCardMtype
• xD Picture Card H type
Card types that can be read with an adapter:
•MemoryStickDuo
• Memory Stick Pro Duo
• Memory Stick Micro
• Reduced-Size M ultiMedia Card (RS-MMC)
• MultiMedia Card micro (MMC micro)
• MultiMedia Card mobile (MMC mobile)
• Mini-SecureDigital Card (Mini SD)
• Micro SecureD igital Card (Micro SD)
When handling m emory cards, comply with the manufacturer’s instructions.
Your dealer ca n supply you with an adapter for your memory card.
14 - English 10600985329, edition 1

Operation
Inserting the memory card
► Carefully insert the memory card into
the slot. The side with writing on it
must face upwards. Do not force the
card in, otherwise the delicate contact
surfaces can be damaged.
Memorycard,
The memory card reader status display
lights up continu ously.
Taking out the memory card
Memorycard,
Always wait until the status display stops flashing before removing the card.
► Take the memory card out of the slot.
10600985329, edition 1 English - 15

Technical data
Technical data
AMILO Desktop L / AMILO Desktop P
Electrical data
Safety standards complied with: CE, product safety LVD 2006/95/EC,
IEC60950-1, EN60950-1 , EMC: 2004 /108/EC,
EN55022, class B, EN55024, EN6100 0-3-2/3,
RTTE 1999 /5/EC, environmental standards:
RoHS FSC-03230
Protective rating: I
Supply voltage range
220 V -240 V
Rated frequency
50 Hz - 60 Hz
Dimensions
Width/depth/height:
373 mm x 175 mm x 398 mm
Weight
Basic set-up: 9.6 kg
Ambient conditions
Temperature
Operation 15 °C .... 35 °C
Transport
–25 °C .... 60 °C
Make sure no condensation is present during operation!
The data sheet for this machine contains further technical data. Th e data sheet
can be found on the Internet under "www.fujitsu -siemens.com".
16 - English 10600985329, edition 1

AMILO Desktop L Series
AMILO Desktop P Series
Première utilisation
Deutsch
English
Français
Italiano
Nederlands

Microsoft, MS
Windows and Windows Vista are registered trademarks of the Microsoft Corporation.
Adobe Reader is
a trademark of Adobe Systems Incorporated.
MultiMediaCard
is a reg istered trademark o f Infineon Technologies AG
Sony and Memory
Stick are registered trademarks of Sony Electronics, Inc.
All other tradem
arks referenced are trademarks or r egiste red trademarks of their
respective own
ers, whose protected rights are acknowledged.
Copyright © Fuji
tsu Siemens Computers GmbH 2008
All rights reserv
ed, including rights of tran slation, reproduction by printing, copying
or similar method
s, either in part or in whole.
Non-compliance i
s subject to c ompensation for damages.
All rights reserv
ed, including rights created by patent grant or registration of a utility model or design.
Subject to ava ila
bility and technical modifications.

Sommaire
Français
Sommaire
Technologie innovante ................................................................. 1
Informationscomplémentaires ........................................................... 1
Manuel d’utilisation " AMILO Desktop" . . . . . ............................................ 1
Symboles .............................................................................. 2
Remarquesimportantes ............................................................... 2
Connecteurs etélémentsdecommande ................................................ 3
Connecteurs . . .......................................................................... 4
Voyantsetélémentsdecommande ....................................................... 6
Mise en service ........................................................................ 6
Déballage et vérificationducontenudelivraison ........................................... 7
Etapesdelapremièremiseenservice .................................................... 7
Miseenplacedel’appareil ............................................................... 8
Brancher des périphériques . . . ........................................................... 8
Branchementdescâbles ............................................................. 8
Débranchementdescâbles .......................................................... 8
Raccordementdel’écran ............................................................ 9
Sourisetclavier ..................................................................... 9
Brancher des périphériques sur les ports USB . ........................................ 9
Branchement de l’appareil sur le secteur . . . . . . ............................................ 10
Premièremisesoustension:lelogicielestinstallé ........................................ 10
Misesoustensiondel’écranetdel’appareil ........................................... 10
Installationlogicielle ................................................................. 11
Utilisation . . . .......................................................................... 11
Mise sous tension de l’appareil ........................................................... 12
Mise hors tension de l’appareil ........................................................... 12
Voyants de l ’appare il . . .................................................................. 12
Lecteurdecartesmémoire .............................................................. 14
Insertiondelacartemémoire ........................................................ 15
Retraitd’unecartemémoire .......................................................... 15
Caractéristiques techniques ........................................................... 15
AMILODesktopL/AMILODesktopP .................................................... 16
10600985329, édition 1 Français

Sommaire
Français 10600985329, édition 1

Technologie innov ant e
Technologie innovante
... et design ergonomique caractérisent votre AMILO Desktop, un ordinateur
de bureau fiable et convivial.
Votre appareil est équipé d’un système d’exploitation Microsoft Windows. Déjà préinstallé,
ce dernier a été configuré pour vous de man ière optimale. L’appareil est immédiatement
prêt à démarrer dès sa prem ière mise sous tension.
Votre appareil est équipé de la toute dernière technologie pour vous permettre de
tirer le meilleur de votre expérience informatique.
• processeur Intel à faible consommation d’énergie
• boîtier arborant le nouveau design noir et blanc de Fujitsu Siemens Computers
Convivial, "l’utilitaire de config uration du BIOS" vous permet de piloter le matériel de
votre appareil et de mieux protéger votre système contre tout accès non autorisé
grâce à des attributs de mot de passe performants.
Le présent manuel d’utilisation vous montre entre autres comment mettre en
service et utiliser votre appareil.
Informations complémentaires
Vous trouverez des informations générales sur votre appareil dans le
manuel d’utilisation "AMILO Desktop".
Les parties de ce manuel relatives aux logiciels renvoient à des produits Microsoft,
sous réserve qu’ils fassent partie du contenu de livraison de votre appareil.
Lors de l’installation d’autres produits l ogiciels, reportez-vous aux
manuels d’utilisation du fabricant.
Manuel d’utilisation "AMILO Desktop "
Vous trouverez le manuel d’utilisation "AMILO Desktop" dans le menu Démarrer
de Windows sous Tous les programmes - Fujitsu Siemens Computers ou sur le site
Internet "www.fujitsu-siemens.com/support.".
10600985329, édition 1 Français - 1

Remarques importantes
Symboles
signale des instructions à respecter impérativement pour votre propre
sécurité, celle de votre appareil et c elle de vos données. La garantie
s’éteint dès l’instant où vous endommagez l’appareil en ne respectant
pas ces consignes.
signale des informations importantes pour l’utilisation correcte de l’appareil
►
signale une opération que vous devez exécuter.
indique un résultat
Cette police
signale des données q ue vous devez saisir sur le clavier dans une fenêtre
de dialogue de programme ou dan s une ligne de commande, p. ex. votre
mot de passe (Nom123) ou une instruction pour démarrer un programme
(start.exe)
Cette police
signale des informations affichées à l’écran par un programme, par ex. :
L’installation est terminée !
Cette police
signale
• des concepts et des textes dans une surface logicielle, par ex. : Cliquez
sur Enregistrer.
• Noms de programmes ou fichiers, p. ex. Windows ou setup.exe.
"Cette police"
signale
• des renvois à d’autres sections, par ex. "Consignes de sécurité"
• Liens vers une source externe, p. ex. une adresse web : Lisez les
informations sur "www.fujitsu-siemens.com"
• des noms de CD, de DVD ainsi que des désignations et des titres
d’autres matériels, p. ex. : "CD/DVD Drivers & Utilities" ou Manuel
"Sécurité"
Abc
indique une touche du clavier, par ex. :
F10
Cette police
signale des concepts et des passage de te xte que l’on souhaite souligner ou
mettre en évidence, par exemple : Ne pas mettre l’appareil hors tension
2 - Français 10600985329, édition 1

Connecteurs et éléments de comma nd e
Remarques importantes
Respectez les consignes de sécurité figurant dans le manuel "Sécurité"
et dans le manuel d’utilisation "AMILO Desktop".
10600985329, édition 1 Français - 3

Connecteurs et éléments de commande
Connecteurs et éléments de commande
Ce chapitre présente les différents composants matériels de votre appareil. Il vous offre
une vue d’ensemble des voyants et connecteurs de votre appareil. Familiarisez-vous
avec ces éléments avant d’utiliser votre appareil.
L’ illustration ci-après peut être différente de votre configuration.
Connecteurs
Désignation Illustration Symbole
Alimentation électrique de
l’ordinateur
Connecteur secteur
4 - Français 10600985329, édition 1

Connecteurs et éléments de comma nd e
Désignation Illustration Symbole
Son (sources audio externes, par
ex. haut-parleur actif, micro)
•Sonintégré
Avec une carte son intégrée
supplémentaire, la fonction audio
de la carte-mère est i nhibée, ou le
„Sound Onboard“ (son intégré) n’est
pas disponible.
Prise jack 3,5 mm
Line In
Line Out
Mic
Connecteur audio numérique,voir
aussi le manuel d’utilisation de la
carte mère.
Connecteur Cinch (Coax)
SPDIF Out (sortie SPDIF)
Branchement de périphériques USB
(par ex. clavier, souris, module
émetteur/récepteur IR, scanner,
imprimante)
USB 2.0
Remarque importante sur l’USB 2.0
: pour garantir un taux de transfert
de données optimal, nous vo us
recommandons d’utiliser un câble de
raccordement USB d’une longueur
max.de3m.
Port USB
ou U SB
Branchement de périphériques
compatibles FireWire ou IEEE-1394
(par ex. magnétoscope, appareil
photo numérique)
FireWire
Port FireWire
1394
Réseau ou modem ADSL
Douille RJ-45
ou
ou L AN
10600985329, édition 1 Français - 5

Mise en service
Désignation Illustration Symbole
Douilled’entréeetdesortievidéo
(en option)
(voir documentation sur la carte
VGA)
Douille 4 broches ou plus
SVIDEO IN (entrée
SVIDEO)
SVIDEO OUT (sortie
SVIDEO)
Raccordement pour signal vidéo
numérique (moniteur)
DVI
Interface aud io/vidéo numérique
HDMI
Voyants et éléments de commande
Désignation Symb ole Signification
Interrupteur
principal
Interrupteur de marche/arrêt. L’appareil ne peut plus
être relancé à partir du r éseau (réveil par LAN).
Bouton
marche/arrêt
Bouton de démarrage du système.
• Le bouton marche/arrêt est allumé en blanc : le
système est sous tension.
• Le bouton marche/arrêt clignote en jaune : le
système c ommunique avec le disque dur.
• Le bouton marche/arrêt clignote en blanc : le
système est en mode économie d’énergie.
6 - Français 10600985329, édition 1

Mise en service
Mise en service
Miseen service
Respectez les consignes de sécurité données d ans le chapitre
"Remarques importantes", Page 2 .
Déballage et vérification du c ontenu de livraison
Il est recomm andé de conserver l’emballage d’origine de ou des appareils
en cas de b esoin de transport.
Emballagecontenudela livraisonEmballage
► Déballez tous les éléments.
► Vérifiez que le contenu de l’emballage n’a subi aucun dommage visible pendant le transport.
► Vérifiez si la livraison coïncide avec les indications figurant sur le bon de livraison.
Si vous constatez des dommages dus au transport ou des incohérences entre le contenu de
l’emballage et le bon de livraison, veuillez en informer immédiatement v otre point de vente !
Etapes de la première mise en service
Premièremiseenservice,vued’ensembleMiseen service
Les étapes à suivre pour effectuer la premiè re mise en service de votre
nouvel appareil sont peu nombreuses :
• Sélection de l’emplacement de l’appareil et mise en place de ce dernier
• Branchement de s périphériques (appareils externes)
•Vérification de la te nsion nominale et branchement de l’appareil sur le secteur
• Mise sous tension de l’appareil
Vous trouverez plus d’informations sur les différentes étapes dans les sections suivantes.
Périphériques (appareils externes)
Si vous avez reçu des périphériques (par ex. une imprimante) en plus de votre
appareil, connectez-les uniquement après l’installation initiale. La procédure de
connexion de ces périphériques est d écrite dans les sections suivantes.
Lecteurs et module s
Si vous avez reçu des lecteurs ou mo dules en plus de votre appareil, ajoutez-les
uniquement après l’installation initiale. L’ajout de lecteurs et modules est décrite
dans le manuel "AMILO Desktop," au chapitre"Exten sions du système".
10600985329, édition 1 Français - 7

Mise en service
Mise en place de l’appareil
Postede travailécranErgonomiqueAppareil
Lors de la mise en place de l’appareil, tenez compte des recommandations
et des consignes de sécurité du manuel "Sécurité".
Mettez l’appareil uniquement dans la position de fonctionnement prévue
à cet effet (verticalement sur ses pieds).
Nous vous conseillons de poser l’appareil sur un support antidérapant.
Certains vernis et revêtements de surfa ce utilisés sur les meubles pourraient
être endomma gés par les pieds en caoutchouc.
Evitez de superposer plusieurs appareils.
L’appareil ne doit être mis en service que debout sur ses pieds.
Le lieu d’installation de votre appareil peut provoquer des vibrations et des bruits
gênants. Pour éviter cela, il convient de resp ecte r une distance minimum de 3 mm entre
les côtés du boîtier sans fentes d’aération et d’éventuels autres appareils ou objets.
Assurez-vous que l’appareil est suffisamment ventilé. Les ouïes de ventilation de l’écran
et de l’appareil ne doivent pas être obstruées afin d’éviter toute surchauffe.
Ne soumettez pas l’appareil à des conditions ambiantes extrêmes (voir "AMILO
Desktop L / AMILO Desktop P", Page 16, section"Conditions ambiantes").
Protégez l’appareil contre la poussière, l’humidité et la c haleur.
Brancher des périphériques
Lisez la documentation relative au périphérique avant de le brancher.
A l’exception des périphériques USB, il est impératif de retirer les fiches secteur
lorsque vous branchez des périphériques externes !
Evitez de brancher ou de débrancher des câbles par te mps d’orage.
Lorsque vous débranchez un câble, tenez-le toujours par son connecteur.
Ne tirez jamais sur le câble !
Lorsque vous branchez ou débranchez des câbles, respectez l’ordre indiqué ci-dessous.
Branchement des câbles
► Mettez hors tension tous les appareils concernés.
CâbleCâbles
► Débranchez tous les fiches secteur des prises avec terre de protection.
► Branchez tous les câbles sur l’appareil et sur les périphériques. Respectez impérativement
les consignes de sécurité du chapitre "Remarques importantes", Pa ge 2 .
► Enfichez tous les câbles de tra nsmission de données dans les prises spéciales des
réseaux de transmission de donnée s/télécommunications.
► Enfichez toutes les fiches secteur dans les prises avec terre de protection.
8 - Français 10600985329, édition 1

Mise en service
Débranchement des câbles
► Mettez hors tension tous les appareils concernés.
Câbles
► Débranchez tous les fiches secteur des prises avec terre de protection.
► Débranchez tous les câbles de transmission de données des prise s des réseaux
de transmission de données/télécommunications.
► Débranchez tous les câbles sur l’appareil et sur les périphériques.
Raccordement de l’écran
► Préparez l’écran comme décrit dans le manue l d’utilisation de l’écran (p. ex. branch er des câbles).
Ecran
► Enfichez le câble de données dans le port écran de l’appareil.
Selon la version de votre appareil et de votre écran, vous pouvez également
raccorder le câble de données à l’interface DVI.
► Branchez le câble secteur dde l’écran sur une prise avec terre de protection.
Souris et clavier
Une souris et un clavier sont livrés avec votre appareil. Vous trouverez une description
appropriée dans le manuel d’utilisation "AMILO De sktop".
Raccordement de la souris et du clavier
► Raccordez la souris et le clavier à un port USB, voir "Brancher des
périphériques sur les ports USB", Page 9 .
Brancher des périphériques sur les ports USB
AppareilsUSBPortUSBPériphériquesAppareils
Vous pouvez brancher sur les ports USB un grand nombre de périphériques (p.
ex. imprimante, scanner, modem ou clavier).
Les pé riphériques USB supportent le branchement à chaud (hot-plug). Par
conséquent, les câbles des périphériques USB peuvent être branchés et
débranchés sans qu’il soit nécessaire d’éteindre l’appareil.
Vous trouverez d’autres informations dan s la documen tation fournie
avec les périphériques USB.
► Branchez le câble de données sur le périphérique.
► Raccordez le câble de données à l’un des ports USB de l’appareil.
10600985329, édition 1 Français - 9

Mise en service
Pilotes
Les périphériques que vous branchez sur l’un de s ports USB n’ont en général besoin
d’aucun pilote propre puisque le logiciel nécessaire est déjà intégré au système
d’exploitation. Mais si le périphérique USB requiert un logiciel propre pour fonctionner,
installez-le au moyen du support de donné es qui accompagne le périphérique USB.
Pour raccorder le port USB avant de votre appareil au périphérique USB, utilisez
uniquement un câble de 3 m de longueur max. pour béné ficier de l’USB 2.0.
Branchement de l’appareil sur le secteur
Adaptateursec teur
2
1
► Branchez l’appareil sur le secteur (1).
► Racc ordez la fiche secteur à une prise secteur avec protection par mise à la terre (2).
Première mise sous tension : le logiciel est installé
InstallationLogicielInstallation
Si l’appareil est intégré à un réseau, les données relatives aux utilisateurs, au serveur et aux
protocoles de réseau sont indispensables lors de l’installation du logiciel.
Le logiciel f ourni est installé et configuré lors de la première mise sous tension de l’appareil.
Prévoyez un certain temps pour cette opération car elle ne doit pas être interrompue.
Dès que l’installation commence, vous ne pouvez plus mettre l’appareil hors
tension, jusqu’à ce q ue l’installation soit termin ée !
Pendant l’installation, vous pouvez redémarrer l’appareil uniquement
si le système vous y invite !
A défaut, l ’installation ne s’effectue pas correctement et le contenu du
disque dur est à restaurer intégralement.
10 - Français 10600985329, édition 1

Utilisation
Mise sous tension de l’écran et de l’appareil
► Allumez l’écran (voir le manuel d’utilisation de ce dernier).
1
2
► Mettez l’interrupteur principal au dos de l’appareil en position "I" (1).
► Appuyez sur le bouton marche/arrêt situé sur l a façade de votre appareil.
Le voyant de marche s’allume et l’appare il démarre.
Installation logicielle
► Pendant l’installation, suivez les instructions à l’écran.
LogicielInst allation
► En cas d’ambiguïtés concernant les données à saisir, consultez l’aide
de votre système d’exploitation.
Vous trouverez de plus amples informations sur le système ainsi que sur les pilotes,
utilitaires et mises à jour dans le manuel de restauration des logiciels installés
et sur le site Internet "http://ww w.fujitsu-siemens.com/support".
10600985329, édition 1 Français - 11

Utilisation
Utilisation
Mise sous tension de l’appareil
► Le cas échéant, mettez l’écran sous tension (voir le manuel d’utilisation de l’écran).
AppareilEcran
► Appuyez sur l’interrupteur Marche/Arrêt sur la face avant de l’appareil.
Mise hors tension de l’appareil
► Quittez le système d’exploitation correctement.
AppareilEcran
► Si le système d’exploitation ne b ascule pas automatiquement l’appareil en m ode
d’économie d’énergie ou ne le met pas hors tension automatiquement, a ppuyez sur
l’interrupteur Marche/Arrêt pendant au moins 4 secondes.
L’appareil consomme ainsi un minimum d’énergie.
L’ interrupteur Marche/Arrêt ne sépare pas l’appareil de la tension de secteur. Pour une
séparation complète, vous devez débrancher la fiche secteur de la prise de courant.
► Le ca s échéant, mettez l’écran hors tension ( voir le manuel d’utilisation de l’écran).
12 - Français 10600985329, édition 1

Utilisation
Voyants de l’appareil
VoyantdemarcheAppareil
Les voyants se situent sur la façade du boîtier.
2
1
1 = Voyant d’état du lecteur de cartes mémoire 2 = Voyant de march e
Voyant d’éta t du lecteur de cartes mémoire
• Le voyant est allumé fixe : une carte mémoire est insérée.
• Le voyant clignote : le système communique avec la carte mémoire insé rée.
• Le voyant n’est pas allumé : il n’y a pas de carte mém oire dans le lecteur.
Voyant de marche
Voyantdemarche
En mode économie d ’énergie, l’appareil ne doit pas être débranché du secteur
sous p e ine d’engendrer une perte de données.
• Le voyant e st allumé en blanc : l’appareil est sous tension.
• Le voyant clignote en blanc : l’appareil est en mode économie d’énergie. Après
avoir allumé le bouton marche/arrêt, l’appareil se met sous tension ou revient à l’état
qui régnait avant le passage en mode économie d’énergie.
• Le voyant clignote en jaune : le système communique avec le disque dur.
• Le voyant n’est pas allumé : l’appareil est débranché du secteur ou prêt à fonctionner. Si
l’appareil est prêt à fonctionner, il p eut être mis sous tension à l’aide du bouto n marche/arrêt.
10600985329, édition 1 Français - 1 3

Utilisation
Lecteur de cartes mémoire
Emplacement
Votre appareil est équipé en façade d’un lecteur de cartes mémoire.
SD/MMC
XD
MS
CF/MD
1
1 = Voyant d ’état du lecteur de cartes mémoire
Ty pes de carte s possibles sans adaptateur :
• CompactFlash Card (Typ e I et II) (CF)
• CompactFlash Ultra DMA
• IBM Microdrive (MD)
• SecureDigital Card (SD)
• SecureDigital Card HC (SD HC)
• MultiMedia Card (MMC)
•MemoryStick(MS)
•MemoryStickPro
• xD Pictu re Card (xD)
•xDPictureCardMtype
• xD Picture Card H type
Ty pes de carte s possibles avec adaptateur :
•MemoryStickDuo
• Memory Stick Pro Duo
• Memory Stick Micro
• Reduced-Size M ultiMedia Card (RS-MMC)
• MultiMedia Card micro (MMC micro)
• MultiMedia Card mobile (MMC mobile)
• Mini-SecureDigital Card (Mini SD)
• Micro SecureD igital Card (Micro SD)
Respectez les indications du fabricant lorsque vous utilisez des cartes mémoire.
Vous trouverez dans le commerce des adaptateurs appropriés à votre carte mémoire.
14 - Français 10600985329, édition 1

Caractéristiques technique s
Insertion de la carte mémoire
► Poussez prudemment la carte mémoire
dans son emplacement (slot). La zone
d’inscription doit être orientée vers le haut.
Ne forcez pas sous peine d’endommager
les surfaces de contact fragiles.
Cartemémoire
Le voyant d’état du lecteur de cartes
mémoire s’allume fixe.
Retrait d’une carte mémoire
Cartemémoire
Attendez im pérativement que le voyant d’état ne clignote plus avant de retirer la carte.
► Retirezlacartemémoiredeson
emplacement (slot).
10600985329, édition 1 Français - 1 5

Caractéristiques techniques
Caractéristiques techniques
AMILO Desktop L / AMILO Desktop P
Caractéristiques électriques
Normes de sécurité respectées :
CE, Sécurité produit LVD (directive basse
tension) 2006/95/CE, IEC60950-1 , EN60950-1,
CEM : 2004/108/CE, EN5502 2, classe B,
EN55024, EN61000-3-2/3, RTTE 1999/5/CE,
normes environnementales : RoHS FSC-03230
Classe de protection :
I
Plage de tension nominale 220 V - 240 V
Fréquence nominale 50 Hz - 60 Hz
Dimensions
Largeur/Profondeur/Hauteur :
373 mm x 175 mm x 398 mm
Poids
en version de base : 9,6 kg
Conditions ambia ntes
Température
Fonctionnement
15 ° C .... 35 ℃
Transport
-25 °C .... 60 ℃
Condensation non autorisée pendant le fonctionnement !
La fiche technique de ces appareils contient des caractéristiques techniques
complémentaires. Vous la trouverez sur le site Internet "www.fujitsu-siemens.com".
16 - Français 10600985329, édition 1

AMILO Desktop L Series
AMILO Desktop P Series
Prima messa in esercizio
Deutsch
English
Français
Italiano
Nederlands

Microsoft, MS
Windows and Windows Vista are registered trademarks of the Microsoft Corporation.
Adobe Reader is
a trademark of Adobe Systems Incorporated.
MultiMediaCard
is a reg istered trademark o f Infineon Technologies AG
Sony and Memory
Stick are registered trademarks of Sony Electronics, Inc.
All other tradem
arks referenced are trademarks or r egiste red trademarks of their
respective own
ers, whose protected rights are acknowledged.
Copyright © Fuji
tsu Siemens Computers GmbH 2008
All rights reserv
ed, including rights of tran slation, reproduction by printing, copying
or similar method
s, either in part or in whole.
Non-compliance i
s subject to c ompensation for damages.
All rights reserv
ed, including rights created by patent grant or registration of a utility model or design.
Subject to ava ila
bility and technical modifications.

Contenuto
Italiano
Contenuto
Tecnologia innovativa .................................................................. 1
Ulterioriinformazioni .................................................................... 1
Istruzioniperl’uso"DesktopAMILO" .................................................. 1
Simboli ................................................................................. 1
Informazioni importanti ................................................................ 3
Collegamenti ed elementi di comando .................................................. 4
Collegamenti . .......................................................................... 4
Indicatoriedelementidicomando ........................................................ 6
Messa in funzione . . . .................................................................. 7
Aprire e controllare il contenuto della confezione . . . ........................................ 7
Fasidellaprimamessainfunzione ....................................................... 7
Posizionamento del dispositivo ........................................................... 8
Collegamento di periferiche esterne . . . ................................................... 8
Collegamentodeicavi ............................................................... 8
Scollegamento dei cavi . . . ........................................................... 8
Collegamentodelloschermo ......................................................... 9
Mouseetastiera .................................................................... 9
CollegamentodiperifericheesternealleporteUSB .................................... 9
Collegare l’apparecchio alla tensione di rete . . . ............................................ 10
Prima accensione: installazione del software . . ............................................ 10
Accensione monitor e apparecchio . ................................................... 10
Installazionedelsoftware ............................................................ 11
Utilizzo ................................................................................ 12
Accensionedeldispositivo ............................................................... 12
Spegnimento del dispositivo . . ........................................................... 12
Indicatori dell’apparecchio . . . . ........................................................... 12
Lettore di schede di memoria . ........................................................... 14
Introdurre la scheda di memoria . . . ................................................... 15
Estrarre la scheda di memoria . ....................................................... 15
Dati tecnici ............................................................................ 15
DesktopAMILOL/DesktopAMILOP .................................................... 16
10600985329, edizione 1 Italiano

Contenuto
Italiano 10600985329, e dizione 1

Tecnolog ia innovativa
Tecnologia innovativa
... e design ergonomico fanno del vostro desktop AMILO un PC desktop affidabile e di facile utilizzo.
Il vostro apparecchio è dotato di un sistema operativo Microsoft Windows. Questo
apparecchio è già pre installato e configurato in maniera ottimale. L’apparecchio
è già pronto per l’uso alla prima a ccensione.
L’ appa recchio è dotato della tecnologia più recente con la quale potete trasformare
la vostra esperienza di computer.
• CPU Intel a basso consumo energetico
• Case nel nuovo design di Fujitsu Siemens Computers bianco/nero
Con "l’utility di c onfigurazione BIOS" potete proteggere meglio l’hardware del vostro apparecchio e
del vostro sistema da accessi non autorizzati utilizzando e fficaci proprietà password.
Le presenti istruzioni per l’uso mostrano tra l’altro come mettere in funzione e utilizzare l’apparecchio.
Ulteriori informazioni
Per informazioni generali sul vostro apparecchio potete consultare
le istruzioni per l’uso "Desktop AMILO ".
Le parti relative al software si riferiscono a prodotti Microsoft nel caso in cui
siano inclusi nella dotazione del vostro apparecchio.
Osservare durante l’installazione di altri prodotti software il manuale
di istruzioni del produttore.
Istruzioni per l’uso "Des ktop AMILO"
Consultare le istruzioni per l’uso del "desktop AMILO " nel me nu di avvio di
Windows in Tutti i programmi - Fujitsu Siemens Computers oppure in Internet
all’indirizzo "www.fujitsu-siemens.com/support".
10600985329, edizione 1 Italiano - 1

Tecnologia innovativa
Simboli
Indica istruzioni a cui è necessario attenersi. La mancata osservanza
potrebbe comportare lesioni personali, compromette re il funzionamento
del dispositivo o la sicurezza dei dati. In caso di guasto provocato della
mancata osserva nza di queste istruzioni, la garanzia non sarà più valida.
Indica inform azioni importanti per l’uso appropriato del dispositivo.
►
Indica una fase di una procedura da eseguire.
Indica un risu ltato.
Questo carattere
Indica immissioni che si eseguono con la tastiera in una finestra di dialogo
del programma oppure in una riga di comando, ad esempio la passw ord
(Nome123) oppure il comando di avvio di un programma (start.exe)
Questo carattere
Indica informazioni visualizzate sullo schermo da un programma, ad
esempio: L’installazione è completata.
Questo carattere
Indica
• Elementi e testo di un’interfaccia utente, ad esempio: Fare clic su Salva.
• Nomidiprogrammiofile, ad esempio Windows o setup.exe.
"Questo carattere"
Indica
• Riferimenti incrociati a un altro paragrafo, ad esempio "Norme di
sicurezza"
• rimanda ad una fonte esterna, ad esempio indirizzo internet: Per
ulteriori informazioni consultare il sito "www.fujitsu-siemens.com"
• Nomi dei CD, DVD nonché denominazioni e titoli di altri prodotti, ad
esempio: "C D/DVD Drivers & Utilities" oppu re il manuale "Sicurezza"
Abc
Indica un tasto della tastiera, ad esempio:
F10
Questo carattere
Indica concetti e testi che devono essere sottolineati o evidenziati, ad
esempio: Non spegnere il dispositivo
2 - Italiano 10600985329, edizione 1

Informazioni importa nt i
Informazioni importanti
Osservare le istruzioni di sicurezza riportate nel manuale "Sicurezza" e
nelle istruzioni per l’uso "del desktop AMILO ".
10600985329, edizione 1 Italiano - 3

Collegamentiedelementidicomando
Collegamenti ed elementi di comando
In questo capitolo vengono presentate le s ingole componenti hardware. È possibile
ottenere una panoramica degli indicatori e dei collegamenti dell’apparecchio. Prende te
confidenza con questi elementi prima di lavorare con l’apparecchio.
La figura seguente può essere diversa dalla vostra configurazione.
Collegamenti
Denominazio ne Figura Simbolo
Alimentazione di tensione e del PC
Collegamento di rete
4 - Italiano 10600985329, edizione 1

Collegamenti ed elementi di comando
Denominazione Figura Simbolo
Sound (fonti sonore esterne, ad es.
altoparlanti attivi, microfono)
• Sound onboard
Se la scheda audio è stata montata
successivamente la funzione audio
non è ancora attivata sulla scheda
madre oppure „Sound onboard“ non
è presente.
Connettori jack da 3,5-mm
Line In
Line Out
Mic
Connessione audio digitale - vedere
anche manuale sulla scheda madre.
Connettore cinch (Coax)
SPDIF Out
Porta di connessione per dispositivi
USB (p . es. tastiera, modulo
ricevitore/trasmettitore IR, scanner,
stampante)
USB 2.0
Nota importante su USB 2.0: al
fine di garantire una velocità di
trasmissione dei dati sicura, si
consiglia l’utilizzo di un cavo USB
con lunghezza max. 3 m.
Boccola USB
oppure USB
Porta di connessione per apparecchi
fireware o compatibili IEEE-1394 (ad
es. videoregistratore, videocamera
digitale)
FireWire
Connettore FireWire
1394
Rete o modem DSL
Connettore RJ-45
oppure
oppure LAN
Collegamento video entrata e uscita
(optional)
(vedere documentazione su scheda
VGA)
Connettore a 4 o più poli
SVIDEO IN
SVIDEO OUT
10600985329, edizione 1 Italiano - 5

Collegamentiedelementidicomando
Denominazio ne Figura Simbolo
Collegamento per segnale video
digitale (monitor)
DVI
Interfaccia audio-video digitale
HDMI
Indicatori ed elementi di comando
Denominazione Simbolo Significato
Interruttore
principale
Interruttore per accensione/spegnimento.
L’apparecchio non p uò più essere avviato dalla rete
(WakeonLAN).
Interruttore on/off
Interruttore per l’accensione del sistema.
• L’interruttore on/off si illumina di bianco: Il
sistema è acceso.
• L’interruttore on/off si illumina di giallo: Si accede
al disco fisso.
• L’interruttore on/off si illumina di bianco: Il
sistema è in modalità risparmio energetico.
6 - Italiano 10600985329, edizione 1

Messa in funzione
Messa in funzione
Messainfunzione
Attenersi alle norme di sicurezza riportate nel capitolo "Informazioni importanti", Pagina
3.
Aprire e controllare il contenuto della confezione
L’imballaggio originale degli apparecchi deve essere conservato in caso di eventuale trasporto.
Contenutod ella confezionedell’imballaggioAprire
► Disimballare tutte le parti.
► Controllare che il contenuto della scatola non abbia danni di trasporto visibili.
► Controllare che il materiale consegnato concida con quello indicato
nella bolla di accomp agnamento .
Se vengono constatati danni dovuti al trasporto oppure incongruenze tra il contenuto della
scatola e la bolla di accomp agnament o informare immediatamente il vostro punto vendita!
Fasi della prima m essa in funzione
Primamessainfunzione,panoramicaPanoramica
Sono necessarie poche mosse per la prima m essa in funzione dell’apparecchio:
• Scegliere la posizione dell’apparecchio e installarlo
• Collegare i dispositivi este rni
• Controllare la tensione nominale e collegate l’apparecchio alla rete elettrica
• Accendere l’apparecchio
Nei paragrafi seguenti è possibile scoprire ulteriori dettagli sulle singole fasi.
Dispositivi esterni
Se vengono forniti altri dispositivi esterni oltre all’apparecchio (ad es. una
stampante), collegarli subito dopo la prima installazione. Il collegamento di
questi dispositivi esterni è descritto n ei seguenti paragrafi.
Unità e moduli
Se vengono forniti ulteriori unità o moduli oltre all’apparecch io, inst allarli subito dopo
la prima installazione. L’installazione di unità e moduli è descritta nel manuale "del
desktop AMILO " al capitolo"Ampliamento del sistema" beschrieben.
10600985329, edizione 1 Italiano - 7

Messa in funzione
Posizionamento del dispositivo
PostazionedilavoroErgo nomiaDispositivo
Nel posizionare il dispositivo , osservare le raccomandazioni e le norme
di sicurezza riportate nel manuale "Sicurezza".
Collocare l’appare cchio solo nella posizione di funzionamento prevista
a questo scopo (verticalmente sui piedini).
Si consiglia di collocare il dispositivo su una superficie non sdrucciolevole. L’enorme
varietà dei tipi di rivestimento e delle vernici usati per i m obili non consente di escludere
che i piedini in plastica del dispositivo possano danneggiare la s uper ficie di appoggio.
Non collocare più dispositivi uno sull’altro.
L’ apparecchio deve essere messo in funzione collocato solo sui piedini.
A seconda della posizione dell’apparecchio si possono verificare fastidiose vibrazioni
e rumori. Per evitare ciò, ai lati del case senza s uperficie di ventilazione deve essere
tenuta una distanza minima di 3 mm rispetto agli altri apparecchi o oggetti.
Assicurarsi che il dispositivo sia sufficientemente ventilato. Le superfici di ventilazione
dello schermo e del dispositivo non devono essere coperte per evitare surriscaldamenti.
Non esporre il dispositivo a condizioni ambientali estreme (vedere "Desktop AMILO L
/ Desktop AMI LO P", Pag ina 16, p aragrafo "Condizioni ambientali"). È necessario
proteggere il dispositivo dalla polvere, dall’umidità e dal calore.
Collegamento d i periferiche esterne
Prima di collegare una periferica esterna, consultare la relativa documentazione.
Ad eccezione delle periferiche USB, quando vengono collegate pe riferiche
esterne, le spine di rete devono essere scollegate.
Non collegare o scollegare cavi durante un temporale.
Per scollegare un cavo, afferrarlo sempre per la spina. Non tirare mai il cavo.
Collegare o staccare i cavi secondo la sequenza qui descritta.
Collegamento dei cavi
► Spegnere tutte le periferiche interessate.
CavoCavi
► Estrarre dalle prese di sicurezza tu tte le spine di rete delle periferiche interessate.
► Collegare tutti i cavi al dispositivo e alle periferiche esterne. Attenersi sempre alle norme
di sicurezza indicate nel capitolo "Informazioni importanti", P agina 3 .
► Inserire tutti i cavi di trasm issione dati negli appositi dispositivi di inserimento
delle reti di dati e di telecomunicazione.
► Inserire tutte le spine di r ete nelle rispettive prese di terra.
8 - Italiano 10600985329, edizione 1

Messa in funzione
Scollegamento dei cavi
► Spegnere tutte le periferiche interessate.
Cavi
► Estrarre dalle prese di sicurezza tutte le spine di rete delle periferiche interessate.
► Staccare tutti i cavi di trasmissione dati dai dispositivi di inserimento delle
reti di dati e di telecomunicazione.
► Scollegare tutti i cavi dal dispo sitivo e dalle periferich e esterne.
Collegamento dello sch ermo
► Predisporre lo schermo come indicato nelle relative istruzioni per l’uso
(ad esempio, collegare i cavi).
Schermo
► Inserire il cavo di trasmissione dati nel co nnettore dello schermo sul dispositivo.
A seconda del modello e dello schermo dell’apparecchio è possibile
collegare il cavo dati anche all’interfaccia DVI.
► Collegare il cavo di rete del dispositivo a una presa di sicurezza con contatto di terra.
Mouse e tastiera
Il mouse e la tastiera sono compresi nella fornitura dell’apparecchio. Una descrizione
è disponibile nelle istruzioni per l’uso "del desktop AMILO ".
Collegamento mouse e tastiera
► Collegare il mouse e la tastiera a c iascuna interfaccia USB, vedere "Collegamento
di periferiche esterne alle porte USB", Pa gina 9 .
Collegamento di periferiche esterne alle porte USB
Perife ricaUSBPortaUSBPerifericheesternePerife riche
È possibile collegare alle porte USB una varietà di periferiche esterne, ad esempio
stampanti, scanner, modem o tastiere.
Le periferiche USB sono del tipo “hot p lug”, ovvero i relativi cavi p ossono
essere collegati e scollegati con il dispositivo acceso.
Per ulteriori informazioni, consultare la documentazione delle periferiche USB.
► Collegare il cavo di trasmissione dati alla periferica est erna.
► Collegare il c avo di trasmissione dati a una delle porte USB del dispositivo.
10600985329, edizione 1 Italiano - 9

Messa in funzione
Driver delle periferiche
Le periferiche esterne USB che ven gono collegate alle p orte USB non richiedono
di solito alcun driver, in quanto il software necessario è già incluso ne l sistema
operativo. Se tuttavia la periferica esterna USB richiede un software specifico,
installarlo dal supporto dati fornito insieme alla periferica US B.
Per collegare la periferica esterna USB alla porta USB anteriore de l dispositivo e
garantire il collegamento USB 2.0, può essere utilizzato solo un cavo da 3 me tri.
Collegare l’apparecchio alla tensione di rete
Collegare
2
1
► Collegare il cavo di rete all’apparecchio (1).
► Inserire il connettore di rete in una presa con contatto di terra collegata a terra (2).
Prima accensione: installazione del software
InstallazioneInstallazioneInstallazione
Se il dispositivo v iene connesso a una re te, per l’installazione del softw are sono necessari
i dati relativi all’utente, al server e al protocollo di rete.
Alla prima accensione del dispositivo, il software fornito viene installato e configurato. Programmare
un certo intervallo di tempo, in quanto questa procedura non può essere interrotta.
Dopo l’inizio dell’installazione, il dispositivo non deve essere s pento fino
a quando l’installazione non è completa.
Durante l’installazione il dispositivo può essere riavviato s olo su richiesta.
In caso contrario, l’installazione non viene eseguita correttamente e sarà necessario
ripristinare completamente il contenuto del disco rigido.
10 - Italiano 10600985329, edizione 1

Messa in funzione
Accensione monitor e apparecchio
► Accendere il monitor (vedere le istruzioni per l’uso del monitor).
1
2
► Collegare l’interruttore principale sul retro dell’apparecchio in posizione "I" (1).
► Premere l’interruttore on/o ff sul pannello anteriore del sistema.
L’indicatore di funzionamento lampeggia, l’apparecchio viene avviato.
Installazione del software
► Seguire le istruzioni sul monitor du rante l’installazione.
InstallazioneSoftware
► In caso di problemi riguardo l’inserimento dei dati richiesti leggere la guida del sistema operativo.
Ulteriori informazioni sul sistema, sul driver, sulle utility e sugli aggiornamenti
sono disponibili nel manuale per il ripristino dei software installati e in Internet
all’indirizzo "http:// www.fujitsu-siemens.com/support".
10600985329, edizione 1 Italiano - 11

Utilizzo
Utilizzo
Accensione del dispositivo
► Accendere lo schermo, se necessario (vedere le Istruzioni per l’uso dello schermo).
DispositivoSchermo
► Premere l’interruttore ON/OFF sul lato anteriore del dispositivo.
Spegnimento del dispositivo
► Chiudere correttamente il sistema operativo.
DispositivoSchermo
► Se il sistema operat ivo non passa automaticamente a l modo di risparmio energetico o non si
arresta, premere il pulsante di accensione e spegnimen to per almeno 4 secondi.
Il dispositivo assorbirà in questo modo una quantità minima di energia.
L’interruttore ON/OFF non scollega il dispositivo dalla tensione di rete.
Per scollegare c ompletamen te il dispositivo dalla tensione di rete, è
necessario estrarre la spina di rete dalla presa.
► Spegnere lo schermo, se necessario (vedere le Istruzioni per l’uso dello sch ermo).
12 - Italiano 10600985329, edizione 1

Utilizzo
Indicatori dell’apparecchio
Indicatoredi funzionamentoIndicatori
Gli indicatori si trovano sul lato frontale del case.
2
1
1 = Indicatore di stato lettore di schede 2 = Indicatore di funzionamento
Indicatore di stato lettore di schede
• L’indicatore lampaeggia in m o do permanente: è inserita una scheda di memoria.
• L’indicatore lampeggia: si accede a lla scheda di memoria.
• L’indicatore non lampeggia: non ci sono schede di memoria nel lettore.
Indicatore d i funzionamento
Indicatoredi funzionamento
Nella modalità risparmio energetico l’apparecchio non può essere separato dalla
rete, in caso contrario s i può verifica re una perdita di dati.
• L’indicatore lampeggia di bianco: l’apparecchio è acceso.
• L’indicatore lampeggia di bianco: l’apparecchio è in modalità risparmio energetico.
Dopo l’accensione dell’interruttore on/off l’apparecchio si accende oppure torna allo
stato anteced ente alla modalità risparmio energetico.
• L’indicatore lampeggia di giallo: si accede al disco fisso.
• L’indicatore non lampeggia: l’apparecchio non è collegato alla rete oppure
pronto al funzionamento. Se l’apparecchio è pronto per il funzioname nto
può essere acceso con l’interruttore on/off.
10600985329, edizione 1 Italiano - 13

Utilizzo
Lettore di schede di memoria
Slot
L’apparecchio è dotato di lettore di schede di memoria sul lato anteriore.
SD/MMC
XD
MS
CF/MD
1
1 = Indicatore di stato lettore di schede
di memoria
Tipi di carta possibili senza adattatore:
• CompactFlash Card (Tipo I e II) (CF)
• CompactFlash Ultra DMA
• IBM Microdrive (MD)
• SecureDigital Card (SD)
• SecureDigital Card HC (SD HC)
• MultiMedia Card (MMC)
•MemoryStick(MS)
•MemoryStickPro
• xD Pictu re Card (xD)
•xDPictureCardMtype
• xD Picture Card H type
Tipi di carta possibili con adattatore:
•MemoryStickDuo
• Memory Stick Pro Duo
• Memory Stick Micro
• Reduced-Size M ultiMedia Card (RS-MMC)
• MultiMedia Card micro (MMC micro)
• MultiMedia Card mobile (MMC mobile)
• Mini-SecureDigital Card (Mini SD)
• Micro SecureD igital Card (Micro SD)
Nell’impiego delle schede di memoria osservare le indicazioni del produttore.
L’ adatta tore pe r le schede di memoria è disponibile in commercio.
14 - Italiano 10600985329, edizione 1

Dati tecnici
Introdurre la scheda di memoria
► Spingere con at tenzione la scheda di
memoria nello slot. Il campo con le scritte
deve essere rivolto verso l’alto. Non forzare
altrimenti le super fici dei contatti sensibili
possono essere danneggiate.
Estrarre
L’ indicatore di stato del lettore di schede di
memoria lampeggia in modo permanente.
Estrarre la scheda di memoria
Estrarre
Attendere fi nché l’indicatore di stato non lampeggia più prima di rimuovere la scheda.
► Togliere la scheda di memoria dallo slot.
10600985329, edizione 1 Italiano - 15

Dati tecnici
Dati tecnici
Desktop AMILO L / Desktop AMILO P
Dati elettrici
Standard di sicurezza rispettati: CE, Sicurezza prodotto LVD 2006/95/EC,
IEC60950-1, EN60950-1, EMV: 2004/108/EC,
EN55022, class B, EN55024, EN6100 0-3-2/3,
RTTE 1999/5/EC, standard ambientali: RoHS
FSC-03230
Classe di protezione:
I
Intervalli di tensione nominale 220 V -240 V
Frequenza nominale 50 Hz - 60 Hz
Dimensioni
Larghezza/Profondità/Altezza:
373 mm x 175 mm x 398 mm
Peso
modello base: 9,6 kg
Condizioni amb ient ali
Temperatura
Funzionamento
15 ° C .... 35 °C
Trasporto
–25 °C .... 60 °C
Non è ammessa condensa nel funzioname nto!
Il modulo dati d el presente apparecchio offre ulteriori dati tecnici. Il modulo dai
in Internet è disponibile all’indirizzo "www.fujitsu-siemens.com".
16 - Italiano 10600985329, edizione 1

AMILO Desktop L Series
AMILO Desktop P Series
Eerste ingebruikname
Deutsch
English
Français
Italiano
Nederlands

Microsoft, MS
Windows and Windows Vista are registered trademarks of the Microsoft Corporation.
Adobe Reader is
a trademark of Adobe Systems Incorporated.
MultiMediaCard
is a reg istered trademark o f Infineon Technologies AG
Sony and Memory
Stick are registered trademarks of Sony Electronics, Inc.
All other tradem
arks referenced are trademarks or r egiste red trademarks of their
respective own
ers, whose protected rights are acknowledged.
Copyright © Fuji
tsu Siemens Computers GmbH 2008
All rights reserv
ed, including rights of tran slation, reproduction by printing, copying
or similar method
s, either in part or in whole.
Non-compliance i
s subject to c ompensation for damages.
All rights reserv
ed, including rights created by patent grant or registration of a utility model or design.
Subject to ava ila
bility and technical modifications.

Inhoud
Nederlands
Inhoud
Innovatieve technologie ................................................................ 1
Meerinformatie ......................................................................... 1
Gebruiksaanwijzing"AMILODesktop" ................................................. 1
Verklaringvansymbolen ................................................................. 1
Belangrijke aanwijzingen ............................................................... 2
Aansluitingenen bedieningselementen ................................................. 3
Aansluitingen ........................................................................... 4
Indicaties en bedieningselementen ....................................................... 6
Ingebruikname ......................................................................... 6
Inhoud van de levering uitpakken en controleren . . . ........................................ 7
Stappen van de eerste ingebruikname . ................................................... 7
Toestelopstellen ........................................................................ 8
Externe toestellen aansluiten . . ........................................................... 8
Bedradingen aansluiten . . . ........................................................... 8
Bedradingenlosmaken .............................................................. 9
Beeldscherm aansluiten . . ........................................................... 9
Muis en toetsenbord . . . . . . ........................................................... 9
Externe toestellen aansluiten op de USB-poorte n . . .................................... 9
Apparaat aansluiten op de netspanning ................................................... 10
Voorheteerstinschakelen:desoftwarewordtgeïnstalleerd ................................ 10
Beeldscherm en apparaat inschakelen . . . . ............................................ 11
Installatievandesoftware ........................................................... 11
Bediening ............................................................................. 11
Toestelinschakelen ..................................................................... 12
Toesteluitschakelen ..................................................................... 12
Indicatiesophetapparaat ............................................................... 12
Geheugenkaartlezer . . . .................................................................. 14
Geheugenkaart plaatse n . . ........................................................... 15
Geheugenkaart verwijderen . . . ....................................................... 15
Technischegegevens .................................................................. 15
AMILODesktopL/AMILODesktopP .................................................... 16
10600985329, uitgave 1 Nederlands

Inhoud
Nederlands 10600985329, uitgave 1

Innovatieve technologi e
Innovatieve technologie
... en ergon omisch design maken uw AMILO Desktop tot een gebruiksvriendelijke en betrouwbare
desktop-pc.
Uw apparaat is voorzien van een Microsoft Windows-besturingssysteem. Dit is al
vooraf geïnstalleerd en optimaal voor u geconfigure erd. H et apparaat is meteen
startklaar, als u het voor het eerst inschakelt.
Uw apparaat is voorzien van de nieuwste technologie, zodat u uw computerervaring optimaal kunt
toepassen.
• stroombesparende Intel CPU
• behuizing in nieuw zwart-wit design van F ujitsu Siemens Computers
Met de gebruiksvriendelijke "BIOS-setup-utility" kunt u de hardware van uw apparaat
besturen en uw systeem beter beschermen tegen onbevoegde toegang door de
krachtige wachtwoord-eigenschappen te gebruiken.
Deze gebruiksaanwijzing laat u onder meer zien hoe u uw apparaat in gebruik neemt en bedient.
Meer in formatie
Algemene informatie over uw apparaat vindt u in de gebruiksaanwijzing "AMILO Desktop".
De gedeelten van deze gebruiksaanwijzing die over software gaan, gelden voor
Microsoft-producten, indien deze met uw apparaat zijn meegeleverd.
Neem bij installatie van andere softwarepro ducten de gebruiksaanwijzingen
van de fabrikant in acht.
Gebruiksaanwijzing "AMILO Desktop"
De ge bruiksaan wijzing "AMILO Desktop" vindt u in het Windows-startmenu onder Alle programma’s -
Fujitsu Siemens Computers of op het internet onder "www.fujitsu-siemens.com/support".
10600985329, uitgave 1 Nederlands - 1

Belangrijke aanwijzingen
Verklaring van symbolen
Besteed in het bijzonder aandacht aan teksten met dit symbool. Als u deze
waarschuwing niet in acht neemt, brengt u uw leven in gevaar, beschadigt
u het systeem, of kan er gegevensverlies opt reden. De garantie vervalt als
het toestel defect raakt doordat u deze instructies niet heeft opgevolgd.
duidt op belangrijke informatie voor de correcte behandeling van het toestel.
►
duidt op een handeling die u moet uitvoeren.
duidt o p een resultaat
Dit lettertype
duidt op ingaven die u m et het toetsenbord in een programma-dialoogvenster
of in een commandoregel kunt uitvoeren (bijvoorbeeld uw wachtwoord)
(Naam123) of een commando om een progra mma te starten (start.exe)
Dit lettertype
duidt op informatie die door een programma op het scherm wordt getoond,
bijv.: De installatie is voltooid!
Dit lettertype
duidt op
• begrippen en teksten in een software-item, bijv.: Klik op Opslaan.
• Namen van programma’s of bestanden, bijv. Windows of setup.exe.
"Dit lettertype" duidt op
• Kruisverwijzingen naar een andere paragraaf, bijv.
"Veiligheidsinstructies"
• Kruisverwijzingen naar een e xterne bron, bijv. een webadres: Lees
meer op "ww w.fujitsu-siemens.com"
• Namen van h arde schijven, CD ’s, DVD’s en betekenissen en titels
van andere materialen, bijvoorbeeld: "CD/DVD Drivers & Utilities" of
handboek "Veiligheid"
Abc
duidt op een toets van het toetsenbord, bijv.:
F10
Dit lettertype duidt op begrippen en teksten die benadrukt worden, bijv.: Toestel niet
uitschakelen
2 - Nederlands 10600985329, uitgave 1

Aansluitingen en b edieningselementen
Belangrijke aanwijzingen
Houd u aan de veiligheidsaanwijzingen in de handleiding "Veiligheid" en
in de gebruiksaanwijzing "AMILO Desktop".
10600985329, uitgave 1 Nederlands - 3

Aansluitingen en bedien ingselementen
Aansluitingen en bedieningselementen
In dit hoofdstuk worden de verschillende hardwarecomponenten van uw appa raat gepresenteerd .
U krijgt een overzicht van de indicaties en de aansluitingen van het apparaat. Maak u
vertrouwd m et deze elementen, voordat u met het ap paraat werkt.
De onderstaande afbeelding kan afwijken van uw configuratie.
Aansluitingen
Omschrijving Afbeelding Symbool
Voeding van de pc
Netaansluiting
4 - Nederlands 10600985329, uitgave 1

Aansluitingen en b edieningselementen
Omschrijving Afbeelding Symboo l
Sound (externe geluidsbronnen, bijv.
actieve luidspreker, microfoon)
• Sound onboard
Bij extra ingebouwde geluidskaart is
de geluidsfunctie op het moederbord
niet geactiveerd of is „Sound
onboard“ niet beschikbaar.
3,5-mm-klinkstekkerbussen
Line In
Line Out
Mic
Digitale geluidsaansluiting, zie ook
handleiding van het moede rbord.
Cinch-aansluiting (Coax)
SPDIF Out
Aansluiting voor USB-appara ten
(bijv. toetsenbord, muis
IR-zender/ontvanger-module,
scanner, printer)
USB 2.0
Belangrijke aanwijzing voor
USB 2.0: om een betrouwbare
datatransmissiesnelheid te
garanderen, adviseren wij u
USB-aansluitkabels met een lengte
van max. 3 m te gebruiken.
USB-bus
of U SB
Aansluiting voor Firewire- of
IEEE-1394-compatibele apparaten
(bijv. videorecorder, digitale camera)
FireWire
FireWire-bus
1394
Netwerk of DSL-modem
RJ-45-bus
of
of LAN
10600985329, uitgave 1 Nederlands - 5

Ingebruikname
Omschrijving Afbeelding Symbool
Aansluiting vo or video-ingang en
-uitgang (optioneel)
(zie documentatie van de VGA-kaart)
4- of meerpolige bus
SVIDEO IN
SVIDEO OUT
Aansluiting voor d igitaal videosignaal
(monitor)
DVI
Digitale audio-video-interface
HDMI
Indicaties en bedieningselementen
Omschrijving Symbool Betekenis
Hoofdschakelaar Sch akelaar om in/uit te schakelen. Het appa raat kan
niet meer vanuit het netwerk worden gestart (Wake
on LAN).
Aan/Uit-schakelaar Schakelaar om het systeem op te starten.
• Aan/Uit-schakelaar brandt wit: het systeem is
ingeschakeld.
• Aan/Uit-schakelaar knippert geel: er wordt
toegang gezocht tot de harde schijf.
• Aan/Uit-schakelaar knippert wit: het systeem is
in de energiebesparingsmodus.
6 - Nederlands 10600985329, uitgave 1

Ingebruikname
Ingebruikname
Ingebruikname
Houd u aan de veiligheidsinstructies in het hoofdstuk "Belangrijke
aanwijzingen", pagina 2 .
Inhoud van de levering uitpakken en controleren
De originele verpakking van de apparaten dient u te bewaren voor een eventueel transport.
VerpakkingInhoudvandeleveringVerpakking
► Pak alle onderdelen uit.
► Controleer de verp akkingsinhoud op zichtbare transportschade.
► Controleer of de levering overeen komt met wat op de pakbon is aangegeven.
Als u transportschade of tegenstrijdigheden tussen verpakkingsinhoud en pakbon constateert,
stel het verkooppu nt hier dan onmiddellijk van op de hoogte!
Stappen van de eerste ingebruikname
Eersteing ebruikname,overzich tIngebruikname
Er zijn maar een paar stappen nodig om uw nieuwe apparaat de eerste keer in gebruik te nemen:
• Standplaats voor het apparaat kiezen en het apparaat plaatsen
• Externe apparaten aansluiten
• Nominale spanning controleren en het apparaat aansluiten op het lichtnet
• Apparaat inschakelen
Over de verschillende stappen leest u meer in de volgende hoofdstukken.
Externe apparaten
Als u naast uw apparaat andere externe apparaten hebt ontvange n (bijv. een
printer), sluit deze dan pas na de eerste installatie aan. Hoe u deze externe
apparaten aansluit, is in de volgende hoofdstukken beschreven.
Stations en mo dules
Als u naast u w appara at stations of modules hebt ontvangen, bouw deze dan pas in
na de eerste installatie. Het inbouwen van stations en modules is in de handleiding
"AMILO Desktop" in het hoofdstuk"Systeemuitbreidingen" beschreven.
10600985329, uitgave 1 Nederlands - 7

Ingebruikname
Toestel opstellen
Werkpostbeelds chermErgonomischTo estel
Hou u bij het opstellen van het toestel aan de aanbevelingen en
veiligheidsinstructies in het handboek "Veiligheid".
Plaats het appara at uitsluitend in de daarvoor bed oelde werkingspositie
(rechtop op de standvoeten).
We raden u aan het toestel o p een slipvaste ondergrond te plaatsen. Gezien de
diversiteit van de bekledingen en lakken die voor meubels gebruikt worden, is he t niet
uit te s luiten dat de kunststof voeten schade veroorzaken aan het vlak waarop ze staan.
Plaats nooit verschillende toestellen boven elkaar.
Het apparaat mag alleen in gebruik worden genomen als het op de standvoete n staat.
Afhankelijk van de standplaats van uw apparaat kunne n er storende trillingen
en geluiden ontstaan. Om dit te voorkomen moet bij zijkanten van de behuizing
die geen ventilatieruimte he bben, een minimumafstand van 3 mm ten opzich te
van andere apparaten of voorwerpen worden aangehouden.
Let op dat het toestel voldoende wordt geventileerd. De verluchtingsvlakken
van het beeldscherm en van het toestel mogen niet worde n afgedekt,
om oververhitting te vermijden.
Stel het toestel niet bloot aan extreme omgevingsvoorwaarden (zie "AMILO
Desktop L / AMILO Desktop P", pagina 16, pa ragraaf "Omgevingsvoorwaarden").
Bescherm het toestel tegen stof, vocht en hitte.
Externe toestellen aansluiten
Lees de documentatie bij het ext erne toestel voordat u dit aansluit.
Behalve voor USB-toestellen moet de netstekker uitgetrokken zijn
als u externe toestellen aansluit!
Tijdens een onweer mag u kab els niet aansluiten of loskoppelen.
Neem bij het losmaken van de be drading steeds de stekker vast. Trek niet aan de draad!
Respecteer bij het aansluiten of losmaken van de bedra ding de
hierna beschreven volgorde.
Bedradingen aansluiten
► Alle b etrokken toestellen uitschakelen.
KabelBedrading
► De netstekker van de betrokken toestellen uit de geaarde stopcontacten trekken.
► Alle kabels op het toestel en op de externe toestellen steken. Le t in ieder geval op de
veiligheidsinstructies in het hoofdstuk " Belangrijke aanwijzingen", pagina 2 .
► Alle bedradingen voor de gegevenstransm issie aansluiten op de voorziene
stopcontacten voor data- en telecommunicatienetten.
► Alle netstekkers in de stopcontacten steken.
8 - Nederlands 10600985329, uitgave 1

Ingebruikname
Bedradingen losmaken
► Schakel alle betrokken toestellen uit.
Bedrading
► De netstekker van de betrokken toe stellen uit de geaarde stopcontacten trekken.
► Alle bedradingen voor de gegevenstransmissie uit de stopcontacten van de
data/telecommunicatienetten trekken.
► Alle kabels van het toestel en de externe toestellen losmaken.
Beeldscherm aansluiten
► Maak het beeldscherm klaar zoals beschreven in de gebruiksaanwijzing
bij het beeldscherm (bijv. kabels insteken).
Beeldscherm
► Steek de datakabel in de beeldschermaansluiting van het toestel.
Afhankelijk van het uitbreidingsniveau van uw apparaat en uw beeldscherm,
kunt u de datakabel aansluiten op de DVI-interface.
► Sluit de netkabel van het beeldscherm op een geaarde beveiligde stopcontact.
Muis en toetsenbord
Met uw apparaat zijn een muis en een toetsenbord meegeleverd. Een beschrijving
hiervan vindt u in de gebruiksaanwijzing "AMILO Desktop".
Muis en toetsenbord aansluiten
► Sluit m uis en t oetsenbord elk aan op een USB-aansluiting, zie " Externe toestellen
aansluiten op de USB-poorten", pagina 9 .
Externe toestellen aansluite n op de USB-po orten
USB-toestellenUSB-aansluitingExternetoestellenToestellen
U kunt diverse externe toestellen (bijv. printer, scann er, mod em of toe tsen bord)
aansluiten op de U S B-poorten.
USB-toestellen zijn hot-plug-compa tibel. U kunt de kabels van USB-toestellen
dus bij ingeschakeld toestel aansluiten en loskoppelen.
Meer informatie vindt u in de docum entatie bij de U SB-toestellen.
► Sluit de datakabel aan op het e xterne toestel.
► Sluit de datakabel aan op een U SB-poort van het toestel.
10600985329, uitgave 1 Nederlands - 9

Ingebruikname
Drivers
De externe USB-toestellen die u op één van de USB-poorten aansluit, h ebben
normaal gezien geen eigen driver nodig, want de vereiste software zit reeds in he t
besturingssysteem. Als het externe USB-toestel toch eigen software nodig heeft, kunt u
die installeren vanaf d e gegevensdra ger die bij het USB-toestel werd geleverd.
Vanaf de voorste USB-poort van het toestel naar het externe U SB-to este l mag slechts
een 3 meter lange kabel worden gebruikt om USB 2.0 te waarborgen.
Apparaat aansluiten op de netspanning
Netadapter
2
1
► Sluit de netvoedingskabel bij (1) a an op het apparaat.
► Steek de netstekker in een geaa rde veiligheidscontactdoos (2).
Voor het eerst inschakelen: de software
wordt geïnstalleerd
InstallatieSoftwareInstallatie
Als het toestel in een netwerk wordt geplaatst, dient u tijdens de software-installatie informatie
op te geven over de gebruiker, de server en het netwerkprotocol.
Wanneer u het toestel voor de eerste maal inschakelt, wordt de bijgeleverde software
geïnstalleerd en geconfigureerd. Hiervoor dient u enige tijd uit te trekken, want
deze procedure mag niet worden onderbroken.
Als de installatie begonnen is, mag het toestel niet worden uitgeschakeld
zolang de installatie niet voltooid is!
Tijdens d e installatie mag het toest el enkel opnieuw worden opgestart
als hierom wordt g evraagd!
Anders wordt de i nstallatie niet correct uitgevoerd en moet de inhoud
van de harde schijf volledig worden hersteld.
10 - Nederlands 10600985329, uitgave 1

Bediening
Beeldscherm en apparaat inschakelen
► Schakel het beeldscherm in (zie gebruiksaanwijzing van het beeldscherm).
1
2
► Zet de hoofdschakelaar aan de achterzijde van het a pparaat op stand "I" (1).
► Druk op de Aan/Uit-schakelaar aan de voorzijde van het apparaat.
De bedrijfsindicatie brandt, het apparaat start.
Installatie van de software
► Volg tijdens de installatie de aanwijzingen op het beeldscherm.
SoftwareIn stallatie
► Mochten er onduidelijkheden zijn over de gevraagde invoergegevens, lees het
dan na in de H elp van uw bestu ringssysteem.
Meer informatie over het s ysteem en over drivers, utilities en updates vindt u
in de handleiding over herstel van geïnstalleerde software en op het internet
onder "h ttp://ww w.fujitsu-siemens.com/support".
10600985329, uitgave 1 Nederlands - 11

Bediening
Bediening
Toestel inschakelen
► Schakel eventueel het beeldscherm in (zie gebru ikshandleiding bij het beeldsch erm).
Toeste lBeeldscherm
► Druk op d e aan-/uitschakelaar op de voorkant van het toestel.
Toestel uitschakelen
► Sluit uw besturingssysteem op de voorgeschreven manier af.
Toeste lBeeldscherm
► Als het besturingssysteem het toestel niet automatisch in een ene rgiespaarmo dus plaatst
of uitschakelt, drukt u minimaal 4 seconden op de aan-/uitschakelaar.
Het toestel verbruikt dan zo weinig mo gelijk energie.
De aan-/uitscha kelaar sluit het toestel niet van het netwerk af. Voor een volledige
afscheiding van de netspanning moet u de stekker uit het stopcontact trekken.
► Schakel eventueel het beeldscherm uit (zie gebru iksaanwijzing bij het beeldsch erm).
12 - Nederlands 10600985329, uitgave 1

Bediening
Indicaties op het apparaat
BedrijfsindicatieApparaat
De indicaties bevinden zich aan de voorzijde van de behuizing.
2
1
1 = Statusindicatie geheugenkaartlezer 2 = Bedrijfsindicatie
Statusindicatie geheugenkaartlezer
• De indicatie bran dt permanent: er is een g eheugenkaart geplaatst.
• De indicatie knippert: er wordt toegang gezocht tot de geplaatste geheugenkaart.
• De indicatie brandt niet: er bevindt zich geen gehe ugenkaart in de geheugenkaartlezer.
Bedrijfsindicatie
Bedrijfsindicatie
In de energiebesparingsmodus mag het app araat niet van het lichtnet worden
gehaald, omdat dit anders tot gegevensverlies kan leiden.
• De indicatie brandt wit: he t apparaat is ingeschakeld.
• De indicatie kn ippert wit: h et apparaat bevindt zich in de energiebesparingsmodus. Na
het inschakelen met de Aan/Uit-sch akelaar schakelt het apparaat in of keert het terug in
de toestand waarin het zich vóór de energiebesparingsmodus bevond.
• De indicatie knippert geel: er w o rdt toegang gezocht tot de harde schijf.
• De indicatie brandt niet: het apparaat is van het lichtnet gehaald of is bedrijfsklaar. Als het
apparaat bedrijfsklaar is, kan het apparaat worden ingesch akeld met de Aan/Uit-schakelaar.
10600985329, uitgave 1 Nederlands - 13

Bediening
Geheugenkaartlezer
Slot
Uw apparaat is aan de voorzijde v oorzien van een geheu genkaartlezer.
SD/MMC
XD
MS
CF/MD
1
1 = Statusindicatie geh eugenkaartlezer
Mogelijke kaarttypen zonder adapter:
• CompactFlash Card (type I en II) (CF)
• CompactFlash Ultra DMA
• IBM Microdrive (MD)
• SecureDigital Card (SD)
• SecureDigital Card HC (SD HC)
• MultiMedia Card (MMC)
•MemoryStick(MS)
•MemoryStickPro
• xD Pictu re Card (xD)
•xDPictureCardMtype
• xD Picture Card H type
Mogelijke kaarttypen met adapter:
•MemoryStickDuo
• Memory Stick Pro Duo
• Memory Stick Micro
• Reduced-Size M ultiMedia Card (RS-MMC)
• MultiMedia Card micro (MMC micro)
• MultiMedia Card mobile (MMC mobile)
• Mini-SecureDigital Card (Mini SD)
• Micro SecureD igital Card (Micro SD)
Neem bij het gebruik van geheugenkaarten de aanwijzingen van de fabrikant in acht.
Adapters voor uw geheugenka art zijn in de vakha ndel verkrijgbaar.
14 - Nederlands 10600985329, uitgave 1

Technische gegevens
Geheugenkaart plaatsen
► Schuif de geheugenkaart voorzichtig in
het slot. Het gedeelte met opschrift moet
naar boven wijzen. Gebruik geen kracht,
omdat de gevoelige contactvlakken anders
beschadigd kunnen raken.
Geheugenkaart
De statusindicatie v an de
geheugenkaartlezer brandt permanent.
Geheugenkaart verwijderen
Geheugenkaart
Wacht beslist tot de statusindicatie niet meer knippert, voord at u de kaa rt verwijdert.
► Trek de geheugenkaart uit het slot.
10600985329, uitgave 1 Nederlands - 15

Technische g ege vens
Technische gegevens
AMILO Desktop L / AMILO Desktop P
Elektrische gegevens
Veiligheidsnormen waaraan is voldaan:
CE, productveiligheid: laagspanningsrichtlijn
(LVD) 2006/ 95/EG , IEC60950-1, EN609 50-1,
EMC: 2004/108/EG, EN5 5022, klasse B,
EN55024, EN61000-3-2/3, RTTE 1999/5/EG,
milieunormen: RoHS FSC-03230
Beschermingsklasse: I
Nominaal spanningsbereik 220 V -240 V
Nominale frequentie
50 Hz - 60 Hz
Afmetingen
Breedte/diepte/hoogte:
373 mm x 175 mm x 398 mm
Gewicht
in basisomvang: 9,6 kg
Omgevingscond ities
Temperatuur
Gebruik 15 °C .... 35 °C
Transport
–25 °C .... 60 °C
Condensatie is tijdens het gebruik niet toegestaan!
Het informatieblad voor dit apparaat biedt meer technische gegevens. U vindt het
informatieblad op het intern et onder "www.fujitsu-siemens.com".
16 - Nederlands 10600985329, uitgave 1
-
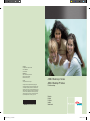 1
1
-
 2
2
-
 3
3
-
 4
4
-
 5
5
-
 6
6
-
 7
7
-
 8
8
-
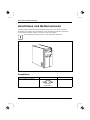 9
9
-
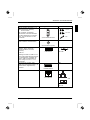 10
10
-
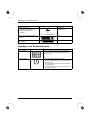 11
11
-
 12
12
-
 13
13
-
 14
14
-
 15
15
-
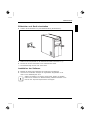 16
16
-
 17
17
-
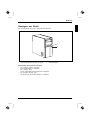 18
18
-
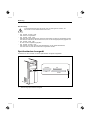 19
19
-
 20
20
-
 21
21
-
 22
22
-
 23
23
-
 24
24
-
 25
25
-
 26
26
-
 27
27
-
 28
28
-
 29
29
-
 30
30
-
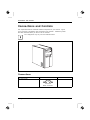 31
31
-
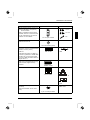 32
32
-
 33
33
-
 34
34
-
 35
35
-
 36
36
-
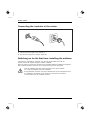 37
37
-
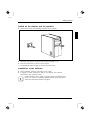 38
38
-
 39
39
-
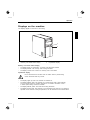 40
40
-
 41
41
-
 42
42
-
 43
43
-
 44
44
-
 45
45
-
 46
46
-
 47
47
-
 48
48
-
 49
49
-
 50
50
-
 51
51
-
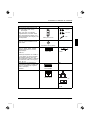 52
52
-
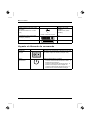 53
53
-
 54
54
-
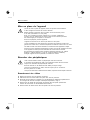 55
55
-
 56
56
-
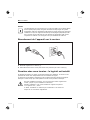 57
57
-
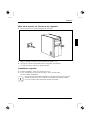 58
58
-
 59
59
-
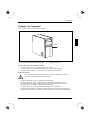 60
60
-
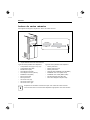 61
61
-
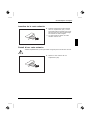 62
62
-
 63
63
-
 64
64
-
 65
65
-
 66
66
-
 67
67
-
 68
68
-
 69
69
-
 70
70
-
 71
71
-
 72
72
-
 73
73
-
 74
74
-
 75
75
-
 76
76
-
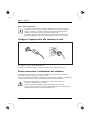 77
77
-
 78
78
-
 79
79
-
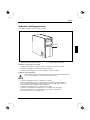 80
80
-
 81
81
-
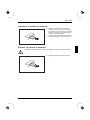 82
82
-
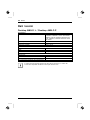 83
83
-
 84
84
-
 85
85
-
 86
86
-
 87
87
-
 88
88
-
 89
89
-
 90
90
-
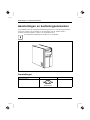 91
91
-
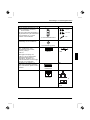 92
92
-
 93
93
-
 94
94
-
 95
95
-
 96
96
-
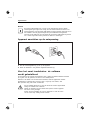 97
97
-
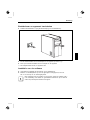 98
98
-
 99
99
-
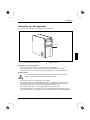 100
100
-
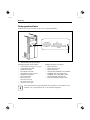 101
101
-
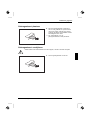 102
102
-
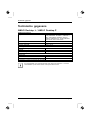 103
103


FUJITSU SIEMENS AMILO Desktop L Series de handleiding
- Categorie
- Accessoires voor het maken van koffie
- Type
- de handleiding
in andere talen
Gerelateerde papieren
Andere documenten
-
Fujitsu Siemens Computers AMILO Li 3910 Snelstartgids
-
Fujitsu Siemens Computers AMILO Xi 3650 de handleiding
-
Renkforce CR22e-SIM External memory card reader USB 2.0 de handleiding
-
-
Fujitsu AMILO Xi 3670 First-Time Setup
-
Fujitsu FSP:GD4SG3000BESBL Data papier
-
Fujitsu REN-12-BRZE-6670 Data papier
-
König CMP-CARDRW43 Handleiding
-
-
HP TouchSmart IQ520 de handleiding