
6(6.%&/QPKVQT
7UGT
lWUGGGXlWUGGGX YWW^TXXTY]GGG㝘䟸GYaZXa\[YWW^TXXTY]GGG㝘䟸GYaZXa\[

The color and appearance of the product may vary depending on the model, and the product specifications are
subject to change without prior notice for reasons of performance enhancement.
Safety Instructions
Notational
Please read the following safety instructions as they are designed to prevent damage to property and
harm to the user.
Warning / Caution
Failure to follow directions noted by this symbol could result in bodily harm or damage to the
equipment.
Notational Conventions
Prohibited Important to read and understand at all times
Do not disassemble Disconnect the plug from the outlet
Do not touch Ground to prevent an electric shock
Power
When not used for an extended period of time, set your computer to DPM.
If using a screen saver, set it to active screen mode.
The images here are for reference only, and are not applicable in all cases (or countries).
Do not use a damaged or loose plug.
z
This may cause electric shock or fire.
Do not pull the plug out by the wire nor touch the plug with wet
hands.
z
This may cause electric shock or fire.
Safety Instructions
Notational
Power
Installation
Clean
Others
Introduction
Connections
Using the Software
Adjusting the LCD monitor
Troubleshooting
Specifications
Information
Appendix
X
zt{T[WXXTl__TTUGGGXzt{T[WXXTl__TTUGGGX YWW^TXXTY_GGG㝘㤸GXWaZ_aZYYWW^TXXTY_GGG㝘㤸GXWaZ_aZY

Use only a properly grounded plug and receptacle.
z
An improper ground may cause electric shock or equipment damage.(Class
l Equipment only.)
Insert the power plug firmly so that it does not come loose.
z
A bad connection may cause fire.
Do not excessively bend the plug and wire nor place heavy objects
upon them, which could cause damage.
z
This may cause electric shock or fire.
Do not connect too many extension cords or plugs to one outlet.
z
This may cause fire.
Do not disconnect the power cord while using the LCD monitor.
z
A surge may be caused by the separation and may damage the LCD
monitor.
Do not use the power cord when the connector or plug is dusty.
z
If the connector or plug of the power cord is dusty, clean it with a dry cloth.
z
Using the power cord with a dusty plug or connector may cause electric
shock or fire.
To disconnect the apparatus from the mains, the plug must be
pulled out from the mains socket, therefore the mains plug shall be
readily operable.
z
This may cause electric shock or fire.
Installation
Be sure to contact an authorized the Service Center, when installing your LCD monitor in a location
with heavy dust, high or low temperatures, high humidity, and exposed to chemical substances and
where it operates for 24 hours such as at airports, train stations etc.
Y
zt{T[WXXTl__TTUGGGYzt{T[WXXTl__TTUGGGY YWW^TXXTY_GGG㝘㤸GXWaZ_a[YYWW^TXXTY_GGG㝘㤸GXWaZ_a[Y

Failure to do so may cause serious damage to your LCD monitor.
Place your LCD monitor in a location with low humidity and a
minimum of dust.
z
Failure to do so may cause electric shock or fire inside the LCD monitor.
Do not drop the LCD monitor when moving it.
z
This may cause damage to the product or the person carrying it.
Install the LCD monitor base in a showcase or shelf so that the end
of the base does not protrude from the showcase or shelf.
z
Dropping the product may cause damage to the product or the person
carrying it.
Do not place the product on an unstable or small surface area.
z
Place the product on an even and stable surface ,as the product may fall
and cause harm to someone walking by, specifically children.
Do not place the product on the floor.
z
Take care, as someone, specifically children may trip over it.
TO PREVENT THE SPREAD OF FIRE, KEEP CANDLES OR OTHER
OPEN FLAMES AWAY FROM THIS PRODUCT AT ALL TIMES.
z
Otherwise, this may cause fire.
Keep any heating devices away from the power cable.
z
A melted coating may cause electric shock or fire.
Do not install the product in places with poor ventilation, for
instance, a bookshelf, closet, etc.
z
Any increase in the internal temperature may cause fire.
Z
zt{T[WXXTl__TTUGGGZzt{T[WXXTl__TTUGGGZ YWW^TXXTY_GGG㝘㤸GXWaZ_a[YYWW^TXXTY_GGG㝘㤸GXWaZ_a[Y

Put down the LCD monitor carefully.
z
Failing to do so may damage the LCD monitor.
Do not place the LCD monitor face down.
z
This may damage the TFT-LCD surface.
The installation of the bracket must be done by a qualified
professional.
z
Installing the bracket by unqualified personnel may result in injury.
z
Always use the mounting device specified in the owner's manual.
When installing the product, make sure to keep it away from the wall
(more than 10 cm / 4 inches) for ventilation purposes.
z
Poor ventilation may cause an increase in the internal temperature of the
product, resulting in a shortened component life and degraded
performance.
Keep the plastic packaging (bag) out of children's reach.
z
The plastic packaging (bag) may cause suffocation if children play with it.
Clean
When cleaning the LCD monitor case or the surface of the TFT-LCD screen, wipe with a slightly
moistened, soft fabric.
Do not spray water or detergent directly onto the LCD monitor.
z
This may cause damage, electric shock or fire.
Use the recommended detergent with a smooth cloth.
[
zt{T[WXXTl__TTUGGG[zt{T[WXXTl__TTUGGG[ YWW^TXXTY_GGG㝘㤸GXWaZ_a[[YWW^TXXTY_GGG㝘㤸GXWaZ_a[[

If the connector between the plug and the pin is dusty or dirty, clean
it properly using a dry cloth.
z
A dirty connector may cause electric shock or fire.
Make sure to unplug the power cord before cleaning the product.
z
Otherwise, this may cause electric shock or fire.
Unplug the power cord from the power outlet and wipe the product
using a soft, dry cloth.
z
Do not use any chemicals such as wax, benzene, alcohol, thinners,
insecticide, air freshener, lubricant or detergent.
Others
Do not remove the cover (or back).
z
This may cause electric shock or fire.
z
Refer to a qualified servicing company.
If your LCD monitor does not operate normally - in particular, if
there is any unusual sound or smell coming from the LCD monitor -
unplug it immediately and contact an authorized dealer or the
Service Center.
z
This may cause electric shock or fire.
Keep the product away from places exposed to oil, smoke or
moisture; do not install inside a vehicle.
z
This may cause a malfunction, electric shock or fire.
z
In particular, avoid operating the LCD monitor near water or outdoors
where the LCD monitor could be exposed to snow or rain.
If the LCD monitor is dropped or the casing is damaged, turn the
LCD monitor off and unplug the power cord. Then contact the
Service Center.
z
The LCD monitor may malfunction, causing electric shock or fire.
\
zt{T[WXXTl__TTUGGG\zt{T[WXXTl__TTUGGG\ YWW^TXXTY_GGG㝘㤸GXWaZ_a[[YWW^TXXTY_GGG㝘㤸GXWaZ_a[[

Do not try to move the LCD monitor by pulling only the wire or the
signal cable.
z
This may cause a breakdown, electric shock or fire due to damage to the
cable.
Do not move the LCD monitor right or left by pulling only the wire or
the signal cable.
z
This may cause a breakdown, electric shock or fire due to damage to the
cable.
Do not cover the vents on the LCD monitor cabinet.
z
Bad ventilation may cause a breakdown or fire.
Do not place water containers, chemical products or small metal
objects on the LCD monitor.
z
This may cause a malfunction, electric shock or fire.
z
If a foreign substance enters the LCD monitor , unplug the power cord and
contact the Service Center.
Keep the product away from combustible chemical sprays or
inflammable substances.
z
This may cause an explosion or fire.
Never insert anything metallic into the LCD monitor openings.
z
This may cause electric shock, fire or injury.
Disconnect the plug from the outlet during storms or lightning or if
it is not used for a long period of time.
z
Failure to do so may cause electric shock or fire.
]
zt{T[WXXTl__TTUGGG]zt{T[WXXTl__TTUGGG] YWW^TXXTY_GGG㝘㤸GXWaZ_a[[YWW^TXXTY_GGG㝘㤸GXWaZ_a[[

outlet and contact the Service Center.
When viewing a fixed screen for an extended period of time, residual
image or blurriness may appear.
z
Change the mode to energy saving mode or set a screensaver to a
changing picture when away from the LCD monitor for an extended period
of time.
Adjusts the resolution and frequency to the level appropriate for the
model.
z
An inappropriate resolution may cause undesirable picture quality.
32 inch (80 cm) - 1360 X 768
Viewing the LCD monitor continuously at a too close angle may
result in damage to your eyesight.
To ease eye strain, take at least a five-minute break after every hour
of using the LCD monitor.
Do not install the product on an unstable, uneven surface or a
location prone to vibrations.
z
Dropping the product may cause damage to the product or the person
carrying it. Using the product in a location prone to vibrations may shorten
the lifetime of the product or may cause the product to catch fire.
When moving the LCD monitor , turn off and unplug the power cord.
Make sure that all cables, including the antenna cable and cables
connected to other devices, are disconnected before moving the
LCD monitor.
z
Failure to disconnect cables may damage it and cause fire or electric
shock.
Do not insert metal objects such as chopsticks, wire and tools or
inflammable objects such as paper or matches into the vent,
headphone port or AV ports or etc.
z
This may cause electric shock or fire. If an alien substances or water enters
the product, turn the product off, unplug the power connector from the wall
^
zt{T[WXXTl__TTUGGG^zt{T[WXXTl__TTUGGG^ YWW^TXXTY_GGG㝘㤸GXWaZ_a[[YWW^TXXTY_GGG㝘㤸GXWaZ_a[[

Place the product out of children’s reach, as they could damage by
hanging onto it.
z
A falling product may cause injury to the person or even fatality.
When not using the product for an extended period of time, keep the
product unplugged.
z
Otherwise, this may cause heat emission from the accumulated dirt or
degraded insulation, causing electric shock or fire.
Do not place your children's favorite toys or any other objects of
interest on the product.
z
Children may try to climb on the product to retrieve an object. The product
could fall, causing injury or even fatality.
When removing batteries from the remote control, be careful that
they are not swallowed by children. keep the batteries out of
children's reach.
z
If the batteries are swallowed, see a doctor immediately.
When replacing batteries, place the batteries in the correct +/-
polarity position as indicated on the battery holder.
z
The incorrect polarity may cause a battery to break or leak and may cause
fire, injury, or contamination (damage).
Use only specified standard batteries. Do not use new and used
batteries together.
z
This may cause a battery to break or leak and may cause fire, injury, or
contamination (damage).
Make sure there are more than two people when moving the
product.
z
Dropping the product may cause a malfunction or injury to the person
carrying it.
_
zt{T[WXXTl__TTUGGG_zt{T[WXXTl__TTUGGG_ YWW^TXXTY_GGG㝘㤸GXWaZ_a[[YWW^TXXTY_GGG㝘㤸GXWaZ_a[[

recycling center or to a store selling the same type of the battery or
rechargeable battery.
© 1995~2008 SAMSUNG. ALL Rights Reserved
The batteries (and rechargeable batteries) is not ordinary refuse and
must be returned for recycling purposes. The customer is
responsible for returning the used or rechargeable batteries for
recycling purposes as the consumer.
z
The customer can return used or rechargeable batteries to a nearby public
`
zt{T[WXXTl__TTUGGG`zt{T[WXXTl__TTUGGG` YWW^TXXTY_GGG㝘㤸GXWaZ_a[[YWW^TXXTY_GGG㝘㤸GXWaZ_a[[

Contents
Safety Instructions
............................................................................................. 1
Notational ............................................................................................................ 1
Power ................................................................................................................. 1
Installation .......................................................................................................... 2
Clean .................................................................................................................. 4
Others ................................................................................................................. 5
Introduction ............................................................................................................ 12
Package Contents ............................................................................................... 12
Your LCD Monitor ................................................................................................ 13
Machanical Layout ............................................................................................... 20
Connections ........................................................................................................... 24
Installing the Stand KIT ......................................................................................... 24
Connecting the LCD Monitor .................................................................................. 25
MDC System ........................................................................................................... 31
Adjusting the LCD Monitor ................................................................................... 50
Input ................................................................................................................. 50
Picture [PC / BNC /DVI Mode] ................................................................................ 51
Picture [AV / S-Video /Component / DVI-Video Mode].................................................. 53
Sound................................................................................................................ 55
Setup .............................................................................................................. 56
Multi Control ....................................................................................................... 59
Direct Functions .................................................................................................. 59
XW
zt{T[WXXTl__TTUGGGXWzt{T[WXXTl__TTUGGGXW YWW^TXXTY_GGG㝘㤸GXWaZ_a[[YWW^TXXTY_GGG㝘㤸GXWaZ_a[[

Troubleshooting ................................................................................................. 60
Self-Test Feature Check ......................................................................................................... 60
Check List ...................................
............................................................................................
61
Q & A .......................................................................................................................................
64
Specifications
.......................................................................................................................... 65
General ...................................................................................................................................
65
PowerSaver ............................................................................................................................
66
Preset Timing Modes ..............................................................................................................
66
Information ....................................................................................................... 68
For Better Display ................................................................................................ 68
PRODUCT INFORMATION (Image Retention Free) .................................................... 68
Appendix .............................................................................................................. 72
Contact SAMSUNG WORLDWIDE .......................................................................... 72
Terms ............................................................................................................... 74
Correct Disposal .................................................................................................. 75
Authority ............................................................................................................ 75
XX
zt{T[WXXTl__TTUGGGXXzt{T[WXXTl__TTUGGGXX YWW^TXXTY_GGG㝘㤸GXWaZ_a[[YWW^TXXTY_GGG㝘㤸GXWaZ_a[[

The color and appearance of the product may vary depending on the model, and the product specifications are
subject to change without prior notice for reasons of performance enhancement.
Introduction
Package Contents
Note
• Please make sure the following items are included with your LCD monitor.
If any items are missing, contact your dealer.
Contact a local dealer to buy optional items.
Note
• This stand is not for the Floor Standing Type.
LCD monitor
Manuals
USERS MANUAL
Warranty Card
(Not available in all locations)
User's Guide, MDC Software
Cables
D-Sub Cable Power Cord
Safety Instructions
Introduction
Package Contents
Your LCD monitor
Machanical Layout
Connections
Using the Software
Adjusting the LCD monitor
Troubleshooting
Specifications
Information
Appendix
XY
zt{T[WXXTl__TTUGGGXYzt{T[WXXTl__TTUGGGXY YWW^TXXTY_GGG㝘㤸GXWaZ_a[[YWW^TXXTY_GGG㝘㤸GXWaZ_a[[

Remote Control Batteries (AAA X 2) Cover-Hole
BNC to RCA
Adaptor Jack
Semi Stand
Sold separately
Wall Mount KIT Speaker Set Stand KIT
DVI Cable BNC Cable
Your LCD monitor
Front
1) MENU
Opens the on-screen menu and exits from the menu or closes the adjustment menu.
2) Navigate buttons (Up-Down buttons)
Moves from one menu item to another vertically or adjusts selected menu values.
3) Adjust buttons (Left-Right buttons)/ Volume buttons
Moves from one menu item to another horizontally or adjusts selected menu values.
XZ
zt{T[WXXTl__TTUGGGXZzt{T[WXXTl__TTUGGGXZ YWW^TXXTY_GGG㝘㤸GXWaZ_a[[YWW^TXXTY_GGG㝘㤸GXWaZ_a[[
Other

Adjusts the audio volume.
4) ENTER
Activates a highlighted menu item.
5) SOURCE
Switches from PC mode to Video mode.
Changing the source is only allowed for external devices that are connected to the LCD monitor at the time.
[PC]
˧
[BNC]
˧
[DVI]
˧
[AV]
˧
[S-Video]
˧
[Component]
>> Click here to see an animation clip.
6) PIP
Push the PIP button to turn the PIP screen On / Off.
More than one PIP cannot overlap on screen as BNC and the component use the same terminal.
>> Click here to see an animation clip.
•
PC
A
V / S-Video / Component Mode
•
BNC
A
V / S-Video Mode
•
DVI
A
V / S-Video / Component Mode
•
AV / S-Video
PC / BNC / DVI Mode
•
Component
PC / DVI Mode
7)
Power button
Turns the LCD monitor On/Off.
8) Power indicator
Shows PowerSaver mode by blinking green.
9) Remote Control Sensor
Aim the remote control towards this spot on the LCD monitor.
Note
•See PowerSaver described in the manual for further information regarding power saving functions. For
energy conservation, turn your LCD monitor OFF when it is not needed or when leaving it unattended for
long periods.
Rear
Note
• For detailed information concerning cable connections, refer to Connecting Cables under Setup. The LCD
monitor 's configuration at the back may vary slightly depending on the LCD monitor model.
X[
zt{T[WXXTl__TTUGGGX[zt{T[WXXTl__TTUGGGX[ YWW^TXXTY_GGG㝘㤸GXWaZ_a[[YWW^TXXTY_GGG㝘㤸GXWaZ_a[[

1) RS232C OUT/IN (RS232C Serial PORT)
MDC(Multiple Display Control) Program Port
2) DVI / PC IN [RGB] (PC Video Connection
Terminal)
Using a D-Sub Cable (15 pin D-Sub) - PC mode
(Analog PC)
3) DVI / PC IN [DVI(HDCP)] (PC Video
Connection Terminal)
Using a DVI Cable (DVI-D to DVI-D) - DVI mode
(Digital PC)
4) DVI / PC IN [PC/DVI/BNC AUDIO IN]
(PC/DVI/BNC Audio Connection Terminal
(Input))
5) COMPONENT AUDIO IN [L-AUDIO-R]
(Component Audio Connection Terminal
(Input))
6) BNC/COMPONENT OUT [R/P
R
, G/Y, B/P
B
,
H, V] (BNC/Component Connection
Terminal (Output))
BNC (Analog PC) Connection: connecting the R,
G, B, H, V ports
Component Connection: connecting the P
R
, Y,
P
B ports
7) BNC/COMPONENT IN [R/PR, G/Y, B/PB, H,
V] (BNC/Component Connection Terminal
(Input))
8) AV AUDIO IN [L-AUDIO-R] (LCD Monitor
Audio Connection Terminal (Input))
9) AV OUT [VIDEO] (VIDEO Connection
Terminal): AV mode (Output)
10) AV IN [VIDEO] (VIDEO Connection
Terminal) (Input)
11) AV OUT [S-VIDEO] (S-VIDEO Connection
Terminal): S-VIDEO mode (Output)
12) AV IN [S-VIDEO] (S-VIDEO Connection
Terminal) (Input)
X\
X\UGGGXX\UGGGX YWW^TXYTYWGGG㝘䟸GXaXWaZ[YWW^TXYTYWGGG㝘䟸GXaXWaZ[

13) EXT SPEAKER(8 )[- - L - +, - - R - +] (EXT
Speaker Connection Terminal)
14) AUDIO OUT [L-AUDIO-R] (LCD Monitor
Audio Connection Terminal (Output))
AUDIO OUT is the terminal for sound output of
PC, DVI or BNC.
15) POWER S/W ON [ | ] / OFF [O]
Switches the LCD Monitor On/Off.
16) POWER IN
The power cord plugs into the LCD Monitor and
the wa
ll
plug.
Note
• The number of LCD Monitor that can be connected to loopout may differ depending on the cables, signal
sourc
e et
c. With cables where there is no degradation or signal source, up to ten LCD Monitors can be
connected.
17) Kensington Lock
The Kensington lock is a device used to
physically fix the system to something when
using it in a public place. (The locking device has
to be purchased separately.)
For using a locking device, contact the place
of purchase.
Note
• See Connecting the LCD Monitor for further information regarding cable connections.
Remote Control
Note
• The performance of the remote control may be affected by a TV or other electronic device operating near
the LCD Display , causing a malfunction due to interference with the frequency.
1. ON / OFF
2. MAGICNET
3. MDC
4. LOCK
5. MagicNet buttons
6.+100 -/--
7. VOL
8. MUTE
9. TTX/MIX
10. MENU
11. ENTER
12. P.MODE
13. AUTO
14. PRE-CH
15 . CH/P
16. SOURCE
17. INFO
18. EXIT
X]
X\UGGGYX\UGGGY YWW^TXYTYWGGG㝘䟸GXaXWaZ`YWW^TXYTYWGGG㝘䟸GXaXWaZ`

19. Up-Down Left-Right buttons
20. S.MODE
21. STILL
22. FM RADIO
23. P.SIZE
24. SRS
25. DUAL/MTS
26. PIP
27. SOURCE
28. SWAP
29. SIZE
30. REW
31. STOP
32. PLAY/PAUSE
33. FF
1) ON / OFF
Turns the LCD Monitor On/Off.
2) MAGICNET
MagicNet Quick Launch Button.
- This fuction does not work for this monitor.
3) MDC
MDC Quick Launch Button.
4) LOCK
Activates or deactivates all function keys on both the remote control and the LCD Display except for the
Power and LOCK buttons.
5) MagicNet buttons
Used for MagicNet.
- This fuction does not work for this monitor.
• Alphanumeric: Used to enter the Internet address.
• DEL: Functions as the backspace.
• SYMBOL: Used to enter the symbols. (.O_-)
• ENTER: Used to enter values.
6) +100 -/--
Press to select channels over 100.
For example, to select channel 121, press "+100", then press "2" and "1".
- This fuction does not work for this monitor.
7) VOL
Adjusts the audio volume.
8)
MUTE
Pauses (mutes) the audio output temporarily.
This is displayed on the lower left corner of the screen.
The audio resumes if MUTE or - VOL + is pressed in the Mute mode.
9)
TTX/MIX
X^
X\UGGGZX\UGGGZ YWW^TXYTYWGGG㝘䟸GXaXWa[XYWW^TXYTYWGGG㝘䟸GXaXWa[X

TV channels provide text information services via teletext.
- This fuction does not work for this monitor.
10)
MENU
Opens the on-screen menu and exits from the menu screen or closes the screen adjustment menu.
11)
ENTER
Activates a highlighted menu item.
12)
P.MODE
When you press this button, current picture mode is displayed on the lower center of the screen.
AV / S-Video / Component : P.MODE
The Monitor has four automatic picture settings that are preset at the factory.
Then push button again to circle through available preconfigured modes.
( Dynamic
˧
Standard
˧
Movie
˧
Custom )
PC/DVI/BNC : M/B (MagicBright™)
MagicBright™ is a new feature providing the optimum viewing environment depending on the contents of
the image you are watching.
Then push button again to circle through available preconfigured modes.
(Entertain
˧
Internet
˧
Text
˧
Custom )
13) AUTO
Adjusts the screen display automatically in PC mode.
By changing the resolution in the control panel, auto function is performed.
14)
PRE-CH
Returns to the immediately previous channel.
- This fuction does not work for this monitor.
15)
CH/P
In TV mode, selects TV channels.
- This fuction does not work for this monitor.
16)
SOURCE
Changes the video source.
17)
INFO
The current picture information is displayed in the top left corner of the screen.
18)
EXIT
Exits from the menu screen.
19) Up-Down Left-Right buttons
Moves from one menu item to another horizontally, vertically or adjusts selected menu values.
20)
S.MODE
When pressing this button, the current mode is displayed at the bottom centre of the screen.
The LCD Display has a built-in high fidelity stereo amplifier.
Then press the button again to circle through available preconfigured modes.
( Standard ˧ Music ˧ Movie ˧ Speech ˧ Custom )
21) STILL
Press the button once to freeze the screen. Press it again to unfreeze.
22) FM RADIO
Turns the FM Radio on/off.
In PC/DVI mode, sets the SOUND to FM Radio.
In general Video mode, selects FM Radio, and turns off the screen.
In areas where the signal is weak, noise may occur during FM radio broadcasts.
- This fuction does not work for this monitor.
23) P.SIZE
Press to change the screen size.
24)
SRS
SRS
25)
DUAL/MTS
DUAL-
X_
X\UGGG[X\UGGG[ YWW^TXYTYWGGG㝘䟸GXaXWa[XYWW^TXYTYWGGG㝘䟸GXaXWa[X

- This fuction does not work for this monitor.
STEREO/MONO, DUAL l / DUAL ll and MONO/NICAM MONO/NICAM STEREO can be operated
depending on the broadcasting type by using the DUAL button on the remote control while watching TV.
MTS-
You can select MTS (Multichannel Television Stereo) mode.
Audio Type MTS/S_Mode Default
FM Stereo
Mono Mono
Manual Change
Stereo
Mono
˩
Stereo
SAP
Mono
˩
SAP
Mono
26)
PIP
Every time you press the button, a PIP screen appears.
27)
SOURCE
Changes the source of the PIP window signal.
28) SWAP
Swaps the contents of the PIP and main image.
The image in the PIP window will appear on the main screen, and the main screen image will appear in the
PIP window.
29)
SIZE
Switches the PIP Picture Size.
30)
REW
Rewind
31) STOP
Stop
32) PLAY / PAUSE
Play/Pause
33) FF
Fast forward
© 1995~2008 SAMSUNG. ALL Rights Reserved
X`
X\UGGG\X\UGGG\ YWW^TXYTYWGGG㝘䟸GXaXWa[XYWW^TXYTYWGGG㝘䟸GXaXWa[X

Mechanical Layout | Monitor Head | Stand | Speaker | Installation VESA Bracket | Wall Bracket Installation
1. Mechanical Layout
2. Monitor Head
YW
X\UGGG]X\UGGG] YWW^TXYTYWGGG㝘䟸GXaXWa[XYWW^TXYTYWGGG㝘䟸GXaXWa[X

3. Stand
4. Speaker
5. Installation VESA Bracket
z
When installing VESA, make sure to comply with the international VESA standards.
z
Purchasing VESA Bracket and Installation Information : Please contact your nearest Samsung Distributor to place
an order. After your order is placed, installation professionals will visit you and install the bracket.
z
At least 2 persons are needed in order to move the LCD Monitor.
z
Samsung is not responsible for any product damage or any injury caused by installation at customer's discretion.
Dimensions
YX
X\UGGG^X\UGGG^ YWW^TXYTYWGGG㝘䟸GXaXWa[XYWW^TXYTYWGGG㝘䟸GXaXWa[X

For securing the bracket on a wall, use only machine screws of 6 mm diameter and 8 to 12 mm length.
6. Wall Bracket Installation
z
Contact a technician for installing the wall bracket.
z
Samsung Electronics is not responsible for any damages to the product or harm to customers when the
installation is done by the customer.
z
This product is for installing on cement walls. The product may not stay in place when installed on plaster or wood.
Components(Sold separately)
Only use the components and accessories shipped with the product.
A
Wall-Bracket
B
Set-Bracket
C
Screw:
8 EA
D
Screw:
3 EA
E
Wood Screw:
7 EA
F
Anchor:
7 EA
G
Installation Guide
How to assemble the Wall Mount Bracket
1
1. Mark the location of hole on the wall.
2. Make over 35mm-depth-hole on the marked location using drill.
3. Fix anchors
F
on each hole on the wall.
4. Connect wall-bracket
A
to the wall with wood screws
E
after fitting
anchors
F
into the wall-bracket
A
.
If the bracket is not firmly fixed to the wall, set can fall off.
2
1. Turn the power off and unplug the power cord from the outlet.
2. Place the monitor faced down on a soft cloth or cushion on a table.
3. Attach the set-bracket
B
onto the rear side of the monitor set and secure the screws
C
.
YY
X\UGGG_X\UGGG_ YWW^TXYTYWGGG㝘䟸GXaXWa[XYWW^TXYTYWGGG㝘䟸GXaXWa[X

3
1. Insert three Hangers of the set-bracket
B
into the grooves of the wall-bracket
A
.
2. Fix set-bracket
B
and wall-bracket
A
with screws
D
.
Before installing the set on the wall, connect the cables to the set first.
YZ
X\UGGG`X\UGGG` YWW^TXYTYWGGG㝘䟸GXaXWa[XYWW^TXYTYWGGG㝘䟸GXaXWa[X

The color and appearance of the product may vary depending on the model, and the product specifications are
subject to change without prior notice for reasons of performance enhancement.
Connections
Installing the Stand KIT
Note
• Only the supplied bolts should be used.
Caution
Samsung Electronics will not be responsible for damages caused by using a base other than those
specified.
Installing the Semi Stand
Left stand
Right stand
Caution
Make sure to install the stand with the Caution label
folded backwards.
1) A 'Cover-Protector' is used to protect the hole at the bottom of the LCD Monitor , where the stand is
inserted. Be sure to remove the 'Cover-Protector' when attaching the provided Semi Stand or Stand KIT
(sold separately) and cover the hole using the 'Cover-Hole' when attaching the wall mount kit.
2) Set up the left and right stands respectively.
3) Insert the stand into the hole at the bottom of the LCD Monitor.
Insert the screw into the hole indicated and tighten it. (M4 x L15)
Caution
Safety Instructions
Introduction
Connections
Installing the Stand KIT
Connecting the LCD
Display
Using the Software
Adjusting the LCD Display
Troubleshooting
Specifications
Information
Appendix
Y[
X\UGGGXWX\UGGGXW YWW^TXYTYWGGG㝘䟸GXaXWa[YYWW^TXYTYWGGG㝘䟸GXaXWa[Y

This stand is designed for adjusting the screen angle. The company is not responsible for any problem
caused when using this stand. Under no circumstances use the product as a stand for placing something on.
Installing the Stand KIT (sold separately)
1) A 'Cover-Protector' is used to protect the hole at the bottom of the LCD Monitor, where the stand is
inserted. Be sure to remove the 'Cover-Protector' when attaching the provided Semi Stand or Stand KIT
(sold separately) and cover the hole using the 'Cover-Hole' when attaching the wall mount kit.
2) Ensure that the parts are inserted in the right direction and in the right place. (M4 x L15)
3) Insert the stand into the hole at the bottom of the LCD Monitor.
4) Insert the screw into the hole indicated and tighten it. (M4 x L15)
Connecting the LCD Monitor
Using a Power cord with Earth
In the event of failure, the earth lead may cause electric shock. Make sure to wire the earth lead in
correctly, before connecting the AC power. When un-wiring the earth lead, make sure to disconnect
the AC power in advance.
Note
• AV input devices such as DVD players, VCR's or camcorders as well as your computer can be connected
to the LCD Monitor. For detailed information on connecting AV input devices, refer to the User Controls
under
Adj
usting Your LCD Monitor.
Connecting to a Computer
Y\
X\UGGGXXX\UGGGXX YWW^TXYTYWGGG㝘䟸GXaXWa[YYWW^TXYTYWGGG㝘䟸GXaXWa[Y

1) Connect the power cord for your LCD Monitor to the power port on the back of the LCD Monitor.
Tr
un on t
he power switch.
2) There are 3 ways to connect the D-sub to your LCD Monitor.
Choose one of the following:
2-1) Using the D-sub (Analog) connector on the video card.
Connect the D -sub to the 15-pin, RGB port on the back of your LCD Monitor and the 15 pin D-
sub P
or
t on the computer.
2-2) Using the DVI (Digital) connector on the video card.
Connect the DVI Cable to the DVI(HDCP) port on the back of your LCD Monitor and the DVI
port
on the c
omputer.
2-3) Using the BNC (Analog) connector on the video card.
Connect the BNC Cable to the BNC/COMPONENT IN - R, G, B, H, V ports on the back of your
LCD Monitor and the 15 pi
n D-sub Port on the computer.
3) Connect the audio cable for your LCD Monitor to the audio port on the back of your computer.
Note
• Turn on both your computer and the LCD Monitor.
Note
• The DVI cable or BNC cable is optional.
Contact a local Samsung Electronics Service Center to buy optional items.
Y]
X\UGGGXYX\UGGGXY YWW^TXYTYWGGG㝘䟸GXaXWa[YYWW^TXYTYWGGG㝘䟸GXaXWa[Y

Connecting Digital DVD
Note
• Input devices such as digital DVD are connected to the DVI IN terminal of the monitor using the DVI cable.
• Then, start the DVD with a DVD disc inserted.
• Select Digital using the SOURCE button.
Note
• The monitor has DVI IN connection terminals to connect DVI input devices digital DVD.
Connecting to a VCR
1) AV input devices such as VCRs or Camcorders are connected via the AV IN [VIDEO] or AV IN [S-VIDEO]
of the LCD Monitor using an S-VHS or BNC cable.
2) Co
nnec
t the Audio (L) and Audio (R) terminals of a VCR or Camcorders to the LCD Display 's AV AUDIO
IN [L-AUDIO -R] using audio cables.
Note
•Select AV or S-Video for a connected VCR or Camcorder using the SOURCE button on the front of the
LCD Monitor or on the remote control.
• The
n, s
tart the VCR or Camcorders with a tape inserted.
Note
• The S-VHS or BNC cable is optional.
Connecting to a DVD Player
Y^
X\UGGGXZX\UGGGXZ YWW^TXYTYWGGG㝘䟸GXaXWa[YYWW^TXYTYWGGG㝘䟸GXaXWa[Y

1) Connect a set of audio cables between the COMPONENT AUDIO IN [L-AUDIO-R] on the LCD Monitor and
the AUDIO OUT jacks on the DVD player.
2) Connect a Component cable between the BNC/COMPONENT IN - P
R, Y, PB port on the LCD Monitor and
the P
R, Y, PB jacks on the DVD player.
Note
•Select Component for the connection to a DVD player using the SOURCE button on the front of the LCD Monitor
or on
the remote control.
• Then, st
art the DVD Player with a DVD disc inserted.
Note
• A component cable is optional.
For an explanation of Component video, consult your DVD manual.
Connecting to a Camcorder
1) Locate the A/V output jacks on the camcorder. They are usually found on the side or back of the
camcorder.
Connect a set of audio cables between the AUDIO OUTPUT jacks on the camcorder and the AV AUDIO IN
[L-AUDIO-R] on the LCD Monitor.
2) Connect a video cable between the VIDEO OUTPUT jack on the cam corder and the AV IN [VIDEO] on the
LCD Monitor.
Note
•Select AV for the Camcorder connection using the SOURCE button on the front of the LCD Display or on
the remote control.
• Then, start the Camcorders with a tape inserted.
Note
Y_
X\UGGGX[X\UGGGX[ YWW^TXYTYWGGG㝘䟸GXaXWa[YYWW^TXYTYWGGG㝘䟸GXaXWa[Y

• The audio-video cables shown here are usually included with a Camcorder.
(If not, check your local electronics store.)
If your camcorder is stereo, you need to connect a set of two cables.
Connecting to a DTV Set Top Box
Note
• The connections for a typical Set Top Box are shown below.
1) Connect a Component cable between the BNC / COMPONENT IN - PR, Y, PB port on the LCD Monitor and
the P
R, Y, PB jacks on the Set Top Box.
2) Connect a set of audio cables between the COMPONENT AUDIO IN [L-AUDIO-R] on the LCD Monitor and
the
AU
DIO OUT jacks on the Set Top Box.
Note
•Select Component for the connection to a DTV Set Top Box using the SOURCE button on the front of the
LCD Monitor or on the remote control.
Note
• For an explanation of Component video, see your Set Top Box owner's manual.
Connecting Speakers
Note
• Fasten the SET and the speaker using the screws.
* Mount the speaker set without the speaker stand.
Y`
X\UGGGX\X\UGGGX\ YWW^TXYTYWGGG㝘䟸GXaXWa[YYWW^TXYTYWGGG㝘䟸GXaXWa[Y

Note
• Connect the speaker connection cable between the speaker connection jack on the back of the SET and
the speaker connection jack on the back of the speaker.
Note
• Do not move the SET while the SET is connected to the speakers.
The speaker-bracket for connecting the SET speaker my become damaged.
Connecting to an Audio System
Note
• Connect a set of audio cables between the AUX L, R jacks on the AUDIO SYSTEM and the AUDIO OUT
[L-AUDIO-R] on LCD Monitor.
© 1995~2008 SAMSUNG. ALL Rights Reserved
ZW
X\UGGGX]X\UGGGX] YWW^TXYTYWGGG㝘䟸GXaXWa[YYWW^TXYTYWGGG㝘䟸GXaXWa[Y

Introduction
A Multiple Display Control (MDC) is an application allowing various monitors to be easily and simultaneously
operated on a PC. RS-232C, a standard of serial communication, is used for the communication between a PC and
a monitor. Therefore, a serial cable should be connected between the serial port on a PC and the serial port on a
monitor.
Main Screen
Click Start > Program > Samsung > MDC System to start the program.
Select a set to see the volume of the selected set within the slider.
Z
zt{T[WXXTl__TTUGGGZZzt{T[WXXTl__TTUGGGZZ YWW^TXXTY_GGG㝘㤸GXWaZ_a[\YWW^TXXTY_GGG㝘㤸GXWaZ_a[\

Main Icons Select Button
Remocon Info Grid
Safety Lock Monitor Selection
Port Selection Control Tools
1. Use the main icons to switch into each screen.
2. Allows you to enable or disable the remote control signal receiving function of the monitor unit.
3. Set the Safety Lock function.
When setting the Lock function, you can only operate power and lock buttons on the remote control and set.
4. The setting for the PC Serial Port can change. The original value is COM1.
5. Click Select all or Clear to select or clear all monitors.
6. Use Grid to view brief information on selected monitor.
7. Select a monitor from monitor Selection.
8. Use Control Tools to control monitors.
<Note> The remote control Enable/Disable function operates whether or not the power is On/Off, and this
applies to all monitors connected to the MDC. However, regardless of the status at the time the MDC is
shut down, the remote control signal receiving function of all monitors is initialized to Enable when the
MDC is closed.
Port Selection
Z
zt{T[WXXTl__TTUGGGZ[zt{T[WXXTl__TTUGGGZ[ YWW^TXXTY_GGG㝘㤸GXWaZ_a[\YWW^TXXTY_GGG㝘㤸GXWaZ_a[\

1. The Multiple Display Control is originally set to COM1.
2. If any port other than COM1 is used, COM1 through COM4 can be selected in the Port Selection Menu.
3. If the exact port name that is connected to the LCD monitor using a serial cable is not selected, communication will
be unavailable.
4. The selected port is stored in the program and used for the next program as well.
Power Control
1. Click Power Control of the main icons and the Power Control screen appears.
Z
zt{T[WXXTl__TTUGGGZ\zt{T[WXXTl__TTUGGGZ\ YWW^TXXTY_GGG㝘㤸GXWaZ_a[\YWW^TXXTY_GGG㝘㤸GXWaZ_a[\

Info Grid shows some basic information necessary to Power Control.
1) (Power Status)
2) Input
3) Image Size
4) On Timer
5) Off Timer
2. Use the Select All button or Check Box to choose a monitor to control.
Power Control allows controlling some of the functions of the selected monitor.
1)
Power On/Off
Z
zt{T[WXXTl__TTUGGGZ]zt{T[WXXTl__TTUGGGZ] YWW^TXXTY_GGG㝘㤸GXWaZ_a[\YWW^TXXTY_GGG㝘㤸GXWaZ_a[\

- Turns the power of the selected monitor On/Off.
2) Volume
- Controls the volume level of the selected monitor.
It receives the volume value of the selected monitor from the sets and monitors it in the slider.
(When you cancel the selection or choose Select All, the value returns to the default value 10)
3)
(Mute On/Off)
- Turns on/off the Mute function of the selected monitor.
When selecting one set at a time, turn on the Mute function for the selected set.
The Mute function is disabled automatically when you adjust the volume level.
(The values return to the default settings when you undo the selections or choose "Select All".)
The Power Control feature is available for all monitors.
The Volume Control and Mute features are available only for the monitors whose power status is ON.
Input Source
1. Click Input Source of the main icons and the Input Source control screen appears.
Click Select All or use Check Box to select a monitor to control.
• TV Mode
• PC Mode
Z
zt{T[WXXTl__TTUGGGZ^zt{T[WXXTl__TTUGGGZ^ YWW^TXXTY_GGG㝘㤸GXWaZ_a[\YWW^TXXTY_GGG㝘㤸GXWaZ_a[\

Info Grid shows some basic information necessary to Input Source Control.
1) PC
- Changes the Input Source of the selected monitor to PC.
2) BNC
- Changes the Input Source of the selected monitor to BNC.
3) DVI
- Changes the Input Source of the selected monitor to DVI.
4) TV
- Changes the Input Source of the selected monitor to TV.
5) AV
- Changes the Input Source of the selected monitor to AV.
6) S-Video
- Changes the Input Source of the selected monitor to S-
V
ideo.
7) Component
- Changes the Input Source of the selected monitor to Component.
8) MagicNet
- The Input source of MagicNet works only on MagicNet model.
9) Channel
- Channel arrow appears when the Input Source is TV.
TV Source can be selected only in products with TV and controlling channels is allowed only when
Input Source is TV.
The Input Source Control feature is available only for the monitors whose power status is ON.
Image Size
PC, BNC, DVI
1. Click Image Size of the main icons and the Image Size control screen appears.
Z
zt{T[WXXTl__TTUGGGZ_zt{T[WXXTl__TTUGGGZ_ YWW^TXXTY_GGG㝘㤸GXWaZ_a[\YWW^TXXTY_GGG㝘㤸GXWaZ_a[\

Info Grid shows some basic information necessary to Image Size Control.
1)
( Power Status)
- Shows the power status of the current monitor.
2) Image Size
- Shows the current Image Size of the monitor in use.
3) Input
- Shows the current Input Source of the monitor in use.
4) Info Grid Displays only the monitors whose Input Source is PC, BNC, DVI.
5) PC Source - When you click Image Size, the PC Source tab first appear.
- The Image Size Control button controls Image Size available for PC, BNC, DVI.
6) Video Source
- Click the Video Source tab to control Image Size for respective Input Source.
The Input source of MagicNet works only on MagicNet model.
Image Size Control is available only for the monitors for which power status is ON.
Image Size
TV, AV, S-Video, Component, DVI(HDCP)
1. Click Image Size of the main icons and the Image Size control screen appears.
Z
zt{T[WXXTl__TTUGGGZ`zt{T[WXXTl__TTUGGGZ` YWW^TXXTY_GGG㝘㤸GXWaZ_a[\YWW^TXXTY_GGG㝘㤸GXWaZ_a[\

Info Grid shows some basic information necessary to Image Size Control.
1) Click the Video Source tab to adjust Image Size for TV, AV, S-Video, Component. , DVI(HDCP).
Click Select All or use Check Box to select a monitor to control.
2) Info Grid Displays only the monitor having TV, AV, S-Video, Component or DVI(HDCP) as input source.
3) Switch Image Size of the selected monitor randomly.
Note: Auto Wide, Zoom1 and Zoom2 are not available for selection when the input signal type for
Component and DVI (HDCP) is 720p or 1080i.
The Input source of MagicNet works only on MagicNet model.
The Image Size Control feature is available only for the monitors whose power status is ON.
Time
1. Click Time of the main icons and the Time Control screen appears.
zt{T[WXXTl__TTUGGG[Wzt{T[WXXTl__TTUGGG[W YWW^TXXTY_GGG㝘㤸GXWaZ_a[\YWW^TXXTY_GGG㝘㤸GXWaZ_a[\

Info Grid shows some basic information necessary to Time Control.
1) Current Time
- Set the current time for the selected monitor (PC Time).
- To change the current time, first change the PC Time.
2) On Time Setup
- Set the Hour, Minute, AM/PM of On Time Setup, Status, Source, Volume of the selected monitor.
3) Off Time Setup
- Set the Hour, Minute, and AM/PM, Status for Off Time Setup of the selected monitor.
4) Shows the On Time settings.
5) Shows the Off Time settings.
The Input source of MagicNet works only on MagicNet model.
Time Control is available only for the monitors for which the power status is ON.
At On Time Setup, TV Source functions only for TV Model.
At On Time Setup, MagicNet Source functions only for MagicNet Model.
PIP
PIP Size
1. Click PIP of the main icons and the PIP control screen appears.
Click Select All or use Check Box to select a monitor to control.
zt{T[WXXTl__TTUGGG[Xzt{T[WXXTl__TTUGGG[X YWW^TXXTY_GGG㝘㤸GXWaZ_a[\YWW^TXXTY_GGG㝘㤸GXWaZ_a[\

Info Grid shows some basic information necessary to PIP Size Control.
1) PIP Size
- Shows the current PIP Size of the monitor in use.
2) OFF
- Turns off the PIP of the selected monitor.
3) Large
- Turns on the PIP of the selected monitor and changes the size to Large.
4) Small
- Turns on the PIP of the selected monitor and changes the size to Small.
5) Double 1
- Turns on the PIP of the selected monitor and changes the size to Double 1.
6) Double 2
- Turns on the PIP of the selected monitor and changes the size to Double 2.
7) Double 3 (Picture By Picture)
- Turns on the PBP of the selected monitor and changes the size to Double 3.
The Input source of MagicNet works only on MagicNet model.
PIP Size can be controlled with turning on the LCD monitor power.
PIP
PIP Source
1. Click PIP of the main icons and the PIP control screen appears.
• PIP TV Mode
[
zt{T[WXXTl__TTUGGG[Yzt{T[WXXTl__TTUGGG[Y YWW^TXXTY_GGG㝘㤸GXWaZ_a[\YWW^TXXTY_GGG㝘㤸GXWaZ_a[\

• PIP S-Video Mode
Info Grid shows some basic information necessary to PIP Source Control.
1) PIP Source
- PIP Source can be controlled with turning on the LCD monitor power.
2) PC
- Changes the source of the PIP of the selected monitor to PC.
3) BNC
- Changes the source of the PIP of the selected monitor to BNC.
4) DVI
- Changes the source of the PIP of the selected monitor to DVI.
5) TV
-Changes the source of the PIP of the selected monitor to TV.
[
zt{T[WXXTl__TTUGGG[Zzt{T[WXXTl__TTUGGG[Z YWW^TXXTY_GGG㝘㤸GXWaZ_a[\YWW^TXXTY_GGG㝘㤸GXWaZ_a[\

6) AV
- Changes the source of the PIP of the selected monitor to AV.
7) S-Video
- Changes the source of the PIP of the selected monitor to S-Video.
8) Component
- Changes the source of the PIP of the selected monitor to Component.
9) Channel
- Channel arrow appears when the PIP Source is TV.
Note: Some of the PIP Sources may not be available for selection, depending on the input source type
of the Main Screen.
The Input source of MagicNet works only on MagicNet model.
TV Source can be selected only in products with TV and controlling channels is allowed only when PIP
Source is TV.
The PIP Control feature is available only for the monitors whose power status is ON and the PIP
function is set to ON.
Settings
Picture
1. Click Settings of the main icons and the Settings Control screen appears.
Info Grid shows some basic information necessary to Settings Control.
When each function is selected, the set value of the selected function is Displayed in the slide.When selected, each
function fetches the value for the set and Displays it on the slide bar. When "Select All" is chosen, the default value
is Displayed. Changing a value in this screen will automatically change the mode to "CUSTOM."
1) Picture
- Available only for TV, AV, S-Video, Component, DVI(HDCP).
2) Contrast
- Adjusts Contrast of the selected monitor.
3) Brightness
- Adjusts Brightness of the selected monitor.
4) Sharpness
- Adjusts Sharpness of the selected monitor.
5) Color
- Adjusts Color of the selected monitor.
6)
Tint
- Adjusts Tint of the selected monitor.
[
zt{T[WXXTl__TTUGGG[[zt{T[WXXTl__TTUGGG[[ YWW^TXXTY_GGG㝘㤸GXWaZ_a[]YWW^TXXTY_GGG㝘㤸GXWaZ_a[]

- Available only for NT.
7) Color Tone
- Adjusts the Color Tone for the selected monitor.
The Input source of MagicNet works only on MagicNet model.
This feature is available only for the monitors whose power status is ON and if no selection is made,
the factory default is Displayed.
Settings
Picture PC
1. Click Settings of the main icons and the Settings Control screen appears.
Info Grid shows some basic information necessary to Settings Control. When each function is selected, the set value
of the selected function is Displayed in the slide. When selected, each function fetches the value for the set and Display
s it on the slide bar. When "Select All" is chosen, the default value is Displayed. Changing a value in this
screen will automatically change the mode to "CUSTOM."
1) Picture PC
- Available only for PC, BNC, DVI.
2) Contrast
- Adjusts Contrast of the selected monitor.
3) Brightness
- Adjusts Brightness for the selected monitor.
4) Red
- Adjusts red Color of the selected monitor.
- Available only for NT.
5) Green
- Adjusts green Color of the selected monitor.
- Available only for NT.
6) Blue
- Adjusts blue Color of the selected monitor.
- Available only for NT.
The Input source of MagicNet works only on MagicNet model.
This feature is available only for the monitors whose power status is ON and if no selection is made,
the factory default is Displayed.
[
zt{T[WXXTl__TTUGGG[\zt{T[WXXTl__TTUGGG[\ YWW^TXXTY_GGG㝘㤸GXWaZ_a[]YWW^TXXTY_GGG㝘㤸GXWaZ_a[]

Settings
Audio
1. Click Settings of the main icons and the Settings Control screen appears.
Info Grid shows some basic information necessary to Settings Control. When each function is selected, the set value
of the selected function is Displayed in the slide. When selected, each function fetches the value for the set and Display
s it on the slide bar. When "Select All" is chosen, the default value is Displayed. Changing a value in this
screen will automatically change the mode to "CUSTOM."
1) Audio
- Controls audio settings for all input sources.
2) Bass
- Adjusts Bass of the selected monitor.
3) Treble
- Adjusts Treble of the selected monitor.
4) Balance
- Adjusts Balance of the selected monitor.
5) SRS TSXT
- SRS TSXT Sound ON/OFF of the selected monitor.
6) Sound Select
- Select either Main or Sub when PIP is On.
The Input source of MagicNet works only on MagicNet model.
This feature is available only for the monitors whose power status is ON and if no selection is made,
the factory default is Displayed.
Settings
Image Lock
1. Click Settings of the main icons and the Settings Control screen appears.
[
zt{T[WXXTl__TTUGGG[]zt{T[WXXTl__TTUGGG[] YWW^TXXTY_GGG㝘㤸GXWaZ_a[]YWW^TXXTY_GGG㝘㤸GXWaZ_a[]

Info Grid shows some basic information necessary to Settings Control.
1) Image Lock
- Available only for PC, BNC.
2) Coarse
- Adjusts Coarse of the selected monitor.
3) Fine
- Adjusts Fine of the selected monitor.
4) Position
- Adjusts Position of the selected monitor.
5) Auto Adjustment
- Self-Adjust to the incoming PC signal.
The Input source of MagicNet works only on MagicNet model.
Settings Control is available only for the monitors for which the power status is ON.
Maintenance
Lamp Control
1. Click on the "Maintenance" icon in the Main Icon column to Display the Maintenance screen.
[
zt{T[WXXTl__TTUGGG[^zt{T[WXXTl__TTUGGG[^ YWW^TXXTY_GGG㝘㤸GXWaZ_a[]YWW^TXXTY_GGG㝘㤸GXWaZ_a[]

An "Info Grid" showing several basic data items appears.
1) Maintenance
- Allows the Maintenance Control function for all input sources.
2) Auto Lamp Control
- Automatically adjusts the backlight of the selected monitor at a specified time.
The Manual Lamp Control automatically turns off if you adjust using the Auto Lamp Control.
3) Manual Lamp Control
- Allows you to adjust the backlight of the selected monitor regardless of the time.
The Auto Lamp Control automatically turns off if you adjust using the Manual Lamp Control.
The Maintenance Control feature is available only for the monitors whose power status is ON.
The Input source of MagicNet works only on MagicNet model.
Maintenance
Scroll
1. Click on the "Maintenance" icon in the Main Icon column to Display the Maintenance screen.
zt{T[WXXTl__TTUGGG[_zt{T[WXXTl__TTUGGG[_ YWW^TXXTY_GGG㝘㤸GXWaZ_a[]YWW^TXXTY_GGG㝘㤸GXWaZ_a[]

1) Safety Screen
- Eliminates the afterimages that can result when the selected monitor stays in Pause mode for an extended period
of time. You can set the repeat cycle timer by selecting the "Interval" by hour and "Second" by second.
It can be set to Scroll, Pixel, Bar and Eraser by Screen Type.
The Input source of MagicNet works only on MagicNet model.
Setting Second, you can set to 1, 2, 3, 4, 5 for Scroll Type and to 10, 20, 30, 40, 50 for Pixel, Bar, and
Eraser Type.
The Maintenance Control feature is available only for the monitors whose power status is ON.
Maintenance
Video Wall
1. Click on the "Maintenance" icon in the Main Icon column to Display the Maintenance screen.
[
zt{T[WXXTl__TTUGGG[`zt{T[WXXTl__TTUGGG[` YWW^TXXTY_GGG㝘㤸GXWaZ_a[]YWW^TXXTY_GGG㝘㤸GXWaZ_a[]

1) Video Wall
- A Video Wall is a set of video screens that are connected together, so that each screen shows a part of the whole
picture or so that the same picture is repeated on each screen.
2) Video Wall (Screen divider)
- The screen can be divided into.
You can select a number of screens with a different layout when dividing.
z Select a mode from Screen divider.
z Select a display from Display Selection.
z
The place will be set up by pressing a number in the selected mode.
z
The MDC program supplied by Samsung supports up to 4x4 LCD monitores.
z
2*2
z 3*3
z 4*4
z 1*2
z
2*1
z
1*5
z
5*1
3)
On / Off
zt{T[WXXTl__TTUGGG\Wzt{T[WXXTl__TTUGGG\W YWW^TXXTY_GGG㝘㤸GXWaZ_a[]YWW^TXXTY_GGG㝘㤸GXWaZ_a[]

- Turns on/off the Video Wall function of the selected monitor.
4) Format
- The format can be selected to see a divided screen.
z
Full
z Natural
You may not operate this function in MagicNet.
The Maintenance Control function is available only for the monitors where the power status is ON.
Troubleshooting
1. The monitor you wish to control does not appear on the Power Control Info Grid
- Check the connection of RS232C. (Check if it is properly connected to the Com1 port)
- Check the monitors to see if any of the other monitors connected have the same ID. If more than one monitors
have the same ID, those monitors are not properly detected by the program due to data conflict.
- Check if the monitor Set ID is a number between 0 and 16 . (Adjust using the Display menu)
Note : A monitor Set ID must be a value between 0 and 16 .
2. The monitor you wish to control does not appear on the other Control Info Grids
- Check to see if the monitor power is ON. (You can check this in Power Control Info Grid)
- Check if you can change the input source of the monitor.
3. The dialogue box appears repeatedly.
- Check to see if the monitor you wish to control is selected.
4. Both On Timer and Off Timer have been set but different time is showing.
- Apply current time to synchronize the monitor clocks.
5. The remote may not function properly when you turn off the remote Function, disconnect the RS-232C cable, or exit
the program in an Irregular manner. Rerun the program and turn the remote function again to Restore normal
functions.
<Note> This program may malfunction due to problems in communication circuits or interference from electronic
appliances nearby.
Settings Value display In Multiple Display Mode
When there are more than one monitors connected, the settings values are displayed as follows.
1. No selection: displays the Factory Default Value.
2. Selected one monitor: Fetches and displays the settings value for the selected monitor.
3. Selected one monitor (ID1) and add another monitor (ID3): The program, which was displaying the settings value of
ID 1, fetches and displays the value of ID3.
4. Selected all sets using Select All: Returns to the Factory Default Value.
zt{T[WXXTl__TTUGGG\Xzt{T[WXXTl__TTUGGG\X YWW^TXXTY_GGG㝘㤸GXWaZ_a[]YWW^TXXTY_GGG㝘㤸GXWaZ_a[]

The color and appearance of the product may vary depending on the model, and the product specifications are
subject to change without prior notice for reasons of performance enhancement.
Adjusting the LCD monitor
Input
Available Modes
PC / BNC / DVI
AV
S-Video
Component
DVI-Video
Source List
[MENU]
˧
[ENTER]
˧
[ENTER]
˧
[
/
]
˧
[ENTER]
Use to select PC, BNC, or other external input sources connected to the LCD monitor.
Use to select the screen of your choice.
1) PC
2) BNC
3) DVI
4) AV
5) S-Video
6) Component
[The direct button on the remote control is the 'SOURCE' button. ]
Note
• PIP turns off when the LCD monitor is switched to an external source.
PIP
When external A/V devices such as VCRs or DVDs are connected to the LCD monitor , PIP allows you to
watch video from those devices in a small window super-imposed on the PC Video signal. (Off/On)
Note
• More than one PIP cannot be overlapped on screen as BNC and the component use the same terminal.
1) PIP
[MENU]
˧
[ENTER]
˧
[
/
]
˧
[ENTER]
˧
[ENTER]
˧
[
/
]
˧
[ENTER]
Turns the PIP Screen Off/On.
- Off
- On
[The direct button on the remote control is the 'PIP' button.]
2) Source
[MENU]
˧
[ENTER]
˧
[
/
]
˧
[ENTER]
˧
[
/
]
˧
[ENTER]
˧
[
/
]
˧
[ENTER]
Selects the input source for the PIP.
- PC : AV / S-Video / Component Mode
- BNC : AV / S-Video Mode
- DVI : AV / S-Video / Component Mode
- AV / S-Video : PC / BNC / DVI Mode
- Component : PC / DVI Mode
[The direct button on the remote control is the 'SOURCE' button.]
Safety Instructions
Introduction
Connections
Using the Software
Adjusting the LCD monitor
Input
Picture
[PC / BNC /DVI Mode]
Picture
[ AV / S-Video /
Component / DVI-Video
Mode]
Sound
Setup
Multi Control
Direct Functions
Troubleshooting
Specifications
Information
Appendix
\
W\UGGGXW\UGGGX YWW^TXYTW]GGG㝘㤸G`aZ`aWXYWW^TXYTW]GGG㝘㤸G`aZ`aWX

3) Swap
[MENU]
˧
[ENTER]
˧
[
/
]
˧
[ENTER]
˧
[
/
]
˧
[ENTER]
Swaps the contents of the PIP and main image.
The image in the PIP window will appear on the main screen, and the main screen image will appear in the
PIP window.
[The direct button on the remote control is the 'SWAP' button.]
4) Size
[MENU]
˧
[ENTER]
˧
[
/
]
˧
[ENTER]
˧
[
/
]
˧
[ENTER]
˧
[
/
]
˧
[ENTER]
Changes the Size of the PIP window.
[The direct button on the remote control is the 'SIZE' button.]
5) Position
[MENU]
˧
[ENTER]
˧
[
/
]
˧
[ENTER]
˧
[
/
]
˧
[ENTER]
˧
[
/
]
˧
[ENTER]
Changes the Position of the PIP window.
6) Transparency
[MENU]
˧
[ENTER]
˧
[
/
]
˧
[ENTER]
˧
[
/
]
˧
[ENTER]
˧
[
/
]
˧
[ENTER]
A
djusts the Transparency of PIP windows.
- High
- Medium
- Low
- Opaque
Note
•
If you select , , in Size, Position and Transparency will not be activated.
Available Modes: PIP
Edit Name
[MENU]
˧
[ENTER]
˧
[
/
]
˧
[ENTER]
˧
[
/
]
˧
[ENTER]
˧
[
/
]
˧
[ENTER]
Name the input device connected to the input jacks to make your input source selection easier.
1) PC
2) BNC
3) DVI
4) AV
5) S-Video
6) Component
Picture [PC / BNC / DVI Mode]
Available Modes
PC / BNC / DVI
AV
S-Video
Component
DVI-Video
MagicBright™
[MENU]
˧
[
/
]
˧
[ENTER]
˧
[ENTER]
˧
[
/
]
˧
[ENTER]
MagicBright™ is a new feature providing the optimum viewing environment depending on the contents of the
image you are watching.
Currently four different modes are available: Entertain, Internet, Text and Custom.
Each mode has its own pre-configured brightness value. You can easily select one of the four settings by
simply pressing the MagicBright™ control button.
1) Entertain
High brightness
For watching motion pictures such as a DVD or VCD.
2) Internet
Medium brightness
For working with a mixture of images such as the text with graphics added.
3) Text
Normal brightness.
For documentations or work involving a lot of text.
\
W\UGGGYW\UGGGY YWW^TXYTW]GGG㝘㤸G`aZ`aXZYWW^TXYTW]GGG㝘㤸G`aZ`aXZ

Although the values are carefully chosen by our engineers, the pre-configured values may not be
comfortable f
or your eyes depending on your taste.
If this is the case, Adjusts the brightness and contrast by using the OSD menu.
[The direct button on the remote control is the 'M/B' button.]
Custom
[MENU]
˧
[
/
]
˧
[ENTER]
˧
[
/
]
˧
[ENTER]
˧
[ENTER]
˧
[
/
] / [< / >]
˧
[ENTER]
By using the on-screen menus, the contrast and brightness can be changed to your personal preference.
1) Contrast
Adjusts the Contrast.
2) Brightness
Adjusts the Brightness.
Note
• By adjusting the picture using the Custom function, MagicBright will change to Custom mode.
Color Tone
[MENU]
˧
[
/
]
˧
[ENTER]
˧
[
/
]
˧
[ENTER]
˧
[
/
]
˧
[ENTER]
The color tones can be changed.
1) Cool
3) Normal
4) Warm
5) Custom
(Available in PC, BNC mode only)
Color Control
[MENU]
˧
[
/
]
˧
[ENTER]
˧
[
/
]
˧
[ENTER]
˧
[ENTER]
˧
[< / >]
˧
[ENTER]
Adjusts the individual R, G, B color controls.
(Available in PC, BNC mode only)
1) Red
2) Green
3) Blue
Note
• If you adjust the picture by using the Custom function, Color Tone will turn to the Cusome mode.
Image Lock
Image Lock is used to fine-tune and get the best image by removing noise that creates unstable images with
jitters and shakiness. If satisfactory results are not obtained using the Fine adjustment, use the Coarse
adjustment and then use Fine again.
(Available in PC, BNC mode only)
1) Coarse
[MENU]
˧
[
/
]
˧
[ENTER]
˧
[
/
]
˧
[ENTER]
˧
[ENTER]
˧
[< / >]
˧
[ENTER]
Removes noise such as vertical stripes. Coarse adjustment may move the screen image area. You may
relocate it to the center using the horizontal control menu.
2) Fine
[MENU]
˧
[
/
]
˧
[ENTER]
˧
[
/
]
˧
[ENTER]
˧
[
/
]
˧
[ENTER]
˧
[< / >]
˧
[ENTER]
Removes noise such as horizontal stripes. If the noise persists even after fine tuning, repeat it after
adjusting the frequency (clock speed).
3) Position
[MENU]
˧
[
/
]
˧
[ENTER]
˧
[
/
]
˧
[ENTER]
˧
[
/
]
˧
[ENTER]
˧
[< / >] / [
/
]
˧
[ENTER]
Adjusts the screen location horizontally and vertically.
\
W\UGGGZW\UGGGZ YWW^TXYTW]GGG㝘㤸G`aZ`aXZYWW^TXYTW]GGG㝘㤸G`aZ`aXZ
4) Custom

Auto Adjustment
[MENU]
˧
[
/
]
˧
[ENTER]
˧
[
/
]
˧
[ENTER]
The values of Fine, Coarse, Position are adjusted automatically.
By changing the resolution in the control panel, the auto function is performed.
(Available in PC, BNC mode only)
[The direct button on the remote control is the 'AUTO' button.]
Signal Balance
This is used to make up for the weak RGB signal transmitted by a long signal cable.
(Available in PC, BNC mode only)
1) Signal Balance
[MENU]
˧
[
/
]
˧
[ENTER]
˧
[
/
]
˧
[ENTER]
˧
[ENTER]
˧
[
/
]
˧
[ENTER]
Selects either On or Off with the signal control.
2) Signal Control
[MENU]
˧
[
/
]
˧
[ENTER]
˧
[
/
]
˧
[ENTER]
˧
[
/
]
˧
[ENTER]
˧
[
/
]
˧
[ENTER]
˧
[
/
]
˧
[< / >]
˧
[ENTER]
A
djusts the R Phase, G Phase, B Phase, Gain and Sharpness manually.
Size
[MENU]
˧
[
/
]
˧
[ENTER]
˧
[
/
]
˧
[ENTER]
˧
[
/
]
˧
[ENTER]
The Size can be switched.
1) 16:9
2) 4:3
PIP Picture
[MENU]
˧
[
/
]
˧
[ENTER]
˧
[
/
]
˧
[ENTER]
˧
[
/
]
˧
[ENTER]
˧
[
/
]
˧
[ENTER]
˧
[
/
]
˧
[ENTER]
˧
[< / >]
˧
[ENTER]
Adjusts the PIP Screen Settings.
1) Contrast
Adjusts the Contrast of the PIP window on the screen.
2) Brightness
Adjusts the Brightness of the PIP window on the screen.
3) Sharpness
Adjusts the difference between the lightest and darkest areas of the PIP window.
4) Color
Adjusts the Color of the PIP window on the screen.
5) Tint
Adds a natural tone to the PIP window.
You can view a picture from AV, S-Video through the PIP screen in PC, BNC and DVI (PC) mode.
Operat
es only if the video signal is NTSC.
Available Modes: PIP ON
Picture [ AV / S-Video / Component / DVI-Video Mode]
Available Modes
PC / BNC / DVI
AV
S-Video
Component
DVI-Video
Mode
[MENU]
˧
[
/
]
˧
[ENTER]
˧
[ENTER]
˧
[
/
]
˧
[ENTER]
The LCD monitor has four automatic picture settings ("Dynamic", "Standard", "Movie" and "Custom") that are
preset at the factory.
Dynamic, Standard, Movie, or Custom can be activated.
\
W\UGGG[W\UGGG[ YWW^TXYTW]GGG㝘㤸G`aZ`aXZYWW^TXYTW]GGG㝘㤸G`aZ`aXZ

1) Dynamic
2) Standard
3) Movie
4) Custom
[The direct button on the remote control is the 'P.MODE' button.]
Custom
[MENU]
˧
[
/
]
˧
[ENTER]
˧
[
/
]
˧
[ENTER]
˧
[
/
]
˧
[ENTER]
˧
[< / >]
˧
[ENTER]
By using the on-screen menus, the contrast and brightness can be changed to your personal preference.
1) Contrast
A
djusts the Contrast.
2) Brightness
A
djusts the Brightness.
3) Sharpness
A
djusts the picture sharpness.
4) Color
A
djusts the picture color.
5) Tint
A
dds a natural tone to the monitor.
Operates only for AV and S-Video mode. Operates only if the video signal is NTSC.
Color Tone
[MENU]
˧
[
/
]
˧
[ENTER]
˧
[
/
]
˧
[ENTER]
˧
[
/
]
˧
[ENTER]
The color tones can be changed. The individual Color components are also user adjustable.
1) Cool 2
2) Cool 1
3) Normal
4) Warm1
5) Warm2
Size
[MENU]
˧
[
/
]
˧
[ENTER]
˧
[
/
]
˧
[ENTER]
˧
[
/
]
˧
[ENTER]
The Size can be switched.
1) 16:9
2) Zoom 1
3) Zoom 2
4) 4:3
[The ZOOM1, ZOOM2 are not available in 1080
i (or over 72
0p) of DTV.]
Digital NR (Digital Noise Reduction)
[MENU]
˧
[
/
]
˧
[ENTER]
˧
[
/
]
˧
[ENTER]
˧
[
/
]
˧
[ENTER]
Turns the Digital Noise Reduction feature Off/On.
The Digital Noise Reduction feature allows you to enjoy clearer and crisper images.
1) Of
f
2) On
Film Mode
[MENU]
˧
[
/
]
˧
[ENTER]
˧
[
/
]
˧
[ENTER]
˧
[
/
]
˧
[ENTER]
Turns Film Mode Off/On.
The Film Mode feature offers you a theater-quality viewing experience.
(Not available in DVI-Video Mode.)
1) Off
2) On
\
W\UGGG\W\UGGG\ YWW^TXYTW]GGG㝘㤸G`aZ`aX\YWW^TXYTW]GGG㝘㤸G`aZ`aX\

PIP Picture
[MENU]
˧
[
/
]
˧
[ENTER]
˧
[
/
]
˧
[ENTER]
˧
[
/
]
˧
[ENTER]
˧
[
/
]
˧
[ENTER]
˧
[< / >]
˧
[ENTER]
Adjusts the PIP Screen Settings.
1) Contrast
A
djusts the Contrast of the PIP window on the screen.
2) Brightness
A
djusts the Brightness of the PIP window on the screen.
Available Modes: PIP
Sound
Available Modes
PC / BNC / DVI
AV
S-Video
Component
DVI-Video
Mode
[MENU]
˧
[
/
]
˧
[ENTER]
˧
[ENTER]
˧
[
/
]
˧
[ENTER]
The LCD monitor has a built-in high fidelity stereo amplifier.
1) Standard
Selects Standard for the standard factory settings.
2) Music
Selects Music when watching music videos or concerts.
3) Movie
Selects Movie when viewing movies.
4) Speech
Selects Speech when watching a show that is mostly dialogue (i.e., news).
5) Custom
Selects Custom if you want to Adjusts the settings according to your personal preferences.
Custom
[MENU]
˧
[
/
]
˧
[ENTER]
˧
[
/
]
˧
[ENTER]
˧
[
/
]
˧
[ENTER]
˧
[< / >]
˧
[ENTER]
The sound settings can be adjusted to suit your your personal preferences.
1) Bass
Emphasizes low frequency audio.
2) Treble
Emphasizes high frequency audio.
3) Balance
A
llows you to Adjusts the sound balance between the left and right speakers.
[You can hear the sound even when sound value is set to 0.]
Note
• If you adjust picture using Sound Custom function, Sound Mode will turn to Custom mode.
Auto Volume
[MENU]
˧
[
/
]
˧
[ENTER]
˧
[
/
]
˧
[ENTER]
˧
[
/
]
˧
[ENTER]
Reduces the difference in volume control between broadcasters.
1) Of
f
2) On
\
W\UGGG]W\UGGG] YWW^TXYTW]GGG㝘㤸G`aZ`aX\YWW^TXYTW]GGG㝘㤸G`aZ`aX\

[MENU]
˧
[
/
]
˧
[ENTER]
˧
[
/
]
˧
[ENTER]
˧
[
/
]
˧
[ENTER]
SRS TS XT is a patented SRS technology that solves the problem of playing 5.1 multichannel content over two
speakers. TruSurround delivers a compelling, virtual surround sound experience through any two-speaker
playback system, including internal television speakers.
It is fully compatible with all multichannel formats.
1) Off
2) On
[The direct button on the remote control is the 'SRS' button.]
Sound Select
[MENU]
˧
[
/
]
˧
[ENTER]
˧
[
/
]
˧
[ENTER]
˧
[
/
]
˧
[ENTER]
Selects either Main or Sub when PIP is On.
1) Main
2) Sub
[Available Modes: PIP]
Setup
Available Modes
PC / BNC / DVI
AV
S-Video
Component
DVI-Video
Language
[MENU]
˧
[
/
]
˧
[ENTER]
˧
[ENTER]
˧
[
/
]
˧
[ENTER]
You can choose from 11 languages.
Note
• The language chosen affects only the language of the OSD.
It has no effect on any software running on the computer.
Time
Selects from one of 4 time settings, Clock Set, Sleep Timer, On Timer, and Off Timer.
1)
Clock Set
[MENU]
˧
[
/
]
˧
[ENTER]
˧
[
/
]
˧
[ENTER]
˧
[ENTER]
˧
[< / >]
˧
[ENTER]
Current Time Setting.
2) Sleep Timer
[MENU]
˧
[
/
]
˧
[ENTER]
˧
[
/
]
˧
[ENTER]
˧
[
/
]
˧
[ENTER]
˧
[< / >]
˧
[
/
]
˧
[ENTER]
˧
[< / >]
˧
[
/
]
˧
[ENTER]
Turns the LCD monitor off automatically at certain times. (Off, 30, 60, 90, 120, 150, 180)
3) On Timer
[MENU]
˧
[
/
]
˧
[ENTER]
˧
[
/
]
˧
[ENTER]
˧
[
/
]
˧
[ENTER]
˧
[< / >]
˧
[
/
]
˧
[ENTER]
Turns the LCD monitor on automatically at a preset time.
Controls the mode and the volume level at the time the LCD monitor turns on automatically.
4) Off Timer
[MENU]
˧
[
/
]
˧
[ENTER]
˧
[
/
]
˧
[ENTER]
˧
[
/
]
˧
[ENTER]
˧
[< / >]
˧
[
/
]
˧
[ENTER]
Turns the LCD monitor off automatically at a preset time.
Note
• When selecting Yes for the On Timer or Off Timer when the Clock is not set up, a guiding message pops
up: "Set the clock first.".
\
W\UGGG^W\UGGG^ YWW^TXYTW]GGG㝘㤸G`aZ`aX\YWW^TXYTW]GGG㝘㤸G`aZ`aX\
SRS TS XT

Menu Transparency
[MENU]
˧
[
/
]
˧
[ENTER]
˧
[
/
]
˧
[ENTER]
˧
[
/
]
˧
[ENTER]
Changes the opaqueness of the OSD background.
1) High
2) Medium
3) Low
4) Opaque
Safety Lock PIN
[MENU]
˧
[
/
]
˧
[ENTER]
˧
[
/
]
˧
[ENTER]
˧
[0~9]
˧
[0~9]
˧
[0~9]
˧
[0~9]
The password can be changed.
Energy Saving
[MENU]
˧
[
/
]
˧
[ENTER]
˧
[
/
]
˧
[ENTER]
˧
[
/
]
˧
[ENTER]
˧
[MENU]
This feature adjusts the power consumption of the unit in order to save energy.
1) On
2) Of
f
Video Wall
A Video Wall is a set of video screens connected together, so that each screen shows a part of the whole
picture or where the same picture is repeated on each screen.
When the Video Wall is on, you can adjust the Video Wall screen setting.
1) Video Wall
[MENU]
˧
[
/
]
˧
[ENTER]
˧
[
/
]
˧
[ENTER]
˧
[ENTER]
˧
[
/
]
˧
[ENTER]
Turns Off/On the Video Wall function of the selected monitor Off/On.
-
Of
f
-
On
2) Format
[MENU]
˧
[
/
]
˧
[ENTER]
˧
[
/
]
˧
[ENTER]
˧
[
/
]
˧
[ENTER]
˧
[
/
]
˧
[ENTER]
The format can be selected to see a divided screen.
-
Full
Provides a full screen without any margins.
-
Natural
monitors a natural image with the original aspect ratio intact.
3) Screen Divider
[MENU]
˧
[
/
]
˧
[ENTER]
˧
[
/
]
˧
[ENTER]
˧
[
/
]
˧
[ENTER]
˧
[
/
]
˧
[ENTER]
The screen can be divided into several images.
A
number of screens can be selected with a different layout when dividing.
• Select a mode in Screen Divider.
• Select a monitor in monitor Selection.
• The selection will be set up by pressing a number in the selected mode.
-
2 x 2
-
3 x 3
-
4 x 4
-
5 x 5
-
1 x 2
-
2 x 1
-
1 x 5
-
5 x 1
Note
• When Video Wall is running, the PIP, Auto Adjustment, Image Lock, and Size functions are not available.
Launching Video Wall while PIP is running, will switch PIP Off.
Safety Screen
The Safety Screen function is used to prevent afterimages that may appear when a still picture is monitored on
the screen over a long time.
\
W\UGGG_W\UGGG_ YWW^TXYTW]GGG㝘㤸G`aZ`aX\YWW^TXYTW]GGG㝘㤸G`aZ`aX\

- The Screen Scroll function scrolls the screen for the specified period of time.
- This function is not available when the power is turned off.
1) Safety Screen
[MENU]
˧
[
/
]
˧
[ENTER]
˧
[
/
]
˧
[ENTER]
˧
[ENTER]
˧
[
/
]
˧
[ENTER]
Determines whether to turn the Screen Scroll function Off or On.
-
Of
f
-
On
2) Interval
[MENU]
˧
[
/
]
˧
[ENTER]
˧
[
/
]
˧
[ENTER]
˧
[
/
]
˧
[ENTER]
˧
[
/
]
˧
[ENTER]
Determines the time interval to run the Screen Scroll operation. (1~10 Hour)
The time is calculated on the basis of the power on time.
By default, the time is set to 10 hours.
-
1~10 Hou
r
3) Second
[MENU]
˧
[
/
]
˧
[ENTER]
˧
[
/
]
˧
[ENTER]
˧
[
/
]
˧
[ENTER]
˧
[
/
]
˧
[ENTER]
Determines the time period to run the Screen Scroll operation. (1~5 Second)
By default, the time is set to 5 seconds.
-
Type-Scroll : 1~5 Second
-
Type-Pixel, Bar, Eraser : 10~50 Second
4) Type
[MENU]
˧
[
/
]
˧
[ENTER]
˧
[
/
]
˧
[ENTER]
˧
[
/
]
˧
[ENTER]
˧
[
/
]
˧
[ENTER]
You can change the Safety Screen Type.
-
Scroll
-
Pixel
-
Bar
-
Erase
r
Resolution Select
[MENU]
˧
[
/
]
˧
[ENTER]
˧
[
/
]
˧
[ENTER]
˧
[
/
]
˧
[ENTER]
When the picture is not monitored properly on the screen when setting the graphics card resolution of the
computer to 1024 x 768 @ 60Hz, 1280 x 768 @ 60Hz, 1360 x 768 @ 60Hz or 1366 x768 @ 60Hz, by using
this function(Resolution Select), you can have the picture monitored on the screen in the specified resolution.
(Available in PC/BNC mode only.)
1) Off
2) 1024 X 768
3) 1280 X 768
4) 1360 X 768
5) 1366 X 768
Note
• Selecting the menu is only allowed when the graphics resolution is set to 1024 x 768 @ 60Hz, 1280 x 768
@ 60Hz, 1360 x 768 @ 60Hz or 1366 x768 @ 60Hz.
Lamp Control
[MENU]
˧
[
/
]
˧
[ENTER]
˧
[
/
]
˧
[ENTER]
˧
[ENTER]
˧
[< / >]
˧
[ENTER]
Adjusts the inverter lamp in order to reduce energy consumption.
Power On Adjustment
[MENU]
˧
[
/
]
˧
[ENTER]
˧
[
/
]
˧
[ENTER]
˧
[ENTER]
˧
[
/
]
˧
[ENTER]
Adjusts the Power On time for the screen.
*Caution: Set the Power On time to be longer to avoid overvoltage.
Reset
The picture parameters are replaced with the factory default values.
1)
Image Reset
[MENU]
˧
[
/
]
˧
[ENTER]
˧
[
/
]
˧
[ENTER]
˧
[ENTER]
˧
[< / >]
˧
[ENTER]
(Available in PC/BNC mode only.)
2)
Color Reset
W\UGGG`W\UGGG` YWW^TXYTW]GGG㝘㤸G`aZ`aX\YWW^TXYTW]GGG㝘㤸G`aZ`aX\
[MENU]
˧
[
/
]
˧
[ENTER]
˧
[
/
]
˧
[ENTER]
˧
[
/
]
˧
[ENTER]
˧
[< / >]
˧
[ENTER]

Multi Control
Available Modes
PC / BNC / DVI
AV
S-Video
Component
DVI-Video
Multi Control
Assigns an individual ID to the SET.
1) ID Setup
[MENU]
˧
[
/
]
˧
[ENTER]
˧
[
/
]
˧
[ENTER]
˧
[ENTER]
˧
[0~9]
A
ssigns distinctive IDs to the SET.
2) ID Input
[MENU]
˧
[
/
]
˧
[ENTER]
˧
[
/
]
˧
[ENTER]
˧
[ENTER]
˧
[0~9]
Use to select the transmitter functions of the individual SET. Only a SET where the ID corresponds to the
transmitter setting becomes activated.
Direct Functions
Available Modes
PC / BNC / DVI
AV
S-Video
Component
DVI-Video
MDC
Moves to the Multi Control OSD screen.
LOCK
Sets the Safety Lock function.
1) Lock On
It will be locked.
2) Lock Off
It will be unlocked.
Note
• When setting the Lock function, you can only operate the lock button on the remote control and set.
The preset password on the LCD monitor is "0000".
Note
• Resetting the password for the function key lock.
Press MUTE
˧
1
˧
8
˧
6
˧
On. The password will be reset to '0000'. The remote control is required for
resetting the password.
© 1995~2008 SAMSUNG. ALL Right Reserved
W\UGGGXWW\UGGGXW YWW^TXYTW]GGG㝘㤸G`aZ`aX\YWW^TXYTW]GGG㝘㤸G`aZ`aX\

The color and appearance of the product may vary depending on the model, and the product specifications are
subject to change without prior notice for reasons of performance enhancement.
Troubleshooting
Self-Test Feature Check
Note
• Check the following items yourself before calling for assistance. Contact a Service Center for problems that
you cannot solve by yourself.
Self-Test Feature Check
Your LCD monitor provides a self test feature that allows you to check whether your LCD monitor is functioning
properly.
1) Turn off both your computer and the LCD monitor.
2) Unplug the video cable from the back of the computer.
3) Turn on the LCD monitor.
The figure shown below ("Check Signal Cable") appears on a black background when the LCD monitor is
working normally even though no video signal is detected: While in the Self-Test mode, the LED power
indicator remains green and the figure moves around on the screen.
4) Turn off your LCD monitor and reconnect the video cable; then turn on both your computer and the LCD
monitor
If your LCD monitor screen remains blank after using the previous procedure, check your video controller and
computer system;
your LCD monitor is functioning properly.
Check Cooling System
If the
"Check Cooling System"
message is monitored on the screen, this is because the cooling fan has a
problem. Contact a service center to repair or replace the fan.
Not Optimum Mode
You can even view the screen at a resolution of 1360X768. However, you will receive the following message for
a minute; You can choose to change the screen resolution or stay in the current mode during that time. And if the
resolution is more than 85Hz, you will see the black screen because the LCD monitor does not support over
85Hz.
Safety Instructions
Introduction
Connections
Using the Software
Adjusting the LCD monitor
Troubleshooting
Self-Test Feature Check
Check List
Q & A
Specifications
Information
Appendix
]
zt{T[WXXTl__TTUGGG][zt{T[WXXTl__TTUGGG][ YWW^TXXTY_GGG㝘㤸GXWaZ_a[^YWW^TXXTY_GGG㝘㤸GXWaZ_a[^

Note
• Refer to Specifications > Preset Timing Modes for the resolutions or frequencies supported by the LCD
monitor.
Maintenance and Cleaning
1) Maintaining the LCD monitor Case.
Clean with a soft cloth after disconnecting the power cord.
• Do not use benzene, thinner or other flammable substances, or a
wet cloth.
• We recommend that a Samsung cleansing agent is used to prevent
damage to the screen.
2) Maintaining the Flat Panel monitor Screen.
Clean with a soft cloth (cotton flannel) smoothly.
• Never use acetone, benzene or thinner.
(They may cause flaws or deformation of the screen surface.)
• The user will be required to pay costs and related expenses for
repairing damages caused.
Symptoms and Recommended Actions
Note
• A LCD monitor recreates visual signals received from the computer. Therefore, if there is a problem with
the computer or the video card, this can cause the LCD monitor to become blank, have poor coloring,
become noisy, and video mode not supported, etc. In this case, first check the source of the problem, and
then contact a Service Center or your dealer.
1) Check if the power cord and the video cables are properly connected to the computer.
2) Check if the computer beeps more than 3 times when booting.
(If it does, request an a service for the main board of the computer.)
3) If you installed a new video card or if you assembled the PC, check if you installed the Adaptor(video).
4) Check if the scanning ratio of the video screen is set to between 50 Hz ~ 85 Hz.
(Do not exceed 60Hz when using the maximum resolution.)
5) If you have problems in installing the Adaptor (video) driver, boot the computer in Safe Mode, remove the display
Adaptor in the "Control Panel, System, Device Administrator" and then reboot the computer to
reinstall the Adaptor (video) driver.
Check List
Note
• The following table lists possible problems and their solutions. Before calling for assistance, check the
information in this section to see if you can remedy any problems for yourself. If you do need assistance,
please call the phone number on the Information section or contact your dealer.
• For more network-related information, refer to the MagicNet Troubleshooting section.
]
zt{T[WXXTl__TTUGGG]\zt{T[WXXTl__TTUGGG]\ YWW^TXXTY_GGG㝘㤸GXWaZ_a[^YWW^TXXTY_GGG㝘㤸GXWaZ_a[^

Problems related to the Installation (PC Mode)
Note
• Problems related to the LCD monitor installation and their solutions are listed.
Problems Solutions
The LCD monitor screen flickers.
z
Check if the signal cable between the computer and the LCD
monitor is securely connected.
(Refer to Connecting to a Computer)
Problems related to the Screen
Note
• Problems related to the LCD monitor screen and their solutions are listed.
Problems Solutions
The screen is blank and the power
indicator is off.
z
Ensure that the power cord is firmly connected and the LCD
LCD monitor is on.
(Refer to the Connecting the LCD monitor )
"Check Signal Cable" message.
z
Ensure that the signal cable is firmly connected to the PC or
video sources.
(Refer to the Connecting the LCD monitor )
z
Ensure that the PC or video sources are turned on.
"Not Optimum Mode " message.
z
Check the maximum resolution and the frequency of the video
Adaptor.
z
Compare these values with the data in the Preset Timing Modes
Chart.
The picture rolls vertically.
z
Check if the signal cable is securely connected.
Re-connect it, if necessary.
(Refer to Connecting to a Computer)
The image is not clear; picture is
blurred.
z
Run Frequency Coarse and Fine tuning.
z
Turn on again after removing all accessories
(video extension cable, etc.)
z
Set the resolution and frequency to the recommended ranges.
The picture image is unstable and
shakes.
Ghost images are shown in the
picture.
z
Check if the resolution and frequency set for the computer video
card falls in the range supported by the LCD monitor.
If not, reset them referring to the current Information under the
LCD monitor menu and Preset Timing Modes.
The image is too light or too dark.
z
Adjusts the brightness and contrast.
(Refer to the Brightness, Contrast)
The screen color is inconsistent.
The color image is distorted by
dark shadows.
The color white is poor.
z
Adjust color using Custom under OSD Color Adjustment menu.
The power Indicator blinks green.
z
The LCD monitor is currently saving the changes made to the
settings to the OSD memory.
The screen is blank and the power
indicator light is steady green or
z
The LCD monitor is using its power management system.
z
Press a key on the keyboard.
]
zt{T[WXXTl__TTUGGG]]zt{T[WXXTl__TTUGGG]] YWW^TXXTY_GGG㝘㤸GXWaZ_a[^YWW^TXXTY_GGG㝘㤸GXWaZ_a[^

blinks every 0.5 or 1 seconds.
The screen is blank and it is
blinking.
z
If you see the "TEST GOOD" message on the screen when you
pressing the MENU button, check the cable connection between
the LCD monitor and the computer to ensure that the connector
is properly connected.
Problems related to Audio
Note
• Problems related to audio signals and their solutions are listed below.
Problems Solutions
No sound.
z
Ensure that the audio cable is firmly connected to both the
audio-in port on your LCD monitor and the audio-out port on
your sound card.
(Refer to the Connecting the LCD monitor )
z
Check the volume level.
The sound level is too low.
z
Check the volume level.
z
If the volume is still too low after turning the control to its
maximum, check the volume control on the computer sound
card or software program.
The sound is too high or too low.
z
Adjusts the Treble and Bass to the appropriate levels.
Problems related to the Remote Control
Note
• Problems related to the remote control and their solutions are listed.
Problems Solutions
The remote control buttons do not
respond.
z
Check the polarities (+/-) of the batteries.
z
Check if the batteries are empty.
z
Check if the power is on.
z
Check if the power cord is securely connected.
z
Check if a special fluorescent or neon lamp is on in the vicinity.
]
zt{T[WXXTl__TTUGGG]^zt{T[WXXTl__TTUGGG]^ YWW^TXXTY_GGG㝘㤸GXWaZ_a[^YWW^TXXTY_GGG㝘㤸GXWaZ_a[^

Q & A
Question Answer
How can I change the frequency?
The frequency can be changed by reconfiguring the video card.
Note that video card support can vary, depending on the version of
the driver used. (Refer to the computer or the video card manual for
details.)
How can I Adjusts the resolution?
z
Windows XP:
Set the resolution in the Control Panel
˧
Appearance and
Themes
˧
display
˧
Settings.
z
Windows ME/2000:
Set the resolution in the Control Panel
˧
display
˧
Settings.
* Contact the video card manufacturer for details.
How can I set the Power Saving
function?
z
Windows XP:
Set the resolution in the Control Panel
˧
Appearance and
Themes
˧
display
˧
Screen Saver.
Set the function in the BIOS-SETUP of the computer. (Refer to
the Windows / Computer Manual).
z
Windows ME/2000:
Set the resolution at the Control Panel
˧
display
˧
Screen
Saver.
Set the function in the BIOS-SETUP of the computer. (Refer to
the Windows / Computer Manual).
How can I clean the outer
case/LCD Panel?
Disconnect the power cord and then clean the LCD monitor with a soft
cloth, using either a cleaning solution or plain water.
Do not leave any detergent or scratches on the case. Do not let any
water enter the LCD monitor.
© 1995~2008 SAMSUNG. ALL Right Reserved
]
zt{T[WXXTl__TTUGGG]_zt{T[WXXTl__TTUGGG]_ YWW^TXXTY_GGG㝘㤸GXWaZ_a[^YWW^TXXTY_GGG㝘㤸GXWaZ_a[^

The color and appearance of the product may vary depending on the model, and the product specifications are
subject to change without prior notice for reasons of performance enhancement.
Specifications
General
General
General
Model Name SMT-3211
LCD Panel
Size 32 " Diagonal (80 cm)
monitor area 697.6845 mm (H) x 392.256 mm (V)
Pixel Pitch 0.51075 mm (H) x 0.51075 mm (V)
Synchronization
Horizontal 30 ~ 81 kHz
Vertical 56 ~ 75 Hz
monitor Color
monitor Color 16.7 M Colors
Resolution
Optimum resolution 1360 x 768 / 1366 x 768 @ 60 Hz depends on graphics card used
Maximum resolution 1366 x 768 @ 60 Hz
Input Signal, Terminated
RGB Analog, DVI(Digital Visual Interface) Compliant Digital RGB.
0.7 Vp-p Positive at 75 ± 10 %
Separate H/V sync, Composite sync, SOG, TTL level , positive or negative.
Maximum Pixel Clock
100 MHz
Power Supply
AC 100 - 240 V~ (+/- 10 %), 50/60 Hz
Signal Cable
15pin to 15pin D-sub cable, Detachable
DVI-D to DVI-D connector, Detachable (option)
Signal Connectors
D-sub, BNC, DVI-D, YPbPr, S-VHS, VCR
Dimensions (WxHxD)/ Weight
780 X 482 X 107 mm / 30.1 X 19.0 X 4.6 inch (without Stand)
780 X 530 X 223 mm / 30.1 X 20.9 X 8.8 inch (with Stand), 16.1 kg / 35.4 lbs
VESA Mounting Interface
200 mm x 200 mm (for use with Specialty(Arm) Mounting hardware.)
Environmental considerations
Operating
Temperature: 50°F ~ 104°F (10°C ~ 40°C)
Humidity: 10 % ~ 80 %, non-condensing
Storage
Temperature: -4°F ~ 113°F (-20°C ~ 45°C)
Humidity: 5 % ~ 95 %, non-condensing
Audio Characteristics
Audio Input 1 RCA Jack Red(R) White(L), 0.5 Vrms (-9 dB)
Safety Instructions
Introduction
Connections
Using the Software
Adjusting the Monitor
Troubleshooting
Specifications
General
PowerSaver
Preset Timing Modes
Information
Appendix
]
^TUGGGX^TUGGGX YWW^TXYTYWGGG㝘䟸GXaX]aYXYWW^TXYTYWGGG㝘䟸GXaX]aYX

Audio Input 2 RCA Jack Red(R) White(L), 0.5 Vrms (-9 dB)
PC Audio Input 3.5 Ø Stereo Jack, 0.5 Vrms (-9 dB)
Frequency RF: 80 Hz ~ 15 kHz (at -3 dB)
Response A/V: 80 Hz ~ 20 kHz (at -3 dB)
Plug and Play Capability
This monitor can be installed on any Plug & Play compatible system. The interaction of the monitor and the
computer systems will provide the best operating conditions and monitor settings. In most cases, the monitor
installation will proceed automatically, unless the user wishes to select alternate settings.
Dot Acceptable
TFT LCD panels manufactured by using advanced semiconductor technology with precision of 1ppm (one
millionth) above are used for this product. But the pixels of RED, GREEN, BLUE and WHITE color appear to
be bright sometimes or some black pixels may be seen. This is not from bad quality and you can use it without
any problelms.
• For example, the number of TFT LCD sub pixels contained in this product are 3,133,440.
Note
• Design and specifications are subject to change without prior notice.
Class B Equipment (Information Communication equipment for residential use)
• This product complies with the Electromagnetic Compatibility Directives for residential use and can be
used in all areas including common residential areas. (Class B equipment emits less electromagnetic
waves than Class A equipment.)
PowerSaver
This monitor has a built-in power management system called PowerSaver. This system saves energy by
switching your monitor to low-power mode when it has not been used for a certain amount of time. The monitor
automatically returns to normal operation when you press a key on the keyboard. For energy conservation, turn
your monitor OFF when it is not needed, or when leaving it unattended for long periods. The PowerSaver system
operates with a VESA DPM compliant video card installed in your computer. Use the software utility installed on
your computer to set up this feature.
State
Normal
Operation
Power saving
mode
Power off
EPA/ENERGY 2000
Power off
Power Indicator Green Green, Blinking Amber Black
Power Consumption
Less than
160 W
Less than 1 W
(Off-mode)
Less than 1 W
(Power button)
0 W
(Power Switch)
This monitor is EPA ENERGY STAR
®
compliant and ENERGY2000
compliant when used with a computer equipped with VESA DPM
functionality.
A
s an ENERGY STAR
®
Partner, SAMSUNG has determined that this
product meets the ENERGY STAR
®
guidelines for energy efficiency.
Preset Timing Modes
Preset Timing Modes
If the signal transferred from the computer is the same as the following Preset Timing Modes, the screen will be
adjusted automatically. However, if the signal differs, the screen may go blank while the power LED is on. Refer
to the video card manual and Adjusts the screen as follows.
monitor Mode
Horizontal
Frequency
(kHz)
Vertical
Frequency
(Hz)
Pixel Clock
(MHz)
Sync Polarity
(H/V)
MAC, 640 x 480 35.000 66.667 30.240 -/-
MAC, 832 x 624 49.726 74.551 49.500 +/+
IBM, 640 x 350 31.469 70.086 25.175 +/-
]
^TUGGGY^TUGGGY YWW^TXYTYWGGG㝘䟸GXaX]aY\YWW^TXYTYWGGG㝘䟸GXaX]aY\

IBM, 640 x 480 31.469 59.940 25.175 -/-
IBM, 720 x 400 31.469 70.087 28.322 -/+
VESA, 640 x 480 37.861 72.809 31.500 -/-
VESA, 640 x 480 37.500 75.000 31.500 -/-
VESA, 640 x 480 43.269 85.008 36.000 -/-
VESA, 800 x 600 35.156 56.250 36.000 +/+
VESA, 800 x 600 37.879 60.317 40.000 +/+
VESA, 800 x 600 48.077 72.188 50.000 +/+
VESA, 800 x600 46.875 75.000 49.500 +/+
VESA, 800 x600 53.674 85.000 56.250 +/+
VESA, 1024 x 768 48.363 60.004 65.000 -/-
VESA, 1024 x 768 56.476 70.069 75.000 -/-
VESA, 1024 x 768 60.023 75.029 78.750 +/+
VESA, 1024 x 768 68.677 85.997 94.500 +/+
VESA, 1360 x 768 47.712 60.000 85.500 +/+
Horizontal Frequency
The time to scan one line connecting the right edge to the left edge of the
screen horizontally is called the Horizontal Cycle and the inverse number
of the Horizontal Cycle is called the Horizontal Frequency. Unit: kHz
Vertical Frequency
Like a fluorescent lamp, the screen has to repeat the same image many
times per second to monitor an image to the user. The frequency of this
repetition is called the Vertical Frequency or Refresh Rate. Unit: Hz
© 1995~2008 SAMSUNG. ALL Right Reserved
]
^TUGGGZ^TUGGGZ YWW^TXYTYWGGG㝘䟸GXaX]aY\YWW^TXYTYWGGG㝘䟸GXaX]aY\

The color and appearance of the product may vary depending on the model, and the product specifications are
subject to change without prior notice for reasons of performance enhancement.
Information
For Better display
Adjust the computer resolution and screen inection rate (refresh rate) on the computer as described below
to enjoy the best picture quality. You can have an uneven picture quality on screen if the best picture
quality is not provided for TFT-LCD.
• Resolution: 1360 x 768
• Vertical frequency (refresh rate): 60 Hz
TFT LCD panels manufactured by using advanced semiconductor technology with a precision of 1ppm
(one millionth) and above is used for this product. But the pixels of RED, GREEN, BLUE and WHITE color
seem to be bright sometimes or some of black pixels could be seen. This is not from bad quality and you
can use it without any problems.
• For example, the number of TFT LCD sub pixels contained in this product are 3,133,440
When cleaning the monitor and the panel outside, please apply the recommended small amount of cleaner
by using a soft cloth to polish. Do not force the LCD area but rub softly.
If excessive force is applied, you may stain it.
If you are not satisfied with the picture quality, you can get better quality of picture by performing the "auto
adjustment function" in display screen that is appeared as window termination button is pressed.
If there's still noise after the automatic adjustment, use the FINE/COARSE adjustment function.
When viewing a fixed screen for an extended period of time, a residual image or blurriness may appear.
Change the mode to energy save or set a screensaver to move the picture when you need to be away
from the LCD monitor for an extended period of time.
PRODUCT INFORMATION (Image Retention Free)
What is Image Retention ?
Image retention may not occur when a LCD panel is operated under normal conditions.
Normal conditions are defined as continuously changing video patterns. When the LCD panel is operated for
a long time with a fixed pattern (over 12 hours), there may be slight difference in voltage between electrodes
that work the liquid crystal (LC) in a pixel. The voltage difference between electrodes increases with time,
forcing the liquid crystal to lean. When this occurs, the previous image may be seen when the pattern is
changed. To prevent this, the accumulated voltage difference must be decreased.
Safety Instructions
Introduction
Connections
Using the Software
Adjusting the LCD monitor
Troubleshooting
Specifications
Information
For Better display
PRODUCT INFORMATION
(Image Retention Free)
Appendix
zt{T[WXXTl__TTUGGG^Yzt{T[WXXTl__TTUGGG^Y YWW^TXXTY_GGG㝘㤸GXWaZ_a[^YWW^TXXTY_GGG㝘㤸GXWaZ_a[^

Power Off, Screen Saver, or Power Save Mode
z
Turn the power off for 4 hours after 20 hours in use
z
Turn the power off for 2 hours after 12 hours in use
z
Set the Monitor to power off with the PC display Properties Power Scheme.
z
Use a Screen saver if possible - Screen saver in one color or a moving image is recommended.
Change the Color Information periodically
Note
• Use Two different colors
Rotate the Color Information with 2 different colors every 30 minutes.
z
Avoid using a combination of characters and background color with large difference in luminance.
Avoid using Grey colors, which can cause Image retention easily.
Avoid: Colors with big difference in luminance (Black & White, Grey)
Change the characters color periodically
z
Use Bright colors with little difference in luminance
- Cycle : Change the characters color and background color every 30 minutes
zt{T[WXXTl__TTUGGG^Zzt{T[WXXTl__TTUGGG^Z YWW^TXXTY_GGG㝘㤸GXWaZ_a[^YWW^TXXTY_GGG㝘㤸GXWaZ_a[^

z
Every 30 minutes, change the characters with movement.
z
All area display Moving image together with Logo periodically.
- Cycle: Display moving image together with Logo for 60 seconds after 4 hours in use.
z
The best way to protect your monitor from Image retention is to turn Power off, or set your PC, or
System to operate a Screen Saver program when you are not using it. Also Warranty service will be
limited based on instruction guide.
Apply the Screen Scroll function on Product
z
Apply the Screen Scroll function
- Symptom: Horizontal Bar with Black Color move up and down.
- Select method
. Instruction Guide : OSD Menu -> Set Up -> Safety Screen -> Screen Scroll
. Time Interval : 1 ~ 10 hours ( Recommend : 1 )
. Time Period : 1 ~ 5 second ( Recommend : 5 )
Note
• ( Please check CD's User Guide at "OSD Function", some model's will not available )
Apply the Screen Pixel function on Product
z
Apply the Screen Pixel function
- Symptom: Dot with Black Color move up and down.
- Select method
. Instruction Guide : OSD Menu -> Set Up -> Safety Screen -> Pixel
. Time Interval : 1 ~ 10 hours ( Recommend : 1 )
. Time Period : 10 ~ 50 second ( Recommend : 50 )
z
Apply the Screen Bar function
- Symptom: Horizontal / Vertical Bar with Black Color move up and down.
^
zt{T[WXXTl__TTUGGG^[zt{T[WXXTl__TTUGGG^[ YWW^TXXTY_GGG㝘㤸GXWaZ_a[^YWW^TXXTY_GGG㝘㤸GXWaZ_a[^

- Select method
. Instruction Guide : OSD Menu -> Set Up -> Safety Screen -> Bar
. Time Interval : 1 ~ 10 hours ( Recommend : 1 )
. Time Period : 10 ~ 50 second ( Recommend : 50 )
Note
• ( Please check CD's User Guide at "OSD Function", some model's will not available. )
Apply the Screen Erasing function on Product
z
Apply the Screen Erasing function
- Symptom: 2 Vertical blocks move with erasing the display
- Select method
. Instruction Guide : OSD Menu -> Set Up -> Safety Screen -> Eraser
. Time Interval : 1 ~ 10 hours ( Recommend : 1 )
. Time Period : 10 ~ 50 second ( Recommend : 50 )
Note
• ( Please check CD's User Guide at "OSD Function", some model's will not available )
© 1995~2008 SAMSUNG. ALL Right Reserved
^
zt{T[WXXTl__TTUGGG^\zt{T[WXXTl__TTUGGG^\ YWW^TXXTY_GGG㝘㤸GXWaZ_a[^YWW^TXXTY_GGG㝘㤸GXWaZ_a[^

The color and appearance of the product may vary depending on the model, and the product specifications are
subject to change without prior notice for reasons of performance enhancement.
Appendix
Contact SAMSUNG WORLDWIDE
Note
• If you have any questions or comments relating to Samsung products, please contact the SAMSUNG
customer care center.
Safety Instructions
Introduction
Connections
Using the Software
Adjusting the LCD monitor
Troubleshooting
Specifications
Information
Appendix
Contact SAMSUNG
WORLDWIDE
Terms
Correct Disposal
Authority
^
zt{T[WXXTl__TTUGGG^]zt{T[WXXTl__TTUGGG^] YWW^TXXTY_GGG㝘㤸GXWaZ_a[^YWW^TXXTY_GGG㝘㤸GXWaZ_a[^
North America
U.S.A
1-800-SAMSUNG(726-7864) http://www.samsung.com
CANADA
1-800-SAMSUNG(726-7864) http://www.samsung.com/ca
MEXICO
01-800-SAMSUNG(726-7864) http://www.samsung.com
Latin America
ARGENTINE
0800-333-3733 http://www.samsung.com/ar
BRAZIL
0800-124-421
4004-0000
http://www.samsung.com
CHILE
800-SAMSUNG(726-7864) http://www.samsung.com/cl
COLOMBIA
01-8000112112 http://www.samsung.com.co
COSTA RICA
0-800-507-7267 http://www.samsung.com/latin
ECUADOR
1-800-10-7267 http://www.samsung.com/latin
EL SALVADOR
800-6225 http://www.samsung.com/latin
GUATEMALA
1-800-299-0013 http://www.samsung.com/latin
JAMAICA
1-800-234-7267 http://www.samsung.com/latin
PANAMA
800-7267 http://www.samsung.com/latin
PUERTO RICO
1-800-682-3180 http://www.samsung.com/latin
REP. DOMINICA
1-800-751-2676 http://www.samsung.com/latin
TRINIDAD & TOBAGO
1-800-SAMSUNG(726-7864) http://www.samsung.com/latin
VENEZUELA
0-800-100-5303 http://www.samsung.com/latin
Europe
AUSTRIA
0800-SAMSUNG(726-7864) http://www.samsung.com/at
BELGIUM
0032 (0)2 201 24 18 http://www.samsung.com/be
NICARAGUA
00-1800-5077267
HONDURAS
800-7919267

^
zt{T[WXXTl__TTUGGG^^zt{T[WXXTl__TTUGGG^^ YWW^TXXTY_GGG㝘㤸GXWaZ_a[^YWW^TXXTY_GGG㝘㤸GXWaZ_a[^
CZECH REPUBLIC
DENMARK
70 70 19 70 http://www.samsung.com/dk
FINLAND
030-6227 515 http://www.samsung.com/fi
FRANCE
3260 SAMSUNG
08 25 08 65 65 (€ 0,15/min)
http://www.samsung.com
GERMANY
01805-SAMSUNG(726-7864)
http://www.samsung.com
HUNGARY
06-80-SAMSUNG(726-7864) http://www.samsung.com
ITALIA
800-SAMSUNG(726-7864) http://www.samsung.com
LUXEMBURG
0035 (0)2 261 03 710 http://www.samsung.com/be
NETHERLANDS
0900-SAMSUNG(726-7864)
http://www.samsung.com/nl
NORWAY
815-56 480 http://www.samsung.com/no
POLAND
0 801 801 881
022-607-93-33
http://www.samsung.com/pl
PORTUGAL
80820-SAMSUNG(726-7864) http://www.samsung.com/pt
EIRE
0818 717 100 http://www.samsung.com/ie
SLOVAKIA
0800-SAMSUNG(726-7864) http://www.samsung.com/sk
SPAIN
902 10 11 30 http://www.samsung.com
SWEDEN
0771-400 200 http://www.samsung.com/se
SWITZERLAND
0800-SAMSUNG(726-7864) www.samsung.com/ch
U.K
0845 SAMSUNG(726-7864) http://www.samsung.com
CIS
ESTONIA
800-7267 http://www.samsung.ee
LATVIA
800-7267 http://www.samsung.com/lv
LITHUANIA
8-800-77777 http://www.samsung.lt
KAZAKHSTAN
8-10-800-500-55-500 http://www.samsung.kz
KYRGYZSTAN
00-800-500-55-500
RUSSIA
8-800-555-55-55 http://www.samsung.com
UKRAINE
8-800-502-0000 http://www.samsung.com
UZBEKISTAN
8-800-120-0-400 http://www.samsung.uz
Asia Pacific
AUSTRALIA
1300 362 603 http://www.samsung.com
CHINA
800-810-5858, 010- 6475 1880 http://www.samsung.com
HONG KONG
3698-4698 http://www.samsung.com/hk
INDIA
3030 8282, 1800 110011 http://www.samsung.com
INDONESIA
0800-112-8888 http://www.samsung.com
JAPAN
0120-327-527 http://www.samsung.com/jp
MALAYSIA
1800-88-9999 http://www.samsung.com/my
NEW ZEALAND
0800SAMSUNG(726-7864) http://www.samsung.com/nz
PHILIPPINES
1800-10-SAMSUNG(726-7864) http://www.samsung.com/ph
SINGAPORE
1800-SAMSUNG(726-7864) http://www.samsung.com
THAILAND
1800-29-3232, 02-689-3232 http://www.samsung.com
(€ 0,15/min)
(€ 0,14/min)
(€ 0,10/min)
TADJIKISTAN
8-10-800-500-55-500
844 000 844 http://www.samsung.com/cz

Terms
Sync Signal
Sync (Synchronized) Signals refer to the standard signals that are required to display desired colors on the
LCD monitor. They are divided into Vertical and Horizontal Sync Signals. These signals display normal color
images by the set resolution and frequency.
Types of Sync Signals
Separate This is a scheme of transmitting individual vertical sync signals to the LCD monitor.
Composite This is a scheme of combining vertical sync signals into one composite signal and
transmitting it to the LCD monitor. The LCD monitor monitors the color signals by
separating the composite signal into original color signals.
Dot Pitch
The image on a LCD monitor is composed of red, green and blue dots. The closer the dots, the higher the
resolution. The distance between two dots of the same color is called the 'Dot Pitch'. Unit: mm
Vertical Frequency
The screen must be redrawn several times per second in order to create and display an image for the user.
The frequency of this repetition per second is called the Vertical Frequency or Refresh Rate. Unit: Hz
Example: If the same light repeats itself 60 times per second, this is regarded as 60 Hz.
Horizontal Frequency
The time to scan one line connecting the right edge to the left edge of the screen horizontally is called the
Horizontal Cycle. The inverse number of the Horizontal Cycle is called Horizontal Frequency. Unit: kHz
Interlace and Non-Interlace Methods
Showing the horizontal lines of the screen from the top to the bottom sequentially is called the Non-Interlace
method while showing odd lines and then even lines in turn is called the Interlace method. The Non-Interlace
method is used for the majority of LCD monitor s to ensure a clear image. The Interlace method is the same
as that used in TVs.
Plug & Play
This is a function that provides the best quality screen for the user by allowing the computer and the LCD
monitor to exchange information automatically. This LCD monitor follows the international standard VESA
DDC for the Plug & Play function.
Resolution
The number of horizontal and vertical dots used to compose the screen image is called the 'resolution'. This
number shows the accuracy of the display. A high resolution is good for performing multiple tasks as more
image information can be shown on the screen.
Example: If the resolution is 1360 X 768 , this means the screen is composed of 1360 horizontal dots
(horizontal resolution) and 768 vertical lines (vertical resolution).
Multiple display Control (MDC)
A Multiple display Control (MDC) is an application allowing various monitors to be easily and simultaneously
operated on a PC. RS-232C, a standard of serial communication, is used for communicating between a PC
and a monitor.
^
zt{T[WXXTl__TTUGGG^_zt{T[WXXTl__TTUGGG^_ YWW^TXXTY_GGG㝘㤸GXWaZ_a[^YWW^TXXTY_GGG㝘㤸GXWaZ_a[^
TAIWAN
0800-329-999 http://www.samsung.com/tw
VIETNAM
1 800 588 889 http://www.samsung.com
Middle East & Africa
SOUTH AFRICA
0860-SAMSUNG(726-7864 ) http://www.samsung.com
TURKEY
444 77 11 http://www.samsung.com
U.A.E
800-SAMSUNG (726-7864)
8000-4726
http://www.samsung.com

Correct Disposal
Correct Disposal of This Product (Waste Electrical & Electronic Equipment) - Europe only
(Applicable in the European Union and other European countries with
separate collection systems)
This marking shown on the product or its literature, indicates that it should not be
disposed with other household waste at the end of its working life. To prevent
possible harm to the environment or damage to health from uncontrolled waste
disposal, please separate this from other types of waste and recycle it responsibly
to promote the sustainable reuse of material resources.
Household users should contact either the retailer where they purchased this
product, or their local government office, for details of where and how they can
take this item for environmentally safe recycling.
Business users should contact their supplier and check the terms and conditions
of the purchase contract. This product should not be mixed with other commercial
wastes for disposal.
Authority
Information in this document is subject to change without notice.
© 2008 Samsung Electronics Co., Ltd. All rights reserved.
Reproduction in any manner whatsoever without the written permission of Samsung Electronics Co., Ltd. is
strictly forbidden.
Samsung Electronics Co., Ltd. shall not be liable for errors contained herein or for incidental or consequential
damages in connection with the furnishing, performance, or use of this material.
Samsung is the registered trademark of Samsung Electronics Co., Ltd.; Microsoft , Windows and Windows NT
are registered trademarks of Microsoft Corporation; VESA , DPM and DDC are registered trademarks of Video
Electronics Standard Association; the ENERGY STAR ® name and logo are registered trademarks of the U.S.
Environmental Protection Agency (EPA). As an ENERGY STAR ® Partner, Samsung Electronics Co., Ltd. has
determined that this product meets the ENERGY STAR ® guidelines for energy efficiency. All other product
names mentioned herein may be the trademarks or registered trademarks of their respective owners.
^`
zt{T[WXXTl__TTUGGG^`zt{T[WXXTl__TTUGGG^` YWW^TXXTY_GGG㝘㤸GXWaZ_a[^YWW^TXXTY_GGG㝘㤸GXWaZ_a[^
^

6(6.%&/10+614
5/6
8VHUĜV*LGV
UGGGXUGGGX YWW^TXXTY_GGG㝘䟸G[a[Wa\YYWW^TXXTY_GGG㝘䟸G[a[Wa\Y

De kleur en het uiterlijk van het apparaat kunnen variëren afhankelijk van het model, en de productspecificaties
kunnen zonder voorgaand bericht worden gewijzigd met als doel het product te verbeteren.
Veiligheidsvoorschriften
Noterend
Lees de volgende veiligheidsinstructies. Ze zijn geschreven om schade aan het eigendom en letsel van
de gebruiker te voorkomen.
Waarschuwing / Voorzichtig
Het niet-naleven van instructies die aangegeven worden met dit symbool, kan lichamelijk letsel of
schade aan de apparatuur veroorzaken.
Gebruikte symbolen
Verboden Goed lezen
Niet demonteren Trek de stekker uit het stopcontact
Niet aanraken
A
arden om een elektrische schok te voorkomen
Stroom
Als u de monitor regelmatig enige tijd niet gebruikt, is het handig om op de pc de DPM instelling
voor energiebeheer van de monitor aan te zetten.
Wanneer u een schermbeveiliging (screensaver) gebruikt, schakel dan bij de instellingen hiervan
de energiebesparende functies in.
De afbeeldingen zijn alleen ter referentie, en mogelijk niet in alle gevallen (of landen) van toepassing.
Gebruik geen beschadigde of niet goed bevestigde stekker.
z
Dit kan leiden tot elektrische schokken en brand.
Trek de stekker niet aan de kabel uit het stopcontact en raak de
stekker nooit aan met natte handen.
Veiligheidsvoorschriften
Noterend
Stroom
Installatie
Reinigen
Overig
Inleiding
Aansluitingen
De software gebruiken
De monitor aanpassen
Problemen oplossen
Specificaties
Informatie
Appendix
X
zt{T[WXXTk__UGGGXzt{T[WXXTk__UGGGX YWW^TXXTY_GGG㝘䟸GYa\_aX_YWW^TXXTY_GGG㝘䟸GYa\_aX_

z
Dit kan leiden tot elektrische schokken en brand.
Gebruik alleen een stekker en stopcontact die zijn voorzien van een
aardeaansluiting.
z
Wanneer het apparaat niet goed is geaard, kan dit leiden tot schokken of
schade aan het apparaat. (Apparatuur van klasse I.)
Sluit het netsnoer goed aan, zodat deze niet losraakt.
z
Een slechte aansluiting kan brand veroorzaken.
Voorkom knikken en beschadigingen van de kabel en de stekker
door ze niet te ver te buigen en er geen voorwerpen op te plaatsen.
z
Dit kan leiden tot elektrische schokken en brand.
Sluit niet teveel verlengsnoeren aan op hetzelfde stopcontact.
z
Hierdoor kan brand ontstaan.
Koppel het netsnoer nooit los als u de monitor gebruikt.
z
De ontkoppeling kan een stroompiek veroorzaken, waardoor de monitor
mogelijk beschadigd raakt.
Gebruik het netsnoer nooit wanneer het aansluitpunt of de stekker
stoffig is.
z
Indien het aansluitpunt of de stekker stoffig is, dient u deze te reinigen met
een droge doek.
z
Gebruik van het netsnoer met een stoffige stekker of stoffig aansluitpunt
kan een elektrische schok of brand veroorzaken.
De stekker moet uit het hoofdstopcontact worden gehaald om het
apparaat te ontkoppelen. De stekker moet daarom goed bereikbaar
zijn.
z
Dit kan leiden tot elektrische schokken en brand.
Installatie
Neem contact op met een geautoriseerd servicentrum als u de monitor installeert in een omgeving
waar veel stof, hoge of lage temperaturen of hoge vochtigheid voorkomt, op een plaats waar
Y
zt{T[WXXTk__UGGGYzt{T[WXXTk__UGGGY YWW^TXXTY_GGG㝘䟸GYa\_aYXYWW^TXXTY_GGG㝘䟸GYa\_aYX

gewerkt wordt met chemische oplossingen of waar de monitor 24 uur per dag in werking is, zoals
een vliegveld of treinstation.
Als u dit niet doet, kan er schade aan het apparaat ontstaan.
Zet uw monitor in een ruimte met een lage luchtvochtigheid en zo
weinig mogelijk stof.
z
Zo voorkomt u kortsluiting en brand in de monitor.
Laat de monitor niet vallen wanneer u hem verplaatst.
z
Dit kan leiden tot schade aan het apparaat en persoonlijke ongelukken.
Zorg er bij het plaatsen van het voetstuk van de monitor voor dat het
voetstuk geheel op de plank of kast past en er niks uitsteekt.
z
Als u het product laat vallen, kan dit schade aan het product of persoonlijk
letsel veroorzaken.
Plaats het product niet op een onstabiele of kleine ondergrond.
z
Plaats het product op een gelijke en stabiele ondergrond, zodat het niet
omvalt en letsel veroorzaakt bij een voorbijganger, vooral kinderen.
Plaats het product niet op de vloer.
z
Iemand, vooral kinderen, zou er over kunnen struikelen.
HOUD HET APPARAAT UIT DE BUURT VAN OPEN VUUR ZOALS
KAARSEN OM BRAND TE VOORKOMEN.
z
Als u dit niet doet, kan er brand ontstaan.
Zorg dat het netsnoer niet in aanraking komt met
verwarmingsapparatuur.
z
Een gesmolten isolatiehuls kan elektrische schokken of brand veroorzaken.
Z
zt{T[WXXTk__UGGGZzt{T[WXXTk__UGGGZ YWW^TXXTY_GGG㝘䟸GYa\_aYXYWW^TXXTY_GGG㝘䟸GYa\_aYX

Zet de monitor voorzichtig op zijn plaats.
z
Zo voorkomt u schade aan de monitor.
Leg de monitor nooit met de voorkant omlaag.
z
Het oppervlak van de beeldbuis kan anders beschadigd raken.
Het installeren van een wandbeugel moet door een deskundig
persoon uitgevoerd worden.
z
Als dit echter niet door een kundig persoon wordt uitgevoerd, kan dit
resulteren in schade of letsel.
z
Gebruik altijd het montagegereedschap dat beschreven staat in de
gebruiksaanwijzing.
Als u het product installeert, zorg dan voor genoeg ruimte tussen
muur en product (meer dan 10 cm) voor een goede ventilatie.
z
Slechte ventilatie kan een verhoogde temperatuur binnenin het product
veroorzaken, wat een verkorte levensduur van de componenten en een
slechtere prestatie ten gevolge heeft.
Houd de plastic verpakking (de zak) buiten het bereik van kinderen.
z
Kinderen kunnen stikken in de plastic verpakking (de zak) als ze ermee
spelen.
Reinigen
Reinig de behuizing van de monitor en/of het oppervlak van de beeldbuis van de TFT-LCD met een
licht vochtig, zacht doekje.
Spuit nooit schoonmaakmiddel rechtstreeks op de monitor.
z
Dit kan leiden tot schade, elektrische schokken en brand.
Installeer het product niet op een plek met slechte ventilatie, zoals
bijvoorbeeld een boekenplank of kast.
z
Verhoging van de temperatuur binnenin het product kan brand
veroorzaken.
[
zt{T[WXXTk__UGGG[zt{T[WXXTk__UGGG[ YWW^TXXTY_GGG㝘䟸GYa\_aYYYWW^TXXTY_GGG㝘䟸GYa\_aYY

Als er stof of vuil tussen de pootjes van de stekker zit, moet u dit
zorgvuldig verwijderen met een droge doek.
z
Vuil tussen de stekker kan leiden tot elektrische schokken en brand.
Controleer dat het netsnoer uit het stopcontact is gehaald voordat u
het product reinigt.
z
Anders kan dit een elektrische schok of brand veroorzaken.
Haal het netsnoer uit het stopcontact en veeg het product schoon
met een zachte, droge doek.
z
Gebruik geen chemische middelen zoals boenmiddel, benzeen, alcohol,
verdunners, insecticide, luchtverfrisser, smeermiddel of wasmiddel.
Overig
Verwijder de beschermkap (of de achterkant) niet.
z
Dit kan leiden tot elektrische schokken en brand.
z
Laat reparatie over aan een gekwalificeerde servicemonteur.
Als uw monitor niet normaal werkt - met name bij ongewone
geluiden of geuren - moet u onmiddellijk de stekker uit het
stopcontact halen en contact opnemen met een geautoriseerde
dealer of service center.
z
Dit kan leiden tot elektrische schokken en brand.
Zorg ervoor dat het product niet op een plaats staat die wordt
blootgesteld aan olie, rook of vocht.
z
Installeer het niet in een voertuig.
z
Hierdoor kan een defect optreden, een elektrische schok ontstaan of kan er
brand uitbreken.
Als u de monitor laat vallen of de behuizing beschadigd is, moet u
de monitor uitschakelen en het netsnoer eruit halen. Neem
aansluitend contact op met het servicecentrum.
z
Een defecte monitor kan een elektrische schok of brand veroorzaken.
Gebruik een aanbevolen schoonmaakmiddel en een zachte doek.
\
zt{T[WXXTk__UGGG\zt{T[WXXTk__UGGG\ YWW^TXXTY_GGG㝘䟸GYa\_aYYYWW^TXXTY_GGG㝘䟸GYa\_aYY

Schakel de stroom niet in als het buiten onweert en bliksemt of
maak gedurende een langere periode geen gebruik van de monitor.
z
Een defecte monitor kan een elektrische schok of brand veroorzaken.
Probeer het beeldscherm niet te verplaatsen door enkel aan het
snoer of de signaalkabel te trekken.
z
Dit kan leiden tot storingen, elektrische schokken en brand ten gevolge van
schade aan de kabel.
Verplaats de monitor niet naar rechts of links door alleen aan het
snoer of de signaalkabel te trekken.
z
Dit kan leiden tot storingen, elektrische schokken en brand ten gevolge van
schade aan de kabel.
Zorg dat de ventilatieopeningen in de behuizing van de monitor vrij
toegankelijk blijven.
z
Onvoldoende ventilatie kan leiden tot storingen of brand.
Zet geen beker met water, chemicaliën of andere kleine metalen
voorwerpen op de monitor.
z
Installeer het niet in een voertuig.
z
Als een onbekende substantie in de monitor loopt, dient u het netsnoer
eruit te trekken en contact op te nemen met het servicecentrum.
Zorg dat het product niet in aanraking komt met ontvlambare
chemische sprays of brandbare substanties.
z
Dit kan leiden tot brand en explosies.
Steek nooit voorwerpen door de openingen in de behuizing van de
monitor.
z
Zeker bij metalen voorwerpen kan dit leiden tot elektrische schokken, brand
en persoonlijke ongelukken.
Stop geen metalen objecten zoals pennen, draad en boortjes of licht
ontvlambare objecten zoals papier en lucifers in de ventilator, de
poort voor de hoofdtelefoon of de AV-poorten.
]
zt{T[WXXTk__UGGG]zt{T[WXXTk__UGGG] YWW^TXXTY_GGG㝘䟸GYa\_aYYYWW^TXXTY_GGG㝘䟸GYa\_aYY

z
Dit kan brand of een elektrische schok veroorzaken. Als er vloeistoffen of
water het product invloeien, zet het product dan uit, haal de stekker uit het
stopcontact en neem contact op met het servicecentrum.
Als het beeld gedurende langere tijd stilstaat, kan de afbeelding licht
"inbranden".
z
Zet de monitor in de spaarstand of activeer een screensaver, als u
gedurende langere tijd de monitor niet gebruikt.
Stel de resolutie en de frequentie in op de gewenste niveaus van het
model.
z
Een niet geschikte resolutie en frequentie kan uw gezichtsvermogen letsel
toebrengen.
32 inch breed (80 cm) - 1360 X 768
Als u gedurende lange tijd te dicht op de monitor zit, kan dit schade
aan uw ogen veroorzaken.
Neem minstens een pauze van 5 minuten, na ieder uur dat u gebruik
maakt van de monitor, om de vermoeidheid van de ogen te
ontlasten.
Installeer het product niet op een onstabiele, ongelijke ondergrond
of op een plaats waar trillingen voorkomen.
z
Als u het product laat vallen, kan dit schade aan het product of persoonlijk
letsel veroorzaken. Als u het product gebruikt op een plaats waar veel
trillingen voorkomen, kan dit de levensduur van het product verkorten of het
product kan vlam vatten.
Zet de monitor uit en trek de stekker uit het stopcontact als u de
monitor verplaatst. Zorg dat alle kabels, inclusief de antennekabel
en met andere apparatuur verbonden kabels, zijn losgekoppeld
voordat u de monitor verplaatst.
z
Indien u een kabel niet loskoppelt, kan deze beschadigd raken. Dit kan
leiden tot brand of een elektrische schok.
^
zt{T[WXXTk__UGGG^zt{T[WXXTk__UGGG^ YWW^TXXTY_GGG㝘䟸GYa\_aYYYWW^TXXTY_GGG㝘䟸GYa\_aYY

Houd het product uit de buurt van kinderen. Zij zouden het product
kunnen beschadigen door er aan te zitten.
z
Een vallend product kan schade, of zelfs de dood, veroorzaken.
Als u het product gedurende lange tijd niet gebruikt, verbreek dan
de stroomtoevoer.
z
Als u dit niet doet, kan dit warmteafgifte van het verzameld vuil of een
verslechterde isolatie veroorzaken, wat tot elektrische schokken of brand
kan leiden.
Plaats favoriete speeltjes van kinderen (of iets anders dat
verleidelijk kan zijn) nooit op het product.
z
Kinderen kunnen proberen op het product te klimmen om een object te
pakken. Daardoor kan het product omvallen en fysieke schade of zelfs de
dood veroorzaken.
Wanneer u de batterijen verwijdert, zorgt u dat deze niet door
kinderen worden ingeslikt. Houd batterijen uit de buurt van
kinderen.
z
Raadpleeg onmiddellijk uw arts als een kind een batterij heeft ingeslikt.
Wanneer u batterijen vervangt, plaats u deze met de plus- en
minpool in de juiste richting zoals op de batterijhouder staat
aangegeven.
z
Door een onjuiste polariteit kan een batterij breken of lekken, en brand,
letsel of aantasting (schade) veroorzaken.
Gebruik alleen de aangegeven standaardbatterijen. Gebruik geen
nieuwe en gebruikte batterijen tegelijk.
z
Hierdoor kan een batterij breken of lekken, en brand, letsel of aantasting
(schade) veroorzaken.
erplaats het product altijd met 2 personen.
z
Het laten vallen van het product kan een defect aan het product of fysieke
schade veroorzaken.
V
_
zt{T[WXXTk__UGGG_zt{T[WXXTk__UGGG_ YWW^TXXTY_GGG㝘䟸GYa\_aYZYWW^TXXTY_GGG㝘䟸GYa\_aYZ

dichtstbijzijnde gemeentelijke afvaldepot of bij een winkel die eenzelfde
type accu of oplaadbare accu verkoopt.
© 1995~2008 SAMSUNG. Alle rechten voorbehouden
De accu (oplaadbaar en niet oplaadbaar) zijn niet standaard afval en
dienen ter recycling worden aangeboden. Als verbruiker van de
accu is de klant verantwoordelijk voor het op de juiste manier
retourneren van gebruikte of oplaadbare accu’s.
z
De klant kan de gebruikte of oplaadbare accu afgeven bij het
`
zt{T[WXXTk__UGGG`zt{T[WXXTk__UGGG` YWW^TXXTY_GGG㝘䟸GYa\_aYZYWW^TXXTY_GGG㝘䟸GYa\_aYZ

Inhoud
Veiligheidsvoorschriften
.................................................................................. 1
Noterend ............................................................................................................ 1
Stroom ................................................................................................................. 1
Installatie .......................................................................................................... 2
Reinigen ................................................................................................................. 4
Overig ................................................................................................................. 5
Inleiding ............................................................................................................ 12
Inhoud van de verpakking......................................................................................... 12
Uw monitor................................................................................................ 13
Mechanische vormgeving ........................................................................................ 20
Aansluitingen ......................................................................................................... 24
De voet installeren ......................................................................................... 24
De monitor aansluiten .................................................................................. 25
MDC System ........................................................................................................... 31
De monitor aanpassen ................................................................................... 51
Input ................................................................................................................. 51
Picture [PC / BNC /DVI Mode] ................................................................................ 52
Picture [AV / S-Video /Component / DVI-Video Mode].................................................. 54
Sound................................................................................................................ 56
Setup .............................................................................................................. 57
Multi Control ....................................................................................................... 60
Directe bedieningsfuncties ...................................................................................... 60
XW
zt{T[WXXTk__UGGGXWzt{T[WXXTk__UGGGXW YWW^TXXTY_GGG㝘䟸GYa\_aYZYWW^TXXTY_GGG㝘䟸GYa\_aYZ

Problemen oplossen ............................................................................................. 62
Controle van de zelftestfunctie ................................................................................. 62
Controlelijst ........................................................................................................... 63
Vraag & antwoord ................................................................................................... 65
Specificaties
.......................................................................................................................... 67
Algemeen
........................................................................................................... 67
Energiebeheer ....................................................................................................... 68
Voorkeurinstellingen ................................................................................................ 68
Informatie ....................................................................................................... 70
Voor een betere weergave ....................................................................................... 70
PRODUCTINFORMATIE (bestand tegen beeld vasthouden) ………………………….. 70
Appendix .............................................................................................................. 74
Neem contact op met SAMSUNG WORLDWIDE .......................................................... 74
Woordenlijst ........................................................................................................ 76
Correcte verwijdering van dit product .......................................................................... 77
Rechten ………..................................................................................................... 77
XX
zt{T[WXXTk__UGGGXXzt{T[WXXTk__UGGGXX YWW^TXXTY_GGG㝘䟸GYa\_aYZYWW^TXXTY_GGG㝘䟸GYa\_aYZ

De kleur en het uiterlijk van het apparaat kunnen variëren afhankelijk van het model, en de productspecificaties
kunnen zonder voorgaand bericht worden gewijzigd met als doel het product te verbeteren.
Inleiding
Inhoud van de verpakking
Opmerking
• Kijk of de volgende items zijn meegeleverd met uw monitor.
Neem contact op met uw leverancier als er onderdelen missen.
Neem dan contact op met uw dealer.
Opmerking
• Plaats het product niet op de vloer.
Monitor
Handleiding
Gebruikershandleiding
Garantiekaart
(Niet overal verkrijgbaar)
Gebruikershandleiding,
MDC software
Kabel
D-Sub-kabel Stroomkabel
Overig
Veiligheidsvoorschriften
Inleiding
Inhoud van de verpakking
Uw monitor
Mechanische vormgeving
Aansluitingen
De software gebruiken
De monitor aanpassen
Problemen oplossen
Specificaties
Informatie
Appendix
XY
zt{T[WXXTk__UGGGXYzt{T[WXXTk__UGGGXY YWW^TXXTY_GGG㝘䟸GYa\_aYZYWW^TXXTY_GGG㝘䟸GYa\_aYZ

Afstandsbediening MagicNet Batterijen (AAA X 2) Afdekplaat
Adapteruitgang voor BNC
naar RCA.
Tijdelijke voet
Apart verkrijgbaar
Muurbevestigsset Luidsprekerset Voet
DVI-kabel BNC-kabel
Uw monitor
Voorkant
1) MENU
Als het menu beeldinstellingen niet geactiveerd is, maak dan gebruik van deze knop om de OSD te openen
en vervolgens een menu-onderdeel te activeren.
2) Omlaag/omhoog-knop
Hiermee gaat u verticaal van het ene menuonderdeel naar het andere of regelt u de geselecteerde
menuwaarden.
XZ
zt{T[WXXTk__UGGGXZzt{T[WXXTk__UGGGXZ YWW^TXXTY_GGG㝘䟸GYa\_aYZYWW^TXXTY_GGG㝘䟸GYa\_aYZ

3) Links/rechts-knop
Hiermee kunt u horizontaal van het ene naar het andere menu-onderdeel gaan of kunt u de geselecteerde
menuwaarden aanpassen.
4) ENTER
De optie wordt gebruikt om het OSD-menu te selecteren.
5) SOURCE
Hiermee schakelt u over van de pc-modus op de videomodus.
Het veranderen van de bron is alleen toegestaan bij externe apparaten, die momenteel zijn aangesloten op
de monitor.
[PC]
˧
[BNC]
˧
[DVI]
˧
[AV]
˧
[S-Video]
˧
[Component]
>> Klik hier om een animatiefilmpje te bekijken.
6) PIP
Telkens als u een knop indrukt, verandert de signaalbron van het PIP-venster.
Als de BNC-kabel en het element gebruik maken van dezelfde terminal, kan slechts een PIP tegelijk het
scherm bedekken.
>> Klik hier om een animatiefilmpje te bekijken.
•
PC
A
V / S-Video / Component Modus
•
BNC
A
V / S-Video Modus
•
DVI
A
V / S-Video / Component Modus
•
AV / S-Video
PC / BNC / DVI Modus
•
Component
PC / DVI Modus
7)
Aan/uit knop
Gebruik deze knop als u de monitor wilt in- of uitschakelen.
8) Het aan/uit
Gaat branden als u de stroom inschakelt.
9) Afstandsbedieningssensor
Richt met de afstandsbediening op de ontvanger van de monitor.
Opmerking
• Meer informatie over het besparen van energie treft u aan in de handleiding, onder de knop
Energiebeheer. U bespaart energie als u uw monitor UITSCHAKELT wanneer u hem niet meer gebruikt.
Achterkant
Opmerking
• Ausführliche Informationen in Bezug auf Kabelverbindungen finden Sie im Abschnitt Anschließen von
Kabeln unter Aufstellen. Die Konfiguration an der Rückseite des Monitors variiert leicht abhängig vom
jeweils verwendeten Monitormodell.
X[
zt{T[WXXTk__UGGGX[zt{T[WXXTk__UGGGX[ YWW^TXXTY_GGG㝘䟸GYa\_aYZYWW^TXXTY_GGG㝘䟸GYa\_aYZ

1) RS232C OUT/IN (Serieller ANSCHLUSS RS232C)
MDC (Multiple Display Control)-Programm-Anschluss
2) DVI / PC IN [RGB] (PC-Video-Anschlussbuchse)
Verwenden des 15-polig, D-Sub – PC-Modus (Analog
PC)
3) DVI / PC IN [DVI(HDCP)] (PC-Video-
Anschlussbuchse):
Verwenden des DVI-D an DVI-D – DVI-Modus (Digital
PC)
4) DVI / PC IN [PC/DVI/BNC AUDIO IN] (PC/DVI/BNC
Audio-aansluitklem (invoer))
5) COMPONENT AUDIO IN [L-AUDIO-R]
(Component Audio-aansluitklem (invoer))
6) BNC/COMPONENT OUT [R/P
R
, G/Y, B/P
B
, H, V]
(BNC-Video-Anschlussbuchse / Component-
Anschlussbuchse(Ausgang))
RGB-3-Modus (Analog PC)-Anschluss: Anschluss von
R, G, B, H, V Port
Component-Anschluss: Anschluss von P
R
, Y, P
B
-Port
7) BNC/COMPONENT IN [R/P
R
, G/Y, B/P
B
, H, V]
(BNC-Video-Anschlussbuchse / Component-
Anschlussbuchse(Eingang))
8) AV AUDIO IN [L-AUDIO-R](MONITOR-Audio-
Anschlussbuchse (Eingang))
9) AV OUT [VIDEO](Video-Anschlussbuchse) : AV-
Modus (Ausgang)
10) AV IN [VIDEO](Video-Anschlussbuchse)
(Eingang)
11) AV OUT [S-VIDEO] (S-Video-Anschlussbuchse) :
S-Video-Modus (Ausgang)
12) AV IN [S-VIDEO](S-Video-Anschlussbuchse)
(Eingang)
X\
kTX[TY`UGGGXkTX[TY`UGGGX YWW^TXYTYWGGG㝘㤸GXXaX\aY\YWW^TXYTYWGGG㝘㤸GXXaX\aY\

13) EXT SPEAKER(8 ) [- - L - +, - - R - +] (Uitgang
luidsprekers (8 ))
14) AUDIO OUT [L-AUDIO-R] (MONITOR-Audio-
Anschlussbuchse (Ausgang))
AUDIO OUT is het aansluitpunt voor geluidsweergave
van PC, DVI of BNC.
15) POWER S/W (Ein/Aus-Schalter) ON [ | ] / OFF
[O]
Hiermee zet u de monitor aan of uit.
16) POWER IN (Signalbuchse):
Netvoeding; wordt op de monitor en het stopcontact
aangesloten.
Opmerking
• Het aantal monitoren dat kan worden verbonden met de loopout (het stroomcircuit) kan afhankelijk zijn van
de kabel, de bron van het signaal, etc. Bij gebruik van een kabel zonder degradatie van het signaal,
kunnen tien monitoren worden aangesloten.
17) Kensingtonslot
Het Kensingtonslot is een instrument dat gebruikt wordt
om het systeem vast te zetten bij gebruik in een
openbare ruimte. (Het slot dient apart aangeschaft te
worden.)
Voor meer informatie over gebruik van het slot, kunt
u contact opnemen met de dealer.
Opmerking
•Zie Aansluiten voor meer informatie over het aansluiten van kabels.
Afstandsbediening MagicNet
Opmerking
• De werking van de afstandsbediening wordt mogelijk beïnvloed door een televisie of ander elektronisch
apparaat in de nabijheid van de monitor. Er kan storing worden veroorzaakt door interferentie met de
frequentie.
1. ON / OFF
2. MAGICNET
3. MDC
4. LOCK
5. MagicNet-knop
6.+100 -/--
7. VOL
8. MUTE
9. TTX/MIX
10. MENU
11. ENTER
12. P.MODE
13. AUTO
14. PRE-CH
15 . CH/P
16. SOURCE
17. INFO
18. EXIT
19. De toetsen Naar boven, naar beneden,
links-rechts knop
20. S.MODE
X]
kTX[TY`UGGGYkTX[TY`UGGGY YWW^TXYTYWGGG㝘㤸GXXaX\aZWYWW^TXYTYWGGG㝘㤸GXXaX\aZW

21. STILL
22. FM RADIO
23. P.SIZE
24. SRS
25. DUAL/MTS
26. PIP
27. SOURCE
28. SWAP
29. SIZE
30. REW
31. STOP
32. PLAY/PAUSE
33. FF
1) ON / OFF
Gebruik deze knop als u de monitor wilt in- of uitschakelen.
2) MAGICNET
MagicNet knop voor snelstart.
- Deze functionaliteit is voor deze monitor niet beschikbaar.
3) MDC
MDC knop voor snelstart.
4) LOCK
Met deze knop kunt u de functietoetsen activeren of deactiveren op zowel de afstandsbediening als op de
monitor, met uitzondering van de Aan/Uit-toetsen en de LOCK-toetsen. (vergrendelingstoetsen)
5) MagicNet-knop
Gebruik deze knoppen voor MagicNet.
- Deze functionaliteit is voor deze monitor niet beschikbaar.
• Alfabet/ nummer: Gebruik de knoppen bij het typen van een webadres.
• DEL : om een spatie terug te gaan
• SYMBOL: om symbolen in te voeren. (.O_-)
• ENTER: om alles te verwerken.
6) +100 -/--
Indrukken om kanalen boven 100 te kiezen.
Als u bijvoorbeeld kanaal 121 wilt kiezen, drukt u op “+100” en vervolgens op “2” en “1”.
- Deze functionaliteit is voor deze monitor niet beschikbaar.
7) - VOL +
Past het geluidsniveau aan.
8)
MUTE
Hiermee pauzeert (dempt) u de geluidsuitvoer tijdelijk.
Het geluid wordt weer geactiveerd als u tijdens de Mute-modus op Mute of op de - VOL + knop van het
Volume drukt.
9)
TTX/MIX
X^
kTX[TY`UGGGZkTX[TY`UGGGZ YWW^TXYTYWGGG㝘㤸GXXaX\aZWYWW^TXYTYWGGG㝘㤸GXXaX\aZW

Tv-kanalen bieden informatiediensten via teletekst.
[TTX / MIX wordt hoofdzakelijk in Europa gebruikt. ]
10)
MENU
Als het menu beeldinstellingen niet geactiveerd is, maak dan gebruik van deze knop om de OSD te openen
en vervolgens een menu-onderdeel te activeren.
11)
ENTER
De optie wordt gebruikt om het OSD-menu te selecteren.
12)
P.MODE
Wanneer u op deze kop drukt, wordt de huidige modus midden onder op het scherm weergegeven.
AV / S-Video /Component Mode : P.MODE( Picture Mode )
De monitor heeft vier automatische beeldinstellingen die op de fabriek reeds zijn ingesteld.
Druk nogmaals op de knop om de beschikbare voorgeconfigureerde modi te doorlopen.
( Dynamic
˧
Standard
˧
Movie
˧
Custom )
PC/DVI/BNC Mode : M/B ( MagicBright™ )
MagicBright is een nieuwe functie, die afhankelijk van de soort afbeelding waarnaar uw bekijkt, een zo
optimaal mogelijke weergave produceerd.
Druk nogmaals op de knop om de beschikbare voorgeconfigureerde modi te doorlopen.
( Entertain ˧ Internet ˧ Text ˧ Custom )
13) AUTO
Druk op deze knop om de OSD automatisch aan te passen.(PC)
14)
PRE-CH
Gebruik deze knop om onmiddellijk terug te gaan naar het vorige kanaal.
- Deze functionaliteit is voor deze monitor niet beschikbaar.
15)
CH/P
In de TV -modus selecteert u hiermee TV -kanalen.
- Deze functionaliteit is voor deze monitor niet beschikbaar.
16)
SOURCE
Hiermee schakelt u over van de PC-modus op de videomodus.
17)
INFO
Huidige beeldinformatie wordt in de linkerbovenhoek van het scherm weergegeven.
18)
EXIT
Als het menu beeldinstellingen geactiveerd is, kunt u met de Exit-knop (Afsluit-knop) het menuvenster of het
venster Menu Instellingen afsluiten.
19) De toetsen Naar boven, naar beneden, links-rechts
Hiermee gaat u horizontaal van het ene menuonderdeel naar het andere of regelt u de geselecteerde
menuwaarden.
20)
S.MODE
Wanneer u op deze kop drukt, wordt de huidige modus midden onder op het scherm weergegeven.
De monitor heeft een ingebouwde hifi-stereo-versterker.
Druk nogmaals op de knop om de beschikbare voorgeconfigureerde modi te doorlopen.
( Standard ˧ Music ˧ Movie ˧ Speech ˧ Custom )
21) STILL
PDruk eenmaal op deze knop om het beeld stil te zetten en druk hier nogmaals op om deze optie weer op
te heffen.
22) FM RADIO
Schakelt de FM-radio in/uit.
Stelt in PC/DVI-modus alleen GELUID in op FM Radio.
In gebieden waar het signaal zwak is, treedt ruis op wanneer de FM RADIO uitzendt.
Stelt in de algemene modus VideoBRON in op FM RADIO, waarbij het scherm wordt uitgeschakeld.
- Deze functionaliteit is voor deze monitor niet beschikbaar.
23) P.SIZE
Druk op de knop om het formaat van het scherm aan te passen.
24)
SRS
SRS
DUAL/MTS
X_
kTX[TY`UGGG[kTX[TY`UGGG[ YWW^TXYTYWGGG㝘㤸GXXaX\aZWYWW^TXYTYWGGG㝘㤸GXXaX\aZW

25)
- Deze functionaliteit is voor deze monitor niet beschikbaar.
DUAL-
STEREO/MONO, DUAL l / DUAL ll en MONO/NICAM MONO/NICAM STEREO kunnen afhankelijk van het
soort uitzending worden bediend door tijdens het tv kijken gebruik te maken van de knop DUAL op de
afstandsbediening.
MTS
Hiermee kunt u de modus MTS (Multichannel Television Stereo) selecteren.
Audio Type MTS/S_Mode Default
FM Stereo
Mono Mono
Handmatig wijzigen
Stereo
Mono ˩ Stereo
SAP
Mono
˩
SAP
Mono
26)
PIP
Telkens als u een knop indrukt, verandert de signaalbron van het PIP-venster.
27)
SOURCE
Hiermee selecteert u de videobron. (PIP)
28) SWAP
De inhoud van de PIP en de hoofdafbeelding verwisselen.
De afbeelding in het PIP-venster verschijnt op het hoofdscherm, terwijl de afbeelding van het hoofdscherm
in het PIP-venster verschijnt.
29)
SIZE
U kunt het beeldformaat wijzigen.
30)
REW
Terugspoelen
31) STOP
Stoppen
32) PLAY / PAUSE
Afspelen / Pauze
33)
FF
Snel vooruit
© 1995~2008 SAMSUNG. Alle rechten voorbehouden
X`
kTX[TY`UGGG\kTX[TY`UGGG\ YWW^TXYTYWGGG㝘㤸GXXaX\aZXYWW^TXYTYWGGG㝘㤸GXXaX\aZX

Mechanische vormgeving | Monitor head | Standaard | Speaker | Aanwijzingen voor het installeren van de VESA-beugel |
Installatie van de wandsteun
1. Mechanische vormgeving
2. Monitor head
YW
kTX[TY`UGGG]kTX[TY`UGGG] YWW^TXYTYWGGG㝘㤸GXXaX\aZXYWW^TXYTYWGGG㝘㤸GXXaX\aZX

3. Standaard
4. Speaker
5. Aanwijzingen voor het installeren van de VESA-beugel
z
Let er bij het installeren van VESA op, dat u voldoet aan de internationale VESA-normen.
z
Informatie over en aankoop en installatie van de VESA-beugel: Neem contact op met uw dichtsbijzijnde Samsung
distributeur om een bestelling te plaatsen. Nadat de bestelling is geplaatst, zal een professioneel team de beugel
bij u komen installeren.
z
Er zijn ten minste twee personen nodig om de LDC-monitor te verplaatsen.
z
Samsung draagt geen verantwoordelijkheid voor schade aan het product of verwondingen die tijdens het
installeren door onvoorzichtigheid van de klant zijn veroorzaakt.
YX
kTX[TY`UGGG^kTX[TY`UGGG^ YWW^TXYTYWGGG㝘㤸GXXaX\aZXYWW^TXYTYWGGG㝘㤸GXXaX\aZX

Afmetingen
Gebruik voor het bevestigen van de beugel aan de muur alleen kolomschroeven met een diameter van 6
mm en een lengte van 8 tot 12 millimeter.
6. Installatie van de wandsteun
z
Neem contact op met een technicus alvorens de wandsteun te bevestigen.
z
Samsung Electronics aanvaardt geen aansprakelijkheid voor enige schade aan het product of letsel bij de klant
als de installatie uitgevoerd wordt door de klant zelf.
z
Dit product is geschikt voor installatie aan cementen muren. The product may not stay in place when installed on
plaster or wood.
Componenten (Afzonderlijk verkocht)
Gebruik alleen de componenten en accessoires die u bijgevoegd bij dit product vindt.
A
Muurbeugel
B
Beugel
C
Schroef: 8EA
D
Schroef: 3EA
E
Houtschroeven: 7EA
F
Anker: 7EA
G
Installatiegids
How to assemble the Wall Mount Bracket
1
1. Markeer de plaats van het gat op de muur.
2. Boor een gat van ongeveer 35 mm diep op de aangegeven plaats.
3. Bevestig de
F
ankers in elk gat in de muur.
4. Plaats de pluggen
F
in de wandsteun
A
en monteer de wandsteun
A
op de
muur met de houtschroeven
E
.
Als de beugel niet stevig aan de muur is bevestigd, kan de LCD-
monitor er af vallen.
2
1. Zet de aan/uit-schakelaar op uit en trek het netsnoer uit de contacdoos.
2. Plaats de monitor op een tafel met het scherm naar beneden op een zachte doek of kussen.
3. Bevestig de apparaatbeugel
B
aan de achterzijde van de monitor-set en draai de schroeven
C
vast.
YY
kTX[TY`UGGG_kTX[TY`UGGG_ YWW^TXYTYWGGG㝘㤸GXXaX\aZXYWW^TXYTYWGGG㝘㤸GXXaX\aZX

3
1. Plaats de 3 hangers van deze apparaatbeugel
B
stevig in de gleuven van de muurbeugel
A
.
2. Bevestig de apparaatbeugel
B
en de muurbeugel
A
met de schroeven
D
.
Sluit eerst de kabels aan voordat u de monitor aan de muur bevestigt.
YZ
kTX[TY`UGGG`kTX[TY`UGGG` YWW^TXYTYWGGG㝘㤸GXXaX\aZXYWW^TXYTYWGGG㝘㤸GXXaX\aZX

De kleur en het uiterlijk van het apparaat kunnen variëren afhankelijk van het model, en de productspecificaties
kunnen zonder voorgaand bericht worden gewijzigd met als doel het product te verbeteren.
Aansluitingen
De voet installeren
Opmerking
• Gebruik hiervoor alleen de meegeleverde schroeven.
Waarschuwing
Samsung Electronics is niet verantwoordelijk voor eventuele schade die veroorzaakt wordt door het gebruik
van een andere voet dan aangegeven.
De tijdelijke voet installeren.
Linker voet
Right stand
Waarschuwing
Plaats het label "caution" aan de
achterzijde.
1) Een afdekkap wordt gebruikt om de opening onder aan de monitor te beschermen, waar de voet in
bevestigd wordt. Zorg er voor dat u de afdekkap verwijderd als u de voet of de standaard (afzonderlijk
verkocht) hierin bevestigt en dek de opening af door gebruik te maken van de afdekplaat tijdens het
bevestigen van de muurbevestigingsbeugel.
2) Installeer de linker en de rechter voet.
3) Plaats de voet in de opening aan de onderkant van de monitor.
Plaats vervolgens een schroef in de opening, zoals aangegeven, en draai deze vast. (M4 × L15)
Veiligheidsvoorschriften
Inleiding
Aansluitingen
De voet installeren
De monitor aansluiten
De software gebruiken
De monitor aanpassen
Problemen oplossen
Specificaties
Informatie
Appendix
Y[
kTX[TY`UGGGXWkTX[TY`UGGGXW YWW^TXYTYWGGG㝘㤸GXXaX\aZXYWW^TXYTYWGGG㝘㤸GXXaX\aZX

Waarschuwing
Deze standaard is oorspronkelijk bedoeld voor het aanpassen van de hoek waar in het scherm is
gepositioneerd. Het bedrijf is niet aansprakelijk voor problemen die worden veroorzaakt door gebruik van
deze standaard. Gebruik dit product nooit als een standaard waarop voorwerpen worden geplaatst.
2. De voet installeren (afzonderlijk verkocht)
1) Een afdekkap wordt gebruikt om de opening onder aan de monitor te beschermen, waar de voet in
bevestigd wordt. Zorg er voor dat u de afdekkap verwijderd als u de voet of de standaard (afzonderlijk
verkocht) hierin bevestigt en dek de opening af door gebruik te maken van de afdekplaat tijdens het
bevestigen van de muurbevestigingsbeugel.
2) Zorg er voor dat u de onderdelen in de juiste richting en plaats heeft neergezet. (M4 × L15)
3) Plaats de voet in de opening aan de onderkant van de monitor.
4) Plaats vervolgens een schroef in de opening, zoals aangegeven, en draai deze vast. (M4 × L15)
De monitor aansluiten
Bij een netsnoer met aarding
In geval van defecten, kan de aardaansluiting een elektrische schok veroorzaken. Zorg ervoor dat de
aardaansluiting op de juiste manier is aangesloten voordat u het apparaat op de netstroom aansluit.
Of als u de aardaansluiting wilt loskoppelen, zorg dan dat u het apparaat vooraf loskoppelt van de
netstroom .
Opmerking
• AV-bronnen zoals dvd-spelers, videorecorders of camcorders alsmede uw computer kunnen op de monitor
worden aangesloten. Voor uitgebreidere informatie over hoe u AV -bronnen moet aansluiten, zie Bediening
onder Uw monitor instellen.
Op een computer aansluiten
Y\
kTX[TY`UGGGXXkTX[TY`UGGGXX YWW^TXYTYWGGG㝘㤸GXXaX\aZXYWW^TXYTYWGGG㝘㤸GXXaX\aZX

1) Sluit het netsnoer aan op de netaansluiting aan de achterkant van uw monitor.
Druk op de Aanknop.
2) U kunt de D-sub op 3 manieren aansluiten op uw monitor.
Kies een van de volgende manieren :
2-1) De D-sub-stekker (analoog) gebruiken op uw videokaart.
Sluit de D-sub aan op de 15-pins RGB-poort op de achterkant van uw monitor en de 15-pins D-
sub-poort op de computer.
2-2) De DVI-stekker (digitaal) gebruiken op uw videokaart.
Sluit de DVI -kabel aan op de DVI (HDCP)-poort aan de achterkant van uw monitor en de DVI-
poort op de computer.
2-3) De BNC (analoog) gebruiken op uw videokaart.
Sluit de BNC -kabel aan op de BNC/COMPONENT IN – R, G, B, H, V-poort op de achterkant van
uw monitor en de 15-pins D-sub-poort op de computer.
3) Sluit de audiokabel van uw monitor aan op de audiopoort van uw computer.
Opmerking
• Zet zowel uw computer als uw monitor aan.
Opmerking
• De DVI of BNC-kabel is optioneel.
Neem contact op met een lokaal servicecentrum van Samsung Electronics, om optionele onderdelen te
kopen.
Y]
kTX[TY`UGGGXYkTX[TY`UGGGXY YWW^TXYTYWGGG㝘㤸GXXaX\aZXYWW^TXYTYWGGG㝘㤸GXXaX\aZX

Digitale DVD-speler aansluiten
Opmerking
• Invoerapparaten zoals een digitale DVD -speler worden aangesloten op de DVI IN-aansluiting van de
monitor met gebruik van de DVI-kabel.
• Schakel de DVD-speler in en zorg dat een schijf in de speler is geplaatst.
• Selecteer Digital met behulp van de toets SOURCE.
Opmerking
• De monitor heeft DVI IN-aansluitpunten voor het aansluiten van DVI-invoerapparaten zoals een digitale
DVD -speler.
Op een computer aansluiten
1) AV-apparaten zoals vcr's of camcorders zijn aangesloten op de AV IN [VIDEO] of AV IN [S-VIDEO] uitgang
van uw monitor. Hierbij wordt gebruik gemaakt van een S-VHS of BNC-kabel.
2) Sluit de Audio (L) en Audio (R) uitgang van een videorecorder of camcorder aan op de AV AUDIO IN [L-
AUDIO-R] van de monitor.
Opmerking
• Selecteer de optie AV of S-Video waarop een video of camcorder is aangesloten, door gebruik te maken
van de source-knop. Deze knop bevindt zich aan de voorkant van de monitor.
• Start vervolgens de videorecorder of camcorder door er een tape.
Opmerking
• De S-VHS of BNC-kabel is optioneel.
Op een dvd-speler aansluiten
Y^
kTX[TY`UGGGXZkTX[TY`UGGGXZ YWW^TXYTYWGGG㝘㤸GXXaX\aZXYWW^TXYTYWGGG㝘㤸GXXaX\aZX

1) Sluit op COMPONENT AUDIO IN [L-AUDIO-R] van de monitor een audiokabel aan en verbindt deze met
de AUDIO-UITGANG van de dvd-speler.
2) Sluit op de BNC/COMPONENT IN - voor aansluiting op P
R, Y, PB poort van de monitor een videokabel
aan en verbindt deze met de P
R, Y, PB van de dvd-speler.
Opmerking
• Selecteer de optie Component waarop een dvdspeler is aangesloten, door gebruik te maken van de
source-knop.
• Start vervolgens de dvd-speler door er een dvd in te stoppen.
Opmerking
• De Component-kabel is optioneel.
Kijk voor uitleg over Component video, in de gebruikershandleiding van de dvd-speler.
Een camcorder aansluiten
1) Zoek de A/V-uitgang op de camcorder. Deze treft u gewoonlijk aan op de zijkant of achterkant van de
camcorder.
Sluit op de AUDIO-UITGANG van de camcorder de audiokabels aan en verbindt deze met de AV AUDIO
IN [L-AUDIO -R] van de monitor.
2) Sluit een videokabel aan tussen de VIDEO-uitgang op de camcorder en de AV IN [VIDEO] op de monitor.
Opmerking
• Selecteer de optie AV waarop een camcorder is aangesloten, door gebruik te maken van de source-knop.
• Start vervolgens de camcorder door er een tape.
Opmerking
• De audio- videokabels die hier worden weergegeven, worden normaliter geleverd bij de camcorder.
(Als dit niet het geval is, neem dan contact op uw lokale dealer.)
Als u een stereo camcorder heeft, moet u twee kabels aansluiten.
Y_
kTX[TY`UGGGX[kTX[TY`UGGGX[ YWW^TXYTYWGGG㝘㤸GXXaX\aZXYWW^TXYTYWGGG㝘㤸GXXaX\aZX

D-TV Set Top Box aansluiten
Opmerking
• De aansluitingen voor een dergelijke Set Top Box worden hieronder weergegeven.
1) Sluit op de BNC/COMPONENT IN - voor aansluiting op PR, Y, PB poort van de monitor een videokabel
aan en verbindt deze met de P
R, Y, PB van de Set Top Box.
2) Sluit op COMPONENT AUDIO IN [L-AUDIO-R] van de monitor een audiokabel aan en verbindt deze met
de AUDIO-UITGANG van de Set Top Box.
Opmerking
• Selecteer de optie Component waarop een D-TV Set Top Box is aangesloten, door gebruik te maken van
de source -knop.
Opmerking
• Kijk voor uitleg over Component video, in de gebruikershandleiding van de Set Top Box.
Het aansluiten van luidsprekers
Opmerking
• Draai de SET en de speaker door middel van de schroeven vast.
* Verzeker u ervan dat u de speakerstandaard verwijdert voor u de speaker op de modemlijnen installeert.
Y`
kTX[TY`UGGGX\kTX[TY`UGGGX\ YWW^TXYTYWGGG㝘㤸GXXaX\aZXYWW^TXYTYWGGG㝘㤸GXXaX\aZX

Opmerking
• Sluit de aansluitkabel van de luidspreker aan tussen de uitgang van de luidsprekeraansluiting aan de
achterzijde van de SET en de uitgang van de luidsprekeraansluiting op de achterzijde van de luidspreker.
Opmerking
• Beweeg de SET met luidspreker niet, wanneer de SET is aangesloten op de luidspreker.
De luidsprekerbeugel voor bevestiging van de SET-luidspreker is mogelijk beschadigd.
Aansluiten op een stereo-installatie
Opmerking
• Sluit op de AUX L en R van de stereo-installatie een audiokabel aan en verbindt deze met de linker en
rechter AUDIO OUT [L -AUDIO-R] van de monitor.
© 1995~2008 SAMSUNG. Alle rechten voorbehouden
ZW
kTX[TY`UGGGX]kTX[TY`UGGGX] YWW^TXYTYWGGG㝘㤸GXXaX\aZYYWW^TXYTYWGGG㝘㤸GXXaX\aZY

Inleiding
Multiple Display Control (MDC) is een toepassing waarmee verschillende beeldschermen gemakkelijk en tegelijk op
een pc kunnen worden gebruikt. RS-232C, een standaard voor seriële communicatie, wordt gebruikt voor de
communicatie tussen een computer en een beeldscherm. Daarom moet er een seriële kabel verbonden worden
met de seriële poort van uw computer en de seriële poort van het beeldscherm.
Begin - Hoofdscherm
Klik op Start > Program > Samsung > MDC System, om het programma te starten.
Selecteer een apparaat, om het volume van het geselecteerde apparaat in de schuifbalk te kunnen zien.
Z
zt{T[WXXTk__UGGGZZzt{T[WXXTk__UGGGZZ YWW^TXXTY_GGG㝘䟸GYa\_aY[YWW^TXXTY_GGG㝘䟸GYa\_aY[

Hoofdpictogrammen Selectieknop
Remocon Overzicht
Safety Lock Selectie beeldscherm
Poortselectie Bedieningsgereedschappen
1. Gebruik de hoofdpictogrammen om over te schakelen naar ieder beeldscherm.
2. Met deze optie kunt u de signaalontvangst van de afstandsbediening van de betreffende beeldschermeenheid in- en
uitschakelen.
3. Stelt de slotfunctie in.
Wanneer u de slotfunctie instelt, kunt u de knoppen power <aan/uit> en lock <slot> alleen op de
afstandsbediening en op de set gebruiken.
4. U kunt de instelling voor de seriële poort van de pc wijzigen. De oorspronkelijke waarde is COM1.
5. Klik op Alles selecteren of Wissen, om alle beeldschermen te wissen of te selecteren.
6. In het overzicht vindt u beknopte informatie over het geselecteerde beeldscherm.
7. Selecteer in Display Selection (Weergaveselectie) een weergave.
8. Maak gebruik van de bedieningsgereedschappen om de beeldschermen te bedienen.
<Opmerking> De in- en uitschakelfunctie van de afstandsbediening werkt onafhankelijk van het feit of het
apparaat wel of niet aanstaat. Dit is van toepassing op alle aangesloten beeldschermen die
aangesloten zijn op schermen die wederom aangesloten zijn op de MDC. Echter ongeacht de
status op het moment dat de MDC uitgezet wordt, zal de signaalontvangstfunctie van de
afstandsbediening van alle beeldschermen geactiveerd worden als de MDC wordt afgesloten.
Port Selection
Z
zt{T[WXXTk__UGGGZ[zt{T[WXXTk__UGGGZ[ YWW^TXXTY_GGG㝘䟸GYa\_aY[YWW^TXXTY_GGG㝘䟸GYa\_aY[

1. De Meervoudige Display Control wordt oorspronkelijk ingesteld op COM1.
2. Als u een andere poort dan COM1 gebruikt, kunt u COM1 tot en met COM4 selecteren in het menu Port selection.
3. Als de exacte poortnaam die op de monitor met een seriële kabel is aangesloten, niet is geselecteerd, is
communicatie niet mogelijk.
4. De geselecteerde poort is in het programma opgeslagen en wordt ook voor het volgende programma gebruikt.
Power Control
1. Klik in de hoofdpictogrammen op de optie Power Control. Naar aanleiding hiervan verschijnt het venster Power
Control.
Z
zt{T[WXXTk__UGGGZ\zt{T[WXXTk__UGGGZ\ YWW^TXXTY_GGG㝘䟸GYa\_aY[YWW^TXXTY_GGG㝘䟸GYa\_aY[

In het overzicht treft u basisinformatie aan die noodzakelijk is voor Power Control.
1) (Power Status (resterend vermogen))
2) Input
3) Image Size
4) On Timer
5) Off Timer
2. Gebruik de knop Alles selecteren of het aankruisvakje, om een beeldscherm te selecteren dat u wilt bedienen.
Met de optie Power Control kunt u sommige functies bedienen van het geselecteerde beeldscherm.
1)
Power On/Off
Z
zt{T[WXXTk__UGGGZ]zt{T[WXXTk__UGGGZ] YWW^TXXTY_GGG㝘䟸GYa\_aY[YWW^TXXTY_GGG㝘䟸GYa\_aY[

- Schakelt het geselecteerde beeldscherm Aan/Uit.
2) Volume
- Controleert het volumeniveau van het geselecteerde scherm.
Het ontvangt de volumewaarde van het geselecteerde beeldscherm en geeft dit weer in de schuifbalk.
(Als u een selectie annuleert of de optie Alles selecteren selecteert, zal de waarde de standaardwaarde 10
aannemen)
3)
Mute On/Off (Mute Aan/Uit)
- Schakelt de Mute van het geselecteerde beeldscherm Aan/Uit.
Als het geselecteerde apparaat al is ingesteld op MUTE en u één voor één een apparaat selecteert, moet u het
scherm MUTE markeren.
(Als u de selecties ongedaan maakt of de optie Alles selecteren selecteert, zullen de standaardinstellingen
aangenomen worden.)
De Power Control is van toepassing op alle beeldschermen.
De Volume- en Mute-functies zijn alleen beschikbaar voor schermen die AANSTAAN.
Input Source
1. Als u in de hoofdpictogrammen op de optie (Input Source)Ingangsbron klikt, verschijnt het scherm waarin u de
ingangsbron kunt instellen.
Klik op de optie Alles selecteren of maak gebruik van het aankruisvakje, om een beeldscherm te selecteren dat u wilt
bedienen.
• TV Mode
• PC Mode
Z
zt{T[WXXTk__UGGGZ^zt{T[WXXTk__UGGGZ^ YWW^TXXTY_GGG㝘䟸GYa\_aY[YWW^TXXTY_GGG㝘䟸GYa\_aY[

Het overzicht toont u basisinformatie die noodzakelijk is voor de Input Source Control.
1) PC
- Verandert de ingangsbron van het geselecteerde display in PC.
2) BNC
- Verandert de ingangsbron van het geselecteerde display in BNC.
3) DVI
- Verandert de ingangsbron van het geselecteerde display in DVI.
4) TV
-
V
erandert de ingangsbron van het geselecteerde display in TV.
5) AV
- Verandert de ingangsbron van het geselecteerde display in AV.
6) S-Video
- Verandert de ingangsbron van het geselecteerde display in S-
V
ideo.
7) Component
-
V
erandert de ingangsbron van het geselecteerde display in Component.
8) MagicNet
- Indgangskilden for MagicNet fungerer kun på MagicNet-modellen.
9) Channel
- De pijl voor het kanaal verschijnt wanneer de tv als Input Source (invoerbron) is ingesteld.
De tv kan alleen als bron worden geselecteerd bij producten met een tv en het besturen van kanalen is
alleen toegestaan wanneer de invoerbron de tv is.
De Input Source Control is alleen beschikbaar voor beeldschermen die AANSTAAN.
Image Size
PC, BNC, DVI
1. Als u in de hoofdpictogrammen op de optie Beeldformaat klikt, verschijnt het scherm waarin u het beeldformaat kunt
instellen.
Z
zt{T[WXXTk__UGGGZ_zt{T[WXXTk__UGGGZ_ YWW^TXXTY_GGG㝘䟸GYa\_aY[YWW^TXXTY_GGG㝘䟸GYa\_aY[

Het overzicht toont u basisinformatie die noodzakelijk is voor het instellen van het beeldformaat.
1)
(Power Status (resterend vermogen))
- Geeft aan of het huidige beeldscherm in of uitgeschakeld is.
2) Image Size
- Geeft aan of het huidige Image Size in of uitgeschakeld is.
3) Input
- Geeft de huidige Ingangsbron aan van het beeldscherm dat u momenteel gebruikt.
4) Het overzicht geeft alleen de beeldschermen weer, waarvan de ingangsbron PC, BNC, DVI is.
5) PC Source - PC Source (pc-bron) is het eerste tabblad aan de linkerzijde wanneer u op het tabblad Image Source
(beeldbron) klikt.
- De knop Beeldformaat instellen, regelt het beeldformaat dat beschikbaar is voor PC, BNC, DVI.
6) Video Source
- Klik op het tabblad Video Source (videobron) om de beeldgrootte voor de respectieve invoerbron te beheren.
Indgangskilden for MagicNet fungerer kun på MagicNet-modellen.
De optie Beeldformaat instellen is alleen beschikbaar voor beeldschermen die AANSTAAN.
Image Size
TV, AV, S-Video, Component, DVI(HDCP)
1. Als u in de hoofdpictogrammen op de optie Beeldformaat klikt, verschijnt het scherm waarin u het beeldformaat kunt
instellen.
Z
zt{T[WXXTk__UGGGZ`zt{T[WXXTk__UGGGZ` YWW^TXXTY_GGG㝘䟸GYa\_aY[YWW^TXXTY_GGG㝘䟸GYa\_aY[

Het overzicht toont u basisinformatie die noodzakelijk is voor het instellen van het beeldformaat.
1) Klik op het tabblad Video Source (videobron) om de beeldgrootte aan te passen voor TV, AV, S-Video, Component.
Klik op de optie Alles selecteren of maak gebruik van het aankruisvakje, om een beeldscherm te selecteren dat u wilt
bedienen.
2) Het overzicht geeft alleen het beeldscherm weer waarvan Video TV, AV, S-VIDEO en Component, DVI(HDCP) de
ingangsbron is.
3) Met deze optie schakelt u willekeurig het beeldformaat van het geselecteerde beeldscherm in.
Opmerking: Auto Wide, Zoom1 en Zoom2 kunnen niet worden geselecteerd wanneer het
ingangssignaaltype voor Component en DVI (HDCP) 720p of 1080i is.
Indgangskilden for MagicNet fungerer kun på MagicNet-modellen.
De optie Beeldformaat instellen is alleen beschikbaar voor beeldschermen die AANSTAAN.
Time
1. Klik in de hoofdpictogrammen op de optie Time Control (Tijdcontrole). Naar aanleiding hiervan verschijnt het venster
Tijdcontrole.
zt{T[WXXTk__UGGG[Wzt{T[WXXTk__UGGG[W YWW^TXXTY_GGG㝘䟸GYa\_aY[YWW^TXXTY_GGG㝘䟸GYa\_aY[

Het overzicht toont u basisinformatie die noodzakelijk is voor Tijdcontrole.
1) Current Time
- Stel de huidige tijd in voor het geselecteerde beeldscherm (PC-tijd)
- U moet eerst de PC-tijd veranderen, voordat u de huidige tijd kunt veranderen.
2) On Time Setup
- Stelt de uren, minuten, AM/PM en het volume van het geselecteerde beeldscherm in op de gewenste starttijd.
3) Off Time Setup
- Stelt de uren, minuten en AM/PM in op de gewenste eindtijd van het geselecteerde beeldscherm.
4) Geeft de instellingen van On Timer (Timer Aan) weer.
5) Geeft de instellingen van Off Timer (Timer Uit) weer.
Indgangskilden for MagicNet fungerer kun på MagicNet-modellen.
De Tijdcontrole is alleen beschikbaar voor beeldschermen die AANSTAAN.
Bij de On Time Setup (instellingen voor inschakelingsduur), werkt TV Source (tv-bron) alleen voor een
tv-model.
PIP
PIP Size
1. Klik in de hoofdpictogrammen op PIP en vervolgens zal het scherm PIP instellen op uw beeldscherm verschijnen.
Klik op de optie Alles selecteren of maak gebruik van het aankruisvakje, om een beeldscherm te selecteren dat u wilt
bedienen.
zt{T[WXXTk__UGGG[Xzt{T[WXXTk__UGGG[X YWW^TXXTY_GGG㝘䟸GYa\_aY[YWW^TXXTY_GGG㝘䟸GYa\_aY[

Het overzicht toont u basisinformatie die noodzakelijk is voor het instellen van het PIP-formaat.
1) PIP Size
- Geeft het huidige PIP-formaat aan van het beeldsherm dat u momenteel gebruikt.
2) OFF
- Schakelt de PIP uit van het geselecteerde display.
3) Large
- Schakelt de PIP in van het geselecteerde display en verandert het formaat in Large.
4) Small
- Schakelt de PIP in van het geselecteerde display en verandert het formaat in Small.
5) Double1
- Schakelt de PIP in van het geselecteerde display en verandert het formaat in Double 1.
6) Double 2
- Schakelt de PIP in van het geselecteerde display en verandert het formaat in Double 2.
7) Double 3 (Dubbel 3) (beeld per beeld)
– Schakelt de functie PBP (picture by picture) van de geselecteerde weergave in en wijzigt het formaat naar Dubbel
3.
Indgangskilden for MagicNet fungerer kun på MagicNet-modellen.
U kunt het PIP-formaat instellen, zodra u de monitor heeft ingeschakeld.
PIP
PIP Source
1. Klik in de hoofdpictogrammen op PIP en vervolgens zal het scherm PIP instellen op uw beeldscherm verschijnen.
• PIP TV Mode
[
zt{T[WXXTk__UGGG[Yzt{T[WXXTk__UGGG[Y YWW^TXXTY_GGG㝘䟸GYa\_aY[YWW^TXXTY_GGG㝘䟸GYa\_aY[

• PIP S-Video Mode
Het overzicht toont u basisinformatie die noodzakelijk is voor het instellen van het PIP-bron.
1) PIP Source
- U kunt de PIP-bron instellen, zodra u de monitor heeft ingeschakeld.
2) PC
- Verandert de PIP-bron van het geselecteerde display in PC.
3) BNC
- Verandert de PIP-bron van het geselecteerde display in BNC.
4) DVI
- Verandert de PIP-bron van het geselecteerde display in DVI.
5) TV
- Verandert de PIP-bron van het geselecteerde display in TV.
[
zt{T[WXXTk__UGGG[Zzt{T[WXXTk__UGGG[Z YWW^TXXTY_GGG㝘䟸GYa\_aY[YWW^TXXTY_GGG㝘䟸GYa\_aY[

6) AV
- Verandert de PIP-bron van het geselecteerde display in AV.
7) S-Video
- Verandert de PIP-bron van het geselecteerde display in S-Video.
8) Component
- Verandert de PIP-bron van het geselecteerde display in Component.
9) Channel
- De pijl voor het kanaal verschijnt wanneer de tv als PIP Source (PIP-bron) is ingesteld.
Opmerking: Sommige PIP-bronnen kunnen wellicht niet worden geselecteerd.
Indgangskilden for MagicNet fungerer kun på MagicNet-modellen.
De tv kan alleen als bron worden geselecteerd bij producten met een tv en het besturen van kanalen is
alleen toegestaan wanneer de PIP-bron de tv is.
Dit is afhankelijk van het ingangsbrontype van het hoofdscherm.
Settings
Picture
1. Klik in de hoofdpictogrammen op Instellingen en vervolgens zal het scherm Settings Control op uw beeldscherm
verschijnen.
Het overzicht toont u basisinformatie die noodzakelijk is voor Settings Control.
Als iedere functie geselecteerd is, wordt de ingestelde waarde van de geselecteerde functie weergeven op de
schuifbalk. Als u de optie Alles selecteren geselecteerd heeft, verandert de waarde weer in de standaardwaarde 50.
Wanneer u een waarde op dit scherm wijzigt, wordt de modus automatisch gewijzigd in "CUSTOM".
1) Picture
- Alleen beschikbaar voor TV, AV, S-Video, Component, DVI(HDCP).
2) Contrast
- Met deze optie kunt het Contrast instellen van het geselecteerde scherm.
3) Brightness
- Met deze optie kunt de Helderheid instellen van het geselecteerde scherm.
4) Sharpness
- Met deze optie kunt de Scherpte instellen van het geselecteerde beeldscherm.
5) Color
- Met deze optie kunt de Kleur instellen van het geselecteerde beeldscherm.
6) Tint
- Met deze optie kunt de Kleur instellen van het geselecteerde beeldscherm.
[
zt{T[WXXTk__UGGG[[zt{T[WXXTk__UGGG[[ YWW^TXXTY_GGG㝘䟸GYa\_aY[YWW^TXXTY_GGG㝘䟸GYa\_aY[

7) Color Tone
- Wijzigt de kleurtoon voor de geselecteerde display.
Indgangskilden for MagicNet fungerer kun på MagicNet-modellen.
Deze optie is alleen beschikbaar voor de weergaven met stroomstatus AAN, en indien er geen selectie
is gemaakt, wordt de fabrieksinstelling weergegeven.
Settings
Picture PC
1. Klik in de hoofdpictogrammen op Instellingen en vervolgens zal het scherm Settings Control op uw beeldscherm
verschijnen.
Het overzicht toont u basisinformatie die noodzakelijk is voor Settings Control. Nadat elke functie is geselecteerd,
wordt de ingestelde waarde voor de geselecteerde functie weergegeven in de schuifbalk. Wanneer de selectie is
gemaakt, zal elke functie de waarde van de instelling ophalen en weergeven in de schuifbalk. Als u de optie Alles
selecteren geselecteerd heeft, verandert de waarde weer in de standaardwaarde 50. Wanneer u een waarde op dit
scherm wijzigt, wordt de modus automatisch gewijzigd in "CUSTOM".
1) Picture PC
- Alleen beschikbaar voor PC, BNC, DVI.
2) Contrast
- Met deze optie kunt het Contrast instellen van het geselecteerde scherm.
3) Brightness
- Met deze optie kunt de Helderheid instellen van het geselecteerde scherm.
4) Red
- De kleurtemperatuur van het geselecteerde beeldscherm instellen.(Red)
5) Green
- De kleurtemperatuur van het geselecteerde beeldscherm instellen.(Green)
6) Blue
- De kleurtemperatuur van het geselecteerde beeldscherm instellen.(Blue)
Indgangskilden for MagicNet fungerer kun på MagicNet-modellen.
Deze optie is alleen beschikbaar voor de weergaven met stroomstatus AAN, en indien er geen selectie
is gemaakt, wordt de fabrieksinstelling weergegeven.
[
zt{T[WXXTk__UGGG[\zt{T[WXXTk__UGGG[\ YWW^TXXTY_GGG㝘䟸GYa\_aY[YWW^TXXTY_GGG㝘䟸GYa\_aY[

Settings
Audio
1. Klik in de hoofdpictogrammen op Instellingen en vervolgens zal het scherm Settings Control op uw beeldscherm
verschijnen.
Het overzicht toont u basisinformatie die noodzakelijk is voor Settings Control. Nadat elke functie is geselecteerd,
wordt de ingestelde waarde voor de geselecteerde functie weergegeven in de schuifbalk. Wanneer de selectie is
gemaakt, zal elke functie de waarde van de instelling ophalen en weergeven in de schuifbalk. Als u de optie Alles
selecteren geselecteerd heeft, verandert de waarde weer in de standaardwaarde 50. Wanneer u een waarde op dit
scherm wijzigt, wordt de modus automatisch gewijzigd in "CUSTOM".
1) Audio
- Bediening van de audio-instellingen van alle ingangsbronnen.
2) Bass
- Adjusts Bass of the selected display.
3) Treble
- Met deze optie kunt u de Treble instellen van het geselecteerde scherm.
4) Balance
- Met deze optie kunt u de Balance instellen van het geselecteerde scherm.
5) SRS TSXT
- SRS TSXT Sound On/Off.
6) Sound Select
- Als de PIP-functie geactiveerd is, kunt u alleen kiezen tussen hoofd- of subscherm (main of sub).
Indgangskilden for MagicNet fungerer kun på MagicNet-modellen.
Deze optie is alleen beschikbaar voor de weergaven met stroomstatus AAN, en indien er geen selectie
is gemaakt, wordt de fabrieksinstelling weergegeven.
Settings
Image Lock
1. Klik in de hoofdpictogrammen op Instellingen en vervolgens zal het scherm Settings Control op uw beeldscherm
verschijnen.
[
zt{T[WXXTk__UGGG[]zt{T[WXXTk__UGGG[] YWW^TXXTY_GGG㝘䟸GYa\_aY[YWW^TXXTY_GGG㝘䟸GYa\_aY[

Het overzicht toont u basisinformatie die noodzakelijk is voor Settings Control.
1) Image Lock
- Alleen beschikbaar voor PC, BNC.
2) Coarse
- Met deze optie kunt u de Coarse instellen van het geselecteerde beeldscherm.
3) Fine
- Met deze optie kunt u de Fine instellen van het geselecteerde beeldscherm.
4) Position
- Met deze optie kunt u de positie instellen van het geselecteerde beeldscherm.
5) Auto Adjustment
- Als u zelf het binnenkomende signaal wilt aanpassen.
Indgangskilden for MagicNet fungerer kun på MagicNet-modellen.
Indstillinger er kun tilgængelige for skærme, der er slået til (ON).
Maintenance
Lamp Control
1. Klik op het pictogram "Maintenance" in de kolom Main Icon om het scherm Maintenance weer te geven.
[
zt{T[WXXTk__UGGG[^zt{T[WXXTk__UGGG[^ YWW^TXXTY_GGG㝘䟸GYa\_aY[YWW^TXXTY_GGG㝘䟸GYa\_aY[

Op het informatieraster ziet u een aantal basisgegevens verschijnen.
1) Maintenance
- Hiermee is de functie Maintenance Control mogelijk voor alle ingangsbronnen.
2) Auto Lamp Control
- Regelt automatisch de achtergrondverlichting van de geselecteerde display op een specifieke tijd.
De Manual Lamp Control (handmatige lampbediening) wordt automatisch uitgeschakeld als u overschakelt naar de
Auto Lamp Control (automatische lampbediening).
3) Manual Lamp Control
- Hiermee kunt u de achtergrondverlicht van de geselecteerde display regelen, ongeacht het tijdstip.
De functie Auto Lamp Control wordt automatisch uitgeschakeld als u de functie Manual Lamp Control regelt.
De functie Maintenance Control is alleen beschikbaar voor beeldschermen die AANSTAAN.
Indgangskilden for MagicNet fungerer kun på MagicNet-modellen.
Maintenance
Scroll
1. Klik op het pictogram "Maintenance" in de kolom Main Icon om het scherm Maintenance weer te geven.
[
zt{T[WXXTk__UGGG[_zt{T[WXXTk__UGGG[_ YWW^TXXTY_GGG㝘䟸GYa\_aY[YWW^TXXTY_GGG㝘䟸GYa\_aY[

1) Safety Screen
- Elimineert de nabeelden die zich kunnen voordoen wanneer de geselecteerde display langere tijd in de modus
Pause staat. U kunt de timer voor de herhalingscyclus instellen door de "Interval" op uur en "Second" op seconde
te selecteren.
U kunt dit per Screen Type (Schermtype) instellen op Scroll (Verschuiven), Pixel, Bar (Balk) en Eraser (Wisser).
Indgangskilden for MagicNet fungerer kun på MagicNet-modellen.
Voor het instellen van de seconden, hebt u de keuze tussen 1, 2, 3, 4 en 5 voor het type Scroll
(Verschuiven) en tussen 10, 20, 30, 40 en 50 voor het type Pixel, Bar (Balk) en Eraser (Wisser).
De functie Maintenance Control is alleen beschikbaar voor beeldschermen die AANSTAAN.
Maintenance
Video Wall
1. Klik op het pictogram "Maintenance" in de kolom Main Icon om het scherm Maintenance weer te geven.
[
zt{T[WXXTk__UGGG[`zt{T[WXXTk__UGGG[` YWW^TXXTY_GGG㝘䟸GYa\_aY\YWW^TXXTY_GGG㝘䟸GYa\_aY\

1) Video Wall
- Een videomuur is een aantal videoschermen die met elkaar zijn verbonden, zodat op ieder scherm een gedeelte
van het geheel wordt weergegeven of zodat op ieder scherm het beeld wordt herhaald.
2) Video Wall (Screen divider)
- De videomuur kan op verschillende manieren worden ingedeeld.
U kunt gebruikmaken van verschillende schermen en deze op verschillende manieren indelen.
z Selecteer een modus in Screen divider (Schermindeling).
z Selecteer in Display Selection (Weergaveselectie) een weergave.
z
U kunt de plaats selecteren door in de geselecteerde modus op een nummer te drukken.
z
Het MDC-programma van Samsung ondersteunt een videoscherm van maximaal 4x4.
z
2*2
z 3*3
z 4*4
z 1*2
z
2*1
z
1*5
z
5*1
3)
On / Off
zt{T[WXXTk__UGGG\Wzt{T[WXXTk__UGGG\W YWW^TXXTY_GGG㝘䟸GYa\_aY\YWW^TXXTY_GGG㝘䟸GYa\_aY\

- U kunt de plaats selecteren door in de geselecteerde modus op een nummer te drukken.
4) Format
- De indeling kan worden geselecteerd om het scherm te splitsen.
z
Full
z Natural
U mag deze functie niet gebruiken in MagicNet.
De functie Maintenance Control is alleen beschikbaar voor beeldschermen die AANSTAAN.
Problemen oplossen
1. Het beeldscherm dat u wilt bedienen, verschijnt niet in het overzicht
- Controleer de verbinding van RS232C. (Controleer of deze goed aangesloten is op de Com1 poort)
- Controleer of andere aangesloten schermen dezelfde ID hebben. Als meer beeldschermen dezelfde ID hebben,
worden deze schermen niet goed waargenomen door het programma. De oorzaak hiervan is een gegevensconflict.
- Controleer of de ID van het beeldscherm tussen een waarde van 0 en 16 ligt. (Instellen via het beeldschermmenu)
Opmerking: Het ID van het beeldscherm moet een waarde hebben tussen de 0 en de 16.
Als deze waarde buiten dit bereik ligt, kan het MDC-systeem het beeldscherm niet bedienen.
2. Het beeldscherm dat u wilt bedienen, verschijnt niet in de andere bedieningsoverzichten.
- Controleer of het scherm AANSTAAT. (Dit kunt u controleren in het overzicht van Power Control)
- Controleer of u de ingangsbron van het beeldscherm kunt veranderen.
3. Het dialoogvenster verschijnt regelmatig.
- Controleer of het beeldscherm dat u wilt bedienen geselecteerd is.
4. Zowel de On Timer als Off Timer is ingesteld, maar er wordt een andere tijd aangegeven.
- Gebruik de huidige tijd om de klok van het beeldscherm te synchroniseren.
5. Het kan zijn dat de afstandsbediening niet goed functioneert, door het uitschakelen van de
afstandsbedieningsfunctie. Haal de RS-232C kabel eruit of sluit het programma af. Start het programma opnieuw op
en schakel de afstandsbedieningsfunctie opnieuw in om de normale functies herstellen.
<Opmerking> Het kan zijn dat dit programma niet werkt door communicatieproblemen of door interferentie van
elektronische apparaten die in de buurt staan.
Settings Value Display (Instellingen waardescherm) in de Multiple
Display (multi-schermmodus)
Als u meer dan vier beeldschermen heeft aangesloten, worden waarden van de instellingen als volgt weergegeven.
1. Geen selectie: Geeft de standaard fabrieksinstellingen weer.
2. Eén beeldscherm geselecteerd: geeft de instellingen van de waarde aan van het geselecteerde beeldscherm.
3.
Een beeldscherm is geselecteerd (ID1) en een andere beeldscherm (ID3) : Het programma gaf eerst de instellingen
zt{T[WXXTk__UGGG\Xzt{T[WXXTk__UGGG\X YWW^TXXTY_GGG㝘䟸GYa\_aY\YWW^TXXTY_GGG㝘䟸GYa\_aY\

van de waarde van ID1 weer en de waarde van ID3.
4. Alle apparaten selecteren via de optie Alles selecteren: alle waarden zullen worden ingesteld op de standaard
fabrieksinstellingen.
\
zt{T[WXXTk__UGGG\Yzt{T[WXXTk__UGGG\Y YWW^TXXTY_GGG㝘䟸GYa\_aY\YWW^TXXTY_GGG㝘䟸GYa\_aY\

De kleur en het uiterlijk van het apparaat kunnen variëren afhankelijk van het model, en de productspecificaties
kunnen zonder voorgaand bericht worden gewijzigd met als doel het product te verbeteren.
De monitor aanpassen
Input
Beschikbare modi
PC / BNC / DVI
AV
S-Video
Component
DVI-Video
Source List
[MENU]
˧
[ENTER]
˧
[ENTER]
˧
[
/
]
˧
[ENTER]
Gebruiken om pc, BNC of andere externe invoerbron die aangesloten is op de monitor te selecteren.
Gebruiken om het scherm van uw keus te selecteren.
1) PC
2) BNC
3) DVI
4) AV
5) S-Video
6) Component
[De rechtstreekse knop op de afstandsbediening is de knop 'SOURCE'.]
Opmerking
• De PIP schakelt uit als de monitor naar een externe bron wordt overgezet.
PIP
Wanneer externe A/V-apparaten zoals vcr's of dvd's op de monitor zijn aangesloten, kunt u met PIP video van
die apparaten kijken in een klein venster dat op het pc-video-signaal wordt gezet. (Off/On)
Opmerking
• Als de BNC-kabel en het element gebruik maken van dezelfde terminal, kan slechts een PIP tegelijk het
scherm bedekken.
1) PIP
[MENU]
˧
[ENTER]
˧
[
/
]
˧
[ENTER]
˧
[ENTER]
˧
[
/
]
˧
[ENTER]
Schakel het PIP in of uit.
- Off
- On
[De rechtstreekse knop op de afstandsbediening is de knop 'PIP'.]
2) Source
[MENU]
˧
[ENTER]
˧
[
/
]
˧
[ENTER]
˧
[
/
]
˧
[ENTER]
˧
[
/
]
˧
[ENTER]
Selecteer de invoerbron voor de PIP
- PC : AV / S-Video / Component Modus
- BNC : AV / S-Video Modus
- DVI: AV / S-Video / Component Modus
- AV / S-Video : PC / BNC / DVI Modus
- Component : PC / DVI Modus
Veiligheidsvoorschriften
Inleiding
Aansluitingen
De software gebruiken
De monitor aanpassen
Input
Picture
[PC / BNC /DVI]
Picture
[AV / S-Video /
Component / DVI-Video]
Sound
Setup
Multi Control
Directe bedieningsfuncties
Problemen oplossen
Specificaties
Informatie
Appendix
\
W\UGGGXW\UGGGX YWW^TXYTXWGGG㝘䟸GXa\\a[WYWW^TXYTXWGGG㝘䟸GXa\\a[W

[De rechtstreekse knop op de afstandsbediening is de knop 'SOURCE'.]
3) Swap
[MENU]
˧
[ENTER]
˧
[
/
]
˧
[ENTER]
˧
[
/
]
˧
[ENTER]
De inhoud van de PIP en de hoofdafbeelding verwisselen.
De afbeelding in het PIP-venster verschijnt op het hoofdscherm, terwijl de afbeelding van het hoofdscherm in
het PIP-venster verschijnt.
[De rechtstreekse knop op de afstandsbediening is de knop 'SWAP'.]
4) Size
[MENU]
˧
[ENTER]
˧
[
/
]
˧
[ENTER]
˧
[
/
]
˧
[ENTER]
˧
[
/
]
˧
[ENTER]
Wijzig het formaat van het PIP-venster.
[De rechtstreekse knop op de afstandsbediening is de knop 'SIZE'.]
5) Position
[MENU]
˧
[ENTER]
˧
[
/
]
˧
[ENTER]
˧
[
/
]
˧
[ENTER]
˧
[
/
]
˧
[ENTER]
Wijzig de positie van het PIP-venster.
6) Transparency
[MENU]
˧
[ENTER]
˧
[
/
]
˧
[ENTER]
˧
[
/
]
˧
[ENTER]
˧
[
/
]
˧
[ENTER]
Past de Transparency (transparantie) van de PIP-schermen aan.
- High
- Medium
- Low
- Opaque
Opmerking
•
Wanneer u , , selecteert in Size (Formaat), worden Position (Positie) en Transparency
(Transparantie) niet geactiveerd.
Beschikbare modi : PIP
Edit Name
[MENU]
˧
[ENTER]
˧
[
/
]
˧
[ENTER]
˧
[
/
]
˧
[ENTER]
˧
[
/
]
˧
[ENTER]
Geef een naam aan het invoerapparaat dat op de ingangen is aangesloten om de keus van de invoerbron te
vergemakkelijken.
1) PC
2) BNC
3) DVI
4) AV
5) S-Video
6) Component
Picture[PC / BNC /DVI]
Beschikbare modi
PC / BNC / DVI
AV
S-Video
Component
DVI-Video
MagicBright™
[MENU]
˧
[
/
]
˧
[ENTER]
˧
[ENTER]
˧
[
/
]
˧
[ENTER]
MagicBright™ is een nieuwe optie die voorziet in een optimale kijkomgeving gebaseerd op de inhoud van het
beeld dat u bekijkt.
Momenteel zijn er 4 verschillende modi beschikbaar: Entertain, Internet, Text en Custom.
Elke modus heeft zijn eigen vooraf ingestelde helderheidswaarde. U kunt eenvoudig één van de 4 instellingen
kiezen door op de knop ‘MagicBright™ te drukken.
1) Entertain
hoge helderheid
Voor het bekijken van bewegende beelden zoals een DVD of VCD.
2) Internet
gemiddelde helderheid
Voor het werken met een combinatie van beelden zoals tekst en grafische voorstellingen.
3) Text
normale helderheid
\
W\UGGGYW\UGGGY YWW^TXYTXWGGG㝘䟸GXa\\a\\YWW^TXYTXWGGG㝘䟸GXa\\a\\

Voor documenten of het werken met veel tekst.
4) Custom
Ondanks het feit dat de waarden zorgvuldig door onze technici zijn geselecteerd, kan het zijn dat u de
voorgeconfigureerde waarden niet prettig vindt voor uw ogen.
Ondanks het feit dat de waarden zorgvuldig door onze technici zijn geselecteerd, kan het zijn dat u de
voorgeconfigureerde waarden niet prettig vindt voor uw ogen.
[De rechtstreekse knop op de afstandsbediening is de knop 'M/B'.]
Custom
[MENU]
˧
[
/
]
˧
[ENTER]
˧
[
/
]
˧
[ENTER]
˧
[ENTER]
˧
[
/
] / [< / >]
˧
[ENTER]
Met de on-screen menu´s kunt u het contrast en de helderheid (brightness) geheel naar wens instellen.
1) Contrast
Contrast instellen.
2) Brightness
Helderheid instellen.
Opmerking
• Als u het beeld regelt met de functie Custom, wordt MagicBright overgeschakeld naar de modus Custom.
Color Tone
[MENU]
˧
[
/
]
˧
[ENTER]
˧
[
/
]
˧
[ENTER]
˧
[
/
]
˧
[ENTER]
De tint van de kleur kan worden gewijzigd.
1) Cool
2) Normaal
3) Warm
4) Custom
(Alleen beschikbaar in modus PC/BNC.)
Color Control
[MENU]
˧
[
/
]
˧
[ENTER]
˧
[
/
]
˧
[ENTER]
˧
[ENTER]
˧
[< / >]
˧
[ENTER]
Hiermee regelt u de afzonderlijke RGB-kleuren.
(Alleen beschikbaar in modus PC/BNC.)
1) Red
2) Groen
3) Blue
Opmerking
• Als u het beeld regelt met de functie color Control, wordt color Tone overgeschakeld naar de modus
Custom.
Image Lock
De beeldvergrendeling (Image Lock) wordt gebruikt om een zo optimaal mogelijke beeldkwaliteit te krijgen. Als
u niet tevreden bent over het resultaat, maak dan gebruik van de optie Coarse en aansluitend weer van de
optie Fine.
(Alleen beschikbaar in modus PC/BNC.)
1) Coarse
[MENU]
˧
[
/
]
˧
[ENTER]
˧
[
/
]
˧
[ENTER]
˧
[ENTER]
˧
[< / >]
˧
[ENTER]
Verwijdert storing zoals verticale strepen. Grof bijstellen kan het weergavegebied van het scherm
verplaatsen. U kunt het weer in het midden plaatsen met gebruik van het horizontale controlemenu.
2) Fine
[MENU]
˧
[
/
]
˧
[ENTER]
˧
[
/
]
˧
[ENTER]
˧
[
/
]
˧
[ENTER]
˧
[< / >]
˧
[ENTER]
Verwijdert ruis, zoals horizontale strepen. Indien de ruis zelfs na Fine tuning (fijnafstemming) aanwezig
blijft, herhaalt u deze procedure na het instellen van de frequentie (kloksnelheid).
3) Position
[MENU]
˧
[
/
]
˧
[ENTER]
˧
[
/
]
˧
[ENTER]
˧
[
/
]
˧
[ENTER]
˧
[< / >] / [
/
]
˧
\
W\UGGGZW\UGGGZ YWW^TXYTXWGGG㝘䟸GXa\\a\\YWW^TXYTXWGGG㝘䟸GXa\\a\\

[ENTER]
Bepaalt de locatie op het scherm, zowel horizontaal als verticaal.
Auto Adjustment
[MENU]
˧
[
/
]
˧
[ENTER]
˧
[
/
]
˧
[ENTER]
De waarden van Fine (fijn), Coarse (grof) en Position (positie) worden automatisch aangepast.
Als u de resolutie wijzigt in het regelpaneel, wordt de functie Auto Adjustment uitgevoerd.
(Alleen beschikbaar in modus PC/BNC.)
[De rechtstreekse knop op de afstandsbediening is de knop 'AUTO'.]
Signal Balance
Hiermee kan een zwak RGB-signaal dat wordt overgebracht door een lange signaalkabel, gecompenseerd
worden.
(Alleen beschikbaar in modus PC/BNC.)
1) Signal Balance
[MENU]
˧
[
/
]
˧
[ENTER]
˧
[
/
]
˧
[ENTER]
˧
[ENTER]
˧
[
/
]
˧
[ENTER]
U kunt deze functie selecteren met behulp van signal control (signaalbesturing) On of Off .
2) Signal Control
[MENU]
˧
[
/
]
˧
[ENTER]
˧
[
/
]
˧
[ENTER]
˧
[
/
]
˧
[ENTER]
˧
[
/
]
˧
[ENTER]
˧
[
/
]
˧
[< / >]
˧
[ENTER]
U kunt R Phase (R-fase), G Phase (G-fase), B Phase (G-fase), Gain (Profijt) en Sharpness (Scherpte).
Size
[MENU]
˧
[
/
]
˧
[ENTER]
˧
[
/
]
˧
[ENTER]
˧
[
/
]
˧
[ENTER]
U kunt de grootte instellen.
1) 16:9
2) 4:3
PIP Picture
[MENU]
˧
[
/
]
˧
[ENTER]
˧
[
/
]
˧
[ENTER]
˧
[
/
]
˧
[ENTER]
˧
[
/
]
˧
[ENTER]
˧
[
/
]
˧
[ENTER]
˧
[< / >]
˧
[ENTER]
U kunt de PIP-scherminstellingen regelen.
1) Contrast
Hiermee regelt u het contrast van het PIP-venster op het scherm.
2) Brightness
Hiermee regelt u de helderheid van het PIP-venster op het scherm.
3) Sharpness
Past de Sharpness van het PIP-venster op uw scherm aan.
4) Color
Het beeld van het PIP-venster op uw scherm aanpassen.
5) Tint
Voegt een natuurlijke tint toe aan het PIP-venster.
U kunt een beeld bekijken van AV, S-Video via het PIP -scherm in PC, BNC en DVI modus. Betrieb
nur bei NTSC-Videosignal möglich.
Beschikbare modi : PIP
Picture [AV / S-Video / Component / DVI-Video]
Beschikbare modi
PC / BNC / DVI
AV
S-Video
Component
DVI-Video
\
W\UGGG[W\UGGG[ YWW^TXYTXWGGG㝘䟸GXa\\a\\YWW^TXYTXWGGG㝘䟸GXa\\a\\

[MENU]
˧
[
/
]
˧
[ENTER]
˧
[ENTER]
˧
[
/
]
˧
[ENTER]
De monitor heeft vier automatische beeldinstellingen ("Dynamic", "Standard", "Movie" en "Custom") die op de
fabriek tevoren zijn ingesteld.
U kunt Dynamic, Standard, Movie of Custom activeren. U kunt Dynamic, Standard, Movie of Custom activeren.
1) Dynamic
2) Standard
3) Movie
4) Custom
[De rechtstreekse knop op de afstandsbediening is de knop 'P.MODE'.]
Custom
[MENU]
˧
[
/
]
˧
[ENTER]
˧
[
/
]
˧
[ENTER]
˧
[
/
]
˧
[ENTER]
˧
[< / >]
˧
[ENTER]
Met de on-screen menu´s kunt u het contrast en de helderheid (brightness) geheel naar wens instellen.
1) Contrast
Contrast instellen.
2) Brightness
Brightness instellen.
3) Sharpness
Sharpness instellen.
4) Color
Color instellen.
5) Tint
Tint instellen.
Werkt alleen in de modi AV en S-Video. Betrieb nur bei NTSC-Videosignal möglich.
color Tone
[MENU]
˧
[
/
]
˧
[ENTER]
˧
[
/
]
˧
[ENTER]
˧
[
/
]
˧
[ENTER]
De tint van de kleur kan worden gewijzigd. De afzonderlijke kleurcomponenten kunnen eveneens door de
gebruiker worden aangepast.
1) Cool 2
2) Cool 1
3) Normaal
4) Warm1
5) Warm2
Size
[MENU]
˧
[
/
]
˧
[ENTER]
˧
[
/
]
˧
[ENTER]
˧
[
/
]
˧
[ENTER]
De verschillende kleur-dtv's kunnen ook door de gebruiker worden aangepast.
1)16:9
2)Zoom 1
3)Zoom 2
4)4:3
[Zoom1, Zoom2 er ikke tilgængelige i 1080i (eller over 720p) for DTV. ]
Digital NR (Digital Noise Reduction)
[MENU]
˧
[
/
]
˧
[ENTER]
˧
[
/
]
˧
[ENTER]
˧
[
/
]
˧
[ENTER]
U kunt de functie Ruisonderdrukking in- en uitschakelen. Met de functie Digitale ruisonderdrukking kunt u van
helderdere en scherpere beelden genieten.
1) Off
2) On
Film Mode
[MENU]
˧
[
/
]
˧
[ENTER]
˧
[
/
]
˧
[ENTER]
˧
[
/
]
˧
[ENTER]
U kunt Film Mode in- en uitschakelen.
De functie Film Mode zorgt voor televisiekijken met theaterkwaliteit.
\
W\UGGG\W\UGGG\ YWW^TXYTXWGGG㝘䟸GXa\\a\\YWW^TXYTXWGGG㝘䟸GXa\\a\\
Mode

Niet beschikbaar in modus (DVI-Video)
1) Of
f
2) On
PIP Picture
[MENU]
˧
[
/
]
˧
[ENTER]
˧
[
/
]
˧
[ENTER]
˧
[
/
]
˧
[ENTER]
˧
[
/
]
˧
[ENTER]
˧
[< / >]
˧
[ENTER]
U kunt de instellingen van het PIP-scherm aanpassen.
1) Contrast
Past het contrast van het PIP-venster op uw scherm aan.
2) Brightness
Past de helderheid van het PIP-venster op uw scherm aan.
Beschikbare modi : PIP
Sound
Beschikbare modi
PC / BNC / DVI
AV
S-Video
Component
DVI-Video
Mode
[MENU]
˧
[
/
]
˧
[ENTER]
˧
[ENTER]
˧
[
/
]
˧
[ENTER]
De monitor heeft een ingebouwde hifi-stereo-versterker.
1) Standard
Kies Standaard voor de standaardfabrieksinstellingen.
2) Music
Kies Muziek wanneer u muziekvideo's of concerten kijkt.
3) Movie
Kies Film wanneer u films kijkt.
4) Speech
Kies spraak wanneer u een show met gesprekken kijkt (bijvoorbeeld het nieuws).
5) Custom
Kies Aangepast wanneer u de instellingen aan uw persoonlijke voorkeur wilt aanpassen.
Custom
[MENU]
˧
[
/
]
˧
[ENTER]
˧
[
/
]
˧
[ENTER]
˧
[
/
]
˧
[ENTER]
˧
[< / >]
˧
[ENTER]
U kunt de geluidsinstellingen aanpassen aan uw persoonlijke voorkeur.
1) Bass
Benadrukt geluid met een lage frequentie.
2) Treble
Benadrukt geluid met een hoge frequentie.
3) Balance
Hiermee kunt u de balans tussen de linker- en rechterluidsprekers instellen.
[U kunt het geluid zelfs horen als de geluidswaarde is ingesteld op 0.]
Opmerking
• Als u het beeld regelt met de functie Custom, wordt MagicBright overgeschakeld naar de modus Custom.
Auto Volume
[MENU]
˧
[
/
]
˧
[ENTER]
˧
[
/
]
˧
[ENTER]
˧
[
/
]
˧
[ENTER]
Vermindert het verschil in volumeniveau tussen de zendkanalen.
1) Off 2) On
\
W\UGGG]W\UGGG] YWW^TXYTXWGGG㝘䟸GXa\\a\\YWW^TXYTXWGGG㝘䟸GXa\\a\\

SRS TS XT
[MENU]
˧
[
/
]
˧
[ENTER]
˧
[
/
]
˧
[ENTER]
˧
[
/
]
˧
[ENTER]
SRS TS XT (SRS-tekst) is een gepatenteerde SRS-technologie die ervoor zorgt dat het afspelen van 5.1-
inhoud van meerdere kanalen via twee luidsprekers verloopt. Trusurround biedt een fascinerende virtuele
surround geluidservaring via elk weergavesysteem met twee luidsprekers, waaronder ook ingebouwde
televisieluidsprekers.
Het is volledig compatibel met alle apparatuur voor meerdere kanalen.
1) Of
f
2) On
[De rechtstreekse knop op de afstandsbediening is de knop 'SRS'.]
Sound Select
[MENU]
˧
[
/
]
˧
[ENTER]
˧
[
/
]
˧
[ENTER]
˧
[
/
]
˧
[ENTER]
Als de PIP-functie geactiveerd is, kunt u alleen kiezen tussen hoofd- of subsc herm (main of sub).
1) Main
2) Sub
[Beschikbare modi : PIP]
Setup
Beschikbare modi
PC / BNC / DVI
AV
S-Video
Component
DVI-Video
Language
[MENU]
˧
[
/
]
˧
[ENTER]
˧
[ENTER]
˧
[
/
]
˧
[ENTER]
U kunt een keuze maken uit zeven talen.
Opmerking
• De taal die u geselecteerd heeft is alleen van toepassing op de OSD.
Het heeft invloed op de software die op uw computer draait.
Time
U kunt kiezen uit vier tijdsinstellingen: Clock Set, Sleep Timer, On Timer en Off Timer.
1)
Clock Set
[MENU]
˧
[
/
]
˧
[ENTER]
˧
[
/
]
˧
[ENTER]
˧
[ENTER]
˧
[< / >]
˧
[ENTER]
Huidige tijdsinstelling.
2) Sleep Timer
[MENU]
˧
[
/
]
˧
[ENTER]
˧
[
/
]
˧
[ENTER]
˧
[
/
]
˧
[ENTER]
˧
[< / >]
˧
[
/
]
˧
[ENTER]
˧
[< / >]
˧
[
/
]
˧
[ENTER]
Hiermee kunt u de monitor zo instellen dat het toestel binnen een aantal minuten automatisch wordt
uitgezet. (Off , 30, 60, 90, 120, 150, 180)
3) On Timer
[MENU]
˧
[
/
]
˧
[ENTER]
˧
[
/
]
˧
[ENTER]
˧
[
/
]
˧
[ENTER]
˧
[< / >]
˧
[
/
]
˧
[ENTER]
(Off , 30, 60, 90, 120, 150, 180)
Hiermee kunt u de modus en het geluidsniveau regelen op het moment dat de monitor automatisch wordt
ingeschakeld.
\
W\UGGG^W\UGGG^ YWW^TXYTXWGGG㝘䟸GXa\\a\\YWW^TXYTXWGGG㝘䟸GXa\\a\\

[MENU]
˧
[
/
]
˧
[ENTER]
˧
[
/
]
˧
[ENTER]
˧
[
/
]
˧
[ENTER]
˧
[< / >]
˧
[
/
]
˧
[ENTER]
Hiermee kunt u de modus en het geluidsniveau regelen op het moment dat de monitor automatisch wordt
ingeschakeld.
Opmerking
• Als u Yes selecteert bij On Timer, Off Timer terwijl u Clock Set niet hebt ingesteld, zal “Set the clock first"
verschijnen. "Set the clock first.".
Menu Transparency
[MENU]
˧
[
/
]
˧
[ENTER]
˧
[
/
]
˧
[ENTER]
˧
[
/
]
˧
[ENTER]
Met deze optie kunt u de transparantie van de achtergrond van het OSD-menu instellen.
1) High
2) Medium
3) Low
4) Opaque
Safety Lock PIN
[MENU]
˧
[
/
]
˧
[ENTER]
˧
[
/
]
˧
[ENTER]
˧
[0~9]
˧
[0~9]
˧
[0~9]
U kunt het paswoord veranderen.
Energy Saving
[MENU]
˧
[
/
]
˧
[ENTER]
˧
[
/
]
˧
[ENTER]
˧
[
/
]
˧
[ENTER]
˧
[MENU]
Deze functie past het stroomverbruik van de eenheid aan om stroom te sparen.
1) On
2) Off
Opmerking
• Als u het energieverbruik gedurende stand-by wilt verminderen, stelt u Energy Saving in op On. Als
Energie Saving (Energiebesparing) echter is ingesteld op On, kunt u de functie Power On van de MDC en
de functie WOL (Wake On LAN) van MagicNet op de afstandsbediening niet gebruiken.
Video Wall
Een videomuur is een aantal videoschermen die met elkaar zijn verbonden, zodat op ieder scherm een
gedeelte van het geheel wordt weergegeven of zodat op ieder scherm het beeld wordt herhaald.
Wanneer Video Wall ingeschakeld is, kunnen de Video Wall-scherminstellingen aangepast worden.
1) Video Wall
[MENU]
˧
[
/
]
˧
[ENTER]
˧
[
/
]
˧
[ENTER]
˧
[ENTER]
˧
[
/
]
˧
[ENTER]
U kunt de plaats selecteren door in de geselecteerde modus op een nummer te drukken.
-
Off
-
On
2) Format
[MENU]
˧
[
/
]
˧
[ENTER]
˧
[
/
]
˧
[ENTER]
˧
[
/
]
˧
[ENTER]
˧
[
/
]
˧
[ENTER]
De indeling kan worden geselecteerd om het scherm te splitsen.
-
Full
Zorgt voor een volledig weergegeven scherm zonder marges.
-
Natural
Geeft de kleuren op natuurlijke wijze weer terwijl de originele hoogte-breedteverhoudingen in tact
worden gelaten.
3) Screen Divider
[MENU]
˧
[
/
]
˧
[ENTER]
˧
[
/
]
˧
[ENTER]
˧
[
/
]
˧
[ENTER]
˧
[
/
]
˧
[ENTER]
De videomuur kan op verschillende manieren worden ingedeeld.
U kunt gebruikmaken van verschillende schermen en deze op verschillende manieren indelen.
• Selecteer een modus in Screen divider (Schermindeling)
• Selecteer in Display Selection (Weergaveselectie) een weergave.
• U kunt de plaats selecteren door in de geselecteerde modus op een nummer te drukken.
-
2 x 2
-
3 x 3
W\UGGG_W\UGGG_ YWW^TXYTXWGGG㝘䟸GXa\\a\\YWW^TXYTXWGGG㝘䟸GXa\\a\\
4) Off Timer

-
4 x 4
-
5 x 5
-
1 x 2
-
2 x 1
-
1 x 5
-
5 x 1
Opmerking
• Wanneer de Video Wall (Videomuur) aanstaat, zijn PIP (BIB), Auto Adjustment (Auto-afstellen), Image
Lock (Beeldblokkering) en Size (Formaat)-functies niet beschikbaar. Als u Video Wall (Videomuur) start
terwijl PIP (BIB) aanstaat, wordt PIP Off (BIB uit) gezet. Video Wall werkt niet in de modus MagicNet.
Safety Screen
De functie Safety Screen wordt gebruikt om ingebrande beelden te voorkomen bij het langdurig weergeven van
een stilstaand beeld.
- Met de functie Safety Screen verschuift het beeld na de aangegeven tijdsperiode.
- Deze functie is niet beschikbaar wanneer de stroom uitgeschakeld is.
1) Safety Screen
[MENU]
˧
[
/
]
˧
[ENTER]
˧
[
/
]
˧
[ENTER]
˧
[ENTER]
˧
[
/
]
˧
[ENTER]
Bepaalt of de functie Safety Screen On of Off moet worden geschakeld.
-
Of
f
-
On
2) Interval
[MENU]
˧
[
/
]
˧
[ENTER]
˧
[
/
]
˧
[ENTER]
˧
[
/
]
˧
[ENTER]
˧
[
/
]
˧
[ENTER]
Bepaalt het tijdsinterval voor het uitvoeren van de bewerking Screen Scroll (Schermverschuiving). (1-10
uur)
De tijd wordt berekend aan de hand van de tijd waarin het apparaat aanstaat.
Standaard is de tijd ingesteld op 10 uur.
-
(1-10 uur)
3) Second
[MENU]
˧
[
/
]
˧
[ENTER]
˧
[
/
]
˧
[ENTER]
˧
[
/
]
˧
[ENTER]
˧
[
/
]
˧
[ENTER]
Bepaalt de duur van de uitvoering van de Safety Screen -operatie. (1-5 seconden)
Standaard is de tijd ingesteld op 5 seconden.
-
Type-Scroll : 1~5 Second
-
Type-Pixel, Bar, Eraser : 10~50 Second
4) Type
[MENU]
˧
[
/
]
˧
[ENTER]
˧
[
/
]
˧
[ENTER]
˧
[
/
]
˧
[ENTER]
˧
[
/
]
˧
[ENTER]
U kunt het Safety Screen Type wijzigen.
-
Scroll
-
Pixel
-
Bar
-
Erase
r
Resolution Select
[MENU]
˧
[
/
]
˧
[ENTER]
˧
[
/
]
˧
[ENTER]
˧
[
/
]
˧
[ENTER]
Als het beeld niet juist wordt weergegeven op het scherm wanneer u de resolutie van de videokaart van de
computer instelt op 1024 x 768 @ 60Hz, 1280 x 768 @ 60Hz, 1360 x 768 @ 60Hz of 1366 x768 @ 60Hz, kunt
u deze functie gebruiken (Resolution Select) om het beeld in de gespecificeerde resolutie weer te geven op het
scherm.
(Alleen beschikbaar in modus PC/BNC.)
1) Off
2) 1024 X 768
3) 1280 X 768
4) 1360 X 768
5) 1366 X 768
Opmerking
• Het selecteren van het menu is alleen toegestaan wanneer de resolutie is ingesteld op 1024 x 768 @
60Hz, 1280 x 768 @ 60Hz, 1360 x 768 @ 60Hz of 1366 x768 @ 60Hz.
W\UGGG`W\UGGG` YWW^TXYTXWGGG㝘䟸GXa\\a\\YWW^TXYTXWGGG㝘䟸GXa\\a\\

Lamp Control
[MENU]
˧
[
/
]
˧
[ENTER]
˧
[
/
]
˧
[ENTER]
˧
[ENTER]
˧
[< / >]
˧
[ENTER]
Wordt gebruikt om het achtergrondlicht aan te passen en zo energie te besparen.
Power On Adjustment
[MENU]
˧
[
/
]
˧
[ENTER]
˧
[
/
]
˧
[ENTER]
˧
[ENTER]
˧
[
/
]
˧
[ENTER]
Past de Power On time voor het scherm aan.
*Waarschuwing: Verhoog de Power On time ter voorkoming van een te hoog voltage.
Reset
U kunt het paswoord veranderen.
1)
Image Reset
[MENU]
˧
[
/
]
˧
[ENTER]
˧
[
/
]
˧
[ENTER]
˧
[ENTER]
˧
[< / >]
˧
[ENTER]
(Alleen beschikbaar in modus PC/BNC.)
2)
Color Reset
[MENU]
˧
[
/
]
˧
[ENTER]
˧
[
/
]
˧
[ENTER]
˧
[
/
]
˧
[ENTER]
˧
[< / >]
˧
[ENTER]
Multi Control
Beschikbare modi
PC / BNC / DVI
AV
S-Video
Component
DVI-Video
Multi Control
[MENU]
˧
[
/
]
˧
[ENTER]
˧
[
/
]
˧
[ENTER]
˧
[ENTER]
˧
[0~9]
Wijst een individuele ID toe aan het toestel.
1) ID Setup
Onderscheidende ID's aan het toestel toewijzen.
2) ID Input
Hiermee kunt u de zenderfuncties per toestel instellen.. Alleen het toestel waarvan de ID overeenkomt met
de zenderinstelling, wordt geactiveerd.
Directe bedieningsfuncties
Beschikbare modi
PC / BNC / DVI
AV
S-Video
Component
DVI-Video
MDC
Ga naar het Multi Control OSD-scherm.
LOCK
Hiermee stelt u de Safety Lock <veiligheidsslotfunctie> in.
1) Lock On
Het slot wordt aangezet.
2) Lock Off
Het slot wordt uitgezet.
Opmerking
]
W\UGGGXWW\UGGGXW YWW^TXYTXWGGG㝘䟸GXa\\a\\YWW^TXYTXWGGG㝘䟸GXa\\a\\

• Wanneer u de functie Lock (Vergrendelen) instelt, kunt u alleen de vergrendelingsknoppen (Lock) op de
afstandsbediening en op de set gebruiken.
Het standaard ingestelde password (wachtwoord) op het beeldscherm is “0000”.
Opmerking
• Het wachtwoord voor de functie key lock (toetsvergrendeling) terugstellen.
Druk op MUTE
˧
1
˧
8
˧
6
˧
On. Het wachtwoord wordt teruggesteld naar '0000'.Voor het terugstellen
van het wachtwoord hebt u de afstandsbediening nodig.
© 1995~2008 SAMSUNG. Alle rechten voorbehouden
]
W\UGGGXXW\UGGGXX YWW^TXYTXWGGG㝘䟸GXa\\a\\YWW^TXYTXWGGG㝘䟸GXa\\a\\

De kleur en het uiterlijk van het apparaat kunnen variëren afhankelijk van het model, en de productspecificaties
kunnen zonder voorgaand bericht worden gewijzigd met als doel het product te verbeteren.
Problemen oplossen
Controle van de zelftestfunctie
Opmerking
• Controleer de volgende punten zelf voordat u het servicecenter belt. Neem contact op met het
servicecenter als u het probleem zelf niet kunt oplossen.
Controle van de zelftestfunctie
Uw monitor is voorzien van een zelftestfunctie waarmee u kunt controleren of uw monitor correct werkt.
1) Zet zowel uw computer als de monitor uit.
2) Koppel de videokabel los van de achterkant van de computer.
3) Zet de monitor aan.
De onderstaande afbeelding ("Signaalkabel controleren") verschijnt tegen een zwarte achtergrond wanneer
de monitor normaal functioneert maar geen videosignaal waarneemt: in de zelftestmodus blijft de groende
LED branden en verplaatst het figuur zich over het scherm.
4) Zet uw monitor uit en sluit de video signaalkabel weer aan. Zet vervolgens de computer en de monitor weer
aan.
Als u geen beeld hebt maar de bovenstaande zelftest wel lukt, controleer dan de videokaart en de computer.
Uw
monitor is dan in orde.
Check Cooling System
Als het bericht
"Check Cooling System"
op het scherm wordt weergegeven, betekent dit dat er een probleem is
met de ventilator. Nem contact op met een servicecentrum of vervang de ventilator met een nieuw exemplaar.
Niet-optimale modus
U kunt de resolutie van het scherm ook hoger instellen dan 1360x768. Er zal dan echter enige tijd een bericht
worden weergegeven. Gedurende die tijd, kunt u kiezen de resolutie van het scherm te wijzigen of de huidige
resolutie te behouden. Als de vernieuwingsfrequentie hoger is dan 85 Hz, zal het scherm zwart worden omdat
frequenties hoger dan 85 Hz niet door de monitor worden ondersteund.
Veiligheidsvoorschriften
Inleiding
Aansluitingen
De software gebruiken
De monitor aanpassen
Problemen oplossen
Controle van de
zelftestfunctie
Controlelijst
Vraag & antwoord
Specificaties
Informatie
Appendix
]
zt{T[WXXTk__UGGG]\zt{T[WXXTk__UGGG]\ YWW^TXXTY_GGG㝘䟸GYa\_aY]YWW^TXXTY_GGG㝘䟸GYa\_aY]

Opmerking
•Zie Specificaties > Vooraf ingestelde timingmodi voor de resoluties of frequentie die door de monitor
worden ondersteund.
Onderhoud en reinigen
1) De monitorbehuizing onderhouden.
Schoonmaken met een zachte doek nadat u de stekker uit het stopcontact hebt gehaald.
• Geen benzeen, verfverdunner of andere ontvlambare stoffen en ook
geen natte doek gebruiken.
• Wij raden u een reinigingsmiddel van Samsung aan om schade aan
het scherm te voorkomen.
2) Het Flat Panel Display-scherm onderhouden
Reinig het beeldscherm voorzichtig met een zachte doek (katoenflanel).
• Nooit aceton, benzeen of verfverdunner gebruiken.
(Dit kan barsten of vervorming van het schermoppervlak
veroorzaken.)
• Als u schade veroorzaakt, moet u zelf de kosten voor de reparatie
betalen.
Symptomen en aanbevolen handelingen
Opmerking
• Een monitor stelt de visuele signalen die van de computer worden ontvangen, opnieuw samen. Als u
daarom een probleem het de pc of de videokaart ondervindt, kan het scherm leeg zijn, slechte kleuren en
ruis hebben, de videomodus niet worden ondersteund, enz. Controleer in dit geval eerst de bron van het
probleem en neem vervolgens contact op met het servicecenter of uw dealer.
1) Controleer of de voedingskabel en de kabel goed op de computer zijn aangesloten.
2) Controleer of u tijdens het opstarten van de computer meer dan 3 pieptonen hoort.
(Als dit het geval is, is het moederbord van de computer toe aan een servicebeurt.)
3) Als u een nieuwe videokaart hebt geïnstalleerd of zelf uw pc hebt samengesteld, controleert u of u het
video(adapter)stuurprogramma en het monitorstuurprogramma hebt geïnstalleerd.
4) Controleer of de scanratio van het beeldscherm ingesteld is op 50 Hz ~ 85 Hz.
(Overschrijd niet de 60 Hz wanneer u de maximumresolutie gebruikt.)
5) Als u problemen ondervindt met het installeren van het adapter(video)stuurprogramma, start u de computer
in de Veilige modus op, verwijdert u de Beeldschermadapter via "
Configuratiescherm, Systeem,
Apparaatbeheer
" en start u de computer opnieuw op en installeert u het adapter(video)stuurprogramma.
Controlelijst
Opmerking
• In de volgende tabel vindt u een lijst met mogelijke problemen en hun oplossingen. Voordat u het
servicecenter belt, controleert u de informatie in deze sectie en kijkt u of u het probleem zelf kunt oplossen.
Als u assistentie nodig hebt, belt u het telefoonnummer dat u in de sectie Informatie vindt of neemt u
contact op met uw dealer.
]
zt{T[WXXTk__UGGG]]zt{T[WXXTk__UGGG]] YWW^TXXTY_GGG㝘䟸GYa\_aY]YWW^TXXTY_GGG㝘䟸GYa\_aY]

Problemen met de installatie
Opmerking
• Hier worden problemen met de installatie van de monitor en hun oplossingen beschreven.
problemen Mulige løsninger
Het monitorscherm knippert
z
Controleer of de signaalkabel tussen de computer en de monitor
goed is aangesloten en bevestigd.
(Zie Aansluiten op een computer)
Problemen met het scherm
Opmerking
• Hier worden problemen met het monitorscherm en hun oplossingen beschreven.
problemen Mulige løsninger
Het scherm is leeg en het
voedingslampje brandt niet
z
Zorg dat de voedingskabel goed is aangesloten en dat de LCD-
monitor is ingeschakeld.
(Zie De monitor aansluiten)
Bericht "Check Signal Cable"
z
Controleer of de signaalkabel goed op de PC of videobron is
aangesloten.
(Zie De monitor aansluiten)
z
Zorg dat de pc of videobron is ingeschakeld.
Bericht "Not Optimum Mode"
z
Controleer de maximumresolutie en de frequentie van de
videoadaptor.
z
Vergelijk deze waarden met de gegevens in grafiek Vooraf
ingestelde timingmodi.
Het beeld rolt verticaal.
z
Controleer of de signaalkabel goed is vastgemaakt.
Maak de kabel nogmaals goed vast.
(Zie Aansluiten op een computer)
De afbeelding is niet helder. Het
beeld is wazig.
z
Voer Coarse en Fine.
z
Nogmaals inschakelen nadat alle accessoires zijn verwijderd
videoverlengkabel, enz.
z
Stel de resolutie en de frequentie in volgens het aanbevolen
bereik.
Het beeld is onstabiel en trilt.
U ziet spookbeelden op het beeld.
z
Controleer of de ingestelde resolutie en frequentie van de
computervideokaart binnen het bereik van de monitor vallen.
Raadpleeg de Informatie onder het monitormenu en de Vooraf
ingestelde timingmodi.
De afbeelding is te licht of te
donker
z
Regel de Brightness en het Contrast.
(Zie Brightness, Contrast)
De schermkleur is inconsistent.
U ziet zwarte schaduwen op de
kleurenafbeelding.
De witte kleur is van matige
kwaliteit.
z
Regel de kleur met Custom in het menu OSD-kleurregeling.
Het groene voedingslampje
knippert.
z
De monitor slaat momenteel de wijzigingen op die in het OSD-
geheugen zijn aangebracht.
Het scherm is leeg en het groene
voedingslampje brandt permanent
z
De monitor gebruikt het voedingsbeheersysteem.
zt{T[WXXTk__UGGG]^zt{T[WXXTk__UGGG]^ YWW^TXXTY_GGG㝘䟸GYa\_aY]YWW^TXXTY_GGG㝘䟸GYa\_aY]

of knippert elke halve seconde of
elke seconde.
z
Druk op een toets op het toetsenbord.
Het scherm is leeg en knippert.
z
Indien u de melding “TEST GOOD” op het scherm ziet wanneer
u de knop MENU indrukt, dient u de kabelverbinding tussen
monitor en computer te controleren om er zeker van te zijn dat
de connector goed is aangesloten.
Problemen met betrekking tot de audio
Opmerking
• Hier worden problemen met audiosignalen en hun oplossingen beschreven.
problemen Mulige løsninger
Geen geluid
z
Controleer of de audiokabel stevig is aangesloten op de audio-
ingang van uw monitor en de audio-uitgang van uw geluidskaart.
(Zie De monitor aansluiten)
z
Controleer het volumeniveau.
Geluidsniveau is te laag
z
Controleer het volumeniveau.
z
Als het volume nog steeds te laag is nadat u de bediening op
het maximale niveau hebt ingesteld, moet u de volumeregeling
op de geluidskaart of in het softwareprogramma van de
computer controleren.
Het geluid klinkt te hoog of te laag
z
Stel de Treble en Bassbas op het juiste niveau in.
Problemen met de afstandsbediening
Opmerking
• Hier worden problemen met de afstandsbediening en hun oplossingen beschreven.
problemen Mulige løsninger
De knoppen van de
afstandsbediening reageren niet.
z
Controleer de batterijpolen (+/-).
z
Controleer of de batterijen leeg zijn.
z
Controleer of de voeding is ingeschakeld.
z
Controleer of de voedingskabel goed is bevestigd.
z
Controleer of er een speciale fluorescerende lamp of neonlamp
in de buurt is.
Vraag & antwoord
Vraag Antwoord
Hoe kan ik de frequentie
veranderen?
De frequentie kan worden gewijzigd door de videokaart opnieuw te
configureren.
De mogelijkheden van de videokaart hangen niet alleen van de kaart
af, maar ook van de gebruikte versie van het stuurprogramma.
(Raadpleeg de handleiding van de computer of de videokaart voor
meer informatie.)
Hoe kan ik de resolutie
veranderen?
z
Windows XP:
Kies de gewenste resolutie en het aantal kleuren in
Configuratiescherm (Control Panel), Appearance and Themes
(Bureaublad - thema's), Beeldscherm (Display), Instellingen
(Settings).
z
Windows ME/2000:
]
zt{T[WXXTk__UGGG]_zt{T[WXXTk__UGGG]_ YWW^TXXTY_GGG㝘䟸GYa\_aY]YWW^TXXTY_GGG㝘䟸GYa\_aY]

Kies de gewenste resolutie en het aantal kleuren in
Configuratiescherm (Control Panel), Beeldscherm (Display),
Instellingen (Settings).
oor details kunt u contact opnemen met de fabrikant van de
videokaart.
Hoe kan ik gebruik maken van
energiebeheer?
z
Windows XP:
Kies de gewenste resolutie en het aantal kleuren in
Configuratiescherm (Control Panel), Appearance and Themes
(Bureaublad - thema's), Beeldscherm (Display), Instellingen
(Settings).
Indstil funktionen i BIOS SETUP på computeren. (Se manualen
til Windows/computeren).
z
Windows ME/2000:
Kies de gewenste resolutie en het aantal kleuren in
Configuratiescherm (Control Panel), Beeldscherm (Display),
Instellingen (Settings).
Indstil funktionen i BIOS SETUP på computeren. (Se manualen
til Windows/computeren).
Hoe kan ik de buitenkant van de
behuizing en het oppervlak van de
beeldbuis reinigen?
Koppel het netsnoer los en reinig de monitor met een zachte doek en
een reinigingsmiddel of gewoon water.
Zorg dat er geen resten reinigingsmiddel achterblijven en voorkom
krassen op de behuizing en het schermoppervlak. Zorg beslist dat er
geen water e.d. in de monitor terecht kan komen.
© 1995~2008 SAMSUNG. Alle rechten voorbehouden
]
zt{T[WXXTk__UGGG]`zt{T[WXXTk__UGGG]` YWW^TXXTY_GGG㝘䟸GYa\_aY]YWW^TXXTY_GGG㝘䟸GYa\_aY]

De kleur en het uiterlijk van het apparaat kunnen variëren afhankelijk van het model, en de productspecificaties
kunnen zonder voorgaand bericht worden gewijzigd met als doel het product te verbeteren.
Specificaties
Algemeen
Algemeen
Algemeen
Model SMT-3211
LCD-scherm
Afmeting 32 inch diagonaal (80 cm)
Beeldgrootte 697,6845 mm (H) x 392,256 mm (V)
Pixel Pitch 0,51075 mm (H) x 0,51075 mm (V)
Synchronisatie
Horizontaal 30 ~ 81 kHz
Verticaal 56 ~ 75 Hz
Beeldschermkleur
Beeldschermkleur 16,7 miljoen kleuren
Resolutie
Optimale resolutie
1360 x 768 / 1366 x 768 @ 60 Hz, afhankelijk van de gebruikte grafische
kaart
Maximale resolutie 1366 x 768 @ 60 Hz
Ingangssignaal, Afgebroken
RGB analoog, DVI (Digital Visual Interface), compliant digital RGB.
0.7Vp-p positief bij 75 ±10% Aparte H/V-sync, Composiete sync, SOG, TTL-niveau, positief of negatief.
Maximale pixelfrequentie
100 MHz
Aansluitwaarden
100-240 V wisselstroom~ (+/- 10 %), 50/60 Hz
Signaalkabel
15 pin naar 15 pin D-sub-kabel, afneembaar
DVI-D naar DVI-D-connector, afneembaar(optioneel)
Signaalconnector
D-sub, BNC, DVI-D, YPbPr, S-VHS, VCR
Afmetingen (BxHxD)/Gewicht
780 X 482 X 107 mm / 30,1 X 19,0 X 4,6 inch (zonder standaard)
780 X 530 X 223 mm / 30,1 X 20,9 X 8,8 inch (met standaard)
VESA Bevestigingsinterface
200 mm x 200 mm (voor gebruik met het speciale wandstatief)
Omgevingsfactoren
In bedrijf
Temperatuur: 10 °C ~ 40 °C (50 °F ~ 104 °F)
Vochtigheid: 10% ~ 80%, geen condensvorming
Opslag
Temperatuur: -20 °C ~ 45 °C (-4 °F ~ 113 °F)
Vochtigheid: 5% ~ 95%, geen condensvorming
Audio Characteristics
Audio Input 1 RCA-jack Rood(R) Wit (L), 0,5 Vrms (-9 dB)
Veiligheidsvoorschriften
Inleiding
Aansluitingen
De software gebruiken
De monitor aanpassen
Problemen oplossen
Specificaties
Algemeen
Energiebeheer
Voorkeurinstellingen
informatie
Appendix
]
^TUGGGX^TUGGGX YWW^TXYTYWGGG㝘䟸GXaWWaZ]YWW^TXYTYWGGG㝘䟸GXaWWaZ]
, 16,1 kg/35,4 lbs

Audio Input 2 RCA-jack Rood(R) Wit (L), 0,5 Vrms (-9 dB)
PC Audio Input 3,5 Ø stereoplug, 0,5 Vrms (-9 dB)
Frequency Radiofrequentie: 80 Hz ~ 15 kHz (bij -3 dB)
Response A/V: 80 Hz ~ 20 kHz (bij -3 dB)
Plug-and-play mogelijkheden
Deze monitor kan op alle Plug en Play compatibele systemen worden aangesloten. De monitor en de
computer zoeken dan samen de beste instellingen uit. In de meeste gevallen gebeurt dit automatisch, tenzij
de gebruiker zelf andere instellingen wil kiezen.
Aanvaardbare punten (Dot Acceptable)
Bij de productie van de TFT/LCD-beeldschermen voor dit product wordt er gebruik gemaakt van
geavanceerde halfgeleiderstechnologie, met een nauwkeurigheid van tenminste 1ppm (per 1 miljoen). De
pixels van de kleuren ROOD, GROEN, BLAUW en WIT lijken soms lichter en soms zijn er zwarte pixels
zichtbaar. U kunt het beeldscherm gewoon gebruiken, zonder dat u zich hierover zorgen hoeft te maken.
• ijvoorbeeld, het aantal TFT LCD subpixels dat dit product bevat is 3.133.440.
Opmerking
• Het ontwerp en de specificaties kunnen zonder voorafgaande kennisgeving worden gewijzigd.
Apparaat van klasse B (Informatie-/communicatieapparatuur voor thuisgebruik)
• Dit apparaat voldoet aan de vereisten voor elektromagnetische compatibiliteit voor thuisgebruik en kan
overal worden gebruikt, inclusief woongebieden.
(Een apparaat van klasse B straalt minder elektromagnetische golven uit dan een apparaat van Klasse A.)
Energiebeheer
De PowerSaver op deze monitor bespaart energie door uw monitor over te schakelen naar een stand waarin hij
minder stroom verbruikt. Deze functie wordt ingeschakeld als u de monitor gedurende langere niet gebruikt. Als
u een toets van het toetsenbord indrukt of met de muis beweegt, wordt de monitor weer automatisch
geactiveerd. Als u energie wilt besparen, zet dan uw monitor UIT als u hem langere tijd niet meer nodig heeft.
Het PowerSaver-systeem werkt met een VESA DPM-videokaart die in uw computer is geïnstalleerd. Deze
functie kunt u instellen met de software op uw computer.
Status Normaal gebruik De uit-stand
Uitzetten
EPA/ENERGY 2000
Uitzetten
Aan/uit-lampje Groene Groene, Knipperen Oranje Zwart
Stroomverbruik
Minder dan
160 W
Minder dan 1 W
(Uit-stand)
Minder dan 1 W
(Aan/Uit-knop)
0 W (Schakelaar)
Deze monitor voldoet aan de EPA ENERGY STAR
®
en ENERGY2000
normen bij aansluiting op een computer die beschikt over VESA DPM
functionaliteit.
A
ls ENERGY STAR
®
Partner heeft SAMSUNG vastgesteld dat dit product
voldoet aan de ENERGY STAR
®
richtlijnen voor efficiënt energiegebruik.
Voorkeurinstellingen
Voorkeurinstellingen
Als het signaal dat van de computer wordt ontvangen gelijk is aan een van de volgende voorkeurinstellingen,
wordt de monito
r hier automatisch op ingesteld. Bij afwijkende signalen kan het scherm leeg blijven ondanks dat
de aan/uit LED indicator brandt. Zie de handleiding van de videokaart en stel het beeldscherm als volgt in.
Weergavemodus
Horizontale
frequentie
(kHz)
Verticale
frequentie
(Hz)
Pixelfrequentie
(MHz)
Synchronisatie Polariteit
(H/V)
MAC, 640 x 480 35,000 66,667 30,240 -/-
MAC, 832 x 624 49,726 74,551 49,500 +/+
IBM, 640 x 350 31,469 70,086 25,175 +/-
IBM, 640 x 480 31,469 59,940 25,175 -/-
^TUGGGY^TUGGGY YWW^TXYTYWGGG㝘䟸GXaWWa[XYWW^TXYTYWGGG㝘䟸GXaWWa[X

IBM, 720 x 400 31,469 70,087 28,322 -/+
VESA, 640 x 480 37,861 72,809 31,500 -/-
VESA, 640 x 480 37,500 75,000 31,500 -/-
VESA, 640 x 480 43,269 85,008 36,000 -/-
VESA, 800 x 600 35,156 56,250 36,000 +/+
VESA, 800 x 600 37,879 60,317 40,000 +/+
VESA, 800 x 600 48,077 72,188 50,000 +/+
VESA, 800 x600 46,875 75,000 49,500 +/+
VESA, 800 x600 53,674 85,000 56,250 +/+
VESA, 1024 x 768 48,363 60,004 65,000 -/-
VESA, 1024 x 768 56,476 70,069 75,000 -/-
VESA, 1024 x 768 60,023 75,029 78,750 +/+
VESA, 1024 x 768 68,677 85,997 94,500 +/+
VESA, 1360 x 768 47,712 60,000 85,500 +/+
Horizontale frequentie
Het aantal horizontale lijnen over de hele breedte van het scherm dat per
seconde kan worden afgebeeld, wordt aangeduid als horizontale
frequentie, met: kHz
Verticale frequentie
Net als een tl-buis moet ook een monitor om flikkeren te voorkomen het
beeld een groot aantal keren per seconde herhalen (verversen). Dit wordt
aangeduid als verticale frequentie of refresh rate, met Hz als eenheid.
met: Hz
© 2008 Samsung Electronics Co., Ltd. Alle rechten voorbehouden
^TUGGGZ^TUGGGZ YWW^TXYTYWGGG㝘䟸GXaWWa[XYWW^TXYTYWGGG㝘䟸GXaWWa[X

De kleur en het uiterlijk van het apparaat kunnen variëren afhankelijk van het model, en de productspecificaties
kunnen zonder voorgaand bericht worden gewijzigd met als doel het product te verbeteren.
Informatie
Voor een betere weergave
Stel de resolutie en de refresh rate (herhalingsfrequentie) in via het configuratiescherm van de computer,
om een zo optimaal mogelijke beeldkwaliteit te krijgen.
• Resolutie: 1360 x 768
• Verticale frequentie (refresh rate): 60 Hz
Bij de productie van de TFT/LCD-beeldschermen voor dit product wordt er gebruik gemaakt van
geavanceerde halfgeleiderstechnologie, met een nauwkeurigheid van tenminste 1ppm (per 1 miljoen). De
pixels van de kleuren ROOD, GROEN, BLAUW en WIT lijken soms lichter en soms zijn er zwarte pixels
zichtbaar.
U kunt het beeldscherm gewoon gebruiken, zonder dat u zich hierover zorgen hoeft te maken.
• Bijvoorbeeld, het aantal TFT LCD subpixels dat dit product bevat is 3.133.440.
Als u de monitor en het beeldscherm wilt schoonmaken, zorg er dan voor dat u de aanbevolen
hoeveelheid schoonmaakmiddel gebruikt en een zachte droge doek. Veeg zacht en behoedzaam over het
LCD-scherm.
Als u te hard over het beeldscherm veegt, kan er een vlek ontstaan.
Als u niet tevreden bent over de kwaliteit van het beeld, kunt het beste de "Auto-aanpassingsfunctie"
activeren.
Als uw beeldscherm dan nog steeds ruis vertoont, maak dan gebruik van de FINE/COARSE-
aanpassingsfunctie.
Als het beeld gedurende langere tijd stilstaat, kan de afbeelding licht "inbranden".
Zet de monitor in de spaarstand of activeer een screensaver, als u gedurende langere tijd de monitor niet
gebruikt.
PRODUCTINFORMATIE (bestand tegen beeld vasthouden)
Wat is scherminbranding?
Scherminbranding komt mogelijk niet voor als een LCD-scherm onder normale omstandigheden wordt
gebruikt.
Normale omstandigheden worden bepaald door continu veranderende videopatronen. Als het LCD-scherm
voor langere tijd wordt gebruikt met een vast patroon (meer dan 12 uur), is er mogelijk een klein verschil in
het voltage tussen de elektroden die de vloeibare kristallen in pixels veranderen. Het voltageverschil tussen
de elektroden verhoogt geleidelijk waardoor de vloeibare kristallen overhellen. Als dit gebeurt, is het mogelijk
dat het vorige beeld zichtbaar is wanneer het patroon wordt gewijzigd. Om dit te voorkomen, moet het
vergrote voltageverschil worden verlaagd.
Veiligheidsvoorschriften
Inleiding
Aansluitingen
De software gebruiken
De monitor aanpassen
Problemen oplossen
Specificaties
Informatie
Voor een betere weergave
PRODUCTINFORMATIE
(bestand tegen beeld
vasthouden)
Appendix
^
zt{T[WXXTk__UGGG^Zzt{T[WXXTk__UGGG^Z YWW^TXXTY_GGG㝘䟸GYa\_aY]YWW^TXXTY_GGG㝘䟸GYa\_aY]

Uitschakelen, schermbeveiliging of energiebesparende modus
z
Schakel de monitor 4 uur uit nadat deze 20 uur achterelkaar in gebruik is geweest.
z
Schakel de monitor 2 uur uit nadat deze 12 uur achterelkaar in gebruik is geweest.
z
Stel de monitor in op uitschakelen met Power Scheme (Energiebeheerschema) in Display Properties
(Eigenschappen beeldscherm) van de computer.
z
Gebruik indien mogelijk een schermbeveiliging. - Een schermbeveiliging in één kleur of een
bewegend beeld wordt aanbevolen.
De kleurgegevens regelmatig wijzigen
Opmerking
• Gebruik twee verschillende kleuren.
Roteer elke 30 minuten de kleurgegevens met 2 andere kleuren.
z
Vermijd een combinatie van tekens en achtergrondkleur met een groot verschil in helderheid.
Vermijd grijze kleuren. Deze kunnen gemakkelijk scherminbranding veroorzaken.
Vermijd: kleuren met een groot verschil in helderheid (zwart en wit, grijs).
De kleur van de tekens regelmatig wijzigen
z
Gebruik heldere kleuren met weinig verschil in helderheid
- Cyclus: wijzig elke 30 minuten de kleur van de tekens en de achtergrond.
^
zt{T[WXXTk__UGGG^[zt{T[WXXTk__UGGG^[ YWW^TXXTY_GGG㝘䟸GYa\_aY]YWW^TXXTY_GGG㝘䟸GYa\_aY]

z
Wijzig elke 30 minuten de bewegende tekens.
z
Voor alle delen op het scherm geldt dat u regelmatig een bewegend beeld met logo moet
weergeven.
- Cyclus: geef na 4 uur gebruik 60 seconden een bewegend beeld met logo weer.
z
De beste manier om uw monitor te beschermen tegen inbranding is om het scherm uit te schakelen
of uw computer of systeem in te stellen met een schermbeveiliging wanneer u de monitor niet
gebruikt. Ook is de garantie beperkt als u zich niet aan de gebruiksaanwijzingen houdt.
De schermverschuivingsfunctie van het product toepassen
z
De schermverschuivingsfunctie toepassen
- Symptoom: Horizontale balk met zwarte kleur omhoog en omlaag verplaatsen.
- Methode selecteren
. Gebruiksaanwijzingen: OSD Menu -> Set Up -> Safety Screen -> Screen Scroll (OSD-menu ->
Instellen -> Veiligheidsscherm -> Schermverschuiving)
. Tijdsinterval: 1 ~ 10 uur (aanbevolen: 1)
. Tijdsduur: 1 ~ 5 seconden (aanbevolen: 5)
Opmerking
• (Controleer in de Gebruikershandleiding op de cd het onderwerp 'OSD-functies'. Voor sommige modellen
is dit niet beschikbaar.)
De schermpixelfunctie van het product toepassen
z
De schermpixelfunctie toepassen
- Symptoom: Stip met zwarte kleur omhoog en omlaag verplaatsen.
- Methode selecteren
. Gebruiksaanwijzingen: OSD Menu -> Set Up -> Safety Screen -> Pixel (OSD-menu -> Instellen ->
Veiligheidsscherm -> Pixel)
. Tijdsinterval: 1 ~ 10 uur (aanbevolen: 1)
. Tijdsduur: 10 ~ 50 seconden (aanbevolen: 50)
z
De schermbalkfunctie toepassen
- Symptoom: Horizontale/verticale balk met zwarte kleur omhoog en omlaag verplaatsen.
^
zt{T[WXXTk__UGGG^\zt{T[WXXTk__UGGG^\ YWW^TXXTY_GGG㝘䟸GYa\_aY]YWW^TXXTY_GGG㝘䟸GYa\_aY]

- Methode selecteren
. Gebruiksaanwijzingen: OSD Menu -> Set Up -> Safety Screen -> Bar (OSD-menu -> Instellen ->
Veiligheidsscherm -> Balk)
. Tijdsinterval: 1 ~ 10 uur (aanbevolen: 1)
. Tijdsduur: 10 ~ 50 seconden (aanbevolen: 50)
Opmerking
• (Controleer in de Gebruikershandleiding op de cd het onderwerp 'OSD-functies'. Voor sommige modellen
is dit niet beschikbaar.)
De schermwisfunctie van het product toepassen
z
De schermwisfunctie toepassen
- Symptoom: 2 verticale blokken bewegen terwijl het scherm wordt gewist.
- Methode selecteren
. Gebruiksaanwijzingen: OSD Menu -> Set Up -> Safety Screen -> Eraser (OSD-menu -> Instellen ->
Veiligheidsscherm -> Wisser)
. Tijdsinterval: 1 ~ 10 uur (aanbevolen: 1)
. Tijdsduur: 10 ~ 50 seconden (aanbevolen: 50)
Opmerking
• (Controleer in de Gebruikershandleiding op de cd het onderwerp 'OSD-functies'. Voor sommige modellen
is dit niet beschikbaar.)
© 1995~2008 SAMSUNG. Alle rechten voorbehouden
^
zt{T[WXXTk__UGGG^]zt{T[WXXTk__UGGG^] YWW^TXXTY_GGG㝘䟸GYa\_aY]YWW^TXXTY_GGG㝘䟸GYa\_aY]

De kleur en het uiterlijk van het apparaat kunnen variëren afhankelijk van het model, en de productspecificaties
kunnen zonder voorgaand bericht worden gewijzigd met als doel het product te verbeteren.
Appendix
Neem contact op met SAMSUNG WORLDWIDE
Opmerking
• Wanneer u suggesties of vragen heeft met betrekking tot Samsung producten, gelieve contact op te
nemen met de consumenten dienst van Samsung
Veiligheidsvoorschriften
Inleiding
Aansluitingen
De software gebruiken
De monitor aanpassen
Problemen oplossen
Specificaties
Informatie
Appendix
Neem contact op met
SAMSUNG WORLDWIDE
Woordenlijst
Correcte verwijdering van
dit product
Rechten
^
zt{T[WXXTk__UGGG^^zt{T[WXXTk__UGGG^^ YWW^TXXTY_GGG㝘䟸GYa\_aY]YWW^TXXTY_GGG㝘䟸GYa\_aY]
North America
U.S.A
1-800-SAMSUNG(726-7864) http://www.samsung.com
CANADA
1-800-SAMSUNG(726-7864) http://www.samsung.com/ca
MEXICO
01-800-SAMSUNG(726-7864) http://www.samsung.com
Latin America
ARGENTINE
0800-333-3733 http://www.samsung.com/ar
BRAZIL
0800-124-421
4004-0000
http://www.samsung.com
CHILE
800-SAMSUNG(726-7864) http://www.samsung.com/cl
COLOMBIA
01-8000112112 http://www.samsung.com.co
COSTA RICA
0-800-507-7267 http://www.samsung.com/latin
ECUADOR
1-800-10-7267 http://www.samsung.com/latin
EL SALVADOR
800-6225 http://www.samsung.com/latin
GUATEMALA
1-800-299-0013 http://www.samsung.com/latin
JAMAICA
1-800-234-7267 http://www.samsung.com/latin
PANAMA
800-7267 http://www.samsung.com/latin
PUERTO RICO
1-800-682-3180 http://www.samsung.com/latin
REP. DOMINICA
1-800-751-2676 http://www.samsung.com/latin
TRINIDAD & TOBAGO
1-800-SAMSUNG(726-7864) http://www.samsung.com/latin
VENEZUELA
0-800-100-5303 http://www.samsung.com/latin
Europe
AUSTRIA
0800-SAMSUNG(726-7864) http://www.samsung.com/at
BELGIUM
0032 (0)2 201 24 18 http://www.samsung.com/be
NICARAGUA
00-1800-5077267
HONDURAS
800-7919267

^
zt{T[WXXTk__UGGG^_zt{T[WXXTk__UGGG^_ YWW^TXXTY_GGG㝘䟸GYa\_aY]YWW^TXXTY_GGG㝘䟸GYa\_aY]
CZECH REPUBLIC
DENMARK
70 70 19 70 http://www.samsung.com/dk
FINLAND
030-6227 515 http://www.samsung.com/fi
FRANCE
3260 SAMSUNG
08 25 08 65 65 (€ 0,15/min)
http://www.samsung.com
GERMANY
01805-SAMSUNG(726-7864)
http://www.samsung.com
HUNGARY
06-80-SAMSUNG(726-7864) http://www.samsung.com
ITALIA
800-SAMSUNG(726-7864) http://www.samsung.com
LUXEMBURG
0035 (0)2 261 03 710 http://www.samsung.com/be
NETHERLANDS
0900-SAMSUNG(726-7864)
http://www.samsung.com/nl
NORWAY
815-56 480 http://www.samsung.com/no
POLAND
0 801 801 881
022-607-93-33
http://www.samsung.com/pl
PORTUGAL
80820-SAMSUNG(726-7864) http://www.samsung.com/pt
EIRE
0818 717 100 http://www.samsung.com/ie
SLOVAKIA
0800-SAMSUNG(726-7864) http://www.samsung.com/sk
SPAIN
902 10 11 30 http://www.samsung.com
SWEDEN
0771-400 200 http://www.samsung.com/se
SWITZERLAND
0800-SAMSUNG(726-7864) www.samsung.com/ch
U.K
0845 SAMSUNG(726-7864) http://www.samsung.com
CIS
ESTONIA
800-7267 http://www.samsung.ee
LATVIA
800-7267 http://www.samsung.com/lv
LITHUANIA
8-800-77777 http://www.samsung.lt
KAZAKHSTAN
8-10-800-500-55-500 http://www.samsung.kz
KYRGYZSTAN
00-800-500-55-500
RUSSIA
8-800-555-55-55 http://www.samsung.com
UKRAINE
8-800-502-0000 http://www.samsung.com
UZBEKISTAN
8-800-120-0-400 http://www.samsung.uz
Asia Pacific
AUSTRALIA
1300 362 603 http://www.samsung.com
CHINA
800-810-5858, 010- 6475 1880 http://www.samsung.com
HONG KONG
3698-4698 http://www.samsung.com/hk
INDIA
3030 8282, 1800 110011 http://www.samsung.com
INDONESIA
0800-112-8888 http://www.samsung.com
JAPAN
0120-327-527 http://www.samsung.com/jp
MALAYSIA
1800-88-9999 http://www.samsung.com/my
NEW ZEALAND
0800SAMSUNG(726-7864) http://www.samsung.com/nz
PHILIPPINES
1800-10-SAMSUNG(726-7864) http://www.samsung.com/ph
SINGAPORE
1800-SAMSUNG(726-7864) http://www.samsung.com
THAILAND
1800-29-3232, 02-689-3232 http://www.samsung.com
(€ 0,15/min)
(€ 0,14/min)
(€ 0,10/min)
TADJIKISTAN
8-10-800-500-55-500
844 000 844 http://www.samsung.com/cz

Woordenlijst
Sync-signaal
Sync-signalen (gesynchroniseerde) hebben betrekking op signalen die nodig zijn om de gewenste kleuren op
de monitor te kunnen weergeven. Deze zijn ingedeeld in verticale en horizontale sync-signalen. Deze signalen
geven normale kleurenbeelden met de ingestelde resolutie en frequentie weer.
Soorten sync-signalen
Gescheiden
Dit is een schema over het verzenden van aparte, verticale sync-signalen naar de
monitor.
Composiet Dit is een schema waarin verticale sync-signalen in een composiet signaal zijn
gecombineerd en naar de monitor worden verzonden. De monitor geeft de kleursignalen
weer door het composiete signaal te scheiden in oorspronkelijke kleursignalen.
Dot pitch
Dotpitch (puntafstand) Het beeld op een monitor bestaat uit rode, groene en blauwe puntjes. Hoe kleiner de
puntjes en hoe dichter ze bij elkaar staan, hoe hoger de resolutie. De afstand tussen twee puntjes met
dezelfde kleur wordt dot pitch genoemd, met mm als eenheid. met mm
Verticale frequentie
Verticale frequentie Om flikkeren te voorkomen moet een monitor het beeld een aantal malen per seconde
herhalen (verversen). Dit wordt aangeduid als verticale frequentie of refresh rate, met Hz als eenheid. met Hz
Bijvoorbeeld:
A
ls hetzelfde lichtje 60 keer per seconde knippert, noemt men dit 60 Hz.
Horizontale frequentie
Horizontale frequentie Het aantal horizontale lijnen over de hele breedte van het scherm dat per seconde kan
worden afgebeeld, wordt aangeduid als horizontale frequentie, met kHz als eenheid. Dit wordt aangeduid als
verticale frequentie of refresh rate, met Hz als eenheid. met: kHz
Interlaced en non-interlaced methodes
Wanneer de horizontale lijnen een voor een van boven naar beneden worden afgebeeld wordt dit non-
interlaced genoemd. Afwisselend afbeelden van alle even en alle oneven lijnen heet interlaced. Bijna alle
monitoren gebruiken de non-interlaced methode voor een heldere weergave. De interlaced methode wordt in
tv's gebruikt.
Plug en Play
Plug en Play Dankzij deze functie heeft de gebruiker altijd de beste weergave, doordat de computer en de
monitor automatisch informatie met elkaar kunnen uitwisselen. De Plug en Play functie van deze monitor
werkt volgens de internationale VESA DDC standaard.
Resolutie
Resolutie Het aantal horizontale en verticale beeldpunten waaruit het beeld kan worden opgebouwd heet
resolutie. De resolutie geeft de precisie van de monitor aan. Een hoge resolutie is prettig wanneer
verschillende programma's tegelijk worden gebruikt, omdat het scherm dan meer informatie kan bevatten.
Bijvoorbeeld: Bij een resolutie van 1360 X 768 wordt het beeld opgebouwd uit 1360 lijnen (verticale
resolutie) die ieder bestaan uit 768 horizontale beeldpunten (horizontale resolutie).
Multiple Display Control (MDC)
Multiple Display Control (MDC) is een toepassing waarmee verschillende beeldschermen gemakkelijk en
tegelijk op een pc kunnen worden gebruikt. RS-232C, een standaard voor seriële communicatie, wordt
^
zt{T[WXXTk__UGGG^`zt{T[WXXTk__UGGG^` YWW^TXXTY_GGG㝘䟸GYa\_aY]YWW^TXXTY_GGG㝘䟸GYa\_aY]
TAIWAN
0800-329-999 http://www.samsung.com/tw
VIETNAM
1 800 588 889 http://www.samsung.com
Middle East & Africa
SOUTH AFRICA
0860-SAMSUNG(726-7864 ) http://www.samsung.com
TURKEY
444 77 11 http://www.samsung.com
U.A.E
800-SAMSUNG (726-7864)
8000-4726
http://www.samsung.com

gebruikt voor de communicatie tussen een computer en een beeldscherm.
Correcte verwijdering van dit product
Correcte verwijdering van dit product (elektrische & elektronische afvalapparatuur) - Alleen
Europa
(Van toepassing in de Europese Unie en andere Europese landen met
individuele verzamelsystemen.)
Dit merkteken op het product of het bijbehorende informatiemateriaal duidt erop
dat het niet met ander huishoudelijk afval verwijderd moet worden aan het einde
van zijn gebruiksduur. Om mogelijke schade aan het milieu of de menselijke
gezondheid door ongecontroleerde afvalverwijdering te voorkomen, moet u dit
product van andere soorten afval scheiden en op een verantwoorde manier
recyclen, zodat het duurzame hergebruik van materiaalbronnen wordt bevorderd.
Hishoudelijke gebruikers moeten contact opnemen met de winkel waar ze dit
product hebben gekocht of met de gemeente waar ze wonen om te vernemen
waar en hoe ze dit product milieuvriendelijk kunnen laten recyclen.
Zakelijke gebruikers moeten contact opnemen met hun leverancier en de
algemene voorwaarden van de koopovereenkomsten nalezen. Dit product moet
niet worden gemengd met ander bedrijfsafval voor verwijdering.
Rechten
De informatie in dit document kan zonder voorafgaande aankondiging worden gewijzigd.
© 2008 Samsung Electronics Co., Ltd. Alle rechten voorbehouden.
Reproductie op welke wijze dan ook zonder schriftelijke toestemming van Samsung Electronics Co., Ltd. is
uitdrukkelijk verboden.
Samsung Electronics Co., Ltd. kan niet aansprakelijk worden gesteld voor eventuele fouten in dit document of
voor rechtstreekse, indirecte of gevolgschade die samenhangt met de verstrekking, kwaliteit of gebruik van dit
materiaal.
Samsung is een gedeponeerd handelsmerk van Samsung Electronics Co., Ltd.; Microsoft , Windows en
Windows NT zijn gedeponeerde handelsmerken van Microsoft Corporation; VESA , DPM en DDC zijn
gedeponeerde handelsmerken van Video Electronics Standard Association; naam en logo van ENERGY STAR
®
zijn gedeponeerde handelsmerken van U.S. Environmental Protection Agency (EPA). Als ENERGY STAR
®
Partner heeft Samsung Electronics Co., Ltd. vastgesteld dat dit product voldoet aan de ENERGY STAR
®
richtlijnen voor efficiënt energiegebruik. Alle overige in dit document genoemde productnamen kunnen
(gedeponeerde) handelsmerken van de betreffende eigenaars zijn.
zt{T[WXXTk__UGGG_Wzt{T[WXXTk__UGGG_W YWW^TXXTY_GGG㝘䟸GYa\_aY]YWW^TXXTY_GGG㝘䟸GYa\_aY]

6(6.%&/10+614
0RGHGĜHPSORL
l|[UGGGXl|[UGGGX YWW^TXXTY^GGG㝘䟸G[aYXaX[YWW^TXXTY^GGG㝘䟸G[aYXaX[

La couleur et l'aspect du produit peuvent varier en fonction du modèle, et ses spécifications peuvent être
modifiées sans préavis pour des raisons d'amélioration des performance.
Consignes de sécurité
Signalement
Veuillez lire les consignes de sécurité suivantes, conçues pour éviter d'endommager le matériel et de
blesser l'utilisateur.
Avertissement / Attention
Ne pas suivre les consignes marquées par ce symbole pourrait avoir comme conséquence des
blessures corporelles ou des dommages sur le matériel.
Avertissement/Attention
Intérdit Important a lire et a comprendre dans toutes circonstances.
Ne pas démonter Déconnecter la prise de la sortie du courant.
Ne pas toucher Mettez dans un endroit stable pour empecher une décharge électrique.
Alimentation
Lorsque vous ne vous en êtes pas servi depuis longtemps, placez votre ordinateur personnel (Pc)
en mode DPM.
Si vous avez un économiseur d'écran, installez-le pour activer le mode d' écran.
Les images n'ont qu'une valeur de référence et ne sont pas applicables à tous les cas (ni à tous les pays).
Ne pas utiliser une prise endommagée ou desserrée.
z
Ceci peut causer une décharge électrique ou un incendie.
Ne pas débrancher une prise en la tirant par son cordon.
z
Ceci peut causer une décharge électrique ou un incendie.
Consignes de sécurité
Signalement
Alimentation
Installation
Nettoyage
Autres
Introduction
Connexions
Utilisation du logiciel
Réglage du moniteur
Réglage du moniteur
Dépannage
Caractéristiques techniques
Information
Annexe
X
zt{T[WXXT__UGGGXzt{T[WXXT__UGGGX YWW^TXXTY_GGG㝘䟸GYa[^aXYYWW^TXXTY_GGG㝘䟸GYa[^aXY

Utiliser uniquement des prises correctement reliées à la terre.
z
Un sol inadapté peut causer un choc électrique ou un incendie. (Appareils
de CLASSE l uniquement.)
Branchez la prise d’alimentation, en veillant à ce qu’elle ne bouge
pas.
z
Une mauvaise connexion entraîne des risques d’incendie.
Ne pas tordre ni la prise ni son cordon. Ne pas poser d’objet lourd
sur ces deux éléments.
z
Ceci peut causer une décharge électrique ou un incendie.
Ne pas brancher trop multiprises ou de cordons à une même prise.
z
Ne pas brancher trop de multiprise ou de câbles à la prise de courant.
Ne débranchez pas le cordon d'alimentation lorsque le moniteur est
sous tension.
z
Cela pourrait entraîner une surtension et endommager le moniteur.
N'utilisez pas le cordon d'alimentation lorsque la prise ou le
connecteur est poussiéreux.
z
Si la prise ou le connecteur est poussiéreux, nettoyez-le avec un chiffon
sec.
z
L'utilisation du cordon d'alimentation avec une prise ou un connecteur
poussiéreux peut provoquer un choc électrique ou un incendie.
Pour déconnecter l'appareil du secteur, la prise doit être débranchée
de la prise électrique du secteur. Par conséquent, la prise du
secteur doit être en état de marche.
z
Ceci peut causer une décharge électrique ou un incendie.
Installation
Veillez à contacter un centre de services homologué lorsque vous installez votre écran dans un
endroit très poussiéreux, humide, exposé à des températures élevées ou faibles ou à des produits
Y
zt{T[WXXT__UGGGYzt{T[WXXT__UGGGY YWW^TXXTY_GGG㝘䟸GYa[^aX^YWW^TXXTY_GGG㝘䟸GYa[^aX^

chimiques, ou s’il fonctionne sans interruption, par exemple dans les aéroports, les gares, etc.
Le non-respect de ce qui précède peut gravement endommager le moniteur.
Mettez votre moniteur dans un endroit peu humide et non
poussiéreux.
z
Un choc électrique ou un incendie peuvent être provoqués à l'interieur du
moniteur.
Ne pas faire tomber le moniteur si vous le déplacez.
z
Ceci peut endommager le moniteur ou blesser les utilisateurs.
Installez la base du moniteur dans une vitrine ou sur une étagère de
façon à ce que l’extrémité de la base ne dépasse pas de la vitrine ou
de l’étagère.
z
S'il tombait, le produit pourrait s'endommager ou blesser quelqu'un.
Ne placez pas le produit sur une surface instable ou trop petite.
z
Placez le produit sur une surface plane et stable, pour éviter qu’il ne
tombe et blesse quelqu’un, tout particulièrement un enfant.
Ne placez pas le produit directement sur le sol.
z
Quelqu’un pourrait trébucher dessus, tout particulièrement un enfant.
POUR ÉVITER TOUT RISQUE D'INCENDIE, VEILLEZ À GARDER CE
PRODUIT LOIN DE BOUGIES OU D'AUTRES SOURCES DE FEU.
z
Cela pourrait provoquer un incendie.
Conservez tout appareil chauffant à distance du câble
d’alimentation.
z
La fonte du revêtement du câble peut entraîner un risque de choc
électrique ou d’incendie.
N’installez pas le produit dans un environnement mal ventilé, par
exemple une étagère, un placard, etc.
z
Toute augmentation de la température interne entraîne un risque
d’incendie.
Z
zt{T[WXXT__UGGGZzt{T[WXXT__UGGGZ YWW^TXXTY_GGG㝘䟸GYa[^aX^YWW^TXXTY_GGG㝘䟸GYa[^aX^

Placer le moniteur sur une surface plane et stable.
z
Il peut être ainsi abîmé ou cassé.
Ne pas utiliser le moniteur sans son support.
z
La surface de TFT-LCD peut ainsi être abîmée.
L'installation du support mural doit être réalisée par un installateur
professionnel.
z
Un personnel non qualifié pourrait se blesser lors de l'installation.
z
Utilisez uniquement le matériel d'installation spécifié dans le mode
d'emploi.
Lors de l’installation du produit, veillez à le maintenir éloigné d’au
moins 10 cm du mur afin d’assurer une bonne ventilation.
z
Une ventilation insuffisante peut provoquer une augmentation de
température interne du produit. Cela entraîne une réduction de la durée de
vie des composants réduite et une diminution des performances.
Conservez l'emballage plastique (sac) hors de portée des enfants.
z
L'enfant risque de suffoquer s'il joue avec l'emballage plastique (sac).
Nettoyage
Lorsque vous voulez nettoyer le boîtier du moniteur ou la surface de l ecran (TFT-LCD), essuyez
avec un tissu doux légèrement humide.
Ne pas pulvériser le détergent directement sur le moniteur.
z
Ceci peut causer des dommages, choc électrique ou un incendie.
Utiliser le détergent recommandé avec un chiffon doux.
[
zt{T[WXXT__UGGG[zt{T[WXXT__UGGG[ YWW^TXXTY_GGG㝘䟸GYa[^aX^YWW^TXXTY_GGG㝘䟸GYa[^aX^

Si le connecteur entre la prise et la broche est poussiéreux ou sale,
le nettoyer correctement avec un chiffon sec.
z
Un connecteur sale peut causer une décharge électrique ou un incendie.
Assurez-vous que le cordon d’alimentation est débranché avant de
nettoyer le produit.
z
Ceci pourrait provoquer un choc électrique ou un incendie.
Débranchez le cordon d’alimentation de la prise secteur et essuyez
le produit à l’aide d’un chiffon doux et sec.
z
N’utilisez pas de produit chimique, tels que de la cire, du benzène, de
l’alcool, du diluant, de l’insecticide, du désodorisant, du lubrifiant ou du
détergent.
Autres
Ne pas enlever le panneau supérieur ni le panneau arrière.
z
Ceci peut causer une décharge électrique ou un incendie.
z
Demander cette opération à un personnel de service qualifié.
Déconnecter le moniteur s’il ne fonctionne pas normalement, si
vous notez des bruits ou des odeurs inhabituels. Contactez votre
revendeur ou service agréé.
z
Ceci peut causer une décharge électrique ou un incendie.
Ne placez pas le produit dans un environnement exposé à l’essence,
à la fumée ou à l’humidité ; n’installez pas le produit dans un
véhicule.
z
Cela peut gener son fonctionnement ou provoquer un incendie.
z
Éviter plus particulièrement d'utiliser votre moniteur près d'une source
d'eau ou à l'extérieur s'il venait à neiger ou à pleuvoir.
Si le moniteur tombe ou si son enveloppe est abîmée, éteignez-le et
débranchez la prise de courant. Contactez ensuite le Centre
d'Assistance.
z
Le moniteur pourrait mal fonctionner, provoquant une électrocution ou un
incendie.
\
zt{T[WXXT__UGGG\zt{T[WXXT__UGGG\ YWW^TXXTY_GGG㝘䟸GYa[^aX^YWW^TXXTY_GGG㝘䟸GYa[^aX^

N’essayez pas de déplacer le moniteur en tirant uniquement sur le fil
ou sur le câble de signal.
z
Ceci peut causer un choc électrique, un incendie ou des bléssures.
Ne déplacez pas le moniteur vers la gauche ni la droite en le tirant
par son cordon ou le câble de signal.
z
Ceci peut causer un choc électrique, un incendie ou des bléssures.
Ne pas couvrir les ouvertures du moniteur.
z
Une mauvaise ventilation peut causer une panne ou un incendie.
Ne pas placer de récipient contenant de l'eau, des produits
chimiques ou de petits objets métalliques sur le moniteur.
z
Cela peut gener son fonctionnement ou provoquer un incendie.
z
Si un corps étranger venait a tomber dans le moniteur, débranchez la prise
électrique et contacter le Centre d'Assistance.
Conservez le produit à distance de tout aérosol chimique ou de
toute substance inflammable.
z
Ceci peut causer une explosion ou un incendie.
Ne jamais insérer d’objet métallique dans les ouvertures du
moniteur.
z
Ceci peut causer un choc électrique, un incendie ou des bléssures.
N'insérez aucun objet métallique, comme un câble ou un foret, et
aucun objet inflammable, comme un morceau de papier ou une
allumette, dans le ventilateur, la prise casque ou les prises AV.
z
Cela pourrait en effet provoquer un incendie ou un choc électrique. Si une
substance étrangère ou de l'eau pénètre dans le produit, mettez-le hors
Laissez votre moniteur éteint en cas d'orage et d'éclairs ou lorsque
vous avez besoin de le laisser inutilisé pendant une période assez
longue.
z
Le moniteur pourrait mal fonctionner, provoquant une électrocution ou un
incendie.
]
zt{T[WXXT__UGGG]zt{T[WXXT__UGGG] YWW^TXXTY_GGG㝘䟸GYa[^aX^YWW^TXXTY_GGG㝘䟸GYa[^aX^

tension, débranchez le connecteur d'alimentation de la prise murale et
contactez le centre de services.
Si vous visualisez un écran fixe pendant une longue période de
temps, une image résiduelle ou floue peut apparaître.
z
Passez en mode économie d'énergie ou réglez l'économiseur d'écran sur
image mobile lorsque vous devez vous éloigner du moniteur pendant une
période prolongée.
Réglez la résolution et la fréquence aux niveaux appropriés à votre
modele.
z
Des niveaux de résolution et de fréquence qui ne sont pas adaptés peuvent
abîmer votre vue.
32 pouces (80 cm) - 1360 X 768
Regarder le moniteur de trop près peut entraîner des troubles de la
vision.
Pour réduire la fatigue oculaire, faites une pause d'au moins cinq
minutes toutes les heures lorsque vous êtes devant le moniteur.
N'installez pas le produit sur une surface non stable ou irrégulière ni
dans un endroit soumis à des vibrations.
z
S'il tombait, le produit pourrait s'endommager ou blesser quelqu'un.
L'utilisation du produit dans un endroit soumis à des vibrations peut
raccourcir sa durée de vie ou entraîner un début d'incendie.
Débranchez le cordon d'alimentation lorsque vous déplacez l'écran.
Vérifiez que tous les câbles, y compris celui de l'antenne et ceux
reliant d'autres appareils, sont débranchés avant de déplacer le
moniteur.
z
Un câble non débranché peut être endommagé et occasionner un incendie
ou un choc électrique.
^
zt{T[WXXT__UGGG^zt{T[WXXT__UGGG^ YWW^TXXTY_GGG㝘䟸GYa[^aX^YWW^TXXTY_GGG㝘䟸GYa[^aX^

Tenez le produit hors de portée des enfants, qui pourraient
l’endommager en s’y accrochant.
z
La chute d’un produit peut causer des blessures et parfois la mort.
Si vous prévoyez de ne pas utiliser le produit pendant une longue
période, débranchez-le.
z
Le non-respect de cette instruction peut entraîner une émission de chaleur
due à l’accumulation de poussière ou une dégradation de l’isolation, dont
peut découler un choc électrique ou un incendie.
Ne placez pas d’objets pouvant attirer un enfant (jouets favoris ou
objets tentants) sur le produit.
z
L’enfant pourrait tenter d'escalader le produit pour récupérer cet objet. Ceci
pourrait entraîner la chute de l’objet, qui peut blesser ou même tuer
l’enfant.
Lorsque vous ôtez les piles de la télécommande, veillez à ne pas les
laisser à la portée des enfants qui pourraient les avaler. Tenez les
piles hors de portée des enfants.
z
En cas d'absorption, consultez un médecin immédiatement.
Lorsque vous remplacez les piles, placez-les dans la position de
polarité correcte +/- comme indiqué sur le compartiment à piles.
z
Une polarité incorrecte peut endommager ou provoquer une fuite de la pile
et occasionner un incendie, des blessures ou des dégâts.
Utilisez uniquement les piles standard indiquées. N'utilisez pas de
piles neuves avec des piles usées.
z
Peut endommager ou provoquer une fuite de la pile et occasionner un
incendie, des blessures ou des dégâts.
Vérifiez que deux personnes sont présentes lors de tout
déplacement du produit.
z
La chute du produit peut entraîner un dysfonctionnement du matériel ou
des blessures.
_
zt{T[WXXT__UGGG_zt{T[WXXT__UGGG_ YWW^TXXTY_GGG㝘䟸GYa[^aX^YWW^TXXTY_GGG㝘䟸GYa[^aX^

recyclage local ou dans un magasin vendant le même type de batterie.
© 1995~2008 Samsung Electronics Co., Ltd. Tous droits résérvés.
La batterie et la batterie rechargeable ne sont pas des déchets
ordinaires et doivent mises au rebus à des fins de recyclage. Il
incombe au client de mettre au rebus les batteries usées.
z
Le client peut mettre au rebus les batteries usées dans un centre de
`
zt{T[WXXT__UGGG`zt{T[WXXT__UGGG` YWW^TXXTY_GGG㝘䟸GYa[^aX^YWW^TXXTY_GGG㝘䟸GYa[^aX^

Sommaire
Consignes de sécurité ........................................................................................... 1
Signalement ............................................................................................................ 1
Alimentation ............................................................................................................ 1
Installation .......................................................................................................... 2
Nettoyage .............................................................................................................. 4
Autres ................................................................................................................. 5
Introduction ............................................................................................................ 12
Contenu de l’emballage .......................................................................................... 12
Votre moniteur ................................................................................................ 13
Agencement mécanique .......................................................................................... 20
Connexions .......................................................................................................... 24
Seuls les boulons fournis doivent être utiliser .............................................................. 24
Connexion du moniteur .................................................................................. 25
MDC System ........................................................................................................... 31
Réglage du moniteur ............................................................................................. 51
Entrée ................................................................................................................. 51
Image [PC / BNC /DVI Mode] ................................................................................ 52
Image [AV / S-Video /Component / DVI-Video Mode].................................................. 54
Son ................................................................................................................ 56
Configuration ....................................................................................................... 57
Multi contrôle ....................................................................................................... 60
Fonctions de commande directe ................................................................................ 60
XW
zt{T[WXXT__UGGGXWzt{T[WXXT__UGGGXW YWW^TXXTY_GGG㝘䟸GYa[^aX^YWW^TXXTY_GGG㝘䟸GYa[^aX^

Dépannage ............................................................................................................. 62
Vérification de la fonction Autotest ............................................................................. 62
Liste de vérification ................................................................................................. 63
Q & R ................................................................................................................... 65
Caractéristiques techniques .................................................................................... 67
Généralités
........................................................................................................... 67
Economie d'énergie ................................................................................................ 68
Présélection des modes de temporisation .................................................................... 68
Information ....................................................................................................... 70
Pour un meilleur affichage ........................................................................................ 70
INFORMATIONS RELATIVES AU PRODUIT (Image sans fantôme résiduel) ..................... 70
Annexe .............................................................................................................. 74
Comment contacter Samsung dans le monde ............................................................... 74
Terme ............................................................................................................... 76
&RPPHQW pOLPLQHU FH SURGXLW ............................................................................... 77
Autorité ............................................................................................................ 77
XX
zt{T[WXXT__UGGGXXzt{T[WXXT__UGGGXX YWW^TXXTY_GGG㝘䟸GYa[^aX^YWW^TXXTY_GGG㝘䟸GYa[^aX^

La couleur et l'aspect du produit peuvent varier en fonction du modèle, et ses spécifications peuvent être
modifiées sans préavis pour des raisons d'amélioration des performance.
Introduction
Contenu de l’emballage
Remarque
• Vérifiez que les éléments suivants sont inclus dans le moniteur.
S'ils manquent quelques choses, contactez votre vendeurr.
Contactez votre revendeur le plus proche si vous souhaitez acheter des équipements optionnels.
Remarque
• Ne placez pas le produit directement sur le sol.
Moniteur
Manuel
Mode d'emploi
Carte de Garantie
(N'est pas disponible dans toutes les
agences)
Guide de l’utilisateur,
logiciels MDC
Câble
Câble de signal VGA
(15 broches D-SUB)
Fil électrique
Consignes de sécurité
Introduction
Contenu de l’emballage
Votre moniteur
Agencement mécanique
Connexions
Utilisation du logiciel
Réglage du moniteur
Dépannage
Caractéristiques techniques
Information
Annexe
XY
zt{T[WXXT__UGGGXYzt{T[WXXT__UGGGXY YWW^TXXTY_GGG㝘䟸GYa[^aX^YWW^TXXTY_GGG㝘䟸GYa[^aX^

Autres
Télécommande Piles (AAA X 2) Bouchon
Jack adaptateur BNC/RCA Support provisoire
Vendu séparément
Kit de fixation au mur Kit haut-parleurs Support fixe
Câble DVI Câble BNC
Votre moniteur
Façade
1) MENU
Il permet d’ouvrir l’OSD et d’activer un élément de menu en surbrillance.
2) Bouton Monter-Descendre
Déplace d’un poste du menu à un autre verticalement ou ajuste la valeur du menu sélectionné.
XZ
zt{T[WXXT__UGGGXZzt{T[WXXT__UGGGXZ YWW^TXXTY_GGG㝘䟸GYa[^aX^YWW^TXXTY_GGG㝘䟸GYa[^aX^

Déplace d’un poste du menu à un autre horizontalement ou ajuste la valeur du menu sélectionné.
Ajuste également le volume du son.
4) ENTER
Pour sélectionner le menu d'affichage à l'écran OSD.
5) SOURCE
SOURCE llume l’indicateur du signal d’entrée en cours de présentation.
Le changement de source n'est possible que pour les appareils externes connectés au moniteur.
[PC]
˧
[BNC]
˧
[DVI]
˧
[AV]
˧
[S-Vidéo]
˧
[Component]
>> Cliquez ici pour voir une animation.
6) PIP
Appuyez sur ce bouton pour contrôler la fenêtre PIP.
Puisque le BNC et le composant utilisent le même terminal, il est impossible de faire chevaucher plus d'un
PIP (incrustation d’image) à l'écran.
>> Cliquez ici pour voir une animation.
•
PC / DVI
A
V / S-Vidéo / Composant
•
BNC
A
V / S-Vidéo
•
DVI
A
V / S-Vidéo / Composant
•
AV / S-Vidéo
PC / BNC / DVI
•
Composante
PC / DVI Mode
7)
Bouton marche/arrêt
Utiliser ce bouton pour allumer et éteindre le moniteur.
8) Voyant d'alimentationr
Indique que le Mode d'économie est en position normale ou Puissance.
9) Capteur télécommande
Orientez la télécommande en direction de ce point sur le Moniteur.
Remarque
•Voir PowerSaver decrit dans le manuel pour plus d'informations concernant les fonctions de l'économie d`
énergie. Pour la consérvation d'énergie, éteindre votre moniteur quand vo us ne vous en servez pas ou
quand vous absentez pour un long moment.
Arrière
Remarque
• Pour une information détaillée concernant le branchement des câbles, se reporter à la rubrique Connecter
des câbles dans "Installation". La configuration de l’arrière du moniteur peut varier légèrement suivant le
modèle du moniteur.
X[
zt{T[WXXT__UGGGX[zt{T[WXXT__UGGGX[ YWW^TXXTY_GGG㝘䟸GYa[^aX^YWW^TXXTY_GGG㝘䟸GYa[^aX^
3) Bouton Gauche-Droite / Bouton Volume

1) RS232C OUT/IN (port série RS232C) :
programme port MDC (Multi Device Control)
2) DVI / PC IN [RGB] (Connexion vidéo PC)
Utilisation d'un 15 broches D-Sub mode PC
(PC analogue)
3) DVI / PC IN [DVI(HDCP)] (Connexion
vidéo PC)
Utilisation d'un DVI-D vers DVI-D - mode DVI
(PC numérique)
4) DVI / PC IN [PC/DVI/BNC AUDIO IN]
(Terminal de connexion audio (entrée)
PC/DVI/BNC)
5) COMPONENT AUDIO IN [L-AUDIO-R]
(Terminal de connexion audio (entrée)
Composantes)
6) BNC/COMPONENT OUT [R/P
R
, G/Y,
B/P
B
, H, V] (Connexion vidéo BNC /
Connexion finale des composantes
(sortie))
BNC (PC analogique) Connexion : connecte
les ports R, G, B, H, V
Connexion des Composantes : connecte les
ports P
R
, Y, P
B
7) BNC/COMPONENT IN [R/P
R
, G/Y, B/P
B
,
H, V] (Connexion vidéo BNC / Connexion
finale des composantes(entrée))
8) AV AUDIO IN [L-AUDIO-R](Connexion
MONITOR audio (entrée))
9) AV OUT [VIDEO](Connexion vidéo ):
mode AV (sortie)
10) AV IN [VIDEO](Connexion vidéo )
(entrée)
11) AV OUT [S-VIDEO](Connexion S-Vidéo ):
mode S-Vidéo (sortie)
12) AV IN [S-VIDEO](Connexion S-Vidéo )
(entrée)
13) EXT SPEAKER(8 )[- - L - +, - - R - +]
(Terminal de connexion haut-parleur (8
))
X\
X\UGGGXX\UGGGX YWW^TXYTYWGGG㝘䟸GXaYXaZYYWW^TXYTYWGGG㝘䟸GXaYXaZY

14) AUDIO OUT [L-AUDIO-R] (terminal
connexion audio du moniteur (sortie))
AUDIO OUT est le terminal pour la sortie son
PC, DVI ou BNC.
15) POWER SW (Interrupteur Marche / Arrêt)
ON/OFF
Allume et éteint le moniteur.
16) POWER IN (Port d'alimentation)
Cordon d'alimentation, connecte le moniteur et
la prise murale.
Remarque
• Le nombre de moniteurs pouvant être connectés à une sortie de boucle diffère en fonction de la
configuration, notamment du câble, de la source du signal, etc. Pour éviter toute dégradation du câble ou
de la source du signal, il est conseillé de ne pas connecter plus de 10 moniteurs.
17) Verrou Kensington
Le verrou Kensington est un périphérique
utilisé pour fixer physiquement le système
lorsque vous l'utilisez dans un lieu public. (le
dispositif de verrouillage est fourni
séparément.)
Contactez le revendeur de votre
périphérique de verrouillage pour obtenir
des informations sur son utilisation.
Remarque
•Voir Connexion de Votre Ordinateur pour plus d'informations concernant la connexion du câble.
Télécommande
Remarque
• LLes performances de la télécommande peuvent être affectées par une télévision ou d'autres appareils
électroniques fonctionnant près du moniteur. Les disfonctionnements sont dus aux interférences de
fréquences.
1. ON / OFF
2. MAGICNET
3. MDC
4. LOCK
5. Touches MagicNet
6.+100 -/--
7. VOL
8. MUTE
9. TTX/MIX
10. MENU
11. ENTER
12. P.MODE
13. AUTO
14. PRE-CH
15 . CH/P
16. SOURCE
17. INFO
18. EXIT
19. Haut - Bas et Gauche-Droite
20. S.MODE
21. STILL
22. FM RADIO
X]
X\UGGGYX\UGGGY YWW^TXYTYWGGG㝘䟸GXaYXaZ]YWW^TXYTYWGGG㝘䟸GXaYXaZ]

23. P.SIZE
24. SRS
25. DUAL/MTS
26. PIP
27. SOURCE
28. SWAP
29. SIZE
30. REW
31. STOP
32. PLAY/PAUSE
33. FF
1) ON / OFF
Il allume et éteint le moniteur.
2) MAGICNET
Bouton de lancement rapide MagicNet.
- Cette fonction n'est pas disponible sur ce moniteur.
3) MDC
Bouton de lancement rapide MDC.
4) LOCK
Ce bouton active ou désactive toutes les touches de fonction de la télécommande et du moniteur, à
l'exception des touches de mise sous tension et LOCK.
5) Touches MagicNet
Utilisez ces boutons pour Magic Net.
- Cette fonction n'est pas disponible sur ce moniteur.
• Alphabétiques/numériques : Utilisez ces boutons pour saisir l'adresse d'un site Web.
• DEL : Equivalent de Retour arrière.
• SYMBOL : A utiliser pour la saisie de signes. (.O_-)
• ENTER : A utiliser pour toute saisie.
6) +100 -/--
Appuyez sur ce bouton pour sélectionner les chaînes au delà de 100.
Par exemple, pour sélectionner la chaîne 121, appuyez sur “+100”, puis appuyez sur “2”, puis sur “1”.
- Cette fonction n'est pas disponible sur ce moniteur.
7) VOL
Il permet également de régler le volume audio.
8)
MUTE
Il suspend (mode muet) la sortie audio temporairement .
Displayed on the lower left corner of the screen.
The audio resumes if MUTE or - VOL + is pressed in the Mute mode.
9)
TTX/MIX
X^
X\UGGGZX\UGGGZ YWW^TXYTYWGGG㝘䟸GXaYXaZ^YWW^TXYTYWGGG㝘䟸GXaYXaZ^

Les chaînes de télévision proposent des services d'informations écrites via le Télétexte.
[TTX / MIX sont principalement utilisés en Europe. ]
10)
MENU
Il permet d’ouvrir l’OSD et d’activer un élément de menu en surbrillance.
11)
ENTER
Active le menu mis en surbrillance.
12)
P.MODE
Bouton Canal précédent - Ce bouton sert à revenir à la première chaîne précédente.
13) AUTO
Il permet de régler l’affichage écran automatiquement. (PC)
Si vous modifiez la résolution à partir du panneau de configuration, la fonction Réglage Automatique sera
exécutée.
14)
PRE-CH
Bouton Canal précédent - Ce bouton sert à revenir à la première chaîne précédente.
- Cette fonction n'est pas disponible sur ce moniteur.
15)
CH/P
En mode TV, sélectionne le canal TV.
- Cette fonction n'est pas disponible sur ce moniteur.
16)
SOURCE
Lorsque vous appuyez sur ce bouton, le mode actuel est affiché dans en bas de la partie centrale de
l'écran.
AV / Ext. / S-Video /Component Mode : P.MODE( Picture Mode )
Le moniteur a quatre paramétrages automatiques de l'image. Ils sont prédéfinis en usine.
Puis appuyez de nouveau sur ce bouton pour afficher les différents modes prédéfinis.
( Dynamique Standard Cinéma Personnalisé )
PC / DVI Mode : M/B ( MagicBright™ )
MagicBright™ est une nouvelle fonction du moniteur qui offre une qualité d'affichage en matière de
luminosité et de clarté deux fois supérieure à celle d'autres moniteurs existants.
Puis appuyez de nouveau sur ce bouton pour afficher les différents modes prédéfinis
( Loisirs Internet Texte Personnalisé )
17)
INFO
Les informations relatives à l'image actuelle s'affichent en haut à gauche de l'écran.
18)
EXIT
Il permet de quitter ou de fermer l’écran de menu.
19) Haut - Bas et Gauche-Droite
Permet de se déplacer horizontalement ou verticalement entre les éléments du menu et de régler les
valeurs sélectionnées.
20)
S.MODE
Lorsque vous appuyez sur ce bouton, le mode audio en cours est affiché en bas à gauche de l’écran.
Le moniteur comprend un amplificateur haute fidélité intégré.
Puis appuyez de nouveau sur ce bouton pour afficher les différents modes prédéfinis
( Standard ˧ Musique ˧ Cinéma ˧ Parole ˧ Personnalisé )
21) STILL
Appuyez une fois sur le bouton pour bloquer l'écran. Appuyez une nouvelle fois pour le débloquer.
22) FM RADIO
Allume/éteint la radio FM.
En mode PC/DVI, définit uniquement le SON pour la .
En mode Video SOURCE (SOURCE vidéo) général, bascule sur la fonction FM Radio (Radio FM) et éteint
l'écran.
Dans les zones où le signal est faible, il se peut que la radio FM subisse des interférences.
- Cette fonction n'est pas disponible sur ce moniteur.
23) P.SIZE
Appuyez sur ce bouton pour modifier la taille de l'écran.
24)
SRS
SRS
X_
X\UGGG[X\UGGG[ YWW^TXYTYWGGG㝘䟸GXaYXaZ^YWW^TXYTYWGGG㝘䟸GXaYXaZ^

25)
DUAL/MTS
- Cette fonction n'est pas disponible sur ce moniteur.
DUAL-
Utilice el botón DUAL en el mando a distancia para seleccionar Estéreo o Mono cuando el monitor está en
el modo TV o Radio FM.
MTS-
Lorsque vous appuyez sur ce bouton, le mode audio en cours est affiché en bas à gauche de l’écran.
(Seulement sur l’Ecran TV).
Type audio Mode_MTS/S Par défaut
FM Stéréo
Mono Mono
Modification manuelle
Stéréo
Mono ˩ Stéréo
SAP
Mono
˩
SAP
Mono
26)
PIP
Appuyez sur ce bouton pour contrôler la fenêtre PIP
27)
SOURCE
Chaque fois que vous appuyez sur le bouton, la source du signal de la fenêtre ISI change. (PIP)
28) SWAP
Echange du contenu des images main et PIP.
L’image de la fenêtre PIP apparaît sur l’écran principal et celle de l’écran principal apparaît dans la fenêtre
PIP.
29)
SIZE
Pour changer la Taille de la fenêtre PIP.
30) REW
Rembobinage
31) STOP
Arrêt
32)
PLAY / PAUSE
Lecture / Pause
33) FF
Avance rapide
© 1995~2008 Samsung Electronics Co., Ltd. Tous droits résérvés.
X`
X\UGGG\X\UGGG\ YWW^TXYTYWGGG㝘䟸GXaYXaZ^YWW^TXYTYWGGG㝘䟸GXaYXaZ^

Agencement mécanique | Tête du moniteur | Socle | Haut-parleur | Installation de la fixation VESA | Installation murale
1. Agencement mécanique
2. Tête du moniteur
YW
X\UGGG]X\UGGG] YWW^TXYTYWGGG㝘䟸GXaYXaZ^YWW^TXYTYWGGG㝘䟸GXaYXaZ^

3. Socle
4. Haut-parleur
5. Installation de la fixation VESA
z
Lorsque vous installez VESA, vérifiez que vous le faites en conformité avec les normes internationales VESA.
z
Achat et installation d'une fixation conforme aux normes VESA : veuillez vous adresser au revendeur Samsung le
plus proche pour passer commande et prendre rendez-vous. Des installateurs professionnels se déplaceront alors
à votre domicile pour mettre en place la fixation.
z
Toute manipulation de l'écran LCD requiert la présence d'au moins deux personnes.
z
Samsung ne saurait être tenu pour responsable des éventuels dégâts ou blessures résultant d'une installation
faite par le client.
YX
X\UGGG^X\UGGG^ YWW^TXYTYWGGG㝘䟸GXaYXaZ^YWW^TXYTYWGGG㝘䟸GXaYXaZ^

Dimensions
Pour poser la fixation au mur, utilisez uniquement des vis à métaux de 6 mm de diamètre et de 8 à 12
mm de long.
6. Installation murale
z
Faites appel à un technicien pour installer la fixation murale.
z
Samsung Electronics ne saurait être tenu responsable des dommages matériels ou corporels qui pourraient être
causés en cas d'installationpar le client.
z
Ce produit doit être installé sur des murs en ciment. Le produit risque de glisser s'il est installé sur du plâtre ou du
bois.
Composants(Éléments)
Utilisez uniquement les composants et accessoires livrés avec le produit.
Éléments
A
Support
mural
B
Support de la
moniteur
C
Vis:
8EA
D
Vis:
3EA
E
Vis à bois:
7EA
F
Cheville:
7EA
G
Guide
d'installation
Comment assembler le kit de fixation mural
1
1. Marquer l'emplacement du trou sur le mur.
2. Percez un trou de 35 mm de profondeur à l'endroit indiqué.
3. Placez les chevilles
F
dans chacun des trous faits.
4. Fixez le support mural
A
au mur à l’aide de vis à bois
E
après avoir
placé les pièces d’ancrage
F
dans le support mural
A
.
Si le support n'est pas fermement fixé aumur, la moniteur LCD
risque de tomber.
2
1. Coupez le courant puis débranchez le cordon de la prise.
2. Placez la moniteur face posée sur un chiffon doux ou un coussin sur une table.
3. Fixez le support de la télévision
B
à l'arrière de la moniteur puis vissez les vis
C
.
YY
X\UGGG_X\UGGG_ YWW^TXYTYWGGG㝘䟸GXaYXaZ^YWW^TXYTYWGGG㝘䟸GXaYXaZ^

3
1. Placez les 3 crochets du support
B
dans les ouvertures du support mural
A
.
2. Assemblez le support de la télévision
B
avec le support mural
A
avec les vis
D
.
Avant d'installer le téléviseur sur le mur, connectez d’abord les câbles au téléviseur.
YZ
X\UGGG`X\UGGG` YWW^TXYTYWGGG㝘䟸GXaYXaZ^YWW^TXYTYWGGG㝘䟸GXaYXaZ^

La couleur et l'aspect du produit peuvent varier en fonction du modèle, et ses spécifications peuvent être
modifiées sans préavis pour des raisons d'amélioration des performance.
Connexions
Seuls les boulons fournis doivent être utiliser.
Remarque
• Seuls les boulons fournis doivent être utiliser.
Attention
Samsung Electronics ne peut être tenu pour responsable de dommages causés par l’emploi d’une base
autre que celles spécifiées.
Installer le Support simple
Support
gauche
Support droit
Attention
Placez l'étiquette "CAUTION" à l'envers.
1) Un "couvercle protecteur" est utilisé pour protéger l'orifice au bas du moniteur, à l'endroit vient s'insérer le
support. Assurez-vous que vous avez bien retiré le "couvercle protecteur" lorsque vous fixez le support
simple ou le support fixe (vendu séparément) et refermez l'orifice en utilisant le bouchon lorsque vous
utilisez le kit de fixation mural.
2) Mettez le support dans l'orifice au bas du moniteur.
3) Mettez le support dans l'orifice au bas du moniteur.
Insérez les vis dans les orifices indiqués et serrez. (M4 × L15)
Attention
Consignes de sécurité
Introduction
Connexions
Seuls les boulons fournis
doivent être utiliser.
Connexion du moniteur
Utilisation du logiciel
Réglage du moniteur
Dépannage
Caractéristiques techniques
Information
Annexe
Y[
X\UGGGXWX\UGGGXW YWW^TXYTYWGGG㝘䟸GXaYXaZ^YWW^TXYTYWGGG㝘䟸GXaYXaZ^

Ce pied est conçu pour régler l'angle de l'écran. La société décline toute responsabilité en cas de problème
découlant de l'utilisation de ce pied. N'utilisez pas le produit comme support.
Installer un support fixe (vendu séparément)
1) Un "couvercle protecteur" est utilisé pour protéger l'orifice au bas du moniteur, à l'endroit vient s'insérer le
support. Assurez-vous que vous avez bien retiré le "couvercle protecteur" lorsque vous fixez le support
simple ou le support fixe (vendu séparément) et refermez l'orifice en utilisant le bouchon lorsque vous
utilisez le kit de fixation mural.
2) Assurez-vous que vous avez bien positionné les éléments. (M4 × L15)
3) Mettez le support dans l'orifice au bas du moniteur.
4) Insérez les vis dans les orifices indiqués et serrez. (M4 × L15)
Connexion du moniteur
En cas de cordon d'alimentation avec terre
En cas de panne, le conducteur de terre peut provoquer un choc électrique. Avant de brancher
l'appareil au secteur, assurez-vous que le conducteur de terre est correctement raccordé. Avant de
débrancher le conducteur de terre, d ébranchez l'appareil du secteur.
Remarque
• Des équipements AV tels que des DVD, des magnétoscopes ou des caméscopes peuvent être connectés
au moniteur comme votre ordinateur. Pour une information détaillée relative à la connexion d’équipements
AV, se reporter à la rubrique Commandes Utilisateur dans Réglage de votre moniteur.
Se connecter à un ordinateur
Y\
X\UGGGXXX\UGGGXX YWW^TXYTYWGGG㝘䟸GXaYXaZ^YWW^TXYTYWGGG㝘䟸GXaYXaZ^

1) Connectez le fil électrique au port qui se situe au dos de votre moniteur.
Mettez l'interrupteur Marche/Arrêt sur Marche.
2) Il existe trois méthodes pour connecter le câble signal à votre moniteur.
Choisissez une des méthodes suivantes :
2-1) Utilisation d'un connecteur D-sub (analogique) sur la carte vidéo.
Connectez le D -sub au port RGB (RVB) 15 broches à l'arrière du moniteur et le port D-sub 15
broches à l'ordinateur.
2-2) Utilisation d'un connecteur DVI (numérique) sur la carte vidéo.
Connectez le c âble DVI au port DVI (HDCP) à l'arrière du moniteur et le port DVI à l'ordinateur.
2-3) Utilisation d'un connecteur BNC (analogique) sur la carte vidéo.
Connectez le c âble BNC au port BNC/COMPONENT IN - R, G, B, H, V à l'arrière du moniteur et
le port D-sub 15 broches à l'ordinateur.
3) Raccordez un câble ici pour reproduire le son en provenance de la carte son de votre ordinateur.
Remarque
• Mettre sous tension l’ordinateur et le moniteur.
Remarque
• Le câble DVI ou BNC est optionnel.
Prendre contact avec un Centre d'Assistance Samsung Electronics pour l’achat d’équipements optionnels.
Connexion d'un lecteur de DVD numérique
Y]
X\UGGGXYX\UGGGXY YWW^TXYTYWGGG㝘䟸GXaYXaZ^YWW^TXYTYWGGG㝘䟸GXaYXaZ^

Remarque
• Des périphériques d'entrée tels qu'un lecteur de DVD numérique sont branchés au connecteur DVI IN du
moniteur à l'aide du câble DVI.
• Ensuite, démarrez le lecteur DVD contenant un DVD.
• Sélectionnez Digital à l'aide du bouton SOURCE.
Remarque
• Le moniteur est doté de connecteurs DVI IN pour connecter des périphériques d'entrée DVI tels qu'un
lecteur de DVD numérique.
Branchement vers un magnétoscope
1) Les périphériques d'entrée AV comme les magnétoscopes ou caméscopes sont branchés sur le terminal
AV IN [VIDEO] ou AV IN [S-VIDEO] du moniteur au moyen du câble S-VHS ou BNC.
2) Connecter les sorties Audio (L) et Audio (R) d’un magnétoscope ou d’un caméscopes aux entrées AV
AUDIO IN [L-AUDIO-R] du moniteur en utilisant des câbles audio.
Remarque
• Sélectionner AV ou S-Viéo pour le magnétoscope ou le caméscopes en utilisant le bouton Source sur la
face avant du m oniteur.
• Démarrer alors le magnétoscope ou le caméscopes en insérant une cassette.
Remarque
• S-VHS or BNC cable is optional.
Branchement d'un Lecteur DVD Player
Y^
X\UGGGXZX\UGGGXZ YWW^TXYTYWGGG㝘䟸GXaYXaZ_YWW^TXYTYWGGG㝘䟸GXaYXaZ_

1) Branchez un groupe de câbles audio reliant les jacks COMPONENT AUDIO IN [L-AUDIO-R] du Moniteur
aux jacks SORTIE AUDIO sur le lecteur DVD.
2) Branchez un câble vidéo entre les jacks BNC/COMPONENT IN - connecte les ports P
R, Y, PB sur le
moniteur et les jacks P
R, Y, PB sur le lecteur DVD
Remarque
• Sélectionner Component pour le DVD, le magnétoscope ou le caméscopes en utilisant le bouton Source
sur la face avant du moniteur.
• Démarrer alors le DVD en ins érant un disque DVD.
Remarque
• Le câble Component est optionnel.
Si vous souhaitez des explications sur la vidéo composant, consultez le guide de l'utilisateur de votre
lecteu r D VD.
Branchement d'un caméscope
1) Localisez les jacks de sortie A/V sur le caméscope. Généralement, ils se situent sur le coté ou au dos du
caméscope
.
Branchez un groupe de câbles audio entre les jacks de SORTIE AUDIO du caméscope et les jacks AV
AUDIO IN [L-AUDIO-R] du Moniteur.
2) Branchez un câble vidéo entre le jack de SORTIE VIDEO du caméscope et le jack AV IN [VIDEO] du
Moniteur.
Remarque
• Sélectionner AV pour le caméscope, le magnétoscope ou le caméscopes en utilisant le bouton Source sur
la face avant du moniteur.
• Démarrer alors le caméscopes en insérant une cassette.
Remarque
• Les câbles audio-vidéo qui sont représentés dans ce document sont généralement fournis avec le
cam
éscope.
(dans le cas contraire, demandez conseil auprès de votre revendeur).
Y_
X\UGGGX[X\UGGGX[ YWW^TXYTYWGGG㝘䟸GXaYXaZ_YWW^TXYTYWGGG㝘䟸GXaYXaZ_

Si votre caméscope fonctionne en stéréo, vous devez brancher un ensemble de deux câbles.
Branchement du décodeur DTV
Remarque
• Les consignes pour le branchement d'un décodeur traditionnel sont indiquées ci-dessous.
1) Branchez un câble vidéo entre les jacks BNC / COMPONENT IN - connecte les ports PR, Y, PB du
Moniteur et les jacks P
R, Y, PB du Décodeur.
2) Branchez un groupe de câbles audio entre les jacks COMPONENT AUDIO IN [L-AUDIO-R] du Moniteur et
les jacks de SORTIE AUDIO du Décodeur.
Remarque
• Sélectionner Component pour le décodeur DTV, le magnétoscope ou le caméscopes en utilisant le
bouton Source sur la face avant du moniteur.
Remarque
• Si vous souhaitez des explications sur la vidéo composant, consultez le guide de l'utilisateur de votre
décodeur.
Branchement des Haut-parleurs
Remarque
• Assemblez le téléviseur/moniteur et les haut-parleurs en utilisant les vis.
* Montez le haut-parleur sans son support.
Y`
X\UGGGX\X\UGGGX\ YWW^TXYTYWGGG㝘䟸GXaYXaZ_YWW^TXYTYWGGG㝘䟸GXaYXaZ_

Remarque
• Branchez le câble de connexion des haut -parleurs à la prise RCA à l'arrière du t éléviseur/moniteur puis à
la prise RCA à l'arrière des haut-parleurs.
Remarque
• Ne déplacez pas le téléviseur/moniteur en le tenant par les haut-parleurs si ces derniers sont branchés.
Le support de fixation des haut-parleurs au téléviseur/moniteur pourrait être endommag é.
Branchement vers un Système Audio
Remarque
• Branchez un groupe de câbles audio entre les jacks AUX L, R du SYSTEME AUDIO et les jacks AUDIO
OUT [L-AUDIO -R] du Moniteur.
© 1995~2008 Samsung Electronics Co., Ltd. Tous droits résérvés.
ZW
X\UGGGX]X\UGGGX] YWW^TXYTYWGGG㝘䟸GXaYXaZ_YWW^TXYTYWGGG㝘䟸GXaYXaZ_

Introduction
Une Commande d'écrans multiples (MDC) est une application qui permet de contrôler facilement et simultanément
divers écrans à partir d'un PC. Le RS-232C, une norme de la communication en série, est utilisé pour assurer la
communication entre le PC et l'écran. Par conséquent, un câble en série devra relier le port en série du PC au port
en série de l'écran.
Main Screen
Cliquez sur Start > Program > Samsung > Commande d'écrans multiples pour lancer le programme.
Sélectionnez un poste pour voir le volume du poste sélectionné dans la case de défilement.
Z
zt{T[WXXT__UGGGXzt{T[WXXT__UGGGX YWW^TXXTY`GGG㝘䟸GXYaX]aZZYWW^TXXTY`GGG㝘䟸GXYaX]aZZ

Icônes du Menu Principal Bouton Sélectionner
Remocon Tableau d'information
Safety Lock Sélection de l'écran
Port Selection Outils de contrôle
1. Utilisez les icônes du menu principal pour passer d'une fenêtre à l'autre.
2. Vous permet d'activer ou de désactiver la fonction de réception du signal de la télécommande de l'écran.
3. Activez la fonction Verrouillage de sécurité.
Lorsque la fonction Lock (Verrouillage) est activée, seuls les boutons power (Alimentation) et lock (Verrouillage)
peuvent être utilisés sur la télécommande et le téléviseur.
4. Applique la fonction Lock (Verrouillage). Le paramètre du port série du PC peut changer.
5. Cliquez sur Sélectionner Tout ou sur Effacer pour sélectionner ou effacer tous les écrans.
6. Utilisez le Tableau pour visualiser des informations sommaires sur l'écran sélectionné.
7. Sélectionnez un affichage dans la fonction Display Selection.
8. Utilisez les Outils de Contrôle pour commander les écrans.
<Remarque> La fonction Activer/Désactiver de la télécommande Fonctionne, que l'alimentation électrique soit
sur Marche ou sur Arrêt et ceci s'applique à tous les écrans connectés au MDC. Toutefois, quel
que soit l'état de la communication au moment où le MDC est éteint, la fonction de réception du
signal de la télécommande de tous les écrans est initialisée sur Désactivé lorsque le MDC est
fermé.
Z
zt{T[WXXT__UGGGYzt{T[WXXT__UGGGY YWW^TXXTY`GGG㝘䟸GXYaX]a[XYWW^TXXTY`GGG㝘䟸GXYaX]a[X

1. Le contrôle multiple d'affichage est normalement défini en COM1.
2. Si un port autre que COM1 est utilisé, vous pouvez alors, dans le menu de sélection, sélectionner des ports de COM1
à COM4.
3. Si le nom exact du port auquel est connecté le moniteur via un câble série n'est pas sélectionné, la communication ne
sera pas possible.
4. Le port sélectionné est enregistré dans le programme et également utilisé pour le programme suivant.
Power Control
1. Cliquez sur l'icône Contrôle de l'Alimentation dans le menu principal pour afficher la fenêtre de Contrôle de
l'Alimentation.
Z
zt{T[WXXT__UGGGZzt{T[WXXT__UGGGZ YWW^TXXTY`GGG㝘䟸GXYaX]a[YYWW^TXXTY`GGG㝘䟸GXYaX]a[Y
Port Selection

Le Tableau d'Information fournit l'information de base nécessaire au Contrôle de l'Alimentation.
1) (Power Status (Indicateur d'Alimentation))
2) Input
3) Image Size
4) Minuterie ON
5) Minuterie OFF
2. Utilisez le bouton Sélectionner Tout ou cochez une case pour sélectionner un écran à contrôler.
Le Contrôle d'Alimentation permet de commander certaines des fonctions de l'écran sélectionné.
1)
Power On/Off (Marche/Arrêt)
Z
zt{T[WXXT__UGGG[zt{T[WXXT__UGGG[ YWW^TXXTY`GGG㝘䟸GXYaX]a[YYWW^TXXTY`GGG㝘䟸GXYaX]a[Y

- Permet d'allumer ou d'éteindre l'écran sélectionné [AF1]
2) Volume
- Contrôle le niveau de volume de l'écran sélectionné.
Il reçoit la valeur du volume de l'écran sélectionné depuis les postes et l'affiche dans la case de défilement.
(Lorsque vous modifiez la sélection ou choisissez Sélectionner Tout, la valeur par défaut 10 est restituée)
3)
Mute On/Off (Marche/Arrêt de la fonction Muet)
- Coupe ou rétablit le son de l'écran sélectionné [AF2] Lorsque vous sélectionnez un poste à la fois, si le poste
sélectionné est déjà en position MUET, vous devez marquer l'écran MUET
(si vous choisissez d'annuler les sélections ou Sélectionner Tout, les valeurs par défaut seront rétablies)
Le Contrôle de l'Alimentation s'applique à tous les écrans.
Les fonctions Volume et Muet sont disponibles uniquement pour les écrans dont l'état d'alimentation
est ACTIF (ON).
Input Source
1. Cliquez sur l'icône Source d'Entrée dans le menu principal pour afficher la fenêtre de contrôle de la Source d'Entrée.
Cliquez sur "Tout sélectionner" ou cochez la Case Contrôle pour faire afficher un type d'affichage.
• TV Mode
• PC Mode
Z
zt{T[WXXT__UGGG\zt{T[WXXT__UGGG\ YWW^TXXTY`GGG㝘䟸GXYaX]a[YYWW^TXXTY`GGG㝘䟸GXYaX]a[Y

Le Tableau d'Information fournit l'information de base nécessaire au Contrôle de la Source d'Entrée.
1) PC
- Remplace la source d'entrée de l'affichage sélection par PC.
2) BNC
- Remplace la source d'entrée de l'affichage sélection par BNC.
3) DVI
- Remplace la source d'entrée de l'affichage sélection par DVI.
4) TV
- Remplace la source d'entrée de l'affichage sélection par TV.
5) AV
- Remplace la source d'entrée de l'affichage sélection par AV.
6) S-Video
- Remplace la source d'entrée de l'affichage sélection par S-
V
ideo.
7) Component
- Remplace la source d'entrée de l'affichage sélection par Component.
8) MagicNet
- La source d’entrée de MagicNet ne fonctionne que sur le modèle MagicNet.
9) Channel
- La flèche de la chaîne s'affiche lorsque Input Source (Source d'entrée) est TV.
TV Source (Source TV) ne peut être sélectionné que pour les produits avec TV et le contrôle des chaînes
n'est autorisé que lorsque Input Source (Source d'entrée) est TV.
Le Contrôle de la Source d'Entrée s'applique uniquement aux écrans dont l'état d'alimentation est
ACTIF (ON).
Image Size
PC, BNC, DVI
1. Cliquez sur Taille de l'image dans les icônes principales et l'écran de contrôle de la taille de l'image apparaîtra.
Z
zt{T[WXXT__UGGG]zt{T[WXXT__UGGG] YWW^TXXTY`GGG㝘䟸GXYaX]a[YYWW^TXXTY`GGG㝘䟸GXYaX]a[Y

La grille d'information affiche des informations sommaires nécessaire au Contrôle de la taille de l'image.
1)
(Power Status (Indicateur d'Alimentation))
- Indique l'état d'alimentation de l'écran utilisé.
2) Image Size
- Affiche la taille actuelle de l'image dans l'affichage sélectionné.
3) Input
- Indique la Source d'Entrée actuelle de l'écran utilisé.
4) La grille d'information liste uniquement les affichages dont la source de l'entrée est PC,BNC,DVI .
5) PC Source (Source PC) Lorsque vous cliquez dessus, l'onglet Image Source (Source image) s'affiche en premier.
- Le bouton Contrôle de la taille de l'image commande la taille de l'image disponible en mode PC, BNC, DVI.
6) Video Source
- Cliquer sur l'onglet Video Source (Source vidéo) pour contrôler la taille de l'image pour chaque source d'entrée.
La source d’entrée de MagicNet ne fonctionne que sur le modèle MagicNet.
Le contrôle de la taille de l'image n'est disponible que pour les affichages dont l'alimentation est
activée.
Image Size
TV, AV, S-Video, Component, DVI(HDCP)
1. Cliquez sur Taille de l'image dans les icônes principales et l'écran de contrôle de la taille de l'image apparaîtra.
Z
zt{T[WXXT__UGGG^zt{T[WXXT__UGGG^ YWW^TXXTY`GGG㝘䟸GXYaX]a[YYWW^TXXTY`GGG㝘䟸GXYaX]a[Y

La grille d'information affiche des informations sommaires nécessaire au Contrôle de la taille de l'image.
1) Cliquer sur l'onglet Video Source (Source vidéo) pour régler la taille de l'image pour TV (TV), AV (AV), S-Video (S-
Vidéo), Component (Composant).
Cliquez sur "Tout sélectionner" ou cochez la Case Contrôle pour faire afficher un type d'affichage.
2) La grille d'information n'affiche que l'affichage ayant TV, AV, S-VIDEO, COMPONENT, DVI(HDCP) comme source
d'entrée.
3) Change aléatoirement la taille de l'image dans l'affichage sélectionné.
Remarque: Auto Wide (Largeur auto), Zoom1 et Zoom2 ne sont pas sélectionnables lorsque le type de
signal d'entrée pour Component (Composant) et DVI (HDCP) est 720p ou 1080i.
La source d’entrée de MagicNet ne fonctionne que sur le modèle MagicNet.
Le contrôle de la taille de l'image n'est disponible que pour les affichages dont l'alimentation est
activée.
Time
1. Cliquez sur l'icône Heure dans le menu principal pour afficher l'écran de Contrôle de l'Heure.
zt{T[WXXT__UGGG_zt{T[WXXT__UGGG_ YWW^TXXTY`GGG㝘䟸GXYaX]a[YYWW^TXXTY`GGG㝘䟸GXYaX]a[Y

Le Tableau d'Information fournit l'information de base nécessaire au Contrôle de l'Heure.
1) Current Time (Heure Actuelle)
- Permet de régler l'heure actuelle pour l'écran sélectionné (Heure PC)
- Pour modifier l'heure actuelle, modifiez d'abord l'Heure PC.
2) On Time Setup (Réglage Heure de Marche)
-
Réglez Hour (Heure), Minute (Minute), AM/PM (Matin/Après-midi) de On Time Setup (Réglage heure mise en
marche), ainsi que Status (Statut), Source (Source), Volume (Volume) pour l'écran sélectionné.
3) Off Time Setup (Réglage Heure d'Arrêt)
-
Réglez Hour (Heure), Minute (Minute), AM/PM (Matin/Après-midi) et Status (Statut) de On Time Setup (Réglage
heure mise en marche) pour l'écran sélectionné.
4) Affiche les paramètres de On Time (Heure mise en marche).
5) Affiche les paramètres de Off Time (Heure arrêt).
La source d’entrée de MagicNet ne fonctionne que sur le modèle MagicNet.
Le Contrôle de l'Heure est uniquement disponible pour les écrans dont l'état d'alimentation est ACTIF
(ON).
Dans On Time Setup (Réglage heure mise en marche), TV Source (Source TV) ne fonctionne que pour
TV Model (Modèle TV).
PIP
PIP Size
1. Cliquez sur PIP dans les icônes principales et l'écran de contrôle de la fenêtre PIP apparaît.
Cliquez sur "Tout sélectionner" ou cochez la Case Contrôle pour faire afficher un type d'affichage.
zt{T[WXXT__UGGG`zt{T[WXXT__UGGG` YWW^TXXTY`GGG㝘䟸GXYaX]a[YYWW^TXXTY`GGG㝘䟸GXYaX]a[Y

La grille d'information affiche des informations sommaires nécessaire au Contrôle de la taille de la fenêtre PIP.
1) PIP Size (Taille de la fenêtre PIP)
- Affiche la taille actuelle de la fenêtre PIP affichée.
2) OFF (Arrêt)
- Désactive la fonction PIP de l'affichage sélectionné.
3) Large
- Active la fonction PIP de l'affichage sélectionné et modifie la taille de la Large.
4) Small
- Active la fonction PIP de l'affichage sélectionné et modifie la taille de la Small.
5) Double1
- Active la fonction PIP de l'affichage sélectionné et modifie la taille de la Double 1.
6) Double2
- Active la fonction PIP de l'affichage sélectionné et modifie la taille de la Double 2.
7) Double 3 (Picture By Picture (Image par image))
– Active PBP (la fonction image par image) de l'écran sélectionné et passe la taille en Double 3.
La source d’entrée de MagicNet ne fonctionne que sur le modèle MagicNet.
La taille de la fenêtre PIP peut se régler après avoir allumé le moniteur.
PIP
PIP Source
1. Cliquez sur PIP dans les icônes principales et l'écran de contrôle de la fenêtre PIP apparaît.
• PIP TV Mode
[
zt{T[WXXT__UGGGXWzt{T[WXXT__UGGGXW YWW^TXXTY`GGG㝘䟸GXYaX]a[YYWW^TXXTY`GGG㝘䟸GXYaX]a[Y

• PIP S-Video Mode
La grille d'information affiche des informations sommaires nécessaire au Contrôle de la Source PIP.
1) PIP Source
- La source de la fenêtre PIP peut se régler après avoir allumé le moniteur.
2) PC
- Remplace la source de la PIP de l'affichage sélectionné par PC.
3) BNC
- Remplace la source de la PIP de l'affichage sélectionné par BNC.
4) DVI
- Remplace la source de la PIP de l'affichage sélectionné par DVI.
5) TV
- Remplace la source de la PIP de l'affichage sélectionné par TV.
[
zt{T[WXXT__UGGGXXzt{T[WXXT__UGGGXX YWW^TXXTY`GGG㝘䟸GXYaX]a[ZYWW^TXXTY`GGG㝘䟸GXYaX]a[Z

6) AV
- Remplace la source de la PIP de l'affichage sélectionné par AV.
7) S-Video
- Remplace la source de la PIP de l'affichage sélectionné par S-Video.
8) Component
- Remplace la source de la PIP de l'affichage sélectionné par Component.
9) Channel (Chaîne)
- La flèche de la chaîne s'affiche lorsque la PIP Source (Source PIP) est TV.
Remarque: Certaines des sources ISI peuvent ne pas être disponibles à la sélection. Cela dépend du
type de signal d'entrée de l'écran principal.
La source d’entrée de MagicNet ne fonctionne que sur le modèle MagicNet.
TV Source (Source TV) ne peut être sélectionné que pour les produits avec TV et le contrôle des chaînes
n'est autorisé que lorsque PIP Source (la Source PIP) est TV.
La fonction Contrôle ISI n'est disponible que pour les affichages dont le statut de "Mise sous tension"
est "ACTIVÉ" et dont la fonction ISI est également "ACTIVÉE"
Settings
Picture
1. Cliquez sur l'icône Réglages dans le menu principal pour afficher l'écran de Contrôle des Paramètres.
Le Tableau d'Information fournit l'information de base nécessaire pour le Contrôle des Paramètres.
Lorsque chaque fonction est sélectionnée, la valeur définie de la fonction sélectionnée s'affiche dans la barre de
défilement. Lorsque vous choisissez Sélectionner Tout, la valeur par défaut (50) est rétablie. Modifier une valeur dans
cet écran vous fera automatiquement passer en mode "PERSONNALISÉ".
1) Picture
- Disponible que pour TV, AV, S-Video, Component, DVI(HDCP).
2) Contrast (Contraste)
- Permet de régler le Contraste sur l'écran sélectionné.
3) Brightness (Luminosité)
- Permet de régler la Luminosité pour l'écran sélectionné.
4) Sharpness (Netteté)
- Permet de régler la Netteté sur l'écran sélectionné.
5) Color (Couleur)
- Permet de régler la Couleur sur l'écran sélectionné.
6) Tint (Teinte)
- Permet de régler la Nuance sur l'écran sélectionné.
[
zt{T[WXXT__UGGGXYzt{T[WXXT__UGGGXY YWW^TXXTY`GGG㝘䟸GXYaX]a[ZYWW^TXXTY`GGG㝘䟸GXYaX]a[Z

7) Color Tone (Nuance Coul.)
- Permet de régler le ton des couleurs pour l'affichage sélectionné.
La source d’entrée de MagicNet ne fonctionne que sur le modèle MagicNet.
Cette fonction est disponible uniquement pour les affichages dont l’alimentation est active. Si aucune
sélection n’a été effectuée, les paramètres d’usine sont restaurés.
Settings
Picture PC
1. Cliquez sur l'icône Réglages dans le menu principal pour afficher l'écran de Contrôle des Paramètres.
Le Tableau d'Information fournit l'information de base nécessaire pour le Contrôle des Paramètres. Lorsque toutes les
fonctions sont sélectionnées, la valeur réglée pour la fonction sélectionnée est affichée sur la réglette. Lorsqu'elles
sont sélectionnées, les fonctions extraient la valeur pour l'ensemble et l'affichent sur la réglette. Lorsque vous
choisissez Sélectionner Tout, la valeur par défaut (50) est rétablie. Modifier une valeur dans cet écran vous fera
automatiquement passer en mode "PERSONNALISÉ".
1) Picture PC
- Disponible que pour PC, BNC, DVI.
2) Contrast (Contraste)
- Permet de régler le Contraste sur l'écran sélectionné.
3) Brightness (Luminosité)
- Permet de régler la Luminosité pour l'écran sélectionné.
4) Red
- Règle la température de la Red couleur de l'affichage sélectionné.
5) Green
- Règle la température de la Green couleur de l'affichage sélectionné.
6) Blue
- Règle la température de la Blue couleur de l'affichage sélectionné.
La source d’entrée de MagicNet ne fonctionne que sur le modèle MagicNet.
Cette fonction est disponible uniquement pour les affichages dont l’alimentation est active. Si aucune
sélection n’a été effectuée, les paramètres d’usine sont restaurés.
Settings
[
zt{T[WXXT__UGGGXZzt{T[WXXT__UGGGXZ YWW^TXXTY`GGG㝘䟸GXYaX]a[ZYWW^TXXTY`GGG㝘䟸GXYaX]a[Z

Audio
1. Cliquez sur l'icône Réglages dans le menu principal pour afficher l'écran de Contrôle des Paramètres.
Le Tableau d'Information fournit l'information de base nécessaire pour le Contrôle des Paramètres. Lorsque toutes les
fonctions sont sélectionnées, la valeur réglée pour la fonction sélectionnée est affichée sur la réglette. Lorsqu'elles
sont sélectionnées, les fonctions extraient la valeur pour l'ensemble et l'affichent sur la réglette. Lorsque vous
choisissez Sélectionner Tout, la valeur par défaut (50) est rétablie. Modifier une valeur dans cet écran vous fera
automatiquement passer en mode "PERSONNALISÉ".
1) Audio
- Permet de contrôler les paramètres sonores pour toutes les sources d'entrée.
2) Bass
- Permet de régler les basses de l'écran sélectionné.
3) Treble
- Permet de régler les aigus de l'écran sélectionné.
4) Balance
- Permet de régler l'équilibrage sonore (balance) de l'écran sélectionné.
5) SRS TSXT
- Marche/Arrêt Son SRS TSXT
6) Sound Select (Sélection du son)
- Lorsque le mode PIP est activé, vous pouvez sélectionner soit Affichage principal soit Sub.
La source d’entrée de MagicNet ne fonctionne que sur le modèle MagicNet.
Cette fonction est disponible uniquement pour les affichages dont l’alimentation est active. Si aucune
sélection n’a été effectuée, les paramètres d’usine sont restaurés.
Settings
Image Lock
1. Cliquez sur l'icône Réglages dans le menu principal pour afficher l'écran de Contrôle des Paramètres.
[
zt{T[WXXT__UGGGX[zt{T[WXXT__UGGGX[ YWW^TXXTY`GGG㝘䟸GXYaX]a[ZYWW^TXXTY`GGG㝘䟸GXYaX]a[Z

Le Tableau d'Information fournit l'information de base nécessaire pour le Contrôle des Paramètres.
1) Verrouillage Image
- Disponible que pour PC, BNC.
2) Coarse (Regl. Base)
- Permet de régler la Coarse de l'écran sélectionné.
3) Fine (Regl. Prec)
- Permet de régler la Fine de l'écran sélectionné.
4) Position
- Permet de régler la Position de l'écran sélectionné.
5) Auto adjustment (Réglage Automatique)
- Appuyez pour ajuster automatiquement le signal PC entrant.
La source d’entrée de MagicNet ne fonctionne que sur le modèle MagicNet.
Permet de régler les paramètres Audio de l'écran sélectionné.
Maintenance
Lamp Control
1. Cliquez sur l'icône "Maintenance" dans la colonne des icônes principales pour afficher l'écran de Maintenance.
[
zt{T[WXXT__UGGGX\zt{T[WXXT__UGGGX\ YWW^TXXTY`GGG㝘䟸GXYaX]a[ZYWW^TXXTY`GGG㝘䟸GXYaX]a[Z

S'affiche alors une "Grille d'informations" affichant différentes données de base.
1) Maintenance
- Autorise la fonction Maintenance Control (Contrôle de maintenance) pour toutes les sources d'entrée.
2) Auto Lamp Control
- Permet de régler automatiquement le rétro-éclairage de l'affichage sélectionné à une heure donnée.
Le Manual Lamp Control (Contrôle automatique de la lampe) s'arrête automatiquement si vous effectuez le réglage
via Auto Lamp Control (Contrôle auto lampe).
3) Manual Lamp Control
- Vous permet de régler le rétro-éclairage de l'affichage sélectionné sans tenir compte de l'heure.
La fonction Réglage automatique de la lampe se désactive automatiquement si vous utilisez la fonction Réglage
manuel de la lampe.
La fonction de Maintenance n'est disponible que pour les affichages dont le statut est "ACTIVÉ".
La source d’entrée de MagicNet ne fonctionne que sur le modèle MagicNet.
Maintenance
Scroll
1. Cliquez sur l'icône "Maintenance" dans la colonne des icônes principales pour afficher l'écran de Maintenance.
[
zt{T[WXXT__UGGGX]zt{T[WXXT__UGGGX] YWW^TXXTY`GGG㝘䟸GXYaX]a[ZYWW^TXXTY`GGG㝘䟸GXYaX]a[Z

1) Screen Scroll
- Permet d'éliminer les images résiduelles pouvant restées à l'écran lorsque l'affichage est resté en mode Pause
pendant longtemps. Vous pouvez activer le minuteur pour répéter le cycle en sélectionnant "Interval" en heures et
"Second" en secondes.
Peut être réglé sur Scroll (Défiler), Pixel (Pixel), Bar (Barre) et Eraser (Gomme) par Screen Type (Type d'écran).
La source d’entrée de MagicNet ne fonctionne que sur le modèle MagicNet.
Setting Second (Réglage des secondes), peut être réglé sur 1, 2, 3, 4, 5 pour Scroll Type (Type de défilé)
et sur 10, 20, 30, 40, 50 pour Pixel (Pixel), Bar (Barre) et Eraser Type (Type gomme).
La fonction de Maintenance n'est disponible que pour les affichages dont le statut est "ACTIVÉ".
Maintenance
Video Wall
1. Cliquez sur l'icône "Maintenance" dans la colonne des icônes principales pour afficher l'écran de Maintenance.
[
zt{T[WXXT__UGGGX^zt{T[WXXT__UGGGX^ YWW^TXXTY`GGG㝘䟸GXYaX]a[ZYWW^TXXTY`GGG㝘䟸GXYaX]a[Z

1) Mur d'images
- Un mur vidéo consiste en un ensemble d'écrans vidéo connectés entre eux, affichant chacun une partie de l'image
ou la même image.
2) Video Wall
- L'écran peut être divisé.
Lors de la division, la même configuration peut être appliquée à plusieurs écrans.
z Sélectionnez un mode dans la fonction Division de l'écran.
z Sélectionnez un affichage dans la fonction Display Selection.
z
L'emplacement sera défini en appuyant sur un numéro dans le mode sélectionné.
z
Le programme MDC fourni par Samsung prend en charge jusqu'à 4x4 écrans LCD.
z
2*2
z 3*3
z 4*4
z 1*2
z
2*1
z
1*5
z
5*1
3)
On / Off
zt{T[WXXT__UGGGX_zt{T[WXXT__UGGGX_ YWW^TXXTY`GGG㝘䟸GXYaX]a[ZYWW^TXXTY`GGG㝘䟸GXYaX]a[Z

- Active/désactive la fonction Wall (Mur) de l'affichage sélectionné.
4) Format
- Le format peut être sélectionné pour afficher un écran divisé.
z
Plein
z Natural
Cette fonction peut ne pas être active dans MagicNet.
La fonction de Maintenance n'est disponible que pour les affichages dont le statut est "ACTIVÉ".
Troubleshooting
1. L'écran que vous souhaitez contrôler n'apparaît pas dans le Tableau d'Information de Contrôle de l'Alimentation
- Vérifiez le branchement du RS232C. (Vérifiez qu'il est correctement branché au port Com1)
- Vérifiez les écrans afin de voir si' l'un des autres écrans connectés a le même ID. Si plusieurs écrans ont le même
ID, ces écrans ne sont pas correctement détectés par le programme en raison d'un conflit de données.
- Vérifiez que l'ID de l'écran est un nombre compris entre 0 et 10 (Réglez à partir du menu de l'écran)
Remarque: l'ID d'un écran doit être une valeur comprise entre 0 et 10.
Si la valeur n'est pas comprise dans cette échelle, le système MDC ne peut pas commander l'écran.
2. L'écran que vous souhaitez contrôler n'apparaît pas sur les autres Tableaux d'Information de Contrôle.
-
Vérifiez que l'écran est actif (ON). (Vous pouvez le voir dans le Tableau d'Information de Contrôle de
l'Alimentation)
- Vérifiez si vous pouvez modifier la source d'entrée de l'écran.
3. La boite de dialogue apparaît sans arrêt.
- Vérifiez que l'écran que vous souhaitez contrôler est bien sélectionné.
4. Le Temporisateur de Marche et le Temporisateur d'Arrêt ont été paramétrés mais une heure différente apparaît.
- Appliquez l'heure actuelle pour synchroniser les horloges de l'écran.
5. La télécommande peut ne pas fonctionner correctement lorsque vous coupez la Fonction télécommande,
déconnectez le câble RS-232C ou quittez le programme de manière incorrecte. Relancez le programme et activez à
nouveau la fonction télécommande pour rétablir les fonctions normales.
<Remarque> Ce programme peut souffrir de dysfonctionnements dus à certains problèmes des circuits de
communication ou en raison des interférences des appareils électroniques situés à proximité.
Affichage de la valeur des paramètres en mode écrans multiples
Lorsque plusieurs écrans sont connectés, les valeurs de réglage sont affichées de la manière suivante.
1. Aucune sélection : Affiche la Valeur d'Usine par Défaut.
2. Un écran sélectionné : Récupère et affiche les valeurs de réglage de l'écran sélectionné.
3. Un écran sélectionné (ID1) et ajouter un autre écran (ID3). Le programme, qui affichait déjà les valeurs de réglage
zt{T[WXXT__UGGGX`zt{T[WXXT__UGGGX` YWW^TXXTY`GGG㝘䟸GXYaX]a[ZYWW^TXXTY`GGG㝘䟸GXYaX]a[Z

de l'ID1, récupère et affiche la valeur de l'ID3.
4. Tous les postes sélectionnés en utilisant « Sélectionner Tout » : Rétablit la Valeur d'Usine par Défaut.
\
zt{T[WXXT__UGGGYWzt{T[WXXT__UGGGYW YWW^TXXTY`GGG㝘䟸GXYaX]a[ZYWW^TXXTY`GGG㝘䟸GXYaX]a[Z

La couleur et l'aspect du produit peuvent varier en fonction du modèle, et ses spécifications peuvent être
modifiées sans préavis pour des raisons d'amélioration des performance.
Réglage du moniteur
Entrée
Modes disponibles
PC / BNC / DVI
AV
S-Vidéo
Composante
DVI-Video
Liste Source
[MENU]
˧
[ENTER]
˧
[ENTER]
˧
[
/
]
˧
[ENTER]
Permet de sélectionner l'ordinateur, la BNC ou toute autre source externe connectée au moniteur.
Permet de sélectionner l'écran de votre choix.
1) PC
2) BNC
3) DVI
4) AV
5) S-Vidéo
6) Composante
[L'accès direct peut se faire par le bouton de la télécommande 'SOURCE'.]
Remarque
• Le PIP disparaît lorsque le moniteur est connecté à une source externe.
PIP
Lorsque des appareils A/V externes, tel qu'un magnétoscope ou un lecteur de DVD, sont connectés au
moniteur, la fonction PIP permet de vISI (PIP)onner des vidéos provenant de ces appareils dans une petite
fenêtre incrustée dans le signal vidéo du PC. (Arrêt/Marche)
Remarque
• Puisque le BNC et le composant utilisent le même terminal, il est impossible de faire chevaucher plus d'un
PIP (incrustation d’image) à l'écran.
1) PIP
[MENU]
˧
[ENTER]
˧
[
/
]
˧
[ENTER]
˧
[ENTER]
˧
[
/
]
˧
[ENTER]
Activez ou désactivez la fenêtre PIP.
Arrêt
Marche
[L'accès direct peut se faire par le bouton de la télécommande 'PIP'.]
2) Source
[MENU]
˧
[ENTER]
˧
[
/
]
˧
[ENTER]
˧
[
/
]
˧
[ENTER]
˧
[
/
]
˧
[ENTER]
Sélectionnez la source d'entrée pour la fenêtre PIP.
- PC / DVI: AV / S-Vidéo / Composant
- BNC: AV / S-Vidéo
- DVI: AV / S-Vidéo / Composant
- AV / S-Vidéo : PC / BNC / DVI
Consignes de sécurité
Introduction
Connexions
Utilisation du logiciel
Réglage du moniteur
Entrée
Image
[PC / BNC /DVI Mode]
Image
[AV / S-Video /
Component / DVI-Video]
Son
Configuration
Multi contrôle
Fonctions de commande
directe
Dépannage
Caractéristiques techniques
Information
Annexe
\
W\UGGGXW\UGGGX YWW^TXYTW]GGG㝘㤸G`a\XaZYYWW^TXYTW]GGG㝘㤸G`a\XaZY

- Composant : PC / DVI Mode
[L'accès direct peut se faire par le bouton de la télécommande 'SOURCE'.]
3) Intervertir
[MENU]
˧
[ENTER]
˧
[
/
]
˧
[ENTER]
˧
[
/
]
˧
[ENTER]
Echange du contenu des images main et PIP.
L’image de la fenêtre PIP apparaît sur l’écran principal et celle de l’écran principal apparaît dans la fenêtre
PIP.
[L'accès direct peut se faire par le bouton de la télécommande 'SWAP'.]
4) Taille
[MENU]
˧
[ENTER]
˧
[
/
]
˧
[ENTER]
˧
[
/
]
˧
[ENTER]
˧
[
/
]
˧
[ENTER]
Pour changer la Taille de la fenêtre PIP .
[L'accès direct peut se faire par le bouton de la télécommande 'SIZE'.]
5) Position
[MENU]
˧
[ENTER]
˧
[
/
]
˧
[ENTER]
˧
[
/
]
˧
[ENTER]
˧
[
/
]
˧
[ENTER]
Pour changer la Position de la fenêtre ISI.
6) Transparency
[MENU]
˧
[ENTER]
˧
[
/
]
˧
[ENTER]
˧
[
/
]
˧
[ENTER]
˧
[
/
]
˧
[ENTER]
A
juste la transparence des fenêtres PIP.
- Elevé
- Moyen
- Bas
- Opaque
Remarque
•
Si vous sélectionnez , , dans Taille, Position et Transparence ne seront pas activées.
Modes disponibles : PIP
Modif. Nom
[MENU]
˧
[ENTER]
˧
[
/
]
˧
[ENTER]
˧
[
/
]
˧
[ENTER]
˧
[
/
]
˧
[ENTER]
Nommer la source connectée aux entrées pour rendre votre sélection plus simple.
1) PC
2) BNC
3) DVI
4) AV
5) S-Vidéo
6) Composante
Image [PC / BNC /DVI]
Modes disponibles
PC / BNC / DVI
AV
S-Vidéo
Composante
DVI-Video
MagicBright™
[MENU]
˧
[
/
]
˧
[ENTER]
˧
[ENTER]
˧
[
/
]
˧
[ENTER]
MagicBright™ est une nouvelle fonctionnalité qui garantit un environnement d'affichage idéal selon le contenu
de l'image regardée.
Actuellement, 4 modes sont disponibles : Loisirs, Internet, Text et Personnalisé.
Chaque mode est associé à une valeur de luminosité prédéfinie. Pour sélectionner l'un de ces 4 réglages, il
vous suffit de cliquer sur le bouton 'MagicBright™.
1) Loisirs
Luminosité élevée
Pour regarder des films venant du lecteur de DVD ou d'un CD Vidéo.
2) Internet
Luminosité moyenne
Pour tout ce qui est travail dans des images complexes comme des textes et des graphiques.
3) Texte
Luminosité normale
Pour tout ce qui est documentation ou lors d'importants travaux dans des textes.
\
W\UGGGYW\UGGGY YWW^TXYTW]GGG㝘㤸G`a\XaZ`YWW^TXYTW]GGG㝘㤸G`a\XaZ`

4) Personnalisé
Bien que rigoureusement choisies par nos ingénieurs, les valeurs préconfigurées peuvent ne pas vous
convenir.
Si tel est le cas, réglez la Brightness (Luminosité) et le Contrast (Contraste) en utilisant le menu de l'OSD.
[L'accès direct peut se faire par le bouton de la télécommande 'M/B'.]
Personnalisé
[MENU]
˧
[
/
]
˧
[ENTER]
˧
[
/
]
˧
[ENTER]
˧
[ENTER]
˧
[
/
] / [< / >]
˧
[ENTER]
Vous pouvez utiliser les menus affichés à l'écran pour changer le contraste et la luminosité suivant vos
préférences personnelles.
1) Contraste
Réglez le Contraste.
2) Luminosité
Réglez la Luminosité.
Remarque
• Si vous réglez l'image en utilisant la fonction Personnalisé, MagicBright passera en mode Personnalisé .
Nuance Coul.
[MENU]
˧
[
/
]
˧
[ENTER]
˧
[
/
]
˧
[ENTER]
˧
[
/
]
˧
[ENTER]
Le ton de la couleur peut être changé.
1) Froide
2) Normal
3) Chaude
4) Personnalisé
(Disponible en mode PC/BNC uniquement)
Contrôle Couleur
[MENU]
˧
[
/
]
˧
[ENTER]
˧
[
/
]
˧
[ENTER]
˧
[ENTER]
˧
[< / >]
˧
[ENTER]
Réglez les individuellement les couleurs R, V et B.
(Disponible en mode PC/BNC uniquement)
1) Rouge
2) Vert
3) Bleu
Remarque
• Si vous réglez l'image en utilisant la fonction Contrôle Couleur, Nuance Coul. passera en mode
Personnalisé.
Verrouillage Image
est utilisé pour effectuer un bon réglage et obtenir la meilleure image possible en enlevant tout bruit créant des
images instables, bougeantes et tremblantes. Si vous n'obtenez pas de résultats satisfaisants en utilisant le
réglage fin, utilisez le réglage de base puis revenez au réglage fin.
(Disponible en mode PC/BNC uniquement)
1) Regl. Base
[MENU]
˧
[
/
]
˧
[ENTER]
˧
[
/
]
˧
[ENTER]
˧
[ENTER]
˧
[< / >]
˧
[ENTER]
Supprime les parasites comme les bandes verticales. Ce réglage peut déplacer la zone de l’image. Pour la
recentrer, utilisez le menu Horizontal Control (Contrôle horizontal).
2) Regl. Prec
[MENU]
˧
[
/
]
˧
[ENTER]
˧
[
/
]
˧
[ENTER]
˧
[
/
]
˧
[ENTER]
˧
[< / >]
˧
[ENTER]
Supprime le bruit tel que les bandes horizontales. Si les parasites persistent même après le réglage fin,
recommencez après avoir réglé la fréquence (vitesse de rafraîchissement).
3) Position
[MENU]
˧
[
/
]
˧
[ENTER]
˧
[
/
]
˧
[ENTER]
˧
[
/
]
˧
[ENTER]
˧
[< / >] / [
/
]
˧
[ENTER]
\
W\UGGGZW\UGGGZ YWW^TXYTW]GGG㝘㤸G`a\XaZ`YWW^TXYTW]GGG㝘㤸G`a\XaZ`

Permet de régler la position horizontale et verticale de l'écran.
Réglage Automatique
[MENU]
˧
[
/
]
˧
[ENTER]
˧
[
/
]
˧
[ENTER]
Les valeurs du réglage fin, du réglage de base et de la position sont automatiquement ajustées.
Si vous modifiez la résolution à partir du panneau de configuration, la fonction Réglage Automatique sera
exécutée.
(Disponible en mode PC/BNC uniquement)
[L'accès direct peut se faire par le bouton de la télécommande 'AUTO'.]
Balance signal
Permet de compenser la faiblesse du signal RVB transmis par un long câble d’interface.
(Disponible en mode PC/BNC uniquement)
1) Balance signal
[MENU]
˧
[
/
]
˧
[ENTER]
˧
[
/
]
˧
[ENTER]
˧
[ENTER]
˧
[
/
]
˧
[ENTER]
Vous pouvez effectuer la sélection avec le contrôle du signal sur Marche ou Arrêt.
2) Contrôle du signal
[MENU]
˧
[
/
]
˧
[ENTER]
˧
[
/
]
˧
[ENTER]
˧
[
/
]
˧
[ENTER]
˧
[
/
]
˧
[ENTER]
˧
[
/
]
˧
[< / >]
˧
[ENTER]
Vous pouvez
r
égler manuellement R Phase (Phase R), G Phase (Phase V), B Phase (Phase B), Gain et
Sharpness (Netteté).
Taille
[MENU]
˧
[
/
]
˧
[ENTER]
˧
[
/
]
˧
[ENTER]
˧
[
/
]
˧
[ENTER]
Vous pouvez faire permuter la Taille.
1) 16:9
2) 4:3
Image PIP
[MENU]
˧
[
/
]
˧
[ENTER]
˧
[
/
]
˧
[ENTER]
˧
[
/
]
˧
[ENTER]
˧
[
/
]
˧
[ENTER]
˧
[
/
]
˧
[ENTER]
˧
[< / >]
˧
[ENTER]
Vous pouvez définir les paramètres de l’écran PIP.
1) Contraste
Permet de régler le contraste de la fenêtre PIP à l’écran.
2) Luminosité
Permet de régler la luminosité de la fenêtre PIP à l’écran.
3) Netteté
Permet de régler la différence entre les zones plus claires et les zones plus foncées de la fenêtre PIP
4) Couleur
Permet de régler les zones plus claires/plus sombres de l'affichage.
5) Teinte
A
joute une nuance naturelle à la fenêtre PIP.
Vous pouvez afficher une image grâce aux fonctions AV, S-Vidéo de l'écran PIP en mode PC,
BNCique et DVI. Fonctionne uniquement si le signal vidéo est NTSC.
Modes disponibles : PIP
Image [AV / S-Vidéo / Component / DVI-Video]
Modes disponibles
PC / BNC / DVI
AV
S-Vidéo
Composante
DVI-Video
Mode
\
W\UGGG[W\UGGG[ YWW^TXYTW]GGG㝘㤸G`a\Xa[WYWW^TXYTW]GGG㝘㤸G`a\Xa[W

[MENU]
˧
[
/
]
˧
[ENTER]
˧
[ENTER]
˧
[
/
]
˧
[ENTER]
Le moniteur a quatre paramétrages automatiques de l'image : ("Dynamique", "Standard""Cinéma", et
"Personnel" ).
Vous pouvez activer indifféremment le Personnel, Dynamique, Standard ou Cinéma. Vous pouvez sélectionner
"Personnel" qui rappellera automatiquement vos paramètres personnels d'image.
1) Dynamique
2) Standard
3) Cinéma
4) Personnalisé
[L'accès direct peut se faire par le bouton de la télécommande 'P.MODE'.]
Personnalisé
[MENU]
˧
[
/
]
˧
[ENTER]
˧
[
/
]
˧
[ENTER]
˧
[
/
]
˧
[ENTER]
˧
[< / >]
˧
[ENTER]
Vous pouvez utiliser les menus affichés à l'écran pour changer le contraste et la luminosité suivant vos
préférences personnelles.
1) Contraste
Permet de donner un ton naturel à l'affichage. (PIP)
2) Luminosité
Pour régler la Luminosité.
3) Netteté
Réglez la netteté de l'image.
4) Couleur
Réglez les couleurs de l'image.
5) Teinte
A
joute une nuance naturelle à la fenêtre PIP.
Ne fonctionne que pour les modes AV et S-Vidéo. Fonctionne uniquement si le signal vidéo est
NTSC.
Nuance Coul.
[MENU]
˧
[
/
]
˧
[ENTER]
˧
[
/
]
˧
[ENTER]
˧
[
/
]
˧
[ENTER]
Le ton de la couleur peut être changé. Les composantes de couleur individuelles sont également réglables par
l'utilisateur.
1) Froide2
2) Froide1
3) Normal
4) Chaude1
5) Chaude2
Taille
[MENU]
˧
[
/
]
˧
[ENTER]
˧
[
/
]
˧
[ENTER]
˧
[
/
]
˧
[ENTER]
Vous pouvez faire permuter la Taille.
1)16:9
2)Zoom 1
3)Zoom 2
4)4:3
[ZOOM1, ZOOM2 ne sont pas disponibles en format 1080i(ou au-dessus de 720p) du DTV.]
Digital Noise Reduction (Réduction numérique de bruit).
[MENU]
˧
[
/
]
˧
[ENTER]
˧
[
/
]
˧
[ENTER]
˧
[
/
]
˧
[ENTER]
Vous pouvez activer ou désactiver la fonction Noise Elimination (Élimination des bruits).
La fonction Digital Noise Reduction (Réduction numérique de bruit) vous permet de profiter d'images toujours
plus belles.
1) Arrêt
2) Marche
Mode film
\
W\UGGG\W\UGGG\ YWW^TXYTW]GGG㝘㤸G`a\Xa[WYWW^TXYTW]GGG㝘㤸G`a\Xa[W

[MENU]
˧
[
/
]
˧
[ENTER]
˧
[
/
]
˧
[ENTER]
˧
[
/
]
˧
[ENTER]
Vous pouvez activer ou désactiver le mode Film.
Réduit les différences de volume entre les différents programmes.
(Non disponible en mode DVI-Video.)
1) Arrêt
2) Marche
Image PIP
[MENU]
˧
[
/
]
˧
[ENTER]
˧
[
/
]
˧
[ENTER]
˧
[
/
]
˧
[ENTER]
˧
[
/
]
˧
[ENTER]
˧
[< / >]
˧
[ENTER]
Vous pouvez définir les paramètres de l’écran PIP.
1) Contraste
Permet de régler le contraste de la fenêtre PIP à l’écran.
2) Luminosité
Permet de régler la luminosité de la fenêtre PIP à l’écran.
Modes disponibles : PIP
Son
Modes disponibles
PC / BNC / DVI
AV
S-Vidéo
Composante
DVI-Video
Mode
[MENU]
˧
[
/
]
˧
[ENTER]
˧
[ENTER]
˧
[
/
]
˧
[ENTER]
Le moniteur dispose d’un amplificateur audio, stéréo et haute fidélité intégré.
1) Standard
Sélectionnez "Standard" pour utiliser les réglages d'usine.
2) Musique
Sélectionnez "Musique" pour vous regardez des vidéos de musique ou des concerts.
3) Cinéma
Sélectionnez "Cinéma" pour regarder un film.
4) Parole
Sélectionnez "Parole" pour regarder une émission basée principalement sur des dialogues (ex. :
informations…)
5) Personnalisé
Sélectionnez "Personnel" pour retrouver vos paramètres personnels.
Personnalisé
[MENU]
˧
[
/
]
˧
[ENTER]
˧
[
/
]
˧
[ENTER]
˧
[
/
]
˧
[ENTER]
˧
[< / >]
˧
[ENTER]
Vous pouvez utiliser les menus affichés à l'écran pour changer le contraste et la luminosité suivant vos
préférences Personnalisé.
1) Basse
Renforce les sons basse fréquence.
2) Aigu
Renforce les sons haute fréquence.
3) Balance
Balance sonore ==> vous permet de régler l'équilibre du son (balance) entre le haut-parleur gauche et le
haut-parleur droit.
[Vous pouvez entendre le son même lorsque la valeur audio est paramétrée sur 0.]
Remarque
• Si vous réglez l'image à l'aide de la fonction Sound Custom (Son personnalisé), Sound Mode (Mode son)
passera à Custom Mode (Mode personnalisé).
\
W\UGGG]W\UGGG] YWW^TXYTW]GGG㝘㤸G`a\Xa[WYWW^TXYTW]GGG㝘㤸G`a\Xa[W

Volume auto
[MENU]
˧
[
/
]
˧
[ENTER]
˧
[
/
]
˧
[ENTER]
˧
[
/
]
˧
[ENTER]
Réduit les différences de volume entre les différents programmes.
1) Arrêt
2) Marche
SRS TS XT
[MENU]
˧
[
/
]
˧
[ENTER]
˧
[
/
]
˧
[ENTER]
˧
[
/
]
˧
[ENTER]
La technologie SRS TS XT est une technologie SRS brevetée qui répond au problème de lecture des contenus
multicanaux 5.1 sur deux haut-parleurs. La technologie TruSurround garantit un son surround virtuel d'une
exceptionnelle qualité sur tout système de lecture à deux haut-parleurs, dont les haut-parleurs du téléviseur.
Cette technologie est entièrement compatible avec tous les formats multicanaux.
1) Arrêt
2) Marche
[L'accès direct peut se faire par le bouton de la télécommande 'SRS'.]
Sélection du son
[MENU]
˧
[
/
]
˧
[ENTER]
˧
[
/
]
˧
[ENTER]
˧
[
/
]
˧
[ENTER]
Lorsque le mode PIP est activé, vous pouvez sélectionner soit Affichage principal soit Secondaire.
1) Principal
2) Secondaire
[Modes disponibles : PIP]
Setup(Configuration)
Modes disponibles
PC / BNC / DVI
AV
S-Vidéo
Composante
DVI-Video
Langue
[MENU]
˧
[
/
]
˧
[ENTER]
˧
[ENTER]
˧
[
/
]
˧
[ENTER]
Vous pouvez choisir une des 11 langues.
Remarque
• La langue choisie sera utilisée uniquement dans l’OSD.
Elle n’a aucun effet sur les logiciels de l’ordinateur.
Horloge
Permet de choisir l’un des 4 paramètres d’heure : Réglage Horloge, Veille, On Timer et Off Timer.
1)
Réglage Horloge
[MENU]
˧
[
/
]
˧
[ENTER]
˧
[
/
]
˧
[ENTER]
˧
[ENTER]
˧
[< / >]
˧
[ENTER]
Paramètre d’heure actuelle.
2) Veille
[MENU]
˧
[
/
]
˧
[ENTER]
˧
[
/
]
˧
[ENTER]
˧
[
/
]
˧
[ENTER]
˧
[< / >]
˧
[
/
]
˧
[ENTER]
˧
[< / >]
˧
[
/
]
˧
[ENTER]
Permet de paramétrer l’arrêt automatique du moniteur pendant un nombre donné de minutes. (Arrêté, 30,
60, 90, 120, 150, 180)
3) Minuterie ON
[MENU]
˧
[
/
]
˧
[ENTER]
˧
[
/
]
˧
[ENTER]
˧
[
/
]
˧
[ENTER]
˧
[< / >]
˧
[
/
]
˧
\
W\UGGG^W\UGGG^ YWW^TXYTW]GGG㝘㤸G`a\Xa[WYWW^TXYTW]GGG㝘㤸G`a\Xa[W

[ENTER]
Permet de paramétrer le lancement automatique du moniteur à une heure prédéfinie.
Permet de contrôler le mode et le niveau du volume au moment où le moniteur se met automatiquement en
marche.
4) Minuterie OFF
[MENU]
˧
[
/
]
˧
[ENTER]
˧
[
/
]
˧
[ENTER]
˧
[
/
]
˧
[ENTER]
˧
[< / >]
˧
[
/
]
˧
[ENTER]
Permet de paramétrer l’arrêt automatique du moniteur à une heure donnée, selon un niveau de volume et
un mode prédéfinis.
Remarque
• Si vous avez activé l'option Minuterie ON ou Minuterie OFF alors que l'horloge n'est pas réglée, le
message "Régler l'horloge en premier" s'affiche.
Transparence du menu
[MENU]
˧
[
/
]
˧
[ENTER]
˧
[
/
]
˧
[ENTER]
˧
[
/
]
˧
[ENTER]
Changer l’opacité du fond de l’OSD.
1) Elevé
2) Moyen
3) Bas
4) Opaque
PIN du verrou de sécurité
[MENU]
˧
[
/
]
˧
[ENTER]
˧
[
/
]
˧
[ENTER]
˧
[0~9]
˧
[0~9]
˧
[0~9]
Vous pouvez modifier le mot de passe.
Gain d’énergie
[MENU]
˧
[
/
]
˧
[ENTER]
˧
[
/
]
˧
[ENTER]
˧
[
/
]
˧
[ENTER]
˧
[MENU]
Cette fonction permet de régler la consommation de l'unité afin d'économiser de l'énergie.
1) Marche
2) Arrêt
Remarque
• Pour réduire la consommation d’énergie en mode veille, définissez Gain d’énergie sur Marche. Toutefois,
lorsque Gain d’énergie est défini sur Marche, vous ne pouvez pas utiliser la fonction distante Power On de
MDC ni la fonction WOL (Wake On LAN) de MagicNet.
Mur d'images
Un mur vidéo consiste en un ensemble d'écrans vidéo connectés entre eux, affichant chacun une partie de
l'image ou la même image.
Lorsque la fonction Mur d'images est activée, les options d'écran Mur d'images peuvent être réglées.
1) Mur d'images
[MENU]
˧
[
/
]
˧
[ENTER]
˧
[
/
]
˧
[ENTER]
˧
[ENTER]
˧
[
/
]
˧
[ENTER]
Active/désactive la fonction Wall (Mur) de l'affichage sélectionné.
-
Arrêt
-
Marche
2) Format
[MENU]
˧
[
/
]
˧
[ENTER]
˧
[
/
]
˧
[ENTER]
˧
[
/
]
˧
[ENTER]
˧
[
/
]
˧
[ENTER]
Le format peut être sélectionné pour afficher un écran divisé.
-
Plein
Affiche un écran plein sans marges.
-
Natural
Affiche une image naturelle avec les rapports d'aspect originaux intacts.
3) Division de l'écran
[MENU]
˧
[
/
]
˧
[ENTER]
˧
[
/
]
˧
[ENTER]
˧
[
/
]
˧
[ENTER]
˧
[
/
]
˧
[ENTER]
L'écran peut être divisé.
Lors de la division, la même configuration peut être appliquée à plusieurs écrans.
• Sélectionnez un mode dans la fonction Division de l'écran.
• Sélectionnez un affichage dans la fonction Display Selection.
W\UGGG_W\UGGG_ YWW^TXYTW]GGG㝘㤸G`a\Xa[WYWW^TXYTW]GGG㝘㤸G`a\Xa[W

• L'emplacement sera défini en appuyant sur un numéro dans le mode sélectionné.
-
2 x 2
-
3 x 3
-
4 x 4
-
5 x 5
-
1 x 2
-
2 x 1
-
1 x 5
-
5 x 1
Remarque
• Lorsque le Mur d'images est en cours d'exécution, les fonctions PIP, Réglage automatique, Verrouillage
Image et Taille ne sont pas disponibles. Si la fonction PIP est activée lorsque vous lancez le Mur d'images,
elle est désactivée. Mur d'images ne fonctionne pas en mode MagicNet.
Ecran de sécurité
La fonction Safety Screen (Ecran sécurité) sert à empêcher la rémanence susceptible d'apparaître en cas
d'affichage d'une image arrêtée pendant longtemps.
- La fonction Screen Scroll fait défiler l'écran pendant la période spécifiée.
- Cette fonction n'est pas disponible lorsque le moniteur est hors tension.
1) Ecran de sécurité
[MENU]
˧
[
/
]
˧
[ENTER]
˧
[
/
]
˧
[ENTER]
˧
[ENTER]
˧
[
/
]
˧
[ENTER]
Détermine le réglage de la fonction Screen Scroll (Défilement de l'écran) sur Marche ou Arrêt.
-
Arrêt
-
Marche
2) Interval
[MENU]
˧
[
/
]
˧
[ENTER]
˧
[
/
]
˧
[ENTER]
˧
[
/
]
˧
[ENTER]
˧
[
/
]
˧
[ENTER]
Détermine l'intervalle de temps de l'opération Screen Scroll (Défilement de l'écran). (1-10 heures)
L'intervalle est calculé sur la base de la durée de marche.
Par défaut, l'intervalle est réglé sur 10 heures.
-
1-10 heures
3) Second
[MENU]
˧
[
/
]
˧
[ENTER]
˧
[
/
]
˧
[ENTER]
˧
[
/
]
˧
[ENTER]
˧
[
/
]
˧
[ENTER]
Détermine la durée d'exécution de l'opération Screen Scroll (Défilement de l'écran). (1-5 secondes)
Par défaut, la durée est réglée sur 5 secondes.
-
Type-Défil. : 1~5 Second
-
Type-Pixel, Barre, efface : 10~50 Second
4) Type
[MENU]
˧
[
/
]
˧
[ENTER]
˧
[
/
]
˧
[ENTER]
˧
[
/
]
˧
[ENTER]
˧
[
/
]
˧
[ENTER]
Vous pouvez modifier la fonction Safety Screen Type (Type écran de sécurité).
-
Défil.
-
Pixel
-
Barre
-
efface
Choix de la résolution
[MENU]
˧
[
/
]
˧
[ENTER]
˧
[
/
]
˧
[ENTER]
˧
[
/
]
˧
[ENTER]
Si l'image ne s'affiche pas correctement à l'écran alors que la résolution de la carte graphique de l'ordinateur
est réglée sur 1 024 x 768 à 60 Hz, 1 280 x 768 à 60 Hz, 1 360 x 768 à 60 Hz ou 1 366 x 768 à 60 Hz, cette
fonction (Choix de la résolution) permet d'afficher l'image à l'écran à la résolution spécifiée.
(Disponible en mode PC/BNC uniquement)
1) Arrêt
2) 1024 X 768
3) 1280 X 768
4) 1360 X 768
5) 1366 X 768
Remarque
• La sélection du menu n'est possible que lorsque la résolution graphique est définie sur 1 024 x 768 @ 60
Hz, 1 280 x 768 @ 60 Hz, 1 360 x 768 @ 60 Hz ou 1 366 x 768 @ 60 Hz.
W\UGGG`W\UGGG` YWW^TXYTW]GGG㝘㤸G`a\Xa[WYWW^TXYTW]GGG㝘㤸G`a\Xa[W

Contrôle de la lampe
[MENU]
˧
[
/
]
˧
[ENTER]
˧
[
/
]
˧
[ENTER]
˧
[ENTER]
˧
[< / >]
˧
[ENTER]
Permet de régler le rétro-éclairage afin de réduire la consommation d’énergie.
Activation au réglage
[MENU]
˧
[
/
]
˧
[ENTER]
˧
[
/
]
˧
[ENTER]
˧
[ENTER]
˧
[
/
]
˧
[ENTER]
Règle la fonction Power On time (Heure marche) pour l'écran.
*Attention: Définissez la fonction Power On time sur un temps plus long pour éviter la surpression.
Réinitialiser
Les paramètres de l'image sont remplacés par les valeurs usine définies par défaut.
1)
Réinitialiser Image
[MENU]
˧
[
/
]
˧
[ENTER]
˧
[
/
]
˧
[ENTER]
˧
[ENTER]
˧
[< / >]
˧
[ENTER]
(Disponible en mode PC/BNC uniquement)
2)
Réinitialiser Couleur
[MENU]
˧
[
/
]
˧
[ENTER]
˧
[
/
]
˧
[ENTER]
˧
[
/
]
˧
[ENTER]
˧
[< / >]
˧
[ENTER]
Multi contrôle
Modes disponibles
PC / BNC / DVI
AV
S-Vidéo
Composante
DVI-Video
Multi contrôle
Affecte un ID propre au SET.
[MENU]
˧
[
/
]
˧
[ENTER]
˧
[
/
]
˧
[ENTER]
˧
[ENTER]
˧
[
/
]
˧
[ENTER]
1) Configuration ID
[MENU]
˧
[
/
]
˧
[ENTER]
˧
[
/
]
˧
[ENTER]
˧
[ENTER]
˧
[
/
]
˧
[ENTER]
A
ffecte des ID différents au SET.
2) Entrée ID
[MENU]
˧
[
/
]
˧
[ENTER]
˧
[
/
]
˧
[ENTER]
˧
[
/
]
˧
[ENTER]
˧
[
/
]
˧
[ENTER]
Permet de sélectionner les fonctions du transmetteur des différents SET. Seul le SET dont l’ID correspond
au paramètre du transmetteur est activé.
Fonctions de commande
directe
Modes disponibles
PC / BNC / DVI
AV
S-Vidéo
Composante
DVI-Video
MDC
Passer à l’écran Multi Control OSD.
Verrouil.
Activez la fonction Verrouillage de sécurité.
1) Verrouillage activé
]
W\UGGGXWW\UGGGXW YWW^TXYTW]GGG㝘㤸G`a\Xa[WYWW^TXYTW]GGG㝘㤸G`a\Xa[W

Le verrouillage sera activé.
2) Verrouillage désactivé
Le verrouillage sera désactivé.
Remarque
• Lorsque la fonction Lock est activée, seul le bouton Lock peut être utilisé sur la télécommande et le
téléviseur.
Le password (mot de passe) prédéterminé du moniteur est "000000".
Remarque
• Réinitialisation du mot de passe pour le verrouillage des touches de fonction.
Appuyez sur MUTE
˧
1
˧
8
˧
6
˧
On. Le mot de passe est réinitialisé (sa valeur devient '0000').
La télécommande est nécessaire pour réinitialiser le mot de passe.
© 1995~2008 Samsung Electronics Co., Ltd. Tous droits résérvés.
]
W\UGGGXXW\UGGGXX YWW^TXYTW]GGG㝘㤸G`a\Xa[WYWW^TXYTW]GGG㝘㤸G`a\Xa[W

La couleur et l'aspect du produit peuvent varier en fonction du modèle, et ses spécifications peuvent être
modifiées sans préavis pour des raisons d'amélioration des performance.
Dépannage
Vérification de la fonction Autotest
Remarque
• Contrôler les points suivants avant de téléphoner à l’assistance. Contacter le Centre d’Assistance pour les
problèmes qu vous ne pouvez pas résoudre vous-même.
Vérification de la fonction Autotest
Le moniteur est doté d'une fonction d'autotest qui vous permet de vérifier son bon fonctionnement.
1) Éteignez le moniteur et l'ordinateur.
2) Débranchez le câble vidéo à l'arrière de l'ordinateur.
3) Mettez le moniteur sous tension.
La figure présentée ci-dessous ("Contôles Câble Vidéo") apparaît sur un fond noir lorsque le moniteur se
trouve dans des conditions de travail normales bien qu’il ne reçoive aucun signal vidéo. Au cours d’un auto
test, le LED de puissance reste vert et la figure se déplace tout autour de l’écran.
4) Éteignez votre moniteur et reconnectez le câble vidéo; puis allumez votre ordinateur et le moniteur.
Si votre écran moniteur reste vierge après cette procédure, contrôler le pilote vidéo et l’ordinateur ;
le moniteur
fonctionne correctement.
Check Cooling System
Le message
"Check Cooling System"
s'affiche à l'écran si le ventilateur de refroidissement a un problème.
Contactez un centre de services afin de faire réparer ou remplacer le ventilateur.
Mode non disponible
L'affichage de l'écran peut être d'une résolution supérieure à 1 360 x 768. Cependant, le message suivant
s'affichera pendant une minute ; pendant ce temps, vous pouvez choisir de modifier la résolution de l'écran ou
de rester dans le mode en cours. Si la résolution est supérieure à 85 Hz, un écran noir s'affiche : le moniteur ne
prend pas en charge plus de 85 Hz.
Consignes de sécurité
Introduction
Connexions
Utilisation du logiciel
Réglage du moniteur
Dépannage
Vérification de la fonction
Autotest
Liste de vérification
Q & R
Caractéristiques techniques
Information
Annexe
]
zt{T[WXXT__UGGGZZzt{T[WXXT__UGGGZZ YWW^TXXTY`GGG㝘䟸GXYaX]a[[YWW^TXXTY`GGG㝘䟸GXYaX]a[[

Remarque
• Se reporter à la rubrique Spécifications > Modes Pré-établis d'Affichage pour les résolutions d’affichage ou
les fréquence de rafraîchissement acceptées par le moniteur.
Entretien et Nettoyage
1) Entretien du caisson du moniteur.
Nettoyez-le avec un chiffon doux après avoir débranché le cordon d’alimentation.
• N’utilisez pas de benzène, de diluant ni d’autres substances
inflammables, ni de chiffon humide.
• Nous vous conseillons d’utiliser un produit de nettoyage Samsung
pour éviter d’endommager votre écran.
2) Entretien de l’Ecran Plat.
Nettoyez doucement à l'aide d'un chiffon doux (coton).
• N’utilisez jamais d’acétone, de benzène ni de diluant.
(Ils peuvent endommager ou déformer la surface de l’écran).
• L’utilisateur devra payer les frais de réparation des dommages qu’il
aura provoqués.
Symptômes et Recommandations
Remarque
• Un moniteur recrée les signaux visuels reçus de l'ordinateur. Ainsi, s'il y a des problèmes avec l'ordinateur
personnel (PC) ou la carte vidéo, cela peut rendre le moniteur blanc, avoir une coloration faible, un bruit de
fond, Fréquence video trop élevée, etc. Dans ce cas, il faut d'abord verifier la source du problème, et
ensuite contacter un centre de service ou votre vendeur.
1) Vérifiez si le fil électrique et le câble sont correctement connectés à l'ordinateur.
2) Vérifiez si l'ordinateur émet un "beep" sonore plus de 3 fois lorsqu'il démarre.
(Si c est le cas, demandez le service après vente pour votre carte mère)
3) Si vous installez une nouvelle carte vidéo ou si vous assemblez un ordinateur(PC), vérifiez si l'adapteur
(video) et le pilote du moniteur sont bien installés.
4) Vérifiez si la fréquence de balayage de l'écran vidéo est réglée sur 50 Hz ~85 Hz.
(Ne pas dépasser 60Hz quand vous utilisez la résolution maximale.)
5) Si vous avez un problème en installant l'adaptateur, démarrez en mode "Sans Échec", puis enlever le Pilote
d' Affichage qui se trouve sur le "
Panneau de Contrôle, Système, Administration des Periphériques
", et
redémarrer l'ordinateur pour réinstaller le pilote de l 'adaptateur (video).
Liste de vérification
Remarque
• La table ci-après liste les éventuels problèmes et leurs solutions. Avant de prendre contact avec le SAV,
regardez dans les informations fournies dans cette section pour voir si vous pouvez trouver une solution à
vos problèmes. Si vous avez besoin d’assistance, vous pouvez cependant contacter le numéro de
téléphone indiqué sur votre bon de garantie, dans la section Informations, ou contactez votre revendeur.
Problèmes liés à l’installation (PC)
Remarque
]
zt{T[WXXT__UGGGZ[zt{T[WXXT__UGGGZ[ YWW^TXXTY`GGG㝘䟸GXYaX]a[[YWW^TXXTY`GGG㝘䟸GXYaX]a[[

• Les problèmes liés à l’installation du moniteur et leurs solutions sont listés ci-dessous.
Problèmes Solutions
L’écran du moniteur scintille.
z
Contrôler que le câble de signal VGA entre l’ordinateur et le
moniteur est correctement connecté et bien serré.
(Se reporter à la rubrique Se connecter à un ordinateur.)
Problèmes liés à l’écran.
Remarque
• Les problèmes liés à l’écran du moniteur et leurs solutions sont listés ci-dessous.
Problèmes Solutions
L’écran reste vierge et l’indicateur
d’alimentation est éteint.
z
S’assurer que le cordon d’alimentation est correctement
connecté et que le moniteur est sous tension.
(Se reporter à la rubrique Connecter des câbles.)
Présence du message [Contöerlez
câble cidéo]
z
S’assurer que le câble de signal est correctement connecté au
PC ou aux sources vidéo.
(Se reporter à la rubrique Connecter des câbles.)
z
S’assurer que le PC ou les sources vidéo sont sous tension.
Présence du message [Mode non
disponible]
z
Contrôler la résolution maximum et la fréquence de l’adaptateur
vidéo.
z
Comparez ces valeurs avec celles données dans le dossier
Modes Pré-établis d'Affichage.
L’image oscille verticalement.
z
S’assurer que le câble de signal VGA est correctement
connecté.
le reconnecter correctement.
(Se reporter à la rubrique Se connecter à un ordinateur.)
L’image n’est pas claire, elle
scintille. Picture is blurred.
z
Jouer sur les réglages de fréquence Grain et Réglage fin.
z
Remettre en route après avoir rebranché tous les accessoires
(câble de liaison vidéo, etc.)
z
Réglez la résolution et la fréquence selon les recommandations.
L’image est instable et vibre.
Des images dédoublées
apparaissent à l’écran.
z
Contrôler que la résolution et la fréquence de la carte vidéo de
l’ordinateur sont dans la plage acceptée par le moniteur.
Dans le cas contraire, reprendre le réglage en fonction du
Information courant du menu du moniteur et selon les valeurs
des Modes Pré-établis d'Affichage.
L’image est trop claire ou trop
foncée.
z
Ajuster la Luminosité et le Contraste.
(Se reporter aux rubriques Luminosité et Contraste.)
La couleur de l’écran est
incohérente.
La couleur de l’image est
déformée avec des ombres noires.
La couleur blanche est sale.
z
Reprendre le réglage de couleur en Personnel dans le menu
Réglage de la Couleur
L’indicateur d’alimentation
clignote en vert.
z
Le moniteur est en train de sauvegarder les modifications
effectuées dans la mémoire OSD.
L’écran est vierge et l’indicateur
d’alimentation est au vert fixe ou
clignote toutes les 0.5 ou 1
secondes.
z
Le moniteur utilise son système de gestion d’alimentation.
z
Déplacer la souris de l’ordinateur ou appuyer sur une touche du
clavier.
L'écran est blanc et clignote.
z
Si vous voyez le message "TEST CORRECT" (TEST GOOD) à
]
zt{T[WXXT__UGGGZ\zt{T[WXXT__UGGGZ\ YWW^TXXTY`GGG㝘䟸GXYaX]a[[YWW^TXXTY`GGG㝘䟸GXYaX]a[[

l'écran lorsque vous appuyez sur le bouton MENU, vérifiez le
câble entre le moniteur et l'ordinateur pour être sûr que les
prises soient correctement branchées.
Problèmes liés à l'audio.
Remarque
• Les problèmes liés aux signaux audio et leurs solutions sont listés ci-dessous.
Problèmes Solutions
Aucun son
z
Veillez à ce que le câble audio soit correctement connecté au
port entrée audio du moniteur et au port sortie audio de la carte
son.
(Se reporter à la rubrique Connecter des câbles.)
z
Contrôler le niveau du volume.
Le niveau du son est trop bas
z
Contrôler le niveau du volume.
z
Si le volume est toujours trop bas après avoir réglé le contrôle à
son maximum, vérifiez le volume sonore sur la carte son de
l'ordinateur ou le programme.
Le son est trop grave ou trop
aïgue.
z
Ajuster Aïgue et Graves au niveau voulu.
Problèmes liés à la télécommande
Remarque
• Les problèmes liés à la télécommande et leurs solutions sont listés ci-dessous.
Problèmes Solutions
Les boutons de commande de la
télécommande ne répondent pas.
z
Contrôler la polarité des piles (+/-).
z
Contrôler la présence des piles.
z
Contrôler la présence de l’alimentation.
z
S’assurer que le câble d’alimentation est correctement
connecté.
z
Contrôler la présence de lampe au néon ou fluorescente dans le
voisinage.
Q & R
Question Réponse
Comment puis-je changer la
fréquence?
La fréquence peut être modifiée par reconfiguration de la carte vidéo.
Notez que le support de la carte vidéo peut varier selon la version du
pilote utilisé. (Pour plus d'informations, reportez-vous au manuel de
l'ordinateur ou de la carte vidéo.)
Comment puis-je ajuster la
résolution?
z
Windows XP:
Réglage de la résolution sur le Panneau de Configuration
˧
Apparences et Thèmes
˧
Thèmes
˧
Paramètres.
z
Windows ME/2000:
Modifiez la résolution dans Panneau de Configuration
˧
Affichage
˧
Installation.
* Contactez le fabricant de la carte vidéo pour plus de détails.
Comment puis-je installer la
fonction Power Saving?
z
Windows XP:
Réglage de la résolution sur le Panneau de Configuration
˧
Apparences et Thèmes
˧
Thèmes
˧
Paramètres.
Ecran de Veille ou avec BIOS SETUP sur l’ordinateur. (Se
]
zt{T[WXXT__UGGGZ]zt{T[WXXT__UGGGZ] YWW^TXXTY`GGG㝘䟸GXYaX]a[[YWW^TXXTY`GGG㝘䟸GXYaX]a[[

référer à Windows/ Guide de l'Ordinateur)
z
Windows ME/2000:
Set the resolution at the Control Panel
˧
Display
˧
Screen
Saver.
Installez la fonction dans le BIOS-SETUP de l'ordinateur ou
dans l'économiseur d'écran. (Se référer à Windows/ Guide de
l'Ordinateur)
Comment puis-je nettoyer le
boîtier extérieur/ le Panneau LCD?
Débranchez le cordon d'alimentation et nettoyez le moniteur avec un
chiffon doux imprégné d'une solution de nettoyage ou d'eau.
Ne pas laisser de détergent ni faire d'égratinure sur la boîtier. Ne pas
laisser l'eau s'infiltrer dans le moniteur.
© 1995~2008 Samsung Electronics Co., Ltd. Tous droits résérvés.
]
zt{T[WXXT__UGGGZ^zt{T[WXXT__UGGGZ^ YWW^TXXTY`GGG㝘䟸GXYaX]a[[YWW^TXXTY`GGG㝘䟸GXYaX]a[[

La couleur et l'aspect du produit peuvent varier en fonction du modèle, et ses spécifications peuvent être
modifiées sans préavis pour des raisons d'amélioration des performance.
Caractéristiques techniques
Généralités
Généralités
Généralités
Nom du Modèle SMT-3211
Panneau LCD
Taille Diagonale de 32" (80 cm)
Zone d'Affichage 697,6845 mm (H) x 392,256 mm(V)
Pixel Pitch 0,51075 mm (H) x 0,51075 mm(V)
Synchronisation
Horizontale 30 ~ 81 kHz
Verticale 56 ~ 75 Hz
Couleur d'Affichage
Couleur d'Affichage 16,7 millions de couleurs
Résolution
Résolution optimale 1360 x 768 / 1366 x 768 à 60 Hz en fonction de la carte graphique utilisée
Résolution maximale 1366 x 768 @ 60 Hz
Signal d'entrée, Terminé
RVB analogique, RVB numérique compatible DVI (Digital Visual Interface).
0,7 Vp-p positif à 75 ohms ± 10 %
sync H/V distincte , Composite sync, SOG, seuil TTL, positif ou négatif .
Fréquence maximale
100 MHz
Alimentation
CA 100 – 240 V~ (+/- 10 %), 50/60 Hz
Câble signal
Câble D-sub 15 broches à 15 broches, détachable
Connecteur DVI-I à DVI-I, d é tachable (en option)
Connecteur de signal
D-sub, BNC, DVI-D, YPbPr, S-VHS, VCR
Dimensions (LxHxP) / Poids
780 X 482 X 107 mm / 30,1 X 19,0 X 4,6 pouces (sans socle)
780 X 530 X 223 mm / 30,1 X 20,9 X 8,8 pouces (Avec socle)
VESA Interface de support
200 mm x 200 mm (destinée à du matériel de fixation spécialisé (bras))
Considérations Environnementales
Fonctionnement
Température: 10 °C ~ 40 °C (50 °F ~ 104 °F)
Humidité: 10% ~ 80%, sans condensation
Stockage
Température: -20 °C ~ 45 °C (-4 °F ~ 113 °F)
Humidité: 5% ~ 95%, sans condensation
Caractéristiques audio
Consignes de sécurité
Introduction
Connexions
Utilisation du logiciel
Réglage du moniteur
Dépannage
Caractéristiques techniques
Généralités
Economie d'énergie
Présélection des modes de
temporisation
Information
Annexe
]
^TUGGGX^TUGGGX YWW^TXYTYWGGG㝘䟸GXaY[aW\YWW^TXYTYWGGG㝘䟸GXaY[aW\
,16,1 kg/35,4 livres

Entrée audio 1 Prise RCA Rouge(R) Blanc(L), 0,5 Vrms (-9 dB)
Entrée audio 2 Prise RCA Rouge(R) Blanc(L), 0,5 Vrms (-9 dB)
Entrée audio PC Prise stéréo diamètre 3,5, 0,5 Vrms (-9 dB)
Fréquence HF : 80 Hz ~ 15 kHz (à -3 dB)
Réponse A/V : 80 Hz ~ 15 kHz (à -3 dB)
Capacité Plug and Play
Ce moniteur peut etre installé sur n'importe quel système compatible Plug & Play. Interaction entre le moniteu
r
et le système de l`ordinateur vont fournir les meilleures conditions d'opération et d'installation du moniteur.
Dans ce cas, l'Installation du moniteur va se faire automatiquement, à moins que l'utilisateur souhaite choisir
une configuration différente.
Point acceptable
Pour ce produit, on a utilisé un affichage TFT LCD fabriqué au moyen d'une technologie avancée de semi-
conducteurs assurant une précision de 1ppm (un millionième). Cependant les pixels des couleurs ROUGE,
VERTE, BLEUE et BLANCHE pourraient apparaître brillants ou encore noirs. Cela n'est pas dû à une
mauvaise qualité et vous pouvez utiliser l'appareil sans inquiétude.
• Par exemple, il y a 3.133.440 sous-pixels dans ce produit.
Remarque
• Le design et les spécifications peuvent changer sans préavis.
Appareils de classe B (appareils de communication d'informations pour un usage domestique)
• Ce produit est conforme aux directives de compatibilité électromagnétique pour un usage domestique. Il
peut être utilisé dans toutes les zones, y compris les zones résidentielles classiques.
(Les appareils de CLASSE B émettent moins d'ondes électromagnétiques que les appareils de
CLASSE A.)
Economie d'énergie
Ce moniteur est doté d' un système d'économie d'énergie appellé "PowerSaver". Ce système fait passer en
mode de base consommation électrique votre moniteur s'il n'a pas été utilisé pendant un certain laps de temps.
Le moniteur retrouve son fonctionnement normal des que vous bougez la souris de l'ordinateur ou si vous
appuyez sur une touche du clavier. Pour économie d'énergie, veuillez couper l'alimentation de votre moniteur
lorsque vous ne vous en servez pas ou lorsque vous le laissez sans l`utiliser pendant une longue période. Pour
que le PowerSaver puisse fonctionner, votre moniteur doit etre connecté à une carte vidéo, installée dans votre
ordinateur,qui doit etre compatible VESA , et conforme au DPM. Utilisez l'utilitaire installé sur l'ordinateur pour
configurer cette fonction.
Mode
Fonctionnement
normal
Mode d'économie
de puissance
Eteindre le courant
électrique
EPA/ENERGY 2000
Eteindre le courant
électrique
Indicateur
d'alimentation
Vert Vert, clignotement Orange Noir
Consommation
d'électricité
Moins de 160 W
Moins de 1 W (mode
désactivé)
Moins de 1 W (bouton
Alimentation)
0 W (interrupteur
d'alimentation)
Ce moniteur est conforme aux normes EPA ENERGY STAR
®
et
Energy2000 lorsqu'il est utilisé avec un ordinateur équipé d'une
fonctionnalité VESA DPM.
Étant en partenariat avec ENERGY STAR
®
affirme que ce produit répond
aux directives de ENERGY STAR
®
concernant l'économie de l'énergie.
Présélection des modes de
temporisation
Présélection des modes de temporisation
Si le signal transféré à partir de l'ordinateur est le meme que les Modes Pré-établis pour l'Affichages, l'écran sera
alors ajusté automatiquement. Cependant, si le signal differe, l'écran peut devenir noir alors que LED fonctionne.
Référez-vous au guide de la carte vidéo et réglez l'écran ainsi:
^TUGGGY^TUGGGY YWW^TXYTYWGGG㝘䟸GXaY[aXWYWW^TXYTYWGGG㝘䟸GXaY[aXW

Mode d’affichage
Fréquence
Horizontale
(kHz)
Fréquence
Verticale
(Hz)
Fréquence
(MHz)
Polarité de Synchronisation
(H/V)
MAC, 640 x 480 35,000 66,667 30,240 -/-
MAC, 832 x 624 49,726 74,551 49,500 +/+
IBM, 640 x 350 31,469 70,086 25,175 +/-
IBM, 640 x 480 31,469 59,940 25,175 -/-
IBM, 720 x 400 31,469 70,087 28,322 -/+
VESA, 640 x 480 37,861 72,809 31,500 -/-
VESA, 640 x 480 37,500 75,000 31,500 -/-
VESA, 640 x 480 43,269 85,008 36,000 -/-
VESA, 800 x 600 35,156 56,250 36,000 +/+
VESA, 800 x 600 37,879 60,317 40,000 +/+
VESA, 800 x 600 48,077 72,188 50,000 +/+
VESA, 800 x600 46,875 75,000 49,500 +/+
VESA, 800 x600 53,674 85,000 56,250 +/+
VESA, 1024 x 768 48,363 60,004 65,000 -/-
VESA, 1024 x 768 56,476 70,069 75,000 -/-
VESA, 1024 x 768 60,023 75,029 78,750 +/+
VESA, 1024 x 768 68,677 85,997 94,500 +/+
VESA, 1360 x 768 47,712 60,000 85,500 +/+
Fréquence Horizontale
Le temps de balayer une ligne reliant le bord droit au bord gauche
horizontale d'écran s'appelle le Cycle Horizontale et le nombre inverse de
ce Cycle Horizontale est appelé la Fréquence horizontale. Unité: kHz
Fréquence verticale
Comme une lampe fluorescente, l'écran doit répéter la meme image
plusieurs fois par seconde pour afficher une image visible pour
l'utilisateur. La fréquence de répétition est appelée Fréquence Verticale
ou le Taux de Rafraîchissement Unité: Hz
© 1995~2008 Samsung Electronics Co., Ltd. Tous droits résérvés.
^TUGGGZ^TUGGGZ YWW^TXYTYWGGG㝘䟸GXaY[aXWYWW^TXYTYWGGG㝘䟸GXaY[aXW

La couleur et l'aspect du produit peuvent varier en fonction du modèle, et ses spécifications peuvent être
modifiées sans préavis pour des raisons d'amélioration des performance.
Information
Pour un meilleur affichage
Afin de bénéficier de la meilleure qualité d'image, procédez au réglage de la résolution et du taux de
rafraîchissement d'écran à partir du panneau de configuration de votre ordinateur en suivant les
instructions ci-dessous. Vous pourriez obtenir une qualité d'image inégale si vous ne sélectionnez pas la
meilleure qualité d'image sur votre écran TFT-LCD.
• Résolution: 1360 x 768
• Fréquence verticale (taux de rafraîchissement) : 60 Hz
Pour ce produit, on a utilisé un affichage TFT LCD fabriqué au moyen d'une technologie avancée de semi-
conducteurs assurant une précision de 1ppm (un millionième). Cependant les pixels des couleurs
ROUGE, VERTE, BLEUE et BLANCHE pourraient apparaître brillants ou encore noirs.
Cela n'est pas dû à une mauvaise qualité et vous pouvez utiliser l'appareil sans inquiétude.
• Par exemple, il y a 3.133.440 sous-pixels dans ce produit.
Pour nettoyer le boîtier du moniteur, utilisez une petite quantité du produit de nettoyage recommandé et
frottez avec un chiffon doux et sec. N'exercez pas de forte pression sur l'écran LCD , et nettoyez-le avec
le plus grand soin.
Si vous appuyez trop fortement, vous pourriez l'endommager.
Si vous n'êtes pas satisfait de la qualité de l'image, vous pouvez améliorer l'affichage en exécutant la «
fonction de réglage automatique » sur l'écran qui s'affiche après avoir appuyé sur le bouton de fermeture
de la fenêtre.
Si le bruit subsiste après le réglage automatique, utilisez la fonction de réglage de la clarification
(FINE/COARSE).
Si vous visualisez un écran fixe pendant une longue période de temps, une image résiduelle ou floue peut
apparaître.
Passez en mode économie d'énergie ou réglez l'économiseur d'écran sur image mobile lorsque vous
devez vous éloigner du moniteur pendant une période prolongée.
INFORMATIONS RELATIVES AU PRODUIT (Image sans fantôme résiduel)
Qu'est-ce que la rétention d'image ?
La rétention d'image ne peut pas se produire lorsqu'un écran LCD fonctionne dans des conditions normales.
Des conditions normales sont définies comme des modes vidéo changeant constamment. Lorsque l'écran
LCD fonctionne pendant un certain temps sur un modèle défini (plus de 12 heures), une légère différence de
tension peut survenir entre les électrodes qui agissent sur les cristaux liquides (LC) dans un pixel. La
différence de tension entre les électrodes augmente avec le temps provoquant une mauvaise répartition des
cristaux liquides. Si ce phénomène se produit, l'image précédente peut être vue alors que le modèle est
modifié. Pour l'éviter, la différence de tension accumulée doit être réduite.
Consignes de sécurité
Introduction
Connexions
Utilisation du logiciel
Réglage du moniteur
Dépannage
Caractéristiques techniques
Information
Pour un meilleur affichage
INFORMATIONS
RELATIVES AU PRODUIT
(Image sans fantôme
résiduel)
Annexe
^
zt{T[WXXT__UGGG[Xzt{T[WXXT__UGGG[X YWW^TXXTY`GGG㝘䟸GXYaX]a[[YWW^TXXTY`GGG㝘䟸GXYaX]a[[

Arrêt, Economiseur d'écran ou Mode économie d'énergie
z
Mettez le moniteur hors tension pendant 4 heures après 20 heures d'utilisation
z
Mettez le moniteur hors tension pendant 2 heures après 12 heures d'utilisation
z
Réglez le moniteur sur la mise hors tension à l'aide du PC Display Properties Power Scheme.
z
Utilisez un économiseur d'écran si possible - Un économiseur d'écran monochrome ou celui d'une
image en mouvement est recommandé.
Modifiez périodiquement les informations couleur
Remarque
• Utilisez deux couleurs différentes
Faites tourner les informations couleur avec deux couleurs différentes toutes les 30 minutes.
z
Evitez d'utiliser une combinaison de caractères et une couleur de fond avec une grande différence
de luminance
Evitez d'utiliser des couleurs grises, celles-ci peuvent facilement entraîner une rétention d'image.
A éviter : des couleurs avec une grande différence de luminance (noir & blanc, gris)
Modifiez périodiquement la couleur des caractères
z
Utilisez des couleurs claires avec peu de différence de luminance
- Cycle : Modifiez la couleur des caractères et celle du fond toutes les 30 minutes
^
zt{T[WXXT__UGGG[Yzt{T[WXXT__UGGG[Y YWW^TXXTY`GGG㝘䟸GXYaX]a[\YWW^TXXTY`GGG㝘䟸GXYaX]a[\

z
Toutes les 30 minutes, modifiez les caractères avec un mouvement.
z
Toutes les zones affichent périodiquement une image en mouvement associée à un logo.
- Cycle : affichez une image en mouvement associée à un logo pendant 60 secondes après 4 heures
d'utilisation.
z
Le meilleur moyen de protéger votre moniteur contre la rétention d'image est de le mettre hors
tension ou de régler votre PC ou votre système sur un programme d'économiseur d'écran lorsque
vous ne l'utilisez pas. Le service de garantie sera également limité sur la base du manuel
d'instructions.
Appliquez la fonction Screen Scroll (Défilement de l'écran) au produit
z
Appliquez la fonction Screen Scroll (Défilement de l'écran)
- Symptôme : Barre horizontale de couleur noire se déplaçant vers le haut et vers le bas.
- Sélectionnez la méthode
. Manuel d'instructions : Menu OSD -> Set Up (Paramètres) -> Safety Screen (Ecran sécurité) ->
Screen Scroll (Défilement de l'écran)
. Intervalle de temps : 1 ~ 10 heures ( recommandé : 1 )
. Durée : 1 ~ 5 secondes ( recommandé : 5 )
Remarque
• ( Vérifiez le Manuel d'utilisation du CD à "Fonction OSD". Certains modèles ne seront pas disponibles )
Appliquez la fonction Screen Pixel (Pixel d'écran) au produit
z
Appliquez la fonction Screen Pixel (Pixel d'écran)
- Symptôme : Un point de couleur noire se déplace verticalement.
- Sélectionnez la méthode
. Manuel d'instructions : Menu OSD -> Set Up (Paramètres) -> Safety Screen (Ecran sécurité) ->
Pixel.
. Intervalle de temps : 1 ~ 10 heures ( recommandé : 1 )
. Durée : 10 ~ 50 secondes ( recommandé : 50 )
z
Appliquez la fonction Screen Bar (barre d'écran)
- Symptôme : Barre horizontale/verticale de couleur noire se déplaçant verticalement.
^
zt{T[WXXT__UGGG[Zzt{T[WXXT__UGGG[Z YWW^TXXTY`GGG㝘䟸GXYaX]a[\YWW^TXXTY`GGG㝘䟸GXYaX]a[\

- Sélectionnez la méthode
. Manuel d'instructions : Menu OSD -> Set Up (Paramètres) -> Safety Screen (Ecran sécurité) -> Bar
(Barre)
. Intervalle de temps : 1 ~ 10 heures ( recommandé : 1 )
. Durée : 10 ~ 50 secondes ( recommandé : 50 )
Remarque
• ( Vérifiez le Manuel d'utilisation du CD à "Fonction OSD". Certains modèles ne seront pas disponibles )
Appliquez la fonction Screen Erasing (Gomme d'écran) au produit
z
Appliquez la fonction Screen Erasing (Gomme d'écran)
- Symptôme : 2 blocs verticaux se déplacent en effaçant l'écran
- Sélectionnez la méthode
. Manuel d'instructions : Menu OSD -> Set Up (Paramètres) -> Safety Screen (Ecran sécurité) ->
Eraser (Gomme)
. Intervalle de temps : 1 ~ 10 heures ( recommandé : 1 )
. Durée : 10 ~ 50 secondes ( recommandé : 50 )
Remarque
• ( Vérifiez le Manuel d'utilisation du CD à "Fonction OSD". Certains modèles ne seront pas disponibles )
© 1995~2008 Samsung Electronics Co., Ltd. Tous droits résérvés.
^
zt{T[WXXT__UGGG[[zt{T[WXXT__UGGG[[ YWW^TXXTY`GGG㝘䟸GXYaX]a[\YWW^TXXTY`GGG㝘䟸GXYaX]a[\

La couleur et l'aspect du produit peuvent varier en fonction du modèle, et ses spécifications peuvent être
modifiées sans préavis pour des raisons d'amélioration des performance.
Annexe
Comment contacter Samsung dans le monde
Remarque
• Si vous avez des suggestions ou des questions concernant les produits Samsung, veuillez contacter le
Service Consommateurs Samsung.
Consignes de sécurité
Introduction
Connexions
Utilisation du logiciel
Réglage du moniteur
Dépannage
Caractéristiques techniques
Information
Annexe
Comment contacter
Samsung dans le monde
Terme
Comment éliminer ce
produit
Autorité
^
zt{T[WXXT__UGGG[\zt{T[WXXT__UGGG[\ YWW^TXXTY`GGG㝘䟸GXYaX]a[\YWW^TXXTY`GGG㝘䟸GXYaX]a[\
North America
U.S.A
1-800-SAMSUNG(726-7864) http://www.samsung.com
CANADA
1-800-SAMSUNG(726-7864) http://www.samsung.com/ca
MEXICO
01-800-SAMSUNG(726-7864) http://www.samsung.com
Latin America
ARGENTINE
0800-333-3733 http://www.samsung.com/ar
BRAZIL
0800-124-421
4004-0000
http://www.samsung.com
CHILE
800-SAMSUNG(726-7864) http://www.samsung.com/cl
COLOMBIA
01-8000112112 http://www.samsung.com.co
COSTA RICA
0-800-507-7267 http://www.samsung.com/latin
ECUADOR
1-800-10-7267 http://www.samsung.com/latin
EL SALVADOR
800-6225 http://www.samsung.com/latin
GUATEMALA
1-800-299-0013 http://www.samsung.com/latin
JAMAICA
1-800-234-7267 http://www.samsung.com/latin
PANAMA
800-7267 http://www.samsung.com/latin
PUERTO RICO
1-800-682-3180 http://www.samsung.com/latin
REP. DOMINICA
1-800-751-2676 http://www.samsung.com/latin
TRINIDAD & TOBAGO
1-800-SAMSUNG(726-7864) http://www.samsung.com/latin
VENEZUELA
0-800-100-5303 http://www.samsung.com/latin
Europe
AUSTRIA
0800-SAMSUNG(726-7864) http://www.samsung.com/at
BELGIUM
0032 (0)2 201 24 18 http://www.samsung.com/be
NICARAGUA
00-1800-5077267
HONDURAS
800-7919267

^
zt{T[WXXT__UGGG[]zt{T[WXXT__UGGG[] YWW^TXXTY`GGG㝘䟸GXYaX]a[\YWW^TXXTY`GGG㝘䟸GXYaX]a[\
CZECH REPUBLIC
DENMARK
70 70 19 70 http://www.samsung.com/dk
FINLAND
030-6227 515 http://www.samsung.com/fi
FRANCE
3260 SAMSUNG
08 25 08 65 65 (€ 0,15/min)
http://www.samsung.com
GERMANY
01805-SAMSUNG(726-7864)
http://www.samsung.com
HUNGARY
06-80-SAMSUNG(726-7864) http://www.samsung.com
ITALIA
800-SAMSUNG(726-7864) http://www.samsung.com
LUXEMBURG
0035 (0)2 261 03 710 http://www.samsung.com/be
NETHERLANDS
0900-SAMSUNG(726-7864)
http://www.samsung.com/nl
NORWAY
815-56 480 http://www.samsung.com/no
POLAND
0 801 801 881
022-607-93-33
http://www.samsung.com/pl
PORTUGAL
80820-SAMSUNG(726-7864) http://www.samsung.com/pt
EIRE
0818 717 100 http://www.samsung.com/ie
SLOVAKIA
0800-SAMSUNG(726-7864) http://www.samsung.com/sk
SPAIN
902 10 11 30 http://www.samsung.com
SWEDEN
0771-400 200 http://www.samsung.com/se
SWITZERLAND
0800-SAMSUNG(726-7864) www.samsung.com/ch
U.K
0845 SAMSUNG(726-7864) http://www.samsung.com
CIS
ESTONIA
800-7267 http://www.samsung.ee
LATVIA
800-7267 http://www.samsung.com/lv
LITHUANIA
8-800-77777 http://www.samsung.lt
KAZAKHSTAN
8-10-800-500-55-500 http://www.samsung.kz
KYRGYZSTAN
00-800-500-55-500
RUSSIA
8-800-555-55-55 http://www.samsung.com
UKRAINE
8-800-502-0000 http://www.samsung.com
UZBEKISTAN
8-800-120-0-400 http://www.samsung.uz
Asia Pacific
AUSTRALIA
1300 362 603 http://www.samsung.com
CHINA
800-810-5858, 010- 6475 1880 http://www.samsung.com
HONG KONG
3698-4698 http://www.samsung.com/hk
INDIA
3030 8282, 1800 110011 http://www.samsung.com
INDONESIA
0800-112-8888 http://www.samsung.com
JAPAN
0120-327-527 http://www.samsung.com/jp
MALAYSIA
1800-88-9999 http://www.samsung.com/my
NEW ZEALAND
0800SAMSUNG(726-7864) http://www.samsung.com/nz
PHILIPPINES
1800-10-SAMSUNG(726-7864) http://www.samsung.com/ph
SINGAPORE
1800-SAMSUNG(726-7864) http://www.samsung.com
THAILAND
1800-29-3232, 02-689-3232 http://www.samsung.com
(€ 0,15/min)
(€ 0,14/min)
(€ 0,10/min)
TADJIKISTAN
8-10-800-500-55-500
844 000 844 http://www.samsung.com/cz

Terme
Signaux de synchronisation
Les signaux de synchronisation font référence aux signaux standards nécessaires pour afficher les couleurs
voulues sur le moniteur. Ils comprennent les signaux de synchronisation verticale et horizontale. Ces signaux
affichent des images couleur normales pour la résolution et la fréquence choisies.
Types de signaux de synchronisation
Séparée
Il s’agit d’un schéma de transmission individuelle des signaux de synchronisation verticale
au moniteur.
Composite Il s’agit d’un schéma qui combine les signaux de synchronisation verticale en un signal
composite transmis au moniteur. Les moniteur affiche les signaux de couleur après avoir
décomposé le signal composite en signaux couleurs originaux.
Pas de masque
L'image de l'écran est composée de points rouges, vert et bleus. Plus les points sont proches, plur la
resolution est haute. La distance entre deux points de même couleur est appelé 'Distance entre les Deux
Points'. Unité: mm
Fréquence verticale
L'écran doit être réaffiché plusieurs fois par seconde afin de créer et afficher l'image pour l'utilisateur. La
fréquence de cette répétition par seconde est appelée Fréquence Verticale ou le Taux de RafraÎchissement.
Unité: Hz
Par exemple : Si une lampe s'allume 60 fois par seconde, on dit qu'elle a une fréquence de 60 Hz.
Fréquence Horizontale
Le temps de balayer une ligne reliant le bord droit au bord gauche horizontale de l'écran s'appelle Cycle
Horizontale. Le nombre inverse de Cycle Horizontale est appelé la Fréquence Horizontale. Unité: kHz
Entrecroiser et methode de Non-Entrecroiser
La methode Entrecroisé consiste à montrer les lignes horizontales de l'écran dans l'ordre de haut en bas. La
méthode Non-Entrecroisé est utilisé dans la plupart des moniteurs pour s`assurer une image claire. La
méthode Entrecroisé est la même que celle de la télévision. La méthode Entrecroisé est la même que celle de
la télévision.
Plug & Play
Ceci est une fonction qui apporte la meilleure qualité d'écran pour l'utilisateur en permettant l' échange
d'informations automatique entre l'ordinateur et le moniteur. Ce moniteur suit le standard international VESA
DDC pour la fonction Plug & Play.
Résolution
Le nombre de points verticaux et horizontaux constituent l'image d'écran appelée 'résolution'. Ce nombre
montre la précision de l'affichage. La haute résolution est excellente pour accomplir des tâches multiples car
plus d'informations et d `images peuvent être affichées sur l'écran
Par exemple : Si la résolution est de 1360 x 768, cela signifie que l'écran est constitué de 1360 points
horizontaux (resolution horizontale) et de 768 lignes verticales(résolution verticale).
Commande d'écrans multiples (MDC)
Une Commande d'écrans multiples (MDC) est une application qui permet de contrôler facilement et
simultanément divers écrans à partir d'un PC. Le RS-232C, une norme de la communication en série, est
^
zt{T[WXXT__UGGG[^zt{T[WXXT__UGGG[^ YWW^TXXTY`GGG㝘䟸GXYaX]a[\YWW^TXXTY`GGG㝘䟸GXYaX]a[\
TAIWAN
0800-329-999 http://www.samsung.com/tw
VIETNAM
1 800 588 889 http://www.samsung.com
Middle East & Africa
SOUTH AFRICA
0860-SAMSUNG(726-7864 ) http://www.samsung.com
TURKEY
444 77 11 http://www.samsung.com
U.A.E
800-SAMSUNG (726-7864)
8000-4726
http://www.samsung.com

utilisé pour assurer la communication entre le PC et l'écran.
Comment éliminer ce produit
Comment éliminer ce produit
(déchets d’équipements électriques et électroniques) - Europe uniquement
(Applicable dans les pays de l’Union Européen et aux autres pays
européens disposant de systémes de collecte sélective)
Ce symbole sur le produit ou sa documentation indique qu’il ne doit pas être
éliminé en fin de vie avec les autres déchets ménagers. L’élimination incontrôlée
des déchets pouvant porter préjudice à l’environnement ou à la santé humaine,
veuillez le séparer des autres types de déchets et le recycler de façon
responsable. Vous favoriserez ainsi la réutilisation durable des ressources
matérielles.
Les particuliers sont invités à contacter le distributeur leur ayant vendu le produit
ou à se renseigner auprès de leur mairie pour savoir où et comment ils peuvent
se débarrasser de ce produit afin qu’il soit recyclé en respectant l’environnement.
Les entreprises sont invitées à contacter leurs fournisseurs et à consulter les
conditions de leur contrat de vente. Ce produit ne doit pas être éliminé avec les
autres déchets commerciaux.
Autorité
Les informations contenues dans ce document peuvent être soumises à des modifications sans
préavis.
© 2008 Samsung Electronics Co., Ltd. Tous droits résérvés.
Toute reproduction par quelque moyen que ce soit , est strictement interdits sans l'autorisation écrite de
Samsung Electronics Co., Ltd.
Samsung Electronics Co., Ltd.n'est pas responsable pour des dommages s ou accidents pour une installation,
pour une demonstration ou pour l'usage de ce matériel.
Logo de Samsung sont des marques commerciales déposées de Samsung Electronics Co., Ltd.; " Microsoft ", "
Windows ", " Windows NT " sont des marques commerciales déposées de Microsoft Corporation. " VESA ", "
DPM " et " DDC " sont des marques commerciales déposées de Video Electronics Standard Association; Le nom
et le logo d' "ENERGY STAR " sont des marques commerciales déposées de U.S. Environmental Protection
Agency (EPA). En sa qualité de partenariat avec ENERGY STAR , Samsung Electronics Co., Ltd.affirme que ce
p
roduit répond aux directives de ENERGY STAR concerna
nt l'économie de l'énergie. Tous les autres noms de
produits mentionnés ci-dessous peuvent être les marques ou les marques déposées de leurs propriétaire
respectifs.
zt{T[WXXT__UGGG_Yzt{T[WXXT__UGGG_Y YWW^TXXTY_GGG㝘䟸GYa[^aYXYWW^TXXTY_GGG㝘䟸GYa[^aYX

%HGLHQXQJVDQOHLWXQJ
UGGGXUGGGX YWW^TXXTY_GGG㝘䟸G[aZ`aZ[YWW^TXXTY_GGG㝘䟸G[aZ`aZ[

Farbe und Aussehen des Geräts sind modellabhängig, und jederzeitige Änderungen der technischen Daten des
Geräts zum Zweck der Leistungssteigerung sind vorbehalten.
Sicherheitshinweise
Zeichenerklärung
Bitte lesen Sie die folgenden Sicherheitshinweise sorgfältig durch, um Schäden an Personen oder
Gegenständen zu vermeiden.
Warnung / Vorsicht
Nichtbeachtung der mit diesem Symbol gekennzeichneten Anweisungen könnte zu
Körperverletzungen oder Schaden an Geräten führen.
Zeichenerklärung
Verboten Wichtig: Muß stets gelesen und verstanden werden
Nicht auseinanderbauen Ziehen Sie den Netzstecker aus der Steckdose
Nicht berühren Zur Vermeidung von elektrischem Schlag erden
Ein/Aus
Wenn der Monitor über einen längeren Zeitraum nicht benutzt wird, stellen Sie Ihren PC auf DPM.
Wenn Sie einen Bildschirmschoner benutzen, stellen Sie auf aktiven Bildschirmmodus.
Die gezeigten Bilder dienen nur als Referenz, und sie sind nicht in allen Fällen (oder Ländern) relevant.
Benutzen Sie keinen schadhaften oder locker sitzenden Stecker.
z
Ein defektes Gerät könnte elektrischen Schlag oder Feuer verursachen.
Ziehen Sie den Stecker nicht am Kabel heraus und berühren Sie den
Stecker nicht mit nassen Händen.
z
Ein defektes Gerät könnte elektrischen Schlag oder Feuer verursachen.
Sicherheitshinweise
Zeichenerklärung
Ein/Aus
Installation
Reinigen
Anderes
Einführung
Anschlussmöglichkeiten
Verwenden der Software
Einstellen des Monitors
Fehlerbehebung
Technische Daten
Informationen
Anhang
X
zt{T[WXXTn__UGGGXzt{T[WXXTn__UGGGX YWW^TXXTY_GGG㝘䟸GYa\ZaW[YWW^TXXTY_GGG㝘䟸GYa\ZaW[

Benutzen Sie nur einwandfrei geerdete Netzstecker und Steckdosen.
z
Unsachgemäße Erdung könnte zu elektrischem Schlag oder Beschädigung
der Geräte führen. (Nur Geräte der Klasse I)
Stecken Sie den Netzstecker in die Steckdose, und stellen Sie
sicher, dass er fest in der Steckdose sitzt.
z
Wackelkontakte können Brände verursachen.
Biegen Sie Netzstecker und Kabel nicht übermäßig und stellen Sie
keine schweren Objekte darauf, die Schaden verursachen könnten.
z
Ein defektes Gerät könnte elektrischen Schlag oder Feuer verursachen.
Schließen Sie nicht zu viele Verlängerungskabel oder Netzstecker
an eine Steckdose an.
z
Dies könnte ein Feuer verursachen.
Ziehen Sie den Netzstecker niemals bei eingeschaltetem Monitor
aus der Steckdose.
z
Durch das Herausziehen kann eine Spannungsspitze auftreten, die den
Monitor beschädigt.
Verwenden Sie niemals den Netzstecker, wenn Stecker oder
Steckdose staubig sind.
z
Wenn Stecker oder Dosenteil des Netzkabels staubig sind, müssen Sie es
mit einem sauberen Tuch reinigen.
z
Durch Verwendung des Netzkabels mit staubigem Stecker oder Dosenteil
können Stromschläge oder Brände verursacht werden.
Wenn Sie das Gerät vom Stromnetz trennen möchten, müssen Sie
den Netzstecker aus der Dose ziehen. Deshalb muss der
Netzstecker jederzeit leicht erreichbar sein.
z
Dies könnte elektrischen Schlag oder Feuer verursachen.
Installation
Wenden Sie sich an den autorisierten Kundendienst, wenn der Monitor an einem Ort mit hoher
Konzentration an Staubpartikeln, außergewöhnlich hoher oder geringer Raumtemperatur, extrem
Y
zt{T[WXXTn__UGGGYzt{T[WXXTn__UGGGY YWW^TXXTY_GGG㝘䟸GYa\ZaXZYWW^TXXTY_GGG㝘䟸GYa\ZaXZ

hoher Luftfeuchtigkeit, in unmittelbarer Nähe zu chemischen Lösungsmitteln oder für den
Dauerbetrieb, z.B. auf Bahn- oder Flughäfen, aufgestellt werden soll.
Nicht fachgerechte Aufstellung kann zu schweren Schäden am Monitor führen.
Stellen Sie Ihren Monitor an einen möglichst staubfreien Ort mit
niedriger Luftfeuchtigkeit.
z
Andernfalls könnte es im Monitor zu einem elektrischen Kurzschluß oder
Feuer kommen.
Lassen Sie den Monitor nicht fallen, wenn Sie seinen Standort
verändern.
z
Es könnte Schaden am Gerät oder Körperverletzungen verursachen.
Stellen Sie den Monitorfuß so in einer Vitrine oder einem Regal auf,
dass der Fuß nicht über die Standfläche hinausragt.
z
Das Gerät darf nicht herunterfallen, da dies zu Schäden am Gerät und
Verletzungsgefahr führen kann.
Stellen Sie das Gerät nicht auf eine instabile oder zu schmale
Fläche.
z
Stellen Sie das Gerät auf eine ebene, stabile Fläche, so dass es nicht
herunterfallen und jemanden (vor allem Kinder) verletzen kann.
Stellen Sie das Gerät nicht auf den Fußboden.
z
Es könnte jemand, vor allem Kinder, darüber fallen.
UM DIE AUSBREITUNG VON FEUER ZU VERHINDERN, SORGEN SIE
DAFÜR, DASS DAS GERÄT NIEMALS MIT KERZEN ODER OFFENEM
FEUER IN BERÜHRUNG KOMMT.
z
Andernfalls kann ein Brand verursacht werden.
Halten Sie das Netzkabel von Heizgeräten fern.
z
Eine geschmolzene Isolierung kann einen elektrischen Schlag oder Brand
verursachen.
Z
zt{T[WXXTn__UGGGZzt{T[WXXTn__UGGGZ YWW^TXXTY_GGG㝘䟸GYa\ZaXZYWW^TXXTY_GGG㝘䟸GYa\ZaXZ

Setzen Sie den Monitor vorsichtig ab.
z
Er könnte sonst beschädigt werden oder zerbrechen.
Stellen Sie den Monitor nicht mit dem Bildschirm nach unten ab.
z
Die TFT-LCD-Oberfläche könnte sonst beschädigt werden.
Die Wandhalterung muss von qualifiziertem Fachpersonal installiert
werden.
z
Eine Installation durch unqualifizierte Personen kann zu Verletzungen
führen.
z
Verwenden Sie dafür stets das in der Bedienungsanleitung angegebene
Montageelement.
Stellen Sie das Gerät in einiger Entfernung von der Wand auf
(mindestens 10 cm), um eine ausreichende Belüftung zu
gewährleisten.
z
Mangelnde Belüftung kann die Innentemperatur des Produkts erhöhen,
was zu einer Verkürzung der Lebensdauer der Komponente und zu einer
verringerten Leistung führen kann.
Halten Sie die Verpackungsfolien (Tasche) von Kindern fern.
z
Spielende Kinder können an der Kunststofffolie (Tasche) ersticken.
Reinigen
Wenn Sie das Monitorgehäuse oder die Oberfläche der TFT-LCD reinigen, wischen Sie sie mit
einem angefeuchteten weichen Tuch ab.
Sprühen Sie Reinigungsmittel nicht direkt auf den Monitor.
z
Dies könnte Schäden, elektrischen Schlag oder Feuer verursachen.
Stellen Sie das Gerät nicht an schlecht belüfteten Orten, wie z.B. in
Regalen oder Schränken, auf.
z
Jede Erhöhung der Innentemperatur des Geräts kann einen Brand
verursachen.
[
zt{T[WXXTn__UGGG[zt{T[WXXTn__UGGG[ YWW^TXXTY_GGG㝘䟸GYa\ZaX[YWW^TXXTY_GGG㝘䟸GYa\ZaX[

Wenn das Verbindungsstück zwischen dem Stecker und dem Stift
staubig oder schmutzig ist, reinigen Sie es sorgfältig mit einem
trockenen Tuch.
z
Ein verschmutztes Verbindungsstück kann elektrischen Schlag oder Feuer
verursachen.
Ziehen Sie vor dem Reinigen des Geräts den Netzstecker.
z
Andernfalls kann ein elektrischer Schlag oder Brand verursacht werden.
Ziehen Sie den Netzstecker aus der Steckdose, und wischen Sie das
Gerät mit einem weichen, trockenen Tuch ab.
z
Verwenden Sie keine Chemikalien wie Wachs, Benzol, Alkohol, Verdünner,
Insektizide, Luftverbesserer, Schmiermittel oder Reinigungsmittel.
Anderes
Entfernen Sie die Abdeckung (oder hintere Abdeckung) nicht.
z
Ein defektes Gerät könnte elektrischen Schlag oder Feuer verursachen.
z
Überlassen Sie die Wartung qualifiziertem Fachpersonal.
Sollte Ihr Monitor nicht normal funktionieren - besonders wenn er
ungewöhnliche Geräusche oder Gerüche abgibt -, ziehen Sie sofort
den Netzstecker heraus und setzen Sie sich mit einem
Vertragshändler oderKundendienst in Verbindung.
z
Ein defektes Gerät könnte elektrischen Schlag oder Feuer verursachen.
Halten Sie das Gerät von Orten fern, an denen es mit Öl, Rauch oder
Feuchtigkeit in Berührung kommen kann. Stellen Sie das Gerät nicht
in Fahrzeugen auf.
z
Nichtbeachtung dieser Verhaltensmaßregel könnte zu elektrischem Schlag
oder Feuer führen.
z
Der Monitor darf auf keinen Fall in der Nähe von Wasser oder im Freien
betrieben werden, wo er Schnee oder Regen ausgesetzt sein könnte.
Wird der Monitor fallen gelassen oder das Gehäuse beschädigt,
schalten Sie den Monitor aus und ziehen den Netzstecker. Setzen
Sie sich dann mit dem Kundendienstzentrum in Verbindung.
z
Es kann zu Funktionsstörungen des Monitors kommen, die einen
elektrischen Schlag oder einen Brand verursachen.
Benutzen Sie das empfohlene Reinigungsmittel mit einem weichen
Tuch.
\
zt{T[WXXTn__UGGG\zt{T[WXXTn__UGGG\ YWW^TXXTY_GGG㝘䟸GYa\ZaX[YWW^TXXTY_GGG㝘䟸GYa\ZaX[

Bewegen Sie den Monitor nicht nach rechts oder links, indem Sie
diesen am Signalkabel festhalten.
z
Dies könnte aufgrund von Kabelbeschädigung Funktionsausfall,
elektrischen Schlag oder Feuer verursachen.
Decken Sie nichts über die Lüftungsöffnungen des
Monitorgehäuses.
z
Unzureichende Belüftung könnte Funktionsausfall oder Feuer verursachen.
Stellen Sie keine Wasserbehälter, chemischen Produkte oder
kleinen Gegenstände aus Metall auf den Monitor.
z
Nichtbeachtung dieser Verhaltensmaßregel könnte zu elektrischem Schlag
oder Feuer führen.
z
Wenn Fremdkörper ins Innere des Monitors gelangt sind, ziehen Sie das
Netzkabel und wenden sich an das Kundendienstzentrum.
Halten Sie das Gerät von entflammbaren chemischen Sprays und
brennbaren Stoffen fern.
z
Dies könnte eine Explosion oder Feuer verursachen.
Schieben Sie niemals etwas Metallenes in die Öffnungen des
Monitors.
z
Dies könnte elektrischen Schlag, Feuer oder Verletzungen verursachen.
Stecken Sie weder Metallgegenstände wie Werkzeuge, Kabel oder
Bohrer, noch leicht entflammbare Gegenstände wie Papier oder
Streichhölzer in die Belüftungsschlitze und die Kopfhörer-bzw. AV-
Anschlüsse.
z
Dadurch könnte ein elektrischer Schlag oder ein Brand verursacht werden.
Wenn Fremdsubstanzen oder Wasser in das Gerät eindringen, schalten
Sie es aus, ziehen Sie den Netzstecker, und benachrichtigen Sie den
Kundendienst.
Wenn permanent dasselbe Standbild auf dem Bildschirm angezeigt
wird, können Nachbilder oder verschwommene Flecken erscheinen.
z
Deshalb sollten Sie zum Energiesparmodus wechseln oder einen
Bildschirmschoner mit einem beweglichen Bild einstellen, wenn Sie für
längere Zeit nicht am Monitor arbeiten.
]
zt{T[WXXTn__UGGG]zt{T[WXXTn__UGGG] YWW^TXXTY_GGG㝘䟸GYa\ZaX[YWW^TXXTY_GGG㝘䟸GYa\ZaX[

optimalen Werte ein.
z
Durch eine ungeeignete Auflösung und Frequenz können Ihre Augen
geschädigt werden.
32 Zoll (80 cm) - 1360 X 768
Halten Sie genügend Sitzabstand zum Monitor, da ständiges
Betrachten des Monitors aus zu geringer Entfernung die
Sehfähigkeit beeinträchtigen kann.
Um eine Überanstrengung der Augen zu vermeiden, sollten Sie nach
einer Stunde Arbeit am Monitor mindestens fünf Minuten Pause
machen.
Stellen Sie das Gerät nicht auf eine instabile, unebene Oberfläche
oder an einen Ort, der Vibrationen ausgesetzt ist.
z
Das Gerät darf nicht herunterfallen, da dies zu Schäden am Gerät und
Verletzungsgefahr führen kann. Bevor Sie den Monitor bewegen,
überprüfen Sie stets, ob alle Kabel, einschließlich des Antennenkabels und
den Kabeln zu den Peripheriegeräten abgezogen wurden.
Zum Transportieren des Monitors schalten Sie diesen aus, und
ziehen Sie das Netzkabel ab. Bevor Sie den Monitor bewegen,
überprüfen Sie stets, ob alle Kabel, einschließlich des
Antennenkabels und den Kabeln zu den Peripheriegeräten
abgezogen wurden.
z
Bei Zuwiderhandlung besteht die Gefahr von Kabelschäden oder
elektrischen Schlägen sowie Bränden.
Das Gerät sollte von mehr als zwei Personen getragen werden.
z
Wenn das Gerät herunterfällt, kann dies zu Fehlfunktionen oder
Verletzungen führen.
Stellen Sie das Gerät außerhalb der Reichweite von Kindern auf, da
diese daran ziehen und es dabei beschädigen könnten.
z
Wenn das Gerät herunterfällt, kann dies zu schweren Verletzungen bis hin
zum Tod führen.
Stellen Sie Auflösung und Frequenz auf die für das Modell
^
zt{T[WXXTn__UGGG^zt{T[WXXTn__UGGG^ YWW^TXXTY_GGG㝘䟸GYa\ZaX[YWW^TXXTY_GGG㝘䟸GYa\ZaX[

elektrischen Schlag oder einen Brand verursachen.
Stellen Sie keine Objekte auf das Gerät, die für Kinder interessant
sein könnten.
z
Kinder könnten versuchen, auf das Gerät zu steigen, um an diese Objekte
zu gelangen. Das Gerät könnte herunterfallen und dabei Verletzungen
verursachen, die u.U. zum Tode führen können.
Wenn Sie die Batterien aus der Fernsteuerung entfernen, darauf
achten, dass diese nicht in die Hände von kleinen Kindern gelangen
und verschluckt werden. Batterien außerhalb der Reichweite von
Kindern aufbewahren.
z
Falls eine Batterie verschluckt wird, sofort einen Arzt aufsuchen.
Achten Sie beim Austausch der Batterien auf die korrekte Polarität
(+/-). Angaben zur Polarität befinden sich auf dem Batteriehalter.
z
Bei falscher Polarität kann sich die Batterie erhitzen, explodieren oder
auslaufen. Es besteht die Gefahr von Bränden, Verletzungen oder
Sachschäden durch auslaufende Batterieflüssigkeit.
Nur spezifizierte Standardbatterien verwenden. Verwenden Sie nicht
neue und gebrauchte Batterien gemeinsam.
z
Kann sich die Batterie erhitzen, explodieren oder auslaufen. Es besteht die
Gefahr von Bränden, Verletzungen oder Sachschäden durch auslaufende
Batterieflüssigkeit.
Batterien und Akkus sind Sondermüll und werden wiederverwertet.
Für das Zuführen der verbrauchten Batterien und Akkus zum
Recycling ist der Kunde als Verbraucher der Batterien
verantwortlich.
z
Der Kunde kann die verbrauchten Batterien und Akkus bei einem
öffentlichen Recycling-Center oder einem Händler, der den gleichen
Batterie- bzw. Akkutyp führt, abgeben.
© 1995~2008 SAMSUNG. ALL Rights Reserved
Wenn Sie das Gerät für einen längeren Zeitraum nicht verwenden,
ziehen Sie den Netzstecker ab.
z
Anderenfalls kann dies zu übermäßiger Wärmeabstrahlung durch den
abgelagerten Schmutz führen oder eine beschädigte Isolierung einen
_
zt{T[WXXTn__UGGG_zt{T[WXXTn__UGGG_ YWW^TXXTY_GGG㝘䟸GYa\ZaX[YWW^TXXTY_GGG㝘䟸GYa\ZaX[

Inhalt
Sicherheitshinweise ............................................................................................. 1
Zeichenerklärung ............................................................................................................ 1
Ein/Aus ................................................................................................................. 1
Installation .......................................................................................................... 2
Reinigen .................................................................................................................. 4
Anderes ................................................................................................................. 5
Einführung ............................................................................................................ 11
Lieferumfang ............................................................................................... 11
Der Monitor ................................................................................................ 12
Bauplan ............................................................................................... 19
Anschlussmöglichkeiten ...................................................................................... 23
Installieren der Füße ......................................................................................... 23
Anschließen des Monitors .................................................................................. 24
MDC ........................................................................................................... 30
Einstellen des Monitors ................................................................................... 49
Eingang ................................................................................................................. 49
Bild [PC / BNC / DVI Modus] ................................................................................ 50
Bild [AV / S-Video / Komp. / DVI-Video Modus] .................................................. 52
Ton ................................................................................................................ 54
Einstellungen .............................................................................................................. 55
Multi Control ....................................................................................................... 58
Direktsteuerungsfunktionen ............................................................................................ 58
`
zt{T[WXXTn__UGGG`zt{T[WXXTn__UGGG` YWW^TXXTY_GGG㝘䟸GYa\ZaX[YWW^TXXTY_GGG㝘䟸GYa\ZaX[

Fehlerbehebung ................................................................................................. 60
Selbsttest zur Funktionsprüfung ...................................................................................... 60
Checkliste ................................................................................................................... 61
F & A ......................................................................................................................... 63
Technische Daten ................................................................................................................ 65
Allgemein
.................................................................................................................... 65
Stromsparmodus .......................................................................................................... 66
Voreinstellte Timer-Modi ........................................................................................... 66
Informationen .................................................................................................... 68
Zur Verbesserung der Anzeigequalität .............................................................................. 68
PRODUKTINFORMATION (Bildkonservierungsfrei) .................................................... 68
Anhang .............................................................................................................. 72
Kontakt zu Samsung .......................................................................... 72
Bezeichnungen ........................................................................................................... 74
Ordnungsgemäße Entsorgung ........................................................................................ 75
Autorisierung ............................................................................................................ 75
XW
zt{T[WXXTn__UGGGXWzt{T[WXXTn__UGGGXW YWW^TXXTY_GGG㝘䟸GYa\ZaX[YWW^TXXTY_GGG㝘䟸GYa\ZaX[

Farbe und Aussehen des Geräts sind modellabhängig, und jederzeitige Änderungen der technischen Daten des
Geräts zum Zweck der Leistungssteigerung sind vorbehalten.
Einführung
Lieferumfang
Hinweis
• Bitte überprüfen Sie, daß die folgenden Teile mit dem Monitor mitgeliefert wurden.
Sollten Teile fehlen, wenden Sie sich an Ihren Händler.
Wenden Sie sich an einen Händler in Ihrer Nähe, um optionale Artikel zu kaufen.
Hinweis
• Stellen Sie das Gerät nicht auf den Fußboden.
Monitor
Bedienungsanleitung
Bedienungsanleitung
Garantiekarte
(Nicht in allen Gebieten erhältlich)
Benutzerhandbuch,
MDC-Software
Kabel
D-Sub-Kabel Netzanschlußkabel
Anderes
Sicherheitshinweise
Einführung
Lieferumfang
Der Monitor
Bauplan
Anschlussmöglichkeiten
Verwenden der Software
Einstellen des Monitors
Fehlerbehebung
Technische Daten
Informationen
Anhang
XX
YYYYUGGGXYYYYUGGGX YWW^TXXTY`GGG㝘䟸GXYaWZaXZYWW^TXXTY`GGG㝘䟸GXYaWZaXZ

Tasten der Fernsteuerung Batterien (AAA X 2) Kappe
BNC-auf-RCA-
Adapterstecker
Provisorische Füße
Separat erhältlich
Wandmontageset Lautsprecherset Füße
DVI-Kabel BNC-Kabel
Der Monitor
Vorderseite
1) MENU
Drücken Sie diese Taste, um das OSD-Menü zu öffnen und das hervorgehobene Menüelement zu
aktivieren.
2) Auf/Ab-Taste
Wenn das Menü zur Bildschirmeinstellung aktiv ist: Schließen Sie mit der Exit-Taste (Ende) den
Menübildschirm oder das Einstellungsmenü.
XY
zt{T[WXXTn__UGGGXYzt{T[WXXTn__UGGGXY YWW^TXXTY_GGG㝘䟸GYa\ZaX\YWW^TXXTY_GGG㝘䟸GYa\ZaX\

3) Links/Rechts-Taste / Lautstarke -Taste
Drücken Sie diese Taste, um vertikal von einem Menübefehl zum nächsten zu wechseln oder die Werte für
das ausgewählte Menü anzupassen.
4) ENTER
Diese Tasten dienen dazu, Optionen auf dem Menü hervorzuheben und einzustellen.
5) SOURCE
Schaltet die LED für Eingangssignal ein, das zurzeit angezeigt wird.
Die Quelle kann nur auf externe Geräte umgeschaltet werden, die derzeit an den Monitor angeschlossen
sind.
[PC]
˧
[BNC]
˧
[DVI]
˧
[AV]
˧
[S-Video]
˧
[Component]
>> Klicken Sie hier, um sich die Animation anzusehen.
6) PIP
Jedes Mal, wenn Sie diese Taste drücken, ändert sich die Signalquelle des PIP-Fensters.
Eine Überschneidung mehrerer PIPs auf dem Bildschirm war nicht möglich, weil BNC und die Komponente
denselben Anschluss verwenden.
>>Klicken Sie hier, um sich die Animation anzusehen.
•
PC
A
V / S-Video / Komp. Modus
•
BNC
A
V / S-Video Modus
•
DVI
A
V / S-Video / Komp. Modus
•
AV / S-Video
PC / BNC / DVI Modus
•
Komp.
PC / DVI Modus
7)
Netzschalter
ücken Sie diese Taste, um den Monitor ein- und auszuschalten.
8) Stromversorgungsanzeige
Leuchtet, wenn Sie die Stromversorgung einschalten. Siehe Technische Daten
9) Fernsteuerungssensor
Richten Sie die Fernsteuerung auf diesen Punkt auf dem Monitor.
Hinweis
• Genauere Informationen zur Energiesparfunktion sind im Handbuch unter PowerSaver
(Energiesparfunktion) aufgeführt. Um Energie zu sparen, schalten Sie den Monitor ab, wenn Sie ihn nicht
benutzen oder wenn Sie Ihren Arbeitsplatz für längere Zeit verlassen.
Rückseite
Hinweis
• Ausführliche Informationen in Bezug auf Kabelverbindungen finden Sie im Abschnitt Anschließen von
Kabeln unter Aufstellen. Die Konfiguration an der Rückseite des Monitors variiert leicht abhängig vom
jeweils verwendeten Monitormodell.
XZ
zt{T[WXXTn__UGGGXZzt{T[WXXTn__UGGGXZ YWW^TXXTY_GGG㝘䟸GYa\ZaX\YWW^TXXTY_GGG㝘䟸GYa\ZaX\

1) RS232C OUT/IN (Serieller ANSCHLUSS RS232C)
MDC (Multiple Display Control)-Programm-Anschluss
2) DVI / PC IN [RGB] (PC-Video-Anschlussbuchse)
Verwenden des 15-polig, D-Sub – PC-Modus (Analog
PC)
3) DVI / PC IN [DVI(HDCP)] (PC-Video-
Anschlussbuchse)
Verwenden des DVI-D an DVI-D – DVI-Modus (Digital
PC)
4) DVI / PC IN [PC/DVI/BNC AUDIO IN] (PC-/DVI-
/BNC-/Audioanschluss (Eingang))
5) COMPONENT AUDIO IN [L-AUDIO-R]
(Component-/Audioanschluss (Eingang))
6) BNC/COMPONENT OUT [R/P
R
, G/Y, B/P
B
, H, V]
(BNC-Video-Anschlussbuchse / Component-
Anschlussbuchse(Ausgang))
RGB-3-Modus (Analog PC)-Anschluss: Anschluss von
R, G, B, H, V Port
- Component-Anschluss: Anschluss von P
R
, Y, P
B
-Port
7) BNC/COMPONENT IN [R/P
R
, G/Y, B/P
B
, H, V]
(BNC-Video-Anschlussbuchse / Component-
Anschlussbuchse(Eingang))
8) AV AUDIO IN [L-AUDIO-R] (MONITOR-Audio-
Anschlussbuchse (Eingang))
9) AV OUT [VIDEO](Video-Anschlussbuchse) : AV-
Modus (Ausgang)
10) AV IN [VIDEO](Video-Anschlussbuchse)
(Eingang)
11) AV OUT [S-VIDEO](S-Video-Anschlussbuchse) :
S-Video-Modus (Ausgang)
12) AV IN [S-VIDEO] (S-Video-Anschlussbuchse)
X[
X\UGGGXX\UGGGX YWW^TXYTYWGGG㝘䟸GXaY`a\[YWW^TXYTYWGGG㝘䟸GXaY`a\[

(Eingang)
13) EXT SPEAKER(8 )[- - L - +, - - R - +]
(Lautsprecheranschlussbuchse (8 ))
14) AUDIO OUT [L-AUDIO-R] (MONITOR-Audio-
Anschlussbuchse (Ausgang))
AUDIO OUT zum Anschließen von PC, DVI, BNC
15) POWER S/W (Ein/Aus-Schalter) ON/OFF
Ein- und Ausschalten des Monitors.
16) POWER IN (Signalbuchse)
Netzkabel (Anschluss an Monitor und Wandsteckdose)
Hinweis
• Die maximale Anzahl anschließbarer Monitore kann je nach Kabel, Signalquelle usw. unterschiedlich sein.
Bei Verwendung von entsprechend geschirmten Kabeln können bis zu 10 Monitore angeschlossen
werden.
17) Kensington-Schloss
Ein Kensington-Schloss dient zur physischen Sicherung
des Systems bei Verwendung in öffentlichen Bereichen.
(Das Schloss muss separat erworben werden.)
Ein Schloss können Sie beim entsprechenden
Händler erwerben.
Hinweis
• Beachten Sie die genaueren Informationen zu den Kabelverbindungen unter Anschließen des Monitors.
Tasten der Fernsteuerung
Hinweis
• Die Leistung der Fernbedienung kann von einem Fernsehgerät oder anderen elektronischen Geräten, die
in der Nähe des Monitors betrieben werden, beeinträchtigt werden; dabei kann es zu einer
Funktionsstörung aufgrund einer Überlagerung der Frequenz kommen.
1. ON / OFF
2. MAGICNET
3. MDC
4. LOCK
5. MagicNettaste
6.+100 -/--
7. VOL
8. MUTE
9. TTX/MIX
10. MENU
11. ENTER
12. P.MODE
13. AUTO
14. PRE-CH
15 . CH/P
16. SOURCE
17. INFO
18. EXIT
19. Auf-Ab Links-Rechts Taste
20. S.MODE
21. STILL
X\
X\UGGGYX\UGGGY YWW^TXYTYWGGG㝘䟸GXaY`a\_YWW^TXYTYWGGG㝘䟸GXaY`a\_

22. FM RADIO
23. P.SIZE
24. SRS
25. DUAL/MTS
26. PIP
27. SOURCE
28. SWAP
29. SIZE
30. REW
31. STOP
32. PLAY/PAUSE
33. FF
1) ON / OFF
Drücken Sie diese Taste, um den Monitor ein- und auszuschalten.
2) MAGICNET
MagicNet-Schnellstarttaste
- Diese Funktion ist bei diesem Monitor nicht verfügbar.
3) MDC
MDC-Schnellstarttaste
4) LOCK
Mit dieser Taste werden alle Funktionstasten sowohl auf der Fernbedienung als auch am Monitor mit
Ausnahme der Netztaste und der Taste LOCK aktiviert oder deaktiviert.
5) MagicNettaste
Verwenden Sie diese Tasten für MagicNet.
- Diese Funktion ist bei diesem Monitor nicht verfügbar.
• Alphabet/Ziffer: Verwenden Sie diese Tasten zum Eingeben von Website-Adressen.
• DEL: Verwenden Sie diese Taste als Rücktaste.
• SYMBOL: Verwenden Sie diese Taste zum Eingeben von Symbolen. (.O_-)
• ENTER: Verwenden Sie diese Taste zum Bestätigen von Eingaben.
6) +100 -/--
Drücken Sie diese Taste, um die Programme mit einer Nummer über 100 auszuwählen.
Zur Auswahl von z. B. Programm 121 drücken Sie erst „+100“, dann „2“ und dann „1“.
- Diese Funktion ist bei diesem Monitor nicht verfügbar.
7) VOL
Mit diesen Tasten bestimmen Sie außerdem die Audiolautstärke.
8)
MUTE
Die Audioausgabe wird vorrübergehend unterbrochen (stummgeschaltet).
Displayed on the lower left corner of the screen.
The audio resumes if MUTE or - VOL + is pressed in the Mute mode.
9)
TTX/MIX
X]
X\UGGGZX\UGGGZ YWW^TXYTYWGGG㝘䟸GXaY`a\_YWW^TXYTYWGGG㝘䟸GXaY`a\_

Fernsehsender bieten Informationen per Videotext an.
[TTX / MIX wird hauptsächlich in Europa verwendet. ]
10)
MENU
Drücken Sie diese Taste, um das OSD-Menü zu öffnen und das hervorgehobene Menüelement zu
aktivieren.
11)
ENTER
Aktivieren Sie mit dieser Taste das hervorgehobene Menüelement.
12)
P.MODE
Wenn Sie diese Taste drücken, wird der aktuelle Modus unten mittig auf dem Bildschirm angezeigt.
AV / S-Video /Component Mode : P.MODE( Picture Mode )
Drücken Sie dann die Taste nochmals, um die verfügbaren vorkonfigurierten Modi zu durchlaufen.
( Dynamic Standard Movie Custom )
PC / DVI Mode : M/B ( MagicBright™ )
MagicBright bezeichnet eine neue Monitorfunktion, die eine optimierte Monitordarstellung ermöglicht, die
verglichen mit der Darstellung auf vorhandenen Monitoren doppelt so brillant und klar ist.
( Entertain Internet Text Custom )
13) AUTO
Mit der Auto-Taste wird der Bildschirm automatisch eingestellt.(PC)
Wenn Sie die Auflösung über das Bedienfeld ändern, wird die Autom. Einstellung-Funktion ausgeführt.
14)
PRE-CH
Wenn Sie diese Taste drücken, wird der aktuelle Modus unten mittig auf dem Bildschirm angezeigt.
- Diese Funktion ist bei diesem Monitor nicht verfügbar.
15)
CH/P
Bei aktiviertem TV-Modus wählen Sie mit diesen Tasten die TV-Kanäle aus.
- Diese Funktion ist bei diesem Monitor nicht verfügbar.
16)
SOURCE
Schaltet die LED für Eingangssignal ein, das zurzeit angezeigt wird. Die Quelle kann nur auf externe Geräte
umgeschaltet werden, die derzeit an den Monitor angeschlossen sind.
17)
INFO
Informationen zum aktuellen Bild werden links oben auf dem Bildschirm angezeigt.
18)
EXIT
Drücken Sie diese Taste, um den Menübildschirm zu schließen.
19) Auf-Ab Links-Rechts Taste
Drücken Sie diese Tasten, um horizontal/vertikal von einem Menüpunkt zum nächsten zu wechseln oder die
Werte für das ausgewählte Menü einzustellen
20)
S.MODE
Wenn Sie auf diese Taste drücken, wird der aktuelle Audio-Modus in der unteren linken Bildschirmecke
angezeigt.
Der Monitor verfügt über einen integrierten HiFi-Audioverstärker.
Then push button again to circle through available preconfigured modes.
( Standard
˧
Music
˧
Movie
˧
Speech
˧
Custom )
21) STILL
Drücken Sie diese Taste einmal, um das Bild "einzufrieren". Drücken Sie sie erneut, um mit der normalen
Wiedergabe fortzufahren.
22) FM RADIO
Schaltet FM Radio (UKW) ein/aus.
Stellt im PC/DVI-Modus nur den KLANG auf UKW ein.
In Gebieten, wo das Signal schwach ist, können beim Empfang von FM RADIO Störungen auftreten.
Stellt im Modus einer allgemeinen VideoQUELLE UKW ein, wobei der Bildschirm ausgeschaltet wird.
- Diese Funktion ist bei diesem Monitor nicht verfügbar.
23) P.SIZE
Drücken Sie diese Taste, um die Bildschirmgröße zu verändern.
24)
SRS
SRS
25)
DUAL/MTS
X^
X\UGGG[X\UGGG[ YWW^TXYTYWGGG㝘䟸GXaY`a\_YWW^TXYTYWGGG㝘䟸GXaY`a\_

- Diese Funktion ist bei diesem Monitor nicht verfügbar.
DUAL-
STEREO/MONO, DUAL l / DUAL ll und MONO/NICAM MONO/NICAM STEREO können in Abhängigkeit
von der Fernsehnorm über die Taste DUAL auf der Fernbedienung beim Fernsehen eingestellt werden.
MTS-
Sie können den Modus MKT (Mehrkanalton) auswählen.
Audiomodus MTS/S_Mode Standard
UKW-Stereo
Mono Mono
Manuelles Umschalten
Stereo
Mono
˩
Stereo
SAP
Mono
˩
SAP
Mono
26)
PIP
Jedes Mal, wenn Sie diese Taste drücken, ändert sich die Signalquelle des PIP-Fensters.
27)
SOURCE
Schaltet die LED für Eingangssignal ein, das zurzeit angezeigt wird. (PIP)
28) SWAP
Tauscht PIP- und Hauptbild-Inhalt.
Das Bild vom PIP-Fenster wird auf dem Hauptbildschirm und das Bild vom Hauptbildschirm wird im PIP-
Fenster angezeigt.
29)
SIZE
Ermöglicht die Auswahl verschiedener Bildgrößen.
30)
REW
Rücklauf
31) STOP
Stop (Stopp)
32) PLAY / PAUSE
Wiedergabe/Pause
33) FF
Schneller Vorlauf
© 1995~2008 SAMSUNG. ALL Rights Reserved
X_
X\UGGG\X\UGGG\ YWW^TXYTYWGGG㝘䟸GXaY`a\_YWW^TXYTYWGGG㝘䟸GXaY`a\_

Bauplan | Monitoroberteil | Ständer | Lautsprecher | Montageanleitung für VESA-Halterung | Montage der Wandhalterung
1. Bauplan
2. Monitoroberteil
X`
X\UGGG]X\UGGG] YWW^TXYTYWGGG㝘䟸GXaY`a\_YWW^TXYTYWGGG㝘䟸GXaY`a\_

3. Ständer
4. Lautsprecher
5. Montageanleitung für VESA-Halterung
z
Wenn Sie VESA installieren, stellen Sie sicher, dass die internationalen VESA-Richtlinien erfüllt sind.
z
Hinweise zu Kauf und Montage der VESA-Halterung: Wenden Sie sich für die Bestellung der Halterung an Ihren
nächsten Samsung-Fachhändler. Unser Montagepersonal montiert nach Eintreffen der Bestellung die Halterung
an Ihrem Monitor.
z
Für das Anheben des Monitors sind mindestens 2 Personen erforderlich.
z
Samsung haftet nicht für Verletzungen oder Schäden, die bei der Montage durch Kunden entstehen.
YW
X\UGGG^X\UGGG^ YWW^TXYTYWGGG㝘䟸GXaY`a\_YWW^TXYTYWGGG㝘䟸GXaY`a\_

Abmessungen
Verwenden Sie für die Wandmontage der Halterung nur Maschinenschrauben mit 6 mm Durchmesser
und 8 bis 12 mm Länge.
6. Montage der Wandhalterung
z
Wenden Sie sich zur Montage der Wandhalterung an einen Techniker.
z
Samsung Electronics haftet nicht für Schäden an Gerät oder Personen, wenn die Montage vom Kunden selbst
durchgeführt wird.
z
Die Halterung ist zur Montage an Betonwänden vorgesehen. Die Stabilität der Halterung bei Montage auf Putz
oder an Täfelungen kannnicht garantiert werden.
Komponenten(Lieferumfang)
Verwenden Sie nur die mitgelieferten Komponenten und das mitgelieferte Zubehör.
A
Wandhalterung
B
Gerätehalterung
C
Schraube:
8EA
C
Schraube:
3EA
E
Holzschraube:
7EA
F
Verankerung:
7EA
G
Montageanleitung
Die Wandhalterung montieren
1
1. Markieren Sie die Position der Löcher an der Wand.
2. Bohren Sie an der markierten Stelle ein Loch von 35 mm Tiefe.
3. Setzen Sie die Verankerungen
F
in die Löcher ein.
4. Richten Sie die Wandhalterung
A
n den Dübeln
F
aus, und bringen
Sie dann die Wandhalterung
A
mit Holzschrauben
E
an der Wand
an.
Wenn die Halterung nicht fest genug an derWand montiert
wurde, kann der LCD-monitor herunterfallen.
2
1. Schalten Sie das Gerät aus und ziehen Sie das Netzkabel aus der Steckdose.
2. Legen Sie das LCD-monitor mit dem Bildschirm nach unten auf ein weiches Tuch oder Kissen auf
einem Tisch.
3. Bringen Sie die Gerätehalterung
B
an der Rückseite des LCD-monitor an und ziehen Sie die
Schrauben
C
fest.
YX
X\UGGG_X\UGGG_ YWW^TXYTYWGGG㝘䟸GXaY`a\_YWW^TXYTYWGGG㝘䟸GXaY`a\_

3
1. Schieben Sie die drei Aufhänger der Gerätehalterung
B
in die Öffnungen der Wandhalterung
A
ein.
2. Befestigen Sie die Gerätehalterung
B
mit Schrauben
D
an der Wandhalterung
A
.
Schließen Sie vor der Wandinstallation zuerst die Kabel am Gerät an.
YY
X\UGGG`X\UGGG` YWW^TXYTYWGGG㝘䟸GXaY`a\_YWW^TXYTYWGGG㝘䟸GXaY`a\_

Farbe und Aussehen des Geräts sind modellabhängig, und jederzeitige Änderungen der technischen Daten des
Geräts zum Zweck der Leistungssteigerung sind vorbehalten.
Anschlussmöglichkeiten
Installieren der Füße
Hinweis
• Sie sollten nur die mitgelieferten Schrauben verwenden.
Achtung
Samsung Electronics übernimmt keine Haftung für Schäden, die durch Verwendung eines anderen Sockels
als dem hier beschriebenen entstehen.
Montage der provisorischen Füße
Linker Fu ß
Rechter Fuß
Achtung
Bringen Sie das Hinweisschild hinten an.
1) Die Öffnung an der Monitorunterseite, wo der Fuß montiert wird, ist durch eine Schutzabdeckung geschützt.
Beachten Sie, dass die Schutzabbdeckung bei der Montage der mitgelieferten provisorischen Füße oder
des Fuß-Sets (separat erhältlich) zu entfernen ist. Wenn Sie das Wandmontageset verwenden, m uss die
Öffnung mit der Kappe verschlossen werden.
2) Stellen Sie den linken bzw. rechten Fuß auf.
3) Stecken Sie den Fuß in das Loch an der Unterseite des Monitors ein.
Stecken Sie die Schrauben in die angebenen Löcher ein und ziehen Sie sie fest. (M4 × L15)
Achtung
Sicherheitshinweise
Einführung
Anschlussmöglichkeiten
Installieren der Füße
Anschließen des Monitors
Verwenden der Software
Einstellen des Monitors
Fehlerbehebung
Technisc he Daten
Informationen
Anhang
YZ
X\UGGGXWX\UGGGXW YWW^TXYTYWGGG㝘䟸GXaY`a\`YWW^TXYTYWGGG㝘䟸GXaY`a\`

Dieser Fuß wurde für die Anpassung der Bildschirmneigung entwickelt. Das Unternehmen übernimmt keine
Verantwortung für Probleme, die durch die Verwendung des Fußes entstehen. Verwenden Sie das Gerät
niemals, um Gegenstände darauf abzustellen.
Installieren der Füße (separat erhältlich)
1) Die Öffnung an der Monitorunterseite, wo der Fuß montiert wird, ist durch eine Schutzabdeckung geschützt.
Beachten Sie, dass die Schutzabbdeckung bei der Montage der mitgelieferten provisorischen Füße oder
des Fuß-Sets (separat erhältlich) zu entfernen ist. Wenn Sie das Wandmontageset verwenden, m uss die
Öffnung mit der Kappe verschlossen werden.
2) Achten Sie darauf, dass sie die Teile ordnungsgemäß ausrichten und an der richtigen Stelle montieren. (M4
× L15)
3) Stecken Sie den Fuß in das Loch an der Unterseite des Monitors ein.
4) Stecken Sie die Schrauben in die angebenen Löcher ein und ziehen Sie sie fest. (M4 × L15)
Anschließen des Monitors
Bei Netzkabel mit Erdung
Bei einer Störung kann die Erdung einen Stromschlag verursachen. Vergewissern Sie sich, dass die
Erdung korrekt angeschlossen ist, ehe Sie den Stecker in die Netzsteckdose stecken. Wenn Sie das
Erdungskabel abtrennen, müssen Sie sich vorher vergewissern, dass der Netzstecker vorher
gezogen wurde.
Hinweis
• Geräte, die sich an einem AV-Eingang anschließen lassen, wie DVD-Player, Videorecorder oder
Camcorders sowie Computer können an den Monitor angeschlossen werden. Ausführliche Informationen
zum Anschluss dieser Geräte finden Sie unter Benutzersteuerung unter Einstellen des LCD-Monitors.
Anschließen an einen Computer
Y[
X\UGGGXXX\UGGGXX YWW^TXYTYWGGG㝘䟸GXaY`a\`YWW^TXYTYWGGG㝘䟸GXaY`a\`

1) Schließen Sie das Netzanschluß kabel für den Monitor an die Netzstrombuchse auf der Rückseite des
Monitors an.
Schalten Sie den Monitor am Netzschalter ein.
2) Es gibt 3 Möglichkeiten, das Signalkabel an den Monitor anzuschließen.
Wählen Sie eine der folgenden:
2-1) Verwenden des D-Sub-Anschlusses (Analog) der Grafikkarte.
Schließen Sie das D-Sub-Kabel an den 15-poligen RGB-Anschluss auf der Rückseite des
Monitors und an den 15-poligen D-Sub-Anschluss ihres Computers an.
2-2) Verwenden des DVI-Anschlusses (Digital) der Grafikkarte.
Schließen Sie das DVI-Kabel an den DVI (HDCP)-Anschluss auf der Rückseite des Monitors an
und den DVI-Anschluss Ihres Computers an.
2-3) Verwenden des BNC-Anschlusses (Analog) der Grafikkarte.
Schließen Sie das BNC-Kabel an den BNC/COMPONENT IN - R, G, B, H, V-Anschluss auf der
Rückseite des Monitors und an den 15-poligen D -Sub-Anschluss ihres Computers an.
3) Schließen Sie das Audiokabel für den Monitor an den Audioanschluss an der Rückseite des Computers an.
Hinweis
• Schalten Sie sowohl den Computer als auch den Monitor ein.
Hinweis
• Das DVI- oder BNC-Kabel ist als Zubehör erhältlich.
Für Informationen über optionales Zubehör setzen Sie sich mit einem Kundendienstzentrum von Samsung
Electronics in Ihrer Nähe in Verbindung.
Y\
X\UGGGXYX\UGGGXY YWW^TXYTYWGGG㝘䟸GXaY`a\`YWW^TXYTYWGGG㝘䟸GXaY`a\`

Digitaler DVD-Anschluss
Hinweis
• Eingangsgeräte wie digitale DVD-Geräte werden mit dem DVI-Kabel an den DVI IN-Anschluss des
Monitors angeschlossen.
• Legen Sie dann eine DVD ein, und starten Sie das DVD-Gerät.
• Wählen Sie mit der Taste SOURCE () die Option Digital aus.
Hinweis
• Der Monitor verfügt über einen DVI IN-Anschluss, mit dem DVI -Eingangsgeräte, wie z.B. digitale DVD-
Geräte, angeschlossen werden können.
Anschließen an einen Videorecorder
1) Geräte, die sich an einen AV-Eingang anschließen lassen, wie Videorecorder oder Camcorder, k önnen m it
dem S-VHS- oder BNC-Kabel an den AV IN [VIDEO] oder AV IN [S-VIDEO] –Anschluss des Monitors
angeschlossen werden.
2) Verbinden Sie den linken und rechten Audioausgang (Audio (L) und Audio (R)) eines Videorecorders oder
Camcorders per Audiokabel mit dem linken und rechten Audioeingang des Monitors.
Hinweis
• Wählen Sie über die Source-Taste (Quelle) an der Vorderseite des Monitors den AV oder S-Video
Eingang, an den Videorecorder oder Camcorder angeschlossen ist.
• Starten Sie anschließend den Videorecorder oder Camcorder mit eingelegter mit einem eingelegten Band.
Hinweis
• Das S-VHS- oder BNC-Kabel ist als Zubehör erhältlich.
Anschließen an einen DVD-Player
Y]
X\UGGGXZX\UGGGXZ YWW^TXYTYWGGG㝘䟸GXaY`a\`YWW^TXYTYWGGG㝘䟸GXaY`a\`

1) Schließen Sie einen Satz Audiokabel zwischen der linken und der rechten COMPONENT AUDIO IN [L-
AUDIO-R] am Monitor und den Audioausgangsbuchsen (AUDIO OUT) am DVD-Player an.
2) Schließen Sie ein Component kabel zwischen den BNC/COMPONENT IN - Anschluss von P
R, Y, PB port
am Monitor und den P
R, Y, PB-Buchsen am DVD-Player an.
Hinweis
• Wählen Sie über die Source-Taste (Quelle) an der Vorderseite des Monitors den Component Eingang, an
einen DVD -Player angeschlossen ist.
• Starten Sie anschließend den DVD-Player mit eingelegter DVD bzw.
Hinweis
• Das Component-Kabel ist als Zubehör erhältlich.
Informationen zu Component-Video finden Sie in der Bedienungsanleitung Ihres DVD -Players.
Anschließen eines Camcorders
1) Suchen Sie die AV-Ausgangsbuchsen am Camcorder. Sie befinden sich normalerweise seitlich am
Camcorder oder a
uf dessen Rückseite.
Schließen Sie einen Satz Audiokabel zwischen den AUDIO OUTPUT-Buchsen am Camcorder und den AV
AUDIO IN [L-AUDIO-R] am Monitor an.
2) Schließen Sie ein Videokabel zwischen die VIDEO OUTPUT-Buchse am Camcorder und der AV IN
[VIDEO] am Monitor an.
Hinweis
• Wählen Sie über die Source-Taste (Quelle) an der Vorderseite des Monitors den AV Eingang, an eines
Camcorders angeschlossen ist.
• Starten Sie anschließend eines Camcorder mit einem eingelegten Band.
Hinweis
• Die hier abgebildeten Audio-Videokabel sind in der Regel im Lieferumfang eines Camcorders enthalten.
(Falls dies nicht der Fall sein sollte, sind diese in einem Elektronikfachgeschäft in Ihrer Nähe erhältlich.)
Y^
X\UGGGX[X\UGGGX[ YWW^TXYTYWGGG㝘䟸GXaY`a\`YWW^TXYTYWGGG㝘䟸GXaY`a\`

Wenn Sie einen Stereo-Camcorder besitzen, müssen Sie ein Satz mit zwei Kabeln anschließen.
Anschließen einer D-TV Set Top Box
Hinweis
• Die Anschlüsse für eine typische Set Top Box werden nachfolgend gezeigt.
1) Schließen Sie ein Videokabel zwischen den BNC/COMPONENT IN - Anschluss von PR, Y, P B-Port am
Monitor und den P
R, Y, PB-Buchsen an der Set Top Box an.
2) Schließen Sie einen Satz Audiokabel zwischen der linken und rechten COMPONENT AUDIO IN [L-AUDIO-
R] am Monitor und den Audioausgangsbuchsen (AUDIO OUT) an der Set Top Box an.
Hinweis
• Wählen Sie über die Source-Taste (Quelle) an der Vorderseite des Monitors den Component Eingang, an
einer D-TV Set Top Box angeschlossen ist.
Hinweis
• Informationen zu Component-Video finden Sie in der Bedienungsanleitung Ihrer Set Top Box.
Anschließen von Lautsprechern
Hinweis
• Befestigen Sie die Lautsprecher mit den Schrauben am GERÄT.
* Montage der Lautsprecher ohne Lautsprecherfuß.
Y_
X\UGGGX\X\UGGGX\ YWW^TXYTYWGGG㝘䟸GXaY`a\`YWW^TXYTYWGGG㝘䟸GXaY`a\`

Hinweis
• Schließen Sie das Lautsprecherverbindungskabel an die Lautsprecherbuchsen auf der Rückwand des
GERÄTS und auf der Rückseite der Lautsprecher an.
Hinweis
• Das Gerät beim Umsetzen o. ä. nicht an den Lautsprechern halten.
Sonst können die Halterungen, mit denen die Lautsprecher am GERÄT befestigt sind, beschädigt werden.
Anschließen an eine Audioanlage
Hinweis
• Schließen Sie die Audio (L)- und Audio (R)-Anschlüsse eines Videorekorders oder Camcorders mit den
Audiokabeln an den AUDIO OUT [L-AUDIO-R]-Anschluss des Monitors an.
© 1995~2008 SAMSUNG. ALL Rights Reserved
Y`
X\UGGGX]X\UGGGX] YWW^TXYTYWGGG㝘䟸GXaY`a\`YWW^TXYTYWGGG㝘䟸GXaY`a\`

Einführung
Main Screen
Klicken Sie auf Start > Programme > Samsung > MDC, um das Programm zu starten.
Wählen Sie eine Wertegruppe, um die Lautstärke für diese Wertegruppe am Schieberegler anzuzeigen.
Z
zt{T[WXXTn__UGGGZYzt{T[WXXTn__UGGGZY YWW^TXXTY_GGG㝘䟸GYa\ZaX]YWW^TXXTY_GGG㝘䟸GYa\ZaX]

Hauptsymbole Auswahlschaltfläche
Remocon Info-Gitter
Safety Lock Display-Auswahl
Port Selection Control-Werkzeuge
1. Klicken Sie auf Hauptsymbole, um zu den jeweiligen Programmbildschirmen zu wechseln.
2. Sie können für das Display den Empfänger für Signale der Fernsteuerung aktivieren bzw. deaktivieren.
3. Dient zum Einstellen der Sperrfunktion.
Wenn die Lock function (Sperrfunktion) eingestellt ist, können auf der Fernbedienung und am Gerät nur noch die
Netztaste und die Sperrtaste verwendet werden.
4. Dient zum Einstellen der Sperrfunktion. Die Standardvorgabe ist COM1.
5. Klicken Sie auf "Select All" (Alle auswählen) oder Clear (Auswahl löschen), um alle Displays auszuwählen oder die
Auswahl rückgängig zu machen.
6. Verwenden Sie das Gitter, um kurze Informationen zum ausgewählten Display anzuzeigen.
7. Wählen Sie ein Display aus der Display-Auswahl.
8. Mit den Control-Werkzeugen legen Sie die Einstellung für die Displays fest.
<Hinweis> Die Funktion " Enable/Disable" (Aktivieren/Deaktivieren) für die Fernsteuerung funktioniert
unabhängig von der Energiefunktion und betrifft alle angeschlossenen Displays, die mit MDC
verbundenen sind. Unabhängig vom Status zum Zeitpunkt, an dem das MDC heruntergefahren wird,
wird die Empfangsfunktion für das Signal der Fernsteuerung für alle Displays beim Beenden von
MDC initialisiert.
Port Selection
Z
zt{T[WXXTn__UGGGZZzt{T[WXXTn__UGGGZZ YWW^TXXTY_GGG㝘䟸GYa\ZaX]YWW^TXXTY_GGG㝘䟸GYa\ZaX]

1. Die Multiple Display Control ist ursprünglich auf COM1 eingestellt.
2. Wird ein anderer Anschluss als COM1 benutzt, stehen im Anschlusswahlmenü COM1 bis COM4 zur Auswahl.
3. Wenn nicht die genaue Bezeichnung des Anschlusses, der mit dem Monitor über ein serielles Kabel verbunden ist,
ausgewählt wird, ist eine Datenübertragung unmöglich.
4. Der ausgewählte Anschluss wird im Programm gespeichert und auch für das nächste Programm verwendet.
Power Control
1. Klicken Sie auf das Hauptsymbol "Power Control" (Stromeinstellungen). Der Bildschirm "Power Control" wird
angezeigt.
Z
zt{T[WXXTn__UGGGZ[zt{T[WXXTn__UGGGZ[ YWW^TXXTY_GGG㝘䟸GYa\ZaX]YWW^TXXTY_GGG㝘䟸GYa\ZaX]

Im Info-Gitter erscheinen einige wesentliche Informationen, die von Power Control benötigt werden.
1) Power Status (Energiestatus)
2) Input
3) Image Size
4) On Timer
5) Off Timer
2. Klicken Sie auf die Schaltfläche "Select All" oder aktivieren Sie ein Kontrollkästchen, um ein Display auszuwählen.
Mit Power Control können Sie einige Funktionen des ausgewählten Display festlegen.
1)
Power On/Off (Strom EIN/AUS)
Z
zt{T[WXXTn__UGGGZ\zt{T[WXXTn__UGGGZ\ YWW^TXXTY_GGG㝘䟸GYa\ZaX]YWW^TXXTY_GGG㝘䟸GYa\ZaX]

- Schaltet die Energieversorgung des ausgewählten Displays EIN bzw. AUS.
2) Volume (Lautstärkeregelung)
- Bestimmt den Lautstärkepegel für das ausgewählte Display.
Der Lautstärkewert wird aus der Wertegruppe ausgelesen und auf dem Schieberegler angezeigt.
(Wenn Sie die Auswahl abbrechen oder "Select All" auswählen, wird der Standardwert 10 wiederhergestellt)
3)
Mute On /Off (Stummschaltung EIN/AUS)
- Schaltet den Lautsprecher des ausgewählten Displays stumm (EIN/AUS).
Wenn Sie nur eine Wertegruppe auswählen und für diese Gruppe die Stummschaltung bereits aktiviert ist, müssen
Sie auf das entsprechende Symbol klicken.
(Wenn Sie diese Auswahl rückgängig machen oder "Select All" auswählen, werden die Standardeinstellungen
wieder aktiviert.)
Power Control betrifft alle Displays.
Dieses Programm ist nur für das Modell Samsung SyncMaster 403T bestimmt. Es ist nicht für andere
Modelle zugelassen.
Input Source
1. Klicken Sie auf das Hauptsymbol "Input Source" (Eingangsquelle). Der Bildschirm "Input Source" wird angezeigt.
Klicken Sie „Select All“ (Alle auswählen) oder ein Kontrollkästchen an, um das Darstellungsfeld, das eingestellt
werden soll, auszuwählen.
• TV Mode
• PC Mode
Z
zt{T[WXXTn__UGGGZ]zt{T[WXXTn__UGGGZ] YWW^TXXTY_GGG㝘䟸GYa\ZaX]YWW^TXXTY_GGG㝘䟸GYa\ZaX]

Im Info-Gitter erscheinen einige wesentliche Informationen, die für die Steuerung der Eingangsquelle erforderlich
sind.
1) PC
- Ändert die Signalquelle des gewählten Displays auf PC.
2) BNC
- Ändert die Signalquelle des gewählten Displays auf BNC.
3) DVI
- Ändert die Signalquelle des gewählten Displays auf DVI.
4) TV
- Ändert die Signalquelle des gewählten Displays auf TV.
5) AV
- Ändert die Signalquelle des gewählten Displays auf AV.
6) S-Video
- Ändert die Signalquelle des gewählten Displays auf S-
V
ideo.
7) Component
- Ändert die Signalquelle des gewählten Displays auf Component.
8) MagicNet
- Die Eingabequelle für MagicNet funktioniert nur bei MagicNet-Modellen.
9) Channel
- Bei TV als Input Source (Signalquelle) wird der Channel-Pfeil (Kanal-Pfeil) angezeigt.
TV-Quelle kann nur in Produkten mit Fernsehfunktion ausgewählt werden, und die Auswahl von
Kanälen ist nur möglich, wenn als Signalquelle TV gewählt ist.
Die Einstellung der Eingangsquelle betrifft nur Displays, die gegenwärtig eingeschaltet sind (Status
ON).
Image Size
PC, BNC, DVI
1. Klicken Sie Image Size (Bildgröße) in der Hauptsymbolleiste an. Daraufhin erscheint der Bildschirm zur Einstellung der
Bildgröße.
Z
zt{T[WXXTn__UGGGZ^zt{T[WXXTn__UGGGZ^ YWW^TXXTY_GGG㝘䟸GYa\ZaX]YWW^TXXTY_GGG㝘䟸GYa\ZaX]

Das Informationsgitter zeigt einige grundlegende Informationen an, die zur Einstellung der Bildgröße erforderlich
sind.
1)
Power Status (Energiestatus)
- Zeigt den Energiestatus für das aktuelle Display an.
2) Image Size
- Legt den Image Size für das gewählte Display fest.
3) Input
- Zeigt die aktuelle Eingangsquelle für das verwendete Display an.
4) Das Informationsgitter zeigt nur die Darstellungsfelder an, deren Signalquelle PC, BNC oder DVI.
5) Signalquelle PC
Wenn Sie auf Image (Bild) klicken, wird zuerst die Registerkarte Source (Quelle) angezeigt.
- Mithilfe der Schaltfläche Image Size wird die für PC, BNC, DVI verfügbare Bildgröße eingestellt.
6) Video Source
- Klicken Sie auf die Registerkarte Video Source (Videoquelle), um die Bildgröße für die entsprechende Signalquelle
einzustellen.
Die Eingabequelle für MagicNet funktioniert nur bei MagicNet-Modellen.
Die Einstellung der Bildgröße ist nur bei denjenigen Darstellungsfeldern verfügbar, die aktiviert (ON)
sind.
Image Size
TV, AV, S-Video, Component, DVI(HDCP)
1. Klicken Sie Image Size (Bildgröße) in der Hauptsymbolleiste an. Daraufhin erscheint der Bildschirm zur Einstellung der
Bildgröße.
Z
zt{T[WXXTn__UGGGZ_zt{T[WXXTn__UGGGZ_ YWW^TXXTY_GGG㝘䟸GYa\ZaX]YWW^TXXTY_GGG㝘䟸GYa\ZaX]

Das Informationsgitter zeigt einige grundlegende Informationen an, die zur Einstellung der Bildgröße erforderlich
sind.
1) Klicken Sie auf die Registerkarte Video Source (Videoquelle), um die Bildgröße für TV, AV, S-Video und Component
einzustellen.
Klicken Sie „Select All“ (Alle auswählen) oder ein Kontrollkästchen an, um das Darstellungsfeld, das eingestellt
werden soll, auszuwählen.
2) Info Grid displays only the display having TV, AV, S-Video, Component or DVI(HDCP) as input source.
3) Die Bildgröße des gewählten Displays beliebig wechseln.
Hinweis: Auto Wide, Zoom1 und Zoom2 stehen nicht zur Auswahl, wenn der Eingangssignaltyp für
Component und DVI (HDCP) 720p oder 1080i ist.
Die Eingabequelle für MagicNet funktioniert nur bei MagicNet-Modellen.
Die Einstellung der Bildgröße ist nur bei denjenigen Darstellungsfeldern verfügbar, die aktiviert (ON)
sind.
Time
1. Klicken Sie auf das Hauptsymbol "Time" (Zeit). Der Bildschirm "Time" wird angezeigt.
Z
zt{T[WXXTn__UGGGZ`zt{T[WXXTn__UGGGZ` YWW^TXXTY_GGG㝘䟸GYa\ZaX]YWW^TXXTY_GGG㝘䟸GYa\ZaX]

Im Info-Gitter erscheinen einige wesentliche Informationen, die für die Zeiteinstellung erforderlich sind.
1) Current Time
- Legt die aktuelle Zeit für das gewählte Display fest (PC-Zeit)
- Um die aktuelle Zeit zu ändern, müssen Sie zunächst die Zeiteinstellung auf dem PC ändern.
2) On Time Setup
- Legen Sie die Stunde, Minute und AM/PM für den On-Timer des ausgewählten Displays fest.
3) On Time Setup
- Legen Sie die Stunde, Minute und AM/PM für den Off-Timer des ausgewählten Displays fest.
4) Zeigt die Einstellungen für den On-Time an.
5) Zeigt die Einstellungen für den Off-Time an.
Die Eingabequelle für MagicNet funktioniert nur bei MagicNet-Modellen.
Sie können die Zeiteinstellungen nur für Displays festlegen, die eingeschaltet sind (Power Status ON).
Bei On Time Setup (Anschaltzeit-Setup) funktionieren die TV Source-Funktionen (TV-Signalquelle) nur
für Modelle mit TV-Funktion.
PIP
PIP Size
1. Klicken Sie PIP in der Hauptsymbolleiste an. Daraufhin erscheint der Bildschirm zur PIP-Einstellung.
Klicken Sie „Select All“ (Alle auswählen) oder ein Kontrollkästchen an, um das Darstellungsfeld, das eingestellt
werden soll, auszuwählen.
zt{T[WXXTn__UGGG[Wzt{T[WXXTn__UGGG[W YWW^TXXTY_GGG㝘䟸GYa\ZaX]YWW^TXXTY_GGG㝘䟸GYa\ZaX]

Das Informationsgitter zeigt einige grundlegende Informationen an, die zur Einstellung der PIP-Größe erforderlich
sind.
1) PIP Size
- Zeigt die aktuelle PIP-Größe des derzeit benutzten Darstellungsfelds an.
2) OFF
- Schließt das PIP-Fenster des gewählten Displays.
3) Large
- Öffnet das PIP-Fenster des gewählten Displays und ändert die Größe auf Large.
4) Small
- Öffnet das PIP-Fenster des gewählten Displays und ändert die Größe auf Small.
5) Double 1
- Öffnet das PIP-Fenster des gewählten Displays und ändert die Größe auf Double 1.
6) Double 2
- Öffnet das PIP-Fenster des gewählten Displays und ändert die Größe auf Double 2.
7) Double 3 (Picture By Picture)
- Öffnet das PIP-Fenster des gewählten Displays und ändert die Größe auf Double 3.
Die Eingabequelle für MagicNet funktioniert nur bei MagicNet-Modellen.
Die PIP-Größe kann beim Einschalten des Monitors festgelegt werden.
PIP
PIP Source
1. Klicken Sie PIP in der Hauptsymbolleiste an. Daraufhin erscheint der Bildschirm zur PIP-Einstellung.
• PIP TV Mode
zt{T[WXXTn__UGGG[Xzt{T[WXXTn__UGGG[X YWW^TXXTY_GGG㝘䟸GYa\ZaX]YWW^TXXTY_GGG㝘䟸GYa\ZaX]

• PIP S-Video Mode
Das Informationsgitter zeigt einige grundlegende Informationen an, die zur Einstellung der PIP-Quelle erforderlich
sind.
1) PIP Source
- Die PIP-Quelle kann beim Einschalten des Monitors festgelegt werden.
2) PC
- Ändert die PIP-Quelle des gewählten Displays auf PC.
3) BNC
- Ändert die PIP-Quelle des gewählten Displays auf BNC.
4) DVI
- Ändert die PIP-Quelle des gewählten Displays auf DVI.
5)
TV
[
zt{T[WXXTn__UGGG[Yzt{T[WXXTn__UGGG[Y YWW^TXXTY_GGG㝘䟸GYa\ZaX]YWW^TXXTY_GGG㝘䟸GYa\ZaX]

-Ändert die PIP-Quelle des gewählten Displays auf TV.
6) AV
- Ändert die PIP-Quelle des gewählten Displays auf AV.
7) S-Video
- Ändert die PIP-Quelle des gewählten Displays auf S-Video.
8) Component
- Ändert die PIP-Quelle des gewählten Displays auf Component.
9) Channel (Kanal)
- Bei TV als PIP-Source (PIP-Signalquelle) wird der Channel-Pfeil (Kanal-Pfeil) angezeigt.
Hinweis: Je nach Art der Eingangsquelle für das Hauptbild stehen manche PIP-Quellen möglicherweise
nicht zur Auswahl.
Die Eingabequelle für MagicNet funktioniert nur bei MagicNet-Modellen.
TV-Quelle kann nur in Produkten mit Fernsehfunktion ausgewählt werden, und die Auswahl von
Kanälen ist nur möglich, wenn als PIP-Signalquelle TV gewählt ist.
Die PIP-Einstellfunktion ist nur für Displays verfügbar, die eingeschaltet sind (Betriebszustand = ON)
und deren PIP-Funktion aktiviert ist.
Settings
Picture
1. Klicken Sie auf das Hauptsymbol "Settings" (Einstellungen). Der Bildschirm "Settings" wird angezeigt.
Im Info-Gitter erscheinen einige wesentliche Informationen, die für die Einstellungen erforderlich sind.
Wenn die einzelnen Funktionen gewählt werden, wird er Wert der jeweiligen Funktion auf dem Regler angezeigt.
Wenn Sie "Select All" auswählen, wird der Standardwert (50) wiederhergestellt. Wird in diesem Fenster ein Wert
geändert, wechselt der Modus automatisch zu "CUSTOM".
1) Picture
- Nur verfügbar für TV, AV, S-Video, Component, DVI(HDCP).
2) Contrast (Kontrast)
- Legt den Kontrast fü
r das gewählte Display fest.
3) Brightness (Helligkeit)
- Legt die Helligkeit für das gewählte Display fest.
4) Sharpness (Konturenschärfe)
- Legt die Konturenschärfe für das gewählte Display fest.
5) Color (Farbe)
- Legt die Farbe für das gewählte Display fest.
6)
Tint (Farbton)
[
zt{T[WXXTn__UGGG[Zzt{T[WXXTn__UGGG[Z YWW^TXXTY_GGG㝘䟸GYa\ZaX]YWW^TXXTY_GGG㝘䟸GYa\ZaX]

- Legt den Farbton für das gewählte Display fest.
7) Color Tone (Farbtemp.)
- Stellt den Farbton für das gewählte Display ein.
Die Eingabequelle für MagicNet funktioniert nur bei MagicNet-Modellen.
Diese Funktion ist nur für Anzeigen verfügbar, deren Netzstatus "Ein" lautet. Wenn keine Auswahl
vorgenommen ist, werden die Werkseinstellungen angezeigt.
Settings
Picture PC
1. Klicken Sie auf das Hauptsymbol "Settings" (Einstellungen). Der Bildschirm "Settings" wird angezeigt.
Im Info-Gitter erscheinen einige wesentliche Informationen, die für die Einstellungen erforderlich sind. When each
function is selected, the set value of the selected function is displayed in the slide. When selected, each function
fetches the value for the set and displays it on the slide bar. When "Select All" is chosen, the default value is
displayed. Wird in diesem Fenster ein Wert geändert, wechselt der Modus automatisch zu "CUSTOM".
1) Picture PC
- Nur verfügbar für PC, BNC, DVI.
2) Contrast (Kontrast)
- Legt den Kontrast für das gewählte Display fest.
3) Brightness (Helligkeit)
- Legt die Helligkeit für das gewählte Display fest.
4) Red(Rot)
- Legt die Red Farbe für das gewählte Display fest.
5) Green (Grün)
- Legt die Green Farbe für das gewählte Display fest.
6) Blue (Blau)
- Legt die Blue Farbe für das gewählte Display fest.
Die Eingabequelle für MagicNet funktioniert nur bei MagicNet-Modellen.
Diese Funktion ist nur für Anzeigen verfügbar, deren Netzstatus "Ein" lautet. Wenn keine Auswahl
vorgenommen ist, werden die Werkseinstellungen angezeigt.
[
zt{T[WXXTn__UGGG[[zt{T[WXXTn__UGGG[[ YWW^TXXTY_GGG㝘䟸GYa\ZaX]YWW^TXXTY_GGG㝘䟸GYa\ZaX]

Settings
Audio
1. Klicken Sie auf das Hauptsymbol "Settings" (Einstellungen). Der Bildschirm "Settings" wird angezeigt.
Im Info-Gitter erscheinen einige wesentliche Informationen, die für die Einstellungen erforderlich sind. When each
function is selected, the set value of the selected function is displayed in the slide. When selected, each function
fetches the value for the set and displays it on the slide bar. When "Select All" is chosen, the default value is
displayed. Wird in diesem Fenster ein Wert geändert, wechselt der Modus automatisch zu "CUSTOM".
1) Audio
- Legt die Audio-Einstellungen für alle Eingangsquellen fest.
2) Bass (Tiefen)
- Legt den Pegel der tiefen Töne für das gewählte Display fest.
3) Treble (Höhen)
- Legt den Pegel der hohen Töne für das gewählte Display fest.
4) Balance (Rechts-Links-Ausgleich)
- Legt den Ausgleich des rechten und linken Lautsprechers für das gewählte Display fest.
5) SRS TSXT
- SRS TSXT Sound On/Off of the selected display.
6) Ton wählen
- Bei aktiviertem PIP können Sie entweder Haupt- oder Nebenbild auswählen.
Die Eingabequelle für MagicNet funktioniert nur bei MagicNet-Modellen.
Diese Funktion ist nur für Anzeigen verfügbar, deren Netzstatus "Ein" lautet. Wenn keine Auswahl
vorgenommen ist, werden die Werkseinstellungen angezeigt.
Settings
Image Lock
1. Klicken Sie auf das Hauptsymbol "Settings" (Einstellungen). Der Bildschirm "Settings" wird angezeigt.
[
zt{T[WXXTn__UGGG[\zt{T[WXXTn__UGGG[\ YWW^TXXTY_GGG㝘䟸GYa\ZaX]YWW^TXXTY_GGG㝘䟸GYa\ZaX]

Im Info-Gitter erscheinen einige wesentliche Informationen, die für die Einstellungen erforderlich sind.
1) Bildjustierung
- Nur verfügbar für PC, BNC.
2) Coarse (Grob)
- Legt die Coarse für das gewählte Display fest.
3) Fine (Fein)
- Legt die Fine für das gewählte Display fest.
4) Position
- Legt die Position für das gewählte Display fest.
5) Auto Adjustment (Automatische Anpassung)
- Drücken Sie diese Taste, damit sich das Gerät selbständig auf das ankommende PC-Signal einstellt.
Die Eingabequelle für MagicNet funktioniert nur bei MagicNet-Modellen.
Sie können die Einstellungen nur für Displays festlegen, die eingeschaltet sind (Power Status ON.)
Maintenance
Scroll
1. Klicken Sie auf das Symbol für "Wartung" in der Symbolleiste, um das Wartungsfenster aufzurufen.
[
zt{T[WXXTn__UGGG[]zt{T[WXXTn__UGGG[] YWW^TXXTY_GGG㝘䟸GYa\ZaX]YWW^TXXTY_GGG㝘䟸GYa\ZaX]

1) Screen Scroll
- Beseitigt Nachbilder, die entstehen können, wenn das ausgewählte Display längere Zeit im Pausenmodus bleibt. Sie
können den Wiederholungszyklus-Timer einstellen und hierfür den "Interval" in Stunden und die "Second" in
Sekunden auswählen.
Sie können den Screen Type (Bildschirmtyp) einzeln auf Scroll (Blättern), Pixel (Pixel), Bar (Balken) oder Eraser
(Löschen) einstellen.
Die Eingabequelle für MagicNet funktioniert nur bei MagicNet-Modellen.
Beim Konfigurieren von Second (Sekunde) können Sie die Werte 1, 2, 3, 4 oder 5 für Blättern einstellen,
oder 10, 20, 30, 40 oder 50 für Pixel, Balken oder Löschen.
Die Funktion zur Steuerung der Wartung ist nur für eingeschaltete Displays (Betriebszustand = ON)
verfügbar.
Maintenance
Video Wall
1. Klicken Sie auf das Symbol für "Wartung" in der Symbolleiste, um das Wartungsfenster aufzurufen.
[
zt{T[WXXTn__UGGG[^zt{T[WXXTn__UGGG[^ YWW^TXXTY_GGG㝘䟸GYa\ZaX]YWW^TXXTY_GGG㝘䟸GYa\ZaX]

1) Video Wall
- Bei einer Videowand sind mehrere Videobildschirme so zusammengeschaltet, dass jeder einzelne Bildschirm ein
Segment eines Gesamtbildes anzeigt bzw. das gleiche Bild auf jedem Bildschirm angezeigt wird.
2) Video Wall (Screen divider)
- Das Bild kann segmentiert werden.
Sie können zum Segmentieren mehrere Bildschirme mit unterschiedlicher Anordnung auswählen.
z Wählen Sie einen Bildsegmentierungsmodus aus.
z Wählen Sie in der Bildschirmauswahl einen Bildschirm aus.
z
Die Stelle wird durch Eingeben einer Zahl im ausgewählten Modus festgelegt.
z
Das von Samsung bereitgestellte MDC-Programm unterstützt maximal 4 x 4 LCD-Displays.
z
2*2
z 3*3
z 4*4
z 1*2
z
2*1
z
1*5
z
5*1
3)
On / Off
[
zt{T[WXXTn__UGGG[_zt{T[WXXTn__UGGG[_ YWW^TXXTY_GGG㝘䟸GYa\ZaX]YWW^TXXTY_GGG㝘䟸GYa\ZaX]

- Aktiviert oder deaktiviert die Video Wallfunktion des ausgewählten Bildschirms.
4) Format
- Das Format für das segmentierte Bild kann ausgewählt werden.
z
Full(Vollbild )
z Natural
Diese Funktion dürfen Sie bei MagicNet nicht verwenden.
Die Funktion zur Steuerung der Wartung ist nur für eingeschaltete Displays (Betriebszustand = ON)
verfügbar.
Maintenance
Lamp Control
1. Klicken Sie auf das Symbol für "Wartung" in der Symbolleiste, um das Wartungsfenster aufzurufen.
Daraufhin erscheint ein "Informationsgitter", in dem verschiedene Grunddaten angezeigt werden.
1) Maintenance
- Ermöglicht die Steuerung der Wartung sämtlicher Eingabequellen.
2) Auto Lamp Control
- Passt zu einer bestimmten Zeit die Hintergrundbeleuchtung des ausgewählten Displays automatisch an.
Die automatische Beleuchtungssteuerung schaltet sich selbsttätig ab, wenn die Einstellung mit der manuellen
Beleuchtungssteuerfunktion vorgenommen wird.
3)
Manual Lamp Control
-
Ermöglicht eine Einstellung der Hintergrundbeleuchtung des ausgewählten Displays unabhängig von der Zeit.
Die automatische Beleuchtungssteuerung schaltet sich selbsttätig ab, wenn die Einstellung mit der manuellen
[
zt{T[WXXTn__UGGG[`zt{T[WXXTn__UGGG[` YWW^TXXTY_GGG㝘䟸GYa\ZaX]YWW^TXXTY_GGG㝘䟸GYa\ZaX]

Beleuchtungssteuerfunktion vorgenommen wird.
Die Funktion zur Steuerung der Wartung ist nur für eingeschaltete Displays (Betriebszustand = ON)
verfügbar.
Die Eingabequelle für MagicNet funktioniert nur bei MagicNet-Modellen.
Troubleshooting
1. Das gewünschte Display wird nicht auf dem Info-Gitter "Power Control" (Stromeinstellungen) angezeigt.
-
Überprüfen Sie die Verbindung mit der RS232C-Schnittstelle. (Überprüfen Sie, ob eine korrekte Verbindung zum
COM1-Port besteht.)
- Überprüfen Sie, ob mehrere der angeschlossenen Displays dieselbe ID haben. Displays mit identischer ID können
wegen einem Datenkonflikt vor Programm nicht ordnungsgemäß erkannt werden.
-
Überprüfen Sie, ob die "Display Set ID" eine Zahl zwischen 1 und 10 ist. (Nehmen Sie die Einstellung über das
Menü "Display" vor.)
Hinweis: Die Display Set ID muss einen Wert zwischen 1 und 10 haben.
Wenn ein ungültiger Wert gewählt wurde, dann das MDC-System das Display nicht einstellen.
2. Das gewünschte Display wird nicht auf den anderen Info-Gittern angezeigt
-
Überprüfen Sie, ob das Display eingeschaltet ist (Power-Status ON). (Sie können dies auf dem Info-Gitter "Power
Control" überprüfen)
- Überprüfen Sie, ob Sie die Eingangsquelle des Displays ändern können.
3. Das Dialogfeld wird wiederholt angezeigt.
- Überprüfen Sie, ob das gewünschte Display ausgewählt ist.
4. "On Timer" und "Off Timer" wurden eingestellt, aber andere Zeitangaben werden angezeigt.
- Wenden Sie die "Current Time" an, um die Display-Uhren zu synchronisieren.
5. Die Fernsteuerung funktioniert u. U. nicht richtig, wenn Sie die Remote-Funktion deaktivieren, das RS-232C-Kabel
entfernen oder das Programm auf ungewöhnliche Weise beenden. Starten Sie das Programm noch einmal, und
aktivieren Sie die Remote-Funktion erneut, um den Normalbetrieb wiederherzustellen.
<Hinweis> Bei Problemen in den Kommunikationsschaltkreisen oder Störungen von Elektrogeräten in der Nähe
kommt es u. U. zu Programmstörungen.
eige der eingestellten Werte im "Multiple Display"-Modus (Mehrere
Displays)
Wenn mehrere Displays angeschlossen sind, werden die eingestellten Werte wie folgt angezeigt.
1. Keine Auswahl: Die werkseitigen Standardwerte werden angezeigt.
2. Ein Display ausgewählt: Die für das ausgewählte Display eingestellten Werte werden ausgelesen und angezeigt.
3. Ein Display ausgewählt (ID1) und ein weiteres Display (ID3) wird hinzugefügt: Zunächst werden vom Programm die
Werte für ID1 angezeigt , und dann werden die Werte für ID3 ausgelesen und angezeigt.
4. Alle Wertegruppen wurden durch Klicken auf ''Select All" ausgewählt: Die werkseitigen Standardwerte werden wieder
hergestellt.
zt{T[WXXTn__UGGG\Wzt{T[WXXTn__UGGG\W YWW^TXXTY_GGG㝘䟸GYa\ZaX]YWW^TXXTY_GGG㝘䟸GYa\ZaX]

Farbe und Aussehen des Geräts sind modellabhängig, und jederzeitige Änderungen der technischen Daten des
Geräts zum Zweck der Leistungssteigerung sind vorbehalten.
Einstellen des Monitors
Eingang
Verfügbare Modi
PC / BNC / DVI
AV
S-Video
Komp.
DVI-Video
Quellen
[MENU]
˧
[ENTER]
˧
[ENTER]
˧
[
/
]
˧
[ENTER]
Schaltet die LED für Eingangssignal ein, das zurzeit angezeigt wird.
Wählen Sie hiermit den gewünschten Bildschirm aus.
1) PC
2) BNC
3) DVI
4) AV
5) S-Video
6) Komp.
[Die Direkttaste auf der Fernbedienung ist 'SOURCE'.]
Hinweis
• PIP wird ausgeschaltet, wenn der Monitor auf eine externe Quelle umgeschaltet wird.
PIP
Wenn externe AV-Geräte, wie DVD-Player oder Videorecorder (VCR) an den Monitor angeschlossen werden,
können Sie mit Hilfe von PIP (Bild im Bild) Videos von der externen Quelle in einem kleinen Fenster anzeigen,
welches das herkömmliche PC-Video-Signal überlagert. (Aus/Ein)
Hinweis
• Eine Überschneidung mehrerer PIPs auf dem Bildschirm war nicht möglich, weil BNC und die Komponente
denselben Anschluss verwenden.
1) PIP
[MENU]
˧
[ENTER]
˧
[
/
]
˧
[ENTER]
˧
[ENTER]
˧
[
/
]
˧
[ENTER]
Jedes Mal, wenn Sie diese Taste drücken, ändert sich die Signalquelle des PIP-Fensters.
- Aus
- Ein
[Die Direkttaste auf der Fernbedienung ist 'PIP'.]
2) Quelle
[MENU]
˧
[ENTER]
˧
[
/
]
˧
[ENTER]
˧
[
/
]
˧
[ENTER]
˧
[
/
]
˧
[ENTER]
Signalquelle für die PIP-Funktion auswählen
- PC / DVI: AV / S-Video / Komp. Modus
- BNC: AV / S-Video Modus
- DVI: AV / S-Video / Komp. Modus
Sicherheitshinweise
Einführung
Anschlussmöglichkeiten
Verwenden der Software
Einstellen des Monitors
Eingang
Bild
[PC / BNC / DVI Modus]
Bild
[AV / S-Video / Komp. /
DVI-Video Modus]
Ton
Einstellungen
Multi Control
Direktsteue-
rungsfunktionen
Fehlerbehebung
Technische Daten
Informationen
Anhang
W\UGGGXW\UGGGX YWW^TXYTXWGGG㝘䟸GXa\_aWXYWW^TXYTXWGGG㝘䟸GXa\_aWX

- AV / S-Video: PC / BNC / DVI Modus
- Komp.: PC / DVI Modus
[Die Direkttaste auf der Fernbedienung ist 'SOURCE'.]
3) Tauschen
[MENU]
˧
[ENTER]
˧
[
/
]
˧
[ENTER]
˧
[
/
]
˧
[ENTER]
Tauscht PIP- und Hauptbild-Inhalt.
Das Bild vom PIP-Fenster wird auf dem Hauptbildschirm und das Bild vom Hauptbildschirm wird im PIP-
Fenster angezeigt.
[Die Direkttaste auf der Fernbedienung ist 'SWAP'.]
4) Grösse
[MENU]
˧
[ENTER]
˧
[
/
]
˧
[ENTER]
˧
[
/
]
˧
[ENTER]
˧
[
/
]
˧
[ENTER]
Mit dieser Option kann der Benutzer den PIP-Bildschirm deaktivieren bzw.
[Die Direkttaste auf der Fernbedienung ist 'SIZE'.]
5) Position
[MENU]
˧
[ENTER]
˧
[
/
]
˧
[ENTER]
˧
[
/
]
˧
[ENTER]
˧
[
/
]
˧
[ENTER]
Ä
ndert die Position des PIP-Fensters.
6) Transparenz
[MENU]
˧
[ENTER]
˧
[
/
]
˧
[ENTER]
˧
[
/
]
˧
[ENTER]
˧
[
/
]
˧
[ENTER]
Reguliert die Transparenz der PIP-Fenster.
- Hoch
- Mittel
- Gering
- Deckend
Hinweis
• Mit dieser Option kann der Benutzer den PIP-Bildschirm deaktivieren bzw. seine Größe anpassen. Wenn
Sie für Größe , , wählen, werden Position und Transparenz nicht aktiviert.
Verfügbare Modi: PIP
Name bearb.
[MENU]
˧
[ENTER]
˧
[
/
]
˧
[ENTER]
˧
[
/
]
˧
[ENTER]
˧
[
/
]
˧
[ENTER]
Vergeben Sie an das an die Eingangsbuchsen angeschlossene Eingabegerät einen Namen, um die Auswahl
der Signalquelle zu vereinfachen.
1) PC
2) BNC
3) DVI
4) AV
5) S-Video
6) Komp.
Bild [PC / BNC / DVI Modus]
Verfügbare Modi
PC / BNC / DVI
AV
S-Video
Komp.
DVI-Video
MagicBright™
[MENU]
˧
[
/
]
˧
[ENTER]
˧
[ENTER]
˧
[
/
]
˧
[ENTER]
Bei MagicBright™ handelt es sich um eine neue Funktion, die abhängig vom angezeigten Bildinhalt die
Anzeige optimiert.
Derzeit sind 4 verschiedene Modi verfügbar: Unterhalt., Internet, Text und Benutzerdef.
Für jeden Modus ist ein Helligkeitswert voreingestellt. Sie können durch Drücken der Taste 'MagicBright™ eine
der 4 Einstelllungen auswählen.
1) Unterhalt.
Hohe Helligkeit
Zum Ansehen von Filmen, von z. B. DVD oder VDC.
\
W\UGGGYW\UGGGY YWW^TXYTXWGGG㝘䟸GXa\_aW]YWW^TXYTXWGGG㝘䟸GXa\_aW]

Mittlere Helligkeit
Optimal für eine Mischung aus Texten und Bildern, wie z. B. Grafiken.
3) Text
Normale Helligkeit
Für Unterlagen, Dokumentation und alle Arbeiten mit umfangreichem Text.
4) Benutzerdef.
Obwohl die vorkonfigurierten Werte sorgfältig von unseren Ingenieuren ausgesucht wurden, entsprechen
sie unter Umständen nicht Ihren Sehgewohnheiten.
Sollte dies der Fall sein, stellen Sie die Helligkeit und den Kontrast über das Bildschirmmenü ein.
[Die Direkttaste auf der Fernbedienung ist 'M/B'.]
Benutzerdef.
[MENU]
˧
[
/
]
˧
[ENTER]
˧
[
/
]
˧
[ENTER]
˧
[ENTER]
˧
[
/
] / [< / >]
˧
[ENTER]
Sie können die Bildschirmmenüs nutzen, um den Kontrast und die Helligkeit nach Ihren persönlichen Vorlieben
zu ändern.
1) Kontrast
Kontrast einstellen.
2) Helligkeit
Helligkeit einstellen.
Hinweis
• Wenn Sie das Bild mit der Funktion Custom einstellen, wechselt MagicBright in den Custom-Modus.
Farbtemp.
[MENU]
˧
[
/
]
˧
[ENTER]
˧
[
/
]
˧
[ENTER]
˧
[
/
]
˧
[ENTER]
Sie können den Farbton ändern.
1) Kalt
2) Normal
3) Warm
4) Benutzerdef.
(Nur im PC/BNC-Modus verfügbar)
Farbanpassung
[MENU]
˧
[
/
]
˧
[ENTER]
˧
[
/
]
˧
[ENTER]
˧
[ENTER]
˧
[< / >]
˧
[ENTER]
Verwenden Sie diese Funktion für die genaue Abstimmung der Farben.
(Nur im PC/BNC-Modus verfügbar)
1) Rot
2) Grün
3) Blau
Hinweis
• Wenn Sie das Bild mit der Funktion Benutzerdef. einstellen, wechselt MagicBright in den Benutzerdef.-
Modus.
Bildjustierung
Mit Bildjustierung führen Sie die Feineinstellung für die beste Bilddarstellung durch. Dabei werden Störungen
entfernt, die für instabile Bilder mit Jitter u.ä verantwortlich sind. Wenn Sie über die Fine-Einstellung keine
zufriedenstellenden Bilder erreichen, führen Sie zunächst eine Coarse-Einstellung mit anschließender Fine-
Einstellung durch.
(Nur im PC/BNC-Modus verfügbar)
1) Coarse (Grob)
[MENU]
˧
[
/
]
˧
[ENTER]
˧
[
/
]
˧
[ENTER]
˧
[ENTER]
˧
[< / >]
˧
[ENTER]
Entfernt Rauschen, z. B. vertikale Streifen. Mit der Grobeinstellung können Sie den Bildschirmbildbereich
verschieben. Mithilfe des Menüs zur Horizontalsteuerung können Sie ihn zentrieren.
\
W\UGGGZW\UGGGZ YWW^TXYTXWGGG㝘䟸GXa\_aW]YWW^TXYTXWGGG㝘䟸GXa\_aW]
2) Internet

[MENU]
˧
[
/
]
˧
[ENTER]
˧
[
/
]
˧
[ENTER]
˧
[
/
]
˧
[ENTER]
˧
[< / >]
˧
[ENTER]
Entfernt Störungen, wie horizontale Streifenbildung. Wenn die Störung auch nach der Fine-Einstellung
bestehen bleibt, wiederholen Sie die Feineinstellung nach dem Anpassen der Frequenz
(Taktgeschwindigkeit).
3) Position
[MENU]
˧
[
/
]
˧
[ENTER]
˧
[
/
]
˧
[ENTER]
˧
[
/
]
˧
[ENTER]
˧
[< / >] / [
/
]
˧
[ENTER]
Mit dieser Option stellen Sie die horizontale und vertikale Bildschirmposition ein.
Auto Adjustment (Automatische Anpassung)
[MENU]
˧
[
/
]
˧
[ENTER]
˧
[
/
]
˧
[ENTER]
Einstellung Die Werte für Fine, Coarse und Position werden automatisch angepasst.
Wenn Sie die Auflösung über das Bedienfeld ändern, wird die Autom.Einstellung-Funktion ausgeführt.
(Nur im PC/BNC-Modus verfügbar)
[Die Direkttaste auf der Fernbedienung ist 'AUTO'.]
Signalabgleich
Wird zum Ausgleichen eines schwachen RGB-Signals aufgrund großer Signalkabelstrecke verwendet.
(Nur im PC/BNC-Modus verfügbar)
1) Signalabgleich
[MENU]
˧
[
/
]
˧
[ENTER]
˧
[
/
]
˧
[ENTER]
˧
[ENTER]
˧
[
/
]
˧
[ENTER]
Sie können mit der Signalsteuerung die Option Ein oder Aus wählen
2) Signalsteuerung
[MENU]
˧
[
/
]
˧
[ENTER]
˧
[
/
]
˧
[ENTER]
˧
[
/
]
˧
[ENTER]
˧
[
/
]
˧
[ENTER]
˧
[
/
]
˧
[< / >]
˧
[ENTER]
Sie können die Werte für R Phase, G Phase, B Phase, Signalverstärkung und Schärfe manuell einstellen.
Format
[MENU]
˧
[
/
]
˧
[ENTER]
˧
[
/
]
˧
[ENTER]
˧
[
/
]
˧
[ENTER]
Ermöglicht die Auswahl verschiedener Bildgrößen.
1) 16:9
2) 4:3
PIP-Bild
[MENU]
˧
[
/
]
˧
[ENTER]
˧
[
/
]
˧
[ENTER]
˧
[
/
]
˧
[ENTER]
˧
[
/
]
˧
[ENTER]
˧
[
/
]
˧
[ENTER]
˧
[< / >]
˧
[ENTER]
Sie können die Einstellungen des Bild-im-Bild-Fensters anpassen.
1) Kontrast
Stellt den Kontrast des Bild-im-Bild-Fensters auf dem Bildschirm ein.
2) Helligkeit
Stellt die Helligkeit des Bild-im-Bild-Fensters auf dem Bildschirm ein.
3) Schärfe
Damit stellen Sie den Unterschied zwischen den hellsten und dunkelsten Anzeigebereichen im Bild-im-Bild-
Fenster ein.
4) Farbe
Damit stellen Sie die Helligkeit/Dunkelheit im Bild-im-Bild-Fenster ein.
5) Farbton
Lässt die PIP-Anzeige natürlicher erscheinen.
Im PIP-Bild können Sie im PC, BNC en und DVI Modus Bilder über AV, S-Video anzeigen. Radi samo
kod NTSC video signala.
Verfügbare Modi: PIP
Bild [AV / S-Video / Komp. / DVI-Video Modus]
Verfügbare Modi
PC / BNC / DVI
\
W\UGGG[W\UGGG[ YWW^TXYTXWGGG㝘䟸GXa\_aW]YWW^TXYTXWGGG㝘䟸GXa\_aW]
2) Fine (Fein)

AV
S-Video
Komp.
DVI-Video
Modus
[MENU]
˧
[
/
]
˧
[ENTER]
˧
[ENTER]
˧
[
/
]
˧
[ENTER]
Der Monitor verfügt über vier werksseitige Bildeinstellungen ("Dynamisch", "Standard", "Film" und
"Benutzerdef.").
Sie können eine der Einstellungen "Dynamisch", "Standard", "Film" oder "Benutzerdef." aktivieren. Bei Auswahl
von "Benutzerdef." werden automatisch Ihre benutzerdefinierten Bildeinstellungen angewendet.
1) Dynamisch
2) Standard
3) Filme
4) Benutzerdef.
[Die Direkttaste auf der Fernbedienung ist 'P.MODE'.]
Benutzerdef.
[MENU]
˧
[
/
]
˧
[ENTER]
˧
[
/
]
˧
[ENTER]
˧
[
/
]
˧
[ENTER]
˧
[< / >]
˧
[ENTER]
Sie können die Bildschirmmenüs nutzen, um den Kontrast und die Helligkeit nach Ihren persönlichen Vorlieben
zu ändern.
1) Kontrast
Verleiht der Darstellung einen natürlichen Ton.(PIP)
2) Helligkeit
Helligkeit einstellen.
3) Schärfe
Einstellen der Bildschärfe
4) Farbe
Einstellen der Bildschärfe
5) Farbton
Lisää näyttöön luonnollisen sävyn.
Diese Option kann nur in den Modi AV und S-Video ausgeführt werden. Radi samo kod NTSC video
signala.
Farbtemp.
[MENU]
˧
[
/
]
˧
[ENTER]
˧
[
/
]
˧
[ENTER]
˧
[
/
]
˧
[ENTER]
Sie können den Farbton ändern. Auch die einzelnen Farbkomponenten können vom Benutzer angepasst
werden.
1) Kalt 2
2) Kalt 1
3) Normal
4) Warm1
5) Warm2
Format
[MENU]
˧
[
/
]
˧
[ENTER]
˧
[
/
]
˧
[ENTER]
˧
[
/
]
˧
[ENTER]
Ermöglicht die Auswahl verschiedener Bildgrößen.
1)16:9
2)Zoom 1
3)Zoom 2
4)4:3
[ZOOM1, ZOOM2, Panorama sind mit 1080i (oder über 720p) DTV nicht verfügbar.]
Digitale RM (Digital Noise Reduction. (Digitale Rauschunterdrückung.))
[MENU]
˧
[
/
]
˧
[ENTER]
˧
[
/
]
˧
[ENTER]
˧
[
/
]
˧
[ENTER]
Sie können die Rauschbeseitigungsfunktion ein- bzw. ausschalten.
\
W\UGGG\W\UGGG\ YWW^TXYTXWGGG㝘䟸GXa\_aW^YWW^TXYTXWGGG㝘䟸GXa\_aW^

Die digitale Rauschbeseitigung sorgt für ein klareres, gestochen scharfes Bild.
1) Aus
2) Ein
Filmmodus
[MENU]
˧
[
/
]
˧
[ENTER]
˧
[
/
]
˧
[ENTER]
˧
[
/
]
˧
[ENTER]
Sie können den Filmmodus ein- bzw. ausschalten.
Die Filmmodus-Funktion bietet ein Seherlebnis in Kinoqualität.
(Im DVI-Video-Modus nicht verfügbar)
1) Aus
2) Ein
PIP-Bild
[MENU]
˧
[
/
]
˧
[ENTER]
˧
[
/
]
˧
[ENTER]
˧
[
/
]
˧
[ENTER]
˧
[
/
]
˧
[ENTER]
˧
[< / >]
˧
[ENTER]
Sie können die Einstellungen des Bild-im-Bild-Fensters anpassen.
1) Kontrast
Stellt den Kontrast des Bild-im-Bild-Fensters auf dem Bildschirm ein.
2) Helligkeit
Stellt die Helligkeit des Bild-im-Bild-Fensters auf dem Bildschirm ein.
Verfügbare Modi: PIP
Ton
Verfügbare Modi
PC / BNC / DVI
AV
S-Video
Komp.
DVI-Video
Modus
[MENU]
˧
[
/
]
˧
[ENTER]
˧
[ENTER]
˧
[
/
]
˧
[ENTER]
Der Monitor verfügt über einen integrierten HiFi-Audioverstärker.
1) Standard
Wählen Sie „Standard“ für die werkseitigen Standardeinstellungen.
2) Musik
Wählen Sie „Musik“, wenn Sie sich Musikvideos oder Konzerte ansehen möchten.
3) Filme
Wählen Sie „Film“, wenn Sie sich einen Film ansehen möchten.
4) Sprache
Wählen Sie „Sprache“, wenn Sie sich Programme mit überwiegend gesprochenem Inhalt (z. B.
Nachrichten) ansehen möchten.
5) Benutzerdef.
Wählen Sie „Benutzerdef“, um Ihre individuellen Einstellungen aufzurufen.
Benutzerdef.
[MENU]
˧
[
/
]
˧
[ENTER]
˧
[
/
]
˧
[ENTER]
˧
[
/
]
˧
[ENTER]
˧
[< / >]
˧
[ENTER]
Dient zum Auswählen der vier Einstellungen Clock, Sleep Timer, On Timer und Off Timer.
1) Tiefen
Die tiefen Audiofrequenzen werden betont (lauter) wiedergegeben.
2) Höhen
Die hohen Audiofrequenzen werden betont (lauter) wiedergegeben.
3) Balance
Klangbalance ==> Ermöglicht die Regulierung der Klangbalance zwischen dem linken und dem rechten
\
W\UGGG]W\UGGG] YWW^TXYTXWGGG㝘䟸GXa\_aW^YWW^TXYTXWGGG㝘䟸GXa\_aW^

Lautsprecher.
[Der Ton ist auch dann noch hörbar, wenn er auf "0" geregelt ist.]
Hinweis
• Wenn Sie das Bild mit der Sound Custom-Funktion (Angepasster Ton) einstellen, wechselt der Sound
Mode (Sound-Modus) zu Custom Mode (Angepasster Modus).
Auto. Lautst.
[MENU]
˧
[
/
]
˧
[ENTER]
˧
[
/
]
˧
[ENTER]
˧
[
/
]
˧
[ENTER]
Diese Funktion verringert die Lautstärkeunterschiede zwischen den einzelnen Sendern.
1) Aus
2) Ein
SRS TS XT
[MENU]
˧
[
/
]
˧
[ENTER]
˧
[
/
]
˧
[ENTER]
˧
[
/
]
˧
[ENTER]
SRS TS XT (SRS-Text) ist eine patentierte SRS-Technologie (SRS), die das Problem mit der Ausgabe von 5.1-
Mehrkanalinhalten über zwei Lautsprecher löst. Mit TruSurround kommen Sie mit jedem Stereo-System mit
zwei Lautsprechern, auch den internen Fernsehlautsprechern, in den Genuss überzeugender Virtual Surround-
Effekte.
Es ist vollständig kompatibel mit allen Mehrkanalformaten.
1) Aus
2) Ein
[Die Direkttaste auf der Fernbedienung ist 'SRS'.]
Ton wählen
[MENU]
˧
[
/
]
˧
[ENTER]
˧
[
/
]
˧
[ENTER]
˧
[
/
]
˧
[ENTER]
Bei aktiviertem PIP können Sie entweder Haupt- oder Nebenbild auswählen.
1) Hauptsende
r
2) PIP-sender
[Verfügbare Modi: PIP]
Setup
Verfügbare Modi
PC / BNC / DVI
AV
S-Video
Komp.
DVI-Video
Sprache
[MENU]
˧
[
/
]
˧
[ENTER]
˧
[ENTER]
˧
[
/
]
˧
[ENTER]
11 verschiedene Sprachen werden angeboten.
Hinweis
• Die von Ihnen gewählte Sprache betrifft nur die Sprache vom OSD-Bildschirmmenü.
Die vom Computer benutzte Software ist also nicht betroffen.
Zeit
Dient zum Auswählen der vier Einstellungen Zeit einstellen, Sleep-Timer, Autom. Ein und Autom. Aus.
\
W\UGGG^W\UGGG^ YWW^TXYTXWGGG㝘䟸GXa\_aW^YWW^TXYTXWGGG㝘䟸GXa\_aW^

1)
Zeit einstellen
[MENU]
˧
[
/
]
˧
[ENTER]
˧
[
/
]
˧
[ENTER]
˧
[ENTER]
˧
[< / >]
˧
[ENTER]
A
ktuelle Zeiteinstellung
2) Sleep-Timer
[MENU]
˧
[
/
]
˧
[ENTER]
˧
[
/
]
˧
[ENTER]
˧
[
/
]
˧
[ENTER]
˧
[< / >]
˧
[
/
]
˧
[ENTER]
˧
[< / >]
˧
[
/
]
˧
[ENTER]
Dient zum Einstellen des Zeitraums, nach dessen Ablauf der Monitor automatisch abgeschaltet wird. (Aus,
30, 60, 90, 120, 150, 180)
3) Autom. Ein
[MENU]
˧
[
/
]
˧
[ENTER]
˧
[
/
]
˧
[ENTER]
˧
[
/
]
˧
[ENTER]
˧
[< / >]
˧
[
/
]
˧
[ENTER]
Schaltet den Monitor zu einem festgelegten Zeitpunkt automatisch ein.
Dient zum Steuern des Modus und Lautstärkenpegels beim automatischen Einschalten des Monitors.
4) Autom. Aus
[MENU]
˧
[
/
]
˧
[ENTER]
˧
[
/
]
˧
[ENTER]
˧
[
/
]
˧
[ENTER]
˧
[< / >]
˧
[
/
]
˧
[ENTER]
Schaltet den Monitor zu einem festgelegten Zeitpunkt, Lautstärkenpegel und Modus automatisch aus.
Hinweis
• Wenn Sie für Autom. Ein, Autom. Aus die Option Ja auswählen, ohne dass die Option Zeit einstellen
eingerichtet wurde, wird die Meldung "Primero ajust. Reloj(Ajustar la hora)" angezeigt.
Menütransparenz
[MENU]
˧
[
/
]
˧
[ENTER]
˧
[
/
]
˧
[ENTER]
˧
[
/
]
˧
[ENTER]
Bestimmt, ob der Hintergrund des OSD durchsichtig oder nicht dargestellt wird.
1) Hoch
2) Mittel
3) Gering
4) Deckend
Sicherheitssperre
[MENU]
˧
[
/
]
˧
[ENTER]
˧
[
/
]
˧
[ENTER]
˧
[0~9]
˧
[0~9]
˧
[0~9]
Sie können das Kennwort ändern.
Energiesparmod.
[MENU]
˧
[
/
]
˧
[ENTER]
˧
[
/
]
˧
[ENTER]
˧
[
/
]
˧
[ENTER]
˧
[MENU]
Diese Funktion reguliert den Stromverbrauch des Geräts so, dass Energie gespart wird.
1) Ein
2) Aus
Hinweis
• Wenn Sie den Energieverbrauch im Standby reduzieren möchten, stellen Sie Energiesparmod. auf Ein ein.
Wenn die Energiesparfunktion jedoch auf Ein festgelegt ist, können Sie nicht die Remotefunktion Power
On der Funktionen MDC und WOL (Wake On LAN) von MagicNet nutzen.
Video Wall
Bei einer Videowand sind mehrere Videobildschirme so zusammengeschaltet, dass jeder einzelne Bildschirm
ein Segment eines Gesamtbildes anzeigt bzw. das gleiche Bild auf jedem Bildschirm angezeigt wird.
Wenn die Option Video Wall aktiviert ist, können die Bildschirmeinstellungen für Video Wall angepasst
werden.
1) Videowand
[MENU]
˧
[
/
]
˧
[ENTER]
˧
[
/
]
˧
[ENTER]
˧
[ENTER]
˧
[
/
]
˧
[ENTER]
Aktiviert oder deaktiviert die Videowandfunktion des ausgewählten Bildschirms.
-
Aus
-
Ein
2) Format
[MENU]
˧
[
/
]
˧
[ENTER]
˧
[
/
]
˧
[ENTER]
˧
[
/
]
˧
[ENTER]
˧
[
/
]
˧
[ENTER]
Das Format für das segmentierte Bild kann ausgewählt werden.
-
Full(Vollbild )
\
W\UGGG_W\UGGG_ YWW^TXYTXWGGG㝘䟸GXa\_aW^YWW^TXYTXWGGG㝘䟸GXa\_aW^

Diese Option ergibt ein Vollbild ohne Ränder.
-
Natural
Diese Option ergibt eine natürliche Bildwiedergabe im ursprünglichen Seitenverhältnis angezeigt.
3) Videowand-Setup
[MENU]
˧
[
/
]
˧
[ENTER]
˧
[
/
]
˧
[ENTER]
˧
[
/
]
˧
[ENTER]
˧
[
/
]
˧
[ENTER]
Das Bild kann segmentiert werden.
Sie können zum Segmentieren mehrere Bildschirme mit unterschiedlicher Anordnung auswählen.
• Wählen Sie einen Bildsegmentierungsmodus aus.
• Wählen Sie ein Display aus der Display-Auswahl.
• Die Stelle wird durch Eingeben einer Zahl im ausgewählten Modus festgelegt.
-
2 x 2
-
3 x 3
-
4 x 4
-
5 x 5
-
1 x 2
-
2 x 1
-
1 x 5
-
5 x 1
Sicherheitsbildschirm
Mit der Safety Screen-Funktion (Sicherheitsbild) können Sie Nachbilder vermeiden, die ansonsten bei längerer
Anzeige von Standbildern auf dem Bildschirm auftreten können.
- Mit der Bildlauffunktion (Screen Scroll) können Nachbilder bei Standbildern vermieden werden, die
ansonsten bei längerer Anzeige auf dem Bildschirm auftreten können.
- Diese Funktion ist nicht verfügbar, wenn der Monitor ausgeschaltet ist.
1) Sicherheitsbildschirm
[MENU]
˧
[
/
]
˧
[ENTER]
˧
[
/
]
˧
[ENTER]
˧
[ENTER]
˧
[
/
]
˧
[ENTER]
Bestimmt, ob die Bildlauffunktion (Screen Scroll) ein- oder ausgeschaltet werden soll.
-
Aus
-
Ein
2) Interval (Intervall)
[MENU]
˧
[
/
]
˧
[ENTER]
˧
[
/
]
˧
[ENTER]
˧
[
/
]
˧
[ENTER]
˧
[
/
]
˧
[ENTER]
Legt das Zeitintervall für die Screen Scroll-Funktion (Bildlauf) fest. (1-10 Stunden)
Dieser Zeitraum wird anhand der Einschaltdauer des Monitors berechnet.
In der Standardeinstellung ist dieser Zeitraum auf 10 Stunden eingestellt.
-
1-10 Stunden
3) Sekunde
[MENU]
˧
[
/
]
˧
[ENTER]
˧
[
/
]
˧
[ENTER]
˧
[
/
]
˧
[ENTER]
˧
[
/
]
˧
[ENTER]
Legt das Zeitintervall für die Screen Scroll-Funktion (Bildlauf) fest. (1-5 Sekunden )
In der Standardeinstellung ist dieser Zeitraum auf 5 Stunden eingestellt.
-
Typ-Blättern : 1~5 Sekunden
-
Typ-Pixel, Balken, Löschen : 10~50 Sekunden
4) Typ
[MENU]
˧
[
/
]
˧
[ENTER]
˧
[
/
]
˧
[ENTER]
˧
[
/
]
˧
[ENTER]
˧
[
/
]
˧
[ENTER]
Sie können den Safety Screen Type (Typ des Sicherheitsbilds) ändern.
-
Blättern
-
Pixel
-
Balken
-
Löschen
Auswahl d. Auflösung
[MENU]
˧
[
/
]
˧
[ENTER]
˧
[
/
]
˧
[ENTER]
˧
[
/
]
˧
[ENTER]
Wenn das Bild bei einer Einstellung der Grafikkartenauflösung auf 1024 x 768 bei 60 Hz, 1280 x 768 bei 60 Hz,
1360 x 768 bei 60 Hz oder 1366 x 768 bei 60 Hz nicht ordnungsgemäß angezeigt wird, können Sie mit dieser
Funktion (Resolution Select) dafür sorgen, dass das Bild in der angegebenen Auflösung angezeigt wird.
(Nur im PC/BNC-Modus verfügbar)
1) Aus
2) 1024 x 768
3) 1280 x 768
4) 1360 x 768
5) 1366 x 768
Hinweis
\
W\UGGG`W\UGGG` YWW^TXYTXWGGG㝘䟸GXa\_aW^YWW^TXYTXWGGG㝘䟸GXa\_aW^

• Eine Menüauswahl ist nur zulässig, wenn als Grafikauflösung 1024 x 768 bei 60 Hz, 1280 x 768 bei 60 Hz,
1360 x 768 bei 60 Hz oder 1366 x 768 bei 60 Hz eingestellt ist.
Lampensteuerung
[MENU]
˧
[
/
]
˧
[ENTER]
˧
[
/
]
˧
[ENTER]
˧
[ENTER]
˧
[< / >]
˧
[ENTER]
Dient zum Einstellen der Hintergrundbeleuchtung zur Verringerung des Energieverbrauchs.
Einschalteinstellung
[MENU]
˧
[
/
]
˧
[ENTER]
˧
[
/
]
˧
[ENTER]
˧
[ENTER]
˧
[
/
]
˧
[ENTER]
Hiermit stellen Sie die Power On time (Anschaltzeit) für den Bildschirm ein.
*Achtung Stellen Sie eine längere Power On time (Anschaltzeit) ein, um Überspannungen zu vermeiden.
Reset
Bild parameters werden wie zu Anfang des Erwerbs zurückgesetzt.
1)
Bild zurücksetzen
[MENU]
˧
[
/
]
˧
[ENTER]
˧
[
/
]
˧
[ENTER]
˧
[ENTER]
˧
[< / >]
˧
[ENTER]
(Nur im PC/BNC-Modus verfügbar)
2)
Farbe zurücksetzen
[MENU]
˧
[
/
]
˧
[ENTER]
˧
[
/
]
˧
[ENTER]
˧
[
/
]
˧
[ENTER]
˧
[< / >]
˧
[ENTER]
Multi Control
Verfügbare Modi
PC / BNC / DVI
AV
S-Video
Komp.
DVI-Video
Multi Control
[MENU]
˧
[
/
]
˧
[ENTER]
˧
[
/
]
˧
[ENTER]
˧
[ENTER]
˧
[0~9]
Weist Einstellungssätzen IDs zu.
1) ID einstellen
Dient zum Zuweisen unterschiedlicher IDs zu Einstellungssätzen.
2) ID eingeben
Dient zum Auswählen der Senderfunktionen für die einzelnen Einstellungssätze. Es wird nur der
Einstellungssatz aktiviert, dessen ID zu den Sendereinstellungen passt.
Direktsteuerungsfunktionen
Verfügbare Modi
PC / BNC / DVI
AV
S-Video
Komp.
DVI-Video
MDC
Zum Multi-Control-OSD-Bildschirm wechseln.
W\UGGGXWW\UGGGXW YWW^TXYTXWGGG㝘䟸GXa\_aW^YWW^TXYTXWGGG㝘䟸GXa\_aW^

Dient zum Einstellen der Sperrfunktion.
1) Lock On
Die Sperre wird aktiviert.
2) Sperre deaktivieren
Die Sperre wird deaktiviert.
Hinweis
• Wenn die Lock-Funktion aktiviert ist, können Sie auf der Fernbedienung und am Gerät nur noch die Lock-
Taste verwenden.
Das voreingestellte Password (Kennwort) für den Monitor lautet „0000“.
Hinweis
• Zurücksetzen des Kennworts für die Funktionstaste lock.
Drücken Sie MUTE
˧
1
˧
8
˧
6
˧
On. Das Kennwort wird auf den Wert ‘0000’ zurückgesetzt. Zum
Zurücksetzen des Kennworts wird die Fernbedienung benötigt.
© 1995~2008 SAMSUNG. ALL Rights Reserved
W\UGGGXXW\UGGGXX YWW^TXYTXWGGG㝘䟸GXa\_aW^YWW^TXYTXWGGG㝘䟸GXa\_aW^
LOCK

Farbe und Aussehen des Geräts sind modellabhängig, und jederzeitige Änderungen der technischen Daten des
Geräts zum Zweck der Leistungssteigerung sind vorbehalten.
Fehlerbehebung
Selbsttest zur
Funktionsprüfung
Hinweis
• Überprüfen Sie die folgenden Punkte, bevor Sie den Kundendienst anrufen. Bei Problemen, die Sie nicht
selbständig lösen können, sollten Sie sich mit einem Kundendienstzentrum in Verbindung setzen.
Selbsttest zur Funktionsprüfung
Der Bildschirm verfügt über eine Selbsttestfunktion, mit der Sie prüfen können, ob Ihr Monitor korrekt arbeitet.
1) Schalten Sie sowohl den Computer als auch den Monitor aus.
2) Ziehen Sie das Videokabel hinten aus dem Computer heraus.
3) Schalten Sie den Monitor ein.
Wenn sich der Monitor im normalen Betriebszustand befindet, jedoch kein Videosignal erkannt werden
kann, wird die Abbildung unter ("Check Signal Cable") auf einem schwarzen Hintergrund angezeigt:
Während des Monitor-Selbsttestes leuchtet die Betriebsanzeige kontinuierlich grün und die Abbildung wird
auf dem Bildschirm bewegt. Dieses Feld wird im normalen Betrieb angezeigt, wenn das Videokabel sich
löst oder beschädigt wird.
4) Schalten Sie Ihren Monitor aus und schließen Sie das Videokabel wieder an; schalten Sie dann sowohl den
Computer als auch den Monitor ein.
Wenn der Monitorbildschirm nach Ausführung des obigen Vorgangs weiterhin leer bleibt, überprüfen Sie Ihre
Videokarte und Computersystem;
Ihr Monitor funktioniert richtig.
Check Cooling System
Wenn die Meldung
"Check Cooling System"
angezeigt wird, liegt dies daran, dass der Lüfter der Kühlung ein
Problem hat. Setzen Sie sich mit einem Kundendienstzentrum in Verbindung, um den Lüfter austauschen oder
reparieren zu lassen.
ungeeign. Modus
Sie können das Bild sogar in einer höheren Auflösung als 1360 x 768 anzeigen. Es wird jedoch für eine Minute
die folgende Meldung angezeigt. Sie können in diesem Zeitraum die Bildschirmauflösung ändern oder den
aktuellen Modus beibehalten. Wenn die Bildwiederholfrequenz mehr als 85 Hz beträgt, wird ein schwarzes Bild
angezeigt, da der Monitor Bildwiederholfrequenzen über 85 Hz nicht unterstützt.
Sicherheitshinweise
Einführung
Anschlussmöglichkeiten
Verwenden der Software
Einstellen des Monitors
Fehlerbehebung
Selbsttest zur
Funktionsprüfung
Checkliste
F & A
Technische Daten
Informationen
Anhang
]
zt{T[WXXTn__UGGG]Zzt{T[WXXTn__UGGG]Z YWW^TXXTY_GGG㝘䟸GYa\ZaX^YWW^TXXTY_GGG㝘䟸GYa\ZaX^

Hinweis
• Informationen zu den Auflösungen und Frequenzen, die vom Monitor unterstützt werden, finden Sie unter
Technische Voreingestellte Anzeigemodi.
Wartung und Reinigung
1) Pflegen des Monitorgehäuses
Reinigen Sie den Monitor mit einem weichen, sauberen Tuch, nachdem Sie den Netzstecker gezogen
haben.
• Verwenden Sie zur Reinigung kein Benzol, Verdünner oder andere
brennbare Substanzen oder feuchte Tücher.
• Wir empfehlen die Verwendung eines milden Samsung-
Reinigungsmittels, um Schäden am Monitor zu vermeiden.
2) Pflege der Flachbildschirmoberfläche.
Zum Reinigen ein weiches Tuch (Baumwollflanell) verwenden.
• Verwenden Sie unter keinen Umständen Aceton, Benzol oder
Verdünner.
(Diese Mittel können die Bildschirmoberfläche beschädigen oder
verformen.)
• Schäden, die durch die Verwendung von Lösungsmitteln verursacht
wurden, sind von der Garantie ausgeschlossen und müssen vom
Benutzer getragen werden.
Symptome und empfohlene Abhilfemaßnahmen
Hinweis
• Ein Monitor stellt vom Computer empfangene visuelle Signale dar. Sollten Probleme mit dem PC oder der
Videokarte auftreten, kann dies daher verursachen, daß der Monitor kein Bild anzeigt, schlechte
Farbqualität, Geräusche, Videofrequenz zu hoch!, etc. aufweist. Überprüfen Sie in diesem Fall zuerst die
Ursache des Problems und wenden Sie sich dann an ein Kundendienstzentrum oder Ihren Händler.
1) Überprüfen Sie, ob Netz- und Signalkabel richtig mit dem Computer verbunden sind.
2) Überprüfen Sie, ob der Computer beim Booten mehr als drei Pieptöne verlauten läßt.
(Wenn ja, fordern Sie technische Unterstützung für die Hauptplatine des Computers an.)
3) Wenn Sie eine neue Videokarte installiert haben oder wenn Sie den PC zusammengebaut haben,
überprüfen Sie, ob Sie den Adapter-(Video)-Treiber und den Monitortreiber installiert haben.
4) Überprüfen Sie, ob die Abtastfrequenz des Video-Bildschirms auf 50 Hz – 85 Hz festgelegt ist.
(Gehen Sie nicht über 60Hz, wenn Sie die maximale Auflösung verwenden.)
5) Wenn Sie Probleme damit haben, den Adapter-(Video)-Treiber zu installieren, booten Sie den Computer im
abgesicherten Modus, entfernen Sie den Anzeige-Adapter bei
"Systemsteuerung, System, Geräte-
Administrator"
und dann booten Sie den Computer neu, um den Adapter-(Video)-Treiber erneut zu
installieren.
Checkliste
Hinweis
]
zt{T[WXXTn__UGGG][zt{T[WXXTn__UGGG][ YWW^TXXTY_GGG㝘䟸GYa\ZaX^YWW^TXXTY_GGG㝘䟸GYa\ZaX^

• In der folgenden Tabelle werden mögliche Probleme sowie deren Lösungen aufgeführt. Bevor Sie den
Kundendienst benachrichtigen, sollten Sie die Informationen in diesem Abschnitt lesen und feststellen, ob
Sie das Problem nicht selbständig lösen können. Falls Sie dennoch Hilfe benötigen, rufen Sie die
Telefonnummer auf der Garantiekarte, die Telefonnummer im Abschnitt Informationen oder
benachrichtigen Sie Ihren Fachhändler.
Installationsprobleme (PC)
Hinweis
• Die hier aufgeführten Probleme und Lösungen betreffen die Monitorinstallation.
Probleme Lösungen
Der Monitorbildschirm flackert.
z
Überprüfen Sie, ob das Signalkabel zwischen Computer und
Monitor fest angeschlossen und die Schrauben angezogen sind.
(Siehe Anschließen an einen Computer)
Bildschirmprobleme
Hinweis
• Die hier aufgeführten Probleme und Lösungen betreffen den Bildschirm.
Probleme Lösungen
Auf dem Bildschirm wird nichts
angezeigt und die Betriebsanzeige
ist ausgeschaltet.
z
Vergewissern Sie sich, dass das Netzkabel fest mit der
Steckdose verbunden und der LCD-Monitor eingeschaltet ist.
(Siehe Anschließen an Monitor)
Meldung "Check Signal
Cable" (Signalkabel prüfen)
z
Vergewissern Sie sich, dass das Signalkabel fest mit dem PC
oder den Videoquellen verbunden ist.
(Siehe Anschließen an Monitor)
z
Vergewissern Sie sich, dass der PC oder die Videoquellen
eingeschaltet sind.
Meldung "ungeeign. Modus"
z
Überprüfen Sie die maximale Auflösung und Frequenz der
Grafikkarte.
z
Vergleichen Sie diese Daten mit den Werten in der Tabelle
Voreingestellte Anzeigemodi.
Das Bild läuft in vertikaler
Richtung.
z
Überprüfen Sie, ob das Signalkabel sicher angeschlossen ist.
Schließen Sie es erneut fest an.
(Siehe Anschließen an einen Computer)
Das Bild ist unklar und unscharf.
z
Rufen Sie die Grob- und Fein-Tuning für die Frequenz auf.
z
Schalten Sie den Monitor erneut ein, nachdem Sie sämtliches
Zubehör entfernt haben (Videoerweiterungskabel, usw.).
z
Einstellen von Auflösung und Frequenz in den empfohlenen
Bereich
Das Bild ist instabil und vibriert.
Das Bild wird durch Schattenbilder
überlagert.
z
Vergewissern Sie sich, dass die eingestellten Werte für
Auflösung und Frequenz innerhalb des vom Monitor
unterstützten Bereichs fallen.
Falls nicht, setzen Sie die Werte zurück. Orientieren Sie sich
dabei an der aktuellen Info im Menü Monitor sowie der Tabelle
mit den voreingestellten Anzeigemodi.
Das Bild ist zu hell oder zu dunkel.
z
Stellen Sie Brightness (Helligkeit) und Contrast (Kontrast) ein.
(Siehe Helligkeit, Kontrast)
Die Bildschirmfarbe ist
ungleichmäßig.
Die Farbbildausgabe ist verzerrt
z
Passen Sie die Farbe über das Menü Benutzermodus unter
]
zt{T[WXXTn__UGGG]\zt{T[WXXTn__UGGG]\ YWW^TXXTY_GGG㝘䟸GYa\ZaX^YWW^TXXTY_GGG㝘䟸GYa\ZaX^

mit dunklen Schatten.
Weiße Farbe wird schlecht
wiedergegeben.
OSD Color Adjustment an.
Die Betriebsanzeige blinkt grün.
z
Der Monitor speichert gegenwärtig Änderungen, die an den
Einstellungen im OSD-Speicher vorgenommen wurden.
Der Bildschirm ist leer und die
Betriebsanzeige leuchtet grün
oder blinkt alle 0.5 oder 1
Sekunde.
z
Der Monitor arbeitet zurzeit im Energiesparmodus.
z
Bewegen Sie die Maus oder drücken Sie eine Taste auf der
Computertastatur.
Der Bildschirm ist leer und blinkt.
z
Wenn Sie die MENU-Taste drücken und es erscheint die
Meldung “TEST GOOD” auf dem Bildschirm, überprüfen Sie die
Kabelverbindung zwischen Monitor und Computer um
sicherzugehen, dass diese ordnungsgemäß miteinander
verbunden sind.
Probleme im Zusammenhang mit der Audiowiedergabe
Hinweis
• Die hier aufgeführten Probleme und Lösungen betreffen die Wiedergabe von Audiosignalen.
Probleme Lösungen
Kein Ton
z
Stellen Sie sicher, dass das Audiokabel fest mit dem
Audioeingang Ihres Monitors und dem Audioausgang Ihrer
Soundkarte verbunden ist.
(Siehe Anschließen an Monitor)
z
Kontrollieren Sie die Lautstärke
Die Lautstärke ist zu leise.
z
Kontrollieren Sie die Lautstärke
z
Wenn die Lautstärke auch dann noch zu niedrig ist, wenn Sie
den Lautstärkeregler auf den Maximalwert gestellt haben,
kontrollieren Sie den Lautstärkeregler an der Soundkarte des
Computers oder im Softwareprogramm.
Soundausgabe ist zu brillant oder
zu basslastig.
z
Bringen Sie die Regler für Höhen und Tiefen in eine geeignete
Stellung.
Probleme im Zusammenhang mit der Fernbedienung
Hinweis
• Die hier aufgeführten Probleme und Lösungen betreffen die Fernsteuerung.
Probleme Lösungen
Die Einstelltasten der
Fernsteuerung reagieren nicht.
z
Überprüfen Sie die Polarität der Batterien (+/-).
z
Überprüfen Sie, ob die Batterien verbraucht sind.
z
Überprüfen Sie, ob der Strom eingeschaltet ist.
z
Überprüfen Sie, ob das Netzkabel sicher angeschlossen ist.
z
Überprüfen Sie, ob sich in der Nähe eine fluoreszierende oder
eine Neonlampe befindet.
F & A
Frag Antwort
Wie kann ich die Frequenz
verändern?
Die Frequenz kann durch Ändern der Konfiguration der Videokarte
geändert werden.
]
zt{T[WXXTn__UGGG]]zt{T[WXXTn__UGGG]] YWW^TXXTY_GGG㝘䟸GYa\ZaX^YWW^TXXTY_GGG㝘䟸GYa\ZaX^

Beachten Sie, daß Videokartenunterstützung je nach Version des
benutzten Treibers unterschiedlich sein kann. (Einzelheiten hierzu
finden Sie Im Handbuch des Computers oder der Videokarte.)
Wie kann ich die Auflösung
einstellen?
z
Windows XP:
Setzen Sie die Auflösung zurück, klicken Sie auf
Systemsteuerung Darstellung und Designs Anzeige
Einstellungen.
z
Windows ME/2000:
Setzen Sie die Auflösung zurück, klicken Sie auf
Systemsteuerung Darstellung und Designs Anzeige
Einstellungen.
* Erfragen Sie Einzelheiten beim Videokartenhersteller.
Wie kann ich die
Energiesparfunktion einstellen?
z
Windows XP:
Setzen Sie die Parameter für die Energiesparfunktionen zurück,
klicken Sie auf Systemsteuerung
˧
Darstellung und Designs
˧
Anzeige
˧
Bildschirmschoner.
Sie können die Einstellungen auch im BIOS SETUP vornehmen.
(Siehe Windows/Computer Manual)
z
Windows ME/2000:
Setzen Sie die Parameter für die Energiesparfunktionen zurück,
klicken Sie auf Systemsteuerung
˧
Anzeige
˧
Bildschirmschoner.
Sie können die Einstellungen auch im BIOS SETUP vornehmen.
(Siehe Windows/Computer Manual)
Wie wird das Gehäuse und der
LCD-Bildschirm gereinigt?
Trennen Sie das Netzkabel, und reinigen Sie den Monitor dann mit
einem weichen Tuch und entweder Reinigungslösung oder klarem
Wasser.
Hinterlassen Sie keine Reinigungsmittelrückstände und zerkratzen
Sie das Gehäuse nicht. Passen Sie auf, daß kein Wasser in den
Monitor gerät.
© 1995~2008 SAMSUNG. ALL Right Reserved
]
zt{T[WXXTn__UGGG]^zt{T[WXXTn__UGGG]^ YWW^TXXTY_GGG㝘䟸GYa\ZaX^YWW^TXXTY_GGG㝘䟸GYa\ZaX^

Farbe und Aussehen des Geräts sind modellabhängig, und jederzeitige Änderungen der technischen Daten des
Geräts zum Zweck der Leistungssteigerung sind vorbehalten.
Technische Daten
Allgemein
Allgemein
Allgemein
Modellbezeichnung SMT-3211
LCD-Bildschirm
Grösse 32,0 Zolldiagonale (80 cm)
Display Fläche 697,6845 mm (H) x 392,256 mm (V)
Pixel Stufe 0,51075 mm (H) x 0,51075 mm (V)
Synchronisierung
Horizontal 30 ~ 81 kHz
Vertikal 56 ~ 75 Hz
Anzeigefarbe
Anzeigefarbe 16,7 M Farben
Auflösung
Optimale Auflösung 1360 x 768 / 1366 x 768 @ 60 Hz, je nach verwendeter Grafikkarte
Maximale Auflösung 1366 x 768 @ 60 Hz
Eingangssignal, terminiert
Analoges RGB-Signal, DVI-kompatibles (Digital Visual Interface), digitales RGB-Signal.
0,7 V Spitze-Spitze positiv bei 75 O ±10 %
Separate H-/V-Synchronisation, Composite-Synchronisation, SOG, TTL-Flanke, positiv oder negativ
Maximaler Pixeltakt
100 MHz
Spannungsversorgung
100 - 240 V~ (+/- 10 %), 50/60 Hz
Signal Kabel
15pin-to-15pin D-Sub Kabel, trennbar
DVI-D-auf-DVI-D Kabel, trennbar - Separat erhältlich
Signalanschluss
D-sub, BNC, DVI-D, YPbPr, S-VHS, VCR
Abmessungen (BxHxT) / Gewicht
780 X 482 X 107 mm / 30,1 X 19,0 X 4,6 inch (Ohne Fuß)
780 X 530 X 223 mm / 30,1 X 20,9 X 8,8 inch (Mit Fuß)
VESA Feste Schnittstelle
200 mm x 200 mm (zur Verwendung mit einem speziellen Schwenkarm-Montagesatz)
Ökologisch Berücksichtigung
Betrieb
Temperatur: 10 °C ~ 40 °C (50 °F ~ 104 °F)
Luftfeuchtigkeit: 10% ~ 80%, nicht kondensierend
Lagerung
Temperatur: -20 °C - 45 °C (-4 °F - 113 °F)
Luftfeuchtigkeit: 5% ~ 95%, nicht kondensierend
Audiomerkmale
Sicherheitshinweise
Einführung
Anschlussmöglichkeiten
Verwenden der Software
Einstellen des Monitors
Fehlerbehebung
Technische Daten
Allgemein
Stromsparmodus
Voreinstellte Timer-Modi
Informationen
Anhang
]
^TUGGGX^TUGGGX YWW^TXYTYWGGG㝘䟸GXaZXa[XYWW^TXYTYWGGG㝘䟸GXaZXa[X
, 16,1 kg/35,4lbs

Audioeingang 1 Cinch-Buchsen Rot (R) Weiß (L), 0,5 V rms (-9 dB)
Audioeingang 2 Cinch-Buchsen Rot (R) Weiß (L), 0,5 V rms (-9 dB)
PC-Audioeingang 3,5 Ø Stereobuchse, 0,5 V rms (-9 dB)
Frequenz HF: 80 Hz - 15 kHz (bei -3 dB)
Frequenzgang Audio/Video: 80 Hz - 15 kHz (bei -3 dB)
Plug und Play-Kompatibilität
Dieser Monitor kann mit jedem Plug & Play-kompatiblen System installiert werden. Die Interaktion von Monitor
und Computersystemen bietet die besten Betriebsbedingungen und Monitoreinstellungen. In den meisten
Fällen geht die Monitorinstallation automatisch vonstatten, es sei denn, der Benutzer möchte andere
Einstellungen wählen
Pixel zulässig
Dieses Produkt verfügt über ein TFT-LC-Display, das mit modernster Halbleitertechnologie hergestellt wurde
und eine Genauigkeit von 1 ppm (ein Millionstel) gewährt. Gelegentlich können rote, grüne, blaue und weiße
Bildpunkte hell erscheinen oder es können schwarze Punkte auftreten. Dies ist kein Zeichen für schlechte
Qualität oder technische Defekte.
• Beispielsweise beträgt die Anzahl der in diesem Produkt enthaltenen TFT LCD-Subpixel 3.133.440.
Hinweis
• Design und Technische Daten können ohne Ankündigung geändert werden.
Gerät der Klasse B (Geräte für Informationsverarbeitung und Kommunikation zur privaten
Nutzung)
• Dieses Produkt entspricht den EMV-Richtlinien für private Nutzung und kann in allen Bereichen, auch in
Wohnbereichen, eingesetzt werden.
(Geräte der Klasse B senden weniger elektromagnetische Störstrahlung aus als Geräte der Klasse A.)
Stromsparmodus
Dieser Monitor verfügt über ein integriertes Strommanagementsystem mit der Bezeichnung PowerSaver. Dieses
System spart Energie, indem es Ihren Monitor in einen Modus mit einer niedrigeren Leistungsaufnahme schaltet,
wenn er über einen bestimmten Zeitraum nicht benutzt wird. Der Monitor kehrt automatisch in den normalen
Betriebszustand zurück, wenn Sie die Maus des Computers bewegen oder eine Taste auf der Tastatur drücken.
Um Energie zu sparen, schalten Sie Ihren Monitor aus, wenn er nicht benutzt wird oder wenn Sie Ihren
A
rbeitsplatz für längere Zeit verlassen. Das PowerSaver-System arbeitet mit einer VESA DPM-kompatiblen, in
Ihrem Computer installierten Videokarte. Zur Einstellung dieser Funktion verwenden Sie ein in Ihrem Computer
installiertes Software-Dienstprogramm.
Status Normalbetrieb Stromsparmodus
Stromanschluß aus
EPA/ENERGY 2000
Stromanschluß
aus
Betriebsanzeige Grün Grün, blinkt Gelb Schwarz
Stromverbrauch Unter 160 W
Unter 1 W
(Aus)
Unter 1 W
(Netzschalter)
0 W
(Netzschalter)
Dieser Monitor entspricht dem EPA Energy STAR
®
und Energy2000-
Standard, wenn er mit einem Computer mit VESA DPM-Funktionalität
eingesetzt wird.
A
ls Energy STAR
®
-Partner hat SAMSUNG festgestellt, daß dieses
Produkt die Energy STAR
®
-Richtlinien für Energieeffizienz erfüllt.
Voreinstellte Timer-Modi
Voreinstellte Timer-Modi
Wenn das vom Computer übermittelte Signal dasselbe ist wie die folgenden voreingestellten Anzeigemodi, dann
wird der Bildschirm automatisch eingestellt. Wenn sich jedoch das Signal davon unterscheidet, könnte das Bild
auf dem Bildschirm verschwinden, während die Betriebsanzeige-LED leuchtet. Sehen Sie im
Videokartenhandbuch nach und stellen Sie den Bildschirm folgendermaßen ein:
Anzeigemodus
Horizontalfrequenz
Vertikalfrequenz Pixeltakt Sync-Polarität
]
^TUGGGY^TUGGGY YWW^TXYTYWGGG㝘䟸GXaZXa[\YWW^TXYTYWGGG㝘䟸GXaZXa[\

(kHz) (Hz) (MHz) (H/V)
MAC, 640 x 480 35,000 66,667 30,240 -/-
MAC, 832 x 624 49,726 74,551 49,500 +/+
IBM, 640 x 350 31,469 70,086 25,175 +/-
IBM, 640 x 480 31,469 59,940 25,175 -/-
IBM, 720 x 400 31,469 70,087 28,322 -/+
VESA, 640 x 480 37,861 72,809 31,500 -/-
VESA, 640 x 480 37,500 75,000 31,500 -/-
VESA, 640 x 480 43,269 85,008 36,000 -/-
VESA, 800 x 600 35,156 56,250 36,000 +/+
VESA, 800 x 600 37,879 60,317 40,000 +/+
VESA, 800 x 600 48,077 72,188 50,000 +/+
VESA, 800 x600 46,875 75,000 49,500 +/+
VESA, 800 x600 53,674 85,000 56,250 +/+
VESA, 1024 x 768 48,363 60,004 65,000 -/-
VESA, 1024 x 768 56,476 70,069 75,000 -/-
VESA, 1024 x 768 60,023 75,029 78,750 +/+
VESA, 1024 x 768 68,677 85,997 94,500 +/+
VESA, 1360 x 768 47,712 60,000 85,500 +/+
Horizontalfrequenz
Die Zeit, die dazu benötigt wird eine Zeile abzutasten, die den rechten
Bildschirmrand horizontal mit dem linken verbindet, wird Horizontalzyklus
genannt, und der Bruch dieses Horizontalzykluswertes nennt sich
Horizontalfrequenz. Einheit: kHz
Vertikalfrequenz
Wie eine Leuchtstofflampe muß der Bildschirm dasselbe Bild viele Male
pro Sekunde wiederholen, um dem Benutzer ein Bild anzuzeigen. Die
Frequenz dieser Wiederholung wird Vertikalfrequenz oder Auffrischrate
genannt. Einheit: Hz
© 1995~2008 SAMSUNG. ALL Right Reserved
]
^TUGGGZ^TUGGGZ YWW^TXYTYWGGG㝘䟸GXaZXa[\YWW^TXYTYWGGG㝘䟸GXaZXa[\

Farbe und Aussehen des Geräts sind modellabhängig, und jederzeitige Änderungen der technischen Daten des
Geräts zum Zweck der Leistungssteigerung sind vorbehalten.
Informationen
Zur Verbesserung der Anzeigequalität
Stellen Sie wie unten beschrieben die Auflösung und Bildwiederholfrequenz in der Systemsteuerung des
Computers so ein, dass Sie ein hochqualitatives Bild erhalten. Bei Darstellungen, deren maximale
Auflösung die TFT-LCD-Qualität nicht erreicht, kann das Bild ungleichmäßig sein.
• Auflösung: 1360 x 768
• Vertikalfre
quenz (Bildwiederholfrequenz): 60 Hz
Dieses Produkt verfügt über ein TFT-LC-Display, das mit modernster Halbleitertechnologie hergestellt
wurde und eine Genauigkeit von 1 ppm (ein Millionstel) gewährt. Gelegentlich können rote, grüne, blaue
und weiße Bildpunkte hell erscheinen oder es können schwarze Punkte auftreten.
Dies ist kein Zeichen für schlechte Qualität oder technische Defekte.
• Das TFT-LC-Display dieses Produkts bietet 3.133.440 Bildpunkte.
Zur äußeren Reinigung von Monitor und Bildschirm benutzen Sie bitte die empfohlene kleine Menge an
Reinigungsmittel und einen trockenen weichen Lappen. Wischen Sie das LC-Display sehr sanft ab.
Übermäßige Kraftanwendung bei der Reinigung kann das Display beschädigen.
Sollten Sie mit der Bildqualität nicht zufrieden sein, können Sie diese verbessern, indem Sie die
Selbstregulierungsfunktion ausführen. Diese Funktion kann gestartet werden, nachdem die Exit-Taste
gedrückt wurde.
Sollte immer noch Bildrauschen vorhanden sein, benutzen Sie die Fein/GROB-Einstellung.
Wenn permanent dasselbe Standbild auf dem Bildschirm angezeigt wird, können Nachbilder oder
verschwommene Flecken erscheinen.
Deshalb sollten Sie zum Energiesparmodus wechseln oder einen Bildschirmschoner mit einem
beweglichen Bild einstellen, wenn Sie für längere Zeit nicht am Monitor arbeiten.
PRODUKTINFORMATION (Bildkonservierungsfrei)
Was ist Bildkonservierung?
Bildkonservierung kann nicht auftreten, wenn ein LCD-Bildschirm unter normalen Bedingungen eingesetzt
wird. Unter den Normalbedingungen sind ständig wechselnde Videobilder zu verstehen. Wenn der LCD-
Bildschirm über einen längeren Zeitraum (mehr als 12 Stunden) hinweg ein unverändertes Bild anzeigt,
kann es zu einer leichten Differenz der Spannung zwischen den Elektroden kommen, die das Flüssigkristall
eines Pixels ansteuern. Diese Spannungsdifferenz zwischen den Elektroden steigt im Laufe der Zeit und
zwingt das Flüssigkristall zum Kippen. Wenn es dazu kommt, kann es passieren, dass weiterhin das alte
Bild angezeigt wird, wenn das Bild wechselt. Um dies zu verhindern, muss die akkumulierte
Spannungsdifferenz gesenkt werden.
Sicherheitshinweise
Einführung
Anschlussmöglichkeiten
Verwenden der Software
Einstellen des Monitors
Fehlerbehebung
Technische Daten
Informationen
Zur Verbesserung der
Anzeigequalität
PRODUKTINFORMATION
(Bildkonservierungsfrei)
Anhang
zt{T[WXXTn__UGGG^Xzt{T[WXXTn__UGGG^X YWW^TXXTY_GGG㝘䟸GYa\ZaX_YWW^TXXTY_GGG㝘䟸GYa\ZaX_

Abschaltung, Bildschirmschoner oder Stromsparmodus
z
Schalten Sie den Strom nach 20-stündigem Einsatz für 4 Stunden ab
z
Schalten Sie den Strom nach 12-stündigem Einsatz für 2 Stunden ab
z
Verwenden Sie das Energieschema der Energieverwaltung bei den Anzeigeeigenschaften Ihres
PCs, um den Monitor entsprechend einzustellen.
z
Verwenden Sie möglichst einen Bildschirmschoner - Wir empfehlen einen einfarbigen
Bildschirmschoner oder ein bewegtes Bild.
Ändern Sie regelmäßig die Farbinformationen
Hinweis
• Verwenden Sie zwei verschiedene Farben
Wechseln Sie die Farbinformationen alle 30 Minuten mit 2 verschiedenen, abwechselnd angezeigten
Farben.
z
Vermeiden Sie Buchstabenkombinationen oder Hintergrundfarben mit starken Helligkeitsdifferenzen.
Vermeiden Sie graue Farben, da diese schnell zu Bildkonservierung führen.
Vermeiden Sie Folgendes: Farben mit starken Helligkeitsunterschieden (Schwarz & Weiß, Grau)
Ändern Sie regelmäßig die Zeichenfarbe
z
Verwenden Sie helle Farben mit geringen Helligkeitsunterschieden
- Regelmäßig : Alle 30 Minuten die Zeichen- und Hintergrundfarbe wechseln
zt{T[WXXTn__UGGG^Yzt{T[WXXTn__UGGG^Y YWW^TXXTY_GGG㝘䟸GYa\ZaX_YWW^TXXTY_GGG㝘䟸GYa\ZaX_

z
Alle 30 Minuten die bewegten Zeichen wechseln.
z
Anzeigen eines regelmäßig bewegten Bildes und eines Logo auf der gesamten Fläche.
- Regelmäßig : Nach 4 Betriebsstunden 60 Sekunden lang ein bewegtes Bild mit Logo anzeigen.
z
Am besten schützen Sie Ihren Bildschirm vor Bildkonservierung, indem Sie ihn abschalten bzw. den
PC oder das System so einrichten, dass ein Bildschirmschoner aktiviert wird, wenn Sie ihn nicht
verwenden. Beachten Sie zudem, dass die Garantie gemäß den Angaben im Bedienungshandbuch
beschränkt ist.
Einsetzen der Screen Scroll-Funktion (Bildlauf) mit dem Gerät
z
Einsetzen der Screen Scroll-Funktion (Bildlauf)
- Symptom: Horizontaler Balken in schwarzer Farbe bewegt sich vertikal durch das Bild.
- Methode wählen
. Bedienungshandbuch: Bildschirmmenü -> Set Up (Einrichten) -> Safety Screen (Sicherheit) ->
Screen Scroll (Bildlauf)
. Zeitabstand: 1 – 10 Stunden ( Empfehlung: 1 )
. Zeitdauer: 1 – 5 Sekunden ( Empfehlung: 5 )
Hinweis
• ( Lesen Sie im Benutzerhandbuch auf der CD unter “OSD-Funktionen” nach, da einige Modelle nicht
verfügbar sind)
Einsetzen der Screen Pixel-Funktion (Bildpixel) mit dem Gerät
z
Einsetzen der Screen Pixel-Funktion (Bildpixel)
- Symptom: Punkt in schwarzer Farbe bewegt sich vertikal durch das Bild.
- Methode wählen
. Bedienungshandbuch: Bildschirmmenü -> Set Up (Einrichten) -> Safety Screen (Sicherheit) -> Pixel
(Löschen)
. Zeitabstand: 1 – 10 Stunden ( Empfehlung: 1 )
. Zeitdauer: 10 – 50 Sekunden ( Empfehlung: 50 )
z
Einsetzen der Screen Bar-Funktion (Bildbalken)
- Symptom: Horizontaler/Vertikaler Balken in schwarzer Farbe bewegt sich vertikal durch das Bild.
^
zt{T[WXXTn__UGGG^Zzt{T[WXXTn__UGGG^Z YWW^TXXTY_GGG㝘䟸GYa\ZaX_YWW^TXXTY_GGG㝘䟸GYa\ZaX_

- Methode wählen
. Bedienungshandbuch: Bildschirmmenü -> Set Up (Einrichten) -> Safety Screen (Sicherheit) -> Bar
(Balken)
. Zeitabstand: 1 – 10 Stunden ( Empfehlung: 1 )
. Zeitdauer: 10 – 50 Sekunden ( Empfehlung: 50 )
Hinweis
• ( Lesen Sie im Benutzerhandbuch auf der CD unter “OSD-Funktionen” nach, da einige Modelle nicht
verfügbar sind)
Einsetzen der Screen Erasing-Funktion (Bildlöschen) mit dem Gerät
z
Einsetzen der Screen Erasing-Funktion (Bildlöschen)
- Symptom: 2 vertikale Blöcke bewegen sich durch das Bild und löschen es dabei
- Methode wählen
. Bedienungshandbuch: Bildschirmmenü -> Set Up (Einrichten) -> Safety Screen (Sicherheit) ->
Erase (Löschen)
. Zeitabstand: 1 – 10 Stunden ( Empfehlung: 1 )
. Zeitdauer: 10 – 50 Sekunden ( Empfehlung: 50 )
Hinweis
• ( Lesen Sie im Benutzerhandbuch auf der CD unter “OSD-Funktionen” nach, da einige Modelle nicht
verfügbar sind)
© 1995~2008 SAMSUNG. ALL Right Reserved
^
zt{T[WXXTn__UGGG^[zt{T[WXXTn__UGGG^[ YWW^TXXTY_GGG㝘䟸GYa\ZaX_YWW^TXXTY_GGG㝘䟸GYa\ZaX_

Farbe und Aussehen des Geräts sind modellabhängig, und jederzeitige Änderungen der technischen Daten des
Geräts zum Zweck der Leistungssteigerung sind vorbehalten.
Anhang
Kontakt zu Samsung
Hinweis
• Falls Sie Fragen oder Anregungen zu Samsung-Produkten haben, wenden Sie sich bitte an den Samsung-
Kundendienst.
Sicherheitshinweise
Einführung
Anschlussmöglichkeiten
Verwenden der Software
Einstellen des Monitors
Fehlerbehebung
Technische Daten
Informationen
Anhang
Kontakt zu Samsung
Bezeichnungen
Ordnungsgemäße
Entsorgung
Autorisierung
^
zt{T[WXXTn__UGGG^\zt{T[WXXTn__UGGG^\ YWW^TXXTY_GGG㝘䟸GYa\ZaX_YWW^TXXTY_GGG㝘䟸GYa\ZaX_
North America
U.S.A
1-800-SAMSUNG(726-7864) http://www.samsung.com
CANADA
1-800-SAMSUNG(726-7864) http://www.samsung.com/ca
MEXICO
01-800-SAMSUNG(726-7864) http://www.samsung.com
Latin America
ARGENTINE
0800-333-3733 http://www.samsung.com/ar
BRAZIL
0800-124-421
4004-0000
http://www.samsung.com
CHILE
800-SAMSUNG(726-7864) http://www.samsung.com/cl
COLOMBIA
01-8000112112 http://www.samsung.com.co
COSTA RICA
0-800-507-7267 http://www.samsung.com/latin
ECUADOR
1-800-10-7267 http://www.samsung.com/latin
EL SALVADOR
800-6225 http://www.samsung.com/latin
GUATEMALA
1-800-299-0013 http://www.samsung.com/latin
JAMAICA
1-800-234-7267 http://www.samsung.com/latin
PANAMA
800-7267 http://www.samsung.com/latin
PUERTO RICO
1-800-682-3180 http://www.samsung.com/latin
REP. DOMINICA
1-800-751-2676 http://www.samsung.com/latin
TRINIDAD & TOBAGO
1-800-SAMSUNG(726-7864) http://www.samsung.com/latin
VENEZUELA
0-800-100-5303 http://www.samsung.com/latin
Europe
AUSTRIA
0800-SAMSUNG(726-7864) http://www.samsung.com/at
BELGIUM
0032 (0)2 201 24 18 http://www.samsung.com/be
NICARAGUA
00-1800-5077267
HONDURAS
800-7919267

^
zt{T[WXXTn__UGGG^]zt{T[WXXTn__UGGG^] YWW^TXXTY_GGG㝘䟸GYa\ZaX_YWW^TXXTY_GGG㝘䟸GYa\ZaX_
CZECH REPUBLIC
DENMARK
70 70 19 70 http://www.samsung.com/dk
FINLAND
030-6227 515 http://www.samsung.com/fi
FRANCE
3260 SAMSUNG
08 25 08 65 65 (€ 0,15/min)
http://www.samsung.com
GERMANY
01805-SAMSUNG(726-7864)
http://www.samsung.com
HUNGARY
06-80-SAMSUNG(726-7864) http://www.samsung.com
ITALIA
800-SAMSUNG(726-7864) http://www.samsung.com
LUXEMBURG
0035 (0)2 261 03 710 http://www.samsung.com/be
NETHERLANDS
0900-SAMSUNG(726-7864)
http://www.samsung.com/nl
NORWAY
815-56 480 http://www.samsung.com/no
POLAND
0 801 801 881
022-607-93-33
http://www.samsung.com/pl
PORTUGAL
80820-SAMSUNG(726-7864) http://www.samsung.com/pt
EIRE
0818 717 100 http://www.samsung.com/ie
SLOVAKIA
0800-SAMSUNG(726-7864) http://www.samsung.com/sk
SPAIN
902 10 11 30 http://www.samsung.com
SWEDEN
0771-400 200 http://www.samsung.com/se
SWITZERLAND
0800-SAMSUNG(726-7864) www.samsung.com/ch
U.K
0845 SAMSUNG(726-7864) http://www.samsung.com
CIS
ESTONIA
800-7267 http://www.samsung.ee
LATVIA
800-7267 http://www.samsung.com/lv
LITHUANIA
8-800-77777 http://www.samsung.lt
KAZAKHSTAN
8-10-800-500-55-500 http://www.samsung.kz
KYRGYZSTAN
00-800-500-55-500
RUSSIA
8-800-555-55-55 http://www.samsung.com
UKRAINE
8-800-502-0000 http://www.samsung.com
UZBEKISTAN
8-800-120-0-400 http://www.samsung.uz
Asia Pacific
AUSTRALIA
1300 362 603 http://www.samsung.com
CHINA
800-810-5858, 010- 6475 1880 http://www.samsung.com
HONG KONG
3698-4698 http://www.samsung.com/hk
INDIA
3030 8282, 1800 110011 http://www.samsung.com
INDONESIA
0800-112-8888 http://www.samsung.com
JAPAN
0120-327-527 http://www.samsung.com/jp
MALAYSIA
1800-88-9999 http://www.samsung.com/my
NEW ZEALAND
0800SAMSUNG(726-7864) http://www.samsung.com/nz
PHILIPPINES
1800-10-SAMSUNG(726-7864) http://www.samsung.com/ph
SINGAPORE
1800-SAMSUNG(726-7864) http://www.samsung.com
THAILAND
1800-29-3232, 02-689-3232 http://www.samsung.com
(€ 0,15/min)
(€ 0,14/min)
(€ 0,10/min)
TADJIKISTAN
8-10-800-500-55-500
844 000 844 http://www.samsung.com/cz

Bezeichnungen
Sync.-Signal
Sync- (synchronisierte) Signale bezieht sich auf die Standardsignale, die zur Anzeige der gewünschten
Farben auf dem Monitor erforderlich sind. Sie werden in vertikale und horizontale Sync.-Signale unterteilt.
Diese Signale zeigen normale Farbbilder mit der festgelegten Auflösung und Frequenz an.
Sync.-Signaltypen
Getrennt
Dabei handelt es sich um eine Konfiguration, bei der einzelne vertikale Sync.-Signale zum
Monitor übertragen werden.
Composite Dabei handelt es sich um eine Konfiguration, bei der vertikale Sync.-Signale zu einem
zusammengesetzten (Composite) Signal kombiniert und zum Monitor übertragen werden.
Der Monitor zeigt die Farbsignale durch Aufspalten des zusammengesetzten (Composite)
Signals in die ursprünglichen Farbsignale an.
Dot Pitch
Das Bild auf einem Monitor setzt sich aus roten, grünen und blauen Punkten zusammen. Je dichter die
Punkte, desto höher die Auflösung. Die Entfernung zwischen zwei gleichfarbigen Punkten wird als
'Lochmaskenabstand' bezeichnet. Einheit: mm
Vertikalfrequenz
Der Bildschirm muß mehrere Male pro Sekunde erneuert werden, um für den Benutzer ein Bild zu erzeugen
und anzuzeigen. Die Frequenz dieser Wiederholung pro Sekunde wird Vertikalfrequenz or Auffrischrate
genannt. Einheit: Hz
Beispiel: Wenn ein Licht 60 Mal pro Sekunde aufleuchtet, wird dies als 60 Hz angesehen.
Horizontalfrequenz
Die Zeit, die dazu benötigt wird eine Zeile abzutasten, die den rechten Bildschirmrand horizontal mit dem
linken verbindet, wird Horizontalzyklus genannt. Der Bruch dieses Horizontalzykluswertes nennt sich
Horizontalfrequenz. Einheit: kHz
Interlace und Non-Interlace Methode
SWenn die horizontalen Bildschirmzeilen nacheinander von oben nach unten dargestellt werden, wird das die
Non-Interlace-Methode genannt, während das abwechselnde Zeigen aller ungeraden Zeilen und dann aller
geraden Zeilen als die Interlace-Methode bezeichnet wird. Bei der Mehrheit aller Monitoren wird die Non-
Interlace-Methode eingesetzt, um ein klares Bild zu gewährleisten. Die Interlace-Methode ist dieselbe
Methode, die beim Fernseher benutzt wird.
Plug & Play
Dies ist eine Funktion, die dem Benutzer durch automatischen Informationsaustausch zwischen Computer
und Monitor die beste Bildschirmqualität bietet. Dieser Monitor entspricht dem internationalen Standard VESA
DDC für die Plug & Play-Funktion.
Auflösung
Die Zahl der horizontalen und vertikalen Punkte, aus denen sich das Monitorbild zusammensetzt, wird als
'Auflösung' bezeichnet. Diese Zahl macht eine Aussage über die Genauigkeit der Anzeige. Eine hohe
Auflösung ist vorteilhaft, wenn mehrere Aufgaben ausgeführt werden, da mehr Bildinformation auf dem
Bildschirm gezeigt werden kann.
Beispiel: Wenn die Auflösung 1360 X 768 ist, bedeutet das, daß der Bildschirm sich aus 1360
horizontalen Punkten (horizontale Auflösung) und 768 vertikalen Linien (vertikale Auflösung)
zusammensetzt.
^
zt{T[WXXTn__UGGG^^zt{T[WXXTn__UGGG^^ YWW^TXXTY_GGG㝘䟸GYa\ZaX_YWW^TXXTY_GGG㝘䟸GYa\ZaX_
TAIWAN
0800-329-999 http://www.samsung.com/tw
VIETNAM
1 800 588 889 http://www.samsung.com
Middle East & Africa
SOUTH AFRICA
0860-SAMSUNG(726-7864 ) http://www.samsung.com
TURKEY
444 77 11 http://www.samsung.com
U.A.E
800-SAMSUNG (726-7864)
8000-4726
http://www.samsung.com

MDC (Multiple Display Control = Steuerung für mehrere Displays)
Bei einem MDC (Multiple Display Control = Steuerung für mehrere Displays) handelt es sich um eine
Anwendung, die den gleichzeitigen Betrieb mehrerer Displays an einem PC ermöglicht. Für die
Kommunikation zwischen dem PC und dem Display wird eine herkömmliche serielle RS-232C-Schnittstelle
verwendet. Aus diesem Grund sollten Sie ein serielles Kabel zwischen dem seriellen Port des PCs und dem
seriellen Port des Displays installieren.
Ordnungsgemäße
Entsorgung
Korrekte Entsorgung dieses Produkts (Elektromüll) - Nur Europa
(Anzuwenden in den Ländern der Europäischen Union und anderen
europäischen Ländern mit einem separaten Sammelsystem)
Die Kennzeichnung auf dem Produkt bzw. auf der dazugehörigen Literatur gibt
an, dass es nach seiner Lebensdauer nicht zusammen mit dem normalen
Haushaltsmüll entsorgt werden darf. Entsorgen Sie dieses Gerät bitte getrennt
von anderen Abfällen, um der Umwelt bzw. der menschlichen Gesundheit nicht
durch unkontrollierte Müllbeseitigung zu schaden. Recyceln Sie das Gerät, um die
nachhaltige Wiederverwertung von stofflichen Ressourcen zu fördern.
Private Nutzer sollten den Händler, bei dem das Produkt gekauft wurde, oder die
zuständigen Behörden kontaktieren, um in Erfahrung zu bringen, wie sie das
Gerät auf umweltfreundliche Weise recyceln können.
Gewerbliche Nutzer sollten sich an Ihren Lieferanten wenden und die
Bedingungen des Verkaufsvertrags konsultieren. Dieses Produkt darf nicht
zusammen mit anderem Gewerbemüll entsorgt werden.
Autorisierung
Änderungen der in diesem Dokument enthaltenen Informationen sind ohne vorherige
Ankündigung vorbehalten.
© 2008 Samsung Electronics Co., Ltd. Alle Rechte vorbehalten.
Reproduktion jeglicher Art ohne schriftliche Einwilligung von Samsung Electronics Co., Ltd. ist strengstens
untersagt.
Samsung Electronics Co., Ltd. haftet nicht für hierin enthaltene Fehler oder für direkt oder als Folge entstandene
Schäden im Zusammenhang mit der Bereitstellung, Leistung oder Verwendung dieses Materials.
Das Samsung Logo sind eingetragene Warenzeichen von Samsung Electronics Co., Ltd.; Microsoft , Windows
und Windows NT sind eingetragene Warenzeichen der Microsoft Corporation; VESA , DPM - und DDC sind
eingetragene Warenzeichen der Video Electronics Standard Association; der ENERGY STAR -Name und -Logo
sind eingetragene Warenzeichen der Umweltschutzbehörde der U.S.A, der U.S. Environmental Protection
Agency (EPA). Als ENERGY STAR -Partner hat Samsung Electronics Co., Ltd. festgestellt, daß dieses Produkt
die ENERGY STAR -Richtlinien für Energieeffizienz erfü
llt. Alle anderen hierin erwähnten Produktnamen sind
möglicherweise die Warenzeichen oder eingetragenen Warenzeichen ihrer jeweiligen Eigentümer.
^
zt{T[WXXTn__UGGG^_zt{T[WXXTn__UGGG^_ YWW^TXXTY_GGG㝘䟸GYa\ZaX_YWW^TXXTY_GGG㝘䟸GYa\ZaX_

/10+6146(6.%&
*XLGDGHOOĜXWHQWH
UGGGXUGGGX YWW^TXXTY_GGG㝘䟸G[aZ`a\\YWW^TXXTY_GGG㝘䟸G[aZ`a\\

La forma e il colore del prodotto possono variare in base al modello, e le specifiche del prodotto sono soggette
a modifiche senza preavviso allo scopo di migliorarne le prestazioni.
Istruzioni di sicurezza
Notazionale
Si prega di leggere accuratamente le seguenti istruzioni di sicurezza in modo da evitare eventuali danni
alla proprietà o lesioni all'utente.
Avvertenza / Attenzione
L’inosservanza delle istruzioni indicate da questo simbolo può comportare infortuni o danni alle
apparecchiature.
Convenzioni per l'identificazione delle note
Vietato È importante leggere e comprendere sempre appieno il contenuto
Non smontare Scollegare la spina dalla presa di corrente
Non toccare Collegamento a massa per evitare scosse elettriche
Alimentazione
In caso di non utilizzo per periodi di tempo prolungati, regolare il PC su DPM.
Se si utilizza uno screen saver, selezionare la modalità.
Le immagini qui riportate sono solo di riferimento, e non sono applicabili in tutti i casi (o paesi).
Non usare apparecchi con la spina danneggiata o allentata.
z
Il mancato rispetto di questa precauzione può essere causa di scosse
elettriche o incendi.
Non estrarre la spina tirandola dal filo e non toccarla con le mani
bagnate.
z
Il mancato rispetto di questa precauzione può essere causa di scosse
Istruzioni di sicurezza
Notazionale
Alimentazione
Installazione
Pulizia
Altro
Introduzione
Collegamenti
Uso del software
Regolazione del monitor
Risoluzione del problemi
Specifiche
Informazioni
Appendice
X
zt{T[WXXTp__UGGGXzt{T[WXXTp__UGGGX YWW^TXXTY_GGG㝘䟸GYa\\aYWYWW^TXXTY_GGG㝘䟸GYa\\aYW

elettriche o incendi.
Usare solo una spina e una presa opportunamente collegata a
massa.
z
Una massa inadatta può causare scosse elettriche o danni alle
apparecchiature. (Classe l solo attrezzatura.)
Inserire saldamente la spina in modo che non possa scollegarsi
dalla presa.
z
Una connessione non sicura può causare un incendio.
Non piegare in modo eccessivo la spina e il filo e non collocare
oggetti pesanti sopra di questi onde evitare danni.
z
Il mancato rispetto di questa precauzione può essere causa di scosse
elettriche o incendi.
Non collegare troppe prolunghe o spine ad una presa di corrente.
z
L’inosservanza di questa precauzione può essere causa di incendio.
Non scollegare il cavo di alimentazione durante l’uso del monitor.
z
Una scarica elettrica causata dalla disconnessione del cavo potrebbe
danneggiare il computer.
Non utilizzare il cavo di alimentazione quando sul connettore o sulla
spina vi è polvere.
z
Se il connettore o la spina del cavo di alimentazione sono ricoperti di
polvere, pulirli con un panno asciutto.
z
Se si collega il cavo di alimentazione utilizzando una spina o un connettore
ricoperti di polvere, può verificarsi una scossa elettrica o un incendio.
Per scollegare l’apparecchio dall’alimentazione, estrarre la spina
dalla presa di corrente.
z
Il mancato rispetto di questa precauzione può essere causa di scosse
elettriche o incendi.
Installazione
Contattare un centro di assistenza autorizzato quando si effettua l'installazione del monitor in una
posizione in cui vi è polvere eccessiva, temperature alte o basse, elevata umidità, sostanze
Y
zt{T[WXXTp__UGGGYzt{T[WXXTp__UGGGY YWW^TXXTY_GGG㝘䟸GYa\\aYZYWW^TXXTY_GGG㝘䟸GYa\\aYZ

chimiche o nel caso in cui il monitor sarà in funzione 24 ore al giorno come negli aeroporti, nelle
stazioni ferroviarie, ecc.
La mancata osservanza di questa precauzione può causare gravi danni allo schermo.
Posizionare il monitor in un luogo in cui l'umidità e la presenza di
polvere siano minime.
z
Seguire questa precauzione per evitare cortocircuiti o incendi all'interno del
monitor.
Durante il trasporto non far cadere il monitor.
z
L’inosservanza di questa precauzione può essere causa di infortuni o di
danni all'apparecchio.
Installare la base del monitor su un ripiano in vetro o una mensola
facendo attenzione che non sporga al di fuori di esso.
z
La caduta del prodotto può causare danni all'unità o lesioni personali.
Non posizionare il prodotto su una superficie piccola o instabile.
z
Posizionare il prodotto su una superficie stabile e uniforme per evitare che
possa cadere causando lesioni alle persone sottostanti, specialmente nel
caso di bambini.
Non posizionare il prodotto sul pavimento.
z
Le persone presenti, specialmente i bambini, potrebbero inciamparvi.
PER EVITARE INCENDI, TENERE CANDELE E ALTRE FIAMME
LIBERE LONTANO DA QUESTO PRODOTTO.
z
Il mancato rispetto di questa precauzione può causare un incendio.
Tenere i dispositivi che generano calore lontano dal cavo di
alimentazione.
z
La fusione del rivestimento del cavo può causare una scossa elettrica o un
incendio.
Z
zt{T[WXXTp__UGGGZzt{T[WXXTp__UGGGZ YWW^TXXTY_GGG㝘䟸GYa\\aYZYWW^TXXTY_GGG㝘䟸GYa\\aYZ

Fissare il monitor con cura.
z
L’inosservanza di questa precauzione può comportare danni o rottura
dell’apparecchio.
Non posizionare il monitor appoggiandolo sullo schermo.
z
Seguendo questa precauzione si evita di danneggiare la superficie del tubo
catodico.
L'installazione della staffa a muro deve essere eseguita da
personale qualificato.
z
Un'installazione eseguita da personale non qualificato potrebbe causare
danni.
z
Utilizzare sempre il dispositivo di montaggio specificato nel manuale
dell'utente.
Quando si installa il prodotto, posizionarlo a una certa distanza
dalla parete (oltre 10 cm) per garantire una corretta ventilazione.
z
Una ventilazione insufficiente può causare un innalzamento della
temperatura interna del prodotto, che può condurre a una riduzione delle
prestazioni e della durata dei componenti.
Tenere l’imballo di plastica (sacchetto) fuori della portata dei
bambini.
z
L’imballo di plastica (sacchetto) può causare soffocamento se lasciato
come gioco alla portata dei bambini.
Pulizia
Per la pulizia del telaio del monitor o della parte esterna del tubo catodico, utilizzare un panno
morbido, leggermente inumidito.
Non spruzzare il detersivo direttamente sul monitor.
z
L’inosservanza di questa precauzione può causare danni, scosse elettriche
o incendi.
Non installare il prodotto in una posizione con scarsa ventilazione,
per esempio su una mensola, in un armadietto ecc.
z
Un innalzamento della temperatura interna del prodotto può causare un
incendio.
[
zt{T[WXXTp__UGGG[zt{T[WXXTp__UGGG[ YWW^TXXTY_GGG㝘䟸GYa\\aY\YWW^TXXTY_GGG㝘䟸GYa\\aY\

Se il connettore tra la spina e il pin è impolverato o sporco, pulirlo in
modo opportuno con un panno asciutto.
z
Un connettore sporco può essere causa di scosse elettriche o incendi.
Assicurarsi di scollegare il cavo di alimentazione prima di pulire il
prodotto.
z
Il mancato rispetto di questa precauzione può causare una scossa elettrica
o un incendio.
Scollegare il cavo di alimentazione dalla presa e pulire il prodotto
con un panno morbido e asciutto.
z
Non usare prodotti chimici quali cera, benzene, alcol, solventi, insetticidi,
deodoranti per l'ambiente, lubrificanti o detergenti.
Altro
Non rimuovere il coperchio (o la copertura sul retro).
z
Il mancato rispetto di questa precauzione può essere causa di scosse
elettriche o incendi.
z
Affidare l'esecuzione delle riparazioni a tecnici qualificati.
Se il monitor non funziona in modo normale, in particolare se
produce rumori inconsueti o emana odori, scollegarlo
immediatamente dall'alimentazione e rivolgersi ad un centro di
assistenza o ad un rivenditore autorizzato.
z
Il mancato rispetto di questa precauzione può essere causa di scosse
elettriche o incendi.
Tenere il prodotto lontano da luoghi esposti a olio, fumo o umidità;
non installare all'interno di un veicolo.
z
Ciò potrebbe causare un malfunzionamento, scosse elettriche o incendio.
z
Evitare in particolar modo di far funzionare il monitor in prossimità di acqua
o all'esterno dove potrebbe essere esposto a neve o pioggia.
Se il monitor cade o il rivestimento viene danneggiato, spegnere il
monitor e scollegare il cavo di alimentazione. Quindi contattare il
servizio di assistenza.
z
Il monitor potrebbe non funzionare correttamente, causando scosse
elettriche o un incendio.
Usare il prodotto detergente raccomandato versandolo su un panno
morbido.
\
zt{T[WXXTp__UGGG\zt{T[WXXTp__UGGG\ YWW^TXXTY_GGG㝘䟸GYa\\aY\YWW^TXXTY_GGG㝘䟸GYa\\aY\

Tenere il monitor spento quando fuori ci sono fulmini e lampi
oppure lasciare che il monitor resti inutilizzato per un lungo periodo
di tempo.
z
Il monitor potrebbe non funzionare correttamente, causando scosse
elettriche o un incendio.
Non tentare di spostare il monitor tirando il cavo elettrico o il cavo
di segnale.
z
Ciò può provocare guasti, scosse elettriche o incendi dovuti al
danneggiamento del cavo.
Non tentare di spostare lo schermo tirando il cavo elettrico o il cavo
di segnale.
z
Ciò può provocare guasti, scosse elettriche o incendi dovuti al
danneggiamento del cavo.
Non coprire le bocchette di ventilazione del monitor.
z
Una cattiva ventilazione può essere causa di guasti o di incendi.
Non posizionare contenitori d'acqua, prodotti chimici o piccoli
oggetti metallici sul monitor.
z
Ciò potrebbe causare un malfunzionamento, scosse elettriche o incendio.
z
Se una sostanza estranea entra all'interno del monitor, scollegare il cavo di
alimentazione e contattare il servizio di assistenza.
Tenere il prodotto lontano da spray chimici combuistibili o sostanze
infiammabili.
z
L’inosservanza di questa precauzione può essere la causa di esplosioni o
incendi.
Non inserire mai oggetti metallici all'interno delle aperture del
monitor.
z
Il mancato rispetto di questa precauzione può essere causa di scosse
elettriche, incendi o infortuni.
Non inserire oggetti metallici come ferretti, cavi, oggetti appuntiti o
infiammabili come carta e fiammiferi nei fori di ventilazione, nella
porta della cuffia o nelle porte AV.
]
zt{T[WXXTp__UGGG]zt{T[WXXTp__UGGG] YWW^TXXTY_GGG㝘䟸GYa\\aY\YWW^TXXTY_GGG㝘䟸GYa\\aY\

z
Può causare un incendio o una scossa elettrica. Se una sostanza estranea
o acqua penetra nel prodotto, spegnere l'unità, scollegare la spina di
alimentazione dalla presa a parete e contattare il centro di assistenza.
Se si visualizza una schermata fissa per un periodo di tempo
prolungato, può verificarsi la comparsa di un'immagine residua o di
una macchia sfocata.
z
Attivare la modalità di risparmio energetico o impostare uno screensaver
per spostare l'immagine quando è necessario allontanarsi dal monitor per
un periodo di tempo prolungato.
Regolare la risoluzione e la frequenza ai livelli appropriati per il
modello.
z
Livelli non appropriati di risoluzione e frequenza potrebbero danneggiare la
vista degli utenti.
32 pollici (80 cm) - 1360 X 768
La visione continua del monitor mantenendosi in una posizione
troppo vicina allo schermo può causare danni alla vista.
Per non stancare gli occhi, fare una pausa di almeno cinque minuti
dopo ogni ora di utilizzo del monitor.
Non installare il prodotto su una superficie instabile o irregolare o in
una posizione che presenta vibrazioni.
z
La caduta del prodotto può causare danni all'unità o lesioni personali. L'uso
del prodotto in una posizione che presenta vibrazioni può ridurre la vita utile
dell'unità o causarne l'incendio.
Quando si sposta il monitor, spegnerlo e scollegare l'alimentazione.
Assicurarsi che i cavi, inclusi il cavo dell’antenna e i cavi di
collegamento ad altri dispositivi, siano scollegati prima di spostare
il monitor.
z
Il mancato scollegamento dei cavi può danneggiare il prodotto e causare
un incendio o scosse elettriche.
^
zt{T[WXXTp__UGGG^zt{T[WXXTp__UGGG^ YWW^TXXTY_GGG㝘䟸GYa\\aY\YWW^TXXTY_GGG㝘䟸GYa\\aY\

Posizionare il prodotto fuori dalla portata dei bambini, poiché
potrebbero provocare danni all'apparecchio.
z
La caduta del prodotto può causare lesioni personali o addirittura la morte.
Se non si utilizza il prodotto per un lungo periodo di tempo,
scollegarlo dalla presa elettrica.
z
In caso contrario, un isolamento danneggiato o un accumulo di sporcizia
può causare una emissione di calore che può causare un incendio.
Non lasciare i giochi preferiti dei bambini (o qualsiasi altra cosa che
possa attirare la loro attenzione) sopra il prodotto.
z
I bambini potrebbero cercare di salire sopra il prodotto per prendere un
oggetto. Il prodotto potrebbe cadere, causando lesioni o addirittura la
morte.
Quando si rimuovono le batterie del telecomando, assicurarsi che le
stesse non vengano ingerite dai bambini. Tenere le batterie lontane
dalla portata dei bambini.
z
Se vengono ingerite, rivolgersi immediatamente a un dottore.
Quando si sostituiscono le batterie, inserire queste ultime
rispettando la corretta disposizione delle polarità +/-, uniformandosi
alle indicazioni nel vano batterie.
z
Una disposizione non corretta delle polarità può causare la rottura della
batteria o perdite di liquidi, con conseguente pericolo di incendio, infortunio
o una dannosa contaminazione.
Utilizzare solo le batterie standard specificate. Non utilizzare
insieme batterie nuove e usate.
z
Può causare la rottura della batteria o perdite di liquidi, con conseguente
pericolo di incendio, infortunio o una dannosa contaminazione.
Quando si sposta il prodotto, assicurarsi che siano disponibili più di
due persone.
z
La caduta del prodotto può causare un malfunzionamento o un danno
all'apparecchiatura.
_
zt{T[WXXTp__UGGG_zt{T[WXXTp__UGGG_ YWW^TXXTY_GGG㝘䟸GYa\\aY\YWW^TXXTY_GGG㝘䟸GYa\\aY\

presso un centro di riciclaggio o un negozio che vende lo stesso tipo di
batteria o di batteria ricaricabile.
© 1995~2008 SAMSUNG. ALL Rights Reserved
La batteria e la batteria ricaricabile non costituiscono rifiuti generici
e devono essere restituiti per il riciclaggio. Il cliente è responsabile
della restituzione della batteria esausta o ricaricabile per il
riciclaggio.
z
Il cliente può portare la batteria esausta o ricaricabile per lo smaltimento
`
zt{T[WXXTp__UGGG`zt{T[WXXTp__UGGG` YWW^TXXTY_GGG㝘䟸GYa\\aY\YWW^TXXTY_GGG㝘䟸GYa\\aY\

Contenuto
Istruzioni di sicurezza ............................................................................................. 1
Notazionale ............................................................................................................ 1
Alimentazione ............................................................................................................... 1
Installazione .......................................................................................................... 2
Pulizia .................................................................................................................. 4
Altro ................................................................................................................. 5
Introduzione .......................................................................................................... 12
Contenuto della confezione .......................................................................................... 12
Il monitor ................................................................................................ 13
Layout meccanico ............................................................................................... 20
Collegamenti ......................................................................................................... 24
Installazione del kit dei supporti ...................................................................................... 24
Collegamento del monitor .................................................................................. 25
MDC ........................................................................................................... 31
Regolazione del monitor ................................................................................... 51
Inserisci ................................................................................................................. 51
Immagine [PC / BNC /DVI] ................................................................................ 52
Immagine [ AV / S-Video / Comp. / DVI-Video] .................................................. 54
Suono ................................................................................................................ 56
Impostazione .............................................................................................................. 57
Controllo multi-schermo ................................................................................................ 60
Funzioni a controllo diretto .............................................................................................. 60
XW
zt{T[WXXTp__UGGGXWzt{T[WXXTp__UGGGXW YWW^TXXTY_GGG㝘䟸GYa\\aY\YWW^TXXTY_GGG㝘䟸GYa\\aY\

Risoluzione del problem ....................................................................................... 62
Verifica funzione test automatico .................................................................................... 62
Lista di controllo ........................................................................................................... 63
D&R .......................................................................................................................... 65
Specifiche
.......................................................................................................................... 67
Generale
.................................................................................................................... 67
Risparmio di energia ..................................................................................................... 68
Modalità di timing predefinite ......................................................................................... 68
Informazioni ....................................................................................................... 70
Per una migliore visualizzazione ............................................................................... 70
INFORMAZIONI SUL PRODOTTO (Assenza di ritenzione dell'immagine) .............................. 70
Appendice .............................................................................................................. 74
Contatti SAMSUNG NEL MONDO .......................................................................... 74
Termini ............................................................................................................... 76
Corretto smaltimento .................................................................................................. 77
Autorità ............................................................................................................ 77
XX
zt{T[WXXTp__UGGGXXzt{T[WXXTp__UGGGXX YWW^TXXTY_GGG㝘䟸GYa\\aY\YWW^TXXTY_GGG㝘䟸GYa\\aY\

La forma e il colore del prodotto possono variare in base al modello, e le specifiche del prodotto sono soggette
a modifiche senza preavviso allo scopo di migliorarne le prestazioni.
Introduzione
Contenuto della
confezione
Nota
• Assicurarsi che i seguenti articoli siano presenti nella confezione del monitor.
Nel caso in cui qualche articolo risultasse mancante, contattare il proprio rivenditore.
Rivolgersi al rivenditore più vicino per acquistare componenti opzionali.
Nota
• Non posizionare il prodotto sul pavimento.
Monitor
manuale
Guida dell'utente
Guida d'installazione
rapida
Guida dell'utente, software MDC
Cavo
Cavo D-Sub Cavo di alimentazione
Istruzioni di sicurezza
Introduzione
Contenuto della confezione
Il monitor
Layout meccanico
Collegamenti
Uso del software
Regolazione del monitor
Risoluzione del problemi
Specifiche
Informazioni
Appendice

Altro
Pulsanti del telecomando Batterie (AAA X 2) Il tappo della bocchetta
Jack adattatore da
BNC a RCA
Supporto temporaneo
Venduto separatamente
Kit per il montaggio a muro Gruppo di altoparlanti kit dei supporti
Cavo DVI Cavo BNC
Il monitor
Parte anteriore
1) MENU
Utilizzare questo pulsante per aprire la visualizzazione OSD e attivare una voce di menu selezionata.
2) Tasto Su-Giù
Consente di selezionare le voci di menu verticalmente oppure di regolare i valori del menu selezionato.
XZ
zt{T[WXXTp__UGGGXZzt{T[WXXTp__UGGGXZ YWW^TXXTY_GGG㝘䟸GYa\\aY\YWW^TXXTY_GGG㝘䟸GYa\\aY\

3) Tasto Sinistra-Destra / Volume Pulsante
Consente di selezionare le voci di menu orizzontalmente oppure di regolare i valori del menu selezionato.
Inoltre, questi pulsanti consentono di regolare il volume dell’audio.
4) ENTER
Utilizzato per selezionare il menu OSD.
5) SOURCE
SOURCE Passa dalla modalità PC alla modalità Video.
Il cambiamento dell'origine è possibile solo con periferiche esterne collegate al monitor in un dato
momento.
[PC]
˧
[BNC]
˧
[DVI]
˧
[AV]
˧
[S-Video]
˧
[Component]
>> Fare clic qui per visualizzare un'animazione dell'operazione.
6) PIP
PIP Premere questo pulsante per controllare la finestra PIP.
Non è possibile sovrapporre più immagini PIP sullo schermo, dato che il BNC e il componente utilizzano lo
stesso terminale.
>> Fare clic qui per visualizzare un'animazione dell'operazione.
•
PC
A
V / S-Video / Comp. modalità
•
BNC
A
V / S-Video Mode
•
DVI
A
V / S-Video / Comp. modalità
•
AV / S-Video
PC / BNC / DVI modalità
•
Component
: PC / DVI modalità
7)
Dell'alimentazione
Utilizzare questo pulsante per accendere e spegnere il monitor.
8) Indicatore dell'alimentazione
Indicatore dell'alimentazione Si illumina all'accensione del monitor.
9) Sensore del telecomando
Sensore del telecomando Direzionare il telecomando verso questo punto del monitor.
Nota
• Per maggiori informazioni relative alle funzioni di risparmio energetico vedere PowerSaver nel manuale.
Per risparmiare energia, SPEGNERE il monitor quando non serve o ci si assenta dal luogo di lavoro per
periodi prolungati.
Parte posterior
Nota
• Per informazioni dettagliate relative al collegamento dei cavi, fare riferimento a Collegamento dei cavi nella
sezione Installazione. La configurazione della parte posteriore del monitor potrebbe variare lievemente a
seconda del modello.
X[
zt{T[WXXTp__UGGGX[zt{T[WXXTp__UGGGX[ YWW^TXXTY_GGG㝘䟸GYa\\aY\YWW^TXXTY_GGG㝘䟸GYa\\aY\

1) RS232C OUT/IN (porta seriale RS232C)
porta di programma MDC (Multiple Display Control)
2) PC IN(RGB) (Terminale di collegamento video del
PC) :
Utilizzo del D-Sub a 15 pin - modalità PC (PC analogico)
3) PC IN(RGB) (Terminale di collegamento video del
PC) :
Utilizzo Da DVI-D a DVI-D - modalità DVI (PC digitale)
4) PC/DVI/BNC AUDIO IN (Terminale per il
collegamento audio di PC/DVI/BNC (ingresso))
5) COMPONENT AUDIO IN [L-AUDIO-R] (Terminale
per il collegamento audio di Component
(ingresso))
6) BNC/COMPONENT OUT [R/P
R
, G/Y, B/P
B
, H, V]
(Terminale di collegamento video del BNC /
Terminale di collegamento Component(uscita))
Collegamento BNC (PC analogico): porta R, G, B, H, V
di collegamento
Collegamento Component: porta P
R
, Y, P
B
di
collegamento
7) BNC/COMPONENT IN [R/P
R
, G/Y, B/P
B
, H, V]
(Terminale di collegamento video del BNC /
Terminale di collegamento Component
(ingresso))
8) AV AUDIO IN (Terminale di collegamento audio
MONITOR (ingresso))
9) AV OUT [VIDEO](Terminale di collegamento
Video) : modalità AV (uscita)
10) AV IN [VIDEO](Terminale di collegamento Video)
(ingresso)
11) AV OUT [S-VIDEO](Terminale di collegamento S-
Video) : modalità S-Video (uscita)
X\
X\UGGGXX\UGGGX YWW^TXYTYWGGG㝘䟸GXaZZa\XYWW^TXYTYWGGG㝘䟸GXaZZa\X

12) AV IN [S-VIDEO](Terminale di collegamento S-
Video) (ingresso)
13) EXT SPEAKER(8 )[- - L - +, - - R - +] (Terminale
di collegamento altoparlanti)
14) AUDIO OUT [L-AUDIO-R] (USCITA AUDIO) [S–
AUDIO–D] (Terminale di collegamento audio
dello schermo (Uscita))
AUDIO OUT è il terminale di uscita audio per PC, DVI o
BNC.
15)
POWER SW (Interruttore di accensione /
spegnimento) ON/OFF
Attiva e disattiva il monitor.
16) POWER IN (Porta di segnale)
Con il cavo di alimentazione collegare il monitor alla
presa a muro.
Nota
• Il numero di monitor che è possibile collegare in un circuito di loopout varia in base al tipo di cavo, alla
fonte del segnale e ad altre circostanze. Possono essere collegati fino a dieci monitor insieme se il cavo o
la fonte del segnale supportano la rete senza alterazioni.
17) Blocco Kensington
il blocco Kensington è un dispositivo utilizzato per
assicurare fisicamente il sistema quando viene utilizzato
in un luogo pubblico. (Il dispositivo di blocco è in vendita
separatamente.)
Per informazioni sull'uso del dispositivo di blocco,
contattare il rivenditore.
Nota
• Per maggiori informazioni sui collegamenti dei cavi vedere Collegamento del monitor.
Pulsanti del telecomando
Nota
• Il funzionamento del telecomando potrebbe essere influenzato da una TV o altri apparecchi elettronici in
funzione nei pressi del monitor, che potrebbero causare malfunzionamenti a causa di interferenze con la
frequenza di comando.
1. ON / OFF
2. MAGICNET
3. MDC
4. LOCK
5. MagicNet tasti
6.+100 -/--
7. VOL
8. MUTE
9. TTX/MIX
10. MENU
11. ENTER
12. P.MODE
13. AUTO
14. PRE-CH
15 . CH/P
X]
X\UGGGYX\UGGGY YWW^TXYTYWGGG㝘䟸GXaZ[aY]YWW^TXYTYWGGG㝘䟸GXaZ[aY]

16. SOURCE
17. INFO
18. EXIT
19. Up-Down Left-Right tasti
20. S.MODE
21. STILL
22. FM RADIO
23. P.SIZE
24. SRS
25. DUAL/MTS
26. PIP
27. SOURCE
28. SWAP
29. SIZE
30. REW
31. STOP
32. PLAY/PAUSE
33. FF
1) ON / OFF
Utilizzare questo pulsante per accendere e spegnere il monitor.
2) MAGICNET
Tasto MagicNet Quick Launch.
- Funzione non disponibile per questo monitor.
3) MDC
Tasto MDC Quick Launch.
4) LOCK
Questo tasto attiva o disattiva tutti i tasti funzione sia sul telecomando sia sul monitor, ad esclusione dei
tasti di alimentazione e LOCK.
5) MagicNet tasti
Utilizzare questi tasti per Magic Net.
- Funzione non disponibile per questo monitor.
• Tasti alfabetici/numerici: Utilizzare questi tasti per immettere l'indirizzo di un sito web.
• DEL: Utilizzato per cancellare l'ultimo comando.
• SYMBOL: Utilizzato per immettere simboli. (.O_-)
• ENTER: Utilizzato per confermare.
6) +100 -/--
Consente di selezionare i canali oltre il numero 100.
Ad esempio, per selezionare il canale 121, premere “+100”, quindi premere “2” e poi “1”.
- Funzione non disponibile per questo monitor.
7) - VOL +
Inoltre, questi pulsanti consentono di regolare il volume dell’audio.
8)
MUTE
Consente di sospendere temporaneamente l’audio.
Quando l’audio è stato sospeso, è possibile ripristinarlo premendo nuovamente il pulsante.
Mute o i pulsanti - VOL + .
9)
TTX/MIX
X^
X\UGGGZX\UGGGZ YWW^TXYTYWGGG㝘䟸GXaZ[aY]YWW^TXYTYWGGG㝘䟸GXaZ[aY]

I canali TV forniscono servizi informativi scritti mediante il Televideo.
[Per informazioni relative alle regolazioni dello schermo. ]
10)
MENU
Utilizzare questo pulsante per aprire la visualizzazione OSD e attivare una voce di menu selezionata.
11)
ENTER
Attivare una voce di menu selezionata.
12)
P.MODE
Premendo questo pulsante, viene visualizzata la modalità corrente in basso al centro dello schermo.
AV / S-Video /Component Mode : P.MODE( Immagine Modalitá )
Il monitor dispone di quattro impostazioni automatiche dell'immagine, le quali sono preimpostate in fabbrica.
Quindi premere ancora questo pulsante per passare ciclicamente da una modalità preconfigurata
disponibile all'altra.
( Dinamica Standard Film Personalizzata )
PC / DVI Mode : M/B ( MagicBright™ )
MagicBright è una nuova funzione che fornisce al monitor una qualità di visualizzazione superiore grazie a
una migliore luminosità e nitidezza rispetto ai monitor comuni.
Quindi premere ancora questo pulsante per passare ciclicamente da una modalità preconfigurata
disponibile all'altra.
( Entertainment Internet Testo Personalizzata )
13) AUTO
Adjusts the screen display automatically in PC mode.
Se si cambia la risoluzione nel pannello di controllo, viene eseguita la funzione Regolazione auto.
14)
PRE-CH
Consente di selezionare le voci di menu verticalmente oppure di regolare i valori del menu selezionato.
- Funzione non disponibile per questo monitor.
15)
CH/P
È possibile utilizzare questi pulsanti anche in modalità PIP.
- Funzione non disponibile per questo monitor.
16)
Sorgente
Accede l’indicatore relativo al segnale video attualmente visualizzato.
17)
INFO
Questo pulsante consente di visualizzare una serie di informazioni nell’angolo superiore destro del monitor.
18)
EXIT
Utilizzare questo pulsante per uscire dal menù attivo o dalle indicazioni a schermo.
19) Up-Down Left-Right tasti
Spostano la selezione delle voci di menu orizzontalmente/verticalmente, oppure regolano i valori della voce
di menu selezionata.
20)
S.MODE
Premendo questo pulsante, viene visualizzata la modalità corrente in basso al centro dello schermo.
Il monitor è dotato di un amplificatore integrato stereo ad alta fedeltà.
Quindi premere ancora questo pulsante per passare ciclicamente da una modalità preconfigurata
disponibile all'altra.
( Standard
˧
Musica
˧
Movie
˧
Dialoghi
˧
Personalizzata )
21) STILL
Premere il tasto una volta per bloccare l'immagine. Premerlo ancora per sbloccare l'immagine in pausa.
22) FM RADIO
Attiva/disattiva la modalità Radio FM.
In PC/DVI mode, sets only SOUND to FM Radio.
Nelle aree in cui il segnale è debole, possono verificarsi disturbi mentre viene trasmessa FM RADIO.
Nella modalità di ORIGINE VIDEO generale, effettua l'impostazione su FM RADIO, spegnendo lo schermo.
- Funzione non disponibile per questo monitor.
23) P.SIZE
Questo pulsante consente di modificare le dimensioni dello schermo.
24)
SRS
X_
X\UGGG[X\UGGG[ YWW^TXYTYWGGG㝘䟸GXaZ[aY^YWW^TXYTYWGGG㝘䟸GXaZ[aY^

SRS
25)
DUAL/MTS
- Funzione non disponibile per questo monitor.
DUAL-
È possibile selezionare STEREO/MONO, DUAL l / DUAL ll e MONO/NICAM MONO/NICAM STEREO a
seconda del tipo di trasmissione utilizzando il pulsante DUAL sul telecomando mentre si guarda la TV.
MTS-
È possibile selezionare la modalità MTS (Multichannel Television Stereo, stereo televisivo multicanale).
Tipo di audio MTS/S_Mode Predefinito
FM Stereo
Mono Mono
Modifica manuale
Stereo
Mono
˩
Stereo
SAP
Mono
˩
SAP
Mono
26)
PIP
Premere questo pulsante per controllare la finestra PIP.
27)
Sorgente
Accede l’indicatore relativo al segnale video attualmente visualizzato. (PIP)
28) SWAP
Scambia il Descrizione della finestra PIP con l'immagine principale.
L’immagine nella finestra PIP appare nella schermata principale mentre l’immagine nella schermata
principale appare nella finestra PIP.
29)
SIZE
Consente di selezionare le diverse dimensioni dell'immagine.
30)
REW
Riavvolgimento
31)
STOP
Arresto
32) PLAY / PAUSE
Riprod./Pausa
33) FF
Avanzamento veloce
© 1995~2008 SAMSUNG. ALL Rights Reserved
X`
X\UGGG\X\UGGG\ YWW^TXYTYWGGG㝘䟸GXaZ[aY^YWW^TXYTYWGGG㝘䟸GXaZ[aY^

Layout meccanico | Testa del monitor | Supporto di sostegno | Altoparlante | Installazione del supporto VESA |
Installazione della staffa a parete
1. Layout meccanico
2. Testa del monitor
YW
X\UGGG]X\UGGG] YWW^TXYTYWGGG㝘䟸GXaZ[aY^YWW^TXYTYWGGG㝘䟸GXaZ[aY^

3. Supporto di sostegno
4. Altoparlante
5. Installazione del supporto VESA
z
Quando si installa VESA, assicurarsi di procedere in conformità agli standard VESA internazionali.
z
Acquisto del supporto VESA e informazioni sull'installazione: Contattare il distributore Samsung piu vicino per
effettuare l'ordine.
Dopo aver effettuato l'ordine, l'installazione del supporto verra eseguita da installatori professionisti.
z
Sono necessarie almeno 2 persone per maneggiare il monitor LCD.
z
Samsung non e responsabile di alcun danno al prodotto, ne di possibili infortuni derivanti da un'installazione
eseguita a discrezione del cliente.
YX
X\UGGG^X\UGGG^ YWW^TXYTYWGGG㝘䟸GXaZ[aY^YWW^TXYTYWGGG㝘䟸GXaZ[aY^

Dimensioni
Per avvitare il supporto al muro, utilizzare solo bulloni a testa scanalata da 6 mm di diametro e da 8 a 12
mm di lunghezza.
6. Installazione della staffa a parete
z
Contattare un tecnico per eseguire l'installazione della staffa a parete.
z
Samsung Electronics non è responsabile per danni al prodotto o lesioni personali qualora l'installazione sia stata
eseguita direttamente dal-l'acquirente del prodotto.
z
Questo prodotto è adatto all'installazione su pareti in cemento. Il prodotto può risultare instabile se installato su
pareti in gesso o legno.
Componenti(Venduto separatamente)
Utilizzare solo i componenti e gli accessori forniti insieme al prodotto.
A
Staffa di
montaggio a muro
B
Gruppo staffa di
montaggio
C
Vite:
8EA
D
Vite:
3EA
E
Vite a
legno: 7EA
F
Tassello:
7EA
G
Guida
all'installazione
Come assemblare la staffa di montaggio a muro
1.
1. Contrassegnare la posizione del foro sul muro.
2. Praticare un foro profondo 35 mm nel punto indicato.
3. Fissare i tasselli
F
su ciascun foro del muro.
4. Fissare la staffa
A
alla parete utilizzando viti da legno
E
dopo aver inserito
i tasselli di ancoraggio
F
nella staffa
A
.
se la staffa non è saldamente fissata al muro, la monitor LCD
può cadere.
2.
1. Spegnere la monitor e scollegare il cavo dell'alimentazione dalla presa.
2. Posizionare la monitor rivolta verso il basso su un panno morbido o un cuscino su una tavola.
3. Fissare il gruppo staffa
B
sulla parte posteriore della monitor e avvitare saldamente le viti
C
.
YY
X\UGGG_X\UGGG_ YWW^TXYTYWGGG㝘䟸GXaZ[aY^YWW^TXYTYWGGG㝘䟸GXaZ[aY^

3.
1. Inserire le 3 asticelle del gruppo
B
staffa nei fori della staffa di montaggio a muro
A
.
2. Fissare il gruppo staffa e la staffa
B
di montaggio a muro
A
utilizzando le viti
D
.
Fare attenzione a collegare i cavi del dispositivo prima di effettuare l'installazione
a parete.
YZ
X\UGGG`X\UGGG` YWW^TXYTYWGGG㝘䟸GXaZ[aY^YWW^TXYTYWGGG㝘䟸GXaZ[aY^

La forma e il colore del prodotto possono variare in base al modello, e le specifiche del prodotto sono soggette
a modifiche senza preavviso allo scopo di migliorarne le prestazioni.
Collegamenti
Installazione del kit dei supporti
Nota
• È consigliabile utilizzare esclusivamente i quattro bulloni forniti.
Attenzione
Samsung Electronics non è da ritenersi responsabile per danni causati dall’utilizzo di un supporto diverso da
quelli specificati.
Installazione del Semi supporto
Supporto
sinistro
Supporto
destro
Attenzione
Posizionare l'etichetta
“CAUTION” sul retro del dispositivo.
1) Un apposito tappo serve a proteggere il foro situato sotto al m onitor, dove si inserisce il supporto.
Accertarsi di rimuovere il tappo di protezione prima di inserire il Semi supporto o il Kit supporto (venduto
separatamente) e tappare il foro utilizzando la 'tappare la bocchetta' quando si fissa il kit di montaggio a
muro.
2) Preparare i supporti destro e sinistro.
3) Inserire i supporti nei rispettivi fori situati sotto al monitor.
Inserire le viti nei fori indicati, quindi serrarle. (M4 × L15)
Istruzioni di sicurezza
Introduzione
Collegamenti
Installazione del kit dei
supporti
Collegamento del monitor
Uso del software
Regolazione del monitor
Risoluzione del problemi
Specifiche
Informazioni
Appendice
Y[
X\UGGGXWX\UGGGXW YWW^TXYTYWGGG㝘䟸GXaZ[aY^YWW^TXYTYWGGG㝘䟸GXaZ[aY^

Attenzione
Questo supporto è stato appositamente progettato per consentire di regolare l'angolazione dello schermo.
La società non può essere ritenuta responsabile per qualsiasi problema causato da altri usi di questo
supporto. Non usare mai il prodotto come supporto per altri oggetti.
Installazione del kit dei supporti (venduto separatamente)
1) Un apposito tappo serve a proteggere il foro situato sotto al m onitor, dove si inserisce il supporto.
Accertarsi di rimuovere il tappo di protezione prima di inserire il Semi supporto o il Kit supporto (venduto
separatamente) e tappare il foro utilizzando la 'tappare la bocchetta' quando si fissa il kit di montaggio a
muro.
2) Accertarsi di inserire le parti nella posizione corretta e nella giusta direzione. (M4 × L15)
3) Inserire i supporti nei rispettivi fori situati sotto al monitor.
4) Inserire le viti nei fori indicati, quindi serrarle. (M4 × L15)
Collegamento del monitor
In caso di cavo di alimentazione con messa a terra
In caso di guasto, il cavo di messa a terra può causare scosse elettriche. Make sure to wire the earth
lead in an approprite manner, before plug-in the AC power. Prima di scollegare il cavo di messa a
terra, estrarre la spina del cavo di alimentazione CA.
Nota
• Oltre al computer, è possibile collegare al monitor dispositivi di input di videofrequenza (AV) quali lettori
DVD, videoregistratori o videocamere. Per informazioni dettagliate relative al collegamento di tali
dispositivi, fare riferimento a Comandi di controllo disponibili per l’utente nella sezione Regolazioni del
monitor.
Collegamento a un computer
Y\
X\UGGGXXX\UGGGXX YWW^TXYTYWGGG㝘䟸GXaZ[aY^YWW^TXYTYWGGG㝘䟸GXaZ[aY^

1) Collegare il cavo di alimentazione del monitor alla porta dell'alimentazione posta sul retro del monitor.
Accendere il sistema utilizzando l'interruttore di alimentazione.
2) Il cavo del segnale può essere collegato al monitor in 3 modi.
Scegliere uno dei modi seguenti:
2-1) Utilizzo del connettore D-sub (analogico) con la scheda video.
Connect the D -sub to the 15-pin, RGB port on the back of your monitor and the 15 pin D-sub
Port on the computer.
2-2) Utilizzo del connettore DVI (digitale) con la scheda video.
Connect the DVI Cable to the DVI(HDCP) port on the back of your monitor and the DVI port on
the computer.
2-3) Utilizzo del connettore BNC (analogico) con la scheda video.
Collegare il cavo BNC alla porta BNC/COMPONENT IN - R, G, B, H, V sul retro dello schermo e
alla porta D-sub a 15 pin del computer.
3) Collegare il cavo audio per il monitor alla porta audio posta sul retro del computer.
Nota
• Accendere il computer e il monitor.
Nota
• I cavi DVI e BNC sono opzionali.
Contattare il centro servizi Samsung Electronics più vicino per acquistare prodotti opzionali.
Y]
X\UGGGXYX\UGGGXY YWW^TXYTYWGGG㝘䟸GXaZ[aY^YWW^TXYTYWGGG㝘䟸GXaZ[aY^

Collegamento di un DVD digitale
Nota
• I dispositivi di ingresso quali i DVD digitali sono collegati al terminale DVI IN dello schermo attraverso il
cavo DVI.
• Quindi, accendere il DVD con un disco DVD inserito.
• Selezionare Digitale utilizzando il tasto SOURCE.
Nota
• Lo schermo dispone di terminali di collegamento DVI IN per collegare dispositivi di ingresso DVI come
DVD digitali.
Collegamento di un videoregistratore (VCR)
1) È possibile collegare ai terminali AV IN [VIDEO] o AV IN [S-VIDEO] del monitor un dispositivo di
videofrequenza quale un lettore videoregistratore o videocamera utilizzando il cavo S-VHS o il cavo BNC.
2) Collegare i terminali Audio sinistro (L) e Audio destro (R) del videoregistratore o videocamera ai terminali
d'ingresso AV AUDIO IN [L-AUDIO-R] del monitor utilizzando cavi audio.
Nota
• Selezionare il segnale AV o S-Video collegato al videoregistratore o videocamera utilizzando il pulsante di
selezione dell'origine Source situato davanti al monitor.
• Quindi, avviare il videoregistratore o videocamera con o il nastro inserito.
Nota
• I cavi S-VHS e BNC sono opzionali.
Collegamento di un lettore DVD
Y^
X\UGGGXZX\UGGGXZ YWW^TXYTYWGGG㝘䟸GXaZ[aY^YWW^TXYTYWGGG㝘䟸GXaZ[aY^

1) player.Collegare un set di cavi audio agli ingressi Audio sinistro COMPONENT AUDIO IN [L-AUDIO-R] del
monitor e alle uscite AUDIO OUT del lettore DVD.
2) Collegare un cavo Component agli ingressi BNC/COMPONENT IN - porta P
R, Y, PB di collegamento del
monitor e alle uscite P
R, Y, PBdel lettore DVD.
Nota
• Selezionare il segnale Component collegato al DVD utilizzando il pulsante di selezione dell'origine Source
situato davanti al monitor.
• Quindi, avviare il DVD con il disco inserito.
Nota
• I cavi Component sono opzionali.
Per una spiegazione di Component Video, consultare il manuale del lettore DVD.
Collegamento di una videocamera
1) Individuare le uscite A/V della videocamera (solitamente situate lateralmente o dietro alla videocamera).
Solita
mente situate lateralmente o dietro alla videocamera.
Collegare un set di cavi audio alle uscite AUDIO OUTPUT della videocamera e agli ingressi AV AUDIO IN
[L-AUDIO-R] del monitor.
2) Collegare un cavo video all'uscita VIDEO OUTPUT della videocamera e all'ingresso AV IN [VIDEO] del
monitor.
Nota
• Selezionare il segnale AV collegato al videocamera il pulsante di selezione dell'origine Source situato
davanti al monitor.
• Quindi, avviare il videocamera con il nastro inserito.
Nota
• I cavi audio e video sono di solito inclusi con la videocamera
(in caso contrario, recarsi dal negozio di componenti elettronici di fiducia).
Se la videocamera è stereo, è necessario collegare un set composto da due cavi.
Y_
X\UGGGX[X\UGGGX[ YWW^TXYTYWGGG㝘䟸GXaZ[aY^YWW^TXYTYWGGG㝘䟸GXaZ[aY^

Collegamento di una Set Top Box DTV
Nota
• I collegamenti di una tipica Set Top Box sono illustrati di seguito.
1) Collegare un cavo video agli ingressi BNC/COMPONENT IN - porta PR, Y, PB di collegamento del monitor
e alle uscite P
R, Y, PB della Set Top Box.
2) Collegare un set di cavi audio agli ingressi Audio sinistro COMPONENT AUDIO IN [L-AUDIO-R] del
monitor e alle uscite AUDIO OUT della Set Top Box.
Nota
• Selezionare il segnale Component collegato al Set Top Box DTV il pulsante di selezione dell'origine
Source situato davanti al monitor.
Nota
• Per una spiegazione del Component Video, consultare il manuale della Set Top Box.
Collegamento degli altoparlanti
Nota
• Fissare schermo e altoparlante utilizzando le viti.
* Montare il gruppo altoparlante senza il supporto.
Y`
X\UGGGX\X\UGGGX\ YWW^TXYTYWGGG㝘䟸GXaZ[aY_YWW^TXYTYWGGG㝘䟸GXaZ[aY_

Nota
• Collegare il cavo dell'altoparlante all'apposita presa situata dietro lo schermo e alla presa dietro
all'altoparlante.
Nota
• Non spostare lo schermo tenendolo dall'altoparlante quando quest'ultimo è montato.
La staffa di fissaggio dell'altoparlante allo schermo potrebbe danneggiarsi.
Collegamento di un Sistema audio
Nota
• Collegare un set di cavi audio agli ingressi sinistro (L) e destro (R) AUX del Sistema e alle MONITOR IN
[L-AUDIO-R] del monitor.
© 1995~2008 SAMSUNG. ALL Rights Reserved
ZW
X\UGGGX]X\UGGGX] YWW^TXYTYWGGG㝘䟸GXaZ[aY_YWW^TXYTYWGGG㝘䟸GXaZ[aY_

Introduzione
Un software MDC (Multiple Display Control, controllo monitor multipli) è un’applicazione che consente a diversi
monitor di funzionare simultaneamente e con semplicità su un unico PC. Per la comunicazione tra un PC e un
monitor viene utilizzato lo standard di comunicazione seriale RS-232C. Per questo motivo, è necessario collegare
un cavo seriale alla porta seriale del PC e alla porta seriale di un monitor.
Main Screen
Fare clic su Click Start > Program > Samsung > MDC System per avviare il programma.
Selezionare un set per visualizzarne il volume nell'indicatore scorrevole.
Z
zt{T[WXXTp__UGGGZZzt{T[WXXTp__UGGGZZ YWW^TXXTY_GGG㝘䟸GYa\\aY]YWW^TXXTY_GGG㝘䟸GYa\\aY]

Icone principali Pulsante di selezione
Remocon Tabella centrale
Safety Lock Selezione monitor
Port Selection Strumenti di controllo
1. Utilizzare le icone principali per passare alla varie schermate.
2. Consente di attivare o disattivare la funzione di ricezione del segnale di controllo dell’unità dei monitor.
3. Imposta la funzione Safety Lock (Blocco di sicurezza).
Quando si imposta la Blocco, è possibile utilizzare solo i tasti di accensione e blocco del telecomando.
4. L’impostazione della porta seriale del PC può variare. Il valore originale è COM1.
5. Fare clic su Select All (seleziona tutto) oppure su Clear (deseleziona) per selezionare o deselezionare tutti i monitor.
6. Utilizzare la Tabella per consultare brevi informazioni sul monitor selezionato.
7. Selezionare un display da Display selection (Selezione display).
8. Utilizzare gli Strumenti di controllo per effettuare operazioni sui monitor.
<Nota> La funzione di attivazione/disattivazione del controllo remoto funziona indipendentemente dallo stato
acceso/spento, ed è applicata a tutti i monitor collegati al MDC. Tuttavia, indipendentemente dallo stato
alla chiusura dell’applicazione MDC, la funzione di ricezione del segnale di controllo remoto di tutti i
monitor viene inizializzata a Enable (attiva) quando l’applicazione MDC viene chiusa.
Port Selection
Z
zt{T[WXXTp__UGGGZ[zt{T[WXXTp__UGGGZ[ YWW^TXXTY_GGG㝘䟸GYa\\aY]YWW^TXXTY_GGG㝘䟸GYa\\aY]

1. Multiple Display Control è originariamente impostato su COM1.
2. Se è utilizzata una porta diversa da COM1, è possibile selezionare una porta compresa tra COM1 e COM4 nel menu
Port Selection (selezione porta).
3. Se non viene selezionata il nome dell’esatta porta collegata al monitor con il cavo seriale, la comunicazione non sarà
possibile.
4. La porta selezionata viene memorizzata nel programma e viene usata anche per il programma successivo.
Power Control
1. Fare clic su Power Control (controllo dello stato generale) tra le icone principale per visualizzare la relativa schermata.
Z
zt{T[WXXTp__UGGGZ\zt{T[WXXTp__UGGGZ\ YWW^TXXTY_GGG㝘䟸GYa\\aY]YWW^TXXTY_GGG㝘䟸GYa\\aY]

La tabella centrale mostra alcune informazioni di base necessarie al controllo dello stato generale.
1) (Power Status (Stato dell'alimentazione))
2) Input
3) Image Size
4) Timer accensione
5) Timer spegnimento
2. Utilizzare il pulsante Select All (seleziona tutto) oppure le caselle di controllo per selezionare i monitor da controllare.
Power Control (controllo dello stato generale) consente di controllare alcune delle funzioni del monitor selezionato.
1)
Power On/Off (accensione/spegnimento)
Z
zt{T[WXXTp__UGGGZ]zt{T[WXXTp__UGGGZ] YWW^TXXTY_GGG㝘䟸GYa\\aY]YWW^TXXTY_GGG㝘䟸GYa\\aY]

- Accende/spegne il monitor selezionato.
2) Volume
- Controlla il livello di volume del monitor selezionato.
Questa barra riceve il valore del volume del monitor selezionato dal set e lo visualizza sull'indicatore scorrevole
(quando si annulla la selezione o si sceglie Select All (seleziona tutto), il valore ritorna all'impostazione predefinita
10)
3)
(Mute On/Off)
- Attiva/disattiva l'audio del monitor selezionato.
Quando si seleziona un set in una volta, se il set selezionato è già impostato su audio disattivato, è necessario
contrassegnare la visualizzazione di disattivazione
(se si sceglie di annullare le selezioni o si sceglie Select All (seleziona tutto), i valori tornano alle impostazioni
predefinite).
Il controllo dello stato generale funziona su tutti i monitor.
Le funzioni di Volume e disattivazione dell'audio sono disponibili solo per i monitor per cui lo stato di
alimentazione è ON.
Input Source
1. Fare clic su Input Source (origine di input) tra le icone principali per visualizzare la schermata di controllo Input
Source.
Fare clic su Seleziona tutto oppure utilizzare le singole caselle di controllo per selezionare un monitor da gestire.
• TV Mode
• PC Mode
Z
zt{T[WXXTp__UGGGZ^zt{T[WXXTp__UGGGZ^ YWW^TXXTY_GGG㝘䟸GYa\\aY]YWW^TXXTY_GGG㝘䟸GYa\\aY]

La tabella centrale mostra alcune informazioni di base necessarie a Input Source.
1) PC
- Cambia l'origine in ingresso del monitor selezionato in PC.
2) BNC
- Cambia l'origine in ingresso del monitor selezionato in BNC.
3) DVI
- Cambia l'origine in ingresso del monitor selezionato in DVI.
4) TV
- Cambia l'origine in ingresso del monitor selezionato in TV.
5) AV
- Cambia l'origine in ingresso del monitor selezionato in AV.
6) S-Video
- Cambia l'origine in ingresso del monitor selezionato in S-
V
ideo.
7) Component
- Cambia l'origine in ingresso del monitor selezionato in Component.
8) MagicNet
- La sorgente di ingresso di MagicNet funziona solo sul modello MagicNet.
9) Channel
- La freccia del canale appare quando Input Source (Sorgente di ingresso) è impostata su TV.
La sorgente TV può essere selezionata solo sui prodotti con TV. Il controllo dei canali è possibile solo
quando la sorgente di ingresso è TV.
Il controllo dell'origine di input funziona solo per i monitor ACCESI.
Image Size
PC, BNC, DVI
1. Fare clic su Input Source (origine di input) tra le icone principali per visualizzare la schermata di controllo Input
Source.
Z
zt{T[WXXTp__UGGGZ_zt{T[WXXTp__UGGGZ_ YWW^TXXTY_GGG㝘䟸GYa\\aY]YWW^TXXTY_GGG㝘䟸GYa\\aY]

Riquadro informazioni visualizza alcune informazioni basilari necessarie per Controllo dimensioni immagine.
1)
(Power Status (Stato dell'alimentazione))
- Mostra lo stato dell'alimentazione del monitor corrente.
2) Image Size
- Mostra le dimensioni correnti dell'immagine sul monitor selezionato.
3) Input
- Mostra l'origine dell'input corrente del monitor in uso.
4) Riquadro informazioni visualizza solo i monitor la cui origine in ingresso è PC,BNC,DVI .
5) PC Source - Facendo clic su Dimensioni immagine viene visualizzata prima la scheda PC, BNC, DVI.
- Il pulsante Controllo dimensioni immagine consente di gestire i controlli delle dimensioni delle immagini disponibili
in PC,BNC,DVI.
6) Video Source
- Fare clic sulla scheda Video Source (Sorgente video) per determinare le dimensioni dell’immagine per la relativa
sorgente di ingresso.
La sorgente di ingresso di MagicNet funziona solo sul modello MagicNet.
Il controllo delle dimensioni dell'immagine è disponibile solo per i monitor ACCESI.
Image Size
TV, AV, S-Video, Component, DVI(HDCP)
1. Fare clic su Input Source (origine di input) tra le icone principali per visualizzare la schermata di controllo Input
Source.
Z
zt{T[WXXTp__UGGGZ`zt{T[WXXTp__UGGGZ` YWW^TXXTY_GGG㝘䟸GYa\\aY^YWW^TXXTY_GGG㝘䟸GYa\\aY^

Riquadro informazioni visualizza alcune informazioni basilari necessarie per Controllo dimensioni immagine.
1) Fare clic sulla scheda Video Source (Sorgente video) per regolare le dimensioni dell’immagine per le modalità TV, AV,
S-Video e Component.
Fare clic su Seleziona tutto oppure utilizzare le singole caselle di controllo per selezionare un monitor da gestire.
2) Il riquadro informazioni visualizza solo il monitor che ha TV, AV, S-VIDEO, Component, DVI(HDCP) come origine in
ingresso.
3) Cambia le dimensioni dell'immagine del monitor selezionato in maniera casuale.
Nota: Le opzioni Auto Wide (Automatico), Zoom1 (Zoom1) e Zoom2 (Zoom2) non possono essere
selezionate quando il tipo di segnale di ingresso delle modalità Component e DVI (HDCP) è 720p o
1080i.
La sorgente di ingresso di MagicNet funziona solo sul modello MagicNet.
Il controllo delle dimensioni dell'immagine è disponibile solo per i monitor ACCESI.
Time
1. Fare clic su Time (orario) tra le icone principali per visualizzare la schermata di controllo dell'orario.
zt{T[WXXTp__UGGG[Wzt{T[WXXTp__UGGG[W YWW^TXXTY_GGG㝘䟸GYa\\aY^YWW^TXXTY_GGG㝘䟸GYa\\aY^

La tabella centrale mostra le informazioni di base necessarie alla funzione di controllo dell'orario.
1) Current Time
- Imposta l'ora corrente per il monitor selezionato (ora del PC).
- Per modificare l'ora corrente modificare prima l'ora del PC.
2) On Time Setup
- Imposta ora, minuti e AM/PM dell'On Timer (timer di attivazione) per il monitor selezionato.
3) Off Time Setup
- Imposta ora, minuti e AM/PM dell'Off Timer (timer di disattivazione) per il monitor selezionato.
4) Mostra le impostazioni del timer di attivazione.
5) Mostra le impostazioni del timer di disattivazione.
La sorgente di ingresso di MagicNet funziona solo sul modello MagicNet.
Il controllo del formato è disponibile solo per i monitor il cui stato di alimentazione è ON.
L’opzione TV Source (Sorgente TV) della funzione On Time Setup (Configurazione tempo di accensione)
può essere utilizzata solo con i modelli TV.
PIP
PIP Size
1. Fare clic su PIP nella barra delle icone principali. Viene visualizzata la schermata di controllo della funzione PIP.
Fare clic su Seleziona tutto oppure utilizzare le singole caselle di controllo per selezionare un monitor da gestire.
zt{T[WXXTp__UGGG[Xzt{T[WXXTp__UGGG[X YWW^TXXTY_GGG㝘䟸GYa\\aY^YWW^TXXTY_GGG㝘䟸GYa\\aY^

Riquadro informazioni visualizza alcune informazioni basilari necessarie per Controllo dimensioni PIP.
1) PIP Size
- Visualizza le dimensioni PIP (immagine nell'immagine) del monitor in uso.
2) OFF
- Disattiva la funzione PIP per il monitor selezionato.
3) Large
- Attiva la funzione PIP per il monitor selezionato e modifica le dimensioni in Large.
4) Small
- Attiva la funzione PIP per il monitor selezionato e modifica le dimensioni in Small.
5) Double1
- Attiva la funzione PIP per il monitor selezionato e modifica le dimensioni in 1.
6) Double 2
- Attiva la funzione PIP per il monitor selezionato e modifica le dimensioni in 2.
7) Double 3 (Doppio 3) (Immagine per immagine)
– Attiva il PBP dello schermo selezionato e imposta il formato su Double 3 (Doppio 3).
La sorgente di ingresso di MagicNet funziona solo sul modello MagicNet.
Le dimensioni PIP possono essere controllate quando si accende il monitor.
PIP
PIP Source
1. Fare clic su PIP nella barra delle icone principali. Viene visualizzata la schermata di controllo della funzione PIP.
• PIP TV Mode
[
zt{T[WXXTp__UGGG[Yzt{T[WXXTp__UGGG[Y YWW^TXXTY_GGG㝘䟸GYa\\aY^YWW^TXXTY_GGG㝘䟸GYa\\aY^

• PIP S-Video Mode
Riquadro informazioni visualizza alcune informazioni basilari necessarie per Controllo Origine PIP.
1) Origine PIP
- L'origine PIP può essere controllata quando si accende il monitor.
2) PC
- Cambia l'origine PIP per il monitor selezionato in PC.
3) BNC
- Cambia l'origine PIP per il monitor selezionato in BNC.
4) DVI
- Cambia l'origine PIP per il monitor selezionato in DVI.
5) TV
- Cambia l'origine PIP per il monitor selezionato in TV.
[
zt{T[WXXTp__UGGG[Zzt{T[WXXTp__UGGG[Z YWW^TXXTY_GGG㝘䟸GYa\\aY^YWW^TXXTY_GGG㝘䟸GYa\\aY^

6) AV
- Cambia l'origine PIP per il monitor selezionato in AV.
7) S-Video
- Cambia l'origine PIP per il monitor selezionato in S-Video.
8) Component
- Cambia l'origine PIP per il monitor selezionato in Component.
9) Channel
- La freccia del canale appare quando la PIP Source (Sorgente PIP) è impostata su TV.
Nota: Alcune delle origini PIP potrebbero non essere disponibili per la selezione, sulla base del tipo di
origine in ingresso della schermata principale.
La sorgente di ingresso di MagicNet funziona solo sul modello MagicNet.
La sorgente TV può essere selezionata solo sui prodotti con TV. Il controllo dei canali è possibile solo
quando la sorgente PIP è TV.
La funzione PIP Control (controllo PIP) è disponibile solo per gli schermi il cui stato di alimentazione è
su ON (acceso) e la cui funzione PIP è attiva.
Settings
Picture
1. Fare clic su Settings (impostazioni) tra le icone principali per visualizzare la schermata di controllo delle impostazioni.
La tabella centrale mostra le informazioni di base necessarie alla funzione di controllo delle impostazioni.
Quando una funzione viene selezionata, il valore impostato della funzione selezionata viene visualizzato nell'apposito
riquadro. Quando si fa clic su Select All (seleziona tutto), viene visualizzato il valore predefinito (50). La modifica di
un valore in questa schermata cambia automaticamente la modalità su “CUSTOM” (personalizzato).
1) Picture
- Disponibile solo per TV,AV, S-Video, Component, DVI(HDCP).
2) Contrast
- Regola il contrasto del monitor selezionato.
3) Brightness
- Regola la luminosità del monitor selezionato.
4) Sharpness
- Regola la nitidezza del monitor selezionato.
5) Color
- Regola il colore del monitor selezionato.
6) Tint
- Regola la tinta del monitor selezionato.
[
zt{T[WXXTp__UGGG[[zt{T[WXXTp__UGGG[[ YWW^TXXTY_GGG㝘䟸GYa\\aY^YWW^TXXTY_GGG㝘䟸GYa\\aY^

7) Color Tone
- Adjusts Color Tone of the selected display.
La sorgente di ingresso di MagicNet funziona solo sul modello MagicNet.
La funzione è disponibile solo per i display in cui lo stato di alimentazione è ON e se non viene fatta
alcuna selezione viene visualizzato il valore predefinito.
Settings
Picture PC
1. Fare clic su Settings (impostazioni) tra le icone principali per visualizzare la schermata di controllo delle impostazioni.
La tabella centrale mostra le informazioni di base necessarie alla funzione di controllo delle impostazioni. Quando
ogni funzione è selezionata, il relativo valore appare nella dispositiva. Al termine della selezione, il valore viene
assegnato alle funzioni e visualizzato nella barra di scorrimento. Quando si fa clic su Select All (seleziona tutto), viene
visualizzato il valore predefinito (50). La modifica di un valore in questa schermata cambia automaticamente la
modalità su “CUSTOM” (personalizzato).
1) Picture PC
- Disponibile solo per PC, BNC, DVI.
2) Contrast
- Regola il contrasto del monitor selezionato.
3) Brightness
- Regola la luminosità del monitor selezionato.
4) Red
- Consente di regolare la temperatura di Red colore del monitor selezionato.
5) Green
- Consente di regolare la temperatura di Green colore del monitor selezionato.
6) Blue
- Consente di regolare la temperatura di Blue colore del monitor selezionato.
La sorgente di ingresso di MagicNet funziona solo sul modello MagicNet.
La funzione è disponibile solo per i display in cui lo stato di alimentazione è ON e se non viene fatta
alcuna selezione viene visualizzato il valore predefinito.
Settings
[
zt{T[WXXTp__UGGG[\zt{T[WXXTp__UGGG[\ YWW^TXXTY_GGG㝘䟸GYa\\aY^YWW^TXXTY_GGG㝘䟸GYa\\aY^

Audio
1. Fare clic su Settings (impostazioni) tra le icone principali per visualizzare la schermata di controllo delle impostazioni.
La tabella centrale mostra le informazioni di base necessarie alla funzione di controllo delle impostazioni. Quando
ogni funzione è selezionata, il relativo valore appare nella dispositiva. Al termine della selezione, il valore viene
assegnato alle funzioni e visualizzato nella barra di scorrimento. Quando si fa clic su Select All (seleziona tutto), viene
visualizzato il valore predefinito (50). La modifica di un valore in questa schermata cambia automaticamente la
modalità su “CUSTOM” (personalizzato).
1) Audio
- Controlla le impostazioni dell'audio per tutte le origini dell'input.
2) Bass
- Regola le frequenze basse del monitor selezionato.
3) Treble
- Regola le frequenze alte del monitor selezionato.
4) Balance
- Regola il bilanciamento del monitor selezionato.
5) SRS TSXT
- Attiva e disattiva l'audio SRS TSXT.
6) Selezione audio
- Quando è attiva la funzionalità PIP, è possibile selezionare la schermata principale o quella secondaria.
La sorgente di ingresso di MagicNet funziona solo sul modello MagicNet.
La funzione è disponibile solo per i display in cui lo stato di alimentazione è ON e se non viene fatta
alcuna selezione viene visualizzato il valore predefinito.
Settings
Image Lock
1. Fare clic su Settings (impostazioni) tra le icone principali per visualizzare la schermata di controllo delle impostazioni.
[
zt{T[WXXTp__UGGG[]zt{T[WXXTp__UGGG[] YWW^TXXTY_GGG㝘䟸GYa\\aY^YWW^TXXTY_GGG㝘䟸GYa\\aY^

La tabella centrale mostra le informazioni di base necessarie alla funzione di controllo delle impostazioni.
1) Blocco immagine
- Disponibile solo per PC, BNC.
2) Grossa
- Regola la Coarse del monitor selezionato.
3) Fine
- Regola la Fine del monitor selezionato.
4) posizione
- Regola la posizione del monitor selezionato.
5) Regolazione auto
- Premere questo pulsante per l'autoregolazione del segnale del PC in ingresso.
La sorgente di ingresso di MagicNet funziona solo sul modello MagicNet.
Il controllo delle impostazioni è disponibile solo per i monitor il cui stato di alimentazione è ON.
Maintenance
Lamp Control
1. Fare clic sull’icona "Maintenance" (manutenzione) nella colonna delle icone principale per visualizzare la schermata di
manutenzione.
[
zt{T[WXXTp__UGGG[^zt{T[WXXTp__UGGG[^ YWW^TXXTY_GGG㝘䟸GYa\\aY^YWW^TXXTY_GGG㝘䟸GYa\\aY^

Appare una tabella informativa "Info Grid" che mostra diverse voci di dati di base.
1) Maintenance
- Consente di utilizzare la funzione Maintenance Control (Controllo manutenzione) per tutte le sorgenti di ingresso.
2) Auto Lamp Control
- Regola automaticamente la retroilluminazione dello schermo selezionato in un momento specifico.
L’opzione Manual Lamp Control (Controllo manuale lampada) si disattiva automaticamente se si effettua la
regolazione tramite Auto Lamp Control (Controllo automatico lampada).
3) Manual Lamp Control
- Consente di regolare la retroilluminazione dello schermo selezionato indipendentemente dal momento.
La funzione Auto Lamp Control si disattiva automaticamente se di eseguono regolazioni utilizzando la funzione
Manual Lamp Control (controllo manuale lampada).
La funzione Maintenance Control (controllo manutenzione) è disponibile solo per gli schermi il cui stato
di alimentazione è su ON (acceso).
La sorgente di ingresso di MagicNet funziona solo sul modello MagicNet.
Maintenance
Scroll
1. Fare clic sull’icona "Maintenance" (manutenzione) nella colonna delle icone principale per visualizzare la schermata di
manutenzione.
[
zt{T[WXXTp__UGGG[_zt{T[WXXTp__UGGG[_ YWW^TXXTY_GGG㝘䟸GYa\\aY^YWW^TXXTY_GGG㝘䟸GYa\\aY^

1) Screen Scroll
- Elimina le immagini persistenti che possono verificarsi quando lo schermo selezionato si trova in modalità Pausa per
un periodo di tempo prolungato. È possibile impostare il timer di ripetizione ciclico selezionando il "Interval" per ora
e "Second" per secondo.
Le opzioni disponibili per Screen Type (Tipo di schermo) sono Scroll (Scorri), Pixel (Pixel), Bar (Barra) e Eraser
(Eraser).
La sorgente di ingresso di MagicNet funziona solo sul modello MagicNet.
L’opzione Second (Secondi) può essere impostata su 1, 2, 3, 4, 5 per Scroll Type (Tipo di scorrimento) e
10, 20, 30, 40, 50 per Pixel (Pixel), Bar (Barra) e Eraser (Eraser).
La funzione Maintenance Control (controllo manutenzione) è disponibile solo per gli schermi il cui stato
di alimentazione è su ON (acceso).
Maintenance
Video Wall
1. Fare clic sull’icona "Maintenance" (manutenzione) nella colonna delle icone principale per visualizzare la schermata di
manutenzione.
[
zt{T[WXXTp__UGGG[`zt{T[WXXTp__UGGG[` YWW^TXXTY_GGG㝘䟸GYa\\aY^YWW^TXXTY_GGG㝘䟸GYa\\aY^

1) Video Wall
- Una parete video è un insieme di schermi collegati insieme, in modo che ognuno di essi proietti una parte
dell'immagine intera oppure che la stessa immagine sia ripetuta su ciascuno schermo.
2) Video Wall (Screen divider)
- Lo schermo può essere suddiviso.
In questo modo, è possibile selezionare un numero di schermi con un layout diverso se suddivisi.
z Selezionare una modalità dall'opzione Suddivisione Schermi.
z Selezionare un display da Display selection (Selezione display).
z
La posizione verrà configurata premendo un numero nella modalità selezionata.
z
Il programma MDC fornito da Samsung supporta fino a 4x4 schermi LCD.
z
2*2
z 3*3
z 4*4
z 1*2
z
2*1
z
1*5
z
5*1
3)
On / Off
zt{T[WXXTp__UGGG\Wzt{T[WXXTp__UGGG\W YWW^TXXTY_GGG㝘䟸GYa\\aY^YWW^TXXTY_GGG㝘䟸GYa\\aY^

- Accendere/Spegnere la funzione Video Wall (Parete video) del display selezionato.
4) Format
- Il formato può essere selezionato per vedere uno schermo suddiviso.
z
2) Formato :
z Naturale
È possibile utilizzare questa funzione in MagicNet.
La funzione Maintenance Control (controllo manutenzione) è disponibile solo per gli schermi il cui stato
di alimentazione è su ON (acceso).
Troubleshooting
1. Il monitor che si desidera controllare non appare nella tabella centrale della schermata Power Control (controllo dello
stato generale)
- Controllare il collegamento RS232C (verificare il corretto collegamento alla porta Com1)
- Verificare l'eventuale presenza dello stesso ID per gli altri monitor collegati. Se più di un monitor presenta lo stesso
ID, essi non vengono correttamente rilevati dal programma a causa di un conflitto di dati.
-
Verificare che i monitor del set abbiano un numero di ID compreso tra 0 e 10 (effettuare l'impostazione mediante il
menu Display)
Nota: Il numero ID del monitor deve essere un valore compreso tra 1 e 10.
Se il valore è esterno all'intervallo, il sistema MDC non è in grado di controllare il monitor.
2. Il monitor che si desidera controllare non appare nelle altre tabelle centrali di controllo
-
Verificare che il monitor sia acceso (stato ON). Il controllo può essere effettuato nella tabella centrale di Power
Control (controllo dello stato generale)
- Verificare che sia possibile cambiare l'origine dell'input del monitor.
3. La finestra di dialogo di figura appare ripetutamente.
- Verificare che sia stato selezionato il monitor che si desidera controllare.
4. Sono stati impostati sia On Timer (timer di attivazione) sia Off Timer (timer di disattivazione) ma viene mostrato un
orario differente.
- Impostare l'ora corrente per sincronizzare gli orologi dei monitor.
5. La funzione di controllo remoto potrebbe non funzionare correttamente se si disattiva la funzione di controllo remoto,
si scollega il cavo RS-232C oppure si chiude il programma in modo irregolare. Tornare al programma e attivare
nuovamente la funzione di controllo remoto per ripristinare il normale funzionamento.
<Nota> Il programma potrebbe non funzionare correttamente a causa di problemi nei circuiti di comunicazione o
interferenze provocate da componenti elettronici situati nelle vicinanze.
Valore di impostazione in modalità a più monitor
Quando vengono collegati più di un monitor, i valori di impostazione sono visualizzati come segue:
zt{T[WXXTp__UGGG\Xzt{T[WXXTp__UGGG\X YWW^TXXTY_GGG㝘䟸GYa\\aY^YWW^TXXTY_GGG㝘䟸GYa\\aY^

1. Nessuna selezione: visualizzazione del valore predefinito di fabbrica.
2. Un monitor selezionato: rilevamento e visualizzazione del valore di impostazione del monitor selezionato.
3. Un monitor selezionato (ID1) e aggiunta di un altro monitor (ID3): il programma, che visualizzava il valore di
impostazione ID1, rileva e visualizza il valore ID3.
4. Tutti i monitor selezionati con il comando Select All (seleziona tutto): ritorno al valore predefinito di fabbrica.
\
zt{T[WXXTp__UGGG\Yzt{T[WXXTp__UGGG\Y YWW^TXXTY_GGG㝘䟸GYa\\aY^YWW^TXXTY_GGG㝘䟸GYa\\aY^

La forma e il colore del prodotto possono variare in base al modello, e le specifiche del prodotto sono soggette
a modifiche senza preavviso allo scopo di migliorarne le prestazioni.
Regolazione del monitor
Inserisci
Modalità disponibili
PC / BNC / DVI
AV
S-Video
Component
DVI-Video
Elenco sorgenti
[MENU]
˧
[ENTER]
˧
[ENTER]
˧
[
/
]
˧
[ENTER]
Accede l’indicatore relativo al segnale video attualmente visualizzato.
Consente di selezionare lo schermo desiderato.
1) PC
2) BNC
3) DVI
4) AV
5) S-Video
6) Component
[Il pulsante diretto sul telecomando è il tasto 'SOURCE'.]
Nota
• L’immagine PIP scompare quando il monitor viene commutato verso una sorgente esterna.
PIP
Quando al monitor sono collegati dispositivi di videofrequenza esterni quali lettori DVD o videoregistratori, la
funzione PIP consente di vedere il segnale video proveniente da tali dispositivi in uno schermo di minori
dimensioni sovrapposto al segnale video del PC. (Off/On)
Nota
• Non è possibile sovrapporre più immagini PIP sullo schermo, dato che il BNC e il componente utilizzano lo
stesso terminale.
1) PIP
[MENU]
˧
[ENTER]
˧
[
/
]
˧
[ENTER]
˧
[ENTER]
˧
[
/
]
˧
[ENTER]
Turn the PIP Screen on or off.
- Off
- On
[Il pulsante diretto sul telecomando è il tasto 'PIP'.]
2) Sorgente
[MENU]
˧
[ENTER]
˧
[
/
]
˧
[ENTER]
˧
[
/
]
˧
[ENTER]
˧
[
/
]
˧
[ENTER]
Ridimensionamento dello schermo PIP
- PC : AV / S-Video / Comp.
- BNC: AV / S-Video Mode
- DVI: AV / S-Video / Comp.
- AV / S-Video: PC / BNC / DVI modalità
Istruzioni di sicurezza
Introduzione
Collegamenti
Uso del software
Regolazione del monitor
Inserisci
Immagine
[PC / BNC /DVI]
Immagine
[ AV / S-Video / Comp. /
DVI-Video]
Suono
Impostazione
Controllo multi-schermo
Funzioni a controllo diretto
Risoluzione del problemi
Specifiche
Informazioni
Appendice
\
W\UGGGXW\UGGGX YWW^TXYTXWGGG㝘䟸GXa\_aZ[YWW^TXYTXWGGG㝘䟸GXa\_aZ[

- Comp: : PC / DVI Mode
[Il pulsante diretto sul telecomando è il tasto 'SOURCE'.]
3) Swap
[MENU]
˧
[ENTER]
˧
[
/
]
˧
[ENTER]
˧
[
/
]
˧
[ENTER]
Scambia il Descrizione della finestra PIP con l'immagine principale.
L’immagine nella finestra PIP appare nella schermata principale mentre l’immagine nella schermata
principale appare nella finestra PIP.
[Il pulsante diretto sul telecomando è il tasto 'SWAP'.]
4) Dimensioni
[MENU]
˧
[ENTER]
˧
[
/
]
˧
[ENTER]
˧
[
/
]
˧
[ENTER]
˧
[
/
]
˧
[ENTER]
Consente all'utente di disattivare la schermata PIP o di regolarne le dimensioni.
[Il pulsante diretto sul telecomando è il tasto 'SIZE'.]
5) Position (posizione)
[MENU]
˧
[ENTER]
˧
[
/
]
˧
[ENTER]
˧
[
/
]
˧
[ENTER]
˧
[
/
]
˧
[ENTER]
Consente di cambiare la posizione della finestra PIP.
6) Trasparenza
[MENU]
˧
[ENTER]
˧
[
/
]
˧
[ENTER]
˧
[
/
]
˧
[ENTER]
˧
[
/
]
˧
[ENTER]
Regola la trasparenza della finestra PIP.
- High
- Medium
- Low
- Opaque
Nota
•
Se si selezione , , in Formato, Posizione e Trasparenza non saranno attivati.
Modalità disponibili : PIP
Modifica Nome
[MENU]
˧
[ENTER]
˧
[
/
]
˧
[ENTER]
˧
[
/
]
˧
[ENTER]
˧
[
/
]
˧
[ENTER]
Consente di dare un nome ai dispositivi di input collegati agli ingressi per rendere più semplice la selezione
dell'origine.
1) PC
2) BNC
3) DVI
4) AV
5) S-Video
6) Component
Immagine[PC / BNC /DVI]
Modalità disponibili
PC / BNC / DVI
AV
S-Video
Component
DVI-Video
MagicBright™
[MENU]
˧
[
/
]
˧
[ENTER]
˧
[ENTER]
˧
[
/
]
˧
[ENTER]
MagicBright™ è una nuova funzione che offre un ambiente di visualizzazione ottimale in base al tipo di
immagine che si sta visualizzando.
Attualmente sono disponibili 4 diverse modalità: Entertain, Internet, Text e Custom.
Ogni modalità ha il suo valore di luminosità predefinito. E’ possibile selezionare una delle 4 impostazioni
semplicemente premendo il tasto 'MagicBright™.
1) Entertainment
Luminosità Alta
Per la visione di film e immagini in movimento, come ad esempio DVD o Video CD.
2) Internet
Luminosità Media
Per lavori che prevedono un misto di testo e grafica.
3) Testo
Luminosità Normale
\
W\UGGGYW\UGGGY YWW^TXYTXWGGG㝘䟸GXa\_aZ^YWW^TXYTXWGGG㝘䟸GXa\_aZ^

Per documenti o lavori che prevedono l'uso frequente di testo.
4) Personalizzata
Sebbene tali valori preimpostati sono stati scelti con cura dagli ingegneri, essi potrebbero non risultare
comodi per le preferenze dell'utente.
In questo caso, regolare Luminosità e Contrasto utilizzando il menu a schermo.
[Il pulsante diretto sul telecomando è il tasto 'M/B'.]
Personalizzata
[MENU]
˧
[
/
]
˧
[ENTER]
˧
[
/
]
˧
[ENTER]
˧
[ENTER]
˧
[
/
] / [< / >]
˧
[ENTER]
Utilizzando i menu a schermo è possibile regolare contrasto e luminosità secondo le proprie preferenze.
1) Contrast (contrasto)
Regola il contrasto.
2) Brightness (luminosità)
Regola la luminosità.
Nota
• Se si regola l'immagine utilizzando la funzione Personalizzata, MagicBright passa nella modalità
Personalizzata.
Toni colore
[MENU]
˧
[
/
]
˧
[ENTER]
˧
[
/
]
˧
[ENTER]
˧
[
/
]
˧
[ENTER]
È possibile modificare la tonalità dei colori.
1) Freddo
2) Normale
3) Caldo
4) Personalizzata
(Disponibile solo in modalità PC/BNC.)
Controllo Colore
[MENU]
˧
[
/
]
˧
[ENTER]
˧
[
/
]
˧
[ENTER]
˧
[ENTER]
˧
[< / >]
˧
[ENTER]
utilizzare questa funzione per le regolazioni di ottimizzazioni del colore.
(Disponibile solo in modalità PC/BNC)
1) Rosso
2) Verde
3) Blue
Nota
• Se si regola l'immagine utilizzando la funzione Controllo Colore, Toni colore passa nella modalità
Personalizzata.
Blocco immagine
Le funzioni di Image Lock sono utilizzate per ottimizzare l’immagine rimuovendo i disturbi che rendono le
immagini instabili attraverso tremolii e scintillii. Se non si ottengono risultati ottimali mediante la regolazione
Fine, utilizzare la regolazione Corse, quindi riprovare nuovamente con Fine.
(Disponibile solo in modalità PC/BNC)
1) Grossa
[MENU]
˧
[
/
]
˧
[ENTER]
˧
[
/
]
˧
[ENTER]
˧
[ENTER]
˧
[< / >]
˧
[ENTER]
Elimina i disturbi come le strisce verticali. La regolazione "grossa" può spostare l'area dell'immagine dello
schermo. Per riposizionarla al centro, utilizzare il menu per il controllo orizzontale.
2) Fine
[MENU]
˧
[
/
]
˧
[ENTER]
˧
[
/
]
˧
[ENTER]
˧
[
/
]
˧
[ENTER]
˧
[< / >]
˧
[ENTER]
Rimuove i disturbi quali strisce orizzontali. Se i disturbi persistono anche dopo la regolazione Fine, ripeterla
dopo aver regolato la frequenza (velocità di clock).
3) posizione
[MENU]
˧
[
/
]
˧
[ENTER]
˧
[
/
]
˧
[ENTER]
˧
[
/
]
˧
[ENTER]
˧
[< / >] / [
/
]
˧
\
W\UGGGZW\UGGGZ YWW^TXYTXWGGG㝘䟸GXa\_aZ^YWW^TXYTXWGGG㝘䟸GXa\_aZ^

Consente di regolare la posi
zione orizzontale e verticale dello schermo.
Regolazione auto
[MENU]
˧
[
/
]
˧
[ENTER]
˧
[
/
]
˧
[ENTER]
Tutti i valori di sintonia vengono automaticamente regolati.
Se si cambia la risoluzione nel pannello di controllo, viene eseguita la funzione Regolazione auto.
(Disponibile solo in modalità PC/BNC)
[Il pulsante diretto sul telecomando è il tasto 'AUTO'.]
Bilanciam segnale
Consente di bilanciare i segnali RGB deboli trasmessi mediante un cavo di segnale lungo.
(Disponibile solo in modalità PC/BNC)
1) Bilanciam segnale
[MENU]
˧
[
/
]
˧
[ENTER]
˧
[
/
]
˧
[ENTER]
˧
[ENTER]
˧
[
/
]
˧
[ENTER]
È possibile impostare il controllo segnale sia su On sia su Off.
2) Controllo segnale
[MENU]
˧
[
/
]
˧
[ENTER]
˧
[
/
]
˧
[ENTER]
˧
[
/
]
˧
[ENTER]
˧
[
/
]
˧
[ENTER]
˧
[
/
]
˧
[< / >]
˧
[ENTER]
E’ possibile regolare manualmente le funzioni R Phase (Fase R), G Phase (Fase G), B Phase (Fase B),
Gain (Guadagno) e Sharpness (Nitidezza).
Formato
[MENU]
˧
[
/
]
˧
[ENTER]
˧
[
/
]
˧
[ENTER]
˧
[
/
]
˧
[ENTER]
Consente di selezionare le diverse formato dell'immagine
1) 16:9
2) 4:3
Immagine PIP
[MENU]
˧
[
/
]
˧
[ENTER]
˧
[
/
]
˧
[ENTER]
˧
[
/
]
˧
[ENTER]
˧
[
/
]
˧
[ENTER]
˧
[
/
]
˧
[ENTER]
˧
[< / >]
˧
[ENTER]
Consente di impostare le opzioni relative alla schermata PIP.
1) Contrast (contrasto)
Regola il contrasto della finestra PIP su schermo.
2) Brightness (luminosità)
Regola la luminosità della finestra PIP su schermo.
3) Sharpness (nitidezza)
Consente di regolare la differenza esistente tra le aree più chiare e quelle più scure della finestra PIP.
4) Colore
Consente di regolare la luminescenza/scurezza della finestra PIP.
5) Tinta
A
ggiunge una tonalità naturale alla finestra PIP.
E’ possibile visualizzare un’immagine da AV, S-Video attraverso la schermata PIP in modalità PC,
BNCico e DVI. Funziona solo se il segnale video è NTSC.
Modalità disponibili : PIP
Immagine [AV / S-Video / Comp. / DVI-Video]
Modalità disponibili
PC / BNC / DVI
AV
S-Video
Component
DVI-Video
\
W\UGGG[W\UGGG[ YWW^TXYTXWGGG㝘䟸GXa\_aZ_YWW^TXYTXWGGG㝘䟸GXa\_aZ_

[MENU]
˧
[
/
]
˧
[ENTER]
˧
[ENTER]
˧
[
/
]
˧
[ENTER]
Regolazione dell'atmosfera di visualizzazione.
1) Dinamica
2) Standard
3) Film
4) Personalizzata
[Il pulsante diretto sul telecomando è il tasto 'P.MODE'.]
Personalizzata
[MENU]
˧
[
/
]
˧
[ENTER]
˧
[
/
]
˧
[ENTER]
˧
[
/
]
˧
[ENTER]
˧
[< / >]
˧
[ENTER]
Utilizzando i menu a schermo è possibile regolare contrasto e luminosità secondo le proprie preferenze.
1) Contrast (contrasto)
Aggiunge un tono naturale all'immagine.
2) Brightness (luminosità)
Regolare luminosità.
3) Sharpness (nitidezza)
Regola la nitidezza dell'immagine.
4) Colore
Regola il colore dell'immagine.
5) Tinta
Regola il Tinta dell'immagine.
Funziona solo con le modalità AV e S-Video. Funziona solo se il segnale video è NTSC.
Toni colore
[MENU]
˧
[
/
]
˧
[ENTER]
˧
[
/
]
˧
[ENTER]
˧
[
/
]
˧
[ENTER]
È possibile modificare la tonalità dei colori. I singoli componenti del colore sono anch’essi regolabili.
1) Freddo2
2) Freddo1
3) Normale
4) Caldo1
5) Caldo2
Formato
[MENU]
˧
[
/
]
˧
[ENTER]
˧
[
/
]
˧
[ENTER]
˧
[
/
]
˧
[ENTER]
Consente di selezionare le diverse formato dell'immagine
1)16:9
2)Zoom 1
3)Zoom 2
4)4:3
[ZOOM1, ZOOM2 non sono disponibili con 1080i (o più di 720p) DTV.]
Digital NR (Digital Noise Reduction.( Riduzione digitale dei disturbi. ) )
[MENU]
˧
[
/
]
˧
[ENTER]
˧
[
/
]
˧
[ENTER]
˧
[
/
]
˧
[ENTER]
È possibile attivare o disattivare la funzione di eliminazione dei disturbi.
La funzione di eliminazione dei disturbi consente di ottenere immagini più chiare e decise.
1) Off
2) On
Modalità Film
[MENU]
˧
[
/
]
˧
[ENTER]
˧
[
/
]
˧
[ENTER]
˧
[
/
]
˧
[ENTER]
È possibile attivare o disattivare la modalità per i filmati.
Questa funzione consente di ottenere una visione di qualità cinematografica.
(Non disponibile in modalità DVI-Video)
1) Off 2) On
\
W\UGGG\W\UGGG\ YWW^TXYTXWGGG㝘䟸GXa\_aZ_YWW^TXYTXWGGG㝘䟸GXa\_aZ_
Modalità

Immagine PIP
[MENU]
˧
[
/
]
˧
[ENTER]
˧
[
/
]
˧
[ENTER]
˧
[
/
]
˧
[ENTER]
˧
[
/
]
˧
[ENTER]
˧
[< / >]
˧
[ENTER]
Consente di impostare le opzioni relative alla schermata PIP.
1) Contrast (contrasto)
Regola il contrasto della finestra PIP su schermo.
2) Brightness (luminosità)
Regola la luminosità della finestra PIP su schermo.
Modalità disponibili : PIP
Suono
Modalità disponibili
PC / BNC / DVI
AV
S-Video
Component
DVI-Video
Modalità
[MENU]
˧
[
/
]
˧
[ENTER]
˧
[ENTER]
˧
[
/
]
˧
[ENTER]
Il monitor è dotato di un amplificatore integrato stereo ad alta fedeltà.
1) Standard
consente di applicare le impostazioni predefinite di fabbrica.
2) Musica
opzione da selezionare quando si visionano concerti o video musicali.
3) Film
opzione da selezionare quando si visionano film.
4) Dialoghi
opzione da selezionare quando si visionano programmi in cui vi è una maggiore presenza di dialoghi (ad
esempio, i telegiornali).
5) Personalizzata
selezionare questa opzione per richiamare le proprie impostazioni personalizzate.
Personalizzata
[MENU]
˧
[
/
]
˧
[ENTER]
˧
[
/
]
˧
[ENTER]
˧
[
/
]
˧
[ENTER]
˧
[< / >]
˧
[ENTER]
Le impostazioni audio possono essere regolate per adattarle alle proprie preferenze.
1) Bass (bassi)
Emphasize low frequency audio.
2) Alti
Emphasize high frequency audio.
3) Balance (bilanciamento)
Bilanciamento del suono ==> Permette di regolare il bilanciamento del suono tra gli altoparlanti destro e
sinistro.
[È possibile udire il suono anche se l’audio è impostato su 0.]
Nota
• Se si regola l’immagine utilizzando la funzione Sound Custom (Audio personalizzato), verrà attivata la
modalità Audio personalizzata.
Volume auto
[MENU]
˧
[
/
]
˧
[ENTER]
˧
[
/
]
˧
[ENTER]
˧
[
/
]
˧
[ENTER]
Riduce le differenze del livello di volume delle diverse emittenti.
1) Off 2) On
\
W\UGGG]W\UGGG] YWW^TXYTXWGGG㝘䟸GXa\_aZ_YWW^TXYTXWGGG㝘䟸GXa\_aZ_

TS XT SRS
[MENU]
˧
[
/
]
˧
[ENTER]
˧
[
/
]
˧
[ENTER]
˧
[
/
]
˧
[ENTER]
TS XT SRS è una tecnologia SRS brevettata che risolve il problema della riproduzione di contenuti multicanale
5.1 su due altoparlanti. TruSurround offre una straordinaria esperienza Surround Sound virtuale attraverso un
sistema di riproduzione a due altoparlanti, inclusi gli altoparlanti interni del televisore.
È pienamente compatibile con tutti i formati multicanale.
1) Of
f
2) On
[Il pulsante diretto sul telecomando è il tasto 'SRS'.]
Selezione audio
[MENU]
˧
[
/
]
˧
[ENTER]
˧
[
/
]
˧
[ENTER]
˧
[
/
]
˧
[ENTER]
audio Quando è attiva la funzionalità PIP, è possibile selezionare la schermata principale o quella secondaria.
1) Principale
2) Secondario
[Modalità disponibili : PIP]
Impostazione
Modalità disponibili
PC / BNC / DVI
AV
S-Video
Component
DVI-Video
Lingua
[MENU]
˧
[
/
]
˧
[ENTER]
˧
[ENTER]
˧
[
/
]
˧
[ENTER]
È possibile scegliere una delle undici lingue.
Nota
• La lingue prescelta influisce solamente sulla lingue dell'OSD.
È possibile scegliere una delle undici lingue.
Ora
Consente di scegliere una delle quattro impostazioni temporali: Imposta Ora, Timer stand-by, Timer accensione
e Timer spegnimento.
1)
Imposta Ora
[MENU]
˧
[
/
]
˧
[ENTER]
˧
[
/
]
˧
[ENTER]
˧
[ENTER]
˧
[< / >]
˧
[ENTER]
Impostazione dell'ora corrente.
2) Timer stand-by
[MENU]
˧
[
/
]
˧
[ENTER]
˧
[
/
]
˧
[ENTER]
˧
[
/
]
˧
[ENTER]
˧
[< / >]
˧
[
/
]
˧
[ENTER]
˧
[< / >]
˧
[
/
]
˧
[ENTER]
Consente di impostare la disattivazione automatica del monitor dopo il numero di minuti specificato. (Off,
30, 60, 90, 120, 150, 180)
3) Timer accensione
[MENU]
˧
[
/
]
˧
[ENTER]
˧
[
/
]
˧
[ENTER]
˧
[
/
]
˧
[ENTER]
˧
[< / >]
˧
[
/
]
˧
[ENTER]
(Off, 30, 60, 90, 120, 150, 180)
Consente di controllare la modalità, il livello del volume e l’ora di spegnimento del monitor.
4) Timer spegnimento
[MENU]
˧
[
/
]
˧
[ENTER]
˧
[
/
]
˧
[ENTER]
˧
[
/
]
˧
[ENTER]
˧
[< / >]
˧
[
/
]
˧
\
W\UGGG^W\UGGG^ YWW^TXYTXWGGG㝘䟸GXa\_aZ`YWW^TXYTXWGGG㝘䟸GXa\_aZ`

[ENTER]
Consente di controllare la modalità, il livello del volume e l’ora di spegnimento del monitor.
Nota
• Selezionando l'opzione Sì di Timer accensione o Timer spegnimento senza avere impostato Imposta Ora,
apparirà il messaggio "Impostare prima l'orologio".
Trasparenza menu
[MENU]
˧
[
/
]
˧
[ENTER]
˧
[
/
]
˧
[ENTER]
˧
[
/
]
˧
[ENTER]
Modifica l’opacità dello sfondo delle schermate OSD.
1) Alta
2) Media
3) Bassa
4) Opaco
Blocco di sicurezza
[MENU]
˧
[
/
]
˧
[ENTER]
˧
[
/
]
˧
[ENTER]
˧
[0~9]
˧
[0~9]
˧
[0~9]
E' possibile cambiare password.
Risp. Energia
[MENU]
˧
[
/
]
˧
[ENTER]
˧
[
/
]
˧
[ENTER]
˧
[
/
]
˧
[ENTER]
˧
[MENU]
Questa funzione regola il consumo di corrente dell’unità per consentire un risparmio energetico.
1) On
2) Of
f
Nota
• Per ridurre il consumo di corrente in modalità standby, impostare Risp. Energia su On. Quando Risp.
Energia è impostato su On, non è possibile utilizzare la funzione remota Power On di MDC né la funzione
WOL (Wake On LAN) di MagicNet.
Video Wall
Una parete video è un insieme di schermi collegati insieme, in modo che ognuno di essi proietti una parte
dell'immagine intera oppure che la stessa immagine sia ripetuta su ciascuno schermo.
Quando la modalità Video Wall è attiva, è possibile regolare le impostazioni della schermata Video Wall.
1) Video Wall
[MENU]
˧
[
/
]
˧
[ENTER]
˧
[
/
]
˧
[ENTER]
˧
[ENTER]
˧
[
/
]
˧
[ENTER]
Accendere/Spegnere la funzione Video Wall del display selezionato.
-
Off
-
On
2) Formato
[MENU]
˧
[
/
]
˧
[ENTER]
˧
[
/
]
˧
[ENTER]
˧
[
/
]
˧
[ENTER]
˧
[
/
]
˧
[ENTER]
Il formato può essere selezionato per vedere uno schermo suddiviso.
-
Full
Consente di visualizzare l’immagine a pieno schermo senza margini.
-
Naturale
Visualizza un’immagine naturale lasciando intatto il rapporto larghezza/altezza originale.
3) Screen Divider
[MENU]
˧
[
/
]
˧
[ENTER]
˧
[
/
]
˧
[ENTER]
˧
[
/
]
˧
[ENTER]
˧
[
/
]
˧
[ENTER]
Lo schermo può essere suddiviso.
In questo modo, è possibile selezionare un numero di schermi con un layout diverso se suddivisi.
• Selezionare una modalità dall'opzione Suddivisione Schermi.
• Selezionare un display da Display selection (Selezione display).
• La posizione verrà configurata premendo un numero nella modalità selezionata.
-
2 x 2
-
3 x 3
-
4 x 4
-
5 x 5
-
1 x 2
W\UGGG_W\UGGG_ YWW^TXYTXWGGG㝘䟸GXa\_aZ`YWW^TXYTXWGGG㝘䟸GXa\_aZ`

-
2 x 1
-
1 x 5
-
5 x 1
Nota
• Quando Video Wall è attivo, le funzioni PIP, Regolazione auto, Blocco immagine e Formato non sono
disponibili. Il lancio di Video Wall mentre è attiva la funzione PIP provocherà la chiusura della funzione PIP
(PIP Off). Quando Video Wall è attivo, le funzioni PIP, Regolazione auto, Blocco immagine e Formato non
sono disponibili.
Schermata di sicurezza
La funzione Schermata di sicurezza viene utilizzata per evitare la formazione di immagini residue che
potrebbero apparire quando viene visualizzata un’immagine fissa sullo schermo per un lungo periodo di tempo.
- La funzione Screen Scroll (Scorri schermate) consente di far scorrere le schermate per il periodo di tempo
impostato.
- Questa funzione non è disponibile se l’alimentazione è scollegata.
1) Schermata di sicurezza
[MENU]
˧
[
/
]
˧
[ENTER]
˧
[
/
]
˧
[ENTER]
˧
[ENTER]
˧
[
/
]
˧
[ENTER]
Determina l’impostazione della funzione Screen Scroll (Scorri schermate) su On o Off.
-
Of
f
-
On
2) Interval (Intervallo):
[MENU]
˧
[
/
]
˧
[ENTER]
˧
[
/
]
˧
[ENTER]
˧
[
/
]
˧
[ENTER]
˧
[
/
]
˧
[ENTER]
Determina l’intervallo di tempo da impostare per la funzione Screen Scroll (Scorri schermate). (1~10 ore)
Il tempo viene calcolato sulla base del numero di ore in cui lo schermo rimarrà acceso.
In base all’impostazione predefinita, il tempo viene impostato su 10 ore.
-
1~10 ore
3) Secondo
[MENU]
˧
[
/
]
˧
[ENTER]
˧
[
/
]
˧
[ENTER]
˧
[
/
]
˧
[ENTER]
˧
[
/
]
˧
[ENTER]
Determina il periodo di tempo per eseguire la funzione Screen Scroll (Scorri schermo). (1~5 secondi)
Come impostazione predefinita, il tempo viene impostato su 5 secondi.
-
Tipo-Scorrimento : 1~5 secondi
-
Tipo-Pixel, Barra, Cancel : 10~50 secondi
4) Tipo
[MENU]
˧
[
/
]
˧
[ENTER]
˧
[
/
]
˧
[ENTER]
˧
[
/
]
˧
[ENTER]
˧
[
/
]
˧
[ENTER]
È possibile modificare il Tipo schermata di sicurezza.
-
Scorrimento
-
Pixel
-
Barra
-
Cancel
Selezione risoluzione
[MENU]
˧
[
/
]
˧
[ENTER]
˧
[
/
]
˧
[ENTER]
˧
[
/
]
˧
[ENTER]
Se l’immagine non viene visualizzata correttamente sullo schermo quando si imposta la risoluzione della
scheda grafica del PC su 1024 x 768 a 60 Hz, 1280 x 768 a 60 Hz, 1360 x 768 a 60 Hz o 1366 x 768 a 60 Hz,
utilizzando questa funzione (Selezione risoluzione) è possibile visualizzare l’immagine sullo schermo nella
risoluzione specificata.
(Disponibile solo in modalità PC/BNC)
1) Off
2) 1024 X 768
3) 1280 X 768
4) 1360 X 768
5) 1366 X 768
Nota
• E’ possibile selezionare il menu solo quando la risoluzione grafica è impostata su 1024 x 768 a 60Hz, 1280
x 768 a 60Hz, 1360 x 768 a 60Hz o 1366 x768 a 60Hz.
Controllo lampada
[MENU]
˧
[
/
]
˧
[ENTER]
˧
[
/
]
˧
[ENTER]
˧
[ENTER]
˧
[< / >]
˧
[ENTER]
W\UGGG`W\UGGG` YWW^TXYTXWGGG㝘䟸GXa\_aZ`YWW^TXYTXWGGG㝘䟸GXa\_aZ`

Consente di regolare la retroilluminazione per ridurre il consumo di energia.
Regolazione accensione
[MENU]
˧
[
/
]
˧
[ENTER]
˧
[
/
]
˧
[ENTER]
˧
[ENTER]
˧
[
/
]
˧
[ENTER]
Regola l’opzione Tempo di accensione dello schermo.
*Attenzione: Impostare Tempo di accensione su un valore più alto per evitare il rischio di
sovratensione.
Reset
I parametri relativi al colore vengono sostituiti con le impostazioni predefinite di fabbrica.
1)
Reset immagine
[MENU]
˧
[
/
]
˧
[ENTER]
˧
[
/
]
˧
[ENTER]
˧
[ENTER]
˧
[< / >]
˧
[ENTER]
(Disponibile solo in modalità PC/BNC)
2)
Reset colore
[MENU]
˧
[
/
]
˧
[ENTER]
˧
[
/
]
˧
[ENTER]
˧
[
/
]
˧
[ENTER]
˧
[< / >]
˧
[ENTER]
Controllo multi-schermo
Modalità disponibili
PC / BNC / DVI
AV
S-Video
Component
DVI-Video
Controllo multi-schermo
[MENU]
˧
[
/
]
˧
[ENTER]
˧
[
/
]
˧
[ENTER]
˧
[ENTER]
˧
[0~9]
Assegna un ID univoco al SET.
1) Impostazione ID
A
ssegna ID distinti al SET.
2) Immissione ID
Consente di selezionare le funzioni del trasmettitore del singolo SET.
Funzioni a controllo diretto
Modalità disponibili
PC / BNC / DVI
AV
S-Video
Component
DVI-Video
MDC
Spostarsi sulla schermata degli OSD Multi Control.
LOCK
Imposta la funzione Safety Lock (Blocco di sicurezza).
1) Blocco attivato
Imposta la funzione Safety Lock (Blocco di sicurezza).
2) Blocco disattivato
Il blocco verrà disattivato.
Nota
•
Quando si imposta la funzione Lock, è possibile utilizzare solo i tasti di blocco (Lock) del telecomando e
dell’apparecchio.
]
W\UGGGXWW\UGGGXW YWW^TXYTXWGGG㝘䟸GXa\_aZ`YWW^TXYTXWGGG㝘䟸GXa\_aZ`

La password predefinita dello schermo è "0000".
Nota
• Reimpostazione della password per la funzione lock.
Premere MUTE
˧
1
˧
8
˧
6
˧
On. La password verrà reimpostata su ‘0000’. Per reimpostare la
password, è necessario il telecomando.
© 1995~2008 SAMSUNG. ALL Rights Reserved
]
W\UGGGXXW\UGGGXX YWW^TXYTXWGGG㝘䟸GXa\_aZ`YWW^TXYTXWGGG㝘䟸GXa\_aZ`

La forma e il colore del prodotto possono variare in base al modello, e le specifiche del prodotto sono soggette
a modifiche senza preavviso allo scopo di migliorarne le prestazioni.
Risoluzione del problemi
Verifica funzione test
automatico
Nota
• Verificare l’esito delle seguenti procedure di controllo prima di rivolgersi al servizio di assistenza, poiché
nella maggior parte di casi sarà possibile risolvere da soli il problema. Contattare il centro assistenza per i
problemi che non è possibile risolvere da soli.
Verifica funzione test automatico
Lo schermo dispone di una funzione test automatico che consente di controllare se lo schermo funziona
correttamente.
1) Spegnere il computer ed il monitor.
2) Scollegare il cavo video dal retro del computer.
3) Accendere il monitor.
La figura illustrata di seguito ("Check Signal Cable", controllare il cavo del segnale) viene visualizzata su
uno sfondo nero quando il monitor è in condizioni di funzionamento normale, ma non rileva la presenza di
alcun segnale video: In modalità di test automatico, il LED dell’indicatore di alimentazione resta di colore
verde mentre l’immagine si sposta sullo schermo.
4) Spegnere il monitor e ricollegare il cavo di segnale video; quindi accendere il computer ed il monitor.
Se lo schermo del monitor rimane oscurato dopo aver eseguito la procedura sopradescritta, controllare il
controller video e il sistema;
il monitor funziona correttamente.
Check Cooling System
Se sullo schermo viene visualizzato il messaggio
"Check Cooling System"
significa che la ventola di
raffreddamento è in avaria. Contattare un centro assistenza per riparare o sostituire la ventola.
Mod non ottimale
E' possibile vedere lo schermo anche con una risoluzione superiore a 1360 x 768. Tuttavia, per un minuto verrà
visualizzato il seguente messaggio; E' possibile scegliere di modificare la risoluzione dello schermo o restare
nella modalità corrente in quel momento. Se la velocità di aggiornamento dello schermo è superiore a 85Hz, lo
schermo risulterà nero poiché il monitor non supporta una frequenza superiore a 85Hz.
Istruzioni di sicurezza
Introduzione
Collegamenti
Uso del software
Regolazione del monitor
Risoluzione del problemi
Verifica funzione test
automatico
Lista di controllo
D&R
Specifiche
Informazioni
Appendice
]
\[[[[[UGGGXZ\[[[[[UGGGXZ YWW^TXXTY`GGG㝘㤸GXXa[Za\]YWW^TXXTY`GGG㝘㤸GXXa[Za\]

Nota
• Visualizzazione della modalità di temporizzazione preimpostata per l'impostazione ottimale della
risoluzione.
Manutenzione e pulizia
1) Manutenzione del rivestimento del monitor.
Eseguire la pulizia con un panno soffice dopo aver scollegato il cavo di alimentazione.
• Non utilizzare benzene, solventi o altre sostanze infiammabili, né
panni umidi.
• Al fine di evitare il danneggiamento dello schermo, si consiglia di
utilizzare il detergente di Samsung.
2) Manutenzione dello schermo piatto .
Pulire delicatamente lo schermo con un panno soffice (in cotone).
• Non utilizzare acetone, benzene o solventi.
(tali sostanze possono provocare imperfezioni o la deformazione
della superficie dello schermo).
• In caso di danni causati dall’utente, quest’ultimo sarà l’unico
responsabile nel sostenere tutte le spese relative alla riparazione.
Problemi e soluzioni consigliate
Nota
• Lo schermo ricrea i segnali video ricevuti dal computer. Quindi, se è presente un problema nel PC o nella
scheda video, questo può far oscurare il monitor, essere causa di colori sbiaditi, disturbi, Frequenza troppo
elevata, eccetera. In tal caso, verificare prima l'origine del problema e poi contattare il centro di assistenza
o il proprio rivenditore.
1) Verificare se il cavo dell'alimentazione e gli altri cavi sono collegati correttamente al computer.
2) Verificare se il computer attiva un segnale acustico per più 3 volte quando viene avviato.
(Se questo segnale acustico viene attivato per più di tre volte, richiedere l'assistenza per la scheda madre
del computer).
3) Se è stata installata una nuova scheda video o se il PC è stato assemblato, assicurarsi di avere installato il
driver della scheda (video) e quello del monitor.
4) Verificare se il rapporto di scansione dello schermo sia impostato a 50 Hz ~ 85 Hz.
(Se si utilizza la risoluzione massima non superare i 60 Hz).
5) In caso di problemi nell'installazione del driver della scheda (video), avviare il computer nella modalità
provvisoria, rimuovere la Scheda video da "
Pannello di controllo, Sistema, Gestione periferiche
" e
quindi riavviare il computer per installare di nuovo il driver della scheda (video).
Lista di controllo
Nota
•
La seguente tabella elenca una serie di possibili problemi e le relative soluzioni. Consultare le informazioni
presenti in questa sezione prima di rivolgersi all’assistenza tecnica poiché potrebbe essere possibile
]
\[[[[[UGGGX[\[[[[[UGGGX[ YWW^TXXTY`GGG㝘㤸GXXa[Za\]YWW^TXXTY`GGG㝘㤸GXXa[Za\]

risolvere da soli il problema. Se si necessita di assistenza tecnica, chiamare il numero di telefono fornito
sul tagliando di garanzia, il numero di telefono della sezione Informazioni o contattare il proprio rivenditore.
Problemi relativi all’installazione (PC Mode)
Nota
• Segue un elenco dei problemi legati all’installazione del monitor e le rispettive soluzioni.
Problemi Soluzioni
Lo schermo del monitor presenta
effetti di sfarfallio.
z
Verificare che il cavo del segnale che collega il monitor al
computer sia saldamente connesso e serrato.
(Consultare la sezione Collegamento a un computer)
Problemi relativi allo schermo
Nota
• Segue un elenco dei problemi legati allo schermo del monitor e le rispettive soluzioni.
Problemi Soluzioni
Lo schermo è vuoto e l’indicatore
dell’alimentazione è spento.
z
Accertarsi che il cavo di alimentazione sia saldamente collegato
e che il monitor LCD sia acceso.
(Consultare la sezione Collegamento a un computer)
Viene visualizzato il messaggio
"Controlla cavo segnale"
z
Accertarsi che il cavo di alimentazione sia saldamente collegato
e che il monitor LCD sia acceso.
(Consultare la sezione Collegamento a un computer)
z
Accertarsi che il PC o l’origine video sia accesa.
Viene visualizzato il messaggio
"Mod non ottimale"
z
Verificare la risoluzione e la frequenza massima della scheda
video.
z
Confrontare questi valori con i dati presenti nel grafico Modi di
Visualizzazione.
L’immagine scorre verticalmente.
z
Verificare che il cavo del segnale sia saldamente collegato.
Ricollegarlo con cura.
(Consultare la sezione Collegamento a un computer)
L’immagine non è chiara e risulta
sfocata. L’immagine non è chiara e
risulta sfocata.
z
Avviare le procedure di regolazione della frequenza Grossa e
Sintonia fine.
z
Riaccendere il monitor dopo aver scollegato tutti gli accessori
esterni
(cavo di prolunga video, ecc.).
z
Impostare la risoluzione e la frequenza sugli intervalli consigliati.
L’immagine è instabile e vibra.
Vengono visualizzate immagini
“fantasma”.
z
Verificare che i parametri di risoluzione e frequenza siano
compresi negli intervalli supportati dal monitor.
In caso contrario, reimpostare tali parametri facendo riferimento
a Informazioni nel menu del monitor e ai Modi di
Visualizzazione.
L’immagine è troppo luminosa o
troppo scura.
z
Regolare luminosità e contrasto .
(Consultare la sezione Luminosità, Contrasto)
I colori dello schermo non sono
realistici.
L’immagine a colori risulta distorta
con ombre scure.
Il bianco risulta povero.
z
Regolare le impostazioni di colore nel sottomenu Modo utente
del menu di regolazione del colore OSD Colore.
]
\[[[[[UGGGX\\[[[[[UGGGX\ YWW^TXXTY`GGG㝘㤸GXXa[Za\]YWW^TXXTY`GGG㝘㤸GXXa[Za\]

L’indicatore di alimentazione
lampeggia ed è verde.
z
Il monitor sta salvando le modifiche effettuate alle impostazioni
nella memoria OSD.
Lo schermo è vuoto e la luce
dell’indicatore di alimentazione è
stabilmente verde o lampeggia a
intervalli di 0,5 / 1 secondi.
z
Il monitor sta utilizzando il sistema di gestione del risparmio
energetico.
z
Spostare il mouse del computer o premere un tasto qualsiasi
della tastiera.
La schermata è vuota e
lampeggiante.
z
Se si vede il messaggio “TEST GOOD” sullo schermo quando si
preme il pulsante MENU, controllare il collegamento del cavo tra
il monitor e il computer per assicurarsi che il connettore sia
propriamente collegato.
Problemi relativi allo schermo
Nota
• Segue un elenco dei problemi legati al segnale audio e le rispettive soluzioni.
Problemi Soluzioni
Nessun suono.
z
Assicurarsi che il cavo audio sia collegato correttamente alla
porta di ingresso audio dello schermo e alla porta di uscita audio
della scheda audio.
(Consultare la sezione Collegamento a un computer)
z
Controllare il livello del volume.
Il livello del suono è troppo basso.
z
Controllare il livello del volume.
z
Se si aumenta al massimo il volume, ma il volume è ancora
troppo basso, controllare il comando del volume sulla scheda
audio del computer o sulla relativa applicazione software.
Il suono ha picchi troppo elevati o
troppo bassi.
z
Regolare le impostazioni di Alti e Bassi al livello appropriato.
Problemi relativi al telecomando
Nota
• Segue un elenco dei problemi legati al telecomando e le rispettive soluzioni.
Problemi Soluzioni
I pulsanti del telecomando non
rispondono.
z
Verificare la polarità delle batterie (+/-).
z
Verificare che le batterie non siano esaurite.
z
Verificare che il sistema sia acceso.
z
Verificare che il cavo di alimentazione sia saldamente collegato.
z
Controllare la presenza di una lampada al neon o fluorescente
speciale nelle immediate vicinanze.
D&R
Domanda Risposta
Qual è la procedura di modifica
della frequenza?
La frequenza può essere modificata riconfigurando la scheda video.
Si noti che il supporto della scheda video può variare, in base alla
versione utilizzata di driver. Per informazioni, consultare il manuale
del computer o della scheda video.
In che modo si regola la
risoluzione?
z
Windows XP:
Impostare la risoluzione da Pannello di controllo --> Aspetto e
temi --> Schermo --> Impostazioni.
z
Windows ME/2000:
]
\[[[[[UGGGX]\[[[[[UGGGX] YWW^TXXTY`GGG㝘㤸GXXa[Za\]YWW^TXXTY`GGG㝘㤸GXXa[Za\]

Impostare la risoluzione da Pannello di controllo --> Schermo -->
Impostazioni.
* Per maggiori informazioni contattare il costruttore della scheda
video.
In che modo si imposta la funzione
di Risparmio energetico?
z
Windows XP:
Impostare la risoluzione da Pannello di controllo
˧
Aspetto e
temi
˧
Schermo
˧
Impostazioni.
Impostare la funzione nel BIOS-SETUP del computer oppure
nella sezione relativa agli screen saver del sistema operativo.
(Consultare la sezione Windows/Computer manuale).
z
Windows ME/2000:
Impostare la risoluzione da Pannello di controllo
˧
Schermo
˧
Impostazioni.
Impostare la funzione nel BIOS-SETUP del computer oppure
nella sezione relativa agli screen saver del sistema operativo.
(Consultare la sezione Windows/Computer manuale).
Come si pulisce il rivestimento
esterno del monitor e il
cinescopio?
Scollegare il cavo di alimentazione, quindi pulire lo schermo con un
panno soffice utilizzando una soluzione detergente o semplice acqua.
Non lasciare residui di detergente o non graffiare il rivestimento. Non
far entrare acqua nel monitor.
© 1995~2008 SAMSUNG. ALL Right Reserved
]
\[[[[[UGGGX^\[[[[[UGGGX^ YWW^TXXTY`GGG㝘㤸GXXa[Za\]YWW^TXXTY`GGG㝘㤸GXXa[Za\]

La forma e il colore del prodotto possono variare in base al modello, e le specifiche del prodotto sono soggette
a modifiche senza preavviso allo scopo di migliorarne le prestazioni.
Specifiche
Generale
Generale
Generale
Modello SMT-3211
Pannello LCD
Dimensioni 32,0 pollici - diagonale (80 cm)
Area di visualizzazione 697,6845 mm (H) x 392,256 mm (V)
Passo Pixel 0,51075 mm (H) x 0,51075 mm (V)
Sincronizzazione
Orizzontale 30 ~ 81 kHz
Verticale 56 ~ 75 Hz
Colori visualizzati
Colori visualizzati 16,7 M colori
Risoluzione
Risoluzione ottimale 1360 x 768 / 1366 x 768 @ 60 Hz in base alla scheda grafica in uso
Risoluzione massima 1366 x 768 @ 60 Hz
Segnale di ingresso, terminato
RGB Analogico, DVI (Digital Visual Interface) conforme a Digital RGB.
0,7Vp-p Positiva a 75O ±10% Sinc O/V separata, Sinc composita, SOG, livello TTL, positivo o negativo.
Massimo clock dei pixel
100 MHz
Alimentazione
CA 100 - 240 V~ (+/- 10 %), 50/60 Hz
Cavo di segnale
Cavo D-sub 15 piedini/15 piedini, staccabile
Cavo DVI-D/DVI-D, staccabile - Opzionale
Connettore segnale
D-sub, BNC, DVI-D, YPbPr, S-VHS, VCR
Dimensioni (LxPxA) / Peso
780 X 482 X 107 mm / 30,1 X 19,0 X 4,6 inch (Senza supporto)
780 X 530 X 223 mm / 30,1 X 20,9 X 8,8 inch (Con supporto)
Interfaccia di fissaggio VESA
200 mm x 200 mm (da usare con elemento di fissaggio speciale/braccio)
Requisiti ambientali
Esercizio
Temperatura : 10 °C ~ 40 °C (50 °F ~ 104 °F)
Umidità : 10 % ~ 80 %, non condensante
Deposito
Temperatura : -20 °C ~ 45 °C (-4 °F ~ 113 °F)
Umidità : 5 % ~ 95 %, non condensante
Caratteristiche audio
Ingresso audio 1 Jack RCA Rosso (D) Bianco (S), 0,5 Vrms (-9 dB)
Istruzioni di sicurezza
Introduzione
Collegamenti
Uso del software
Regolazione del monitor
Risoluzione del problemi
Specifiche
Generale
Risparmio di energia
Modalità di timing
predefinite
Informazioni
Appendice
]
^TUGGGX^TUGGGX YWW^TXYTYWGGG㝘䟸GXaZ^aWWYWW^TXYTYWGGG㝘䟸GXaZ^aWW
, 16,1 kg/35,4lbs

Ingresso audio 2 Jack RCA Rosso (D) Bianco (S), 0,5 Vrms (-9 dB)
Ingresso audio PC Jack stereo 3,5 Ø, 0,5 Vrms (-9 dB)
Frequenza RF: 80 Hz ~ 15 kHz (a -3 dB)
Risposta A/V: 80 Hz ~ 20 kHz (a -3 dB)
Funzione Plug & Play
Questo monitor può essere installato su un qualsiasi sistema compatibile ad uso immediato (Plug & Play).
L'interazione del monitor e dei sistemi informatici offrirà le migliori condizioni di funzionamento e impostazioni
del monitor. Nella maggior parte dei casi, l'installazione del monitor procederà automaticamente, a meno che
l'utente non desideri selezionare impostazioni alternative.
Numero accettabile di punti
Il pannello TFT LCD è fabbricato facendo uso la tecnologia di semiconduttori sofisticati con una precisione del
1ppm (un milionesimo) utilizzata per questo prodotto. Ma i pixel dei colori ROSSO, VERDE, BLU e BIANCO a
volte possono apparire più brillanti o si possono visualizzare alcuni pixel neri. Cio' non è dovuto ad una cattiva
qualità e si puo' quindi far uso del prodotto in tutta sicurezza.
• Ad esempio, il numero di sotto pixel TFT LCD contenuto in questo prodotto è 3.133.440.
Nota
• ll progetto e le specifiehe sono Sync on Greengetti a variazioni senza preavviso.
Apparecchiatura di classe B (apparecchiatura per uso residenziale)
• Questo prodotto è conforme alle direttive sulla compatibilità elettromagnetica per installazioni residenziali e
può essere utilizzato in tutti gli ambienti, comprese le normali aree residenziali.
(Un’apparecchiatura di classe B emette una quantità inferiore di onde magnetiche rispetto a
un’apparecchiatura di classe A).
Risparmio di energia
Questo monitor dispone di un sistema incorporato di gestione dell'energia detto PowerSaver. Questo sistema
permette di risparmiare energia attivando una modalità a basso consumo del monitor quando non è utilizzato per
un certo lasso di tempo. Il monitor ritorna automaticamente al normale funzionamento spostando il mouse del
computer o premendo un tasto della tastiera. Per risparmiare energia, SPEGNERE il monitor quando non serve
o ci si assenta dal luogo di lavoro per periodi prolungati. Il sistema PowerSaver funziona con una scheda video
DPM VESA-compatibile installata nel computer. Utilizzare un'utilità software installata nel computer per
impostare questa funzione.
Stato
Funzionamento
normale
Modalità di
risparmio
energetico
Disattivazione
dell'alimentazione
EPA/ENERGY 2000
Disattivazione
dell'alimentazione
Spia
dell'alimentazione
Verde
Verde,
lampeggiante
Ambra Nero
Consumo di energia
Inferiore a
160 W
Inferiore a
1 W
(Spento )
Inferiore a 1 W
(Dell'alimentazione)
0 W
(Pulsante
dell'alimentazione)
Questo monitor è conforme con gli standard EPA ENERGY STAR
®
ed
ENERGY2000 quando viene utilizzato con un computer dotato della
funzione DPM VESA.
In qualità di partner di ENERGY STAR
®
, SAMSUNG ha determinato che
questo prodotto soddisfa le linee guida ENERGY STAR
®
per l'efficienza
elettrica.
Modalità di timing predefinite
Modalità di timing predefinite
Se il segnale trasferito dal computer è uguale a quello indicato per le modalità di visualizzazione predefinite, lo
schermo viene regolato automaticamente. Tuttavia, se il segnale è diverso, lo schermo può oscurarsi mentre il
LED di alimentazione è acceso. Fare riferimento al manuale della scheda a distanza e regolare lo schermo nel
seguente modo.
Modalità di visualizzazione
Frequenza
orizzontale
Frequenza
Clock dei pixel Polarità di sincronizzazione
^TUGGGY^TUGGGY YWW^TXYTYWGGG㝘䟸GXaZ^aW[YWW^TXYTYWGGG㝘䟸GXaZ^aW[

(kHz) verticale
(Hz)
(MHz) (H/V)
MAC, 640 x 480 35,000 66,667 30,240 -/-
MAC, 832 x 624 49,726 74,551 49,500 +/+
IBM, 640 x 350 31,469 70,086 25,175 +/-
IBM, 640 x 480 31,469 59,940 25,175 -/-
IBM, 720 x 400 31,469 70,087 28,322 -/+
VESA, 640 x 480 37,861 72,809 31,500 -/-
VESA, 640 x 480 37,500 75,000 31,500 -/-
VESA, 640 x 480 43,269 85,008 36,000 -/-
VESA, 800 x 600 35,156 56,250 36,000 +/+
VESA, 800 x 600 37,879 60,317 40,000 +/+
VESA, 800 x 600 48,077 72,188 50,000 +/+
VESA, 800 x600 46,875 75,000 49,500 +/+
VESA, 800 x600 53,674 85,000 56,250 +/+
VESA, 1024 x 768 48,363 60,004 65,000 -/-
VESA, 1024 x 768 56,476 70,069 75,000 -/-
VESA, 1024 x 768 60,023 75,029 78,750 +/+
VESA, 1024 x 768 68,677 85,997 94,500 +/+
VESA, 1360 x 768 47,712 60,000 85,500 +/+
Frequenza orizzontale
Il tempo per la scansione di una linea collegando il bordo destro a quello
sinistro dello schermo in orizzontale viene chiamato Ciclo orizzontale e il
numero inversamente proporzionale del Ciclo di scansione orizzontale
viene chiamato Frequenza di scansione orizzontale. Unità: kHz
Frequenza verticale
Come per la lampada fluorescente, lo schermo deve ripetere la stessa
immagine molte volte al secondo per visualizzarla all'utente. La frequenza
di questa ripetizione è chiamata Frequenza verticale o Frequenza di
aggiornamento. Unità: Hz
© 1995~2008 SAMSUNG. ALL Right Reserved
^TUGGGZ^TUGGGZ YWW^TXYTYWGGG㝘䟸GXaZ^aW[YWW^TXYTYWGGG㝘䟸GXaZ^aW[

La forma e il colore del prodotto possono variare in base al modello, e le specifiche del prodotto sono soggette
a modifiche senza preavviso allo scopo di migliorarne le prestazioni.
Informazioni
Per una migliore visualizzazione
Per ottenere una migliore qualità d'immagine, regolare la risoluzione del computer e l'indice di riattivazione
dello schermo (indice di refresh) come descritto qui di seguito, selezionando il pannello di controllo. Se
non è fornita la migliore qualità d'immagine in TFT-LCD, si rischia di ottenere sullo schermo un'immagine
di qualità irregolare.
• Risoluzione: 1360 x 768
• Frequenza verticale (indice di refresh): 60 Hz
Il pannello TFT LCD è fabbricato facendo uso la tecnologia di semiconduttori sofisticati con una precisione
del 1ppm (un milionesimo) utilizzata per questo prodotto. Ma i pixel dei colori ROSSO, VERDE, BLU e
BIANCO a volte possono apparire più brillanti o si possono visualizzare alcuni pixel neri.
Cio' non è dovuto ad una cattiva qualità e si puo' quindi far uso del prodotto in tutta sicurezza.
• Ad esempio, il numero di sotto pixel TFT LCD contenuto in questo prodotto è 3.133.440.
Per pulire esternamente il monitor ed il pannello, utilizzare un panno morbido ed asciutto leggermente
imbevuto di un prodotto detergente raccomandato per tale scopo e lucidare. Spolverare leggermente lo
schermo a cristalli liquidi (LCD) senza effettuare alcuna pressione.
si rischierebbe, in tal caso di provocare una macchia.
Qualora non foste soddisfatti della qualità dell'immagine, potete eseguire direttamente sullo schermo la
"funzione di auto regolazione" che appare con una finestra che si attiva quando viene premuto il tasto fine.
Se, in seguito alla regolazione automatica, si nota ancora del brusio di fondo, utilizzare la funzione
FINE/COARSE.
Se si visualizza una schermata fissa per un periodo di tempo prolungato, può verificarsi la comparsa di
un'immagine residua o di una macchia sfocata.
Attivare la modalità di risparmio energetico o impostare uno screensaver per spostare l'immagine quando
è necessario allontanars
i dal monitor per un periodo di tempo prolungato.
INFORMAZIONI SUL PRODOTTO (Assenza di ritenzione
dell'immagine)
Che cos'è la ritenzione dell'immagine?
La ritenzione dell'immagine si verifica talvolta quando non si utilizza il pannello LCD in condizioni normali. Le
condizioni normali comportano una costante variazione dei motivi grafici. Se invece si utilizza un modello
grafico fisso per un lungo periodo (più di 12 ore), potrebbe esserci una leggera differenza di tensione tra gli
elettrodi utilizzati per il trattamento dei cristalli liquidi (LC) nei pixel. Col tempo, questa differenza di tensione
tra gli elettrodi tende ad aumentare "congelando" i cristalli liquidi. In questo caso, l'immagine precedente
rimane visibile anche quando il modello grafico cambia. Per evitare questo problema, è necessario ridurre la
differenza di tensione accumulata.
Istruzioni di sicurezza
Introduzione
Collegamenti
Uso del software
Regolazione del monitor
Risoluzione del problemi
Specifiche
Informazioni
Per una migliore
visualizzazione
INFORMAZIONI SUL
PRODOTTO
(Assenza di ritenzione
dell'immagine)
Appendice
^
\[[[[[UGGGYX\[[[[[UGGGYX YWW^TXXTY`GGG㝘㤸GXXa[Za\^YWW^TXXTY`GGG㝘㤸GXXa[Za\^

Spegnimento, salvaschermo o risparmio energetico
z
Spegnere il prodotto per 4 ore dopo 20 ore di utilizzo
z
Spegnere il prodotto per 2 ore dopo 12 ore di utilizzo
z
Impostare lo spegnimento automatico dello schermo utilizzando Combinazioni risparmio energia
nella finestra Proprietà - Schermo del PC.
z
Utilizzare un salvaschermo, se possibile - Si consiglia di utilizzare un salvaschermo monocromatico o
un'immagine in movimento.
Modificare periodicamente le informazioni sul colore
Nota
• Utilizzare due diversi colori
Ruotare le informazioni sul colore con due diversi colori ogni 30 minuti.
z
Evitare l'uso di una combinazione di caratteri e colore di sfondo con una forte differenza di
luminanza.
Evitare l'uso dei grigi, i quali possono causare più facilmente la ritenzione dell'immagine.
Evitare: colori con una forte differenza di luminanza (bianco e nero, grigio)
Modificare periodicamente il colore dei caratteri
z
Utilizzare colori brillanti con una leggere differenza di luminanza
- Ciclo: modificare il colore dei caratteri e il colore di sfondo ogni 30 minuti
^
\[[[[[UGGGYY\[[[[[UGGGYY YWW^TXXTY`GGG㝘㤸GXXa[Za\^YWW^TXXTY`GGG㝘㤸GXXa[Za\^

z
Ogni 30 minuti, modificare i caratteri con il movimento.
z
Visualizzare periodicamente sull'intera area un'immagine in movimento insieme al logo.
- Ciclo: visualizzare un'immagine in movimento insieme al logo per 60 secondi ogni 4 ore di utilizzo.
z
Il modo migliore per proteggere lo schermo dalla ritenzione delle immagini è quello di spegnerlo
quando non è in uso oppure attivare un salvaschermo. La mancata osservanza delle istruzioni fornite
nel manuale può invalidare la garanzia.
Attivare la funzione Screen Scroll (Scorri schermata)
z
Attivare la funzione di scorrimento delle schermate
- Sintomo: Barra orizzontale nera che si muove in alto e in basso.
- Metodo di selezione
. Manuale di istruzioni: Menu OSD -> Set Up (Impostazione) -> Safety Screen (Schermata di
sicurezza) -> Screen Scroll (Scorri schermata)
. Time Interval (Intervallo): 1 ~ 10 ore (consigliato: 1)
. Time Period (Periodo): 1 ~ 5 secondi (consigliato: 5)
Nota
• (Si prega di controllare la sezione “Funzione OSD” nel Manuale dell'utente sul CD. Su alcuni modelli
questa funzione non è disponibile.)
Applicare la funzione Screen Pixel (Pixel schermo) al prodotto
z
Attivare la funzione Screen Pixel (Pixel schermo)
- Sintomo: Un punto di colore nero che si muove su e giù.
- Metodo di selezione
. Manuale di istruzioni: Menu OSD
˧
Set Up
˧
Safety Screen
˧
Pixel (Menu OSD
˧
Impostazione
˧
Schermata di sicurezza
˧
Pixel)
. Time Interval (Intervallo): 1 ~ 10 ore (consigliato: 1)
. Time Period (Periodo): 10 ~ 50 secondi (consigliato: 50)
z
Attivare la funzione Screen Bar (Barra schermo)
- Sintomo: Barra orizzontale / verticale nera che si muove in alto e in basso.
^
\[[[[[UGGGYZ\[[[[[UGGGYZ YWW^TXXTY`GGG㝘㤸GXXa[Za\^YWW^TXXTY`GGG㝘㤸GXXa[Za\^

- Metodo di selezione
. Manuale di istruzioni: Menu OSD
˧
Set Up
˧
Safety Screen
˧
Bar (Menu OSD
˧
Impostazione
˧
Schermata di sicurezza
˧
Barra)
. Time Interval (Intervallo): 1 ~ 10 ore (consigliato: 1)
. Time Period (Periodo): 10 ~ 50 secondi (consigliato: 50)
Nota
• (Si prega di controllare la sezione “Funzione OSD” nel Manuale dell'utente sul CD. Su alcuni modelli
questa funzione non è disponibile.)
Attivare la funzione Screen Erasing (Cancella schermo)
z
Attivare la funzione Screen Erasing (Cancella schermo)
- Sintomo: 2 blocchi verticali in movimento che cancellano l'immagine
- Metodo di selezione
. Manuale di istruzioni: Menu OSD -> Set Up (Impostazione) -> Safety Screen (Schermata di
sicurezza) -> Eraser (Cancella)
. Time Interval (Intervallo): 1 ~ 10 ore (consigliato: 1)
. Time Period (Periodo): 10 ~ 50 secondi (consigliato: 50)
Nota
• (Si prega di controllare la sezione “Funzione OSD” nel Manuale dell'utente sul CD. Su alcuni modelli
questa funzione non è disponibile.)
© 1995~2008 SAMSUNG. ALL Right Reserved
^
\[[[[[UGGGY[\[[[[[UGGGY[ YWW^TXXTY`GGG㝘㤸GXXa[Za\^YWW^TXXTY`GGG㝘㤸GXXa[Za\^

La forma e il colore del prodotto possono variare in base al modello, e le specifiche del prodotto sono soggette
a modifiche senza preavviso allo scopo di migliorarne le prestazioni.
Appendice
Contatti SAMSUNG NEL MONDO
Nota
• Se avete commenti o domande sui prodotti Samsung, contattate il Servizio Clienti Samsung
Istruzioni di sicurezza
Introduzione
Collegamenti
Uso del software
Regolazione del monitor
Risoluzione del problemi
Specifiche
Informazioni
Appendice
Contatti SAMSUNG NEL
MONDO
Termini
Corretto smaltimento
Autorità
^
\[[[[[UGGGY\\[[[[[UGGGY\ YWW^TXXTY`GGG㝘㤸GXXa[Za\^YWW^TXXTY`GGG㝘㤸GXXa[Za\^
North America
U.S.A
1-800-SAMSUNG(726-7864) http://www.samsung.com
CANADA
1-800-SAMSUNG(726-7864) http://www.samsung.com/ca
MEXICO
01-800-SAMSUNG(726-7864) http://www.samsung.com
Latin America
ARGENTINE
0800-333-3733 http://www.samsung.com/ar
BRAZIL
0800-124-421
4004-0000
http://www.samsung.com
CHILE
800-SAMSUNG(726-7864) http://www.samsung.com/cl
COLOMBIA
01-8000112112 http://www.samsung.com.co
COSTA RICA
0-800-507-7267 http://www.samsung.com/latin
ECUADOR
1-800-10-7267 http://www.samsung.com/latin
EL SALVADOR
800-6225 http://www.samsung.com/latin
GUATEMALA
1-800-299-0013 http://www.samsung.com/latin
JAMAICA
1-800-234-7267 http://www.samsung.com/latin
PANAMA
800-7267 http://www.samsung.com/latin
PUERTO RICO
1-800-682-3180 http://www.samsung.com/latin
REP. DOMINICA
1-800-751-2676 http://www.samsung.com/latin
TRINIDAD & TOBAGO
1-800-SAMSUNG(726-7864) http://www.samsung.com/latin
VENEZUELA
0-800-100-5303 http://www.samsung.com/latin
Europe
AUSTRIA
0800-SAMSUNG(726-7864) http://www.samsung.com/at
BELGIUM
0032 (0)2 201 24 18 http://www.samsung.com/be
NICARAGUA
00-1800-5077267
HONDURAS
800-7919267

^
\[[[[[UGGGY]\[[[[[UGGGY] YWW^TXXTY`GGG㝘㤸GXXa[Za\^YWW^TXXTY`GGG㝘㤸GXXa[Za\^
CZECH REPUBLIC
DENMARK
70 70 19 70 http://www.samsung.com/dk
FINLAND
030-6227 515 http://www.samsung.com/fi
FRANCE
3260 SAMSUNG
08 25 08 65 65 (€ 0,15/min)
http://www.samsung.com
GERMANY
01805-SAMSUNG(726-7864)
http://www.samsung.com
HUNGARY
06-80-SAMSUNG(726-7864) http://www.samsung.com
ITALIA
800-SAMSUNG(726-7864) http://www.samsung.com
LUXEMBURG
0035 (0)2 261 03 710 http://www.samsung.com/be
NETHERLANDS
0900-SAMSUNG(726-7864)
http://www.samsung.com/nl
NORWAY
815-56 480 http://www.samsung.com/no
POLAND
0 801 801 881
022-607-93-33
http://www.samsung.com/pl
PORTUGAL
80820-SAMSUNG(726-7864) http://www.samsung.com/pt
EIRE
0818 717 100 http://www.samsung.com/ie
SLOVAKIA
0800-SAMSUNG(726-7864) http://www.samsung.com/sk
SPAIN
902 10 11 30 http://www.samsung.com
SWEDEN
0771-400 200 http://www.samsung.com/se
SWITZERLAND
0800-SAMSUNG(726-7864) www.samsung.com/ch
U.K
0845 SAMSUNG(726-7864) http://www.samsung.com
CIS
ESTONIA
800-7267 http://www.samsung.ee
LATVIA
800-7267 http://www.samsung.com/lv
LITHUANIA
8-800-77777 http://www.samsung.lt
KAZAKHSTAN
8-10-800-500-55-500 http://www.samsung.kz
KYRGYZSTAN
00-800-500-55-500
RUSSIA
8-800-555-55-55 http://www.samsung.com
UKRAINE
8-800-502-0000 http://www.samsung.com
UZBEKISTAN
8-800-120-0-400 http://www.samsung.uz
Asia Pacific
AUSTRALIA
1300 362 603 http://www.samsung.com
CHINA
800-810-5858, 010- 6475 1880 http://www.samsung.com
HONG KONG
3698-4698 http://www.samsung.com/hk
INDIA
3030 8282, 1800 110011 http://www.samsung.com
INDONESIA
0800-112-8888 http://www.samsung.com
JAPAN
0120-327-527 http://www.samsung.com/jp
MALAYSIA
1800-88-9999 http://www.samsung.com/my
NEW ZEALAND
0800SAMSUNG(726-7864) http://www.samsung.com/nz
PHILIPPINES
1800-10-SAMSUNG(726-7864) http://www.samsung.com/ph
SINGAPORE
1800-SAMSUNG(726-7864) http://www.samsung.com
THAILAND
1800-29-3232, 02-689-3232
(€ 0,15/min)
(€ 0,14/min)
(€ 0,10/min)
TADJIKISTAN
8-10-800-500-55-500
844 000 844 http://www.samsung.com/cz

Termini
Segnale Sinc
I segnali Sinc (sincronizzati) si riferiscono ai segnali standard richiesti per visualizzare i colori desiderati sul
monitor. Essi sono suddivisi in segnali Sinc verticali e orizzontali. Questi segnali visualizzano le normali
immagini a colori mediante l’impostazione di risoluzione e frequenza.
Tipi di segnali Sinc
Separato Schema di trasmissione dei singoli segnali Sinc verticali al monitor.
Composito Schema di combinazione dei segnali Sinc verticali in un unico segnale composito, il quale
viene poi trasmesso al monitor. Il monitor provvede a visualizzare i segnali dei colori
separando il segnale composito nei suoi segnali dei colori originali.
Dimensione punto
Dot pitch (distanza tra i punti luminosi) L'immagine sul monitor è composta da punti rossi, verdi e blu. Minore è
la distanza tra i punti, maggiore è la risoluzione. La distanza tra due punti dello stesso colore viene chiamata
'Dot pitch'. Unità: mm
Frequenza verticale
Frequenza verticale La schermata deve essere ridisegnata diverse volte al secondo per creare e visualizzare
un'immagine per l'utente. La frequenza di questa ripetizione per secondo è chiamata Frequenza verticale o
Frequenza di aggiornamento. Unità: Hz
Per esempio: Se la stessa luce lampeggia 60 volte al secondo, riguarda 60 Hz.
Frequenza orizzontale
Frequenza orizzontale Il tempo per la scansione di una linea collegando il bordo destro a quello sinistro dello
schermo in orizzontale viene chiamato Ciclo di scansione orizzontale. Il numero inversamente proporzionale
del Ciclo di scansione orizzontale viene chiamato Frequenza di scansione orizzontale. Unità: kHz
Metodi interlacciato e non interlacciato
Metodi interlacciato e non interlacciato Il sistema che mostra le linee orizzontali dello schermo dall'alto al
basso in sequenza è chiamato Metodo Non interlacciato, mentre il sistema che mostra le linee dispari e poi
quelle pari in successione è chiamato metodo Interlacciato. Il metodo Non interlacciato viene utilizzato dalla
maggior parte dei monitor per assicurare un'immagine nitida. Il metodo Interlacciato è uguale a quello
utilizzato nei televisori.
Plug & Play
Plug & Play Si tratta di una funzione che offre la qualità migliore per l'utente permettendo al computer e al
monitor di scambiare automaticamente le informazioni. Questo monitor si attiene allo standard internazionale
VESA DDC per la funzione Plug & Play.
Risoluzione
Risoluzione Il numero di punti orizzontali e verticali per comporre l'immagine sullo schermo è chiamato
'risoluzione'. Questo numero indica il livello di precisione della visualizzazione. Un'alta risoluzione è
appropriata per eseguire più attività in quanto sullo schermo possono essere informazioni più informazioni
relative all'immagine.
Per esempio: Se la risoluzione è 1360 X 768, ciò significa che la schermata è composta da 1360 punti
orizzontali (risoluzione orizzontale) e 768 linee verticali (risoluzione verticale).
^
\[[[[[UGGGY^\[[[[[UGGGY^ YWW^TXXTY`GGG㝘㤸GXXa[Za\^YWW^TXXTY`GGG㝘㤸GXXa[Za\^
TAIWAN
0800-329-999 http://www.samsung.com/tw
VIETNAM
1 800 588 889 http://www.samsung.com
Middle East & Africa
SOUTH AFRICA
0860-SAMSUNG(726-7864 ) http://www.samsung.com
TURKEY
444 77 11 http://www.samsung.com
U.A.E
800-SAMSUNG (726-7864)
8000-4726
http://www.samsung.com

Un software MDC (Multiple Display Control, controllo monitor multipli) è un’applicazione che consente a
diversi monitor di funzionare simultaneamente e con semplicità su un unico PC. Per la comunicazione tra un
PC e un monitor viene utilizzato lo standard di comunicazione seriale RS-232C.
Corretto smaltimento
Corretto smaltimento del prodotto (rifiuti elettrici ed elettronici) - Solo Europa
(Applicabile in i paesi dell’Unione Europea e in quelli con sistema di
raccolta differenziata)
Il marchio riportato sul prodotto o sulla sua documentazione indica che il prodotto
non deve essere smaltito con altri rifiuti domestici al termine del ciclo di vita. Per
evitare eventuali danni all'ambiente o alla salute causati dall'inopportuno
smaltimento dei rifiuti, si invita l'utente a separare questo prodotto da altri tipi di
rifiuti e di riciclarlo in maniera responsabile per favorire il riutilizzo sostenibile delle
risorse materiali.
Gli utenti domestici sono invitati a contattare il rivenditore presso il quale è stato
acquistato il prodotto o l'ufficio locale preposto per tutte le informazioni relative
alla raccolta differenziata e al riciclaggio per questo tipo di prodotto.
Gli utenti aziendali sono invitati a contattare il proprio fornitore e verificare i termini
e le condizioni del contratto di acquisto. Questo prodotto non deve essere smaltito
unitamente ad altri rifiuti commerciali.
Autorità
Le informazioni in questo documento sono soggette a modifica senza preavviso.
© 2008 Samsung Electronics Co., Ltd. Tutti i diritti riservati.
È vietata la riproduzione in qualsiasi maniera senza il consenso scritto di Samsung Electronics Co., Ltd.
Samsung Electronics Co., Ltd. non risponde degli errori qui inclusi o dei danni diretti o indiretti in relazione alla
fornitura, funzionamento o utilizzo di questo materiale.
Il logo " Samsung " sono marchi di fabbrica registrati di Samsung Electronics Co., Ltd.; " Microsoft ", " Windows "
e " Windows NT " sono marchi registrati di Microsoft Corporation; " VESA ", " DPM " e " DDC " sono marchi
registrati di Video Electronics Standard Association; il nome " ENERGY STAR
®
" ed il logo sono marchi
registrati dell'Agenzia americana per la protezione dell'ambiente (EPA). In qualità di partner di ENERGY STAR
®
, Samsung Electronics Co., Ltd ha determinato che questo prodotto soddisfa le linee guida ENERGY STAR
®
per l'efficienza elettrica. Tutti gli altri nomi di prodotto qui indicati possono essere marchi o marchi registrati dei
rispettivi proprietari.
zt{T[WXXTp__UGGG_Wzt{T[WXXTp__UGGG_W YWW^TXXTY_GGG㝘䟸GYa\\aY`YWW^TXXTY_GGG㝘䟸GYa\\aY`
MDC (Multiple Display Control, controllo monitor multipli)

/10+6146(6.%&
,QVWUXNFMDREVńXJL
UGGGXUGGGX YWW^TXXTY_GGG㝘䟸G[a[WaX`YWW^TXXTY_GGG㝘䟸G[a[WaX`

W zalenoci od modelu mog wystpowa rónice w kolorze i wygldzie produktu. W celu zwikszenia
wydajnoci produktu dane techniczne mog ulega zmianom bez uprzedniego powiadomienia.
Zasady bezpieczestwa
Zasady obowizujce w danym kraju
Prosimy o zapoznanie si z poniszymi zaleceniami i przestrzeganie ich w celu uniknicia uszkodzenia
urzdzenia, a take w trosce o wasne bezpieczestwo.
Ostrzeenie / uwaga:
Niezastosowanie si do wskazówek oznaczonych tym symbolem moe doprowadzi do obrae
ciaa lub uszkodzenia sprztu.
Symbole uywane w instrukcji
Zabronione.
Naley przeczyta i zawsze stosowa si do tych
zalece.
Nie naley otwiera obudowy
monitora.
Naley wyj wtyczk z gniazda zasilajcego.
Nie dotyka. Uziemienie dla zapobieenia poraenia prdem.
Zasilanie
Gdy komputer nie jest uywany przez duszy czas naley wczy funkcj DPM.
Jeli si uywa wygaszacza ekranu, naley go ustawi na tryb "ekran aktywny
ˉ
.
Przedstawione ilustracje su jako przykady i nie maj zastosowania we wszystkich przypadkach (lub krajach).
Nie naley uywa zniszczonej lub poluzowanej wtyczki.
z
Moe to spowodowa poraenie prdem lub poar.
Przy wyczaniu z zasilania nie naley cign za przewód; nie
naley te dotyka wtyczki mokrymi rkami.
z
Moe to spowodowa poraenie prdem lub poar.
Zasady bezpieczestwa
Zasady obowizujce w
danym kraju
Zasilanie
Instalacja
Czyszczenie
Inne
Wprowadzenie
Poczenia
Korzystanie z
oprogramowania
Dostosowywanie ustawie
monitora
Rozwizywanie problemów
Parametry
Informacje
Dodatek
X
zt{T[WXXTw__UGGGXzt{T[WXXTw__UGGGX YWW^TXXTY_GGG㝘䟸GYa\^aX_YWW^TXXTY_GGG㝘䟸GYa\^aX_

Naley uywa wycznie wtyczki i gniazdka z odpowiednim
uziemieniem.
z
Niewaciwe uziemienie moe spowodowa poraenie prdem lub
uszkodzenie sprztu.(Tylko sprzt klasy 1.)
Umieci wtyczk przewodu zasilajcego solidnie w gniazdku, aby
si nie poluzowaa.
z
Niewaciwe podczenie wtyczki do gniazdka moe spowodowa poar.
Nie naley nadmiernie wygina wtyczki i przewodu, ani ka na nie
cikich przedmiotów, gdy moe to spowodowa uszkodzenie.
z
Moe to spowodowa poraenie prdem lub poar.
Nie naley podcza zbyt wielu urzdze i przewodów do jednego
gniazdka.
z
Moe to spowodowa poar.
Nie odcza przewodu zasilajcego podczas pracy monitora.
z
Odczenie moe spowodowa przepicie, co grozi uszkodzeniem
monitora.
Nie korzysta z przewodu zasilajcego, jeli zcze lub wtyk jest
zakurzone.
z
Jeli zcze lub wtyk przewodu zasilajcego jest zakurzone, oczy je
such szmatk.
z
Uywanie przewodu zasilajcego z zakurzonym wtykiem lub zczem grozi
poraeniem prdem elektrycznym lub poarem.
Gniazdo sieciowe powinno znajdowa si w atwo dostpnym
miejscu, aby mona byo bez problemu wycign wtyczk w
przypadku koniecznoci odczenia urzdzenia od sieci.
z
Moe to spowodowa poraenie prdem lub poar.
Instalacja
W przypadku instalacji produktu w miejscu, gdzie jest on wystawiony na dziaanie duych iloci
kurzu, wysokich lub niskich temperatur, wilgoci czy preparatów chemicznych oraz uywania go
Y
zt{T[WXXTw__UGGGYzt{T[WXXTw__UGGGY YWW^TXXTY_GGG㝘䟸GYa\^aYXYWW^TXXTY_GGG㝘䟸GYa\^aYX

przez 24 godziny na dob, np. w przypadku lotniska, stacji kolejowej itp., naley skonsultowa si z
autoryzowanym punktem serwisowym.
Konsultacja jest konieczna, gdy korzystanie z monitora w takich warunkach moe spowodowa
jego powane uszkodzenie.
Monitor powinien by ulokowany w miejscu moliwie suchym i
czystym.
z
We wntrzu monitora moe powsta zwarcie lub poar.
Przy przenoszeniu nie dopuci do upuszczenia.
z
Moe to spowodowa uszkodzenie sprztu lub obraenia cielesne.
Postaw podstaw monitora na póce tak, aby nie wystawaa poza jej
krawd.
z
Jeli monitor spadnie, moe ulec uszkodzeniu lub spowodowa obraenia
ciaa u osób.
Nie stawia produktu na niestabilnym lub niewielkim podou.
z
Produkt powinno si umieszcza na równej, stabilnej powierzchni, gdy
jego upadek moe spowodowa obraenia ciaa osób znajdujcych si w
pobliu, zwaszcza dzieci.
Nie stawia produktu na pododze.
z
Takie ustawienie monitora stwarza ryzyko potknicia, zwaszcza w
przypadku dzieci.
ABY UNIKN ZAGROENIA POAREM, NIE WOLNO STAWIA
WIEC I INNYCH RÓDE OTWARTEGO OGNIA W POBLIU TEGO
PRODUKTU.
z
Niezastosowanie si do tego zalecenia stwarza ryzyko poaru.
Zachowa odpowiedni odlego pomidzy urzdzeniami
grzewczymi a przewodem zasilajcym.
z
Nadtopienie osony przewodu grozi poraeniem prdem lub poarem.
Z
zt{T[WXXTw__UGGGZzt{T[WXXTw__UGGGZ YWW^TXXTY_GGG㝘䟸GYa\^aYXYWW^TXXTY_GGG㝘䟸GYa\^aYX

z
Wzrost temperatury wewntrz urzdzenia grozi poarem.
Monitor naley stawia ostronie.
z
Moe ulec uszkodzeniu.
Nie naley ka monitora ekranem w dó.
z
Moe to uszkodzi powierzchni ekranu.
Instalacj wspornika naciennego powinien przeprowadzi
wykwalifikowany specjalista.
z
Instalacj wspornika naciennego powinien przeprowadzi
wykwalifikowany specjalista.
z
Instalacja wykonana przez osoby niewykwalifikowane moe prowadzi do
obrae ciaa.
Przy montau produktu naley zachowa odpowiedni odlego od
ciany (przynajmniej 10 cm) w celu zapewnienia odpowiedniej
wentylacji.
z
Niedostateczna wentylacja moe powodowa wzrost temperatury wewntrz
produktu, co skraca ywotno podzespoów oraz obnia jako
funkcjonowania.
Plastikowe opakowanie (torb) naley przechowywa poza
zasigiem dzieci.
z
Podczas zabawy plastikow torb istnieje ryzyko przypadkowego
uduszenia si.
Czyszczenie
Czyszczc obudow monitora lub powierzchni ekranu, naley uywa lekko wilgotnej, mikkiej
szmatki.
Nie naley rozpyla detergentu bezporednio na powierzchni
monitora.
z
Grozi to uszkodzeniem, poraeniem prdem elektrycznym lub poarem.
Nie stawia produktu w miejscach o sabej wentylacji, na przykad
na póce czy w szafce.
[
zt{T[WXXTw__UGGG[zt{T[WXXTw__UGGG[ YWW^TXXTY_GGG㝘䟸GYa\^aYYYWW^TXXTY_GGG㝘䟸GYa\^aYY

Jeli wtyk jest brudny lub zakurzony, naley go dokadnie wyczyci
such szmatk.
z
Brudny wtyk moe spowodowa poraenie prdem lub poar.
Przed czyszczeniem monitora pamita o wczeniejszym odczeniu
przewodu zasilajcego.
z
Czyszczenie urzdzenia znajdujcego si pod napiciem grozi poraeniem
prdem elektrycznym lub poarem.
Wyj wtyczk przewodu zasilajcego z gniazdka i przetrze
monitor mikk, such szmatk.
z
Nie uywa adnych substancji chemicznych, takich jak wosk, benzyna,
alkohol, rozpuszczalnik, rodki owadobójcze, odwieacze powietrza,
rodki smarne lub detergenty.
Inne
Nie naley zdejmowa pokrywy (lub tylnej czci).
z
Moe to spowodowa poraenie prdem lub poar.
z
Wszelkie naprawy powinny by wykonywane przez wykwalifikowanych
pracowników serwisu.
Jeli monitor nie dziaa prawidowo, a zwaszcza, gdy wydaje
nienormalne dwiki lub, gdy dochodzi z niego swd, naley
natychmiast wyczy zasilanie i zgosi si do autoryzowanego
dealera lub serwisu.
z
Moe to spowodowa poraenie prdem lub poar.
Produktu nie naley instalowa w miejscach, w których
przechowywane s oleje, a take w zadymionych lub wilgotnych
pomieszczeniach.
z
W przeciwnym razie moe doj do uszkodzenia, poraenia prdem lub
poaru.
z
Nie wolno uruchamia monitora w pobliu wody, okien lub drzwi, gdzie
byby naraony na nieg lub deszcz.
Jeli monitor zostanie upuszczony lub jego obudowa ulegnie
uszkodzeniu, naley go wyczy i odczy przewód zasilajcy.
Nastpnie naley skontaktowa si z Serwisem.
z
W przeciwnym razie monitor moe ulec uszkodzeniu, powodujc poraenie
prdem lub poar.
Naley uywa zalecanych detergentów i mikkiej szmatki.
\
zt{T[WXXTw__UGGG\zt{T[WXXTw__UGGG\ YWW^TXXTY_GGG㝘䟸GYa\^aYYYWW^TXXTY_GGG㝘䟸GYa\^aYY

W czasie wyadowa atmosferycznych na zewntrz naley wyczy
zasilanie monitora lub nie korzysta z niego przez jaki czas.
z
W przeciwnym razie monitor moe ulec uszkodzeniu, powodujc poraenie
prdem lub poar.
Nie przesuwaj monitora, cignc za przewód lub kabel sygnaowy.
z
Moe to spowodowa awari sprztu, poraenie prdem lub poar w
rezultacie uszkodzenia przewodu.
Nie przesuwaj monitora w prawo ani w lewo, cignc za przewód lub
kabel sygnaowy.
z
Moe to spowodowa awari sprztu, poraenie prdem lub poar w
rezultacie uszkodzenia przewodu.
Nie naley zasania otworów wentylacyjnych monitora.
z
Nieodpowiednia wentylacja moe spowodowa awari lub poar.
Nie wolno stawia na monitorze pojemników z wod, produktów
chemicznych ani maych metalowych przedmiotów.
z
W przeciwnym razie moe doj do uszkodzenia, poraenia prdem lub
poaru.
z
W przypadku dostania si do monitora obcej substancji odcz przewód
zasilajcy i skontaktuj si z punktem serwisowym.
Nie stawia monitora w pobliu substancji atwopalnych.
z
Moe to spowodowa eksplozj lub poar.
Nie naley nigdy wkada adnych przedmiotów metalowych w
otwory monitora.
z
Moe to spowodowa poraenie prdem, poar lub obraenia ciaa.
W otworze wentylacyjnym, w gniazdku suchawkowym ani w
gniazdach AV nie naley umieszcza metalowych przedmiotów (np.
wtyków, przewodów, rubokrtów) ani przedmiotów atwopalnych
]
zt{T[WXXTw__UGGG]zt{T[WXXTw__UGGG] YWW^TXXTY_GGG㝘䟸GYa\^aYYYWW^TXXTY_GGG㝘䟸GYa\^aYY

(np. papieru, zapaek).
z
Grozi to poraeniem prdem elektrycznym. Jeli do produktu dostanie si
obca substancja lub woda, naley go wyczy, wyj wtyczk z gniazdka
elektrycznego i skontaktowa si z punktem Serwisem.
Ogldanie tego samego ekranu przez duszy czas moe sprawi, e
ekran bdzie zamazany lub widoczny bdzie trway obraz.
z
Wczaj tryb oszczdzania energii lub wygaszacz ekranu o ruchomym
obrazie, kiedy pozostawiasz monitor na duszy okres czasu.
Rozdzielczo i czstotliwo naley dostosowa odpowiednio do
modelu.
z
Niewaciwa rozdzielczo i czstotliwo moe uszkodzi wzrok.
32-calowa - (80 cm) - 1360 X 768
Cige patrzenie na monitor ze zbyt maej odlegoci moe
spowodowa uszkodzenie wzroku.
Aby pozwoli odpocz oczom, po kadej godzinie pracy przed
monitorem zrób co najmniej 5-minutow przerw.
Nie naley instalowa produktu na niestabilnej, nierównej
powierzchni lub w miejscu naraonym na drgania.
z
Jeli monitor spadnie, moe ulec uszkodzeniu lub spowodowa obraenia
ciaa u osób. Korzystanie z produktu w miejscu naraonym na drgania
moe spowodowa jego szybsze zuycie lub zapalenie.
Monitor mona przenosi, gdy jest on wyczony a przewód
zasilajcy jest odczony. Przed przeniesieniem monitora sprawd,
czy wszystkie kable, w tym kabel antenowy i kable przyczeniowe
innych urzdze s odczone.
z
W przeciwnym razie mog ulec uszkodzeniu i prowadzi do poaru lub
poraenia prdem.
^
zt{T[WXXTw__UGGG^zt{T[WXXTw__UGGG^ YWW^TXXTY_GGG㝘䟸GYa\^aYZYWW^TXXTY_GGG㝘䟸GYa\^aYZ

Aby zapobiec ewentualnemu uszkodzeniu monitora, powinno si go
stawia w miejscu niedostpnym dla dzieci.
z
Naley równie pamita o tym, i upadek monitora moe spowodowa
straty materialne, obraenia, a nawet mier.
Zaleca si odczenie urzdzenia od róda zasilania w przypadku
duszej przerwy w eksploatacji.
z
Pozostawienie urzdzenia pod napiciem w takim przypadku grozi
poraeniem prdem lub poarem.
Nie umieszcza na monitorze zabawek lub innych przedmiotów,
którymi mogoby si zainteresowa dziecko.
z
Ch signicia przedmiotu moe spowodowa upadek monitora, a w
konsekwencji straty materialne, obraenia ciaa lub nawet mier.
Po wyjciu baterii z pilota uwaaj, aby nie zostay poknite przez
dzieci. Trzymaj baterie z dala od dzieci.
z
W razie poknicia natychmiast skontaktuj si z lekarzem.
Podczas wymiany baterii pamitaj o prawidowym umieszczeniu
biegunów +/-, zgodnie z ilustracj.
z
Nieprawidowe umieszczenie biegunów moe prowadzi do pknicia lub
wycieku baterii, a w nastpstwie do poaru, obrae lub skaenia
(uszkodzenia).
Uywaj tylko baterii okrelonego typu. Nie uywaj nowych i starych
baterii razem.
z
Moe prowadzi do pknicia lub wycieku baterii, a w nastpstwie do
poaru, obrae lub skaenia (uszkodzenia).
Podczas przenoszenia monitora skorzysta z pomocy drugiej
osoby.
z
Upadek moe spowodowa wadliwe dziaanie lub fizyczne uszkodzenie
monitora.
_
zt{T[WXXTw__UGGG_zt{T[WXXTw__UGGG_ YWW^TXXTY_GGG㝘䟸GYa\^aYZYWW^TXXTY_GGG㝘䟸GYa\^aYZ

akumulatory tego samego typu.
© 1995~2008 Samsung Electronics Co., Ltd.
Baterie (i akumulatory) nie s zwykymi odpadami i wymagaj
specjalnej utylizacji. Jako uytkownik Klient jest odpowiedzialny za
zwrot zuytych baterii lub akumulatorów do utylizacji.
z
Klient moe odda zuyte baterie lub akumulatory do najbliszego
publicznego punktu utylizacji lub sklepu sprzedajcego baterie lub
`
zt{T[WXXTw__UGGG`zt{T[WXXTw__UGGG` YWW^TXXTY_GGG㝘䟸GYa\^aYZYWW^TXXTY_GGG㝘䟸GYa\^aYZ

Spis treci
Zasady bezpieczestwa .......................................................................................... 1
Zasady obowizujce w danym kraju ................................................................................ 1
Zasilanie ................................................................................................................. 1
Instalacja .......................................................................................................... 2
Czyszczenie .................................................................................................................. 4
Inne ................................................................................................................. 5
Wprowadzenie ....................................................................................................... 12
Zawarto opakowania ............................................................................................... 12
Monitor ................................................................................................ 13
Elementy mechaniczne ............................................................................................... 20
Poczenia ........................................................................................................... 24
Monta podstawy ......................................................................................... 24
Podczanie monitora .................................................................................. 25
MDC ........................................................................................................... 31
Dostosowywanie ustawie monitora ................................................................. 50
Input ................................................................................................................. 50
Picture [PC / BNC /DVI] ................................................................................ 51
Picture [AV / S-Video /Component / DVI-Video].................................................. 53
Sound................................................................................................................ 55
Setup .............................................................................................................. 56
Multi Control ....................................................................................................... 59
Funkcje bezporeDNIe Demogo sterowania ....................................................................... 59
XW
zt{T[WXXTw__UGGGXWzt{T[WXXTw__UGGGXW YWW^TXXTY_GGG㝘䟸GYa\^aYZYWW^TXXTY_GGG㝘䟸GYa\^aYZ

Rozwizywanie problemów ................................................................................. 61
Sprawdzanie funkcji autotestu ......................................................................................... 61
Naley sprawdzi ......................................................................................................... 62
Pytania i odpowiedzi ................................................................................................... 64
Parametry .......................................................................................................................... 66
Ogólne
....................................................................................................................... 66
System oszczdzania energii ............................................................................................... 67
Fabrycznie ustawione tryby wywietlania
........................................................................... 67
Informacje ....................................................................................................... 69
Aby poprawic obraz ................................................................................................ 69
INFORMACJE O PRODUKCIE (brak efektu pozostawania obrazu) ...................................... 69
Dodatek .............................................................................................................. 73
Skontaktuj si z firm SAMSUNG na caym wiecie ............................................................. 73
Terminologia ............................................................................................................... 75
Zasady usuwania .................................................................................................. 76
Osoba upowaniona ..................................................................................................... 76
XX
zt{T[WXXTw__UGGGXXzt{T[WXXTw__UGGGXX YWW^TXXTY_GGG㝘䟸GYa\^aYZYWW^TXXTY_GGG㝘䟸GYa\^aYZ

W zalenoci od modelu mog wystpowa rónice w kolorze i wygldzie produktu. W celu zwikszenia
wydajnoci produktu dane techniczne mog ulega zmianom bez uprzedniego powiadomienia.
Wprowadzenie
Zawarto opakowania
Uwaga
• Naley si upewni, czy w opakowaniu znajduj si nastpujce elementy.
Aby zakupi wyposaenie dodatkowe skontaktuj si z lokalnym przedstawicielem handlowym.
Uwaga
• Nie stawia produktu na pododze.
Monitor
Instrukcja
Karta gwarancyjna
(Nie wszdzie
dostpna)
Instrukcja obsugi, oprogramowanie
MDC
Kabel
Port sygnaowy(15 pin D-Sub) Kabel zasilania
Inne
Zasady bezpieczestwa
Wprowadzenie
Zawarto opakowania
Monitor
Elementy mechaniczne
Poczenia
Korzystanie z
oprogramowania
Dostosowywanie ustawie
monitora
Rozwizywanie problemów
Parametry
Informacje
Dodatek
XY
WYYYYUGGGXWYYYYUGGGX YWW^TXXTY`GGG㝘㤸GXXa\^a\_YWW^TXXTY`GGG㝘㤸GXXa\^a\_
Instrukcja obsugi

Pilot Baterie (AAA X 2) Zalepka
Gniazdo adaptera BNC-RCA Podstawa tymczasowa
Do nabycia osobno
ZESTAW do montau na cianie Zestaw gonikowy Podstawy
Kabel DVI Kabel BNC
Monitor
Przód
1) MENU
Suy równie do zamykania menu OSD lub powrotu do poprzedniego menu.
2) Przycisk góra-dó
Suy do przechodzenia w pionie z jednej pozycji menu do kolejnej lub do regulacji wybranej wartoci
menu.
3) Przycisk lewo-prawo / gono przycisk
Suy do przechodzenia w poziomie z jednej pozycji menu do kolejnej lub do regulacji wybranej wartoci
XZ
zt{T[WXXTw__UGGGXZzt{T[WXXTw__UGGGXZ YWW^TXXTY_GGG㝘䟸GYa\^aYZYWW^TXXTY_GGG㝘䟸GYa\^aYZ

menu.
Suy równie do regulacji gonoci.
4) ENTER
Suy do wybierania menu OSD.
5) SOURCE
SOURCE Suy do przeczania midzy trybami PC i Video.
W zalenoci od typu transmisji w danym kraju, niektóre opcje mog by niedostpne.
[PC]
˧
[BNC]
˧
[DVI]
˧
[AV]
˧
[S-Video]
˧
[Component]
>> Kliknij tutaj, aby wywietli animacj.
6) PIP
PIP Nacinij ten przycisk, aby sterowa oknem PIP (obraz w obrazie).
Nie mona naoy wicej ni jednego obrazu PIP, poniewa przewody BNC i Component korzystaj z tego
samego gniazda.
>> Kliknij tutaj, aby wywietli animacj.
•
PC
A
V / S-Video / Component
•
BNC
A
V / S-Video
•
DVI
A
V / S-Video / Component
•
AV / S-Video
PC / BNC / DVI
•
Component
PC / DVI
7)
Przycisk zasilania
Przycisk ten suy do wczania i wyczania monitora.
8) Wskanik zasilania
Wskanik zasilania Suy do wczania i wyczania monitora.
9) Czujnik zdalnego sterowania
Skieruj pilota w stron tego punktu na monitorze.
Uwaga
• Zapoznaj si z opisem funkcji oszczdzania energii PowerSaver zawartym w podrczniku uytkownika.
Dla oszczdnoci energii naley WYCZA monitor, kiedy nie jest w uyciu lub, kiedy si od niego
odchodzi na duej.
Ty
Uwaga
• Szczegóowe informacje dotyczce podczania kabli znajduj si w czci Podczanie kabli w sekcji
Instalacja. Panel tylny monitora moe si róni w zalenoci od modelu.
X[
zt{T[WXXTw__UGGGX[zt{T[WXXTw__UGGGX[ YWW^TXXTY_GGG㝘䟸GYa\^aYZYWW^TXXTY_GGG㝘䟸GYa\^aYZ

1) RS232C OUT/IN (PORT szeregowy RS232C):
port programowy MDC (Multiple Display Control)
2) PC IN(RGB) (Gniazdo sygnaowe PC) :
Uywajc 15-pinowe D-Sub - tryb PC (Analog PC)
3) DVI IN(RGB) (Gniazdo sygnaowe PC) :
Uywajc DVI-D do DVI-D - tryb DVI (Digital PC)
4) PC/DVI/BNC AUDIO IN (Zcze audio (wejcie)
DVI / BNC / PC)
5) COMPONENT AUDIO IN [L-AUDIO-R] (Zcze
audio (wejcie) Component)
6) BNC/COMPONENT OUT [R/P
R
, G/Y, B/P
B
, H, V]
(Gniazdo sygnaowe BNC / Gniazdo sygnaowe
Component (wyjúcie))
zcze BNC (Analog PC) : podczanie portu R, G, B, H,
V - zcze Component: podczanie portu P
R
, Y, P
B
7) BNC/COMPONENT IN [R/P
R
, G/Y, B/P
B
, H, V]
(Gniazdo sygnaowe BNC / Gniazdo sygnaowe
Component (wyjúcie))
8) AV AUDIO IN [L-AUDIO-R](Gniazdo sygnaowe
audio MONITOR (wejúcie))
9) AV OUT [VIDEO](Gniazdo sygnaowe) : tryb AV
(wyjúcie)
10) AV IN [VIDEO](Gniazdo sygnaowe) (wejúcie)
11) AV OUT [S-VIDEO](Gniazdo sygnaowe S-
Video) : tryb S-Video (wyjúcie)
12) AV IN [S-VIDEO](Gniazdo sygnaowe S-Video)
(wejúcie)
13) EXT SPEAKER(8)[- - L - +, - - R - +] (Gniazdo
mikrofonowe (8))
14) AUDIO OUT [L-AUDIO-R](Gniazdo sygnaowe
X\
X\UGGGXX\UGGGX YWW^TXYTYWGGG㝘䟸GXa[\aZ`YWW^TXYTYWGGG㝘䟸GXa[\aZ`

audio MONITOR (wyjúcie))
GNIAZDA WYJCIOWE MONITORA: do poczenia ze
zczami PC, DVI, BNC
15) POWER S/W ON [ | ] / OFF [O]
Wcza i wycza monitor.
16) POWER IN (Kabel sygnalowy):
Jeden koniec kabla zasilajcego naley podczy do
gniazda monitora, a drugi do gniazda sieci
elektrycznej.
Uwaga
• Liczba monitorów, które mona podczy do wyjcia ptli, jest róna w zalenoci od takich warunków, jak
kabel, ródo sygnau itp. W przypadku róda sygnau lub kabla nie powodujcego osabienia sygnau
mona podczy dziesi monitorów.
17) Kensington Lock(zabezpieczenie przed
kradzie)
Zabezpieczenie Kensington to mechanizm sucy do
fizycznego zablokowania urzdzenia uywanego w
miejscach publicznych. (Mechanizm blokujcy naley
kupi osobno.)
Informacje na temat sposobu korzystania z kódki
mona uzyska w miejscu jej zakupu.
Uwaga
•
Dodatkowe informacje na temat podczania kabli mona znale w punkcie „Podczanie monitora
ˉ
.
Pilot
Uwaga
• Na prac pilota moe wpywa telewizor lub inne urzdzenia elektroniczne uywane w pobliu monitora,
bdce przyczyn nieprawidowego dziaania z powodu zakóce czstotliwoci.
1. ON / OFF
2. MAGICNET
3. MDC
4. LOCK
5. Przyciski MagicNet
6.+100 -/--
7. VOL
8. MUTE
9. TTX/MIX
10. MENU
11. ENTER
12. P.MODE
13. AUTO
14. PRE-CH
15 . CH/P
16. SOURCE
17. INFO
18. EXIT
19. Przyciski Góra-Dól, Lewo-Prawo
20. S.MODE
21. STILL
22. FM RADIO
23. P.SIZE
24. SRS
25. DUAL/MTS
X]
X\UGGGYX\UGGGY YWW^TXYTYWGGG㝘䟸GXa[\a[ZYWW^TXYTYWGGG㝘䟸GXa[\a[Z

26. PIP
27. SOURCE
28. SWAP
29. SIZE
30. REW
31. STOP
32. PLAY/PAUSE
33. FF
1) ON / OFF
Przycisk ten suy do wczania i wyczania monitora.
2) MAGICNET
Przycisk szybkiego uruchamiania MagicNet
- Ta funkcja nie jest dostpna na tym monitorze.
3) MDC
Przycisk szybkiego uruchamiania MDC.
4) LOCK
Ten przycisk umoliwia wczenie/wyczenie wszystkich przycisków na pilocie oraz monitorze, z wyjtkiem
przycisku zasilania i LOCK (blokady).
5) Przyciski MagicNet
- Do obsugi programu MagicNet su nastpujce przyciski:
- Ta funkcja nie jest dostpna na tym monitorze.
•
A
lphabet/ Number : Use the buttons when inputting an address of website.
• DEL : Kasowanie ostatniego wprowadzonego znaku.
• SYMBOL : Umoliwia wprowadzanie symboli. (.O_-)
• ENTER : Suy do zatwierdzenia wprowadzonych danych.
6) +100 -/--
Nacinij, aby wybra kana oznaczony numerem wyszym ni 100.
Na przykad, aby wybra kana 121, nacinij „+100ˉ, a nastpnie „2ˉGi „1ˉ.
- Ta funkcja nie jest dostpna na tym monitorze.
7) VOL
Dopasowywanie gonoci dwiku.
8)
MUTE
Sluzy do chwilowego zatrzymania (wyciszenia) wyjscia audio.
Wywietlany w dolnym, lewym rogu ekranu.
Nacisniecie przycisku Mute lub - VOL + w trybie Mute spowoduje wlaczenie dzwieku.
9)
TTX/MIX
X^
X\UGGGZX\UGGGZ YWW^TXYTYWGGG㝘䟸GXa[\a[ZYWW^TXYTYWGGG㝘䟸GXa[\a[Z

Kanay telewizyjne oferuj usugi informacyjne w postaci teletekstu.
[Funkcja TTX / MIX jest uywana gównie w Europie. ]
10)
MENU
Suy równie do zamykania menu OSD lub powrotu do poprzedniego menu.
11)
ENTER
Suy do wybierania menu OSD.
12)
P.MODE
Dostosuj obraz monitora, wybierajc jedno z ustawie fabrycznych (lub wybierz wasne, niestandardowe
ustawienia obrazu).
AV / S-Video /Component Mode : P.MODE
W monitorze obsuguje cztery automatyczne ustawienia obrazu, które zostay fabrycznie zaprogramowane.
Nastpnie ponownie nacinij przycisk, aby cyklicznie zmienia dostpne fabrycznie skonfigurowane tryby.
( Dynamic Standard Movie Custom )
PC / DVI Mode : M/B ( MagicBright
˞
)
MagicBright to nowa funkcja monitora, która umoliwia uzyskanie obrazu o dwukrotnie lepszej jakoci w
porównaniu do monitorów obecnych na rynku.
( Entertain Internet Text Custom )
13) AUTO
Suy do przeprowadzenia automatycznej regulacji obrazu.(PC)
14)
PRE-CH
Suy do zmiany kanau telewizyjnego w trybie TV .
- Ta funkcja nie jest dostpna na tym monitorze.
15) CH/P
Suy do przechodzenia w poziomie z jednej pozycji menu do kolejnej lub do regulacji wybranej wartoci
menu.
- Ta funkcja nie jest dostpna na tym monitorze.
16)
SOURCE
Powoduje wczenie wskanika, informujcego o wywietlanym aktualnie sygnale wejciowym.
17)
INFO
Suy do wywietlania informacji o Video Source, Audio Source, numerze biecego kanau, rodzaju
dwiku oraz Speaker Mute ON/OFF w górnym prawym rogu ekranu.
18)
EXIT
Kiedy menu regulacji ekranu jest wczone:
19) Przyciski Góra-Dól, Lewo-Prawo
Sluza do przechodzenia z jednej pozycji menu do drugiej w poziomie, pionie lub do regulacji wybranych
wartosci menu.
20)
S.MODE
Dostosuj obraz monitora, wybierajc jedno z ustawie fabrycznych (lub wybierz wasne, niestandardowe
ustawienia obrazu).
Monitor posiada wbudowany wzmacniacz fonii stereo hi-fi.
Nastpnie ponownie nacinij przycisk, aby cyklicznie zmienia dostpne fabrycznie skonfigurowane tryby.
( Standard ˧ Music ˧ Movie ˧ Speech ˧ Custom )
21) STILL
Nacisn przycisk jeden raz, aby wczy pauz. Nacisn ponownie, aby j wyczy.
22) FM RADIO
Wcza/wycza opcj FM Radio (Radio FM).
W trybie PC/DVI ustawia sam DWIK na FM Radio.
W trybie ogólnym RÓDO SYGNAU WideO ustawia FM RADIO, wyczajc ekran.
Na obszarach o sabym sygnale podczas odbioru FM RADIO mog wystpi szumy.
- Ta funkcja nie jest dostpna na tym monitorze.
23) P.SIZE
Nacinij, aby zmieni rozmiar obrazu.
24)
SRS
SRS
25)
DUAL/MTS
X_
X\UGGG[X\UGGG[ YWW^TXYTYWGGG㝘䟸GXa[\a[ZYWW^TXYTYWGGG㝘䟸GXa[\a[Z

- Ta funkcja nie jest dostpna na tym monitorze.
DUAL-
STEREO/MONO, DUAL l / DUAL ll i MONO/NICAM MONO/NICAM STEREO s dostpne w zalenoci od
typu transmisji za pomoc przycisku DUAL na pilocie podczas ogldania TV.
MTS-
Suy do przeczania MONO/STEREO, DUAL 1/DUAL 2 i MONO/NICAM MONO/NICAM STEREO.
Typ dwiku Tryb MTS/S_Mode Domylny
FM Stereo
Mono Mono
Zmiana rczna
Stereo
Mono
˩
Stereo
SAP
Mono
˩
SAP
Mono
26)
PIP
Nacinij ten przycisk, aby sterowa oknem PIP (obraz w obrazie).
27)
SOURCE
Wywietla ródo sygnau wideo. (PIP)
28) SWAP
Przeczanie zawartoci okna PIP i gównego obrazu.
Obraz wywietlany w oknie PIP pojawi si na gównym ekranie, za obraz z gównego ekranu pojawi si w
oknie PIP.
29)
SIZE
Umoliwia wybór rónych rozmiarów obrazu.
30) REW
Przewijanie do tyu (Rewind)
31) STOP
Stop
32)
PLAY / PAUSE
Odtwarzanie / zatrzymanie (Play / Pause)
33) FF
Przewijanie do przodu (Fast forward)
© 1995~2008 Samsung Electronics Co., Ltd.
X`
X\UGGG\X\UGGG\ YWW^TXYTYWGGG㝘䟸GXa[\a[ZYWW^TXYTYWGGG㝘䟸GXa[\a[Z

Elementy mechaniczne | Górna krawd monitora | Podstawa | Gonik | Jak zainstalowa wspornik VESA | Monta
wspornika naciennego
1. Elementy mechaniczne
2. Górna krawd monitora
YW
X\UGGG]X\UGGG] YWW^TXYTYWGGG㝘䟸GXa[\a[ZYWW^TXYTYWGGG㝘䟸GXa[\a[Z

3. Podstawa
4. Gonik
5. Jak zainstalowa wspornik VESA
z
Naley upewni si, e instalacja wspornika VESA jest zgodna z midzynarodowymi standardami VESA.
z
Informacje na temat zakupu i instalacji wspornika VESA: Prosimy o kontakt z lokalnym dystrybutorem firmy
Samsung w celu zoenia zamówienia. Po zoeniu zamówienia odwiedz Pastwa profesjonalni instalatorzy,
którzy dokonaj montau wspornika.
z
Do przenoszenia monitora LCD potrzebne s co najmniej dwie osoby.
z
Firma Samsung nie jest odpowiedzialna za jakiekolwiek uszkodzenia produktu bd obraenia odniesione
podczas samodzielnej instalacji dokonywanej przez klienta.
YX
X\UGGG^X\UGGG^ YWW^TXYTYWGGG㝘䟸GXa[\a[ZYWW^TXYTYWGGG㝘䟸GXa[\a[Z

Wymiary
Do mocowania wspornika na cianie naley uywa wycznie wkrtów do czci metalowych o
rednicy 6 mm i dugoci od 8 do 12 mm.
6. Monta wspornika naciennego
z
Aby zamontowa wspornik nacienny, naley skontaktowa si z pracownikiem technicznym.
z
Firma Samsung Electronics nie ponosi odpowiedzialnoci za szkody poniesione przez klienta w przypadku
przeprowadzenia samodzielnego montau.
z
Produkt jest przeznaczony do montau na cianach wykonanych z cementu. Produkt moe odpa, jeli zostanie
zamontowany na tynku lub drewnie.
Komponenty (Sprzedawanego oddzielnie)
Naley uywa wycznie elementów i akcesoriów dostarczonych razem z produktem.
A
Wspornik
nacienny
B
Wspornik
monitor
C
Wkrt:
8EA
D
Wkrt:
3EA
E
Wkrt do
drewna: 7EA
F
Koek
rozporowy: 7EA
G
Instrukcja
montau
Skadanie wspornika do montau na cianie
1.
1. Zaznacz miejsce na otwór na cianie.
2. Wywierci otwór o gbokoci 35 mm w zaznaczonym miejscu.
3. Umie koki rozporowe we wszystkich otworach w cianie
F
.
4. Po umieszczeniu koków rozporowych
F
w otworach wspornika
A
,
przymocuj go do ciany wkrtami do drewna
E
.
Jeli wspornik nie zostanie pewnie przymocowany do ciany,
monitor LCD moe spa.
2.
1. Wycz zasilanie i wyjmij wtyczk przewodu zasilania z gniazda.
2. Umie monitor ekranem na mikkiej tkaninie lub poduszce na stole.
3. Przymocuj wspornik monitor
B
z tyu odbiornika monitor i zamocuj za pomoc wkrtów
C
.
YY
X\UGGG_X\UGGG_ YWW^TXYTYWGGG㝘䟸GXa[\a[ZYWW^TXYTYWGGG㝘䟸GXa[\a[Z

3.
1. Wsu 3 wieszaki wspornika telewizora
B
w wyobienia we wsporniku naciennym
A
.
2. Pocz wspornik telewizora
B
i wspornik nacienny
A
za pomoc wkrtów
D
.
Przed zamontowaniem zestawu na cianie naley najpierw podczy do niego
kable.
YZ
X\UGGG`X\UGGG` YWW^TXYTYWGGG㝘䟸GXa[\a[ZYWW^TXYTYWGGG㝘䟸GXa[\a[Z

W zalenoci od modelu mog wystpowa rónice w kolorze i wygldzie produktu. W celu zwikszenia
wydajnoci produktu dane techniczne mog ulega zmianom bez uprzedniego powiadomienia.
Poczenia
Monta podstawy
Uwaga
• Naley wykorzysta wycznie dostarczone rubki.
Ostrzeenie
Firma Samsung Electronics nie ponosi adnej odpowiedzialnoci za szkody powstae w wyniku
zastosowania podstawy innej, ni zalecana.
Monta Podstawa tymczasowa
Lewa
podstawa
Prawa
podstawa
Ostrzeenie
Umieci etykiet „CAUTION
ˉG
na odwrocie.
1) ‘Pokrywa ochronna
˅G
suy do zabezpieczenia otworu w dolnej czci monitora, w którym umieszczana jest
podstawa. Pamitaj, aby zdj ‘pokryw ochronn’ przed zamocowaniem doczonej podstawy
tymczasowej lub podstawy seryjnej (sprzedawanej oddzielnie) oraz zasoni otwór za lep k rzed
przymocowaniem zestawu do m ontau na cianie.
2) Odpowiednio rozmieci lew i praw podstaw .
3) Woy podstaw w otwór w dolnej cz ci monitora.
Umieci rubk w oznaczonym otworze i dokrci. (M4
Ý
L15)
Ostrzeenie
Zasady bezpieczestwa
Wprowadzenie
Poczenia
Monta podstawy
Podczanie monitora
Korzystanie z
oprogramowania
Dostosowywanie ustawie
monitora
Rozwizywanie problemów
Parametry
Informacje
Dodatek
Y[
X\UGGGXWX\UGGGXW YWW^TXYTYWGGG㝘䟸GXa[\a[ZYWW^TXYTYWGGG㝘䟸GXa[\a[Z

Podstawa zaprojektowana jest do regulacji k ta ustawienia ekranu. Firma nie odpowiada za jakiekolwiek
problemy spowodowane uytkowaniem podstawy. Produktu nie wolno uywa jako podstawy pod inne
przedm ioty ni monitor.
Monta podstawy (sprzedawanego oddzielnie)
1) ‘Pokrywa ochronna
˅G
suy do zabezpieczenia otworu w dolnej czci monitora, w którym umieszczana jest
podstawa. Pamitaj, aby zdj ‘pokryw ochronn’ przed zamocowaniem doczonej podstawy
tymczasowej lub podstawy seryjnej (sprzedawanej oddzielnie) oraz zasoni otwór za lep k rzed
przymocowaniem zestawu do m ontau na cianie.
2)
Upewni si, czy cz ci s odpowiednio zoone i umieszczone we waciwym miejscu. (M4
Ý
L15)
3) Woy podstaw w otwór w dolnej cz ci monitora.
4)
Umieci rubk w oznaczonym otworze i dokrci. (M4
Ý
L15)
Podczanie monitora
W przypadku kabla zasilajcego z uziemieniem:
W przypadku uszkodzenia przewód uziemiajcy moe spowodowa poraenie prdem. Przed
podczeniem do zasilania prdem zmiennym upewnij si, e przewód uziemiajcy jest podczony w
odpowiedni spos ób. Przed odczeniem przewodu uziemiajcego od cz najpierw zasilanie prdem
zmiennym.
Uwaga
• Oprócz komputera do monitora mona podczy równie takie urzdzenia wejcia AV, jak odtwarzacze
DVD, magnetowidy czy kamery. Szczegóowe informacje dotyczce podczania urzdze AV znajduj si
w czci Regulacja w sekcji Regulacja monitora.
Podczanie do komputera
Y\
X\UGGGXXX\UGGGXX YWW^TXYTYWGGG㝘䟸GXa[\a[[YWW^TXYTYWGGG㝘䟸GXa[\a[[

1) Podlacz przewód zasilania monitora do gniazda przewodu zasilania w tylnej czesci obudowy monitora.
Wczy zasilanie.
2) Sygna D-sub mona doprowadzi do monitora na trzy sposoby.
Wybierz jeden z nastpujcych:
2-1) Uywajc zcza D -sub (analogowego) na karcie graficznej. Po cz kablem D-sub 15-pinowy port
RGB z tyu monitora z 15-pinowym portem D-sub w komputerze.
2-2) Uywajc zcza DVI (cyfrowego) na karcie graficznej.
Podcz kabel DVI do portu DVI(HDCP) z tyu monitora oraz portu DVI w komputerze.
2-3) Uywajc zcza BNC (analogowego) na karcie graficznej.
Podlacz kabel BNC do portu zcze BNC/COMPONENT IN : podczanie portu R, G, G, H, V z
tylu m onitora.
3) Podczy kabel audio monitora do portu audio z tyu komputera.
Uwaga
• Wczy komputer i monitor.
Uwaga
• Kabel DVI lub BNC stanowi wyposaýenie dodatkowe.
eby zakupi elementy wyposaenia dodatkowego, naley skontaktowa si z Serwisemlokalnym firmy
Samsung Electronics.
Podczanie odtwarzacza DVD do zcza cyfrowego
Y]
X\UGGGXYX\UGGGXY YWW^TXYTYWGGG㝘䟸GXa[\a[[YWW^TXYTYWGGG㝘䟸GXa[\a[[

Uwaga
• Urzdzenia wejciowe, np. odtwarzacz DVD, s pod czane do zcza DVI IN monitora przy pomocy kabla
DVI.
• Nastpnie rozpocznij odtwarzanie pyty DVD.
• Wybierz opcj Digital za pomoc przycisku SOURCE.
Uwaga
• Monitor jest wyposaony w z cza DVI IN umoliwiajce podczenie urzdze cyfrowych wyposaonych w
zcza DVI, np. odtwarzacza DVD.
Podczanie do komputera
1) Urzdzenia wejcia AV, takie jak magnetowidy czy kamery podcza si do gniazda Gniazdo sygnaowe
AV IN [VIDEO] lub Gniazdo sygnaowe AV IN [S-VIDEO] monitora za pomoc kabla S-VHS lub BNC.
2) Podczy kocówki kabla Audio (L) i Audio (R) magnetowidu lub kamery do wejú AV IN [L-AUDIO-R].
Uwaga
• Uywajc przycisku Source na przednim panelu monitora naley wybra ródo sygnau AV lub S-Video
podczonego magnetowidu lub kamery.
• Nastpnie uruchom magnetowid lub kamer , umieszczajc w urzdzeniu kaset.
Uwaga
• Kabel S-VHS lub BNC stanowi wyposaenie dodatkowe.
Podczanie do magnetowidu
Y^
X\UGGGXZX\UGGGXZ YWW^TXYTYWGGG㝘䟸GXa[\a[[YWW^TXYTYWGGG㝘䟸GXa[\a[[

1) Podcz kable audio do gniazd COMPONENT AUDIO IN [L-AUDIO-R] monitora i gniazd AUDIO OUT
odtwarzacza DVD.
2) Podcz kabel wideo do gniazd BNC/COMPONENT IN - podczanie portu P
R, Y, PB monitora i gniazd
P
R, Y, PB odtwarzacza DVD.
Uwaga
• Uywajc przycisku Source na przednim panelu monitora naley wybra ródo sygnau Component
podczonego odtwarzacza DVD.
• Nastpnie uruchom odtwarzacz DVD, umieszczajc w urzdzeniu pyt DVD lub.
Uwaga
• Kabel S-VHS lub Component stanowi wyposaýenie dodatkowe.
Opis gniazd urzdzenia wideo znajduje si w instrukcji uytkownika odtwarzacza DVD.
Podczanie kamery
1) Odszukaj wyjcia A/V w kamerze. Zazwyczaj mona je znale z boku lub z tyu kamery.
Podcz kabl
e audio do gniazd AUDIO OUTPUT kamery i AV AUDIO IN [L-AUDIO-R] monitora.
2) Za pomoc kabla wideo pod cz gniazda VIDEO OUTPUT na kamerze i AV IN [VIDEO] na monitorze.
Uwaga
• Uywajc przycisku Source na przednim panelu monitora naley wybra ródo sygnau AV podczonego
kamery.
• Nastpnie uruchom kamer , umieszczajc w urzdzeniu kaset.
Uwaga
• Przedstawione kable audio-wideo stanowi zazwyczaj elementy wyposaenia kamery.
(Jeli nie, naley je zakupi w sklepie elektronicznym.)
Jeli posiadana kamera obsuguje dwik stereo, naley podczy dwa kable.
Y_
X\UGGGX[X\UGGGX[ YWW^TXYTYWGGG㝘䟸GXa[\a[[YWW^TXYTYWGGG㝘䟸GXa[\a[[

Podczanie przystawki internetowej DTV
Uwaga
• Sposób podczenia standardowej przystawki internetowej zosta przedstawiony poniej.
1) Podcz kabel wideo do gniazd BNC/COMPONENT IN - podczanie portu PR, Y, PB monitora i gniazd
P
R, Y, PB odtwarzacza DVD.
2) Podcz kable audio do gniazd COMPONENT AUDIO IN [L-AUDIO-R] monitora i gniazd AUDIO OUT
odtwarzacza DVD.
Uwaga
• Uywajc przycisku Source na przednim panelu monitora naley wybra ródo sygnau Component
podczonego przystawki internetowej DTV.
Uwaga
• Opis gniazd urzdzenia wideo znajduje si w instrukcji uytkownika przystawki internetowej.
Podczanie goników
Uwaga
• Przymocuj goniki do ODBIORNIKA za pomoc wkrtów.
* Zam ontuj zestaw g oników bez podstawy gonika.
Uwaga
Y`
X\UGGGX\X\UGGGX\ YWW^TXYTYWGGG㝘䟸GXa[\a[[YWW^TXYTYWGGG㝘䟸GXa[\a[[

• Pocz kablem gonikowym gniazda gonikowe z tyu ODBIORNIKA oraz z tyu goników.
Uwaga
• Po przymocowaniu g oników do ODBIORNIKA, nie przesuwaj go chwytajc za gonik.
Moe to uszkodzi mocowanie gonika.
Podczanie do systemu audio
Uwaga
• Pod cz kable audio do gniazd AUX L, R systemu audio i gniazd MONITOR IN [L-AUDIO-R] monitora.
© 1995~2008 Samsung Electronics Co., Ltd.
ZW
X\UGGGX]X\UGGGX] YWW^TXYTYWGGG㝘䟸GXa[\a[[YWW^TXYTYWGGG㝘䟸GXa[\a[[

Wprowadzenie
Multiple Display Control (MDC) to program umoliwiajcy atwe sterowanie kilkoma monitorami równoczenie. Do
komunikacji midzy komputerem i wywietlaczem suy standardowy port szeregowy RS-232C. Dlatego, aby
poczy porty szeregowe komputera i wywietlacza naley zastosowa kabel szeregowy.
Main Screen
Aby uruchomi program, kliknij Start > Program > Samsung > MDC System.
Wybierz urzdzenie, aby sprawdzi jego ustawienie gonoci na suwaku.
Z
zt{T[WXXTw__UGGGZZzt{T[WXXTw__UGGGZZ YWW^TXXTY_GGG㝘䟸GYa\^aY[YWW^TXXTY_GGG㝘䟸GYa\^aY[

Ikony gówne Przycisk wyboru
Remocon Info Grid
Safety Lock Wybór wywietlacza
Port Selection Narzdzia sterowania
1. Wcz wywietlacze za pomoc gównych ikon.
2. Suy do wczania lub wyczania funkcji odbioru sygnau zdalnego sterowania przez wywietlacz.
3. Ustawienie funkcji blokady.
Podczas ustawiania opcji Lock function (Funkcja blokady) mona uywa tylko przycisków zasilania i blokady
znajdujcych si na pilocie i urzdzeniu.
4. Ustawienie portu szeregowego komputera mona zmieni. Wartoci oryginaln jest COM1.
5. Kliknij Select All lub Clear All, aby wybra lub usun wszystkie wywietlacze.
6. Uyj siatki do wywietlenia krótkiej informacji o wybranym wywietlaczu.
7. 2) Format :
8. Uyj narzdzi sterowania do regulacji wywietlaczy.
<Uwaga> Funkcja wczania/wyczania zdalnego sterowania dziaa we wszystkich wywietlaczach,
podczonych do programu MDC, niezalenie od zasilania. Jednak bez wzgldu na stan w chwili
wyczenia programu MDC, jego zamknicie powoduje wczenie funkcji odbioru sygnau zdalnego
sterowania we wszystkich wywietlaczach.
Port Selection
Z
zt{T[WXXTw__UGGGZ[zt{T[WXXTw__UGGGZ[ YWW^TXXTY_GGG㝘䟸GYa\^aY[YWW^TXXTY_GGG㝘䟸GYa\^aY[

1. Program Multiple Display Control jest oryginalnie ustawiony na COM1.
2. Jeli uywany jest jakikolwiek inny port ni COM1, mona wybra porty od COM1 do COM4 w menu Port Selection.
3. Jeli nie zostanie wybrana dokadna nazwa portu podczonego do monitora kablem szeregowym, komunikacja nie
bdzie dostpna.
4. Wybrany port zostaje zachowany w programie i wykorzystany take w kolejnym programie.
Power Control
1. Kliknij ikon Power Control, aby wywietli ekran sterowania zasilaniem.
Z
zt{T[WXXTw__UGGGZ\zt{T[WXXTw__UGGGZ\ YWW^TXXTY_GGG㝘䟸GYa\^aY[YWW^TXXTY_GGG㝘䟸GYa\^aY[

Siatka informacyjna zawiera podstawowe informacje potrzebne do sterowania zasilaniem.
1) (Power Status (Stan zasilania))
2) Input
3) Image Size
4) On Timer
5) Off Timer
2. Aby wybra wywietlacz, kliknij przycisk Select All lub zaznacz odpowiednie pole wyboru.
Power Control umoliwia regulacj niektórych funkcji wybranego wywietlacza.
1)
Power On/Off
Z
zt{T[WXXTw__UGGGZ]zt{T[WXXTw__UGGGZ] YWW^TXXTY_GGG㝘䟸GYa\^aY[YWW^TXXTY_GGG㝘䟸GYa\^aY[

- Wcza i wycza zasilanie wybranego wywietlacza.
2) Volume
- Steruje poziomem gonoci wybranego wywietlacza.
Odbiera poziom gonoci wywietlacza i wywietla j na suwaku.
(Po anulowaniu wyboru lub klikniciu Select All, zostaje przywrócona warto domylna 10)
3)
(Mute On/Off)
- Wcza i wycza dwik wybranego wywietlacza.
Zaznaczajc pojedynczy wywietlacz, jeli wyczono w nim dwik, naley to zaznaczy.
(Jeli anulujesz zaznaczenie lub klikniesz Select All, zostan przywrócone wartoci domylne.)
Sterowanie zasilaniem dotyczy wszystkich wywietlaczy.
Funkcje Volume i Mute s dostpne tylko dla wywietlaczy z wczonym zasilaniem.
Input Source
1. Kliknij ikon Input Source, aby wywietli ekran regulacji sygnau wejciowego.
Aby wybra obraz do regulacji, kliknij przycisk Zaznacz wszystko lub zaznacz odpowiednie pole wyboru.
• TV Mode
• PC Mode
Z
zt{T[WXXTw__UGGGZ^zt{T[WXXTw__UGGGZ^ YWW^TXXTY_GGG㝘䟸GYa\^aY[YWW^TXXTY_GGG㝘䟸GYa\^aY[

Siatka informacyjna zawiera podstawowe informacje potrzebne do sterowania sygnaem wejciowym.
1) PC
- Suy do zmiany sygnau ródowego wybranego wywietlacza na PC.
2) BNC
- Suy do zmiany sygnau ródowego wybranego wywietlacza na BNC.
3) DVI
- Suy do zmiany sygnau ródowego wybranego wywietlacza na DVI.
4) TV
- Suy do zmiany sygnau ródowego wybranego wywietlacza na TV.
5) AV
- Suy do zmiany sygnau ródowego wybranego wywietlacza na AV.
6) S-Video
- Suy do zmiany sygnau ródowego wybranego wywietlacza na S-
V
ideo.
7) Component
- Suy do zmiany sygnau ródowego wybranego wywietlacza na Component.
8) MagicNet
- ródo sygnau wejciowego programu MagicNet dostpne jest wycznie w modelach wyposaonych w
oprogramowanie MagicNet.
9) Channel
- Jeli dla ustawienia Input Source (ródo sygnau wejciowego) wybrano opcj TV, obok opcji kanau pojawi si
strzaka.
Warto TV Source (ródo TV) mona wybra tylko w produktach z funkcj telewizora, a kontrola
kanaów jest moliwa tylko wtedy, gdy dla opcji Input Source (ródo sygnau wejciowego) wybrano
ustawienie TV.
Regulacja sygnau wejciowego dotyczy tylko wywietlaczy z wczonym zasilaniem.
Image Size
PC, BNC, DVI
1. Kliknij ikon Rozmiar obrazu, aby wywietli ekran regulacji Rozmiar obrazu.
Z
zt{T[WXXTw__UGGGZ_zt{T[WXXTw__UGGGZ_ YWW^TXXTY_GGG㝘䟸GYa\^aY[YWW^TXXTY_GGG㝘䟸GYa\^aY[

Tabela informacyjna zawiera podstawowe informacje potrzebne do regulacji rozmiaru obrazu.
1)
(Power Status (Stan zasilania))
- Informuje o stanie zasilania biecego wywietlacza.
2) Image Size
- Suy do wywietlania informacji o rozmiarze biecego obrazu wybranego monitora.
3) Input
- Informuje o biecym sygnale wejciowym uywanego wywietlacza.
4) W tabeli informacyjnej znajduj si tylko obrazy, których sygnaem ródowym jest PC,BNC,DVI .
5) PC Source - Po klikniciu Rozmiar obrazu, najpierw pojawi si zakadki PC, BNC, DVI.
- Przycisk Regulacja rozmiaru obrazu reguluje rozmiar obrazu dostpny dla PC, BNC, DVI.
6) Video Source
- Kliknicie karty Video Source (ródo wideo) pozwala sterowa rozmiarem obrazu dla danego róda sygnau
wejciowego.
ródo sygnau wejciowego programu MagicNet dostpne jest wycznie w modelach wyposaonych
w oprogramowanie MagicNet.
Regulacja rozmiaru obrazu jest dostpna tylko dla wywietlaczy z wczonym zasilaniem.
Image Size
TV, AV, S-Video, Component, DVI(HDCP)
1. Kliknij ikon Rozmiar obrazu, aby wywietli ekran regulacji Rozmiar obrazu.
Z
zt{T[WXXTw__UGGGZ`zt{T[WXXTw__UGGGZ` YWW^TXXTY_GGG㝘䟸GYa\^aY[YWW^TXXTY_GGG㝘䟸GYa\^aY[

Tabela informacyjna zawiera podstawowe informacje potrzebne do regulacji rozmiaru obrazu.
1) Kliknicie karty Video Source (ródo wideo) umoliwia dostosowanie rozmiaru obrazu dla opcji TV, AV, S-Video i
Komponent (Komponentowe).
Aby wybra obraz do regulacji, kliknij przycisk Zaznacz wszystko lub zaznacz odpowiednie pole wyboru.
2) W tabeli informacyjnej znajduj si tylko obrazy, których sygnaem ródowym jest TV, AV, S-VIDEO, Component,
DVI(HDCP).
3) Dowolnie zmienia rozmiar obrazu wybranego monitora.
Uwaga: Trybów Auto Wide (Automatyczna szeroko), Zoom1 i Zoom2 nie mona wybra, jeli typ
wejciowego sygnau komponentowego lub DVI (HDCP) to 720p lub 1080i.
ródo sygnau wejciowego programu MagicNet dostpne jest wycznie w modelach wyposaonych
w oprogramowanie MagicNet.
Regulacja rozmiaru obrazu jest dostpna tylko dla wywietlaczy z wczonym zasilaniem.
Time
1. Kliknij ikon Time, aby wywietli ekran regulacji godziny.
zt{T[WXXTw__UGGG[Wzt{T[WXXTw__UGGG[W YWW^TXXTY_GGG㝘䟸GYa\^aY[YWW^TXXTY_GGG㝘䟸GYa\^aY[

Siatka informacyjna zawiera podstawowe informacje potrzebne do regulacji godziny.
1) Current Time
- Ustaw aktualn godzin dla wybranych wywietlaczy (godzina w komputerze)
- Aby zmieni aktualn godzin, najpierw zmie godzin w komputerze.
2) On Time Setup
-
Zdefiniuj ustawienia Hour (Godzina), Minute (Minuta), AM/PM (Przed/po poudniu) opcji On Time Setup
(Konfiguracja uruchamiania), Status (Stan), Source (ródo), Volume (Gono) dla wybranego ekranu.
3) Off Time Setup
-
Zdefiniuj ustawienia Hour (Godzina), Minute (Minuta), AM/PM (Przed/po poudniu) i Status (Stan) opcji Off Time
Setup (Konfiguracja wyczania) dla wybranego ekranu.
4) Wywietla ustawienia opcji On Time (Czas uruchomienia).
5) Wywietla ustawienia opcji Off Time (Czas wyczenia).
ródo sygnau wejciowego programu MagicNet dostpne jest wycznie w modelach wyposaonych
w oprogramowanie MagicNet.
Regulacja godziny dotyczy tylko wywietlaczy z wczonym zasilaniem.
W przypadku opcji On Time Setup (Konfiguracja uruchamiania) ustawienie TV Source (ródo TV)
dziaa tylko w modelach z telewizorem.
PIP
PIP Size
1. Kliknij ikon PIP, aby wywietli ekran Regulacja PIP.
Aby wybra obraz do regulacji, kliknij przycisk Zaznacz wszystko lub zaznacz odpowiednie pole wyboru.
zt{T[WXXTw__UGGG[Xzt{T[WXXTw__UGGG[X YWW^TXXTY_GGG㝘䟸GYa\^aY[YWW^TXXTY_GGG㝘䟸GYa\^aY[

Tabela informacyjna zawiera podstawowe informacje potrzebne do regulacji rozmiaru PIP.
1) PIP Size
- Informuje o biecym rozmiarze obrazu uywanego wywietlacza.
2) OFF
- Suy do wyczania funkcji PIP wybranego wywietlacza.
3) Large
- Suy do wczania funkcji PIP wybranego wywietlacza oraz zmiany rozmiaru okna na Large.
4) Small
- Suy do wczania funkcji PIP wybranego wywietlacza oraz zmiany rozmiaru okna na Small.
5) Double1
- Suy do wczania funkcji PIP wybranego wywietlacza oraz zmiany rozmiaru okna na Double 1.
6) Double 2
- Suy do wczania funkcji PIP wybranego wywietlacza oraz zmiany rozmiaru okna na Double 2.
7) Double 3 (Picture By Picture)
- Podwójny ekran 3 (Obraz po obrazie) - Wcza funkcj PBP dla wybranego ekranu i zmienia rozmiar na Podwójny
ekran 3.
ródo sygnau wejciowego programu MagicNet dostpne jest wycznie w modelach wyposaonych
w oprogramowanie MagicNet.
Regulacja rozmiaru okna PIP jest moliwa po wczeniu zasilania monitora.
PIP
PIP Source
1. Kliknij ikon PIP, aby wywietli ekran Regulacja PIP.
• PIP TV Mode
[
zt{T[WXXTw__UGGG[Yzt{T[WXXTw__UGGG[Y YWW^TXXTY_GGG㝘䟸GYa\^aY[YWW^TXXTY_GGG㝘䟸GYa\^aY[

• PIP S-Video Mode
Tabela informacyjna zawiera podstawowe informacje potrzebne do regulacji róda PIP.
1) PIP Source
- Regulacja róda PIP jest moliwa po wczeniu zasilania monitora.
2) PC
- Suy do zmiany sygnau ródowego PIP wybranego wywietlacza na PC.
3) BNC
- Suy do zmiany sygnau ródowego PIP wybranego wywietlacza na BNC.
4) DVI
- Suy do zmiany sygnau ródowego PIP wybranego wywietlacza na DVI.
5) TV
- Suy do zmiany sygnau ródowego PIP wybranego wywietlacza na TV.
[
zt{T[WXXTw__UGGG[Zzt{T[WXXTw__UGGG[Z YWW^TXXTY_GGG㝘䟸GYa\^aY[YWW^TXXTY_GGG㝘䟸GYa\^aY[

6) AV
- Suy do zmiany sygnau ródowego PIP wybranego wywietlacza na AV.
7) S-Video
- Suy do zmiany sygnau ródowego PIP wybranego wywietlacza na S-Video.
8) Component
- Suy do zmiany sygnau ródowego PIP wybranego wywietlacza na Component.
9) Channel
– Jeli dla opcji PIP Source (ródo obrazu PIP) wybrano warto TV, obok opcji kanau pojawi si strzaka.
Uwaga: Niektóre róda PIP mog by niedostpne, zalenie od typu sygnau wejciowego gównego
ekranu.
ródo sygnau wejciowego programu MagicNet dostpne jest wycznie w modelach wyposaonych
w oprogramowanie MagicNet.
Ustawienie TV Source (ródo TV) mona wybra tylko w produktach z funkcj telewizora, a kontrola
kanaów jest moliwa tylko wtedy, gdy dla opcji PIP Source (ródo obrazu PIP) wybrano ustawienie
TV.
Funkcja PIP Control (Regulacja PIP) jest dostpna tylko dla monitorów z wczonym zasilaniem i
funkcj PIP.
Settings
Picture
1. Kliknij ikon Settings, aby wywietli ekran regulacji ustawie.
Siatka informacyjna zawiera podstawowe informacje potrzebne do regulacji ustawie.
Po zaznaczeniu danej funkcji, jej warto zostaje wywietlona na suwaku. Kliknicie przycisku Select All powoduje
przywrócenie wartoci domylnej (50). Zmiana wartoci tego ekranu spowoduje automatyczn zmian trybu na
„CUSTOM” (NIESTANDARDOWY).
1) Picture
- Dostpny tylko dla sygnaów TV, AV, S-Video, Component, DVI(HDCP).
2) Contrast
- Reguluje kontrast wybranego wywietlacza.
3) Brightness
- Reguluje jaskrawo wybranego wywietlacza.
4) Sharpness
- Reguluje ostro wybranego wywietlacza.
5) Color
- Reguluje kolory wybranego wywietlacza.
[
zt{T[WXXTw__UGGG[[zt{T[WXXTw__UGGG[[ YWW^TXXTY_GGG㝘䟸GYa\^aY[YWW^TXXTY_GGG㝘䟸GYa\^aY[

6) Tint
- Reguluje odcie wybranego wywietlacza.
7) Color Tone
- Suy do regulacji odcienia kolorów wybranego monitora.
ródo sygnau wejciowego programu MagicNet dostpne jest wycznie w modelach wyposaonych
w oprogramowanie MagicNet.
Z funkcji tej mona korzysta tylko w przypadku, gdy wczone jest zasilanie wywietlacza; brak
wyboru parametrów powoduje wywietlenia wartoci fabrycznych.
Settings
Picture PC
1. Kliknij ikon Settings, aby wywietli ekran regulacji ustawie.
Siatka informacyjna zawiera podstawowe informacje potrzebne do regulacji ustawie. Po wybraniu kadej funkcji
ustawiona dla niej warto jest wywietlana na suwaku. Po wybraniu kada funkcja pobiera warto dla zestawu i
wywietla j na suwaku. Kliknicie przycisku Select All powoduje przywrócenie wartoci domylnej (50). Zmiana
wartoci tego ekranu spowoduje automatyczn zmian trybu na „CUSTOM” (NIESTANDARDOWY).
1) Picture PC
- Dostpny tylko dla sygnaów PC, BNC, DVI.
2) Contrast
- Reguluje kontrast wybranego wywietlacza.
3) Brightness
- Reguluje jaskrawo wybranego wywietlacza.
4) Red
- Suy do regulacji temperatury barw wybranego wywietlacza.
5) Green
- Suy do regulacji temperatury barw wybranego wywietlacza.
6) Blue
- Suy do regulacji temperatury barw wybranego wywietlacza.
ródo sygnau wejciowego programu MagicNet dostpne jest wycznie w modelach wyposaonych
w oprogramowanie MagicNet.
Z funkcji tej mona korzysta tylko w przypadku, gdy wczone jest zasilanie wywietlacza; brak
wyboru parametrów powoduje wywietlenia wartoci fabrycznych.
[
zt{T[WXXTw__UGGG[\zt{T[WXXTw__UGGG[\ YWW^TXXTY_GGG㝘䟸GYa\^aY[YWW^TXXTY_GGG㝘䟸GYa\^aY[

Settings
Audio
1. Kliknij ikon Settings, aby wywietli ekran regulacji ustawie.
Siatka informacyjna zawiera podstawowe informacje potrzebne do regulacji ustawie. Po wybraniu kadej funkcji
ustawiona dla niej warto jest wywietlana na suwaku. Po wybraniu kada funkcja pobiera warto dla zestawu i
wywietla j na suwaku. Kliknicie przycisku Select All powoduje przywrócenie wartoci domylnej (50). Zmiana
wartoci tego ekranu spowoduje automatyczn zmian trybu na „CUSTOM” (NIESTANDARDOWY).
1) Audio
- Reguluje ustawienia dwiku wszystkich sygnaów wejciowych.
2) Bass
- Reguluje basy wybranego wywietlacza.
3) Treble
- Reguluje wysokie tony wybranego wywietlacza.
4) Balance
- Reguluje balans wybranego wywietlacza.
5) SRS TSXT
- Dwik SRS TSXT w./wy.
6) Sound Select
- Kiedy funkcja PIP jest wczona, moesz wybra dwik Main lub Sub.
ródo sygnau wejciowego programu MagicNet dostpne jest wycznie w modelach wyposaonych
w oprogramowanie MagicNet.
Z funkcji tej mona korzysta tylko w przypadku, gdy wczone jest zasilanie wywietlacza; brak
wyboru parametrów powoduje wywietlenia wartoci fabrycznych.
Settings
Image Lock
1. Kliknij ikon Settings, aby wywietli ekran regulacji ustawie.
[
zt{T[WXXTw__UGGG[]zt{T[WXXTw__UGGG[] YWW^TXXTY_GGG㝘䟸GYa\^aY[YWW^TXXTY_GGG㝘䟸GYa\^aY[

Siatka informacyjna zawiera podstawowe informacje potrzebne do regulacji ustawie.
1) Image Lock
- Dostpny tylko dla sygnaów PC, BNC.
2) Coarse
- Reguluje Coarse wybranego wywietlacza.
3) Fine
- Reguluje Fine wybranego wywietlacza.
4) Position
- Reguluje pooenie wybranego wywietlacza.
5) Auto Adjustment
- Nacinij, aby automatycznie dostosowa monitor do sygnau PC.
ródo sygnau wejciowego programu MagicNet dostpne jest wycznie w modelach wyposaonych
w oprogramowanie MagicNet.
Regulacja ustawie dotyczy tylko wywietlaczy z wczonym zasilaniem.
Maintenance
Lamp Control
1. Funkcja Maintenance Control (Obsuga) jest dostpna tylko dla monitorów z wczonym zasilaniem.
[
zt{T[WXXTw__UGGG[^zt{T[WXXTw__UGGG[^ YWW^TXXTY_GGG㝘䟸GYa\^aY[YWW^TXXTY_GGG㝘䟸GYa\^aY[

Pojawi si Info Grid (Siatka informacyjna) zawierajca kilka podstawowych danych.
1) Maintenance
- Umoliwia uycie funkcji Maintenance Control (Sterowanie obsug) dla wszystkich róde sygnau wejciowego.
2) Auto Lamp Control
- Automatycznie reguluje podwietlenie wybranego monitora w okrelonym czasie.
Opcja Manual Lamp Control (Rczne sterowanie lamp) automatycznie wycza si po uyciu opcji Auto Lamp
Control (Automatyczne sterowanie lamp).
3) Manual Lamp Control
- Umoliwia regulacj podwietlenia wybranego monitora niezalenie od czasu.
Funkcja Auto Lamp Control (Automatyczna regulacja podwietlenia) automatycznie wycza si przy
przeprowadzaniu regulacji za pomoc funkcji Manual Lamp Control (Rczna regulacja podwietlenia).
Funkcja Maintenance Control (Obsuga) jest dostpna tylko dla monitorów z wczonym zasilaniem.
ródo sygnau wejciowego programu MagicNet dostpne jest wycznie w modelach wyposaonych
w oprogramowanie MagicNet.
Maintenance
Scroll
1. Funkcja Maintenance Control (Obsuga) jest dostpna tylko dla monitorów z wczonym zasilaniem.
[
zt{T[WXXTw__UGGG[_zt{T[WXXTw__UGGG[_ YWW^TXXTY_GGG㝘䟸GYa\^aY\YWW^TXXTY_GGG㝘䟸GYa\^aY\

1) Screen Scroll
- Eliminuje lady obrazu, które mog wystpi, kiedy wybrany monitor pozostaje przez duszy czas w trybie Pause
(Pauza). Mona ustawi timer odwieania wybierajc Interval wg godzin i Second wg sekund.
Dla opcji Screen Type (Typ ekranu) mona wybra wartoci Scroll (Przewijanie), Pixel (Piksele), Bar (Pas) i Eraser
(Wymazywanie).
ródo sygnau wejciowego programu MagicNet dostpne jest wycznie w modelach wyposaonych w
oprogramowanie MagicNet.
Konfigurujc ustawienie Second (Sekundy), dla opcji Scroll (Przewijanie) mona wybra wartoci 1, 2,
3, 4, 5, a dla opcji Pixel (Piksele), Bar (Pas) i Eraser (Wymazywanie) wartoci 10, 20, 30, 40, 50.
Funkcja Maintenance Control (Obsuga) jest dostpna tylko dla monitorów z wczonym zasilaniem.
Maintenance
Video Wall
1. Funkcja Maintenance Control (Obsuga) jest dostpna tylko dla monitorów z wczonym zasilaniem.
[
zt{T[WXXTw__UGGG[`zt{T[WXXTw__UGGG[` YWW^TXXTY_GGG㝘䟸GYa\^aY\YWW^TXXTY_GGG㝘䟸GYa\^aY\

1) Video Wall
- ciana wideo to zestaw poczonych ze sob ekranów, z których kady moe wywietla odpowiedni cz caego
obrazu lub cay obraz (kady ekran zestawu wywietla kompletny obraz osobno).
2) Video Wall (Screen divider)
- Ekran moe zosta podzielony.
Ekran mona podzieli na par mniejszych ekranów.
z Wybierz tryb z menu Screen divider (Podzia ekranu).
z Wybierz wywietlacz z listy.
z
Pooenie zostanie ustawione po naciniciu liczby w wybranym trybie.
z
Program MDC dostarczony przez firm Samsung umoliwia obsug do 4x4 wywietlaczy LCD.
z
2*2
z 3*3
z 4*4
z 1*2
z
2*1
z
1*5
z
5*1
3)
On / Off
zt{T[WXXTw__UGGG\Wzt{T[WXXTw__UGGG\W YWW^TXXTY_GGG㝘䟸GYa\^aY\YWW^TXXTY_GGG㝘䟸GYa\^aY\

- Wcza/wycza funkcj Video Wall (ciana wideo) dla wybranego ekranu.
4) Format
- Wybierz format, aby uzyska podzielony ekran.
z
Full
z Natural
Funkcja ta moe nie dziaa w programie MagicNet.
Funkcja Maintenance Control (Obsuga) jest dostpna tylko dla monitorów z wczonym zasilaniem.
Rozwizywanie problemów
1. Wywietlacz, który chcesz wyregulowa nie znajduje si w siatce informacyjnej regulacji zasilania.
- Sprawd port RS232C. (Sprawd, czy kabel jest prawidowo podczony do portu Com1.)
- Sprawd, czy podczone wywietlacze maj róne numery ID. Jeli kilka wywietlaczy ma taki sam numer ID, nie
zostay one prawidowo wykryte przez program z powodu konfliktu danych.
- Sprawd, czy numer ID wywietlacza zawiera si midzy 0 i 10. (Ustaw za pomoc menu wywietlacza)
Uwaga: Numer ID wywietlacza musi zawiera si midzy 0 i 10.
Jeli warto jest poza zakresem, system MDC nie moe sterowa wywietlaczem.
2. The display you wish to control does not appear on the other Control Info Grids
- Wywietlacz, który chcesz wyregulowa nie znajduje si w pozostaych siatkach informacyjnych regulacji
- Sprawd, czy moesz zmieni sygna wejciowy wywietlacza.
3. Wielokorotnie pojawia si okno dialogowe.
- Sprawd, czy wywietlacz, który chcesz wyregulowa, zosta wybrany.
4. Ustawiono godzin wczenia i wyczenia, lecz wywietlana jest inna godzina.
- Ustaw aktualn godzin, aby zsynchronizowa zegary wywietlaczy.
5. Po wyczeniu funkcji zdalnego sterowania, odczeniu kabla RS-232C lub nieprawidowym zamkniciu programu,
pilot moe nie dziaa prawidowo. Ponownie uruchom program i wcz funkcj zdalnego sterowania, przywracajc
funkcje standardowe.
<Uwaga> Program moe nie dziaa prawidowo z powodu istniejcych problemów z przesyaniem danych lub
zakóce wytwarzanych przez inne urzdzenia.
Wywietlanie ustawie w trybie wielu wywietlaczy
Po podczeniu wicej ni jednego wywietlacza, ustawienia s wywietlane w nastpujcy sposób.
1. Brak zaznaczenia: Wywietla ustawienia domylne.
2. Wybrano jeden wywietlacz: Pobiera i wywietla ustawienia wybranego wywietlacza.
3. Wybrano jeden wywietlacz (ID 1) i dodano drugi (ID 3): Program, który wywietla ustawienia wywietlacza ID 1,
pobiera i wywietla ustawienia wywietlacza ID 3.
4. Wybrano wszystkie urzdzenia za pomoc przycisku Select All: Przywraca ustawienia domylne.
zt{T[WXXTw__UGGG\Xzt{T[WXXTw__UGGG\X YWW^TXXTY_GGG㝘䟸GYa\^aY\YWW^TXXTY_GGG㝘䟸GYa\^aY\

W zalenoci od modelu mog wystpowa rónice w kolorze i wygldzie produktu. W celu zwikszenia
wydajnoci produktu dane techniczne mog ulega zmianom bez uprzedniego powiadomienia.
Dostosowywanie ustawie monitora
Input
Dostpne tryby
PC / BNC / DVI
AV
S-Video
Component
DVI-Video
Source List
[MENU]
˧
[ENTER]
˧
[ENTER]
˧
[
/
]
˧
[ENTER]
Powoduje wczenie wskanika, informujcego o wywietlanym aktualnie sygnale wejciowym
Suy do wybierania danego ekranu.
1) PC
2) BNC
3) DVI
4) AV
5) S-Video
6) Component
[ Bezporednim przyciskiem na pilocie jest przycisk 'SOURCE'. ]
Uwaga
• Funkcja PIP zostaje wyczona po przeczeniu monitora na ródo zewntrzne.
PIP
Kiedy do monitora podczone s urzdzenia zewntrzne AV, takie jak magnetowid lub odtwarzacz DVD,
funkcja PIP umoliwia ogldanie pochodzcego z nich obrazu w maym oknie, naoonym na sygna wideo
komputera. (w./wy)
Uwaga
• Nie mona naoy wicej ni jednego obrazu PIP, poniewa przewody BNC i Component korzystaj z
tego samego gniazda.
1) PIP
[MENU]
˧
[ENTER]
˧
[
/
]
˧
[ENTER]
˧
[ENTER]
˧
[
/
]
˧
[ENTER]
(w./wy)
[ Bezporednim przyciskiem na pilocie jest przycisk 'PIP'.]
2) SOURCE
[MENU]
˧
[ENTER]
˧
[
/
]
˧
[ENTER]
˧
[
/
]
˧
[ENTER]
˧
[
/
]
˧
[ENTER]
suy do wybrania zródla dla funkcji PIP (obraz w obrazie)
- PC : AV / S-Video / Component
- BNC: AV / S-Video
- DVI: AV / S-Video / Component
- AV / S-Video: PC / BNC / DVI
- Component: PC / DVI
[ Bezporednim przyciskiem na pilocie jest przycisk 'SOURCE'.]
Zasady bezpieczestwa
Wprowadzenie
Poczenia
Korzystanie z
oprogramowania
Dostosowywanie ustawie
monitora
Input
Picture
[PC / BNC /DVI]
Picture
[AV / S-Video /
Component / DVI-Video]
Sound
Setup
Multi Control
Funkcje bezporeDNIe
Demogo sterowania
Rozwizywanie problemów
Parametry
Informacje
Dodatek
\
W\UGGGXW\UGGGX YWW^TXYTXWGGG㝘䟸GXa\`aZZYWW^TXYTXWGGG㝘䟸GXa\`aZZ

3) Swap
[MENU]
˧
[ENTER]
˧
[
/
]
˧
[ENTER]
˧
[
/
]
˧
[ENTER]
Przeczanie zawartoci okna PIP i gównego obrazu.
Obraz wywietlany w oknie PIP pojawi si na gównym ekranie, za obraz z gównego ekranu pojawi si w
oknie PIP.
[ Bezporednim przyciskiem na pilocie jest przycisk 'SWAP'.]
4) Size
[MENU]
˧
[ENTER]
˧
[
/
]
˧
[ENTER]
˧
[
/
]
˧
[ENTER]
˧
[
/
]
˧
[ENTER]
Umoliwia uytkownikowi wyczenie oraz regulacj rozmiaru okna PIP.
[ Bezporednim przyciskiem na pilocie jest przycisk 'SIZE'.]
5) Position
[MENU]
˧
[ENTER]
˧
[
/
]
˧
[ENTER]
˧
[
/
]
˧
[ENTER]
˧
[
/
]
˧
[ENTER]
Zmieni pozycj okna PIP.
6) Transparency
[MENU]
˧
[ENTER]
˧
[
/
]
˧
[ENTER]
˧
[
/
]
˧
[ENTER]
˧
[
/
]
˧
[ENTER]
Ustaw przezroczysto okienek PIP.
- High
- Medium
- Low
- Opaque
Uwaga
•
Wybierajc , , w Size, Position i Transparency nie bd aktywne.
Dostpne tryby : PIP
Edit Name
[MENU]
˧
[ENTER]
˧
[
/
]
˧
[ENTER]
˧
[
/
]
˧
[ENTER]
˧
[
/
]
˧
[ENTER]
Nazwij urzdzenia wejcia podczone do gniazd wejciowych, aby uatwi sobie wybór róda sygnau.
1) PC
2) BNC
3) DVI
4) AV
5) S-Video
6) Component
Picture [PC / BNC /DVI]
Dostpne tryby
PC / BNC / DVI
AV
S-Video
Component
DVI-Video
MagicBright
˞
[MENU]
˧
[
/
]
˧
[ENTER]
˧
[ENTER]
˧
[
/
]
˧
[ENTER]
MagicBright
˞
to nowa funkcja oferujca optymalne warunki ogldania w zalenoci od zawartoci
wywietlanego obrazu. Obecnie dostpne s 4 róne tryby: Entertain, Internet, Text i Custom. Kady tryb ma
wasne fabryczne ustawienia jasnoci. Jedno z 4 ustawie mona wybra w prosty sposób, naciskajc przycisk
„MagicBright
˞ˉ
.
1) Entertain
Po wybraniu opcji Entertain monitor przeczy si na jasno maksymaln, porównywaln do jasnoci
odbiorników telewizyjnych, która jest optymalna do ogldania programów rozrywkowych (animacji, filmów
DVD, programów telewizyjnych czy gier internetowych).
2) Internet
Po wybraniu opcji Internet monitor przeczy si na zwikszon jasno, odpowiedni do przegldania
Internetu (tekstu i grafiki), zachowujc jednoczenie czytelno liter.
3) Text
Po wybraniu opcji Text monitor przeczy si na jasno normaln, dostpn równie w monitorach
obecnych na rynku, odpowiedni do czytania lub pracy z tekstem.
\
W\UGGGYW\UGGGY YWW^TXYTXWGGG㝘䟸GXa\`aZ]YWW^TXYTXWGGG㝘䟸GXa\`aZ]

Cho parametry s starannie dobrane przez inynierów, ustawienia wstpne mog nie by dostosowane do
Twojego wzroku i preferencji. W takim przypadku wyreguluj Jasno i Kontrast za pomoc menu OSD.
[Bezporednim przyciskiem na pilocie jest przycisk 'M/B'.]
Custom
[MENU]
˧
[
/
]
˧
[ENTER]
˧
[
/
]
˧
[ENTER]
˧
[ENTER]
˧
[
/
] / [< / >]
˧
[ENTER]
Menu ekranowe su do regulacji kontrastu i jaskrawoci odpowiednio do indywidualnych preferencji.
1) Contrast
Regulacja kontrastu.
2) Brightness
Regulacja jasnoci.
Uwaga
• Regulujc obraz za pomoc funkcji Custom, funkcja MagicBright przeczy si w tryb Custom.
Color Tone
[MENU]
˧
[
/
]
˧
[ENTER]
˧
[
/
]
˧
[ENTER]
˧
[
/
]
˧
[ENTER]
Odcien koloru mozna zmienic. kolorów.
1) Cool
2) Normal
3) Warm
4) Custom
(Opcja dostpna tylko w trybie PC/BNC).
Color Control
[MENU]
˧
[
/
]
˧
[ENTER]
˧
[
/
]
˧
[ENTER]
˧
[ENTER]
˧
[< / >]
˧
[ENTER]
Ta funkcja suy do dokadnej regulacji kolorów.
(Opcja dostpna tylko w trybie PC/BNC).
1) Red
2) Green
3) Blue
Uwaga
• Regulujc obraz za pomoc funkcji Color Control, funkcja Color Tone przeczy si w tryb Custom.
Image Lock
Image Lock uywane jest do dokadnej regulacji i uzyskania najlepszego obrazu poprzez usunicie zakóce
(drenia i migotania), wpywajcych niekorzystnie jego stabilno. Jeli regulacja Fine nie umoliwia
osignicia dostatecznej jakoci obrazu, naley skorzysta z regulacji Coarse, a nastpnie ponownie z funkcji
Fine.
(Opcja dostpna tylko w trybie PC/BNC).
1) Coarse
[MENU]
˧
[
/
]
˧
[ENTER]
˧
[
/
]
˧
[ENTER]
˧
[ENTER]
˧
[< / >]
˧
[ENTER]
Suy do usuwania zakóce, taki jak pasy pionowe. Regulacja Coarse moe spowodowa przesunicie
obrazu. Obraz mona ponownie ustawi na rodku ekranu, uywajc menu Regulacja obrazu w poziomie.
2) Fine
[MENU]
˧
[
/
]
˧
[ENTER]
˧
[
/
]
˧
[ENTER]
˧
[
/
]
˧
[ENTER]
˧
[< / >]
˧
[ENTER]
Suy do usuwania zakóce, taki jak pasy poziome. Jeli po regulacji Fine nadal wystpuj zakócenia,
naley j powtórzy po uprzedniej regulacji czstotliwoci (prdkoci zegara).
3) Position
[MENU]
˧
[
/
]
˧
[ENTER]
˧
[
/
]
˧
[ENTER]
˧
[
/
]
˧
[ENTER]
˧
[< / >] / [
/
]
˧
[ENTER]
Suy do regulacji pozycji obrazu w poziomie i w pionie.
\
W\UGGGZW\UGGGZ YWW^TXYTXWGGG㝘䟸GXa\`aZ]YWW^TXYTXWGGG㝘䟸GXa\`aZ]
4) Custom

Auto Adjustment
[MENU]
˧
[
/
]
˧
[ENTER]
˧
[
/
]
˧
[ENTER]
Wartoci Fine (Dokadnie), Coarse (Z grubsza) i pooenie zostaj dostosowane automatycznie.
(Opcja dostpna tylko w trybie PC/BNC).
[Bezporednim przyciskiem na pilocie jest przycisk 'AUTO'.]
Signal Balance
Uywany do kompensacji sabego sygnau RGB transmitowanego przez dugi kabel sygnaowy.
(Opcja dostpna tylko w trybie PC/BNC).
1) Signal Balance
[MENU]
˧
[
/
]
˧
[ENTER]
˧
[
/
]
˧
[ENTER]
˧
[ENTER]
˧
[
/
]
˧
[ENTER]
Istnieje moliwo wyboru tego ustawienia przy wczonej i wyczonej kontroli sygnau.
2) Signal Control
[MENU]
˧
[
/
]
˧
[ENTER]
˧
[
/
]
˧
[ENTER]
˧
[
/
]
˧
[ENTER]
˧
[
/
]
˧
[ENTER]
˧
[
/
]
˧
[< / >]
˧
[ENTER]
Parametry R Phase, G Phase, B Phase, Gain and Sharpness mona ustawia rcznie.
Size
[MENU]
˧
[
/
]
˧
[ENTER]
˧
[
/
]
˧
[ENTER]
˧
[
/
]
˧
[ENTER]
Umoliwia wybór rónych rozmiarów obrazu.
1) 16:9
2) 4:3
PIP Picture
[MENU]
˧
[
/
]
˧
[ENTER]
˧
[
/
]
˧
[ENTER]
˧
[
/
]
˧
[ENTER]
˧
[
/
]
˧
[ENTER]
˧
[
/
]
˧
[ENTER]
˧
[< / >]
˧
[ENTER]
Istnieje moliwo dostosowania ustawie obrazu PIP.
1) Contrast
Reguluje kontrast okna obrazu PIP na ekranie.
2) Brightness
Reguluje jasno okna obrazu PIP na ekranie.
3) Sharpness
Suy do regulacji rónicy midzy najjaniejszymi i najciemniejszymi obszarami okna PIP (Obraz w
obrazie).
4) Color
Suy do rozjaniania/przyciemniania obrazu w oknie PIP (Obraz w obrazie).
5) Tint
Nadaje naturalny odcie obrazowi wywietlanemu w oknie PIP.
Obrazy ze róde sygnau AV, S-Video mona wywietla za pomoc okna PIP w trybach PC, BNC.
Dziaa tylko wtedy, gdy sygna wideo ma format NTSC.
Dostpne tryby : PIP
Picture [AV / S-Video / Component / DVI-Video]
Dostpne tryby
PC / BNC / DVI
AV
S-Video
Component
DVI-Video
Mode
[MENU]
˧
[
/
]
˧
[ENTER]
˧
[ENTER]
˧
[
/
]
˧
[ENTER]
Regulacja otoczenia obrazu.
1) Dynamic
2) Standard
\
W\UGGG[W\UGGG[ YWW^TXYTXWGGG㝘䟸GXa\`aZ]YWW^TXYTXWGGG㝘䟸GXa\`aZ]

3) Movie
4) Custom
[Bezporednim przyciskiem na pilocie jest przycisk 'P.MODE'.]
Custom
[MENU]
˧
[
/
]
˧
[ENTER]
˧
[
/
]
˧
[ENTER]
˧
[
/
]
˧
[ENTER]
˧
[< / >]
˧
[ENTER]
Menu ekranowe su do regulacji kontrastu i jaskrawoci odpowiednio do indywidualnych preferencji.
1) Contrast
Nadaje obrazowi naturaln tonacj barw.
2) Brightness
Regulacja jasnoci.
3) Sharpness
Wyreguluj ostro obrazu.
4) Color
Wyreguluj kolory obrazu.
5) Tint
A
djusts the picture Tint.
Dziaa tylko w przypadku trybu AV i S-Video. Dziaa tylko wtedy, gdy sygna wideo ma format NTSC.
Color Tone
[MENU]
˧
[
/
]
˧
[ENTER]
˧
[
/
]
˧
[ENTER]
˧
[
/
]
˧
[ENTER]
Odcien koloru mozna zmienic. kolorów. Indywidualne komponenty systemu kolorów mona take dostosowa.
1) Cool 2
2) Cool 1
3) Normal
4) Warm1
5) Warm2
Size
[MENU]
˧
[
/
]
˧
[ENTER]
˧
[
/
]
˧
[ENTER]
˧
[
/
]
˧
[ENTER]
Umoliwia wybór rónych rozmiarów obrazu.
1)16:9
2)Zoom 1
3)Zoom 2
4)4:3
[Tryby ZOOM1 i ZOOM2 s niedostpne dla sygnau 1080i (lub powyej 720p) telewizji cyfrowej.
Digital NR (Digital Noise Reduction)
[MENU]
˧
[
/
]
˧
[ENTER]
˧
[
/
]
˧
[ENTER]
˧
[
/
]
˧
[ENTER]
Funkcj eliminacji zakóce mona wczy lub wyczy.
Funkcja cyfrowej redukcji szumów zapewnia wyraniejszy i ostrzejszy obraz.
1) Of
f
2) On
Film Mode
[MENU]
˧
[
/
]
˧
[ENTER]
˧
[
/
]
˧
[ENTER]
˧
[
/
]
˧
[ENTER]
Tryb filmowy mona wczy lub wyczy.
The Film Mode feature offers you a theater-quality viewing experience.
(Opcja niedostpna w trybie DVI-Video).
1) Off
2) On
\
W\UGGG\W\UGGG\ YWW^TXYTXWGGG㝘䟸GXa\`aZ]YWW^TXYTXWGGG㝘䟸GXa\`aZ]

[MENU]
˧
[
/
]
˧
[ENTER]
˧
[
/
]
˧
[ENTER]
˧
[
/
]
˧
[ENTER]
˧
[
/
]
˧
[ENTER]
˧
[< / >]
˧
[ENTER]
Istnieje moliwo dostosowania ustawie obrazu PIP.
1) Contrast
Reguluje kontrast okna obrazu PIP na ekranie.
2) Brightness
Reguluje jasno okna obrazu PIP na ekranie.
Dostpne tryby : PIP
Sound
Dostpne tryby
PC / BNC / DVI
AV
S-Video
Component
DVI-Video
Mode
[MENU]
˧
[
/
]
˧
[ENTER]
˧
[ENTER]
˧
[
/
]
˧
[ENTER]
Monitor posiada wbudowany wzmacniacz fonii stereo hi-fi.
1) Standard
Suy do przywracania standardowych ustawie fabrycznych.
2) Music
Suy do ogldania programów muzycznych lub koncertów.
3) Movie
Suy do ogldania filmów.
4) Speech
Suy do ogldania programów zoonych gównie z wypowiedzi (np. wiadomoci).
5) Custom
Suy do przywracania indywidualnych ustawie uytkownika.
Custom
[MENU]
˧
[
/
]
˧
[ENTER]
˧
[
/
]
˧
[ENTER]
˧
[
/
]
˧
[ENTER]
˧
[< / >]
˧
[ENTER]
Moesz regulowa ustawienia dwiku odpowiednio do indywidualnych preferencji.
1) Bass
Zwikszy dwik niskiej czstotliwoci.
2) Treble
Zwikszy dwik wysokiej czstotliwoci.
3) Balance
Balans dwiku ==> Umoliwia równomierne rozoenie dwiku na prawy i lewy gonik.
Dwik sycha nawet wtedy, gdy gono jest ustawiona na 0.
Uwaga
• Po dostosowaniu obrazu za pomoc funkcji Sound Custom (Dwik niestandardowy), tryb Sound Mode
(Tryb dwiku) zostanie przeczony na tryb Custom Mode (Tryb niestandardowy).
Auto Volume
[MENU]
˧
[
/
]
˧
[ENTER]
˧
[
/
]
˧
[ENTER]
˧
[
/
]
˧
[ENTER]
Suy do zmniejszania rónicy poziomu gonoci rónych nadawców.
1) Off
2) On
SRS TS XT
[MENU]
˧
[
/
]
˧
[ENTER]
˧
[
/
]
˧
[ENTER]
˧
[
/
]
˧
[ENTER]
\
W\UGGG]W\UGGG] YWW^TXYTXWGGG㝘䟸GXa\`aZ^YWW^TXYTXWGGG㝘䟸GXa\`aZ^
PIP Picture

SRS TS XT to opatentowana technologia firmy SRS, która umoliwia odtwarzanie 5.1-kanaowego dwiku
przy uyciu dwóch goników. Technologia Trusurround zapewnia przekonujce, wirtualne wraenie dwiku
przestrzennego przez dowolny zestaw dwóch goników, w tym take przez goniki wbudowane w telewizorze.
Jest w peni zgodna ze wszystkimi formatami dwiku wielokanaowego.
1) Of
f
2) On
[ Bezporednim przyciskiem na pilocie jest przycisk 'SRS'.]
Sound Select
[MENU]
˧
[
/
]
˧
[ENTER]
˧
[
/
]
˧
[ENTER]
˧
[
/
]
˧
[ENTER]
Kiedy funkcja PIP jest wczona, moesz wybra dwik Main lub Sub.
1) Main
2) Sub
[Dostpne tryby : PIP]
Setup
Dostpne tryby
PC / BNC / DVI
AV
S-Video
Component
DVI-Video
Language
[MENU]
˧
[
/
]
˧
[ENTER]
˧
[ENTER]
˧
[
/
]
˧
[ENTER]
Do wyboru jest 11 jzyków.
Uwaga
• Wybrany jzyk dotyczy tylko menu ekranowego.
Nie wypywa na jzyk oprogramowania zainstalowanego w komputerze.
Time
Pozwala na wybranie jednego z czterech ustawie: zegara, wcznika czasowego, wycznika czasowego,
automatycznego wyczania monitora po upywie okrelonego czasu.
1)
Clock Set
[MENU]
˧
[
/
]
˧
[ENTER]
˧
[
/
]
˧
[ENTER]
˧
[ENTER]
˧
[< / >]
˧
[ENTER]
Biece ustawienia czasu.
2) Sleep Timer
[MENU]
˧
[
/
]
˧
[ENTER]
˧
[
/
]
˧
[ENTER]
˧
[
/
]
˧
[ENTER]
˧
[< / >]
˧
[
/
]
˧
[ENTER]
˧
[< / >]
˧
[
/
]
˧
[ENTER]
Pozwala na ustawienie automatycznego wyczenia monitora po upywie okrelonej iloci minut. (Off(Wy.),
30, 60, 90, 120, 150, 180)
3) On Timer
[MENU]
˧
[
/
]
˧
[ENTER]
˧
[
/
]
˧
[ENTER]
˧
[
/
]
˧
[ENTER]
˧
[< / >]
˧
[
/
]
˧
[ENTER]
Pozwala na ustawienie automatycznego wczenia monitora o okrelonej godzinie.
Pozwala na ustawienie trybu oraz poziomu gonoci w momencie automatycznego wczenia monitora.
4) Off Timer
[MENU]
˧
[
/
]
˧
[ENTER]
˧
[
/
]
˧
[ENTER]
˧
[
/
]
˧
[ENTER]
˧
[< / >]
˧
[
/
]
˧
[ENTER]
Pozwala na ustawienie automatycznego wyczenia monitora o okrelonej godzinie, poziomie gonoci,
trybie.
Uwaga
•
Jeli wybierzesz opcj On Timer, Off Timer dla funkcji wycznika, nie ustawiwszy zegara w menu Clock
\
W\UGGG^W\UGGG^ YWW^TXYTXWGGG㝘䟸GXa\`aZ^YWW^TXYTXWGGG㝘䟸GXa\`aZ^

Set, wywietli si komunikat „ "Set the clock first.
ˉ
.
Menu Transparency
[MENU]
˧
[
/
]
˧
[ENTER]
˧
[
/
]
˧
[ENTER]
˧
[
/
]
˧
[ENTER]
Zmieni przezroczysto ta OSD.
1) High
2) Medium
3) Low
4) Opaque
Safety Lock PIN
[MENU]
˧
[
/
]
˧
[ENTER]
˧
[
/
]
˧
[ENTER]
˧
[0~9]
˧
[0~9]
˧
[0~9]
Haso mona zmieni.
Energy Saving
[MENU]
˧
[
/
]
˧
[ENTER]
˧
[
/
]
˧
[ENTER]
˧
[
/
]
˧
[ENTER]
˧
[MENU]
Funkcja ta umoliwia dostosowanie ustawie urzdzenia dotyczcych zuycia energii w celu jej oszczdzania.
1) On
2) Of
f
Uwaga
• Aby ograniczy pobór mocy urzdzenia w trybie gotowoci, ustaw opcj Energy Saving na On. Jeli
jednake opcja Energy Saving (Oszczdno energii) jest ustawiona na On, funkcja pilota Power On MDC
i funkcja WOL (Wake On LAN) MagicNet s niedostpne.
Video Wall
ciana wideo to zestaw poczonych ze sob ekranów, z których kady moe wywietla odpowiedni cz
caego obrazu lub cay obraz (kady ekran zestawu wywietla kompletny obraz osobno).
Wczenie funkcji Video Wall umoliwia dokonanie ustawie okna Video Wall.
1) Video Wall
[MENU]
˧
[
/
]
˧
[ENTER]
˧
[
/
]
˧
[ENTER]
˧
[ENTER]
˧
[
/
]
˧
[ENTER]
Wcza/wycza funkcj Video Wall (ciana wideo) dla wybranego ekranu.
-
Off
-
On
2) Format
[MENU]
˧
[
/
]
˧
[ENTER]
˧
[
/
]
˧
[ENTER]
˧
[
/
]
˧
[ENTER]
˧
[
/
]
˧
[ENTER]
Wybierz format, aby uzyska podzielony ekran.
-
Full
Umoliwia wywietlenie obrazu na caym ekranie, bez pozostawiania ciemnych obrzey.
-
Natural
Pozwala wywietli naturalny obraz bez zmiany oryginalnego formatu obrazu.
3) Screen Divider
[MENU]
˧
[
/
]
˧
[ENTER]
˧
[
/
]
˧
[ENTER]
˧
[
/
]
˧
[ENTER]
˧
[
/
]
˧
[ENTER]
Ekran moe zosta podzielony.
Ekran mona podzieli na par mniejszych ekranów.
• Wybierz tryb z menu Screen divider (Podzia ekranu).
• Wybierz ekran z menu Display Selection (Wybór ekranu).
• Pooenie zostanie ustawione po naciniciu liczby w wybranym trybie.
-
2 X 2
-
3 X 3
-
4 X 4
-
5 X 5
-
1 X 2
-
2 X 1
-
1 X 5
-
5 X 1
\
W\UGGG_W\UGGG_ YWW^TXYTXWGGG㝘䟸GXa\`aZ^YWW^TXYTXWGGG㝘䟸GXa\`aZ^

• Jeeli uruchomiona jest funkcja Video Wall (ciana wideo), funkcje PIP (Obraz w obrazie), Auto
Adjustment (Automatyczny wybór róda), Image Lock (Blokada obrazu) oraz Size (Rozmiar) nie s
dostpne. Wczenie funkcji Video Wall (ciana wideo) podczas dziaania funkcji PIP (Obraz w obrazie)
spowoduje jej wyczenie (PIP Off). Funkcja Video Wall nie dziaa w trybie MagicNet.
Safety Screen
Funkcja Safety Screen (Zabezpieczenie ekranu) zapobiega powstawaniu efektu obrazu szcztkowego, który
moe wystpi po dugotrwaym wywietlaniu na ekranie nieruchomego obrazu.
- Funkcja Sreen Scroll przewija wywietlany obraz przez okrelony okres czasu.
- Funkcja ta jest niedostpna, gdy wyczone jest zasilanie.
1) Safety Screen
[MENU]
˧
[
/
]
˧
[ENTER]
˧
[
/
]
˧
[ENTER]
˧
[ENTER]
˧
[
/
]
˧
[ENTER]
Okrela, czy konieczne jest wczenie lub wyczenie funkcji Screen Scroll.
-
Of
f
-
On
2) Interval
[MENU]
˧
[
/
]
˧
[ENTER]
˧
[
/
]
˧
[ENTER]
˧
[
/
]
˧
[ENTER]
˧
[
/
]
˧
[ENTER]
Umoliwia okrelenie czstotliwoci, z jak dziaa bdzie funkcja przewijania ekranu. (1–10 godzin)Czas
ten jest obliczany w oparciu o czas pracy monitora. Ustawieniem domylnym jest warto 10 godzin.
-
1~10 godzin
3) Second
[MENU]
˧
[
/
]
˧
[ENTER]
˧
[
/
]
˧
[ENTER]
˧
[
/
]
˧
[ENTER]
˧
[
/
]
˧
[ENTER]
Umoliwia okrelenie czasu, przez jaki dziaa bdzie funkcja Screen Scroll. (1–5 sekund) Ustawieniem
domylnym jest warto 5 sekund.
-
Type-Scroll : 1~5 Second
-
Type-Pixel, Bar, Eraser : 10~50 Second
4) Type
[MENU]
˧
[
/
]
˧
[ENTER]
˧
[
/
]
˧
[ENTER]
˧
[
/
]
˧
[ENTER]
˧
[
/
]
˧
[ENTER]
Uytkownik moe zmieni ustawienie Safety Screen Type.
-
Scroll
-
Pixel
-
Bar
-
Erase
r
Resolution Select
[MENU]
˧
[
/
]
˧
[ENTER]
˧
[
/
]
˧
[ENTER]
˧
[
/
]
˧
[ENTER]
Jeli obraz nie jest prawidowo wywietlany na ekranie przy ustawieniu karty graficznej komputera na
rozdzielczo 1024 x 768 przy 60 Hz, 1280 x 768 przy 60 Hz, 1360 x 768 przy 60 Hz lub 1366 x 768 przy 60
Hz, korzystajc z tej funkcji (Resolution Select) mona wywietli obraz na ekranie w okrelonej rozdzielczoci.
(Opcja dostpna tylko w trybie PC/BNC).
1) Off
2) 1024 X 768
3) 1280 X 768
4) 1360 X 768
5) 1366 X 768
Uwaga
• Menu mona uywa tylko w przypadku rozdzielczoci 1024 x 768 przy 60 Hz, 1280 x 768 przy 60 Hz,
1360 x 768 przy 60 Hz lub 1366 x 768 przy 60 Hz.
Lamp Control
[MENU]
˧
[
/
]
˧
[ENTER]
˧
[
/
]
˧
[ENTER]
˧
[ENTER]
˧
[< / >]
˧
[ENTER]
Funkcja uywana do dostosowania podwietlenia w celu zmniejszenia poboru energii.
Power ON Adjustment
[MENU]
˧
[
/
]
˧
[ENTER]
˧
[
/
]
˧
[ENTER]
˧
[ENTER]
˧
[
/
]
˧
[ENTER]
Regulacja ustawienia Power On Time dla ekranu.
W\UGGG`W\UGGG` YWW^TXYTXWGGG㝘䟸GXa\`aZ^YWW^TXYTXWGGG㝘䟸GXa\`aZ^
Uwaga

Uwaga: Naley wybra wysz warto ustawienia Power On Time, aby nie dopuci do wystpienia
przepicia.
Reset
Parametry kolorów zostaj zastpione przez wartoci fabryczne.
1)
Image Reset
[MENU]
˧
[
/
]
˧
[ENTER]
˧
[
/
]
˧
[ENTER]
˧
[ENTER]
˧
[< / >]
˧
[ENTER]
(Opcja dostpna tylko w trybie PC/BNC).
2)
Color Reset
[MENU]
˧
[
/
]
˧
[ENTER]
˧
[
/
]
˧
[ENTER]
˧
[
/
]
˧
[ENTER]
˧
[< / >]
˧
[ENTER]
Multi Control
Verfügbare Modi
PC / BNC / DVI
AV
S-Video
Komp.
DVI-Video
Multi Control
[MENU]
˧
[
/
]
˧
[ENTER]
˧
[
/
]
˧
[ENTER]
˧
[ENTER]
˧
[0~9]
Przypisuje indywidualny identyfikator do ustawie.
1) ID Setup
Przypisywanie wyróniajcych identyfikatorów ustawieniom.
2) ID Input
Wybiera funkcje nadajnika dla poszczególnych ustawie. Aktywowane zostan tylko te ustawienia, których
identyfikator odpowiada ustawieniom nadajnika.
Funkcje bezporeDNIe Demogo sterowania
Dostpne tryby
PC / BNC / DVI
AV
S-Video
Component
DVI-Video
MDC
Przejd do ekranu OSD Multi Control (Sterowanie wieloma).
LOCK
Ustaw funkcj Safety Lock (Blokada bezpieczestwa).
1) Lock On
Blokada zostanie wczona.
2) Lock Off
Blokada zostanie wyczona.
Uwaga
• Podczas ustawiania funkcji Lock (Blokada) mona uywa tylko przycisków Lock (Blokada) znajdujcych
si na pilocie i urzdzeniu.
Fabrycznie ustawione haso monitora to „0000
ˉ
.
Uwaga
•
Przywracanie hasa dla klawisza funkcyjnego lock (blokada)
W\UGGGXWW\UGGGXW YWW^TXYTXWGGG㝘䟸GXa\`aZ^YWW^TXYTXWGGG㝘䟸GXa\`aZ^

Nacinij kolejno przyciski MUTE
˧
1
˧
8
˧
6
˧
On. Zostanie przywrócone haso „0000
ˉ
.
W celu przywrócenia hasa konieczne jest uycie pilota zdalnego sterowania.
© 1995~2008 Samsung Electronics Co., Ltd.
]
W\UGGGXXW\UGGGXX YWW^TXYTXWGGG㝘䟸GXa\`aZ^YWW^TXYTXWGGG㝘䟸GXa\`aZ^

W zalenoci od modelu mog wystpowa rónice w kolorze i wygldzie produktu. W celu zwikszenia
wydajnoci produktu dane techniczne mog ulega zmianom bez uprzedniego powiadomienia.
Rozwizywanie problemów
Sprawdzanie funkcji autotestu
Uwaga
• Przed skontaktowaniem si z serwisem naley sprawdzi nastpujce pozycje. W razie wystpienia
problemów, z którymi nie mona sobie poradzi, naley skontaktowa si z serwisem.
Sprawdzanie funkcji autotestu
Monitor jest wyposaony w funkcj autotestu, która pozwala sprawdzi, czy monitor dziaa poprawnie.
1) Wycz zarówno komputer, jak i monitor.
2) Odcz kabel wideo podczony z tyu komputera.
3) Wcz monitor.
Przedstawiona poniej cyfra („Check Signal Cable
ˉ
) pojawia si na czarnym tle, kiedy monitor normalnie
pracuje, lecz nie odbiera adnego sygnau wideo: W trybie automatycznego testowania, dioda zasilania
pozostaje zielona, a cyfra porusza si po ekranie.
4) Wycz monitor, podcz z powrotem kabel sygnau video i wcz zarówno komputer jak i monitor.
Jeli ekran pozostaje wygaszony po wykonaniu powyszych czynnoci, sprawd kart grafiki i komputer,
gdy
monitor dziaa prawidowo.
Check Cooling System
Wywietlenie na ekranie komunikatu
Check Cooling System (Sprawd system chodzenia)
oznacza, e
wystpi problem z wentylatorem chodzcym. Aby naprawi lub wymieni wentylator, naley skontaktowa si z
centrum serwisowym.
Skalowanie
Obraz mona oglda w rozdzielczoci ekranu wikszej ni 1360 x 768. Jednak zostanie na chwil wywietlony
nastpujcy komunikat: „You can choose to change the screen resolution or stay in the current mode during that
time
ˉG
(Moesz zmieni rozdzielczo ekranu lub pozosta w aktualnym trybie). Jeli czstotliwo odwieania
przekracza maksymaln obsugiwan czstotliwo 85 Hz, wywietlony zostanie czarny obraz.
Zasady bezpieczestwa
Wprowadzenie
Poczenia
Korzystanie z
oprogramowania
Dostosowywanie ustawie
monitora
Rozwizywanie problemów
Sprawdzanie funkcji
autotestu
Naley sprawdzi
Pytania i odpowiedzi
Parametry
Informacje
Dodatek
]
W\\\\UGGGXZW\\\\UGGGXZ YWW^TXXTY`GGG㝘㤸GXXa\Xa[]YWW^TXXTY`GGG㝘㤸GXXa\Xa[]

Uwaga
• Informacje dotyczce rozdzielczoci i czstotliwoci obsugiwanych przez ten monitor znajduj si w czci
Fabrycznie ustawione tryby wywietlania.
Konserwacja i czyszczenie
1) Konserwacja obudowy monitora Czyci mikk szmatk po uprzednim odczeniu kabla zasilajcego.
Nie naley stosowa benzenu, rozcieczalnika ani innych substancji atwopalnych.
• Nie naley równie uywa mokrej szmatki.
• eby zapobiec uszkodzeniu ekranu zaleca si stosowanie rodków
czyszczcych firmy Samsung.
2) Konserwacja ekranu panelu LCD
Monitor naley delikatnie czyci mikk szmatk (z flaneli bawenianej).
• Nigdy nie naley stosowa acetonu, benzenu czy rozcieczalnika.
(Mog one spowodowa zacieki lub znieksztacenia na powierzchni
ekranu.)
• Uytkownik bdzie zobowizany pokry wszelkie koszty napraw
spowodowanych uszkodze.
Objawy i zalecane czynnoci
Uwaga
• Monitor wywietla sygna wizji odbierany z komputera. Dlatego, gdy komputer lub karta video dziaaj
nieprawidowo, moe to spowodowa zniknicie obrazu, zej jakoci kolory, gon prac, Video mode not
supported, itd. W takim przypadku naley znale ródo problemu, a nastpnie skontaktowa si z
serwisem lub dealerem.
1) Sprawd, czy kabel zasilania jest odpowiednio podczony do komputera.
2) Sprawd, czy komputer przy uruchamianiu wydaje sygna dwikowy wicej ni 3 razy.
(Jeli tak, naley przeprowadzi fachowy przegld gównej pyty komputera.)
3) Jeli zmieniana bya karta video lub inne urzdzenia, sprawd czy sterowniki karty video i monitora zostay
zainstalowane.
4) Sprawd, czy czstotliwo odchylania obrazu jest ustawiona na zakres 50 Hz ~ 85 Hz.
(Nie przekraczaj 60Hz przy maksymalnej rozdzielczoci.)
5) Jeli masz problemy z zainstalowaniem sterownika karty video, uruchom komputer w Trybie awaryjnym,
usu Kart grafiki, klikajc najpierw przyciski Panel sterowania, System, Administrator urzdzenia, a
nastpnie uruchom ponownie komputer.
Naley sprawdzi
Uwaga
• Nastpujca tabela zawiera list moliwych problemów i ich rozwizania. Przed skontaktowaniem si z
serwisem naley sprawdzi, czy informacje zawarte w tej czci umoliwiaj samodzielne rozwizanie
problemu. Jeli pomoc serwisu jest konieczna, naley zadzwoni pod numer podany na karcie
gwarancyjnej, pod numer podany w czci informacyjnej lub skontaktowa si ze sprzedawc monitora.
]
W\\\\UGGGX[W\\\\UGGGX[ YWW^TXXTY`GGG㝘㤸GXXa\Xa[]YWW^TXXTY`GGG㝘㤸GXXa\Xa[]

Problemy z instalacj(PC)
Uwaga
• Problemy z instalacj monitora oraz ich rozwizania.
Problemy Rozwizania
Obraz monitora migocze.
z
Sprawdzi, czy kabel sygnaowy czcy monitor z komputerem
zosta podczony pewnie i dokadnie.
(Patrz Podczanie do komputera)
Problemy z Obraz
Uwaga
• Problemy z obrazem monitora oraz ich rozwizania.
Problemy Rozwizania
Ekran jest pusty, a wskanik
zasilania wyczony.
z
Sprawdzi, czy kabel zasilajcy zosta pewnie podczony oraz
czy monitor LCD jest wczony.
(Patrz Podczenie monitora)
Komunikat „Check Signal Cable
ˉ
z
Sprawdzi, czy kabel sygnaowy zosta pewnie podczony do
komputera lub urzdzenia wideo.
(Patrz Podczenie monitora)
z
Sprawdzi, czy komputer lub urzdzenie wideo jest wczone.
Komunikat „Not Optimum Mode
ˉ
z
Sprawdzi rozdzielczo maksymaln i czstotliwo karty
graficznej.
z
Porówna te wartoci z danymi w tabeli Fabrycznie ustawione
tryby wywietlania.
Obraz przewija si w pionie.
z
Sprawdzi, czy kabel sygnaowy zosta pewnie podczony.
Poprawi podczenie kabla sygnaowego.
(Patrz Podczanie do komputera)
Obraz jest niewyrany. Obraz jest
zamazany.
z
Uruchomi regulacj Coarse i Fine tuning.
z
Wczy monitor ponownie po usuniciu wszystkich akcesoriów
(kabla wideo, itp.)
z
Ustaw dla rozdzielczoci i czstotliwoci zalecane zakresy.
Picture image is unstable and
vibrates.
Na obrazie widoczne s cienie.
z
Sprawdzi, czy monitor obsuguje zadan rozdzielczo i
czstotliwo karty graficznej komputera.
Jeli nie, naley je zresetowa zgodnie z biec Informacje w
menu monitora oraz z Fabrycznie ustawionymi trybami
wywietlania.
Obraz jest zbyt jasny lub zbyt
ciemny.
z
Wyregulowa Brightness i Contrast.
(Patrz Brightness, Contrast)
Kolory obrazu nie s spójne.
Obraz kolorowy jest
znieksztacony i wystpuj na nim
cienie.
Jako biaego koloru jest
niezadowalajca.
z
Wyregulowa kolory uywajc User Mode w menu OSD Color
Adjustment.
Wskanik zasilania pulsuje na
zielono.
z
Monitor zachowuje zmiany w ustawieniach w pamici OSD.
Ekran jest pusty, a wskanik
z
Monitor korzysta z systemu zarzdzania energi.
]
W\\\\UGGGX\W\\\\UGGGX\ YWW^TXXTY`GGG㝘㤸GXXa\Xa[]YWW^TXXTY`GGG㝘㤸GXXa\Xa[]

zasilania wieci si na zielono lub
pulsuje co 0,5 lub co 1 sekund.
z
Poruszy mysz komputerow lub nacisn dowolny klawisz na
klawiaturze.
Ekran jest pusty i pulsuje.
z
Jeli po naciniciu przycisku MENU na ekranie pojawi si
komunikat „TEST GOOD
ˉ
, sprawd czy poczenie kablowe
midzy monitorem i komputerem jest prawidowe.
Problemy z Obraz
Uwaga
• Problemy z sygnaem dwikowym i ich rozwizania.
Problemy Rozwizania
No sound
z
Upewnij si, e kabel audio jest prawidowo podczony
zarówno do portu wejciowego audio monitora, jak i portu
wyjciowego audio karty dwikowej.
(Patrz Podczenie monitora)
z
Sprawd poziom gonoci.
Poziom gonoci jest zbyt niski.
z
Sprawd poziom gonoci.
z
Jeli po ustawieniu poziomu dwiku na maksimum gono
jest wci zbyt maa, sprawd ustawienia gonoci na karcie
dwikowej komputera lub w uywanym programie.
Dwik jest zbyt wysoki lub zbyt
niski.
z
Ustawi Treble i Bass na odpowiednim poziomie.
Problemy z pilotem
Uwaga
• Problemy z pilotem oraz ich rozwizania.
Problemy Rozwizania
Przyciski na pilocie nie dziaaj.
z
Sprawdzi biegunowo (+/-) baterii.
z
Sprawdzi, czy nie naley wymieni baterii.
z
Sprawdzi, czy zostao wczone zasilanie.
z
Sprawdzi, czy kabel zasilajcy zosta pewnie podczony.
z
Sprawdzi, czy w pobliu nie znajduje si lampa jarzeniowa
(jarzeniówka) lub fluorescencyjna (wietlówka).
Pytania i odpowiedzi
Pytanie Odpowied
Jak mona zmieni czstotliwo?
Czstotliwo mona zmieni, ponownie konfigurujc kart graficzn.
Obsugiwanie czstotliwoci przez kart video moe si róni,
zalenie od sterownika. (Aby uzyska szczegóowe informacje,
zapoznaj si z instrukcj obsugi komputera lub karty graficznej).
Jak mona regulowa
rozdzielczo?
z
Windows XP :
Ustaw rozdzielczo klikajc najpierw kolejno Panel sterowania,
Ekran, Ustawienia.
z
Windows ME/2000 :
Ustaw rozdzielczo klikajc najpierw kolejno Panel sterowania,
Ekran, Ustawienia.
* Uzyskaj dalsze infrmacje od producenta karty video.
Jak mona zainstalowa funcj
oszczdzania energii PowerSaver?
z
Windows XP :
Ustaw rozdzielczo klikajc najpierw kolejno Panel sterowania,
]
W\\\\UGGGX]W\\\\UGGGX] YWW^TXXTY`GGG㝘㤸GXXa\Xa[]YWW^TXXTY`GGG㝘㤸GXXa\Xa[]

Ekran, Ustawienia.
Ustawi wygaszacz ekranu lub funkcj w BIOS-SETUP
komputera. (Patrz Windows/komputera Manual)
z
Windows ME/2000 :
Ustaw rozdzielczo klikajc najpierw kolejno Panel sterowania,
Ekran, Ustawienia.
Ustawi wygaszacz ekranu lub funkcj w BIOS-SETUP
komputera. (Patrz Windows/komputera Manual)
Jak naley czyci obudow
zewntrzn/Panel LCD?
Odcz kabel zasilajcy i wyczy monitor mikk szmatk, uywajc
do tego samej wody lub rodka czyszczcego.
Naley dobrze usun resztki detergentu i nie rysowa obudowy. Nie
dopuszcza, aby woda dostaa si do monitora.
© 1995~2008 Samsung Electronics Co., Ltd.
]
W\\\\UGGGX^W\\\\UGGGX^ YWW^TXXTY`GGG㝘㤸GXXa\Xa[]YWW^TXXTY`GGG㝘㤸GXXa\Xa[]

W zalenoci od modelu mog wystpowa rónice w kolorze i wygldzie produktu. W celu zwikszenia
wydajnoci produktu dane techniczne mog ulega zmianom bez uprzedniego powiadomienia.
Parametry
Ogólne
Ogólne
Ogólne
Nazwa modelu SMT-3211
Panel LCD
Odcien koloru mozna zmienic.
kolorów.
przektna 32-calowa (80 cm)
Wielko obrazu 697,6845 mm (H) x 392,256 mm (V)
Rozstaw pikseli 0,51075 mm (H) x 0,51075 mm (V)
Synchronizacja
poziomo 30 ~ 81 kHz
pionowo 56 ~ 75 Hz
Kolor obrazu
Kolor obrazu 16,7 M Kolory Colors
Rozdzielczo
Rozdzielczo optymalna
Dostpno rozdzielczoci 1360 x 768 /1366 x 768 @ 60 Hz zaley od
karty graficznej
Rozdzielczo maksymalna 1366 x 768 @ 60 Hz
Sygna wejciowy, Przesy
Zcze RGB analogowe, DVI (Digital Visual Interface), obsugujce cyfrowy sygna RGB,
0,7 Vp-p dodatni przy 75 omach
·
10% Oddzielna synchronizacja pozioma i pionowa, synchronizacja sygnau
kompozytowego, SOG, poziom TTL, dodatni lub ujemny.
Maksymalna czstotliwo piksela
100 MHz
Zasilanie
AC 100 - 240 V~ (+/- 10 %), 50/60 Hz
Kabel sygnaowy
15pin-to-15pin D-sub, odczalny
Kabel DVI-D do DVI-D, odczalny (Opcja)
Zcze sygnaowe
D-sub, BNC, DVI-D, YPbPr, S-VHS, VCR
Wymiary (Szer. x Wys. x Gb) / Waga
780 X 482 X 107 mm / 30,1 X 19,0 X 4,6 inch (Bez podstawy)
780 X 530 X 223 mm / 30,1 X 20,9 X 8,8 inch (Z podstaw)
Zcze montaowe zgodne ze standardem VESA
200 mm x 200 mm (do uytku z osprztem montaowym – wspornikiem)
Warunki uytkowaia
Przy pracy
Temperatura: 10
C ~ 40
C (50
F ~ 104
F)
Wilgotno: 10% ~ 80%, bez kondensacji
Przechowywanie
Temperatura: -20
C ~ 45
C (-4
F ~ 113
F)
Wilgotno: 5% ~ 95%, bez kondensacji
Zasady bezpieczestwa
Wprowadzenie
Poczenia
Korzystanie z
oprogramowania
Dostosowywanie ustawie
monitora
Rozwizywanie problemów
Parametry
Ogólne
System oszczdzania
energii PowerSaver
Fabrycznie ustawione tryby
wywietlania
Informacje
Dodatek
]
^TUGGGX^TUGGGX YWW^TXYTYWGGG㝘䟸GXa[]aYZYWW^TXYTYWGGG㝘䟸GXa[]aYZ
, 16,1 kg/ 35,4lbs

Tor fonii
Wejcie audio 1 Gniazdo RCA: czerwone (R) i biae (L), 0,5 Vrms (-9 dB)
Wejcie audio 2 Gniazdo RCA: czerwone (R) i biae (L), 0,5 Vrms (-9 dB)
Wejcie sygnau audio z
komputera
Gniazdo stereofoniczne typu jack o rednicy 3,5mm, 0,5 Vrms (-9 dB)
Pasmo RF: 80 Hz ~ 15 kHz (przy -3 dB)
Przenoszenia A/V: 80 Hz ~ 20 kHz (przy -3 dB)
Funcja Plug and Play
Ten monitor moe by zainstalowany w kadym systemie zgodnym ze standardem Plug & Play. Monitor
zostanie rozpoznany przez system, który zapewni optymalne warunki dziaania i ustawienia monitora. W
wikszoci przypadków, instalacja monitora odbywa si automatycznie, chyba, e uytkownik zechce wybra
wasne ustawienia.
Piksele
Dla tego produktu uyto panelu TFT LCD wytworzonego przy uyciu zaawansowanej technologii
póprzewodnikowej o precyzji rzdu 1ppm (jedna milionowa).. Jednake piksele CZERWONY, ZIELONY,
NIEBIESKI I BIAY wydaj si czasem jaskrawe lub widoczne s czarne piksele. Nie wynika to ze zej jakoci
monitora i nie powinno niepokoi uytkownika.
• DNa przykad, w tym produkcie znajduje si 3.133.440 subpikseli TFT LCD.
Uwaga
• Wygld i parametry techniczne monitora mog ulec zmianie bez wczeniejszej zapowiedzi.
Urzdzenie klasy B (Informacje dotyczce uytkowania urzdzenia komunikacyjnego na obszarach
mieszkalnych)
• Ten produkt spenia wymogi dyrektyw dotyczcych kompatybilnoci elektromagnetycznej podczas
uytkowania na obszarach mieszkalnych i moe by uywany na wszystkich typach obszarów, w tym na
obszarach mieszkalnych.
(Urzdzenia klasy B emituj mniej sygnaów elektromagnetycznych ni urzdzenia klasy A).
System oszczdzania
energii PowerSaver
Monitor ten ma wbudowany system oszczdzania energii zwany PowerSaver. System ten ogranicza zuycie
energii, przeczajc monitor po pewnym czasie nieuywania na tryb o niskim poborze mocy. Monitor
automatycznie powraca do normalnej pracy po poruszeniu myszk komputera lub naciniciu dowolnego
klawisza klawiatury. Dla oszczdnoci energii, naley WYCZA monitor, kiedy nie jest w uyciu lub, kiedy
odchodzi si od niego na duszy czas. System oszczdnoci energii PowerSaver dziaa z kart video
komputera zgodn ze standardem VESA DPM. Aby zainstalowa te funkcj, naley uy posiadanego programu
narzdziowego.
Stan Normalna Praca
Tryb
oszczdzania
energii
Wycznik zasilania
wyczony
EPA/ENERGY 2000
Wycznik
zasilania
wyczony
Wskanik zasilania Zielony Migajcy Zielony Bursztynowy Czarny
Pobór mocy Poniej 160 W
Poniej 1 W
(Wyczony)
Poniej 1 W (Przycisk
zasilania)
0 W
(Wskanik zasilania)
Ten monitor jest zgodny ze standardem EPA ENERGY STAR
®
oraz
standardem organizacji ENERGY2000, kiedy jest w uyciu z komputerem
wyposaonym w VESA DPM.
Jako uczestnik programu ENERGY STAR
®
, firma SAMSUNG owiadcza,
e produkt ten spenia wymagania ENERGY STAR
®
w zakresie
wykorzystania energii.
Fabrycznie ustawione tryby
wywietlania
Fabrycznie ustawione tryby wywietlania
Jeli sygna z komputera jest taki sam, jak ponisze Ustawienia fabryczne, obraz na ekranie zostanie
uregulowany automatycznie. Jednake, jeli sygna jest inny, ekran moe zosta wyczyszczony przy wieccej
]
^TUGGGY^TUGGGY YWW^TXYTYWGGG㝘䟸GXa[]aY]YWW^TXYTYWGGG㝘䟸GXa[]aY]

si diodzie LED. Posugujc si podrcznikiem ustaw parametry obrazu nastpujco.
Tryb wywietlania
Czstotliwo
odchylania
poziomego (kHz)
Czstotliwo
odchylania pionowego
(Hz)
Czstotliwo
Piksela(MHz)
Sync
Polarity
(H/V)
MAC, 640 x 480 35,000 66,667 30,240 -/-
MAC, 832 x 624 49,726 74,551 49,500 +/+
IBM, 640 x 350 31,469 70,086 25,175 +/-
IBM, 640 x 480 31,469 59,940 25,175 -/-
IBM, 720 x 400 31,469 70,087 28,322 -/+
VESA, 640 x 480 37,861 72,809 31,500 -/-
VESA, 640 x 480 37,500 75,000 31,500 -/-
VESA, 640 x 480 43,269 85,008 36,000 -/-
VESA, 800 x 600 35,156 56,250 36,000 +/+
VESA, 800 x 600 37,879 60,317 40,000 +/+
VESA, 800 x 600 48,077 72,188 50,000 +/+
VESA, 800 x600 46,875 75,000 49,500 +/+
VESA, 800 x600 53,674 85,000 56,250 +/+
VESA, 1024 x 768 48,363 60,004 65,000 -/-
VESA, 1024 x 768 56,476 70,069 75,000 -/-
VESA, 1024 x 768 60,023 75,029 78,750 +/+
VESA, 1024 x 768 68,677 85,997 94,500 +/+
VESA, 1360 x 768 47,712 60,000 85,500 +/+
Czstotliwo odchylania poziomego
Czas skanowania jednej linii czcej praw i lew krawd ekranu
nazywa si cyklem poziomym. Odwrotno Cyklu poziomego nazywa si
Czstotliwoci odchylania poziomego. Jednostka: kHz
Czstotliwo odchylania pionowego
Podobnie jak lampa fluorescencyjna, ekran wielokrotnie wywietla ten
sam obraz w cigu sekundy, aby powsta obraz widzialny dla
uytkownika. Czstotliwo tego powtórzenia jest nazywana
czstotliwoci pionow lub czstotliwoci odwieania. Jednostka: Hz
© 1995~2008 SAMSUNG. ALL Right Reserved
^TUGGGZ^TUGGGZ YWW^TXYTYWGGG㝘䟸GXa[]aY]YWW^TXYTYWGGG㝘䟸GXa[]aY]

W zalenoci od modelu mog wystpowa rónice w kolorze i wygldzie produktu. W celu zwikszenia
wydajnoci produktu dane techniczne mog ulega zmianom bez uprzedniego powiadomienia.
Informacje
Aby poprawic obraz
Wedug poniszych wskazówek ustaw odpowiednio czstotliwo odwieania monitora w panelu
sterowania komputera, aby zapewni moliwie wysok jako obrazu. Jako obrazu moe by nierówna,
gdy w TFT-LCD nie ustawiono najwyszej jakoci obrazu.
• Rozdzielczo 1360 X 768
• Czstotliwo odchylania pionowego: 60Hz
Dla tego produktu uyto panelu TFT LCD wytworzonego przy uyciu zaawansowanej technologii
póprzewodnikowej o precyzji rzdu 1ppm (jedna milionowa).. Jednake piksele CZERWONY, ZIELONY,
NIEBIESKI I BIAY wydaj si czasem jaskrawe lub widoczne s czarne piksele.
Nie wynika to ze zej jakoci monitora i nie powinno niepokoi uytkownika.
• Na przykad, w tym produkcie znajduje si 3.133.440 subpikseli TFT LCD.
Monitor i panel zewntrzny naley czyci mikk i such szmatk, nakadajc na ni niewielk ilo
zalecanego rodka. Panel LCD naley czyci delikatnie, bez uycia siy.
Czyszczenie z nadmiern si moe doprowadzi do odbarwie.
Jeli jako obrazu nie jest zadowalajca, mona j poprawi za pomoc „funkcji samodostrajania
ˉ
,
pojawiajcej si na ekranie, po naciniciu przycisku konieca.
Jeli po przeprowadzeniu automatycznej regulacji nie znikn szumy, naley uy funkcji strojenia
ZGRUBNRGO/PRECYZYJNEGO.
Ogldanie tego samego ekranu przez duszy czas moe sprawi, e ekran bdzie zamazany lub
widoczny bdzie trway obraz.
Wczaj tryb oszczdzania energii lub wygaszacz ekranu o ruchomym obrazie, kiedy pozostawiasz
monitor na duszy okres czasu.
INFORMACJE O PRODUKCIE (brak efektu pozostawania obrazu)
Co to jest utrwalenie obrazu?
Utrwalenie obrazu nie wystpuje, gdy ekran LCD dziaa w normalnych warunkach. Warunki te zdefiniowano
jako cigle zmieniajce si wzory obrazu wideo. Gdy ekran LCD wywietla przez dugi czas (ponad 12
godzin) stay wzór, moe wystpi
nieznaczna rónica w napiciu midzy elektrodami obsugujcymi cieky
kryszta (LC) w pikselu. Rónica napicia midzy elektrodami wzrasta z czasem, powodujc przyleganie
czstek ciekego krysztau. Zjawisko to sprawia, e po zmianie wzoru moe by widoczny poprzedni obraz.
Aby temu zapobiec, zgromadzona rónica napicia musi zosta zmniejszona.
Zasady bezpieczestwa
Wprowadzenie
Poczenia
Korzystanie z
oprogramowania
Dostosowywanie ustawie
monitora
Rozwizywanie problemów
Parametry
Informacje
Aby poprawic obraz
INFORMACJE O
PRODUKCIE
(brak efektu pozostawania
obrazu)
Dodatek
W\\\\UGGGYXW\\\\UGGGYX YWW^TXXTY`GGG㝘㤸GXXa\Xa[]YWW^TXXTY`GGG㝘㤸GXXa\Xa[]

Wyczenie, wygaszacz ekranu lub tryb oszczdnoci energii
z
Zasilanie naley wycza na 4 godziny po 20 godzinach uytkowania
z
Zasilanie naley wycza na 2 godziny po 12 godzinach uytkowania
z
Mona ustawi wyczanie monitora za pomoc harmonogramu oszczdzania energii we
waciwociach ekranu komputera.
z
Gdy to moliwe, naley korzysta z wygaszacza ekranu - Zaleca si uywanie jednego koloru
wygaszacza ekranu lub poruszajcego si obrazu.
Okresowa zmiana schematów kolorów
Note
• Naley uywa dwóch rónych kolorów
Naley uy dwóch schematów kolorów zmienianych cyklicznie co 30 minut.
• Naley unika kombinacji kolorów znaków i ta znaczco rónicych si jaskrawoci.
Naley unika korzystania z szaroci, które maj niekorzystny wpyw na zjawisko utrwalenia obrazu.
Zaleca si unikanie: Kolorów znaczco rónicych si jaskrawoci (biay i czarny, szary)
Okresowa zmiana kolorów znaków
z
Zalecane jest uywanie jasnych kolorów nieznacznie rónicych si jaskrawoci
- Zmiana cykliczna: Naley dokonywa zmiany kolorów znaków i ta co 30 minut
^
W\\\\UGGGYYW\\\\UGGGYY YWW^TXXTY`GGG㝘㤸GXXa\Xa[]YWW^TXXTY`GGG㝘㤸GXXa\Xa[]

z
Co 30 minut zalecane jest przesuwanie znaków
z
Cay wywietlany obszar, cznie z logo, naley okresowo przesuwa.
- Zmiana cykliczna: Wywietlanie ruchomych obrazów, razem z logo, przez 60 sekund po 4
godzinach uytkowania.
z
Najlepszym sposobem na ochron monitora przed wystpieniem zjawiska utrwalenia obrazu jest
wyczenie zasilania albo skonfigurowanie komputera lub systemu tak, aby wcza program
wygaszacza ekranu w czasie, gdy nastpuje przerwa w uytkowaniu ekranu. Naley pamita, e
usugi gwarancyjne s ograniczone zgodnie z opisem w instrukcji obsugi.
Stosowanie przewijania ekranu
z
Naley stosowa przewijanie ekranu
- Oznaka: Czarny, poziomy pasek przesuwa si w gór i w dó.
- Wybór metody
. Instrukcja obsugi: Menu ekranowe
˧
opcja Set Up (Konfiguracja)
˧
opcja Screen Scroll
(Przewijanie ekranu)
. Odstp czasowy: 1 ~ 10 godzin (zalecane: 1 )
. Odstp czasowy: 1 ~ 5 sekund (zalecane: 5 )
Note
•
Prosimy zajrze do instrukcji obsugi na dysku CD, w czci „Funkcja menu ekranowego
ˉ
; w niektórych
modelach funkcja ta nie jest dostpna.
Stosowanie funkcji zmiany pikseli obrazu
z
Zastosuj funkcj Piksele ekranowego.
- Oznaka: Czarna plama przesuwa si w gór i w dó.
- Wybór metody
. Instrukcja obsugi: Menu ekranowe
˧
opcja Set Up (Konfiguracja)
˧
opcja Safety Screen
(Zabezpieczanie ekranu)
˧
opcja Pixel (Piksele).
. Odstp czasowy: 1 ~ 10 godzin (zalecane: 1 )
. Odstp czasowy: 10 ~ 50 sekund (zalecane: 50 )
z
Zastosuj funkcj paska ekranowego
- Oznaka: Czarny, poziomy lub pionowy pasek przesuwa si w gór i w dó.
^
W\\\\UGGGYZW\\\\UGGGYZ YWW^TXXTY`GGG㝘㤸GXXa\Xa[]YWW^TXXTY`GGG㝘㤸GXXa\Xa[]

- Wybór metody
. Instrukcja obsugi: Menu ekranowe
˧
opcja Set Up (Konfiguracja)
˧
opcja Safety Screen
(Zabezpieczanie ekranu)
˧
opcja Bar (Pasek).
. Odstp czasowy: 1 ~ 10 godzin (zalecane: 1 )
. Odstp czasowy: 10 ~ 50 sekund (zalecane: 50 )
Note
•
Prosimy zajrze do instrukcji obsugi na dysku CD, w czci „Funkcja menu ekranowego
ˉ
; w niektórych
modelach funkcja ta nie jest dostpna.
Stosowanie funkcji wymazywania ekranu
z
Naley stosowa funkcj wymazywania ekranu
- Oznaka: 2 pionowe obszary przesuwaj si, wymazujc wywietlany obraz
- Wybór metody
. Instrukcja obsugi: Menu ekranowe
˧
opcja Set Up (Konfiguracja)
˧
opcja Eraser (Wymazywanie)
. Odstp czasowy: 1 ~ 10 godzin (zalecane: 1 )
. Odstp czasowy: 10 ~ 50 sekund (zalecane: 50 )
Note
•
Prosimy zajrze do instrukcji obsugi na dysku CD, w czci „Funkcja menu ekranowego
ˉ
; w niektórych
modelach funkcja ta nie jest dostpna.
© 1995~2008 Samsung Electronics Co., Ltd.
^
W\\\\UGGGY[W\\\\UGGGY[ YWW^TXXTY`GGG㝘㤸GXXa\Xa[]YWW^TXXTY`GGG㝘㤸GXXa\Xa[]

W zalenoci od modelu mog wystpowa rónice w kolorze i wygldzie produktu. W celu zwikszenia
wydajnoci produktu dane techniczne mog ulega zmianom bez uprzedniego powiadomienia.
Dodatek
Skontaktuj si z firm SAMSUNG na caym wiecie
Uwaga
• Jeeli masz jakie uwagi lub pytania w sprawie produktów marki Samsung, skontaktuj si z nasz infolini.
Zasady bezpieczestwa
Wprowadzenie
Poczenia
Korzystanie z
oprogramowania
Dostosowywanie ustawie
monitora
Rozwizywanie problemów
Parametry
Informacje
Dodatek
Skontaktuj si z firm
SAMSUNG na caym
wiecie
Terminologia
Zasady usuwania
Osoba upowaniona
^
W\\\\UGGGY\W\\\\UGGGY\ YWW^TXXTY`GGG㝘㤸GXXa\Xa[]YWW^TXXTY`GGG㝘㤸GXXa\Xa[]
North America
U.S.A
1-800-SAMSUNG(726-7864) http://www.samsung.com
CANADA
1-800-SAMSUNG(726-7864) http://www.samsung.com/ca
MEXICO
01-800-SAMSUNG(726-7864) http://www.samsung.com
Latin America
ARGENTINE
0800-333-3733 http://www.samsung.com/ar
BRAZIL
0800-124-421
4004-0000
http://www.samsung.com
CHILE
800-SAMSUNG(726-7864) http://www.samsung.com/cl
COLOMBIA
01-8000112112 http://www.samsung.com.co
COSTA RICA
0-800-507-7267 http://www.samsung.com/latin
ECUADOR
1-800-10-7267 http://www.samsung.com/latin
EL SALVADOR
800-6225 http://www.samsung.com/latin
GUATEMALA
1-800-299-0013 http://www.samsung.com/latin
JAMAICA
1-800-234-7267 http://www.samsung.com/latin
PANAMA
800-7267 http://www.samsung.com/latin
PUERTO RICO
1-800-682-3180 http://www.samsung.com/latin
REP. DOMINICA
1-800-751-2676 http://www.samsung.com/latin
TRINIDAD & TOBAGO
1-800-SAMSUNG(726-7864) http://www.samsung.com/latin
VENEZUELA
0-800-100-5303 http://www.samsung.com/latin
Europe
AUSTRIA
0800-SAMSUNG(726-7864) http://www.samsung.com/at
BELGIUM
0032 (0)2 201 24 18 http://www.samsung.com/be
NICARAGUA
00-1800-5077267
HONDURAS
800-7919267

^
W\\\\UGGGY]W\\\\UGGGY] YWW^TXXTY`GGG㝘㤸GXXa\Xa[]YWW^TXXTY`GGG㝘㤸GXXa\Xa[]
CZECH REPUBLIC
DENMARK
70 70 19 70 http://www.samsung.com/dk
FINLAND
030-6227 515 http://www.samsung.com/fi
FRANCE
3260 SAMSUNG
08 25 08 65 65 (€ 0,15/min)
http://www.samsung.com
GERMANY
01805-SAMSUNG(726-7864)
http://www.samsung.com
HUNGARY
06-80-SAMSUNG(726-7864) http://www.samsung.com
ITALIA
800-SAMSUNG(726-7864) http://www.samsung.com
LUXEMBURG
0035 (0)2 261 03 710 http://www.samsung.com/be
NETHERLANDS
0900-SAMSUNG(726-7864)
http://www.samsung.com/nl
NORWAY
815-56 480 http://www.samsung.com/no
POLAND
0 801 801 881
022-607-93-33
http://www.samsung.com/pl
PORTUGAL
80820-SAMSUNG(726-7864) http://www.samsung.com/pt
EIRE
0818 717 100 http://www.samsung.com/ie
SLOVAKIA
0800-SAMSUNG(726-7864) http://www.samsung.com/sk
SPAIN
902 10 11 30 http://www.samsung.com
SWEDEN
0771-400 200 http://www.samsung.com/se
SWITZERLAND
0800-SAMSUNG(726-7864) www.samsung.com/ch
U.K
0845 SAMSUNG(726-7864) http://www.samsung.com
CIS
ESTONIA
800-7267 http://www.samsung.ee
LATVIA
800-7267 http://www.samsung.com/lv
LITHUANIA
8-800-77777 http://www.samsung.lt
KAZAKHSTAN
8-10-800-500-55-500 http://www.samsung.kz
KYRGYZSTAN
00-800-500-55-500
RUSSIA
8-800-555-55-55 http://www.samsung.com
UKRAINE
8-800-502-0000 http://www.samsung.com
UZBEKISTAN
8-800-120-0-400 http://www.samsung.uz
Asia Pacific
AUSTRALIA
1300 362 603 http://www.samsung.com
CHINA
800-810-5858, 010- 6475 1880 http://www.samsung.com
HONG KONG
3698-4698 http://www.samsung.com/hk
INDIA
3030 8282, 1800 110011 http://www.samsung.com
INDONESIA
0800-112-8888 http://www.samsung.com
JAPAN
0120-327-527 http://www.samsung.com/jp
MALAYSIA
1800-88-9999 http://www.samsung.com/my
NEW ZEALAND
0800SAMSUNG(726-7864) http://www.samsung.com/nz
PHILIPPINES
1800-10-SAMSUNG(726-7864) http://www.samsung.com/ph
SINGAPORE
1800-SAMSUNG(726-7864) http://www.samsung.com
THAILAND
1800-29-3232, 02-689-3232 http://www.samsung.com
(€ 0,15/min)
(€ 0,14/min)
(€ 0,10/min)
TADJIKISTAN
8-10-800-500-55-500
844 000 844 http://www.samsung.com/cz

Terminologia
Sync Signal
Ssynchronizacja (Sync.) oznacza standardowe sygnay, potrzebne do wywietlenia okrelonych kolorów na
monitorze. Wyrónia si synchronizacj pionow i poziom. Sygnay te umoliwiaj wywietlanie obrazów w
normalnych kolorach poprzez ustawienie rozdzielczoci i czstotliwoci.
Types of Sync Signals
Separate Oto schemat transmisji poszczególnych sygnaów synchronizacji pionowej do monitora.
Zoony Oto schemat poczenia sygnaów synchronizacji pionowej w jeden sygna zoony i jego
transmisji do monitora. Monitor wywietla sygnay kolorów dzielc sygna zoony na
sygnay kolorów pierwotnych.
Odlego plamek
Dot Pitch Obraz na ekranie skada si z czerwonych, zielonych i niebieskich punktów. Im bliej znajduj si te
punkty, tym wiksza rozdzielczo obrazu. Odlego pomidzy punktami o tym samym kolorze nosi nazw
Plamki Jednostka: mm
Czstotliwo odchylania pionowego
Czstotliwo odchylania pionowego Obraz na ekranie musi by odnawiany kilka razy na sekund, aby
powsta widoczny obraz. Czstotliwo tych powtórze zwana jest Czstotliwoci odchylania pionowego lub
czstotliwoci odwieania. Jednostka: Hz
Przykad: Miganie lampki z szybkoci 60 zapale na sekund traktowane jest jako czstotliwo
60 Hz.
Czstotliwo odchylania poziomego
Czas skanowania jednej linii czcej praw i lew krawd ekranu nazywa si cyklem poziomym.
Odwrotno Cyklu poziomego nazywa si Czstotliwoci odchylania poziomego. Jednostka: kHz
Interlace and Non-Interlace Methods
Wyswietlanie linii poziomych obrazu po kolei od góry do dou nazywa si metod bez przeplotu, natomiast
wywietlanie najpierw linii parzystych, a potem nieparzystych nazywa si metod z przeplotem. Wywietlanie
bez przeplotu uywane jest w wikszoci monitorów, aby zapewni czysty obraz. Metoda z przeplotem jest
identyczna do stosowanej w odbiornikach telewizyjnych.
Plug & Play (Wcz i pracuj)
Jest to funkcja pozwalajca na osignicie najwyszej jakoci obrazu poprzez umoliwienie automatycznej
wymiany informacji pomidzy komputerem, a monitorem. Ten monitor jest zgodny ze standardem VESA DDC
dla funkcji Plug & Play.
Rozdzielczo
Rozdzielczo Liczba punktów w linii poziomej i w linii pionowej, skadajcych si na obraz nazywa si
„rozdzielczoci”. Liczba ta okrela dokadno wywietlania. Wysoka rozdzielczo jest korzystna przy
wykonywaniu równoczesnych zada, gdy pozwala na wywietlanie na ekranie wikszej iloci informacji.
Przykad: Jeli rozdzielczo wynosi 1360 X 768, to oznacza, e obraz skada si z 1360 punktów
poziomych (rozdzielczo pozioma) i 768 linii pionowych (rozdzielczo pionowa).
MDC (Multiple Display Control)
Multiple Display Control (MDC) to program umoliwiajcy atwe sterowanie kilkoma monitorami równoczenie.
Do komunikacji midzy komputerem i wywietlaczem suy standardowy port szeregowy RS-232C.
^
W\\\\UGGGY^W\\\\UGGGY^ YWW^TXXTY`GGG㝘㤸GXXa\Xa[]YWW^TXXTY`GGG㝘㤸GXXa\Xa[]
TAIWAN
0800-329-999 http://www.samsung.com/tw
VIETNAM
1 800 588 889 http://www.samsung.com
Middle East & Africa
SOUTH AFRICA
0860-SAMSUNG(726-7864 ) http://www.samsung.com
TURKEY
444 77 11 http://www.samsung.com
U.A.E
800-SAMSUNG (726-7864)
8000-4726
http://www.samsung.com

Zasady usuwania
Prawidowe usuwanie produktu (zuyty sprzt elektryczny i elektroniczny) - Tylko obszar
Europy
Dotyczy Unii Europejskiej i innych europejskich krajów korzystajcych
z metod osobnej zbiórki.
Oznaczenie umieszczone na produkcie lub w odnoszcych si do niego tekstach
wskazuje, e produktu po upywie okresu uytkowania nie naley usuwa z
innymi odpadami pochodzcymi z gospodarstw domowych. Aby unikn
szkodliwego wpywu na rodowisko naturalne i zdrowie ludzi wskutek
niekontrolowanego usuwania odpadów, prosimy o oddzielenie produktu od innego
typu odpadów oraz odpowiedzialny recykling w celu promowania ponownego
uycia zasobów materialnych jako staej praktyki.
W celu uzyskania informacji na temat miejsca i sposobu bezpiecznego dla
rodowiska recyklingu tego produktu uytkownicy w gospodarstwach domowych
powinni skontaktowa si z punktem sprzeday detalicznej, w którym dokonali
zakupu produktu, lub z organem wadz lokalnych.
Uytkownicy w firmach powinni skontaktowa si ze swoim dostawc i sprawdzi
warunki umowy zakupu. Produktu nie naley usuwa razem z innymi odpadami
komercyjnymi.
Osoba upowaniona
Informacje zawarte w tym dokumencie mog ulec zmianie bez wczeniejszej zapowiedzi.
© 2008 Samsung Electronics Co., Ltd.
Powielanie w jakiejkolwiek formie bez pisemnej zgody Samsung Electronics Co., Ltd. jest surowo zabronione.
Samsung Electronics Co., Ltd. nie ponosi odpowiedzialnoci za bdy zawarte w niniejszej publikacji ani za
przypadkowe lub porednie szkody wynike z jej udostpnienia, dziaania lub uycia.
Samsung jest zastrzeonym znakiem handlowym firmy Samsung Electronics Co., Ltd.; Microsoft, Windows i
Windows NT s zastrzeonymi znakami towarowymi firmy Microsoft Corporation VESA, DPM i DDC s
zastrzeonymi znakami towarowymi firmy Video Electronics Standard Association; Nazwa i logo ENERGY
STAR
®
s zastrzeonymi znakami handlowymi U.S. Environmental Protection Agency (EPA).
Wszelkie inne nazwy produktów wspomniane w tym dokumencie mog by znakami towarowymi lub
zastrzeonymi znakami towarowymi ich wacicieli.
^
zt{T[WXXTw__UGGG^`zt{T[WXXTw__UGGG^` YWW^TXXTY_GGG㝘䟸GYa\^aY]YWW^TXXTY_GGG㝘䟸GYa\^aY]

ƣƧƩƫƪƥƯƫƭ6(6.%&
ƧƪơƥƙƥƛƨƩƙƥƦƥƢƳƞƥƙƗƩƜƢƶ
UGGGXUGGGX YWW^TXXTY_GGG㝘䟸G[a[WaW`YWW^TXXTY_GGG㝘䟸G[a[WaW`

,
.
,
.
/
, ,
.
,
,
.
, .
( ).
.
z
.
X
zt{T[WXXTy__UGGGXzt{T[WXXTy__UGGGX YWW^TXXTY_GGG㝘䟸GYa\]aX_YWW^TXXTY_GGG㝘䟸GYa\]aX_
+-
/
0
1
#
$
% "
&

.
z
.
.
z
. ( l.)
, , .
z
.
,
.
z
.
.
z
.
.
z
,
.
,
.
z
.
z
.
,
.
.
z
.
,
, ,
Y
zt{T[WXXTy__UGGGYzt{T[WXXTy__UGGGY YWW^TXXTY_GGG㝘䟸GYa\]aYXYWW^TXXTY_GGG㝘䟸GYa\]aYX

,
, , . .
.
.
z
.
, .
z
.
,
.
z
.
.
z
, ,
,
, .
.
z
,
.
.
z
.
.
z
.
Z
zt{T[WXXTy__UGGGZzt{T[WXXTy__UGGGZ YWW^TXXTY_GGG㝘䟸GYa\]aYXYWW^TXXTY_GGG㝘䟸GYa\]aYX

.
z
.
.
z
.
.
z
.
z
,
.
( 10 /4 ),
.
z
, , ,
.
()
.
z
()
.
.
.
z
, .
,
, , ..
z
.
[
zt{T[WXXTy__UGGG[zt{T[WXXTy__UGGG[ YWW^TXXTY_GGG㝘䟸GYa\]aYZYWW^TXXTY_GGG㝘䟸GYa\]aYZ

.
, .
z
.
, .
z
.
, .
z
, , , ,
, , , ,
.
( ).
z
.
z
.
- ,
-
.
z
.
,
, ;
.
z
,
.
z
, .
.
.
z
,
.
\
zt{T[WXXTy__UGGG\zt{T[WXXTy__UGGG\ YWW^TXXTY_GGG㝘䟸GYa\]aYZYWW^TXXTY_GGG㝘䟸GYa\]aYZ

..
z
,
.
,
.
z
, -
..
,
.
z
, -
..
.
z
.
,
.
z
,
.
z
.
.
z
..
.
z
, .
,
,
,
]
zt{T[WXXTy__UGGG]zt{T[WXXTy__UGGG] YWW^TXXTY_GGG㝘䟸GYa\]aYZYWW^TXXTY_GGG㝘䟸GYa\]aYZ

AV.
z
. ,
,
.
.
z
,
,
.
,
.
z
.
32 (80 ) - 1360 X 7
68
.
,
.
,
, .
z
.
,
.
.
,
.
z
, .
^
zt{T[WXXTy__UGGG^zt{T[WXXTy__UGGG^ YWW^TXXTY_GGG㝘䟸GYa\]aYZYWW^TXXTY_GGG㝘䟸GYa\]aYZ

.
, (
, ).
z
.
, .
z
-
,
.
(
, ).
z
, .
, .
,
. .
z
.
,
+/-,
.
z
, ,
(
).
.
.
z
, ,
().
.
z
_
zt{T[WXXTy__UGGG_zt{T[WXXTy__UGGG_ YWW^TXXTY_GGG㝘䟸GYa\]aYZYWW^TXXTY_GGG㝘䟸GYa\]aYZ

.
z
,
.
© 1995~2008 SAMSUNG. ALL Rights Reserved
, ,
. ,
`
zt{T[WXXTy__UGGG`zt{T[WXXTy__UGGG` YWW^TXXTY_GGG㝘䟸GYa\]aYZYWW^TXXTY_GGG㝘䟸GYa\]aYZ

ƮNjǁǂǍǃƽNJDžǂ
.......................................................................... 1
............................................................................................................ 1
................................................................................................................. 1
.......................................................................................................... 2
.................................................................................................................. 4
................................................................................................................. 5
............................................................................................................ 12
............................................................................................... 12
................................................................................................ 13
........................................................................................... 20
....................................................................................................... 24
................................................................................ 24
.................................................................................. 25
MDC ........................................................................................................... 31
................................................................................... 51
................................................................................................................. 51
[ / BNC /DVI ] ............................................................................. 52
[AV / S-Video / . / DVI-Video ] ............................................ 55
................................................................................................................ 56
.............................................................................................................. 57
M. . ....................................................................................................... 60
...................................................................................... 60
XW
zt{T[WXXTy__UGGGXWzt{T[WXXTy__UGGGXW YWW^TXXTY_GGG㝘䟸GYa\]aYZYWW^TXXTY_GGG㝘䟸GYa\]aYZ

.............................................................................. 62
............................................................................................... 62
......................................................................................................... 63
....................................................................................................... 65
.................................................................................................................... 67
....................................................................................................................... 67
.............................................................................................................. 68
..................................................................................... 68
....................................................................................................... 70
................................................................. 70
( ) ...... 70
Appendix .............................................................................................................. 74
SAMSUNG ..................................................................... 74
............................................................................................................... 76
............................................................................................................ 77
XX
zt{T[WXXTy__UGGGXXzt{T[WXXTy__UGGGXX YWW^TXXTY_GGG㝘䟸GYa\]aYZYWW^TXXTY_GGG㝘䟸GYa\]aYZ

,
.
• , ,
.
! - , " .
.
• # .
(
)
,
!"
MDC
!
!(15-# D-SUB) ! $
%
!
$
"
%
%&"
!
!"
'
*
+
.+
%
XY
YYYUGGGXYYYUGGGX YWW^TXXTY`GGG㝘䟸GXYaW`aX\YWW^TXXTY`GGG㝘䟸GXYaW`aX\
РУКОВОДСТВО ПОЛЬЗОВАТЕЛЯ

(AAA X 2)
BNC RCA
DVI BNC
1) MENU
(OSD)
XZ
zt{T[WXXTy__UGGGXZzt{T[WXXTy__UGGGXZ YWW^TXXTY_GGG㝘䟸GYa\]aYZYWW^TXXTY_GGG㝘䟸GYa\]aYZ

.
2) /
.
3) / /
. .
.
4) ENTER
.
5) SOURCE
, , .
[PC]
˧
[BNC]
˧
[DVI]
˧
[AV]
˧
[S-Video]
˧
[Component]
>> .
6) PIP
PIP PIP.
PIP, BCN
.
>> .
•
PC / DVI
A
V / S-Video /
•
BNC
A
V / S-Video
•
DVI
A
V / S-Video /
•
AV / S-Video
PC / BNC / DVI
•
PC / DVI
7)
-
.
8)
. .
.
9)
.
• ,
. , , ,
.
• . " s "
""
.
X[
zt{T[WXXTy__UGGGX[zt{T[WXXTy__UGGGX[ YWW^TXXTY_GGG㝘䟸GYa\]aYZYWW^TXXTY_GGG㝘䟸GYa\]aYZ

1) RS232C OUT/IN (
RS232C) :
MDC (Multiple Display Control)
2) PC IN(RGB) (
) :
15- D-Sub - PC
( )
3) PC IN([DVI(HDCP)] ) (
) :
DVI-D - DVI-D - DVI ( )
4) DVI / PC IN [PC/DVI/BNC AUDIO IN] (
PC/BNC/DVI ())
5) COMPONENT AUDIO IN [L-AUDIO-R] (
())
6) BNC/COMPONENT OUT [R/P
R
, G/Y, B/P
B
, H, V]
(
/
() )
BNC ( ) :
R, G, B, H, V
:
P
R
, Y, P
B
7) BNC/COMPONENT IN [R/P
R
, G/Y, B/P
B
, H, V]
(
/
())
8) AV AUDIO IN [L-AUDIO-R] (
MONITOR) ()
9) AV OUT [VIDEO] (
Video) : AV ()
10) AV IN [VIDEO] (
Video) ()
X\
X\UGGGXX\UGGGX YWW^TXYTYWGGG㝘䟸GXa[_aXWYWW^TXYTYWGGG㝘䟸GXa[_aXW

11) AV OUT [S-VIDEO] (
S-Video) S-Video ()
12) AV IN [S-VIDEO] ( S-
Video) ()
13) EXT SPEAKER(8 ) [- - L - +, - - R - +] (
(8 ))
14) AUDIO OUT [L-AUDIO-R] (
MONITOR)
()
-: PC,
DVI, BNC
15) POWER S/W ON/OFF
16) POWER IN
.
• , , ,
..
, .
17)
Kensington lock -
. (
.)
!" #$
" % ,
"% .
• ,
.
$
•
, .
1. ON / OFF
2. MAGICNET
3. MDC
4. LOCK
5. MagicNet
6.+100 -/--
7. VOL
8. MUTE
9. TTX/MIX
10. MENU
11. ENTER
12. P.MODE
13. AUTO
14. PRE-CH
X]
X\UGGGYX\UGGGY YWW^TXYTYWGGG㝘䟸GXa[_aXZYWW^TXYTYWGGG㝘䟸GXa[_aXZ

15 . CH/P
16. SOURCE
17. INFO
18. EXIT
19. '-', '-'
20. S.MODE
21. STILL
22. FM RADIO
23. P.SIZE
24. SRS
25. DUAL/MTS
26. PIP
27. SOURCE
28. SWAP
29. SIZE
30. REW
31. STOP
32. PLAY/PAUSE
33. FF
1) ON / OFF
.
2) MAGICNET
MagicNet.
- &$ * .
3) MDC
MDC.
4) LOCK
, ,
Power LOCK.
5) MagicNet
MagicNet.
- &$ * .
• / : -.
• DEL : .
• SYMBOL : Used to enter the symbols.
• ENTER : .
6) +100 -/--
100.
, 121 "+100", "2" "1".
- &$ * .
7) VOL
.
8)
MUTE
() .
Displayed on the lower left corner of the screen.
Mute - VOL + Mute
.
9)
TTX/MIX
X^
X\UGGGZX\UGGGZ YWW^TXYTYWGGG㝘䟸GXa[_aXZYWW^TXYTYWGGG㝘䟸GXa[_aXZ

, .
[; < TTX / MIX. ]
10)
MENU
(OSD)
.
11)
ENTER
.
12)
P.MODE
( )
.
AV / S-Video /. Mode : P.MODE
-
.
.
( . . . )
PC / DVI Mode : M/B ( MagicBright
˞
)
MagicBright
˞
- ,
.
( . . )
13) AUTO
Auto () . (PC)
, AUTO.
14)
PRE-CH
.
- &$ * .
15)
CH/P
TV .
- &$ * .
16)
SOURCE
, , .
17)
INFO
.
18)
EXIT
.
19) '-', '-'
,
.
20)
S.MODE
( )
.
.
.
( Standard
˧
Music
˧
Movie
˧
Speech
˧
Custom )
21) STILL
.
.
22) FM RADIO
, FM Radio
In PC/DVI mode, sets only SOUND to FM Radio.
In general Video SOURCE mode, sets to FM RADIO, turning off the screen.
In areas where signal is weak, noise may occur while FM radio is broadcast.
- &$ * .
23) P.SIZE
X_
X\UGGG[X\UGGG[ YWW^TXYTYWGGG㝘䟸GXa[_aX[YWW^TXYTYWGGG㝘䟸GXa[_aX[

.
24)
SRS
SRS
25)
DUAL/MTS
- &$ * .
DUAL-
/, l / ll /NICAM /NICAM
DUAL
.
MTS-
/, 1/ 2 /NICAM
/NICAM .
= : MTS/S_Mode >
FM
˩
...
˩
...
26)
PIP
PIP.
27)
SOURCE
, , .
28)
SWAP
PIP .
PIP ,
PIP.
29)
SIZE
.
30) REW
31) STOP
Stop ()
32) PLAY / PAUSE
/
33)
FF
© 1995~2008 SAMSUNG. ALL Rights Reserved
X`
X\UGGG\X\UGGG\ YWW^TXYTYWGGG㝘䟸GXa[_aX[YWW^TXYTYWGGG㝘䟸GXa[_aX[

| | | | VESA |
1. ?
2. ;
YW
X\UGGG]X\UGGG] YWW^TXYTYWGGG㝘䟸GXa[_aX[YWW^TXYTYWGGG㝘䟸GXa[_aX[

3. >
4. @
5. J VESA
z
VESA VESA.
z
VESA: ,
Samsung. .
z
- , , 2 .
z
Samsung ,
.
YX
X\UGGG^X\UGGG^ YWW^TXYTYWGGG㝘䟸GXa[_aX[YWW^TXYTYWGGG㝘䟸GXa[_aX[

@ J J$
6 8 12 .
6. Q J
z
.
z
Samsung Electronics
.
z
.
.
( )
, .
A
B
C
:
8EA
D
:
3EA
E
:
7EA
F
:
7EA
G
Q J
1.
1. .
2. 35 .
3.
F
.
4.
F
c
A
E
.
,
.
2.
1. .
2. , -
.
3.
B
C
.
YY
X\UGGG_X\UGGG_ YWW^TXYTYWGGG㝘䟸GXa[_aX[YWW^TXYTYWGGG㝘䟸GXa[_aX[

3.
1.
B
A
.
2.
D
B
A
.
. ,
.
YZ
X\UGGG`X\UGGG` YWW^TXYTYWGGG㝘䟸GXa[_aX[YWW^TXYTYWGGG㝘䟸GXa[_aX[

,
.
>
• , .
Samsung Electronics
, .
Q ;
\
>
"CAUTION".
1) ,
.
( ),
, .
2) .
3) .
. (M4 x L15)
>
"
;
>
"
"
^
Q
`$#$
b#$
>
Y[
X\UGGGXWX\UGGGXW YWW^TXYTYWGGG㝘䟸GXa[_aX[YWW^TXYTYWGGG㝘䟸GXa[_aX[

.
, .
.
( )
1) ,
.
( ),
, .
2) ,
. (M4 x L15)
3) .
4) . (M4 x L15)
>
"
.
.
.
• , , -, DVD-
, .
- . " "
" ".
>
Y\
X\UGGGXXX\UGGGXX YWW^TXYTYWGGG㝘䟸GXa[_aX[YWW^TXYTYWGGG㝘䟸GXa[_aX[

1) .
.
2) 3 D-sub .
:
2-1) D-sub () .
D-SUB 15- RGB 15-
D-SUB .
2-2) DVI () .
DVI DVI(HDCP) DVI
.
2-3) BNC () .
BNC BNC/COMPONENT IN - R, G, B, H, V
15- D-SUB
3) Audio (L) Audio (R) DVD-,
- L R.
• .
• DVI BNC .
Samsung
Electronics.
Y]
X\UGGGXYX\UGGGXY YWW^TXYTYWGGG㝘䟸GXa[_aX[YWW^TXYTYWGGG㝘䟸GXa[_aX[

> $# DVD
• , DVD, DVI
IN DVI.
• DVD .
• f# SOURCE.
• DVI DVI .,
DVD.
> #
1) - -, , ,
AV IN [VIDEO] AV
IN [S-VIDEO] S-VHS BNC.
2) Audio (L) ( ()) Audio (R) ( ())
AV AUDIO IN [L-AUDIO-R] .
• AV S-Vide, ,
(Source) .
• , DVD-
.
• S-VHS BNC .
Y^
X\UGGGXZX\UGGGXZ YWW^TXYTYWGGG㝘䟸GXa[_aX[YWW^TXYTYWGGG㝘䟸GXa[_aX[

> DVD-
1) - (AUDIO OUTPUT)
COMPONENT AUDIO IN [L-AUDIO-R] .
2) (VIDEO OUTPUT)
BNC/COMPONENT IN - P
R, Y, PB
.
• Component, DVD-,
(Source) .
• DVD-, DVD-.
• Component .
Component video . DVD-.
>
1) / .
.
- (AUDIO OUTPUT)
AV AUDIO IN [L-AUDIO-R] .
2) (VIDEO OUTPUT)
AV IN [VIDEO] .
• AV, ,
(Source) .
• , .
Y_
X\UGGGX[X\UGGGX[ YWW^TXYTYWGGG㝘䟸GXa[_aX[YWW^TXYTYWGGG㝘䟸GXa[_aX[

• - .
( .)
- , .
>
• .
1) BNC/COMPONENT IN -
P
R, Y, PB PR, Y, PB .
2)
COMPONENT AUDIO IN [L-AUDIO-R] AUDIO OUT .
• Component, ,
(Source) .
• Component video . .
>
• .
* .
Y`
X\UGGGX\X\UGGGX\ YWW^TXYTYWGGG㝘䟸GXa[_aX\YWW^TXYTYWGGG㝘䟸GXa[_aX\

•
.
• , .
.
>
• AUX L, R AUDIO
OUT [L-AUDIO -R] .
© 1995~2008 SAMSUNG. ALL Rights Reserved
ZW
X\UGGGX]X\UGGGX] YWW^TXYTYWGGG㝘䟸GXa[_aX\YWW^TXYTYWGGG㝘䟸GXa[_aX\

(Multiple Display Control; MDC)
, .
RS-232C.
.
-
Start > Program > Samsung > MDC System.
.
Z
zt{T[WXXTy__UGGGZZzt{T[WXXTy__UGGGZZ YWW^TXXTY_GGG㝘䟸GYa\]aY[YWW^TXXTY_GGG㝘䟸GYa\]aY[

Remocon
Safety Lock
Port Selection
1. .
2.
.
3. .
4. . COM1.
5. Select All Clear All .
6. .
7. Display Selection ( )
8. .
<.> / (Enable/Disable)
, ,
, , MDC ,
, MDC,
Enable,
MDC .
Port Selection
Z
zt{T[WXXTy__UGGGZ[zt{T[WXXTy__UGGGZ[ YWW^TXXTY_GGG㝘䟸GYa\]aY[YWW^TXXTY_GGG㝘䟸GYa\]aY[

1. Multiple Display Control COM1.
2. , COM1, Port Selection
COM1 ~ COM4.
3. , ,
.
4. .
Power Control
1. / (Power Control),
Power Control.
Z
zt{T[WXXTy__UGGGZ\zt{T[WXXTy__UGGGZ\ YWW^TXXTY_GGG㝘䟸GYa\]aY[YWW^TXXTY_GGG㝘䟸GYa\]aY[

,
Power Control.
1) Power Status ( )
2) Input Source
3) Image Size
4) On Timer Status
5) Off Timer Status
2. , , Select All .
Power Control .
Z
zt{T[WXXTy__UGGGZ]zt{T[WXXTy__UGGGZ] YWW^TXXTY_GGG㝘䟸GYa\]aY[YWW^TXXTY_GGG㝘䟸GYa\]aY[

1) Power On/Off
- / (On/Off) .
2) Volume
- .
.
( Select All 10,
)
3)
Mute On/Off
- / .
, ,
MUTE,
MUTE.
( (undo) Select All,
, ).
Power Control .
Volume Mute (
ON).
Input Source
1. Input Source,
(Input Source Control).
Select All (" ") .
• TV Mode
• PC Mode
Z
zt{T[WXXTy__UGGGZ^zt{T[WXXTy__UGGGZ^ YWW^TXXTY_GGG㝘䟸GYa\]aY[YWW^TXXTY_GGG㝘䟸GYa\]aY[

,
Input Source Control.
1) PC
- PC.
2) BNC
- BNC.
3) DVI
- DVI.
4) TV
- PC.
5) AV
- AV.
6) S-Video
- S-
V
ideo.
7) Component
- Component.
8) MagicNet
- MagicNet MagicNet.
9) Channel
- , Input Source ( ).
, .
Input Source Control ,
( - ON)
Image Size
PC, BNC, DVI
1. Image Size (" ") ,
.
Z
zt{T[WXXTy__UGGGZ_zt{T[WXXTy__UGGGZ_ YWW^TXXTY_GGG㝘䟸GYa\]aY[YWW^TXXTY_GGG㝘䟸GYa\]aY[

,
.
1)
Power Status ( )
- .
2) Image Size
- .
3) Input
- S .
4) , PC, BNC,
DVI.
5) PC Source - Image Size (" ") PC, BNC, DVI.
- Image Size Control (" ")
PC, BNC, DVI.
6) Video Source
- Video Source
.
MagicNet MagicNet.
Image Size Control ,
( - ON)
Image Size
TV, AV, S-Video, Component, DVI(HDCP)
1. Image Size (" ") ,
.
Z
zt{T[WXXTy__UGGGZ`zt{T[WXXTy__UGGGZ` YWW^TXXTY_GGG㝘䟸GYa\]aY[YWW^TXXTY_GGG㝘䟸GYa\]aY[

,
.
1) TV, AV, S-VIDEO, Component tab
TV, AV, S-VIDEO, Component.
Select All (" ") .
2) TV, AV, S-VIDEO, Component.
3) .
.: Auto Wide, Zoom1, and Zoom2 ,
Component DVI (HDCP) 720p 1080i.
MagicNet MagicNet.
Image Size Control ,
( - ON)
Time
1. Time, (Time Control).
zt{T[WXXTy__UGGG[Wzt{T[WXXTy__UGGG[W YWW^TXXTY_GGG㝘䟸GYa\]aY[YWW^TXXTY_GGG㝘䟸GYa\]aY[

,
Time Control.
1) Current Time
- ( )
- .
2) On Time Setup
-
, .( (AM)/ (PM))
(On Timer) .
3) Off Time Setup
-
, .( (AM)/ (PM))
(Off Timer) .
4) .
5) .
MagicNet MagicNet.
Time Control (
ON).
At On Time Setup, TV Source functions only for TV Model.
PIP
PIP Size
1. PIP (" ") ,
PIP.
Select All (" ") .
zt{T[WXXTy__UGGG[Xzt{T[WXXTy__UGGG[X YWW^TXXTY_GGG㝘䟸GYa\]aY[YWW^TXXTY_GGG㝘䟸GYa\]aY[

,
PIP.
1) PIP Size
- PIP .
2) OFF
- PIP .
3) Large
- PIP Large.
4) Small
- PIP Small.
5) Double1
- PIP Double 1.
6) Double2
- PIP Double 2.
7) Double3 (Picture By Picture)
- PIP Double 3.
MagicNet MagicNet.
PIP .
PIP
PIP Source
1. PIP (" ") ,
PIP.
• PIP TV Mode
[
zt{T[WXXTy__UGGG[Yzt{T[WXXTy__UGGG[Y YWW^TXXTY_GGG㝘䟸GYa\]aY\YWW^TXXTY_GGG㝘䟸GYa\]aY\

• PIP S-Video Mode
,
PIP.
1) PIP Source
- PIP .
2) PC
- PIP PC.
3) BNC
- PIP BNC.
4) DVI
- PIP DVI.
5)
TV
[
zt{T[WXXTy__UGGG[Zzt{T[WXXTy__UGGG[Z YWW^TXXTY_GGG㝘䟸GYa\]aY\YWW^TXXTY_GGG㝘䟸GYa\]aY\

- PIP TV.
6) AV
- PIP AV.
7) S-Video
- PIP S-Video.
8) Component
- PIP Component.
9) Channel
- , PIP .
.: PIP .
.
MagicNet MagicNet.
, PIP .
PIP Control ( PIP) ,
ON (), PIP
ON ().
Settings
Picture
1. Settings, (Settings Control).
,
Settings Control.
.
Select All (50).
"CUSTOM" ().
1) Picture
- TV, AV, S-Video, Component, DVI(HDCP).
2) Contrast
- .
3) Brightness
- .
4) Sharpness
- .
[
zt{T[WXXTy__UGGG[[zt{T[WXXTy__UGGG[[ YWW^TXXTY_GGG㝘䟸GYa\]aY\YWW^TXXTY_GGG㝘䟸GYa\]aY\

5) Color
- .
6) Tint
- .
7) Color Tone
- .
MagicNet MagicNet.
, , ,
.
Settings
Picture PC
1. Settings, (Settings Control).
,
Settings Control.
.
Select All (50).
"CUSTOM" (<>).
1) Picture PC
- PC, BNC, DVI.
2) Contrast
- .
3) Brightness
- .
4) Red
- .
5) Green
- .
6) Blue
- .
MagicNet MagicNet.
, , ,
.
[
zt{T[WXXTy__UGGG[\zt{T[WXXTy__UGGG[\ YWW^TXXTY_GGG㝘䟸GYa\]aY\YWW^TXXTY_GGG㝘䟸GYa\]aY\

Settings
Audio
1. Settings, (Settings Control).
,
Settings Control.
.
Select All (50).
"CUSTOM" (<>).
1) Audio
- Audio .
2) Bass
- .
3) Treble
- .
4) Balance
- .
5) SRS TSXT
- / SRS TSXT.
6)
- PIP Main Sub.
MagicNet MagicNet.
, , ,
.
Settings
Image Lock
1. Settings, (Settings Control).
[
zt{T[WXXTy__UGGG[]zt{T[WXXTy__UGGG[] YWW^TXXTY_GGG㝘䟸GYa\]aY\YWW^TXXTY_GGG㝘䟸GYa\]aY\

,
Settings Control.
1) Image Lock
- PC, BNC.
2) Coarse
- Coarse .
3) Fine
- Fine .
4) Position
- .
5) Auto Adjustment
- , .
MagicNet MagicNet.
Settings Control (
ON).
Maintenance
Lamp Control
1. "Maintenance" . Maintenance ().
[
zt{T[WXXTy__UGGG[^zt{T[WXXTy__UGGG[^ YWW^TXXTY_GGG㝘䟸GYa\]aY\YWW^TXXTY_GGG㝘䟸GYa\]aY\

("Info Grid") .
1) Maintenance
- (Maintenance Control) .
2) Auto Lamp Control
- .
Manual Lamp Control
Auto Lamp Control.
3) Manual Lamp Control
- .
Auto Lamp Control
Manual Lamp Control.
Maintenance Control ( ) ,
ON ().
MagicNet MagicNet.
Maintenance
Scroll
1. "Maintenance" . Maintenance ().
[
zt{T[WXXTy__UGGG[_zt{T[WXXTy__UGGG[_ YWW^TXXTY_GGG㝘䟸GYa\]aY\YWW^TXXTY_GGG㝘䟸GYa\]aY\

1) Safety Screen
- ,
. "Interval"
"Second".
Scroll (), Pixel (), Bar () Eraser ()
Screen Type ( ).
MagicNet MagicNet.
1, 2, 3, 4, 5
10, 20, 30, 40, 50 , .
Maintenance Control ( ) ,
ON ().
Maintenance
Video Wall
1. "Maintenance" . Maintenance ().
[
zt{T[WXXTy__UGGG[`zt{T[WXXTy__UGGG[` YWW^TXXTY_GGG㝘䟸GYa\]aY\YWW^TXXTY_GGG㝘䟸GYa\]aY\

1) Video Wall
- ,
, .
2) Screen Divider
- .
.
z Screen divider ( )
z Display Selection ( )
z
.
z
MDC, Samsung, 4x4 -.
z
z 2*2
z
3*3
z
4*4
z
1*2
z
2*1
z
1*5
z 5*1
zt{T[WXXTy__UGGG\Wzt{T[WXXTy__UGGG\W YWW^TXXTY_GGG㝘䟸GYa\]aY\YWW^TXXTY_GGG㝘䟸GYa\]aY\

3) On / Off
- / Video Wall () .
4) Format
- .
z
Full
z Natural
MagicNet.
Maintenance Control ( ) ,
ON ().
1. , .
- RS232C. ( Com1)
- ,
- .
-
, 0 16. (
)
.: 0 - 16.
, MDC
.
2. , , .
-
, . ( /
)
- , .
3. .
- , , .
4. (On Timer) (Off Timer), ,
.
- .
5.
, RS-232C .
.
<.>
.
zt{T[WXXTy__UGGG\Xzt{T[WXXTy__UGGG\X YWW^TXXTY_GGG㝘䟸GYa\]aY\YWW^TXXTY_GGG㝘䟸GYa\]aY\

.
1. : - ,
.
2. :
.
3. (ID1) (ID3): ,
ID 1, ID3.
4. Selected all: -
, .
\
zt{T[WXXTy__UGGG\Yzt{T[WXXTy__UGGG\Y YWW^TXXTY_GGG㝘䟸GYa\]aY\YWW^TXXTY_GGG㝘䟸GYa\]aY\

,
.
PC / BNC / DVI
AV
S-Video
DVI-Video
.
[MENU]
˧
[ENTER]
˧
[ENTER]
˧
[
/
]
˧
[ENTER]
, , .
1)
2) BNC
3) DVI
4) AV
5) S-Video
6)
[ 'SOURCE' ]
• , PIP .
PIP
-,
DVD-, PIP
, , . (/)
• PIP, BCN
.
1) PIP
[MENU]
˧
[ENTER]
˧
[
/
]
˧
[ENTER]
˧
[ENTER]
˧
[
/
]
˧
[ENTER]
PIP.
-
-
[ 'PIP']
2)
[MENU]
˧
[ENTER]
˧
[
/
]
˧
[ENTER]
˧
[
/
]
˧
[ENTER]
˧
[
/
]
˧
[ENTER]
PIP
- PC / DVI: AV / S-Video /
- BNC: AV / S-Video
- DVI: AV / S-Video /
- AV / S-Video: PC / BNC / DVI
- : PC / DVI
[ / BNC /DVI ]
[AV / S-Video /
. / DVI-Video
]
M. .
\
W\UGGGXW\UGGGX YWW^TXYTXWGGG㝘䟸GYaWWaWWYWW^TXYTXWGGG㝘䟸GYaWWaWW

[ 'SOURCE']
3)
[MENU]
˧
[ENTER]
˧
[
/
]
˧
[ENTER]
˧
[
/
]
˧
[ENTER]
PIP .
PIP ,
PIP.
[ 'SWAP']
4)
[MENU]
˧
[ENTER]
˧
[
/
]
˧
[ENTER]
˧
[
/
]
˧
[ENTER]
˧
[
/
]
˧
[ENTER]
PIP .
[ 'SIZE']
5)
[MENU]
˧
[ENTER]
˧
[
/
]
˧
[ENTER]
˧
[
/
]
˧
[ENTER]
˧
[
/
]
˧
[ENTER]
PIP.
6)
[MENU]
˧
[ENTER]
˧
[
/
]
˧
[ENTER]
˧
[
/
]
˧
[ENTER]
˧
[
/
]
˧
[ENTER]
PIP ( ).
-
-
-
-
•
, , Size Transparency .
: PIP
. .
[MENU]
˧
[ENTER]
˧
[
/
]
˧
[ENTER]
˧
[
/
]
˧
[ENTER]
˧
[
/
]
˧
[ENTER]
, ,
.
1)
2) BNC
3) DVI
4) AV
5) S-Video
6)
[ / BNC /DVI ]
/ BNC / DVI
AV
S-Video
DVI-Video
MagicBright
˞
[MENU]
˧
[
/
]
˧
[ENTER]
˧
[ENTER]
˧
[
/
]
˧
[ENTER]
MagicBright
˞
- ,
.
4 : . .
.
MagicBright
˞
,
.
1)
, , DVD VCD.
2)
, , .
\
W\UGGGYW\UGGGY YWW^TXYTXWGGG㝘䟸GYaWWaW[YWW^TXYTXWGGG㝘䟸GYaWWaW[

3)
, .
4)
, , ,
,
.
(Brightness) (Contrast)
.
[ 'M/B'.]
[MENU]
˧
[
/
]
˧
[ENTER]
˧
[
/
]
˧
[ENTER]
˧
[ENTER]
˧
[
/
] / [< / >]
˧
[ENTER]
,
.
1)
.
2)
.
• Custom MagicBright
Custom.
[MENU]
˧
[
/
]
˧
[ENTER]
˧
[
/
]
˧
[ENTER]
˧
[
/
]
˧
[ENTER]
- -.
1)
2)
3)
4)
( PC/BNC)
[MENU]
˧
[
/
]
˧
[ENTER]
˧
[
/
]
˧
[ENTER]
˧
[ENTER]
˧
[< / >]
˧
[ENTER]
.
( PC/BNC)
1) .
2) .
3) .
• Color Control Color Tone
Custom.
.
". ." ( )
, ,
. ("")
, (""),
("").
( PC/BNC)
1)
[MENU]
˧
[
/
]
˧
[ENTER]
˧
[
/
]
˧
[ENTER]
˧
[ENTER]
˧
[< / >]
˧
[ENTER]
, , .
\
W\UGGGZW\UGGGZ YWW^TXYTXWGGG㝘䟸GYaWWaW[YWW^TXYTXWGGG㝘䟸GYaWWaW[

.
.
2)
[MENU]
˧
[
/
]
˧
[ENTER]
˧
[
/
]
˧
[ENTER]
˧
[
/
]
˧
[ENTER]
˧
[< / >]
˧
[ENTER]
, , .
("") ,
.
3)
[MENU]
˧
[
/
]
˧
[ENTER]
˧
[
/
]
˧
[ENTER]
˧
[
/
]
˧
[ENTER]
˧
[< / >] / [
/
]
˧
[ENTER]
.
[MENU]
˧
[
/
]
˧
[ENTER]
˧
[
/
]
˧
[ENTER]
T .
, AUTO.
( PC/BNC)
'AUTO'
RGB,
.
( PC/BNC)
1)
[MENU]
˧
[
/
]
˧
[ENTER]
˧
[
/
]
˧
[ENTER]
˧
[ENTER]
˧
[
/
]
˧
[ENTER]
. .
2)
[MENU]
˧
[
/
]
˧
[ENTER]
˧
[
/
]
˧
[ENTER]
˧
[
/
]
˧
[ENTER]
˧
[
/
]
˧
[ENTER]
˧
[
/
]
˧
[< / >]
˧
[ENTER]
R Phase, G Phase, B Phase,
.
[MENU]
˧
[
/
]
˧
[ENTER]
˧
[
/
]
˧
[ENTER]
˧
[
/
]
˧
[ENTER]
.
1) 16:9
2) 4:3
PIP
[MENU]
˧
[
/
]
˧
[ENTER]
˧
[
/
]
˧
[ENTER]
˧
[
/
]
˧
[ENTER]
˧
[
/
]
˧
[ENTER]
˧
[
/
]
˧
[ENTER]
˧
[< / >]
˧
[ENTER]
PIP.
1)
Contrast () PIP .
2)
Brightness () PIP .
3)
PIP.
4)
Color () PIP .
5)
PIP.
“PC
ˉ
,
ˈ
BNC
ˉG
PIP,
“AV
ˉG
,
ˈ
S-Video
ˉG
. NTSC.
: PIP
\
W\UGGG[W\UGGG[ YWW^TXYTXWGGG㝘䟸GYaWWaW[YWW^TXYTXWGGG㝘䟸GYaWWaW[

]
PC / BNC / DVI
AV
S-Video
DVI-Video
[MENU]
˧
[
/
]
˧
[ENTER]
˧
[ENTER]
˧
[
/
]
˧
[ENTER]
-
. .
1)
2)
3)
4)
[ 'P.MODE']
[MENU]
˧
[
/
]
˧
[ENTER]
˧
[
/
]
˧
[ENTER]
˧
[
/
]
˧
[ENTER]
˧
[< / >]
˧
[ENTER]
,
.
1)
.
2)
3)
.
4)
.
5)
.
AV S-Video. NTSC.
[MENU]
˧
[
/
]
˧
[ENTER]
˧
[
/
]
˧
[ENTER]
˧
[
/
]
˧
[ENTER]
- -.
- -.
1) .2
2) .1
3)
4) .1
5) .2
[MENU]
˧
[
/
]
˧
[ENTER]
˧
[
/
]
˧
[ENTER]
˧
[
/
]
˧
[ENTER]
.
1) 16:9
2) .1
3) .2
4) 4:3
[ .1, .2, 1080i ( 720p)
DTV.]
\
W\UGGG\W\UGGG\ YWW^TXYTXWGGG㝘䟸GYaWWaW[YWW^TXYTXWGGG㝘䟸GYaWWaW[
. NTSC.
: PIP
[AV / S-Video / . / DVI-Video
\]
[AV / S-Video / . / DVI-Video

. /
[MENU]
˧
[
/
]
˧
[ENTER]
˧
[
/
]
˧
[ENTER]
˧
[
/
]
˧
[ENTER]
.
.
1) .
2) .
""
[MENU]
˧
[
/
]
˧
[ENTER]
˧
[
/
]
˧
[ENTER]
˧
[
/
]
˧
[ENTER]
(Film Mode).
(Film Mode) ,
( DVI-Video )
1) .
2) .
PIP
[MENU]
˧
[
/
]
˧
[ENTER]
˧
[
/
]
˧
[ENTER]
˧
[
/
]
˧
[ENTER]
˧
[
/
]
˧
[ENTER]
˧
[< / >]
˧
[ENTER]
PIP.
1)
PIP .
2)
PIP .
: PIP
PC / BNC / DVI
AV
S-Video
DVI-Video
[MENU]
˧
[
/
]
˧
[ENTER]
˧
[ENTER]
˧
[
/
]
˧
[ENTER]
.
1)
Standard .
2) Music
Music .
3)
Movie .
4)
Speech ,
(, ).
5)
.
[MENU]
˧
[
/
]
˧
[ENTER]
˧
[
/
]
˧
[ENTER]
˧
[
/
]
˧
[ENTER]
˧
[< / >]
˧
[ENTER]
.
1) H/
.
\
W\UGGG]W\UGGG] YWW^TXYTXWGGG㝘䟸GYaWWaW[YWW^TXYTXWGGG㝘䟸GYaWWaW[

.
3)
==> .
, 0.
• Custom MagicBright
Custom.
.
[MENU]
˧
[
/
]
˧
[ENTER]
˧
[
/
]
˧
[ENTER]
˧
[
/
]
˧
[ENTER]
Reduces the differences in volume level among broadcasters.
1) .
2) .
SRS TS XT
[MENU]
˧
[
/
]
˧
[ENTER]
˧
[
/
]
˧
[ENTER]
˧
[
/
]
˧
[ENTER]
SRS TS XT SRS, 5.1-
. TruSurround
,
. .
1) .
2) .
[ 'SRS'.]
[MENU]
˧
[
/
]
˧
[ENTER]
˧
[
/
]
˧
[ENTER]
˧
[
/
]
˧
[ENTER]
PIP Main Sub.
1)
2)
[ : PIP]
PC / BNC / DVI
AV
S-Video
DVI-Video
[MENU]
˧
[
/
]
˧
[ENTER]
˧
[ENTER]
˧
[
/
]
˧
[ENTER]
.
• OSD.
, .
- ".", " ", " ."
" .".
\
W\UGGG^W\UGGG^ YWW^TXYTXWGGG㝘䟸GYaWWaW[YWW^TXYTXWGGG㝘䟸GYaWWaW[
2) /

1)
.
[MENU]
˧
[
/
]
˧
[ENTER]
˧
[
/
]
˧
[ENTER]
˧
[ENTER]
˧
[< / >]
˧
[ENTER]
.
2)
[MENU]
˧
[
/
]
˧
[ENTER]
˧
[
/
]
˧
[ENTER]
˧
[
/
]
˧
[ENTER]
˧
[< / >]
˧
[
/
]
˧
[ENTER]
˧
[< / >]
˧
[
/
]
˧
[ENTER]
(
). (. , 30, 60, 90, 120, 150, 180)
3)
[MENU]
˧
[
/
]
˧
[ENTER]
˧
[
/
]
˧
[ENTER]
˧
[
/
]
˧
[ENTER]
˧
[< / >]
˧
[
/
]
˧
[ENTER]
.
. . , .
, " ".
4)
[MENU]
˧
[
/
]
˧
[ENTER]
˧
[
/
]
˧
[ENTER]
˧
[
/
]
˧
[ENTER]
˧
[< / >]
˧
[
/
]
˧
[ENTER]
.
• . . , .
, " ".
[MENU]
˧
[
/
]
˧
[ENTER]
˧
[
/
]
˧
[ENTER]
˧
[
/
]
˧
[ENTER]
OSD.
1)
2)
3)
4)
[MENU] > [
/
] > [ENTER] > [
/
] > [ENTER] > [0~9] > [0~9] > [0~9]
.
Energy Saving
[MENU]
˧
[
/
]
˧
[ENTER]
˧
[
/
]
˧
[ENTER]
˧
[
/
]
˧
[ENTER]
˧
[MENU]
MDC, Samsung, 4x4 -.
1) .
2) .
• ,
. . , Energy Saving ,
Power On MDC
WOL (Wake On LAN) MagicNet .
Video Wall
,
,
.
Video Wall, Video Wall.
1)
[MENU]
˧
[
/
]
˧
[ENTER]
˧
[
/
]
˧
[ENTER]
˧
[ENTER]
˧
[
/
]
˧
[ENTER]
/ Video Wall () .
-
.
-
.
W\UGGG_W\UGGG_ YWW^TXYTXWGGG㝘䟸GYaWWaW[YWW^TXYTXWGGG㝘䟸GYaWWaW[

2)
[MENU]
˧
[
/
]
˧
[ENTER]
˧
[
/
]
˧
[ENTER]
˧
[
/
]
˧
[ENTER]
˧
[
/
]
˧
[ENTER]
.
-
Full
.
-
Natural
.
3)
[MENU]
˧
[
/
]
˧
[ENTER]
˧
[
/
]
˧
[ENTER]
˧
[
/
]
˧
[ENTER]
˧
[
/
]
˧
[ENTER]
.
.
• Screen divider ( ).
• Display Selection ( ).
• .
-
2 x 2
-
3 x 3
-
4 x 4
-
5 x 5
-
1 x 2
-
2 x 1
-
1 x 5
-
5 x 1
• PIP, ,
. PIP, PIP .
MagicNet.
Safety Screen ( )
.<
- .
- , .
1)
[MENU]
˧
[
/
]
˧
[ENTER]
˧
[
/
]
˧
[ENTER]
˧
[ENTER]
˧
[
/
]
˧
[ENTER]
(./.) .
-
.
-
.
2)
[MENU]
˧
[
/
]
˧
[ENTER]
˧
[
/
]
˧
[ENTER]
˧
[
/
]
˧
[ENTER]
˧
[
/
]
˧
[ENTER]
Screen Scroll ( ).
(1~10 )
.
10 .
-
1~10
3)
[MENU]
˧
[
/
]
˧
[ENTER]
˧
[
/
]
˧
[ENTER]
˧
[
/
]
˧
[ENTER]
˧
[
/
]
˧
[ENTER]
Screen Scroll ( ). (1~5
)
5 .
-
- : 1~5
-
-, , : 10~50
4)
[MENU]
˧
[
/
]
˧
[ENTER]
˧
[
/
]
˧
[ENTER]
˧
[
/
]
˧
[ENTER]
˧
[
/
]
˧
[ENTER]
Safety Screen Type ( ).
-
-
-
-
[MENU]
˧
[
/
]
˧
[ENTER]
˧
[
/
]
˧
[ENTER]
˧
[
/
]
˧
[ENTER]
1024 x 768 60 , 1280 x 768
W\UGGG`W\UGGG` YWW^TXYTXWGGG㝘䟸GYaWWaW[YWW^TXYTXWGGG㝘䟸GYaWWaW[

60 , 1360 x 768 60 1366 x768 60 ,
, ( )
.
( PC/BNC)
1) .
2) 1024 X 768
3) 1280 X 768
4) 1360 X 768
5) 1366 X 768
• , 1024 x 768 60 ,
1280 x 768 60 , 1360 x 768 60 1366 x768 60 .
[MENU]
˧
[
/
]
˧
[ENTER]
˧
[
/
]
˧
[ENTER]
˧
[ENTER]
˧
[< / >]
˧
[ENTER]
1 English
Power On Adjustment
[MENU]
˧
[
/
]
˧
[ENTER]
˧
[
/
]
˧
[ENTER]
˧
[ENTER]
˧
[
/
]
˧
[ENTER]
Power On time ( ) .
*: Power On time ( )
.
1)
[MENU]
˧
[
/
]
˧
[ENTER]
˧
[
/
]
˧
[ENTER]
˧
[ENTER]
˧
[< / >]
˧
[ENTER]
( PC/BNC)
2)
.
[MENU]
˧
[
/
]
˧
[ENTER]
˧
[
/
]
˧
[ENTER]
˧
[
/
]
˧
[ENTER]
˧
[< / >]
˧
[ENTER]
M.
PC / BNC / DVI
AV
S-Video
DVI-Video
M.
[MENU]
˧
[
/
]
˧
[ENTER]
˧
[
/
]
˧
[ENTER]
˧
[ENTER]
˧
[0~9]
.
1) . ID
.
2) ID
. ,
.
PC / BNC / DVI
]
W\UGGGXWW\UGGGXW YWW^TXYTXWGGG㝘䟸GYaWWaW[YWW^TXYTXWGGG㝘䟸GYaWWaW[

AV
S-Video
DVI-Video
MDC
MagicNet.
LOCK
.
1) .
.
2) .
.
• Lock Lock
.
password () - "0000".
• .
MUTE
˧
1
˧
8
˧
6
˧
On. ‘0000
˅
.
© 1995~2008 SAMSUNG. ALL Rights Reserved
]
W\UGGGXXW\UGGGXX YWW^TXYTXWGGG㝘䟸GYaWWaW[YWW^TXYTXWGGG㝘䟸GYaWWaW[

,
.
• , , .
- , .
, ,
.
1) .
2) .
3) .
(" . ") ,
, :
,
.
4) .
, ;
.
Check Cooling System
"Check Cooling System"
, ,
. .
, 1360 768.
.
. 85 ,
, 85 .
]
\\\\UGGGXZ\\\\UGGGXZ YWW^TXXTY`GGG㝘䟸GXYaW^aY`YWW^TXXTY`GGG㝘䟸GXYaW^aY`

•
.
1) .
, .
• ,
, .
•
, Samsung.
2) .
( ).
• ,
.
(
).
• ,
,
.
• , . ,
, , , , ..
,
.
1) , .
2) , .
( , ).
3) , ,
.
4) , 50 -85 .
( 60 .)
5) (),
,
, ,
, ,
().
]
\\\\UGGGX[\\\\UGGGX[ YWW^TXXTY`GGG㝘䟸GXYaW^aY`YWW^TXXTY`GGG㝘䟸GXYaW^aY`

• . ,
, , ,
. ,
, , ,
"" , .
, (PC)
• , , .
.
z
,
, .
(. )
,
• , .
,
.
z
, ,
LCD-.
(. )
" . "
z
,
.
(. )
z
,
.
" "
z
.
z
(.
.)
""
.
z
, .
.
(. )
.
.
z
.
z
,
(- ..)
z
.
.
.
z
,
,
, .
,
""
.
.
z
.
(Refer to the Brightness, Contrast)
.
z
, ". "
]
\\\\UGGGX\\\\\UGGGX\ YWW^TXXTY`GGG㝘䟸GXYaW^aY`YWW^TXXTY`GGG㝘䟸GXYaW^aY`

.
.
OSD "".
.
z
OSD.
,
0,5
1 .
z
.
z
.
.
z
MENU
"TEST GOOD", ,
.
,
• , , .
z
,
- -
.
(. )
z
.
z
.
z
- ,
.
.
z
" " "
" .
,
• , ,
.
.
z
(+/-).
z
, .
z
, .
z
, .
z
,
.
?
.
,
]
\\\\UGGGX]\\\\UGGGX] YWW^TXXTY`GGG㝘䟸GXYaW^aY`YWW^TXXTY`GGG㝘䟸GXYaW^aY`

. (
.)
?
z
Windows XP:
,
˧
˧
˧
.
z
Windows ME/2000:
,
˧
˧
.
* .
?
z
Windows XP:
,
˧
˧
˧
.
,
--> --> ,
BIOS (BIOS SETUP)
. ( Windows/Computer)
z
Windows ME/2000:
,
˧
˧
.
,
--> --> ,
BIOS (BIOS SETUP)
. ( Windows/Computer)
?
, ,
.
.
.
© 1995~2008 SAMSUNG. ALL Right Reserved
]
\\\\UGGGX^\\\\UGGGX^ YWW^TXXTY`GGG㝘䟸GXYaW^aY`YWW^TXXTY`GGG㝘䟸GXYaW^aY`

,
.
SMT-3211
32 (80 cm)
697,6845 () x 392,256 ()
0,51075 () x 0,51075 ()
30 ~ 81
56 ~ 75
16,7 M
1360 x 768 / 1366 x 768 @ 60
,
RGB, RGB, DVI ( ). 0,7 Vp-p
75 ±10 % . . ,
., SOG, TTL.
100 MHz
100 - 240 , (+/- 10 %), 50/60
15pin-to-15pin D-sub,
DVI-D to DVI-D, ()
D-sub, BNC, DVI-D, YPbPr, S-VHS, VCR
(x) /
780 X 482 X 107 / 30,1 X 19,0 X 4,6 ( )
780 X 530 X 223 / 30,1 X 20,9 X 8,8 ( )
VESA
200 x 200 ( ( ))
: 10
C ~ 40
C (50
F ~ 104
F)
: 10% ~ 80%,
: -20
C ~ 45
C (-4
F ~ 113
F)
: 5% ~ 95%,
]
^TUGGGX^TUGGGX YWW^TXYTYWGGG㝘䟸GXa[_a\[YWW^TXYTYWGGG㝘䟸GXa[_a\[
, 16,1 / 35,4
1366 x 768 @ 60

1 RCA () (), 0,5 (-9 )
2 RCA () (), 0,5 (-9 )
3,5 , 0,5 (-9 )
: 80 ~ 15 ( -3 )
/: 80 ~ 20 ( -3 )
Plug & Play
Plug & Play .
.
,
.
- (TFT-LCD),
1 ppm ( ).
, , .
.
, - 3.133.440.
• " -7"
B (-
)
•
,
.
( B , A.)
, .
, .
,
. ,
. VESA DPM
, . ,
.
EPA/ENERGY 2000
.
,
160
1
(. )
1
(-
)
0 W
(-
)
EPA ENERGY STAR
®
ENERGY2000,
, VESA
DPM.
ENERGY STAR
®
,
SAMSUNG ,
,
ENERGY STAR
®
.
,
, . ,
^TUGGGY^TUGGGY YWW^TXYTYWGGG㝘䟸GXa[_a\^YWW^TXYTYWGGG㝘䟸GXa[_a\^

, , .
.
()
()
()
(H/V)
MAC, 640 x 480 35,000 66,667 30,240 -/-
MAC, 832 x 624 49,726 74,551 49,500 +/+
IBM, 640 x 350 31,469 70,086 25,175 +/-
IBM, 640 x 480 31,469 59,940 25,175 -/-
IBM, 720 x 400 31,469 70,087 28,322 -/+
VESA, 640 x 480 37,861 72,809 31,500 -/-
VESA, 640 x 480 37,500 75,000 31,500 -/-
VESA, 640 x 480 43,269 85,008 36,000 -/-
VESA, 800 x 600 35,156 56,250 36,000 +/+
VESA, 800 x 600 37,879 60,317 40,000 +/+
VESA, 800 x 600 48,077 72,188 50,000 +/+
VESA, 800 x600 46,875 75,000 49,500 +/+
VESA, 800 x600 53,674 85,000 56,250 +/+
VESA, 1024 x 768 48,363 60,004 65,000 -/-
VESA, 1024 x 768 56,476 70,069 75,000 -/-
VESA, 1024 x 768 60,023 75,029 78,750 +/+
VESA, 1024 x 768 68,677 85,997 94,500 +/+
VESA, 1360 x 768 47,712 60,000 85,500 +/+
,
,
,
. : .
,
,
.
, . : .
© 1995~2008 SAMSUNG. ALL Right Reserved
^TUGGGZ^TUGGGZ YWW^TXYTYWGGG㝘䟸GXa[_a\^YWW^TXYTYWGGG㝘䟸GXa[_a\^

,
.
( )
. ,
- (TFT-LCD) .
• : 1360 x 768
• Vertical frequency 60
- (TFT-LCD),
1 ppm ( ).
, ,
.
.
• , - 3.133.440.
.
-, .
.
,
"" ("auto adjustment function").
,
(FINE/COARSE ).
.
,
,
.
(
)
?
, -
.
. -
( 12 ),
, , .
, “” .
, .
, .
(
)
^
\\\\UGGGYX\\\\UGGGYX YWW^TXXTY`GGG㝘䟸GXYaW^aZWYWW^TXXTY`GGG㝘䟸GXYaW^aZW

,
z
4 20- .
z
2 12- .
z
.
z
, . -
.
•
30 , 2 .
z
.
, ..
.
( , ).
z
- : 30 .
^
\\\\UGGGYY\\\\UGGGYY YWW^TXXTY`GGG㝘䟸GXYaW^aZWYWW^TXXTY`GGG㝘䟸GXYaW^aZW

z
30 .
z
.
- : 60 4-
.
z
-
,
, .
.
Screen Scroll ( )
z
Screen Scroll ( )
- : .
-
. : -> Set Up () -> Safety Screen (
) -> Screen Scroll ( )
. : 1 - 10 (: 1)
. : 1 - 5 (: 5)
• (. -, .
.)
Screen Pixel ( )
z
Screen Pixel ( )
- : .
-
. :
˧
Set Up ()
˧
Safety Screen (
)
˧
Pixel ()
. : 1 - 10 (: 1)
. : 10 - 50 (: 50)
z
Screen Bar ( )
- :
.
^
\\\\UGGGYZ\\\\UGGGYZ YWW^TXXTY`GGG㝘䟸GXYaW^aZWYWW^TXXTY`GGG㝘䟸GXYaW^aZW

-
. : -> Set Up () -> Safety Screen (
) -> Bar ()
. : 1 - 10 (: 1)
. : 10 - 50 (: 50)
• (. -, .
.)
Screen Erasing ( )
z
Screen Erasing ( )
- : 2 , .
-
. : -> Set Up () -> Safety Screen (
) -> Eraser ( )
. : 1 - 10 (: 1)
. : 10 - 50 (: 50)
• (. -, .
.)
© 1995~2008 SAMSUNG. ALL Right Reserved
^
\\\\UGGGY[\\\\UGGGY[ YWW^TXXTY`GGG㝘䟸GXYaW^aZWYWW^TXXTY`GGG㝘䟸GXYaW^aZW

,
.
Appendix
SAMSUNG
• Samsung,
Samsung.
Appendix
SAMSUNG
^
\\\\UGGGY\\\\\UGGGY\ YWW^TXXTY`GGG㝘䟸GXYaW^aZWYWW^TXXTY`GGG㝘䟸GXYaW^aZW
North America
U.S.A
1-800-SAMSUNG(726-7864) http://www.samsung.com
CANADA
1-800-SAMSUNG(726-7864) http://www.samsung.com/ca
MEXICO
01-800-SAMSUNG(726-7864) http://www.samsung.com
Latin America
ARGENTINE
0800-333-3733 http://www.samsung.com/ar
BRAZIL
0800-124-421
4004-0000
http://www.samsung.com
CHILE
800-SAMSUNG(726-7864) http://www.samsung.com/cl
COLOMBIA
01-8000112112 http://www.samsung.com.co
COSTA RICA
0-800-507-7267 http://www.samsung.com/latin
ECUADOR
1-800-10-7267 http://www.samsung.com/latin
EL SALVADOR
800-6225 http://www.samsung.com/latin
GUATEMALA
1-800-299-0013 http://www.samsung.com/latin
JAMAICA
1-800-234-7267 http://www.samsung.com/latin
PANAMA
800-7267 http://www.samsung.com/latin
PUERTO RICO
1-800-682-3180 http://www.samsung.com/latin
REP. DOMINICA
1-800-751-2676 http://www.samsung.com/latin
TRINIDAD & TOBAGO
1-800-SAMSUNG(726-7864) http://www.samsung.com/latin
VENEZUELA
0-800-100-5303 http://www.samsung.com/latin
Europe
AUSTRIA
0800-SAMSUNG(726-7864) http://www.samsung.com/at
BELGIUM
0032 (0)2 201 24 18 http://www.samsung.com/be
NICARAGUA
00-1800-5077267
HONDURAS
800-7919267

^
\\\\UGGGY]\\\\UGGGY] YWW^TXXTY`GGG㝘䟸GXYaW^aZWYWW^TXXTY`GGG㝘䟸GXYaW^aZW
CZECH REPUBLIC
DENMARK
70 70 19 70 http://www.samsung.com/dk
FINLAND
030-6227 515 http://www.samsung.com/fi
FRANCE
3260 SAMSUNG
08 25 08 65 65 (€ 0,15/min)
http://www.samsung.com
GERMANY
01805-SAMSUNG(726-7864)
http://www.samsung.com
HUNGARY
06-80-SAMSUNG(726-7864) http://www.samsung.com
ITALIA
800-SAMSUNG(726-7864) http://www.samsung.com
LUXEMBURG
0035 (0)2 261 03 710 http://www.samsung.com/be
NETHERLANDS
0900-SAMSUNG(726-7864)
http://www.samsung.com/nl
NORWAY
815-56 480 http://www.samsung.com/no
POLAND
0 801 801 881
022-607-93-33
http://www.samsung.com/pl
PORTUGAL
80820-SAMSUNG(726-7864) http://www.samsung.com/pt
EIRE
0818 717 100 http://www.samsung.com/ie
SLOVAKIA
0800-SAMSUNG(726-7864) http://www.samsung.com/sk
SPAIN
902 10 11 30 http://www.samsung.com
SWEDEN
0771-400 200 http://www.samsung.com/se
SWITZERLAND
0800-SAMSUNG(726-7864) www.samsung.com/ch
U.K
0845 SAMSUNG(726-7864) http://www.samsung.com
CIS
ESTONIA
800-7267 http://www.samsung.ee
LATVIA
800-7267 http://www.samsung.com/lv
LITHUANIA
8-800-77777 http://www.samsung.lt
KAZAKHSTAN
8-10-800-500-55-500 http://www.samsung.kz
KYRGYZSTAN
00-800-500-55-500
RUSSIA
8-800-555-55-55 http://www.samsung.com
UKRAINE
8-800-502-0000 http://www.samsung.com
UZBEKISTAN
8-800-120-0-400 http://www.samsung.uz
Asia Pacific
AUSTRALIA
1300 362 603 http://www.samsung.com
CHINA
800-810-5858, 010- 6475 1880 http://www.samsung.com
HONG KONG
3698-4698 http://www.samsung.com/hk
INDIA
3030 8282, 1800 110011 http://www.samsung.com
INDONESIA
0800-112-8888 http://www.samsung.com
JAPAN
0120-327-527 http://www.samsung.com/jp
MALAYSIA
1800-88-9999 http://www.samsung.com/my
NEW ZEALAND
0800SAMSUNG(726-7864) http://www.samsung.com/nz
PHILIPPINES
1800-10-SAMSUNG(726-7864) http://www.samsung.com/ph
SINGAPORE
1800-SAMSUNG(726-7864) http://www.samsung.com
THAILAND
1800-29-3232, 02-689-3232 http://www.samsung.com
(€ 0,15/min)
(€ 0,14/min)
(€ 0,10/min)
TADJIKISTAN
8-10-800-500-55-500
844 000 844 http://www.samsung.com/cz

,
. .
.
.
() .
.
, . .
"". :
, ,
. ,
. , .
: .
: 60 , 60 .
, ,
.
. : .
-
-
, , ,
. - ,
. ,
.
Plug & Play ( )
.
VESA DDC Plug & Play ( ).
, ,
"". .
,
.
^
\\\\UGGGY^\\\\UGGGY^ YWW^TXXTY`GGG㝘䟸GXYaW^aZWYWW^TXXTY`GGG㝘䟸GXYaW^aZW
TAIWAN
0800-329-999 http://www.samsung.com/tw
VIETNAM
1 800 588 889 http://www.samsung.com
Middle East & Africa
SOUTH AFRICA
0860-SAMSUNG(726-7864 ) http://www.samsung.com
TURKEY
444 77 11 http://www.samsung.com
U.A.E
800-SAMSUNG (726-7864)
8000-4726
http://www.samsung.com

: 1360 X 768, ,
1360 ( ) 768
( ).
Multiple Display Control(MDC)
(Multiple Display Control; MDC)
, .
RS-232C.
, ,
.
© 2008 . . .
- Samsung Electronics Co.,
Ltd. .
Samsung Electronics Co., Ltd.
, ,
.
Samsung Samsung Electronics Co., Ltd.; Microsoft ,,
Windows Windows NT ;
VESA , DPM DDC
; ENERGY STAR
®
(EPA). ENERGY STAR
®
,
, ENERGY STAR
®
. , ,
.
zt{T[WXXTy__UGGG_Wzt{T[WXXTy__UGGG_W YWW^TXXTY_GGG㝘䟸GYa\]aY^YWW^TXXTY_GGG㝘䟸GYa\]aY^

6(6.%&/10+614
*XtDGHXVXDULR
l|[UGGGXl|[UGGGX YWW^TXXTY^GGG㝘䟸G[aYXaY_YWW^TXXTY^GGG㝘䟸G[aYXaY_

El aspecto externo y el color del producto pueden variar dependiendo del modelo; las especificaciones del
producto se pueden cambiar sin previo aviso para la mejora del rendimiento.
Instrucciones de seguridad
Simbología
Lea atentamente las siguientes instrucciones de seguridad que han sido creadas para prevenir daños al
producto y al usuario.
Advertencia / Precaución
Negligencia en el cumplimiento de las indicaciones señaladas por este símbolo podría ocasionar
daños físicos o perjuicios al equipo.
Símbolos convencionales
Prohibido Es importante leer y entender en todo momento
No desensambla
r
Desconectar la clavija del tomacorriente
No tocar Conectar a tierra para prevenir una descarga eléctrica
Encendido
Cuando no use el computador durante largos periodos de tiempo, ajústelo a DPM.
Si usa un protector de pantalla, póngalo al modo de pantalla activa.
La imágenes que se muestran son sólo de referencia y no se pueden aplicar en todos los casos (o países).
No use un enchufe estropeado o flojo.
z
Esto podría originar una descarga eléctrica o fuego.
No jale del cordón ni toque el tomacorriente con las manos
mojadas.
z
Esto podría causar una descarga eléctrica o fuego.
Instrucciones de seguridad
Simbología
Encendido
Instalación
Limpieza
Otros
Introducción
Conexiones
Uso del software
Ajuste del monitor
Resolución de problemas
Especificaciones
Information
Apéndice
X
zt{T[WXXTz__UGGGXzt{T[WXXTz__UGGGX YWW^TXXTY_GGG㝘䟸G\aXYaXWYWW^TXXTY_GGG㝘䟸G\aXYaXW

Use solamente conectores y receptáculos apropiados para hacer la
conexión a tierra.
z
Una conexión a tierra inapropiada podría causar una descarga eléctrica o
una avería en el equipo. (Sólo equipo de Clase l.)
Apriete firmemente el enchufe del cable de alimentación de manera
que no se afloje.
z
Una conexión incorrecta podría provocar un incendio.
No doble excesivamente el enchufe ni el cordón, tampoco coloque
objetos pesados sobre él, esto podría ocasionar daños.
z
El incumplimiento de esta recomendación podría causar una descarga
eléctrica o fuego.
No conecte muchas extensiones o enchufes a un tomacorriente.
z
Esto podría ocasionar fuego.
No desconecte el cable de alimentación mientras esté usando el
monitor.
z
Debido a la desconexión se puede producir un sobrevoltaje que dañe el
monitor.
No utilice el cable de alimentación si el conector o el enchufe están
sucios.
z
Si el conector o el enchufe están sucios, límpielos con un paño seco.
z
Si conecta el cable de alimentación con el conector o el enchufe sucios se
puede causar un cortocircuito o un incendio.
Para desconectar el aparato de la corriente, debe desenchufar el
cable de la toma principal, por lo que el enchufe principal debe estar
siempre fácilmente accesible.
z
El incumplimiento de esta recomendación podría causar una descarga
eléctrica o fuego.
Instalación
Póngase en contacto con un centro de servicio técnico autorizado cuando instale el monitor en un
lugar expuesto a gran cantidad de polvo, temperaturas extremas, alto nivel de humedad y
productos químicos, y en lugares donde el producto se vaya a utilizar las 24 del día, como
Y
zt{T[WXXTz__UGGGYzt{T[WXXTz__UGGGY YWW^TXXTY_GGG㝘䟸G\aXYaX`YWW^TXXTY_GGG㝘䟸G\aXYaX`

aeropuertos, estaciones, etc.
El incumplimiento de estas indicaciones puede causar serios desperfectos en el monitor.
Ponga el monitor en un lugar con poca humedad y un mínimo de
polvo.
z
Podría producirse un corto circuito o fuego en el interior del monitor.
No deje caer el monitor cuando lo mueva.
z
Esto podría causar daño al producto o al cuerpo humano.
Instale la base del monitor en una vitrina o un estante de tal manera
que la base no sobresalga.
z
Una caída del producto podría dañar éste o causar lesiones físicas.
No coloque el aparato en una superficie pequeña o inestable.
z
Coloque el aparato en una superficie lisa y estable, ya que el aparato
puede caer y producir lesiones a alguien que pase junto a él,
especialmente a los niños.
No deje el aparato en el suelo.
z
Una persona (especialmente un niño) podría tropezar con él.
PARA IMPEDIR QUE EL FUEGO SE PROPAGUE, MANTENGA LAS
VELAS U OTRAS LLAMAS EXPUESTAS SIEMPRE ALEJADAS DE
ESTE PRODUCTO.
z
Podría provocar un incendio.
Mantenga el cable de alimentación alejado de las fuentes de calor.
z
Un aislamiento fundido podría provocar un incendio o una descarga
eléctrica.
No instale el aparato en lugares mal ventilados, como por ejemplo
unas estanterías, un armario, etc.
z
Un aumento de la temperatura interna puede causar un incendio.
Z
zt{T[WXXTz__UGGGZzt{T[WXXTz__UGGGZ YWW^TXXTY_GGG㝘䟸G\aXYaX`YWW^TXXTY_GGG㝘䟸G\aXYaX`

Coloque el monitor cuidadosamente.
z
Podría dañarse o romperse.
No asiente el monitor sobre la pantalla.
z
Se podría dañar la superficie TFT-LCD.
La instalación de un soporte de pared debe hacerse por un
instalador profesional calificado.
z
La instalación por parte de personal incompetente puede dar lugar a
lesiones.
z
Use siempre el dispositivo de montaje especificado en el manual del
propietario.
Cuando instale el equipo, procure guardar una distancia de más de
10 cm desde la pared para facilitar la ventilación.
z
Una ventilación inadecuada puede causar un aumento de la temperatura
interna del producto que da como resultado que los componentes tengan
una vida útil más corta y el rendimiento sea menor.
Mantenga el embalaje de plástico (bolsa) lejos del alcance de los
niños.
z
Si juegan con el embalaje de plástico (bolsa) los niños pueden asfixiarse.
Limpieza
Cuando limpie la caja del monitor o la superficie del TFT-LCD, limpie con una tela suave,
ligeramente mojada.
No rocíe detergente directamente sobre el monitor.
z
Puede causar daños, una descarga eléctrica o un incendio.
Use el detergente recomendado con una tela suave.
[
zt{T[WXXTz__UGGG[zt{T[WXXTz__UGGG[ YWW^TXXTY_GGG㝘䟸G\aXYaX`YWW^TXXTY_GGG㝘䟸G\aXYaX`

Si el conector entre el enchufe y el pin está oxidado o sucio,
límpielo apropiadamente con una tela seca.
z
Un conector sucio puede causar una descarga eléctrica o fuego.
No olvide desenchufar el cable de alimentación antes de limpiar el
producto.
z
Podría provocar un incendio o una descarga eléctrica.
Desenchufe el cable de alimentación de la toma de corriente y
seque el aparato con un paño suave y seco.
z
No utilice ningún producto químico como cera, benzol, alcohol, disolventes,
insecticida, ambientador de aire, lubricante o detergente.
Otros
IMPORTANTE:
PARA PREVENIR CUALQUIER MAL FUNCIONAMIENTO Y EVITAR DAÑOS, LEA
DETALLADAMENTE ESTE MANUAL DE INSTRUCCIONES ANTES DE CONECTAR Y
OPERAR EL APARATO, CONSERVE EL MANUAL PARA FUTURAS REFERENCIAS,
GRACIAS. POR FAVOR LEA ESTE MANUAL ANTES DE OPERAR EL APARATO Y
GUÁRDELO PARA REFERENCIAS FUTURAS.
No retire la cubierta (o la tapa posterior).
z
Esto podría causar una descarga eléctrica o fuego.
z
Solicite la revisión al personal calificado de reparaciones y mantenimiento.
Si su monitor no funciona normalmente- en particular, si hay
algunos sonidos inusuales o sale algún olor del interior-
desconéctelo inmediatamente y contáctese con un centro de venta
autorizado o un centro de servicios.
z
Esto podría causar una descarga eléctrica o fuego.
Mantenga el aparato alejado de lugares expuestos a petróleo, humo
o humedad; no lo instale en el interior de un vehículo.
z
Esto podría causar un funcionamiento incorrecto, una descarga eléctrica o
fuego.
z
Evite especialmente la utilización del monitor cerca del agua o al aire libre
donde podría estar expuesto a la nieve o a la lluvia.
Si se cae el monitor o se daña la cubierta, apáguelo y desenchufe el
cordón de suministro eléctrico. A continuación, consulte al Centro
de Servicio.
z
El monitor puede funcionar incorrectamente, provocando una descarga
eléctrica o un fuego.
\
zt{T[WXXTz__UGGG\zt{T[WXXTz__UGGG\ YWW^TXXTY_GGG㝘䟸G\aXYaX`YWW^TXXTY_GGG㝘䟸G\aXYaX`

Mantenga la unidad apagada cuando haya truenos y relámpagos en
el exterior, y no permita que el monitor deje de utilizarse durante un
período de tiempo prolongado.
z
El monitor puede funcionar incorrectamente, provocando una descarga
eléctrica o un fuego.
No intente mover el monitor tirando solamente del cable o del cable
de señal.
z
Esto podría causar una avería, descarga eléctrica o fuego debido al daño
del cable.
No mueva el monitor a la izquierda o a la derecha jalando solamente
el cordón o el cable de señal.
z
Esto podría causar una avería, descarga eléctrica o fuego debido al daño
del cable.
No cubrir las rejillas de ventilación del gabinete del monitor.
z
Una mala ventilación podría causar averías o fuego.
No coloque objetos contenedores de agua, productos químicos o
pequeños objetos de metal sobre el monitor.
z
Esto podría causar un funcionamiento incorrecto, una descarga eléctrica o
fuego.
z
Si un cuerpo extraño entra en el monitor, desenchufe el cable de
alimentación y póngase en contacto con el Centro de Servicio.
Mantenga el aparato alejado de aerosoles químicos combustibles y
sustancias inflamables.
z
Esto podría causar una explosión o fuego.
Nunca meta algo metálico en las aberturas del monitor.
z
Esto podría causar una descarga eléctrica, fuego o lesiones.
No introduzca objetos de metal como la punta de un destornillador,
un cable o un taladro, ni objetos inflamables como papel o cerillas
en los orificios de ventilación, conectores de altavoces o puertos
]
zt{T[WXXTz__UGGG]zt{T[WXXTz__UGGG] YWW^TXXTY_GGG㝘䟸G\aXYaX`YWW^TXXTY_GGG㝘䟸G\aXYaX`

AV.
z
Podría provocar un incendio o una descarga eléctrica. Si se introducen
sustancias extrañas o se vierte agua en el aparato, apague éste,
desenchúfelo y póngase en contacto con un centro de servicio técnico.
Si el aparato muestra una imagen fija durante un largo período de
tiempo, puede quedar una imagen residual o cierta indefinición.
z
Establezca el modo de ahorro de energía o configure un protector de
pantalla con una imagen en movimiento, cuando sea necesario dejar
desatendido el monitor durante un largo período de tiempo.
Ajuste la resolución y la frecuencia a los niveles apropiados para el
modelo.
z
Los niveles inadecuados de resolución y de frecuencia pueden dañar la
vista del usuario.
32 pulgadas (80 cm) - 1360 X 768
Mirar el monitor continuamente desde una corta distancia puede
causar daños en la vista.
Para evitar la tensión del ojo, tome un descanso de al menos cinco
minutos después de cada hora de uso del monitor.
No instale el producto en una superficie inestable, desigual o que
pueda experimentar vibraciones.
z
Una caída del producto podría dañar éste o causar lesiones físicas. El uso
del producto en una ubicación que experimente vibraciones puede acortar
la vida útil del aparato o provocar un incendio.
Cuando quiera desplazar el monitor, apáguelo y desenchúfelo de la
toma de corriente. Cerciórese de que todos los cables, incluyendo
el cable de la antena y los cables de conexión con otros
dispositivos, estén desconectados antes de mover el monitor.
z
No desconectar correctamente un cable puede dañarlo y provocar un
incendio o una descarga eléctrica.
^
zt{T[WXXTz__UGGG^zt{T[WXXTz__UGGG^ YWW^TXXTY_GGG㝘䟸G\aXYaX`YWW^TXXTY_GGG㝘䟸G\aXYaX`

Coloque el aparato fuera del alcance de los niños ya que podrían
estropearlo si se suben encima.
z
La caída del aparato puede causar daños físicos o incluso la muerte.
Si no va a utilizar el producto durante un período de tiempo
prolongado, desenchufe el cable de alimentación.
z
Podría producir emisiones de calor por la acumulación de polvo o la
disminución del aislamiento que causaran descargas eléctricas o un
incendio.
No deposite los objetos favoritos de los niños (o cualquier otro
objeto que pueda resultarles atractivo) encima del aparato.
z
Los niños pueden intentar subirse al aparato para coger el objeto. El
aparato puede caer y causar lesiones físicas o incluso la muerte.
Cuando quite las pilas del mando a distancia, tenga cuidado de no
dejarlas al alcance de los niños, ya que podrían tragarlas. Mantenga
las pilas fuera del alcance de los niños.
z
En caso de intoxicación, consulte a un médico inmediatamente.
reemplazar las pilas, colóquelas en la polaridad correcta (+/-) según
lo indicado en el compartimiento de las pilas.
z
La polaridad incorrecta puede hacer que una pila se rompa o sufra un
derrame del líquido interior, con riesgo de incendio, lesiones, o
contaminación (daños).
Use sólo pilas estándar según lo especificado. No use pilas nuevas
y usadas juntas.
z
puede hacer que una pila se rompa o sufra un derrame del líquido interior,
con riesgo de incendio, lesiones, o contaminación (daños).
Traslade el aparato entre dos o más personas.
z
Una caída del aparato puede dañar éste o causar lesiones físicas.
_
zt{T[WXXTz__UGGG_zt{T[WXXTz__UGGG_ YWW^TXXTY_GGG㝘䟸G\aXYaX`YWW^TXXTY_GGG㝘䟸G\aXYaX`

municipal de reciclaje más próximo o a un establecimiento que venda el
mismo tipo de baterías o de baterías recargables.
© 1995~2008 SAMSUNG. ALL Rights Reserved
Las baterías (y las baterías recargables) no son residuos normales y
deben devolverse al lugar adecuado para su reciclaje. El usuario es
responsable de devolver las baterías usadas o recargables al lugar
adecuado para que se proceda a su reciclaje.
z
El usuario puede devolver las baterías usadas o recargables al centro
`
zt{T[WXXTz__UGGG`zt{T[WXXTz__UGGG` YWW^TXXTY_GGG㝘䟸G\aXYaX`YWW^TXXTY_GGG㝘䟸G\aXYaX`

Contenido
Instrucciones de seguridad .................................................................................... 1
Simbología .......................................................................................................... 1
Encendido ............................................................................................................... 1
Instalación .......................................................................................................... 2
Limpieza ................................................................................................................ 4
Otros ................................................................................................................. 5
Introducción .......................................................................................................... 12
Contenido del paquete ............................................................................................. 12
Su monitor ................................................................................................ 13
Disposición mecánica ............................................................................................. 20
Conexiones ........................................................................................................... 24
Instalación del kit del soporte .................................................................................... 24
Conexión del monitor .................................................................................. 25
MDC ........................................................................................................... 31
Ajuste del monitor ................................................................................... 51
Entrada ............................................................................................................... 51
Picture [PC / BNC /DVI Modo] ................................................................................ 52
Picture [AV / S-Video /Component / DVI-Video Modo].................................................. 54
Sonido ................................................................................................................ 56
Setup .............................................................................................................. 57
Control múltiple ..................................................................................................... 60
Características de Control Directo .............................................................................. 60
XW
jYUGGGXjYUGGGX YWW^TXYTY]GGG㝘䟸GXa\`aY]YWW^TXYTY]GGG㝘䟸GXa\`aY]

Resolución de problemas ..................................................................................... 62
Comprobación de las funciones de autoverificación .............................................................. 62
Lista de
chequeo
.................................................................................................... 63
Q & A ....................................................................................................................................... 65
Especificaciones .................................................................................................................. 67
Generales
............................................................................................................. 67
Ahorro de energía .................................................................................................. 68
Modos de temporización predefinidos ......................................................................... 68
Information ....................................................................................................... 70
Para Obtener una Mejor Presentación ........................................................................ 70
INFORMACIÓN de PRODUCTO (Libre de retención de imágenes) .................................. 70
Apéndice .............................................................................................................. 74
Contacte con SAMSUNG WORLDWIDE .................................................................... 74
Téminos ............................................................................................................... 76
Eliminación correcta ............................................................................................... 77
Autoridad ............................................................................................................ 77
XX
jYUGGGYjYUGGGY YWW^TXYTY]GGG㝘䟸GXa\`aZWYWW^TXYTY]GGG㝘䟸GXa\`aZW

El aspecto externo y el color del producto pueden variar dependiendo del modelo; las especificaciones del
producto se pueden cambiar sin previo aviso para la mejora del rendimiento.
Introducción
Contenido del paquete
Nota
• Compruebe que los siguientes elementos se incluyan con el monitor.
Si falta algún elemento, contáctese con su proveedor.
Póngase en contacto con un distribuidor local para adquirir los artículos adicionales.
Nota
• No deje el aparato en el suelo.
Monitor
Manual
Guía de usuario
Documento de garantía
(no esta disponible en todas las
localidades)
Guide de l’utilisateur,
logiciels MDC
Cable
Cable de señal Cordón eléctrico
Instrucciones de seguridad
Introducción
Contenido del paquete
Su monitor
Disposición mecánica
Conexiones
Uso del software
Ajuste del monitor
Resolución de problemas
Especificaciones
Information
Apéndice
XY
zt{T[WXXTz__UGGGXYzt{T[WXXTz__UGGGXY YWW^TXXTY_GGG㝘䟸G\aXYaX`YWW^TXXTY_GGG㝘䟸G\aXYaX`

Control remoto Baterías (AAA X 2) Cubierta-tapón
Conector adaptador BNC
a RCA.
Soporte temporal
Se vende por separado
Kit de montaje en la pared Juego de altavoces Kit del soporte
Cable DVI Cable BNC
Su monitor
Parte Delantera
1) MENU
Abre el menú OSD. También se usa para salir del menú OSD o volver al menú anterior.
2) Botón Arriba-Abajo
Mueve verticalmente desde un elemento de menú a otro o ajusta los valores del menú seleccionados.
XZ
zt{T[WXXTz__UGGGXZzt{T[WXXTz__UGGGXZ YWW^TXXTY_GGG㝘䟸G\aXYaX`YWW^TXXTY_GGG㝘䟸G\aXYaX`
Otros

3) Botón Izquierda-Derecha / Botón Volumen
Mueve horizontalmente desde un elemento de menú a otro o ajusta los valores del menú seleccionados.
También ajusta el volumen del audio.
4) ENTER
Botón Source (Fuente) Se usa para seleccionar el menú OSD.
5) SOURCE
Cambia desde modo de pantalla PC a modo de pantalla Video.
Cambiar la fuente se permite solamente para los dispositivos externos que están conectados con el
monitor en ese momento.
[PC]
˧
[BNC]
˧
[DVI]
˧
[AV]
˧
[S-Video]
˧
[Component]
>> Haga clic aquí para ver una secuencia de animación.
6) PIP
Pulse este botón para controlar la ventana PIP.
No se puede solapar más de un PIP en la pantalla, puesto que BNC y el componente utilizan el mismo
terminal.
>>Haga clic aquí para ver una secuencia de animación.
•
PC
A
V / S-Video / Component Modo
•
BNC
A
V / S-Video Modo
•
DVI
A
V / S-Video / Component Modo
•
AV / S-Video
PC / BNC / DVI Modo
•
Componente
PC / DVI Modo
7)
Energía
Use este botón para encender y apagar el monitor.
8) Indicador de encendido
Use este botón para encender y apagar el monitor.
9) Sensor de control remoto
Oriente el control remoto hacia esta zona del monitor.
Nota
•Vea Ahorrador de Energía, descrito en el manual, para mayor información en lo referente a las funciones
de ahorro de energía. Para ahorrar energía, apague el monitor cuando no lo necesite o cuando no lo use
por periodos largos de tiempo.
Parte Posterior
Nota
• Para más información referente a las Conexiónes de cable, véase Conexión de cables en Instalación. La
disposición trasera del monitor puede variar levemente dependiendo del modelo del monitor.
X[
zt{T[WXXTz__UGGGX[zt{T[WXXTz__UGGGX[ YWW^TXXTY_GGG㝘䟸G\aXYaYWYWW^TXXTY_GGG㝘䟸G\aXYaYW

1) RS232C OUT/IN (Puerto serie RS232C)
Puerto de programa de MDC (Multiple Display Control,
Control de dispositivos múltiples)
2) DVI / PC IN [RGB] (Terminal de conexión de
vídeo de PC)
Usando el D-SUB de 15 contactos - modo PC (PC
Analógico)
3) DVI / PC IN [DVI(HDCP)] (Terminal de conexión
de vídeo de PC)
Usando el DVI-D a DVI-D - modo DVI (PC digital)
4) DVI / PC IN [PC/DVI/BNC AUDIO IN] (Terminal de
connexion audio (entrée) PC/DVI/BNC)
5) COMPONENT AUDIO IN [L-AUDIO-R] (Terminal
de connexion audio (entrée) compuesta)
6) BNC/COMPONENT OUT [R/P
R
, G/Y, B/P
B
, H, V]
(Terminal de conexión de vídeo de BNC /
Terminal de conexión de señal compuesta
(salida))
Conexión BNC (PC Analógico): conexión del puerto R,
G, B, H, V
Conexión de señal compuesta: conexión del puerto P
R
,
Y, P
B
7) BNC/COMPONENT IN [R/P
R
, G/Y, B/P
B
, H, V]
(Terminal de conexión de vídeo de BNC /
Terminal de conexión de señal compuesta
(entrada))
8) AV AUDIO IN [L-AUDIO-R](Terminal de conexión
de audio compuesto) (entrada)
9) AV OUT [VIDEO] (Terminal de conexión de
Vídeo) : Modo de AV (salida)
10) AV IN [VIDEO] (Terminal de conexión de Vídeo)
(entrada)
X\
X\UGGGXX\UGGGX YWW^TXYTYWGGG㝘䟸GXa\ZaY\YWW^TXYTYWGGG㝘䟸GXa\ZaY\

11) AV OUT [S-VIDEO] (Terminal de conexión de S-
Vídeo) : Modo de S-Vídeo (salida)
12) AV IN [S-VIDEO](Terminal de conexión de S-
Vídeo) (entrada)
13) EXT SPEAKER(8 ) [- - L - +, - - R - +] (Terminal
de conexión de altavoz (8 ))
14) AUDIO OUT [L-AUDIO-R] (Terminal de conexión
de audio compuesto) (salida)
Salida del monitor: conexión de PC, DVI y BNC
15)
POWER SW ON [ | ] / OFF [O] (Botón de
alimentación on/off )
Encendido y apagado del monitor.
16) POWER IN (Toma de corriente)
Cable de alimentación, Conexiónes en el monitor y
enchufe de pared.
Nota
• El número de monitores que se pueden conectar con la salida del bucle puede variar según el cable, la
fuente de la señal, etc. Se pueden conectar diez monitores con un cable si no hay daños en éste ni en la
fuente de señal.
17) Bloqueo Kensington
El bloqueo Kensington es un dispositivo que se utiliza
para fijar físicamente el sistema cuando se utiliza en un
sitio público. (El dispositivo de bloqueo debe adquirirse
por separado.)
Si necesita información sobre el uso del dispositivo
de bloqueo, póngase en contacto con el
establecimiento donde lo haya adquirido.
Nota
• Vea Conexión del Monitor para mayor información en lo referente a las Conexiónes de cable.
Control remoto
Nota
• El funcionamiento del mando a distancia puede verse entorpecido por un televisor o algún otro dispositivo
electrónico utilizado cerca del monitor, provocando un funcionamiento incorrecto debido a las
interferencias con la frecuencia.
1. ON / OFF
2. MAGICNET
3. MDC
4. LOCK
5. Botón MagicNet
6.+100 -/--
7. VOL
8. MUTE
9. TTX/MIX
10. MENU
11. ENTER
12. P.MODE
13. AUTO
14. PRE-CH
X]
X\UGGGYX\UGGGY YWW^TXYTYWGGG㝘䟸GXa\ZaY`YWW^TXYTYWGGG㝘䟸GXa\ZaY`

15 . CH/P
16. SOURCE
17. INFO
18. EXIT
19. Arriba-abajo Izquierda-derecha
20. S.MODE
21. STILL
22. FM RADIO
23. P.SIZE
24. SRS
25. DUAL/MTS
26. PIP
27. SOURCE
28. SWAP
29. SIZE
30. REW
31. STOP
32. PLAY/PAUSE
33. FF
1) ON / OFF
Enciende y apaga el monitor.
2) MAGICNET
Botón de Inicio rápido de Magicnet.
- Esta función no está disponible para este monitor.
3) MDC
Botón de Inicio rápido de MDC.
4) LOCK
Este botón activará o desactivará todas las teclas de función tanto del mando a distancia como del monitor
excepto los botones de encendido y LOCK.
5) Botón MagicNet
Use estos botones para MagicNet.
- Esta función no está disponible para este monitor.
• Letras y números: use estos botones para escribir una dirección de Internet.
• DEL: utilícelo para retroceder.
• SYMBOL: utilícelo para escribir signos. (.O_-)
• ENTER: utilícelo para el comando intro.
6) +100 -/--
Púlselo para seleccionar los canales superiores al 100.
Por ejemplo, para seleccionar el canal 121 pulse “+100” y, a continuación, pulse “2” y “1”.
- Esta función no está disponible para este monitor.
7) - VOL +
También ajusta el volumen del audio.
8)
MUTE
Interrumpe (silencia) la salida de audio temporalmente.
Aparece en la esquina inferior izquierda de la pantalla.
El audio se reanuda si se pulsa el botón Silencio o El sonido vuelve si se pulsa Mute, + o – en el modo
Mute (Silencio).
9)
TTX/MIX
X^
X\UGGGZX\UGGGZ YWW^TXYTYWGGG㝘䟸GXa\ZaY`YWW^TXYTYWGGG㝘䟸GXa\ZaY`

Los canales de TV proporcionan servicios informativos escritos vía teletexto.
[TTX / MIX se utiliza principalmente en Europa. ]
10)
MENU
Abre el OSD y activa un elemento del menú resaltado.
11)
ENTER
Activa un elemento del menú resaltado.
12)
P.MODE
Cuando se pulsa este botón, el modo actual se visualiza en la parte inferior central de la pantalla.
AV / S-Video /Component Mode : P.MODE
El monitor tiene cuatro configuraciones automáticas de imagen que vienen predefinidas desde fábrica.
Pulse el botón otra vez para cambiar entre los modos configurados previamente disponibles. ( Dinámico
Normal Cine Favorito )
PC / DVI Mode : M/B ( MagicBright™ )
MagicBright™ es una función nueva que proporciona un entorno de visualización óptimo en función del
contenido de la imagen que está mirando.
Pulse el botón otra vez para cambiar entre los modos configurados previamente disponibles. ( Diversión
Internet Texto Favorito )
13) AUTO
Ajusta la visualización de la pantalla automáticamente. (PC)
14)
PRE-CH
Este botón se usa para volver al canal utilizado anteriormente.
- Esta función no está disponible para este monitor.
15)
CH/P
En el modo TV, selecciona los canales de TV.
- Esta función no está disponible para este monitor.
16)
SOURCE
Cambia desde modo de pantalla PC a modo de pantalla Video.
17)
INFO
La información actual de la imagen se visualiza en la esquina superior izquierda de la pantalla.
18)
EXIT
Sale de o cierra la pantalla del menú.
19) Botones Arriba-Abajo e Izquierda-Derecha
Mueve horizontalmente, verticalmente desde un elemento de menú a otro o ajusta los valores del menú
seleccionados.
20)
S.MODE
Cuando se pulsa este botón, el modo actual se visualiza en la parte inferior central de la pantalla.
Cuando pulse este botón, el modo de audio actual se muestra en la esquina inferior izquierda de la
pantalla.
Pulse el botón otra vez para cambiar entre los modos configurados previamente disponibles.
( Normal ˧ Música ˧ Cine ˧ Diálogo ˧ Favorito )
21) STILL
Pulse una vez el botón para congelar la pantalla. Púlselo otra vez para descongelar.
22) FM RADIO
Enciende o apaga FM Radio (Radio FM).
En el modo PC/DVI, sólo configura SOUND (SONIDO) como FM Radio (Radio FM).
En el modo general de Video SOURCE (FUENTE de vídeo), configura FM RADIO (RADIO FM), apagando
la pantalla.
En las zonas donde la señal es débil, puede haber ruido de fondo durante una emisión de FM.
- Esta función no está disponible para este monitor.
23) P.SIZE
Púlselo para cambiar el tamaño de pantalla.
24)
SRS
SRS
25)
DUAL/MTS
X_
X\UGGG[X\UGGG[ YWW^TXYTYWGGG㝘䟸GXa\ZaY`YWW^TXYTYWGGG㝘䟸GXa\ZaY`

- Esta función no está disponible para este monitor.
DUAL-
Utilice el botón DUAL en el mando a distancia para seleccionar Estéreo o Mono cuando el monitor está en
el modo TV.
MTS-
Puede seleccionar el modo MTS (Multichannel Television Stereo).
26)
PIP
Avance rápido
27)
SOURCE
MagicBright
28)
SWAP
Intercambio del Descripción de la imagen PIP y de la imagen principal.
La imagen de la ventana PIP aparecerá en la pantalla principal, y la imagen de la pantalla principal
aparecerá en la ventana PIP.
29)
SIZE
Drag
30)
REW
Rebobinar
31) STOP
Parar
32) PLAY / PAUSE
Reproducir/Pausa
33) FF
Avance rápido
© 1995~2008 SAMSUNG. ALL Rights Reserved
X`
X\UGGG\X\UGGG\ YWW^TXYTYWGGG㝘䟸GXa\ZaY`YWW^TXYTYWGGG㝘䟸GXa\ZaY`

Disposición mecánica | Monitor | Pie | Altavoz | Cómo instalar el soporte VESA | Instalación del soporte mural
1. Disposición mecánica
2. Monitor
YW
X\UGGG]X\UGGG] YWW^TXYTYWGGG㝘䟸GXa\ZaY`YWW^TXYTYWGGG㝘䟸GXa\ZaY`

3. Pie
4. Altavoz
5. Cómo instalar el soporte VESA
z
Cuando instale VESA, asegúrese de que cumpla con los estándares VESA internacionales.
z
Información para adquirir e instalar el soporte VESA: Póngase en contacto con el distribuidor de Samsung más
cercano para realizar el pedido. Una vez realizado el pedido, le visitarán técnicos especializados y le instalarán el
soporte.
z
Se necesitan al menos 2 personas para mover el monitor LCD.
z
Samsung no se hace responsable de ningún daño producido al producto ni de las lesiones personales producidas
por la instalación realizada directamente por el cliente.
YX
X\UGGG^X\UGGG^ YWW^TXYTYWGGG㝘䟸GXa\ZaY`YWW^TXYTYWGGG㝘䟸GXa\ZaY`

Dimensiones
Para fijar el soporte a la pared, utilice únicamente tornillos para metal de 6 mm de diámetro y de 8 a 12
mm de longitud.
6. Instalación del soporte mural
z
Para la instalación del soporte mural, póngase en contacto con un técnico.
z
Samsung Electronics no se hace responsable de los daños causados al producto o al usuario si la instalación la
ha efectuado el usuario.
z
Este producto está indicado para su instalación en paredes de cemento. Puede que este producto no quede bien
sujeto si se instala sobreyeso o madera.
Componentes(Opción)
Utilice sólo los componentes y accesorios entregados con el producto.
A
Soporte de
pared
B
Soporte de
aparato
C
Tornillo :
8EA
D
Tornillo :
3EA
E
Tornillo de
madera: 7EA
F
Anclaje:
7EA
G
Guía de
instalación
Cómo ensamblar el Soporte de montaje de pared
1.
1. Marque la ubicación del orificio en la pared.
2. Abra un orificio de 35 mm de profundidad en la ubicación marcada.
3. Fije los anclajes
F
en cada orificio de la pared.
4. Monte el soporte de pared
A
sobre la pared con tornillos de madera
E
después de acoplar los anclajes
F
en el soporte de pared.
Si el soporte no está firmemente fijado en la pared, el monitor
LCD puede caerse.
2.
1. Desconecte la alimentación y desenchufe. el cordón eléctrico de la toma de corriente.
2. Coloque hacia abajo el monitor sobre un paño suave o un almohadón sobre una mesa.
3. Acople el soporte del aparato
B
sobre la parte posterior del monitor y apriete los tornillos
C
.
YY
X\UGGG_X\UGGG_ YWW^TXYTYWGGG㝘䟸GXa\ZaY`YWW^TXYTYWGGG㝘䟸GXa\ZaY`

3.
1. Inserte los 3 Colgadores del soporte del aparato
B
en los surcos del soporte de pared
A
.
2. Fije el soporte del aparato
B
y el soporte de pared
A
con los tornillos
D
.
antes de instalar el aparato en la pared, conecte los cables al aparato.
YZ
X\UGGG`X\UGGG` YWW^TXYTYWGGG㝘䟸GXa\ZaY`YWW^TXYTYWGGG㝘䟸GXa\ZaY`

El aspecto externo y el color del producto pueden variar dependiendo del modelo; las especificaciones del
producto se pueden cambiar sin previo aviso para la mejora del rendimiento.
Conexiones
Instalación del kit del soporte
Nota
• Sólo se deben usar los pernos que se incluyen.
Pozor
Samsung Electronics no será responsable de los daños causados por la utilización de una base distinta de
las especificadas.
Instalación del Semi-soporte
Soporte
izquierdo
Soporte
derecho
Pozor
Ponga la etiqueta "CAUTION" hacia atrás.
1) Para proteger el orificio ubicado en la parte inferior del monitor, allí donde se acopla el soporte, se usa una
cubierta protectora. Asegúrese de quitar la "cubierta de protección" antes del acoplamiento del Semi-
Soporte o del Kit del soporte (vendido por separado) y de tapar el orificio usando la cubierta-tapón durante
el acoplamiento del it de montaje de pared.
2) Instalación de los soportes izquierdo y derecho respectivamente.
3) Ponga el soporte en el agujero situado en la parte inferior del monitor.
Inserte el tornillo en el agujero indicado y apriete. (M4 x L15)
Pozor
Instrucciones de seguridad
Introducción
Conexiones
Instalación del kit del
soporte
Conexión del monitor
Uso del software
Ajuste del monitor
Resolución de problemas
Especificaciones
Information
Apéndice
Y[
X\UGGGXWX\UGGGXW YWW^TXYTYWGGG㝘䟸GXa\ZaZWYWW^TXYTYWGGG㝘䟸GXa\ZaZW

Este soporte está diseñado específicamente para el ajuste del ángulo de la pantalla. La em presa no se hace
responsable de problema alguno derivado del uso de este soporte. No utilice nunca este soporte para
colocar otros objetos.
Instalación del kit del soporte (Vendido por separado)
1) Para proteger el orificio ubicado en la parte inferior del monitor, allí donde se acopla el soporte, se usa una
cubierta protectora. Asegúrese de quitar la "cubierta de protección" antes del acoplamiento del Semi-
Soporte o del Kit del soporte (vendido por separado) y de tapar el orificio usando la cubierta-tapón durante
el acoplamiento del it de montaje de pared.
2) Asegúrese de colocar las piezas en la dirección adecuada y en el sitio correcto. (M4 × 15)
3) Ponga el soporte en el agujero situado en la parte inferior del monitor.
4) Inserte el tornillo en el agujero indicado y apriete. (M4 × 15)
Conexión del monitor
En el caso de un cable de alimentación con conexión a tierra
Si se produce un fallo, la conexi ón a tierra puede provocar una descarga eléctrica. Antes de conectar
la alim entación de CA, debe asegurarse de que el cable de conexión a tierra esté instalado
correctamente. Asimismo, cuando vaya a desconectar el cable de conexión a tierra, no se olvide de
desactivar la alimentación de CA.
Nota
• Los dispositivos de entrada de audio y vídeo (AV) como DVD, VCR o Cámaras de vídeo, al igual que su
computadora, se pueden conectar con el monitor. Para más inform ación sobre cómo conectar los
dispositivos de entrada de audio y vídeo (AV), véase Controles de usuario en Ajuste del monitor.
Conexión con una computadora
Y\
X\UGGGXXX\UGGGXX YWW^TXYTYWGGG㝘䟸GXa\ZaZWYWW^TXYTYWGGG㝘䟸GXa\ZaZW

1) Conecte el cordón de suministro eléctrico del monitor a la toma de corriente de la parte trasera del monitor.
Active el interruptor de alimentación.
2) Hay 3 formas para conectar el D-sub al monitor.
Seleccione una de las siguientes:
2-1) Usando el conector D-sub (analógico) en la tarjeta de vídeo.
Conecte el cable D-sub al puerto RGB de 15 patillas de la parte posterior del monitor y al puerto
D-sub de 15 patillas del ordenador.
2-2) Usando el conector DVI (digital) en la tarjeta de vídeo.
Conecte el cable DVI al puerto DVI(HDCP) de la parte posterior del monitor y al puerto DVI del
ordenador.
2-3) Usando el conector BNC (anal ógico) en la tarjeta de vídeo.
Conecte el cable BNC al puerto BNC/COMPONENT IN - R, G, B, H, V en la parte posterior del
monitor y al puerto D-sub de 15 patillas del ordenador.
3) Conecte un cable aquí para recibir el sonido de la tarjeta de sonido de la computadora.
Nota
• Encienda la computadora y el monitor.
Nota
• El cable de DVI o de BNC es opcional.
Consulte a un centro de servicio local de Samsung Electronics para comprar los elementos opcionales.
Y]
X\UGGGXYX\UGGGXY YWW^TXYTYWGGG㝘䟸GXa\ZaZWYWW^TXYTYWGGG㝘䟸GXa\ZaZW

Conexión de un DVD digital
Nota
• Los dispositivos de entrada como el DVD digital están conectados al terminal de DVI IN del monitor
mediante el cable DVI.
• Después, inicie el DVD con un disco DVD insertado.
• Seleccione Digital mediante el botón SOURCE.
Nota
• El monitor dispone de terminales de conexión de DVI IN para conectar los dispositivos de entrada DVI
como un DVD digital.
Conexión a un VCR
1) Los dispositivos de audio y vídeo como los VCR o C ámaras de vídeo se conectan con el terminal AV IN
[VIDEO] o AV IN [S-VIDEO] del monitor usando el cable de S-VHS o de BNC.
2) Conecte los terminales Audio (L) (Audio (I))y Audio (R) (Audio (D)) del aparato de vídeo o de la
videocámara a los terminales AV AUDIO IN [L-AUDIO-R] del monitor mediante los cables de audio.
Nota
• Seleccione AV o S-Vídeo cuando esté conectado un VCR o una cámara de vídeo usando el botón Fuente
en la parte delantera del monitor.
• Seguidamente, inicia el VCR o la cámara de vídeo con una cinta.
Nota
• El cable de S-VHS o de BNC es opcional
Conexión con un reproductor DVD
Y^
X\UGGGXZX\UGGGXZ YWW^TXYTYWGGG㝘䟸GXa\ZaZWYWW^TXYTYWGGG㝘䟸GXa\ZaZW

1) Conectar el cableado de audio necesario entre los conectores COMPONENT AUDIO IN [L-AUDIO-R] en el
monitor y los conectores AUDIO OUT en el reproductor DVD.
2) Conectar un cable de vídeo entre los conectores BNC/COMPONENT IN - conexión del puerto P
R, Y, PB
en el monitor y los conectores P
R, Y, PB en el reproductor DVD.
Nota
• Seleccione Component cuando esté conectado un DVD usando el botón Fuente en la parte delantera del
monitor.
• Seguidamente, inicia el DVD con una cinta.
Nota
• El cable de Component es opcional
Para más información sobre vídeo de componente, consulte el manual de usuario del reproductor DVD.
Conexión con una cámara de vídeo
1) Localice los conectores de salida A/V en la cámara de vídeo. Suelen estar ubicados en un lateral o en la
part
e de atrás de la cámara de vídeo.
Conecte el cableado de audio necesario entre los conectores AUDIO OUTPUT en la cámara de vídeo y los
conectores AV AUDIO IN [L-AUDIO-R] en el monitor.
2) Conecte un cable de vídeo entre el conector VIDEO OUTPUT de la cámara de vídeo y el conector AV IN
[VIDEO] en el monitor.
Nota
• Seleccione AV cuando esté conectado una cámara de vídeo el botón Fuente en la parte delantera del
monitor.
• Seguidamente, inicia la cámara de vídeo con una cinta.
Nota
• Los cables de audio y vídeo que se muestran aquí suelen venir incluidos con la cámara de vídeo.
(Si no fuera así, consulte a la tienda de electrónica más cercana).
Si la cámara de vídeo fuera estéreo, sería necesario conectar dos cables.
Y_
X\UGGGX[X\UGGGX[ YWW^TXYTYWGGG㝘䟸GXa\ZaZWYWW^TXYTYWGGG㝘䟸GXa\ZaZW

Conexión de un decodificador de señal DTV
Nota
• Las conexiones habituales de un decodificador de señal se muestran a continuación.
1) Conecte un cable de vídeo entre los conectores BNC / COMPONENT IN - conexión del puerto PR, Y, PB
en el monitor y los conectores P
R, Y, PB en el decodificador digital.
2) Conecte el cableado de audio necesario entre los conectores COMPONENT AUDIO IN [L-AUDIO-R] en el
monitor y los conectores AUDIO OUT en el decodificador de señal.
Nota
• Seleccione Component cuando esté conectado un decodificador de señal DTV el botón Fuente en la
parte delantera del monitor.
Nota
• Para más información sobre v ídeo de componente, consulte el manual de usuario del decodificador digital.
Conexión de altavoces
Nota
• Acople el televisor y los altavoces usando los tornillos.
* Monte el altavoz sin el pie.
Y`
X\UGGGX\X\UGGGX\ YWW^TXYTYWGGG㝘䟸GXa\ZaZWYWW^TXYTYWGGG㝘䟸GXa\ZaZW

Nota
• Conecte el cable de conexión del altavoz entre el conector de altavoz en la parte posterior del televisor y el
conector de altavoz en la parte posterior del altavoz.
Nota
• No mueva el televisor que sostiene el altavoz cuando están conectados el televisor y el altavoz.
Se podr ía dañar el soporte de altavoz donde se conecta el altavoz del televisor.
Conexión a un equipo de audio
Nota
• Conecte un conjunto de cables de audio entre las tomas AUX L, R del AUDIO SYSTEM (SISTEMA DE
AUDIO) y las tom as AUDIO OUT [L-AUDIO-R] (SALIDA AUDIO [I-AUDIO-D]) del monitor.
© 1995~2008 SAMSUNG. ALL Rights Reserved
ZW
X\UGGGX]X\UGGGX] YWW^TXYTYWGGG㝘䟸GXa\ZaZWYWW^TXYTYWGGG㝘䟸GXa\ZaZW

Introducción
Un MDC (Multiple Display Control) (MDC, Multiple Display Control) es una aplicación que permite trabajar en un PC
con varias pantallas fácil y simultáneamente. RS-232C, un estándar de comunicación serial, se usa para la
comunicación entre un PC y una pantalla. Por tanto, es necesario conectar un cable serial entre el puerto serial del
PC y el puerto serial de cada pantalla.
Pantalla principal
Haga clic en Start > Program > Samsung > MDC System para inicial el programa.
Seleccione un juego para ver su volumen seleccionado con el control deslizante.
Z
zt{T[WXXTz__UGGGZZzt{T[WXXTz__UGGGZZ YWW^TXXTY_GGG㝘䟸G\aXYaYXYWW^TXXTY_GGG㝘䟸G\aXYaYX

Iconos principales Botón Select (seleccionar)
Remocon
Info Grid (Cuadrícula de
información)
Safety Lock Selección de pantalla
Port Selection Herramientas de control
1. Use los iconos principales para modificar en cada pantalla.
2. Permite que se active o se desactive la función de recepción de control remoto de la unidad de la pantalla.
3. Establece la función Lock (seguridad para niños)
4. La configuración para el puerto serie del PC puede cambiar. El valor original es COM1.
5. Haga clic en Seleccionar todo o Borrar para seleccionar o para borrar todas las pantallas.
6. Use Cuadrícula para ver cierta información sobre control de la pantalla seleccionada.
7. Seleccione una pantalla dentro de la sección Selección de pantalla.
8. Use Herramientas de control para controlar las pantallas.
<Nota> La función Activar/Desactivar del control remoto funciona esté o no activada la energía, y esto se aplica
a todas las pantallas activadas y conectadas con el MDC. Sin embargo, independientemente del estado
en el momento en que está apagado el MDC, la función de recepción de señal del control remoto de
todas las pantallas se inicializa con el estado Enable (activado) cuando se cierra el MDC.
Port Selection
Z
zt{T[WXXTz__UGGGZ[zt{T[WXXTz__UGGGZ[ YWW^TXXTY_GGG㝘䟸G\aXYaYXYWW^TXXTY_GGG㝘䟸G\aXYaYX

1. El Control de pantallas múltiples está configurado originalmente como COM1.
2. Si se utiliza cualquier puerto distinto de COM1, se puede seleccionar desde COM1 hasta COM4 en el menú de
Selección de puertos.
3. Si el nombre de puerto exacto que está conectado al monitor usando un cable serial no está seleccionado, la
comunicación no será posible.
4. Le port sélectionné est enregistré dans le programme et également utilisé pour le programme suivant.
Power Control
1. Haga clic en el icono Power Control (Control de energía), de entre los iconos principales, y aparecerá la pantalla
Power Control (Control de energía).
Z
zt{T[WXXTz__UGGGZ\zt{T[WXXTz__UGGGZ\ YWW^TXXTY_GGG㝘䟸G\aXYaYXYWW^TXXTY_GGG㝘䟸G\aXYaYX

Info Grid muestra información básica necesaria para gestionar Control de energía.
1) (Power Status (Estado de energía))
2) Input
3) Image Size
4) On Timer Status
5) Off Timer Status
2. Use el botón Select All (Seleccionar todo) o la casilla de verificación correspondiente para ajustar las propiedades de
pantalla.
Control de energía permite controlar algunas de las funciones de la pantalla seleccionada.
Z
zt{T[WXXTz__UGGGZ]zt{T[WXXTz__UGGGZ] YWW^TXXTY_GGG㝘䟸G\aXYaYXYWW^TXXTY_GGG㝘䟸G\aXYaYX

1) Power On/Off
- Activa o desactiva la energía de la pantalla seleccionada.
2) Volume
- Controla el nivel de volumen de la pantalla seleccionada.
Está definido con el valor del volumen de la pantalla seleccionada a partir de los juegos y lo muestra en la barra
de desplazamiento.
(Cuando se cancela la selección o se escoge Seleccionar todo, el valor toma la configuración predeterminada de
10)
3)
(Mute On/Off (Activar/desactivar silencio))
- Activa o desactiva el silencio de la pantalla seleccionada On / Off .
Cuando se selecciona un juego cada vez, si el juego seleccionado ya está definido como MUTE (Silencio), es
necesario marcar la pantalla MUTE.
(Si elige deshacer las selecciones o escoge Seleccionar todo, los valores vuelven a la configuración
predeterminada).
Control de energía se aplica a todas las pantallas.
Las funciones Volumen y Mute sólo están disponibles para pantallas cuyo estado de energía está ON
(activado).
Input Source
1. Haga clic en Input Source (Fuente de entrada), situada en los iconos principales, y aparecerá la pantalla de control
de fuente de entrada.
Haga clic en Select All (Seleccionar todo), o utilice la casilla de verificación, para seleccionar una pantalla con
intención de controlarla.
• TV Mode
• PC Mode
Z
zt{T[WXXTz__UGGGZ^zt{T[WXXTz__UGGGZ^ YWW^TXXTY_GGG㝘䟸G\aXYaYXYWW^TXXTY_GGG㝘䟸G\aXYaYX

Info Grid muestra información básica necesaria para controlar la fuente de entrada.
1) PC
- Cambia la fuente de entrada de la pantalla seleccionada a PC.
2) BNC
- Cambia la fuente de entrada de la pantalla seleccionada a BNC.
3) DVI
- Cambia la fuente de entrada de la pantalla seleccionada a DVI.
4) TV
- Cambia la fuente de entrada de la pantalla seleccionada a TV.
5) AV
- Cambia la fuente de entrada de la pantalla seleccionada a AV.
6) S-Video
- Cambia la fuente de entrada de la pantalla seleccionada a S-
V
ideo.
7) Component
- Cambia la fuente de entrada de la pantalla seleccionada a Component.
8) MagicNet
- La source d’entrée de MagicNet ne fonctionne que sur le modèle MagicNet.
9) Channel
- La flecha del canal aparece cuando la opción Input Source (Fuente de entrada) es TV.
La fuente TV se puede seleccionar sólo en productos con TV, y el control de los canales únicamente se
permite cuando la opción Input Source (Fuente de entrada) es TV.
El control de Fuente de entrada se aplica sólo está disponible para las pantallas para las cuales está
activado (ON) el estado de suministro eléctrico.
Image Size
PC, BNC, DVI
1. Haga clic en Tamaño de imagen, situado en los iconos principales, y aparecerá la pantalla de control de Tamaño de
imagen.
Z
zt{T[WXXTz__UGGGZ_zt{T[WXXTz__UGGGZ_ YWW^TXXTY_GGG㝘䟸G\aXYaYXYWW^TXXTY_GGG㝘䟸G\aXYaYX

Info Grid (Cuadrícula de información) muestra cierta información básica necesaria para entender el control Tamaño
de imagen.
1)
(Power Status (Estado de energía))
- Muestra el estado de energía de la pantalla seleccionada.
2) Image Size
- Muestra el tamaño de imagen actual de la pantalla seleccionada.
3) Input
- Muestra la fuente actual de entrada de la pantalla utilizada.
4) Info Grid (Cuadrícula de información) sólo muestra las pantallas cuya Fuente de entrada es PC,BNC,DVI .
5) PC Source - Cuando haga clic en Tamaño de imagen, aparecen primero las fichas PC, BNC, DVI.
- El botón Control de Tamaño de imagen controla el Tamaño de imagen disponible para PC,BNC,DVI.
6) Video Source
- Haga clic en la ficha AV, S-VIDEO, Componente para controlar el Tamaño de imagen para la Fuente de entrada
respectiva.
La source d’entrée de MagicNet ne fonctionne que sur le modèle MagicNet.
El control Tamaño de imagen sólo está disponible para las pantallas para las cuales está activado (ON)
el estado de suministro eléctrico.
Image Size
TV, AV, S-Video, Component, DVI(HDCP)
1. Haga clic en Tamaño de imagen, situado en los iconos principales, y aparecerá la pantalla de control de Tamaño de
imagen.
Z
zt{T[WXXTz__UGGGZ`zt{T[WXXTz__UGGGZ` YWW^TXXTY_GGG㝘䟸G\aXYaYXYWW^TXXTY_GGG㝘䟸G\aXYaYX

Info Grid (Cuadrícula de información) muestra cierta información básica necesaria para entender el control Tamaño
de imagen.
1) Haga clic en la pestaña (Fuente de vídeo) para ajustar el tamaño de la imagen para TV, AV, S-vídeo, componentes.
Haga clic en Select All (Seleccionar todo), o utilice la casilla de verificación, para seleccionar una pantalla con
intención de controlarla.
2) Info Grid (Cuadrícula de información) sólo muestra la pantalla que tiene TV, AV, S-VIDEO, Componente como fuente
de entrada.
3) Cambia aleatoriamente el tamaño de imagen de la pantalla seleccionada.
Nota: Auto Wide (Ancho automático), Zoom1 (Zoom1) y Zoom2 (Zoom2) no se pueden seleccionar
cuando el tipo de señal de entrada para componentes y DVI (HDCP) es 720p o 1080i
La source d’entrée de MagicNet ne fonctionne que sur le modèle MagicNet.
El control Tamaño de imagen sólo está disponible para las pantallas para las cuales está activado (ON)
el estado de suministro eléctrico.
Time
1. Haga clic en Time (hora) , entre los iconos principales, y aparecerá la pantalla Control de Time (hora).
zt{T[WXXTz__UGGG[Wzt{T[WXXTz__UGGG[W YWW^TXXTY_GGG㝘䟸G\aXYaYXYWW^TXXTY_GGG㝘䟸G\aXYaYX

Info Grid muestra información básica de Time (hora).
1) Current Time
- Seleccione la hora actual para la pantalla seleccionada PC Time (hora del PC)
- Para cambiar la hora actual, cambie primero PC Time (hora del PC).
2) On Time Setup
- Define la hora, el minuto, y el valor de AM/PM para On Timer (Temporizador activado) de la pantalla seleccionada.
3) Off Time Setup
-
Define la hora, el minuto, y el valor de AM/PM para Off Timer Setup (Configuración de hora desactivada) de la
pantalla seleccionada.
4) Muestra la configuración de On Timer (Temporizador activado).
5) Muestra la configuración de Off Timer (Temporizador desactivado).
La source d’entrée de MagicNet ne fonctionne que sur le modèle MagicNet.
Control de Time (hora) está disponible sólo para las pantallas cuyo estado de energía está ON
(activado).
En On Time Setup (Configuración de hora de apagado), las funciones TV Source (Fuente de TV) sólo en
los modelos con TV.
PIP
PIP Size
1. Haga clic en PIP, entre los iconos principales, y aparecerá la pantalla Control PIP.
Haga clic en Select All (Seleccionar todo), o utilice la casilla de verificación, para seleccionar una pantalla con
intención de controlarla.
zt{T[WXXTz__UGGG[Xzt{T[WXXTz__UGGG[X YWW^TXXTY_GGG㝘䟸G\aXYaYXYWW^TXXTY_GGG㝘䟸G\aXYaYX

Info Grid (Cuadrícula de información) muestra cierta información básica necesaria para entender el control Tamaño
PIP.
1) PIP Size
- Muestra el Tamaño PIP actual de la pantalla utilizada.
2) OFF
- Desactiva el modo PIP de la pantalla seleccionada.
3) Large
- Activa el modo PIP de la pantalla seleccionada y cambia el tamaño a Large.
4) Small
- Activa el modo PIP de la pantalla seleccionada y cambia el tamaño a Small.
5) Double1
- Activa el modo PIP de la pantalla seleccionada y cambia el tamaño a Double 1.
6) Double 2
- Activa el modo PIP de la pantalla seleccionada y cambia el tamaño a Double 2.
7) Double3 (Picture By Picture)
- Activa el modo PIP de la pantalla seleccionada y cambia el tamaño a Double 3.
La source d’entrée de MagicNet ne fonctionne que sur le modèle MagicNet.
El Tamaño PIP se puede controlar cuando se enciende el monitor.
PIP
PIP Source
1. Haga clic en PIP, entre los iconos principales, y aparecerá la pantalla Control PIP.
• PIP TV Mode
[
zt{T[WXXTz__UGGG[Yzt{T[WXXTz__UGGG[Y YWW^TXXTY_GGG㝘䟸G\aXYaYXYWW^TXXTY_GGG㝘䟸G\aXYaYX

• PIP S-Video Mode
Info Grid (Cuadrícula de información) muestra cierta información básica necesaria para entender el control Fuente
PIP.
1) PIP Source
- La Fuente PIP se puede controlar cuando se enciende el monitor.
2) PC
- Cambia la Fuente PIP de la pantalla seleccionada a PC.
3) BNC
- Cambia la Fuente PIP de la pantalla seleccionada a BNC.
4) DVI
- Cambia la Fuente PIP de la pantalla seleccionada a DVI.
5)
TV
[
zt{T[WXXTz__UGGG[Zzt{T[WXXTz__UGGG[Z YWW^TXXTY_GGG㝘䟸G\aXYaYXYWW^TXXTY_GGG㝘䟸G\aXYaYX

- Cambia la Fuente PIP de la pantalla seleccionada a TV.
6) AV
- Cambia la Fuente PIP de la pantalla seleccionada a AV.
7) S-Video
- Cambia la Fuente PIP de la pantalla seleccionada a S-Video.
8) Component
- Cambia la Fuente PIP de la pantalla seleccionada a Component.
9) Channel
- La flecha del canal aparece cuando la opción PIP Source (Fuente PIP) es TV.
Nota: Algunas de las fuentes PIP pueden no estar disponibles dependiendo del tipo de fuente de
entrada de la pantalla principal.
La source d’entrée de MagicNet ne fonctionne que sur le modèle MagicNet.
La fuente TV se puede seleccionar sólo en productos con TV, y el control de los canales únicamente se
permite cuando la opción PIP Source (Fuente PIP) es TV.
La función de Control PIP sólo está disponible para las pantallas donde el estado de la energía sea
activado (ON) y la función PIP esté configurada como ON.
Settings
Picture
1. Haga clic en Configuración , entre los iconos principales, y aparecerá la pantalla Control Brightness (Brillo).
Info Grid muestra información básica necesaria para Settings Control. Cuando se selecciona cada función, el valor
definido de la función seleccionada se muestra en la diapositiva.
Cuando Select All (Seleccionar todo) está seleccionado, vuelve el valor predeterminado de (50).
El cambio de un valor en esta pantalla cambia automáticamente el modo a "CUSTOM".
1) Picture
- Disponible sólo para TV, AV, S-Video, Component, DVI(HDCP).
2) Contrast
- Ajusta el contraste de la pantalla seleccionada.
3) Brightness
- Ajusta la luminosidad de la pantalla seleccionada.
4) Sharpness
- Ajusta la nitidez de la pantalla seleccionada.
5) Color
- Ajusta el color de la pantalla seleccionada.
6)
Tint
[
zt{T[WXXTz__UGGG[[zt{T[WXXTz__UGGG[[ YWW^TXXTY_GGG㝘䟸G\aXYaYXYWW^TXXTY_GGG㝘䟸G\aXYaYX

- Ajusta el matiz de la pantalla seleccionada.
7) Color Tone
- Ajusta el tono de color para la pantalla seleccionada.
La source d’entrée de MagicNet ne fonctionne que sur le modèle MagicNet.
Cette fonction est disponible uniquement pour les affichages dont l’alimentation est active.
Settings
Picture PC
1. Haga clic en Configuración , entre los iconos principales, y aparecerá la pantalla Control Brightness (Brillo).
Info Grid muestra información básica necesaria para Settings Control. Cuando se selecciona cada función, el valor
definido de la función seleccionada se muestra en la diapositiva.
Cuando Select All (Seleccionar todo) está seleccionado, vuelve el valor predeterminado (50).
El cambio de un valor en esta pantalla cambia automáticamente el modo a "CUSTOM".
1) Picture PC
- Disponible sólo para PC, BNC, DVI.
2) Contrast
- Ajusta el contraste de la pantalla seleccionada.
3) Brightness
- Ajusta la luminosidad de la pantalla seleccionada.
4) Red
- Ajusta la Temperatura del color de la pantalla seleccionada.
5) Green
- Ajusta la Temperatura del color de la pantalla seleccionada.
6) Blue
- Ajusta la Temperatura del color de la pantalla seleccionada.
La source d’entrée de MagicNet ne fonctionne que sur le modèle MagicNet.
Cette fonction est disponible uniquement pour les affichages dont l’alimentation est active.
Settings
[
zt{T[WXXTz__UGGG[\zt{T[WXXTz__UGGG[\ YWW^TXXTY_GGG㝘䟸G\aXYaYXYWW^TXXTY_GGG㝘䟸G\aXYaYX

Audio
1. Haga clic en Configuración , entre los iconos principales, y aparecerá la pantalla Control Brightness (Brillo).
Info Grid muestra información básica necesaria para Settings Control. Cuando se selecciona cada función, el valor
definido de la función seleccionada se muestra en la diapositiva.
Cuando Select All (Seleccionar todo) está seleccionado, vuelve el valor predeterminado de (50).
El cambio de un valor en esta pantalla cambia automáticamente el modo a "CUSTOM".
1) Audio
- Controla la configuración de audio para todas las fuentes de entrada.
2) Bass
- Ajusta los graves de la pantalla seleccionada.
3) Treble
- Ajusta los agudos de la pantalla seleccionada.
4) Balance
- Ajusta el balance de la pantalla seleccionada.
5)
SRS TSXT
- Encendido y apagado de Sonido SRS TSXT.
6) Sound Select
- Puede seleccionar Main (Principal) o Sub (Secundario) cuando PIP esté activado.
La source d’entrée de MagicNet ne fonctionne que sur le modèle MagicNet.
Cette fonction est disponible uniquement pour les affichages dont l’alimentation est active.
Settings
Image Lock
1. Haga clic en Configuración , entre los iconos principales, y aparecerá la pantalla Control Brightness (Brillo).
[
zt{T[WXXTz__UGGG[]zt{T[WXXTz__UGGG[] YWW^TXXTY_GGG㝘䟸G\aXYaYYYWW^TXXTY_GGG㝘䟸G\aXYaYY

Info Grid muestra información básica necesaria para Settings Control.
1) Image Lock
- Disponible sólo para PC, BNC.
2) Coarse
- Ajusta la fase de la pantalla Coarse.
3) Fine
- Ajusta la fase de la pantalla Fine.
4) Position
- Ajusta la posición de la pantalla seleccionada.
5) Auto Adjustment
- Púlselo para que se ajuste automáticamente a la señal proveniente del PC.
La source d’entrée de MagicNet ne fonctionne que sur le modèle MagicNet.
Control Brightness (Brillo) está disponible sólo para las pantallas cuyo estado de energía está ON
(activado).
Maintenance
Lamp Control
1. Haga clic en el icono "Maintenance (Mantenimiento)" en la columna Main Icon (Icono principal) para mostrar la
pantalla de mantenimiento.
[
zt{T[WXXTz__UGGG[^zt{T[WXXTz__UGGG[^ YWW^TXXTY_GGG㝘䟸G\aXYaYYYWW^TXXTY_GGG㝘䟸G\aXYaYY

Aparece una cuadrícula de información "Info Grid" mostrando varios elementos básicos de datos.
1) Maintenance
- Permite la función Maintenance Control (Control de mantenimiento) para todas las fuentes de entrada.
2) Auto Lamp Control
- Ajusta automáticamente la luz posterior de la pantalla seleccionada a una hora especificada.
El Manual Lamp Control (Control de lámpara manual) se desactiva automáticamente cuando el ajuste se realiza
con Auto Lamp Control (Control de lámpara automático).
3) Manual Lamp Control
- Le permite ajustar la luz posterior de la pantalla seleccionada sin importar la hora.
La función de Control de lámpara automático se desactiva automáticamente si se ajusta usando la función Control
de lámpara manual.
La función de Control del mantenimiento sólo está disponible para las pantallas para las cuales está
activado (ON) el estado de suministro eléctrico.
La source d’entrée de MagicNet ne fonctionne que sur le modèle MagicNet.
Maintenance
Scroll
1. Haga clic en el icono "Maintenance (Mantenimiento)" en la columna Main Icon (Icono principal) para mostrar la
pantalla de mantenimiento.
[
zt{T[WXXTz__UGGG[_zt{T[WXXTz__UGGG[_ YWW^TXXTY_GGG㝘䟸G\aXYaYYYWW^TXXTY_GGG㝘䟸G\aXYaYY

1) Safety Screen
- Elimina las imágenes residuales que pueden producirse cuando la pantalla seleccionada está en modo de pausa
durante un período de tiempo prolongado. Puede usar el temporizador del ciclo de repeticiones seleccionando el
periodo "Interval" por hora y las veces "Second" por segundo.
Screen Type (Tipo de pantalla) se puede configurar como Scroll (Desplazamiento), Pixel (Píxel), Bar (Barra) o
Eraser (Borrador).
La source d’entrée de MagicNet ne fonctionne que sur le modèle MagicNet.
Configuración de los segundos: el tipo de desplazamiento se puede configurar como 1, 2, 3, 4, 5 y el
tipo de píxel, barra y borrador como 10, 20, 30, 40, 50.
La función de Control del mantenimiento sólo está disponible para las pantallas para las cuales está
activado (ON) el estado de suministro eléctrico.
Maintenance
Video Wall
1. Haga clic en el icono "Maintenance (Mantenimiento)" en la columna Main Icon (Icono principal) para mostrar la
pantalla de mantenimiento.
[
zt{T[WXXTz__UGGG[`zt{T[WXXTz__UGGG[` YWW^TXXTY_GGG㝘䟸G\aXYaYYYWW^TXXTY_GGG㝘䟸G\aXYaYY

1) Video Wall
- Un vídeo mural es un conjunto de pantallas de vídeo conectadas entre sí, de manera que cada una puede mostrar
una parte de la imagen completa o la misma imagen repetida en cada pantalla.
2) Video Wall (Screen divider)
- Se puede dividir la pantalla en otras varias.
Puede seleccionar varias pantallas con una distribución diferente al dividirlas.
z Seleccione un modo en el Divisor de pantalla.
z Seleccione una pantalla en la Display Selection (Selección de pantalla).
z
La ubicación se configurará pulsando un número en el modo seleccionado.
z
El programa MDC suministrado por Samsung admite hasta 4x4 pantallas LCD.
z
2*2
z 3*3
z 4*4
z 1*2
z
2*1
z
1*5
z
5*1
3)
On / Off
zt{T[WXXTz__UGGG\Wzt{T[WXXTz__UGGG\W YWW^TXXTY_GGG㝘䟸G\aXYaYYYWW^TXXTY_GGG㝘䟸G\aXYaYY

- Enciende o apaga la función Video Wall (Vídeo mural) en la pantalla seleccionada.
4) Format
- Se puede seleccionar el formato para ver una pantalla dividida.
z
Full
z Natural
La source d'entrée de MagicNet ne fonctionne que sur le modèle MagicNet.
La función de Control del mantenimiento sólo está disponible para las pantallas para las cuales está
activado (ON) el estado de suministro eléctrico.
Solución de problemas
1. La pantalla que desea controlar no aparece en la cuadrícula de información de control de energía.
- Compruebe la conexión de RS232C. (Compruebe que esté conectada correctamente con el puerto Com1)
- Compruebe las pantallas por si alguna de las otras tiene el mismo ID. Si hay más de una pantalla con el mismo ID,
el programa no puede detectarlas correctamente debido a un conflicto de datos.
- Compruebe si el ID de juego de pantalla es un número entre 0 y 16. (ajústelo con el menú Pantalla)
Nota: Un ID de juego de pantalla debe tener un valor de entre 0 y 16, Si el valor está fuera del intervalo, el
Sistema MDC (Multiple Display Control, MDC (Multiple Display Control)) no puede controlar la pantalla.
2. La pantalla que se desea controlar no aparece en el resto de cuadrículas de información de control.
-
Compruebe que la pantalla seleccionada esté activada (ON). (Puede comprobarlo en Cuadrícula de información de
control Energía)
- Compruebe si se puede cambiar la fuente de entrada de la pantalla.
3. El cuadro de diálogo aparece en varias ocasiones.
- Compruebe si la pantalla que desea controlar está seleccionada.
4. Se ha configurado On Timer (Temporizador activado) y Off Timer (Temporizador desactivado) pero muestran una
hora diferente.
- Aplique la hora actual para sincronizar los relojes de la pantalla.
5. La función remota no funcionará correctamente cuando se desactiva la misma, se desconecta el cable RS-232C, o se
sale del programa de forma irregular. Vuelva a ejecutar el programa y active de nuevo la función remota para volver
al funcionamiento normal.
<Nota> Este programa puede funcionar incorrectamente debido a problemas en los circuitos de la comunicacióno
interferencias de aparatos electrónicos cercanos.
Pantalla Settings Value (Valor de configuración) en Modo Multiple
Display (Pantallas múltiples)
Cuando hay más de una pantalla conectada, los valores de la configuración se muestran de esta manera.
zt{T[WXXTz__UGGG\Xzt{T[WXXTz__UGGG\X YWW^TXXTY_GGG㝘䟸G\aXYaYYYWW^TXXTY_GGG㝘䟸G\aXYaYY

1. No hay selección: Muestra el valor predeterminado de fábrica.
2. Una pantalla seleccionada: Obtiene y muestra el valor de configuración para la pantalla seleccionada.
3. Seleccionada una pantalla (ID1 ) y se añade otra pantalla (ID3): el programa, que mostraba el valor de configuración
de ID 1, obtiene y muestra el valor de ID3.
4. Seleccionados todos los juegos usando Select All (Seleccionar todo): devuelve el valor predeterminado de fábrica.
\
zt{T[WXXTz__UGGG\Yzt{T[WXXTz__UGGG\Y YWW^TXXTY_GGG㝘䟸G\aXYaYYYWW^TXXTY_GGG㝘䟸G\aXYaYY

El aspecto externo y el color del producto pueden variar dependiendo del modelo; las especificaciones del
producto se pueden cambiar sin previo aviso para la mejora del rendimiento.
Ajuste del monitor
Entrada
Modos disponibles
PC / BNC / DVI
AV
S-Vídeo
Componente
DVI-Video
Fuentes
[MENU]
˧
[ENTER]
˧
[ENTER]
˧
[
/
]
˧
[ENTER]
Activa el indicador para reflejar la señal de entrada que se muestra actualmente.
1) PC
2) BNC
3) DVI
4) AV
5) S-Vídeo
6) Componente
[El botón directo en el mando a distancia es el botón 'SOURCE'.]
Nota
• El PIP se apaga si el monitor se conecta a una fuente externa.
PIP
Cuando los dispositivos externos de A/V (audio y video), tales como VCR o DVD, están conectados con el
monitor, PIP permite ver el vídeo de dichos dispositivos en una ventana pequeña superpuesta sobre la señal
de video del PC. ( Des.
Nota
• ( Act.) No se puede solapar más de un PIP en la pantalla, puesto que BNC y el componente utilizan el
mismo terminal.
1) PIP
[MENU]
˧
[ENTER]
˧
[
/
]
˧
[ENTER]
˧
[ENTER]
˧
[
/
]
˧
[ENTER]
Act. Activa o desactiva la pantalla PIP
- Des.
- Act.
[El botón directo en el mando a distancia es el botón 'PIP'.]
2) Source (Fuente)
[MENU]
˧
[ENTER]
˧
[
/
]
˧
[ENTER]
˧
[
/
]
˧
[ENTER]
˧
[
/
]
˧
[ENTER]
Selecciona la fuente de entrada para el modo PIP.
- PC : AV / S-Video / Componente Modo
- BNC: AV / S-Video Modo
- DVI: AV / S-Video / Componente Modo
- AV / S-Video: PC / BNC / DVI Modo
- Componente: PC / DVI Modo
Instrucciones de seguridad
Introducción
Conexiones
Uso del software
Ajuste del monitor
Entrada
Picture
[PC / BNC /DVI Modo]
Picture
[AV / S-Video /
Component / DVI-Video
Modo]
Sonido
Setup
Control múltiple
Características de Control
Directo
Resolución de problemas
Especificaciones
Information
Apéndice
\
W\UGGGXW\UGGGX YWW^TXYTW]GGG㝘㤸G`a\`aX[YWW^TXYTW]GGG㝘㤸G`a\`aX[

[El botón directo en el mando a distancia es el botón 'SOURCE'.]
3) Fuente
[MENU]
˧
[ENTER]
˧
[
/
]
˧
[ENTER]
˧
[
/
]
˧
[ENTER]
Intercambio del Descripción de la imagen PIP y de la imagen principal.
La imagen de la ventana PIP aparecerá en la pantalla principal, y la imagen de la pantalla principal
aparecerá en la ventana PIP.
[El botón directo en el mando a distancia es el botón 'SWAP'. ]
4) Tamaño
[MENU]
˧
[ENTER]
˧
[
/
]
˧
[ENTER]
˧
[
/
]
˧
[ENTER]
˧
[
/
]
˧
[ENTER]
Permite que el usuario desactive o ajuste al tamaño de la Pantalla PIP.
[El botón directo en el mando a distancia es el botón 'SIZE'. ]
5) Posición
[MENU]
˧
[ENTER]
˧
[
/
]
˧
[ENTER]
˧
[
/
]
˧
[ENTER]
˧
[
/
]
˧
[ENTER]
Cambia la posición de la ventana PIP.
6) Transparenc.
[MENU]
˧
[ENTER]
˧
[
/
]
˧
[ENTER]
˧
[
/
]
˧
[ENTER]
˧
[
/
]
˧
[ENTER]
A
justa la transparencia de las ventanas PIP.
- Alto
- Medio
- Bajo
- Opaco
Nota
•
Si se selecciona , , en Tamaño, Posición y Transparencia no se desactivará.
Modos disponibles : PIP
Editar nombre
[MENU]
˧
[ENTER]
˧
[
/
]
˧
[ENTER]
˧
[
/
]
˧
[ENTER]
˧
[
/
]
˧
[ENTER]
Da nombre al dispositivo de entrada de información conectado con los conectores de entrada para hacer la
selección de fuente de entrada más fácil.
1) PC
2) BNC
3) DVI
4) AV
5) S-Vídeo
6) Componente
Picture [PC / BNC /DVI Modo]
Modos disponibles
PC / BNC / DVI
AV
S-Vídeo
Componente
DVI-Video
MagicBright™
[MENU]
˧
[
/
]
˧
[ENTER]
˧
[ENTER]
˧
[
/
]
˧
[ENTER]
MagicBright™ es una nueva función que proporciona un entorno de visualización óptimo, de acuerdo con el
contenido de la imagen que esté viendo.
En la actualidad hay 4 modos diferentes disponibles: Entertain, Internet, Text y Custom.
Cada modo tiene su propio valor de brillo configurado previamente. Puede seleccionar fácilmente una de las 4
configuraciones pulsando el botón 'MagicBright™.
1) Ocio
Luminosidad Alta
Para visualización de imágenes en movimiento, como un DVD o un VCD.
2) Internet
Luminosidad Media
Para trabajar con una mezcla visual de texto y gráficos.
3) Texto
Luminosidad Normal
Apropiado para documentos o trabajos que requieren la visualización de gran cantidad de texto.
\
W\UGGGYW\UGGGY YWW^TXYTW]GGG㝘㤸G`a\`aY]YWW^TXYTW]GGG㝘㤸G`a\`aY]

4) Personal
A
unque los valores se han elegido con minuciosidad por nuestros ingenieros, los valores preconfigurados
pueden no resultar cómodos a sus ojos dependiendo de su gusto.
[El botón directo en el mando a distancia es el botón 'M/B'.]
Personal
[MENU]
˧
[
/
]
˧
[ENTER]
˧
[
/
]
˧
[ENTER]
˧
[ENTER]
˧
[
/
] / [< / >]
˧
[ENTER]
Puede usar los menús en pantalla para cambiar el contraste y la luminosidad según sus preferencias
personales.
1) Contraste
Calibre el Contraste.
2) Brillo
Calibre el Luminosidad.
Nota
• Si se ajusta la imagen usando la función Personal, entonces MagicBright cambia al modo Personal.
Tono de color
[MENU]
˧
[
/
]
˧
[ENTER]
˧
[
/
]
˧
[ENTER]
˧
[
/
]
˧
[ENTER]
El tono del color se puede cambiar.
1) Frío
2) Normal
3) Cálido
4) Personal
(Disponible solamente en el modo PC/BNC)
Control de color
[MENU]
˧
[
/
]
˧
[ENTER]
˧
[
/
]
˧
[ENTER]
˧
[ENTER]
˧
[< / >]
˧
[ENTER]
utilice esta función para ajustar ligeramente el color.
(Disponible solamente en el modo PC/BNC)
1) Rojo
2) Verde
3) Azul
Nota
• Si se ajusta la imagen usando la función Control de color, entonces Tono de color cambia al modo
Personal.
Fijar la Imagen
Fijar la imagen se usa para ajustar y obtener la mejor imagen quitando las perturbaciones que provocan
imágenes inestables con agitaciones y resplandores débiles. Si no se obtienen resultados satisfactorios
usando el Ajuste fino, use la configuración Ajuste grueso y, después, use Ajuste fino otra vez.
(Disponible solamente en el modo PC/BNC)
1) Grueso
[MENU]
˧
[
/
]
˧
[ENTER]
˧
[
/
]
˧
[ENTER]
˧
[ENTER]
˧
[< / >]
˧
[ENTER]
Suprime las interferencias como las bandas verticales. El ajuste grueso puede mover el área de imagen de
la pantalla. Puede volver a ubicarla en el centro mediante el menú Horizontal Control (Control horizontal).
2) Fino
[MENU]
˧
[
/
]
˧
[ENTER]
˧
[
/
]
˧
[ENTER]
˧
[
/
]
˧
[ENTER]
˧
[< / >]
˧
[ENTER]
Quita perturbaciones tales como rayas horizontales. Si persiste la perturbación incluso después de Ajuste
fino, repítalo después de ajustar la frecuencia (velocidad del reloj).
3) Posición
[MENU]
˧
[
/
]
˧
[ENTER]
˧
[
/
]
˧
[ENTER]
˧
[
/
]
˧
[ENTER]
˧
[< / >] / [
/
]
˧
[ENTER]
Esto ajusta la ubicación de la pantalla horizontalmente y verticalmente.
\
W\UGGGZW\UGGGZ YWW^TXYTW]GGG㝘㤸G`a\`aY]YWW^TXYTW]GGG㝘㤸G`a\`aY]

Ajuste automático
[MENU]
˧
[
/
]
˧
[ENTER]
˧
[
/
]
˧
[ENTER]
Los valores de fino, grueso y posición se ajustan automáticamente.
(Disponible solamente en el modo PC/BNC)
[El botón directo en el mando a distancia es el botón 'AUTO'.]
Balance de la señal
Se utiliza para recomponer la señal RGB débil que se ha transmitido a través de un cable largo de señal.
(Disponible solamente en el modo PC/BNC)
1) Balance de la señal
[MENU]
˧
[
/
]
˧
[ENTER]
˧
[
/
]
˧
[ENTER]
˧
[ENTER]
˧
[
/
]
˧
[ENTER]
Puede seleccionar que el control de la señal esté en Act. o Des.
2) Control de la señal
[MENU]
˧
[
/
]
˧
[ENTER]
˧
[
/
]
˧
[ENTER]
˧
[
/
]
˧
[ENTER]
˧
[
/
]
˧
[ENTER]
˧
[
/
]
˧
[< / >]
˧
[ENTER]
Puede ajustar manualmente R Phase, G Phase, B Phase, Aumento y Nitidez.
Tamaño
[MENU]
˧
[
/
]
˧
[ENTER]
˧
[
/
]
˧
[ENTER]
˧
[
/
]
˧
[ENTER]
Puede cambiar el tamaño.
1) 16:9
2) 4:3
Imagen PIP
[MENU]
˧
[
/
]
˧
[ENTER]
˧
[
/
]
˧
[ENTER]
˧
[
/
]
˧
[ENTER]
˧
[
/
]
˧
[ENTER]
˧
[
/
]
˧
[ENTER]
˧
[< / >]
˧
[ENTER]
Puede ajustar los parámetros de la imagen PIP.
1) Contraste
A
justa el contraste de la ventana PIP en la pantalla.
2) Brillo
A
justa la Luminosidad (Brightness) de la ventana PIP en la pantalla.
3) Sharpness
Se usa para ajustar la diferencia entre las áreas más claras y más oscuras de la ventana PIP.
4) Nitidez
Se usa para ajustar la luminosidad y la oscuridad de la pantalla.
5) Matiz
A
grega un tono natural a la ventana PIP.
Puede ver una imagen desde las fuentes AV, S-Vídeo a través de la pantalla PIP en los modos PC,
BNC. Funciona sólo si la señal de vídeo es NTSC.
Modos disponibles : PIP
Picture [ AV / S-Video / Component / DVI-Video Modo]
Modos disponibles
PC / BNC / DVI
AV
S-Vídeo
Componente
DVI-Video
Modo
[MENU]
˧
[
/
]
˧
[ENTER]
˧
[ENTER]
˧
[
/
]
˧
[ENTER]
El monitor tiene cuatro configuraciones automáticas de imagen ("Dinámico", "Estándar", "Película", y
"Personal") que están establecidas previamente en la fábrica.
Puede activar Dinámico, Estándar, Película, o Personal. Puede seleccionar "Personal" que automáticamente
\
W\UGGG[W\UGGG[ YWW^TXYTW]GGG㝘㤸G`a\`aY_YWW^TXYTW]GGG㝘㤸G`a\`aY_

establece su configuración de imagen personalizada.
1) Dinámico
2) Estándar
3) Películas
4) Personal
[El botón directo en el mando a distancia es el botón 'P.MODE'.]
Personal
[MENU]
˧
[
/
]
˧
[ENTER]
˧
[
/
]
˧
[ENTER]
˧
[
/
]
˧
[ENTER]
˧
[< / >]
˧
[ENTER]
Puede usar los menús en pantalla para cambiar el contraste y la luminosidad según sus preferencias
personales.
1) Contraste
A
justa el Contraste.
2) Brillo
A
justa el Luminosidad.
3) Nitidez
A
justa la nitidez de la imagen.
4) Color
A
justa el color de la imagen.
5) Matiz
A
grega un tono natural a la pantalla.
Funciona sólo en los modos AV y S-Vídeo. Funciona sólo si la señal de vídeo es NTSC.
Tono de color
[MENU]
˧
[
/
]
˧
[ENTER]
˧
[
/
]
˧
[ENTER]
˧
[
/
]
˧
[ENTER]
El tono del color se puede cambiar.
1) Frío 2
2) Frío 1
3) Normal
4) Cálido1
5) Cálido2
Tamaño
[MENU]
˧
[
/
]
˧
[ENTER]
˧
[
/
]
˧
[ENTER]
˧
[
/
]
˧
[ENTER]
Puede cambiar el tamaño de imagen.
1) 16:9
2) Zoom 1
3) Zoom 2
4) 4:3
[ZOOM1, ZOOM2, Panorama no están disponibles en 1080i (o más de 720p) de DTV.]
Digital NR ( Reducción digital del nivel de ruidos.)
[MENU]
˧
[
/
]
˧
[ENTER]
˧
[
/
]
˧
[ENTER]
˧
[
/
]
˧
[ENTER]
Puede activar y desactivar la característica Eliminación de ruido (Noise Elimination).
La función Eliminación digital de ruido (Digital Noise Elimination) permite gozar de imágenes más claras y
vibrantes.
1) Des.
2) Act.
Modo película
[MENU]
˧
[
/
]
˧
[ENTER]
˧
[
/
]
˧
[ENTER]
˧
[
/
]
˧
[ENTER]
Puede activar o desactivar ( Des./Act.) el Modo de cine (Film Mode).
La característica Modo de cine (Film Mode) ofrece una experiencia visual con la calidad de las salas de
espectáculos.
(No disponible en el modo DVI-Video)
\
W\UGGG\W\UGGG\ YWW^TXYTW]GGG㝘㤸G`a\`aY_YWW^TXYTW]GGG㝘㤸G`a\`aY_

1) Des.
2) Act.
Imagen PIP
[MENU]
˧
[
/
]
˧
[ENTER]
˧
[
/
]
˧
[ENTER]
˧
[
/
]
˧
[ENTER]
˧
[
/
]
˧
[ENTER]
˧
[< / >]
˧
[ENTER]
Puede ajustar los parámetros de la imagen PIP.
1) Contraste
A
justa el contraste de la ventana PIP en la pantalla.
2) Brillo
A
justa el brillo de la ventana PIP en la pantalla.
Modos disponibles : PIP
Sonido
Modos disponibles
PC / BNC / DVI
AV
S-Vídeo
Componente
DVI-Video
Modo
[MENU]
˧
[
/
]
˧
[ENTER]
˧
[ENTER]
˧
[
/
]
˧
[ENTER]
El monitor tiene un amplificador integrado de audio estéreo de alta fidelidad.
1) Estándar
Seleccione Normal para volver a la configuración estándar de fábrica.
2) Música
Seleccione Música cuando esté visualizando vídeos musicales o conciertos.
3) Películas
Seleccione Cine cuando esté visualizando largometrajes.
4) Diálogo
Seleccione Diálogo cuando esté visualizando Descripcións ricos en diálogos (por ejemplo, noticias).
5) Favorito
Seleccione Favorito para volver a la configuración personalizada.
Personal
[MENU]
˧
[
/
]
˧
[ENTER]
˧
[
/
]
˧
[ENTER]
˧
[
/
]
˧
[ENTER]
˧
[< / >]
˧
[ENTER]
La configuración del sonido se puede ajustar para satisfacer sus preferencias personales.
1) Graves
Intensifica el audio de baja frecuencia.
2) Agudos
Intensifica el audio de alta frecuencia.
3) Balance
Balance de sonido ==> Permite ajustar el balance de sonido entre los altavoces izquierdo y derecho.
[Puede oír sonido aunque el valor del sonido sea 0.]
Nota
• Si ajusta la imagen con la función de Sound Custom (Sonido personal), el Sound Mode (Modo de sonido)
cambiará al Custom Mode (Modo personal).
Volumen autom.
[MENU]
˧
[
/
]
˧
[ENTER]
˧
[
/
]
˧
[ENTER]
˧
[
/
]
˧
[ENTER]
Reduce las diferencias en el nivel del volumen para las distintas fuentes de emisión.
1) Des.
2) Act.
\
W\UGGG]W\UGGG] YWW^TXYTW]GGG㝘㤸G`a\`aY_YWW^TXYTW]GGG㝘㤸G`a\`aY_

SRS TS XT
[MENU]
˧
[
/
]
˧
[ENTER]
˧
[
/
]
˧
[ENTER]
˧
[
/
]
˧
[ENTER]
SRS TS XT es una tecnología SRS patentada que solventa el problema de reproducir contenido multicanal 5.1
en dos altavoces. TruSurround proporciona una sensación de sonido virtual convincente a través de cualquier
sistema de reproducción con dos altavoces, incluso con los altavoces internos del televisor.
Es totalmente compatible con todos los formatos multicanal.
1) Des.
2) Act.
[El botón directo en el mando a distancia es el botón 'SRS']
Selección de sonido
[MENU]
˧
[
/
]
˧
[ENTER]
˧
[
/
]
˧
[ENTER]
˧
[
/
]
˧
[ENTER]
Puede seleccionar entre Principal o Sub cuando PIP esté activado (On).
1) Principal
2) Sub
[Modos disponibles : PIP]
Setup
Modos disponibles
PC / BNC / DVI
AV
S-Vídeo
Componente
DVI-Video
Idioma
[MENU]
˧
[
/
]
˧
[ENTER]
˧
[ENTER]
˧
[
/
]
˧
[ENTER]
Puede escoger uno de los 11 idiomas siguientes.
Nota
• El idioma elegido afecta sólo al idioma del OSD.
No afecta en absoluto al software que se ejecuta en el equipo.
Hora
Se usa para seleccionar una apagado.
1)
Reloj prog.
[MENU]
˧
[
/
]
˧
[ENTER]
˧
[
/
]
˧
[ENTER]
˧
[ENTER]
˧
[< / >]
˧
[ENTER]
Ajuste de la hora.
2) Temp. de desc.
[MENU]
˧
[
/
]
˧
[ENTER]
˧
[
/
]
˧
[ENTER]
˧
[
/
]
˧
[ENTER]
˧
[< / >]
˧
[
/
]
˧
[ENTER]
˧
[< / >]
˧
[
/
]
˧
[ENTER]
Se usa para que el monitor se apague automáticamente tras una serie de minutos. (Apagado, 30, 60, 90,
120, 150, 180)
3) Temp. de encen.
[MENU]
˧
[
/
]
˧
[ENTER]
˧
[
/
]
˧
[ENTER]
˧
[
/
]
˧
[ENTER]
˧
[< / >]
˧
[
/
]
˧
[ENTER]
Se usa para que el monitor se encienda a una hora determinada.
Se usa para controlar el modo y el nivel de volumen en el momento en que se encienda el monitor
automáticamente.
4) Temp. de apag.
[MENU]
˧
[
/
]
˧
[ENTER]
˧
[
/
]
˧
[ENTER]
˧
[
/
]
˧
[ENTER]
˧
[< / >]
˧
[
/
]
˧
[ENTER]
Se usa para ajustar cuándo se debe apagar automáticamente el monitor, el volumen y el modo.
\
W\UGGG^W\UGGG^ YWW^TXYTW]GGG㝘㤸G`a\`aY_YWW^TXYTW]GGG㝘㤸G`a\`aY_

Nota
• Si no tiene configurado Reloj prog. y selecciona Sí en (Temporizador de encendido) Temp. de encen. o en
(Temporizador de apagado) Temp. de apag., aparecerá el mensaje Reloj(Ajustar la hora)”
Transpar. de menús
[MENU]
˧
[
/
]
˧
[ENTER]
˧
[
/
]
˧
[ENTER]
˧
[
/
]
˧
[ENTER]
Cambia la opacidad del fondo del OSD.
1) Alto
2) Medio
3) Bajo
4) Opaco
PIN bloqueo de seguridad
[MENU]
˧
[
/
]
˧
[ENTER]
˧
[
/
]
˧
[ENTER]
˧
[0~9]
˧
[0~9]
˧
[0~9]
Puede cambiar la contraseña.
Ahorro energía
[MENU]
˧
[
/
]
˧
[ENTER]
˧
[
/
]
˧
[ENTER]
˧
[
/
]
˧
[ENTER]
˧
[MENU]
Esta función permite ajustar el consumo eléctrico de la unidad para ahorrar energía.
1) Act.
2) Des.
Nota
• Si desea reducir el consumo eléctrico en el modo de espera, ajuste Ahorro energía en Des. Sin embargo,
cuando Ahorro energía está en Des, no puede usar la función remota Power On de MDC ni la función
WOL (Wake On LAN) de MagicNet.
Video Wall
Un vídeo mural es un conjunto de pantallas de vídeo conectadas entre sí, de manera que cada una puede
mostrar una parte de la imagen completa o la misma imagen repetida en cada pantalla.
Si Video Wall está activado se podrá ajustar la configuración de la pantalla Video Wall.
1) Video Wall
[MENU]
˧
[
/
]
˧
[ENTER]
˧
[
/
]
˧
[ENTER]
˧
[ENTER]
˧
[
/
]
˧
[ENTER]
Enciende o apaga la función Video Wall (Vídeo mural) en la pantalla seleccionada.
-
Des.
-
Act.
2) Formato
[MENU]
˧
[
/
]
˧
[ENTER]
˧
[
/
]
˧
[ENTER]
˧
[
/
]
˧
[ENTER]
˧
[
/
]
˧
[ENTER]
Se puede seleccionar el formato para ver una pantalla dividida.
-
Llena
Proporciona una pantalla completa sin márgenes.
-
Natural
Muestra una imagen natural con su relación de aspecto original intacta.
3) Divisor de pantalla
[MENU]
˧
[
/
]
˧
[ENTER]
˧
[
/
]
˧
[ENTER]
˧
[
/
]
˧
[ENTER]
˧
[
/
]
˧
[ENTER]
Se puede dividir la pantalla en otras varias.
Puede seleccionar varias pantallas con una distribución diferente al dividirlas.
• Seleccione un modo en el Divisor de pantalla.
• Seleccione una pantalla en la Display Selection (Selección de pantalla).
• La ubicación se configurará pulsando un número en el modo seleccionado.
-
2 x 2
-
3 x 3
-
4 x 4
-
5 x 5
-
1 x 2
-
2 x 1
-
1 x 5
-
5 x 1
W\UGGG_W\UGGG_ YWW^TXYTW]GGG㝘㤸G`a\`aY_YWW^TXYTW]GGG㝘㤸G`a\`aY_

Nota
• Cuando Video Wall está en funcionamiento, las funciones PIP, Ajuste automático, Bloqueo de Imagen y
Tamaño no están disponibles. Si se inicia Video Wall mientras PIP está en funcionamiento, la función PIP
pasará a Des. Video Wall no funciona en el modo MagicNet.
Pantalla de seguridad
La función Safety Screen (Pantalla de seguridad) se utiliza para evitar que puedan aparecer restos de
imágenes en la pantalla cuando se visualiza una imagen fija por un período prolongado.
- La función Screen Scroll (Desplazamiento de pantalla) desplaza la pantalla el tiempo que se haya
especificado.
- Esta función no está disponible cuando el aparato está apagado.
1) Pantalla de seguridad
[MENU]
˧
[
/
]
˧
[ENTER]
˧
[
/
]
˧
[ENTER]
˧
[ENTER]
˧
[
/
]
˧
[ENTER]
Determina si la función Screen Scroll (Desplazamiento de pantalla) debe estar Act. o Des.
-
Des.
-
Act.
2) Intervalo
[MENU]
˧
[
/
]
˧
[ENTER]
˧
[
/
]
˧
[ENTER]
˧
[
/
]
˧
[ENTER]
˧
[
/
]
˧
[ENTER]
Determina el intervalo que debe pasar hasta que se ejecute Screen Scroll (Desplazamiento de pantalla).
(1~10 horas)
El tiempo se calcula tomando como base el tiempo de encendido.
De forma predeterminada, el tiempo se establece en 10 horas.
-
1~10 horas
3) Segundos
[MENU]
˧
[
/
]
˧
[ENTER]
˧
[
/
]
˧
[ENTER]
˧
[
/
]
˧
[ENTER]
˧
[
/
]
˧
[ENTER]
Determina el período que debe pasar hasta que se ejecute Screen Scroll (Desplazamiento de pantalla).
(1~5 segundos)
De forma predeterminada, el tiempo se establece en 5 segundos.
-
Tipo-Despl. : 1~5 segundos
-
Tipo-Píxel, Barra, Borrador : 10~50 segundos
4) Tipo
[MENU]
˧
[
/
]
˧
[ENTER]
˧
[
/
]
˧
[ENTER]
˧
[
/
]
˧
[ENTER]
˧
[
/
]
˧
[ENTER]
Se puede cambiar el Safety Screen Type (Tipo de pantalla de seguridad).
-
Despl.
-
Píxel
-
Barra
-
Borrado
r
Selecc. resolución
[MENU]
˧
[
/
]
˧
[ENTER]
˧
[
/
]
˧
[ENTER]
˧
[
/
]
˧
[ENTER]
Si la imagen no aparece correctamente en la pantalla al ajustar la resolución de la tarjeta gráfica del ordenador
a 1024 x 768 a 60 Hz, 1280 x 768 a 60 Hz, 1360 x 768 a 60 Hz o 1366 x 768 a 60 Hz, gracias al uso de esta
función (Selecc. resolución) puede conseguir que la imagen aparezca en la pantalla del ordenador con la
resolución especificada.
(Disponible solamente en el modo PC/BNC)
1) Des.
2) 1024 X 768
3) 1280 X 768
4) 1360 X 768
5) 1366 X 768
Nota
• Solamente se puede seleccionar un menú si los valores de la resolución de gráficos son 1024 x 768 a 60
Hz, 1280 x 768 a 60 Hz, 1360 x 768 a 60 Hz o 1366 x768 a 60 Hz.
Control de lámpara
[MENU]
˧
[
/
]
˧
[ENTER]
˧
[
/
]
˧
[ENTER]
˧
[ENTER]
˧
[< / >]
˧
[ENTER]
Se usa para ajustar la luz de fondo, con el fin de reducir el consumo de energía.
W\UGGG`W\UGGG` YWW^TXYTW]GGG㝘㤸G`a\`aY_YWW^TXYTW]GGG㝘㤸G`a\`aY_

Ajuste de encendido
[MENU]
˧
[
/
]
˧
[ENTER]
˧
[
/
]
˧
[ENTER]
˧
[ENTER]
˧
[
/
]
˧
[ENTER]
Ajusta el Power On time (Tiempo de encendido) de la pantalla.
*Precaución : Ajuste el Power On time (Tiempo de encendido) para que sea más largo, a fin prevenir las
sobrecargas de tensión.
Restablecer
Los parámetros de color se sustituyen con los valores predeterminados de fábrica.
1)
Restablecer imagen
[MENU]
˧
[
/
]
˧
[ENTER]
˧
[
/
]
˧
[ENTER]
˧
[ENTER]
˧
[< / >]
˧
[ENTER]
(Disponible solamente en el modo PC/BNC)
2)
Restablecer color
[MENU]
˧
[
/
]
˧
[ENTER]
˧
[
/
]
˧
[ENTER]
˧
[
/
]
˧
[ENTER]
˧
[< / >]
˧
[ENTER]
Control múltiple
Modos disponibles
PC / BNC / DVI
AV
S-Vídeo
Componente
DVI-Video
Control múltiple
[MENU]
˧
[
/
]
˧
[ENTER]
˧
[
/
]
˧
[ENTER]
˧
[ENTER]
˧
[0~9]
Asigna un ID al aparato.
1) Configuración de ID
A
signación de ID diferenciadores al aparato.
2) Entrada de ID
Se utilizan para seleccionar las funciones del transmisor del aparato. Sólo se activa el aparato cuyo ID se
corresponda con el valor del transmisor.
Características de Control
Directo
Modos disponibles
PC / BNC / DVI
AV
S-Vídeo
Componente
DVI-Video
MDC
Vaya a la pantalla OSD de Multi Control.
Bloquear
Ajuste la función Bloqueo de seguridad.
1) Activar bloqueo
Se bloqueará.
2) Desactivar bloqueo
Se desbloqueará.
Nota
•
Cuando se configura la función Lock, sólo funcionan los botones Lock del mando a distancia y del equipo.
]
W\UGGGXWW\UGGGXW YWW^TXYTW]GGG㝘㤸G`a\`aY_YWW^TXYTW]GGG㝘㤸G`a\`aY_

La password (contraseña) preestablecida del monitor es "000000".
Nota
• Restablecimiento de la contraseña para lock (bloqueo) de la tecla de función.
Pulse MUTE
˧
1
˧
8
˧
6
˧
On. La contraseña se debe restablecer como ‘0000’. El mando a distancia
es necesario para restablecer la contraseña.
© 1995~2008 SAMSUNG. ALL Rights Reserved
]
W\UGGGXXW\UGGGXX YWW^TXYTW]GGG㝘㤸G`a\`aY_YWW^TXYTW]GGG㝘㤸G`a\`aY_

El aspecto externo y el color del producto pueden variar dependiendo del modelo; las especificaciones del
producto se pueden cambiar sin previo aviso para la mejora del rendimiento.
Resolución de problemas
Comprobación de las
funciones de
autoverificación
Nota
• Compruebe lo siguiente antes de llamar al servicio técnico. Consulte con el centro de servicio acerca de
problemas que no pueda solucionar por sí mismo.
Comprobación de las funciones de autoverificación
Se provee un dispositivo de autoprueba que permite inspeccionar la función apropiada del monitor. Si el monitor
y el computador están conectados apropiadamente pero la pantalla del monitor permanece obscura y el
indicador de abastecimiento de energía está intermitente, ejecute la autoprueba del monitor, siguiendo los
siguientes pasos:
1) Apague el computador y el monitor.
2) Desconecte el cable de video de la parte trasera del computador.
3) Prenda el monitor.
La figura que aparece debajo ("Comprobar cable de señal") aparece sobre un segundo plano negro
cuando el monitor está en situación de funcionamiento normal pero no detecta ninguna señal de video:
Mientras está en el modo Autoprueba, el indicador de suministro de energía LED sigue verde y la figura se
mueve por la pantalla.
4) Apague el monitor y vuelva a conectar el cable de video; luego prenda el computador y el monitor.
Si la pantalla del monitor sigue en blanco después de seguir el procedimiento anterior, compruebe el controlador
de vídeo y el sistema de la computadora;
el monitor está funcionando correctamente.
Check Cooling System
Si en la pantalla se muestra el mensaje
"Check Cooling System"
, quiere decir que hay un problema con el
ventilador de refrigeración. Póngase en contacto con un centro de servicio para reparar o reemplazar el
ventilador.
Modo no óptimo
Puede ver la pantalla con una resolución superior a 1360 x 768. No obstante, verá el mensaje siguiente durante
un minuto; durante ese tiempo, puede cambiar la resolución de la pantalla o continuar en el modo actual. Si la
frecuencia de actualización es de más de 85Hz verá la pantalla negra porque el monitor no admite más de
Instrucciones de seguridad
Introducción
Conexiones
Uso del software
Ajuste del monitor
Resolución de problemas
Comprobación de las
funciones de
autoverificación
Lista de chequeo
Q & A
Especificaciones
Information
Apéndice
]
zt{T[WXXTz__UGGG]\zt{T[WXXTz__UGGG]\ YWW^TXXTY_GGG㝘䟸G\aXYaYZYWW^TXXTY_GGG㝘䟸G\aXYaYZ

85Hz.
Nota
• Véase Especificaciones > Modos de Pantalla Prefijados acerca de las resoluciones o frecuencias
compatibles con el monitor.
Mantenimiento y Limpieza
1) Mantenimiento de la Caja del monitor
Limpie con un paño suave después de desconectar el cordón de suministro eléctrico.
• No use benceno, disolvente u otras sustancias inflamables, o un
paño mojado.
• Se recomienda un producto de limpieza de Samsung para prevenir
daños en la pantalla.
2) Mantenimiento de la Pantalla de panel plano.
Limpie con un paño blando (una bayeta de algodón) suavemente.
• Nunca use acetona, benceno o disolvente.
(Pueden causar defectos o deformaciones en la superficie de la
pantalla).
• El usuario tendrá que pagar los costes y los gastos relacionados por
la reparación de los daños causados por el o ella.
Síntomas y Acciones recomendadas
Nota
• Un monitor reconstruye señales visuales que recibe del computador. Por lo tanto, si hay algún problema
con el PC o la tarjeta de video, esto podría causar que el monitor se ponga en blanco, o tenga malos
colores, sonido, Sincronización Fuera de Rango, etc. En este caso , primero inspeccione la fuente del
problema y luego póngase en contacto con el centro de servicio o el distribuidor.
1) Inspeccione si el cordón de suministro de energía está conectado apropiadamente al computador.
2) Inspeccione si el computador emite el sonido "beep" más de 3 veces cuando se inicie.
(Si es afirmativo, solicite un servicio de mantenimiento para la placa base del computador).
3) Si instala una nueva tarjeta de video o si ensambla el PC, inspeccione si la unidad del adaptador (video) o
el controlador del monitor está instalado.
4) Compruebe si la frecuencia de exploración de la pantalla de vídeo está configurada en 50 Hz ~ 85 Hz.
(Cuando use la máxima resolución no exceda 60 Hz ).
5) Si tiene problemas en la instalación del controlador del adaptador (video), inicie el computador en el Modo
Seguro, remueva el Adaptador de Pantalla en "
Panel de Control , Sistema, Dispositivo de
Administración
" y luego reiniciar el computador para reinstalar el controlador del adaptador (video).
Lista de chequeo
Nota
•
La tabla siguiente enumera los posibles problemas y sus soluciones. Antes de llamar al servicio técnico,
compruebe la información de esta sección para ver si puede remediar el problema usted mismo. Si
]
zt{T[WXXTz__UGGG]]zt{T[WXXTz__UGGG]] YWW^TXXTY_GGG㝘䟸G\aXYaYZYWW^TXXTY_GGG㝘䟸G\aXYaYZ

necesite ayuda, llame al número del teléfono de la tarjeta de garantía, el número de teléfono en la sección
Información o consulte con su distribuidor.
Problemas relacionados con la instalación (PC)
Nota
• Los problemas relacionados con la instalación del monitor y sus soluciones están en la lista.
Problemas Soluciones
La pantalla del monitor parpadea.
z
Compruebe si el cable de señal entre el equipo y el monitor está
conectado y acoplado con firmeza.
(Véase Conexión con una computadora)
Blemas relacionados con la pantalla
Nota
• Los problemas relacionados con la pantalla del monitor y sus soluciones están en la lista.
Problemas Soluciones
La pantalla está en blanco y el
indicador de suministro de energía
está apagado
z
Asegúrese de que el cordón de suministro eléctrico esté
conectado firmemente y el monitor LCD está encendido.
(Véase Conexión del Monitor)
Mensaje "Check Cable Señal"
z
Asegúrese de que el cable de señal esté conectado firmemente
con las fuentes de PC o de vídeo.
(Véase Conexión del Monitor)
z
Asegúrese de que las fuentes de PC o de vídeo estén
activadas.
Mensaje "Modo no óptimo".
z
Compruebe la resolución y la frecuencia máximas del adaptador
de video.
z
Compare estos valores con los datos del Gráfico Modos de
Pantalla Prefijados.
La imagen rueda verticalmente.
z
Compruebe si el cable de señal está conectado con seguridad.
Conéctelo otra vez firmemente.
(Véase Conexión con una computadora)
La imagen no está clara. La
imagen está borrosa.
z
Ejecute el Ajuste de frecuencia Ajuste Grueso y Ajuste Fino.
z
Enciéndalo otra vez después de quitar todos los accesorios
(cable de extensión de video, etc)
z
Establezca la resolución y la frecuencia dentro de los rangos
recomendados. Modelo 19 pulgadas(1280 x 768 @ 60Hz)
La imagen es inestable y vibra.
Aparecen imágenes fantasma en la
imagen.
z
Compruebe si la resolución y la frecuencia definidos para la
tarjeta de video del equipo están dentro del rango admitido por
el monitor.
Si no, vuelva a establecerlos según Información en el menú del
monitor y Modos de Pantalla Prefijados.
La imagen es demasiado clara o
demasiado oscura.
z
Ajuste la Luminosidad y el Contraste.
(Véase Luminosidad, Contraste)
El color de la pantalla es
inconsistente.
El color de la imagen está
distorsionado con sombras
oscuras.
El color blanco es pobre.
z
Ajuste el color usando Favorito en el menú OSD Color
Adjustment (Ajuste del color OSD).
]
zt{T[WXXTz__UGGG]^zt{T[WXXTz__UGGG]^ YWW^TXXTY_GGG㝘䟸G\aXYaYZYWW^TXXTY_GGG㝘䟸G\aXYaYZ

El indicador de suministro de
energía parpadea en verde.
z
El monitor está guardando los cambios realizados en la
configuración en la memoria de OSD.
La pantalla está en blanco y la luz
del indicador de suministro de
energía es verde constante o
parpadea cada 0,5 o 1 segundos
z
El monitor está usando su sistema de administración de
energía.
z
Mueva el ratón del equipo o pulse una tecla del teclado.
La pantalla está oscura y
parpadea.
z
Si aparece el mensaje “TEST GOOD” en pantalla al pulsar el
botón MENÚ, compruebe la conexión del cable entre el monitor
y el equipo informático para asegurar que el conector está
conectado correctamente.
Problemas relacionados con el audio
Nota
• Los problemas relacionados con las señales de audio y sus soluciones se enumeran a continuación.
Problemas Soluciones
No hay sonido
z
Asegúrese de que el cable de audio esté correctamente
conectado al puerto de entrada de audio del monitor y el puerto
de salida de audio de su tarjeta de sonido.
(Véase Conexión del Monitor)
z
Compruebe el nivel del volumen.
El nivel del sonido es demasiado
bajo
z
Compruebe el nivel del volumen.
z
Si el volumen sigue siendo demasiado bajo después ajustar el
control al máximo, compruebe el control del volumen en la
tarjeta de sonido del equipo o en el programa de software.
El sonido está demasiado alto o
demasiado bajo
z
Ajuste Agudo y Grave al nivel apropiado.
Problemas relacionados con el Control remoto
Nota
• Los problemas relacionados con el control remoto y sus soluciones se enumeran a continuación.
Problemas Soluciones
Los botones del control remoto no
responden.
z
Compruebe las polaridades de las baterías (+/-).
z
Compruebe si se han agotado las baterías.
z
Compruebe si está encendido
z
Compruebe si el cordón de suministro eléctrico está conectado
con seguridad.
z
Compruebe si hay encendida una lámpara fluorescente o de
neón en su cercanía.
Q & A
Pregunta Respuesta
¿Cómo se puede cambiar la
frecuencia?
Se puede cambiar la frecuencia reconfigurando la tarjeta de video.
Note que el soporte de la tarjeta de video puede variar, dependiendo
de la versión del controlador usado. (Busque detalles en el manual
del computador o de la tarjeta de video).
¿Cómo se puede regular la
resolución?
z
Windows XP:
Restablezca la resolución haciendo clic en Panel de control
˧
]
zt{T[WXXTz__UGGG]_zt{T[WXXTz__UGGG]_ YWW^TXXTY_GGG㝘䟸G\aXYaYZYWW^TXXTY_GGG㝘䟸G\aXYaYZ

Apariencia y temas
˧
Pantalla
˧
Configuración.
z
Windows ME/2000:
Restablezca la resolución haciendo clic en Panel de control
˧
Pantalla
˧
Configuración.
* Contáctese con el fabricante de la tarjeta de video para
obtener más detalles.
¿Cómo se puede poner la función
Ahorro de Energía?
z
Windows XP:
Poner la función en Programa de Instalación-BIOS(sistema
básico de entrada -salida) del computador o del protector de
pantalla.
Poner la función en Programa de Instalación-BIOS(sistema
básico de entrada -salida) del computador o del protector de
pantalla. (Consulte el Manual del Computador / Windows)
z
Windows ME/2000:
Set the resolution at the Control Panel
˧
Display
˧
Screen
Saver.
Poner la función en Programa de Instalación-BIOS(sistema
básico de entrada -salida) del computador o del protector de
pantalla. (Consulte el Manual del Computador / Windows)
¿Cómo se puede limpiar el Tubo
de imagen/Panel LCD?
Desconecte el cordón de suministro de energía y luego limpie el
monitor con una tela suave, usando una solución limpiadora o
simplemente agua.
No deje restos de detergente ni raye la caja. No permita que entre
agua en el computador.
© 1995~2008 SAMSUNG. ALL Right Reserved
]
zt{T[WXXTz__UGGG]`zt{T[WXXTz__UGGG]` YWW^TXXTY_GGG㝘䟸G\aXYaYZYWW^TXXTY_GGG㝘䟸G\aXYaYZ

El aspecto externo y el color del producto pueden variar dependiendo del modelo; las especificaciones del
producto se pueden cambiar sin previo aviso para la mejora del rendimiento.
Especificaciones
Generales
Generales
Generales
Nombre del Modelo SMT-3211
Panel LCD
Tamaño 32 pulgadas de diagonal (80 cm)
Area de Presentación 697,6845 mm (H) x 392,256 mm (V)
Distancia entre Pixels 0,51075 mm (H) x 0,51075 mm (V)
Sincronización
Horizontal 30 ~ 81 kHz
Vertical 56 ~ 75 Hz
Color de Pantalla
Color de Pantalla 16,7 M colores
Resolución
Analógico
1360 x 768 / 1366 x 768 @ 60 Hz: depende de la tarjeta gráfica que se
utilice
Digital
Señal de entrada, terminado
RGB analógico, RGB digital compatible con DVI (Interfaz visual digital).
0,7 Vp-p positivo a 75 ohmios ±10 % sincronización de H/V separado, compuesto, SOG, nivel TTL, positivo o
negativo.
H/V independiente, nivel TTL, positivo o negativo
100 MHz
Fuente de poder
CA 100 - 240 V~ (+/- 10%), 50/60 Hz
Cable de Señal
15pines-a-15pines D-sub cable, desarmable
DVI-D-a-DVI-D connector, desarmable - Opción
Conector de señal
D-sub, BNC, DVI-D, YPbPr, S-VHS, VCR
Dimensiones (PxAxD) / Peso
780 X 482 X 107 mm / 30,1 X 19,0 X 4,6 inch (Sin soporte)
780 X 530 X 223 mm / 30,1 X 20,9 X 8,8 inch (Con soporte)
Interfase de Montaje VESA
200 mm x 200 mm (Para uso con hardware de Montaje especial (Brazo))
Consideraciones medioambientales
Operación
Temperatura : 10 °C ~ 40 °C (50 °F ~ 104 °F)
Humedad : 10% ~ 80%, no-condensación
Almacenamiento
Temperatura : -20 °C ~ 45 °C (-4 °F ~ 113 °F)
Humedad : 5% ~ 95%, no-condensación
Características del audio
Instrucciones de seguridad
Introducción
Conexiones
Uso del software
Ajuste del monitor
Resolución de problemas
Especificaciones
Generales
Ahorro de energía
Modos de temporización
predefinidos
Information
Apéndice
]
^TUGGGX^TUGGGX YWW^TXYTYWGGG㝘䟸GXa\[aY`YWW^TXYTYWGGG㝘䟸GXa\[aY`
,16,1 kg/ 35,4lbs
1366 x 768 @ 60 Hz

Entrada de audio 1 Clavija RCA roja (D) blanca (I), 0,5 Vrms (-9 dB)
Entrada de audio 2 Clavija RCA roja (D) blanca (I), 0,5 Vrms (-9 dB)
Entrada de audio de PC Clavija estéreo de 3,5 Ø, 0,5 Vrms (-9 dB)
Frecuencia RF: 80 Hz ~ 15 kHz (a -3 dB)
Respuesta A/V: 80 Hz ~ 20 kHz (a -3 dB)
Posibilidad de Plug y Play
Este monitor puede instalarse en cualquier sistema con Plug & Play compatible. Las interacciones de los
sistemas del monitor y el PC proveen las mejores condiciones operativas y configuración del sistema. En la
mayoría de los casos, la instalación del monitor se hará automáticamente, a menos que el usuario desee
seleccionar configuraciones alternas.
Punto aceptable
Para este producto se usa la pantalla TFT LCD fabricada con tecnología avanzada de semiconductores con
una precisión de 1 ppm (una millonésima). Pero a veces, los píxeles de color ROJO, VERDE, AZUL y
BLANCO parecen estar brillantes o se pueden ver algunos píxeles negros. Esto no es debido a una mala
calidad y usted puede usarlo con confianza.
• Por ejemplo, el número de píxeles secundarios de TFT LCD contenidos en este producto es 3.133.440
Nota
• El diseño y las especificaciones están sujetos a cambios sin previo aviso.
Equipo de Clase B (equipo de comunicación de información para uso doméstico)
• Este equipo cumple con las directrices de Compatibilidad electromagnética para uso doméstico y se
puede utilizar en todas las áreas incluso las zonas residenciales comunes.
(El equipo de Clase B irradia menos ondas electromagnéticas que el equipo de Clase A.).
Ahorro de energía
Este monitor tiene un sistema incorporado de manejo de energía llamado Ahorrador de Energía . Este sistema
ahorra energía cambiando el monitor a un modo de bajo consumo de energía cuando no es usado por cierto
periodo de tiempo. El monitor regresa automaticamente a una operación normal cuando se mueve el mouse del
computador o se presiona una tecla del teclado. Para ahorrar energía, apague el monitor cuando no lo necesite,
o cuando no lo use durante largos periodos de tiempo. El sistema del Ahorrador de Energía funciona con un
VESA DPM de acuerdo a la tarjeta de video instalada en el computador. Use un programa de herramientas
instalado en el computador para instalar esta característica.
Estado
Operación
normal
Modo de ahorro
energético
Apagado de la
Fuente de
Alimentación
EPA/ENERGY 2000
Apagado de la
Fuente de
Alimentación
Indicador de
Suministro de
Energía
Verde Verde, intermitente Ámbar Negro
Consumo de Energía
Menos de
160 W
Menos de 1 W
(Modo Off)
Menos de 1 W
(Energía)
0 W
(Botón de suministro
de energia)
Este monitor es compatible con EPA ENERGY STAR
®
y con
ENERGY2000 es usado con un computador que está equipado con
VESA DPM.
Como socio de NERGY STAR
®
Partner, SAMSUNG ha determinado que
este producto sigue las directrices de ENERGY STAR
®
sobre eficiencia
energética.
Modos de temporización
predefinidos
Modos de temporización predefinidos
Si la señal transferida del computador es la misma a la de los Modos de Pantalla Prefijados siguientes, la
pantalla se regula automáticamente. Sin embargo, si la señal difiere, la pantalla podría ponerse en blanco
mientras el indicador de suministro de energía LED está prendido. Consulte el manual de la tarjeta de video y
^TUGGGY^TUGGGY YWW^TXYTYWGGG㝘䟸GXa\[aZZYWW^TXYTYWGGG㝘䟸GXa\[aZZ

regule la pantalla de la siguiente manera.
Modo Pantalla
Frecuencia H
(kHz)
Frecuencia V
(Hz)
Ancho de Banda
(MHz)
Polaridad Sync
(H/V)
MAC, 640 x 480 35,000 66,667 30,240 -/-
MAC, 832 x 624 49,726 74,551 49,500 +/+
IBM, 640 x 350 31,469 70,086 25,175 +/-
IBM, 640 x 480 31,469 59,940 25,175 -/-
IBM, 720 x 400 31,469 70,087 28,322 -/+
VESA, 640 x 480 37,861 72,809 31,500 -/-
VESA, 640 x 480 37,500 75,000 31,500 -/-
VESA, 640 x 480 43,269 85,008 36,000 -/-
VESA, 800 x 600 35,156 56,250 36,000 +/+
VESA, 800 x 600 37,879 60,317 40,000 +/+
VESA, 800 x 600 48,077 72,188 50,000 +/+
VESA, 800 x600 46,875 75,000 49,500 +/+
VESA, 800 x600 53,674 85,000 56,250 +/+
VESA, 1024 x 768 48,363 60,004 65,000 -/-
VESA, 1024 x 768 56,476 70,069 75,000 -/-
VESA, 1024 x 768 60,023 75,029 78,750 +/+
VESA, 1024 x 768 68,677 85,997 94,500 +/+
VESA, 1360 x 768 47,712 60,000 85,500 +/+
Frecuencia H
El tiempo para escanear una línea que conecta horizontalmente el lado
derecho de la pantalla al lado izquierdo es llamado Ciclo Horizontal y el
número inverso del Ciclo Horizontal es llamado Frecuencia H. Unidad:
kHz
Frecuencia V
A semejanza de una lámpara fluorescente, la pantalla tiene que repetir la
misma imagen muchas veces por segundo para mostrar una imagen al
usuario. La frecuencia de esta repetición es llamada Frecuencia V o
Frecuencia de Escaneo. Unidad: Hz
© 1995~2008 SAMSUNG. ALL Right Reserved
^TUGGGZ^TUGGGZ YWW^TXYTYWGGG㝘䟸GXa\[aZZYWW^TXYTYWGGG㝘䟸GXa\[aZZ

El aspecto externo y el color del producto pueden variar dependiendo del modelo; las especificaciones del
producto se pueden cambiar sin previo aviso para la mejora del rendimiento.
Information
Para Obtener una Mejor Presentación
Ajuste la resolución de la computadora y la velocidad de inyección de la pantalla (intervalo de
actualización) del panel de control de la computadora, como se indica a continuación, para que disfrute de
la mejor calidad de imagen. Usted puede tener una calidad irregular de imagen en la pantalla si la mejor
calidad de imagen no se provee en TFT-LCD.
• Resolución : 1360 x 768
• Frecuencia Vertical (actualización) : 60 Hz
Para este producto se usa la pantalla TFT LCD fabricada con tecnología avanzada de semiconductores
con una precisión de 1 ppm (una millonésima). Pero a veces, los píxeles de color ROJO, VERDE, AZUL y
BLANCO parecen estar brillantes o se pueden ver algunos píxeles negros.
Esto no es debido a una mala calidad y usted puede usarlo con confianza.
• Por ejemplo, el número de píxeles secundarios de LCD contenidos en este producto es
Cuando limpie el monitor y el panel exterior, por favor aplique con un paño suave y seco la pequeña
cantidad de limpiador que se recomienda, y púlalo. No aplique fuerza al área del LCD sino estregue
suavemente.
Si se aplica mucha fuerza, puede mancharse.
Si no está satisfecho con la calidad de la imagen, puede lograr mejor calidad de imagen al llevar a cabo la
"función de ajuste automático" en la pantalla que aparece cuando se presiona el botón de cierre de
ventana.
Si hay todavía ruido después del ajuste automático, use la función de ajuste FINO / GRUESO.
Si el aparato muestra una imagen fija durante un largo período de tiempo, puede quedar una imagen
residual o cierta indefinición.
Establezca el modo de ahorro de energía o configure un protector de pantalla con una imagen en
movimiento, cuando sea necesario dejar desatendido el monitor durante un largo período de tiempo.
INFORMACIÓN de PRODUCTO (Libre de retención de
imágenes)
¿Qué es la retención de imagen?
La retención de imagen no debe producirse cuando un panel LCD funciona en condiciones normales. Éstas
se definen como patrones de vídeo que cambian continuamente. Cuando el panel LCD funciona largo
tiempo con un patrón fijo (más de 12 horas), se produce una ligera diferencia de voltaje entre los electrodos
que introducen el cristal líquido (LC) en un píxel. Con el tiempo la diferencia de voltaje entre los electrodos
se va incrementando, con lo que el cristal líquido se va haciendo más delgado. Cuando esto sucede, puede
que se vea la imagen anterior si el patrón ha cambiado. Para impedir esto, se debe reducir la diferencia de
voltaje acumulado.
Instrucciones de seguridad
Introducción
Conexiones
Uso del software
Ajuste del monitor
Resolución de problemas
Especificaciones
Information
Para Obtener una Mejor
Presentación
INFORMACIÓN de
PRODUCTO
(Libre de retención de
imágenes)
Apéndice
^
zt{T[WXXTz__UGGG^Zzt{T[WXXTz__UGGG^Z YWW^TXXTY_GGG㝘䟸G\aXYaYZYWW^TXXTY_GGG㝘䟸G\aXYaYZ

Apagar, salvapantallas o modo de ahorro de energía
z
Apague el aparato durante 4 horas tras un periodo de uso de 20 horas.
z
Apague el aparato durante 2 horas tras un periodo de uso de 12 horas.
z
Configure el monitor para que se apague con el esquema de alimentación de las propiedades de la
pantalla del PC.
z
Utilice un salvapantallas si es posible. - Es aconsejable usar un salvapantallas de un color o una
imagen en movimiento.
Cambiar la información de color periódicamente
Nota
• Use dos colores diferentes
Alterne la información de color con dos colores diferentes cada 30 minutos.
z
Evite usar una combinación de caracteres y color de fondo con una gran diferencia de luminancia.
No utilice colores grises, ya que pueden producir fácilmente una retención de imagen.
Evite: colores con gran diferencia de luminancia (blanco y negro, gris).
Cambiar el color de los caracteres periódicamente
z
Use colores brillantes con pequeña diferencia de luminancia
- Ciclo: cambie el color de los caracteres y del fondo cada 30 minutos
^
zt{T[WXXTz__UGGG^[zt{T[WXXTz__UGGG^[ YWW^TXXTY_GGG㝘䟸G\aXYaYZYWW^TXXTY_GGG㝘䟸G\aXYaYZ

z
Cada 30 minutos, cambie los caracteres con movimiento.
z
La imagen en movimiento de toda el área junto con el logo periódicamente.
- Ciclo: Imagen en movimiento de la pantalla junto con el logo durante 60 segundos después de 4
horas de uso.
z
El mejor modo de impedir la retención de imagen en el monitor es apagar éste o configurar el PC o
sistema para que se active un salvapantallas cuando el equipo no se utilice. El servicio de garantía
también se limitará de acuerdo con la guía de instrucciones.
Aplicar la función de desplazamiento de pantalla en el producto
z
Aplique la función de desplazamiento de pantalla
- Síntoma: la barra horizontal de color negro se mueve arriba y abajo.
- Seleccione el método
. Guía de instrucciones: Menú OSD -> Set Up (Configurar) -> Safety Screen (Pantalla de seguridad)-
> Screen Scroll (Desplazamiento de pantalla)
. Intervalo de tiempo: 1~10 horas (Recomendado: 1 )
. Periodo de tiempo: 1~5 segundos (Recomendado: 5 )
Nota
• (Consulte la guía del usuario del CD en "Función OSD"; en algunos modelos no está disponible)
Aplicar la función de píxeles de la pantalla en el producto
z
Aplique la función de la Píxel de la pantalla
- Síntoma: El punto de color negro se mueve arriba y abajo.
- Seleccione el método
. Guía de instrucciones: Menú OSD -> Set Up (Configurar) -> Safety Screen (Pantalla de seguridad)-
> Pixel (Píxel).
. Intervalo de tiempo: 1~10 horas (Recomendado: 1 )
. Periodo de tiempo: 10~50 segundos (Recomendado: 50 )
z
Aplique la función de la barra de la pantalla
- Síntoma: las barras horizontal y vertical de color negro se mueven arriba y abajo.
^
zt{T[WXXTz__UGGG^\zt{T[WXXTz__UGGG^\ YWW^TXXTY_GGG㝘䟸G\aXYaYZYWW^TXXTY_GGG㝘䟸G\aXYaYZ

- Seleccione el método
. Guía de instrucciones: Menú OSD -> Set Up (Configurar) -> Safety Screen (Pantalla de seguridad)-
> Bar (Barra)
. Intervalo de tiempo: 1~10 horas (Recomendado: 1 )
. Periodo de tiempo: 10~50 segundos (Recomendado: 50 )
Nota
• (Consulte la guía del usuario del CD en "Función OSD"; en algunos modelos no está disponible)
Aplicar la función de borrado de la pantalla en el producto
z
Aplique la función de borrado de la pantalla en el producto
- Síntoma: Dos bloques verticales se desplazan mientras se borra la pantalla.
- Seleccione el método
. Guía de instrucciones: Menú OSD -> Set Up (Configurar) -> Safety Screen (Pantalla de seguridad)-
> Eraser (Borrador)
. Intervalo de tiempo: 1~10 horas (Recomendado: 1 )
. Periodo de tiempo: 10~50 segundos (Recomendado: 50 )
Nota
• (Consulte la guía del usuario del CD en "Función OSD"; en algunos modelos no está disponible)
© 1995~2008 SAMSUNG. ALL Right Reserved
^
zt{T[WXXTz__UGGG^]zt{T[WXXTz__UGGG^] YWW^TXXTY_GGG㝘䟸G\aXYaYZYWW^TXXTY_GGG㝘䟸G\aXYaYZ

El aspecto externo y el color del producto pueden variar dependiendo del modelo; las especificaciones del
producto se pueden cambiar sin previo aviso para la mejora del rendimiento.
Apéndice
Contacte con SAMSUNG WORLDWIDE
Nota
• Si tiene alguna pregunta o comentario referente a nuestros productos, por favor contacte con nuestro
Servicio de Atención al Cliente
Instrucciones de seguridad
Introducción
Conexiones
Uso del software
Ajuste del monitor
Resolución de problemas
Especificaciones
Information
Apéndice
Contacte con SAMSUNG
WORLDWIDE
Téminos
Eliminación correcta
Autoridad
^
zt{T[WXXTz__UGGG^^zt{T[WXXTz__UGGG^^ YWW^TXXTY_GGG㝘䟸G\aXYaYZYWW^TXXTY_GGG㝘䟸G\aXYaYZ
North America
U.S.A
1-800-SAMSUNG(726-7864) http://www.samsung.com
CANADA
1-800-SAMSUNG(726-7864) http://www.samsung.com/ca
MEXICO
01-800-SAMSUNG(726-7864) http://www.samsung.com
Latin America
ARGENTINE
0800-333-3733 http://www.samsung.com/ar
BRAZIL
0800-124-421
4004-0000
http://www.samsung.com
CHILE
800-SAMSUNG(726-7864) http://www.samsung.com/cl
COLOMBIA
01-8000112112 http://www.samsung.com.co
COSTA RICA
0-800-507-7267 http://www.samsung.com/latin
ECUADOR
1-800-10-7267 http://www.samsung.com/latin
EL SALVADOR
800-6225 http://www.samsung.com/latin
GUATEMALA
1-800-299-0013 http://www.samsung.com/latin
JAMAICA
1-800-234-7267 http://www.samsung.com/latin
PANAMA
800-7267 http://www.samsung.com/latin
PUERTO RICO
1-800-682-3180 http://www.samsung.com/latin
REP. DOMINICA
1-800-751-2676 http://www.samsung.com/latin
TRINIDAD & TOBAGO
1-800-SAMSUNG(726-7864) http://www.samsung.com/latin
VENEZUELA
0-800-100-5303 http://www.samsung.com/latin
Europe
AUSTRIA
0800-SAMSUNG(726-7864) http://www.samsung.com/at
BELGIUM
0032 (0)2 201 24 18 http://www.samsung.com/be
NICARAGUA
00-1800-5077267
HONDURAS
800-7919267

^
zt{T[WXXTz__UGGG^_zt{T[WXXTz__UGGG^_ YWW^TXXTY_GGG㝘䟸G\aXYaYZYWW^TXXTY_GGG㝘䟸G\aXYaYZ
CZECH REPUBLIC
DENMARK
70 70 19 70 http://www.samsung.com/dk
FINLAND
030-6227 515 http://www.samsung.com/fi
FRANCE
3260 SAMSUNG
08 25 08 65 65 (€ 0,15/min)
http://www.samsung.com
GERMANY
01805-SAMSUNG(726-7864)
http://www.samsung.com
HUNGARY
06-80-SAMSUNG(726-7864) http://www.samsung.com
ITALIA
800-SAMSUNG(726-7864) http://www.samsung.com
LUXEMBURG
0035 (0)2 261 03 710 http://www.samsung.com/be
NETHERLANDS
0900-SAMSUNG(726-7864)
http://www.samsung.com/nl
NORWAY
815-56 480 http://www.samsung.com/no
POLAND
0 801 801 881
022-607-93-33
http://www.samsung.com/pl
PORTUGAL
80820-SAMSUNG(726-7864) http://www.samsung.com/pt
EIRE
0818 717 100 http://www.samsung.com/ie
SLOVAKIA
0800-SAMSUNG(726-7864) http://www.samsung.com/sk
SPAIN
902 10 11 30 http://www.samsung.com
SWEDEN
0771-400 200 http://www.samsung.com/se
SWITZERLAND
0800-SAMSUNG(726-7864) www.samsung.com/ch
U.K
0845 SAMSUNG(726-7864) http://www.samsung.com
CIS
ESTONIA
800-7267 http://www.samsung.ee
LATVIA
800-7267 http://www.samsung.com/lv
LITHUANIA
8-800-77777 http://www.samsung.lt
KAZAKHSTAN
8-10-800-500-55-500 http://www.samsung.kz
KYRGYZSTAN
00-800-500-55-500
RUSSIA
8-800-555-55-55 http://www.samsung.com
UKRAINE
8-800-502-0000 http://www.samsung.com
UZBEKISTAN
8-800-120-0-400 http://www.samsung.uz
Asia Pacific
AUSTRALIA
1300 362 603 http://www.samsung.com
CHINA
800-810-5858, 010- 6475 1880 http://www.samsung.com
HONG KONG
3698-4698 http://www.samsung.com/hk
INDIA
3030 8282, 1800 110011 http://www.samsung.com
INDONESIA
0800-112-8888 http://www.samsung.com
JAPAN
0120-327-527 http://www.samsung.com/jp
MALAYSIA
1800-88-9999 http://www.samsung.com/my
NEW ZEALAND
0800SAMSUNG(726-7864) http://www.samsung.com/nz
PHILIPPINES
1800-10-SAMSUNG(726-7864) http://www.samsung.com/ph
SINGAPORE
1800-SAMSUNG(726-7864) http://www.samsung.com
THAILAND
1800-29-3232, 02-689-3232 http://www.samsung.com
(€ 0,15/min)
(€ 0,14/min)
(€ 0,10/min)
TADJIKISTAN
8-10-800-500-55-500
844 000 844 http://www.samsung.com/cz

Téminos
Señal de Sincronización (Sync.)
Las señales de sync (sincronizado) son las señales estándar necesarias para mostrar los colores deseados
en el monitor. Se dividen en Señales de sincronización Vertical y Horizontal. Estas señales muestran las
imágenes de color normales mediante la resolución y la frecuencia establecidas.
Tipos de señales de sincronización
Separada
Este es un esquema de transmisión de señales de sincronización verticales individuales
al monitor.
Compuesta Este es un esquema de combinación de las señales de sincronización verticales dentro
de una señal compuesta y de transmitirlas al monitor. El monitor muestra las señales del
color separando la señal compuesta en las señales del color originales.
Dot Pitch (Ancho de Punto)
La imagen en el monitor está compuesta de puntos de color rojo, verde y azul. Mientras más cercanos estén,
mejor será la nitidez. La distancia entre dos puntos del mismo color es llamada "dot pitch". Unidad: mm
Frecuencia V
La pantalla debe ser dibujada varias veces en un intervalo de un segundo a fin de crear y mostrar una imagen
al usuario. La frecuencia de esta repetición es llamada Frecuencia Vertical o Tasa de Refresco. Unidad: Hz
Ejemplo : Si la misma luz se repite 60 veces por segundo, se considera como de 60 Hz.
Frecuencia H
El tiempo que toma para escanear una línea que conecta horizontalmente el extremo derecho con el extremo
izquierdo de la pantalla es llamado Ciclo Horizontal . Al número inverso del Ciclo Horizontal se le llama
Frecuencia Horizontal. Unidad: kHz
Métodos de Entrelazamiento y No-Entrelazamiento
A la muestra de las líneas horizontales en la pantalla, desde el tope hasta la base, se le llama método de No-
Entrelazamiento, mientras que a la muestra de líneas impares y luego líneas pares alternativamente se le
llama método de Enlazamiento. El método de No-Entrelazamiento es usado por la mayoría de monitores para
asegurar una imagen clara. El método de Entrelazamiento es el mismo que se usa en la TV.
Plug & Play (Enchufar y Operar)
Esta es una función que otorga al usuario la mejor calidad de pantalla, permitiendo al monitor y al computador
intercambiar información automáticamente. Este monitor cumple con el estándar internacional VESA DDC
para la función Plug & Play.
Resolución
Al número de puntos que se alínean vertical y horizontalmente para formar la imagen se le llama "resolución".
Este número muestra la precisión de la pantalla. Es bueno tener una resolución alta para realizar tareas
múltiples ya que se puede mostrar más información en la pantalla.
Ejemplo : Si la resolución es 1360 X 768, esto significa que la pantalla está compuesta de 1360
puntos horizontales (resolución horizontal) y 768 líneas verticales (resolución vertical).
Un MDC (Multiple Display Control)
Un MDC (Multiple Display Control) es una aplicación que permite trabajar en un PC con varias pantallas fácil
y simultáneamente. RS-232C, un estándar de comunicación serial, se usa para la comunicación entre un PC
^
zt{T[WXXTz__UGGG^`zt{T[WXXTz__UGGG^` YWW^TXXTY_GGG㝘䟸G\aXYaYZYWW^TXXTY_GGG㝘䟸G\aXYaYZ
TAIWAN
0800-329-999 http://www.samsung.com/tw
VIETNAM
1 800 588 889 http://www.samsung.com
Middle East & Africa
SOUTH AFRICA
0860-SAMSUNG(726-7864 ) http://www.samsung.com
TURKEY
444 77 11 http://www.samsung.com
U.A.E
800-SAMSUNG (726-7864)
8000-4726
http://www.samsung.com

y una pantalla. Por tanto, es necesario conectar un cable serial entre el puerto serial del PC y el puerto serial
de cada pantalla.
Eliminación correcta
Eliminación correcta de este producto (material eléctrico y electrónico de descarte) -
Europa solamente
(Aplicable en la Unión Europea y en países europeos con sistemas de
recogida selectiva de residuos)
La presencia de esta marca en el producto o en el material informativo que lo
acompaña, indica que al finalizar su vida útil no deberá eliminarse junto con otros
residuos domésticos. Para evitar los posibles daños al medio ambiente o a la
salud humana que representa la eliminación incontrolada de residuos, separe
este producto de otros tipos de residuos y recíclelo correctamente para promover
la reutilización sostenible de recursos materiales.
Los usuarios particulares pueden contactar con el establecimiento donde
adquirieron el producto, o con las autoridades locales pertinentes, para
informarse sobre cómo y dónde pueden llevarlo para que sea sometido a un
reciclaje ecológico y seguro.
Los usuarios comerciales pueden contactar con su proveedor y consultar las
condiciones del contrato de compra. Este producto no debe eliminarse mezclado
con otros residuos comerciales.
Autoridad
La información de este manual está sujeta a cambios sin previo aviso.
© 2008 Samsung Electronics Co., Ltd. Todos los derechos reservados.
Está estrictamente prohibida la reproducción de este manual, por cualquier medio, sin el permiso escrito de
Samsung electronics Co., Ltd .
Samsung electronics Co., Ltd. no será responsable de los errores incurridos aquí o de los daños consiguientes o
incidentales relacionados con el suministro, interpretación o uso de este material
El logotipo " Samsung " son marcas registradas de Samsung Electronics Co., Ltd.; " Microsoft ", " Windows " y "
Windows NT " son marcas registradas de Microsoft Corporation; " VES A", " DPM " y " DDC " son marcas
registradas de Video Electronics Standard Association; el nombre y logotipo " ENERGY STAR " son marcas
registradas de la Agencia de Protección Ambiental de EE.UU. (APA). Como socio de ENERGY STAR ,
Samsung Electronics Co., Ltd. ha determinado que este producto cumple con las directrices de ENERGY STAR
sobre eficiencia energética. Todos los demás nombres mencionados aquí podrían ser marcas comerciales o
marcas registradas de sus respectivos dueños.
- MÉXICO SÓLO -
IMPORTADO POR:
AV. PRESIDENTE MASARIK No. 111 INT. 701
Col. Chapultepec Morales, DELEGACIO
N MIGUEL HIDALGO
C.P. 11570, MEXICO, DISTRITO FEDERAL
Tel:01(55) 5747.5100/01.800.726.7864
Fax:01(55) 5747.5202/01.800.849.1743
zt{T[WXXTz__UGGG_Wzt{T[WXXTz__UGGG_W YWW^TXXTY_GGG㝘䟸G\aXYaYZYWW^TXXTY_GGG㝘䟸G\aXYaYZ

6(6.%&/10+614
.XOODQĸFĸ.ĸODYX]X
l|[UGGGXl|[UGGGX YWW^TXXTY^GGG㝘䟸G[aYXa[YYWW^TXXTY^GGG㝘䟸G[aYXa[Y

Ürünün rengi ve görünümü modeline bal olarak farkllk gösterebilir ve performans gelitirmeleri nedeniyle
ürün özellikleri önceden haber verilmeksizin deitirilebilir.
Güvenlik Talimatlar
aretleme
Aadaki güvenlik talimatlar ürünlerin ve kullanclarn zarar görmesini önlemek için hazrlanmtr;
lütfen okuyun.
Uyar / Dikkat
Bu simgeyle iaretlenmi olan yönergelerin izlenmemesi cihaza fiziksel zarar verebilir veya hasara
uramasna neden olabilir.
aretle
r
Yasaktr Her zaman okunmu ve anlalm olmas önemlidir
Parçalarna ayrmayn Fii elektrik prizinden çkarn
Dokunmayn Elektrik çarpmasn engellemek için topraklama
Açk/Kapal durumu
Uzun bir süre kullanlmayacaksa, bilgisayarnz Görüntü Güç Yönetimi Sistemi'ne (DPM) ayarlayn.
Ekran koruyucu kullanyorsanz, etkin ekran moduna ayarlayn.
Buradaki görüntüler sadece referans amaçldr, tüm durumlar (veya ülkeler) için geçerli deildir.
Zarar görmü veya gevek priz kullanmayn.
z
Bu, elektrik çarpmasna veya yangna neden olabilir.
Fii kablosundan tutarak çekmeyin veya elleriniz slakken fie
dokunmayn.
z
Bu, elektrik çarpmasna veya yangna neden olabilir.
Güvenlik Talimatlar
aretleme
Açk/Kapal durumu
Kurulum
Temizlik
Dier
Giri
Baðlantýlar
Yazlmn Kullanlmas
Monitörün Ayarlanmas
Sorun Giderme
Özellikler
Bilgiler
Appendix
X
zt{T[WXXT{__UGGGXzt{T[WXXT{__UGGGX YWW^TXXTY_GGG㝘䟸G[a\]aY\YWW^TXXTY_GGG㝘䟸G[a\]aY\

Yalnzca gerektii gibi topraklanm fi ve prizleri kullann.
z
Topraklama ileminin düzgün yaplmamas elektrik çarpmasna veya
cihazn bozulmasna neden olabilir.(Sadece Snf l Cihaz.)
Elektrik fiini, gevemeyecek ekilde skca takn.
z
Düzgün olmayan balantlar yangna neden olabilir.
Fii ve kabloyu ar derecede bükmeyin ve üzerine ar nesneler
koymayn; bunlar hasar görmesine neden olabilir.
z
Bu, elektrik çarpmasna veya yangna neden olabilir.
Prize çok fazla uzatma kablosu veya fi balamayn.
z
Bu, yangna neden olabilir.
Monitörü kullanrken elektrik kablosunu çkarmayn.
z
Çkarma srasnda dalgalanma meydana gelebilir ve monitöre zarar
verebilir.
Konektör veya priz tozluyken elektrik kablosunu kullanmayn.
z
Elektrik kablosunun prizi veya konektör tozluysa kuru bir bezle iyice
temizleyin.
z
Tozlu prizi olan bir elektrik kablosu veya konektör kullanlmas, elektrik
çarpmasna veya yangna neden olabilir.
Cihazn elektrik balantsn kesmek için, fiin elektrik prizinden
çkarlmas gerekir ve böylece fi kullanlabilir durumda olur.
z
Bu uyarlara uyulmamas elektrik çarpmasna veya yangna yol açabilir.
Kurulum
Monitörü ar tozlu yerler, ar yüksek ya da düük scaklklara maruz kalan yerler, çok nemli
yerler, kimyasal maddelerin kullanld yerler veya ürünün tekrar tekrar uzun süreler kullanld
havaalanlar ve istasyonlar gibi yerlere kurmadan önce yetkili bir servis merkeziyle görüün.
Y
zt{T[WXXT{__UGGGYzt{T[WXXT{__UGGGY YWW^TXXTY_GGG㝘䟸G[a\]aZ_YWW^TXXTY_GGG㝘䟸G[a\]aZ_

Bunun yaplmamas, monitörünüzde ciddi hasara neden olabilir.
Monitörünüzü az nemli ve az tozlu bir yere koyun.
z
Monitörün içinde elektrik çarpmas veya yangn oluabilir.
Monitörü tarken yere sert bir ekilde brakmayn.
z
Bu hareket, ürüne veya size zarar verebilir.
Monitör altln vitrine ya da rafa yerletirirken, altln ucunun,
vitrinden ya da raftan dar tamamasna dikkat edin.
z
Ürünün yere düürülmesi, ürüne zarar verebilir ya da kiisel yaralanmalara
neden olabilir.
Ürünü dengesiz ya da yüzey alan küçük yerlere yerletirmeyin.
z
Ürün düüp özellikle çocuklar olmak üzere yanndan yürüyenlere zarar
verebileceinden, yalnzca düz ve dengeli bir yüzeye yerletirin.
Ürünü, yere yerletirmeyin.
z
Özellikle çocuklar olmak üzere insanlar üzerinden geçebilir.
YANGIN ÇIKMASINI ÖNLEMEK IÇIN, MUMLARI VEYA DIER AÇIK
ALEVLI NESNELERI HER ZAMAN ÜRÜNDEN UZAKTA TUTUN.
z
Aksi takdirde yangna yol açabilir.
Tüm stma cihazlarn, elektrik kablosundan uzakta tutun.
z
Eriyen kaplama, elektrik çarpmasna ya da yangna neden olabilir.
Ürünü, bir raf ya da dolap gibi havalandrmann yetersiz olduu
yerlere yerletirmeyin.
z
ç scaklktaki yükselme, yangna neden olabilir.
Z
zt{T[WXXT{__UGGGZzt{T[WXXT{__UGGGZ YWW^TXXTY_GGG㝘䟸G[a\]aZ_YWW^TXXTY_GGG㝘䟸G[a\]aZ_

Monitörü yerine dikkatle koyun.
z
Zarar görebilir veya krlabilir.
Monitörü yüz üstü koymayn.
z
Ekran yüzeyi zarar görebilir.
Monitörü taban destei olmadan kullanmayn.
z
Kötü havalandrma nedeniyle bozulabilir veya yangna neden olabilir.
z
Monitör taban desteiyle kullanlmayacaksa, yeterli havalandrma salamak
için gereken admlar uygulayn.
Ürünü monte ederken, havalandrmann salanmas için duvarla
arasnda mesafe (10 cm/ 4 inçten fazla) braktnzdan emin olun.
z
Havalandrmann yetersiz olmas, ürünün iç scaklnda bir arta,
dolaysyla parça ömrünün ksalmasna ve performansn düük olmasna
neden olabilir.
Ambalaj naylonunu çocuklarn ulaamayaca bir yere koyun.
z
Çocuklar ambalaj naylonu ile oynarsa boulma tehlikesi olabilir.
Temizlik
Monitörün kasasn veya ekran yüzeyini hafif nemli, yumuak bir bezle silerek temizleyin.
Deterjan dorudan monitöre püskürtmeyin.
z
Bu, hasara, elektrik çarpmasna veya yangna neden olabilir.
Önerilen bir deterjan yumuak bir bez kullanarak uygulayn.
[
zt{T[WXXT{__UGGG[zt{T[WXXT{__UGGG[ YWW^TXXTY_GGG㝘䟸G[a\]aZ_YWW^TXXTY_GGG㝘䟸G[a\]aZ_

Prizle pin arasndaki konektör tozlu veya kirliyse kuru bir bezle iyice
temizleyin.
z
Kirli bir konektör elektrik çarpmasna veya yangna neden olabilir.
Ürünü temizlemeden önce güç kablosunu çkarttnzdan emin
olun.
z
Aksi takdirde, bu durum elektrik çarpmasna veya yangna neden olabilir.
Elektrik kablosunu prizden çkartn ve ürünü yumuak, kuru bir
bezle silin.
z
Balmumu, benzin, alkol, tiner, böcek ilac, oda spreyi, yalayclar ya da
deterjan gibi kimyasal maddeler kullanmayn.
Dier
Kapa (veya arka ksm) çkarmayn.
z
Bu, elektrik çarpmasna veya yangna neden olabilir.
z
Bakm için yetkili bir servis personeline bavurun.
Monitörünüz normal çalmyorsa, özellikle allmadk sesler çkyor
ya da koku geliyorsa hemen fiten çekin ve yetkili satcya veya
servise bavurun.
z
Bu, elektrik çarpmasna veya yangna neden olabilir.
Ürünü, ya, duman ya da neme maruz kalan yerlerden uzakta tutun;
bir arabann içine monte etmeyin.
z
Bu, elektrik çarpmasna veya yangna neden olabilir.
z
Monitörü kar ve yamurla kar karya kalabilecei açk havada veya su
yaknnda çaltrmayn.
Monitör düerse veya kasas zarar görürse, monitörü kapatn ve
elektrik kablosunu çkarn. Bu durumda Service Center (Servis
Merkezi) ile iletiim kurun.
z
Bu, monitörün hatal çalmasna, elektrik çarpmasna veya yangna neden
olabilir.
\
zt{T[WXXT{__UGGG\zt{T[WXXT{__UGGG\ YWW^TXXTY_GGG㝘䟸G[a\]aZ_YWW^TXXTY_GGG㝘䟸G[a\]aZ_

Monitörü elektrik kablosundan veya sinyal kablosundan çekerek
hareket ettirmeye çalmayn.
z
Bu, kablonun hasar görmesine, elektrik çarpmasna veya yangna neden
olabilir.
Yalnzca elektrik veya sinyal kablosundan çekerek monitörü saa
veya sola hareket ettirmeyin.
z
Bu, kablonun hasar görmesine, elektrik çarpmasna veya yangna neden
olabilir.
Monitör kabinindeki havalandrma noktalarn kapatmayn.
z
Kötü havalandrma arzaya veya yangna neden olabilir.
Monitörün üzerine ar nesneler koymayn.
z
Bu, elektrik çarpmasna veya yangna neden olabilir.
z
Monitörün içine yabanc bir madde kaçarsa, elektrik kablosunu çkartn ve
Servis Merkezi'yle görüün.
Ürünü yanc kimyasal spreylerden ya da yanc maddelerden uzak
tutun.
z
Bu, patlamaya veya yangna neden olabilir.
Monitörün üzerindeki deliklerden içeri hiçbir metal nesne sokmayn.
z
Bu, elektrik çarpmasna, yangna veya yaralanmaya neden olabilir.
Frtnal havalarda veya imek çaktnda ya da uzun süreyle
kullanlmayacaksa monitörün fiini prizden çekin.
z
Bu uyarlara uyulmamas elektrik çarpmasna veya yangna yol açabilir.
]
zt{T[WXXT{__UGGG]zt{T[WXXT{__UGGG] YWW^TXXTY_GGG㝘䟸G[a\]aZ_YWW^TXXTY_GGG㝘䟸G[a\]aZ_

çkartn ve servis merkeziyle görüün.
Uzun bir sure sabit bir ekran görüntüleniyorsa, görüntü art denen
durum veya bulanklk meydana gelebilir.
z
Uzun süre monitörden uzak kalacaksanz, enerji tasarrufu moduna geçin
veya hareketli görüntüler içeren bir ekran koruyucu ayarlayn.
Modele uygun çözünürlük ve frekans düzeyleri ayarlayn.
z
Uygun olmayan çözünürlük istenmeyen resim kalitesine neden olabilir.
32 inç (80 cm) - 1360 X 768
Monitörün sürekli olarak çok yakndan izlenmesi, gözlerde
bozulmaya neden olabilir.
Göz yorgunluunu gidermek için monitörü kullanrken saatte bir en
az be dakika ara verin.
Ürünü, dengesiz, düzgün olmayan ya da titreime maruz kalan
yerlere yerletirmeyin.
z
Ürünün yere düürülmesi, ürüne zarar verebilir ya da kiisel yaralanmalara
neden olabilir. Ürünün, titreime maruz kalan yerlere yerletirilmesi, ürünün
ömrünü ksaltabilir ya da yangna neden olabilir.
Monitörü tarken, monitörü dümesinden kapatn ve elektrik
kablosunu prizden çkarn. Monitörü tamadan önce anten kablosu
ve dier cihazlara bal kablolar da dahil, tüm kablo balantlarn
çkardnzdan emin olun.
z
Kablonun çkarlmamas zarar görmesine ve yangna neden yol açabilecei
gibi elektrik çarpmasna da neden olabilir.
Monitörün havalandrma deliklerinden, kulaklk ya da AV balant
noktalarndan, bçak, tel, ine gibi metal nesneler ya da kat, kibrit
gibi yanc nesneler sokmayn.
z
Bu, elektrik çarpmasna veya yangna neden olabilir. Ürünün içine yabanc
madde kaçarsa ya da su dökülürse, cihaz kapatn, elektrik fiini prizden
^
zt{T[WXXT{__UGGG^zt{T[WXXT{__UGGG^ YWW^TXXTY_GGG㝘䟸G[a\]aZ_YWW^TXXTY_GGG㝘䟸G[a\]aZ_

Üzerinden aslarak zarar verebileceklerinden ürünü çocuklarn
ulaamayaca bir yere yerletirin.
z
Yere düen ürün, fiziksel hasara hatta ölüme neden olabilir.
Ürünü uzun bir süre kullanmayacaksnz elektrik kablosunu prizden
çkartn.
z
Aksi takdirde biriken toz s yaylmasna ya da yaltmn azalmasna yol
açarak elektrik çarpmalarna ya da yangna neden olabilir.
Çocuklarn sevdii nesneleri (ya da çekici gelebilecek herhangi bir
eyi), ürünün üzerine yerletirmeyin.
z
Çocuklar, nesneleri almak için ürünün üzerine trmanmaya çalabilirler.
Ürün düebilir ve fiziksel hasara veya ölüme neden olabilir.
Uzaktan kumandann pillerini çkardnzda, çocuklarn pilleri
yutmamasna dikkat edin. Pilleri çocuklarn eriemeyecei bir yerde
saklayn.
z
Yutarlarsa, hemen bir doktora gidin.
Pilleri deitirirken, +/- uçlarn pilleri tutan ksmda belirtildii
ekilde doru konuma yerletirin.
z
Uçlarn yanl yerletirilmesi pilin çatlamasna veya akmasna neden olarak
yangn, yaralanma veya kirlilie (hasar) yol açabilir.
Yalnzca belirtilen standart pilleri kullann. Yeni ve kullanlm pilleri
bir arada kullanmayn.
z
Bu pilin çatlamasna veya akmasna neden olarak yangn, yaralanma veya
kirlilie (hasar) yol açabilir.
Ürünün, ikiden daha fazla kiiyle tanmas gerekmektedir.
z
Ürünün yere düürülmesi, bozulmasna ya da fiziksel olarak zarar
görmesine neden olabilir.
_
zt{T[WXXT{__UGGG_zt{T[WXXT{__UGGG_ YWW^TXXTY_GGG㝘䟸G[a\]aZ_YWW^TXXTY_GGG㝘䟸G[a\]aZ_

dönüüm merkezine ya da benzer türde piller ya da arj edilebilir piller
satan bir maazaya götürebilir.
© 1995~2008 SAMSUNG. ALL Rights Reserved
Pil (ve arj edilebilir pil), sradan bir atk deildir ve geri dönüüme
gönderilmelidir. Kullanlm ya da arj edilebilir pilin geri dönüüm
amacyla gönderilmesinden, pilin tüketicisi olarak müteri
sorumludur.
z
Müteri, kullanlm ya da arj edilebilir pili bulunduu yere yakn bir geri
`
zt{T[WXXT{__UGGG`zt{T[WXXT{__UGGG` YWW^TXXTY_GGG㝘䟸G[a\]aZ_YWW^TXXTY_GGG㝘䟸G[a\]aZ_

çindekiler
Güvenlik Talimatlar ............................................................................................. 1
aretleme .................................................................................................... 1
Açk/Kapal durumu ................................................................................................... 1
Kurulum .......................................................................................................... 2
Temizlik .................................................................................................................. 4
Dier................................................................................................................. 5
Giri ............................................................................................................ 12
Paket Ýçindekiler ............................................................................................... 12
Monitörünüz ................................................................................................ 13
Mekanik Düzen ............................................................................................... 20
Baðlantýlar ........................................................................................................... 24
Altlk Kitinin Taklmas ......................................................................................... 24
Monitörün Balanmas .................................................................................. 25
MDC ........................................................................................................... 31
Monitörün Ayarlanmas ................................................................................... 51
Input ................................................................................................................. 51
Picture [PC / BNC /DVI Mode] ................................................................................ 52
Picture [AV / S-Video /Component / DVI-Video Mode].................................................. 54
Sound................................................................................................................ 56
Setup .............................................................................................................. 57
Multi Control ....................................................................................................... 60
Dorudan levler .................................................................................................. 60
XW
zt{T[WXXT{__UGGGXWzt{T[WXXT{__UGGGXW YWW^TXXTY_GGG㝘䟸G[a\]aZ_YWW^TXXTY_GGG㝘䟸G[a\]aZ_

Sorun Giderme ................................................................................................. 61
Kendi Kendine Test Özellii Kontrolü .......................................................................... 61
Denetim Listesi ..................................................................................................... 62
Soru ve Yant ......................................................................................................... 64
Özellikler .......................................................................................................................... 66
Genel
................................................................................................................... 66
PowerSaver ............................................................................................................................ 67
Önceden Ayarl Zamanlama Modlar
........................................................................... 67
Information ....................................................................................................... 69
Daha yi Görüntü Elde Etmek çin ............................................................................. 69
ÜRÜN BLGLER (Görüntü Sabitlemesiz ) ............................................... 69
Appendix .............................................................................................................. 73
Dünyann her yerinden SAMSUNG’a ulan ................................................................. 73
Koullar ............................................................................................................... 75
Yetki Bildirimi ........................................................................................................ 76
XX
zt{T[WXXT{__UGGGXXzt{T[WXXT{__UGGGXX YWW^TXXTY_GGG㝘䟸G[a\]aZ_YWW^TXXTY_GGG㝘䟸G[a\]aZ_

Ürünün rengi ve görünümü modeline bal olarak farkllk gösterebilir ve performans gelitirmeleri nedeniyle
ürün özellikleri önceden haber verilmeksizin deitirilebilir.
Giri
Paket Ýçindekiler
Not
• Lütfen monitörünüzle birlikte aadakilerin de geldiinden emin olun.
Eksik parça varsa satcnza bavurun.
stee bal öeleri satn almak için bir yerel satcya bavurun.
Not
• Ürünü, yere yerletirmeyin.
Monitör
Klavuz
Kullanici Klavuzu
Garanti Kart
(Tüm bölgelerde olmayabilir)
Kullanc Klavuzu,
MDC yazlm
Kablosu
D-sub kablosuyla Elektrik Kablosu
Dier
Güvenlik Talimatlar
Giri
Paket Ýçindekiler
Monitörünüz
Mekanik Düzen
Baðlantýlar
Yazlmn Kullanlmas
Monitörün Ayarlanmas
Sorun Giderme
Özellikler
Bilgiler
Appendix
XY

Uzaktan Kumanda Piller (AAA X 2) Delik kapa
BNC - RCA
Adaptör Jak
Yarm Altlk
Ayr satlr
Duvara Takma Seti Hoparlör Seti Altlk Seti
DVI Kablosu BNC Kablosu
Monitörünüz
Ön Taraf
1) MENU
Ekran menü sistemini açmak, menü ekranndan çkmak veya ekran ayar menüsünü kapatmak için bu
dümeyi kullann.
2) Hareket dümesi (Yukar-Aa Dümesi)
Bir menü öesinden dierine dikey olarak hareket eder veya seçilen menü deerlerini ayarlar.
3) Ayarlama dümesi (Sol-Sa Dümesi)/ Ses yükseklii dümesi
XZ
zt{T[WXXT{__UGGGXZzt{T[WXXT{__UGGGXZ YWW^TXXTY_GGG㝘䟸G[a\]aZ_YWW^TXXTY_GGG㝘䟸G[a\]aZ_

Bir menü öesinden dierine yatay olarak hareket eder veya seçilen menü deerlerini ayarlar. Ayrca ses
düzeyini de ayarlar.
4) ENTER
OSD menüsünü seçmek için kullanlr.
5) SOURCE
PC modundan Video moduna geçirir.
Kaynak deitirme ilemine, yalnzca monitöre bal harici aygtlar için izin veril.
Ekran moduna geçirmek için:
[PC]
˧
[BNC]
˧
[DVI]
˧
[AV]
˧
[S-Video]
˧
[Component]
>>Animasyon klibini görmek için buray tklatn.
6) PIP
PIP ekrann açp/kapatmak (On/Off) için PIP dümesine basn.
BNC ve komponent ayn terminali kullandklarndan birden fazla PIP ekranda üst üste açlamaz.
>>Animasyon klibini görmek için buray tklatn.
•
PC
A
V / S-Video / Component
•
BNC
A
V / S-Video
•
DVI
A
V / S-Video / Component
•
AV / S-Video
PC / BNC / DVI
•
Component
PC / DVI
7)
Güç dümesi
Bu dümeyi monitörü açp kapatmak için kullann.
8) Güç göstergesiv
Bu k normal çalma srasnda yeil yanar ve ayarlarnz monitör tarafnda kaydedilirken yeil olarak bir
kez yanp söner.
9) Uzaktan Kumanda Alglaycs
Uzaktan kumandann yönünü televizyondaki bu noktaya çevirir.
Not
• Güç tasarrufu ilevleriyle ilgili daha fazla bilgi edinmek için klavuzda açklanan PowerSaver konusuna
bakn. Enerji tasarrufu salamak için, kullanmanz gerekmeyen zamanlarda veya uzun süre
kullanmayacanz durumlarda monitörünüzü KAPATIN.
Arka Taraf
Not
• Kablo balantlaryla ilgili ayrntl bilgi için Kurulum altnda Kablolarn Balanmas konusuna bakn.
Monitörün arka düzeni, modeline bal olarak biraz farkl olabilir.
X[
zt{T[WXXT{__UGGGX[zt{T[WXXT{__UGGGX[ YWW^TXXTY_GGG㝘䟸G[a\]aZ_YWW^TXXTY_GGG㝘䟸G[a\]aZ_

1) RS232C OUT/IN (RS232C Seri Balant Noktas)):
MDC(Çoklu Aygt Kontrolü) Program Balant Noktas
2) DVI IN(RGB) (PC Video Balant Terminali)
D-Sub Kablo kullanlarak (15 pin D-Sub) - PC mod
(Analog PC)
3) DVI / PC IN(HDCP) (PC Video Balant Terminali)
DVI Kablo (DVI-D - DVI-D) kullanlarak - DVI modu
(Dijital PC)
4) PC/DVI/BNC AUDIO IN (PC/DVI/BNC Audio
Balant Terminali (Giri))
5) COMPONENT AUDIO IN [L-AUDIO-R]
(Komponent Audio Balant Terminali (Giri))
6) BNC/COMPONENT OUT [R/P
R
, G/Y, B/P
B
, H, V]
(BNC/Komponent Balant Terminali(Çk))
BNC (Analog PC) Balants : R, G, B, H, V balant
noktalarn balar
- Komponent Balants: P
R
, Y, P
B
balant noktalarn
balar
7) BNC/COMPONENT OUT [R/P
R
, G/Y, B/P
B
, H, V]
(BNC/Komponent Balant Terminali (Giri) )
8) AV AUDIO IN [L-AUDIO-R](Monitör Audio
Balant Terminali) (Giri)
9) AV OUT [VIDEO](VIDEO Balant Terminali) : AV
modu (Çk)
10) AV IN [VIDEO](VIDEO Balant Terminali) (Giri)
11) AV OUT [S-VIDEO](S-Video Balant Terminali) :
S-Video modu (Çk)
12) AV IN [S-VIDEO](S-Video Balant Terminali)
(Giri)
13) EXT SPEAKER(8 )[- - L - +, - - R - +] (HARC
Hoparlör (8 ))
X\
X\UGGGXX\UGGGX YWW^TXYTYWGGG㝘䟸GXa\]aZWYWW^TXYTYWGGG㝘䟸GXa\]aZW

14) AUDIO OUT [L-AUDIO-R](Audio Balant
Terminali) (Giri)
- MONTÖR ÇIKII: PC, DVI, BNC balanr
15) POWER SW (Güç Aç/Kapat Dümesi):
Monitörü açar ve kapatr.
16) POWER IN (Güç balant noktas):
Elektrik kablosu, monitöre ve prize taklr.
Not
• Kablo, sinyal kayna vs. gibi durumlarda devreye balanabilecek monitör says farkl olabilir. Sinyal
kaynann azalmad bir kablo ile 10 taneye kadar monitör balanabilir.
17) Kensington Lock
Kensington kilidi, TV'yi halka açk bir ortamda
kullanyorsanz, sistemi fiziksel olarak sabitlemek için
kullanlan bir aygttr. (Kilitleme aygtnn ayrca satn
alnmas gerekmektedir.)
Kilitleme cihaz kullanmak için satn aldnz yere
bavurun.
Not
• Kablo balantlar hakknda daha fazla bilgi edinmek için Monitörünüzü Balama konusuna bakn.
Uzaktan Kumanda
Not
• Uzaktan kumandann performans, moniturün yannda çaltrlan TV veya baka elektronik aygtlar
tarafndan etkilenebilir ve frekans giriimi nedeniyle hatal çalmasna neden olabilir.
1. ON / OFF
2. MAGICNET
3. MDC
4. LOCK
5. MagicNet Dümesi
6.+100 -/--
7. VOL
8. MUTE
9. TTX/MIX
10. MENU
11. MUTE
12. P.MODE
13. AUTO
14. PRE-CH
15 . CH/P
16. SOURCE
17. INFO
18. EXIT
19. Yukar-Aa Sol-Sa Dümesi
20. S.MODE
21. STILL
22. FM RADIO
23. P.SIZE
24. SRS
25. DUAL/MTS
26. PIP
X]
X\UGGGYX\UGGGY YWW^TXYTYWGGG㝘䟸GXa\]aZ\YWW^TXYTYWGGG㝘䟸GXa\]aZ\

27. SOURCE
28. SWAP
29. SIZE
30. REW
31. STOP
32. PLAY/PAUSE
33. FF
1) ON / OFF
Bu dümeyi monitörü açp kapatmak için kullann.
2) MAGICNET
MagicNet Hzl Balatma Dümesi.
- Bu ilev, bu monitörde kullanlamaz.
3) MDC
MDC Hzl Balatma Dümesi.
4) LOCK
Bu düme, uzaktan ve monitör üzerindeki Güç ve LOCK dümeleri dndaki tüm ilev tularn etkinletirir
ya da kapatr.
5) MagicNet Dümesi
- MagicNet için bu dümeleri kullann.
- Bu ilev, bu monitörde kullanlamaz.
• Alfabe/Numara: Bir web sitesi adresi girerken bu dümeleri kullann.
• DEL: Bir önceki karakteri siler.
• SYMBOL : aret girerken bunu kullann. (.O_-)
• ENTER : Giri için bunu kullann.
6) +100 -/--
100˅ün üzerinde kanal seçmek için basn.
Örnein, kanal 121
˅
I seçmek için önce
ˈ
+100
ˉG
daha sonra
ˈ
2
ˉG
ve son olarak
ˈ
1
ˉG
dümesine basn.
- Bu ilev, bu monitörde kullanlamaz.
7) VOL
Ses düzeyini ayarlar.
8)
MUTE
Ses çkn geçici olarak duraklatr (sessizletirir).
Mute (sessiz) modundayken Mute veya - VOL + dümesine basldnda sesli duruma geri dönülür.
9)
TTX/MIX
X^
X\UGGGZX\UGGGZ YWW^TXYTYWGGG㝘䟸GXa\]aZ\YWW^TXYTYWGGG㝘䟸GXa\]aZ\

TV kanallar teleteks araclyla yazl bilgi hizmeti salar.
[TTX / MIX genellikle Avrupa
˅
da kullanlr. ]
10)
MENU
Ekran menü sistemini açmak, menü ekranndan çkmak veya ekran ayar menüsünü kapatmak için bu
dümeyi kullann.
11)
ENTER
Menü ekranndan çkar veya ekran ayar menüsünü kapatr.
12)
P.MODE
Bu dümeye bastnzda, ekrann alt orta ksmnda geçerli mod görüntülenir.
AV / S-Video /Component Mode : P.MODE( Picture Mode )
Monitörün fabrikada önceden ayarlanm dört otomatik resim ayar vardr.
Önceden yaplandrlm mevcut modlar arasnda dolamak için dümeye yeniden basn.
( Dynamic Standard Movie Custom )
PC / DVI Mode : M/B ( MagicBright
˞
)
MagicBright
˞
görüntülediiniz resmin içeriine bal olarak en iyi görüntüleme ortamn salayan yeni bir
özelliktir.
Önceden yaplandrlm mevcut modlar arasnda dolamak için dümeye yeniden basn.
( Entertain Internet Text Custom )
13) AUTO
Dorudan eriimi otomatik olarak ayarlamak için bu dümeyi kullann. (PC)
Kontrol panelinde çözünürlüü deitirirseniz, AUTO ilevi yürütülür.
14)
PRE-CH
Bu düme önceki kanala dönmek için kullanlr.
- Bu ilev, bu monitörde kullanlamaz.
15)
CH/P
TV modunda, TV kanallarn seçer.
- Bu ilev, bu monitörde kullanlamaz.
16)
SOURCE
PC modundan Video moduna geçirir.
17)
INFO
Geçerli resim bilgileri ekrann sol üst köesinde görüntülenir.
18)
EXIT
Menü ekranndan çkar.
19) Yukar-Aa Sol-Sa Dümesi
Bir menü öesinden dierine yatay veya dikey olarak hareket eder ya da seçilen menü deerlerini ayarlar.
20)
S.MODE
Bu dümeye bastnzda, ekrann alt orta ksmnda geçerli mod görüntülenir.
Monitör, yerleik uygunluk düzeyi yüksek stereo amplifikatör içerir.
Önceden yaplandrlm mevcut modlar arasnda dolamak için dümeye yeniden basn.
( Standard ˧ Music ˧ Movie ˧ Speech ˧ Custom )
21) STILL
Ekran dondurmak için dümeye bir kere basn. Çözmek için yeniden basn.
22) FM RADIO
FM Radio˅yu açar veya kapatr.
PC/DVI modunda yalnzca SOUND
˅
u FM Radio olarak ayarlar.
Sinyalin zayf olduu alanlarda, FM RADIO yayn yaparken gürültü olabilir.
Genellikle Video SOURCE modunda, ekran kapatarak FM RADIO olarak ayarlar.
- Bu ilev, bu monitörde kullanlamaz.
23) P.SIZE
Zoom1, Zoom2, DTV - 1080i (veya 720p üstü) için mevcut deildir.
24)
SRS
SRS
25)
DUAL/MTS
DUAL-
X_
X\UGGG[X\UGGG[ YWW^TXYTYWGGG㝘䟸GXa\]aZ\YWW^TXYTYWGGG㝘䟸GXa\]aZ\

- Bu ilev, bu monitörde kullanlamaz.
STEREO/MONO, DUAL l / DUAL ll ve MONO/NICAM MONO/NICAM STEREO yayn türüne bal olarak
çaltrlabilir; bunun için TV seyrederken uzaktan kumandadaki DUAL dümesini kullann.
MTS-
MTS (Multichannel Television Stereo) modunu seçebilirsiniz.
Ses Tipi MTS/S_Modu Varsaylan
FM Stereo
Mono Mono
Manuel Deiiklik
Stereo
Mono
˩
Stereo
SAP
Mono
˩
SAP
Mono
26)
PIP
PIP ekrann açp/kapatmak (On/Off) için PIP dümesine basn.
27)
SOURCE
Video kaynan seçer.(PIP)
28) SWAP
PIP ve ana görüntünün içeriklerini deitirir.
PIP penceresindeki görüntü ana ekranda, ana ekrandaki görüntü PIP penceresinde görüntülenir.
29)
SIZE
Resim Boyutu˅nu deitirebilirsiniz.
30) REW
Geri sar
31) STOP
Stop (Durdur)
32)
PLAY / PAUSE
Oynat / Duraklat
33) FF
Hzl ileri
© 1995~2008 SAMSUNG. ALL Rights Reserved
X`
X\UGGG\X\UGGG\ YWW^TXYTYWGGG㝘䟸GXa\]aZ\YWW^TXYTYWGGG㝘䟸GXa\]aZ\

Mekanik Düzen | Monitör Kafas | Altlk | Hoparlör | VESA Braketinin Taklmas | Wall Bracket InstallationDuvar Braketi
Montaj
1. Mekanik Düzen
2. Monitör Kafas
YW
X\UGGG]X\UGGG] YWW^TXYTYWGGG㝘䟸GXa\]aZ\YWW^TXYTYWGGG㝘䟸GXa\]aZ\

3. Altlk
4. Hoparlör
5. VESA Braketinin Taklmas
z
VESA taktnzda, uluslararas VESA standartlarna tam olarak uyduunuzdan emin olun.
z
VESA Braketini Satn Alma ve Kurulum Bilgileri: Lütfen sipari vermek için en yakn Samsung Distribütörüne
urayn. Sipariiniz verildikten sonra kurulum uzmanlar sizi ziyaret edecek ve braketinizi takacaktr.
z
LCD Ekran tamak için en az 2 kii gereklidir.
z
Samsung, müterinin isteine bal olarak yaplan ilemlerde meydana gelebilecek ürün hasarlarndan ve kiisel
yaralanmalardan sorumlu olmayacaktr.
YX
X\UGGG^X\UGGG^ YWW^TXYTYWGGG㝘䟸GXa\]aZ\YWW^TXYTYWGGG㝘䟸GXa\]aZ\

Boyutlar
Braketi duvara sabitlemek için, yalnzca 6 mm çapnda ve 8-12 mm uzunluunda makine vidalarn
kullann.
6. Wall Bracket InstallationDuvar Braketi Montaj
z
Duvar braketini takmak için bir teknisyenle görüün.
z
Samsung Electronics, montaj müteri tarafndan yapldnda ürüne ya da müterilere gelecek zararlardan
sorumlu deildir.
z
Bu ürün, çimento duvarlara monte edilmek içindir. Ürün, sva ya da ahap üzerine monte edildiinde yerinde
durmayabilir.
Bileenler (Ayr Olarak Satlr)
Yalnzca ürünle birlikte verilen parçalar ve aksesuarlar kullann.
A
Duvar
Destei
B
Balant
Destei
C
Vida:
8EA
D
Vida:
3EA
E
Tahta Vidas :
7EA
F
Tespit Cvatas :
7EA
G
Montaj
Klavuzu
Duvar Montaj Desteini birletirme
1.
1. Mark the location of hole on the wall.
2. aretli yerden 35 mm derinliinde bir delik açn.
3. Tespit cvatalarn
F
duvardaki her delie yerletirin.
4. Duvar braketini
A
, dubelleri
F
duvar braketine
A
tutturduktan sonra tahta
vidalaryla
E
duvara takn.
Destek duvara tam olarak sabitlenmezse, LCD Monitör
düebilir.
2.
1. Televizyonu kapatn ve güç kablosunu prizden çkartn.
2. Monitör
˅
yi yüzü aa gelecek ekilde masa üzerinde yumuak bir kuma parçasnn veya yastn
üzerine yerletirin.
3. Balant desteini
B
monitör
˅
nin arkasna takn ve vidalar
C
skn.
YY
X\UGGG_X\UGGG_ YWW^TXYTYWGGG㝘䟸GXa\]aZ\YWW^TXYTYWGGG㝘䟸GXa\]aZ\

3.
1. Balant desteinin
B
3 Asksn duvar desteinin
A
oluklarna geçirin.
2. Balant desteini
B
ve duvar desteini
A
vidalarla
D
sabitleyin.
Seti duvara monte etmeden önce, önce kablolar sete balayn.
YZ
X\UGGG`X\UGGG` YWW^TXYTYWGGG㝘䟸GXa\]aZ\YWW^TXYTYWGGG㝘䟸GXa\]aZ\

Ürünün rengi ve görünümü modeline bal olarak farkllk gösterebilir ve performans gelitirmeleri nedeniyle
ürün özellikleri önceden haber verilmeksizin deitirilebilir.
Baðlantýlar
Altlk Kitinin Taklmas
Not
• Yalnzca ürünle birlikte verilen cvatalar kullanlmaldr.
Dikkat
Samsung Electronics, belirtilen dnda bir altlk kullanlmasndan kaynaklanacak hasarlardan sorumlu
olmayacaktr.
1. Yarm Altln Taklmas
Sol altlk
Sa altlk
Dikkat
"CAUTION" etiketini arkaya dönük olarak
yerletirin.
1) Monitörün altnda bulunan, altln takld delii korumak i çin bir 'Kapak Koruyucu' kullan lr. Ürünle birlikte
verilen Yarm Altlk ya da altlk setini (ayrca satlr) takarken 'Kapak Koruyucu'yu çkartmay ve duvara
takma setini takarken 'Delik-Kapa'n kullanarak delii kapatmay unutmayn.
2) Srasyla sol ve sa altlklar takn.
3) Altl, monitörün altndaki delie yerletirin.
Viday, belirtilen delie yerletirin ve s kn. (M4
Ý
L15)
Dikkat
Güvenlik Talimatlar
Giri
Baðlantýlar
Altlk Kitinin Taklmas
Monitörün Balanmas
Yazlmn Kullanlmas
Monit örün Ayarlanmas
Sorun Giderme
Özellikler
Bilgiler
Appendix
Y[
X\UGGGXWX\UGGGXW YWW^TXYTYWGGG㝘䟸GXa\]aZ\YWW^TXYTYWGGG㝘䟸GXa\]aZ\

Bu stand, orijinal olarak ekran açsnn ayarlanmas için tasarlanmtr. Bu standn herhangi bir
kullanmndan kaynaklanabilecek sorunlardan firma sorum lu deildir. Ürünü asla üzerine nesneler konan bir
sehpa olarak kullanmayn.
2. Altlk Setinin (ayrca satlr) Taklmas
1) Monitörün altnda bulunan, altln takld delii korumak i çin bir 'Kapak Koruyucu' kullan lr. Ürünle birlikte
verilen Yarm Altlk ya da altlk setini (ayrca satlr) takarken 'Kapak Koruyucu'yu çkartmay ve duvara
takma setini takarken 'Delik-Kapa'n kullanarak delii kapatmay unutmayn.
2)
Parçalar doru yönde ve doru yere yerletirdiinizden emin olun. (M4
Ý
L15)
3) Altl, monitörün altndaki delie yerletirin.
4) Viday, belirtilen delie yerletirin ve s kn. (M4
Ý
L15)
Monit örün Balanmas
Toprakl bir Güç kablosu durumunda
Arza olmas durumunda topraklama ucu elektrik çarpmasna yol açabilir. AC gücünü fie takmadan
önce topraklama balantsn uygun bir ekilde yapt nzdan emin olun. Ya da, topraklama
balantsn sökmeden önce AC gücünü fiten çkardnzdan emin olun.
Not
• DVD'ler, VCR'lar ya da Video kameralar gibi AV giri aygtlarnn yan sra bilgisayarnz monitöre
balayabilirsiniz. AV giri aygtlarnn balanmasyla ilgili daha ayrntl bilgi için Monitörün Ayarlanmas
bölümünde Kullanc Kontrolleri konusuna bakn.
1. Bilgisayara Balama
Y\
X\UGGGXXX\UGGGXX YWW^TXYTYWGGG㝘䟸GXa\]aZ]YWW^TXYTYWGGG㝘䟸GXa\]aZ]

1) Monitörünüzün güç kablosunu monitörün arkasndaki güç balant noktasna takn.
Açma/kapatma dümesini açk duruma getirin.
2) D-sub kablosunu monitöre üç ekilde balayabilirsiniz.
Aadaki yöntem lerden birini seçin:
2-1) Video kartndaki D-sub (Analog) konektörü kullanarak.
Sinyal kablosunu, monitörün arkas ndaki 15 pin RGB balant noktasna takn.
2-2) Video kartndaki DVI (Dijital) konektörü kullanarak.
DVI Kablosunu monitörünüzün arkasndaki DVI(HDCP) balant noktasna takn.
2-3) Video kartndaki BNC (Analog) konektörü kullanarak.
BNC Kablosunu Monitörünüzün arkasndaki BNC/COMPONENT IN - R, G, B, H, V balant
noktasna balayarak.
3) Monitörünüzün güç kablosunu monitörün arkasndaki güç balant noktasna takn.
Not
• Bilgisayarnz ve monitörünüzü açn.
Not
• DVI kablosu ya da BNC kablosu istee baldr.
stee bal öeleri satn almak için bölgenizdeki Samsung Electronics servis merkezine bavurun.
Dijital DVD Balama
Y]
X\UGGGXYX\UGGGXY YWW^TXYTYWGGG㝘䟸GXa\]aZ]YWW^TXYTYWGGG㝘䟸GXa\]aZ]

Not
• Dijital DVD'ler gibi giri cihazlar, DVI kablosu kullanlarak monitörün DVI IN terminaline balanr.
• Ardndan DVD diski takl halde DVD'yi çaltrn.
• SOURCE dümesini kullanarak Digital seçin.
Not
• Monitörde DVI IN giri cihazlarn dijital DVD'ye balamak için DVI balant noktalar vardr.
VCR
˅
a Balama
1) VCR'lar ya da Video Kameralar gibi AV giri aygtlar, S-VHS ya da BNC kablolar kullanlarak monitörün AV
IN [VIDEO] ya da AV IN [S-VIDEO] balanrlar.
2) VCR veya Video kamerann Audio (L) ve Audio (R) terminallerini, ses kablolar kullanarak monitörün AV IN
[L-AUDIO-R] balayn.
Not
• Monitörün önünde ya da uzaktan kumandada yer alan Kaynak dümesini kullanarak VCR ya da Video
kameraya bal olan AV ya da S-Video'den birini seçin.
• Ardndan kaset takl halde VCR ya da Video kameray çaltrn.
Not
• S-VHS ya da BNC kablosu istee baldr.
DVD Oynatcya Balama
Y^
X\UGGGXZX\UGGGXZ YWW^TXYTYWGGG㝘䟸GXa\]aZ]YWW^TXYTYWGGG㝘䟸GXa\]aZ]

1) Monitörün COMPONENT AUDIO IN [L-AUDIO-R] ile DVD oynatcnn AUDIO OUT jaklar aras na bir tak m
audio kablosu balayn.
2) Monitörün BNC/COMPONENT IN - P
R, Y, PB balant noktas ile DVD oynatcnn PR, Y, PB jaklar
arasna bir Component kablosu balayn.
Not
• Monitörün ön tarafnda ya da uzaktan kumandada bulunan Kaynak dümesini kullanarak DVD oynatcnn
bal olduu Component kayna n seçin.
• Ardndan DVD diski takl halde DVD Oynatcy çaltrn.
Not
• Component kablosu istee baldr.
Komponent video hakk nda daha fazla açklama için DVD oynat cnzn kullanma klavuzuna bakn.
Video Kamera Balama
1) Video kamerann A/V çk jaklarn bulun. Genellikle vide
o kamerann yan ya da arka tarafnda bulunurlar.
Video kamera üzerindeki AUDIO OUTPUT jaklaryla monitörün AV AUDIO IN [L-AUDIO-R] arasna bir
takm ses kablosu takn.
2) Video kamerann VIDEO OUTPUT jak ile monitörün üzerindeki AV IN [VIDEO] (AV GR [VDEO])
arasna bir video kablosu takn.
Not
• Monitörün ön tarafnda ya da uzaktan kumandada bulunan Kaynak dümesini kullanarak Video kameraya
bal AV kaynan seçin.
• Ardndan kaset takl halde Video kameray çaltrn.
Not
• Burada gösterilen audio-video kablolar genellikle Video kamera ile birlikte verilir.
(Birlikte verilmediyse, bölgenizdeki elektronik ürün maazalarna bakabilirsiniz.)
Video kameranz stereo ses veriyorsa, iki kablodan oluan kablo takmlarn balamanz gerekmektedir.
Y_
X\UGGGX[X\UGGGX[ YWW^TXYTYWGGG㝘䟸GXa\]aZ]YWW^TXYTYWGGG㝘䟸GXa\]aZ]

DTV Set Üstü Kutusunu Balama
Not
• Tipik bir Set Üstü Kutusunun balantlar aada gösterilmitir.
1) Monitörün BNC/COMPONENT IN - PR, Y, PB balant noktas ile Set Üstü Kutusunun PR, Y, PB jaklar
arasna bir Component kablosu balayn.
2) Monitörün COMPONENT AUDIO IN [L-AUDIO-R] ile Set Üstü Kutusunun AUDIO OUT jaklar arasna bir
takm audio kablosu balayn.
Not
• Monitörün ön tarafnda ya da uzaktan kumandada bulunan Kaynak dümesini kullanarak DTV Set Üstü
Kutusunun ba l olduu Component kaynan seçin.
Not
• Komponent video hakknda daha fazla açklama için Set Üstü Kutusunun kullanma klavuzuna bakn.
Hoparlörlerin Balanmas
Not
• Vidalar kullanarak SET'i ve hoparlörleri skn.
* Hoparlör standsz hoparlör setini takn.
Y`
X\UGGGX\X\UGGGX\ YWW^TXYTYWGGG㝘䟸GXa\]aZ]YWW^TXYTYWGGG㝘䟸GXa\]aZ]

Not
• SET'in arkasndaki hoparlör balant jak ile hoparlörün arkasndaki hoparlör balant jak arasna bir
hoparlör ba lant kablosu ba layn.
Not
• SET hoparlörlere balyken hoparlörü tutarak SET'i hareket ettirmeyin.
SET hoparlörünün balanmas için kullanlan hoparlör destei zarar görebilir.
Ses Sistemine Balama
Not
• AUDIO SSTEM üzerindeki AUX L, R jaklaryla Monitörün MONITOR IN [L-AUDIO-R] arasna bir takm
audio kablosu takn.
© 1995~2008 SAMSUNG. ALL Rights Reserved
ZW
X\UGGGX]X\UGGGX] YWW^TXYTYWGGG㝘䟸GXa\]aZ]YWW^TXYTYWGGG㝘䟸GXa\]aZ]

Giri
Çoklu Ekran Kontrolü (MDC), çeitli ekranlarn kolayca ve ayn anda bir bilgisayar üzerinde çaltrlmasn salayan
bir uygulamadr. Bilgisayar ve ekran arasndaki iletiim için bir seri iletiim standard olan RS-232C kullanlr. Bu
nedenle bilgisayarn seri balant noktas ile ekrann seri balant noktas arasna bir seri kablo taklmaldr.
Balangç - Ana Ekran
Program balatmak için Start > Program > Samsung > MDC System öesini seçin.
Seçilen setin ses yüksekliini kaydrmal kontrolde görmek için bir set seçin.
Z
zt{T[WXXT{__UGGGZZzt{T[WXXT{__UGGGZZ YWW^TXXTY_GGG㝘䟸G[a\]aZ`YWW^TXXTY_GGG㝘䟸G[a\]aZ`

Ana Simgeler Seçme Dümesi
Remocon Bilgi Tablosu
Safety Lock Ekran Seçimi
Port Selection Kontrol Araçlar
1. Herbir ekrana geçmek için ana simgeleri kullann.
2. Ekran biriminin uzaktan kumanda sinyal alm ilevini etkinletirmenizi ya da devre d brakmanz salar.
3. Kilitleme levini ayarlar.
Lock function’ (Kilitleme ilevi) ayarlarken yalnzca uzaktan kumanda ve set üzerindeki güç ve kilitleme dümelerini
kullanabilirsiniz.
4. PC Seri Balant noktas ayarlar deiebilir. Orijinal deer COM1'dir.
5. Tüm ekranlar seçmek ya da seçimleri kaldrmak için Select all (Tümünü seç) ya da Clear (Temizle) dümelerini
tklatn.
6. Seçilen ekranla ilgili ksa bilgiler görmek için Tabloyu kullann.
7. Ekran Seçimi ksmndan bir ekran seçin.
8. Ekranlar kontrol etmek için Kontrol Araçlarn kullann.
<Not> Uzaktan kumanda Etkinletirme/Kapatma ilevi, aygt açk ya da kapal haldeyken çalr ve bu durum,
MDC'ye bal tüm ekranlar için geçerlidir. Ancak MDC kapalyken durum ne olursa olsun, MDC
kapandnda tüm ekranlarn uzaktan kumanda sinyali alm ilevi Etkin hale getirilir.
Port Selection
Z
zt{T[WXXT{__UGGGZ[zt{T[WXXT{__UGGGZ[ YWW^TXXTY_GGG㝘䟸G[a\]aZ`YWW^TXXTY_GGG㝘䟸G[a\]aZ`

1. Çoklu Ekran Kontrolü ilk olarak COM1'e ayarlanmtr.
2. COM1 dnda herhangi bir balant noktas kullanldnda, Port Selection (Balant Noktas Seçimi) menüsünden
COM1-COM4 aras portlar seçilebilir.
3. Seri kablo kullanlarak monitöre balanan tam balant noktas ad seçilmezse, iletiim salanamayacaktr.
4. Seçilen balant noktas programa kaydedilir ve bir sonraki programda da kullanlr.
Power Control
1. Ana simgelerden Power Control'u (Güç Kontrolü) tklattnzda Power Control (Güç Kontrolü) ekran açlr.
Z
zt{T[WXXT{__UGGGZ\zt{T[WXXT{__UGGGZ\ YWW^TXXTY_GGG㝘䟸G[a\]aZ`YWW^TXXTY_GGG㝘䟸G[a\]aZ`

Bilgi Tablosu, Güç Kontrolü için gerekli baz temel bilgileri gösterir.
1) (Power Status(Güç Durumu))
2) Input
3) Image Size
4) On Timer
5) Off Timer
2. Kontrol etmek istediiniz ekran seçmek için Select All (Tümünü Seç) dümesini ya da Check Box (Kutuyu aretle)
dümesini kullann.
Power Control (Güç Kontrolü), seçilen ekrann ilevlerinden bazlarnn kontrol edilmesine izin verir.
Z
zt{T[WXXT{__UGGGZ]zt{T[WXXT{__UGGGZ] YWW^TXXTY_GGG㝘䟸G[a\]aZ`YWW^TXXTY_GGG㝘䟸G[a\]aZ`

1) Power On/Off
- Seçilen ekran açar ya da kapatr.
2) Volume
- Seçilen ekrann ses seviyesini kontrol eder.
Setlerde seçilen ekrann ses yükseklii deerini alr ve kayar kontrolde gösterir.
(Seçimi iptal ederseniz ya da Select All (Tümünü Seç) seçerseniz ayar, varsaylan deeri olan 10'a geri döner)
3)
Mute On/Off (Sessiz Aç/Kapat)
- Seçilen ekrann Mute (Sessiz) ilevini etkinletirir/kapatr.
Her seferinde bir set seçildiinde, seçilen set için Mute (Sessiz) ilevi etkinken Mute (Sessiz) etkindir.
Ses seviyesini ayarladnzda Mute (Sessiz) ilevi otomatik olarak devre d kalr.
(Seçimleri kaldrdnzda ya da "Select All" (Tümünü Seç) seçtiinizde ayarlar varsaylan deerlerine geri döner.)
Power Control (Güç Kontrolü) ilevi, tüm ekranlar için kullanlr.
Volume (Ses) Kontrolü ve Mute (Sessiz) ilevleri yalnzca güç durumu ON (AÇIK) olan ekranlarda
kullanlabilir.
Input Source
1. Ana simgelerden Input Source (Giri Kayna) tklattnzda Input Source (Güç Kayna) ekran açlr.
Kontrol etmek istediiniz ekran seçmek için Select All (Tümünü Seç) dümesini ya da Check Box (Kutuyu aretle)
dümesini kullann.
• TV Mode
• MagicNet Mode
Z
zt{T[WXXT{__UGGGZ^zt{T[WXXT{__UGGGZ^ YWW^TXXTY_GGG㝘䟸G[a\]aZ`YWW^TXXTY_GGG㝘䟸G[a\]aZ`

Bilgi Tablosu, Input Source (Giri Kayna) Kontrolü için gerekli baz temel bilgileri gösterir.
1) PC
- Seçilen ekrann Giri Kaynan PC'ye deitirir.
2) BNC
- Seçilen ekrann Giri Kaynan BNC'ye deitirir.
3) DVI
- Seçilen ekrann Giri Kaynan DVI'ye deitirir.
4) TV
- Seçilen ekrann Giri Kaynan TV deitirir.
5) AV
- Seçilen ekrann Giri Kaynan AV'ye deitirir.
6) S-Video
- Seçilen ekrann Giri Kaynan S-Video'ya deitirir.
7) Component
- Seçilen ekrann Giri Kaynan Component'e (Komponent) deitirir.
8) MagicNet
- MagicNet Giri kayna yalnzca MagicNet modelinde çalr.
9) Channel
- Input Source (Giri Kayna) TV olduunda, Channel (Kanal) oku görüntülenir.
TV Kayna sadece televizyonlu ürünlerde seçilebilir ve kanallar kontrol etme ilemine Input Source
(Giri Kayna) TV iken izin verilir.
Input Source (Giri Kayna) Kontrolü yalnzca güç durumu ON (AÇIK) olan ekranlarda kullanlabilir.
Image Size
PC, BNC, DVI
1. Ana simgelerden Image Size (Görüntü Boyutu) tklattnzda Image Size (Görüntü Boyutu) ekran açlr.
Z
zt{T[WXXT{__UGGGZ_zt{T[WXXT{__UGGGZ_ YWW^TXXTY_GGG㝘䟸G[a\]aZ`YWW^TXXTY_GGG㝘䟸G[a\]aZ`

Bilgi Tablosu, Image Size (Görüntü Boyutu) için gerekli baz temel bilgileri gösterir.
1)
(Power Status(Strömstatus))
- Geçerli ekrann açk veya kapal olduunu gösterir.
2) Image Size
- Kullanlan ekrann geçerli Image Size (Görüntü Boyutu) deerini gösterir.
3) Input
- Kullanlan ekrann geçerli Input Source (Giri Kayna) deerini gösterir.
4) Bilgi Tablosu, Input Source (Giri Kayna) deeri PC, BNC, DVI olan ekranlar gösterir.
5) PC Source -PC Kayna Image Source (Görüntü Kayna) sekmesini tklattnzda görüntülenir.
- Image Size (Görüntü Boyutu) Kontrolü dümesi, PC, BNC, DVI için kullanlabilen Image Size (Görüntü Boyutu)
deerlerini kontrol eder.
6) Video Source
- lgili Input Source (Giri Kayna) için Image Size (Görüntü Boyutu) deerini kontrol etmek amacyla Video Source
(Video Kayna) sekmesini tklatn.
MagicNet Giri kayna yalnzca MagicNet modelinde çalr.
Image Size (Görüntü Boyutu) kontrolü yalnzca güç durumu ON (AÇIK) olan ekranlar için kullanlabilir.
Image Size
TV, AV, S-Video, Component, DVI(HDCP)
1. Ana simgelerden Image Size (Görüntü Boyutu) tklattnzda Image Size (Görüntü Boyutu) ekran açlr.
Z
zt{T[WXXT{__UGGGZ`zt{T[WXXT{__UGGGZ` YWW^TXXTY_GGG㝘䟸G[a\]a[WYWW^TXXTY_GGG㝘䟸G[a\]a[W

Bilgi Tablosu, Image Size (Görüntü Boyutu) için gerekli baz temel bilgileri gösterir.
1) TV, AV, S-Video, Component (Komponent) için Image Size (Görüntü Boyutu) deerini ayarlamak amacyla Video
Source (Video Kayna) sekmesini tklatn.
Kontrol etmek istediiniz ekran seçmek için Select All (Tümünü Seç) dümesini ya da Check Box (Kutuyu aretle)
dümesini kullann.
2) Bilgi Tablosu, giri kayna yalnzca TV,AV, S-Video, Component (Komponent) ya da DVI (HDCP) olan ekranlar
gösterir.
3) Seçilen ekrann Image Size (Görüntü Boyutu) deerini deitirir.
Not: Auto Wide (Otomatik Genilik), Zoom1 (Yaknlatrma 1) ve Zoom2 (Yaknlatrma 2) ayarlar,
Component (Komponent) ve DVI (HDCP) giri sinyali türü 720p ya da 1080i olduunda seçilebilir
durumda deildir.
MagicNet Giri kayna yalnzca MagicNet modelinde çalr.
Image Size (Görüntü Boyutu) Kontrolü yalnzca güç durumu ON (AÇIK) olan ekranlarda kullanlabilir.
Time
1. Ana simgelerden Time' (Saat) tklattnzda Time Control (Saat Kontrolü) ekran açlr.
zt{T[WXXT{__UGGG[Wzt{T[WXXT{__UGGG[W YWW^TXXTY_GGG㝘䟸G[a\]a[WYWW^TXXTY_GGG㝘䟸G[a\]a[W

Bilgi Tablosu, Time (Saat) Kontrolü için gerekli baz temel bilgileri gösterir.
1) Current Time
- Seçilen ekran için geçerli saati belirler (PC Saati).
- Geçerli saati deitirmek için önce PC Saatini deitirin.
2) On Time Setup
-
Seçilen ekrann Hour (Saat), Minute (Dakika), On Time Setup (Açl Saati Ayar) AM/PM bilgisini, Status (Durum),
Source (Kaynak), Volume (Ses seviyesi) deerini ayarlayn.
3) Off Time Setup
-
Seçilen ekrann Off Time Setup (Kapan Saati Ayar) ayar için Hour (Saat), Minute (Dakika), AM/PM bilgisini,
Status (Durum) bilgilerini ayarlayn.
4) On Time (Açl Saati) ayarlarn gösterir.
5) Off Time (Kapan Saati) ayarlarn gösterir.
MagicNet Giri kayna yalnzca MagicNet modelinde çalr.
Time (Saat) kontrolü yalnzca güç durumu ON (AÇIK) olan ekranlar için kullanlabilir.
On Time Setup (Açl Saati Ayar), TV Source (TV Kayna) ilevleri yalnzca TV Modelinde çalr.
PIP
PIP Size
1. Ana simgelerden PIP'i tklattnzda PIP Control (PIP Kontrolü) ekran açlr.
Kontrol etmek istediiniz ekran seçmek için Select All (Tümünü Seç) dümesini ya da Check Box (Kutuyu aretle)
dümesini kullann.
zt{T[WXXT{__UGGG[Xzt{T[WXXT{__UGGG[X YWW^TXXTY_GGG㝘䟸G[a\]a[WYWW^TXXTY_GGG㝘䟸G[a\]a[W

Bilgi Tablosu, PIP Size (PIP Boyutu) için gerekli baz temel bilgileri gösterir.
1) PIP Size
- Kullanlan ekrann geçerli PIP Size (PIP Boyutu) deerini gösterir.
2) OFF
- Seçilen ekrann PIP'ini kapatr.
3) Large
- Seçilen ekrann PIP'ini açar ve boyutu Large (Büyük) deerine getirir.
4) Small
- Seçilen ekrann PIP'ini açar ve boyutu Small (Küçük) deerine getirir.
5) Double1
- Seçilen ekrann PIP'ini açar ve boyutu Double 1 (Çift 1)deerine getirir.
6) Double2
- Seçilen ekrann PIP'ini açar ve boyutu Double 2 (Çift 2)deerine getirir.
7) Double 3 (Resim Yannda Resim)
- Seçilen ekrann PBP'sini açar ve boyutu Double 3 (Çift 3) deerine getirir.
MagicNet Giri kayna yalnzca MagicNet modelinde çalr.
PIP Size (PIP Boyutu), monitör açk haldeyken kontrol edilebilir.
PIP
PIP Source
1. Ana simgelerden PIP'i tklattnzda PIP Control (PIP Kontrolü) ekran açlr.
• PIP TV Mode
[
zt{T[WXXT{__UGGG[Yzt{T[WXXT{__UGGG[Y YWW^TXXTY_GGG㝘䟸G[a\]a[WYWW^TXXTY_GGG㝘䟸G[a\]a[W

• PIP S-Video Mode
Bilgi Tablosu, PIP Source (PIP Kayna) Kontrolü için gerekli baz temel bilgileri gösterir.
1) PIP Source (PIP Kayna)
- PIP Source (PIP Kayna), monitör açk haldeyken kontrol edilebilir.
2) PC
- Seçilen ekrann PIP kaynan PC'ye deitirir.
3) BNC
- Seçilen ekrann PIP kaynan BNC'ye deitirir.
4) DVI
- Seçilen ekrann PIP kaynan DVI'ye deitirir.
5) TV
- Seçilen ekrann PIP kaynan TV'ye deitirir.
[
zt{T[WXXT{__UGGG[Zzt{T[WXXT{__UGGG[Z YWW^TXXTY_GGG㝘䟸G[a\]a[WYWW^TXXTY_GGG㝘䟸G[a\]a[W

6) AV
- Seçilen ekrann PIP kaynan AV'ye deitirir.
7) S-Video
- Seçilen ekrann PIP kaynan S-Video'ya deitirir.
8) Component
- Seçilen ekrann PIP kaynan Component'e (Komponent) deitirir.
9) Channel
- PIP Source (PIP Kayna) TV iken Kanal oku görüntülenir.
Not: Ana Ekrann giri kayna türüne bal olarak PIP kaynaklarndan bazlar seçilemeyebilir.
MagicNet Giri kayna yalnzca MagicNet modelinde çalr.
TV Kayna sadece televizyonlu ürünlerde seçilebilir ve kanallar kontrol etme ilemine PIP Source (PIP
Kayna) TV iken izin verilir.
PIP Control (PIP Kontrolü= özellii yalnzca güç durumu ON (AÇIK) olan ve PIP ilevi ON (AÇIK) halde
bulunan ekranlarda kullanlabilir.
Settings
Picture
1. Ana simgelerden Settings'i (Ayarlar) tklattnzda Settings Control (Ayarlar Kontrolü) ekran açlr.
Bilgi Tablosu, Settings (Ayarlar) Kontrolü için gerekli baz temel bilgileri gösterir.
Her bir ilev seçildiinde, seçilen ilevin ayar deeri kayar kontrolde gösterilir. Select All (Tümünü Seç) seçildiinde,
varsaylan deere (50) geri dönülür. "Select All" (Tümünü Seç) seçildiinde, varsaylan deer görüntülenir. Bu
ekranda herhangi bir deerin deitirilmesi modu otomatik olarak "CUSTOM" (ÖZEL) yapacaktr.
1) Picture
- Yalnzca TV, AV, S-Video, Component (Komponent), DVI(HDCP) için kullanlabilir.
2) Contrast
- Seçilen ekrann Contrast (Kontrast) deerini ayarlar.
3) Brightness
- Seçilen ekrann Brightness (Parlaklk) deerini ayarlar.
4) Sharpness
- Seçilen ekrann Sharpness (Netlik) deerini ayarlar.
5) Color
- Seçilen ekrann Color (Renk) deerini ayarlar.
6) Tint
- Seçilen ekrann Tint (Ton) deerini ayarlar.
[
zt{T[WXXT{__UGGG[[zt{T[WXXT{__UGGG[[ YWW^TXXTY_GGG㝘䟸G[a\]a[WYWW^TXXTY_GGG㝘䟸G[a\]a[W

7) Color Tone
- Seçilen ekrann Color Tone (Renk Tonu) deerini ayarlar.
MagicNet Giri kayna yalnzca MagicNet modelinde çalr.
Bu özellik yalnzca güç durumu ON (AÇIK) olan ekranlarda kullanlabilir. Herhangi bir seçim yaplmazsa
fabrika varsaylan deeri gösterilir.
Settings
Picture PC
1. Ana simgelerden Settings'i (Ayarlar) tklattnzda Settings Control (Ayarlar Kontrolü) ekran açlr.
Bilgi Tablosu, Settings (Ayarlar) Kontrolü için gerekli baz temel bilgileri gösterir. Her bir ilev seçildiinde, seçilen
ilevin ayar deeri kayar kontrolde gösterilir.
Select All (Tümünü Seç) seçildiinde, varsaylan deere (50) geri dönülür.
Bu ekranda herhangi bir deerin deitirilmesi modu otomatik olarak "CUSTOM" (ÖZEL) yapacaktr.
1) Picture PC
- Yalnzca PC, BNC, DVI için kullanlabilir.
2) Contrast
- Seçilen ekrann Contrast (Kontrast) deerini ayarlar.
3) Brightness
- Seçilen ekrann Brightness (Parlaklk) deerini ayarlar.
4) Red
- Seçilen ekrann Red (Krmz) renk deerini ayarlar.
5) Green
- Seçilen ekrann Green (Yeil) renk deerini ayarlar.
6) Blue
- Seçilen ekrann Blue (Mavi) renk deerini ayarlar.
MagicNet Giri kayna yalnzca MagicNet modelinde çalr.
Bu özellik yalnzca güç durumu ON (AÇIK) olan ekranlarda kullanlabilir. Herhangi bir seçim yaplmazsa
fabrika varsaylan deeri gösterilir.
Settings
[
zt{T[WXXT{__UGGG[\zt{T[WXXT{__UGGG[\ YWW^TXXTY_GGG㝘䟸G[a\]a[WYWW^TXXTY_GGG㝘䟸G[a\]a[W

Audio
1. Ana simgelerden Settings'i (Ayarlar) tklattnzda Settings Control (Ayarlar Kontrolü) ekran açlr.
Bilgi Tablosu, Settings (Ayarlar) Kontrolü için gerekli baz temel bilgileri gösterir. Her bir ilev seçildiinde, seçilen
ilevin ayar deeri kayar kontrolde gösterilir.
Select All (Tümünü Seç) seçildiinde, varsaylan deere (50) geri dönülür.
Bu ekranda herhangi bir deerin deitirilmesi modu otomatik olarak "CUSTOM" (ÖZEL) yapacaktr.
1) Audio
- Tüm giri kaynaklarnn ses ayarlarn kontrol eder.
2) Bass
- Seçilen ekrann Bass (Bas) deerini ayarlar.
3) Treble
- Seçilen ekrann Treble (Tiz) deerini ayarlar.
4) Balance
- Seçilen ekrann Balance (Denge) deerini ayarlar.
5) SRS TSXT
- Seçilen ekrann SRS TSXT Sound özelliini Açk/Kapal hale getirir.
6) Sound Select
- PIP açkken Ana veya Alt ekran seçebilirsiniz.
MagicNet Giri kayna yalnzca MagicNet modelinde çalr.
Bu özellik yalnzca güç durumu ON (AÇIK) olan ekranlarda kullanlabilir. Herhangi bir seçim yaplmazsa
fabrika varsaylan deeri gösterilir.
Settings
Image Lock
1. Ana simgelerden Settings'i (Ayarlar) tklattnzda Settings Control (Ayarlar Kontrolü) ekran açlr.
[
zt{T[WXXT{__UGGG[]zt{T[WXXT{__UGGG[] YWW^TXXTY_GGG㝘䟸G[a\]a[WYWW^TXXTY_GGG㝘䟸G[a\]a[W

Bilgi Tablosu, Settings (Ayarlar) Kontrolü için gerekli baz temel bilgileri gösterir.
1) Image Lock
- PC, BNC için kullanlabilir.
2) Coarse
- Seçilen ekrann Coarse (ri) deerini ayarlar.
3) Fine
- Seçilen ekrann Fine (nce) deerini ayarlar.
4) Position
- Seçilen ekrann Position (Konum) deerini ayarlar.
5) Auto Adjustment
- Gelen PC sinyaline göre kendiliinden ayarlar.
MagicNet Giri kayna yalnzca MagicNet modelinde çalr.
Settings (Ayarlar) kontrolü yalnzca güç durumu ON (AÇIK) olan ekranlar için kullanlabilir.
Maintenance
Lamp Control
1. Maintenance (Bakm) ekrann görüntülemek için Ana Simgeler sütununda "Maintenance" (Bakm) simgesini tklatn.
[
zt{T[WXXT{__UGGG[^zt{T[WXXT{__UGGG[^ YWW^TXXTY_GGG㝘䟸G[a\]a[WYWW^TXXTY_GGG㝘䟸G[a\]a[W

Bir çok temel veri öesini gösteren "Bilgi Tablosu" görüntülenir.
1) Maintenance
- Tüm giri kaynaklar için Maintenance Control (Bakm Kontrolü) ilevine izin verir.
2) Auto Lamp Control
- Seçilen ekrann arka n, belirtilen zamanda otomatik olarak ayarlar.
Manual Lamp Control (Manuel Lamba Kontrolü), Auto Lamp Control'u (Otomatik Lamba Kontrolü) kullanarak
ayarlama yaptnzda otomatik olarak kapanr.
3) Manual Lamp Control
- Saatten bamsz olarak seçilen ekrann arka n ayarlamanz salar.
Auto Lamp Control (Otomatik Lamba Kontrolü), Manual Lamp Control'u (Manuel Lamba Kontrolü) kullanarak
ayarlama yaptnzda otomatik olarak kapanr.
Maintenance Control (Bakm Kontrolü) yalnzca güç durumu ON (AÇIK) olan ekranlarda kullanlabilir.
MagicNet Giri kayna yalnzca MagicNet modelinde çalr.
Maintenance
Scroll
1. Maintenance (Bakm) ekrann görüntülemek için Ana Simgeler sütununda "Maintenance" (Bakm) simgesini tklatn.
[
zt{T[WXXT{__UGGG[_zt{T[WXXT{__UGGG[_ YWW^TXXTY_GGG㝘䟸G[a\]a[WYWW^TXXTY_GGG㝘䟸G[a\]a[W

1) Screen Scroll
- Seçilen ekran uzun sure Pause (Duraklatma) modunda kaldnda ortaya çkabilecek görüntü izlerini önler. "Interval"
ayarn saat ve "Second" ayarn saniye cinsinden seçerek tekrarlama sürelerini ayarlayabilirsiniz.
Screen Type (Ekran Türü) ile Scroll (Kaydrma), Pixel (Piksel), Bar (Çubuk) veya Eraser (Silici) olarak ayarlanabilir.
MagicNet Giri kayna yalnzca MagicNet modelinde çalr.
Second (Saniye) deerini yaplandrrken Scroll (Kaydrma) Türünü 1, 2, 3, 4, 5 deerlerine, Pixel
(Piksel), Bar (Çubuk) veya Eraser (Silici) Türünü 10, 20, 30, 40, 50 deerlerine ayarlayabilirsiniz.
Maintenance Control (Bakm Kontrolü) yalnzca güç durumu ON (AÇIK) olan ekranlarda kullanlabilir.
Maintenance
Video Wall
1. Maintenance (Bakm) ekrann görüntülemek için Ana Simgeler sütununda "Maintenance" (Bakm) simgesini tklatn.
[
zt{T[WXXT{__UGGG[`zt{T[WXXT{__UGGG[` YWW^TXXTY_GGG㝘䟸G[a\]a[WYWW^TXXTY_GGG㝘䟸G[a\]a[W

1) Video Wall
- Video duvar, bir dizi video ekrannn birbirine balanarak, her ekrann resmin bir parçasn göstermesi ya da tüm
ekranlarda ayn resmin tekrarlanmasdr.
2) Video Wall (Screen divider)
- Ekran bölünebilir.
Bölme srasnda, farkl sayda ekran seçebilirsiniz.
z Ekran bölücüden bir mod seçin.
z Ekran Seçimi ksmndan bir ekran seçin.
z
Yer, seçilen modda bir numaraya baslarak ayarlanacaktr.
z
Samsung'un salad MDC program en fazla 4x4 LCD Ekranlar destekler.
z
2*2
z 3*3
z 4*4
z 1*2
z
2*1
z
1*5
z
5*1
3)
On / Off
zt{T[WXXT{__UGGG\Wzt{T[WXXT{__UGGG\W YWW^TXXTY_GGG㝘䟸G[a\]a[WYWW^TXXTY_GGG㝘䟸G[a\]a[W

- Seçilen ekrann Video Duvar ilevini açar/kapatr.
4) Format
- Biçim, bölünmü ekran gösterecek ekilde seçilebilir.
z
Full
z Natural
MagicNet Giri kayna yalnzca MagicNet modelinde çalr.
Maintenance Control (Bakm Kontrolü) yalnzca güç durumu ON (AÇIK) olan ekranlarda kullanlabilir.
Sorun Giderme
1. Kontrol etmek istediiniz ekran Power Control (Güç Kontrolü) Bilgi Tablosunda görünmüyor
- RS232C balantsn kontrol edin. (Com1 balant noktasna düzgün biçimde bal olup olmadn kontrol edin)
- Bal ekranlardan herhangi birinin ayn ID deerine sahip olup olmadn görmek için ekranlar kontrol edin. Eer
birden fazla ekran ayn ID deerine sahipse, veri çakmas nedeniyle bu ekranlar program tarafndan düzgün
biçimde alglanmaz.
-
Display Set ID (Ekran Seti ID) deerinin 0-16 aras bir say olduunu kontrol edin. (Display (Ekran) menüsünü
kullanarak ayarlayn.)
Not: Display Set ID (Ekran Seti ID), 0-16 aras bir deer olmaldr.
Eer deer, bu deer aral dndaysa, MDC sistemi ekran kontrol edemez.
2. Kontrol etmek istediiniz ekran dier kontrollerin Bilgi Tablosunda görünmüyor
-
Ekrann ON (AÇIK) durumda olduunu kontrol edin. (Bunu, Power Control (Güç Kontrolü) Bilgi Tablosunda
görebilirsiniz)
- Ekrann giri kaynan deitirip deitiremediinizi kontrol edin.
3. letiim kutusu, tekrar tekrar görüntüleniyor.
- Kontrol etmek istediiniz ekrann seçili olup olmadna bakn.
4. Hem On Timer (Açlma Saati) hem de Off Timer (Kapanma Saati) ayarl olmasna karn farkl bir saat gösteriliyor.
- Ekranlarn saatini ayn deere getirmek için geçerli saati tüm ekranlara uygulayn.
5. Uzaktan kumanda ilevini kapattnzda, RS-232C kablosunu çkarttnzda ya da programdan normal olmayan bir
ekilde çktnzda uzaktan kumanda düzgün çalmayabilir. Normal çalmaya geri dönmek için program yeniden
çaltrn ve uzaktan kumanda ilevini açn.
<Not> Bu program, iletiim devrelerindeki sorunlar ya da yaknlardaki elektronik cihazlarn yaratt parazitten
dolay düzgün çalmayabilir.
Çoklu Ekran Modunda Ayar Deerlerinin Gösterilmesi
Birden fazla ekran bal olduunda, ayar deerleri aadaki gibi görüntülenir.
1. Seçim yok: Fabrika Varsaylan Deerini gösterir.
zt{T[WXXT{__UGGG\Xzt{T[WXXT{__UGGG\X YWW^TXXTY_GGG㝘䟸G[a\]a[WYWW^TXXTY_GGG㝘䟸G[a\]a[W

2. Bir ekran seçili: Seçilen ekrann ayar deerleri alnr ve görüntülenir.
3. Bir ekran seçili (ID1) ve baka bir ekran ekleniyor (ID3): ID 1 ayar deerini gösteren program, ID3'ün deerlerini alr
ve görüntüler.
4. Select All (Tümünü Seç) ile tüm setler seçili: Fabrika Varsaylan Deerine geri döner.
\
zt{T[WXXT{__UGGG\Yzt{T[WXXT{__UGGG\Y YWW^TXXTY_GGG㝘䟸G[a\]a[WYWW^TXXTY_GGG㝘䟸G[a\]a[W

Ürünün rengi ve görünümü modeline bal olarak farkllk gösterebilir ve performans gelitirmeleri nedeniyle
ürün özellikleri önceden haber verilmeksizin deitirilebilir.
Monitörün Ayarlanmas
Input
Kullanlabilir Modlar
PC / BNC / DVI
AV
S-Video
Component
DVI-Video
Source List
[MENU]
˧
[ENTER]
˧
[ENTER]
˧
[
/
]
˧
[ENTER]
Uzaktan kumandadaki dorudan düme 'SOURCE' dümesidir.
stediiniz ekran seçmek için kullann.
1) PC
2) BNC
3) DVI
4) AV
5) S-Video
6) Component
[Uzaktan kumandadaki dorudan düme 'SOURCE' dümesidir.]
Not
• Monitör harici bir kaynaa geçirildiinde PIP kapanr.
PIP
VCR ve DVD gibi harici A/V aygtlar monitöre baldr; PIP, PC Video sinyalinde eklenmi küçük bir pencerede
bu aygtlardan video seyretmenize olanak sa (Off/On)
Not
• BNC ve komponent ayn terminali kullandklarndan birden fazla PIP ekranda üst üste açlamaz.
1) PIP
[MENU]
˧
[ENTER]
˧
[
/
]
˧
[ENTER]
˧
[ENTER]
˧
[
/
]
˧
[ENTER]
PIP Ekrann kapatr veya açar.
- Off
- On
[Uzaktan kumandadaki dorudan düme 'PIP' dümesidir.]
2) Source
[MENU]
˧
[ENTER]
˧
[
/
]
˧
[ENTER]
˧
[
/
]
˧
[ENTER]
˧
[
/
]
˧
[ENTER]
PIP için giri kayna seçin.
- PC : AV / S-Video / Component Mode
- BNC: AV / S-Video Mode
- DVI: AV / S-Video / Component Mode
- AV / S-Video: PC / BNC / DVI Mode
- Component: PC / DVI Mode
[Uzaktan kumandadaki dorudan düme 'SOURCE' dümesidir.]
Güvenlik Talimatlar
Giri
Baðlantýlar
Yazlmn Kullanlmas
Monitörün Ayarlanmas
Input
Picture
[PC / BNC /DVI Mode]
Picture
[AV / S-Video /
Component / DVI-Video
Mode]
Sound
Setup
Multi Control
Dorudan levler
Sorun Giderme
Özellikler
Bilgiler
Appendix
\
W\UGGGXW\UGGGX YWW^TXYTXWGGG㝘䟸GYaWWaZWYWW^TXYTXWGGG㝘䟸GYaWWaZW

3) Swap
[MENU]
˧
[ENTER]
˧
[
/
]
˧
[ENTER]
˧
[
/
]
˧
[ENTER]
PIP ve ana görüntünün içeriklerini deitirir.
PIP penceresindeki görüntü ana ekranda, ana ekrandaki görüntü PIP penceresinde görüntülenir.
[Uzaktan kumandadaki dorudan düme 'SWAP' dümesidir.]
4) Size
[MENU]
˧
[ENTER]
˧
[
/
]
˧
[ENTER]
˧
[
/
]
˧
[ENTER]
˧
[
/
]
˧
[ENTER]
PIP penceresinin Boyutunu deitirir.
[Uzaktan kumandadaki dorudan düme 'SIZE' dümesidir.]
5) Position
[MENU]
˧
[ENTER]
˧
[
/
]
˧
[ENTER]
˧
[
/
]
˧
[ENTER]
˧
[
/
]
˧
[ENTER]
PIP penceresinin Konumunu deitirir.
6) Transparency
[MENU]
˧
[ENTER]
˧
[
/
]
˧
[ENTER]
˧
[
/
]
˧
[ENTER]
˧
[
/
]
˧
[ENTER]
PIP pencerelerinin Saydamln ayarlar.
- High
- Medium
- Low
- Opaque
Not
•
Size içinde , , öesini seçerseniz, Position ve Transparency etkinlemez.
Kullanlabilir Modlar : PIP
Edit Name
[MENU]
˧
[ENTER]
˧
[
/
]
˧
[ENTER]
˧
[
/
]
˧
[ENTER]
˧
[
/
]
˧
[ENTER]
Giri kayna seçiminizi kolaylatrmak için giri jaklarna bal giri cihazn adlandrn.
1) PC
2) BNC
3) DVI
4) AV
5) S-Video
6) Component
Picture [PC / BNC /DVI Mode]
Kullanlabilir Modla
r
PC / BNC / DVI
AV
S-Video
Component
DVI-Video
MagicBright
˞
[MENU]
˧
[
/
]
˧
[ENTER]
˧
[ENTER]
˧
[
/
]
˧
[ENTER]
MagicBright
˞
, görüntülediiniz resmin içeriine bal olarak en iyi görüntüleme ortamn salayan yeni bir
özelliktir.
u anda üç farkl moddan biri kullanlabilir: Metin, Internet ve Elence.
Her modun kendine özgü önceden yaplandrlm bir parlaklk deeri vardr. MagicBright
˞
denetim
dümelerine basarak bu üç ayardan birini kolayca seçebilirsiniz.
1) Entertain
Yüksek Parlaklk
DVD veya VCD gibi filmleri izlemek için.
2) Internet
Orta Parlaklk
Metin ve grafik gibi karma görüntülerin bulunduu çalmalar için.
3) Text
Normal Parlaklk
Büyük metinler içeren belge veya çalmalar için.
4) Custom
Mühendislerimiz tarafndan dikkatle seçilmi olmasna ramen önceden ayarlanm deerler, zevkinize
\
W\UGGGYW\UGGGY YWW^TXYTXWGGG㝘䟸GYaWWaZZYWW^TXYTXWGGG㝘䟸GYaWWaZZ

bal olarak, gözleriniz için uygun olmayabilir.
Bu durumda, OSD menüsünü kullanarak Parlaklk ve Kontrast ayarlayn.
[Uzaktan kumandadaki dorudan düme 'M/B' dümesidir.]
Custom
[MENU]
˧
[
/
]
˧
[ENTER]
˧
[
/
]
˧
[ENTER]
˧
[ENTER]
˧
[
/
] / [< / >]
˧
[ENTER]
Kontrast ve parlakl kiisel tercihlerinize göre deitirmek için ekran menülerini kullanabilirsiniz.
1) Contrast
Yeil Rengi ayarla.
2) Brightness
Dorudan Denetim Özellikleri
Not
• Resmi Custom ilevini kullanarak ayarlarsanz, MagicBright Custom moduna döner.
Color Tone
[MENU]
˧
[
/
]
˧
[ENTER]
˧
[
/
]
˧
[ENTER]
˧
[
/
]
˧
[ENTER]
Renk tonu deitirilebilir.
1) Cool
2) Normal
3) Warm
4) Custom
(Yalnzca PC/BNC Modunda Kullanlr)
Color Control
[MENU]
˧
[
/
]
˧
[ENTER]
˧
[
/
]
˧
[ENTER]
˧
[ENTER]
˧
[< / >]
˧
[ENTER]
R,G,B renk dengesini ayr ayr ayarlamak için aadaki admlar uygulayn.
(Yalnzca PC/BNC Modunda Kullanlr)
1) Red
2) Green
3) Blue
Not
• Resmi Color Control ilevini kullanarak ayarlarsanz, Color Tone Custom moduna döner.
Image Lock
Image Lock (Görüntü Kilitleme), titrek ve parltl kararsz görüntüler oluturan parazitleri kaldrarak ince ayar
yapmak ve en iyi görüntüyü almak için kullanlr. Fine ayar kullanarak elde edilen sonuçlar yeterli deilse,
Coarse ayarn ve sonra da yeniden Fine ayarn kullann.
(Yalnzca PC/BNC Modunda Kullanlr)
1) Coarse
[MENU]
˧
[
/
]
˧
[ENTER]
˧
[
/
]
˧
[ENTER]
˧
[ENTER]
˧
[< / >]
˧
[ENTER]
Dikey çizgiler gibi istenmeyen görüntüleri giderir. Genel ayar, ekran görüntü alann tayabilir. Bu alan
Yatay Kontrol menüsünü kullanarak yeniden yerine yerletirebilirsiniz.
2) Fine
[MENU]
˧
[
/
]
˧
[ENTER]
˧
[
/
]
˧
[ENTER]
˧
[
/
]
˧
[ENTER]
˧
[< / >]
˧
[ENTER]
Yatay çizgiler gibi istenmeyen görüntüleri giderir. stenmeyen görüntü nce ayar sonrasnda da
kaybolmadysa, frekans (saat hzn) ayarladktan sonra bu ilemi tekrarlayn.
3) Position
[MENU]
˧
[
/
]
˧
[ENTER]
˧
[
/
]
˧
[ENTER]
˧
[
/
]
˧
[ENTER]
˧
[< / >] / [
/
]
˧
[ENTER]
Ekrann konumunu yatay ve dikey olarak ayarlar.
\
W\UGGGZW\UGGGZ YWW^TXYTXWGGG㝘䟸GYaWWaZZYWW^TXYTXWGGG㝘䟸GYaWWaZZ

[MENU]
˧
[
/
]
˧
[ENTER]
˧
[
/
]
˧
[ENTER]
Fine, Coarse ve Position deerleri otomatik olarak ayarlanr.
Kontrol panelinde çözünürlüü deitirirseniz, AUTO ilevi yürütülür.
(Yalnzca PC/BNC Modunda Kullanlr)
[Uzaktan kumandadaki dorudan düme 'AUTO' dümesidir.]
Signal Balance
Uzun sinyal kablosuyla iletilen zayf RGB sinyalini telafi etmek için kullanlr.
(Yalnzca PC/BNC Modunda Kullanlr)
1) Signal Balance
[MENU]
˧
[
/
]
˧
[ENTER]
˧
[
/
]
˧
[ENTER]
˧
[ENTER]
˧
[
/
]
˧
[ENTER]
Signal control, On ya da Off haldeyken seçebilirsiniz.
2) Signal Control
[MENU]
˧
[
/
]
˧
[ENTER]
˧
[
/
]
˧
[ENTER]
˧
[
/
]
˧
[ENTER]
˧
[
/
]
˧
[ENTER]
˧
[
/
]
˧
[< / >]
˧
[ENTER]
R Phase, G Phase, B Phase, Gain and Sharpness deerlerini kendiniz ayarlayabilirsiniz.
Size
[MENU]
˧
[
/
]
˧
[ENTER]
˧
[
/
]
˧
[ENTER]
˧
[
/
]
˧
[ENTER]
Boyutu deitirebilirsiniz.
1) 16:9
2) 4:3
PIP Picture
[MENU]
˧
[
/
]
˧
[ENTER]
˧
[
/
]
˧
[ENTER]
˧
[
/
]
˧
[ENTER]
˧
[
/
]
˧
[ENTER]
˧
[
/
]
˧
[ENTER]
˧
[< / >]
˧
[ENTER]
PIP Ekran Ayarlarn ayarlayabilirsiniz.
1) Contrast
Ekranda PIP penceresinin Kontrastn ayarlar.
2) Brightness
Ekranda PIP penceresinin Parlakln ayarlar.
3) Sharpness
PIP penceresinin en açk ve en koyu bölgeleri arasndaki fark ayarlamak için kullann.
4) Color
PIP penceresinde Renk ayarlar.
5) Tint
PIP penceresine, doal bir ton katar.
PC, BNC modunda PIP ekran ile AV, S-Video
˅
den resmi görüntüleyebilirsiniz. Yalnzca video sinyali
NTSC ise çalr.
Kullanlabilir Modlar : PIP
Picture [AV / S-Video / Component / DVI-Video Mode]
Kullanlabilir Modlar
PC / BNC / DVI
AV
S-Video
Component
DVI-Video
Mode
[MENU]
˧
[
/
]
˧
[ENTER]
˧
[ENTER]
˧
[
/
]
˧
[ENTER]
Monitörün fabrikada önceden ayarlanm dört otomatik resim ayar (
ˈ
Custom
ˉ
,
ˈ
Dynamic
ˉ
, Standard
ˉG
ve
“Movie
ˉ
) vardr.
Custom, Dynamic, Standard veya Movie ayarndan birini etkinletirebilirsiniz. Otomatik olarak kiiselletirilmi
resim ayarlarnz çaran
ˈ
Custom
ˉG
ayarn seçebilirsiniz.
\
W\UGGG[W\UGGG[ YWW^TXYTXWGGG㝘䟸GYaWWaZ[YWW^TXYTXWGGG㝘䟸GYaWWaZ[
Auto Adjustment

2) Standard
3) Movie
4) Custom
[Uzaktan kumandadaki dorudan düme 'P.MODE' dümesidir.]
Custom
[MENU]
˧
[
/
]
˧
[ENTER]
˧
[
/
]
˧
[ENTER]
˧
[
/
]
˧
[ENTER]
˧
[< / >]
˧
[ENTER]
Kontrast ve parlakl kiisel tercihlerinize göre deitirmek için ekran menülerini kullanabilirsiniz.
1) Contrast
PIP penceresine doal bir ton ekler.
2) Brightness
Yeil Rengi ayarla.
3) Sharpness
Görüntünün netliini ayarlar.
4) Color
Resim rengini ayarlar.
5) Tint
Ekrana, doal bir ton katar.
Sadece AV ve S-Video modlar için çalr. Yalnzca video sinyali NTSC ise çalr.
Color Tone
[MENU]
˧
[
/
]
˧
[ENTER]
˧
[
/
]
˧
[ENTER]
˧
[
/
]
˧
[ENTER]
Renk tonu deitirilebilir. Buna ek olarak renk Componentleri de kullanc tarafndan özelletirilebilir.
1) Cool 2
2) Cool 1
3) Normal
4) Warm1
5) Warm2
Size
[MENU]
˧
[
/
]
˧
[ENTER]
˧
[
/
]
˧
[ENTER]
˧
[
/
]
˧
[ENTER]
Boyutu deitirebilirsiniz.
1)16:9
2)Zoom 1
3)Zoom 2
4)4:3
[ZOOM1, ZOOM2, DTV - 1080i (veya 720p üstü) için mevcut deildir.]
Digital NR (Dijital Gürültü Azaltma)
[MENU]
˧
[
/
]
˧
[ENTER]
˧
[
/
]
˧
[ENTER]
˧
[
/
]
˧
[ENTER]
Gürültü Yoketme özellii için Off/On ilemini uygulayn.
Dijital Gürültü Yoketme özellii, daha temiz ve net resimlerden zevk almanz salar
1) Off
2) On
Film Mode
[MENU]
˧
[
/
]
˧
[ENTER]
˧
[
/
]
˧
[ENTER]
˧
[
/
]
˧
[ENTER]
Film Modunu Açp/Kapatabilirsiniz (Film Mode Off/On).
Film Modu özellii, tiyatro kalitesinde görüntüleme deneyimi sunar.
( DVI-Video Modda Kullanlamaz)
1) Off
2) On
\
W\UGGG\W\UGGG\ YWW^TXYTXWGGG㝘䟸GYaWWaZ[YWW^TXYTXWGGG㝘䟸GYaWWaZ[
1) Dynamic

[MENU]
˧
[
/
]
˧
[ENTER]
˧
[
/
]
˧
[ENTER]
˧
[
/
]
˧
[ENTER]
˧
[
/
]
˧
[ENTER]
˧
[< / >]
˧
[ENTER]
PIP Ekran Ayarlarn ayarlayabilirsiniz.
1) Contrast
Ekranda PIP penceresinin Kontrastn ayarlar.
2) Brightness
Ekranda PIP penceresinin Parlakln ayarlar.
Kullanlabilir Modlar : PIP
Sound
Kullanlabilir Modlar
PC / BNC / DVI
AV
S-Video
Component
DVI-Video
Mode
[MENU]
˧
[
/
]
˧
[ENTER]
˧
[ENTER]
˧
[
/
]
˧
[ENTER]
Monitör, yerleik uygunluk düzeyi yüksek stereo amplifikatör içerir.
1) Standard
Standard fabrika ayarlar için Standart seçeneini belirtin.
2) Music
Müzik videosu veya konseri seyrederken Müzik seçeneini belirtin.
3) Movie
Filim seyrederken Filim seçeneini belirtin.
4) Speech
Daha çok konuma içeren bir (örnein, haberler) program seyrederken Konuma
˅
y seçin.
5) Custom
Ayarlar kiisel tercihlere göre ayarlamak isterseniz, Özel seçeneini belirtin.
Custom
[MENU]
˧
[
/
]
˧
[ENTER]
˧
[
/
]
˧
[ENTER]
˧
[
/
]
˧
[ENTER]
˧
[< / >]
˧
[ENTER]
Ses ayarlar, kiisel tercihlerinize uygun olarak ayarlanabilir.
1) Bass
Ses ayarlar, kiisel tercihlerinize uygun olarak ayarlanabilir.
2) Treble
Yüksek frekans sesi vurgular.
3) Balance
Sol ve sa hoparlörler arasnda ses dengesini ayarlamanz salar.
[Ses deeri 0'a ayarlanm olsa bile ses duyabilirsiniz.]
Not
• Resmi Sound ilevini kullanarak ayarlarsanz, Sound Mode Custom moduna döner.
Auto Volume
[MENU]
˧
[
/
]
˧
[ENTER]
˧
[
/
]
˧
[ENTER]
˧
[
/
]
˧
[ENTER]
Yaynlayanlar arasnda ses düzeyi farkllklarn azaltr.
1) Off
2) On
SRS TS XT
[MENU]
˧
[
/
]
˧
[ENTER]
˧
[
/
]
˧
[ENTER]
˧
[
/
]
˧
[ENTER]
SRS TS XT, 5.1 çok kanall içerii iki hoparlör üzerinde çalma sorununu çözen patentli bir SRS teknolojisidir.
\
W\UGGG]W\UGGG] YWW^TXYTXWGGG㝘䟸GYaWWaZ[YWW^TXYTXWGGG㝘䟸GYaWWaZ[
PIP Picture

TruSurround, sanal surround ses deneyimini dahili televizyon hoparlörlerini de kapsayacak ekilde tüm iki
hoparlörlü çalma sistemleri üzerinden sunar.
Tüm çok kanall biçimlerle tamamen uyumludur.
1) Of
f
2) On
[Uzaktan kumandadaki dorudan düme 'SRS' dümesidir.]
Sound Select
[MENU]
˧
[
/
]
˧
[ENTER]
˧
[
/
]
˧
[ENTER]
˧
[
/
]
˧
[ENTER]
PIP açkken Ana veya Alt seçeneini belirtebilirsiniz.
1) Main
2) Sub
[Kullanlabilir Modlar : PIP]
Setup
Kullanlabilir Modla
r
PC / BNC / DVI
AV
S-Video
Component
DVI-Video
Language
[MENU]
˧
[
/
]
˧
[ENTER]
˧
[ENTER]
˧
[
/
]
˧
[ENTER]
11 dilden birini seçebilirsiniz.
Not
•
Seçilen dil yalnzca OSD
˅
nin dilini etkiler.
Bilgisayarda çalan yazlmlar etkilemez.
Time
Monitörü dakika cinsinden belirli bir sure içinde otomatik olarak kapanacak ekilde ayarlamak için kullann.
1)
Clock Set
[MENU]
˧
[
/
]
˧
[ENTER]
˧
[
/
]
˧
[ENTER]
˧
[ENTER]
˧
[< / >]
˧
[ENTER]
Geçerli Saat Ayar.
2) Sleep Timer
[MENU]
˧
[
/
]
˧
[ENTER]
˧
[
/
]
˧
[ENTER]
˧
[
/
]
˧
[ENTER]
˧
[< / >]
˧
[
/
]
˧
[ENTER]
˧
[< / >]
˧
[
/
]
˧
[ENTER]
Dakika cinsinden belirli bir süre sonra Monitörün otomatik olarak kapanmasn salamak için kullann. (Off
(kapal), 30, 60, 90, 120, 150, 180)
3) On Timer
[MENU]
˧
[
/
]
˧
[ENTER]
˧
[
/
]
˧
[ENTER]
˧
[
/
]
˧
[ENTER]
˧
[< / >]
˧
[
/
]
˧
[ENTER]
Monitörün belirlenmi bir saatte otomatik olarak açlmasn ayarlamak için kullann.
Monitörün otomatik olarak açld zaman kullanlacak modu, ses seviyesini kontrol etmek için kullann.
4) Off Timer
[MENU]
˧
[
/
]
˧
[ENTER]
˧
[
/
]
˧
[ENTER]
˧
[
/
]
˧
[ENTER]
˧
[< / >]
˧
[
/
]
˧
[ENTER]
Monitörün otomatik olarak açld zaman kullanlacak modu, ses seviyesini kontrol etmek için kullann.
Not
• On Timer 'da Yes seçerseniz, Off Timer'da Clock Set ayar yoksa, mesaj görüntülenir: "Set the clock first.".
\
W\UGGG^W\UGGG^ YWW^TXYTXWGGG㝘䟸GYaWWaZ[YWW^TXYTXWGGG㝘䟸GYaWWaZ[

[MENU]
˧
[
/
]
˧
[ENTER]
˧
[
/
]
˧
[ENTER]
˧
[
/
]
˧
[ENTER]
Bilgisayarda çalan yazlmlar etkilemez.
1) High
2) Medium
3) Low
4) Opaque
Safety Lock PIN
[MENU]
˧
[
/
]
˧
[ENTER]
˧
[
/
]
˧
[ENTER]
˧
[0~9]
˧
[0~9]
˧
[0~9]
Parolay deitirebilirsiniz.
Energy Saving
[MENU]
˧
[
/
]
˧
[ENTER]
˧
[
/
]
˧
[ENTER]
˧
[
/
]
˧
[ENTER]
˧
[MENU]
Bu özellik enerji tasarrufu için ünitenin güç tüketimini ayarlar.
1) On
2) Off
Not
• Bekleme güç tüketimini azaltmak istiyorsanz, Energy Saving öesini On olarak ayarlayn. Ancak, Enerji
Tasarrufu
˅
nu On olarak ayarladnzda, MDC'nin uzaktan Power On ilevini ve MagicNet
˅
in WOL (Wake
On LAN) ilevini kullanamazsnz.
Video Wall
Video duvar, bir dizi video ekrannn birbirine balanarak, her ekrann resmin bir parçasn göstermesi ya da
tüm ekranlarda ayn resmin tekrarlanmasdr.
Video Wall açkken, Video Wall ekran ayarlar düzenlenebilir.
1) Video Wall
[MENU]
˧
[
/
]
˧
[ENTER]
˧
[
/
]
˧
[ENTER]
˧
[ENTER]
˧
[
/
]
˧
[ENTER]
Seçilen ekrann Video Duvar ilevini açar/kapatr.
-
Off
-
On
2) Format
[MENU]
˧
[
/
]
˧
[ENTER]
˧
[
/
]
˧
[ENTER]
˧
[
/
]
˧
[ENTER]
˧
[
/
]
˧
[ENTER]
Biçim, bölünmü ekran gösterecek ekilde seçilebilir.
-
Full
Kenar boluksuz tam ekran görüntü salar.
-
Natural
Orijinal en-boy orann deitirmeden doal bir görüntü verir.
3) Screen Divider
[MENU]
˧
[
/
]
˧
[ENTER]
˧
[
/
]
˧
[ENTER]
˧
[
/
]
˧
[ENTER]
˧
[
/
]
˧
[ENTER]
Ekran bölünebilir.
Bölme srasnda, farkl sayda ekran seçebilirsiniz.
• Ekran bölücüden bir mod seçin.
• Ekran Seçimi ksmndan bir ekran seçin.
• Yer, seçilen modda bir numaraya baslarak ayarlanacaktr.
-
2 x 2
-
3 x 3
-
4 x 4
-
5 x 5
-
1 x 2
-
2 x 1
-
1 x 5
-
5 x 1
Not
• Video Wall (Video Duvar) çalyorken, PIP (Resim içinde Resim), Auto Adjustment (Otomatik Ayarlama),
Image Lock (Görüntü Kilidi) ve Size (Boyut) ilevleri kullanlamaz. PIP (Resim içinde Resim) çalyorken
Video Wall (Video Duvar) özelliinin balatlmas PIP Off (PIP Kapal) durumuna geçilmesine neden olur.
Video Wall, MagicNet modunda çalmaz.
W\UGGG_W\UGGG_ YWW^TXYTXWGGG㝘䟸GYaWWaZ[YWW^TXYTXWGGG㝘䟸GYaWWaZ[
Menu Transparency

Safety Screen
Safety Screen ilevi, ekranda uzun süre sabit bir görüntü gösterildiinde meydana gelebilecek görüntü izlerini
önlemek için kullanlmaktadr.
- - Safety Screen ilevi, belirli bir süre için ekrandaki görüntüyü kaydrr.
- Bu ilev, güç kapatldnda kullanlamaz.
1) Safety Screen
[MENU]
˧
[
/
]
˧
[ENTER]
˧
[
/
]
˧
[ENTER]
˧
[ENTER]
˧
[
/
]
˧
[ENTER]
Safety Screen ilevinin, On (açk) ya da Off (Kapal) olmasn belirler.
-
Of
f
-
On
2) Interval
[MENU]
˧
[
/
]
˧
[ENTER]
˧
[
/
]
˧
[ENTER]
˧
[
/
]
˧
[ENTER]
˧
[
/
]
˧
[ENTER]
Safety Screen ileminin çaltrlmas için gerekli zaman araln belirler. (1~10 Saat)
Zaman, açk kalma süresine göre hesaplanr.
Varsaylan olarak süre, 10 saate ayarlanmtr.
-
1~10 Saat
3) Second
[MENU]
˧
[
/
]
˧
[ENTER]
˧
[
/
]
˧
[ENTER]
˧
[
/
]
˧
[ENTER]
˧
[
/
]
˧
[ENTER]
Safety Screen ileminin çaltrlaca süreyi belirler. (1~5 Saniye)
Varsaylan olarak süre, 5 saniyeye ayarlanmtr.
-
Type-Scroll : 1~5 Second
-
Type-Pixel, Bar, Eraser : 10~50 Second
4) Type
[MENU]
˧
[
/
]
˧
[ENTER]
˧
[
/
]
˧
[ENTER]
˧
[
/
]
˧
[ENTER]
˧
[
/
]
˧
[ENTER]
Safety Screen Type (Güvenlik Ekran Türü) ayarlarn deitirebilirsiniz.
-
Scroll
-
Pixel
-
Bar
-
Erase
r
Resolution Select
[MENU]
˧
[
/
]
˧
[ENTER]
˧
[
/
]
˧
[ENTER]
˧
[
/
]
˧
[ENTER]
Grafik kartnn çözünürlüünü 1024 x 768 @ 60Hz, 1280 x 768 @ 60Hz, 1360 x 768 @ 60Hz ya da 1366 x768
@ 60Hz'e ayarladnzda ekrandaki görüntü düzgün olmuyorsa bu ilevi kullanarak (Resolution Select)
görüntünün belirtilen çözünürlükte gösterilmesini salayabilirsiniz.
(Yalnzca PC/BNC Modunda Kullanlr)
1) Off
2) 1024 X 768
3) 1280 X 768
4) 1360 X 768
5) 1366 X 768
Not
• Menünün seçilmesine, yalnzca grafik çözünürlüü 1024 x 768 @ 60Hz, 1280 x 768 @ 60Hz, 1360 x 768
@ 60Hz ya da 1366 x768 @ 60Hz olduunda izin verilir.
Lamp Control
[MENU]
˧
[
/
]
˧
[ENTER]
˧
[
/
]
˧
[ENTER]
˧
[ENTER]
˧
[< / >]
˧
[ENTER]
Enerji tüketimini azaltmak amacyla Arka I ayarlamak için kullanlr.
Power On Adjustment
[MENU]
˧
[
/
]
˧
[ENTER]
˧
[
/
]
˧
[ENTER]
˧
[ENTER]
˧
[
/
]
˧
[ENTER]
Ekrann Power On time deerini ayarlayn.
*Dikkat: Ar voltaj engellemek için Power On time deerini daha uzun ayarlayn.
W\UGGG`W\UGGG` YWW^TXYTXWGGG㝘䟸GYaWWaZ[YWW^TXYTXWGGG㝘䟸GYaWWaZ[

Parolay deitirebilirsiniz.
1)
Image Reset
[MENU]
˧
[
/
]
˧
[ENTER]
˧
[
/
]
˧
[ENTER]
˧
[ENTER]
˧
[< / >]
˧
[ENTER]
(Yalnzca PC/BNC Modunda Kullanlr)
2)
Color Reset
[MENU]
˧
[
/
]
˧
[ENTER]
˧
[
/
]
˧
[ENTER]
˧
[
/
]
˧
[ENTER]
˧
[< / >]
˧
[ENTER]
Multi Control
Kullanlabilir Modlar
PC / BNC / DVI
AV
S-Video
Component
DVI-Video
Multi Control
[MENU]
˧
[
/
]
˧
[ENTER]
˧
[
/
]
˧
[ENTER]
˧
[ENTER]
˧
[0~9]
SET'e ayr bir ID atar.
1) ID Setup
SET'e ayr bir ID atar.
2) ID Input
Herbir SET'in iletici ilevlerini seçmek için kullann. Yalnzca ID'si iletici ayarna karlk gelen SET
etkinletirilir.
Dorudan levler
Kullanlabilir Modlar
PC / BNC / DVI
AV
S-Video
Component
DVI-Video
MDC
Multi Control OSD ekranna geçer.
LOCK
Safety Lock ilevini ayarlayn.
1) Lock On
: Kilitlenir.
2) Lock Off
: Kilidi açlr.
Not
• Lock ilevini ayarlarken yalnzca uzaktan kumanda ve set üzerindeki Lock dümelerini kullanabilirsiniz.
Monitör üzerinde önceden ayarlanm password (parola) "0000"dr.
Not
• Lock ilev tuu için parolay sfrlama.
MUTE
˧
1
˧
8
˧
6
˧
On dümesine basn. Parola
˄
0000
˅G
olarak sfrlanacaktr. Parolann sfrlanmas
için uzak kontrol gereklidir.
© 1995~2008 SAMSUNG. ALL Rights Reserved
]
W\UGGGXWW\UGGGXW YWW^TXYTXWGGG㝘䟸GYaWWaZ[YWW^TXYTXWGGG㝘䟸GYaWWaZ[
Reset

Ürünün rengi ve görünümü modeline bal olarak farkllk gösterebilir ve performans gelitirmeleri nedeniyle
ürün özellikleri önceden haber verilmeksizin deitirilebilir.
Sorun Giderme
Kendi Kendine Test Özellii
Kontrolü
Not
• Servis çarmadan önce kontrol edin Servis çarmadan önce aadaki öeleri kendiniz kontrol edin.
Çözemediiniz sorunlar için servise dann.
Kendi Kendine Test Özellii Kontrolü
Monitörünüzde, düzgün çalp çalmadn kontrol etmenizi salayan bir kendi kendini snama özellii vardr.
1) Hem bilgisayarnz hem de monitörünüzü kapatn.
2) Video kablosunu bilgisayarn arkasndan çkarn.
3) Monitörü açn.
Monitör video sinyali alglamad normal çalma durumunda olduunda siyah bir arka plan üzerinde
aada gösterilen ekil (
ˈ
Sinyal Kablosunu Kontrol Edin
ˉ
) görüntülenir. Kendini Snama modundayken güç
göstergesi yeil kalr ve ekil ekranda hareket eder.
4) Monitörünüzü kapatn ve video kablosunu yeniden balayn; sonra bilgisayarnz ve monitörünüzü açn.
Önceki yordam uyguladktan sonra monitörünüzün ekran karanlk kaldysa, video denetleyicisini ve bilgisayar
sisteminizi kontrol edin; çünkü monitörünüz düzgün çalmaktadr.
Check Cooling System
Ekranda
"Check Cooling System"
iletisi gösterilirse, soutma fannda bir sorun var demektir. Fan onarmak
veya deitirmek için bir servis merkezine bavurun.
Not Optimum Mode(En Uygun Mod Deil)
Ekran 1360x768'den daha yüksek çözünürlükte bile görebilirsiniz. Ancak, bir dakika boyunca aadaki mesaj
görürsünüz. Ekran çözünürlüünü deitirmeyi ya da o srada bulunduunuz modda kalmay seçebilirsiniz.
Çözünürlük 85 Hz'den yüksekse, monitör 85 Hz'den yükseini desteklemediinden siyah bir ekran görürsünüz.
Güvenlik Talimatlar
Giri
Baðlantýlar
Yazlmn Kullanlmas
Monitörün Ayarlanmas
Sorun Giderme
Kendi Kendine Test Özellii
Kontrolü
Denetim Listesi
Soru ve Yant
Özellikler
Bilgiler
Appendix
zt{T[WXXT{__UGGG]\zt{T[WXXT{__UGGG]\ YWW^TXXTY_GGG㝘䟸G[a\]a[XYWW^TXXTY_GGG㝘䟸G[a\]a[X
]
]

Not
• Monitörün destekledii çözünürlükler veya frekanslar örenmek için Belirtimler > Önceden Ayarl
Zamanlama Modlar konusuna bakn.
Bakm ve Temizlik
1) Monitör Kasasnn bakm
Güç kablosunun balantsn çkardktan sonra yumuak bir bezle temizleyin.
• Benzin, tiner veya benzeri yanc maddeler veya slak bez
kullanmayn.
• Ekrann zarar görmesini engellemek için Samsung temizlik
malzemesi kullanlmasn öneririz.
2) Düz Panelli Görüntü Ekran Bakm
Yumuak bir bezle (pamuklu) bastrmadan temizleyin.
• Hiçbir zaman aseton, benzin veya tiner kullanmayn.
(Ekran yüzeyinde çatlaklara veya bozulmaya neden olabilir.)
• Kullanc kendisinin neden olduu hasarlarn onarmyla ilikili
harcamalar ve maliyetleri ödemekle yükümlüdür.
Belirtiler ve Önerilen Eylemler
Not
•
Monitör PC
˅
den alnan görsel sinyalleri yeniden oluturur. Bu nedenle, PC
˅
de veya video kartnda sorun
olmas monitörün kararmasna, renklerin bozulmasna, parazite, Video modunun desteklenmemesine ve
benzeri durumlara neden olur. Bu durumda öncelikle sorunun kaynan kontrol edin, sonra da servis
merkezine veya satcnza dann.
1) Güç kordonunun ve kablosunun bilgisayara düzgün bir ekilde bal olup olmadn kontrol edin.
2)
Bilgisayarn açlrken 3
˅
ten fazla sinyal sesi çkarp çkarmadn kontrol edin.
(Çkaryorsa, bilgisayarn ana kart için sat sonras servis isteyin.)
3)
Yeni bir video kart taktysanz veya PC
˅
yi monte ettiyseniz, adaptör (video) sürücüsünü ve monitör
sürücüsünü takp takmadnz kontrol edin.
4) Video ekrannn tarama hznn 50 Hz ~85 Hz olarak ayarlanp ayarlanmadn kontrol edin.
(Maksimum çözünürlük kullanrken 60 Hz hz geçmeyin.)
5)
Adaptör (video) sürücüsünü yüklerken sorunla karlarsanz, bilgisayar Güvenli Mod
˅
da açn,
ˈ
Denetim
Masas, Sistem, Aygt Yöneticisi
ˉG
altndaki Ekran Badatrcs’n kaldrn ve adaptör (video) sürücüsünü
yeniden yüklemesi için bilgisayar yeniden balatn.
Denetim Listesi
Not
• Aadaki tablo olas sorunlar ve çözümlerini listeler. Servisi aramadan önce sorunu çözüp
çözemeyeceinizi görmek için bu bölümdeki bilgileri kontrol edin. Yardma gereksiniminiz varsa lütfen
garanti kartndaki veya Bilgi bölümündeki telefon numarasn arayn ya da satcnza dann.
Yüklemeyle ilgili sorunlar
Not
]
zt{T[WXXT{__UGGG]]zt{T[WXXT{__UGGG]] YWW^TXXTY_GGG㝘䟸G[a\]a[XYWW^TXXTY_GGG㝘䟸G[a\]a[X

• Monitör kurulumuyla ilgili sorunlar ve çözümleri aada listelenmitir.
Sorunlar Çözümleri
Monitör ekran titriyor
z
Bilgisayar ve monitör arasndaki sinyal kablosunun salam bir
ekilde balanm ve sktrlm olup olmadn kontrol edin.
(Refer to Bilgisayara Balama konusuna bakn)
Ekranla ilgili sorunlar
Not
• Monitör ekranyla ilgili sorunlar ve çözümleri aada listelenmitir.
Sorunlar Çözümleri
Ekran bo ve güç göstergesi
kapal
z
Güç kablosunun sk bir ekilde bal ve LCD monitörün açk
olduundan emin olun.
(Monitörünüze Balama konusuna bakn)
"Check Signal Cable" mesaj
z
Sinyal kablosunun PC veya video kaynaklarna sk bir ekilde
bal olduundan emin olun.
(Monitörünüze Balama konusuna bakn)
z
PC veya video kaynaklarnn açk olduundan emin olun.
"Not Optimum Mode" mesaj
z
Video adaptörünün maksimum çözünürlük ve frekansn kontrol
edin.
z
Bu deerleri Önceden Ayarl Zamanlama Modlar Çizelgesindeki
verilerle karlatrn.
Resim dikey olarak salnyor.
z
Sinyal kablosunun salam bir ekilde bal olup olmadn
kontrol edin.
Salam bir ekilde yeniden balayn.
(Refer to Bilgisayara Balama konusuna bakn)
Görüntü net deil. Resim bulank.
z
Frekansa ilikin Coarse ve Fine ayarlarn çaltrn.
z
Tüm aksesuarlar çkardktan sonra yeniden açn
(video uzatma kablosu, vb.)
z
Çözünürlük ve frekans önerilen aralklara ayarlayn.
Resim görüntüsü kararl deil ve
titriyor.
Resimde gölge görüntüler var.
z
Bilgisayar video kartnda ayarlanan çözünürlük ve frekans
deerlerinin monitörün destekledii aralk içinde olup olmadn
kontrol edin.
Bu aralkta deillerse monitör menüsünün altndaki geçerli
Bilgi
˅
ye ve Önceden Ayarl Zamanlama Modlar ’na bakarak
sfrlayn.
Görüntü çok açk veya çok koyu
z
Brightness ve Contrast deerlerini ayarlayn.
(Brightness, Contrast konularna bakn)
Ekran rengi tutarl deil
Renkli görüntü koyu gölgelerle
bozuluyor.
Beyaz renk kalitesi kötü.
z
OSD Renk Ayar menüsünün altndaki Custom seçeneini
kullanarak rengi ayarlayn.
Güç Göstergesi yeil olarak yanp
sönüyor.
z
Monitör ayarlarda yaplan deiiklikleri OSD belleine
kaydediyor.
Ekran karanlk ve güç göstergesi
sürekli yeil yanyor veya 0,5 veya
1 saniyelik aralklarla yanp
sönüyor
z
Monitör güç yönetimi sistemini kullanyor.
z
Bilgisayarn faresini hareket ettirin veya klavyede bir tua basn.
Ekran bo ve yanp sönüyor.
z
MENU dümesine bastnzda
ˈ
TEST GOOD
ˉG
mesajn
]
zt{T[WXXT{__UGGG]^zt{T[WXXT{__UGGG]^ YWW^TXXTY_GGG㝘䟸G[a\]a[XYWW^TXXTY_GGG㝘䟸G[a\]a[X

görüyorsanz, konektörün düzgün balandndan emin olmak
üzere monitor ve bilgisayar arasndaki kabloyu denetleyin.
Ekranla ilgili sorunlar
Not
• Ses sinyalleriyle ilgili sorunlar ve çözümleri aada listelenmitir.
Sorunlar Çözümleri
Ses yok
z
Ses kablosunun hem monitörünüzdeki ses girii balant
noktasna hem de ses kartnzdaki ses çk balant noktasna
skca bal olduundan emin olun.
(Monitörünüze Balama konusuna bakn)
z
Ses düzeyini kontrol edin.
Ses düzeyi çok düük.
z
Ses düzeyini kontrol edin.
z
Denetimi en yüksek noktaya çevirdiiniz halde ses çok azsa,
bilgisayarn ses kartndaki veya yazlm programndaki ses
denetimini kontrol edin.
Ses düzeyi çok düük.
z
Adjust the Treble and Bass to appropriate level.
Uzaktan Kumandayla ilgili sorunlar
Not
• Uzaktan kumandayla ilgili sorunlar ve çözümleri aada listelenmitir.
Sorunlar Çözümleri
Uzaktan kumanda dümeleri yant
vermiyor.
z
Pil kutuplarn (+/-) kontrol edin.
z
Pillerin bitmi olup olmadn kontrol edin.
z
Cihazn açk olup olmadn kontrol edin.
z
Güç kablosunun salam bir ekilde bal olup olmadn kontrol
edin.
z
Etrafta flüoresan veya neon k olup olmadn kontrol edin.
Soru ve Yant
Soru Yanit
Frekans nasl deitirebilirim?
Frekans, video kart yeniden yaplandrlarak deitirilebilir.
Video kart desteinin, kullanlan sürücünün sürümüne bal olduunu
unutmayn. (Ayrntlar için bilgisayarn veya video kartnn klavuzuna
bakn.)
Çözünürlüü nasl ayarlayabilirim?
z
Windows XP :
Çözünürlüü Denetim Masas, Görünüm ve Temalar, Görüntü,
Ayarlar seçeneklerini kullanarak ayarlayn.
z
Windows ME/2000 :
Çözünürlüü Denetim Masas, Görüntü, Ayarlar seçeneklerini
kullanarak ayarlayn.
Ayrntlar için video kart üreticisine dann.
Güç Tasarrufu ilevini nasl
ayarlayabilirim?
z
Windows XP :
Çözünürlüü Denetim Masas, Görünüm ve Temalar, Görüntü,
Ayarlar seçeneklerini kullanarak ayarlayn.
levi bilgisayarn BIOS-SETUP uygulamasnda veya ekran
koruyucusunda ayarlayn. (Windows/Bilgisayar Klavuzu'na
bakn).
z
Windows ME/2000 :
]
zt{T[WXXT{__UGGG]_zt{T[WXXT{__UGGG]_ YWW^TXXTY_GGG㝘䟸G[a\]a[XYWW^TXXTY_GGG㝘䟸G[a\]a[X

Çözünürlüü Denetim Masas, Görüntü, Ayarlar seçeneklerini
kullanarak ayarlayn.
levi bilgisayarn BIOS-SETUP uygulamasnda veya ekran
koruyucusunda ayarlayn. (Windows/Bilgisayar Klavuzu'na
bakn).
Dis kasayi/LCD panelini nasil
temizleyebilirim?
Güç kablosunu çkarn ve sulandrlm temizlik malzemesi veya
dorudan su kullanarak yumuak bir bezle monitörü temizleyin.
Kasann üzerinde deterjan veya kir kalmamasna dikkat edin.
Monitörün içine su girmemesine özen gösterin.
© 1995~2008 SAMSUNG. ALL Right Reserved
]
zt{T[WXXT{__UGGG]`zt{T[WXXT{__UGGG]` YWW^TXXTY_GGG㝘䟸G[a\]a[XYWW^TXXTY_GGG㝘䟸G[a\]a[X

Ürünün rengi ve görünümü modeline bal olarak farkllk gösterebilir ve performans gelitirmeleri nedeniyle
ürün özellikleri önceden haber verilmeksizin deitirilebilir.
Özellikler
Genel
Genel
Genel
Model Ad SMT-3211
LCD Panel
Boyut 32,0 inç (diyagonal) (80 cm)
Görüntü alan 697,6845 mm (H) x 392,256 mm (V)
Piksel Aral 0,51075 mm (H) x 0,51075 mm (V)
Senkronizasyon
Yatay 30 ~ 81 kHz
Dikey 56 ~ 75 Hz
Ekran Rengi
Ekran Rengi 16,7 M renkler
Çözünürlük
En iyi çözünürlük 1360 x 768 / 1366 x 768 @ 60 Hz, kullanlan grafik kartna baldr
Maksimum çözünürlük 1366 x 768 @ 60 Hz
Giri Sinyali, Sonlu
RGB Analog , DVI (Dijital Görsel Arayüz) Uyumlu Dijital RGB.
75Ù ±%10
˅
da 0,7Vp-p Pozitif Ayr H/V senk, Kompozit senk, SOG, TTL seviyesi, pozitif ya da negatif.
Maksimum Piksel Hz
100 MHz
Güç Kayna
AC 100 - 240 V~ (+/- %10), 50/60 Hz
Sinyal Kablosu
15 pin - 15 pin D-sub kablo, çkarlabilir
DVI-D – DVI-D konektörü, çkarlabilir - istee bal
Sinyal Konektörü
D-sub, BNC, DVI-D, YPbPr, S-VHS, VCR
Boyutlar (AxYxD)/ Arlk
780 X 482 X 107 mm / 30,1 X 19,0 X 4,6 inch (Altlksz)
780 X 530 X 223 mm / 30,1 X 20,9 X 8,8 inch (Altlkl)
VESA Montaj Arayüzü
200 mm x 200 mm (Specialty(Arm) Montaj donanmyla birlikte kullanlr.)
Ortam koullar
Çalma
Scakl: 10
C ~ 40
C (50
F ~ 104
F)
Nem : %10 ~ %80, younlamayan
Depolama
Scakl: -20
C ~ 45
C (-4
F ~ 113
F)
Nem : %5 ~ %95, younlamayan
Ses Özellikleri
Ses Girii 1 RCA Jak Krmz(Sa) Beyaz(Sol), 0,5 Vrms (-9 dB)
Güvenlik Talimatlar
Giri
Baðlantýlar
Yazlmn Kullanlmas
Monitörün Ayarlanmas
Sorun Giderme
Özellikler
Genel
PowerSaver
Önceden Ayarl
Zamanlama Modlar
Bilgiler
Appendix
]
^TUGGGX^TUGGGX YWW^TXYTYWGGG㝘䟸GYaW`aX`YWW^TXYTYWGGG㝘䟸GYaW`aX`
, 16,1 kg/ 35,4 lbs

Ses Girii 2 RCA Jak Krmz(Sa) Beyaz(Sol), 0,5 Vrms (-9 dB)
PC Ses Girii 3.5 Ø ereo Jak, 0,5 Vrms (-9 dB)
Frekans RF: 80 Hz ~ 15 kHz (-3 dB'de)
Tepki A/V: 80 Hz ~ 20 kHz (at -3 dB)
Tak ve Kullan Özellii
Bu monitör Tak ve Kullan uyumlu sistemlere taklabilir. Monitör ve bilgisayar sistemleri arasndaki etkileim en
iyi çalma koullarn ve monitör ayarlarn salar. Çounlukla, kullancnn farkl ayarlar seçmek istedii
durumlar dnda monitör kurulumu otomatik olarak ilerler.
Kabul Edilebilen Nokta Says
Bu üründe, 1ppm (milyonda bir) orannda duyarla sahip gelimi yar iletken teknolojisi kullanlarak üretilen
TFT LCD panel kullanlmtr. Ancak KIRMIZI, YEL, MAV ve BEYAZ renk pikselleri arada srada parlak
görünebilir veya arada baz siyah pikseller görünebilir. Bunun nedeni kalitenin düük olmas deildir, paneli
herhangi bir kukuya kaplmadan kullanabilirsiniz.
• Örnein, bu üründeki TFT LCD alt piksellerinin says 3.133.440
˅
dur.
Not
• Tasarm ve belirtimler önceden belirtilmeden deitirilebilir.
B Snf Cihaz (Meskende kullanm için Bilgi letiim cihaz)
• Bu ürün meskende kullanm için Elektromanyetik Uyumluluk Yönetmelikleri ile uyumludur ve genel yerleim
bölgeleri dahil olmak üzere tüm bölgelerde kullanlabilir.
(B Snf cihazlar A Snf cihazlara göre daha az elektromanyetik etkiye sahiptir.)
PowerSaver
Bu monitörde PowerSaver ad verilen yerleik bir güç yönetim sistemi vardr. Bu sistem, monitörünüzü, belli bir
süre kullanlmadnda düük enerji moduna geçirerek enerji tasarrufu salar. Fareyi hareket ettirdiinizde veya
klavyedeki bir tua bastnzda monitör otomatik olarak normal çalma durumuna döner. Enerji tasarrufu
salamak için, kullanmanz gerekmeyen zamanlarda veya uzun süre kullanmayacanz durumlarda
monitörünüzü KAPATIN. PowerSaver sistemi bilgisayarnza taklan VESA DPM uyumlu bir video kartyla çalr.
Bu özellii kurmak için bilgisayarnza yüklü bir yazlm yardmc programn kullann.
Durum Normal Çalma
Power saving
mode
Mekanik Güç S/W
kapal
EPA/ENERGY 2000
Mekanik Güç S/W
kapal
Güç Göstergesi Yeil Yeil, Yanp Söner Sar Siyah
Güç Tüketimi 160 W'dan daha az
1 W'dan daha az
(Kapal modu)
1 W'dan daha az
(Kapal modu)
0 W
(Güç dümesi)
Bu monitör VESA DPM ilevi olan bir bilgisayarla kullanlrsa EPA
ENERGY STAR
®
ve ENERGY2000 ile uyumludur.
SAMSUNG ENERGY STAR
®
i orta olarak, bu ürünün enerji verimlilii
açsndan ENERGY STAR
®
yönergelerine uygun olduunu belirlemitir.
Önceden Ayarl Zamanlama
Modlar
Önceden Ayarl Zamanlama Modlar
Bilgisayardan gönderilen sinyal aadaki Önceden Ayarl Zamanlama Modlar ile aynysa, ekran otomatik olarak
ayarlanr. Ancak sinyal farklysa güç yanmaya devam ederken ekran kararabilir. Video kartnn klavuzuna
bakn ve ekran aadaki gibi ayarlayn.
Ekran Modu Yatay Frekans (kHz) Dikey Frekans (Hz) Piksel Saati (MHz) Sync Polaritesi (H/V)
MAC, 640 x 480 35,000 66,667 30,240 -/-
MAC, 832 x 624 49,726 74,551 49,500 +/+
IBM, 640 x 350 31,469 70,086 25,175 +/-
IBM, 640 x 480 31,469 59,940 25,175 -/-
]
^TUGGGY^TUGGGY YWW^TXYTYWGGG㝘䟸GYaW`aYZYWW^TXYTYWGGG㝘䟸GYaW`aYZ

IBM, 720 x 400 31,469 70,087 28,322 -/+
VESA, 640 x 480 37,861 72,809 31,500 -/-
VESA, 640 x 480 37,500 75,000 31,500 -/-
VESA, 640 x 480 43,269 85,008 36,000 -/-
VESA, 800 x 600 35,156 56,250 36,000 +/+
VESA, 800 x 600 37,879 60,317 40,000 +/+
VESA, 800 x 600 48,077 72,188 50,000 +/+
VESA, 800 x600 46,875 75,000 49,500 +/+
VESA, 800 x600 53,674 85,000 56,250 +/+
VESA, 1024 x 768 48,363 60,004 65,000 -/-
VESA, 1024 x 768 56,476 70,069 75,000 -/-
VESA, 1024 x 768 60,023 75,029 78,750 +/+
VESA, 1024 x 768 68,677 85,997 94,500 +/+
VESA, 1360 x 768 47,712 60,000 85,500 +/+
Yatay Frekans
Ekrann sa kenarn sol kenarna balayan bir satrn yatay olarak
taranma süresine Yatay Döngü denir ve Yatay Döngü'nün tersi alnarak
elde edilen sayya da Yatay Frekans ad verilir. Birim: kHz
Dikey Frekans
Ekranda kullancnn görebilecei bir görüntü olumas için, floresan
lambalara benzer ekilde, ayn görüntünün saniyede pek çok defa
yinelenmesi gerekir. Bu yineleme sklna Dikey Frekans veya Yenileme
Hz denir. Birim: Hz
© 1995~2008 SAMSUNG. ALL Right Reserved
^TUGGGZ^TUGGGZ YWW^TXYTYWGGG㝘䟸GYaW`aYZYWW^TXYTYWGGG㝘䟸GYaW`aYZ

Ürünün rengi ve görünümü modeline bal olarak farkllk gösterebilir ve performans gelitirmeleri nedeniyle
ürün özellikleri önceden haber verilmeksizin deitirilebilir.
Information
Daha yi Görüntü Elde Etmek çin
En iyi görüntü kalitesini elde etmek için bilgisayarn denetim masasndan bilgisayar çözünürlüünü ve
ekran enjeksiyon hzn (yenileme hz) aada açkland gibi ayarlayn. TFT-LCD
˅
de en iyi görüntü
kalitesi salanmazsa, ekrandaki görüntünün kalitesi düük olabilir.
• Çözünürlük: 1360 x 768
• Dikey frekans (yenileme hz): 60 Hz
Bu üründe, 1ppm (milyonda bir) orannda duyarla sahip gelimi yar iletken teknolojisi kullanlarak
üretilen TFT LCD panel kullanlmtr. Ancak KIRMIZI, YEL, MAV ve BEYAZ renk pikselleri arada srada
parlak görünebilir veya arada baz siyah pikseller görünebilir.
Bunun nedeni kalitenin düük olmas deildir, paneli herhangi bir kukuya kaplmadan kullanabilirsiniz.
•
Örnein, bu üründeki TFT LCD alt piksellerinin says 3.133.440
˅
dur.
Monitörü ve d paneli temizlerken lütfen önerildii gibi çok az miktarda temizleme maddesiyle yumuak ve
kuru bir bez kullann; temizledikten sonra ürünü iyice silerek parlatn. LCD alan, üzerine bastrlmadan
yumuak bir ekilde silinmelidir.
Fazla bastrlrsa, üzerinde iz braklabilir.
Resim kalitesinden memnun deilseniz, pencere kapatma dümesine bastnzda ekranda görünecek
olan
ˈ
otomatik ayar ilevini
ˉG
kullanarak daha iyi bir resim elde edebilirsiniz.
Otomatik ayar sonrasnda da görüntüde bozukluklar varsa, FINE/COARSE ayar ilevini kullann.
Uzun süre sabit bir ekran görüntülerseniz, görüntü kalntlar veya bulanklk oluabilir.
Uzun süre monitörden uzak kalacaksanz, enerji tasarrufu moduna geçin veya hareketli görüntüler içeren
bir ekran koruyucu ayarlayn.
ÜRÜN BLGLER (Görüntü Sabitlemesiz )
Görüntü Sabitlemesi nedir?
Bir LCD paneli normal koullarda çaltrldnda görüntü sabitlemesi olumayabilir. Normal koullar, sürekli
olarak deien desenler olarak tanmlanr. LCD paneli uzun süre sabit bir desende çaltrldnda (12
saatten fazla), bir pikselde sv kristalini (LC) çaltran elektrotlar arasnda hafif bir voltaj fark olabilir.
Elektrotlar arasndaki voltaj fark zamanla artar ve sv kristalin zayflamasna neden olur. Bu durum
olutuunda, desen deitiinde bir önceki görüntü görünebilir. Bunu önlemek için, toplam voltaj fark
azaltlmaldr.
Güvenlik Talimatlar
Giri
Baðlantýlar
Yazlmn Kullanlmas
Monitörün Ayarlanmas
Sorun Giderme
Özellikler
Bilgiler
Daha yi Görüntü Elde
Etmek çin
ÜRÜN BLGLER
(Görüntü Sabitlemesiz )
Appendix
zt{T[WXXT{__UGGG^Zzt{T[WXXT{__UGGG^Z YWW^TXXTY_GGG㝘䟸G[a\]a[XYWW^TXXTY_GGG㝘䟸G[a\]a[X

Güç Kapal, Ekran Koruyucu ya da Enerji Tasarrufu Modu
z
20 saatlik kullanmn ardndan 4 saat gücü kapal tutun
z
12 saatlik kullanmn ardndan 2 saat gücü kapal tutun
z
Monitörü PC Ekran Özellikleri Güç emas ile kapanmaya ayarlayn.
z
Mümkünse bir Ekran Koruyucu kullann - Tek renkli bir ekran koruyucu ya da hareketli bir görüntü
önerilir.
Renk Bilgilerini periyodik olarak deitirin
Not
• ki farkl renk kullann
2 farkl renkle Renk Bilgilerini 30 dakikada bir döndürün.
z
Büyük parlaklk farkna sahip karakter ve arka plan rengi kombinasyonlar kullanmaktan kaçnn.
Kolayca görüntü sabitlemesine yol açabilen gri renklerini kullanmaktan kaçnn.
Kaçnlmas gerekenler: Büyük parlaklk farkna sahip renkler (Siyah ve Beyaz, Gri)
Karakterlerin rengini periyodik olarak deitirin
z
Küçük parlaklk farkna sahip parlak renkler kullann
- Döngü : 30 dakikada bir karakterlerin rengini ve arka plan rengini deitirin.
^
zt{T[WXXT{__UGGG^[zt{T[WXXT{__UGGG^[ YWW^TXXTY_GGG㝘䟸G[a\]a[XYWW^TXXTY_GGG㝘䟸G[a\]a[X

z
30 dakikada bir hareketli karakterleri deitirin.
z
Tüm alan periyodik olarak Logo ile birlikte hareketli görüntü görüntüler.
- Döngü: 4 saatlik kullanmn ardndan 60 saniye boyunca Logo ile birlikte hareketli görüntü
görüntüler.
z
Monitörünüzü görüntü sabitlemesinden korumann en iyi yolu, Gücü kapatmak ya da siz
kullanmadnz zamanlarda PC'nizin veya Sisteminizin bir Ekran Koruyucu program çaltrmasdr.
Ayrca talimat klavuzuna dayanarak Garanti hizmeti de snrlanacaktr.
Ürüne Screen Scroll (Ekran Kaydrma) ilevi uygulayn
z
Screen Scroll (Ekran Kaydrma) ilevi uygulayn
- Belirti: Yukar aa hareket eden Siyah Renkli Yatay Çubuk.
- Yöntem seçin
. Talimat Klavuzu : OSD Menu -> Set Up -> Safety Screen -> Screen Scroll (OSD Menü
˧
Ayarlar
˧
Güvenlik Ekran -> Ekran Kaydrma)
. Zaman Aral : 1 ~ 10 saat ( Önerilen : 1 )
. Süre : 1 ~ 5 saniye ( Önerilen : 5 )
Not
• (Lütfen CD Kullanm Klavuzunun "OSD levi"nde olmasna dikkat edin, baz modellerde bulunmaz)
Ürüne Pixel (Piksel) ilevi uygulayn
z
Ekran Pixel (Piksel) ilevi uygulayn
- Belirti: Yukar aa hareket eden Siyah Renkli Nokta.
- Yöntem seçin
. Talimat Klavuzu: OSD Menu -> Set Up -> Safety Screen -> Pixel (OSD Menü -> Ayarlar ->
Güvenlik Ekran -> Piksel)
. Zaman Aral : 1 ~ 10 saat ( Önerilen : 1 )
. Süre : 10 ~ 50 saniye ( Önerilen : 50 )
z
Ekran Çubuu ilevi uygulayn
- Belirti: Yukar aa hareket eden Siyah Renkli Yatay / Dikey Çubuk.
^
zt{T[WXXT{__UGGG^\zt{T[WXXT{__UGGG^\ YWW^TXXTY_GGG㝘䟸G[a\]a[XYWW^TXXTY_GGG㝘䟸G[a\]a[X

- Yöntem seçin
. Talimat Klavuzu :OSD Menu
˧
Set Up
˧
Safety Screen
˧
Bar (OSD Menü
˧
Ayarlar
˧
Güvenlik
Ekran
˧
Çubuk)
. Zaman Aral : 1 ~ 10 saat ( Önerilen : 1 )
. Süre : 10 ~ 50 saniye ( Önerilen : 50 )
Not
• (Lütfen CD Kullanm Klavuzunun "OSD levi"nde olmasna dikkat edin, baz modellerde bulunmaz)
Ürüne Ekran Silme ilevi uygulayn
z
Ekran Silme ilevi uygulayn
- Belirti: 2 Dikey blok, ekran silerek hareket eder
- Yöntem seçin
. Talimat Klavuzu : OSD Menu -> Set Up -> Safety Screen -> Eraser (OSD Menü -> Ayarlar ->
Güvenlik Ekran -> Ekran Kaydrma -> Silici)
. Zaman Aral : 1 ~ 10 saat ( Önerilen : 1 )
. Süre : 10 ~ 50 saniye ( Önerilen : 50 )
Not
• (Lütfen CD Kullanm Klavuzunun "OSD levi"nde olmasna dikkat edin, baz modellerde bulunmaz)
© 1995~2008 SAMSUNG. ALL Right Reserved
^
zt{T[WXXT{__UGGG^]zt{T[WXXT{__UGGG^] YWW^TXXTY_GGG㝘䟸G[a\]a[YYWW^TXXTY_GGG㝘䟸G[a\]a[Y

Ürünün rengi ve görünümü modeline bal olarak farkllk gösterebilir ve performans gelitirmeleri nedeniyle
ürün özellikleri önceden haber verilmeksizin deitirilebilir.
Appendix
Dünyann her yerinden SAMSUNG
˅
a ulan
Not
• Samsung ürünleri ile ilgili sorularnz ya da yorumlarnz varsa lütfen SAMSUNG müteri hizmetleri merkezi
ile temasa geçin.
Güvenlik Talimatlar
Giri
Baðlantýlar
Yazlmn Kullanlmas
Monitörün Ayarlanmas
Sorun Giderme
Özellikler
Bilgiler
Appendix
Dünyann her yerinden
SAMSUNG
˅
a ulan
Koullar
Yetki Bildirimi
^
zt{T[WXXT{__UGGG^^zt{T[WXXT{__UGGG^^ YWW^TXXTY_GGG㝘䟸G[a\]a[YYWW^TXXTY_GGG㝘䟸G[a\]a[Y
North America
U.S.A
1-800-SAMSUNG(726-7864) http://www.samsung.com
CANADA
1-800-SAMSUNG(726-7864) http://www.samsung.com/ca
MEXICO
01-800-SAMSUNG(726-7864) http://www.samsung.com
Latin America
ARGENTINE
0800-333-3733 http://www.samsung.com/ar
BRAZIL
0800-124-421
4004-0000
http://www.samsung.com
CHILE
800-SAMSUNG(726-7864) http://www.samsung.com/cl
COLOMBIA
01-8000112112 http://www.samsung.com.co
COSTA RICA
0-800-507-7267 http://www.samsung.com/latin
ECUADOR
1-800-10-7267 http://www.samsung.com/latin
EL SALVADOR
800-6225 http://www.samsung.com/latin
GUATEMALA
1-800-299-0013 http://www.samsung.com/latin
JAMAICA
1-800-234-7267 http://www.samsung.com/latin
PANAMA
800-7267 http://www.samsung.com/latin
PUERTO RICO
1-800-682-3180 http://www.samsung.com/latin
REP. DOMINICA
1-800-751-2676 http://www.samsung.com/latin
TRINIDAD & TOBAGO
1-800-SAMSUNG(726-7864) http://www.samsung.com/latin
VENEZUELA
0-800-100-5303 http://www.samsung.com/latin
Europe
AUSTRIA
0800-SAMSUNG(726-7864) http://www.samsung.com/at
BELGIUM
0032 (0)2 201 24 18 http://www.samsung.com/be
NICARAGUA
00-1800-5077267
HONDURAS
800-7919267

^
zt{T[WXXT{__UGGG^_zt{T[WXXT{__UGGG^_ YWW^TXXTY_GGG㝘䟸G[a\]a[YYWW^TXXTY_GGG㝘䟸G[a\]a[Y
CZECH REPUBLIC
DENMARK
70 70 19 70 http://www.samsung.com/dk
FINLAND
030-6227 515 http://www.samsung.com/fi
FRANCE
3260 SAMSUNG
08 25 08 65 65 (€ 0,15/min)
http://www.samsung.com
GERMANY
01805-SAMSUNG(726-7864)
http://www.samsung.com
HUNGARY
06-80-SAMSUNG(726-7864) http://www.samsung.com
ITALIA
800-SAMSUNG(726-7864) http://www.samsung.com
LUXEMBURG
0035 (0)2 261 03 710 http://www.samsung.com/be
NETHERLANDS
0900-SAMSUNG(726-7864)
http://www.samsung.com/nl
NORWAY
815-56 480 http://www.samsung.com/no
POLAND
0 801 801 881
022-607-93-33
http://www.samsung.com/pl
PORTUGAL
80820-SAMSUNG(726-7864) http://www.samsung.com/pt
EIRE
0818 717 100 http://www.samsung.com/ie
SLOVAKIA
0800-SAMSUNG(726-7864) http://www.samsung.com/sk
SPAIN
902 10 11 30 http://www.samsung.com
SWEDEN
0771-400 200 http://www.samsung.com/se
SWITZERLAND
0800-SAMSUNG(726-7864) www.samsung.com/ch
U.K
0845 SAMSUNG(726-7864) http://www.samsung.com
CIS
ESTONIA
800-7267 http://www.samsung.ee
LATVIA
800-7267 http://www.samsung.com/lv
LITHUANIA
8-800-77777 http://www.samsung.lt
KAZAKHSTAN
8-10-800-500-55-500 http://www.samsung.kz
KYRGYZSTAN
00-800-500-55-500
RUSSIA
8-800-555-55-55 http://www.samsung.com
UKRAINE
8-800-502-0000 http://www.samsung.com
UZBEKISTAN
8-800-120-0-400 http://www.samsung.uz
Asia Pacific
AUSTRALIA
1300 362 603 http://www.samsung.com
CHINA
800-810-5858, 010- 6475 1880 http://www.samsung.com
HONG KONG
3698-4698 http://www.samsung.com/hk
INDIA
3030 8282, 1800 110011 http://www.samsung.com
INDONESIA
0800-112-8888 http://www.samsung.com
JAPAN
0120-327-527 http://www.samsung.com/jp
MALAYSIA
1800-88-9999 http://www.samsung.com/my
NEW ZEALAND
0800SAMSUNG(726-7864) http://www.samsung.com/nz
PHILIPPINES
1800-10-SAMSUNG(726-7864) http://www.samsung.com/ph
SINGAPORE
1800-SAMSUNG(726-7864) http://www.samsung.com
THAILAND
1800-29-3232, 02-689-3232 http://www.samsung.com
(€ 0,15/min)
(€ 0,14/min)
(€ 0,10/min)
TADJIKISTAN
8-10-800-500-55-500
844 000 844 http://www.samsung.com/cz

Koullar
Senk. Sinyali
Senk. (Senkronize) Sinyaller, monitörde istenen renkleri görüntülemek için gereken standart sinyalleri belirtir.
Dikey ve Yatay Senk. Sinyalleri olarak ikiye ayrlr. Bu sinyaller ayarlanan çözünürlük ve frekansta normal
renkli görüntüler gösterir.
Senk. Sinyali türleri
Ayr Bu, monitöre dikey senk. sinyalleri iletme emasdr.
Birleik Bu, dikey senk. sinyallerini bir birleik sinyalde birletirme ve monitöre iletme emasdr.
Monitör birleik sinyali özgün renk sinyallerine ayrarak renk sinyallerini görüntüler.
Nokta Aral
Monitördeki görüntü krmz, yeil ve mavi noktalardan oluur. Noktalar birbirine yaknlatkça çözünürlük artar.
Ayn renkteki iki nokta arasndaki uzakla "Nokta Aral" denir. Birim: mm
Dikey Frekans
Görüntüyü oluturmak ve kullancya göstermek için ekrann saniyede birkaç defa yeniden çizilmesi gerekir.
Saniyedeki yineleme sklna Dikey Frekans veya Yenileme Hz denir. Birim: Hz
Örnek:
A
yn n kendini saniyede 60 defa yinelerse, bu 60 Hz olarak kabul edilir.
Yatay Frekans
Ekrann sa kenarn sol kenarna balayan bir satr yatay olarak tarama süresine Yatay Döngü denir. Yatay
Döngü'nün tersi alnarak elde edilen sayya Yatay Frekans denir. Birim: kHz
Taramal ve Taramasz Yöntemler
Ekrann en üstünden en altna kadar olan yatay satrlar srasyla göstermeye Taramasz Yöntem, tek
numaral satrlarla çift numaral satrlar dönüümlü olarak göstermeye Taramal yöntem denir. Net bir görüntü
olumasn salamak için çou monitör Taramasz yöntemi kullanlr. Taramal yöntem televizyonlarda
kullanlan yöntemdir.
Tak ve Kullan
Bu ilev, bilgisayarla monitör arasnda otomatik bilgi deiimine olanak tanyarak kullancya yüksek kaliteli bir
ekran sunar. Bu monitör Tak ve Kullan ilevi için uluslararas VESA DDC standardna uygundur.
Çözünürlük
Ekran görüntüsü oluturmak için kullanlan yatay ve dikey nokta saysna "çözünürlük" denir. Bu say ekrann
hassasiyetini gösterir. Yüksek çözünürlük, ekranda daha fazla görüntü bilgisi gösterilmesine olanak
saladndan birçok görevi gerçekletirmeye uygundur.
Örnek: Çözünürlük 1360 X 768 ise, ekran 1360 yatay nokta (yatay çözünürlük) ve 768 dikey
çizgiden (dikey çözünürlük) oluuyor demektir.
Multiple Display Control (MDC)
Çoklu Ekran Kontrolü (MDC), çeitli ekranlarn kolayca ve ayn anda bir bilgisayar üzerinde çaltrlmasn
salayan bir uygulamadr. Bilgisayar ve ekran arasndaki iletiim için bir seri iletiim standard olan RS-232C
kullanlr.
^
zt{T[WXXT{__UGGG^`zt{T[WXXT{__UGGG^` YWW^TXXTY_GGG㝘䟸G[a\]a[YYWW^TXXTY_GGG㝘䟸G[a\]a[Y
TAIWAN
0800-329-999 http://www.samsung.com/tw
VIETNAM
1 800 588 889 http://www.samsung.com
Middle East & Africa
SOUTH AFRICA
0860-SAMSUNG(726-7864 ) http://www.samsung.com
TURKEY
444 77 11 http://www.samsung.com
U.A.E
800-SAMSUNG (726-7864)
8000-4726
http://www.samsung.com

Bu belgedeki bilgiler önceden belirtilmeden deitirilebilir.
© 2008 Samsung Electronics Co., Ltd. All rights reserved.
Samsung Electronics Co., Ltd. irketinin yazl izni olmadan herhangi bir ekilde yeniden üretilmesi kesinlikle
yasaktr.
Samsung Electronics Co., Ltd. bu belgedeki hatalardan veya bu malzemenin yaps, performans veya
kullanmna bal olarak ortaya çkan veya oluan zararlardan sorumlu tutulamaz.
Samsung , Samsung Electronics Co., Ltd. irketinin kaytl ticari markasdr; Microsoft , Windows ve Windows NT
Microsoft Corporation irketinin kaytl ticari markalardr; VESA , DPM ve DDC Video Electronics Standard
A
ssociation'n kaytl ticari markalardr; ENERGY STAR
®
ad ve amblemi U.S. Environmental Protection
A
gency'nin (EPA) kaytl ticari markasdr. Samsung Electronics Co., Ltd. irketi ENERGY STAR
®
Orta
olarak, enerji verimlilii açsndan bu ürünün ENERGY STAR
®
yönergelerine uygun olduunu belirlemitir.
Burada sözü edilen dier tüm ürün adlar ilgili sahiplerinin ticari markalar veya kaytl ticari markalardr.
Manufacturer :SAMSUNG ELECTRONICS CO., LTD
12th FL., Samsung Main Bldg., 250, 2-ga, Taepyung-Ro
Seoul, Korea
Tel : +82 2 727 7114
LVD : P.O. Box 73 Blindern, N-0314 Oslo, Norway
Tel) 47-22-96-03-30, Fax) 44-22-96-05-50
EMC : Samsung Electronics Co., Ltd. EMC Test Laboratory
416 Maetan-3 Dong, Yeongtong-gu, Suwon City, Gyeonggi-do,
Korea, 442-742
Tel) 82-31-200-2185, Fax) 82-31-200-2189
zt{T[WXXT{__UGGG_Wzt{T[WXXT{__UGGG_W YWW^TXXTY_GGG㝘䟸G[a\]a[YYWW^TXXTY_GGG㝘䟸G[a\]a[Y
Yetki Bildirimi
-
 1
1
-
 2
2
-
 3
3
-
 4
4
-
 5
5
-
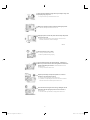 6
6
-
 7
7
-
 8
8
-
 9
9
-
 10
10
-
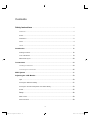 11
11
-
 12
12
-
 13
13
-
 14
14
-
 15
15
-
 16
16
-
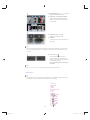 17
17
-
 18
18
-
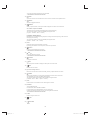 19
19
-
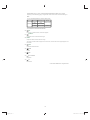 20
20
-
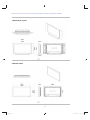 21
21
-
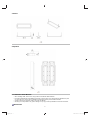 22
22
-
 23
23
-
 24
24
-
 25
25
-
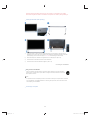 26
26
-
 27
27
-
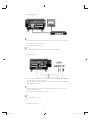 28
28
-
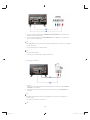 29
29
-
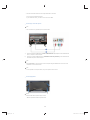 30
30
-
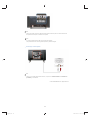 31
31
-
 32
32
-
 33
33
-
 34
34
-
 35
35
-
 36
36
-
 37
37
-
 38
38
-
 39
39
-
 40
40
-
 41
41
-
 42
42
-
 43
43
-
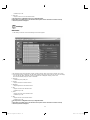 44
44
-
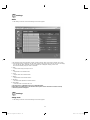 45
45
-
 46
46
-
 47
47
-
 48
48
-
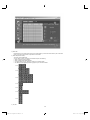 49
49
-
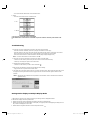 50
50
-
 51
51
-
 52
52
-
 53
53
-
 54
54
-
 55
55
-
 56
56
-
 57
57
-
 58
58
-
 59
59
-
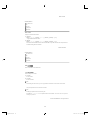 60
60
-
 61
61
-
 62
62
-
 63
63
-
 64
64
-
 65
65
-
 66
66
-
 67
67
-
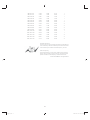 68
68
-
 69
69
-
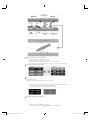 70
70
-
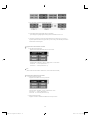 71
71
-
 72
72
-
 73
73
-
 74
74
-
 75
75
-
 76
76
-
 77
77
-
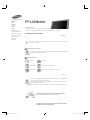 78
78
-
 79
79
-
 80
80
-
 81
81
-
 82
82
-
 83
83
-
 84
84
-
 85
85
-
 86
86
-
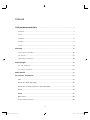 87
87
-
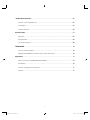 88
88
-
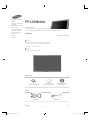 89
89
-
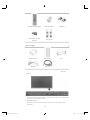 90
90
-
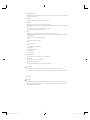 91
91
-
 92
92
-
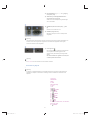 93
93
-
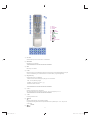 94
94
-
 95
95
-
 96
96
-
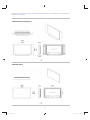 97
97
-
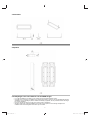 98
98
-
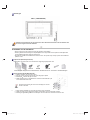 99
99
-
 100
100
-
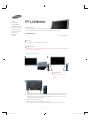 101
101
-
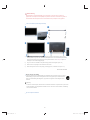 102
102
-
 103
103
-
 104
104
-
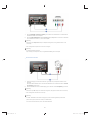 105
105
-
 106
106
-
 107
107
-
 108
108
-
 109
109
-
 110
110
-
 111
111
-
 112
112
-
 113
113
-
 114
114
-
 115
115
-
 116
116
-
 117
117
-
 118
118
-
 119
119
-
 120
120
-
 121
121
-
 122
122
-
 123
123
-
 124
124
-
 125
125
-
 126
126
-
 127
127
-
 128
128
-
 129
129
-
 130
130
-
 131
131
-
 132
132
-
 133
133
-
 134
134
-
 135
135
-
 136
136
-
 137
137
-
 138
138
-
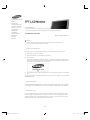 139
139
-
 140
140
-
 141
141
-
 142
142
-
 143
143
-
 144
144
-
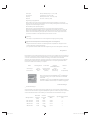 145
145
-
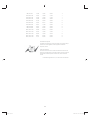 146
146
-
 147
147
-
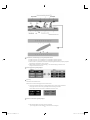 148
148
-
 149
149
-
 150
150
-
 151
151
-
 152
152
-
 153
153
-
 154
154
-
 155
155
-
 156
156
-
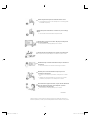 157
157
-
 158
158
-
 159
159
-
 160
160
-
 161
161
-
 162
162
-
 163
163
-
 164
164
-
 165
165
-
 166
166
-
 167
167
-
 168
168
-
 169
169
-
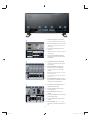 170
170
-
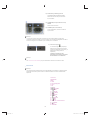 171
171
-
 172
172
-
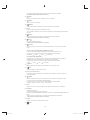 173
173
-
 174
174
-
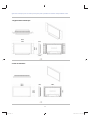 175
175
-
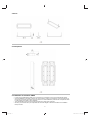 176
176
-
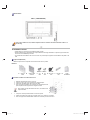 177
177
-
 178
178
-
 179
179
-
 180
180
-
 181
181
-
 182
182
-
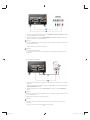 183
183
-
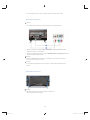 184
184
-
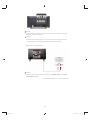 185
185
-
 186
186
-
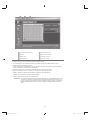 187
187
-
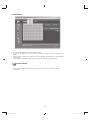 188
188
-
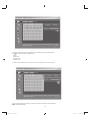 189
189
-
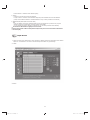 190
190
-
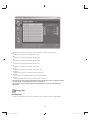 191
191
-
 192
192
-
 193
193
-
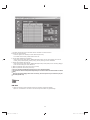 194
194
-
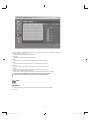 195
195
-
 196
196
-
 197
197
-
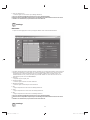 198
198
-
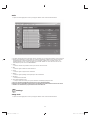 199
199
-
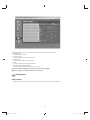 200
200
-
 201
201
-
 202
202
-
 203
203
-
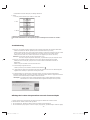 204
204
-
 205
205
-
 206
206
-
 207
207
-
 208
208
-
 209
209
-
 210
210
-
 211
211
-
 212
212
-
 213
213
-
 214
214
-
 215
215
-
 216
216
-
 217
217
-
 218
218
-
 219
219
-
 220
220
-
 221
221
-
 222
222
-
 223
223
-
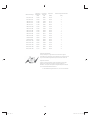 224
224
-
 225
225
-
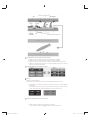 226
226
-
 227
227
-
 228
228
-
 229
229
-
 230
230
-
 231
231
-
 232
232
-
 233
233
-
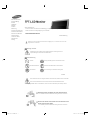 234
234
-
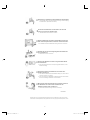 235
235
-
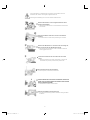 236
236
-
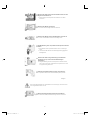 237
237
-
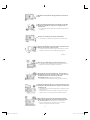 238
238
-
 239
239
-
 240
240
-
 241
241
-
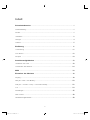 242
242
-
 243
243
-
 244
244
-
 245
245
-
 246
246
-
 247
247
-
 248
248
-
 249
249
-
 250
250
-
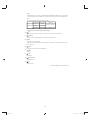 251
251
-
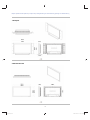 252
252
-
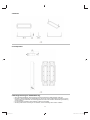 253
253
-
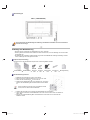 254
254
-
 255
255
-
 256
256
-
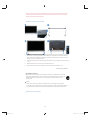 257
257
-
 258
258
-
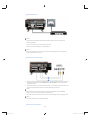 259
259
-
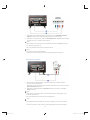 260
260
-
 261
261
-
 262
262
-
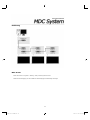 263
263
-
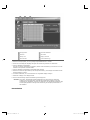 264
264
-
 265
265
-
 266
266
-
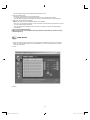 267
267
-
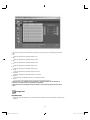 268
268
-
 269
269
-
 270
270
-
 271
271
-
 272
272
-
 273
273
-
 274
274
-
 275
275
-
 276
276
-
 277
277
-
 278
278
-
 279
279
-
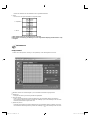 280
280
-
 281
281
-
 282
282
-
 283
283
-
 284
284
-
 285
285
-
 286
286
-
 287
287
-
 288
288
-
 289
289
-
 290
290
-
 291
291
-
 292
292
-
 293
293
-
 294
294
-
 295
295
-
 296
296
-
 297
297
-
 298
298
-
 299
299
-
 300
300
-
 301
301
-
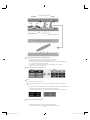 302
302
-
 303
303
-
 304
304
-
 305
305
-
 306
306
-
 307
307
-
 308
308
-
 309
309
-
 310
310
-
 311
311
-
 312
312
-
 313
313
-
 314
314
-
 315
315
-
 316
316
-
 317
317
-
 318
318
-
 319
319
-
 320
320
-
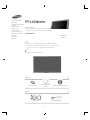 321
321
-
 322
322
-
 323
323
-
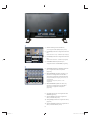 324
324
-
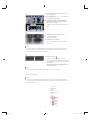 325
325
-
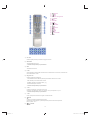 326
326
-
 327
327
-
 328
328
-
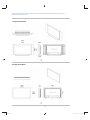 329
329
-
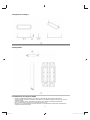 330
330
-
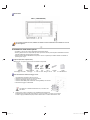 331
331
-
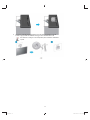 332
332
-
 333
333
-
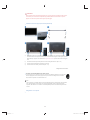 334
334
-
 335
335
-
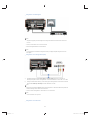 336
336
-
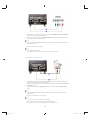 337
337
-
 338
338
-
 339
339
-
 340
340
-
 341
341
-
 342
342
-
 343
343
-
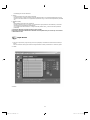 344
344
-
 345
345
-
 346
346
-
 347
347
-
 348
348
-
 349
349
-
 350
350
-
 351
351
-
 352
352
-
 353
353
-
 354
354
-
 355
355
-
 356
356
-
 357
357
-
 358
358
-
 359
359
-
 360
360
-
 361
361
-
 362
362
-
 363
363
-
 364
364
-
 365
365
-
 366
366
-
 367
367
-
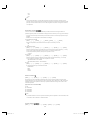 368
368
-
 369
369
-
 370
370
-
 371
371
-
 372
372
-
 373
373
-
 374
374
-
 375
375
-
 376
376
-
 377
377
-
 378
378
-
 379
379
-
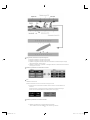 380
380
-
 381
381
-
 382
382
-
 383
383
-
 384
384
-
 385
385
-
 386
386
-
 387
387
-
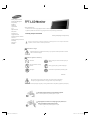 388
388
-
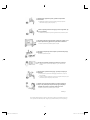 389
389
-
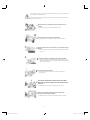 390
390
-
 391
391
-
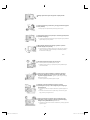 392
392
-
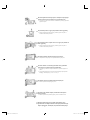 393
393
-
 394
394
-
 395
395
-
 396
396
-
 397
397
-
 398
398
-
 399
399
-
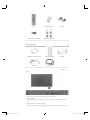 400
400
-
 401
401
-
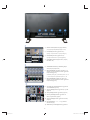 402
402
-
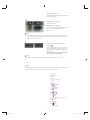 403
403
-
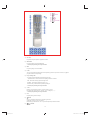 404
404
-
 405
405
-
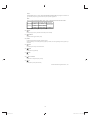 406
406
-
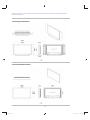 407
407
-
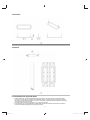 408
408
-
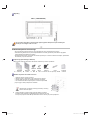 409
409
-
 410
410
-
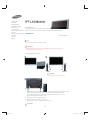 411
411
-
 412
412
-
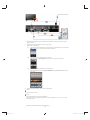 413
413
-
 414
414
-
 415
415
-
 416
416
-
 417
417
-
 418
418
-
 419
419
-
 420
420
-
 421
421
-
 422
422
-
 423
423
-
 424
424
-
 425
425
-
 426
426
-
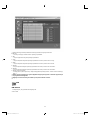 427
427
-
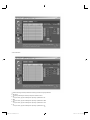 428
428
-
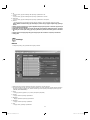 429
429
-
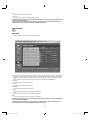 430
430
-
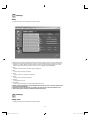 431
431
-
 432
432
-
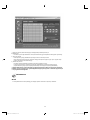 433
433
-
 434
434
-
 435
435
-
 436
436
-
 437
437
-
 438
438
-
 439
439
-
 440
440
-
 441
441
-
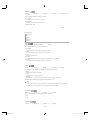 442
442
-
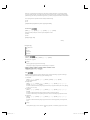 443
443
-
 444
444
-
 445
445
-
 446
446
-
 447
447
-
 448
448
-
 449
449
-
 450
450
-
 451
451
-
 452
452
-
 453
453
-
 454
454
-
 455
455
-
 456
456
-
 457
457
-
 458
458
-
 459
459
-
 460
460
-
 461
461
-
 462
462
-
 463
463
-
 464
464
-
 465
465
-
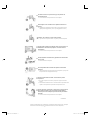 466
466
-
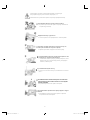 467
467
-
 468
468
-
 469
469
-
 470
470
-
 471
471
-
 472
472
-
 473
473
-
 474
474
-
 475
475
-
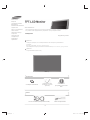 476
476
-
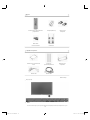 477
477
-
 478
478
-
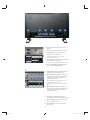 479
479
-
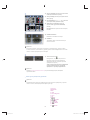 480
480
-
 481
481
-
 482
482
-
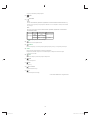 483
483
-
 484
484
-
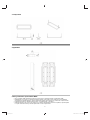 485
485
-
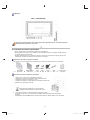 486
486
-
 487
487
-
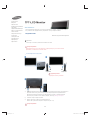 488
488
-
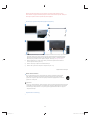 489
489
-
 490
490
-
 491
491
-
 492
492
-
 493
493
-
 494
494
-
 495
495
-
 496
496
-
 497
497
-
 498
498
-
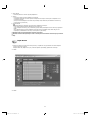 499
499
-
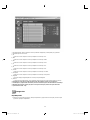 500
500
-
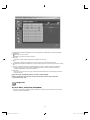 501
501
-
 502
502
-
 503
503
-
 504
504
-
 505
505
-
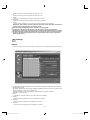 506
506
-
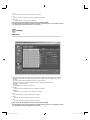 507
507
-
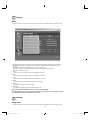 508
508
-
 509
509
-
 510
510
-
 511
511
-
 512
512
-
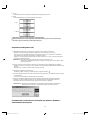 513
513
-
 514
514
-
 515
515
-
 516
516
-
 517
517
-
 518
518
-
 519
519
-
 520
520
-
 521
521
-
 522
522
-
 523
523
-
 524
524
-
 525
525
-
 526
526
-
 527
527
-
 528
528
-
 529
529
-
 530
530
-
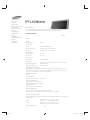 531
531
-
 532
532
-
 533
533
-
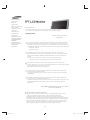 534
534
-
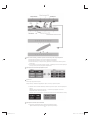 535
535
-
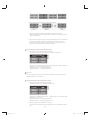 536
536
-
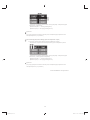 537
537
-
 538
538
-
 539
539
-
 540
540
-
 541
541
-
 542
542
-
 543
543
-
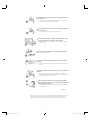 544
544
-
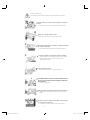 545
545
-
 546
546
-
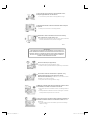 547
547
-
 548
548
-
 549
549
-
 550
550
-
 551
551
-
 552
552
-
 553
553
-
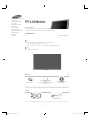 554
554
-
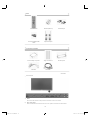 555
555
-
 556
556
-
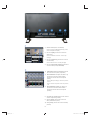 557
557
-
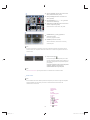 558
558
-
 559
559
-
 560
560
-
 561
561
-
 562
562
-
 563
563
-
 564
564
-
 565
565
-
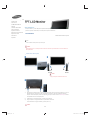 566
566
-
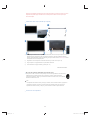 567
567
-
 568
568
-
 569
569
-
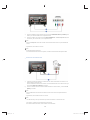 570
570
-
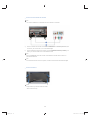 571
571
-
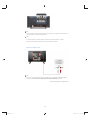 572
572
-
 573
573
-
 574
574
-
 575
575
-
 576
576
-
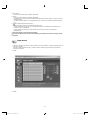 577
577
-
 578
578
-
 579
579
-
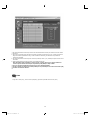 580
580
-
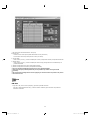 581
581
-
 582
582
-
 583
583
-
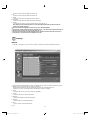 584
584
-
 585
585
-
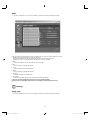 586
586
-
 587
587
-
 588
588
-
 589
589
-
 590
590
-
 591
591
-
 592
592
-
 593
593
-
 594
594
-
 595
595
-
 596
596
-
 597
597
-
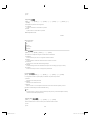 598
598
-
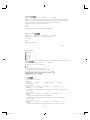 599
599
-
 600
600
-
 601
601
-
 602
602
-
 603
603
-
 604
604
-
 605
605
-
 606
606
-
 607
607
-
 608
608
-
 609
609
-
 610
610
-
 611
611
-
 612
612
-
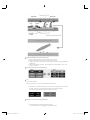 613
613
-
 614
614
-
 615
615
-
 616
616
-
 617
617
-
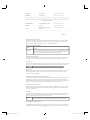 618
618
-
 619
619
-
 620
620
-
 621
621
-
 622
622
-
 623
623
-
 624
624
-
 625
625
-
 626
626
-
 627
627
-
 628
628
-
 629
629
-
 630
630
-
 631
631
-
 632
632
-
 633
633
-
 634
634
-
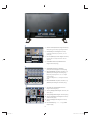 635
635
-
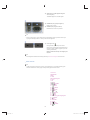 636
636
-
 637
637
-
 638
638
-
 639
639
-
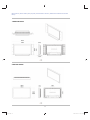 640
640
-
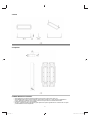 641
641
-
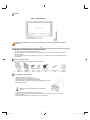 642
642
-
 643
643
-
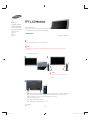 644
644
-
 645
645
-
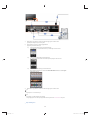 646
646
-
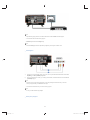 647
647
-
 648
648
-
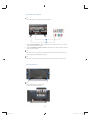 649
649
-
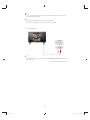 650
650
-
 651
651
-
 652
652
-
 653
653
-
 654
654
-
 655
655
-
 656
656
-
 657
657
-
 658
658
-
 659
659
-
 660
660
-
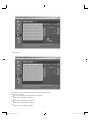 661
661
-
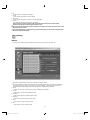 662
662
-
 663
663
-
 664
664
-
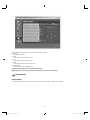 665
665
-
 666
666
-
 667
667
-
 668
668
-
 669
669
-
 670
670
-
 671
671
-
 672
672
-
 673
673
-
 674
674
-
 675
675
-
 676
676
-
 677
677
-
 678
678
-
 679
679
-
 680
680
-
 681
681
-
 682
682
-
 683
683
-
 684
684
-
 685
685
-
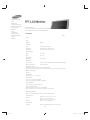 686
686
-
 687
687
-
 688
688
-
 689
689
-
 690
690
-
 691
691
-
 692
692
-
 693
693
-
 694
694
-
 695
695
-
 696
696


in andere talen
- italiano: Samsung SMT-3211N Manuale utente
- français: Samsung SMT-3211N Manuel utilisateur
- español: Samsung SMT-3211N Manual de usuario
- Deutsch: Samsung SMT-3211N Benutzerhandbuch