
Cod.: P206VEN130
VENTILATORE PIANTANA CON TIMER
STAND FAN WITH TIMER
VENTILATEUR À PIED AVEC MINUTERIE
STANDVENTILATOR MIT TIMER
VENTILADOR DE PIE CON TEMPORIZADOR
ΑΝΕΜΙΣΤΉΡΑΣ ΜΕ ΟΡΘΟΣΤΑΤΉ ΜΕ ΧΡΟΝΟΔΙΑΚΟΠΤΉ
VENTILATOR CU TIMER
STOJANOVÝ VENTILÁTOR S ČASOVAČEM
STAND VENTILATOR MET TIMER
WENTYLATOR STOJĄCY Z TIMEREM
VENTILATORS AR TAIMERI
IT
EN
FR
DE
ES
GR
RO
CZ
NL
PL
LV
For further information and/or for instructions for use in other languages , please visit: beper.com
pag. 3
pag. 7
pag. 11
pag. 16
pag. 20
pag. 25
pag. 29
pag. 33
pag. 38
pag. 42
pag. 46
MONTAGGIO
ASSEMBLING

Fig. A
1
3 5
4 6
2
10
13
8
9
7
11
12
14
16
15
17
18

Ventilatore piantana con timer Manuale di istruzioni
IT
3
Avvertenze generali
Leggere queste istruzioni prima di usare l’apparecchio.
Prima e durante l’uso dell’apparecchio è necessario seguire alcune
precauzioni elementari.
Dopo aver tolto l’imballaggio assicurarsi dell’integrità dell’apparec-
chio. In caso di dubbio non utilizzare l’apparecchio e rivolgersi a per-
sonale professionalmente qualicato. Gli elementi dell’imballaggio
(sacchetti di plastica, polistirolo, ecc.) non devono essere lasciati alla
portata dei bambini, in quanto potenziali fonti di pericolo.
Assicurarsi sempre che la tensione di rete elettrica sia uguale a quel-
la indicata nell’etichetta dati tecnici e che l’impianto sia compatibile
con la potenza dell’apparecchio.
Non tirare mai il cavo per scollegarlo dalla presa di corrente elettrica.
Assicurarsi che il cavo non sia in contatto con superci calde o ta-
glienti.
Non utilizzare l’apparecchio con il cavo danneggiato.
Se il cavo di alimentazione è danneggiato, esso deve essere sostitu-
ito dal Costruttore o dal suo Servizio Assistenza Tecnica o comunque
da una persona con qualica similare, in modo da prevenire ogni
rischio.
Collegare l’apparecchio esclusivamente ad una presa di corrente
elettrica alternata.
In generale è sconsigliabile l’uso di adattatori, prese multiple e/o pro-
lunghe. Qualora il loro uso si rendesse indispensabile è necessario
utilizzare solamente adattatori e prolunghe conformi alle vigenti nor-
me di sicurezza.
Questo apparecchio dovrà essere destinato solo all’uso per il quale
è stato espressamente concepito. Ogni altro uso è da considerarsi
improprio e quindi pericoloso, nonché far decadere la garanzia. Il
costruttore non può essere considerato responsabile per eventuali
danni derivati da usi impropri, erronei ed irragionevoli.
Per evitare surriscaldamenti pericolosi si raccomanda di svolgere in
tutta la sua lunghezza il cavo di alimentazione e di staccare la spina
dalla rete di alimentazione elettrica quando l’apparecchio non è uti-
lizzato.
Prima di effettuare qualsiasi operazione di pulizia o di manutenzione,
disinserire l’apparecchio dalla rete di alimentazione elettrica.
Non immergere mai l’apparecchio in acqua o in altri liquidi.

Ventilatore piantana con timer Manuale di istruzioni
4
Non tenere l’apparecchio vicino a fonti di calore (es. termosifone).
Questo apparecchio non deve essere utilizzato da persone (compre-
si i bambini) con capacità siche, sensoriali o mentali ridotte; da per-
sone che manchino di esperienza e conoscenza del l’apparecchio, a
meno che siano attentamente sorvegliate o ben istruite relativamente
all’utilizzo dell’apparecchio stesso da parte di una persona responsa-
bile della loro sicurezza.
Assicurarsi che i bambini non giochino con l’apparecchio.
Allorché si decida di smaltire come riuto questo apparecchio, si rac-
comanda di renderlo inoperan te.
Si raccomanda inoltre di rendere innocue quelle par-
ti dell’apparecchio suscettibili di costituire un peri-
colo. Questo apparecchio non deve essere utilizza-
to dai bambini. Tenere l’apparecchio ed il suo cavo
fuori dalla portata dei bambini.
Alcune avvertenze
Non collegare la spina di alimentazione senza prima aver assembla-
to correttamente ogni parte del ventilatore.
Prima di ogni utilizzo vericare l’integrità del cavo di alimentazione e
liberarlo da eventuali grovigli.
Posizionare il ventilatore soltanto su superci piane e stabili.
Non posizionare il ventilatore in ambienti molto umidi.
Mantenere il ventilatore ad un’adeguata distanza da pareti, porte, -
nestre e oggetti che potrebbero ostacolare il movimento oscillante.
Non coprire in alcun modo il corpo e la griglia del ventilatore durante
il funzionamento.
Non inlare oggetti nella griglia e nelle fessure del corpo del ventila-
tore.
Non staccare la spina tirando il cavo di alimentazione.
Dopo ogni utilizzo del ventilatore scollegare la spina dalla presa di
corrente.
Se il ventilatore deve essere immagazzinato per lungo tempo e non
usato regolarmente, riporre il ventilatore nel suo imballo originale e
metterlo in un luogo secco ed asciutto. Quando lo si usa per la prima
volta dopo un lungo tempo di inutilizzo, controllare che il ventilatore
sia pulito e che le pale del motore girino liberamente (a motore spen-
to) senza alcun freno.

Ventilatore piantana con timer Manuale di istruzioni
IT
5
Descrizione dell’articolo Fig.A
1. Griglia anteriore
2. Ganci di chiusura
3. Fermo della ventola
4. Ventola
5. Fermo della griglia posteriore
6. Griglia posteriore
7. Albero motore
8. Perno di oscillazione
9. Corpo motore
Assemblaggio del ventilatore
Posizionare la base di appoggio sul pavimento.
Inserire il tubo interno all’interno del tubo esterno no alla sua fuoriuscita.
Fissare la manopola per la regolazione dell’altezza.
Agganciare il tubo esterno alla base di appoggio avvitando la vite a L.
Estrarre il tubo interno, alzare no alla misura desiderata. Avvitare con forza la manopola per la regolazione
dell’altezza.
Inlare il pannello di controllo sul tubo completamente..
Avvitare completamente la vite in modo che il pannello sia ben saldo al tubo interno.
Posizionare la griglia posteriore a contatto con la angia del corpo motore, in modo che i fori della griglia si inca-
strino con i perni situati sul corpo motore del ventilatore.
Avvitare il fermo della griglia posteriore completamente in modo da bloccare la griglia al corpo motore.
Inlare la ventola sull’albero motore e avvitare il fermo della ventola completamente sull’albero motore, in modo
da bloccare la ventola al corpo del motore.
Portare a contatto le due griglie anteriore e posteriore inserendo i ganci di chiusura, posizionati sulla griglia
anteriore, sulla griglia posteriore. Chiudere i ganci in modo da bloccare le griglie.
Scelta della velocità
Scegliere la velocità di ventilazione desiderata premendo i tasti del pannello di controllo.
In posizione 0 il ventilatore è spento.
In posizione 1 velocità bassa.
In posizione 2 velocità media.
In posizione 3 velocità alta.
Timer
È possibile impostare il timer da 10 a 60 minuti tramite l’apposita manopola posta sul pannello di controllo del
ventilatore.
Trascorso il tempo impostato il ventilatore si spegnerà automaticamente.
Inclinazione della testa
E’ possibile inclinare la testa del ventilatore in differenti posizioni, permettendo di cambiare inclinazione del
usso dell’aria.
Prima di cambiare l’inclinazione spegnere il ventilatore.
Impugnare il corpo motore ed inclinare la testa del ventilatore, a scatto, nella posizione desiderata.
Attenzione: non forzare il movimento previo rottura del meccanismo di inclinazione.
Oscillazione della testa
Agendo sul perno di oscillazione è possibile attivare o disattivare l’oscillazione della testa del ventilatore. L’oscil-
lazione permette di distribuire uniformemente l’aria nell’ambiente. Per attivare l’oscillazione spingere il perno di
oscillazione verso il basso no a completo bloccaggio; la testa del ventilatore ruota automaticamente a destra
e a sinistra.
Per disattivare l’oscillazione sollevare completamente il perno verso l’alto.
Pulizia
Prima di effettuare qualsiasi operazione di pulizia spegnere il ventilatore e scollegare la spina dalla presa di
corrente. Per pulire il ventilatore utilizzare un panno morbido, eventualmente inumidito con acqua.
10. Perno regolazione inclinazione
11. Timer
12. Pannello di controllo
13. Vite per aggancio al tubo
14. Tubo interno
15. Tubo esterno
16. Manopola per la regolazione dell’altezza
17. Vite a L per aggancio alla base con rondella
18. Base d’appoggio

Ventilatore piantana con timer Manuale di istruzioni
6
Non utilizzare alcool o agenti chimici come diluenti, prodotti abrasivi in genere.
Non spruzzare acqua e liquidi sul ventilatore, previo inltrazioni dannose.
Asciugare bene tutte le parti interessate dalla pulizia prima di accendere il ventilatore.
Quando non si usa il ventilatore durante la stagione invernale conservarlo in un luogo asciutto pulito.
Dati tecnici
Potenza: 40W
Alimentazione: 220V ~ 50Hz
In un’ottica di miglioramento continuo Beper si riserva la facoltà di apportare modiche e migliorie al
prodotto in oggetto senza previo preavviso.
Il simbolo del cestino barrato riportato sull’apparecchio indica che il prodotto, alla ne della propria vita
utile, dovendo essere trattato separatamente dai riuti domestici, deve essere conferito in un centro di
raccolta differenziata per apparecchiature elettriche ed elettroniche oppure riconsegnato al rivenditore
al momento dell’acquisto di una nuova apparecchiatura equivalente.
L’adeguata raccolta differenziata per l’avvio successivo dell’apparecchio al riciclaggio, al trattamento e allo smal-
timento ambientalmente compatibile contribuisce ad evitare possibili effetti negativi sull’ambiente e sulla salute
e favorisce il recupero dei materiali di cui è composto.
L’utente è responsabile del conferimento dell’apparecchio a ne vita alle appropriate strutture di raccolta. Per
informazioni più dettagliate inerenti i sistemi di raccolta disponibili, rivolgersi al servizio locale di smaltimento
riuti, o al negozio dove è stato effettuato l’acquisto.
Chiunque abbandona o cestina questo apparecchio e non lo riporta in un centro di raccolta differenziata per riuti
elettrici-elettronici è punito con la sanzione amministrativa pecuniaria prevista dalla normativa vigente in materia
di smaltimento abusivo di riuti
CERTIFICATO DI GARANZIA
La garanzia di applicazione è valida 24 mesi dalla data di acquisto per difetti di materiale o di fabbricazione.
La garanzia è valida unicamente presentando il certicato di garanzia e il documento di acquisto (scon-
trino scale) che certichi la data di acquisto e il nome del modello dell’apparecchio acquistato.
Se l’apparecchio dovesse richiedere assistenza tecnica rivolgersi al venditore o presso la nostra sede. Questo
per conservare inalterata l’efcienza del vostro apparecchio e per NON invalidare la garanzia. Eventuali ma-
nomissioni dell’apparecchio da parte di personale non autorizzato invalideranno automaticamente la garanzia.
CONDIZIONI DI GARANZIA
Se ci sono guasti a causa di difetti di materiale e/o fabbricazione durante il periodo di garanzia, garantiamo la
riparazione del prodotto gratuitamente.
Non sono coperte dalla garanzia tutte le parti che dovessero risultare difettose a causa di:
a. Danni da trasporto o da cadute accidentali,
b. Errata installazione o inadeguatezza impianto elettrico,
c. Riparazioni o modiche operate da personale non autorizzato,
d. Mancata o non corretta manutenzione e pulizia,
e. Prodotto e/o parti di prodotto soggette a usura e/o consumabili (es.: lampade, batterie, lame)
f. Mancata osservanza delle istruzioni per il funzionamento dell’apparecchio, negligenza
o trascuratezza nell’uso.
L’elenco di cui sopra è a titolo meramente esemplicativo e non esaustivo, in quanto la presente garanzia è comun-
que esclusa per tutte quelle circostanze che non possono farsi risalire a difetti di fabbricazione dell’apparecchio.
La garanzia è inoltre esclusa in tutti i casi di uso improprio dell’apparecchio ed in caso di uso professionale.
Beper Srl declina ogni responsabilità per eventuali danni che possano direttamente o indirettamente derivare a
persone, cose ed animali domestici in conseguenza della mancata osservanza di tutte le prescrizioni indicate
nell’apposito “Libretto Istruzioni ed avvertenze” in tema di installazione, uso e manutenzione dell’apparecchio.
Per assistenza e/o informazioni tecniche scrivere a:
assistenza@beper.com

Stand Fan with Timer Use Instructions
EN
7
Precautions
Read the following instructions carefully, since they give you
useful safety information about installation, use and maintenan-
ce and help you avoid mishaps and possible accidents.
Remove the packing and make sure that the appliance is intact, with
special attention to the supply cable.
The elements of the packing (plastic bags, polystyrene, etc) do not
have to be accessible to the children, in order to preserve them from
danger sources. It is recommended not to throw these packing ma-
terial in the domestic waste, but to deliver them to the appropriate
station of collection or destruction refusals, asking eventually infor-
mation to the manager of the Sanitation Department of your own mu-
nicipality.
If the supply cord is damaged, it must be replaced by the manufac-
turer, its service agent or similarly qualied persons in order to avoid
a hazard.
Before connecting the appliance make sure that the mains voltage
corresponds to the data specied on the label.
The appliance can be damaged if the voltage is not correct.
If the plug does not suit the socket, let it be replaced with another
suitable plug by qualied personnel only, which shall also ensure that
the section of the socket cables is suitable for your appliance power
absorption.
Generally, the use adaptors multiple plugs and/or extensions is not
recommended; should they be necessary, please use only simple or
multiple adaptors and extensions in compliance with the safety rules
in force, making sure that the capacity absorption limit marked on the
simple adaptors and the extensions and the maximum power limit
marked on the multiple adaptor are not exceeded.
Do not use the appliance if the cable or the plug shows any damages.
Do not use the appliance after a possible irregular working. In this
case, switch it off and do not break it open. Refer to an authorized
Beper after-sale service for repair and require original spare parts
only. Failing to follow these instructions may impair the safety of your
appliance.
This appliance is to be destined to its special purpose only. Any other
use is to be considered as improper and thus dangerous. The manu-
facturer cannot be responsible for any damages deriving from impro-
per, wrong or incautious use.

Stand fan with timer Use instructions
8
This appliance is for household use only.
To protect against electric shock, do not immerse cord, plug or any
parts of the appliance into water or other uids.
Do not use the appliance near explosives, highly ammable mate-
rials, gases or burning ames.
Do not allow children, disabled people or every pe-
ople without experience or technical ability to use
the appliance if they are not properly watched over.
Close supervision is necessary when any appliance
used by or near children.
Some warnings
Do not plug the supply cord before assembly every parts of the fan.
Before using, check the integrity of the supply cord and eventually
remove possible nodes.
Place the fan on a at and stable surface in a dry place.
Keep away to a reasonable distance the fan from walls, doors, win-
dows or every object that could avoid the appliance to work in the
correct way.
Do not cover the body or grid of the fan when the appliance is wor-
king.
Do not plug objects into the grid or inside the appliance.
Do not pull on the supply cord to unplug the appliance.
After using the fan, unplug the cord supply.
If the fan must be stored for a long period or non-used, replace the
fan in the original packaging in a dry place. For every next use, check
that the fan is clean and that the blades turn in the correct way (motor
off).

Stand Fan with Timer Use Instructions
EN
9
Description of the item Fig.A
1. Front grid
2. Closure nut
3. Nut blades
4. Blades
5. Rear grid nut
6. Rear grid
7. Motor
8. Swing button
9. Body motor
Assembly instructions
Put the base on the oor.
Insert completely the internal pipe inside the external pipe.
Fix the high adjustment handle.
Fix the external pipe to the base with the screw (included in packaging).
Take off the external pipe, and regulate it until the desired height. Strongly screw the high adjustment handle.
Place the control panels on the pipe.
Screw completely with the screw in order that the control panels is well xed to the intern pipe.
Place the rear grid on the motor, in order that the holes of the grid are well inserted into the motor of the fan
Strongly and completely screw the rear grid in order to block the grid on the motor.
Insert the blades of the fan on the motor and completely screw the nut blade on the motor, in order to block the
body motor.
Assembly the 2 grid front and rear ones by inserting the closure nut, place the front grid, on the rear grid. Close
the nuts to block the grids.
Speed selection
Choose the speed desired pressing on the buttons of the control panels.
Position 0 the fan switch off.
Position 1 low speed.
Position 2 medium speed.
Position 3 high speed.
Timer
The timer can be set from 10 to 60 minutes by turning the knob on the control panel. Once the time set has
expired, the fan will shut off automatically.
Head inclination
It is possible to choose various positions and change the air ow swing.
Before changing it, switch off the fan.
Take the motor body, unscrew the regulation axis and change the inclination of the fan as desired and screw the
air strongly.
Attention: do not try to force the inclination position in order to avoid any failure.
Swing
When pressing the swing button, It is possible to activate or disconnect the swing of the fan, by touching the
swing button. Swing allow to provide the air uniformly.
To activate the push the swig button down until is completely blocked ; the head fan turns automatically from right
to left. To disconnect the swing raise completely the button.
Cleaning
Before cleaning, switch off and unplug the fan.
For cleaning use a soft cloth, that may be softly wet.
Do not use alcohol or chemical substances, or any detergent that could damage this appliance.
Do not spray water or other liquids on the fan in order to protect it.
After cleaning, dry every parts before using the appliance.
During the winter and when not used, keep this appliance in a dry and clean place.
10. Inclination set button
11. Timer
12. Control panels
13. Screw for pipe
14. Internal pipe
15. External pipe
16. High adjustment handle
17. Screw pipe coupling with clamping washer
18. Base

Ventilatore piantana con timer Manuale di istruzioni
10
Technical data
Power: 40W
Power supply: 220V ~ 50Hz
For any improvement reasons, Beper reserves the right to modify or improve the product without any
notice.
The European directive 2011/65/EU on Waste Electrical and Electronic Equipment (WEEE), requires
that old household electrical appliances must not be disposed of in the normal unsorted municipal
waste stream. Old appliances must be collected separately in order to optimize the recovery and
recycling of the materials they contain, and reduce the impact on human health and the environment.
The crossed out “wheeled bin” symbol on the product reminds you of your obligation, that when you
dispose of the appliance, it must be separately collected.
GUARANTEE CERTIFICATE
This appliance has been checked in the factory. From the date of original purchase a 24 month guarantee ap-
plies to material and production defects. The purchase receipt and the guarantee certicate must be submitted
together in case of claim to guarantee.
The guarantee is valid only with a guaranty certicate and proof of purchase (scal receipt) indicating
the date of purchase and the model of the appliance
For any technical assistance, please contact directly the seller or our head ofce in order to preserve the applian-
ce’s efciency and NOT TO void the guarantee. Any intervention on this appliance by non-authorized persons
will automatically void the guarantee.
GUARANTEE CONDITIONS
If the appliance shows defects as a result of faulty material and/or production during the period of guarantee, we
guarantee repair free of charge on condition that:
- The appliance has been used properly and for the purpose for which it has been intended.
- The appliance has not been tampered with, otherwise it is not maintainable.
- The purchase receipt shall be presented.
- The appliance showing a fair wear and tear shall not be covered by this guarantee.
Therefore, any part that could be accidentally broken or having visible signs of use in consumable products
(such as lamps, batteries, heating elements…) the aesthetic parts are excluded from the guarantee, and any
defect whatsoever resulting from non-respect of the rules for use, negligence in usage and/or maintenance of
the appliance, carelessness, wrong or improper installation, damage during transport and any other damage not
attributable the supplier.
For every defect that could not be repaired within the guarantee period, the appliance will be replaced free of
charge.
In any case, if the part to be replaced for defect, breakage or malfunction is an accessory and/or a detachable
part of the product, Beper reserves the right to replace only the very part in question and not the entire product
Contact your distributor in your country or after sales department Beper.
E-mail assistenza@beper.com which will forward your enquiries to your distributor.

ES
11
Ventilateur à pied avec minuterie Manuel d’instructions
FR
Lire attentivement les instructions suivantes avant la premiere
utilisation de l’appareil.
Avant et durant l’utilisation de cet appareil il est nécessaire de suivre
précautions élémentaires suivantes.
Après avoir enlever l’emballage, s’assurer de l’intégrité de l’appareil.
En cas de doute ne pas utiliser l’appareil et s’adresser à un pro-
fessionnel qualié. Les éléments d’emballage (sachets plastique,
polystyrène, etc.) ne doivent pas être laissés à la portée des enfants,
car potentiellement dangereux.
Il est recommandé de ne pas jeter les éléments d’emballage dans les
déchets ménagers, mais de les déposer dans les centres de traite-
ment des déchets appropriés, en demandant éventuellement conseil
au gérant du centre de sa commune de résidence.
Toujours s’assurer que la tension électrique soit la même que cel-
le indiquée sur l’étiquette des données techniques et que le réseau
électrique soit compatible avec la puissance de l’appareil.
En cas d’incompatibilité entre la prise électrique murale et celle de
l’appareil faire changer la prise de l’appareil par un professionnel
qualié. Ce dernier devra s’assurer que la section des câbles de la
prise soit adaptée à la puissance absorbée par l’appareil.
Ne jamais tirer sur le câble d’alimentation pour débrancher la prise
électrique.
S’assurer que le câble n’entre pas en contact avec des supercies
chaudes ou coupantes.
Ne pas utiliser l’appareil si le câble d’alimentation est abîmé.
Si le câble d’alimentation est endommagé, pour éviter tout risque, il
devra être substitué par le constructeur, par son service d’assistance
technique ou toute autre personne de même qualication.
Brancher l’appareil exclusivement sur une prise de courant alterné.
Il est en général déconseiller d’utiliser des adaptateurs, prises mul-
tiples et/ou rallonges. En cas de nécessité, utiliser seulement des
adaptateurs ou rallonges conformes aux normes de sécurité en vi-
gueur.
Cet appareil ne devra être utilisé que pour l’usage pour lequel il a été
conçu.
Tout autre usage sera considéré comme inapproprié et donc dange-
reux, et engendrera l’annulation de la garantie. Le constructeur ne
peut être tenu pour responsable en cas de dommages causés par
une utilisation incorrecte, inappropriée et déraisonnable.

12
Ventilateur à pied avec minuterie Manuel d’instructions
Pour éviter tout risque d’échauffement il est recommandé de dérouler
entièrement le câble d’alimentation et de débrancher l’appareil de la
prise de courant en cas d’inutilisation.
Avant d’effectuer toute opération de nettoyage ou entretien, débran-
cher l’appareil de la prise de courant électrique.
Ne jamais immerger l’appareil dans l’eau ou d’autres liquides.
Ne pas toucher l’appareil avec les mains et pieds mouillés ou humi-
des.
Ne pas utiliser l’appareil si vous êtes pieds nus.
Ne pas laisser l’appareil exposé aux agents atmosphériques comme
la pluie, le soleil …
Ne pas laisser l’appareil près d’une source de chaleur (ex. Radiateur)
Ne pas laisser les enfants, les personnes avec des capacités physi-
ques, sensorielles ou mentales réduites, ou manquant d’expérience
ou de connaissance technique, utiliser cet appareil sans surveillance
S’assurer que les enfants ne jouent pas avec cet appareil.
Dès lors que l’appareil doit être détruit, il est recom-
mandé de couper le câble d’alimentation, et de reti-
rer toutes les parties susceptibles de présenter un
quelconque danger, en particulier pour les enfants
qui pourraient utiliser cet appareil comme un jeu.
Quelques précautions
Ne pas brancher la prise d’alimentation sans avoir auparavant as-
semblé correctement chaque partie du ventilateur.
Pour chaque utilisation vérier l’intégrité du câble d’alimentation et de
libérer des éventuels enchevêtrements.
Positionner le ventilateur seulement sur des supercies plates et sta-
bles.
Ne pas positionner le ventilateur dans des environnements très hu-
mides.
Maintenir le ventilateur à une distance appropriée des parois, des
portes, des fenêtres et des objets qui pourraient empêcher le mou-
vement oscillant.
Ne pas couvrir en aucune façon le corps et la grille du ventilateur
pendant le fonctionnement.
Ne pas enler des objets dans la grille et dans les ssures du corps
du ventilateur.

ES
13
Ventilateur à pied avec minuterie Manuel d’instructions
FR
Ne pas débrancher la prise en tirant le câble d’alimentation.
Après chaque utilisation du ventilateur débrancher la che de la prise
de courant.
Si le ventilateur doit être emmagasiné pour une longue période et
pas utilisé régulièrement, placer le ventilateur dans son emballage
original et le mettre dans un lieu sec. Quand vous l’utilisez pour la
première fois après une longue période de non utilisation, contrôlez
que le ventilateur soit propre et que les pales du moteur tournent li-
brement (à moteur éteint) sans aucun frein.
Description de l’article Fig.A
1. Grille avant
2. Crochets de fermeture
3. Fermoir des pales
4. Pales
5. Fermoir de la grille arrière
6. Grille arrière
7. Arbre moteur
8. Bouton d’oscillation
9. Corps du moteur
Assemblage du ventilateur
Placer la base d’appui sur le sol.
Insérer complètement le tube interne à l’intérieur du tube externe.
Fixer la poignée de réglage de la hauteur.
Fixer le tube externe à la base d’appui en vissant la vis (incluse dans l’emballage).
Extraire du tube interne, lever à la hauteur désirée. Visser fermement la poignée de réglage de la hauteur.
Enler complètement le panneau de contrôle sur le tube.
Visser complètement la vis de façon à ce que le panneau de contrôle soit bine xé au tube interne.
Placer la grille arrière au contact du moteur, de façon à ce que les trous de la grille s’encastrent avec les tiges
du moteur.
Visser complètement le fermoir de la grilla arrière de façon à bloquer la grille sur le corps du moteur.
Mettre les pales en place sur l’arbre moteur et visser complètement le fermoir des pales sur l’arbre moteur, de
façon à bloquer les pales sur le moteur.
Mettre en contact les deux grilles avant et arrière en insérant les crochets de fermeture, en positionnant la grille
avant sur la grille arrière. Fermer les crochets de façon à bloquer les grilles.
Choix de la vitesse
Choisir la vitesse de ventilation désirée en appuyant sur les touches du panneau de contrôle.
En position 0 le ventilateur est éteint.
En position 1 basse vitesse.
En position 2 vitesse moyenne.
En position 3 vitesse élevée.
Minuterie
Il est possible de congurer la minuterie de 10 à 60 minutes grâce au bouton positionné sur le panneau de con-
trôle. Quand le temps sélectionné sera expiré, le ventilateur s’arrêtera.
Inclination de la tête
Il est possible d’incliner la tête du ventilateur dans différentes positions, permettant ainsi de changer l’inclination
du ux d’air.
Avant de changer l’inclination éteindre le ventilateur.
Empoigner le corps du moteur et incliner la tête du ventilateur, à cran, dans la position désirée.
Attention: ne pas forcer le mouvement pour éviter de casser le mécanisme d’inclination.
10. Bouton réglage inclination
11. Minuterie
12. Panneau de contrôle
13. Vis de xation du tube
14. Tube interne
15. Tube externe
16. Poignée de réglage de la hauteur
17. Vis de xation de la base et Rondelle de blocage
18. Base d’appui

14
Ventilateur à pied avec minuterie Manuel d’instructions
Oscillation de la tête
En agissant sur le bouton d’oscillation il est possible d’activer ou désactiver l’oscillation de la tête du ventilateur.
L’oscillation permet de distribuer uniformément l’air.
Pour activer l’oscillation pousser le bouton d’oscillation vers le bas jusqu’au blocage complet ; la tête du ventila-
teur tourne automatiquement de droite à gauche.
Pour désactiver l’oscillation soulever complètement le bouton vers le haut.
Nettoyage
Avant d’effectuer toute opération de nettoyage éteindre le ventilateur et le de la prise de courant.
Pour nettoyer le ventilateur utiliser un chiffon humide, éventuellement légèrement humidié.
Ne pas utiliser d’alcool ou agents chimiques comme des diluants, ou produits abrasifs en général.
Ne vaporisez pas d’eau ni de liquide sur le ventilateur pour éviter des inltrations dommageables.
Bien sécher toutes les parties nettoyées avant d’utiliser le ventilateur.
En cas de non utilisation pendant la période hivernale conserver l’appareil dans un endroit sec.
Données techniques
Puissance: 40W
Alimentation: 220V ~ 50Hz
Dans une optique d’amélioration constante Beper se réserve le droit de modier ou améliorer cet appa-
reil sans préavis.
Le produit en n de vie doit être détruit selon les normes en vigueur relatives à l’élimination des
déchets et ne peut être traité comme simple déchet ménagé.
Le produit doit être détruit dans un centre d’élimination des déchets adapté ou être restitué au reven-
deur dans le cas d’une substitution avec un autre produit équivalent neuf.
Le fabricant prendra à sa charge les frais occasionnés pour la destruction du produit selon les termes
de la loi en vigeur.
Le produit est composé de pièces non biodégradables et substances qui peuvent polluer l’environnement si
détruites de façon inapropriée . Par ailleurs, certaines parties de ces matières peuvent être recyclées évitant ain-
si toute pollution pour l’environnement. Il est de votre et notre devoir de préserver la santé de l’environnement.
Le symbole indique que le produit répond aux normes requises par les nouvelles
directives introduites en faveur de l’environnement (2011/65/EU) et que le produit doit être détruit de façon ap-
propriée au terme du cycle de vie.
Si besoin, informez-vous auprès des autorités locales compétentes en matière d’élimination des déchets de
votre commune.
Toute personne qui ne tiendra pas compte de ces règles d’élimination des déchets indiquées dans ce para-
graphe en répondra selon la loi en vigueur.

ES
15
Ventilateur à pied avec minuterie Manuel d’instructions
FR
CERTIFICAT DE GARANTIE
La garantie d’application est valable pour 24 mois à partir de la date d’achat pour des défauts de matériel ou de
fabrication.
La garantie est valable uniquement en présentant le certicat de garantie et le document d’achat (ticket
de caisse) qui certie la date d’achat et le nom du modèle de l’appareil acheté
Si l’appareil devrait demander l‘assistance technique s’adresser au vendeur ou auprès de notre siège. Ceci pour
conserver inaltérée l ‘efcacité de votre appareil et pour NON invalider la garantie. Des éventuelles manipula-
tions de l’appareil de la part du personnel non autorisé invalident automatiquement a garantie.
CONDITIONS DE GARANTIE
S’il y a des pannes à cause des défauts de matériel et/ou de fabrication pendant la période de garantie, nous
garantissons la réparation du produit gratuitement.
Elles ne sont pas couvertes de la garantie toutes les parties qui devraient résulter défectueuses à cause de :
a. Dommages de transport ou de chutes accidentelles,
b. Installation erronée ou inadaptation de l’installation électrique,
c. Réparations ou modications effectuées par un personnel non autorisé,
d. Manque ou incorrect entretien et nettoyage,
e. Produit et/ou parties du produit relevant de l’usure et/ou consommables (ex : lampes piles, lames)
f. Manque d’observation des instructions pour le fonctionnement de l’appareil, négligence dans l’utilisation
La liste indiquée ci-dessus est à titre purement exemplaire et non exhaustif, car la présente garantie est donc
exclue pour toutes les circonstances qui ne peuvent pas dériver des défauts de fabrication de l’appareil.
En outre la garantie est exclue dans tous les cas d’usage impropre de l’appareil et en cas d’usage professionnel.
Beper S.R.L. décline chaque responsabilité pour des éventuels dommages qui peuvent directement ou indi-
rectement dériver à des personnes, des choses et des animaux domestiques, en conséquence au non-respect
de toutes les prescriptions indiquées dans le « livret des instructions et des précautions » approprié, en thème
d’installation, d’utilisation et d’entretien de l’appareil.
Le service après-vente est effectué par votre revendeur ou par l’importateur/distributeur des produits Beper.
Écrivez un e-mail au assistenza@beper.com pour connaitre le centre service agrée Beper le plus proche de
chez vous.

Standventilator mit Timer Betriebsanleitung
16
Allgemeine warnhinweise
Lesen sie diese anleitung, bevor sie das gerät in betrieb nehmen.
Vor und während des Gebrauchs des Gerätes ist es notwendig, eini-
ge grundlegende Vorsichtsmaßnahmen zu beachten. Vergewissern
Sie sich nach dem Entfernen der Verpackung, dass das Gerät intakt
ist. Verwenden Sie das Gerät im Zweifelsfall nicht und wenden Sie
sich an fachlich qualiziertes Personal. Verpackungselemente (Pla-
stiktüten, Polystyrol, etc.) dürfen nicht in Reichweite von Kindern blei-
ben, da sie potenzielle Gefahrenquellen darstellen.
Vergewissern Sie sich immer, dass die Netzspannung mit der auf
dem technischen Datenschild angegebenen übereinstimmt und dass
das System mit der Leistung des Geräts kompatibel ist.
Ziehen Sie niemals am Kabel, um es von der Steckdose zu trennen.
Achten Sie darauf, dass das Kabel nicht mit heißen oder scharfen
Oberächen in Berührung kommt.
Verwenden Sie das Gerät nicht, wenn das Kabel beschädigt ist.
Bei Beschädigung des Netzkabels muss dieses durch den Hersteller
oder seinen Technischen Kundendienst oder in jedem Fall durch eine
Person mit ähnlicher Qualikation ersetzt werden, um ein Risiko zu
vermeiden.
Schließen Sie das Gerät nur an eine Wechselstrom- Steckdose an.
Im Allgemeinen wird die Verwendung von Adaptern, Mehrfach-
steckdosen und/oder Verlängerungskabeln nicht empfohlen. Wenn
ihre Verwendung unerlässlich wird, verwenden Sie nur Adapter und
Verlängerungskabel, die den geltenden Sicherheitsnormen entspre-
chen.
Dieses Gerät darf nur für den Zweck verwendet werden, für den es
ausdrücklich konzipiert wurde. Jede andere Verwendung ist als unsa-
chgemäß und damit gefährlich anzusehen und führt zum Erlöschen
der Garantie. Der Hersteller haftet nicht für Schäden, die durch un-
sachgemäßen, fehlerhaften oder ungeeigneten Gebrauch entstehen.
Um eine gefährliche Überhitzung zu vermeiden, wird empfohlen, das
Netzkabel über die gesamte Länge abzuwickeln.
Trennen Sie das Gerät vom Stromnetz, bevor Sie das Zubehör we-
chseln oder reinigen.
Lassen Sie das Gerät nicht Witterungseinüssen (Regen, Sonne,
etc.) ausgesetzt.
Halten Sie das Gerät nicht in der Nähe von Wärmequellen (z.B.
Heizkörpern).

Standventilator mit Timer Betriebsanleitung
DE
17
Dieses Gerät darf nicht von Personen (einschließlich Kindern) mit ein-
geschränkten körperlichen, sensorischen oder geistigen Fähigkeiten
verwendet werden; von Personen, denen die Erfahrung und Kennt-
nisse über das Gerät fehlen, es sei denn, sie werden von einer für
ihre Sicherheit verantwortlichen Person sorgfältig überwacht oder gut
in die Bedienung des Geräts eingewiesen.
Achten Sie darauf, dass Kinder nicht mit dem Gerät spielen.
Wenn Sie sich entscheiden, dieses Gerät als Abfall zu entsorgen,
wird empfohlen, es außer Betrieb zu setzen.
Es wird auch empfohlen, teile des gerätes, die eine
gefahr darstellen können, sicher zu entsorgen. Die-
ses gerät darf nicht von kindern benutzt werden. Be-
wahren sie das gerät ausserhalb der reichweite von
kindern auf.
Warnhinweise
Schließen Sie den Netzstecker nicht an, bevor Sie nicht alle Teile des
Ventilators korrekt zusammengebaut haben.
Überprüfen Sie vor jedem Gebrauch die Unversehrtheit des Netzka-
bels und entfernen Sie alle Verwicklungen.
Stellen Sie den Ventilator nur auf ebenen und stabilen Flächen auf.
Stellen Sie den Ventilator nicht in sehr feuchten Umgebungen auf.
Halten Sie den Ventilator in ausreichendem Abstand von Wänden,
Türen, Fenstern und Gegenständen, die die oszillierende Bewegung
behindern könnten.
Decken Sie das Ventilator Gehäuse und den Grill während des Be-
triebs nicht ab.
Führen Sie keine Gegenstände in das Gitter und die Schlitze im
Gehäuse des Ventilators ein.
Ziehen Sie den Stecker nicht am Netzkabel.
Ziehen Sie nach jedem Gebrauch des Ventilator den Stecker aus der
Steckdose.
Wenn der Ventilator längere Zeit gelagert und nicht regelmäßig
verwendet werden soll, lagern Sie ihn in der Originalverpackung und
lagern Sie ihn an einem trockenen Ort. Stellen Sie bei der ersten
Verwendung nach längerer Inaktivität sicher, dass der Ventilator sau-
ber ist und sich die Motorblätter ohne Bremse frei drehen (bei ausge-
schaltetem Motor).

Standventilator mit Timer Betriebsanleitung
18
Artikelbeschreibung Fig.A
1. Frontgitter
2. Verschlussmutter
3. Mutter Klingen
4. Klingen
5. hintere Gittermutter
6. hinteres Gitter
7. Motor
8. Swing-Taste
9. Körpermotor
Zusammenbau des Ventilators
Stellen Sie die Basis auf den Boden.
Führen Sie das Innenrohr vollständig in das Außenrohr ein.
Fixieren Sie den Hoher Einstellgriff.
Befestigen Sie das Außenrohr mit der Schraube (im Lieferumfang enthalten) am Basis.
Nehmen Sie das äußere Rohr ab und regulieren Sie es auf die gewünschte Höhe. Schrauben Sie den oberen
Einstellgriff fest.
Platzieren Sie die Bedienfelder auf dem Rohr.
Mit der Schraube vollständig verschrauben, damit die Bedienfelder gut am Innenrohr befestigt sind.
Setzen Sie das hintere Gitter auf den Motor, damit die Löcher des Gitters gut in den Motor des Lüfters eingesetzt
werden.
Das hintere Gitter fest und vollständig einschrauben, um das Gitter am Motor zu blockieren.
Setzen Sie die Klingen am Motor ein und schrauben Sie die Mutterügel vollständig am Motor fest, um den
Gehäusemotor zu blockieren.
Montieren Sie die beiden vorderen und hinteren Gitter, indem Sie die Verschlussmutter einsetzen. Platzieren Sie
das vordere Gitter auf dem hinteren Gitter. Schließen Sie die Muttern, um die Gitter zu blockieren.
Geschwindigkeit Auswahl
Wählen Sie die Geschwindigkeitsstufen durch die verschiedenen Knöpfe des Schaltbretts.
0 = Standventilator ist ausgeschaltet
1= niedrige Geschwindigkeit
2 = mittlere Geschwindigkeit
3 = hohe Geschwindigkeit
Timer
Man kann den Timer von 10 bis 60 Minuten durch den entsprechenden Knopf auf dem Lüfter Bedienfeld einstel-
len. Nach dem Intervall schaltet der Lüfter sich automatisch aus
Kopfneigung
Man kann den Ventilator-Kopf und damit auch den Eingang von dem Luftstrom in verschiedenen Stellungen
neigen.
Bevor Sie die Neigung verändern, schalten Sie das Gerät aus.
Motorgehäuse greifen und Neigung des Ventilator-Kopfes durch Nachvorne- und Hintenneigen einstellen. Der
Ventilator-Kopf kann nun in einer möglichen Stellung eingerastet werden, was durch einhörbares Klicken ange-
zeigt wird.
Vorsicht: um Schäden an dem Schwenkbereich zu vermeiden, bewegen Sie den Kopf, ohne zu viel
Druck zu üben.
Kopfoszillation
Beim Hineindrücken des Oszillationsschalters kann man die Oszillation des Kopfes ein-oder abschalten. Diese
Bewegung erlaubt eine gleichmäßige Luftverteilung in dem Raum.
Drücken Sie den Oszillationsschalter komplett nach unten, um die Oszillationsbewegung einzuschalten; der
Kopf schwenkt automatisch nach rechts und nach links.
Zur Abschaltung der Oszillation ziehen Sie den Schalter komplett nach oben.
Reinigung
10. Neigungsschaltknopf
11. Timer
12. Bedienfelder
13. Schraube für Rohr
14. Innen Rohr
15. Außer Rohr
16. Hoher Einstellgriff
17. Verschraubung mit Klemmscheibe
18. Basis

Standventilator mit Timer Betriebsanleitung
DE
19
Die WEEE-Richtlinie (von engl.: Waste Electrical and Electronic Equipment; deutsch: (Elektro- und
Elektronikgeräte-Abfall) ist die EG-Richtlinie 2011/65/EU zur Reduktion der zunehmenden Menge
an Elektronikschrott aus nicht mehr benutzten Elektro- und Elektronikgeräten. Ziel ist das Vermei-
den, Verringern sowie umweltverträgliche Entsorgen der zunehmenden Mengen an Elektronikschrott
durch eine erweiterte Herstellerverantwortung.
Ihr Gerät enthält wertvolle Rohstoffe, die wieder verwertet werden können.
Bringen Sie das Gerät zur Entsorgung zu einer Sammelstelle Ihrer Stadt oder Gemeinde.
Elektro- und Elektronikgeräte mit folgender Kennzeichnung versehen und dürfen nicht mehr über Restmüll,
sondern nur noch über die öffentlichen Entsorgungsträger und anschließende Rückgabe an die Hersteller und
Importeure entsorgt werden.
GARANTIESCHEIN
Die Gewährleistung gilt 24 Monate ab Kaufdatum für Material- und Herstellungsfehler.
Die Garantie gilt nur wenn der Garantieschein vom Kaufbeleg (Quittung), mit Kaufdatum und Name des
gekauften Gerätemodells, begleitet wird.
Sollte das Gerät einmal technische Unterstützung benötigen, wenden Sie sich bitte an dem Verkäufer oder
an unserem Firmensitz. Dies um die Efzienz des Gerätes aufrechtzuerhalten und damit die Garantie NICHT
erlischt. Bei eventuellen Beschädigungen des Gerätes durch nicht autorisierte Personen, erlischt die Garantie
automatisch.
GARANTIEBEDINGUNGEN
Sollte es zu Funktionsstörungen aufgrund von Fehlern in Material und / oder Verarbeitung während der Garan-
tiezeit kommen, garantieren wir die Reparatur des Produkts kostenlos.
Alle Teile die nicht durch Garantie gedeckt sind, sind die, die sich als defekt erweisen aufgrund von:
a. Transportschäden oder Stürze,
b. Falscher Installation oder ungeeigneter elektrischer Anlage,
c. Reparaturen oder Änderungen durch nicht autorisierte Personen,
d. Fehlender oder falscher Wartung und Reinigung,
e. Produkt und / oder Teile des Produkts, die dem Verschleiß unterliegen und / oder Verbrauchsmaterial (z. B.:
Lampen, Batterien, Klingen) darstellen
f. Nicht befolgen der Gebrauchsanweisungen des Gerätes, Fahrlässigkeit oder unvorsichtigem Gebrauch.
Die obige Liste ist beispielhaft und nicht erschöpfend, da diese Garantie für all jene Situationen ausgeschlossen
ist, den keinem Produktionsfehler zuzuweisen sind.
Die Garantie ist auch in allen Fällen von missbräuchlichen Verwendung des Gerätes und im Falle vom berui-
chen Einsatz ausgeschlossen.
Beper Srl übernimmt keine Verantwortung für Schäden, die direkt oder indirekt Personen, Gegenstände und
Haustieren betreffen könnten, als Folge der Nicht-Einhaltung aller in der Broschüre „Gebrauchsanweisungen
und Warnungen” enthaltenen Anweisungen in Bezug auf Installation, Bedienung und Wartung.
Treten sie bitte in verbindung mit ihren händler in ihrem land oder post sales abteilung von fa. Beper.
E-mail assistenza@beper.com die ihren händler nennen wird
Reinigung
Vor der Reinigung Standventilator ausschalten und Stecker aus der Steckdose ziehen.
Für die Reinigung benutzen Sie ein weiches angefeuchtetes Tuch.
Niemals Alkohol, Verdünnungsmittel, Schleifmittel, usw. für die Reinigung benutzen.
Kein Wasser oder andere Flüssigkeiten auf dem Gerät sprühen. Sie können es beschädigen.
Technische Daten
Leistung: 40W
Betriebsspannung: 220V ~ 50Hz
In hinblick auf eine verbesserungsperspektive behält sich beper das recht vor, das betreffende produkt
ohne voranmeldung zu ändern bzw. Umzubauen.

Ventilador de pie con temporizador Manual de instrucciones
20
Advertencias generales
Leer estas instrucciones antes de usar el aparato
Antes y durante el uso del artículo es necesario seguir algunas pre-
cauciones básicas.
Tras haber quitado el embalaje, asegurarse de la integridad del
artículo. En caso de duda, no utilizar el artículo y dirigirse a personal
profesionalmente cualicado.
Los elementos del embalaje (bolsas de plástico, polistirolo, etc.) no
deben dejarse cerca del alcance de los niños al representar un peli-
gro para ellos.
Se recomienda no tirar junto con los residuos domésticos los ma-
teriales presentes en el embalaje sino depositarlos en centros de
recogida de residuos, solicitando información adicional al gestor del
punto de recogida urbano del propio ayuntamiento donde se resida.
Asegurarse siempre de que la tensión de la red eléctrica sea igual a
la indicada en la etiqueta de los datos técnicos que y que la instala-
ción sea compatible con la potencia del aparato.
En caso de incompatibilidad entre el enchufe del aparato y la toma
de corriente, sustituir el enchufe por otro por una persona profesio-
nalmente cualicada. En concreto, este último, deberá también cor-
roborar que la sección de cables de presa sea la idónea a la potencia
necesaria para el aparato.
No tirar nunca el cable para desenchufarlo de la corriente eléctrica.
Asegurarse de que el cable no esté en contacto con supercies ca-
lientes o cortantes.
No utilizar el aparato con el cable dañado.
Conectar el aparato exclusivamente a una presa de corriente alterna.
En general, se desaconseja el uso de adaptadores, presas múltiples
y prolongadores. Si el uso fuera indispensable, es necesario utilizar
sólamente adaptadores y prolongadores de acuerdo a las normas
vigentes de seguridad.
Este aparato deberá destinarse sólo al uso para el que ha sido fabri-
cado. Cualquier otro tipo de uso será considerado inapropiado y, por
lo tanto, peligroso y hará perder la garantía del mismo. El fabricante
no podrá ser considerado el responsable de los posibles daños deri-
vados de usos inadecuados, erróneos e irracionales.
Para evitar sobrecalentamientos peligrosos, se recomienda estirar
totalmente el cable de alimentación y de desenchufar el enchufe de
la red de alimentación eléctrica cuando el aparato no esté siendo
utilizado.

Ventilador de pie con temporizador Manual de instrucciones
ES
21
Para evitar calentamientos peligrosos, se recomienda estirar com-
pletamente el cable de alimentación y desenchufarlo de la red eléc-
trica cuando no esté siendo utilizado.
No introducir nunca el aparato en agua u otros líquidos.
No tocar el aparato con las manos o pies mojados o húmedos.
No utilizar el aparato con los pies desnudos.
No dejar el aparato expuesto a los agentes atmosféricos (lluvia, sol,
etc.)
No dejar el aparato cerca de fuente de calor (ej.radiador)
Este aparato no debe ser utilizado por personas (incluido niños) con
capacidad física, sensorial o mental reducida o personas con falta de
experiencia y conocimiento del aparato salvo que estén controladas
o bien instruidas respecto al uso del propio aparato por parte de la
persona responsable de su seguridad.
Asegurarse de que no niños no jueguen con el apa-
rato.
Cuando se decida tirar a la basura este aparato, se
recomienda convertirlo en inoperante previamente
cortando el cable de alimentación.
Se recomienda además convertir en inócuas las par-
tes del aparato susceptibles de constituir un proble-
ma, especialmente para los niños que podrían utili-
zar el aparato para jugar.
Algunas advertencias
No conecte la toma de alimentación sin haber ensamblado correcta-
mente cada pieza del ventilador.
Antes de cada uso verique la integridad del cable de alimentación y
lo libere de eventuales enredos.
Coloque el ventilador solamente encima de supercies llanas y estables.
No coloque el ventilador en lugares muy húmedos.
Mantenga el ventilador lejos de paredes, puertas, ventanas y objetos
que pueden impedir la oscilación.
No cubra de ninguna manera el cuerpo y la rejilla del ventilador mien-
tras este funciona.
No introduzca objetos dentro la rejilla y las suras del cuerpo del ven-
tilador. No desconecte el enchufe estirando el cable de alimentación.

Ventilador de pie con temporizador Manual de instrucciones
22
Descripción del artículo Fig.A
1. Rejilla anterior
2. Corchetes para cerrar
3. Seguro del rotor
4. Rotor
5. Seguro de la rejilla posterior
6. Rejilla posterior
7. Árbol motor
8. Perno de oscilación
9. Cuerpo del motor
Montaje del ventilador
Colocar la base de apoyo en el piso
Introducir el tubo interior adentro del tubo exterior hasta su salida
Fijar el pomo de regolación de la altitud.
Enganchar el tubo exterior a la base de apoyo introducendo el tornillo (incluido en el embalaje).
Sacar el tubo interior, alzar hasta la medida deseada. Enganchar con fuerza el pomo de regolación de la altitud.
Ensertar completamente el panel de control en el tubo.
Introducir completamente el tornillo para que el panel esté bien jado al tubo interior.
Poner la rejilla posterior a contacto con la brida del cuerpo-motor de manera que los agujeros de la rejilla se
encajen con los pernos del cuerpo-motor del aparato.
Introducir completamente el seguro de la rejilla posterior, para jar la rejilla al cuerpo-motor.
Ensertar el rotor en el árbol-motor e introducir completamente el seguro del rotor en el árbol-motor, para jar el
rotor al cuerpo del motor.
Poner en contacto las dos rejillas anterior y posterior, poniendo los corchetes para cerrar de la rejilla anterior, en
la rejilla posterior. Cerrar los corchetes para jar las rejillas.
Elección de la velocidad
Elejir la velocidad de ventilación deseada apretando las teclas del panel de control.
En posición 0 el ventilador está apagado
En posición 1 baja velocidad
En posición 2 velocidad mediana
En posición 3 alta velocidad
Timer
Es posible programar el temorizador de 10 a 60 minutos a través de la perilla situada en el panel de ocntrol del
ventilador. Una vez nalizado el tiempo seleccionado el ventilador se apagará automáticamente.
Inclinación de la cabeza
Es posible inclinar la cabeza del ventilador en diferentes posiciones, para cambiar la inclinación del ujo de aire.
Antes de cambiar inclinación apagar el aparato.
Agarrar el cuerpo-motor e inclinar la cabeza del ventilador, a saltos, hasta la posición deseada.
Cuidado: no forzar el movimento para no romper el mecanismo de inclinación.
Después cada uso del ventilador desconecte el enchufe de la toma
de corriente.
Si tiene que guardar por mucho tiempo el ventilador y no lo usa con
regularidad, lo reponga en su embalaje original y lo guarde en un
lugar seco y no húmedo. Cuando lo emplea por primera vez después
un largo período, controle que sea limpio y que las paletas del motor
giren libremente (con el motor apagado) sin problemas.
10. Perno de regolación de la inclinación
11. Timer
12. Panel de control
13. Tornillo para enganchar al tubo
14. Tubo interior
15. Tubo exterior
16. Pomo de regolación de la altitud
17. Tornillo para enganchar a al base y Arandela de bloqueo
18. Base de apoyo

Ventilador de pie con temporizador Manual de instrucciones
ES
23
Al término de la vida útil del aparato, no eliminar como residuo municipal sólido mixto sino eliminarlo
en un centro de recogida especíco colocado en vuestra zona o entregarlo al distribuidor a la hora
de comprar un nuevo aparato del mismo tipo y destinado a las mismas funciones. El distribudor se
cargarà el costo de eliminación de los equipos siguendo las normas actuales.
Este procedimiento de recogida separada de los equipos eléctricos y electrónicos se realiza con el propósito de
una política del medioambiente comunitaria con objetivos de salvaguardia, defensa y mejoramiento de la cali-
dad del medioambiente y para evitar efectos potenciales en la salud de los seres humanos debido a la presencia
de dentro de estos equipos o a un uso inapropiado de los mismos o de algunas de sus partes. Està Vuestra y
nuestra competencia aiudar la defensa del medioambiente.
El símbolo indica que este producto respecta la normativa europea de mdioam biente ( 2011/65/EU) y le re-
cuerda que todos los productos electrónicos y eléctricos deben ser objeto de recogida por separado al nalizar
su ciclo de vida. Para obtener información sobre el reciclaje de este producto y dónde encontrar puntos de re-
cogida llame las supuestas autoridades locales. Una eliminación no correcta de este producto podría conllevar
sanciones.
Oscilación de la cabeza
Con el perno de oscilación es posible activar o desactivar la oscilación de la cabeza del ventilador.
La oscilación permite distribuir de manera uniforme el aire en el ambiente.
Para activar la oscilación, empujar el perno de oscilación hacia abajo hasta su bloqueo completo; la cabeza del
ventilador da la vuelta automáticamente a la derecha y a la izquierda.
Para desactivar la oscilación empujar el perno completamente hacia arriba.
Limpieza
Apagar el ventilador y desconectar el enchufe de la toma de corriente antes de hacer cualquier operación de
limpieza.
Para limpiar el ventilador utilizar una tela suave, eventualmente humedecida con agua.
No utilizar alcohol o agentes químicos como diluyentes, productos abrasivos en general.
No rociar agua y líquidos sobre el ventilador, para evitar inltraciones peligrosas.
Secar bien todas las partes mojadas del ventilador antes de encenderlo.
Cuando no se utiliza el ventilador en la temporada invernal, ponerlo en un luger seco y limpio.
Datos técnicos
Potencia: 40W
Alimentación: 220V ~ 50Hz
Con el objetivo de una mejora continua, beper se reserva el derecho de añadir cambios y mejoras al
producto sin previo aviso.

Ventilador de pie con temporizador Manual de instrucciones
24
CERTIFICADO DE GARANTĺA
La garantía es valida 24 meses a partir de la fecha de compra para todos los defectos de material o de fabri-
cación.
La garantía es valida sólo si presenta el recibo scal con la fecha de compra y el nombre del modelo del
aparato comprado.
Si el aparato requiere asistencia, contacte su vendedor o nuestra empresa. Eso para preservar el rendimiento
de su aparato y NO invalidar la garantía. Toda manipulación del aparato por una persona no autorizada anula
automáticamente la garantía.
CONDICIONES DE GARANTÍA
Si aparecen averías a causa de un defecto de material y/o fabricación durante la garantía garantizamos gratu-
itamente la reparación del aparato.
No se tienen en cuenta en la garantía todas las partes que sean defectuosas debidas a:
a. Daños en el transporte o caídas accidentales.
b. Instalación eléctrica incorrecta y no conforme.
c. Reparaciones o modicaziones realizadas por personal no especializado.
d. Falta o incorrectos limpieza y mantenimiento.
e. Aparato y/o partes del aparato expuestas a deterioro y/o consumo (lámparas, pilas, cuchillas).
f. Falta de cumplimiento de las instrucciones para el funcionamiento del aparato, negligencia en el uso.
Esta lista es simplicada y no completa ya que esta garantía se anula para todas aquellas circunstancias que
no permiten remontar a defectos de fabricación del aparato.
La garantía se anula en cada caso de uso impropio del aparato y en caso de un uso profesional.
Beper Srl declina toda responsabilidad por cualquier daño que puede directamente o indirectamente resultar de
personas, cosas o animales domésticos en consecuencia de la falta de cumplimiento de todas las instrucciones
indicadas en este “Manual de Instrucciones y Advertencias” en términos de instalación, uso y mantenimiento
del aparato.
Contacte con el distribudor de su pais o el departamento de post venta de Beper.
Envie un e-mail a assistenza@beper.com y le enviaremos datos de su servicio tecnico en su pais.

Ανεμιστήρας με ορθοστάτη με χρονοδιακόπτη Εγχειρίδιο οδηγιών
GR
25
Σημαντικες προειδοποιησεις ασφαλειας
Πριν χρησιμοποιήσετε την συσκευή διαβάστε προσεκτικά τις
παρακάτω οδηγίες χρήσεως και φυλάξτε τις για μελλοντική χρήση.
Διαβάστε προσεκτικά τις παρακάτω οδηγίες, δεδομένου ότι θα σας
δώσουν χρήσιμες πληροφορίες για την ασφάλεια σχετικά με την
εγκατάσταση, τη χρήση και τη συντήρηση και θα σας βοηθήσουν να
αποφύγετε ατυχίες και πιθανά ατυχήματα.
Αφαιρέστε τη συσκευασία και βεβαιωθείτε ότι η συσκευή είναι
άθικτη με ιδιαίτερη προσοχή στο καλώδιο τροφοδοσίας. Τα στοιχεία
της συσκευασίας (πλαστικές σακούλες κλπ.) δεν πρέπει να είναι
προσβάσιμα στα παιδιά, προκειμένου να προφυλαχθούν από τις
πηγές κινδύνου. Συνιστάται να μην ρίξετε τα στοιχεία της συσκευασίας
σε οικιακά απορρίμματα, αλλά να τα τοποθετήσετε στο κατάλληλο
σημείο συλλογής ή καταστροφής των απορριμμάτων του τμήματος
καθαριότητας του Δήμου σας.
Εάν το καλώδιο τροφοδοσίας έχει υποστεί ζημιά πρέπει να
αντικατασταθεί από τον κατασκευαστή, τον αντιπρόσωπο ή από
εξίσου ειδικευμένα άτομα προς αποφυγή κινδύνου.
Πριν συνδέσετε τη συσκευή, βεβαιωθείτε ότι η τάση του δικτύου
αντιστοιχεί στα στοιχεία που αναγράφονται στην ετικέτα. Η συσκευή
μπορεί να καταστραφεί αν η τάση δεν είναι σωστή.
Αν το φις δεν ταιριάζει στην πρίζα απευθυνθείτε σε ειδικευμένο άτομο
προκειμένου να αντικαταστήσει το βύσμα με το κατάλληλο και να
διασφαλίσει ότι το τμήμα καλωδίων της πρίζας είναι κατάλληλο για
την απορρόφηση της ενέργειας της συσκευής σας.
Γενικά, η χρήση προσαρμογέα πολλαπλών βυσμάτων και / ή
επεκτάσεων δεν συνιστάται. Αν είναι απαραίτητο, χρησιμοποιείστε
μόνο απλό ή πολλαπλό προσαρμογέα και επέκταση σύμφωνα
με τους κανόνες ασφαλείας που ισχύουν, διασφαλίστε ότι τα όρια
ισχύος τα οποία είναι σημειωμένα στον απλό προσαρμογέα και στις
επεκτάσεις και η μέγιστη ισχύς που είναι σημειωμένη στον πολλαπλό
προσαρμογέα δεν υπερβαίνονται.
Μην χρησιμοποιείτε την συσκευή αν το καλώδιο τροφοδοσίας έχει
υποστεί ζημία.
Μην χρησιμοποιείτε τη συσκευή μετά από μια μη σωστή λειτουργία.
Σε αυτή την περίπτωση, απενεργοποιήστε την για μην ανοίξει και
σπάσει και επικοινωνήστε με ένα εξουσιοδοτημένο κατάστημα για την
επισκευή της συσκευής γιατί απαιτούνται γνήσια ανταλλακτικά. Η μη
σωστή τήρηση των οδηγιών μπορεί να επηρεάσει την ασφάλεια της
συσκευής σας.

Ανεμιστήρας με ορθοστάτη με χρονοδιακόπτη Εγχειρίδιο οδηγιών
26
Αυτή η συσκευή πρέπει να προορίζεται για την χρήση για την οποία
κατασκευάστηκε.
Κάθε άλλη χρήση πρέπει να θεωρείται ως ακατάλληλη και κατά
συνέπεια επικίνδυνη.
Ο κατασκευαστής δεν μπορεί να θεωρηθεί υπεύθυνος για τυχόν
ζημιές που οφείλονται σε ακατάλληλη, λανθασμένη ή απερίσκεπτη
χρήση. Η συσκευή αυτή προορίζεται ΜΟΝΟ ΓΙΑ ΟΙΚΙΑΚΗ ΧΡΗΣΗ.
Για την προστασία από ηλεκτροπληξία, μη βυθίζετε το καλώδιο, το
βύσμα ή οποιοδήποτε άλλο μέρος της συσκευής σε νερό ή άλλο υγρό.
Μη χρησιμοποιείτε τη συσκευή κοντά σε εκρηκτικές ύλες, εύφλεκτα
υλικά, αέρια και φλόγες.
Μην αφήνετε τα παιδιά, τα άτομα με αναπηρία ή ανθρώπους χωρίς
εμπειρία ή τεχνική ικανότητα να χρησιμοποιούν τη συσκευή, εάν
δεν έχουν σωστή επίβλεψη. Η στενή επίβλεψη είναι απαραίτητη
όταν οποιαδήποτε συσκευή χρησιμοποιείται από ή κοντά σε παιδιά.
Βεβαιωθείτε ότι τα παιδία δεν παίζουν με την συσκευή.
Μη κρατάτε τη συσκευή με βρεγμένα χέρια ή πόδια. Μη κρατάτε τη
συσκευή με γυμνά πόδια.
Ποτέ μην χρησιμοποιείτε άλλα εξαρτήματα εκτός από εκείνα που
προβλέπονται από Beper. Η χρήση εξαρτημάτων που δεν συνιστώνται
από τον κατασκευαστή της συσκευής μπορεί να προκαλέσουν κίνδυνο
ή τραυματισμό.
Μην χρησιμοποιείτε την συσκευή στον άμεσο
περιβάλλοντα χώρο του μπάνιου, του ντους ή της
πισίνας.
Ποτέ μην τραβάτε το καλώδιο τροφοδοσίας για να
αποσυνδέσετε την συσκευή.
Βεβαιωθείτε ότι το καλώδιο δεν κρέμεται από την
άκρη του τραπεζιού ή από τον πάγκο της κουζίνας
και δεν έρχεται σε επαφή με θερμές επιφάνειες.
Προειδοποιήσεις
Μην συνδέετε το καλώδιο τροφοδοσίας πριν τη συναρμολόγηση
του ανεμιστήρα. Πριν από τη χρήση, ελέγξτε την ακεραιότητα του
καλωδίου τροφοδοσίας. Τοποθετήστε τον ανεμιστήρα σε μια επίπεδη
και σταθερή επιφάνεια σε ξηρό μέρος. Κρατήστε μακριά σε μια λογική
απόσταση τον ανεμιστήρα από τους τοίχους, πόρτες, παράθυρα ή
κάθε αντικείμενο που θα μπορούσε να εμποδίσει τη συσκευή να
λειτουργεί με το σωστό τρόπο.

Ανεμιστήρας με ορθοστάτη με χρονοδιακόπτη Εγχειρίδιο οδηγιών
GR
27
Μην συνδέετε αντικείμενα στο πλέγμα ή στο εσωτερικό της συσκευής.
Μην τραβάτε το καλώδιο τροφοδοσίας για να αποσυνδέσετε τη
συσκευή. Μετά τη χρήση του ανεμιστήρα, αποσυνδέστε την παροχή
ρεύματος. Αν ο ανεμιστήρας πρέπει να αποθηκευτεί για μεγάλο
χρονικό διάστημα ή δεν χρησιμοποιείται, επανατοποθετείστε τον στην
αρχική συσκευασία του, σε ξηρό μέρος. Για κάθε επόμενη χρήση,
βεβαιωθείτε ότι ο ανεμιστήρας είναι καθαρός και ότι οι λεπίδες γυρίζουν
με το σωστό τρόπο (έχοντας τον ανεμιστήρα απενεργοποιημένο).
Περιγραφη του προϊοντος Εικ. Α
1. Front grid
2. Closure nut
3. Nut blades
4. Blades
5. Rear grid nut
6. Rear grid
7. Motor
8. Swing button
9. Body motor
Assembly instructions
Put the base on the oor.
Insert completely the internal pipe inside the external pipe.
Fix the high adjustment handle.
Fix the external pipe to the base with the screw (included in packaging).
Take off the external pipe, and regulate it until the desired height. Strongly screw the high adjustment handle.
Place the control panels on the pipe.
Screw completely with the screw in order that the control panels is well xed to the intern pipe.
Place the rear grid on the motor, in order that the holes of the grid are well inserted into the motor of the fan
Strongly and completely screw the rear grid in order to block the grid on the motor.
Insert the blades of the fan on the motor and completely screw the nut blade on the motor, in order to block the
body motor.
Assembly the 2 grid front and rear ones by inserting the closure nut, place the front grid, on the rear grid. Close
the nuts to block the grids.
Speed selection
Choose the speed desired pressing on the buttons of the control panels.
Position 0 the fan switch off.
Position 1 low speed.
Position 2 medium speed.
Position 3 high speed.
Timer
The timer can be set from 10 to 60 minutes by turning the knob on the control panel. Once the time set has
expired, the fan will shut off automatically.
Head inclination
It is possible to choose various positions and change the air ow swing.
Before changing it, switch off the fan.
Take the motor body, unscrew the regulation axis and change the inclination of the fan as desired and screw the
air strongly.
Attention: do not try to force the inclination position in order to avoid any failure.
10. Inclination set button
11. Timer
12. Control panels
13. Screw for pipe
14. Internal pipe
15. External pipe
16. High adjustment handle
17. Screw pipe coupling with clamping washer
18. Base

Ανεμιστήρας με ορθοστάτη με χρονοδιακόπτη Εγχειρίδιο οδηγιών
28
Swing
When pressing the swing button, It is possible to activate or disconnect the swing of the fan, by touching the
swing button. Swing allow to provide the air uniformly. To activate the push the swig button down until is com-
pletely blocked ; the head fan turns automatically from right to left. To disconnect the swing raise completely
the button.
Cleaning
Before cleaning, switch off and unplug the fan. For cleaning use a soft cloth, that may be softly wet.
Do not use alcohol or chemical substances, or any detergent that could damage this appliance.
Do not spray water or other liquids on the fan in order to protect it. After cleaning, dry every parts before using
the appliance. During the winter and when not used, keep this appliance in a dry and clean place.
Technical data
Power: 40W
Power supply: 220V ~ 50Hz
Για οποιουσδήποτε λόγους βελτίωσης, η εταιρεία Beper διατηρεί το δικαίωμα να τροποποιήσει ή να
βελτιώσει το προϊόν χωρίς καμία προειδοποίηση.
Η Ευρωπαϊκή Οδηγία 2011/65/EU σχετικά με τα απόβλητα ειδών ηλεκτρικού και ηλεκτρονικού
εξοπλισμού, προβλέπει ότι παλαιές οικιακές ηλεκτρικές συσκευές δεν πρέπει να απορρίπτονται μαζί
με τα υπόλοιπα αστικά απόβλητα. Οι παλιές συσκευές πρέπει να συλλέγονται χωριστά, προκειμένου
να βελτιστοποιηθεί η ανάκτηση και ανακύκλωση των υλικών που περιέχουν, καθώς και τη μείωση των
επιπτώσεων στην ανθρώπινη υγεία και το περιβάλλον. Το σύμβολο διαγραμμένο “δοχείο αποβλήτων”
στο προϊόν υπενθυμίζει σε σας την υποχρέωσή σας, πως όταν επιθυμείτε να πετάξετε τη συσκευή,
πρέπει να συλλέγεται ξεχωριστά.
ΌΡΟΙ ΕΓΓΎΗΣΗΣ
Αγαπητέ/ή πελάτη,
Σας ευχαριστούμε που αγοράσατε αυτό το προϊόν. Σε περίπτωση που το προϊόν που διαθέτετε απαιτεί service
βάσει εγγύησης, επικοινωνήστε με το κεντρικό service μας.
Για την αποφυγή της άσκοπης αναστάτωσης, σας συμβουλεύουμε να διαβάσετε προσεκτικά τα
εγχειρίδια χρήστη πριν να επικοινωνήσετε με το service μας.
Τα προϊόντα καλύπτονται με εγγύηση έναντι οποιουδήποτε κατασκευαστικού ελαττώματος για 2 χρόνια από την
ημερομηνία της αρχικής αγοράς. Εάν κατά τη διάρκεια αυτής της περιόδου το προϊόν αποδειχθεί ελαττωματικό
λόγω ακαταλληλότητας υλικού ή ποιότητας εργασίας, το κεντρικό service θα επιδιορθώσει ή θα αντικαταστήσει
(κατά την αποκλειστική του κρίση) το προϊόν βάσει των ορίων και συνθηκών που ορίζονται πιο κάτω, χωρίς
χρέωση για την εργασία και τα ανταλλακτικά:
1. Η εγγύηση ισχύει υπό την προϋπόθεση ότι το προϊόν χρησιμοποιείται και συντηρείται σύμφωνα με τις οδηγίες
της κατασκευαστικής εταιρείας.
1. Η εγγύηση παρέχεται μόνο με την προσκόμιση του προϊόντος μαζί με το αρχικό τιμολόγιο ή την απόδειξη
αγοράς, όπου θα δηλώνεται η ημερομηνία αγοράς και ο τύπος του προϊόντος.
2. Η εγγύηση δεν θα ισχύσει σε περίπτωση :
Ζημίας που προκαλείται λόγω κακής χρήσης συμπεριλαμβανομένης, ενδεικτικά, της μη χρήσης του προϊόντος
για το σκοπό για τον οποίο προορίζεται ή σύμφωνα με τις οδηγίες χρήστη που αφορούν τη σωστή χρήση και
συντήρηση, καθώς και της εγκατάστασης ή χρήσης του προϊόντος χωρίς να τηρούνται τα ισχύοντα πρότυπα
ασφαλείας στη χώρα που χρησιμοποιείται.
Ζημίας που προκαλείται λόγω ατυχημάτων, συμπεριλαμβανομένων, ενδεικτικά, κεραυνού, ύδατος, πυρός,
κατάχρησης ή αμέλειας.
Μετατροπής, παραμόρφωσης, μη δυνατότητας ανάγνωσης ή αφαίρεσης του μοντέλου ή του σειριακού αριθμού
από το προϊόν.
Ζημίας που προκαλείται από επιδιορθώσεις ή ρυθμίσεις που έχουν πραγματοποιηθεί από μη εξουσιοδοτημένα
άτομα ή εταιρείες service.
Ελαττωμάτων σε οποιοδήποτε σύστημα με το οποίο έχει ενοποιηθεί ή χρησιμοποιείται το προϊόν.
Επικοινωνηστε με τον επισημο διανομεα της beper στην χωρα σας ή me το τμημα υποστηριξης της Beper στο
e-mail assistenza@beper.com
To οποιο θα προωθησει το αιτημα σας στον επισημο διανομεα της Beper της χωρας σας.

Ventilator cu timer Manual de instrucțiuni
RO
29
Instrucțiuni generale privind siguranța
Citiți cu atenție instrucțiunile de folosire înainte de prima folosi-
re a aparatului.
Citiți cu atenție următoarele instrucțiuni, deoarece ele vă oferă
informații utile de siguranță în legătură cu instalarea, folosirea și
întreținerea și vă ajută să evitați posibilele accidente.
Îndepărtați ambalajul și asigurați-vă, că aparatul este intact, acordând
atenție specială cablului de curent. Ambalajul conține (pungi de pla-
stic, polistiren, etc.) nu au voie să e accesibile pentru copii, pentru
a-i feri de sursele de pericol.
Se recomandă să nu aruncați aceste ambalaje în gunoiul menajer,
însă ele se pot transporta la centrol de colectare din apropiere sau
cerând informații la primărie.
Înainte de conectarea aparatului asigurați-vă că tensiunea rețelei co-
respunde cu cea trecută pe plăcuța aparatului.
În cazul în care ștecherul nu este potrivit pentru priza dvs, acesta
trebuie înlocuit cu altul potrivit de un personal calicat autorizat spe-
cializat, care ar trebui să se asigure, că secțiunea ștecherului cablului
este potrivit pentru tensiunea aparatului dvs.
Pentru a scoate ștecherul din priză nu trageți niciodată de cablu, doar
de ștecher.
Trebuie să vă asigurați că niciodată nu intră cablul în contact cu
suprafețe erbinți sau ascuțite.
Nu folosiți aparatul dacă cablul de curent este deteriorat. În cazul
unei deteriorări, acesta trebuie înlocuit de producător, de un agent
service sau orice altă persoană asemănătoare calicată autorizată
pentru evitarea unui pericol.
Doar conectați aparatul la curent alternativ.
În general nu este recomandată folosirea prizelor multiple și/sau
prelungitoarelor; dacă totuși folosirea lor este necesară, folosiți vă
rugăm adaptoare simple sau multiple în conformitate cu regulile de
siguranță în vigoare și limita maximă de putere trecută pe adaptorul
multiplu să nu e depășită.
Acest aparat poate folosit numai pentru scopul pentru care a fost
creat.
Orice altă folosire se consideră a improprie și de asemenea
periculoasă. Producătorul nu poate responsabil pentru niciun fel
de deteriorare a aparatului apărută în urma folosirii improprii, greșite
sau neatentă.

Ventilator cu timer Manual de instrucțiuni
30
Pentru a evita orice risc de încălzire, se recomandă să derulați com-
plet cablul de rețea și să scoateți ștecherul din priză când nu îl folosiți.
Înainte de curățare scoateți ștecherul din priză.
Pentru protecție împotriva electrocutării, nu cufundați cablul, ștecherul
sau orice altă parte a aparatului în apă sau alte lichide.
Nu țineți aparatul cu mâinile sau picioarele ude.
Nu țineți aparatul când sunteți în picioarele goale.
Nu expuneți aparatul fenomenelor naturii cum sunt ploaia, vântul,
ninsoarea.
Nu folosiți aparatul lângă materiale explozive, inamabile, gaze,
ăcări, încălzitoare.
Nu permiteți copiilor, persoanelor cu dizabilități sau oricărei persoa-
ne fără experiență sau abilitate tehnică să folosească aparatul dacă
nu sunt supravegheați corespunzător. Este necesară supravegherea
atentă când aparatul este folosit lângă sau de copii.
Asigurați-vă, că al dvs copil nu se joacă cu aparatul.
În cazul în care decideți să nu mai folosiți vreodată
aparatul, faceți-l ireparabil tăind cablul de curent
după scoaterea ștecherului din priză.
Deci toate părțile periculoase ale aparatului trebuie
să e făcute ireparabile, în special pentru copiii care
s-ar putea juca cu aparatul.
Avertisment
Nu conectați ștecherul la priză înainte de asamblarea tuturor părților ven-
tilatorului. Înainte de folosire, vericați integritatea cablului de alimentare
și îndepărtați eventualele noduri dacă este necesar. Puneți ventilatorul
într-un loc uscat pe o suprafață netedă și stabilă.
Păstrați o distanță rezonabilă între ventilator și pereți, uși, ferestre și ori-
ce obiect care ar putera împiedica aparatul să funcționeze corect.
Nu acoperiți carcasa sau grilajul ventilatorului când aparatul este pus în
funcțiune. Nu inserați obiecte în grilaj sau în interiorul aparatului.
Nu trageți de cablul de alimentare pentru a deconecta aparatul.
După folosirea ventilatorului scoateți ștecherul din priză.
Dacă ventilatorul trebuie depozitat pentru a perioadă mai lungă de timp
respectiv urmează să nu e folosit mai mult timp, puneți ventilatorul în
ambalajul original într-un loc uscat. La ecare următoare folosire vericați
ventilatorul să e curat iar elicele să se învârtă în direcția corectă (motor
oprit).

Ventilator cu timer Manual de instrucțiuni
RO
31
Descrierea produsului Fig.A
1. Grilaj din față
2. Piuliță de închidere
3. Elicele piuliței
4. Elice
5. Piuliță de la grilajul din spate
6. Grilaj din spate
7. Motor
8. Buton pentru oscilare
9. Carcasă motor
Instrucțiuni de asamblare
Puneți baza pe podea.
Inserați complet țeava internă în țeava exterioară.
Fixați mânerul pentru ajustarea înălțimii.
Fixați țeava exterioară de bază cu șurub (inclus în ambalaj).
Scoateți țeava exterioară, și reglați-o până la înălțimea dorită. Înșurubați ferm mânerul de ajustare a înălțimii.
Puneți panoul de control pe țeavă.
Înșurubați complet pentru a xa panoul de control de țeava interioară.
Puneți grilajul din spate pe motor, astfel încât oriciile grilajului să e inserate bine în motorul ventilatorului.
Înșurubați complet și ferm grilajul din spate pentru a bloca grilajul pe motor.
Inserați elicele ventilatorului pe motor și înșurubați complet piulița cu elice pe motor, pentru a bloca carcasa
motorului.
Asamblați cele două grilaje cel din față și cel din spate prin inserarea piuliței de închidere, puneți grilajul din față
pe grilajul din spate. Închideți piulițele pentru a bloca grilajele.
Selectarea vitezei
Alegeți viteza dorită apăsând butoanele de pe panoul de control.
Poziția 0 ventilatorul este oprit.
Poziția 1 viteză redusă.
Poziția 2 viteză medie.
Poziția 3 viteză ridicată.
Timer
Timerul poate setat de la 10 la 60 minute prin rotirea butonului de pe panoul de control. Îndată ce timpul setat
a expirat, ventilatorul se oprește automat.
Înclinarea capului
Puteți alege diferite poziții și să modicați oscilarea uxului de aer.
Înainte de modicare opriți ventilatorul.
Luați carcasa motorului, deșurubați axul de reglare și modicați unghiul de înclinare al ventilatorului cum doriți
și înșurubați ferm.
Atenție : nu încercați să forțați poziția de înclinare pentru a evita orice eșuare.
Oscilare
Când apăsați butonul pentru oscilare, este posibil să activați sau să dezactivați funcția de oscilare a ventilatoru-
lui, prin atingerea butonului de oscilare. Funcția de oscilare permite furnizarea uniformă a aerului.
Pentru activare apăsați butonul pentru oscilare până este complet blocat ; capul ventilatorului oscilează automat
de la dreapta la stânga.
Pentru deconectarea funcției de oscilare ridicați butonul complet.
Curățare
Înainte de curățare opriți și deconectați ventilatorul de la rețeaua de curent.
Pentru curățare folosiți un prosop moale, care poate ușor umed.
Nu folosiți alcool sanitar sau substanțe chimice, respectiv niciun fel de detergent care ar putea deteriora acest
aparat. Nu pulverizați apă sau alte lichide pe ventilator pentru a-l proteja.
10. Buton pentru setul de înclinare
11. Timer
12. Panou de control
13. Șurub pentru țeavă
14. Țeavă interioară
15. Țeavă exterioară
16. Mâner pentru ajustarea înălțimii
17. Cuplaj cu șurub cu șaibă de xare
18. Bază

Ventilator cu timer Manual de instrucțiuni
32
După curățare uscați ecare parte înainte de folosirea aparatului.
În timpul iernii și când nu este folosit, țineți aparatul într-un loc uscat și curat.
Date tehnice
Putere : 40W
Alimentare : 220V ~ 50Hz
În scopul îmbunătățirii perspectivei beper își rezervă dreptul de a modica produsul în cauză fără noti-
care sau reconstruire.
CERTIFICAT DE GARANȚIE
Acest aparat a fost vericat în fabrică. De la data achiziționării originale se aplică o garanție de 24 luni la material
și defecte de producție. Bonul scal trebuie predat împreună cu certicatul de garanție în cazul unei reclamații.
Garanția este valabilă numai cu un certicat de garanție și bon scal pe care apare data achiziționării și
modelul aparatului.
Pentru orice asistență tehnică, vă rugăm contactați direct vânzătorul sau sediul nostru central pentru a păstra
eciența aparatului și pentru a NU anula garanția.
CONDIȚII DE GARANȚIE
Dacă aparatul prezintă defecțiuni ale materialelor defecte și/sau producție în timpul perioadei de garanție, noi vă
garantăm reparația gratuită în condițiile în care:
- Aparatul a fost folosit corespunzător și conform scopului pentru care a fost creat.
- Aparatul nu a fost modicat.
- Bonul scal trebuie prezentat.
- Uzura normală și excesivp nu face obiectul garanției.
De aceea orice parte care ar putea ruptă accidental sau prezintă semne vizibile de uzură la produsele con-
sumabile (precum la lămpi, baterii, elemente de încălzire ...) părțile estetice sunt excluse din garanție și orice
defect rezultat din nerespectarea regulilor privind utilizarea, neglijența în folosire și/sau întreținerea aparatului,
nepăsare, greșeală sau instalare improprie, deteriorare în timpul transportului și orice altă deteriorare neatribu-
tabile pentru furnizor.
Pentru orice defecțiune care nu poate reparată în perioada de garanție, aparatul va înlocuit gratuit. În orice
caz, dacă partea care trebuie înlocuită din cauza defecțiunilor, ruperii sau funcționării eronate este un accesoriu
și/sau o parte detașabilă a produsului, Beper își rezervă dreptul de a înlocui numai partea defectată și nu întreg
produsul.
Chiar și după expirarea garanției acordăm întotdeauna atenție reparațiilor aparatelor defectate. Pentru suport
tehnic și/sau reparații după perioada de garanție ne puteți contacta direct la adresa de mai jos:
Contactați distribuitorul din țara dvs. Sau departamentul de vânzări Beper.
E-mail assistenza@beper.com care va trimite mai departe ancheta la distribuitorul dvs.
Directiva Europeană 2011/65/EU privind Deșeurile de echipamente electrice și electronice (DEEE),
pretinde ca electrocasnicele să nu pot scoase din uz prin deșeurile normale nesortate. Aparatele ve-
chi trebuie colectate separat pentru a optimiza restabilirea și reciclarea materialelor pe care le conține
și pentru a reduce impactul asupra sănătății umane și asupra mediului. Simbolul tomberonului cu
roți barat de pe produs vă amintește de obligația dvs referitoare la scoaterea din uz a unui aparat, și
anume că acesta trebuie colectat separat.

33
Stojanový ventilátor s časovačem Pokyny pro bezpečnost a použití
CZ
Všeobecné bezpečnostní informace
Před prvním použitím zařízení si pozorně přečtěte tyto pokyny.
Přečtěte si pečlivě následující pokyny, protože vám poskytují užitečné
bezpečnostní informace o instalaci, používání a údržbě a pomohou
vám vyhnout se chybám a možným nehodám.
Odstraňte ochranný obal a ujistěte se, že je spotřebič neporušený.
Prvky balení (plastové sáčky, polystyren, atd.) by se neměli dostat
k dětem, mohou být pro ně nebezpečné.
Obalový materiál odevzdejte ve sběrném dvoře nebo uložte na
místo určené obcí pro sběr tříděného odpadu. Tímto místem jsou
většinou sběrné kontejnery.
Před připojením zařízení se ujistěte, že napětí v zásuvce odpovídá
napětí uvedenému na výrobku. Zařízení může být poškozeno, pokud
si napětí neodpovídá.
Pokud zástrčka nepasuje do vaší zásuvky, nechte si ji vyměnit za
jinou kvalikovaným pracovníkem, který také zkontroluje, jestli jsou
vaše zásuvky vhodné k napájení tohoto přístroje.
Neodpojujte spotřebič od zásuvky tahem za síťový kabel, hrozí
nebezpečí poškození síťového kabelu či zásuvky. Kabel odpojujte od
zásuvky tahem za vidlici síťového kabelu.
Nepokládejte síťový kabel spotřebiče v blízkosti horkých ploch, nebo
přes ostré předměty.
Dbejte na to, aby síťový kabel nevisel přes okraj pracovní plochy,
protože to může vést k nehodám, např. za něj mohou zatáhnout malé
děti.
Nepoužívejte přístroj s poškozeným síťovým kabelem. Je-li přívodní
vedení tohoto přístroje poškozeno, musí být vyměněno výrobcem,
jeho servisem nebo podobně kvalikovanou osobou, aby se předešlo
ohrožení.
Přístroj připojujte pouze na střídavý proud s napětím podle typového
štítku.
V případě použití prodlužovacích kabelů musí být tyto kabely vhodné
pro napájení zařízení, aby nedošlo k ohrožení obsluhy a byla
zabezpečena bezpečnost prostředí, ve kterém je přístroj používán.
Nevhodné prodlužovací kabely mohou způsobit provozní anomálie.
Tento přístroj je určen pouze pro jeho zvláštní účel. Jakékoliv jiné
použití je považováno za nevhodné a tedy nebezpečné. Výrobce
nemůže být zodpovědný za jakékoliv škody vyplývající z nesprávného,
špatného či neopatrného použití. Toto zařízení je určeno pouze pro
domácí potřebu.

34
Stojanový ventilátor s časovačem Pokyny pro bezpečnost a použití
Abyste předešli riziku vznícení, úplně rozmotejte přívodní šňůru a
také vypojte spotřebič ze zásuvky, pokud jej nepoužíváte.
Po použití a před čištěním výrobek vždy vypojte ze zásuvky.
Pro ochranu proti úrazu elektrickým proudem nedávejte a nepok-
ládajte kabel nebo jiné části přístroje do vody nebo jiných tekutin.
Nedotýkejte se přístroje mokrýma rukama nebo nohama.
Nevystavujte přístroj působení atmosférických vlivů jako např. déšť,
vítr nebo sníh.
Nepoužívejte přístroj v blízkosti výbušnin, vysoce hořlavých materiálů,
plynů, hořících plamenů nebo ohřívačů.
Tento spotřebič není určen pro osoby (včetně dětí) se sníženou
fyzickou, smyslovou nebo mentální schopností nebo osobám s
omezenými zkušenostmi a znalostmi, pokud nad nimi není veden
odborný dohled nebo podány instrukce zahrnující použití tohoto
spotřebiče osobou odpovědnou za jejich bezpečnost. Zvláštní dohled
je vyžadován, pokud je přístroj používán v blízkosti dětí nebo přímo
dítětem.
Pokud se rozhodnete přístroj dále nevyužívat,
odpojte jej od napětí a přeřízněte napájecí kabel, aby
se přístroj stal nefunkčním. Učiňte také nefunkčními
nebezpečné části výrobku, zejména kvůli dětem,
které si mohou s výrobkem hrát.
Upozornění
Nezapojujte přívodní šňůru před dokončením kompletní montáže všech
částí ventilátoru.
Před použitím zkontrolujte integritu napájecího kabelu a případně
odstraňte “uzly” na kabelu.
Umístěte ventilátor na suché místo, na rovný a stabilní povrch.
Ventilátor udržujte v dostatečné vzdálenosti od stěn, dveří, oken nebo
všech předmětů, které by mohly způsobit, že spotřebič nebude fungovat
správně.
Nikdy nezakrývejte tělo nebo mřížku ventilátoru, když je zařízení v pro-
vozu.
Nevkládejte žádné předměty do mřížky, když je spotřebič v provozu.
Netahejte za přívodní šňůru, abyste odpojili spotřebič.
Po použití ventilátoru odpojte napájecí kabel.

35
Stojanový ventilátor s časovačem Pokyny pro bezpečnost a použití
CZ
Popis spotřebiče Obr. A
1. Přední mřížka
2. Uzavírací matice
3. Matice lopatky
4. Lopatky
5. Matice mřížky
6. Zadní mřížka
7. Motor
8. Tlačítko rotace
9. Motor
Montážní návod
Základnu položte na podlahu.
Vnitřní trubku zcela zasuňte do vnější trubky.
Namontujte rukojeť.
Upevněte vnější trubku na základnu šroubem (součástí balení).
Vytáhněte trubku a nastavte ji až do požadované výšky. Pevně zašroubujte s rukojetí.
Umístěte ovládací panel na trubku.
Zajistěte panel šroubem, aby byl panel dobře připevněn k vnitřní trubce.
Umístěte zadní mřížku motoru tak, aby otvory mřížky byly dobře zasunuty do motoru ventilátoru
Našroubujte zadní mřížku, aby byl chránený motor.
Vložte lopatky na motor a pevně zašroubujte matici lopatky.
Umístěte přední mřížku na zadní mřížku a maticí spojte mřížky.
Nastavení rychlosti
Zvolte požadovanou rychlost stisknutím tlačítka na ovládacím panelu.
Poloha 0 Vypnutí ventilátoru
Poloha 1 Nízká rychlost
Poloha 2 Střední rychlost
Poloha 3 Vysoká rychlost
Časovač
Časovač lze nastavit od 10 do 60 minut otáčením knoíku na ovládacím panelu. Po uplynutí nastavené doby se
ventilátor automaticky vypne.
Nastavení sklonu
Je možné zvolit různé nastavení sklonu ventilátoru. Před změnou vypněte ventilátor!
Vezměte tělo motoru, povolte šroub regulace sklonu a nastavte požadovaný sklon. Opět utáhněte šroub.
Pozor: pozici náklonu nastavujte opatrně, nikoliv „přes sílu“. Zabráníte tak poškození ventilátoru.
Nastavení rotace
Chcete-li nastavit rotaci ventilátoru (kontinuální otáčení zprava doleva), stiskněte páčku otáčení směrem dolů.
Hlava ventilátoru se otáčí zleva doprava. Pro vypnutí nastavte tlačítko nahoru.
Pokud je třeba přístroj delší dobu uskladnit nebo pokud není denně
používán, umístěte spotřebič do původního obalu a uložte jej na suchém
místě. Při následném použití zařízení po uskladnění zkontrolujte, zda
je spotřebič čistý a zda se čepele správně otáčejí správným způsobem
(přístroj musí být při této kontrole vždy vypnutý).
10. Nastavení sklonu
11. Časovač
12. Ovládací panel
13. Šroub trubky
14. Vnitřní trubka
15. Vnější trubka
16. Rukojeť nastavení výšky
17. Šroubová spojka s upínací podložkou
18. Základna

36
Stojanový ventilátor s časovačem Pokyny pro bezpečnost a použití
Čištění
Před čištěním vždy vypněte ventilátor.
Čištěte ventilátor měkkým suchým hadříkem, případně lehce navlhčeným vodou.
Nepoužívejte alkohol nebo chemické látky jako jsou ředidla nebo jiné čisticí prostředky.
Na ventilátor nestříkejte vodu ani jiné kapaliny, aby nedošlo k jeho poškození.
Před opětovným použitím ventilátoru otřete a vysušte všechny součásti.
Pokud přístroj nepoužíváte během zimního období, uskladněte přístroj na suchém a čistém místě.
Technická data
Výkon: 40W
Napájení: 220V ~ 50Hz
Z důvodů zlepšování si Beper vyhrazuje právo na změnu nebo vylepšení produktu bez předchozího
Evropská směrnice 2011/65 / EU o odpadních elektrických a elektronických zařízení (OEEZ), vyžaduje,
aby staré domácí elektrické spotřebiče nebyly odkládány do běžného netříděného komunálního odpa-
du. Staré spotřebiče musí být shromažďovány odděleně za účelem optimalizace obnovy a recyklace
materiálů, které obsahují, a snížení dopadu na lidské zdraví a životní prostředí. Symbol “Přeškrtnuté
popelnice” na výrobku vás upozorňuje na povinnost, že při likvidaci spotřebiče musí být shromažďovány
odděleně.
OBECNÉ PODMÍNKY ZÁRUKY
Tento spotřebič byl zkontrolován v továrně. Od data původního nákupu se na materiálové a výrobní vady
vztahuje záruka 24 měsíců.
Záruční doba začíná běžet od data nabytí spotřebiče koupí, jak je uvedeno na záručním listu (popř.
účtence) nebo faktuře a potvrzeném razítkem prodejce. Práva odpovědnosti za vady lze uplatňovat
u prodejce, u kterého byl výrobek zakoupen.
Záruka je platná pouze se záručním listem nebo s dokladem o koupi (daňový doklad) s uvedením data
nákupu a modelu spotřebiče Pokud potřebujete technickou pomoc, obraťte se na prodejce nebo na naše
ústředí, aby se zachovala efektivita zařízení a aby se záruka nezrušila. Jakékoli zásahy na tomto zařízení
neoprávněnými osobami automaticky ruší záruku.
ZÁRUČNÍ PODMÍNKY
Pokud se na zařízení během záruční doby projeví vady v důsledku vadného materiálu a / nebo výroby,
garantujeme bezplatnou opravu za předpokladu, že:
- Spotřebič byl používán správně a pro účel, pro který byl určen.
- Zařízení nebylo poškozeno a bylo pravidelně a správně udržováno.
- Byl předložen doklad o koupi.
Záruka se nevztahuje na opotřebení věci (výrobku) způsobené jejím obvyklým používáním. (§ 619 odst.
2 Občanského zákoníku). Záruka se též nevztahuje na závady výrobku, způsobené jiným, než obvyklým
používáním výrobku.
Za obvyklé používání v tomto smyslu rma BEPER považuje zejména, pokud výrobek:
Je používán pouze k účelu, ke kterému je určen a který je popsán v přiloženém návodu k použití. Pouze
návod v českém jazyce vydaný rmou BEPER je pro spotřebitele závazný.
Je používán a správně udržován podle tohoto návodu, používán šetrně, pozorně a nepřetěžován.
Je používán v čistém, bezprašném a nezakouřeném prostředí, je chráněn pouzdrem nebo krytkou, pokud je
přiložena. Výrobek je určen výhradně pro jiný účel než pro podnikání s tímto výrobkem.
Je používán za pokojové teploty, dostatečného větrání a s nezakrytými větracími otvory.
Nebyl vystaven nepříznivému vnějšímu vlivu, např. slunečnímu a jinému záření či elektromagnetickému
poli, vniknutí tekutiny, vniknutí předmětu, přepětí v síti, přepětí nebo zkratu na vstupech či výstupech,
napětí vzniklému při elektrostatickém výboji (včetně blesku), chybnému napájecímu nebo vstupnímu napětí
a nevhodnému vniknutí předmětu, přepětí v síti, přepětí nebo zkratu na vstupech či výstupech, napětí
vzniklému při elektrostatickém výboji (včetně blesku), chybnému napájecímu nebo vstupnímu napětí a
nevhodné polaritě tohoto napětí, vlivu chemických procesů např. použitých napájecích článků apod.

37
Stojanový ventilátor s časovačem Pokyny pro bezpečnost a použití
CZ
Nebyl udržován a čištěn nevhodnými způsoby nebo nesprávně použitými čistícími prostředky (např. che-
mický a mechanický vliv).
Nebyly kýmkoliv provedeny úpravy, modikace, změny konstrukce nebo adaptace ke změně nebo rozšíření
funkcí výrobku oproti zakoupenému provedení nebo pro možnost jeho provozu v jiné zemi, než pro kterou
byl navržen, vyroben a schválen.
Je používán s doporučeným čistým neopotřebovaným příslušenstvím a je mu pravidelně vyměňováno
příslušenství, podléhající rychlejšímu opotřebení (např. baterie). Firma BEPER nenese odpovědnost za
nesprávný chod a případné vady výrobku vzniklé vlivem použitého příslušenství a náplní jiných výrobců,
stejně jako použitím poškozeného, opotřebovaného a znečistěného příslušenství a náplní.
Není mechanicky, tepelně nebo chemicky poškozen; neměl sejmutý ochranný kryt, nemá odstraněny nebo
smazány štítky, poškozeny plomby a šrouby nebo není poškozen otřesy pádem, teplem, tekutinou (i z bate-
rií), zlomením nebo přetržením kabelu, konektoru, spínače, krytu či jiné části, včetně poškození v průběhu
přepravy od okamžiku zakoupení a předání výrobku ze strany prodávajícího.
Je používán v souladu se zákony, technickými normami a bezpečnostními předpisy platnými v České repu-
blice, a též na vstupy výrobku je připojeno napětí odpovídající těmto normám a charakteru výrobku.
Je používán s intenzitou a v prostředí odpovídajícím provozu v domácnosti.
Záruka se nevztahuje na žádnou část, která by mohla být náhodně rozbitá nebo měla viditelné známky
použití v spotřebních výrobcích (jako jsou lampy, baterie, topné články a podobně), a jakákoliv závada
způsobená nedodržením pravidel z neznalosti při používání a / nebo údržbě spotřebiče, nedbalosti, ne-
správném použití nebo nesprávné instalaci, poškozením při přepravě a jakýchkoliv jiných škod, které nelze
dodavateli přičíst.
Pokud bude mít výrobek vadu, kterou je možno rychle a bez následků odstranit, vyhrazuje si společnost
Beper právo řešit reklamační nárok spotřebitele jejím odstraněním (opravou) nebo výměnou části výrobku.
Nárok na výměnu věci při výskytu odstranitelné vady vzniká spotřebiteli pouze v případě, že to není vzhle-
dem k povaze vady neúměrné.
Kontaktujte distributora ve vaší zemi případně kontaktujte prodejní oddělení Beper,
e-mail assistenza@beper.com, který předá váš požadavek na lokálního distributora.

38
Stand ventilator met timer Handleiding
Algemeen veiligheidsadvies
Lees de gebruiksaanwijzing zorgvuldig door voordat u het appa-
raat voor de eerste keer in gebruik neemt.
Lees de volgende instructies aandachtig door aangezien ze nuttige
veiligheidsinformatie bevatten over de installatie, het gebruik en het
onderhoud. Hiermee kunt u ongevallen en ongelukken voorkomen.
Verwijder de verpakking en controleer of het apparaat volledig intact
is. De onderdelen van de verpakking (plastic zakken, polystyreen,
enz.) mogen niet in het bezit komen van kinderen ten einde hen te
beschermen tegen gevaren.
We raden u aan om dit verpakkingsmateriaal niet met het huisafval
weg te gooien maar om het, in verband met vernietiging of verwer-
king, af te leveren op het juiste verzamelpunt. Hiertoe kunt u infor-
matie opvragen bij het management van de Vuilverwerking van uw
gemeente.
Controleer, voordat u het apparaat aansluit, of de netspanning overe-
enkomt met de gegevens op het etiket.
Als de stekker niet in het stopcontact past, laat dan een geschikte
stekker monteren door een gekwaliceerde persoon die er ook voor
kan zorgen dat de aansluitkabels van het stopcontact geschikt zijn
voor het gebruik van uw apparaat.
Trek nooit aan het netsnoer om de stekker van het apparaat uit het
stopcontact te trekken.
Zorg ervoor dat het netsnoer nooit in contact komt met hete of scher-
pe oppervlakken.
Gebruik dit apparaat niet als het netsnoer beschadigd is. In geval
van schade moet het netsnoer, om gevaar te voorkomen, worden
vervangen door de fabrikant, zijn onderhoudsvertegenwoordiger of
soortgelijke gekwaliceerde personen.
Sluit dit apparaat alleen aan op wisselstroom.
Over het algemeen wordt het gebruik van adapters met meerdere
connectoren en/ of verlengingsunits niet aanbevolen; mochten deze
toch nodig zijn, gebruik dan alleen enkelvoudige of multi-adapters en
verlengingsunits in overeenstemming met de van kracht zijnde vei-
ligheidsregels, waarbij ervoor gezorgd dient te worden dat de limiet,
zoals aangegeven op de enkelvoudige adapters en de verlengingsu-
nits, de maximale vermogenslimiet zoals aangegeven op de multi-
adapter niet overschrijdt.
Dit apparaat dient alleen te worden gebruikt voor het daarvoor be-
stemde doel.

39
Stand ventilator met timer Handleiding
NL
Dit apparaat dient alleen te worden gebruikt voor het daarvoor be-
stemde doel.
Elk ander gebruik moet als ongepast en dus gevaarlijk worden be-
schouwd. De fabrikant kan niet aansprakelijk worden gesteld voor
schade die voortvloeit uit onjuist, verkeerd of onzorgvuldig gebruik.
Om elk risico op oververhitting te voorkomen, wordt aangeraden het
netsnoer volledig af te rollen en het apparaat los te koppelen wanne-
er het niet wordt gebruikt.
Haal de stekker altijd uit het stopcontact voordat u het apparaat scho-
onmaakt.
Ter voorkoming van elektrische schokken mag u het snoer, de stekker
of onderdelen van het apparaat niet onderdompelen in water of an-
dere vloeistoffen.
Raak het apparaat niet aan met natte handen of voeten.
Raak het apparaat niet aan met blote voeten.
Stel het apparaat niet bloot aan weersinvloeden zoals regen, wind,
sneeuw en hagel.
Gebruik het apparaat niet in de buurt van explosieven, licht ontvlam-
bare stoffen, gassen, vuur en kachels.
Sta niet toe dat kinderen, mensen met een handicap, of mensen zon-
der ervaring of technische bekwaamheid het apparaat zonder be-
geleiding gebruiken. Wanneer een apparaat door of in de buurt van
kinderen wordt gebruikt is nauwgezet toezicht noodzakelijk.
Zorg ervoor dat kinderen niet met dit apparaat gaan spelen.
Als u van plan bent om het apparaat nooit meer te gebruiken, maak
het dan onbruikbaar door de voedingskabel door te snijden nadat u
de stekker uit het stopcontact heeft gehaald.
Zorg er ook voor dat alle gevaarlijke onderdelen
onbruikbaar worden gemaakt, met name met het
oog op kinderen die met het apparaat zouden kun-
nen gaan spelen.
Waarschuwing
Steek de stekker van het netsnoer niet in het stopcontact voordat alle
onderdelen van de ventilator zijn gemonteerd.
Controleer voor gebruik de staat van de voedingskabel en verwijder
eventueel eventuele knopen.
Plaats de ventilator op een vlakke en stabiele ondergrond op een
droge plaats.

40
Stand ventilator met timer Handleiding
Houd de ventilator op een redelijke afstand van muren, deuren, ra-
men of voorwerpen die een correcte werking van het apparaat kun-
nen voorkomen.
Bedek de behuizing of het rooster van de ventilator niet tijdens het
gebruik.
Steek geen voorwerpen in het rooster of in het apparaat.
Trek niet aan het netsnoer om de stekker van het apparaat uit het
stopcontact te trekken.
Na gebruik van de ventilator de stekker uit het stopcontact halen.
Als de ventilator voor langere tijd moet worden bewaard of niet wordt
gebruikt, vervang de ventilator dan in de originele verpakking op een
droge plaats. Controleer bij elk volgend gebruik of de ventilator scho-
on is en of de bladen op de juiste manier draaien (motor uitgescha-
keld).
Beschrijving van het artikel Afb. A
1. Rooster aan de voorzijde
2. Sluiting moer
3. Moerbladen
4. Bladen
5. Roostermoer achteraan
6. Achterste rooster
7. Motor
8. Zwenkknop
9. Motor
Montage-instructies
Leg de basis op de vloer. Plaats de binnenste buis volledig in de buitenste buis. Bevestig de hoogte afstelhendel.
Bevestig de buitenste buis aan de basis met de schroef (meegeleverd in de verpakking).
Verwijder de buitenste buis en regel deze tot de gewenste hoogte. Schroef de hoogte instelhendel stevig vast.
Plaats de bedieningspanelen op de buis.
Schroef volledig vast met de schroef, zodat de bedieningspanelen goed vastzitten aan de binnenste buis.
Plaats het achterste rooster op de motor, zodat de gaten van het rooster goed in de motor van de ventilator zijn
geplaatst.
Schroef het achterste rooster stevig en volledig vast om het rooster op de motor te blokkeren.
Plaats de bladen van de ventilator op de motor en schroef het moerblad volledig op de motor om de motor van
het huis te blokkeren.
Monteer de 2 voorste en achterste roosters door het plaatsen van de sluitmoer, plaats het voorste roosters, op
het achterste roosters. Sluit de moeren om de roosters te blokkeren.
Toerentalkeuze
Kies de gewenste snelheid door op de knoppen van de bedieningspanelen te drukken.
Stand 0 de ventilator schakelt uit.
Positie 1 lage snelheid.
Positie 2 gemiddelde snelheid.
Stand 3 hoge snelheid.
Timer
De timer kan worden ingesteld van 10 tot 60 minuten door aan de knop op het bedieningspaneel te draaien. Na
aoop van de ingestelde tijd wordt de ventilator automatisch uitgeschakeld.
Helling van de kop
Het is mogelijk om verschillende posities te kiezen en de luchtstroomschommeling te veranderen.
Schakel de ventilator uit voordat u hem vervangt.
Neem de motorbehuizing, draai de regelas los en verander de hellingshoek van de ventilator naar wens en
schroef de stevig vast.
10. Knop voor het instellen van de hellingshoek
11. Timer
12. Bedieningspanelen
13. Schroef voor staander
14. Interne staander
15. Externe staander
16. Hoogte instelhandvat
17. Buiskoppeling met klemring
18. Basis

41
Stand ventilator met timer Handleiding
NL
GARANTIECERTIFICAAT
Dit apparaat is in de fabriek gecontroleerd. Vanaf de datum van oorspronkelijke aankoop geldt een garantie van
24 maanden op materiaal- en productiefouten. Het aankoopbewijs en het garantiebewijs moeten samen worden
toegezonden in geval van een aanspraak op de garantie.
De garantie is alleen geldig met een garantiecerticaat en een aankoopbewijs (scaal ontvangstbewijs)
met vermelding van de aankoopdatum en het model van het apparaat.
Neem voor technische assistentie rechtstreeks contact op met de verkoper of ons hoofdkantoor ten einde de ef-
ciëntie van het apparaat te waarborgen en ervoor te zorgen dat de garantie NIET ongeldig wordt. Elke ingreep
aan dit apparaat door niet-geautoriseerde personen maakt de garantie automatisch ongeldig.
GARANTIEVOORWAARDEN
Als het apparaat tijdens de garantieperiode gebreken vertoont als gevolg van defecte materialen en/ of produc-
tiefouten garanderen wij gratis reparatie op voorwaarde dat:
- Het apparaat correct is gebruikt voor het doel waarvoor het is bedoeld.
- Er niet aan het apparaat is geknoeid omdat het anders niet te onderhouden is.
- Het aankoopbewijs kan worden getoond.
- Normale slijtage aan het apparaat niet onder deze garantie valt.
Daarom zijn alle onderdelen die per ongeluk kapot kunnen gaan, die zichtbare tekenen van gebruik met betrek-
king tot verbruiksartikelen kunnen vertonen (zoals lampen, batterijen, verwarmingselementen, ...) en esthetische
onderdelen uitgesloten van garantie, alsook elk defect ten gevolge van niet-naleving van de regels voor gebruik,
nalatigheid van gebruik en/ of onderhoud van het apparaat, onzorgvuldigheid, verkeerde of onjuiste installatie,
schade tijdens transport, en alle andere schades die de leverancier niet aan te rekenen zijn.
Voor elk defect dat niet binnen de garantieperiode kan worden gerepareerd, wordt het apparaat gratis vervangen.
Als het in verband met een defect, breuk of storing te vervangen onderdeel een accessoire en/ of een afneem-
baar onderdeel van het product betreft, behoudt Beper zich het recht voor om alleen het betreffende onderdeel
te vervangen en niet het volledige product.
Neem contact op met de distributeur in uw land of de after sales-afdeling van Beper.
E-mail assistenza@beper.com en we zorgen ervoor dat uw bericht bij uw distributeur terecht komt.
De Europese richtlijn 2011/65/EU inzake afgedankte elektrische en elektronische apparaten (AEEA)
vereist dat oude elektrische huishoudapparaten niet mogen worden vernietigd via de normale onge-
sorteerde gemeentelijke afvalstroom. Oude apparaten moeten apart worden ingezameld om hergebru-
ik en recycling van de materialen die ze bevatten te optimaliseren, en de gevolgen voor de menselijke
gezondheid en het milieu te minimaliseren. Het symbool met de doorgekruiste “afvalcontainer” op het
product herinnert u aan uw verplichting om het afgedankte product apart in te leveren.
Opgelet: probeer de hellingspositie niet te forceren om storingen te voorkomen.
Zwenken
Wanneer u op de zwenkknop drukt, is het mogelijk om de zwenkinrichting van de ventilator te activeren of te
ontkoppelen door de zwenkknop in te duwen. De zwenkinrichting zorgt voor een gelijkmatige luchttoevoer.
Om de zwenkknop in te schakelen, drukt u de zwenkknop in tot deze volledig geblokkeerd is; de hoofdventilator
draait automatisch van rechts naar links. Om de zwenkinrichting te ontkoppelen, de knop volledig optillen.
Reinigen
Schakel de ventilator uit en trek de stekker uit het stopcontact voordat u deze reinigt.
Gebruik voor het reinigen een zachte doek, die licht vochtig kan zijn.
Gebruik geen alcohol, chemische stoffen of detergenten die dit apparaat kunnen beschadigen.
Spuit geen water of andere vloeistoffen op de ventilator om deze te beschermen.
Na het reinigen, droogt u alle onderdelen af voordat u het apparaat in gebruik neemt.
Bewaar dit apparaat tijdens de winter en wanneer het niet gebruikt wordt, op een droge en schone plaats.
Technische gegevens
Vermogen: 40W
Stroomvoorziening: 220V ~ 50Hz
Om eventuele verbeteringsredenen behoudt Beper zich het recht voor om het product zonder vooraf-
gaande kennisgeving te wijzigen of te verbeteren.

42
Wentilators ar taimeri Instrukcja obsługi
Środki ostrożności
Należy uważnie przeczytać instrukcję obsługi przed pierwszym
użyciem urządzenia.
Przeczytaj uważnie poniższe instrukcje, ponieważ dostarczają one
użytecznych informacji dotyczących bezpieczeństwa, instalacji,
użytkowania i konserwacji oraz pomagają uniknąć zagrożeń.
Usuń opakowanie i upewnij się, że urządzenie jest nienaruszone.
Elementy opakowania (karton, torby plastikowe, styropian itp.) nie
powinny być dostępne dla dzieci, gdyż mogą stanowić zagrożenie.
Zaleca się, aby nie wyrzucać elementów opakowania do odpadów
domowych, ale dostarczyć je do odpowiedniego punktu odbioru
materiałów do recyklingu.
Przed użyciem upewnij się, że napięcie zasilania jest takie samo, jak
wskazane na etykiecie. Jeśli wtyczka nie pasuje do gniazda, może
być ona wymieniona tylko przez autoryzowany serwis gwarancyjny z
uwzględnieniem parametrów urządzenia.
Nie ciągnij za wtyczkę i przewód, nie dotykaj ich mokrymi rękoma.
Nie kładź przewodu zasilającego na ostrych krawędziach; trzymaj pr-
zewód z dala od źródeł ciepła.
Nie używaj urządzenia, jeśli przewód zasilający jest uszkodzony. W
przypadku uszkodzenia, musi być wymieniony tylko przez autoryzo-
wany serwis gwarancyjny. Urządzenie należy podłączyć do źródła
prądu zmiennego.
Nie zaleca się stosowania rozgałęźników. Jeśli okaże się to koniecz-
ne, używaj adapterów rozgałęźników zgodnych obowiązującymi za-
sadami bezpieczeństwa elektrycznego i upewnij się, że ich moc jest
odpowiednia dla urządzenia.
To urządzenie jest przeznaczone wyłącznie do użytku domowe-
go. Każde inne użycie należy uznać za niewłaściwe, a zatem nie-
bezpieczne. Producent nie ponosi odpowiedzialności za jakiekolwiek
szkody wynikające z niewłaściwego lub nieostrożnego użycia.
Aby uniknąć ryzyka przegrzania, zaleca się całkowite rozwinięcie pr-
zewodu zasilającego i odłączenie urządzenia, gdy nie jest używane.
Przed czyszczeniem zawsze odłączaj urządzenie od zasilania.
Aby zabezpieczyć się przed porażeniem prądem, nie zanurzaj pr-
zewodu, wtyczki ani żadnych części urządzenia w wodzie lub innych
płynach.
Nie trzymaj urządzenia mokrymi rękami lub stopami.
Nie trzymaj urządzenia gołymi stopami.

43
Wentilators ar taimeri Instrukcja obsługi
PL
Nie wystawiaj urządzenia na działanie czynników atmosferycznych,
takich jak deszcz, wiatr, śnieg, grad itp.
Nie używaj urządzenia w pobliżu materiałów wybuchowych,
łatwopalnych, gazów, płomieni, grzejników itp.
Jeśli zdecydujesz nie korzystać z urządzenia przez dłuższy czas,
odłącz je od zasilania wyjmując wtyczkę z gniazda.
Nie pozwalaj dzieciom, osobom o ograniczonej sprawności zycznej,
sensorycznej
Lub umysłowej korzystać z urządzenia bez nadzoru
osoby odpowiedzialnej za ich bezpieczeństwo.
Dzieci nie mogą bawić się urządzeniem.
Ostrzeżenie
Nie podłączaj przewodu zasilającego przed poprawnym montażem
wszystkich części wentylatora.
Przed użyciem sprawdź integralność przewodu zasilającego i usuń
ewentualne węzły.
Ustaw wentylator na płaskiej i stabilnej powierzchni w suchym
miejscu.
Trzymaj wentylator w odpowiedniej odległości od ścian, drzwi, okien
lub każdego obiektu, który mógłby uniemożliwić prawidłowe działanie
urządzenia.
Nie zakrywaj obudowy ani kratki wentylatora podczas pracy
urządzenia.
Nie wkładaj przedmiotów do kratki lub do wnętrza urządzenia.
To urządzenie nie nadaje się do celów komercyjnych, tylko do użytku
w gospodarstwie domowym.
Nie ciągnij za przewód zasilający, aby odłączyć urządzenie od zasi-
lania.
Po użyciu wentylatora odłącz przewód zasilający.
Jeśli wentylator musi być przechowywany przez dłuższy czas lub jest
nieużywany, należy go przechowywać w oryginalnym opakowaniu w
suchym miejscu. Przy każdym kolejnym użyciu należy sprawdzić, czy
wentylator jest czysty i czy łopaty obracają się we właściwy sposób
(silnik wyłączony).

44
Wentilators ar taimeri Instrukcja obsługi
Opis produktu Rys. A
1. Przednia kratka
2. Nakrętka
3. Nakrętka łopat
4. Łopaty
5. Tylna nakrętka
6. Tylna kratka
7. Wał
8. Przycisk obrotu
9. Obudowa silnika
Instrukcje składania
Połóż podstawę na podłodze.
Włóż całkowicie kolumnę wewnętrzną do kolumny zewnętrznej.
Zamocuj uchwyt do regulacji wysokości.
Przymocuj zewnętrzną kolumnę do podstawy za pomocą śruby (w zestawie).
Zdejmij zewnętrzną kolumnę i reguluj ją do żądanej wysokości. Mocno przykręć uchwyt regulacji wysokości.
Umieść panel sterowania na kolumnie.
Przykręć dokładnie śrubą, aby panel sterowania był dobrze przymocowany do kolummny wewnętrznej.
Umieść tylną kratkę na wale, aby otwory kratki były dobrze dopasowane do wału wentylatora.
Mocno i dokładnie przykręć tylną kratkę, aby zablokować ją na wale.
Włóż łopatki wentylatora na wał i całkowicie przykręć nakrętki do wału, aby zablokować korpus.
Zamontuj 2 kratki przednią i tylną, wkładając nakrętkę zamykającą, umieść przednią kratkę na tylnej kratce.
Zamknij nakrętki, aby zablokować kratki.
Wybór prędkości
Wybierz żądaną prędkość, naciskając przyciski na panelu sterowania.
Ustaw 0 wyłącznik wentylatora.
Pozycja 1 niska prędkość.
Pozycja 2 średnia prędkość.
Pozycja 3 wysoka prędkość.
Regulator czasowy
Timer można ustawić w zakresie od 10 do 60 minut, obracając pokrętło na panelu sterowania. Po upływie usta-
wionego czasu wentylator wyłączy się automatycznie.
Nachylenie
Możliwe jest wybranie różnych pozycji i zmiana prędkości przepływu powietrza.
Przed zmianą wyłącz wentylator.
Odkręć oś regulacji korpusu silnika i zmień nachylenie wentylatora zgodnie z potrzebami i mocno dokręć.
Uwaga: nie próbuj wymuszać pozycji nachylenia, aby uniknąć awarii.
Oscylacja
Po naciśnięciu przycisku obrotu można włączyć lub wyłączyć ruch oscylacyjny wentylatora, dotykając przycisku
obrotu. Oscylacja umożliwia równomierny przepływ powietrza.
Aby aktywować, naciśnij przycisk swig, aż zostanie całkowicie zablokowany; wentylator obraca się auto-
matycznie od prawej do lewej.
Aby odłączyć oscylację, podnieś całkowicie przycisk.
Czyszczenie
Przed czyszczeniem wyłącz i odłącz wentylator.
Do czyszczenia używaj miękkiej ściereczki, która może być lekko wilgotna.
Nie używaj alkoholu, substancji chemicznych ani detergentów, które mogłyby uszkodzić urządzenie.
Nie rozpylaj wody ani innych płynów na wentylator, aby go chronić.
Po czyszczeniu osusz wszystkie części przed użyciem urządzenia.
Zimą i gdy nie jest używane, przechowuj urządzenie w suchym i czystym miejscu.
10. Przycisk nachylenia
11. Timer
12. Panel sterowania
13. Śruba do kolumny
14. Kolumna wewnętrzna
15. Kolumna zewnętrzna
16. Uchwyt regulacji wysokości
17. Złącze śrubowe z podkładką mocującą
18. Baza

45
Wentilators ar taimeri Instrukcja obsługi
PL
Specykacja techniczna
Moc: 40 W.
Zasilanie: 220 V ~ 50 Hz
W przypadku jakichkolwiek ulepszeń Beper zastrzega sobie prawo do modykowania lub ulepszania
produktu bez powiadamiania.
Dyrektywa europejska 2011/65 / UE w sprawie zużytego sprzętu elektrycznego i elektronicznego
(WEEE) wymaga, aby wyrzucane domowe urządzenia elektryczne nie były utylizowane w zwykłym
nieposortowanym strumieniu odpadów komunalnych.
Należy je zbierać osobno, aby zoptymalizować odzyskiwanie i recykling zawartych w nich materiałów
oraz zmniejszyć negatywny wpływ na zdrowie ludzkie i środowisko.
Przekreślony symbol “kosza na śmieci” na produkcie przypomina o obowiązku oddzielnej utylizacji
urządzenia.
CERTYFIKAT GWARANCJI
To urządzenie zostało sprawdzone fabrycznie. Od daty pierwotnego zakupu obowiązuje 24-miesięczna gwa-
rancja na wady materiałowe i produkcyjne. Dowód zakupu i certykat gwarancji należy złożyć razem w przypadku
roszczenia gwarancyjnego.
Gwarancja jest ważna tylko z zaświadczeniem gwarancyjnym i dowodem zakupu (paragon skalny)
wskazującym datę zakupu i model urządzenia.
Aby uzyskać pomoc techniczną, skontaktuj się bezpośrednio ze sprzedawcą lub naszą centralą. Każda inge-
rencja w to urządzenie przez osoby nieupoważnione spowoduje automatyczną utratę gwarancji.
WARUNKI GWARANCJI
Jeśli urządzenie wykazuje wady materiału i / lub produkcji w okresie gwarancji, gwarantujemy bezpłatną naprawę
pod warunkiem, że:
- Urządzenie zostało prawidłowo użyte do celu, do którego zostało przeznaczone.
- Urządzenie nie zostało naruszone.
- Należy przedstawić dowód zakupu.
Każda część, która może zostać przypadkowo uszkodzona lub ma widoczne oznaki użytkowania w podzespołach
eksploatacyjnych (takich jak lampy, baterie, elementy grzejne itp.) oraz uszkodzenia mechaniczne dotyczące
wyglądu urządzenia, są wyłączone z gwarancji, a wszelkie wady wynikające z nieprzestrzegania zasad
użytkowania, zaniedbania w użytkowaniu i / lub konserwacji urządzenia, niedbalstwo, niewłaściwy montaż,
uszkodzenie podczas transportu i wszelkie inne szkody, nie są objęte gwarancją. W przypadku każdej wady,
której nie można naprawić w okresie gwarancyjnym, urządzenie zostanie wymienione bezpłatnie. W każdym
przypadku, jeśli element, który ma zostać wymieniony w celu usunięcia wady, pęknięcia lub wadliwego działania,
jest akcesorium i / lub odłączaną częścią produktu, Beper zastrzega sobie prawo do wymiany tylko samej części,
a nie całego produktu.
W przypadku pytań skontaktuj się z dystrybutorem Beper w polsce assistenza@beper.com

46
Ventilators Lietošanas instrukcija
Vispārīgi drošības padomi
Pirms ierīces pirmās lietošanas rūpīgi izlasiet ekspluatācijas in-
strukcijas.
Rūpīgi izlasiet šo instrukciju, jo tā sniedz jums noderīgu drošības
informāciju par uzstādīšanu, lietošanu un apkopi un palīdz izvairīties
no neveiksmēm un iespējamiem negadījumiem.
Izņemiet iepakojumu un pārliecinieties, vai ierīce ir neskarta, īpašu
uzmanību pievēršot barošanas kabelim. Iepakojuma elementiem
(plastmasas maisiņi, polistirols utt.) nav jābūt pieejamiem bērniem,
lai pasargātu viņus no bīstamiem avotiem.
Ieteicams neizmest šos iesaiņojuma materiālus sadzīves atkritumos,
bet nogādāt tos attiecīgajā atkritumu savākšanas vai iznīcināšanas
vietā.
Pirms ierīces pievienošanas pārliecinieties, vai tīkla spriegums atbilst
uz etiķetes norādītajiem datiem.
Ja kontaktdakša nav piemērota kontaktligzdai, ļaujiet to nomainīt tikai
kvalicētam speciālistam.
Nekad nevelciet barošanas vadu, lai atvienotu ierīci no strāvas.
Pārliecinieties, ka barošanas vads nekad nesaskaras ar karstām vai
griešanas virsmām
Nelietojiet šo ierīci, ja barošanas vads ir bojāts. Bojājuma gadījumā
tas jāmaina ražotājam, tā servisa pārstāvim vai līdzīgi kvalicētām
personām, lai izvairītos no briesmām.
Pievienojiet šo ierīci tikai maiņstrāvai
Parasti nav ieteicams izmantot adapterus, kas satur vairākus
spraudņus un / vai paplašinājumus; ja tie ir nepieciešami, lūdzu,
izmantojiet tikai vienkāršus vai vairākus adapterus un paplašinājumus,
ievērojot spēkā esošos drošības noteikumus, pārliecinoties, ka uz
vienkāršajiem adapteriem un paplašinājumiem norādītā jaudas ab-
sorbcijas robeža un uz vairāku adapteru marķētā maksimālā jaudas
robeža netiek pārsniegts.
Šī ierīce ir paredzēta tikai tās īpašajam mērķim.
Jebkāda cita izmantošana ir jāuzskata par nepareizu un tādējādi
bīstamu. Izgatavotājs nav atbildīgs par zaudējumiem, kas radušies
nepareizas, nepareizas vai nelikumīgas lietošanas dēļ.
Lai izvairītos no jebkāda apkures riska, ieteicams pilnībā atskrūvēt
barošanas vadu un atvienot ierīci, ja to nelieto.
Pirms tīrīšanas vienmēr atvienojiet ierīci no elektrotīkla.
Lai aizsargātu pret elektriskās strāvas triecienu, neiegremdējiet vadu,
kontaktdakšu vai citas ierīces daļas ūdenī vai citos šķidrumos.

47
Ventilators Lietošanas instrukcija
LV
Neturiet ierīci ar mitrām rokām
Nepakļaujiet ierīci atmosfēras iedarbībai, tādiem kā, lietus, vējš,
sniegs, krusa.
Nelietojiet ierīci sprāgstvielu, viegli uzliesmojošu materiālu, gāzu,
degošas liesmas, sildītāju tuvumā.
Neļaujiet bērniem, invalīdiem vai visiem cilvēkiem bez pieredzes vai
tehniskām iespējām lietot ierīci, ja viņi netiek pienācīgi uzraudzīti.
Cieša uzraudzība ir nepieciešama, ja jebkuru ierīci lieto bērni.
Pārliecinieties, ka bērni nespēlē ar šo ierīci.
Ja jūs nolemjat vairs nelietot ierīci, padariet to nelie-
tojamu, izslēdziet un atvienojiet no strāvas
Visas bīstamās ierīces daļas atslēdziet un glabājiet
bērniem nepieejamā vietā.
Brīdinājums
Pirms katras ventilatora daļas montāžas nepievienojiet barošanas
vadu.
Pirms lietošanas pārbaudiet barošanas vada integritāti un, iespējams,
noņemiet iespējamos mezglus.
Novietojiet ventilatoru uz līdzenas un stabilas virsmas sausā vietā.
Novietojiet ventilatoru pietiekamā attālumā no sienām, durvīm, lo-
giem vai visiem priekšmetiem, kas varētu novērst ierīces pareizu
darbību.
Kad ierīce darbojas, neaizklājiet ventilatora korpusu vai režģi.
Nepievienojiet priekšmetus režģim vai ierīces iekšpusē.
Nevelciet barošanas vadu, lai atvienotu ierīci no strāvas.
Pēc ventilatora izmantošanas atvienojiet strāvas padevi.
Ja ventilators ilgstoši jāuzglabā vai nav jāizmanto, nomainiet ventilato-
ru oriģinālajā iepakojumā sausā vietā. Katru nākamo reizi pārbaudiet,
vai ventilators ir tīrs un vai asmeņi ir pareizi pagriezti (motors izslēgts).
10. Slīpuma iestatīšanas poga
11. Taimeris
12. Vadības paneļi
13. Skrūve caurulei
14. Iekšējā caurule
15. Ārējā caurule
16. Augstas regulēšanas rokturis
17. Skrūvju cauruļu savienojums ar iespīlēšanas paplāksni
18. Bāze
Produkta apraksts A attēls
1. Priekšējais režģis
2. Noslēgšanas uzgrieznis
3. Skrūves asmeņi
4. Asmeņi
5. Aizmugurējā režģa uzgrieznis
6. Aizmugurējais režģis
7. Motors
8. Šūpoles poga
9. Ķermeņa motors

48
Ventilators Lietošanas instrukcija
Montāžas instrukcijas
Ielieciet pamatni uz grīdas.
Pilnīgi ievietojiet iekšējo cauruli ārējās caurules iekšpusē.
Piestipriniet augsto regulēšanas rokturi.
Piestipriniet ārējo cauruli pie pamatnes ar skrūvi (iekļauta iepakojumā).
Noņemiet ārējo cauruli un noregulējiet to līdz vēlamajam augstumam. Stingri pieskrūvējiet augsto regulēšanas
rokturi.
Novietojiet vadības paneļus uz caurules.
Pieskrūvējiet pilnībā ar skrūvi, lai vadības paneļi būtu labi piestiprināti pie iekšējās caurules.
Novietojiet aizmugurējo režģi uz motora, lai režģa caurumi būtu labi ievietoti ventilatora motorā
Stingri un pilnībā pieskrūvējiet aizmugurējo režģi, lai bloķētu režģi uz motora.
Ievietojiet ventilatoru lāpstiņas uz motora un pilnībā pieskrūvējiet uzgriezni uz motora, lai bloķētu korpusa mo-
toru.
Salieciet divus režģa priekšējos un aizmugurējos, ievietojot aizbāzni un novietojiet priekšējo režģi uz aizmugurējā
režģa. Aizveriet uzgriežņus, lai bloķētu režģus.
Ātruma izvēle
Izvēlieties vēlamo ātrumu, nospiežot vadības paneļu pogas.
Pozīcijā 0 ventilators tiek izslēgts.
1. pozīcija ar mazu ātrumu.
2. pozīcija vidēja ātruma.
3. pozīcija lielā ātrumā.
Taimeris
Taimeri var iestatīt no 10 līdz 60 minūtēm, pagriežot vadības paneļa pogu. Pēc noteiktā laika beigām ventilators
automātiski izslēgsies.
Galvas slīpums
Ir iespējams izvēlēties dažādas pozīcijas un mainīt gaisa plūsmas šūpoles.
Pirms tā maiņas izslēdziet ventilatoru.
Paņemiet motora korpusu, atskrūvējiet regulēšanas asi un pēc vajadzības mainiet ventilatora slīpumu un stingri
ieskrūvējiet gaisu.
Uzmanību: nemēģiniet piespiest slīpuma stāvokli, lai izvairītos no kļūmēm.
Šūpoles
Nospiežot šūpoles pogu, ir iespējams aktivizēt vai atvienot ventilatora šūpoles, pieskaroties šūpoles pogai.
Šūpoles ļauj vienmērīgi nodrošināt gaisu.
Lai aktivizētu, spiediet groza pogu uz leju, līdz tā ir pilnībā bloķēta; galvas ventilators automātiski matemātiski
griežas no labās uz kreiso pusi.
Lai atvienotu šūpoles, pilnībā paceliet pogu.
Tīrīšana
Pirms tīrīšanas izslēdziet un atvienojiet ventilatoru.
Tīrīšanai izmantojiet mīkstu drānu, kas var būt nedaudz mitra.
Nelietojiet alkoholu, ķīmiskas vielas vai mazgāšanas līdzekļus, kas varētu sabojāt šo ierīci.
Neizsmidziniet ūdeni vai citus šķidrumus uz ventilatora, lai to aizsargātu.
Pēc tīrīšanas pirms ierīces lietošanas nosusiniet visas detaļas.
Ja ziemā to nelietojat, glabājiet to sausā un tīrā vietā.
Tehniskie dati
Jauda: 40W
Barošanas avots: 220V ~ 50Hz
Jebkura uzlabojuma dēļ Beper patur tiesības modicēt vai uzlabot produktu bez iepriekšēja brīdinājuma.

49
Ventilators Lietošanas instrukcija
LV
Eiropas direktīvā 2011/65 / ES par elektrisko un elektronisko iekārtu atkritumiem (WEEE) noteikts,
ka vecās sadzīves elektriskās ierīces nedrīkst izmest parastā nešķirotā sadzīves atkritumu plūsmā.
Vecās ierīces jāvāc atsevišķi, lai optimizētu tajās esošo materiālu reģenerāciju un pārstrādi un
samazinātu ietekmi uz cilvēku veselību un vidi. Izsvītrotais simbols “atkritumu ratiņi uz riteņiem” uz
izstrādājuma atgādina jums par jūsu pienākumu, ka, utilizējot ierīci, tā ir jāsavāc atsevišķi.
GARANTIJAS SERTIFIKĀTS
Šī ierīce ir pārbaudīta rūpnīcā. Sākot no sākotnējā pirkuma, materiāla un ražošanas defektiem tiek piemērota 24
mēnešu garantija. Pirkuma kvīts un garantijas sertikāts jāiesniedz kopā, ja tiek pieprasīta garantija.
Garantija ir derīga tikai ar garantijas sertikātu un pirkuma apliecinājumu (skālo kvīti), kurā norādīts
pirkuma datums un ierīces modelis
Lai saņemtu tehnisko palīdzību, lūdzu, tieši sazinieties ar pārdevēju vai mūsu galveno biroju, lai saglabātu ierīces
efektivitāti un NEVAJADZĒTU anulēt garantiju. Jebkura neatļautu personu iejaukšanās šajā ierīcē automātiski
anulē garantiju.
GARANTIJAS NOSACĪJUMI
Ja garantijas laikā ierīcei ir defekti kļūdaina materiāla un / vai ražošanas rezultātā, mēs garantējam remontu bez
maksas ar nosacījumu, ka:
- Ierīce ir izmantota pareizi un tam paredzētajam mērķim.
- Ierīce nav sagrozīta, pretējā gadījumā to nevar uzturēt.
- jāuzrāda pirkuma kvīts.
- Šī garantija neattiecas uz ierīci, kurai ir pienācīgs nodilums.
Tāpēc visām detaļām, kuras var nejauši saplīst vai kurām ir redzamas lietošanas pazīmes patērējamiem
izstrādājumiem (piemēram, lampām, akumulatoriem, sildelementiem…), estētiskās daļas tiek izslēgtas no
garantijas, un visiem defektiem, kas rodas noteikumu neievērošanas dēļ par lietošanu, neuzmanīgu ierīces
lietošanu un / vai apkopi, neuzmanību, nepareizu vai nepareizu uzstādīšanu, bojājumiem pārvadāšanas laikā un
citiem bojājumiem, kas nav saistīti ar piegādātāju.
Par katru defektu, kuru garantijas laikā nevar izlabot, ierīci nomainīs bez maksas.
Jebkurā gadījumā, ja detaļa, kas jāmaina defekta, salūšanas vai nepareizas darbības dēļ, ir papildierīce un / vai
noņemama izstrādājuma daļa, Beper patur tiesības nomainīt tikai konkrēto daļu, nevis visu izstrādājumu.
Sazinieties ar pārdevēju jūsu valstī vai pārdošanas departamenta Beperi.
E-pasts assistenza@beper.com kuri parsūtīs jūsu iesniegumu jūsu izplatītājam.

Digital Mist Fan
Cod.: VE.510
Touch screen
3 Speeds
Mist function
Horizontal oscillation
12H timer
beper.com
YOU MIGHT ALSO LIKE

Intelligent Multidirectional Fan
Cod.: P206VEN260
12 speeds selectable by remote control included
3 fans modes: normal, natural and night
Programmable timer up to 12 hours
Automatic horizontal and vertical oscillation,
for better air circulation in the room
Touch screen panel and LED display
Assembled and ready to use
beper.com
YOU MIGHT ALSO LIKE

BEPER SRL
Via Salieri, 30 - 37050 - Vallese di Oppeano - Verona
Tel. 045/7134674 – Fax 045/6984019
beper.com
CUSTOMER CARE
BEPER
-
 1
1
-
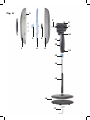 2
2
-
 3
3
-
 4
4
-
 5
5
-
 6
6
-
 7
7
-
 8
8
-
 9
9
-
 10
10
-
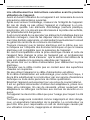 11
11
-
 12
12
-
 13
13
-
 14
14
-
 15
15
-
 16
16
-
 17
17
-
 18
18
-
 19
19
-
 20
20
-
 21
21
-
 22
22
-
 23
23
-
 24
24
-
 25
25
-
 26
26
-
 27
27
-
 28
28
-
 29
29
-
 30
30
-
 31
31
-
 32
32
-
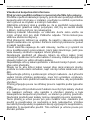 33
33
-
 34
34
-
 35
35
-
 36
36
-
 37
37
-
 38
38
-
 39
39
-
 40
40
-
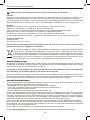 41
41
-
 42
42
-
 43
43
-
 44
44
-
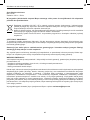 45
45
-
 46
46
-
 47
47
-
 48
48
-
 49
49
-
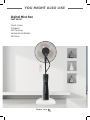 50
50
-
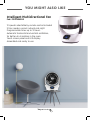 51
51
-
 52
52


in andere talen
- italiano: Beper P206VEN130 Stand Fan Manuale utente
- français: Beper P206VEN130 Stand Fan Manuel utilisateur
- español: Beper P206VEN130 Stand Fan Manual de usuario
- Deutsch: Beper P206VEN130 Stand Fan Benutzerhandbuch
- čeština: Beper P206VEN130 Stand Fan Uživatelský manuál
- polski: Beper P206VEN130 Stand Fan Instrukcja obsługi
- română: Beper P206VEN130 Stand Fan Manual de utilizare